

Page 1
NOTE
•For information on the components included with your machine and system requirements,
refer to pp.1-1, 1-2, of the Quick Reference Guide.
•When installing the software in Windows 2000/XP, you must log on as Administrator or
have Administrator privileges.
•If you have previously installed an earlier version of the MultiPASS Suite software (version
4.4 or earlier), you must remove it before installing this version. For details on removing the
software, refer to the documentation of the previous version.
Install the software.
1 Turn on your computer.
2 On your computer, quit any open applications, including virus checkers.
3 Insert the Canon MP730/700 Setup CD-ROM into your
disk drive.
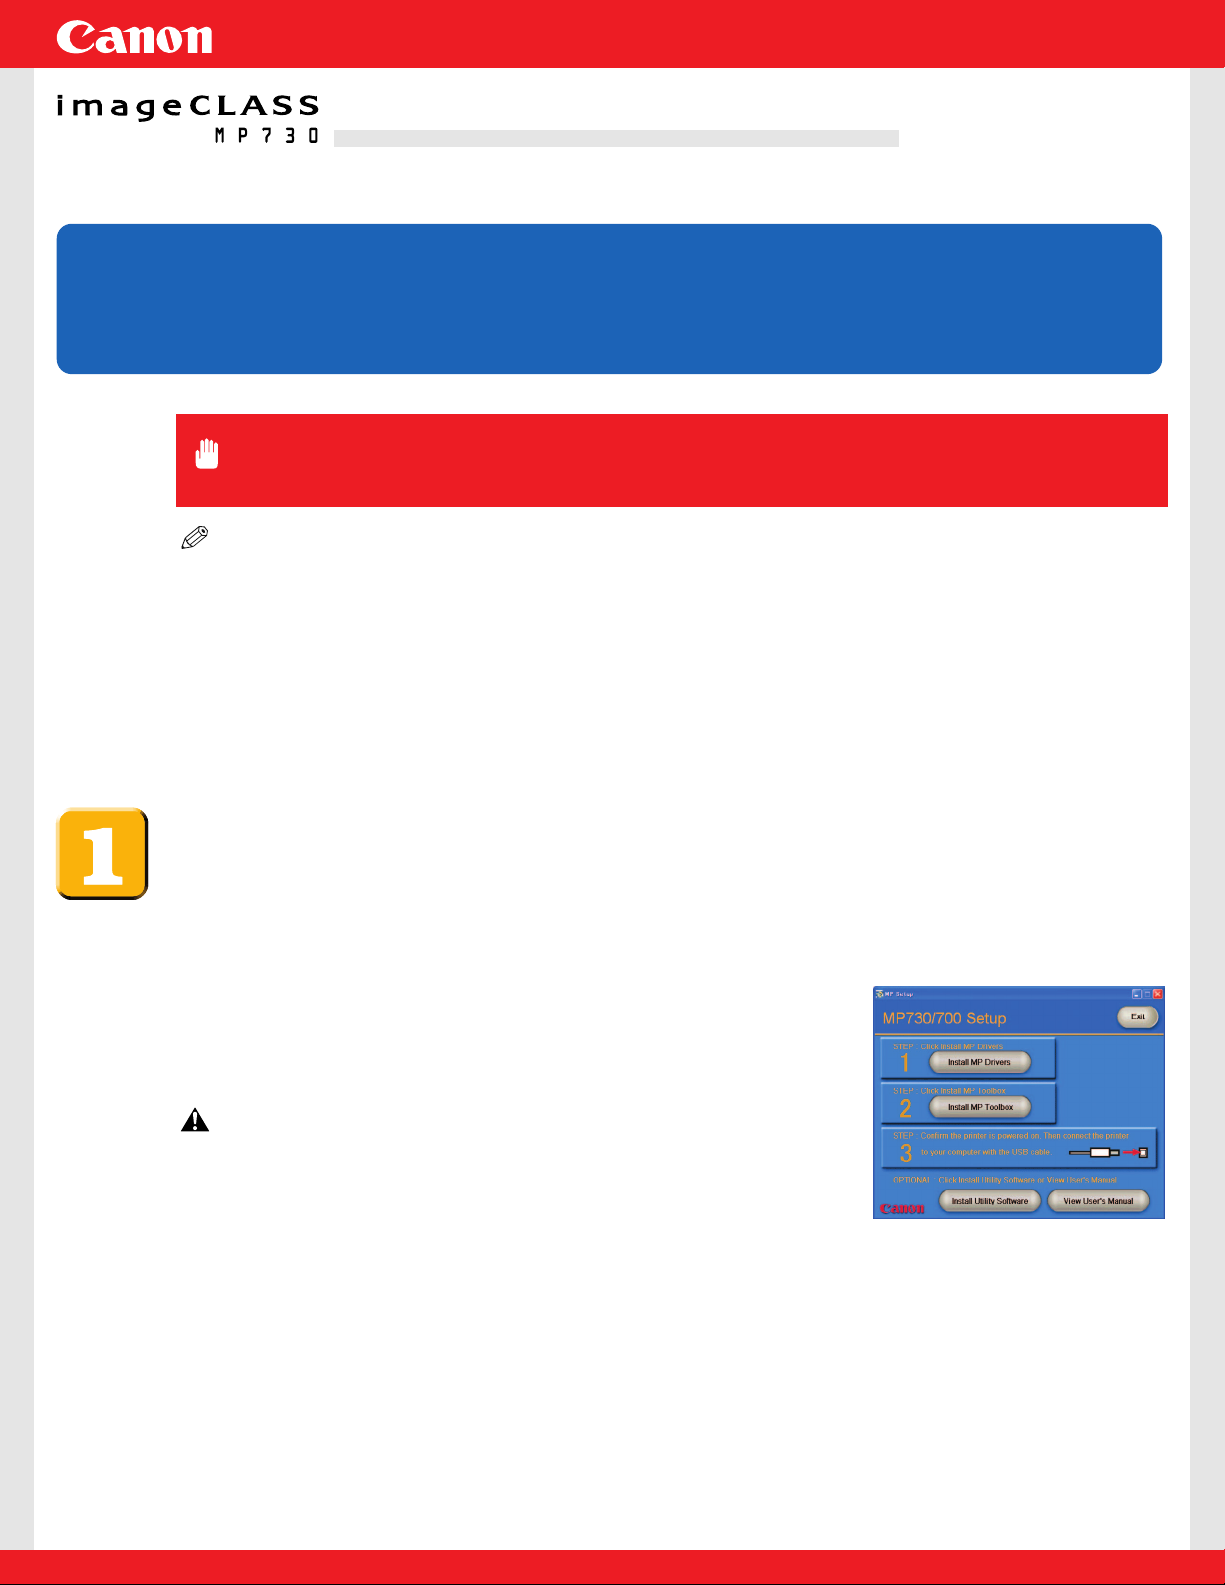
When the [MP Setup] screen on the right is displayed,
perform steps 1 and 2 in order.
CAUTION
• Do not perform step 3 on the last page until you reach
it after performing all the other instructions before it.
If this screen is not displayed, on the Windows desktop, double-click [My Computer]
(Windows XP: Click [Start], then click [My Computer]). Open the CD-ROM icon, then
double-click [setup (setup.exe)].
Set-Up Sheet
Set-Up Sheet
IMPORTANT
• DO NOT connect the USB cable before installing the software.
Thank you for purchasing the imageCLASS MP730.
To get your machine ready for use, please follow the instructions in this Set-Up Sheet
before referring to any other documentation.
READ THIS SHEET FIRSTREAD THIS SHEET FIRST
Page 2
● STEP1: Install MP Drivers
1 In the [MP Setup] screen, click [Install MP Drivers].
2 Follow the on-screen instructions.
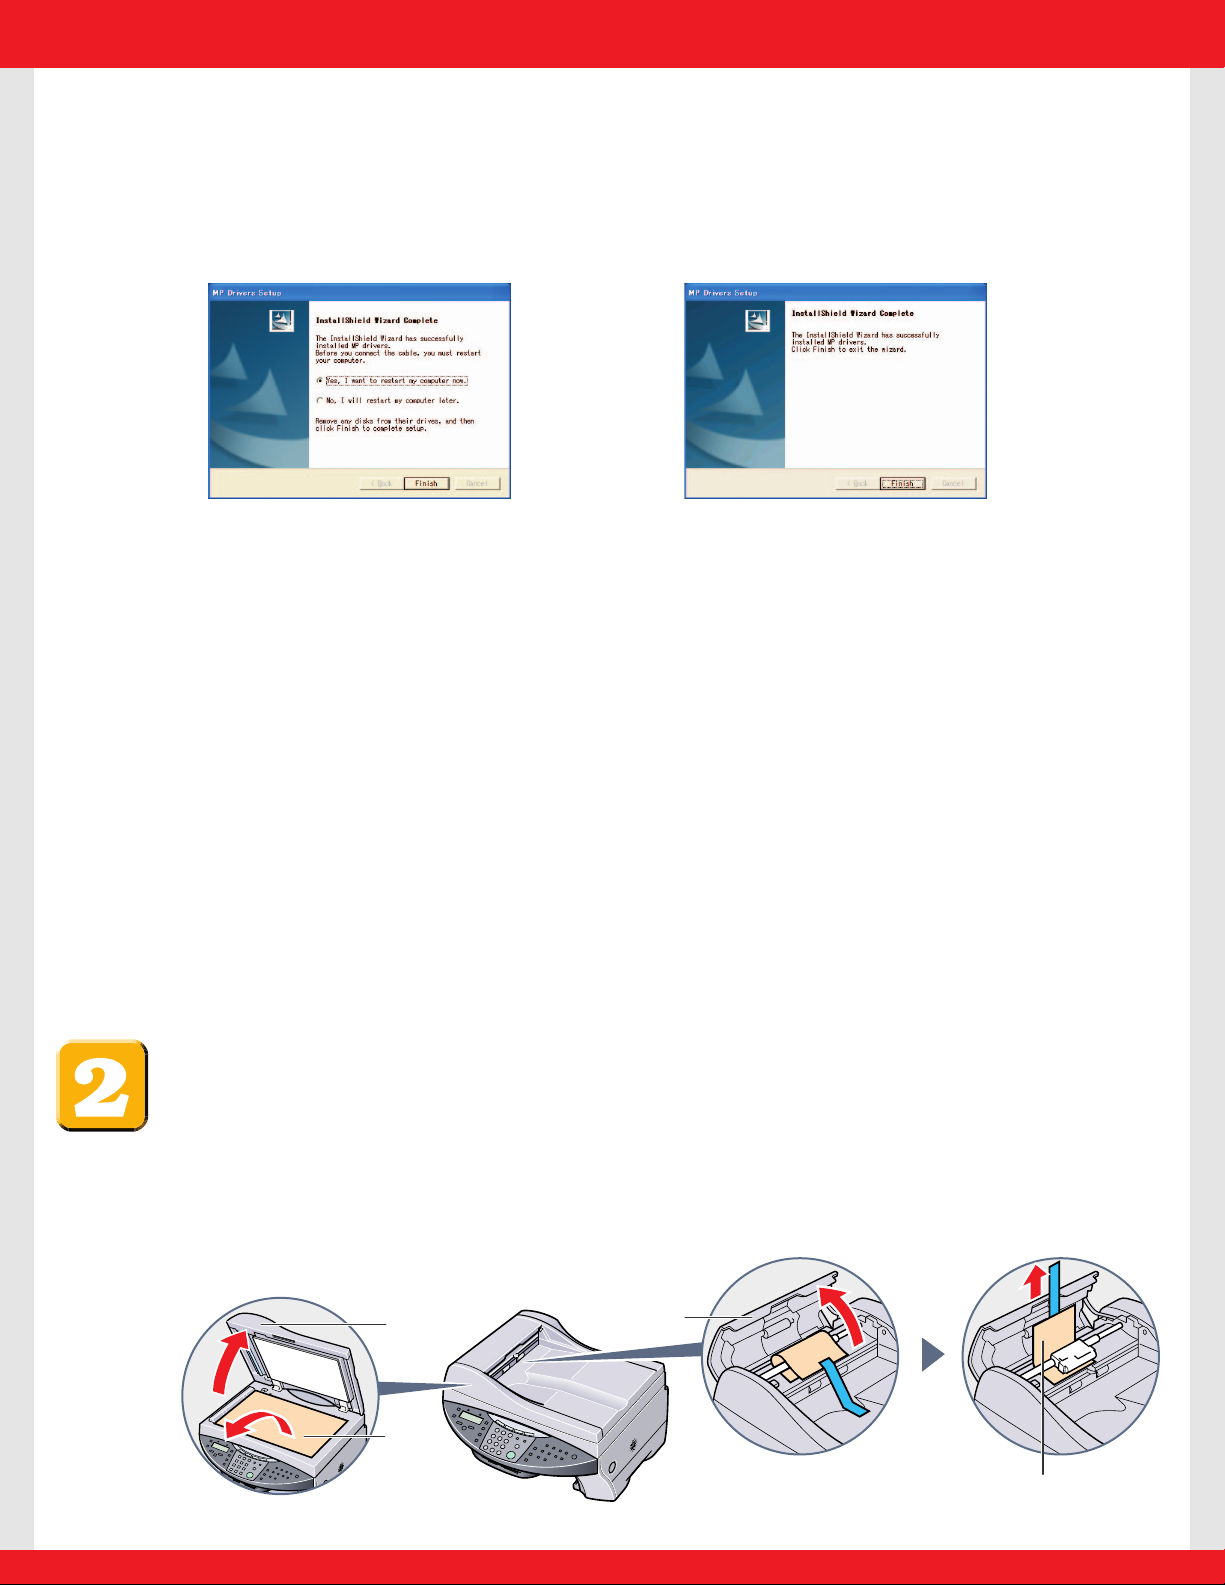
[Yes, I want to restart my computer now.] is
selected. (Click [Finish] to restart your computer.
Do not remove the CD-ROM at this stage.)
3 Click [Finish].
● STEP2: Install MP Toolbox
1 In the [MP Setup] screen, click [Install MP Toolbox].
• When you restart your computer and this screen is not displayed or you have closed it, on
the Windows desktop, double-click [My Computer] (Windows XP: Click [Start], then click
[My Computer]). Open the CD-ROM icon, then double-click [setup (setup.exe)].
2 Follow the on-screen instructions.
3 Click [Finish].
At this point, DO NOT perform step 3. Continue with the steps on this Set-Up
Sheet until required to connect the USB cable (sold separately).
Remove the shipping material from the machine.
1 Place the machine on a flat surface.
2 Remove all shipping tapes from the exterior of the machine.
3 Open the document cover A and remove the protective sheet B.
4 Open the feeder cover C and remove the shipping material D as shown below.
D
C
A
B
If you do not need to restart your computer,
the following screen is displayed.
If you need to restart your computer,
the following screen is displayed.
Page 3
Assemble the machine.
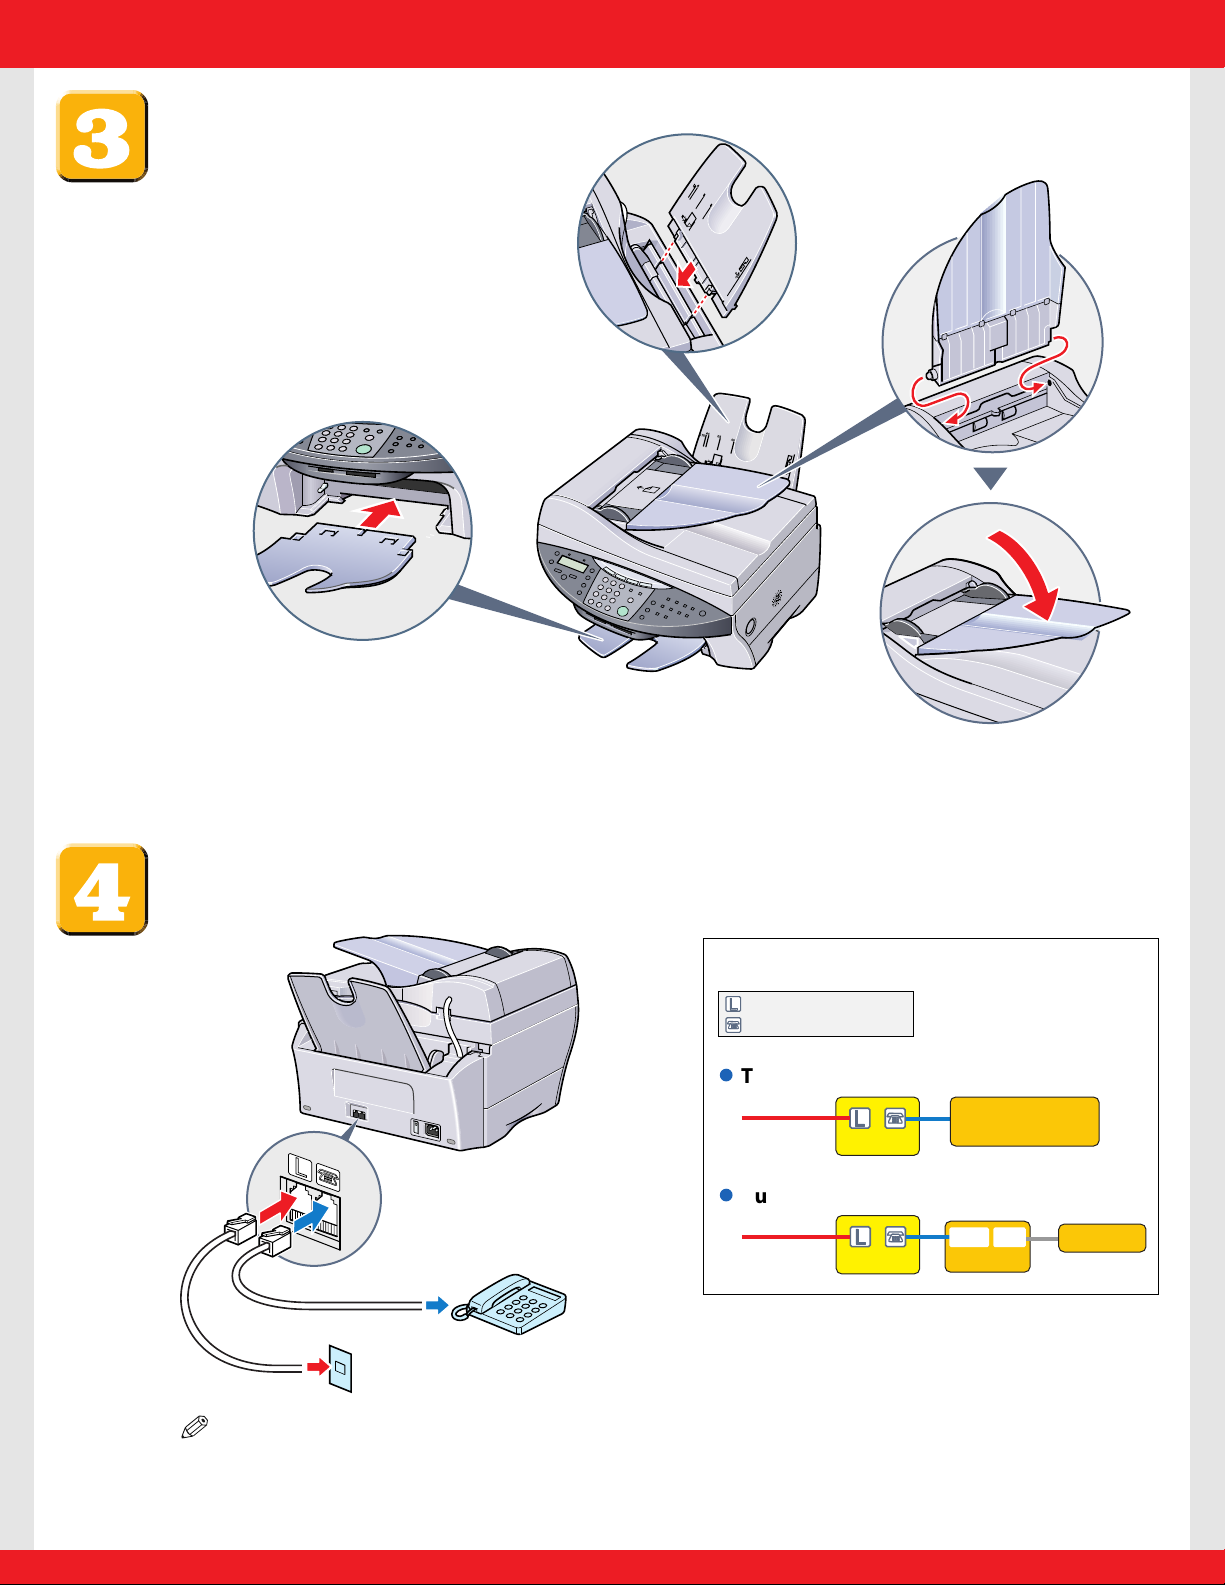
Connect the telephone line and any necessary external
device.
NOTE
• Before using your machine,you need to make sure it is set for your telephone line type.
For details, see p. 7-2 of the Quick Reference Guide.
You can connect an external
device (telephone or answering
machine) if necessary.
Connect the telephone line
cord to the wall jack.
3 Attach the document tray,
then lower it.
2 Attach the paper output tray
until an audible click is heard.
1 Attach the multi-purpose tray.
l
Telephone or answering machine
l
Built-in computer modem and telephone
Connect external devices as follows:
Telephone
line
Machine
Telephone
line
Machine
Telephone or
answering machine
Computer
= Telephone line jack
= External device jack
Telephone
TELLINE
Page 4
Connect the power cord.
IMPORTANT
• Before turning on the power, make sure the document cover A is closed.
Load paper.
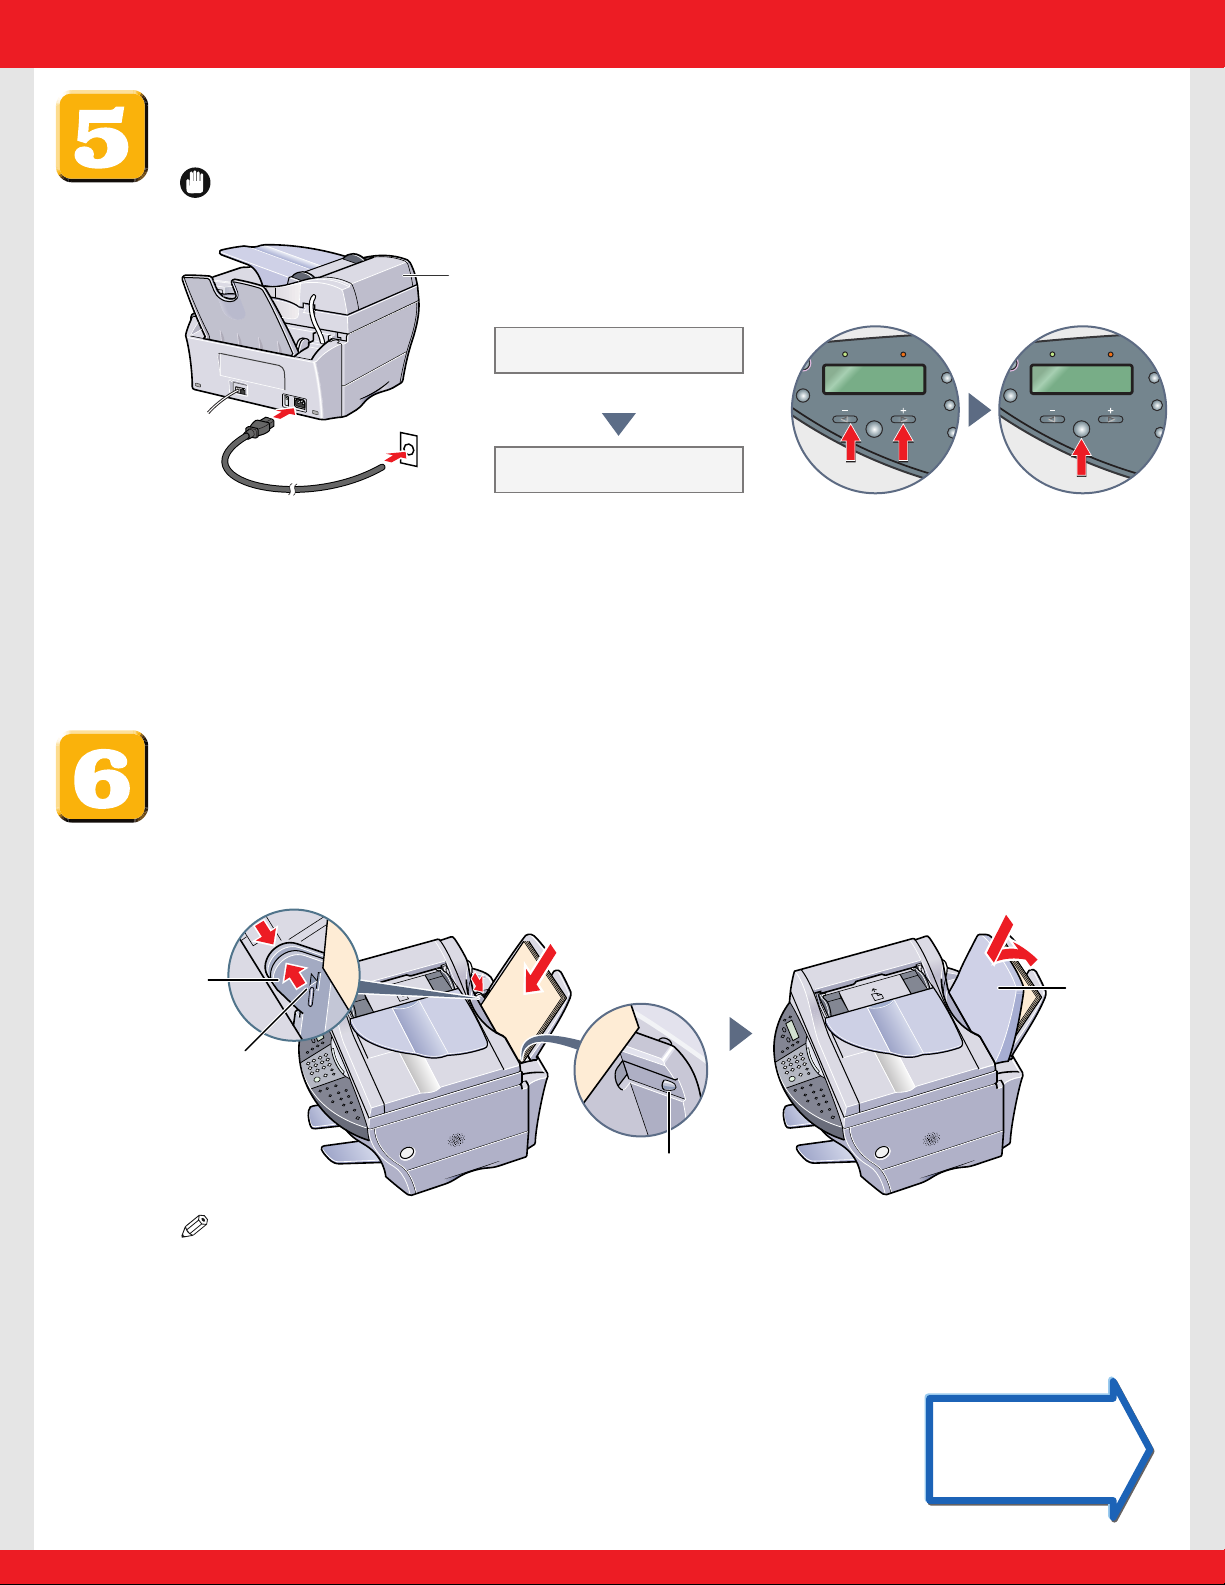
Place a stack of paper (print-side up) in the multi-purpose tray q.Pinch the paper
guide A and adjust to the width of the stack w.Then place the tray cover D over
the multi-purpose tray e.
NOTE
•Make sure the stack does not exceed the paper limit mark B or tab C.Otherwise a paper
jam may occur.
C
q
e
w
D
A
B
PLEASE WAIT
DISPLAY LANGUAGE
< ENGLISH >
Approx. 30 seconds
1 Plug the power
cord into a socket.
2 When you connect the
machine, the above messages
should appear in the LCD.
•If nothing appears in the LCD,
press [ON/OFF (1 sec.)] to turn on
the machine.
3 Use [2] or [3] to select
the language for the
LCD, then press [OK].
A
Turn over to
continue
Turn over to
continue
Page 5
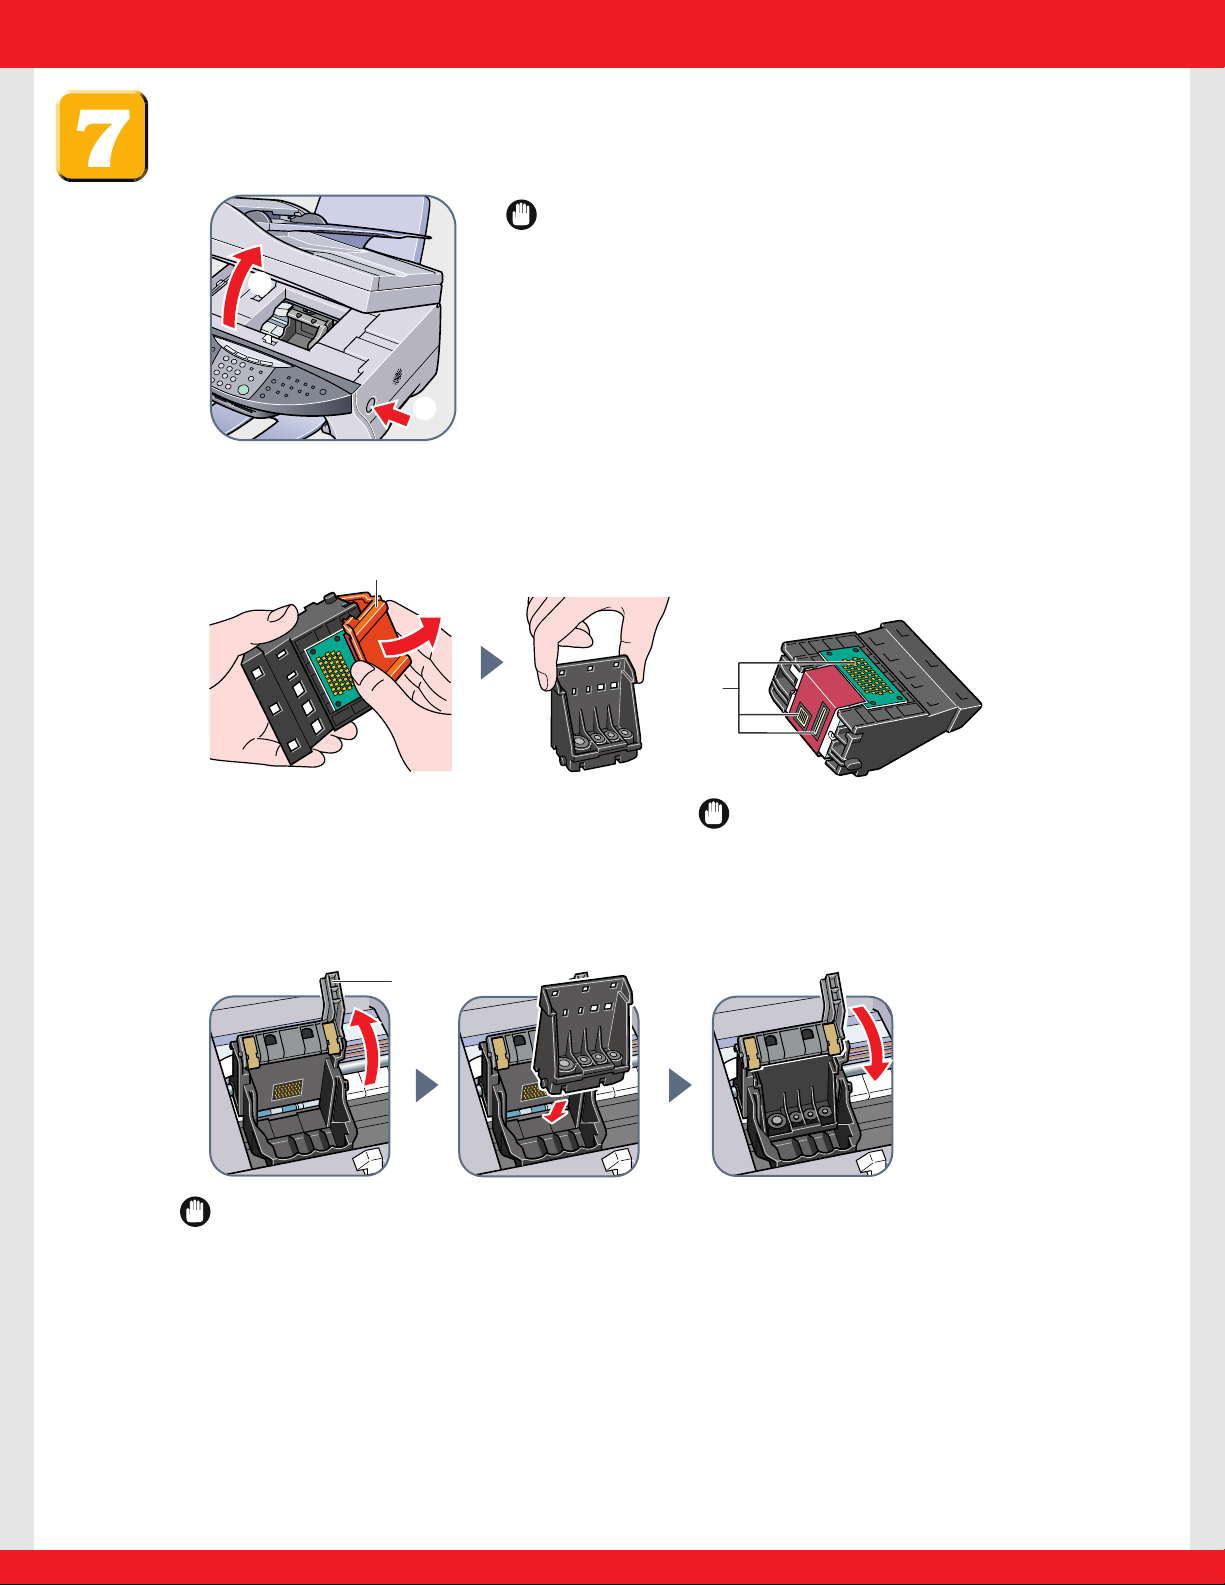
Install the printhead.
1 Press [Open] q and lift up the scanning unit w.
IMPORTANT
• Do not touch the metal rod or any parts inside the
machine.
• Do not turn off the machine when opening the scanning
unit.
2 Remove the printhead from its packaging, then remove the orange protective
cap A.
IMPORTANT
•Do not touch the electrical contacts B.
3 Raise the lock lever C, then gently slide the printhead into the holder.
Lower the lock lever.
IMPORTANT
• Do not touch the lock lever once the printhead has been installed.
C
B
A
q
w
Page 6
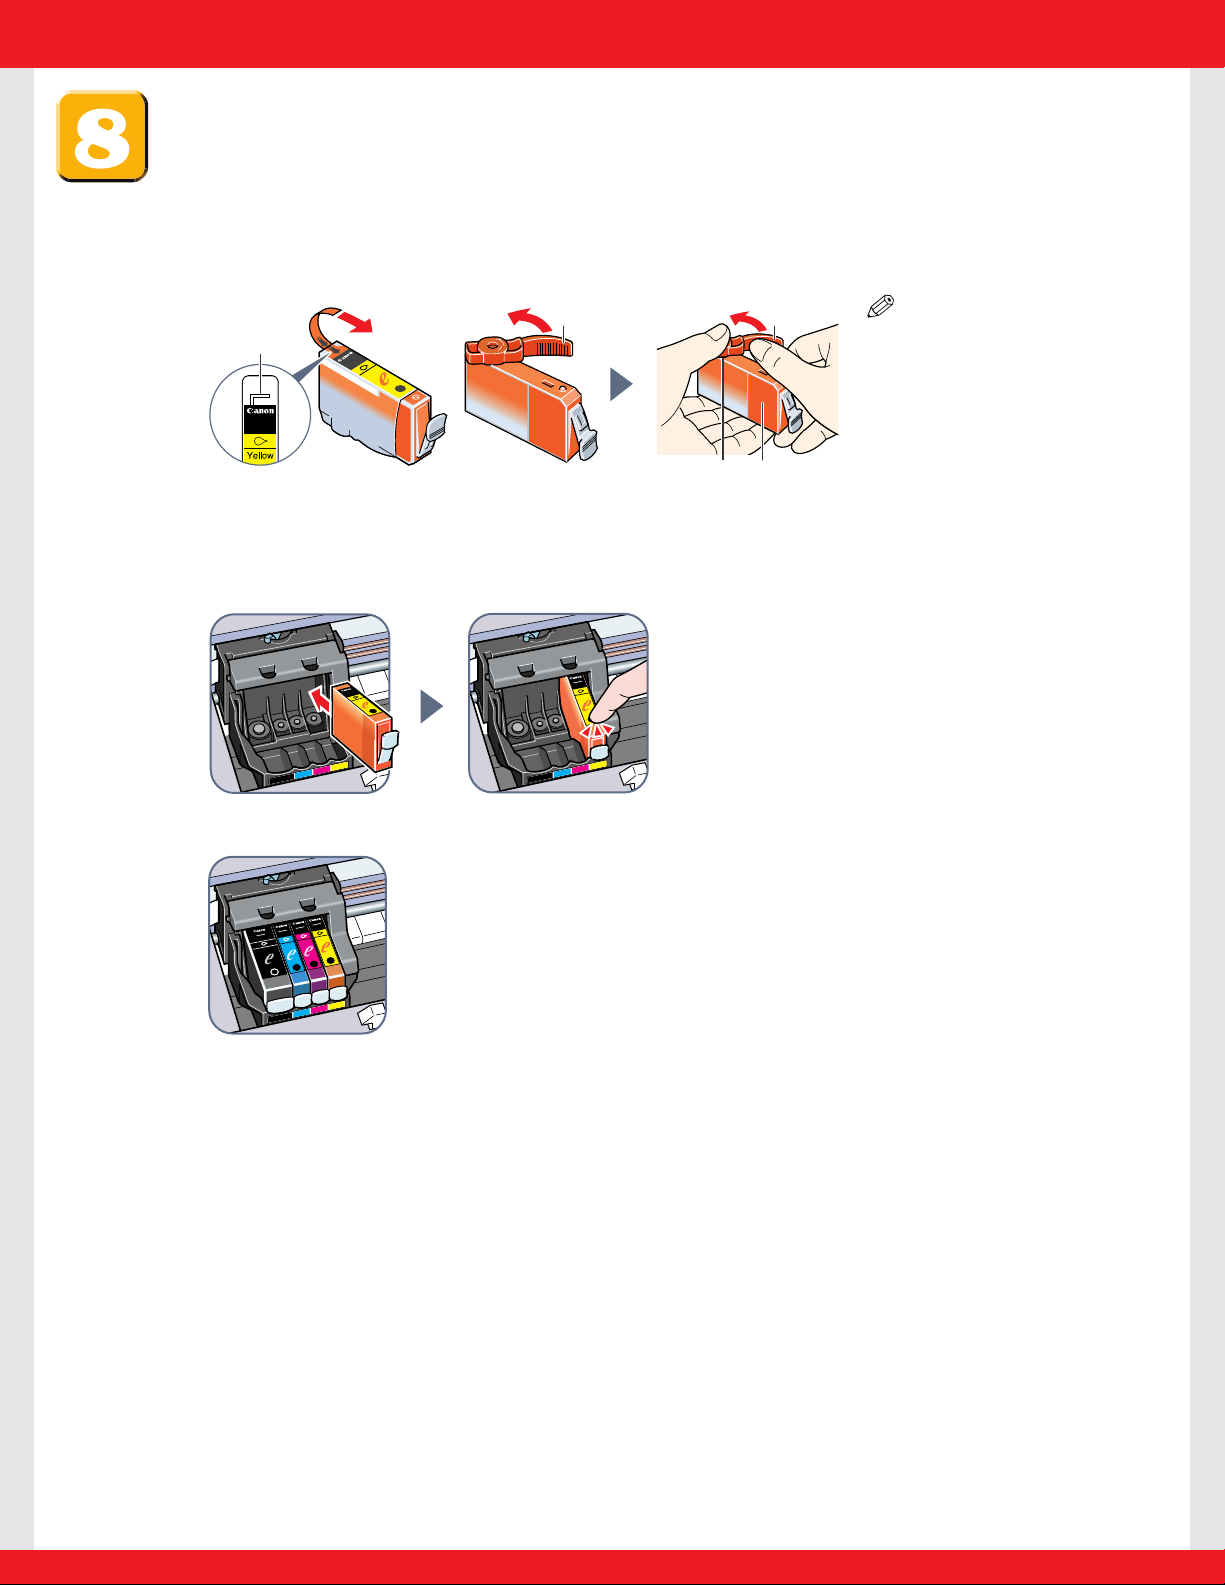
Install the ink tanks.
1 Start with the yellow ink tank. Pull the orange tape in the direction of the arrow
and remove the plastic wrapper so you can see the air hole A.Turn the ink tank
over so that the protective cap B is facing up.Then hold the ink tank as shown
below and remove the protective cap B.
NOTE
•To avoid spilling ink, never
press on the long sides of
the ink tank C.
• Once you remove the
protective cap B, do not
touch the ink port D.
2 Insert the ink tank (label-side up) into the correct slot (refer to the color guide on
the printhead). Press down gently on the ink tank until an audible click is heard.
3 Repeat steps 1 and 2 to install the remaining magenta, cyan, and black ink tanks.
4 Close the scanning unit until it locks into place.
Be sure to now align the printhead as explained in step 9.
Black
Yellow
Magenta
Cian
Black
BCI-3eC
BCI-3eBK
BCI-3eM
BCI-3eY
Yellow
Magenta
Cian
P
U
S
H
P
U
S
H
P
U
S
H
P
U
S
H
Black
B
la
ck
Y
ellow
M
agenta
C
ian
B
lack
BCI-3eY
Yellow
P
U
S
H
B
lack
Y
ellow
M
ag
enta
C
ian
B
lack
B
C
I
-
3
e
Y
Y
e
l
l
o
w
P
U
S
H
P
U
S
U
Y
e
llo
w
M
a
d
e
i
n
J
a
p
a
n
Ink Tank
B
C
I-3
e
Y
P
U
L
L
P
U
L
L
BCI-3eY
Ink Tank
A
BB
D
C
Page 7
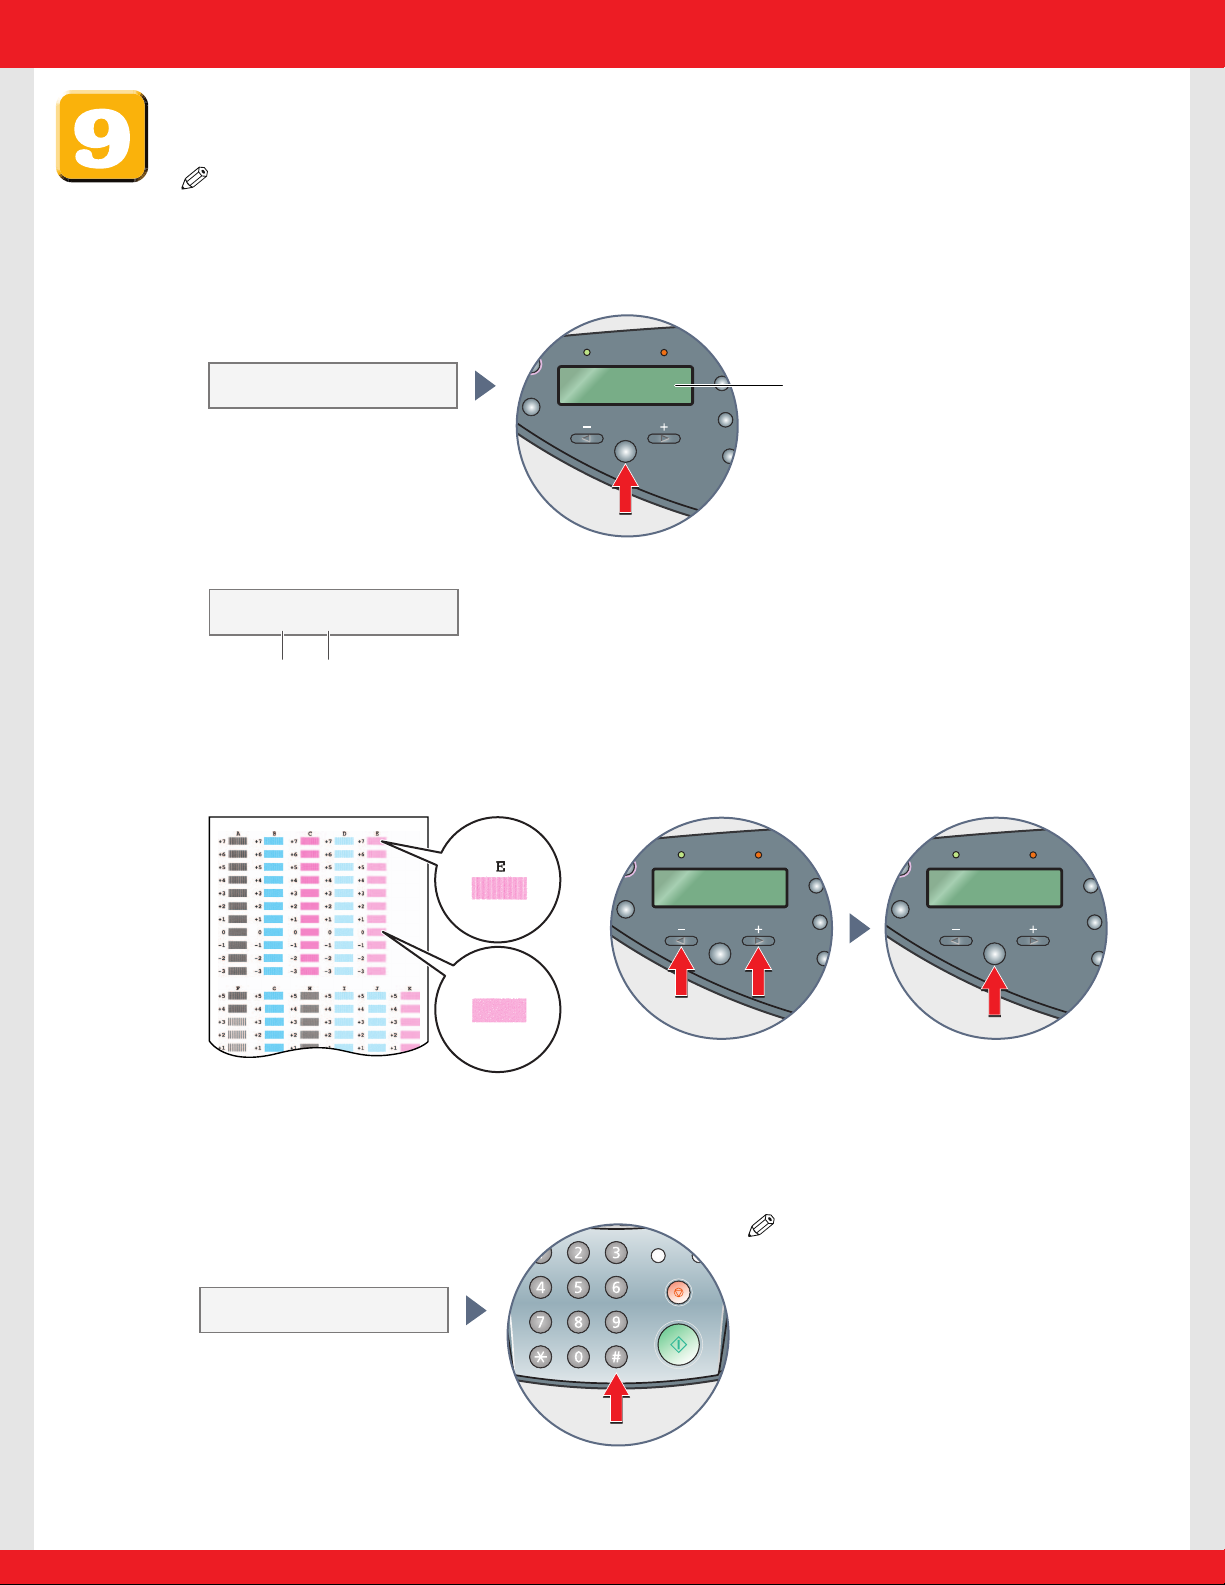
Align the printhead.
NOTE
• If you are installing the software, you can also align the printhead from the software.
For details, refer to the Software Guide.
1 When the LCD A displays the following, press [OK].
The machine will print a horizontal pattern, and the LCD will display:
2 In column A on the printout, note which box has the most solid image. Note the
value next to this box and use [2] or [3] on the operation panel to enter it.
Then press [OK].
3 Repeat step 2 for columns B to K.
4 When values for all columns have been entered and the LCD displays the
following, press [#] to return to standby mode.
NOTE
•If streaks appear on the printed
surface when you use the machine,
perform the vertical printhead
alignment. For details, refer to the
User’s Guide.
PRINT VERT. PATTERN?
YES=(A ) NO=(#)
Most solid
box
Least solid
box
BAD
SAMPLE
GOOD
SAMPLE
Column A Value for column A
CHANGE H VALUE
A 0
ALIGN PRINT HEAD
PRESS OK KEY
A
Page 8
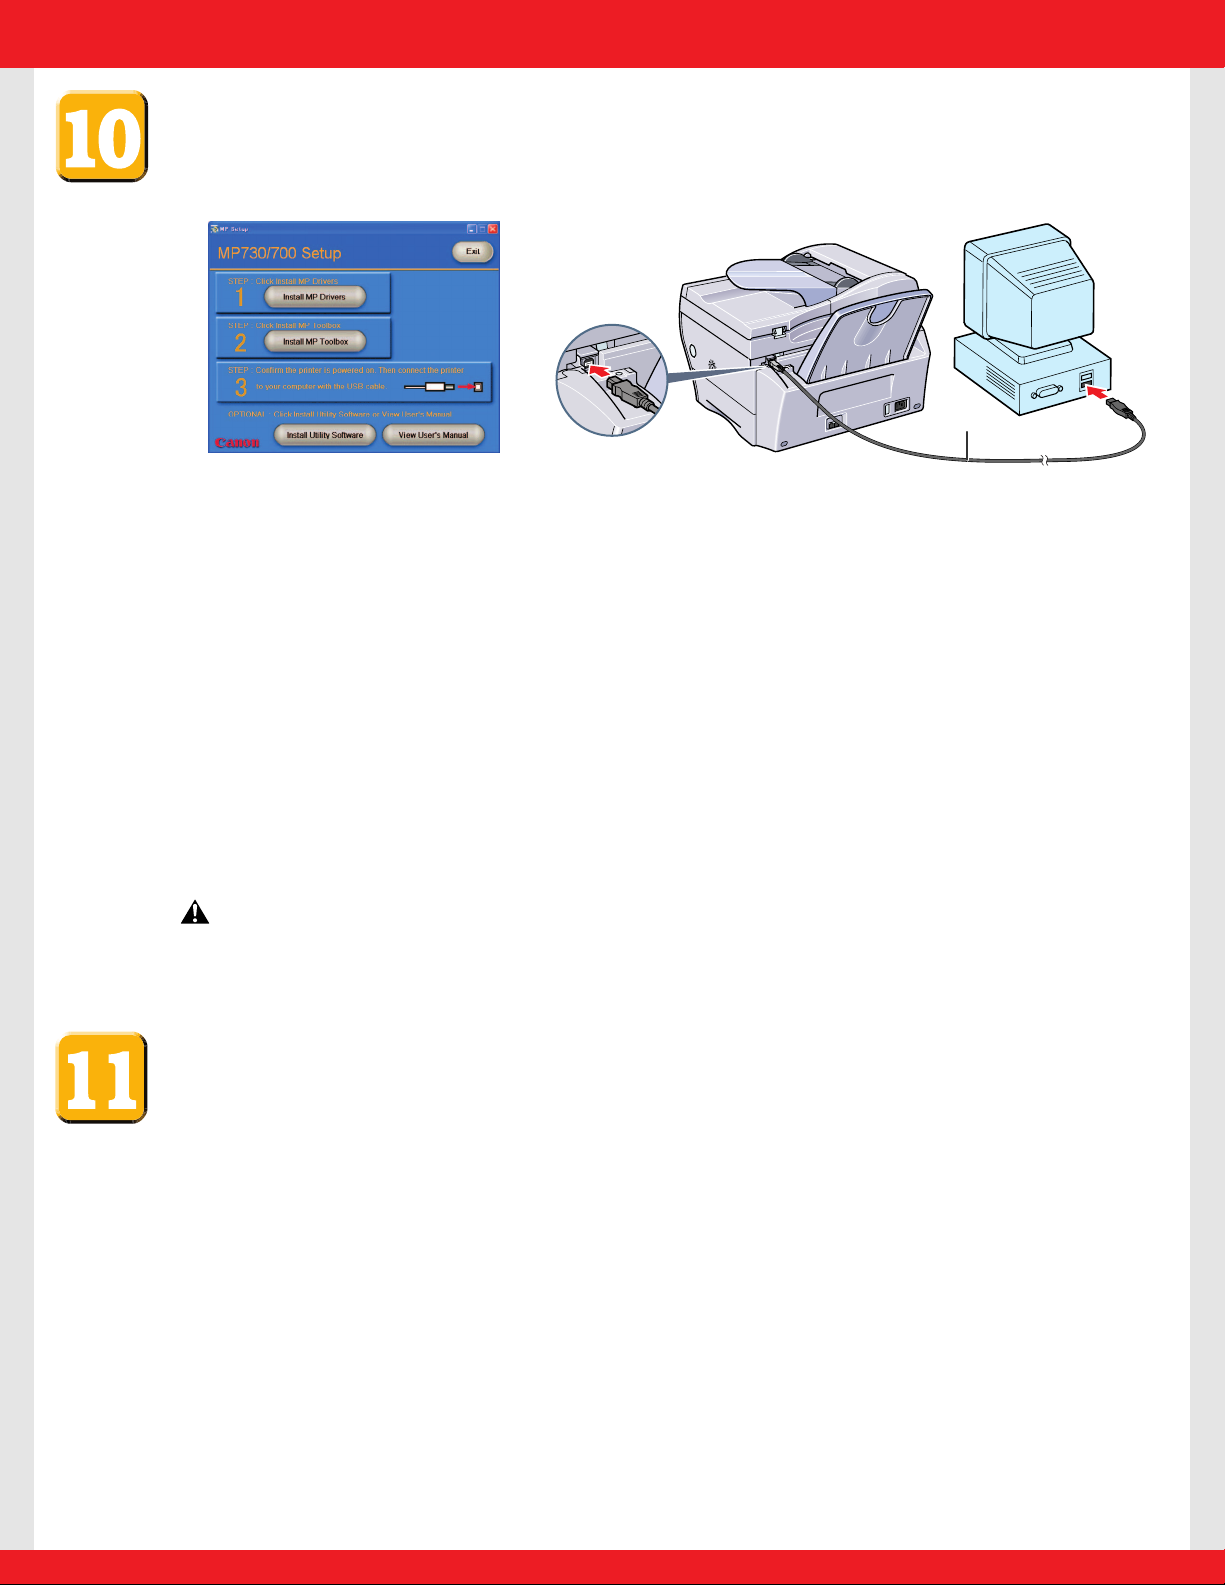
Connect the USB cable to complete the computer settings.
● STEP3: Connect the machine to your computer with the USB cable.
1
Make sure the machine is turned on.
2 Connect the USB cable A to the machine and computer USB ports.
Depending on your computer, a message may display asking you to restart your
computer. If this is the case, restart your computer.
● Install Utility Software
To install the Utility software, in the [MP Setup] screen, click [Install Utility
Software].
You can choose not to install the Utility software at this stage and install it later.
● View User’s Manual
To read the manual on the CD-ROM, click [View User’s Manual] on the [MP Setup]
screen.
CAUTION
• For Windows 2000, the machine may not be able to be set as the default printer.
If that happens, refer to Setting the default printer in the Software Guide.
Congratulations! You have now completed your machine
setup.
Where to from here...
Once you have completed all steps in this Set-Up Sheet, refer to the Quick Reference
Guide for basic operation instructions of all functions of your machine.
If after reading the Quick Reference Guide you require more detailed information,
refer to the User’s Guide or Software Guide (included in the CD-ROM).
A
Part no. HT3-2133-000-V.1.0
© 2003 Canon Inc.
Canon, imageCLASS,and BCI are trademarks of Canon Inc.
All other products and brand names are registered
trademarks or trademarks of their respective owners.
Specifications subject to change without notice.
PRINTED IN THAILAND
 Loading...