

Page 1
Getting Started
Getting Started
Read this guide rst.
Please read this guide before operating this product. After you nish reading this guide, store it in a safe place for future
reference.
1
2
3
4
Preface
P. 2
Installing the Machine
P. 4
Conguring and
Connecting the Fax
P.
20
Connecting to a Computer
and Installing the Drivers
P. 14
Downloaded from ManualsPrinter.com Manuals
Page 2
2
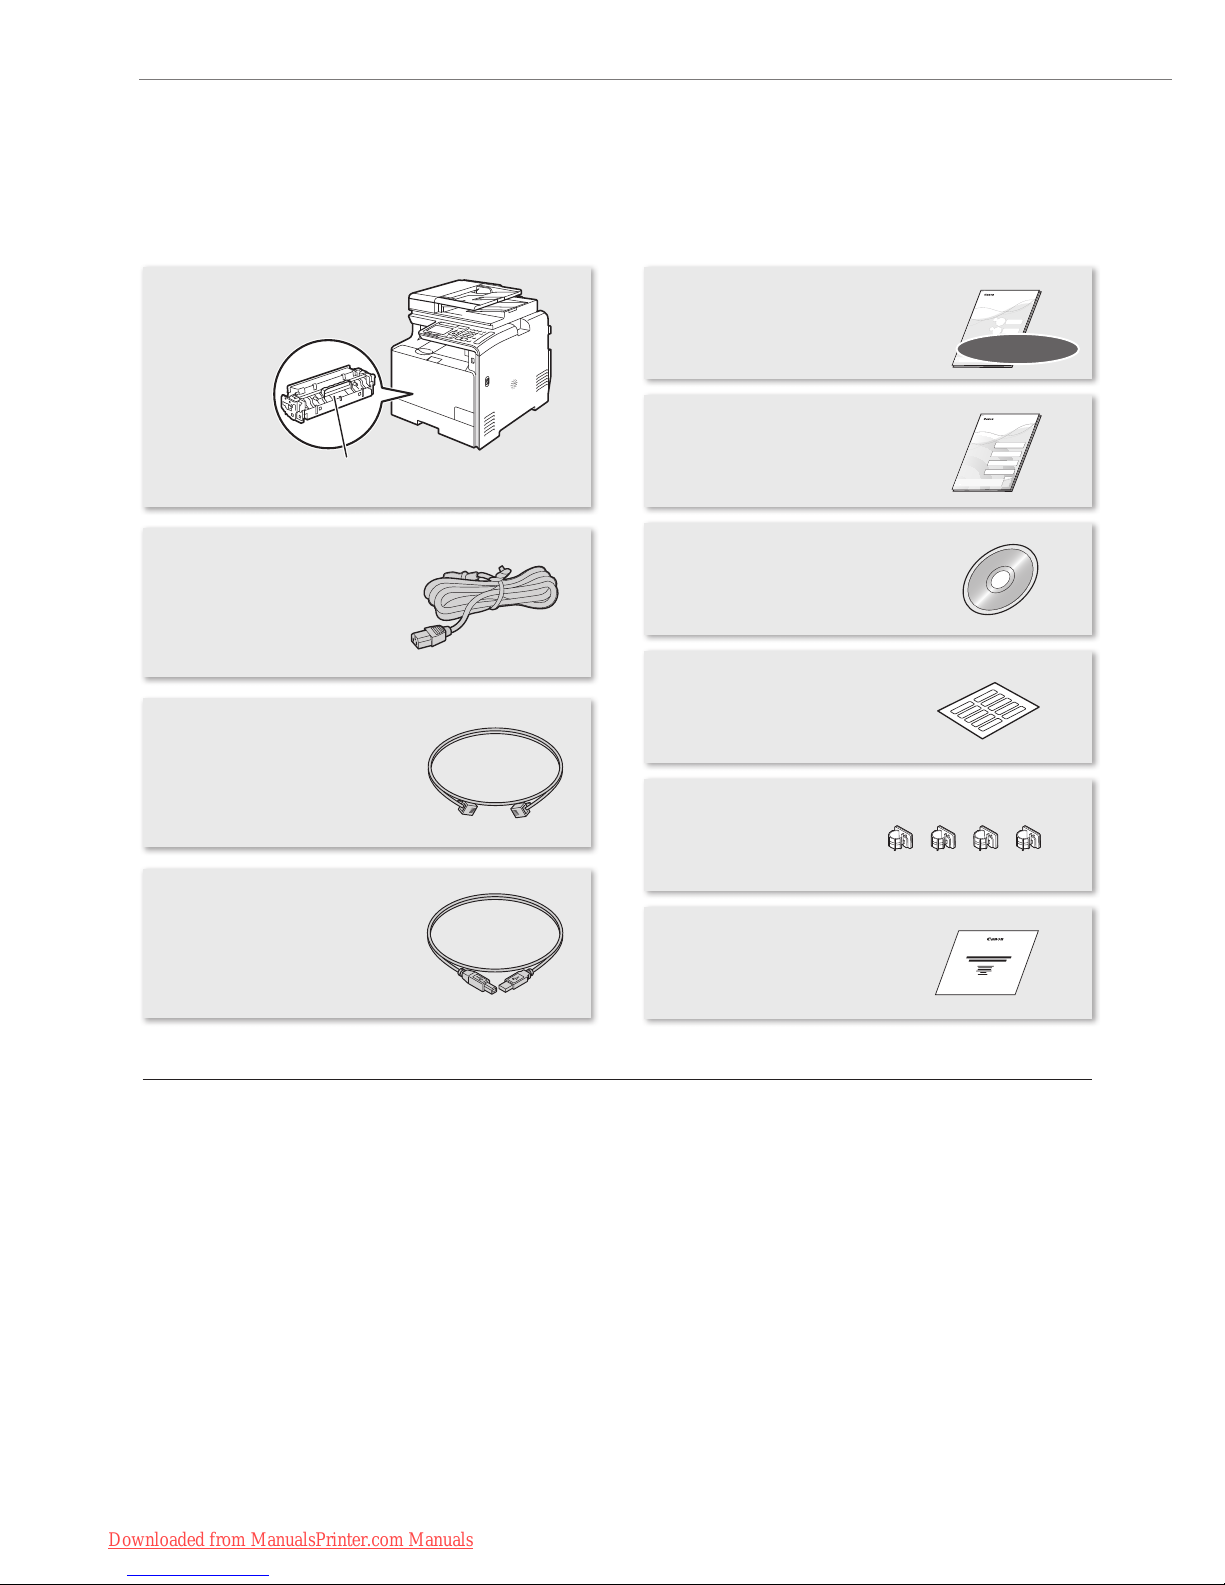
Checking the Supplied Accessories
Conrm that all the supplied accessories are contained in the box. If an item is missing or damaged, please contact the Canon
Authorized Service Facilities or the Canon Customer Care Center.
User Software CD-ROM
The User Software CD-ROM contains the MF Drivers,
MF Toolbox, various software, Send Setting Guide, and
e-Manual.
Depending on the operating system you are using, some
functions of the driver software included in the CD-ROM may
not be usable. The newest software is posted on the Canon
web site. Please verify the operating environment etc. and
download the appropriate software if required.
MF Drivers
The MF Driver contains the Network Scan Utility* (to use
to scan over a network) as well as printer, fax, and scanner
drivers.
* Windows XP/Vista/7/8 only.
MF Toolbox
The MF Toolbox provides a group of commands for you,
such as to open a scanned image in an application, send it
as an e-mail attachment le, and store it on the hard disk.
Miscellaneous Software
The User Software CD-ROM contains Presto! PageManager.
Install it from the [Custom Installation] option.
About the LAN cable
The machine does not come with a LAN cable. Have it ready
as necessary.
• Please use LAN Cable of Category 5 twisted pair cable or
higher for support.
• When connecting the machine to a 100BASE-TX Ethernet
network, all the devices on the LAN must be compatible
with 100BASE-TX.
Wireless LAN Setting Guide
Power Cord
User Software CD-ROM
Shortcut key label
PRODUCT ON-SITE
WARRANTY TERMS AND
CONDITIONS*
Telephone Cable
Handset Cable Clamps
Machine Unit
The toner cartridge is already installed.
USB Cable
Getting Started
Starter Guide
This manual
* The included items may vary depending on your country or region.
Downloaded from ManualsPrinter.com Manuals
Page 3
3
Checking the Supplied Accessories
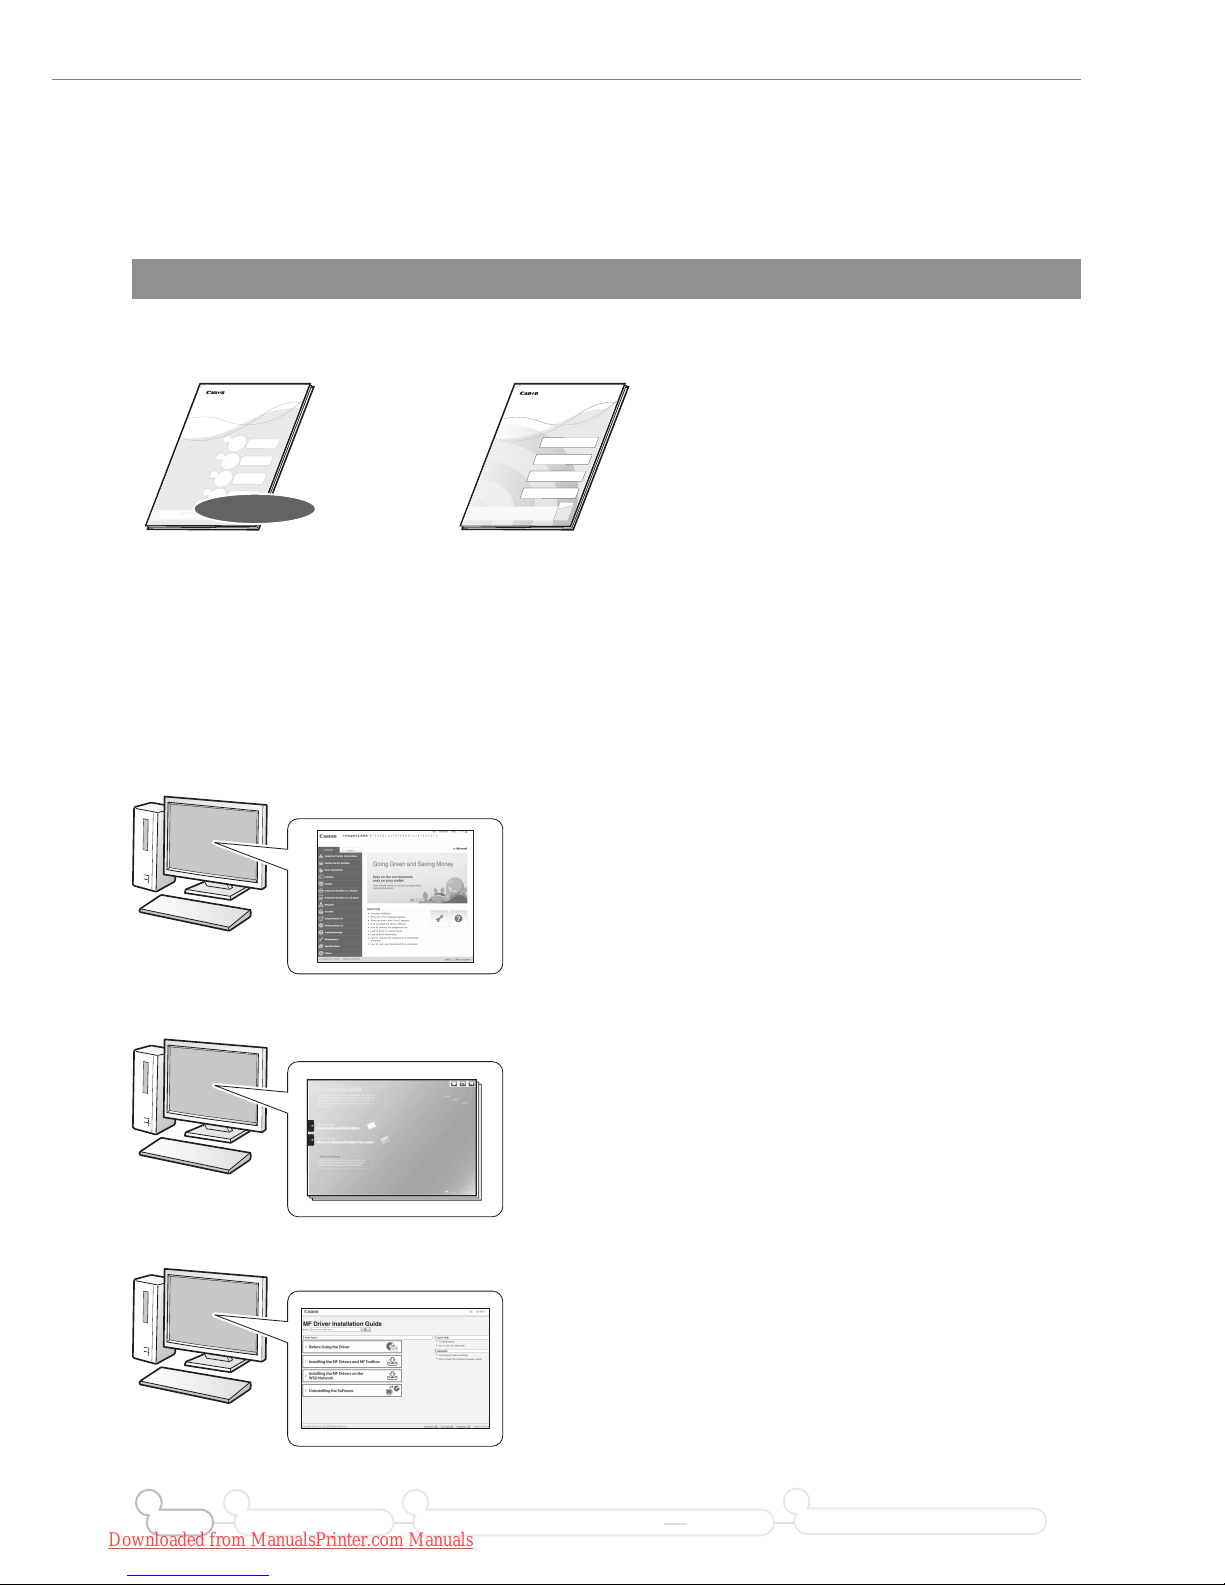
Included Documents
Printed Manuals
Starter Guide
This manual
Getting Started
This manual describes the
conguration and software installation.
Wireless LAN Setting Guide
This manual explains the wireless LAN
setup procedures and troubleshooting
during the setup.
Manuals Included in the CD-ROM
e-Manual
This manual explains all the features of the machine, and is
categorized by subject.
Displaying the e-Manual from the CD-ROM
Insert the User Software CD-ROM in your computer, click [Manuals],
and then click [e-Manual] in the displayed screen. If the User Software
CD-ROM has been already inserted in your computer and [Manuals] is
not displayed, remove the CD-ROM and insert it again.
Send Setting Guide
This manual describes how to use the Send Function Setting Tool
to set up the machine for scanning documents as e-mails (Send to
E-mail) and scanning documents to shared folders (Store to Shared
Folder).
MF Driver Installation Guide
This manual describes how to install the MF Drivers, MF Toolbox, and
software included on the User Software CD-ROM.
Preface Installing the Machine
2
Connecting to a Computer and Installing the Drivers
31
Configuring and Connecting the Fax
4
Downloaded from ManualsPrinter.com Manuals
Page 4
4
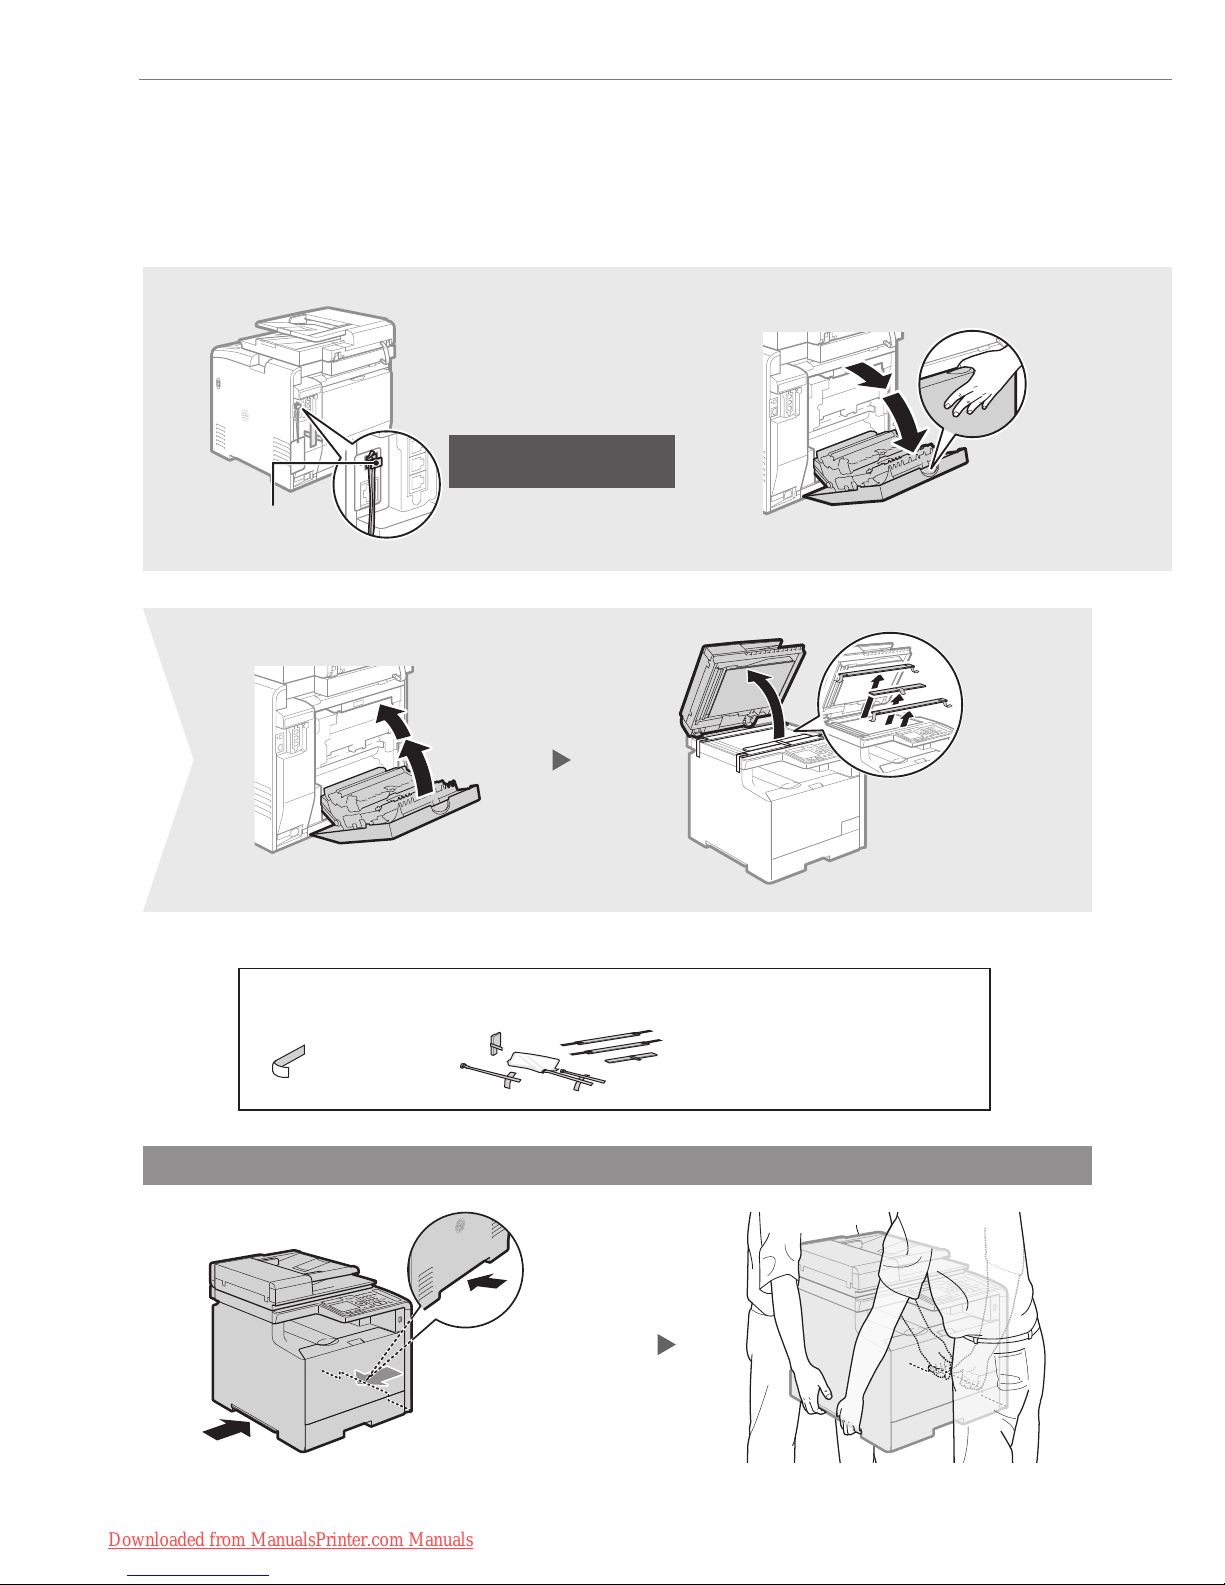
Removing the Packing Materials
Remove all the packing materials, such as orange tape. Packing materials may change in form or placement, or may be added or
removed without prior notice.
Proper Handling
1
3
Check!
Are all the packing materials removed?
43
Do not remove the cap
from the USB port.
Packing materials with tapeTape
Cap
Hold here.
Hold here.
Downloaded from ManualsPrinter.com Manuals
Page 5
5
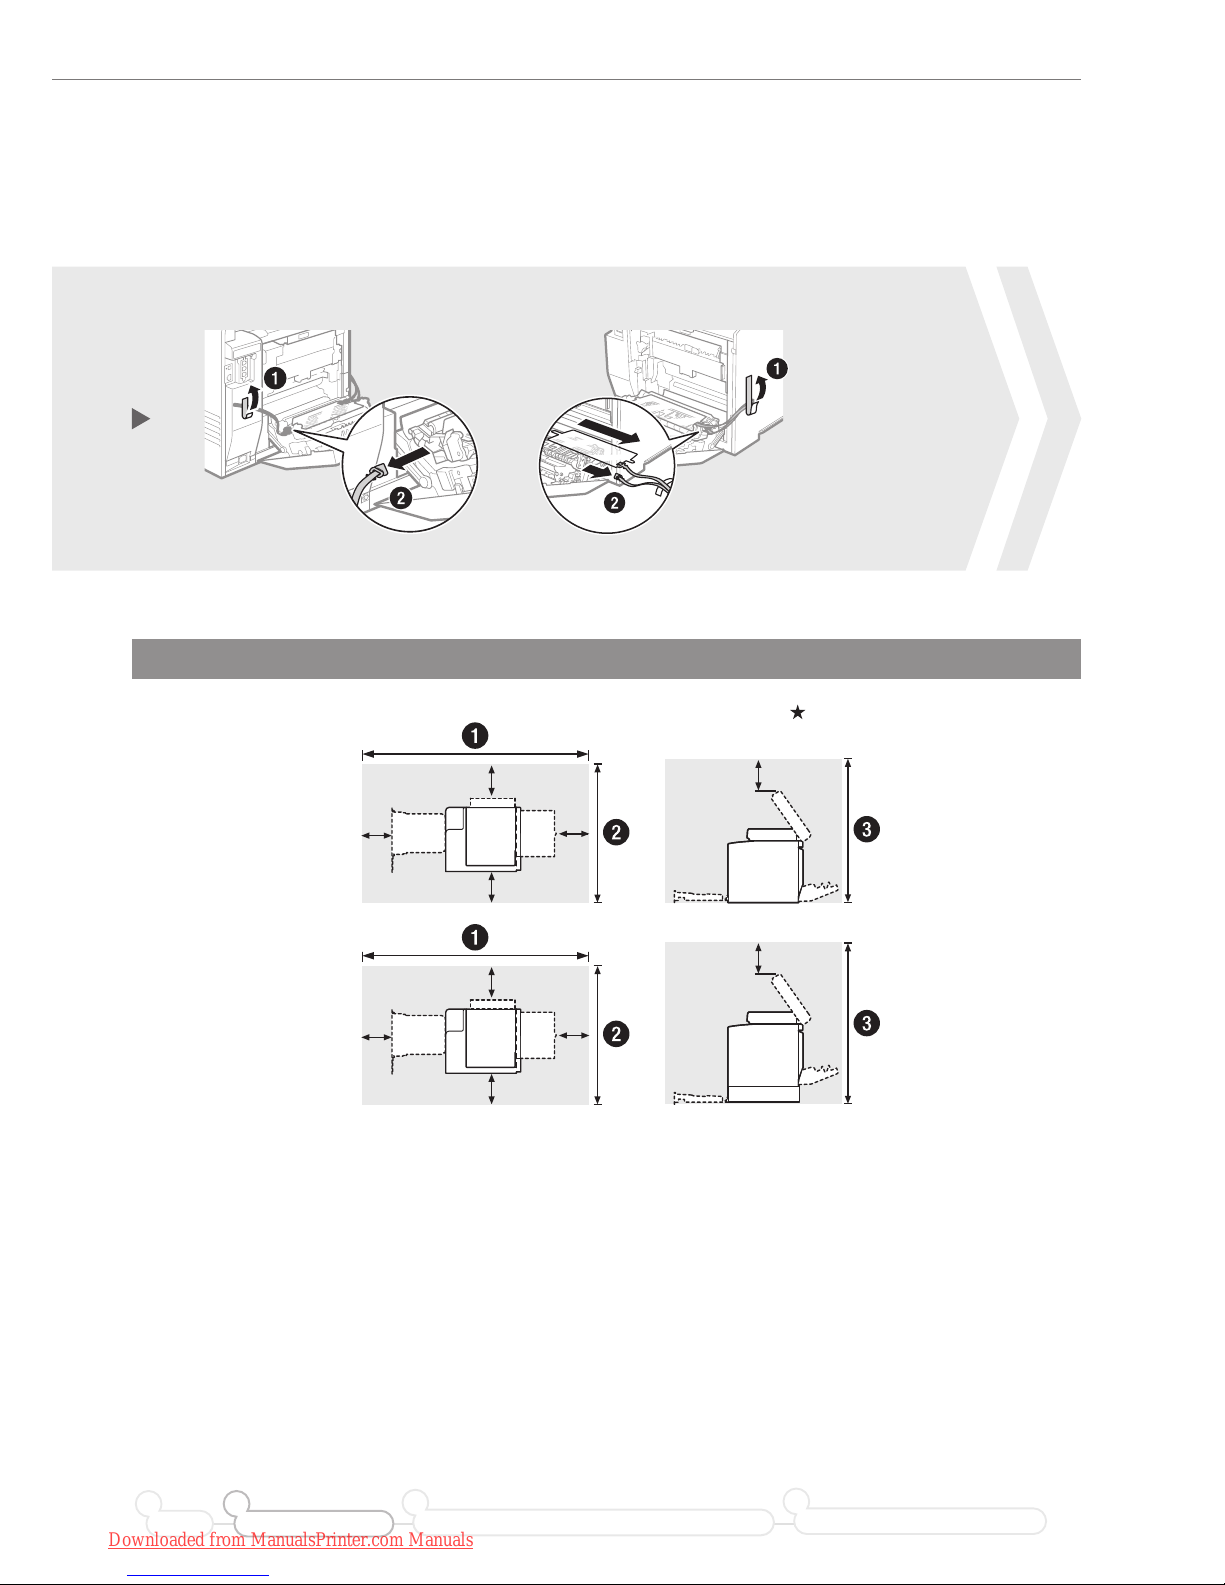
Removing the Packing Materials
Establishing an Installation Site
= 100 mm
When the optional
Cassette Feeding Unit-V1
is not installed
1,327 mm
674 mm
851 mm
★
★ ★
★
★
When the optional
Cassette Feeding Unit-V1
is installed
1,327 mm
679 mm
951 mm
★
★ ★
★
★
Do not place the machine near the following:
• Alcohol, paint thinner, or other ammable substances ▶ If ammable substances come into contact with electrical
parts inside the machine, this may result in a re or electrical shock.
• Any medical equipment
▶ Radio wave emitted from this machine may interfere with medical equipment.
• Surfaces that are unstable, subject to excessive vibration, objects that could block the ventilation slot, dampness
or dust, in direct sunlight or exposed to the elements, subject to high temperatures, open ames, and poor
ventilation
▶ Installing the machine in locations with these characteristics may result in personal injury, re, or
electric shock.
Ozone from the Unit
Although ozone is generated from the machine during operation, it does not have any aect on the human body.
However, if you intend to use the machine for long periods of time, ensure that the installation location is well
ventilated for a comfortable working environment.
2
Preface Installing the Machine
21
Connecting to a Computer and Installing the Drivers
3
Configuring and Connecting the Fax
4
Downloaded from ManualsPrinter.com Manuals
Page 6
6
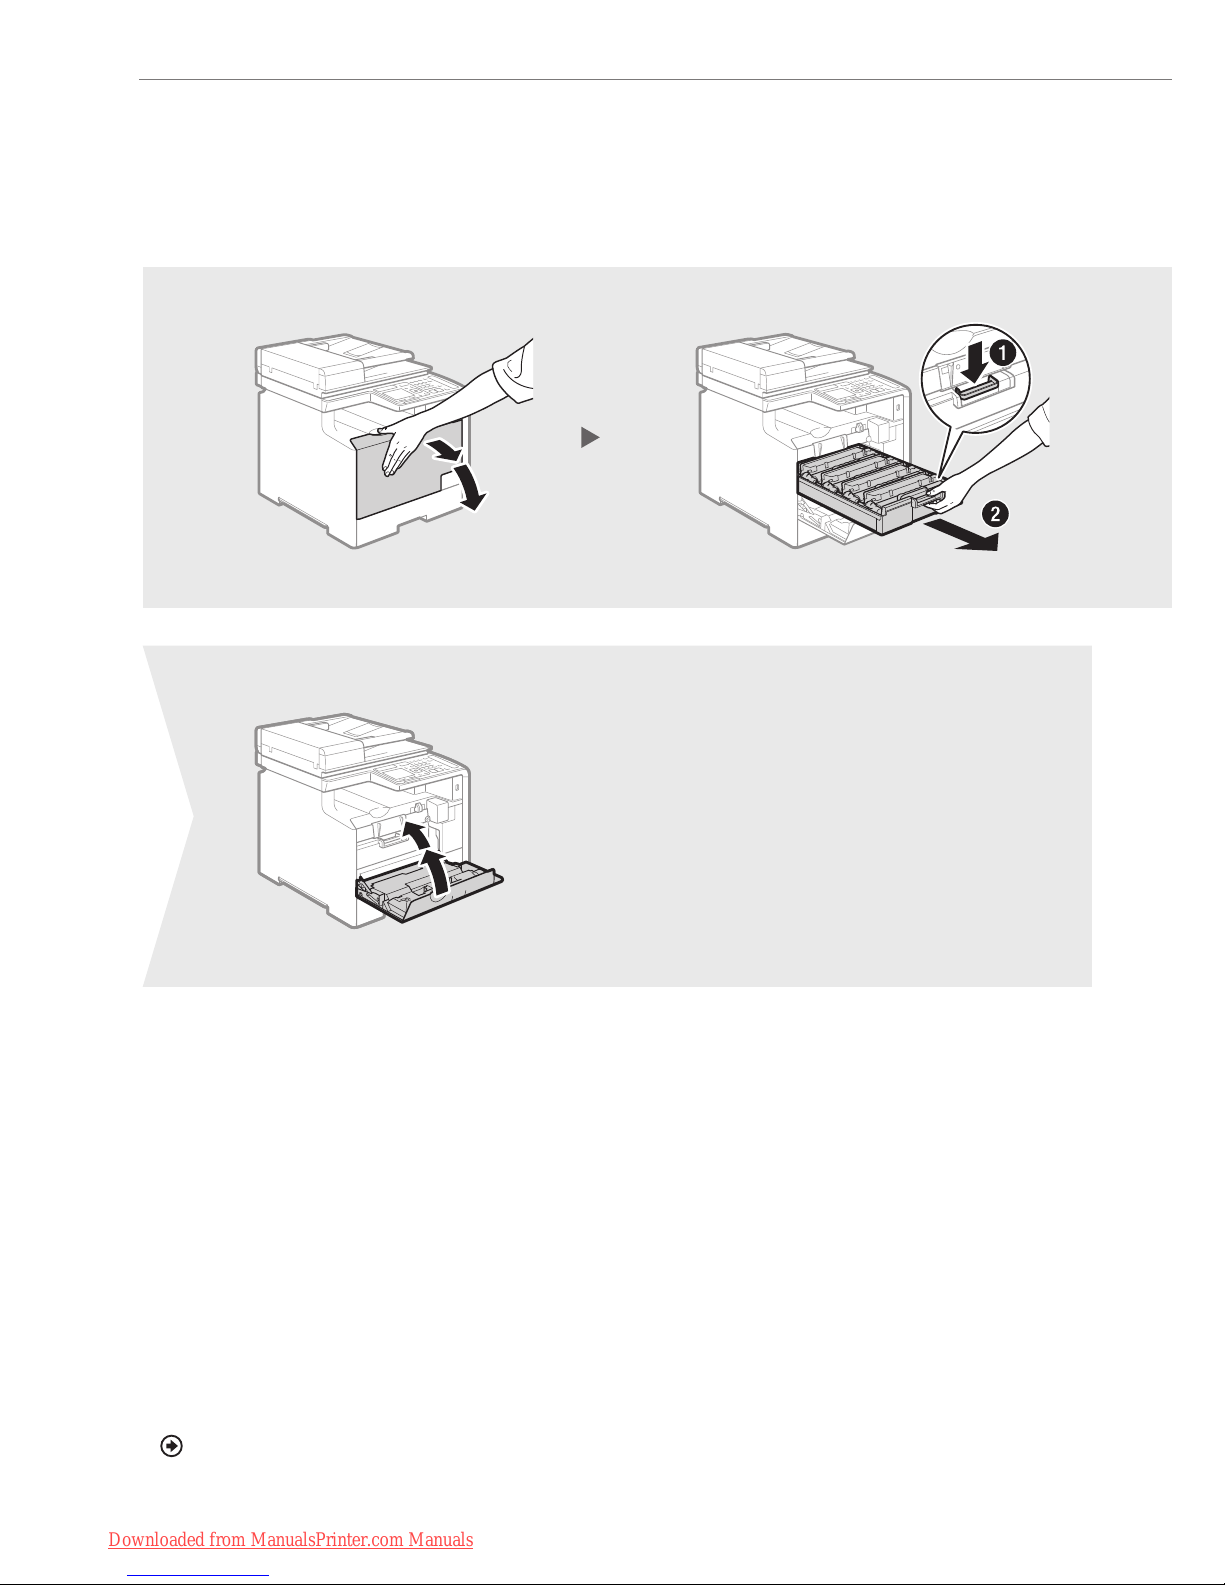
Preparing the Toner Cartridge
1
5
2
Supplied Toner Cartridges
• The average yield is 1,200 sheets for the included K (Black) toner cartridge, and 1,400 sheets for the included
Composite C (Cyan), M (Magenta), and Y (Yellow) toner cartridges.* The average yield of replacement toner
cartridges dier from the supplied toner cartridges.
• To purchase replacement toner cartridges:
“About Replacement Toner Cartridges” in the e-Manual
* The average yield is based on “ISO/IEC 19798” when printing A4 size paper with the default printing density.
Downloaded from ManualsPrinter.com Manuals
Page 7
7
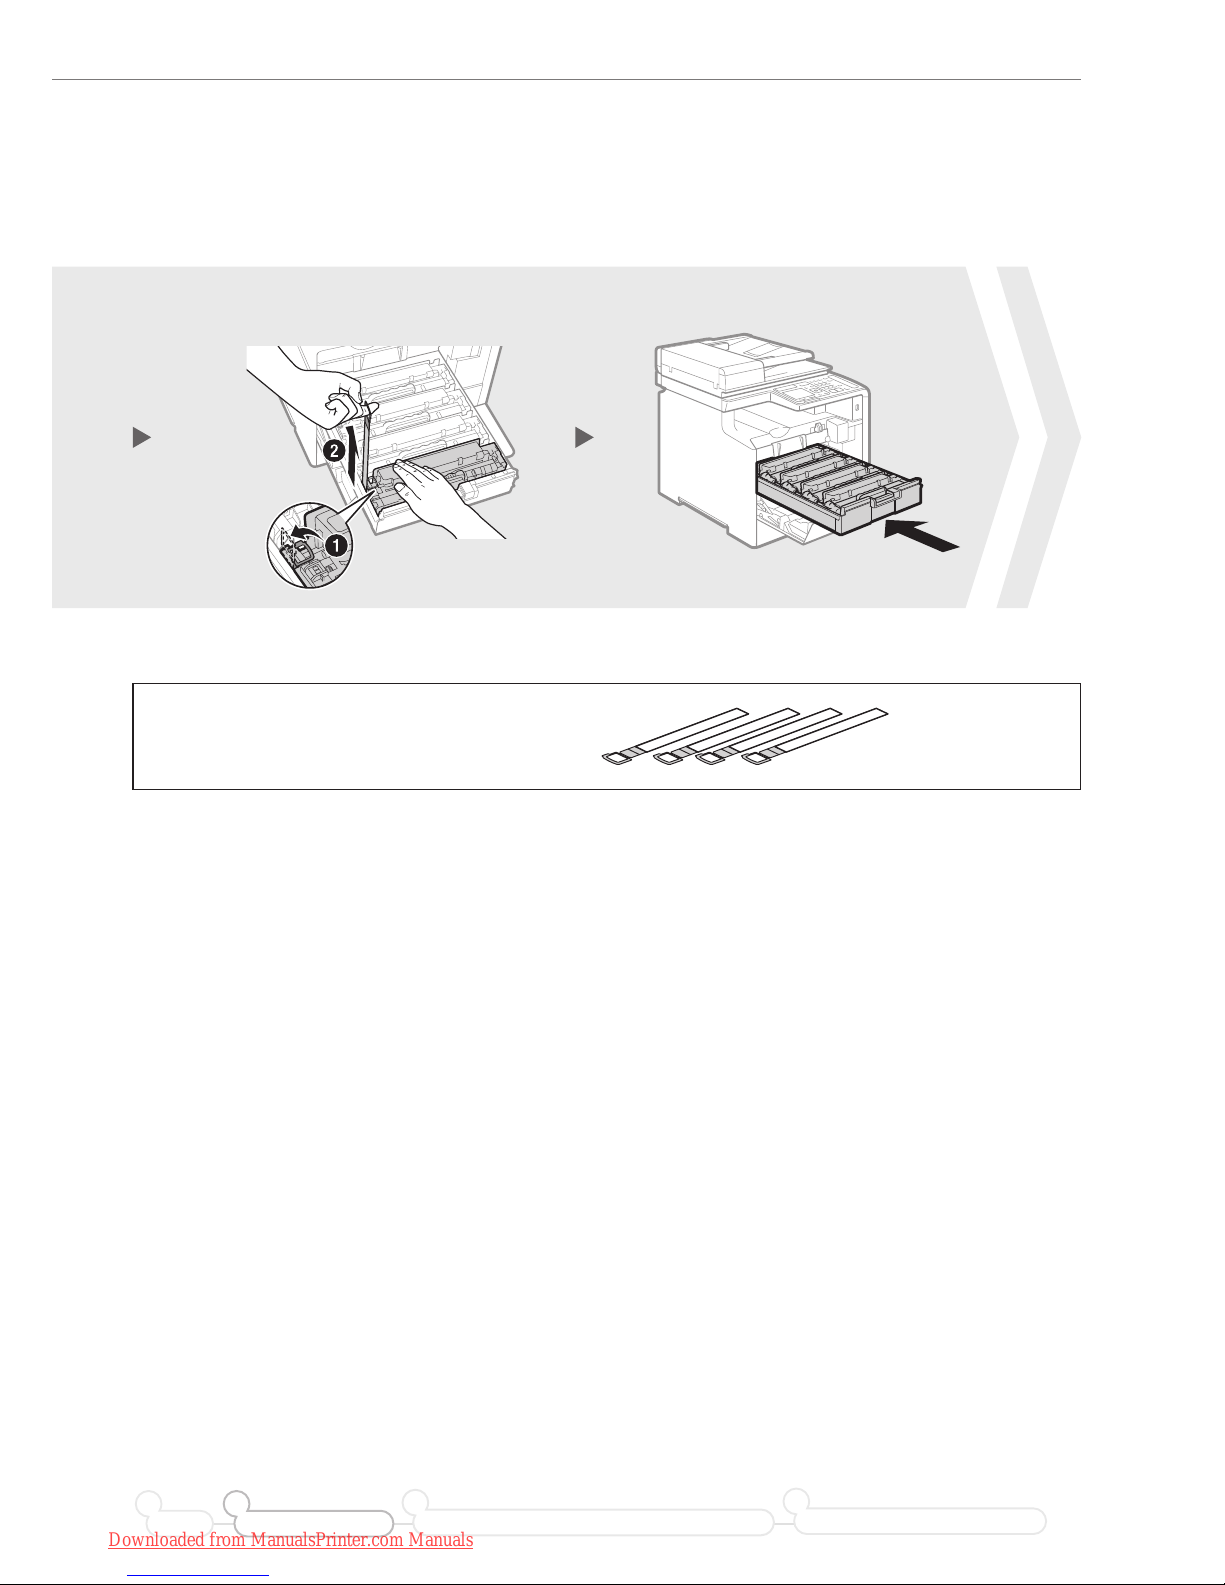
Preparing the Toner Cartridge
Check!
Are all the packing materials removed?
3 4
Sealing tape
Preface Installing the Machine
21
Connecting to a Computer and Installing the Drivers
3
Configuring and Connecting the Fax
4
Downloaded from ManualsPrinter.com Manuals
Page 8
8
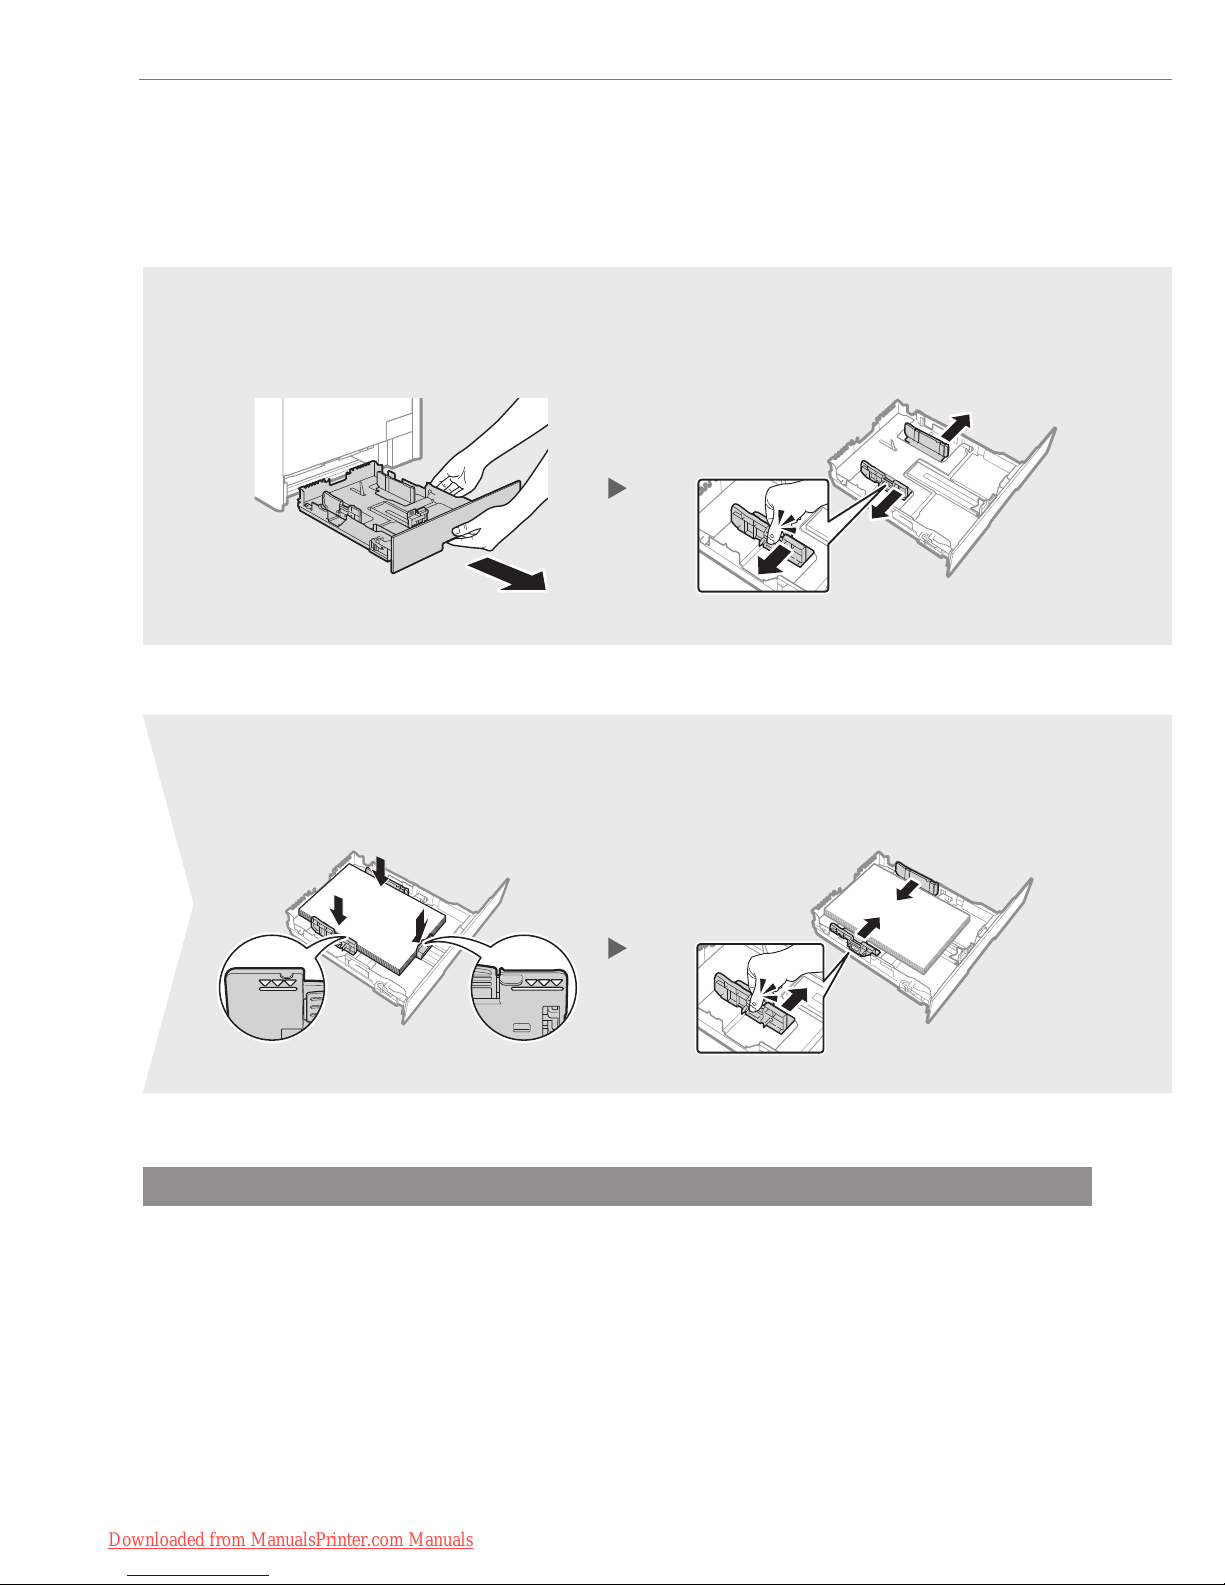
Loading Paper
Loading Paper Other than A4 Size
The procedure here is for loading A4 size paper. To load paper other than A4 size, such as A5 or B5, see “Loading
Paper Other than A4 Size” (P. 24) after nishing the initial settings.
Press the lock release lever, and slide the
side paper guides inward until they are
aligned securely against the edges of the
paper.
Set the paper under the hooks. Make
sure that the paper stack does not
exceed the load limit mark.
Press the lock release lever and spread
the side paper guides a little wider than
the width of the paper.
1 2
5 6
Downloaded from ManualsPrinter.com Manuals
Page 9
9
Loading Paper
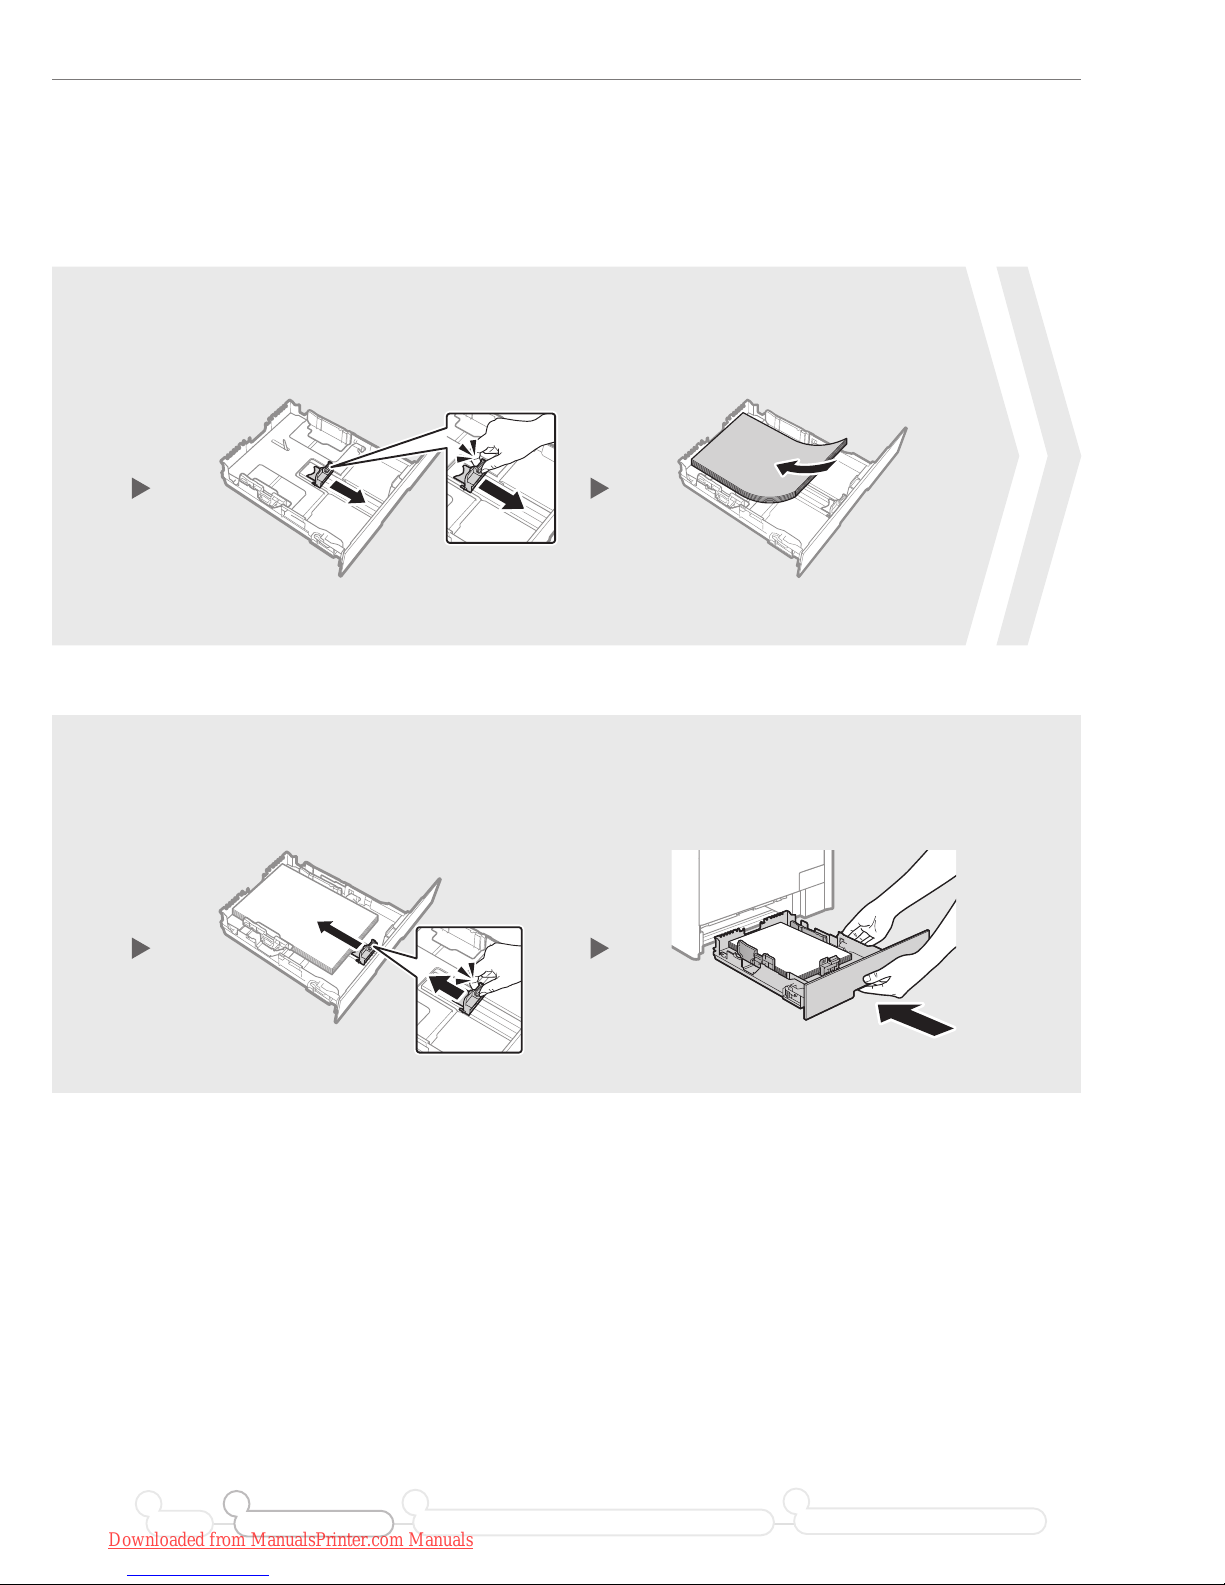
Press the lock release lever, and slide
the front-center paper guide inward
until it is aligned securely against the
edges of the paper.
Load paper so that its edge is
aligned with the rear side of the
paper drawer.
Press the lock release lever and
spread the front-center paper guide a
little wider than the length of the paper.
43
7 8
Preface Installing the Machine
21
Connecting to a Computer and Installing the Drivers
3
Configuring and Connecting the Fax
4
Downloaded from ManualsPrinter.com Manuals
Page 10
10
Connecting the Handset (Option)
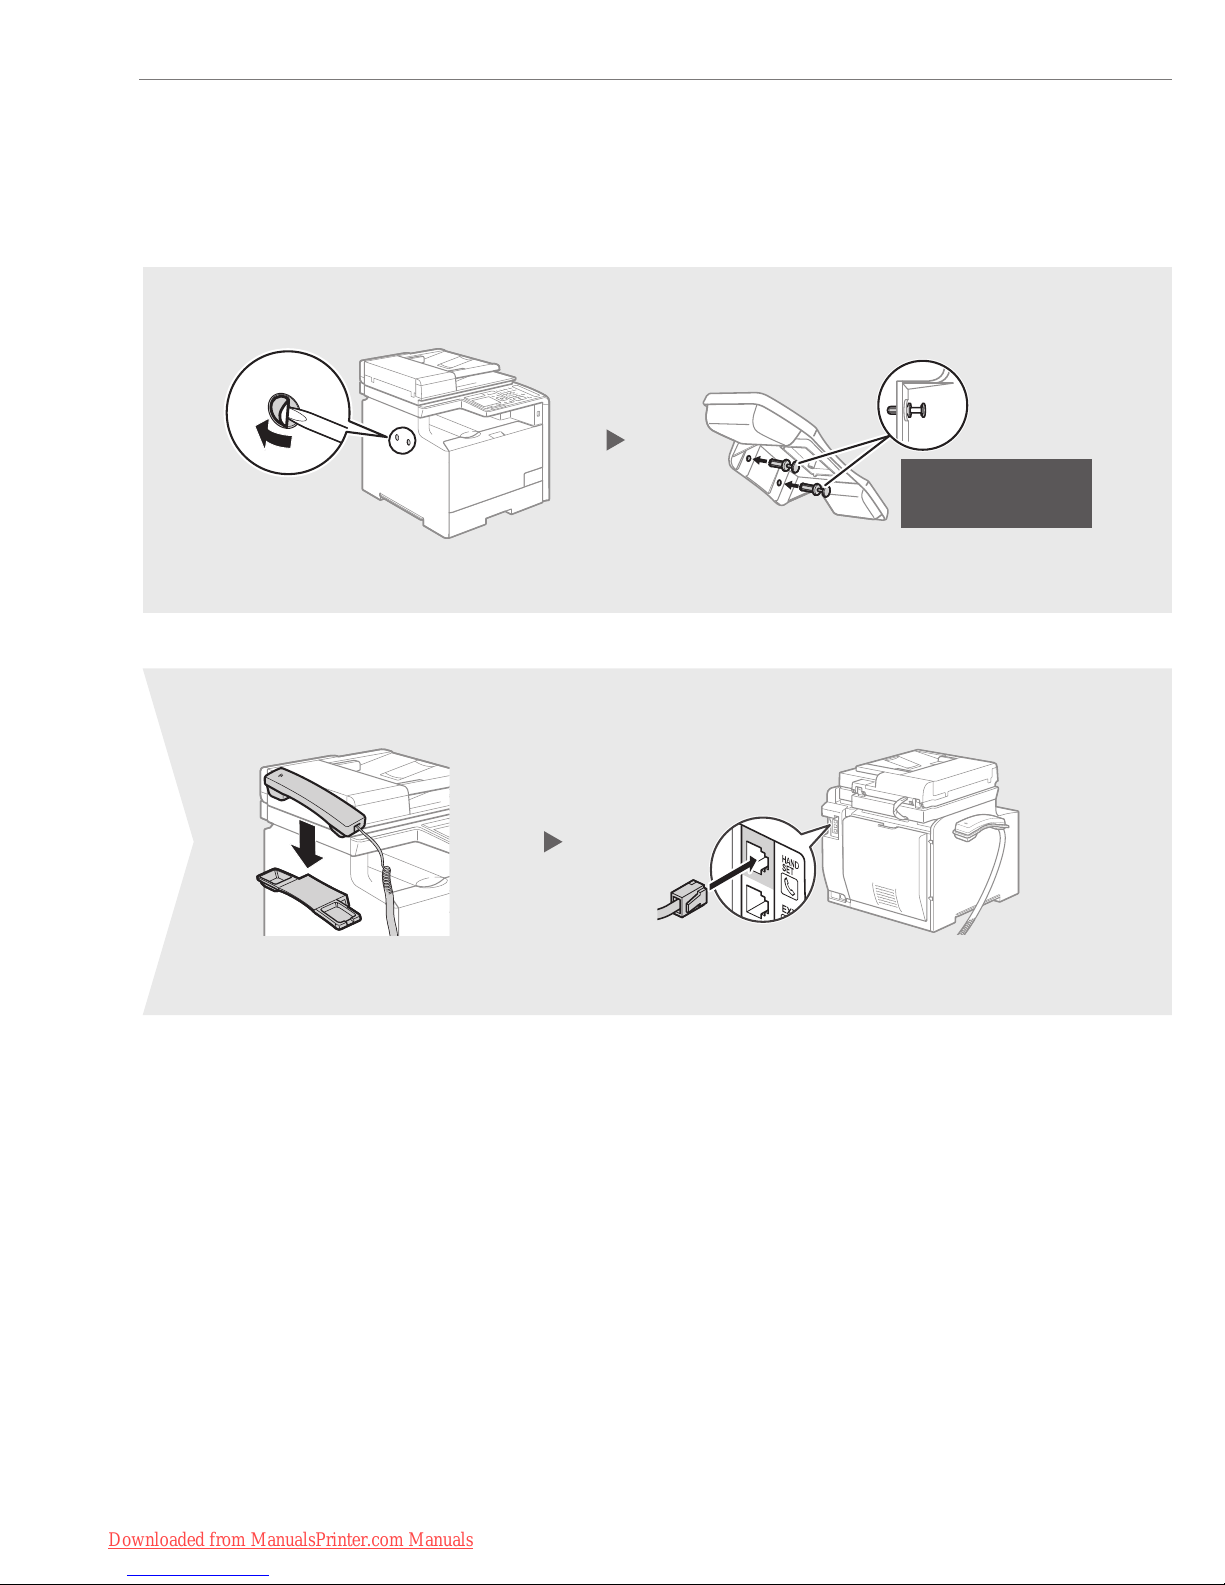
1 2
5 6
Do not fully insert the
pins into the plugs at
this point.
Downloaded from ManualsPrinter.com Manuals
Page 11
11
Connecting the Handset (Option)
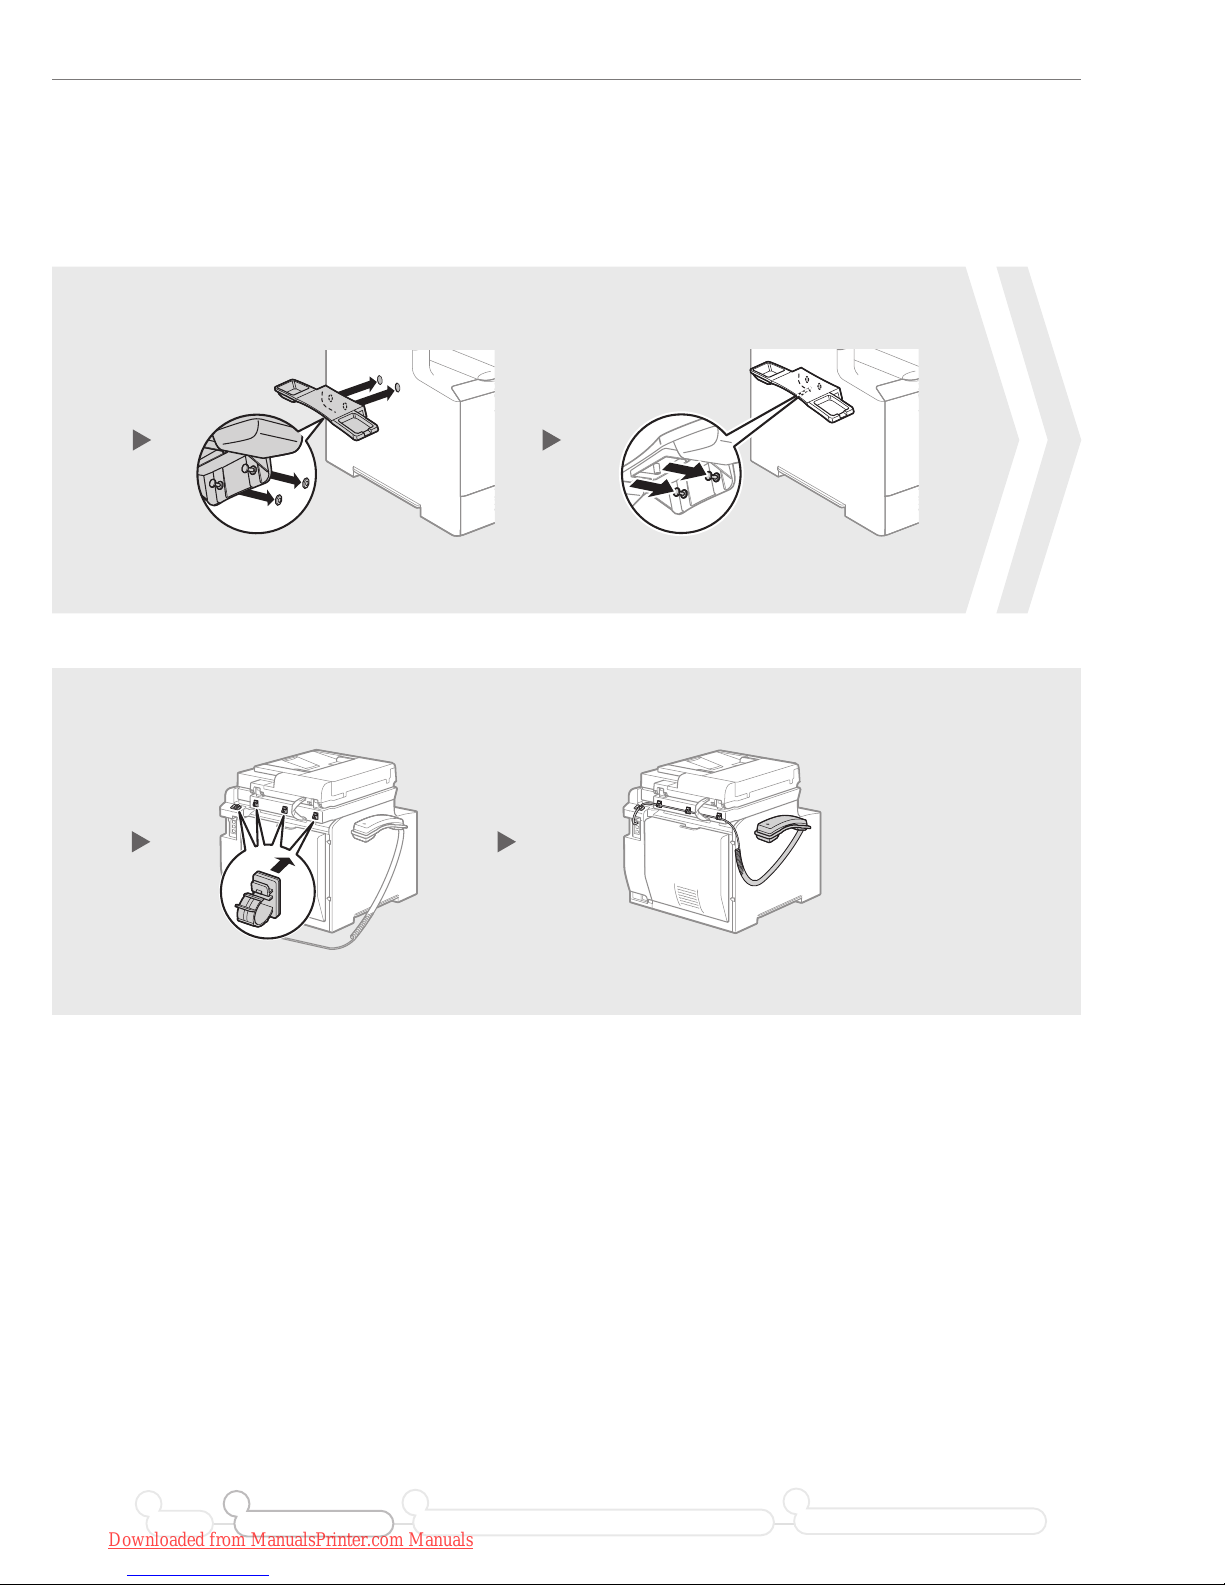
43
87
Preface Installing the Machine
21
Connecting to a Computer and Installing the Drivers
3
Configuring and Connecting the Fax
4
Downloaded from ManualsPrinter.com Manuals
Page 12
12
Connecting the Power Cord
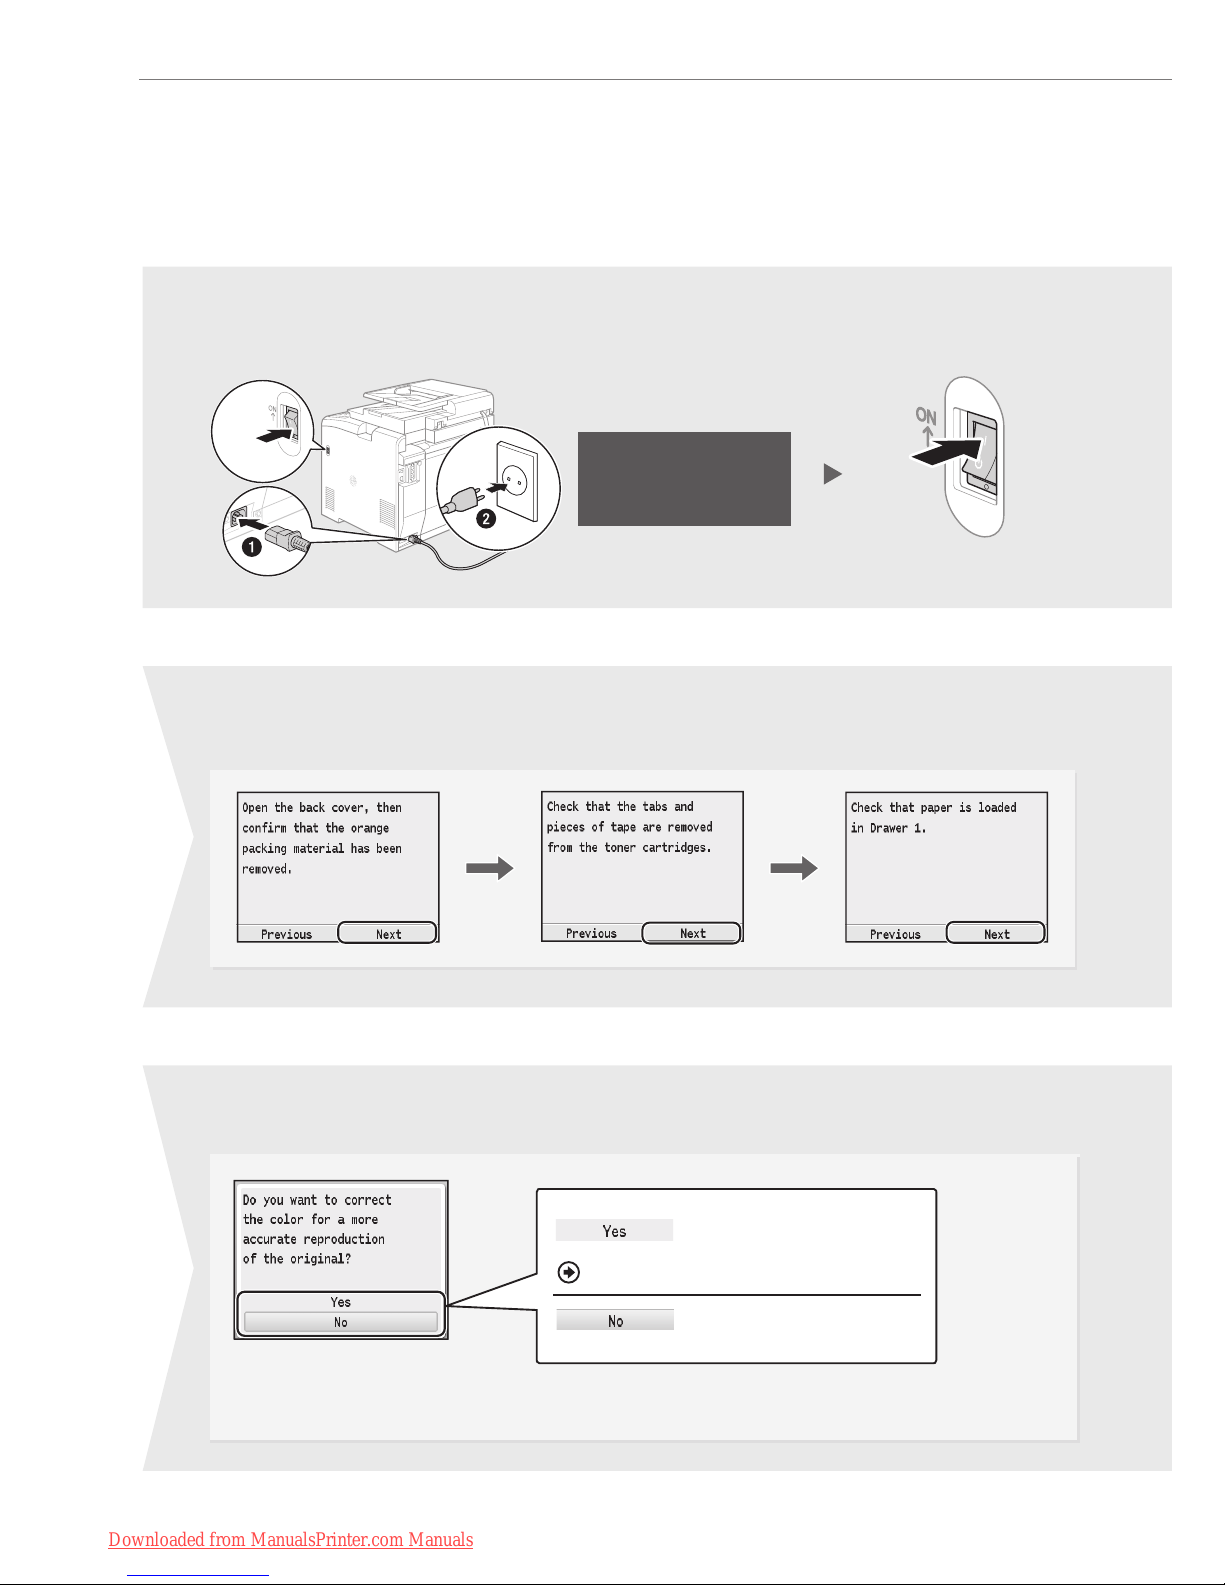
Do not connect
the USB cable.
Connect the cable when
installing the software.
Turn ON the machine.
Make sure that the machine is turned OFF,
and then connect the power cord.
Select whether or not to perform color correction.
It is recommended to perform color correction to obtain optimum copy or printout results.
Press <Next>.
1
8
5
2
Perform color correction.
Proceed to the next step.
“Performing Color Correction” (P. 26)
OFF
ON
Downloaded from ManualsPrinter.com Manuals
Page 13
13
Connecting the Power Cord
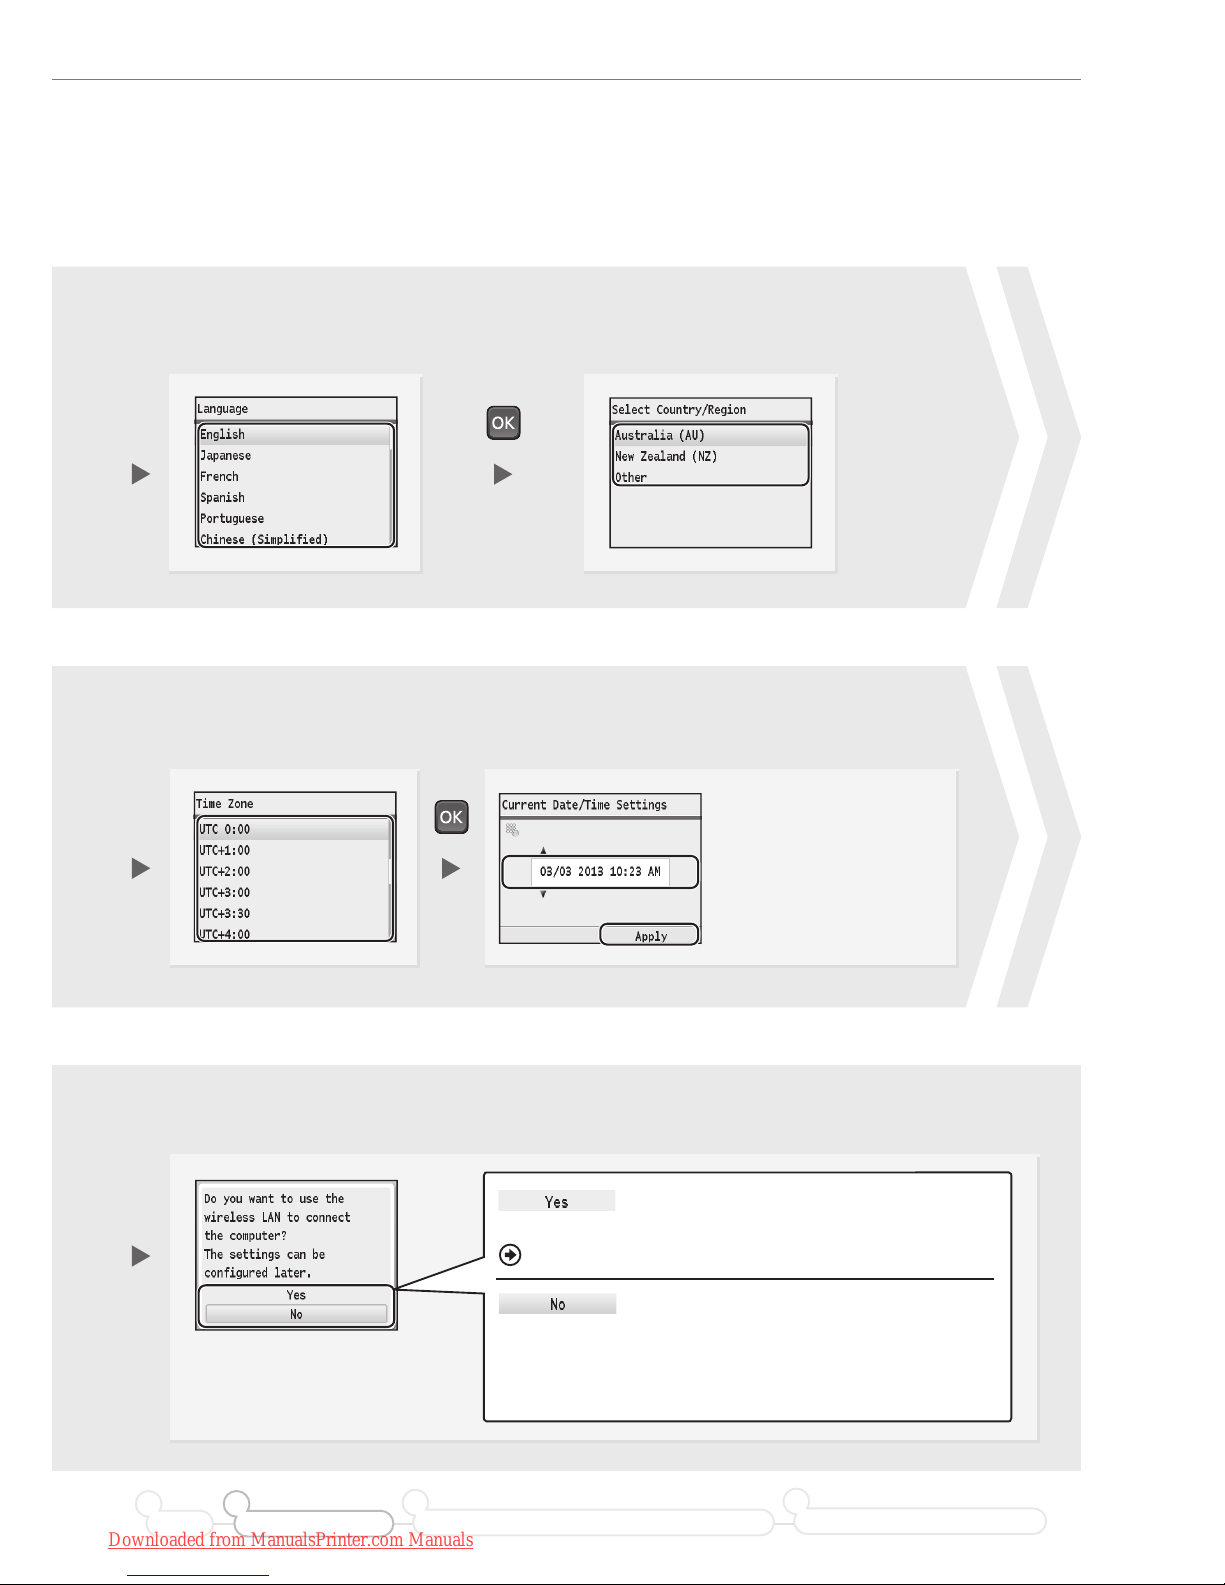
Press [▲] or [▼] to highlight a
language*, and then press [OK].
Select whether or not to connect using wireless LAN immediately.
Press [▲] or [▼] to highlight a
region*, and then press [OK].
3 4
9
•
Press [◀] or [▶] to move the
cursor to the left and right.
• Press [▲] or [▼] to
change the numeric
value, or AM/PM.
The factory default settings for
time display is set as 12-Hour.
Enter the date and time, and then press <Apply>.
Press [▲] or [▼] to
highlight your time zone**,
and then press [OK].
76
Connect to the computer via a
wireless LAN immediately.
Proceed to the next page.
• Select <No> if you want to connect the machine to a
computer via a wireless LAN later. When connecting,
refer to Wireless LAN Setting Guide.
• If you do not connect the machine to a computer,
proceed to fax conguration (P. 20).
Start from step on P. 4 in Wireless LAN Setting Guide.
Preface Installing the Machine
21
Connecting to a Computer and Installing the Drivers
3
Configuring and Connecting the Fax
4
* The screen may dier depending on the country or region where you are using the machine.
** The time zone setting indicates the time dierence between your local time zone and Coordinated Universal Time (UTC).
The correct time zone setting is required for Internet communications.
Downloaded from ManualsPrinter.com Manuals
Page 14
14
Connecting to the Computer
Check!
Choosing the Method to Connect the Machine to the Computer
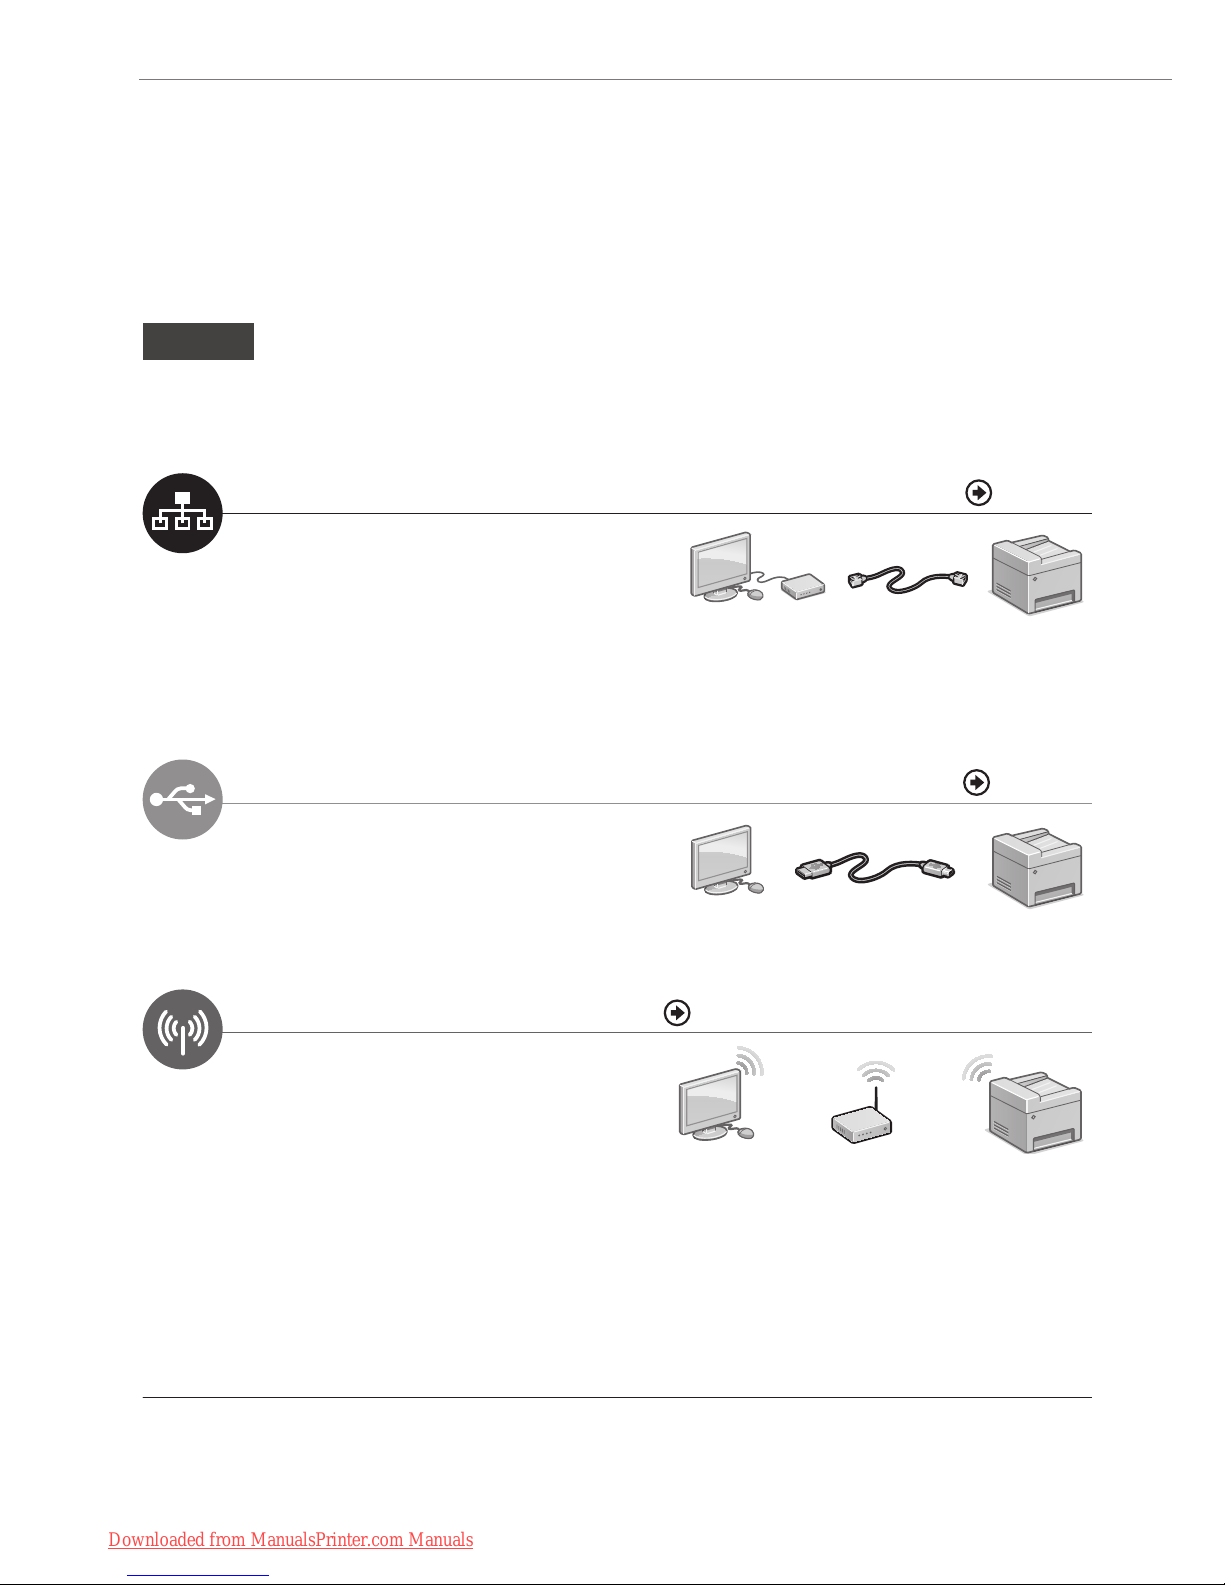
First, you need to decide on the method you would like to connect your machine to the computer. Choose from the
following three options.
Connecting via a Wired LAN P. 15
You can connect the machine to the computer
through a wired router. Use the LAN cables to
connect the machine to the wired router.
• Make sure that there is an available port in the router to connect
the machine and the computer.
• Have a LAN Cable of Category 5 twisted-pair cable or higher
ready.
LAN Cable
Wired Router
Connecting via a USB P. 17
You can connect the machine to the computer using
a USB cable.
USB Cable
Connecting via a Wireless LAN See “Wireless LAN Setting Guide”
You can connect the machine to the computer
through a wireless router*. Since it is connected
wireless, no LAN cables are needed.
* A wireless router which supports IEEE 802.11b/g/n is required.
Wireless Router
If you are not sure whether your router is wired or wireless:
See the instruction manual provided with your network device, or contact the manufacturer.
Downloaded from ManualsPrinter.com Manuals
Page 15
15
Connecting to the Computer
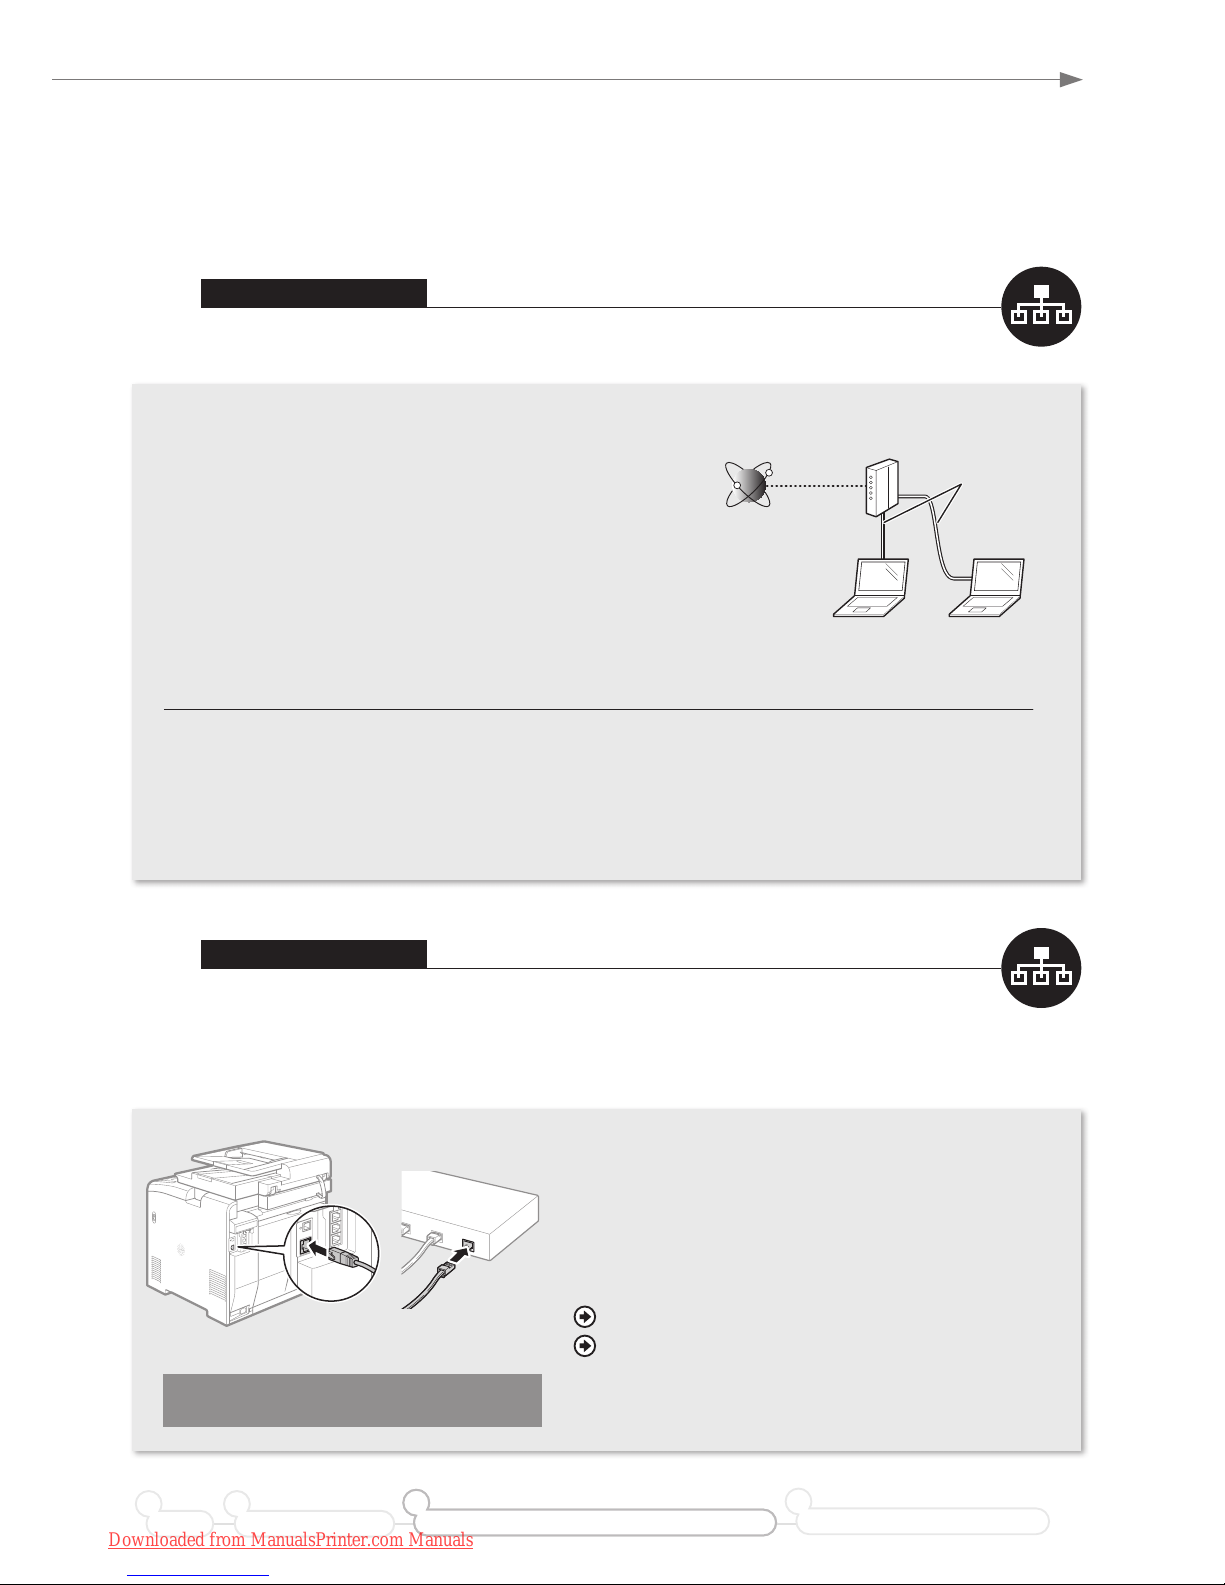
Are the computer and the router properly
connected using a LAN cable?
For details, see the instruction manual provided with your
network device, or contact the manufacturer.
Has the network settings on the computer been
complete?
If the computer is not properly congured, you may not
use the wired LAN connection even after completing the
following settings.
NOTE
• You cannot connect both the wired LAN and wireless
LAN at the same time.
• When you connect to a network environment that
is not security protected, your personal information
could be disclosed to third parties. Please use
caution.
• If you connect through a LAN in the oce, contact
your network administrator.
If the IP address on this machine has been changed:
If the machine is on the same subnet as the computer, the
connection is maintained.
* If you want to manually congure the IP address:
If you have set a static IP address to the IP address of the
computer, manually congure a static IP Address.
“Setting IPv4 Address” in the e-Manual
“Setting IPv6 Address” in the e-Manual
Wait for approximately 2 minutes.
The IP address will be automatically congured.*
Router
LAN Cable
Internet
Router
LAN Cable
1
Wired LAN Connection
Check the following rst.
2
Wired LAN Connection
Connect the LAN cable.
The machine does not come with a LAN cable or router. Have LAN Cable of Category 5 twisted pair cable or higher
ready.
Preface Installing the Machine
21
Connecting to a Computer and Installing the Drivers
3
Configuring and Connecting the Fax
4
Downloaded from ManualsPrinter.com Manuals
Page 16
16
Connecting to the Computer
3
Wired LAN Connection
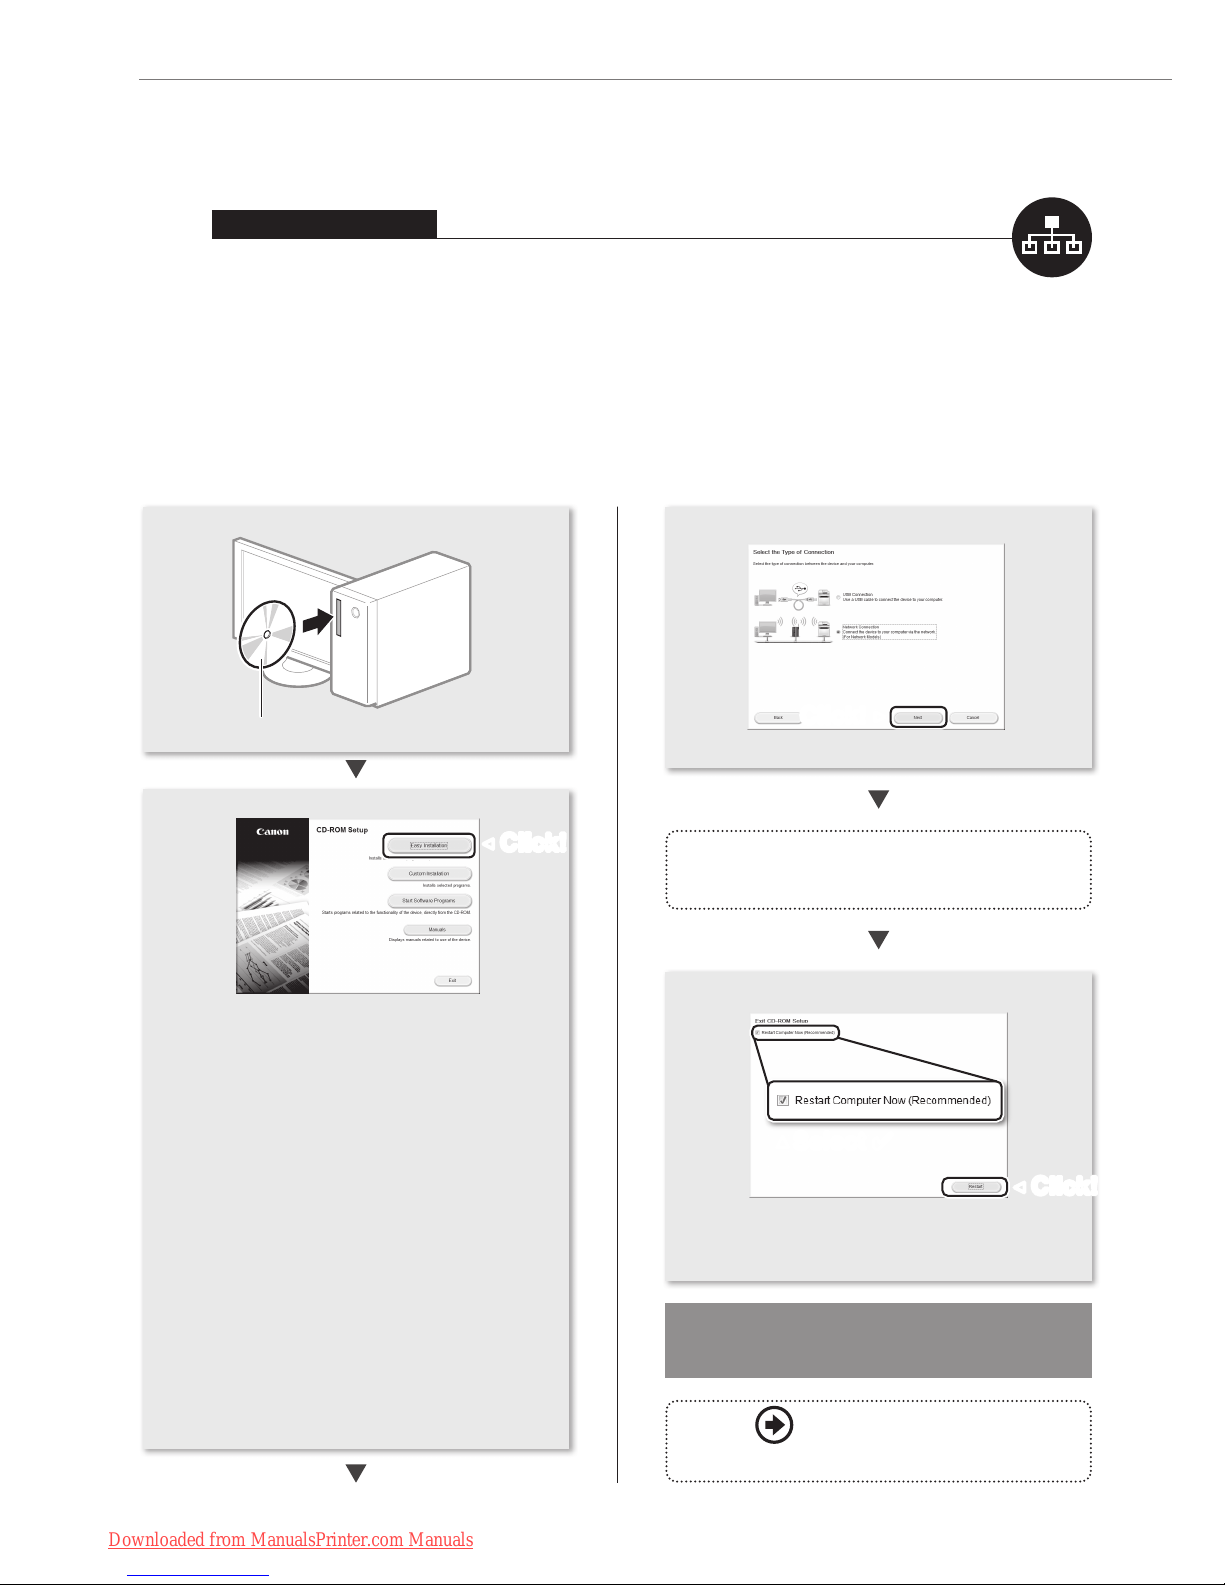
Install the software.
Install the MF Drivers and the MF Toolbox. Make sure that the machine is turned ON, and log on to Windows as a
user with administrative privileges. Shut down all applications that are running. See MF Driver Installation Guide for
details about installation.
NOTE
• If you are operating in the IPv6 environment, you may not install the software following the procedures below. See “Installing
the MF Drivers on the WSD Network” in MF Driver Installation Guide.
• You may not use the scan function in the IPv6 environment.
4
Follow the instructions
on the screen to continue.
Computer connection via the
wired LAN is now complete.
• Take the CD-ROM out, if necessary.
• Printer, fax, scanner drivers and MF Toolbox
will be installed.
• Select [Custom Installation] to install Presto!
PageManager and the e-Manual.
If the screen is not correctly displayed:
• Windows XP/Server 2003
[Start] Menu → [Run] → enter [D:\MInst.exe]*
→ [OK]
• Windows Vista/7/Server 2008
[Start] Menu → [Search programs and les]
(or [Start Search]) → enter [D:\MInst.exe]* →
press the [Enter] key
• Windows 8/Server 2012
Right-click the lower-left corner of the screen
→ select [Run] → enter [D:\Minst.exe]* → [OK]
* The CD-ROM drive name is indicated as "D:" in this
manual.
User Software CD-ROM
▲
Proceed to P. 20
to configure the fax.
◀
Click!
Click!
▶
▲
Select ✔
◀
Click!
Downloaded from ManualsPrinter.com Manuals
Page 17
17
Connecting to the Computer
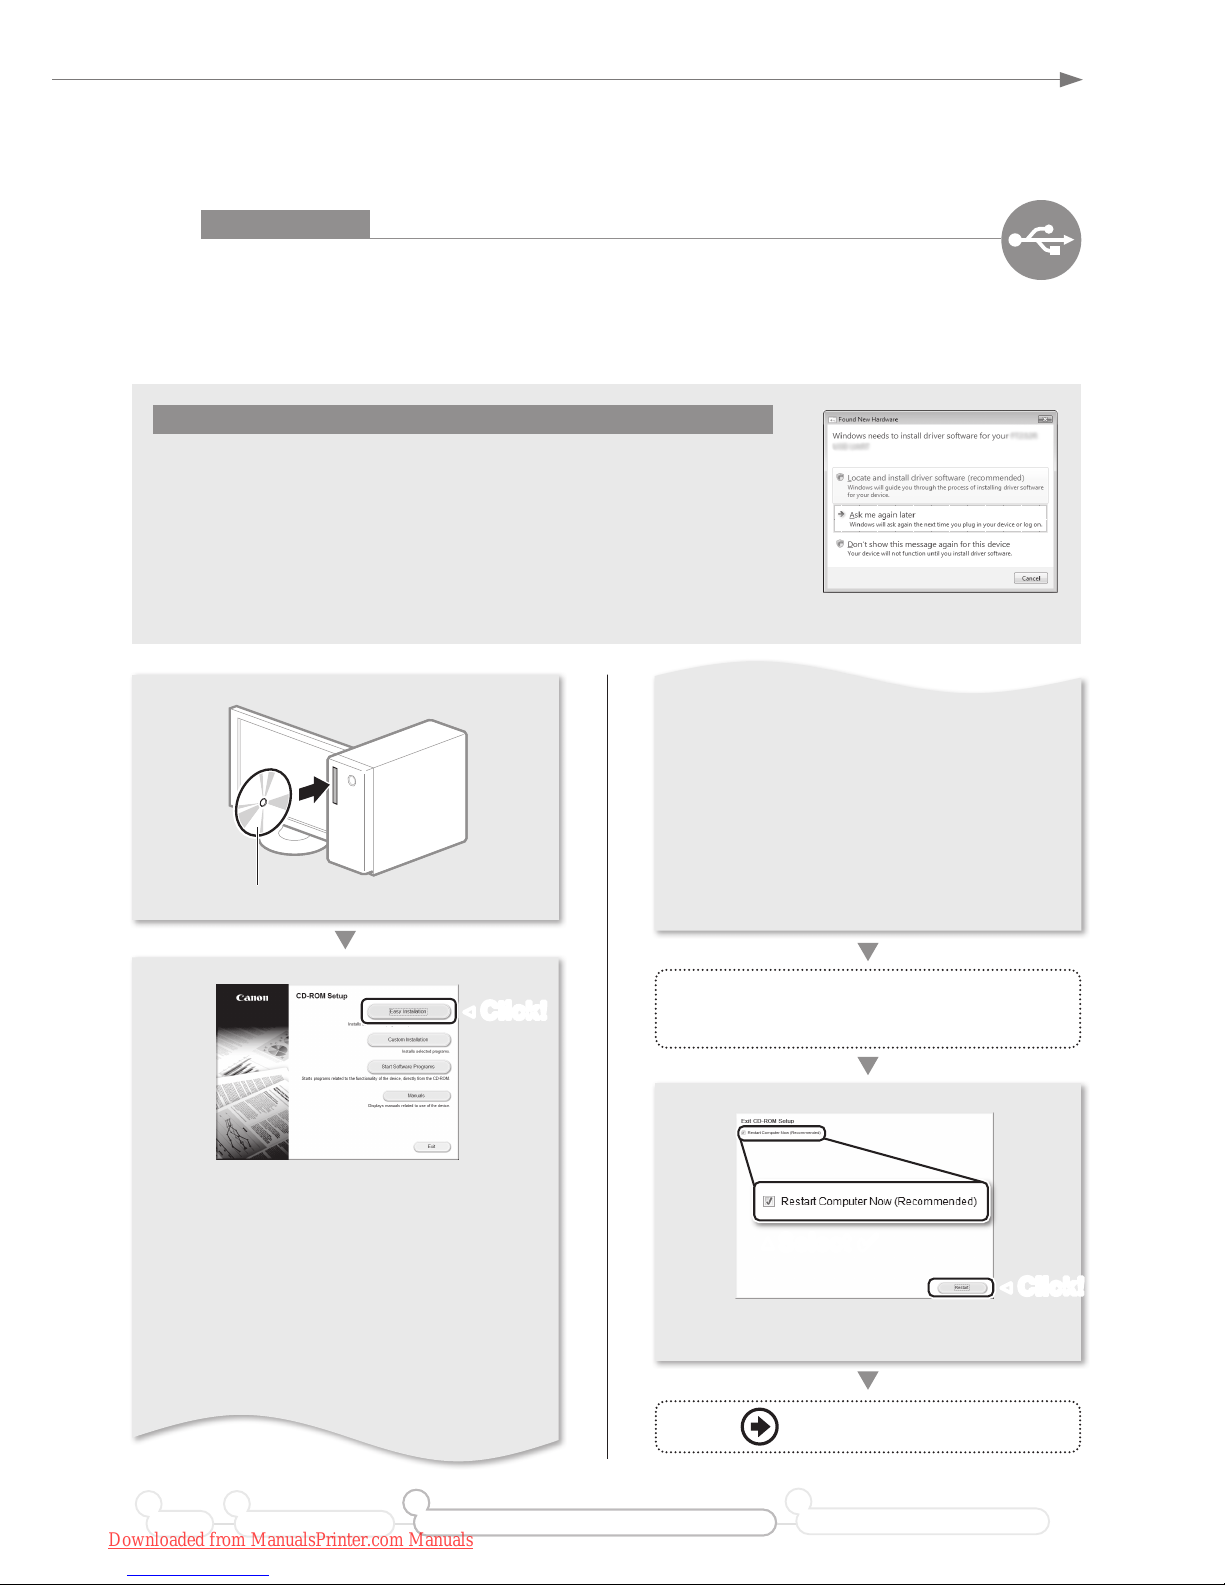
1
USB Connection
Install the Software.
Install the MF Drivers and the MF Toolbox. Make sure that the machine is turned ON, and log on to Windows as a
user with administrative privileges. Shut down all applications that are running. See MF Driver Installation Guide for
details about installation.
Do not connect the USB cable yet.
Connect the USB cable after installing the MF Drivers and the MF Toolbox.
If you already connected the USB cable:
Windows 7/8:
Disconnect the USB cable from the computer,
and then
proceed to step .
Windows XP/Vista: If the dialog box on the right appears, disconnect the USB cable
from the computer*,
click [Cancel],
and then proceed to step .
* If the USB cable is disconnected and the dialog box disappears, proceed to step .
For Windows XP/Vista
• Printer, fax, scanner drivers and MF Toolbox
will be installed.
• Select [Custom Installation] to install Presto!
PageManager and the e-Manual.
If the screen is not correctly displayed:
• Windows XP
[Start] Menu → [Run] → enter [D:\MInst.exe]*
→ [OK]
• Remove the CD-ROM, if necessary.
Follow the instructions
on the screen to continue.
User Software CD-ROM
▲
• Windows Vista/7
[Start] Menu → [Search programs and les]
(or [Start Search]) → enter [D:\MInst.exe]* →
press the [Enter] key
• Windows 8
Right-click the lower-left corner of the screen
→ select [Run] → enter [D:\Minst.exe]* → [OK]
* The CD-ROM drive name is indicated as "D:" in this
manual.
Proceed to P. 18
Preface Installing the Machine
21
Connecting to a Computer and Installing the Drivers
3
Configuring and Connecting the Fax
4
◀
Click!
▲
Select ✔
◀
Click!
Downloaded from ManualsPrinter.com Manuals
Page 18
18
Connecting to the Computer
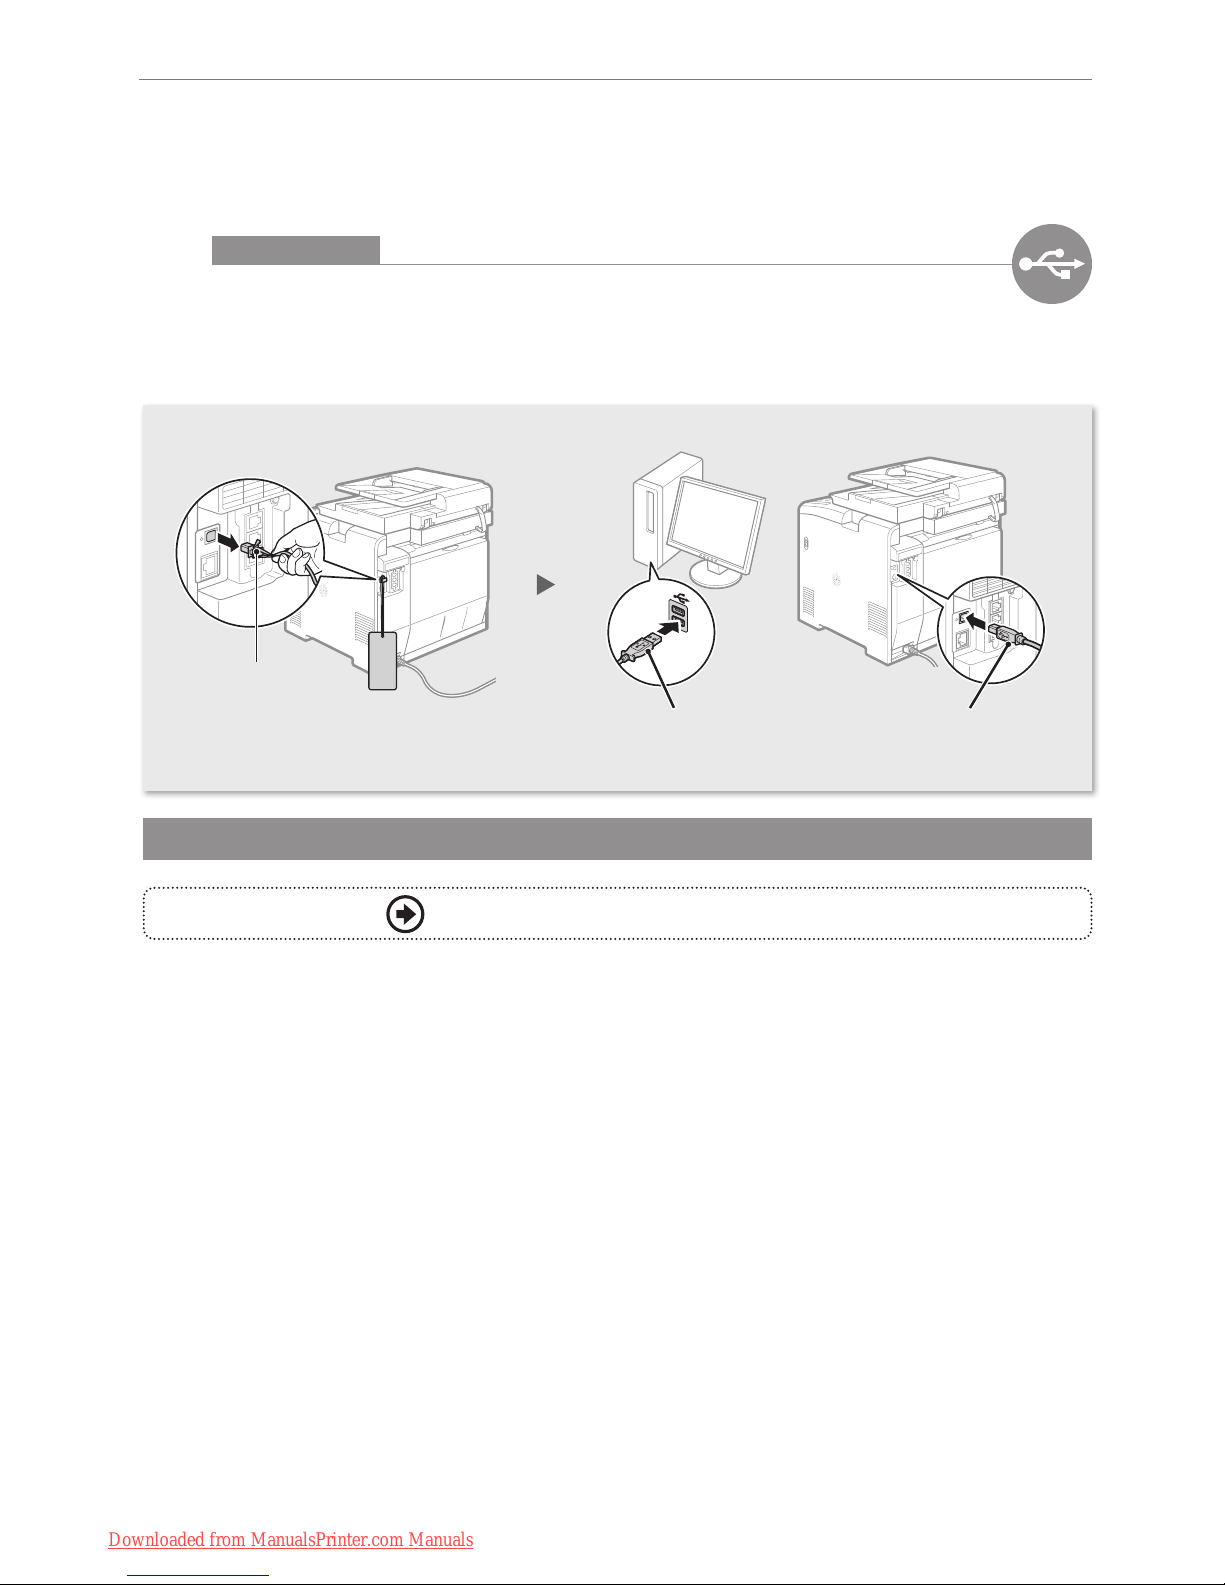
Computer connection via the USB is now complete.
2
USB Connection
Connect the USB cable.
After installing the software, such as MF Driver, connect the USB cable. Make sure the software is installed rst.
Proceed to P. 20 to congure the fax.
Remove this.
Flat Connector
Connect to the computer.
Square Connector
Connect to the machine.
Downloaded from ManualsPrinter.com Manuals
Page 19

19
Preface Installing the Machine
21
Connecting to a Computer and Installing the Drivers
3
Configuring and Connecting the Fax
4
Downloaded from ManualsPrinter.com Manuals
Page 20
20
Conguring the Fax
Check!
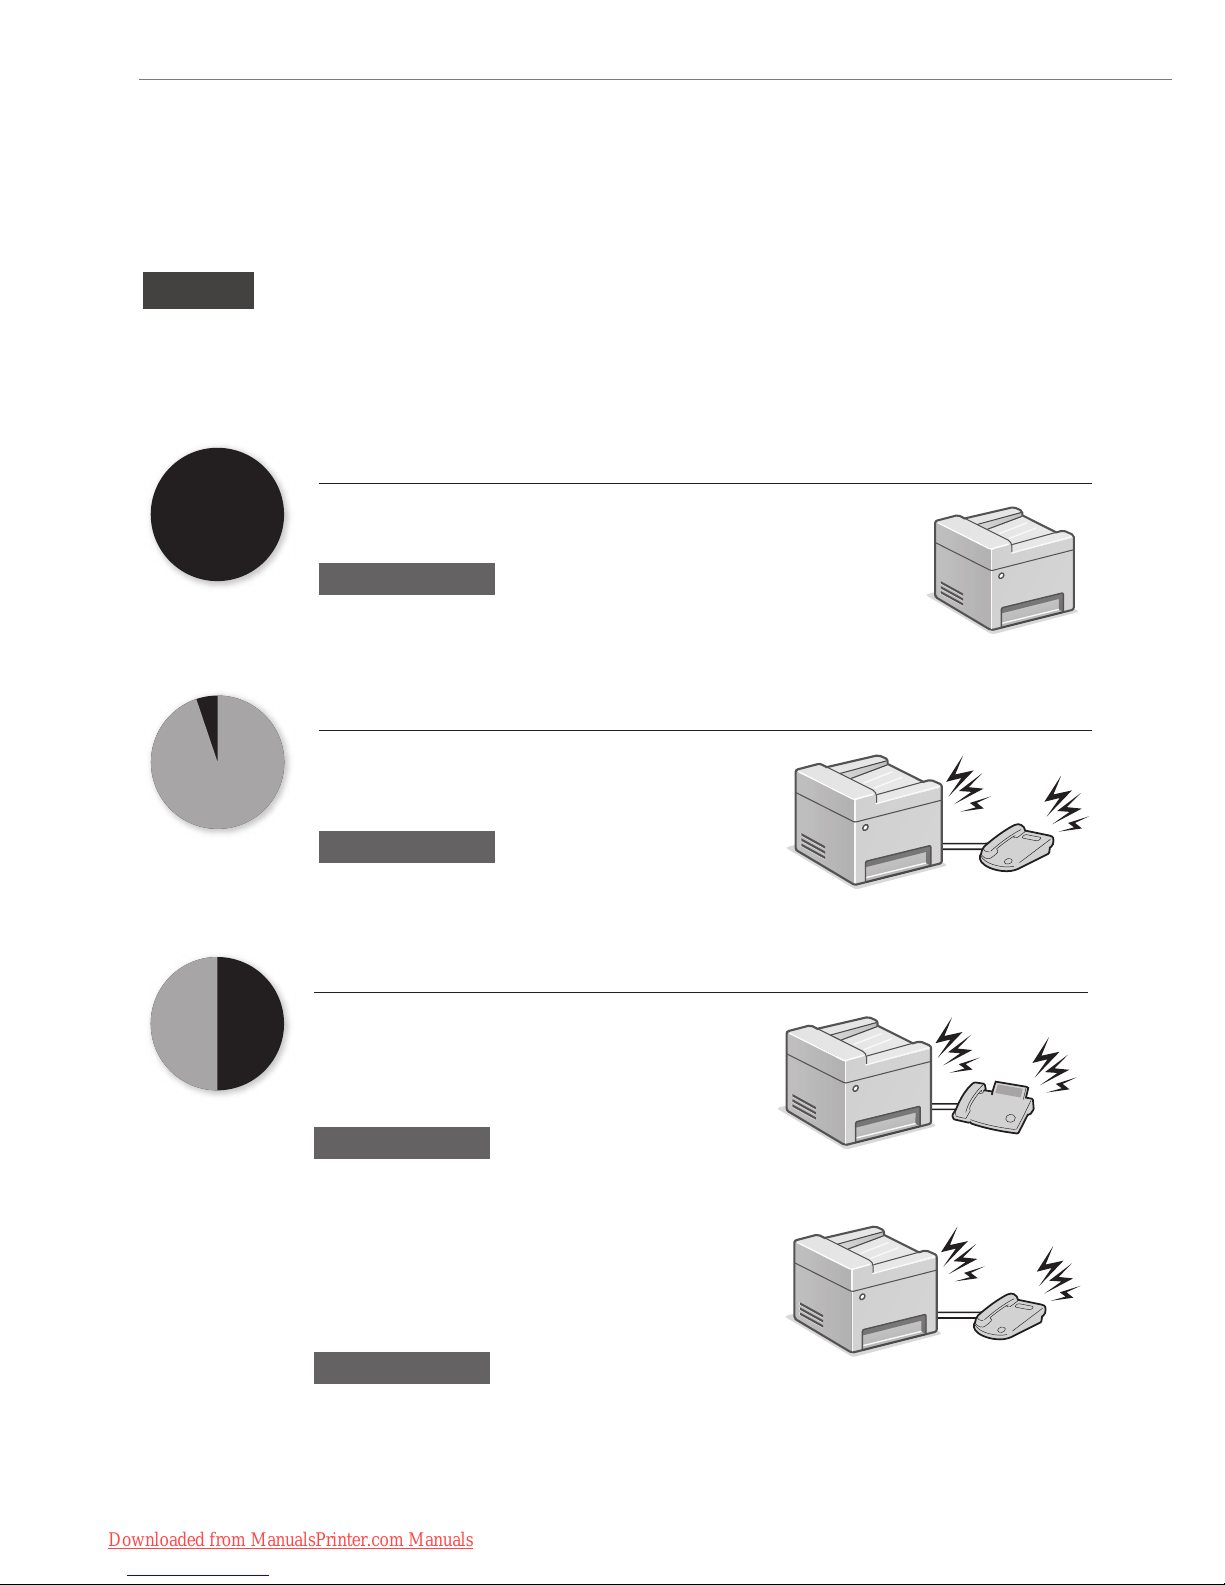
Selecting a Receive Mode That Fits Your Purpose
Choose your purpose to know the receive mode* to use. Remember the receive mode to congure the setting in
“Selecting the Fax Receive Mode” (P. 22).
* You may be able to manually set a receive mode other than those described below, depending on your country or region. See the e-Manual for
details about other receive mode.
Fax
Use for Fax Only/No Voice Calls
You can use only for fax and may not use for voice calls. You do not
need to connect the external telephone.
Receive Mode
⇒
Auto
Phone
Mainly Use for Voice Calls/Almost Not Use for Fax
Connect an external phone* to receive calls.
Press the start button to receive faxes.
* You can also use an optional handset.
Receive Mode
⇒
Manual
Telephone
Phone Fax
Use for Fax and Voice Call
Using an answering machine
Connect an external answering machine to record
voice messages when you are out, as well as
receive calls. Faxes will be automatically received.
Receive Mode
⇒
Answering Machine
Answering machine
Using a General Telephone
Connect the external telephone*. Faxes will be
automatically received and the machine will ring
when voice calls come in.
* You can also use an optional handset.
Receive Mode
⇒
Fax/Tel Auto Switch
Telephone
Downloaded from ManualsPrinter.com Manuals
Page 21
21
Conguring the Fax
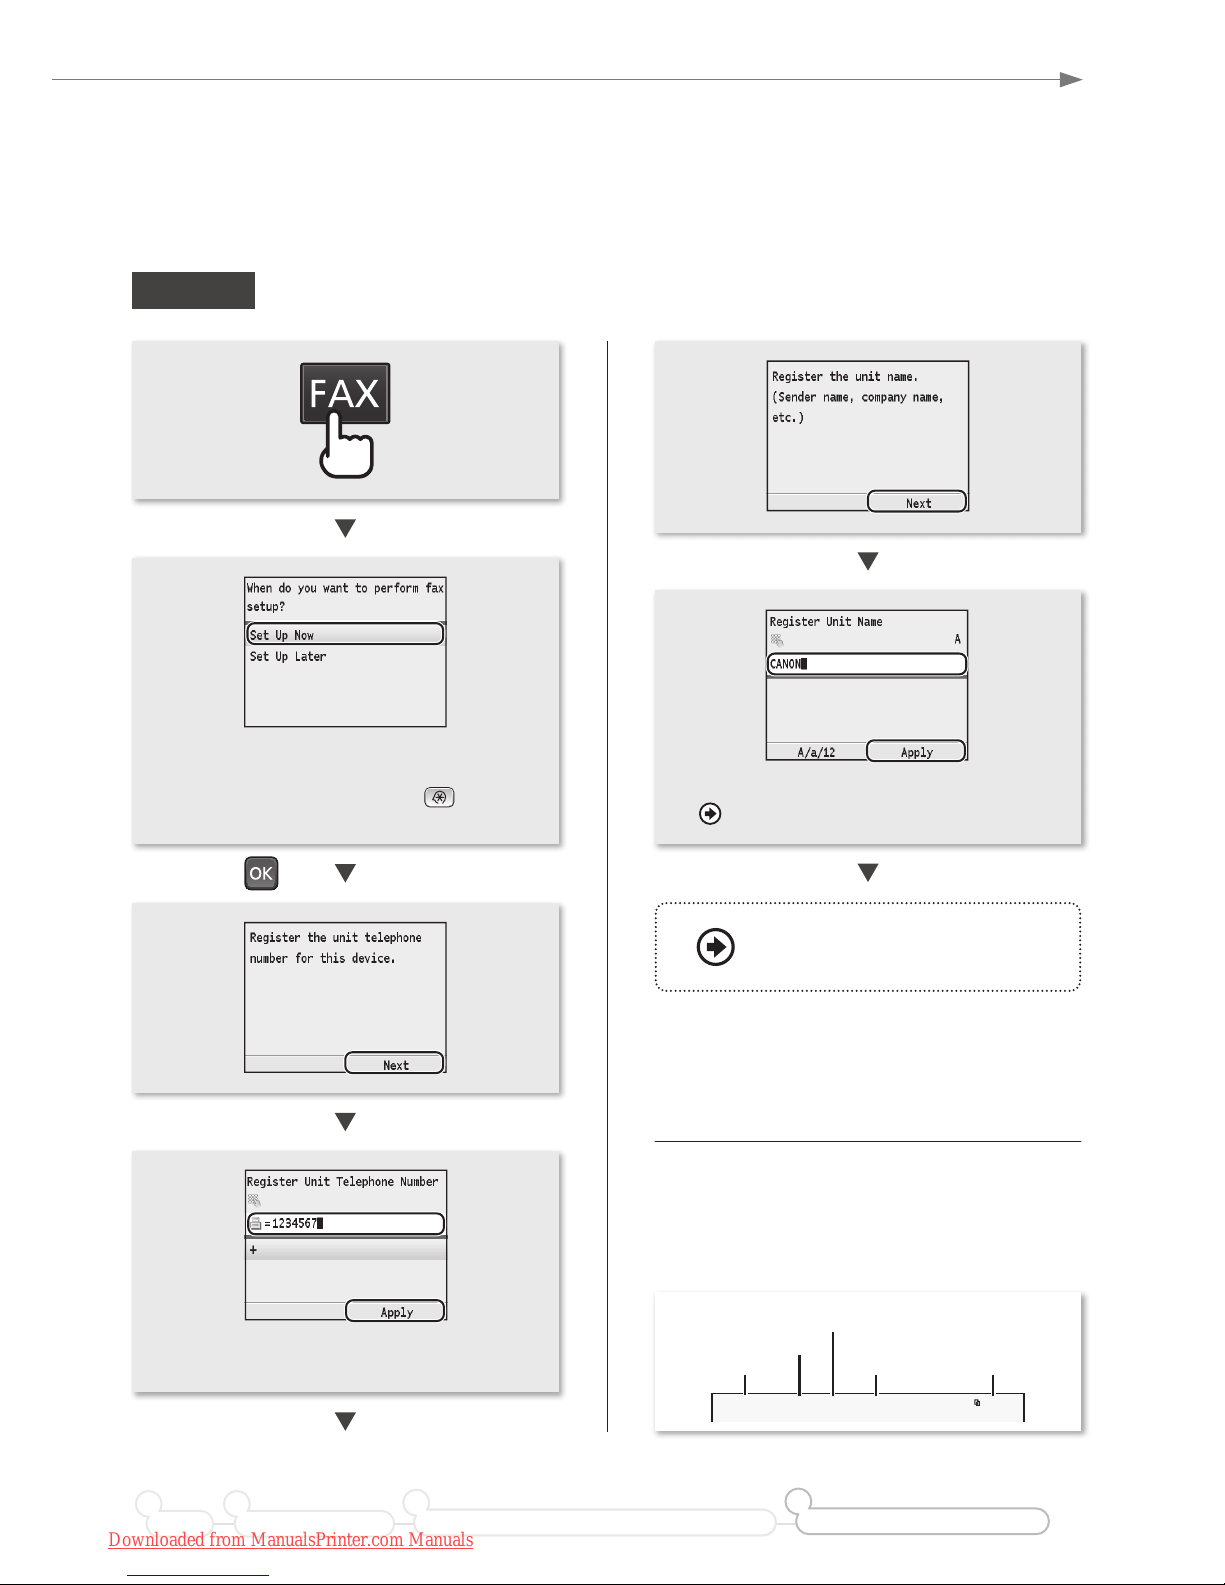
Set Up 1
Registering the Fax Number and Unit Name
• Enter the unit name, and then press <Apply>.
“Entering Text” (P. 35)
Registered information will be printed on the
recipient's paper.
The fax number and unit name registered here will
be printed on the recipient's paper as the sender
information.
• If you select <Set Up Later>, the receive mode
will be set to <Auto>.
• To recongure the settings, press
→ <Fax
Settings> → <Fax Setup Guide>.
03/03 2013 02:07 PM FAX 123XXXXXXX CANON 0001/ 0001
Sent Time Page Number
Fax Number
Unit Name
Number's Type
• Enter the fax number using the numeric keys,
and then press <Apply>.
Proceed to the next page
Preface Installing the Machine
21
Connecting to a Computer and Installing the Drivers
3
Configuring and Connecting the Fax
4
Downloaded from ManualsPrinter.com Manuals
Page 22
22
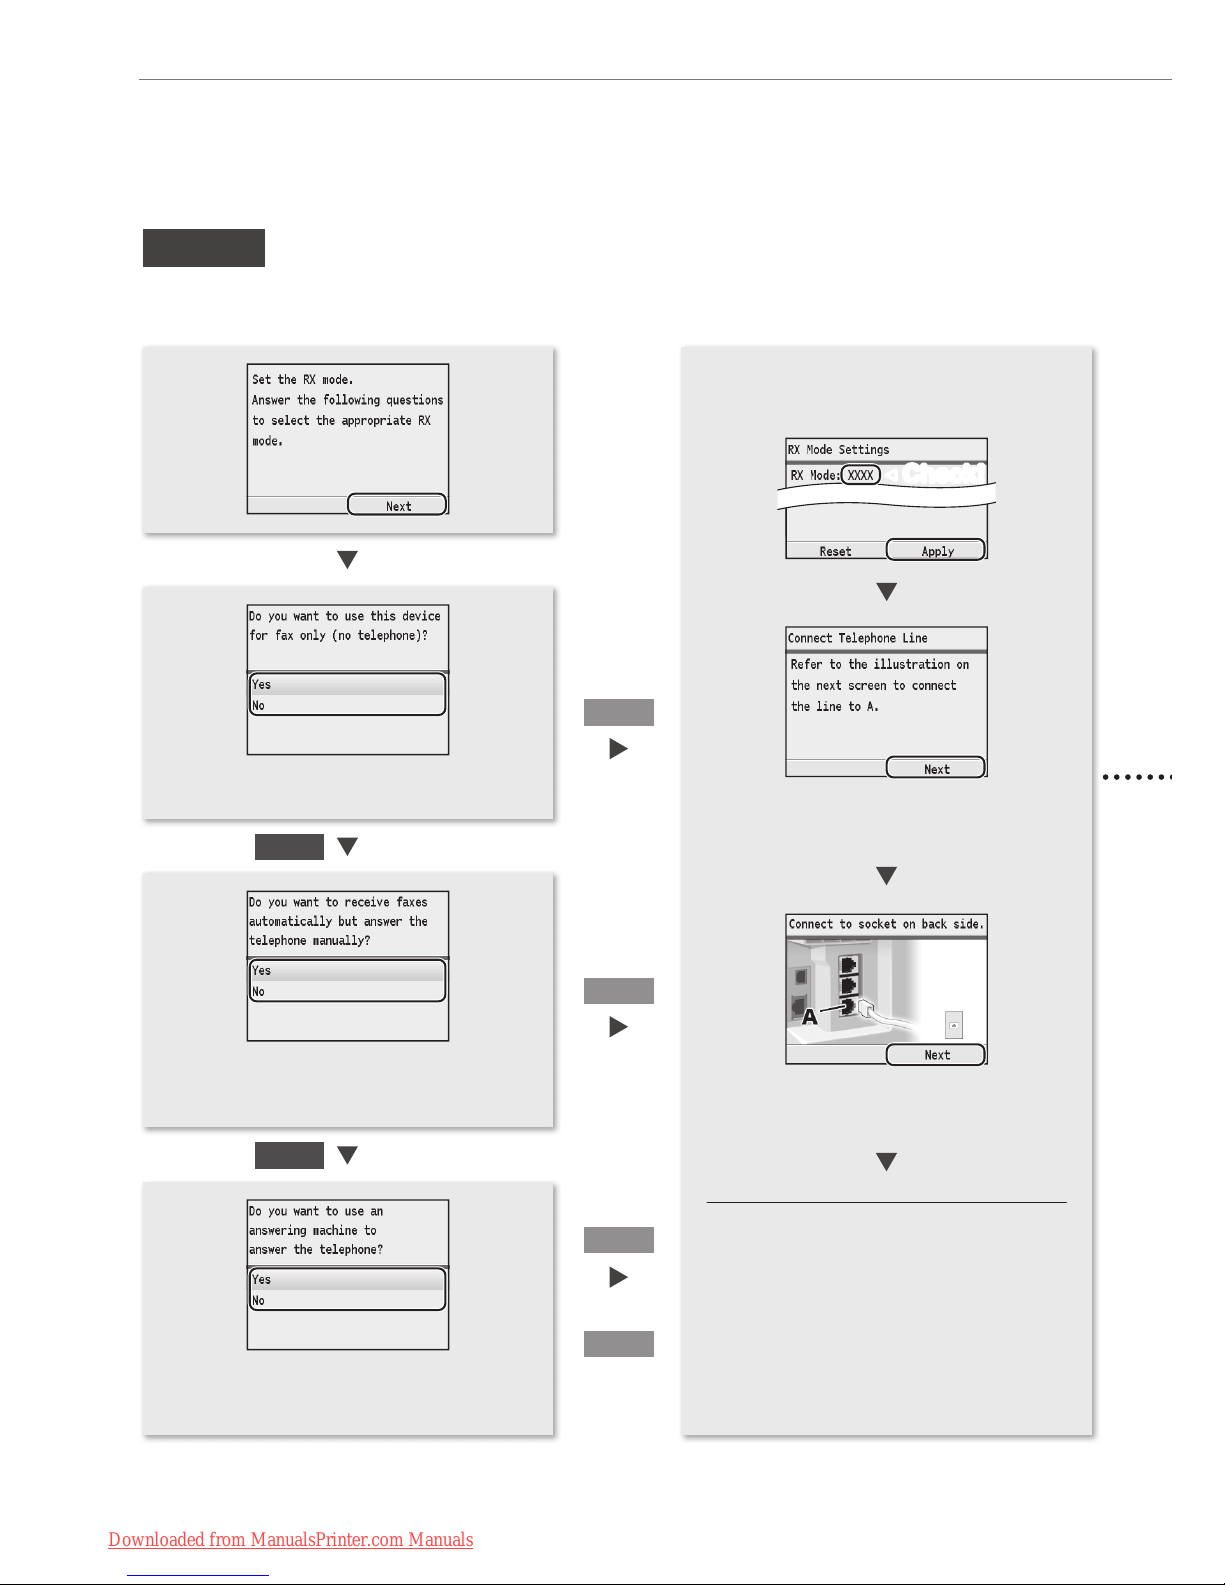
Conguring the Fax
Set Up 2
Selecting the Fax Receive Mode
Set the receive mode that you conrmed in “Selecting a Receive Mode That Fits Your Purpose” (P. 20).
• To set to Auto mode → <Yes> → [OK]
• To set to other receive modes → <No> → [OK]
• To set to Fax/Tel Auto Switch mode → <Yes>
→ [OK]
• To set to other receive modes → <No> → [OK]
• To set to Answering Machine mode → <Yes>
→ [OK]
• To set to Manual mode → <No> → [OK]
Yes
Yes
No
No
The screen that appears varies
depending on the receive mode
selected.
The screen that appears varies
depending on the receive mode
selected.
<Auto>
<Fax/Tel>
Yes
No
<Answer>
<Manual>
When connecting a telephone with fax
functions:
Set the fax receive mode of the telephone to
“manual.”
Other receiving mode:
You may be able to manually set a receive mode
other than those described here, depending on
your country or region. See the e-Manual for
details about other receive mode.
◀
Check!
Downloaded from ManualsPrinter.com Manuals
Page 23
23
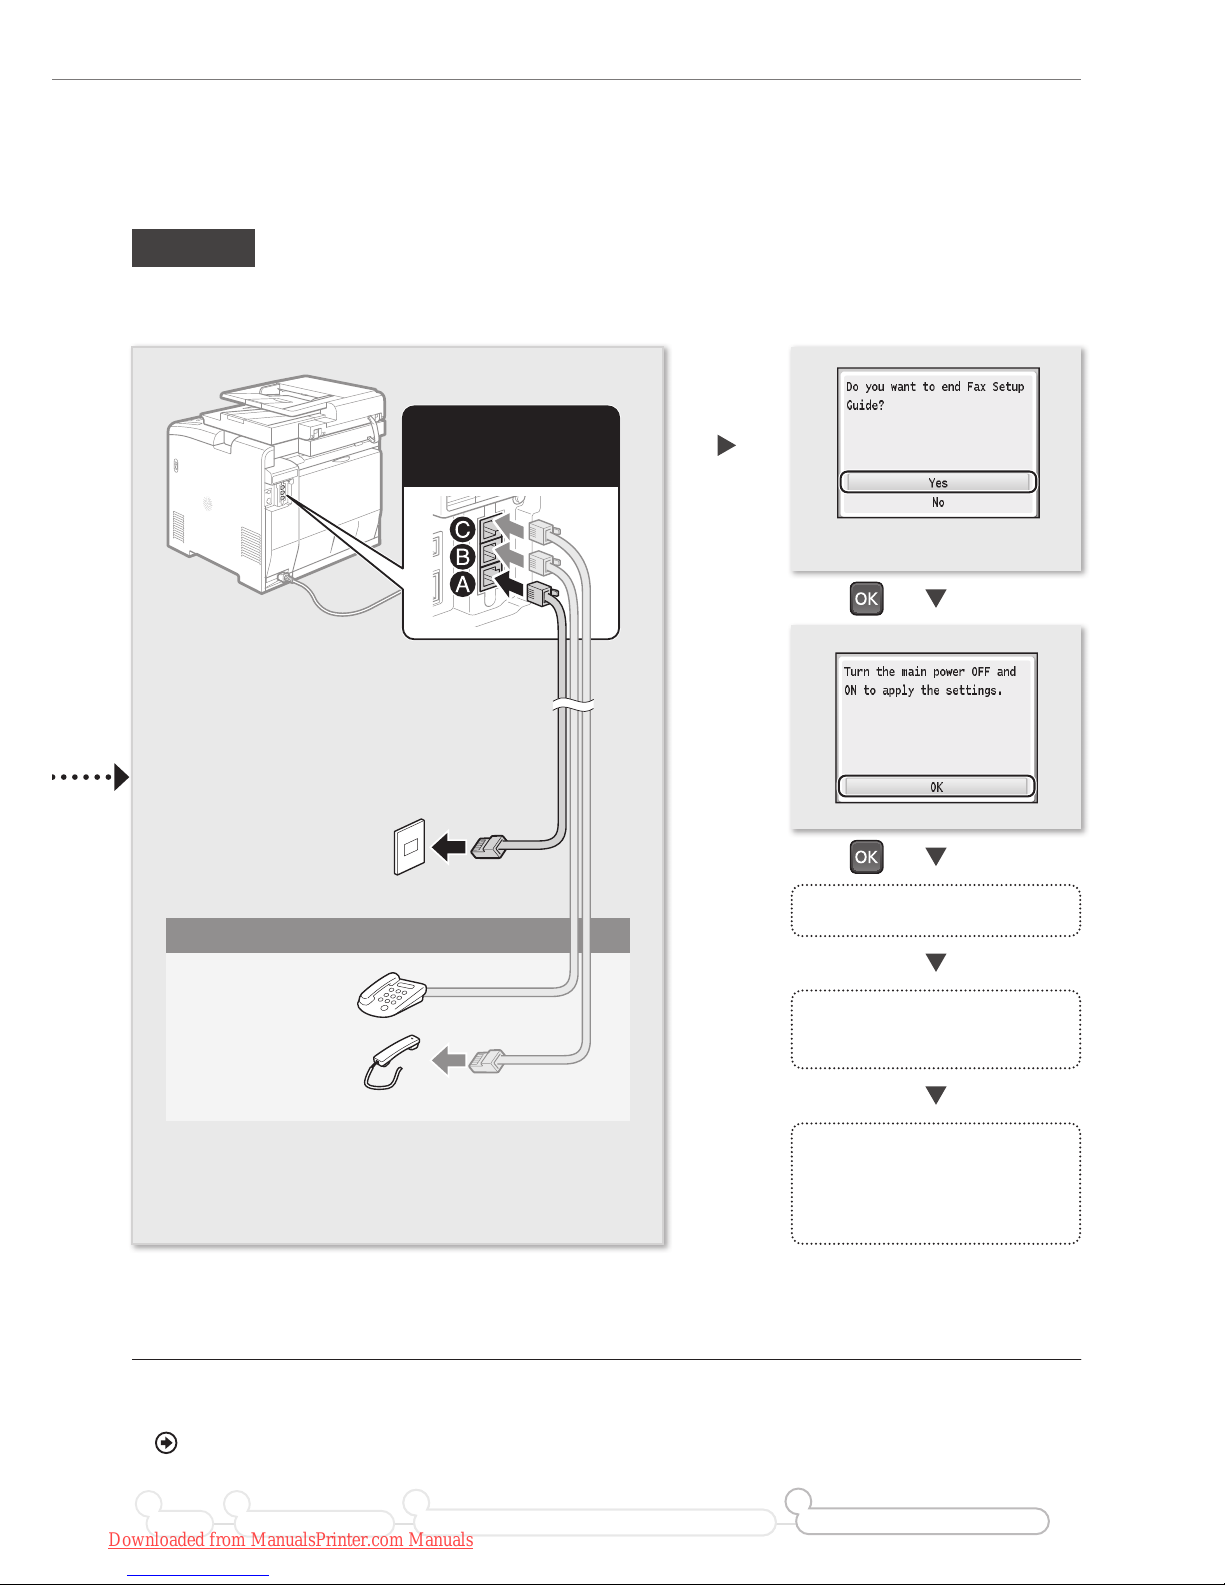
Conguring the Fax
Turn OFF the machine.
Wait for at least 10
seconds.
Turn ON the machine.
The machine will restart, and
the telephone line type will be
automatically set*.
Press [▲] to select <Yes>.
Set Up 3
Connecting the Telephone Line
* If the telephone line type is not automatically set:
See the e-Manual to set manually.
“Setting Menu List” → “Fax Settings (MF8580Cdw / MF8280Cw Only)” → “Basic Settings” → “Select Line
Type” in the e-Manual
Connect if necessary
You cannot use the
fax function if it is not
properly connected.
Telephone
(answering machine)
Handset (option)
Preface Installing the Machine
21
Connecting to a Computer and Installing the Drivers
3
Configuring and Connecting the Fax
4
To an analog
telephone line
Downloaded from ManualsPrinter.com Manuals
Page 24
24
Appendix
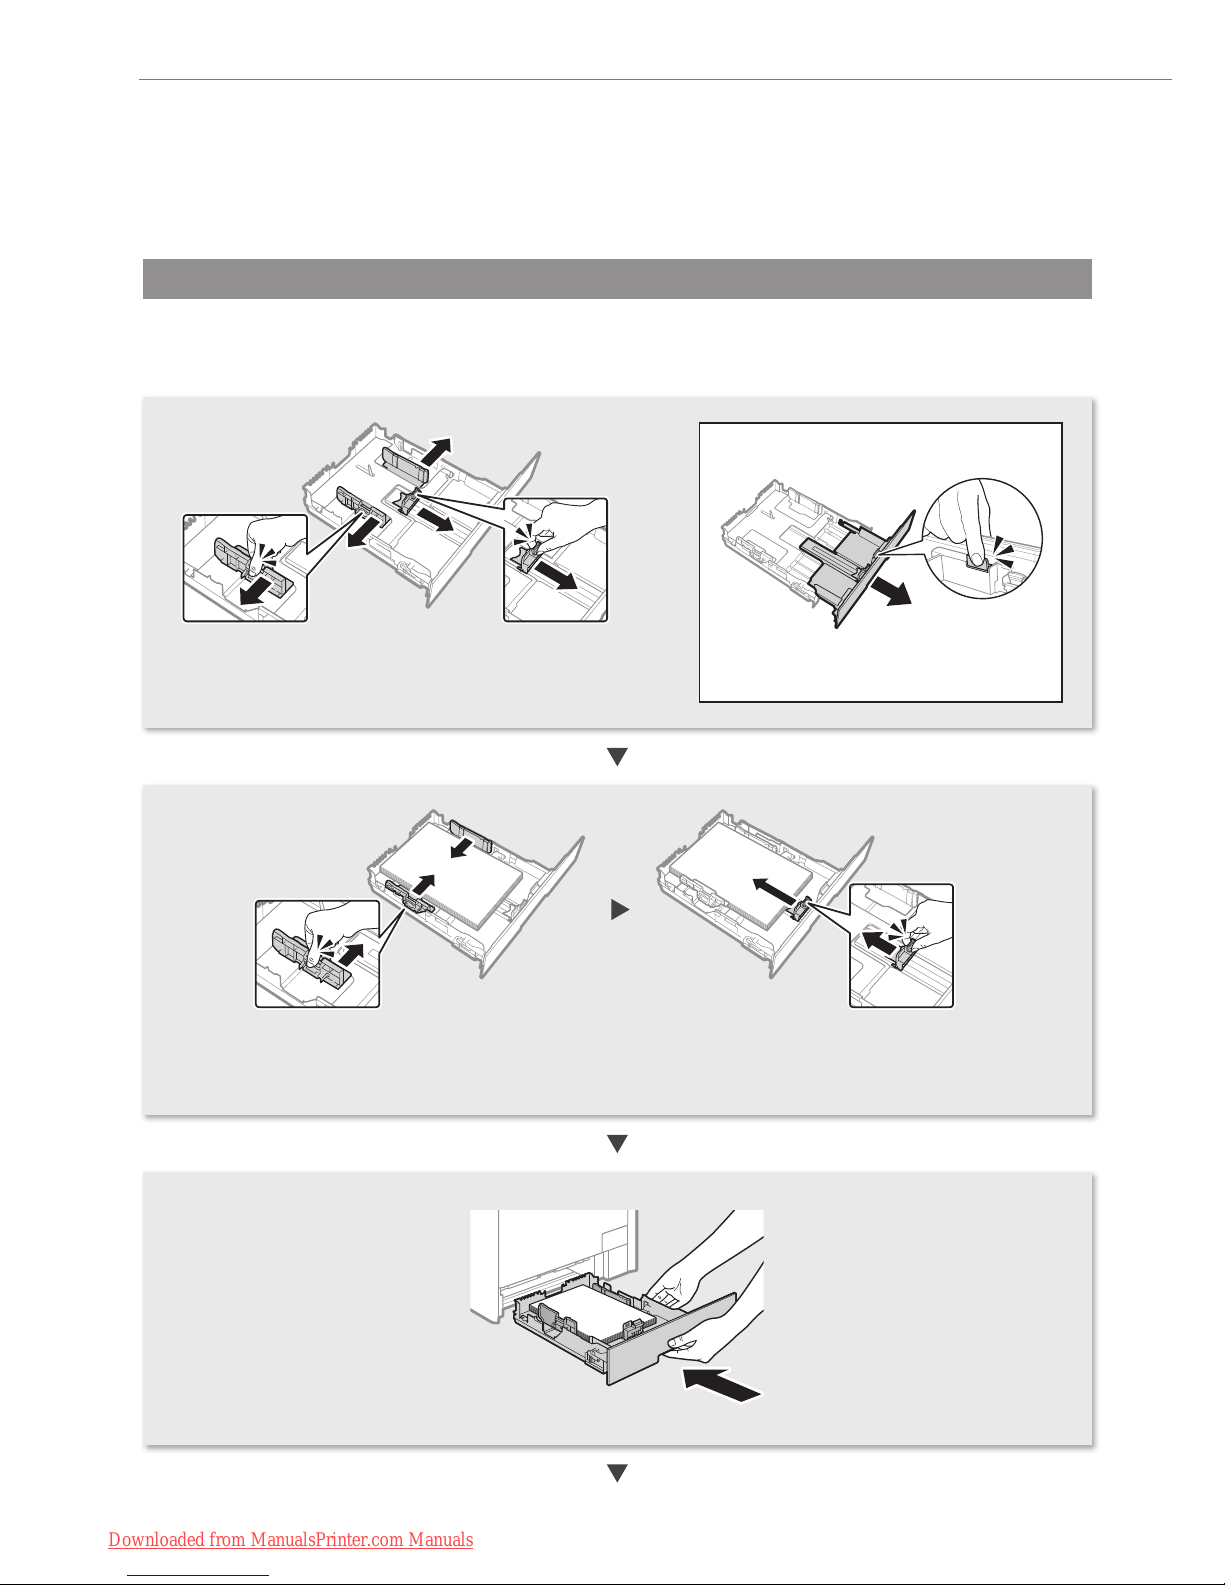
Loading Paper Other than A4 Size
To load paper other than A4 size, such as A5 or B5, see “Loading Paper” (P. 8) and the following procedure to load
paper and specify the paper size and type.
• After loading paper, slide the side paper guides and the front-center paper guide inward
until they are aligned securely against the edges of the paper.
• Make sure that the paper stack does not exceed the load limit mark.
• Pull out the paper drawer.
• Slide the paper guides, and spread them a little wider
than the actual paper width.
When loading Legal size paper
Press the lock release lever and adjust the
length of the paper drawer.
Downloaded from ManualsPrinter.com Manuals
Page 25
25
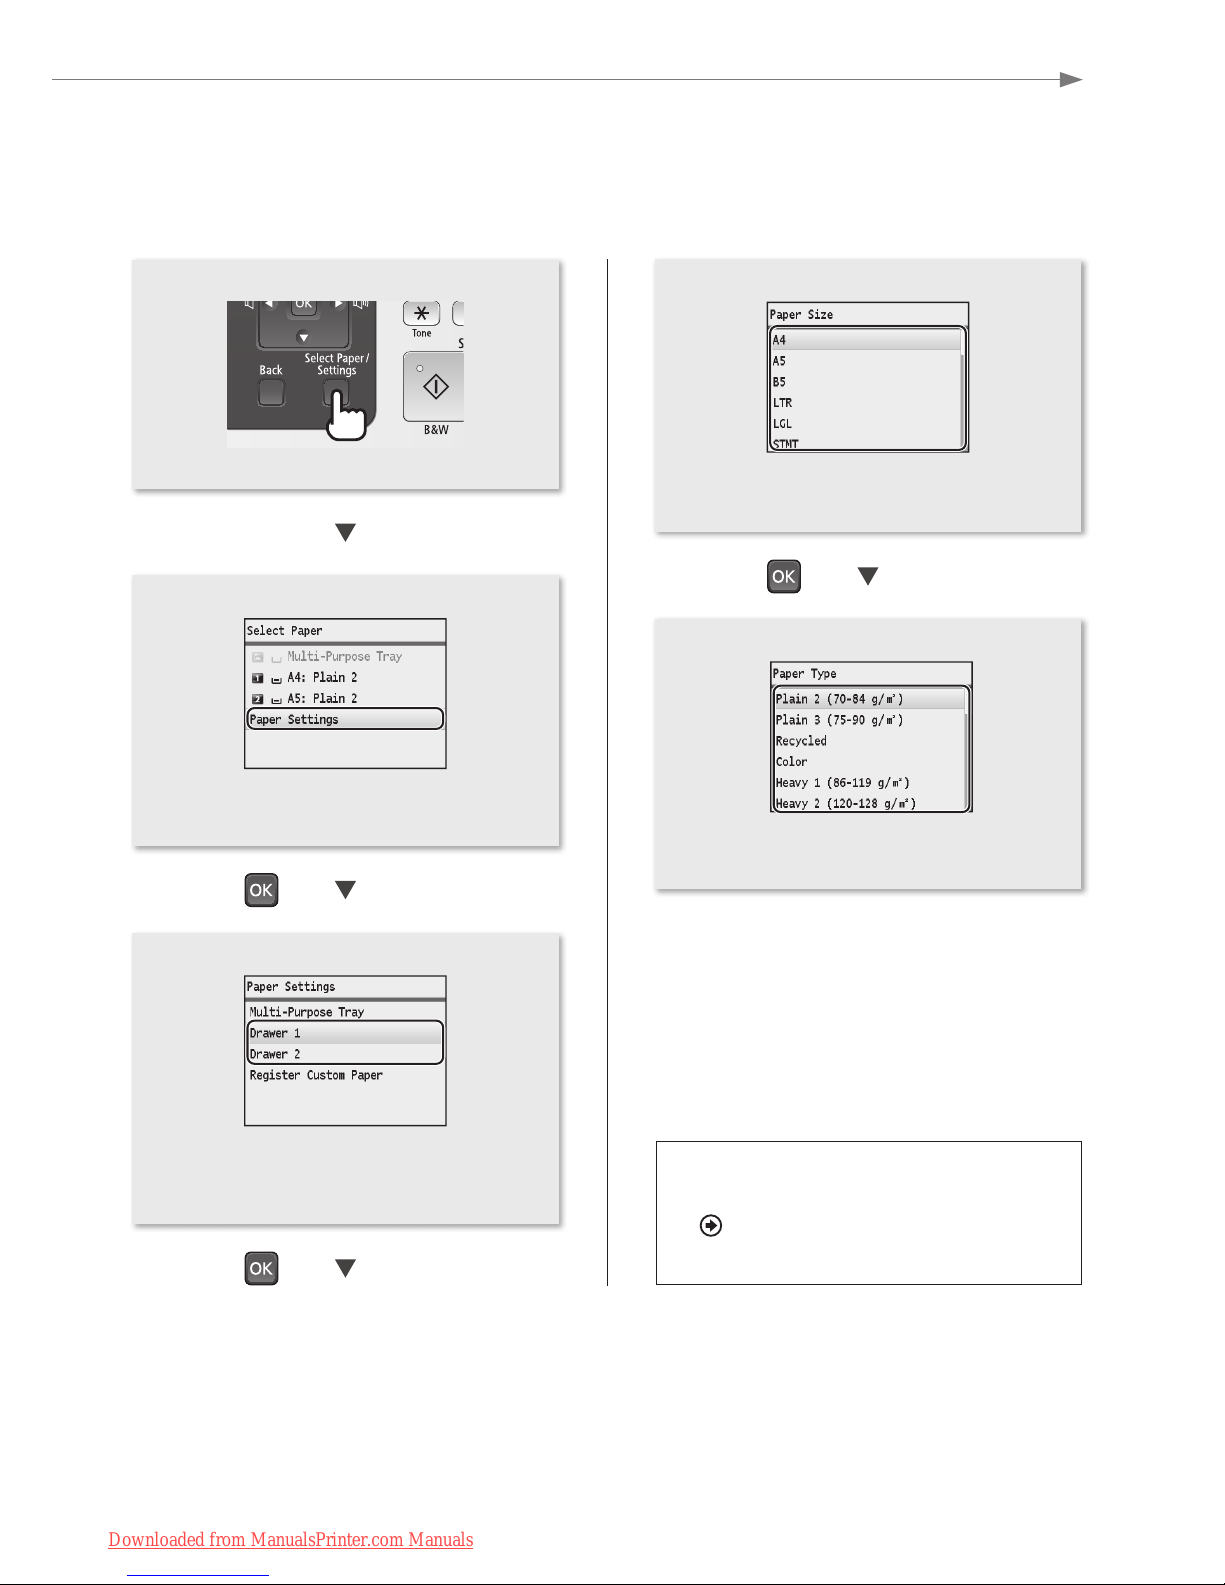
Appendix
4
• Press [▲] or [▼] to highlight a paper size, and
then press [OK].
• Press [▲] or [▼] to highlight a paper type, and
then press [OK].
• Press [▲] or [▼] to highlight <Paper Settings>,
and then press [OK].
• Press [▲] or [▼] to highlight the paper drawer
for which you want to set the paper size and
type, and then press [OK].
Loading Preprinted Paper
“Loading Preprinted Paper” in the
e-Manual
Downloaded from ManualsPrinter.com Manuals
Page 26
26
Appendix
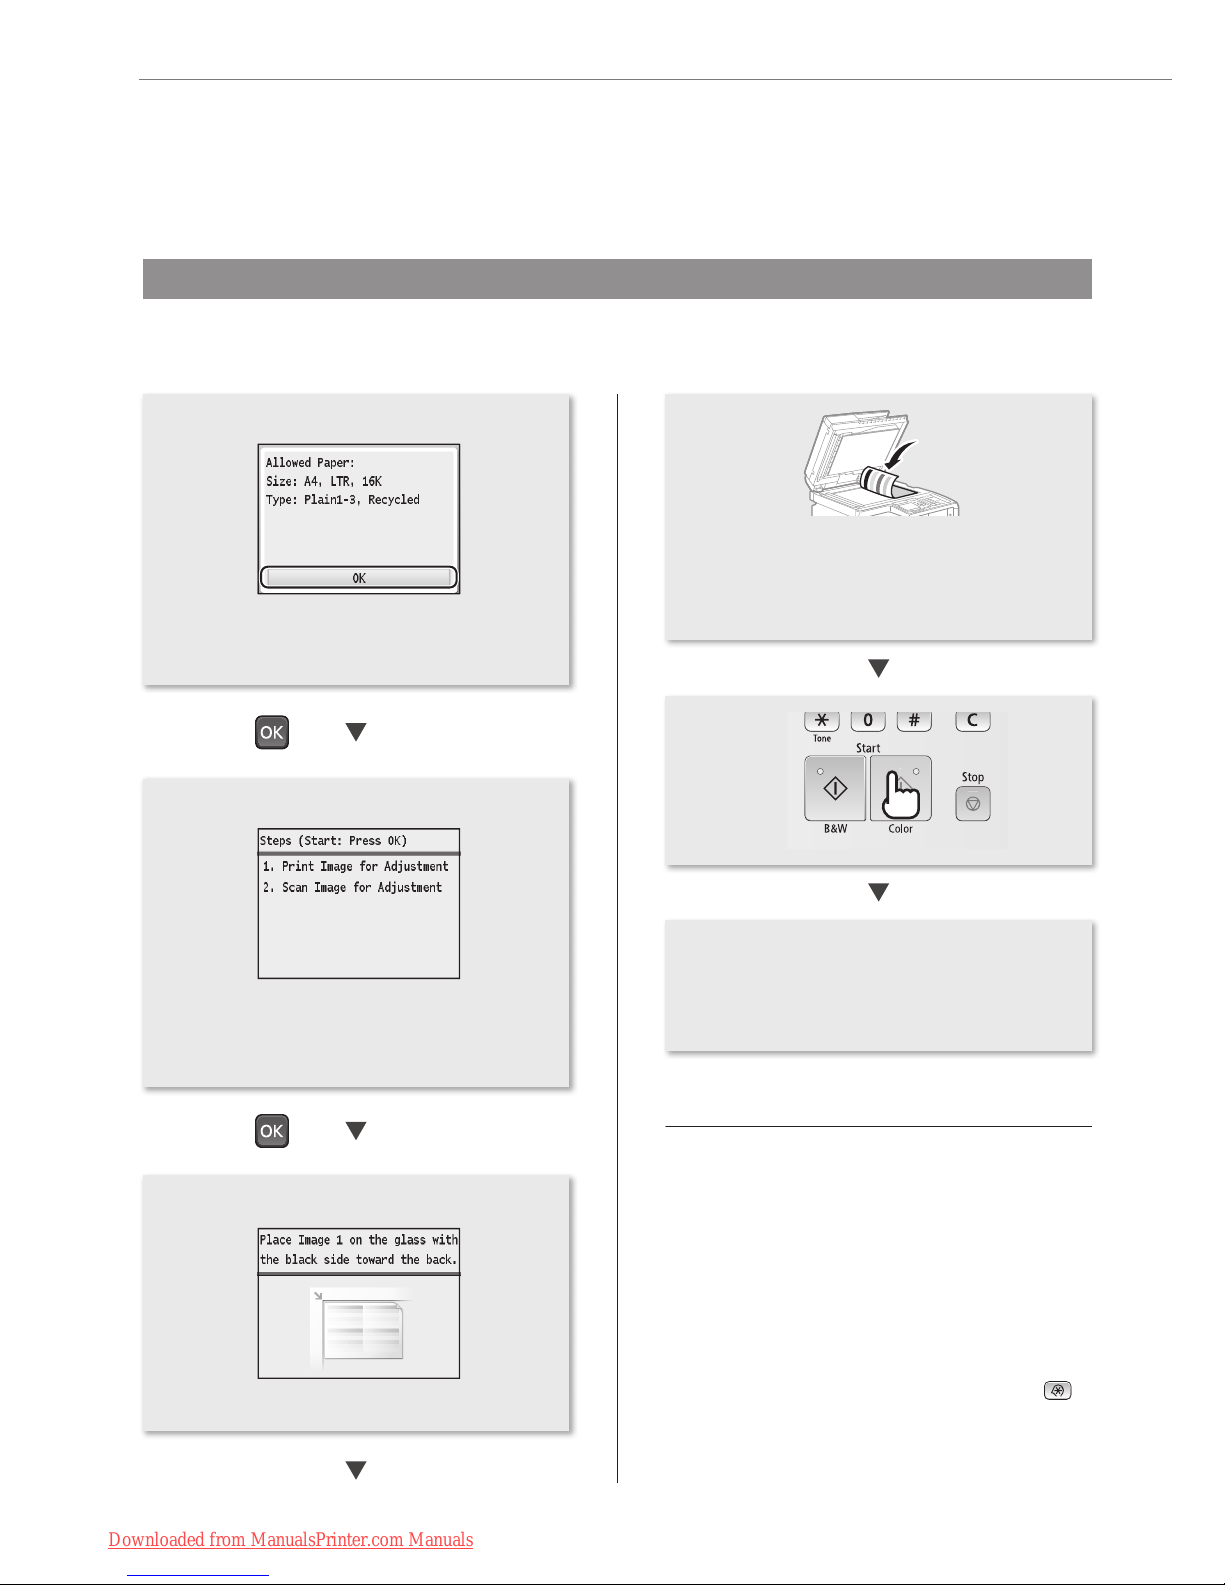
Performing Color Correction
It is recommended to perform color correction to obtain optimum copy or printout results.
4
• Conrm the procedure for color correction,
and then press [OK].
• An adjustment image is printed.
• Open the feeder, place the adjustment image
on the platen glass with the print side face
down, and then close the feeder.
• Place the paper so that the black stripe is at
the back side of the machine.
If <Correction failed.> appears:
• Is the paper loaded correctly?
→ Load plain or recycled paper of A4/Letter size in the
paper drawer.
• Is the adjustment image placed on the platen glass
correctly?
→ Place the adjustment image with the print side face
down and the black stripe toward the back of the
machine.
• Has a paper jam occurred?
→ Remove the jammed paper.
If you want to perform color correction again, press
,
and then select the following settings in the following
order.
<Adjustment/Maintenance> → <Auto Adjust Gradation >
→ <Adjust Copy Image>
• When <Finished> is displayed, remove the
adjustment image placed on the platen glass
in Step 4.
• Make sure that paper is loaded, and then
press [OK].
Downloaded from ManualsPrinter.com Manuals
Page 27
27
Appendix
4
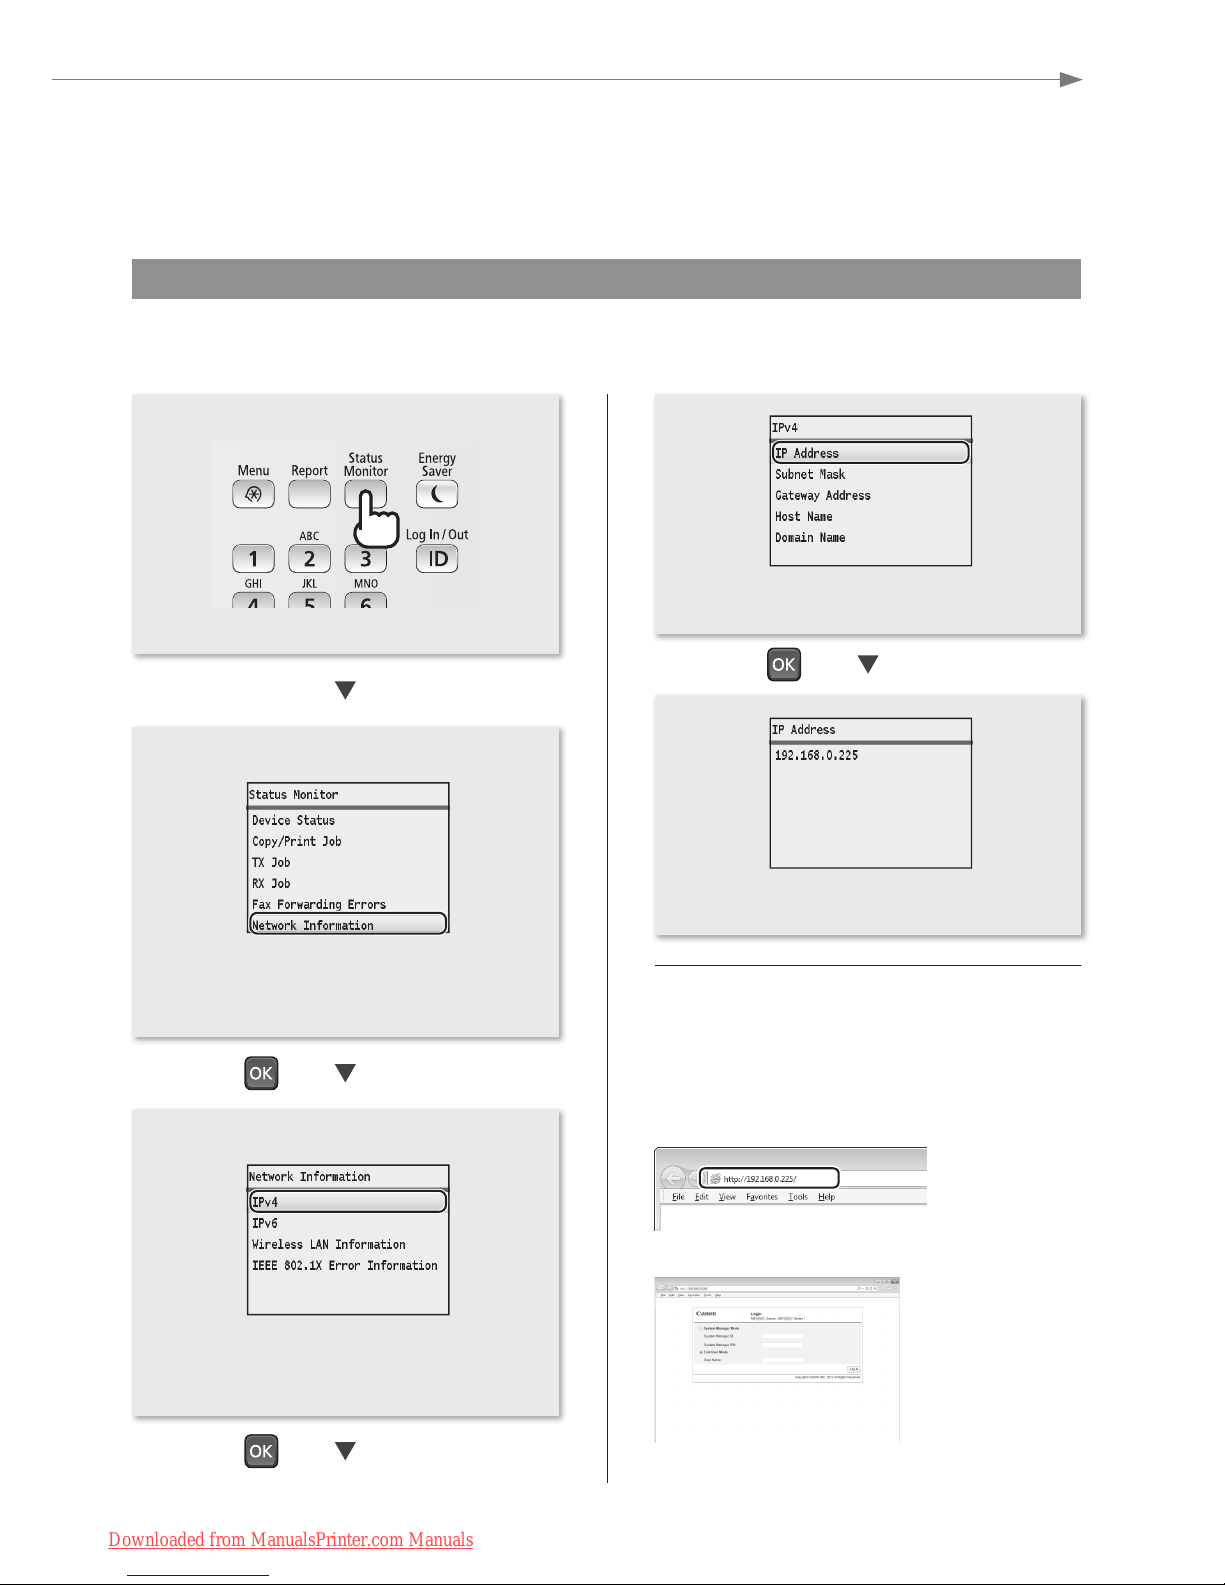
Checking the IP Address
You can check the IP address of the machine. Use it when you need to enter the IP address during the conguration
or registration.
• Press [▲] or [▼] to highlight <Network
Information>, and then press [OK].
• The IP address is displayed. Press [Status
Monitor] to close the screen.
• Press [▲] or [▼] to highlight <IP Address>,
and then press [OK].
Check if the Machine Is Connected to
the Network Correctly
Start a Web browser of the computer that is
connected to the network, enter [http://IP address of
the machine], and then press [ENTER]. (Example:
http://192.168.0.225/)
The screen below (Remote UI) should be displayed.
*
* If the remote UI screen is not displayed, see the e-Manual.
• Press [▲] or [▼] to highlight <IPv4>, and
then press [OK].
Downloaded from ManualsPrinter.com Manuals
Page 28
28
Appendix
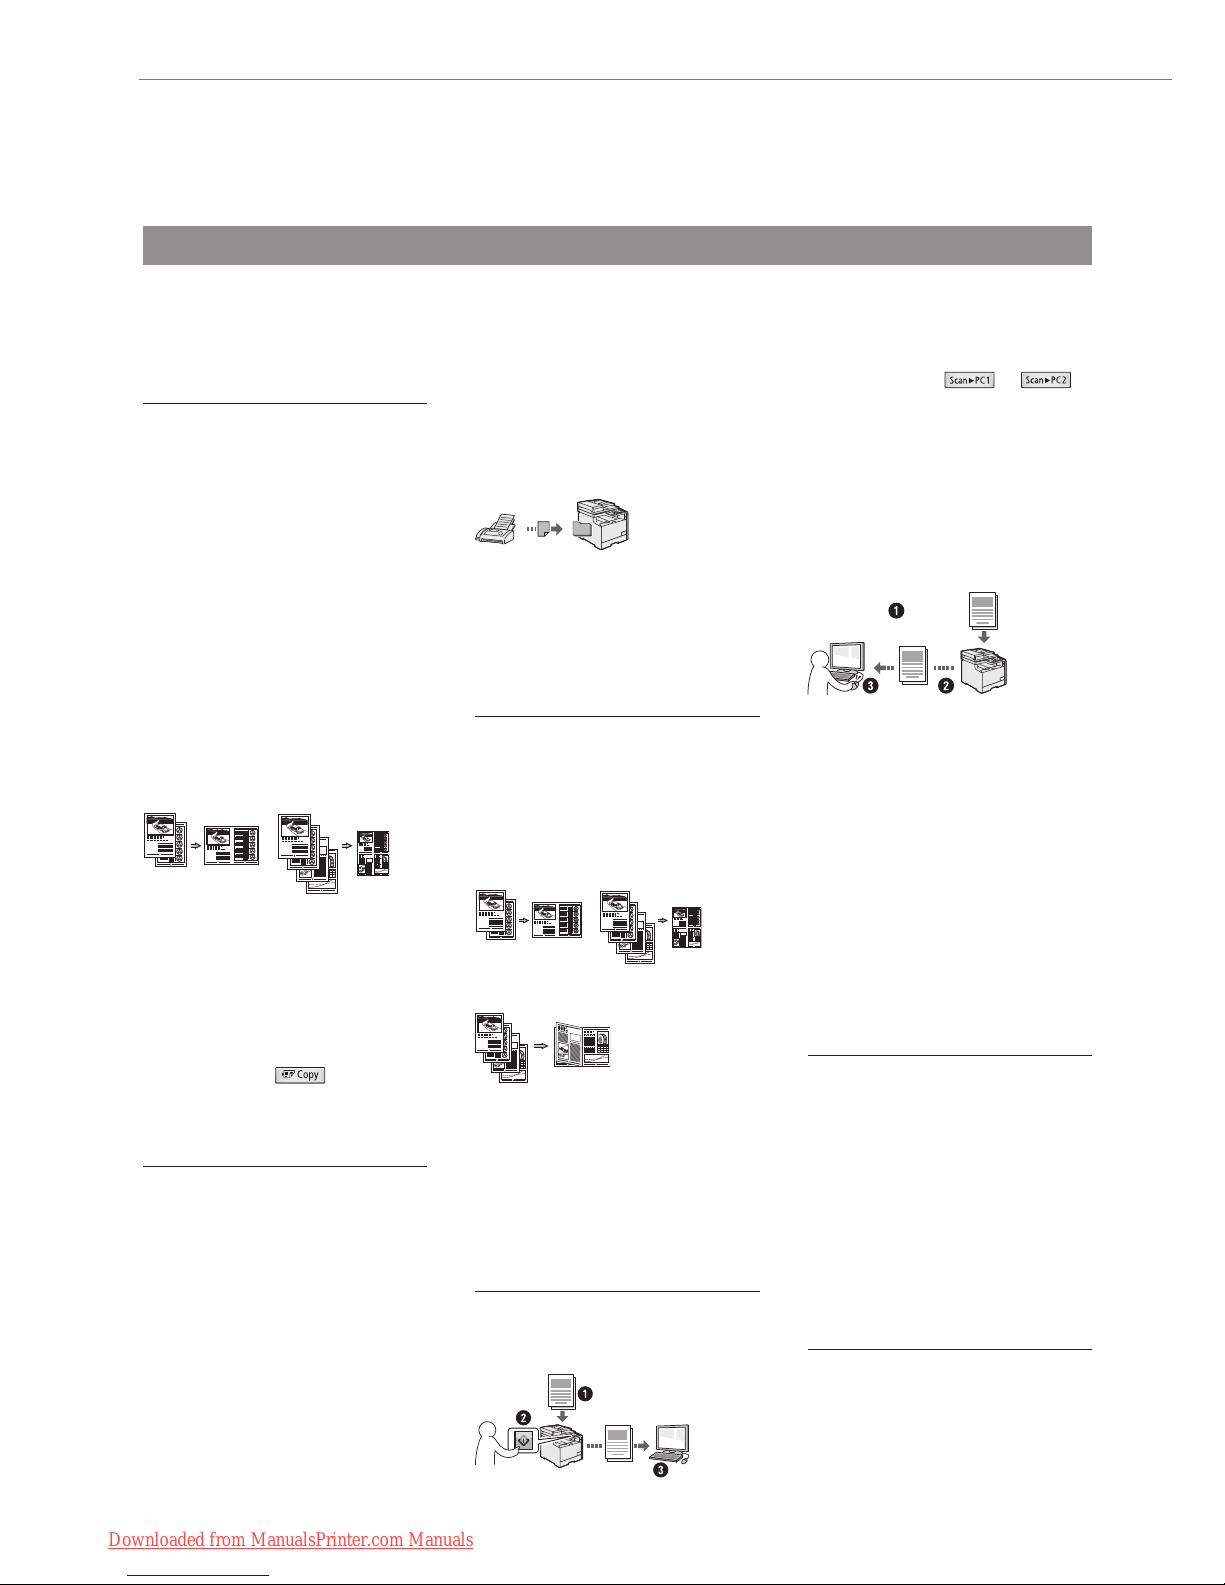
Copy
Enlarged/Reduced Copies
You can enlarge or reduce standard
size documents to copy on standard
size paper or specify the copy ratio in
percentage.
2-Sided Copying
You can copy 1-sided documents on
both sides of paper.
Collating
You can sort copies into sets arranged
in page order.
Reduced Layout
You can reduce multiple documents to
copy them onto one sheet.
2 on 1 4 on 1
Copying ID Card
You can make a copy of a 2-sided
card onto one side of paper.
Paper Save Copy
You can choose the desired copy
settings from the options displayed
when you select [ ] on the
operation panel.
Fax
Sending a Document Directly
from a Computer (PC Fax)
In addition to the normal sending and
receiving faxes, you can use the PC
fax.
Sending
You can specify the destinations using
the Address Book, enabling you to
send documents quickly and easily.
Destination search/Favorites list/
Coded dialing/Destination Group/
Specifying from the sending history/
Sequential broadcast
Receiving
• Receiving in the memory
You can store the received documents
in the memory. You can print the stored
documents at any time, and if you do
not need them, you can delete them.
• Remote Receiving
If an external telephone is connected,
you can switch to the fax receiving mode
immediately using the dial buttons of the
telephone during a phone call.
Print
Enlarged/Reduced Printing
2-Sided Printing
Reduced Layout
You can reduce multiple documents to
print them onto one sheet.
2 on 1 4 on 1
Booklet Printing
Poster Printing
Watermark Printing
Displaying a Preview before
Printing
Selecting a “Prole”
Scan
Saving the Documents Using the
Operation Panel of the Machine
Documents
Data
Scanning with [ ]/[ ]
You can simplify the procedure for
selecting the destination and making
the scan settings by registering them
in the keys on the operation panel.
Saving the Documents Using
Operations from a Computer
• Scanning with the MF Toolbox
• Scanning from an Application
Documents
Data
Saving in a USB Memory
You can save scanned documents
in a USB memory connected to the
machine.
E-mailing Scanned Documents
You can send scanned documents to
your e-mail application.
Sending Scanned Documents to
a File Server
You can send scanned documents to
a le server.
Network Settings
This machine comes equipped with
a network interface that you can
construct a network environment
easily. You can connect to the network
using the wireless LAN. Also you can
print a document, use the PC fax,
and use the network scan from all
computers which are connected with
the machine. The machine supports to
increase work eciency as a shared
machine in the oce.
Remote UI
You can understand the condition
of the machine from the computers
on the network. You can access the
machine and manage jobs or specify
various settings via network.
Perform Useful Tasks
You can use various functions in this machine. Following functions are the overview of the main functions that you
can use routinely.
Downloaded from ManualsPrinter.com Manuals
Page 29
29
Appendix
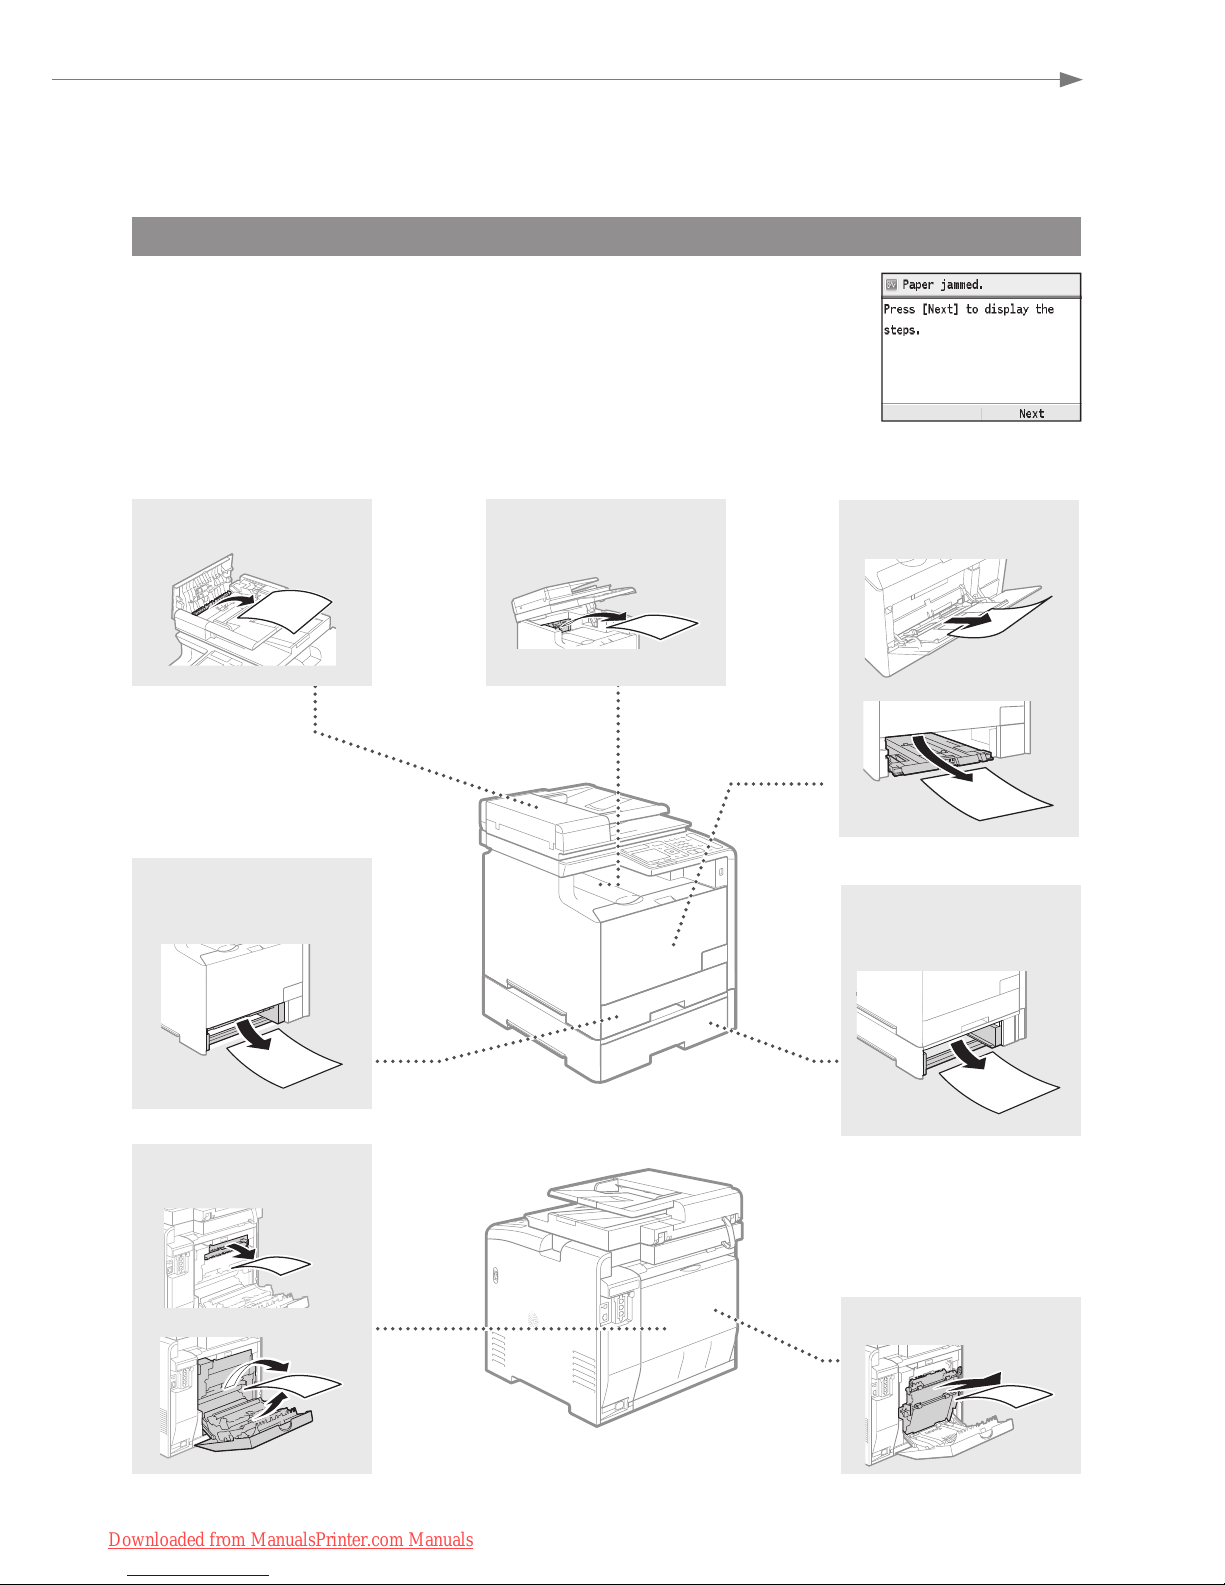
Clearing Paper Jams
If the following screen appears, a paper jam has occurred in the feeder or inside
the machine. Follow the procedure displayed on the screen to remove the jammed
document or paper. This manual indicates only areas where paper jams occur. For
details on the procedures, see the e-Manual.
Manual feed slot
Paper drawer
(of the main unit)
Optional paper
drawer
Back side
Back side
Feeder Output area
Downloaded from ManualsPrinter.com Manuals
Page 30
30
Appendix
Replacing Toner Cartridges
Toner cartridges are consumables. When the toner becomes nearly empty or has run out completely in the middle
of a job run, a message appears on the screen, or the following problems may occur. Take the appropriate action
accordingly.
When a Message Appears
When the toner becomes nearly empty in the middle of a job run, a message appears on the screen.
Message
When the message is
displayed on the screen
Description and solutions
Prepare the <Toner
Color>* toner
cartridge.
The toner cartridge needs a
replacement soon.
We recommend checking the level of remaining toner and replacing the
cartridge with a new one before printing high-volume documents.
e-Manual “Replacing Toner Cartridges”
If this message is displayed, the incoming fax will be stored in the
memory without being printed. Also, reports may not be printed, even if
they are set to be printed automatically.
If <Continue Printing When Toner Is Low> in <RX Print Settings> is set
to <On>, however, printing will be continued, but faxes may fade or blur.
e-Manual “Printing Reports and Lists”
e-Manual “Setting Menu List”
End of Toner Cart.
Lifetime <Toner
Color>*
The toner cartridge has
reached the end of its life.
If this message does not disappear, replace the toner cartridge. You
can continue printing, but the print quality cannot be guaranteed.
e-Manual “Replacing Toner Cartridges”
End of cart. parts
lifetime. Cart.
replacement
recommended.
<Toner Color>*
The machine may not print
properly because a toner
cartridge that has reached the
end of its lifetime is still in the
machine.
If this message does not disappear, replace the toner cartridge. You
can continue printing, but the print quality may be poor.
e-Manual “Replacing Toner Cartridges”
* Black, yellow, magenta, or cyan will appear in <Toner Color>.
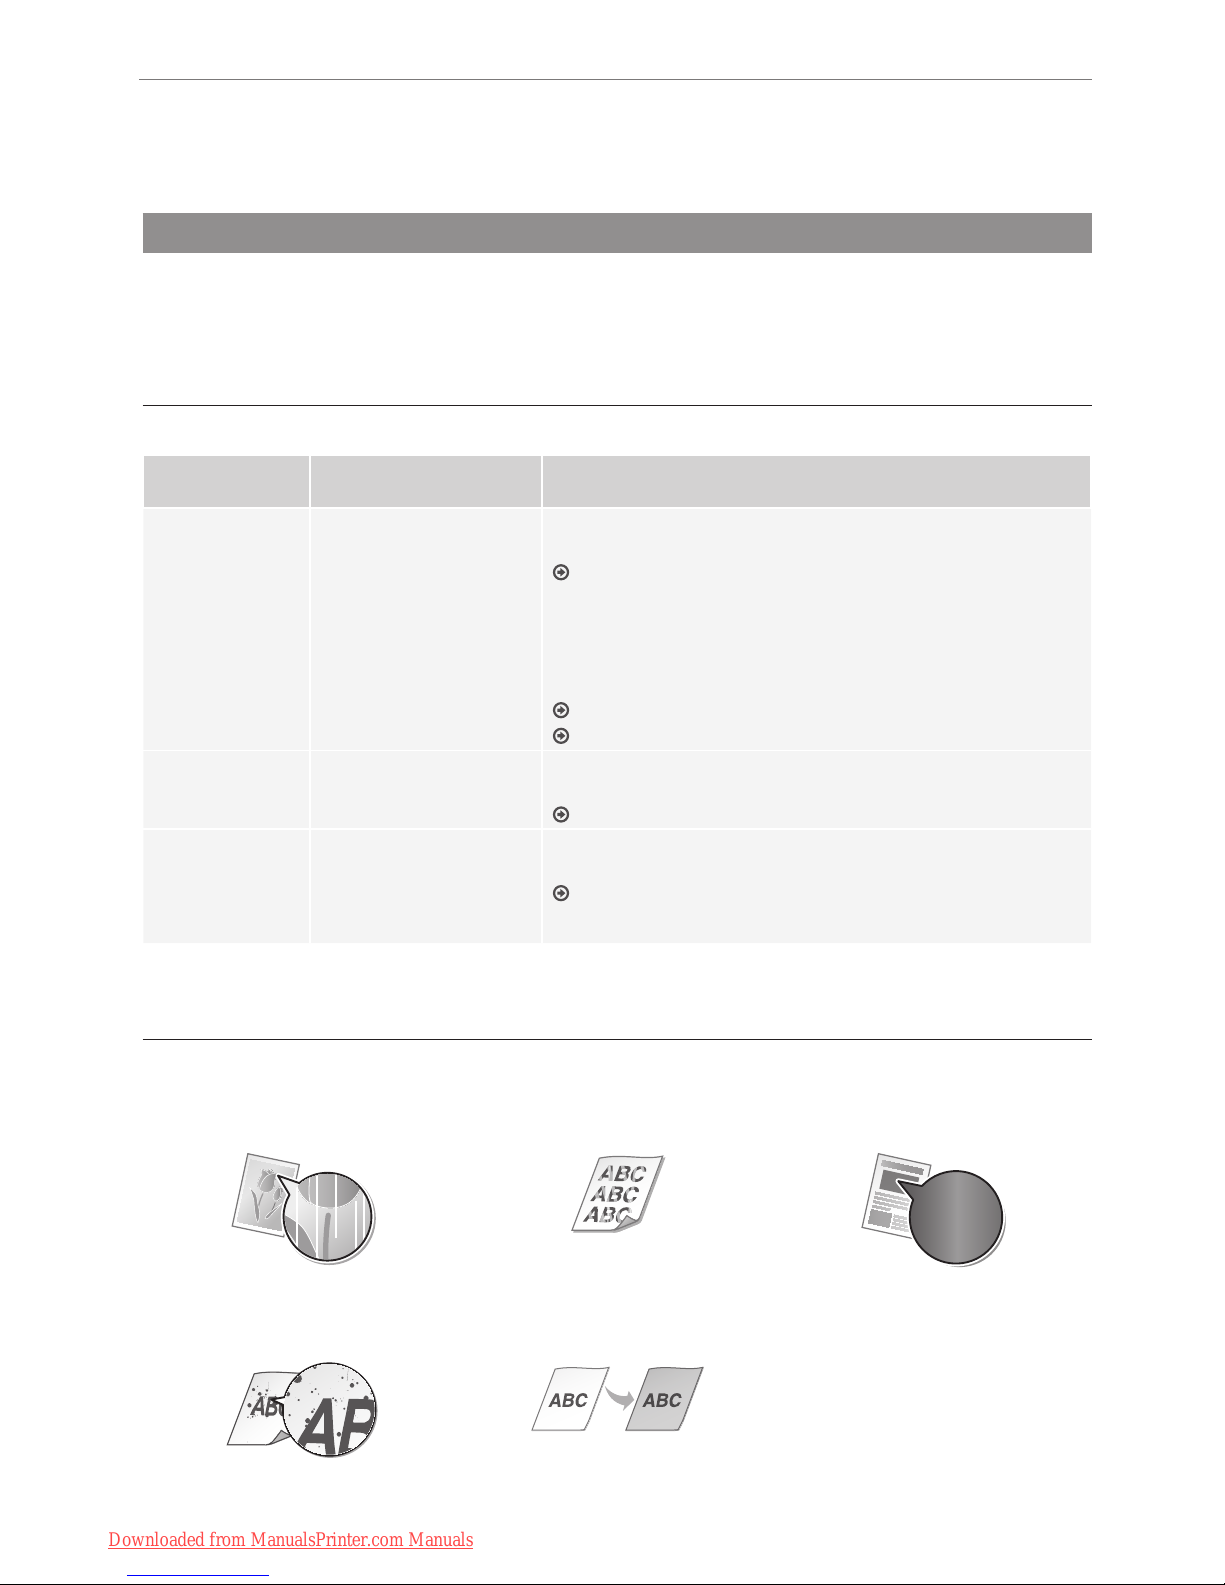
If Printouts are Poor in Quality
If your printouts begin to show any of the following features, one of your toner cartridges is nearly empty. Replace
the nearly empty toner cartridge even if no message is displayed.
White streaks appear Partially faded Uneven density
Toner smudges and splatters
appear
Blank space of originals
becomes grayish in printouts
Downloaded from ManualsPrinter.com Manuals
Page 31
31
Symbols Used in This Manual
WARNING
Indicates a warning concerning operations that may lead to
death or injury to persons if not performed correctly. To use
the machine safely, always pay attention to these warnings.
CAUTION
Indicates a caution concerning operations that may lead
to injury to persons if not performed correctly. To use the
machine safely, always pay attention to these cautions.
IMPORTANT
Indicates operational requirements and restrictions. Be
sure to read these items carefully to operate the machine
correctly, and avoid damage to the machine or property.
Indicates an operation that must not be performed. Read
these items carefully, and make sure not to perform the
described operations.
Keys and Buttons Used in This Manual
The following symbols and key names are a few examples of
how keys to be pressed are expressed in this manual.
• Operation panel keys:
Key icon
Example:
• Display: <Specify the destination.>
• Buttons and items on the computer display: [Preferences]
Important Safety Instructions
Please read the “Important Safety Instructions” in this
manual and in the e-Manual thoroughly before operating the
machine.
As these instructions are intended to prevent injury to the
user and other persons or to prevent destruction of property,
always pay attention to these instructions and operational
requirements.
Please note that you are responsible for all damages caused
by failure to follow the directions provided herein, using the
device for any purpose for which it was not intended, or
repairs or alterations made by anyone other than a Canonapproved technician.
Installation
WARNING
• Do not install the machine near ammable substances
such as alcohol-based products or paint thinners. If these
substances come in contact to the electrical parts inside
the machine could ignite these substances and cause a
re or increase your risk of electric shock.
• Do not place necklaces and other metal objects or
containers lled with liquid on the machine. If foreign
substances come into contact with electrical parts inside
the machine, this may result in a re or electrical shock.
If any of these substances falls into the machine, turn o
the power to the machine immediately and contact your
local Canon dealer.
• Do not use near any medical equipment. Radio wave
emitted from this machine may interfere with medical
equipments, which may result in serious accidents.
CAUTION
• Do not install the machine in the following locations. Doing
so may result in personal injury, re or electrical shock.
ư Unstable location
ư A location subject to excessive vibrations
ư A location where block the ventilation slots (too close to
walls, bed, shaggy rug, and other similar objects)
ư A damp or dusty location
ư A location exposed to direct sunlight or an outside place
ư A location subject to high temperatures
ư A location near open ames
ư A location with poor ventilation system
• Although ozone is generated from the machine during
operation, it does not have any aect on the human
body. However, if you intend to use the machine for long
periods of time, ensure that the installation location is well
ventilated.
• Do not connect unapproved cables to this machine. Doing
so may result in a re or an electric shock.
Power Supply
WARNING
• Do not use power cords other than the one provided, as
this can result in a re or electrical shock.
• Do not modify or bend the power cord and do not pull on it
with great force. Do not place heavy objects on the power
cord. Damaging the power cord may result in a re or an
electric shock.
• Do not plug or unplug the power plug with wet hands, as
this can result in electrical shock.
• Do not use extension cords or multi-plug power strips
with this machine. Doing so may result in a re or electric
shock.
• Do not bundle up or tie up the power cord in a knot, as this
can result in a re or electrical shock.
• Insert the power plug completely into the AC power outlet.
Failure to do so can result in a re or electrical shock.
• Remove the power plug completely from the power outlet
during a thunder storm. Failure to do may result in a re,
electric shock, or malfunction.
CAUTION
• Use only a power supply that meets the voltage
requirements listed herein. Failure to do so may result in a
re or electric shock.
• Do not obstruct the power outlet where this machine is
connected, so that you can unplug the power cord easily
in an emergency.
Downloaded from ManualsPrinter.com Manuals
Page 32
32
Handling
WARNING
• Do not disassemble or modify the machine. There are
high-temperature and high-voltage components inside the
machine which may result in a re or electrical shock.
• Do not allow children to touch or play with the power cord
and cables or internal or electrical parts. Doing so may
result in serious personal injury.
• Please contact an authorized Canon dealer if the machine
makes an unusual noise, emits an unusual smell, or emits
smoke or excessive heat. Continued use may result in a
re or electric shock.
• Do not use ammable sprays near the machine. If
ammable substances come into contact with electrical
parts inside the machine, this may result in a re or electric
shock.
CAUTION
• For your safety, please unplug the power cord if the
machine will not be used for a long period of time.
• Use caution when opening and closing covers to avoid
injury to your hands.
• Keep hands and clothing away from the rollers in the
output area. If the rollers catch your hands or clothing, this
may result in personal injury.
• The inside of the machine and the output slot is very
hot during and immediately after use. Avoid contact with
these areas to prevent burns. Also, printed paper may be
hot immediately after being output, so use caution when
handling it. Failure to do so may result in burns.
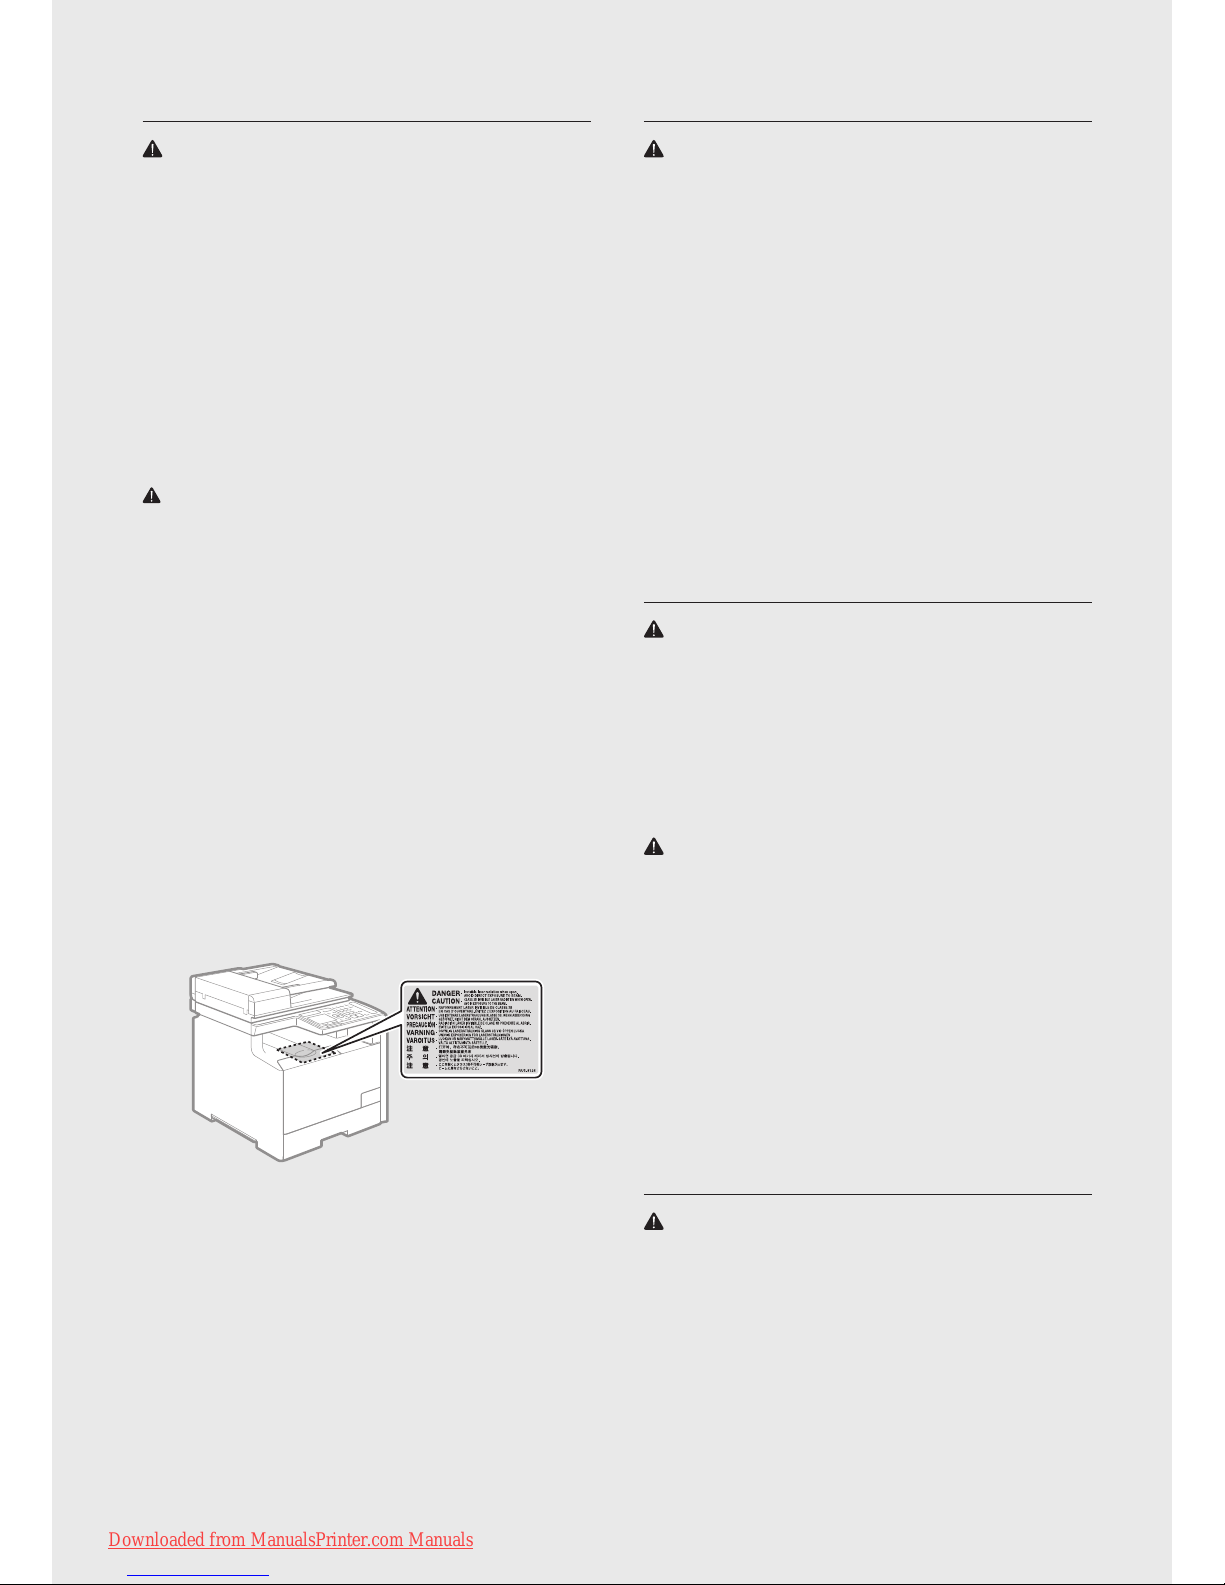
• The laser beam can be harmful to the human body. The
laser beam is conned in the laser scanner unit by a cover,
so there is no danger of the laser beam escaping during
normal machine operation. Read the following remarks
and instructions for safety.
ư Never open covers other than those indicated in this
manual.
ư Do not remove the caution label attached to the cover of
the laser scanner unit.
ư If the laser beam should escape and enter your eyes,
exposure may cause damage to your eyes.
Maintenance and Inspections
WARNING
• Turn o the machine and unplug the power cord from the
outlet before cleaning. Failure to do so may result in a re
or an electric shock.
• Unplug the power plug from the power outlet periodically
and clean the area around the base of the power plug’s
metal pins and the power outlet with a dry cloth to remove
dust and grime. When damp, accumulated dust may
cause short circuiting or res.
• Use a damp, well wrung-out cloth to clean the machine.
Dampen cleaning cloths with water only. Do not use
alcohol, benzenes, paint thinners, or other ammable
substances. If these substances come into contact with
electrical parts inside the machine, this may result in a re
or electric shock.
• Check the power cord and plug regularly for damage.
Check the machine for rust, dents, scratches, cracks,
or excessive heat generation. Use of poorly-maintained
equipment may result in a re or electric shock.
Consumables
WARNING
• Do not dispose of used toner cartridges in open ames.
This may cause an ignition, and result in burns or re.
• If you accidentally spill or scatter toner, carefully wipe up
the loose toner with a damp, soft cloth and avoid inhaling
any toner dust. Never use a vacuum cleaner to clean up
loose toner. Doing so may cause a malfunction in the
vacuum cleaner or result in a dust explosion due to static
discharge.
CAUTION
• Keep the toner cartridges and other consumables out of
the reach of small children. If toner is ingested, consult a
physician or poison control center immediately.
• Do not attempt to disassemble the toner cartridge. The
toner may scatter and get into your eyes or mouth. If toner
gets into your eyes or mouth, wash them immediately with
cold water and consult a physician.
• If toner spills from the toner cartridge, avoid inhaling it or
allowing it to come into contact with your skin. If the toner
comes into contact with your skin, wash immediately with
soap. If you inhale the toner or your skin becomes irritated
due to contact with the toner, consult a physician or poison
control center immediately.
Others
WARNING
• If you are using a cardiac pacemaker:
This machine generates a low level magnetic eld. If
you feel any abnormalities in your body while using this
machine, please move away from the machine and
consult your physician immediately.
Downloaded from ManualsPrinter.com Manuals
Page 33
33
Legal Notices
Model Names
MF8580Cdw (F164802)
EMC requirements of EC Directive
This equipment conforms with the essential EMC
requirements of EC Directive. We declare that this product
conforms with the EMC requirements of EC Directive at
nominal mains input 230 V, 50 Hz although the rated input of
the product is 220 to 240 V, 50/60 Hz. Use of shielded cable
is necessary to comply with the technical EMC requirements
of EC Directive
Laser Safety Information
Laser radiation could be hazardous to the human body. For
this reason, laser radiation emitted inside this equipment
is hermetically sealed within the protective housing and
external cover. No radiation can leak from the machine in the
normal operation of the product by the user.
This machine is classied as a Class 1 Laser Product under
IEC 60825-1: 2007, EN60825-1: 2007.
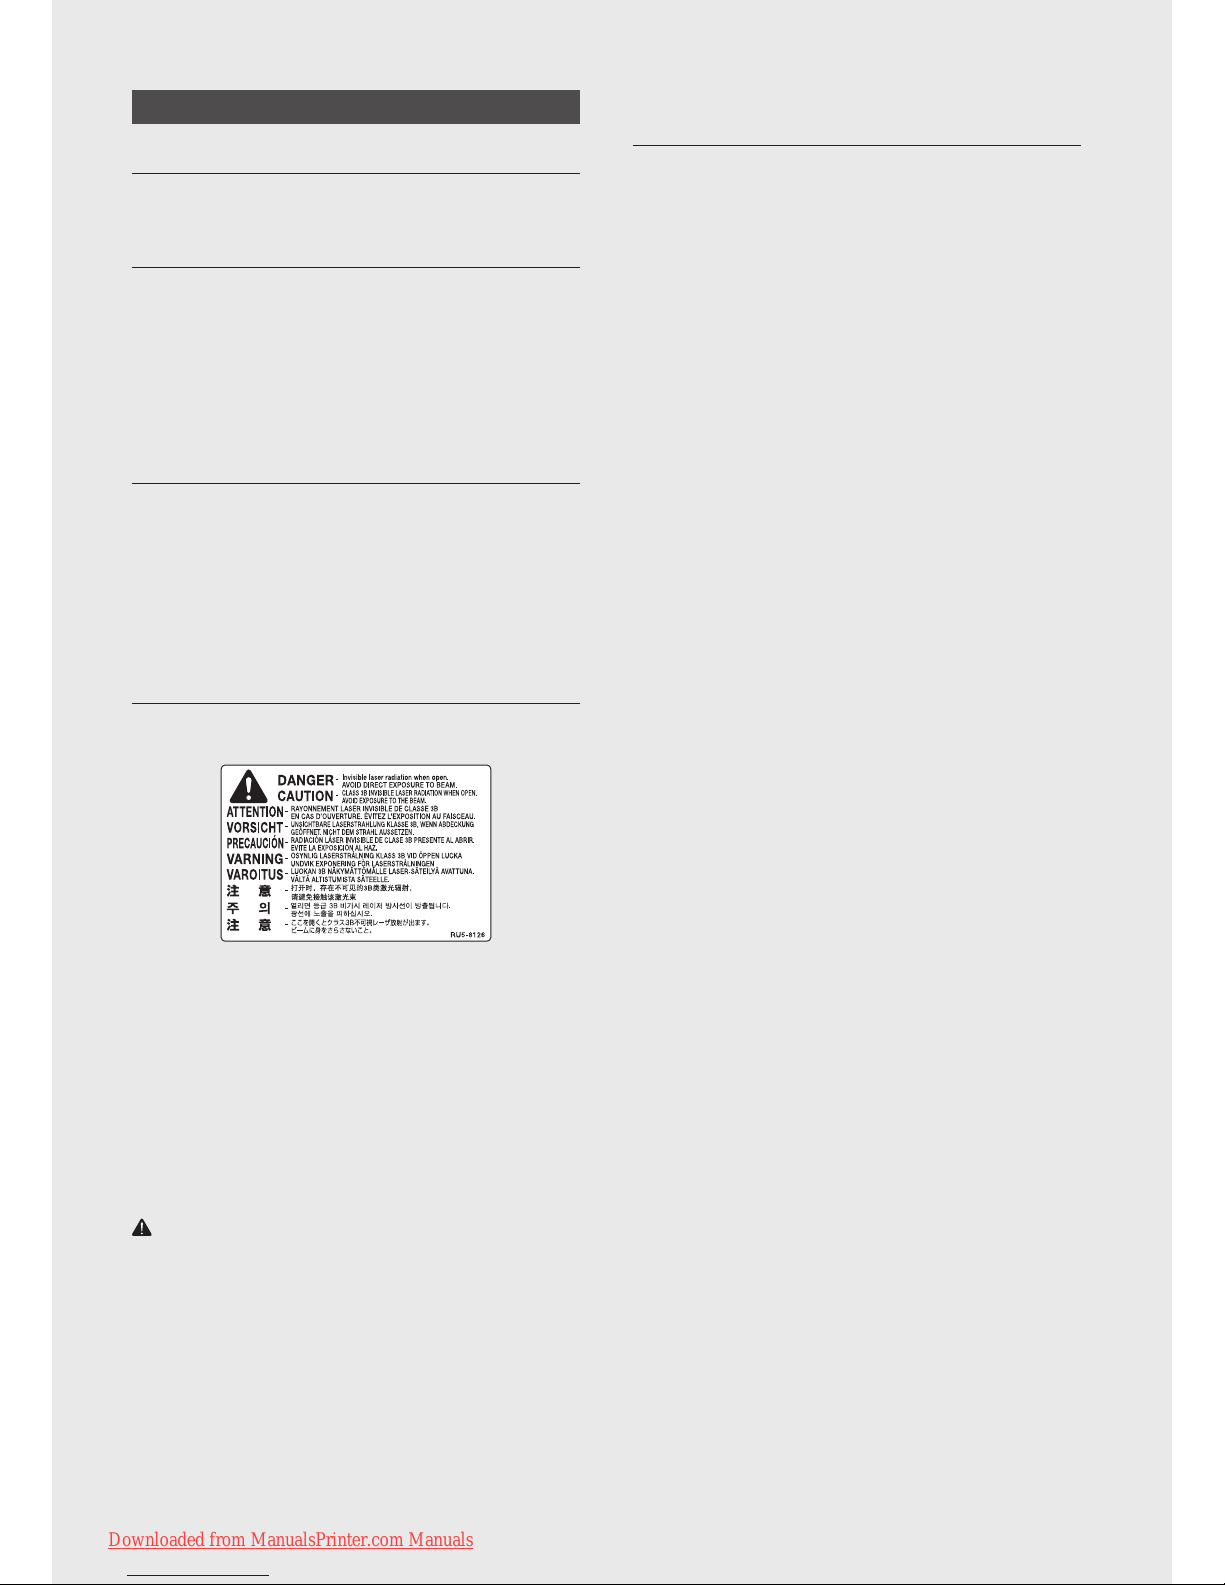
220 to 240 V Model
The label shown below is attached to the laser scan unit on
the machine.
This machine has been classied under IEC 60825-1: 2007,
EN60825-1: 2007 and conforms to the following classes:
CLASS 1 LASER PRODUCT
LASER KLASSE 1
APPAREIL À LASER DE CLASSE 1
APPARECCHIO LASER DI CLASSE 1
PRODUCTO LÁSER DE CLASE 1
APARELHO A LASER DE CLASSE 1
LUOKAN 1 LASER-TUOTE
LASERPRODUKT KLASS 1
CAUTION
Use of controls, adjustments, or performance of procedures
other than those specied in the manuals for the machine
may result in hazardous radiation exposure.
Legal Limitations on Usage of Your Product
and the Use of Images
Using your product to scan, print or otherwise reproduce
certain documents, and the use of such images as scanned,
printed or otherwise reproduced by your product, may be
prohibited by law and may result in criminal and/or civil
liability. A non-exhaustive list of these documents is set
forth below. This list is intended to be a guide only. If you are
uncertain about the legality of using your product to scan,
print or otherwise reproduce any particular document, and/
or of the use of the images scanned, printed or otherwise
reproduced, you should consult in advance with your legal
advisor for guidance.
ư Paper Money
ư Traveler’s Checks
ư Money Orders
ư Food Stamps
ư Certicates of Deposit
ư Passports
ư Postage Stamps (canceled or uncanceled)
ư Immigration Papers
ư Identifying Badges or Insignias
ư Internal Revenue Stamps (canceled or uncanceled)
ư Selective Service or Draft Papers
ư Bonds or Other Certicates of Indebtedness
ư Checks or Drafts Issued by Governmental Agencies
ư Stock Certicates
ư Motor Vehicle Licenses and Certicates of Title
ư Copyrighted Works/Works of Art without Permission of
Copyright Owner
Considerable eort has been made to make sure that
the manuals for the machine are free of inaccuracies and
omissions. However, as we are constantly improving our
products if you need an exact specication, please contact
Canon.
Downloaded from ManualsPrinter.com Manuals
Page 34

34
Disclaimers
The information in this document is subject to change
without notice. CANON INC. MAKES NO WARRANTY
OF ANY KIND WITH REGARD TO THIS MATERIAL,
EITHER EXPRESS OR IMPLIED, EXCEPT AS PROVIDED
HEREIN, INCLUDING WITHOUT LIMITATION,
THEREOF, WARRANTIES AS TO MARKETABILITY,
MERCHANTABILITY, FITNESS FOR A PARTICULAR
PURPOSE OF USE OR NON-INFRINGEMENT. CANON
INC. SHALL NOT BE LIABLE FOR ANY DIRECT,
INCIDENTAL, OR CONSEQUENTIAL DAMAGES OF ANY
NATURE, OR LOSSES OR EXPENSES RESULTING FROM
THE USE OF THIS MATERIAL.
Trademarks
Canon, the Canon logo, and imageCLASS are registered
trademarks of Canon Inc. in the United States and may also
be trademarks or registered trademarks in other countries.
Microsoft, Windows, Windows Vista and Windows Server
are either registered trademarks or trademarks of Microsoft
Corporation in the United States and/or other countries.
This product contains the Universal Font Scaling Technology
or UFST® under license from Monotype Imaging, Inc.
UFST® is a trademark of Monotype Imaging, Inc. registered
in the United States Patent and Trademark Oce and may
be registered in certain jurisdictions.
UFST: Copyright © 1989 - 1996, 1997, 2003, 2004, 2008, all
rights reserved, by Monotype Imaging Inc.
All other product and brand names are registered
trademarks, trademarks or service marks of their respective
owners.
Copyright
© CANON INC. 2013 All Rights Reserved
No part of this publication may be reproduced, transmitted,
transcribed, stored in a retrieval system, or translated into
any language or computer language in any form or by any
means, electronic, mechanical, magnetic, optical, chemical,
manual, or otherwise, without the prior written permission of
Canon Inc.
Downloaded from ManualsPrinter.com Manuals
Page 35
35
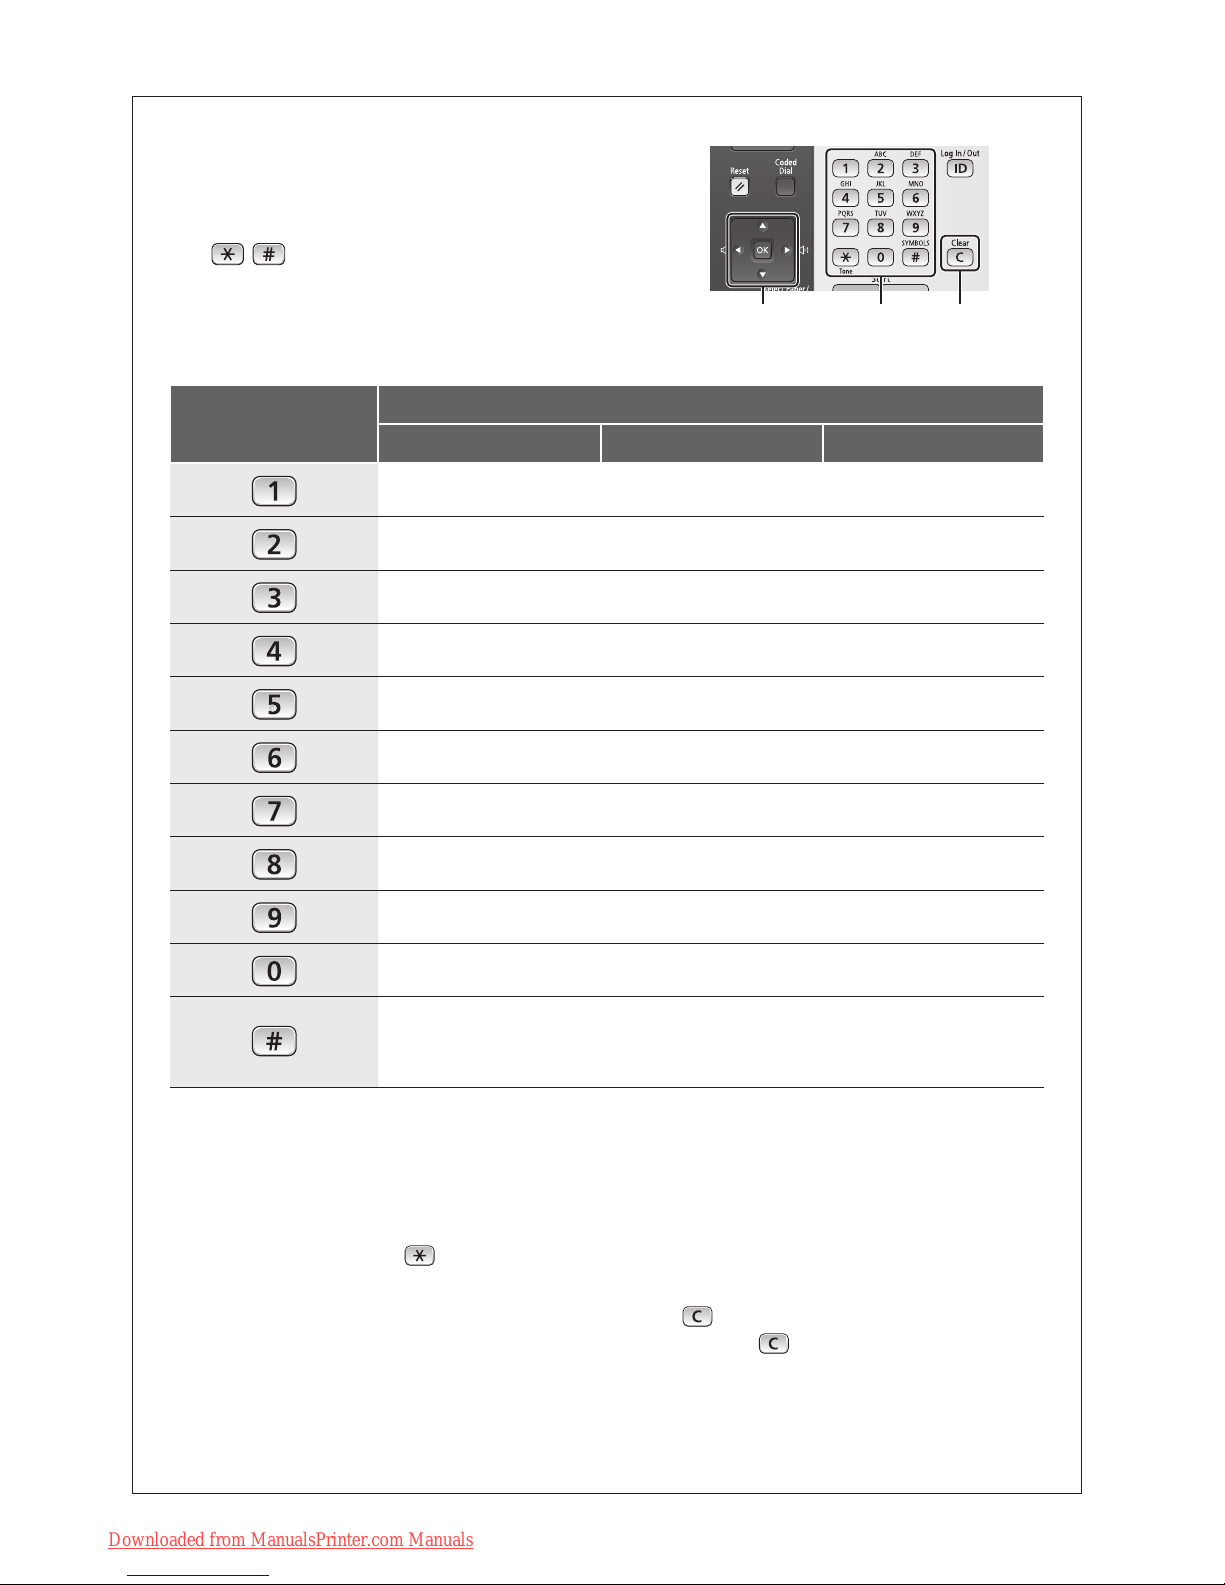
Entering Text
During the setup or initial conguration, you may need to
enter letters and numbers. Use [▲], [▼], [◀], [▶], numeric
keys, , , and [OK] to enter text.
Numeric Key
Entry Mode (See below on how to change the Entry mode)
<A> <a> <12>
@.-_/ 1
ABC abc 2
DEF def 3
GHI ghi 4
JKL jkl 5
MNO mno 6
PQRS pqrs 7
TUV tuv 8
WXYZ wxyz 9
(Not available)
0
(space) @ . / - _ ! ? & $ % # ( ) [ ] { } < > * + = " , ; : ' ^ ` | \
~
(Not available)
Changing the Entry Mode
The machine supports three entry modes: <A>
for uppercase, <a> for lowercase, and <12> for
numbers. Press <A/a/12> or to change the
entry mode.
Moving the Cursor
Press [◀] or [▶] to move the cursor.
Entering a Space
Move the cursor to the end of the text, and then
press [▶].
Deleting Characters
Press to delete characters.
Press and hold
to delete all characters.
OK
▼ ▲ ◀ ▶
Numeric
keys, *, #
Clear
Downloaded from ManualsPrinter.com Manuals
Page 36
Getting Started
Getting Started
FT6-0119 (000) XXXXXXXXXX © CANON INC. 2013 PRINTED IN CHINA
CANON INC.
30-2, Shimomaruko 3-chome, Ohta-ku, Tokyo 146-8501, Japan
CANON MARKETING JAPAN INC.
16-6, Konan 2-chome, Minato-ku, Tokyo 108-8011, Japan
CANON U.S.A., INC.
One Canon Park, Melville, NY 11747, U.S.A.
CANON EUROPA N.V.
Bovenkerkerweg 59, 1185 XB Amstelveen, The Netherlands
CANON CHINA CO. LTD.
15F Jinbao Building No.89, Jinbao Street, Dongcheng District, Beijing 100005, PRC
CANON SINGAPORE PTE LTD
1 HarbourFront Avenue, #04-01 Keppel Bay Tower, Singapore 098632
CANON AUSTRALIA PTY LTD
1 Thomas Holt Drive, North Ryde, Sydney NSW 2113, Australia
CANON GLOBAL WORLDWIDE SITES
http://www.canon.com/
Downloaded from ManualsPrinter.com Manuals
 Loading...