

Page 1
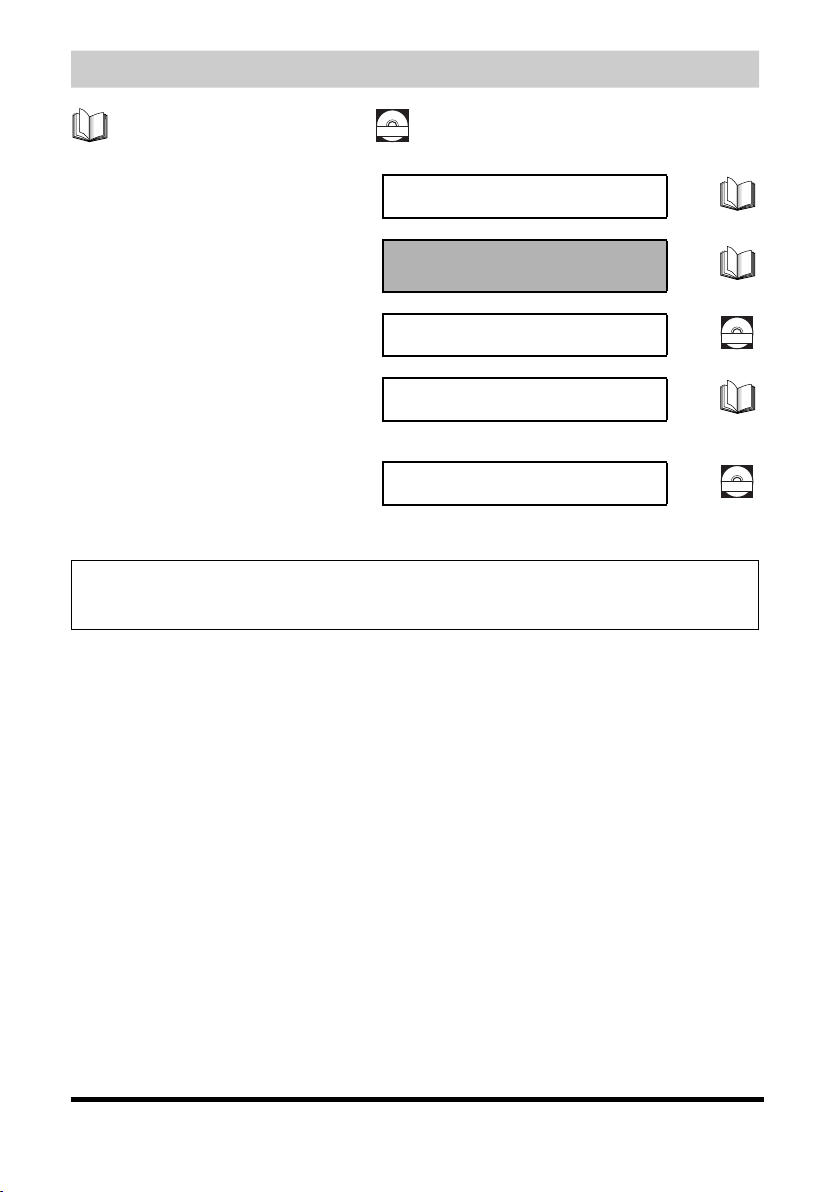
Manuals for the Machine
Guides with this symbol are
printed manuals.
• Setting Up the Machine
• Software Installation
• Introduction on Machine Use
• Copying, Printing Instructions
• Troubleshooting
• Fax Instructions
• Troubleshooting
Only for the MF5650 model.
• Software Installation and
Instructions
• Troubleshooting
Model Name
• F145600 (imageCLASS MF5630)
• F145602 (imageCLASS MF5650)
Guides with this symbol are PDF manuals
CD-ROM
included on the accompanying CD-ROM.
Set-Up Sheet
Quick Reference Guide
(This Manual)
User’s Guide
Facsimile Guide
Software Guide
CD-ROM
CD-ROM
·To view the manuals in PDF format, Adobe Reader/Adobe Acrobat Reader is required. If Adobe Reader/Adobe Acrobat Reader is not installed on your
system, please download it from the Adobe Syste ms Incorporated website.
·Considerable effort has be en made to ensure that this manual is free of inaccuracies and omissions. However, as we are constantly improving our
products, if you need an exact specification, please contact Canon.
1
Page 2

About This Manual
Symbols
CAUTION
Cautions tell you how to avoid actions that could injure you or damage your
machine.
IMPORTANT
Importants indicate operational requirements and restrictions. Read them carefully to
operate the machine correctly and to avoid damage to the machine.
NOTE
Notes provide advice for using your machine more effectively, describe operating
restrictions, and explain how to avoid minor operating difficulties.
Notations
Press [Start]. Keys on the control panel
If <DISPLAY LANGUAGE> appears, Messages on LCD
Click [OK]. Buttons and menu items on the PC screen
User’s Guide Manual names
2
About This Manual
Page 3

Contents
Preface
1 Safety Instructions
2 Operation
3 Main Functions
4 Maintenance
Trademarks . . . . . . . . . . . . . . . . . . . . . . . . . . . . . . . . . . . . . . . . . . . . . . . . 5
Copyright . . . . . . . . . . . . . . . . . . . . . . . . . . . . . . . . . . . . . . . . . . . . . . . . . . 5
Notice. . . . . . . . . . . . . . . . . . . . . . . . . . . . . . . . . . . . . . . . . . . . . . . . . . . . . 5
1.1 General . . . . . . . . . . . . . . . . . . . . . . . . . . . . . . . . . . . . . . . . . . . . . . . . 6
1.2 Location for the Machine . . . . . . . . . . . . . . . . . . . . . . . . . . . . . . . . . . . 8
1.3 Laser Safety Information . . . . . . . . . . . . . . . . . . . . . . . . . . . . . . . . . . . 8
1.4 Customer Support . . . . . . . . . . . . . . . . . . . . . . . . . . . . . . . . . . . . . . . . 9
2.1 Components . . . . . . . . . . . . . . . . . . . . . . . . . . . . . . . . . . . . . . . . . . . 10
2.2 Operation Panel. . . . . . . . . . . . . . . . . . . . . . . . . . . . . . . . . . . . . . . . . 11
2.2.1 MF5650 . . . . . . . . . . . . . . . . . . . . . . . . . . . . . . . . . . . . . . . . . . 11
2.2.2 MF5630 . . . . . . . . . . . . . . . . . . . . . . . . . . . . . . . . . . . . . . . . . . 11
2.3 Enter Characters . . . . . . . . . . . . . . . . . . . . . . . . . . . . . . . . . . . . . . . . 13
3.1 Set Paper Size. . . . . . . . . . . . . . . . . . . . . . . . . . . . . . . . . . . . . . . . . . 14
3.2 Load the Document . . . . . . . . . . . . . . . . . . . . . . . . . . . . . . . . . . . . . . 14
3.2.1 Platen Glass . . . . . . . . . . . . . . . . . . . . . . . . . . . . . . . . . . . . . . . 14
3.2.2 ADF . . . . . . . . . . . . . . . . . . . . . . . . . . . . . . . . . . . . . . . . . . . . . 15
3.3 Copy. . . . . . . . . . . . . . . . . . . . . . . . . . . . . . . . . . . . . . . . . . . . . . . . . . 16
3.3.1 Resolution . . . . . . . . . . . . . . . . . . . . . . . . . . . . . . . . . . . . . . . . 16
3.3.2 Density . . . . . . . . . . . . . . . . . . . . . . . . . . . . . . . . . . . . . . . . . . . 16
3.3.3 Copy Ratio (Enlarge/Reduce) . . . . . . . . . . . . . . . . . . . . . . . . . 16
3.4 Print . . . . . . . . . . . . . . . . . . . . . . . . . . . . . . . . . . . . . . . . . . . . . . . . . . 17
3.5 Scan. . . . . . . . . . . . . . . . . . . . . . . . . . . . . . . . . . . . . . . . . . . . . . . . . . 17
5 Troubleshooting
Contents
4.1 Replace Cartridge . . . . . . . . . . . . . . . . . . . . . . . . . . . . . . . . . . . . . . . 18
5.1 Remove Jammed Paper . . . . . . . . . . . . . . . . . . . . . . . . . . . . . . . . . . 20
5.1.1 Inside Machine . . . . . . . . . . . . . . . . . . . . . . . . . . . . . . . . . . . . . 20
5.1.2 ADF . . . . . . . . . . . . . . . . . . . . . . . . . . . . . . . . . . . . . . . . . . . . . 24
3
Page 4

Preface
Thank you for purchasing the Canon imageCLASS MF5600 Series. Please read this
manual to learn the basic operation of the machine. If you have not set up the machine,
see Set-Up Sheet first.
As an ENERGY STAR
®
Partner, Canon has determined that the
machine meets the Energy Star guidelines for energy efficiency.
Super G3 is a phrase used to describe the new generation of fax
machines that use ITU-T V.34 standard 33.6 Kbps* modems. Super
G3 High Speed Fax machines allow transmission time of approx. 3
seconds* per page which results in reduced telephone line charges.
* Approx. 3 seconds per page fax data transmission time based on Canon FAX Standard
Chart No.1, (Standard Mode) at 33.6 Kbps modem speed. The Public Switched
Telephone Network (PSTN) currently supports 28.8 Kbps modem speed or lower,
depending on telephone line conditions.
4
Preface
Page 5

Trademarks
Canon and the Canon Logo are trademarks of Canon Inc.
Microsoft and Windows are either registered trademarks or trademarks of Microsoft
Corporation in the United States and/or in other countries. Other brand and product
names are trademarks or registered trademarks of their respective companies.
Copyright
Copyright 2004 Canon Inc. All rights reserved.
No part of this publication may be reproduced, transmitted, transcribed, stored in a
retrieval system, or translated into any language or computer language, in any form or by
any means, electronic, mechanical, magnetic, optical, chemical, manual, or otherwise,
without the prior written permission of Canon Inc.
Notice
The information in this document is subject to change without notice.
CANON INC. MAKES NO WARRANTY OF ANY KIND WITH REGARD TO THIS
MATERIAL, EITHER EXPRESS OR IMPLIED, EXCEPT AS PROVIDED HEREIN,
INCLUDING WITHOUT LIMITATION, THEREOF, WARRANTIES AS TO
MARKETABILITY, MERCHANTABILITY, FITNESS FOR A PARTICULAR PURPOSE OF
USE OR AGAINST INFRINGEMENT OF ANY PATENT. CANON INC. SHALL NOT BE
LIABLE FOR ANY DIRECT, INCIDENTAL, OR CONSEQUENTIAL DAMAGES OF ANY
NATURE, OR LOSSES OR EXPENSES RESULTING FROM THE USE OF THIS
MATERIAL.
Preface
5
Page 6

1 Safety Instructions
Please read these safety instructions thoroughly before using the machine.
1.1 General
CAUTION
Except as specifically described in User’s Guide, do not attempt to service
the machine yourself. Never attempt to disassemble the machine: opening
and removing its interior covers will expose you to dangerous voltages and
other risks. For all services, contact your local authorized Canon dealer or
the Canon help line.
• Always follow all warnings and instructions marked on the machine.
• Do not use the machine near water. If you spill liquid on or into the machine, unplug it
immediately and call your local authorized Canon dealer or the Canon help line.
• The back of the machine includes slots and openings for ventilation. To keep the machine
from overheating (which can cause it to operate abnormally and create a fire risk), take
care not to block or cover these openings. Do not operate the machine on a bed, sofa, rug,
or other similar soft surface, or near a radiator or other heat source. Do not place the
machine in a closet or cabinet or on shelves unless adequate ventilation is available.
• Operate the machine only from the type of power source indicated on the label on the back
of the machine. If you are unsure of the type of power available from your wall outlets,
contact your local power company.
• Make sure the total amperage used by all devices plugged into the wall outlet does not
exceed the ampere rating of the outlet’s circuit breaker.
• Do not allow anything to rest on the power cord and do not place the machine where the
cord will be walked on. Make sure the cord is not knotted or kinked.
• Do not insert object of any kind into the slots or openings on the machine’s cabinet, as
they could touch dangerous voltage points or short out parts, and result in fire or electric
shock.
• Do not allow small objects (such as pins, paper clips, or staples) to fall into the machine. If
something does fall into it, unplug the machine immediately and call your local authorized
Canon dealer or the Canon help line.
• Do not plug the power cord into an uninterruptible power supply (UPS).
• Always unplug the machine before moving or cleaning it.
6
1 Safety Instructions
Page 7
• Do not plug the machine into the same circuit as an appliance such as an air conditioner,
electric typewriter, television, or copier. Such devices generate electrical noise that can
interfere with sending or receiving faxes. (MF5650 only)
• Whenever you unplug the machine, wait at least 5 seconds before you plug it back in.
• Always unplug the machine during thunderstorms.
• Before you transport the machine, remove the toner cartridge.
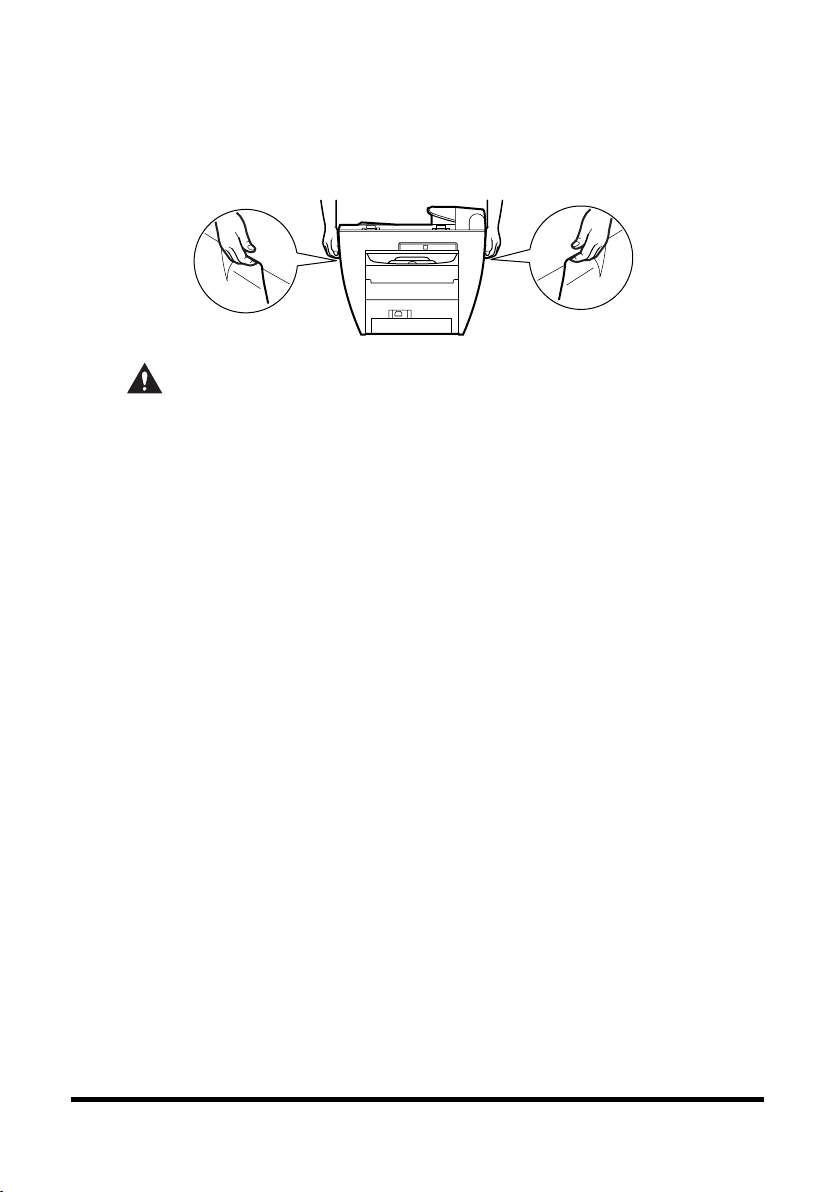
• Always lift the machine as shown below:
CAUTION
Unplug the machine and contact your local authorized Canon dealer or the
Canon help line in any of these situations:
- If the power cord or plug is damaged or frayed.
- If liquid spills into the machine, or if it is otherwise exposed to rain or
liquids.
- If you notice smoke, unusual noises or odor coming from it.
- If the machine does not operate normally when you follow the operating
instructions. Adjust only those controls that are covered by the operating
instructions in the manuals, or you can damage the machine and require
extensive repair work.
- If the machine is dropped or its cabinet damaged.
- If the machine begins performing poorly, and you cannot correct the
problem by following the procedures in User’s Guide.
- This product emits low level electromagnetic waves. If you use a cardiac
pacemaker and feel abnormalities, move away from this product and
consult your doctor.
1 Safety Instructions
7
Page 8
1.2 Location for the Machine
Install the machine in a location that meets following conditions:
- A flat, stable, vibration-free surface strong enough to support its weight (about 15 kg).
- Cool, dry, clean, well ventilated.
- Dust-free.
- Stable temperature between 10° and 32.5°C. No extreme temperature fluctuations.
- Relative humidity between 20% and 80%.
- No direct sunlight.
- Near a telephone outlet, to allow for an easy connection of the telephone line to the
machine. (MF5650 only)
- Near an electrical wall outlet that provides 200 to 240-volt AC (50 to 60 Hz) power.
- Near the PC you will connect it to. Make sure you can reach the machine easily.
1.3 Laser Safety Information
Laser radiation could be hazardous to the human body. For this reason, laser radiation
emitted inside this product is hermetically sealed within the protective housing and
external cover. No radiation can leak from the product in the normal operation of the
product by the user.
This product is classified as a Class 1 Laser Product under IEC 60825-1:1993 and EN
60825-1:1994.
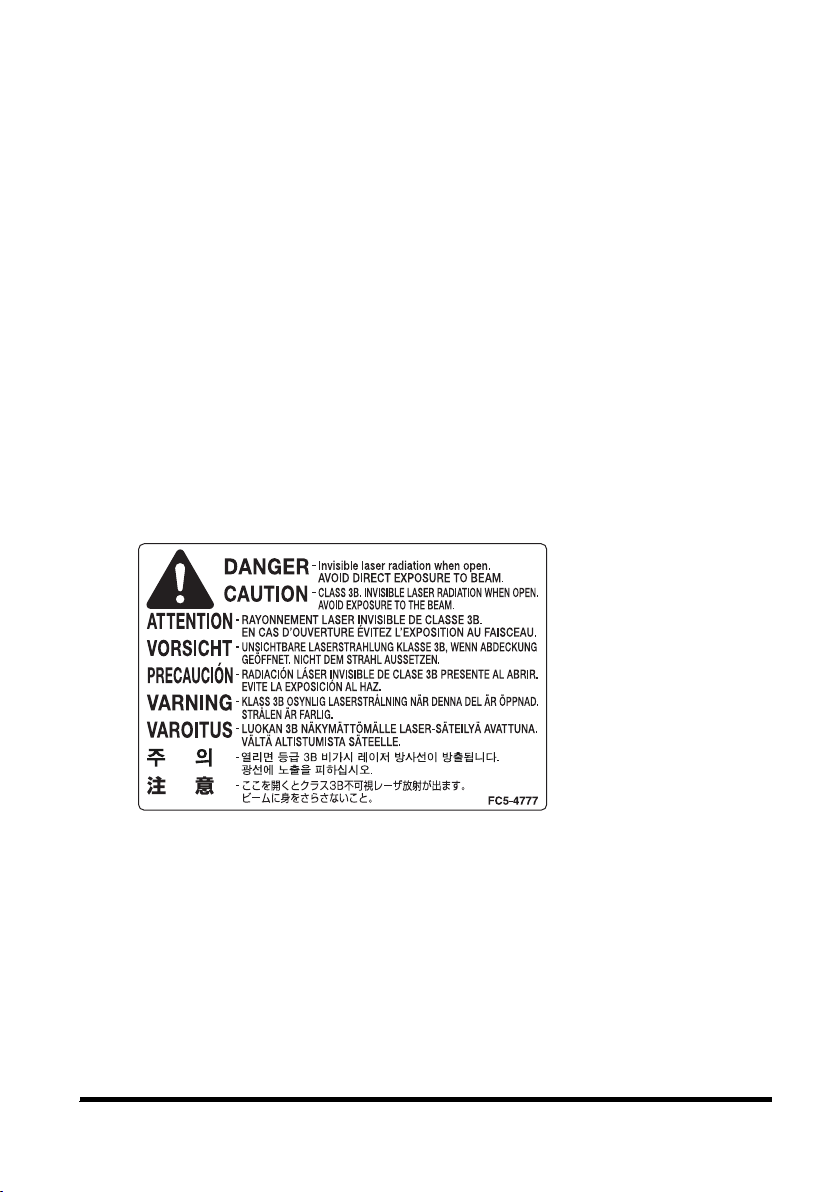
■ 200-240V Model
The label shown below is attached to the laser scanner assembly within the product.
8
1 Safety Instructions
Page 9

This product has been classified under IEC60825-1:1993 and EN60825-1:1994, and
conforms to the following classes:
CLASS 1 LASER PRODUCT
LASER KLASSE 1
APPAREIL A RAYONNEMENT LASER DE CLASSE 1
APPARECCHIO LASER DI CLASSE 1
PRODUCTO LASER DE CLASE 1
APARELHO A LASER DE CLASSE 1
PERFORMANCE OF PROCEDURES OTHER THAN THOSE SPECIFIED IN
THE MANUALS FOR THIS PRODUCT MAY RESULT IN HAZARDOUS
RADIATION EXPOSURE.
1.4 Customer Support
If you encounter a problem with the machine’s operation, try to solve it by referring to the
User’s Guide. If you cannot solve the problem or if you think your machine needs
servicing, contact your local authorized Canon dealer or the Canon help line.
1 Safety Instructions
9
Page 10
2 Operation
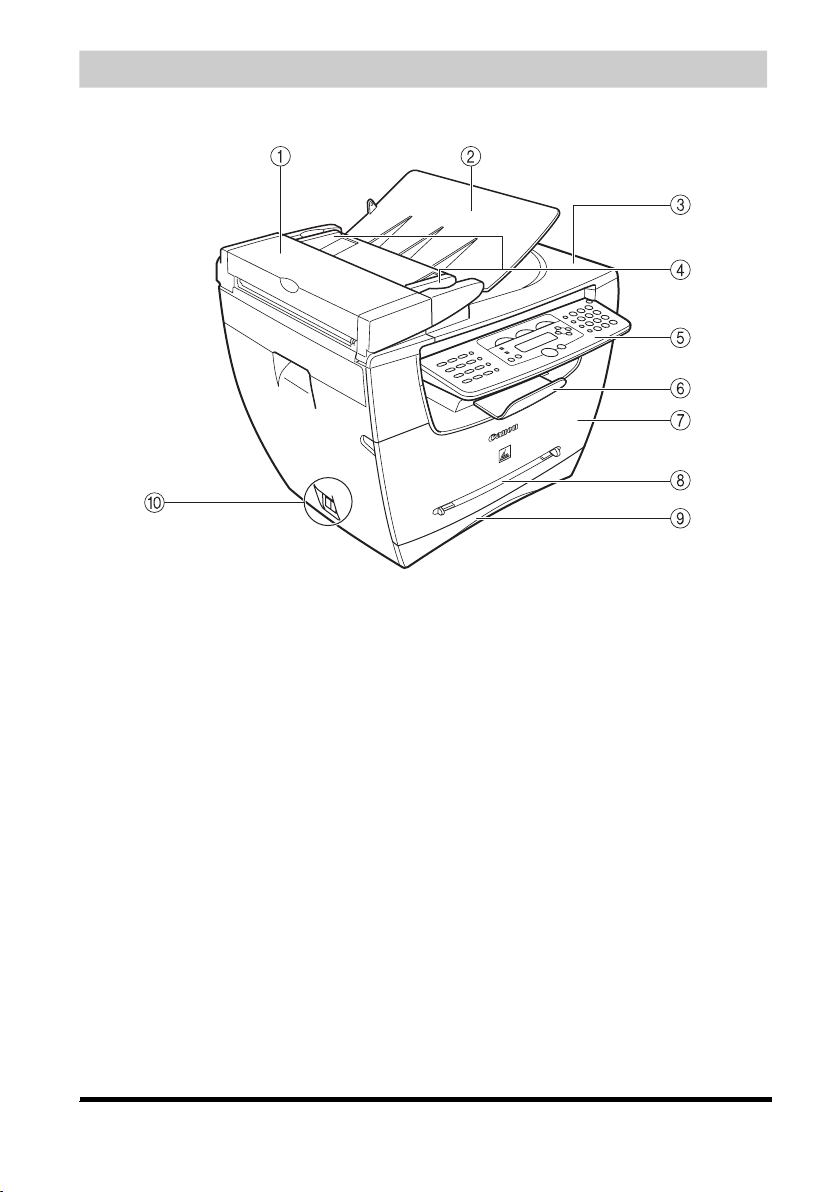
2.1 Components
a Automatic Document Feeder (ADF)
b Document feeder tray
c Document output tray
d Document guides
e Operation panel
10
f Output tray
g Front cover
h Multi-purpose feeder
i Cassette
j Telephone jacks (MF5650 only)
2 Operation
Page 11
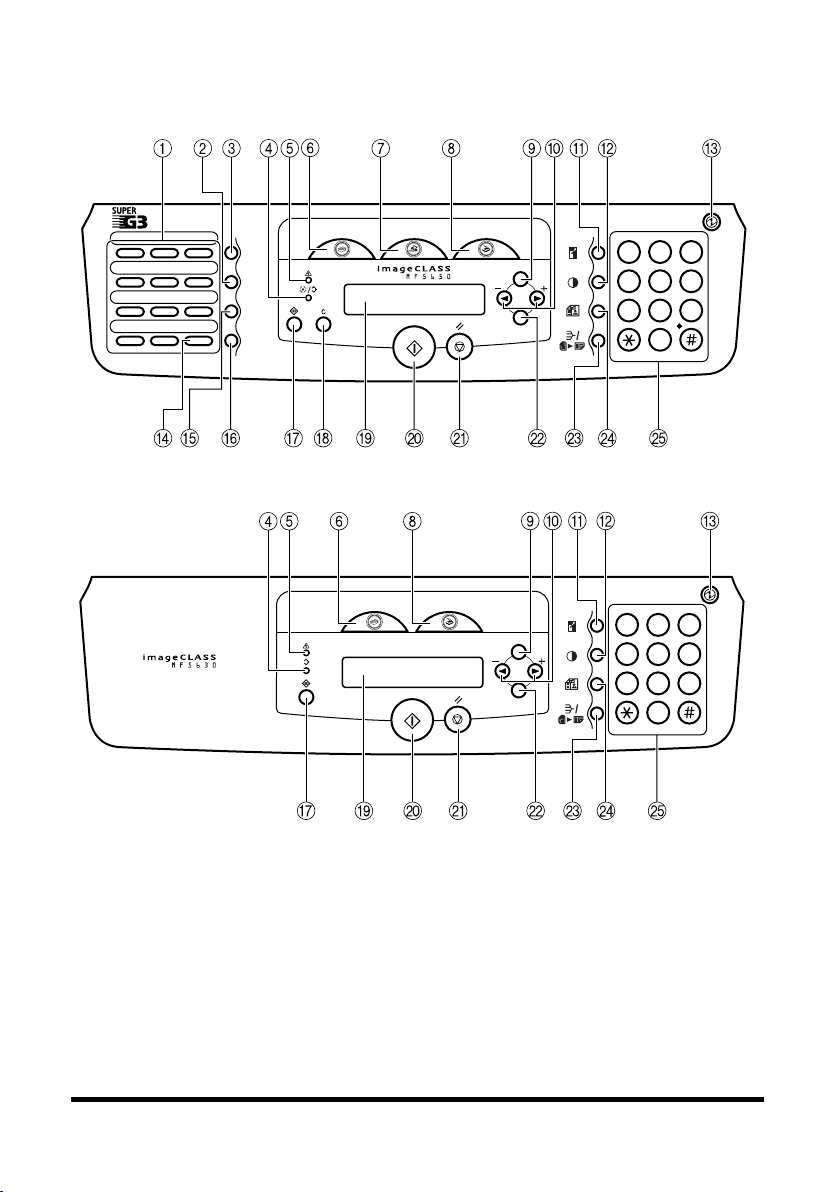
2.2 Operation Panel
■ 2.2.1 MF5650
01 02 03
04
07
10
05
08
11 12
06
09
R
■ 2.2.2 MF5630
Redial/
Pause
Coded
Dial
Directory
Hook
COPY
COPY
FAX
SCAN
SCAN
Menu
Menu
DEF
ABC
1
23
MNO
JKL
GHI
5
4
RS
PQ
7
OK
1
4
7
OK
TUV
T
6
WXYZ
8
9
0
23
5
6
8
9
0
2 Operation
11
Page 12

a One-Touch Speed Dialing keys
b Coded Dial key
c Redial/Pause key
d In Use/Memory indicator
e Alarm indicator
f COPY key
g FAX k ey
h SCAN key
i Menu key
j and keys
k Enlarge/Reduce key
l Exposure key
m Energy Saver key
n R key
o Directory key
p Hook key
q Status Monitor key
r Clear key
s LCD
t Start key
u Stop/Reset key
v OK key
w Collate/2on1 key
x Image Quality key
y Numeric keys
12
2 Operation
Page 13
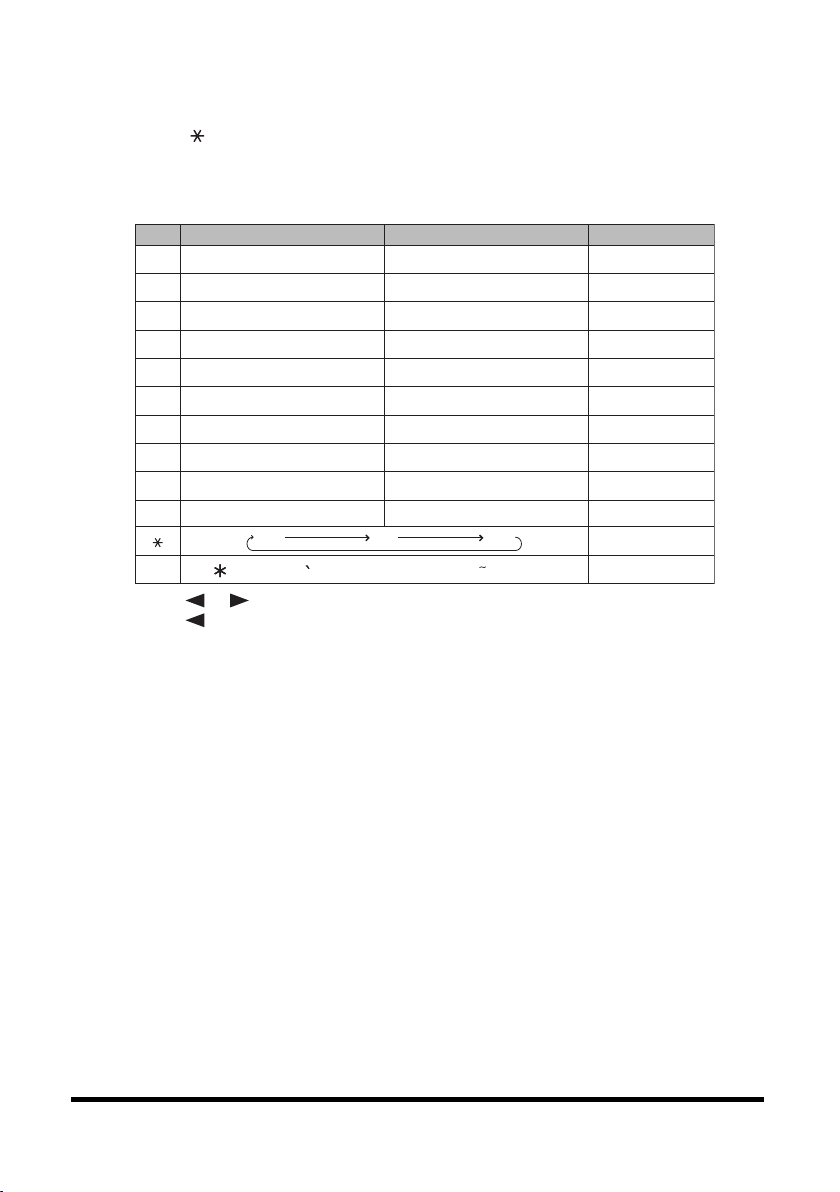
2.3 Enter Characters
• Use numeric keys to enter characters. Press the numeric key repeatedly until the required
character appears.
• Press [#] to enter symbols.
• Press [] to switch between input modes:
- Uppercase letter mode (:A)
- Lowercase letter mode (:a)
- Number mode (:1)
:
A
[1] @.-_/ @.-_/
[2] ABC abc 2
[3] DEF def 3
[4] GHI ghi 4
[5] JKL jkl 5
[6] MNO mno 6
[7]
[8]
[9]
PQRS pqrs
TUV tuv
WXYZ wxyz
[0] 0
[ ]
[#]
– . # ! “ , ; : ^ _ = / | ’ ? $ @ % & + \ ( ) [ ] { } < >
:A
:a
• Press or to move the cursor.
• Press or [C] to delete a previous character. Hold [C] to delete the entire entry.
• Press [OK] to confirm the entry.
:
a
:
1
1
7
8
9
:1
2 Operation
13
Page 14
3 Main Functions
3.1 Set Paper Size
1
Press [Menu].
2
Press or to select <1.PAPER SETTINGS> ➞ [OK].
3
Press or to select <1.CASSETTE> ➞ [OK].
4
Press or to select <1.PAPER SIZE> ➞ [OK].
5
Press or to select the paper size ➞ [OK].
6
Press [Stop/Reset].
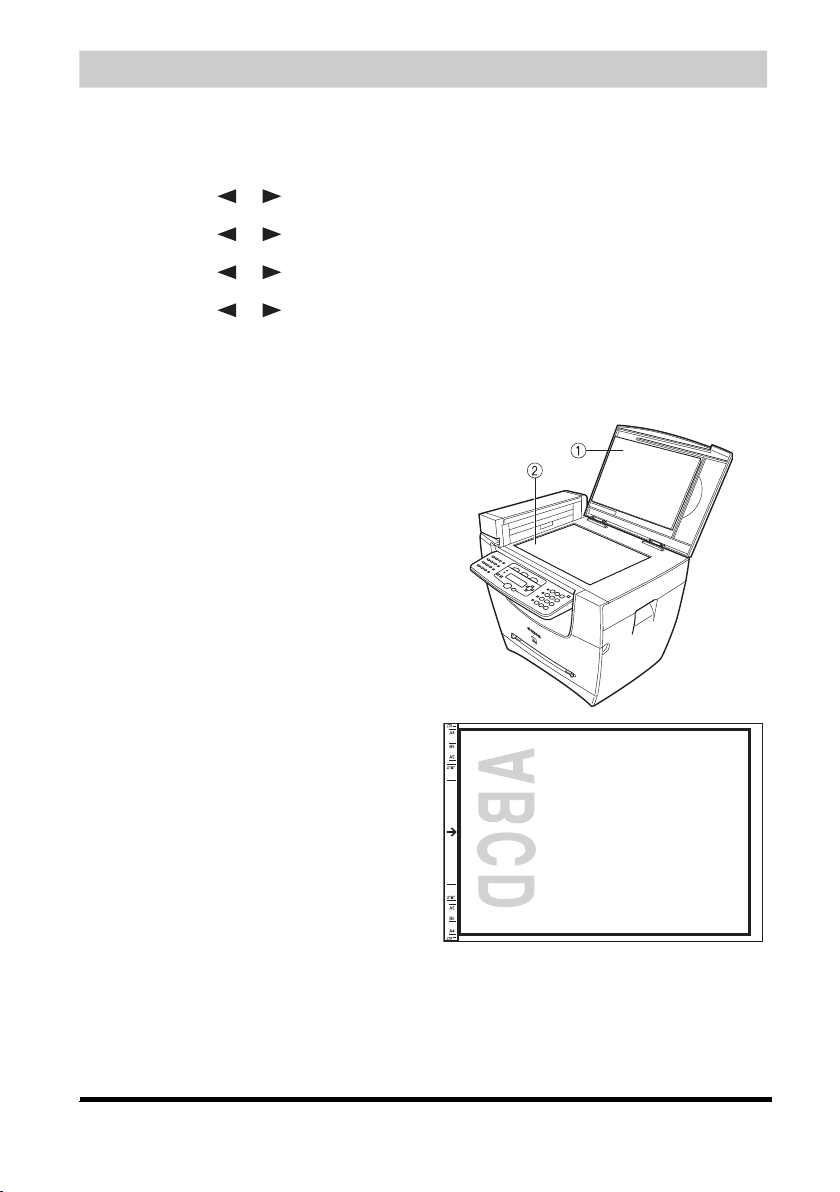
3.2 Load the Document
■ 3.2.1 Platen Glass
1
Open the platen glass cover a.
2
Place your document face down
on the platen glass
b.
3
Align the document with the paper
size marks or center arrow on the
left side of the platen glass.
4
Gently close the platen glass cover.
14
3 Main Functions
Page 15
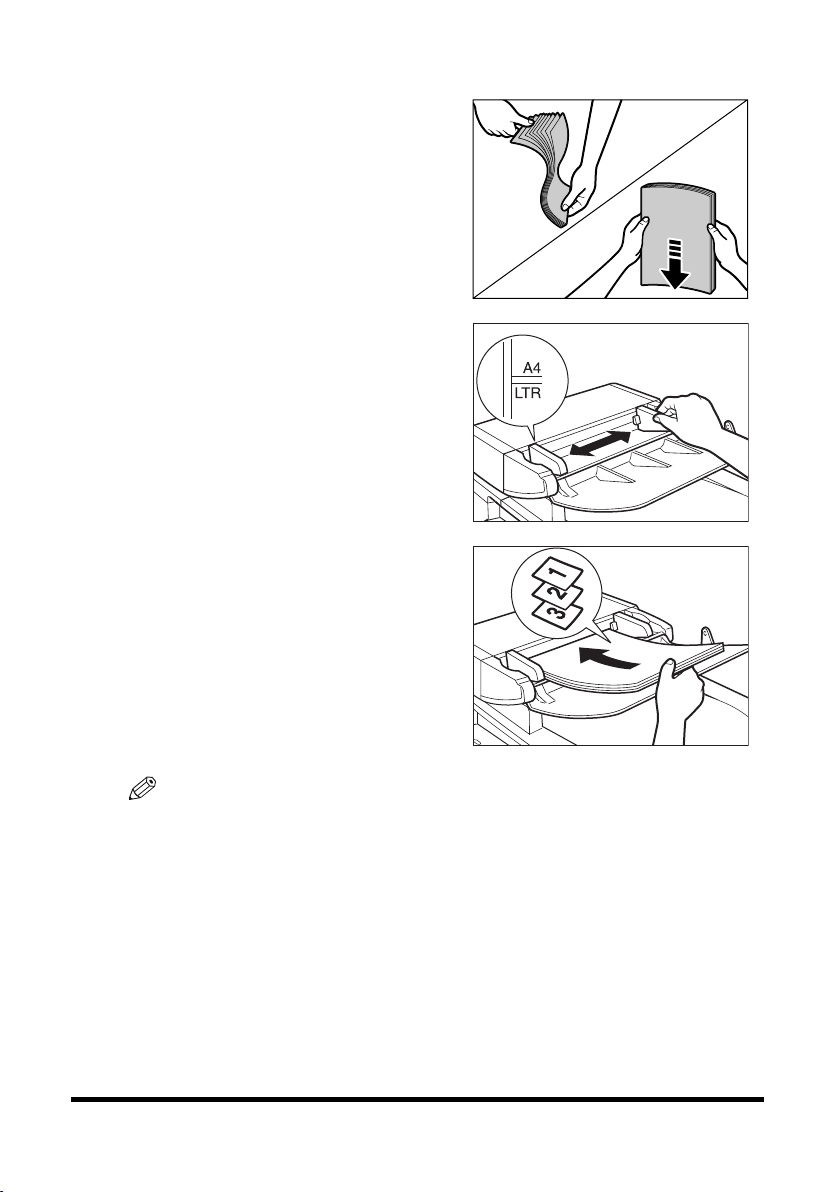
■ 3.2.2 ADF
1
Fan and tap the edges of the multi-page
document.
2
Adjust the document guides to the width of
the document.
3
Load the document face up in the ADF.
NOTE
See User’s Guide for document requirements and proper positioning.
3 Main Functions
15
Page 16

3.3 Copy
1
Load the document (ADF or platen glass). See 3.2, “Load the Document.”
2
Press [COPY].
3
Use numeric keys to enter the required number of copies.
4
Adjust settings if required (see below):
- Resolution
- Density
- Copy ratio (enlarge/reduce)
5
Press [Start].
NOTE
Press
[Stop/Reset]
■ 3.3.1 Resolution
1
Press [Image Quality] to select the required image quality:
- <TEXT> for text-only documents
- <PHOTO> for photographs
- <TEXT/PHOTO> for documents with text and photographs
■ 3.3.2 Density
Automatically:
1
Press [Exposure] to select the auto mode ➞ press [OK].
to cancel copying.
Manually:
1
Press [Exposure] to select the manual mode.
2
Press (lighter) or (darker) to adjust the copy exposure ➞ press [OK].
■ 3.3.3 Copy Ratio (Enlarge/Reduce)
1
Press [Enlarge/Reduce] ➞ or to select a copy ratio.
2
Press [OK].
NOTE
You can also set a custom copy ratio selectable in 1% increments. For details, see
User’s Guide.
16
3 Main Functions
Page 17
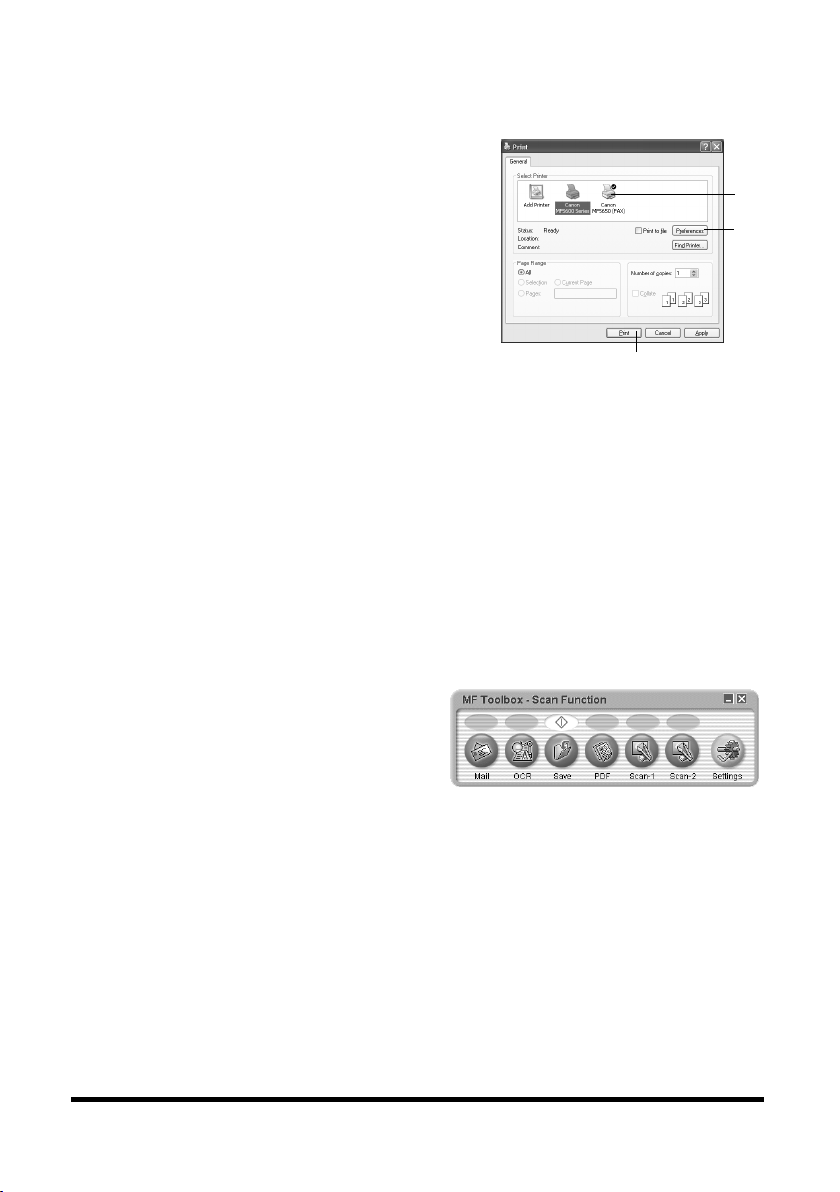
3.4 Print
Follow these steps to print from a PC running Windows XP. For other OS, see Software
Guide.
1
Open an application on your PC.
2
Select [Print] from the [File] menu.
3
Select the icon (A) for the printer you want to
use.
4
Click [Preferences] (B) to change print
settings if required. See Software Guide for
details.
5
Click [Print] (C).
C
To cancel printing:
1
Click [Start] on the Windows task bar.
2
Select [Control Panel] ➞ [Printers and Other Hardware] ➞ [Printers and Faxes].
3
Double-click the corresponding printer driver icon.
4
Right-click the print job ➞ click [Cancel Printing].
3.5 Scan
Follow these steps to scan a document using the [SCAN] key on the machine. To scan
from MF Toolbox or a PC application, see Software Guide.
1
Load the document (ADF or platen glass). See 3.2, “Load the Document.”
A
B
2
Press [SCAN] ➞ [Start] on the
machine to start scanning.
The [MF Toolbox - Scan Function]
screen appears. For details on scan
settings, see Software Guide.
3 Main Functions
17
Page 18
4 Maintenance
4.1 Replace Cartridge
NOTE
If toner comes into contact with your skin or clothing, wash immediately with cold
water. Warm water will permanently set the toner.
1
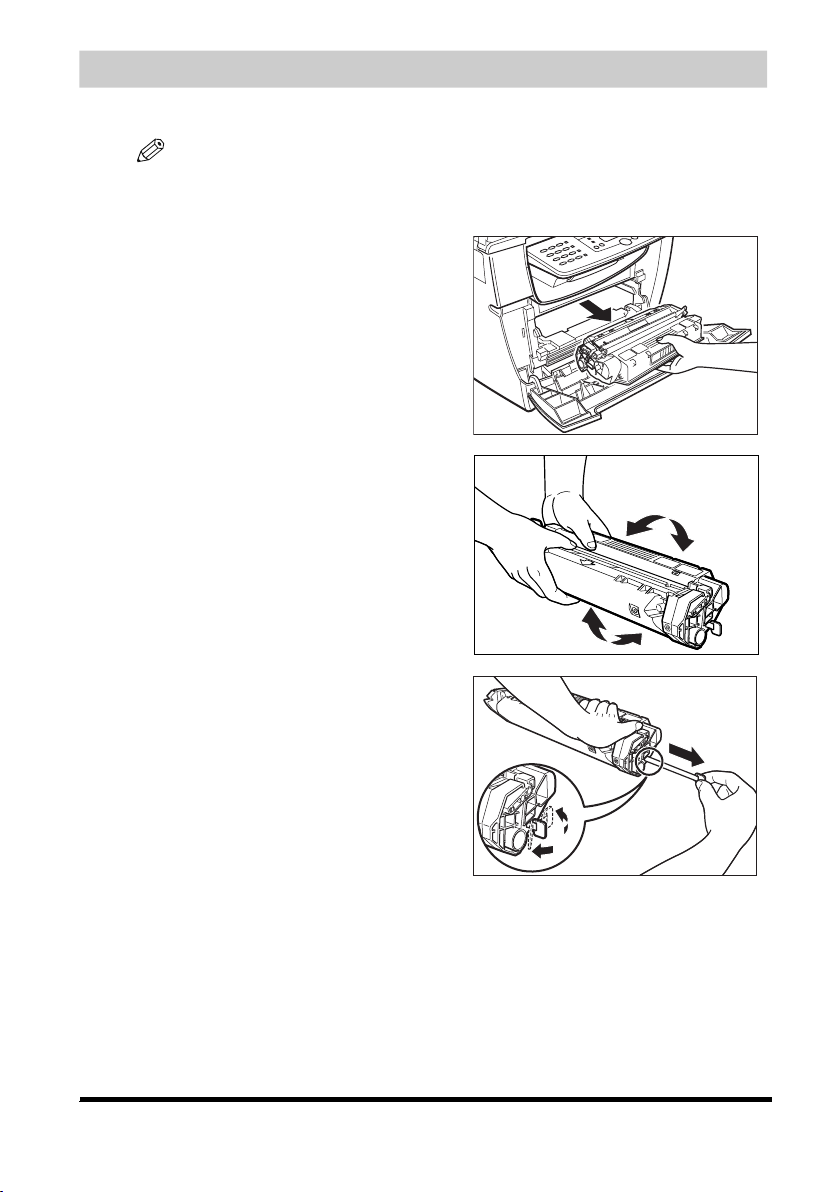
Open the front cover.
2
Pull out the old cartridge horizontally.
3
Remove the new cartridge from the bag.
Keep the bag for future use.
4
Rock the cartridge several times to
distribute toner evenly.
5
Hold the cartridge. Break the tab (A) and
pull out the seal (B) completely.
B
A
18
4 Maintenance
Page 19
6
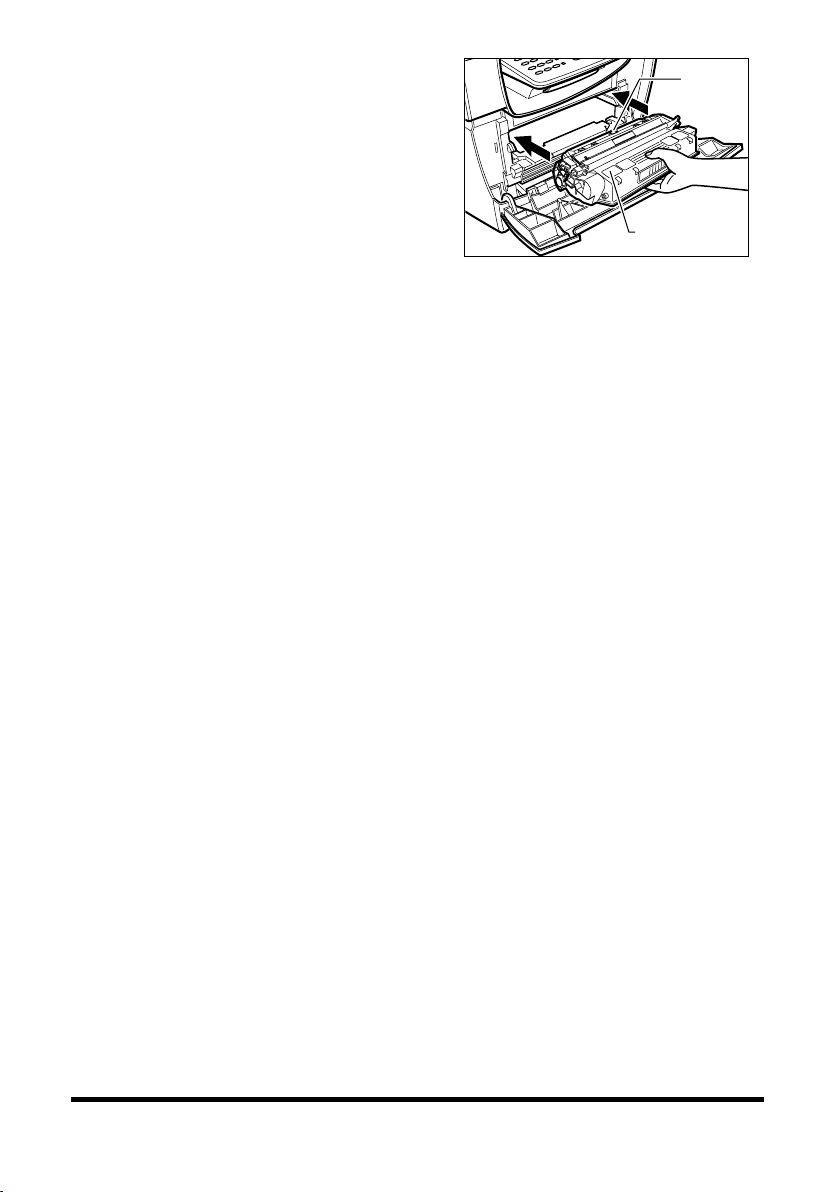
Hold the cartridge with instructions (C)
face up and arrow (D) pointing to the
machine. Insert the cartridge as far as it
will go.
7
Close the front cover.
D
C
4 Maintenance
19
Page 20
5 Troubleshooting
5.1 Remove Jammed Paper
■ 5.1.1 Inside Machine
CAUTION
Some areas inside the machine are high in temperature and voltage. Take
precaution to avoid burns or electrical shock.
1
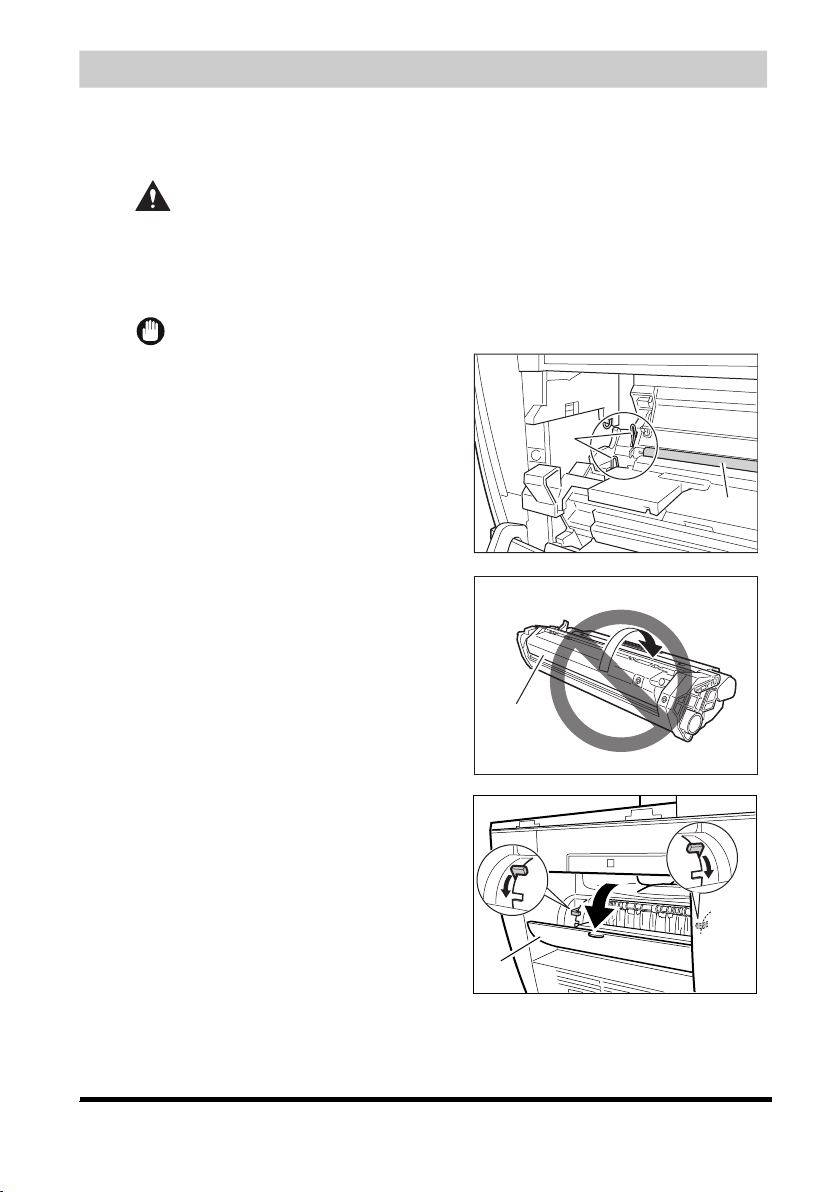
Open the front cover and pull out the cartridge horizontally.
IMPORTANT
•
Remove metal items (watches and rings)
when touching inside the machine.
•
Do not touch the transfer roller (A) or pins
(B) when removing jammed paper.
•
Do not open the drum protective shutter
(C) or touch the drum inside.
B
A
C
2
Open the face up cover (D) and push down
the green levers (E) on both sides.
E
E
D
20
5 Troubleshooting
Page 21
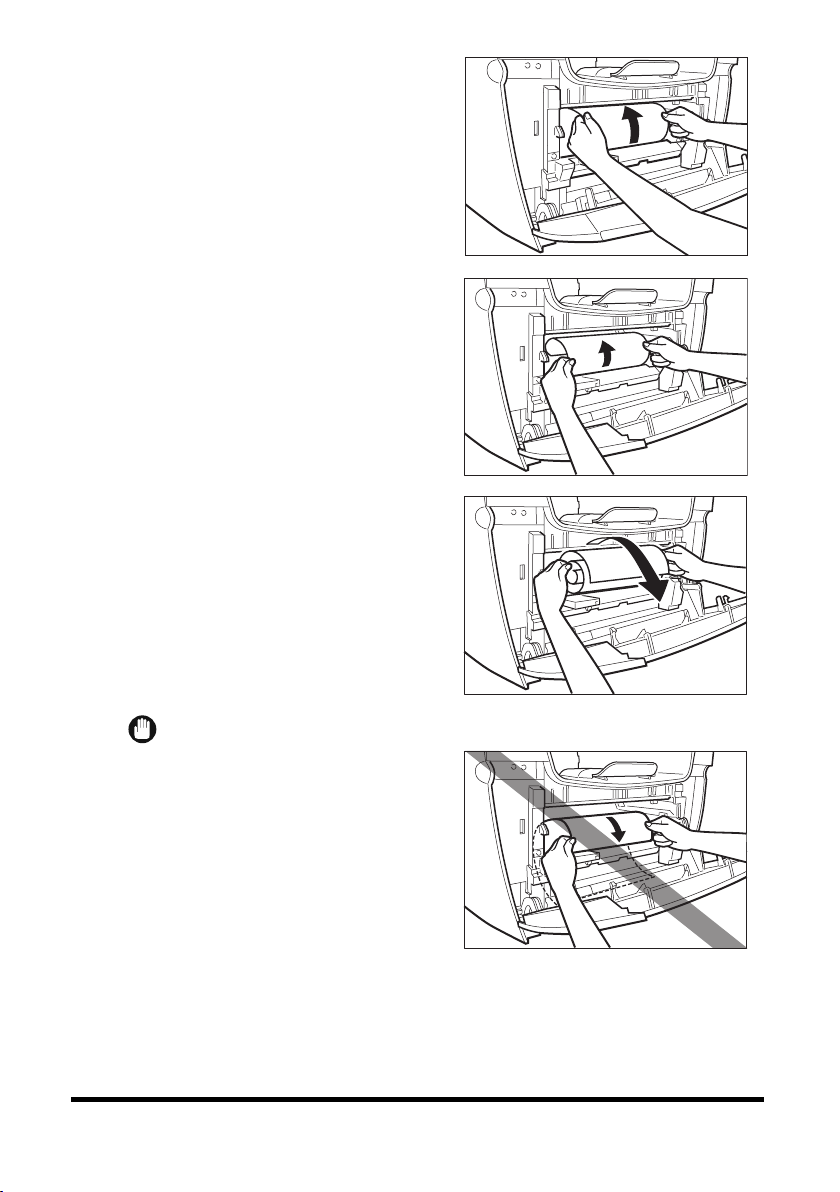
3
Hold both sides of paper and carefully pull
the bottom edge of paper out of the
machine.
4
Pull out the paper from the machine.
5
If the paper has not entered imaging area,
pull it forward and roll it inward.
IMPORTANT
•
To avoid machine malfunction, do not pull
the jammed paper outward from the
cassette.
5 Troubleshooting
21
Page 22
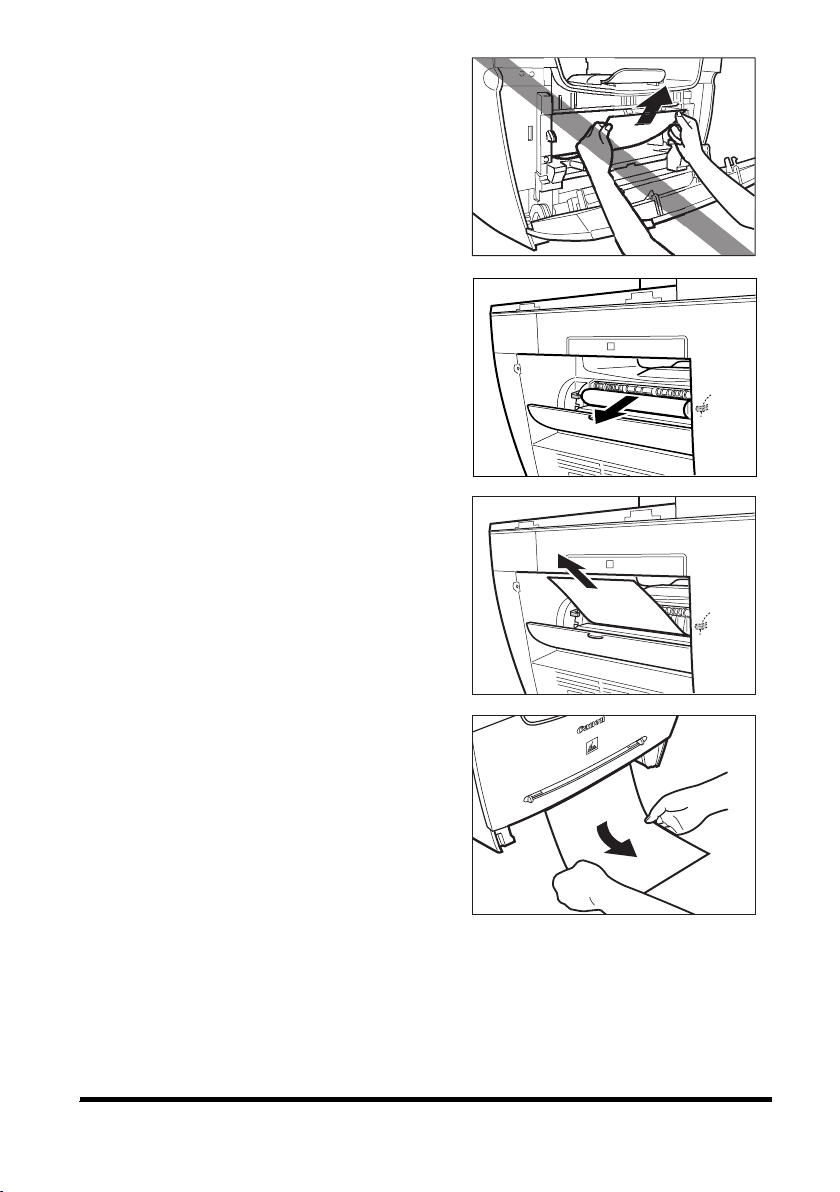
•
To avoid toner staining the machine
permanently, do not pull the jammed
paper upward.
6
Gently pull jammed paper between output
rollers until the leading edge appears.
7
Carefully pull out the jammed paper.
8
For paper jammed in the paper cassette,
pull out the cassette first. Pull down the
paper out of the machine.
22
5 Troubleshooting
Page 23
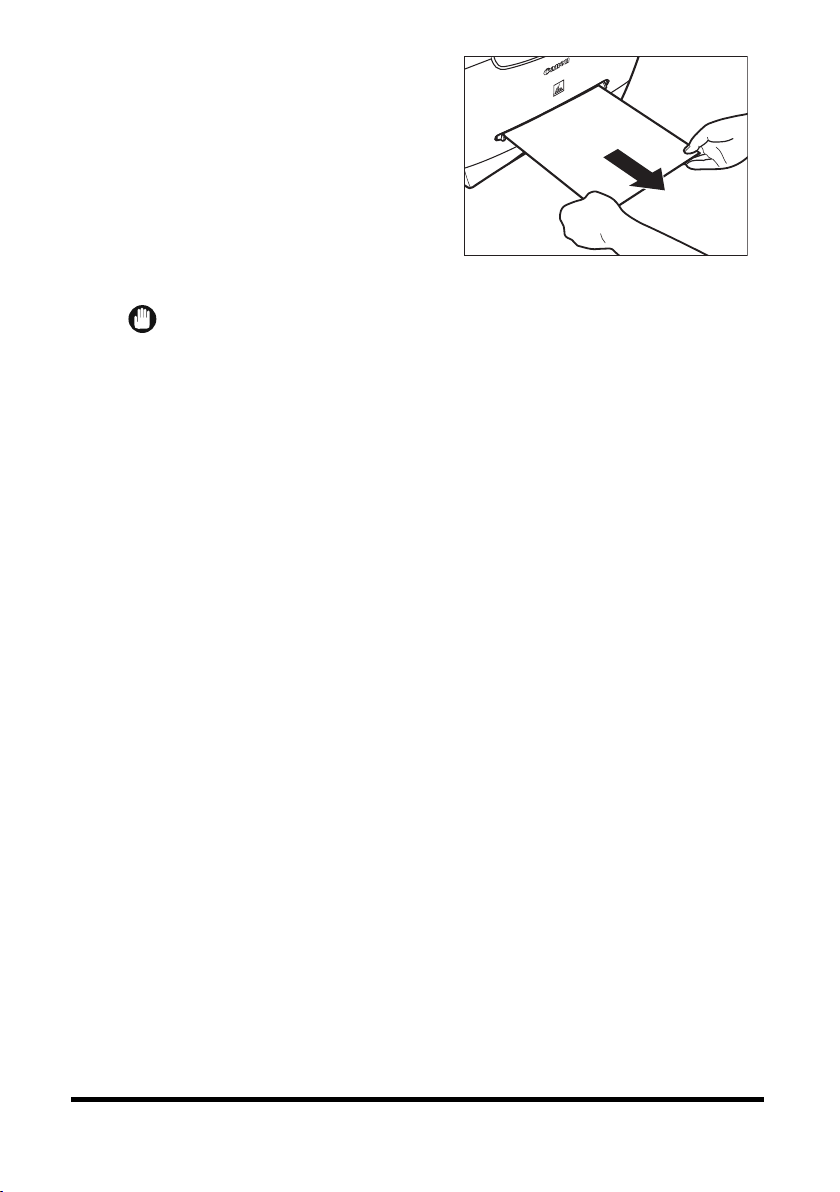
9
For paper jammed in the multi-purpose
feeder, hold both sides and pull it out.
10
Push up the green levers and close the face up cover on the back of the machine.
IMPORTANT
To avoid damage to the fixing assembly, never push down the green levers while
printing.
11
Insert the cartridge in the machine and close the front cover.
5 Troubleshooting
23
Page 24
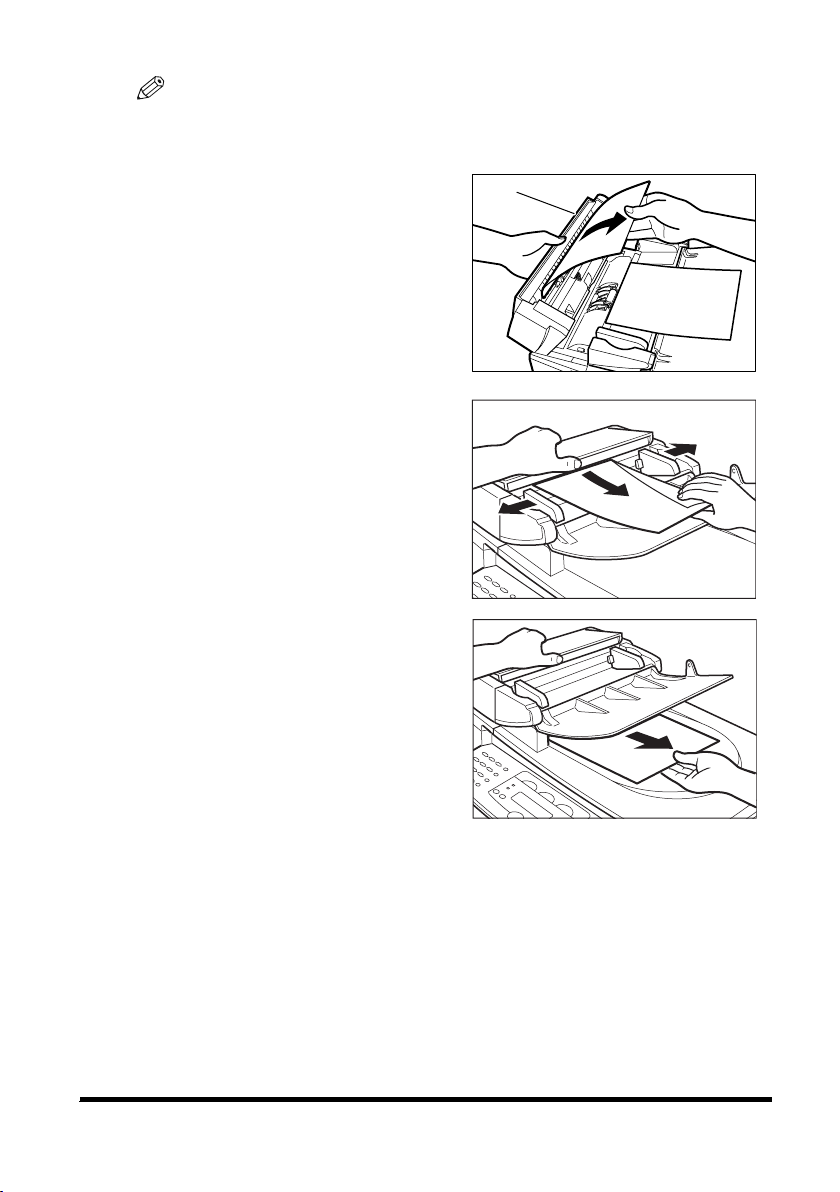
■ 5.1.2 ADF
NOTE
To avoid damage to the document, do not open the platen glass cover until the
jammed paper is removed.
1
Open the ADF (A) and remove jammed
paper.
2
Widen the document guides. Open the
ADF and remove jammed paper.
3
Open the ADF and remove jammed
paper from the document output tray.
A
24
5 Troubleshooting
 Loading...