

Page 1
R eferenc e G uide
R eferenc e G uide
Pleas e read this guide before operating this equipment.
After you finish reading this guide, store it in a s afe plac e for future referenc e.
E NG
Page 2
i
Your machine includes the following documentation. This documentation has been designed so that you can
easily use your machine to suit your particular needs.
Setting up the machine......................................
Setting up paper ..............................................
Installing the CAPT...........................................
Document and paper handling .............................
Making copies ................................................
Maintenance ..................................................
Troubleshooting feed and copy issues ....................
Sending and receiving faxes ...............................
Speed dialing .................................................
Troubleshooting fax issues .................................
Printing with the CAPT.......................................
Checking the status of a print job..........................
Troubleshooting CAPT issues...............................
• Documentation is included on the CD-ROM in PDF form.
• The machine shown in this guide is the imageCLASS D680 model.
Copyright
Copyright ©2002 Canon, Inc. All rights reserved. No part of this publication may be reproduced, transmitted,
transcribed, stored in a retrieval system, or translated into any language or computer language in any form or by
any means, electric, mechanical, magnetic, optical, chemical, manual, or otherwise, without the prior written
permission of Canon, Inc.
Trademarks
Canon is a registered trademark and UHQ™ is a trademark of Canon, Inc.
As an ENERGY STAR
®
Partner, Canon U.S.A., Inc. has determined that this product
meets the ENERGY STAR®guidelines for energy efficiency.
NOTE
Using Your Documentation
Set-up Instructions
Reference Guide
Fax Guide
Only for the imageCLASS D680 model
Printer Guide
Page 3
ii
Laser Safety
This machine complies with 21 CFR Chapter 1 Subchapter J as a Class 1 laser product under the U.S. Department
of Health and Human Services (DHHS) Radiation Performance Standard according to the Radiation Control for
Health and Safety Act of 1968. This means that the machine does not produce hazardous laser radiation.
Since radiation emitted inside the fax is completely confined within protective housings, and external covers, the
laser beam cannot escape from the machine during any phase of user operation.
CDRH Regulations
The Center for Devices and Radiological Health (CDRH) of the U.S. Food and Drug Administration implemented
regulations for laser products on August 2, 1976. These regulations apply to laser products manufactured from
August 1, 1976. Compliance is mandatory for products marketed in the United States.
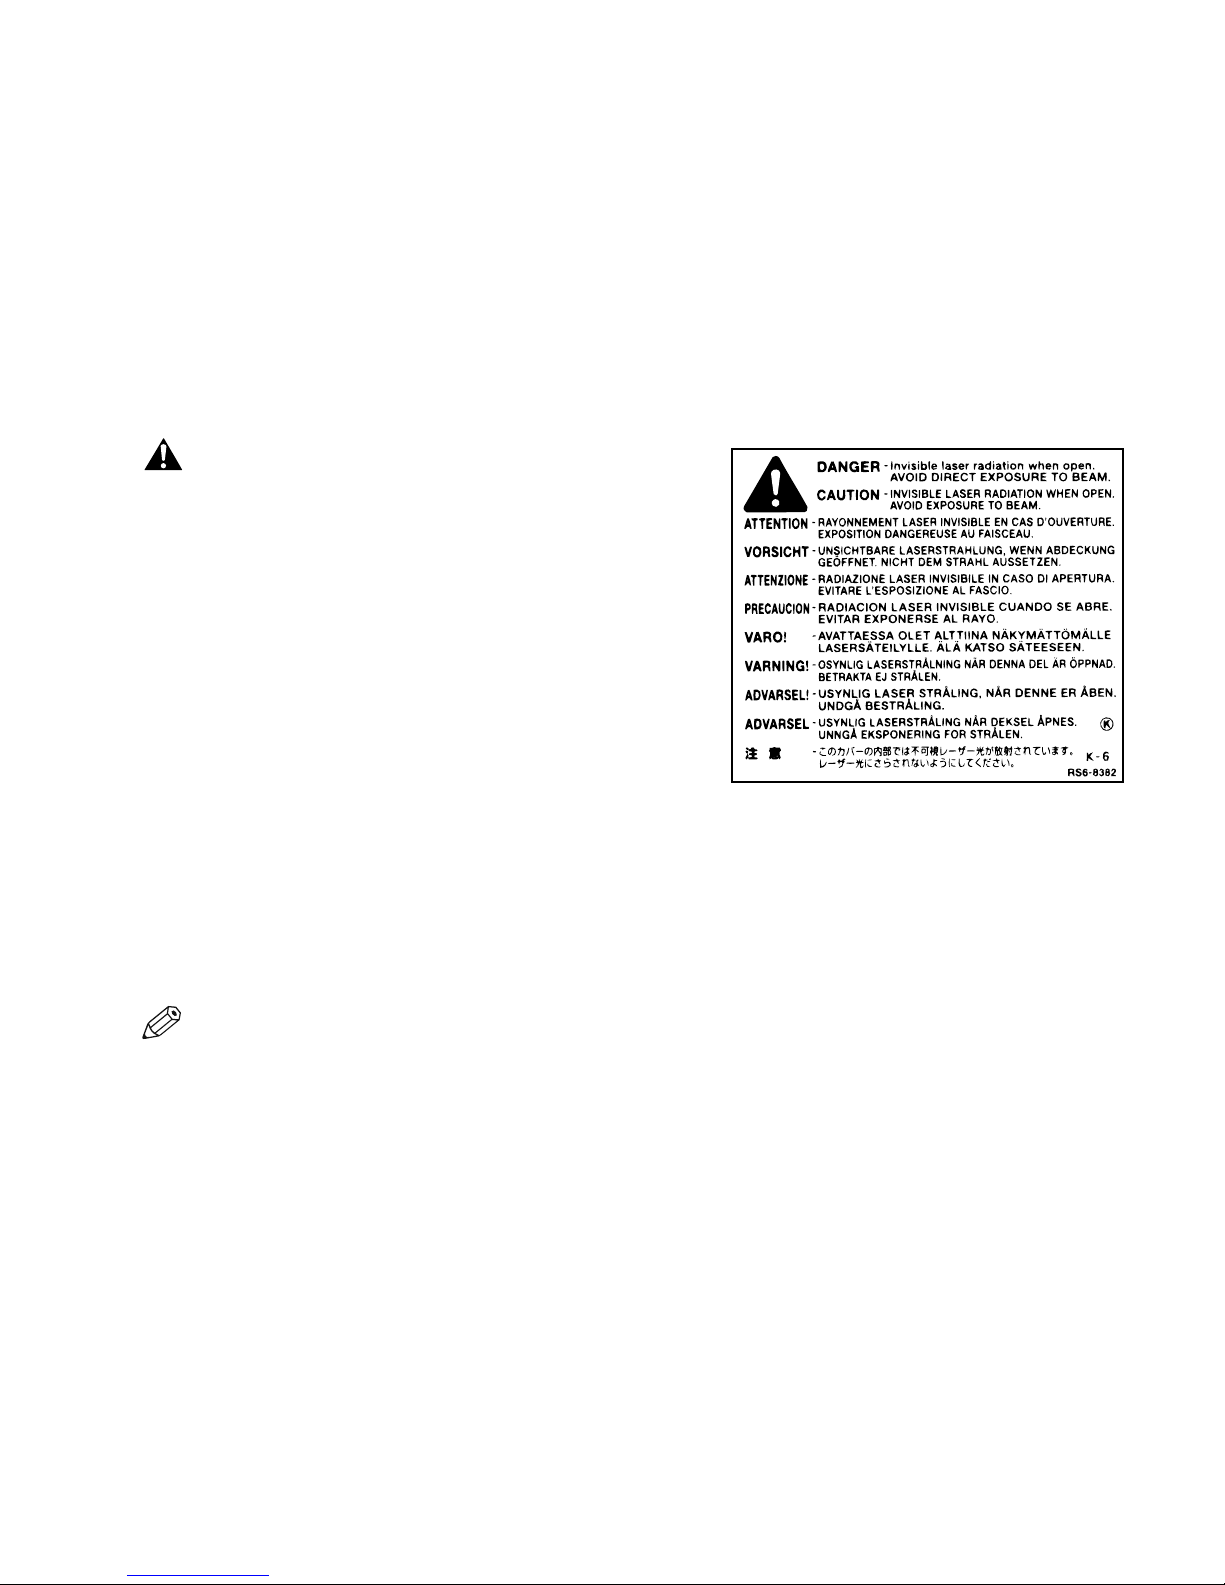
• Use of controls, adjustments or performance of
procedures other than those specified in this user’s
guide may result in hazardous radiation exposure.
This label is attached to the laser scanner unit inside the fax and is
not in a user access area.
FCC Notice
Multi Function Printer, Model F141412
This device complies with Part 15 of the FCC Rules.
Operation is subject to the following two conditions:
(1) This device may not cause harmful interference, and
(2) this device must accept interference received, including interference that may cause undesired operation.
• This equipment has been tested and found to comply with the limits for a class B digital device, pursuant
to Part 15 of the FCC Rules. These limits are designed to provide reasonable protection against harmful
interference in a residential installation. This equipment generates, uses and can radiate radio frequency
energy and, if not installed and used in accordance with the instructions, may cause harmful interference
to radio communications. However, there is no guarantee that interference will not occur in a particular
installation. If this equipment does cause harmful interference to radio or television reception, which can
be determined by turning the equipment off and on, the user is encouraged to try to correct the
interference by one or more of the following measures:
• Reorient or relocate the receiving antenna.
• Increase the separation between the equipment and receiver.
• Connect the equipment into an outlet on a circuit different from that to which the receiver is connected.
• Consult the dealer or an experienced radio/TV technician for help.
Use of shielded cable is required to comply with class B limits in Subpart B of Part 15 of FCC Rules.
Do not make any changes or modifications to the equipment unless otherwise specified in the Reference Guide. If
such changes or modifications should be made, you could be required to stop operation of the equipment.
Canon U.S.A. Inc.
One Canon Plaza, Lake Success, NY 11042, U.S.A.
TEL No. (516) 328-5000
NOTE
CAUTION
Page 4

iii
Contents
Chapter 1: Introduction
Customer Support .............................................1-1
Important Safety Instructions ...........................1-1
Main Components of the Machine ...................1-4
Operation Panel ................................................1-6
Standby Display ................................................1-7
Energy Saver Mode ..........................................1-8
Setting the Energy Saver Mode Manually .....1-8
Restoring from the Energy Saver Mode ........1-8
Chapter 2: Paper Handling
Print Media Requirements.................................2-1
Printable Areas...............................................2-2
Loading Paper ..................................................2-3
Loading Paper in the Cassette ......................2-3
Adjusting a Cassette to Hold a Different Paper
Size ................................................................2-5
Loading Paper in the Multi-purpose Tray.......2-6
Loading Envelopes in the Multi-purpose
Tray................................................................2-7
Chapter 3: Document Handling
Documents You Can Copy ...............................3-1
Scanned Area of a Document........................3-2
Setting Up Documents ......................................3-3
Placing a Document on the Platen Glass......3-3
Loading Documents in the ADF.....................3-4
The Paper Path of the Automatic Document
Feeder............................................................3-5
Chapter 4: Making Copies
Documents You Can Copy ...............................4-1
Copying Documents .........................................4-1
Canceling the Copy Job.................................4-2
Making Multiple Copies .....................................4-3
Selecting the Paper Feeding Location
(Cassette or Multi-purpose Tray)...................4-3
Setting Enlarging/Reducing ...........................4-5
Setting the Image Quality ..............................4-6
Adjusting the Copy Exposure ........................4-6
Special Features ...............................................4-7
Collate Copy ..................................................4-7
2 on 1 Copy ...................................................4-9
Reserve Copy ..............................................4-11
Two-Sided Copy...........................................4-13
Chapter 5: Maintenance
Periodic Cleaning ..............................................5-1
Cleaning the Exterior .....................................5-1
Cleaning the Scanning Area..........................5-1
When to Replace the Cartridge.........................5-4
Copy Yield......................................................5-5
Handling and Storing the Cartridge .................5-5
Replacing the Cartridge ...................................5-7
The Clean Earth Campaign...............................5-9
U.S.A. PROGRAM ..........................................5-10
Packaging ....................................................5-10
Shipping .......................................................5-11
CANADA PROGRAM
– CANADA PROGRAMME..........................5-12
Repacking and Transporting ...........................5-13
Chapter 6: Troubleshooting
Clearing Jams ...................................................6-1
LCD Messages .................................................6-4
Paper Feeding Problems ..................................6-6
Copying Problems ............................................6-7
Print Quality Problems .....................................6-8
Printing Problems ...........................................6-10
General Problems ...........................................6-10
If You Cannot Solve the Problem ...................6-11
Chapter 7: Setting the Additional
Functions
Understanding the “Additional Functions” ........7-1
Accessing the Additional Functions ..............7-1
Menu Descriptions ........................................7-2
Appendix: Specifications ........................A-1
Index ................................................................I-1
Page 5

iv
Please read the list below of symbols, terms, and abbreviations used in this guide.
• Indicates a warning concerning operations that may lead to death or injury to persons if not
performed correctly. In order to use the machine safely, always pay attention to these warnings.
• Indicates a caution concerning operations that may lead to injury to persons or damage to
property if not performed correctly. In order to use the machine safely, always pay attention to
these cautions.
• Indicates an operational warning or restriction. Be certain to read these items to operate the machine
correctly, and to avoid damage to the machine.
• Indicates a note for operation or an additional explanation. Reading these is highly recommended.
(→ p. n-nn) A number preceded by an arrow and enclosed in parenthesis refers to a page in this
guide where more information on the topic of the previous sentence can be found.
→ Set-up Instructions Refer to the Set-up Instructions for details on the topic of the previous sentence.
→ Fax Guide* Refer to the Fax Guide for details on the topic of the previous sentence.
→ Printer Guide Refer to the Printer Guide for details on the topic of the previous sentence.
machine The word “machine” refers to the imageCLASS D680/D660/D661 models.
default A setting that remains in effect unless you change it.
document or fax* The original sheet(s) of paper you copy, send or receive with the machine.
menu A list of settings from which you select an item to set up or change. A menu has a title
which appears in the LCD.
Available menus and the display differ depending on the machine type. This guide shows
the display of the imageCLASS D680 model as an example.
In addition, this guide uses distinctive typefaces to identify keys and information in the LCD:
• The keys you press appear in this typeface: Stop/Reset.
• Information in the LCD appears in this typeface: COPY SETTINGS.
* Only for the imageCLASS D680 model
NOTE
IMPORTANT
CAUTION
WARNING
Type Conventions Used in This Guide
Page 6

v
Set-Up Help & Product Registration (USA)
Before you unpack your new copier, CALL 1-800-828-4040 for help with set-up and operation. You can also
register your copier with us. Call the Canon USA Consumer Information Center between 8 a.m. and 8 p.m. EST,
Monday through Friday, except holidays.
Machine Model: imageCLASS ________________ Serial Number: ________________________
If you have any problems with your copier, DO NOT return it to your retailer.
Call 1-800-828-4040.
Canon Information Center in Canada
Should service be necessary please call the following number for information regarding Personal Copier
Authorized Service Facilities.
Canon Canada Inc. 6390 Dixie Road, Mississauga, Ontario L5T 1P7
Call 1-800-263-1121
Supplies & Accessories
Call or visit your local retailer/dealer for genuine Canon supplies. You can also order genuine supplies and
accessories for your Copier from Canon. Call us at:
1-800-828-4040 Canon USA Consumer Information Center
1-800-OK-CANON Canon Canada Information Center
Please have your credit card ready. Local sales tax, shipping and handling charges are added to each order.
Express shipments are available.
Cartridges Trays & Cassettes
Canon L50 Cartridge Output Tray
LTR/LGL Cassette: 500 sheets
Transparencies Power Cord
Canon Type E
* All items subject to availability. Note: Accessories are also available for other Canon consumer products.
Page 7

vi
Using your product to scan, print or otherwise reproduce certain documents, and the use of such images as
scanned, printed or otherwise reproduced by your product, may be prohibited by law and may result in criminal
and/or civil liability. A non-exhaustive list of these documents is set forth below. This list is intended to be a
guide only. If you are uncertain about the legality of using your product to scan, print or otherwise reproduce any
particular document, and/or of the use of the images scanned, printed or otherwise reproduced, you should
consult in advance with your legal advisor for guidance.
• Paper Money
• Traveler’s Checks
• Money Orders
• Food Stamps
• Certificates of Deposit
• Passports
• Postage Stamps (canceled or uncanceled)
• Immigration Papers
• Identifying Badges or Insignias
• Internal Revenue Stamps (canceled or uncanceled)
• Selective Service or Draft Papers
• Bonds or Other Certificates of Indebtedness
• Checks or Drafts Issued by Governmental Agencies
• Stock Certificates
• Motor Vehicle Licenses and Certificates of Title
• Copyrighted Works/Works of Art without Permission of Copyright Owner
Legal Limitation on Usage of Your Product and the Use of Images
Page 8
1-1
Your machine is designed with the latest technology to provide trouble-free operation. If you encounter a problem
with the machine’s operation, try to solve it by using the information in Chapter 6. If you cannot solve the
problem or if you think your machine needs servicing, contact your service representative. (→ p. v)
Read these safety instructions thoroughly before using your machine, and keep them handy in case you need to
refer to them later.
For users of a cardiac pacemaker
• This product and the cartridge emit low level magnetic flux. If you use a cardiac pacemaker and
feel abnormalities, please move away from this product and the cartridge, and consult your
doctor.
• Do not disassemble or modify. There are high-temperature and high-voltage components inside
the machine which may result in a fire or electrical shock.
• Follow all warnings and instructions marked on the machine.
■ Location
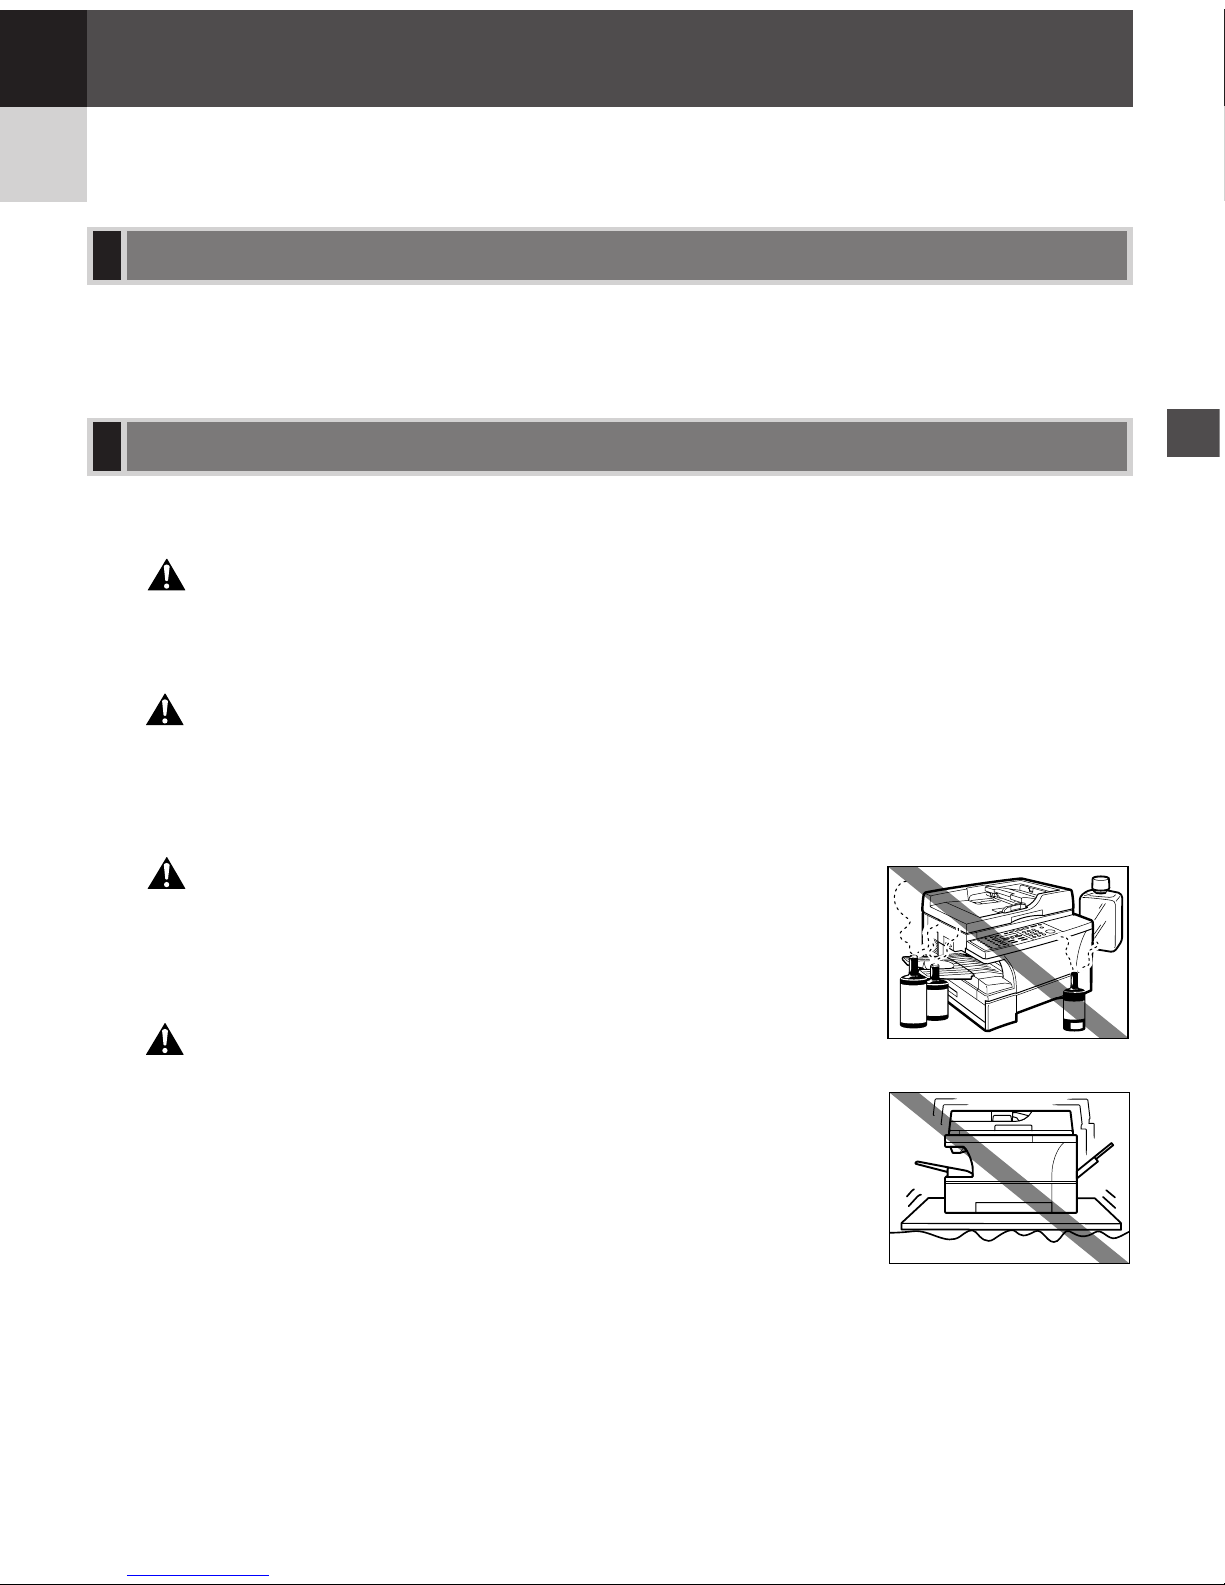
• Do not place the machine near alcohol, paint thinner or other
inflammable substances. If inflammable substances come into
contact with electrical parts inside the machine, it may result in a
fire or electrical shock.
• Do not block or cover the ventilation port or any openings on the
machine with objects, as this may result in a fire.
• Place the machine on a flat, stable, vibration-free surface that is
strong enough to support its weight (approx. 52.9 lb./24.0 kg).
• Make sure the area is free from dust.
• Avoid poorly ventilated locations.
During use, the machine generates ozone. However, the amount of ozone
generated is not enough to affect the human body. Nevertheless, if the
machine is used for a prolonged period of time in a poorly ventilated room, or
when making a large quantity of prints, be sure to ventilate the room to make
the working environment as comfortable as possible.
• Do not install the machine near devices that contain magnets or generate
magnetic fields, such as speakers.
• Make sure the machine is approximately 4 inches (10 cm) away from walls
and other equipment for proper ventilation.
CAUTION
WARNING
CAUTION
WARNING
Important Safety Instructions
Customer Support
Introduction
1
Introduction
Chapter 1
Page 9
1-2
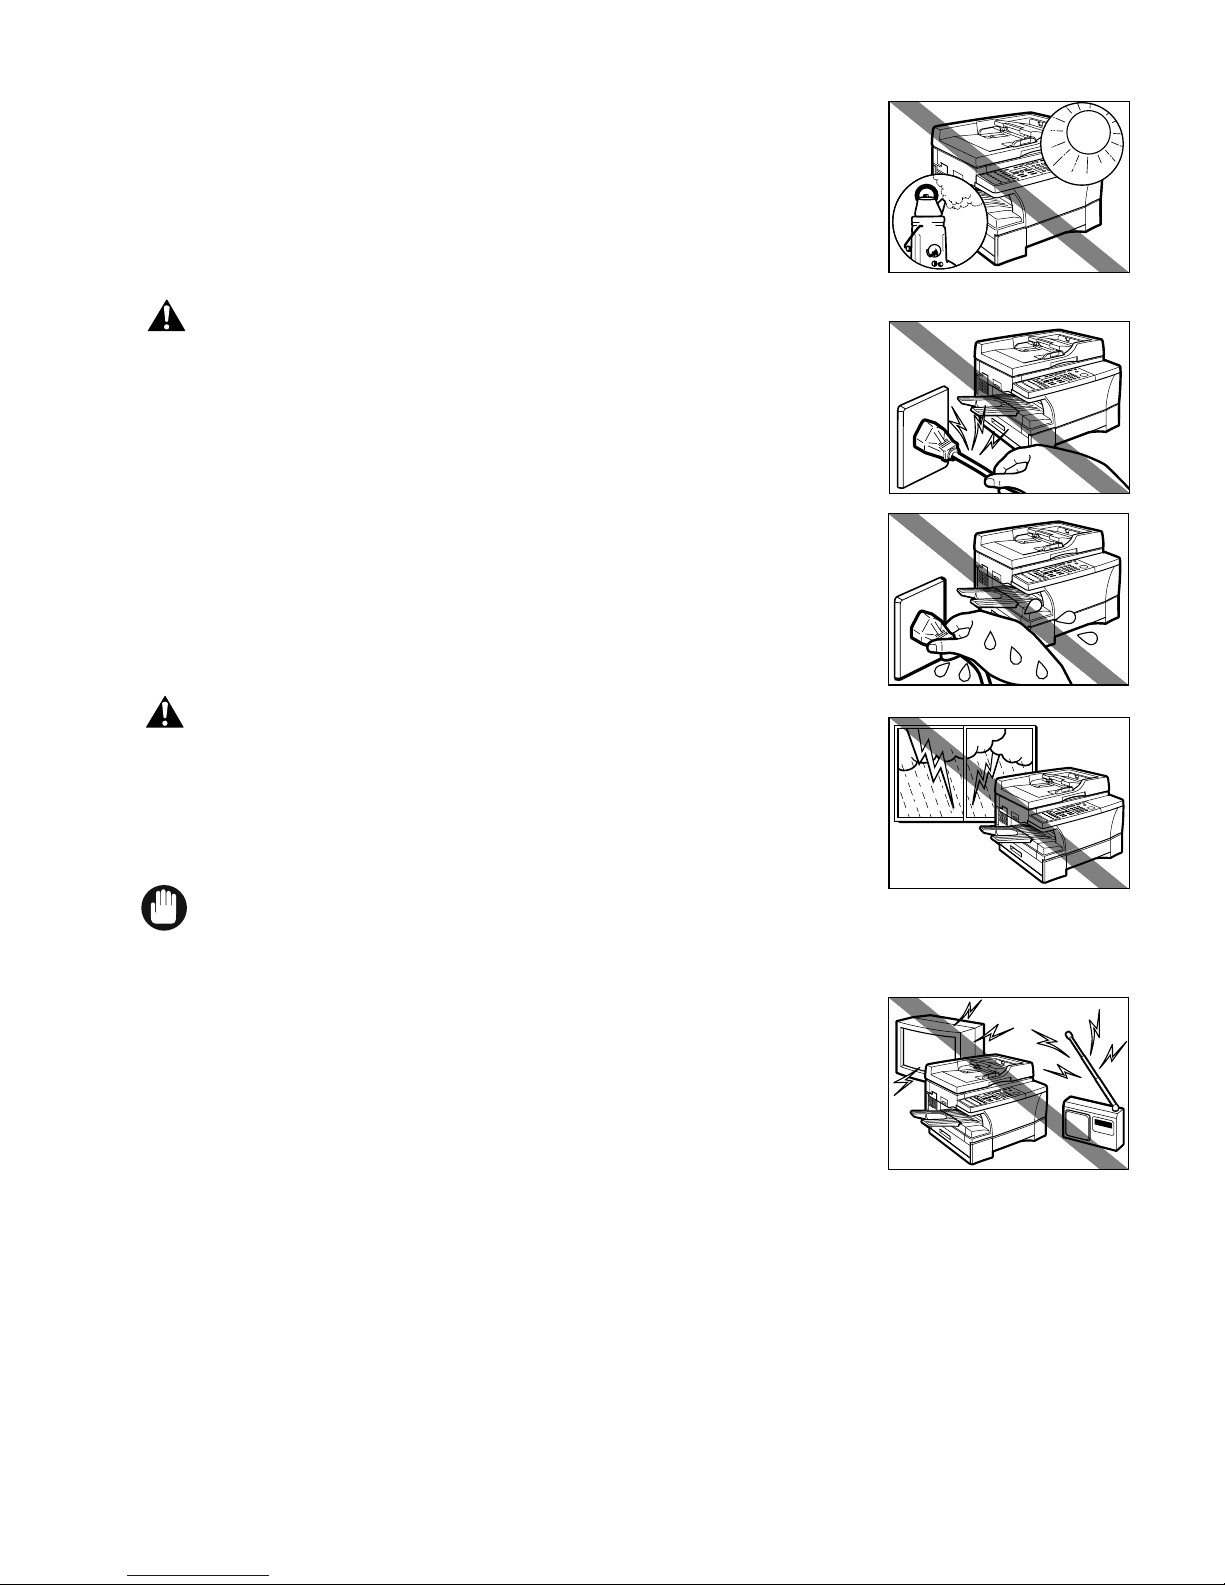
• Make sure the location is not affected by extreme temperature changes, and
always stays between 68°F and 77°F (20°C and 25°C).
• Make sure the relative humidity of the area is between 40% and 70%.
• Keep the machine away from direct sunlight.
• Do not use or store the machine outdoors.
■ Power Supply
• Do not damage or modify the power cord and power plug. Also do
not place heavy objects on the power cord, pull on it, or extensively
bend it. These actions may cause electrical damage and result in a
fire or electrical shock.
• Do not insert or unplug the power plug with wet hands, as this may
result in electrical shock.
• During electrical storms, disconnect the telephone line and the
power cord from the power outlet. Electrical storms may cause
damage to the machine and result in a fire or electrical shock.
• If dust accumulates around the plug of the power cord when it is
connected to a power outlet, unplug the machine and wipe the plug with
a clean, dry cloth.
• For the D680 model, do not plug the machine into the same circuit with
appliances such as an air conditioner, television or copier. These devices
generate an electrical noise, and may interfere with your machine’s
ability.
• Plug the machine into a standard 120 V AC/60 Hz, three-prong grounded outlet. Operate the machine only
from the type of power source indicated on the machine’s label. If you are not sure of the type of power
available, consult your local power company.
• Use only the power cord that came with the machine.
• Unplug the machine in the following conditions:
– When the power cord or plug is damaged or frayed.
– If liquid has spilled into the machine.
– If the machine has been exposed to rain or water.
– If the machine does not operate normally when you have followed the instructions in the guides included
with your machine. Adjust only those controls that are covered by the instructions in the guides since
improper adjustment of other controls may result in damage and will often require extensive work by a
qualified technician to restore the product to normal operation.
– If the machine has been dropped or damaged.
– If the machine exhibits a distinct change in performance, indicating a need for servicing.
IMPORTANT
CAUTION
WARNING
Page 10
1-3
■ Handling
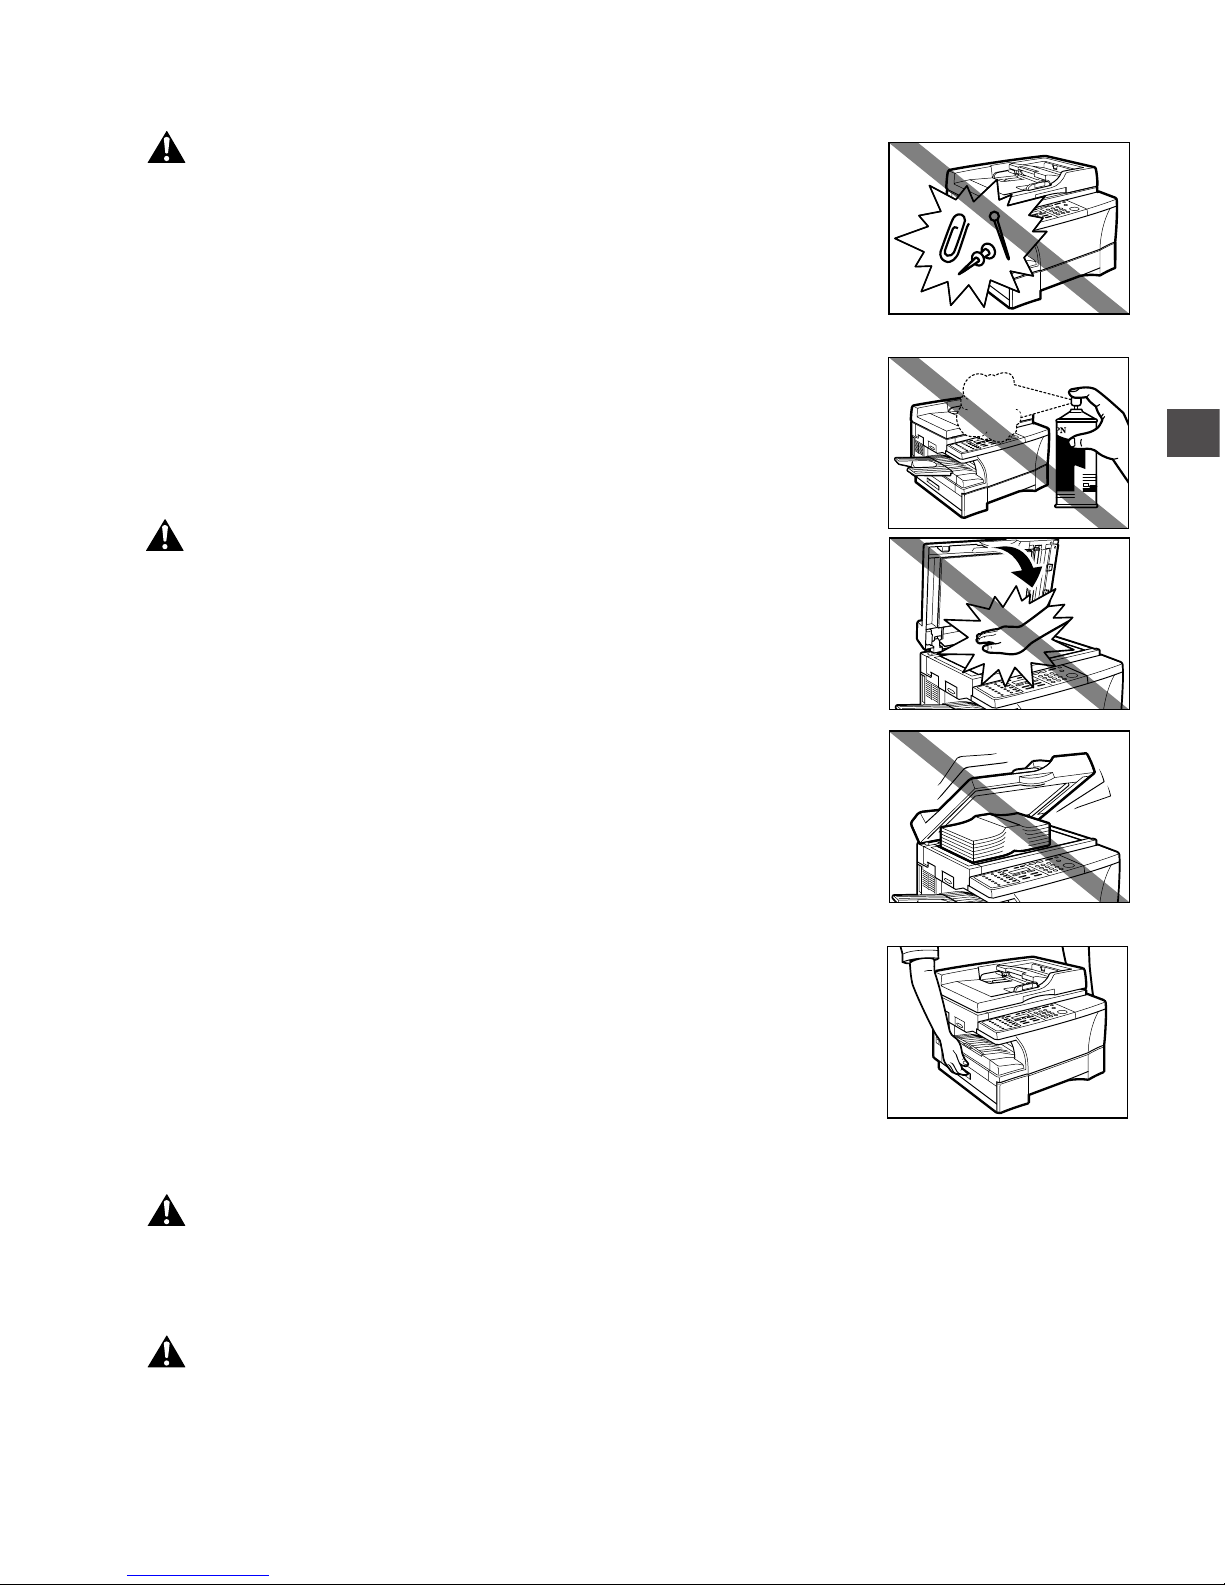
• Do not drop paper clips, staples, or other metal objects inside the
machine. Also do not spill water, liquid or inflammable substances
inside the machine. If these items come into contact with high-voltage
parts inside of the machine, it may result in a fire or electrical shock.
If these items are dropped or spilled in the machine, unplug the
power cord immediately with dry hands. Then, contact your service
representative.
• Do not use any highly flammable spray near the machine. If gas
from a spray comes into contact with the electrical components
inside the machine, it will result in a fire.
• Close the ADF or the platen unit gently to avoid catching your hand.
Failing to do so may result in personal injury.
• Do not press down hard on the ADF when using the platen glass to scan
thick books. This may damage the platen glass and/or result in personal
injury.
• Do not subject the machine to strong physical shock or vibration.
• Unplug the machine before moving it.
• Do not lift the machine by any of its attachments.
• If the machine exhibits a distinct change in performance, this indicates a need
for servicing.
■ Maintenance
• Do not place the cartridge in fire. Toner powder is flammable.
• Keep the machine clean. Dust accumulation may prevent the machine from operating properly.
• Do not service the machine yourself except as specifically described in this guide. If further
servicing is required, contact your service representative.
WARNING
WARNING
CAUTION
WARNING
Introduction
1
Page 11
1-4
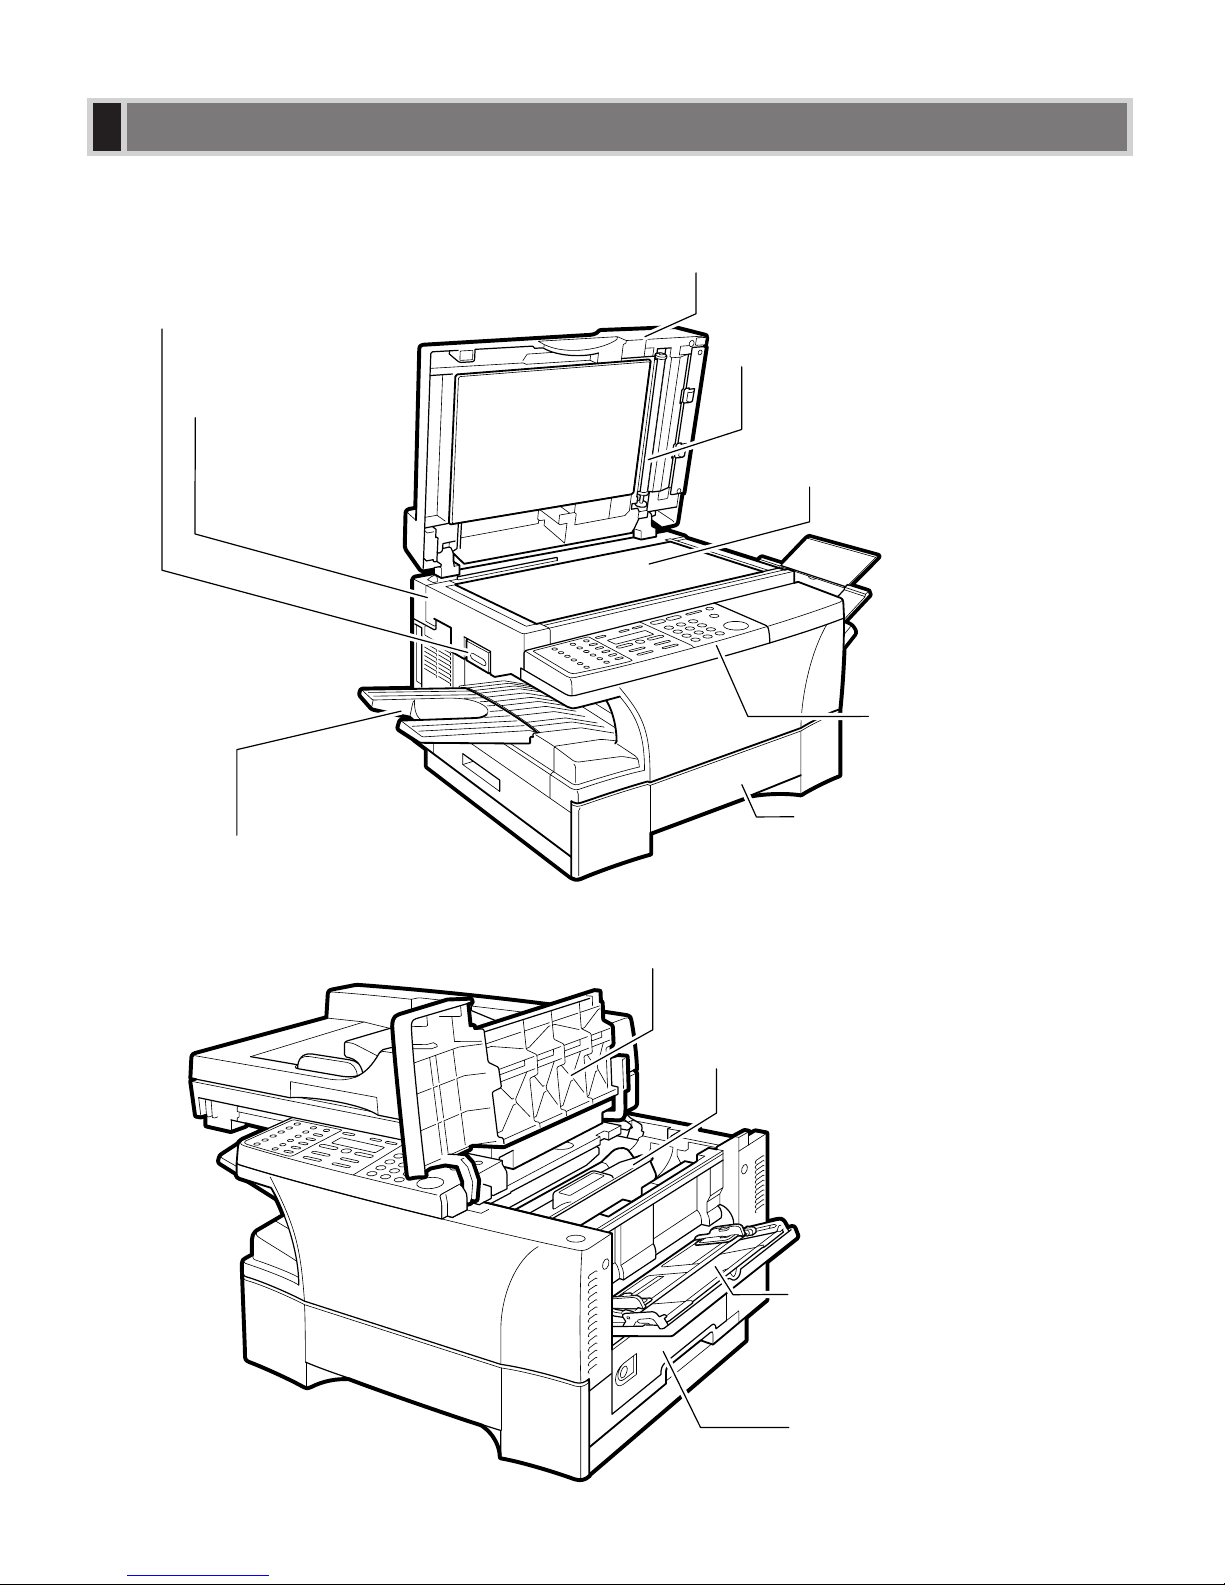
This section describes the main components of the machine.
Front View
Inside View
CARTRIDGE COVER
Open it when you install the cartridge,
or remove jammed paper.
CARTRIDGE
MULTI-PURPOSE TRAY
When copying on plain paper
and other print media, pull out
the paper tray and load paper
in the multi-purpose tray.
RIGHT COVER
Open it when you remove
jammed paper.
PAPER CASSETTE
Holds plain paper.
PLATEN UNIT LEVER
Use it to release and slide
the platen unit.
ADF (AUTOMATIC DOCUMENT FEEDER)
Open to place a document on the platen glass.
ADF ROLLER
Feeds documents from the ADF to
the scanning unit.
PLATEN GLASS
PLATEN UNIT
Slide it to the left when
you install the cartridge,
or remove jammed
paper.
OUTPUT TRAY
Outputs printed pages.
OPERATION PANEL
Controls the machine.
Main Components of the Machine
Page 12
1-5
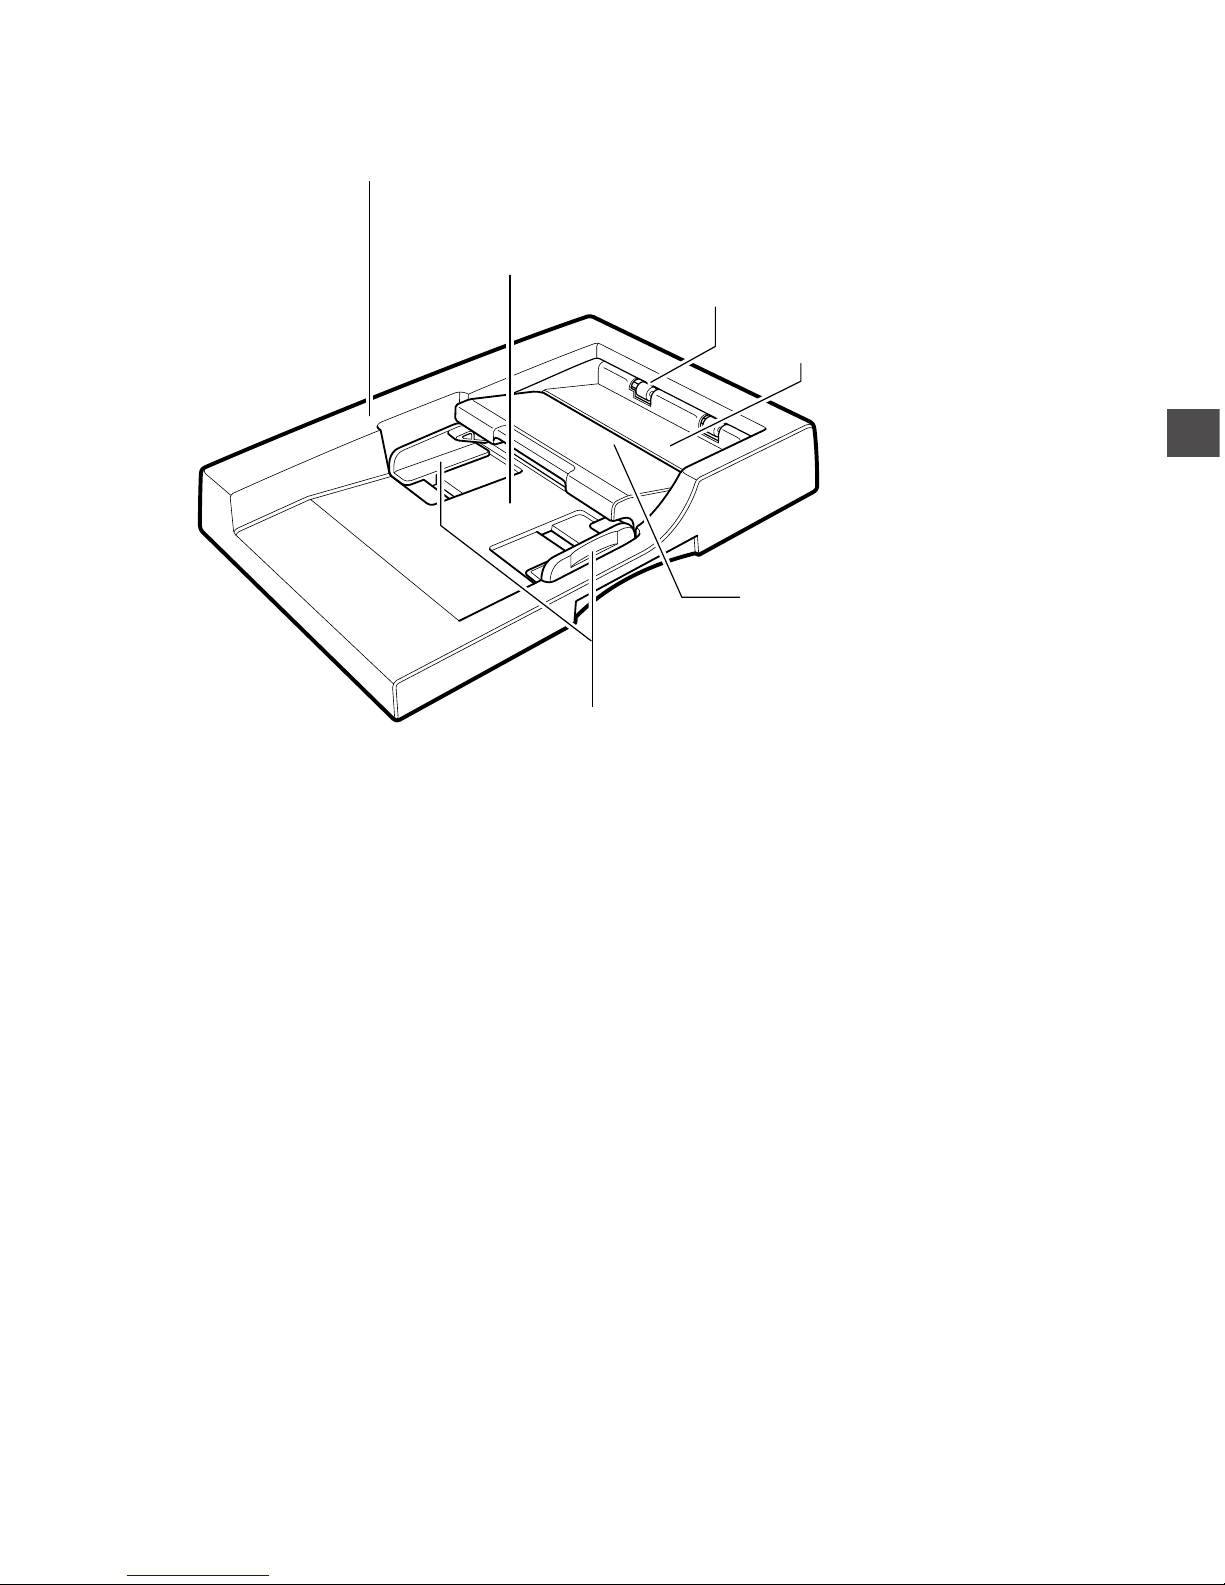
Front View of the ADF
DOCUMENT OUTPUT SLOT
Documents come out here.
SLIDE GUIDE
Adjusts to the width of the document.
FEEDER COVER
ADF (AUTOMATIC DOCUMENT FEEDER)
Holds documents for copying and sending faxes
and feeds them automatically into the scanning unit.
DOCUMENT OUTPUT TRAY
DOCUMENT FEEDER TRAY
Introduction
1
Page 13
1-6
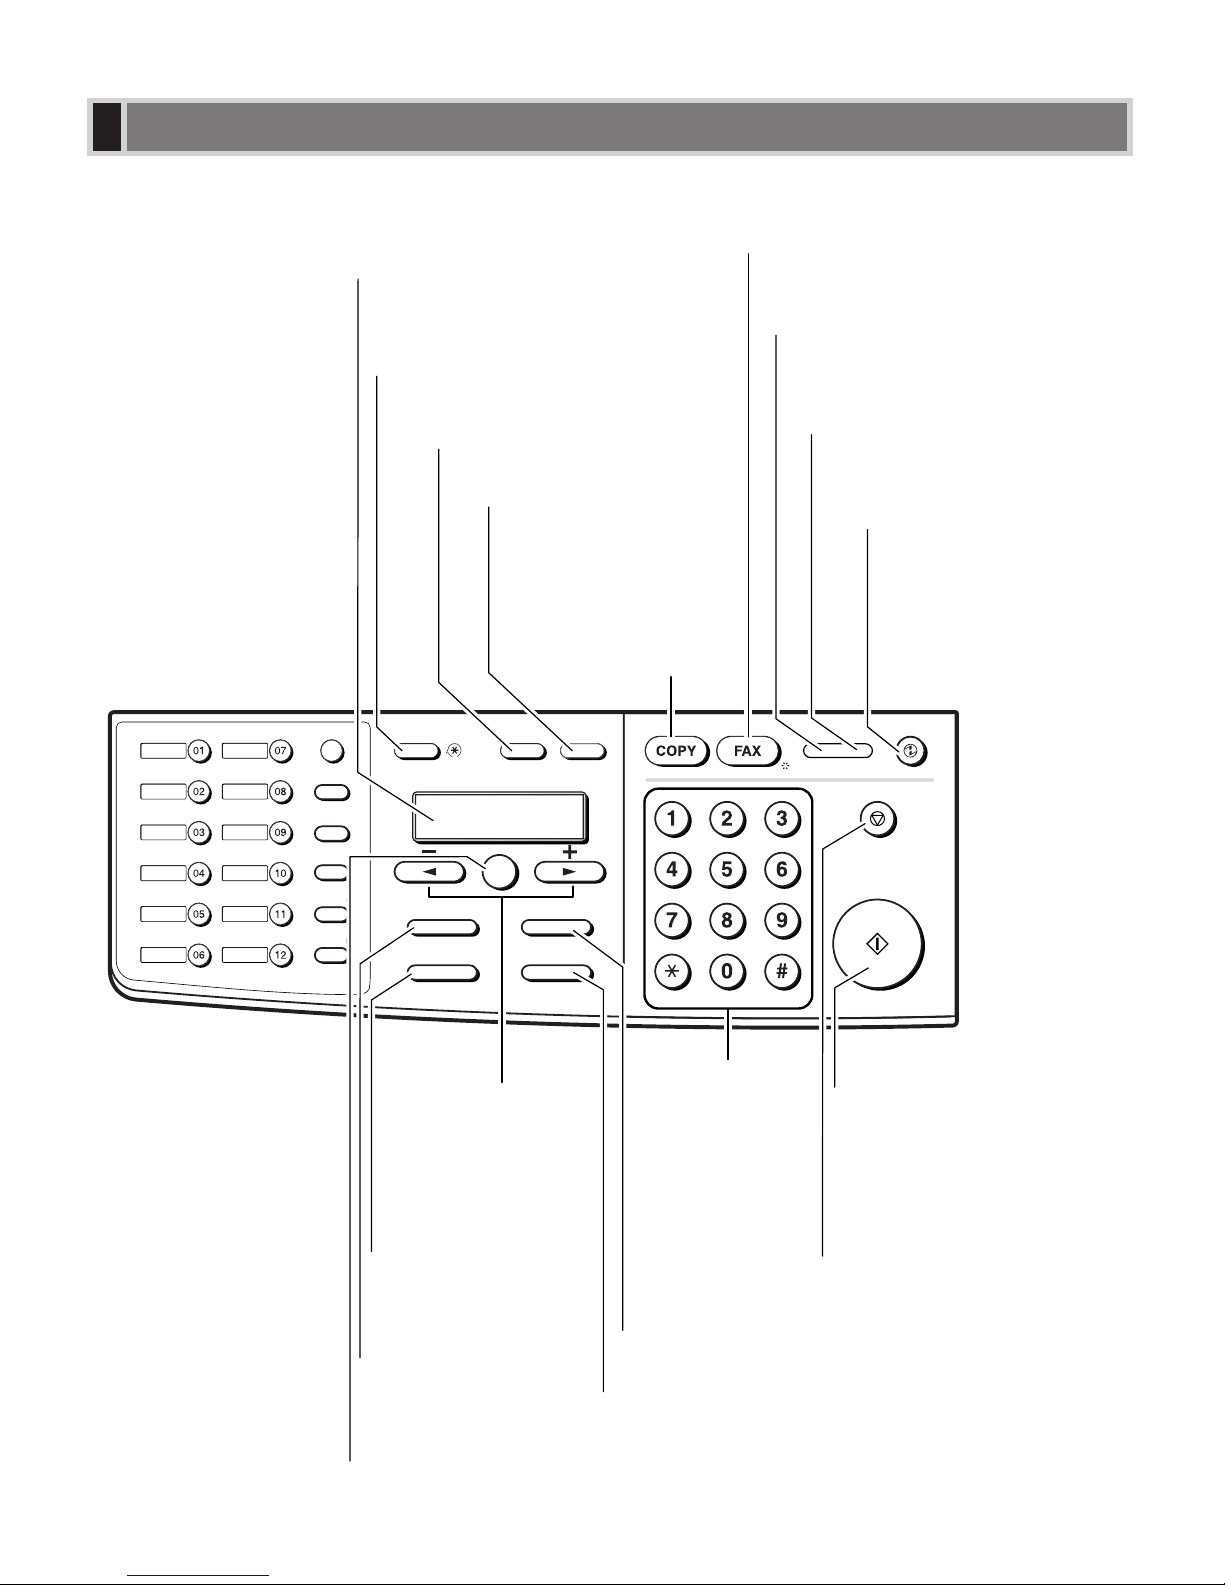
This section describes keys used when making copies and setting the additional functions.
■ imageCLASS D680
2 on 1Collate
Paper SelectEnlarge/Reduce
Image QualityExposure
Additional Functions
In Use/Memory Alarm
Stop/Reset
Start
Energy Saver
ABC DEF
GHI
JKL
MNO
PRS TUV WXY
OPER
SYMBOLS
Tone
Report
Memory
Reference
Fax Monitor
Delayed
Transmission
Book Sending
Clear
Delete
Space
+
Function
Redial / Pause
Coded Dial
Directory
Receive Mode
FAX Resolution
Set
LCD
Displays messages and prompts during
operation. Also displays selections, text
and numbers when specifying settings.
Additional Functions Key
Customizes the way your machine
operates.
Collate Key
Sorts copies in order of pages.
2 on 1 Key
Reduces 2 letter-size
sheets of documents to fit
on a single letter-size sheet.
COPY Key
Switches standby
display to Copy Mode.
FAX Key
Switches standby display to
Fax Mode.
In Use/Memory indicator
Lights green during copying or
when the copy job is stored in
memory.
Alarm indicator
Flashes orange when the
machine has a problem such
as paper jams, etc.
Energy Saver Key
Sets or cancels the
energy saver mode
manually. The key
lights green when the
energy saver mode is set,
or goes off when the
mode is canceled.
Set Key
Determines the contents you set or registered. Also, if the document being scanned
stops in the ADF, pressing this key makes the document come out automatically.
Enlarge/Reduce Key
Sets an enlargement or
reduction ratio of the copy.
Exposure Key
Adjusts the copy
exposure.
4 (–), e (+) Keys
Scroll through the
selection so you can
see other selections.
Image Quality Key
Adjusts the quality of copy image.
Paper Select Key
Selects the paper feeding location
(cassette or multi-purpose tray).
Numeric Keys
Enter number of
copy quantity and
other numerical
values.
Stop/Reset Key
Cancels copying and other
operations, and returns the
machine to standby mode.
Also, this key is used to
confirm the copy job you
reserved.
Start Key
Starts copying.
Operation Panel
Page 14
1-7
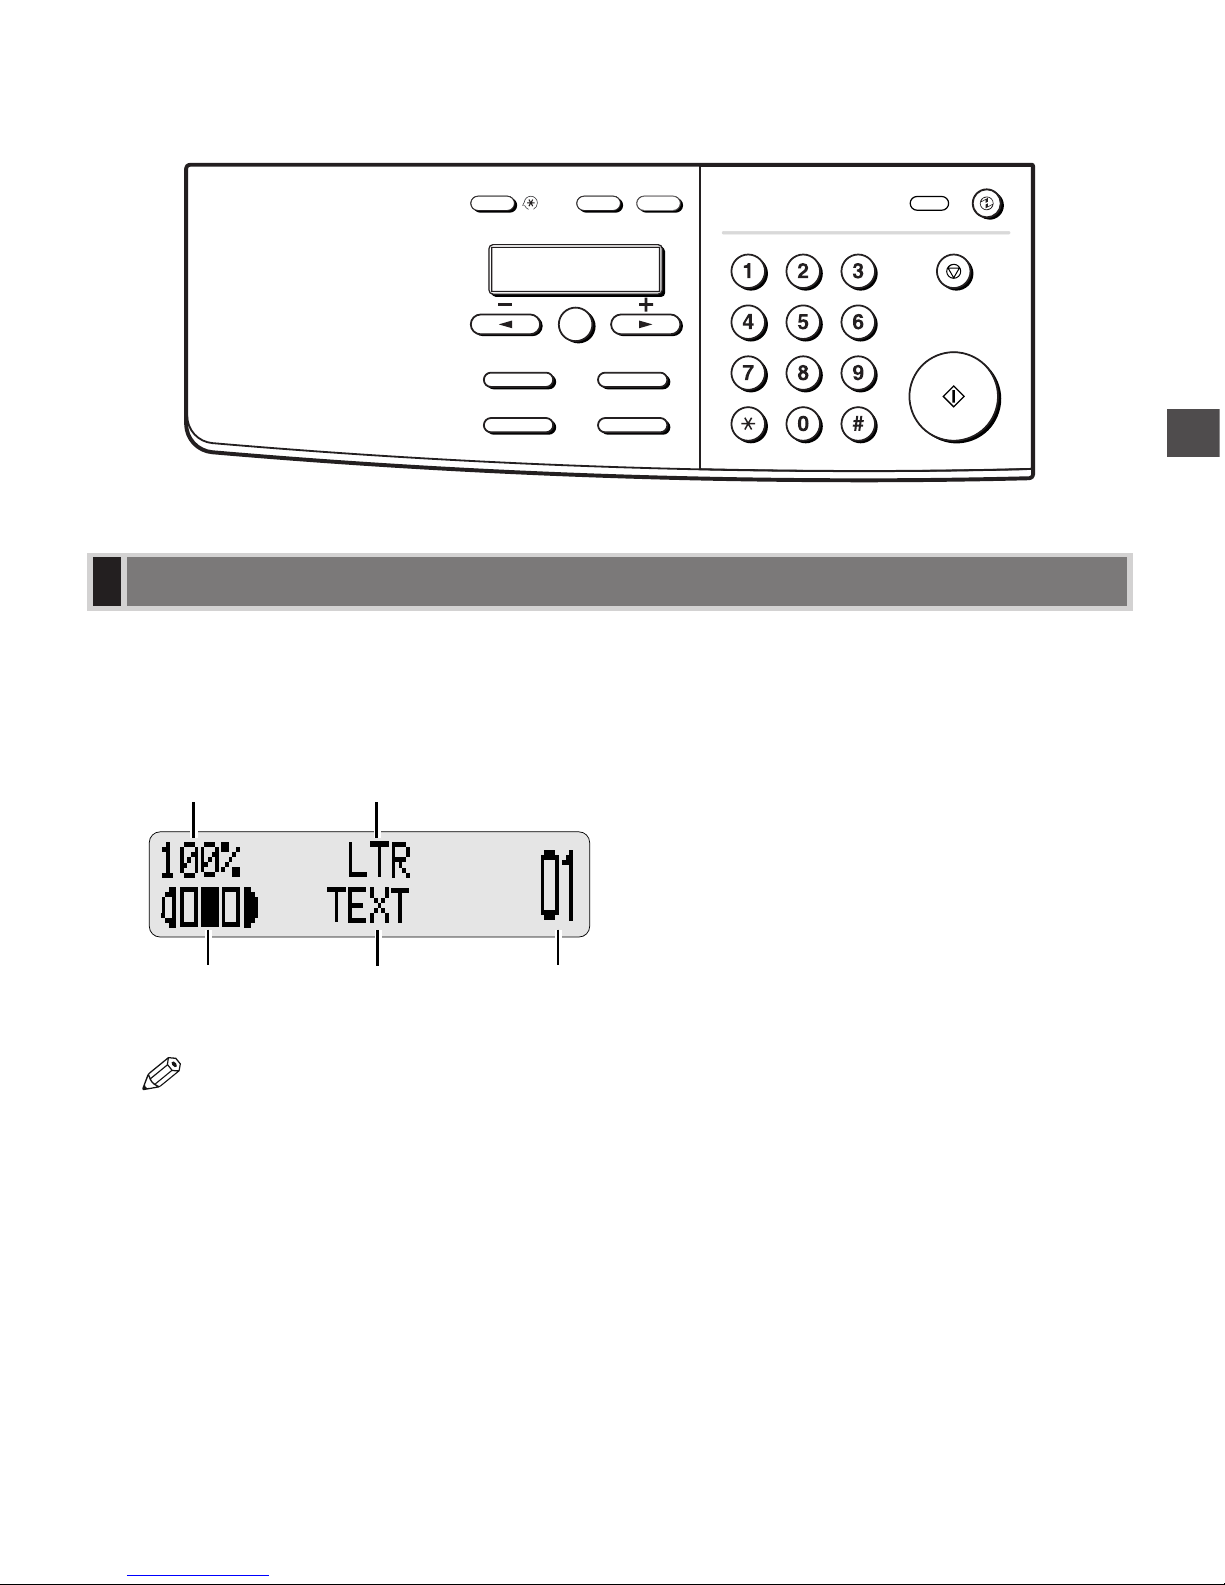
■ imageCLASS D660/D661
The standby display differs depending on which mode is selected. The standby display in Copy Mode is as
follows:
■ Copy Mode
• When the machine is plugged in, the LCD displays PLEASE WAIT for a while, then the Copy Mode
standby display appears.
• The Fax Mode standby display appears only with the D680 model. (→ Fax Guide)
NOTE
Copy Ratio
Exposure Copy Quantity
Paper Size
Image Quality
Standby Display
Introduction
1
2 on 1Collate
Paper SelectEnlarge/Reduce
Image QualityExposure
Additional Functions
Alarm
Stop/Reset
Start
Energy Saver
Set
Page 15

1-8
This machine provides an energy saver function. When no operations are performed for about 5 minutes, the
machine automatically enters the energy saver mode.
• The time until the machine enters the energy saver mode can be specified in the range from 3 minutes
to 30 minutes. You can also turn off the energy saver function. (→ p. 7-4)
• The energy saver function does not activate when the machine is in the following status:
– When printing out copies or faxes* or other pages
– When sending or receiving faxes*
– While a copy job is saved in memory or when the reserve copy or other functions are operating, or
when the In Use/Memory indicator lights up*
– When paper jams occur
– When the platen unit is not returned to the original position
– When an error code appears and the Alarm indicator flashes
– When PRESS SET KEY is displayed
* Only for the imageCLASS D680 model
Setting the Energy Saver Mode Manually
Restoring from the Energy Saver Mode
NOTE
Energy Saver Mode
1
Press Energy Saver.
• The LCD is turned off and the Energy Saver key lights up.
• Right after the machine is restored from the energy saver mode, or right after copying finishes, wait
about 5 seconds before pressing Energy Saver.
NOTE
1
Press Energy Saver.
• The Energy Saver key goes off and the machine enters standby mode.
• The machine can be restored from the energy saver mode immediately. However, it may vary according
to room temperature and circumstances.
NOTE
Page 16

2-1
For high-quality copies, we recommend using paper and transparencies recommended by Canon. Some types of
paper available at office supply stores may not be suitable for this machine. If you have any questions about
paper and transparencies, consult your dealer or Canon Customer Relations.
Paper Storage
In order to prevent paper jams, follow the procedure below:
• To prevent moisture buildup, store remaining paper wrapped tightly in its original package. Store paper in a dry
location, out of direct sunlight.
• To prevent curling, store paper flat, not upright.
• After copying, do not leave paper in the Multi-purpose tray.
Unacceptable Paper
Do not copy on the following types of copy stock; doing so will result in paper jams.
• Severely curled or wrinkled paper
• Transparencies for full-color copiers or printers
• Paper which has already been copied using a digital full-color copier (Do not copy on the reverse side either.)
• Paper which has been printed on using a thermal transfer printer (Do not copy on the reverse side either.)
• Never attempt to make copies on full-color transparencies. Doing so may result in copier malfunction.
Acceptable Paper
IMPORTANT
Print Media Requirements
Paper Handling
2
Paper Handling
Chapter 2
Paper size
Paper weight
Type of paper
Cassette
Legal, Letter
17 - 20-lb bond or 64 - 80 g/m
2
– Plain paper
– Colored paper
– Recycled paper
Multi-purpose Tray
Legal (8 1/2”×14”) - 3”× 5”
16 - 32-lb bond or 56 - 128 g/m
2
– Plain paper (17 - 20-lb bond or
64 - 80 g/m
2
)
– Thick paper (21 - 32-lb bond or
81 - 128 g/m
2
)
– Colored paper
– Labels
– Transparencies
– Recycled paper
– Tracing paper
– Envelopes
Page 17
2-2
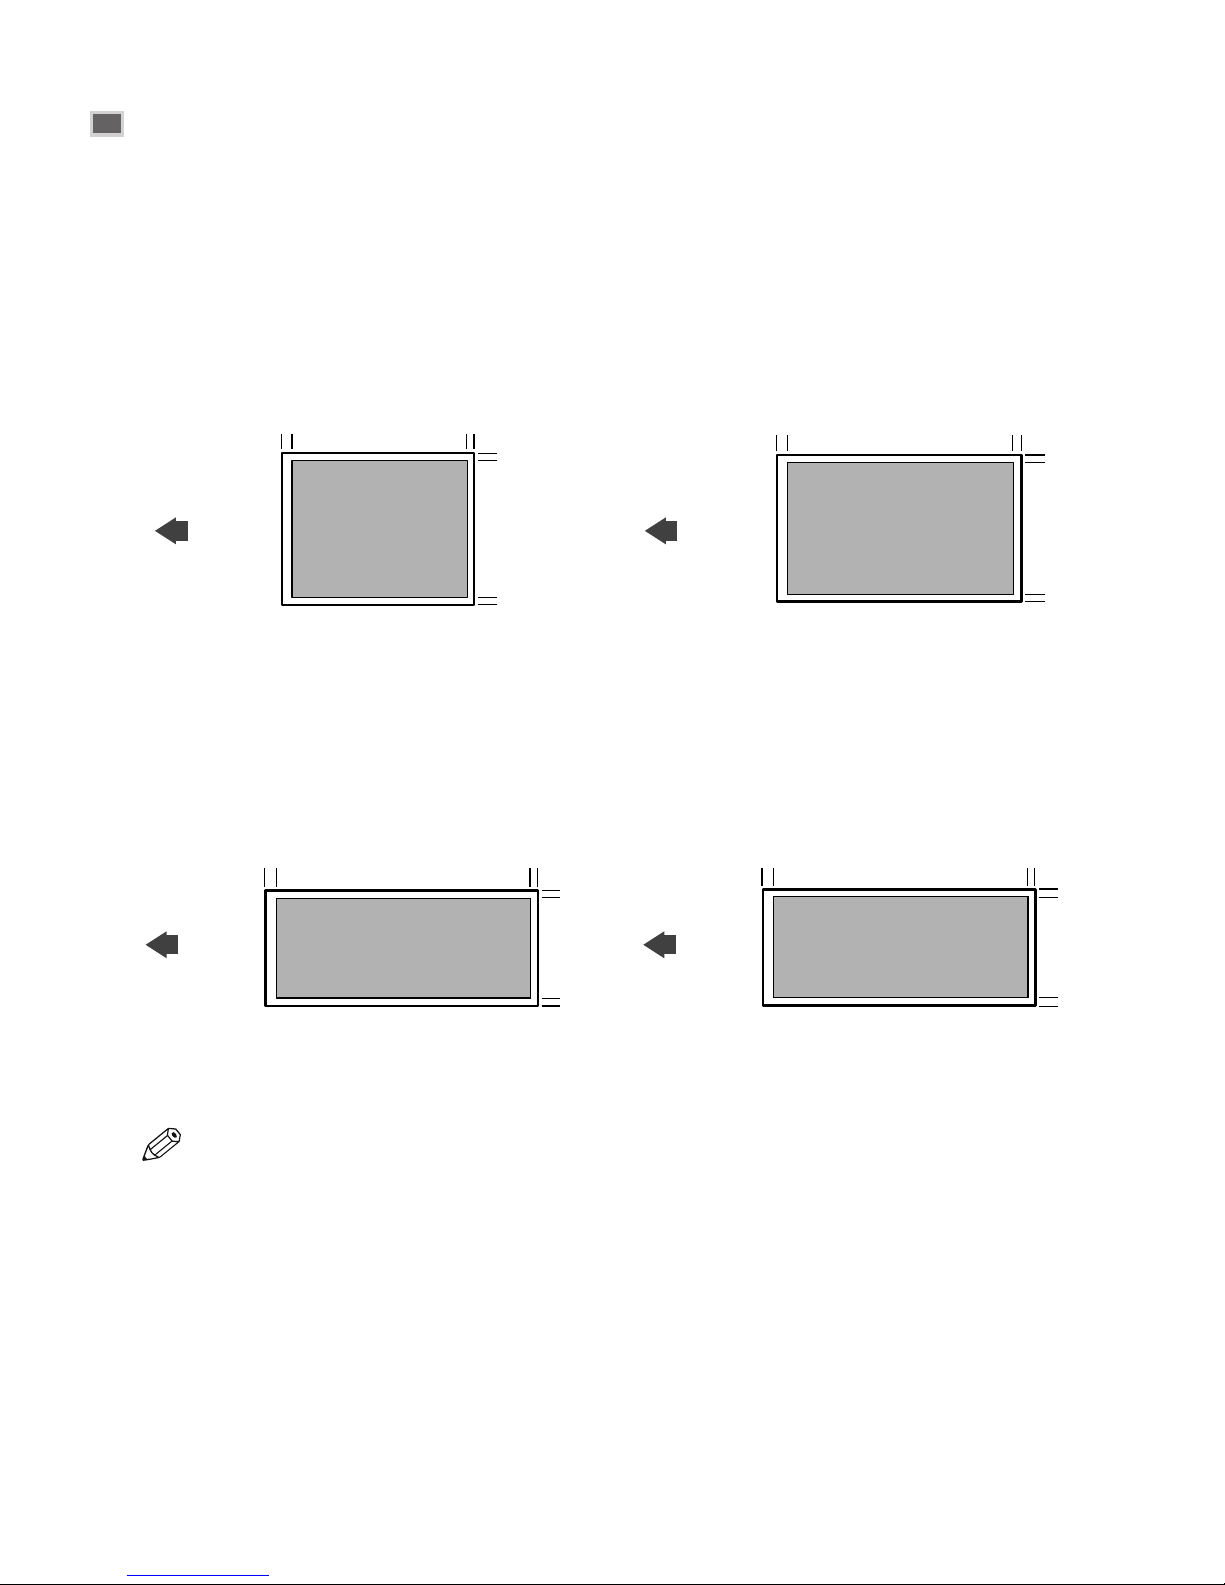
Printable Areas
Please note that the term “printing area” represents both the recommended area for optimum print quality and the
entire area where the machine can technically print.
Printing area (light shade) : Canon recommends that you print within this area.
■ Paper
■ Envelope
• The printing area is 0.20" (5 mm) inside from all four edges of the paper when using this machine as a
printer.
NOTE
0.18”
(4.5 mm)
0.18”
(4.5 mm)
0.18” (4.5 mm)
0.20” (5 mm)
0.18”
(4.5 mm)
0.18”
(4.5 mm)
0.18” (4.5 mm)
0.20” (5 mm)
FEEDING
DIRECTION
FEEDING
DIRECTION
EUROPEAN DL
U.S.
COMMERCIAL
NO. 10
0.20” (5 mm) 0.18” (4.5 mm)
0.18”
(4.5 mm)
0.18”
(4.5 mm)
0.20” (5 mm) 0.18” (4.5 mm)
0.18”
(4.5 mm)
0.18”
(4.5 mm)
FEEDING
DIRECTION
FEEDING
DIRECTION
LETTER LEGAL
Page 18
2-3
Loading Paper in the Cassette
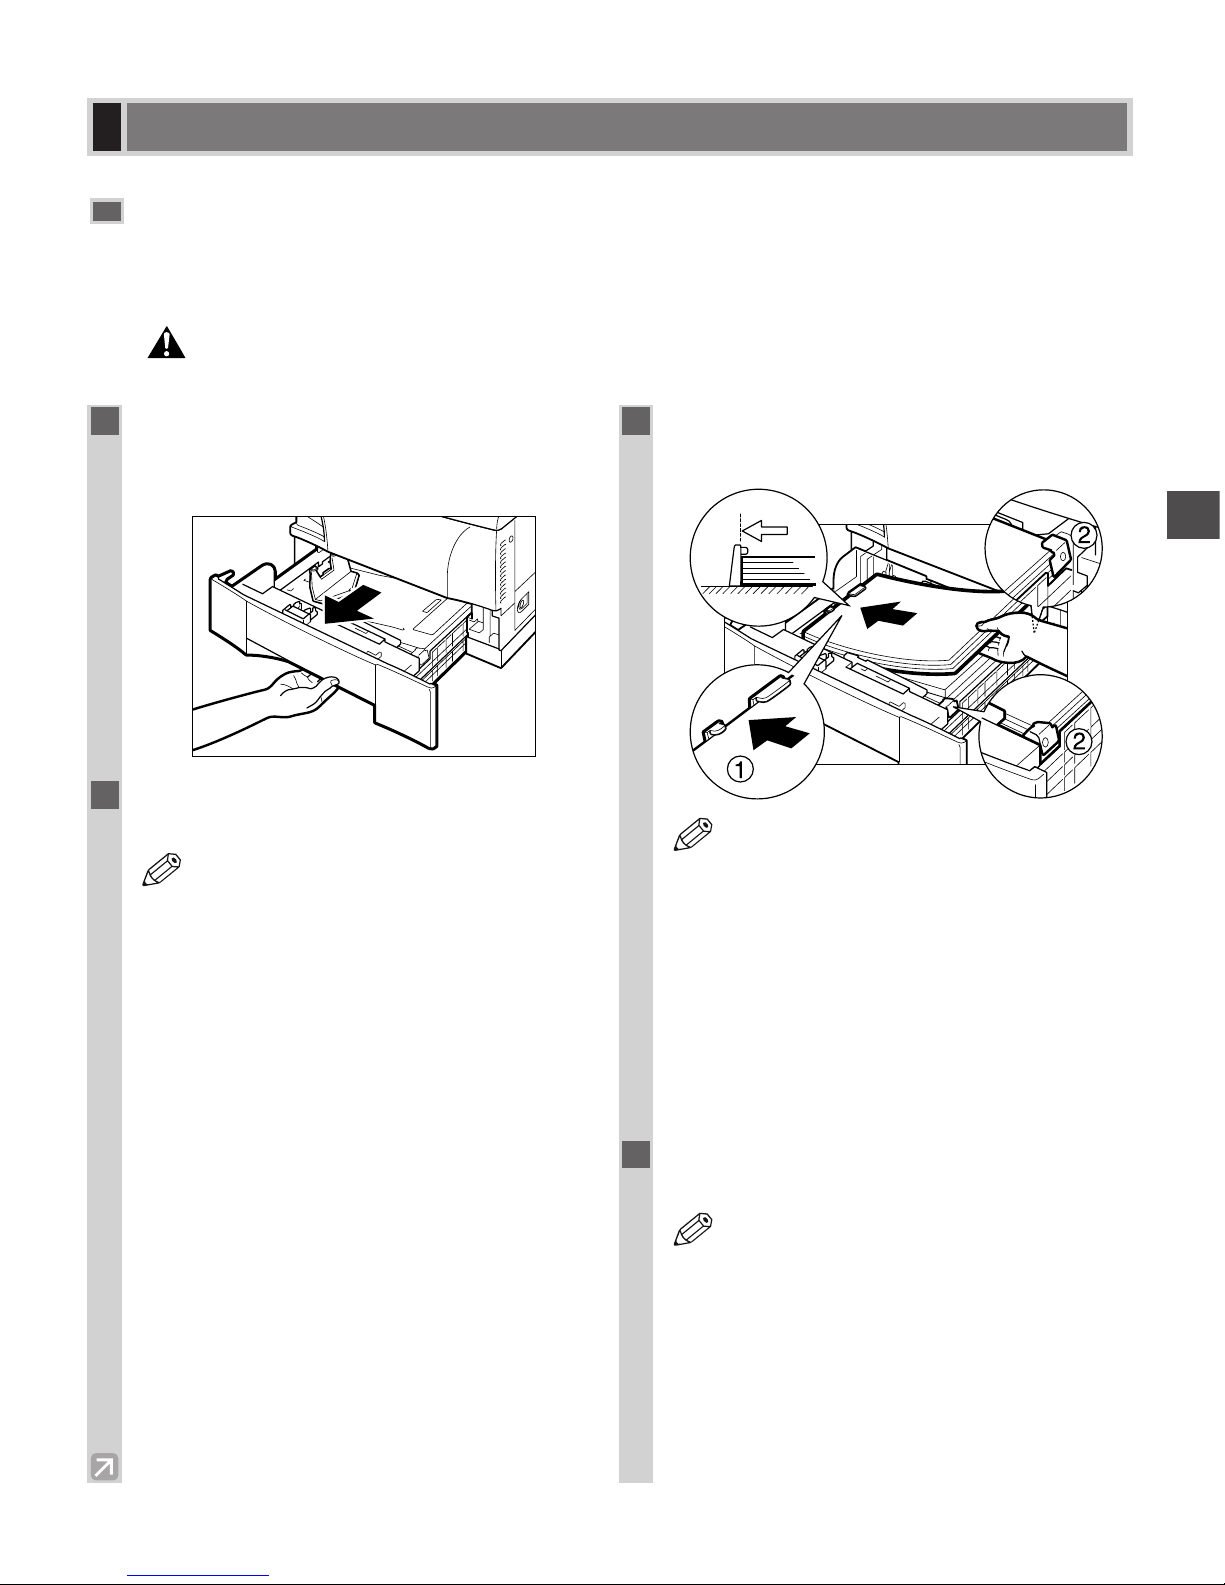
This section describes how to load paper in the cassette.
To make copies on any other size paper, → p. 2-5.
• When loading paper, take care not to cut your hands on the edges of the paper.
CAUTION
Loading Paper
Paper Handling
2
1
Grip the cassette handle, and pull it out
towards you until the cassette comes to a
stop.
2
Open a package of paper, and remove the
paper stack.
• If the paper is curled, uncurl it before
placing it in the cassette. Failure to do so
will cause paper creases and a paper jam.
• 17 to 20-lb bond (64 to 80 g/m
2
) paper is
acceptable.
• The cassette holds up to approximately 500
sheets of 20-lb bond (80 g/m
2
) paper.
3
Load the paper stack beneath the cassette’s
length guide ➀ and width guide’s claws ➁.
• Make sure that the paper stack does not
exceed the length and width guides’ claws
in the cassette. Failure to do so will cause a
paper jam.
• Do not load extra paper when there is still
paper left in the cassette.
• Only load one size of paper into the
cassette. Do not load different sizes of
paper into the cassette at the same time.
• Do not load labels or transparencies into
the cassette.
4
Gently insert the cassette as far as it will
go.
• The cassette is for plain paper, colored
paper or recycled paper only. Loading
other paper in the cassette may cause a
paper jam.
• If copies are curled, or a paper jam occurs,
remove the paper stack from the cassette.
Turn it over and then place it in the
cassette.
• If you load paper while making copies, do
not load a different paper size.
NOTE
NOTE
NOTE
Page 19
2-4
Closing the cassette
When closing the cassette, make sure to push it in completely as far as it will go. If copying is performed when
the cassette is not pushed in completely, it will cause a paper jam.
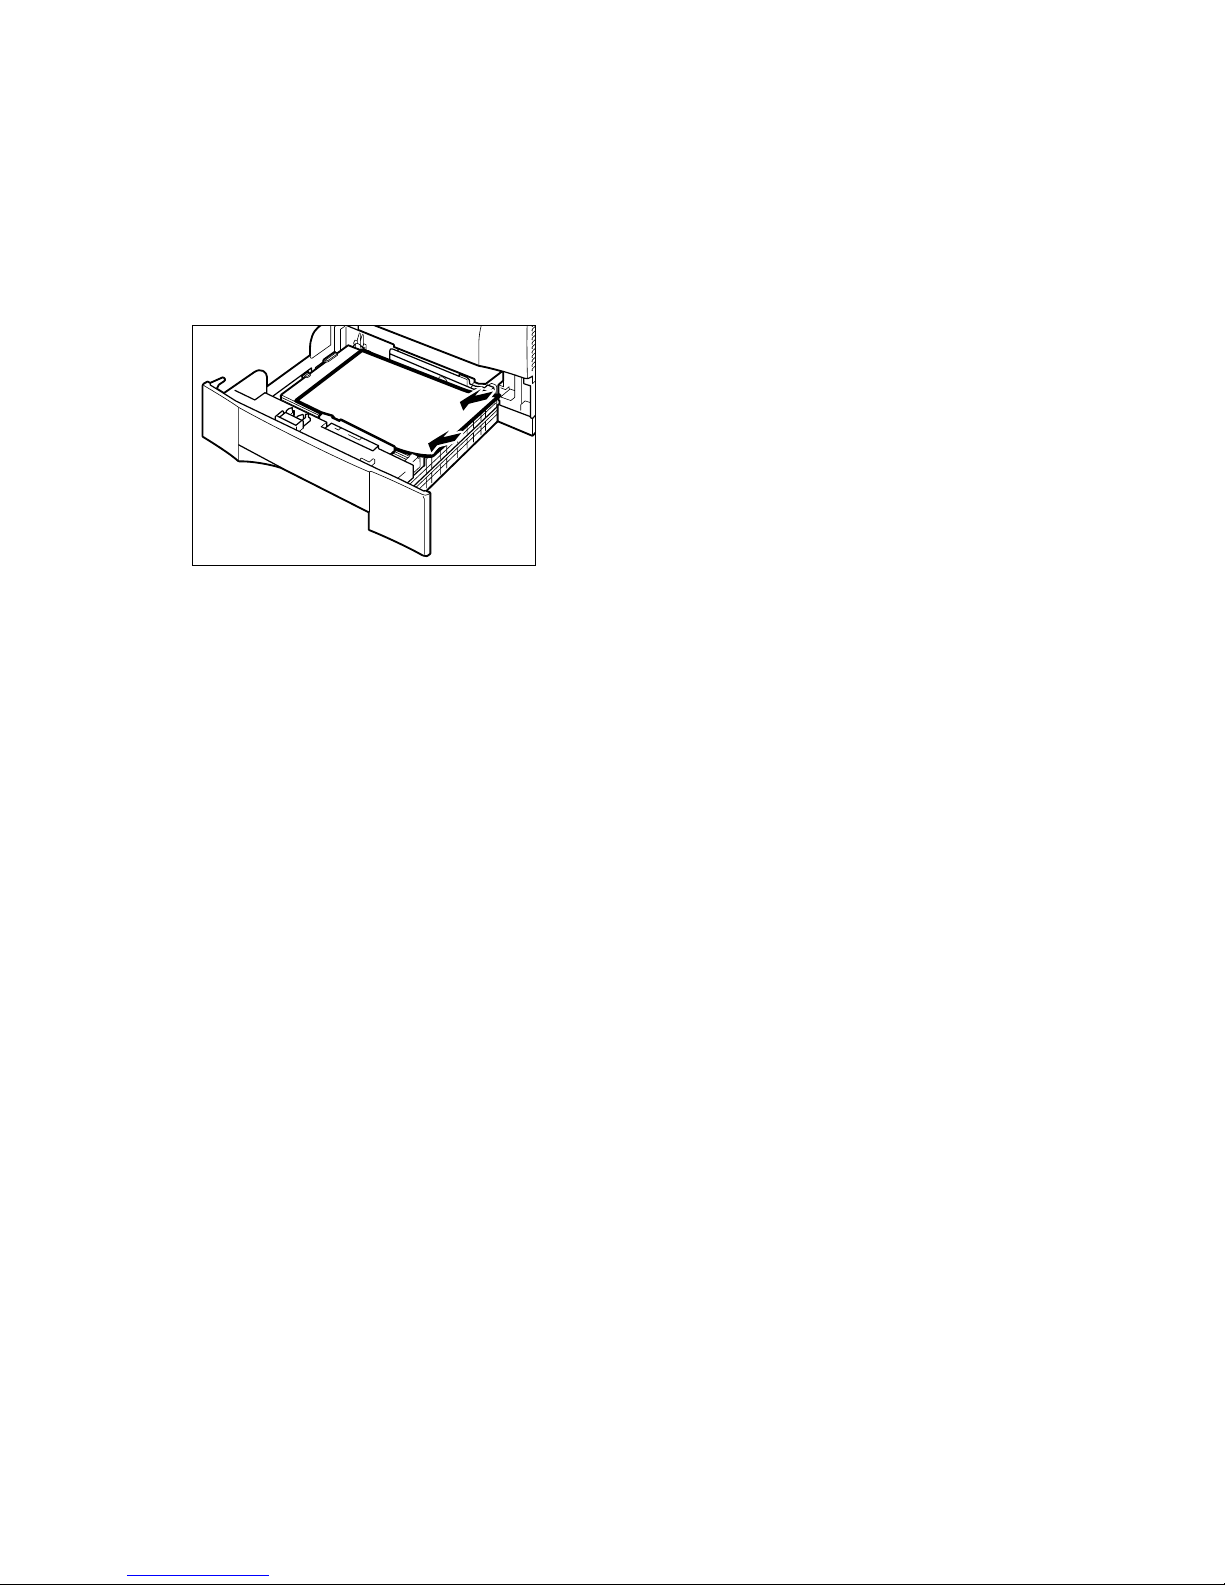
If copy paper is sticking out of the cassette
Sometimes, when you pull out the cassette, paper may stick out, as shown in the illustration below. Make sure
that the paper is neatly loaded into the cassette, before you push the cassette back into the main unit.
Page 20
2-5
Adjusting a Cassette to Hold a Different Paper Size
If you want to load a different paper size in the cassette, follow the procedure described below to adjust the
cassette guides.
You can adjust the cassette to hold the following standard paper sizes : LGL and LTR.
If you want to make copies on any other size paper, use the multi-purpose tray. (→ p. 2-6)
Paper Handling
2
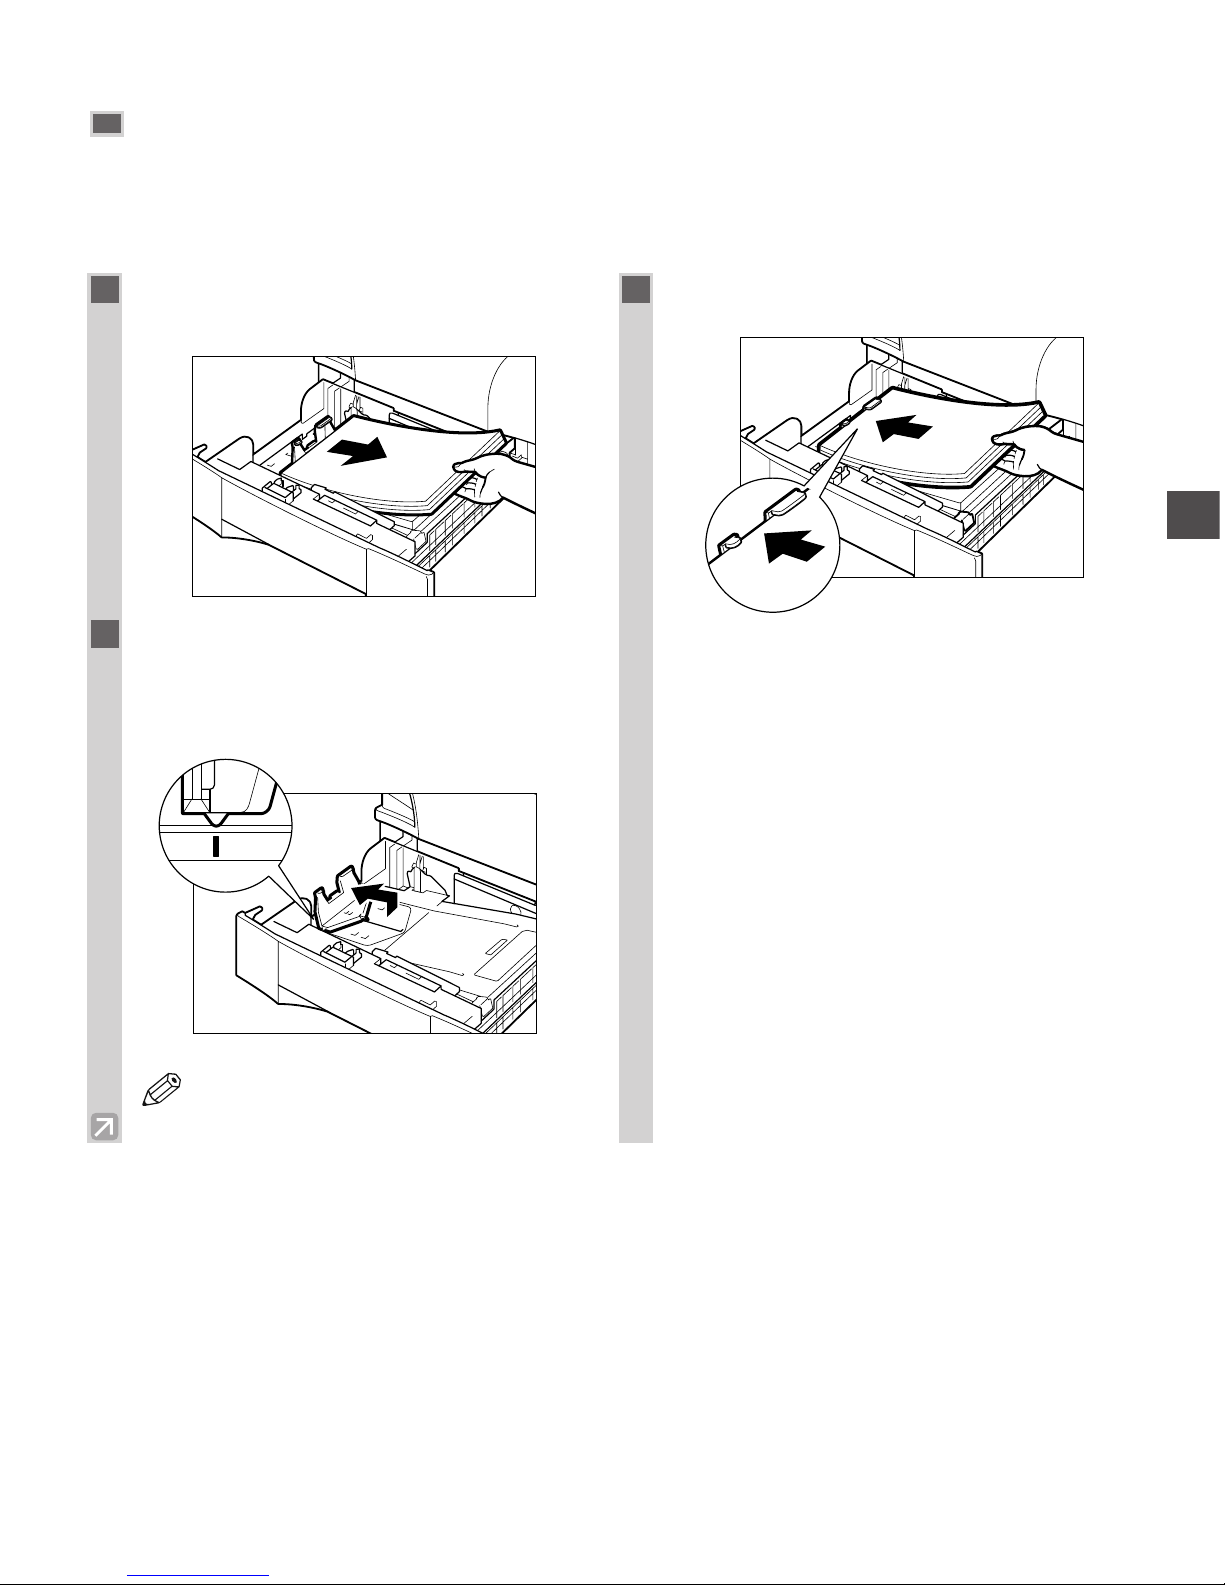
1
Pull out the cassette, and remove all loaded
paper.
2
Slide the length guide while lifting it up
slightly, and align the length guide with the
length mark for the paper to be loaded in
the cassette.
• Be sure to align the length guide with the
LGL or LTR mark.
3
Load the paper into the cassette.
NOTE
LGL
Page 21
2-6
Loading Paper in the Multi-purpose Tray
Use the multi-purpose tray when you want to print on special paper, such as envelopes, transparencies, labels or
heavy paper. You can place up to 100 sheets of 20-lb bond (80 g/m
2
) paper stack (a stack approximately 3/16” or 10
mm high) in the multi-purpose tray to be automatically fed into the machine.
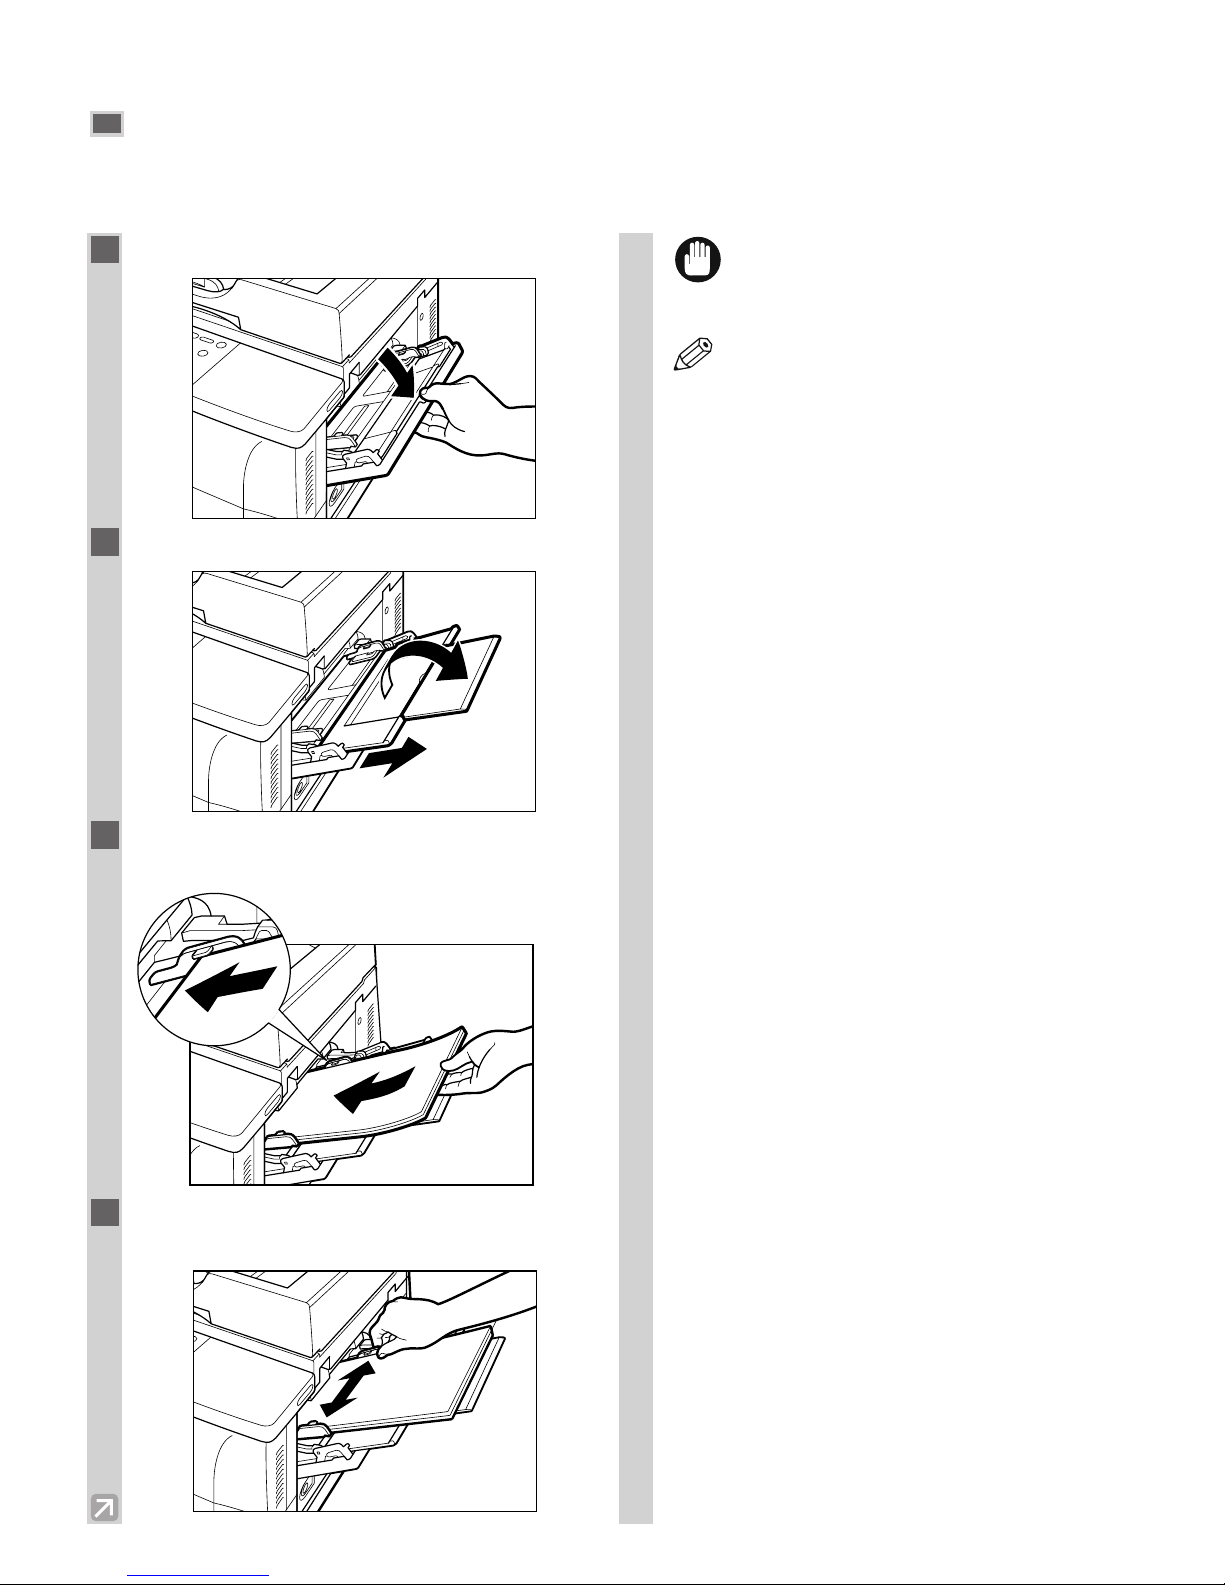
1
Open the multi-purpose tray.
2
Pull out the paper tray.
3
Load the paper stack facing up into the
multi-purpose tray.
4
Adjust the slide guides to fit the size of the
paper stack.
• If the slide guides are not adjusted correctly
for the paper size, the quality of your print
images may be adversely affected.
• When making copies on LTR-size paper
after having continuously copied on paper
smaller than LTR-size paper, the copies
may be dirty. To prevent copies from being
dirty, wait about one minute before making
copies.
• Insert the paper stack into the machine as
far as it will go.
• If the paper is curled, uncurl it before
placing it in the multi-purpose tray. Failure
to do so will cause paper creases and a
paper jam.
• 16 to 32-lb bond (56 to 128 g/m
2
) paper is
acceptable.
• Make sure that the paper stack does not
exceed the paper limit guide.
• Some types of paper may not feed properly
into the multi-purpose tray. For highquality copies, be sure to use the paper and
transparencies recommended by Canon.
(→ p. 2-1)
• Load transparencies one by one.
• When making copies of a small size
document or thick paper, etc., the copy
speed may be slightly slower than usual.
• To specify the paper size every time you
load the paper into the multi-purpose tray,
follow the procedure below:
Press Additional Functions, then
select:
COMMON SETTINGS,
MP TRAY PAPERSIZE,
OFF,
SET ON LOADING.
Load the paper into the multi-purpose
tray, and choose the paper size using
4 (–) or e (+), then press Set.
For details, refer to “Selecting the Paper
Feeding Location (Cassette or Multipurpose Tray).” (→ p. 4-3)
NOTE
IMPORTANT
Page 22
2-7
Loading Envelopes in the Multi-purpose Tray
• The recommended envelopes are US COMMERCIAL 10, MONARCH, EUROPEAN DL, ISO-B5,
ISO-C5, YOGATA #4 or YOGATA #2 envelopes. Using other envelopes may affect the quality of the
copy image.
NOTE
Paper Handling
2
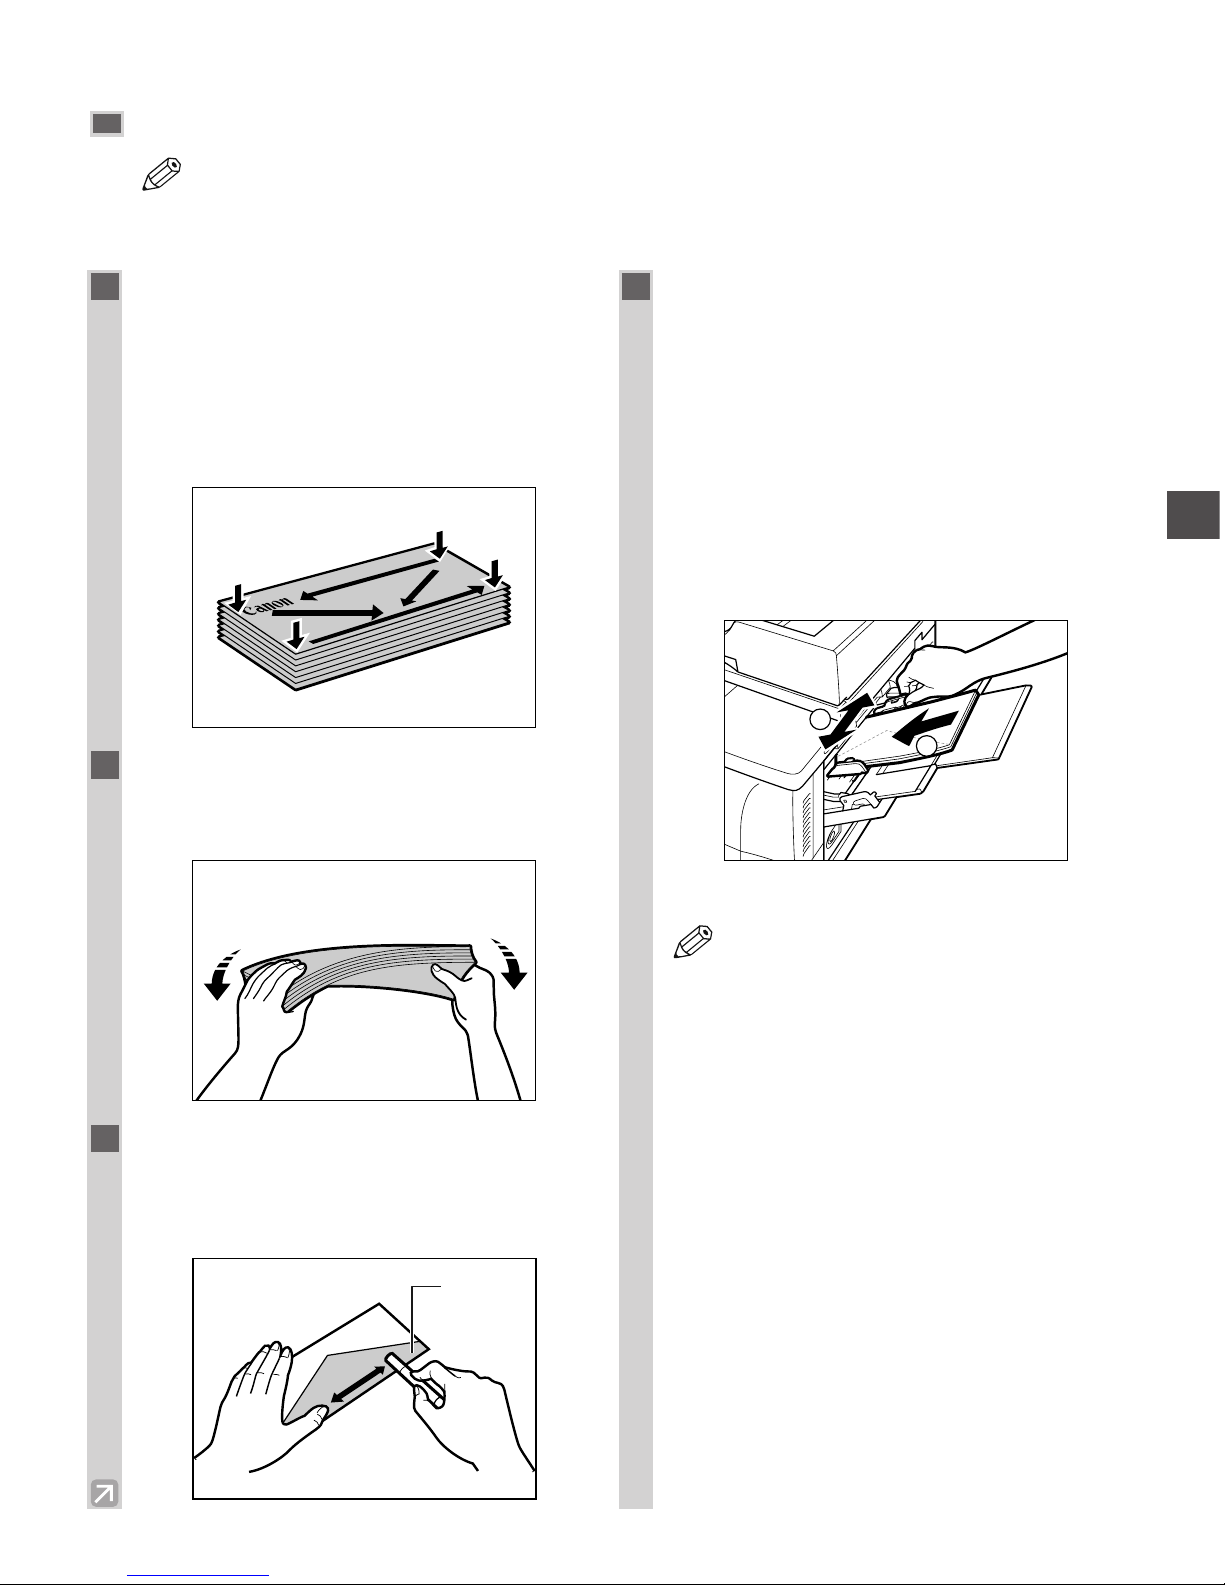
1
Arrange the stack of envelopes on a firm,
clean surface, and press down firmly on the
edges to make the folds crisp.
• Press all the way around the envelopes to remove
any curls and expel air from inside the envelopes.
Also, press firmly on the area that corresponds to
the edges of the back flap.
2
Remove any curling from the envelopes by
holding the edges diagonally and bending
them gently.
3
Run a pen or other rounded object along
the back flaps to flatten them.
• The flaps should not bulge more than 0.2 inch
(5 mm).
4
Insert the stack of envelopes into the multipurpose tray
q, and adjust the slide guides
to fit the size of the envelope w.
• Position the envelopes with the print side up (flaps
should not be visible) and load the envelope so
that the right edge (stamp side) feeds first in the
multi-purpose tray.
• If the envelope to be loaded has a flap on the short
edge, this edge must enter the machine first. Not
loading it this way will result in paper jams.
• Make sure the stack does not exceed the paper
limit guide.
• The machine is now ready to print.
• The orientation of a document and the
loading position of the envelope are
reversed.
• To select the type of envelope to be loaded
in the multi-purpose tray, follow the
procedure below:
Press Additional Functions, then
select:
COMMON SETTINGS,
MP TRAY PAPERSIZE,
OFF,
SET ON LOADING.
Load the envelope into the multi-purpose
tray, and select ENVELOPE, then press
Set.
Use 4 (–) or e (+) to select the type of
envelope (US COMMERCIAL 10,
MONARCH, EUROPEAN DL, ISO-B5,
ISO-C5, YOGATA #4 or YOGATA
#2) then press Set.
NOTE
1
2
Flap
Page 23

2-8
Page 24

3-1
The documents placed on the platen glass or loaded into the ADF must meet the requirements shown in the table
below.
*
1
When copying a transparent document such as tracing paper or transparencies, place a plain piece of white
paper against the back of the document.
*
2
356 mm can be specified in the Additional Functions. (→ p. 3-2)
*
3
20-lb bond (80 g/m2) paper
Documents You Can Copy
Document Handling
3
Document Handling
Chapter 3
Type of document
Size (W × L)
Quantity
Weight
Platen Glass
– Plain paper
– Thick documents
– Photographs
– Small documents (e.g. index cards)
– Special types of paper
(e.g. tracing paper*
1
, transparencies*1,
etc.)
– Book
Max. 8.5 × 13 in.
(Max. 216 mm × 330 mm*
2
)
1 sheet
Max. 4.4 lb (2 kg)
ADF
– Plain paper
(Multipage documents of the same size,
thickness and weight or one page
documents.)
Max. 8.5 × 14 in.
(Max. 216 mm × 356 mm)
Min. 5.5 × 5 in.
(Min. 139.7 × 128 mm)
Max. 30 letter- or A4-size sheets*
3
Max. 15 legal-size sheets*
3
15 to 32-lb bond. (50 to 128 g/m2)
Page 25
3-2
Problem Documents
• Make sure any glue, ink, or correction fluid on the document is completely dry before placing it on the platen
glass or loading it into the ADF.
• Remove all fasteners (staples, paper clips, etc.) before loading the document into the ADF.
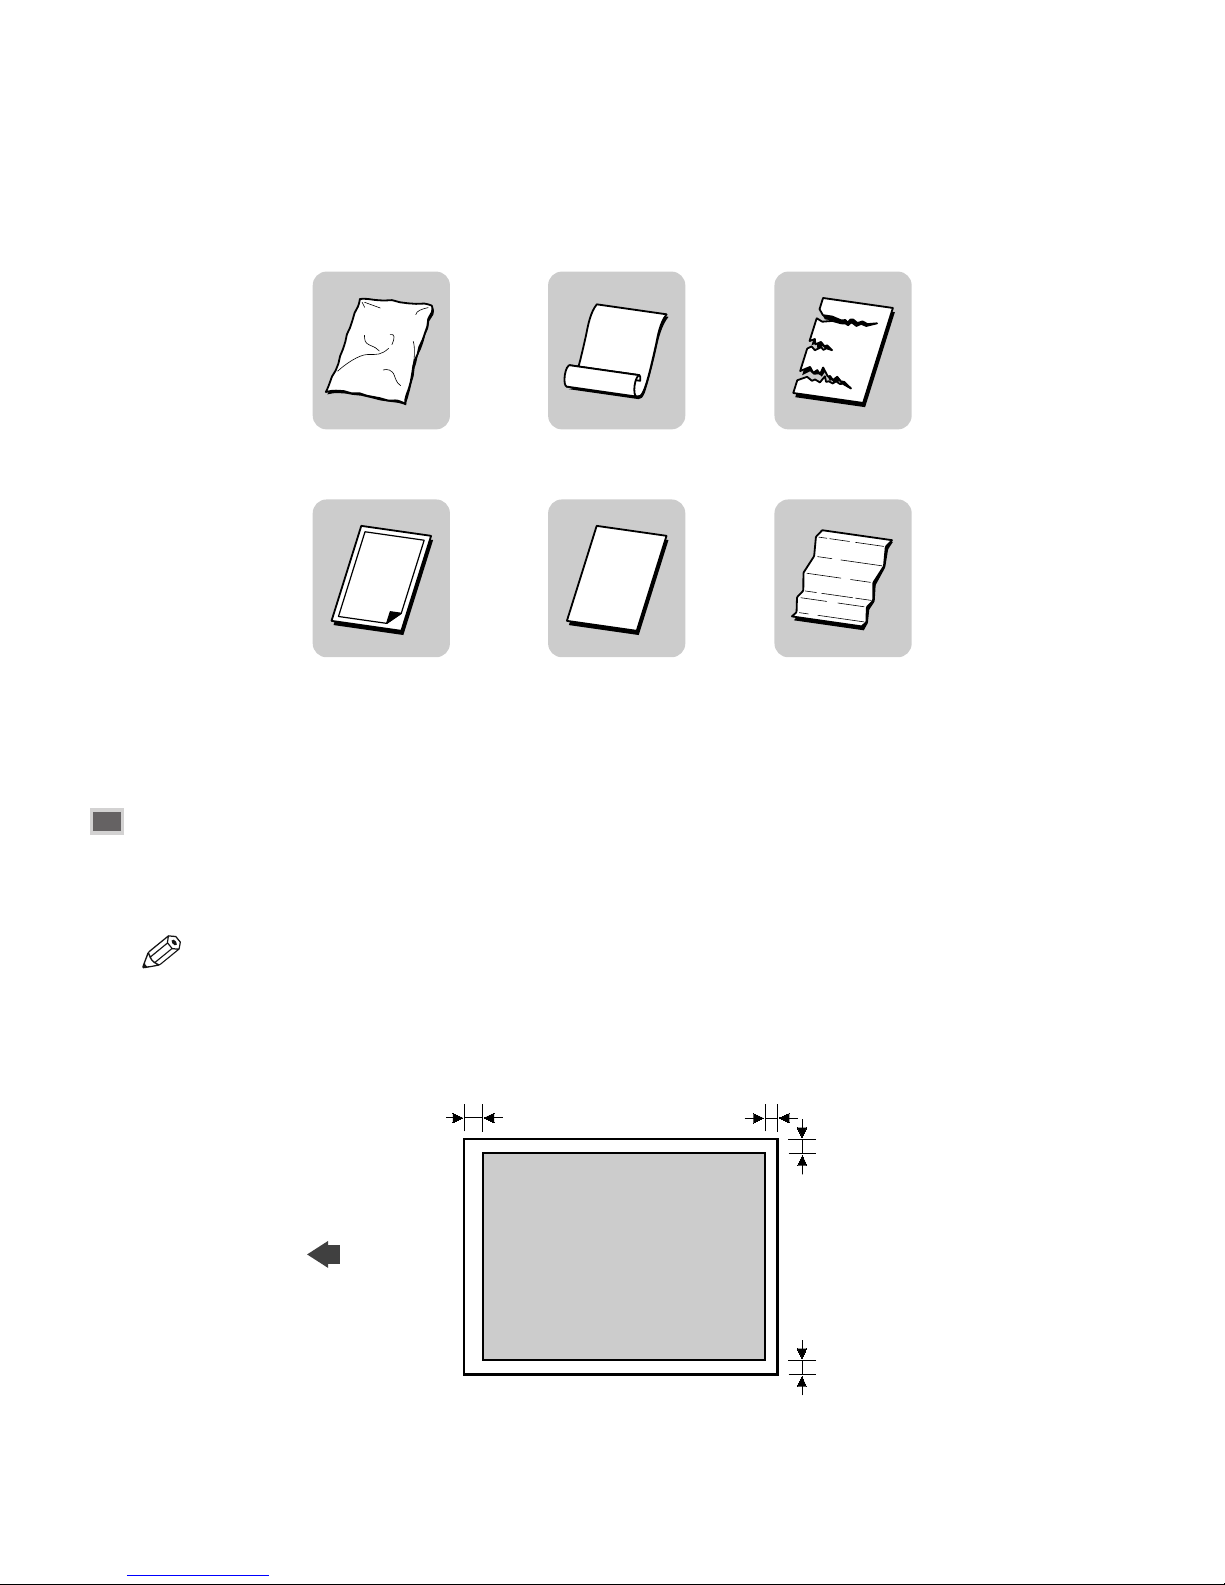
• To prevent document jams in the ADF, do not use any of the following:
Scanned Area of a Document
The shaded area in the illustration below shows the scanned area of a document. Make sure your document’s text
and graphics are within this area.
• The scanning limit of documents set on the platen glass will differ depending on the MAX. SCAN
LENGTH of 330 mm or 356 mm specified in COPY SETTINGS of the Additional Functions.
NOTE
Wrinkled or creased paper Curled or rolled paper Torn paper
Carbon paper or carbon-
backed paper
Coated paper Onion skin or thin paper
MAX. 0.08”
(MAX. 2.0 mm)
MAX. 0.16”
(MAX. 4.0 mm)
MAX. 0.08”
(MAX. 2.0 mm)
Letter/Legal
MAX. 0.08”
(MAX. 2.0 mm)
SCANNING
DIRECTION
Page 26
Document Handling
3
3-3
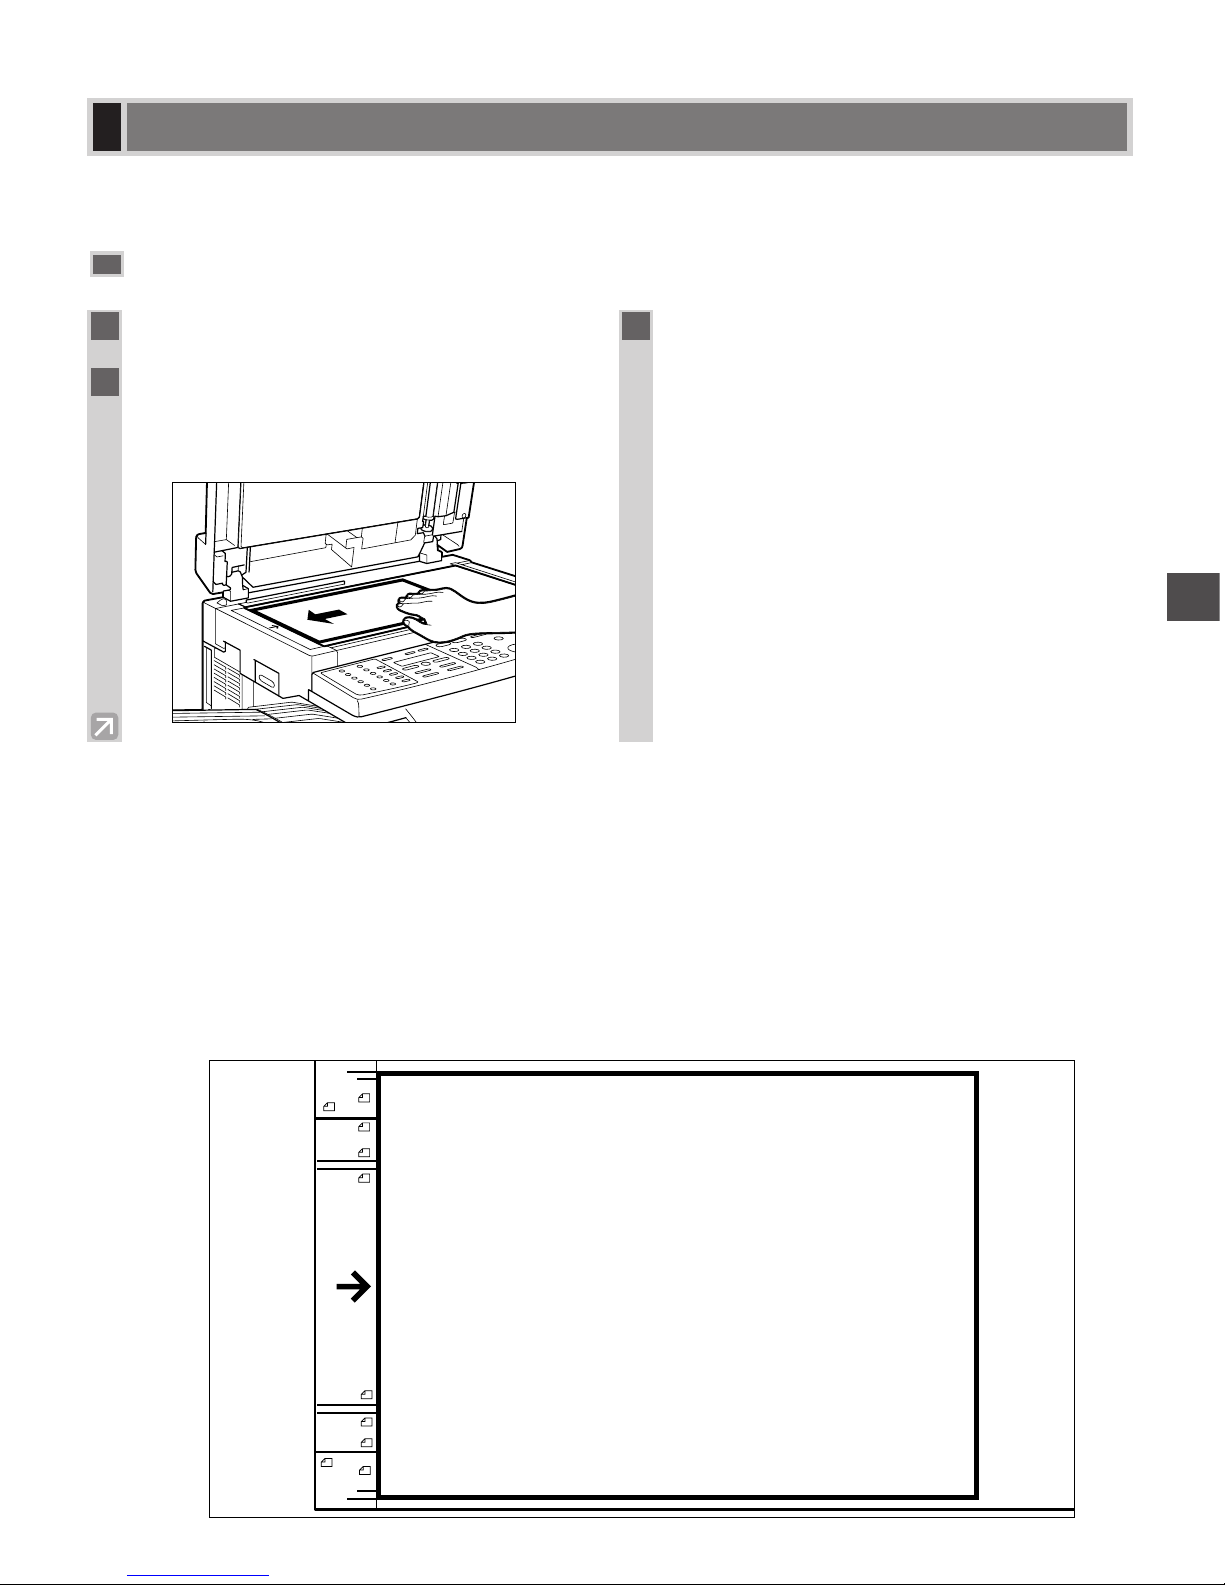
For scanning, place your documents on the platen glass or load them into the ADF. Where you set up your
documents depends on the size and type of documents you have. (→ p. 3-1)
Placing a Document on the Platen Glass
Positioning Documents
Use the size indicators on the left side of the platen glass to position a document.
■ If your document conforms to a standard paper size (e.g., LTR or STMT), align the document between the
appropriate paper size marks.
■ If you do not know the size of your document, or if your document does not match any of the paper size
marks, align the center of your document with the ➔ mark.
The illustration below shows how to place an LTR-size original.
Setting Up Documents
1
Open the ADF.
2
Place your document face down on the
platen glass. Align the document with the
appropriate paper size marks.
3
Gently lower the ADF.
• The document is now ready for scanning.
AB
STMT
A4
A5
B5
LTR/
FLS/
LGL
ABCD
STMT
A4
LTR/
FLS/
LGL
A5
B5
Page 27
Loading Documents in the ADF
3-4
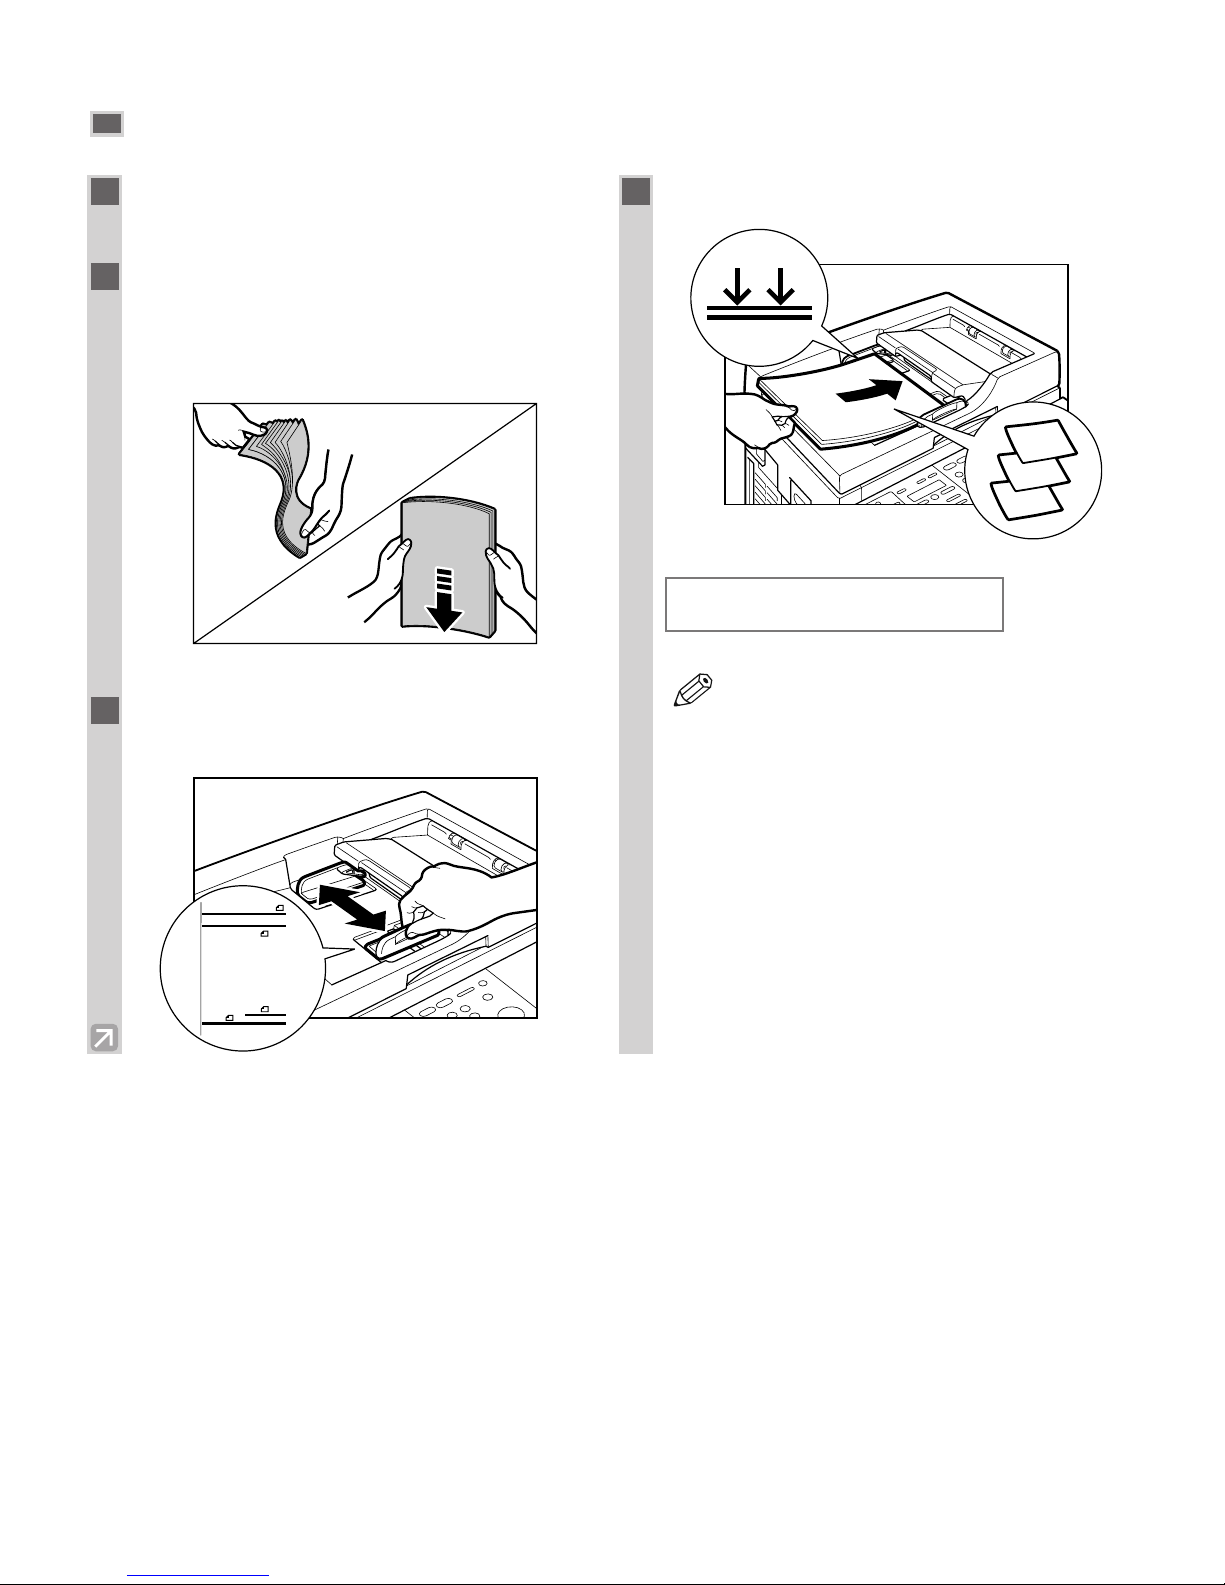
1
Make sure there is no document on the
platen glass.
2
Fan the edges that will feed into the
machine first then, tap the edge of
multipage documents on a flat surface to
even the stack.
3
Adjust the slide guides to the width of the
document.
4
Load the documents face down in the ADF.
• The document is now ready for scanning.
• For a multipage document, the pages are
fed one by one from the top of the stack
(from the last page).
• Wait until all pages of your document have
been scanned before starting a new job.
• 30 sheets of LTR-size (80 g/m
2
) documents
can be set in the ADF. If more than 30
sheets (LTR) of documents are set in the
ADF, paper jams may occur.
• 15 sheets of LGL-size (80 g/m
2
) documents
can be set in the ADF.
NOTE
DOCUMENT READY
1
2
3
STMT
A5
A4
LTR/
FLS/
LGL
Page 28
3-5
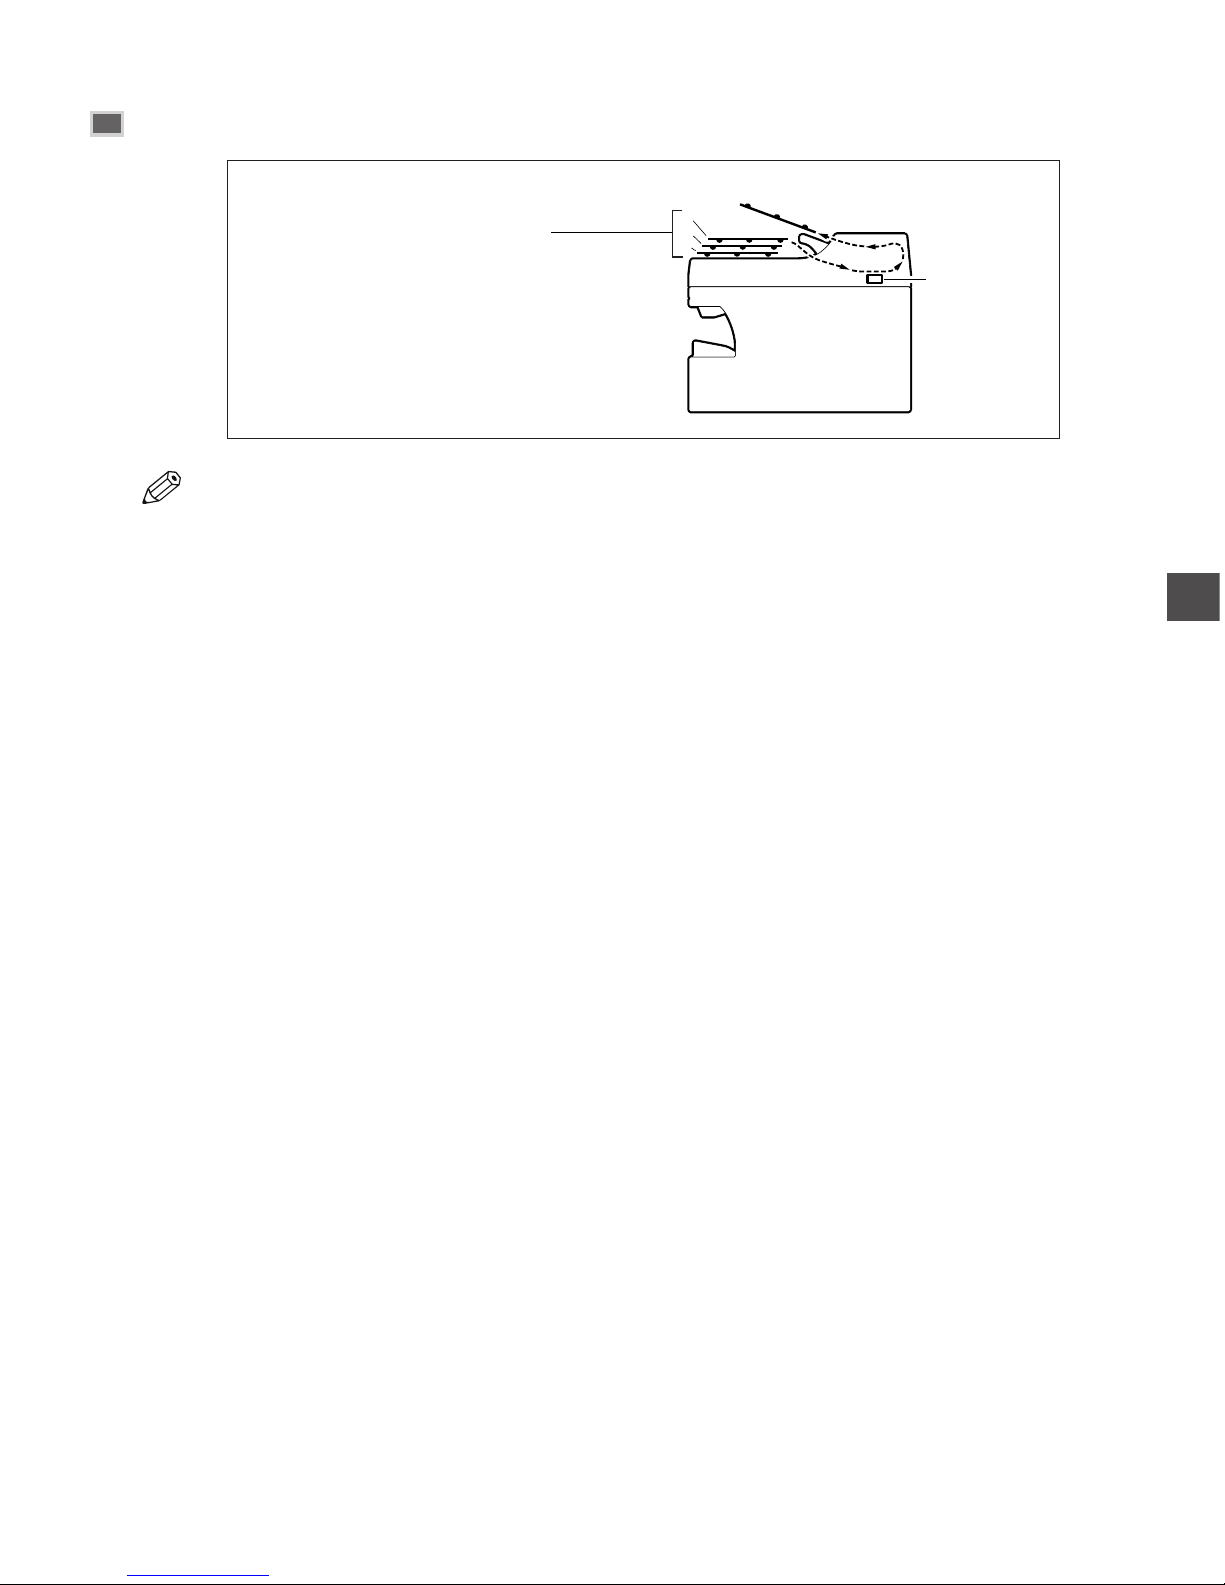
The Paper Path of the Automatic Document Feeder
• When documents are set in the ADF, the scanning unit moves to the position shown in the figure above
and it is fixed there.
When a document is placed on the platen glass, the scanning unit moves to scan it.
NOTE
1
4
2
3
Scanning
unit
The machine scans documents
from the last page.
Document Handling
3
Page 29

3-6
Page 30
4-1
For information on the types of documents you can copy, their requirements, and details on setting up documents,
→ Chapter 3.
Copying Documents
Documents You Can Copy
Making Copies
4
Making Copies
Chapter 4
1
Press COPY to set to Copy Mode.
• For the imageCLASS D660/D661 models,
this operation is not required.
Ex:
2
Prepare the document and place it on the
platen glass or load it face down in the
ADF. (→ pp. 3-3, 3-4)
3
You can choose to set the below copy
features.
• Copy quantity (→ p. 4-3)
• Paper feeding location (cassette or multi-purpose
tray) (→ pp. 2-3, 2-6)
• Enlarging/reducing (→ p. 4-5)
• Image quality (→ p. 4-6)
• Exposure (→ p. 4-6)
• Collate (→ p. 4-7)
• 2 on 1 (→ p. 4-9)
• Please note that you cannot change settings
during copying.
4
Press Start to begin copying.
Ex:
• If the paper in the cassette or multi-purpose tray runs
out during copying, the LCD displays SUPPLY
REC. PAPER. Load paper in the cassette or load
paper in the multi-purpose tray when it is used to
feed paper. When paper is loaded, the machine
automatically resumes copying.
• If you load paper while making copies, do
not load a different paper size.
• You can reserve the next copy job while the
machine is outputting copies. (→ p. 4-11)
• After the machine finishes copying, the
setting will remain. However, if you press
Stop/Reset or if no key is pressed for 2
minutes, the paper feeding location will be
reset to the cassette, and other settings will
also be reset to the default settings. (The
time until the machine enters the AUTO
CLEAR mode can be specified. (→ p. 7-
4))
• The capacity of the output tray is 100
sheets (80 g/m
2
) of paper. To prevent paper
jams, remove paper from the output tray
before the count reaches 100.
NOTE
SCANNING
COPY NO. 0001
NOTE
100% LTR
TEXT
NOTE
01
Page 31
4-2
Canceling the Copy Job
■ While scanning documents in the ADF
■ After scanning documents
1
Press Stop/Reset.
2
Press 4 (–).
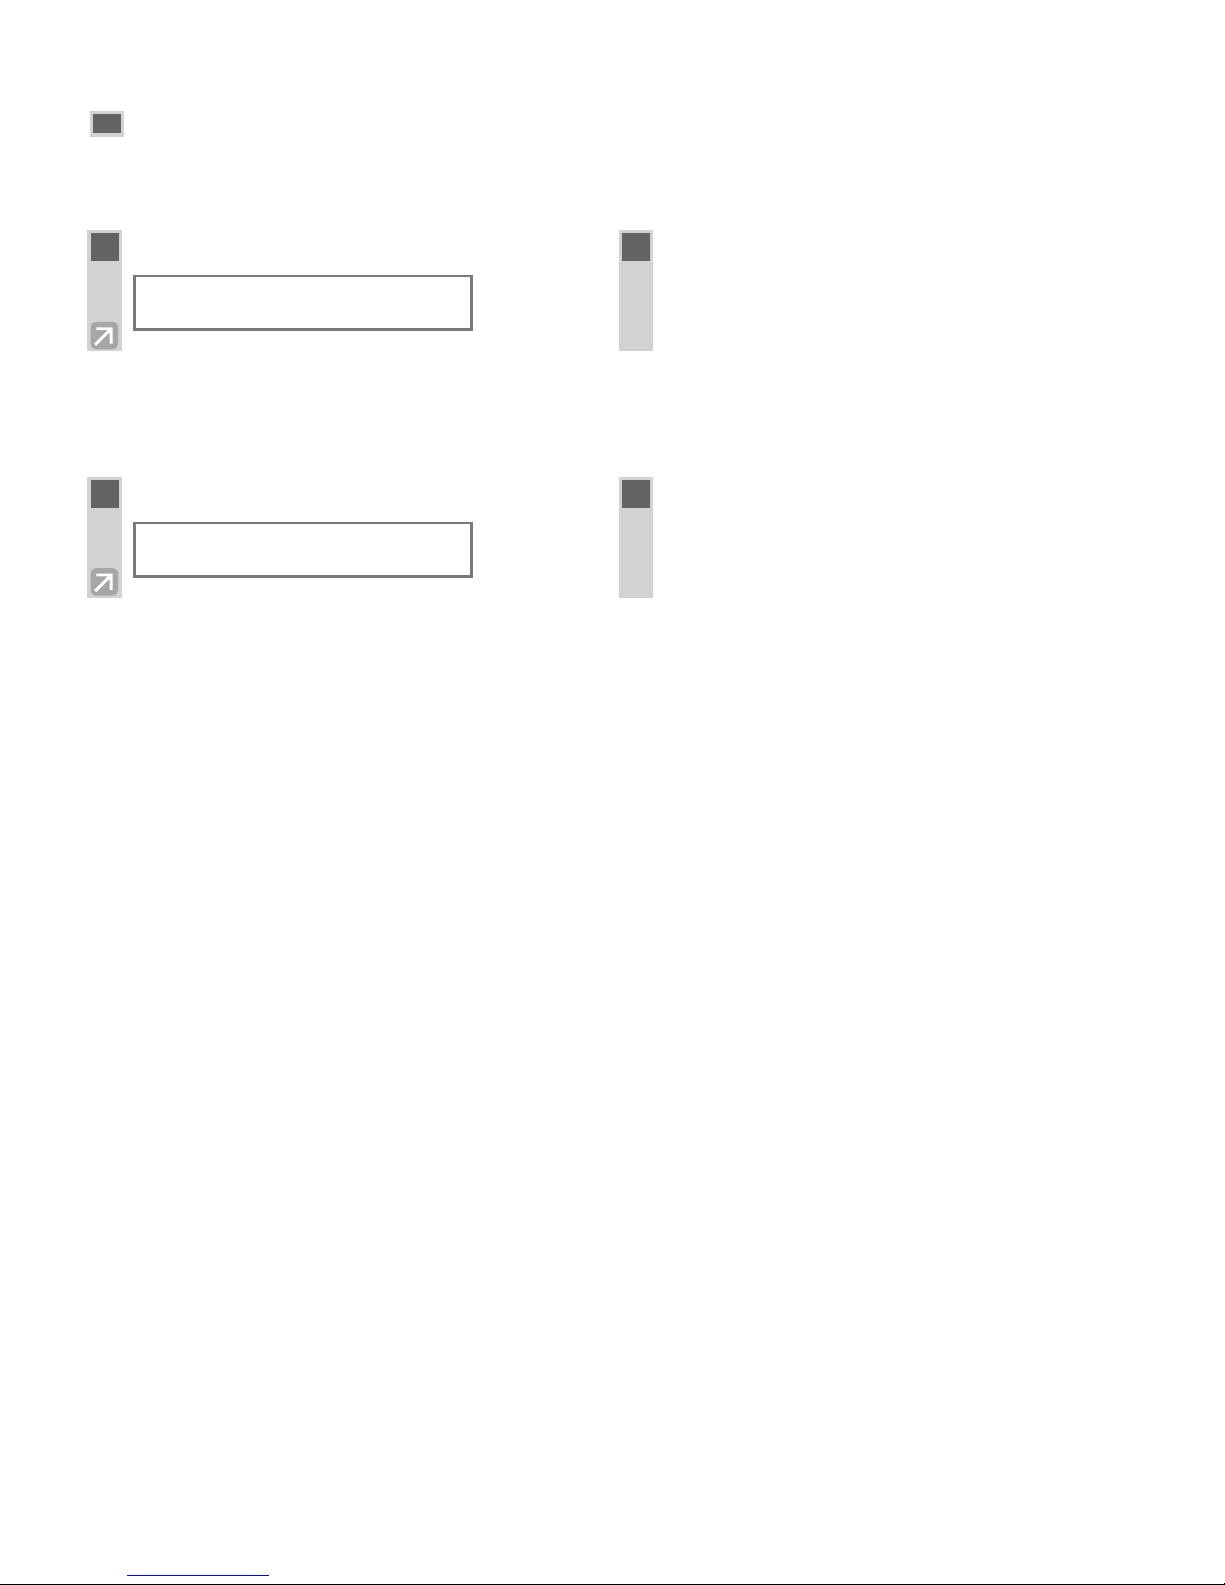
CANCEL COPYING?
<YES NO>
1
Press Stop/Reset.
2
Press Set.
• The document that has stopped in the ADF will
come out.
STOP KEY PRESSED
PRESS SET KEY
Page 32
4-3
Making Copies
4
You can make multiple copies.
Selecting the Paper Feeding Location
(Cassette or Multi-purpose Tray)
When making copies on paper which cannot be loaded in the cassette, such as thick paper, transparencies, labels,
envelopes, tracing paper, etc., you can use the multi-purpose tray.
• The settings changed in the Additional Functions are not returned automatically to the settings you set
previously. Change to the previous settings again if necessary.
■ Specifying the Paper Size
At the factory the paper size has already been set to FREE SIZE. Normally, you can make copies in this
setting. However, when the copy images or the back of the paper is dirty, you can prevent the paper from
getting dirty by specifying the paper size according to the following.
• To set the Additional Functions, see “Accessing the Additional Functions”. (→ p. 7-1)
– To specify the paper size every time you load the paper: Press Additional Functions, then
select:
COMMON SETTINGS,
MP TRAY PAPERSIZE,
OFF
Then choose SET ON LOADING.
NOTE
NOTE
Making Multiple Copies
1
Use the numeric keys to enter the number
of copies you want.
Ex:
• The LCD displays the number of copies you
entered.
• You can make up to 99 copies.
• You can reserve the next copy job while the
machine is outputting copies. (→ p. 4-11)
• The LCD keeps on displaying the specified
number of copies until copying finishes.
When the auto clear function activates, the
LCD returns to standby display and the
number of copies returns to 01 (factory
default setting).
NOTE
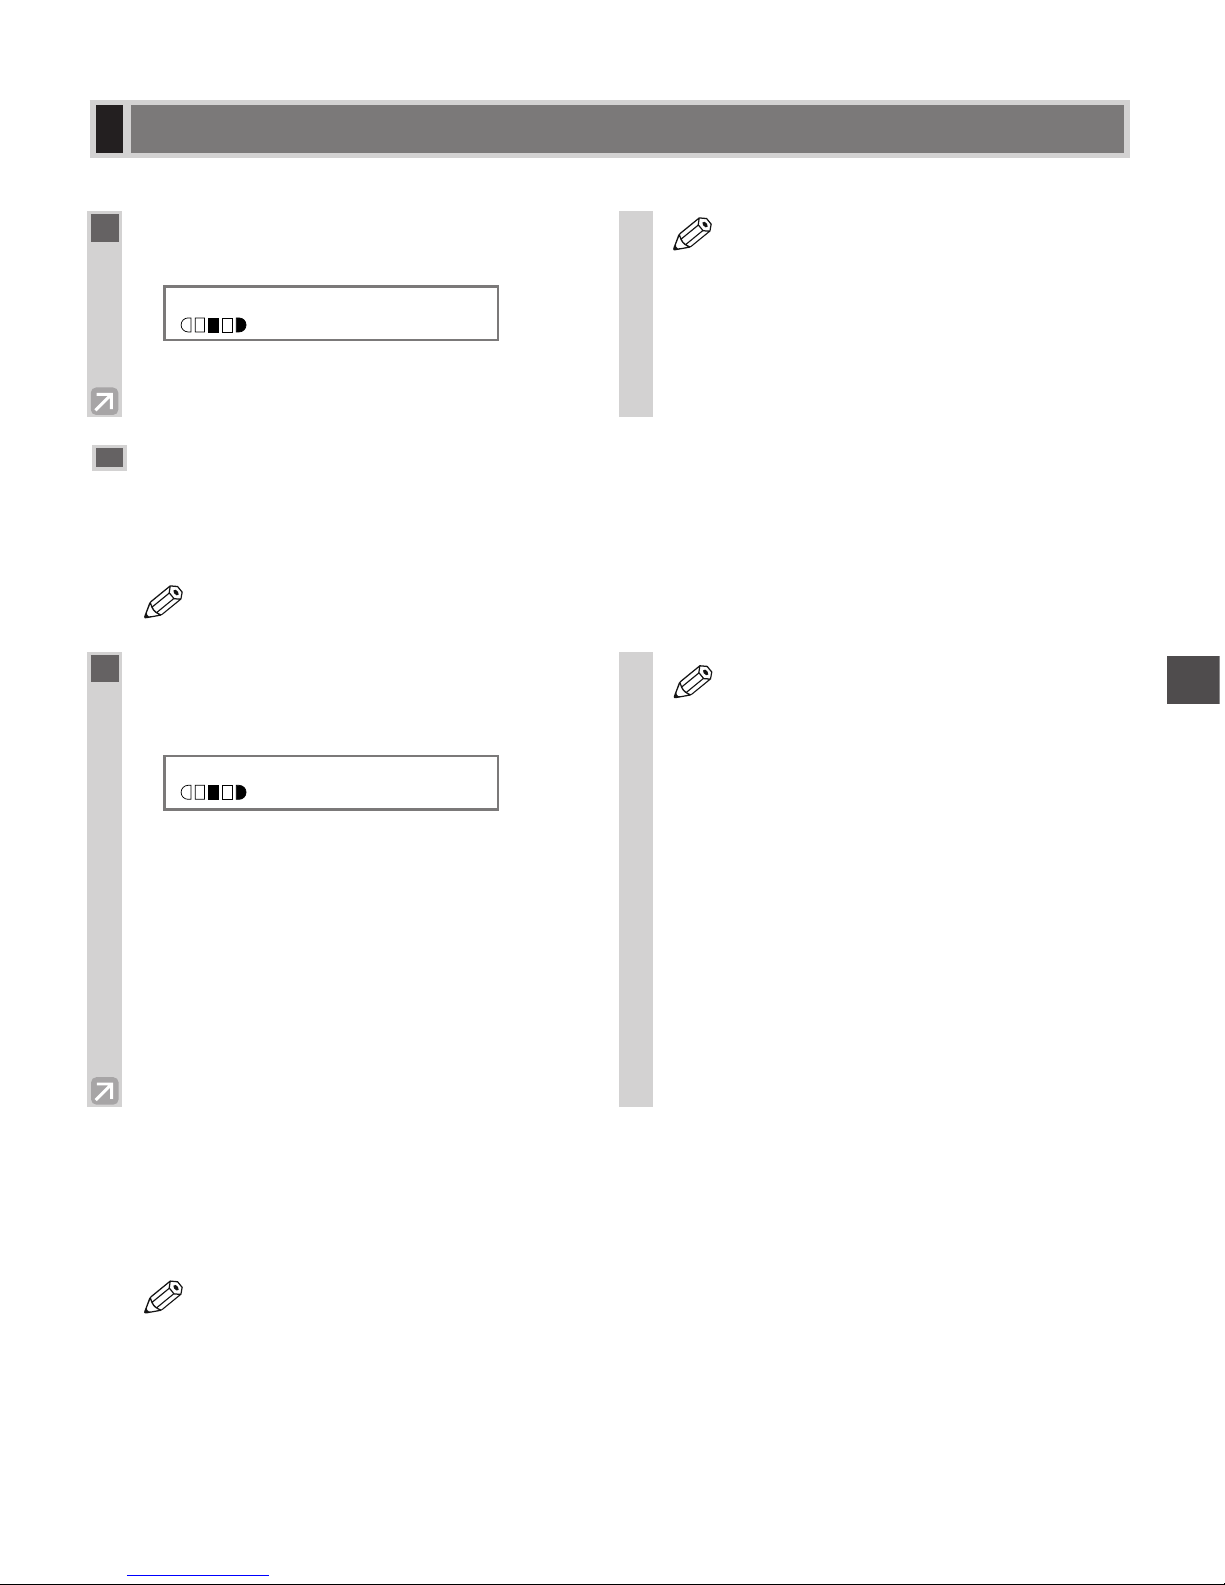
100% LTR
TEXT
05
1
Press Paper Select to select the paper
feeding location (cassette or multi-purpose
tray).
Ex:
A:If you select a paper type other than PLAIN
PAPER in MP PAPERTYPE. (→ p. 4-4)
#:If you set HIGH COPY MODE to ON. (→ p. 4-4)
• When making copies on LTR-size paper
after having continuously copied on paper
smaller than LTR-size paper, the copies
may be dirty. To prevent copies from being
dirty, wait about one minute before making
copies.
• When making copies of a small size or
thick paper*, etc., the copy speed may be
slightly slower than usual.
* The paper type should be selected in the
Additional Functions.
• If you intend to make a copy and print with a
thermal transfer printer on one sheet of paper,
make the copy first. Failure to do so may
make copies dirty or cause a paper jam.
• When copying onto transparencies, remove
each transparency from the output tray as it
is output.
NOTE
100% TRAY A #A4
TEXT
01
Page 33
4-4
– To set a fixed paper size: Press Additional Functions, then
select:
COMMON SETTINGS,
MP TRAY PAPERSIZE,
ON
Choose the appropriate paper size from LTR, STMT, CUSTOM PAPER SIZE*, A4, B5, A5 or LGL.
* When CUSTOM PAPER SIZE is selected, specify the width and length of the paper in mm.
Available setting range in length : 5” (127 mm) to 14” (356 mm)
Available setting range in width : 3” (76 mm) to 8
1
/2” (216 mm)
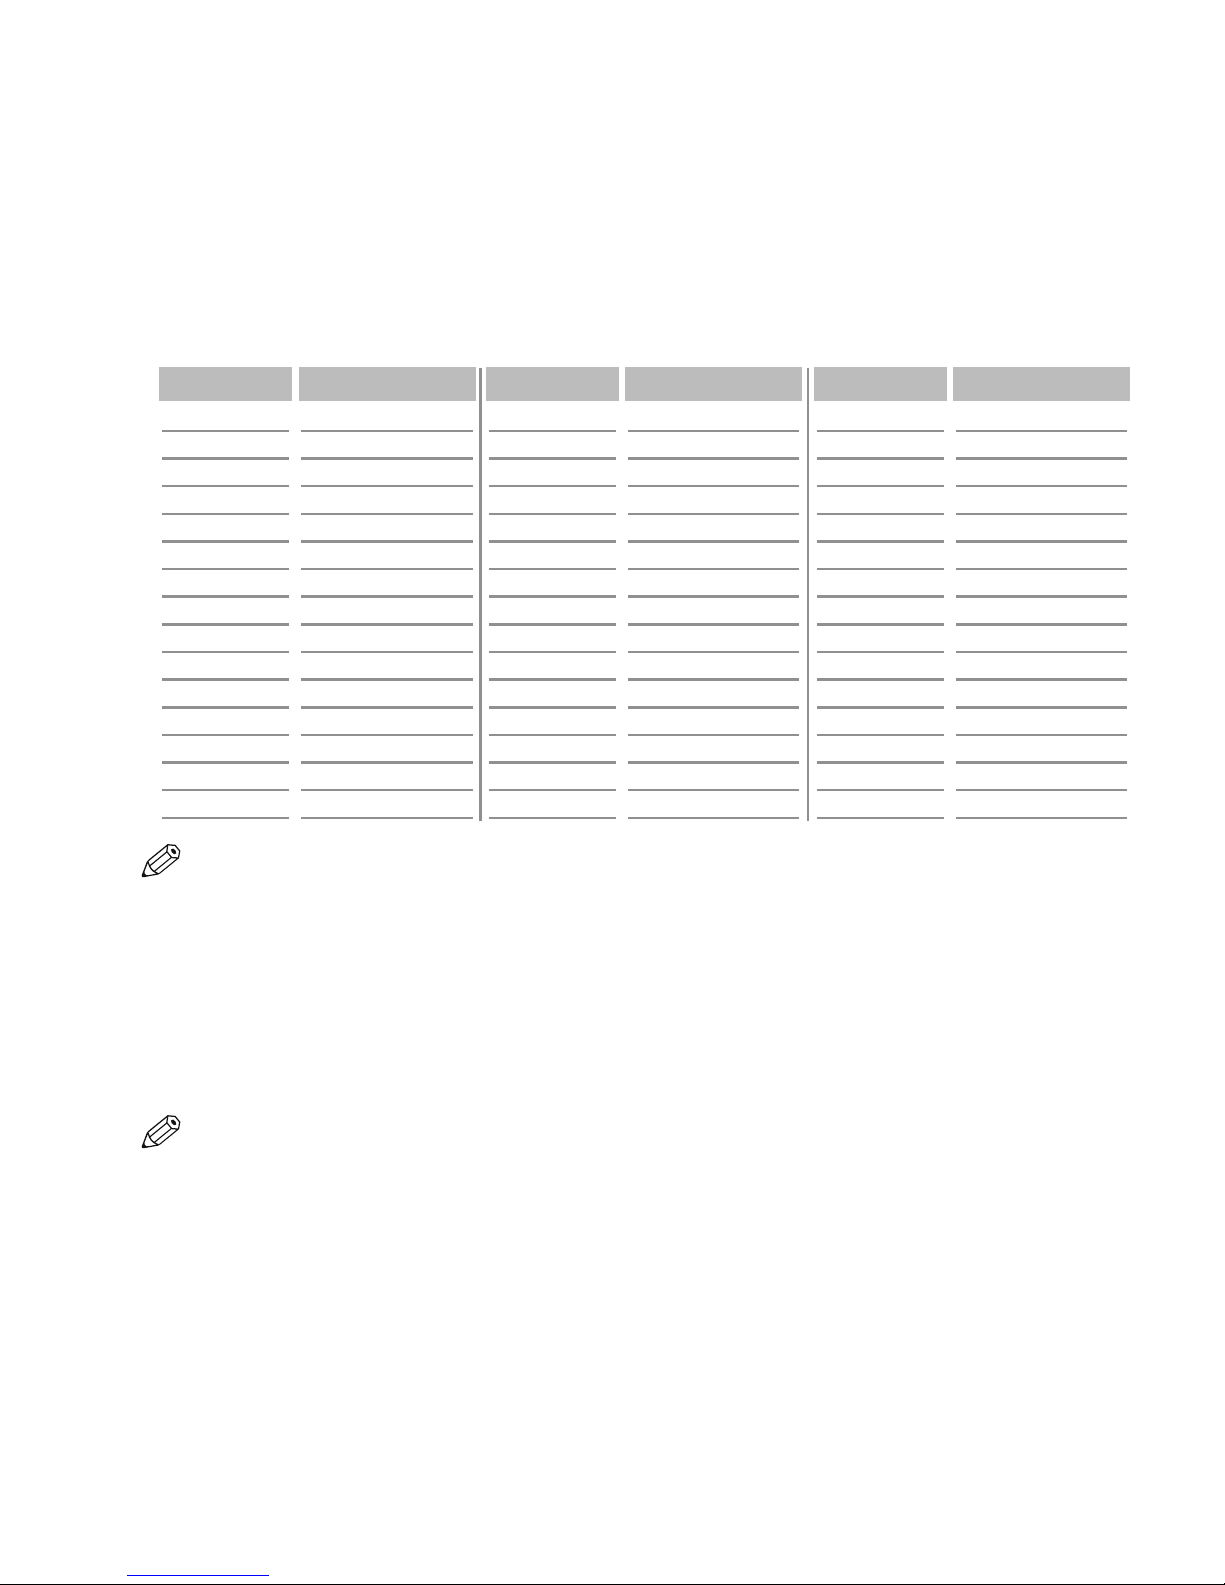
Refer to the following conversion table for inches and millimeters.
• To specify the paper size every time you load the paper into the multi-purpose tray, follow the
procedure below:
When MP TRAY PAPERSIZE is set to SET ON LOADING in the Additional Functions, the
machine selects the multi-purpose tray as the paper feeding location. In this setting, you can also select
the type of the envelope loaded in the multi-purpose tray.
■ Specifying the Paper Type
PLAIN PAPER is selected as the default paper type. When making copies on other paper than plain paper, you
can specify the paper type according to the following. Specifying the paper type can prevent poor copy quality, or
the copy image not being printed correctly.
• To set the Additional Functions, see “Accessing the Additional Functions”. (→ p. 7-1)
Press Additional Functions, then
select:
COMMON SETTINGS,
MP PAPERTYPE
Then choose the paper type from the following.
– TRACING PAPER (16 - 17-lb bond or 56 - 63 g/m
2
) : Thin paper, tracing paper
– TRANSPARENCY : Transparencies
– SPECIAL PAPER 1 (21 - 32-lb bond or 81 - 128 g/m
2
) : Thick paper*
– SPECIAL PAPER 2 : Envelopes
* If the images are dirty even when making copies in the SPECIAL PAPER 1 setting, do the following.
Press Additional Functions, then
select:
COMMON SETTINGS,
HIGH COPY MODE
Then choose ON.
NOTE
NOTE
Inch Millimeter Inch Millimeter Inch Millimeter
3”
3 1/
4”
3 1/
2”
3 3/4”
4”
4 1/4”
4 1/2”
4 3/
4”
5”
5 1/4”
5 1/2”
5 3/4”
6”
6 1/4”
6 1/2”
76
83
89
95
102
108
114
121
127
133
140
146
152
159
165
6 3/4”
7”
7 1/
4”
7 1/2”
7 3/
4”
8”
8 1/4”
8 1/
2”
8 3/4”
9”
9 1/4”
9 1/2”
9 3/4”
10”
10 1/4”
171
178
184
191
197
203
210
216
222
229
235
241
248
254
260
10 1/2”
10 3/
4”
11”
11 1/4”
11 1/
2”
11 3/4”
12”
12 1/
4”
12 1/2”
12 3/4”
13”
13 1/4”
13 1/2”
13 3/4”
14”
267
273
279
286
292
298
305
311
318
324
330
337
343
349
356
Page 34
4-5
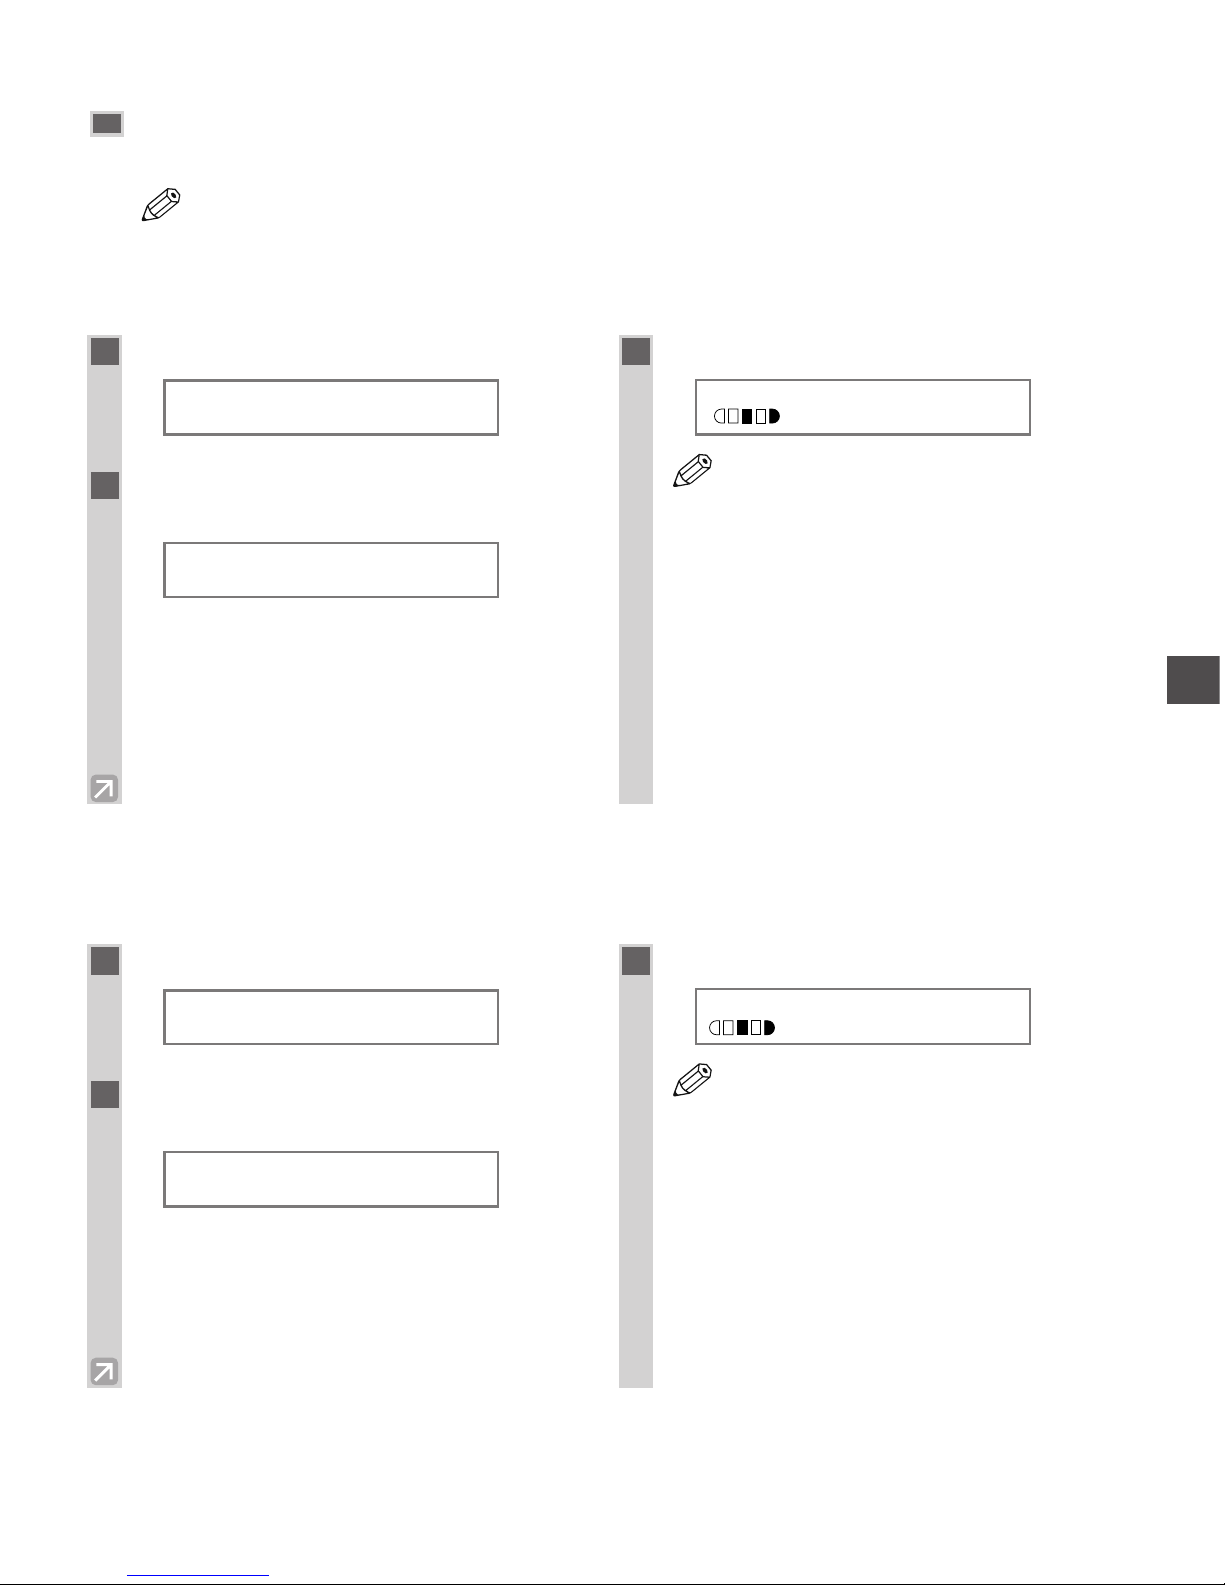
Setting Enlarging/Reducing
You can enlarge or reduce the copy size using preset copy ratios or using custom copy ratios.
• When the MAX. SCAN LENGTH is set to 356 mm in COPY SETTINGS of the Additional
Functions, the shadow of the ADF roller appears on reduced copies when using the platen glass.
■ Enlarging/Reducing using preset copy ratios
■ Enlarging/Reducing using custom copy ratios
(only for the imageCLASS D680/D660 models)
NOTE
Making Copies
4
1
Press Enlarge/Reduce.
Ex:
2
Use 4 (–) or e (+) to select the copy
ratio.
Ex:
• You can select from the following:
- 200% MAX.
- 129% STMT → LTR
- 100%
- 78% LGL → LTR
- 64% LTR → STMT
- 50% MIN.
3
Press Set.
Ex:
• If the PAPER SIZE GROUP of COPY
SETTINGS in the Additional Functions
is set to A or AB, the preset copy ratios will
be as follows:
A: 50%, 70%, 100%, 141% and 200%;
AB: 50%, 70%, 81%, 86%, 100%, 115%,
141% and 200%.
• Enlarging or reducing using preset copy
ratio is not available with the 2 on 1 copy
function.
• To reset the copy ratio, press
Enlarge/Reduce several times to display
DIRECT 100% ratio, then press Set.
NOTE
78% LTR
TEXT
PRESET RATIO
- 78% LGL→LTR +
PRESET RATIO
- 100% +
01
1
Press Enlarge/Reduce twice.
Ex:
2
Use the numeric keys to enter the copy
ratio.
Ex:
• You can enter the copy ratio from 50% to 200%,
selectable in 1% increments.
• Even after entering the copy ratio, you can use 4
(–) or e (+) to adjust the copy ratio. To increase
the copy ratio, press e (+). To decrease the copy
ratio, press 4 (–).
3
Press Set.
Ex:
• Enlarging or reducing using custom copy
ratio is not available with the 2 on 1 copy
function.
• To reset the copy ratio, press
Enlarge/Reduce several times to display
DIRECT 100% ratio, then press Set.
NOTE
80% LTR
TEXT
ZOOM 50-200%
- 80% +
ZOOM 50-200%
- 100% +
01
Page 35
4-6
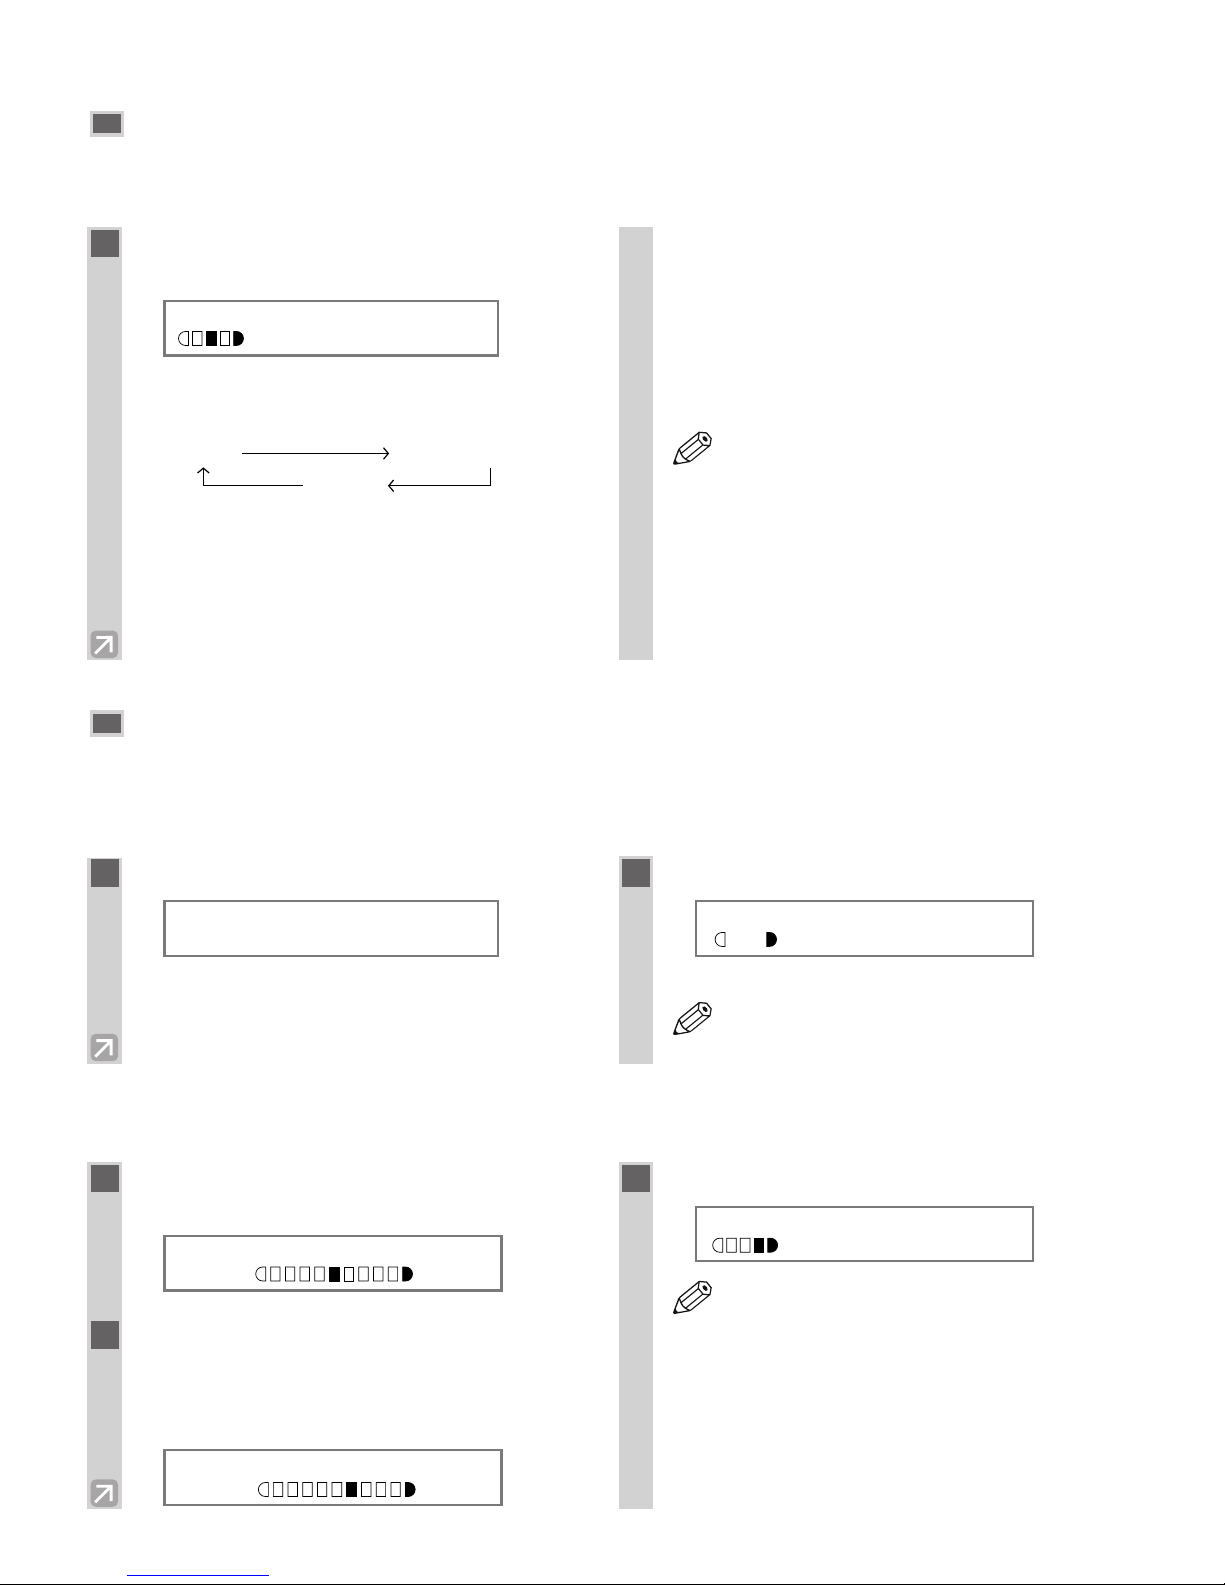
Setting the Image Quality
You can adjust image quality to the appropriate level best suited for a document with text or photos. Three modes
are available for adjusting image quality.
Adjusting the Copy Exposure
You can adjust the copy exposure automatically or manually according to how light or dark your document is.
■ Adjusting Automatically
■ Adjusting Manually
1
Press Image Quality to select the image
quality.
Ex:
Each time Image Quality is pressed, the image
quality mode changes as follows:
– TEXT
Suitable for making copies from text originals. Good
copies can be made from even blueprints or faint
pencil-drawn originals.
– TEXT/PHOTO
Suitable for making copies from originals containing
both text and photos, or photo originals containing
half-tones (i.e. printed photos).
– PHOTO
Suitable for making copies from photos printed on
photographic paper.
• Copy exposure automatically changes to
manual mode when TEXT/PHOTO or
PHOTO is set.
• To sharpen the black and white contrast of
an image, adjust the image as follows:
Press Additional Functions, then
select
COPY SETTINGS.
Then choose SHARPNESS. (→ p. 7-3)
NOTE
TEXT TEXT/PHOTO
PHOTO
100% LTR
TEXT
1
Press Exposure to select the auto mode.
Ex:
2
Press Set.
Ex:
• The copy exposure is adjusted automatically.
• Image quality mode automatically changes
to TEXT when AUTO EXPOSURE is set.
NOTE
100% LTR
A TEXT
DENSITY
AUTO EXPOSURE
1
Press Exposure to select the manual
mode.
Ex:
2
Use 4 (–) or e (+) to adjust the copy
exposure. For a lighter copy exposure,
press 4 (–). For a darker copy exposure,
press e (+).
Ex:
3
Press Set.
Ex:
• When setting the exposure lighter, the
indicator moves to the left. When setting
the exposure darker, the indicator moves to
the right.
NOTE
100% LTR
TEXT
DENSITY
-LT DK+
DENSITY
-LT DK+
01
01
01
Page 36
4-7
Making Copies
4
The machine has the following SPECIAL COPY features. These features allow you to sort copies in order of
pages, and create special copies easily.
– Collate Copy
Sorting copies in order of pages.
– 2 on 1
Reducing 2 letter size documents to fit on a single letter size paper.
– Reserve Copy
Reserves the next job while the machine is printing out.
– Two-sided copy
Making copies on both sides of the paper.
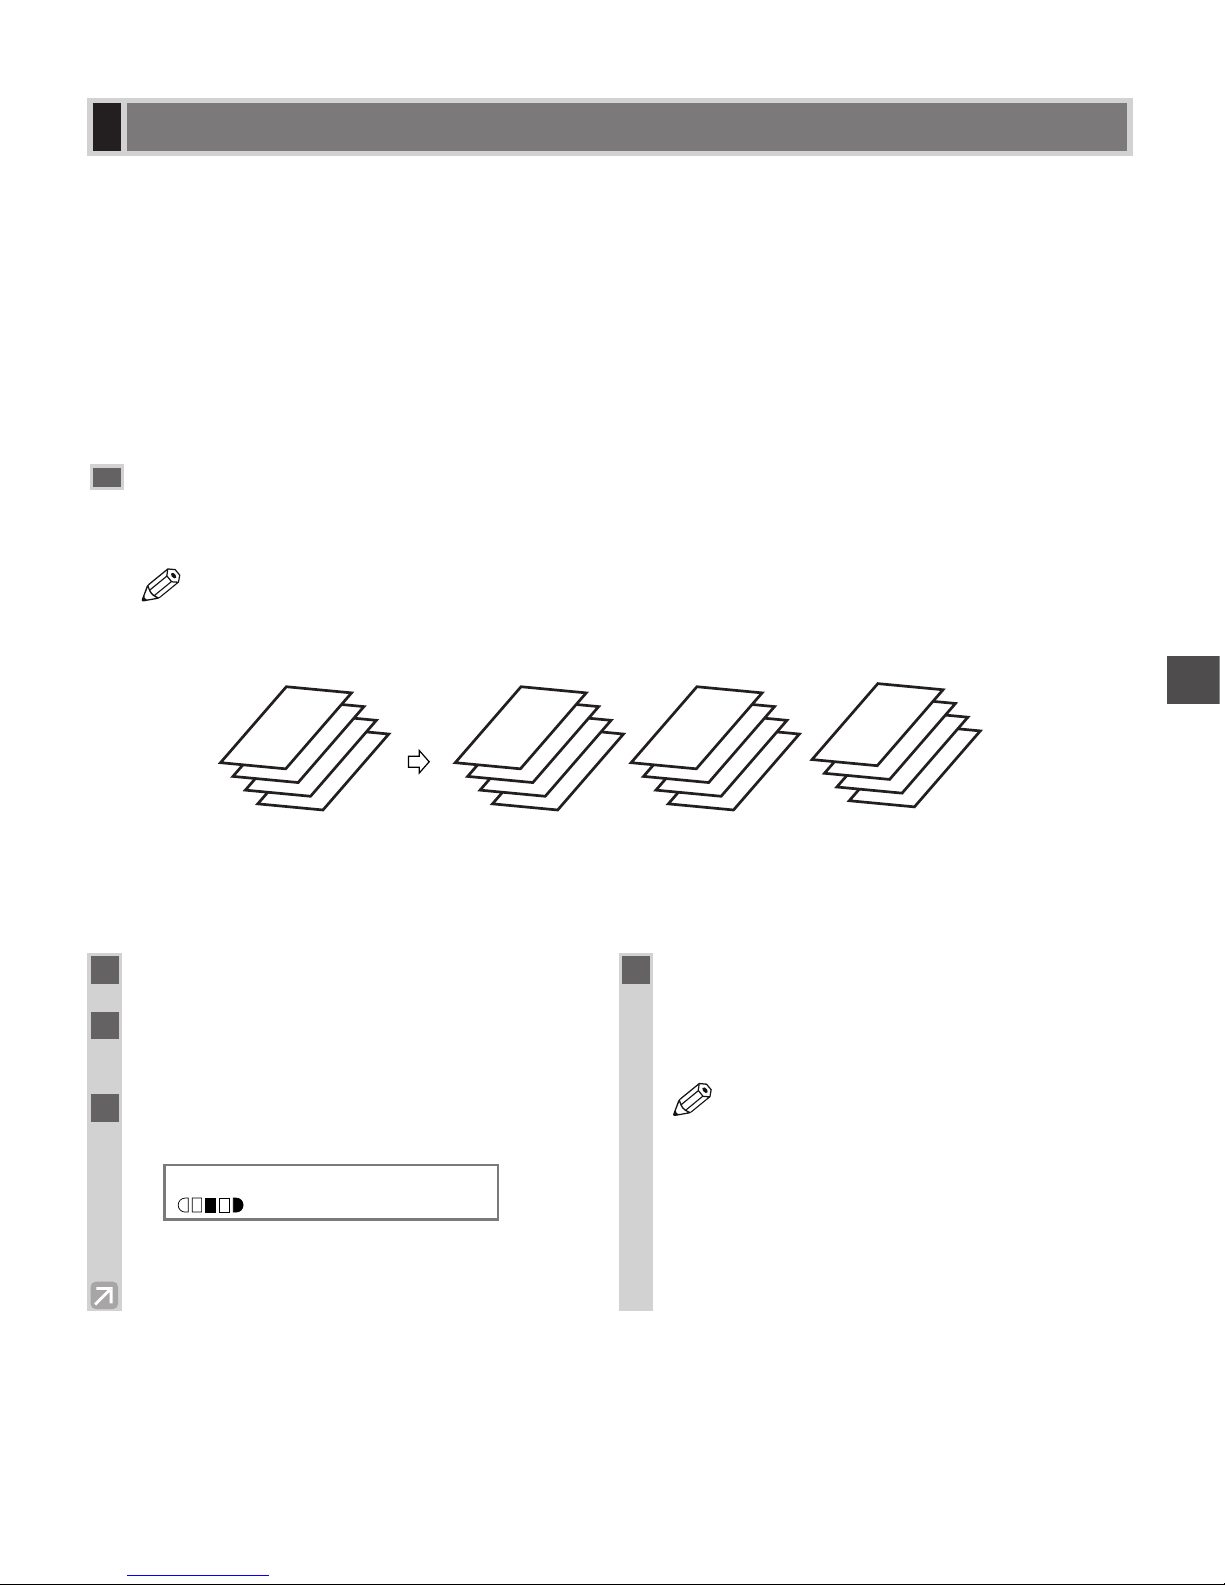
Collate Copy
The collate copy allows you to sort copies in order of pages. It is convenient when you make multiple copies of
multipage documents.
• The collate copy is not available with the 2 on 1 copy function.
■ When Loading Documents in the ADF
4
3
2
1
4
3
2
1
4
3
2
1
4
3
2
1
Set 3
sets of copies
Copy 1 Copy 2 Copy 3
NOTE
Special Features
1
Load documents face down in the ADF.
2
Press Collate.
• The Collate key lights green.
3
Use the numeric keys to set the copy
quantity. (→ p. 4-3)
Ex:
4
Press Start.
• The machine begins scanning from the last page of
the document. After scanning, the scanned
documents will come out in order.
• When scanning multipage documents,
MEMORY FULL and PRESS SET KEY
may appear in the LCD, and the document
being scanned stops in the ADF. Press Set
to make the document come out
automatically. In this case, reduce the
documents to be scanned. Or, change
image quality mode to TEXT.
NOTE
100% LTR
TEXT
03
Page 37
4-8
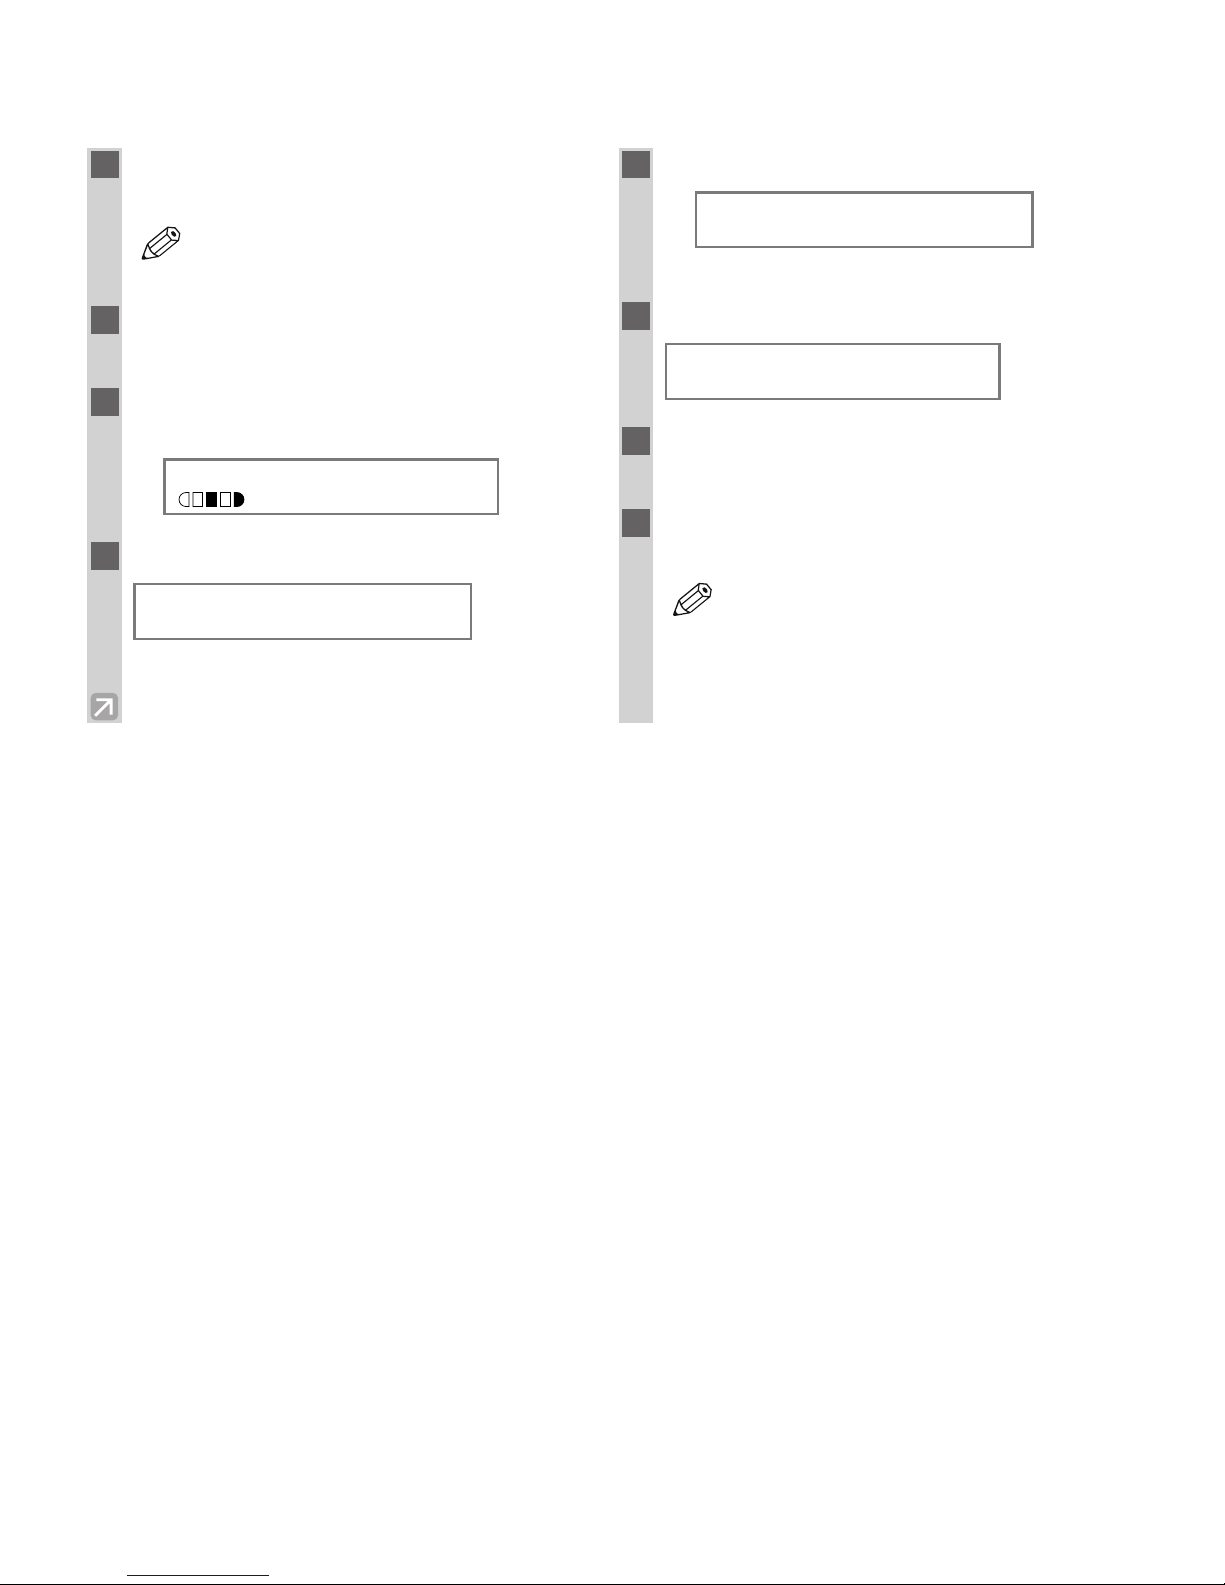
■ When Placing a Document on the Platen Glass
1
Place the last page of a document on the
platen glass.
• If a document is set from the first page, the
printing will be performed in reverse order.
2
Press Collate.
• The Collate key lights green.
3
Use the numeric keys to set the copy
quantity. (→ p. 4-3)
Ex:
4
Press Start.
5
Press Start.
Ex:
• The machine begins scanning.
6
Place the next page of the document.
7
Press Start.
• Repeat steps 6 and 7 to scan all documents.
8
Press Set.
• The machine begins printing out.
• When scanning multipage documents,
MEMORY FULL may appear in the LCD
and scanning is canceled. In this case,
reduce the documents to be scanned. Or,
change image quality mode to TEXT.
NOTE
NEXT PAGE :[START]
FINISH SCAN :[SET]
SCANNING
COPY NO. 0015
SET FROM END OF DOC.
PRESS THE START KEY
100% LTR
TEXT
NOTE
03
Page 38
4-9
Making Copies
4
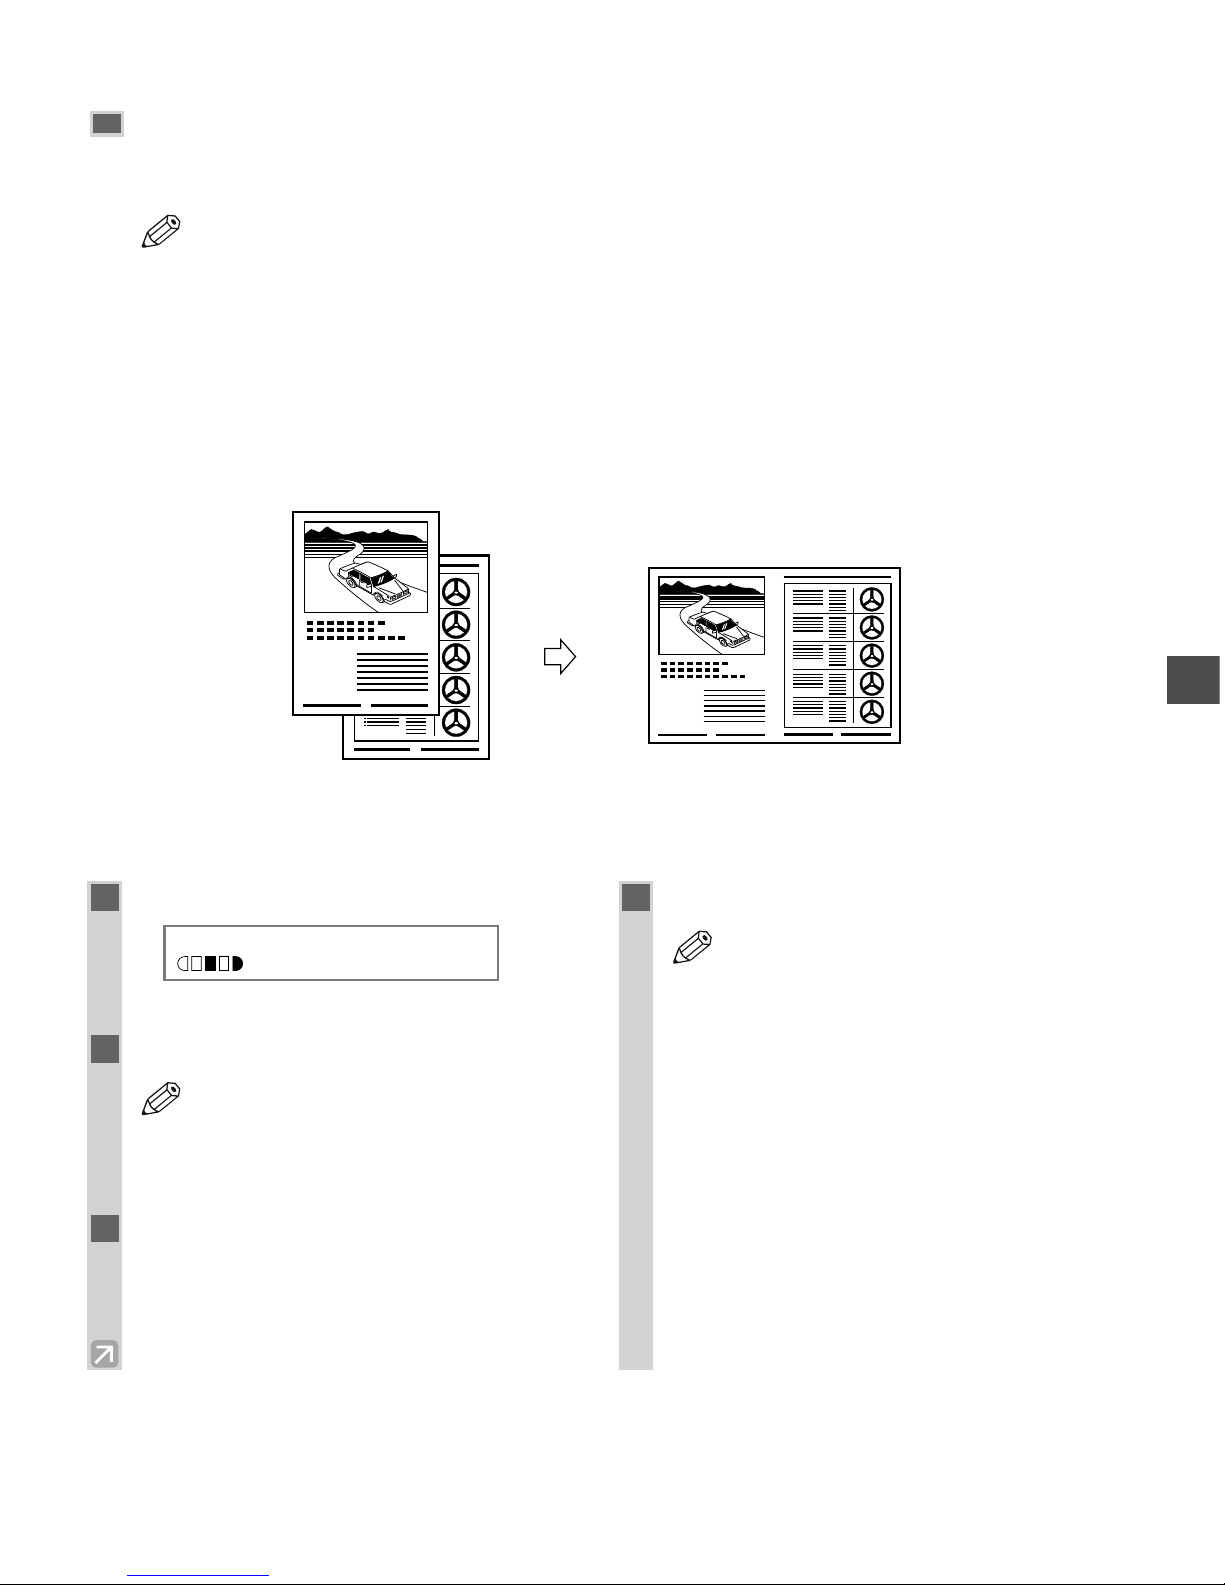
2 on 1 Copy
Use 2 on 1 to reduce 2 sheets to fit on one sheet. Two letter-size documents are automatically reduced to fit on a
letter-size page.
• The 2 on 1 copy is not available with the collate function.
• The 2 on 1 copy is not available with an enlarging or reducing function.
• When no letter-size paper is loaded in the cassette, LOAD LTR SIZE PAPER appears in the LCD
and the 2 on 1 copy is canceled. In this case, load the letter size paper in the cassette or multi-purpose
tray and set the 2 on 1 copy again.
• To make a 2 on 1 copy reducing two A4-size documents to fit on an A4-size page, set PAPER SIZE
GROUP to A or AB in COPY SETTINGS of the Additional Functions. Be sure to load A4-size paper
in the cassette or multi-purpose tray.
■ When Loading Documents in the ADF
2
1
1
2
Originals Copy
2 on 1
NOTE
1
Press 2 on 1.
Ex:
• 2ON1 appears in the LCD.
2
Load documents face down in the ADF.
• When you make a 2 on 1 copy of a
document with an odd number of pages,
add one more blank letter size paper to
scan.
3
Use the numeric keys to set the copy
quantity. (→ p. 4-3)
4
Press Start.
• If the available memory decreases,
SCANNING, PLEASE WAIT and MAKING
SPACE IN MEM are displayed
alternatively. If memory space becomes
available, the scanning begins again
automatically.
• For D680, check if there are received faxes
or faxes to be sent in memory. If so, wait
for the machine to send and print any
faxes, or delete any documents in memory
before making a copy.
• If MEMORY FULL and PRESS SET KEY
appear while scanning, the document being
scanned stops in the ADF. In this case,
press Set to make the document come out
automatically.
NOTE
NOTE
2ON1 LTR
TEXT
01
Page 39
4-10
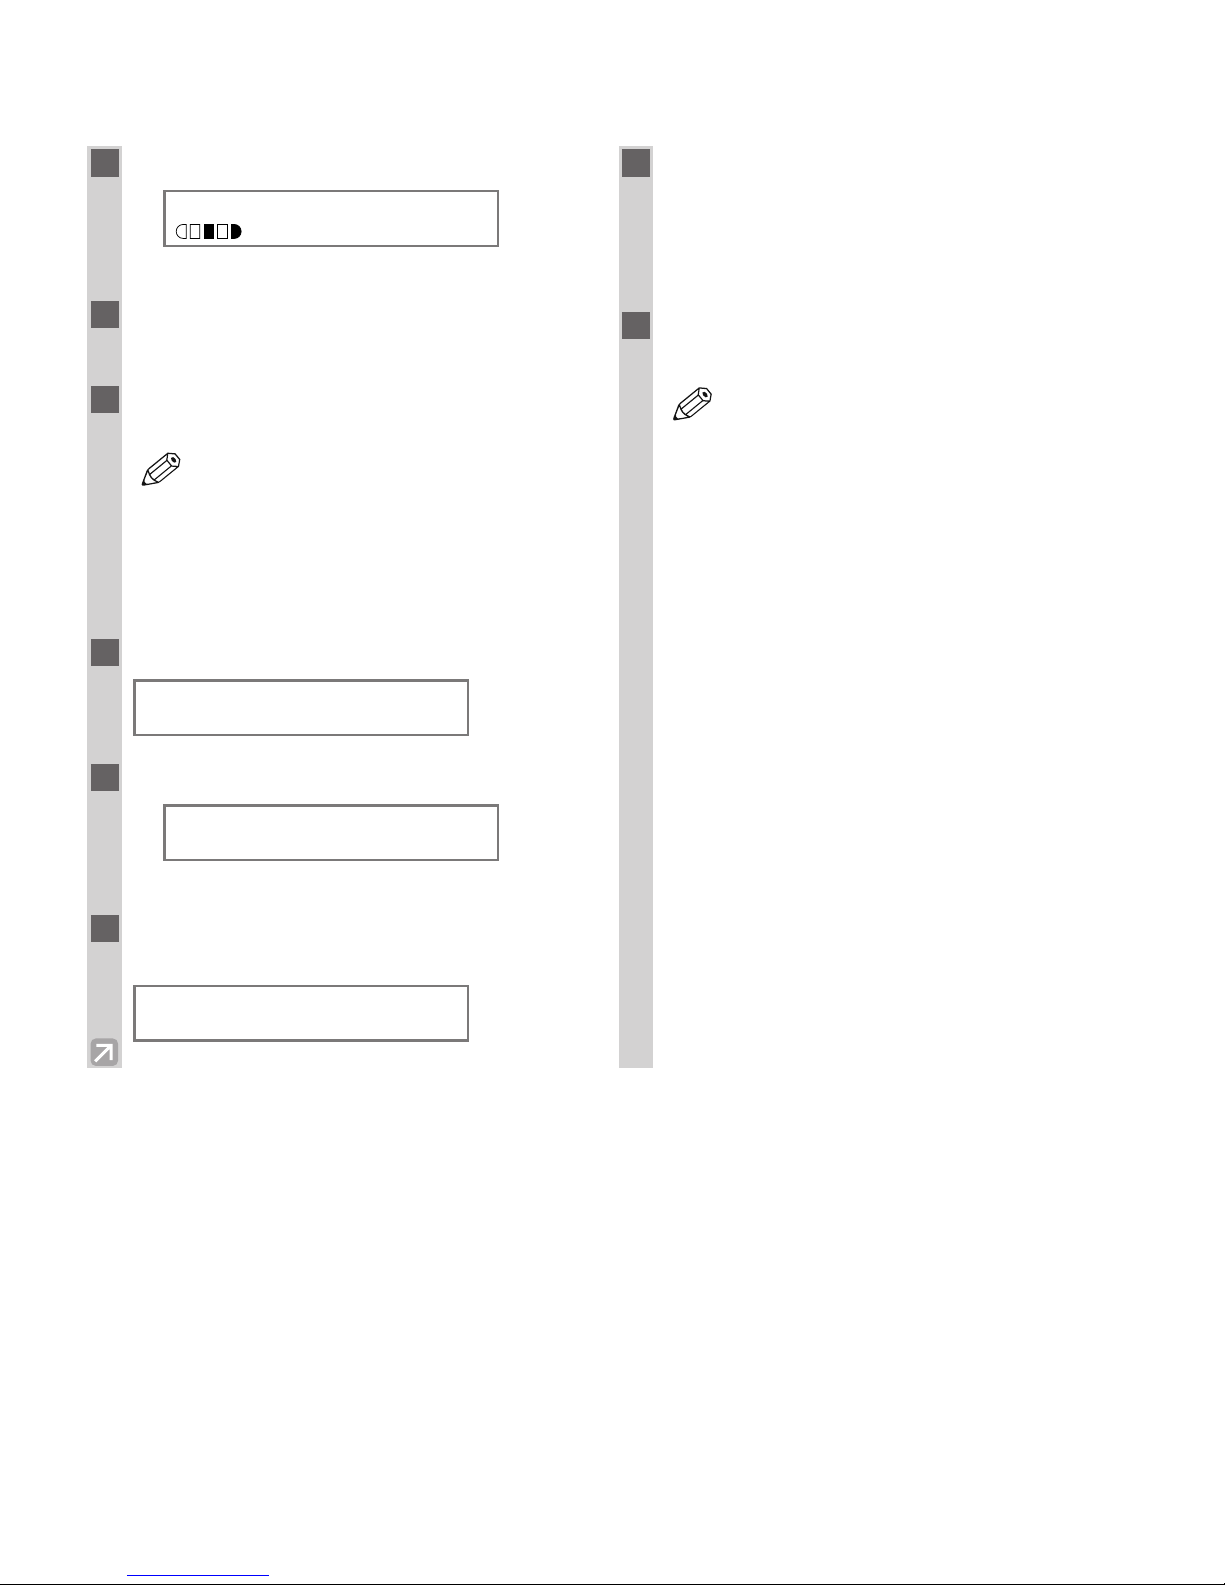
■ When Placing a Document on the Platen Glass
1
Press 2 on 1.
Ex:
• 2ON1 appears in the LCD.
2
Use the numeric keys to set the copy
quantity. (→ p. 4-3)
3
Place the last page of a document on the
platen glass.
• If a document is set from the first page, the
printing will be performed in reverse order.
• When the document has an odd number of
pages, first place a blank sheet of white
paper on the platen glass and then scan the
document.
4
Press Start.
5
Press Start.
Ex:
• The machine begins scanning.
6
Place the next page of the document on the
platen glass.
7
Press Start.
• After scanning every two sheets, the quantity of
copies of the document specified in step 2 will
print out.
• Repeat steps 6 and 7 to scan all documents.
8
Press Set to finish the 2 on 1 copy
function.
• If the available memory decreases,
SCANNING, PLEASE WAIT and MAKING
SPACE IN MEM are displayed
alternatively. If memory space becomes
available, the scanning begins again
automatically.
• For D680, check if there are received faxes
or faxes to be sent in memory. If so, wait
for the machine to send and print any
faxes, or delete any documents in memory
before making a copy. If MEMORY FULL
appears although there is no fax in
memory, change copy exposure mode to
AUTO EXPOSURE, or change image
quality mode to TEXT before making a
copy.
• If image quality mode is set to other than
TEXT when making a 2 on 1 copy of a
document which has many graphics or
photos, MEMORY FULL will appear and
copying will be canceled. If this happens,
change image quality mode to TEXT. Even
if you do so, MEMORY FULL may appear
depending on the document, and copying
may be canceled.
NOTE
NEXT PAGE :[START]
FINISH SCAN :[SET]
SCANNING
COPY NO. 0015
SET FROM END OF DOC.
PRESS THE START KEY
NOTE
2ON1 LTR
TEXT
01
Page 40
4-11
Reserve Copy
This feature allows you to reserve the next job while the machine is printing out a current job.
■ Reserving the Next Copy Job
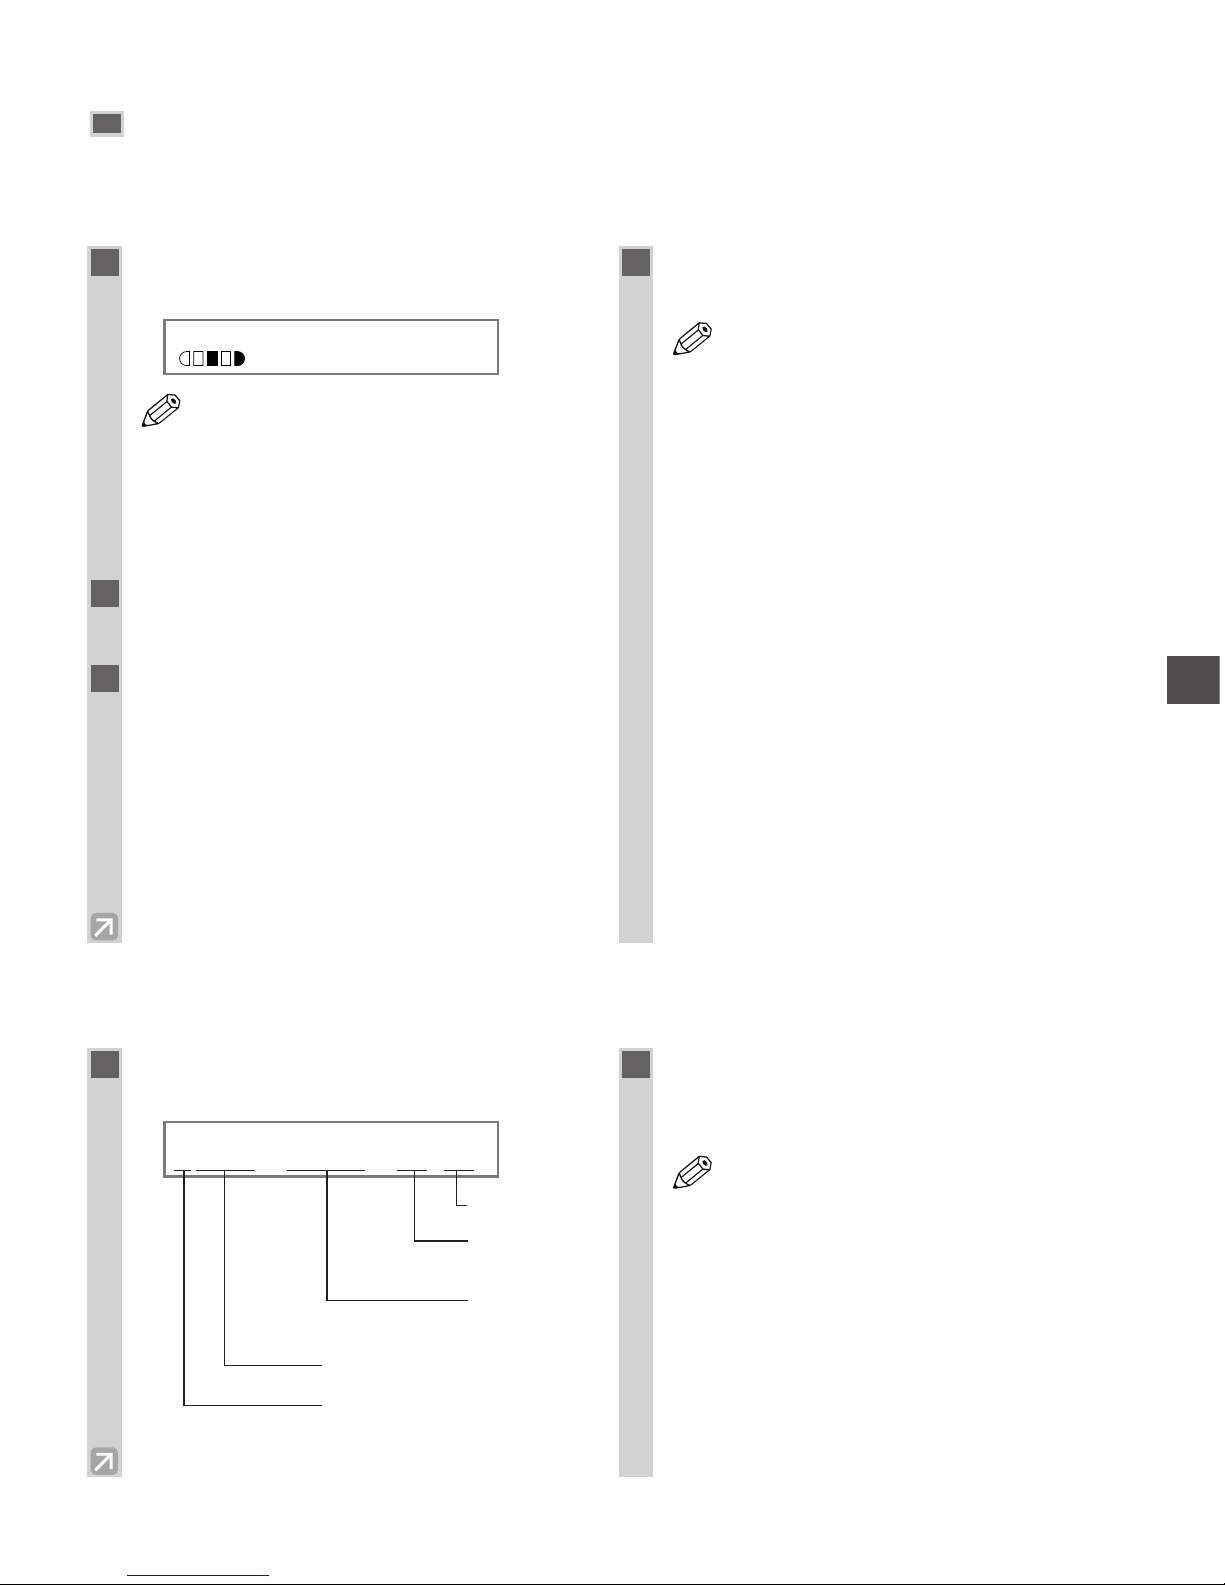
■ Confirming the Copy Job You Reserved
Making Copies
4
1
Press Stop/Reset twice while the
machine is printing out.
Ex:
• Make sure that the machine has finished
scanning all the documents, then press
Stop/Reset.
• It is necessary to return to the standby
display in order to reserve the next copy
job.
2
Place the document to be reserved, face
down on the platen glass or in the ADF.
3
Set copy features if you wish. You can set
the features below.
• Copy quantity (→ p. 4-3)
• Paper feeding location (cassette or multi-purpose
tray) (→ pp. 2-3, 2-6)
• Enlarging/reducing (→ p. 4-5)
• Image quality (→ p. 4-6)
• Exposure (→ p. 4-6)
• Collate (→ p. 4-7)
• 2 on 1 (→ p. 4-9)
4
Press Start.
• The machine begins scanning.
• After printing of the current copy job is
complete, the next copy job begins.
• If the machine’s memory becomes full
while scanning, MEMORY FULL will
appear. When the ADF is used for
scanning, the document being scanned
stops in the ADF. In this case, press Set to
make the document come out
automatically.
All of the scanned documents will be
erased if MEMORY FULL appears, so
divide the document and copy each part
separately, or select a lower image quality
mode and make copies again.
• If the available memory decreases,
SCANNING, PLEASE WAIT and MAKING
SPACE IN MEM are displayed
alternatively. If memory space becomes
available, the scanning begins again
automatically.
• Also, check that the cassette or multipurpose tray is not empty.
NOTE
NOTE
100% LTR
TEXT
01
1
Press Stop/Reset while the machine is
printing out.
Ex:
2
Use 4 (–) or e (+) to confirm the
reservation number, time and number of
documents.
• To finish confirming, press Stop/Reset.
NOTE
SELECT JOB TO CANCEL
A0044 16:20 02× 30
No. of copy
No. of
document
Reservation
time
Reservation No.
A: Printing
Blank: Waiting
–: No paper, paper jams, etc.
Page 41
4-12
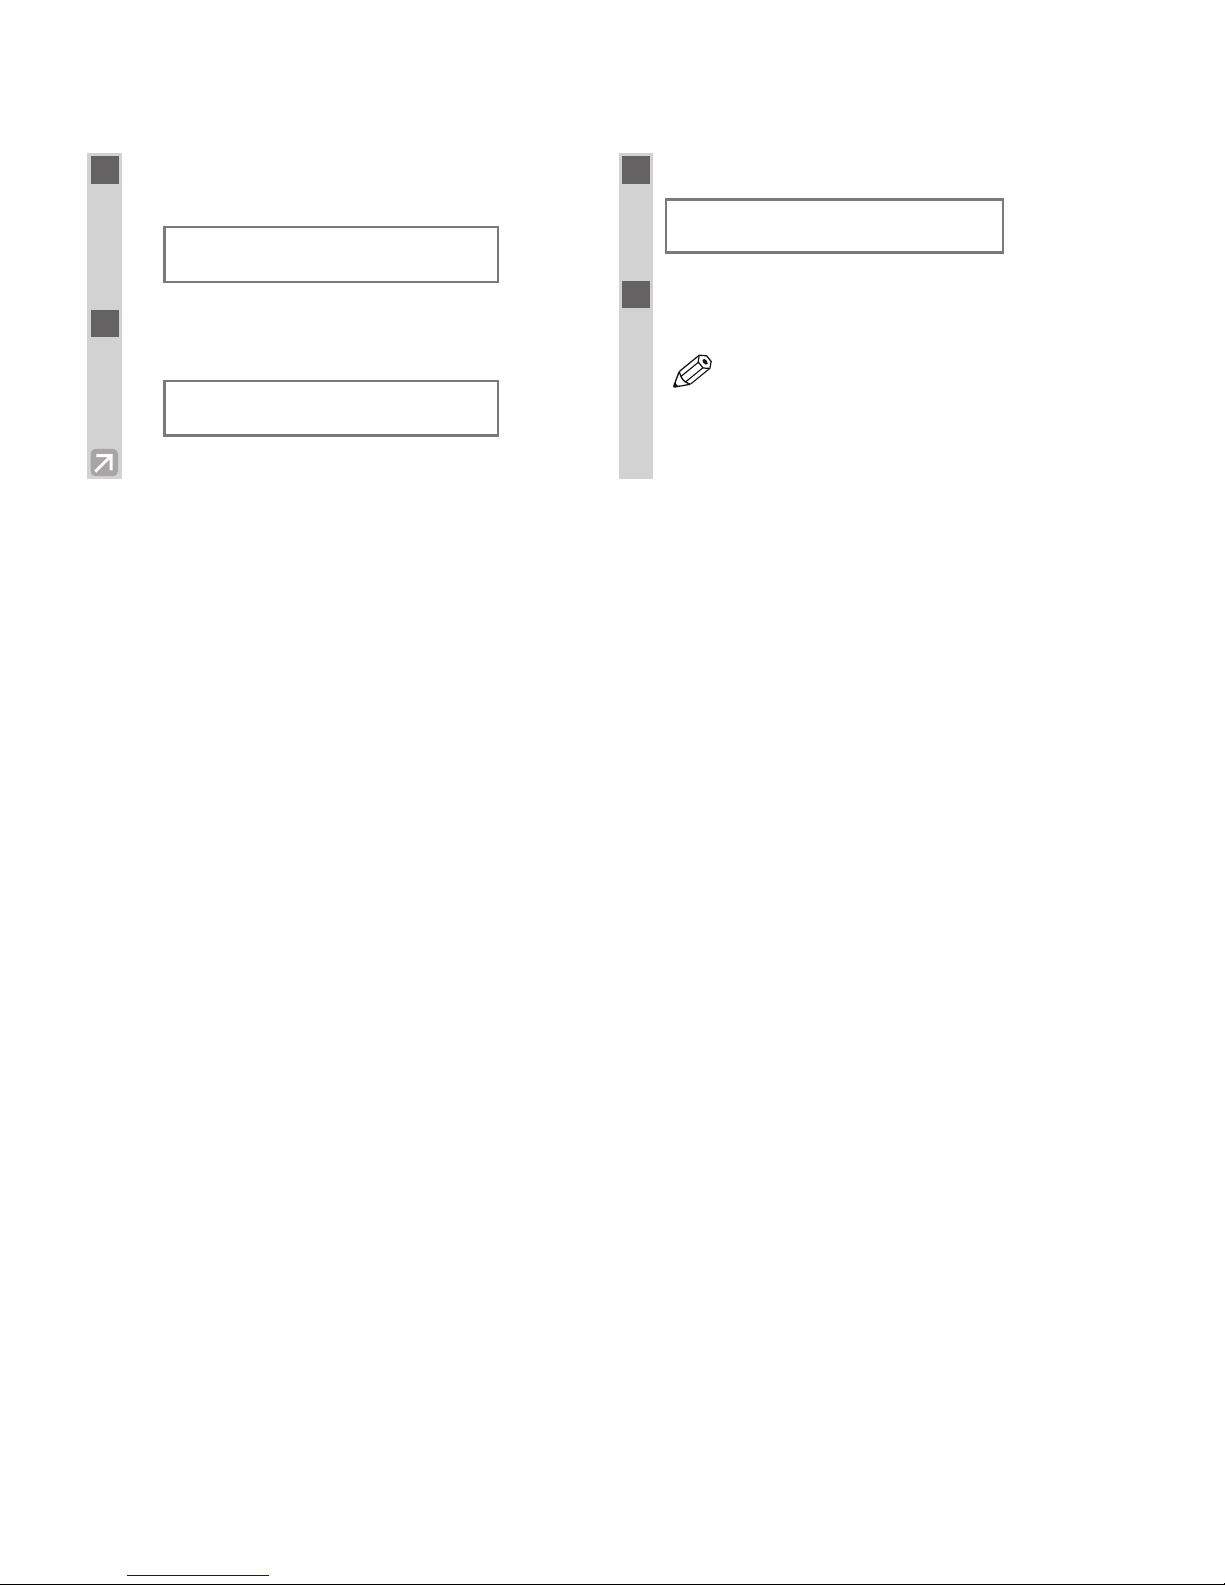
■ Deleting the Copy Job You Reserved
1
Press Stop/Reset while the machine is
printing out.
Ex:
2
Use 4 (–) or e (+) to display the job to be
deleted.
Ex:
3
Press Set.
4
Press 4 (–).
• The reserved copy job is deleted.
• To cancel deleting the copy job, press e
(+).
• Once the copy job is deleted, it is
impossible to restore the job again.
NOTE
CANCEL COPYING?
<YES NO>
SELECT JOB TO CANCEL
0045 16:40 01× 20
SELECT JOB TO CANCEL
A0044 16:20 02× 30
Page 42
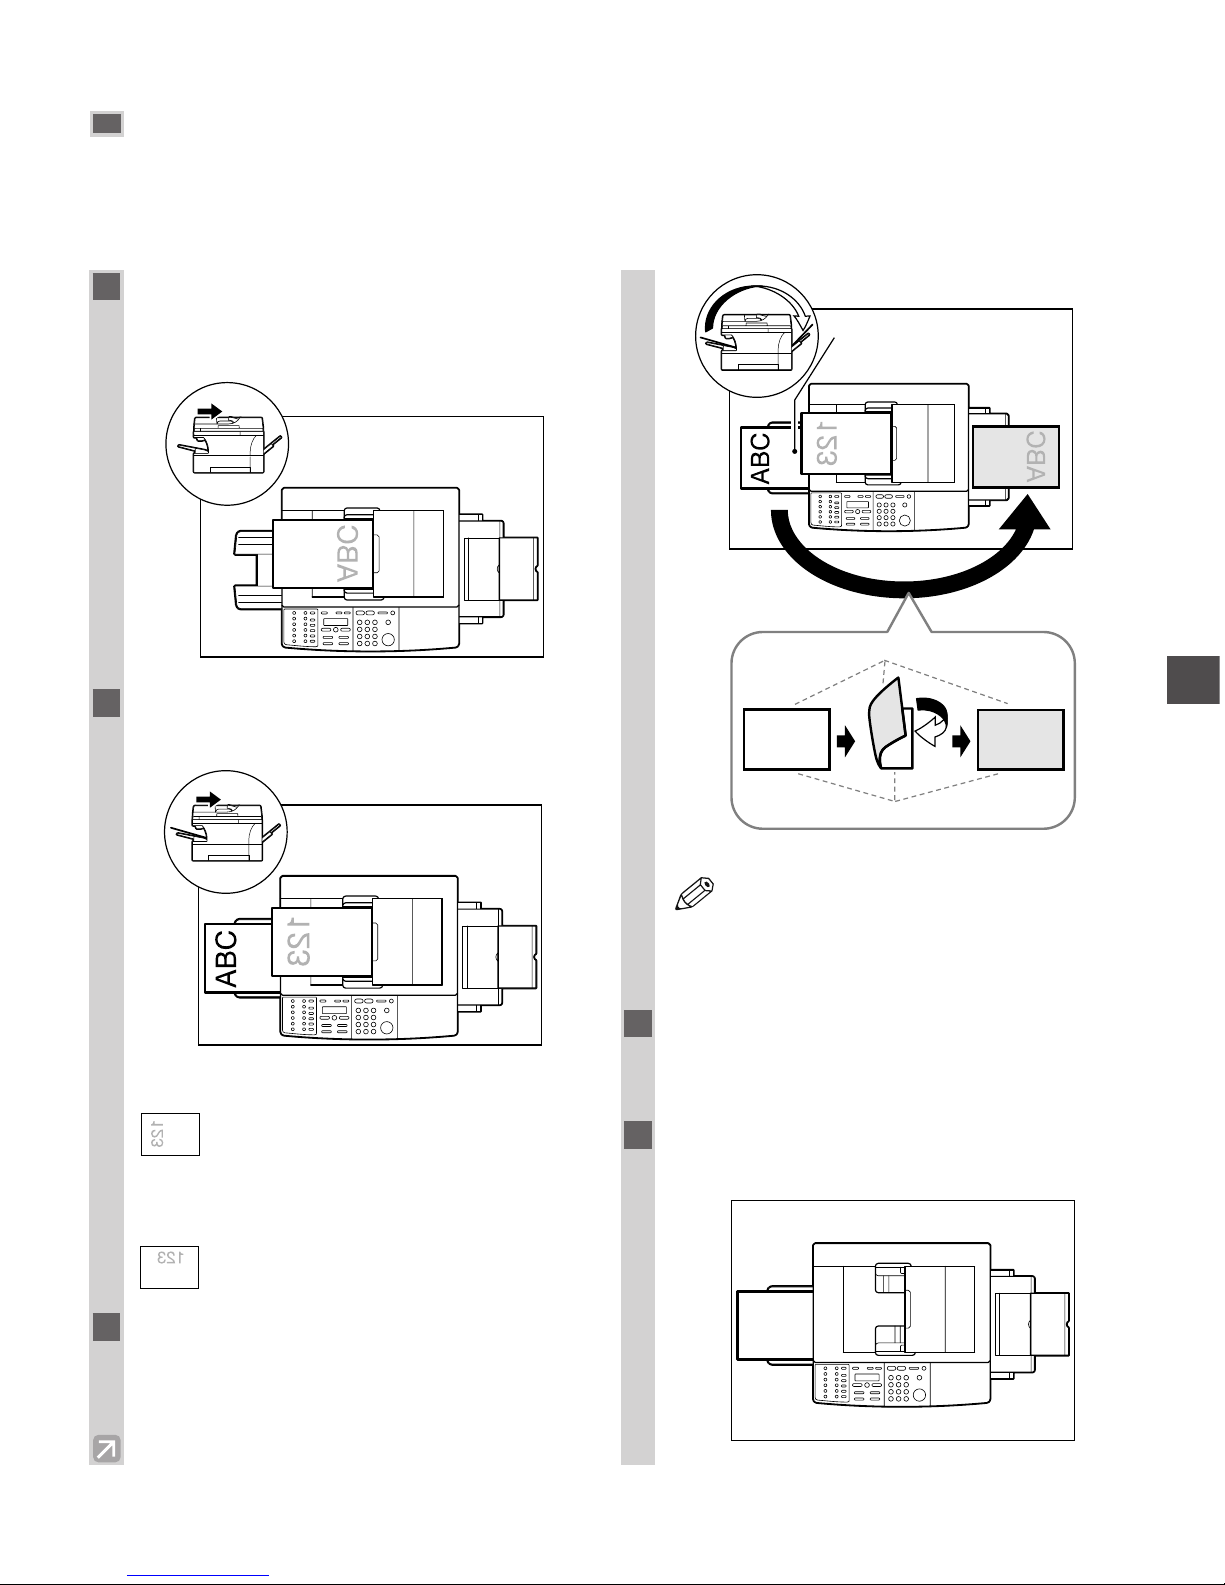
4-13
Two-Sided Copy
Using the multi-purpose tray, you can copy 2 documents on opposite sides of a single sheet.
■ When Loading Documents in the ADF
Making Copies
4
1
Load the first page of the document face
down in the ADF, then press Start to begin
copying.
2
Load the next page of the document in the
ADF.
Portrait orientation documents:
Load the page so that the top edge is
opposite to the top edge of the previous
page.
Landscape orientation documents:
Load the page so that the orientation is the
same as the previous page.
3
Turn over the copy you made in step 1 to
make sure that the inner and front side of it
will remain in the same position as shown
below, then insert it into the multi-purpose
tray.
• If the copied sheet is curled, uncurl it
before inserting it into the multi-purpose
tray. Failure to do so will cause paper
creases and paper jams.
4
Press Paper Select to select the multi-
purpose tray.
• For details, refer to p. 4-3.
5
Press Start to copy the next page to finish
making your two-sided copy.
123
NOTE
Turn over the
copy
Insert
ABC
ABC
ABC
Front side
Inner side
Copy of the first page of the
document
Page 43
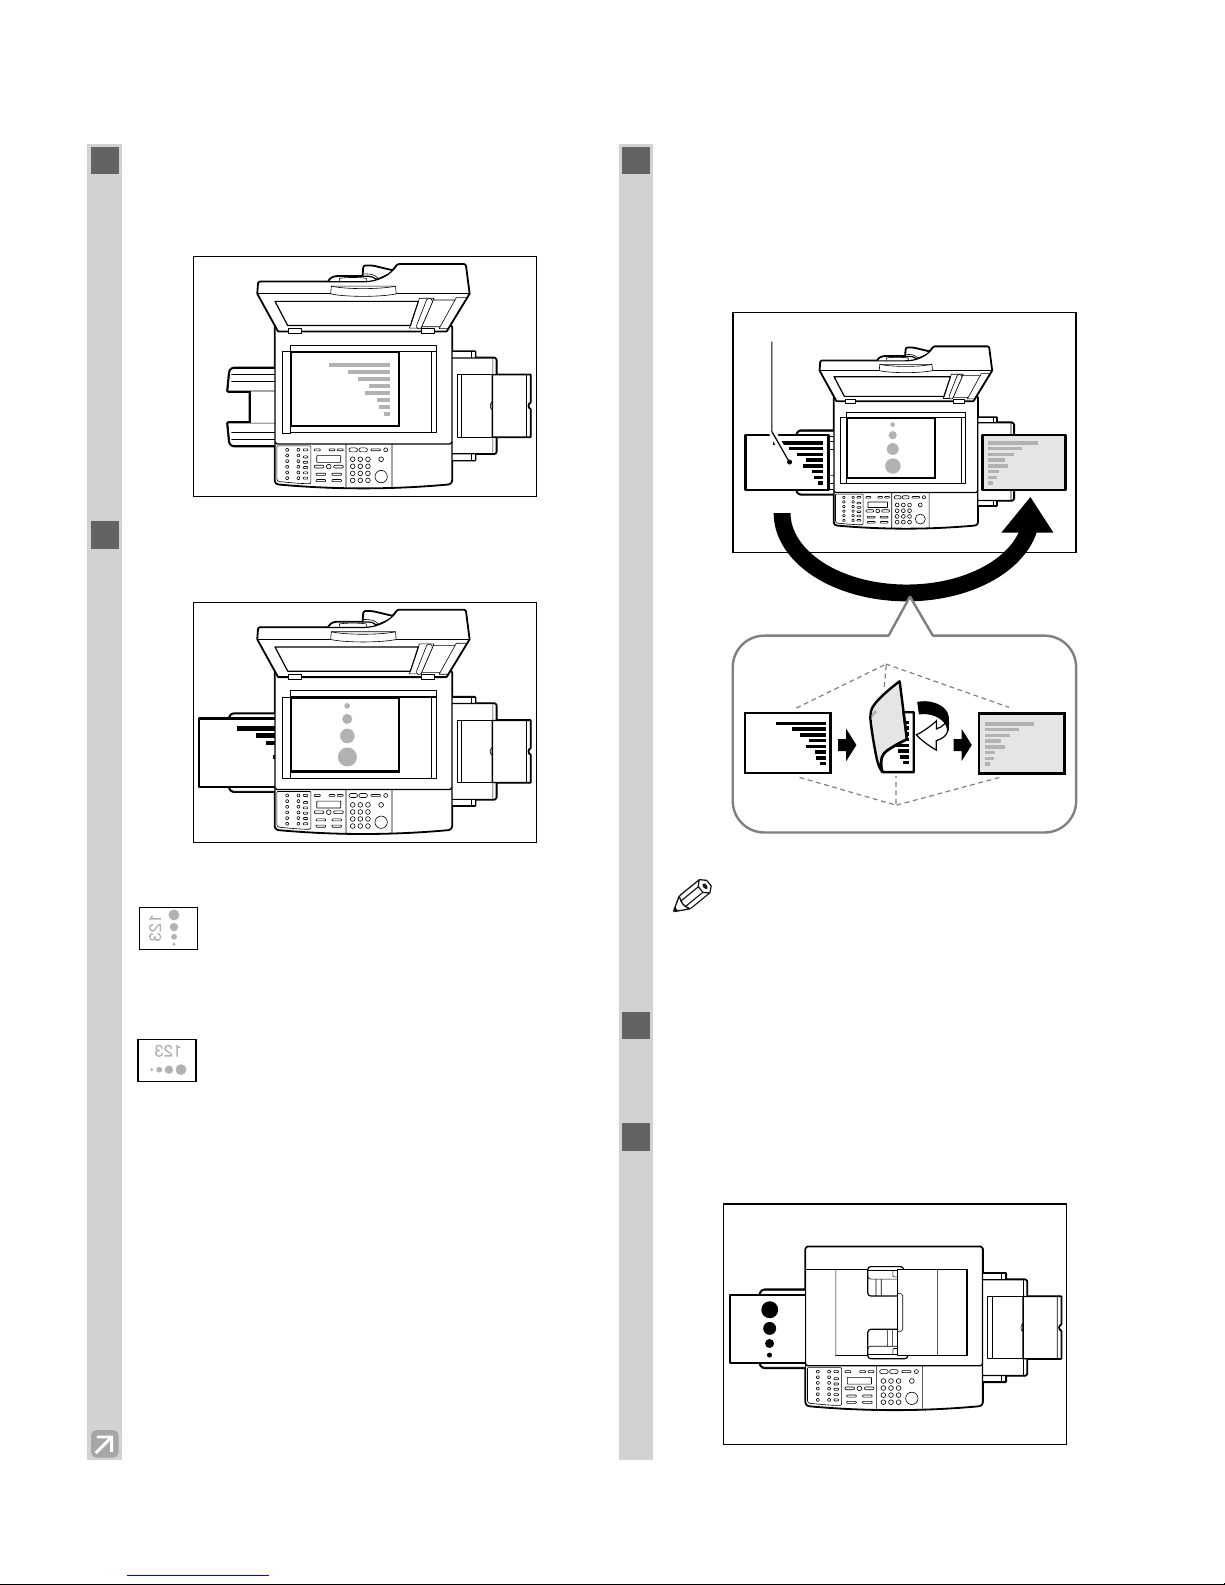
4-14
■ When Placing a Document on the Platen Glass
1
Place the first page of the document face
down on the platen glass, then press Start
to begin copying.
2
Place the next page of the document on the
platen glass.
Portrait orientation documents:
Place the page so that the top edge is
opposite to the top edge of the previous
page.
Landscape orientation documents:
Place the page so that the orientation is the
same as the previous page.
3
Turn over the copy you made in step 1 to
make sure that the inner and front side of it
will remain in the same position as shown
below, then insert it into the multi-purpose
tray.
• If the copied sheet is curled, uncurl it
before inserting it into the multi-purpose
tray. Failure to do so will cause paper
creases and paper jams.
4
Press Paper Select to select the multi-
purpose tray.
• For details, refer to p. 4-3.
5
Press Start to copy the next page to finish
making your two-sided copy.
123
NOTE
ABC
ABC
123
Copy of the first page of the document
Insert
ABC
ABC
ABC
Inner side
Front side
Turn over the
copy
ABC
123
ABC
Page 44
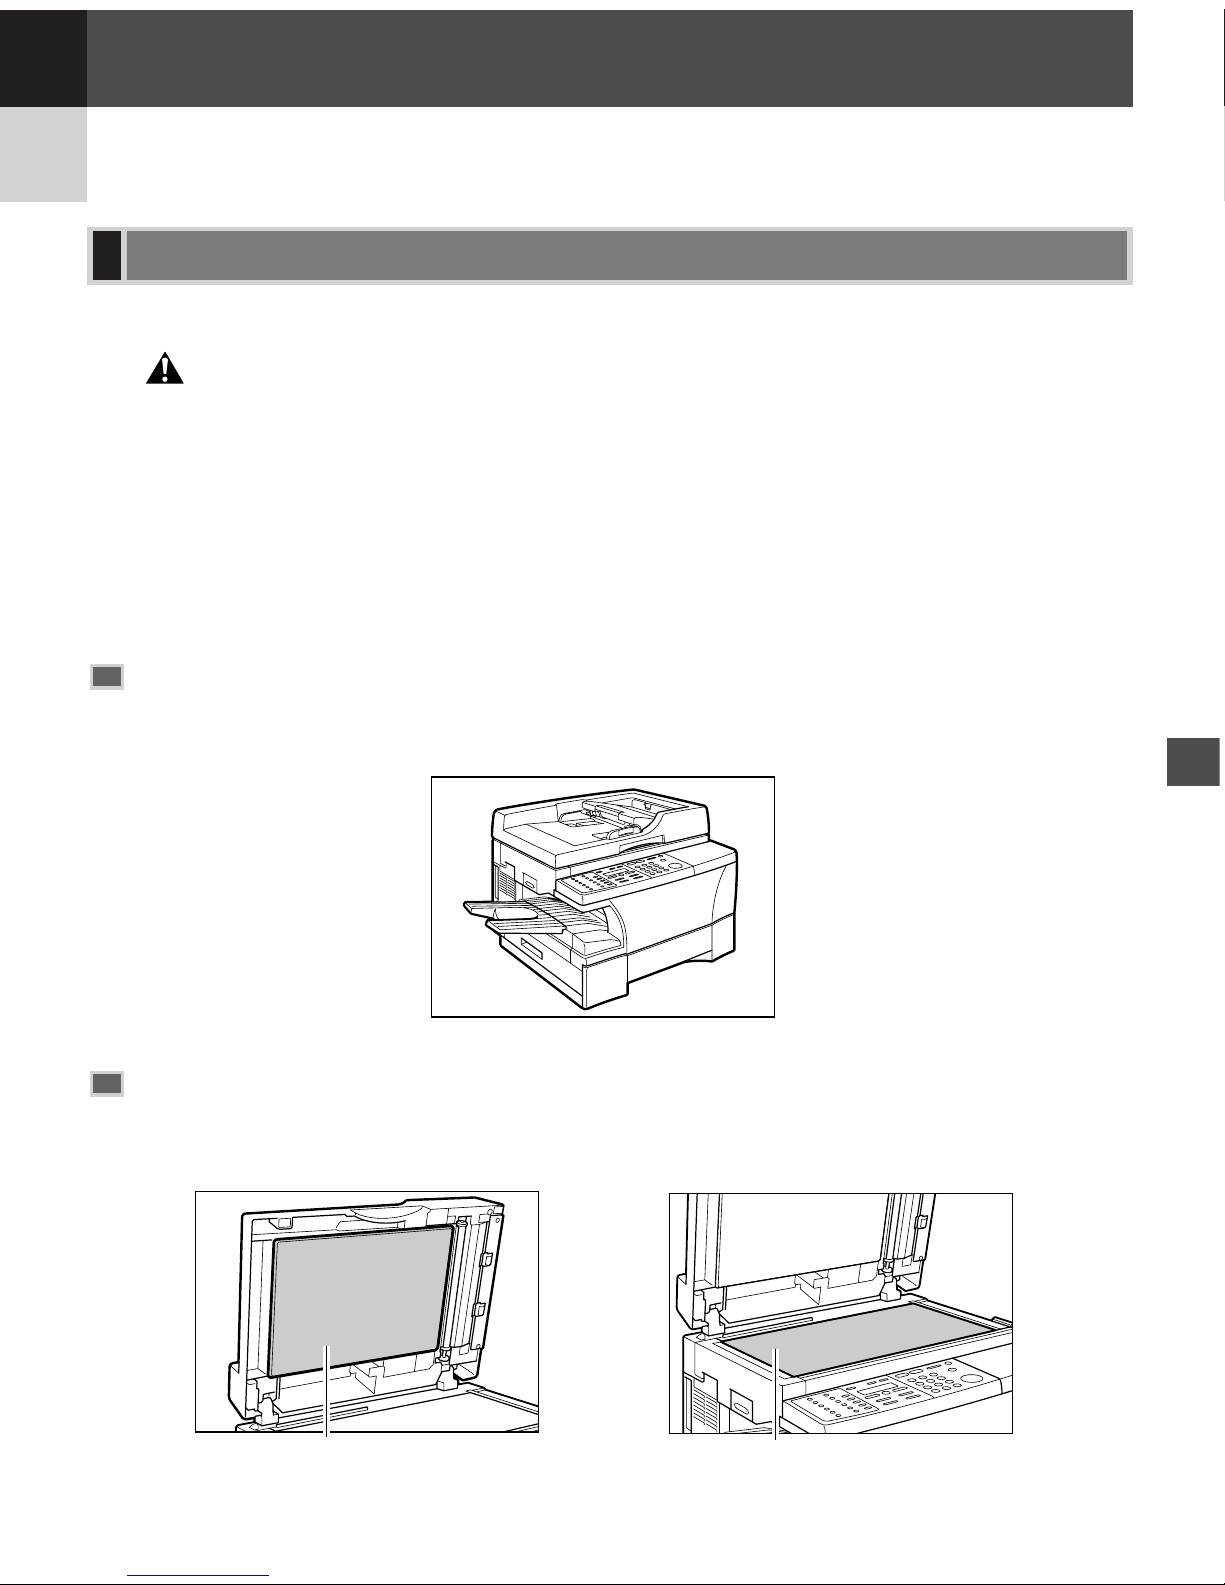
5-1
Your machine requires little periodic maintenance. This section describes the necessary cleaning procedures for
your machine.
• When cleaning the machine’s exterior or the platen glass, be sure to disconnect the power cord
before cleaning the machine.
• For the model with the fax function, print any received faxes stored in memory before
disconnecting the power cord, since documents in memory are backed up only for about 2 hours
when the power cord is disconnected. (→ Fax Guide)
• Do not use tissue paper, paper towels, or similar materials for cleaning; they can stick to the
components or generate static charges.
Use a soft cloth to avoid scratching the components.
• Never use volatile liquids such as thinner, benzene, acetone, or any other chemical cleaner to clean
the interior of the machine; these can damage the machine’s components.
Cleaning the Exterior
Wipe the machine’s exterior with a clean, soft, lint-free cloth moistened with water or diluted dishwashing
detergent solution.
Cleaning the Scanning Area
Wipe the scanning area (shaded area) with a clean, soft, lint-free cloth moistened with water, then wipe with a
clean, soft, dry, lint-free cloth.
Platen glass
Rear side of the ADF
CAUTION
Periodic Cleaning
Maintenance
5
Maintenance
Chapter 5
Page 45
5-2
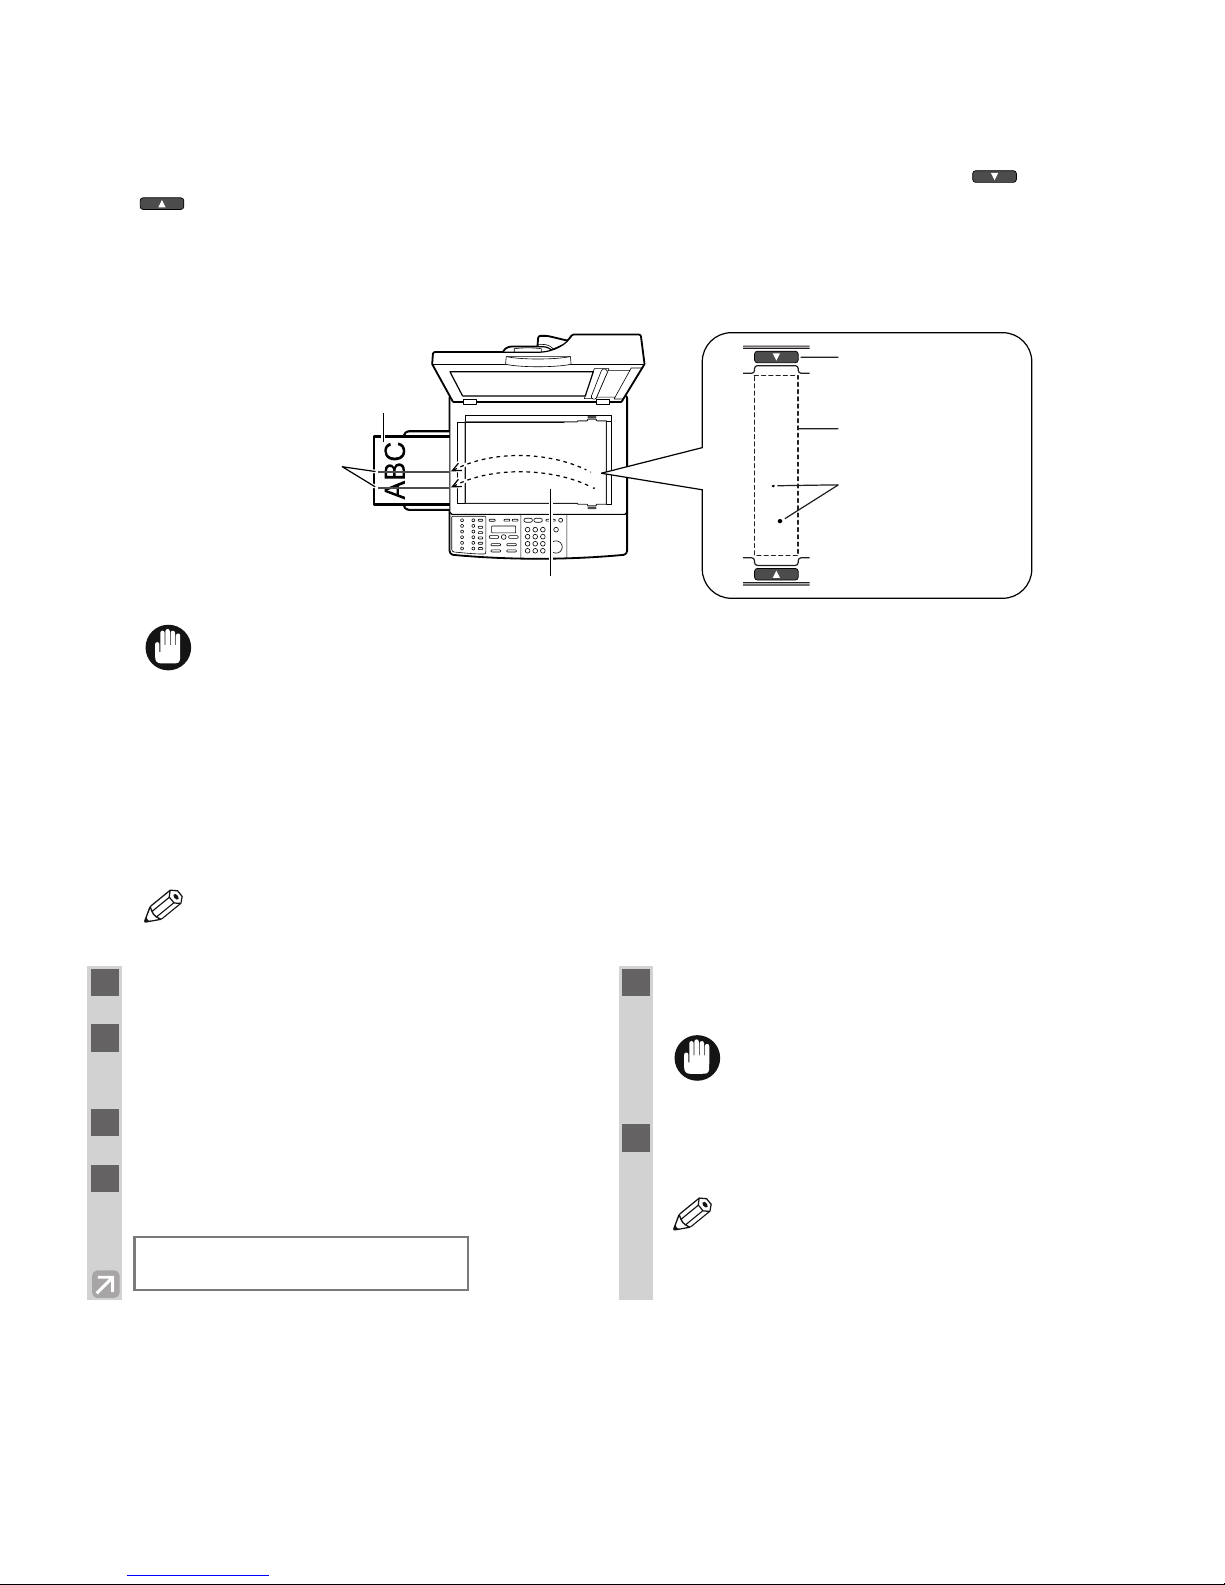
■ Cleaning the Read Area of the Platen Glass
Black lines may appear in copies as shown in the illustration below when the ADF is used to feed documents.
This is caused by paste, ink, correction fluid, or other foreign matter in the read area (between and
) of the platen glass. Use a clean soft cloth to wipe the read area clean. Take particular care to clean at the
locations where the black lines are appearing on copies.
If you have trouble getting the glass clean, wipe with a cloth moistened with water or a mild neutral detergent,
and then wipe the glass dry with another cloth.
• Paste, ink, correction fluid, and other foreign matter can soil the platen glass when you send a
document through the ADF while the paste, ink, or correction fluid on the original is still wet. This is
what causes black lines on copies. Whenever you load a document in the ADF, always check to make
sure that any paste, ink, or correction fluid that is on the document is completely dry.
■ Cleaning the Rollers Inside the Main Unit
If the rollers inside the main unit are dirty, it will affect the copy quality. In this case, you can clean the rollers
using the Additional Functions.
• While the In Use/Memory indicator is lit, the machine does not clean the roller even if you perform the
procedure below (for the imageCLASS D680 model).
NOTE
IMPORTANT
1
Press Additional Functions.
2
Use 4 (–) or e (+) to select
ADJUST/CLEAN.
3
Press Set.
4
Use 4 (–) or e (+) to select ROLLER
CLEANING.
5
Set letter size paper in the multi-purpose
tray.
• You must use a plain LTR size paper.
6
Press Set.
• The machine begins cleaning the rollers.
• It takes about 3 minutes until the machine
finishes cleaning the roller.
NOTE
IMPORTANT
ADJUST/CLEAN
1.ROLLER CLEANING
Platen glass
Copy
Black lines
Read area label
Read area
Paste, ink,
correction fluid, etc.
Page 46
5-3
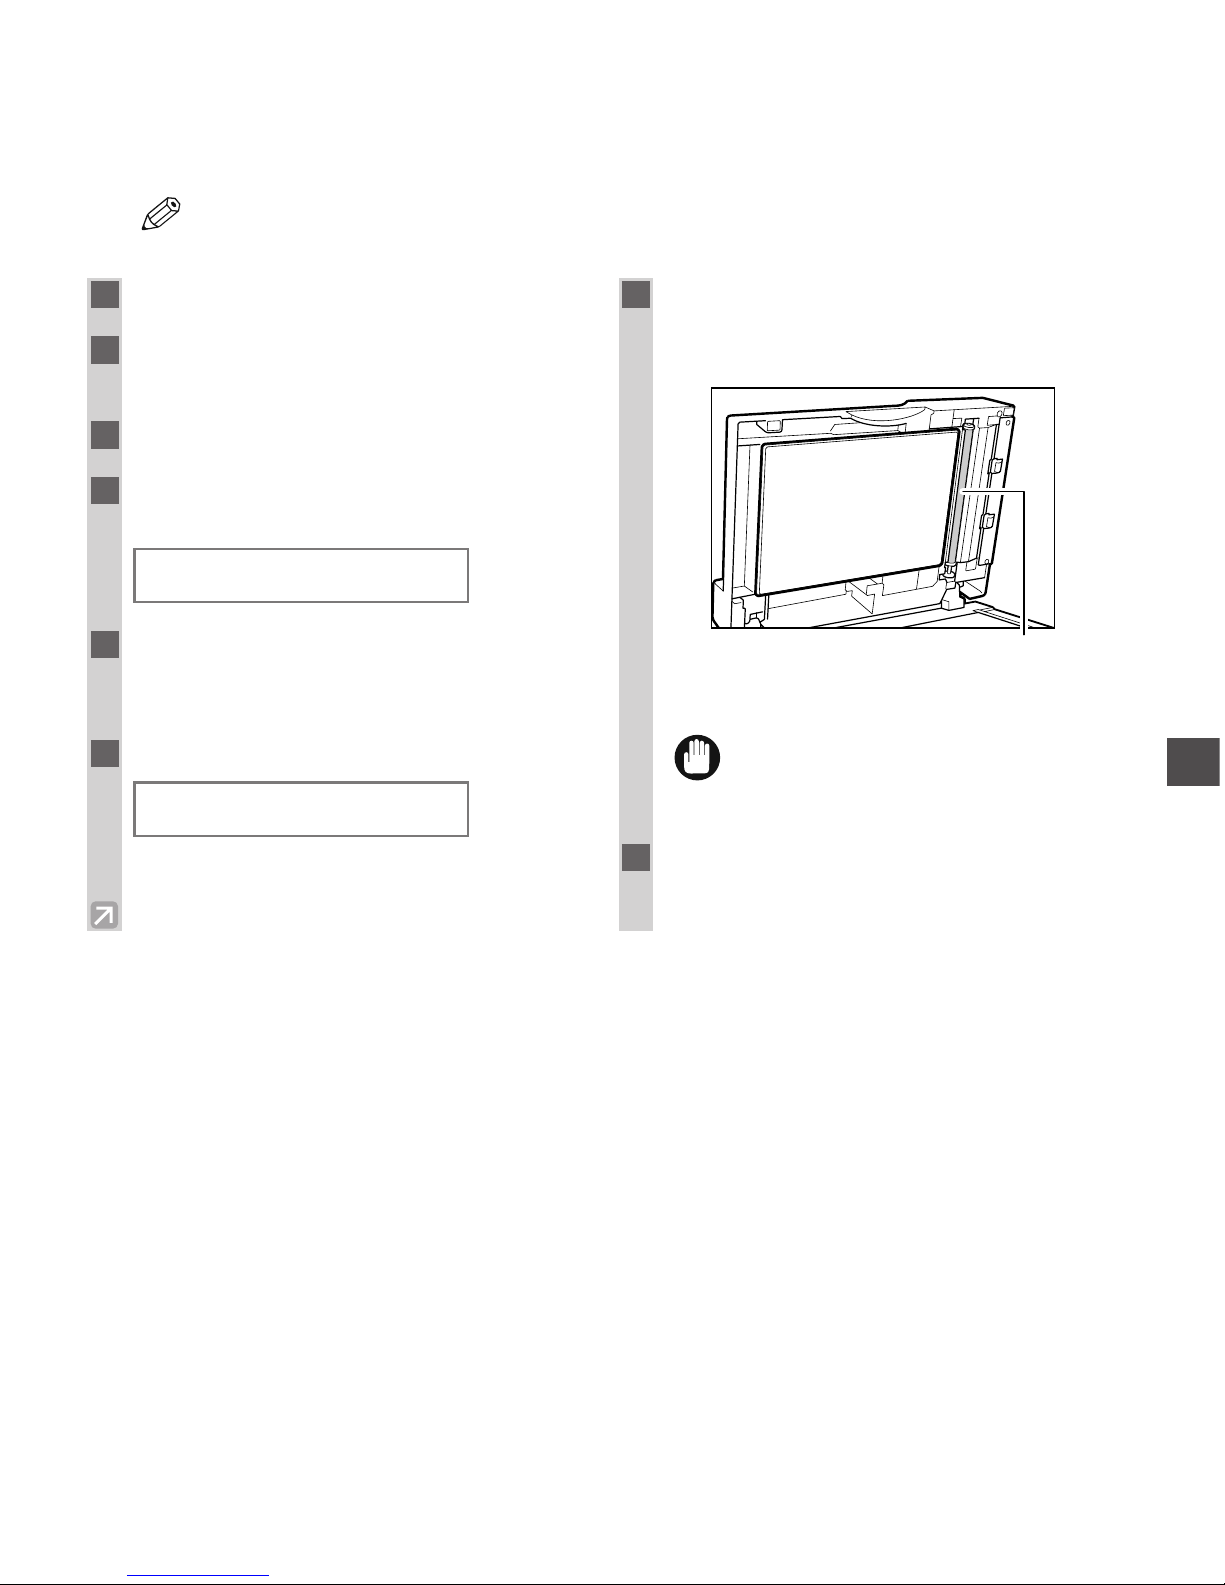
■ Cleaning the ADF Roller
If the ADF roller is dirty, the documents will be dirty after you feed them into the ADF. In this case, you can
clean the ADF roller using the Additional Functions.
• If a paper jam occurs in the ADF, remove jammed paper from the ADF (→ p. 6-3), then perform the
procedure below.
NOTE
Maintenance
5
1
Press Additional Functions.
2
Use 4 (–) or e (+) to select
ADJUST/CLEAN.
3
Press Set.
4
Use 4 (–) or e (+) to select CLEAN ADF
ROLLER.
5
Open the ADF.
• If you attempt to clean the ADF roller when the
ADF is closed, OPEN THE ADF appears.
6
Press Set.
7
Each time you press Set, the ADF roller
rotates about 1/3 of the roller. Wipe the
ADF roller with a dry cloth.
• Repeat this step until the ADF roller becomes
clean.
• Do not touch the ADF roller being rotated.
Your fingers or clothing may be pinched in
the roller, resulting in personal injury.
8
Press Stop/Reset to finish the cleaning.
• The LCD returns to standby display.
IMPORTANT
ADF roller
START CLEAN :[SET]
END CLEAN :[STOP]
ADJUST/CLEAN
2.CLEAN ADF ROLLER
Page 47
5-4
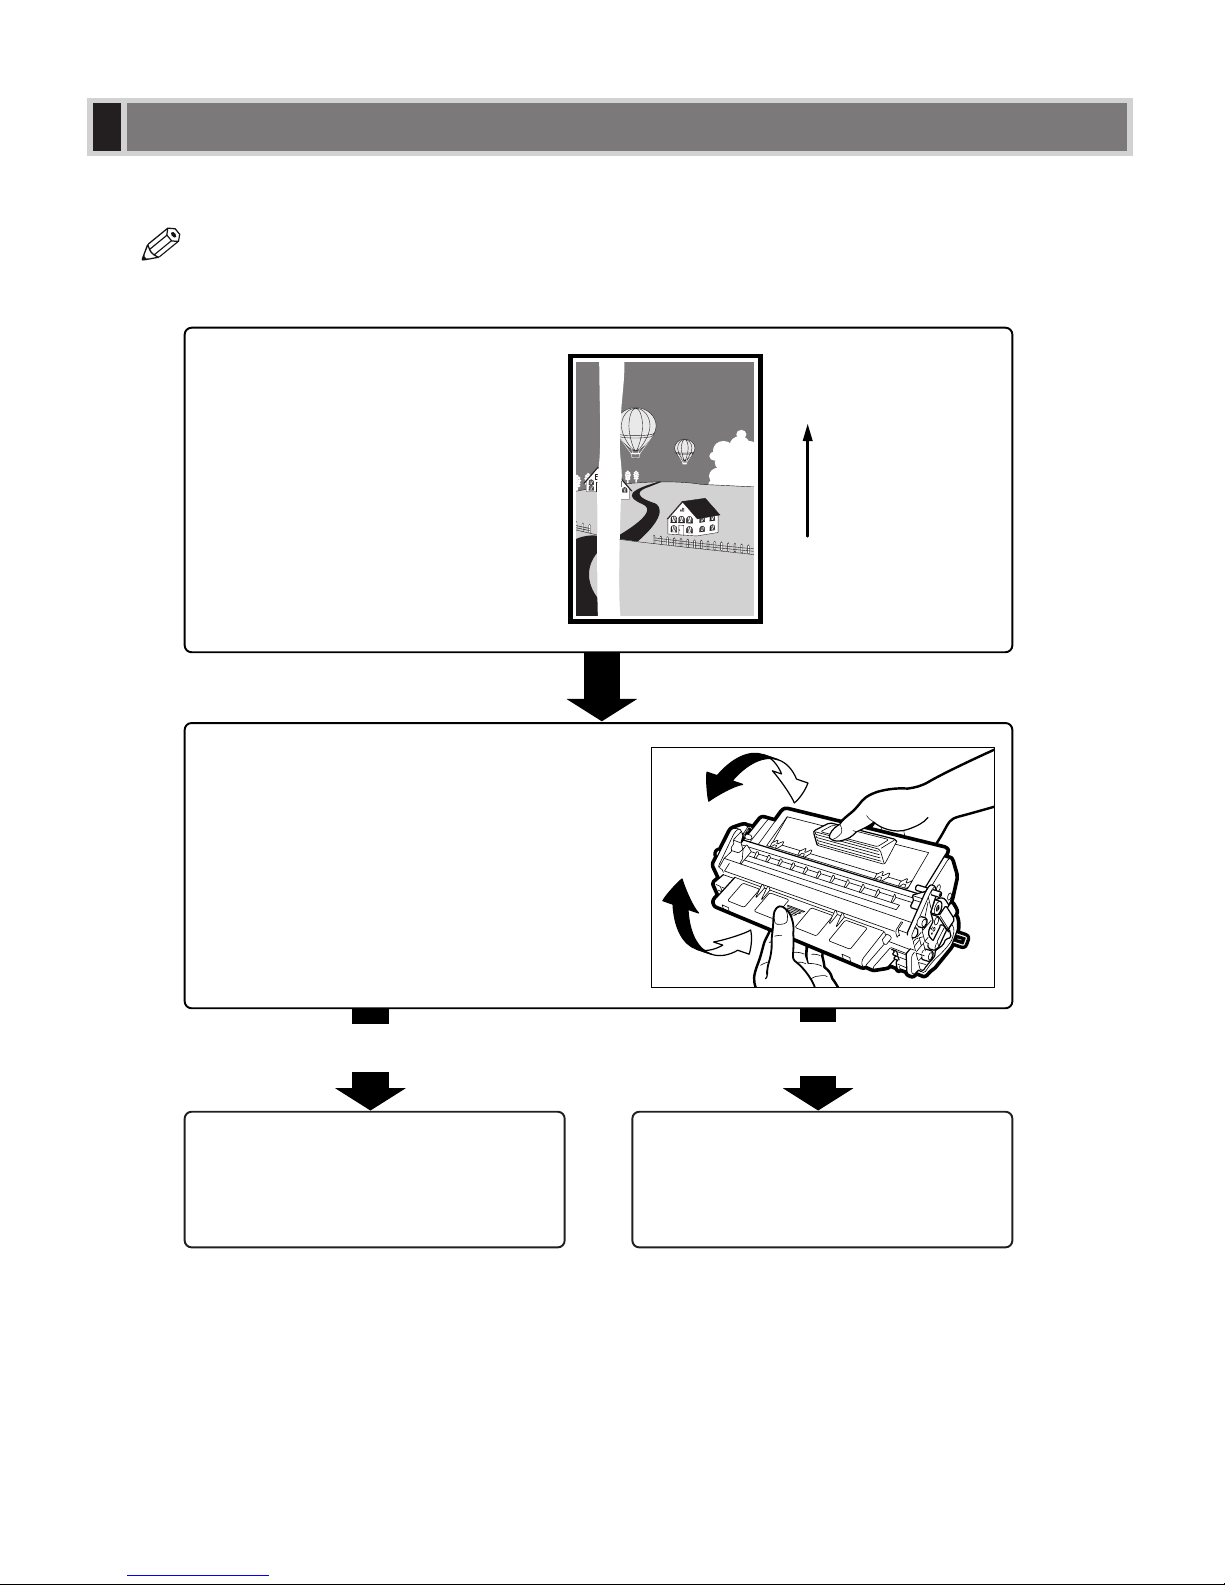
The cartridge is a consumable item and should be replaced when the toner runs out.
The following guidelines will help you to determine when to replace the cartridge.
• When the toner is running low, the LCD displays REPLACE CARTRIDGE.
If white streaks or light bands
are still present
If the copies appear normal
Remove the cartridge from the machine.
Rock the cartridge 5 or 6 times to
distribute the toner evenly.
Re-install the cartridge in the machine.
Then, make a few test copies or
printouts.
If white streaks or light bands
are displayed on copies, or
REPLACE CARTRIDGE appears
on the LCD, the toner in the
cartridge is running low.
You can use the cartridge,
however, a new one will be
needed soon.
Replace the cartridge with a
new one. (→ p. 5-7)
Paper feeding
direction
NOTE
When to Replace the Cartridge
Page 48
5-5
Maintenance
5
Copy Yield
This section describes the approximate number of copies that can be made per cartridge.
Approximate copy yield
Canon L50 Cartridge: approx. 5,000 copies (A4 at 5% ink coverage).
* The term “A4 at 5% ink coverage” denotes an original on which the area covered with black ink is 5% of the
total area of an A4-size sheet.
• The actual number of copies that can be made per cartridge depends in part on the copy exposure setting, room
temperature and humidity.
• If you copy a large number of originals which contain heavy print or many photographs, toner consumption
will increase, and white streaks will appear on copies sooner than indicated above. Toner consumption will
also increase if you copy with the ADF left open.
• Small-sized originals and originals with less print will use less toner. However, although you may be able to
use the cartridge longer than indicated above, dark bands might appear on copies.
Handling and Storing the Cartridge
This section describes the precautions to ensure optimum copy quality.
Handling Precautions
• Do not throw cartridge into open flames, as this may cause the toner to ignite and result in burns
or a fire.
• The cartridge emits low level magnetic flux. If you use a cardiac pacemaker and feel
abnormalities, please move away from the cartridge, and consult your doctor.
• Never attempt to disassemble the cartridge or open the protective shutter of the drum.
• If the machine is brought from the cold outdoors into a warm room, or if the room is rapidly heated,
condensation may form inside the machine.
This can adversely effect the quality of your copy images (e.g., copies are completely black).
When the machine is exposed to such conditions, allow at least two hours for the machine to adjust to
room temperature before attempting to use it.
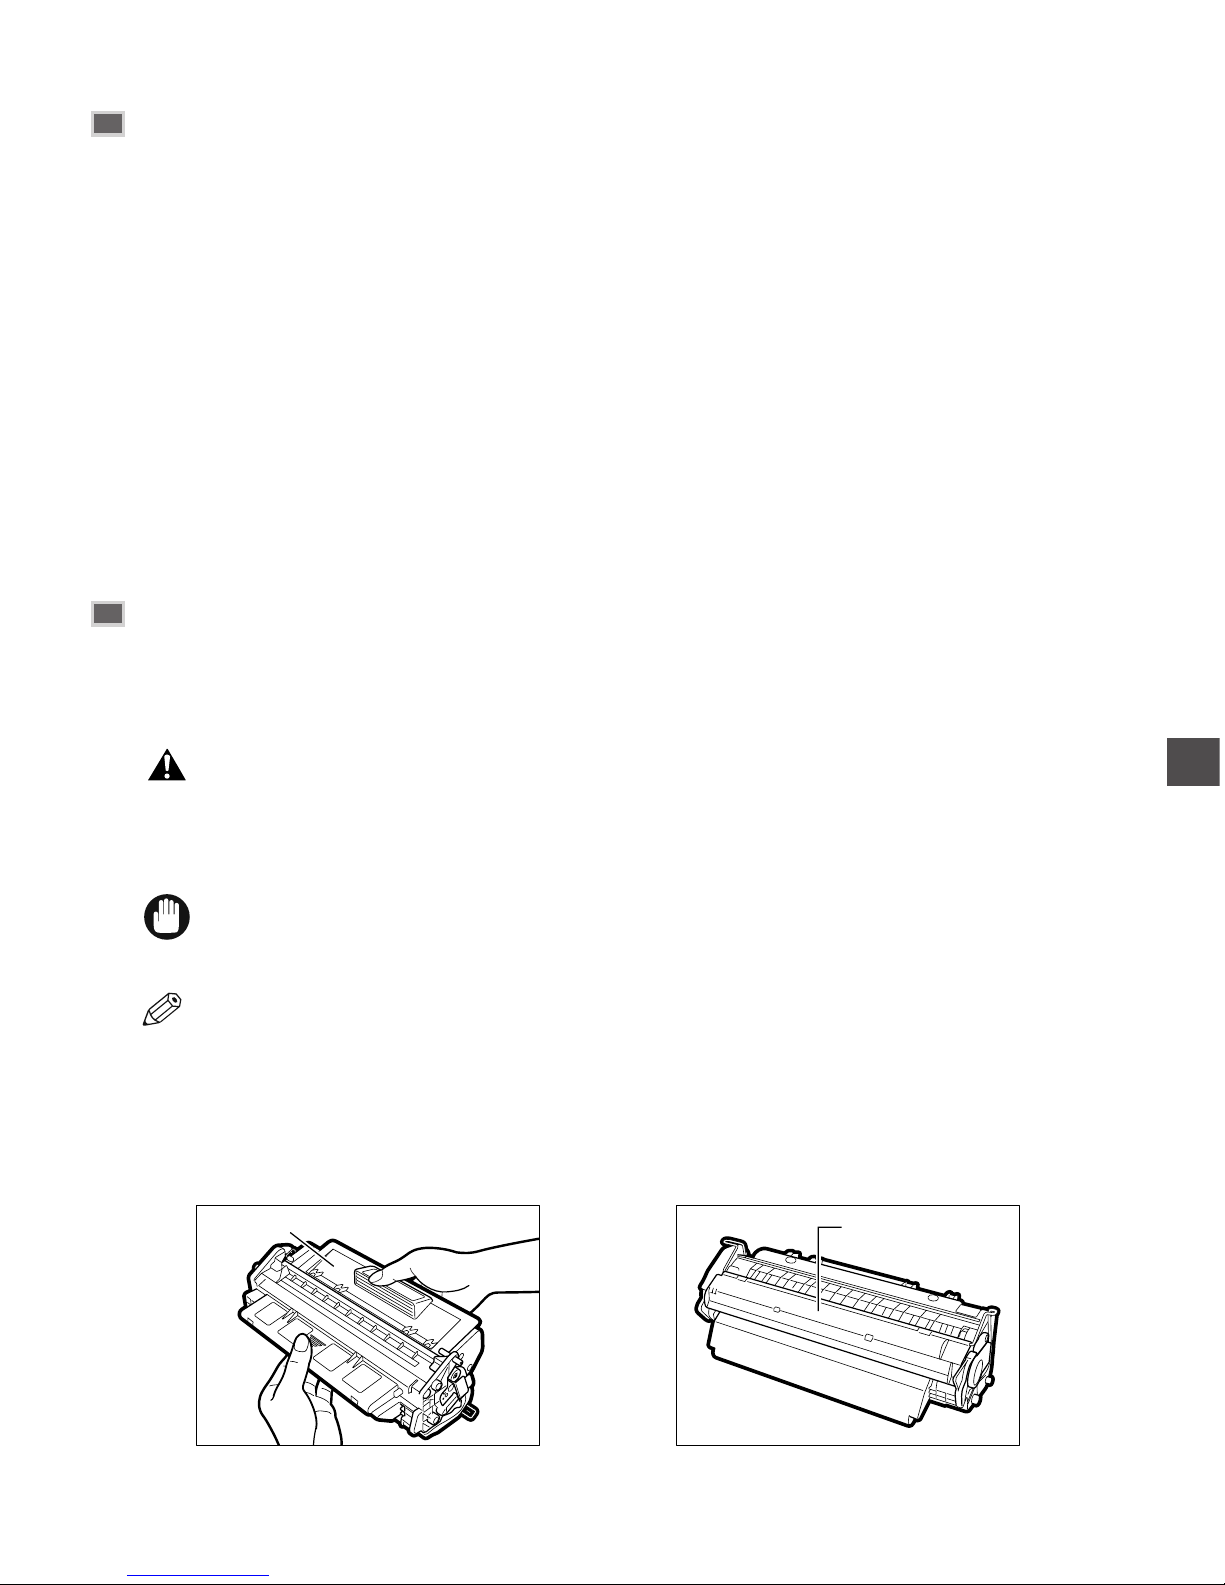
• Always hold the cartridge as shown so that the side with the written instructions facing upward. Do not
forcefully move or push the protection shutter of the drum in any way.
Drum’s protective
shutter
Written instructions
NOTE
IMPORTANT
WARNING
Page 49
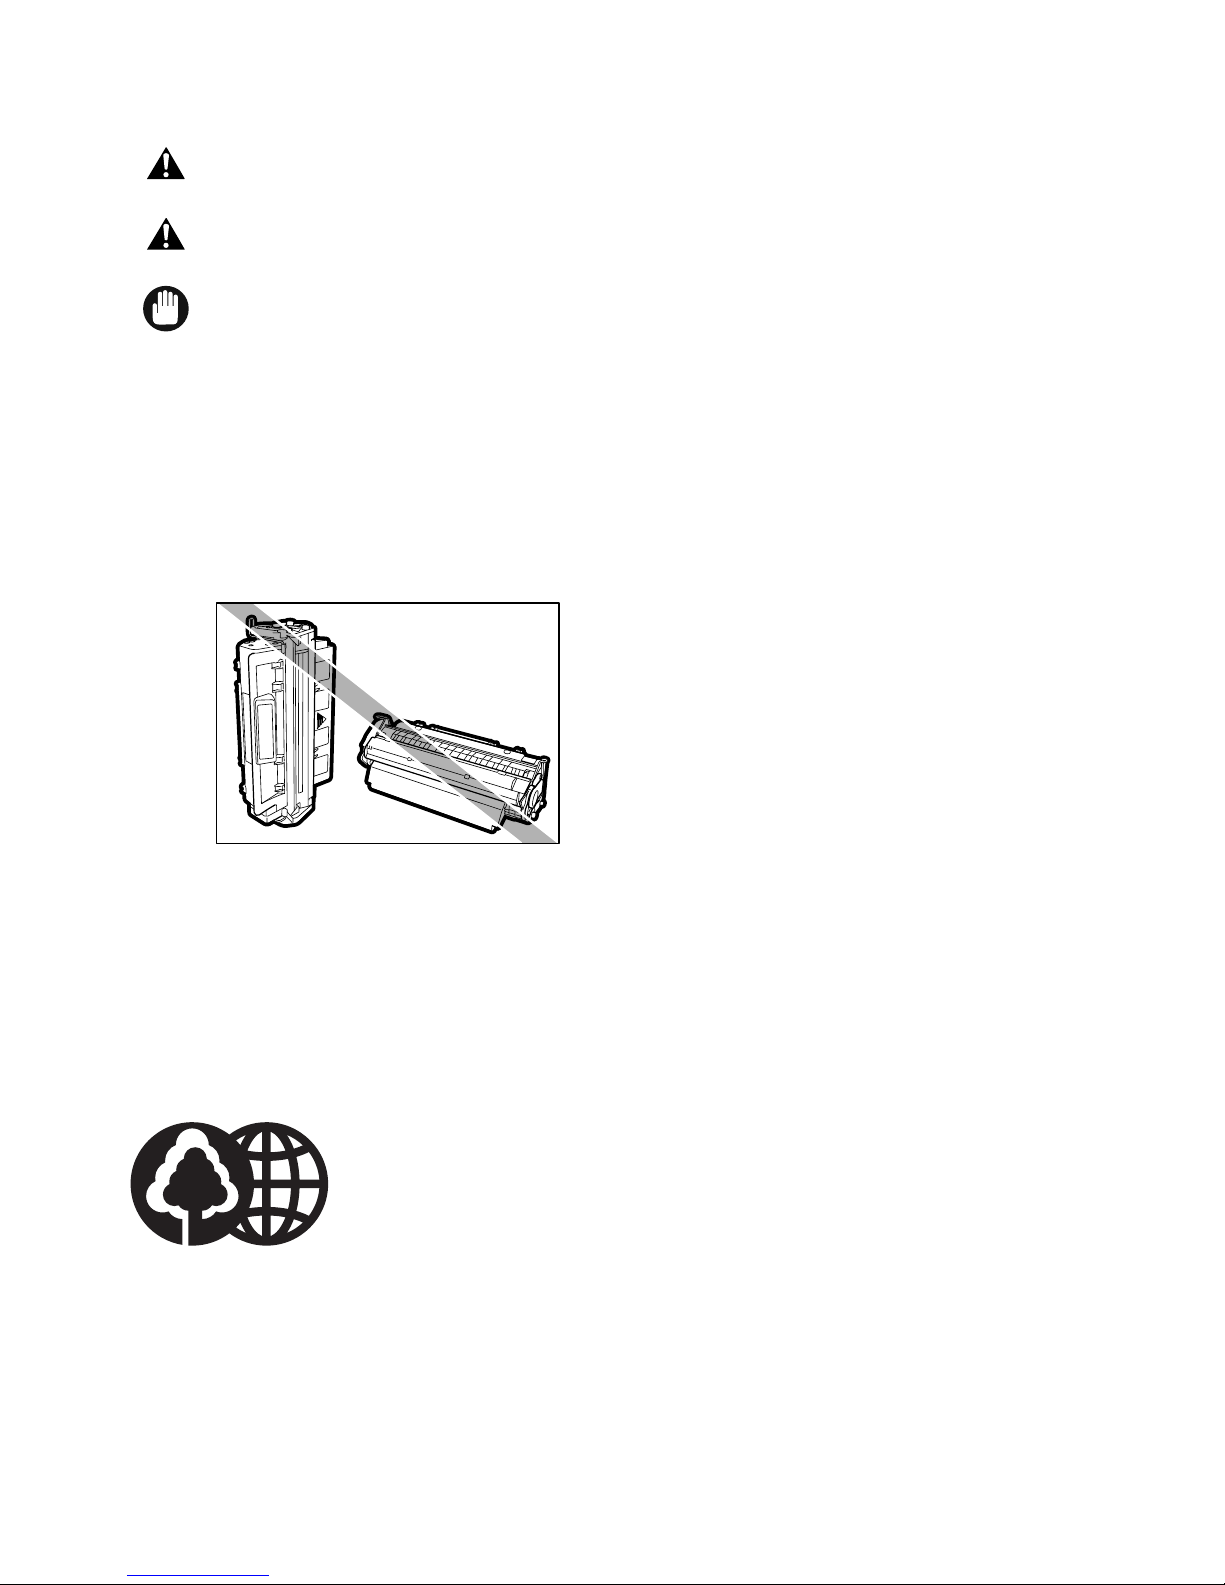
5-6
Storage Precautions
• Do not store cartridges or copy paper in places exposed to open flames, as this may cause the
toner or copy paper to ignite and resulting in burns or a fire.
• Keep cartridges and other consumables out of the reach of children. If the contents of these items
are ingested, consult a physician immediately.
• Place the cartridge in its protective bag so that the side with the written instructions is facing upward.
Then, place the bagged cartridge into its shipping box. Store the unused cartridge out of direct sunlight.
• For partially used/opened cartridges, place the cartridge in its protective bag so that the side with the
written instructions is facing upward. Then place the bagged cartridge into its shipping box and store it
away from direct sunlight.
• Avoid storing the cartridge in front of heaters and humidifiers, etc. Store it in a location where the
temperature does not exceed 104°F (40°C).
• The recommended storage conditions are as follows:
Temperature 68°F to 77°F (20°C to 25°C)
Relative Humidity 40% to 70%.
• Do not stand the cartridge on end or turn it upside down.
Storing Partially Used Cartridges
If you remove a cartridge from the machine, store the cartridge as described below.
Place the cartridge in its protective bag so that the side with the written instructions is facing upward. Then, place
the cartridge into its shipping box. Be sure to securely close the lid of the shipping box.
If you do not have the protective bag or shipping box for the cartridge, store the cartridge in a dark location.
Recycling Used Cartridges
Canon has instituted a worldwide recycling program for cartridges called “The Clean
Earth Campaign.” This program preserves precious natural resources by utilizing a
variety of materials found in the used cartridges that are of no further use, to
remanufacture new cartridges which, at the same time, keeps the environment cleaner
by reducing landfill waste. Complete details concerning this program are enclosed in
each PC Cartridge box.
IMPORTANT
CAUTION
WARNING
Page 50
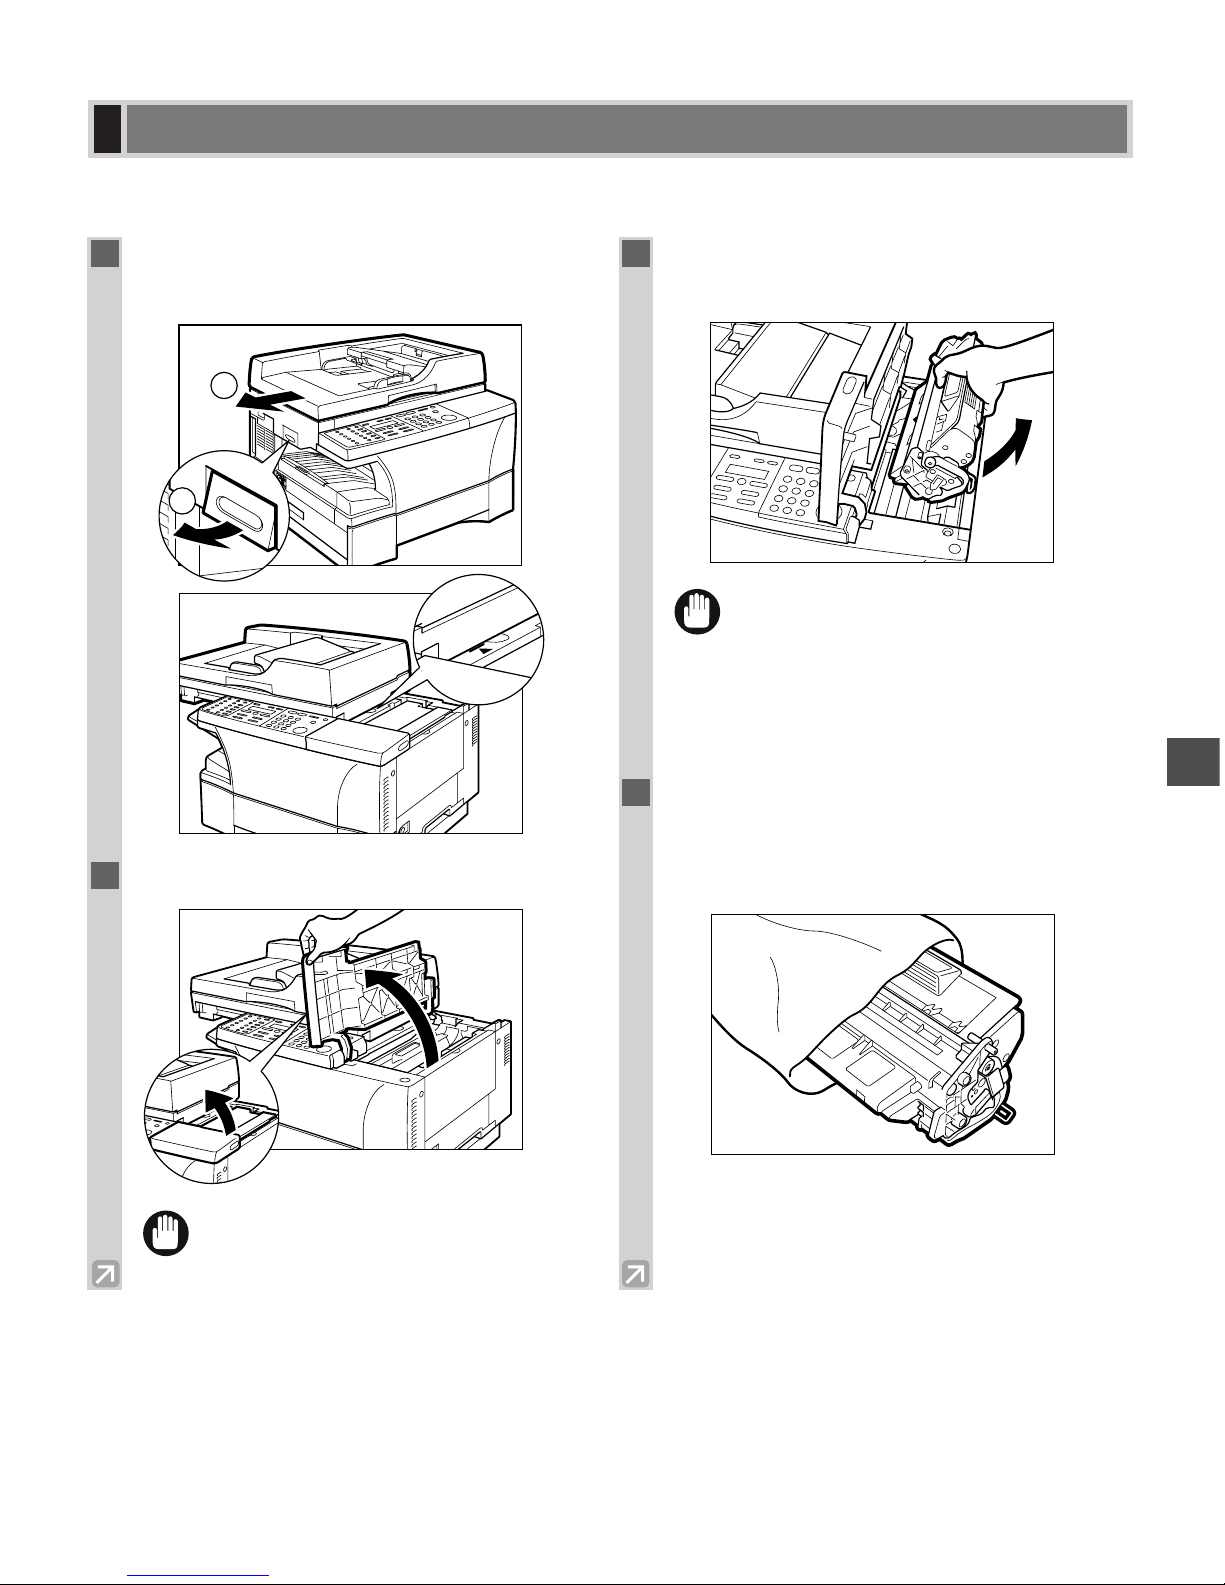
5-7
Maintenance
5
This section describes how to remove the used cartridge and replace it with a new one. Before replacing the
cartridge, be sure to read the section When to Replace the Cartridge. (→ p. 5-4)
Replacing the Cartridge
1
Lift the platen unit lever q and slide the
platen unit w until the
3
4 mark appears.
2
Open the cartridge cover.
• You cannot replace the cartridge when the
cartridge cover is partially open.
3
Grip the end of the cartridge, and remove it
from the machine.
• There are some areas inside the machine
and cartridge which are subject to high
voltages and high temperatures. Take
adequate precaution when performing
internal inspections, to avoid burns or
electrical shock.
4
Remove the new cartridge from its
protective bag. Save the protective bag.
You may need it later when you remove the
cartridge from the machine.
IMPORTANT
IMPORTANT
2
1
Page 51
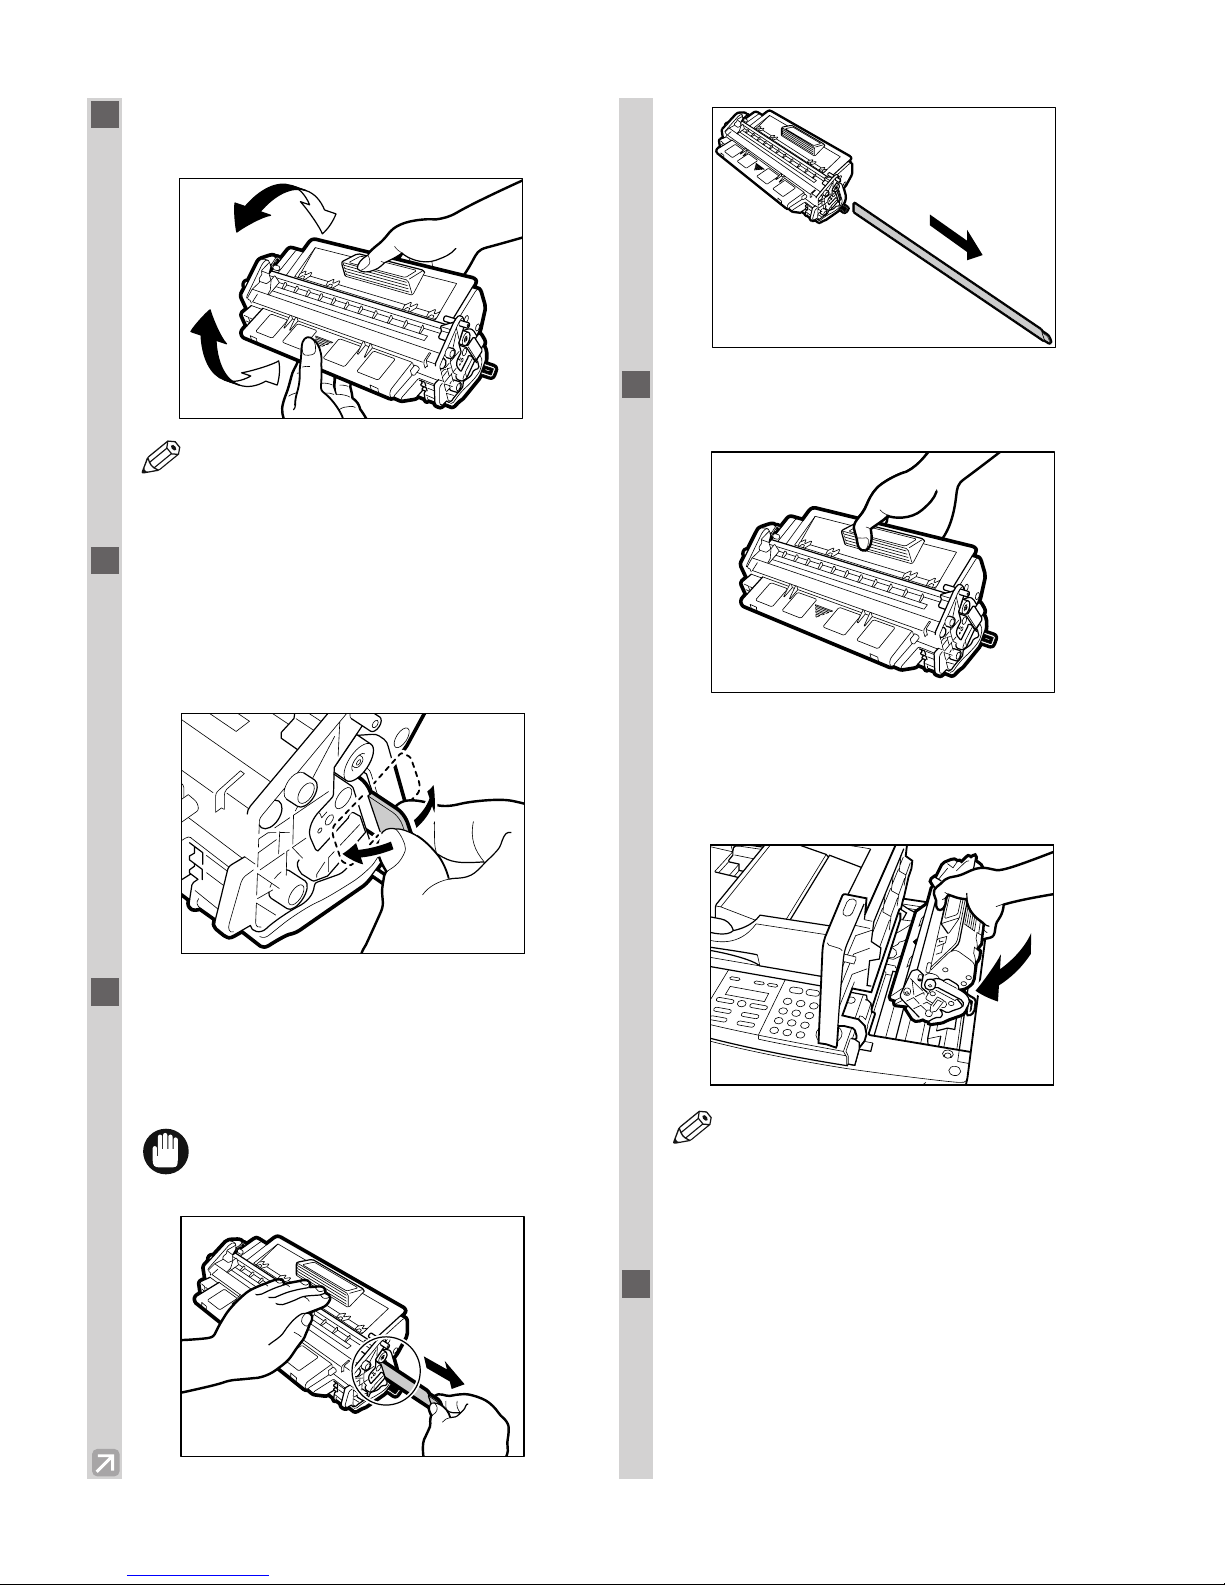
5-8
5
Rock the cartridge 5 or 6 times to distribute
the toner evenly.
• If toner is not evenly distributed inside the
cartridge, it can cause streaking or fading
on the printed page.
6
Place the cartridge on a flat and stable
surface. And, grip the sealing tape tab and
snap it in the direction as shown below.
Make sure that the tab itself is detached
from the cartridge.
7
While grasping the cartridge with one
hand, firmly and slowly pull the sealing
tape tab with the other hand to remove the
sealing tape completely. Throw the tape
away.
• To avoid breaking the tape, do not pull the
tape out at an upward or downward angle.
8
Hold the cartridge as shown below, so that
the Canon logo label is facing up.
Position the arrow mark on the cartridge
toward the inside of the machine, and
gently slide the cartridge into the machine
as far as it will go.
• When the cartridge is installed or removed
from the machine, the drum’s protective
shutter opens. Do not touch the
photosensitive drum. Finger oil could cause
a deterioration in copy quality.
9
Close the cartridge cover and slide the
platen unit to the original position.
NOTE
IMPORTANT
NOTE
Page 52

5-9
THE CANON CARTRIDGE RECYCLING PROGRAM
The Canon Cartridge Recycling Program fulfills the first initiative of Canon’s Clean Earth Campaign, which
supports four critical environmental areas:
• Recycling in the Workplace
• Conserving Environmental Resources
• Scientific Research and Education
• Encouraging Outdoors Appreciation
The remaining “Clean Earth” initiatives are supported in the U.S. through sponsorships of the National Park
Foundation, the National Wildlife Federation, and The Nature Conservancy and in Canada through donations to
the World Wildlife Fund Canada and The Nature Conservancy of Canada.
Since its inception, The Canon Cartridge Recycling Program has collected millions of cartridges that otherwise
would have been discarded into landfills or similar facilities. Instead, this rapidly growing program returns used
cartridges to the manufacturing process, thus conserving an array of resources.
Becoming a part of this worthwhile program is easy. When your cartridge is of no further use, simply follow the
instructions detailed for U.S. or Canadian residents.
We appreciate your support of The Canon Cartridge Recycling Program.
Working together we can make a significant contribution to a cleaner planet.
• Cartridges collected through this program are not refilled.
• You are not entitled to a tax deduction or rebate for the return of empty cartridges.
• This program may be modified or discontinued without notice.
The Clean Earth Campaign
Maintenance
5
Page 53
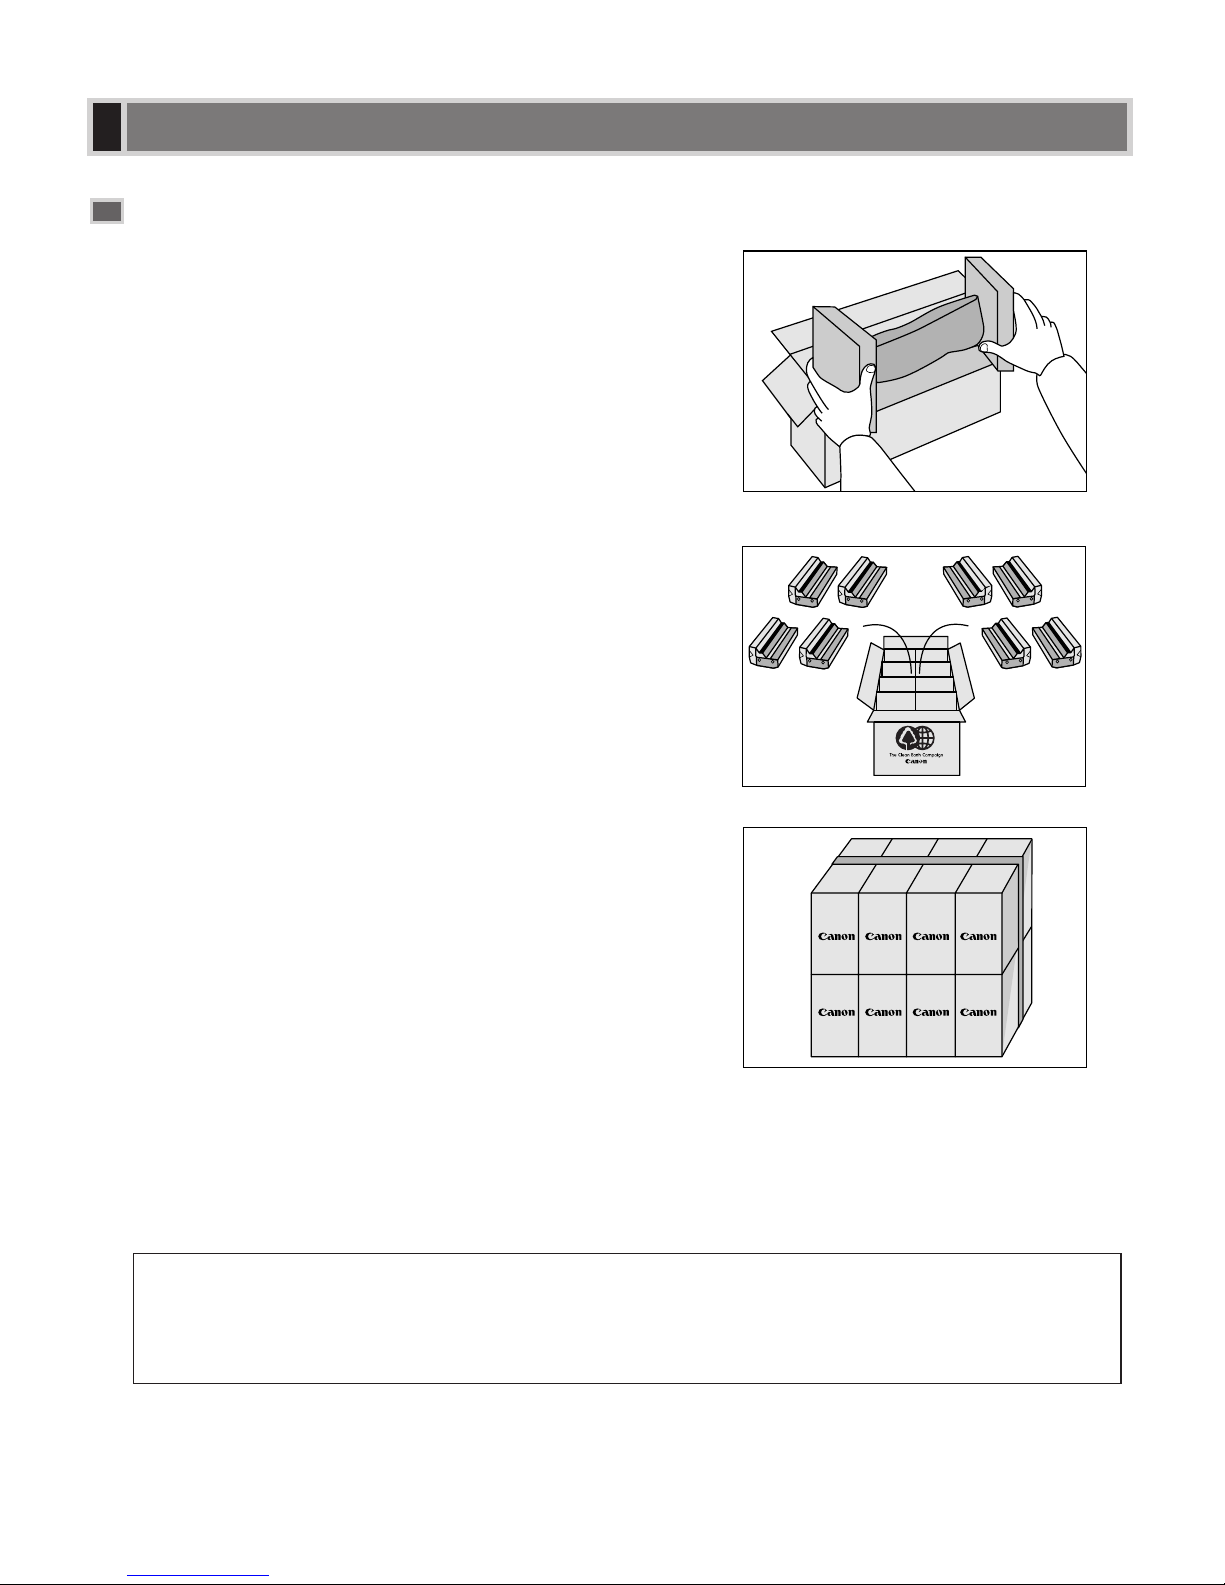
5-10
Packaging
Option A-1: Single Box Return
• Repackage the empty cartridge utilizing the wrapper and pulp
mould end-blocks from the new cartridge’s box.
• Place the empty cartridge in the box of your new cartridge.
Seal the box.
Option B: Volume Box Return
We encourage you to use this option as a more efficient way to
ship cartridges.
• Place as many cartridges as possible into one box.
Carefully seal the box with tape;
or
• Call 1-800-OK-CANON to receive your free eight cartridge
collection box.
Option A-2: Multiple Box Return
We encourage you to use this option as a more efficient way to
ship cartridges.
• Complete Option A-1.
• Bundle multiple cartridge boxes together securely with tape.
Please be sure that the shipment does not exceed UPS specifications.
Maximum weight = 70 pounds
Maximum length = 108 inches
Maximum girth (length + 2 × width + 2 × height) = 130 inches
If your shipment exceeds the above limits, please call 1-800-OK-CANON for special shipping information.
Please Note:
Do not send defective cartridges for replacement.
Defective cartridges under warranty should be exchanged by an authorized dealer or service facility as
provided in the warranty.
U.S.A. PROGRAM
Page 54
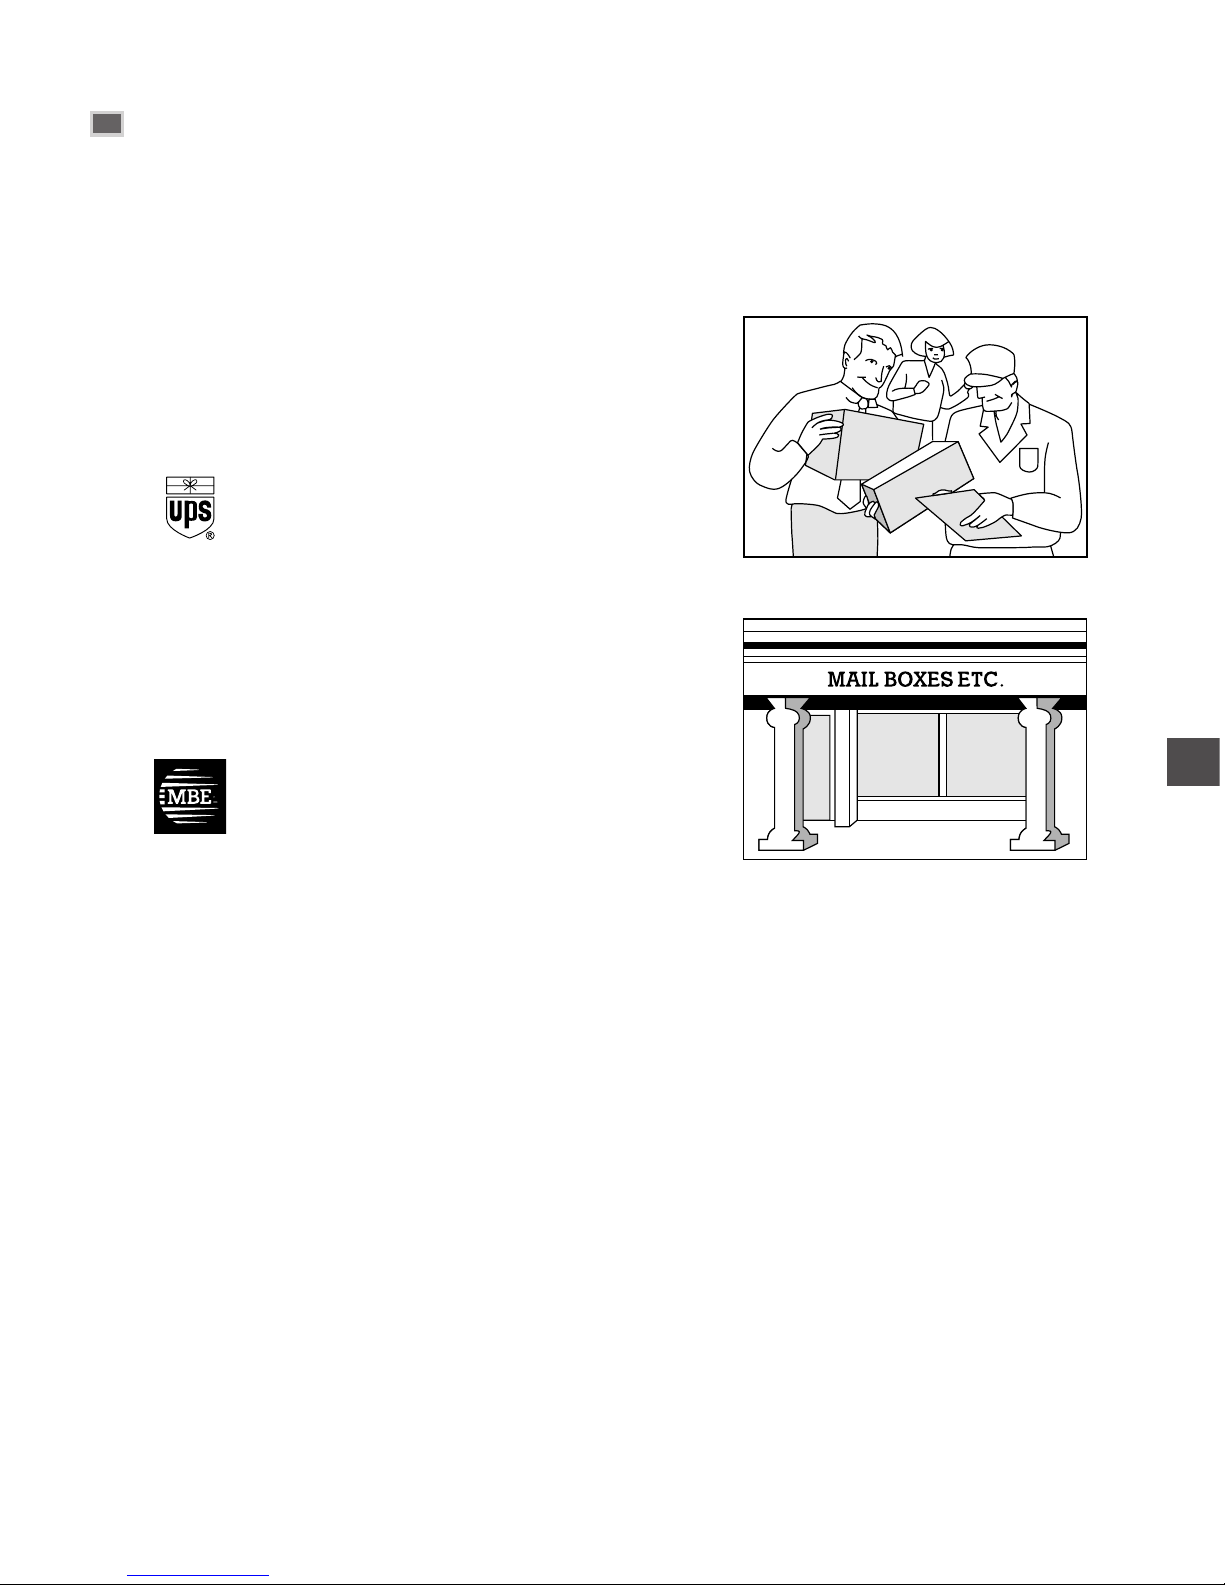
5-11
Shipping
Apply the UPS authorized returning label provided in this guide.
Residents of Alaska and Hawaii: Do not use the UPS authorized returning label. For Alaska and Hawaii
Canon set up alternative mail service with the U.S. Postal Service.
Please call 1-800-OK-CANON to receive U.S. Postal Service merchandise returning label.
Option A: UPS Pick-up
• Give the shipment to your UPS driver when you receive your
next regular delivery;
or
• Take the shipment to your local UPS receiving point.
Option B: MBE Drop off
Take the shipment to a participating MBE (Mail Boxes, Etc.)
Center.
For location, please call 1-800-949-6660.
By using either of the above methods of shipment, your used cartridge(s) will be forwarded to
the Canon Cartridge Collection Center at no charge to you.
For further information about the Clean Earth Campaign in the United States, please call:
1-800-OK-CANON
Maintenance
5
Page 55
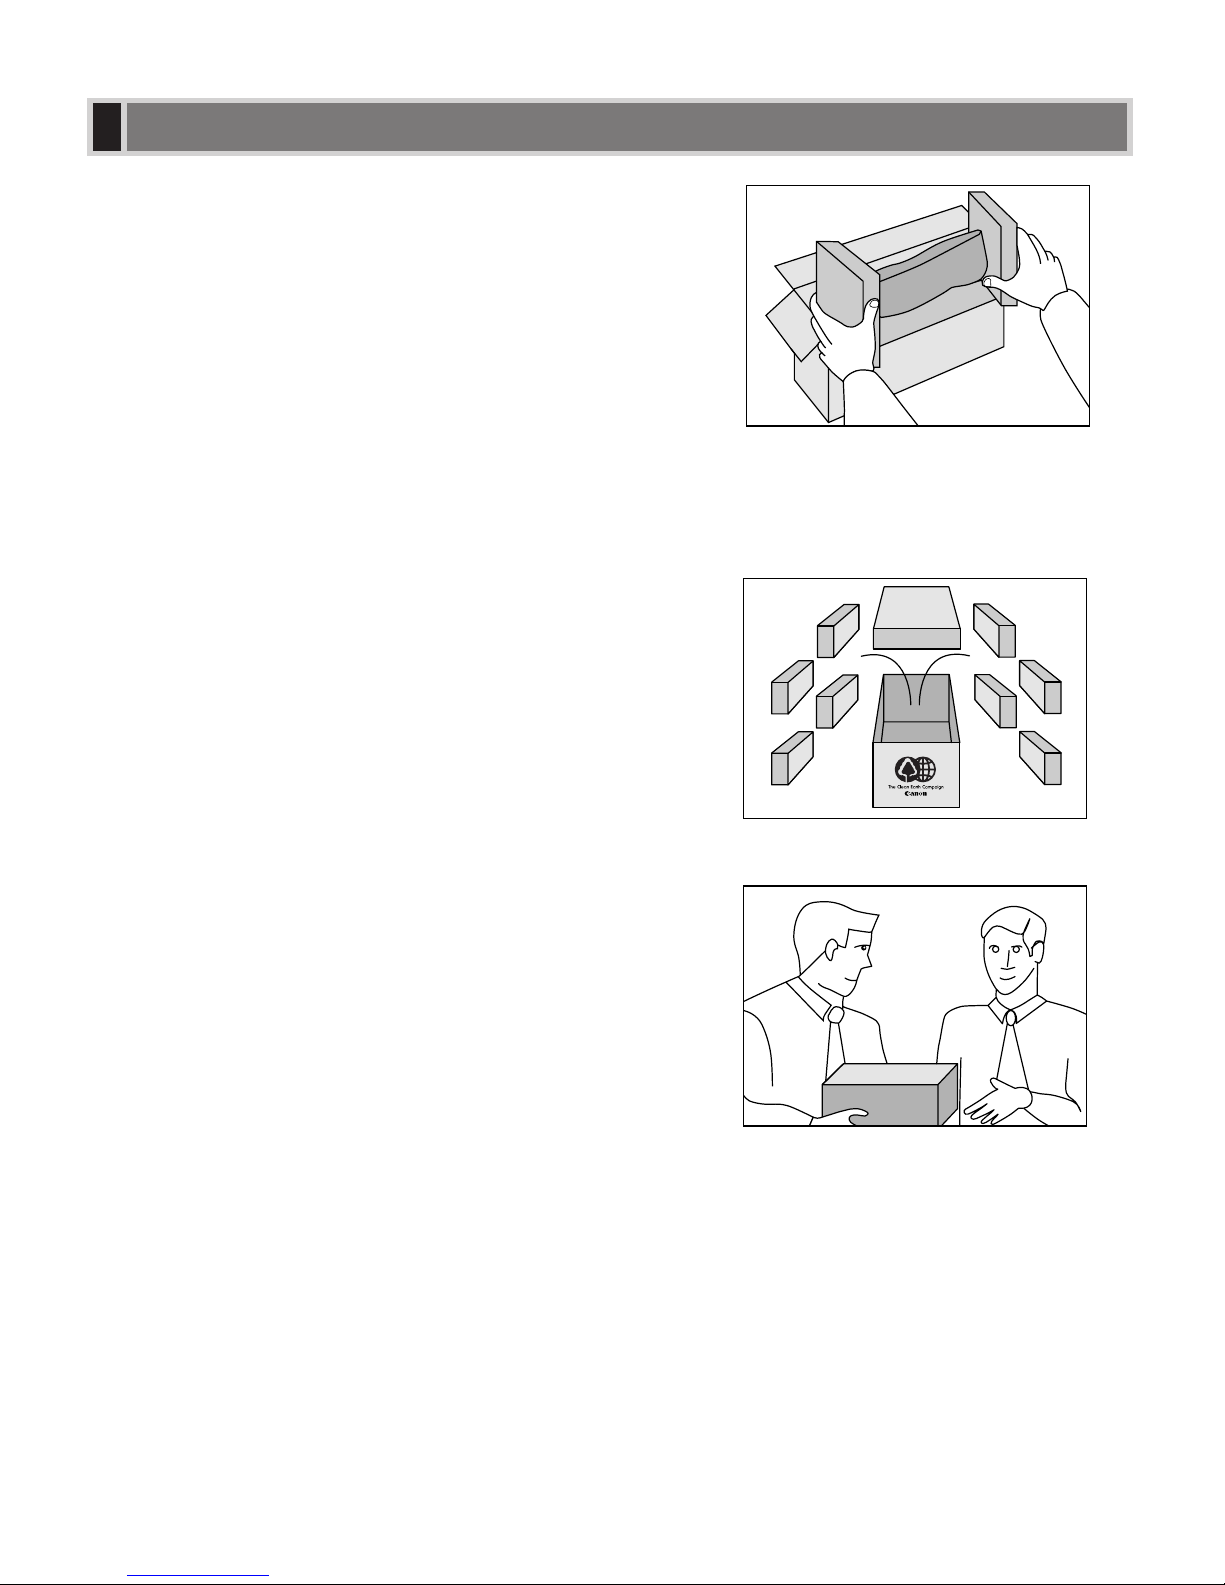
5-12
Option A: Single Box Return
• Repackage the empty cartridge utilizing the wrapper and pulp
mould end-blocks from the new cartridge’s box.
• Place the empty cartridge in the box of your new cartridge.
Seal the box.
• Apply the Canon Canada Inc./Canada Post label provided in
this brochure.
Canon’s labels are specially marked so that Canon pays the
postage.
• Deposit your empty cartridge in any full size street mailbox
or take it to your local Canada Post outlet or franchise.
Option B: Volume Box Return (8 or more cartridges)
We encourage you to use this option as a more efficient way
to ship cartridges.
• Call 1-800-667-2666 to receive your free Canon collection
box kit.
The collection box can accommodate eight individual
cartridge boxes.
• Place your eight individually packaged boxes of empty
cartridges into the Canon collection box. Seal the box.
• Apply the Canon Canada Inc./Canada Post label provided in
this brochure.
Canon’s labels are specially marked so that Canon pays the
postage.
• Deliver to any local Canada Post outlet or franchise.
Customers who hold a Commercial pick-up agreement with
Canada Post may have their collection box picked up.
Working to preserve endangered species is a long-standing Canon interest.
To this end, for every cartridge collected, Canon Canada donates $1, shared equally between World Wildlife Fund
Canada and the Nature Conservancy of Canada. This donation is utilized in Canada.
For further information about The Clean Earth Campaign in Canada, please call or write to Canon.
1-800-667-2666
Canon Canada Inc.
Corporate Customer Relations
6390 Dixie Road
Mississauga, ON L5T 1P7
CANADA PROGRAM-CANADA PROGRAMME
Page 56
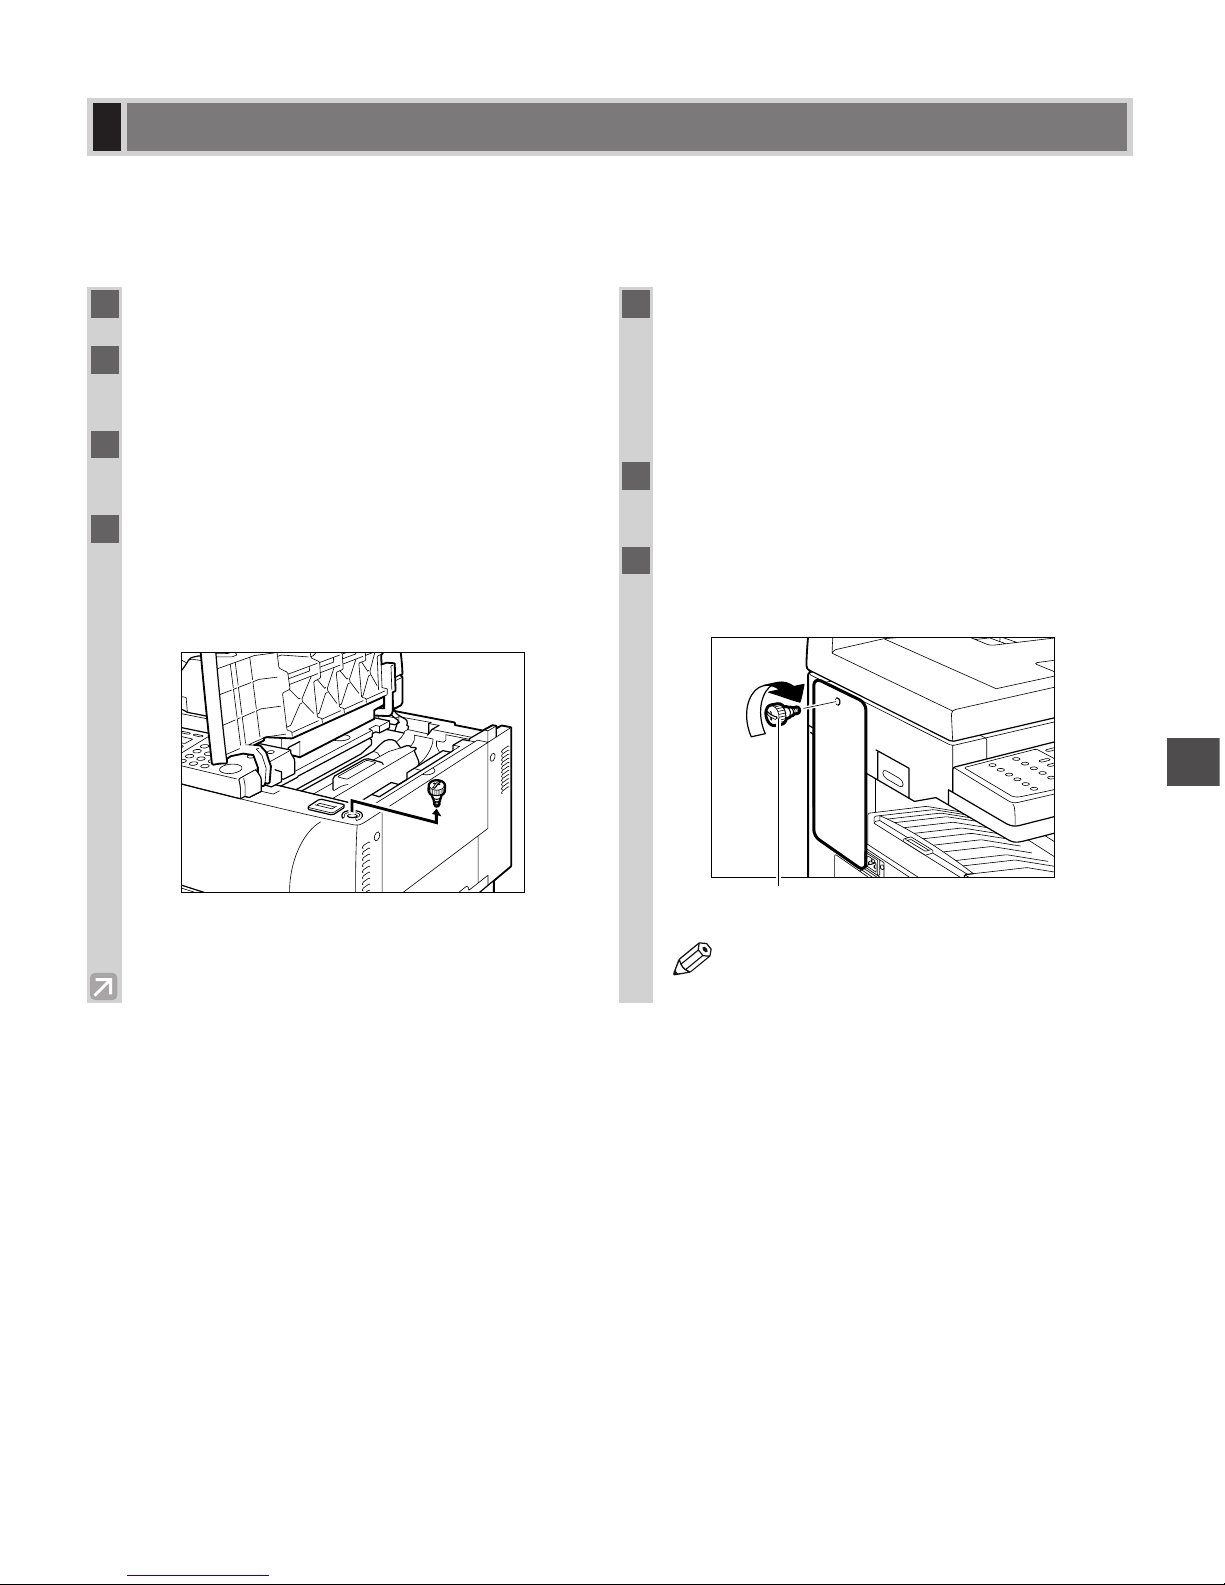
5-13
Maintenance
5
Be sure to unplug the power cord before transporting the machine. If the machine is likely to be subjected to
vibration (e.g., when transporting over long distances), the following precautions should be taken. If you do not
follow these precautions, the machine may be damaged or the quality of your copy images may be adversely
affected.
Repacking and Transporting
1
Unplug the power cord.
2
If the machine is connected to a telephone
or PC, remove the telephone line or cable.
3
Lift the platen unit lever, slide the platen
unit and open the cartridge cover.
4
Pull out the shipping attachment you
inserted in the holder when installing the
machine. (The removed shipping
attachment is needed in step 7.)
5
Grip the end of the cartridge, and remove it
from the machine. In order to avoid direct
sunlight, put the removed cartridge in the
protective bag that the cartridge was in
when you purchased it.
6
Close the cartridge cover and slide the
platen unit to the original position.
7
Attach the shipping attachment on the left
side of the machine using a coin.
• Affix the label that was removed from the
machine during unpacking.
NOTE
Shipping attachment
Page 57
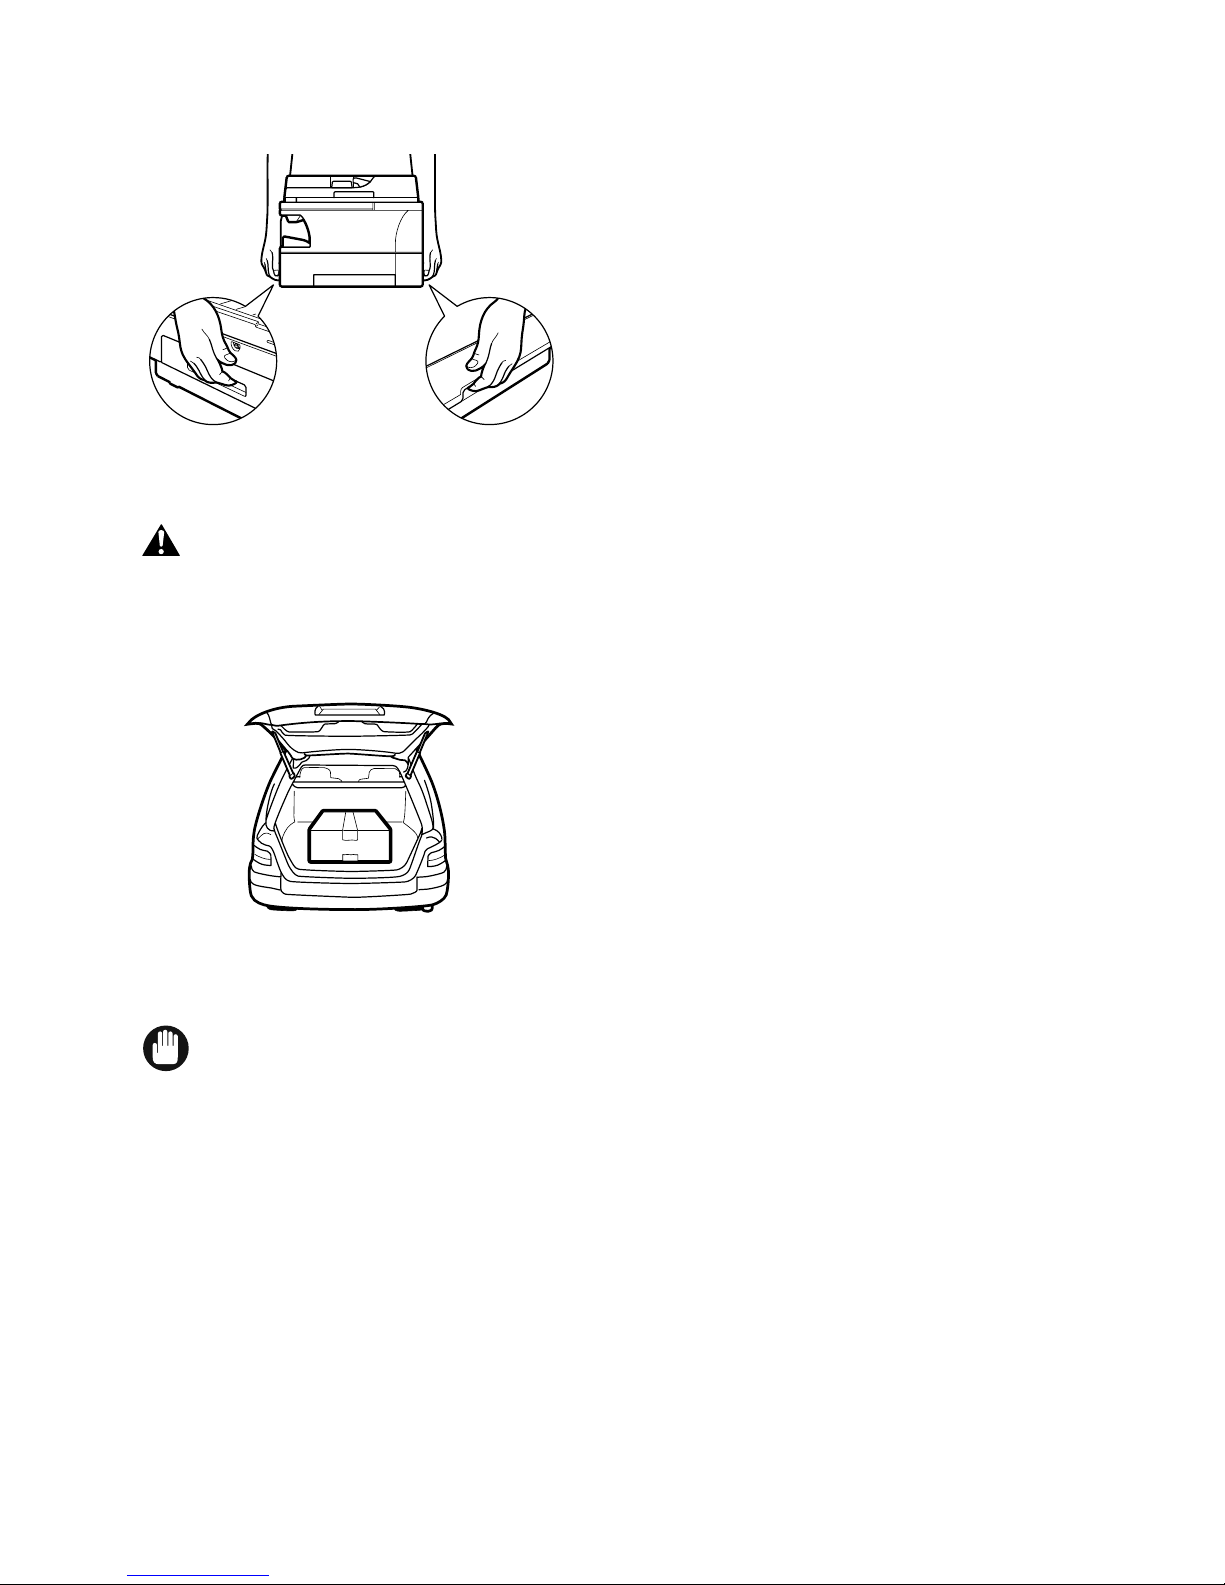
5-14
Carrying the Machine by the Sides
Remove the output tray and close the multi-purpose tray.
Grip the handles on the sides of the machine and lift up the machine, as shown in the illustration above.
• When carrying this machine, be sure to hold it in the designated places as shown in the
illustration. Dropping the machine can cause personal injury.
Transporting the Machine by Car
Pack the machine, using the original packing material and box.
Place the machine on a level, stable surface.
• Do not leave the machine inside a car for a long period of time; the temperature can become very high
or low.
• Avoid rough roads; excessive vibration may damage the machine or adversely affect the quality of your
copy images.
• Place a cover over the machine. Do not leave the machine in direct sunlight.
• When moving the machine, use the original shipping box that it was packed in when you purchased it.
• When using the original shipping box, do not place the power cord or other objects on the ADF; this
may damage the ADF.
IMPORTANT
CAUTION
Page 58
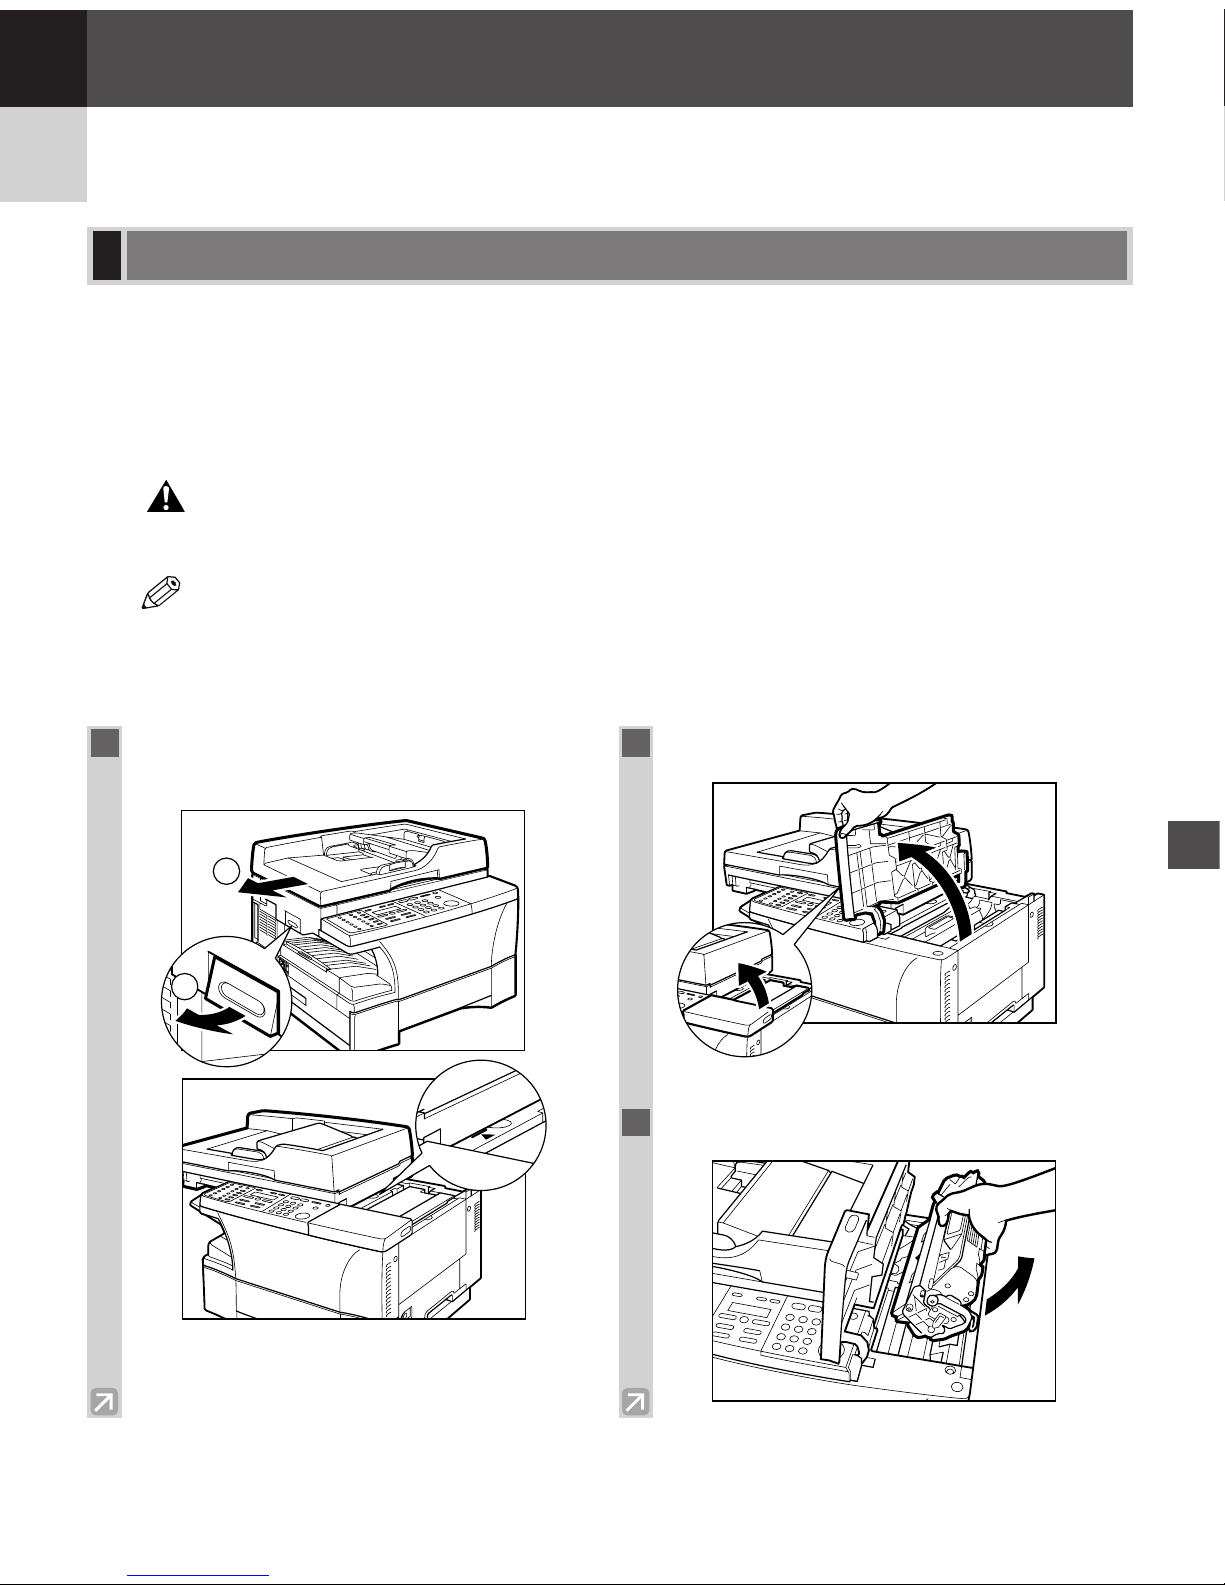
6
6-1
This section describes how to remove jammed paper from the main unit, paper cassette, ADF, and multi-purpose
tray.
Removing Jammed Paper from Inside the Main Unit
When print media jams inside the main unit, the LCD displays REC. PAPER JAM and SLIDE PLATEN
LEFT.
• There are some areas inside the machine and cartridge which are subject to high voltages and
high temperatures. Take adequate precaution when performing internal inspections, to avoid
burns or electrical shock.
• When removing copy paper which has become jammed from inside the machine, take care not to allow
the toner on the jammed copy paper to come into contact with your hands or clothing, as this will dirty
your hands or clothing. If they become dirty, wash them immediately with cold water. Washing with
warm water will set the toner and make it impossible to remove the toner stains.
NOTE
CAUTION
Clearing Jams
Troubleshooting
Troubleshooting
Chapter 6
1
Lift the platen unit lever q and slide the
platen unit w until the
3
4 mark appears.
2
Open the cartridge cover.
3
Remove the cartridge from the machine.
2
1
Page 59
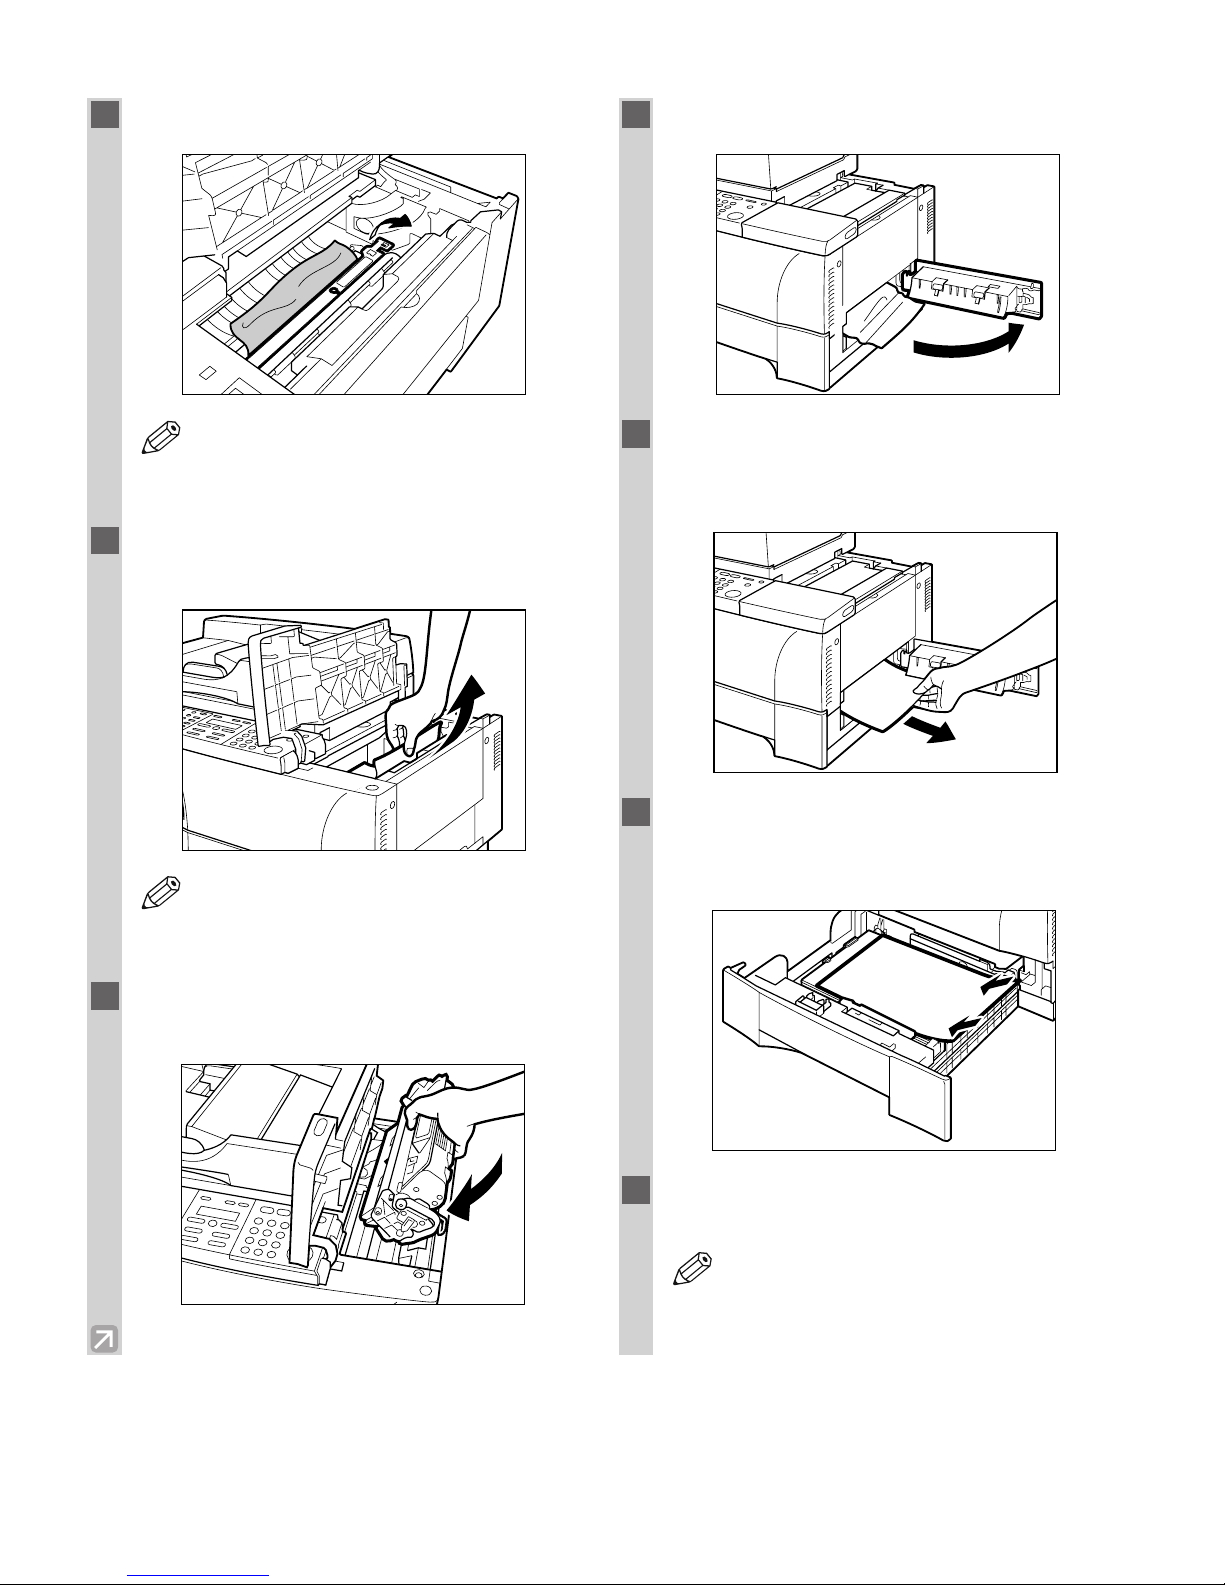
6-2
4
Flip the transfer guide.
• Be sure to remove jammed paper from
inside the main unit even when the jammed
paper has been partially output.
5
Gently remove any jammed paper from
inside the main unit.
• After removing jammed paper, be sure to
return the transfer guide to the original
position.
6
Return the cartridge back into the machine,
then close the cartridge cover.
7
Open the right cover.
8
Gently remove any jammed paper from
inside the main unit, then close the right
cover.
9
Pull out the cassette and reset any paper
stuck out of the cassette. Then, push the
cassette back into the main unit.
10
Slide the platen unit to the original
position.
• The print out will start again.
NOTE
NOTE
NOTE
Page 60
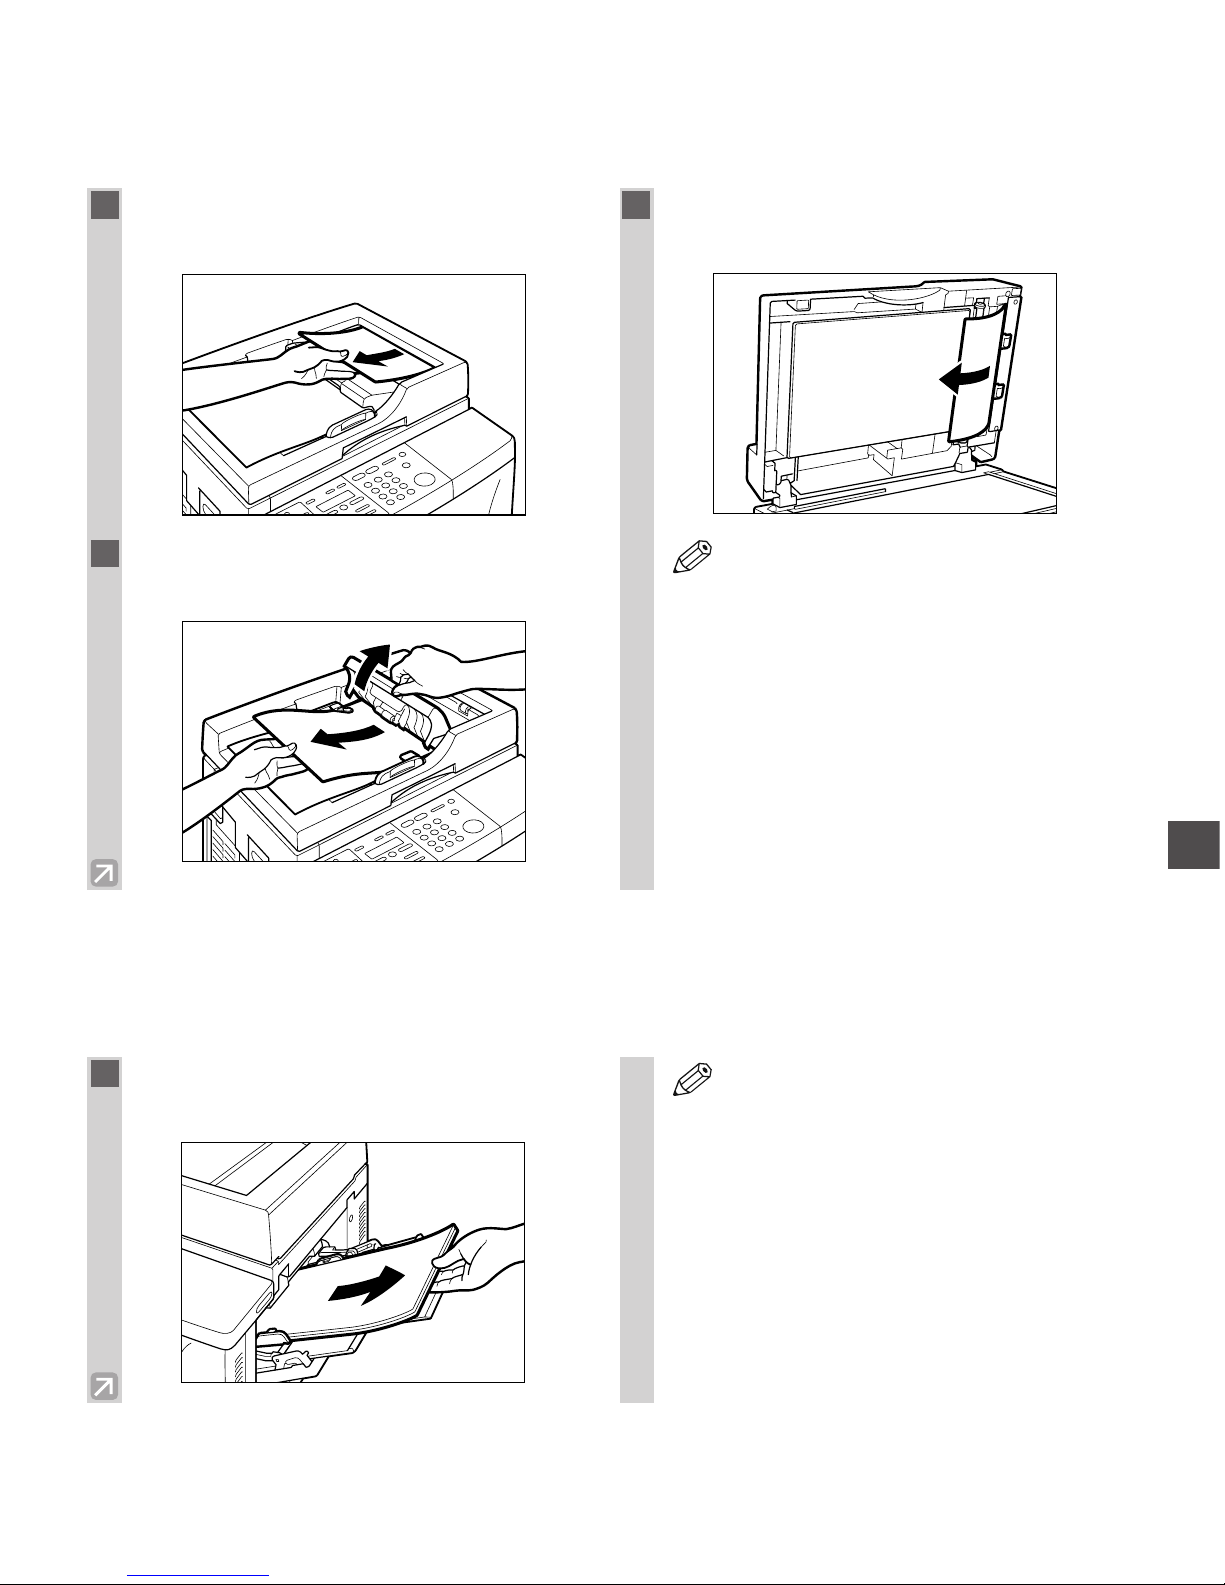
6
6-3
Troubleshooting
Removing Jammed Paper from the ADF
When print media jams in the ADF, the LCD displays CHECK DOCUMENT and OPEN THE ADF.
Removing Jammed Paper from the Multi-purpose Tray
When print media jams in the multi-purpose tray, the LCD displays REC. PAPER JAM and SLIDE PLATEN
LEFT.
1
Gently remove the jammed paper from the
document output slot of the ADF.
2
Open the feeder cover and gently remove
the jammed paper from the ADF.
3
Open the ADF, then pull the paper out
straight.
• Open the ADF and make sure there is no
document left.
• After removing jammed paper, even edges
of the document and reload it in the ADF.
NOTE
1
Gently remove the jammed paper from the
multi-purpose tray.
• Please check any jammed paper inside the
machine. (
→ p. 6-1)
NOTE
Page 61

6-4
The following messages are displayed in the LCD when the machine is performing a function or encounters an error.
This section describes the general messages and ones related to copy functions. For the messages related to fax
functions, → Fax Guide.
LCD Messages
Message
CHANGE DOCUMENT
CHECK DOCUMENT
OPEN THE ADF
CHECK PRINTER
DOCUMENT TOO LONG
INCORRECT PAPER SIZE
INSTALL CARTRIDGE
LOAD LTR SIZE PAPER
MEMORY FULL
SCANNING
MAKING SPACE IN MEM
PLEASE WAIT
Cause
When collating copies or making a
2 on 1 copy of documents using the
platen glass, Start is pressed
before replacing a document.
There is a paper jam in the ADF.
An abnormality has occurred in the
printer.
The document is longer than 14
inches (356 mm).
The ADF roller rotates without
feeding documents.
The size of the paper in the cassette
and that specified in the CAS.
PAPER SIZE setting of the
Additional Functions are different.
The cartridge is not installed.
No letter size paper is loaded in the
cassette.
The machine’s memory is full
because collate copy or 2 on 1 copy
was set when a large document is
loaded.
Memory is getting low during
scanning because the document has
many graphics or photos,
alternatively 2 on 1 copy is set.
Action
Replace the document then press Start.
Remove the document you are trying to copy
or send from the ADF. (→ p. 6-3)
Make sure that the document is not too long
or too short. (→ p. 3-1)
Unplug the machine and wait for 10 minutes,
then plug it in again. If the message remains,
unplug the machine and call your service
representative.
Reduce the length of the document to within
14 inches (356 mm), and then copy/re-send
it.
Fan the edge that will feed into the machine
first, then tap the edge of multipage
documents on a flat surface to even the stack.
Load the correct paper size or change the
CAS. PAPER SIZE setting of the
Additional Functions (→ p. 7-2). Then reset
the machine by sliding the platen unit to the
left and then back to the original position.
Install the cartridge correctly.
Load letter size paper in the cassette.
(→ pp. 4-9, 4-10)
Divide the document and copy each part
separately.
If MEMORY FULL and PRESS SET KEY
appear while scanning documents using the
ADF, the document being scanned stops in
the ADF. In this case, press Set to make the
document come out automatically.
When memory space becomes available as
printing continues, the scanning resumes
automatically.
↔
↔
Page 62

6
6-5
Troubleshooting
Message
PLATEN IS OPEN
CLOSE THE PLATEN
REC. PAPER JAM
SLIDE PLATEN LEFT
REMOVE DOC. ON GLASS
REPLACE CARTRIDGE
START AGAIN
STOP KEY PRESSED
PRESS SET KEY
SUPPLY REC. PAPER
SYSTEM ERROR
Exxx
Cause
The platen unit is not closed
correctly.
There is a paper jam.
A document has been left on the
platen glass.
The toner inside the cartridge is
running low.
The paper in the cassette has run
out, the toner is running low, paper
jams have occurred, or the paper
size setting is wrong while the
report is printing.
The document has stopped in the
ADF because you pressed
Stop/Reset while scanning.
No paper is loaded in the cassette
or multi-purpose tray.
An error of some kind has occurred
in the machine.
Action
Slide the platen unit to the original position.
Clear the paper jam (→ pp. 6-1 to 6-3) and
reload paper in the cassette or multi-purpose
tray.
Remove or change the document from the
platen glass.
Prepare a new cartridge, or replace the
cartridge with a new one. (→ p. 5-4)
After loading paper in the cassette, replacing
the toner cartridge, clearing jams, or
specifying the correct paper size, print the
report again.
Press Set to make the document come out
automatically.
Load paper in the cassette or multi-purpose
tray (→ pp. 2-3, 2-6). Make sure the paper
stack in the cassette or multi-purpose tray
does not exceed the height of the length
guide’s claws or the paper limit guide
respectively. (→ pp. 2-3, 2-6)
If you load paper while making copies, do
not load a different paper size.
Unplug the machine and wait for 10 minutes,
then plug it in again. If this does not solve
the problem, unplug the machine and call
your service representative.
Page 63

6-6
❚ Paper does not feed correctly.
The cassette or multi-purpose tray may contain too many sheets.
• Make sure the paper stack in the cassette or multi-purpose tray does not exceed the height of the length guide’s
claws or the paper limit guide. (→ pp. 2-3, 2-6)
Paper may not be loaded correctly.
• Make sure the paper stack is loaded properly in the cassette or multi-purpose tray, and that the length guide of
the cassette and the slide guide of the multi-purpose tray is adjusted correctly. (→ pp. 2-3, 2-6)
❚ Paper feeds skewed. (Printing is skewed.)
Paper may not be loaded correctly.
• Make sure the paper stack is loaded properly in the cassette or multi-purpose tray, and that the length guide of
the cassette and the slide guide of the multi-purpose tray is adjusted correctly. (→ pp. 2-3, 2-6)
• Make sure the paper exit path is clear.
❚ Multiple sheets feed into the machine at the same time.
Paper may not be loaded correctly.
• Make sure the paper stack is loaded properly in the cassette or multi-purpose tray, and that the length guide of
the cassette and the slide guide of the multi-purpose tray is adjusted correctly. (→ pp. 2-3, 2-6)
Sheets of paper may be sticking together.
• Be sure to fan the paper stack before loading it in the cassette or multi-purpose tray. This keeps the sheets of
paper from sticking together.
The cassette or multi-purpose tray may contain too many sheets.
• Make sure the paper stack in the cassette or multi-purpose tray does not exceed the height of the length guide’s
claws or the paper limit guide. (→ pp. 2-3, 2-6)
• Do not force the paper stack into the cassette or multi-purpose tray.
Different types of paper may be loaded in the cassette or multi-purpose tray.
• Load only one type of paper.
• Make sure you load paper that meets the paper requirements for the machine. (→ Chapter 2)
❚ Transparencies do not feed correctly.
The transparencies are loaded in the cassette.
• Do not load transparencies in the cassette. Load them in the multi-purpose tray.
The transparencies may not be loaded in the multi-purpose tray correctly.
• Make sure they are loaded properly (→ p. 2-6). The transparencies should be loaded one by one in the multipurpose tray.
The transparencies for color copiers may be loaded in the multi-purpose tray.
• Do not use any transparencies for color copiers. They will cause a paper jam. Please use transparencies
recommended by Canon.
Paper Feeding Problems
Page 64

6
6-7
Troubleshooting
❚ Repeated paper jams occur.
The paper you are using may be causing the jams.
• Be sure to fan the paper stack before loading it in the cassette or multi-purpose tray. This keeps the sheets of
paper from sticking together.
• Check that the size, thickness and type of the paper you are using and your printing environment are within the
specifications of the machine. (→ Chapter 2, p. 1-1)
❚ Envelopes do not feed correctly.
The envelopes are loaded in the cassette.
• Do not load the envelopes in the cassette. Load them in the multi-purpose tray.
Envelopes may not be loaded correctly.
• Make sure the envelopes are loaded properly (→ p. 2-7). Do not load more than 10 envelopes in the multipurpose tray.
The envelopes you are using may not meet the requirements for the machine.
• Envelopes must be US COMMERCIAL 10, MONARCH, EUROPEAN DL, ISO-B5, ISO-C5, YOGATA #4,
YOGATA #2 envelopes. (→ p. 2-7)
❚ The machine will not make a copy.
The cartridge may not be installed properly.
• Make sure the cartridge is installed properly. (→ Set-up Instructions)
The sealing tape may not be removed from the cartridge.
• Remove the sealing tape from the cartridge. (→ Set-up Instructions)
The paper cassette may not be inserted completely into the main unit.
• Insert the paper cassette as far as it will go. (→ p. 2-3)
The document may not have been loaded correctly.
• Remove the document, stack it if necessary, and load it in the ADF correctly. (→ p. 3-4)
• Make sure the ADF is closed.
Document may be left on the platen glass.
• Remove the document from the platen glass, and load it in the ADF again.
❚ MEMORY FULL or MAKING SPACE IN MEM appears in the LCD when making
copies of a multiple-page document.
Paper in the cassette or multi-purpose tray may be run out.
• If there is no paper and the machine’s memory becomes full during copying, MAKING SPACE IN MEM and
SUPPLY REC. PAPER are displayed alternately. If paper is loaded, the copying resumes automatically.
The document you are copying may have too many graphics or photos.
• When making copies of such documents, separate the documents into smaller stacks or feed them one by one.
The machine’s memory is full.
• Print or delete any documents stored in memory (→ Fax Guide) to free up space in the machine’s memory,
then start again.
Copying Problems
Page 65

6-8
❚ If the documents have black streaks or appear dirty after you feed them in the ADF.
The ADF roller is dirty.
• Clean the ADF roller. (→ p. 5-3)
• For additional troubleshooting, → Print Quality Problems.
❚ The print quality is not what you expect; print is not clear, has missing dots or white
streaks.
The size, thickness and type of the paper you are using are not within the specifications of the machine.
• Check that the paper you are using is supported by the specifications of the machine. (→ p. 2-1)
The cartridge may not be installed properly.
• Make sure the cartridge is installed properly. (→ Set-up Instructions)
The toner in the cartridge may be low.
• Refer to “When to Replace the Cartridge” (→ p. 5-4) and replace if necessary. (→ p. 5-7)
The copy exposure may not be adjusted correctly.
• Adjust exposure correctly. (→ p. 4-6)
❚ Copies are dirty.
The platen glass or rear side of the ADF may be dirty.
• Clean the platen glass or rear side of the ADF. (→ p. 5-1)
The rollers inside the machine are dirty.
• Clean the rollers. (→ p. 5-2)
There may be a scratch on the cartridge.
• Replace the cartridge with a new one.
Condensation has built up inside the machine.
• Allow at least two hours for the machine to adjust to room temperature before attempting to use it.
The machine may be installed in a location where the floor or foundation is unstable.
• Install the machine in a proper location. (→ p. 1-1)
❚ Black lines on the copy
The read area of the platen glass is dirty.
• Clean the read area of the platen glass. (→ p. 5-2)
❚ Copies are too dark or too light.
The copy exposure may not be adjusted correctly.
• Adjust the copy exposure correctly in the PRINT EXPOSURE of the COMMON SETTINGS of the Additional
Functions. (→ p. 7-2)
TONER SAVER MODE may be set to ON in the COMMON SETTINGS of the Additional Functions.
• Set TONER SAVER MODE to OFF. (→ p. 7-2)
Print Quality Problems
NOTE
Page 66

6
6-9
Troubleshooting
❚ The copy images are partly missing or shaded when you make copies on thick paper.
MP PAPERTYPE or HIGH COPY MODE of COMMON SETTINGS of the Additional Functions may not be
set correctly.
• Select SPECIAL PAPER 1 in MP PAPERTYPE. (→ p. 7-2)
• Set HIGH COPY MODE to ON. (→ p. 7-2)
❚ The copy images are missing when you make copies on envelopes.
MP PAPERTYPE of COMMON SETTINGS of the Additional Functions may not be set correctly.
• Select SPECIAL PAPER 2 in MP PAPERTYPE. (→ p. 7-2)
❚ The copy images are missing when you make copies using the 2 on 1 function.
The documents may not be the letter size.
• Be sure to use 2 sheets of letter size documents when you make copies using the 2 on 1 function.
❚ The copy images are missing when you make copies.
330 mm may be selected in MAX. SCAN LENGTH of COPY SETTINGS of the Additional Functions.
• Select 356 mm in MAX. SCAN LENGTH. (→ p. 7-3)
❚ The edges of copies are dirty when you make copies using the multi-purpose tray.
MP TRAY PAPERSIZE of COMMON SETTINGS of the Additional Functions may not be set correctly.
• Set MP TRAY PAPERSIZE to ON and specify the size. (→ p. 7-2)
❚ The copies are dirty only when you use thin paper or tracing paper.
Other mode except for TRACING PAPER in MP PAPERTYPE of COMMON SETTINGS of the Additional
Functions may be selected.
• Select TRACING PAPER. (→ p. 7-2)
❚ There are shaded parts on the bottoms of copies.
You made copies of a letter size document on legal size paper.
• Select 330 mm in MAX. SCAN LENGTH of COPY SETTINGS of the Additional Functions. (→ p. 7-3)
❚ A copy of large-size document cannot be made.
330 mm may be selected in MAX. SCAN LENGTH of COPY SETTINGS of the Additional Functions.
• Select 356 mm in MAX. SCAN LENGTH. (→ p. 7-3)
Page 67

6-10
❚ The Alarm indicator comes on.
The machine may have a paper jam.
• Clear the paper jam. (→ pp. 6-1 to 6-3)
• If the machine has no paper jam, unplug the machine and wait 10 minutes, then plug it in again. If the problem
is fixed, the Alarm indicator will turn off, and the LCD will return to standby mode. If the Alarm indicator
remains lit, unplug the machine, and call your service representative.
❚ Printout does not match paper size.
Paper may not be loaded and aligned correctly in the cassette or in the multi-purpose tray.
• Make sure the paper is loaded and aligned correctly. (→ pp. 2-3, 2-6)
❚ The machine has no power.
The power cord may not be plugged in securely.
• Check that the power cord is plugged securely into the machine and into the wall outlet. Insert the power cord
straight into the power cord connector on the left side of the machine. Do not insert it at an angle. Otherwise,
the machine may not be properly connected to the power source and may not turn on. If this happens,
disconnect the power cord, and reconnect it correctly after a minute or more. (→ Set-up Instructions)
❚ Nothing appears in the LCD.
The power cord may not be plugged in securely.
• Check that the power cord is plugged securely into the machine and into the wall outlet. Insert the power cord
straight into the power cord connector on the left side of the machine. Do not insert it at an angle. Otherwise,
the machine may not be properly connected to the power source and may not turn on. If this happens,
disconnect the power cord, and reconnect it correctly after a minute or more. (→ Set-up Instructions) If the
LCD remains blank, unplug the machine and wait more than 10 minutes until the temperature inside the
machine lowers, then plug it in again. If the LCD remains blank, unplug the machine, and call your service
representative.
The Energy Saver key lights up.
• The energy saver mode activates. To restore the machine from the energy saver mode, press Energy Saver.
❚ The letter “E” and numbers appear in the LCD.
An abnormality has occurred in the machine.
• Unplug the machine and wait more than 10 minutes, then plug it in again. If the message is still displayed,
unplug the machine and call your service representative.
General Problems
Printing Problems
Page 68
6
6-11
If you have a problem with your machine and you cannot solve it by referring to the information in this chapter,
call your service representative. (→ p. v)
• If the machine makes strange noises, emits smoke or strange smells, unplug the power cord
immediately, and then call your service representative. Do not attempt to disassemble or repair
the machine yourself.
• Attempting to repair the machine yourself may void the limited warranty.
If you need to call your service representative, make sure you have the following information:
• Product name
imageCLASS D680/D660/D661
• Serial number
The serial number is on the label located at the back of the machine.
• CAPT software version number → Printer Guide
• Place of purchase
• Nature of problem
• Steps you have taken to solve the problem and the results
IMPORTANT
CAUTION
If You Cannot Solve the Problem
Troubleshooting
Page 69

6-12
Page 70
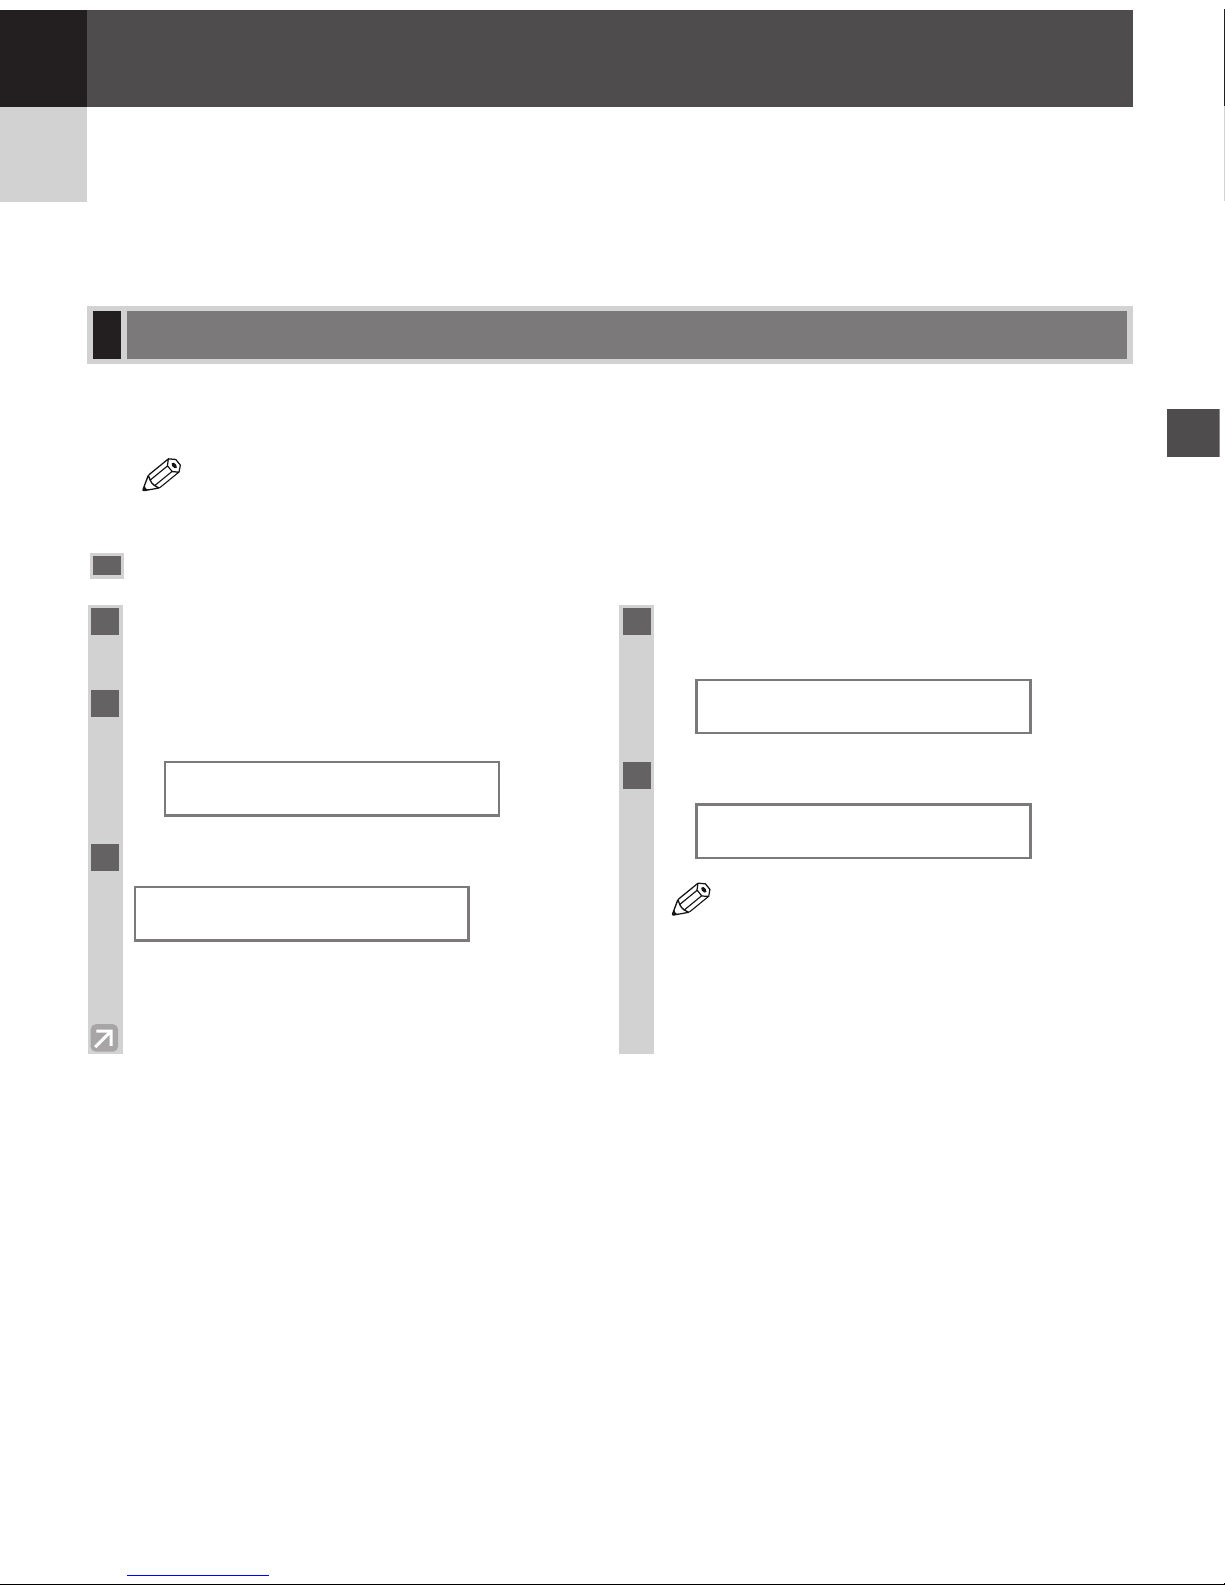
7-1
The menus of the Additional Functions can allow you to specify or register various settings. Available menus
differ depending on the machine type. This chapter explains the procedure to access the menus, and the contents
of the menus related to the common settings and the copy functions.
• To specify or register the settings of the fax function, → Fax Guide.
Accessing the Additional Functions
NOTE
Understanding the “Additional Functions”
7
Setting the Additional Functions
Setting the Additional
Functions
Chapter 7
1
Press Additional Functions.
• The Additional Functions key blinks.
2
Press 4 (–) or e (+) to select the menu
you want to change.
Ex:
3
Press Set.
4
Use 4 (–) or e (+) to select the sub menu
you want to change.
Ex:
5
Press Set.
Ex:
• Details for sub menus, → pp. 7-2 to 7-4.
• After selecting the item or value with
4 (–) or e (+), press Set to enter the
setting.
• Press Stop/Reset to exit from Additional
Functions.
NOTE
STANDARD EXPOSURE
AUTO
COPY SETTINGS
2.STANDARD EXPOSURE
COPY SETTINGS
1.STD. IMAGEQUALITY
ADDITIONAL FUNCTIONS
2.COPY SETTINGS
Page 71
7-2
Menu Descriptions
COMMON SETTINGS
MP TRAY PAPERSIZE Selects the size of paper in the multi-purpose tray.
OFF Select when you do not select the size of paper in the
multi-purpose tray.
FREE SIZE: Free size
SET ON LOADING: Select when specifying the paper size
each time you use the multi-purpose tray. The envelope type
can also be specified in SET ON LOADING.
ON LTR, STMT, CUSTOM PAPER SIZE (length and width
can be specified in millimeters), A4, B5, A5, LGL
CAS. PAPER SIZE Select the size of paper loaded in the cassette.
LTR/LGL, B5, FOLIO, FOOLSCAP, A4
PRINT EXPOSURE The exposure can be adjusted to one of five levels.
(center)
MP PAPERTYPE Select the paper type.
PLAIN PAPER, TRACING PAPER, TRANSPARENCY,
SPECIAL PAPER 1, SPECIAL PAPER 2
(If you select a paper type other than PLAIN PAPER
and select the multi-purpose tray with Paper Select, T
will appear on the standby display.)
HIGH COPY MODE Set this mode when making copies on thick paper, or
when the humidity is high.
ON Sets a high quality printing copy.
(If you set it to ON and select the multi-purpose tray with
Paper Select, # will appear on the standby display.)
OFF Sets a normal quality printing copy.
TONER SAVER MODE Sets the toner save mode.
ON The toner save mode is turned on.
OFF The toner save mode is turned off.
PRT FEED INTERVAL Sets a paper feeding interval.
When successively making copies from photo originals
containing half-tones on LTR-, LGL-, A4- or B5-size
paper, black bands may appear on copies. To avoid this,
select LONG INTERVAL.
LONG INTERVAL Printing is performed at a slightly longer feeding interval
while adjustments are made to the drum.
NORMAL INTERVAL Printing is performed at a normal feeding interval.
DISPLAY LANGUAGE Select the message language.
ENGLISH, FRENCH, SPANISH, PORTUGUESE
• For the D680 model, DEFAULT SETTINGS, SW AFTER AUTO CLR and VOLUME CONTROL are
also displayed. (→ Fax Guide)
NOTE
Name Descriptions
(The factory default setting is in bold face.)
Page 72
7-3
COPY SETTINGS
STD. IMAGEQUALITY Select the document type.
TEXT ORIGINAL: Character mode
TEXT/PHOTO*
1
: Text/photo mode
PHOTO*
1
: Photo mode
STANDARD EXPOSURE Selects the auto or manual mode of exposure setting.
AUTO*
2
The exposure is adjusted automatically.
MANUAL The exposure is adjusted manually.
The exposure can be adjusted in 9 steps. (center)
STD ZOOM RATIO Selects the copy ratio (for the D680/D660 models only).
50 to 200 % (100 %)
STANDARD COPY QTY Selects the copy quantity.
01 to 99 (01)
AUTO SORT Sets the auto sort.
ON The auto sort function is turned on.
OFF The auto sort function is turned off.
MAX. SCAN LENGTH Selects the maximum book scanning length.
330 mm Select when not using the legal size document (when the
document size is smaller than the letter or A4 size).
356 mm Select when using the legal size document.
PAPER SIZE GROUP The paper size group can be selected. If the paper size
group is changed, the preset copy ratios, 2 on 1 copy
ratio and 2 on 1 paper size will change.
INCH Preset copy ratios: 50%, 64%, 78%, 100%, 129%, 200%.
2 on 1 copy ratio: 64%, LTR size.
A Preset copy ratios: 50%, 70%, 100%, 141%, 200%.
2 on 1 copy ratio: 70%, A4 size.
AB Preset copy ratios: 50%, 70%, 81%, 86%, 100%, 115%,
141%, 200%.
2 on 1 copy ratio: 70%, A4 size.
SHARPNESS Black and white of an image can be sharpened. When
you want to make characters and lines clear, select a big
number. When you make copies of photographs, select a
small number.
1 to 9 (5)
*1STANDARD EXPOSURE automatically changes to MANUAL when TEXT/PHOTO or PHOTO is selected.
*
2
STD.IMAGEQUALITY automatically changes to TEXT ORIGINAL when AUTO is selected.
7
Setting the Additional Functions
Name Descriptions
(The factory default setting is in bold face.)
Page 73
7-4
TIMER SETTINGS
DATE/TIME SETTING Enter the current date and time.
AUTO CLEAR Sets the auto clear function.
ON The auto clear function is turned on.
1 to 9 MIN. (2 MIN.)
OFF The auto clear function is turned off.
ENERGY SAVER The energy saver mode can be set.
ON The energy saver mode is set.
3 to 30 MIN. (5 MIN.)
OFF The energy saver mode is turned off.
DAILY TIMER SET The time of each day to execute the energy saver
function can be set.
1.SUN, 2.MON, 3.TUE, 4.WED, 5.THU, Enter the desired time for the desired day. You can adjust
6.FRI, 7.SAT the time by 1 minute in the range from 00:00 to
23:59.
If you want to clear the settings, press #.
DATE SETUP Set the format for the DATE & TIME settings menu and
how the date is displayed in the LCD in standby mode.
MM/DD/YYYY, DD/MM YYYY, YYYY MM/DD
ADJUST/CLEAN
ROLLER CLEANING Select when the printed paper is dirty.
CLEAN ADF ROLLER Select when the documents have black streaks and appear
dirty after they were fed out of the ADF.
RESTART PRINTER Restarts the printer functions. (→ Printer Guide)
PRINT LISTS
USER DATA Prints out a list of items set or registered in the
Additional Functions.
CANCEL REPORT Cancels printout of the report.
• For the D680 model, SPEED DIAL LIST is also displayed. (→ Fax Guide)
NOTE
Name Descriptions
Name Descriptions
Name Descriptions
(The factory default setting is in bold face.)
Page 74

A-1
Type: Personal Desktop
Platen: Stationary
Automatic Document Feeder: 30 sheets (Letter size, 20-lb bond or 80 g/m
2
)
15 sheets (Legal size, 20-lb bond or 80 g/m
2
)
Photoconductive Material: Organic Photosensitive Conductor
Copying System: Indirect Electrostatic Transfer System
Developing System: Toner Projection System
Fixing System: Canon’s RAPID Fusing System™
Resolution: Approx. 1200 dpi × 600 dpi
Number of Tones: 256
Acceptable Originals: Up to Legal size
Sheets, books, and three-dimensional objects (up to 4.4 lb or 2 kg)
Acceptable Copy Stock: Cassette Feeding: 17 to 20-lb bond (64 to 80 g/m
2
)
Multi-purpose Tray: 16 to 32-lb bond (56 to 128 g/m
2
)
Plain paper, colored paper, recycled paper, transparencies*, tracing paper*, labels*,
envelopes*, and heavy paper* (up to 32-lb bond or 128 g/m
2
)
*Asterisk indicates copy stocks that need to be fed through the Multi-purpose tray.
Copy Sizes: Legal (8
1
/2" × 14") to 3" × 5"
Automatic Document Feeder: Legal (8
1
/2" × 14") to Statement (5 1/2" × 8 1/2")
Non-image Area: 0.20" (5 mm) at leading edge, 0.18" (4.5 mm) at trailing edge, left and right side
Warm-up Time: 1 sec. (at room temperature of 68°F)
First Copy Time: 13 sec. [Letter size, direct, Manual Exposure Control, Cassette Feeding, platen
glass selected (except just after being restored from energy saver mode)]
Copy Speed: Direct: LTR 13 cpm
LGL 10 cpm
Reduction: LGL → LTR (78%) 13 cpm
LTR → STMT (64%) 13 cpm
Min. (50%)
Enlargement: STMT → LTR (129%) 13 cpm
Max. (200%)
Magnification: 1:1 ±1.0%, 1:2.000, 1:1.294, 1:0.786, 1:0.647, 1:0.500
Zoom: 0.500 to 2.000 in 1% increments (D680/D660)
Paper Feeding System: Cassette Feeding: 500 sheets of 20-lb bond (80 g/m
2
)
Multi-purpose Tray: 100 sheets; stack approx.
3
/8" (10 mm) high
Multiple Copies: 1- 99
Power Requirements: 120 V, 60 Hz [Power requirements differ depending on the country in which you
purchased the copier.]
Power Consumption: 0.78 kW (max.)
Dimensions (W × D × H): 18
3
/4" × 17 3/8" × 15 1/8" (475 mm × 442 mm × 384 mm)
Installation Space (W × D): 32
1
/2" × 17 3/8" (825 mm × 442 mm) [With the output tray attached and the multi-
purpose tray open]
Weight: Approx. 52.9 lb (24.0 kg) (including cartridge)
Features are subject to change without notice due to product improvements.
For high-quality copies, we recommend using paper and transparencies recommended by Canon. Some types of paper
available at office supply stores may not be suitable for this copier. If you have any questions about paper and
transparencies, consult your dealer or Canon Customer Relations.
A
Specifications
Specifications
Appendix:
Page 75

A-2
Page 76

I-1
I
Index
Index
4 (–) key ................................................................1-6
e (+) key................................................................1-6
2 on 1
copy.....................................................................4-9
key.......................................................................1-6
A
Additional Functions
accessing .............................................................7-1
key ...............................................................1-6, 7-1
understanding......................................................7-1
ADF (Automatic Document Feeder)
capacity ...............................................................3-4
jams in.................................................................6-3
loading documents in..........................................3-4
roller....................................................................1-4
ADJUST/CLEAN ...................................................7-4
Alarm indicator.......................................................1-6
AUTO CLEAR setting....................................4-1, 7-4
AUTO SORT setting...............................................7-3
C
CANCEL REPORT setting.....................................7-4
Cartridge
cover....................................................................1-4
handling...............................................................5-5
replacing...............................................5-4, 5-7, 5-8
storage .................................................................5-6
CAS. PAPER SIZE setting.....................................7-2
Cassette ...................................................................2-3
CHANGE DOCUMENT message .........................6-4
CHECK DOCUMENT OPEN THE ADF
message...................................................................6-4
CHECK PRINTER message ..................................6-4
CLEAN ADF ROLLER setting ......................5-3, 7-4
Cleaning
ADF roller...........................................................5-3
machine’s exterior...............................................5-1
periodic ...............................................................5-1
read area of the platen glass................................5-2
rollers at the inside of the main unit...................5-2
scanning area.......................................................5-1
CLOSE THE PLATEN message ............................6-5
Collate
copy.....................................................................4-7
key.......................................................................1-6
Colored paper .........................................................2-1
COMMON SETTINGS..........................................7-2
Convention, type.......................................................iv
COPY key .......................................................1-6, 4-1
Copy Mode .............................................................4-1
COPY SETTINGS..................................................7-3
Copy yield...............................................................5-5
Copying
adjusting the copy exposure ...............................4-6
document requirements.......................................3-1
paper requirements..............................................2-1
problems..............................................................6-7
setting enlarging/reducing...................................4-5
setting image quality...........................................4-6
Customer support....................................................1-1
D
DAILY TIMER SET setting ...................................7-4
DATE SETUP setting .............................................7-4
DATE/TIME SETTING .........................................7-4
DISPLAY LANGUAGE setting.............................7-2
Document
guides...........................................................1-5, 3-4
loading .........................................................3-3, 3-4
output slot ...........................................................1-5
positioning...........................................................3-3
problem ...............................................................3-2
quantity ...............................................................3-1
requirements........................................................3-1
scanned area........................................................3-2
size ......................................................................3-1
type......................................................................3-1
weight..................................................................3-1
Document feed
ADF.....................................................................3-4
platen glass..........................................................3-3
DOCUMENT TOO LONG message......................6-4
Page 77

I-2
E
Energy saver key ....................................................1-6
ENERGY SAVER setting ...............................1-8, 7-4
Enlarge/Reduce
key.......................................................................1-6
setting..................................................................4-5
Envelopes
loading.................................................................2-7
printable area.......................................................2-2
Exposure
automatically.......................................................4-6
key.......................................................................1-6
manually..............................................................4-6
F
FAX key..................................................................1-6
Feeder cover ....................................................1-5, 6-3
G
Guide
document .....................................................1-5, 3-4
length...................................................................2-5
slide..............................................................1-5, 2-6
H
Handling, safety instructions ..................................1-3
HIGH COPY MODE setting..................................7-2
I
Image Quality key...........................................1-6, 4-6
Image Quality, setting.............................................4-6
INCORRECT PAPER SIZE message ....................6-4
Indicator
alarm ...................................................................1-6
in use/memory.....................................................1-6
INSTALL CARTRIDGE message..........................6-4
InUse/Memory indicator.........................................1-6
J
Jams
clearing................................................................6-1
in ADF.................................................................6-3
in multi-purpose tray...........................................6-3
inside the main unit.............................................6-1
L
LCD ........................................................................1-6
Length guide ...........................................................2-5
LOAD LTR SIZE PAPER message.......4-9, 4-10, 6-4
Loading
documents in the ADF........................................3-4
envelopes in the multi-purpose tray ...................2-7
Loading paper
in the cassette......................................................2-3
in the multi-purpose tray.....................................2-6
Location, safety instructions...................................1-1
M
Maintenance, safety instructions ............................1-3
MAKING SPACE IN MEM message....................6-4
MAX. SCAN LENGTH setting .............................7-3
MEMORY FULL message .....................................6-4
Menu descriptions...................................................7-2
Messages, LCD ...............................................6-4, 6-5
MP PAPERTYPE setting.................................4-4, 7-2
MP TRAY PAPERSIZE setting ......................4-3, 7-2
Multi-purpose tray
capacity ...............................................................2-6
jams in.................................................................6-3
loading paper.......................................................2-6
Multiple copies .......................................................4-3
N
Numeric keys..........................................................1-6
O
Operation panel ...............................................1-4, 1-6
Output tray..............................................................1-4
P
Paper
cassette ................................................................1-4
feeding problems.................................................6-6
jam ...............................................................2-1, 6-1
loading.................................................................2-3
printable area.......................................................2-2
requirements........................................................2-1
Paper Select key ..............................................1-6, 4-3
PAPER SIZE GROUP setting ................................7-3
Plain paper ..............................................................2-1
Page 78

I-3
Platen
glass.....................................................................1-4
unit ......................................................................1-4
unit lever .............................................................1-4
PLATEN IS OPEN
CLOSE THE PLATEN message ............................6-5
PLEASE WAIT message ........................................6-4
Positioning document .............................................3-3
Power supply, safety instructions ...........................1-2
Preset Reduction/Enlargement................................4-5
PRINT EXPOSURE setting ...................................7-2
PRINT LISTS .........................................................7-4
Print media
requirements........................................................2-1
size ......................................................................2-1
type......................................................................2-1
weight..................................................................2-1
Print quality problems ............................................6-8
Printable areas.........................................................2-2
Problems
cannot solve ......................................................6-11
copying................................................................6-7
document.............................................................3-2
general...............................................................6-10
paper feeding.......................................................6-6
print quality.........................................................6-8
printing..............................................................6-10
PRT FEED INTERVAL setting ..............................7-2
Q
Quality
print problems .....................................................6-8
Quantity
document.............................................................3-1
setting..................................................................4-3
R
Read area ................................................................5-2
REC. PAPER JAM SLIDE PLATEN LEFT
message...................................................................6-5
Recycled paper .......................................................2-1
Reduction/Enlargement ..........................................4-5
REMOVE DOC. ON GLASS message..................6-5
REPLACE CARTRIDGE message........................6-5
Replacing
cartridge ...............................................5-4, 5-7, 5-8
Reserve Copy........................................................4-11
Right cover .............................................................1-4
ROLLER CLEANING setting ........................5-2, 7-4
S
Safety instructions
handling...............................................................1-3
location................................................................1-1
maintenance ........................................................1-3
power supply.......................................................1-2
Scan area.................................................................3-2
SCANNING message .............................................6-4
Set key ....................................................................1-6
SHARPNESS setting..............................................7-3
Size
document.............................................................3-1
indicators.............................................................3-3
print media ..........................................................2-1
Slide guide
ADF .............................................................1-5, 3-4
multi-purpose tray...............................................2-6
STANDARD COPY QTY setting ..........................7-3
STANDARD EXPOSURE setting .........................7-3
Standby display.......................................................1-7
START AGAIN message ........................................6-5
Start key ..........................................................1-6, 4-1
STD ZOOM RATIO setting ...................................7-3
STD. IMAGEQUALITY setting ............................7-3
STOP KEY PRESSED
PRESS SET KEY message.....................................6-5
Stop/Reset key.................................................1-6, 4-1
SUPPLY REC. PAPER message ............................6-5
SYSTEM ERROR message ...................................6-5
T
TIMER SETTINGS................................................7-4
Toner in the cartridge..............................................5-4
TONER SAVER MODE setting.............................7-2
Transparencies.................................................2-1, 3-1
Tray
multi-purpose ......................................................1-4
output ..................................................................1-4
Two-sided copy ...........................................4-13, 4-14
I
Index
Page 79

I-4
U
USER DATA setting ...............................................7-4
W
Weight
document.............................................................3-1
machine ..............................................................A-1
print media ..........................................................2-1
Z
Zoom.......................................................................4-5
Page 80

I-5
Memo
I
Index
Page 81

I-6
Memo
Page 82
120V
FA7 - 391 3- 010 © C ANO N IN C . 200 2 P R INTE D IN T H AIL AN D
CANON INC.
30-2, Shimomaruko 3-chome, Ohta-ku, Tokyo 146-8501, Japan
CANON U.S.A., INC.
One Canon Plaza, Lake Success, NY 11042, U.S.A.
CANON CANADA INC.
6390 Dixie Road Mississauga, Ontario L5T 1P7, Canada
CANON EUROPA N.V.
Bovenkerkerweg 59-61 P.O. Box 2262, 1180 EG Amstelveen, The Netherlands
CANON FRANCE S.A.
17,quai du President Paul Doumer 92414 Courbevoie Cedex, France
CANON COMMUNICATION & IMAGE FRANCE S.A.
(Pour les utilisateurs de l'imprimante laser uniquement)
102, avenue du GŽnŽral de Gaulle 92257 La Garenne-Colombes Cedex, France
CANON (U.K.) LTD.
Woodhatch, Reigate, Surrey, RH2 8BF, United Kingdom
CANON DEUTSCHLAND GmbH
Europark Fichtenhain A10, 47807 Krefeld, Germany
CANON ITALIA S.p.A.
Palazzo L Strada 6 20089 Milanofiori Rozzano (MI) Italy
CANON LATIN AMERICA, INC.
703 Waterford Way Suite 400 Miami, Florida 33126 U.S.A.
CANON AUSTRALIA PTY. LTD
1 Thomas Holt Drive, North Ryde, Sydney, N.S.W. 2113, Australia
CANON SINGAPORE PTE. LTD.
79 Anson Road #09-01/06, Singapore 079906
CANON HONGKONG CO., LTD
9/F, The Hong Kong Club Building, 3A Chater Road, Central, Hong Kong
 Loading...