

Page 1
E
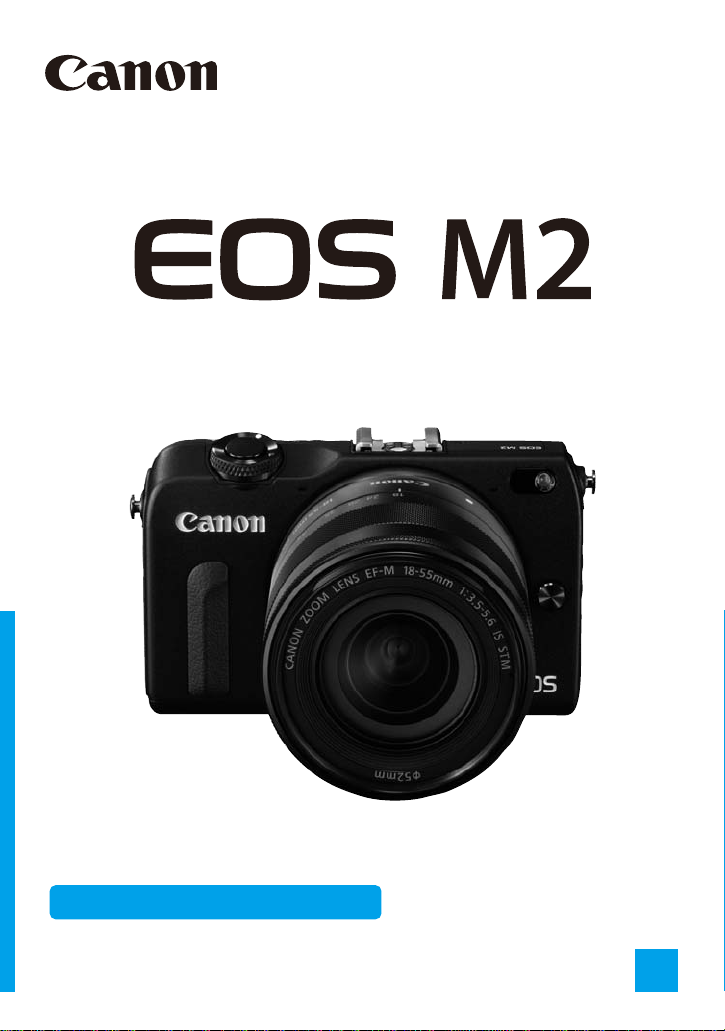
EOS M2 (W)
This basic manual covers only the most basic operations.
For detailed information, refer to the “Camera Instruction
Manual” available for download from the Canon Web site (p.5).
Basic Instruction Manual
Page 2

Introduction
The EOS M2 is a high-performance, interchangeable-lens digital camera
featuring a fine-detail CMOS sensor with approx. 18.0 effective megapixels,
DIGIC 5, Hybrid CMOS AF II, approx. 4.6 fps continuous shooting, Full HighDefinition (Full HD) movie shooting, and Wi-Fi functions.
The camera is highly responsive to any shooting situation, and provides
many features for demanding shots.
Refer to This Manual while Using the Camera to Further
Familiarize Yourself with the Camera
With a digital camera, you can immediately view the image you have
captured. While reading this manual, take a few test shots and see how they
come out. You can then better understand the camera.
To avoid botched pictures and accidents, first read the “Safety Warnings”
(p.110-111) and “Handling Precautions” (p.11-13).
Testing the Camera Before Use and Liability
After shooting, play images back and check whether they have been properly
recorded. If the camera or memory card is faulty and the images cannot be
recorded or downloaded to a computer, Canon cannot be held liable for any
loss or inconvenience caused.
Copyrights
Copyright laws in your country may prohibit the use of your recorded images
or copyrighted music and images with music in the memory card for anything
other than private enjoyment. Also be aware that certain public performances,
exhibitions, etc., may prohibit photography even for private enjoyment.
2
Page 3
Compatible Cards
In this manual, “card” refers to SD memory cards, SDHC memory cards,
and SDXC memory cards.
* The camera does not come with any cards for recording images/
movies. Please purchase these cards separately.
The camera can use the following cards regardless of capacity. If the card is
new or was previously formatted by another camera or computer,
formatting the card with this camera is recommended (p.49).
• SD memory cards
• SDHC memory cards*
• SDXC memory cards*
* UHS-I cards supported.
Cards that Can Record Movies
When shooting movies, use a large-capacity SD card rated SD Speed
Class 6 “ ” or higher.
If you use a slow-writing card when shooting movies, the movie may not
be recorded properly. Also, if you play back a movie on a card with a slow
reading speed, the movie may not play back properly.
If you want to shoot still photos while shooting a movie, you will need an
even faster card.
To check a card’s reading/writing speed, refer to the card manufacturer’s
Web site.
3
Page 4
Item Check List
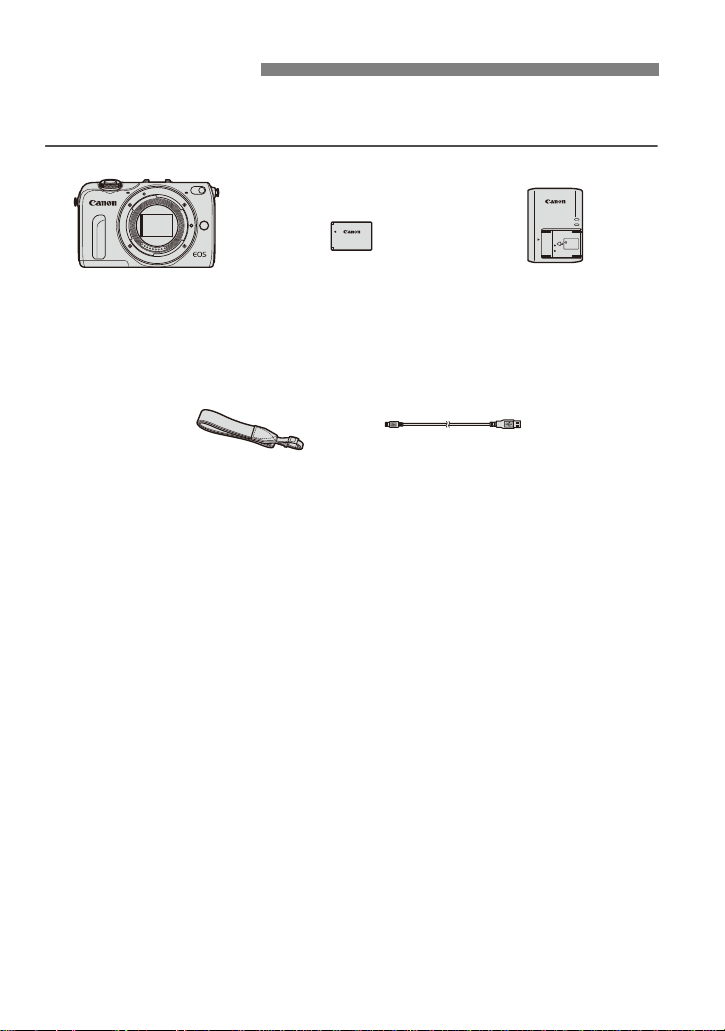
Battery Pack
LP-E12
(with protective cover)
Battery Charger
LC-E12/LC-E12E*
Neck Strap
EM-100DB
Camera
(with body cap)
Interface Cable
Before starting, check that all the following items have been included with
your camera. If anything is missing, contact your dealer.
* Battery Charger LC-E12 or LC-E12E is provided. (The LC-E12E comes with a power
cord.)
Software is not provided with the camera. Download it from the Canon Web
site at the following URL.
http://www.canon.com/icpd/
For information on how to download or install the software and Software Instruction
Manual PDFs, see “Software Start Guide” (p.102) in this manual.
The Instruction Manuals provided are listed on the next page.
Depending on the Lens Kit type, Lens Instruction Manuals may also be included.
Check that all the bundled accessories are included in the camera’s package.
Be careful not to lose any of the above items.
4
Page 5
Instruction Manuals
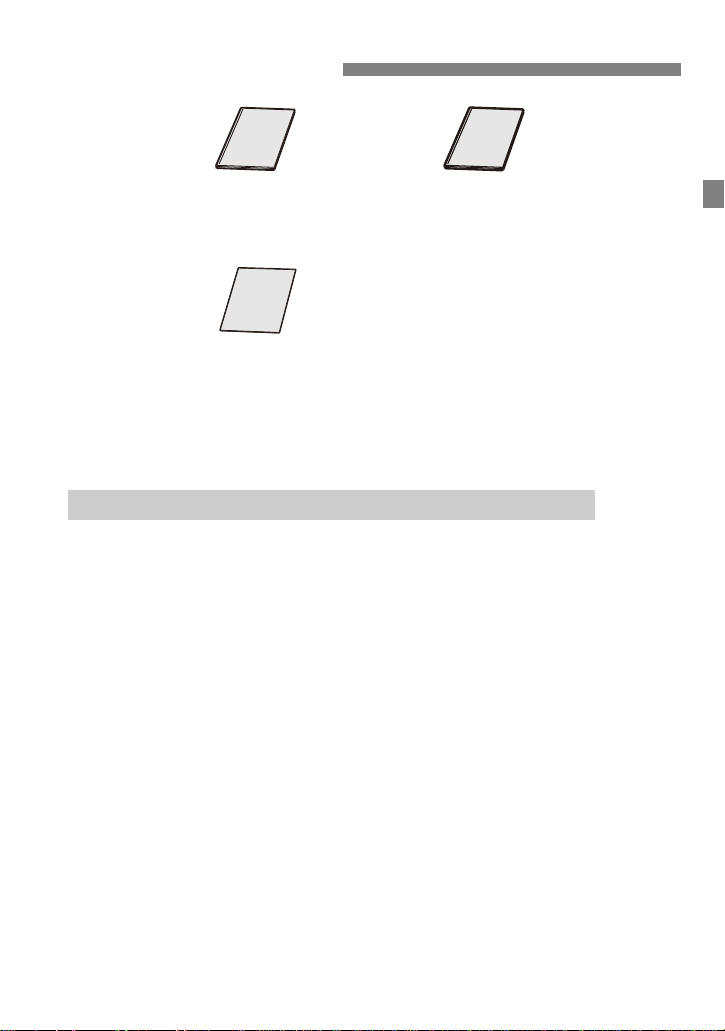
Camera Basic
Instruction Manual
Wi-Fi Cautions
Wi-Fi Function
Basic Instruction
Manual
The Instruction Manuals consist of the provided booklets and more detailed
Instruction Manual PDFs available for download from the Canon Web site.
Instructions for downloading and viewing the Instruction Manual PDFs are shown
below.
Downloading and Viewing the Instruction Manual PDFs
1 Download the Instruction Manual PDFs.
Connect to the Internet from a computer and access the Canon Web
site at the following URL.
http://www.canon.com/icpd/
Select your country or region of residence and download the Instruction
Manual PDFs.
Instruction Manual PDFs Available for Download
• Camera Instruction Manual
• Wi-Fi Function Instruction Manual
• Software Instruction Manuals
2 View the Instruction Manual PDFs.
Double-click a downloaded Instruction Manual PDF to open it.
To view the Instruction Manual PDFs, Adobe Reader must be installed
on your computer.
Adobe Reader can be downloaded free from the Internet.
5
Page 6
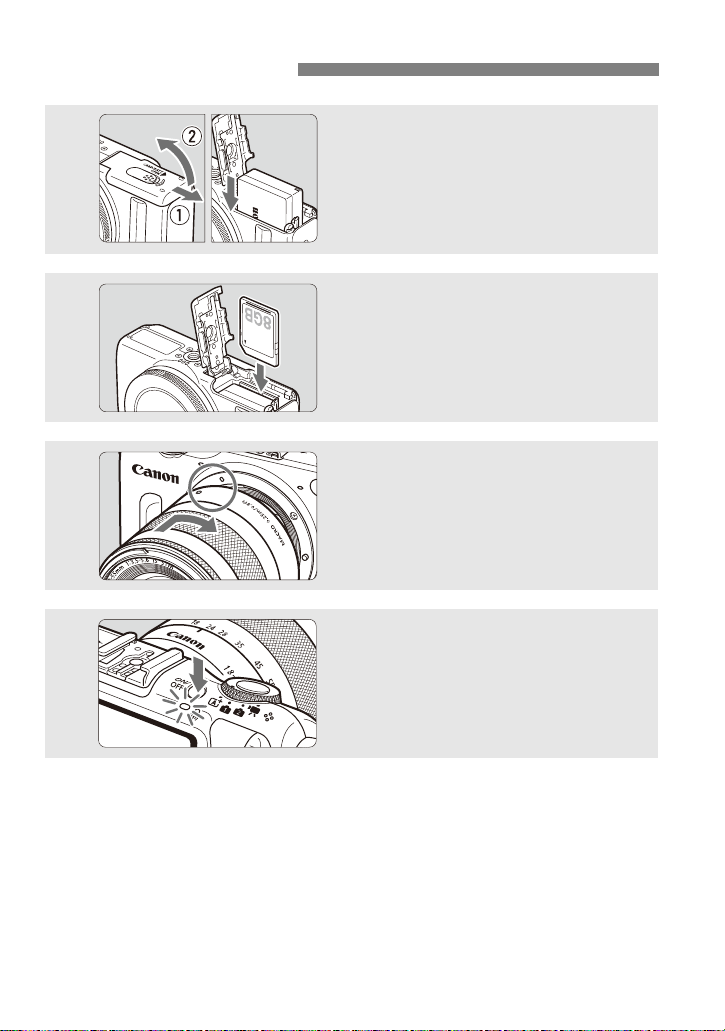
Quick Start Guide
1
2
3
4
Insert the battery (p.26).
To charge the battery, see page 24.
Insert a card (p.26).
With the card’s label facing toward the
front of the camera, insert it into the
card slot.
Attach a lens (p.36).
Align the lens’ mount index with the
camera’s mount index.
Press the power button to turn on
the camera
When the LCD monitor displays the
date/time/zone setting screens, see
page 33.
(p.29).
6
Page 7
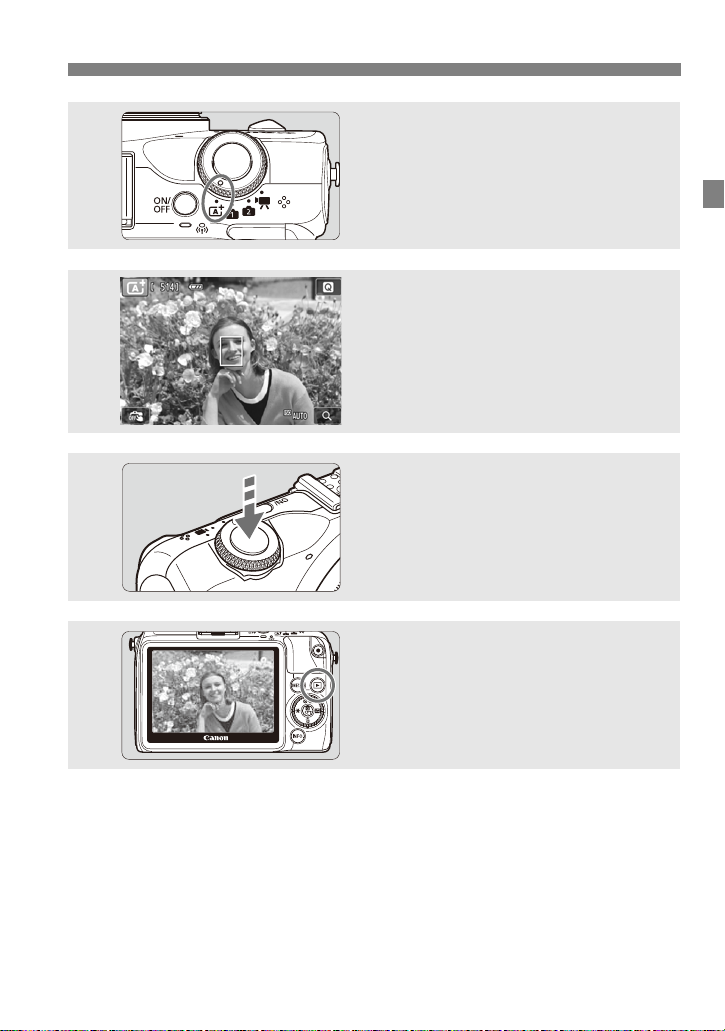
Quick Start Guide
5
6
7
8
Set the Mode Dial to <A> (Scene
Intelligent Auto)
All the necessary camera settings will
be set automatically.
Focus the subject (p.41).
Aim the LCD monitor’s center over the
subject.
Press the shutter button halfway. The
camera will focus the subject.
Take the picture (p.41).
Press the shutter button completely to
take the picture.
Review the picture.
The captured image will be displayed
for 2 sec. on the LCD monitor.
To display the image again, press the
<x> button (p.96).
(p.54).
To view the images captured so far, see “Image Playback” (p.96).
After you finish shooting, attach the lens cap to protect the lens.
7
Page 8

Conventions Used in this Manual
Icons in this Manual
<5> : Indicates the Main Dial.
<W><X><Y><Z><S> : Indicates the Main Dial’s top, bottom, left, and
right keys.
<Q>/<0> : Indicates the Main Dial’s center button.
0, 9, I, 7, 8 : Indicates that the corresponding function
remains active for 4 sec., 6 sec., 8 sec., 10
sec., or 16 sec. respectively after you let go of
the button.
* In this manual, the icons and markings indicating the camera’s buttons, dials, and
settings correspond to the icons and markings on the camera and on the LCD
monitor.
3 : Indicates a function that can be changed by pressing the
<M> button and changing the setting.
(p.**) : Reference page numbers for more information.
: Warning to prevent shooting problems.
: Supplemental information.
: Tips or advice for better shooting.
: Problem-solving advice.
Basic Assumptions
All operations explained in this manual assume that the power is <1>
(p.29).
It is assumed that all the menu settings and Custom Functions are set
to their defaults.
The illustrations in this manual show the camera with the EF-M
18-55mm f/3.5-5.6 IS STM lens attached as an example.
8
Page 9

Contents
Introduction 2
Compatible Cards .................................................................................... 3
Item Check List ........................................................................................ 4
Instruction Manuals.................................................................................. 5
Quick Start Guide.......................... ... ............................... ... ... ................... 6
Conventions Used in this Manual............................................................. 8
Contents................................................................................................... 9
Handling Precautions.............................................................................11
Nomenclature......................................................................................... 14
Getting Started 23
1
Charging the Battery .............................................................................. 24
Installing and Removing the Battery and Card....................................... 26
Turning on the Power.................... ... .. ... ................................ .. ............... 29
<5> Main Dial and <Q/0> Button........................... ... .................... 32
Setting the Date, Time, and Zone..........................................................33
Selecting the Interface Language............................... ...........................35
Attaching and Detaching a Lens............................................................ 36
Image Stabilizer ..................................................................................... 38
Basic Operation...................................................................................... 40
Quick Control ... ... ... .. ................................ .. ................................ .. .......... 42
3 Menu Operations..........................................................................46
Formatting the Card .............. ... ... .. ... ............................... ... .................... 49
d Using the Touch Screen .................................................................... 50
Feature Guide..................... .. ................................ .. ............................... 52
Basic Shooting 53
2
A Fully Automatic Shooting (Scene Intelligent Auto) .......................... 54
A Full Auto Techniques (Scene Intelligent Auto) ................................ 57
Selecting a Shooting Mode (Basic Zone Mode)..................................... 59
C Creative Auto Shooting............................................... .....................60
2 Shooting Portraits (Portrait) .............................................................. 65
9
Page 10

Contents
3 Shooting Landscapes (Landscape)......................... ........................ 66
4 Shooting Close-ups (Close-up)......................................................... 67
5 Shooting Moving Subjects (Sports) ..................................... .. ... ....... 68
C Shooting Children (Kids)................................. ..................................69
P Shooting Food (Food) ....................................................................... 70
6 Shooting Night Portraits (With a Tripod)........................................... 71
F Shooting Night Scenes (Handheld) .................................................. 72
G Shooting Backlit Scenes (HDR Backlight Control) ........................... 73
j Using the Self-timer .......................................................................... 75
Functions that Can Be Set with Quick Control....................................... 76
Autofocus 77
3
Selecting a Focusing Method................................................................. 78
Using AF to Focus (AF Method)............................................................ 79
x Shooting with the Touch Shutter...................................................... 86
Shooting Movies 87
4
k Shooting Movies.............................................................................. 88
B Quick Control During Movie Shooting........................................... 91
Setting the Movie Recording Size........... ... ................................ .. ... ....... 92
Image Playback 95
5
x Image Playback ...... ... .. ... ... .. ................................ .. .......................... 96
d Playback with the Touch Screen ........................ ... .. .......................... 97
k Playing Movies........ ... .. ... ... .. ................................ .. .......................... 99
Software Start Guide /
6
Downloading Images to Your Computer 101
Software Start Guide.......................................... ... ............................... 102
Downloading and Viewing the Software Instruction Manual PDFs...... 104
Downloading Images to a Computer.................................................... 105
10
Page 11

Handling Precautions
Camera Care
This camera is a precision instrument. Do not drop it or subject it to
physical shock.
Do not point the camera toward an intense light source, such as the sun
on a sunny day or an intense artificial light source. Doing so may
damage the image sensor or the camera’s internal components.
The camera is not waterproof and cannot be used underwater. If you
accidentally drop the camera into water, promptly consult the nearest
Canon Service Center. Wipe off any water droplets with a dry and clean
cloth. If the camera has been exposed to salty air, wipe it with a wellwrung wet cloth.
Never leave the camera near anything that has a strong magnetic field
such as a magnet or electric motor. Also avoid using or leaving the
camera near anything emitting strong radio waves such as a large
antenna. Strong magnetic fields can cause camera misoperation or
destroy image data.
Do not leave the camera in excessive heat, such as in a car in direct
sunlight. High temperatures can cause the camera to malfunction.
The camera contains precision electronic circuitry. Never attempt to
disassemble the camera yourself.
Do not block the shutter operation with your finger, etc. Doing so may
cause a malfunction.
Use a blower to blow away any dust on the lens. Do not use cleaners
that contain organic solvents to clean the camera body or lens. For
stubborn dirt, take the camera to the nearest Canon Service Center.
Do not touch the camera’s electrical contacts with your fingers. This is
to prevent the contacts from corroding. Corroded contacts can cause
camera misoperation.
If the camera is suddenly brought in from the cold into a warm room,
condensation may form on the camera and internal parts. T o prevent
condensation, first put the camera in a sealed plastic bag and let it
adjust to the warmer temperature before taking it out of the bag.
If condensation forms on the camera, do not use the camera. This is to
avoid damaging the camera. If there is condensation, remove the lens,
card and battery from the camera, and wait until condensation has
evaporated before using the camera.
If the camera will not be used for an extended period, remove the
battery and store the camera in a cool, dry, well-v en ti l a te d lo cation.
Even while the camera is in storage, press the shutter button a few
times once in a while to check that the camera is still working.
11
Page 12

Handling Precautions
Avoid storing the camera where there are chemicals that result in rust
and corrosion such as in a chemical lab.
If the camera has not been used for an extended period, test all its
functions before using it. If you have not used the camera for some time
or if there is an important shoot such as a foreign trip coming up, have
the camera checked by the nearest Canon Service Center or check the
camera yourself and make sure it is working properly.
When you detach the lens, the image sensor will be exposed. To
prevent scratching the image sensor, do not touch the image sensor.
If you use continuous shooting or movie shooting for a prolonged
period, the camera may become hot. This is not a malfunction.
LCD Monitor
Although the LCD monitor is manufactured with very high precision
technology with over 99.99% effective pixels, there may be a few dead
pixels displaying only black or red, etc. among the remaining 0.01% or
less pixels. Dead pixels are not a malfunction. They do not affect the
images recorded.
If the LCD monitor is left on for a prolonged period with the same screen
displayed, screen burn-in may occur where you see remnants of what
was displayed. However, this is only temporary and will disappear when
the camera is left unused for a few days.
The LCD monitor display may seem slow in low temperatures, or look
black in high temperatures. It will return to normal at room temperature.
After changing the LCD monitor’s brightness settings, the display may
look a little coarse, depending on the subject. This is not a malfunction
and will not affect the recorded image.
12
Page 13
Handling Precautions
Contacts
Cards
To protect the card and its recorded data, note the following:
Do not drop, bend, or wet the card. Do not subject it to excessive force,
physical shock, or vibration.
Do not touch the card’s electronic contacts with your fingers or anything
metallic.
Do not affix any stickers, etc., on the card.
Do not store or use the card near anything that has a strong magnetic
field, such as a TV set, speakers, or magnet. Also avoid places prone to
having static electricity.
Do not leave the card in direct sunlight or near a heat source.
Store the card in a case.
Do not store the card in hot, dusty, or humid locations.
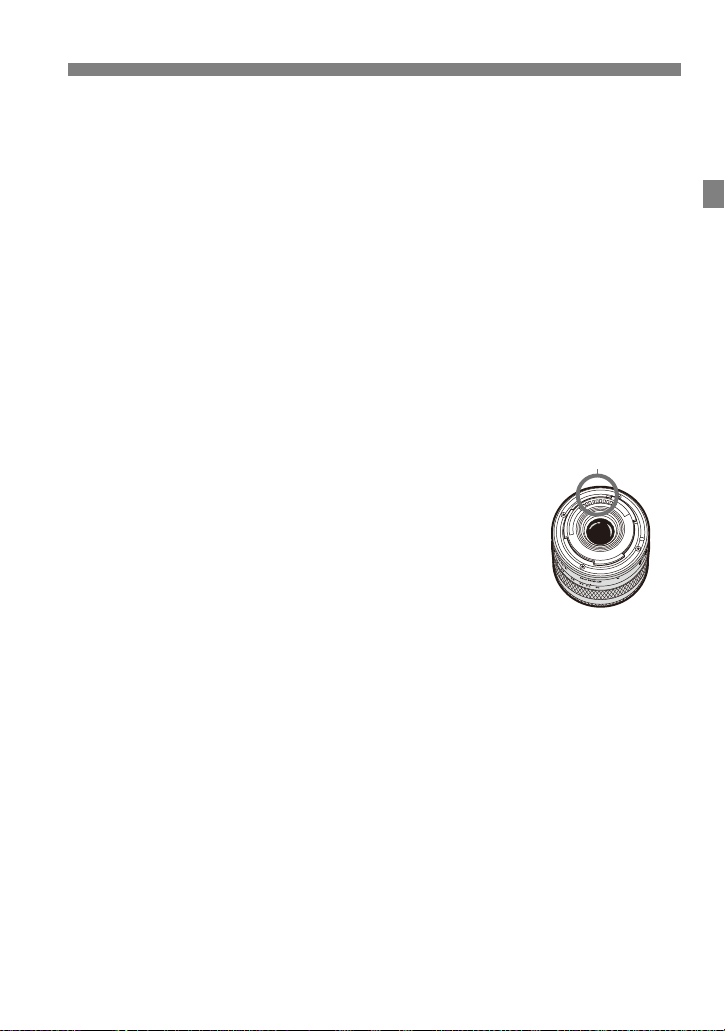
Lens
After detaching the lens from the camera, put down
the lens with the rear end up and attach the lens caps
to avoid scratching the lens surface and electrical
contacts.
Smudges Adhering to the Front of the Sensor
Besides dust entering the camera from outside, in rare
cases lubricant from the camera’s internal parts may
adhere to the front of the sensor. If visible spots still
remain after the automatic sensor cleaning, having the
sensor cleaned by a Canon Service Center is
recommended.
Lens Mount
Periodically cleaning the camera’s body and lens mount with a soft lens
cleaning cloth is recommended.
13
Page 14
Nomenclature
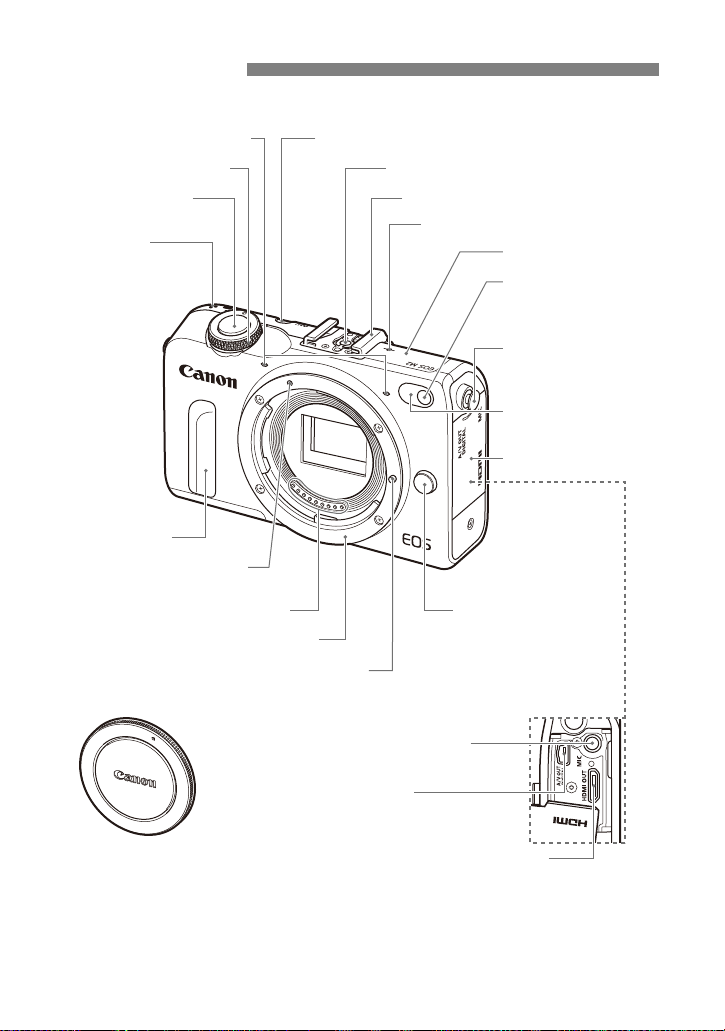
Microphone (p.89)
Shutter button
(p.41)
Mode Dial (p.18)
Speaker
(p.99)
Contacts (p.13)
EF-M lens mount index
(p.36)
Grip
Lens mount
Lens lock pin
<Y> External microphone
IN terminal
<q/C>
Audio/video OUT/Digital terminal
<D> HDMI mini OUT terminal
Lens release button
(p.37)
Terminal cover
Remote control
sensor
Strap mount (p.21)
Self-timer lamp
(p.75)/
AF-assist lamp
<V> Focal plane mark (p.67)
Hot shoe
Flash sync contacts
Power button (p.29)
Body cap (p.36)
Wi-Fi antenna
14
Page 15
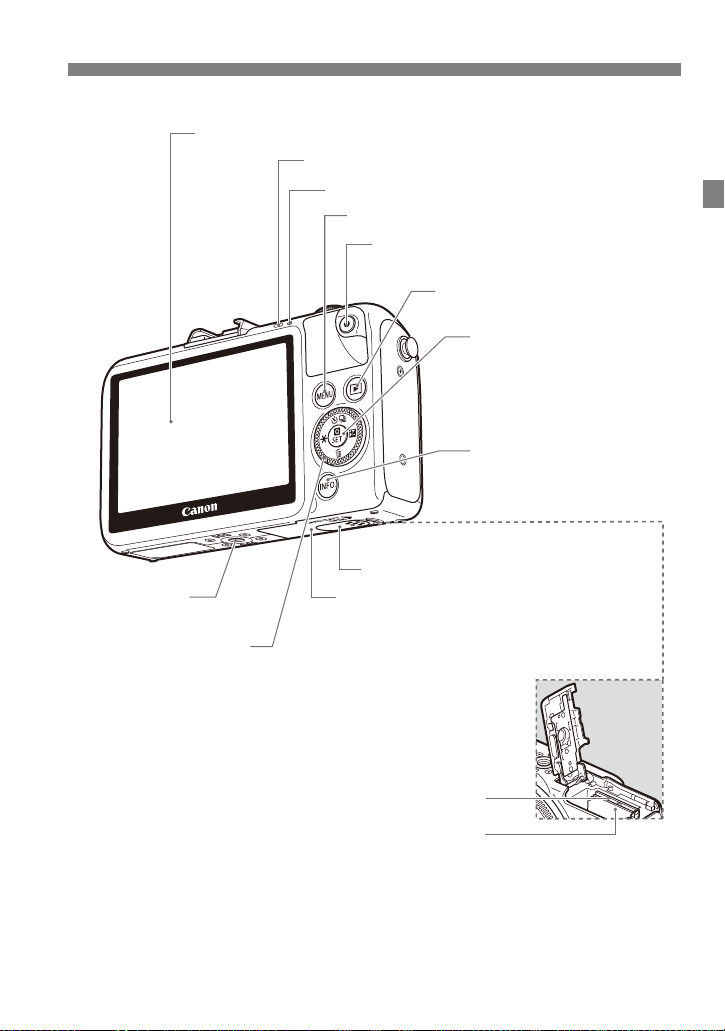
LCD monitor/Touch screen (p.46/p.50, 97, 99)
Power/Access lamp (p.27)
<k> Wi-Fi lamp
<M> Menu button (p.46)
<o> Movie start/stop button
(p.88)
<x> Playback button
(p.96)
<Q/0>
Quick Control/
Set button
(p.42, 76/p.32, 46)
<B> Info button
(p.44, 56, 90, 96)
DC Coupler terminal cover
Tripod socket
Card slot/Battery compartment cover
(p.26)
Card slot (p.26)
Battery compartment (p.26)
<5> Main Dial (p.32)
<Wj/i> Drive mode selection button (p.64, 75)
<XL> Erase button
<YA> AE lock/FE lock button
<ZO> Aperture/Exposure compensation button
Nomenclature
15
Page 16
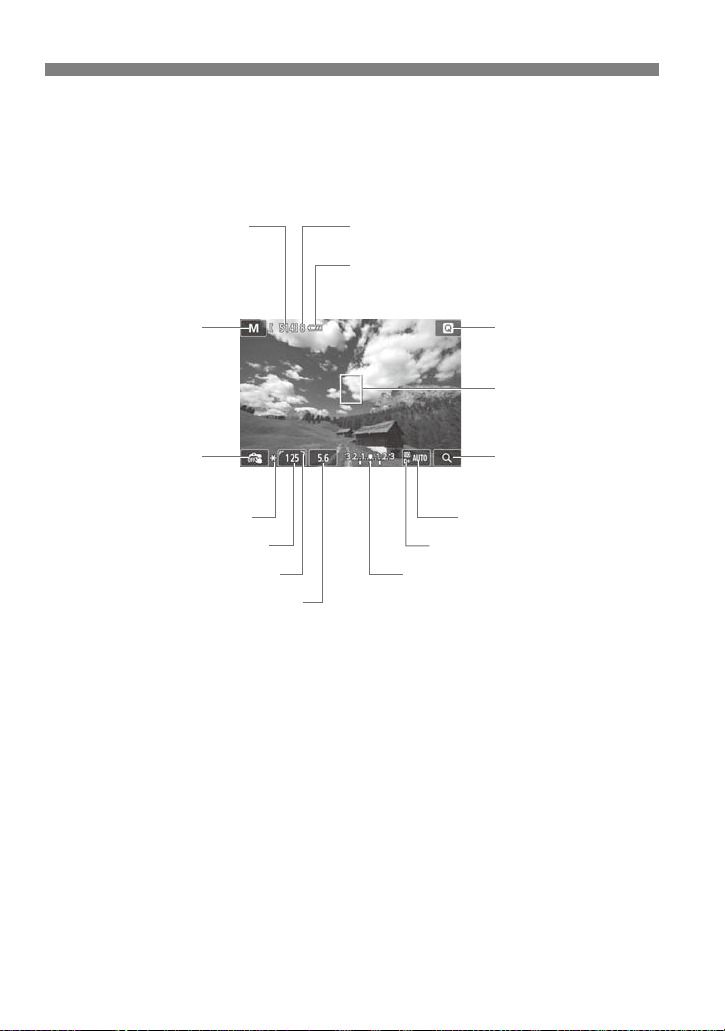
Nomenclature
Number of possible shots
Number of possible shots
during WB bracketing
Self-timer countdown
Shooting mode
AE lock
Shutter speed
Main Dial pointer Exposure level indicator
Exposure compensation
amount
AEB range
Highlight tone priority
ISO speed
Magnified view
QQuick Control
Battery check (p.31)
zxcn
AF point
(FlexiZone - Single)
(p.79)
Touch shutter
(p.86)
Maximum burst
Aperture
Information Display 1: Basic Information (in Creative Zone modes, p.18)
The display will show only the settings currently applied.
16
Page 17
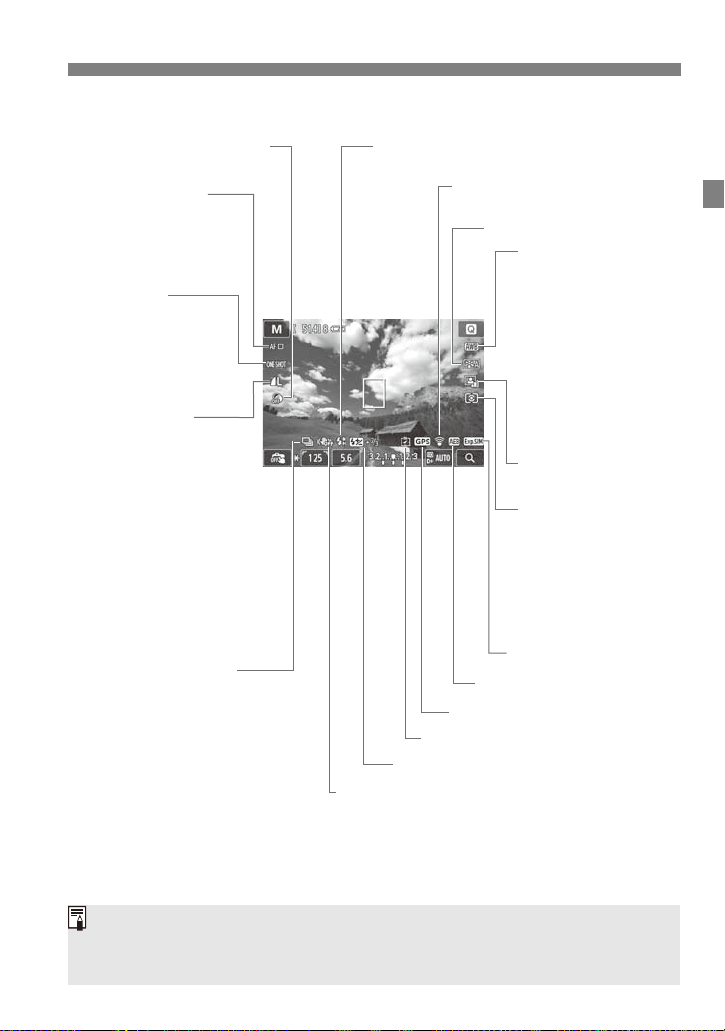
Nomenclature
Creative filters
AF method (p.79)
d FlexiZone - Single
c u+Tracking
o FlexiZone - Multi
AF operation
X
One-Shot AF
4 Servo AF
MF Manual Focus
Image-recording
quality
73 Large/Fine
83 Large/Normal
74 Medium/Fine
84 Medium/Normal
7a Small 1/Fine
8a Small 1/Normal
b Small 2 (Fine)
c Small 3 (Fine)
1+73
RAW+Large/Fine
1 RAW
Drive mode (p.64, 75)
u Single shooting
i Continuous shooting
Q Self-timer:10 sec/
remote control
l Self-timer:2 sec
q Self-timer:Continuous
Image Stabilizer: OFF
(
only when a lens with IS function is attached
)
Digital compass
GPS connection indicator
AEB/FEB
White balance
Q Auto
W Daylight
E Shade
R Cloudy
Y Tungsten light
U
White
fluorescent light
I Flash
O Custom
Metering mode
q Evaluative
metering
w Partial metering
r Spot metering
e
Center-weighted
average metering
Auto Lighting
Optimizer
Picture Style
Eye-Fi transmission status
e High-speed sync
d FE lock/FEB in-progress
Exposure simulation
Flash exposure compensation
If you use the <F> or <G> shooting mode, use flash, or set a bulb exposure,
the <g> icon and histogram will be grayed out (for your reference). The
histogram may not be properly displayed in low- or bright-light conditions.
Information Display 2: Det ailed information (in Creative Zone modes, p.18)
The display will show only the settings currently applied.
17
Page 18
Nomenclature
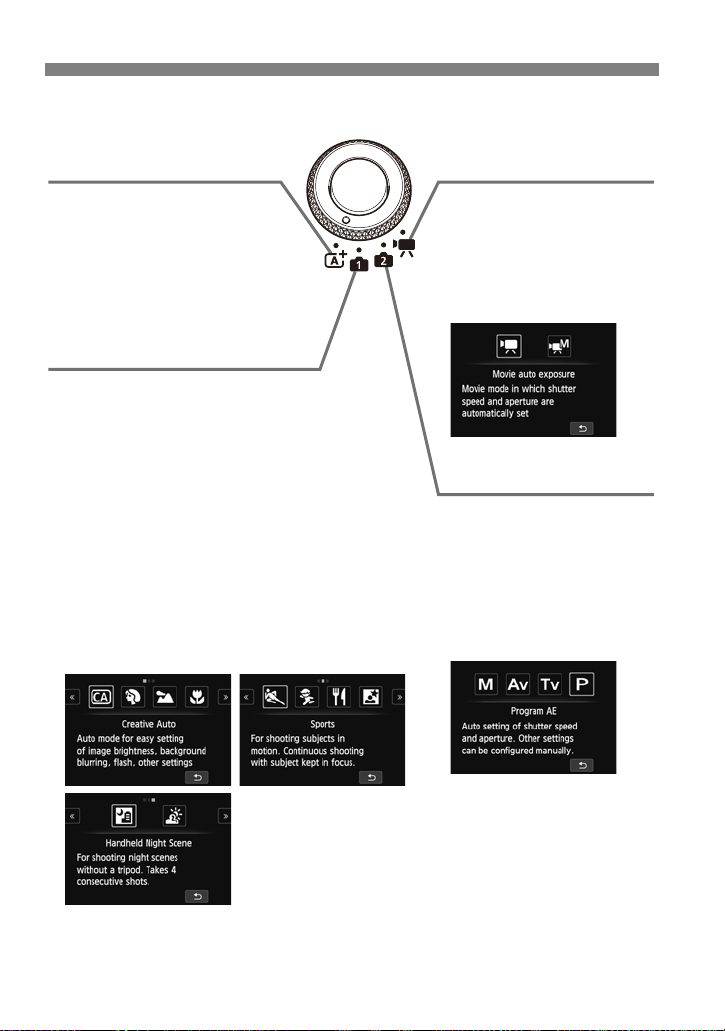
A
: Scene Intelligent Auto
w: Creative Zone Modes
This is a fully automatic
mode.
The camera analyzes the
scene and sets the optimum
settings automatically (p.54).
v: Basic Zone Modes
All you do is press the shutter button.
The camera sets everything to suit t he
subject or scene.
C : Creative Auto (p.60)
2 : Portrait (p.65)
3 : Landscape (p.66)
4 : Close-up (p.67)
5 : Sports (p.68)
C : Kids (p.69)
P : Food (p.70)
6 : Night Portrait (p.71)
F : Handheld Night Scene (p.72)
G : HDR Backlight Control (p.73)
These modes give you
more control for shooting
various subjects.
a : Manual exposure
f:
Aperture-priority AE
s : Shutter-priority AE
d : Program AE
k
: Movie Shooting Modes
You can shoot movies
(p.88).
k : Movie auto
exposure
M : Movie manual
exposure
Mode Dial
18
Page 19
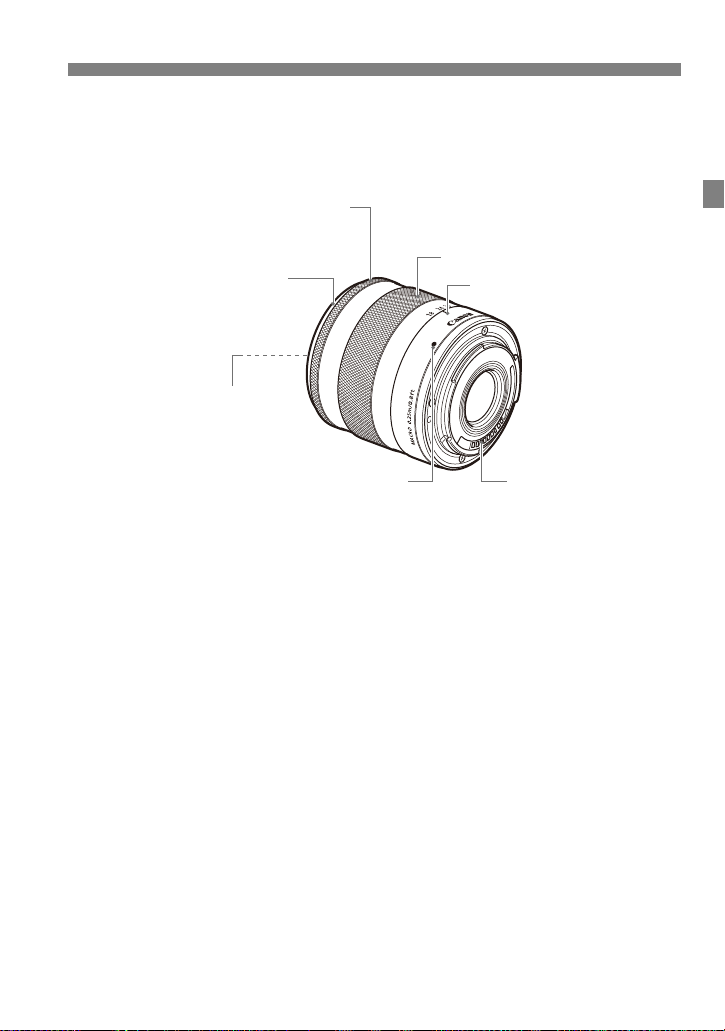
Lens
Focusing ring
(p.78)
Hood mount
Zoom ring (p.37)
Zoom position index (p.37)
Filter thread
(front of lens)
Lens mount index (p.36) Contacts (p.13)
EF-M Lens
(Lens with no focus mode switch and no Image Stabilizer switch.)
Nomenclature
19
Page 20
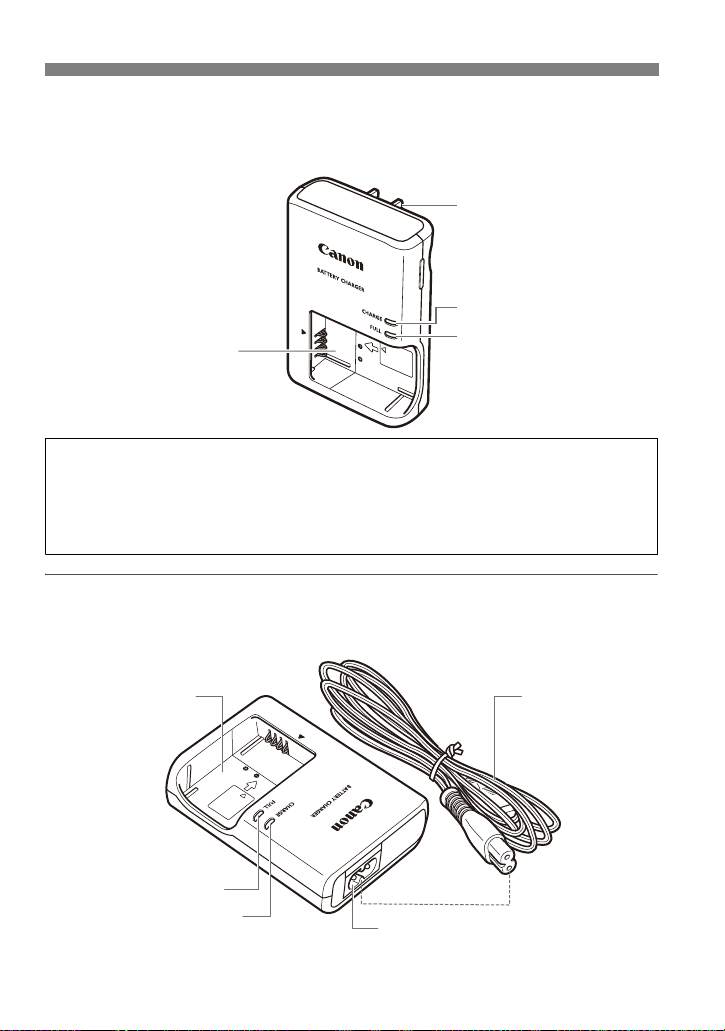
Nomenclature
Battery pack slot
Power plug
Charge lamp
Full-charge lamp
IMPORTANT SAFETY INSTRUCTIONS-SAVE THESE INSTRUCTIONS.
DANGER-TO REDUCE THE RISK OF FIRE OR ELECTRIC SHOCK,
CAREFULLY FOLLOW THESE INSTRUCTIONS.
For connection to a supply not in the U.S.A., use an attachment plug adapter of the
proper configuration for the power outlet, if needed.
Full-charge lamp
Power cord
Power cord socket
Battery pack slot
Charge lamp
Battery Charger LC-E12
Charger for Battery Pack LP-E12 (p.24).
Battery Charger LC-E12E
Charger for Battery Pack LP-E12 (p.24).
20
Page 21
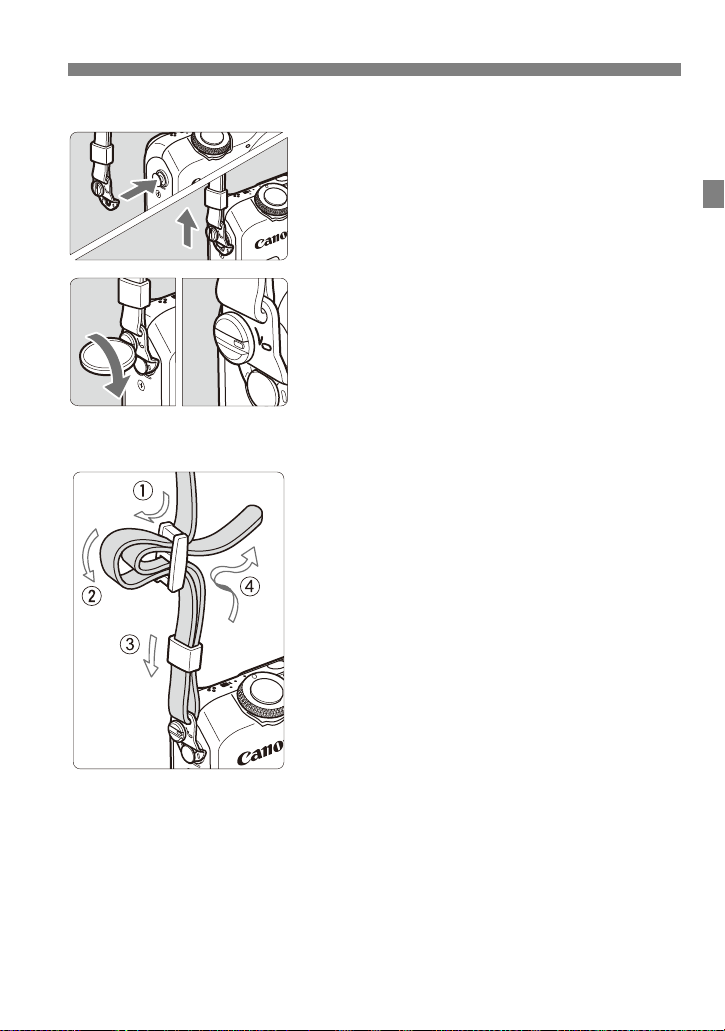
Attaching the Strap
Threading the Strap
Nomenclature
Attach the strap’ s met allic ring to th e
1
camera.
Fit the strap’s metallic ring over the
camera’s strap mount.
Lock the strap’s metallic ring.
2
Use a coin or similar tool to turn the
stopper clockwise until it stops (the index
marks are aligned).
Make sure the strap’s metallic ring is not
loose.
Thread the strap as shown in the
illustration and adjust the strap length.
21
Page 22

Nomenclature
Use of genuine Canon accessories is recommended
This product is designed to achieve excellent performance when used with genuine
Canon accessories.
Canon shall not be liable for any damage to this product and/or accidents such as
fire, etc., caused by the malfunction of non-genuine Canon accessories (e.g., a
leakage and/or explosion of a battery pack). Please note that this warranty does not
apply to repairs arising out of the malfunction of non-genuine Canon accessories,
although you may request such repairs on a chargeable basis.
Certification Logo
Under the [54] tab, if you select [Certification Logo Display] and press
<0>, some of the logos of the camera’s certifications will appear. Other
certification logos can be found in this Instruction Manual, on the camera body,
and on the camera’s package.
22
Page 23

1
Getting Started
This chapter explains preparatory steps before you start
shooting and basic camera operations.
23
Page 24
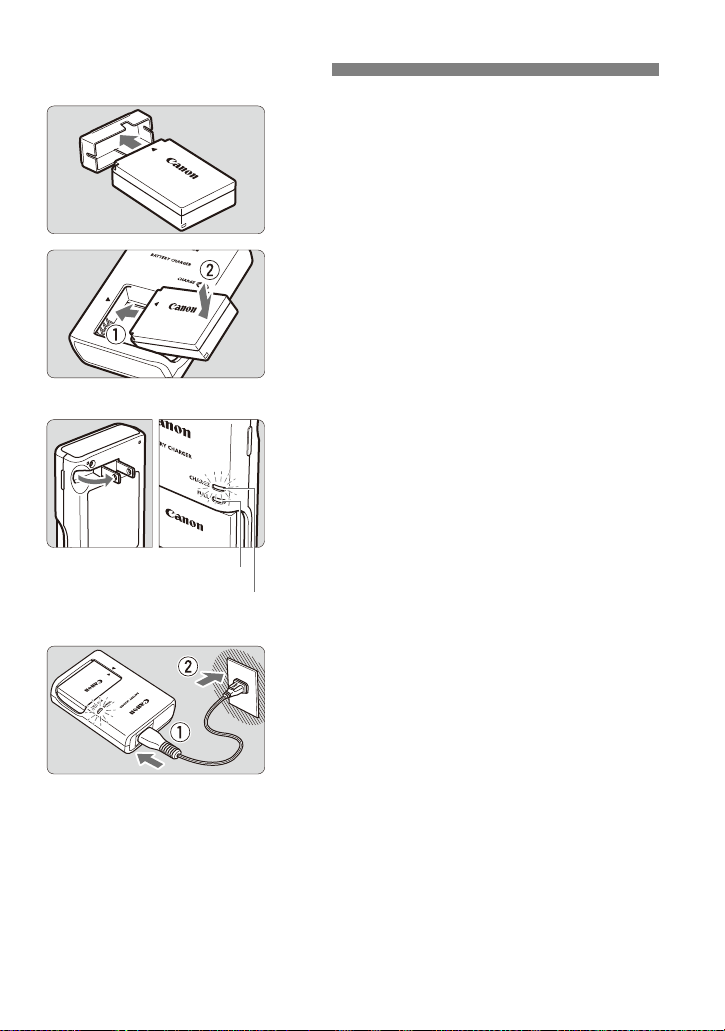
Charging the Battery
LC-E12
LC-E12E
Full-charge lamp
Charge lamp
Remove the protective cover.
1
Detach the protective cover provided with
the battery.
Attach the battery.
2
Align the battery’s h mark with the
battery charger’s g mark, then attach the
battery securely.
To detach the battery, follow the above
procedure in reverse.
Recharge the battery.
3
For LC-E12
As shown by the arrow, flip out the
battery charger’s prongs and insert the
prongs into a power outlet.
For LC-E12E
Connect the power cord to the charger
and insert the plug into a power outlet.
Recharging starts automatically and the
charge lamp lights up in orange.
When the battery is fully recharged, the
full-charge lamp will light up in green.
It takes approx. 2 hours to fully recharge a completely exhausted battery at
room temperature (23°C / 73°F). The time required to recharge the battery will
vary greatly depending on the ambient temperature and the battery’s
remaining capacity.
For safety reasons, recharging in low temperatures (5°C - 10°C / 41°F - 50°F) will
take longer (up to approx. 4 hours).
24
Page 25
Charging the Battery
After disconnecting the charger’s power plug, do not touch the prongs for at
least 3 sec.
Do not charge any battery other than a Battery Pack LP-E12.
Battery Pack LP-E12 is dedicated to Canon products only. Using it with an
incompatible battery charger or product may result in malfunction or accidents
for which Canon cannot be held liable.
Tips for Using the Battery and Charger
Upon purchase, the battery is not fully charged.
Charge the battery before use.
Recharge the battery on the day before or on the day it is to be used.
Even during storage, a charged battery will gradually drain and lose its
capacity.
After recharging the battery, detach it and disconnect the charger
from the power outlet.
When not using the camera, remove the battery.
If the battery is left in the camera for a prolonged period, a small amount of
power current is released, resulting in excess discharge and shorter
battery life. Store the battery with the protective cover (provided) attached.
Storing the battery when it is fully charged may lower the battery’s
performance.
The battery charger can also be used in foreign countries.
The battery charger is compatible with a 100 V AC to 240 V AC 50/60 Hz
household power outlet. If necessary, attach a commercially-available plug
adapter for the respective country or region. Do not attach any portable
voltage transformer to the battery charger. Doing so can damage the
battery charger.
If the battery becomes exhausted quickly even after being fully
charged, the battery has reached the end of its service life.
Purchase a new battery.
25
Page 26
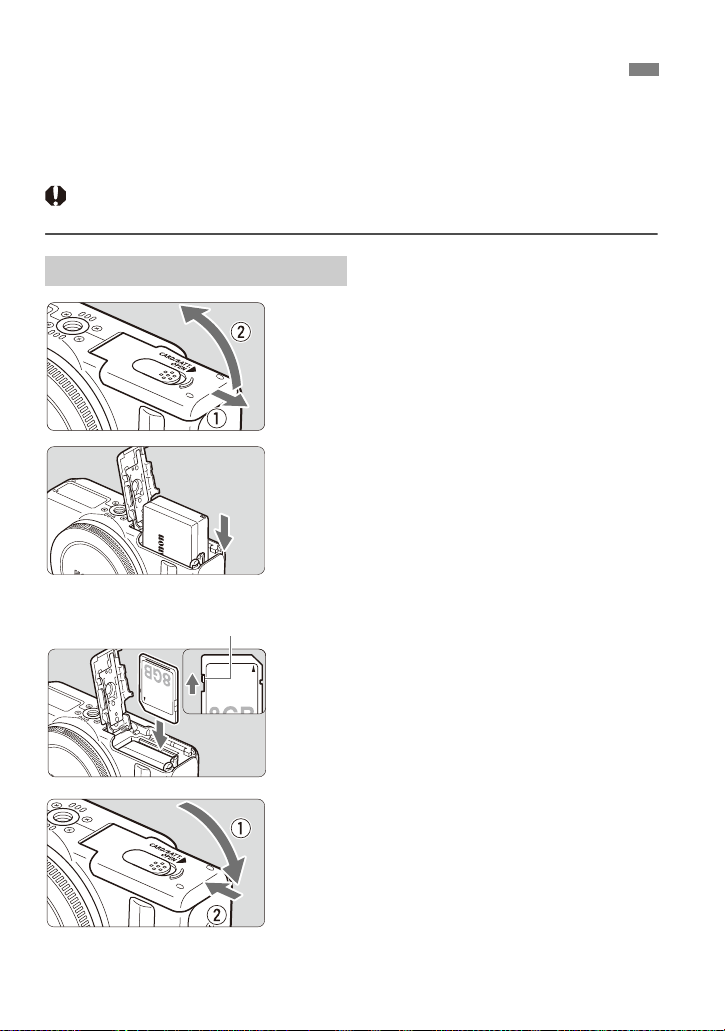
Installing and Removing the Battery and Card
Write-protect switch
Load a fully charged Battery Pack LP-E12 into the camera. The camera can
use an SD, SDHC, or SDXC memory card (sold separately). UHS-I Speed
Class SDHC and SDXC memory cards can also be used. The captured
images are recorded onto the card.
Make sure the card’s write-protect switch is set upward to enable
writing/erasing.
Installing the Battery and Card
Open the cover.
1
Slide the cover as shown by the arrows
and open it.
Insert the battery.
2
The battery’s “Canon” logo must be
toward the camera’s front side as you
insert the battery with the battery
contacts in first.
Insert the battery until it clicks and locks
in place.
Insert the card.
3
The card’s la be l si de must be towa rd
the front of the camera.
Insert it straight down until it stops.
26
Close the cover.
4
Press the cover until it snaps shut.
Page 27
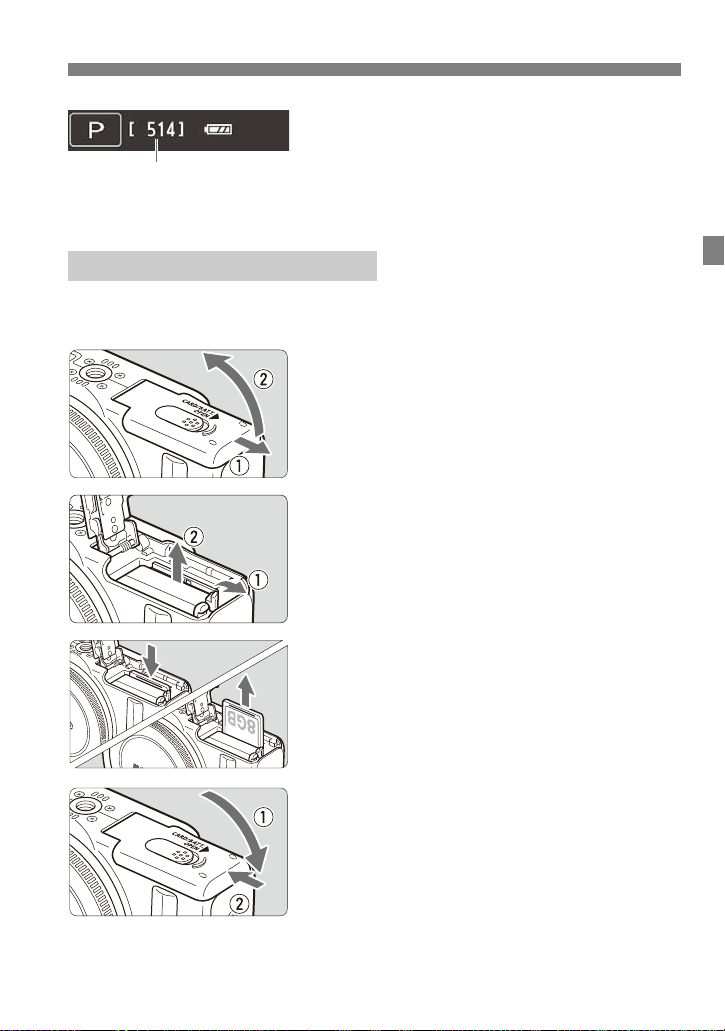
Check the number of possible shots.
Possible shots
5
When you set the power to <1>, the
remaining number of images you can
record to the card will be displayed on the
LCD monitor.
Removing the Battery and Card
Set the power to <2>.
1
Open the cover.
2
Make sure the LCD monitor and
access lamp are off, then open the
cover.
If [Recording...] is displayed, close the
cover.
Remove the battery.
3
Press the battery lock lever as shown by
the arrow and remove the battery.
To prevent short circuiting of the battery
contacts, be sure to attach the provided
protective cover (p.24) to the battery.
Remove the card.
4
Gently push in the card, then let go to
eject it.
Pull the card straight out.
Installing and Removing the Battery and Ca rd
Close the cover.
5
Press the cover until it snaps shut.
27
Page 28
Installing and Removing the Batte ry and Card
After opening the card slot/battery compartment cover, be careful not to swing
it back further. Otherwise, the hinge may break.
When the access lamp is blinking in orange, it indicates that images are
being written to or read by the card, being erased, or data is being
transferred. Do not open the card slot/battery compartment cover. Also,
never do any of the following while the access lamp is blinking in
orange. Otherwise, the image data, card, or camera may be damaged.
• Removing the card.
• Removing the battery.
• Shaking or banging the camera around.
If the card already contains recorded images, the image number may not start
from 0001.
If a card-related error message is displayed on the LCD monitor, remove and
reinsert the card. If the error persists, use a different card.
If you can transfer all the images on the card to a computer, transfer all the
images and then format the card with the camera (p.49). The card may then
return to normal.
Do not touch the card’s contacts with your fingers or metal objects.
Multimedia cards (MMC) cannot be used (card error will be displayed).
The number of possible shots depends on the remaining capacity of the card,
image-recording quality, ISO speed, etc.
Setting [A1: Release shutter without card] to [Disable] will prevent you
from forgetting to insert a card.
28
Page 29
Turning on the Power
If you set the power to <2> while an image is being recorded to the card,
[Recording...] will be displayed and the power will turn off after the card finishes
recording the image.
If you set the power to <1> and the date/time/zone setting screen
appears, see page 33 to set the date/time/zone.
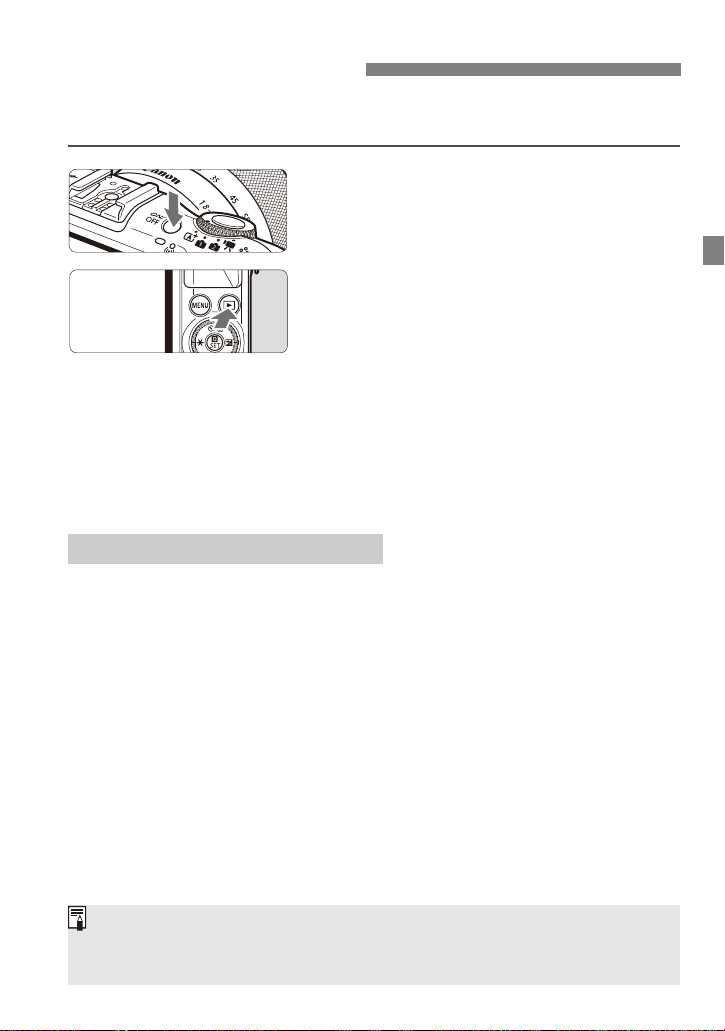
Pressing the power button toggles between
<1> and <2>.
With the power <2>, holding down the
<x> button for 2 sec. or longer will start the
playback mode.
When an EF-M lens is attached to the
camera and the power is off, the aperture
stops down to reduce the amount of light
entering the camera and protect the
internal components of the camera.
When you set the power to <1> or
<2>, the aperture makes a small
noise as it opens or closes.
Automatic Self-Cleaning Sensor
When you set the power to <1>/<2> or if the time set with [Camera
auto off] under [52: Power saving] elapses and the camera turns off,
sensor cleaning will be executed automatically. (A small sound may be
heard.) During the sensor cleaning after intentionally turning the camera
<2>, the LCD monitor will display the <f> icon.
If you repeatedly switch the power to <1>/<2> at a short interval,
the <f> icon may not be displayed. This is normal and not a
malfunction.
29
Page 30

Turning on the Power
Do not hold the camera in the same position for long periods of time.
Even if the camera does not feel too hot, prolonged contact with the same body
part may cause skin redness, blistering or low-temperature contact burns. The
use of a tripod is recommended for people with circulation problems or very
sensitive skin, or when using the camera in very hot places.
3 Power-saving Features
To save power, the LCD monitor turns off automatically if you do not
operate the camera. If you continue to not operate the camera, the power
will turn off automatically. While the LCD monitor is off, operation such as
pressing a button will turn on the LCD monitor again. If the power turns off,
either press the power button or press the <x> for at least approx. 2 sec.
to turn on the power again.
You can change the LCD monitor auto off time and camera auto off time
with [LCD auto off] and [Camera auto off] under [52: Power saving].
30
Page 31
Turning on the Power
The battery power will be consumed faster with any of the following
operations:
• Pressing the shutter button halfway for a prolonged period.
• Using Continuous AF.
• Using the lens Image Stabilizer.
• Shooting movies for a prolonged period.
• Using Movie Servo AF.
The number of possible shots may decrease depending on the actual
shooting conditions.
The lens operation is powered by the camera’s battery. Depending on the lens
used, the battery power may be consumed faster.
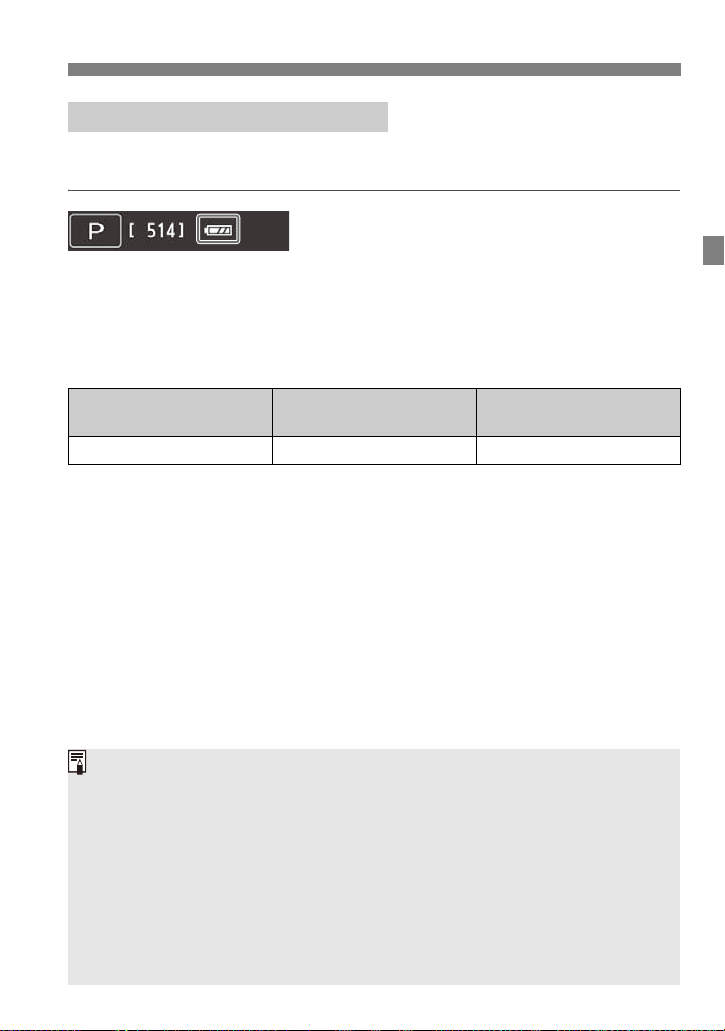
z Checking the Battery Level
When the power is turned on, the battery level will be indicated in one of four
levels.
z : Battery level is sufficient.
x : Battery level is low, but the ca mera
can still be used.
c : Battery will be exhausted soon.
(Blinks)
n : Recharge the battery.
Number of Possible Shots [Approx. number of shots]
Temperature
Possible shots 230 200
The figures above are based on a fully-charged Battery Pack LP-E1 2 and CIPA
(Camera & Imaging Products Association) testing standards.
Room Temperature
(23°C / 73°F)
Low Temperatures
(0°C / 32°F)
31
Page 32
<5> Main Dial and <Q/
0
> Button
Main Dial
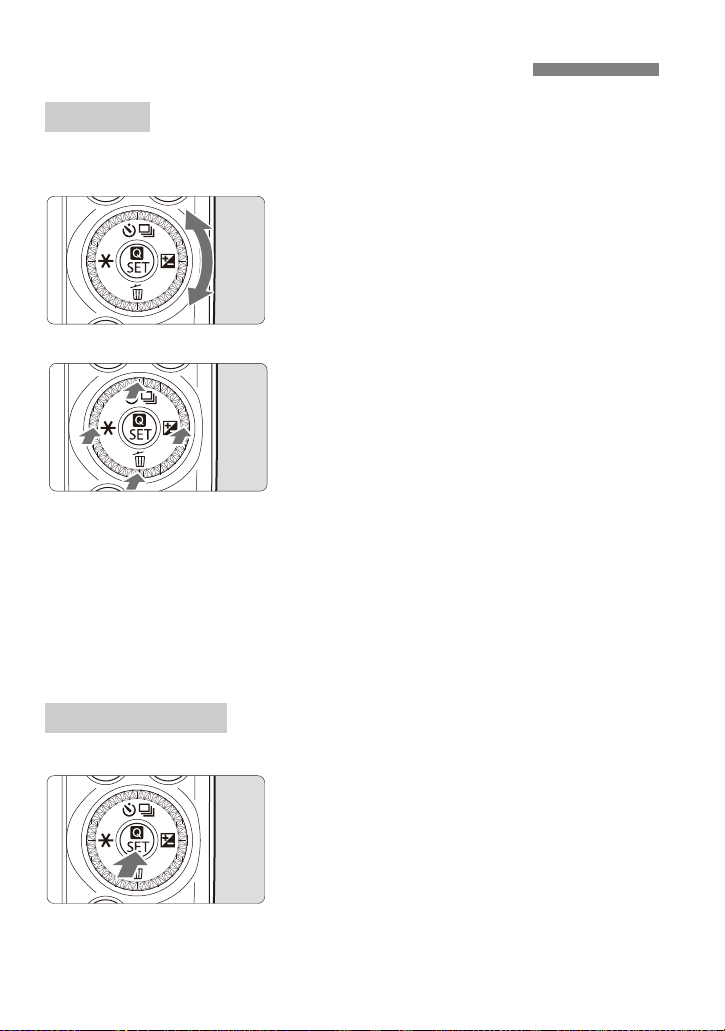
The Main Dial can be operated in two ways: by turning it or pressing the top,
bottom, left, or right edge.
Turn the Main Dial <5>.
When a function can be set (after pressing
a button or tapping an icon on the screen),
you can mainly make a horizontal
selection by turning the <5> dial.
You can set the shutter speed, aperture,
etc. by turning the <5> dial.
Press the top, bottom, left, or right of
the Main Dial <5>.
When a function can be set (after
pressing a button or tapping an icon on
the screen), you can select or adjust an
item by pressing the top, bottom, left, or
right of the <5> dial.
When shooting, you can select a drive
mode by pressing the <j/i> button, set
exposure compensation by pressing the
<O> button, or apply AE lock by pressing
the <A> button. (May not be available
depending on the shooting mode.)
During playback, you can erase an image
by pressing the <L> Erase button.
<Q/0> Button
The <Q/0> button has two features: <Q> Quick Control and <0> Set.
<Q> Quick Control
You can display the Quick Control screen
by pressing the <Q> button while an
image is displayed during shooting or
playback (p.42).
<0> Set
Press <0> to accept your selection in
menus, Quick Control functions, etc.
32
Page 33
3 Setting the Date, Time, and Zone
The menu setting procedure is explained on pages 46-48.
In step 3, the time displayed on the upper right of the screen is the time
difference compared with Coordinated Universal Time (UTC). If you do not
see your time zone, set the time zone while referring to the difference with
UTC.
When you turn on the camera for the first time or if the date/time/zone has
been reset, the date/time/zone setting screen will appear. Follow the steps
below to set the time zone first. If you set the camera to the correct time zone
for where you currently live, when you travel to another time zone you can
simply set the camera to the correct time zone for your destination to update
the camera’s date/time automatically.
Note that the date/time appended to recorded images will be based on
this date/time setting. Be sure to set the correct date/time.
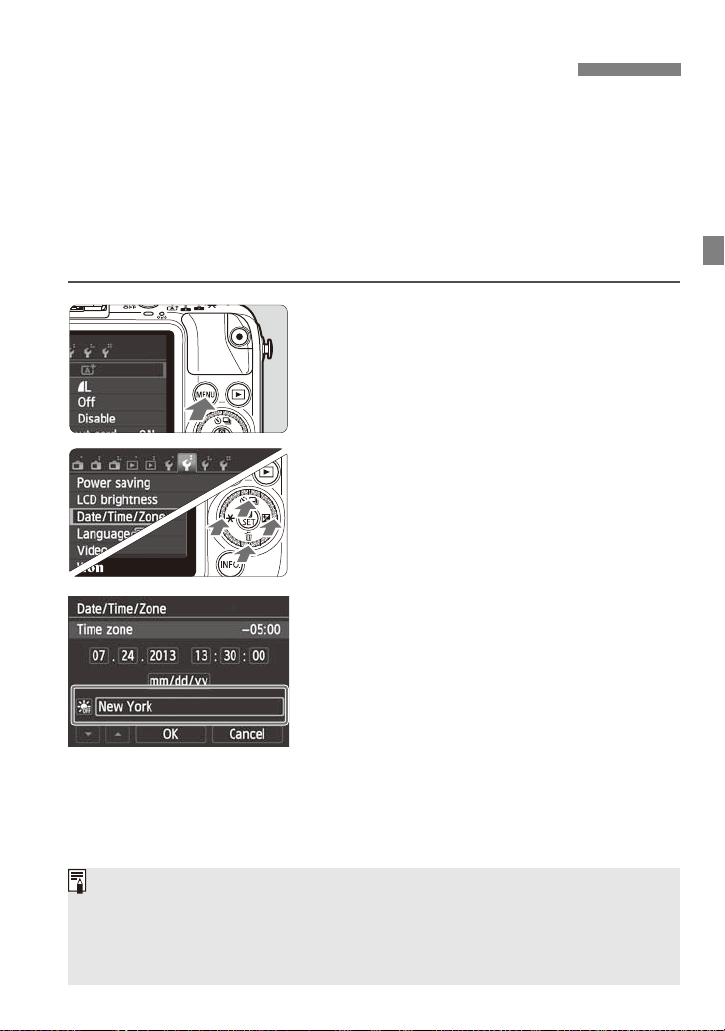
Display the menu screen.
1
Press the <M> button.
Under the [52] tab, select [Date/
2
Time/Zone].
Press the <Y> <Z> keys to select the
[52] tab.
Press the <W> <X> keys to select [Date/
Time/Zone], then press <0>.
Set the time zone.
3
[London] is set by default.
Press the <Y> <Z> keys to select the
time zone box.
Press <0> so <a> is displayed.
Press the <W> <X> keys to select the
time zone, then press <0>. (Returns
to <b>.)
33
Page 34
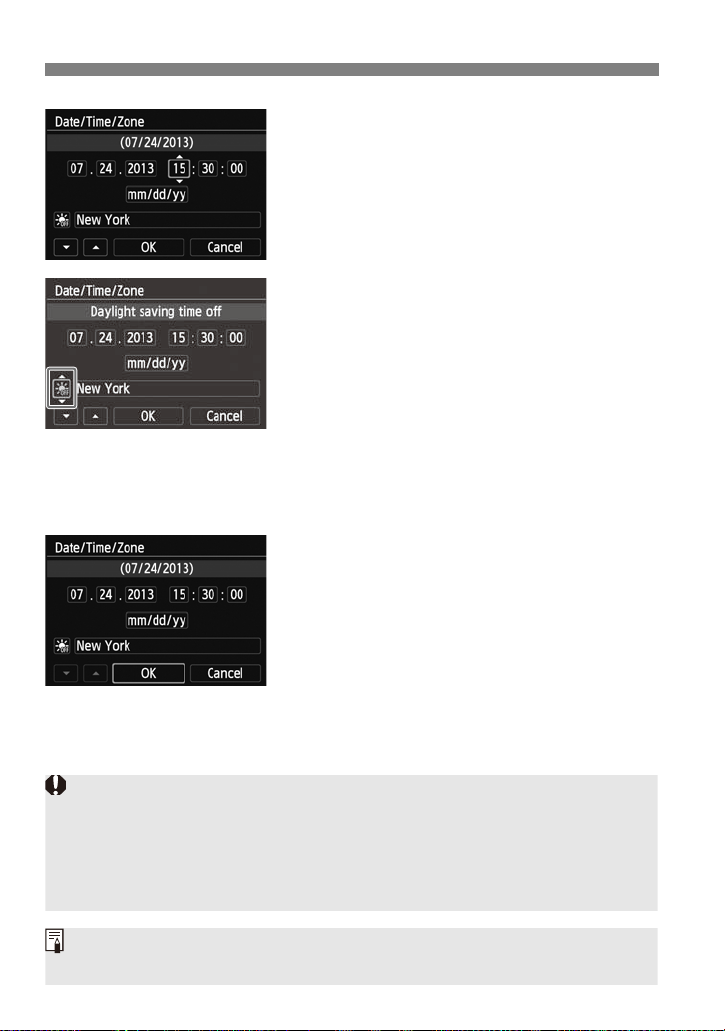
3 Setting the Date, Time, and Zone
The date/time/zone settings may be reset in the following cases. If this happens,
set the date/time/zone again.
• When the camera is stored without the battery.
• When the camera’s battery becomes exhausted.
• When the camera is exposed to below freezing temperatures for a prolonged
period.
The date/time that was set will start from when you press <0> in step 6.
After changing the time zone, check that the correct date/time has been set.
4
5
6
Set the date and time.
Press the <Y> <Z> keys to select the
number.
Press <0> so <a> is displayed.
Press the <W> <X> keys to set the
number, then press <0>. (Returns to
<b>.)
Set the daylight saving time.
Set it if necessary.
Press the <Y> <Z> keys to select [Y].
Press <0> so <a> is displayed.
Press the <W> <X> keys to select [Z],
then press <0>.
When the daylight saving time is set to
[Z], the time set in step 4 will advance
by 1 hour. If [Y] is set, the daylight
saving time will be canceled and the time
will go back by 1 hour.
Exit the setting.
Press the <Y> <Z> keys to select [OK],
then press <0>.
The date/time/zone and daylight saving
time will be set and the menu will
reappear.
34
Page 35
3 Selecting the Interface Language
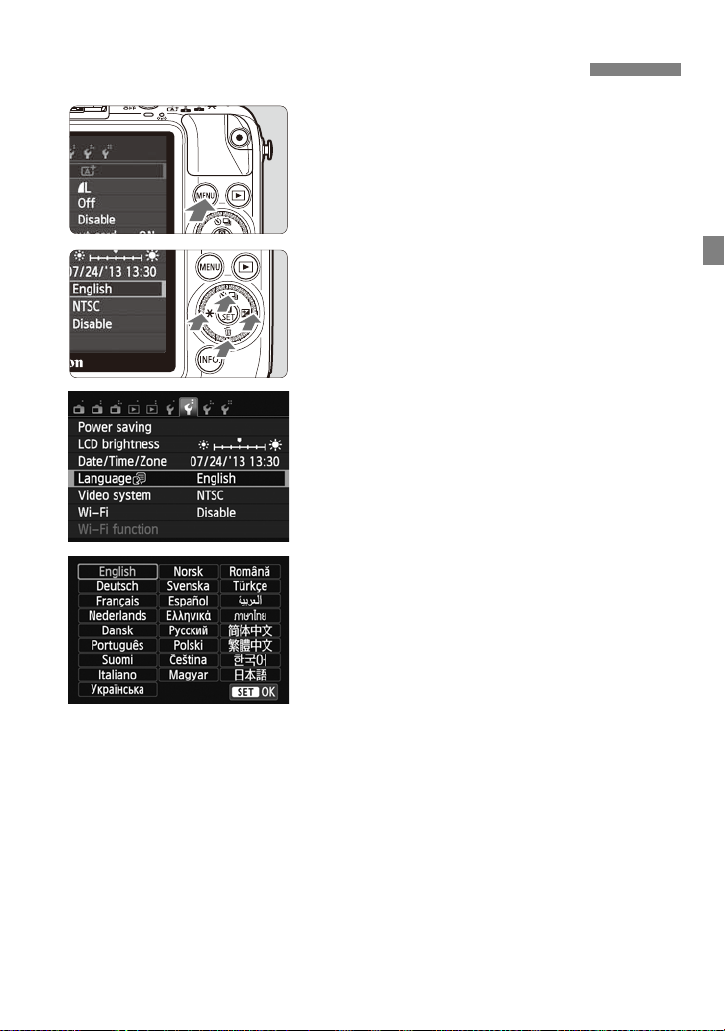
Display the menu screen.
1
Press the <M> button.
Under the [52] tab, select
2
[LanguageK].
Press the <Y> <Z> keys to select the
[52] tab.
Press the <W> <X> keys to select
[LanguageK], then press <0>.
Set the desired language.
3
Press the <W> <X> keys to select the
language, then press <0>.
The interface language will change.
35
Page 36
Attaching and Detaching a Lens
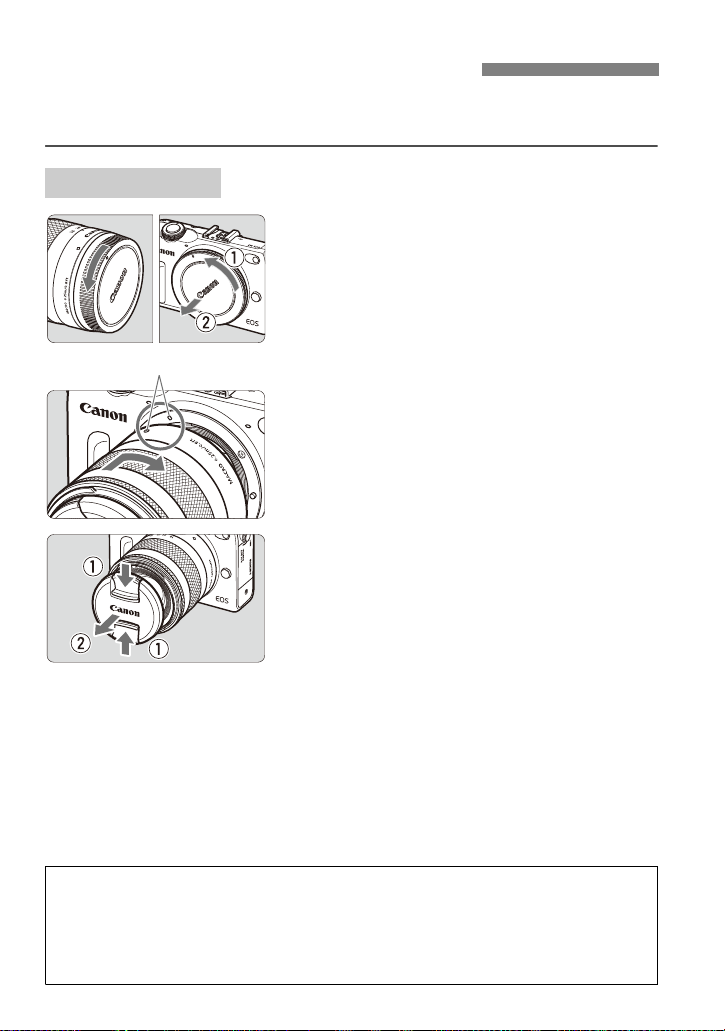
Index
Minimizing Dust
When changing lenses, do it quickly in a place with minimal dust.
When storing the camera without a lens attached, be sure to attach the body cap
to the camera.
Remove dust on the body cap before attaching it.
The camera is compatible with EF-M lenses. If you use Mount Adapter EFEOS M, you can also use EF and EF-S lenses.
Attaching a Lens
Remove the caps.
1
Remove the rear lens cap and the body
cap by turning them as shown by the
arrows.
Attach the lens.
2
Align the lens’ white mount index with the
camera’s white mount index. Turn the
lens as shown by the arrow until it clicks
in place.
Remove the front lens cap.
3
36
Page 37
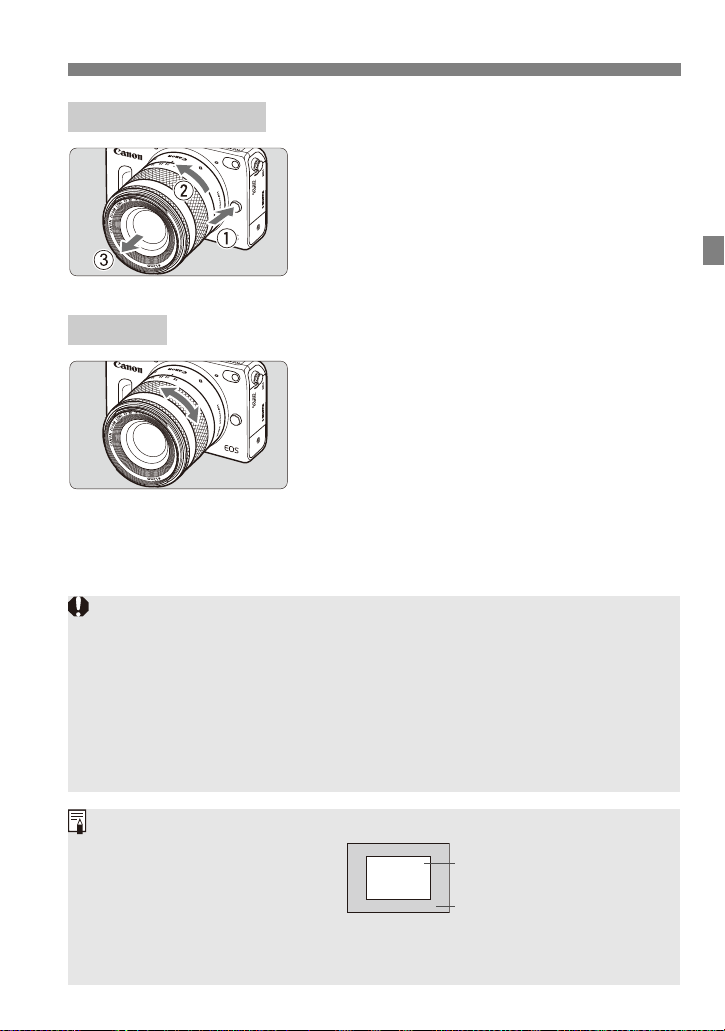
Detaching the Lens
Do not look at the sun directly through any lens. Doing so may cause loss of
vision.
When attaching or detaching a lens, set the camera’s power to <2>.
If the front part (focusing ring) of the lens rotates during autofocusing, do not
touch the rotating part.
The focus preset function of some super telephoto lenses cannot be used
with this camera. Also, Power Zoom cannot be used even if you attach a lens
featuring the Power Zoom function, such as the EF35-80mm f/4-5.6 POWER
ZOOM.
Lens Focal Length (Image Conversion Factor)
Since the image sensor size is
smaller than the 35mm film format,
it will look like the lens focal length
is increased by approx. 1.6x.
Example: An 18-55mm focal length would be equivalent to an approx. 29-88mm
focal length on a 35mm camera.
Image sensor size (Approx.)
(22.3 x 14.9 mm / 0.88 x 0.59 in.)
35mm image size
(36 x 24 mm / 1.42 x 0.94 in.)
Zooming
Attaching and Detaching a Lens
While pressing the lens release
button, turn the lens as shown by the
arrow.
Turn the lens until it stops, then detach it.
Attach the rear lens cap to the detached
lens.
T o zoom, turn the zoom ring on the lens with
your fingers.
If you want to zoom, do it before
focusing. Turning the zoom ring after
achieving focus may throw off the focus
slightly.
37
Page 38
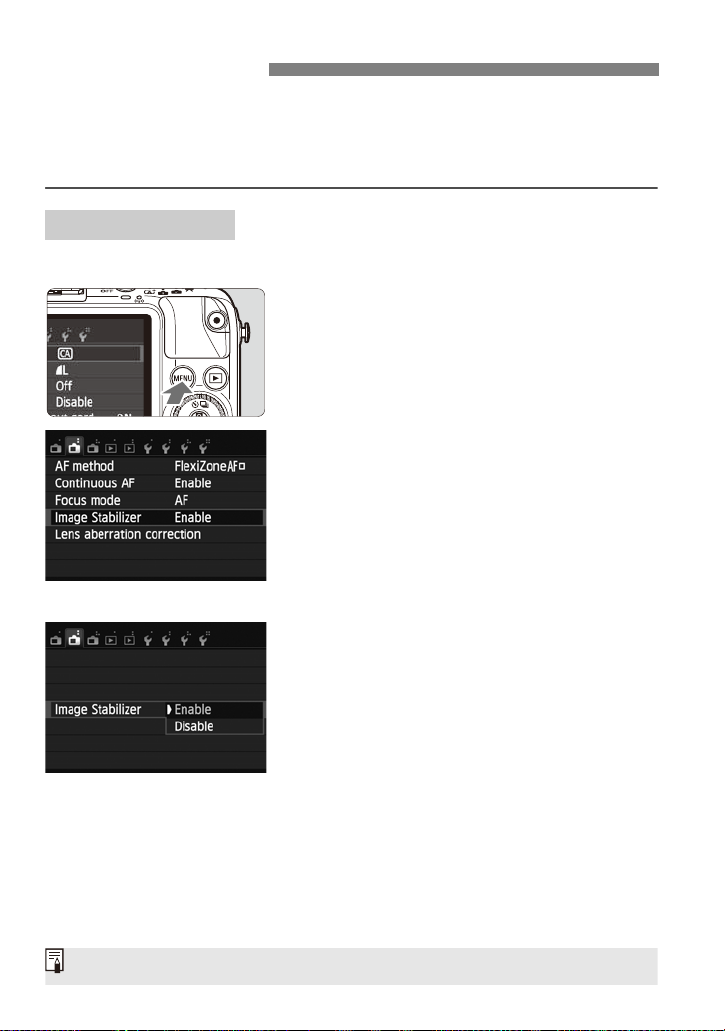
Image Stabilizer
IS stands for Image Stabilizer.
When you use a lens with built-in Image Stabilizer, camera shake is corrected
to obtain a sharper shot. With <A>, the Image Stabilizer is automatically set
to [Enable]. (It does not appear in the menu.)
* Lenses with built-in Image Stabilizer have “IS” in their names.
With an EF-M Lens
Set it with the menu. The default setting is [Enable].
Display the menu screen.
1
Press the <M> button.
Under the [A2] tab, select [Image
2
Stabilizer].
[Image Stabilizer] is displayed when an
EF-M lens with IS function is attached.
Press the <Y> <Z> keys to select the
[A2] tab.
Press the <W> <X> keys to select
[Image Stabilizer], then press <0>.
Select [Enable].
3
Press the <W> <X> keys to select
[Enable], then press <0>.
Press the <M> button.
38
Page 39
With a Non-EF-M Lens
The Image Stabilizer cannot correct “subject blur”, when the subject moves at
the time of exposure.
For bulb exposures, set the IS to <2>. If <1> is set, Image Stabilizer
misoperation may occur.
The Image Stabilizer may not be effective for excessive shaking such as on a
rocking boat.
The Image Stabilizer works in all focus modes.
When the IS is set to <2>, H will appear on the screen.
When using a tripod, you can still shoot with the IS set to <1> with no
problem. However, to save battery power, setting the IS to <2> is
recommended.
The Image Stabilizer is effective even when the camera is mounted on a
monopod.
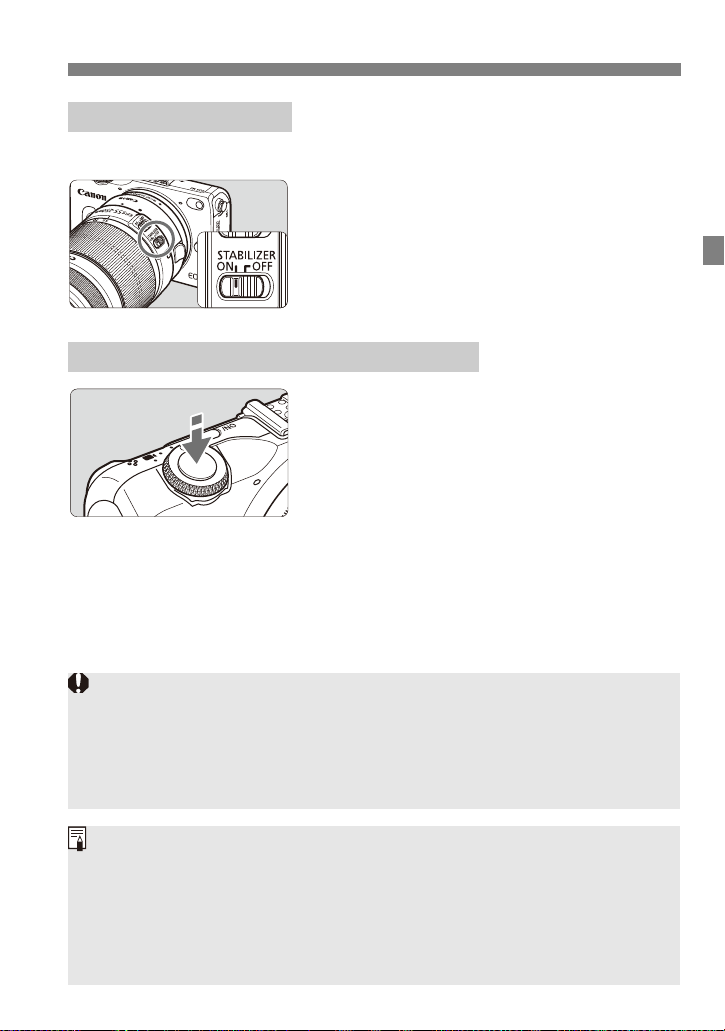
Use the Image Stabilizer switch on the lens.
Set the ST ABILIZER swit ch to <1>.
Using the Image Stabilizer when Shooting
Press the shutter button halfway.
1
The Image Stabilizer will operate.
Take the picture.
2
When the picture looks steady on the
LCD monitor, press the shutter button
completely to take the picture.
Image Stabilizer
39
Page 40
Basic Operation
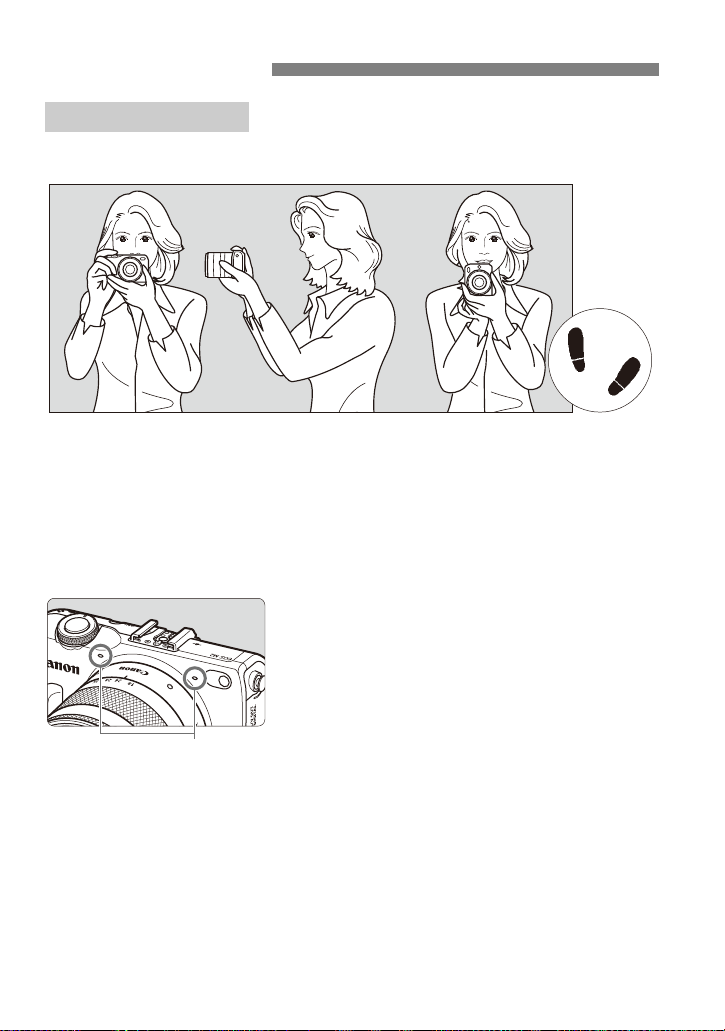
Vertical shootingHorizontal shooting
Microphones
Holding the Camera
To obtain sharp images, hold the camera still to minimize camera shake.
1.Wrap your right hand around the camera grip firmly.
2.Hold the lens bottom with your left hand.
3.Rest your hand’s right index finger lightly on the shutter button.
4.Press your arms and elbows lightly against the front of your body.
5.To maintain a stable stance, place one foot slightly ahead of the other.
When shooting movies, be careful not to
cover the microphones.
40
Page 41
Basic Operation
If you press the shutter button completely without pressing it halfway first, or if
you press the shutter button halfway and then press it completely
immediately, the camera will take a moment before it takes the picture.
Even during menu display, image playback, or image recording, you can
instantly go back to shooting-ready by pressing the shutter button halfway.
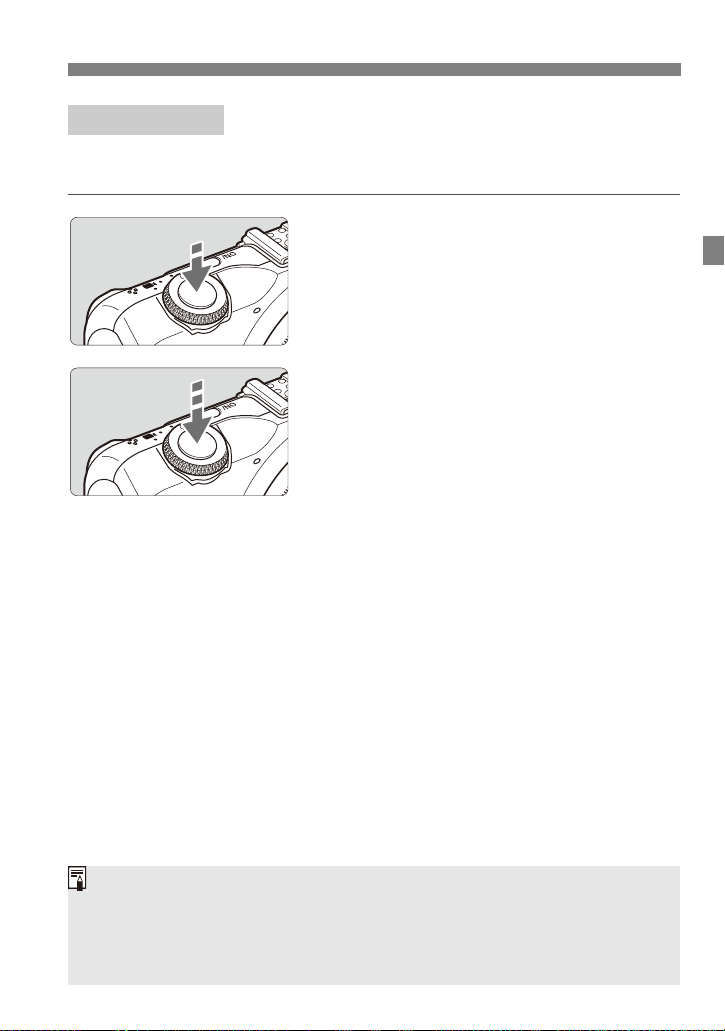
Shutter Button
The shutter button has two steps. You can press the shutter button halfway.
Then you can further press the shutter button completely.
Pressing Halfway
The camera will focus and adjust the
exposure automatically (shutter speed and
aperture set automatically).
The exposure setting (shutter speed and
aperture) is displayed (I).
Pressing Completely
This releases the shutter and takes the
picture.
Preventing Camera Shake
Hand-held camera movement during the moment of exposure is called
camera shake. It can cause blurred pictures. To prevent camera shake, note
the following:
• Hold and steady the camera as shown on the preceding page.
• Press the shutter button halfway to autofocus, then slowly press the shutter
button completely.
41
Page 42
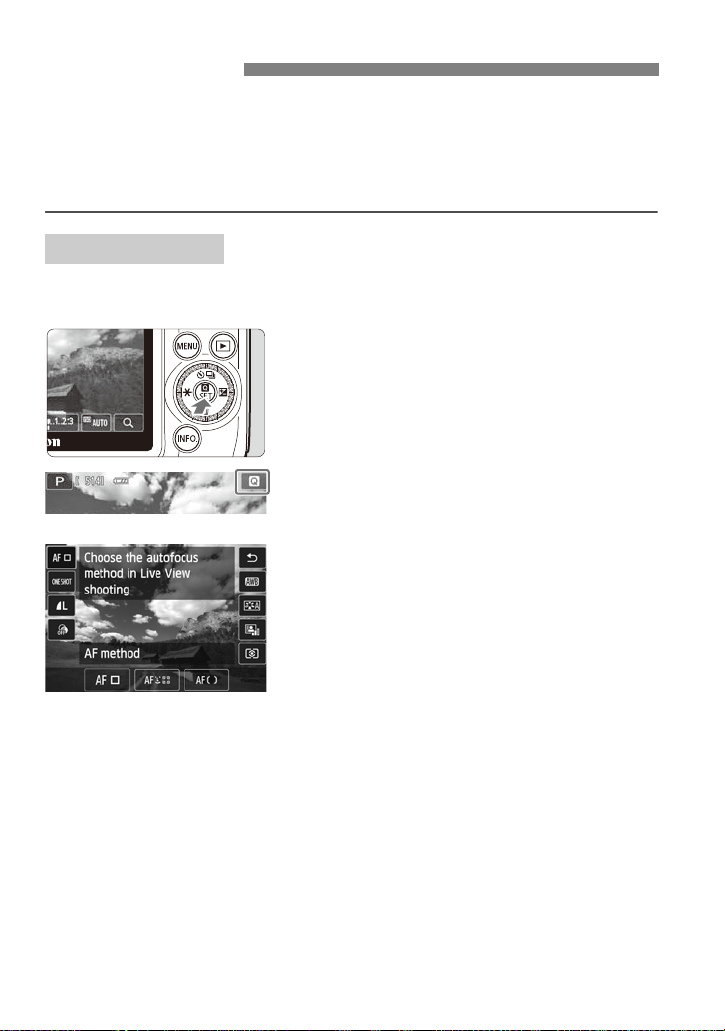
Quick Control
You can directly select and set the shooting functions displayed on the LCD
monitor. This is called Quick Control.
There are two types of Quick Control screens: Q Quick Control and B
Quick Control.
Hereafter, “Quick Control” refers to Q Quick Control.
Q Quick Control
With Q Quick Control, you can set functions while looking at the shooting
screen.
Display the Q Quick Control screen
1
(7).
Press the <Q> button.
You can also display the Quick Control
screen by tapping [Q] on the upper right
of the screen.
Select the desired function.
2
Tap the function to be set.
The selected function and Feature guide
will appear.
42
Page 43
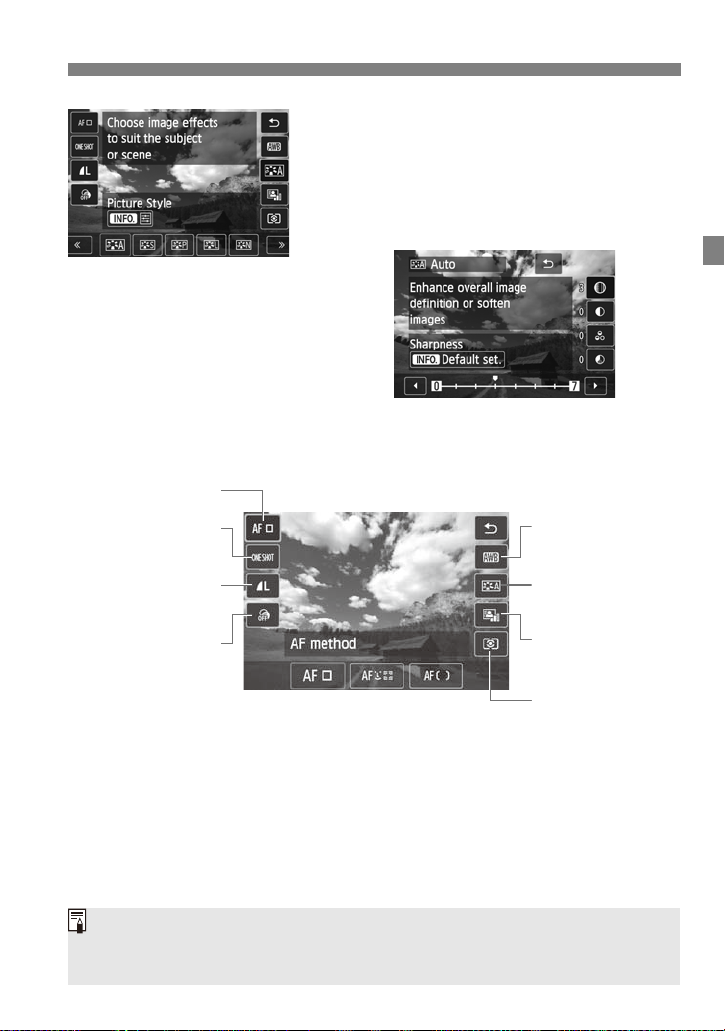
Quick Control
White balance
Picture Style
Auto Lighting
Optimizer
Metering mode
AF method (p.79)
AF operation
Image-recording
quality
Creative filters
You can also perform the setting procedure with the Main Dial’s <S> or
<5> and <0>.
The settable functions differ depending on the shooting mode.
Set the desired function setting.
3
Select the function setting by tapping an
icon displayed at the bottom of the
screen.
There are also functions with more
settings when you tap [ze].
To return to the shooting screen, tap [2]
or press <0>.
43
Page 44
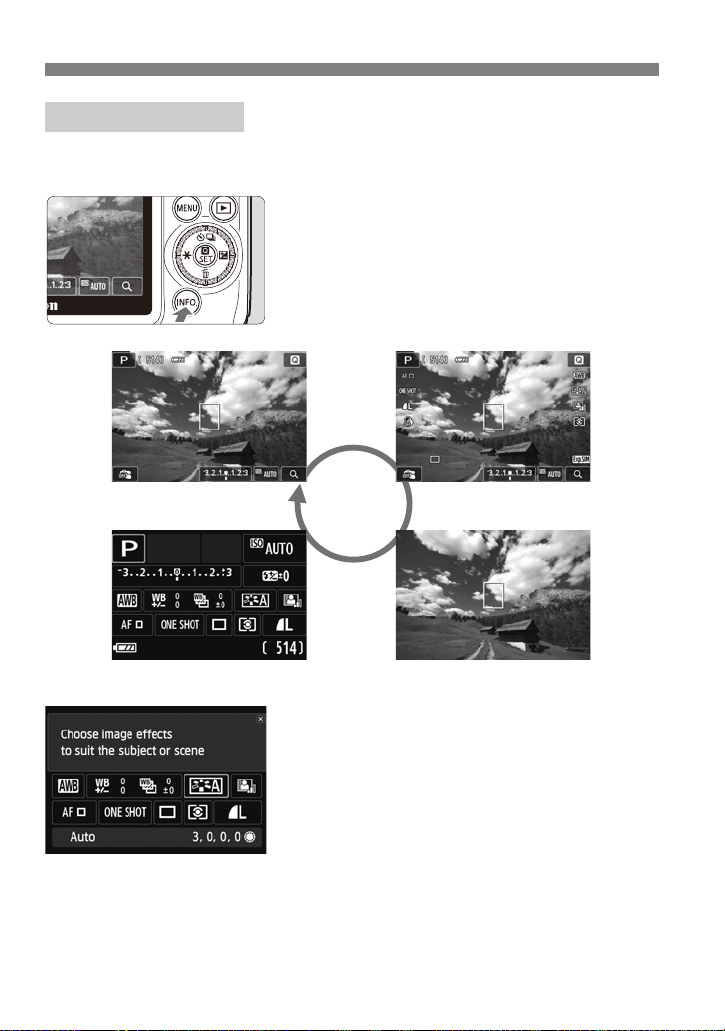
Quick Control
Basic information
B Quick Control
Detailed information
No information
B Quick Control
With B Quick Control, you can select a shooting function from a list and
set it.
Press the <B> button.
1
Each time you press the button, the
displayed information will change.
Display the B Quick Control screen.
44
Select the desired function.
2
Tap the function to be set.
The Feature guide will appear.
Tap it again to display the function setting
screen.
Page 45
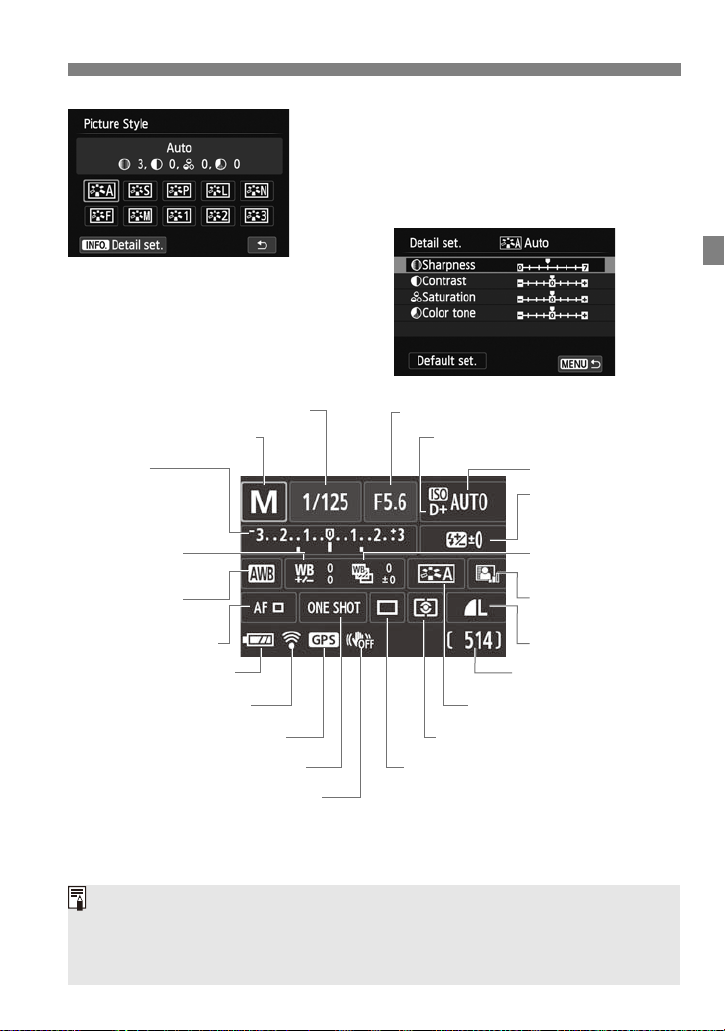
Set the desired function setting.
Shutter speed
White balance
Highlight tone priority*
Auto Lighting
Optimizer
Metering mode
Picture Style
Exposure
compensation/
AEB setting
Flash exposure
compensation
ISO speed
Aperture
Drive mode (p.64, 75)
White balance
correction
Possible shots*
Shooting mode (p.18)
AF method (p.79)
Eye-Fi card*
Image quality
Battery check* (p.31)
AF operation
White balance
bracketing
Image Stabilizer: OFF* (p.38)
GPS connection indicator*
You can also perform the setting procedure with the Main Dial’s <S> or
<5> and <0>.
* These functions cannot be set with the B Quick Control screen.
The settable functions differ depending on the shooting mode.
3
On the screen that appears, tap a
function setting to set it.
There are also functions with more
settings when you tap [zDetail set.].
Quick Control
45
Page 46
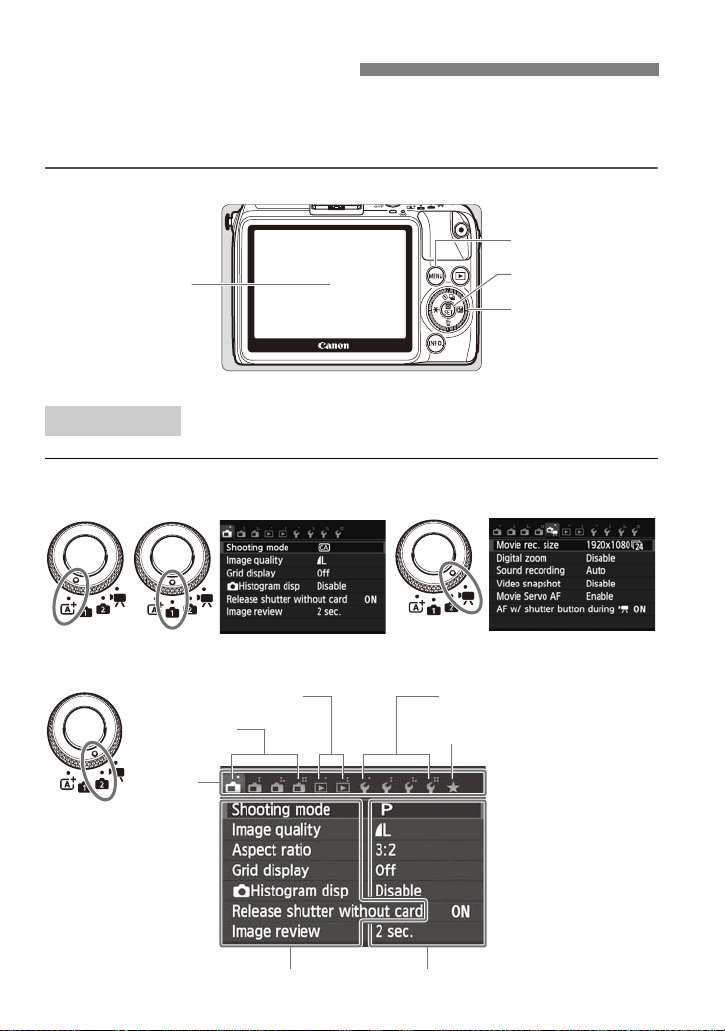
3 Menu Operations
Main Dial
LCD monitor
<0> button
<M> button
Scene Intelligent Auto
Basic Zone Modes
Creative Zone Modes
Tabs
Menu items
A Shooting
5 Set-up
9 My Menu
3 Playback
Menu settings
Movie Shooting Modes
You can set various settings with the menus such as the image-recording
quality, date/time, etc. Operate the menu functions with the <M> button,
Main Dial, and <0> button.
Menu Screen
The menu tabs and items displayed will differ d epending on the shooting mode.
46
Page 47
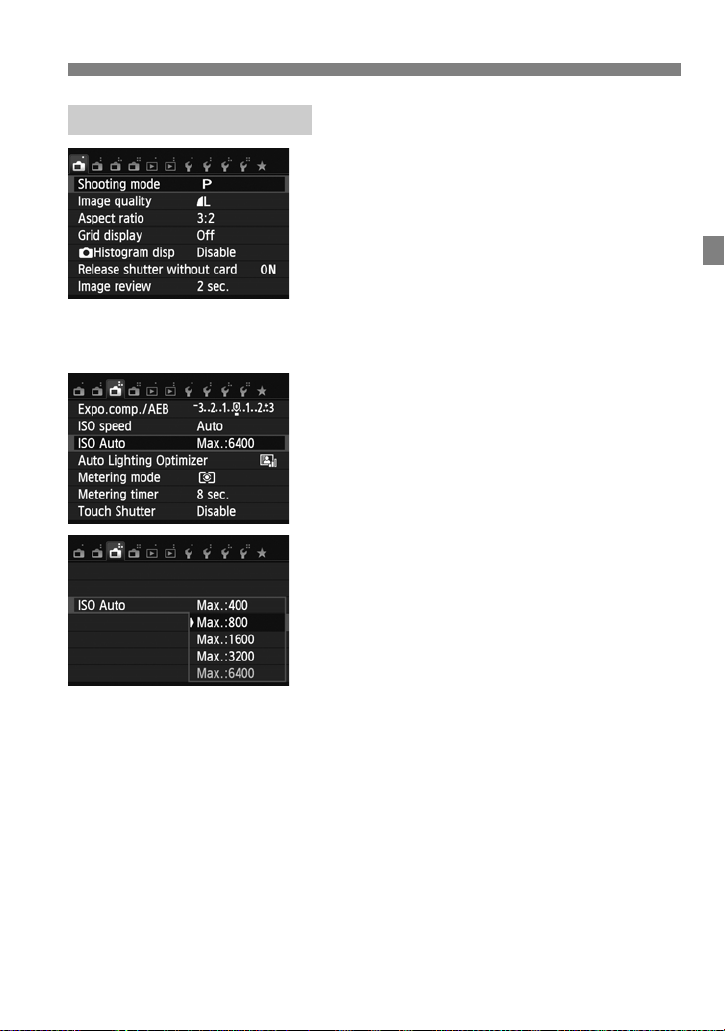
Menu Setting Procedure
3 Menu Operations
Display the menu screen.
1
Press the <M> button.
Select a tab.
2
Press the Main Dial’s <Y> <Z> keys to
select a tab (group of functions).
For example, in this manual, “the [A3]
tab” refers to the screen displayed when
the third A (Shooting) tab from the left
[S] is selected.
Select the desired item.
3
Press the Main Dial’s <W> <X> keys to
select the item, then press <0>.
Select the setting.
4
Press the Main Dial’s <W> <X> or <Y>
<Z> keys to select the desired setting.
(Some settings require you to press
either the <W> <X> or <Y> <Z> keys
to select them.)
The current setting is indicated in blue.
47
Page 48
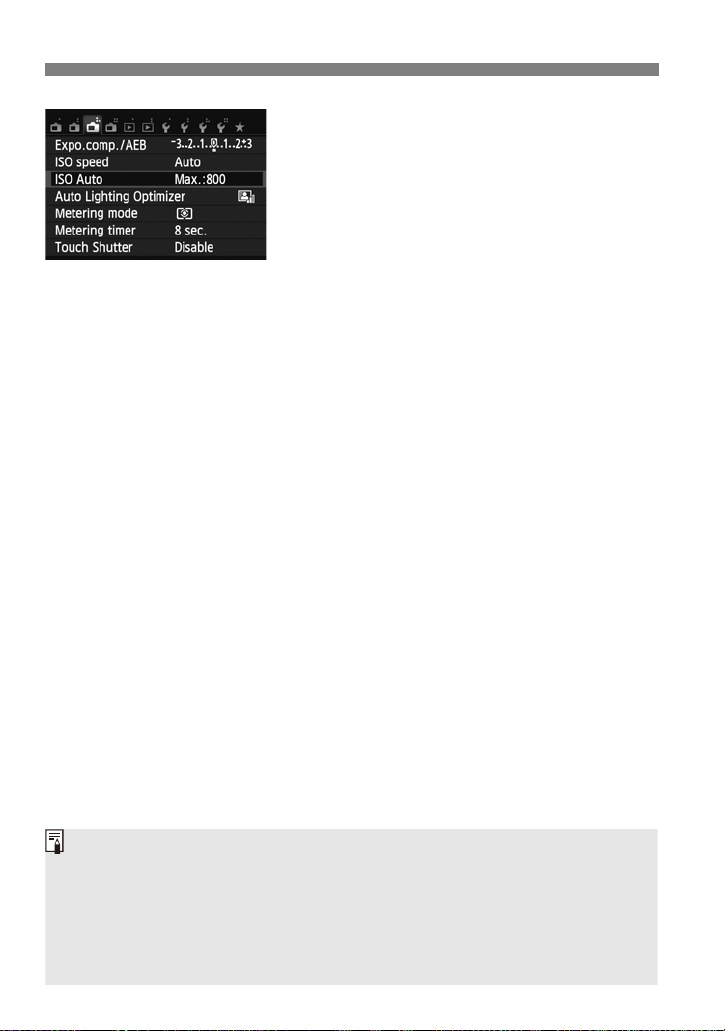
3 Menu Operations
Even when the menu screen or captured image is displayed, pressing the
shutter button will enable you to shoot immediately.
In step 2, you can also turn the <5> dial to select a menu tab.
In steps 2 to 5, you can also use the LCD monitor’s touch screen (p.50).
The explanation of menu functions hereinafter assumes that you have
pressed the <M> button to display the menu screen.
To cancel, press the <M> button.
Set the desired setting.
5
Press <0> to set it.
Exit the setting.
6
Press the <M> button to return to the
shooting function settings screen.
48
Page 49
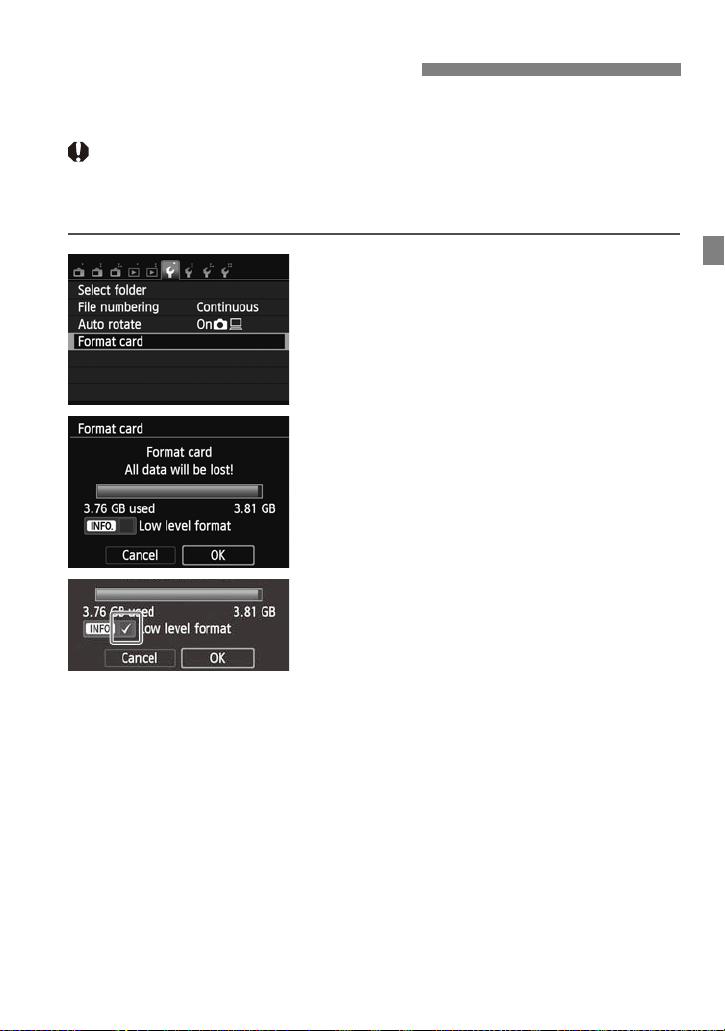
3 Formatting the Card
If the card is new or was previously formatted by another camera or
computer, formatting the card with the camera is recommended.
When the card is formatted, all images and data in the card will be
erased. Even protected images will be erased, so make sure there is
nothing you need to keep. If necessary, transfer the images and data
to a computer, etc., before formatting the card.
Select [Format card].
1
Under the [51] tab, select [Format card],
then press <0>.
Format the card.
2
Select [OK], then press <0>.
When the formatting is completed, the
menu will reappear.
For low-level formatting, press the
<B> button to append [Low level
format] with a checkmark [X], then
select [OK].
49
Page 50
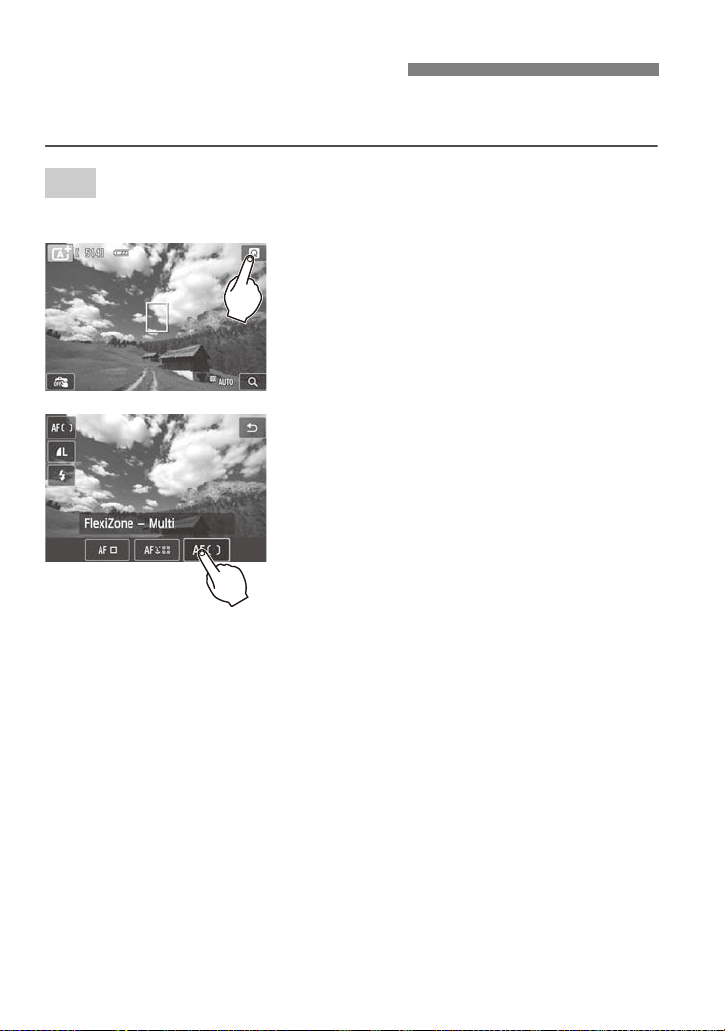
d Using the Touch Screen
The LCD monitor is a touch-sensitive panel that you can operate with your
fingers.
Tap
Quick Control (Sample display)
Use your finger to tap (touch briefly and
then remove your finger from) the LCD
monitor.
By tapping, you ca n select menus, ic ons,
etc., displayed on the LCD monitor.
When touch-screen operation is possible,
a frame will appear around the icon
(except on menu screens).
Tap [2] to return to the previous screen.
Operations possible by tapping the screen
Setting menu functions after pressing the <M> button
Quick Control
Setting a function after you press the <j/i> button
Touch shutter
Playback operations
50
Page 51
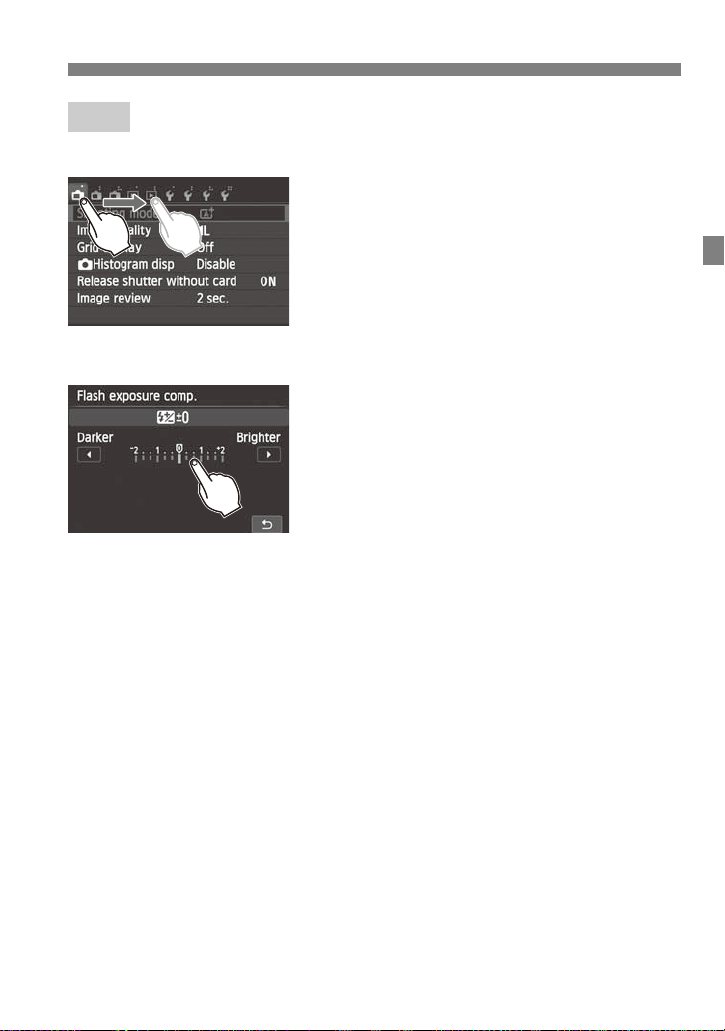
d Using the Touch Screen
Drag
Menu screen (Sample display)
Slide your finger while touching the LCD
monitor.
Scale display (Sample display)
Operations possible by dragging your finger on the screen
Selecting a menu tab or item after pressing the <M> button
Setting a scale control
Quick Control
Playback operations
51
Page 52
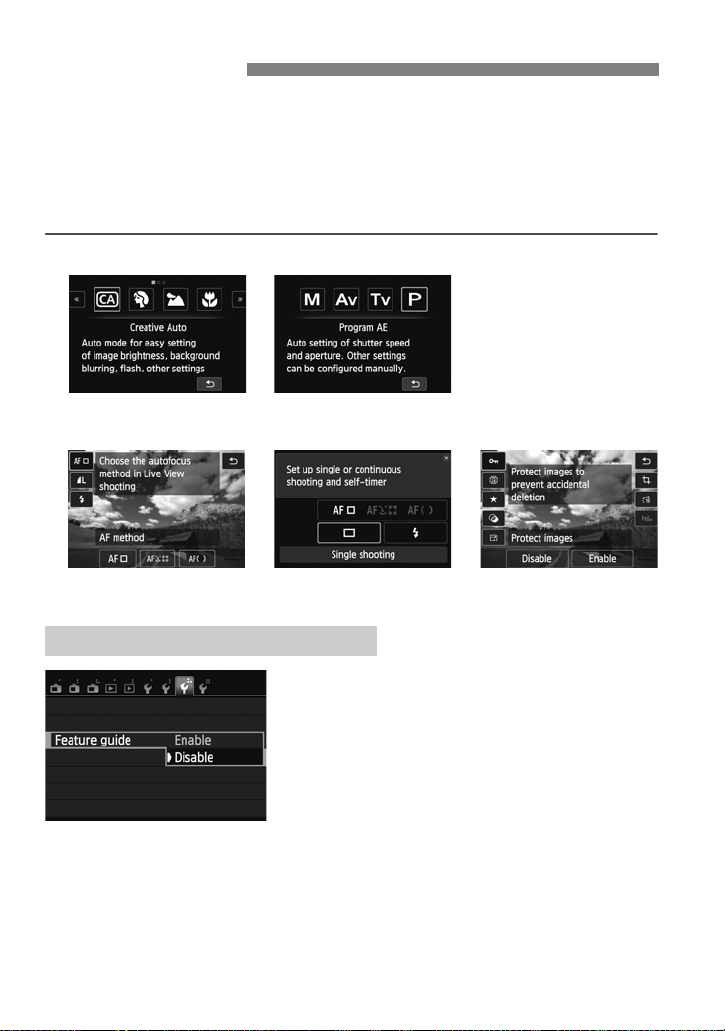
Feature Guide
Q Quick Control B Quick Control Playback
The Feature guide is a simple description of the respective shooting mode,
function, or option. It is displayed when you change the shooting mode or use
the Quick Control screen during still photo shooting, movie shooting, or
playback. When you select a function or option on the Quick Control screen,
the Feature guide description is displayed. When you proceed with the
operation, the Feature guide will disappear.
Shooting mode (Sample)
Quick Control (Sample)
3 Disabling the Feature Guide
Select [Feature guide].
Under the [53] tab, select [Feature
guide], then press <0>.
Select [Disable], then press <0>.
52
Page 53
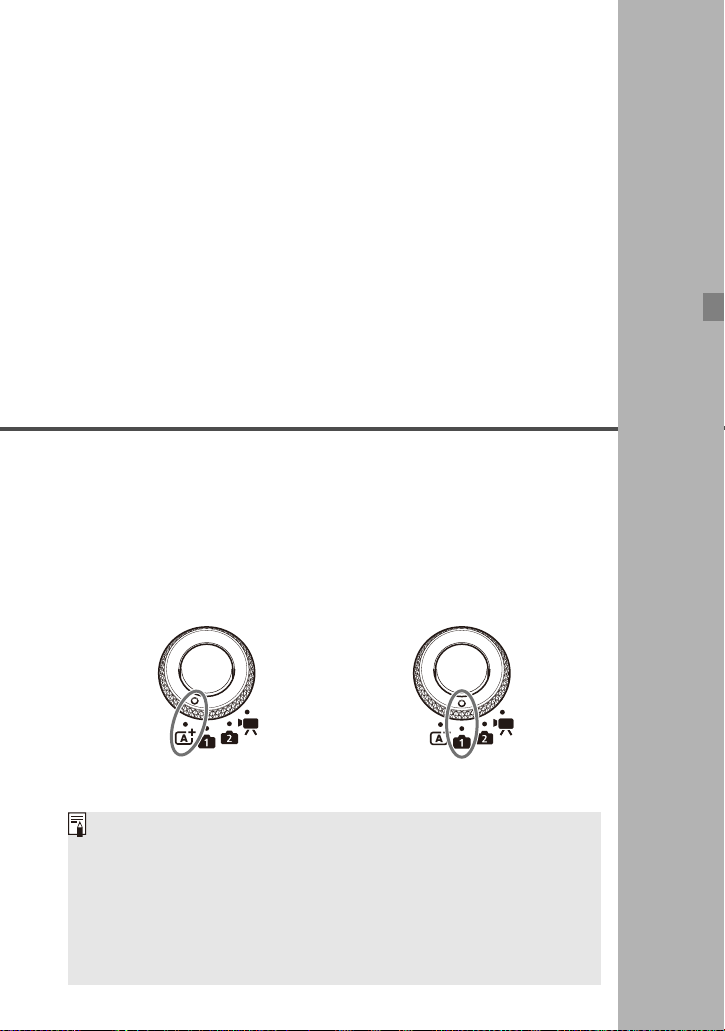
2
Scene Intelligent Auto Basic Zone Modes
Checking the Shooting Mode Set for <v>
There are 10 Basic Zone modes (shooting modes). Select [A1:
Shooting mode] on the menu to check the current shooting mode
(p.47).
Flash Firing of Speedlite 90EX
If you use the Speedlite 90EX in a Basic Zone mode, the flash will
fire automatically depending on the shooting mode (p.76).
Basic Shooting
This chapter explains how to shoot with Scene Intelligent
Auto and Basic Zone modes.
With <A>, you can shoot just by pressing the shutter button.
With <v>, you can also blur the background (p.63), change the
ambience, and match the lighting or scene.
53
Page 54
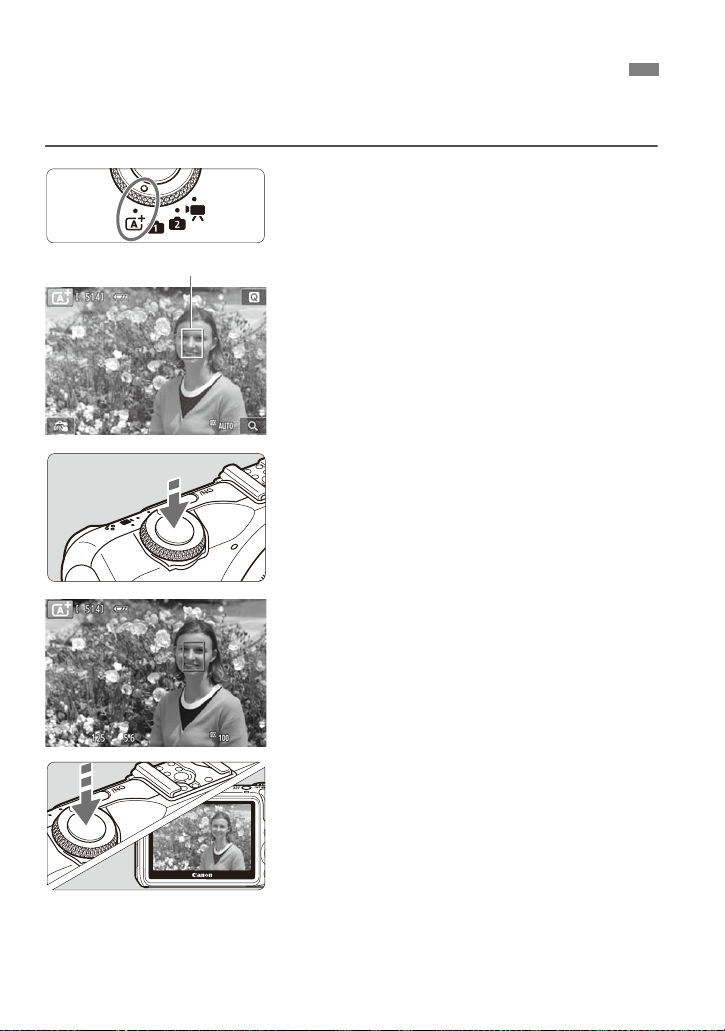
A
AF point
Fully Automatic Shooting (Scene Intelligent Auto)
<A> is a fully automatic mode. The camera analyzes the scene and
sets the optimum settings automatically.
Set the Mode Dial to <A>.
1
Move the AF point.
2
Tap the screen to move the AF point to
where you want to focus. (It cannot go to
the edges of the picture.)
To return the AF point to the center,
press the <XL> button.
Focus the subject.
3
Press the shutter button halfway to focus.
When focus is achieved, the AF point will
turn green and the beeper will sound.
54
Take the picture.
4
Press the shutter button completely.
The captured image will be displayed for
2 sec. on the LCD monitor.
Page 55
A Fully Automatic Shooting (Scene Intelligent Auto)
The <A> mode makes the colors look more impressive in nature, outdoor,
and sunset scenes. If the desired color tone is not obtained, use a Creative
Zone mode and select a Picture Style other than <D> and shoot.
The image’s coverage is approx. 100% (with the image-recording quality set
to JPEG 73).
During continuous shooting, the exposure set for the first shot will also be
applied to subsequent shots.
With the stereo AV cable AVC-DC400ST (sold separately) or HDMI cable
HTC-100 (sold separately), you can display the image being shot on a TV set.
FAQ
The AF point turns orange and focus is not achieved.
Try again, aiming the AF point at an area with a good bright/dark contrast,
then press the shutter button halfway. Also, focus may not be achieved if
you are too close to the subject. Move away from the subject and shoot.
Multiple AF points appear in green.
Focus has been achieved at all the green AF points. When the AF point
covering the desired subject turns green, take the picture.
Pressing the shutter button halfway does not focus the subject.
When an EF or EF-S lens is used, if the focus mode switch on the lens is
set to <MF> (manual focus), manual focusing will be in effect. Set the
focus mode switch to <AF> (autofocus).
55
Page 56
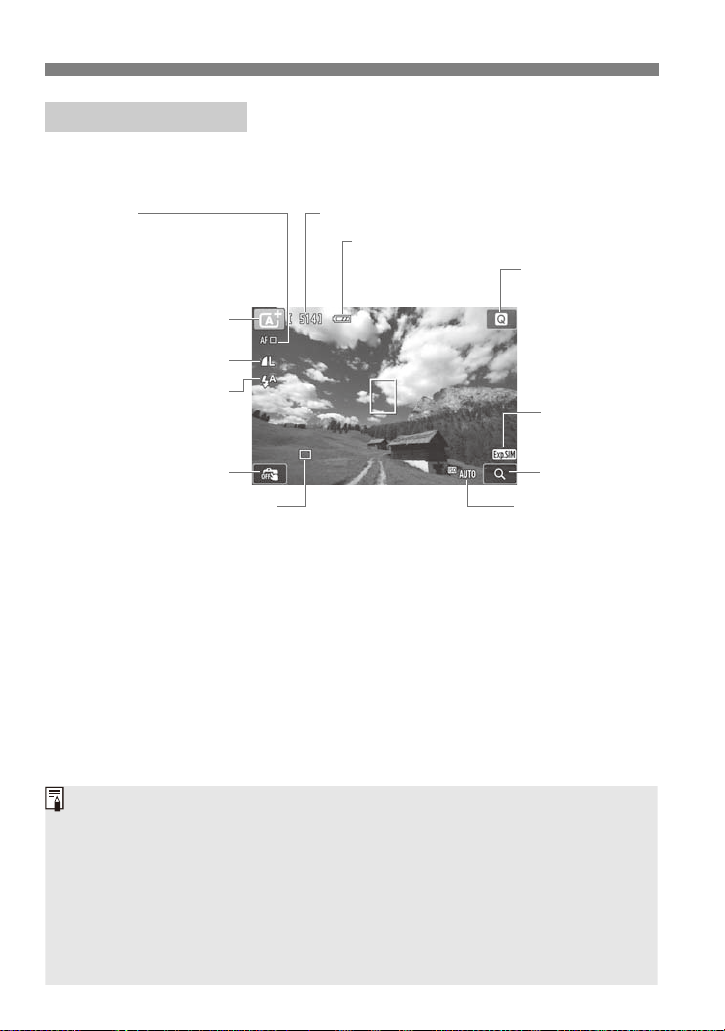
A Fully Automatic Shooting (Scene Intelligent Auto)
ISO speed
Magnified view
Exposure
simulation
Image-recording quality
Q Quick Control
AF method
• d : FlexiZone - Single
• c :u+Tracking
• o : FlexiZone - Multi
Shooting mode/
Scene icons
Touch shutter
Drive mode
Possible shots
Battery check
Flash
When <g> is displayed in white, it indicates that the image brightness is
close to what the captured image will look like.
If <g> is blinking, it indicates that the image is not being displayed at the
suitable brightness due to low- or bright-light conditions. However, the actual
image recorded will reflect the exposure setting. Note that noise may be more
noticeable than the actual image recorded.
When [A1: zHistogram disp] is set to a setting other than [Disable], you
can press the <B> button to display the histogram. However, the
histogram will not be displayed while the shutter button is pressed completely.
Information Display
Each time you press the <B> button, the information display will
change.
56
Page 57
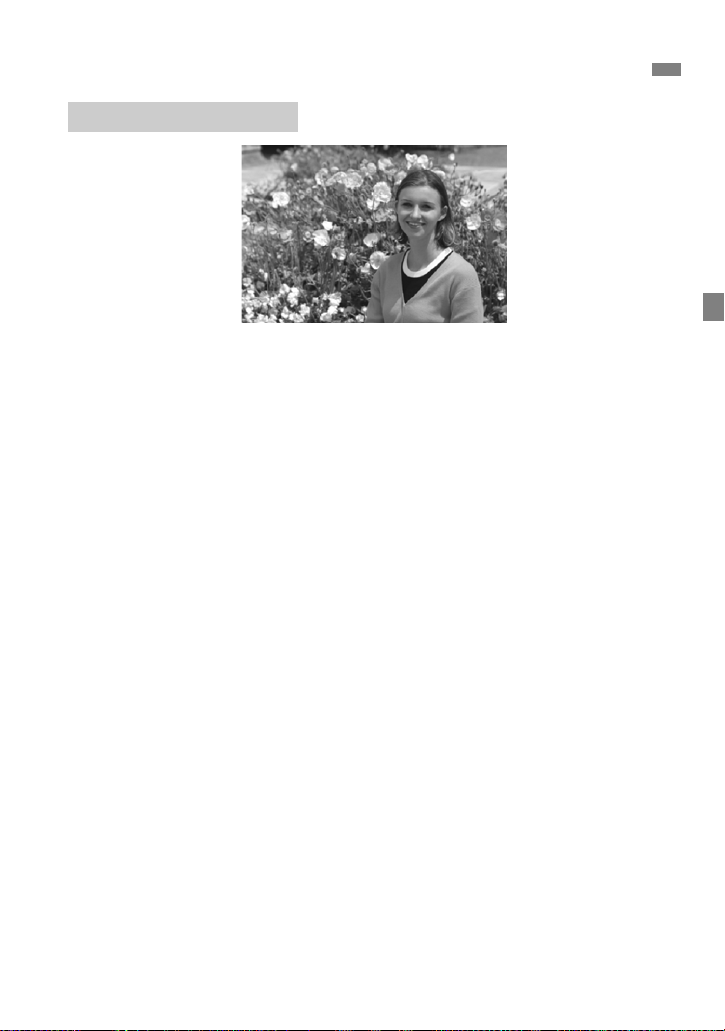
A
Full Auto Techniques (Scene Intelligent Auto)
Recomposing the Shot
Depending on the scene, instead of having the subject at the center, you can
put the subject toward the right or left and include some background. This
gives the picture more balance and depth.
While you press the shutter button halfway to focus a still subject, the focus
will be locked at the subject’s distance. Then move the camera slightly to the
right or left and press the shutter button completely. This is called “focus
lock”. Focus lock is also possible in Basic Zone modes (except <5> and
<C>).
57
Page 58
A Full Auto Techniques (Scene Intelligen t Au to )
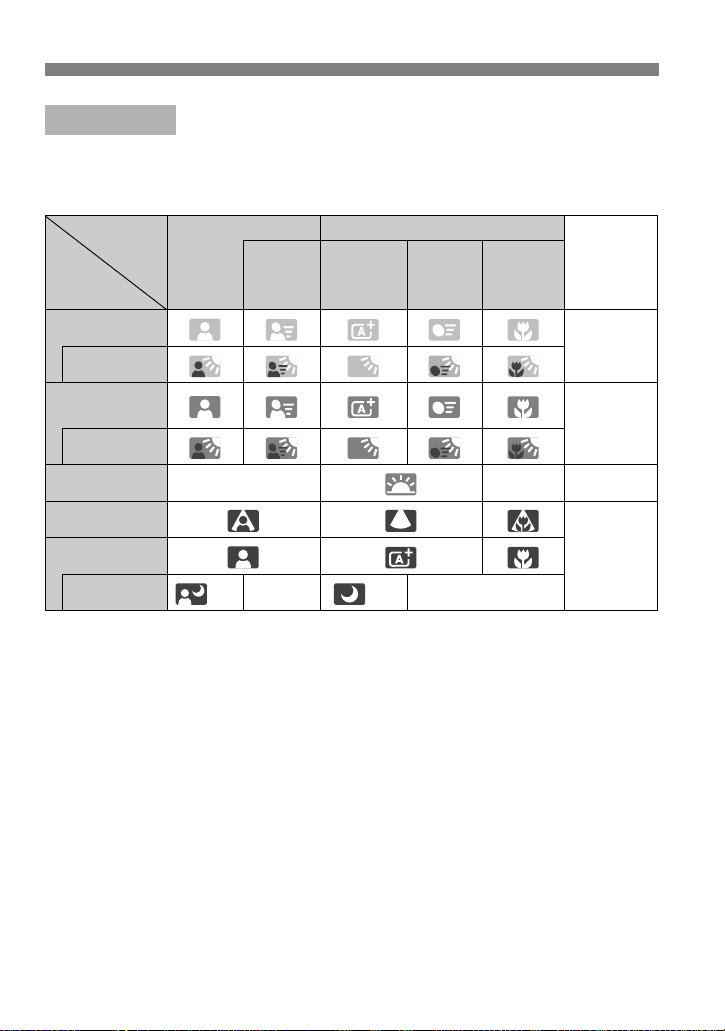
Scene Icons
When you shoot in the <A> mode, an icon representing the scene detected
by the camera will be displayed on the upper left of the screen (at the position
of the shooting mode icon).
Subject Portrait
Background
Bright
Backlit
Blue sky
included
Backlit
*1
Movement
Nature and
Outdoor
Scene
Non-Portrait
Movement
Close
Background
*2
Light blue
Color
Gray
Sunset
*3 *3
Orange
Spotlight
Dark blueDark
With tripod
*1:Displayed only when the AF method is set to [u+Tracking]. If another AF method
is set, the “Non-Portrait” icon will be displayed even if a person is detected.
*2:Displayed when the attached lens has distance information. With an Extension Tube
or Close-up Lens, the icon displayed may not match the actual scene.
*3:The icon suiting the scene detected will be displayed.
*4:Displayed when you use a tripod for a low-light or night scene.
*5:Displayed with any of the lenses below:
• EF-S18-55mm f/3.5-5.6 IS II • EF-S55-250mm f/4-5.6 IS II
• EF300mm f/2.8L IS II USM • EF400mm f/2.8L IS II USM
• IS lenses marketed in 2012 or later.
*4+*5:If the conditions in both *4 and *5 are met, the shutter speed will slow down.
* For certain scenes, the icon displayed may not match the actual scene.
*4*5
*3
*4*5
*3
58
Page 59
Selecting a Shooting Mode (Basic Zone Mode)
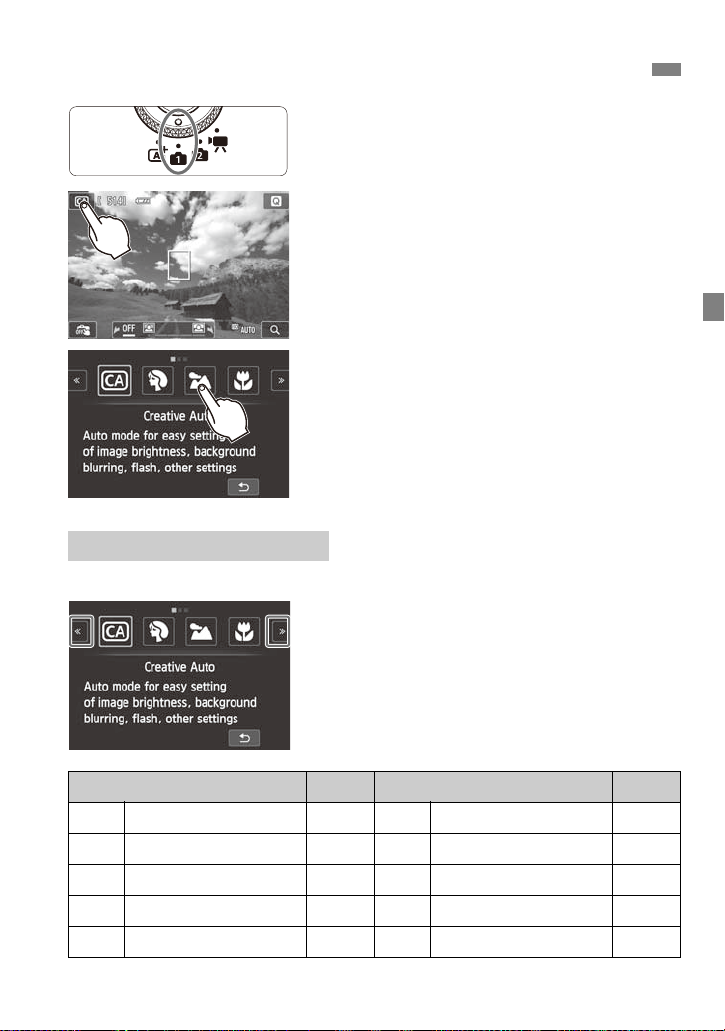
Set the Mode Dial to <v>.
1
Tap the shooting mode icon on the
2
screen’s upper left corner.
The shooting mode selection screen will
appear.
If this screen is not displayed, press the
<B> button a few times.
Tap the screen to select a shooting
3
mode.
Available Shooting Modes
The Basic Zone mode selection screen has three pages.
Tap [L] and [N] on the left and right
sides of the screen to go to another
page.
To return to the shooting screen, tap [2]
or press <0>.
Shooting Mode Page Shooting Mode Page
C
Creative Auto
2 Portrait p.65 P Food p.70
3 Landscape p.66 6 Night Portrait p.71
4 Close-up p.67 F
5 Sports p.68 G
p.60 C Kids p.69
Handheld Night Scene
HDR Backlight Control
p.72
p.73
59
Page 60
C Creative Auto Shooting
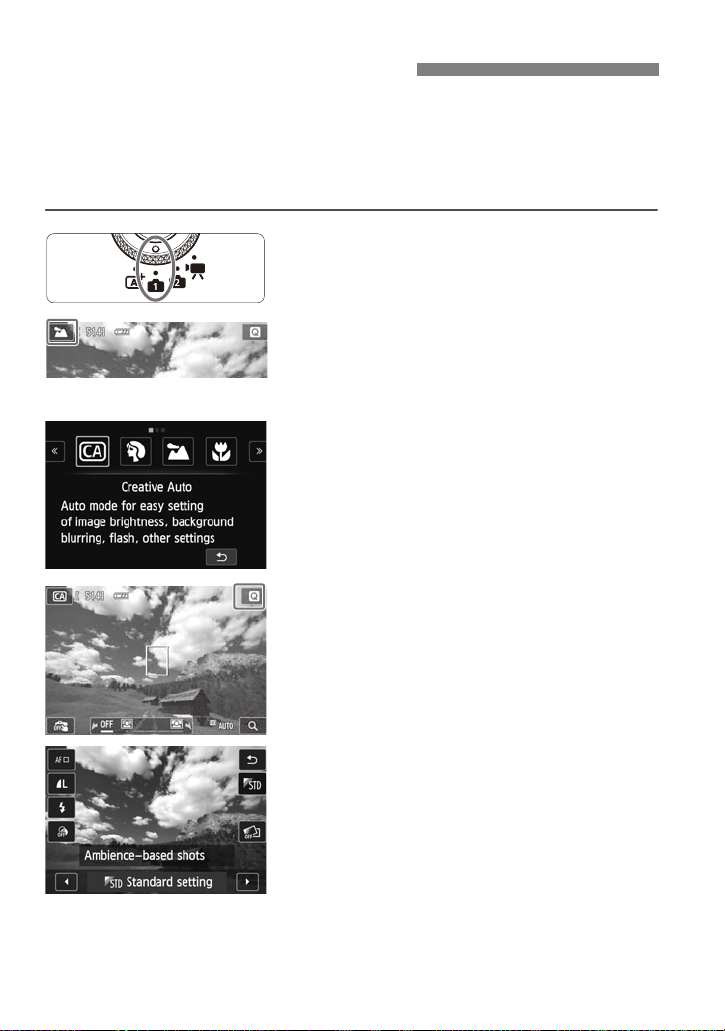
In the <C> mode, you can set the following functions before shooting:
(1) Ambience-based shots, (2) Extra Effect Shot, (3) Flash firing, (4)
Background blur, and (5) Drive/self-timer mode. The default settings are the
same as the <A> mode.
* CA stands for Creative Auto.
Set the Mode Dial to <v>.
1
Tap the shooting mode icon on the
2
screen’s upper left corner.
The shooting mode selection screen will
appear.
Tap the screen to select [C].
3
Display the Quick Control screen.
4
Press the <Q> button to display it.
60
Select the desired function.
5
Extra Effect Shot, Ambience-based
shots, and flash firing can be set with
Quick Control.
Background blur can be set by tapping
the icon on the shooting screen.
Drive/self-timer mode can be set by
pressing the <j/i> button.
Page 61
6
If you change the shooting mode or set the power to <2>, the functions you
have set on this screen will revert to their default settings. However, the AF
method, Creative filter, image-recording quality, and self-timer settings will be
retained.
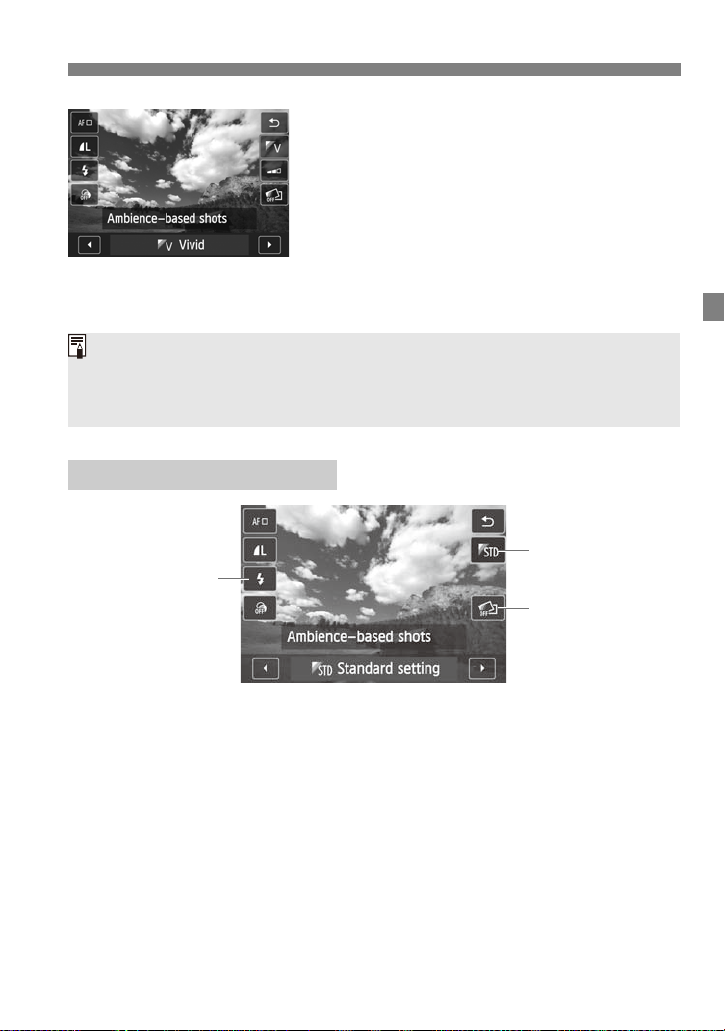
(1)
(2)
(3)
7
Setting from Quick Control
C Creative Auto Shooting
Tap the desired setting to select it.
The selected function and Feature guide
(p.52) will appear.
For setting procedure and details on each
function, see pages 61-64.
Select the function, then tap [2].
Take the picture.
Press the shutter button.
(1)Ambience-based shots
• You can choose the ambience you want to convey in your images.
61
Page 62

C Creative Auto Shooting
You cannot set Extra Effect Shot and Ambience-based shots, or Extra Effect
Shot and Background blur, at the same time.
(2)Extra Effect Shot
• You can select any of the following effects before shooting: Creative
filters, Picture Styles, and Ambience-based shots.
•Select [c: Enable], then tap [2].
•Tap [e] and [f] to select a shooting effect.
• When you take a picture, two images will be recorded. One with the
effect applied and one without. Immediately after you take a picture, both
images will be displayed together. The image without the effect is
displayed on the left and the one with the effect will be on the right.
* If you are using an Eye-Fi card and have set it to erase images after their
transfer, the image without the effect will not be displayed during the playback
immediately after shooting.
Registering your favorite shooting effects
• During the image review immediately after shooting and during
playback, the image applied with the effect will have the [d] icon. You
can check which shooting effect was applied by tapping the icon.
• You can register up to two shooting effects under [9: Favorite effect].
• When you select the registered [9: Favorite effect], you can shoot with
that shooting effect applied. You can also overwrite the [9: Favorite
effect].
(3)Attached Speedlite 90EX flash firing
[a] Auto flash : The flash fires automatically when necessary.
[I] Flash on : The flash fires at all times.
[b] Flash off : The flash is disabled.
* When a flash other than the Speedlite 90EX is attached, the flash mode will be
set to Flash on.
62
Page 63
C Creative Auto Shooting
(4)
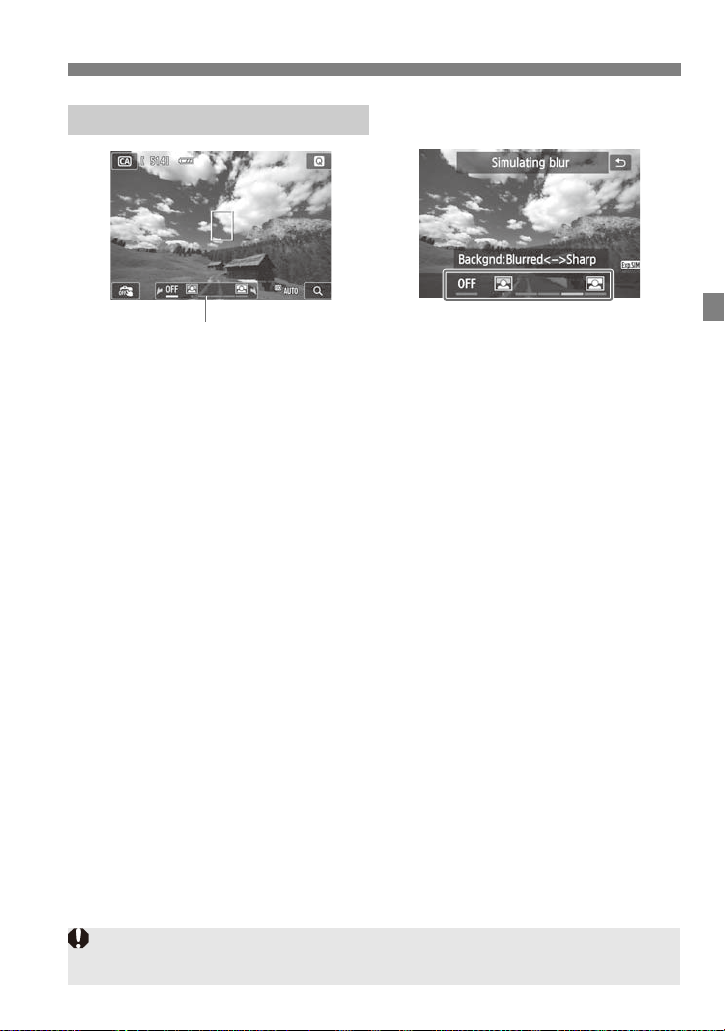
If [g] blinks while [Simulating blur] is displayed, the image may have more
noise or look darker than the actual image.
Setting by Tapping the Screen
(4)Background blur
• On the shooting screen, tap Background blur and set it.
• If [2] is set, the degree of background blur will change depending on
the brightness.
• If it is set to other than [2], [Simulating blur] will appear on the
screen and you can adjust the background blur regardless of brightness.
• Set by tapping the screen. Move the index mark toward the right to make
the background look more in focus, or move it toward the left to make
the background look more blurred. Note that depending on the lens’
maximum aperture (f/number), some positions may not be selectable.
• If you want to blur the background, see “Shooting Portraits” on page 65.
• Depending on the lens and shooting conditions, the background may not
look so blurred.
• Cannot be used with flash.
• When using a Speedlite, Background blur will change to [2] when
the Speedlite is fully recharged.
63
Page 64
C Creative Auto Shooting
(5)
If you have set Extra Effect Shot, [i] [q] cannot be set.
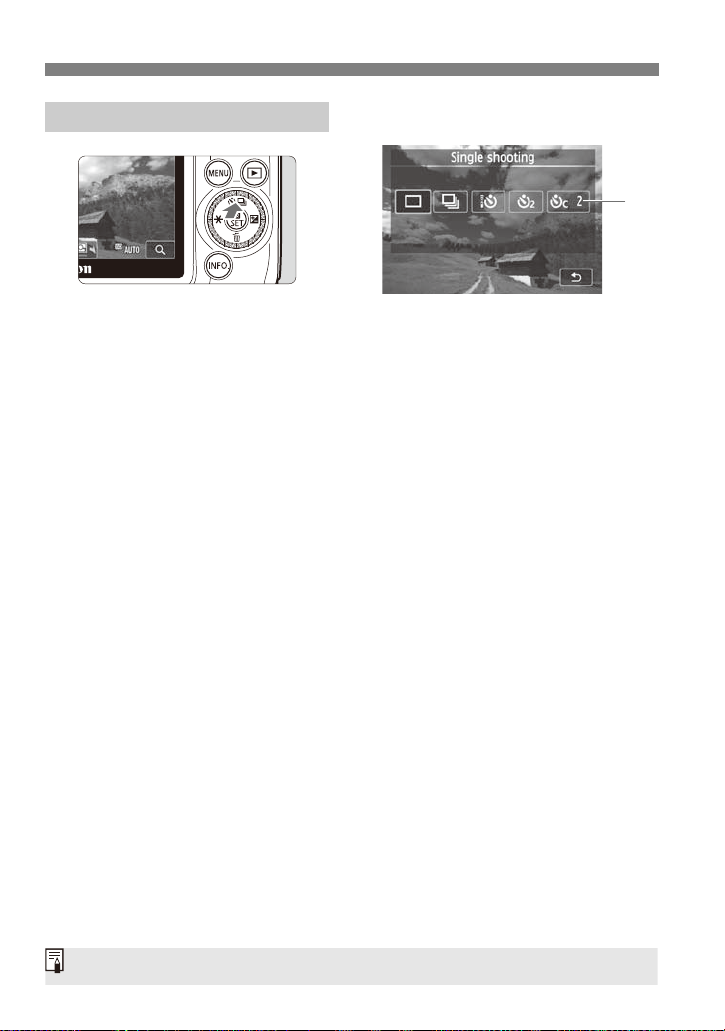
Setting by Pressing <j/i>
(5)Drive/self-timer mode
Set by pressing <j/i>.
[u] Single shooting:
Shoot one image at a time.
[i] Continuous shooting:
While you hold down the shutter button completely, shots will be
taken continuously. You can shoot up to approx. 4.6 shots per
second.
[Q] Self-timer: 10sec./remote control:
The picture is taken 10 seconds after you press the shutter button. A
remote controller can also be used.
[l] Self-timer: 2 sec.:
The picture is taken 2 seconds after you press the shutter button.
[q] Self-timer: Continuous:
Tap [d]/[f] to set the number of multiple shots (2 to 10) to be taken
with the self-timer. 10 seconds after you press the shutter button,
the set number of multiple shots will be taken.
64
Page 65
2 Shooting Portraits (Portrait)
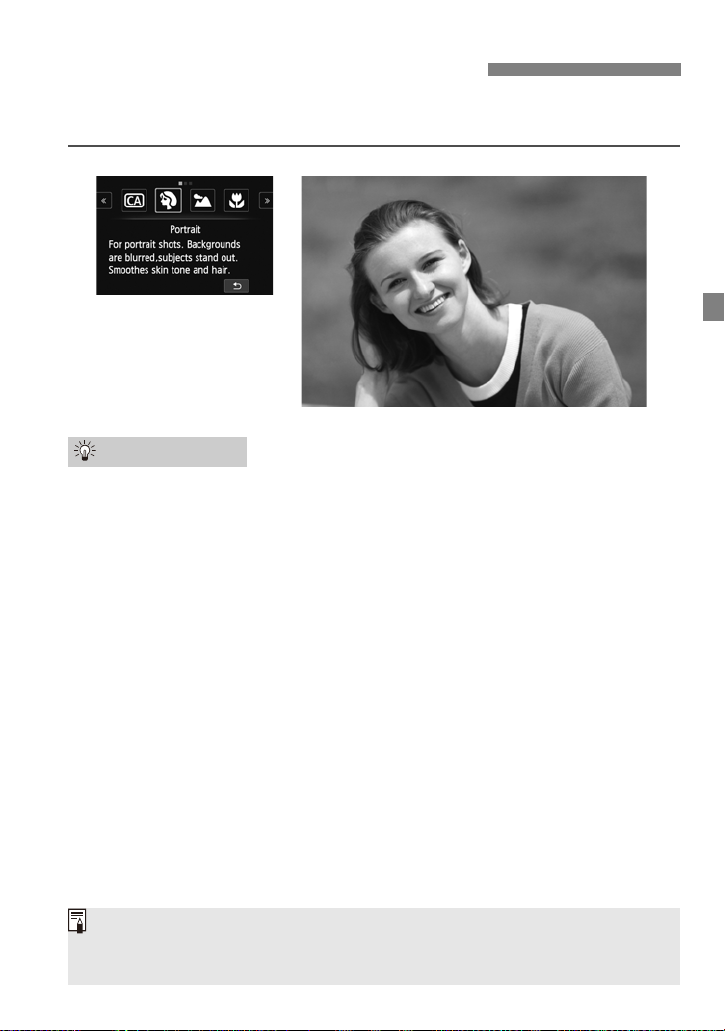
The default setting is [i] (continuous shooting). If you hold down the shutter
button, you can shoot continuously to capture subtle changes in the subject’s
pose and facial expression (max. approx. 4.6 shots/sec.).
The <2> (Portrait) mode blurs the background to make the person stand out
better. It also makes skin tones and the hair look softer.
Shooting Tips
The further the distance between the subject and background, the
better.
The further the distance between the subject and background, the more
blurred the background will look. The subject will also stand out better
against an uncluttered dark background.
Use a telephoto lens.
If you have a zoom lens, use the telephoto end to fill the frame with the
subject from the waist up. Move in closer if necessary.
Focus the face.
Check that the AF point covering the face turns green. For close-ups of the
face, focus on the eyes.
65
Page 66
3 Shooting Landscapes (Landscape)
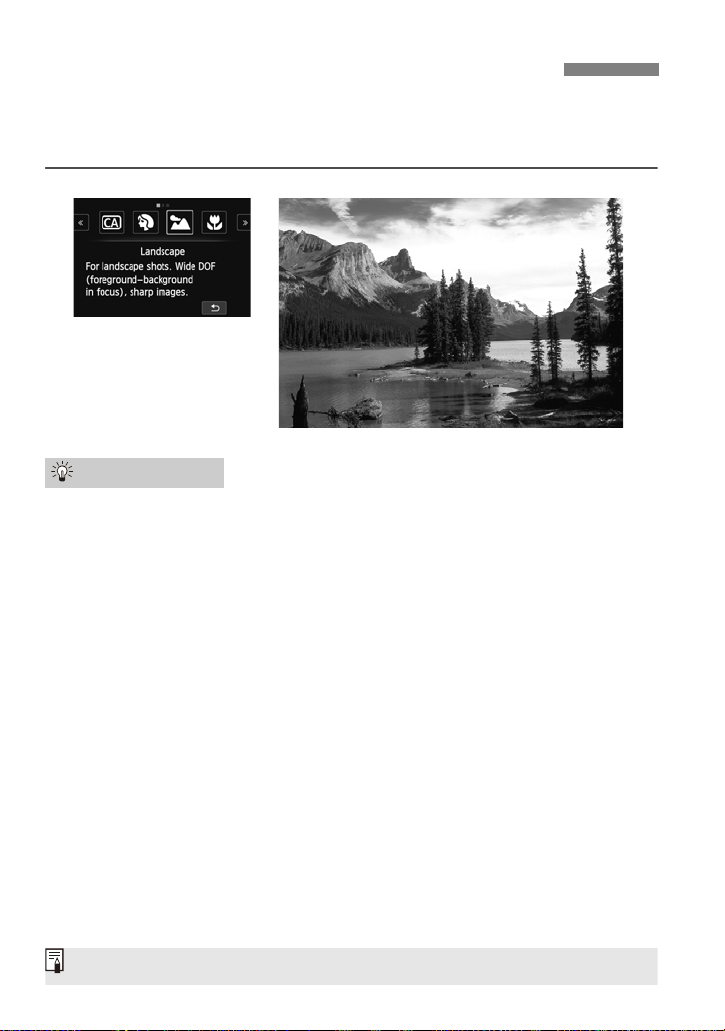
With <3>, the flash does not fire even if the Speedlite 90EX is attached.
Use the <3> (Landscape) mode for wide scenes when you want everything
to be in focus from near to far. For vivid blues and greens, and very sharp and
crisp images.
Shooting Tips
With a zoom lens, use the wide-angle end.
When using the wide-angle end of a zoom lens, objects near and far will
be in focus better than at the telephoto end. It also adds breadth to
landscapes.
Shooting night scenes.
Use a tripod to prevent camera shake.
66
Page 67
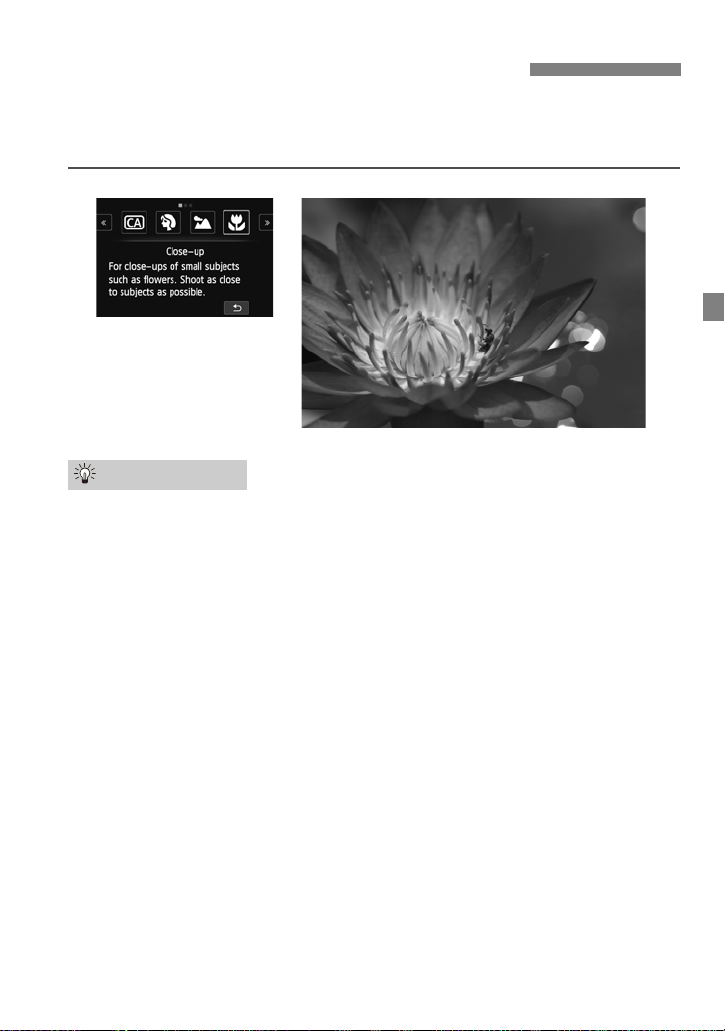
4 Shooting Close-ups (Close-up)
When you want to shoot flowers or small objects up close, use the <4>
(Close-up) mode. To make small things appear much larger, use a macro
lens (sold separately).
Shooting Tips
Use a simple background.
A simple background with no other flowers or leaves, etc., makes small
objects such as flowers stand out better.
Move as close as possible to the subject.
Check the lens for its minimum focusing distance. Some lenses have
indications such as <MACRO 0.25/0.8ft>. (This example indicates a
minimum focusing distance of 25 cm/0.8 ft.) The lens minimum focusing
distance is measured from the <V> (focal plane) mark on the top of the
camera to the subject. If you are too close to the subject, focus cannot be
achieved.
With a zoom lens, use the telephoto end.
If you have a zoom lens, using the telephoto end will make the subject look
larger.
67
Page 68
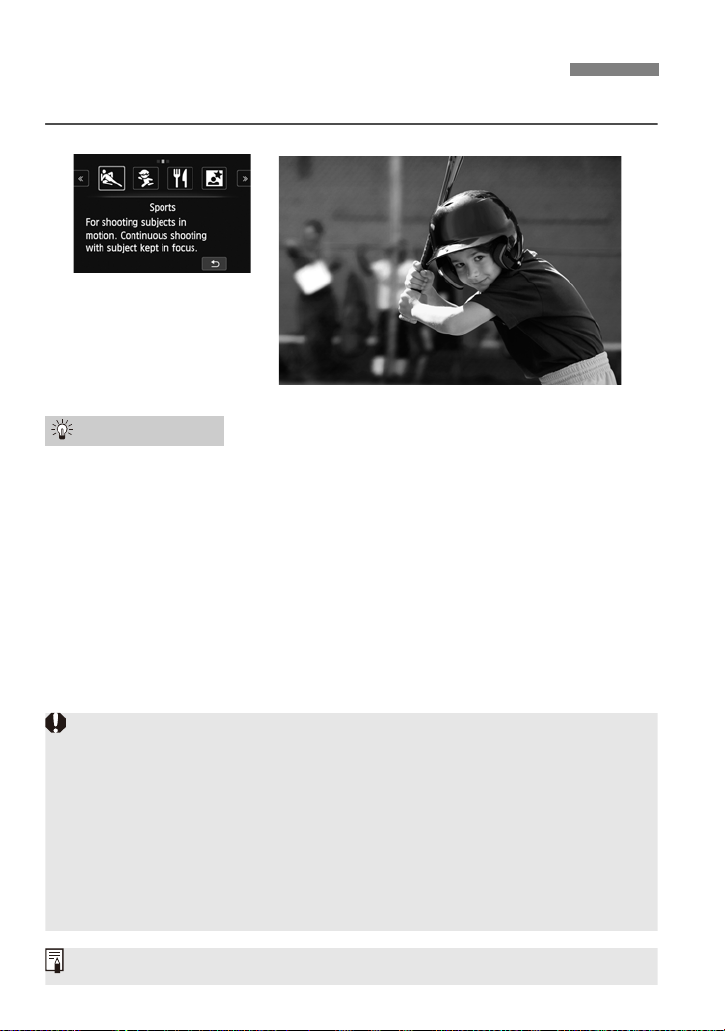
5 Shooting Moving Subjects (Sports)
When using a lens with “STM” in its name, such as the EF-M18-55mm f/3.5-
5.6 IS STM, the continuous shooting speed becomes slower since the camera
keeps focusing and shooting continuously.
Setting the [AF method] to [FlexiZone - Single] is recommended.
Depending on the shooting conditions, it may take a moment until the shutter
is released.
Under low light, when camera shake is prone to occur, the LCD monitor’s shutter
speed display on the bottom left will blink. Hold the camera steady and shoot.
When
[FlexiZone - Multi]
is set, press the shutter button halfw ay to fix the AF p oints.
When
[u (face)+Tracking]
is set, the AF point is fixed during contin uous shoo ting.
With <5>, the flash does not fire even if the Speedlite 90EX is attached.
Use the <5> (Sports) mode to shoot a moving subject.
Shooting Tips
Shoot continuously.
When focus is achieved, the AF point will turn blue.
While the camera focuses, the beeper will sound. If focus cannot be
achieved, the AF point will turn orange.
When you want to take the picture, press the shutter button completely. If
you hold down the shutter button completely, the camera will shoot
continuously so you can capture the changing movement.
When using a lens with “STM” in its name, such as the EF-M18-55mm
f/3.5-5.6 IS STM, the camera can keep focusing and shooting
continuously. With other lenses, the focus will be locked for the second
and subsequent frames during continuous shooting.
68
Page 69
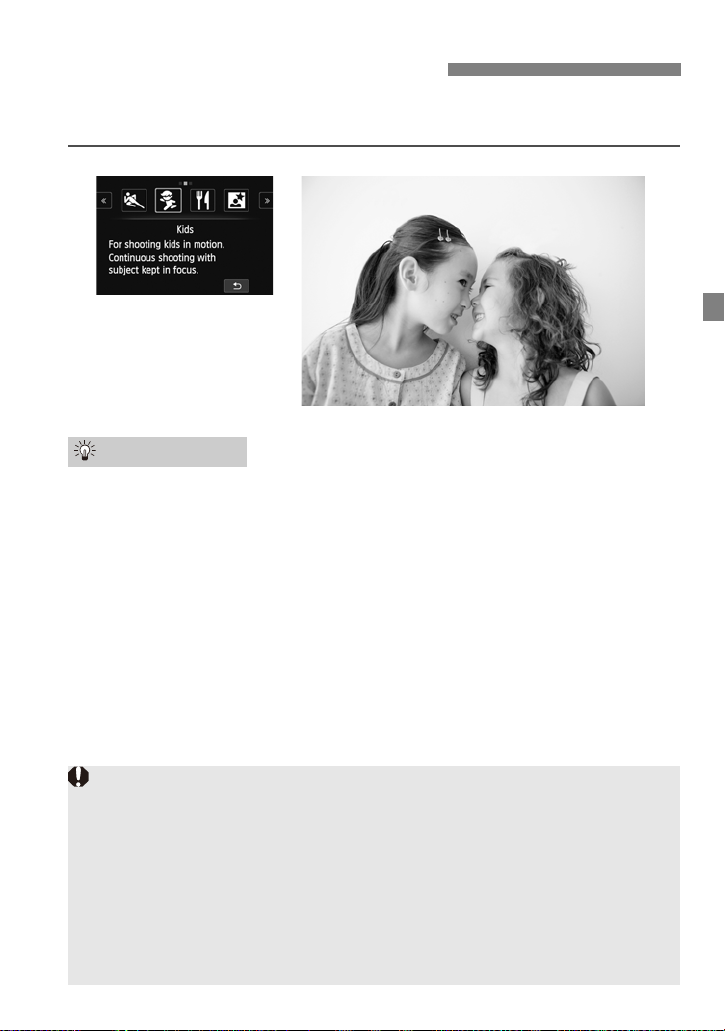
C Shooting Children (Kids)
When using a lens with “STM” in its name, such as the EF-M18-55mm f/3.5-
5.6 IS STM, the continuous shooting speed becomes slower since the camera
keeps focusing and shooting continuously.
Setting the [AF method] to [FlexiZone - Single] is recommended.
Depending on the shooting conditions, it may take a moment until the shutter
is released.
When [FlexiZone - Multi] is set, press the shutter button halfway to fix the AF
points.
When [u (face)+Tracking] is set, the AF point is fixed during continuous
shooting.
When you want to continuously focus and shoot children moving around, use
<C> (Kids). Skin tones will look healthy.
Shooting Tips
Shoot continuously.
When focus is achieved, the AF point will turn blue.
While the camera focuses, the beeper will sound. If focus cannot be
achieved, the AF point will turn orange.
When you want to take the picture, press the shutter button completely. If
you hold down the shutter button completely, the camera will shoot
continuously so you can capture the changing movement.
When using a lens with “STM” in its name, such as the EF-M18-55mm
f/3.5-5.6 IS STM, the camera can keep focusing and shooting
continuously. With other lenses, the focus will be locked for the second
and subsequent frames during continuous shooting.
69
Page 70
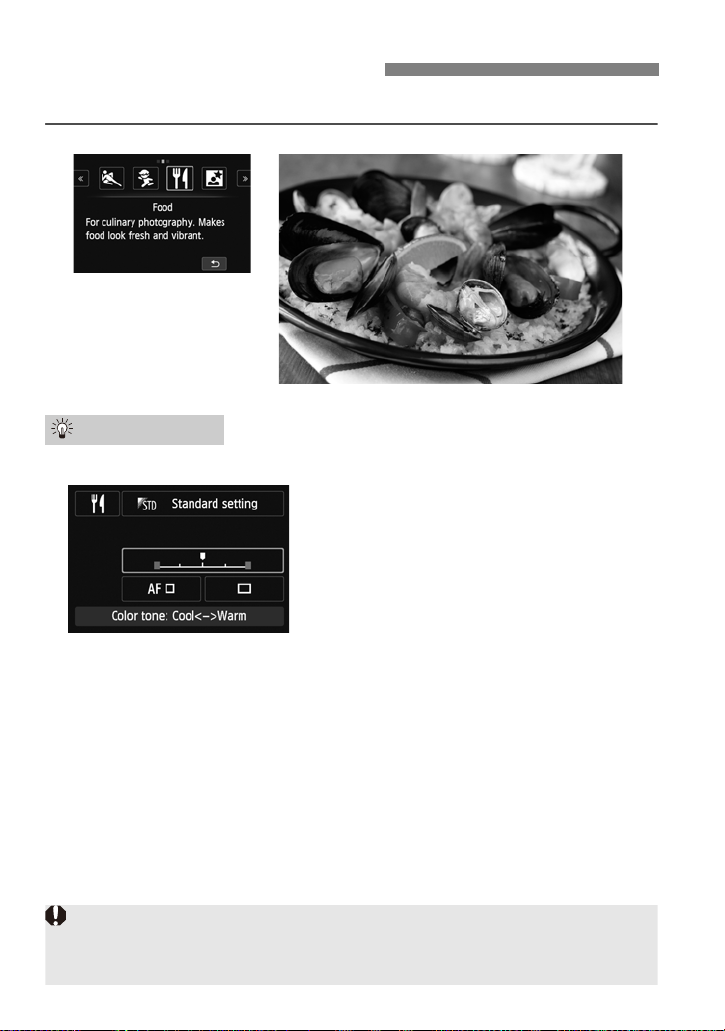
P Shooting Food (Food)
Since this mode sets the color tone to make food look vivid, human subjects
may be shot in an unsuitable skin tone.
If you use flash, the [Color tone] setting will switch to the default setting.
When shooting food, use <P> (Food). The photo will look bright and vivid.
Shooting Tips
Change the color tone.
You can change [Color tone]. Food
photos with a reddish tinge usually make
the food look more vivid. To increase the
food’s reddish tinge, set it toward
[Warm]. Set it toward [Cool] if it looks too
red.
Shoot the subject in close-up.
If you have a zoom lens, use the telephoto end to shoot the food in closeup.
Light the subject diagonally from behind.
Lighting the food diagonally from behind will make it look more threedimensional in the photo.
Avoid using flash.
If you use flash, the light may reflect off the dish or food and results in
unnatural shadows.
70
Page 71
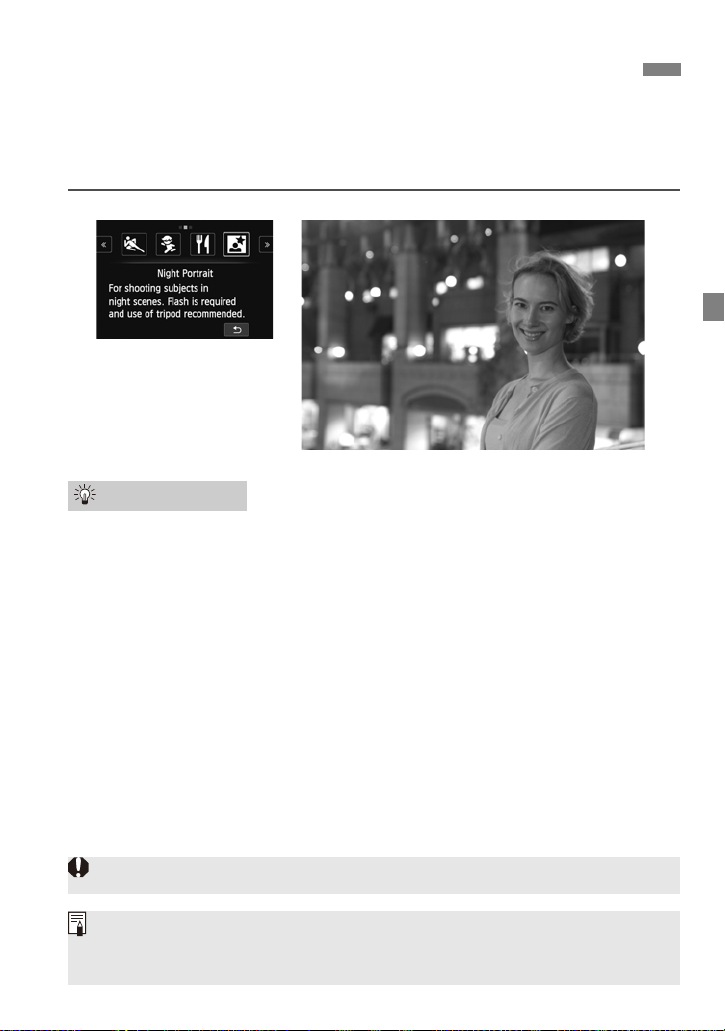
6 Shooting Night Portraits (With a Tripod)
See the cautions on page 74.
Tell the subject to keep still even after the flash fires.
If you use the self-timer together with flash, the self-timer lamp will light up
briefly after the picture is taken.
To shoot people at night and obtain a natural-looking night scene in the
background, use the <6> (Night Portrait) mode. A flash is required for
shooting.
Using a tripod is also recommended.
Shooting Tips
Use a wide-angle lens and a tripod.
When using a zoom lens, use the wide-angle end to obtain a wide night
view. Also, use a tripod to prevent camera shake.
Check the subject’s brightness.
When the Speedlite 90EX’s power is <1>, the flash will fire
automatically under low-light conditions to obtain a nice portrait. It is
recommended to play back the image after the shooting to check the
image brightness. If the subject looks dark, move nearer and shoot again.
71
Page 72
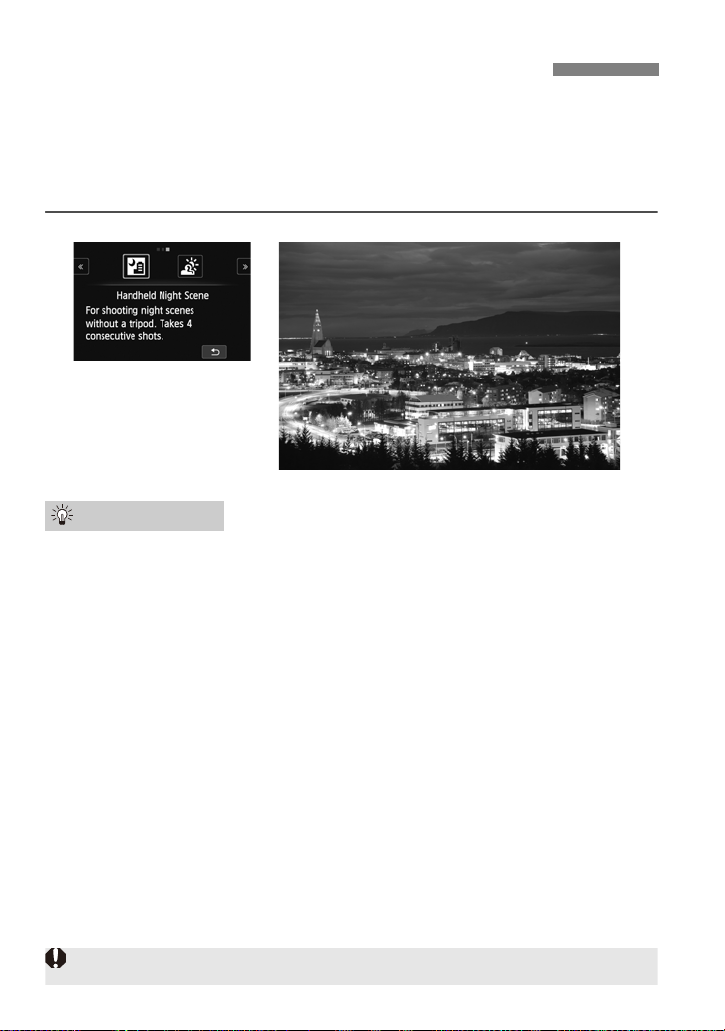
F Shooting Night Scenes (Handheld)
See the cautions on page 74.
Using a tripod when shooting a night scene gives the best results. However,
the <F> (Handheld Night Scene) mode enables you to shoot night scenes
even while handholding the camera. Four shots are taken continuously for
each picture, and the resulting image with reduced camera shake is
recorded.
Shooting Tips
Hold the camera firmly.
While shooting, hold the camera firmly and steadily. In this mode, four
shots are aligned and merged into a single image. However, if there is
significant misalignment in any of the four shots due to camera shake, they
may not align properly in the final image.
For shots of people, turn on the flash.
When you use flash, you can shoot portraits with a night scene in the
background. To take a nice portrait, the first shot will use flash. Tell the
subject not to move until all four continuous shots are taken.
72
Page 73
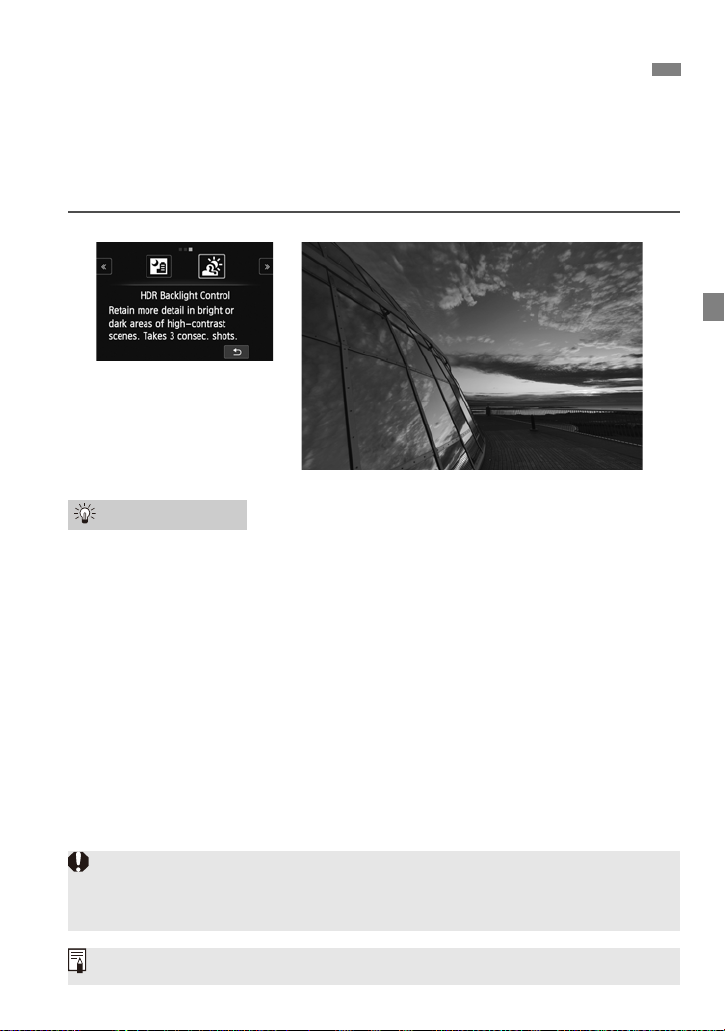
G
Flash shooting is not possible. In low light, the AF-assist beam may be
emitted.
See the cautions on page 74.
HDR stands for High Dynamic Range.
Shooting Backlit Scenes (HDR Backlight Control)
When shooting a scene having both bright and dark areas, use the <G>
(HDR Backlight Control) mode. When you take one picture in this mode,
three continuous shots are taken at different exposures. This results in one
image, with a wide tonal range, that has minimized the blocked-up shadows
caused by backlighting.
Shooting Tips
Hold the camera firmly.
While shooting, hold the camera firmly and steadily. In this mode, three
shots are aligned and merged into a single image. However, if there is
significant misalignment in any of the three shots due to camera shake,
they may not align properly in the final image.
73
Page 74

Cautions for <6> Night Portrait and <F> Handheld Night Scene
It may be difficult to focus dots of light such as in a night scene. In such a
case, set the lens’s focus mode to [MF] and focus manually.
Cautions for <F> Handheld Night Scene and <G> HDR Backlight
Control
Compared with other shooting modes, the shooting area will be smaller.
1+73 or 1 cannot be selected. If 1+73 or 1 has been set, 73
will be set.
If you shoot a moving subject, the subject’s movement may leave afterimages
or the surrounding area of the subject may become dark.
The image alignment may not function properly with repetitive patterns
(lattice, stripes, etc.), flat or single-tone images, or images significantly
misaligned due to camera shake.
Recording the image to the card will take longer than with normal shooting.
During the processing of the images, “BUSY” will be displayed and you
cannot take another picture until the processing is completed.
You cannot use Creative filters when shooting.
Final image simulation is not available.
If the shooting mode is set to <F> or <G>, direct printing is not possible.
Cautions for <F> Handheld Night Scene
When shooting flash photography, if the subject is too close to the camera,
the picture may come out extremely bright (overexposure).
If you use flash to shoot a night scene with few lights, the shots may not align
correctly. This can result in a blurry photo.
If you use flash and the human subject is close to the background that is also
illuminated by the flash, the shots may not align correctly. This can result in a
blurry photo. Unnatural shadows and unsuitable colors may also appear.
Regarding flash coverage:
• When using a Speedlite with automatic flash coverage setting, the zoom
position will be fixed to the wide end, regardless of the lens’ zoom position.
• If you have to set the flash coverage manually, set it to the wide-angle end.
Cautions for <G> HDR Backlight Control
Note that the image may not be rendered with a smooth gradation and may
look irregular or have significant noise.
HDR Backlight Control may not be effective for excessively backlit scenes or
extremely high-contrast scenes.
When shooting subjects that are sufficiently bright, for example for normally lit
scenes, the image may look unnatural because of the applied HDR effect.
74
Page 75
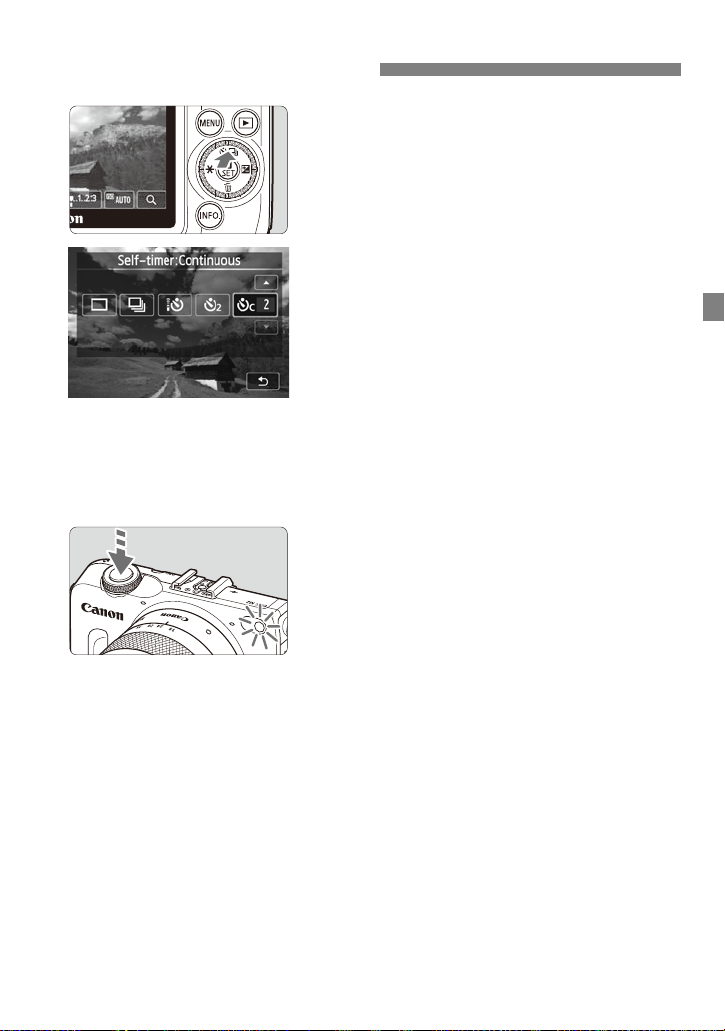
j Using the Self-timer
Press the <j/i> button.
1
Y ou can also select the shooting mode on
the B Quick Control screen.
Tap the self-timer.
2
Q: 10-sec. self-timer
l: 2-sec. self-timer
q: 10-sec. self-timer plus continuous
By tapping [2], you can return to the
previous screen.
Take the picture.
3
Focus the subject, then press the shutter
button completely.
You can check the self-timer operation
with the self-timer lamp, beeper, and
countdown display (in seconds) on the
LCD monitor.
Two seconds before the picture is taken,
the self-timer lamp will light up and the
beeper will sound faster.
The remote controller can also be
used.
shots
Tap [d]/[f] to set the number of
multiple shots (2 to 10) to be taken with
the self-timer.
T o cancel the self-timer shooting:
Press the <j/i> button or tap the screen.
To cancel the self-timer setting, press the <j/i> button and tap [u] or
[i].
75
Page 76
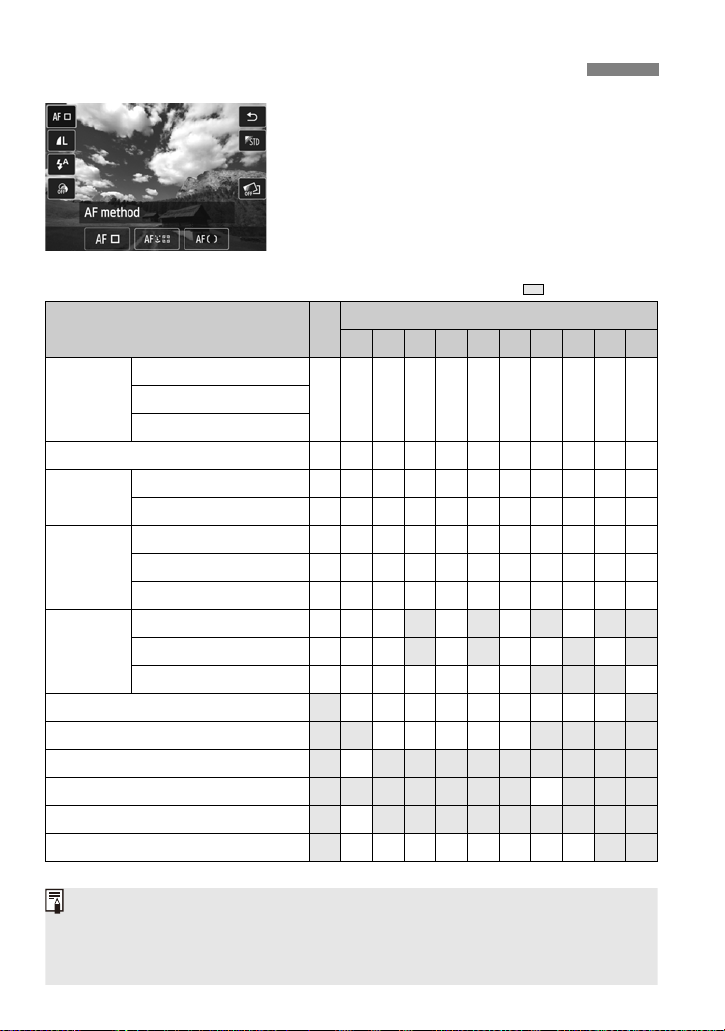
Functions that Can Be Set with Quick Control
If you change the shooting mode or set the power to <2>, it will revert to the default
settings (except the AF method, image-recording quality and self-timer). The Creative
filter setting will not be canceled even after setting the power to <
2
>. However , it
will be canceled if you change the shooting mode to <
A
>, <F>, <G>, or <k>.
With <A> and in Basic Zone modes, you
can set the following functions with Q
Quick Control (p.42) and B Quick
Control (p.44).
Functions that Can Be Set with <A> and in Basic Zone Modes
o: Default setting k: User selectable : Not selectable
Function A
AF
FlexiZone - Single
method
Q
(p.79)
FlexiZone - Multi
Image-recording quality
Drive
mode
Self-
timer
(p.75)
u: Single shooting o o k o o k k o o o o
i:
Continuous shooting
Q (10 sec.)
l (2 sec.) k k k k k k k k k k k
q (Continuous)
Q k k k k k k k k k k k
C 2 3 4 5 C P 6 F G
k k k k k k k k k k ku+Tracking
k k o k k o o k k k k
k k k k k k k k k k k
k k k k k k k k k k k
a: Automatic firing o o o o o o
Speedlite
90EX Q
D
: Flash on (Fires at all times)
k k k k ko o
b: Flash off k k k o k o k o
Ambience-based shots
Q k k k k k k k k k
Light/scene-based shots Q k k k k k
Background blur (p.63) k
Color tone Q k
Extra Effect Shot (p.62) Q k
Creative filters Q k k k k k k k k
* Functions with Q can be set with the Q Quick Control screen.
Basic Zone Modesv
76
Page 77

3
Autofocus
You can select an AF method to suit the shooting cond itions
and your subject.
77
Page 78
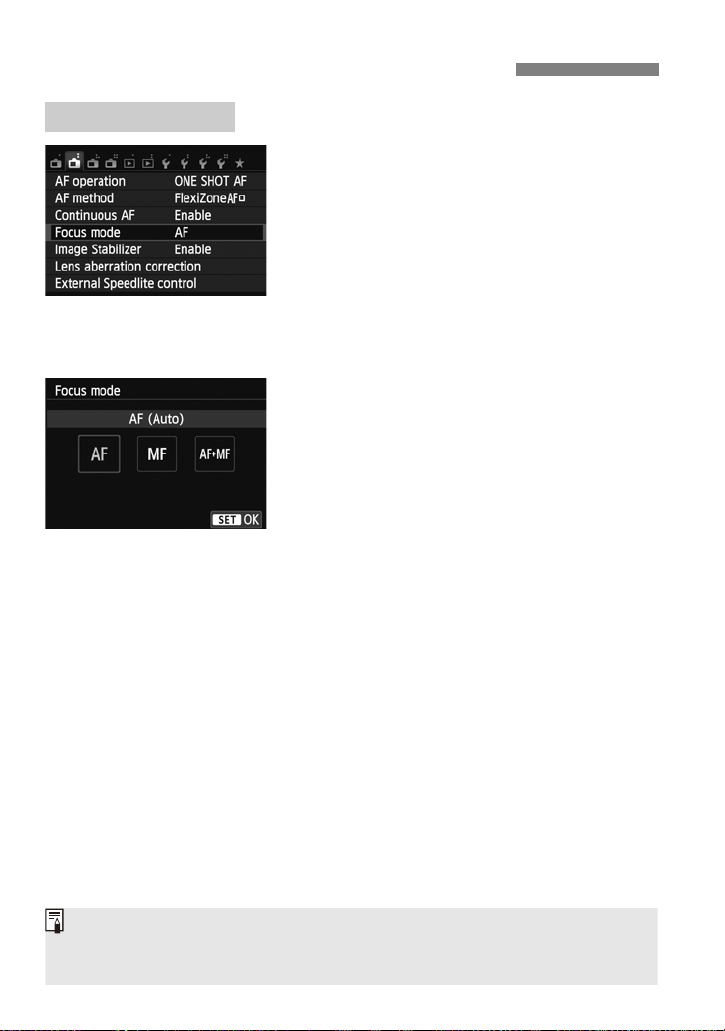
3 Selecting a Focusing Method
With <5> or <C>, or if [AF operation] is set to [Servo AF], priority is given to
Servo AF. In such cases, even if you set the focus mode to [AF+MF], you will not
be able to focus manually.
With an EF-M Lens
Select [Focus mode].
1
Under the [A2] tab, select [Focus
mode].
[Focus mode] will be displayed when an
EF-M lens is attached. It will not be
displayed when an EF or EF-S lens is
attached.
With <A>, this setting will not be
displayed. (It will be set to AF
automatically.)
Select the desired item.
2
AF: AF (Auto)
Stands for autofocus.
MF: MF (Manual)
Stands for manual focus.
AF+MF: Manual focus after AF
After focus is achieved using AF, you can
make final focus adjustments manually.
After the AF operation, turn the focusing
ring while holding the shutter button
pressed halfway.
78
Page 79
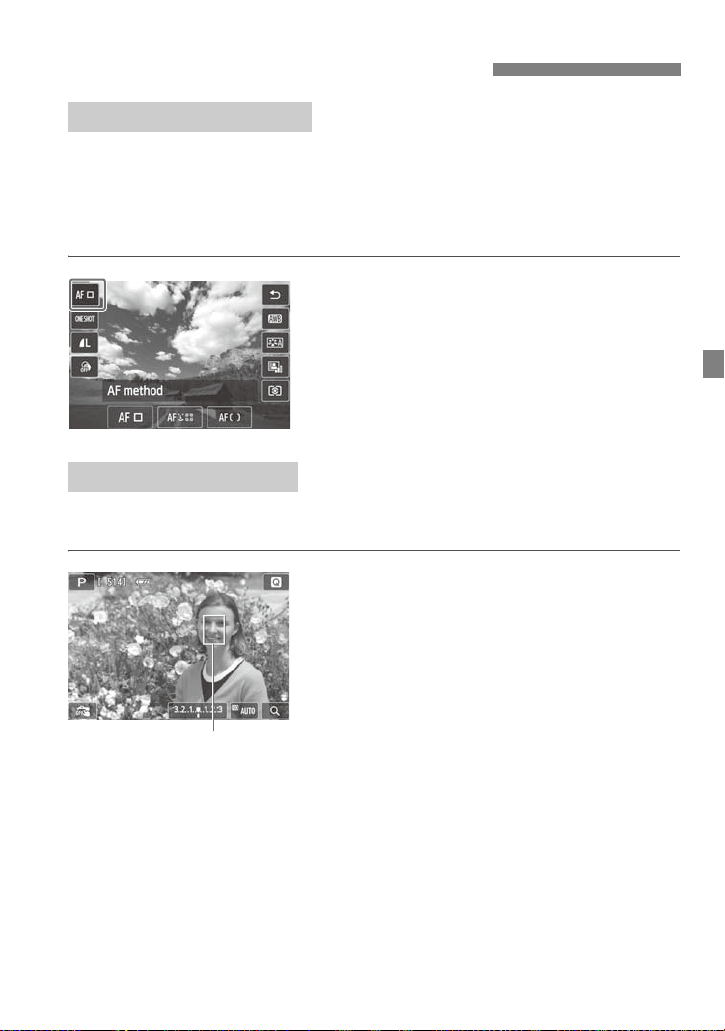
Using AF to Focus (AF Method)
AF point
Selecting the AF Method
Y ou can select an AF method to suit the shooting conditions and your subject.
The following AF methods are provided: [FlexiZone - Single], [u (face)+
Tracking] (p.80), and [FlexiZone - Multi] (p.82).
If you want to achieve precise focus, set the lens focus mode switch to [MF],
magnify the image, and focus manually.
Select the AF method.
Select the AF method with Quick Control
(p.42).
Select the desired AF method at the
bottom of the screen, then tap [2] to set.
You can also select from [AF method]
under the [A2] tab.
FlexiZone - Single: d
This is effective when you want to focus a particular subject, since only one
AF point is used to focus.
Move the AF point.
1
Tap the screen to move the AF point to
where you want to focus. (It cannot go to
the edges of the picture.)
To return the AF point to the center, press
the <XL> button.
During movie shooting, if [Movie Servo
AF] is set to [Enable], the AF point will be
displayed in a larger size.
79
Page 80
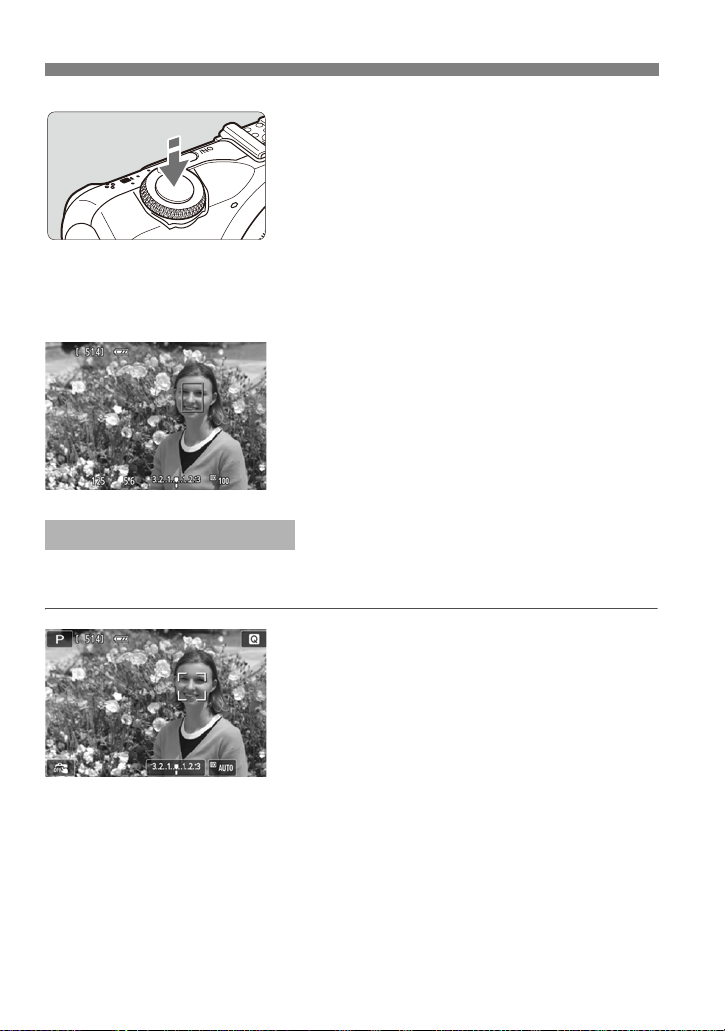
Using AF to Focus (AF Method)
Focus the subject.
2
Aim the AF point over the subject and
press the shutter button halfway.
When focus is achieved, the AF point
turns green and the beeper sounds. (If
[AF operation] is set to [Servo AF], the
AF point turns blue and the beeper will
not sound.)
If focus is not achieved, the AF point will
turn orange.
Take the picture.
3
Press the shutter button completely
(p.54).
u (face)+Tracking: c
Human faces are detected and focused. If a face moves, the AF point <p>
also moves to track the face.
80
Check the AF point.
1
When a face is detected, the <p> AF
point will appear over the face to be
focused.
You can also tap th e LCD monit or screen
to select the face or subject. If the subject
is not a face, <t> will be displayed.
If no faces can be detected, or if you tap
the LCD monitor but do not select any
face or subject, the camera will switch to
[FlexiZone - Multi] with automatic
selection (p.82).
Page 81
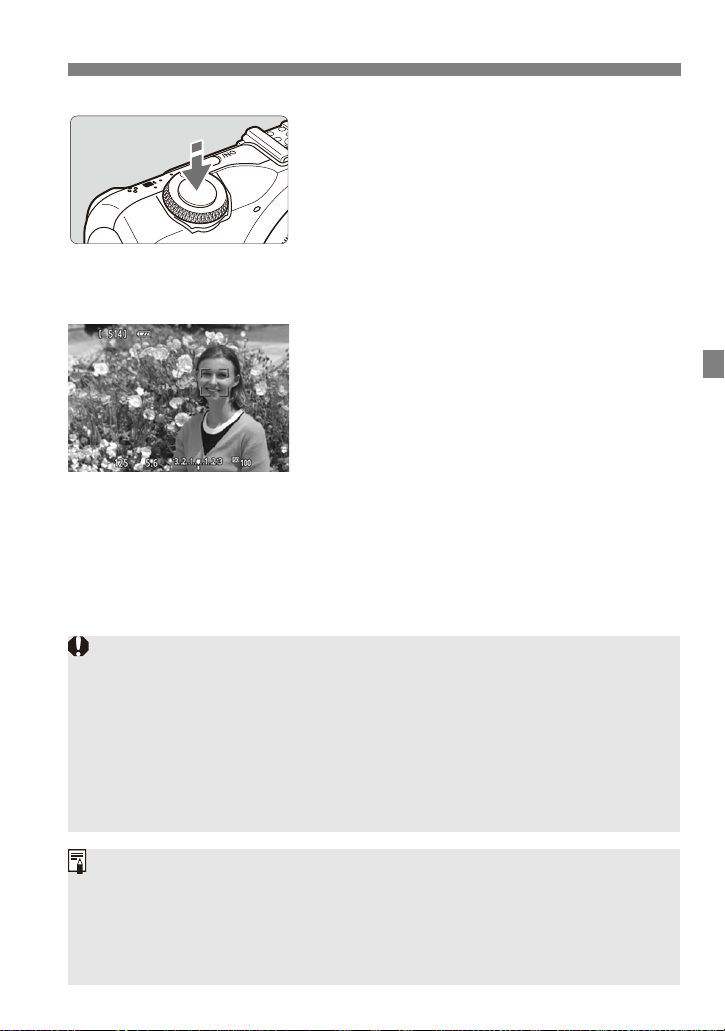
Using AF to Focus (AF Method)
If the subject’s face is significantly out of focus, face detection will not be
possible. You can prevent this by setting [Continuous AF] to [Enable].
An object other than a human face may be detected as a face.
Face detection will not work if the face is very small or large in the picture, too
bright or too dark, or partially hidden.
The <p> may cover only part of the face.
If you press the shutter button to focus again while the access lamp is
illuminated after shooting, the focus mode may momentarily switch to
[FlexiZone - Multi]. (Face detection will not function.)
When you press the <XL> button, the <t> AF point will appear at the
center of the screen. Drag it to move the AF point. Press the <XL> button
again, and the AF point will move to the detected subject.
Since AF is not possible with a face detected near the edge of the picture, the
<p> will be grayed out. If you press the shutter button halfway, the subject
will be focused in [FlexiZone - Multi] AF method with automatic selection.
Focus the subject.
2
Press the shutter button halfway to focus.
When focus is achieved, the AF point
turns green and the beeper sounds. (If
[AF operation] is set to [Servo AF], the
AF point turns blue and the beeper will
not sound.)
If focus is not achieved, the AF point will
turn orange.
Take the picture.
3
Press the shutter button completely
(p.54).
81
Page 82
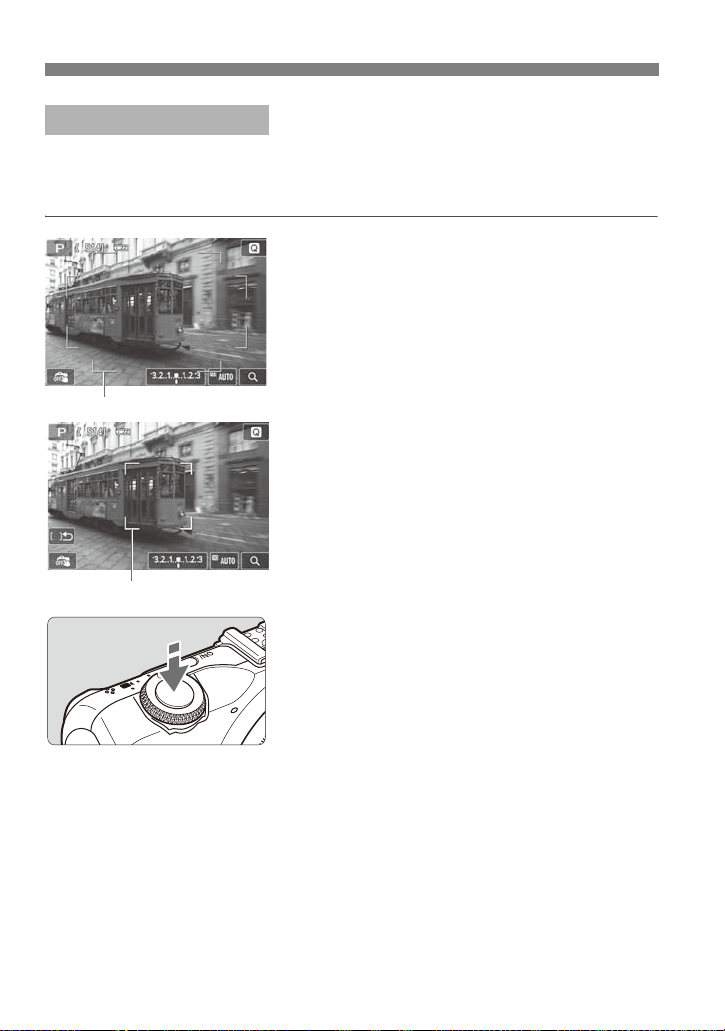
Using AF to Focus (AF Method)
Area frame
Zone frame
FlexiZone - Multi: o
Up to 31 AF points (automatically selected) covering a wide area can be used
to focus. This wide area can also be divided into 9 zones for focusing (zone
selection).
Select the AF zone. w
1
During automatic selection, tap the
screen to switch to zone selection. With
<A> and in Basic Zone modes,
automatic selection will be set.
To select a zone, tap it on the screen. To
return to the center zone, press the
<XL> button.
During zone selection, tap the [F] icon
on the screen to switch to automatic
selection.
Focus the subject.
2
Aim the AF point over the subject and
press the shutter button halfway.
When focus is achieved, the AF point
turns green and the beeper sounds. (If
[AF operation] is set to [Servo AF], the
AF point turns blue and the beeper will
not sound.)
If focus is not achieved, the area frame or
zone frame will turn orange.
82
Page 83
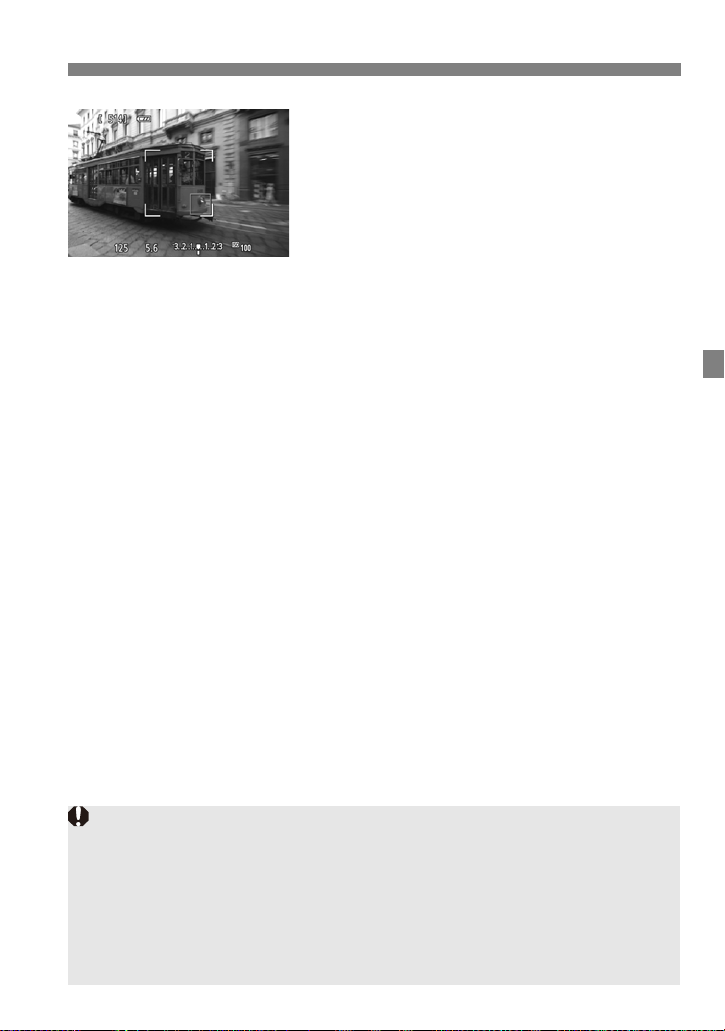
Using AF to Focus (AF Method)
When the camera does not focus the desired target subject with automatic AF
point selection, switch the AF method to zone selection or [FlexiZone Single], and focus again.
Depending on the aspect ratio setting, the number of AF points will differ. At
[3:2], there will be 31 AF points. At [1:1] and [4:3], there will be 25 AF points.
And at [16:9], 21 AF points. Also, at [16:9], there will be only three zones.
For movie shooting, there will be 21 AF points (or 25 AF points if [640x480] is
set) and three zones (or 9 zones if [640x480] is set).
Take the picture.
3
Press the shutter button completely
(p.54).
83
Page 84

Using AF to Focus (AF Method)
If you shoot a peripheral subject and it is slightly out of focus, aim the center AF
point or zone over the subject to focus, focus again and th en take the picture.
In magnified view, focusing using AF may be difficult due to the magnified
effect of camera shake. Using a tripod is recommended.
Notes About [FlexiZone - Single], [u (face)+Tracking], and
[FlexiZone - Multi]
AF Operation
Even when focus has been achieved, pressing the shu tte r button halfwa y
will focus again.
The image brightness may change during and after th e AF opera ti on.
If the light source changes during autofocusing, the screen may flicker and
focusing may be difficult. If this happens, turn the camera off and on again,
then autofocus under the actual light source.
When [FlexiZone - Single] is set and you t ap on [u] on the screen , the
image at the AF point will be magnified. When you press the shutter button
halfway , the came ra will focus whil e the magnifi ed image is displaye d.
(However, if [AF operation] is set to [Servo AF], the display will return to
normal and then the camera will focus.) This is ef fective when the camera is
attached to a tripod and you need to attain very precise focus. If fo cusing is
difficult in the magnified view, return to the normal display and use AF. No te
that the AF speed may differ between the normal and magnified views.
The image can also be magnified when [FlexiZone - Multi] is set. However,
if you press the shutter button halfway , the display wi ll return to normal and
the camera will focus.
When [FlexiZone - Multi] is set, press the shutter button halfway to fix the
AF points.
If you magnify the view after focusing with [FlexiZone - Single] or
[FlexiZone - Multi] in the normal view, precise focus may not be achieved.
If [u (face)+Tracking] is set, magnified view is not possible. The AF point
is fixed during continuous shooting.
When [u (face)+Tracking] or [FlexiZone - Multi] is set, the AF point is
fixed during continuous shooting.
Continuous Shooting when [AF operation] is Set to [Servo AF]:
When using a lens with “STM” in its name, such as the EF-M18-55mm
f/3.5-5.6 IS STM, the camera can keep focusing and shooting continuously
during Servo AF. (The continuous shooting speed becomes slower.) With
other lenses, the focus will be locked for the second and subsequent
frames during continuous shooting.
84
Page 85

Using AF to Focus (AF Method)
In the above cases, if the camera cannot focus automatically, focus manually.
With some EF or EF-S lenses (Mount Adapter EF-EOS M required), it may
take longer to achieve focus or correct focus may not be achieved. For more
information, refer to Canon Web site.
Shooting Conditions that Make Focusing Difficult
Low-contrast subjects such as the blue sky, solid-colo r flat surfaces or
when highlights or shadow details are lost.
Extremely bright or dark subjects.
Stripes and other patterns where there is contrast only in the horizontal
direction.
Subjects with repetitive patterns (skyscraper windows, computer
keyboards, etc.).
Fine lines and subject outlines.
Under a light source whose brightness, color, or pattern keeps changing.
Night scenes or points of light.
When the image flickers under fluorescent or LED light sources.
Extremely small subjects.
Subjects at the edge of the picture.
Subjects strongly reflecting light.
The AF point covers both near and distant subjects (such as an animal in a
cage).
Subjects that keep moving within the AF point and cannot keep still due to
camera shake or subject blur.
Autofocusing while the subject is very far out of focus.
Soft focus effect is applied with a soft focus lens.
A special effect filter is used.
Noise (spots, banding, etc.) appears on the screen during AF.
85
Page 86
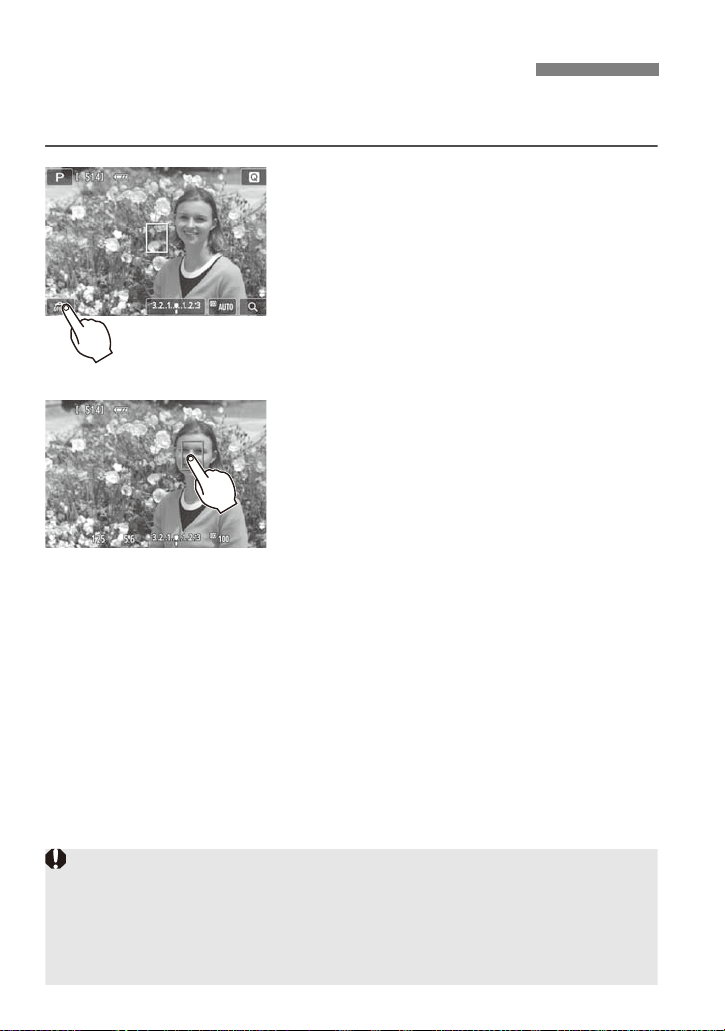
x Shooting with the Touch Shutter
Even if the drive mode is set to [i] (continuous shooting), single shooting will
take effect.
The touch shutter does not work with the magnified view.
When [5: Shutter/AE lock button] is set to [1: AE lock/AF] or [3: AE/AF, no
AE lock] under [54: Custom Functions (C.Fn )], autofocusing does not take
effect.
Just by tapping the LCD monitor screen, you can focus and take the picture
automatically. This works in all shooting modes.
Enable the touch shutter.
1
Tap [y] on the screen’s bottom left.
Each time you tap the icon, it will toggle
between [y] and [x].
[x] (Touch Shutter: Enable)
You can tap to focus and shoot.
[y] (Touch Shutter: Disable)
You can tap to select the point to focus.
Then, press the shutter button completely
to shoot.
Tap the screen to shoot.
2
Tap the face or subject on the screen.
At the point you tap, the camera will focus
in the AF method that was set (p.79-83).
When [FlexiZone - Multi] is set, it will
switch to [FlexiZone - Single].
When focus is achieved, the AF point
turns green and the picture is taken
automatically.
If focus is not achieved, the AF point
turns orange and the picture cannot be
taken. Tap the face or subject on the
screen again.
86
Page 87
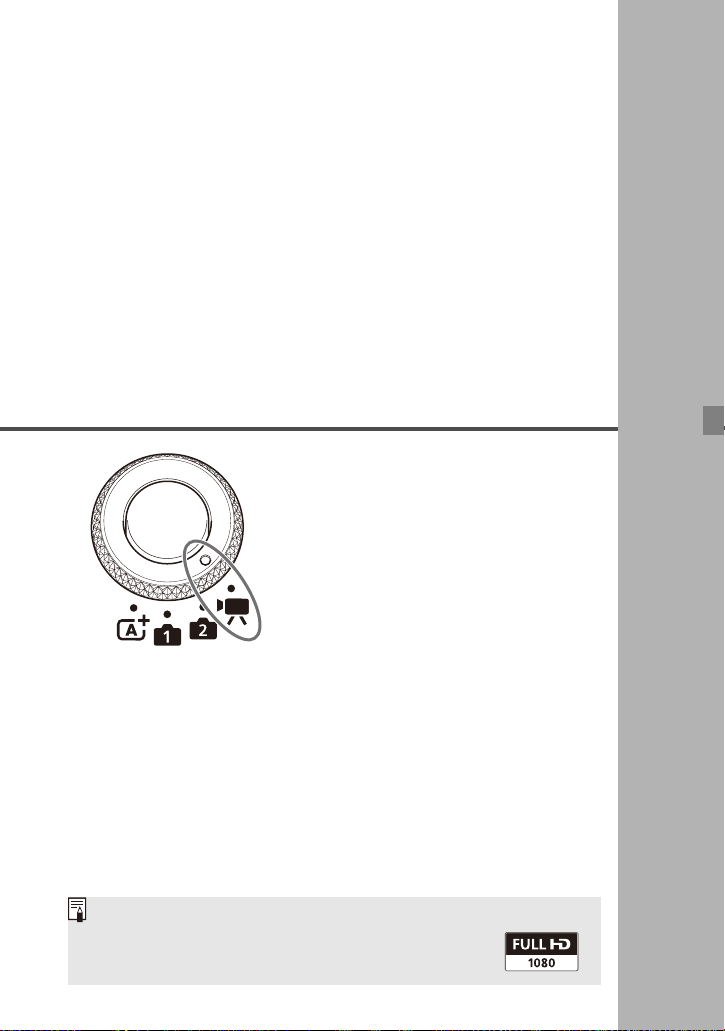
4
Full HD 1080
Full HD 1080 indicates compatibility with High-Definition
featuring 1080 vertical pixels (scanning lines).
Shooting Movies
Set the Mode Dial to <k> to shoot
movies. The movie recording
format will be MOV.
For information on which cards can
record movies, see page 3.
87
Page 88
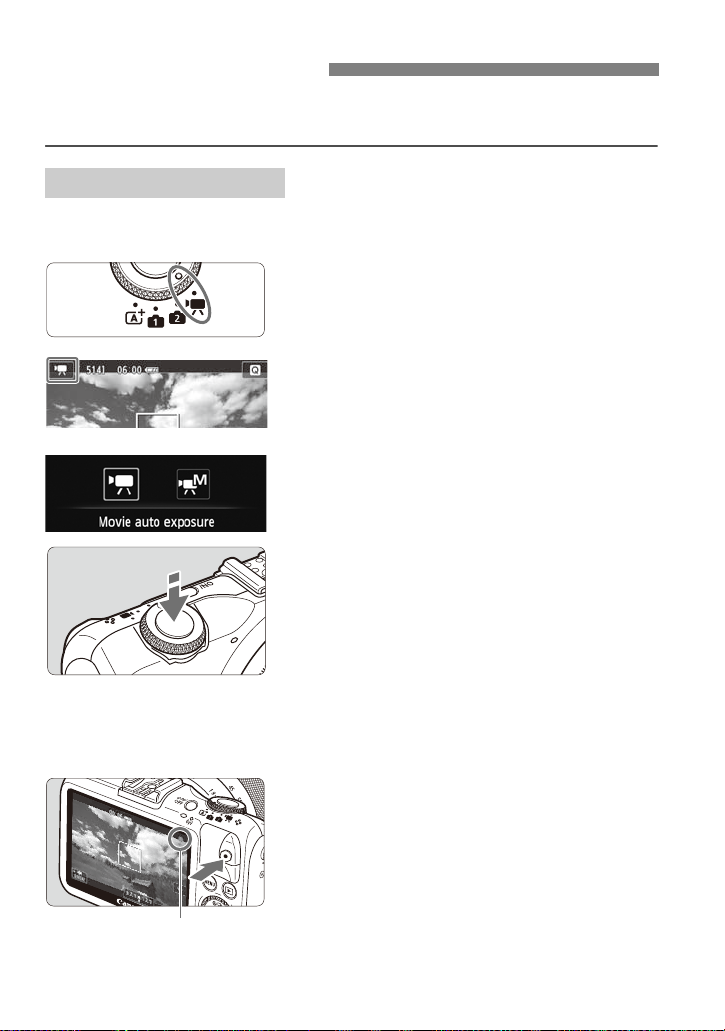
k Shooting Movies
Recording movie
Connecting the camera to a TV set is recommended to play back the movies
shot.
Autoexposure Shooting
When you select the movie shooting mode [k], autoexposure is set to adjust
the brightness automatically.
Set the Mode Dial to <k>.
1
Tap the shooting mode icon on the
2
screen’s upper left corner.
The shooting mode selection screen will
appear.
Select [k] (Movie auto exposure)
3
for the shooting mode.
Focus the subject.
4
Before shooting a movie, focus with AF
or manual focus (p.78-83).
By default, [Movie Servo AF: Enable] is
set for continuous focusing.
When [Movie Servo AF] is set to
[Enable], you can tap [B] on the
screen’s lower left to stop/start the
focusing. If you stop the focusing, the AF
point will turn gray.
Shoot the movie.
5
Press the <o> (Movie start/stop) button
to start shooting a movie. To stop
shooting the movie, press the <o>
(Movie start/stop) button again.
While the movie is being shot, the “o”
mark will be displayed on the upper right
of the screen.
88
Page 89
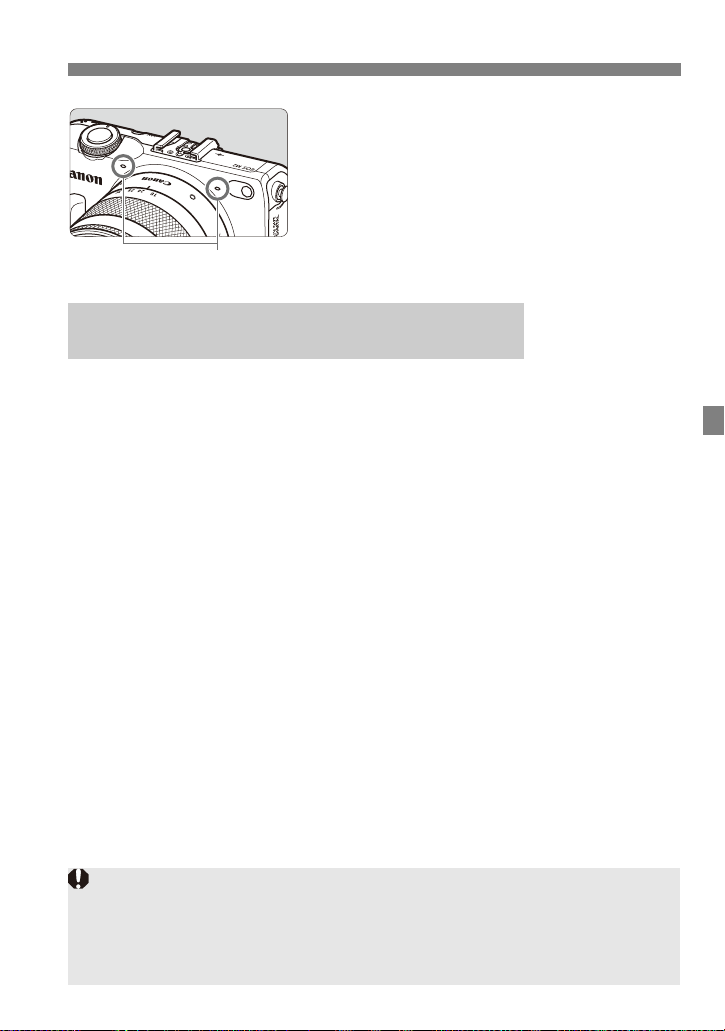
k Shooting Movies
Microphones
Do not hold the camera in the same position for long periods of time.
Even if the camera does not feel too hot, prolonged contact with the same body
part may cause skin redness, blistering or low-temperature contact burns. The
use of a tripod is recommended for people with circulation problems or very
sensitive skin, or when using the camera in very hot places.
While shooting a movie, be careful not to
cover the microphones with your finger.
Using an EX-series Speedlite (Sold Separately)
Equipped with an LED Light
This camera is compatible with the function turning on the LED light
automatically in low-light conditions during autoexposure shooting. For
details, refer to the EX-series Speedlite’s instruction manual.
89
Page 90
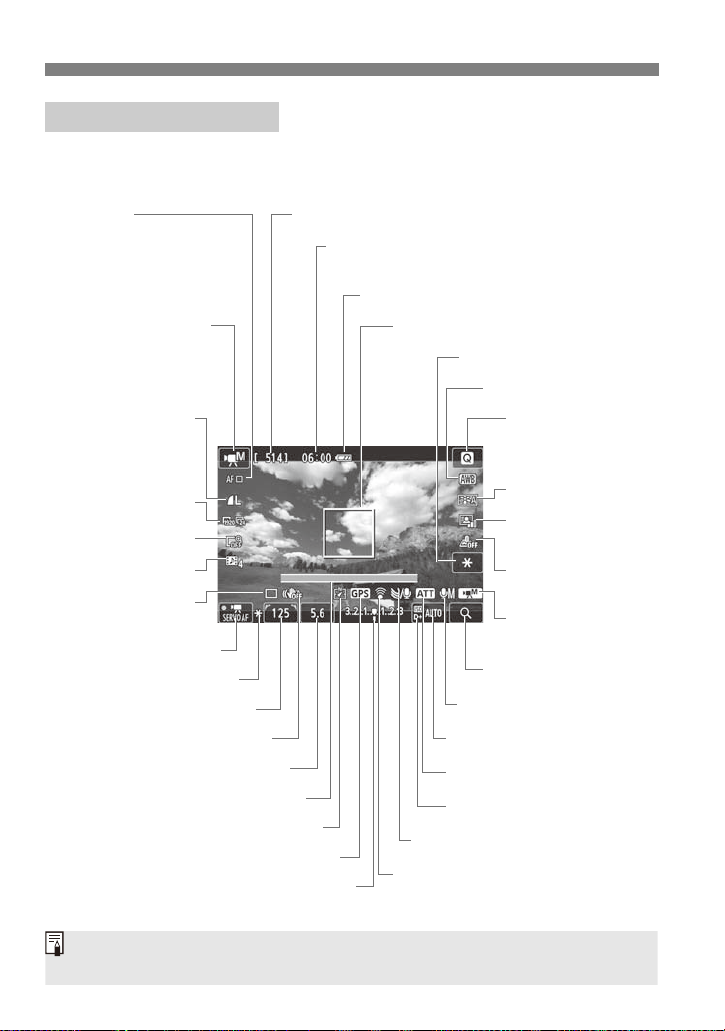
k Shooting Movies
Movie shooting remaining time*/
Elapsed time
Quick Control
ISO speed
Exposure level indicator
Image Stabilizer: OFF
White balance
Movie recording
size
Image-recording
quality
(still photos)
Auto Lighting
Optimizer
AF method
• d : FlexiZone - Single
• c : u+Tracking
• o : FlexiZone - Multi
Battery check
Picture Style
Movie shooting mode
L : Autoexposure
K : Manual exposure
Recording level: Manual
Video snapshot
Video snapshot shooting duration
AE lock
Wind filter
Attenuator
AF point (FlexiZone - Single)
Exposure mode
Shutter speed
Drive mode
Possible shots (still photos)
Movie Servo AF
AE lock
Highlight tone priority
Magnify/Digital zoom
Miniature effect
movie
Digital compass
GPS connection indicator
Eye-Fi card
Digital zoom
Aperture
When movie shooting starts, the movie shooting remaining time will change to
the elapsed time.
Movie Shooting Screen
Each time you press the <B> button, the information display will
change.
* Applies to a single movie clip.
90
Page 91
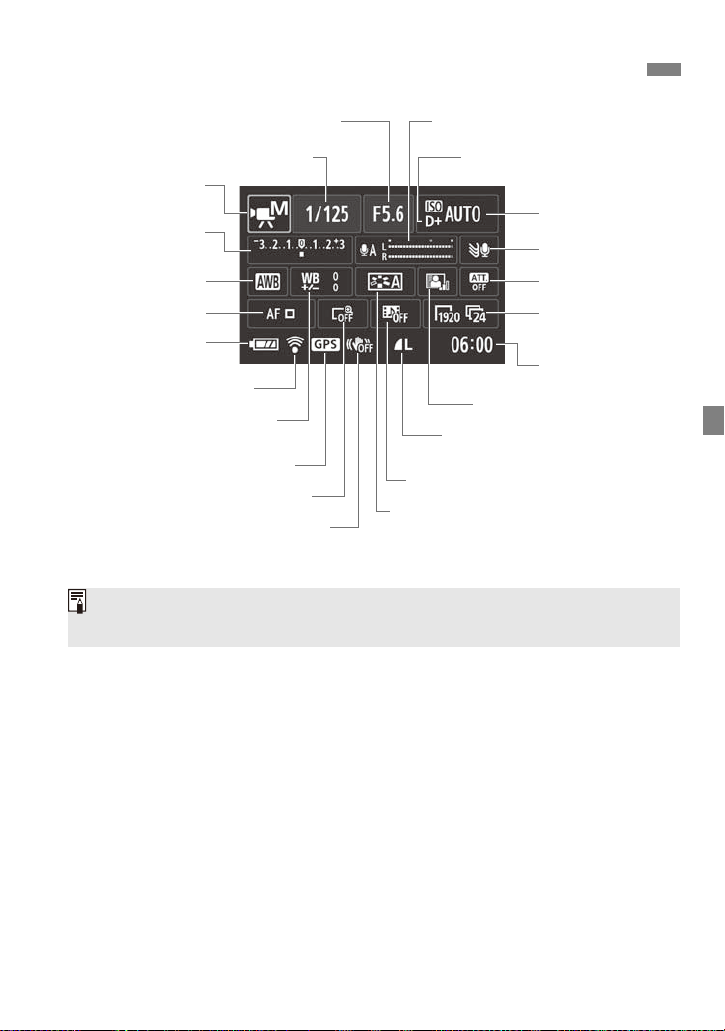
B Quick Control During Movie Shooting
ISO speed
Aperture Sound recording
Battery check*
Attenuator
Shutter speed
Picture Style
Wind filter
Highlight tone priority*
Digital zoom
Video snapshot
White balance
AF method
Auto Lighting Optimizer
Movie recording
size
Movie shooting
time*
Image-recording quality
(still photos)*
Movie shooting
mode
Exposure
compensation
White balance correction/
White balance bracketing
Eye-Fi card*
Image Stabilizer: OFF*
GPS connection indicator*
* These functions cannot be set with the B Quick Control screen.
The settable functions differ depending on the shooting mode.
91
Page 92
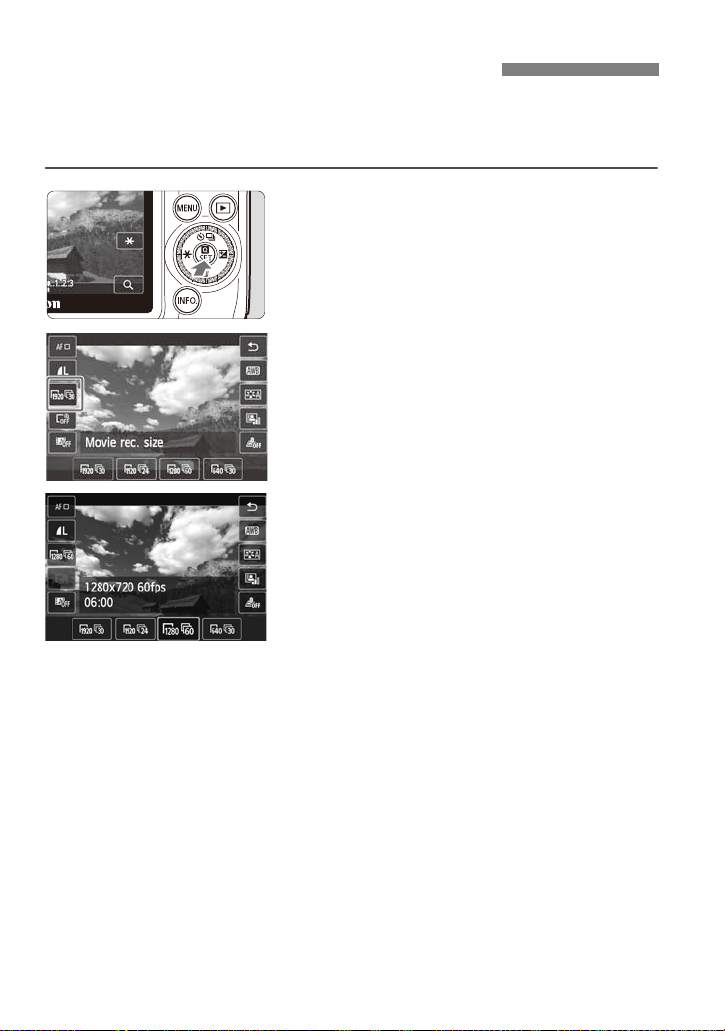
Setting the Movie Recording Size
You can select the movie’s image size [****x****] and frame rate [9] (frames
recorded per second). The 9(frame rate) switches automatically depending
on the [52: Video system] setting.
Display the Quick Control screen.
1
Press the <Q> button to display it.
Tap the movie recording size.
2
Tap the desired setting to select it.
3
Tap the desired setting to select it, then
tap [2].
Image size
A [1920x1080] : Full High-Definition (Full HD) recording quality. The
aspect ratio will be 16:9.
B [1280x720] : High-Definition (HD) recording quality. The aspect
ratio will be 16:9.
C [640x480] : Standard-definition recording quality . The aspect ratio
will be 4:3.
Frame rate (fps: frames per second)
6/8 : For areas where the TV format is NTSC (North America, Japan,
Korea, Mexico, etc.).
5/7 : For areas where the TV format is PAL (Europe, Russia, China,
Australia, etc.).
4 : Records the movie at the cinematic rate of 24 fps.
92
Page 93
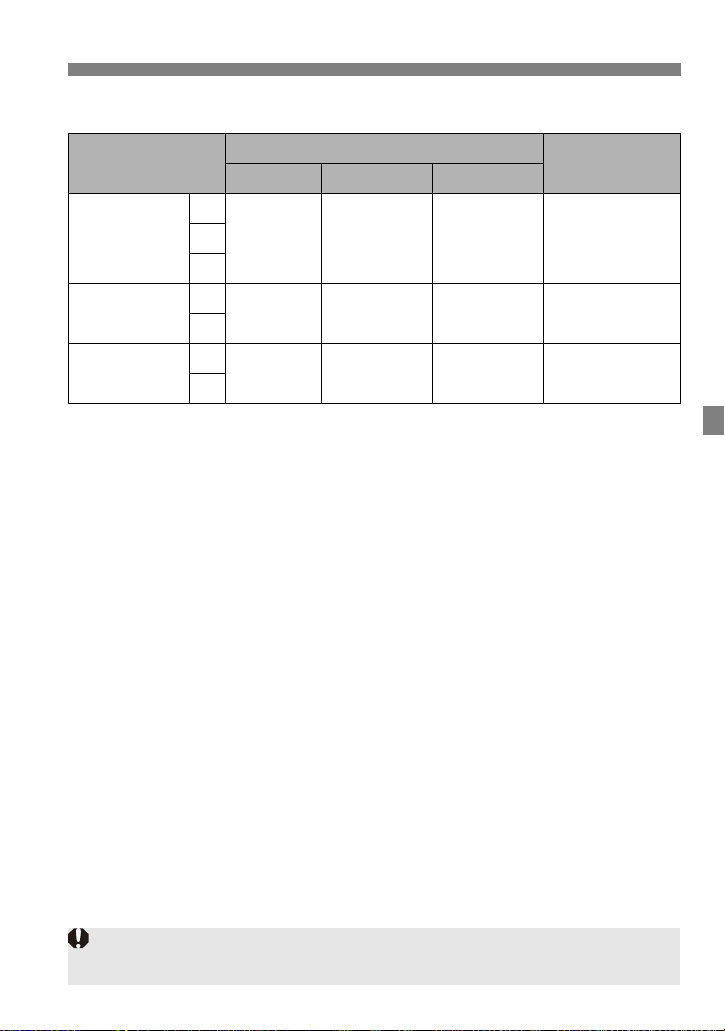
Setting the Movie Recording Size
An increase of the camera’s internal temperature may cause movie shooting to
stop before the maximum recording time shown in the table above.
Total Movie Recording Time and File Size Per Minute
Movie Recording
Size
Total Recording Time (approx.)
4 GB Card 8 GB Card 16 GB Card
File Size
(approx.)
6
[1920x1080]
11 min. 22 min. 44 min. 330 MB/min.5
4
[1280x720]
[640x480]
8
11 min. 22 min. 44 min. 330 MB/min.
7
6
46 min. 1 hr. 32 min. 3 hr. 4 min. 82.5 MB/min.
5
Movie Files Exceeding 4 GB
Even if you shoot a movie exceeding 4 GB, you can keep shooting without
interruption.
During movie shooting, approx. 30 sec. before the movie reaches the 4 GB
file size, the elapsed shooting time displayed in the movie shooting screen
will start blinking. If you keep shooting the movie and the file size exceeds
4 GB, a new movie file will be created automatically and the elapsed
shooting time will stop blinking.
When you play back the movie, you will have to play each movie file
individually. Movie files cannot play back consecutively automatically . After
the movie playback ends, select the next movie to be played.
Movie Shooting Time Limit
The maximum recording time of one movie clip is 29 min. 59 sec. If the
movie shooting time reaches 29 min. 59 sec., the movie shooting will stop
automatically. You can resume movie shooting by pressing the <o>
(Movie start/stop) button. (A new movie file is recorded.)
93
Page 94
Page 95
5
Images shot and saved with another device
The camera may not be able to properly display images captured with a
different camera, edited with a computer, or that have had their file
names changed.
Image Playback
This chapter explains functions related to viewing photos
and movies.
95
Page 96
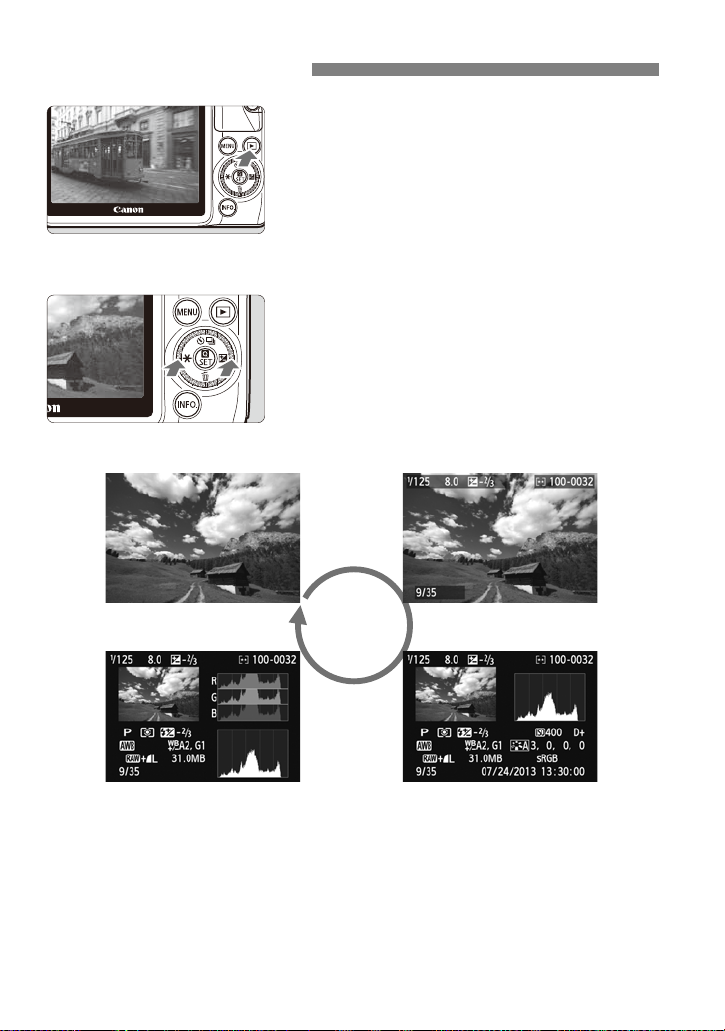
x Image Playback
No information
Histograms
With basic information
Shooting information
1
2
Play back the image.
Press the <x> button.
The last captured image or last image
played back will appear.
When the power is <2> and you hold
down the <x> button for 2 seconds or
longer, the power will turn <1> and the
playback screen will appear.
Select an image.
When you press the <Y> key, the last
image captured will be displayed first.
When you press the <Z> key, the first
image captured will be displayed first.
Each time you press the <B> button,
the information display will change.
96
Exit the image playback.
3
Press the <x> button to exit the image
playback and return to the shooting
screen.
Page 97
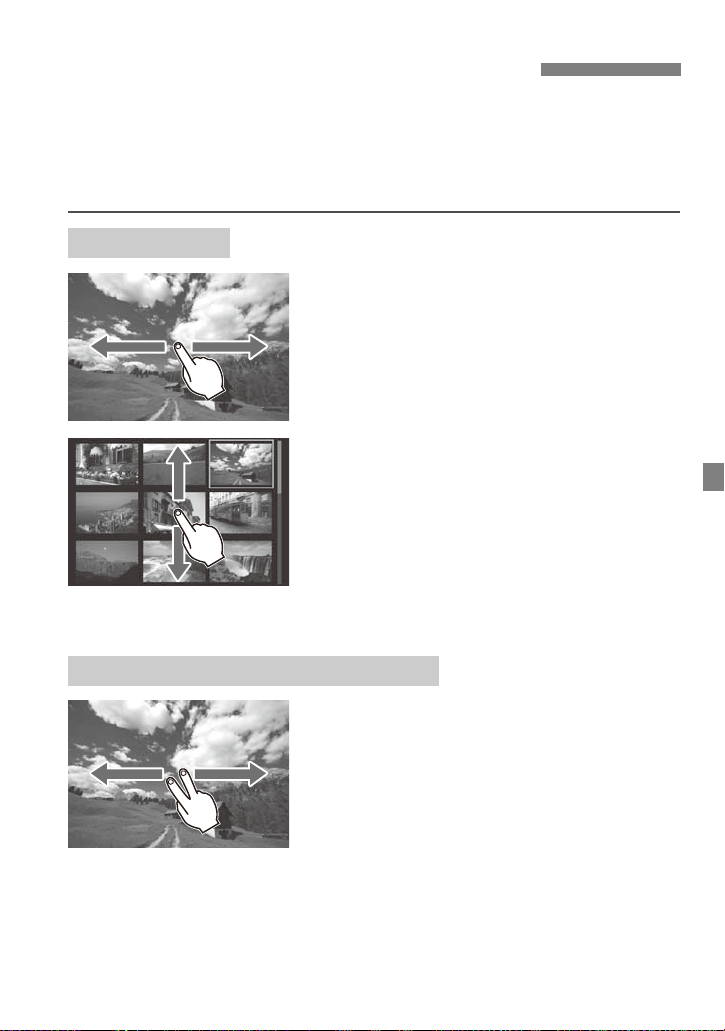
d Playback with the Touch Screen
The LCD monitor is a touch-sensitive panel that you can touch with your
fingers for playback operations. Press the <x> button to play back
images. (The last captured image will appear.)
If the power is off, you can hold do wn the <x> button for 2 sec. or longer to
turn on the camera and display the playback screen.
Browse Images
Swipe with one finger.
In the single-image display, use one
finger to swipe the image to the left or
right to see another image.
Swipe to the left to see the next (newer)
image or swipe to the right to see the
previous (older) image.
In the index display (where multiple
images are displayed), use one finger to
scroll up or down the screen to display
another screen of index images. Swipe
your finger up to see newer images or
swipe your finger down to see the older
images. When you select an image and
tap it, it will be displayed as a single
image.
Jump through Images (Jump Display)
Swipe with two fingers.
When you use two fingers to swipe left or
right on the screen, you can jump through
images with the method set in [Image jump
with 5] under the [x2] tab.
97
Page 98
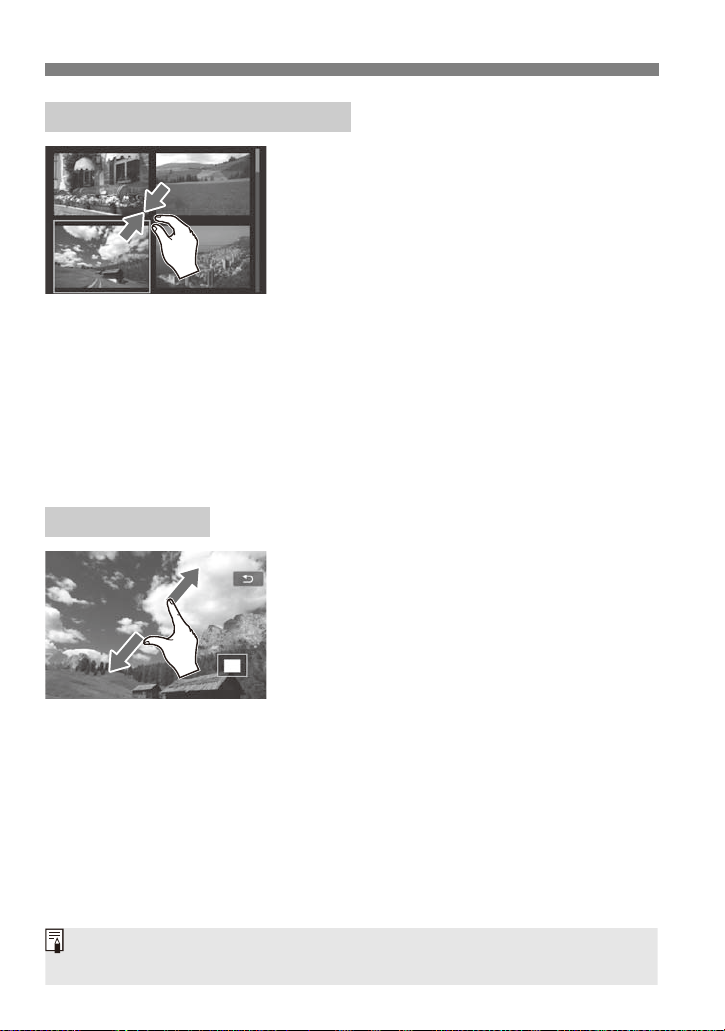
d Playback with the Touch Screen
Touch screen operations on the camera’s LCD monitor are also possible while
playing back images on a TV set connected to your camera.
Reduce Images (Index Display)
Pinch two fingers.
Touch the screen with two fingers spread
apart, and pinch your fingers together on the
screen.
Each time you pinch your fingers, the
In the index display, perforations at the
In the index display, press <0> to
Magnify Images
Spread two fingers apart.
Touch the screen with two fingers together,
then spread your fingers apart on the
screen.
As you spread your fingers, the image
The image can be magnified up to
You can scroll around the image by
To reduce the image, pinch your fingers
Tapping [2] on the screen’s upper right
screen changes from a single-image
display to an index display of 4 images, 9
images, 36 images, then 100 images.
left edge of a thumbnail indicate a movie.
switch to the single-image display.
Alternatively, select an image to display
an orange frame, then tap the image
again to display it as a single image.
will be magnified.
approx. 10x.
dragging your finger.
together on the screen.
will return to the single-image display.
98
Page 99
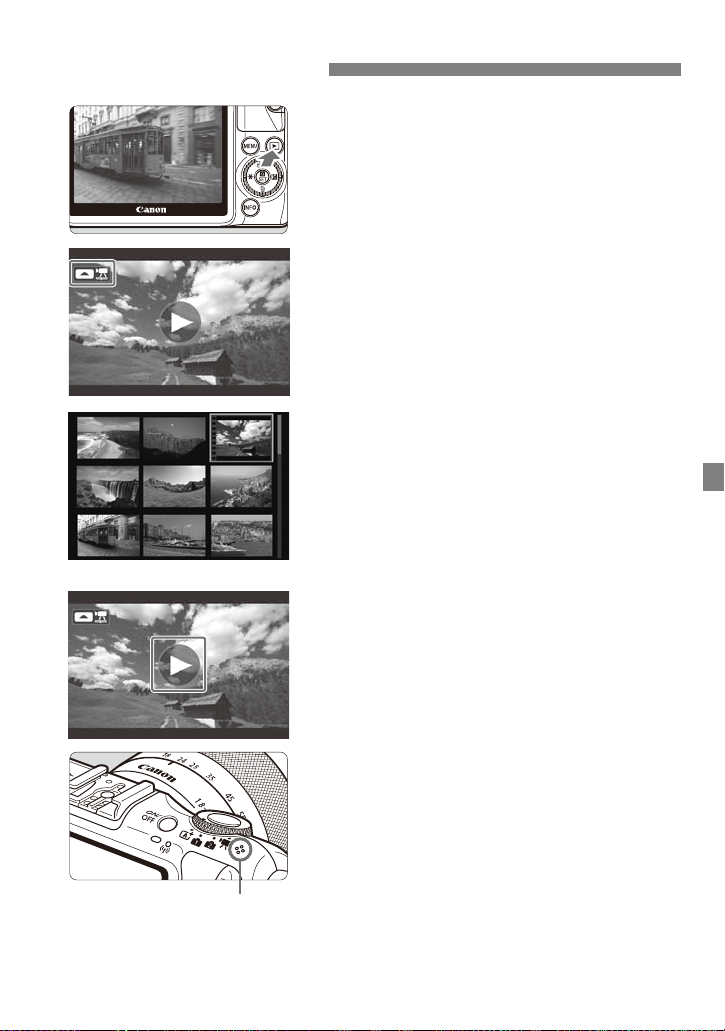
k Playing Movies
Speaker
1
2
3
Play back the image.
Press the <x> button to display images.
Select a movie.
Press the <Y> <Z> keys to select a
movie.
In the single-image display, [Z1]
displayed on the upper left of the screen
indicates a movie. If the movie is a video
snapshot, [Ze] will be displayed.
You can press the <B> button to
switch to the shooting information
display.
In the index display, perforations at the
left edge of a thumbnail indicate a movie.
As movies cannot be played in the
index display, press <0> to switch
to the single-image display.
Tap [7] at the center of the screen.
The movie will start playing.
To pause the movie while it is playing, tap
the screen. The movie playback panel
will also appear (p.100).
During movie playback, you can turn the
<5> dial to adjust the built-in speaker’s
sound volume.
99
Page 100
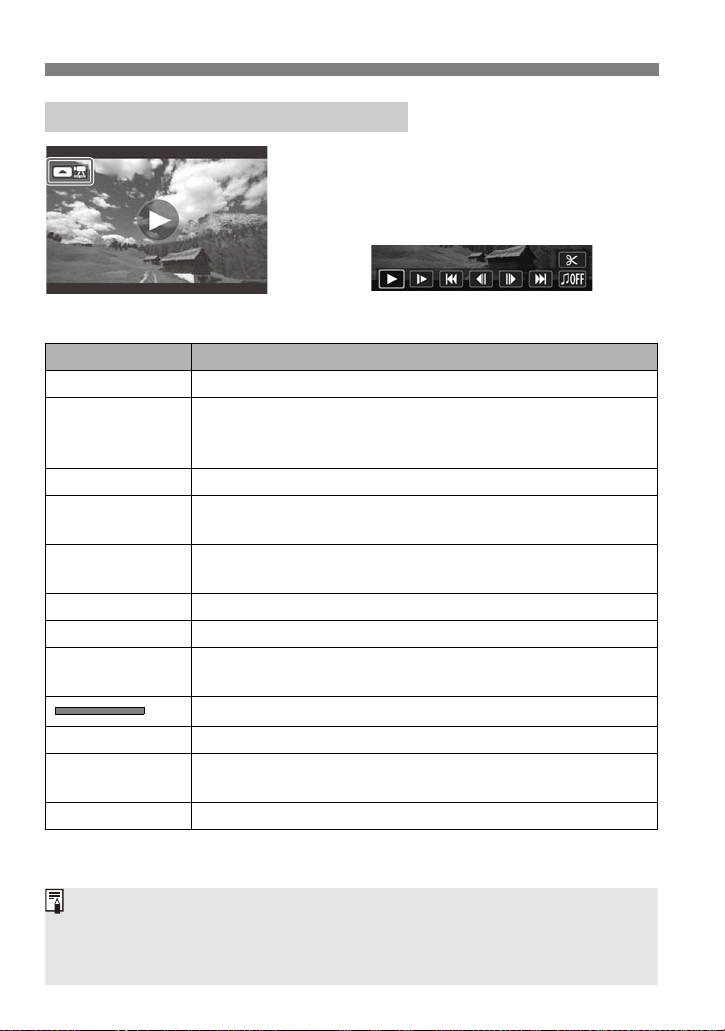
k Playing Movies
With a fully-charged Battery Pack LP-E12, the continuous playback time at
room temperature (23
°C/73°F) will be as follows: approx. 2 hr. 20 min.
If you took a still photo while you shot the movie, the still photo will be
displayed for approx. 1 sec. during the movie playback.
Displaying the Movie Playback Panel
In the single-image display, tap
[Z1].
The movie playback panel will appear at
the bottom of the screen.
Movie Playback Panel
Operation Playback Description
7 Play Press <0> to toggle between play and stop.
Adjust the slow motion speed by pressing the <Y> <Z>
8 Slow motion
5 First frame Displays the movie’s first frame.
3 Previous
frame
6 Next frame
4 Last frame Displays the movie’s last frame.
X Edit Displays the editing screen.
0 Background
music*
mm' ss" Playback time (minutes:seconds)
9 Volume
3 2 Returns to the single-image display.
* When background music is set, the movie’s sound will not be played.
keys. The slow motion speed is indicated at the upper
right of the screen.
Each time you press <0>, the previous frame is
displayed. Hold down <0> to rewind the movie.
Each time you press <0>, the next frame is displayed.
Hold down <0> to fast forward the movie.
Play back a movie with the selected background music.
Playback position
You can adjust the volume of the built-in speaker (p.99)
by turning the <5> dial.
100
 Loading...