

Page 1

E
Advanced User Guide
Page 2

Introduction
Before Starting to Shoot, Be Sure to Read the Following
To avoid shooting problems and accidents, fi rst read the “Safety Instructions”
(
=
25–
=
27) and “Handling Precautions” (
=
28–
=
30). Also,
read this manual carefully to ensure that you use the camera correctly.
Refer to This Manual while Using the Camera to Further
Familiarize Yourself with the Camera
While reading this manual, take a few test shots and see how they come
out. You can then better understand the camera. Be sure to store this
manual safely, too, so that you can refer to it again when necessary.
Testing the Camera Before Use and Liability
After shooting, play images back and check whether they have been
properly recorded. If the camera or memory card is faulty and the images
cannot be recorded or downloaded to a computer, Canon cannot be held
liable for any loss or inconvenience caused.
Copyrights
Copyright laws in some countries prohibit the unauthorized use of images
recorded with the camera (or music/images with music transferred to the
memory card) for purposes other than personal enjoyment. Also be aware
that certain public performances, exhibitions, etc. may prohibit photography
even for private enjoyment.
Page 3
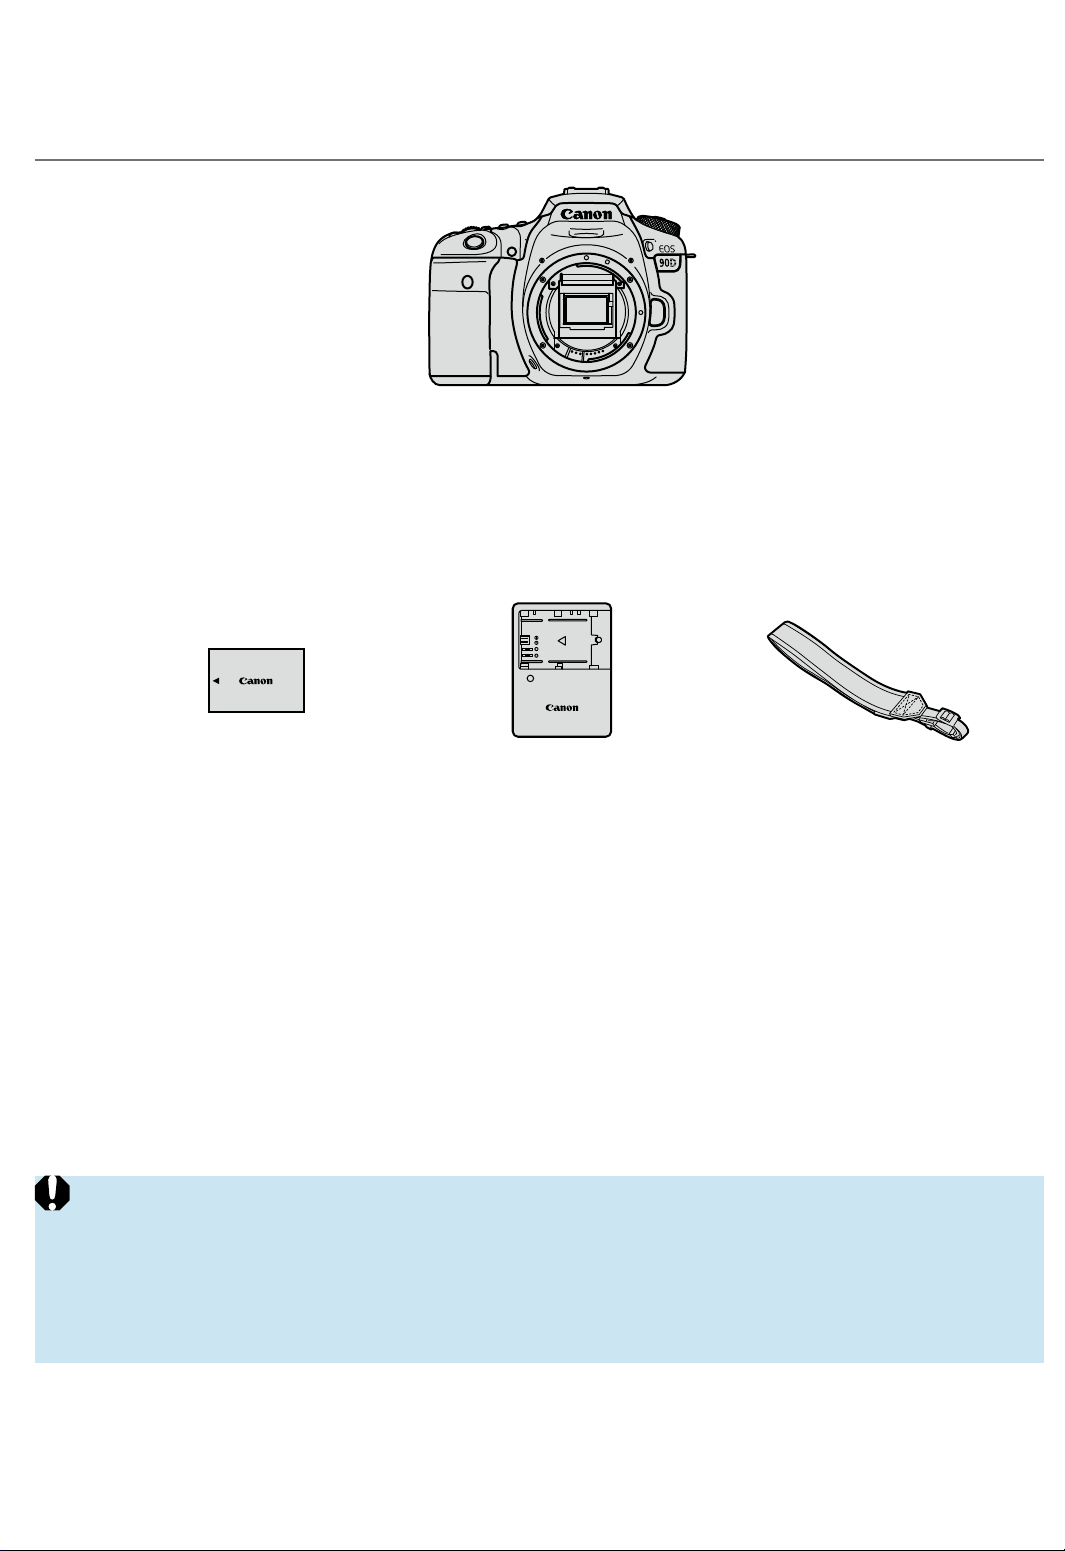
Item Check List
Before starting, check that all the following items are included with your
camera. If anything is missing, contact your dealer.
Strap
Camera
(with body cap)
Battery Charger
LC-E6/LC-E6E*
Battery Pack LP-E6N
(with protective cover)
* Battery Charger LC-E6 or LC-E6E is provided. (The LC-E6E comes with a power
cord.)
oThe camera does not come with a memory card (=10), interface cable, or HDMI
cable.
oFor details on the Advanced User Guide and Instruction Manuals, see the next page.
oIf you purchased a Lens Kit, check that the lenses are included.
oBe careful not to lose any of the above items.
oWhen you need Lens Instruction Manuals, download them from the Canon
website (=4).
The Lens Instruction Manuals (PDF fi les) are for lenses sold individually. Note
that when purchasing the Lens Kit, some of the accessories included with the
lens may not match those listed in the Lens Instruction Manual.
Page 4
Instruction Manuals
The Instruction Manual included with the camera provides
basic instructions for the camera and Wi-Fi functions.
The Advanced User Guide (this PDF fi le) with complete
instructions and separate Supplemental Information PDF with
specifi cations and other details can be downloaded from the
Canon website to a computer or other device.
Downloading the Advanced User Guide/Instruction Manuals
The Advanced User Guide and Instruction Manuals for lenses and software
(PDF fi les) can be downloaded from the Canon website to a computer or
other device.
Download site
Advanced User Guide or Supplemental Information
www.canon.com/icpd
Lens Instruction Manual
www.canon.com/icpd
Software Instruction Manual
www.canon.com/icpd
o
To view the PDF fi
les, an Adobe PDF viewing software such as Adobe
Acrobat Reader DC (most recent version recommended) is required.
oAdobe Acrobat Reader DC can be downloaded for free from the Internet.
oDouble-click the downloaded PDF fi le to open it.
oTo learn how to use PDF viewing software, refer to the software’
s Help section
or the like.
Page 5
Instruction Manuals
Downloading the Advanced User Guide/Instruction Manuals
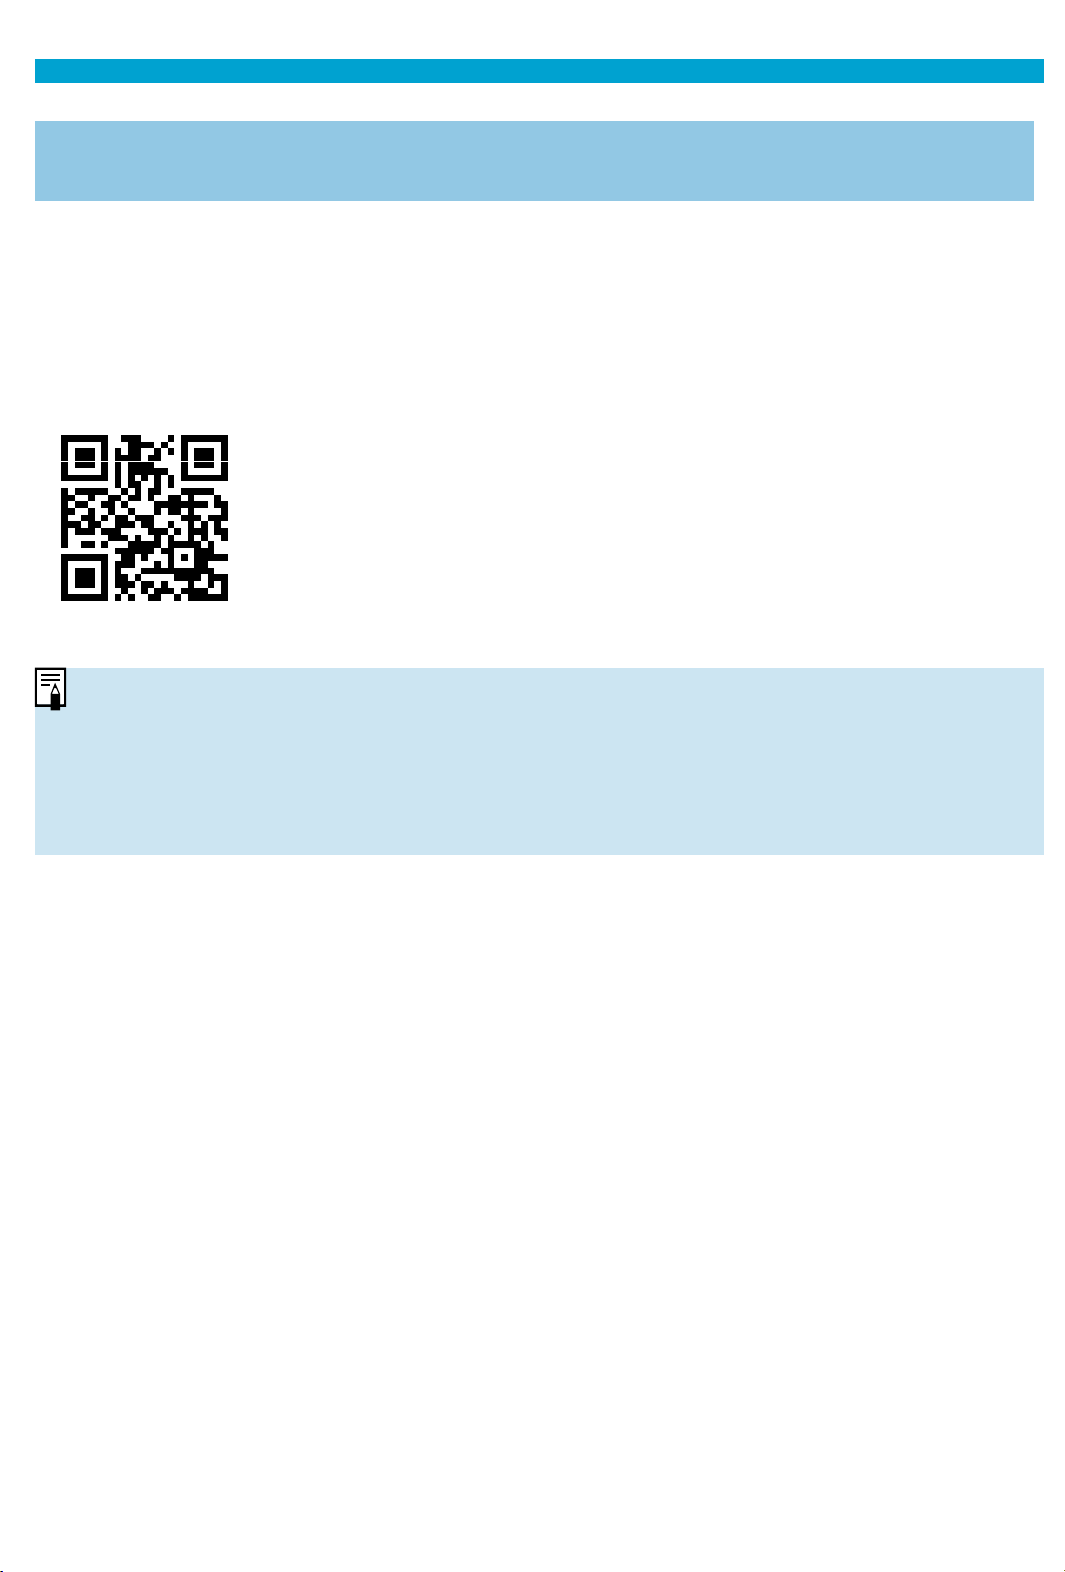
Using QR Code
The Advanced User Guide and Instruction Manuals for lenses and software
(PDF fi les) can be downloaded to a smartphone or tablet using the QR
code.
www.canon.com/icpd
oA software app is required to read the QR code.
oSelect your country or region of residence, then download the Advanced User
Guide/Instruction Manuals.
oSelect [5: Manual/software URL] to display the QR code on the camera
screen.
Page 6
Quick Start Guide
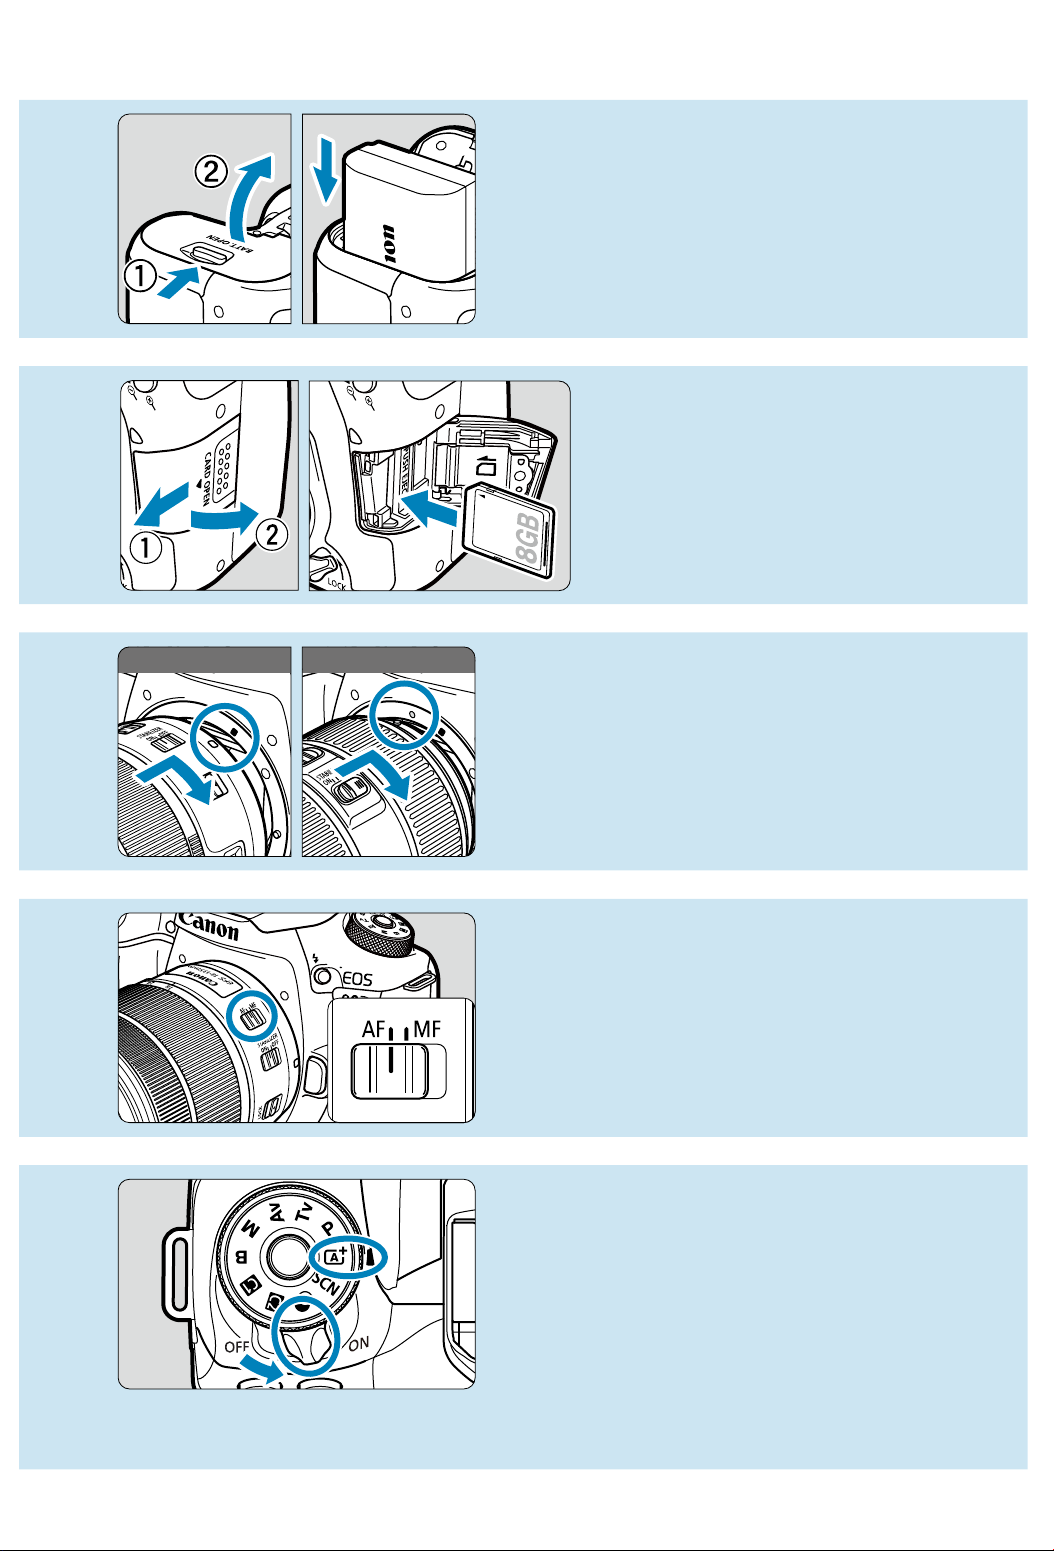
1
Insert the battery (
=
47).
Upon purchase, charge the battery
to start using (
=
44).
2
Insert the card (
=
48).
With the card’s label facing
toward the back of the
camera, insert it into the
card slot.
3
White index Red index
Attach the lens (
=
54).
Align the mount indexes on the lens
and camera (red or white) to attach
the lens.
4
Set the lens’s focus mode
switch to <AF> (
=
54).
5
Set the power switch to <
1
>,
then set the Mode dial to <
A
>
(
=
52).
Turn the Mode dial while holding
down the center.
All the necessary camera settings
will be set automatically.
Page 7
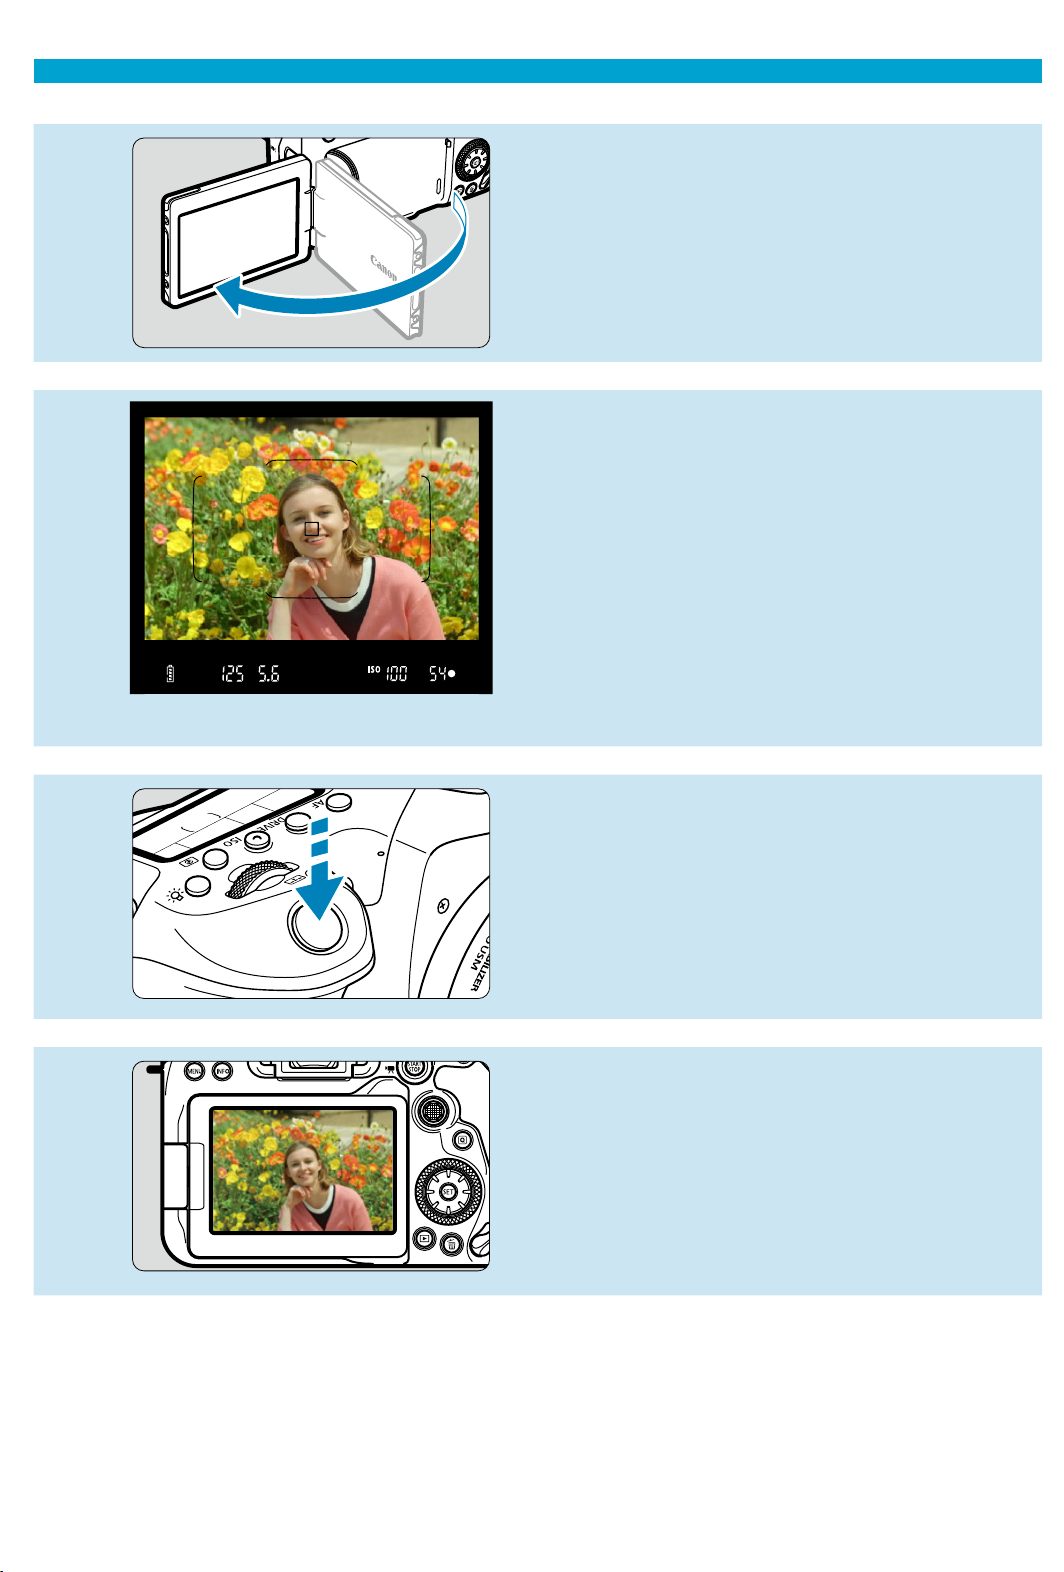
Quick Start Guide
6
Flip out the screen (
=
51).
When the date/time/zone setting
screen is displayed, see
=
516.
7
Focus on the subject (
=
57).
Look through the viewfi nder and
center the subject on the screen.
Press the shutter button halfway,
and the camera will focus on the
subject.
If <D> blinks in the viewfi nder,
press the <D> button to raise the
built-in fl ash.
8
Take the picture (
=
57).
Press the shutter button completely
to take the picture.
9
Review the picture.
The image just captured will be
displayed for approx. 2 sec. on the
screen.
To display the image again, press
the <
x
> button (
=
332).
To shoot while looking at the screen, see “Live View Shooting” (
=
71).
Page 8
About This Manual
Icons in this Manual
<
6
> : Indicates the Main dial.
<5> : Indicates the Quick control dial.
<j> <9> : Indicates Multi-controller 1 and 2.
<W/X/Y/Z> : Indicates the direction to press the Multi-controller.
<
0
> : Indicates the Setting button.
* : Indicates the duration (in * seconds) of the operation
for the button you pressed, as timed after you
release the button.
• In addition to the above, the icons and symbols used on the camera’s buttons and
displayed on the screen are also used in this manual when discussing relevant
operations and functionality.
M
: A M icon to the right of a page title indicates that the function is
available only in Creative Zone <d>, <
s
>, <
f
>, <a>, or
<F> mode.
=
*** : Reference page numbers for more information.
: Warning to prevent shooting problems.
: Supplemental information.
: Tips or advice for better shooting.
: Troubleshooting advice.
Page 9

About This Manual
Basic Assumptions for Operational Instructions, Sample
Photos
Before following any instructions, make sure the power switch is set to
<
1
> and the Multi-function lock feature is off (
=
52,
=
60).
It is assumed that all the menu settings and Custom Functions are set to
their defaults.
The illustrations in this manual show the camera attached with the
EF-S18-135mm f/3.5-5.6 IS USM lens as an example.
The sample photos displayed on the camera and used in this manual are
for instructional purposes only.
Page 10
Compatible Cards
The following cards can be used with the camera regardless of capacity.
If the card is new or was previously formatted (initialized) by another
camera or computer, format the card with this camera (
=
511).
SD/SDHC/SDXC memory cards
UHS-II and UHS-I cards supported.
Cards that Can Record Movies
When recording movies, use a high-capacity card with ample performance
(fast enough writing and reading speeds) for the movie recording size. For
details, see
=
618.
In this manual, “card” refers to SD memory cards, SDHC memory
cards, and SDXC memory cards.
* The camera does not come with a card for recording photos/
movies. Please purchase it separately.
Page 11

Chapters
Introduction 2
Preparation and Basic Operations 43
Basic Zone 75
Creative Zone 109
AF, Drive, and Exposure Settings 123
Flash Photography 163
Shooting 191
Playback 329
Wireless Features 395
Set-up 501
Custom Functions / My Menu 551
Reference 589
Page 12

Introduction 2
Item Check List ......................................................................................3
Instruction Manuals ................................................................................4
Quick Start Guide ...................................................................................6
About This Manual .................................................................................8
Compatible Cards ................................................................................10
Chapters...............................................................................................11
Contents ...............................................................................................12
Index to Features .................................................................................21
Safety Instructions ...............................................................................25
Handling Precautions ...........................................................................28
Part Names ..........................................................................................31
Preparation and Basic Operations 43
Charging the Battery ............................................................................44
Inserting/Removing the Battery ............................................................47
Inserting and Removing the Card ........................................................48
Using the Screen .................................................................................51
Turning on the Power ...........................................................................52
Attaching and Detaching a Lens ..........................................................54
Basic Operations ..................................................................................56
Menu Operations and Settings ............................................................63
Quick Control .......................................................................................67
Touch-Screen Operation ......................................................................70
Viewing the Screen as You Shoot (Live View Shooting) ......................71
Contents
Page 13

Contents
Basic Zone 75
Fully Automatic Shooting (Scene Intelligent Auto) ...............................76
Special Scene Mode ............................................................................84
Shooting Portraits ................................................................................86
Shooting Group Photos ........................................................................87
Shooting Landscapes ..........................................................................88
Shooting Moving Subjects ...................................................................89
Photographing Children .......................................................................90
Panning ................................................................................................91
Shooting Close-ups ..............................................................................93
Shooting Food ......................................................................................94
Shooting Candlelight Portraits .............................................................95
Shooting Night Portraits (With a Tripod) ..............................................96
Handheld Shooting of Night Scenes ....................................................97
Shooting Backlit Scenes ......................................................................98
Cautions for the <SCN> Modes ...........................................................99
Shooting with Filter Eff ects Applied ....................................................103
Creative Zone 109
Program AE ........................................................................................110
Setting the Shutter Speed Before Shooting (Shutter-Priority AE) ......112
Setting the Aperture Value Before Shooting (Aperture-Priority AE) ...114
Setting the Exposure Before Shooting (Manual Exposure) ...............117
Long (Bulb) Exposures ......................................................................119
Page 14

Contents
AF, Drive, and Exposure Settings 123
Selecting the AF Operation ................................................................124
Selecting the AF Area and AF Point (Viewfi nder Shooting)................128
Selecting the AF Method (Live View Shooting) ..................................135
Manual Focus.....................................................................................147
Selecting the Drive Mode ...................................................................150
Using the Self-Timer ..........................................................................153
Remote Control Shooting ...................................................................155
Eyepiece Cover ..................................................................................157
Selecting the Metering Mode .............................................................158
Exposure Compensation ....................................................................160
Locking the Exposure (AE Lock) ........................................................161
Flash Photography 163
Shooting With the Built-in Flash .........................................................164
Flash Function Settings .....................................................................168
Shooting With External Speedlites .....................................................179
Wireless Flash Photography Using
Optical Transmission ..........................................................................180
Shooting 191
Still Photo Shooting 192
Tab Menus: Still Photo Shooting (Viewfi nder Shooting) .....................193
Tab Menus: Still Photo Shooting (Live View Shooting) ......................196
Image Quality Settings .......................................................................199
Still Image Aspect Ratio .....................................................................202
Page 15

Contents
Image Review Time............................................................................204
Card Reminder ...................................................................................205
Correction of Lens Aberrations due to Optical Characteristics ..........206
Auto Exposure Bracketing (AEB) .......................................................211
ISO Speed Settings for Still Photos ...................................................213
Auto Correction of Brightness and Contrast
(Auto Lighting Optimizer) ...................................................................218
Highlight Tone Priority Settings ..........................................................219
Metering Timer (Live View Shooting) .................................................220
Exposure Simulation (Live View Shooting) ........................................221
White Balance Settings ......................................................................222
White Balance Correction ..................................................................227
Color Space Settings .........................................................................229
Picture Style Selection .......................................................................230
Picture Style Customization ...............................................................233
Picture Style Registration ...................................................................236
Noise Reduction Settings ...................................................................238
Appending Dust Delete Data .............................................................241
Shutter Release Method (Live View Shooting) ..................................243
Multiple Exposures .............................................................................245
HDR (High Dynamic Range) Shooting ...............................................251
Focus Bracketing (Live View Shooting) .............................................255
Interval Timer Shooting ......................................................................258
Flicker Eff ect Reduction .....................................................................261
Mirror Lockup .....................................................................................263
Page 16

Contents
Continuous AF (Live View Shooting) ..................................................265
Lens Electronic MF Settings ..............................................................266
AF-Assist Beam Settings ...................................................................267
General Still Photo Shooting Cautions ...............................................269
Movie Recording 273
Tab Menus: Movie Recording ............................................................274
Movie Recording ................................................................................277
HDR Movie Recording .......................................................................284
Movie Recording With Filter Eff ects Applied ......................................285
Movie Recording Quality Settings ......................................................288
Setting the Sound Recording .............................................................295
Movie Digital IS ..................................................................................298
Recording Time-lapse Movies ............................................................300
Recording Video Snapshots ...............................................................312
Movie Servo AF ..................................................................................317
Movie Servo AF Track Sensitivity .......................................................319
Movie Servo AF Speed ......................................................................320
Other Menu Functions .......................................................................322
General Movie Recording Cautions ...................................................326
Playback 329
Tab Menus: Playback .........................................................................330
Image Playback .................................................................................332
Index Display (Multiple-Image Display) ..............................................334
Magnifi ed Image Display ....................................................................336
Movie Playback ..................................................................................337
Page 17

Contents
Editing a Movie’s First and Last Scenes ............................................340
Frame Extraction from 4K Movies or 4K Time-Lapse Movies ............342
Playback on a TV Set .........................................................................344
Protecting images ..............................................................................346
Image Rotation ...................................................................................349
Erasing Images ..................................................................................350
Digital Print Order Format (DPOF) .....................................................354
Specifying Images for a Photobook ...................................................358
Creative Filter Eff ects .........................................................................361
RAW Image Processing .....................................................................364
Processing With Your Preferred Eff ects Applied (Creative Assist) .....370
Selecting the Type of RAW Image Processing ..................................372
Red-Eye Correction............................................................................373
Editing Video Snapshot Albums .........................................................374
Cropping JPEG Images .....................................................................377
Resizing JPEG Images ......................................................................379
Image Ratings ....................................................................................380
Image Slide Shows (Auto Playback) ..................................................383
Filtering Images for Playback .............................................................385
Jump Display (Jumping Through Images) .........................................387
Customizing Playback Information Display ........................................389
Displaying the Highlight Alert .............................................................391
AF Point Display.................................................................................392
Grid Display........................................................................................393
Specifying Initial Image Display When Playback Begins ...................394
Page 18

Contents
Wireless Features 395
Tab Menus: Wireless Tab ...................................................................396
Selection of Wi-Fi/Bluetooth Connection ...........................................397
Connecting to a Smartphone .............................................................399
Connecting to a Computer via Wi-Fi ..................................................426
Connecting to a Printer via Wi-Fi .......................................................434
Sending Images to a Web Service .....................................................444
Wi-Fi Connection via Access Points ..................................................458
Connecting to a Wireless Remote Control .........................................464
Reconnecting via Wi-Fi ......................................................................467
Registering Multiple Connection Settings ..........................................469
Wi-Fi Settings .....................................................................................470
Bluetooth Settings ..............................................................................471
Changing the Nickname .....................................................................472
Geotagging Images with GPS Information from Other Devices .........473
Changing or Deleting Connection Settings ........................................478
Clearing Wireless Communication Settings to Default ......................480
View Info Screen ................................................................................481
Virtual Keyboard Operations ..............................................................482
Responding to Error Messages .........................................................483
Wireless Communication Function Notes ..........................................494
Security ..............................................................................................496
Checking Network Settings ................................................................497
Wireless Communication Status ........................................................498
Page 19

Contents
Set-up 501
Tab Menus: Set-up .............................................................................502
Creating and Selecting a Folder ........................................................505
File Numbering Methods ....................................................................507
The Auto Rotation of Vertical Images .................................................510
Formatting Memory Cards ................................................................. 511
Auto Power Off ...................................................................................513
Adjusting the Screen Brightness ........................................................514
Turning the Screen Off /On .................................................................515
Setting the Date, Time, and Time Zone .............................................516
Interface Language ............................................................................519
Video System .....................................................................................520
Touch Sensitivity Settings ..................................................................521
Beeping for Camera Operations ........................................................522
Headphone Volume ...........................................................................523
Checking the Battery Information .......................................................524
Sensor Cleaning ................................................................................528
Displaying the Shooting Mode Guide .................................................532
Feature Guide Display .......................................................................533
Help Features.....................................................................................534
Customization of Information in the Viewfi nder ..................................536
<
B
> Button Display Options .........................................................538
Customization of On-Screen Information ...........................................539
Shutter Button Customization for Movie Recording ...........................542
HDMI Output Resolution ....................................................................543
RAW Image Display on HDR TVs ......................................................544
Page 20

Contents
Multi-Function Lock ............................................................................545
Registering Custom Shooting Modes ................................................546
Restoring Camera Defaults ................................................................547
Copyright Information .........................................................................548
Other Information ...............................................................................550
Custom Functions / My Menu 551
Tab Menus: Customization .................................................................552
Setting Custom Functions ..................................................................553
Custom Functions ..............................................................................554
Custom Function Setting Items ..........................................................556
Fine Adjustment of AF Position (AF Microadjustment) .......................575
Clearing Custom Function Settings ...................................................581
Tab Menus: My Menu .........................................................................582
Registering My Menu .........................................................................583
Reference 589
Software .............................................................................................590
Importing Images to a Computer .......................................................592
Battery Grip BG-E14 ..........................................................................594
Household Power Outlet Accessory ...................................................594
Troubleshooting Guide .......................................................................595
Error Codes ........................................................................................613
Performance Data ..............................................................................614
Information Display ............................................................................622
Index ..................................................................................................635
Page 21

Index to Features
Power
Charging the battery (=44)
Battery level (=53)
Power saving (=513)
Checking battery information
(
=
524)
Cards
Releasing shutter without card
(
=
205)
Formatting (=511)
Cards compatible with movie
recording (=617)
Lens
Attaching (=54)
Detaching (=55)
Basic Settings
Date/Time/Zone (=516)
Language (=519)
Beeper (=522)
Clear all camera settings (=547)
Copyright information (=548)
Viewfi nder
Dioptric adjustment (=56)
Information display in viewfi nder
(
=
536)
Viewfi nder display format (=536)
Screen
Vari-angle (=51)
Touch control (=70)
Brightness (
=
514)
Help (=534)
Electronic level (=539)
AF
AF operation (=124)
AF method (
=
135)
AF point selection (=140)
Eye Detection AF (=142)
Manual focusing (=147)
MF peaking settings (=149)
Continuous AF (=265)
Electronic manual focus (=266)
AF-assist beam (=267)
Metering
Metering mode (=158)
Drive
Drive mode (=150)
Self-timer (
=
153)
Maximum burst (=201)
Image Recording Settings
Creating/Selecting a folder
(
=
505)
File numbering (=507)
Page 22

Index to Features
Image Quality
Image quality (
=
199)
Still image aspect ratio (=202)
Lens aberration correction
(=206)
ISO speed (still photos) (=213)
Auto Lighting Optimizer (=218)
Highlight tone priority (=219)
White balance (=222)
Picture Style (=230)
Noise reduction for long exposures
(=238)
Noise reduction for high ISO
speeds (=239)
Reducing fl icker (=261)
Shooting
Shooting mode (=38)
Multi-function lock (=60)
Quick Control (=67)
Touch shutter (=72)
Creative Assist (=82)
Creative fi lters (=103)
Depth-of-fi eld preview (=116)
Bulb timer (=120)
Magnifi ed view (=144)
Remote control (=155)
Remote switch (
=
156)
Multiple exposures (=245)
HDR mode (=251)
Focus bracketing (=255)
Interval timer (=258)
Mirror lockup (=263)
Shooting information display
(=539)
Grid display (=540)
Error codes (=613)
Exposure
Exposure compensation with
M+ISO Auto (=118)
Exposure compensation (=160)
AE lock (=161)
AEB (=211)
Exposure simulation (=221)
Safety shift (=558)
Flash
Built-in fl ash (=164)
Flash exposure compensation
(=166)
FE lock (=167)
Flash function settings (=168)
External fl ash (=179)
Optical wireless fl ash photography
(=180)
Page 23

Index to Features
Movie Recording
Autoexposure recording (=277)
Manual exposure recording
(
=
279)
HDR movie (=284)
Creative fi lters mode (
=
285)
Movie recording size (
=
288)
Wind fi lter (=295)
Sound recording (=295)
Microphone (=296)
Attenuator (=296)
Time-lapse movie (=300)
Video snapshot (=312)
Movie Servo AF (=317)
Movie Servo AF track sensitivity
(
=
319)
Movie Servo AF speed (=320)
ISO speed (movie) (=322)
Remote control shooting (=322)
Auto slow shutter (=324)
HDMI output (=325)
4K movie (=342)
Headphone (=523)
HDMI output resolution (=543)
Playback
Image review time (=204)
Single-image display (=332)
Touch playback (
=
335)
Magnifi ed view (=336)
Index display (
=
334)
Movie playback (
=
337)
Editing a movie’s fi rst and last
scenes (=340)
Frame Grab (4K) (=342)
Viewing images on a television
(
=
344)
Protect (=346)
Image rotation (
=
349)
Erasing (=350)
Rating (=380)
Slide show (=383)
Setting image search conditions
(
=
385)
Image browsing (Jump display)
(
=
387)
Playback information display
(
=
389)
Highlight alert (=391)
AF point display (=392)
Grid display (
=
393)
Shooting information display
(
=
539)
HDR output (=544)
Page 24

Index to Features
Image Editing
Creative fi lters (=361)
RAW image processing (=364)
Red-eye correction (=373)
Video snapshot album (
=
374)
Cropping JPEGs (=377)
Resizing JPEGs (=379)
Print Order
Print order (DPOF) (=354)
Photobook Set-up (=358)
Customization
Custom shooting mode (=546)
Custom Functions (C.Fn) (=552)
Custom Controls (=571)
My Menu (=583)
Sensor Cleaning and Dust Reduction
Appending Dust Delete Data
(=241)
Sensor cleaning (=528)
Manual sensor cleaning (=530)
Software
Downloading and Installing
(=590)
Software Instruction Manuals
(=591)
Wireless Features
Connect to smartphones (=399)
Auto send images to smartphones
(=412)
Remote control (EOS Utility)
(=426)
Auto send images to computers
(=431)
Print from Wi-Fi printers (=434)
Upload to Web services (=444)
Connect to a wireless remote
control (
=
464)
Geotagging Images (=473)
Clear wireless settings (=480)
Page 25

Safety Instructions
Be sure to read these instructions in order to operate the product safely.
Follow these instructions to prevent injury or harm to the operator of the
product or others.
WARNING
:
Denotes the risk of serious injury or death.
oKeep the product out of the reach of young children.
A strap wrapped around a person’s neck may result in strangulation.
The parts or provided items of cameras or accessories are dangerous if
swallowed. If swallowed, seek immediate medical assistance.
The battery is dangerous if swallowed. If swallowed, seek immediate medical
assistance.
oUse only power sources specifi ed in this instruction manual for use with the product.
oDo not disassemble or modify the product.
oDo not expose the product to strong shocks or vibration.
oDo not touch any exposed internal parts.
oStop using the product in any case of unusual circumstances such as the presence
of smoke or a strange smell.
oDo not use organic solvents such as alcohol, benzine or paint thinner to clean the
product.
oDo not get the product wet. Do not insert foreign objects or liquids into the product.
oDo not use the product where fl ammable gases may be present.
This may cause electric shock, explosion or fi re.
oDo not leave a lens or a camera/camcorder with a lens attached, exposed without
the lens cap attached.
The lens may concentrate the light and cause fi re.
oFor products featuring a viewfi nder, do not look through the viewfi nder at strong light
sources such as the sun on a bright day or lasers and other strong artifi cial light
sources.
This may harm your vision.
oDo not touch the product connected to a power outlet during lightning storms.
This may cause electric shock.
oObserve the following instructions when using commercially available batteries or
provided battery packs.
Use batteries/battery packs only with their specifi ed product.
Do not heat batteries/battery packs or expose them to fi re.
Do not charge batteries/battery packs using non-authorized battery chargers.
Do not expose the terminals to dirt or let them come into contact with metallic pins
or other metal objects.
Do not use leaking batteries/battery packs.
When disposing of batteries/battery packs, insulate the terminals with tape or other
means.
This may cause electric shock, explosion or fi re.
Page 26

Safety Instructions
If a battery/battery pack leaks and the material contacts your skin or clothing,
fl ush the exposed area thoroughly with running water. In case of eye contact,
fl ush thoroughly with copious amounts of clean running water and seek
immediate medical assistance.
oObserve the following instructions when using a battery charger.
Periodically remove any dust buildup from the power plug and power outlet using a
dry cloth.
Do not plug in or unplug the product with wet hands.
Do not use the product if the power plug is not fully inserted into the power outlet.
Do not expose the power plug and terminals to dirt or let them come into contact
with metallic pins or other metal objects.
oDo not place heavy objects on the power cord. Do not damage, break or modify the
power cord.
oDo not wrap the product in cloth or other materials when in use or shortly after use
when the product is still warm in temperature.
oDo not unplug the product by pulling the power cord.
oDo not leave the product connected to a power source for long periods of time.
oDo not charge batteries/battery packs at temperatures outside the range of 5 - 40 °C
(41 - 104 °F).
This may cause electric shock, explosion or fi re.
oDo not allow the product to maintain contact with the same area of skin for extended
periods of time during use.
This may result in low-temperature contact burns, including skin redness and
blistering, even if the product does not feel hot. The use of a tripod or similar
equipment is recommended when using the product in hot places and for people
with circulation problems or less sensitive skin.
oFollow any indications to turn off the product in places where its use is forbidden.
Not doing so may cause other equipment to malfunction due to the eff ect of
electromagnetic waves and even result in accidents.
Page 27

Safety Instructions
CAUTION:
Denotes the risk of injury.
oDo not fi re the fl ash near the eyes.
It may hurt the eyes.
oDo not look at the screen or through the viewfi nder for prolonged periods of time.
This may induce symptoms similar to motion sickness. In such a case, stop using
the product immediately and rest for a while before resuming use.
oFlash emits high temperatures when fi red. Keep fi ngers, any other part of your body,
and objects away from the fl ash unit while taking pictures.
This may cause burns or malfunction of the fl ash.
oDo not leave the product in places exposed to extremely high or low temperatures.
The product may become extremely hot/cold and cause burns or injury when
touched.
oStrap is intended for use on the body only. Hanging the strap with any product
attached on a hook or other object may damage the product. Also, do not shake the
product or expose the product to strong impacts.
oDo not apply strong pressure on the lens or allow an object to hit it.
This may cause injury or damage to the product.
oOnly mount the product on a tripod that is suffi ciently sturdy.
oDo not carry the product when it is mounted on a tripod.
This may cause injury or may result in an accident.
oDo not touch any parts inside the product.
This may cause injury.
oIf any abnormal skin reaction or irritation occurs during or following the use of this
product, refrain from further use and get medical advice/attention.
Page 28

Handling Precautions
Camera Care
This camera is a precision instrument. Do not drop it or subject it to
physical shock.
The camera is not waterproof and cannot be used underwater.
To maximize the camera’s dust- and drip- resistance, keep the terminal
cover, battery compartment cover, card slot cover, and all other covers
fi rmly closed.
This camera is designed to be dust- and drip- resistant, in order to help
prevent sand, dust, dirt, or water that falls on it unexpectedly from getting
inside, but it is impossible to prevent dirt, dust, water, or salt from getting
inside at all. As far as possible, do not allow dirt, dust, water, or salt to get
on the camera.
If water gets on the camera, wipe it off with a dry and clean cloth. If dirt,
dust, or salt gets on the camera, wipe it off with a clean, well-wrung wet
cloth.
Using the camera in a location with large amounts of dirt or dust may
cause a malfunction.
Cleaning the camera after use is recommended. Allowing dirt, dust, water,
or salt to remain on the camera may cause a malfunction.
If you accidentally drop the camera into water or are concerned that
moisture (water), dirt, dust, or salt may have gotten inside it, promptly
consult the nearest Canon Service Center.
Never leave the camera near anything having a strong magnetic fi eld
such as a magnet or electric motor. Also, avoid using or leaving the
camera near anything emitting strong radio waves, such as a large
antenna. Strong magnetic fi elds can cause camera malfunction or destroy
image data.
Do not leave the camera in excessive heat, such as in a car in direct
sunlight. High temperatures can cause the camera to malfunction.
The camera contains precision electronic circuitry. Never attempt to
disassemble the camera yourself.
Page 29

Handling Precautions
Do not block the mirror operation with your fi nger, etc. Doing so may
cause a malfunction.
Use only a commercially available blower to blow away dust when it
adheres to the lens, viewfi nder, mirror, focusing screen etc. Do not use
cleaners that contain organic solvents to clean the camera body or lens.
For stubborn dirt, take the camera to the nearest Canon Service Center.
Do not touch the camera’s electrical contacts with your fi ngers. This is
to prevent the contacts from corroding. Corroded contacts can cause
camera malfunction.
If the camera is suddenly brought in from the cold into a warm room,
condensation may form on the camera and internal parts. To prevent
condensation, fi rst put the camera in a sealed plastic bag and let it adjust
to the warmer temperature before taking it out of the bag.
If condensation forms on the camera, to avoid damage, do not use the
camera or remove the lens, card, or battery.
Turn the camera off and wait until the moisture has fully evaporated
before resuming use. Even after the camera is completely dry, if it is still
internally cold, do not remove the lens, card, or battery until the camera
has adjusted to the ambient temperature.
If the camera will not be used for an extended period, remove the battery
and store the camera in a cool, dry, well-ventilated location. Even while
the camera is in storage, press the shutter button a few times once in a
while to check that the camera is still working.
Avoid storing the camera where there are chemicals that result in rust
and corrosion such as in a chemical lab.
If the camera has not been used for an extended period, test all its
functions before using it. If you have not used the camera for some time
or if there is an important shoot such as a foreign trip coming up, have
the camera checked by your nearest Canon Service Center or check the
camera yourself and make sure it is working properly.
If you repeat continuous shooting or perform Live View shooting or movie
shooting for a prolonged period, the camera may become hot. This is not
a malfunction.
If there is a bright light source inside or outside the image area, ghosting
may occur.
Page 30
Handling Precautions
Screen and LCD Panel
Although the screen is manufactured with very high precision technology
with over 99.99% eff ective pixels, 0.01% or fewer of the pixels may be
dead, and there may also be spots of black, red, or other colors. This is
not a malfunction. They do not aff ect the images recorded.
If the screen is left on for a prolonged period, screen burn-in may occur
where you see remnants of what was displayed. However, this is only
temporary and will disappear when the camera is left unused for a few
days.
The screen display may seem slightly slow in low temperatures or
may look black in high temperatures. It will return to normal at room
temperature.
Cards
To protect the card and its recorded data, note the following:
Do not drop, bend, or wet the card. Do not subject it to excessive force,
physical shock, or vibration.
Do not touch the card’s electronic contacts with your fi ngers or anything
metallic.
Do not affi x any stickers, etc. on the card.
Do not store or use the card near anything that has a strong magnetic
fi eld, such as a television, speakers, or magnets. Also avoid places prone
to having static electricity.
Do not leave the card in direct sunlight or near a heat source.
Store the card in a case.
Do not store the card in hot, dusty, or humid locations.
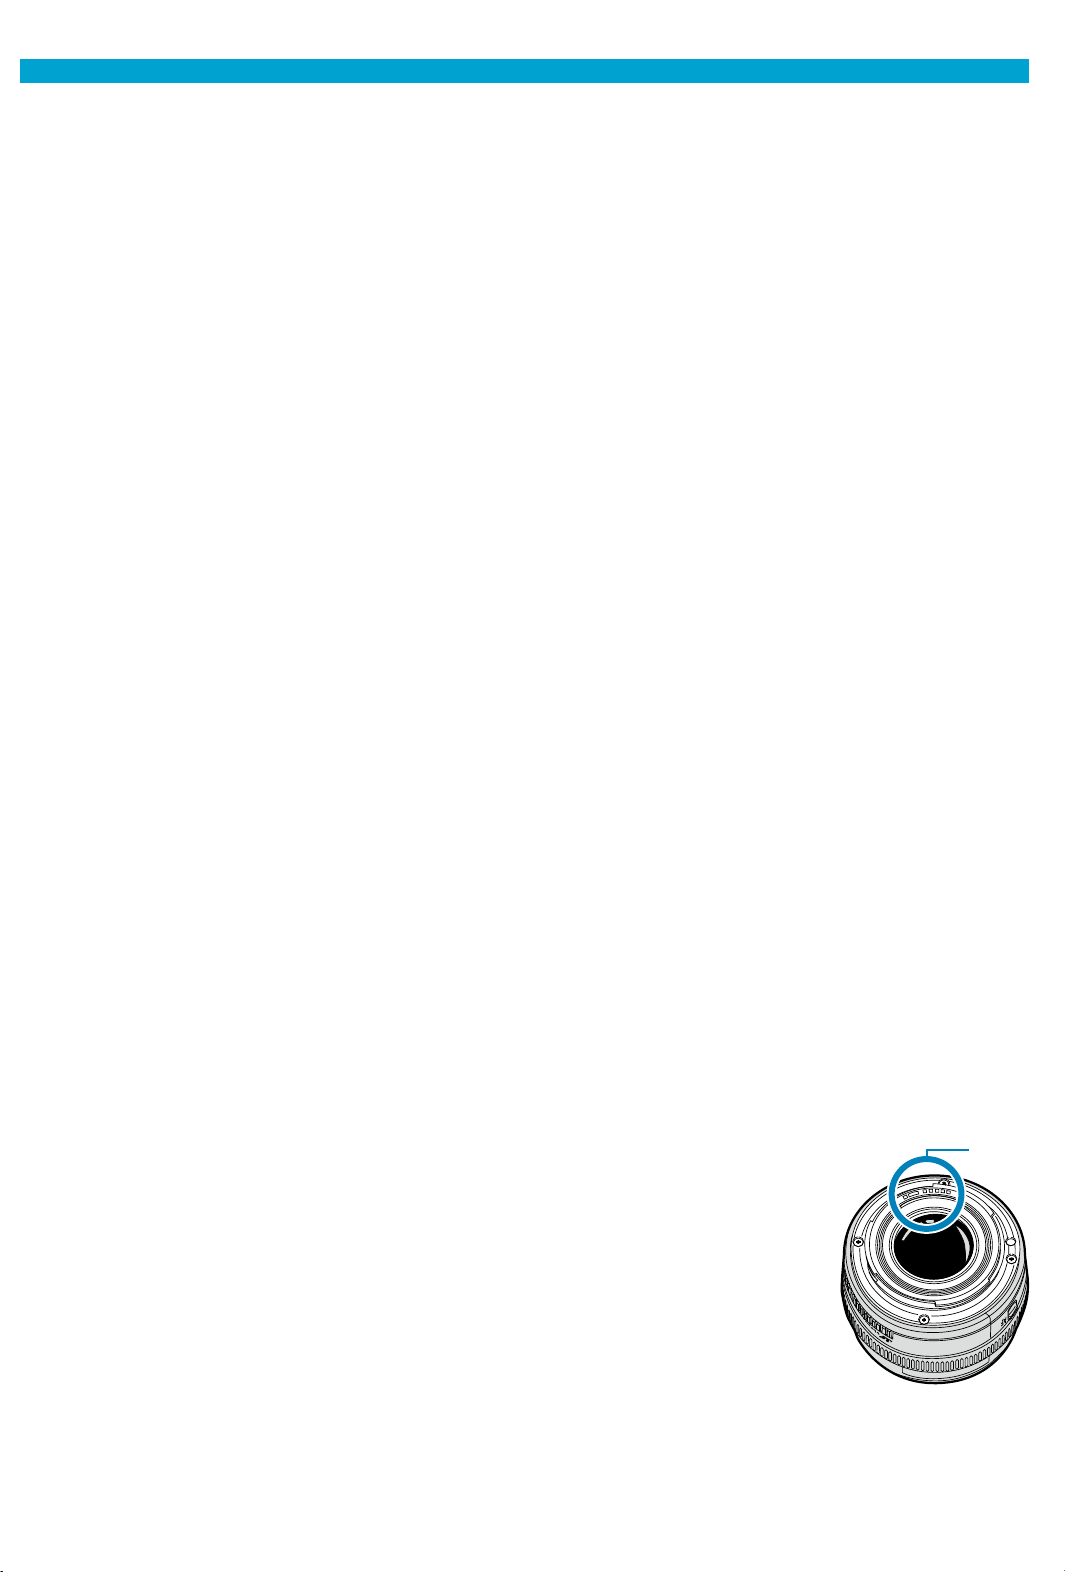
Lens
After detaching the lens from the camera, put down
the lens with the rear end up and attach the rear lens
cap to avoid scratching the lens surface and electrical
contacts (1).
(1)
Page 31
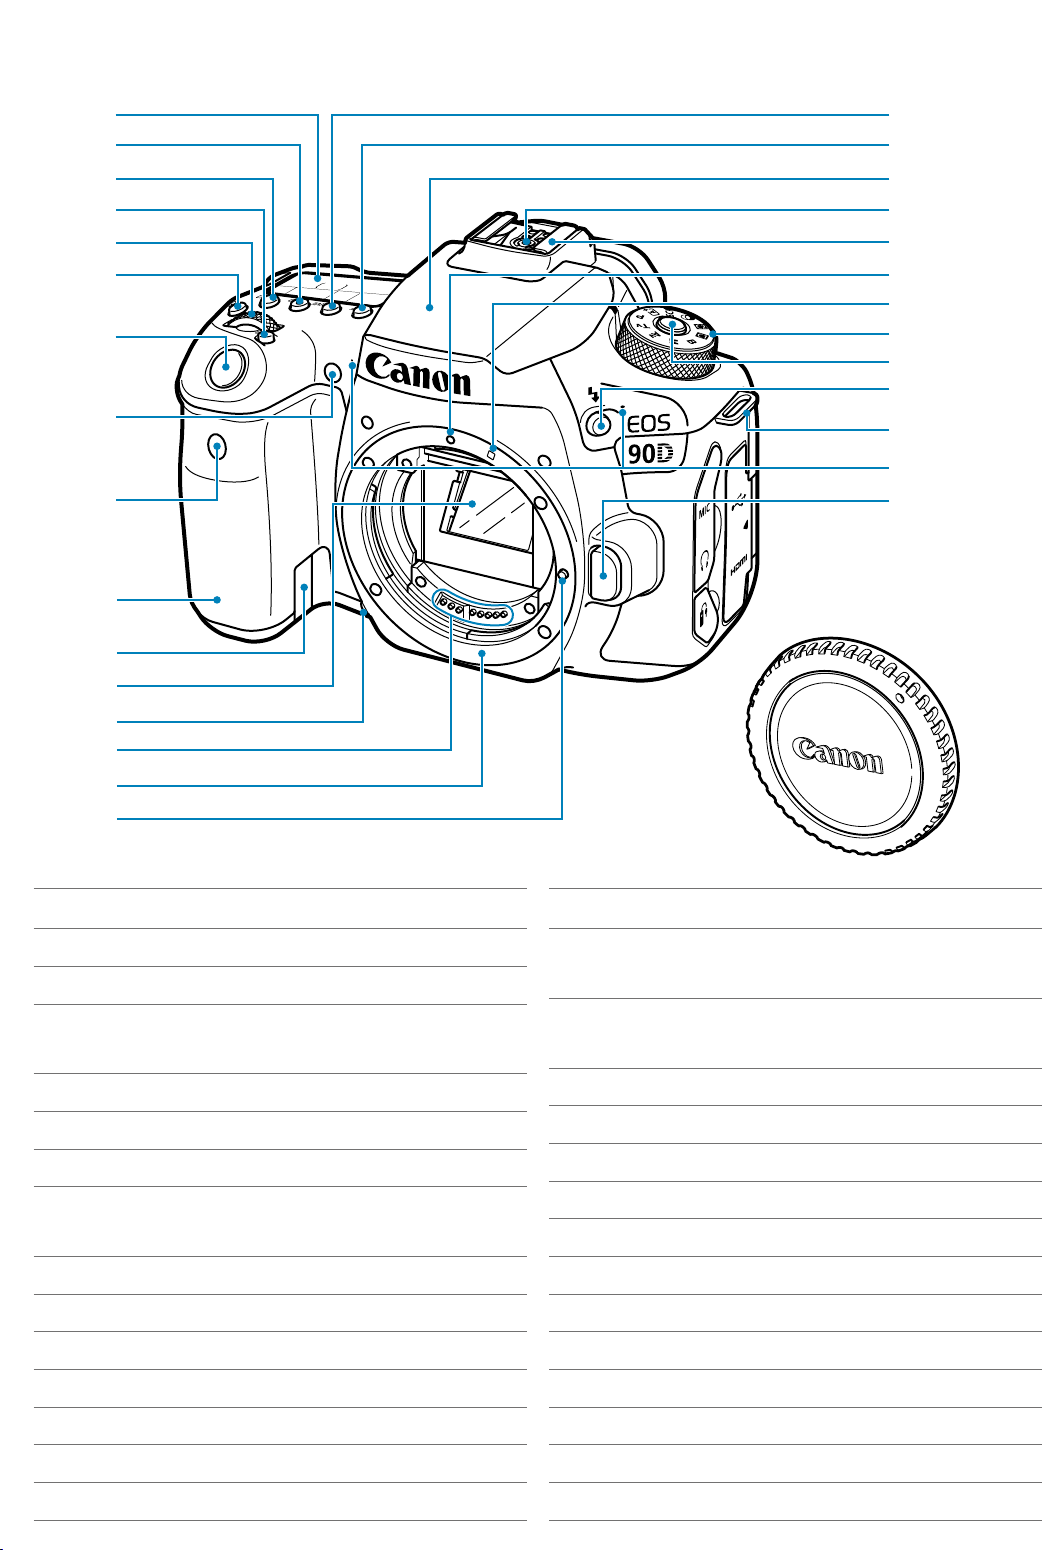
Part Names
(18)
(10)
(11)
(12)
(14)
(13)
(15)
(16)
(17)
(19)
(30)
(20)
(21)
(22)
(23)
(25)
(24)
(26)
(27)
(28)
(29)
(5)
(6)
(1)
(2)
(3)
(4)
(7)
(8)
(9)
(1) LCD panel
(2) <
i
> ISO speed setting button
(3) <q>
Metering mode selection button
(4) <
G
> AF area/AF method
selection button
(5) <
6
> Main dial
(6) <U>
LCD panel illumination button
(7) Shutter button
(8) Red-eye reduction/Self-timer/
Remote control lamp
(9) Remote control sensor
(10) Grip (Battery compartment)
(11) DC coupler cord hole
(12) Mirror
(13) Depth-of-fi eld preview button
(14) Contacts
(15) Lens mount
(16) Lens lock pin
(17) <
R
> Drive mode selection
button
(18) <AF> AF operation/AF method
selection button
(19)
Built-in fl ash/AF-assist beam emitter
(20) Flash sync contacts
(21) Hot shoe
(22) EF lens mount index
(23) EF-S lens mount index
(24) Mode dial
(25) Mode dial lock-release button
(26) <D> Flash button
(27) Strap mount
(28) Built-in microphones
(29) Lens release button
(30) Body cap
Page 32
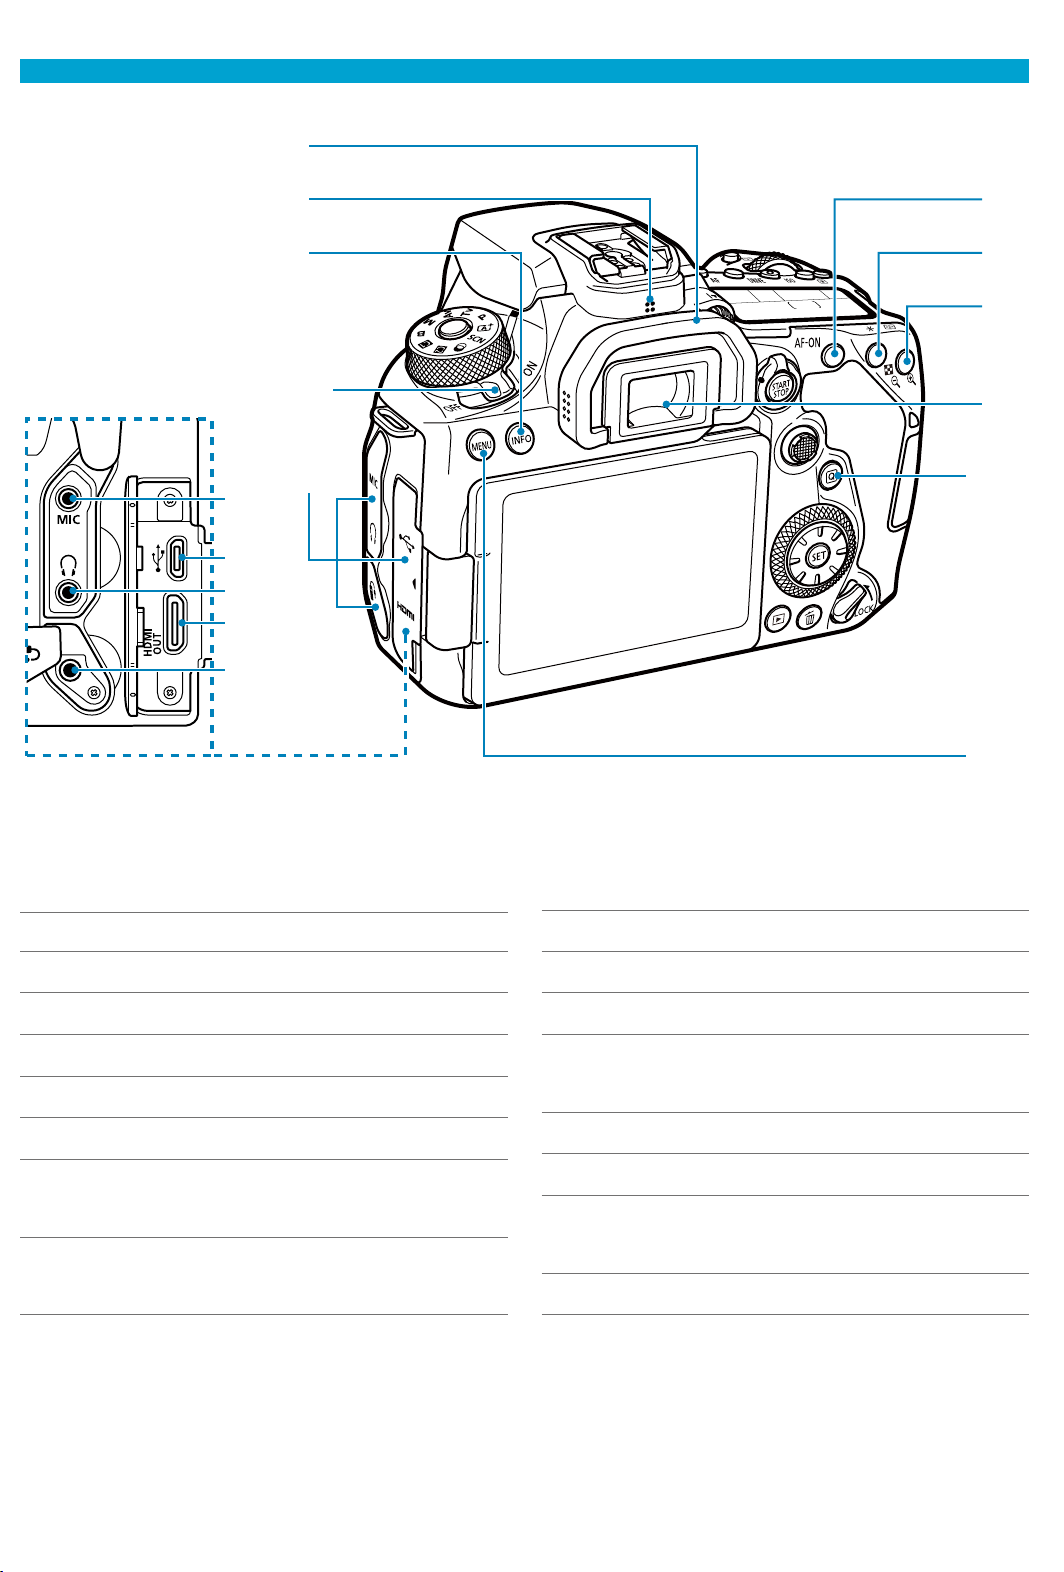
Part Names
(3)
(5)
(4)
(11)
(6)
(7)
(10)
(8)
(9)
(12)
(14)
(16)
(13)
(15)
(2)
(1)
(1) Eyecup
(2) Speaker
(3) <
B
> Info button
(4) Power switch
(5) Terminal cover
(6) <
p
> AF start button
(7) <A> AE lock/FE lock button
<y> Index/Reduce button
(8) <
S
> AF point selection/
<v> Magnify button
(9) Viewfi nder eyepiece
(10) <Q> Quick Control button
(11) <
M
> Menu button
(12) <
Y
> External microphone IN
terminal
(13) <
g
> Digital terminal
(14) <n> Headphone terminal
(15) <
D
> HDMI mini OUT
terminal
(16) <F> Remote control terminal
Page 33
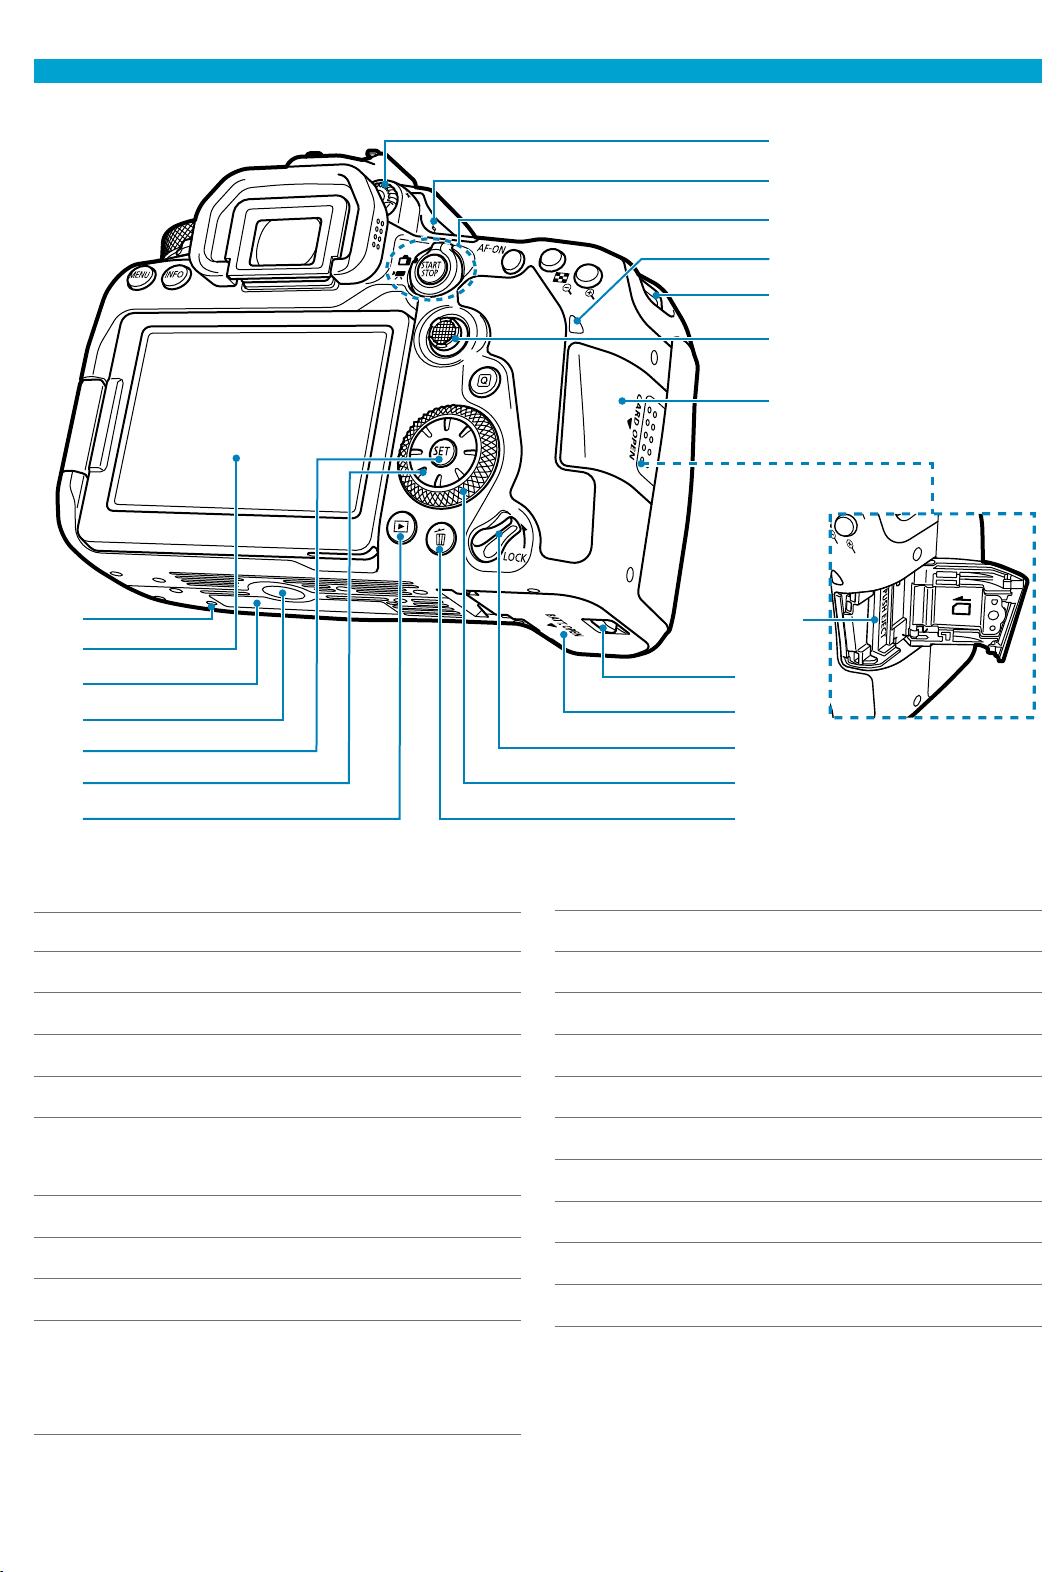
Part Names
(10)
(8)
(12)
(14)
(16)
(17)
(18)
(20)
(19)
(1)
(3)
(2)
(4)
(5)
(6)
(7)
(11)
(13)
(9)
(15)
(1) Accessory positioning hole
(2) Screen
(3) Serial number
(4) Tripod socket
(5) <0> Setting button
(6) <9> <W> <X> <Y> <Z>
Multi-controller 2
(7) <
x
> Playback button
(8) Dioptric adjustment knob
(9) <
V
> Focal plane mark
(10) <
A
> Live View shooting/
<
k
> Movie shooting switch
<
0
> Start/Stop button
(11) Access lamp
(12) Strap mount
(13) <j> Multi-controller 1
(14) Card slot cover
(15) Card slot
(16) Battery compartment cover lock
(17) Battery compartment cover
(18) Multi-function lock switch
(19) <5> Quick control dial
(20) <L> Erase button
Page 34
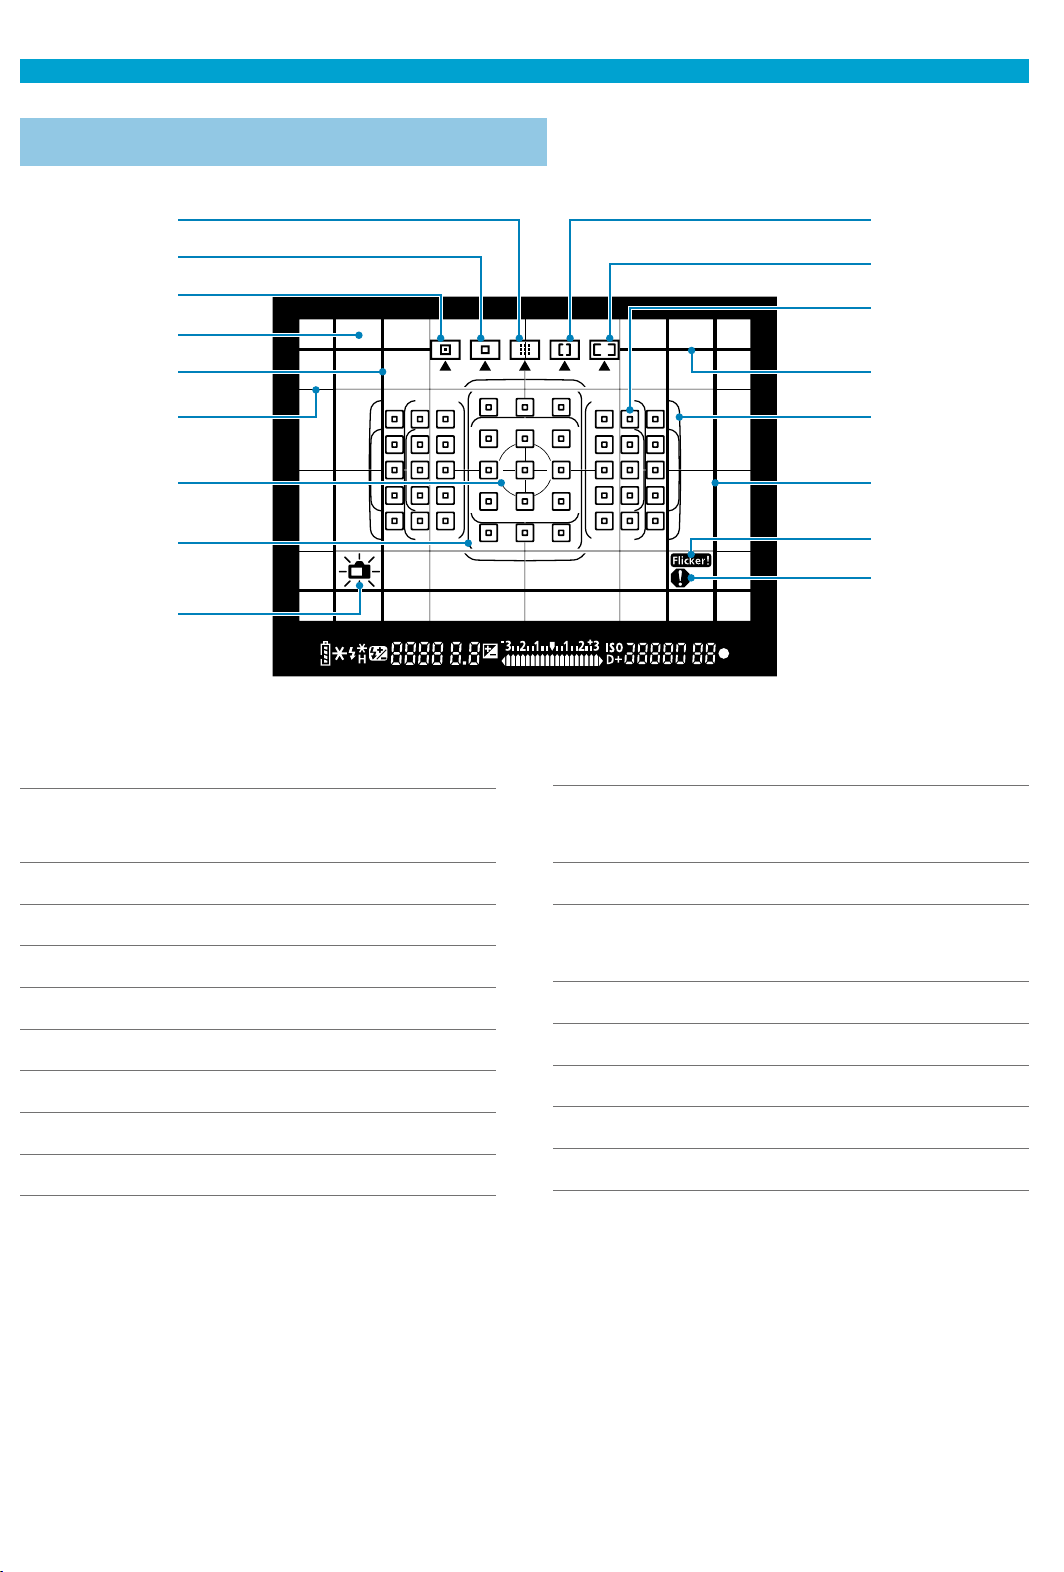
Part Names
Viewfi nder Information Display
(1) Zone AF (Manual selection of
zone)
(2) 1-point AF (Manual selection)
(3) Spot AF (Manual selection)
(4) Focusing screen
(5) Aspect ratio line (1:1)
(6) Grid
(7) Spot metering circle
(8) Large Zone AF frame
(9) Electronic level
(10) Large Zone AF (Manual selection
of zone)
(11) Automatic selection AF
(12) <S> 1-point AF point
<O> Spot AF point
(13) Aspect ratio line (16:9)
(14) Area AF frame
(15) Aspect ratio line (4:3)
(16) <
G
> Flicker detection
(17) <z> Warning icon
* The display will show only the settings currently applied.
(6)
(7)
(3)
(2)
(1)
(12)
(11)
(10)
(16)
(14)
(13)
(15)
(17)
(9)
(8)
(5)
(4)
Page 35
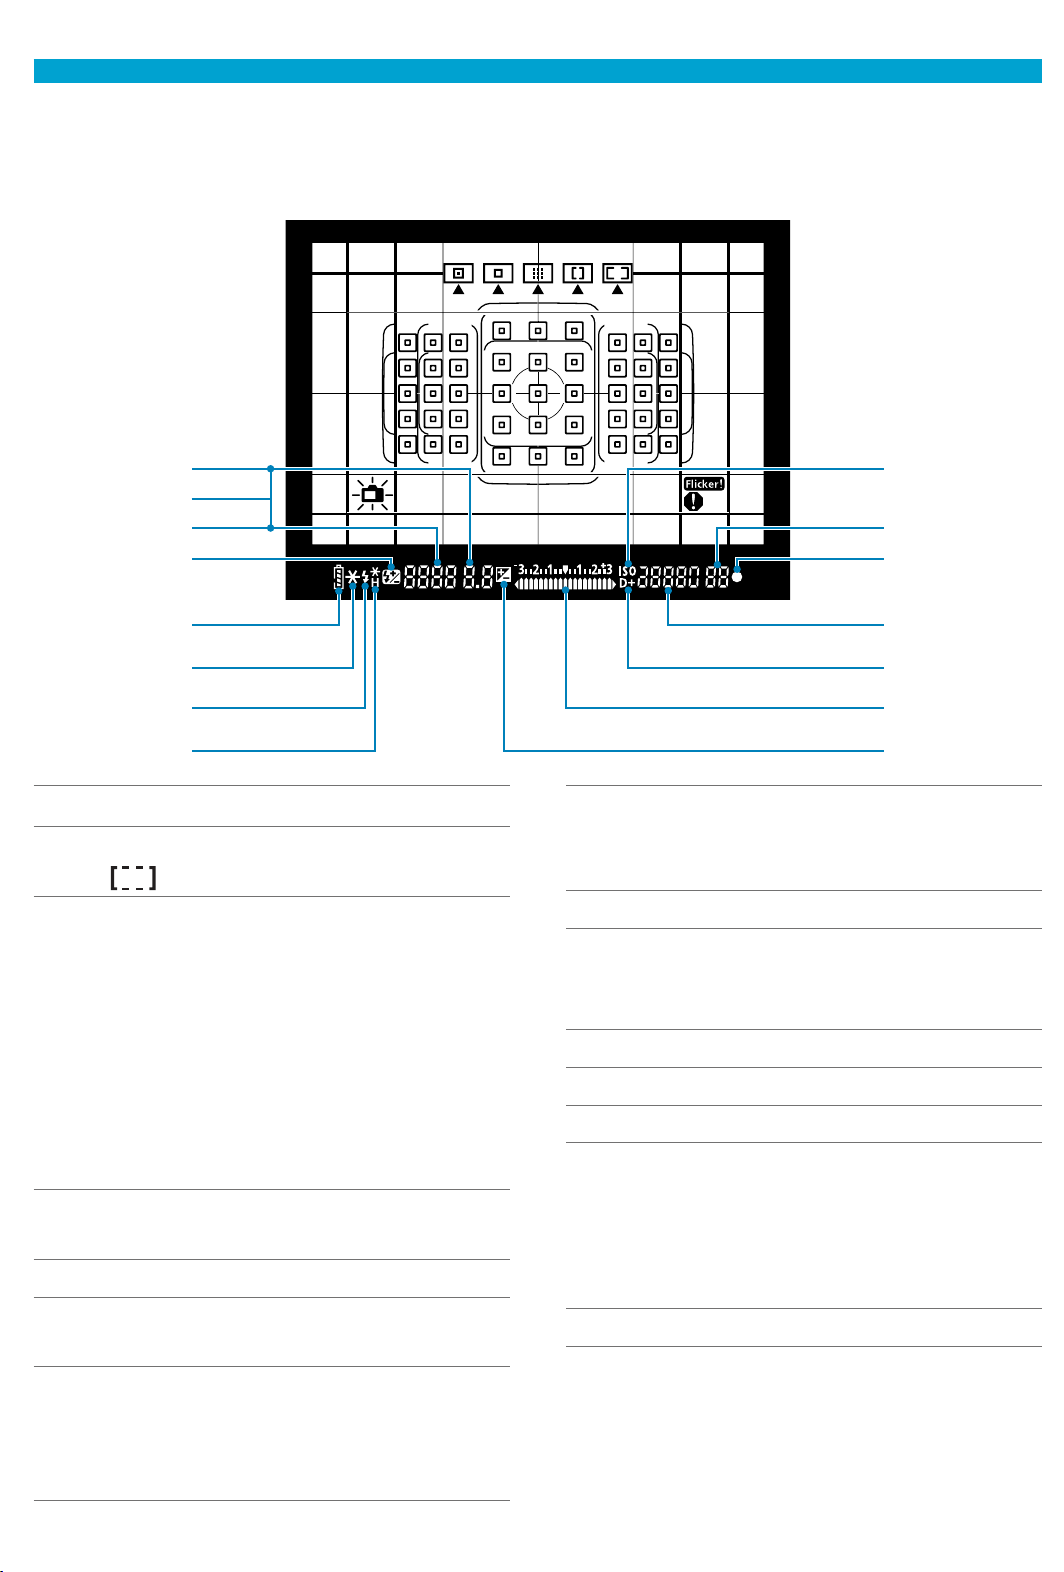
Part Names
(27)
(26)
(28)
(30)
(29)
(31)
(32)
(20)
(19)
(18)
(22)
(21)
(24)
(23)
(25)
(18) Aperture value
(19) AF point selection
(
AF, SEL [ ], SEL AF)
(20) Shutter speed
Bulb (buLb)
FE lock (FEL)
Busy/Charging the fl ash (buSY)
Multi-function lock warning (L)
No card warning (Card)
Card full warning (FuLL)
Card error warning (Card)
Error codes (Err)
(21) <
y
> Flash exposure
compensation
(22) <
z
> Battery level
(23) <A> AE lock
AEB in-progress
(24) <D>
Warning to use fl ash (blinking)
Flash ready (on)
FE lock out of range warning
(blinking)
(25) <
d
> FE lock
FEB in-progress
<
e
> High-speed sync
(26) <
i
> ISO speed
(27) Maximum burst
Number of remaining multiple
exposures
(28) <o> Focus indicator
(29) ISO speed
(30) <
A
> Highlight tone priority
(31) Exposure level indicator
Exposure compensation amount
AEB range
Red-eye reduction lamp on
indicator
(32) <O> Exposure compensation
* The display will show only the settings currently applied.
Page 36
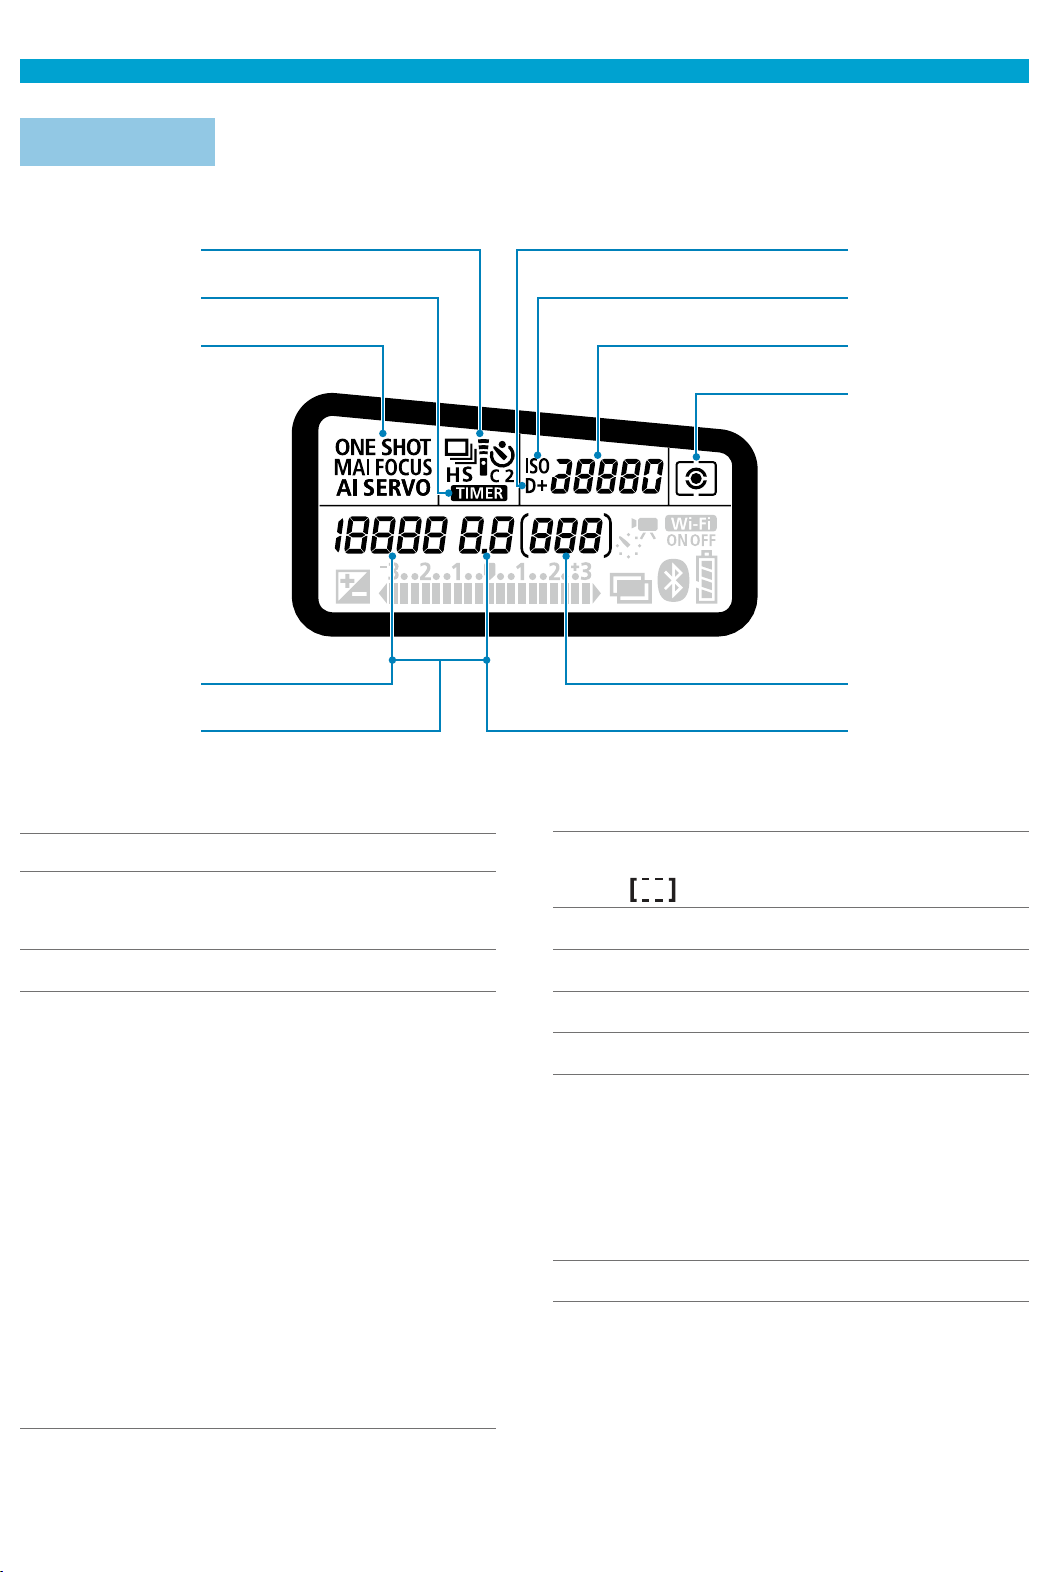
Part Names
* The display will show only the settings currently applied.
(1) Drive mode
(2) <
H
> Bulb timer/Interval
timer
(3) AF operation
(4) Shutter speed
Bulb (buLb)
FE lock (FEL)
Remaining number of shots for
time-lapse movie
Busy/Charging the fl ash (buSY)
Multi-function lock warning (L)
Cleaning image sensor (CLn)
No card warning (Card)
Card full warning (FuLL)
Card error warning (Card)
Error codes (Err)
(5) AF point selection
(
AF, SEL [ ], SEL AF)
(6) <
A
> Highlight tone priority
(7) <
i
> ISO speed
(8) ISO speed
(9) Metering mode
(10) Number of possible shots
Self-timer countdown
Bulb exposure time
Error number
Remaining images to record
(11) Aperture value
LCD Panel
(1)
(3)
(2)
(5)
(4)
(10)
(7)
(6)
(8)
(9)
(11)
Page 37
Part Names
(14)
(13)
(12) (16)
(17)
(18)
(15)
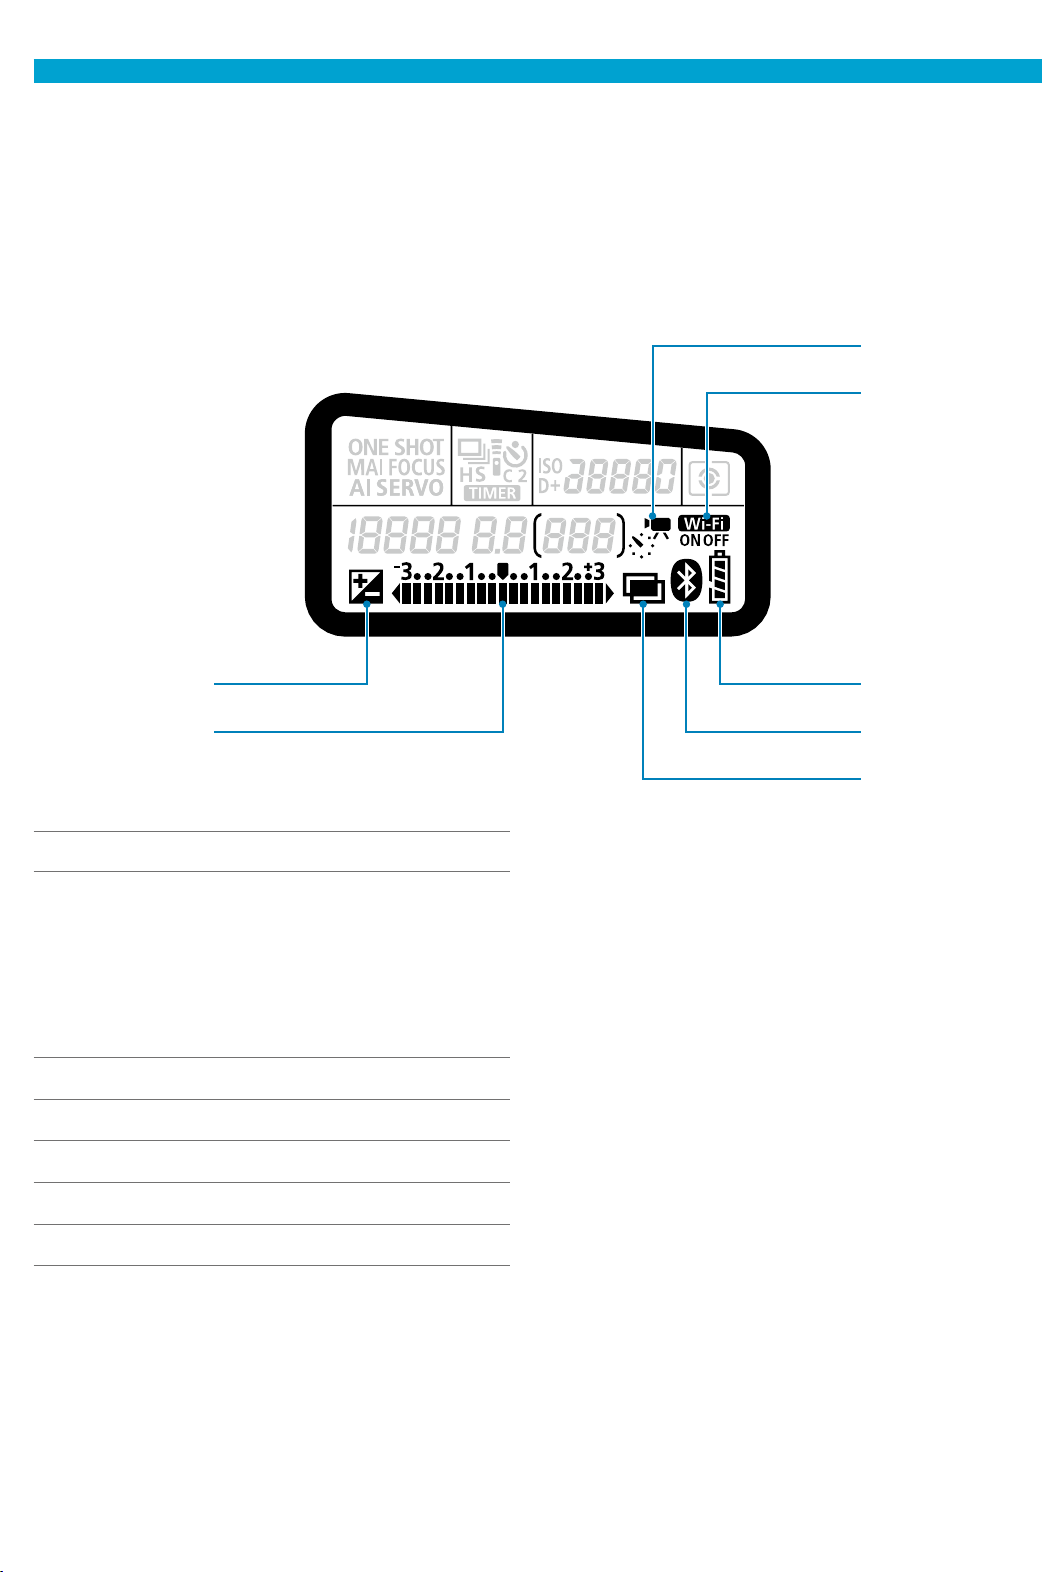
(12) <O> Exposure compensation
(13) Exposure level indicator
Exposure compensation amount
AEB range
Red-eye reduction lamp on
indicator
(14) <
a
> Time-lapse movies
(15) <
l
> Wi-Fi function
(16) Battery level
(17) <s> Bluetooth function
(18) <P> Multiple exposures
Page 38
Part Names
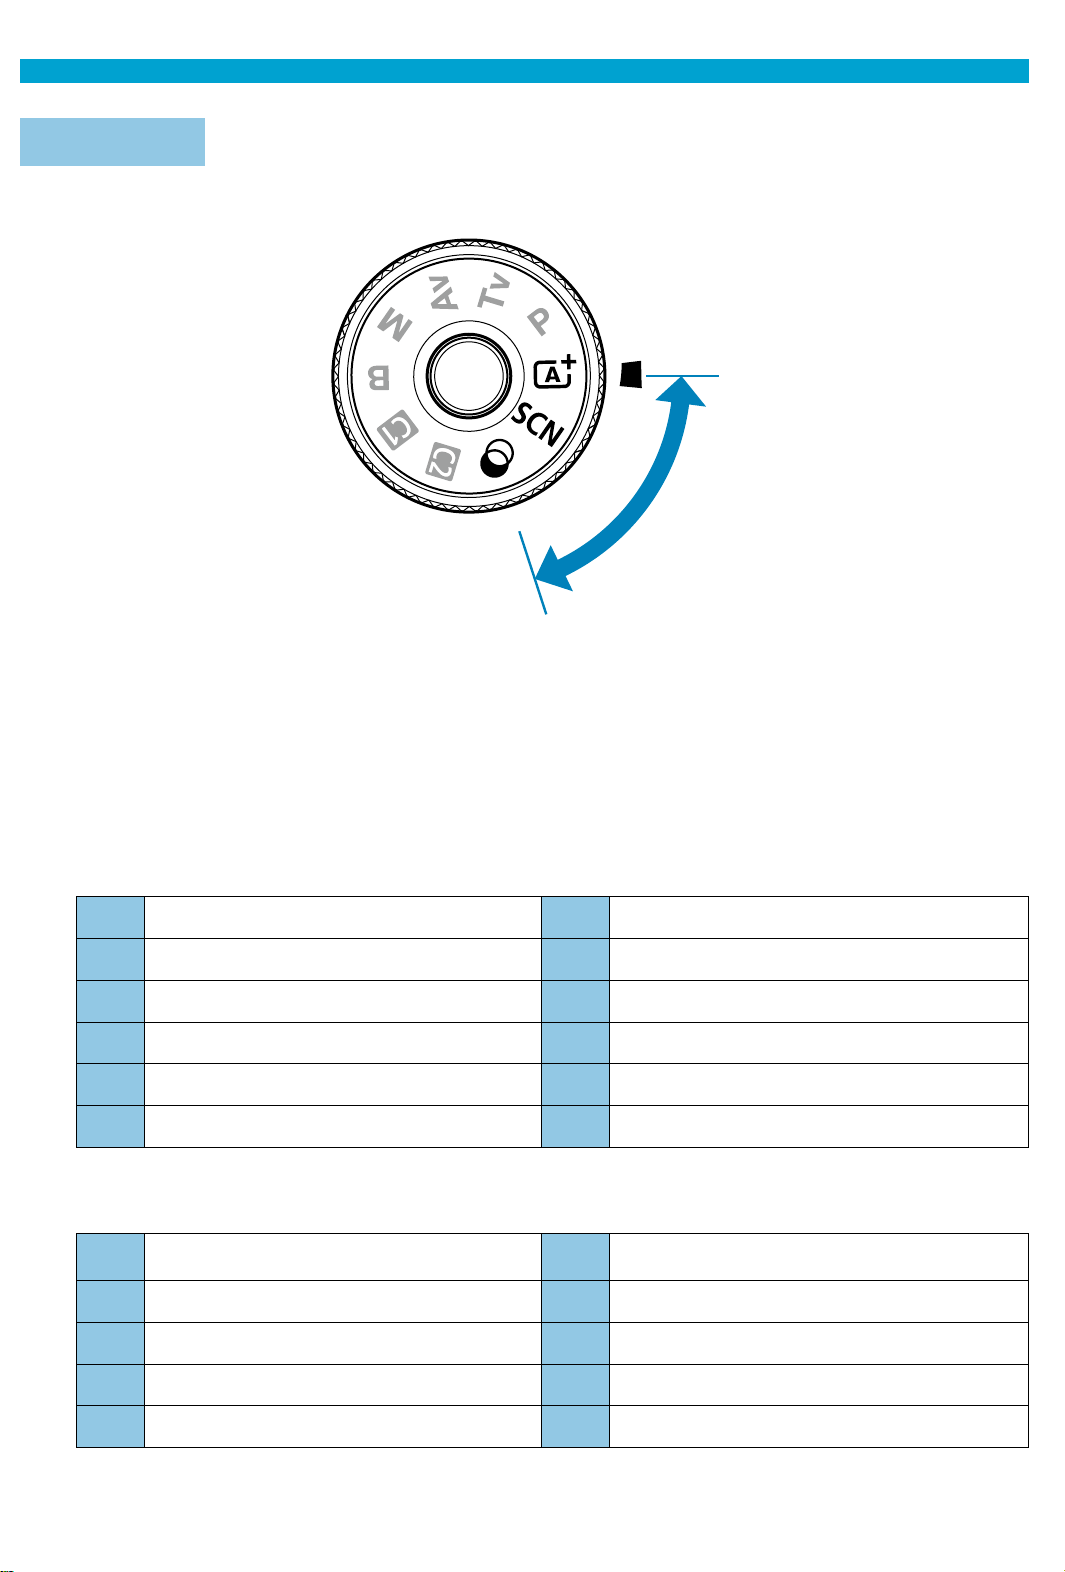
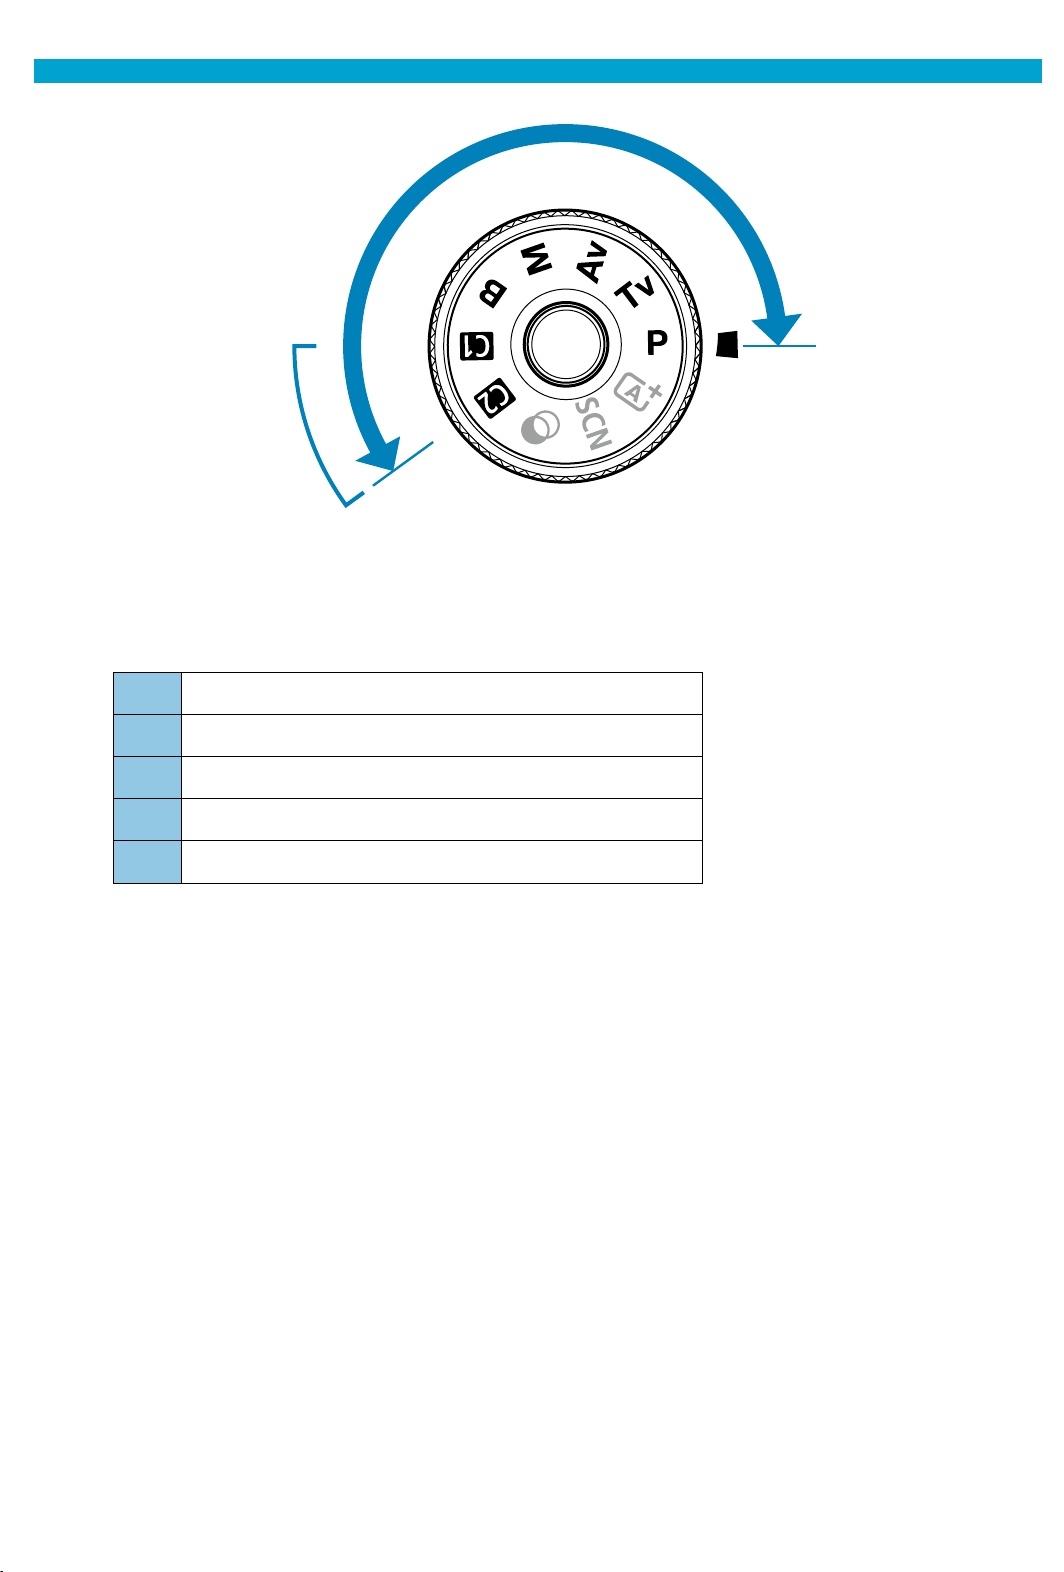
Mode Dial
Turn the Mode dial while holding down the lock-release button in the center.
(1)
(1) Basic Zone
All you do is press the shutter button. The camera sets everything to suit the
subject or scene for shooting.
A
: Scene Intelligent Auto (
=
76)
8
: Special scene (
=
84)
2
Portrait (=86)
4
Close-up (=93)
q
Group Photo (=87)
P
Food (=94)
3
Landscape (=88)
y
Candlelight (=95)
5
Sports (=89)
6
Night Portrait (=96)
C
Kids (=90)
F
Handheld Night Scene (=97)
r
Panning (=91)
G
HDR Backlight Control (=98)
U
: Creative fi lters (
=
103)
I
Grainy B/W (=105)
c
Miniature eff ect (=106)
W
Soft focus (=105)
A
HDR art standard (=106)
X
Fish-eye eff ect (=105)
B
HDR art vivid (=106)
Z
Water painting eff ect (=105)
C
HDR art bold (=106)
H
Toy camera eff ect (=105)
D
HDR art embossed (=106)
Page 39
Part Names
(2)
(3)
(2) Creative Zone
These modes give you more control for shooting various subjects as
desired.
d
Program AE (=110)
s
Shutter-priority AE (=112)
f
Aperture-priority AE (=114)
a
Manual exposure (=117)
F
Bulb (=119)
(3) Custom shooting modes
You can assign <d>, <
s
>, <
f
>, <a>, <F>, AF operation, menu
functions, and more to <w>, or <x> (
=
546).
Page 40
Part Names
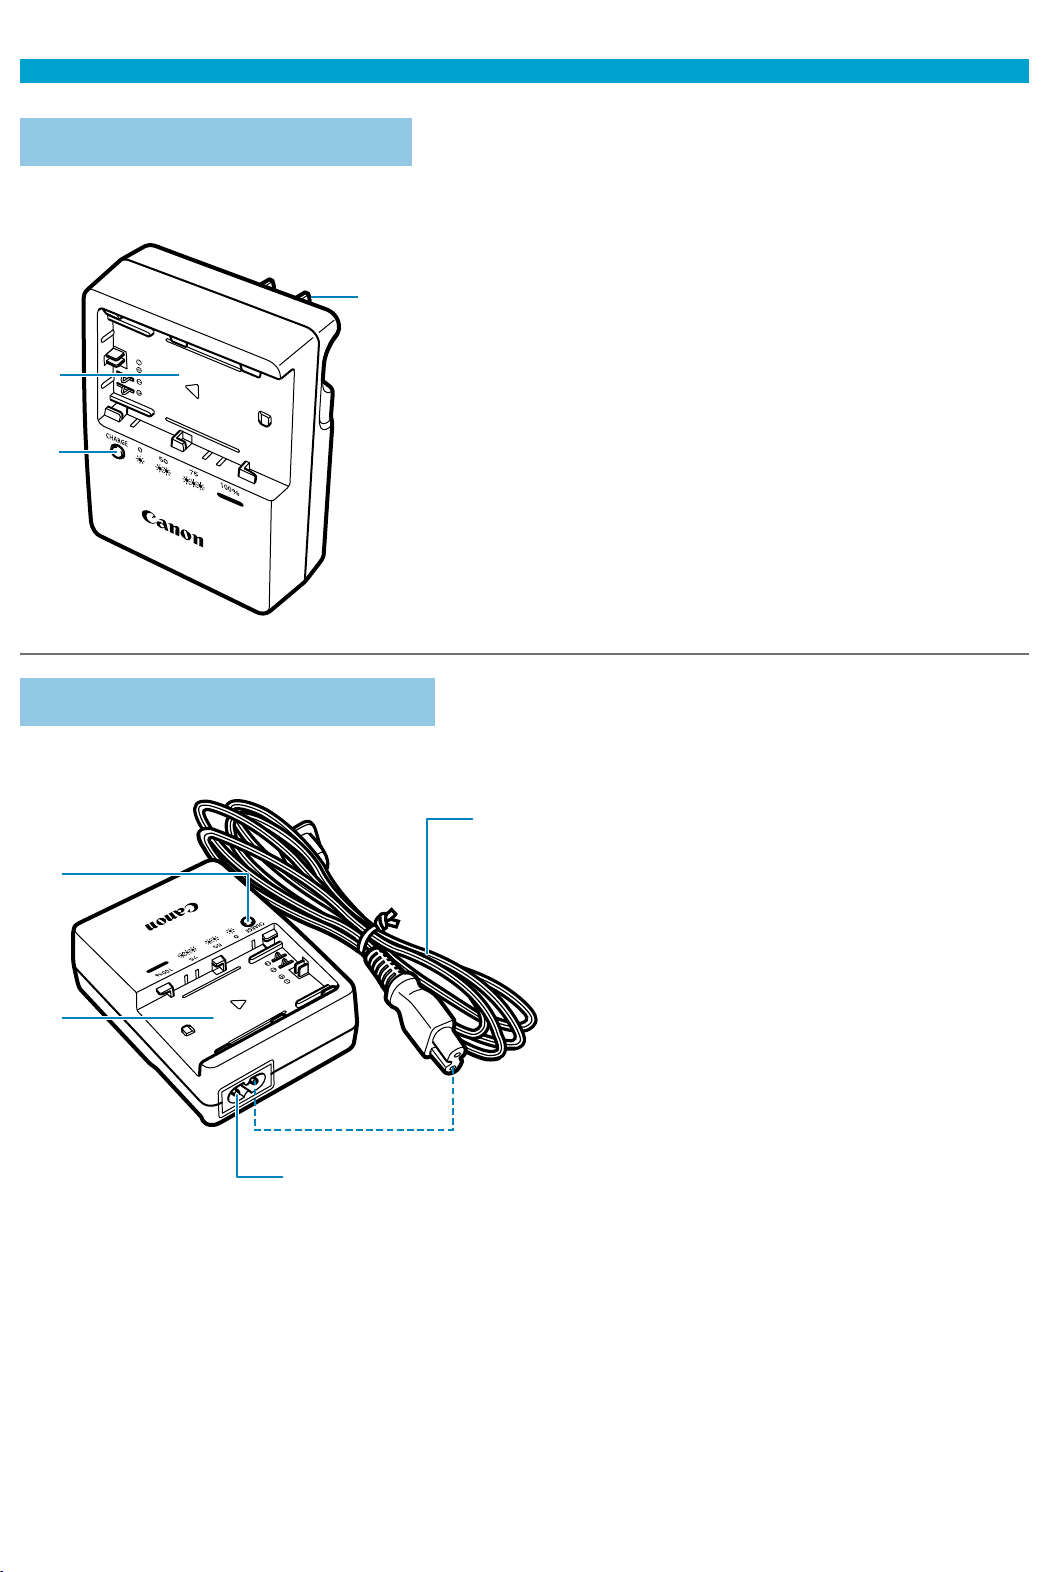
Battery Charger LC-E6
Charger for Battery Pack LP-E6N/LP-E6 (
=
44).
(1)
(2)
(3
)
(1) Battery pack slot
(2) Charge lamp
(3) Power plug
Battery Charger LC-E6E
Charger for Battery Pack LP-E6N/LP-E6 (
=
44).
(3)
(4)
(2)
(1)
(1) Charge lamp
(2) Battery pack slot
(3) Power cord
(4) Power cord socket
Page 41
Part Names
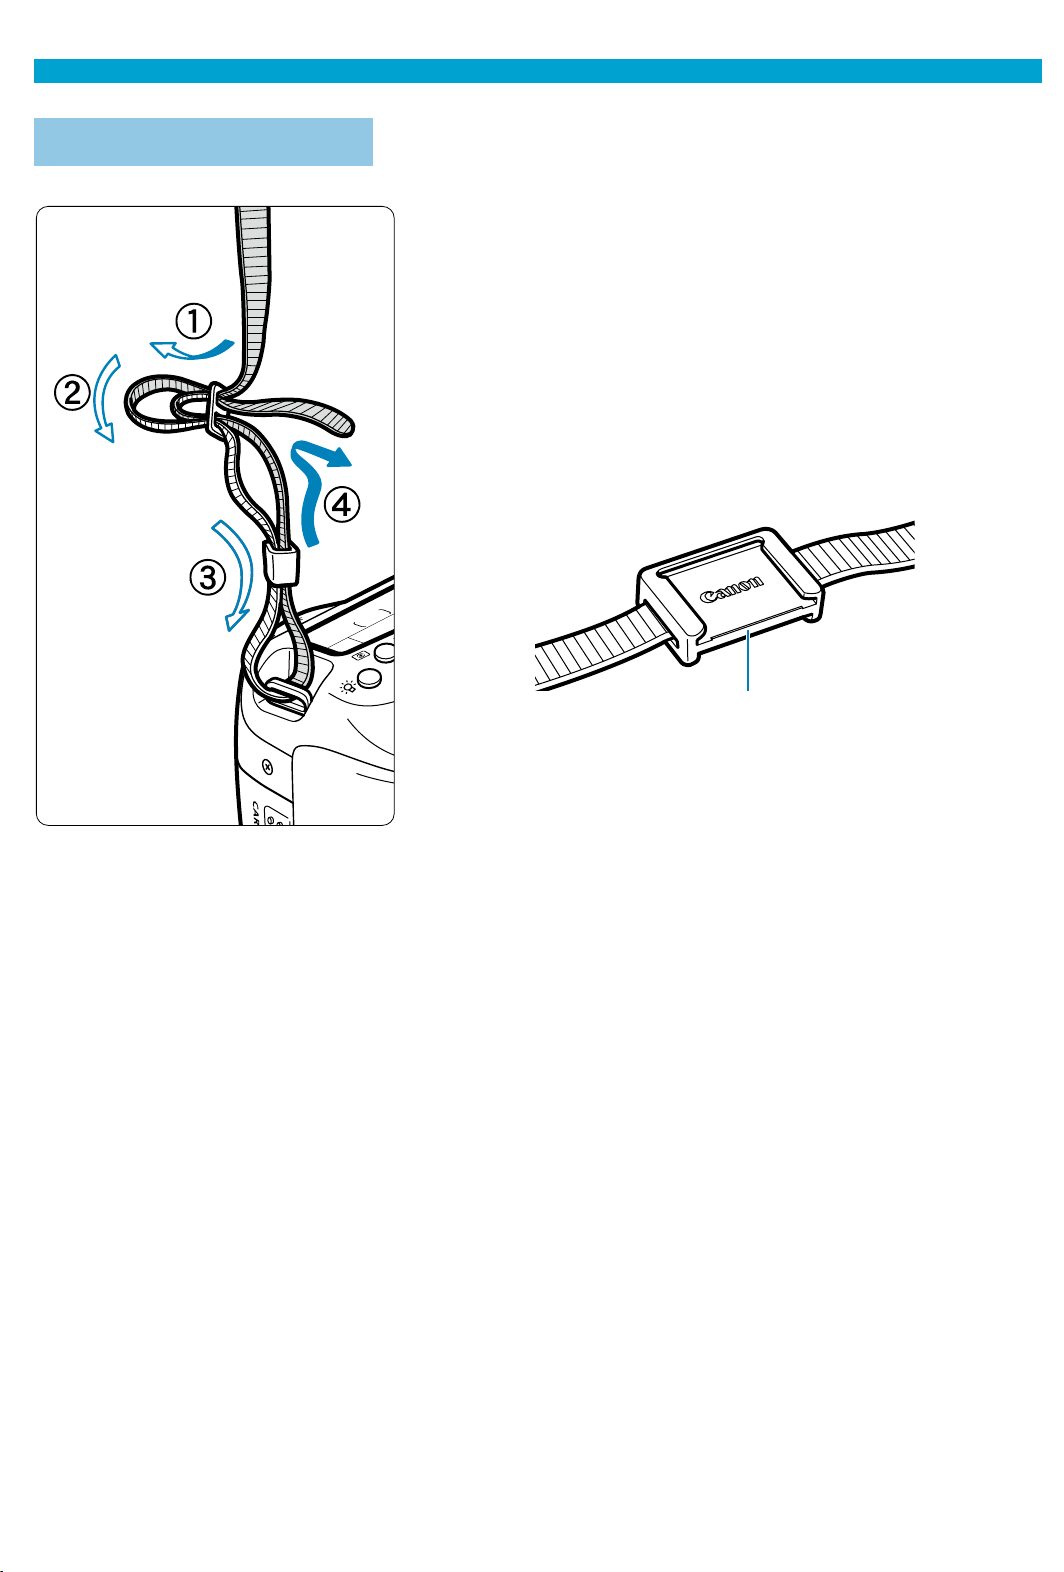
Attaching the Strap
Pass the end of the strap through the
camera’s strap mount eyelet from the bottom.
Then pass it through the strap’s buckle as
shown in the illustration. Pull the strap to take
up any slack and make sure the strap will not
loosen from the buckle.
The eyepiece cover (1) is attached to the
strap (
=
157).
(1)
Page 42

Page 43

Preparation and Basic
Operations
This chapter describes preparatory steps before you start shooting
and the basic camera operations.
Page 44
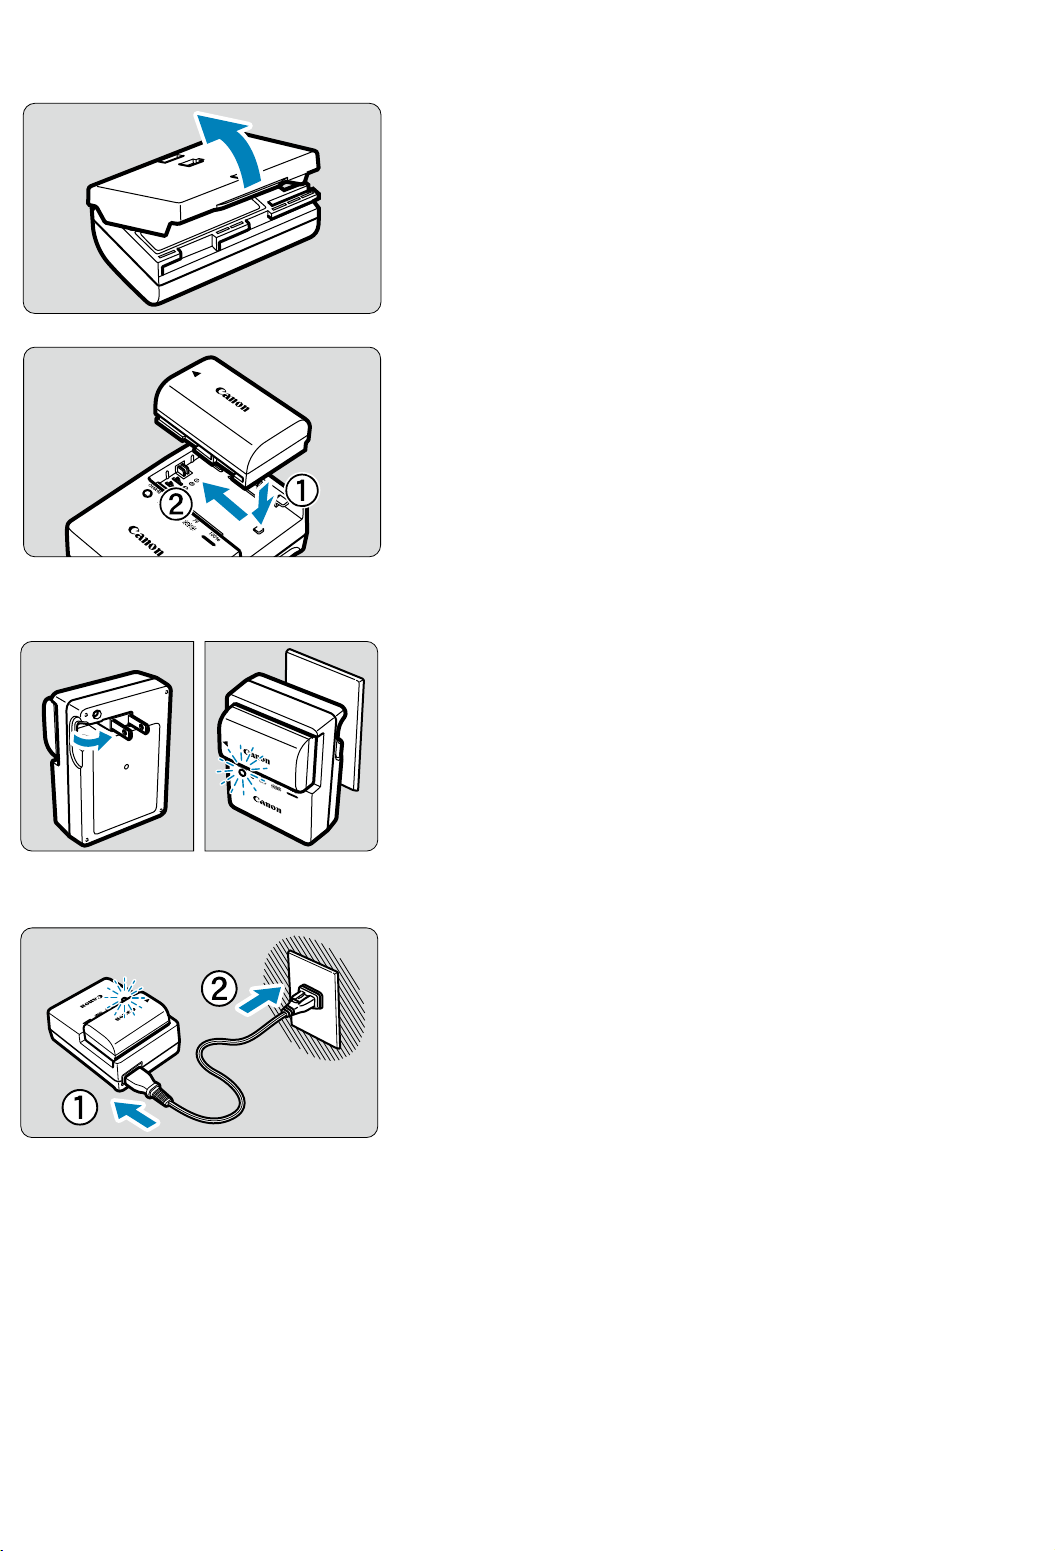
Charging the Battery
1
Detach the protective cover
provided with the battery.
2
Insert the battery in the charger.
Do the opposite to remove the battery.
LC-E6
LC-E6E
3
Recharge the battery.
For LC-E6
As shown by the arrow, fl ip out the
battery charger’s prongs and insert the
prongs into a power outlet.
For LC-E6E
Connect the power cord to the charger
and insert the plug into a power outlet.
Recharging starts automatically and the
charge lamp blinks in orange.
Page 45

Charging the Battery
Charge Level
Charge Lamp
Color Display
0–49%
Orange
Blinks once per second
50–74% Blinks twice per second
75% or higher
Blinks three times per
second
Fully charged Green Turned on
It takes approx. 2 hr. and 30 min. to fully recharge a completely
exhausted battery at room temperature (23°C / 73°F). The time
required to charge the battery will vary greatly depending on the ambient
temperature and the battery’s remaining capacity.
For safety reasons, charging in low temperatures (5–10°C / 41–50°F) will
take longer (up to approx. 4 hr.).
Page 46
Charging the Battery
Upon purchase, the battery is not fully charged.
Charge the battery before use.
Recharge the battery on the day before or on the day it is to be
used.
Even during storage, a charged battery will gradually drain and lose its
capacity.
After recharging the battery, remove it and disconnect the charger
from the power outlet.
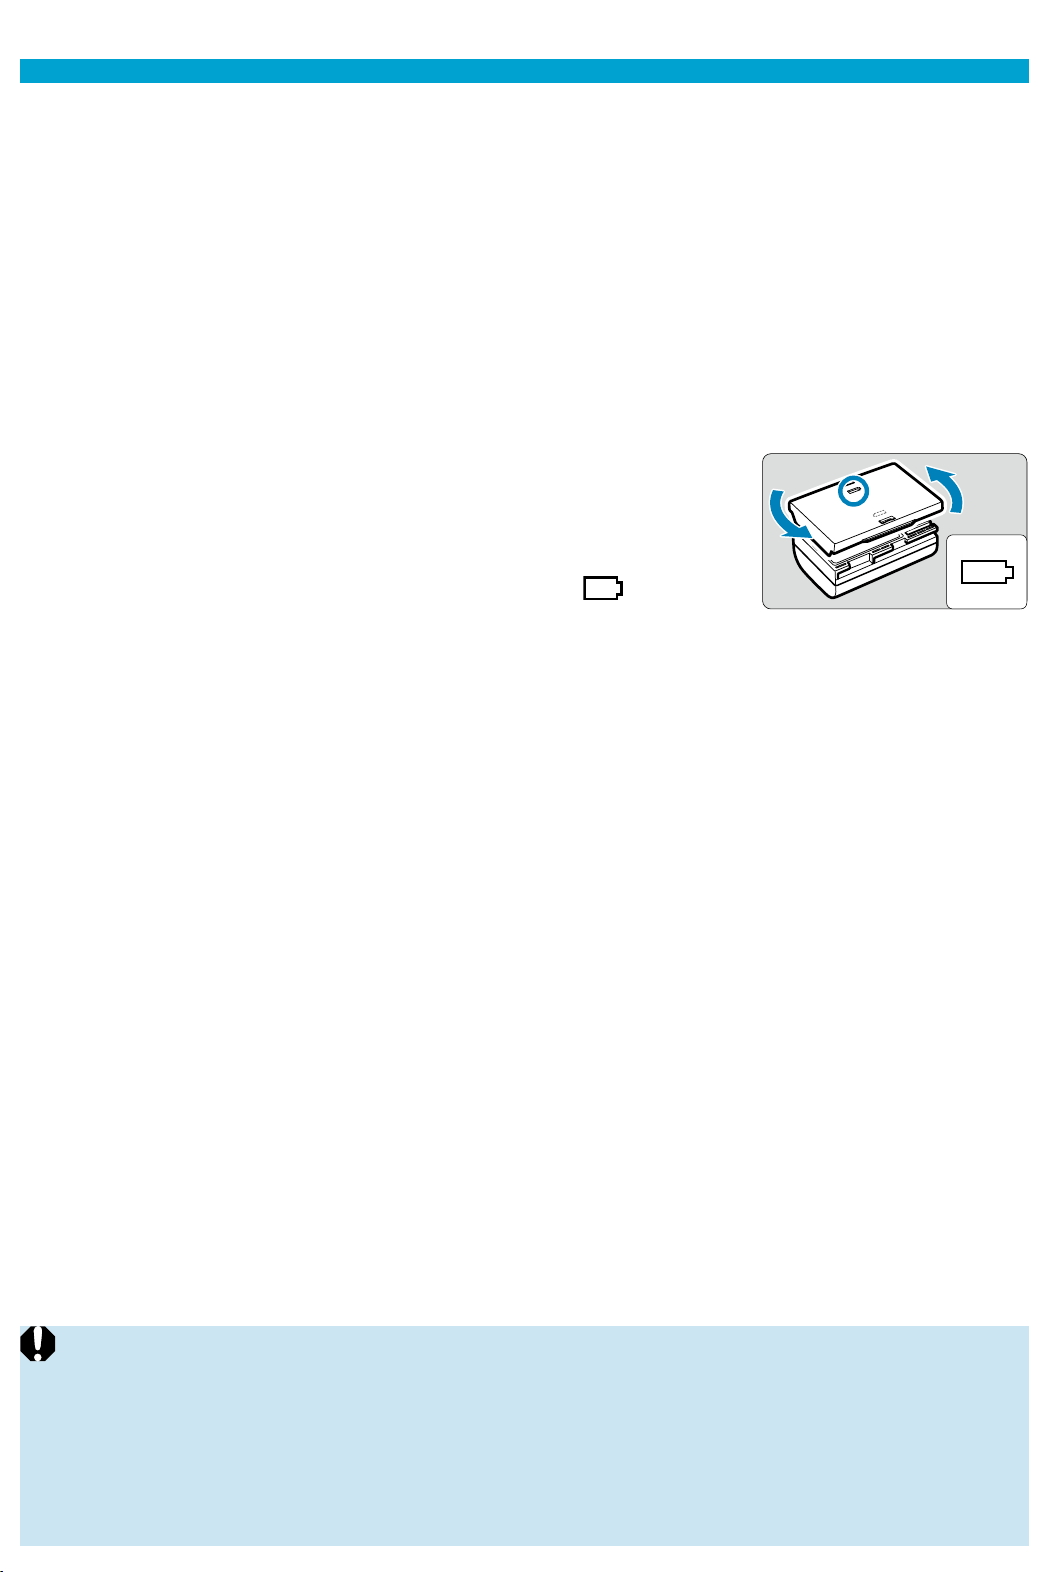
You can attach the protective cover in a
diff
erent orientation to indicate whether the
battery is recharged or not.
If the battery is recharged, attach the protective
cover so that the battery-shaped hole <
> is
aligned over the blue sticker on the battery. If the
battery is exhausted, attach the protective cover in
the opposite orientation.
When not using the camera, remove the battery.
If the battery is left in the camera for a prolonged period, a small amount
of power current will keep being released, resulting in excess discharge
and shorter battery life. Store the battery with the protective cover
attached. Storing the battery when it is fully charged may lower the
battery performance.
The battery charger can also be used in foreign countries.
The battery charger is compatible with a 100 V AC to 240 V AC 50/60 Hz
power source. If necessary, attach a commercially available plu
g adapter
for the respective country or region. Do not attach any portable voltage
transformer to the battery charger. Doing so may damage the battery
charger.
If the battery becomes exhausted quickly even after having been
fully charged, the battery has reached the end of its service life.
Check the battery’s recharge performance (
=
524) and purchase a new
battery.
oAfter disconnecting the charger’s power plug, do not touch the prongs for
approx. 10 sec.
oIf the battery’s remaining capacity (=524) is 94% or higher, the battery will
not be recharged.
oThe provided charger cannot charge any battery other than Battery Pack
LP-E6N/LP-E6.
Page 47
Inserting/Removing the Battery
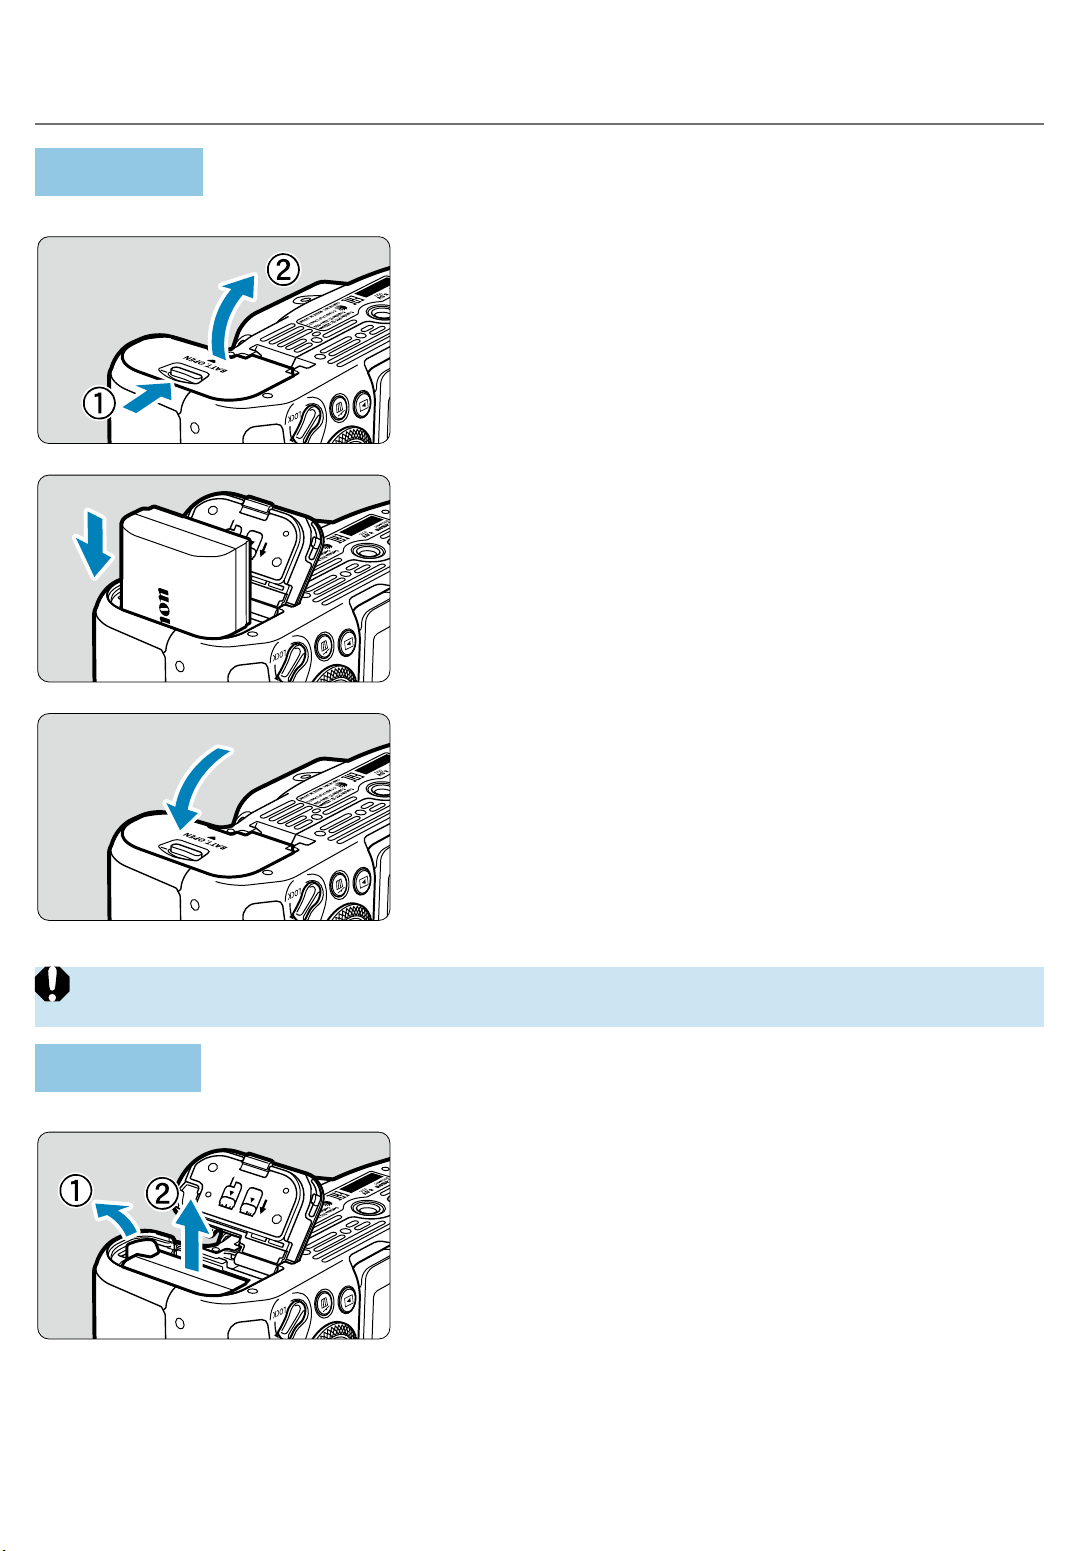
Insert a fully-charged Battery Pack LP-E6N (or LP-E6) into the camera.
Insertion
1
Slide the battery compartment
cover lock and open the cover.
2
Insert the battery.
Insert the end with the electrical
contacts.
Insert the battery until it locks in place.
3
Close the cover.
Press the cover until it snaps shut.
oYou cannot use batteries other than the Battery Pack LP-E6N or LP-E6.
Removal
Open the cover and remove the
battery.
Press the battery lock lever as shown by
the arrow and remove the battery.
To prevent short-circuits, always attach
the included protective cover (
=
44)
to the battery.
Page 48
Inserting and Removing the Card
The captured images are recorded onto the card.
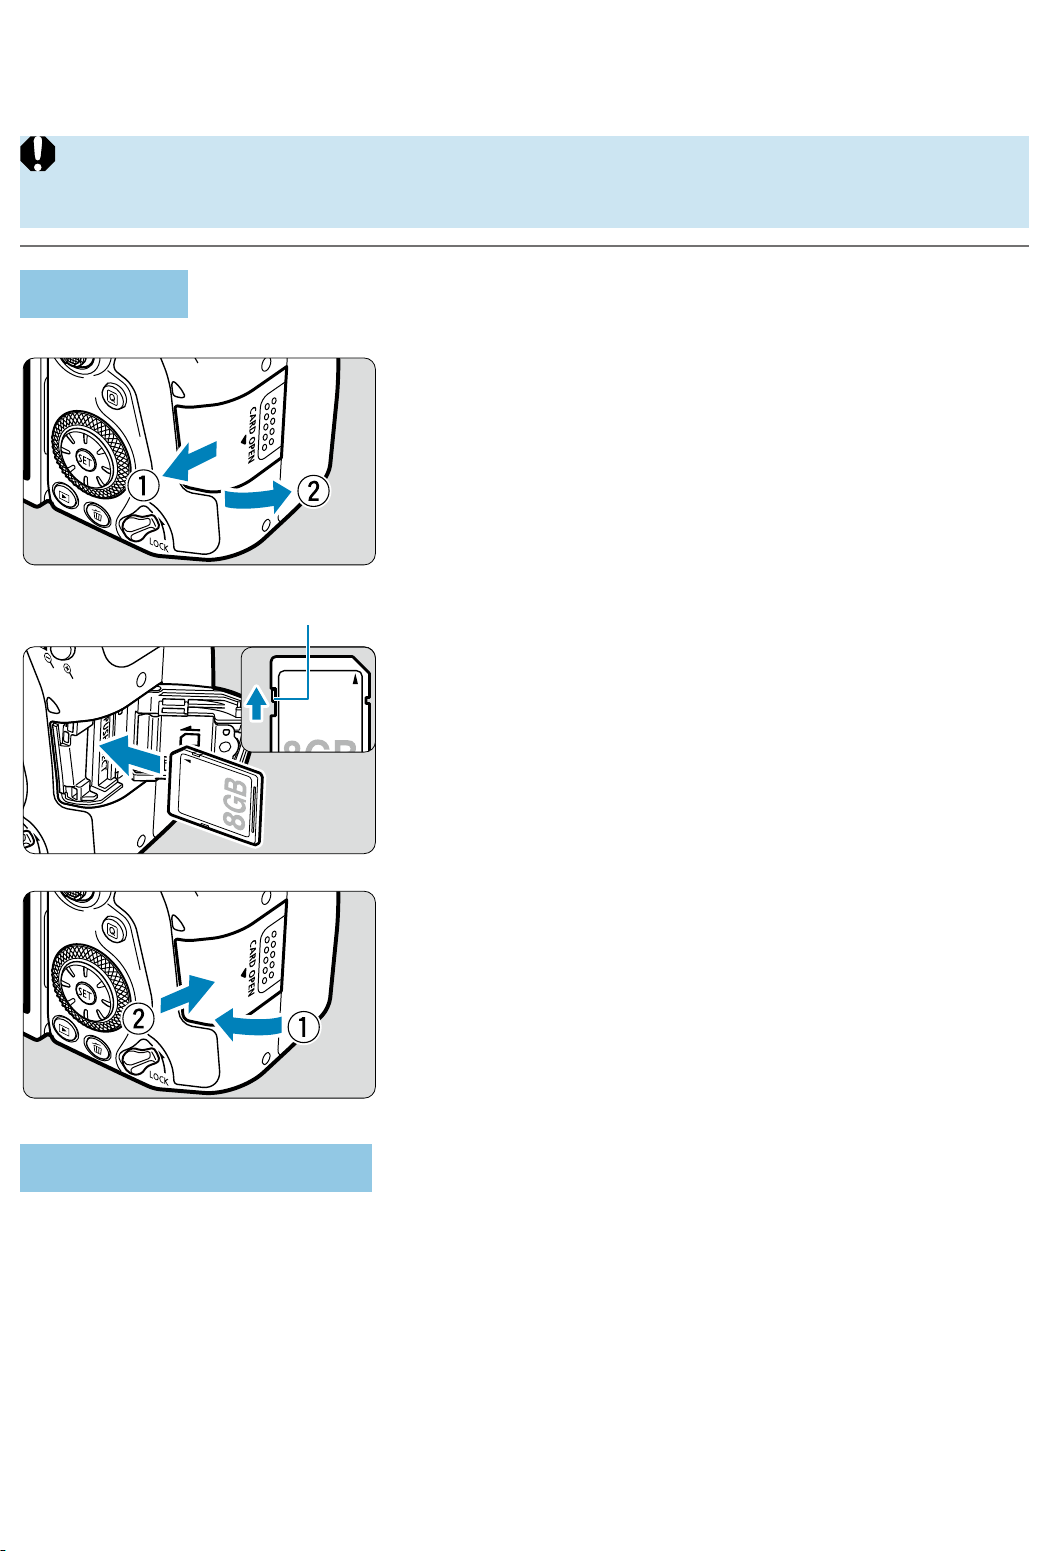
o Make sure the card’s write-protect switch (1) is set upward to enable
writing and erasing.
Insertion
1
Slide the cover to open it.
(1)
2
Insert the card.
As shown by the illustration, face the
card’s label side toward you and insert it
until it clicks in place.
3
Close the cover.
Close the cover and slide it in the
direction shown by the arrows until it
snaps shut.
Formatting the Card
If the card is new or was previously formatted (initialized) by another camera
or computer, format the card with this camera (
=
511).
Page 49
Inserting and Removing the Card
Removal
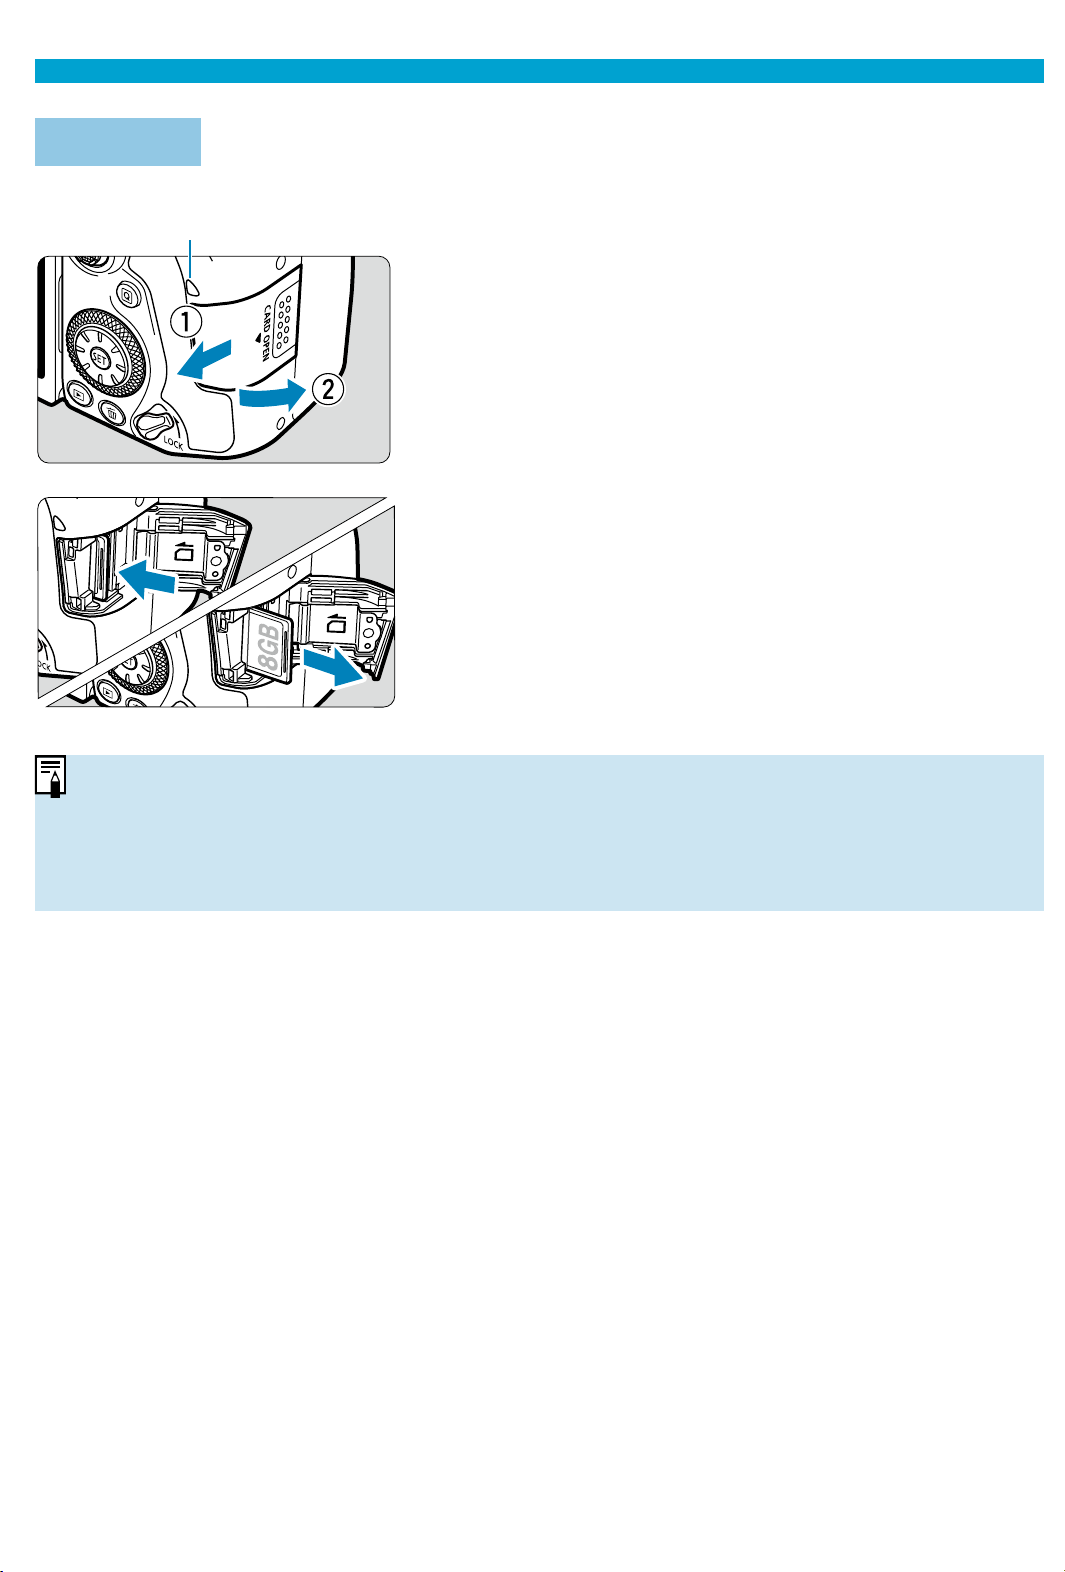
(1)
1
Open the cover.
Set the power switch to <
2
>.
Check that the access lamp (1) is off ,
then open the cover.
If [Saving...] is displayed on the screen,
close the cover.
2
Remove the card.
Gently push in the card, then let it go to
eject.
Pull the card straight out, then close the
cover.
oThe number of possible shots varies depending on the remaining capacity of
the card, the settings of image quality, ISO speed, etc.
oSetting [z: Release shutter without card] to [Disable] will prevent you from
forgetting to insert a card (=205).
Page 50

Inserting and Removing the Card
o When the access lamp is lit or blinking, it indicates that images are
being written to, read from, or erased from the card, or data is being
transferred. Do not open the card slot cover during this time.
Also,
never do any of the following while the access lamp is lit or blinking.
Otherwise, it can damage the image data, card, or camera.
• Removing the card.
• Removing the battery.
• Shaking or striking the camera.
• Unplugging or plugging in a power cord when using household power
outlet accessories (sold separately,
=
594).
oIf the card already contains recorded images, the image number may not start
from 0001 (=507).
oIf a card-related error message is displayed on the screen, remove and
reinsert the card. If the error persists, use a diff
erent card.
If you can transfer images on the card to a computer, transfer all the images
and then format the card with the camera (=511). The card may then return
to normal.
oDo not touch the card’
s contacts with your fi ngers or metal objects. Do not
expose the contacts to dust or water
. If smudges adhere to the contacts,
contact failure may result.
oMultimedia cards (MMC) cannot be used. (Card error will be displayed.)
oUse of UHS-II microSDHC/SDXC cards with a microSD to SD adapter is not
recommended. When using UHS-II cards, use SDHC/SDXC cards.
Page 51
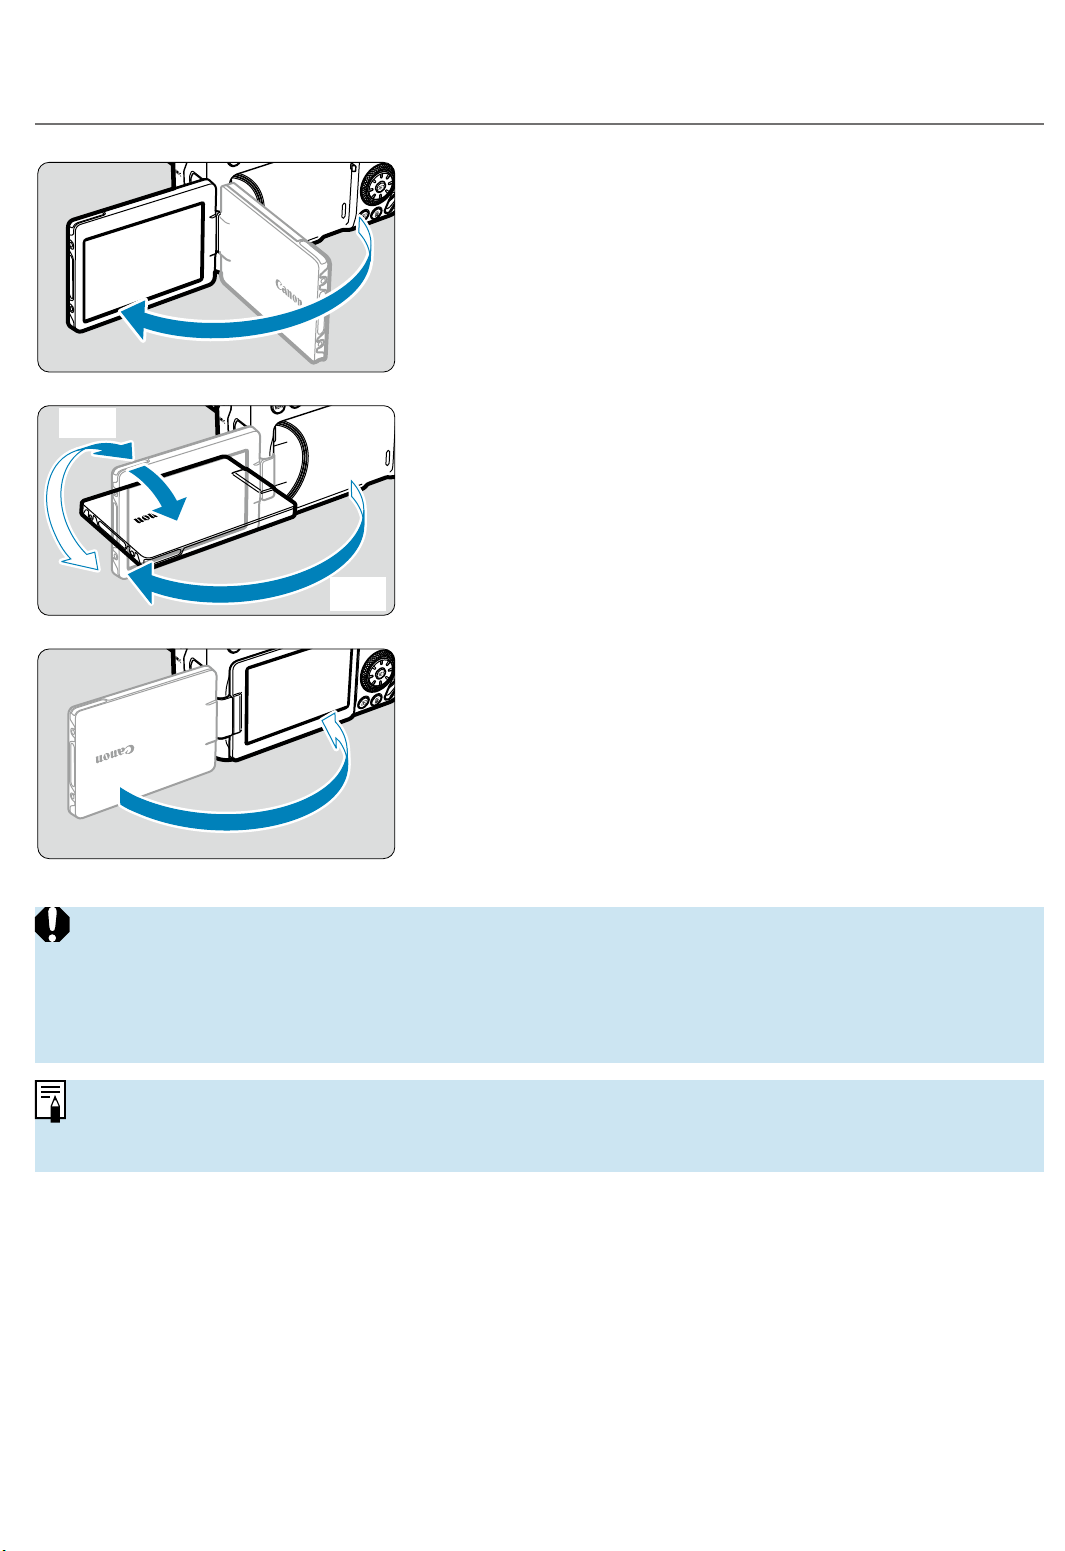
Using the Screen
You can change the direction and angle of the screen.
1
Flip out the screen.
175°
180°
90°
2
Rotate the screen.
When the screen is swung out, you can
rotate it up, down, or over 180° to face
the subject.
The indicated angle is only approximate.
3
Face it toward you.
Normally, use the camera with the
screen facing you.
oBe careful not to forcefully rotate the screen, putting much power on the
rotating axis (hinge).
oWhen a cable is connected to a camera terminal, the rotation angle range of
the fl ipped-out screen will be limited.
oWhen not using the camera, close the screen facing inward. You can protect
the screen.
Page 52
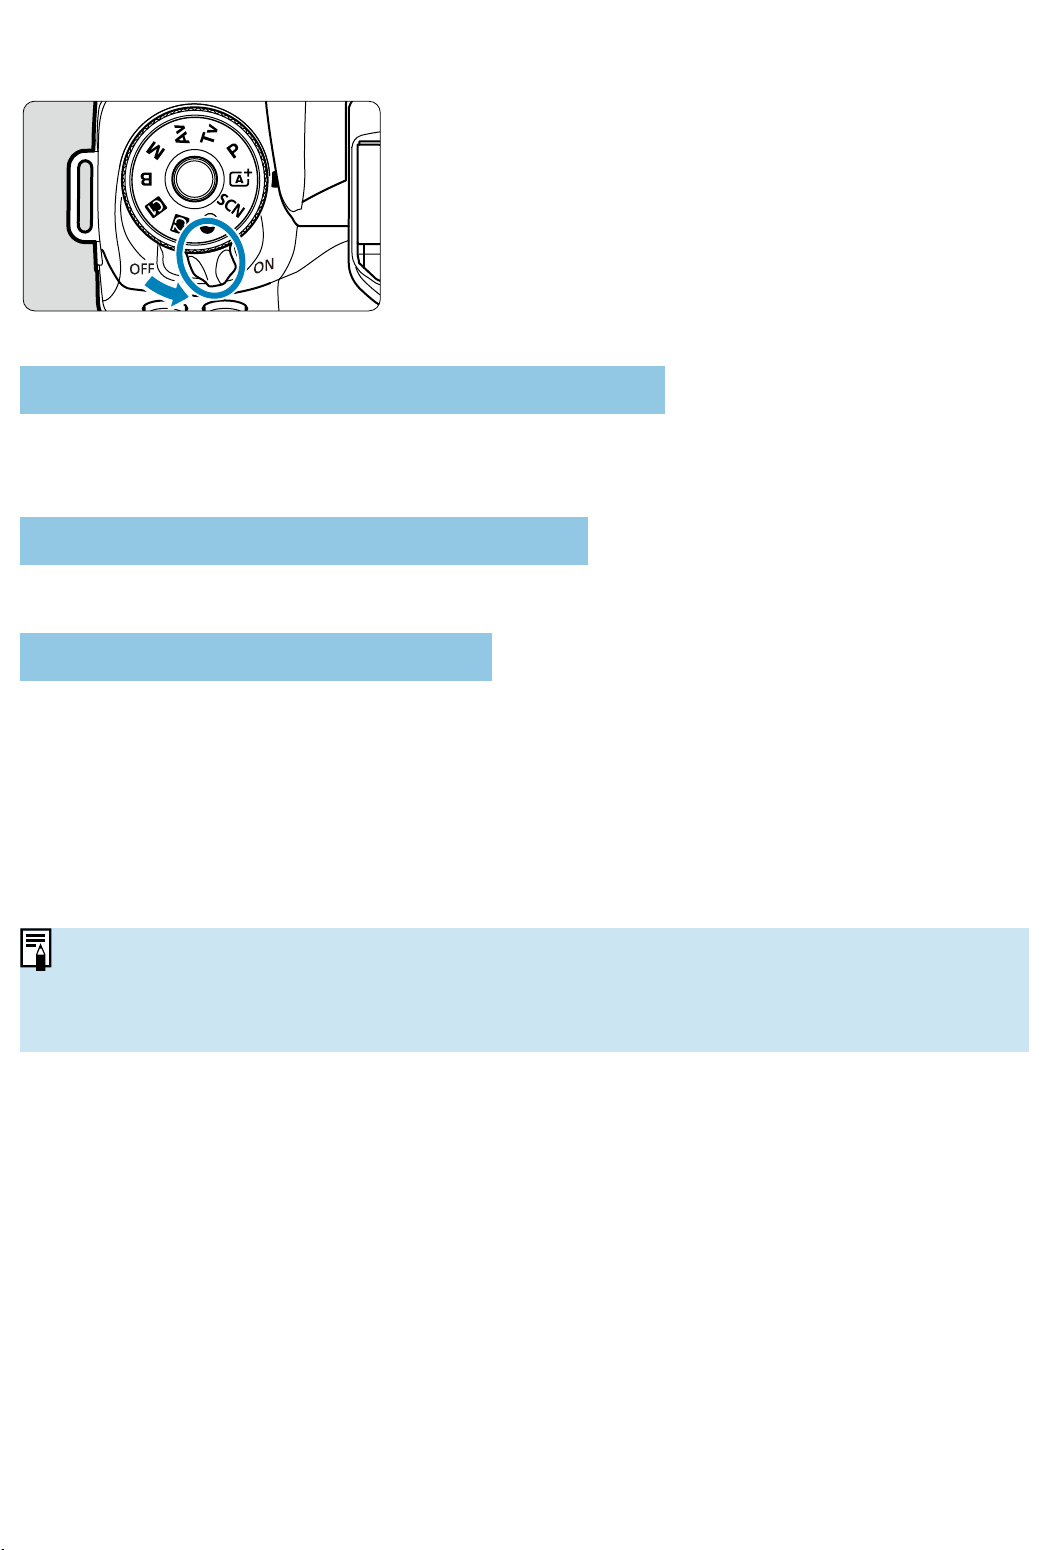
Turning on the Power
<
1
>
The camera turns on.
<
2
>
The camera is turned off and does not
function. Set the power switch to this
position when not using the camera.
Setting the Date, Time, and Time Zone
If you turn on the power switch and the date/time/zone setting screen
appears, see
=
516 to set the date/time/zone.
Changing the Interface Language
To change the interface language, see
=
519.
Automatic Sensor Cleaning
Whenever you set the power switch to <
1
> or <
2
>, sensor cleaning
will be performed automatically. (A small sound may be audible.) During
the sensor cleaning, the screen will display <
f
>.
If you repeatedly turn the power switch <
1
>/<
2
> at a short
interval, the <
f
> icon may not be displayed. This is normal and not a
malfunction.
oIf you set the power switch to <
2
> while an image is being recorded to
the card, [Saving...] will be displayed and the power will turn off after the
recording fi nishes.
Page 53
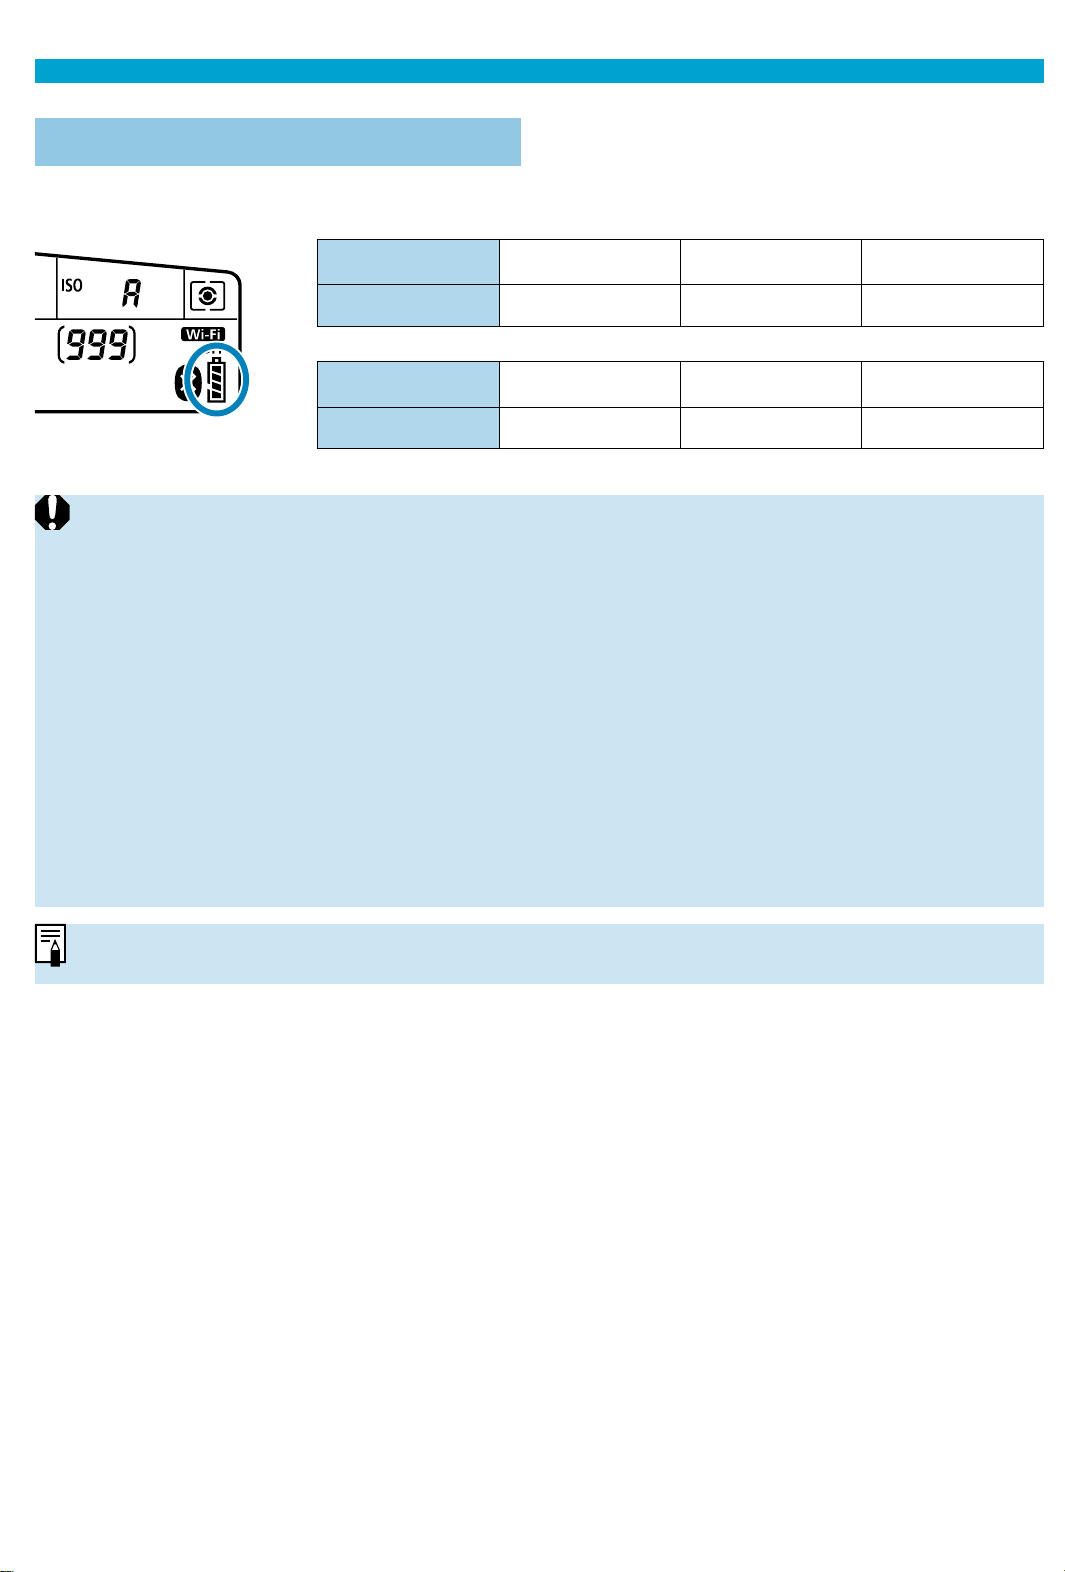
Turning on the Power
z
Battery Level Indicator
When the power switch is set to <
1
>, the battery level will be indicated.
Display
zxc
Level (%) 100–70 69–50 49–20
Display
m
bn
Level (%) 19–10 9–1 0
oDoing any of the following will exhaust the battery faster:
• Pressing the shutter button halfway for a prolonged period.
• Activating the AF frequently without taking a picture.
• Using the lens’s Image Stabilizer.
• Using the Wi-Fi function or Bluetooth function.
• Using the screen frequently.
oThe number of possible shots may decrease depending on the actual shooting
conditions.
oThe lens operation is powered by the camera’s battery. Certain lenses may
exhaust the battery faster than others.
oIn low ambient temperatures, shooting may not be possible even with a
suffi
cient battery level.
oSee [5: Battery info.] to check the battery status (=524).
Page 54
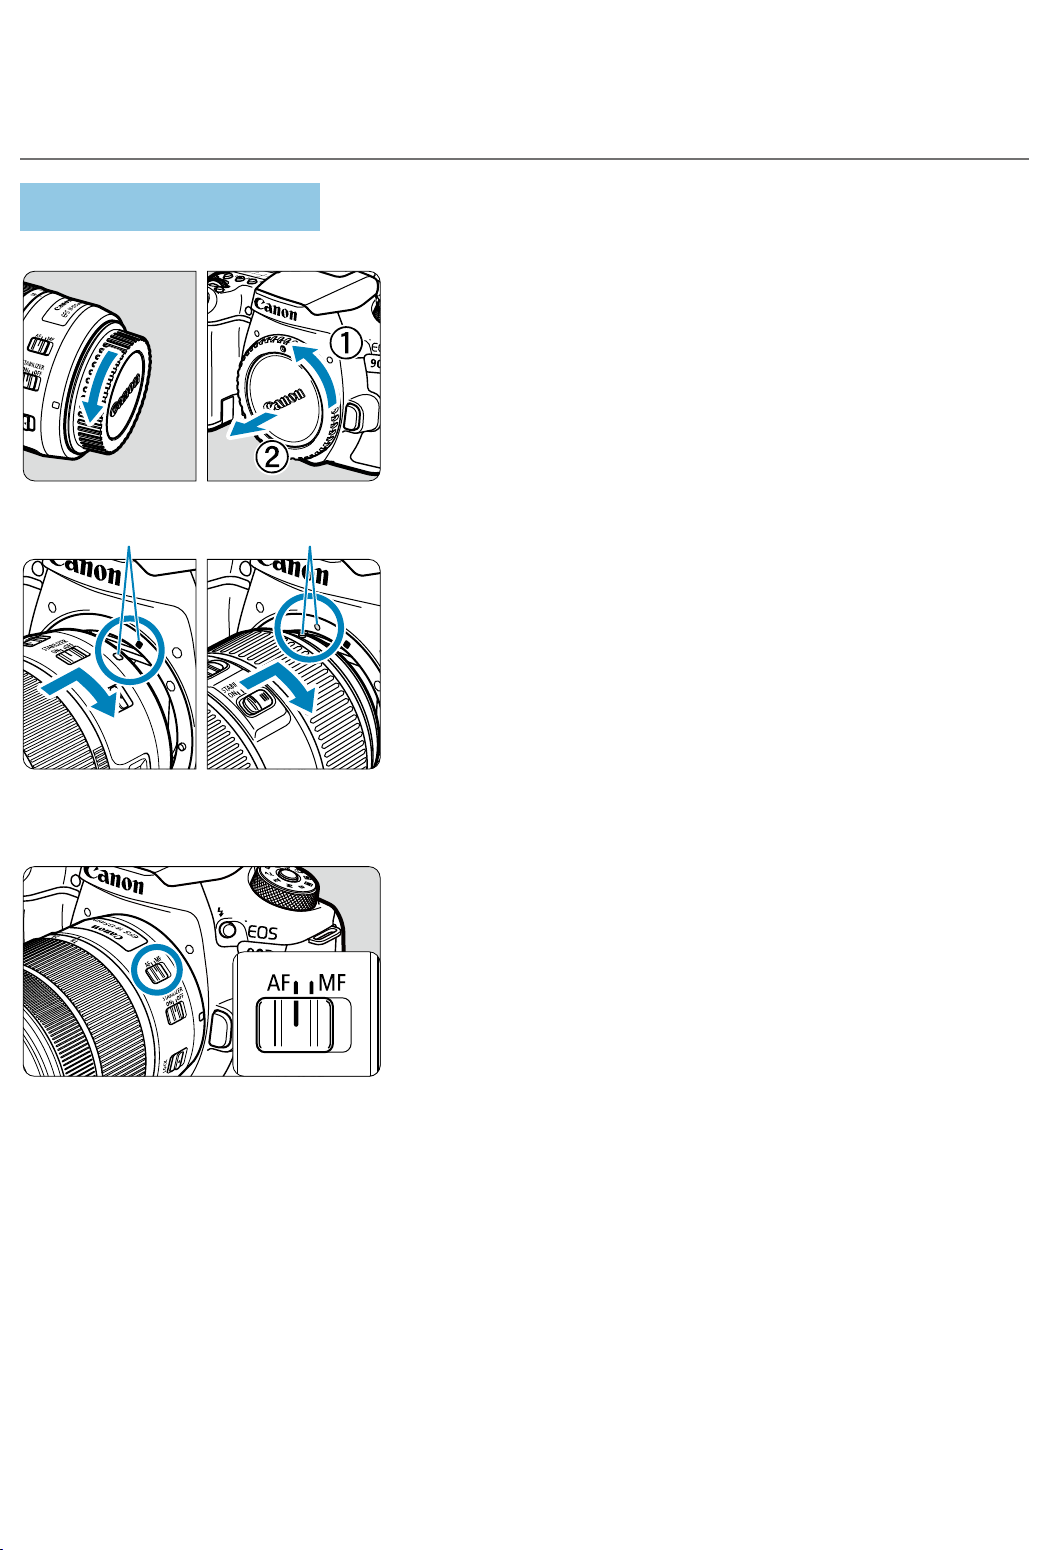
Attaching and Detaching a Lens
All EF and EF-S lenses can be used. The camera cannot be used with RF
or EF-M lenses.
Attaching a Lens
1
Remove the caps.
Remove the rear lens cap and the body
cap by turning them as shown by the
arrows.
(1) (2)
2
Attach the lens.
Align the white or red mount index on
the lens with the corresponding mount
index on the camera and turn the lens
as shown by the arrow until it clicks into
place.
(1) White index
(2) Red index
3
Set the lens’s focus mode switch
to <AF>.
<AF> stands for autofocus.
<MF> stands for manual focus.
Autofocus will not operate.
4
Remove the front lens cap.
Page 55
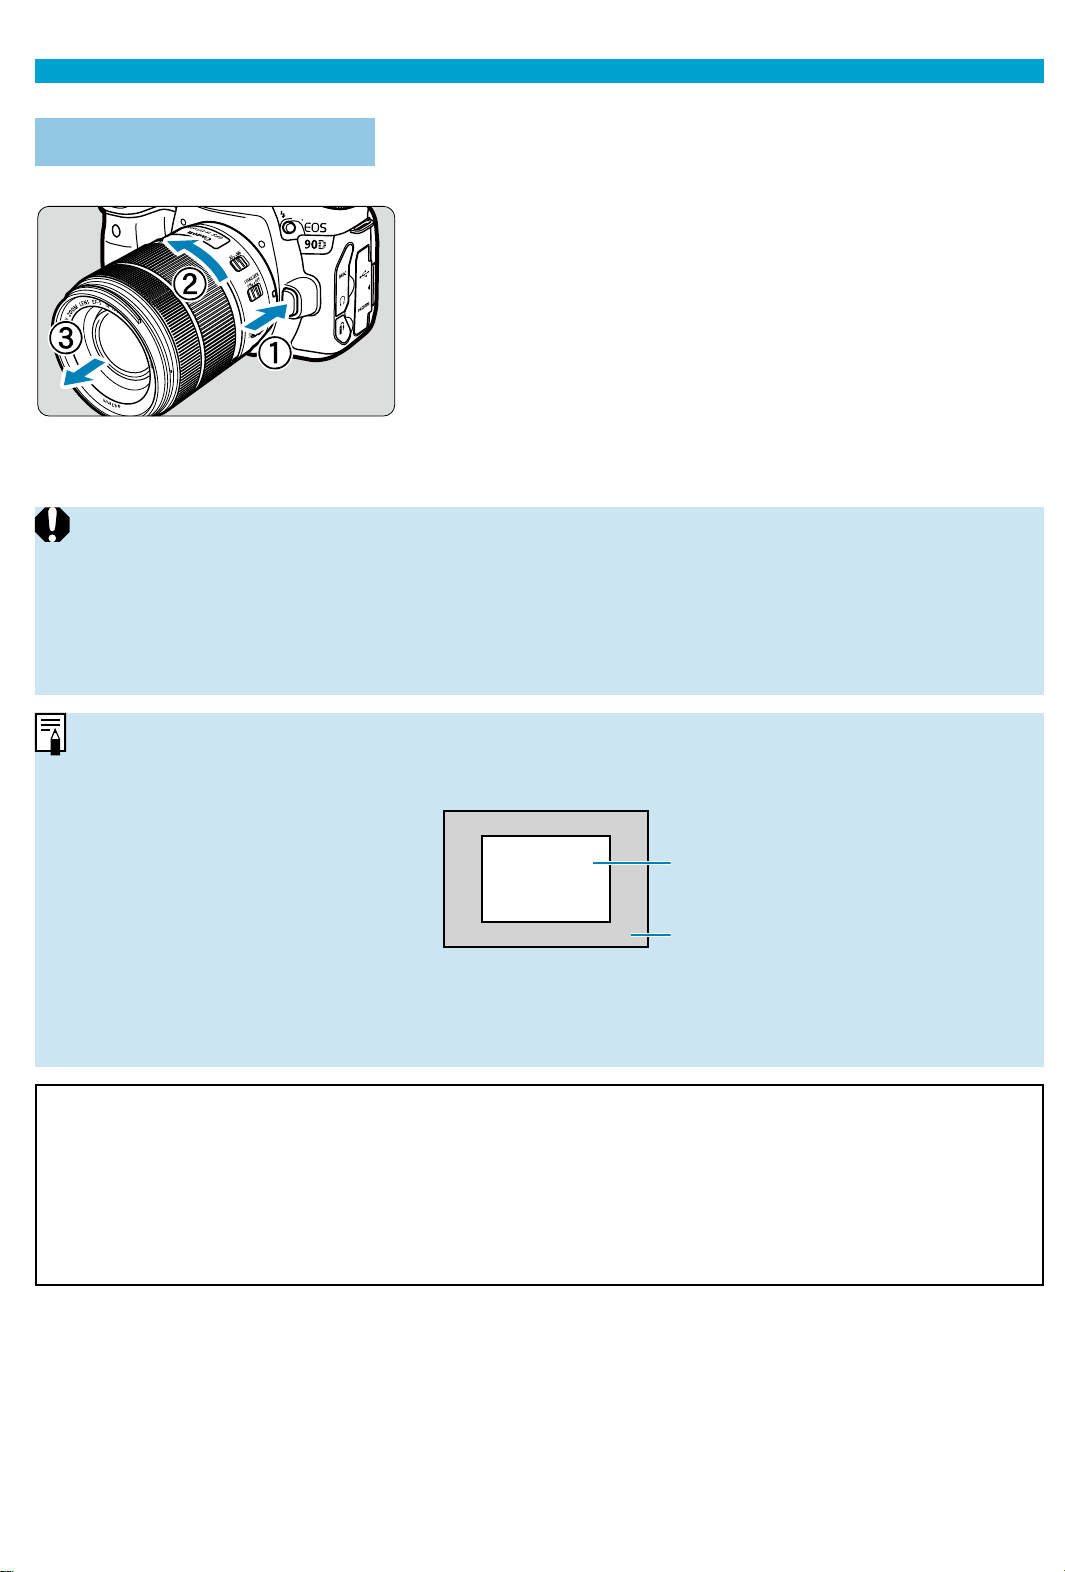
Attaching and Detaching a Lens
Detaching the Lens
While pressing the lens release
button, turn the lens as shown by
the arrow.
Turn the lens until it stops, then detach
it.
Attach the rear lens cap to the detached
lens.
oDo not look at the sun directly through any lens. Doing so may cause loss of
vision.
oWhen attaching or detaching a lens, set the camera’s power switch to <
2
>.
oIf the front part (focusing ring) of the lens rotates during autofocusing, do not
touch the rotating part.
oFor instructions on how to use the lens, refer to the Lens Instruction Manual
(=4).
Shooting angle of view
Because the image area
is smaller than 35mm fi lm
format, the eff ective angle
of view corresponds to
approx. 1.6 times the lens’s
indicated focal length.
Image area (approx.)
(22.3×14.8 mm / 0.88 x 0.58 in.)
35mm fi lm format
(36×24 mm / 1.42 x 0.94 in.)
Tips for Avoiding Smudges and Dust
oWhen changing lenses, do it quickly in a place with minimal dust.
oWhen storing the camera without a lens attached, be sure to attach the body cap
to the camera.
oRemove dust on the body cap before attaching it.
Page 56
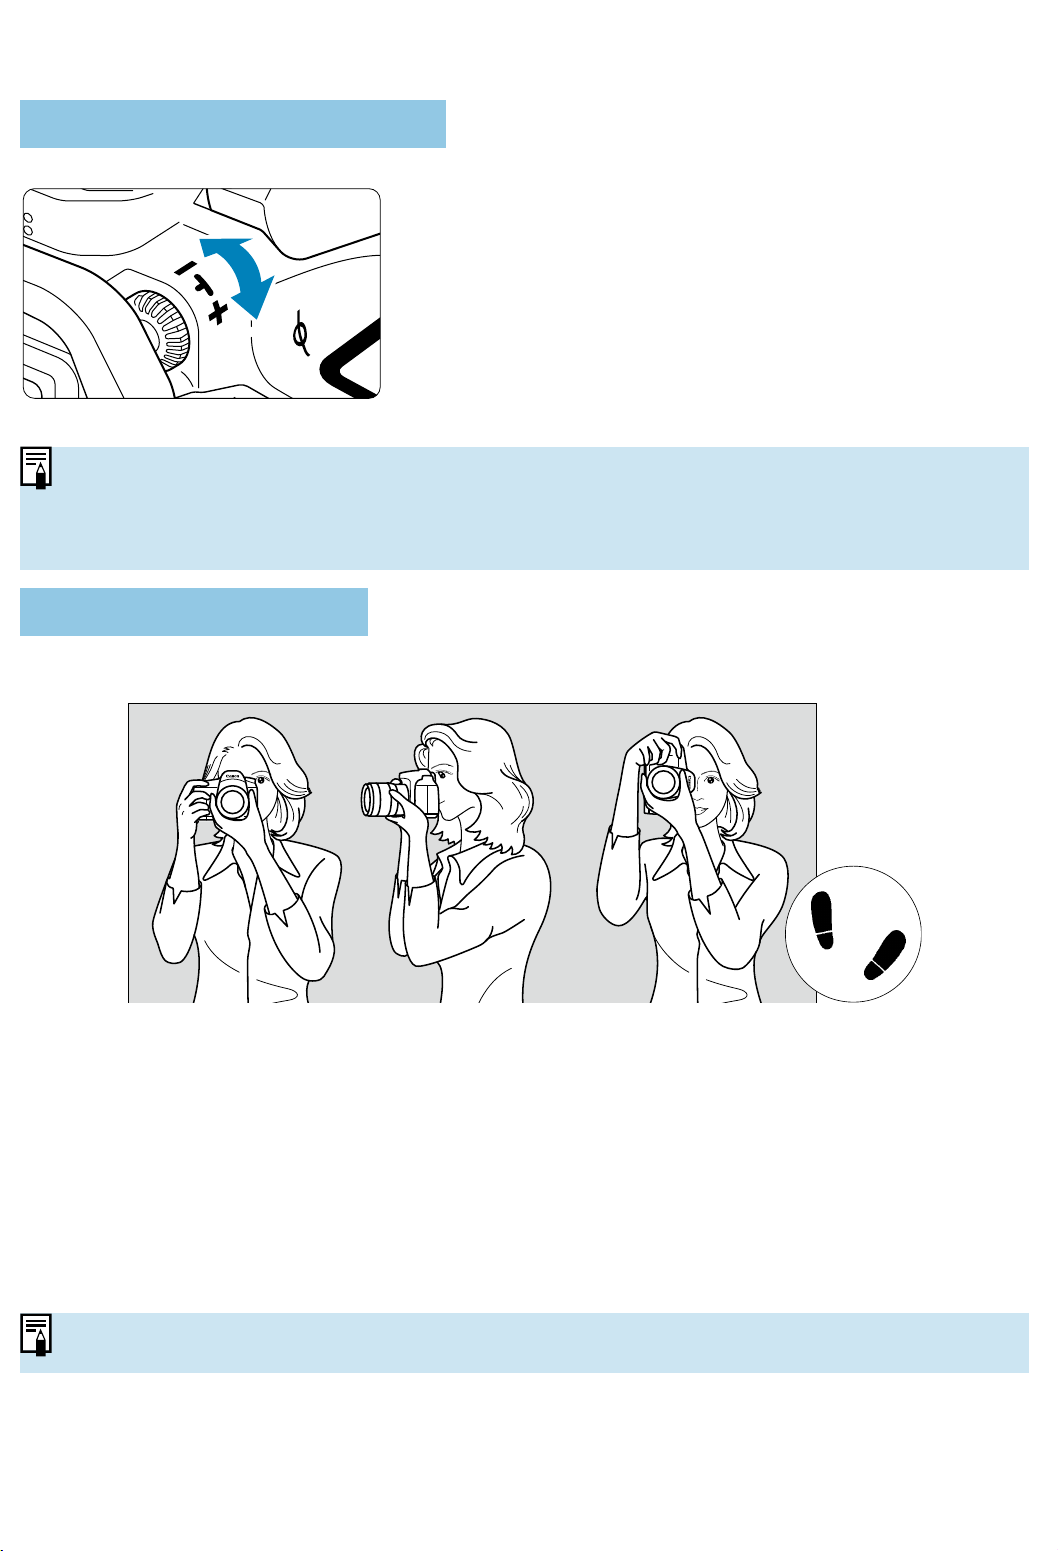
Basic Operations
Adjusting the Viewfi nder
Turn the dioptric adjustment knob left
or right so that the AF points in the
viewfi nder look sharp.
If the knob is diffi cult to turn, remove the
eyecup (
=
157).
oIf the camera’s dioptric adjustment still cannot provide a sharp viewfi nder
image, using E-series Dioptric Adjustment Lenses (sold separately) is
recommended.
Holding the Camera
To obtain sharp images, hold the camera still to minimize camera shake.
Horizontal shooting Vertical shooting
1. Wrap your right hand around the camera grip fi rmly.
2. Hold the lens bottom with your left hand.
3. Rest your right index fi nger lightly on the shutter button.
4. Press your arms and elbows lightly against the front of your body.
5. To maintain a stable stance, place one foot slightly ahead of the other.
6. Press the camera against your face and look through the viewfi nder.
oTo shoot while looking at the screen, see =71.
Page 57
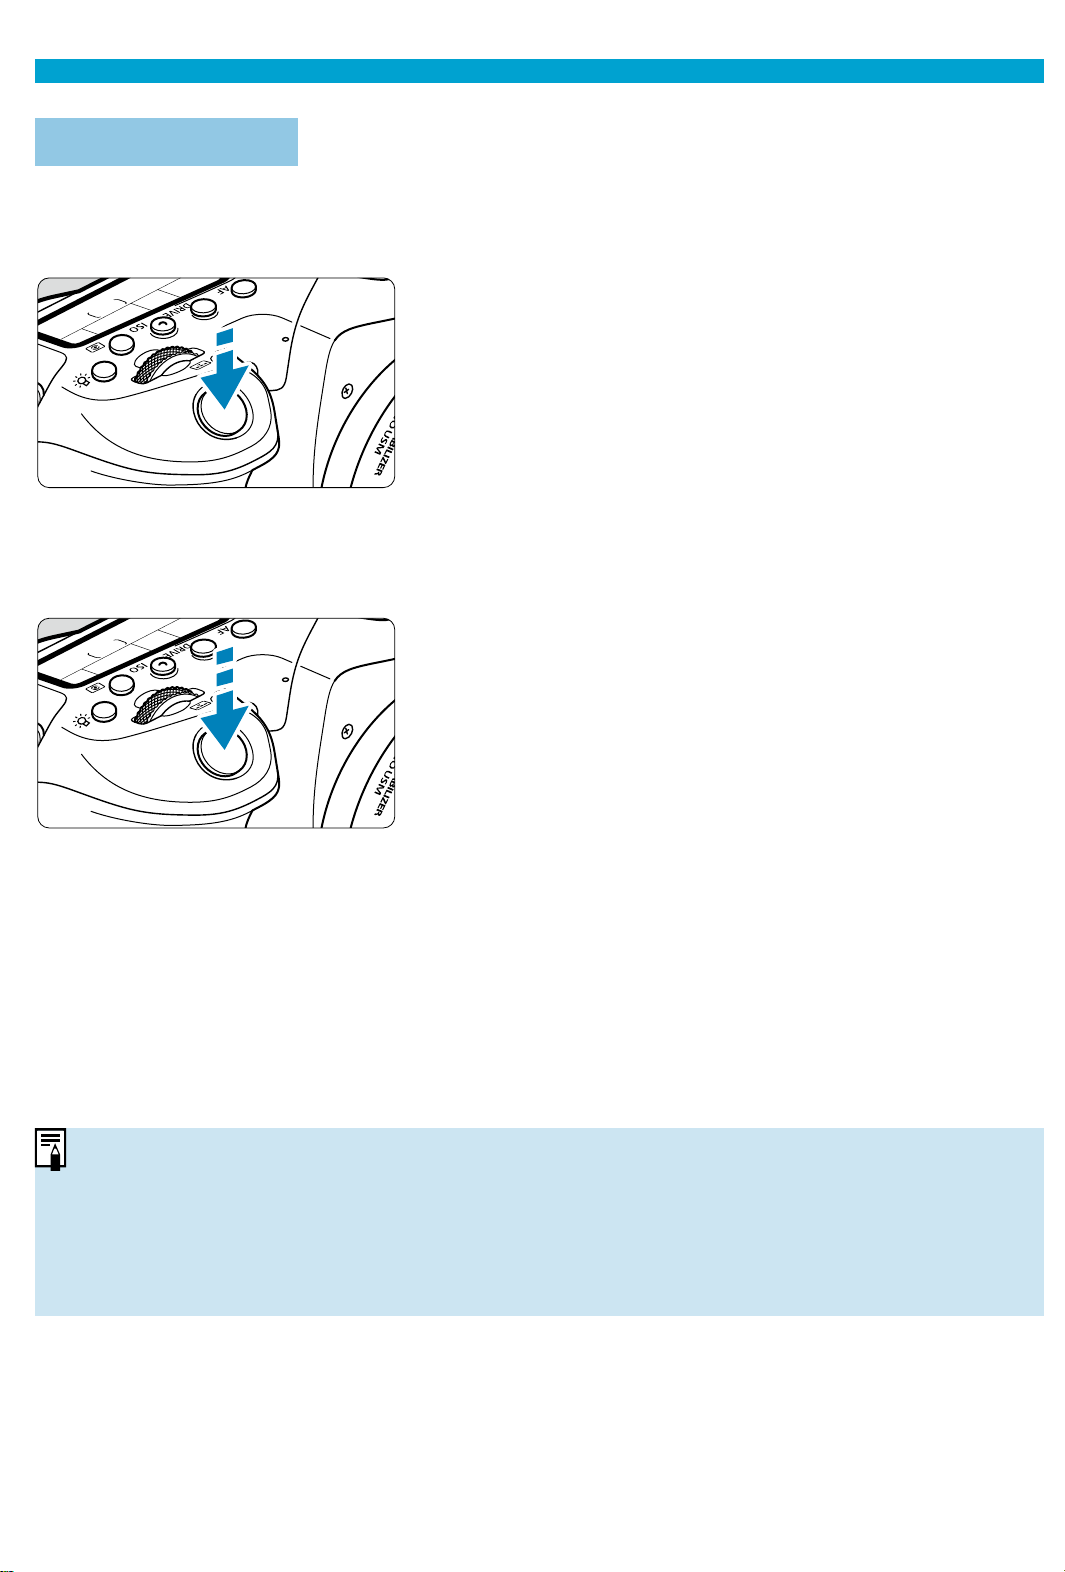
Basic Operations
Shutter Button
The shutter button has two steps. You can press the shutter button halfway.
Then you can further press the shutter button completely.
Pressing Halfway
This activates autofocusing and the
automatic exposure system that sets the
shutter speed and aperture.
The exposure setting (shutter speed and
aperture) is displayed in the viewfi nder
and on the LCD panel for approx. 4 sec.
(metering timer/
0
).
Pressing Completely
This releases the shutter and takes the
picture.
Preventing Camera Shake
Hand-held camera movement during the moment of exposure is called
camera shake. It can cause blurred pictures. To prevent camera shake,
note the following:
Hold and steady the camera as shown on the preceding page.
Press the shutter button halfway to autofocus, then slowly press the
shutter button completely
.
oIf you press the shutter button completely without pressing it halfway fi rst, or if
you press the shutter button halfway and then press it completely immediately,
the camera will take a moment before it takes the picture.
oEven during menu display or image playback, you can go back to shooting-
ready state by pressing the shutter button halfway
.
Page 58
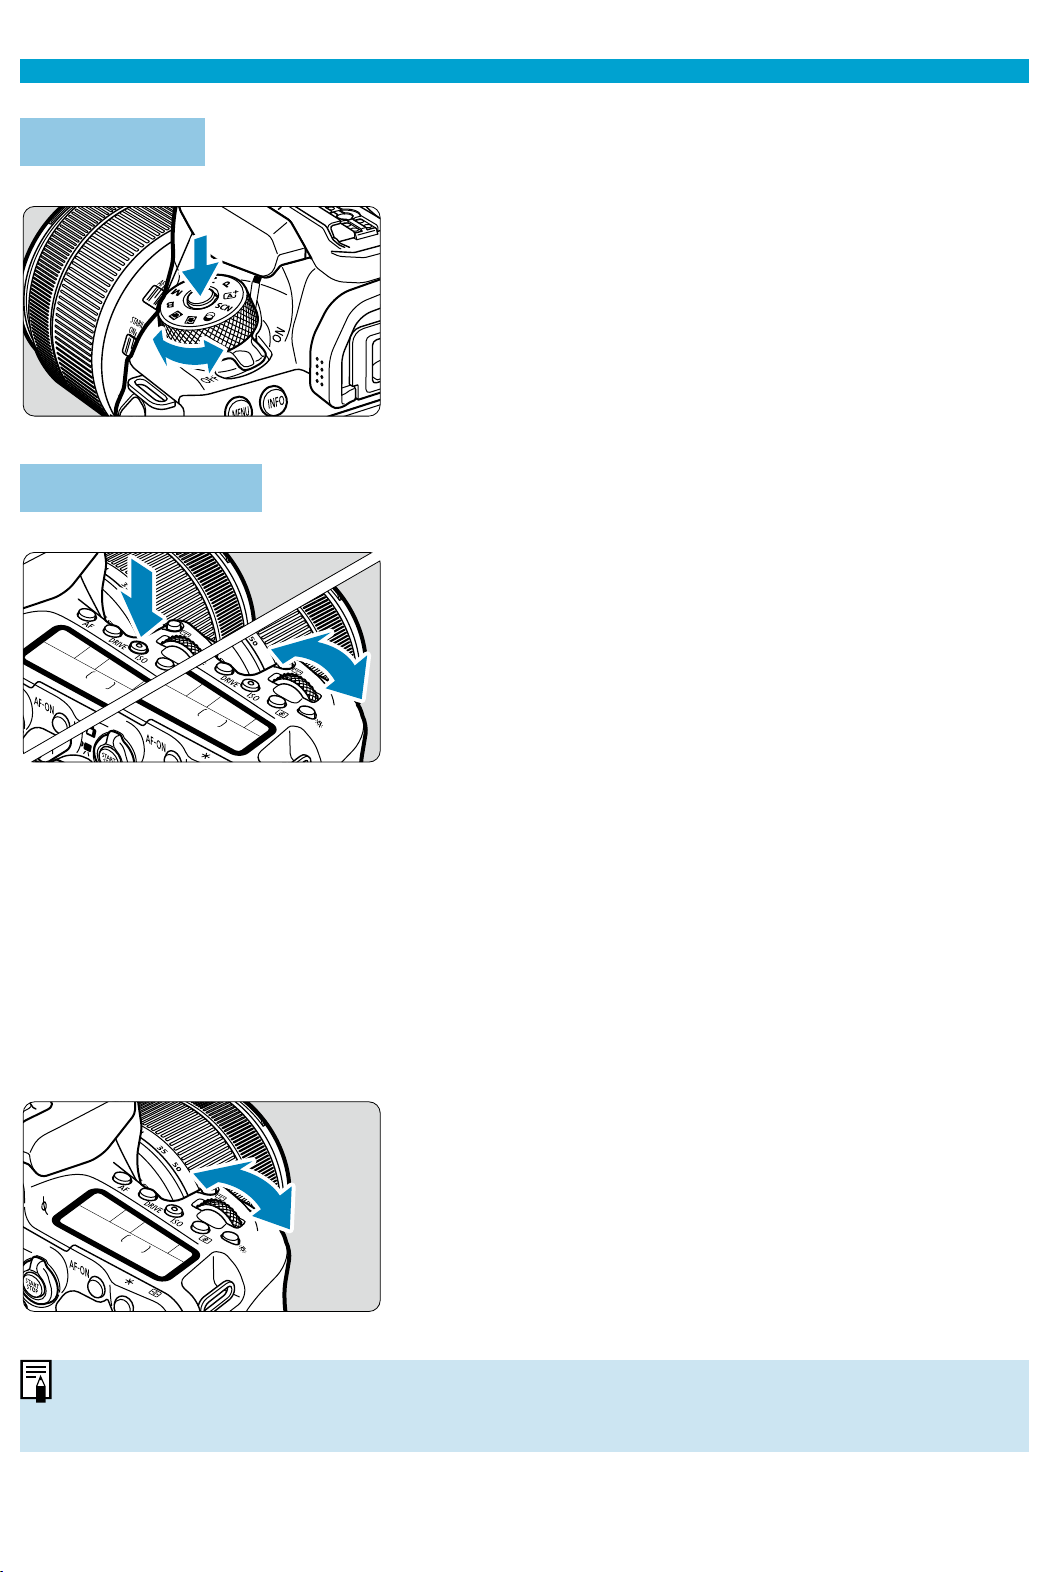
Basic Operations
Mode Dial
Turn the dial while holding down
the lock-release button at the
center of the dial.
Use it to set the shooting mode.
6
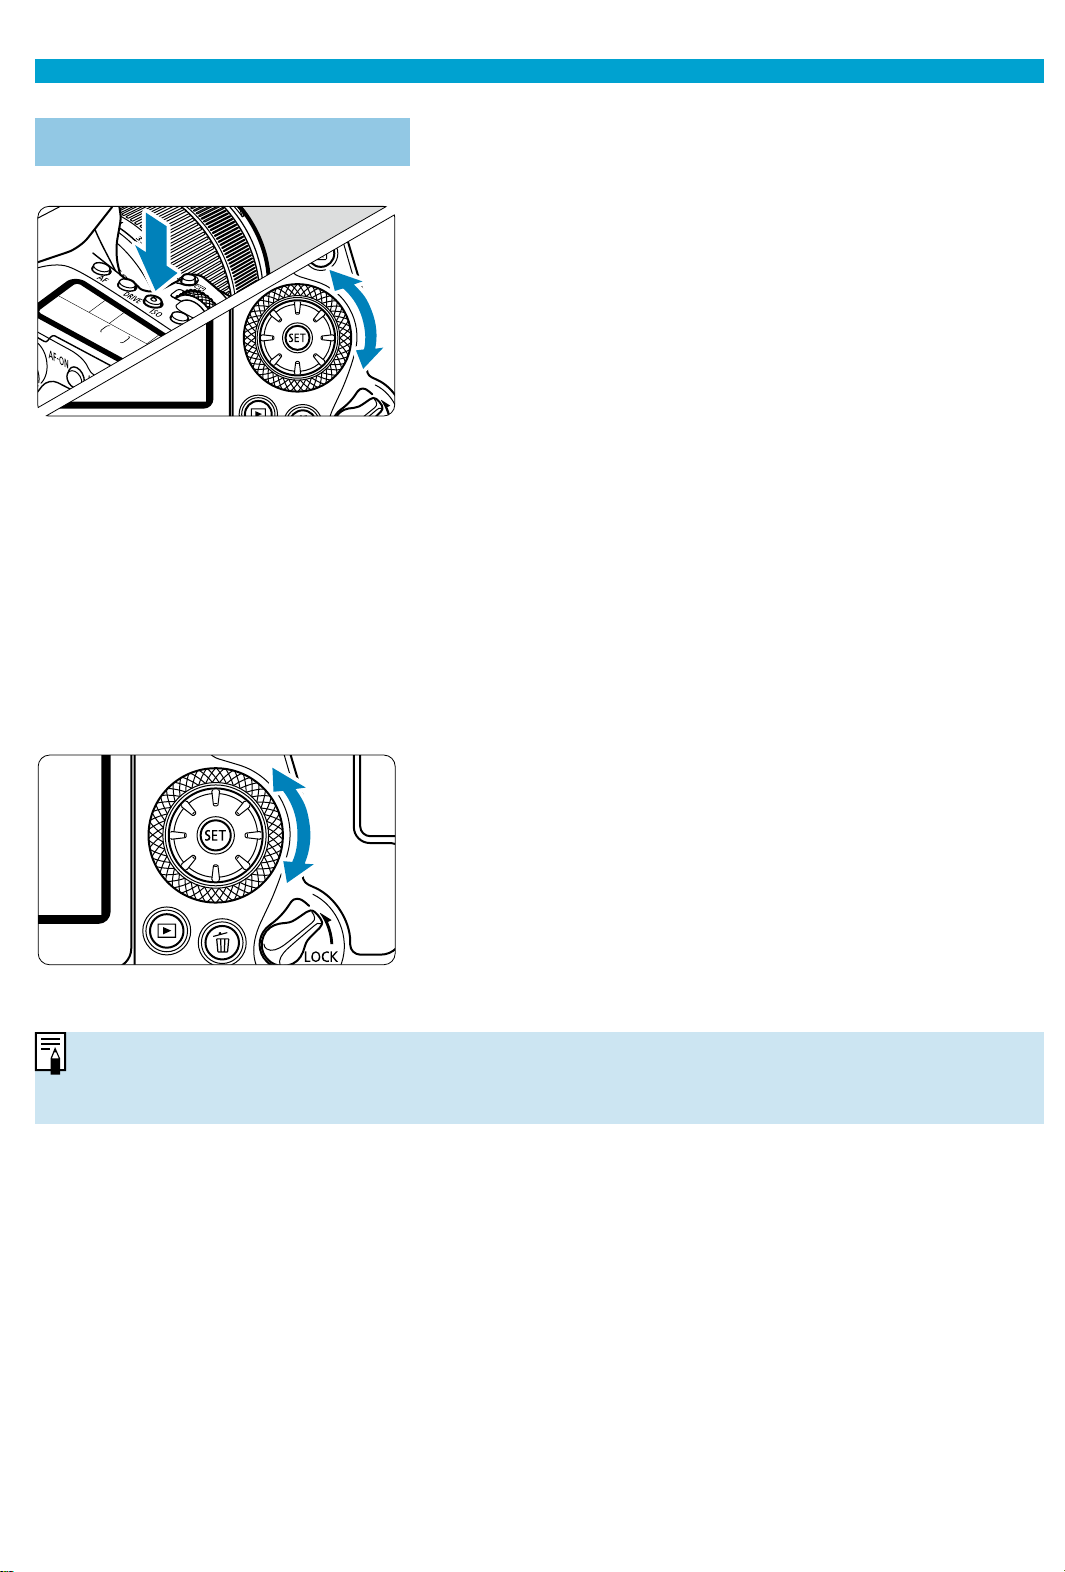
Main Dial
(1) After pressing a button, turn the
<
6
> dial.
When you press a button such as <AF>,
<
R
>, <
i
>, or <
q
>, the respective
function remains selectable for approx. 6
sec. (
9
). During this time, you can turn
the <
6
> dial to change the setting.
When the timer ends or if you press the
shutter button halfway, the camera will go
back to shooting-ready state.
Use this dial to select the AF operation,
drive mode, ISO speed, metering mode,
AF point, etc.
(2) Turn only the <
6
> dial.
While looking at the viewfi nder display or
LCD panel, turn the <
6
> dial.
Use this dial to set the shutter speed,
aperture value, etc.
oThe operations in (1) can be performed even when the <
R
> switch is set
upward (Multi-function lock, =60).
Page 59
Basic Operations
5
Quick Control Dial
(1) After pressing a button, turn the
<
5
> dial.
When you press a button such as <AF>,
<
i
>, or <
q
>, the respective function
remains selectable for approx. 6 sec. (
9
).
During this time, you can turn the <5> dial
to change the setting.
When the timer ends or if you press the
shutter button halfway, the camera will go
back to shooting-ready state.
Use this dial to select the AF operation,
ISO speed, metering mode,
AF point,
etc.
(2) Turn only the <
5
> dial.
While looking at the viewfi nder display or
LCD panel, turn the <5> dial.
Use this dial to set the exposure
compensation amount, the aperture
setting for manual exposures, etc.
oThe operations in (1) can be performed even when the <
R
> switch is set
upward (Multi-function lock, =60).
Page 60
Basic Operations
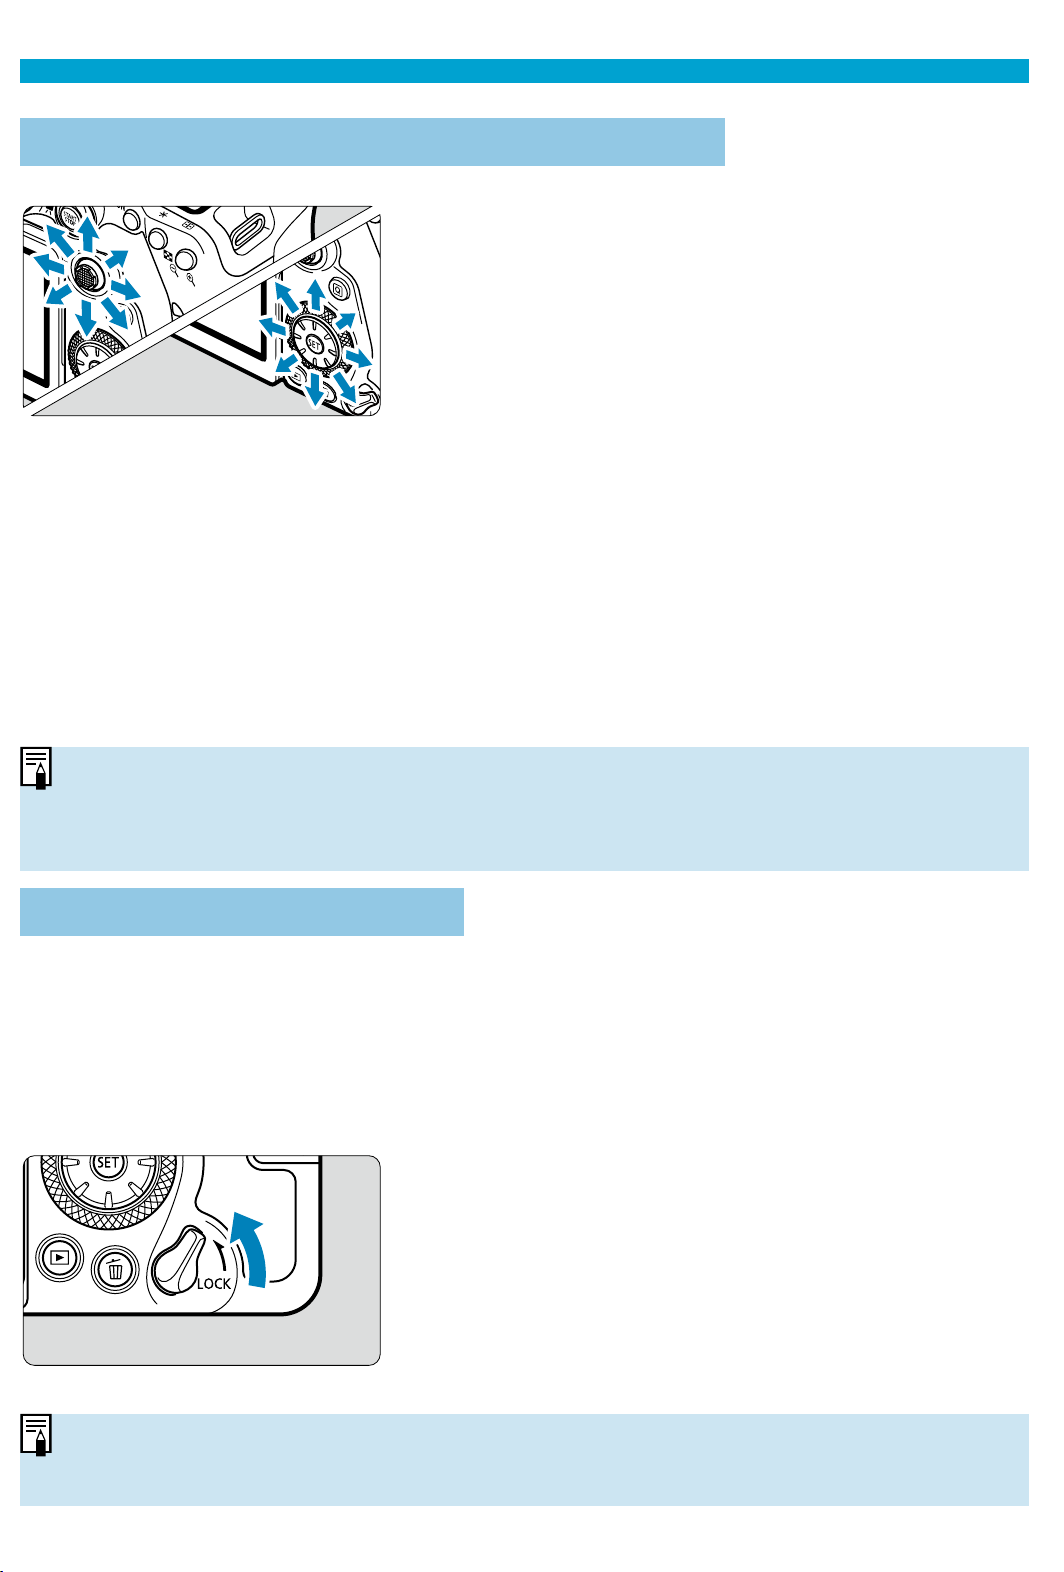
j
Multi-Controller 1/
9
Multi-Controller 2
<j> is an eight-direction key with
center button. To use it, press lightly with
the tip of your thumb.
<9> is an eight-direction key.
Used for operations such as AF point
selection, white balance correction, AF
point/magnifying frame movement in
Live View shooting or movie recording,
magnifying frame movement during
playback, or Quick Control settings.
Can also be used to select or set menu
items.
<9> can also be used for image
browsing during playback.
oCorrecting the white balance and moving the magnifying frame during
playback can be done even with the <
R
> switch set upward (Multi-function
lock).
R
Multi-Function Lock
With [5: Multi function lock] set and the <
R
> switch set upward, you
can prevent the settings from being changed by accidentally operating Main
dial, Quick control dial, or Multi-controller or by inadvertently tapping on the
touch-screen panel.
For [5: Multi function lock] details, see
=
545.
<
R
> switch set upward: Lock engaged
<
R
> switch set downward: Lock
released
oBy default, the <5> dial will be locked when the multi-function lock switch is
in the lock position.
Page 61
Basic Operations
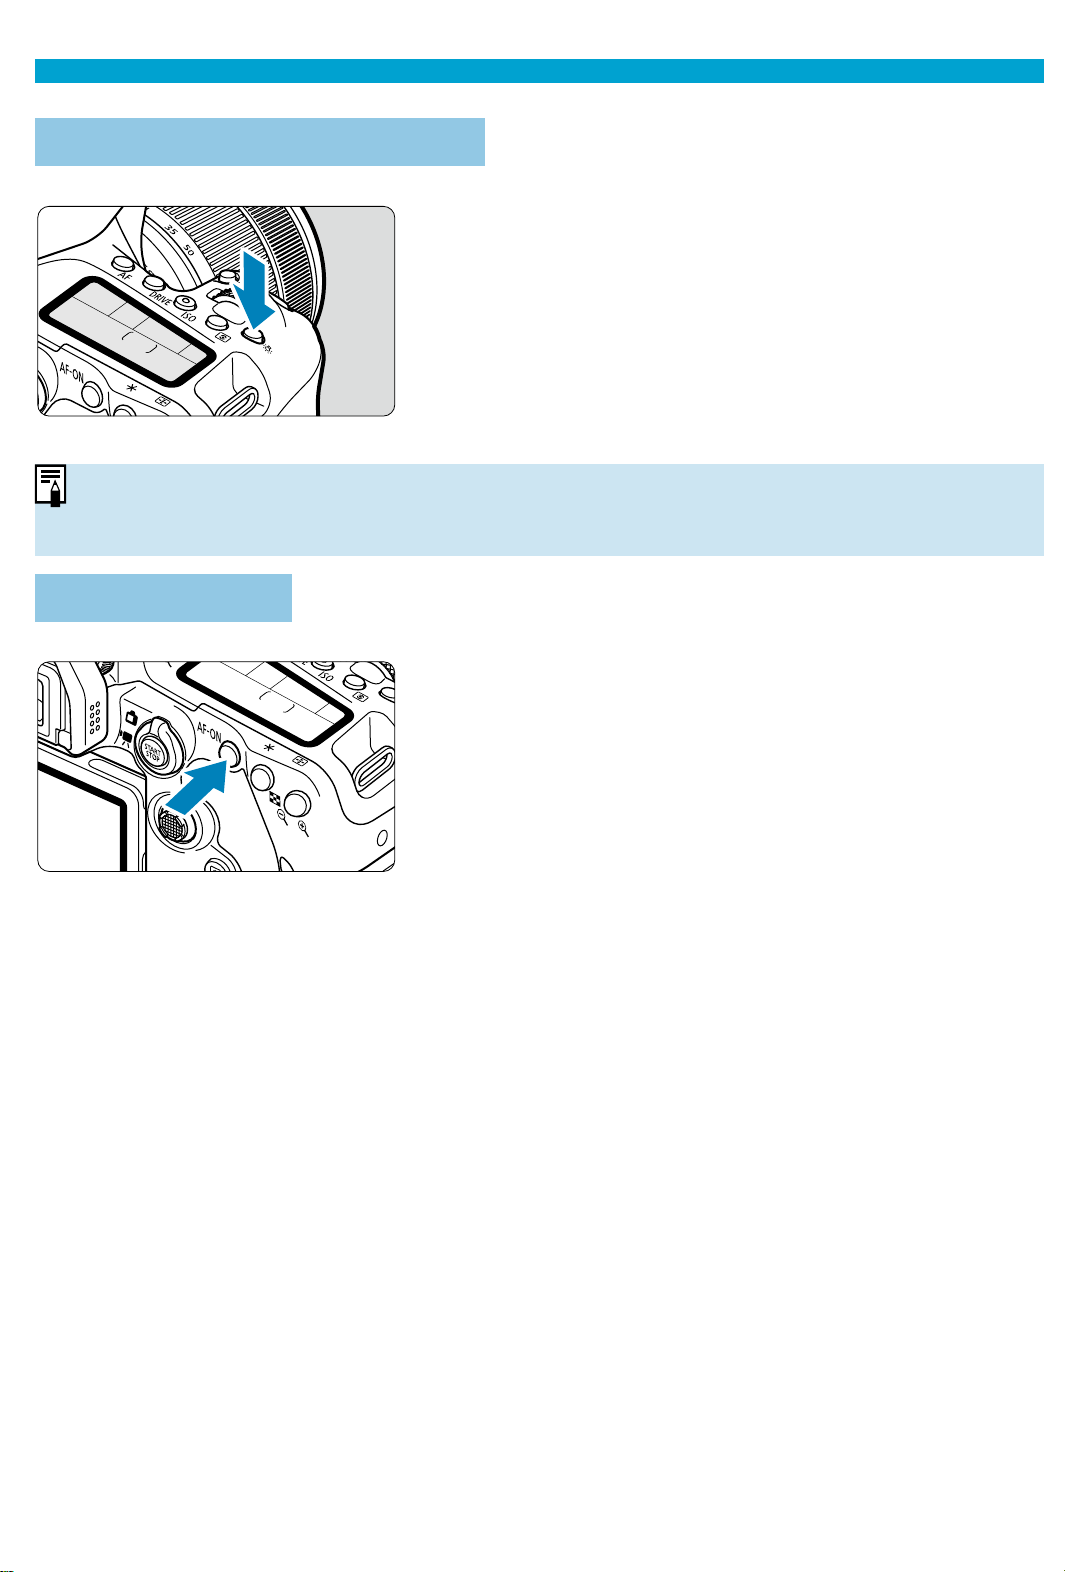
U
LCD Panel Illumination
You can illuminate the LCD panel by
pressing the <U> button. Turn on (
9
) or
off the LCD panel illumination by pressing
the <U> button.
oDuring a bulb exposure, pressing the shutter button completely will turn off the
LCD panel illumination.
p
Button
In still photo shooting, has the same eff ect
as pressing the shutter button halfway, in
Creative Zone modes (
=
57).
In movie recording as well, enables
autofocusing in Creative Zone modes.
Page 62
Basic Operations
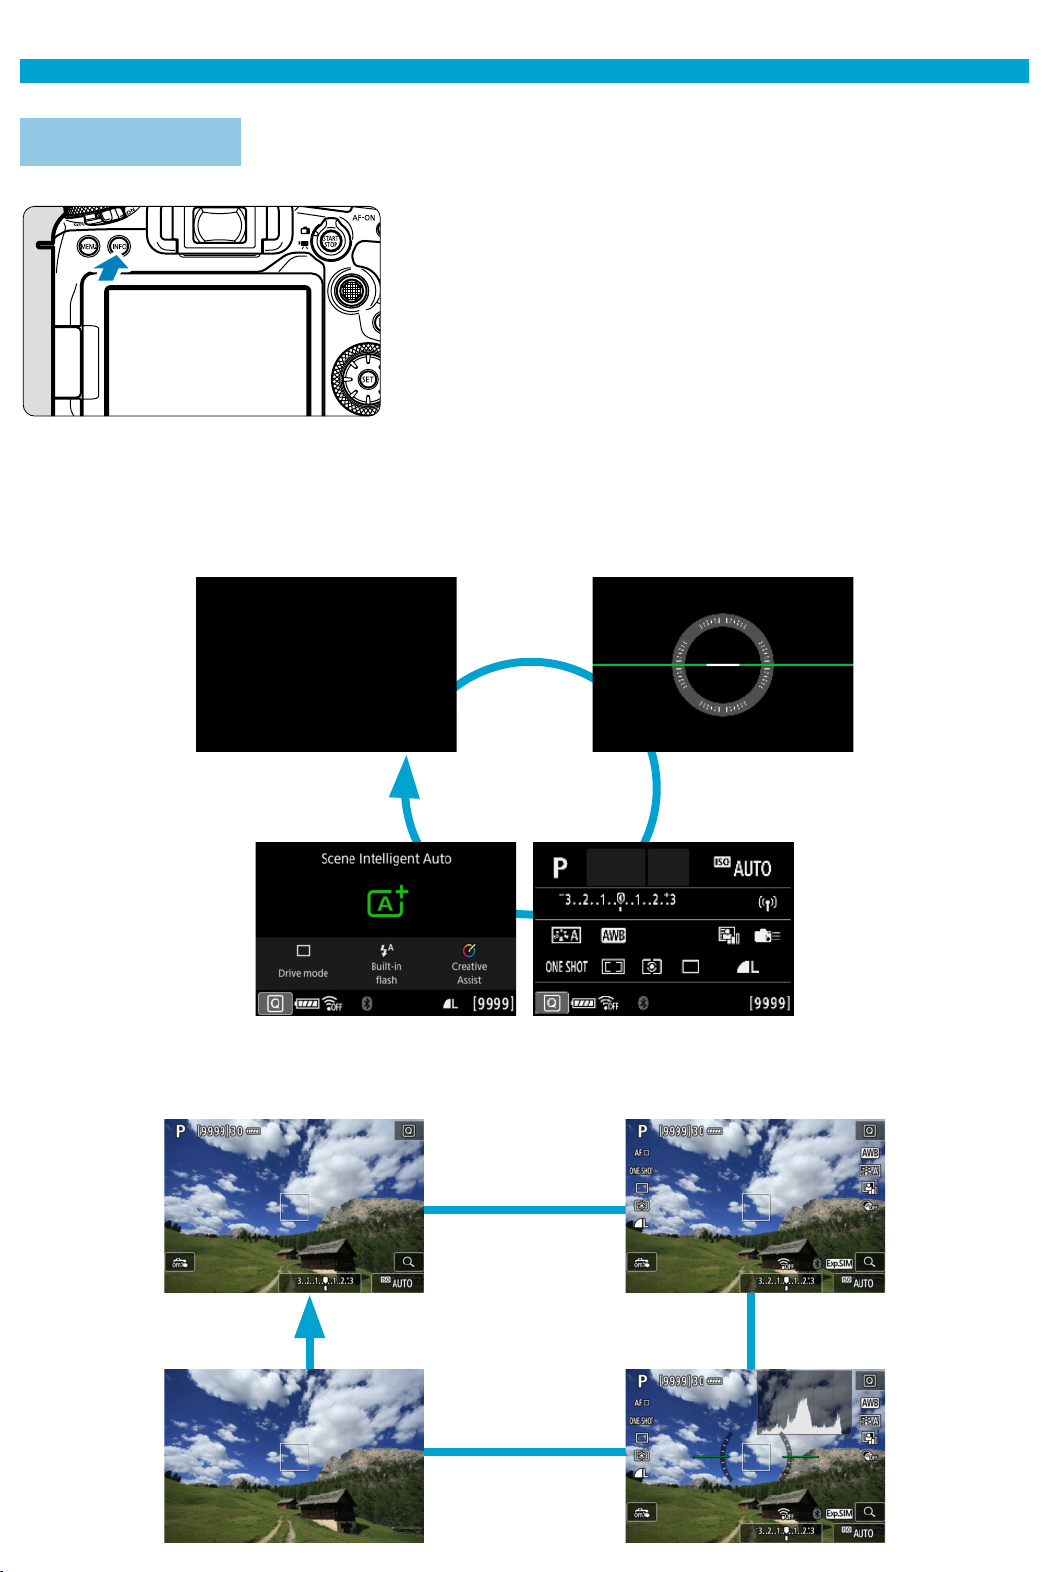
B
button
Each press of the <
B
> button changes
the information shown.
The following sample screens are for still
photos.
When the Quick Control screen is
displayed, you can press the <Q> button
and confi gure shooting functions directly
(
=
67).
In viewfi nder shooting
Quick Control screen
Electronic
level
In Live View shooting
Page 63
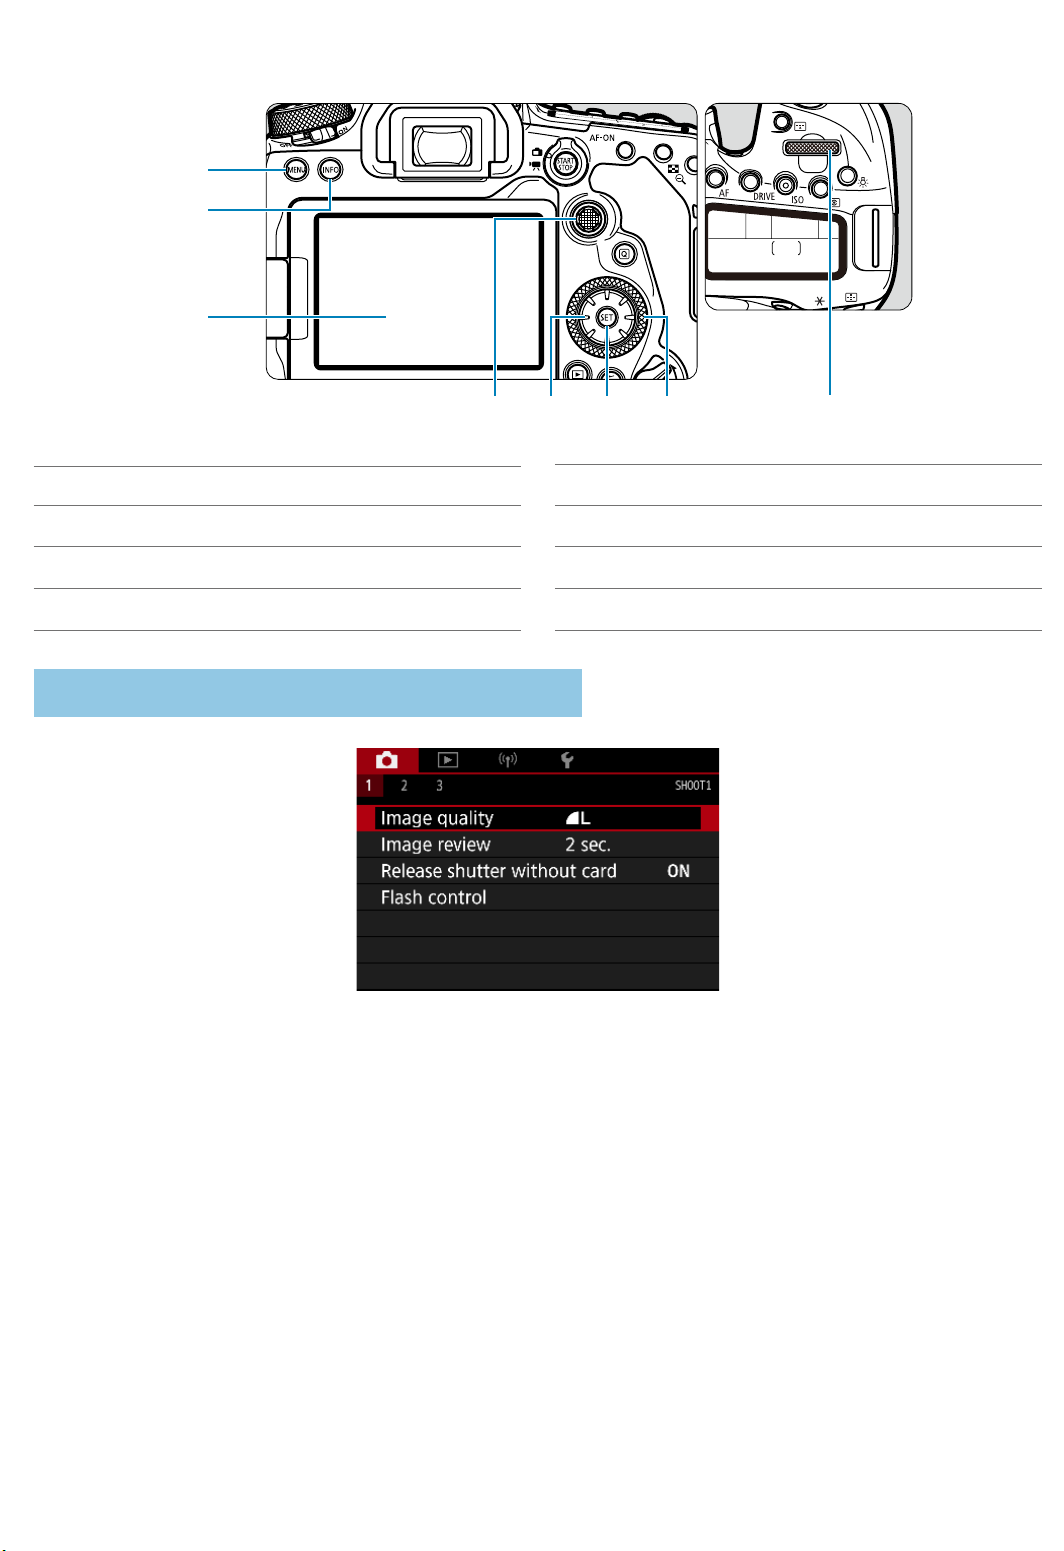
Menu Operations and Settings
(1)
(8)(5)
(3)
(2)
(4) (7)(6)
(1) <
M
> button
(2) <
B
> button
(3) Screen
(4) <j> Multi-controller 1
(5) <9> Multi-controller 2
(6) <0> button
(7) <5> Quick control dial
(8) <
6
> Main dial
Basic Zone Modes Menu Screen
* In Basic Zone modes, some tabs and menu items do not appear.
Page 64
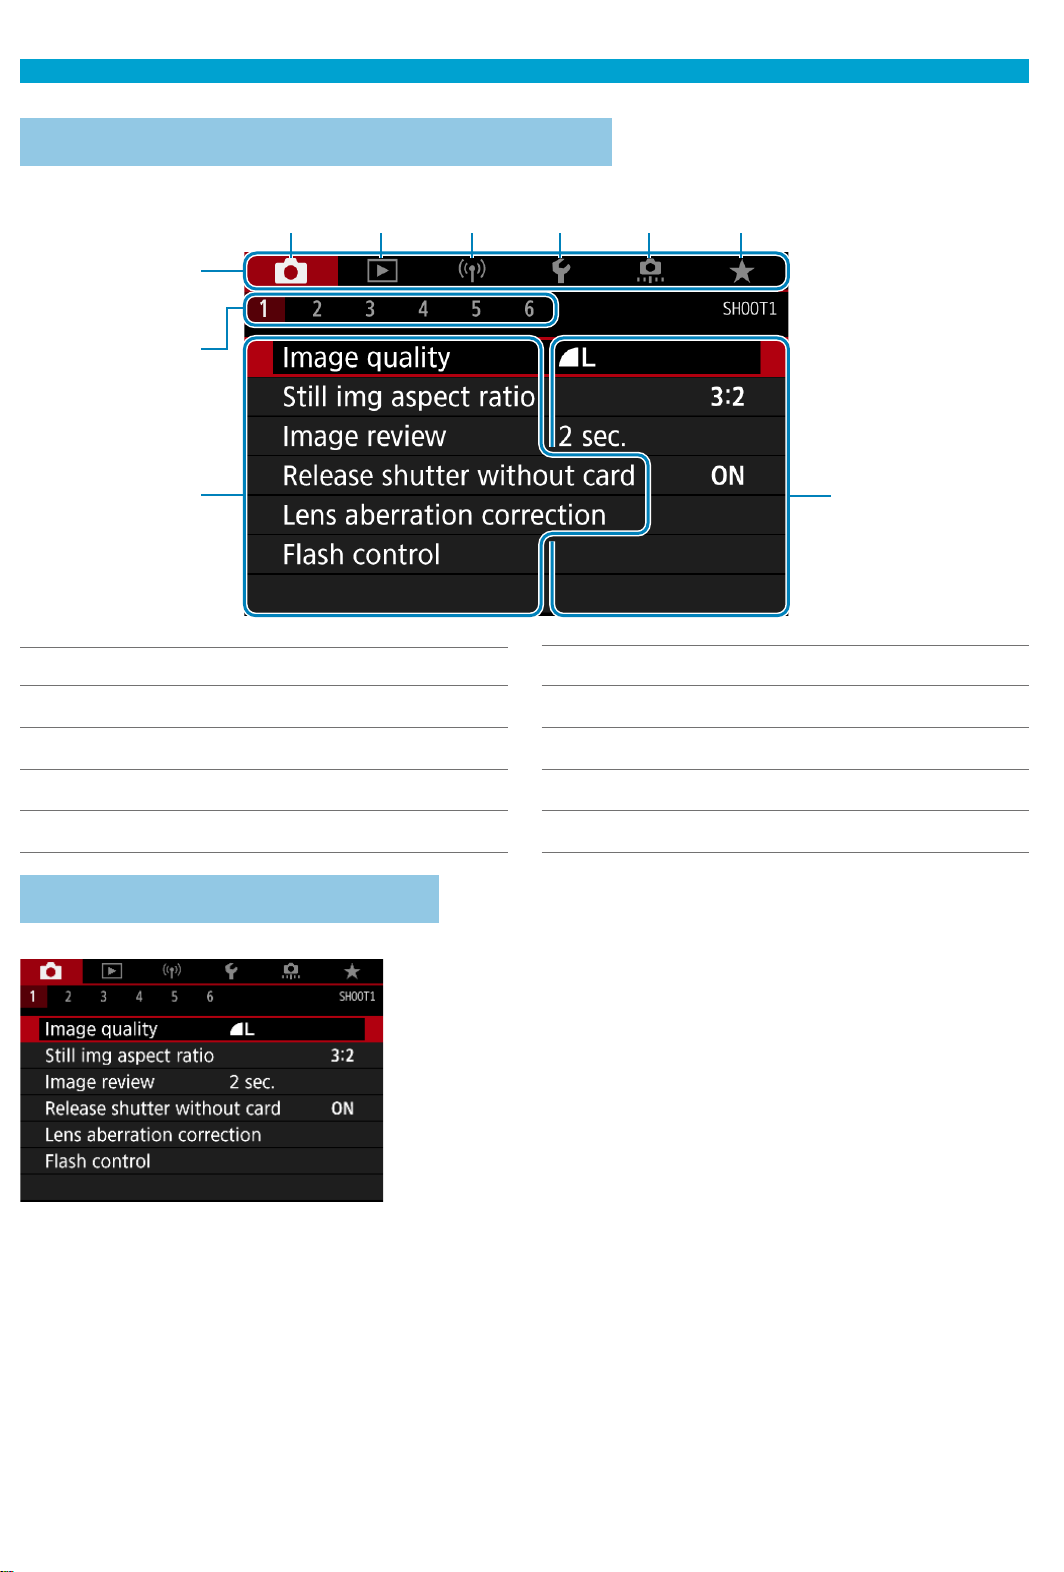
Menu Operations and Settings
Creative Zone Modes Menu Screen
(2)
(3)
(10)
(4) (5) (7) (8) (9)
(1)
(6)
(1) Main tabs
(2) Secondary tabs
(3) Menu items
(4)
z
: Shooting
(5)
3
: Playback
(6)
k
: Wireless features
(7)
5
: Set-up
(8)
8
: Custom Functions
(9)
9
: My Menu
(10) Menu settings
Menu Setting Procedure
1
Display the menu screen.
Press the <
M
> button.
2
Select a tab.
Each time you press the <Q> or
<
B
> button, the main tab (group of
functions) will switch.
Turn the <
6
> dial to select a
secondary tab.
Page 65
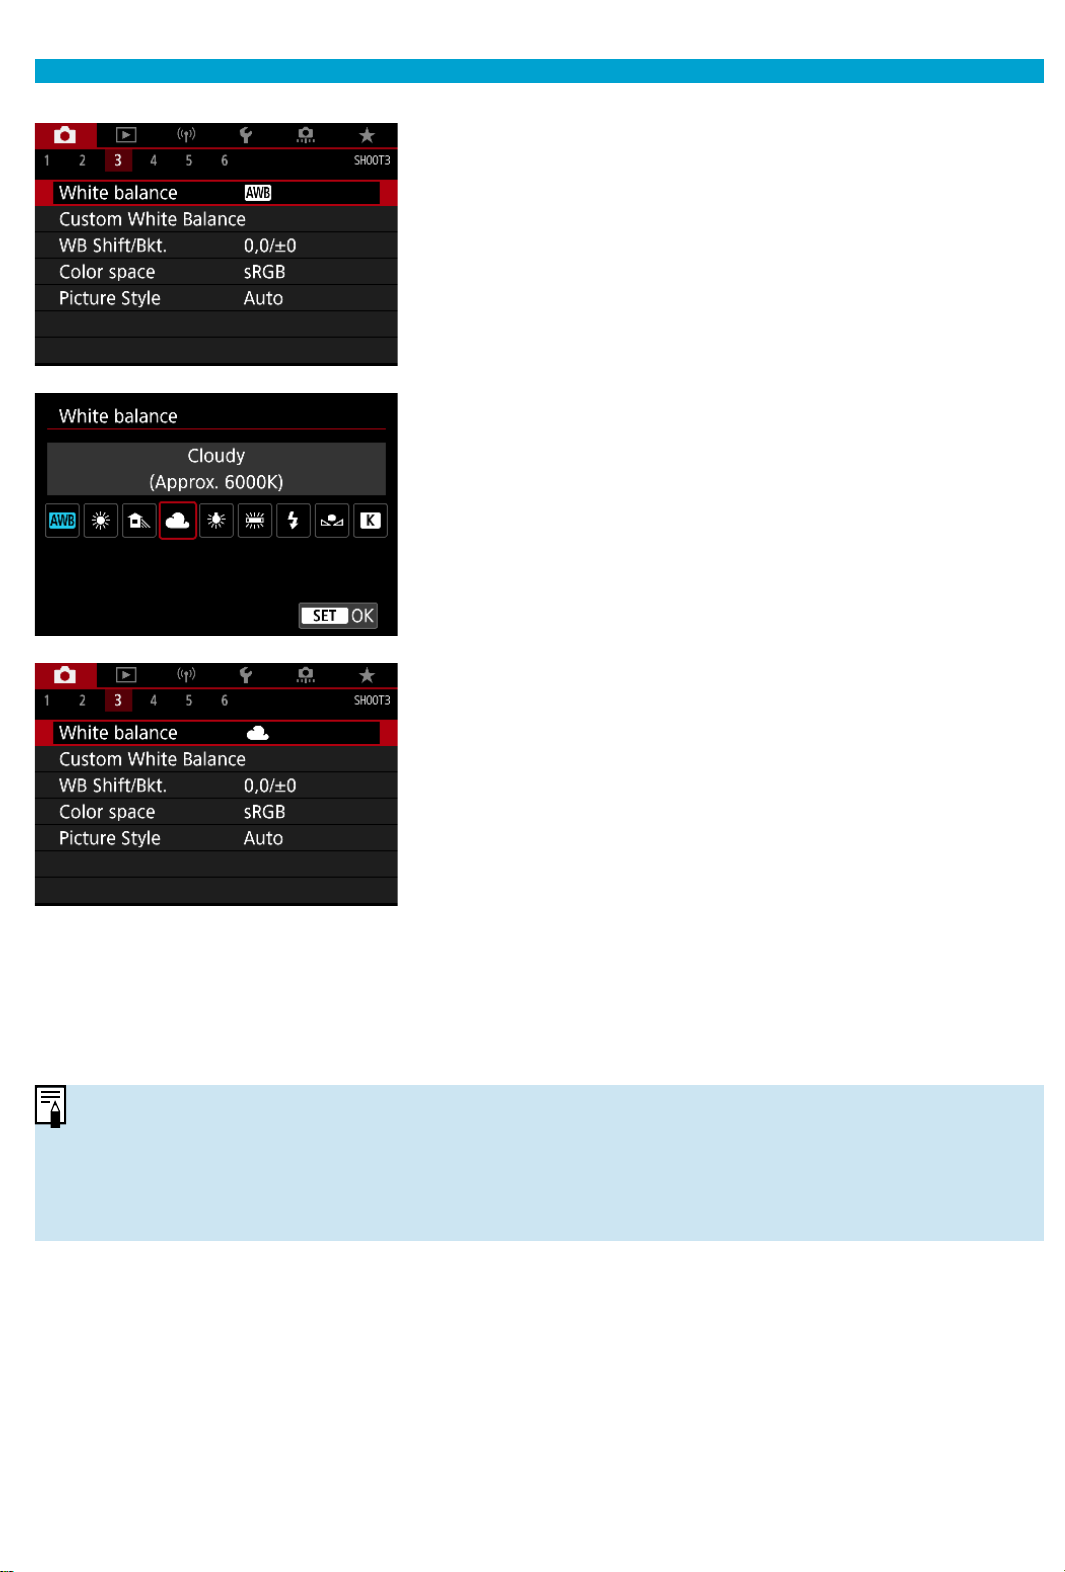
Menu Operations and Settings
3
Select an item.
Turn the <
5
> dial to select an item,
then press <
0
>.
4
Select an option.
Turn the <
5
> dial to select an option.
The current setting is indicated in blue.
5
Set an option.
Press <
0
> to set it.
6
Exit the setting.
Press the <
M
> button to fi nish and
prepare for shooting.
oThe description of menu functions hereafter assumes that you have pressed
the <
M
> button to display the menu screen.
oYou can also tap on the menu screen or use <j> <9> to operate the menu.
oTo cancel the operation, press the <
M
> button.
Page 66
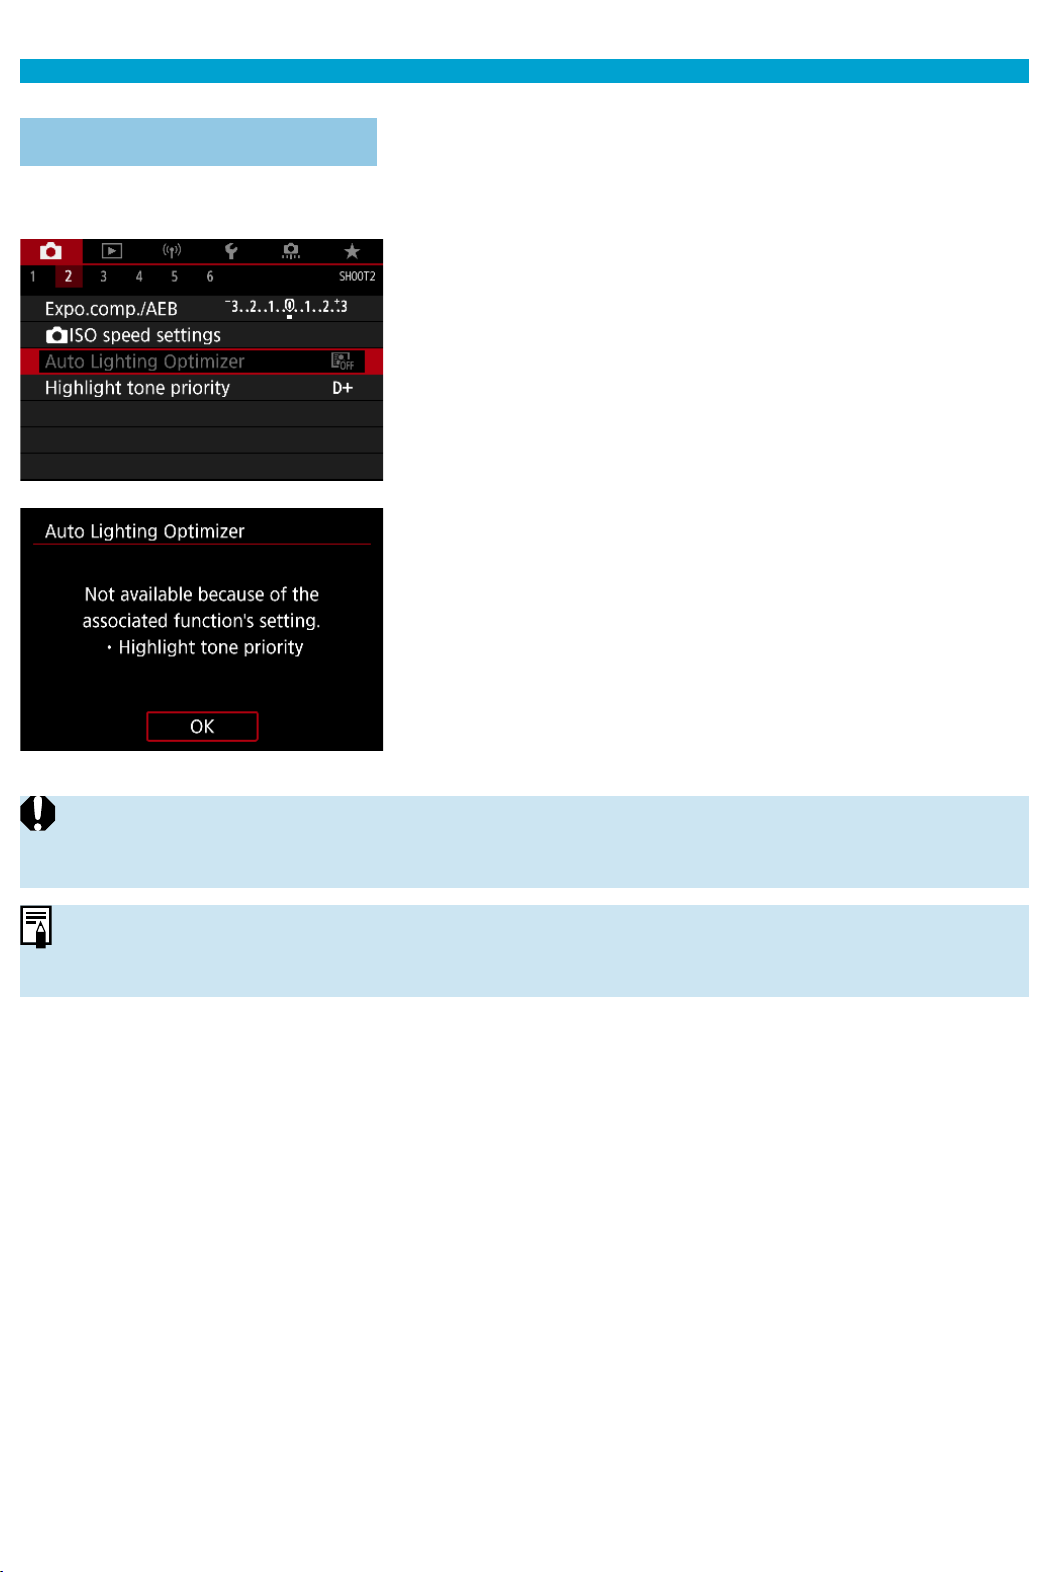
Menu Operations and Settings
Dimmed Menu Items
Example: Highlight tone priority
Dimmed menu items cannot be set. The
menu item is dimmed if another function
setting is overriding it.
You can see the overriding function by
selecting the dimmed menu item and
pressing <
0
>.
If you cancel the overriding function’s
setting, the dimmed menu item will become
settable.
oYou may not be able to see the overriding function for certain dimmed menu
items.
oWith [5: Clear all camera settings], you can reset the menu functions to the
default settings (=547).
Page 67
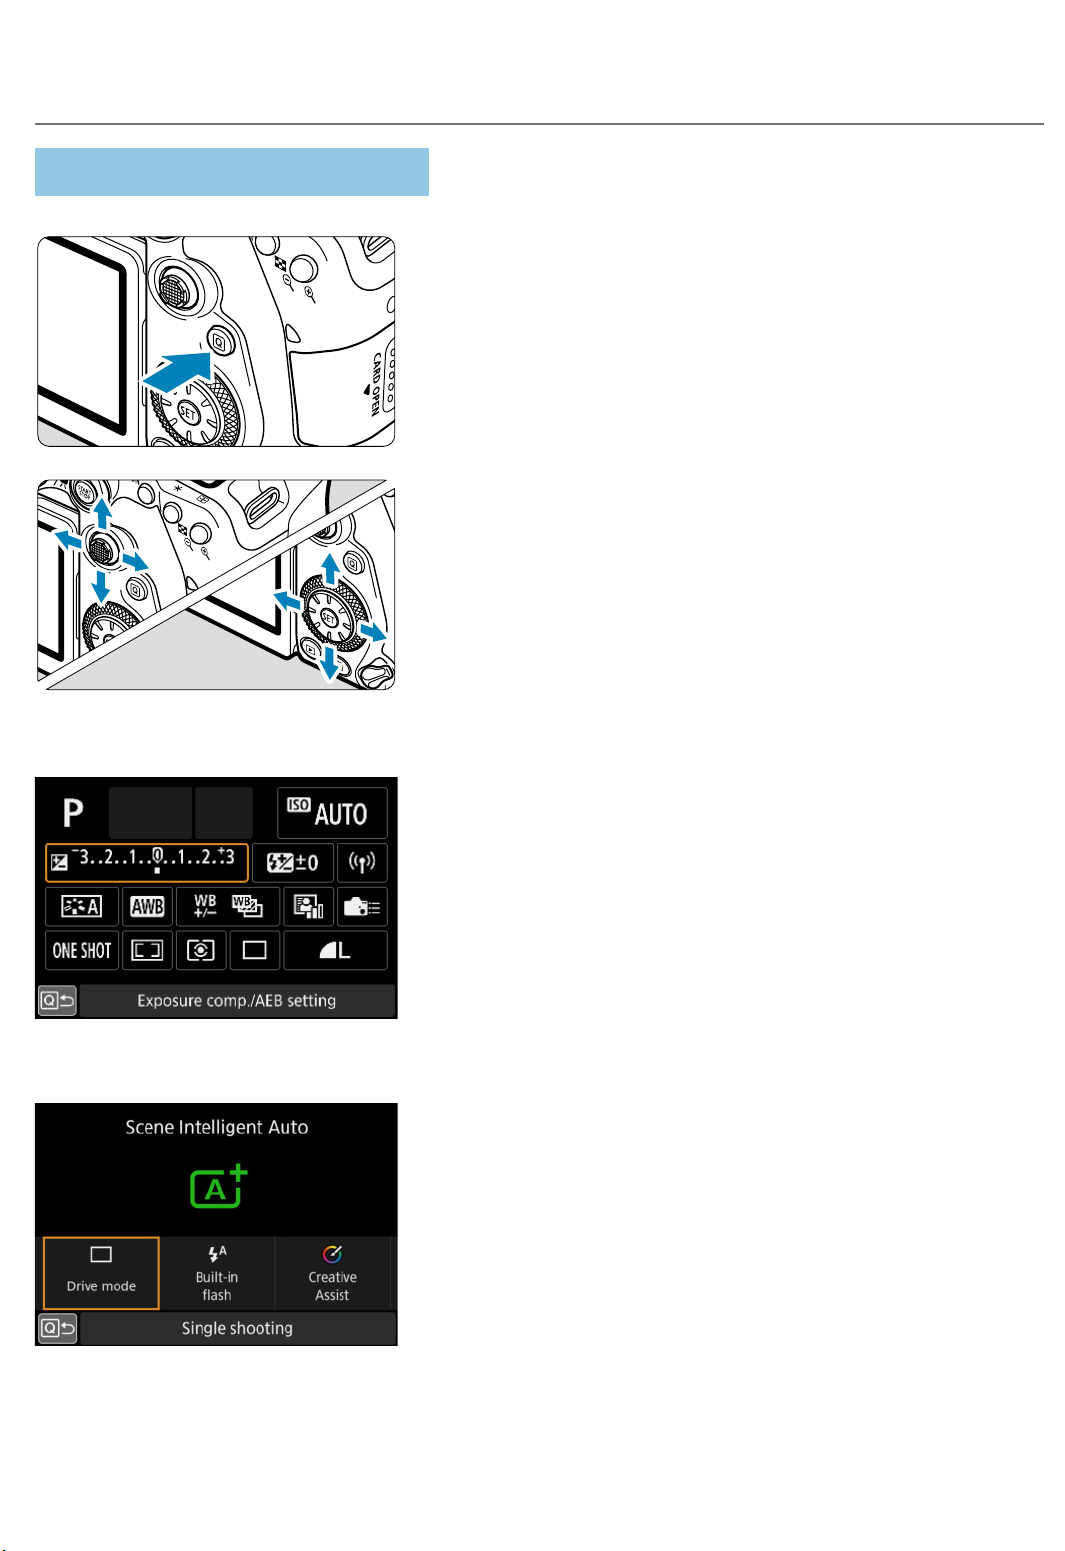
Quick Control
You can directly select and set the settings displayed on the screen.
In Viewfi nder Shooting
1
Press the <Q> button (7).
2
Select a setting item.
Press the <W> <X> <Y> <Z> keys for
selection.
Creative Zone
Press <
0
>.
Some items can be set by turning the
<
6
> or <5> dial without pressing
<
0
>.
Basic Zone
Page 68
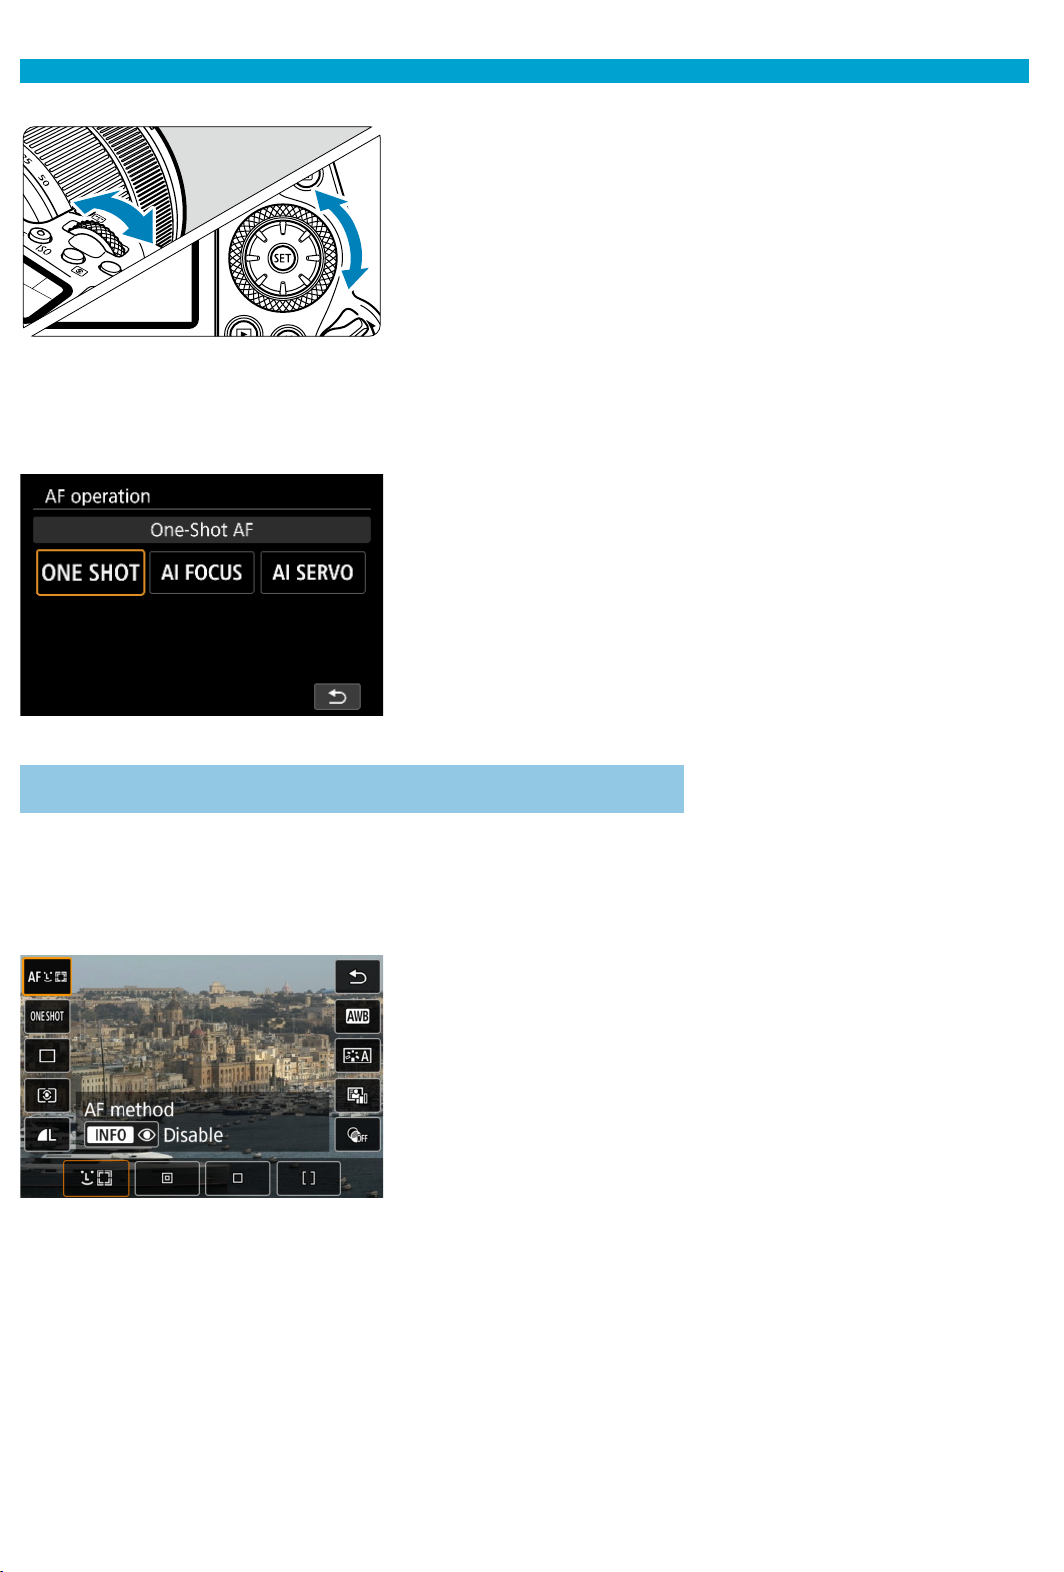
Quick Control
3
Select an option.
Turn the <
6
> or <5> dial, or press
the <Y> <Z> keys to change the
setting. Some items are set by pressing
a button after this.
Press <
0
> to return to the previous
screen.
If you have selected <
7
>, <
H
>, or
<
k
>, press the <
M
> button to exit.
To access the corresponding setting
screen from the Quick Control screen,
press the <
f
>, <
R
>, <
i
>,
<
q
>, <
S
>, or <
G
> button, then
adjust the setting with the <
6
> or
<5> dial, <Y> <Z> keys, or <
G
>
button.
In Live View Shooting/Movie Recording
1
Press the <Q> button (7).
2
Select a setting item.
Press the <W> <X> keys for selection.
3
Select an option.
Turn the <
6
> or <5> dial, or press
the <Y> <Z> keys to change the
setting. Some items are set by pressing
a button after this.
Press the <Q> button to return to the
previous screen.
Page 69
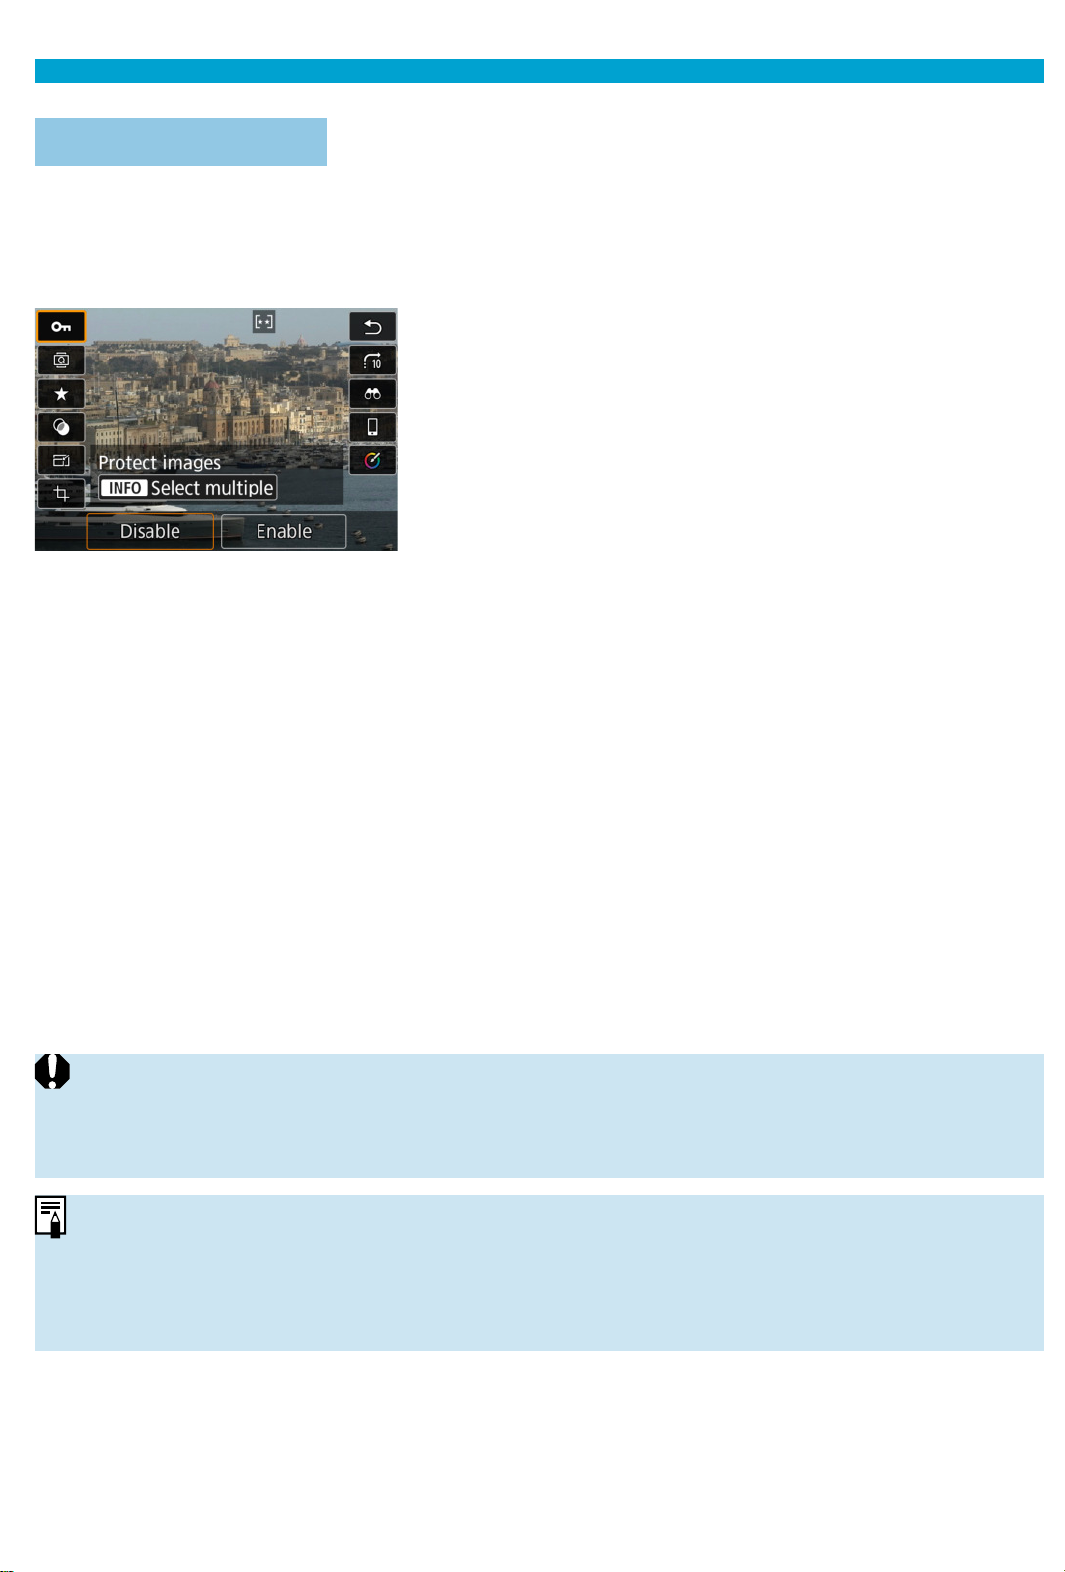
Quick Control
During Playback
1
Press the <Q> button (7).
2
Select a setting item.
Press the <W> <X> keys for selection.
3
Select an option.
Turn the <
6
> or <5> dial, or press
the <Y> <Z> keys to change the
setting. Some items are set by pressing
a button after this.
Confi gure items labeled with a [
s
]
icon on the bottom of the screen by
pressing <
0
>.
To cancel this operation, press the
<
M
> button.
Press the <
Q
> button to return to the
previous screen.
oBefore rotating images, set [5: Auto rotate] to [On
z
D
] (=349). When
[5: Auto rotate] is set to [OnD] or [Off ], images will be tagged with your
selected [b Rotate image] option but not rotated on the camera.
oPressing the <Q> button during index display will switch to single-image
display and show the Quick Control screen. Pressing the <Q> button again
returns to index display.
oFor images from other cameras, available options may be restricted.
Page 70
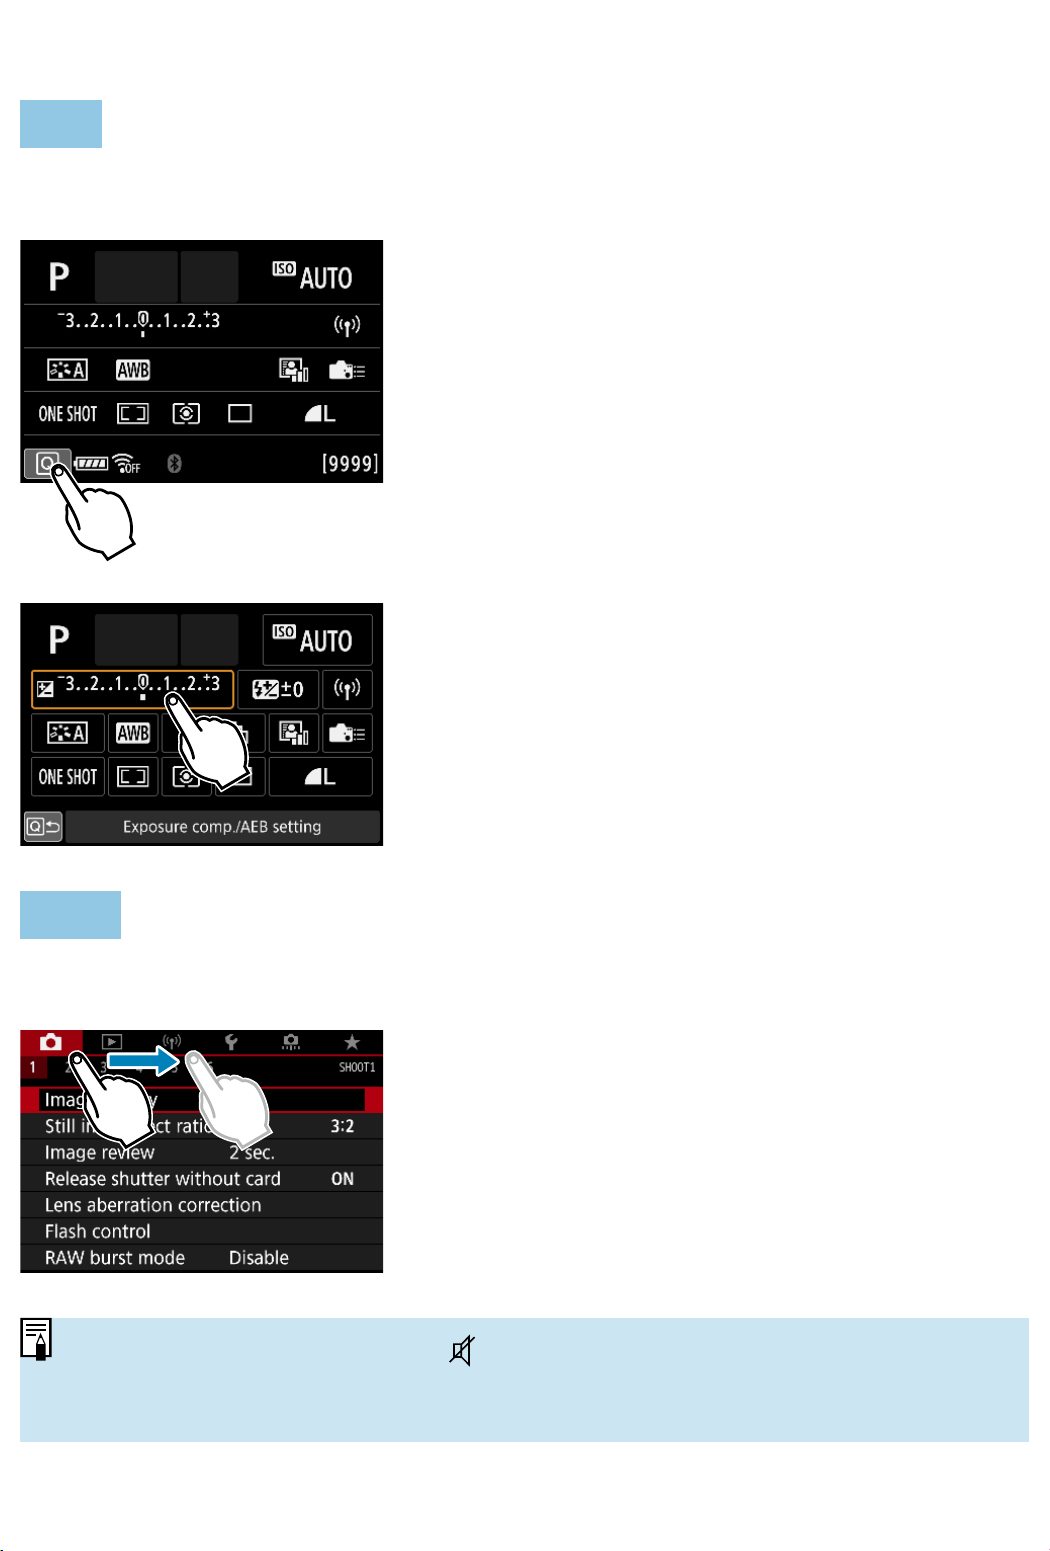
Touch-Screen Operation
Tap
Sample screen (Quick Control)
Use your fi nger to tap on (touch briefl y
and then remove your fi nger from) the
screen.
For example, when you tap on [Q],
the Quick Control screen appears. By
tapping on [
Q
], you can return to the
preceding screen.
Drag
Sample screen (Menu screen)
Slide your fi nger while touching the
screen.
oIf [5: Beep] is set to [Touch
] or [Disable], the beep will not sound for
touch operations (=522).
oTouch control settings can be adjusted in [5: Touch control] (=521).
Page 71
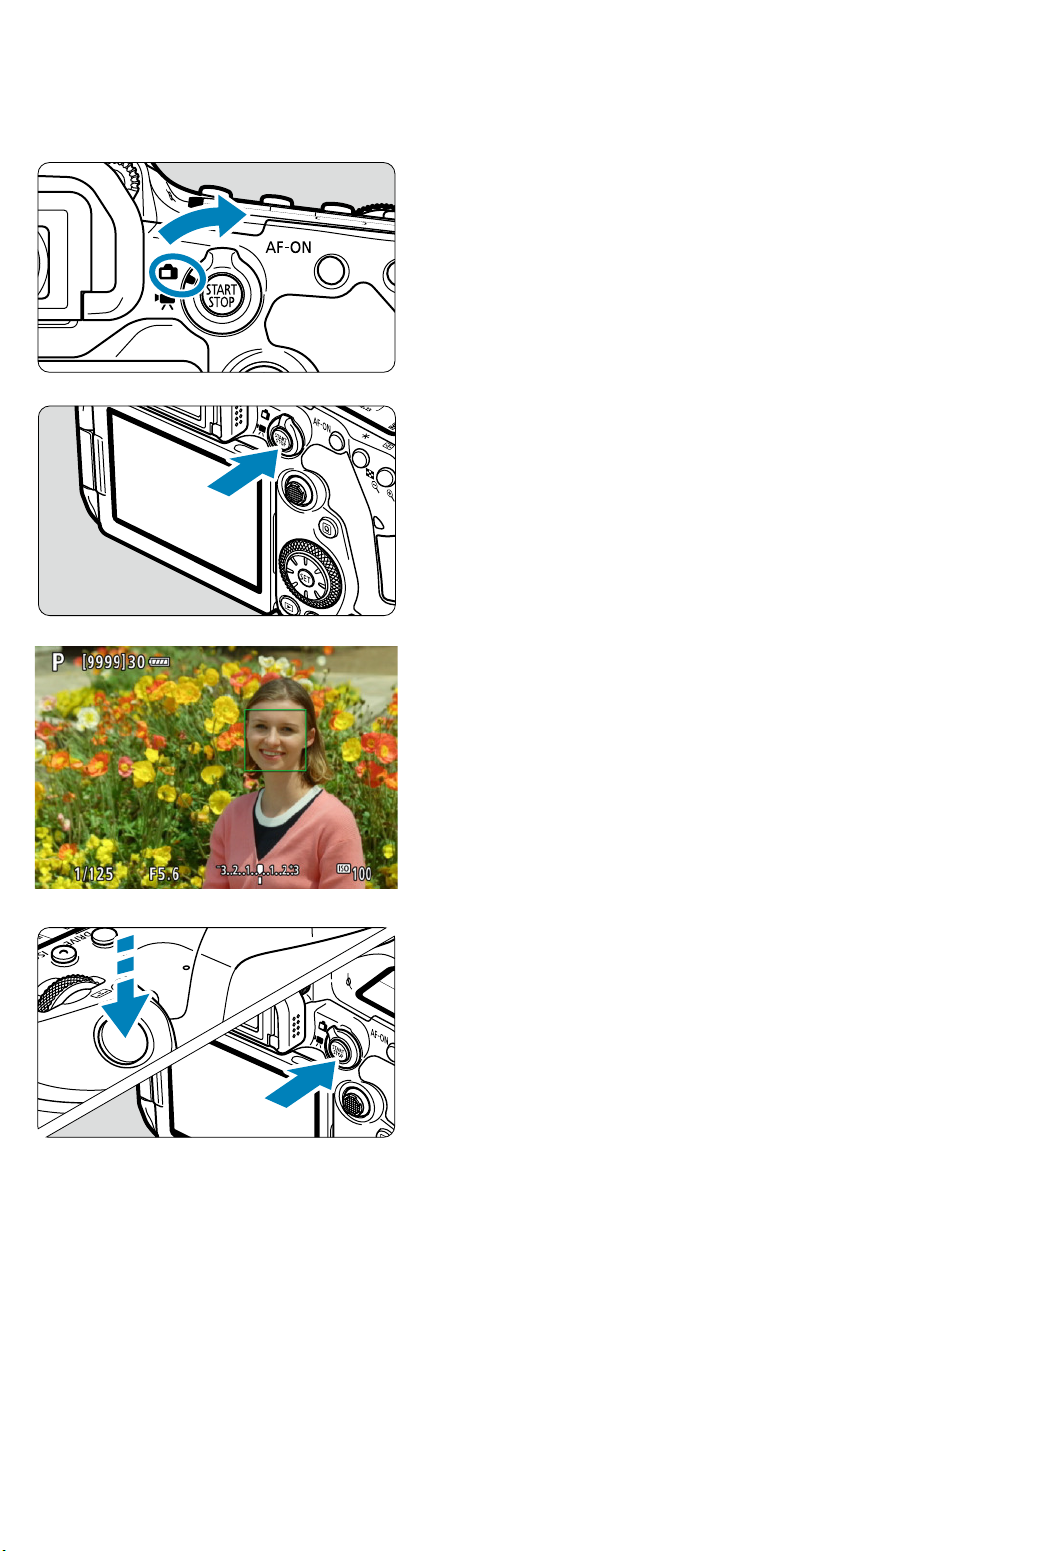
Viewing the Screen as You Shoot (Live View
Shooting)
1
Set the Live View shooting/Movie
shooting switch to <A>.
2
Display the Live View image.
Press the <
0
> button.
The Live View image will be displayed
in the brightness level closely matching
that of the actual image to be captured.
3
Focus on the subject.
Press the shutter button halfway to
focus.
If <D> blinks, press the <D> button to
raise the built-in fl ash.
You can also tap on the screen to select
the face or subject (
=
72).
4
Take the picture.
Press the shutter button completely.
Press the <
0
> button to exit Live View
shooting.
Page 72
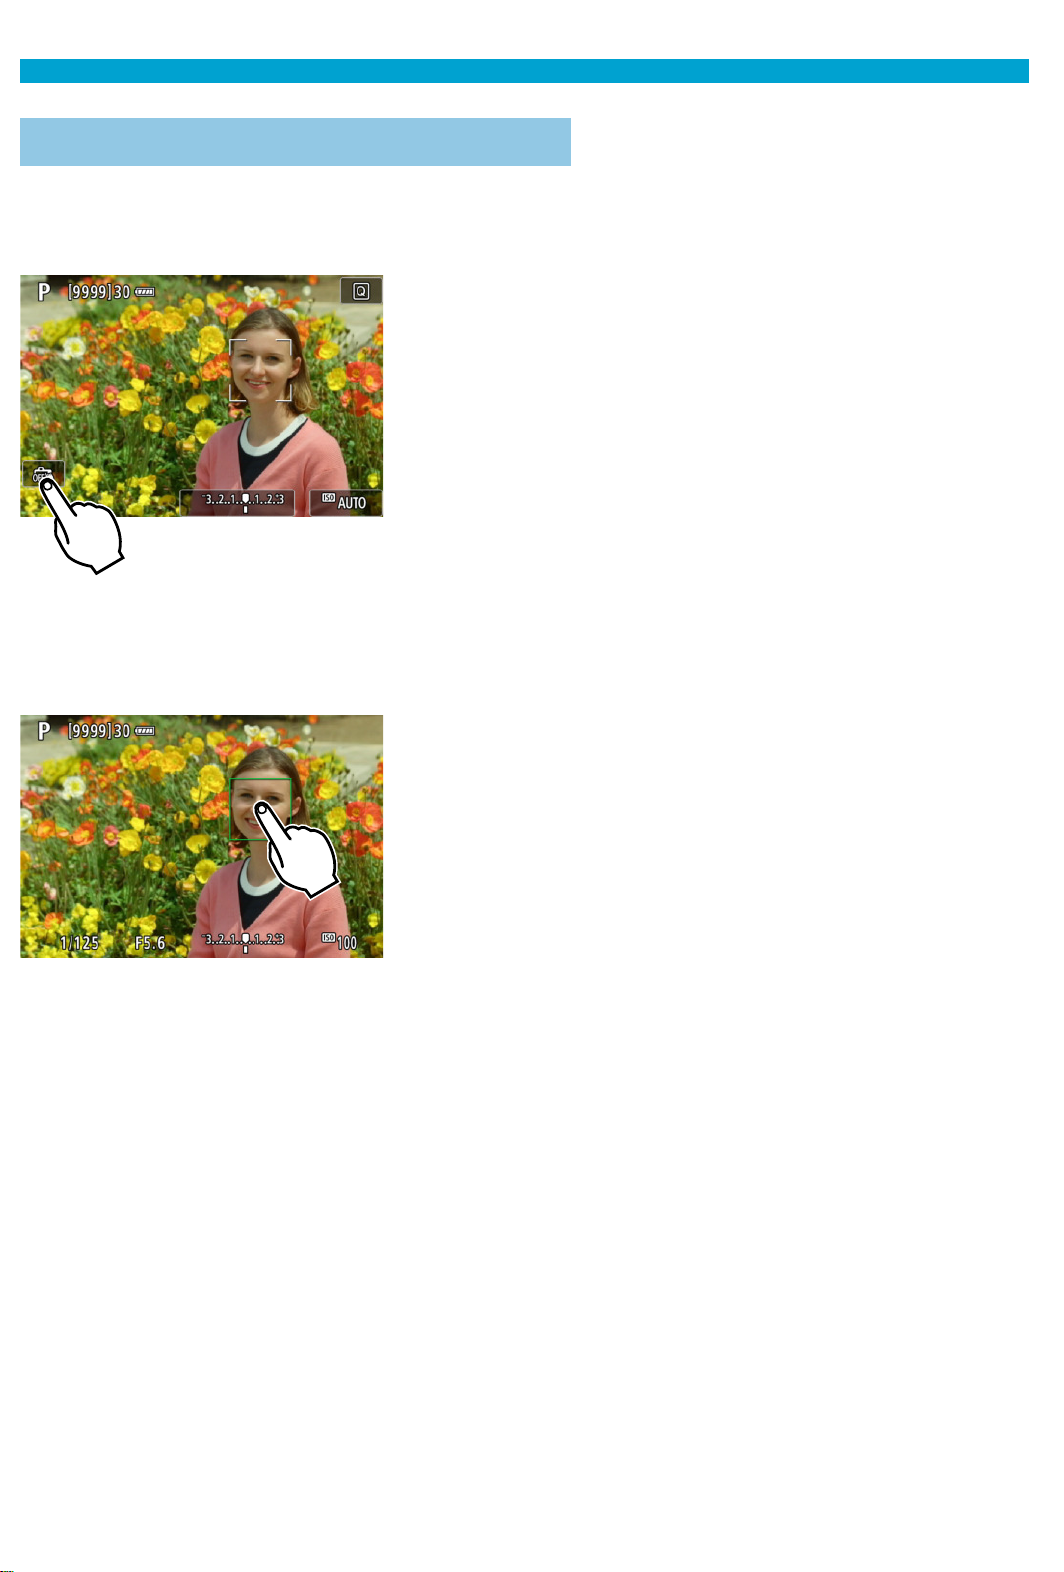
Viewing the Screen as You Shoot (Live View Shooting)
Shooting with the Touch Shutter
Just by tapping on the screen, you can focus and take the picture
automatically.
1
Enable the Touch Shutter.
Tap [
y
] on the screen’s bottom left.
Each time you tap on the icon, it will
toggle between [
y
] and [
x
].
[
x
] (Touch Shutter: Enable)
The camera will focus on the spot you
tap on, then the picture will be taken.
[
y
] (T
ouch Shutter: Disable)
Y
ou can tap on a spot to perform
focusing on the spot. Press the shutter
button completely to take the picture.
2
Tap on the screen to shoot.
Tap on the face or subject on the screen.
On the point you tap, the camera will
focus (Touch AF) with the AF method
that was set (
=
135–
=
136).
When [
x
] is set, the
AF point turns
green when focus is achieved, then the
picture is taken automatically.
If focus is not achieved, the AF point
turns orange and the picture cannot be
taken. Tap on the face or subject on the
screen again.
Page 73
Viewing the Screen as You Shoot (Live View Shooting)
oThe camera shoots in single shooting mode regardless of the drive mode
setting.
oTapping the screen focuses with [One-Shot AF] regardless of the AF
operation setting.
oTapping on the screen in magnifi
ed view will not focus or take the picture.
oRegardless of where you tap to shoot with the Fish-eye eff
ect Creative fi lter,
your shots will be in focus at the
AF point in the center of the screen.
oTouch Shutter has no eff ect when you shoot with the Miniature eff ect Creative
fi
lter.
oIf you shoot with [z: Image review] set to [Hold], you can press the shutter
button halfway to take the next shot.
oIn bulb exposures, tap once to start exposure and again to stop exposure. Be
careful not to shake the camera when tapping on the screen.
Page 74

Page 75
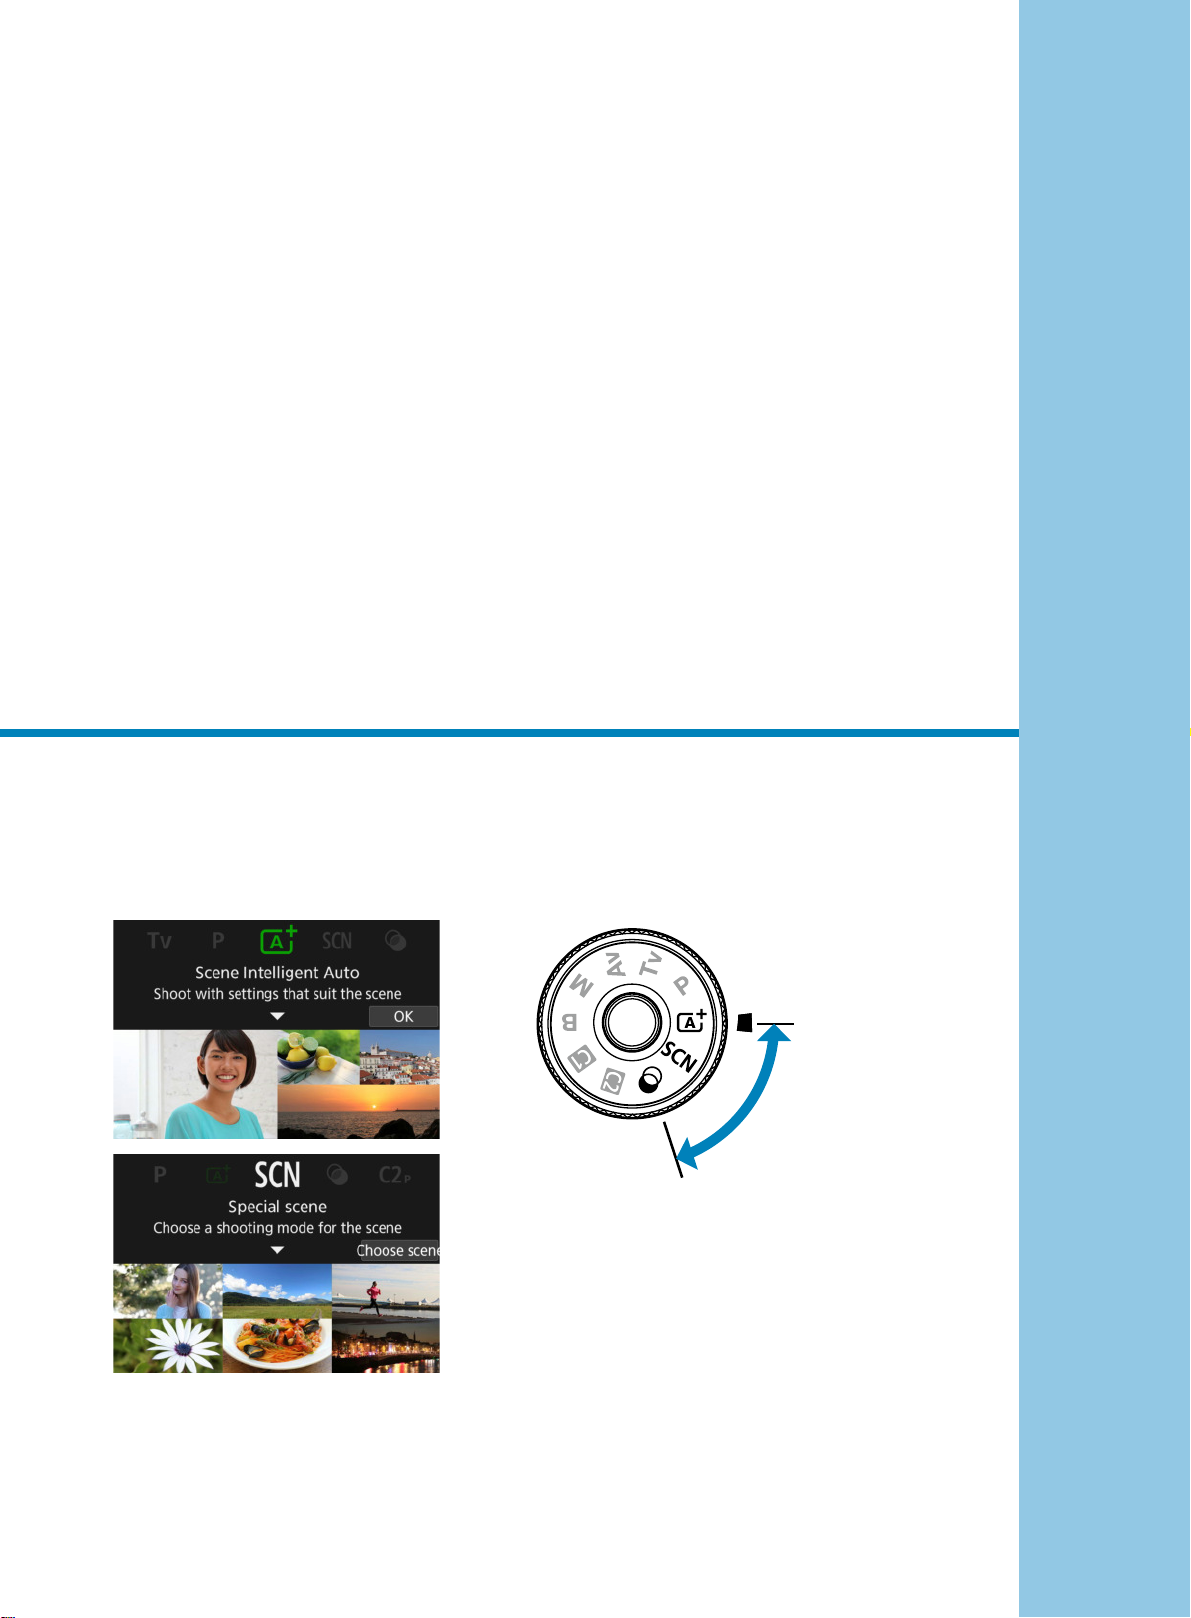
Basic Zone
This chapter describes how to use the Basic Zone modes on the
Mode dial for best results.
With Basic Zone modes, all you do is point and shoot, and the
camera sets everything automatically.
Page 76
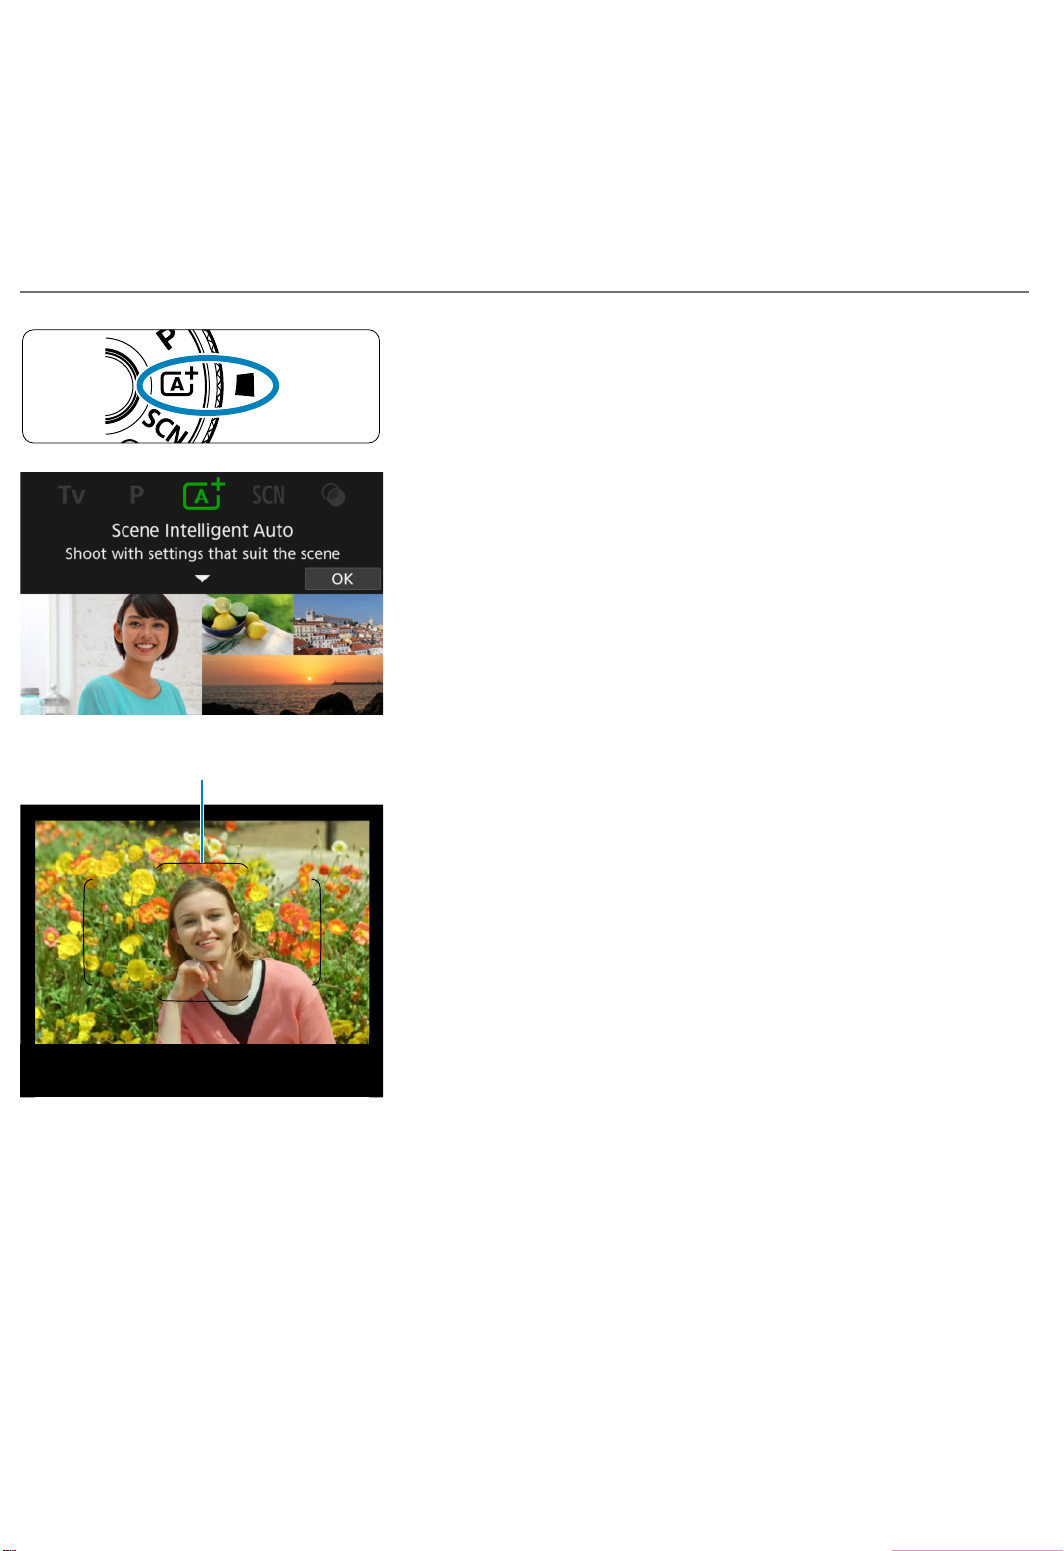
Fully Automatic Shooting (Scene Intelligent
Auto)
<
A
> is a fully automatic mode. The camera analyzes the scene
and sets the optimum settings automatically. It can also adjust focus
automatically on either the still or moving subject by detecting the motion of
the subject (
=
80).
1
Set the Mode dial to <A>.
2
Press <0>.
Read the message and select [OK].
(1)
3
Aim the camera at what you will
shoot (the subject).
Essentially, the camera focuses on the
closest subject.
In viewfi nder shooting, you can assist
with focusing by centering the Area AF
frame (1) over the subject.
In Live View shooting, when a frame (AF
point) appears on the screen, aim it over
the subject.
Page 77
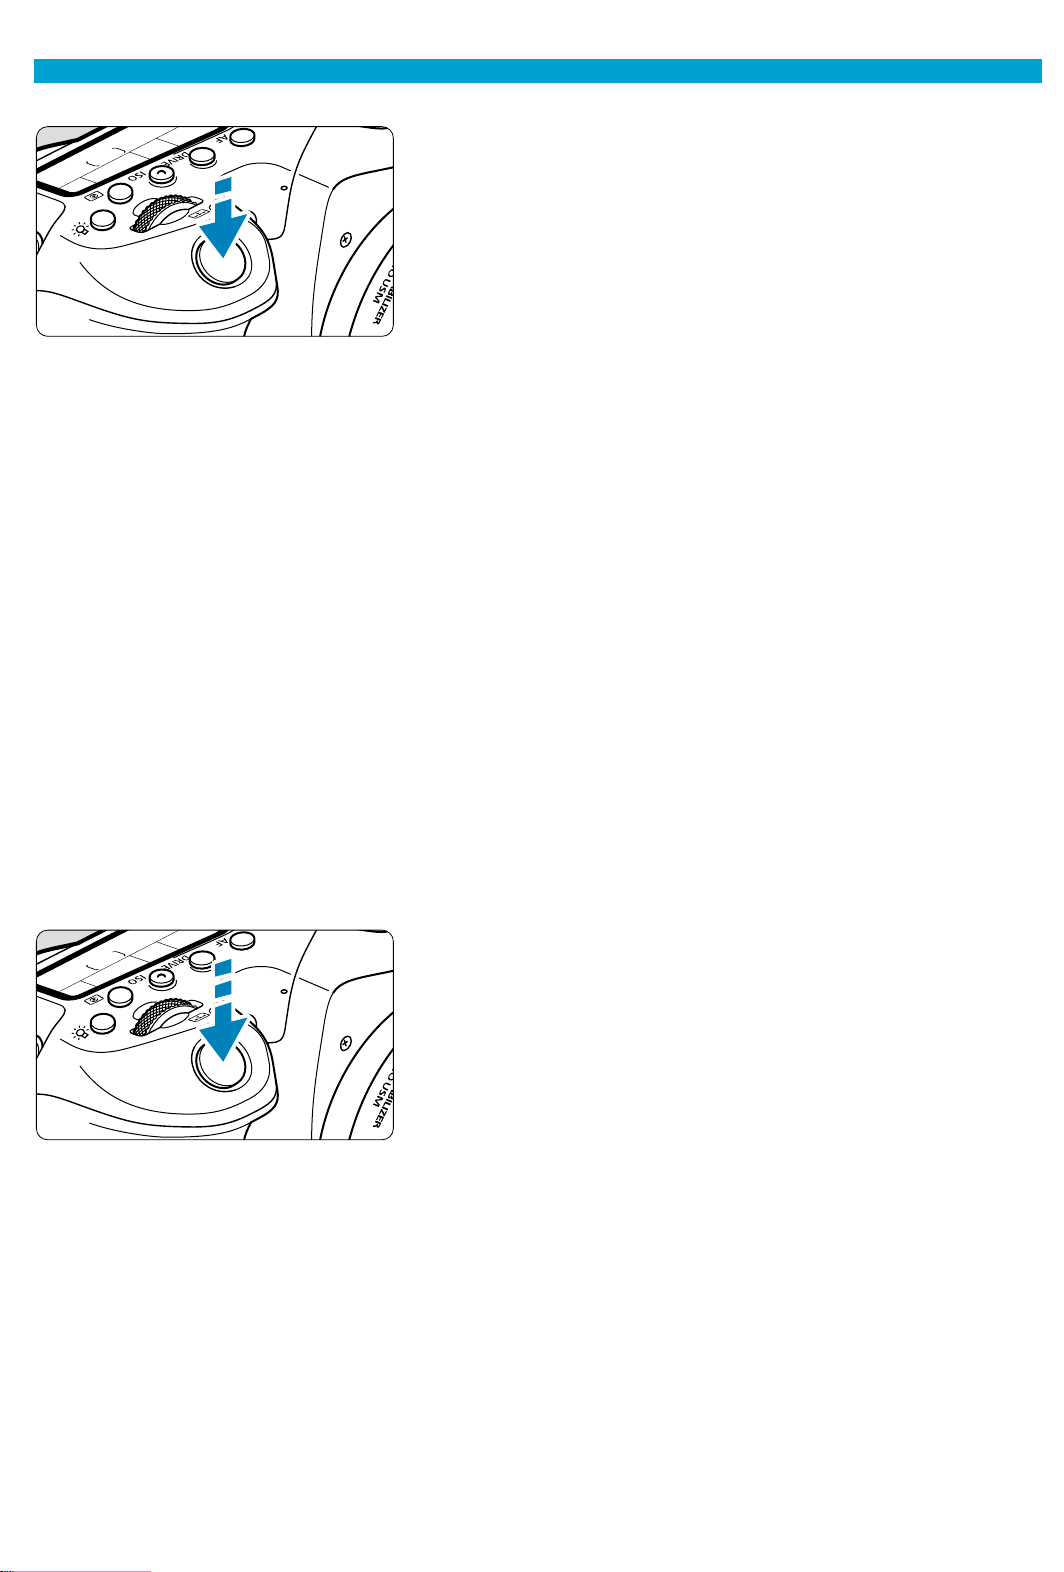
Fully Automatic Shooting (Scene Intelligent Auto)
4
Focus on the subject.
Press the shutter button halfway to
focus.
If <D> blinks, press the <D> button to
raise the built-in fl ash.
With viewfi nder shooting
When achieving focus, the AF point that
has achieved focus will be displayed.
At the same time, the beeper will sound
and the focus indicator <o> in the
viewfi
nder will light up. In low light, the
AF point(s) will light up briefl y in red.
Under low light, the
AF-assist beam
(continuous fl ash) fi res automatically as
needed when the built-in fl ash is raised.
With Live View shooting
Once the subject is in focus, that AF
point turns green and the camera beeps.
The AF point in focus on a moving
subject turns blue and tracks subject
movement. The camera does not beep.
5
Take the picture.
Press the shutter button completely to
take the picture.
The image just captured will be
displayed for approx. 2 sec. on the
screen.
To retract the built-in fl ash, push it down
with your fi ngers.
Page 78
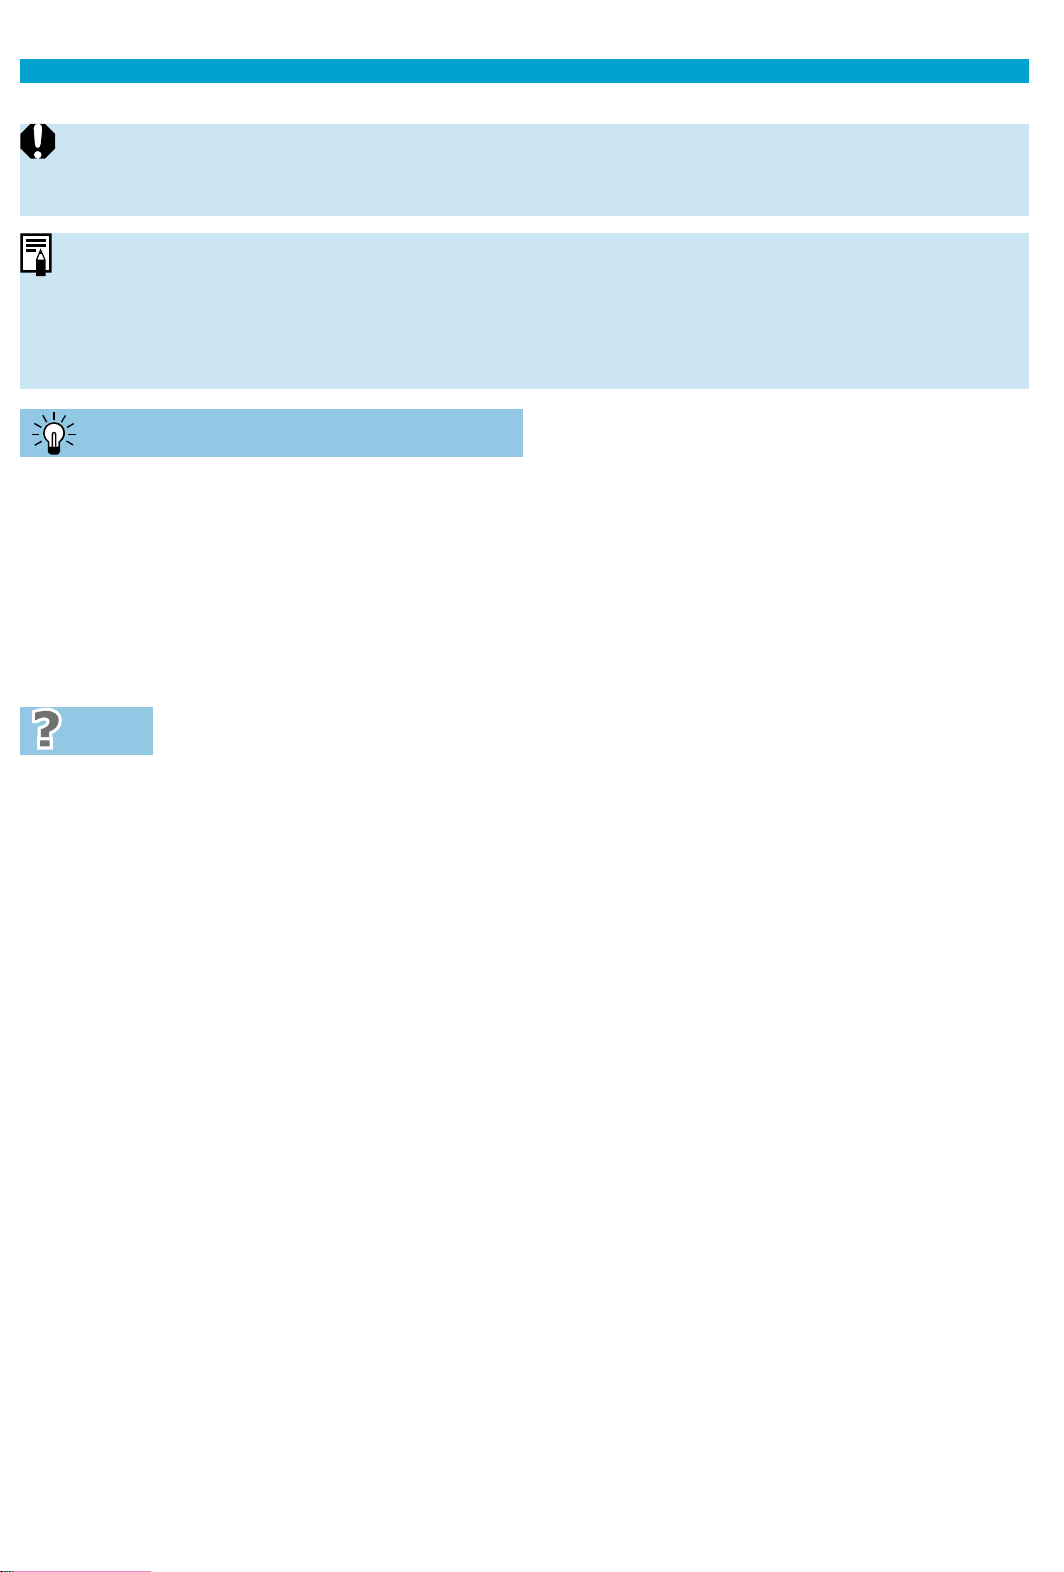
Fully Automatic Shooting (Scene Intelligent Auto)
oSubject movement (whether subjects are still or moving) may not be detected
correctly for some subject or shooting conditions.
oThe <
A
> mode makes the colors look more impressive in nature, outdoor,
and sunset scenes. If you do not obtain the desired color tones, change the
mode to a Creative Zone mode (=39) and select a Picture Style other than
<
D
>, then shoot again (=230).
Minimizing Blurred Photos
Be careful about camera shake in handheld shots. To avoid camera
shake, consider using a tripod. Use a sturdy tripod that can bear the
weight of the shooting equipment. Attach the camera securely to the
tripod.
Using a remote switch (sold separately,
=
156) or a wireless remote
control (sold separately,
=
155) is recommended.
FAQ
Focusing is not possible (indicated by a blinking <o> in the
viewfi nder, in viewfi nder shooting, or by an orange AF point
in Live View shooting).
Aim the AF point over an area with good contrast, then press the shutter
button halfway (
=
57). If you are too close to the subject, move away
and shoot again.
Multiple AF points are displayed simultaneously.
Focus has been achieved at all those points.
Pressing the shutter button halfway does not focus the
subject.
If the focus mode switch on the lens is set to <MF>, set it to <AF>.
The shutter speed display is blinking.
Since it is too dark, taking the picture may result in a blurred subject due
to camera shake. Using a tripod, the built-in fl ash, or an external fl ash
(
=
179) is recommended.
Page 79

Fully Automatic Shooting (Scene Intelligent Auto)
Pictures are too dark.
Raise the built-in fl ash to enable automatic fl ash fi ring, in case subjects in
daytime shots are backlit, or when shooting under low light.
The built-in fl ash fi red repeatedly when raised while
shooting under low light.
To make autofocusing easier, the built-in fl ash may fi re repeatedly when
you press the shutter button halfway (
=
126).
Pictures taken with fl ash are too bright.
Pictures may be bright (overexposed) if you shoot subjects at close range
in fl ash photography. Move away from the subject and shoot again.
The bottom part of pictures taken with fl ash is unnaturally
dark.
Shooting subjects that are too close may make the shadow of the lens
visible in your shots. Move away from the subject and shoot again. Also
remove the lens hood before shooting.
Note the following if you are not using the built-in fl ash.
oUnder low light where camera shake tends to occur, the viewfi nder’s shutter
speed display will blink. Hold the camera steady or use a tripod. When using
a zoom lens, you can reduce the blur caused by camera shake by setting the
lens to the wide-angle end.
oWhen shooting portraits under low light, tell subjects to stay still until you have
fi
nished shooting. Any movement as you shoot will make the person look
blurry in the picture.
Page 80
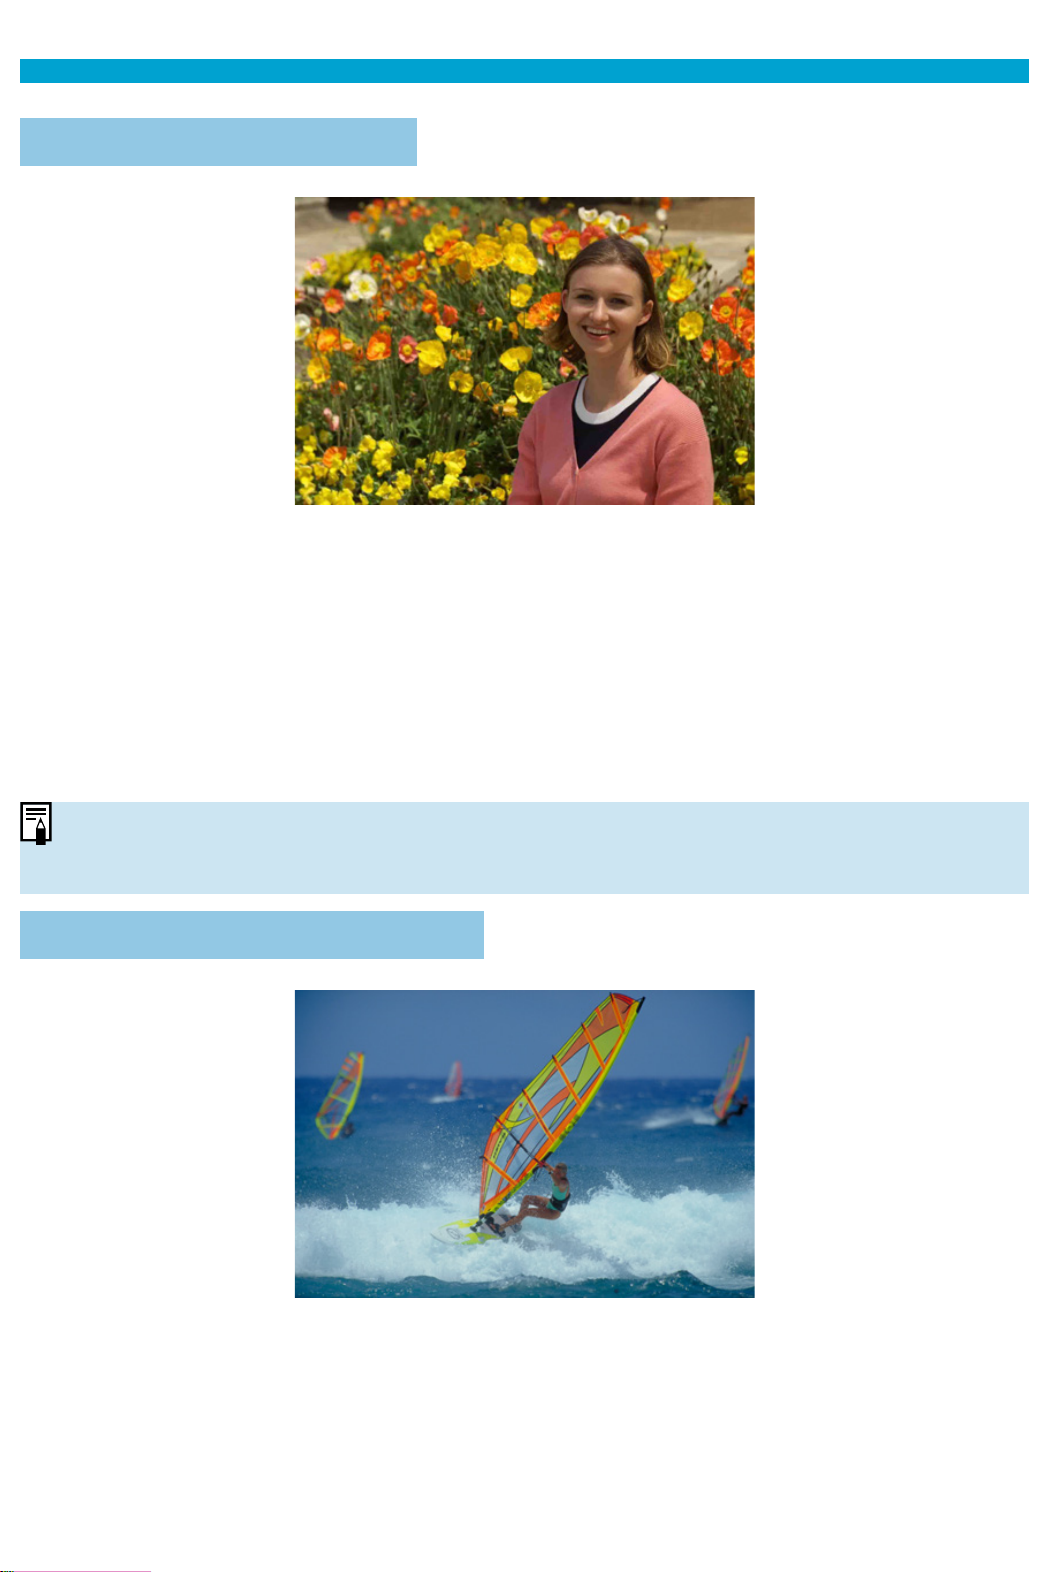
Fully Automatic Shooting (Scene Intelligent Auto)
Recomposing the Shot
Depending on the scene, positioning the subject toward the left or right
to include a balanced background will result in a picture with better
perspective.
Pressing the shutter button halfway to focus on a still subject will lock the
focus on that subject. Recompose the shot while keeping the shutter button
pressed halfway, and then press the shutter button completely to take the
picture. This is called “focus lock”.
oIn Live View shooting, the camera continues to focus on any faces initially
detected and focused on, even if you recompose the shot.
Shooting a Moving Subject
Pressing the shutter button halfway tracks moving subjects to keep them in
focus.
Keep the subject in the Area AF frame (in viewfi nder shooting) or on the
screen (in Live View shooting) as you hold down the shutter button halfway,
and at the decisive moment, press the shutter button completely.
Page 81
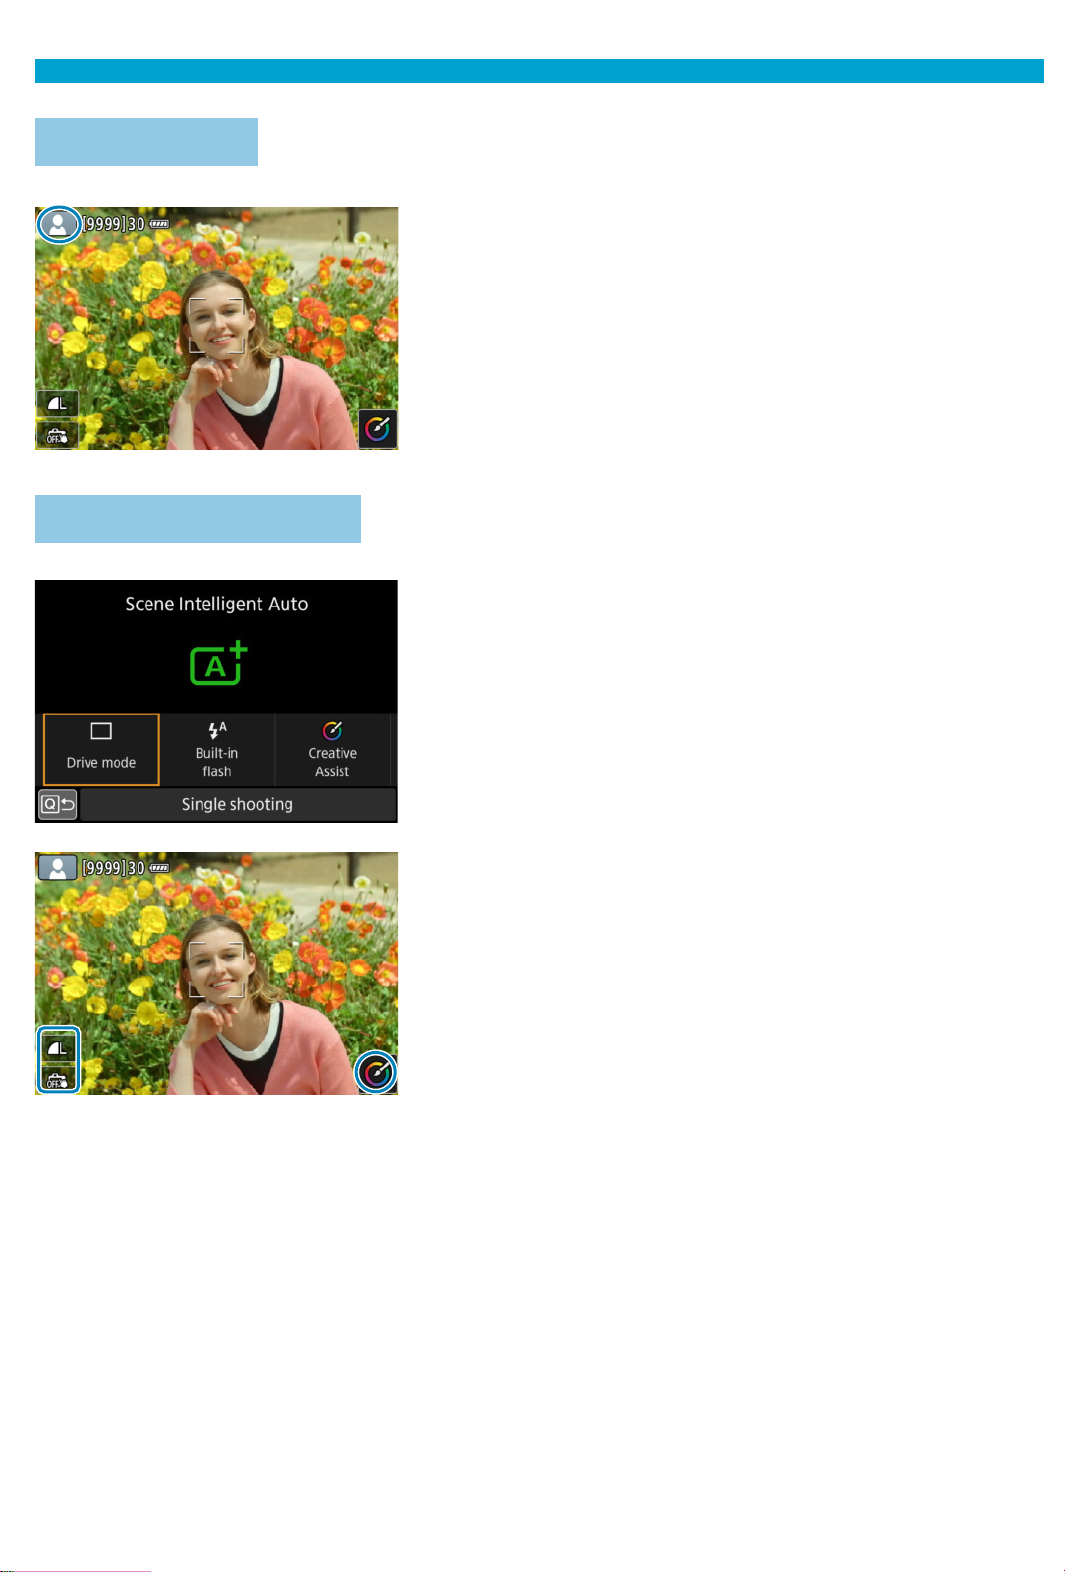
Fully Automatic Shooting (Scene Intelligent Auto)
Scene Icons
The camera detects the scene type and
sets everything automatically to suit the
scene. In Live View shooting, an icon
representing the type of scene detected
appears in the upper left of the screen
(
=
627).
Adjusting Settings
In viewfi nder shooting, you can adjust drive
mode, built-in fl ash fi ring, and Creative
Assist settings by pressing the <Q>
button.
In Live View shooting, you can adjust
image quality, Touch Shutter, and Creative
Assist settings by touching icons.
Page 82
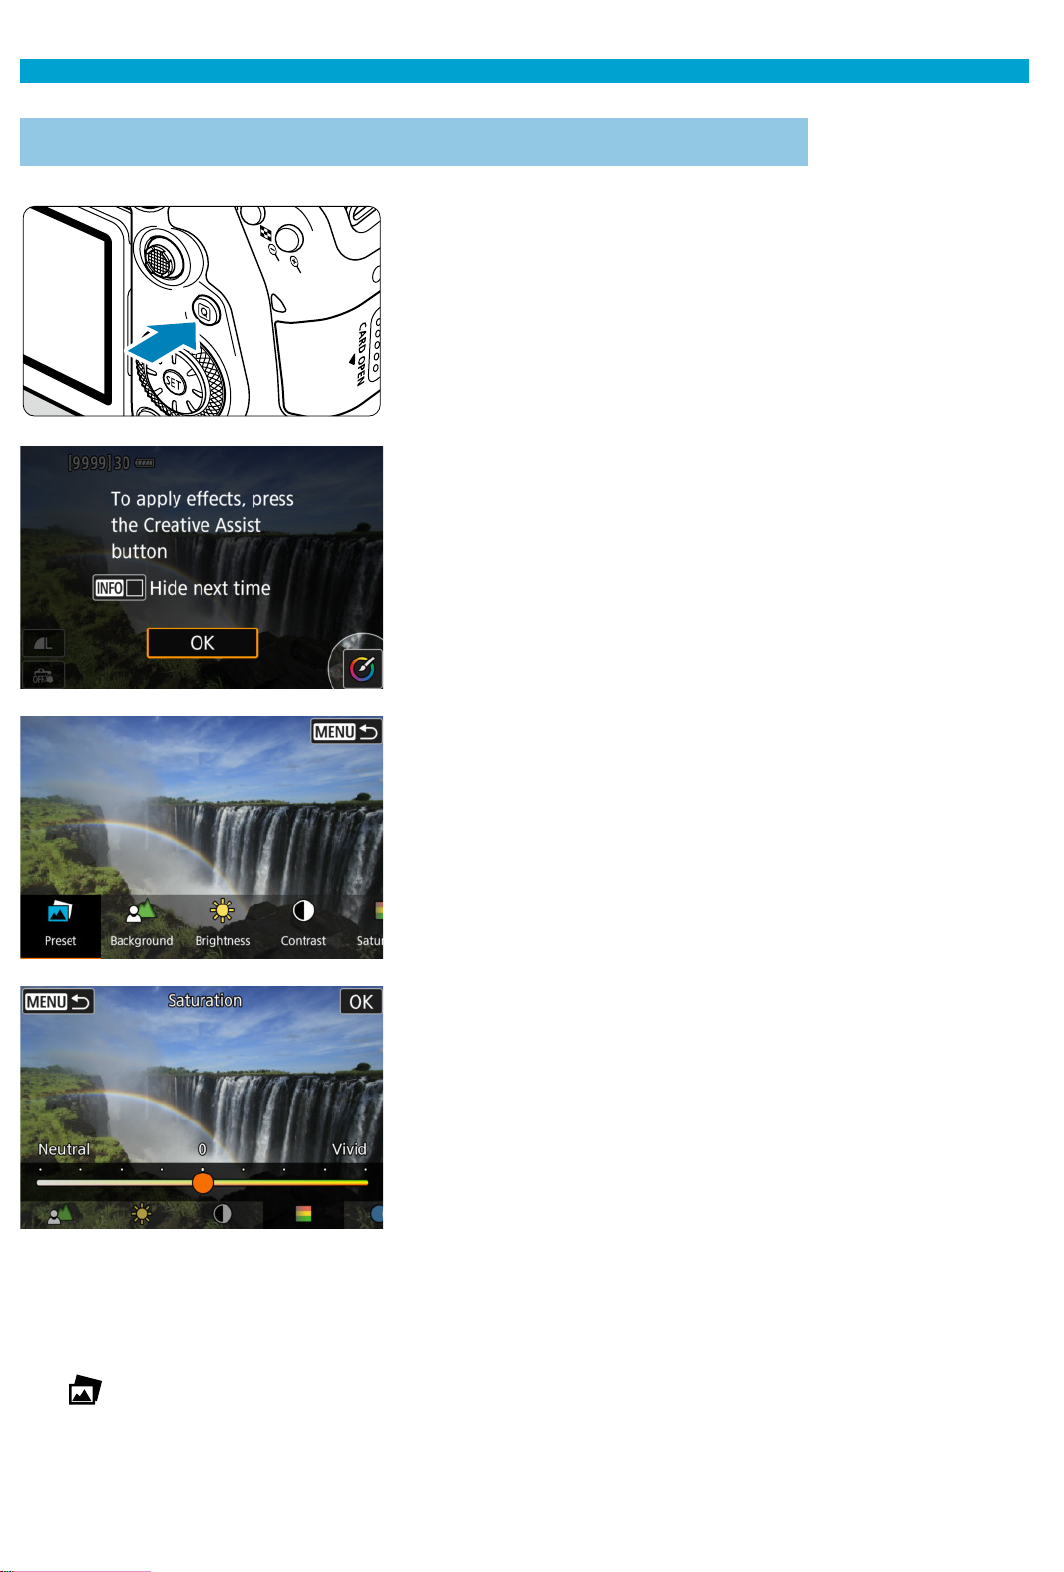
Fully Automatic Shooting (Scene Intelligent Auto)
Shooting with Eff ects Applied (Creative Assist)
1
Press the <Q> button.
In viewfi nder shooting, use the <Y>
<Z> keys to select [Creative Assist],
then press <
0
>.
In Live View shooting, read the message
and select [OK].
2
Select an eff ect.
Use the <Y> <Z> keys to select an
eff ect, then press <
0
>.
You can also turn the <
6
> or <5>
dial to select it.
3
Select the eff ect level and other
details.
Use the <Y> <Z> keys to set it, then
press <
0
>.
To reset the setting, press the <A>
button, then select [OK].
You can also turn the <
6
> or <5>
dial to set it.
Creative Assist Eff ects
[
] Preset
Select one of the preset eff ects.
Note that [Saturation], [Color tone 1], and [Color tone 2] are not
available with [B&W].
Page 83
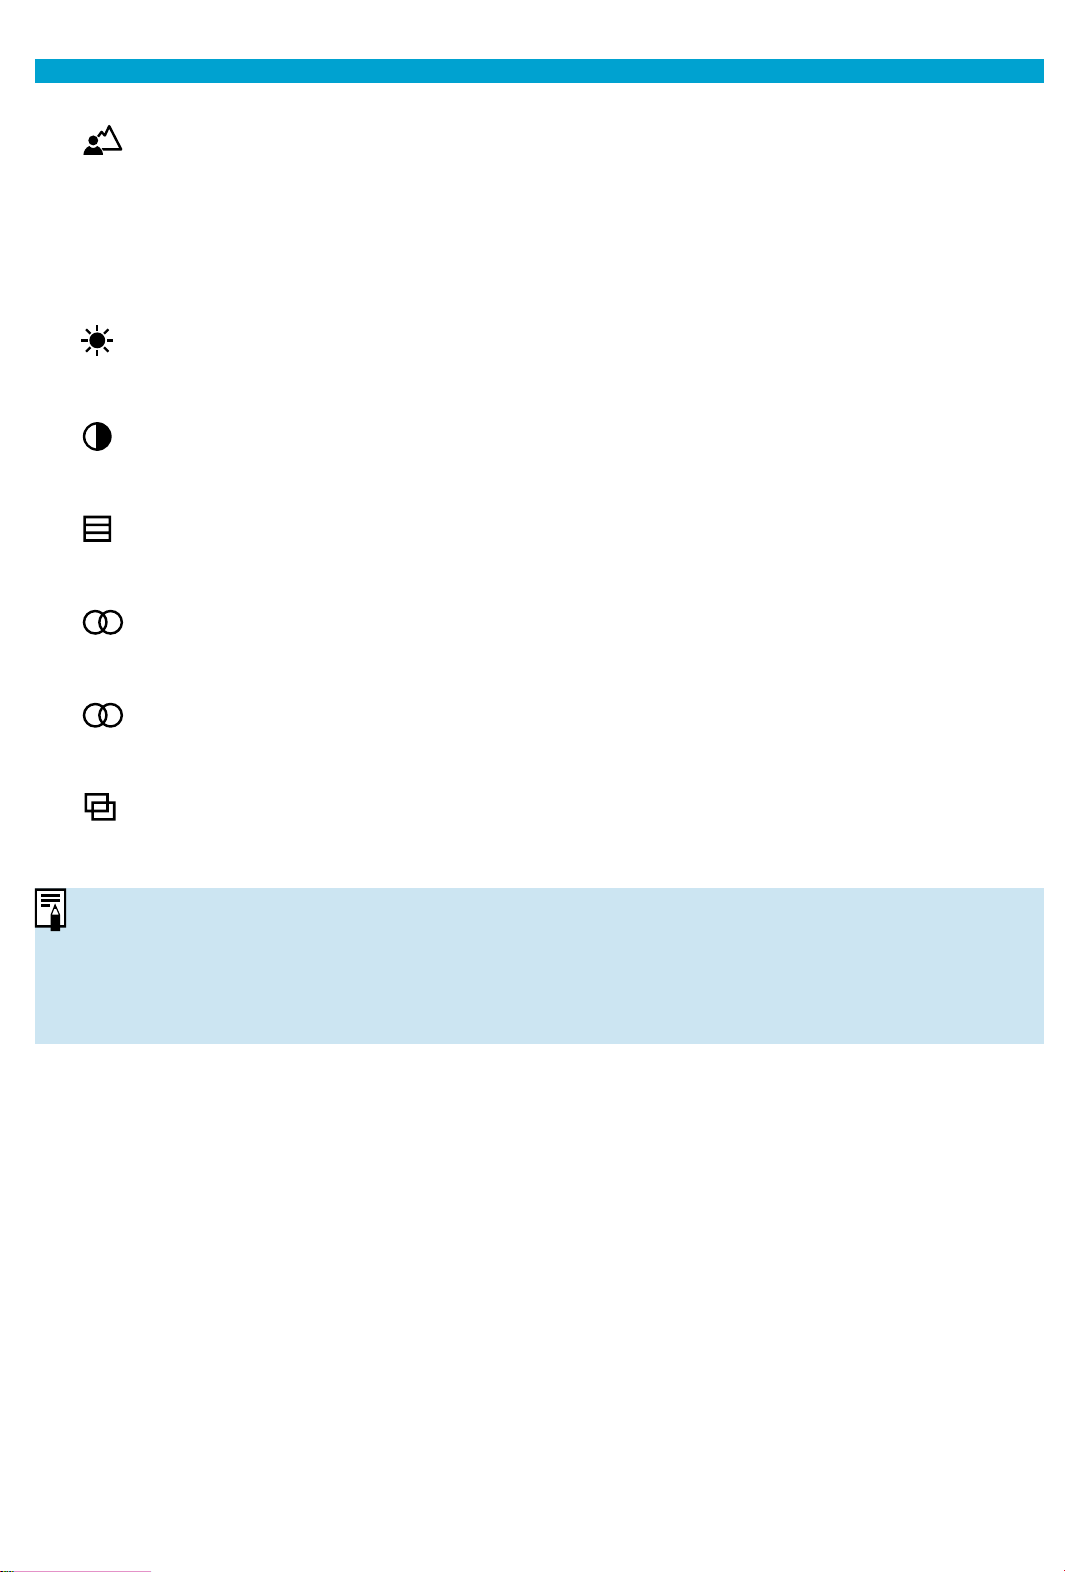
Fully Automatic Shooting (Scene Intelligent Auto)
[ ] Background blur
Adjust background blur. Choose higher values to make backgrounds
sharper, or lower values to make them blurrier. [Auto] adjusts background
blurring to match the brightness. Depending on lens brightness (f/
number), some positions may not be available.
[ ] Brightness
Adjust image brightness.
[ ] Contrast
Adjust contrast.
[ ] Saturation
Adjust the vividness of colors.
[ ] Color tone 1
Adjust amber/blue color tone.
[ ] Color tone 2
Adjust green/magenta color tone.
[ ] Monochrome
Set the toning eff ect for monochrome shooting.
o
[Background blur] is not available when the fl
ash is used.
oThese settings are reset when you switch shooting modes or set the power
switch to <
2
>. To save the settings, set [z: Retain Creative Assist data]
to
[Enable].
Saving Eff ects
To save the current setting to the camera, press the <
B
> button on the
Creative Assist setting screen, then select [OK]. Up to three presets can be
saved as [USER*]. After three have been saved, an existing [USER*] preset
must be overwritten to save a new one.
Page 84
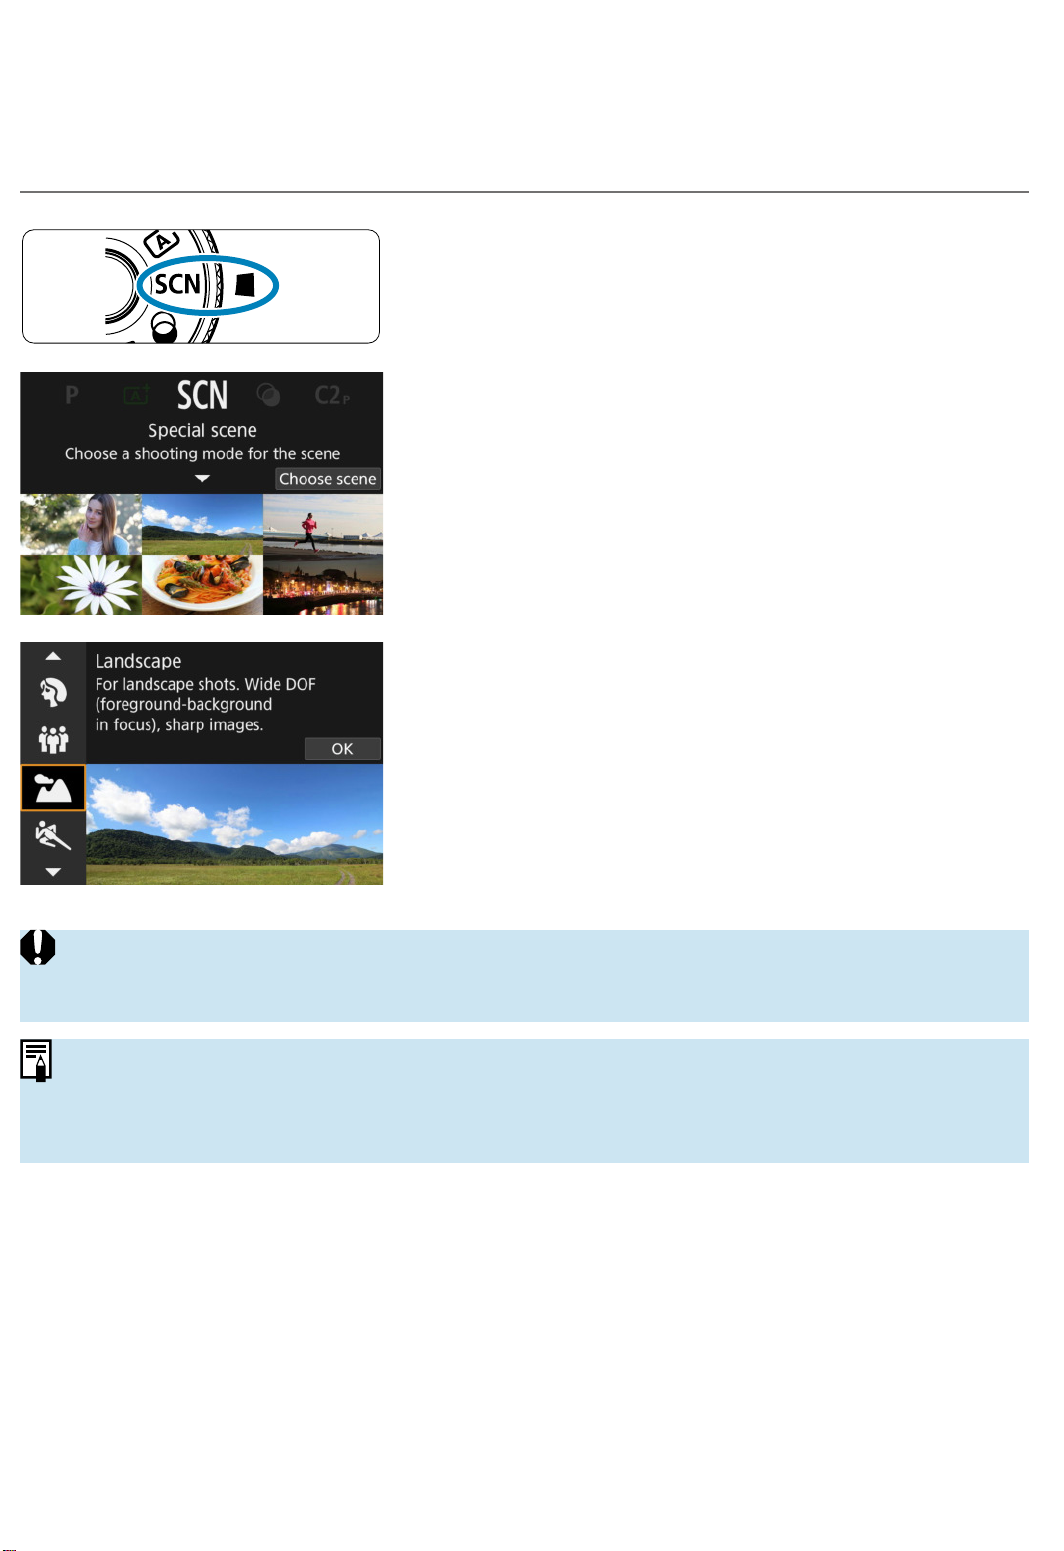
Special Scene Mode
The camera will automatically choose the appropriate settings when you
select a shooting mode for your subject or scene.
* <
8
> stands for Special Scene.
1
Set the Mode dial to <8>.
2
Press <0>.
3
Select a shooting mode.
Press the <W> <X> keys to select the
shooting mode, then press <
0
>.
Selection is also possible by turning the
<
6
> or <5> dial.
oCautions on each shooting mode are listed together (=99). Read the
cautions before shooting.
oWhen [5: Mode guide] is set to [Disable], after step 1, press the <Q>
button, use the <Y> <Z> keys to select [Choose scene], use the <W> <X>
keys to select a shooting mode, then press <0>.
Page 85
Special Scene Mode
Available Shooting Modes in the
8
Mode
Shooting Mode Page Shooting Mode Page
2
Portrait
=
86
4
Close-up
=
93
q
Group Photo
=
87
P
Food
=
94
3
Landscape
=
88
y
Candlelight
=
95
5
Sports
=
89
6
Night Portrait
=
96
C
Kids
=
90
F
Handheld Night Scene
=
97
r
Panning
=
91
G
HDR Backlight Control
=
98
oLive View shooting is not available in <y> mode.
Page 86
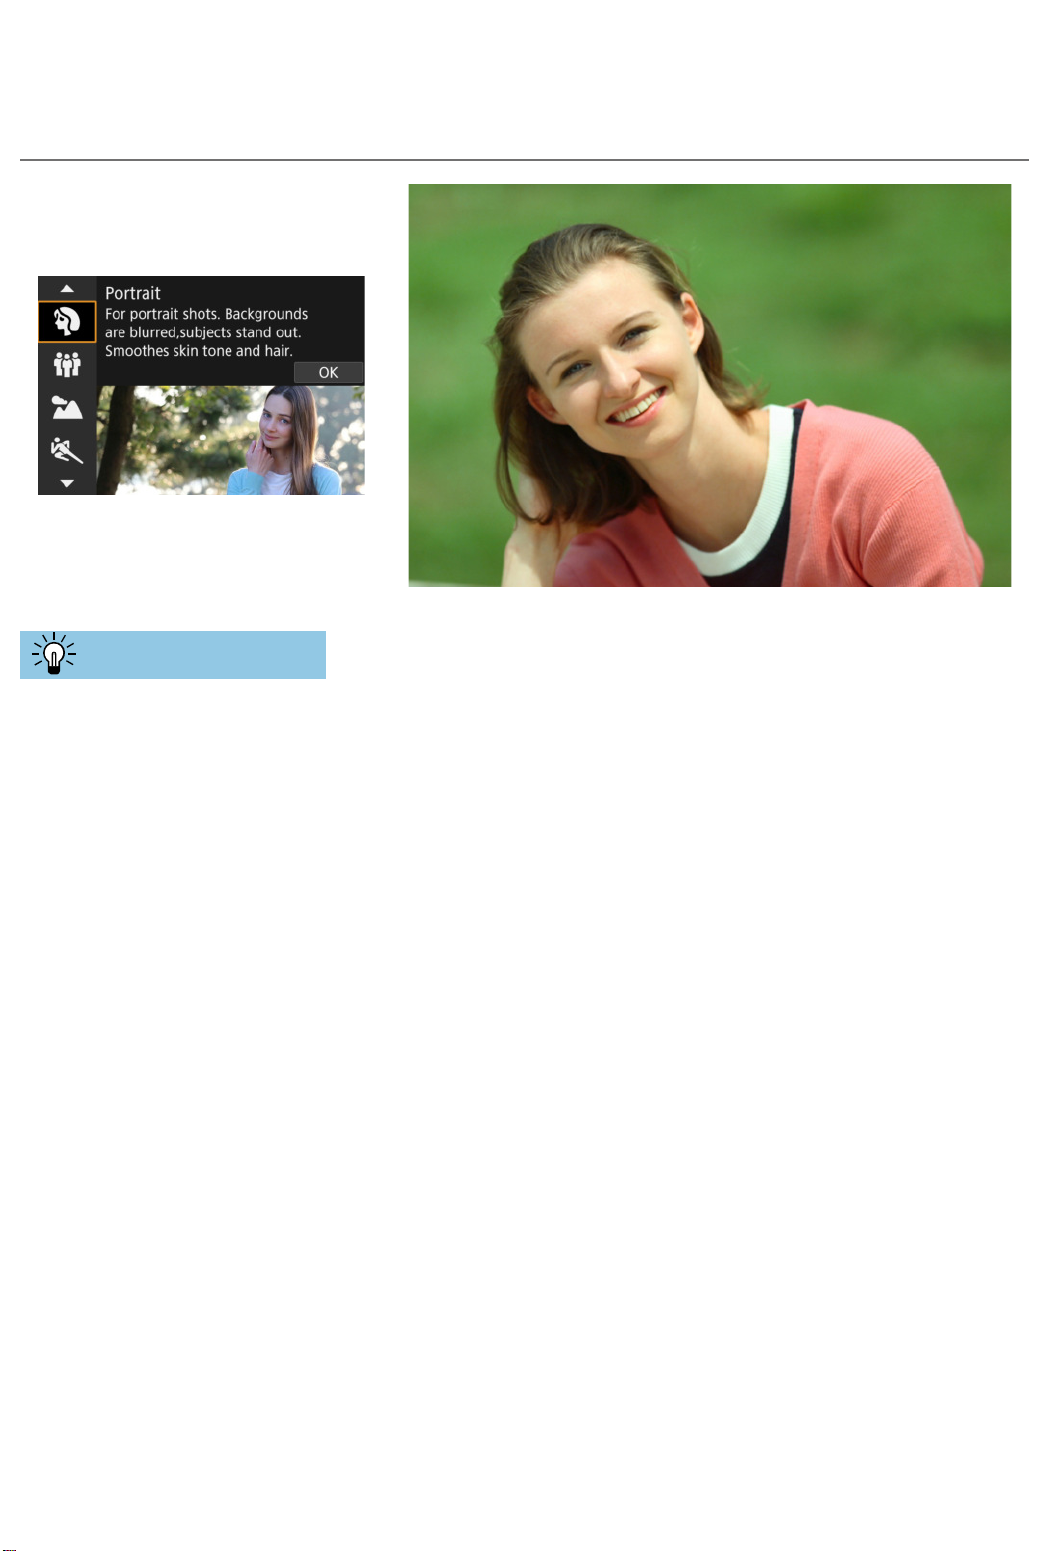
Shooting Portraits
The <2> (Portrait) mode blurs the background to make the human subject
stand out. It also makes skin tones and hair look softer.
Shooting Tips
Select the location where the distance between the subject
and the background is the farthest.
The further the distance between the subject and background, the more
blurred the background will look. The subject will also stand out better
against an uncluttered dark background.
Use a telephoto lens.
If you have a zoom lens, use the telephoto end to fi ll the frame with the
subject from the waist up.
Focus on the face.
As you focus before shooting, make sure that an AF point is displayed on
the face (in viewfi nder shooting), or that the AF point on the face is green
(in Live View shooting). When shooting close-ups of the face in Live View
shooting, you can set [z: Eye Detection AF] to [Enable] to shoot with
the subject’s eyes in focus.
Shoot continuously.
The default setting is <
i
> (Low-speed continuous shooting). If you keep
holding down the shutter button, you can shoot continuously to capture
changes in the subject’s facial expression and pose.
Page 87
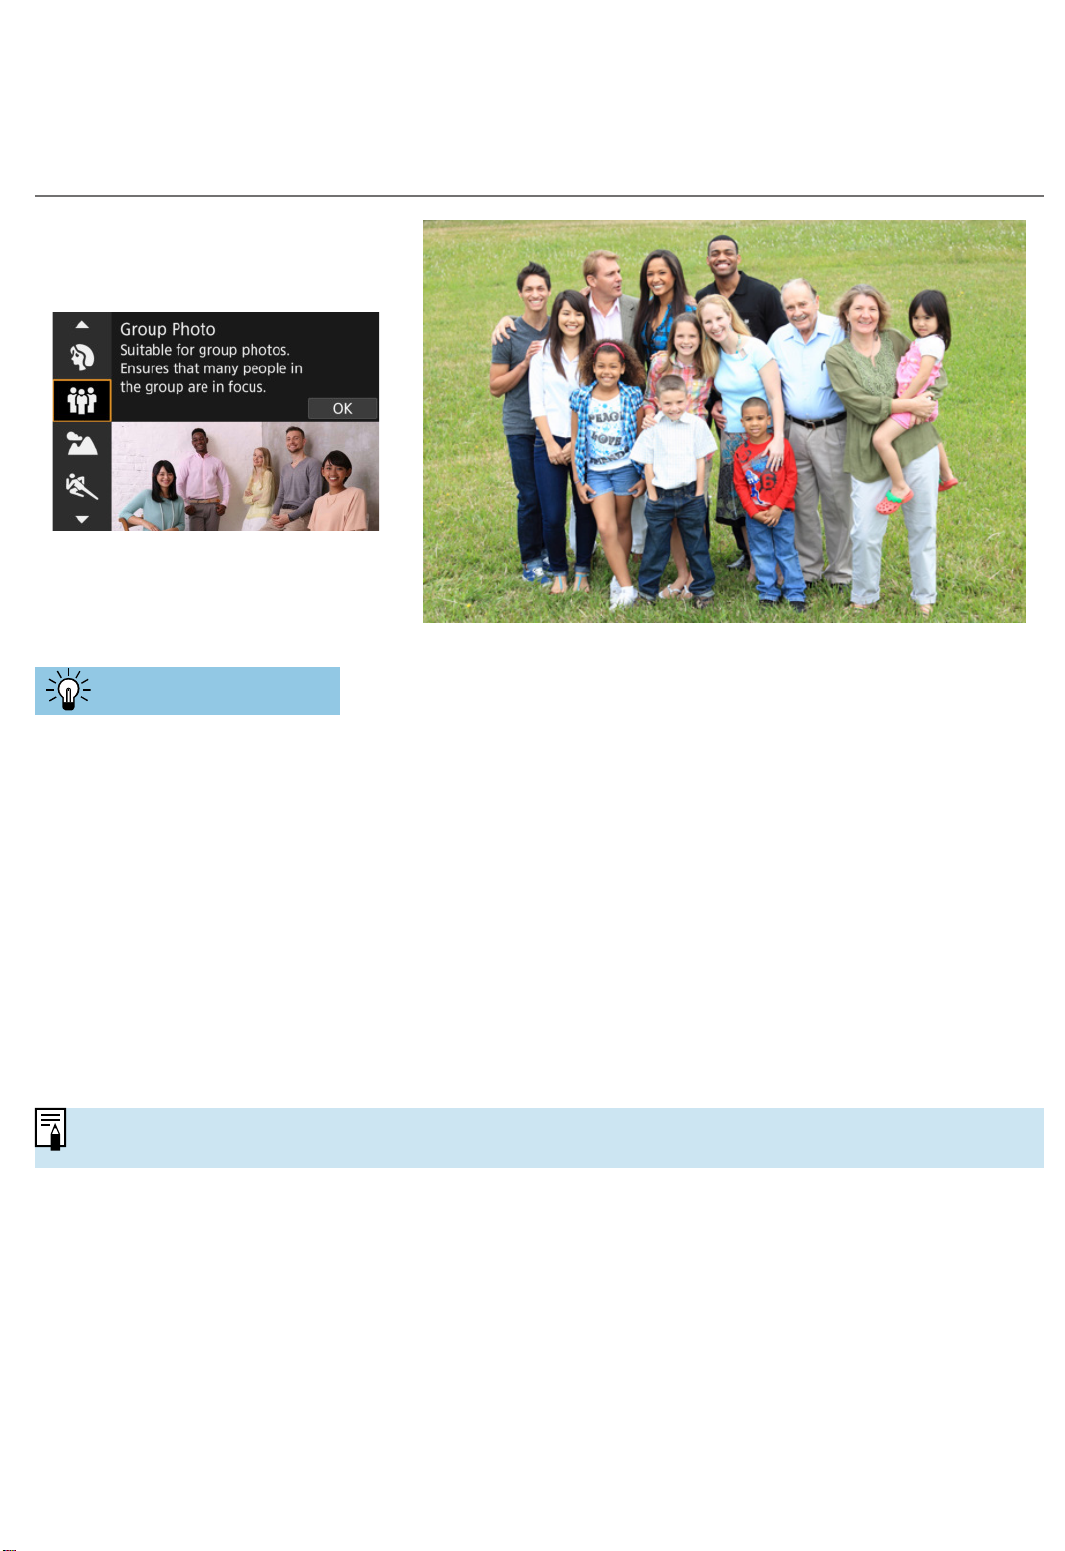
Shooting Group Photos
Use the <q> (Group Photo) mode to shoot group photos. You can take a
picture in which both the people in the front and people in the back are all in
focus.
Shooting Tips
Use a wide-angle lens.
When using a zoom lens, use the wide-angle end to make it easy to get
all the people in the group in focus at once, from the front row to the back.
Also, if you place a little distance between the camera and the subjects (so
that the subjects’ entire bodies are in the shot), the focus range increases
in depth.
Take multiple shots of the group.
It is recommended to shoot multiple photos in case some people close
their eyes.
oUsing a tripod is recommended when shooting indoors or under low light.
Page 88
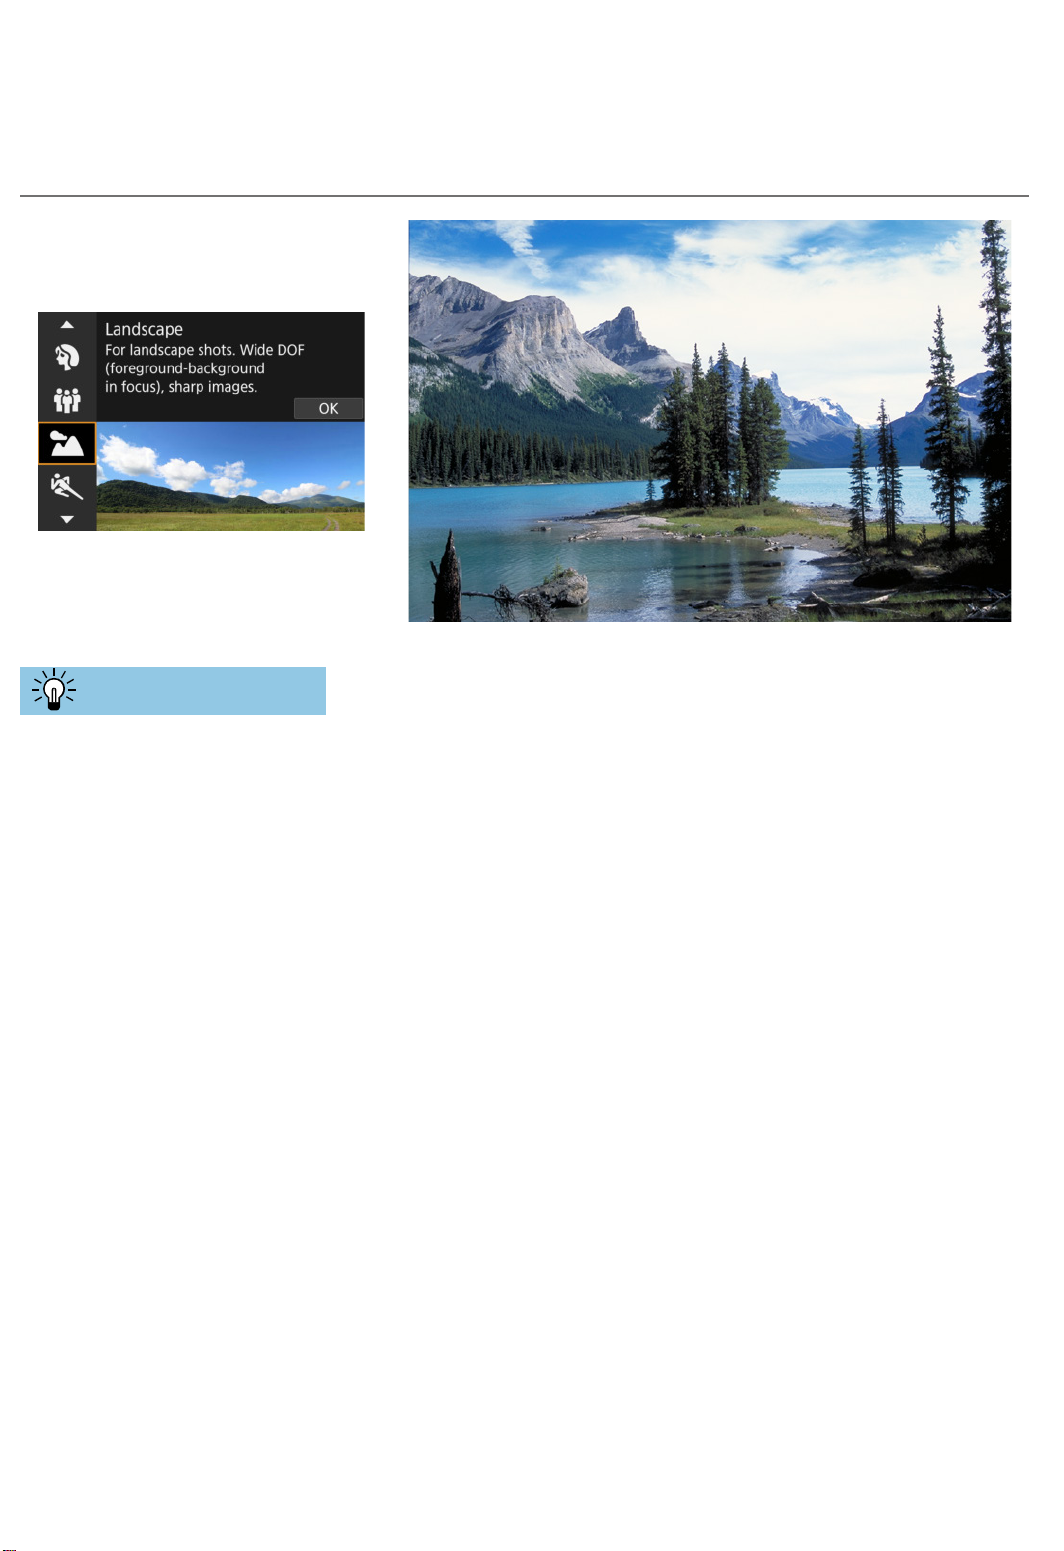
Shooting Landscapes
Use the <
3
> (Landscape) mode for expansive scenery or to have
everything in focus from near to far. For vivid blues and greens, and sharp
and crisp images.
Shooting Tips
With a zoom lens, use the wide-angle end.
When using a zoom lens, set the lens to the wide-angle end to make the
objects near and far in focus. It also adds breadth to landscapes.
Keep the camera steady when shooting night scenes.
Using a tripod is recommended.
Page 89
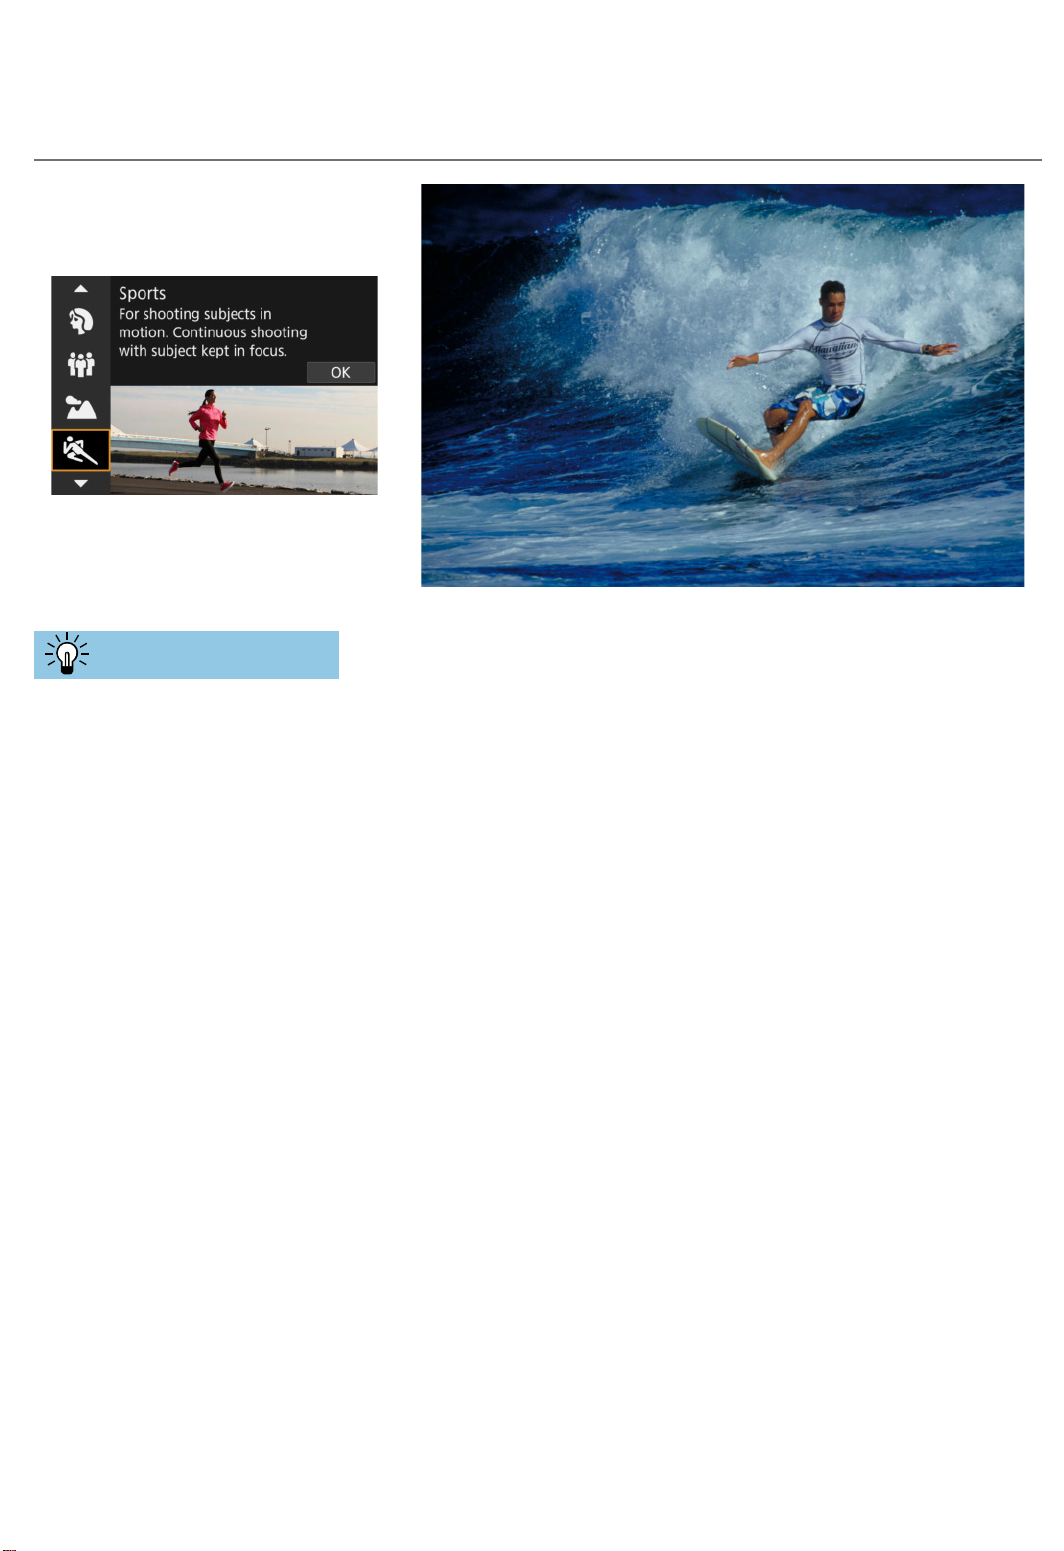
Shooting Moving Subjects
Use the <
5
> (Sports) mode to shoot a moving subject, such as a running
person or a moving vehicle.
Shooting Tips
Use a telephoto lens.
Use of a telephoto lens is recommended to enable shooting from a
distance.
Track the subject with the Area AF frame.
In viewfi nder shooting, aim the Area AF frame over the subject and press
the shutter button halfway to start focusing. During autofocusing, the
beeper will continue beeping softly. If focus cannot be achieved, the focus
indicator <o> will blink.
In Live View shooting, an Area AF frame appears after you press the
shutter button halfway. Once the subject is in focus, the AF point turns
blue.
Shoot continuously.
The default setting is <
o
> (High-speed continuous shooting). At the
decisive moment, press the shutter button completely to take the shot. To
track the subject and capture changes as it moves, keep holding down
the shutter button to shoot continuously.
Page 90
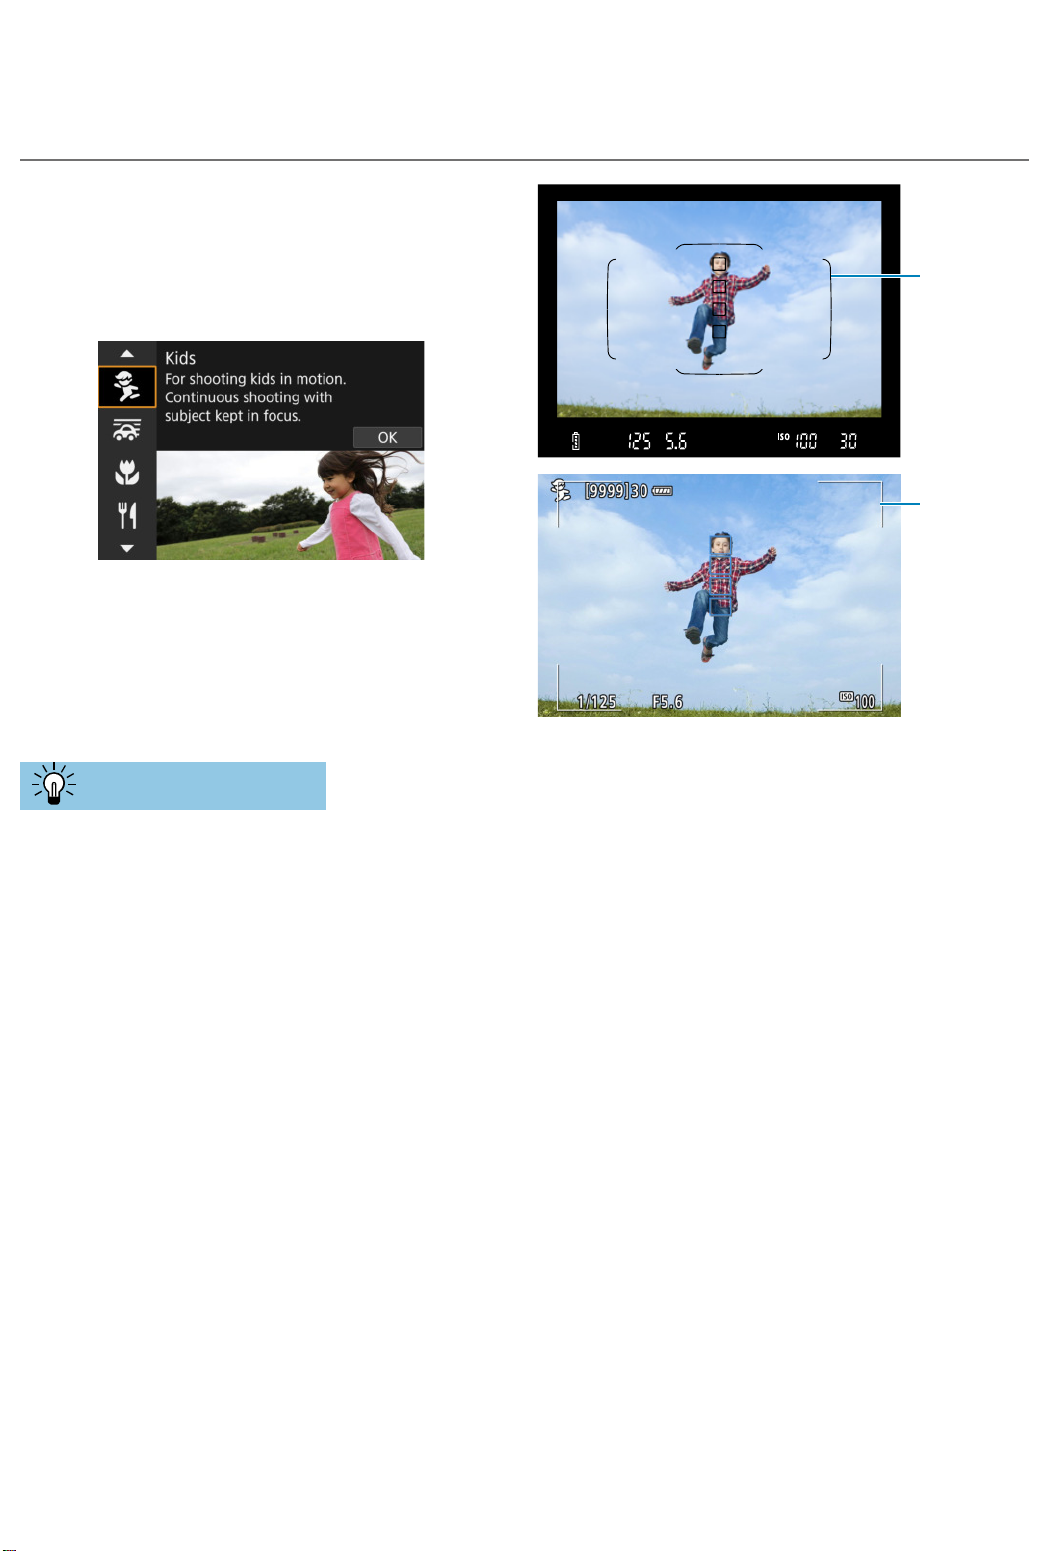
Photographing Children
To photograph the children running around, use the <C> (Kids) mode. Skin
tones will look healthy.
(1)
(2)
Shooting Tips
Track the subject with the Area AF frame.
In viewfi nder shooting, aim the Area AF frame (1) over the subject and
press the shutter button halfway to start focusing. During autofocusing,
the beeper will continue beeping softly. If focus cannot be achieved, the
focus indicator <o> will blink.
In Live View shooting, an Area AF frame (2) appears after you press the
shutter button halfway. Once the subject is in focus, the AF point turns
blue.
Shoot continuously.
The default setting is <
o
> (High-speed continuous shooting). At
the decisive moment, press the shutter button completely to take the
shot. To track the subject and capture changes in facial expression and
movement, keep holding down the shutter button to shoot continuously.
When <D> blinks
Press the <D> button to raise the built-in fl ash.
Page 91
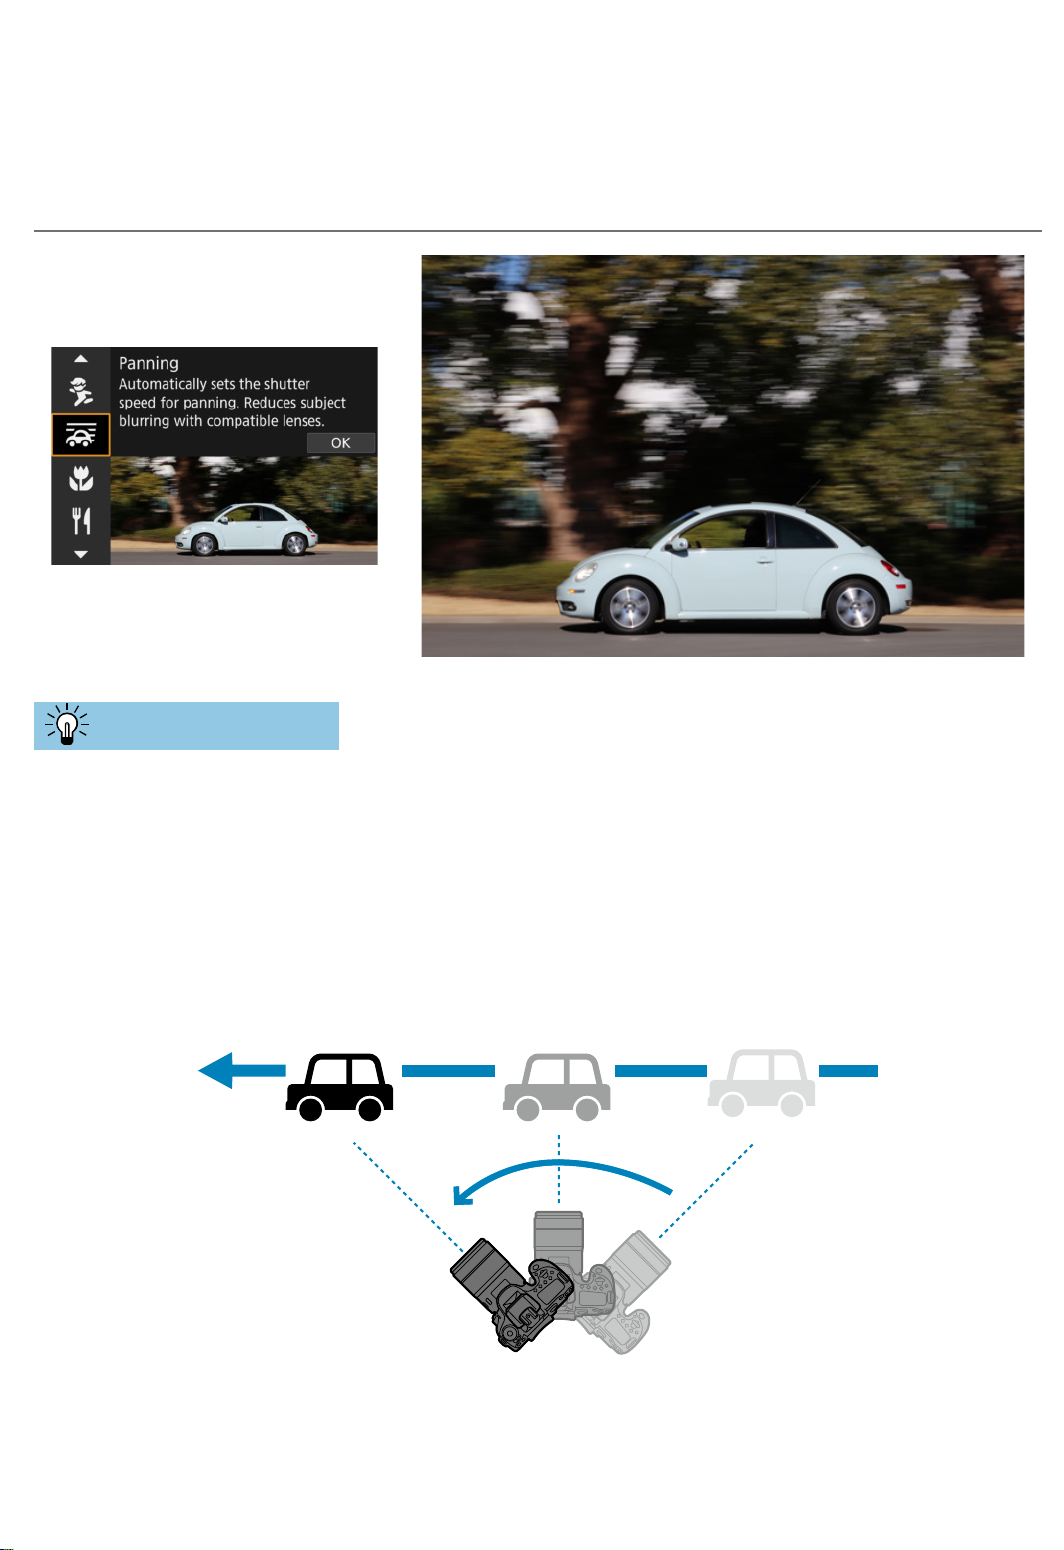
Panning
If you want to take a picture with the feel of speed and a blurred motion
eff ect on the subject’s background, use the <
r
> (Panning) mode. If you
use a lens supporting the <
r
> mode, subject blur is detected, corrected,
and reduced.
Shooting Tips
Turn the camera to follow the moving subject.
When shooting, turn the camera smoothly as you track the moving
subject. Aim the AF point over the part of the moving subject where you
want to focus, then press the shutter button halfway and keep holding
it down as you turn the camera to match the subject’s speed and
movement. Press the shutter button completely while moving the camera
to take the picture. Keep tracking the subject with the camera.
Page 92

Panning
Set the level of background motion blur.
With [Eff ect], you can set the level of background motion blur. The [Max]
setting will set a slower shutter speed to increase the background motion
blur around the subject. If the subject blur is noticeable, set [Eff ect] to
[Med] or [Min] to reduce the blur.
Shoot continuously.
By default, <
i
> (Continuous shooting) is set. At the decisive moment,
press the shutter button completely to take the picture. You can track
moving subjects by panning the camera as you keep holding down the
shutter button to shoot continuously.
oTo see which lenses support the <
r
> mode, refer to the Canon website.
oWith lenses that support <
r
> mode, the camera automatically corrects
subject blur and (based on the [Eff
ect] setting) adjusts shutter speed,
regardless of the lens IS setting.
oThe AF Area selection mode’s default setting is Zone AF with the center of the
screen selected.
oThe AF method can only be set to [1-point AF] or [Zone AF]. By default, it is
set to [Zone AF], with the zone in the center of the screen selected.
oT
o prevent camera shake, it is recommended that you hold the camera with
both hands, tighten your arms close to your body, and track the subject’s
movement smoothly to take pictures.
oThis eff
ect is most eff
ective with trains, cars, etc. that move at a constant
speed in one direction.
oTaking test shots or checking the image by playing it back immediately after
shooting is recommended.
oWith telephoto lenses, be careful about camera shake and subject blur
.
To
avoid camera shake, consider using a tripod or monopod.
Page 93
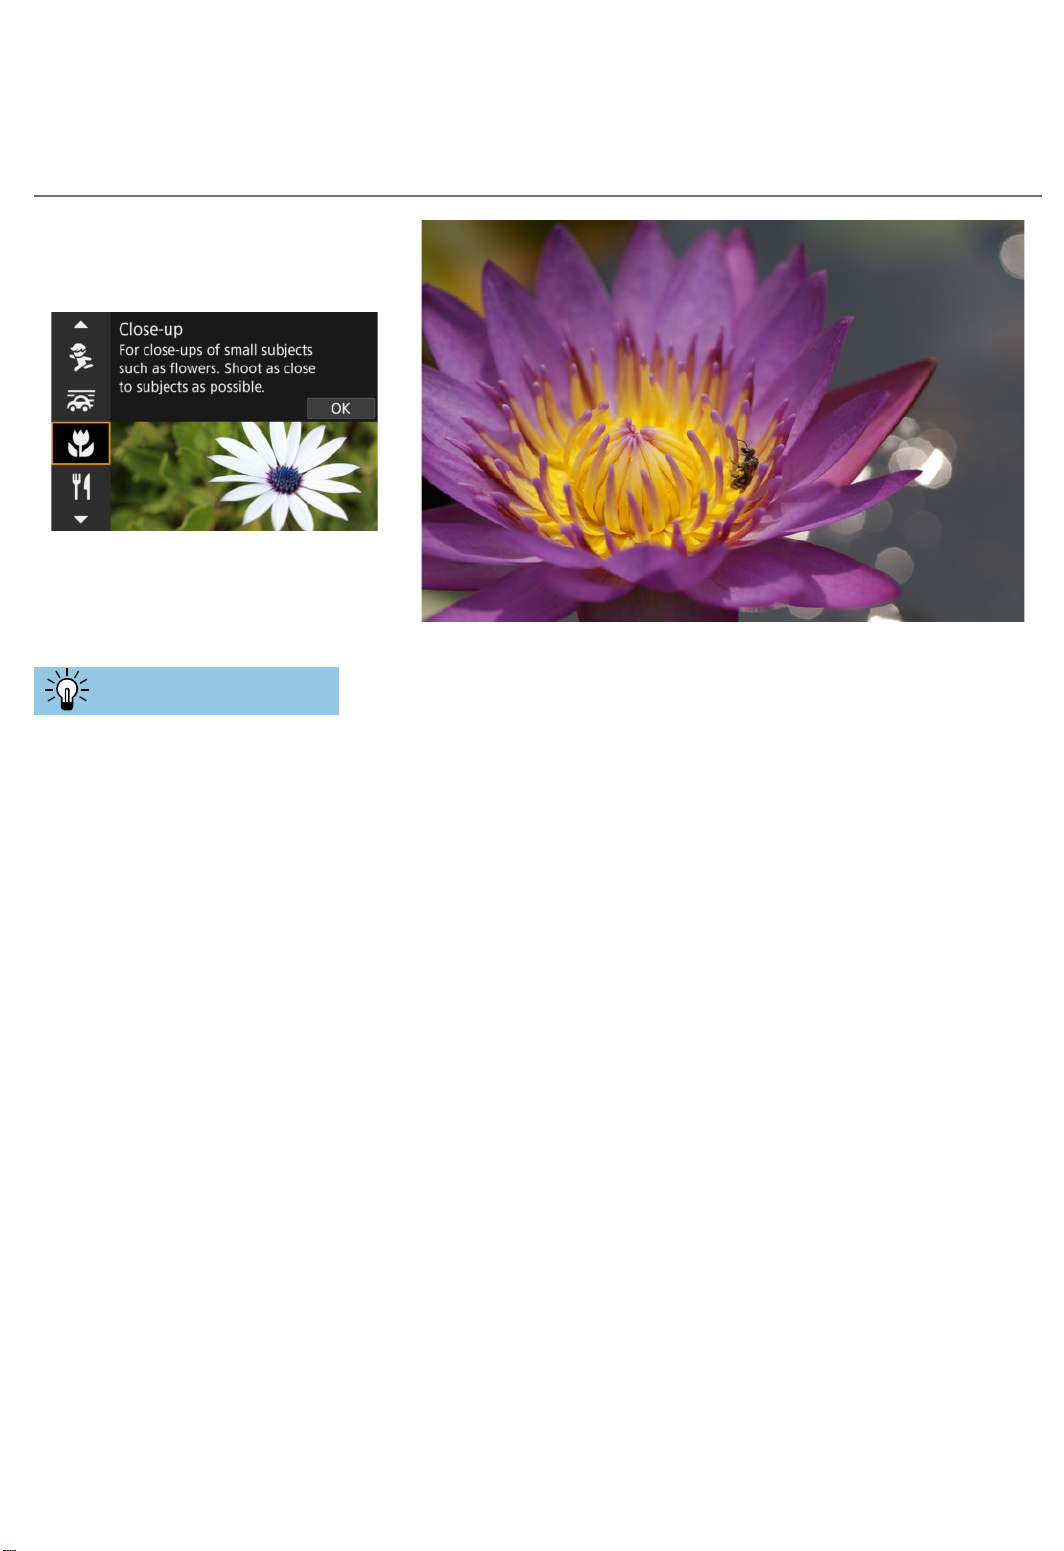
Shooting Close-ups
When you want to shoot fl owers or small things up close, use the <4>
(Close-up) mode. To make small things appear much larger, use a macro
lens (sold separately).
Shooting Tips
Use a simple background.
A simple background makes small objects such as fl owers stand out
better.
Move in as close as possible to the subject.
Check the lens for its minimum focusing distance. The lens minimum
focusing distance is measured from the <
V
> (focal plane) mark on the
top of the camera to the subject. Focusing is not possible if you are too
close.
With a zoom lens, use the telephoto end.
If you have a zoom lens, using the telephoto end will make the subject
look larger.
When <D> blinks
Press the <D> button to raise the built-in fl ash.
Page 94
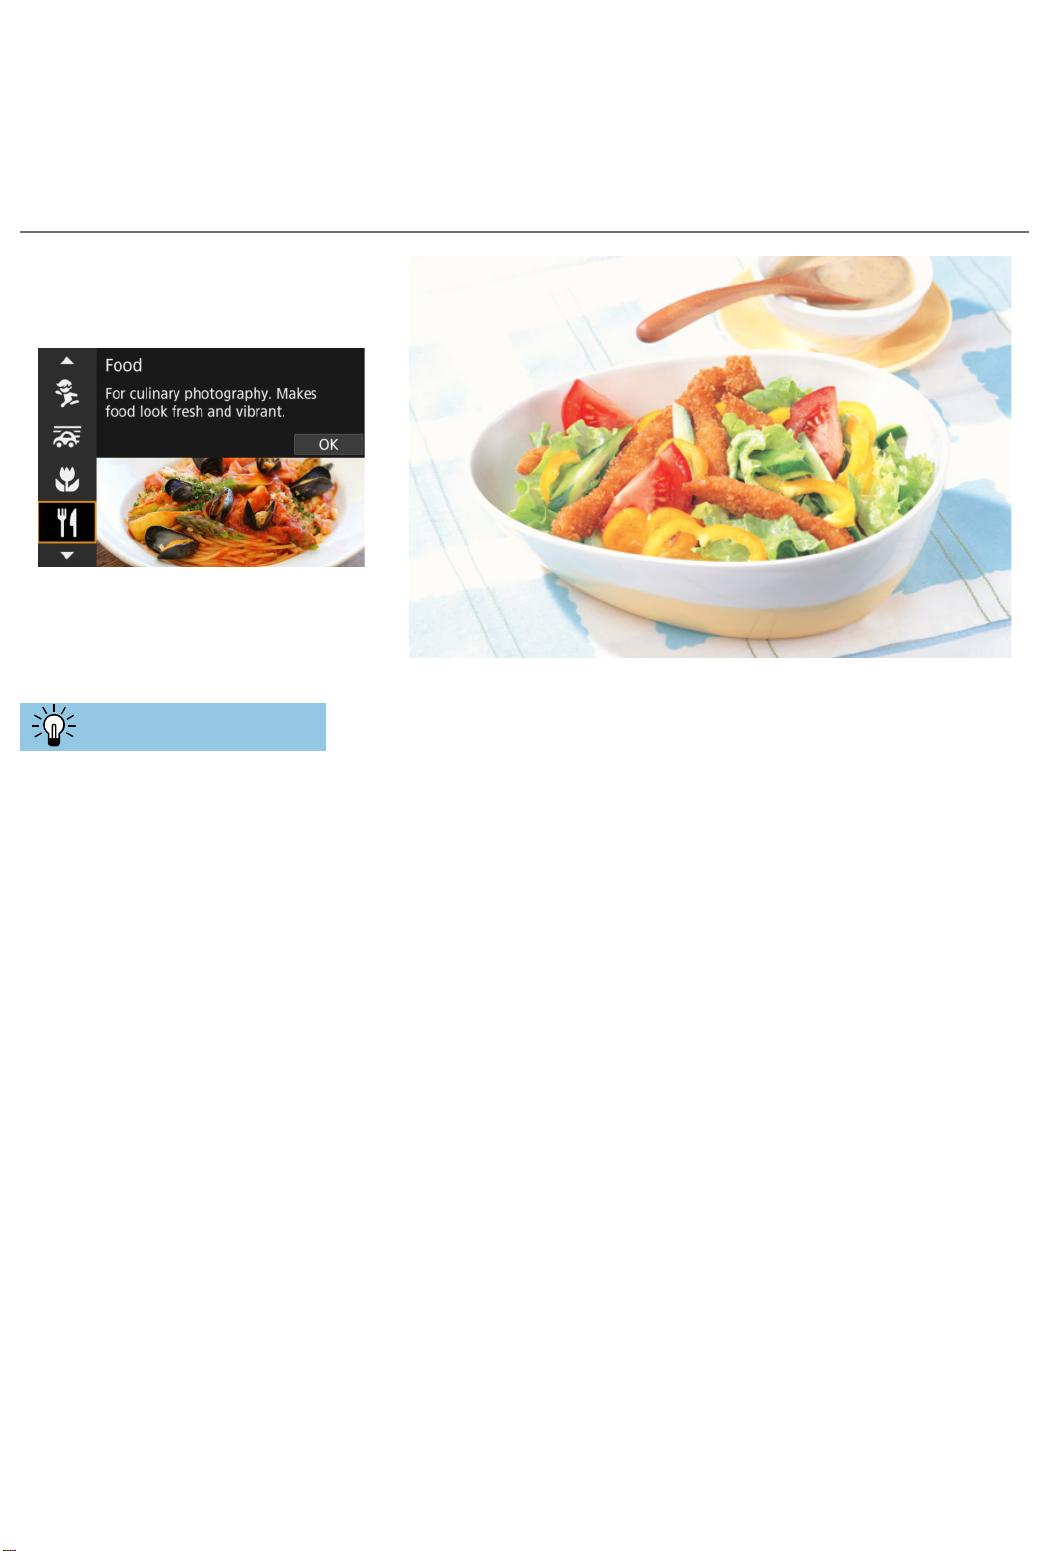
Shooting Food
When you want to take pictures of food, use the <P> (Food) mode. The
photo will look bright and appetizing. Also, depending on the light source,
the reddish tinge will be suppressed in the pictures taken under tungsten
lights, etc.
Shooting Tips
Change the color tone.
You can change [Color tone]. To increase the food’s reddish tinge, set it
toward [Warm] (red). Set it toward [Cool] (blue) if it looks too red.
Page 95
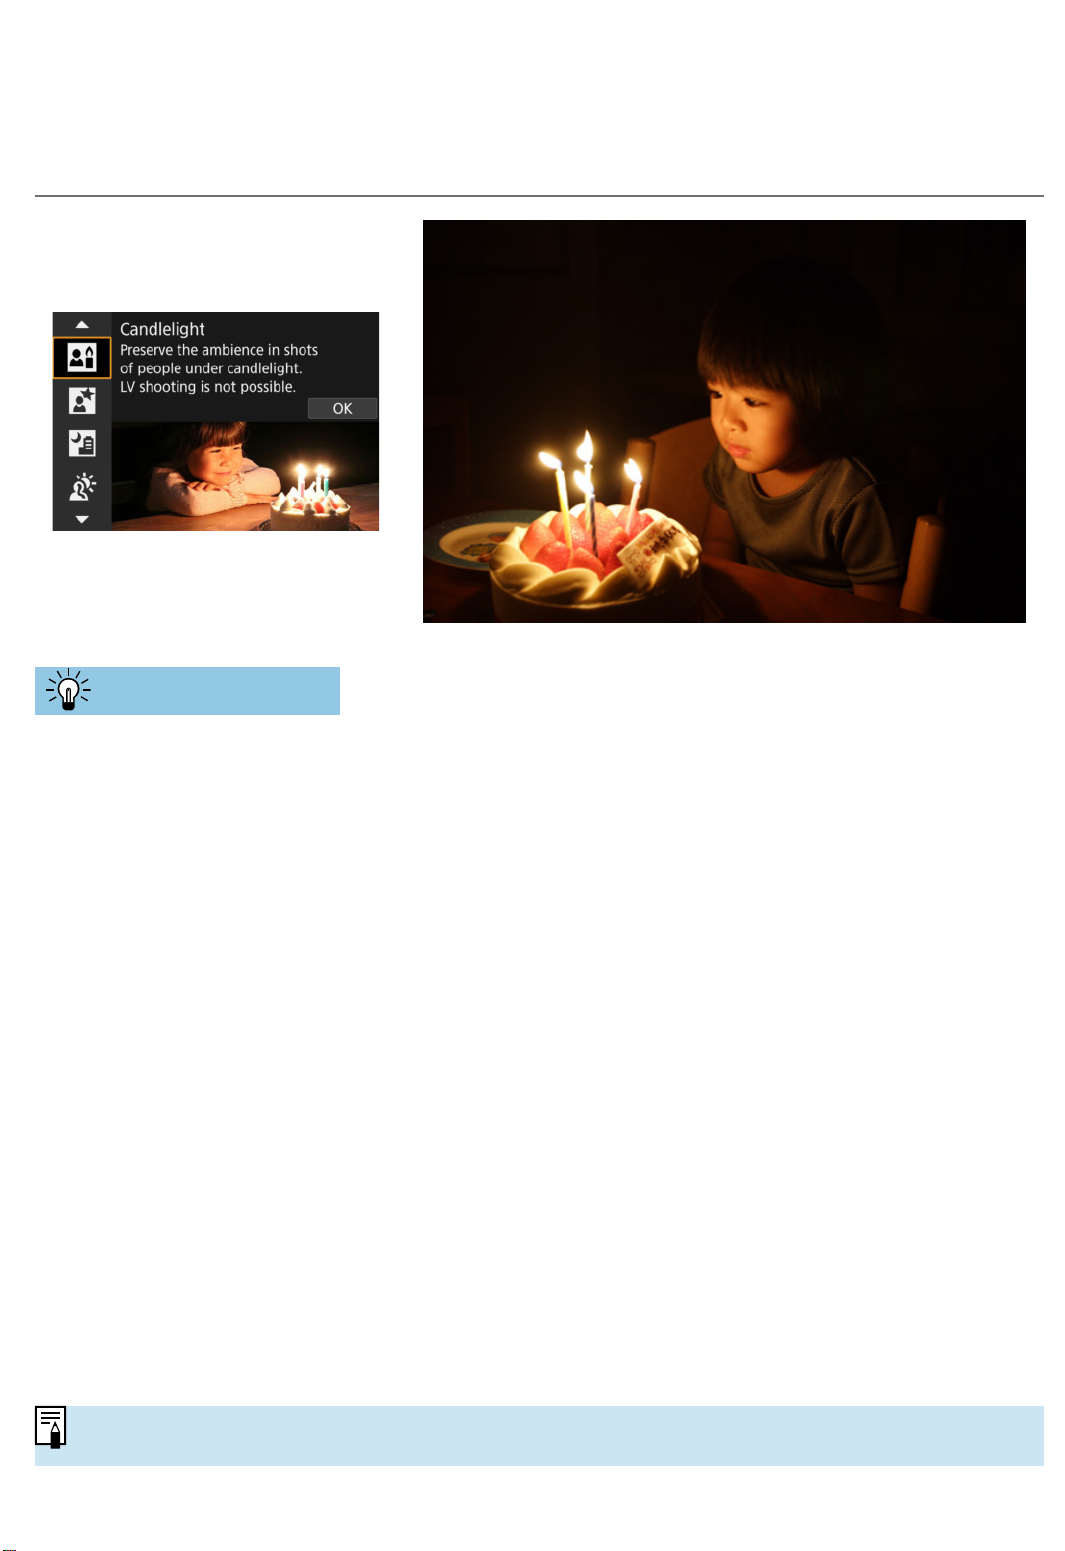
Shooting Candlelight Portraits
When you want to photograph a person in candlelight, use the <y>
(Candlelight) mode. The atmosphere of candlelight is refl ected in the color
tones of the picture.
Shooting Tips
Use the center AF point to focus.
Aim the center AF point in the viewfi nder on the subject, then shoot.
Prevent camera shake if the numeric display (shutter speed)
in the viewfi nder blinks.
Under low light where camera shake tends to occur, the viewfi nder’s
shutter speed display will blink. When using a zoom lens, consider
zooming out and either holding the camera steady or using a tripod.
When using a zoom lens, you can reduce the blur caused by camera
shake by setting the lens to the wide-angle end.
Change the color tone.
You can change [Color tone]. To increase the candlelight’s reddish tinge,
set toward [Warm tone] (red), or set toward [Cool tone] (blue) if it looks
too red.
Adjust brightness.
You can change [Brightness]. To brighten the image, set toward +, or set
toward – if the image is too bright.
oThe AF method can only be set to [1-point AF].
Page 96
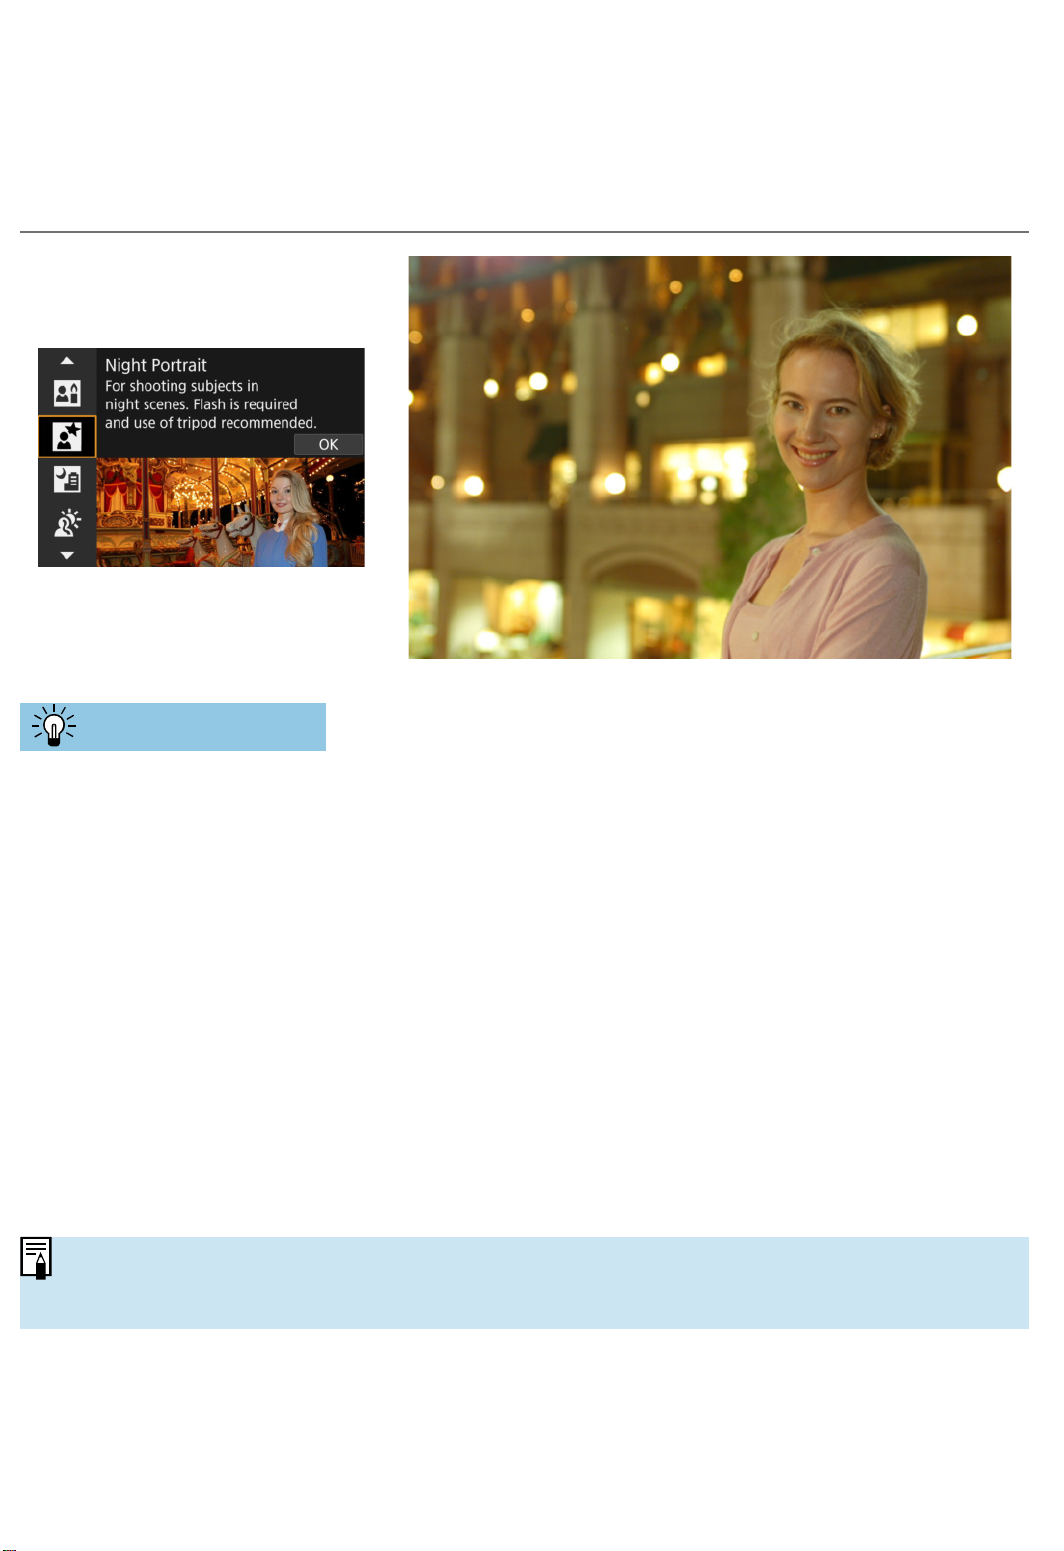
Shooting Night Portraits (With a Tripod)
When you want to photograph people at night and obtain a natural-looking
night scene in the background, use the <6> (Night Portrait) mode. Note
that shooting in this mode requires the built-in fl ash or an external
Speedlite. Using a tripod is recommended.
Shooting Tips
Use a wide-angle lens and a tripod.
When using a zoom lens, use the wide-angle end to obtain a wide night
view. Because camera shake occurs in handheld shooting, using a tripod
is also recommended.
Check the image brightness.
It is recommended to play back the captured image on location to check
the image brightness. If the subject looks dark, move nearer and shoot
again.
Also shoot in other shooting modes.
Since camera shake is prone to occur with night shots, shooting also with
<
A
> and <F> modes is recommended.
oIf you use the self-timer together with a fl ash, the self-timer lamp will light up
briefl y after the picture is taken.
Page 97
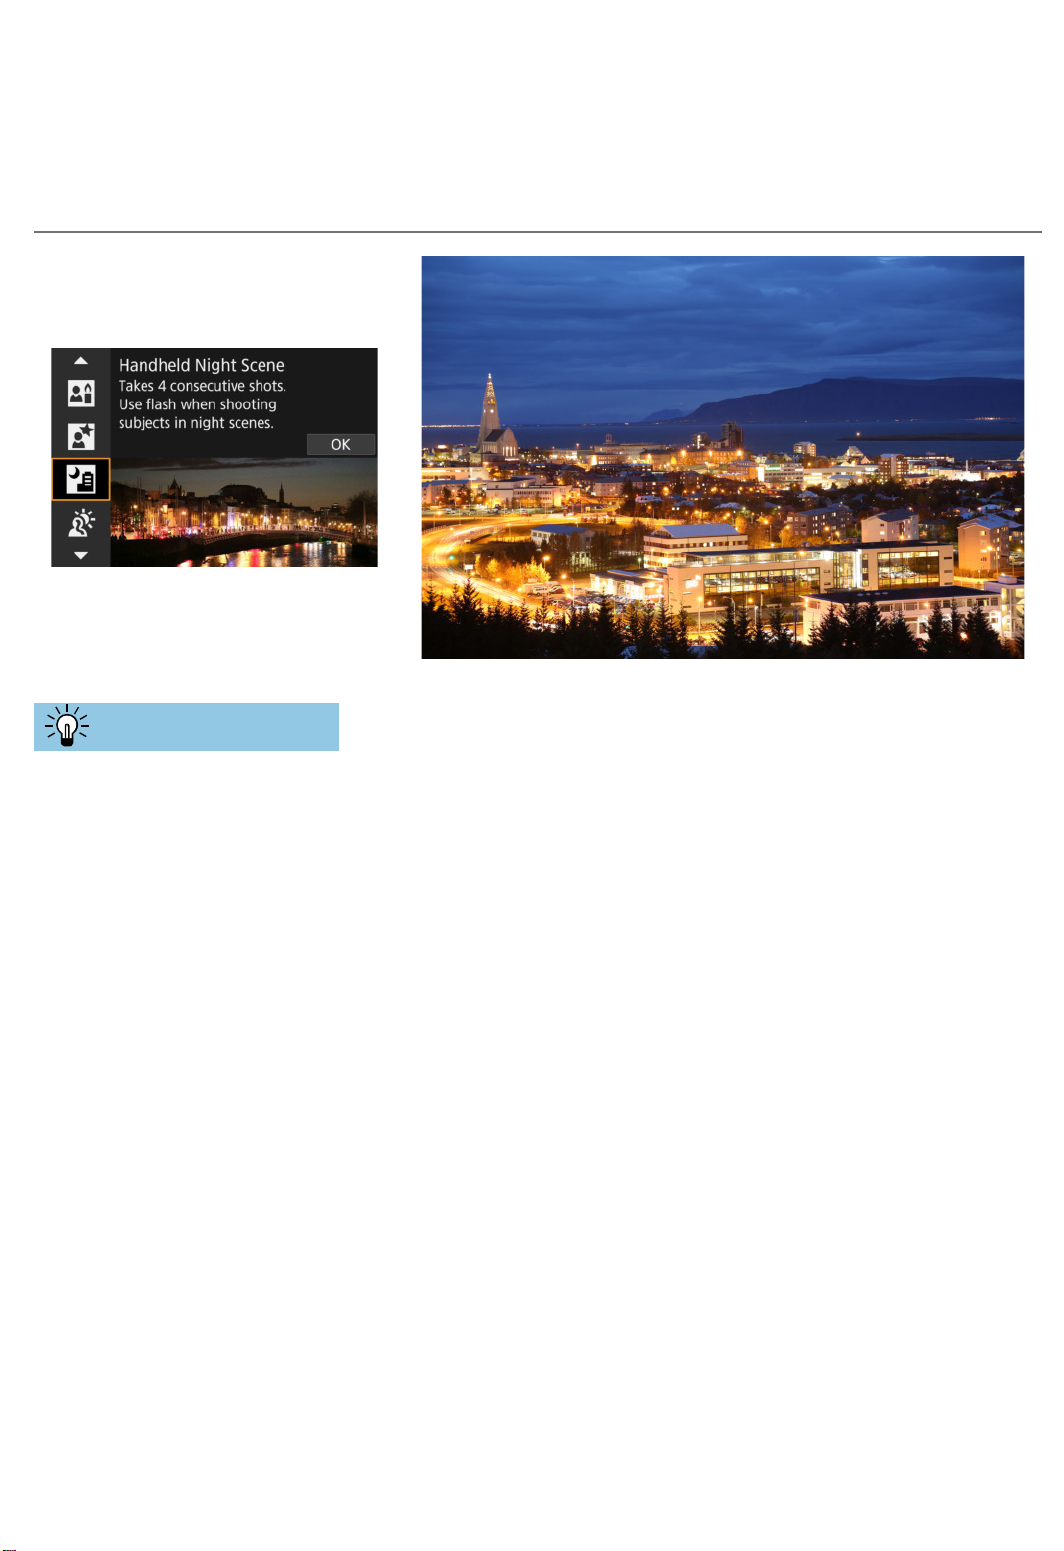
Handheld Shooting of Night Scenes
The <F> (Handheld Night Scene) mode enables you to shoot night scenes
even while handholding the camera. In this shooting mode, four shots are
taken consecutively for each picture, and the resulting one image with
reduced camera shake is recorded.
Shooting Tips
Hold the camera steady.
Keep your elbows close to your body to hold the camera steady (
=
56).
In this mode, four shots are aligned and merged into a single image.
However, if there is signifi cant misalignment in any of the four shots due
to camera shake, they may not align properly in the fi nal image.
For portraits, use fl ash.
If your shots will include people, use the built-in fl ash or an external
Speedlite. To take a nice portrait, the fi rst shot will use fl ash. Tell the
subject not to move until all four consecutive shots are taken.
Page 98
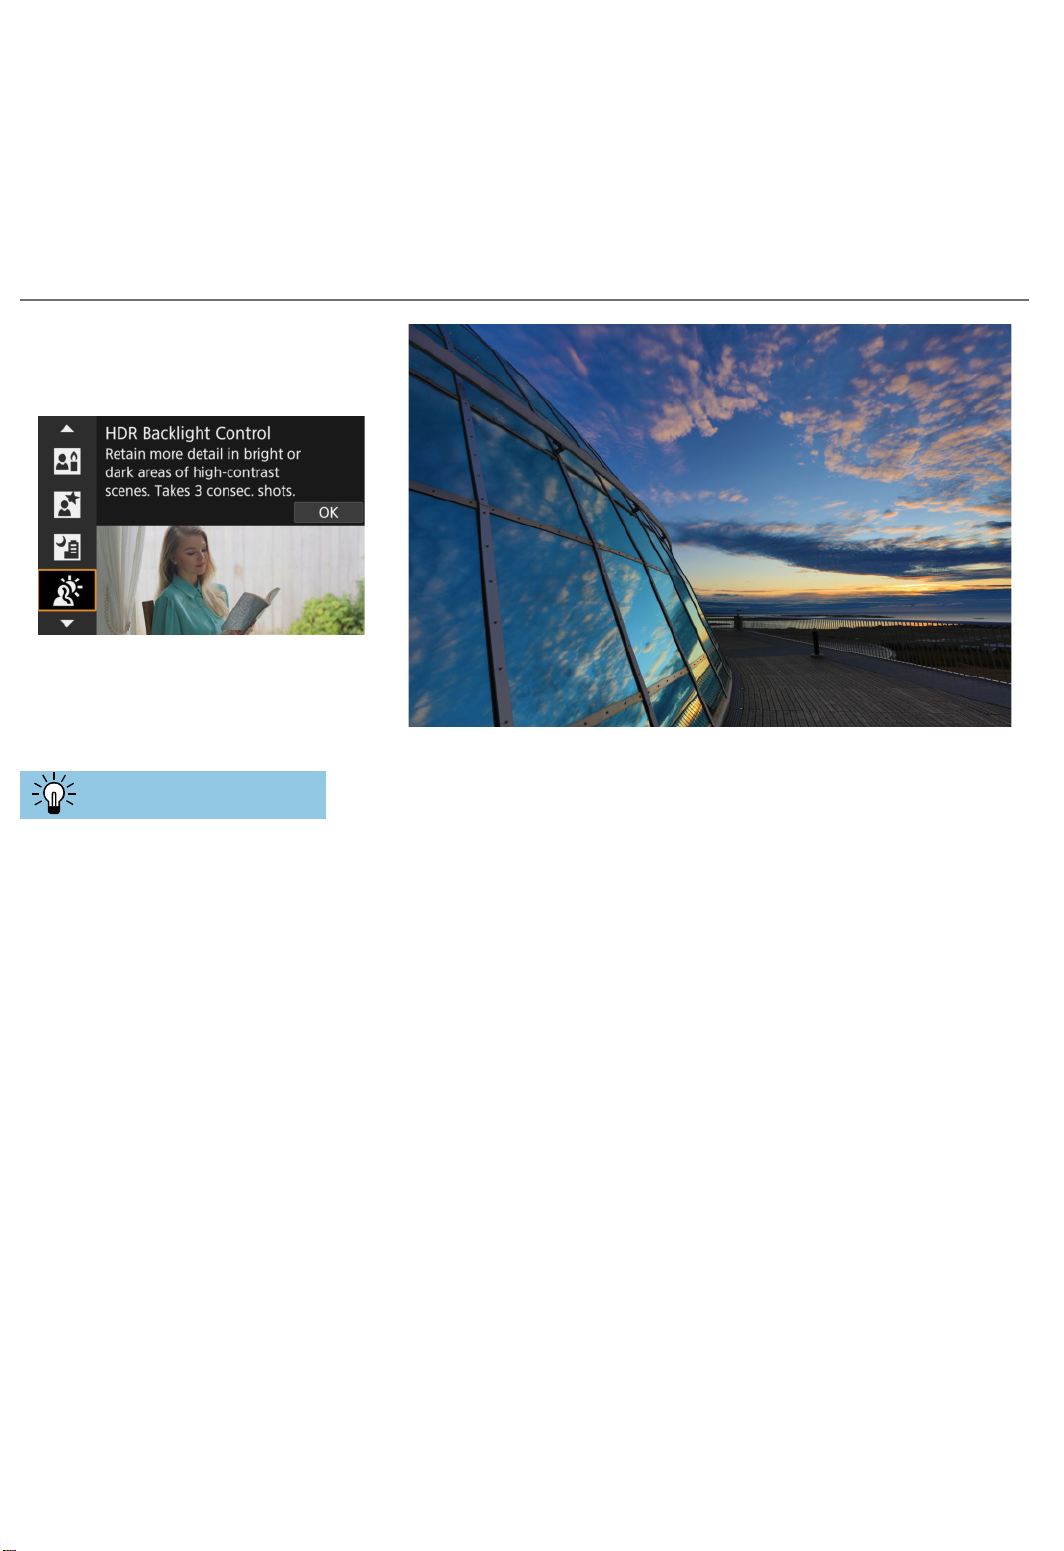
Shooting Backlit Scenes
When shooting a scene having both the bright and dark areas, use the
<G> (HDR Backlight Control) mode. When you take one picture in this
mode, three consecutive shots are taken at diff erent exposures. This results
in one image, with a wide tonal range, that has minimized the clipped
shadows caused by backlighting.
* HDR stands for High Dynamic Range.
Shooting Tips
Hold the camera steady.
Keep your elbows close to your body to hold the camera steady (
=
56).
In this mode, three shots are aligned and merged into a single image.
However, if there is signifi cant misalignment in any of the three shots due
to camera shake, they may not align properly in the fi nal image.
Page 99

Cautions for the <SCN> Modes
q
: Group Photo
oThe angle of view changes slightly, due to distortion correction.
oDepending on the shooting conditions, focus may not be attained for everyone
from the front to the back of the image.
3
: Landscape
oThe built-in fl ash will not fi re, even if it is raised when you shoot.
oSpeedlites will not fi re either, if used.
5
: Sports
oUnder low light where camera shake tends to occur, the shutter speed value in
the lower left will blink. Hold the camera steady and shoot.
oUsing a fl ash will decrease the continuous shooting speed.
C
: Kids
oContinuous shooting speed is slower when a fl ash fi res during continuous Live
View shooting. The camera keeps shooting at the lower continuous shooting
speed even after the fl ash stops fi ring.
r
: Panning
oThe shutter speed will become slower. Therefore, this mode is not suitable for
any shooting except for panning.
o<
o
> or <
M
> cannot be selected.
oFlash photography is not possible.
oAlthough lens IS is applied to images captured with lenses supporting <
r
>
mode, the eff
ect is not shown in the viewfi nder or on the screen as you shoot.
(IS and subject blur correction are activated when you shoot, r
egardless of the
lens IS setting.)
oIf the lens does not support the <
r
> mode, subject blur will not be corrected.
However
, the automatic shutter speed adjustment alone will take eff ect
according to the setting of [Eff ect].
oWhen shooting under bright light such as a sunny summer day or when
shooting a slow subject, the set degree of panning eff
ect may not be obtained.
Page 100

Cautions for the <SCN> Modes
r
: Panning (continued)
oWith a lens supporting the <
r
> mode, subject blur may not be corrected
properly when shooting the following subjects or under the following shooting
conditions.
•
Subjects with very low contrast.
• Subjects in low light.
• Strongly backlit or refl ective subjects.
• Subjects with repetitive patterns.
• Subjects with less patterns or monotonous patterns.
• Subjects with refl ections (images refl ected in glass, etc.).
• Subjects smaller than the Zone AF frame.
• When there are multiple subjects moving within the Zone AF frame.
• Subjects moving in irregular directions or at irregular speeds.
• Subjects whose movements are partly irregular. (For example, the vertical
movement of a runner.)
• Subjects whose speed changes dramatically. (For example, right after the
start of movement or while turning along a curve.)
• When you move the camera too fast or too slow.
• When the camera’s movement does not match the subject’s movement.
• When the lens focal length is long.
P
: Food
oThe warm color cast of subjects may fade.
oWhen multiple light sources are included in the scene, the warm color cast of
the picture may not be reduced.
oIf you use a fl ash, [Color tone] will be set to Standard.
oIf there are people in the picture, the skin tone may not be reproduced
properly
.
y
: Candlelight
oThe fl ash will not fi re. However, raising the fl ash beforehand is recommended,
to enable fi ring of the AF-assist beam (=126).
 Loading...