

Canon A510 - PowerShot 3.2MP Digital Camera, PowerShot A510, Digital Camera Solution Disk Version 22 Software Starter Manual
Page 1
ENGLISH
Windows/Macintosh
Software Starter Guide For Version 22
Software Starter Guide
(For the Canon Digital Camera Solution Disk Version 22)
You must install the software bundled on the Canon
Digital Camera Solution Disk before connecting the
camera to the computer.
Install the software.
Windows
Macintosh
p. 10
p. 49
Connect the camera
to the computer.
Windows Macintosh
CDI-E169-010 xx04xxxx © 2004 CANON INC. PRINTED IN JAPAN
• This guide explains how to install the software programs and
briefly introduces their functions and operating procedures.
• Please read the software license agreement in this guide before
using the software. By using the software, you agree to be
bound by the terms of the agreement.
Page 2
SAFETY PRECAUTIONS
The precautions noted within this guide are intended to instruct you in the safe and correct use of
the products and to prevent injuries or damage to yourself, other persons and property. Please
read and ensure that you understand them before proceeding to other sections of the guide.
Warnings
This symbol indicates topics that could lead to death or serious injury if
ignored or handled incorrectly.
Warnings
• Do not play the supplied CD-ROM(s) in any CD player that does not support data CD-
ROMs. Playing the CD-ROM(s) in an audio CD player (music player) could damage the
speakers. It is also possible to suffer from hearing loss from listening with headphones to
the loud sounds of a CD-ROM played on a music CD player.
Disclaimer
• While every effort has been made to ensure that the information contained in this guide is
accurate and complete, no liability can be accepted for any errors or omissions. Canon
reserves the right to change the specifications of the hardware and software described
herein at any time without prior notice.
• No part of this guide may be reproduced, transmitted, transcribed, stored in a retrieval
system, or translated into any language in any form, by any means, without the prior
written permission of Canon.
• Canon makes no warranties for damages resulting from corrupted or lost data due to a
mistaken operation or malfunction of the camera, the software, the CompactFlash™ cards
(CF cards), personal computers, peripheral devices, or use of non-Canon CF cards.
Canon Customer Support
For Canon Customer Support contacts, please see the Canon Limited Warranty supplied with
your camera.
ArcSoft Customer Support
North America
46601 Fremont Blvd., Fremont, CA 94538
Tel: (510) 440-9901 (Mon. - Fri., 8:30 AM - 5:30 PM PST)
E-mail: support@arcsoft.com
Other Regions
Please see the ArcSoft web site: http://www.arcsoft.com/maininternational.html.
Trademark Acknowledgments
• Canon and PowerShot are trademarks of Canon Inc.
• ArcSoft, the ArcSoft logo and ArcSoft PhotoStudio are trademarks or registered trademarks of
ArcSoft, Inc.
• Adobe is a trademark of Adobe Systems Incorporated.
• CompactFlash is a trademark of SanDisk Corporation.
• Macintosh, Mac OS and QuickTime are trademarks of Apple Computer Inc., registered in the
United States and other countries.
•Microsoft
Corporation in the United States and/or other countries.
• Other names and products not mentioned above may be registered trademarks or trademarks of
their respective companies.
Copyright © 2004 Canon Inc. All rights reserved.
®
and Windows® are either registered trademarks or trademarks of Microsoft
Page 3
READ CAREFULLY BEFORE USING
Canon Software License Agreement
IMPORTANT - READ THIS AGREEMENT BEFORE USING THE SOFTWARE ON THE CD-ROM IN THIS
BOX. BY USING THE SOFTWARE, YOU AGREE TO BE BOUND BY THE TERMS OF THIS AGREEMENT.
This is a license agreement (the “Agreement”) between you and Canon Inc. (“Canon”).
IF YOU DO NOT AGREE TO THE TERMS AND CONDITIONS OF THIS AGREEMENT, DO NOT USE THE
SOFTWARE PROGRAM ON THE CD-ROM (INCLUDING ALL SOUND AND IMAGE DATA) AND THE
USER MANUAL IN THIS BOX (COLLECTIVELY, THE “SOFTWARE”) AND PROMPTLY RETURN THE
SOFTWARE TO YOUR POINT OF PURCHASE FOR A REFUND.
In consideration of the right to use the SOFTWARE, you agree to abide by the terms and
conditions of this Agreement.
1. LICENSE: Canon grants you the personal, non-exclusive right to use the SOFTWARE only on a single
computer. You may physically transfer the SOFTWARE from one computer to another provided that the
SOFTWARE is used on only one computer at a time. You shall not install or use the SOFTWARE on a
network, multiple CPU, multiple site arrangement, or any other hardware configuration where the
SOFTWARE is accessible to more than one CPU or to more than one user.
With respect to the sound and image data (“Data”) contained in the Software, which are to be
downloaded to the applicable Canon digital camera product, Canon grants you a personal, non-
exclusive license to use the Data on a single Canon digital camera product only.
YOU SHALL NOT ASSIGN, SUBLICENSE, RENT, LEASE, LOAN, CONVEY OR OTHERWISE USE,
TRANSFER, COPY, TRANSLATE, CONVERT TO ANOTHER PROGRAMMING LANGUAGE, ALTER,
MODIFY, DECOMPILE OR DISASSEMBLE THE SOFTWARE, IN WHOLE OR IN PART, EXCEPT AS
EXPRESSLY PROVIDED IN THIS AGREEMENT.
2. BACK-UP COPY: You may make one copy of the SOFTWARE solely for back-up purposes, or copy the
SOFTWARE onto the permanent storage device (e.g. a hard disk) of your computer and retain the
original for back-up purposes. Any other copying of the SOFTWARE is a violation of this Agreement.
You must reproduce and include the copyright notice on the back-up copy.
3. SUPPORT AND UPDATES: Neither Canon, nor its subsidiaries, dealers or distributors will be responsible
for providing maintenance or support for use of the SOFTWARE. No updates, fixes or support will be
made available for the SOFTWARE.
4. LIMITED WARRANTY AND LIMITATION OF LIABILITY: It is your responsibility to choose, maintain
and match the hardware and software components of your computer system. Thus Canon does not
guarantee uninterrupted service or correction of errors or that the functions or performance of the
SOFTWARE will meet your requirements. THE SOFTWARE IS LICENSED ON AN “AS IS” BASIS AND
WITHOUT WARRANTY OR CONDITION OF ANY KIND. The CD-ROM storing the SOFTWARE is
warranted only against defective material under normal use for a period of ninety (90) days after
purchase from an authorized Canon dealer as evidenced by your sales receipt. Your sole remedy for a
defective CD-ROM shall be replacement of the same without charge when returned by you at your
expense to your point of purchase and proven to be defective upon inspection. The Replacement CD-
ROM will be warranted for the remainder of the original ninety (90) day warranty period of the
defective CD-ROM. The limited warranty does not apply if the failure of the CD-ROM resulted from
accident, abuse or misapplication of the SOFTWARE and shall not extend to anyone other than the
original user of the SOFTWARE.
EXCEPT AS SPECIFICALLY SET FORTH IN THIS PARAGRAPH 4, CANON, CANON’S SUBSIDIARIES,
DISTRIBUTORS AND DEALERS DISCLAIM ALL WARRANTIES, OR CONDITIONS, EXPRESS OR
IMPLIED, INCLUDING ANY WARRANTY OR CONDITION OF MERCHANTABILITY OR FITNESS FOR
A PARTICULAR PURPOSE, WITH RESPECT TO THE SOFTWARE.
NEITHER CANON NOR ANY OF CANON’S SUBSIDIARIES, DISTRIBUTORS OR DEALERS IS LIABLE
FOR ANY DAMAGES HOWSOEVER CAUSED, INCLUDING WITHOUT LIMITATION, DIRECT,
CONSEQUENTIAL OR INCIDENTAL LOSS OR DAMAGE INCLUDING LOSS OF PROFITS, EXPENSE
OR INCONVENIENCE HOWSOEVER CAUSED OR ARISING OUT OF THE SOFTWARE OR THE USE
THEREOF.
i
Page 4
ii
NEITHER CANON, NOR ANY OF CANON’S SUBSIDIARIES, DISTRIBUTORS OR DEALERS SHALL
HAVE ANY OBLIGATION TO INDEMNIFY YOU AGAINST ANY CLAIM OR SUIT BROUGHT BY A
THIRD PARTY ALLEGING THAT THE SOFTWARE OR THE USE THEREOF INFRINGES ANY
INTELLECTUAL PROPERTY OF SUCH THIRD PARTY.
SOME STATES, PROVINCES OR LEGAL JURISDICTIONS DO NOT ALLOW THE EXCLUSION OF
IMPLIED WARRANTIES, OR THE LIMITATION OR EXCLUSION OF LIABILITY FOR INCIDENTAL OR
CONSEQUENTIAL DAMAGES, OR PERSONAL INJURY OR DEATH RESULTING FROM NEGLIGENCE
ON THE PART OF THE SELLER, SO THE ABOVE DISCLAIMERS AND EXCLUSIONS MAY NOT APPLY
TO YOU.
5. TERM: This Agreement is effective upon your using the SOFTWARE and remains in effect until
expiration of all copyright interests in the SOFTWARE unless earlier terminated. You may terminate this
Agreement by destroying the SOFTWARE. This Agreement will also terminate without notice to you if
you fail to comply with any of the terms of this Agreement and you must then promptly return the
SOFTWARE. In addition, Canon may enforce its other legal rights.
6. U.S. GOVERNMENT RESTRICTED RIGHTS NOTICE:
The SOFTWARE is a “commercial item,” as that term is defined at 48 C.F.R. 2.101 (Oct 1995),
consisting of “commercial computer software” and “commercial computer software documentation,”
as such terms are used in 48 C.F.R. 12.212 (Sept 1995). Consistent with 48 C.F.R. 12.212 and 48 C.F.R.
227.7202-1 through 227.72024 (June 1995), all U.S. Government End Users shall acquire the
SOFTWARE with only those rights set forth herein. Manufacturer is Canon Inc./30-2, Shimomaruko 3-
chome, Ohta-ku, Tokyo 146-8501, Japan.
7. EXPORT RESTRICTIONS: You agree to comply with all export laws and restrictions and regulations of
the country involved, and not to export or re-export, directly or indirectly, the SOFTWARE in violation of
any such laws and restrictions and regulations, or without all necessary approvals.
8. SEVERABILITY:
In the event that any provision of this Agreement is declared or found to be illegal by any court or
tribunal of competent jurisdiction, such provision shall be null and void with respect to the jurisdiction
of that court or tribunal and all the remaining provisions of this Agreement shall remain in full force and
effect.
9. CONTROLLING LAW: The terms of this Agreement as it relates to purchases of the Software in the
United States of America shall be governed and construed in all respects in accordance with the laws
and regulations of the State of New York, without reference to choice of law principles. The terms of
this Agreement as it relates to purchases of the Software in Canada shall be governed by the laws of
the province of Ontario.
10.OWNERSHIP: All rights, including but not limited to copyrights and trade secret rights, to the
SOFTWARE belong to Canon, its affiliated corporations and third party licensors. Your use of the
SOFTWARE is subject to the laws of the United States, and Canada, and other applicable copyright and
trademark laws, and nothing in this Agreement constitutes a waiver of the rights of Canon, its affiliated
corporations and third party licensors under such laws. You only own the CD-ROM media in which the
Software is stored. Except as expressly provided herein, no license or right, express or implied, is hereby
conveyed or granted by Canon to you for any intellectual property of Canon. Nothing contained in
Paragraph 1 shall be construed to give Canon any ownership rights in any images, graphics or textual
material that you save in connection with the Software.
You may not modify, remove or delete any or all copyright notices (i) which are contained in the
Software, including any copy thereof, and (ii) which are on the original CD-ROM and on the medium of
a back-up copy made pursuant to Section 2 above.
11.ACKNOWLEDGEMENT: BY USING THE SOFTWARE, YOU ACKNOWLEDGE THAT YOU HAVE
READ THIS AGREEMENT, UNDERSTOOD IT, AND AGREE TO BE BOUND BY ITS TERMS AND
CONDITIONS. YOU ALSO AGREE THAT THIS AGREEMENT IS THE COMPLETE AND EXCLUSIVE
STATEMENT OF AGREEMENT BETWEEN YOU AND CANON CONCERNING THE SUBJECT MATTER
HEREOF AND SUPERSEDES ALL PROPOSALS OR PRIOR AGREEMENTS, VERBAL OR WRITTEN,
AND ANY OTHER COMMUNICATIONS BETWEEN THE PARTIES RELATING TO THE SUBJECT
MATTER HEREOF. NO AMENDMENT TO THIS AGREEMENT SHALL BE EFFECTIVE UNLESS SIGNED
BY A DULY AUTHORIZED OFFICER OF CANON.
Page 5
Table of contents
Read This First 3
It’s so Simple! Make Prints Right at Home Like a Pro ...................... 4
Unbounded Possibilities with Entertaining Software .....................6
System Requirements ........................................................................ 8
Using the Software on the Windows Platform
– Preparations 10
Installing the Software and USB Driver .......................................... 10
Using the Software on the Windows Platform
– The Basics 15
Downloading Images to the Computer .......................................... 15
Printing Images ................................................................................ 21
Using the Software on the Windows Platform
– Advanced Techniques 26
The ZoomBrowser EX Windows ...................................................... 26
ZoomBrowser EX Features ..............................................................32
Checking Images before Downloading .......................................... 34
Replaying Movies ............................................................................. 36
Editing Movies .................................................................................37
Converting RAW Images ................................................................. 38
Operating the Shutter Remotely .................................................... 41
Merging Panoramic Images - PhotoStitch ...................................... 44
Enjoy Customizing Your Camera with the My Camera Settings ... 45
1
Using the Software on the Macintosh Platform
– Preparations 49
Installing the Software .................................................................... 49
Using the Software on the Macintosh Platform
– The Basics 51
Downloading Images to the Computer .......................................... 51
Printing Images ................................................................................ 55
Page 6
Table of contents
2
Using the Software on the Macintosh Platform
– Advanced Techniques 58
The ImageBrowser Windows ..........................................................58
ImageBrowser Features ................................................................... 64
Checking Images before Downloading .......................................... 66
Replaying Movies ............................................................................. 68
Editing Movies .................................................................................69
Converting RAW Images ................................................................. 70
Operating the Shutter Remotely .................................................... 72
Merging Panoramic Images - PhotoStitch ...................................... 75
Enjoy Customizing Your Camera with the My Camera Settings ... 76
Appendices 80
ArcSoft PhotoStudio ........................................................................ 80
Uninstalling the Software ............................................................... 82
Memory Card Folder Structure ....................................................... 85
Troubleshooting .............................................................................. 86
Information about Your Camera 94
Information Common to All Models .............................................. 94
PowerShot A520/PowerShot A510 .................................................. 96
Index ................................................................................................. 97
Using the PDF Manuals
The following PDF-format manuals (hereafter PDF manuals) are provided to
explain the features and procedures for using ZoomBrowser EX and
ImageBrowser.
• ZoomBrowser EX Software User Guide (Windows)
• ImageBrowser Software User Guide (Macintosh)
Adobe Reader or Adobe Acrobat Reader must be installed to read
the aforementioned PDF manuals. If one of these applications is
not already installed on your computer, download it from the
following website.
http://www.adobe.com/products/acrobat/readstep2.html
Viewing PDF Manuals
Viewing Manuals Downloaded from a Website
These PDF-format manuals are available on the Canon website. Use your
browser program to download these manuals from the following URL:
http://web.canon.jp/Imaging/information-e.html
Page 7
Read This First
This chapter explains what you can accomplish using the camera with the software contained
on the Canon Digital Camera Solution Disk.
It also lists the computer system configurations required to use the software.
About this Guide
• The explanations in this guide are based on Windows XP and Mac OS X v10.3. If you are
using another version of these operating systems, the actual screen contents and
procedures may vary slightly from those shown.
• The following terms are used in this guide.
Mac OS X is used for Mac OS X (v10.1.5-v10.3)
Memory card is used for CF cards, SD cards, MultiMediaCards and PC cards.
3
Page 8
It’s so Simple! Make Prints Right at Home Like a Pro
4
It’s so Simple! Make Prints Right at Home
Like a Pro
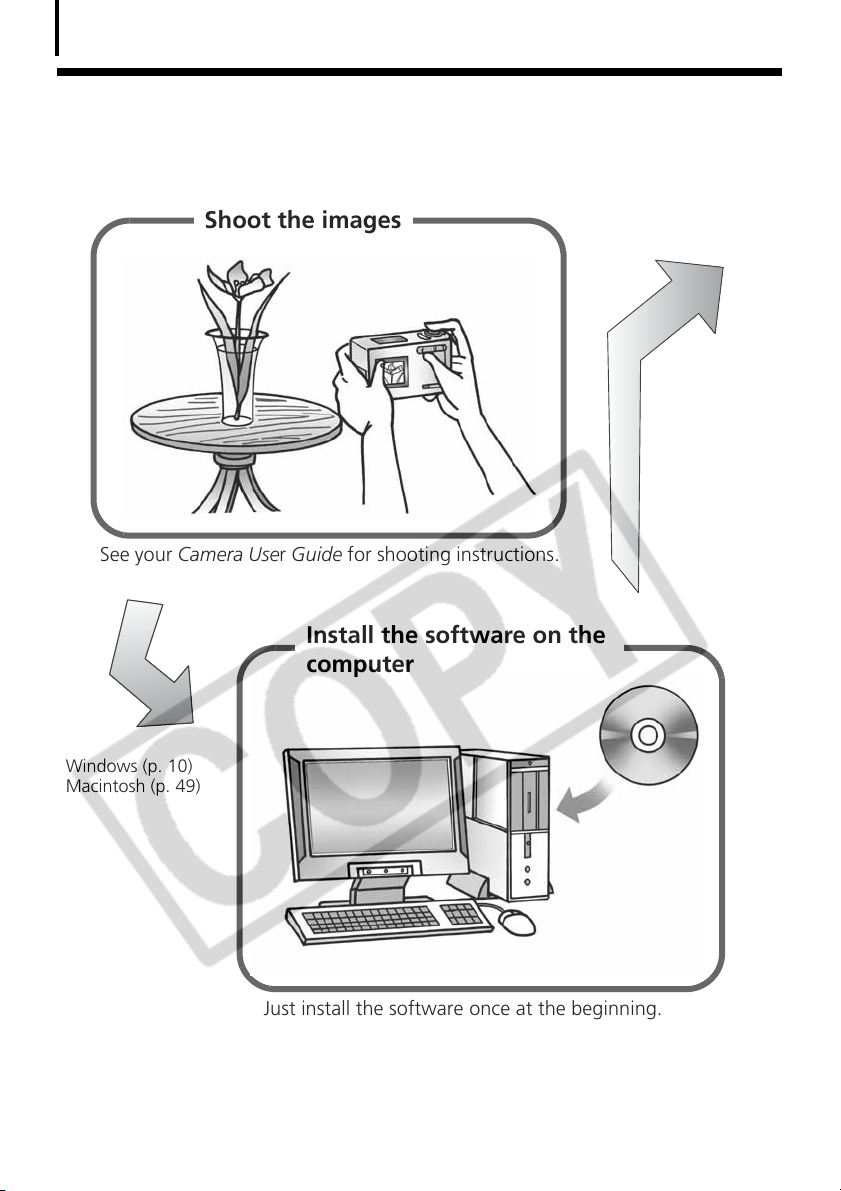
Shoot the images
See your Camera User Guide for shooting instructions.
Windows (p. 10)
Macintosh (p. 49)
Install the software on the
computer
Just install the software once at the beginning.
Page 9
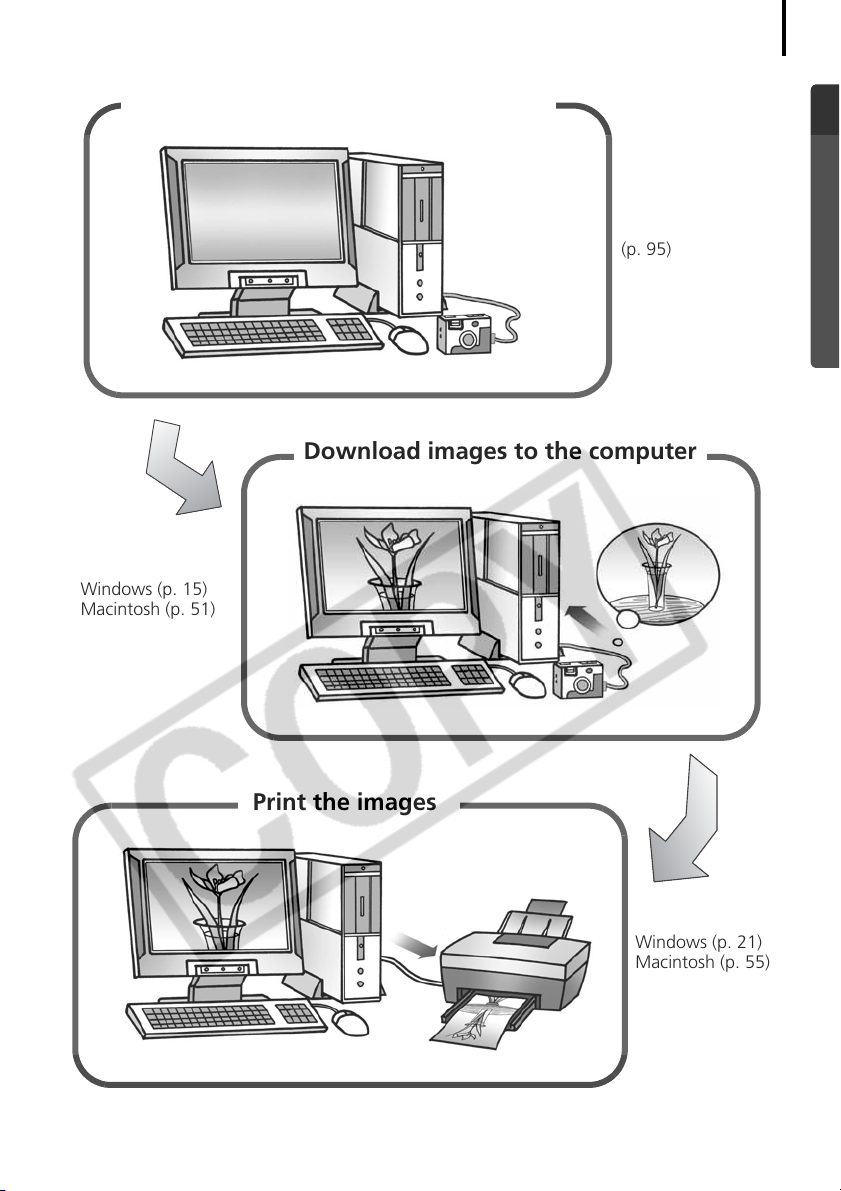
Connect the camera to the computer
Download images to the computer
Windows (p. 15)
Macintosh (p. 51)
5
(p. 95)
Print the images
Windows (p. 21)
Macintosh (p. 55)
Page 10
Unbounded Possibilities with Entertaining Software
6
Unbounded Possibilities with Entertaining
Software
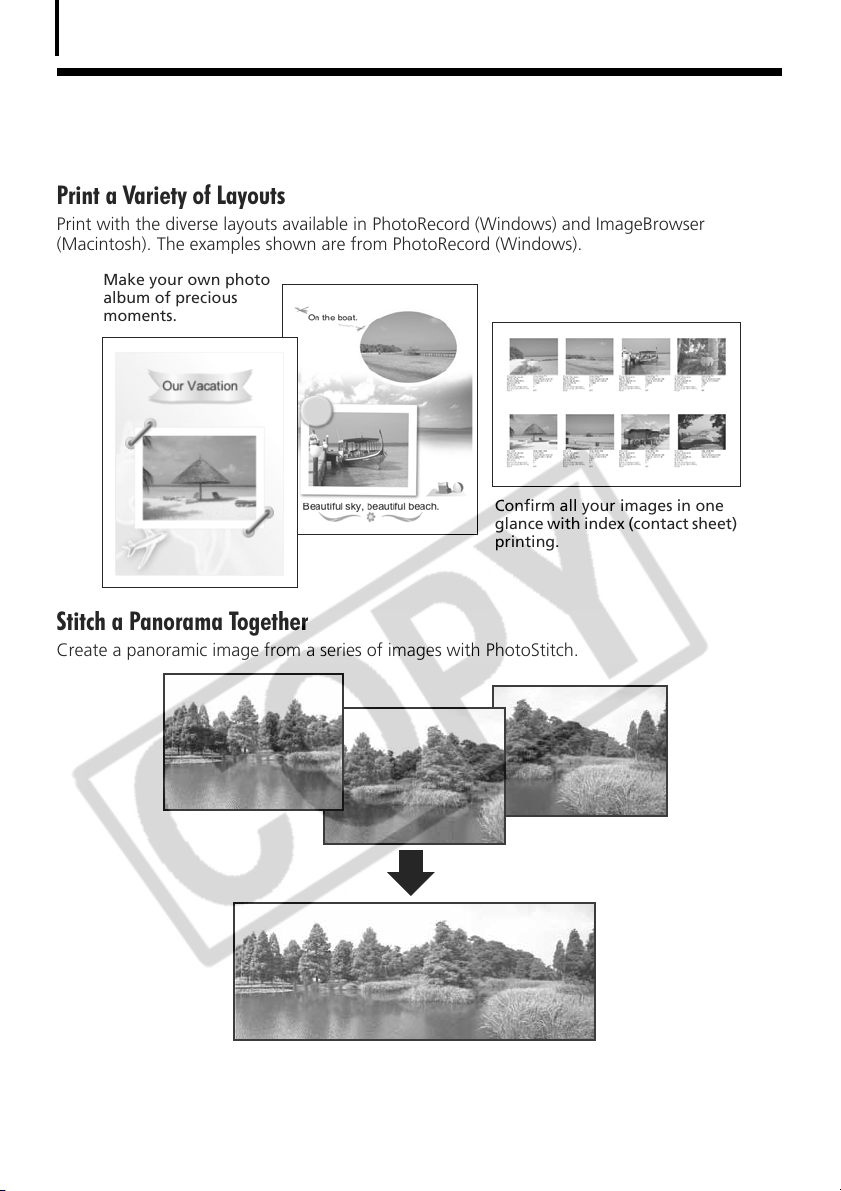
Print a Variety of Layouts
Print with the diverse layouts available in PhotoRecord (Windows) and ImageBrowser
(Macintosh). The examples shown are from PhotoRecord (Windows).
Make your own photo
album of precious
moments.
Confirm all your images in one
glance with index (contact sheet)
printing.
Stitch a Panorama Together
Create a panoramic image from a series of images with PhotoStitch.
Page 11

Send an Image as an E-mail Attachment
Attach an image to an e-mail message by starting your mail software from within
ZoomBrowser EX (Windows) or ImageBrowser (Macintosh).
Operate the Camera Shutter from the Computer
Release the camera’s shutter from the computer with ZoomBrowser EX (Windows) or
ImageBrowser (Macintosh). The recorded image is saved directly to your computer.
7
Release the shutter from the computer.
Edit a Movie
You can create and edit movies: link movies and stills that have been downloaded to your
computer, add background music, superimpose titles and other text, and apply various effects
to the movies.
Convert a RAW Image
RAW images are extremely high-quality images that are free of the resolution loss associated
with compression processing. However, since RAW images are a special type of image, it is
necessary to convert them into standard images. You can make fine adjustments to the image
quality and coloration when they are converted.
Page 12
System Requirements
8
System Requirements
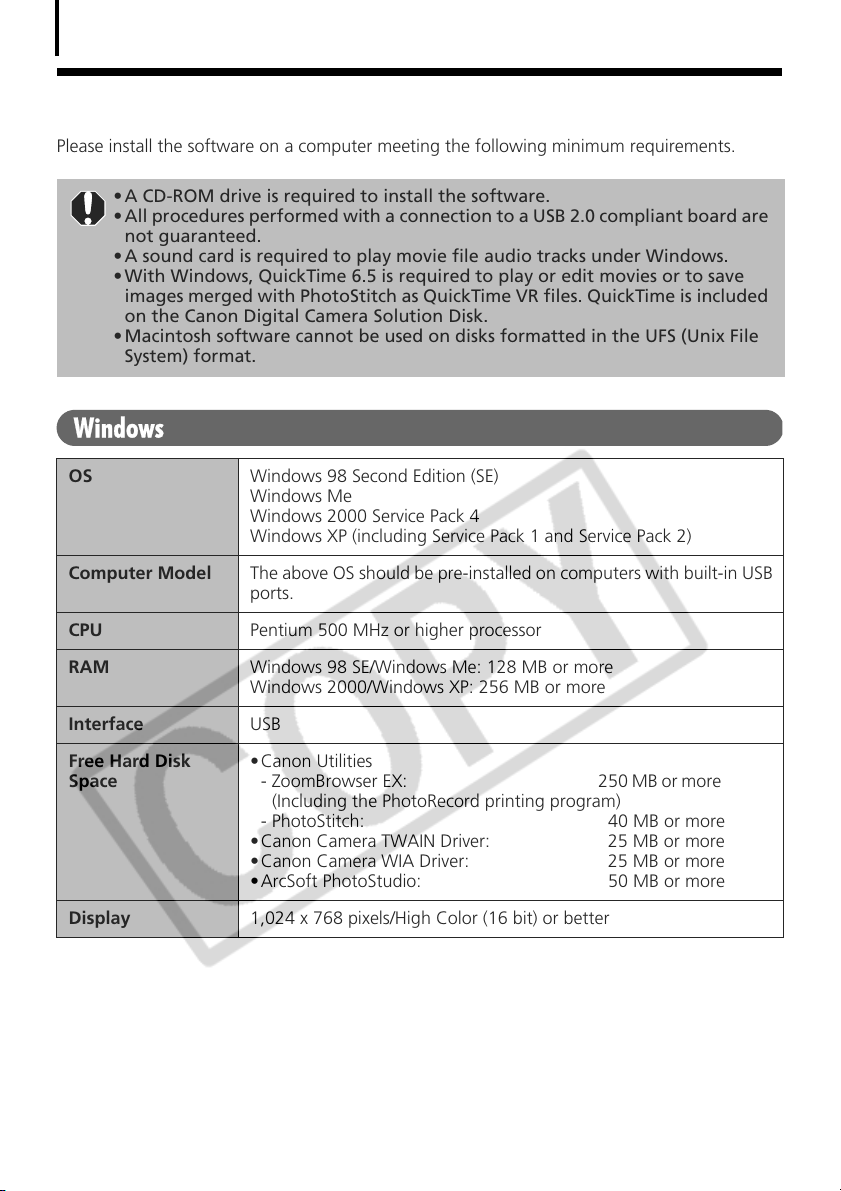
Please install the software on a computer meeting the following minimum requirements.
• A CD-ROM drive is required to install the software.
• All procedures performed with a connection to a USB 2.0 compliant board are
not guaranteed.
• A sound card is required to play movie file audio tracks under Windows.
• With Windows, QuickTime 6.5 is required to play or edit movies or to save
images merged with PhotoStitch as QuickTime VR files. QuickTime is included
on the Canon Digital Camera Solution Disk.
• Macintosh software cannot be used on disks formatted in the UFS (Unix File
System) format.
Windows
OS Windows 98 Second Edition (SE)
Windows Me
Windows 2000 Service Pack 4
Windows XP (including Service Pack 1 and Service Pack 2)
Computer Model The above OS should be pre-installed on computers with built-in USB
ports.
CPU Pentium 500 MHz or higher processor
RAM Windows 98 SE/Windows Me: 128 MB or more
Interface USB
Free Hard Disk
Space
Display 1,024 x 768 pixels/High Color (16 bit) or better
Windows 2000/Windows XP: 256 MB or more
•Canon Utilities
- ZoomBrowser EX: 250 MB or more
(Including the PhotoRecord printing program)
- PhotoStitch: 40 MB or more
•Canon Camera TWAIN Driver: 25 MB or more
•Canon Camera WIA Driver: 25 MB or more
•ArcSoft PhotoStudio: 50 MB or more
Page 13
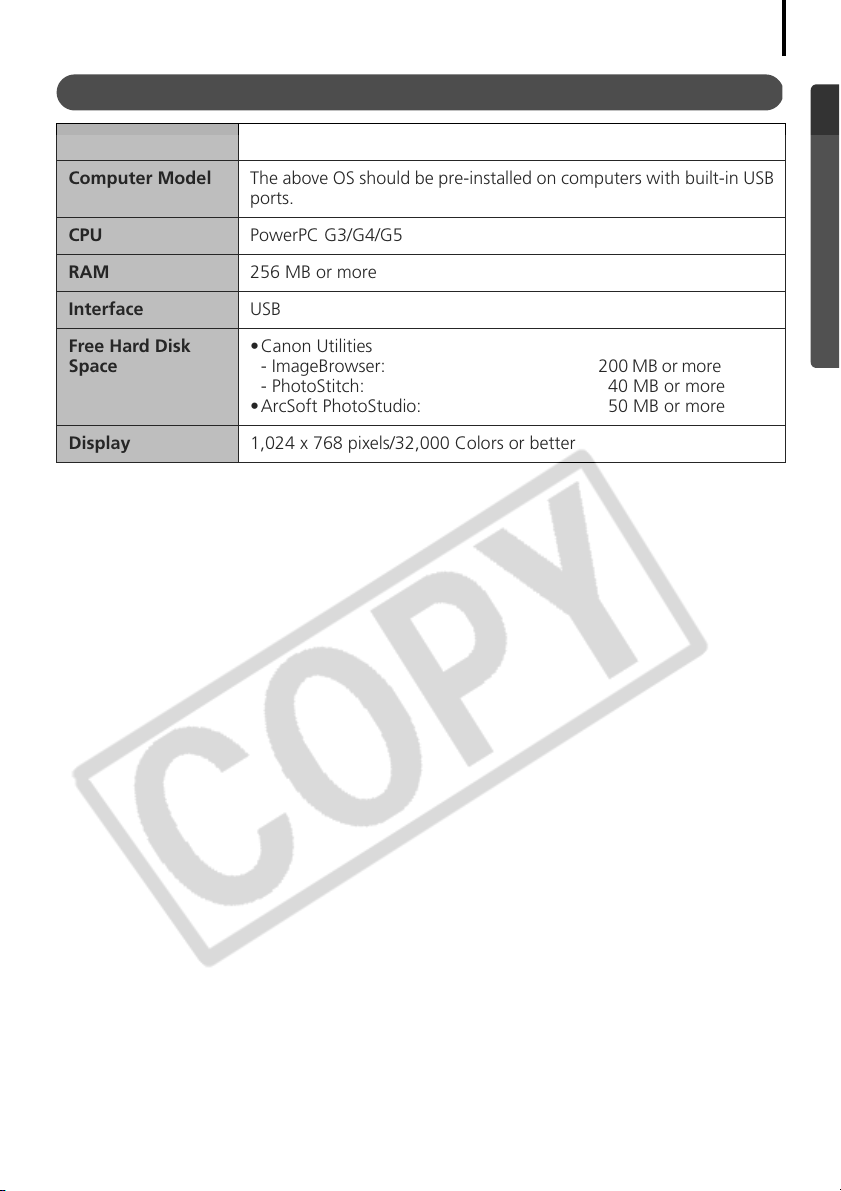
Macintosh
OS Mac OS X (v10.1.5-v10.3)
9
Computer Model The above OS should be pre-installed on computers with built-in USB
CPU PowerPC G3/G4/G5
RAM 256 MB or more
Interface USB
Free Hard Disk
Space
Display 1,024 x 768 pixels/32,000 Colors or better
ports.
•Canon Utilities
- ImageBrowser: 200 MB or more
- PhotoStitch: 40 MB or more
•ArcSoft PhotoStudio: 50 MB or more
Page 14
10
Using the Software on the Windows
Platform – Preparations
This chapter explains the basic procedures for installing the software and connecting the
camera to a computer. Read this material before you connect the camera to the computer.
Installing the Software and USB Driver
Start by installing the software from the Canon Digital Camera Solution Disk.
• You must install the software before you connect the camera to the
computer.
• Users of Windows XP and Windows 2000 must first log in as an Administrator
(computer system administrator) to install programs.
See ArcSoft PhotoStudio (p. 80) for details on how to install ArcSoft
PhotoStudio.
Items to Prepare
• Your camera and computer
• Canon Digital Camera Solution Disk
• Interface cable supplied with the camera
Installation Procedures
Confirm that the camera is NOT connected to
1
the computer.
If it is, disconnect the cable. The software cannot
be properly installed if the camera is connected to
the computer at the start.
2 Close any programs that are running.
Page 15
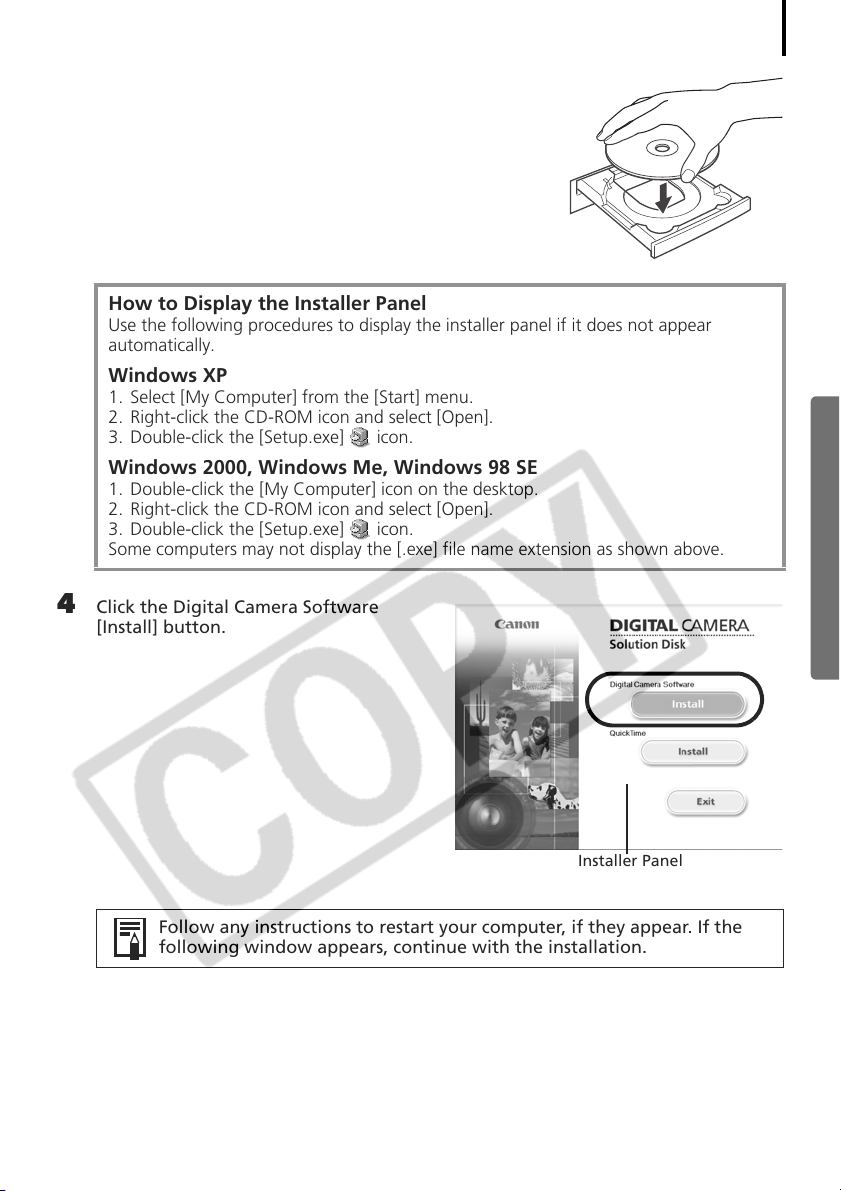
3 Place the Canon Digital Camera Solution Disk in the
computer’s CD-ROM drive.
If the installer panel does not appear automatically, use the
following procedures.
How to Display the Installer Panel
Use the following procedures to display the installer panel if it does not appear
automatically.
Windows XP
1. Select [My Computer] from the [Start] menu.
2. Right-click the CD-ROM icon and select [Open].
3. Double-click the [Setup.exe] icon.
Windows 2000, Windows Me, Windows 98 SE
1. Double-click the [My Computer] icon on the desktop.
2. Right-click the CD-ROM icon and select [Open].
3. Double-click the [Setup.exe] icon.
Some computers may not display the [.exe] file name extension as shown above.
4 Click the Digital Camera Software
[Install] button.
11
Installer Panel
Follow any instructions to restart your computer, if they appear. If the
following window appears, continue with the installation.
Page 16
Installing the Software and USB Driver
12
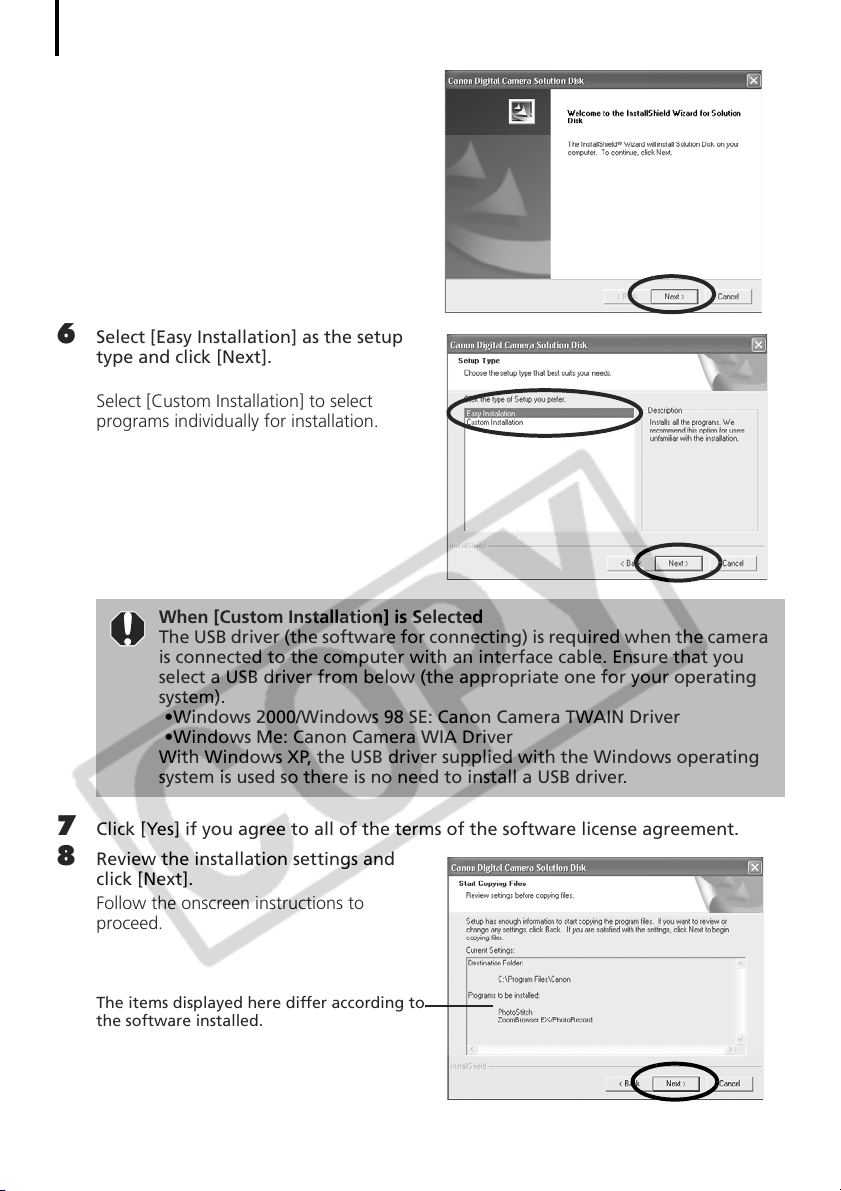
5 Click [Next].
6 Select [Easy Installation] as the setup
type and click [Next].
Select [Custom Installation] to select
programs individually for installation.
When [Custom Installation] is Selected
The USB driver (the software for connecting) is required when the camera
is connected to the computer with an interface cable. Ensure that you
select a USB driver from below (the appropriate one for your operating
system).
•Windows 2000/Windows 98 SE: Canon Camera TWAIN Driver
•Windows Me: Canon Camera WIA Driver
With Windows XP, the USB driver supplied with the Windows operating
system is used so there is no need to install a USB driver.
7 Click [Yes] if you agree to all of the terms of the software license agreement.
8 Review the installation settings and
click [Next].
Follow the onscreen instructions to
proceed.
The items displayed here differ according to
the software installed.
Page 17
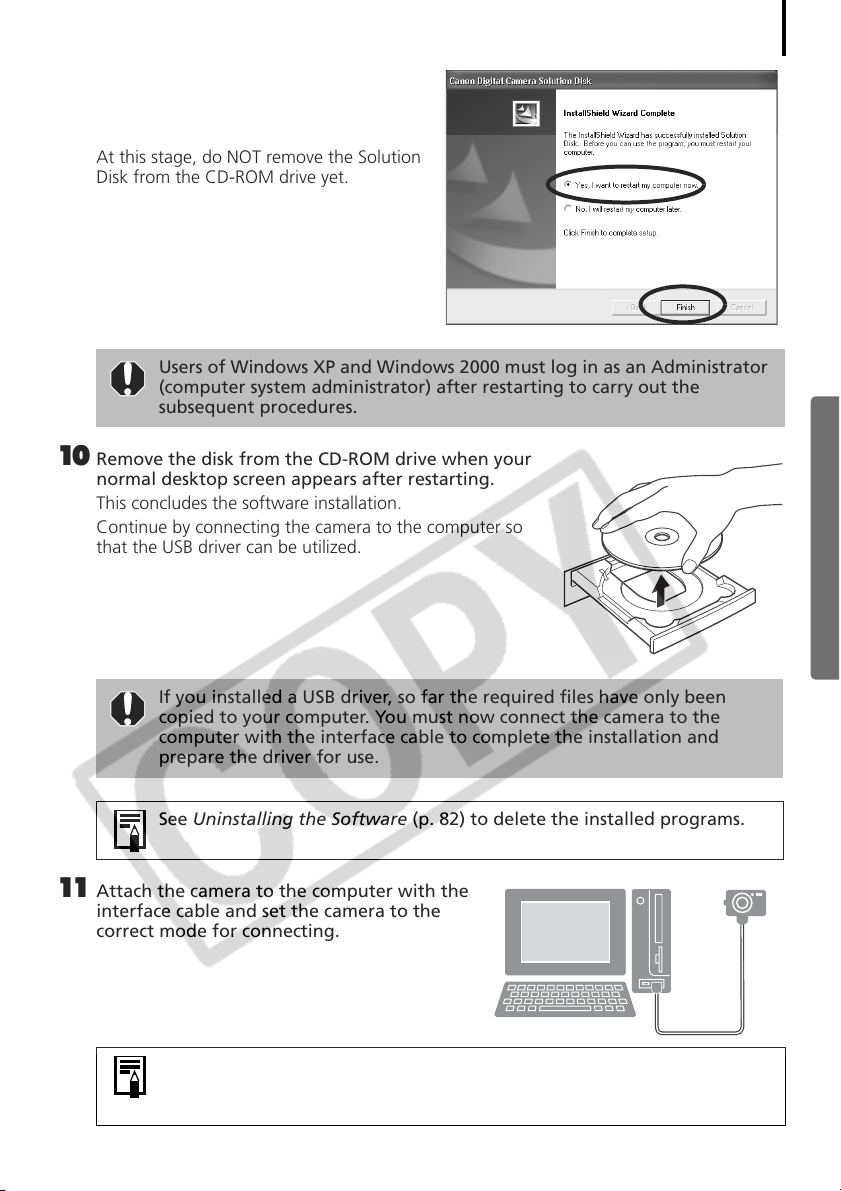
9 When the installation is over, select
[Yes, I want to restart my computer
now.] and click [Finish].
At this stage, do NOT remove the Solution
Disk from the CD-ROM drive yet.
Users of Windows XP and Windows 2000 must log in as an Administrator
(computer system administrator) after restarting to carry out the
subsequent procedures.
10 Remove the disk from the CD-ROM drive when your
normal desktop screen appears after restarting.
This concludes the software installation.
Continue by connecting the camera to the computer so
that the USB driver can be utilized.
13
If you installed a USB driver, so far the required files have only been
copied to your computer. You must now connect the camera to the
computer with the interface cable to complete the installation and
prepare the driver for use.
See Uninstalling the Software (p. 82) to delete the installed programs.
11 Attach the camera to the computer with the
interface cable and set the camera to the
correct mode for connecting.
Procedures for attaching the camera to the computer and placing the
camera in the correct mode for connecting vary between camera models.
See Information about Your Camera (p. 94).
Page 18
Installing the Software and USB Driver
14
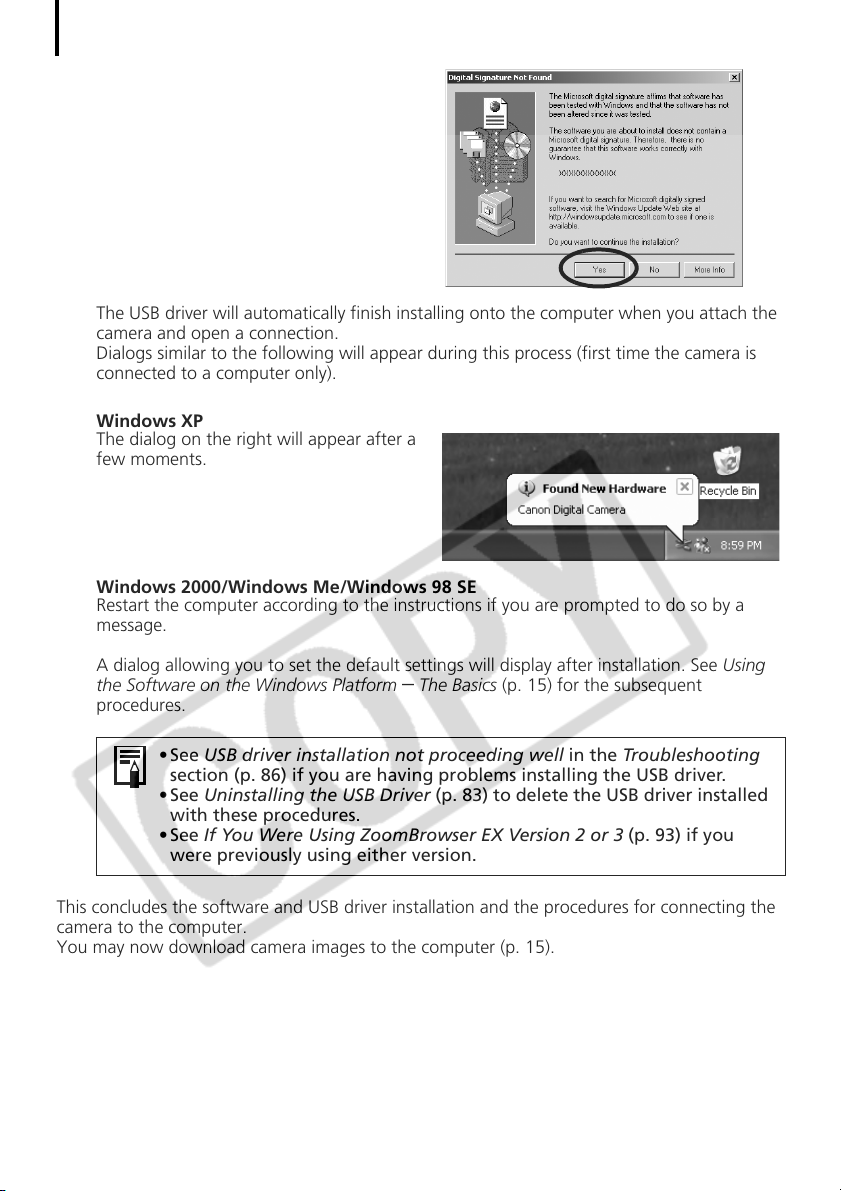
If the Digital Signature Not Found window
appears, click [Yes].
The USB driver will automatically finish installing onto the computer when you attach the
camera and open a connection.
Dialogs similar to the following will appear during this process (first time the camera is
connected to a computer only).
Windows XP
The dialog on the right will appear after a
few moments.
Windows 2000/Windows Me/Windows 98 SE
Restart the computer according to the instructions if you are prompted to do so by a
message.
A dialog allowing you to set the default settings will display after installation. See Using
the Software on the Windows Platform
procedures.
•See USB driver installation not proceeding well in the Troubleshooting
section (p. 86) if you are having problems installing the USB driver.
•See Uninstalling the USB Driver (p. 83) to delete the USB driver installed
with these procedures.
•See If You Were Using ZoomBrowser EX Version 2 or 3 (p. 93) if you
were previously using either version.
This concludes the software and USB driver installation and the procedures for connecting the
camera to the computer.
You may now download camera images to the computer (p. 15).
– The Basics (p. 15) for the subsequent
Page 19
Using the Software on the Windows
Platform – The Basics
This chapter explains the procedures for using ZoomBrowser EX to download the camera's
images to the computer and print them.
Read this chapter after completing the preparations in the Using the Software on the Windows
Platform
Downloading Images to the Computer
Begin by downloading the images to your computer. The downloading procedure is slightly
different according to whether you are using a camera to computer connection (see below) or
a memory card reader (p. 19).
– Preparations section.
You can also display an index of the camera or memory card images to check
them before downloading or to download them selectively. For instructions,
see Checking Images before Downloading (p. 34).
15
Camera to Computer Connection
Attach the supplied interface cable to the computer’s USB port and the camera’s
1
DIGITAL Terminal. Prepare the camera for communication with the computer.
Procedures for attaching the camera to the computer and placing it in
the correct mode for connecting vary between camera models. See
Information about Your Camera (p. 94).
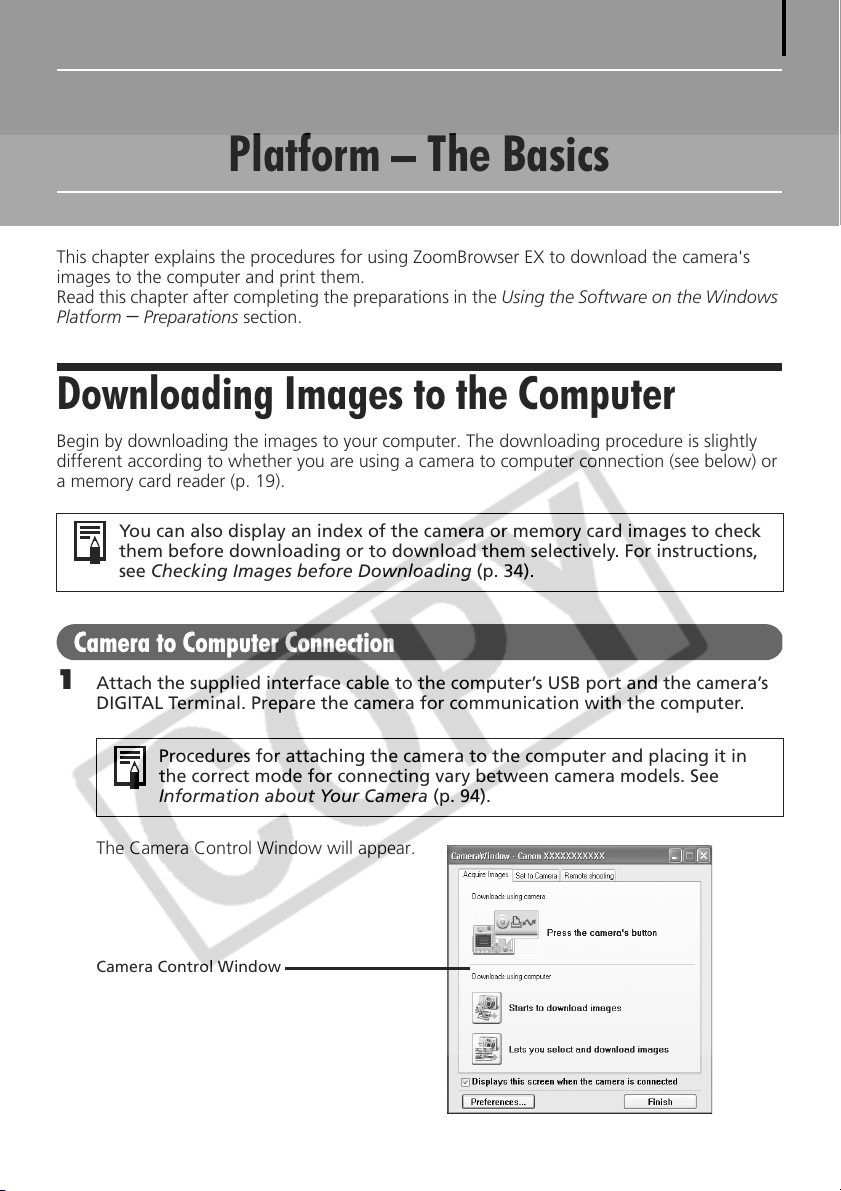
The Camera Control Window will appear.
Camera Control Window
Page 20
Downloading Images to the Computer
16
First Time Camera is Connected to a Computer
Set the following settings the first time you connect the camera to the computer. These
procedures are not required from the second connection onward.
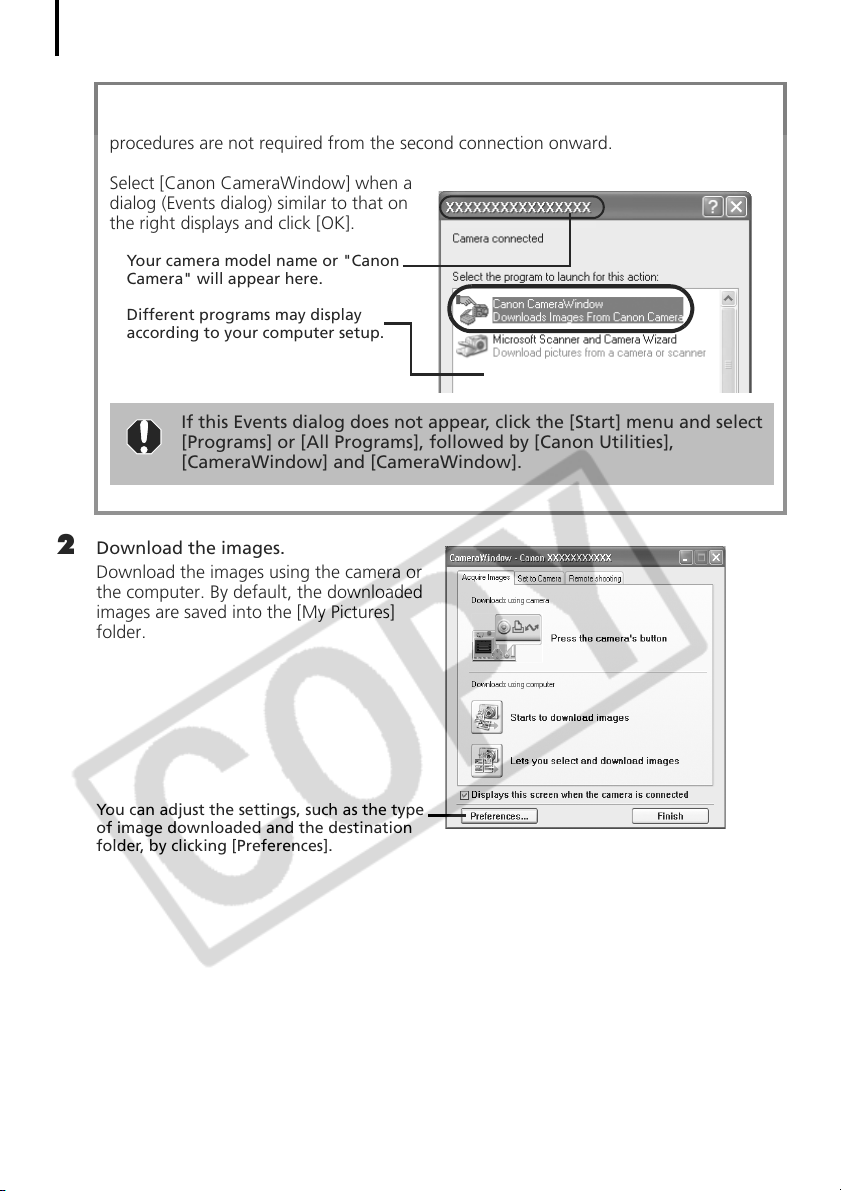
Select [Canon CameraWindow] when a
dialog (Events dialog) similar to that on
the right displays and click [OK].
Your camera model name or "Canon
Camera" will appear here.
Different programs may display
according to your computer setup.
If this Events dialog does not appear, click the [Start] menu and select
[Programs] or [All Programs], followed by [Canon Utilities],
[CameraWindow] and [CameraWindow].
2 Download the images.
Download the images using the camera or
the computer. By default, the downloaded
images are saved into the [My Pictures]
folder.
You can adjust the settings, such as the type
of image downloaded and the destination
folder, by clicking [Preferences].
Page 21
Using the Camera to Download Images (Direct Transfer Function)
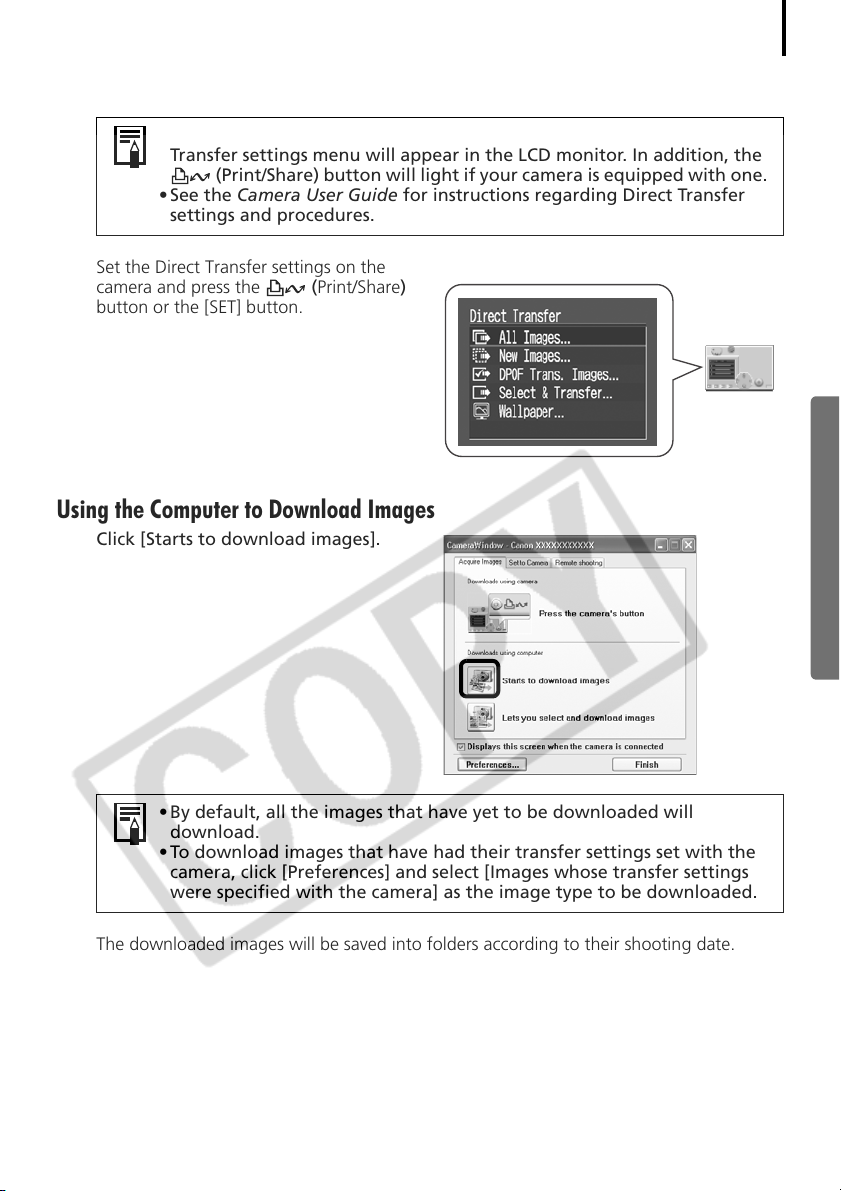
• If the conditions are right for the Direct Transfer function, the Direct
Transfer settings menu will appear in the LCD monitor. In addition, the
(Print/Share) button will light if your camera is equipped with one.
• See the Camera User Guide for instructions regarding Direct Transfer
settings and procedures.
Set the Direct Transfer settings on the
camera and press the (Print/Share)
button or the [SET] button.
Using the Computer to Download Images
Click [Starts to download images].
17
• By default, all the images that have yet to be downloaded will
download.
• To download images that have had their transfer settings set with the
camera, click [Preferences] and select [Images whose transfer settings
were specified with the camera] as the image type to be downloaded.
The downloaded images will be saved into folders according to their shooting date.
Page 22
Downloading Images to the Computer
18
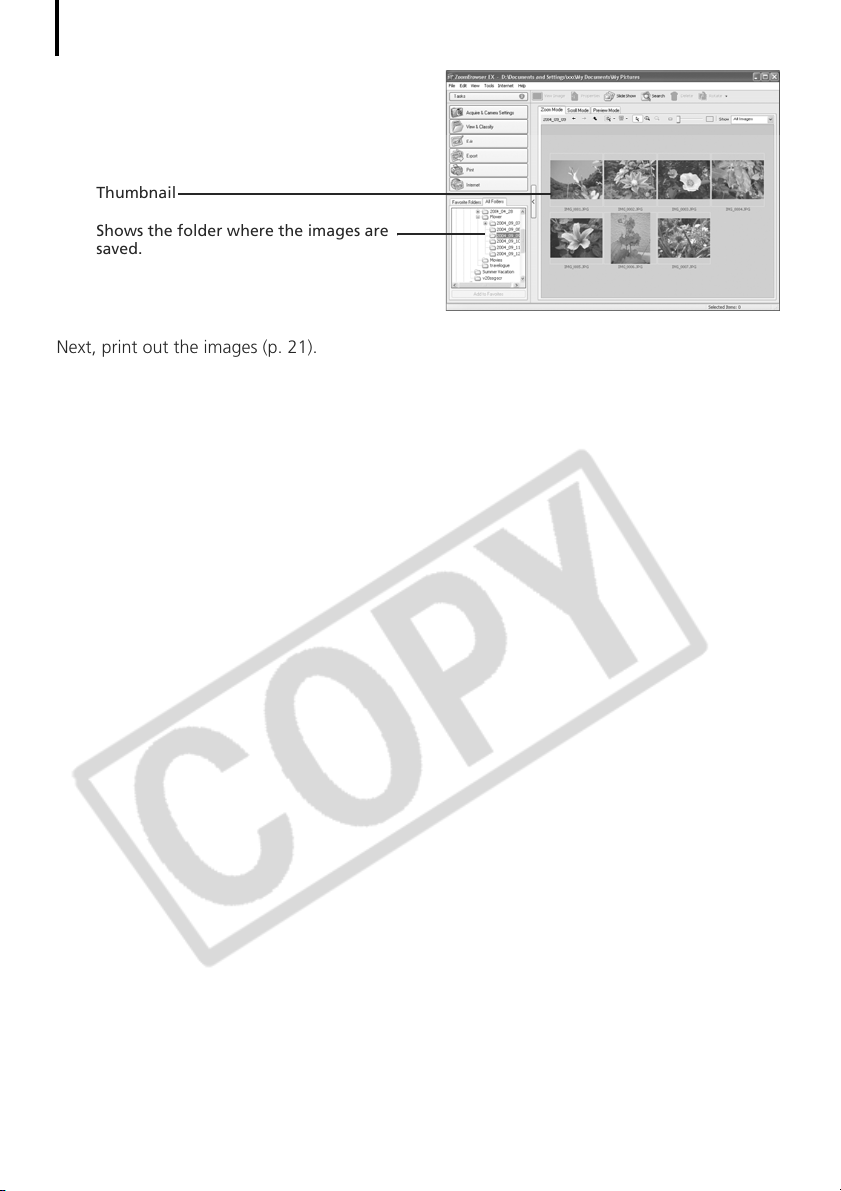
By default, when downloading is complete,
the thumbnails (tiny versions) of the
downloaded images display in
ZoomBrowser EX’s Main Window.
Thumbnail
Shows the folder where the images are
saved.
Next, print out the images (p. 21).
Page 23

Memory Card Connection
Insert the memory card into the reader.
1
Use a separately sold card adapter (PCMCIA adapter) if required.
See the manual for the memory card reader for its connection and handling instructions.
(2) Insert the loaded adapter into the slot.
(1) Place the memory card in an adapter if required.
The card adapter and memory card shape may vary according
to the type of memory card your camera utilizes.
2 Select [View/Download Images using
Canon CameraWindow] when the
dialog to the right appears and click
[OK].
The Camera Control Window will display.
19
If the dialog above fails to appear, click the [Start] menu and select
[Programs] or [All Programs], followed by [Canon Utilities],
[CameraWindow] and [CameraWindow], and proceed to Step 3.
3 Click [Starts to download images].
You can adjust the settings, such as the type
of image downloaded and the destination
folder, by clicking [Preferences].
Page 24
Downloading Images to the Computer
20
• By default, all the images that have yet to be downloaded will
download to the [My Pictures] folder.
• To download images that have had their transfer settings set with the
camera, click [Preferences] and select [Images whose transfer settings
were specified with the camera] as the image type to be downloaded.
•See Memory Card Folder Structure (p. 85) for information about
memory card folder structures and file names.
The downloaded images are saved into folders according to the shooting date.
By default, when the download is complete, the thumbnails (tiny versions) of the
downloaded images display in ZoomBrowser EX’s main window.
Next, print out the images (p. 21).
Page 25
Printing Images
This section explains the basic procedures for using PhotoRecord, a printing utility program. See
the program’s [Help] menu for more details.
• Movies cannot be printed.
•With images shot by Exif 2.2 (called Exif Print) compatible cameras, shooting
information such as the shooting settings and mode can be included with
the images. This data is then used to correct the images to obtain better
prints.
• PhotoRecord automatically carries out image correction (by default) both
with images shot with Exif 2.2 compatible cameras and other images,
yielding high-quality prints.
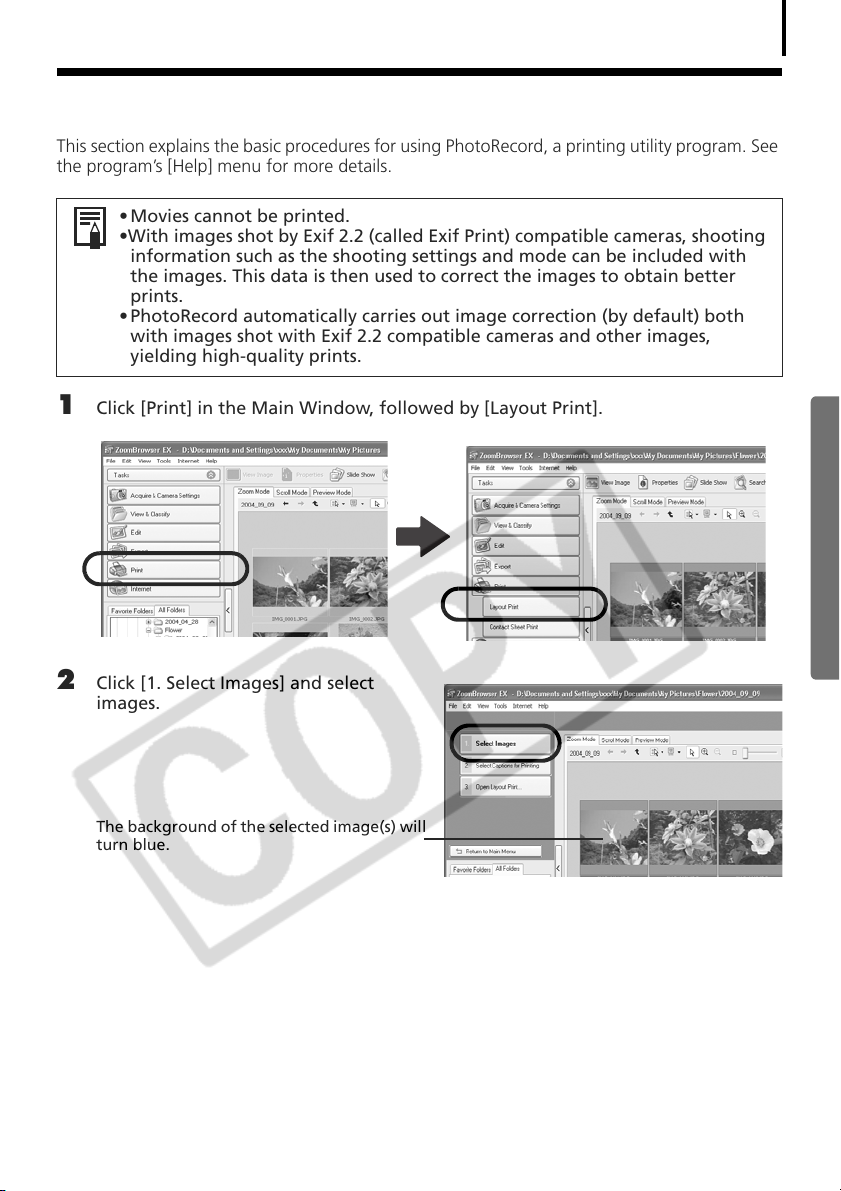
1 Click [Print] in the Main Window, followed by [Layout Print].
21
2 Click [1. Select Images] and select
images.
The background of the selected image(s) will
turn blue.
Page 26
Printing Images
22
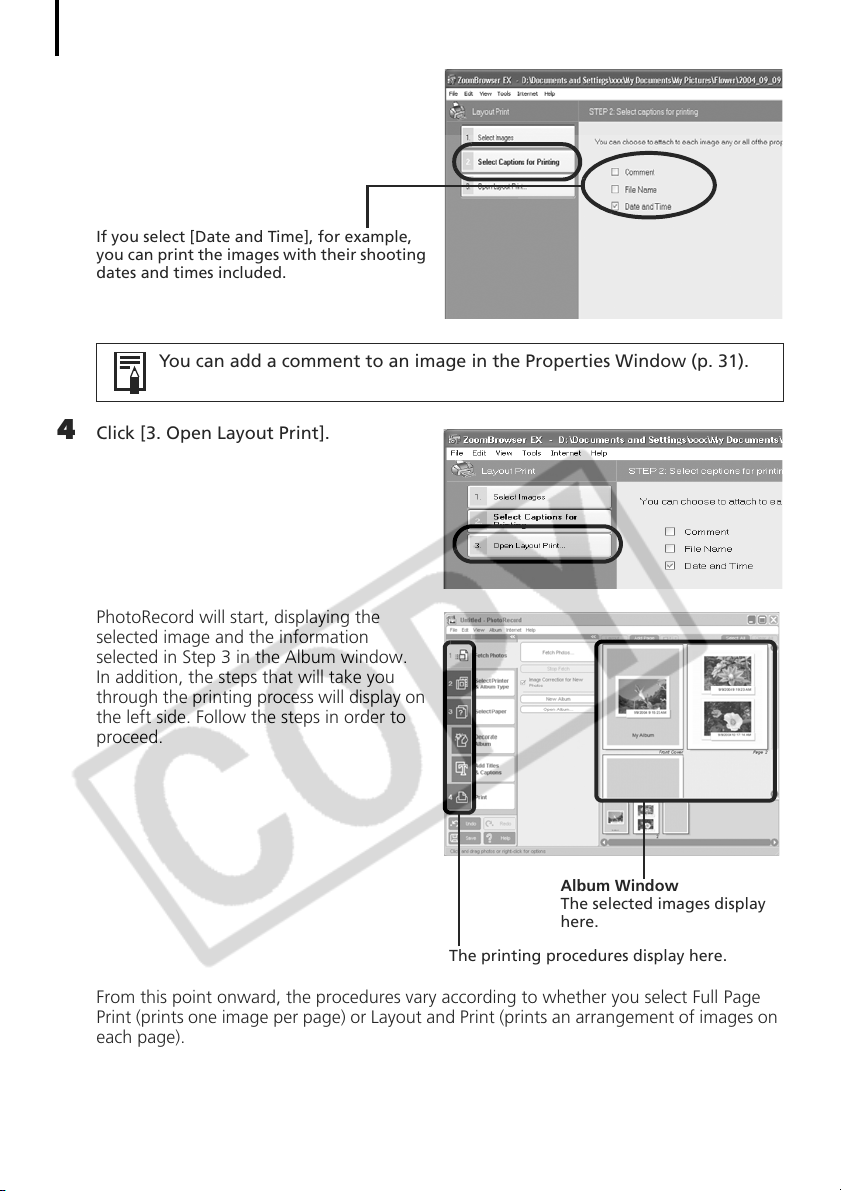
3 Click [2. Select Captions for Printing]
and place a check mark beside the type
of information that will be printed with
the images.
If you select [Date and Time], for example,
you can print the images with their shooting
dates and times included.
You can add a comment to an image in the Properties Window (p. 31).
4 Click [3. Open Layout Print].
PhotoRecord will start, displaying the
selected image and the information
selected in Step 3 in the Album window.
In addition, the steps that will take you
through the printing process will display on
the left side. Follow the steps in order to
proceed.
Album Window
The selected images display
here.
The printing procedures display here.
From this point onward, the procedures vary according to whether you select Full Page
Print (prints one image per page) or Layout and Print (prints an arrangement of images on
each page).
Page 27
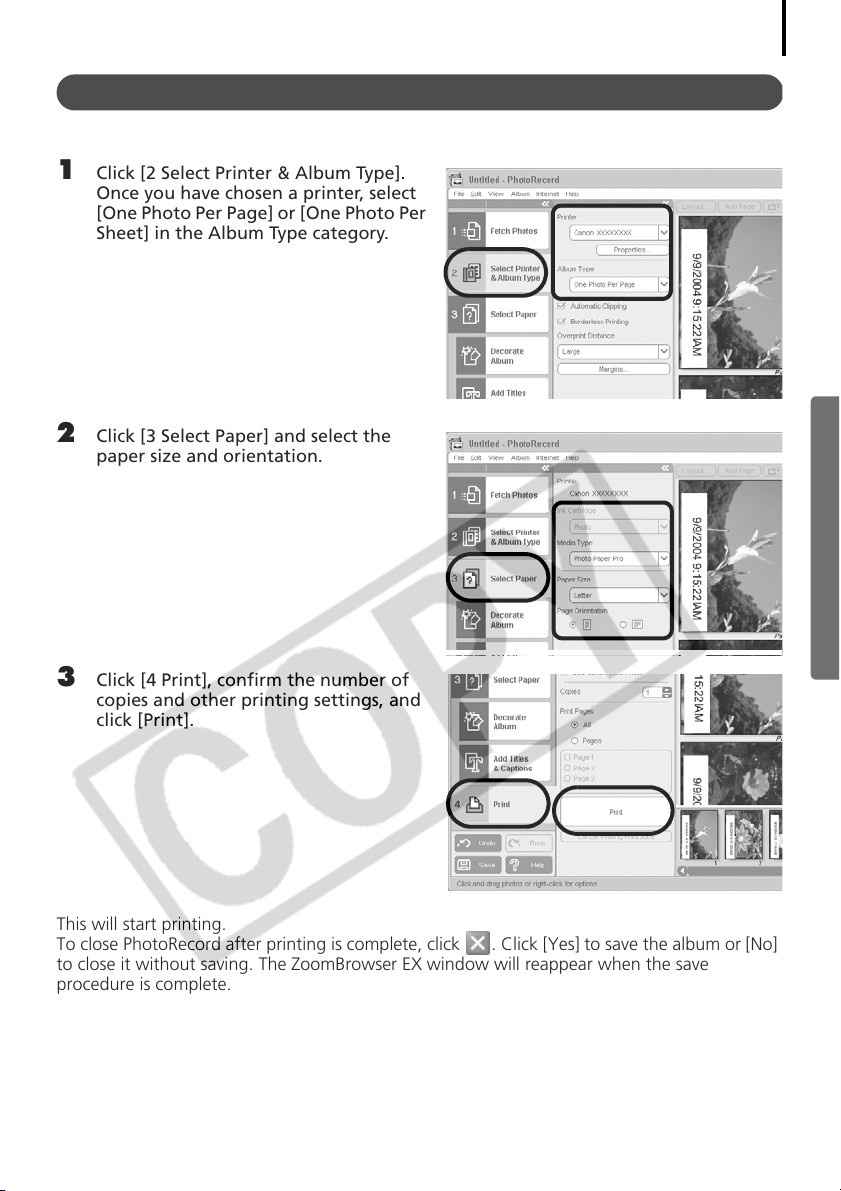
Full Page Print
This option prints one image per page.
1 Click [2 Select Printer & Album Type].
Once you have chosen a printer, select
[One Photo Per Page] or [One Photo Per
Sheet] in the Album Type category.
2 Click [3 Select Paper] and select the
paper size and orientation.
23
3 Click [4 Print], confirm the number of
copies and other printing settings, and
click [Print].
This will start printing.
To close PhotoRecord after printing is complete, click . Click [Yes] to save the album or [No]
to close it without saving. The ZoomBrowser EX window will reappear when the save
procedure is complete.
Page 28
Printing Images
24
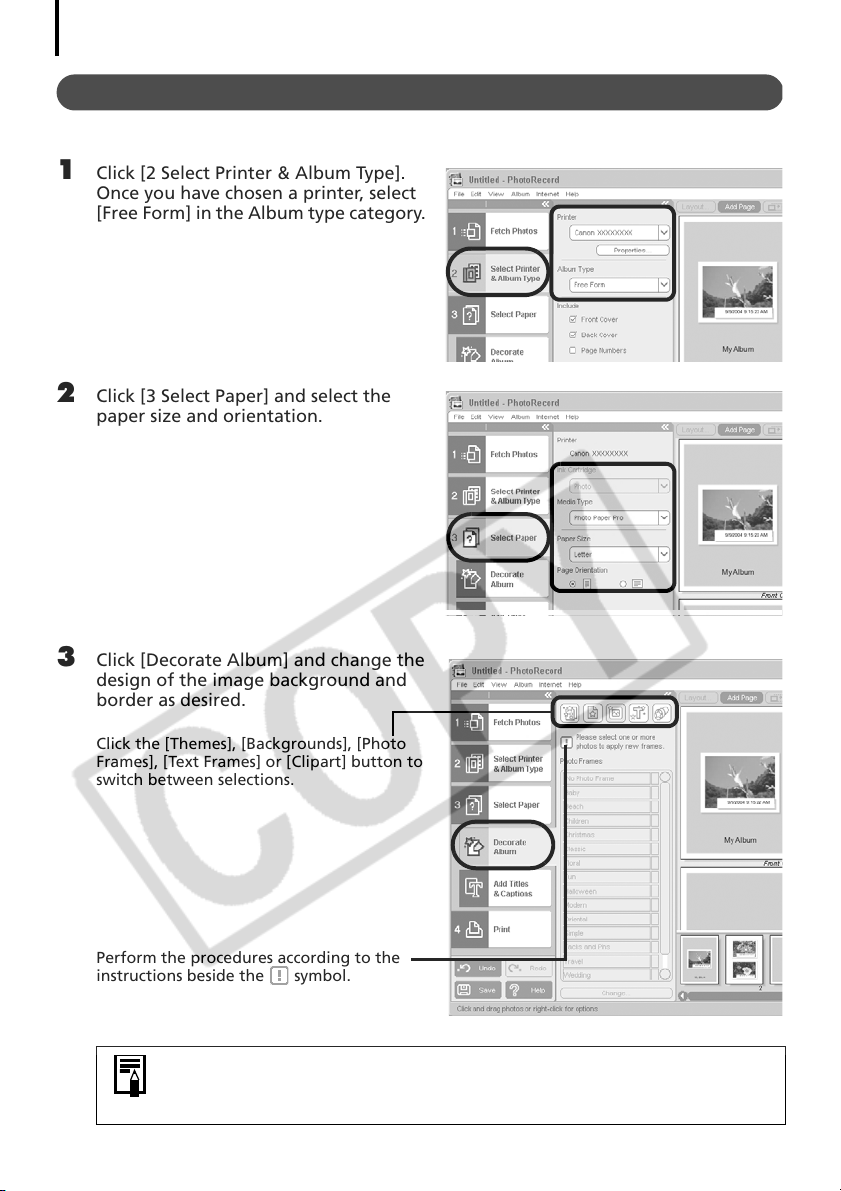
Layout and Print
This option prints multiple images on a single page as in a photo album.
1 Click [2 Select Printer & Album Type].
Once you have chosen a printer, select
[Free Form] in the Album type category.
2 Click [3 Select Paper] and select the
paper size and orientation.
3 Click [Decorate Album] and change the
design of the image background and
border as desired.
Click the [Themes], [Backgrounds], [Photo
Frames], [Text Frames] or [Clipart] button to
switch between selections.
Perform the procedures according to the
instructions beside the symbol.
• The [Themes] category provides consistent designs for use throughout
an entire album.
•You can also click [Add Titles & Captions] to add text as a title or caption.
Page 29
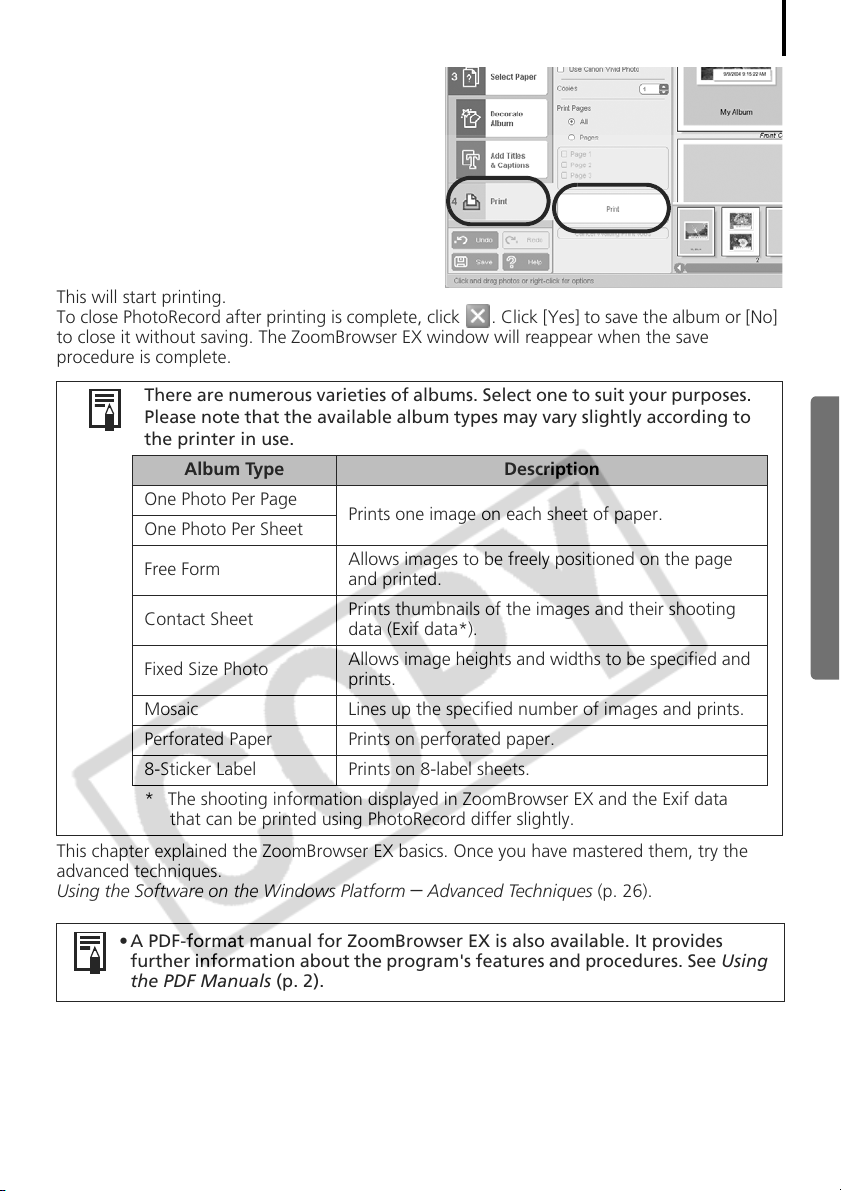
4 Click [4 Print], confirm the number of
copies and other printing settings, and
click [Print].
This will start printing.
To close PhotoRecord after printing is complete, click . Click [Yes] to save the album or [No]
to close it without saving. The ZoomBrowser EX window will reappear when the save
procedure is complete.
There are numerous varieties of albums. Select one to suit your purposes.
Please note that the available album types may vary slightly according to
the printer in use.
Album Type Description
One Photo Per Page
One Photo Per Sheet
Free Form
Contact Sheet
Fixed Size Photo
Mosaic Lines up the specified number of images and prints.
Perforated Paper Prints on perforated paper.
8-Sticker Label Prints on 8-label sheets.
* The shooting information displayed in ZoomBrowser EX and the Exif data
that can be printed using PhotoRecord differ slightly.
This chapter explained the ZoomBrowser EX basics. Once you have mastered them, try the
advanced techniques.
Using the Software on the Windows Platform
Prints one image on each sheet of paper.
Allows images to be freely positioned on the page
and printed.
Prints thumbnails of the images and their shooting
data (Exif data*).
Allows image heights and widths to be specified and
prints.
– Advanced Techniques (p. 26).
25
• A PDF-format manual for ZoomBrowser EX is also available. It provides
further information about the program's features and procedures. See Using
the PDF Manuals (p. 2).
Page 30
26
Using the Software on the Windows
Platform – Advanced Techniques
This chapter explains various ZoomBrowser EX features.
Proceed to this chapter once you have mastered the basic ZoomBrowser EX procedures in the
Using the Software on the Windows Platform
The ZoomBrowser EX Windows
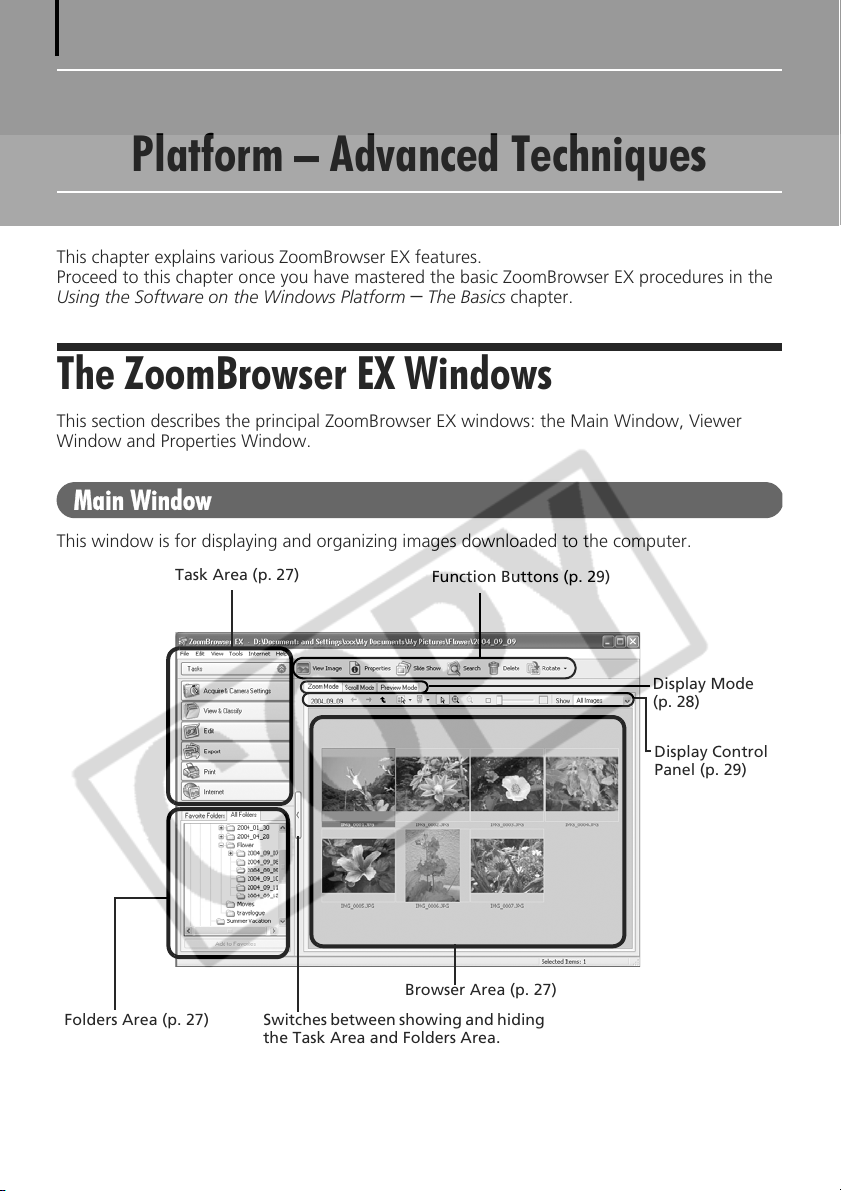
This section describes the principal ZoomBrowser EX windows: the Main Window, Viewer
Window and Properties Window.
Main Window
This window is for displaying and organizing images downloaded to the computer.
Task Area (p. 27)
– The Basics chapter.
Function Buttons (p. 29)
Folders Area (p. 27)
Display Mode
(p. 28)
Display Control
Panel (p. 29)
Browser Area (p. 27)
Switches between showing and hiding
the Task Area and Folders Area.
Page 31
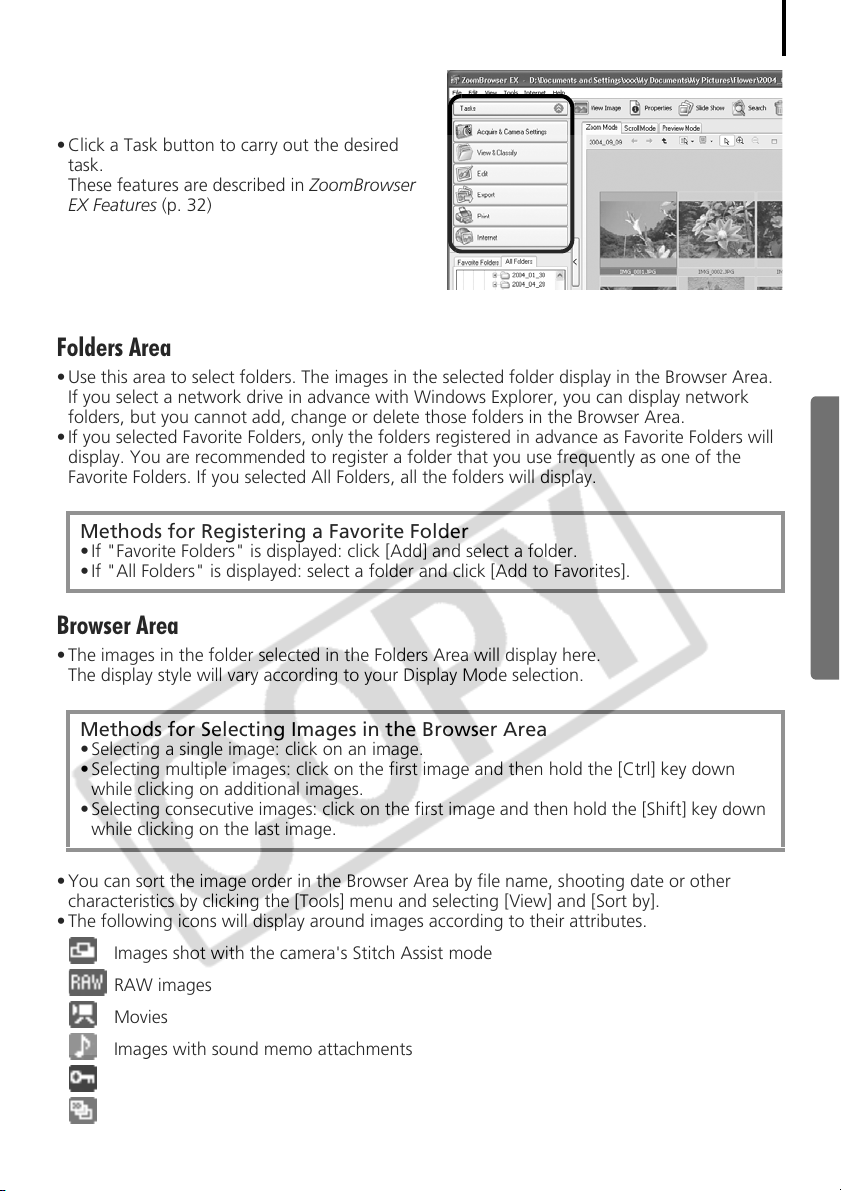
Task Area
• ZoomBrowser EX's tasks are arranged here like
an index.
• Click a Task button to carry out the desired
task.
These features are described in ZoomBrowser
EX Features (p. 32)
Folders Area
• Use this area to select folders. The images in the selected folder display in the Browser Area.
If you select a network drive in advance with Windows Explorer, you can display network
folders, but you cannot add, change or delete those folders in the Browser Area.
• If you selected Favorite Folders, only the folders registered in advance as Favorite Folders will
display. You are recommended to register a folder that you use frequently as one of the
Favorite Folders. If you selected All Folders, all the folders will display.
Methods for Registering a Favorite Folder
• If "Favorite Folders" is displayed: click [Add] and select a folder.
• If "All Folders" is displayed: select a folder and click [Add to Favorites].
27
Browser Area
• The images in the folder selected in the Folders Area will display here.
The display style will vary according to your Display Mode selection.
Methods for Selecting Images in the Browser Area
• Selecting a single image: click on an image.
• Selecting multiple images: click on the first image and then hold the [Ctrl] key down
while clicking on additional images.
• Selecting consecutive images: click on the first image and then hold the [Shift] key down
while clicking on the last image.
• You can sort the image order in the Browser Area by file name, shooting date or other
characteristics by clicking the [Tools] menu and selecting [View] and [Sort by].
• The following icons will display around images according to their attributes.
Images shot with the camera's Stitch Assist mode
RAW images
Movies
Images with sound memo attachments
Protected images
Images shot with the camera's AEB function
Page 32
The ZoomBrowser EX Windows
28
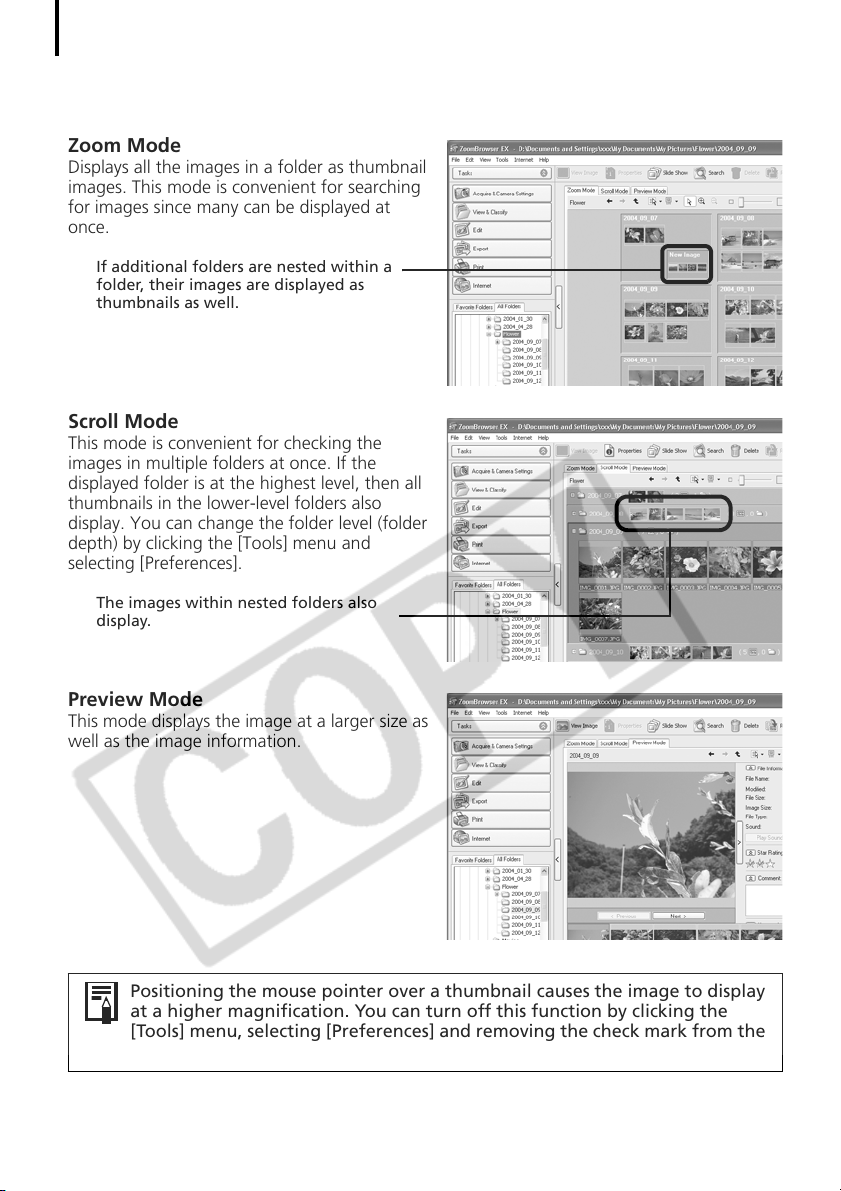
Display Mode
• Selects the display style for the Browser Area.
Zoom Mode
Displays all the images in a folder as thumbnail
images. This mode is convenient for searching
for images since many can be displayed at
once.
If additional folders are nested within a
folder, their images are displayed as
thumbnails as well.
Scroll Mode
This mode is convenient for checking the
images in multiple folders at once. If the
displayed folder is at the highest level, then all
thumbnails in the lower-level folders also
display. You can change the folder level (folder
depth) by clicking the [Tools] menu and
selecting [Preferences].
The images within nested folders also
display.
Preview Mode
This mode displays the image at a larger size as
well as the image information.
Positioning the mouse pointer over a thumbnail causes the image to display
at a higher magnification. You can turn off this function by clicking the
[Tools] menu, selecting [Preferences] and removing the check mark from the
[Show mouse over windows] option.
Page 33
Display Control Panel
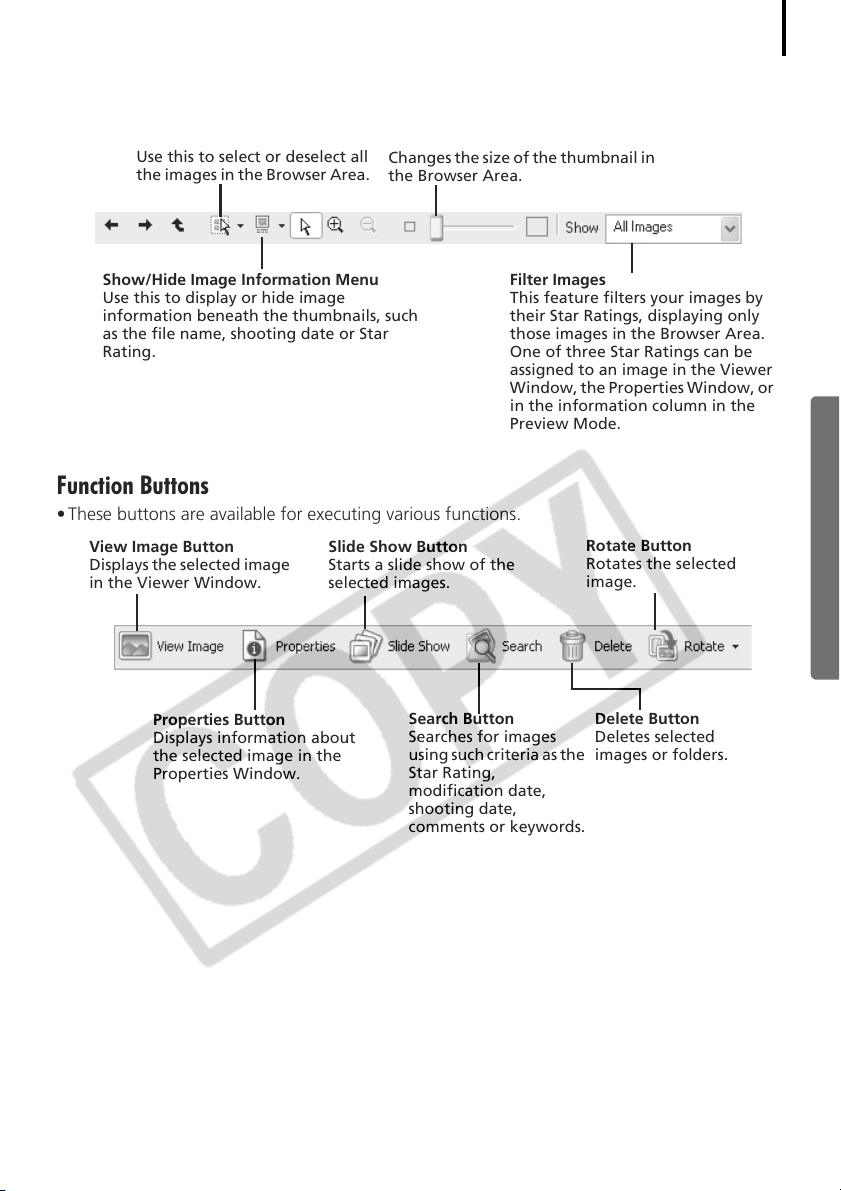
• This panel adjusts the display settings for the Browser Area.
Selection Menu
Use this to select or deselect all
the images in the Browser Area.
Display Size
Changes the size of the thumbnail in
the Browser Area.
29
Show/Hide Image Information Menu
Use this to display or hide image
information beneath the thumbnails, such
as the file name, shooting date or Star
Rating.
Function Buttons
• These buttons are available for executing various functions.
View Image Button
Displays the selected image
in the Viewer Window.
Properties Button
Displays information about
the selected image in the
Properties Window.
Slide Show Button
Starts a slide show of the
selected images.
Search Button
Searches for images
using such criteria as the
Star Rating,
modification date,
shooting date,
comments or keywords.
Filter Images
This feature filters your images by
their Star Ratings, displaying only
those images in the Browser Area.
One of three Star Ratings can be
assigned to an image in the Viewer
Window, the Properties Window, or
in the information column in the
Preview Mode.
Rotate Button
Rotates the selected
image.
Delete Button
Deletes selected
images or folders.
Page 34
The ZoomBrowser EX Windows
30
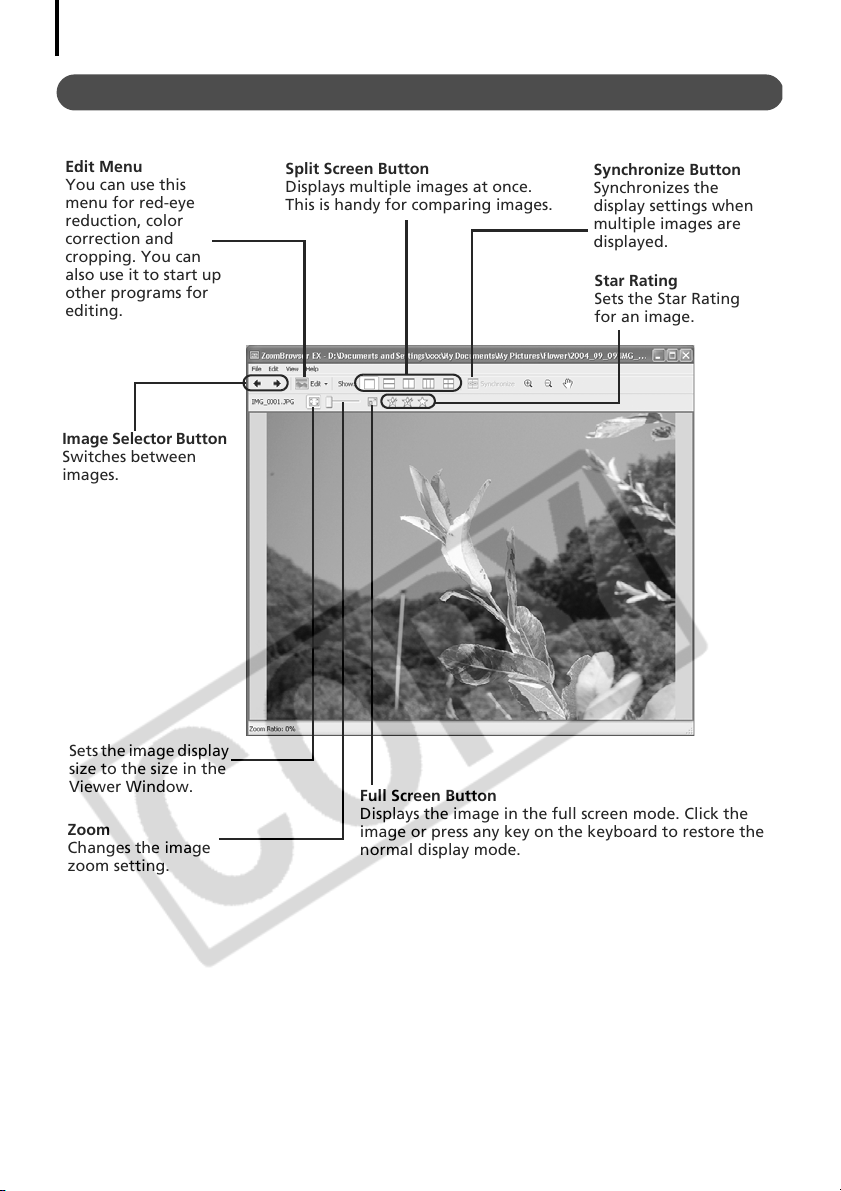
Viewer Window
Double-click an image in the Browser Area to display it in the Viewer Window.
Edit Menu
You can use this
menu for red-eye
reduction, color
correction and
cropping. You can
also use it to start up
other programs for
editing.
Image Selector Button
Switches between
images.
Split Screen Button
Displays multiple images at once.
This is handy for comparing images.
Synchronize Button
Synchronizes the
display settings when
multiple images are
displayed.
Star Rating
Sets the Star Rating
for an image.
Sets the image display
size to the size in the
Viewer Window.
Zoom
Changes the image
zoom setting.
Full Screen Button
Displays the image in the full screen mode. Click the
image or press any key on the keyboard to restore the
normal display mode.
Page 35
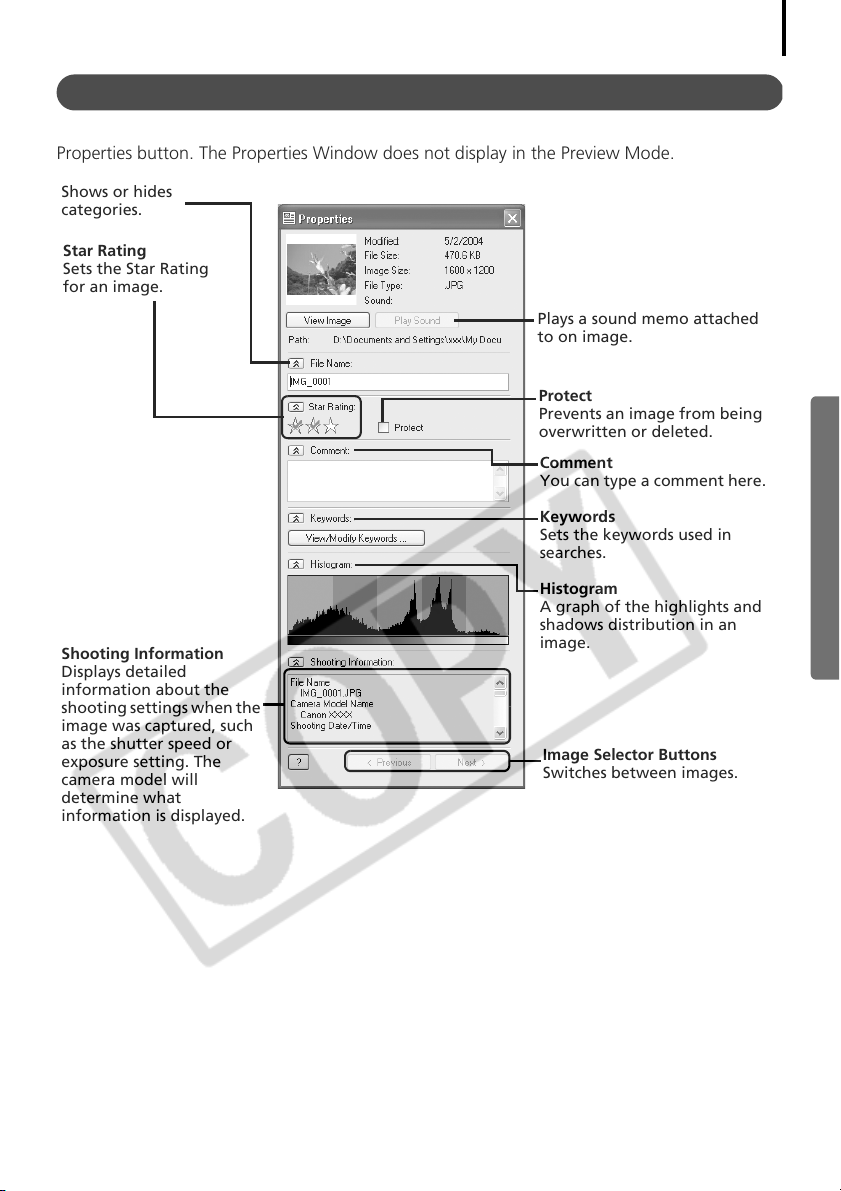
Properties Window
The Properties Window displays when you select an image in the Browser Area and click the
Properties button. The Properties Window does not display in the Preview Mode.
Shows or hides
categories.
Star Rating
Sets the Star Rating
for an image.
Plays a sound memo attached
to on image.
Protect
Prevents an image from being
overwritten or deleted.
Comment
You can type a comment here.
Keywords
Sets the keywords used in
searches.
Histogram
A graph of the highlights and
shadows distribution in an
Shooting Information
Displays detailed
information about the
shooting settings when the
image was captured, such
as the shutter speed or
exposure setting. The
camera model will
determine what
information is displayed.
image.
Image Selector Buttons
Switches between images.
31
Page 36
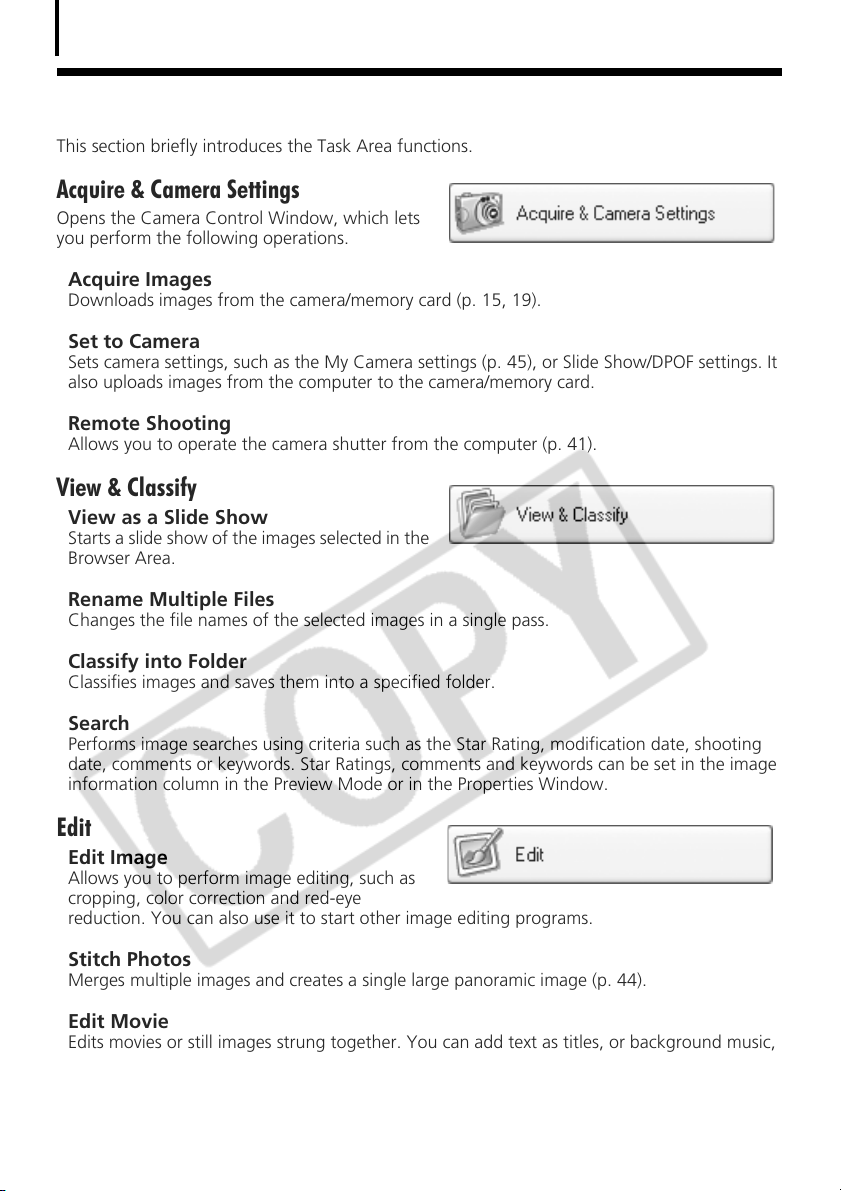
ZoomBrowser EX Features
32
ZoomBrowser EX Features
This section briefly introduces the Task Area functions.
Acquire & Camera Settings
Opens the Camera Control Window, which lets
you perform the following operations.
Acquire Images
Downloads images from the camera/memory card (p. 15, 19).
Set to Camera
Sets camera settings, such as the My Camera settings (p. 45), or Slide Show/DPOF settings. It
also uploads images from the computer to the camera/memory card.
Remote Shooting
Allows you to operate the camera shutter from the computer (p. 41).
View & Classify
View as a Slide Show
Starts a slide show of the images selected in the
Browser Area.
Rename Multiple Files
Changes the file names of the selected images in a single pass.
Classify into Folder
Classifies images and saves them into a specified folder.
Search
Performs image searches using criteria such as the Star Rating, modification date, shooting
date, comments or keywords. Star Ratings, comments and keywords can be set in the image
information column in the Preview Mode or in the Properties Window.
Edit
Edit Image
Allows you to perform image editing, such as
cropping, color correction and red-eye
reduction. You can also use it to start other image editing programs.
Stitch Photos
Merges multiple images and creates a single large panoramic image (p. 44).
Edit Movie
Edits movies or still images strung together. You can add text as titles, or background music,
and apply various effects (p. 37).
Page 37
Process RAW Images
Converts RAW images into standard images. You can adjust the image brightness, contrast
and color balance among other attributes during conversion (p. 38).
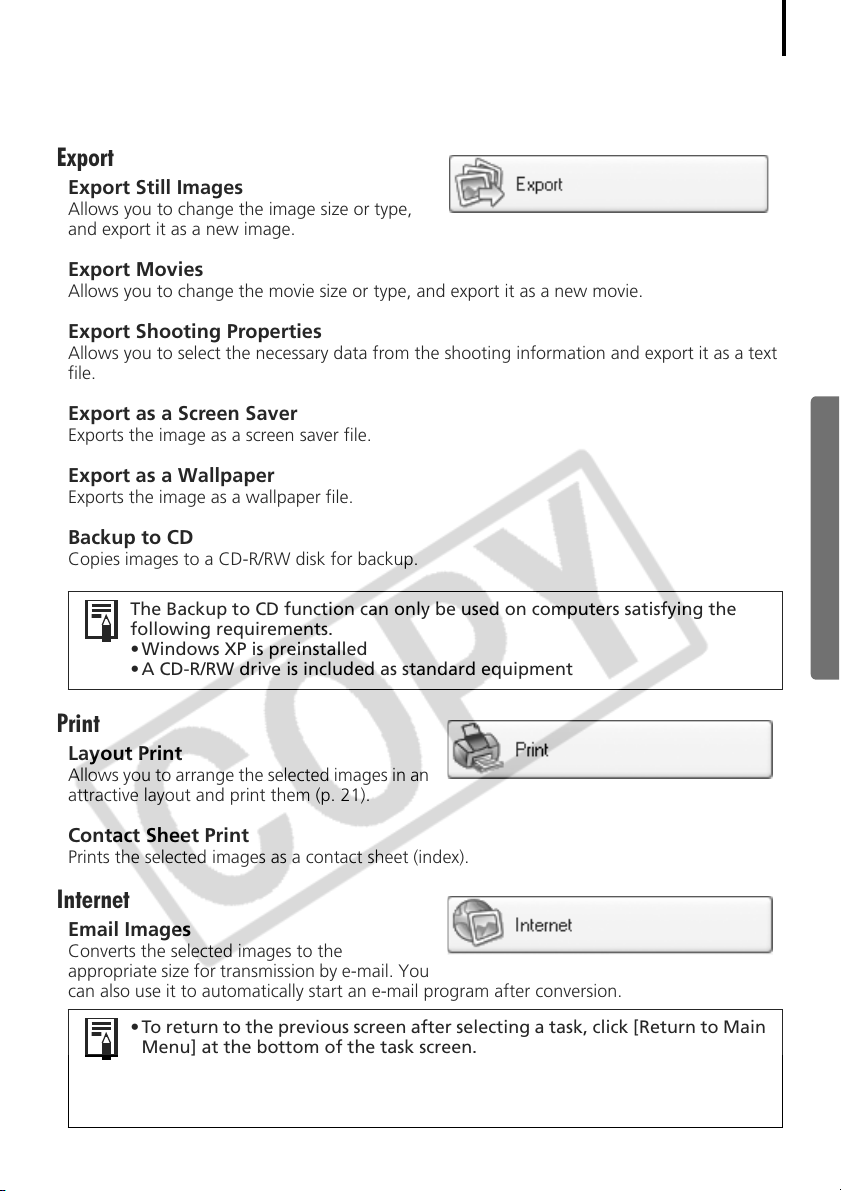
Export
Export Still Images
Allows you to change the image size or type,
and export it as a new image.
Export Movies
Allows you to change the movie size or type, and export it as a new movie.
Export Shooting Properties
Allows you to select the necessary data from the shooting information and export it as a text
file.
Export as a Screen Saver
Exports the image as a screen saver file.
Export as a Wallpaper
Exports the image as a wallpaper file.
Backup to CD
Copies images to a CD-R/RW disk for backup.
The Backup to CD function can only be used on computers satisfying the
following requirements.
• Windows XP is preinstalled
• A CD-R/RW drive is included as standard equipment
33
Print
Layout Print
Allows you to arrange the selected images in an
attractive layout and print them (p. 21).
Contact Sheet Print
Prints the selected images as a contact sheet (index).
Internet
Email Images
Converts the selected images to the
appropriate size for transmission by e-mail. You
can also use it to automatically start an e-mail program after conversion.
• To return to the previous screen after selecting a task, click [Return to Main
Menu] at the bottom of the task screen.
• Various Help functions are available in ZoomBrowser EX. Click the [Help]
menu, [?] button or [Help] button to display topics about operational
procedures or the functions available.
Page 38
Checking Images before Downloading
34
Checking Images before Downloading
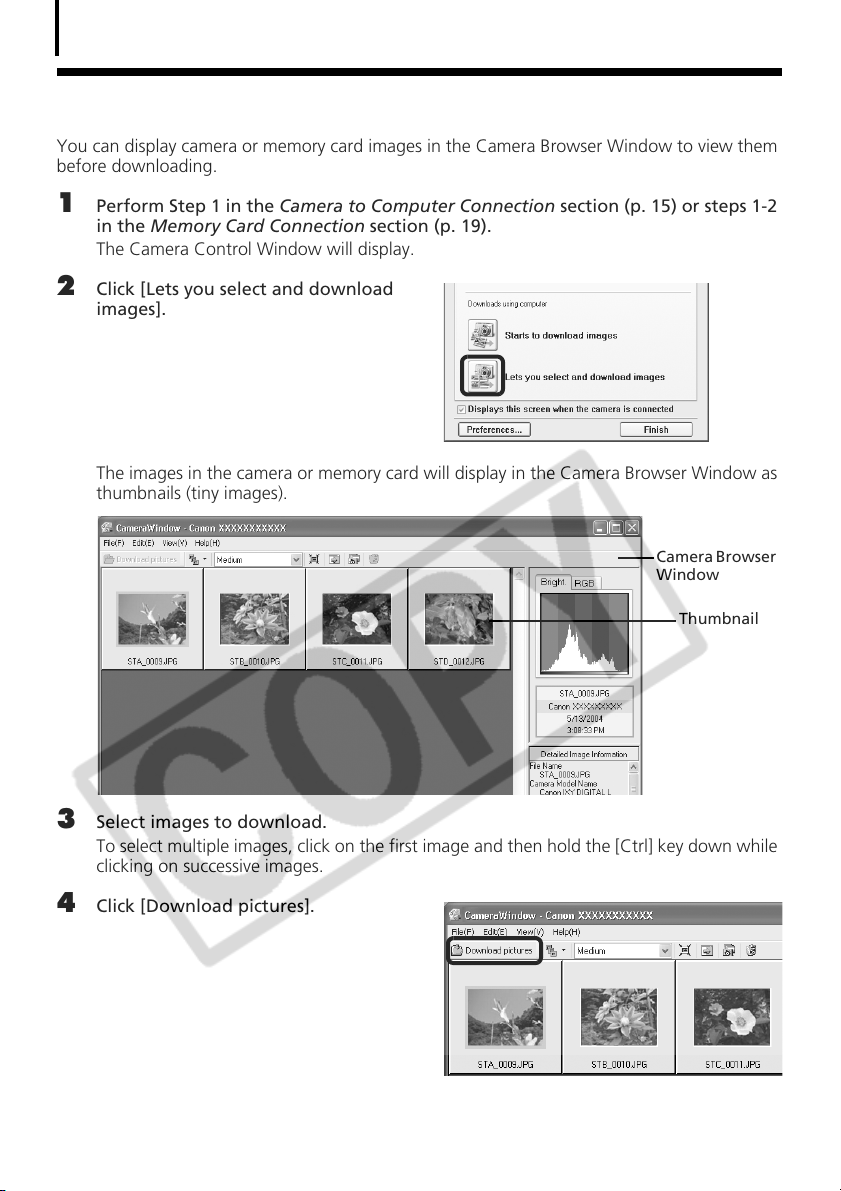
You can display camera or memory card images in the Camera Browser Window to view them
before downloading.
1 Perform Step 1 in the Camera to Computer Connection section (p. 15) or steps 1-2
in the Memory Card Connection section (p. 19).
The Camera Control Window will display.
2 Click [Lets you select and download
images].
The images in the camera or memory card will display in the Camera Browser Window as
thumbnails (tiny images).
Camera Browser
Window
Thumbnail
3 Select images to download.
To select multiple images, click on the first image and then hold the [Ctrl] key down while
clicking on successive images.
4 Click [Download pictures].
Page 39
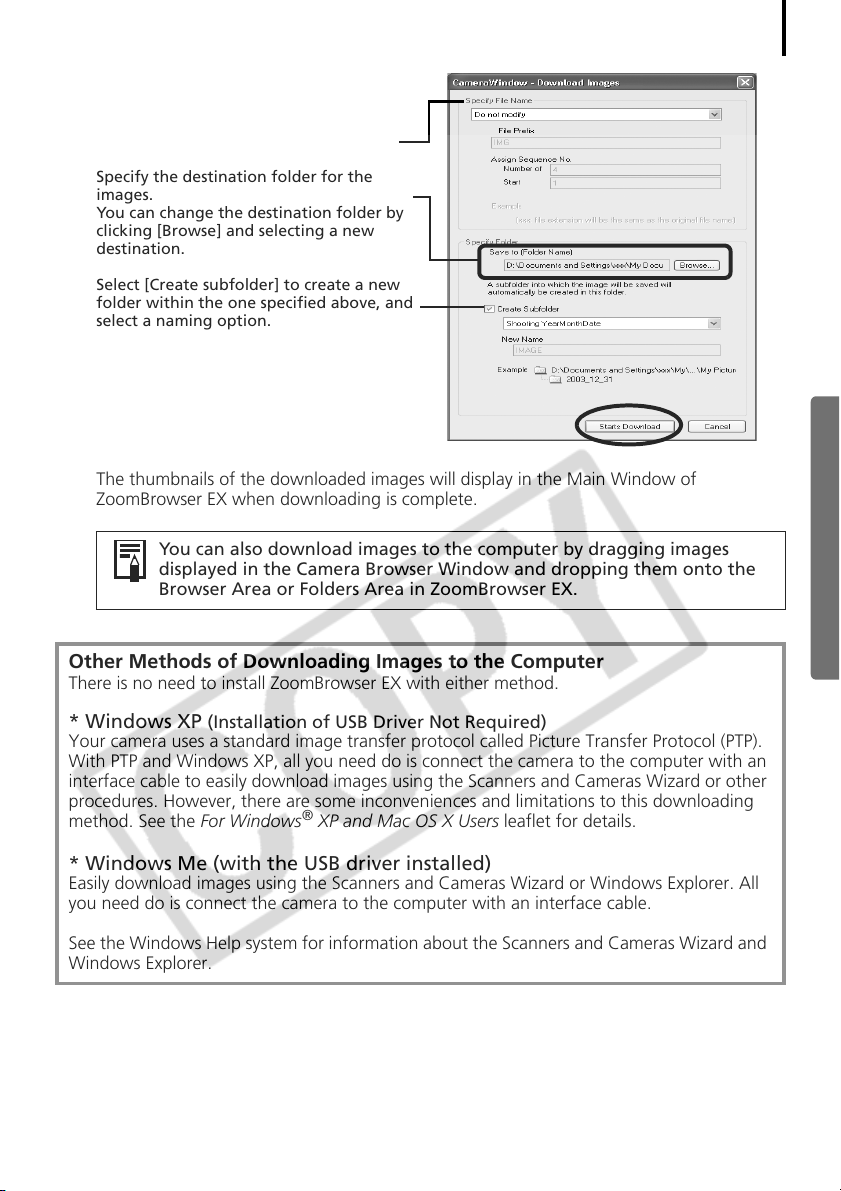
5 Confirm the destination folder and click
[Starts Download].
Specify the file name for saved images.
Specify the destination folder for the
images.
You can change the destination folder by
clicking [Browse] and selecting a new
destination.
Select [Create subfolder] to create a new
folder within the one specified above, and
select a naming option.
The thumbnails of the downloaded images will display in the Main Window of
ZoomBrowser EX when downloading is complete.
You can also download images to the computer by dragging images
displayed in the Camera Browser Window and dropping them onto the
Browser Area or Folders Area in ZoomBrowser EX.
35
Other Methods of Downloading Images to the Computer
There is no need to install ZoomBrowser EX with either method.
* Windows XP (Installation of USB Driver Not Required)
Your camera uses a standard image transfer protocol called Picture Transfer Protocol (PTP).
With PTP and Windows XP, all you need do is connect the camera to the computer with an
interface cable to easily download images using the Scanners and Cameras Wizard or other
procedures. However, there are some inconveniences and limitations to this downloading
method. See the For Windows
®
XP and Mac OS X Users leaflet for details.
* Windows Me (with the USB driver installed)
Easily download images using the Scanners and Cameras Wizard or Windows Explorer. All
you need do is connect the camera to the computer with an interface cable.
See the Windows Help system for information about the Scanners and Cameras Wizard and
Windows Explorer.
Page 40
Replaying Movies
36
Replaying Movies
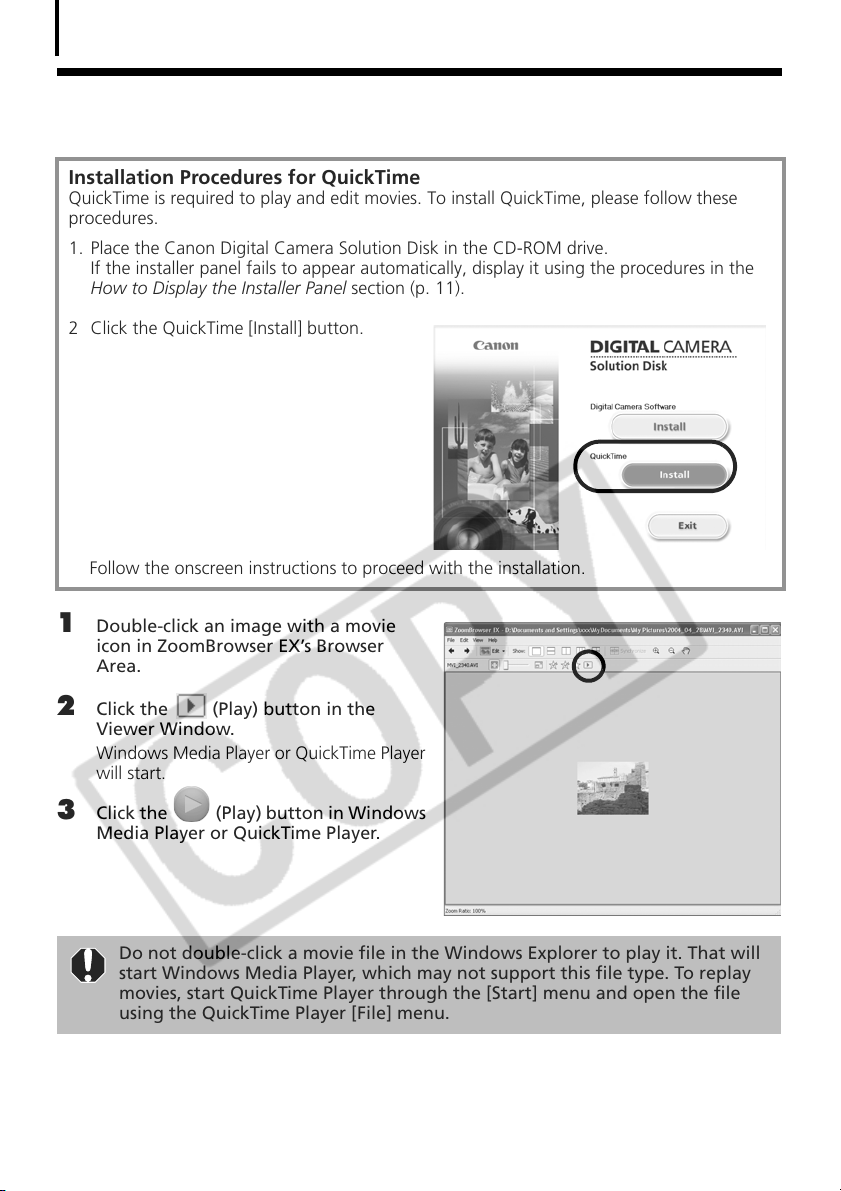
Installation Procedures for QuickTime
QuickTime is required to play and edit movies. To install QuickTime, please follow these
procedures.
1. Place the Canon Digital Camera Solution Disk in the CD-ROM drive.
If the installer panel fails to appear automatically, display it using the procedures in the
How to Display the Installer Panel section (p. 11).
2 Click the QuickTime [Install] button.
Follow the onscreen instructions to proceed with the installation.
1 Double-click an image with a movie
icon in ZoomBrowser EX’s Browser
Area.
2 Click the (Play) button in the
Viewer Window.
Windows Media Player or QuickTime Player
will start.
3 Click the (Play) button in Windows
Media Player or QuickTime Player.
Do not double-click a movie file in the Windows Explorer to play it. That will
start Windows Media Player, which may not support this file type. To replay
movies, start QuickTime Player through the [Start] menu and open the file
using the QuickTime Player [File] menu.
Page 41
Editing Movies
You can create and edit movies: link movies and stills that have been downloaded to your
computer, add background music, superimpose titles and other text, and apply various effects
to the movies.
• QuickTime is required to play and edit movies. Use the Installation
Procedures for QuickTime section (p. 36) to install it.
• Movies are saved as Motion JPEG AVI movies.
1 Click [Edit] in ZoomBrowser EX’s Main Window, followed by [Edit Movie].
2 Click [1. Add Images] and select the image (movie or still) you wish to edit.
You can select multiple movies or stills.
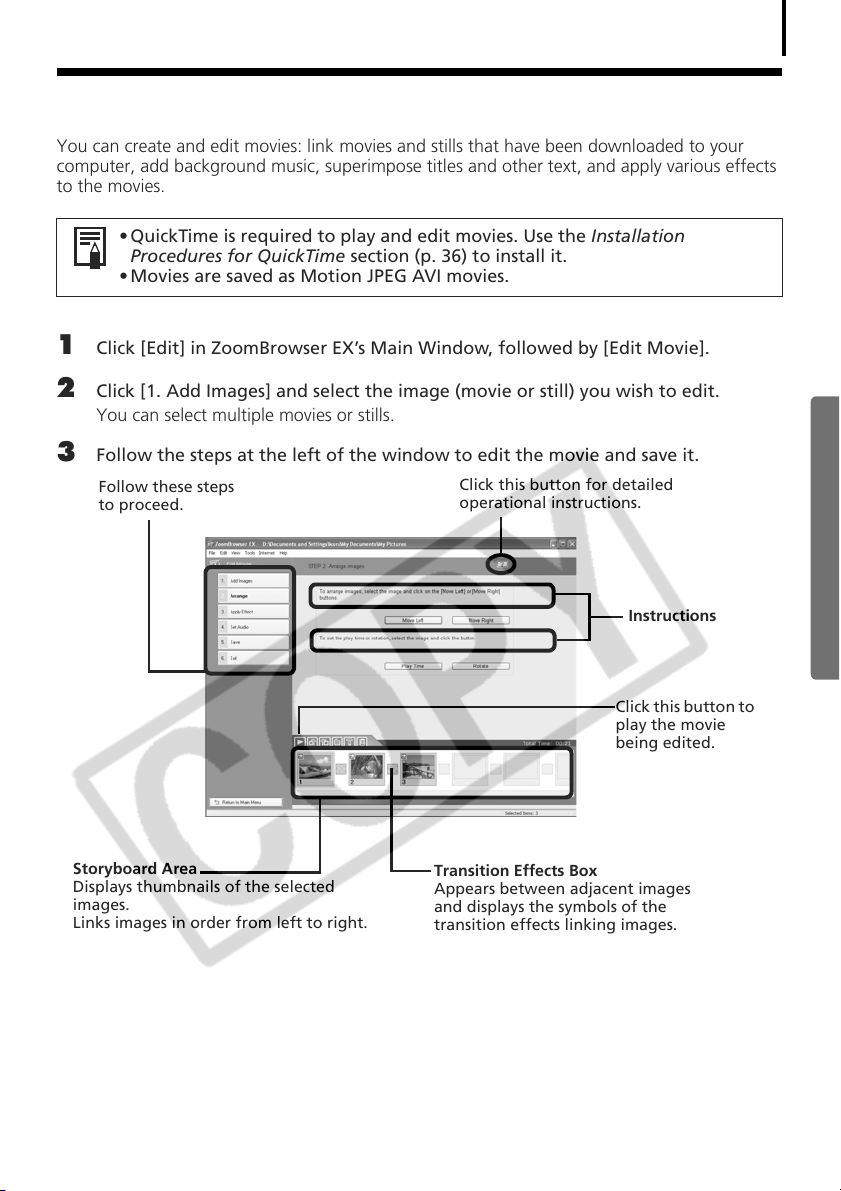
3 Follow the steps at the left of the window to edit the movie and save it.
Follow these steps
to proceed.
Click this button for detailed
operational instructions.
Instructions
37
Storyboard Area
Displays thumbnails of the selected
images.
Links images in order from left to right.
Click this button to
play the movie
being edited.
Transition Effects Box
Appears between adjacent images
and displays the symbols of the
transition effects linking images.
Page 42
Converting RAW Images
38
Converting RAW Images
RAW images are extremely high-quality images that are not subject to any deterioration due to
compression processing. Since they are a special type of image, they cannot be opened by
many image editing programs. It is first necessary to convert them into standard image files.
•See Information about Your Camera (p. 94) to determine whether your
camera model supports this function.
• See the Camera User Guide for information about the camera settings for
shooting RAW images.
Procedures for Converting RAW Images
Select a RAW image in ZoomBrowser EX’s Browser Area.
1
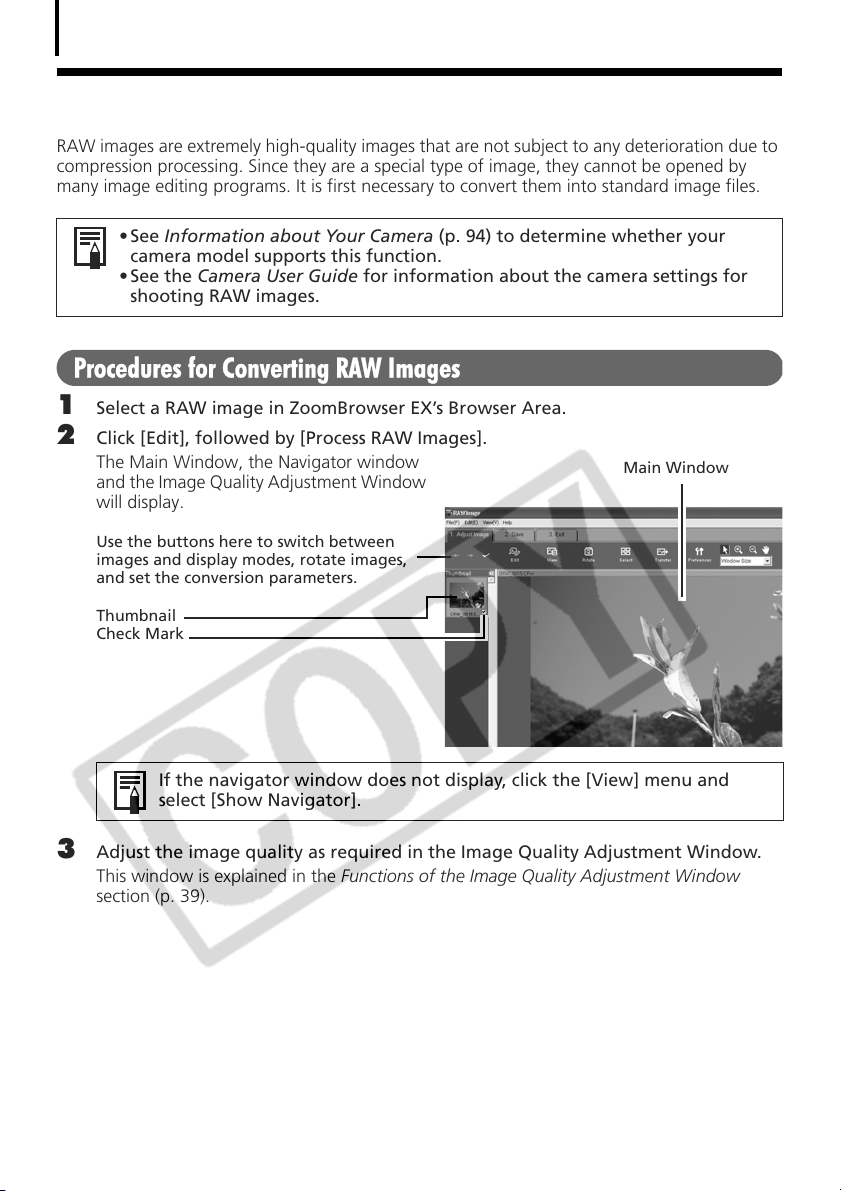
2 Click [Edit], followed by [Process RAW Images].
The Main Window, the Navigator window
and the Image Quality Adjustment Window
will display.
Use the buttons here to switch between
images and display modes, rotate images,
and set the conversion parameters.
Thumbnail
Check Mark
Main Window
If the navigator window does not display, click the [View] menu and
select [Show Navigator].
3 Adjust the image quality as required in the Image Quality Adjustment Window.
This window is explained in the Functions of the Image Quality Adjustment Window
section (p. 39).
Page 43
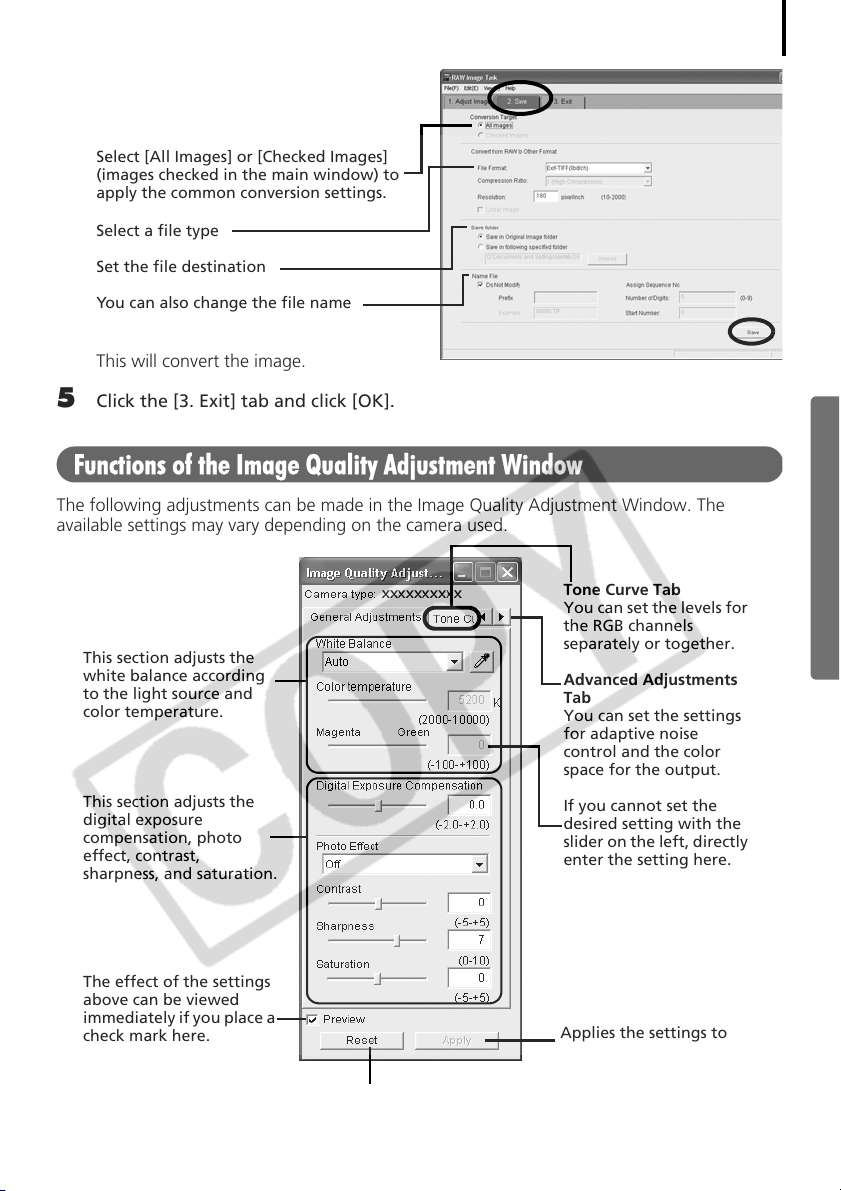
4 Click the [2. Save] tab, set the file type
and destination, and then click [Save].
Select [All Images] or [Checked Images]
(images checked in the main window) to
apply the common conversion settings.
Select a file type
Set the file destination
You can also change the file name
This will convert the image.
5 Click the [3. Exit] tab and click [OK].
Functions of the Image Quality Adjustment Window
The following adjustments can be made in the Image Quality Adjustment Window. The
available settings may vary depending on the camera used.
Tone Curve Tab
You can set the levels for
the RGB channels
This section adjusts the
white balance according
to the light source and
color temperature.
This section adjusts the
digital exposure
compensation, photo
effect, contrast,
sharpness, and saturation.
separately or together.
Advanced Adjustments
Tab
You can set the settings
for adaptive noise
control and the color
space for the output.
If you cannot set the
desired setting with the
slider on the left, directly
enter the setting here.
39
The effect of the settings
above can be viewed
immediately if you place a
check mark here.
Restores all settings to the settings stored
in the camera at the time of shooting.
Applies the settings to
the displayed image
Page 44

Converting RAW Images
40
You can change the coloration of the image to your preferred settings when
you convert a RAW image. You can also select preset color schemes, such as
Positive Film. Furthermore, you can add your own color schemes (My Color) to
apply to other RAW images when they are being converted. See the PDF
manual for ZoomBrowser EX for more information (p. 2).
Page 45
Operating the Shutter Remotely
You can record still images by using a computer to control the shutter of a connected camera.
This is particularly useful for checking images on the larger display of the computer as you
record them and for high volume photography without worrying about filling the camera’s
memory card.
Preparing for Remote Shooting
Attach the supplied interface cable to the computer's USB port and the camera's
1
DIGITAL terminal and place the camera in the correct mode for connecting.
• Methods for connecting the camera to the computer and placing it in
the correct mode for connecting vary between models. Some cameras
need to be in Playback mode when connected to the computer, please
refer to the Information about Your Camera section (p. 94).
• Perform the settings described in First Time Camera is Connected to a
Computer (p. 16) the first time you connect the camera to the
computer.
The Camera Control Window will display.
2 Open the lens cover or remove the lens cap on models equipped with them.
Proceed to the next step if your model does not have one.
41
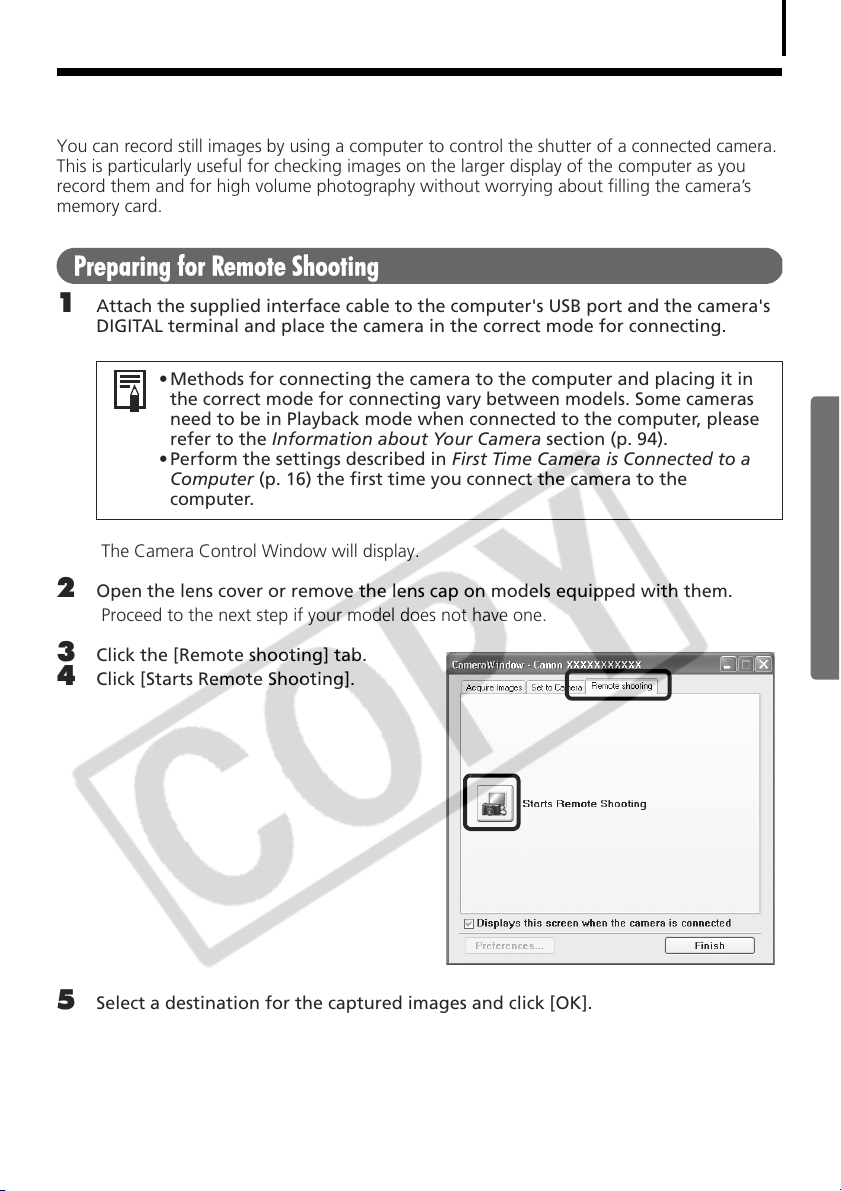
3 Click the [Remote shooting] tab.
4 Click [Starts Remote Shooting].
5 Select a destination for the captured images and click [OK].
Page 46
Operating the Shutter Remotely
42
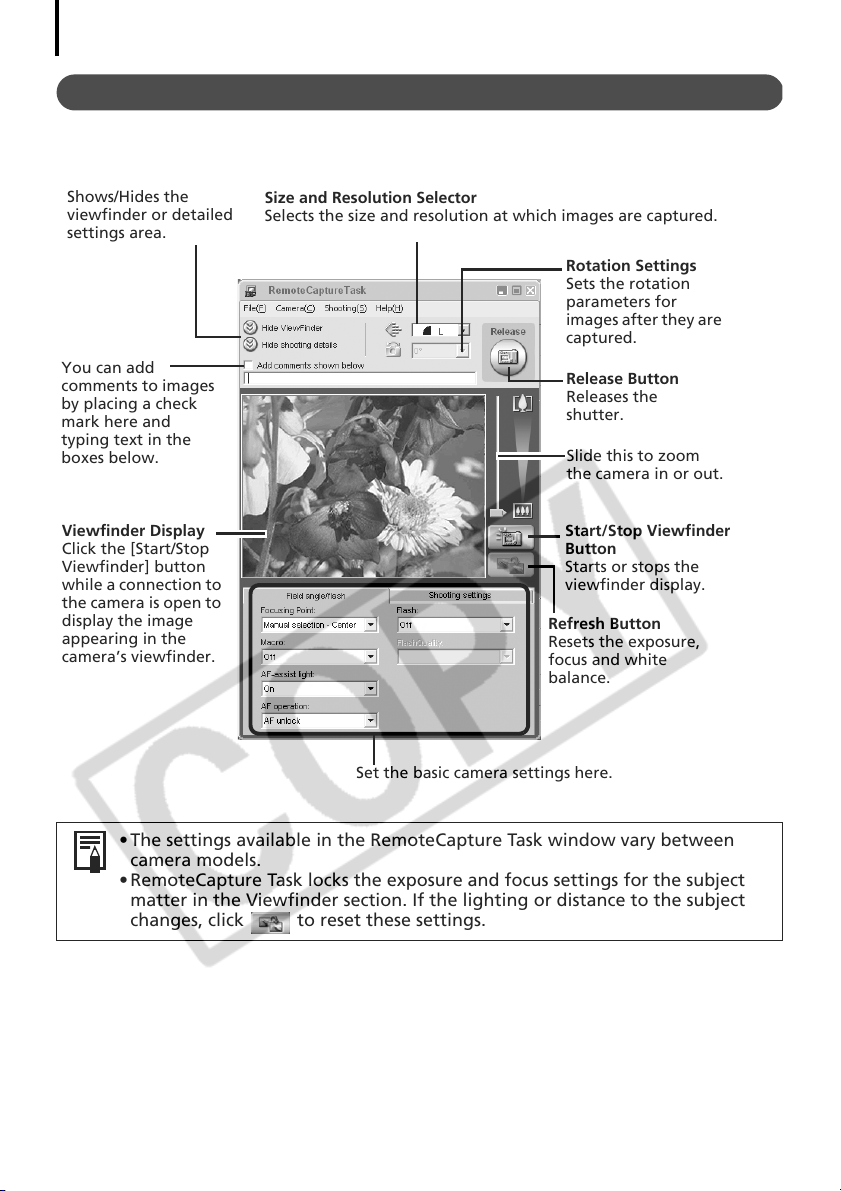
RemoteCapture Task Window
The RemoteCapture Task window has the following features.
Shows/Hides the
viewfinder or detailed
settings area.
You can add
comments to images
by placing a check
mark here and
typing text in the
boxes below.
Viewfinder Display
Click the [Start/Stop
Viewfinder] button
while a connection to
the camera is open to
display the image
appearing in the
camera’s viewfinder.
Size and Resolution Selector
Selects the size and resolution at which images are captured.
Rotation Settings
Sets the rotation
parameters for
images after they are
captured.
Release Button
Releases the
shutter.
Slide this to zoom
the camera in or out.
Start/Stop Viewfinder
Button
Starts or stops the
viewfinder display.
Refresh Button
Resets the exposure,
focus and white
balance.
Set the basic camera settings here.
• The settings available in the RemoteCapture Task window vary between
camera models.
• RemoteCapture Task locks the exposure and focus settings for the subject
matter in the Viewfinder section. If the lighting or distance to the subject
changes, click to reset these settings.
Page 47
Remote Shooting
Ensure that you turn off your computer’s standby mode before you begin
remote shooting. The device performance cannot be guaranteed if the
computer enters the standby mode.
Click and check the subject in the viewfinder.
1
2 Change the image size or resolution, the rotation settings and the settings at the
bottom of the window as required.
If you intend to hold the camera vertically to photograph a subject, you can save the
image to the computer with the correct orientation if you set the rotation settings in
advance.
If your camera is equipped with the Auto Rotate function and you set it
to On, the image will automatically be rotated and appear in the correct
viewing orientation in the RemoteCapture Task window.
3 Click the [Release] button.
• You can release the shutter by pressing the camera’s shutter button or
the keyboard’s space key.
• Other than the shutter button, the camera's buttons and switches,
including the zoom, cannot be operated while the camera is being
controlled with the Remote Shooting function.
• You may notice that the interval between the shutter release and
activation is slightly longer for remote shooting than when the camera
is used independently.
43
Page 48
Merging Panoramic Images - PhotoStitch
44
Merging Panoramic Images - PhotoStitch
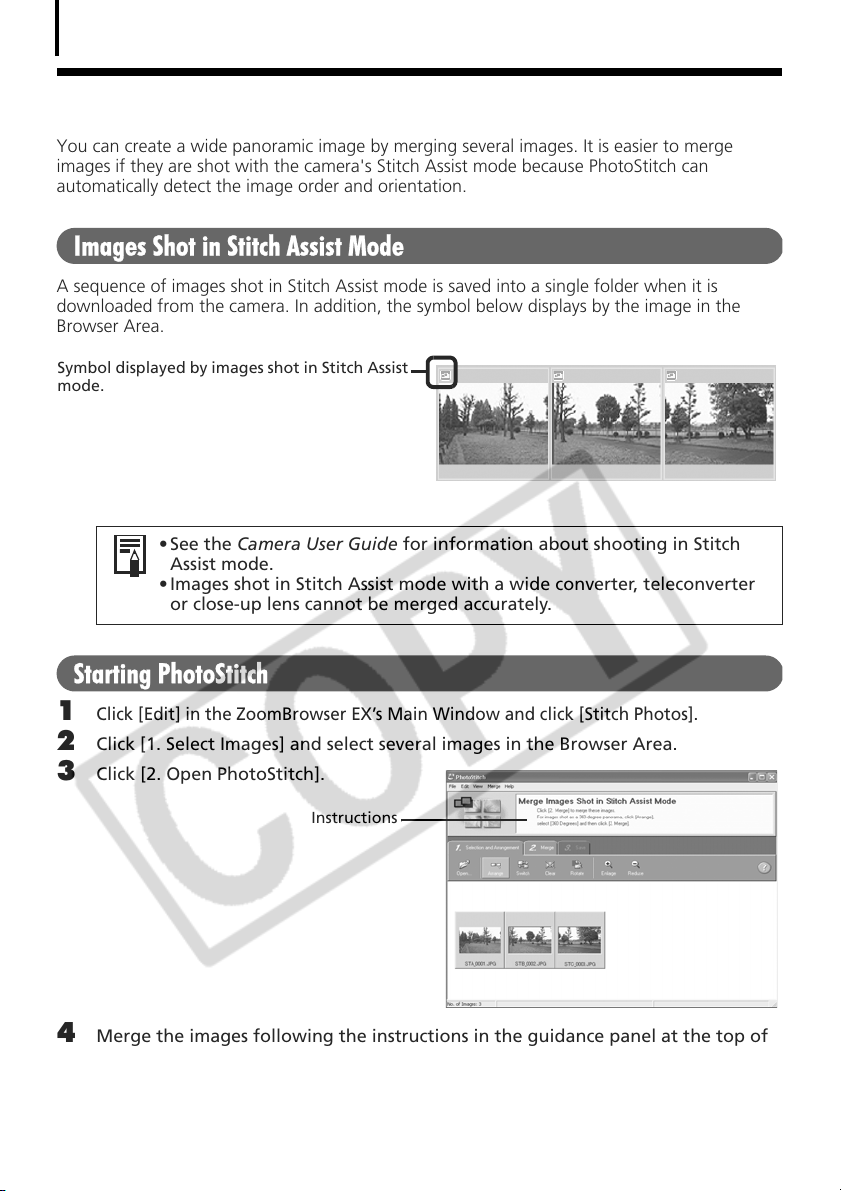
You can create a wide panoramic image by merging several images. It is easier to merge
images if they are shot with the camera's Stitch Assist mode because PhotoStitch can
automatically detect the image order and orientation.
Images Shot in Stitch Assist Mode
A sequence of images shot in Stitch Assist mode is saved into a single folder when it is
downloaded from the camera. In addition, the symbol below displays by the image in the
Browser Area.
Symbol displayed by images shot in Stitch Assist
mode.
• See the Camera User Guide for information about shooting in Stitch
Assist mode.
• Images shot in Stitch Assist mode with a wide converter, teleconverter
or close-up lens cannot be merged accurately.
Starting PhotoStitch
Click [Edit] in the ZoomBrowser EX’s Main Window and click [Stitch Photos].
1
2 Click [1. Select Images] and select several images in the Browser Area.
3 Click [2. Open PhotoStitch].
Instructions
4 Merge the images following the instructions in the guidance panel at the top of
the PhotoStitch window.
Page 49
Enjoy Customizing Your Camera with the My
Camera Settings
The start-up image, start-up sound, shutter sound, operation sound, and self-timer sound are
called the My Camera settings. You can add your favorite images and sounds from your
computer to the My Camera settings. This topic explains how to upload the My Camera
settings saved onto your computer to the camera and vice versa.
Displaying the My Camera Window
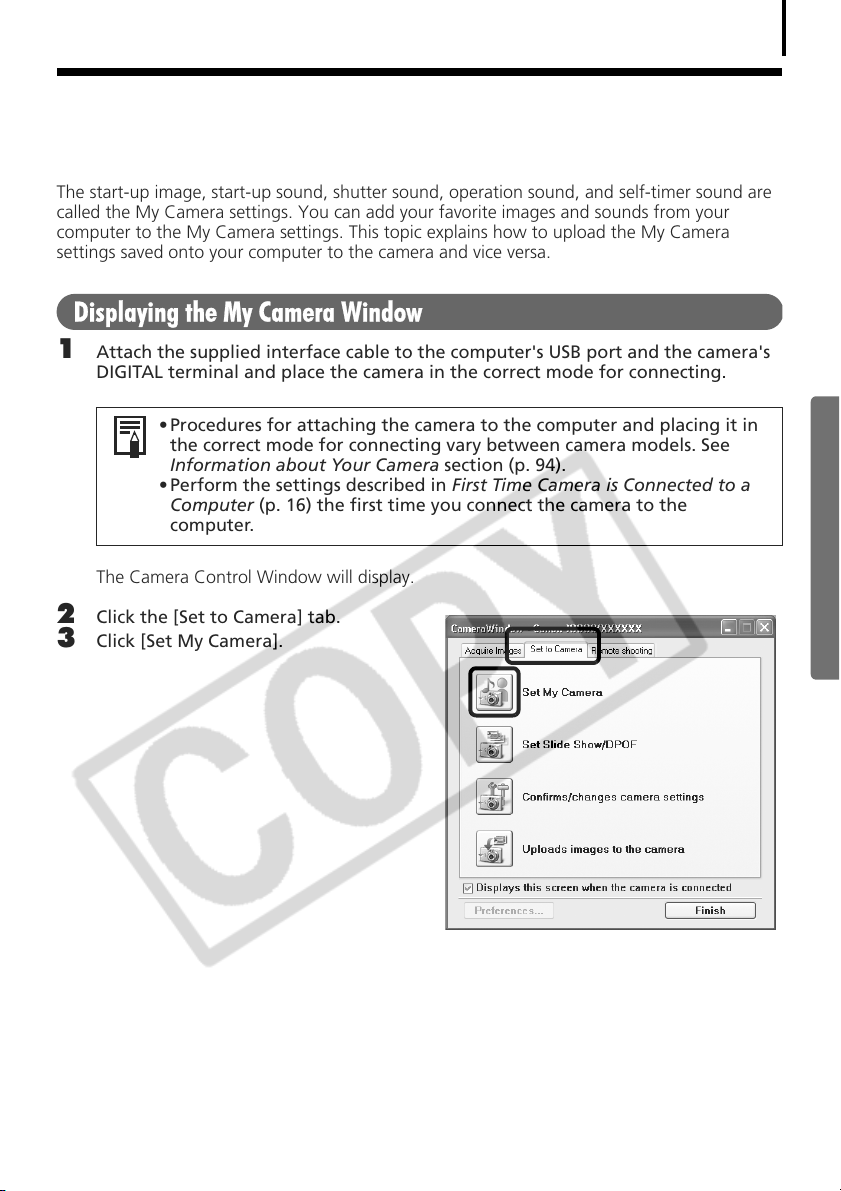
Attach the supplied interface cable to the computer's USB port and the camera's
1
DIGITAL terminal and place the camera in the correct mode for connecting.
• Procedures for attaching the camera to the computer and placing it in
the correct mode for connecting vary between camera models. See
Information about Your Camera section (p. 94).
• Perform the settings described in First Time Camera is Connected to a
Computer (p. 16) the first time you connect the camera to the
computer.
The Camera Control Window will display.
2 Click the [Set to Camera] tab.
3 Click [Set My Camera].
45
Page 50
Enjoy Customizing Your Camera with the My Camera Settings
46
The My Camera Window Features
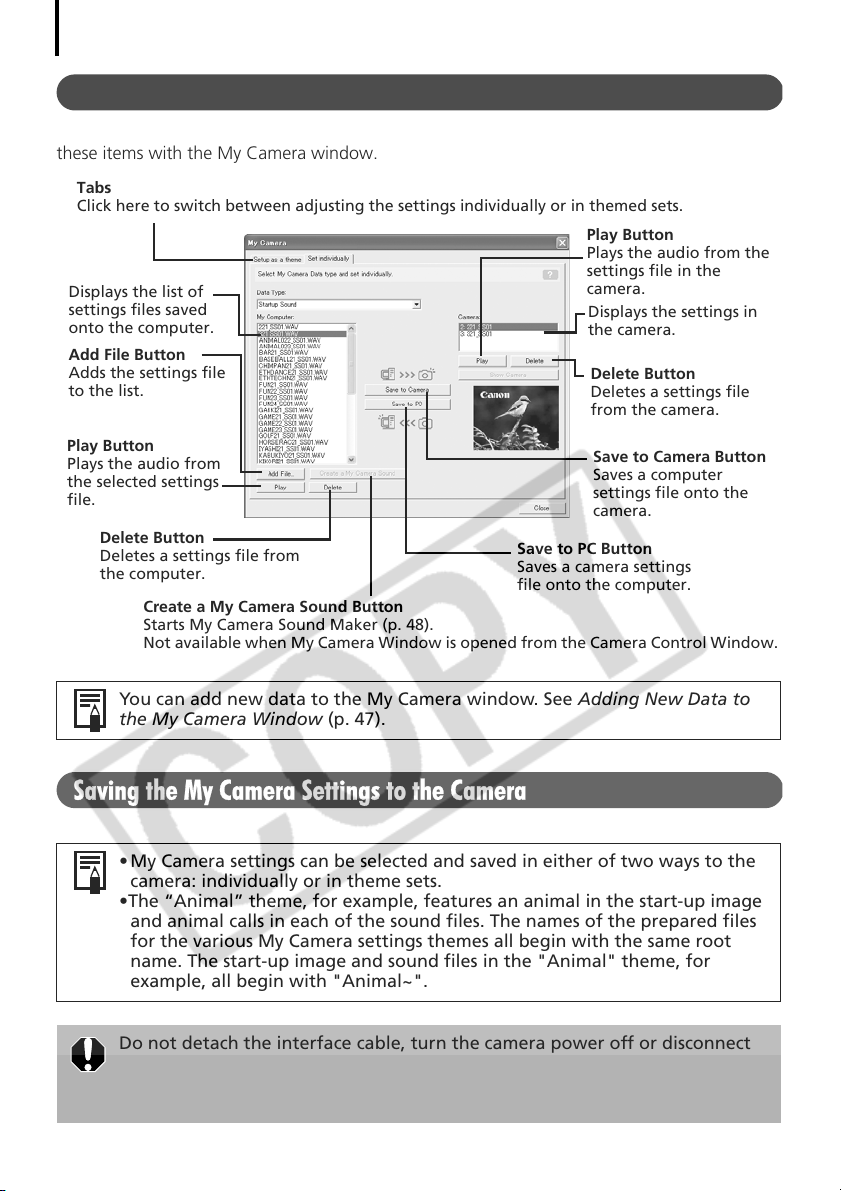
ZoomBrowser EX already contains several pre-recorded My Camera settings. You can check
these items with the My Camera window.
Tabs
Click here to switch between adjusting the settings individually or in themed sets.
Play Button
Plays the audio from the
settings file in the
Displays the list of
settings files saved
onto the computer.
Add File Button
Adds the settings file
to the list.
camera.
Displays the settings in
the camera.
Delete Button
Deletes a settings file
from the camera.
Play Button
Plays the audio from
the selected settings
file.
Delete Button
Deletes a settings file from
the computer.
Create a My Camera Sound Button
Starts My Camera Sound Maker (p. 48).
Not available when My Camera Window is opened from the Camera Control Window.
Save to PC Button
Saves a camera settings
file onto the computer.
Save to Camera Button
Saves a computer
settings file onto the
camera.
You can add new data to the My Camera window. See Adding New Data to
the My Camera Window (p. 47).
Saving the My Camera Settings to the Camera
• My Camera settings can be selected and saved in either of two ways to the
camera: individually or in theme sets.
•The “Animal” theme, for example, features an animal in the start-up image
and animal calls in each of the sound files. The names of the prepared files
for the various My Camera settings themes all begin with the same root
name. The start-up image and sound files in the "Animal" theme, for
example, all begin with "Animal~".
Do not detach the interface cable, turn the camera power off or disconnect
the camera from the computer while the My Camera settings are being saved
to the camera or the settings from the camera are being saved to the
computer.
Page 51
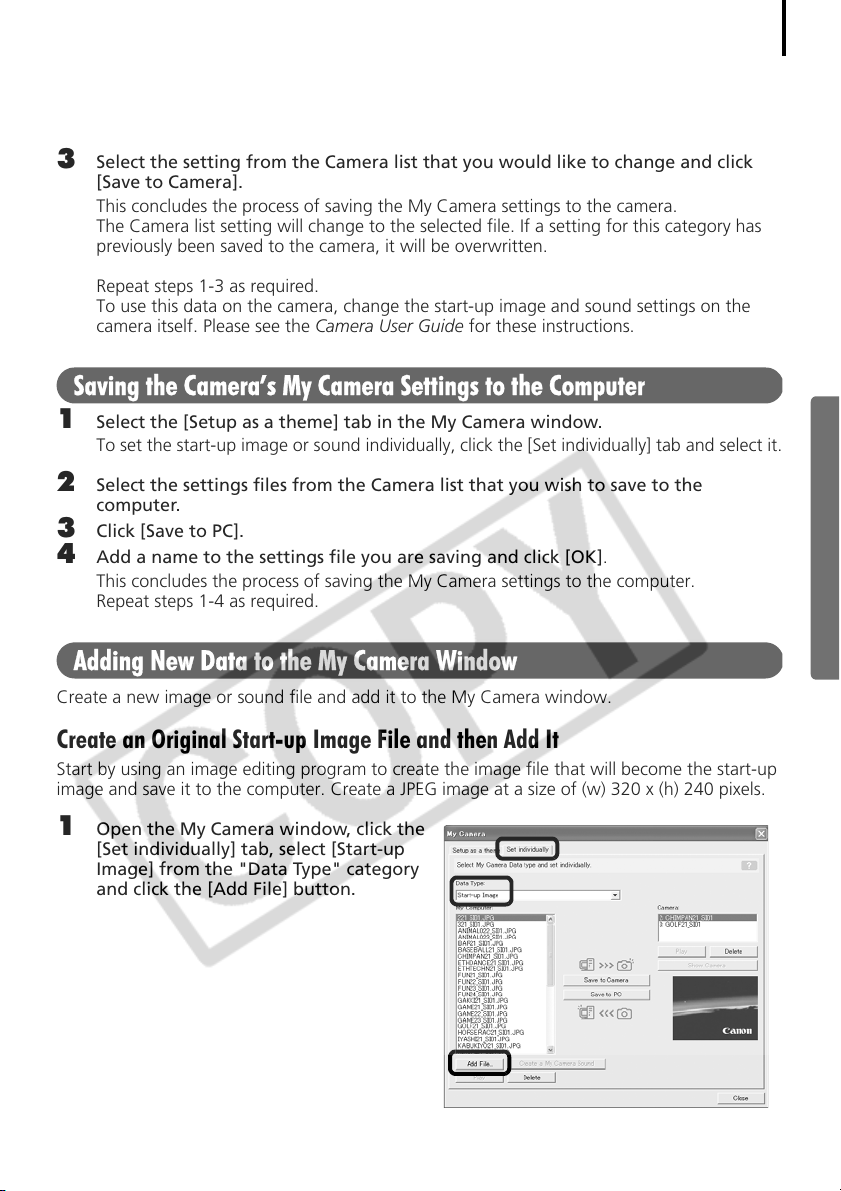
1 Select the [Setup as a theme] tab in the My Camera window.
To set the start-up image or sound individually, click the [Set individually] tab and select it.
2 Select the settings file you wish to save to the camera from the My Computer list.
3 Select the setting from the Camera list that you would like to change and click
[Save to Camera].
This concludes the process of saving the My Camera settings to the camera.
The Camera list setting will change to the selected file. If a setting for this category has
previously been saved to the camera, it will be overwritten.
Repeat steps 1-3 as required.
To use this data on the camera, change the start-up image and sound settings on the
camera itself. Please see the Camera User Guide for these instructions.
Saving the Camera’s My Camera Settings to the Computer
1
Select the [Setup as a theme] tab in the My Camera window.
To set the start-up image or sound individually, click the [Set individually] tab and select it.
2 Select the settings files from the Camera list that you wish to save to the
computer.
3 Click [Save to PC].
4 Add a name to the settings file you are saving and click [OK].
This concludes the process of saving the My Camera settings to the computer.
Repeat steps 1-4 as required.
47
Adding New Data to the My Camera Window
Create a new image or sound file and add it to the My Camera window.
Create an Original Start-up Image File and then Add It
Start by using an image editing program to create the image file that will become the start-up
image and save it to the computer. Create a JPEG image at a size of (w) 320 x (h) 240 pixels.
1 Open the My Camera window, click the
[Set individually] tab, select [Start-up
Image] from the "Data Type" category
and click the [Add File] button.
Page 52
Enjoy Customizing Your Camera with the My Camera Settings
48
2 Select the file you created and click [Open].
This concludes the process for adding new data.
You can save the newly created data to the camera using the procedures described in the
Saving the My Camera Settings to the Camera section (p. 46).
Create an Original Sound File and then Add It
It is easy to create a sound file using My Camera Sound Maker.
QuickTime is required to play the recorded sound.
1 Click the [Edit] menu in the ZoomBrowser EX Main Window and select [Manage
My Camera].
The My Camera window will display.
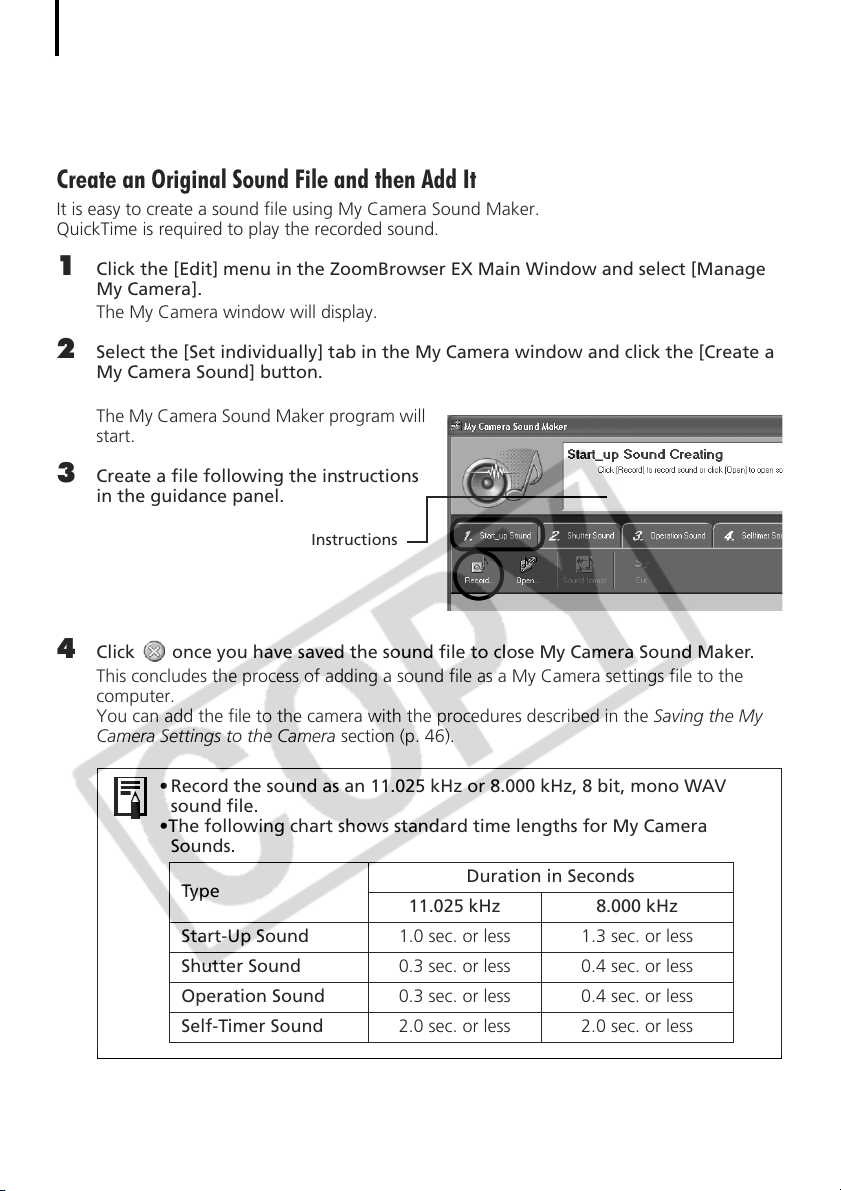
2 Select the [Set individually] tab in the My Camera window and click the [Create a
My Camera Sound] button.
The My Camera Sound Maker program will
start.
3 Create a file following the instructions
in the guidance panel.
Instructions
4 Click once you have saved the sound file to close My Camera Sound Maker.
This concludes the process of adding a sound file as a My Camera settings file to the
computer.
You can add the file to the camera with the procedures described in the Saving the My
Camera Settings to the Camera section (p. 46).
• Record the sound as an 11.025 kHz or 8.000 kHz, 8 bit, mono WAV
sound file.
•The following chart shows standard time lengths for My Camera
Sounds.
Type
Start-Up Sound 1.0 sec. or less 1.3 sec. or less
Shutter Sound 0.3 sec. or less 0.4 sec. or less
Operation Sound 0.3 sec. or less 0.4 sec. or less
Self-Timer Sound 2.0 sec. or less 2.0 sec. or less
Duration in Seconds
11.025 kHz 8.000 kHz
Page 53
Using the Software on the Macintosh
Platform – Preparations
This chapter explains the basic procedures for installing the software. Read this material before
you connect the camera to the computer for the first time.
Installing the Software
Start by installing the software from the Canon Digital Camera Solution Disk.
See ArcSoft PhotoStudio (p. 80) for details on how to install ArcSoft
PhotoStudio.
Items to Prepare
• Your camera and computer
• Canon Digital Camera Solution Disk
• Interface cable supplied with the camera
49
Installation Procedures
Close any programs that are running.
1
2 Place the Canon Digital Camera Solution Disk in the
computer’s CD-ROM drive.
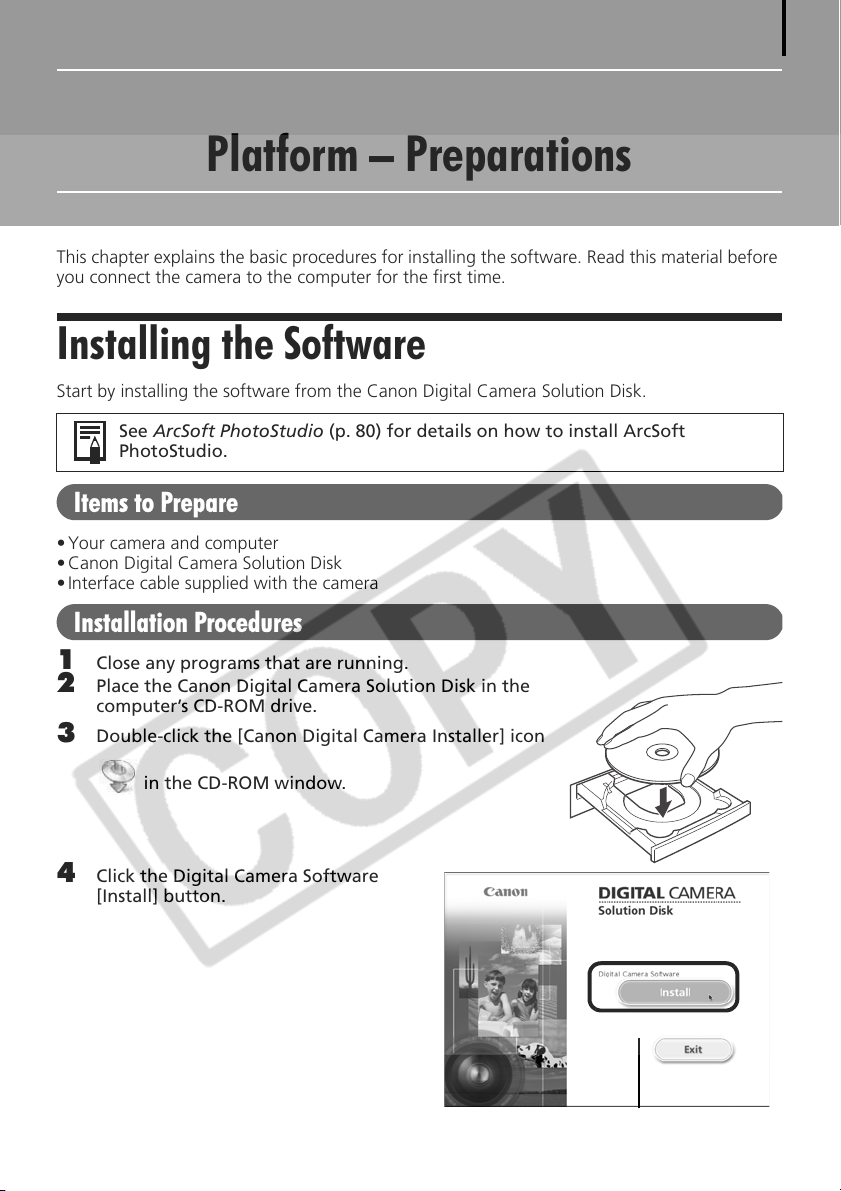
3 Double-click the [Canon Digital Camera Installer] icon
in the CD-ROM window.
4 Click the Digital Camera Software
[Install] button.
Installer Panel
Page 54
Installing the Software
50
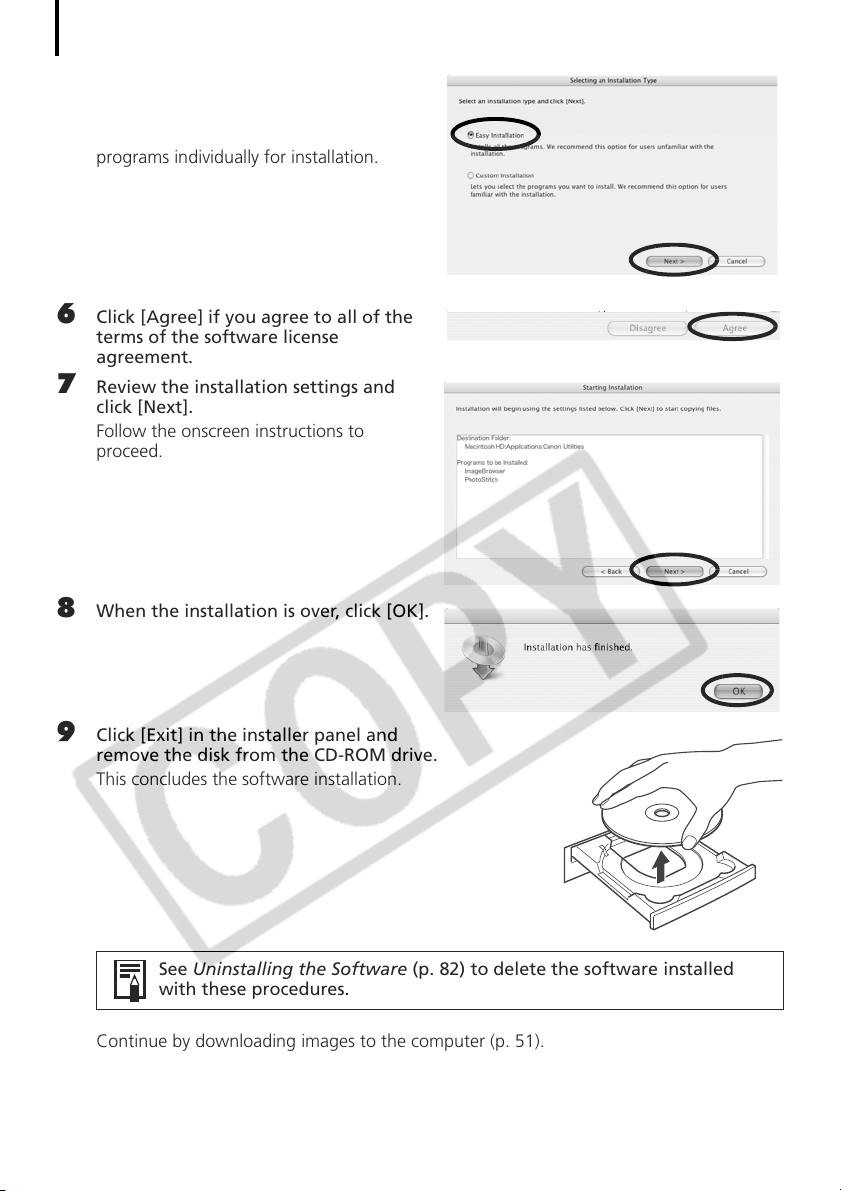
5 Select [Easy Installation] and click
[Next].
Select [Custom Installation] to select
programs individually for installation.
6 Click [Agree] if you agree to all of the
terms of the software license
agreement.
7 Review the installation settings and
click [Next].
Follow the onscreen instructions to
proceed.
8 When the installation is over, click [OK].
9 Click [Exit] in the installer panel and
remove the disk from the CD-ROM drive.
This concludes the software installation.
See Uninstalling the Software (p. 82) to delete the software installed
with these procedures.
Continue by downloading images to the computer (p. 51).
Page 55
Using the Software on the Macintosh
Platform – The Basics
This chapter explains the procedures for using ImageBrowser to download the camera's images
to the computer and print them.
Read this chapter after completing the preparations in the Using the Software on the
Macintosh Platform
Downloading Images to the Computer
Begin by downloading the images to your computer. The downloading procedure is slightly
different according to whether you are using a camera to computer connection (see below) or
a memory card reader (p. 53).
You may not be able to download the camera images if there are more than
approximately 1000 images in the camera. Use a memory card reader to
download in that case.
You can also display an index of the camera or memory card images to check
them before downloading or download them selectively. For instructions, see
Checking Images before Downloading (p. 66).
– Preparations section.
51
Camera to Computer Connection
Set the ImageBrowser auto start settings before you connect the camera to the computer for
the first time. This step is not required from the second connection onward.
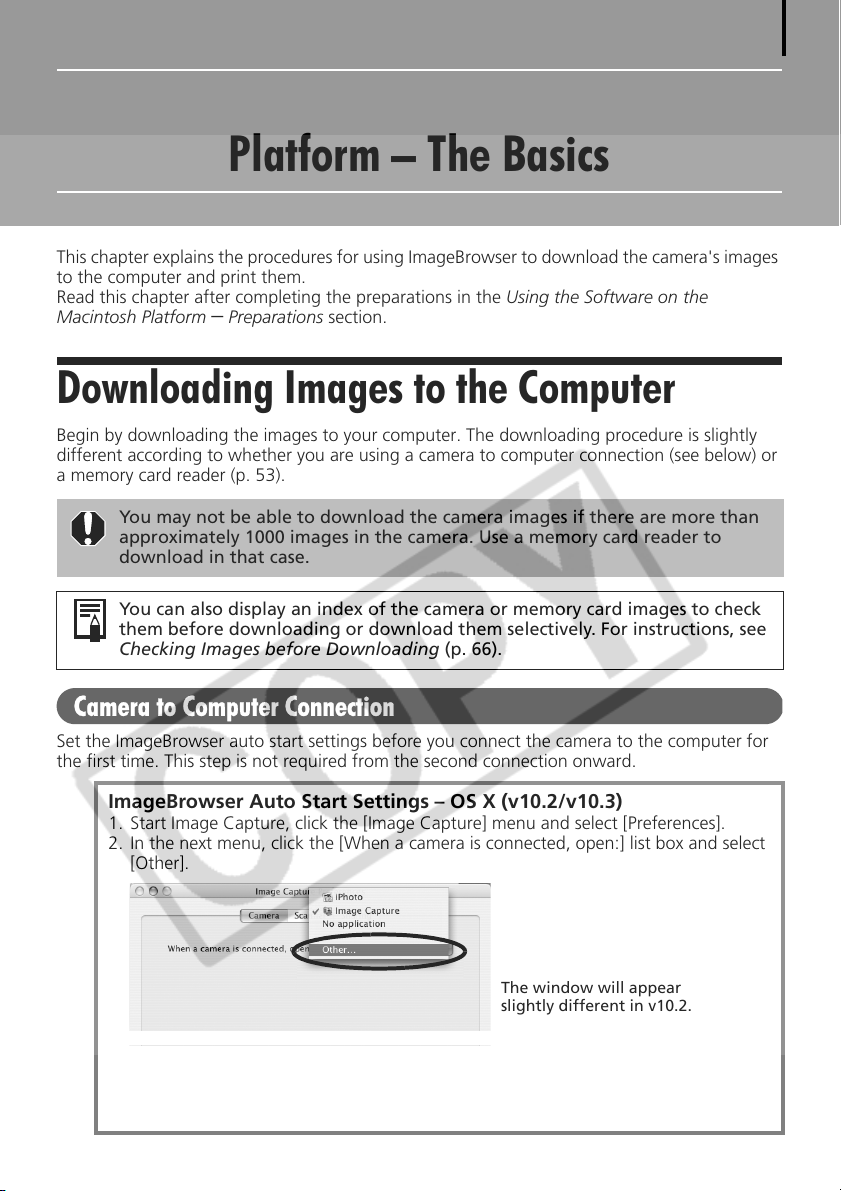
ImageBrowser Auto Start Settings – OS X (v10.2/v10.3)
1. Start Image Capture, click the [Image Capture] menu and select [Preferences].
2. In the next menu, click the [When a camera is connected, open:] list box and select
[Other].
The window will appear
slightly different in v10.2.
3. Select [CameraWindow] in the program selection window.
CameraWindow is generally installed into the folder opened by selecting the
[Applications], [Canon Utilities] and [CameraWindow] folders.
4. Click [OK] and then close Image Capture.
Page 56
Downloading Images to the Computer
52
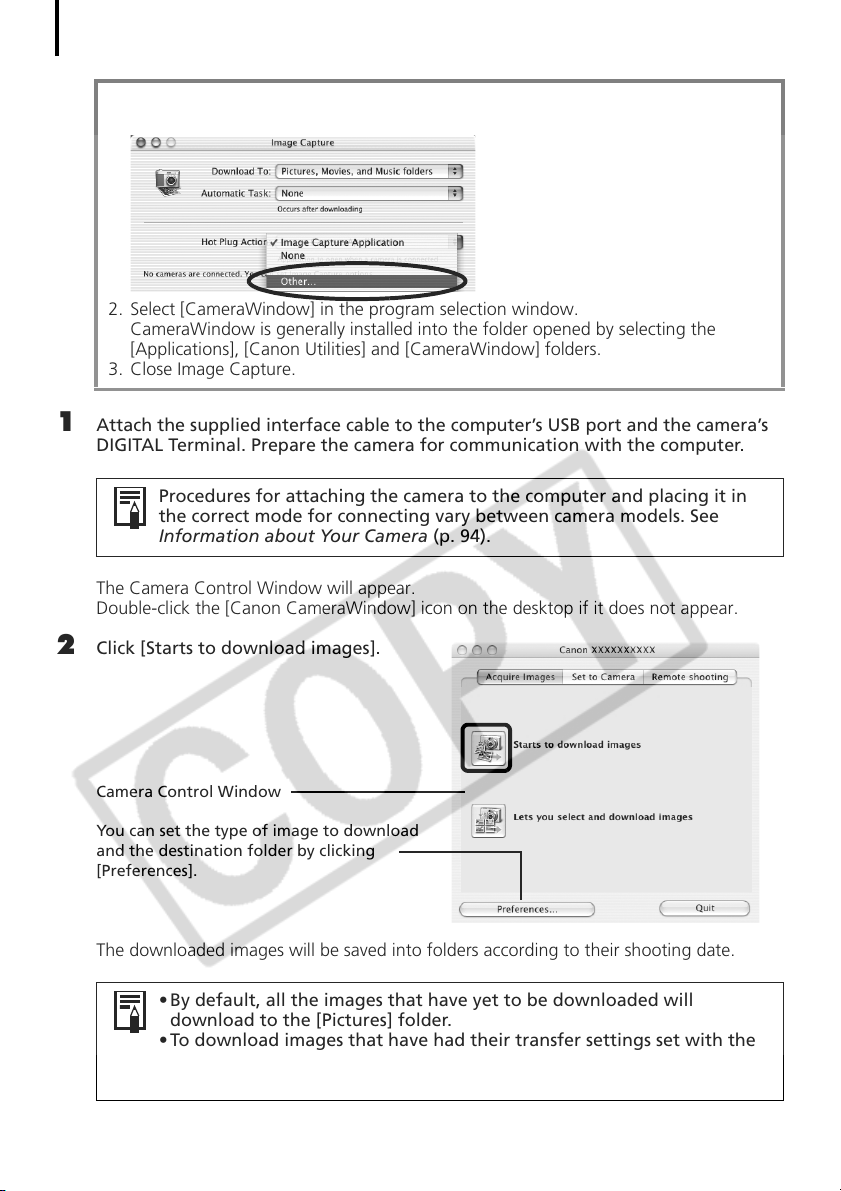
ImageBrowser Auto Start Settings – OS X (v10.1)
1. Start Image Capture and select [Other] from the Hot Plug Action list box.
2. Select [CameraWindow] in the program selection window.
CameraWindow is generally installed into the folder opened by selecting the
[Applications], [Canon Utilities] and [CameraWindow] folders.
3. Close Image Capture.
1 Attach the supplied interface cable to the computer’s USB port and the camera’s
DIGITAL Terminal. Prepare the camera for communication with the computer.
Procedures for attaching the camera to the computer and placing it in
the correct mode for connecting vary between camera models. See
Information about Your Camera (p. 94).
The Camera Control Window will appear.
Double-click the [Canon CameraWindow] icon on the desktop if it does not appear.
2 Click [Starts to download images].
Camera Control Window
You can set the type of image to download
and the destination folder by clicking
[Preferences].
The downloaded images will be saved into folders according to their shooting date.
• By default, all the images that have yet to be downloaded will
download to the [Pictures] folder.
• To download images that have had their transfer settings set with the
camera, click [Preferences] and select [Images whose transfer settings
were specified with the camera] as the image type to be downloaded.
Page 57
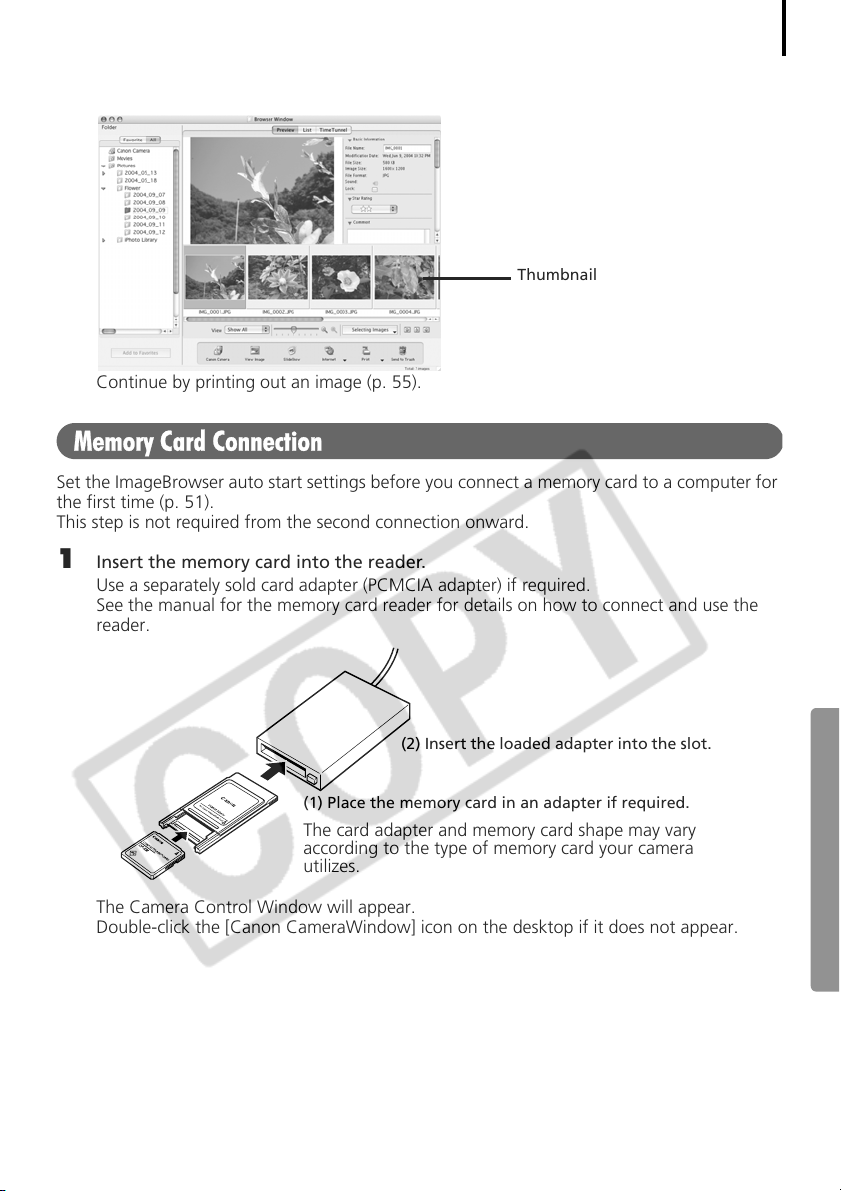
By default, when the download is complete, the thumbnails (tiny versions) of the
downloaded images display in ImageBrowser’s Browser Window.
Thumbnail
Continue by printing out an image (p. 55).
Memory Card Connection
Set the ImageBrowser auto start settings before you connect a memory card to a computer for
the first time (p. 51).
This step is not required from the second connection onward.
1 Insert the memory card into the reader.
Use a separately sold card adapter (PCMCIA adapter) if required.
See the manual for the memory card reader for details on how to connect and use the
reader.
53
(2) Insert the loaded adapter into the slot.
(1) Place the memory card in an adapter if required.
The card adapter and memory card shape may vary
according to the type of memory card your camera
utilizes.
The Camera Control Window will appear.
Double-click the [Canon CameraWindow] icon on the desktop if it does not appear.
Page 58
Downloading Images to the Computer
54
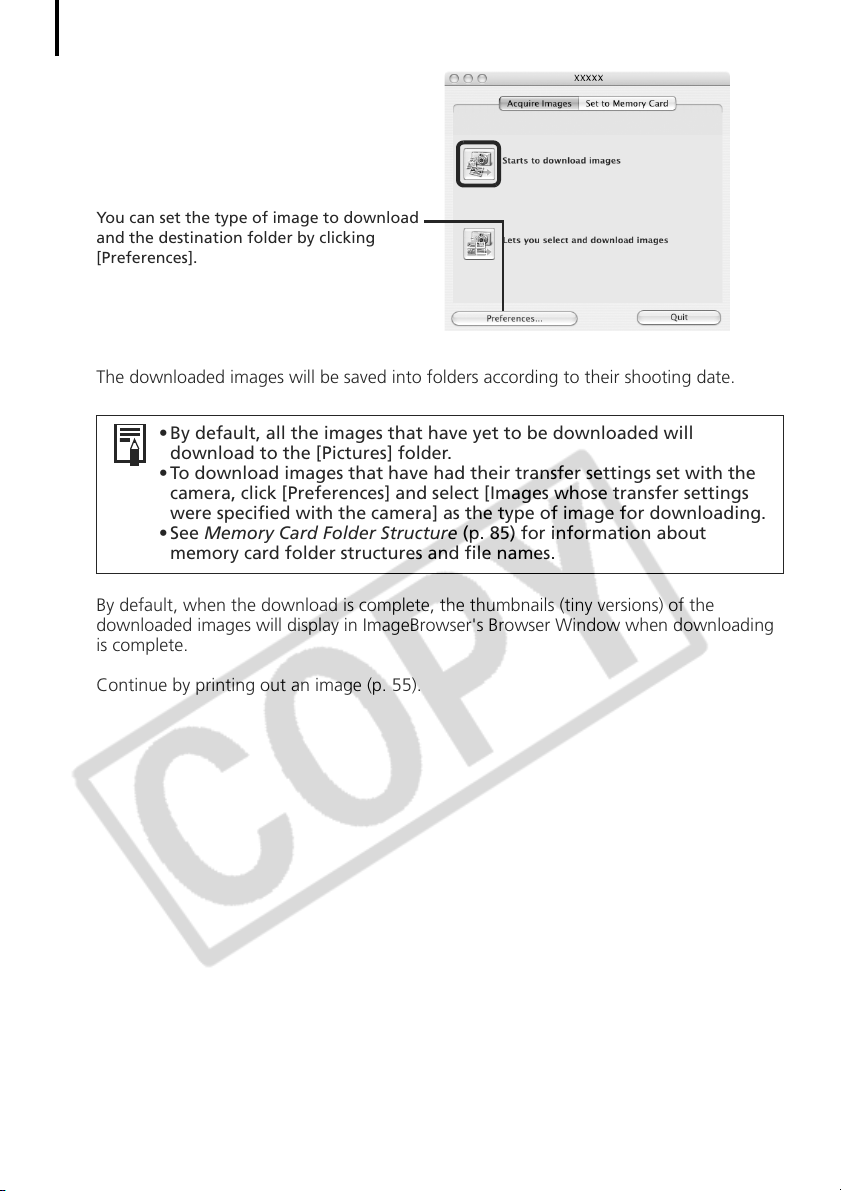
2 Click [Starts to download images].
You can set the type of image to download
and the destination folder by clicking
[Preferences].
The downloaded images will be saved into folders according to their shooting date.
• By default, all the images that have yet to be downloaded will
download to the [Pictures] folder.
• To download images that have had their transfer settings set with the
camera, click [Preferences] and select [Images whose transfer settings
were specified with the camera] as the type of image for downloading.
•See Memory Card Folder Structure (p. 85) for information about
memory card folder structures and file names.
By default, when the download is complete, the thumbnails (tiny versions) of the
downloaded images will display in ImageBrowser's Browser Window when downloading
is complete.
Continue by printing out an image (p. 55).
Page 59
Printing Images
Printing
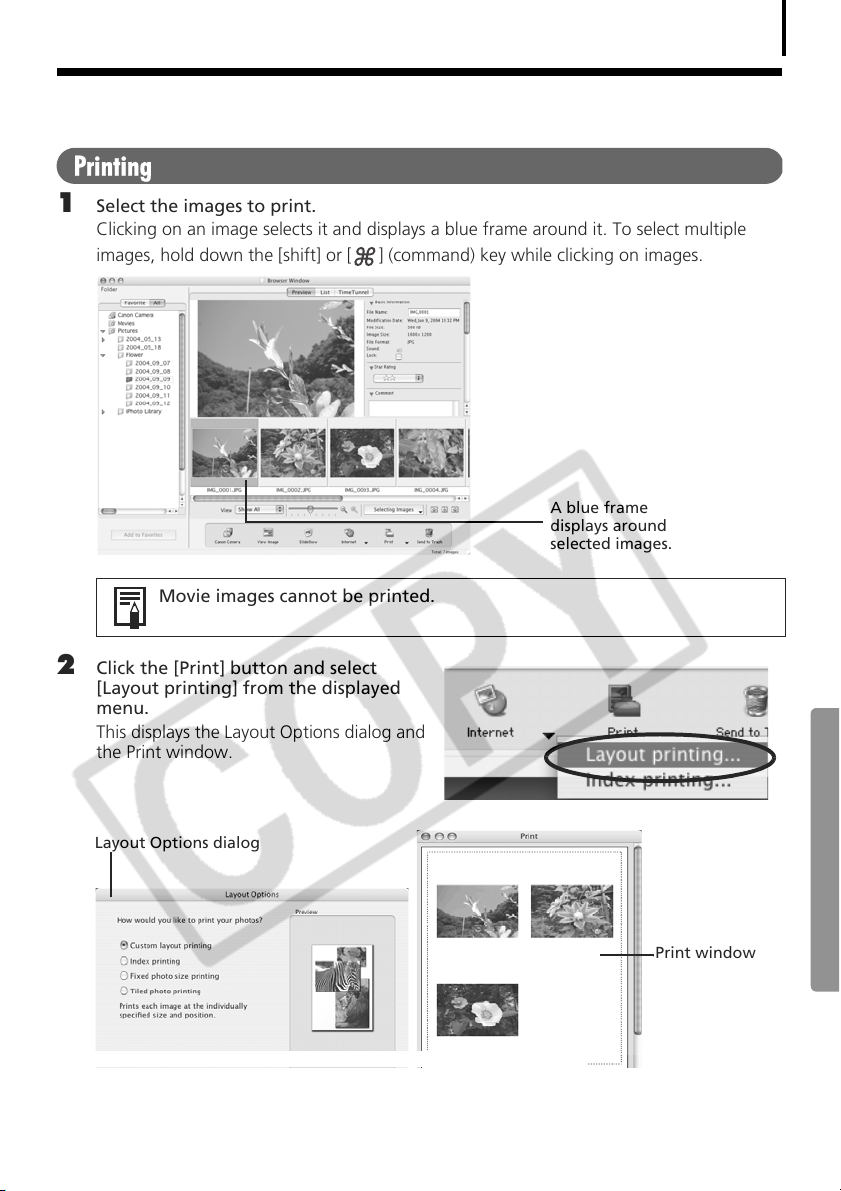
Select the images to print.
1
Clicking on an image selects it and displays a blue frame around it. To select multiple
images, hold down the [shift] or [ ] (command) key while clicking on images.
A blue frame
displays around
selected images.
Movie images cannot be printed.
55
2 Click the [Print] button and select
[Layout printing] from the displayed
menu.
This displays the Layout Options dialog and
the Print window.
Layout Options dialog
Print window
From this point onward, the procedures vary according to whether you select Full Page
Print (prints one image per page) or Layout and Print (prints an arrangement of images on
each page).
Page 60
Printing Images
56
Full Page Print
This option prints one image per page.
1 Select [Tiled photo printing] in the Layout Options dialog and click [Next].
2 Once you have set the paper size and other settings, select [1 (1 x 1)] in the No. of
images category and click [OK].
3 Click the [Print] button in the Print window.
This will display the Print dialog.
4 Click [Print] to start printing.
Layout and Print
This option prints multiple images on a single page as in a photo album.
1 Select [Custom layout printing] in the Layout Options dialog and click [Next].
2 Select settings, such as the paper size, and click [OK].
3 As required, change the layout and add text in the Print window.
See Print Window Features (p. 57) for the procedures for changing layouts and adding
text.
4 Click the [Print] button in the Print window.
This will display the Print dialog.
5 Click [Print] to start printing.
• You can print image thumbnails by selecting [Index printing] in the
Layout Options dialog.
• Images shot with Exif 2.2-compliant cameras (Exif Print) incorporate
information about the shooting settings, such as the camera modes and
settings. Better prints can be made by using this information to correct
the image. To set this function, click the [ImageBrowser] menu and
select [Preferences]. Select [Print] from the list box at the upper left of
the Preferences window and select the desired settings in the "Image
Correction Settings" category.
Page 61
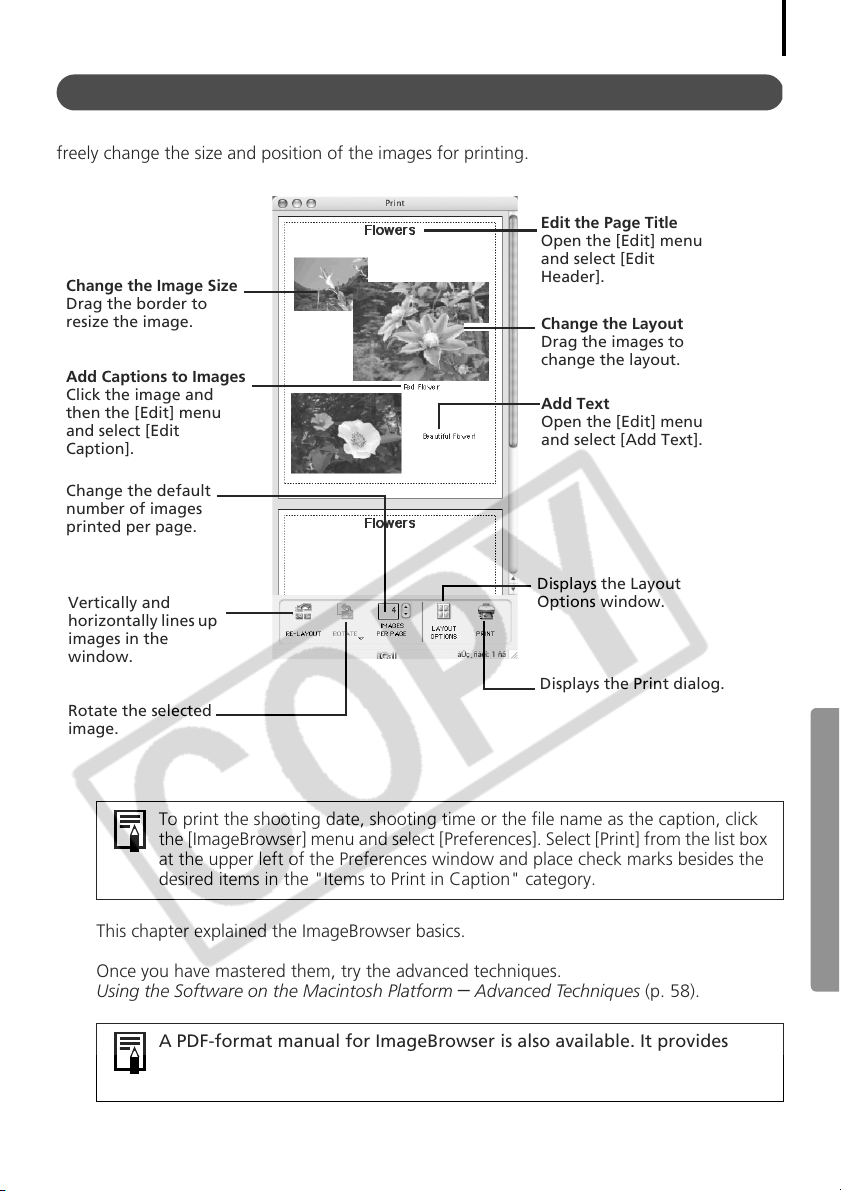
Print Window Features
When the [Custom layout printing] option is selected in the Layout Options window, you can
freely change the size and position of the images for printing.
Edit the Page Title
Open the [Edit] menu
and select [Edit
Change the Image Size
Drag the border to
resize the image.
Add Captions to Images
Click the image and
then the [Edit] menu
and select [Edit
Caption].
Change the default
number of images
printed per page.
Vertically and
horizontally lines up
images in the
window.
Rotate the selected
image.
Header].
Change the Layout
Drag the images to
change the layout.
Add Text
Open the [Edit] menu
and select [Add Text].
Displays the Layout
Options window.
Displays the Print dialog.
57
To print the shooting date, shooting time or the file name as the caption, click
the [ImageBrowser] menu and select [Preferences]. Select [Print] from the list box
at the upper left of the Preferences window and place check marks besides the
desired items in the "Items to Print in Caption" category.
This chapter explained the ImageBrowser basics.
Once you have mastered them, try the advanced techniques.
Using the Software on the Macintosh Platform
– Advanced Techniques (p. 58).
A PDF-format manual for ImageBrowser is also available. It provides
further information about the program's features and procedures. See
Using the PDF Manuals (p. 2).
Page 62
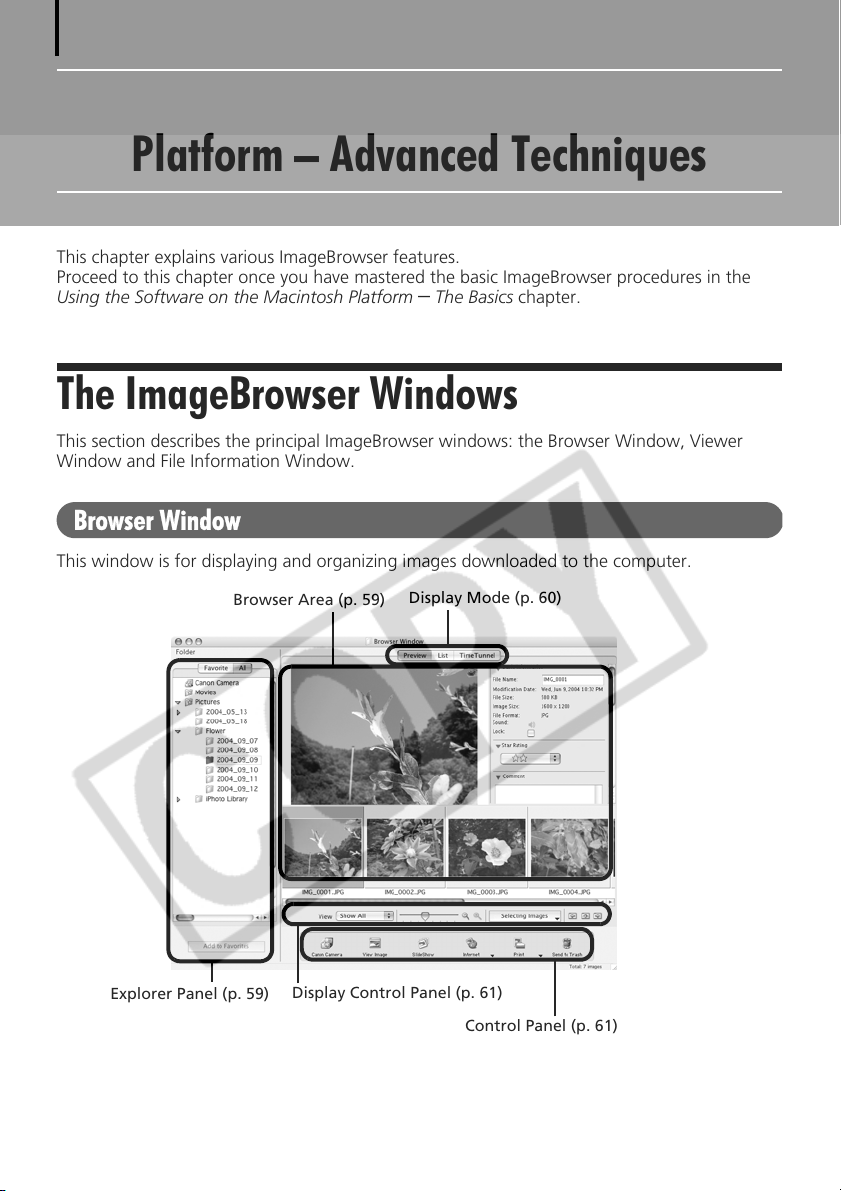
58
Using the Software on the Macintosh
Platform – Advanced Techniques
This chapter explains various ImageBrowser features.
Proceed to this chapter once you have mastered the basic ImageBrowser procedures in the
Using the Software on the Macintosh Platform
The ImageBrowser Windows
This section describes the principal ImageBrowser windows: the Browser Window, Viewer
Window and File Information Window.
Browser Window
This window is for displaying and organizing images downloaded to the computer.
– The Basics chapter.
Browser Area (p. 59)
Explorer Panel (p. 59)
Display Mode (p. 60)
Display Control Panel (p. 61)
Control Panel (p. 61)
Page 63
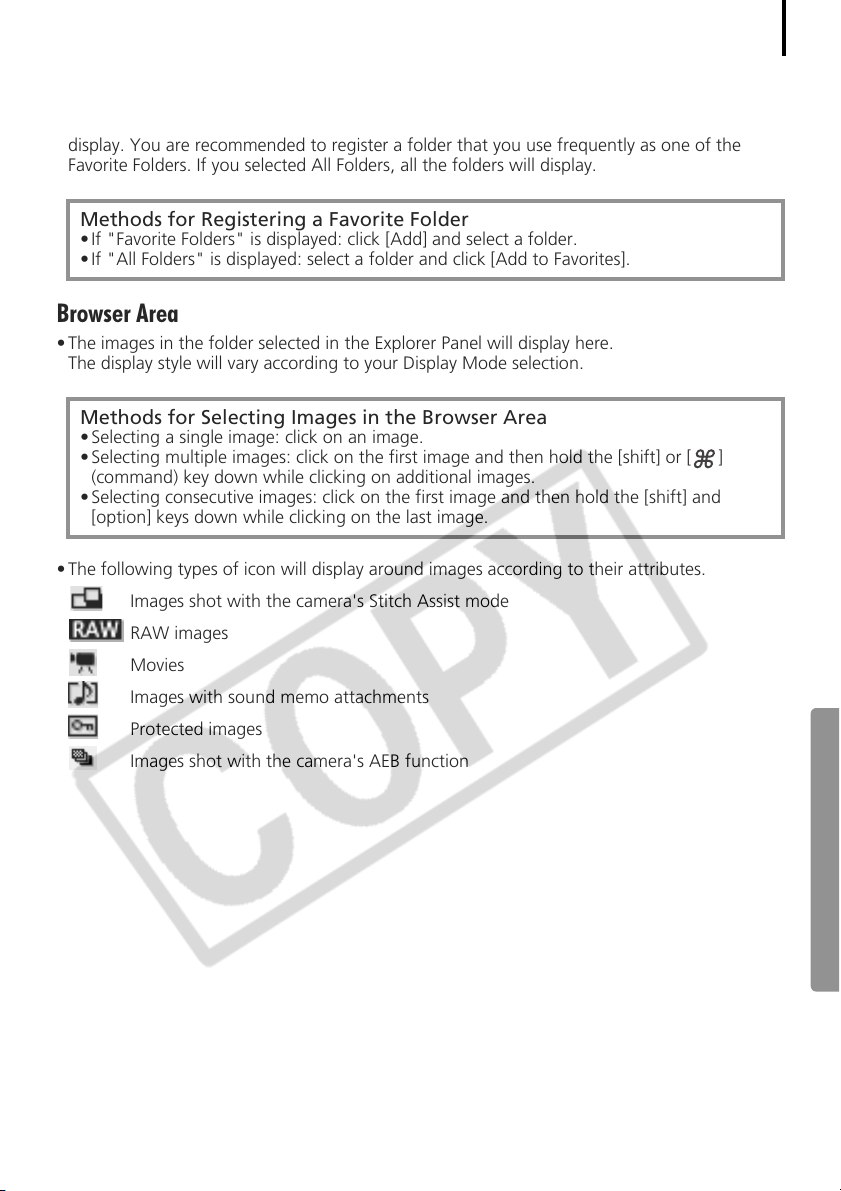
Explorer Panel
• Use this area to select folders. The images in the selected folder display in the Browser Area.
• If you selected Favorite Folders, only the folders registered in advance as Favorite Folders will
display. You are recommended to register a folder that you use frequently as one of the
Favorite Folders. If you selected All Folders, all the folders will display.
Methods for Registering a Favorite Folder
• If "Favorite Folders" is displayed: click [Add] and select a folder.
• If "All Folders" is displayed: select a folder and click [Add to Favorites].
Browser Area
• The images in the folder selected in the Explorer Panel will display here.
The display style will vary according to your Display Mode selection.
Methods for Selecting Images in the Browser Area
• Selecting a single image: click on an image.
• Selecting multiple images: click on the first image and then hold the [shift] or [ ]
(command) key down while clicking on additional images.
• Selecting consecutive images: click on the first image and then hold the [shift] and
[option] keys down while clicking on the last image.
• The following types of icon will display around images according to their attributes.
Images shot with the camera's Stitch Assist mode
RAW images
Movies
Images with sound memo attachments
Protected images
Images shot with the camera's AEB function
59
Page 64
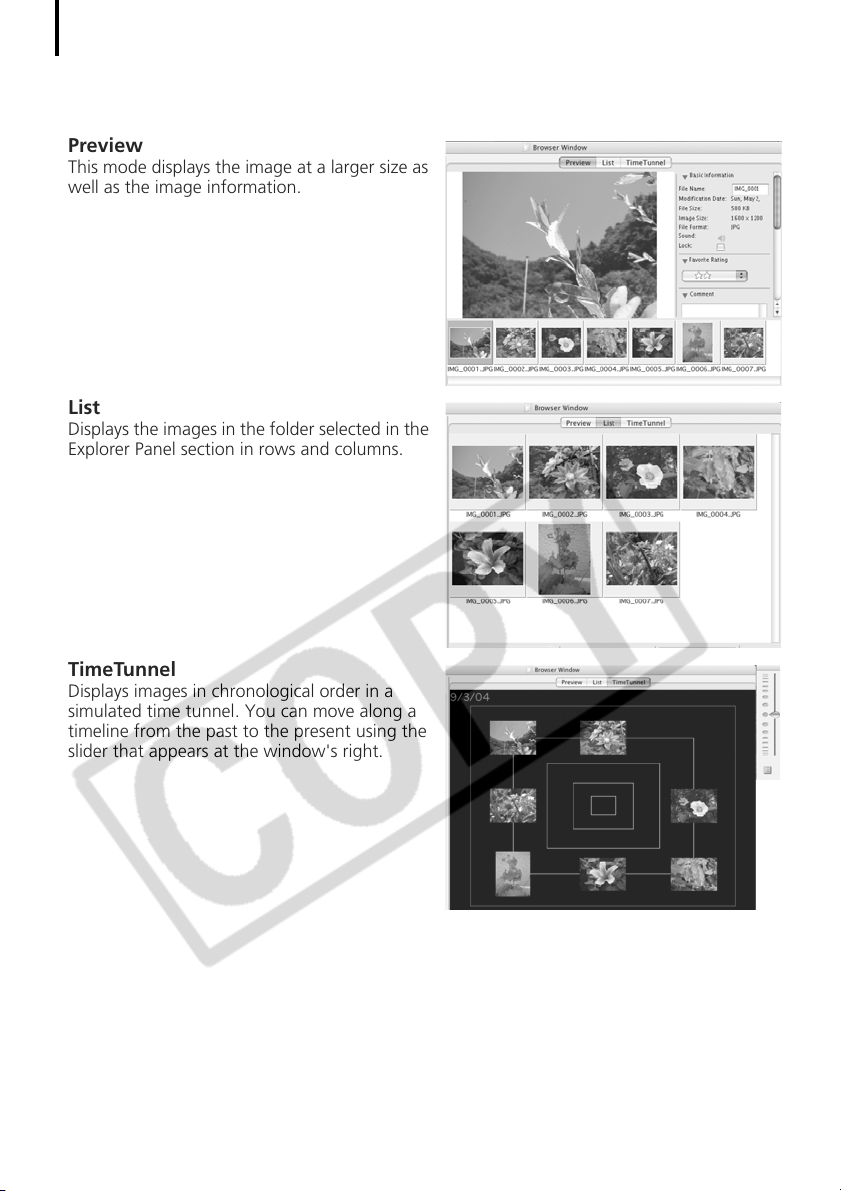
The ImageBrowser Windows
60
Display Mode
• Selects the display style for the Browser Area.
Preview
This mode displays the image at a larger size as
well as the image information.
List
Displays the images in the folder selected in the
Explorer Panel section in rows and columns.
TimeTunnel
Displays images in chronological order in a
simulated time tunnel. You can move along a
timeline from the past to the present using the
slider that appears at the window's right.
Page 65
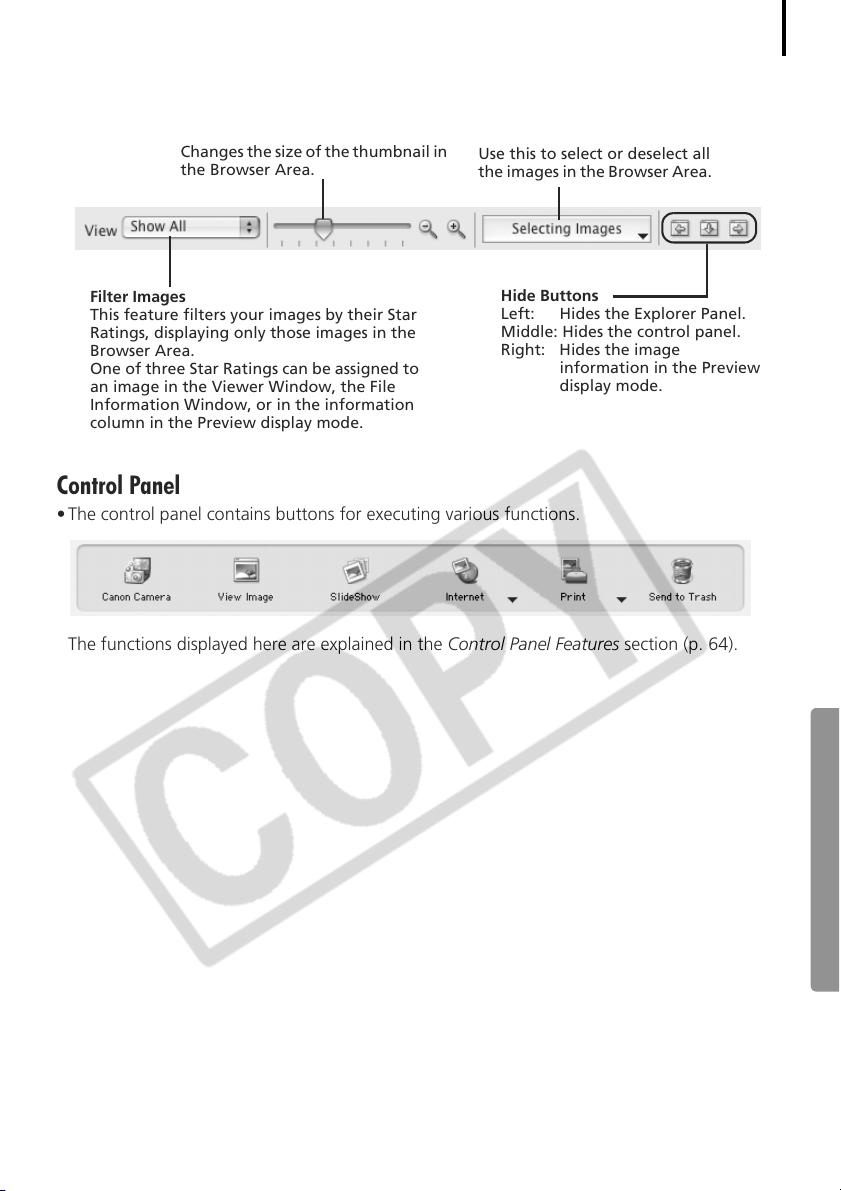
Display Control Panel
• This panel adjusts the display settings for the Browser Area.
Display Size
Changes the size of the thumbnail in
the Browser Area.
Selection Menu
Use this to select or deselect all
the images in the Browser Area.
61
Filter Images
This feature filters your images by their Star
Ratings, displaying only those images in the
Browser Area.
One of three Star Ratings can be assigned to
an image in the Viewer Window, the File
Information Window, or in the information
column in the Preview display mode.
Hide Buttons
Left: Hides the Explorer Panel.
Middle: Hides the control panel.
Right: Hides the image
information in the Preview
display mode.
Control Panel
• The control panel contains buttons for executing various functions.
The functions displayed here are explained in the Control Panel Features section (p. 64).
Page 66
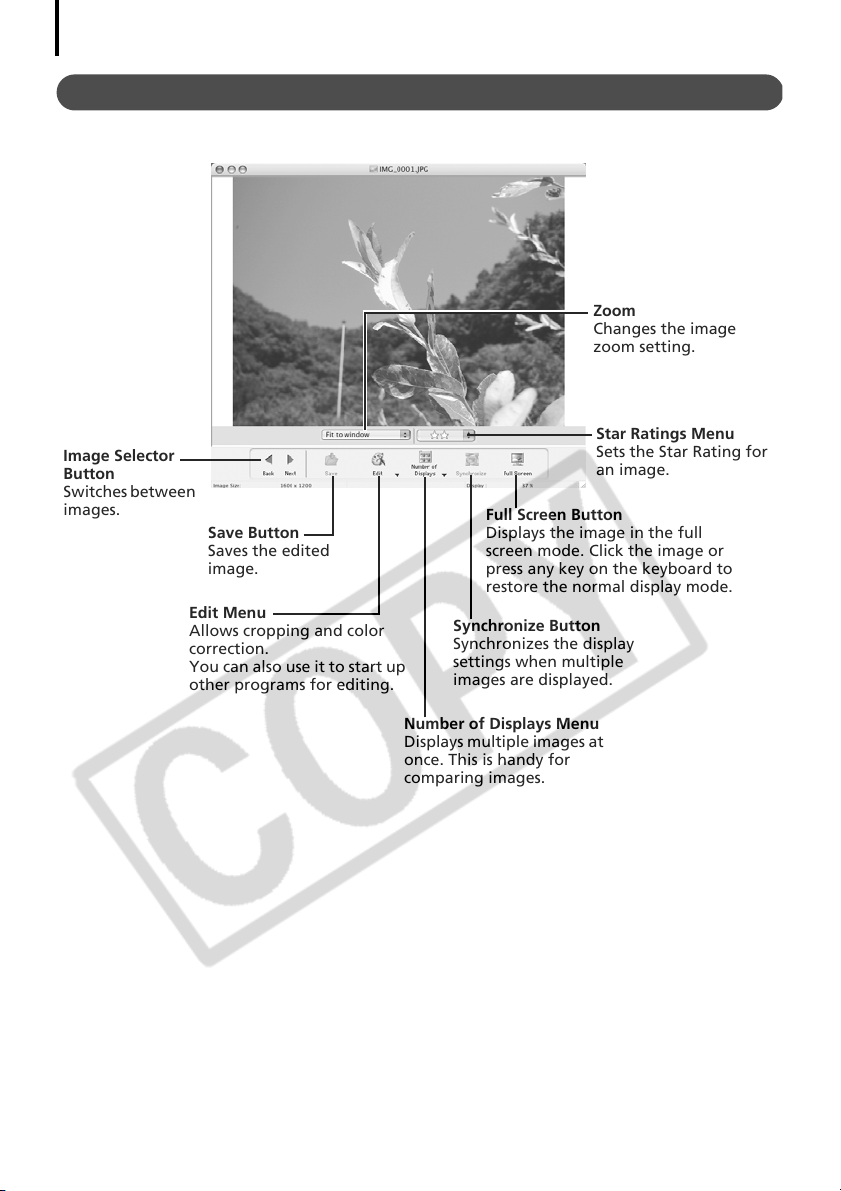
The ImageBrowser Windows
62
Viewer Window
Double-click an image in the Browser Area to display it in the Viewer Window.
Image Selector
Button
Switches between
images.
Save Button
Saves the edited
image.
Edit Menu
Allows cropping and color
correction.
You can also use it to start up
other programs for editing.
Full Screen Button
Displays the image in the full
screen mode. Click the image or
press any key on the keyboard to
restore the normal display mode.
Synchronize Button
Synchronizes the display
settings when multiple
images are displayed.
Zoom
Changes the image
zoom setting.
Star Ratings Menu
Sets the Star Rating for
an image.
Number of Displays Menu
Displays multiple images at
once. This is handy for
comparing images.
Page 67
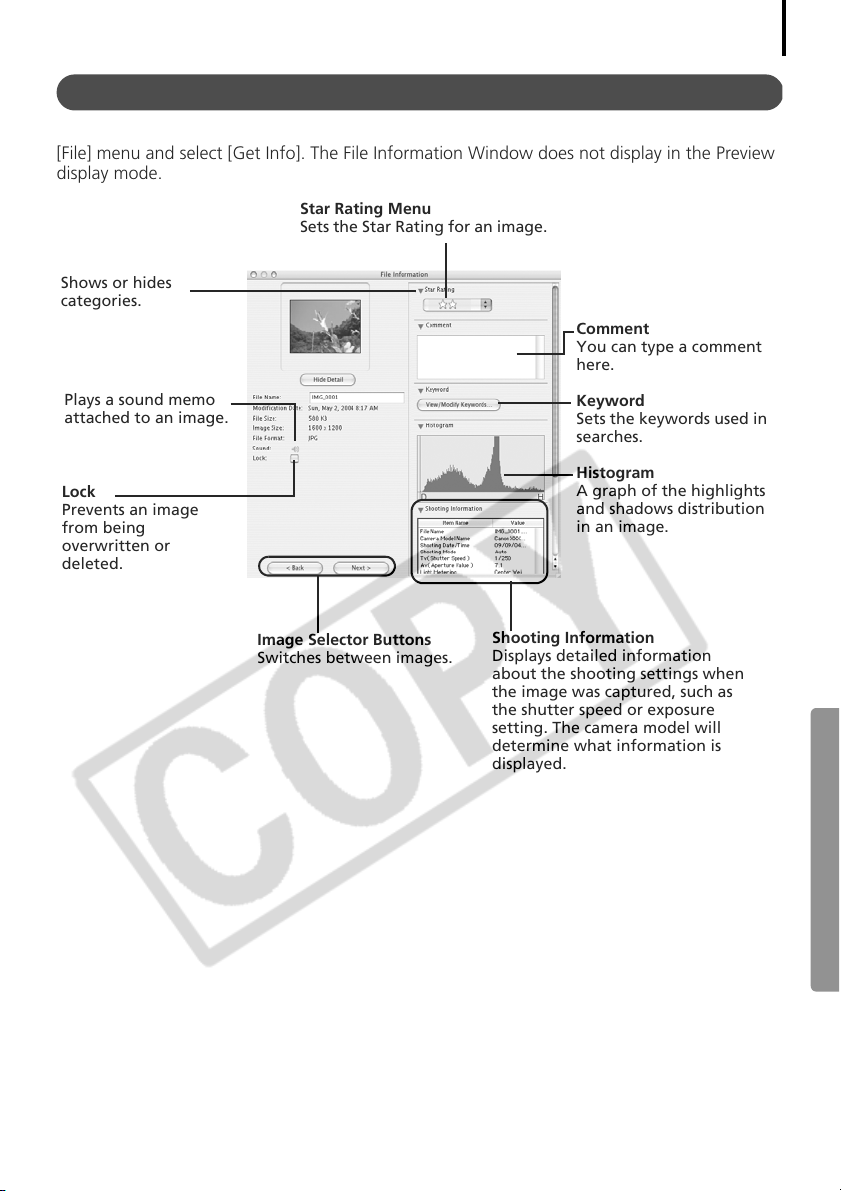
File Information Window
The File Information Window displays when you select an image in the Browser Area, click the
[File] menu and select [Get Info]. The File Information Window does not display in the Preview
display mode.
Star Rating Menu
Sets the Star Rating for an image.
Shows or hides
categories.
Comment
You can type a comment
here.
63
Plays a sound memo
attached to an image.
Lock
Prevents an image
from being
overwritten or
deleted.
Image Selector Buttons
Switches between images.
Keyword
Sets the keywords used in
searches.
Histogram
A graph of the highlights
and shadows distribution
in an image.
Shooting Information
Displays detailed information
about the shooting settings when
the image was captured, such as
the shutter speed or exposure
setting. The camera model will
determine what information is
displayed.
Page 68
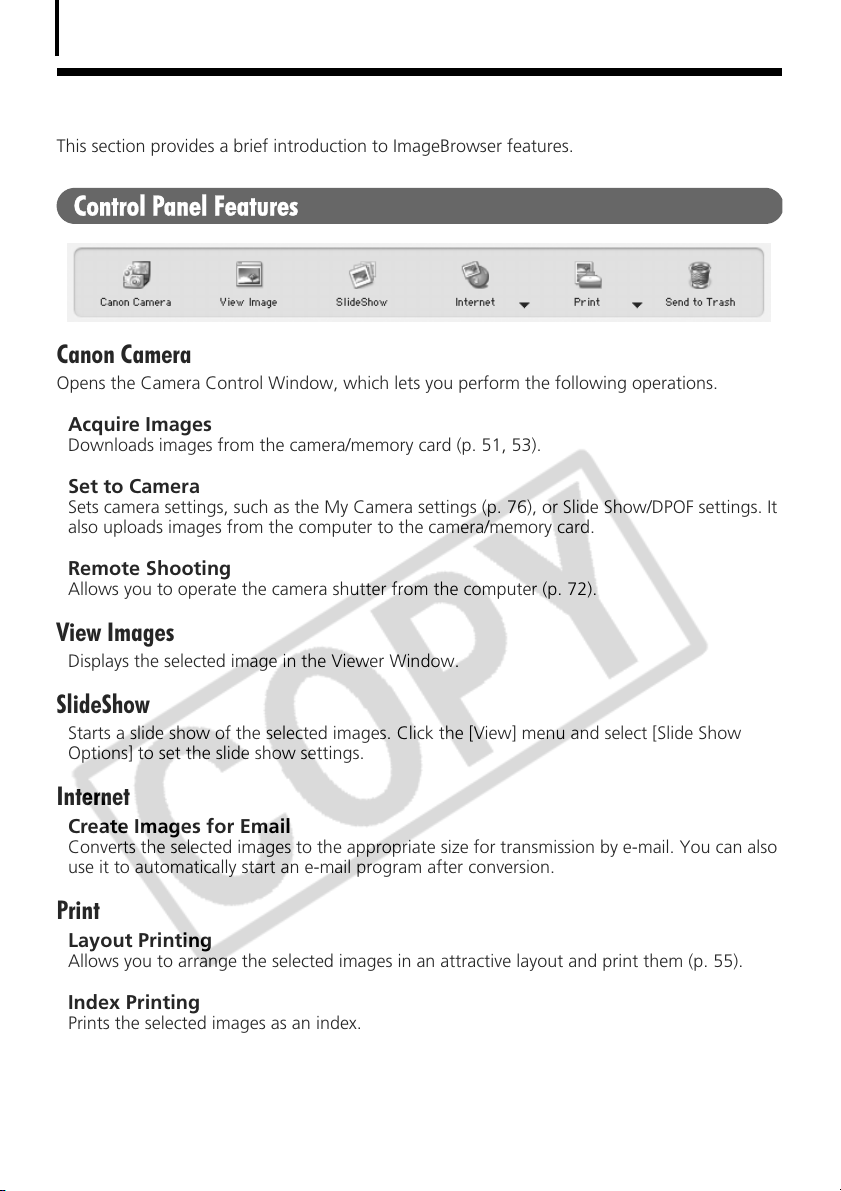
ImageBrowser Features
64
ImageBrowser Features
This section provides a brief introduction to ImageBrowser features.
Control Panel Features
Canon Camera
Opens the Camera Control Window, which lets you perform the following operations.
Acquire Images
Downloads images from the camera/memory card (p. 51, 53).
Set to Camera
Sets camera settings, such as the My Camera settings (p. 76), or Slide Show/DPOF settings. It
also uploads images from the computer to the camera/memory card.
Remote Shooting
Allows you to operate the camera shutter from the computer (p. 72).
View Images
Displays the selected image in the Viewer Window.
SlideShow
Starts a slide show of the selected images. Click the [View] menu and select [Slide Show
Options] to set the slide show settings.
Internet
Create Images for Email
Converts the selected images to the appropriate size for transmission by e-mail. You can also
use it to automatically start an e-mail program after conversion.
Print
Layout Printing
Allows you to arrange the selected images in an attractive layout and print them (p. 55).
Index Printing
Prints the selected images as an index.
Send to Trash
Sends the selected images or folders to the Trash.
Page 69
Functions Selected from Menus
Search Images: [File] menu, [Search]
Searches images by criteria such as Star Rating, dates, keywords, comments.
Export Images: [File] menu, [Export Images]
•Edit and Save: allows you to change the file type or size and export the file.
•Export Shooting Properties: allows you to export the shooting properties as a text file.
•Export as a Screensaver: Exports the image as a screen saver file.
•Export an Image as Wallpaper: Exports the image as a wallpaper file.
Organize Images: [File] menu, [Organize Image]
•Sort Images: sorts images according to criteria such as the shooting date and time or Star
Rating and saves them into a specified folder.
•Rename: changes the files names of multiple images in a single pass.
Convert RAW Images: [File] menu, [RAW image processing]
Converts RAW images. You can adjust the image brightness, contrast and color balance
among other attributes during conversion (p. 70).
Merge Panoramas: [Edit] menu, [PhotoStitch]
Merges multiple images and creates a single large panoramic image (p. 75).
Edit Movies: [Edit] menu, [Movie Edit]
Edits movies or still images strung together. You can add titles or background music and
apply various effects (p. 69).
65
Display Settings: [View] menu, [View Settings]
Hides or shows image information beneath the thumbnail, such as the file name or the
shooting date and time.
Sort Images: [View] menu, [Sort]
Arranges image order in the Browser Area according to criteria such as the filename, file
modification date, file size or shooting date.
Page 70
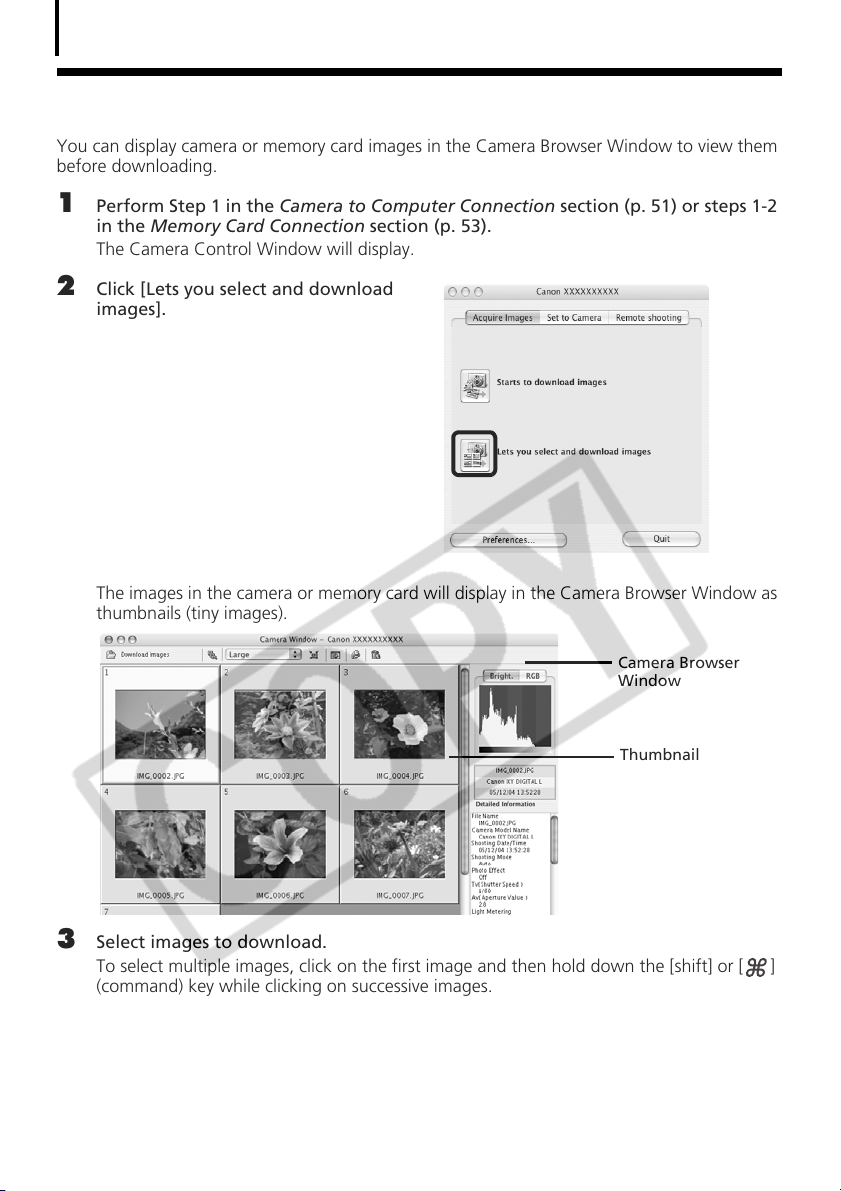
Checking Images before Downloading
66
Checking Images before Downloading
You can display camera or memory card images in the Camera Browser Window to view them
before downloading.
1 Perform Step 1 in the Camera to Computer Connection section (p. 51) or steps 1-2
in the Memory Card Connection section (p. 53).
The Camera Control Window will display.
2 Click [Lets you select and download
images].
The images in the camera or memory card will display in the Camera Browser Window as
thumbnails (tiny images).
Camera Browser
Window
Thumbnail
3 Select images to download.
To select multiple images, click on the first image and then hold down the [shift] or [ ]
(command) key while clicking on successive images.
Page 71
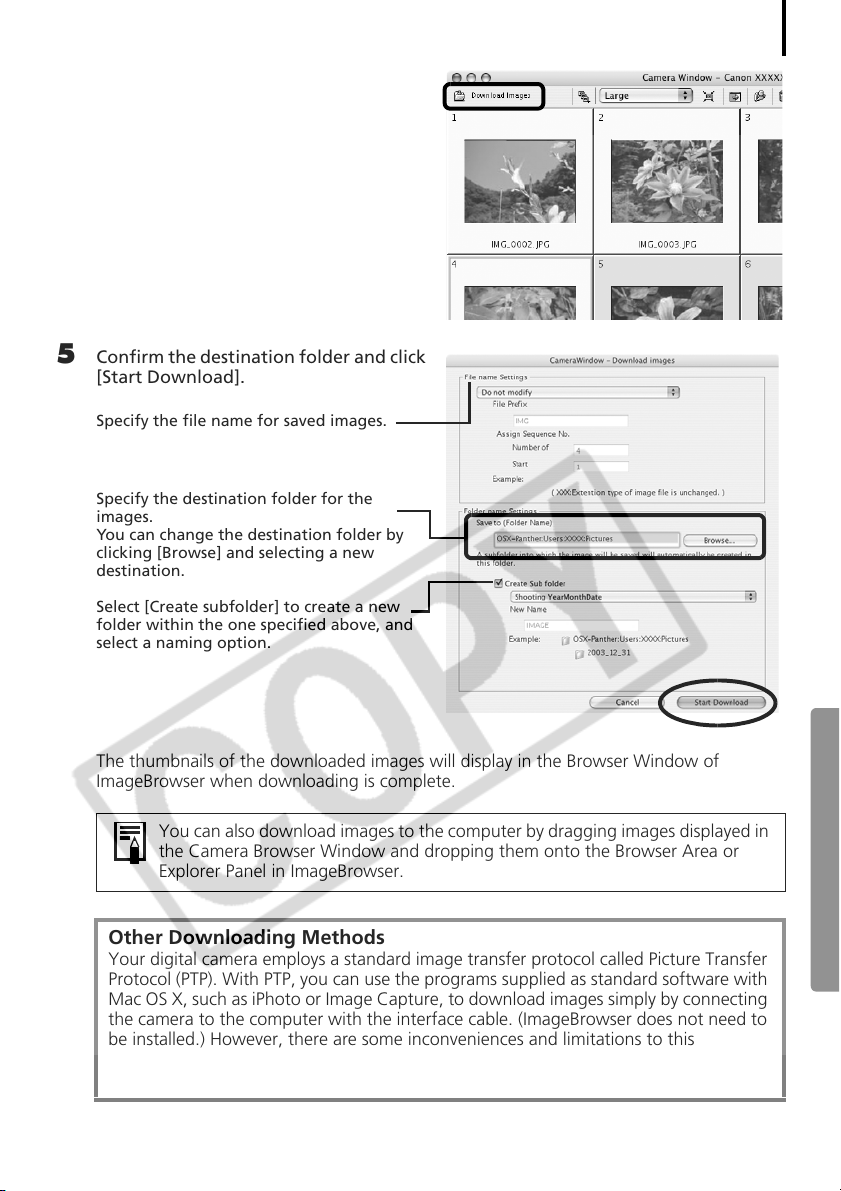
4 Click [Download images].
5 Confirm the destination folder and click
[Start Download].
Specify the file name for saved images.
Specify the destination folder for the
images.
You can change the destination folder by
clicking [Browse] and selecting a new
destination.
Select [Create subfolder] to create a new
folder within the one specified above, and
select a naming option.
67
The thumbnails of the downloaded images will display in the Browser Window of
ImageBrowser when downloading is complete.
You can also download images to the computer by dragging images displayed in
the Camera Browser Window and dropping them onto the Browser Area or
Explorer Panel in ImageBrowser.
Other Downloading Methods
Your digital camera employs a standard image transfer protocol called Picture Transfer
Protocol (PTP). With PTP, you can use the programs supplied as standard software with
Mac OS X, such as iPhoto or Image Capture, to download images simply by connecting
the camera to the computer with the interface cable. (ImageBrowser does not need to
be installed.) However, there are some inconveniences and limitations to this
downloading method. See the leaflet entitled For Windows
for details.
®
XP and Mac OS X Users
Page 72
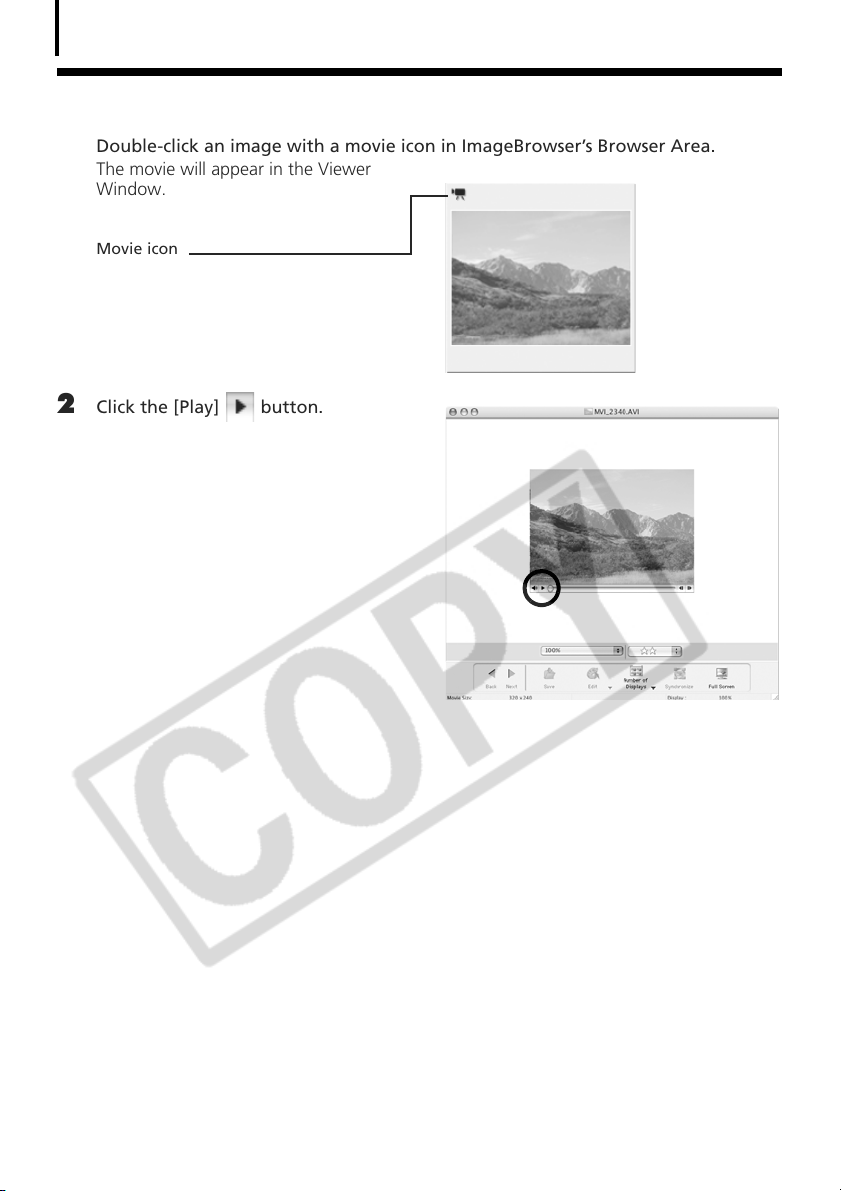
Replaying Movies
68
Replaying Movies
1 Double-click an image with a movie icon in ImageBrowser’s Browser Area.
The movie will appear in the Viewer
Window.
Movie icon
2 Click the [Play] button.
Page 73
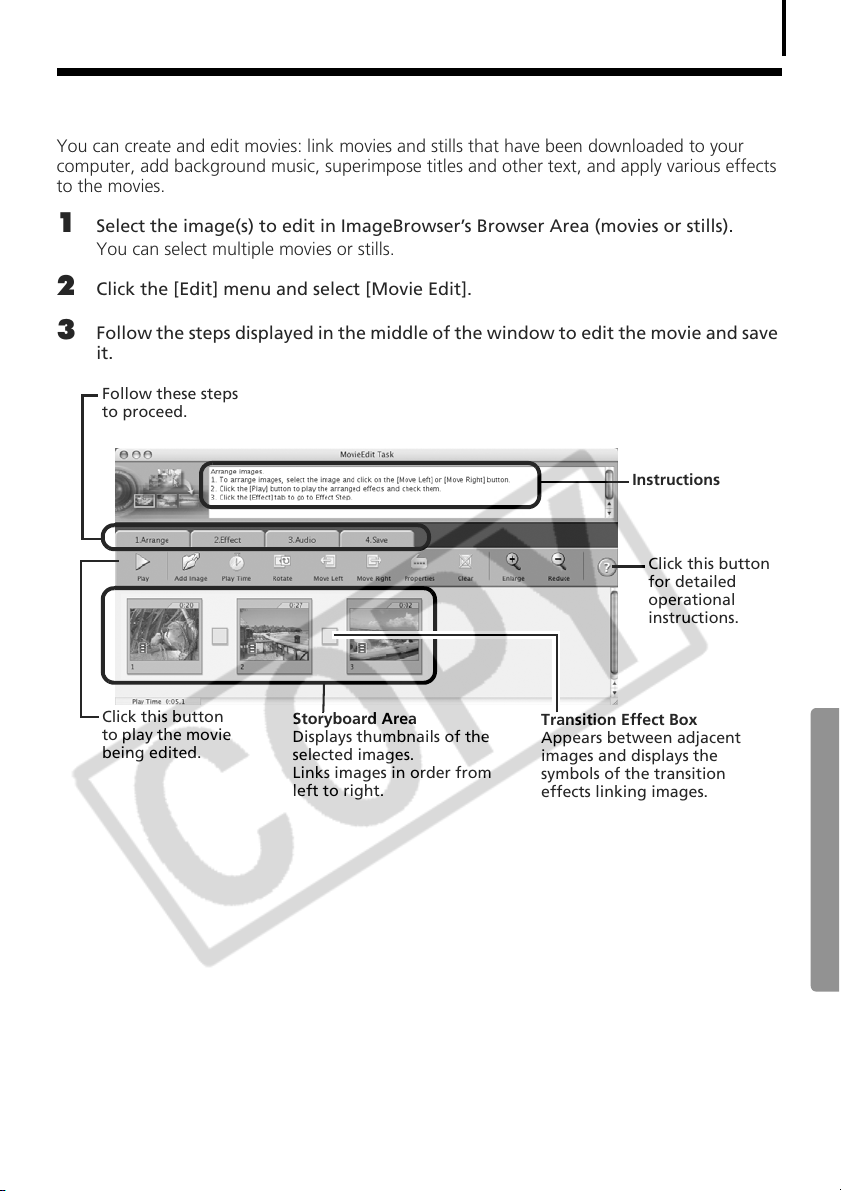
Editing Movies
You can create and edit movies: link movies and stills that have been downloaded to your
computer, add background music, superimpose titles and other text, and apply various effects
to the movies.
1 Select the image(s) to edit in ImageBrowser’s Browser Area (movies or stills).
You can select multiple movies or stills.
2 Click the [Edit] menu and select [Movie Edit].
3 Follow the steps displayed in the middle of the window to edit the movie and save
it.
Follow these steps
to proceed.
Instructions
Click this button
for detailed
operational
instructions.
69
Click this button
to play the movie
being edited.
Storyboard Area
Displays thumbnails of the
selected images.
Links images in order from
left to right.
Transition Effect Box
Appears between adjacent
images and displays the
symbols of the transition
effects linking images.
Page 74
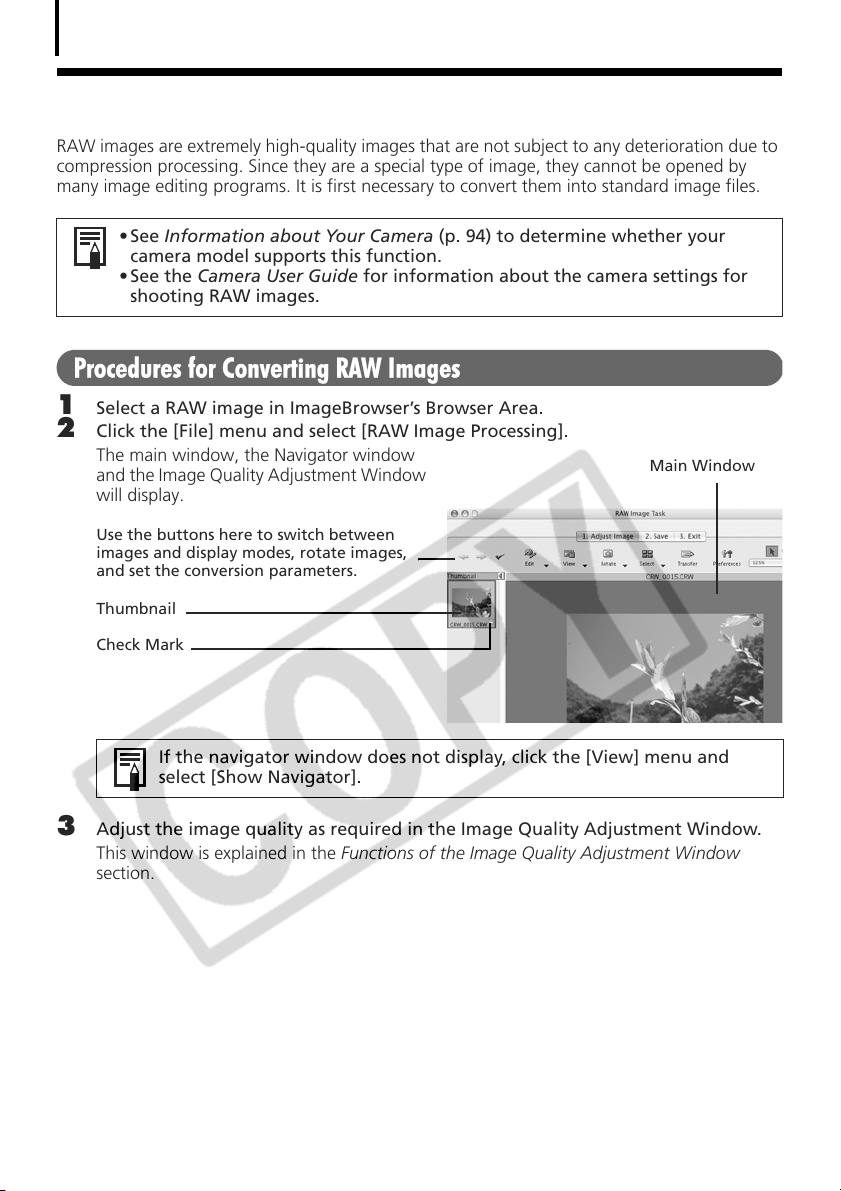
Converting RAW Images
70
Converting RAW Images
RAW images are extremely high-quality images that are not subject to any deterioration due to
compression processing. Since they are a special type of image, they cannot be opened by
many image editing programs. It is first necessary to convert them into standard image files.
•See Information about Your Camera (p. 94) to determine whether your
camera model supports this function.
• See the Camera User Guide for information about the camera settings for
shooting RAW images.
Procedures for Converting RAW Images
Select a RAW image in ImageBrowser’s Browser Area.
1
2 Click the [File] menu and select [RAW Image Processing].
The main window, the Navigator window
and the Image Quality Adjustment Window
will display.
Use the buttons here to switch between
images and display modes, rotate images,
and set the conversion parameters.
Thumbnail
Main Window
Check Mark
If the navigator window does not display, click the [View] menu and
select [Show Navigator].
3 Adjust the image quality as required in the Image Quality Adjustment Window.
This window is explained in the Functions of the Image Quality Adjustment Window
section.
Page 75
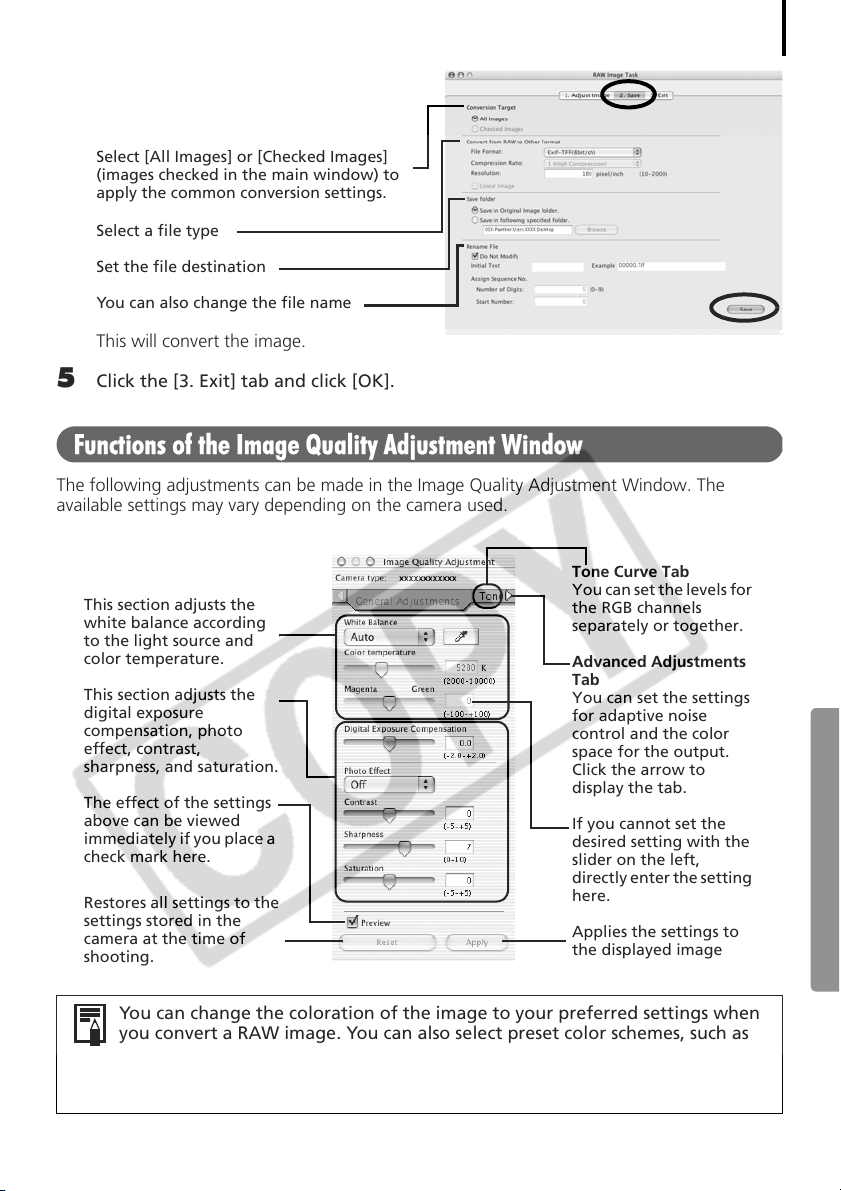
4 Click the [2. Save] tab, set the file type
and destination, and then click [Save].
Select [All Images] or [Checked Images]
(images checked in the main window) to
apply the common conversion settings.
Select a file type
Set the file destination
You can also change the file name
This will convert the image.
5 Click the [3. Exit] tab and click [OK].
Functions of the Image Quality Adjustment Window
The following adjustments can be made in the Image Quality Adjustment Window. The
available settings may vary depending on the camera used.
Tone Curve Tab
This section adjusts the
white balance according
to the light source and
color temperature.
This section adjusts the
digital exposure
compensation, photo
effect, contrast,
sharpness, and saturation.
The effect of the settings
above can be viewed
immediately if you place a
check mark here.
Restores all settings to the
settings stored in the
camera at the time of
shooting.
You can set the levels for
the RGB channels
separately or together.
Advanced Adjustments
Tab
You can set the settings
for adaptive noise
control and the color
space for the output.
Click the arrow to
display the tab.
If you cannot set the
desired setting with the
slider on the left,
directly enter the setting
here.
Applies the settings to
the displayed image
71
You can change the coloration of the image to your preferred settings when
you convert a RAW image. You can also select preset color schemes, such as
Positive Film. Furthermore, you can add your own color schemes (My Color) to
apply to other RAW images when they are being converted. See the PDF
manual for ImageBrowser for more information (p. 2).
Page 76
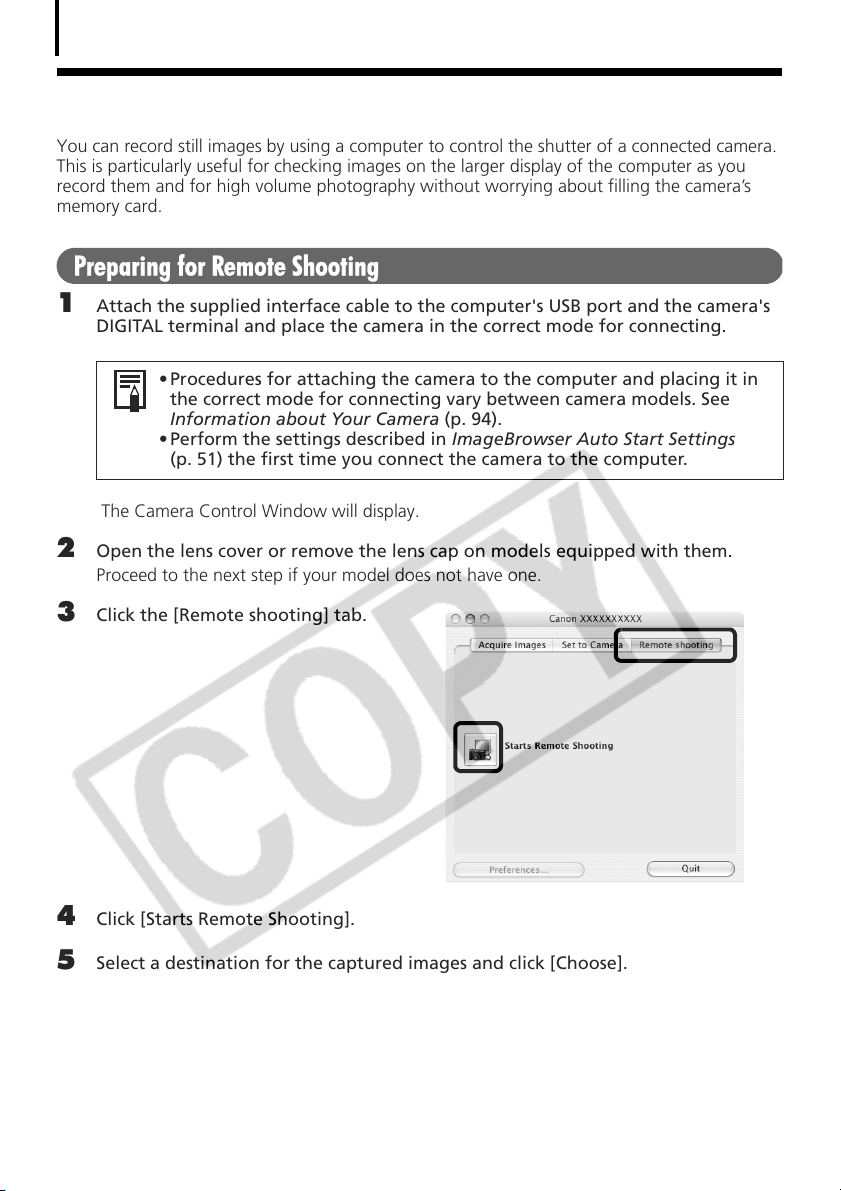
Operating the Shutter Remotely
72
Operating the Shutter Remotely
You can record still images by using a computer to control the shutter of a connected camera.
This is particularly useful for checking images on the larger display of the computer as you
record them and for high volume photography without worrying about filling the camera’s
memory card.
Preparing for Remote Shooting
Attach the supplied interface cable to the computer's USB port and the camera's
1
DIGITAL terminal and place the camera in the correct mode for connecting.
• Procedures for attaching the camera to the computer and placing it in
the correct mode for connecting vary between camera models. See
Information about Your Camera (p. 94).
• Perform the settings described in ImageBrowser Auto Start Settings
(p. 51) the first time you connect the camera to the computer.
The Camera Control Window will display.
2 Open the lens cover or remove the lens cap on models equipped with them.
Proceed to the next step if your model does not have one.
3 Click the [Remote shooting] tab.
4 Click [Starts Remote Shooting].
5 Select a destination for the captured images and click [Choose].
Page 77
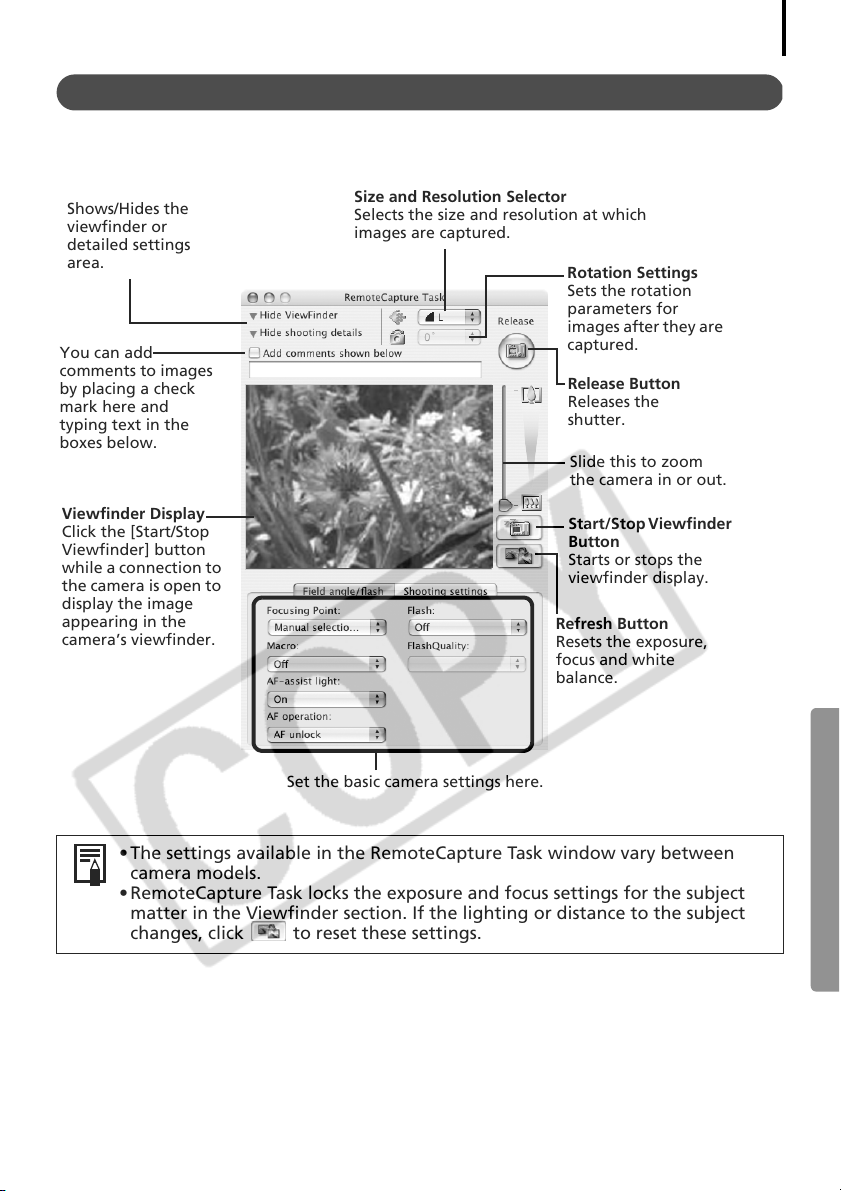
RemoteCapture Task Window
The RemoteCapture Task window has the following features.
73
Shows/Hides the
viewfinder or
detailed settings
area.
You can add
comments to images
by placing a check
mark here and
typing text in the
boxes below.
Viewfinder Display
Click the [Start/Stop
Viewfinder] button
while a connection to
the camera is open to
display the image
appearing in the
camera’s viewfinder.
Size and Resolution Selector
Selects the size and resolution at which
images are captured.
Rotation Settings
Sets the rotation
parameters for
images after they are
captured.
Release Button
Releases the
shutter.
Slide this to zoom
the camera in or out.
Start/Stop Viewfinder
Button
Starts or stops the
viewfinder display.
Refresh Button
Resets the exposure,
focus and white
balance.
Set the basic camera settings here.
• The settings available in the RemoteCapture Task window vary between
camera models.
• RemoteCapture Task locks the exposure and focus settings for the subject
matter in the Viewfinder section. If the lighting or distance to the subject
changes, click to reset these settings.
Page 78
Operating the Shutter Remotely
74
Remote Shooting
Ensure that you turn off your computer’s sleep mode before you begin remote
shooting. The device performance cannot be guaranteed if the computer
enters the sleep mode.
Click and check the subject in the viewfinder.
1
2 Change the image size or resolution, the rotation settings and the settings at the
bottom of the window as required.
If you intend to hold the camera vertically to photograph a subject, you can save the
image to the computer with the correct orientation if you set the rotation settings in
advance.
If your camera is equipped with the Auto Rotate function and you set it
to On, the image will automatically be rotated and appear in the correct
viewing orientation in the RemoteCapture Task window.
3 Click the [Release] button.
• You can release the shutter by pressing the camera’s shutter button or
the keyboard’s space key.
• Other than the shutter button, the camera's buttons and switches,
including the zoom, cannot be operated while the camera is being
controlled with the Remote Shooting function.
• You may notice that the interval between the shutter release and
activation is slightly longer for remote shooting than when the camera
is used independently.
Page 79
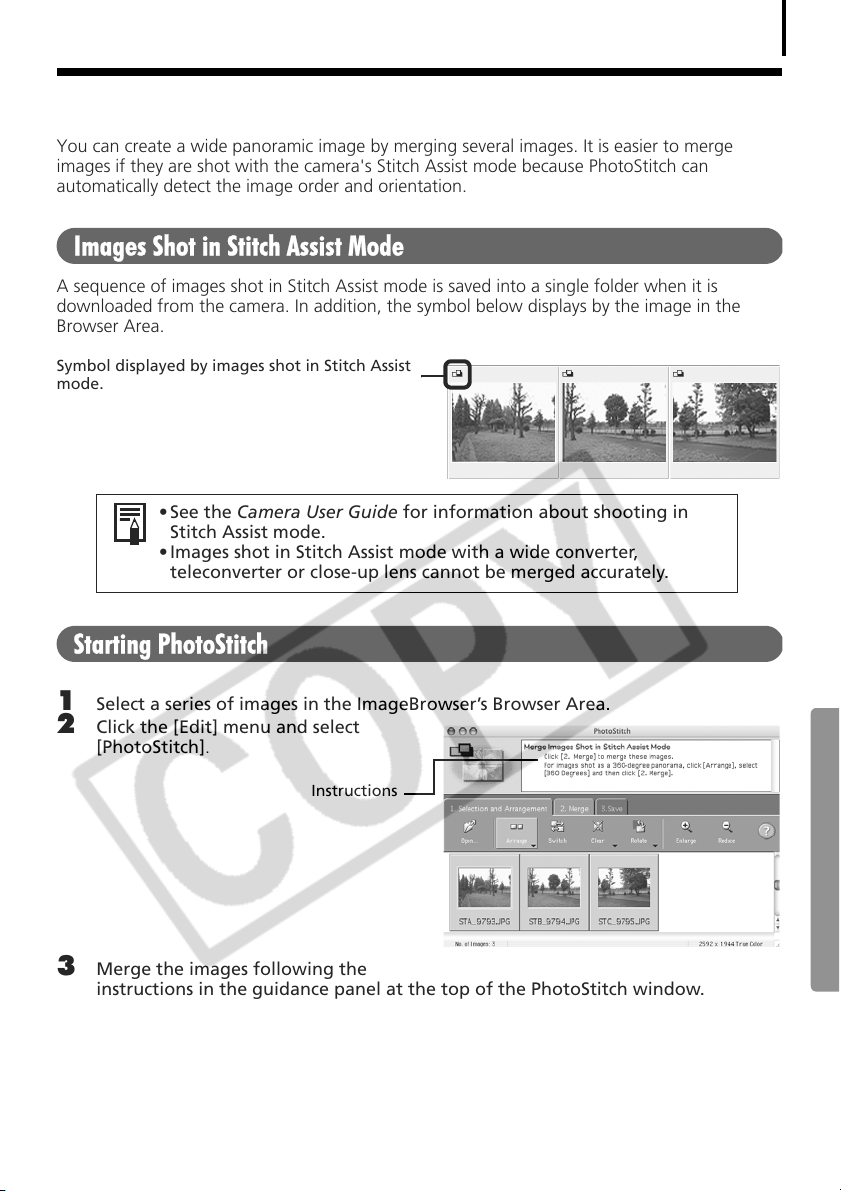
Merging Panoramic Images - PhotoStitch
You can create a wide panoramic image by merging several images. It is easier to merge
images if they are shot with the camera's Stitch Assist mode because PhotoStitch can
automatically detect the image order and orientation.
Images Shot in Stitch Assist Mode
A sequence of images shot in Stitch Assist mode is saved into a single folder when it is
downloaded from the camera. In addition, the symbol below displays by the image in the
Browser Area.
Symbol displayed by images shot in Stitch Assist
mode.
• See the Camera User Guide for information about shooting in
Stitch Assist mode.
• Images shot in Stitch Assist mode with a wide converter,
teleconverter or close-up lens cannot be merged accurately.
75
Starting PhotoStitch
1
Select a series of images in the ImageBrowser’s Browser Area.
2 Click the [Edit] menu and select
[PhotoStitch].
Instructions
3 Merge the images following the
instructions in the guidance panel at the top of the PhotoStitch window.
Page 80
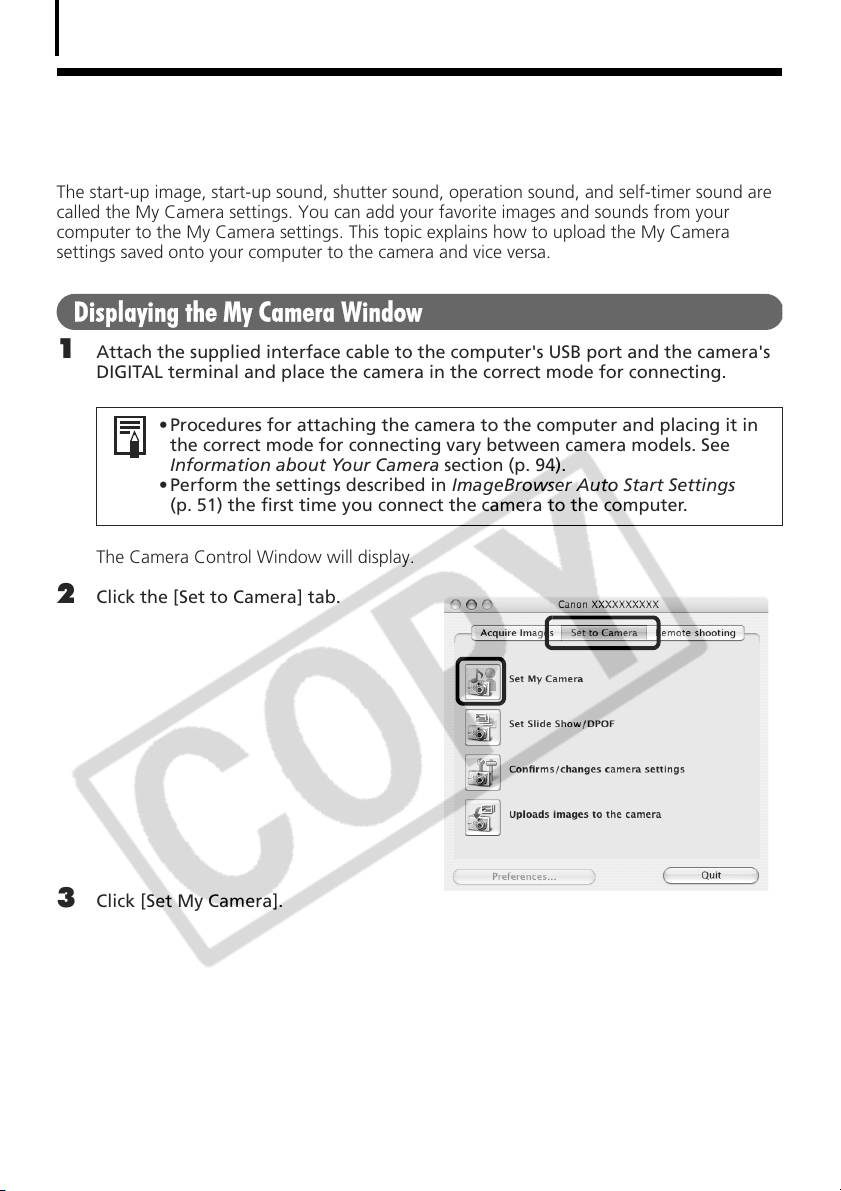
Enjoy Customizing Your Camera with the My Camera Settings
76
Enjoy Customizing Your Camera with the My
Camera Settings
The start-up image, start-up sound, shutter sound, operation sound, and self-timer sound are
called the My Camera settings. You can add your favorite images and sounds from your
computer to the My Camera settings. This topic explains how to upload the My Camera
settings saved onto your computer to the camera and vice versa.
Displaying the My Camera Window
Attach the supplied interface cable to the computer's USB port and the camera's
1
DIGITAL terminal and place the camera in the correct mode for connecting.
• Procedures for attaching the camera to the computer and placing it in
the correct mode for connecting vary between camera models. See
Information about Your Camera section (p. 94).
• Perform the settings described in ImageBrowser Auto Start Settings
(p. 51) the first time you connect the camera to the computer.
The Camera Control Window will display.
2 Click the [Set to Camera] tab.
3 Click [Set My Camera].
Page 81
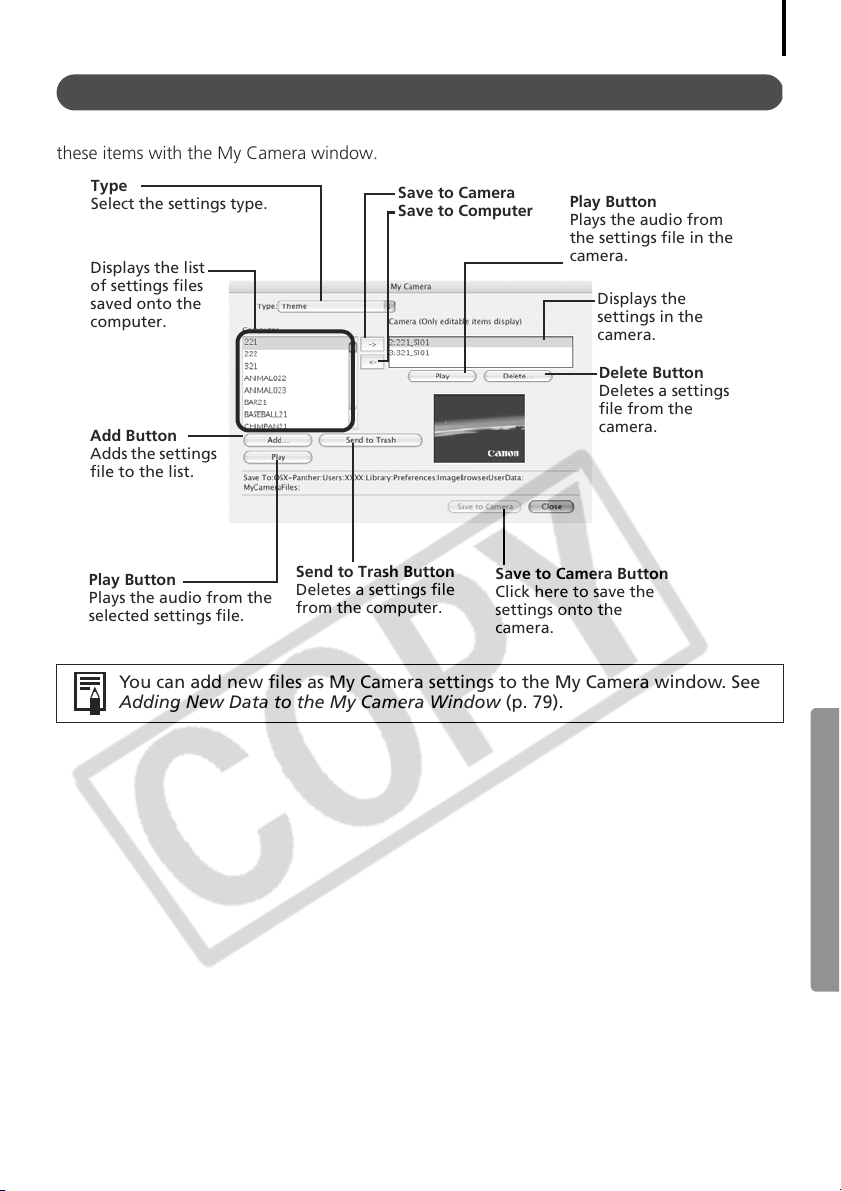
The My Camera Window
ImageBrowser already contains several pre-recorded My Camera settings items. You can check
these items with the My Camera window.
Type
Select the settings type.
Displays the list
of settings files
saved onto the
computer.
Add Button
Adds the settings
file to the list.
Save to Camera
Save to Computer
Play Button
Plays the audio from
the settings file in the
camera.
Displays the
settings in the
camera.
Delete Button
Deletes a settings
file from the
camera.
77
Play Button
Plays the audio from the
selected settings file.
Send to Trash Button
Deletes a settings file
from the computer.
Save to Camera Button
Click here to save the
settings onto the
camera.
You can add new files as My Camera settings to the My Camera window. See
Adding New Data to the My Camera Window (p. 79).
Page 82
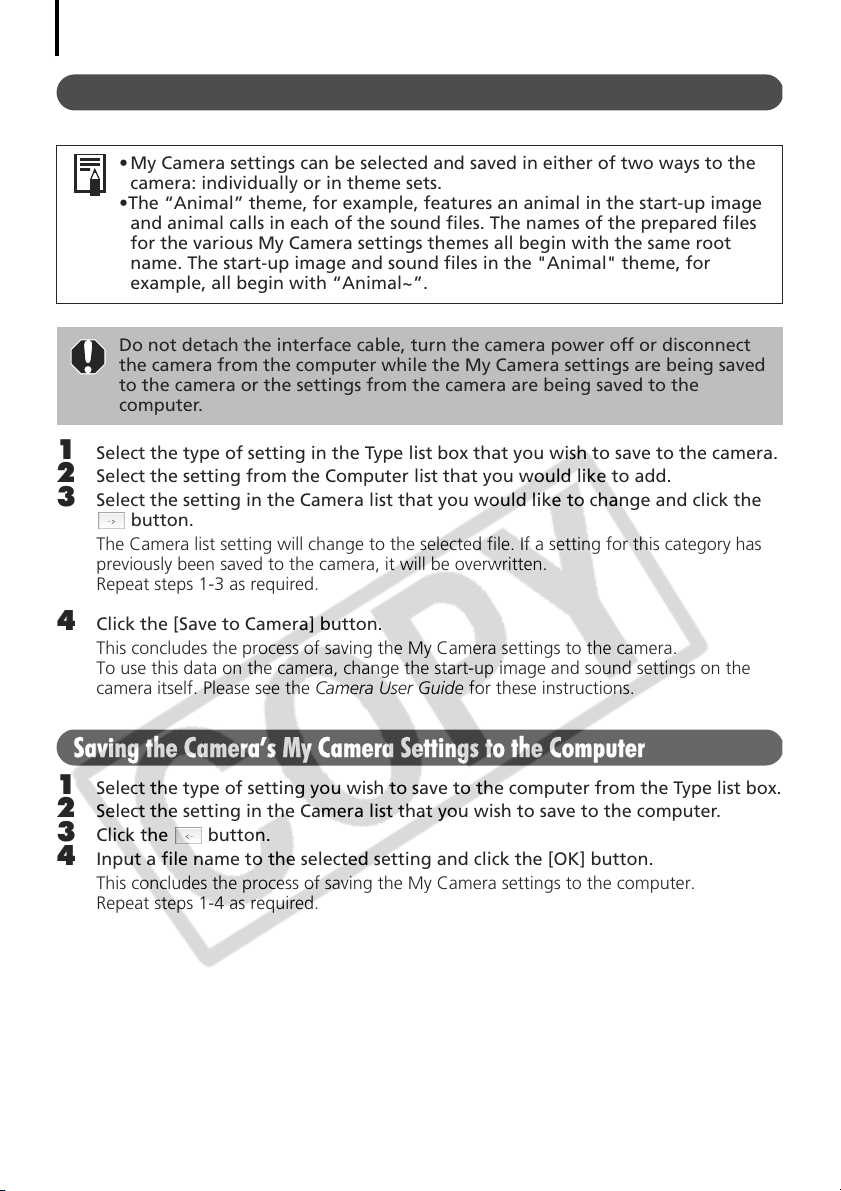
Enjoy Customizing Your Camera with the My Camera Settings
78
Saving the My Camera Settings to the Camera
• My Camera settings can be selected and saved in either of two ways to the
camera: individually or in theme sets.
•The “Animal” theme, for example, features an animal in the start-up image
and animal calls in each of the sound files. The names of the prepared files
for the various My Camera settings themes all begin with the same root
name. The start-up image and sound files in the "Animal" theme, for
example, all begin with “Animal~”.
Do not detach the interface cable, turn the camera power off or disconnect
the camera from the computer while the My Camera settings are being saved
to the camera or the settings from the camera are being saved to the
computer.
1
Select the type of setting in the Type list box that you wish to save to the camera.
2 Select the setting from the Computer list that you would like to add.
3 Select the setting in the Camera list that you would like to change and click the
button.
The Camera list setting will change to the selected file. If a setting for this category has
previously been saved to the camera, it will be overwritten.
Repeat steps 1-3 as required.
4 Click the [Save to Camera] button.
This concludes the process of saving the My Camera settings to the camera.
To use this data on the camera, change the start-up image and sound settings on the
camera itself. Please see the Camera User Guide for these instructions.
Saving the Camera’s My Camera Settings to the Computer
Select the type of setting you wish to save to the computer from the Type list box.
1
2 Select the setting in the Camera list that you wish to save to the computer.
3 Click the button.
4 Input a file name to the selected setting and click the [OK] button.
This concludes the process of saving the My Camera settings to the computer.
Repeat steps 1-4 as required.
Page 83
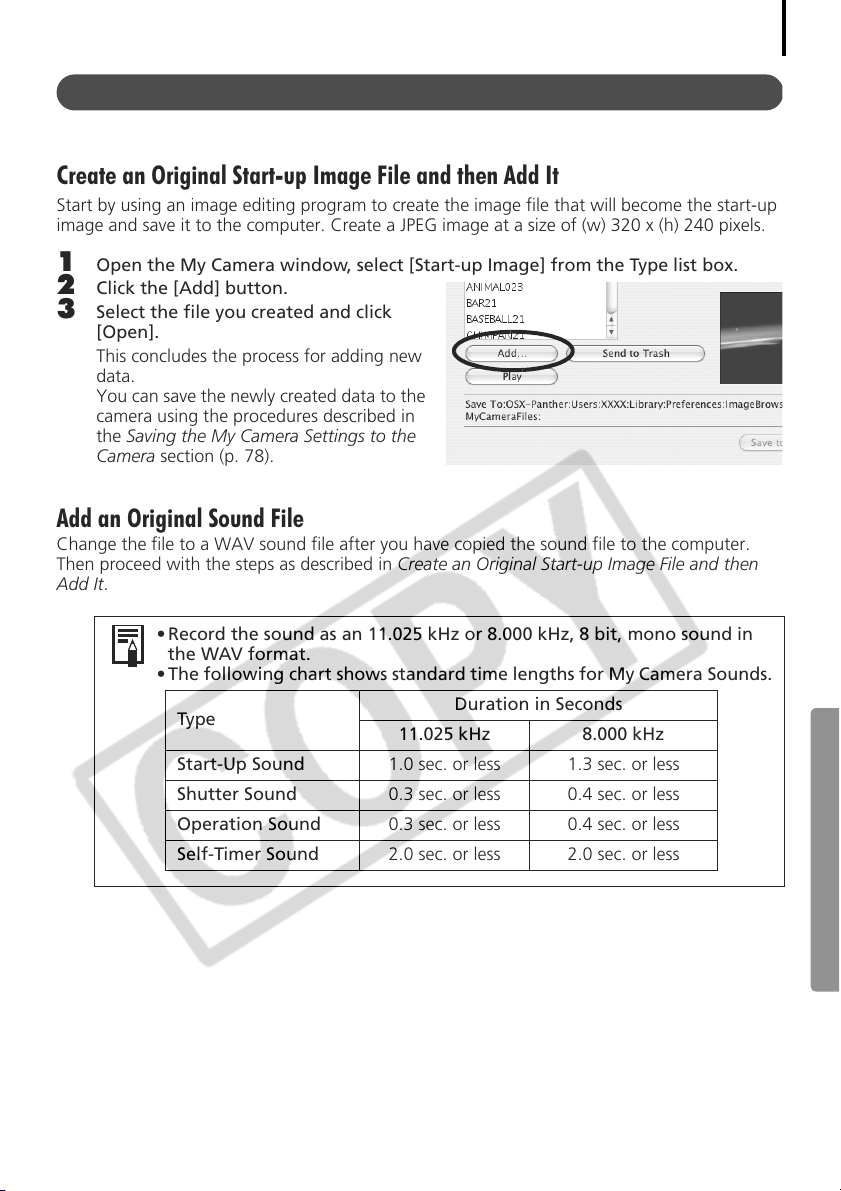
Adding New Data to the My Camera Window
Create a new image or sound file and add it to the My Camera window.
Create an Original Start-up Image File and then Add It
Start by using an image editing program to create the image file that will become the start-up
image and save it to the computer. Create a JPEG image at a size of (w) 320 x (h) 240 pixels.
1 Open the My Camera window, select [Start-up Image] from the Type list box.
2 Click the [Add] button.
3 Select the file you created and click
[Open].
This concludes the process for adding new
data.
You can save the newly created data to the
camera using the procedures described in
the Saving the My Camera Settings to the
Camera section (p. 78).
Add an Original Sound File
Change the file to a WAV sound file after you have copied the sound file to the computer.
Then proceed with the steps as described in Create an Original Start-up Image File and then
Add It.
79
• Record the sound as an 11.025 kHz or 8.000 kHz, 8 bit, mono sound in
the WAV format.
• The following chart shows standard time lengths for My Camera Sounds.
Type
Start-Up Sound 1.0 sec. or less 1.3 sec. or less
Shutter Sound 0.3 sec. or less 0.4 sec. or less
Operation Sound 0.3 sec. or less 0.4 sec. or less
Self-Timer Sound 2.0 sec. or less 2.0 sec. or less
Duration in Seconds
11.025 kHz 8.000 kHz
Page 84
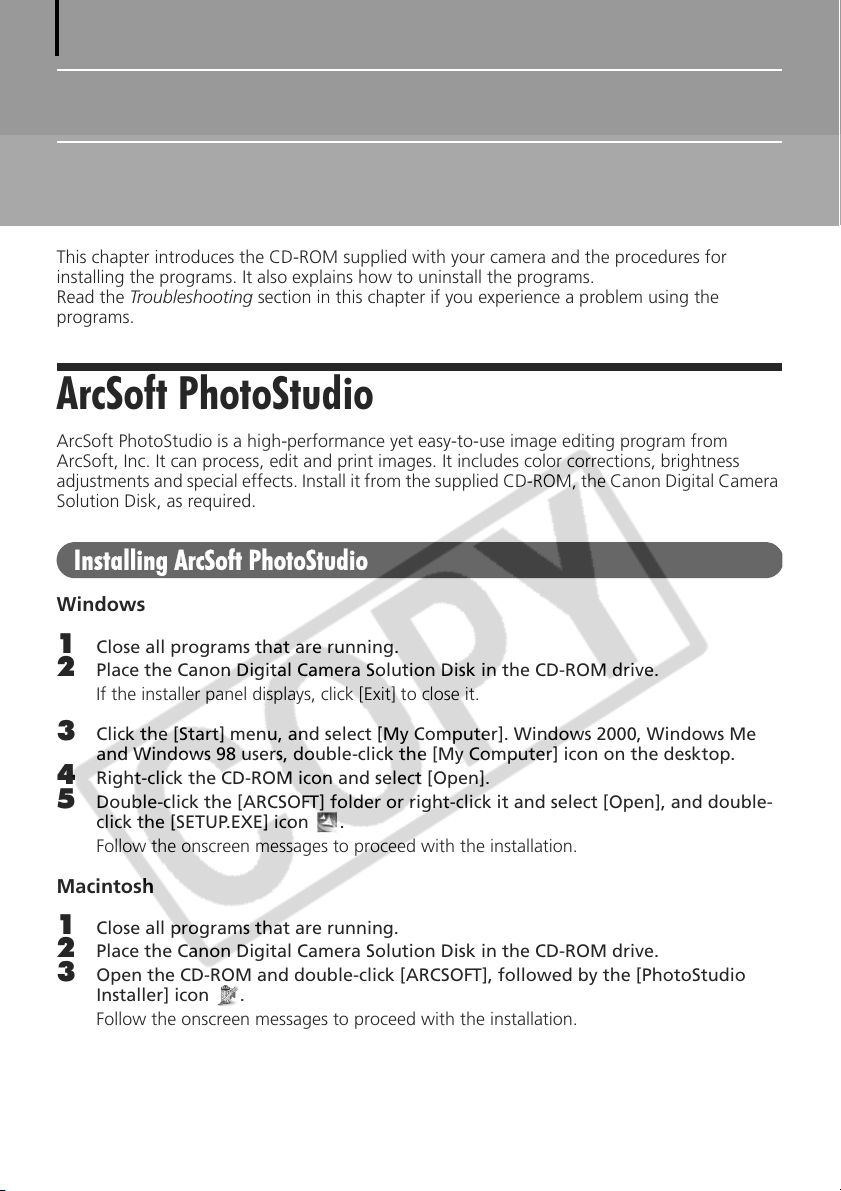
80
Appendices
This chapter introduces the CD-ROM supplied with your camera and the procedures for
installing the programs. It also explains how to uninstall the programs.
Read the Troubleshooting section in this chapter if you experience a problem using the
programs.
ArcSoft PhotoStudio
ArcSoft PhotoStudio is a high-performance yet easy-to-use image editing program from
ArcSoft, Inc. It can process, edit and print images. It includes color corrections, brightness
adjustments and special effects. Install it from the supplied CD-ROM, the Canon Digital Camera
Solution Disk, as required.
Installing ArcSoft PhotoStudio
Windows
1 Close all programs that are running.
2 Place the Canon Digital Camera Solution Disk in the CD-ROM drive.
If the installer panel displays, click [Exit] to close it.
3 Click the [Start] menu, and select [My Computer]. Windows 2000, Windows Me
and Windows 98 users, double-click the [My Computer] icon on the desktop.
4 Right-click the CD-ROM icon and select [Open].
5 Double-click the [ARCSOFT] folder or right-click it and select [Open], and double-
click the [SETUP.EXE] icon .
Follow the onscreen messages to proceed with the installation.
Macintosh
1 Close all programs that are running.
2 Place the Canon Digital Camera Solution Disk in the CD-ROM drive.
3 Open the CD-ROM and double-click [ARCSOFT], followed by the [PhotoStudio
Installer] icon .
Follow the onscreen messages to proceed with the installation.
4 Click [OK] when a message appears stating that the installation is complete.
Page 85
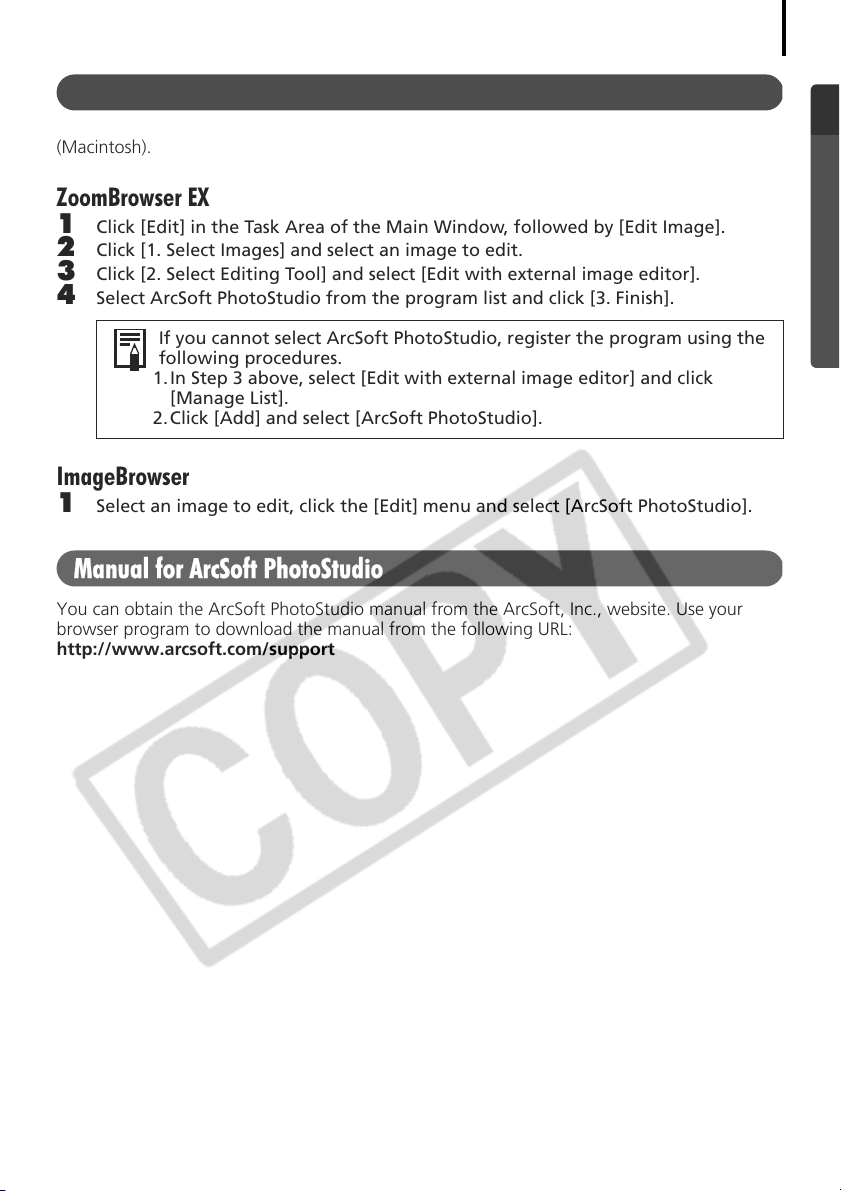
Starting ArcSoft PhotoStudio
You can start ArcSoft PhotoStudio from within ZoomBrowser EX (Windows) or ImageBrowser
(Macintosh).
ZoomBrowser EX
1 Click [Edit] in the Task Area of the Main Window, followed by [Edit Image].
2 Click [1. Select Images] and select an image to edit.
3 Click [2. Select Editing Tool] and select [Edit with external image editor].
4 Select ArcSoft PhotoStudio from the program list and click [3. Finish].
If you cannot select ArcSoft PhotoStudio, register the program using the
following procedures.
1.In Step 3 above, select [Edit with external image editor] and click
[Manage List].
2.Click [Add] and select [ArcSoft PhotoStudio].
ImageBrowser
1 Select an image to edit, click the [Edit] menu and select [ArcSoft PhotoStudio].
Manual for ArcSoft PhotoStudio
You can obtain the ArcSoft PhotoStudio manual from the ArcSoft, Inc., website. Use your
browser program to download the manual from the following URL:
http://www.arcsoft.com/support
81
Page 86
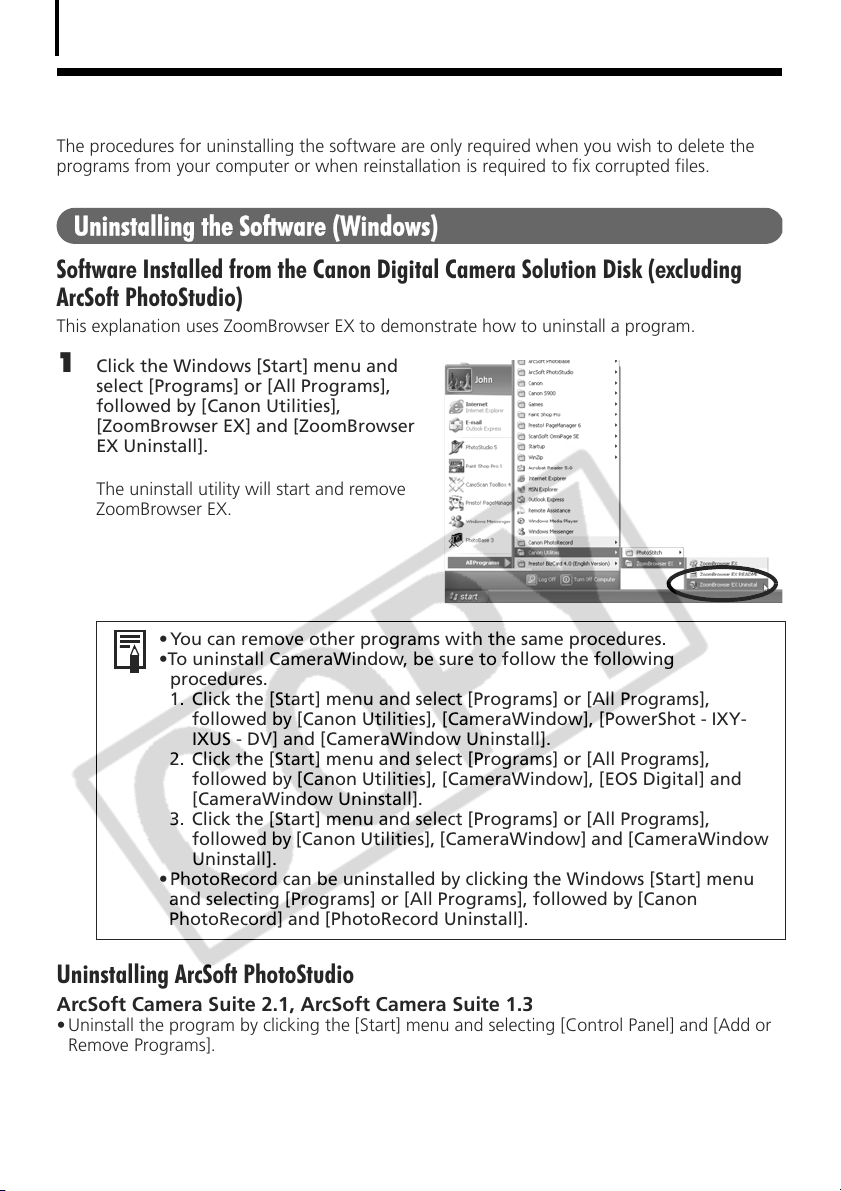
Uninstalling the Software
82
Uninstalling the Software
The procedures for uninstalling the software are only required when you wish to delete the
programs from your computer or when reinstallation is required to fix corrupted files.
Uninstalling the Software (Windows)
Software Installed from the Canon Digital Camera Solution Disk (excluding
ArcSoft PhotoStudio)
This explanation uses ZoomBrowser EX to demonstrate how to uninstall a program.
1 Click the Windows [Start] menu and
select [Programs] or [All Programs],
followed by [Canon Utilities],
[ZoomBrowser EX] and [ZoomBrowser
EX Uninstall].
The uninstall utility will start and remove
ZoomBrowser EX.
• You can remove other programs with the same procedures.
•To uninstall CameraWindow, be sure to follow the following
procedures.
1. Click the [Start] menu and select [Programs] or [All Programs],
followed by [Canon Utilities], [CameraWindow], [PowerShot - IXY-
IXUS - DV] and [CameraWindow Uninstall].
2. Click the [Start] menu and select [Programs] or [All Programs],
followed by [Canon Utilities], [CameraWindow], [EOS Digital] and
[CameraWindow Uninstall].
3. Click the [Start] menu and select [Programs] or [All Programs],
followed by [Canon Utilities], [CameraWindow] and [CameraWindow
Uninstall].
• PhotoRecord can be uninstalled by clicking the Windows [Start] menu
and selecting [Programs] or [All Programs], followed by [Canon
PhotoRecord] and [PhotoRecord Uninstall].
Uninstalling ArcSoft PhotoStudio
ArcSoft Camera Suite 2.1, ArcSoft Camera Suite 1.3
• Uninstall the program by clicking the [Start] menu and selecting [Control Panel] and [Add or
Remove Programs].
• With Windows 2000/Me/98, uninstall the program by clicking the [Start] menu and selecting
[Settings] followed by [Control Panel] and [Add/Remove Programs].
Page 87
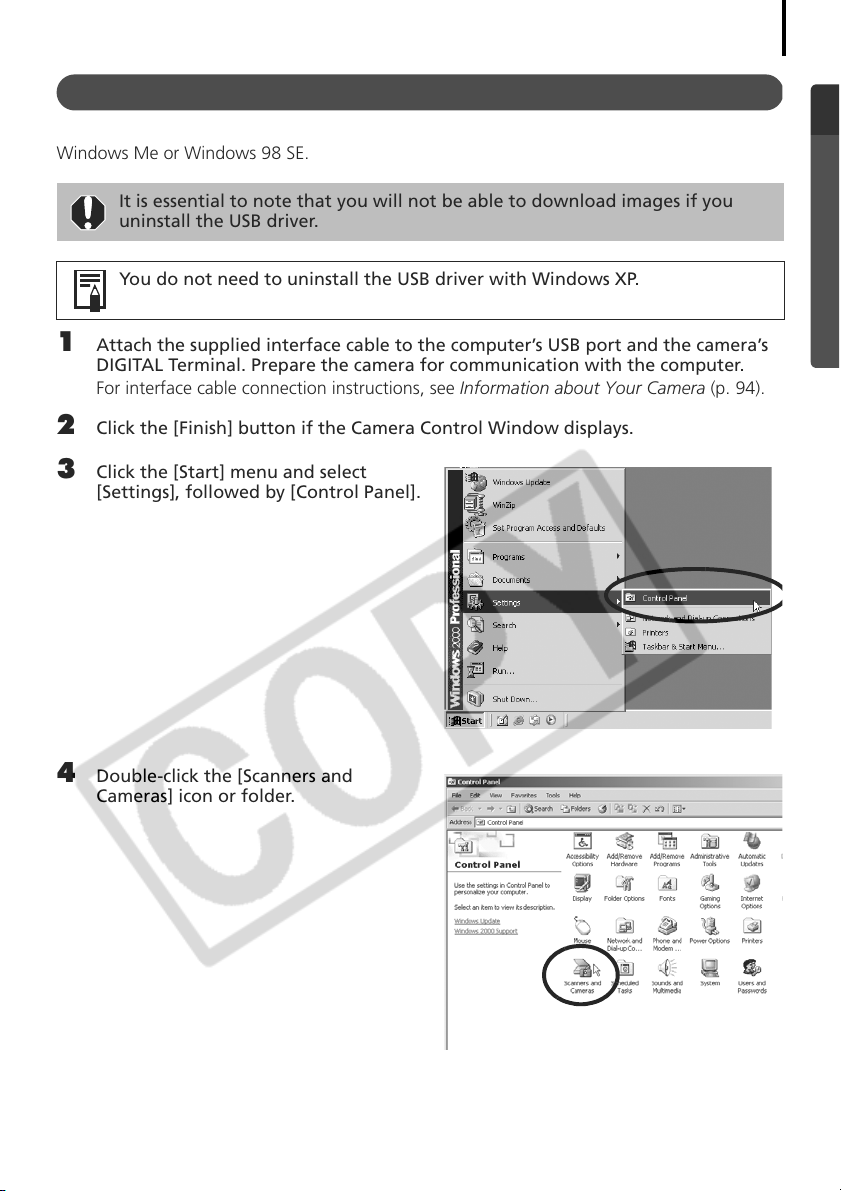
Uninstalling the USB Driver (Windows)
Uninstall the USB Driver using the following procedures if you are using Windows 2000,
Windows Me or Windows 98 SE.
It is essential to note that you will not be able to download images if you
uninstall the USB driver.
You do not need to uninstall the USB driver with Windows XP.
1 Attach the supplied interface cable to the computer’s USB port and the camera’s
DIGITAL Terminal. Prepare the camera for communication with the computer.
For interface cable connection instructions, see Information about Your Camera (p. 94).
2 Click the [Finish] button if the Camera Control Window displays.
3 Click the [Start] menu and select
[Settings], followed by [Control Panel].
83
4 Double-click the [Scanners and
Cameras] icon or folder.
Page 88
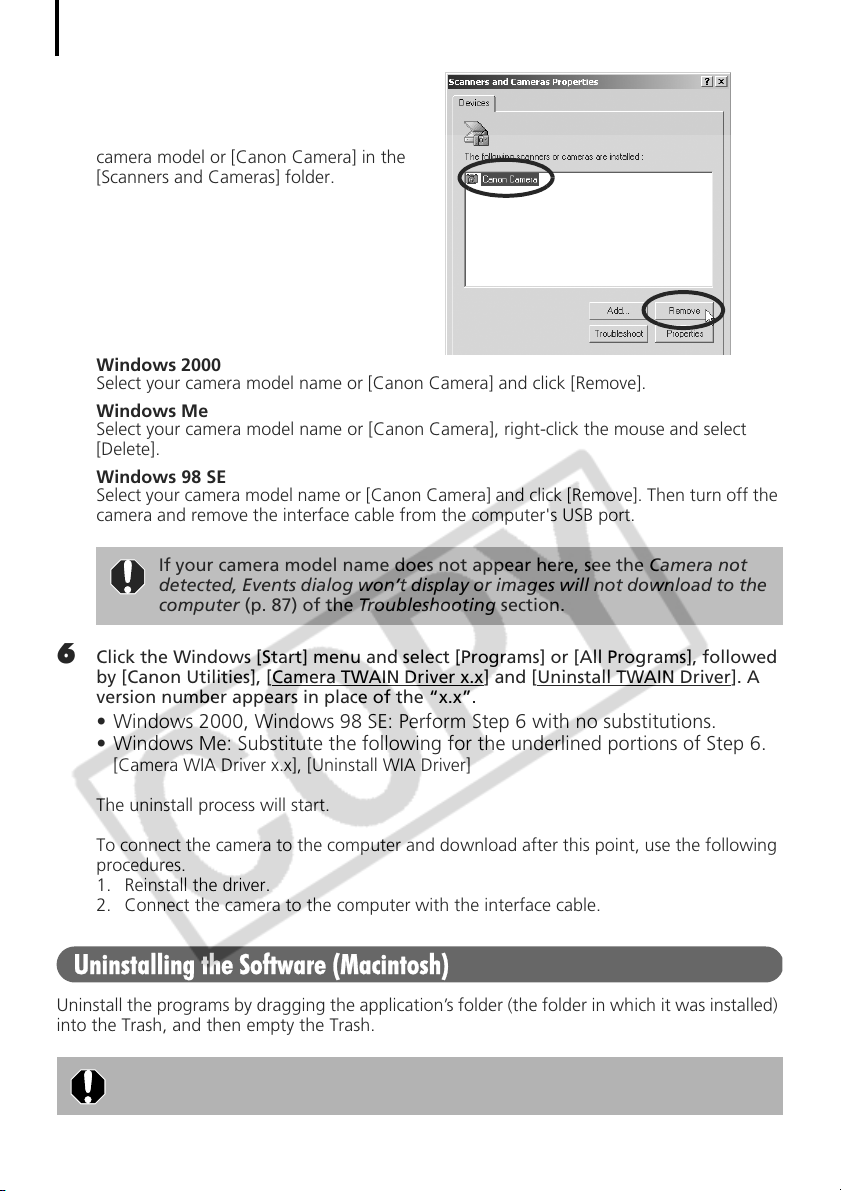
Uninstalling the Software
84
5 Delete your camera model name or
[Canon Camera] in the [Scanners and
Cameras Properties] dialog.
Windows Me users should delete their
camera model or [Canon Camera] in the
[Scanners and Cameras] folder.
Windows 2000
Select your camera model name or [Canon Camera] and click [Remove].
Windows Me
Select your camera model name or [Canon Camera], right-click the mouse and select
[Delete].
Windows 98 SE
Select your camera model name or [Canon Camera] and click [Remove]. Then turn off the
camera and remove the interface cable from the computer's USB port.
If your camera model name does not appear here, see the Camera not
detected, Events dialog won’t display or images will not download to the
computer (p. 87) of the Troubleshooting section.
6 Click the Windows [Start] menu and select [Programs] or [All Programs], followed
by [Canon Utilities], [Camera TWAIN Driver x.x
version number appears in place of the “x.x”.
• Windows 2000, Windows 98 SE: Perform Step 6 with no substitutions.
• Windows Me: Substitute the following for the underlined portions of Step 6.
[Camera WIA Driver x.x], [Uninstall WIA Driver]
The uninstall process will start.
To connect the camera to the computer and download after this point, use the following
procedures.
1. Reinstall the driver.
2. Connect the camera to the computer with the interface cable.
] and [Uninstall TWAIN Driver]. A
Uninstalling the Software (Macintosh)
Uninstall the programs by dragging the application’s folder (the folder in which it was installed)
into the Trash, and then empty the Trash.
Please be careful not to accidentally delete any folders with downloaded
images that may be contained within the application folder.
Page 89
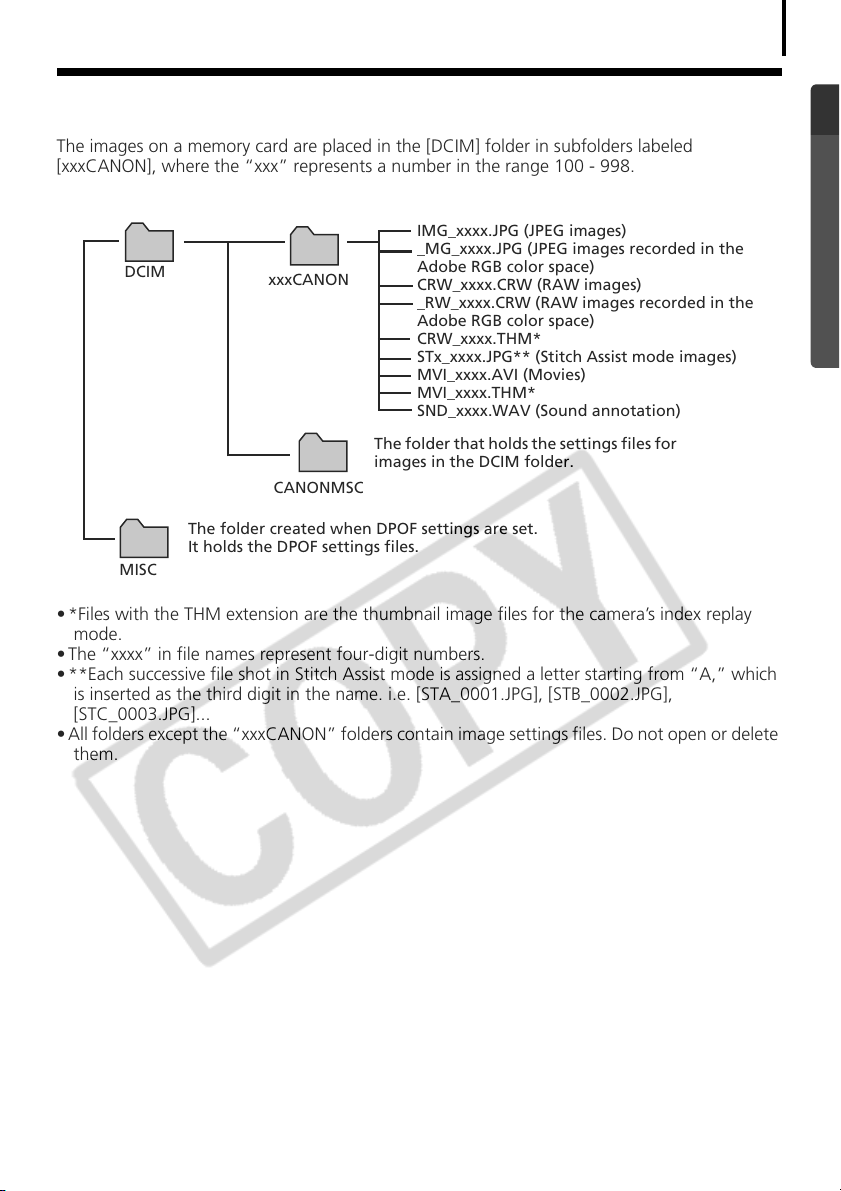
Memory Card Folder Structure
The images on a memory card are placed in the [DCIM] folder in subfolders labeled
[xxxCANON], where the “xxx” represents a number in the range 100 - 998.
IMG_xxxx.JPG (JPEG images)
_MG_xxxx.JPG (JPEG images recorded in the
DCIM
The folder created when DPOF settings are set.
It holds the DPOF settings files.
MISC
xxxCANON
CANONMSC
• *Files with the THM extension are the thumbnail image files for the camera’s index replay
mode.
• The “xxxx” in file names represent four-digit numbers.
• **Each successive file shot in Stitch Assist mode is assigned a letter starting from “A,” which
is inserted as the third digit in the name. i.e. [STA_0001.JPG], [STB_0002.JPG],
[STC_0003.JPG]...
• All folders except the “xxxCANON” folders contain image settings files. Do not open or delete
them.
Adobe RGB color space)
CRW_xxxx.CRW (RAW images)
_RW_xxxx.CRW (RAW images recorded in the
Adobe RGB color space)
CRW_xxxx.THM*
STx_xxxx.JPG** (Stitch Assist mode images)
MVI_xxxx.AVI (Movies)
MVI_xxxx.THM*
SND_xxxx.WAV (Sound annotation)
The folder that holds the settings files for
images in the DCIM folder.
85
Page 90
Troubleshooting
86
Troubleshooting
Please read this section if you encounter a problem using the software.
Start by Checking This
Investigate the following points first if you encounter a problem.
Does your computer satisfy the requirements listed in the
Requirements
Is the camera correctly connected to the computer?
See Information about Your Camera (p. 94) for the correct connection
procedures. Also check to ensure that you are using the correct cable and
that it is securely attached at both ends.
Is the camera set to the playback mode? (some models only)
Some models require the camera to be set to the playback mode to
transfer data. See Information about Your Camera (p. 94) for details.
Is the battery sufficiently charged?
Check the battery charge if you are powering the camera with a battery.
You are recommended to use a household power source (AC adapter) to
power the camera when it is connected to a computer (if available for
your camera model).
section (p. 8)?
System
Problems
Try the suggested solutions to the common problems listed below.
USB driver installation not proceeding well (Windows)
Uninstall the driver (p. 83) before reinstalling it with the procedures in Installing
the Software and USB Driver (p. 10).
Page 91
Add New Hardware Wizard or New Hardware Found (Windows 2000)
Wizard displays when the camera is connected to the computer with an
interface cable.
Click [Cancel] to close the window. Temporarily disconnect the camera from the
computer. Next, read Start by Checking This on the previous page and resolve
the problem.
Images won’t download into a TWAIN-compliant program (Camera and
computer connected via interface cable (Windows 2000, Windows 98 SE)).
Click the [Finish] button in the Camera Control Window to close it.
Camera not detected, Events dialog won’t display or images will not
download to the computer (when camera is connected to the computer
via an interface cable).
Cause 1:
There is a problem with one of the items in the Start by Checking This
section (p. 86).
Solution:
Resolve the problem.
Cause 2:
The USB driver is not installed (Windows only).
Solution:
Install it with the procedures in Installing the Software and USB Driver (p. 10).
Cause 3:
The USB driver is not correctly installed (Windows only).
Solution:
Uninstall the driver (p. 83) before reinstalling it with the procedures in Installing
the Software and USB Driver (p. 10).
Cause 4:
The camera may have been recognized as another device under the
following circumstances (Windows only).
• The camera was connected to the computer before the USB driver was
installed.
• The [Scanners and Cameras] icon or the [Scanners and Cameras] folder cannot
be found in the [Control Panel] or the [Printers and Other Hardware] window.
• Your camera model name, [Canon Camera] or a camera icon does not display
in the [Scanners and Cameras Properties] dialog or the [Scanners and
Cameras] folder.
87
Page 92
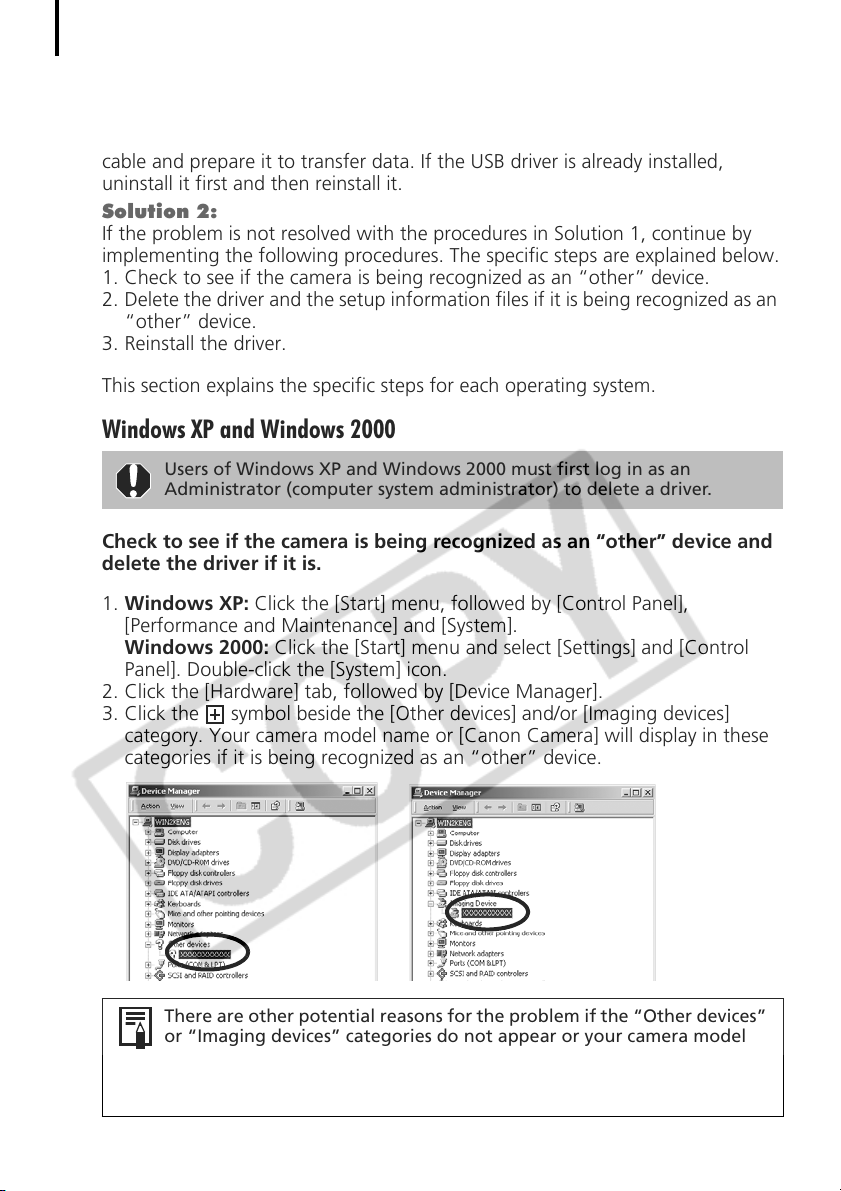
Troubleshooting
88
Solution 1:
Start with the following procedures.
Install the USB driver with the procedures in Installing the Software and USB
Driver (p. 10). Then connect the camera to the computer with the interface
cable and prepare it to transfer data. If the USB driver is already installed,
uninstall it first and then reinstall it.
Solution 2:
If the problem is not resolved with the procedures in Solution 1, continue by
implementing the following procedures. The specific steps are explained below.
1. Check to see if the camera is being recognized as an “other” device.
2. Delete the driver and the setup information files if it is being recognized as an
“other” device.
3. Reinstall the driver.
This section explains the specific steps for each operating system.
Windows XP and Windows 2000
Users of Windows XP and Windows 2000 must first log in as an
Administrator (computer system administrator) to delete a driver.
Check to see if the camera is being recognized as an “other” device and
delete the driver if it is.
1. Windows XP: Click the [Start] menu, followed by [Control Panel],
[Performance and Maintenance] and [System].
Windows 2000: Click the [Start] menu and select [Settings] and [Control
Panel]. Double-click the [System] icon.
2. Click the [Hardware] tab, followed by [Device Manager].
3. Click the symbol beside the [Other devices] and/or [Imaging devices]
category. Your camera model name or [Canon Camera] will display in these
categories if it is being recognized as an “other” device.
There are other potential reasons for the problem if the “Other devices”
or “Imaging devices” categories do not appear or your camera model
name or [Canon Camera] does not appear. Proceed to Step 6,
temporarily quit the procedures and investigate the other potential
causes.
Page 93
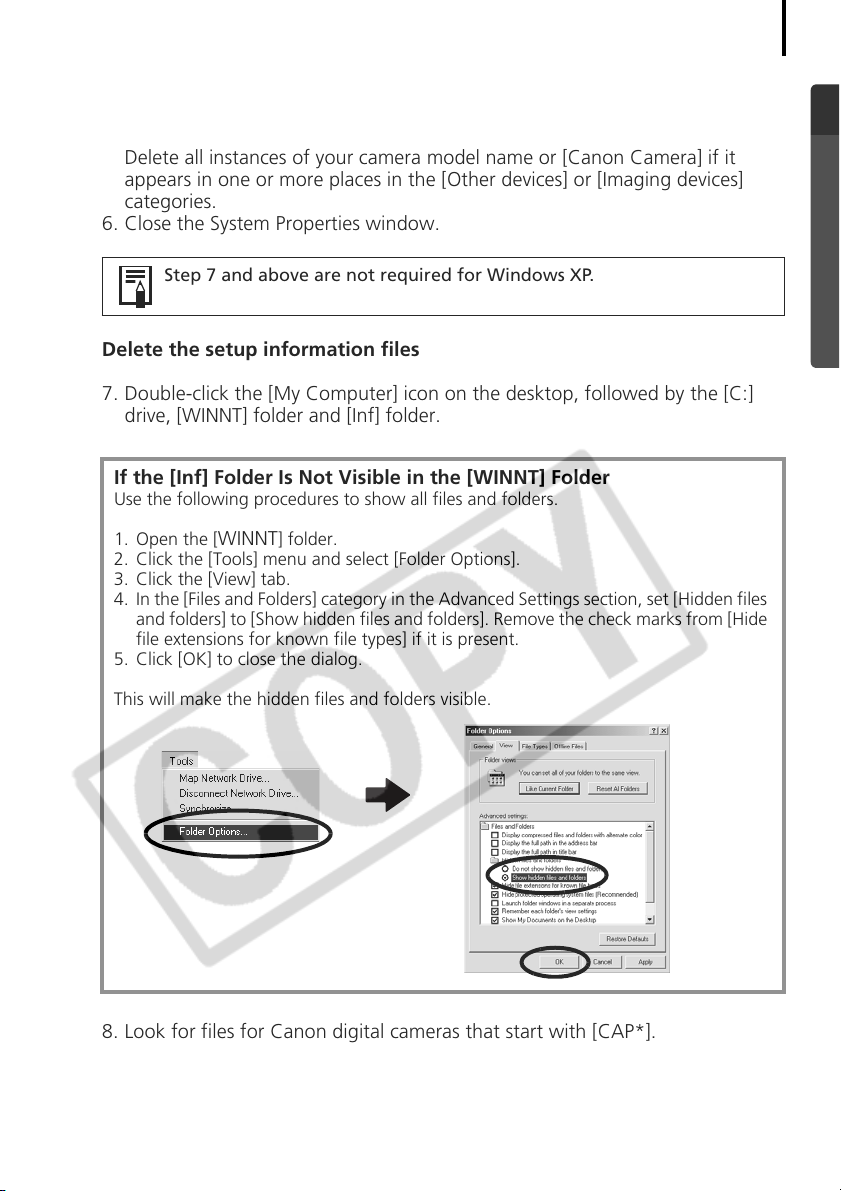
4. Select your camera model name or [Canon Camera], right-click and select
[Delete].
5. Click [OK] in the confirmation dialog.
Delete all instances of your camera model name or [Canon Camera] if it
appears in one or more places in the [Other devices] or [Imaging devices]
categories.
6. Close the System Properties window.
Step 7 and above are not required for Windows XP.
Delete the setup information files
7. Double-click the [My Computer] icon on the desktop, followed by the [C:]
drive, [WINNT] folder and [Inf] folder.
If the [Inf] Folder Is Not Visible in the [WINNT] Folder
Use the following procedures to show all files and folders.
89
1. Open the [
2. Click the [Tools] menu and select [Folder Options].
3. Click the [View] tab.
4. In the [Files and Folders] category in the Advanced Settings section, set [Hidden files
and folders] to [Show hidden files and folders]. Remove the check marks from [Hide
file extensions for known file types] if it is present.
5. Click [OK] to close the dialog.
This will make the hidden files and folders visible.
WINNT] folder.
8. Look for files for Canon digital cameras that start with [CAP*].
The “*” represents a number, such as 0 or 1.
[CAP*] files come in pairs of [CAP*.inf] and [CAP*.pnf] files (For example,
[CAP0.inf] and [CAP0.pnf]).
Page 94
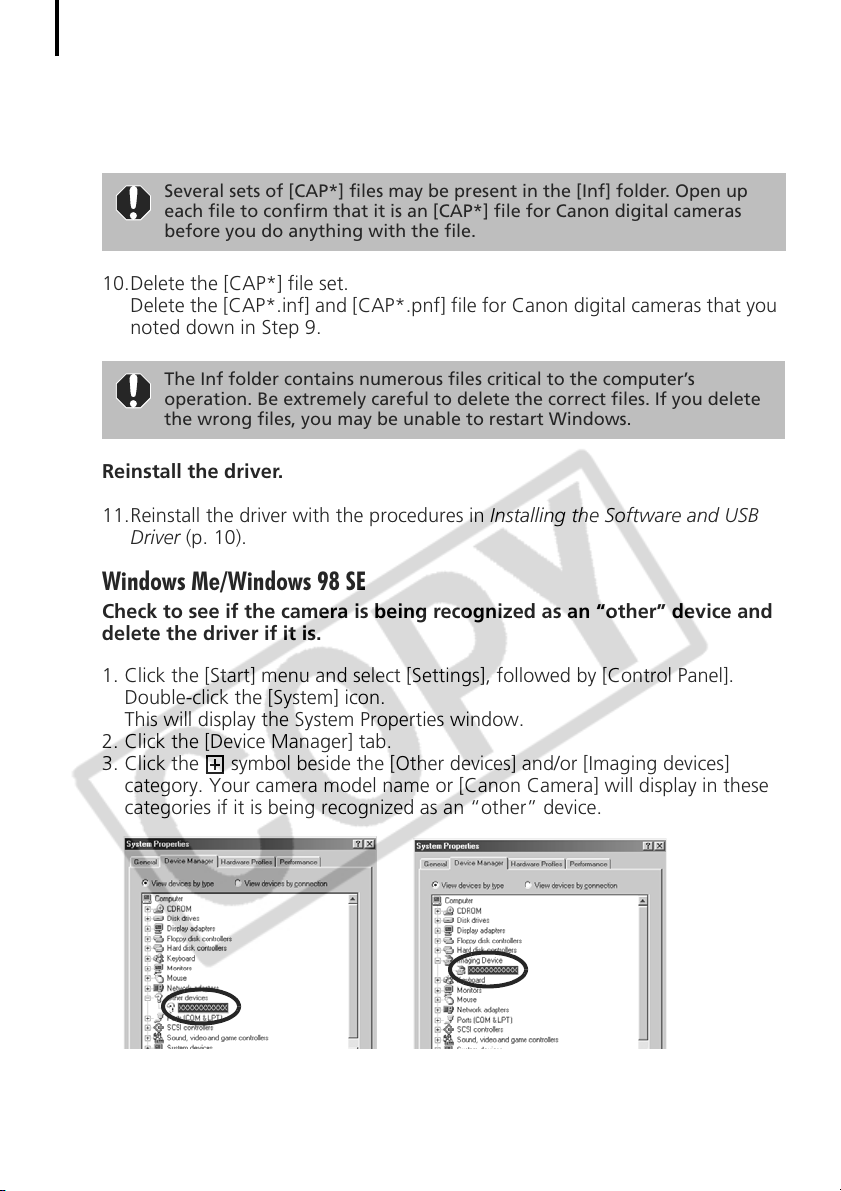
Troubleshooting
90
9. Double-click the [CAP*] files to check their contents.
Double-clicking an [CAP*.inf] file will open it in the Windows Notepad
program. Look for [;****Canon Camera Driver Setup File****] in the first
line. Note down the names of these files.
Several sets of [CAP*] files may be present in the [Inf] folder. Open up
each file to confirm that it is an [CAP*] file for Canon digital cameras
before you do anything with the file.
10.Delete the [CAP*] file set.
Delete the [CAP*.inf] and [CAP*.pnf] file for Canon digital cameras that you
noted down in Step 9.
The Inf folder contains numerous files critical to the computer’s
operation. Be extremely careful to delete the correct files. If you delete
the wrong files, you may be unable to restart Windows.
Reinstall the driver.
11.Reinstall the driver with the procedures in Installing the Software and USB
Driver (p. 10).
Windows Me/Windows 98 SE
Check to see if the camera is being recognized as an “other” device and
delete the driver if it is.
1. Click the [Start] menu and select [Settings], followed by [Control Panel].
Double-click the [System] icon.
This will display the System Properties window.
2. Click the [Device Manager] tab.
3. Click the symbol beside the [Other devices] and/or [Imaging devices]
category. Your camera model name or [Canon Camera] will display in these
categories if it is being recognized as an “other” device.
Page 95
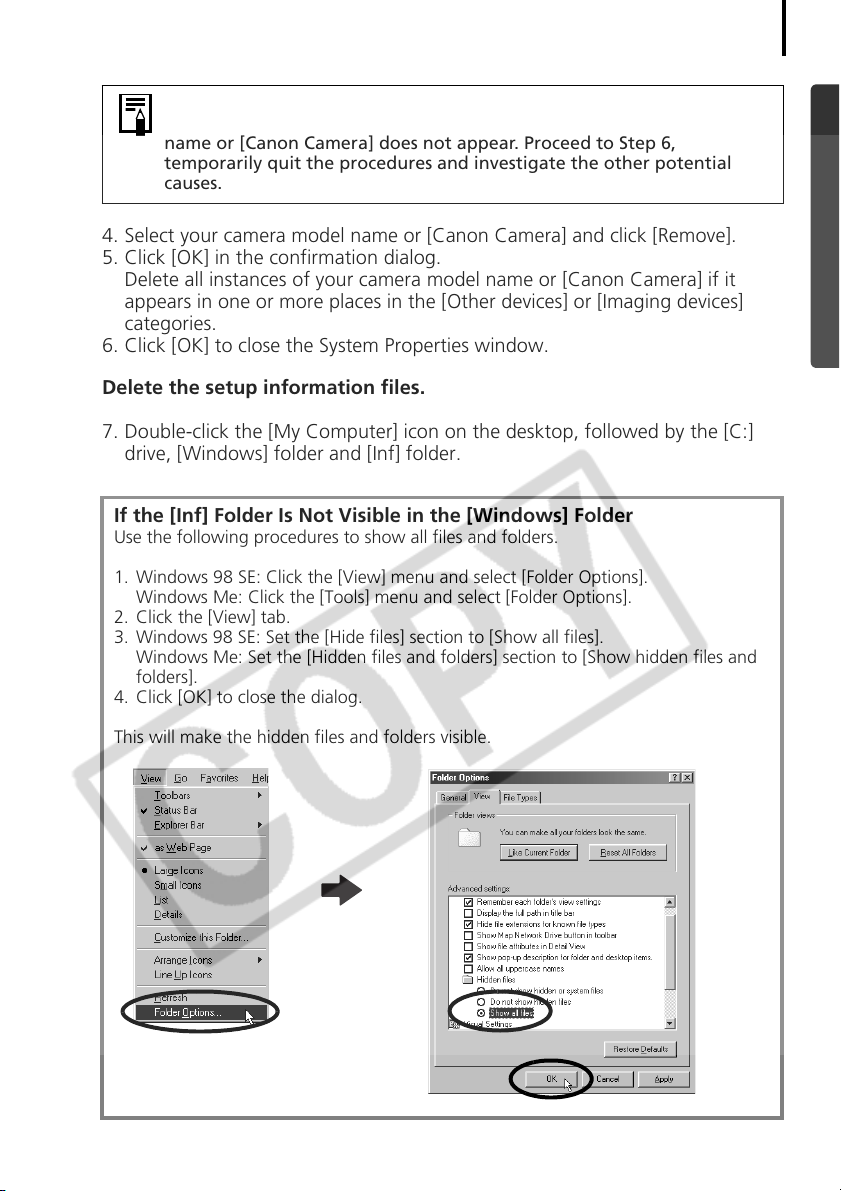
There are other potential reasons for the problem if the “Other devices”
or “Imaging devices” categories do not appear or your camera model
name or [Canon Camera] does not appear. Proceed to Step 6,
temporarily quit the procedures and investigate the other potential
causes.
4. Select your camera model name or [Canon Camera] and click [Remove].
5. Click [OK] in the confirmation dialog.
Delete all instances of your camera model name or [Canon Camera] if it
appears in one or more places in the [Other devices] or [Imaging devices]
categories.
6. Click [OK] to close the System Properties window.
Delete the setup information files.
7. Double-click the [My Computer] icon on the desktop, followed by the [C:]
drive, [Windows] folder and [Inf] folder.
If the [Inf] Folder Is Not Visible in the [Windows] Folder
Use the following procedures to show all files and folders.
1. Windows 98 SE: Click the [View] menu and select [Folder Options].
Windows Me: Click the [Tools] menu and select [Folder Options].
2. Click the [View] tab.
3. Windows 98 SE: Set the [Hide files] section to [Show all files].
Windows Me: Set the [Hidden files and folders] section to [Show hidden files and
folders].
4. Click [OK] to close the dialog.
91
This will make the hidden files and folders visible.
Page 96
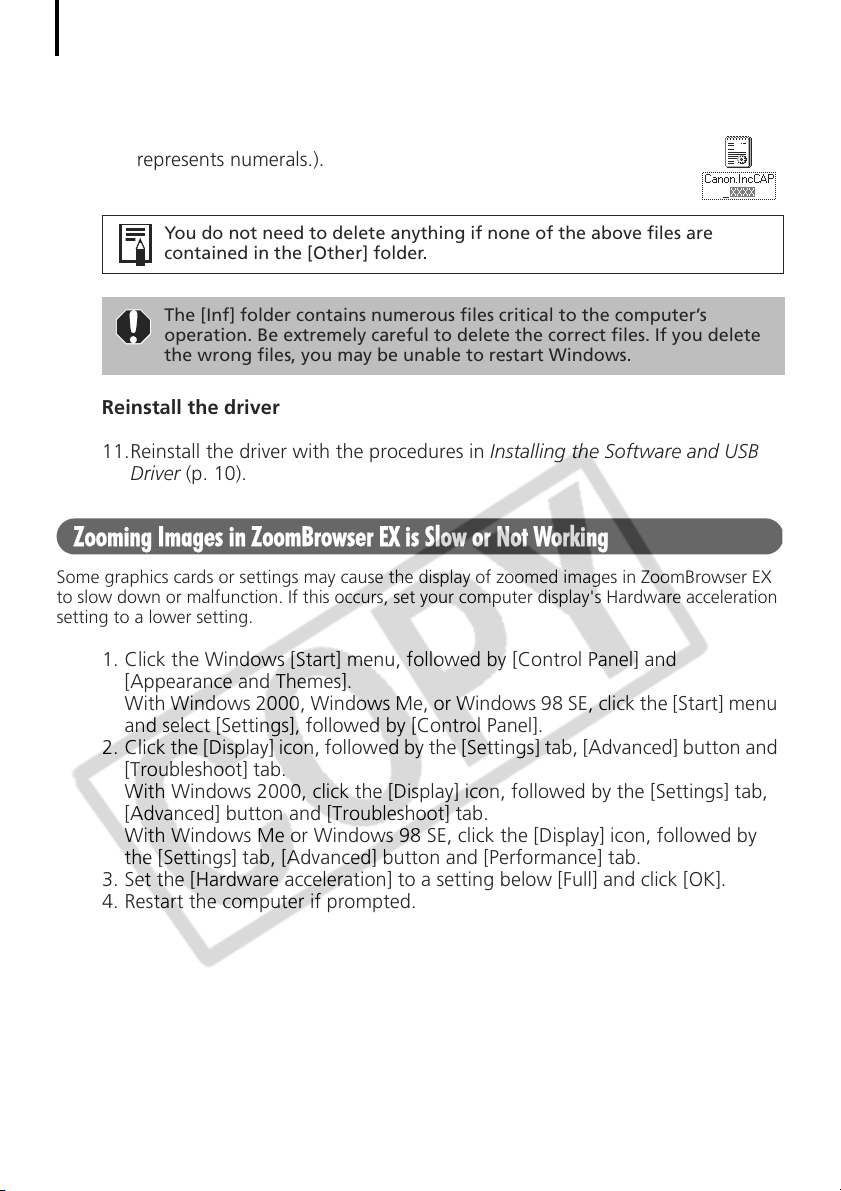
Troubleshooting
92
8. Find and delete the [Drvdata.bin] and [Drvidx.bin] files.
9. In the [Inf] folder, double-click the [Other] folder to open it.
10. Find and delete the [Canon.IncCAP_xxx.Inf] file (The xxx
represents numerals.).
You do not need to delete anything if none of the above files are
contained in the [Other] folder.
The [Inf] folder contains numerous files critical to the computer’s
operation. Be extremely careful to delete the correct files. If you delete
the wrong files, you may be unable to restart Windows.
Reinstall the driver
11.Reinstall the driver with the procedures in Installing the Software and USB
Driver (p. 10).
Zooming Images in ZoomBrowser EX is Slow or Not Working
Some graphics cards or settings may cause the display of zoomed images in ZoomBrowser EX
to slow down or malfunction. If this occurs, set your computer display's Hardware acceleration
setting to a lower setting.
1. Click the Windows [Start] menu, followed by [Control Panel] and
[Appearance and Themes].
With Windows 2000, Windows Me, or Windows 98 SE, click the [Start] menu
and select [Settings], followed by [Control Panel].
2. Click the [Display] icon, followed by the [Settings] tab, [Advanced] button and
[Troubleshoot] tab.
With Windows 2000, click the [Display] icon, followed by the [Settings] tab,
[Advanced] button and [Troubleshoot] tab.
With Windows Me or Windows 98 SE, click the [Display] icon, followed by
the [Settings] tab, [Advanced] button and [Performance] tab.
3. Set the [Hardware acceleration] to a setting below [Full] and click [OK].
4. Restart the computer if prompted.
Page 97
If You Were Using ZoomBrowser EX Version 2 or 3
Take the following steps if you were using ZoomBrowser EX version 2 or 3 with Windows.
If Titles and Comments Were Attached to Your Images.
Take the following steps to display in version 5 the titles and comments you
input in version 2/3.
1. Use Windows Explorer to open the [Program] folder within the folder in
which you installed ZoomBrowser EX 5.
(e.g. C:\Program Files\Canon\ZoomBrowser EX\Program)
2. Double-click [dbconverter.exe] found in this folder to start this utility.
3. Select the database file you were using up to this point and click the [Start]
button.
(e.g. C:\Program Files\Canon\ZoomBrowser EX\Database\My Database.zbd)
This will display the titles and comments input in the earlier versions in the
comments section of ZoomBrowser EX 5.
If You Had Images in a Folder Below the Program Files Folder
Image files in the [Program Files] folder or a subfolder cannot be displayed in
ZoomBrowser EX 5 from that location. To display these files, first perform steps
1-3 above and then carry on with Step 4.
4. Use Windows Explorer to copy the folder and the images it contains from the
[Program Files] folder to another folder.
(e.g. Copy the image folders in C:\Program Files\Canon\ZoomBrowser
EX\Library One to another location.)
93
The moved folder images can now be selected and displayed with
ZoomBrowser EX 5.
Page 98
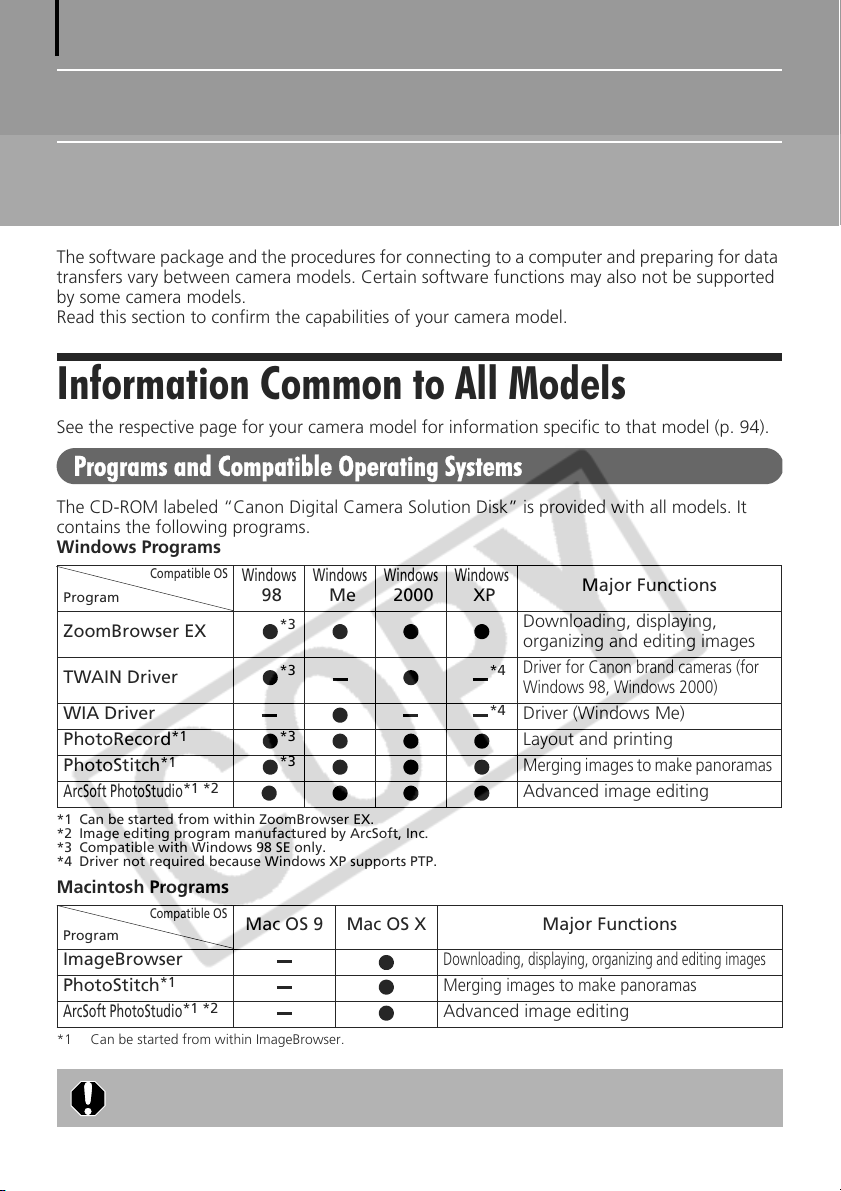
94
Information about Your Camera
The software package and the procedures for connecting to a computer and preparing for data
transfers vary between camera models. Certain software functions may also not be supported
by some camera models.
Read this section to confirm the capabilities of your camera model.
Information Common to All Models
See the respective page for your camera model for information specific to that model (p. 94).
Programs and Compatible Operating Systems
The CD-ROM labeled “Canon Digital Camera Solution Disk” is provided with all models. It
contains the following programs.
Windows Programs
Compatible OS
Program
ZoomBrowser EX
TWAIN Driver
WIA Driver
PhotoRecord
PhotoStitch
*1
*1
ArcSoft PhotoStudio
*1 Can be started from within ZoomBrowser EX.
*2 Image editing program manufactured by ArcSoft, Inc.
*3 Compatible with Windows 98 SE only.
*4 Driver not required because Windows XP supports PTP.
Macintosh Programs
Compatible OS
Program
ImageBrowser
PhotoStitch
ArcSoft PhotoStudio
*1 Can be started from within ImageBrowser.
*2 Image editing program manufactured by ArcSoft, Inc.
*1
*1 *2
*1 *2
Windows
98
*3
Windows
Me
Windows
2000
Windows
XP
Major Functions
Downloading, displaying,
organizing and editing images
*3 *4
Driver for Canon brand cameras (for
Windows 98, Windows 2000)
*4
Driver (Windows Me)
*3
*3
Layout and printing
Merging images to make panoramas
Advanced image editing
Mac OS 9 Mac OS X Major Functions
Downloading, displaying, organizing and editing images
Merging images to make panoramas
Advanced image editing
See ArcSoft PhotoStudio (p. 80) for information about this program.
Page 99
Connecting the Camera to a Computer
Ensure that you have installed the software from the supplied Canon Digital
Camera Solution Disk before you connect the camera to the computer.
Item to Prepare
• Your camera and computer
• Canon Digital Camera Solution Disk
• Interface cable supplied with the camera
• Use the interface cable to attach the camera directly to a USB port on the
computer, not through a USB hub. The connection may not operate correctly
through a USB hub.
• The connection may not operate correctly if you are using other USB devices,
excluding USB mice or keyboards, at the same time as the camera. If this
occurs, disconnect the other devices from the computer and try reconnecting
the camera.
• Do not connect two or more cameras at the same time to the same computer
via the USB interface. The connections may not operate correctly.
• Never allow the computer to go into standby (sleep) mode while a camera is
connected via the USB interface. If it does happen, never disconnect the
interface cable. Try to awaken the computer with the camera in the
connected state. Some computers will not awaken properly if you disconnect
the camera while they are in standby (sleep) mode. Please refer to your
computer manual for instructions regarding the standby (sleep) mode.
95
You are recommended to power the camera from a household power source
(AC adapter) when connecting to a computer (if available for your camera
model). Ensure that you use fully charged batteries if you will not be using a
household power source.
See the page (p. 94) for your specific model for information about connecting the camera to
the computer.
Page 100
PowerShot A520/PowerShot A510
96
PowerShot A520/PowerShot A510
How to Connect the Camera to a Computer and Prepare to Transfer Data
1 Attach the supplied interface cable to the computer's USB port and the camera's
DIGITAL terminal.
2 Set the mode switch to Play and turn the camera power on.
The camera and computer will be set to the correct mode for communicating.
Non-Supported Programs and Features
The camera does not record RAW images.
 Loading...