


Retinal imaging control software NM
(CR-1 Mark II)
Operation Manual
Before using the instrument, be sure to read this manual thoroughly.
Keep the manual where it is easily accessible.

PLEASE NOTE
1. For 110/120V countries:
Computer and monitor used in the retinal imaging control software NM must be conforming to the
IEC60601-1/UL60601-1 or IEC60950/UL60950. Be sure to also use an isolation transformer conforming to
IEC60601-1/UL60601-1 when a computer or monitor conforming to IEC60950/UL60950 is used.
For 220/230/240V countries:
Computer and monitor used in the retinal imaging control software NM must be conforming to the
IEC60601-1/UL60601-1.
2. Reading of image and storage of data must be performed in accordance with the law of the country where
the product is being used. Also, the user is responsible for maintaining the privacy of image data.
3. In no event will Canon be liable for direct or indirect consequential damage arising out of the use of this
product.
Canon will not be liable for loss of image data due to any reason.
4. Before installing this product, you must read through the license agreement covering the terms and
conditions under which the software is to be used.
5. Please ask the distributor or Canon representative where you made the purchase to install this product.
6. Canon reserves the right to change the specifications and other aspects of this product without prior notice.
• Microsoft and Windows are either registered trademarks or trademarks of Microsoft Corporation in the
United States and/or other countries.
• Other systems and product names in this manual are the trademarks of each manufacturer that developed
them.
© CANON INC. 2009
All rights reserved.
Under copyright laws, this manual may not be copied, in whole or in part, without the written consent
of Canon.

Contents
1. Introduction ...................................................................................1
1.1 Overview of software .............................................................................1
1.2 Software operating environment ...........................................................2
2. Notes on use.................................................................................3
2.1 Software ................................................................................................3
2.2 Digital camera settings .......................................................................... 5
2.3 CF cards ................................................................................................6
3. Starting up and exiting the software .............................................7
3.1 Starting up the software and logging in ................................................. 7
3.2 Exiting the software ...............................................................................8
4. Performing studies........................................................................9
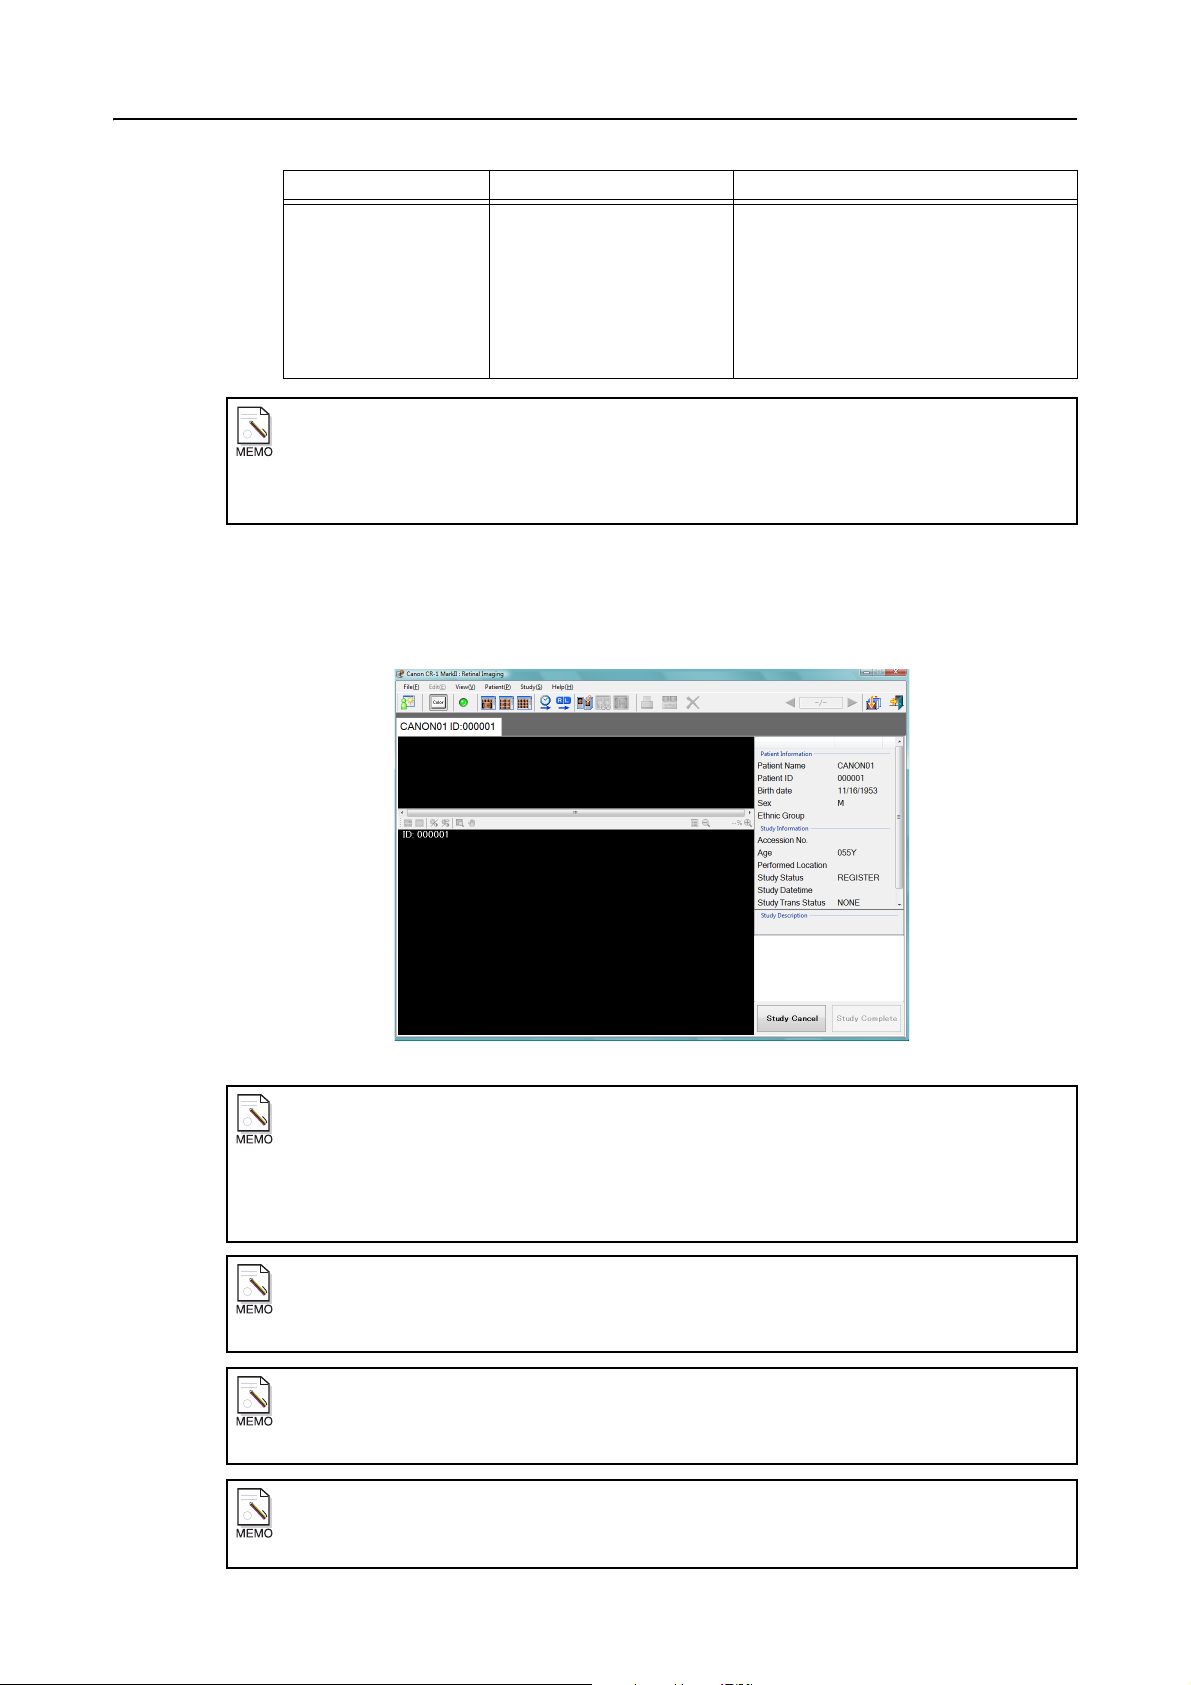
4.1 Displaying the main screen ...................................................................9
4.2 Inputting the study ............................................................................... 10
4.2.1 Methods of inputting the study ......................................................................... 10
4.2.2 Manual input .................................................................................................... 11
4.2.3 Magnetic card/barcode input ............................................................................ 13
4.2.4 List input ........................................................................................................... 16
4.2.5 Worklist input ................................................................................................... 19
4.3 Starting a study without opening the Study Input screen .................... 22
4.4 Taking images ..................................................................................... 23
4.5 Ending a study and transferring images .............................................. 25
4.5.1 Ending a study ................................................................................................. 25
4.5.2 Checking the transfer status ............................................................................ 27
4.5.3 When a transfer error occurs ........................................................................... 28
4.6 Logging off ..........................................................................................29
5. Operations on study logs ............................................................31
5.1 Temporarily saved study logs ..............................................................31
5.1.1 Displaying list of temporarily saved study logs ................................................31
5.1.2 Searching for studies ....................................................................................... 32
5.1.3 Transferring studies ......................................................................................... 33
5.1.3.1 Selecting studies for transfer .........................................................................................33
5.1.3.2 Transferring all studies .................................................................................................. 34
5.1.4 Saving studies .................................................................................................. 35
5.1.5 Deleting studies ............................................................................................... 36
5.1.6 Setting the display items .................................................................................. 36
5.2 Study log file ........................................................................................37
5.2.1 Displaying study log files list ............................................................................ 37
5.2.2 Deleting study logs ........................................................................................... 37

Contents
5.3 Study log screens ................................................................................ 38
5.3.1 Displaying a study log screen .......................................................................... 38
5.3.2 Changing study ................................................................................................ 39
5.3.3 Study log screen and photography .................................................................. 39
5.3.4 Exiting the study log screen ............................................................................. 40
5.3.4.1 Transferring the study and exiting the study log screen ................................................ 40
5.3.4.2 Exiting the study log screen ...........................................................................................40
6. Main screen operations ..............................................................41
6.1 Main screen .........................................................................................41
6.1.1 Toolbar ............................................................................................................. 41
6.1.2 Display information .......................................................................................... 42
6.1.3 Menu bar .......................................................................................................... 43
6.2 Image display methods and properties ............................................... 44
6.2.1 Selecting the display method ........................................................................... 44
6.2.2 Referencing the image properties .................................................................... 45
6.3 Image operations ................................................................................48
6.3.1 Zooming ........................................................................................................... 48
6.3.2 RGB channel view ........................................................................................... 49
6.3.3 Contrast/brightness adjustment ....................................................................... 50
6.3.4 Enlarging an area of the image (Loupe) ..........................................................51
6.3.5 Moving the displayed area ............................................................................... 51
6.4 Comparing studies ..............................................................................52
6.4.1 Image display icon ........................................................................................... 53
6.4.2 Displayed item setting ...................................................................................... 53
6.5 Measuring C/D ratio ............................................................................ 54
6.5.1 Displaying the C/D ratio enlarge screen ..........................................................54
6.5.2 Measuring area ratio ........................................................................................ 55
6.5.3 Measuring the line ratio .................................................................................... 57
6.6 Stereo view .........................................................................................58
6.7 Printing images ...................................................................................60
6.7.1 Adjusting the printing parameters .................................................................... 60
6.7.2 Using simple printing to print images ............................................................... 61
6.7.3 Using Easy-PhotoPrint EX to print images ......................................................63
6.8 QA ....................................................................................................... 65
6.9 Rejecting images .................................................................................67
6.10 Changing the patient information ......................................................68
6.11 Saving as JPEG files ......................................................................... 69
6.11.1 Save as .......................................................................................................... 69
6.11.2 JPEG settings ................................................................................................ 70
6.12 Changing the password ....................................................................71
6.13 Displaying the version information .................................................... 72

Contents
7. Settings.......................................................................................73
7.1 Settings Menu screen .........................................................................73
7.2 System ................................................................................................74
7.2.1 System tab ....................................................................................................... 74
7.2.2 Transfer Timing tab .......................................................................................... 75
7.2.3 Specific Character Set tab ............................................................................... 76
7.3 Device .................................................................................................77
7.3.1 Retinal Camera Settings .................................................................................. 77
7.3.2 EOS Settings ................................................................................................... 78
7.4 Study Management ............................................................................. 80
7.5 Study Input .......................................................................................... 82
7.5.1 Module Settings tab ......................................................................................... 82
7.5.2 Manual Input tab .............................................................................................. 83
7.5.3 Mag Barcode Input tab ..................................................................................... 86
7.5.4 List Input tab .................................................................................................... 86
7.5.5 Worklist tab ...................................................................................................... 88
7.5.5.1 Setting the display items ................................................................................................ 88
7.5.5.2 Performing the Worklist Server Settings ........................................................................ 88
7.5.5.3 Setting the search conditions ......................................................................................... 89
7.5.6 MPPS tab ......................................................................................................... 91
7.6 Storage ................................................................................................92
7.6.1 Registering the storages ..................................................................................92
7.6.2 Advanced export settings (when Export is selected for the storages) ............. 95
7.6.3 Setting the storage server ................................................................................96
7.6.4 Changing the registered information ................................................................ 96
7.6.5 Deleting storages ............................................................................................. 96
7.7 DICOM Tag ......................................................................................... 97
7.7.1 Study tab .......................................................................................................... 97
7.7.1.1 Setting image comments ............................................................................................... 98
7.7.2 Study Logs tab ................................................................................................. 99
7.8 User Accounts ................................................................................... 100
7.8.1 Registering users ........................................................................................... 100
7.8.2 Changing the user information ....................................................................... 101
7.8.3 Deleting the user information ......................................................................... 101
7.8.4 Resetting the password ................................................................................. 101
7.9 Screen ...............................................................................................102
7.9.1 Main Image Info. tab ...................................................................................... 102
7.9.2 Thumbnail Image Info. tab ............................................................................. 103
7.9.3 Study Info. tab ................................................................................................104
7.9.4 Thumbnail Order tab ...................................................................................... 105
7.9.5 Loupe tab ....................................................................................................... 106
7.9.6 C/D Ratio tab ................................................................................................. 107
7.9.7 Stereo View tab .............................................................................................. 108
7.10 Print .................................................................................................109
7.11 Study Logs ......................................................................................110
7.12 Magnetic Card/Bar Code ................................................................. 110

Contents
8. Before calling the service technician ........................................111
8.1 Appearance of the message screen .................................................111
8.2 Error ..................................................................................................112
8.3 Warning .............................................................................................116
8.4 Information ........................................................................................125
Index .............................................................................................127

NOTATION
Notation 1
Button names are indicated by [ ].
Notation example: Click [OK].
Notation 2
Available options in the taskbar or menu bar are indicated by [ ], and when options are selected in submenus, the
order of selection is indicated by >. The available shortcut keys are displayed after the option in the menu bar.
Notation example: Click the commands from the taskbar in the following order.
[Start] > [All Programs] > [Canon Retinal imaging control software NM] >
[Canon CR-1 Mark II]
[Study] > [Skip Study Input F5]
Notation 3
For check boxes, indicates a checked option, and indicates an unchecked option.
Notation example: When this is checked, a Warning screen will be displayed when the amount of free space on the
hard disk has fallen below the setting.
Notation 4
For radio buttons, indicates a selected option, and indicates an unselected option.
Notation example: Select Manual or By User Defined Code.
Notation 5
If an operating procedure or description in a section continues from an odd-numbered page to an even-numbered
page, “Continued on the following page>>” is written at the bottom right of the odd-numbered page.
Notation 6
If a detailed explanation for the operation or setting is available on another page, the notation (see page number) is
used to refer to this page.
Notation example: 1. End the study. (see page 25)


1. Introduction
1.1 Overview of software
This software is used when taking retinal images with Canon Digital Retinal Camera CR-1 Mark II, and it
enables the images taken to be browsed, operated, processed, stored, sent to DICOM storage server,
exported as DICOM or JPEG format file and, output to a printer.
This software provides SCU functions of the Modality Worklist Management Service Class, Modality
Performed Procedure Step Service Class and DICOM Storage Service Class in compliance with the
DICOM standards.
This software enables connection to an HIS, RIS or other system, and worklists can be obtained to input
study.
This software enables searches and studies using list input and using input from magnetic cards/barcode
readers.
When a study is completed, the image data, study information and patient information are saved in the
database managed by this software. Studies saved in the database can be saved to any user-selected
storage. Studies from this location can also be viewed.
When images are output to the DICOM server or exported DICOM format file, DICOM format images are
created with the information stored in the database.
C/D ratio measurement, stereo view, and other operations are available for enabling easy diagnosis of
images.
-1-
1. Introduction
1.2 Software operating environment
For details on the system, contact a Canon representative or distributor.
Hardware or software Specifications
CPU Core 2 Duo 2 GHz or higher
RAM 2 GB or more
Screen resolution: XGA (1024 × 768 pixels) or higher
Display
Keyboard
Mouse Microsoft Mouse or compatible mouse
WXGA (1280 × 800 pixels) or higher recommended
Screen colors: 24 bits or more
USB2.0 (for communication with digital camera)
Interface
Operating system
Software
Compatible EOS EOS 50D
USB1.1 (for communication with retinal camera: emulating RS-232C)
RS-232C (for the magnetic card/barcode reader)
Microsoft Windows XP Professional SP2/SP3 [US]*
Microsoft Windows Vista Business SP1 [US]*
* This software does not support x64 (64-bit version).
Microsoft .NET Framework Version 3.5
SQL Server 2005 Express Edition SP2
Canon Easy-PhotoPrint EX Version 2.0.0 or later (for printing the images)
-2-

Continued on the following page >>
2. Notes on use
2.1 Software
(1) This software can only be used by users who belong either of the following groups of the
User Accounts.
Windows XP: Administrators
Windows Vista: Users (Standard user) or Administrators
(2) Be sure to set the access rights for the saving folder to be used in the following cases.
• When exporting files to the Storage Types of the Export (DICOM) or Export (JPEG)
• When changing the saving directory for the study management to a folder other than
the default folder (Installation folder\Database\Images)
• When saving the temporarily saved study logs
• When using a study file for list input (such as ccrhis.his)
In the Security tab under Folder Properties, set Allow for Modify in the Users group and
Allow for Full Control in the Administrators group.
(3) Please use care with the following when saving the temporarily saved study logs or
viewing the study log files.
• To specify a folder on the network, get the access rights to the folder as the Windows
login user. For details on the access rights on the network, contact the system
administrator.
• Do not set the password on the removable media (CD, DVD or flash drive etc.).
(4) Do not use the “Switch User” (where the user is switched without logging off) function in
Windows. When multiple users are using the software, be sure to select “Log Off” in Log
Off Windows, and then log in again as a different user.
(5) Do not attempt to change the OS settings (such as screen resolution, date format, date,
or language) while the application is running. If changes are made while the application is
running, it may not function properly.
(6) When using this software, make the Screen saver and Power Options settings as shown
below.
Windows XP:
Screen saver None
Turn off monitor Never
Turn off hard disks Never
System standby Never
When I press the power button on
my computer
Enable hibernation Disable
Shut down
-3-

2. Notes on use
(7) Do not operate the retinal camera while operating this software. The software and
(8) After taking the image, do not operate the software until importing of the image is
Windows Vista:
Screen Saver None
Turn off the display Never
Put the computer to sleep Never
Turn off hard disks Never
When I press the power button Shut down
Start menu power button Shut down
Also, during the Windows shut down process, do not perform any of the following
operations.
Windows XP: Standby
Windows Vista: Sleep
camera may fail to operate properly.
completed. Otherwise, it may not function properly.
(9) Check cable connections if a communication error with the retinal camera occurs. Restart
the computer if the communication error still occurs even after all cable connections have
been checked.
(10) If an application error is displayed during a study, turn the retinal camera and digital
camera off and then on again, and restart the PC.
In this case, perform the procedure below.
1) Turn off the retinal camera and digital camera.
2) Turn off the PC.
3) Turn on the PC.
4) After the OS is started, turn on the retinal camera and digital camera.
(11) While images are being transferred from the digital camera, do not turn off the retinal
camera or disconnect the DC coupler of the digital camera and the cables between the
PC and retinal camera.
(12) If this software freezes or the image cannot be displayed, turn the retinal camera and
digital camera off and then on again, and restart using the procedure below.
1) Turn off the retinal camera and digital camera.
2) Turn off the PC.
3) Remove the DC coupler of the digital camera, and then reinsert it.
4) Turn on the PC.
5) After the OS is started, turn on to the retinal camera and digital camera.
-4-

Continued on the following page >>
(13) Properties settings for the EOS digital camera
To prevent a wizard or menu opening when the EOS digital camera is connected, perform
the procedure below.
Windows Vista:
1) Open the Control Panel, and click Hardware and Sound, and click Play
CDs or other media automatically.
2) Select “Take no action” from the drop-down list for Canon EOS 50D.
Then, click [Save].
Windows XP:
1) Select Scanners and Cameras in the Control Panel.
2) Right-click Canon EOS 50D, then open the Properties screen.
3) Click the Events tab and select “Take no action”, then click [OK].
2.2 Digital camera settings
(1) This software can only be used for digital cameras that were set by service personnel at
installation. For details on the supported digital camera and to change the digital camera
that is used, please contact a Canon representative or distributor.
2. Notes on use
(2) The settings may vary depending on the digital camera model.
(3) Do not make any improper changes to the digital camera settings. If the proper settings
are not made, the camera may be unable to take images. After changing the settings,
turn off the power switch to the digital camera to save the settings.
Setting example (EOS 50D)
For details on settings, see the EOS 50D Instruction Manual.
Note: Items listed as “Auto” in the Remarks column are automatically set by this software. Items
listed as “Required” show items where retinal images cannot be taken unless the settings
are made as indicated.
Items listed as “Recommended” are settings recommended by Canon. The customer
should act responsibly when making setting changes.
Basic settings
Item Settings Remarks
Shooting mode M (Manual exposure) Auto
Drive mode
White balance
(Single shooting)
(Flash)
Auto
Auto
Shutter speed 60 (1/60 sec) Auto
ISO speed 1600 • 3200 • 6400 Auto
-5-

2. Notes on use
Settings based on menu functions
The settings for menu items not shown here can be changed as desired.
Menu items
AEB 0 Required
WB SHIFT/BKT 0,0/±0 Required
Color space sRGB Required
Picture Style Neutral Auto
Review time Off Required
Auto power off Off Required
Date/Time Set to the correct date and time Recommended
C.Fn I: Exposure 3 ISO expansion Set Auto
C.Fn II: Image 2
High ISO speed noise reduction
Shoot w/o card On Required
Live View function settings
[Live View shoot]
Settings Remarks
0Auto
Disable Auto
2.3 CF cards
(1) Do not insert CF cards into the digital camera.
Note: After turning on the digital camera or using the menu button, “No card” (“No CF card”) and
“Sensor cleaning” are displayed once only on the LCD monitor of the digital camera. This
is not an error.
-6-

3. Starting up and exiting the software
3.1 Starting up the software and logging in
Note: Before proceeding, log in as a user who has an appropriate access rights in Windows.
For details, refer to (2) in 2.1 Software (see page 3).
Check that the power of the retinal camera is on, and either double-click the Canon CR-1 Mark II icon on
the desktop or from the taskbar click [Start] > [All Programs] > [Canon Retinal imaging control
software NM] > [Canon CR-1 Mark II] in this order. The login screen will appear.
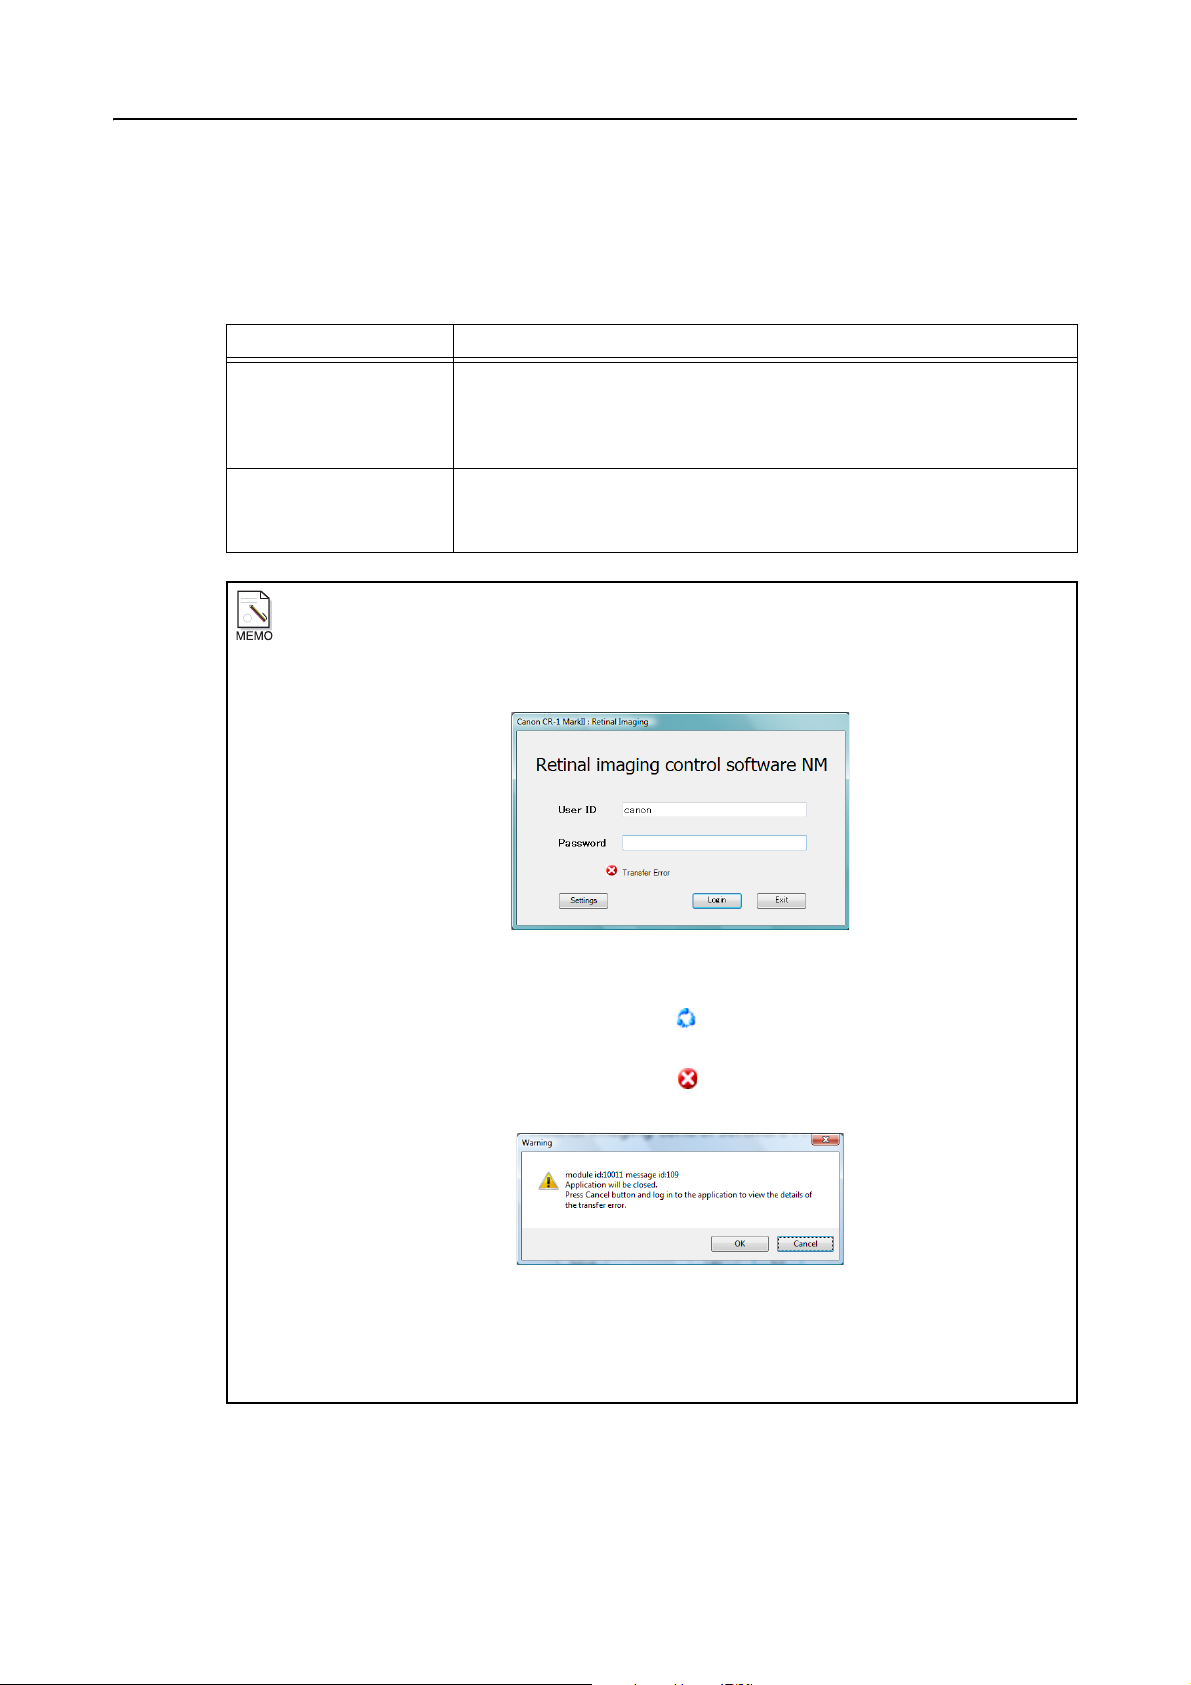
Login screen
Objective Operation
Input the User ID and Password, and click [Login].
Performing
studies
Setting the
software
Exiting the
software
The main screen is displayed.
User ID distinguishes neither upper-case letters nor lower-
case letters.
Input the User ID and Password with which the Privilege
(see page 100) has been set to the Administrator, and
click [Settings].
The setting screen is displayed.
User ID distinguishes neither upper-case letters nor lower-
case letters.
Click [Exit].
However, it cannot be clicked while images are being
transferred.
Reference chapter
and page
4. Performing
studies (see page 9)
7. Settings (see
page 73)
3.2 Exiting the
software (see
page 8)
-7-
3. Starting up and exiting the software
3.2 Exiting the software
When the software is to be exited, exit it on the login screen.
The steps taken to return to the log-in screen differ depending on whether the setting screen or the main
screen is displayed.
Screen Operation
Setting screen
Main screen
Icon displays on the login screen
If there is a study which is being transferred, the Transfer icon is displayed on the login screen; if
there is a study with a transfer error, the Transfer Error icon is displayed instead.
1. Return to the setting menu screen.
2. On the setting menu screen, click [Close] to return to the login screen
(see page 73).
3. On the login screen, click [Exit].
1. End the study. (see page 25)
2. Log off. (see page 29)
3. On the login screen, click [Exit].
Display of Transfer Error icon
[Exit] cannot be clicked while the Transfer icon is displayed so wait until the transfer is
completed and the icon is cleared.
If [Exit] is clicked while the Transfer Error icon is displayed, a Warning screen will appear.
Warning screen
If this is the case, the Transfer Error screen (see page 28) will appear when next logging into the
system.
-8-
4. Performing studies
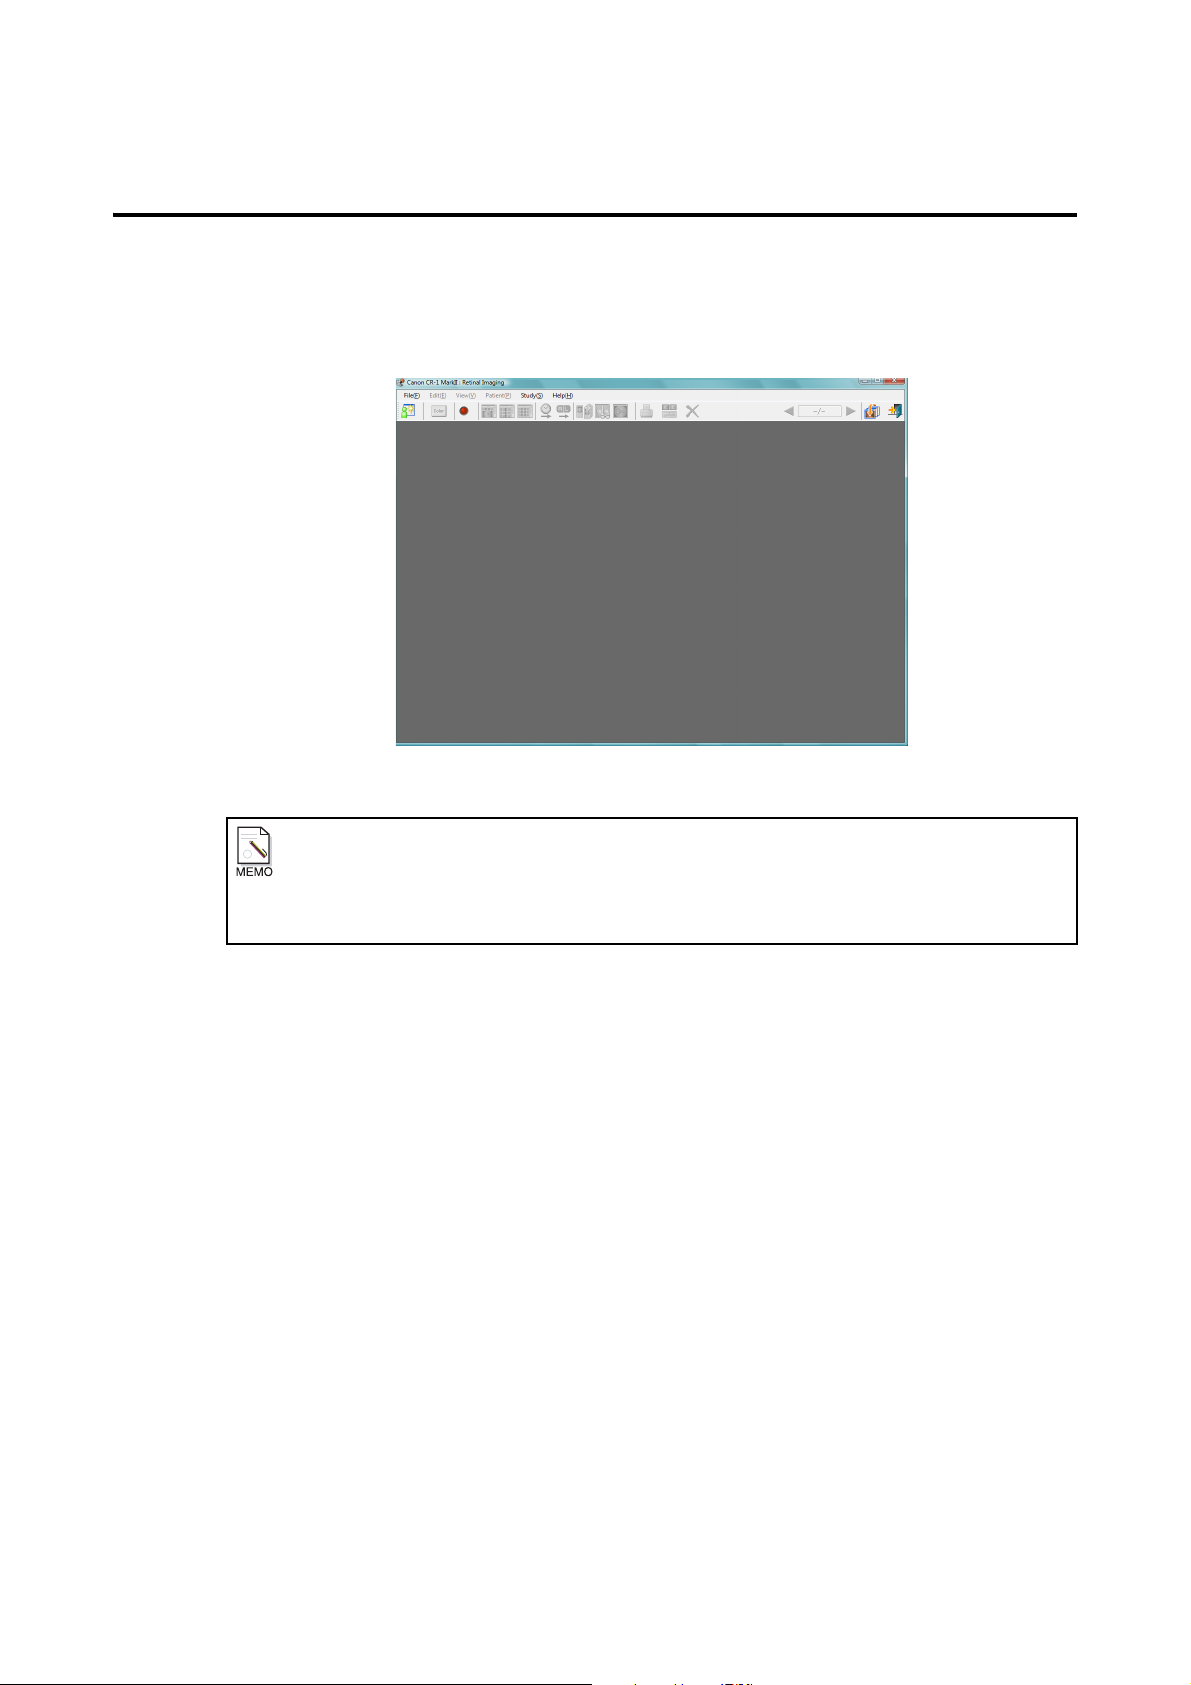
4.1 Displaying the main screen
On the login screen, input the User ID and Password, and click [Login]. The main screen is displayed.
For details on the main screen, refer to 6. Main screen operations (see page 41).
Main screen
If there is a study with a transfer error
If there is a study whose transfer status (see page 31) is a transfer error, the error message
screen and Re-Transfer Study(ies) of Failed Transfer screen are displayed.
If this is the case, refer to 4.5.3 When a transfer error occurs (see page 28).
-9-
4. Performing studies
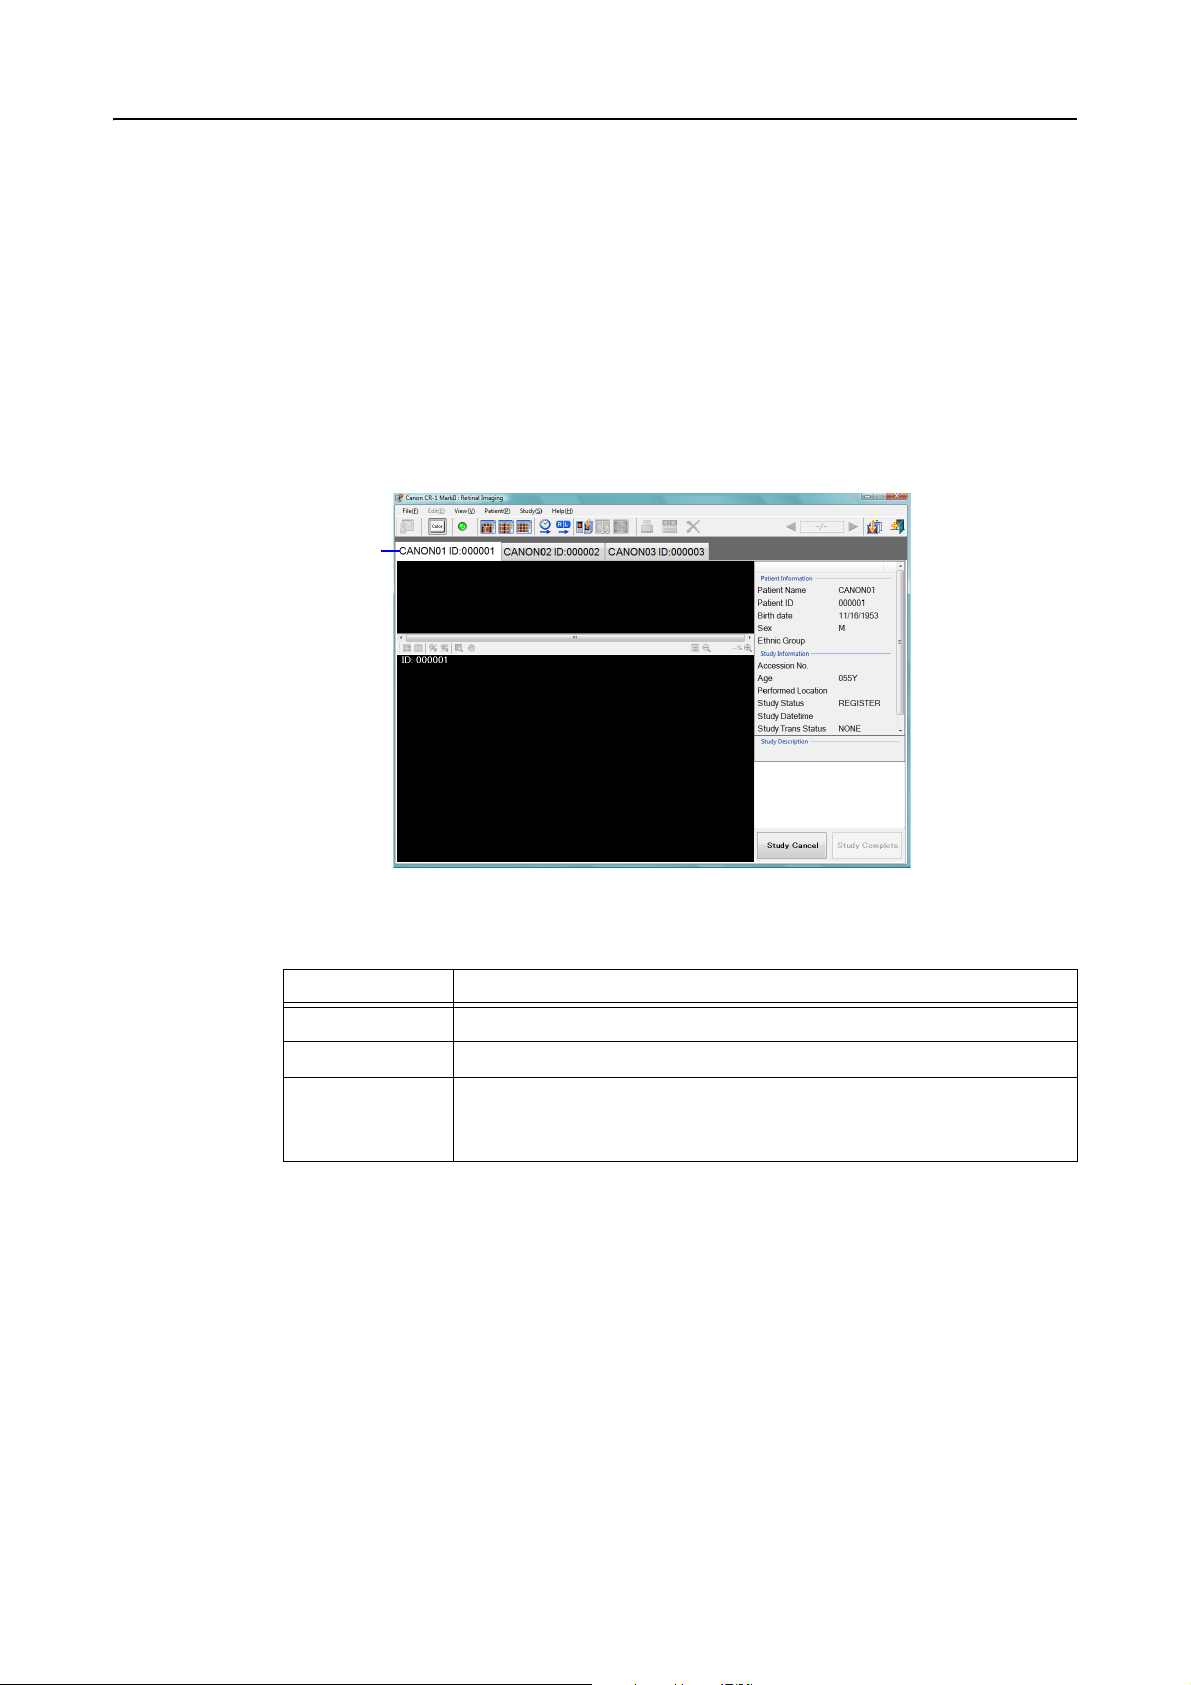
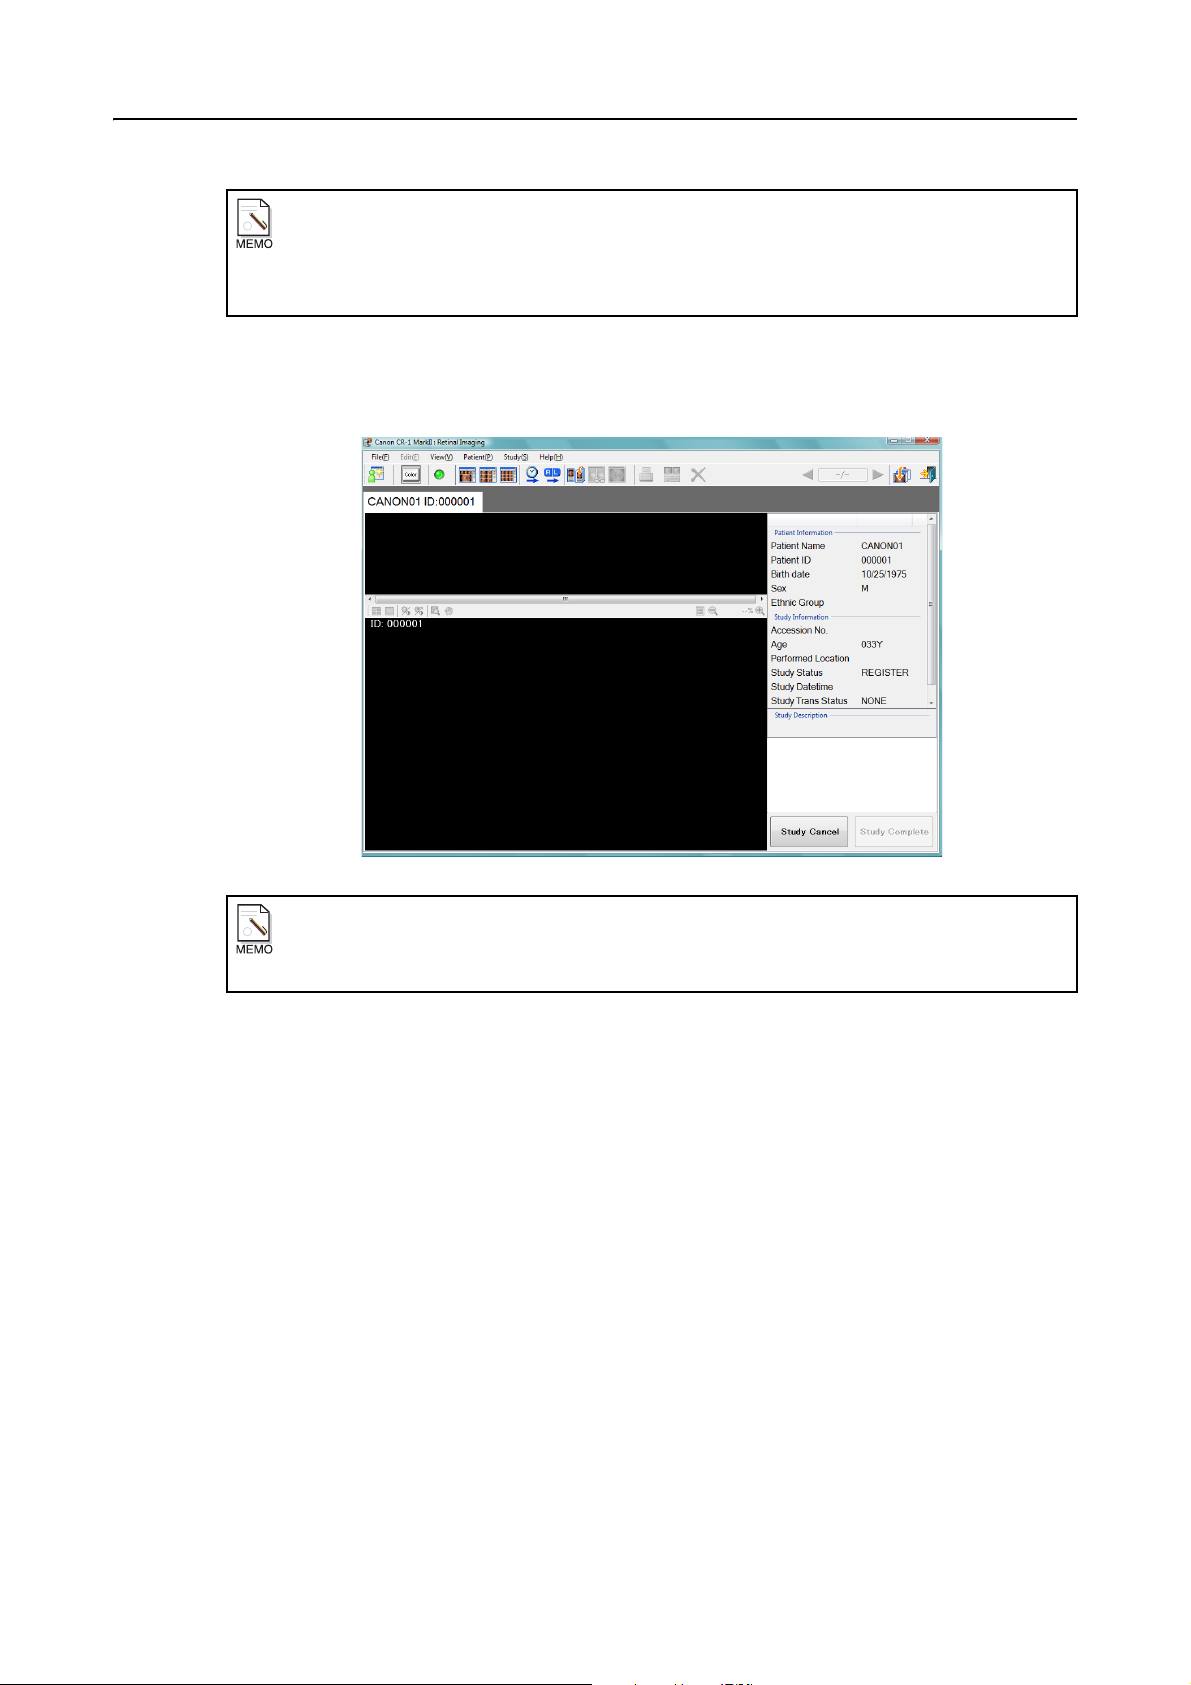
Study tab
4.2 Inputting the study
4.2.1 Methods of inputting the study
There are four methods below for inputting the study:
1. Manual input (see page 11)
2. Magnetic card/barcode input (see page 13)
3. List input (see page 16)
4. Worklist input (see page 19).
Up to three sets of study can be input, after which it is no longer possible to click the Study icon.
When a multiple number of sets of study have been input, click the study tab to select a study.
The following information is displayed on the study tab.
Item Description
Patient Name This item is indicated as the Patient Name.
Patient ID This item is indicated as the ID: Patient ID.
This item is indicated as the No. Accession No. However, if both the
Accession No.
Patient ID and Accession No. have been input, only the Patient ID will be
displayed.
-10-
Continued on the following page >>
4.2.2 Manual input
Input the study using the keyboard and mouse.
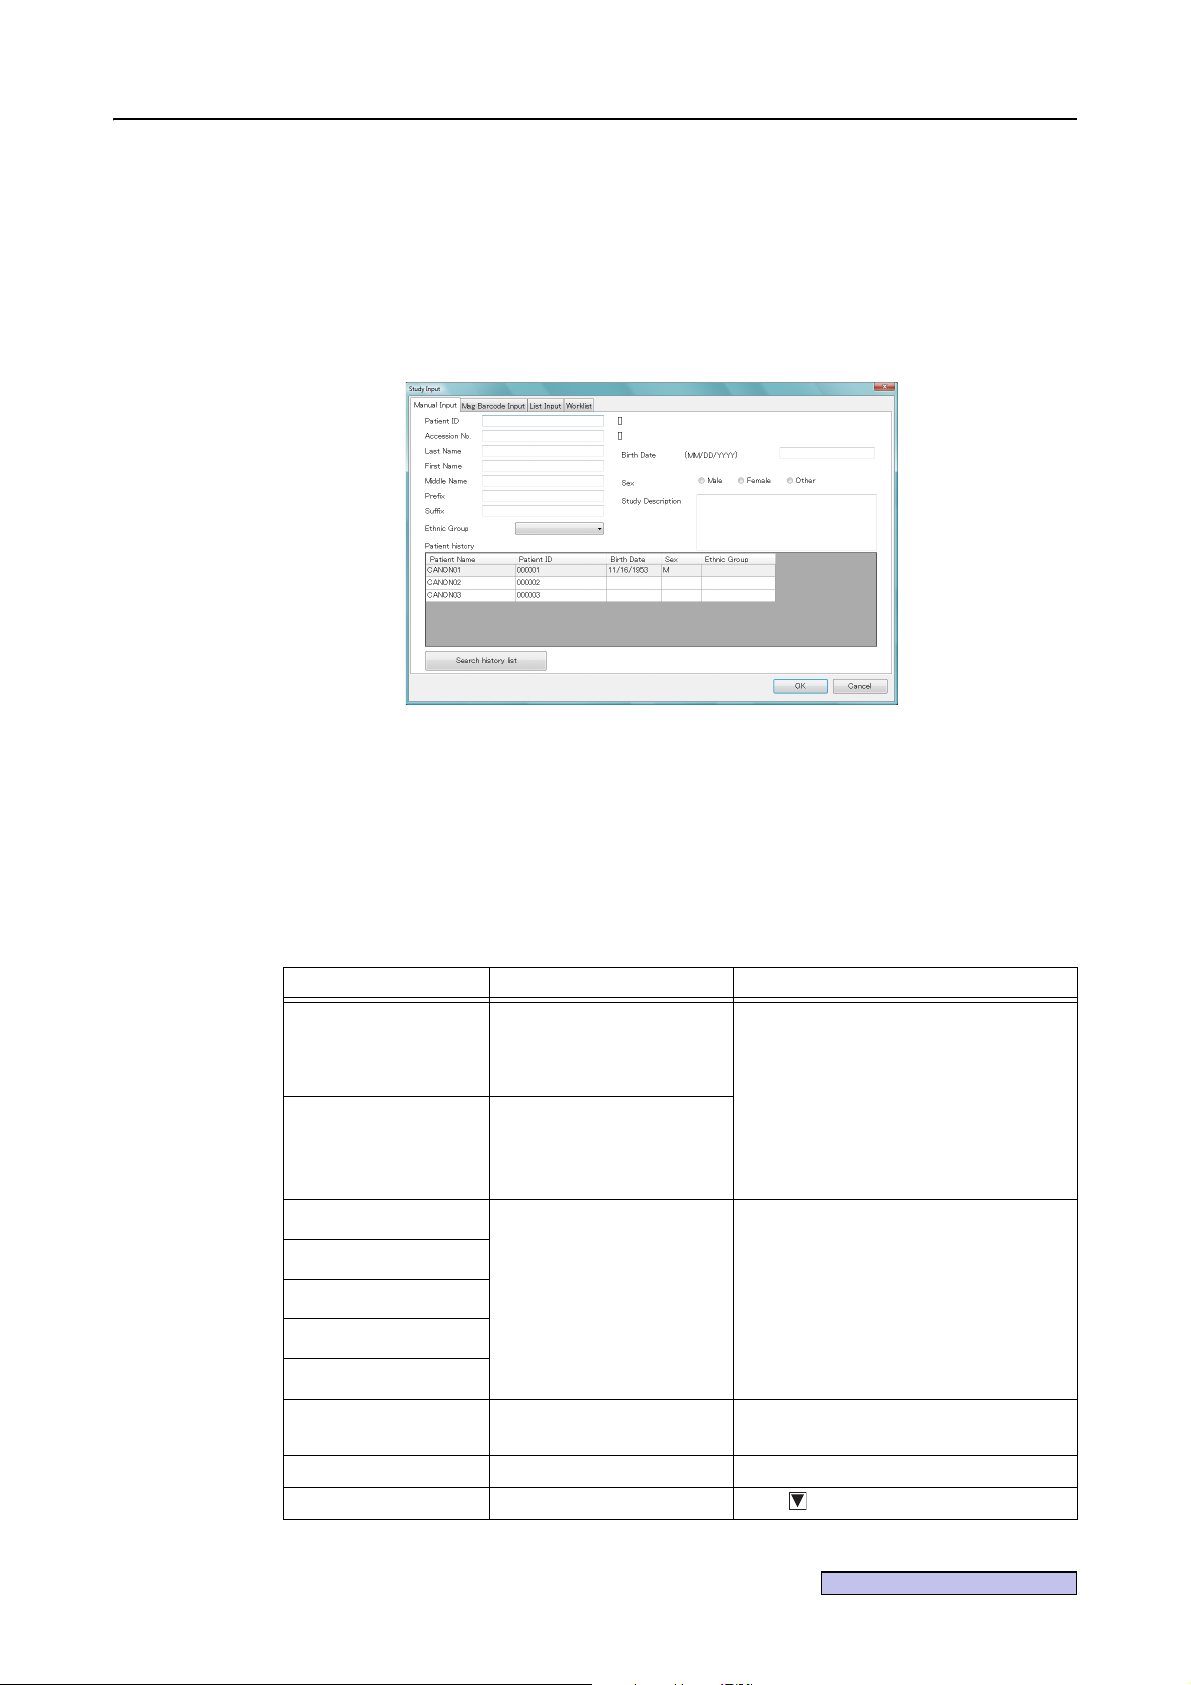
Display the Study Input screen.
1
Click the Study icon, or [Study] > [Study F1] from the menu bar.
If a tab other than Manual Input is displayed, click the Manual Input tab.
4. Performing studies
Study Input screen (Manual Input tab)
Input the study.
2
The names of the items which have been set as Essential Data
However, if the Patient Name has been set as an Essential Data, only
will be displayed in blue.
In items where the input format (see page 84) was set, input text of the character type or specific
character set.
Item name No. of characters Description
Patient ID Not more than 64 characters
Accession No. Not more than 16 characters
Last Name
First Name
Middle Name
Prefix
Suffix
Birth Date
Sex Select either Male, Female or Other.
Ethnic Group Click and select the Ethnic Group.
The total for these items must
not be more than 60
characters. Separate each
item with “^”.
(see page 83)
Last Name
The backslash (\) cannot be input.
Characters other than the preset specific
character set (see page 76) cannot be
input.
Results organized based on the input
format (see page 84) settings are
displayed with square brackets [ ] at the
right of the input item field.
The backslash (\) and equal sign (=)
cannot be input.
Characters other than the preset specific
character set (see page 76) cannot be
input.
If the patient name has been set as an
Essential Data, an error will result unless
at least one form of the name is input.
How this is input depends on the birth
date input setting (see page 83).
are indicated in blue.
and/or
First Name
-11-
4. Performing studies
Display the main screen.
3
Click [OK]. The main screen is displayed, and the study information is displayed on it.
When the new study is input, the study is registered on the Patient History.
Item name No. of characters Description
The backslash (\) cannot be input.
Information input in Study Description is
displayed in the Study Description section
Study Description Not more than 64 characters
To re-input previously input study
To re-input previously input study, click study information from the Patient History.
To search the Patient History, input the search condition, and click [Search history list]. Only
those studies matching the conditions are now displayed.
in the main screen.
Characters other than the preset specific
character set (see page 76) cannot be
input.
Main screen
How the system determines whether to treat the input study as a new study
The Patient ID, Last Name, First Name, Middle Name, Prefix, Suffix, Birth Date and Sex of
the study which have been input are compared with the study registered on the previously studied
patient list, and if there is no study all of whose items match the input items, the study is treated as
new study.
Display items in the Patient History
The Patient History can display the Patient ID, Patient Name, Birth Date, Sex, and Ethnic Group,
but items that are set as Input-Disabled Data (see page 83) are not displayed.
Input items saved to the Patient History
The input items saved to the Patient History are the Patient ID, Last Name, First Name,
Middle Name, Prefix, Suffix, Sex, Birth Date and Ethnic Group.
When the Worklist search screen is displayed
If the Worklist search screen (see page 20) is displayed, click [Cancel].
-12-
4. Performing studies
Continued on the following page >>
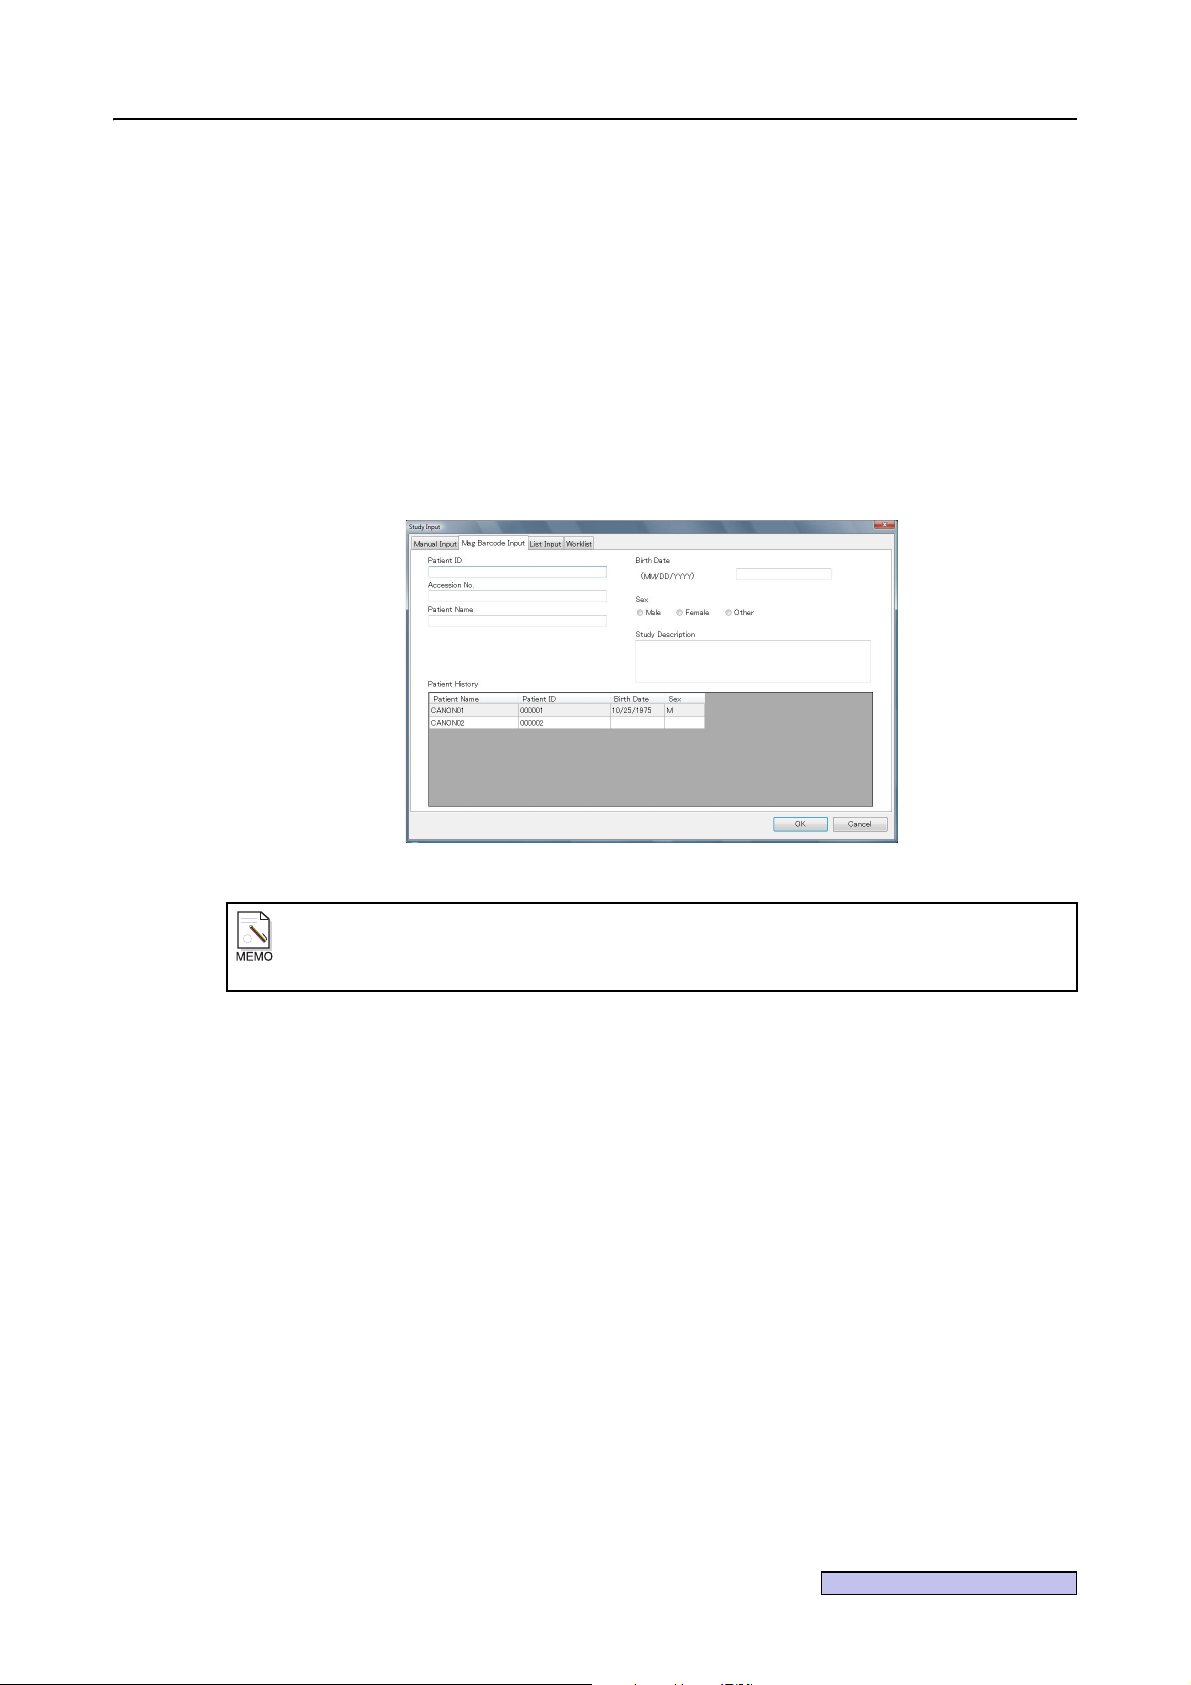
4.2.3 Magnetic card/barcode input
Studies can be input from magnetic cards and barcodes.
Data and communication settings must be made for the magnetic card/barcode reader that is used.
For details, please contact a Canon representative or distributor.
This describes the input procedure after the magnetic card/barcode settings (see page 110) have been
made.
Display the Study Input screen.
1
Click the Study icon, or click [Study] > [Study F1] from the menu bar.
If a tab other than Mag Barcode Input is displayed, click the Mag Barcode Input tab.
Items that are set as Essential Data (see page 86) appear with the item name in blue.
Mag Barcode Input screen
When the Worklist search screen is displayed
If the Worklist search screen (see page 20) is displayed, click [Cancel].
-13-
4. Performing studies
Input the study from the magnetic card/barcode reader.
2
Use the magnetic card/barcode reader to input the study.
A search for the input items is performed on the previously studied patient list, and the search results
are input.
If the input items were already manually input, they are overwritten by the data from the magnetic
card/barcode reader.
Mag Barcode Input screen (after search)
Input the required study items manually.
3
Item name No. of characters Description
Patient ID Not more than 64 characters
Accession No. Not more than 16 characters
Patient Name Not more than 64 characters
Birth Date
Sex Select either Male, Female or Other.
Study Description Not more than 64 characters
The backslash (\) cannot be input.
Characters other than the preset specific
character set (see page 76) cannot be
input.
The backslash (\) and equal sign (=)
cannot be input.
Characters other than the preset specific
character set (see page 76) cannot be
input.
If the patient name has been set as an
Essential Data, an error will result unless
at least one form of the name is input.
Input the items separated by a space,
comma, or circumflex (^) in the order of
Last Name, First Name, Middle Name,
Prefix, and Suffix.
How this is input depends on the birth
date input setting (see page 83).
The backslash (\) cannot be input.
Characters other than the preset specific
character set (see page 76) cannot be
input.
Information input in Study Description is
displayed in the Study Description section
in the main screen.
-14-
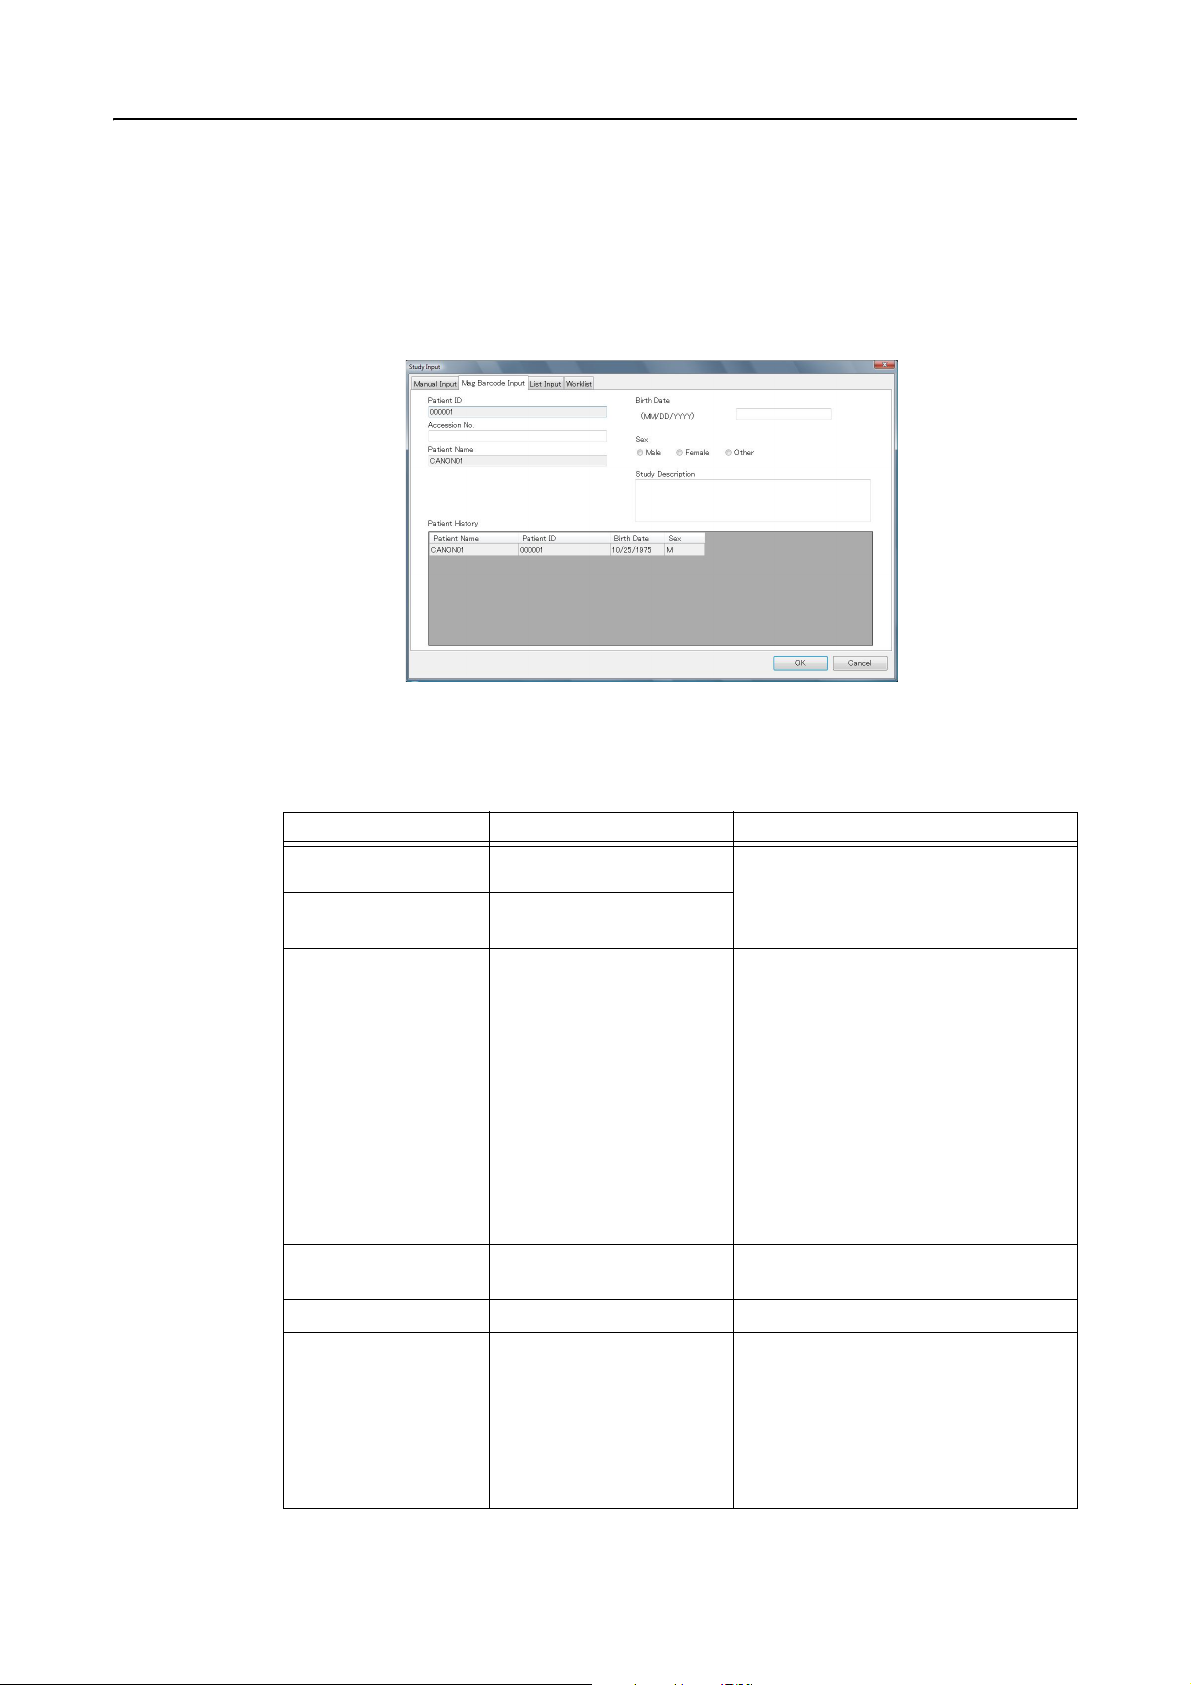
Changing information input from the magnetic card/barcode reader
The information input from the magnetic card/barcode reader cannot be changed from the Study
Input screen.
To make revisions, refer to 6.10 Changing the patient information (see page 68).
Display the main screen.
4
Click [OK]. The main screen is displayed, and the study information is displayed on it.
4. Performing studies
Patient History information
The input items saved in the Patient History are the Patient Name, Patient ID, Birth Date, Sex
and Ethnic Group.
-15-
4. Performing studies
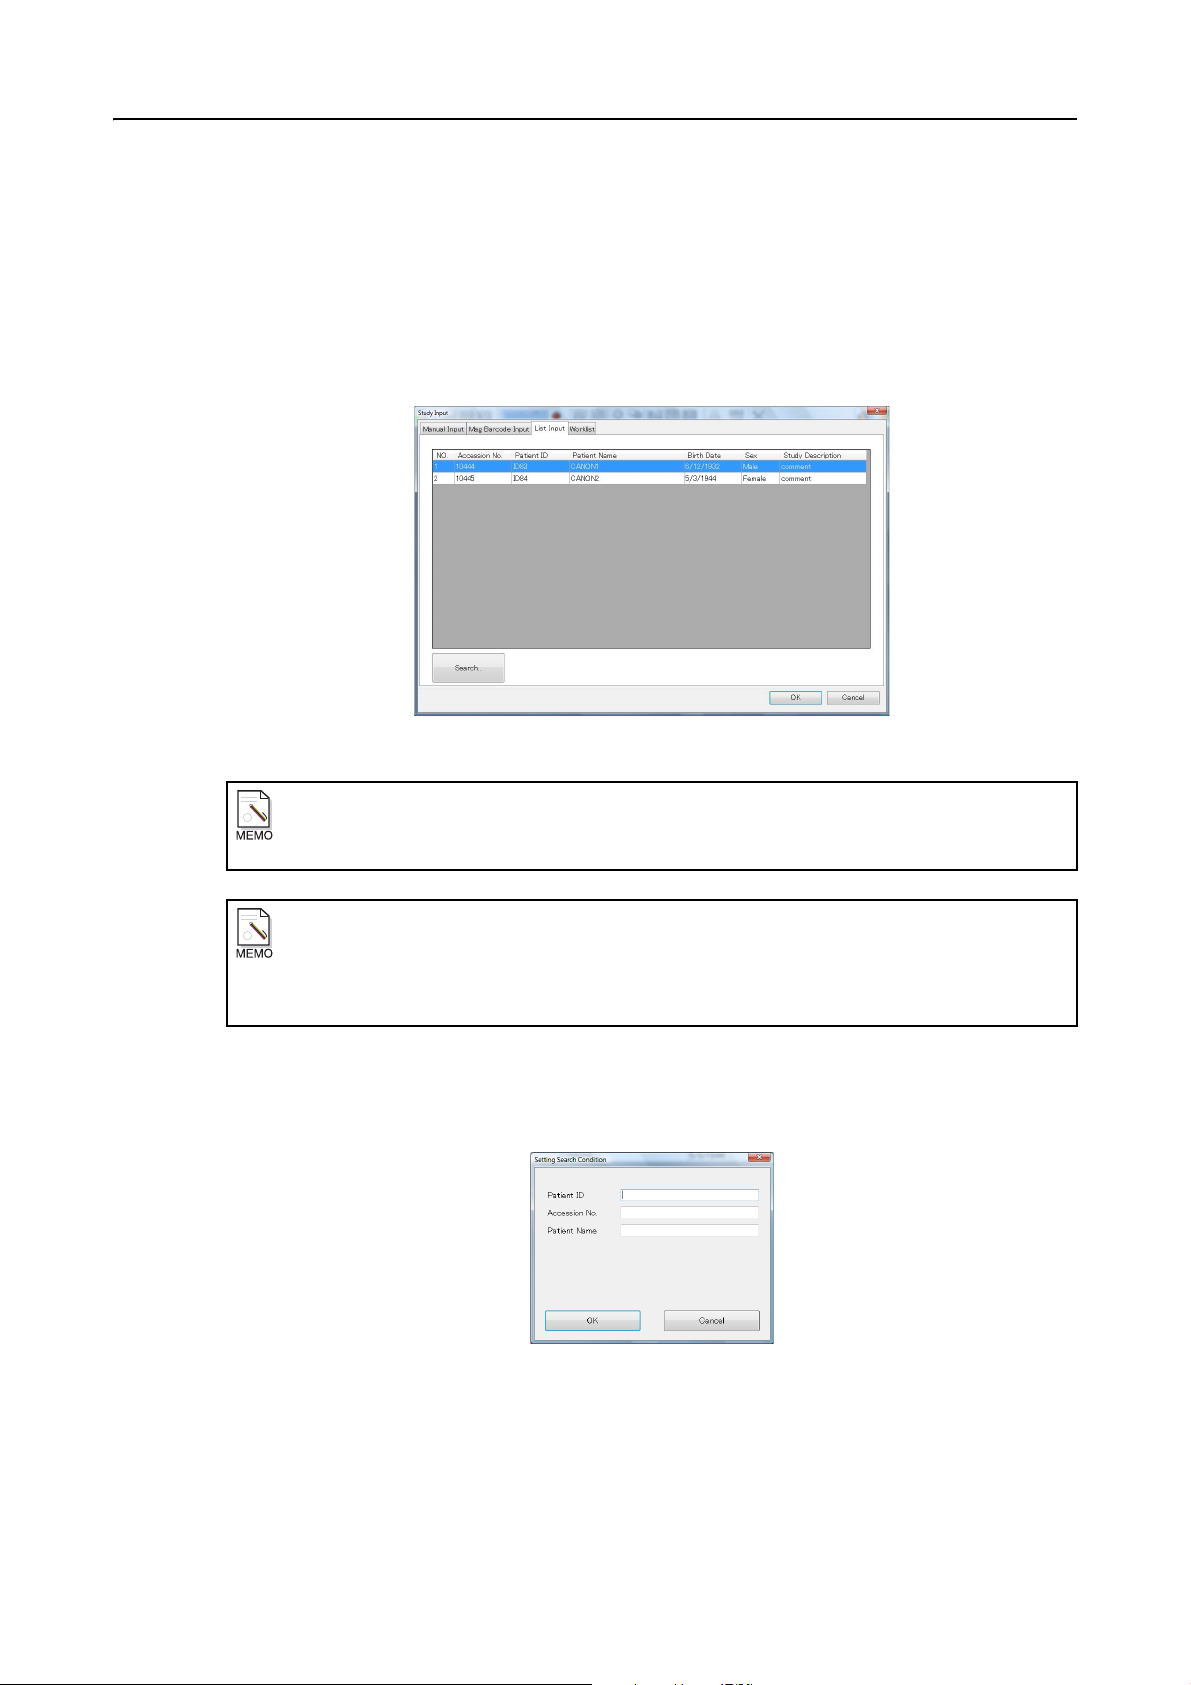
4.2.4 List input
Study information is acquired from the study file (ccrhis.his) and input.
Open the Study Input screen.
1
Click the Study icon, or click [Study] > [Study F1] from the menu bar.
If a tab other than List Input is displayed, click the List Input tab.
The List Input screen that was set in 7.5.4 List Input tab (see page 86) is displayed.
List Input screen
When the Worklist search screen is displayed
If the Worklist search screen (see page 20) is displayed, click [Cancel].
List display
Up to 10,000 items can be displayed in the list.
When the item name of the header is clicked, the sequence in which the studies are displayed can
be changed. However, this does not apply to the No.
Display the Setting Search Condition screen.
2
Click [Search...] to display the Setting Search Condition screen.
Setting Search Condition screen
-16-
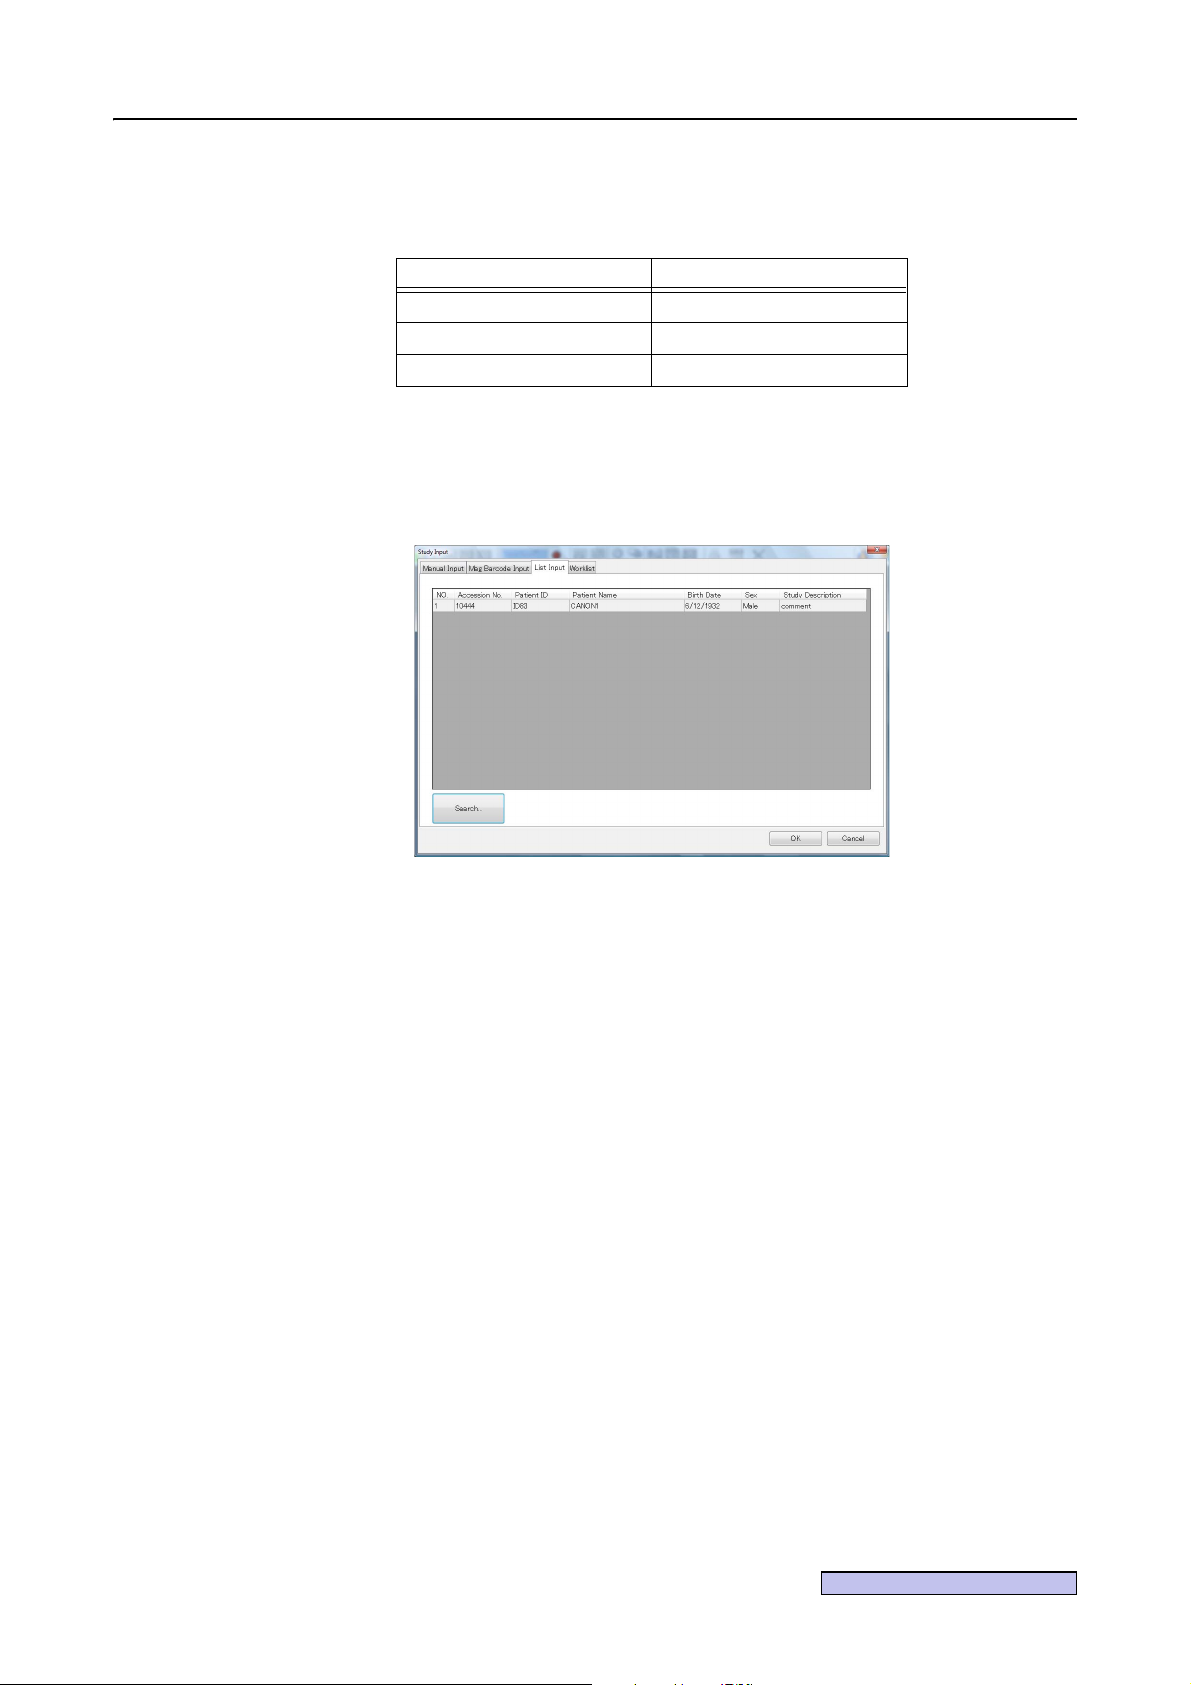
Continued on the following page >>
Input the search conditions.
3
Input the search items.
Item name No. of characters
Patient ID Not more than 64 characters
Accession No. Not more than 16 characters
Patient Name Not more than 64 characters
Perform a refined search of the list.
4
Click [OK].
The refined search results are displayed in a list.
4. Performing studies
List Input screen (Refined search results)
-17-
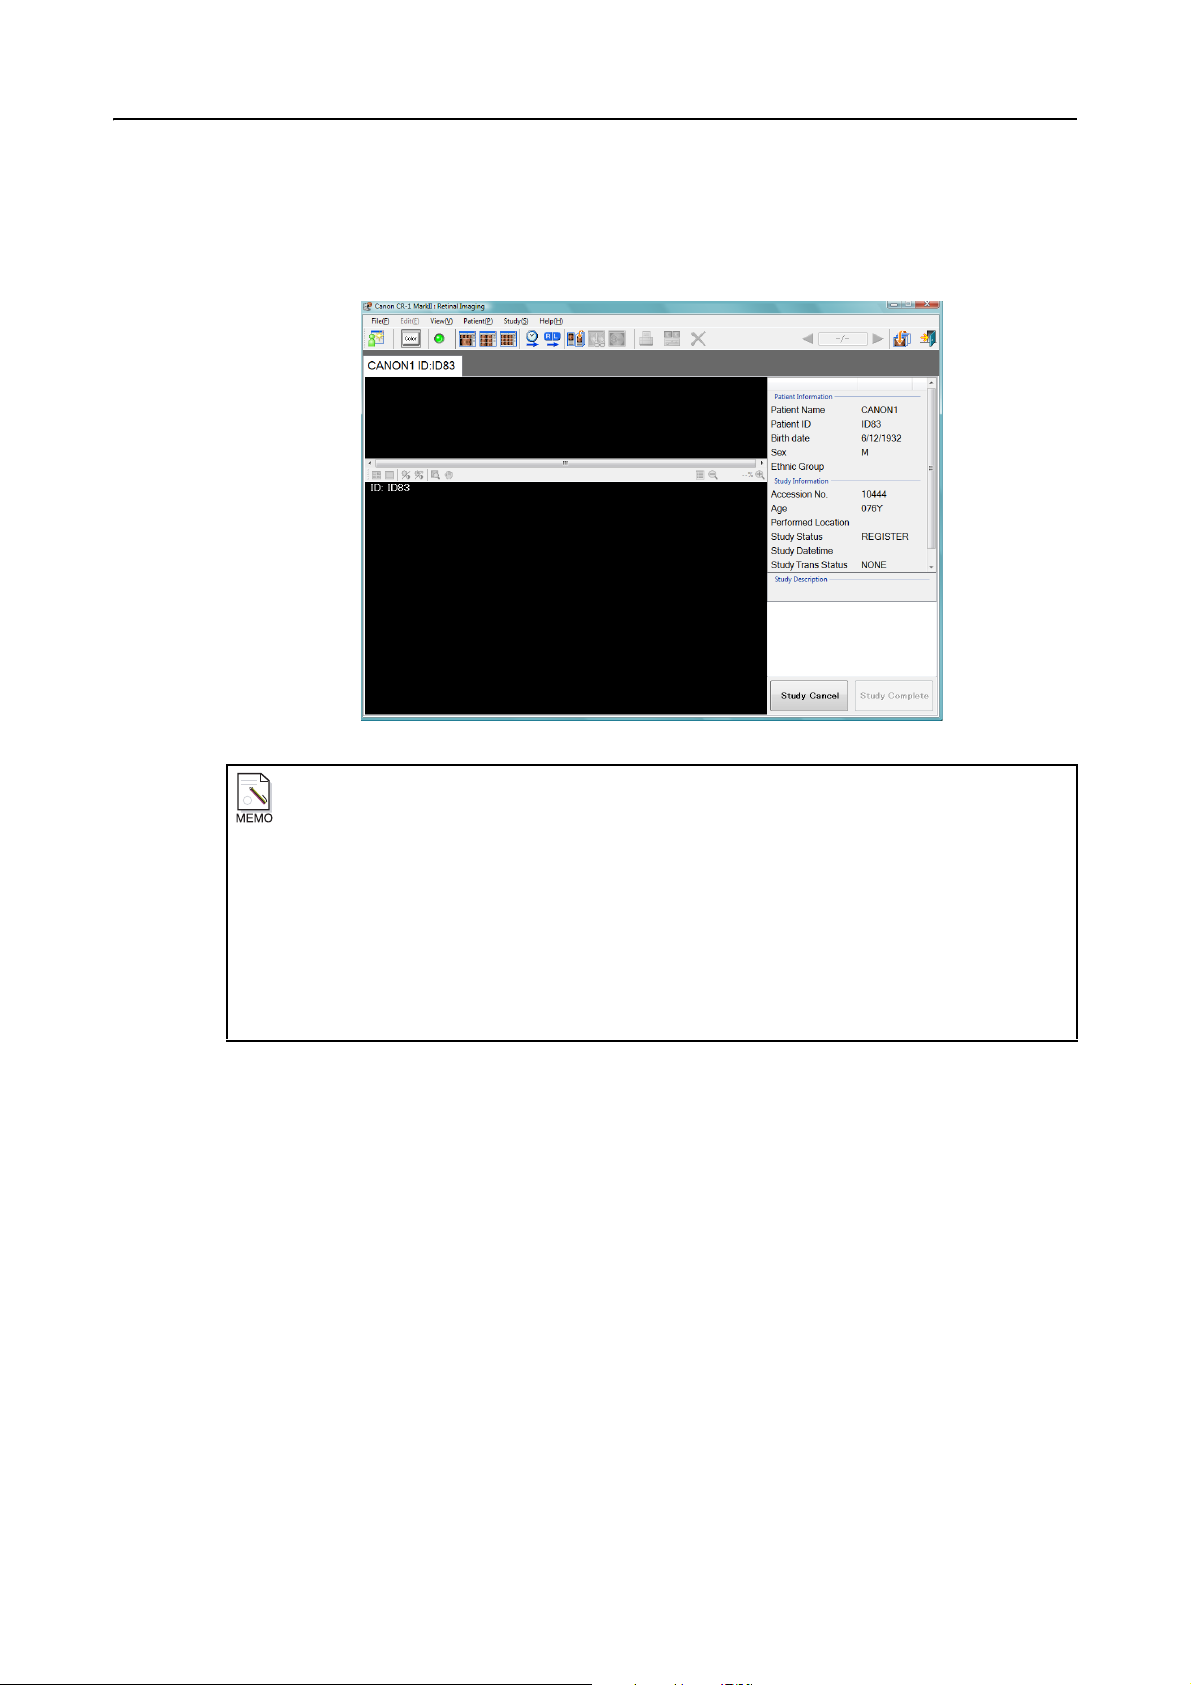
4. Performing studies
Display the main screen.
5
Select the study line in the list, and then click [OK].
The main screen is displayed, and the study information is displayed on it.
Refined search using magnetic card/barcode reader
If a study is input from a magnetic card/barcode reader while the List Input screen is being displayed,
a refined search of the list is conducted based on the search information that was input.
If there is multiple study information (such as Patient Name and Patient ID), a search is performed
for studies matching all the information, and the search results are displayed in a list.
Also, if a study is input from a magnetic card/barcode reader while the Setting Search Conditions
screen is being displayed, the search conditions are modified based on the study information that
was input.
To perform a refined search of the list, click [OK].
-18-
Continued on the following page >>
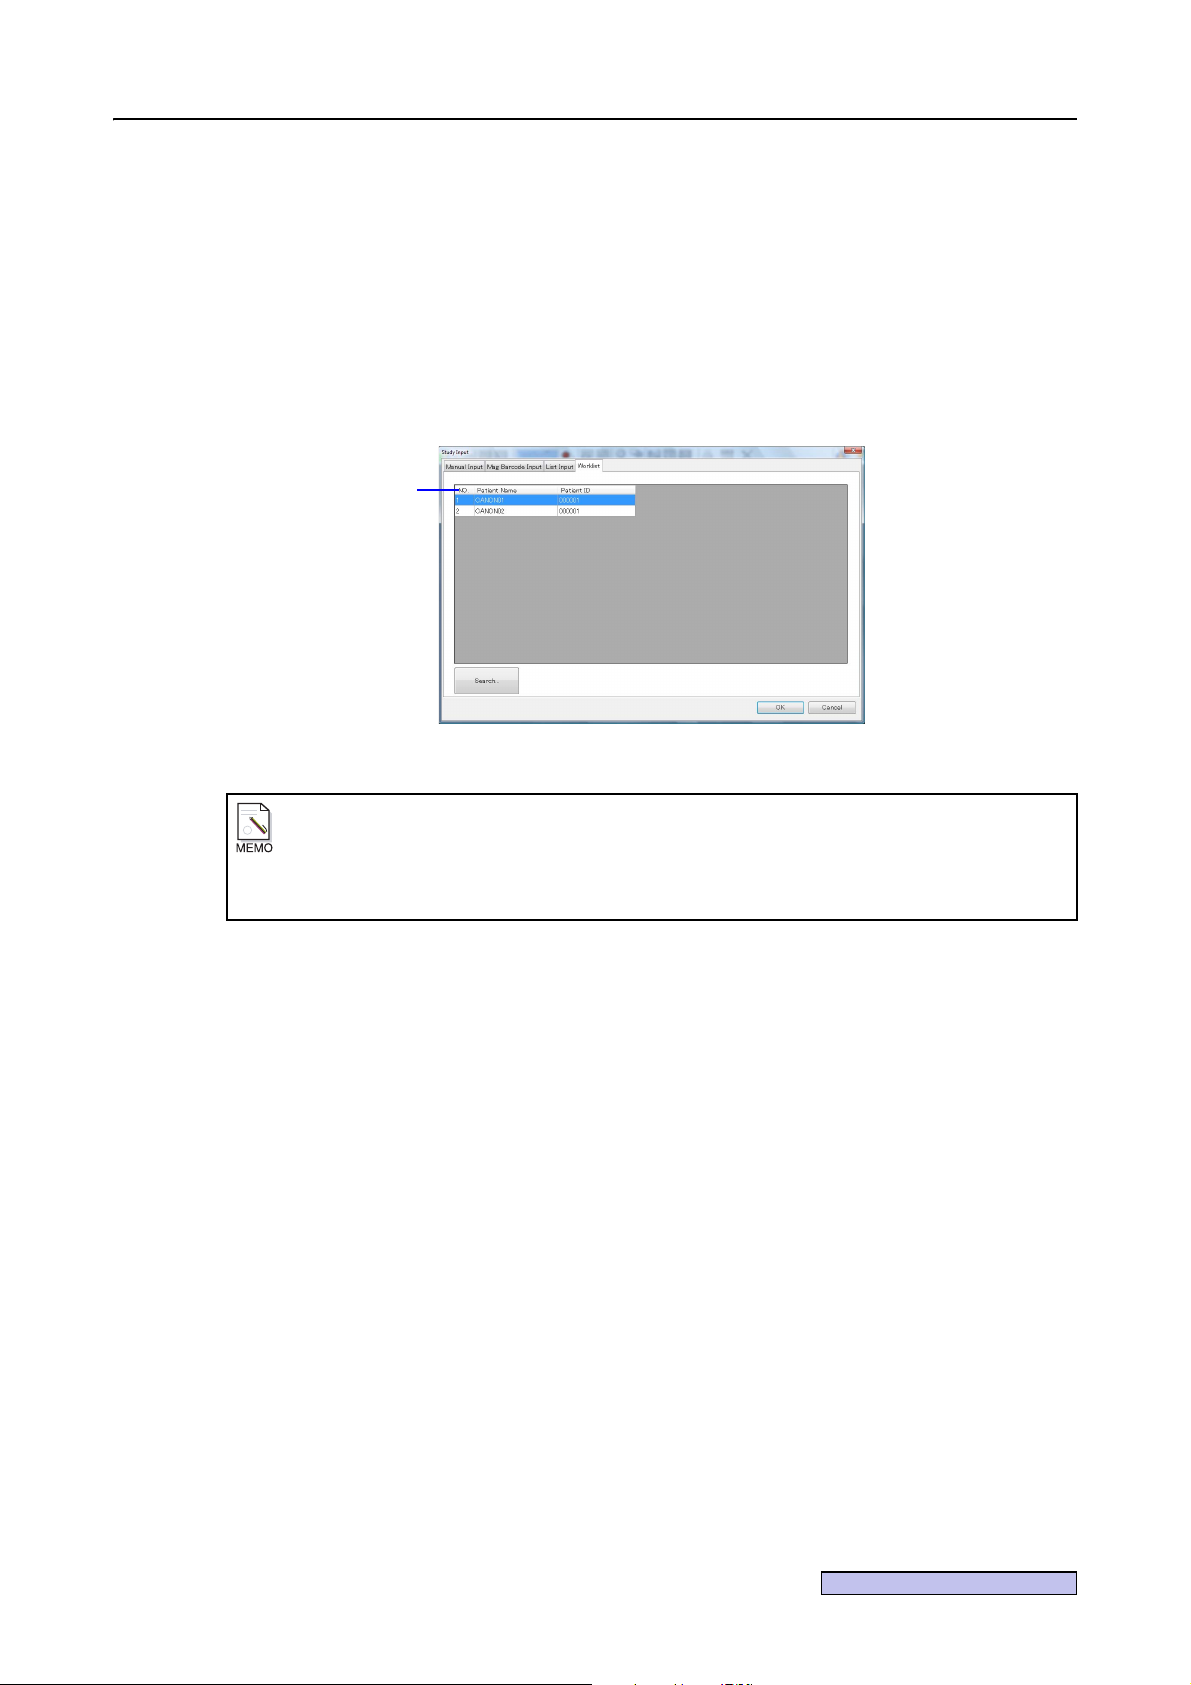
4.2.5 Worklist input
Header
Acquire the worklist from the worklist server.
Display the Study Input screen.
1
Click the Study icon, or click [Study] > [Study F1] from the menu bar.
If a tab other than Worklist is displayed, click the Worklist tab.
The worklist matching the search conditions set in 7.5.5.3 Setting the search conditions (see
page 89) is displayed.
4. Performing studies
Study Input screen (Worklist tab)
Concerning the worklist display
Up to 100 studies can be displayed.
When the item name of the header is clicked, the sequence in which the studies are displayed can
be changed. However, this does not apply to No.
-19-
4. Performing studies
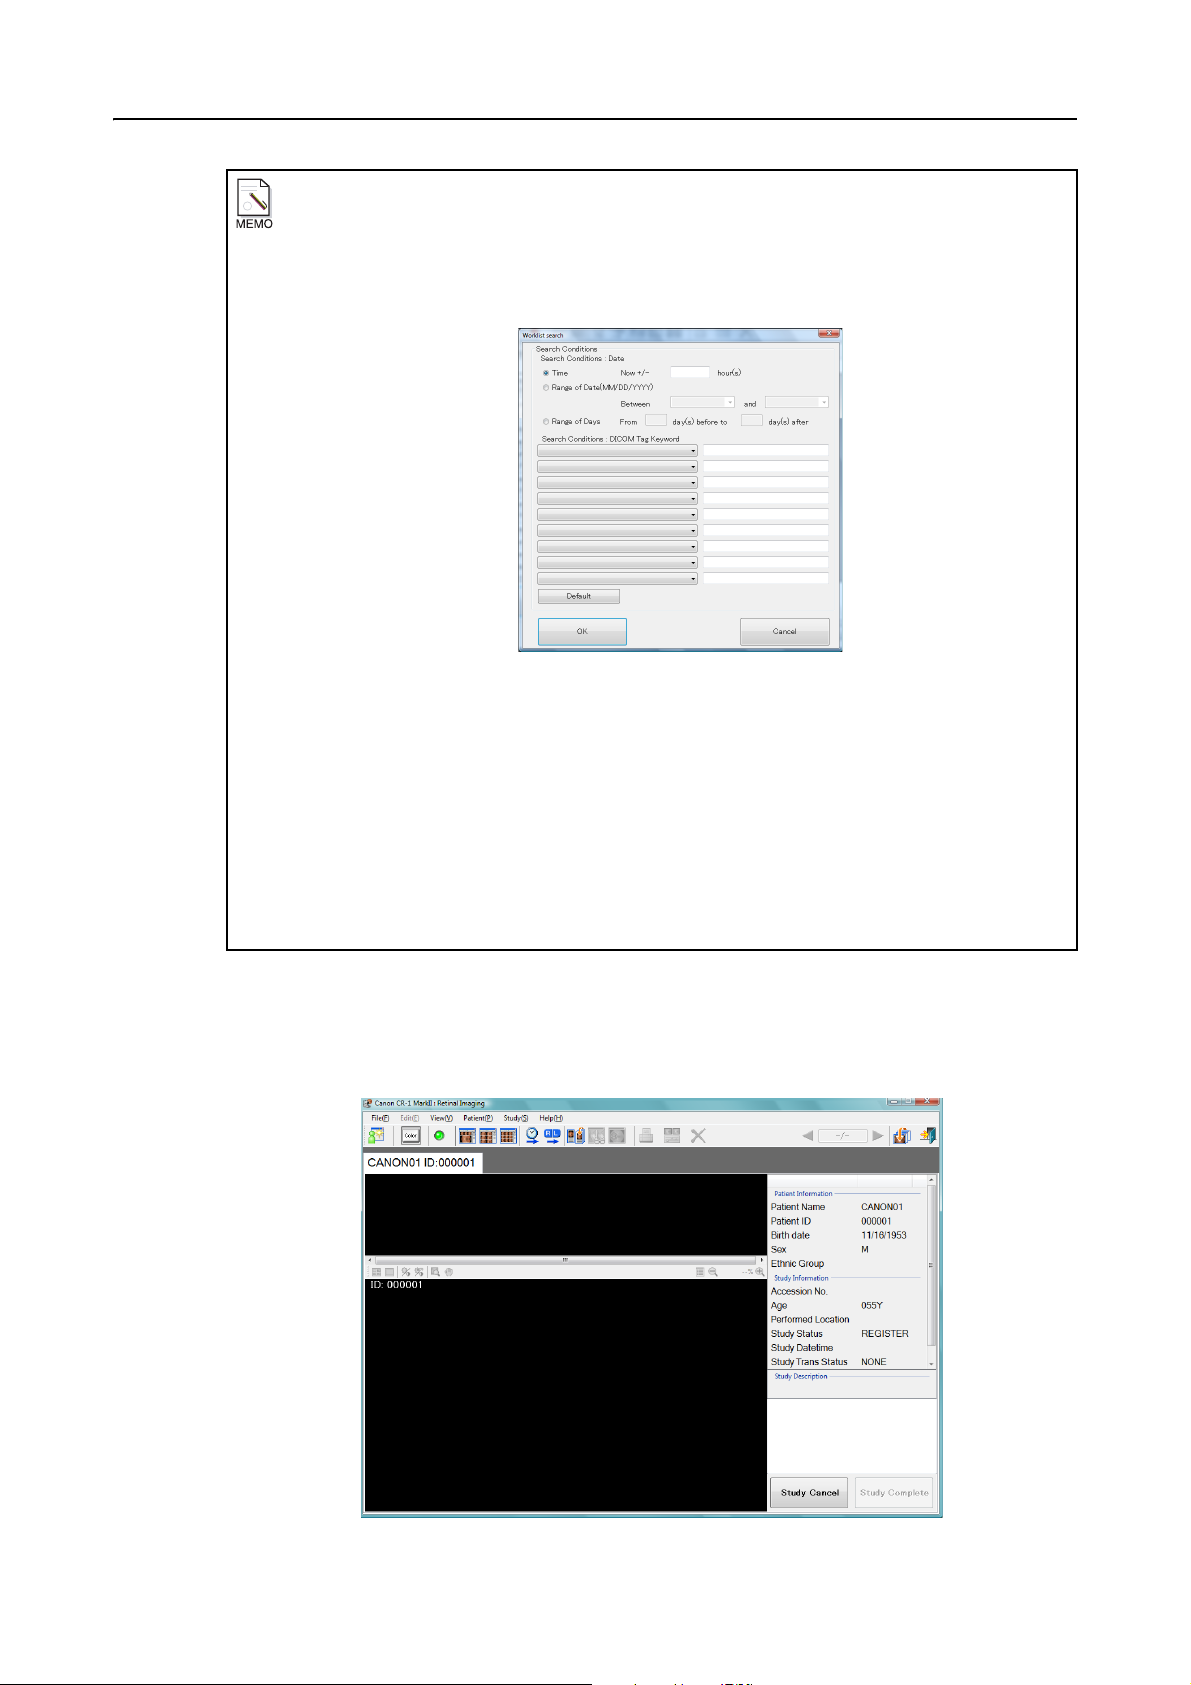
Concerning worklist server searches
If Display Worklist Search window has been checked in 7.5.5.3 Setting the search
conditions (see page 89), the Worklist search screen is displayed automatically.
To display the Worklist search screen manually, click [Search...] on the Study Input screen.
Worklist search screen
The search conditions can be changed on the Worklist search screen. Input the conditions, and
click [OK].
Among the changed search conditions, Patient ID, Patient Name, Accession No. and Requested
Procedure ID are saved until either the Study Input screen is closed or switching to another
screen. The other items are saved until either exiting the software or the settings are changed in
7.5.5.3 Setting the search conditions (see page 89).
When [Default] is clicked, the values which were set in 7.5.5.3 Setting the search conditions
(see page 89) will be input.
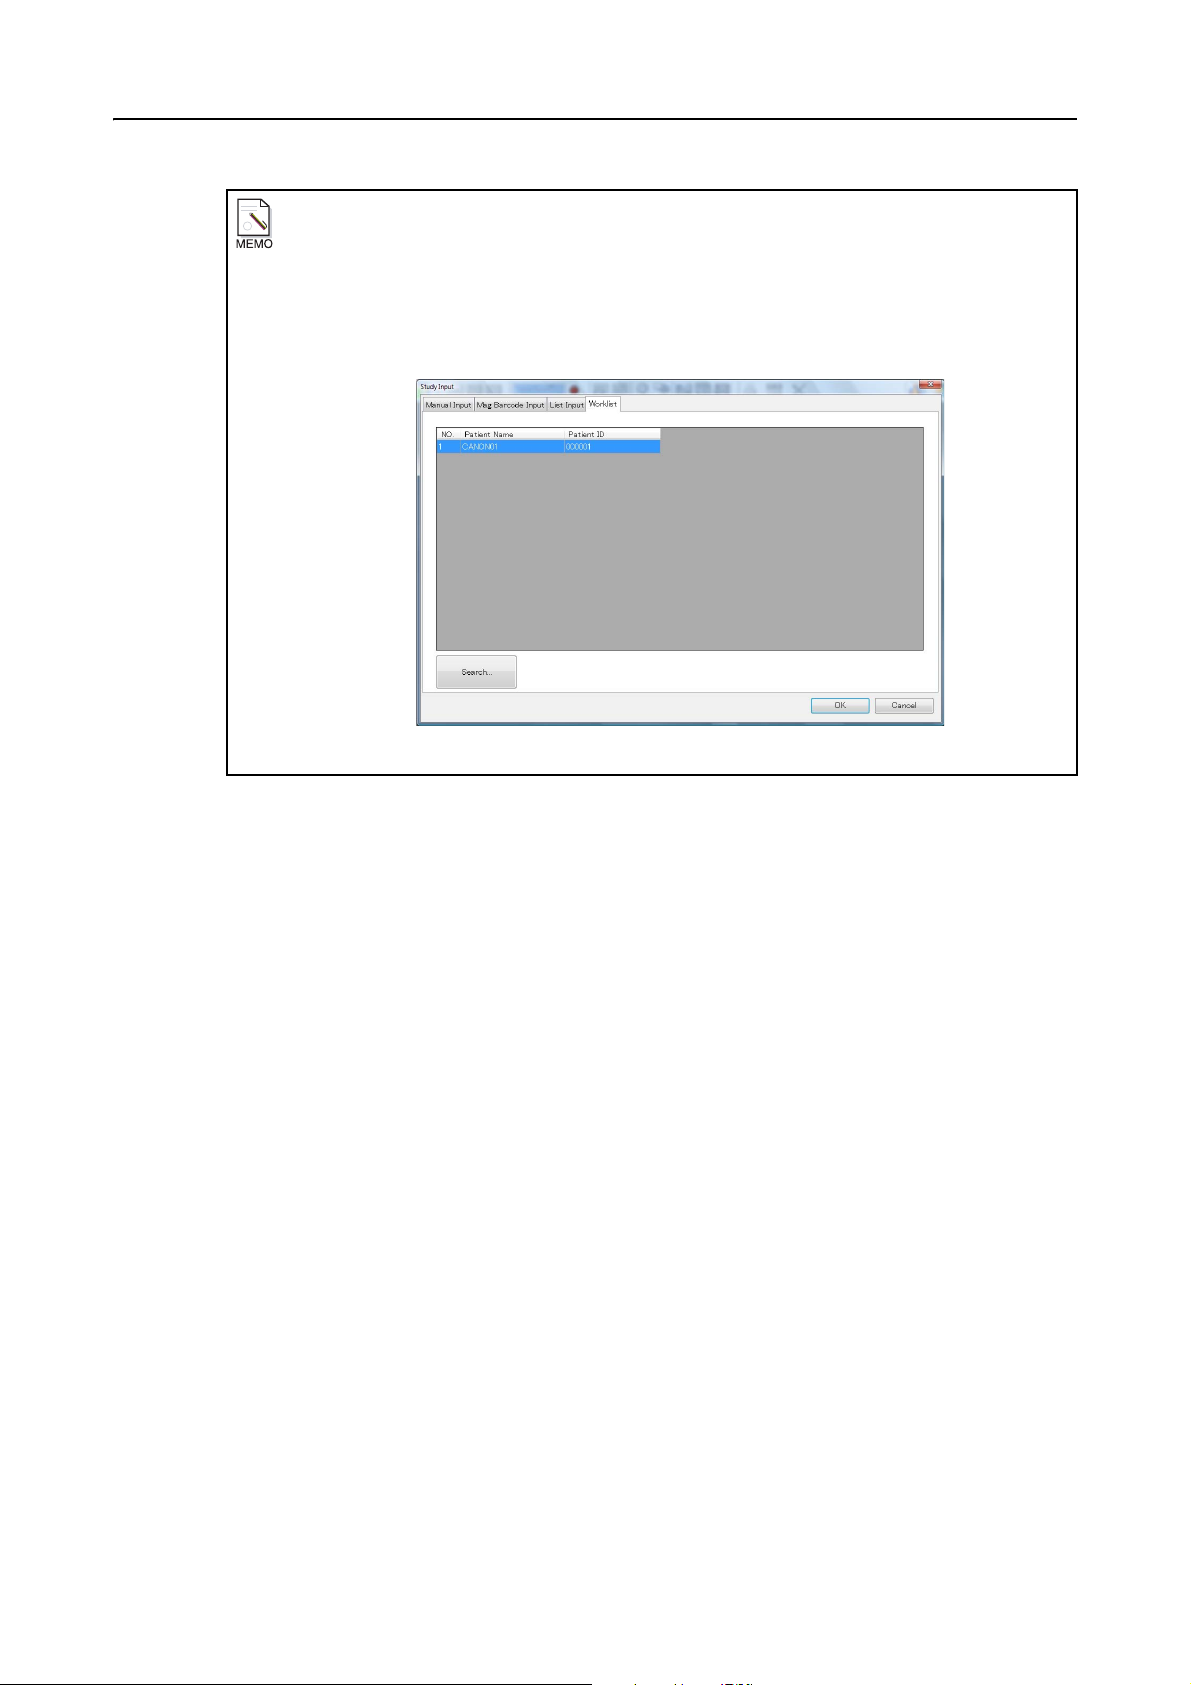
Display the main screen.
2
Click the worklist to be acquired, and then click [OK] or double-click the worklist.
The main screen is displayed, and the information of the acquired worklist is displayed.
Main screen
-20-
4. Performing studies
Searches using a magnetic card/barcode reader during worklist input
If a study is input from a magnetic card/barcode reader while the Worklist Input screen is being
displayed, a search of the worklist is performed again based on the current worklist search conditions
and study information that was input from the magnetic card/barcode reader, and the search results
are displayed in a list. If the Search screen is displayed, the search conditions will be changed.
Study Input screen (Worklist re-search results)
-21-
4. Performing studies
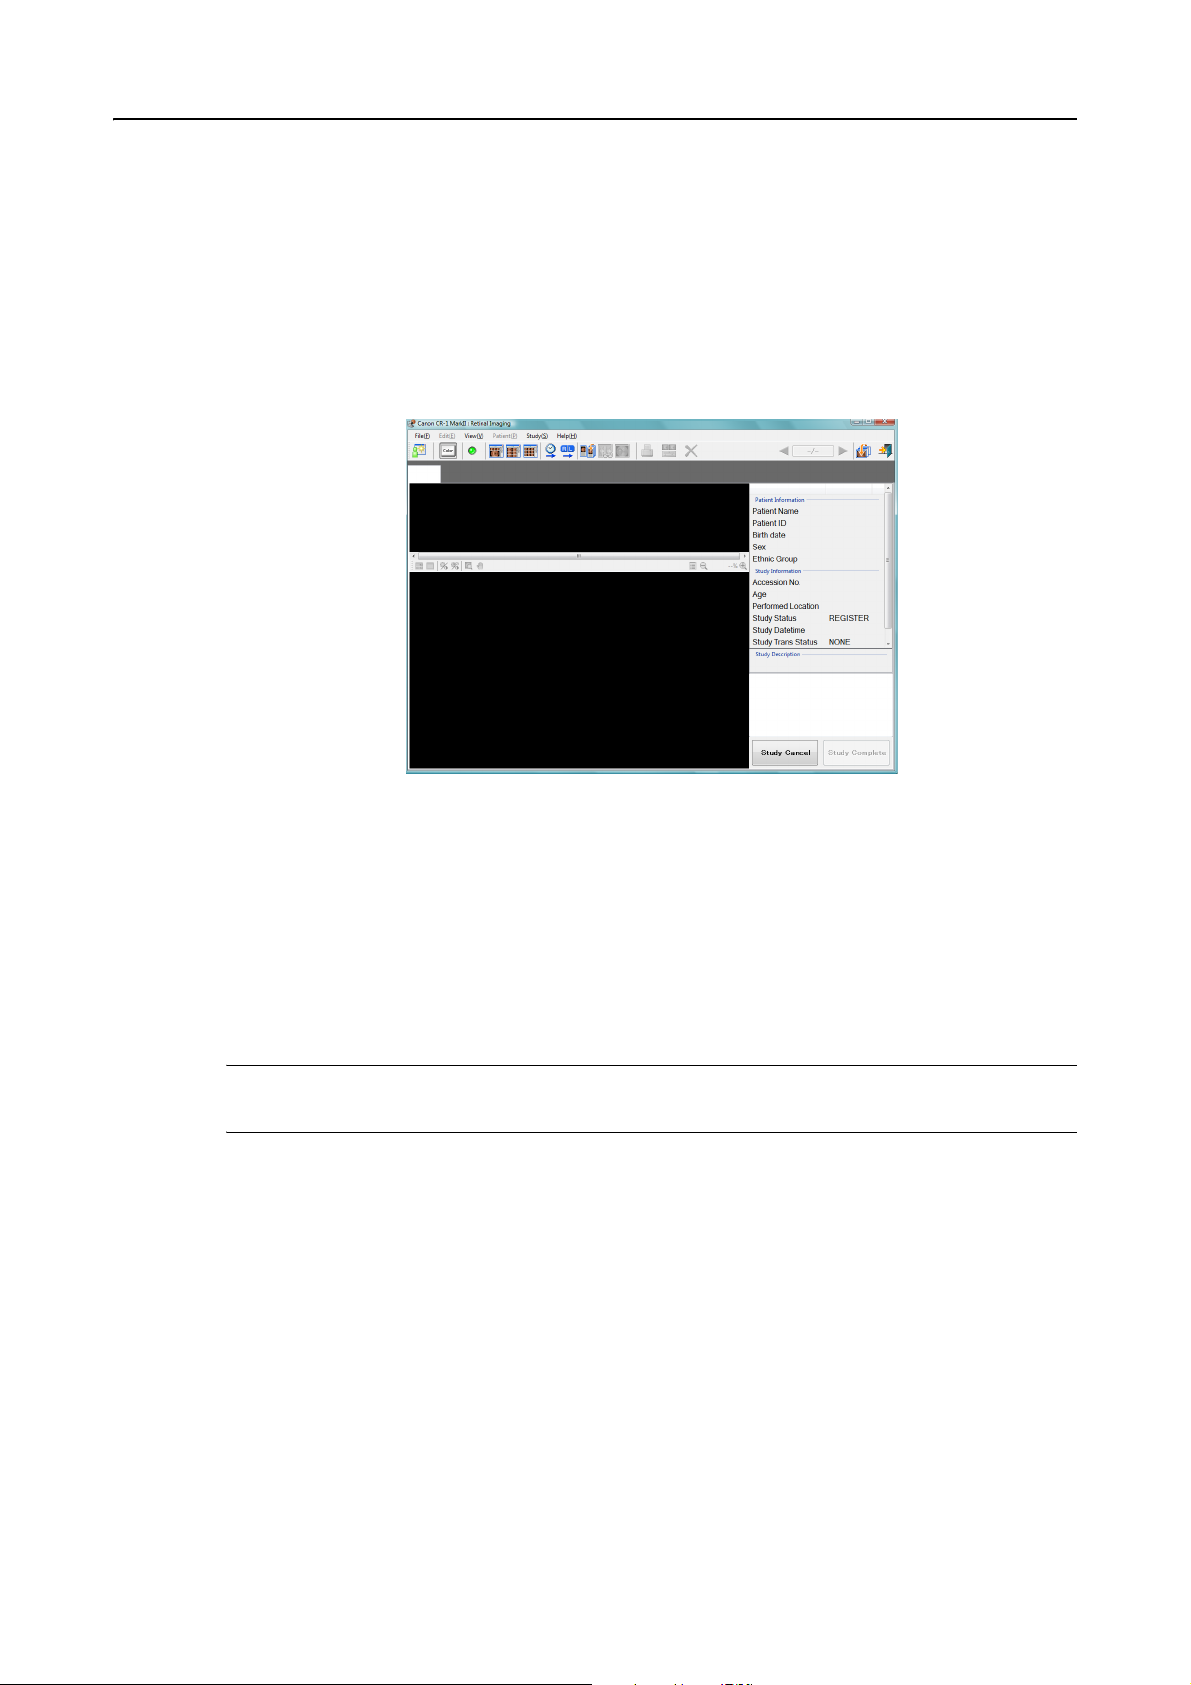
4.3 Starting a study without opening the Study Input screen
A study can be started as quick as thought skipping input of study information. Enter the patient
information when the study is completed.
Display the main screen.
1
Click [Study] > [Skip Study Input F5] from the menu bar, or press the F5 key on the keyboard.
The main screen is displayed with the Study tab left blank.
Skip Study Input main screen
Display the Study Input screen.
2
Refer to 4.4 Taking images (see page 23) and 4.5.1 Ending a study (see page 25) to perform
the study. Click [Study Complete] (see page 24), and the Study Input screen opens automatically.
Input the patient information.
3
Refer to 4.2.1 Methods of inputting the study (see page 10) to input the items, and click [OK]
to close the screen.
Note: When the setting for the Automatic Accession No. Assignation (see page 85) has been
made, Skip Study Input is disabled.
-22-
 Loading...