

Canon CP800 User Manual
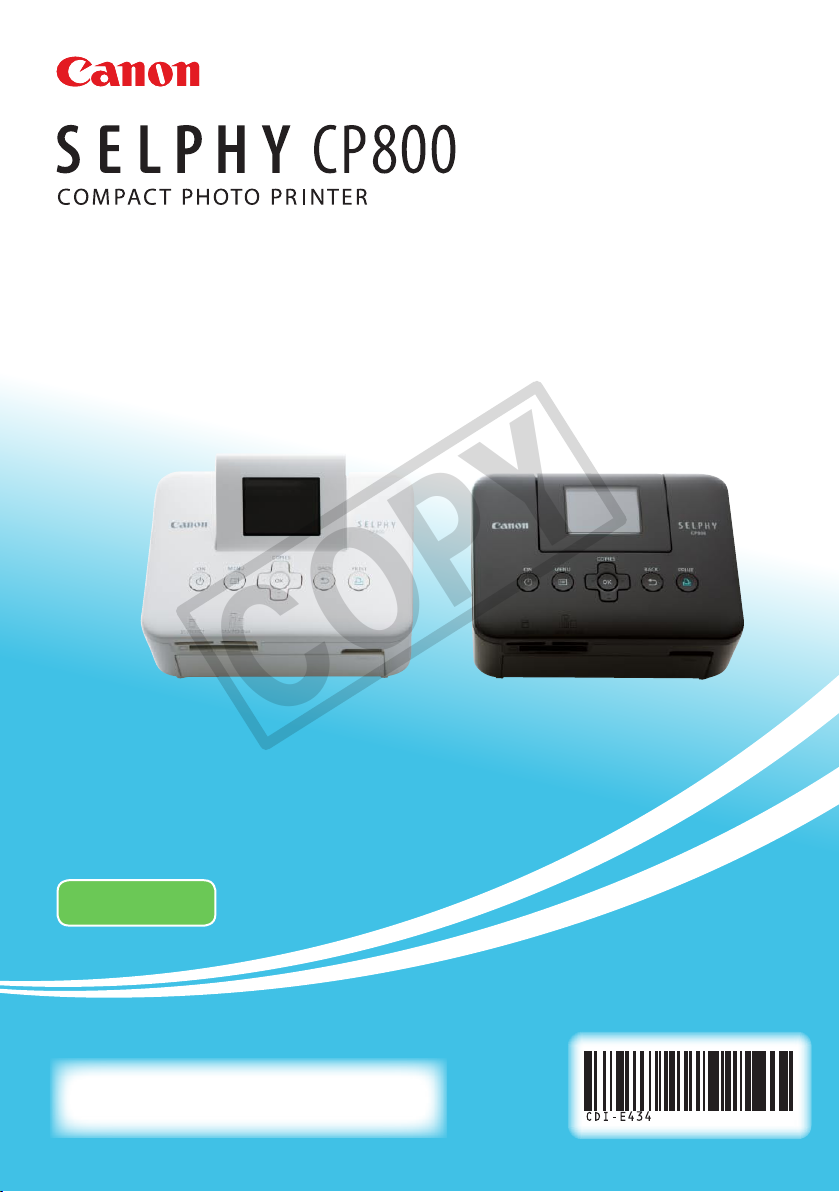
Printer User Guide
COPY
ENGLISH
Make sure you read this guide, including the “Safety
Precautions” section, before using the printer.
Store this guide safely so that you can use it in the future.
Package Contents
COPY
Check if the following items are included in your printer package, using the □ check boxes.
If anything is missing, contact the retailer where you purchased the printer.
SELPHY Printer Unit
□
Compact Power Adapter
□
CA-CP200 W
Power Cord
□
Paper Cassette (Postcard Size)
□
□
* Card size paper cassette may not be included depending on the region.
PCP-CP300
Printer User Guide (This Guide)
Paper Cassette (Card Size)*
□
PCC-CP300
Support Guide
□
□
COMPACT PHOTO
PRINTER Solution Disk
Warranty Card
□
Ink and Paper (Sold Separately)
Before using the printer, be sure to purchase a Color Ink Cassette/Paper Set separately.
Color Ink Cassette/Paper Set
Product Name Paper Size
Color Ink Cassette/Paper Set KP-36IP
(Postcard)
Color Ink Cassette/Paper Set KP-72IN
(Photo Paper)
Color Ink Cassette/Paper Set KP-108IN
(Photo Paper)
Color Ink Cassette/Paper Set KC-36IP
Color Ink Cassette/Label Set KC-18IF
(Full-page labels)
Color Ink Cassette/Label Set KC-18IL
(8-label sheets)
Some accessories may not be available depending on the region.
Postcard Size
Card Size
Number of
Possible Prints
36
72
108
36
18
18
Necessary Paper Cassette
Paper Cassette PCP-CP300
(Included with SELPHY)
Cassette PCC-CP300
Paper
CD-ROM:
2

Read This First
COPY
Warning Against Copyright Infringement
The images printed with this product should be intended for personal use. Do not print images that
infringe upon copyright laws without the prior permission of the copyright holder.
Warranty Limitations
This product’s warranty is only effective in the country of sale. If there is a problem with the printer
while abroad, please return it to the country of sale before proceeding with a warranty claim to a Canon
Customer Support Help Desk.
LCD Monitor (Screen)
The LCD monitor is produced with extremely high-precision manufacturing techniques. More than
99.99% of the pixels operate to specication. However, some pixels may occasionally misre or
appear as red or black dots. This has no effect on the printed image and does not constitute a
malfunction.
The LCD monitor may be covered with a thin plastic lm for protection against scratches during
shipment. If so, remove the lm before using the printer.
Conventions Used in this Guide
This printer will be referred to as “SELPHY” or “printer”.
The various types of memory cards that can be used in this printer are collectively referred to as “memory
cards”.
Icons are used in the text to represent SELPHY’s buttons. For details, refer to “Controls”
(p. 6).
Language that displays on the screen appears inside [ ] (square brackets).
: Things you should be careful about
: Supplemental information
(p. XX) : Reference pages (“XX” stands for a page number)
guide assumes all functions are at their default settings.
This
Table of Contents
Package Contents ________________________ 2
Ink and Paper (Sold Separately) _____________ 2
Read This
Conventions Used in this Guide _____________ 3
Safety Precautions _______________________ 4
Setting Up SELPHY _______________________ 5
Components Guide _______________________ 6
Information Displayed on the Screen _________ 7
Getting Started __________________________ 8
Setting the Display Language _______________ 11
Compatible Memory Cards and
Memory
Images That
Selecting and Printing Images _______________13
Printing All
First __________________________ 3
Card Slots _______________________12
Can Be Printed ________________12
Images ________________________15
Storing the Printed Photos _________________16
Cleaning Up After
Printing a Variety of Images _________________17
Printing From Your Computer ______________ 22
Installing and Starting the Software __________ 23
Using the Software to Print ________________ 25
Printing From Your Digital Camera __________ 27
Printing Images Using Digital Camera Specied
Settings (DPOF Print) ____________________ 28
Using the Battery Pack ___________________ 29
Printing From Your Mobile Phone ___________ 30
Troubleshooting __________________________31
Specications __________________________ 33
Handling Precautions ____________________ 34
Printing __________________16
3
Safety Precautions
COPY
Before using the product, please ensure that you read the safety precautions described below. Always
ensure that the product is used correctly.
The safety precautions noted on the following pages are intended to prevent injuries to yourself and other
or damage to the equipment.
persons,
Be sure to also check the guides included with any separately sold accessories you use.
Warning
Store this equipment out of the reach of children and infants.
Mistakenly putting the power cord around a child’s neck could result in asphyxiation.
Use only recommended power sources.
Do not attempt to disassemble, alter or apply heat to the product.
Avoid dropping or subjecting the product to severe impacts.
To avoid the risk of injury, do not touch the interior of the printer if it has been dropped or otherwise
damaged.
Stop using the product immediately if it emits smoke, a strange smell, or otherwise behaves
abnormally.
Do not use organic solvents such as alcohol, benzine, or thinner to clean the equipment.
Do not let the product come into contact with water (e.g. sea water) or other liquids.
Do not allow liquids or foreign objects to enter the printer.
This could result in electrical shock or re.
If liquid comes into contact with the product, unplug it from the outlet and consult your retailer or a Canon
Customer
This could result in electrical shock or re. Immediately stop using the equipment and distance yourself from it.
This could result in electrical shock or re.
Playing the CD-ROM(s) in an audio CD player (music player) could damage the speakers. It is also possible
to suffer hearing loss from listening with headphones to the loud sounds of a CD-ROM played on a music CD
player.
Support Help Desk.
Do not touch this printer or the power plug during thunderstorms.
Unplug the power cord periodically and wipe away any dust and dirt that has collected on the plug,
the exterior of the power outlet, and the surrounding area with a dry cloth.
Do not handle the power cord with wet hands.
Do not use the equipment in a manner that exceeds the rated capacity of the electrical outlet or
wiring accessories. Do not use if the power cord or plug are damaged, or not fully plugged into the
outlet.
Do not allow dirt or metal objects (such as pins or keys) to contact the terminals or plug.
Do not cut, damage, alter or place heavy items on the power cord.
Do not play the supplied CD-ROM(s) in any CD player that does not support data CD-ROMs.
Denotes the possibility of serious injury or death.
Caution
Do not stick any part of your hand into the printer interior.
Be sure to place SELPHY safely so as to avoid tripping over the power cord.
This could lead to injury or damage the printer.
Avoid using, placing or storing the printer in the following places.
Places subject to strong sunlight. Places subject to temperatures above 40 °C (104 °F).
Humid or dusty areas.
These could result in electrical shock, burns, re or other injuries.
High
temperatures may cause deformation of the adapter or printer casing.
Denotes the possibility of injury.
Places subject to strong vibrations.
4

Caution
COPY
Unplug the product from the power outlet when you are not using it.
Do not place anything, such as cloth, on top of the printer while in use.
Leaving the unit plugged in for a long period of time may cause it to overheat and become distorted, resulting
in re.
Denotes the possibility of damage to the equipment.
Setting Up SELPHY
Place SELPHY on a stable and even surface, such as a
More than the
length of the
paper
10 cm (4 in.)
or
more
10 cm (4 in.)
more
or
table. Never place it on an unstable or tilted surface.
Keep SELPHY at least 1 m (3 ft.) from devices emitting
electromagnetic waves or strong magnetic elds.
Make sure there is at least 10 cm (4 in.) of free space
around SELPHY.
Since paper will pass in and out of SELPHY during
printing, make sure the space behind the printer is greater
than the length of the paper.
Never place SELPHY close to motors or other devices that generate strong electromagnetic elds.This
may damage the printer or cause it to malfunction.
Do not place near a television or radio. This may cause the printer to malfunction.
5
Components Guide
COPY
Card Slots (p. 12)
Paper Cassette
Compartment (p. 10)
Paper Cassette
Compartment Cover (p. 10)
USB Terminal for Digital Camera/
USB Flash Memory Connection
(pp. 14, 27, 30)
Battery/Battery Cover
Lock (p. 29)
Battery Cover (p. 29)
(Air vents are behind
the battery cover (p. 34))
Paper Ejection Slot
*
Security cables, such as a Kensington lock, can be attached to this slot.
Controls
Ink Cassette Lock (p. 14)
Ink Cassette Compartment (p. 10)
Ink Cassette Compartment Cover
(p. 10)
USB Terminal for Computer
Connection (p. 24)
DC IN (Power Input) Terminal
(p. 10)
Security Slot*
Icons Used in This
Guide
— Screen (LCD Monitor) Displays images, settings screens, or error messages (p. 32).
q
k
o
u
d
l
r
v
p
6
Name Function
Power Button Turns SELPHY on or off (p. 11).
Menu Button Displays the menu screen (p. 11).
OK Button Sets
Up/+ Copies Button
Down/– Copies Button
Left Button
Right Button
Back Button Restores the previous screen (p. 7), cancels printing (p. 14).
Print Button Starts printing (p. 14).
the selected item.
Species number of copies, selects items to set.
Switches images, changes settings.
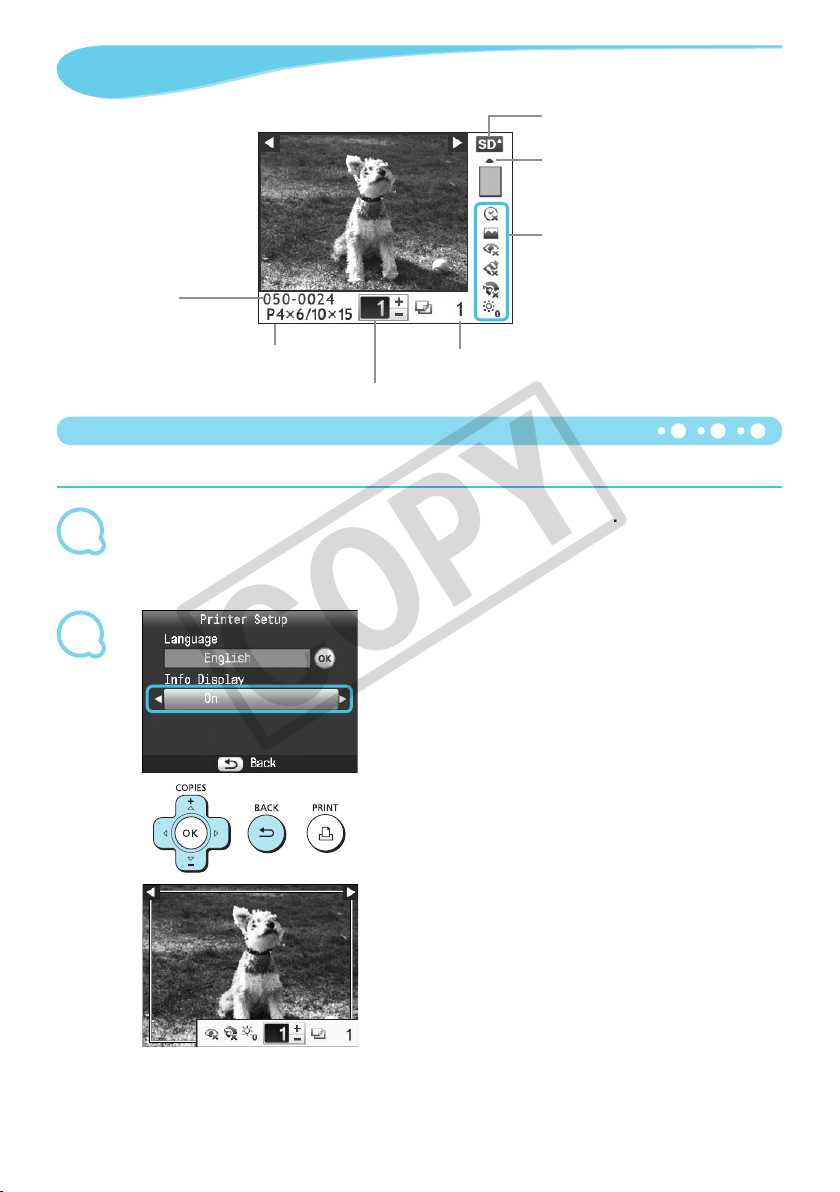
Information Displayed on the Screen
COPY
Memory card slot (p. 12) currently
in use (An SD card is used in this
example)
orientation
Paper
settings
Print
(Settings that are not available are
grayed out)
File number
ink cassette type
Installed
(Postcard size is used in this example)
Number of copies for the displayed image
Hiding Information Displayed on the Screen
You can hide the information displayed on the screen and view images at a larger size.
Total number of images to be printed
(pp. 18 – 21)
1
2
Display the settings screen.
Follow Steps 1 – 3 on p. 11.
Make the setting.
Press the ud buttons to select [Info Display].
Press the l r buttons to select [Off], then press the v
button to complete the setting.
Pressing the v button again will restore the image
display screen.
The image will display full screen, and a frame that
indicates the printing area will appear.
7
Getting Started
COPY
Preparations for printing images. A Postcard size Color Ink Cassette/Paper Set (sold separately) (p. 2) will be
used as an example, however Color Ink Cassette/Paper Sets other than Postcard size may also be used in
the same way to prepare for printing.
Preparing the Ink Cassette
Check the ink cassette.
Check that the paper size and the size shown on the color
ink cassette (Card size, Postcard size etc.) match.
Check that the ink sheet is taut with no slack. If the ink
sheet is slack, push and turn the sprocket as shown in the
illustration.
If you overwind the ink sheet, it may not be possible to
use all the paper for printing and the ink sheet may tear.
Ink sheet
Do not touch or pull on the ink sheet. Do not touch the ink cassette with wet or sweaty hands. You may not
be able to print if the ink sheet is damaged, dirty or wet.
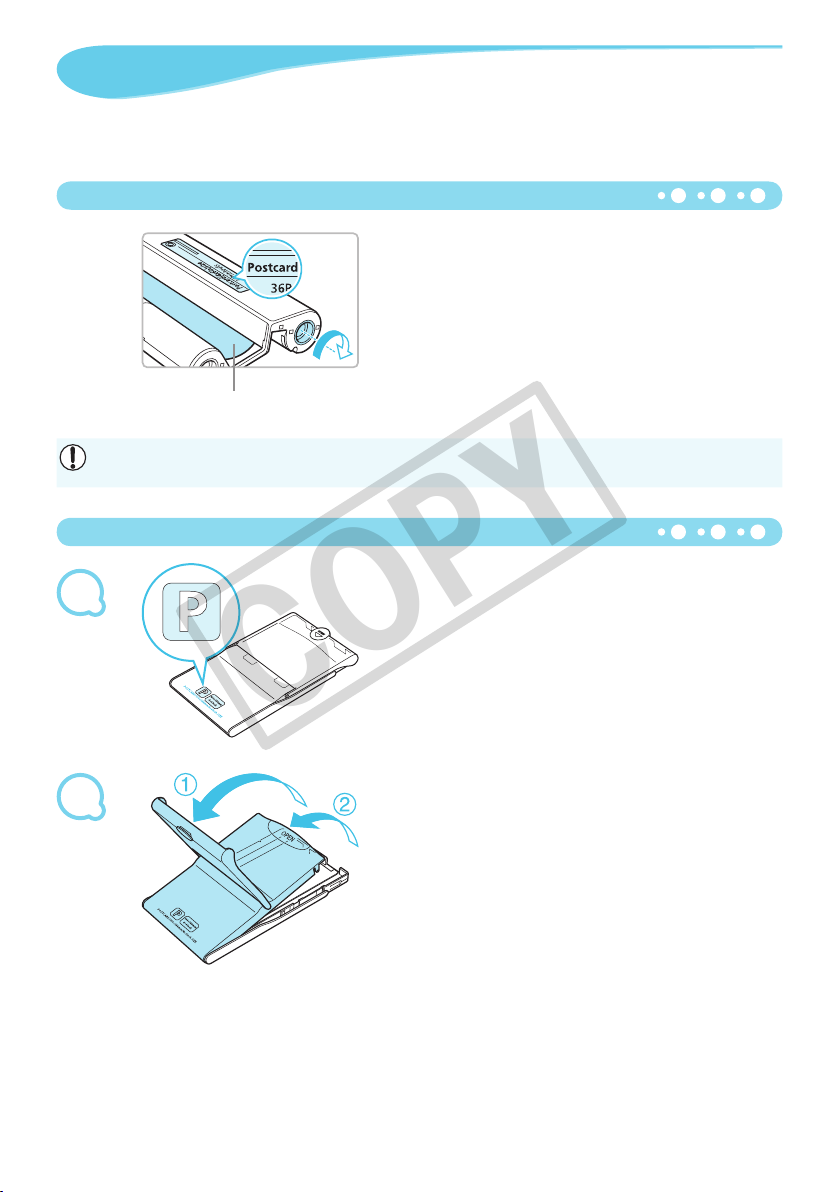
Preparing the Paper Cassette
Check the paper size.
1
Check that the prepared ink cassette and the size shown
on the paper cassette (Card size, Postcard size, etc.)
match.
2
8
Open the lid.
There are two steps to open the lid. Open the outer lid ()
rst, then open the inner lid ().
3
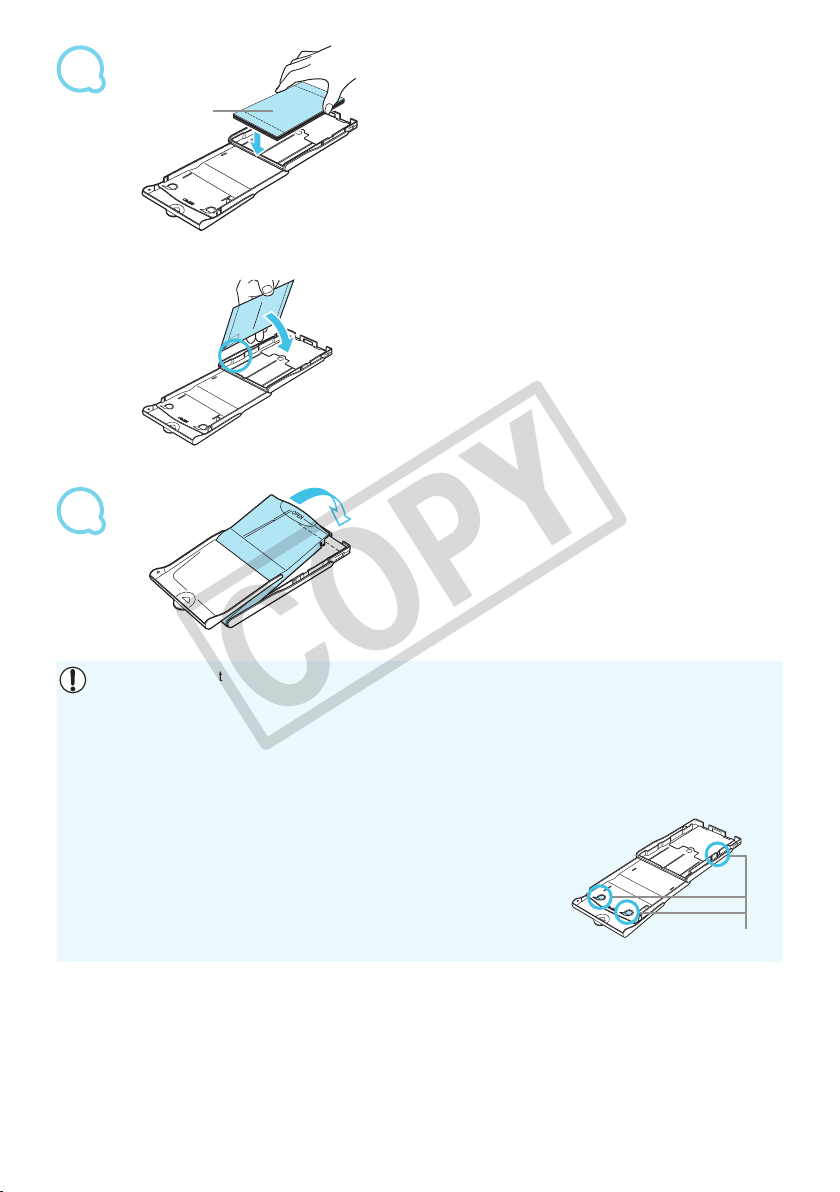
COPY
Shiny side
Set the paper.
Set the paper into the paper cassette that you prepared.
You can place up to 18 sheets in the paper cassette.
Inserting 19 or more sheets may damage the printer or
cause malfunction.
Hold the paper as shown in the illustration, with the shiny
side facing up and put it into the paper cassette. Do not
touch the print side (shiny side) of the paper with your
ngers. This may prevent you from making clean prints.
If a protective sheet is included with the paper, remove it
and
set the paper only into the cassette.
When making Postcard size prints that have a section
for pasting a stamp, insert the paper so that the stamp
section is facing the direction shown in the illustration.
4
Use only dedicated paper for use in SELPHY CP series printers included in the genuine Canon brand
Color Ink Cassette/Paper Sets. Regular printing paper, regular postcards, or dedicated paper for SELPHY
ES series printers cannot be used.
Never do the following, as it may result in failure or cause the printer to malfunction:
reverse the paper (the shiny side is the print side)
-
bend or separate the paper at the perforations before printing
-
use label sheets that have begun to peel or label sheets with portions peeled back
-
write on a sheet before printing
on already printed paper
print
-
reuse a spent ink cassette
-
Do not touch the springs of the paper cassette.
If the springs are bent or deformed, paper will not feed correctly into
SELPHY.
Do not touch or scratch the print surface (shiny side), or touch the
paper with wet hands. If the print surface becomes dirty or wet, you
will not be able to make clean prints.
Close the inner lid until it clicks into place.
Leave the outer lid open during printing.
Close the lid.
Spring
9
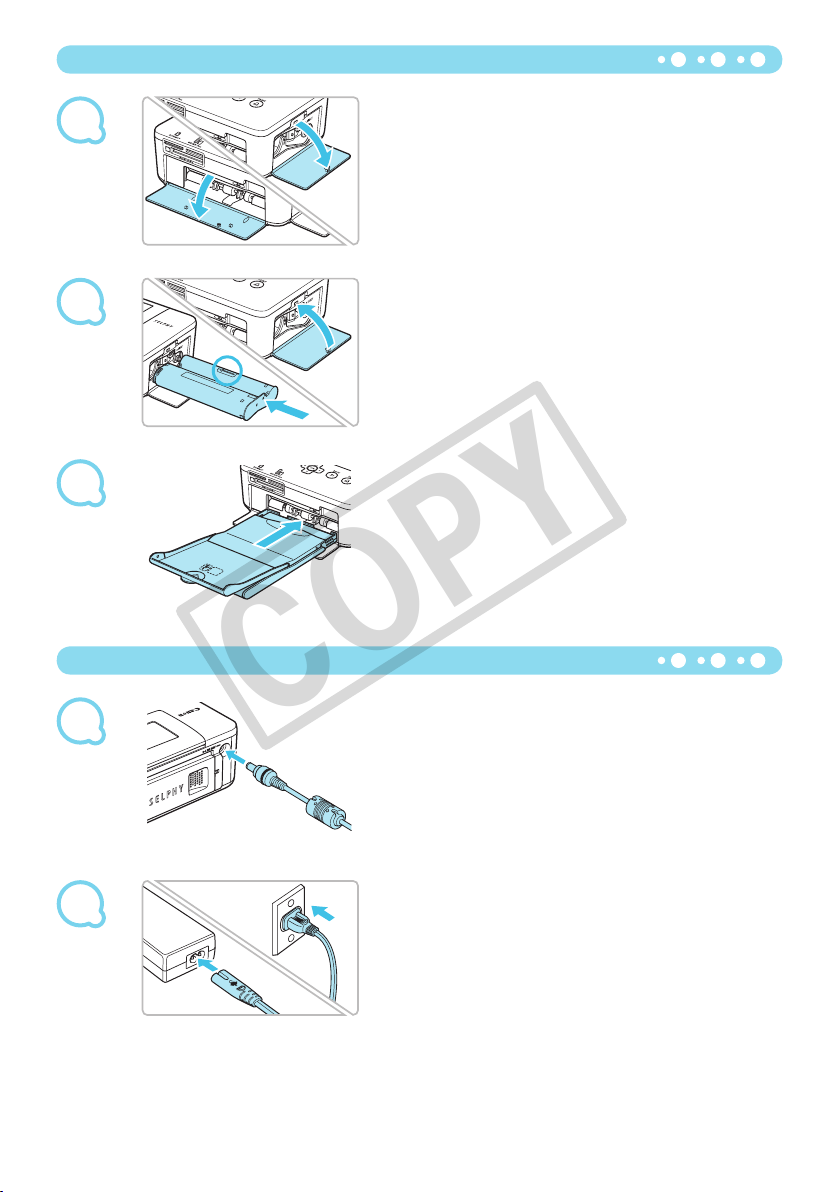
Inserting the Ink and Paper Cassettes
COPY
1
2
3
Connecting SELPHY
Open the covers.
Open the covers for the ink cassette and paper cassette
compartments.
Insert the ink cassette.
Insert the ink cassette into the printer in the direction
indicated by the arrow on the cassette until it clicks and
locks into place.
Close the ink cassette compartment cover.
Insert the paper cassette.
Make sure that the outer lid is open (p. 8) and insert the
paper cassette all the way into the compartment.
10
1
2
Plug the adapter cord into SELPHY.
Fully insert the adapter plug into SELPHY.
Connect the power cord.
Connect the power cord to the compact power adapter,
then plug the other end into a power outlet.
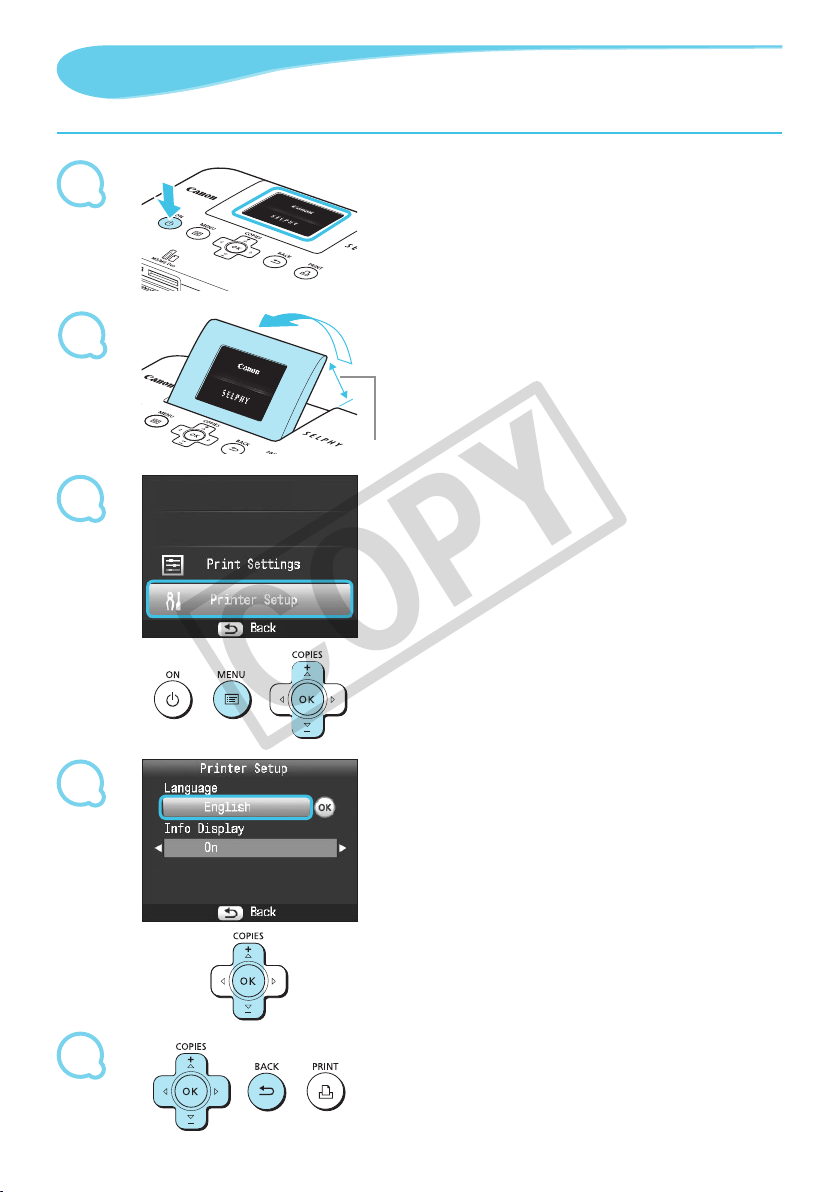
Setting the Display Language
COPY
You can change the language displayed in the LCD monitor menus and messages.
1
2
3
Turn on SELPHY.
Press and hold the q button until the screen shown at
the left displays.
To turn the power off, press and hold the q button again
until the displayed screen changes or turns off.
Adjust the screen for ease of viewing.
Raise the LCD monitor and adjust until the screen is
easily visible.
Do not raise the LCD monitor more than 45° as this may
result in damage or malfunction.
Approx. 45°
Display the settings screen.
Press the k button.
Press the ud buttons to select [Printer Setup], then
press the o button.
4
5
Display the language settings screen.
Press the ud buttons to select [Language].
Press the o button.
Select a language.
Press the
press the o button.
Pressing the v button twice will restore the screen in
Step 1.
udl r
buttons to select a language, then
11
 Loading...