

Page 1
Getting Started
ENGLISH
Guide de mise en route
FRANÇAIS
CEL-ST4JA2M0© CANON INC. 2012
Page 2
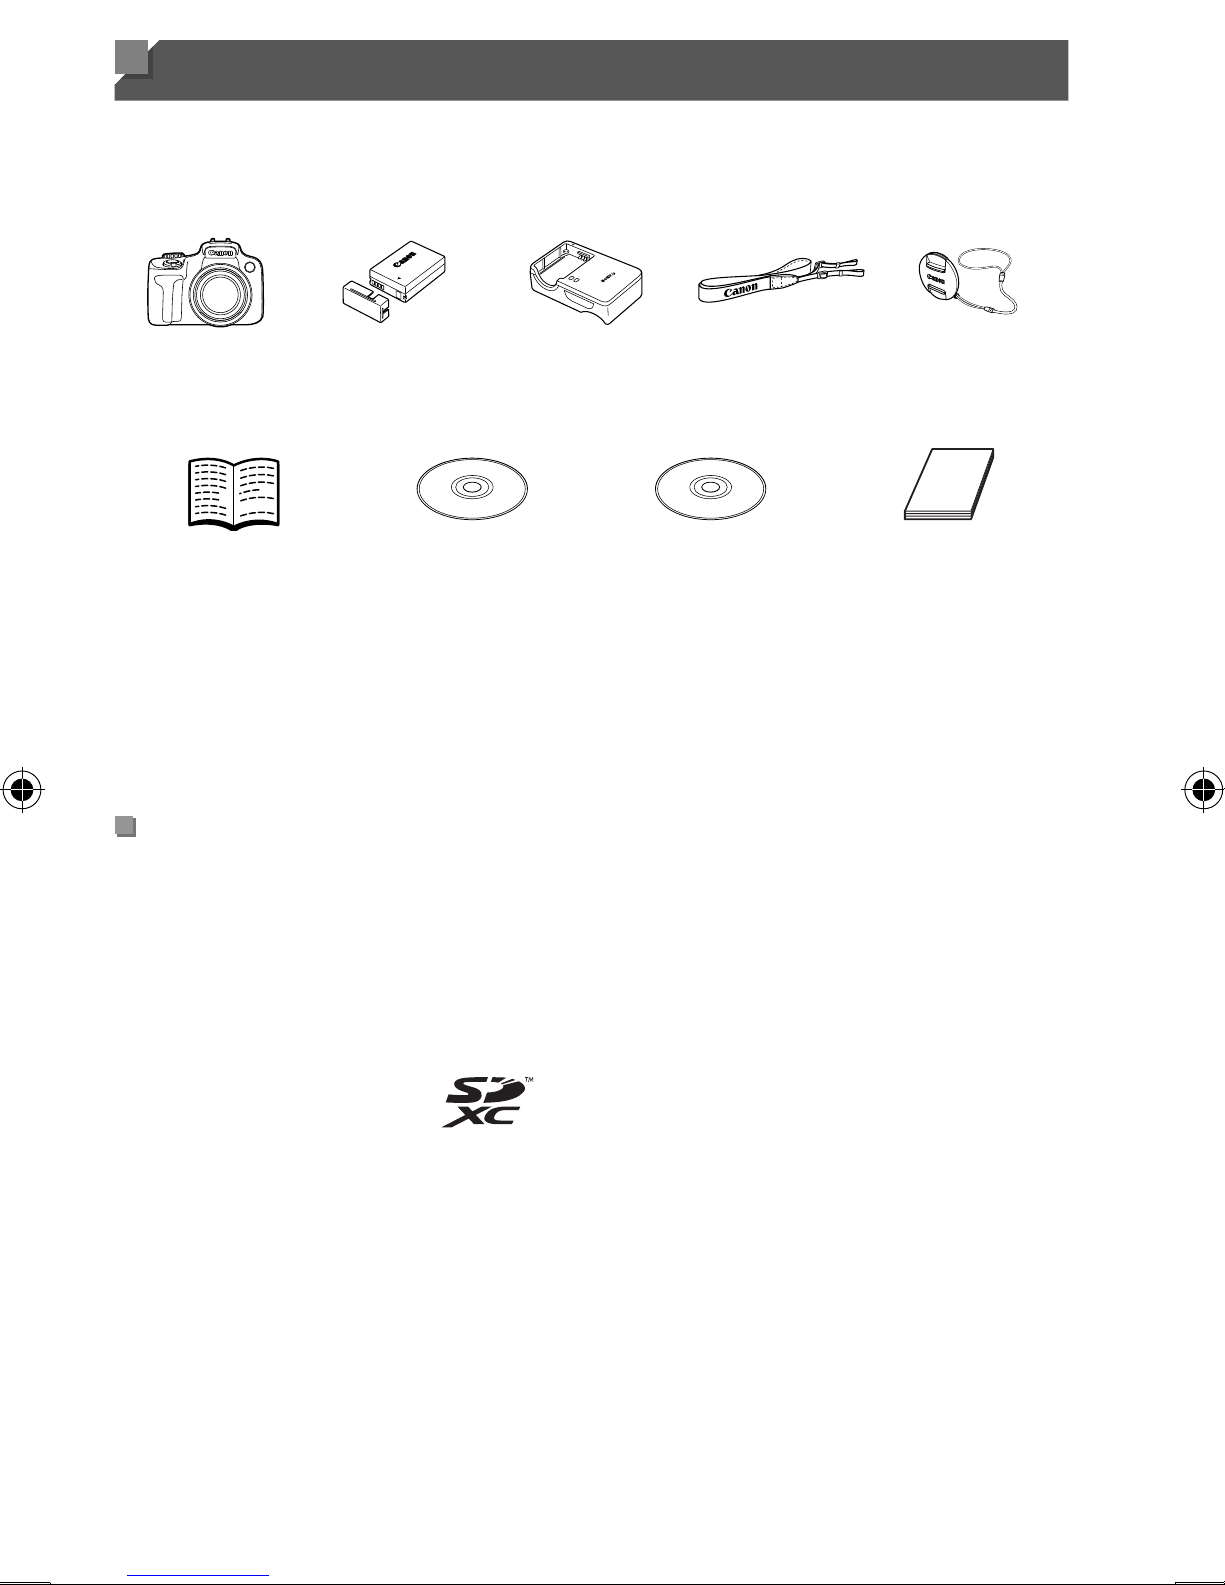
Package Contents
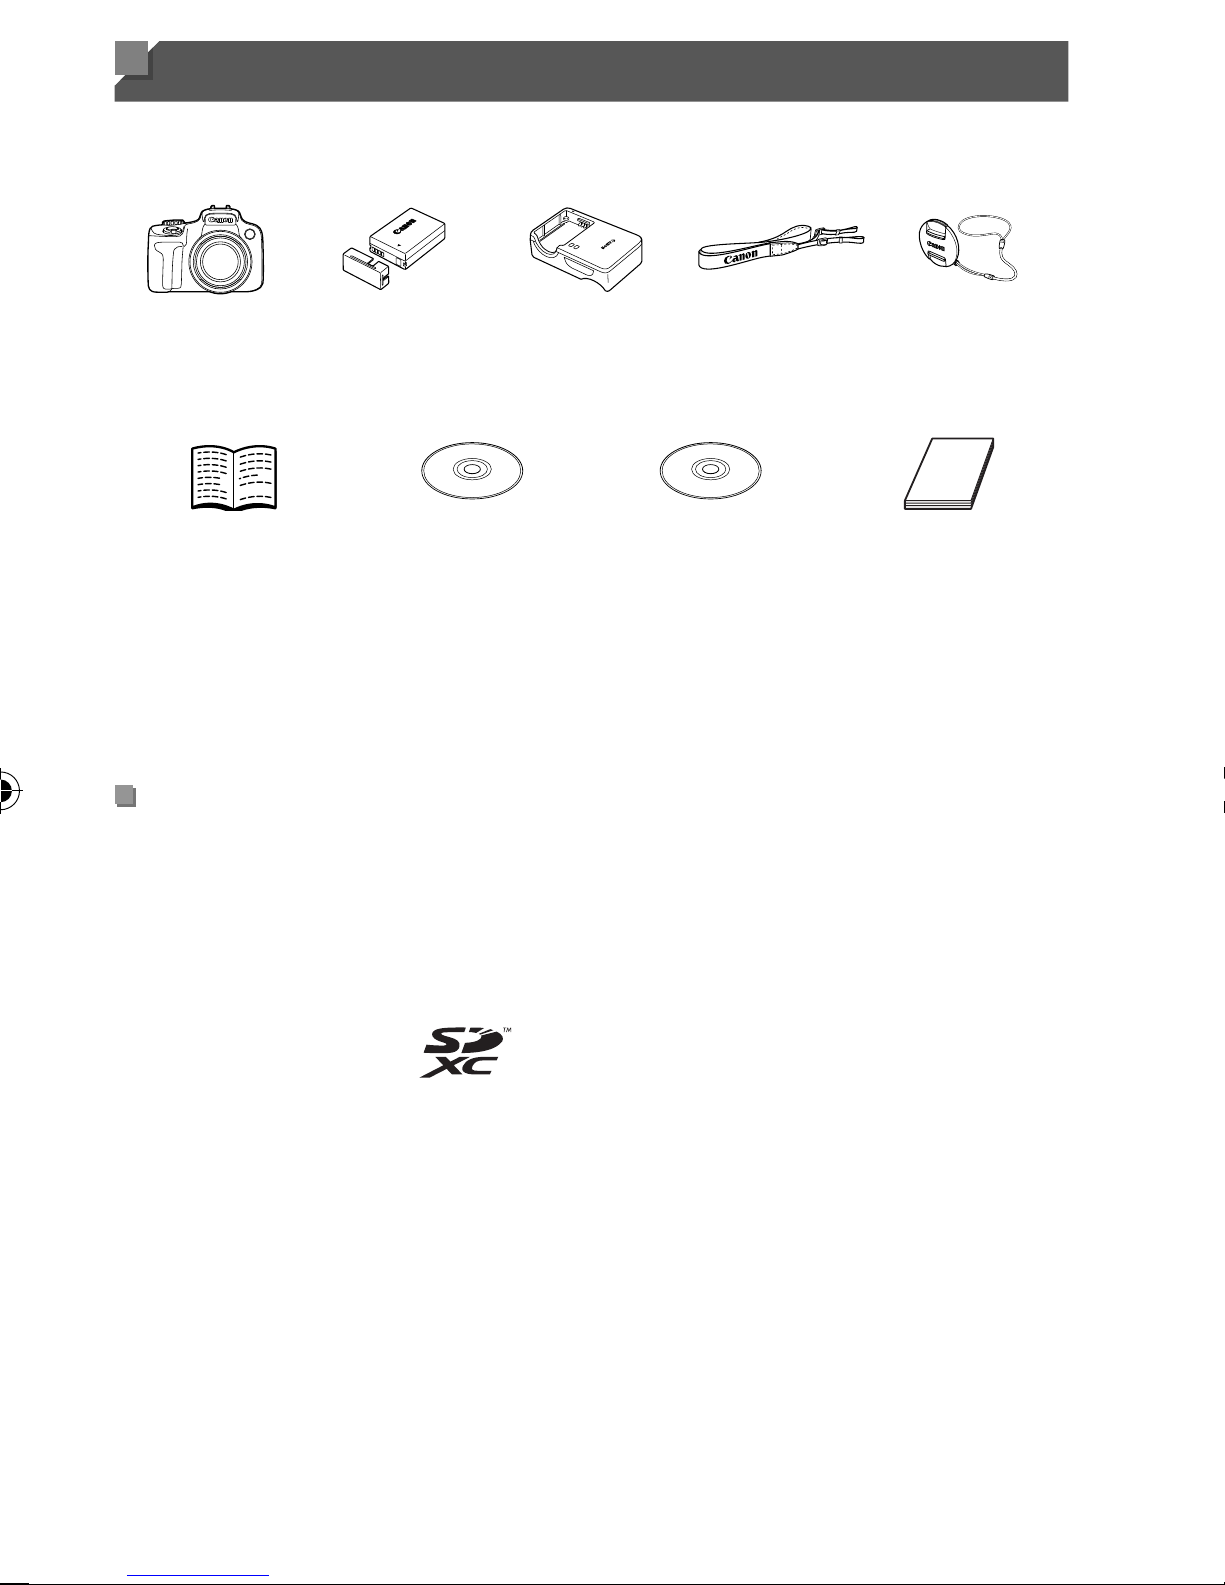
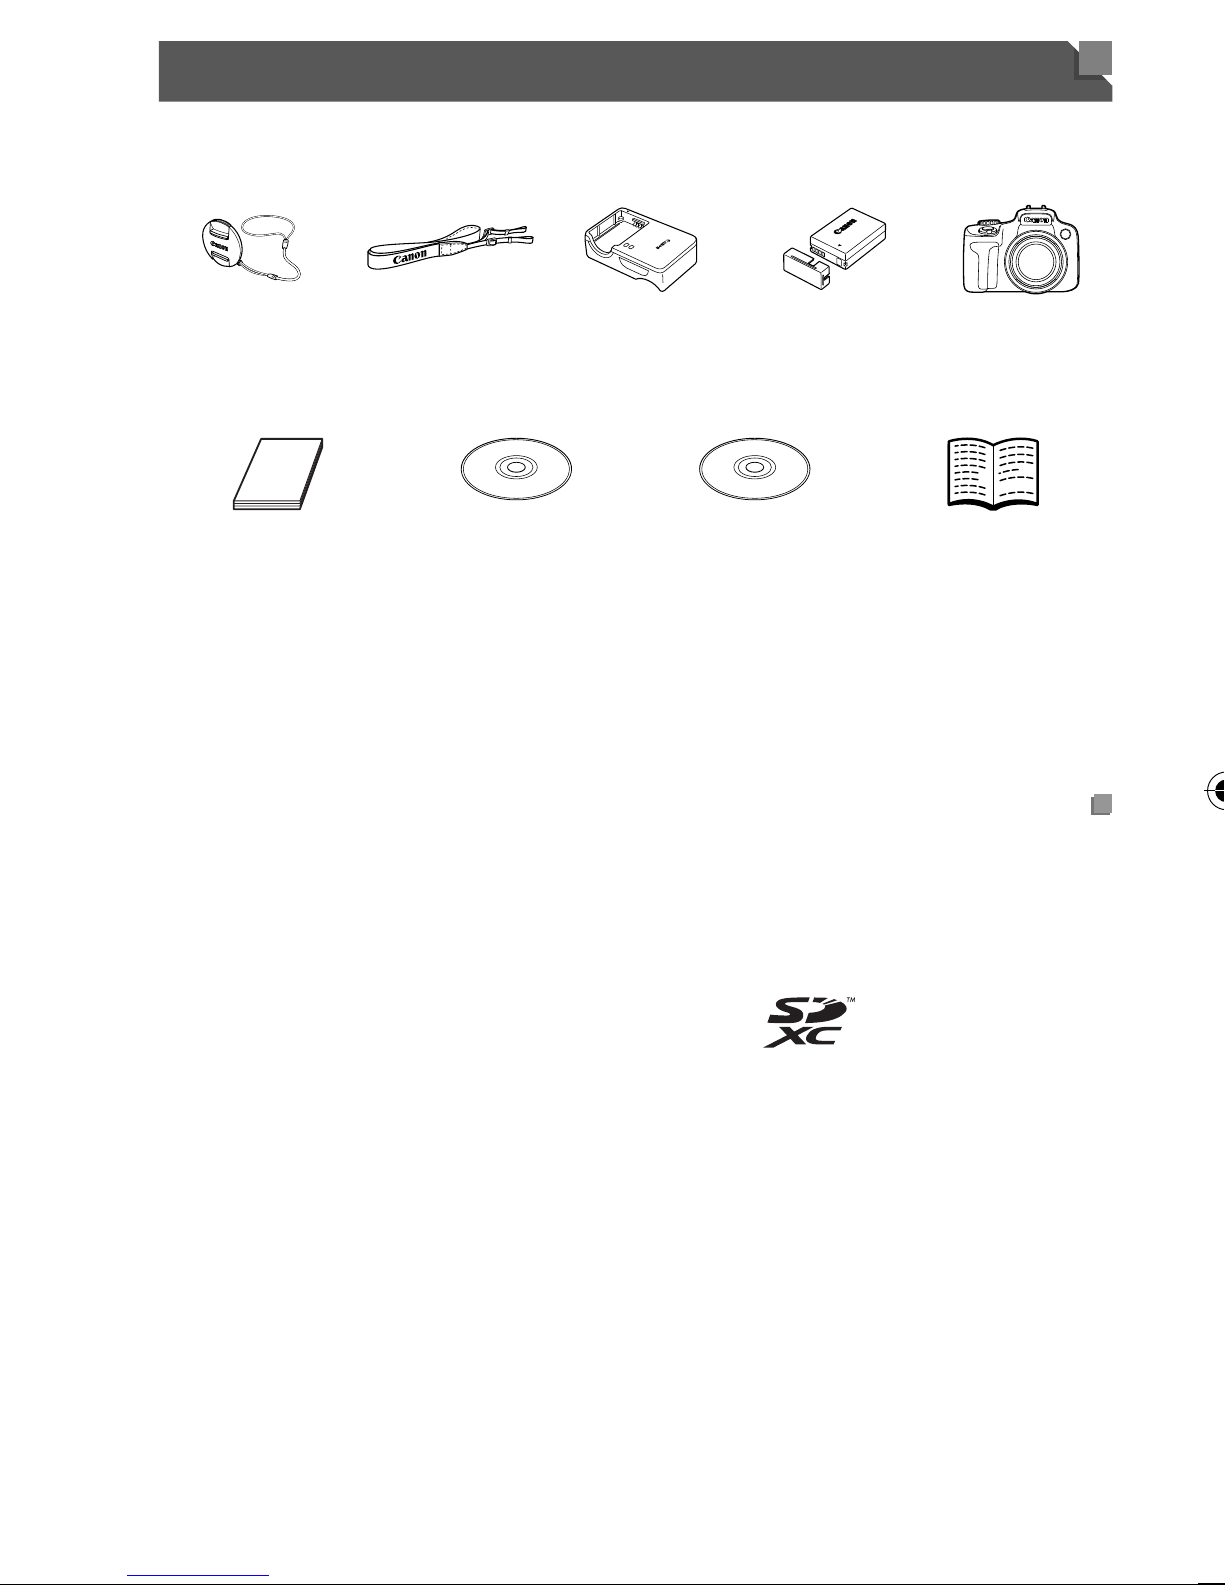
Before use, make sure the following items are included in the package.
If anything is missing, contact your camera dealer.
Camera
Getting Started
(This Guide)
*1 For attachment instructions, refer to the Camera User Guide on the DIGITAL
CAMERA Manuals Disk.
*2 Contains manuals (=
*3 Contains software. For installation instructions, refer to the Camera User Guide, and
for instructions on use, refer to the Software Guide.
Battery Pack
NB-10L (with
terminal cover)
DIGITAL CAMERA
Manuals Disk
3).
Battery Charger
CB-2LCE
DIGITAL CAMERA
*2
Solution Disk
Neck Strap
NS-DC11
*1
*3
Lens Cap
(with cord)
Warranty System
Booklet
*1
Compatible Memory Cards
No memory card is included. Purchase one of the following kinds of card
as needed. These memory cards can be used, regardless of capacity. For
details on the number of shots and recording time per memory card, refer to
“Specifications” in the Camera User Guide.
• SD memory cards
*
• SDHC memory cards
• SDXC memory cards
• Eye-Fi cards
* Conforms to SD specifications. However, not all memory cards have been verified to
work with the camera.
About Eye-Fi Cards
This product is not guaranteed to support Eye-Fi card functions (including
wireless transfer). In case of an issue with an Eye-Fi card, please check
with the card manufacturer.
Also note that an approval is required to use Eye-Fi cards in many countries
or regions. Without approval, use of the card is not permitted. If it is unclear
whether the card has been approved for use in the area, please check with
the card manufacturer.
2 ٢
*
*
Page 3
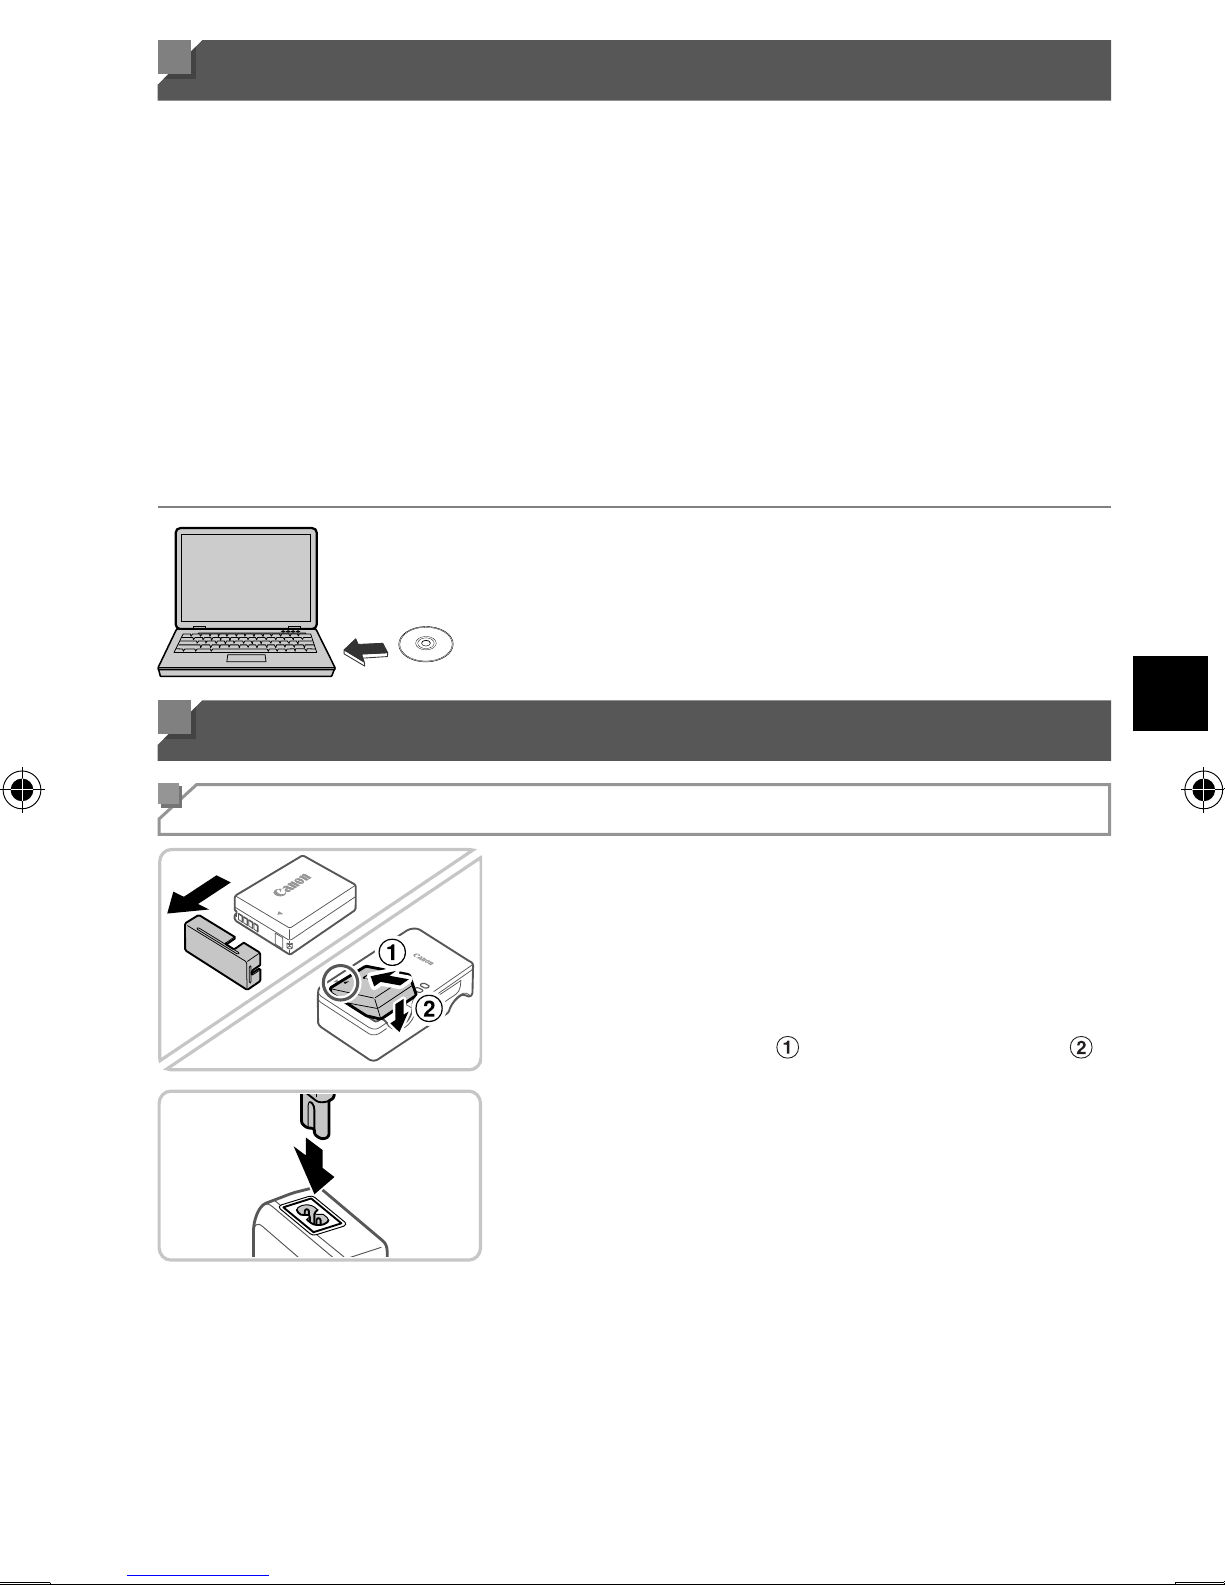
Viewing the Manuals
The following manuals are provided on the included DIGITAL CAMERA
Manuals Disk. Adobe Reader is required to view the PDF manuals.
Camera User Guide
This guide covers the following topics.
Camera basics, from getting ready to shooting, playback, installing the
included software, and importing images
Other instructions, about all camera features
Software Guide
This guide describes how to use the included software.
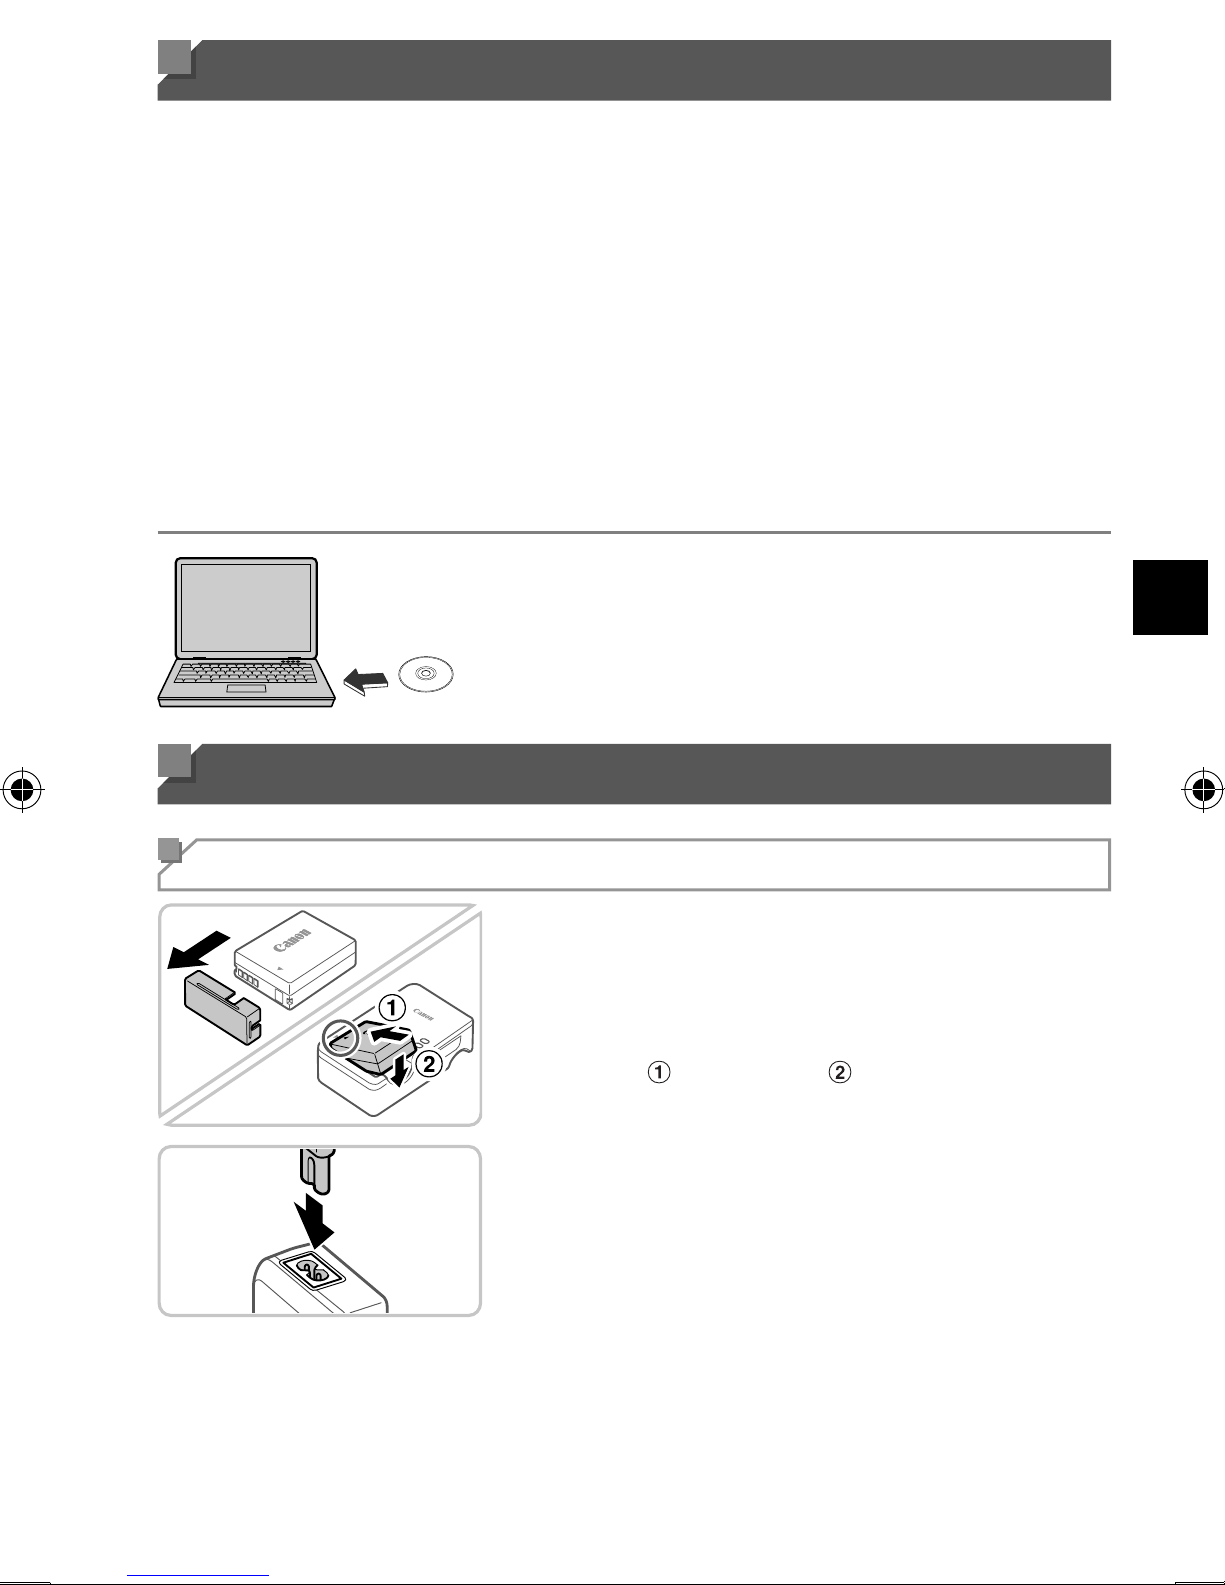
Insert the DIGITAL CAMERA Manuals
Disk in the computer’s CD-ROM drive.
Follow the instructions displayed to view
the manual.
Initial Preparations
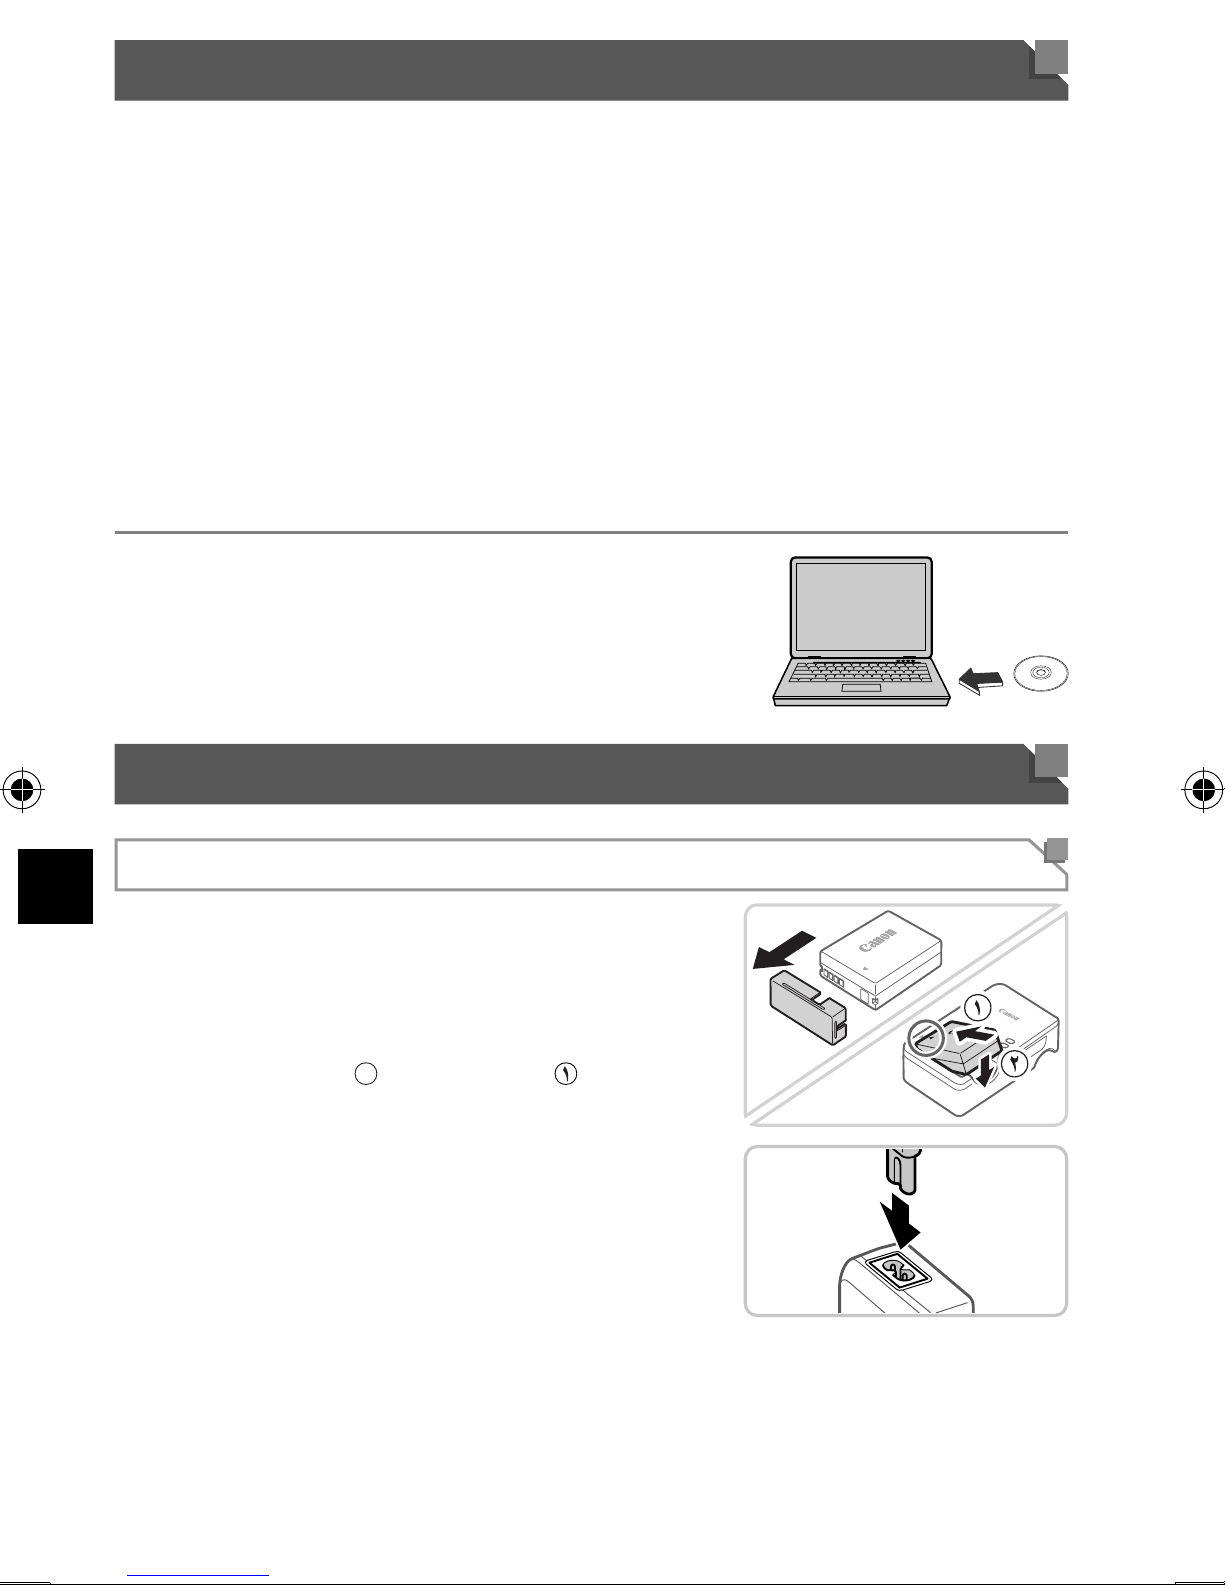
Charging the Battery
1 Remove the battery cover and
insert the battery.
After aligning the ▲ marks on the battery
and charger, insert the battery by pushing
it in ( ) and down ( ).
2 Charge the battery.
Once you connect the power cord to the
charger and plug the cord into a power
outlet, the lamp will light up orange.
When charging is fi nished, the lamp turns
green. Remove the battery.
For details on charging time and the
number of shots or recording time
available with a fully charged battery,
refer to “Specifi cations” in the Camera
User Guide.
3
Page 4
Initial Preparations
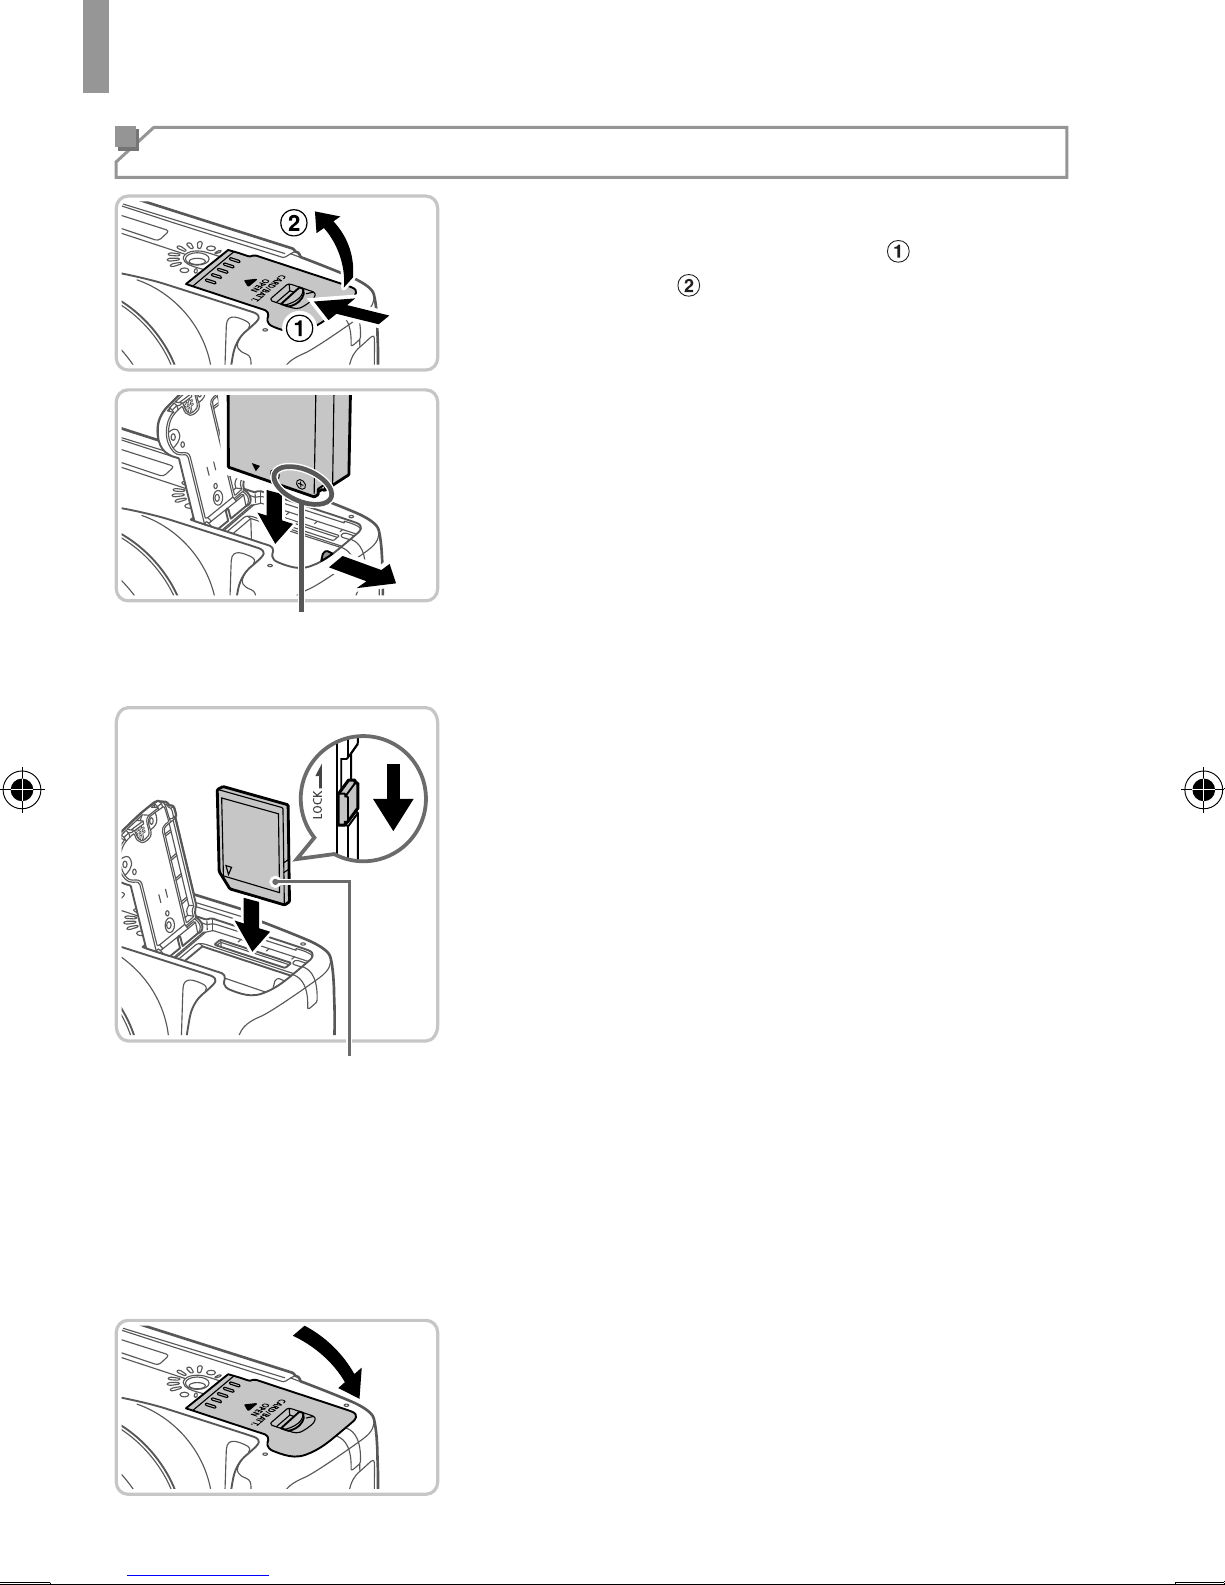
Inserting the Battery and Memory Card
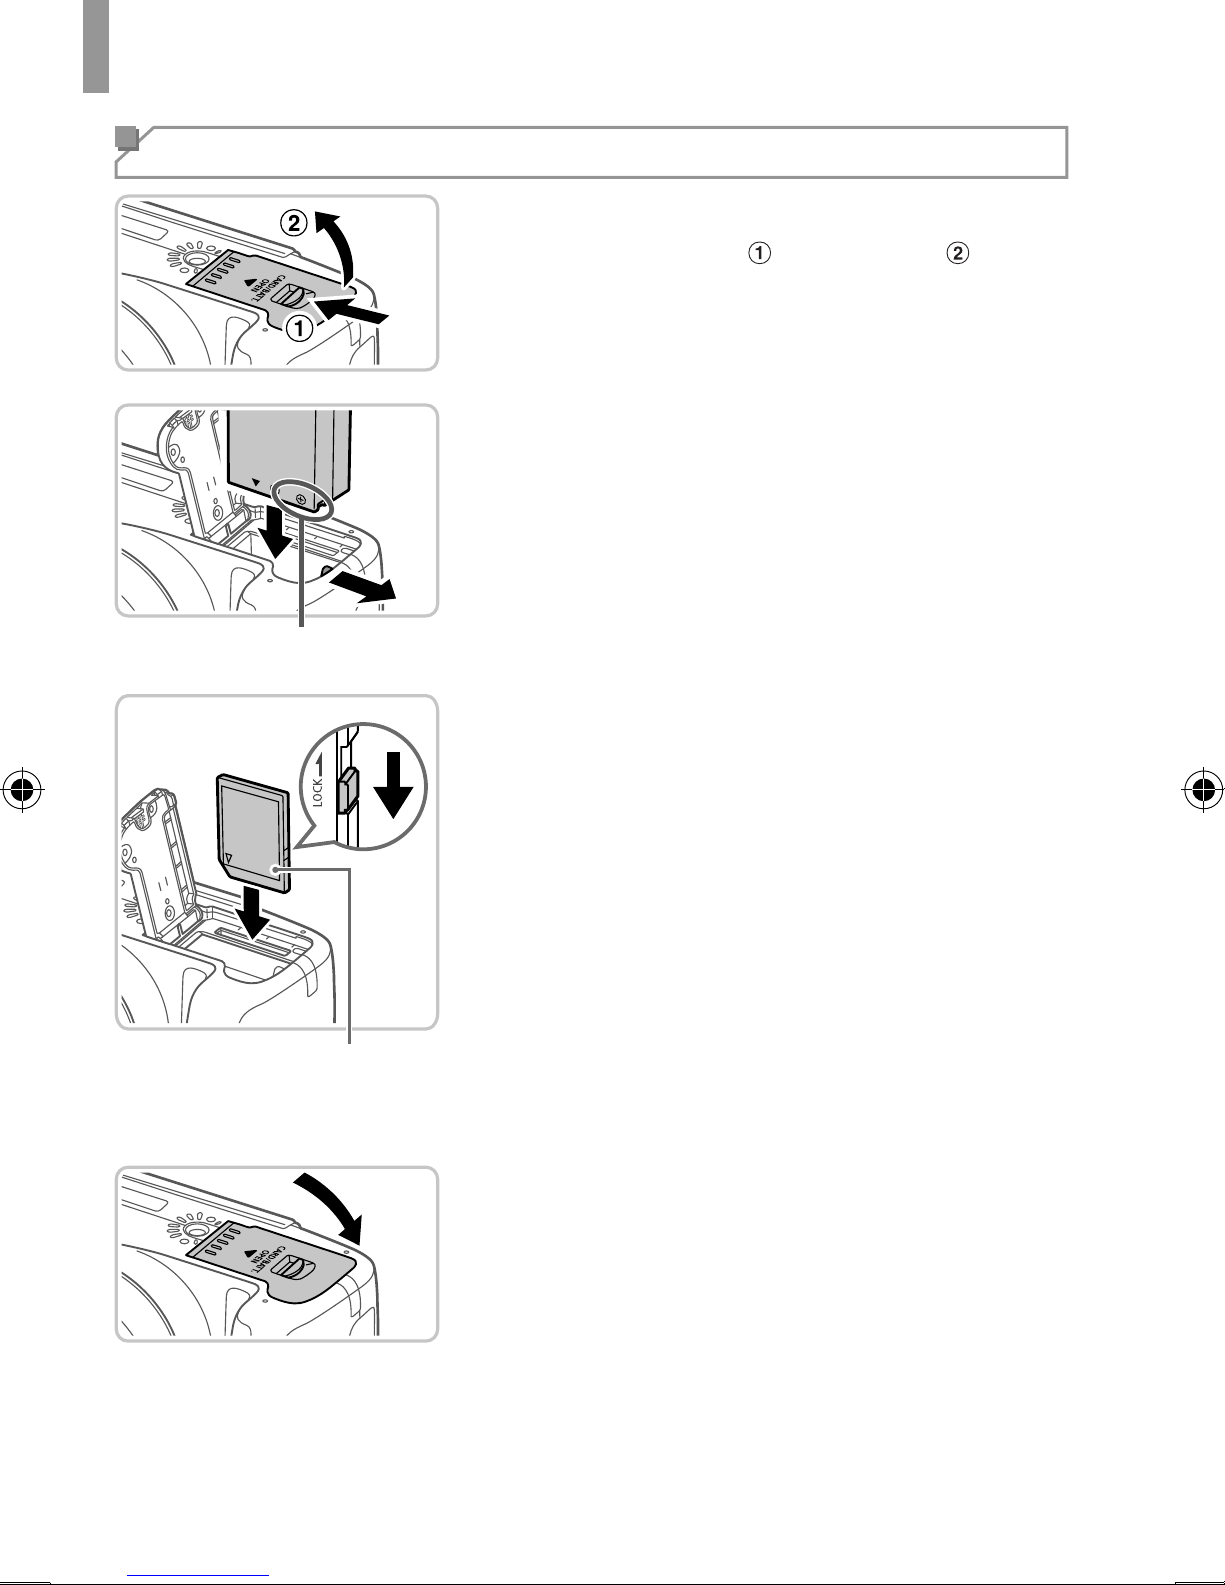
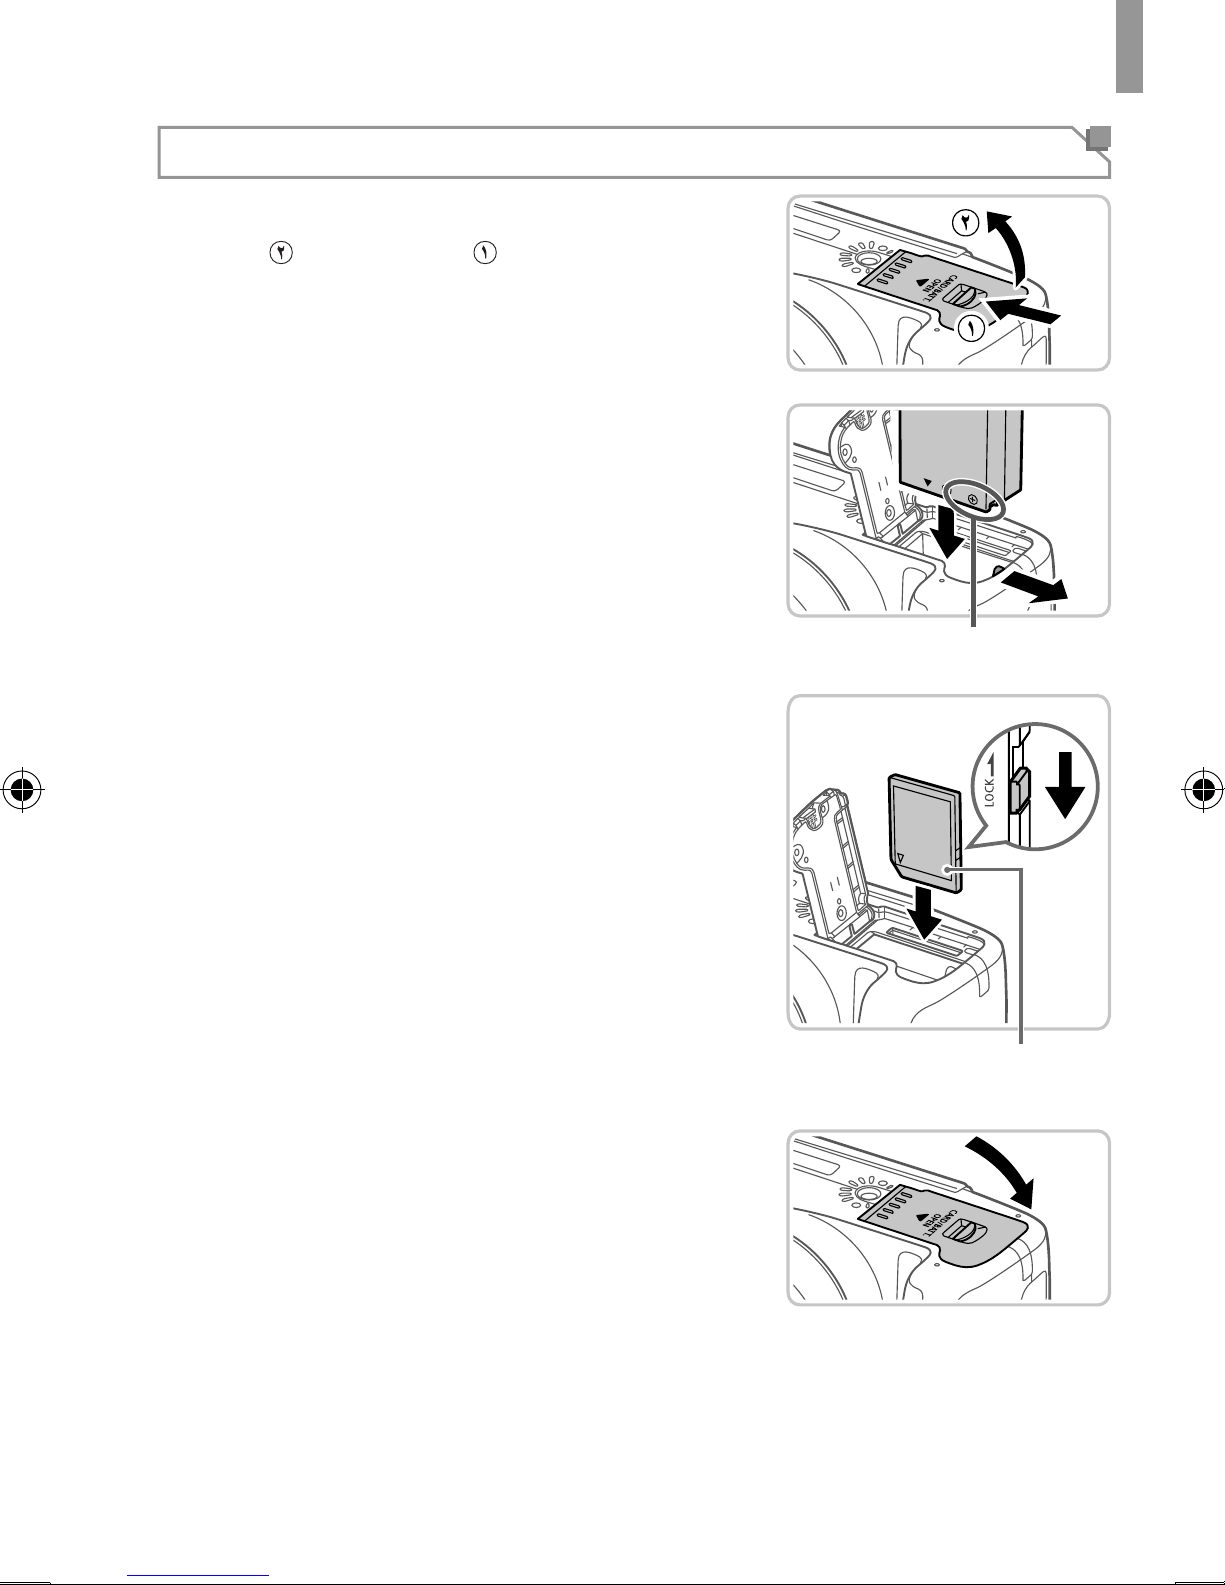
1 Open the cover.
Slide the cover ( ) and open it ( ).
2 Insert the battery.
While pressing the battery lock in the
direction of the arrow, insert the battery
as shown and push it in until it clicks into
the locked position.
To remove the battery, press the battery
Terminals
lock in the direction of the arrow.
Label
3 Check the card’s write-protect
tab and insert the memory card.
Recording is not possible on memory
cards with a write-protect tab when the
tab is in the locked (downward) position.
Slide the tab up until it clicks into the
unlocked position.
Insert the memory card facing as shown
until it clicks into the locked position.
To remove the memory card, push it in
until you feel a click, and then slowly
release it.
4 Close the cover.
Lower the cover in the direction of the
arrow and press it until it clicks into the
4
closed position.
Page 5
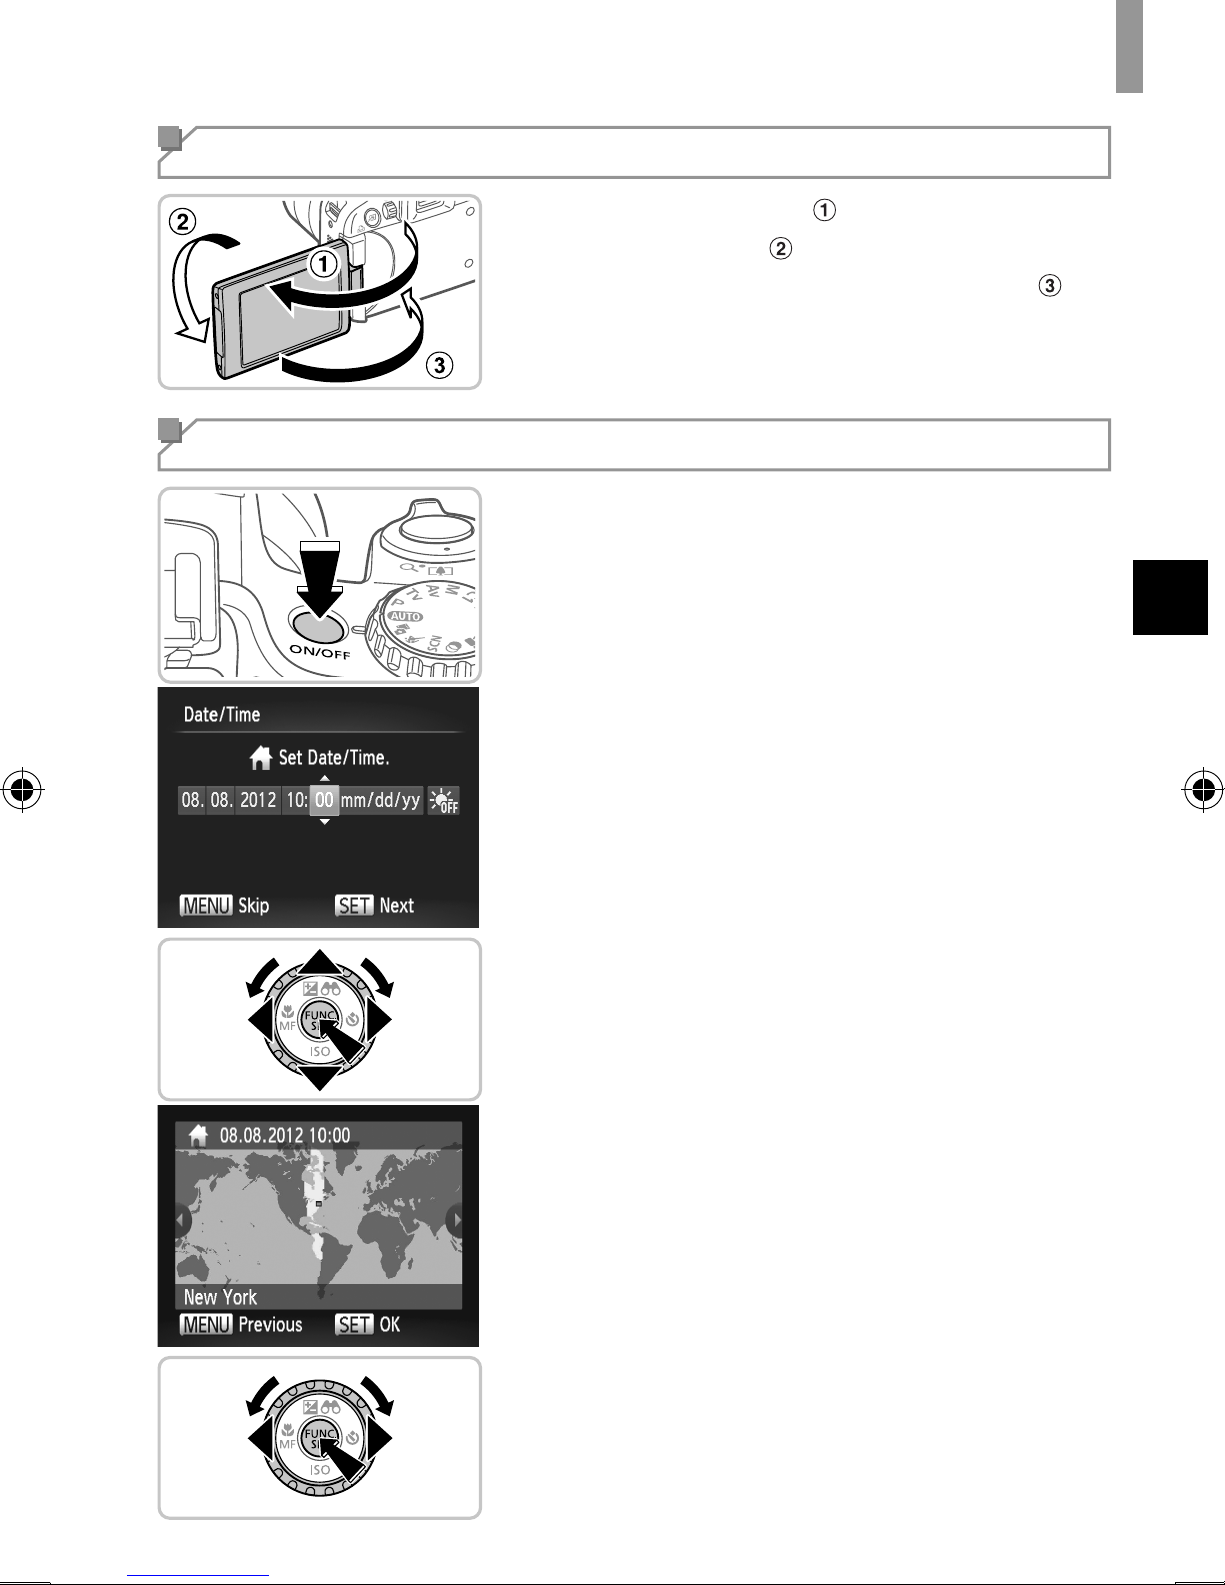
Using the Screen
Initial Preparations
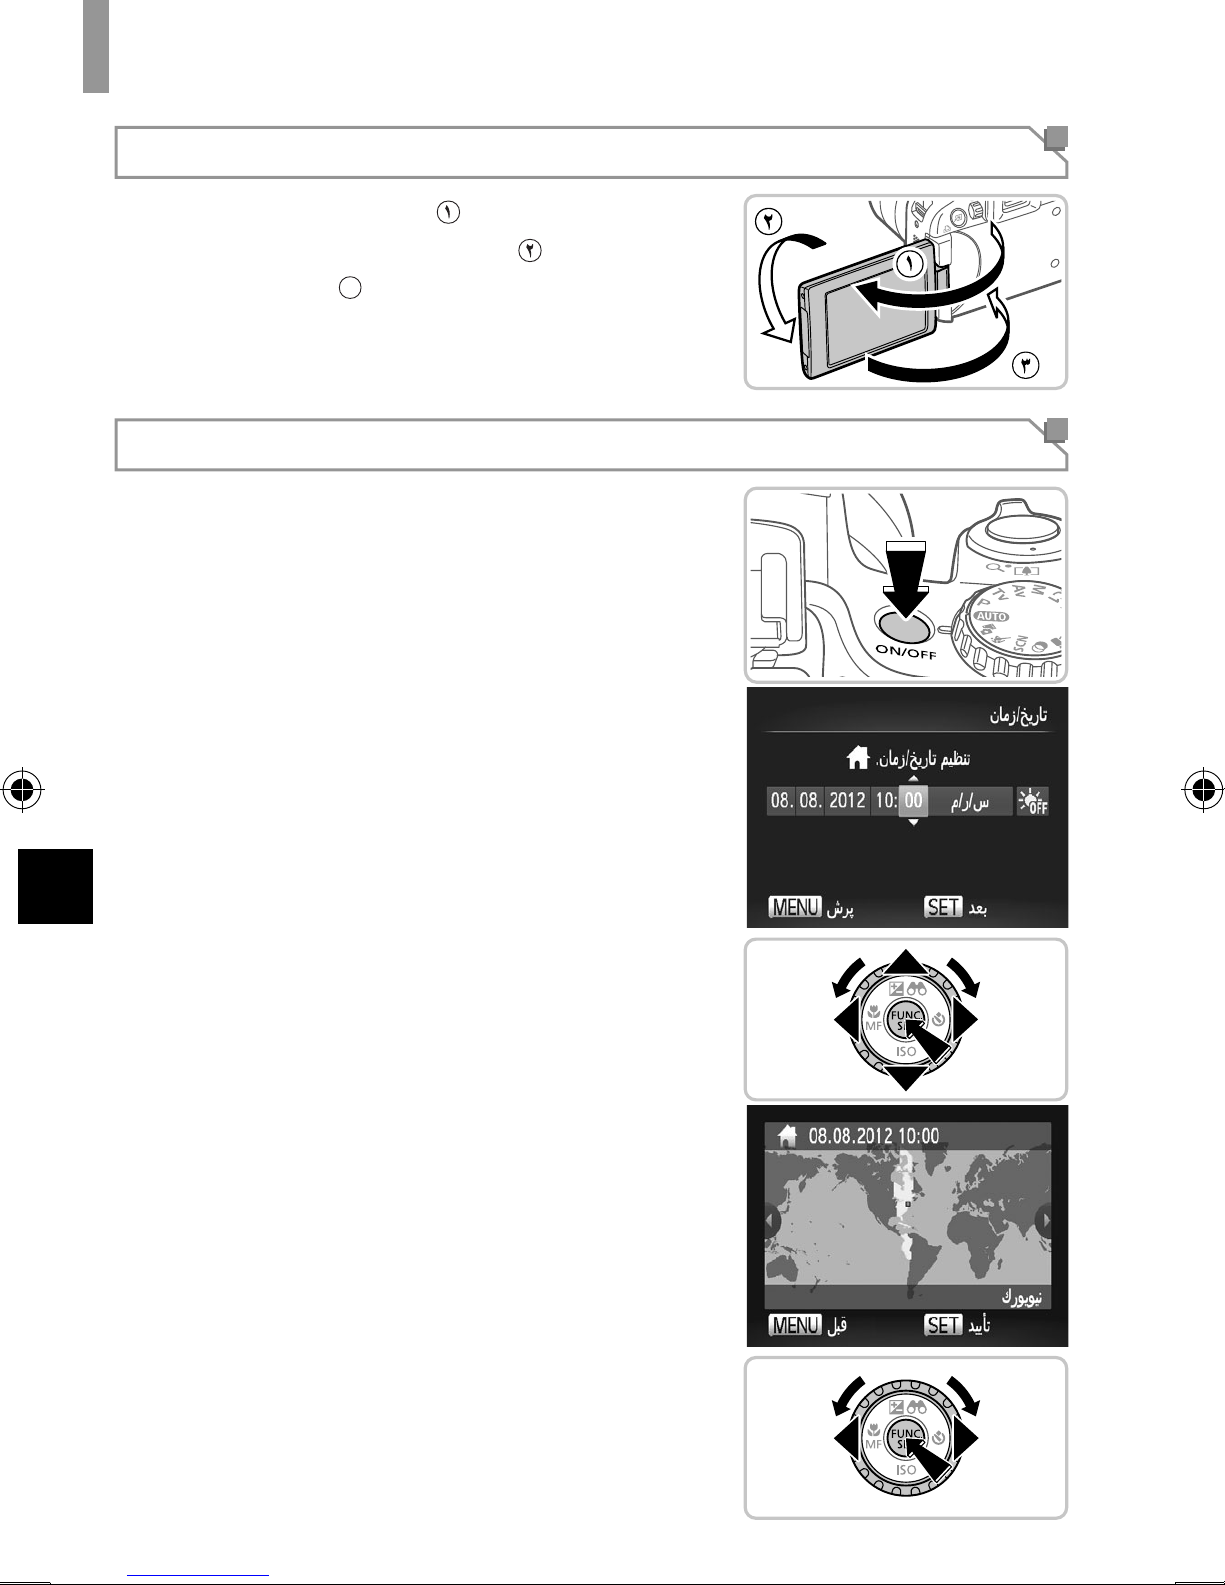
Open the screen ( ) and rotate it toward
the lens 180° (
Close the screen in this orientation ( ).
Setting the Date and Time
1 Turn the camera on.
Press the ON/OFF button.
The [Date/Time] screen is displayed.
2 Set the date and time.
Press the <q><r> buttons to choose an
option.
Press the <o><p> buttons or turn the
).
<5> dial to specify the date and time.
When fi nished, press the <m> button.
3 Set the local time zone.
Press the <q><r> buttons or turn the
<5> dial to choose your local time zone.
Press the <m> button when fi nished.
After a confi rmation message, the setting
screen is no longer displayed.
To turn off the camera, press the ON/OFF
button.
5
Page 6
Initial Preparations
Changing the Date and Time
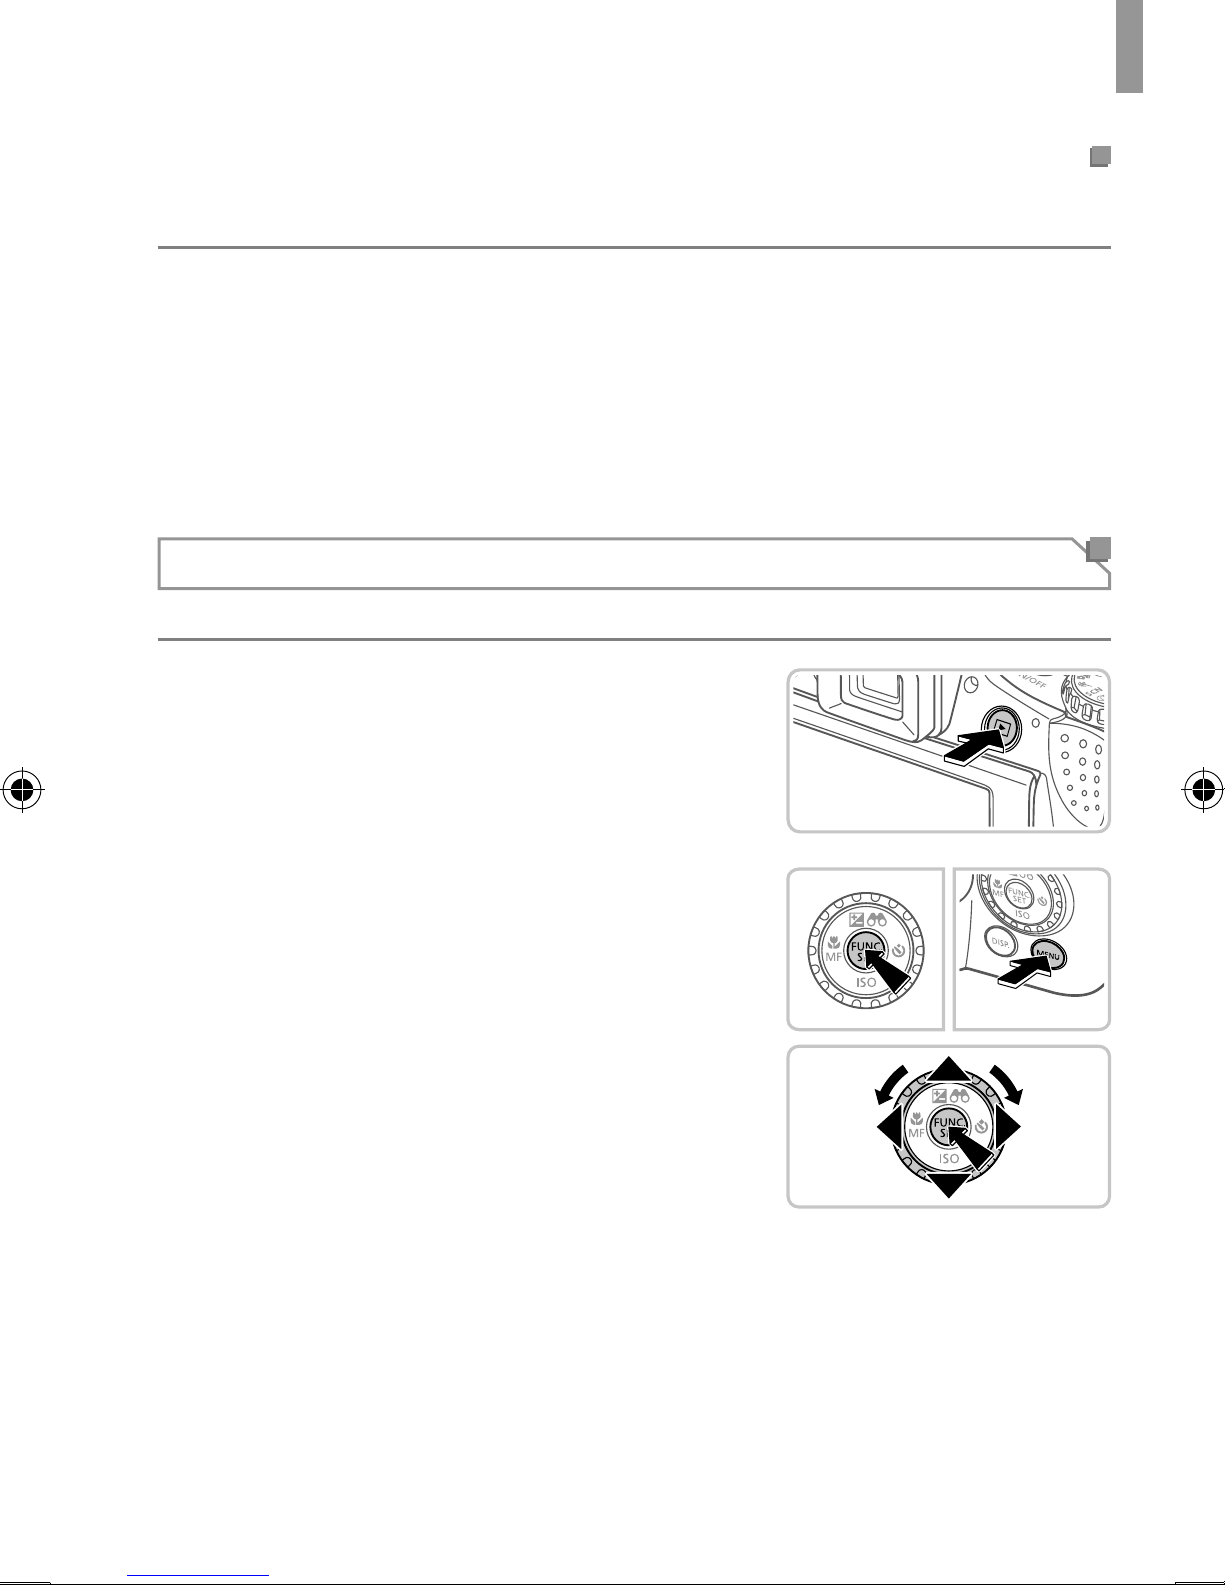
To adjust the date and time once you have set it, do the following.
1 Press the <n> button.
2 Move the zoom lever to choose the [3] tab.
3 Press the <o><p> buttons or turn the <5> dial to choose [Date/
Time], and then press the <m> button.
4 Follow step 2 in “Setting the Date and Time” to adjust the settings.
5 Press the <n> button.
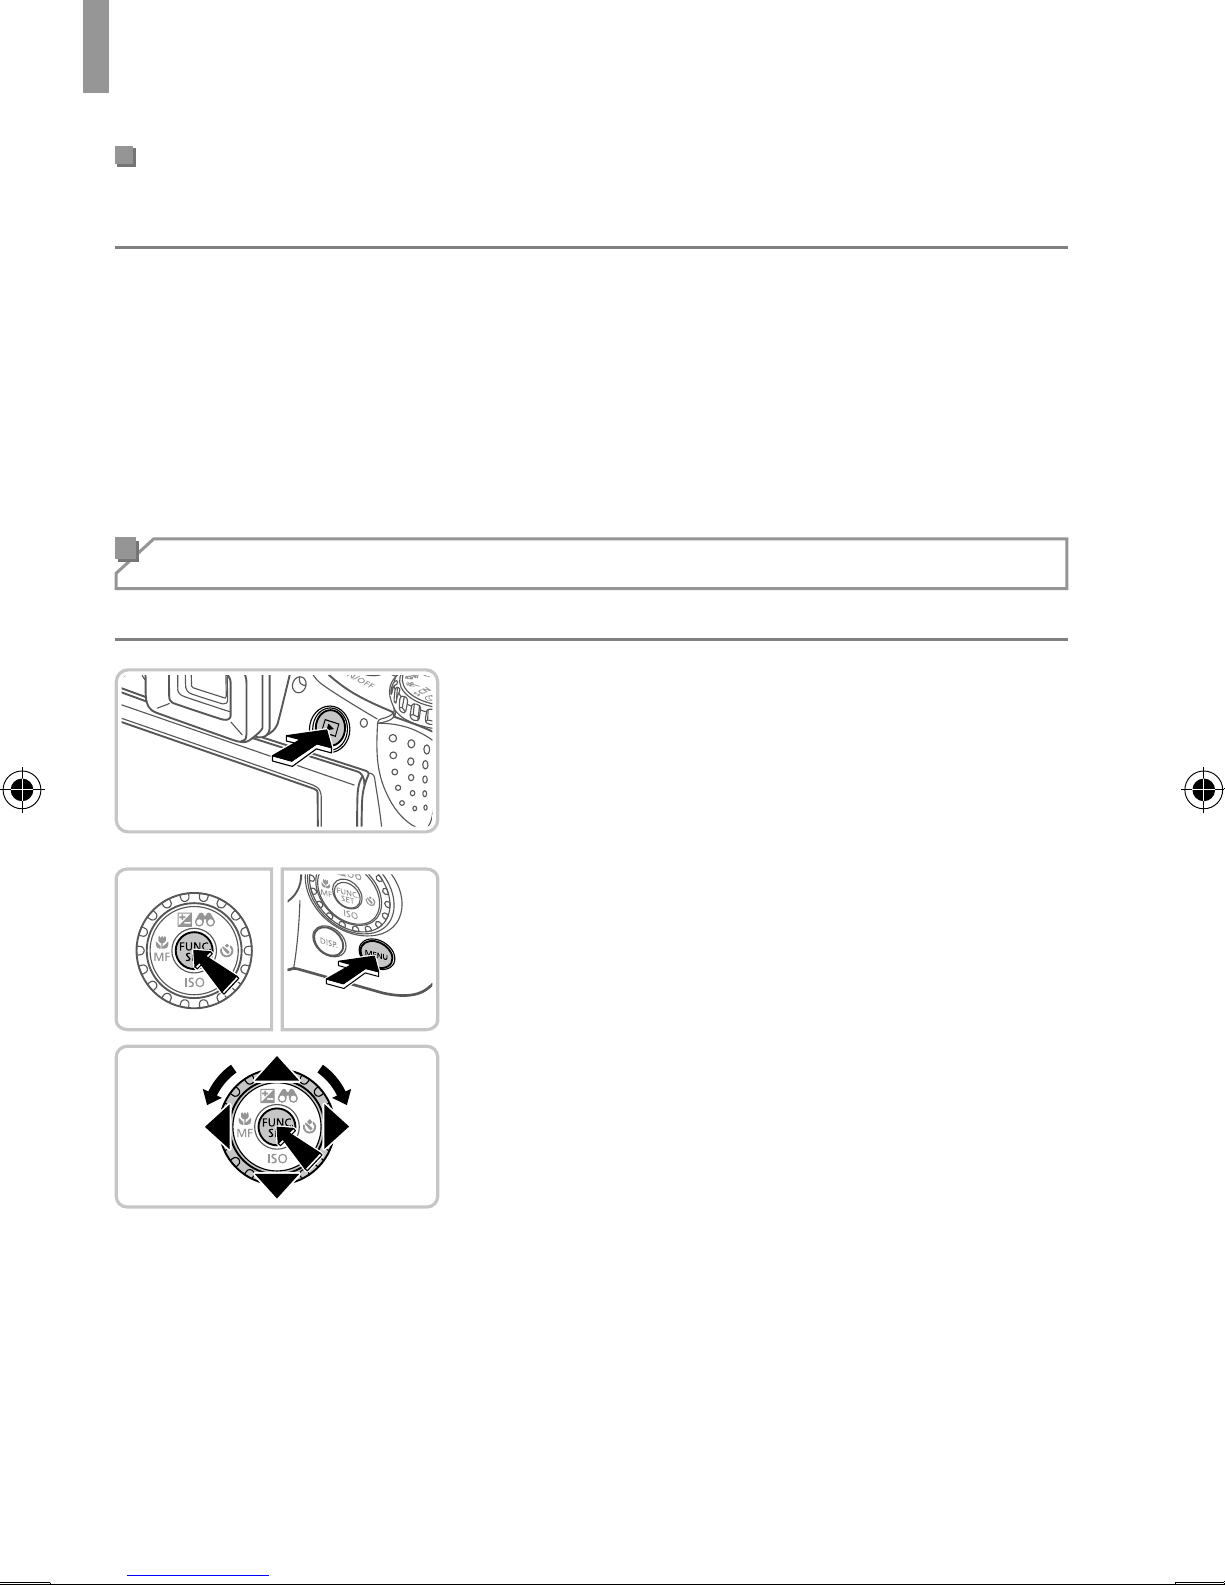
Display Language
The display language can be changed as needed.
1 Enter Playback mode.
Press the <1> button.
2 Access the setting screen.
Press and hold the <m> button, and
then immediately press the <n>
button.
Press the <o><p><q><r> buttons or
turn the <5> dial to choose a language,
and then press the <m> button.
6
Page 7
Trying the Camera Out
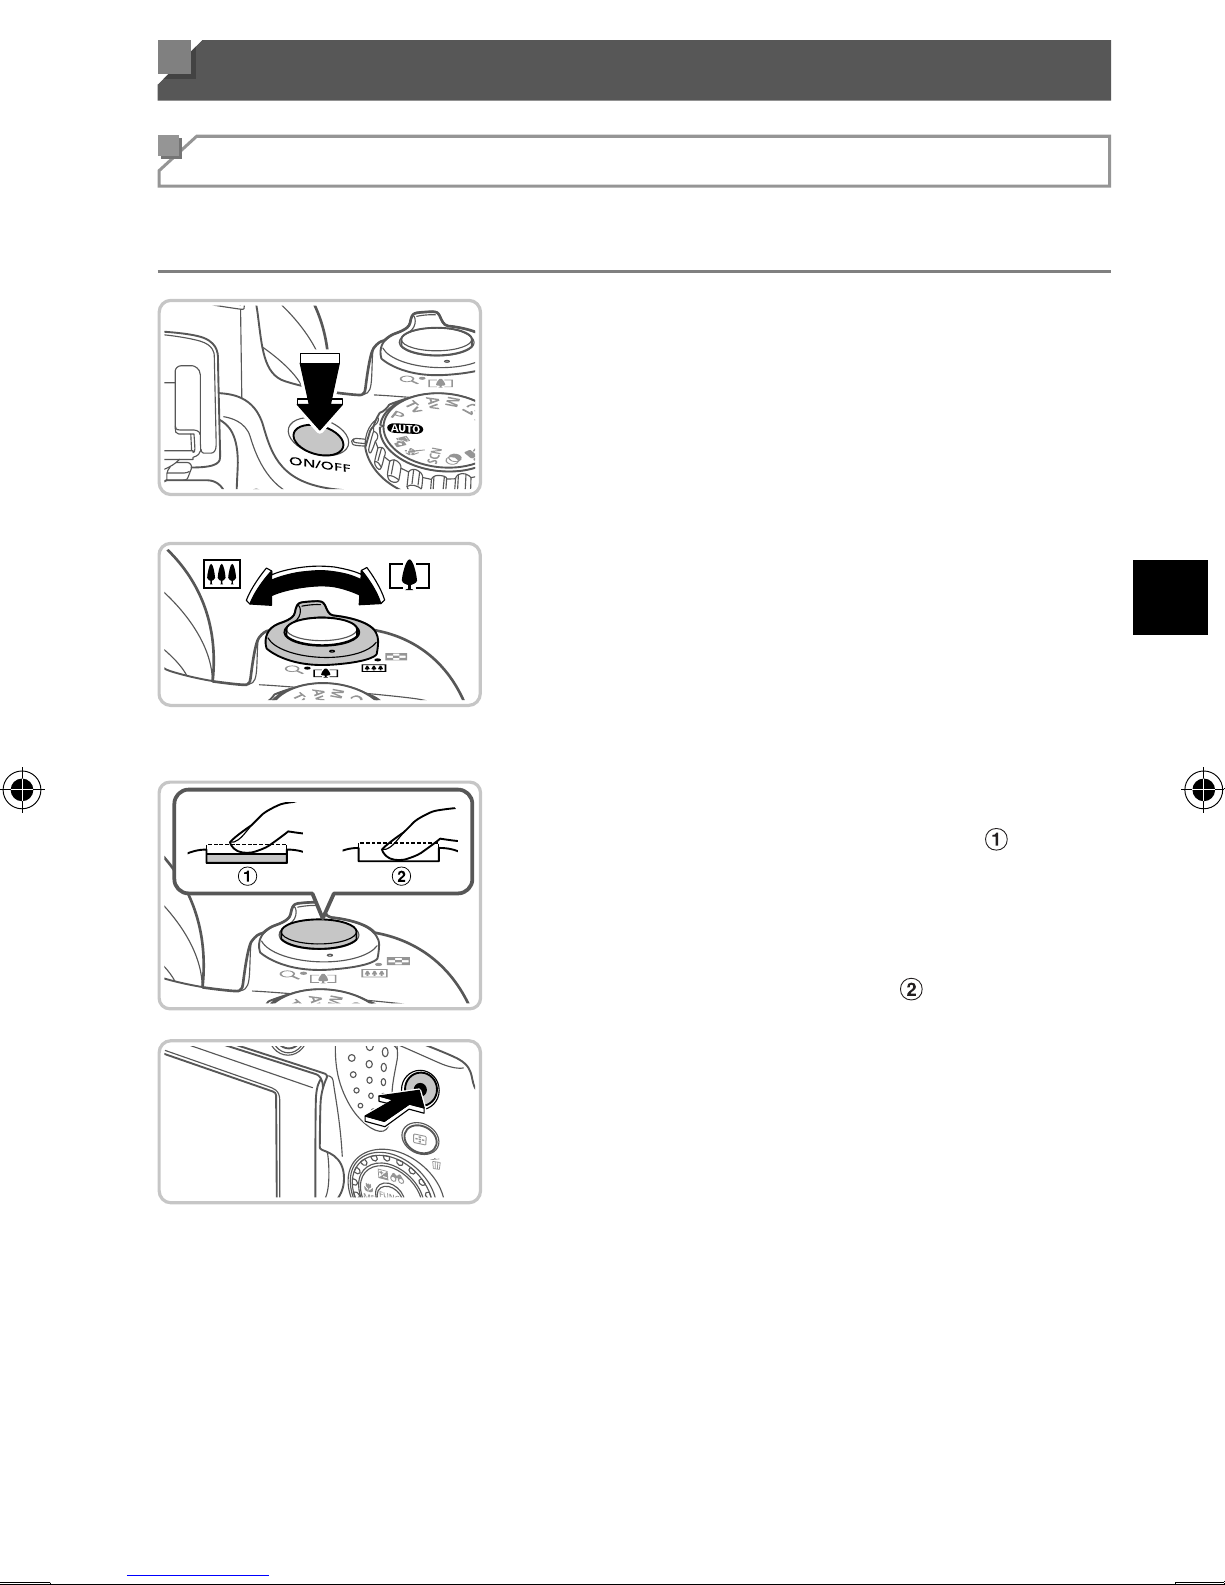
Shooting
For fully automatic selection of the optimal settings for specifi c scenes,
simply let the camera determine the subject and shooting conditions.
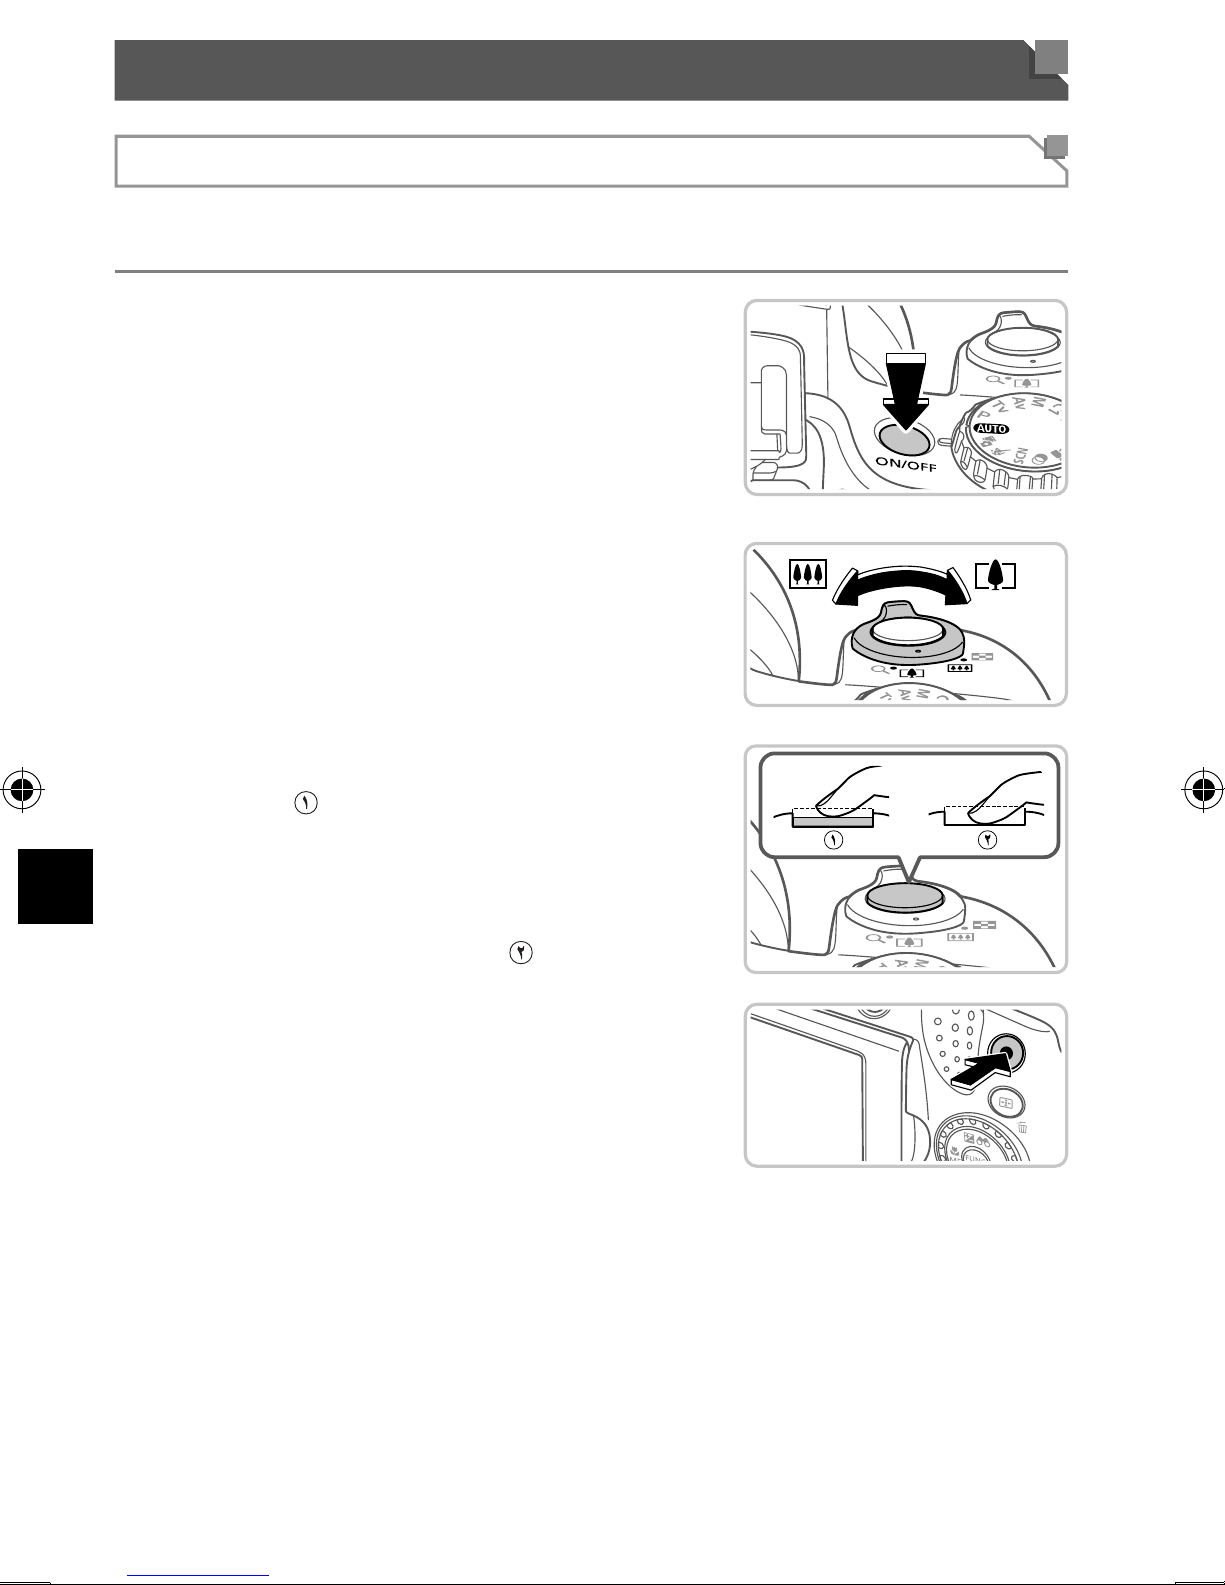
1 Turn the camera on and enter
<A> mode.
Press the ON/OFF button.
Set the mode dial to <A>.
2 Compose the shot.
To zoom in and enlarge the subject, move
the zoom lever toward <i> (telephoto)
as you watch the screen, and to zoom
away from the subject, move it toward
<j> (wide angle).
3 Shoot still images.
Press the shutter button lightly ( ).
The camera beeps twice after focusing,
and AF frames are displayed to indicate
image areas in focus. Press the shutter
button all the way down (
Shoot movies.
Press the movie button to start shooting,
and press it again to stop.
).
7
Page 8
Trying the Camera Out
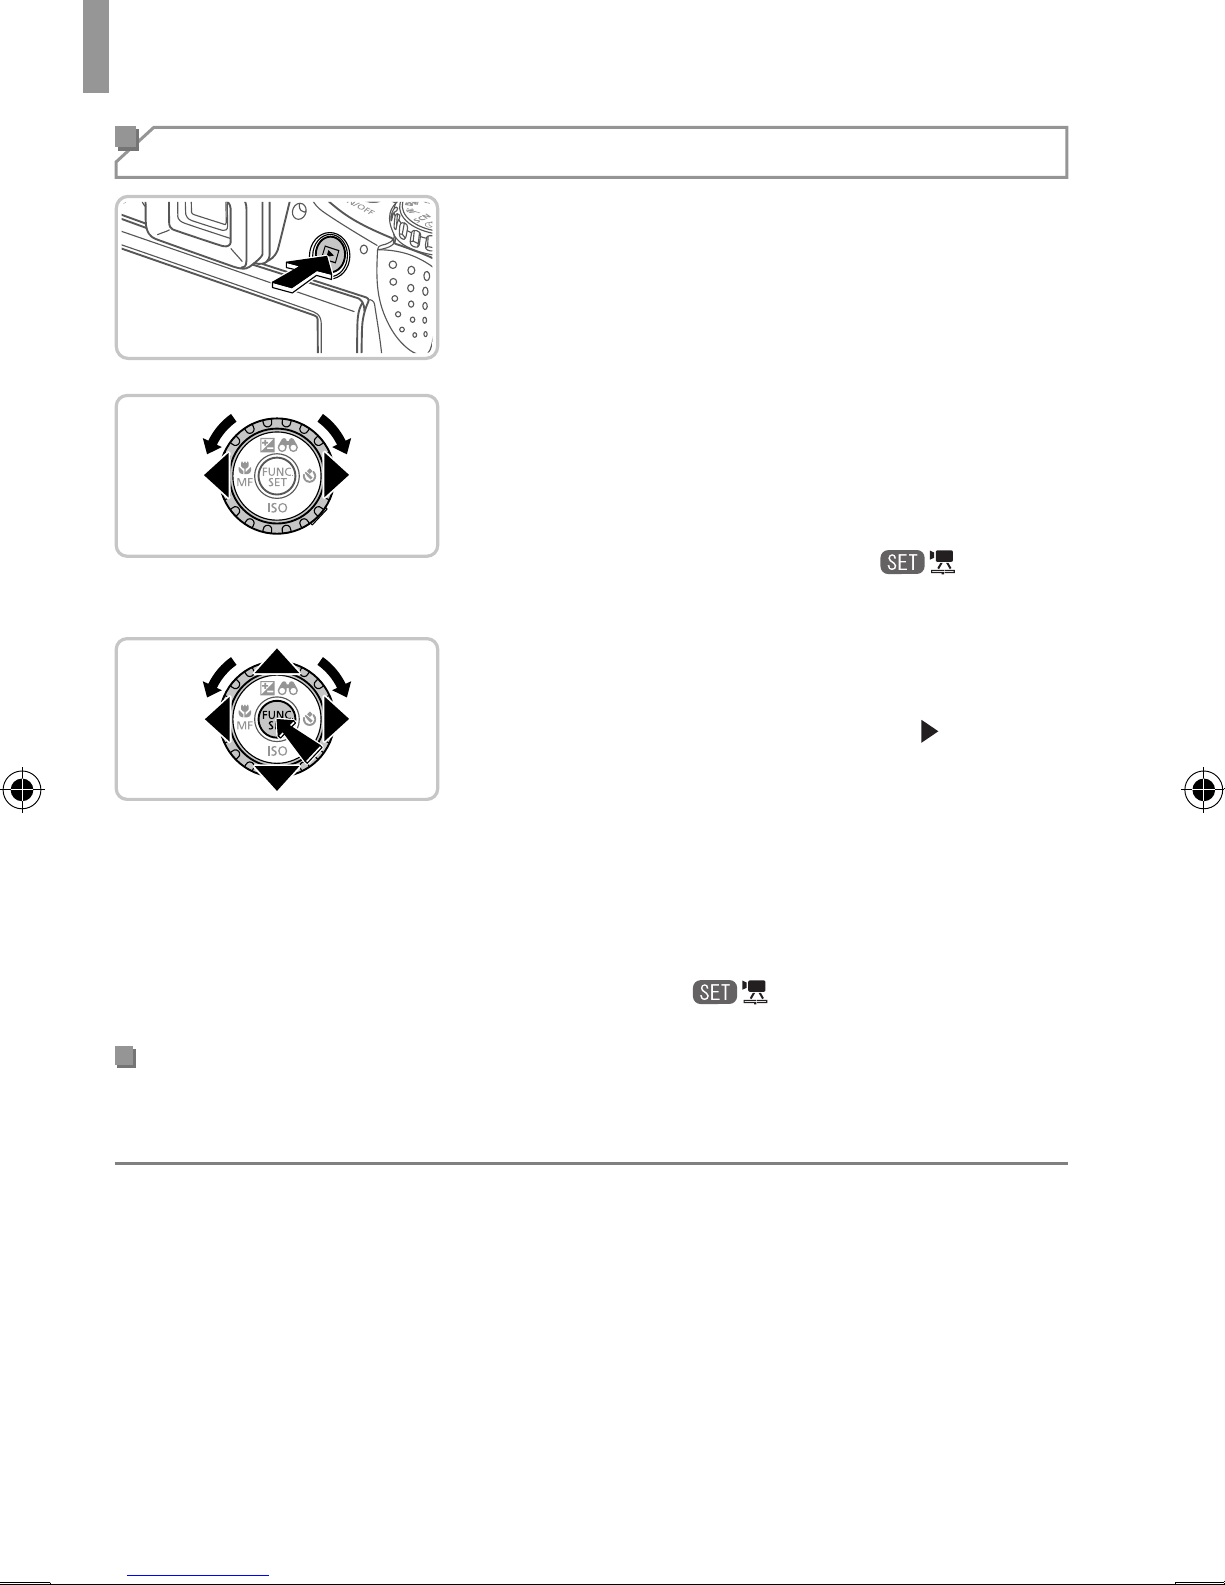
Viewing
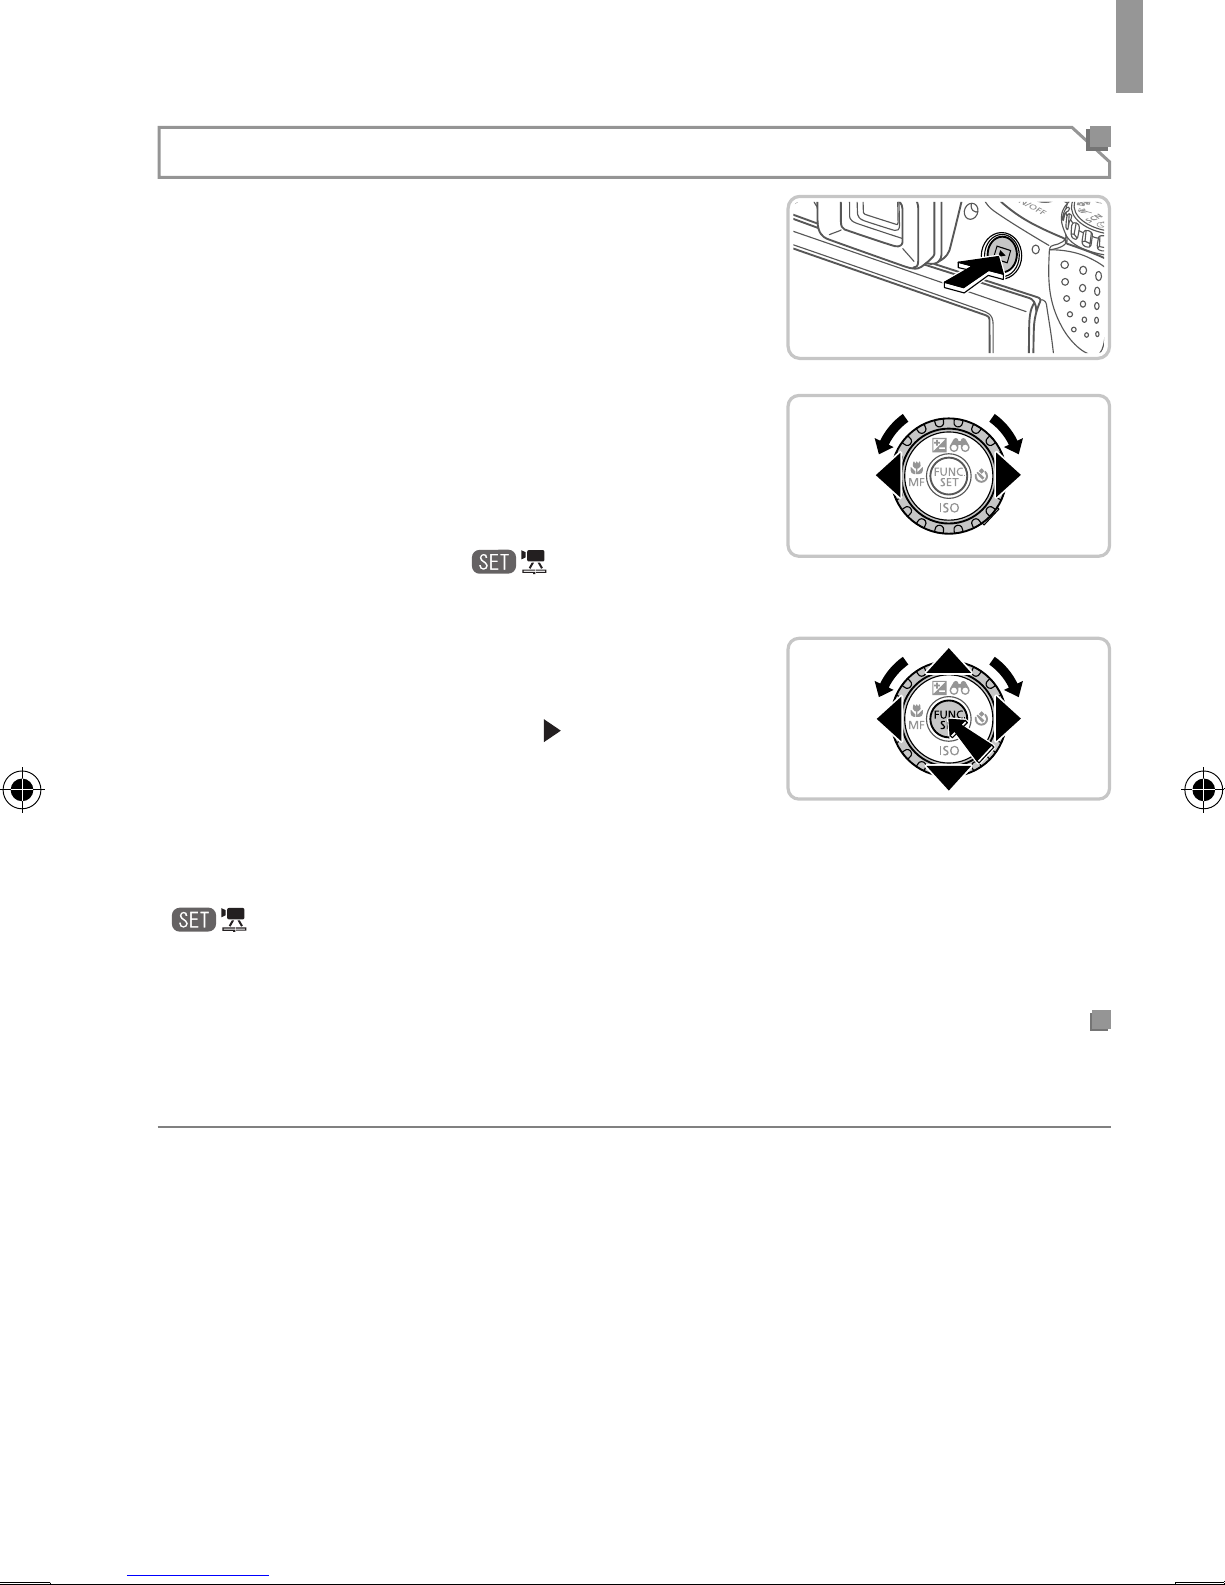
1 Enter Playback mode.
Press the <1> button.
2 Browse through your images.
To view the previous or next image, press
the <q><r> buttons or turn the <5>
dial.
Movies are identifi ed by a [ ] icon. To
play movies, go to step 3.
3 Play movies.
Press the <m> button to access the
movie control panel, choose [
press the <q><r> buttons or turn the
<5> dial), and then press the <m>
button again.
To adjust the volume, press the <o><p>
buttons.
Playback now begins, and after the movie
is fi nished, [
] is displayed.
Erasing the Images
To erase the image you chose in step 2, do the following. Note that erased
images cannot be recovered.
1 Press the <a> button.
] (either
2 After [Erase?] is displayed, press the <q><r> buttons or turn the <5>
dial to choose [Erase], and then press the <m> button.
8
Page 9
European Union (and EEA) only.
These symbols indicate that this product is not to be disposed
of with your household waste, according to the WEEE
Directive (2002/96/EC), the Battery Directive (2006/66/EC)
and/or your national laws implementing those Directives.
If a chemical symbol is printed beneath the symbol shown
above, in accordance with the Battery Directive, this indicates
that a heavy metal (Hg = Mercury, Cd = Cadmium, Pb =
Lead) is present in this battery or accumulator at a concentration above an applicable
threshold specifi ed in the Battery Directive.
This product should be handed over to a designated collection point, e.g., on an
authorized one-for-one basis when you buy a new similar product or to an authorized
collection site for recycling waste electrical and electronic equipment (EEE) and
batteries and accumulators. Improper handling of this type of waste could have a
possible impact on the environment and human health due to potentially hazardous
substances that are generally associated with EEE.
Your cooperation in the correct disposal of this product will contribute to the effective
usage of natural resources.
For more information about the recycling of this product, please contact your local city
offi ce, waste authority, approved scheme or your household waste disposal service or
visit www.canon-europe.com/environment.
(EEA: Norway, Iceland and Liechtenstein)
CAUTION
RISK OF EXPLOSION IF BATTERY IS REPLACED BY AN INCORRECT
TYPE.
DISPOSE OF USED BATTERIES ACCORDING TO LOCAL REGULATION.
CANON INC.
30-2, Shimomaruko 3-chome, Ohta-ku, Tokyo 146-8501, Japan
CANON EUROPA N.V.
Bovenkerkerweg 59-61, 1185 XB Amstelveen, The Netherlands
© CANON INC. 2012 PRINTED IN THE EU
9
Page 10
Contenu du coffret
Vérifi ez que les éléments suivants sont inclus dans le coffret avant d’utiliser
l’appareil photo.
Si un élément venait à manquer, contactez le revendeur de l’appareil photo.
Appareil photo
Guide de mise en
route (ce guide)
*1 Pour obtenir des instructions pour la fi xation, reportez-vous au Guide d’utilisation
de l’appareil photo sur le CD-ROM DIGITAL CAMERA Manuals Disk.
*2 Contient les manuels (=
*3 Contient les logiciels. Pour obtenir des instructions sur l’installation, reportez-vous au
Guide d’utilisation de l’appareil photo et pour des instructions concernant l’utilisation,
consultez le Guide d’utilisation des logiciels.
Batterie NB-10L
(avec couvre-
bornes)
CD-ROM
DIGITAL CAMERA
Manuals Disk
3).
Chargeur
de batterie
CB-2LCE
DIGITAL CAMERA
*2
Solution Disk
Courroie
NS-DC11
CD-ROM
Cache de
*1
Brochure sur le
système de garantie
*3
l’objectif
(avec cordon)
de Canon
*1
Cartes mémoire compatibles
Aucune carte mémoire n’est fournie. Achetez un des types de carte
suivants, selon les besoins. Vous pouvez utiliser ces cartes mémoire, quelle
que soit leur capacité. Pour en savoir plus sur le nombre de prises de vue
et la durée d’enregistrement par carte mémoire, reportez-vous à la section
« Caractéristiques » du Guide d’utilisation de l’appareil photo.
• Cartes mémoire SD
• Cartes mémoire SDHC
• Cartes mémoire SDXC
*
*
*
• Cartes Eye-Fi
* Conformes aux spécifi cations SD. Le fonctionnement de toutes les cartes mémoire
avec l’appareil photo n’a cependant pas été vérifi é.
À propos des cartes Eye-Fi
La compatibilité de ce produit avec les fonctions des cartes Eye-Fi
(y compris le transfert sans fi l) n’est pas garantie. En cas de problème
avec une carte Eye-Fi, veuillez consulter le fabricant de la carte.
Veuillez noter également que dans de nombreux pays ou régions,
l’utilisation de cartes Eye-Fi requiert un agrément. Sans agrément, l’usage
de ces cartes n’est pas autorisé. En cas d’incertitude quant à l’agrément
des cartes dans un lieu donné, veuillez consulter le fabricant de la carte.
2
Page 11
Visualisation des manuels
Vous pouvez trouver les manuels suivants sur le CD-ROM DIGITAL
CAMERA Manuals Disk fourni. Adobe Reader est nécessaire pour
visualiser les manuels.
Guide d’utilisation de l’appareil photo
Ce guide couvre les sujets suivants :
Principes de base de l’appareil photo, depuis la mise en route à la prise
de photo, la lecture, l’installation des logiciels fournis et l’importation
de photos
Autres instructions à propos de toutes les fonctions de l’appareil photo
Guide d’utilisation des logiciels
Ce guide explique comment utiliser les logiciels fournis.
Insérez le CD-ROM DIGITAL CAMERA
Manuals Disk dans le lecteur de CD-ROM
de l’ordinateur.
Suivez les instructions qui s’affi chent
pour visualiser le manuel.
Préparatifs initiaux
Chargement de la batterie
1 Retirez le couvercle du
logement de la batterie et
insérez la batterie.
Après avoir aligné les symboles ▲ de la
batterie et du chargeur, insérez la batterie
en l’enfonçant (
2 Chargez la batterie.
Une fois que vous connectez le cordon
d’alimentation au chargeur et branchez
l’autre extrémité sur la prise secteur,
le témoin s’allume en orange.
Une fois la charge terminée, le témoin
devient vert. Retirez la batterie.
), puis en l’abaissant ( ).
Pour en savoir plus sur la durée de
charge et le nombre de prises ou la
durée d’enregistrement en cas de charge
complète de la batterie, reportez-vous
à la section « Caractéristiques » du
Guide d’utilisation de l’appareil photo.
3
Page 12
Préparatifs initiaux
Insertion de la batterie et de la carte mémoire
1 Ouvrez le couvercle.
Faites glisser le couvercle ( ) et
ouvrez-le ( ).
2 Insérez la batterie.
Tout en appuyant sur le verrou de la
batterie dans le sens de la fl èche, insérez
la batterie comme illustré et enfoncez-la
jusqu’à ce qu’un déclic indique qu’elle est
en position verrouillée.
Bornes
Étiquette
Pour retirer la batterie, appuyez sur le
verrou de la batterie dans le sens de
la fl èche.
3 Vérifi ez la position de la
languette de protection contre
l’écriture de la carte mémoire et
insérez cette dernière.
L’enregistrement n’est pas possible sur
les cartes mémoire dont la languette de
protection contre l’écriture est en position
verrouillée (abaissée). Faites glisser la
languette vers le haut jusqu’à ce qu’un
déclic indique qu’elle est en position
déverrouillée.
Insérez la carte mémoire dans le sens
illustré jusqu’à ce qu’un déclic indique
qu’elle est en position verrouillée.
4
Pour retirer la carte mémoire, appuyez
dessus jusqu’à ce que vous sentiez un
déclic, puis relâchez-la lentement.
4 Fermez le couvercle.
Abaissez le couvercle en direction de
la fl èche et appuyez dessus jusqu’à
ce qu’un déclic indique qu’il est en
position fermée.
Page 13
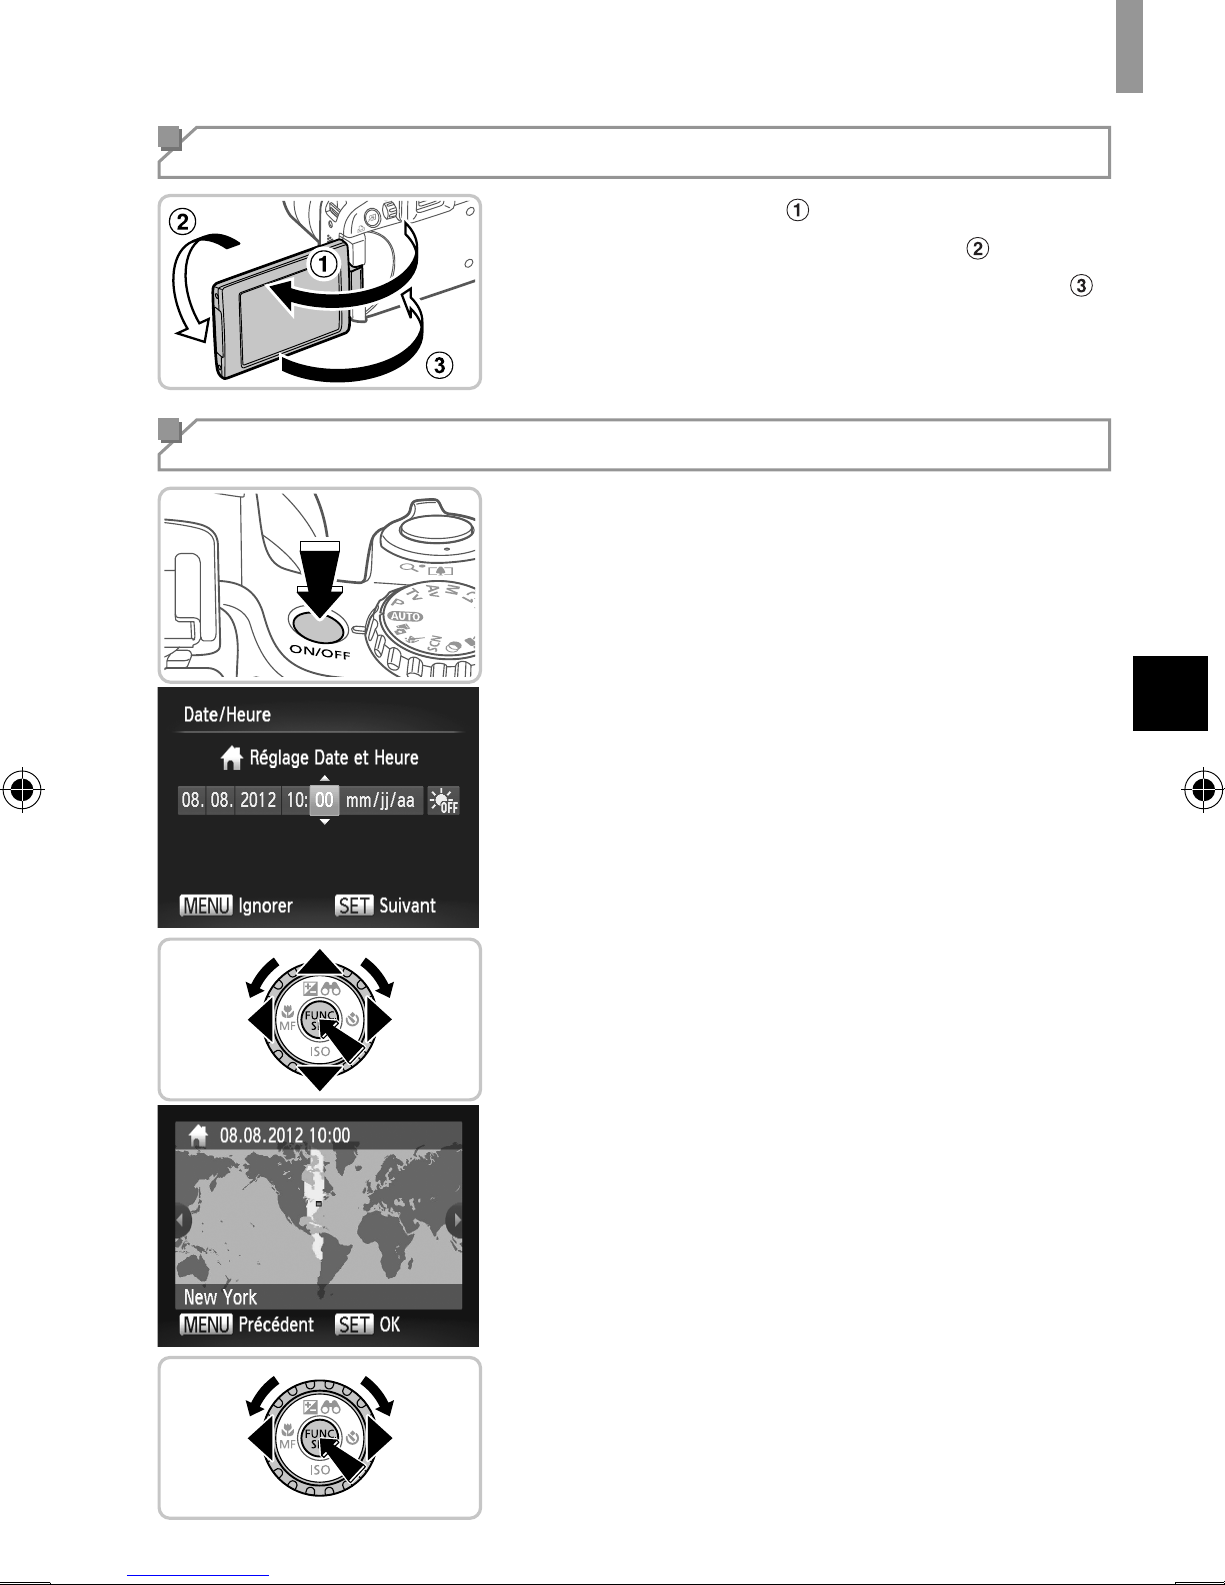
Utilisation de l’écran
Ouvrez l’écran ( ) et faites-le pivoter en
Préparatifs initiaux
direction de l’objectif de 180° (
Fermez l’écran dans cette orientation ( ).
Réglage de la date et de l’heure
1 Mettez l’appareil photo
sous tension.
Appuyez sur la touche ON/OFF.
L’écran [Date/Heure] s’affi che.
2 Réglez la date et l’heure.
Appuyez sur les touches <q><r> pour
choisir une option.
Appuyez sur les touches <o><p> ou
).
tournez la molette <5> pour spécifi er
la date et l’heure.
Une fois que vous avez terminé, appuyez
sur la touche <m>.
3 Défi nissez le fuseau
horaire local.
Appuyez sur les touches <q><r> ou
tournez la molette <5> pour choisir
le fuseau horaire local.
Appuyez sur la touche <m> une fois
que vous avez terminé. Après l’affi chage
d’un message de confi rmation, l’écran de
réglage disparaît.
Pour mettre l’appareil photo hors tension,
appuyez sur la touche ON/OFF.
5
Page 14
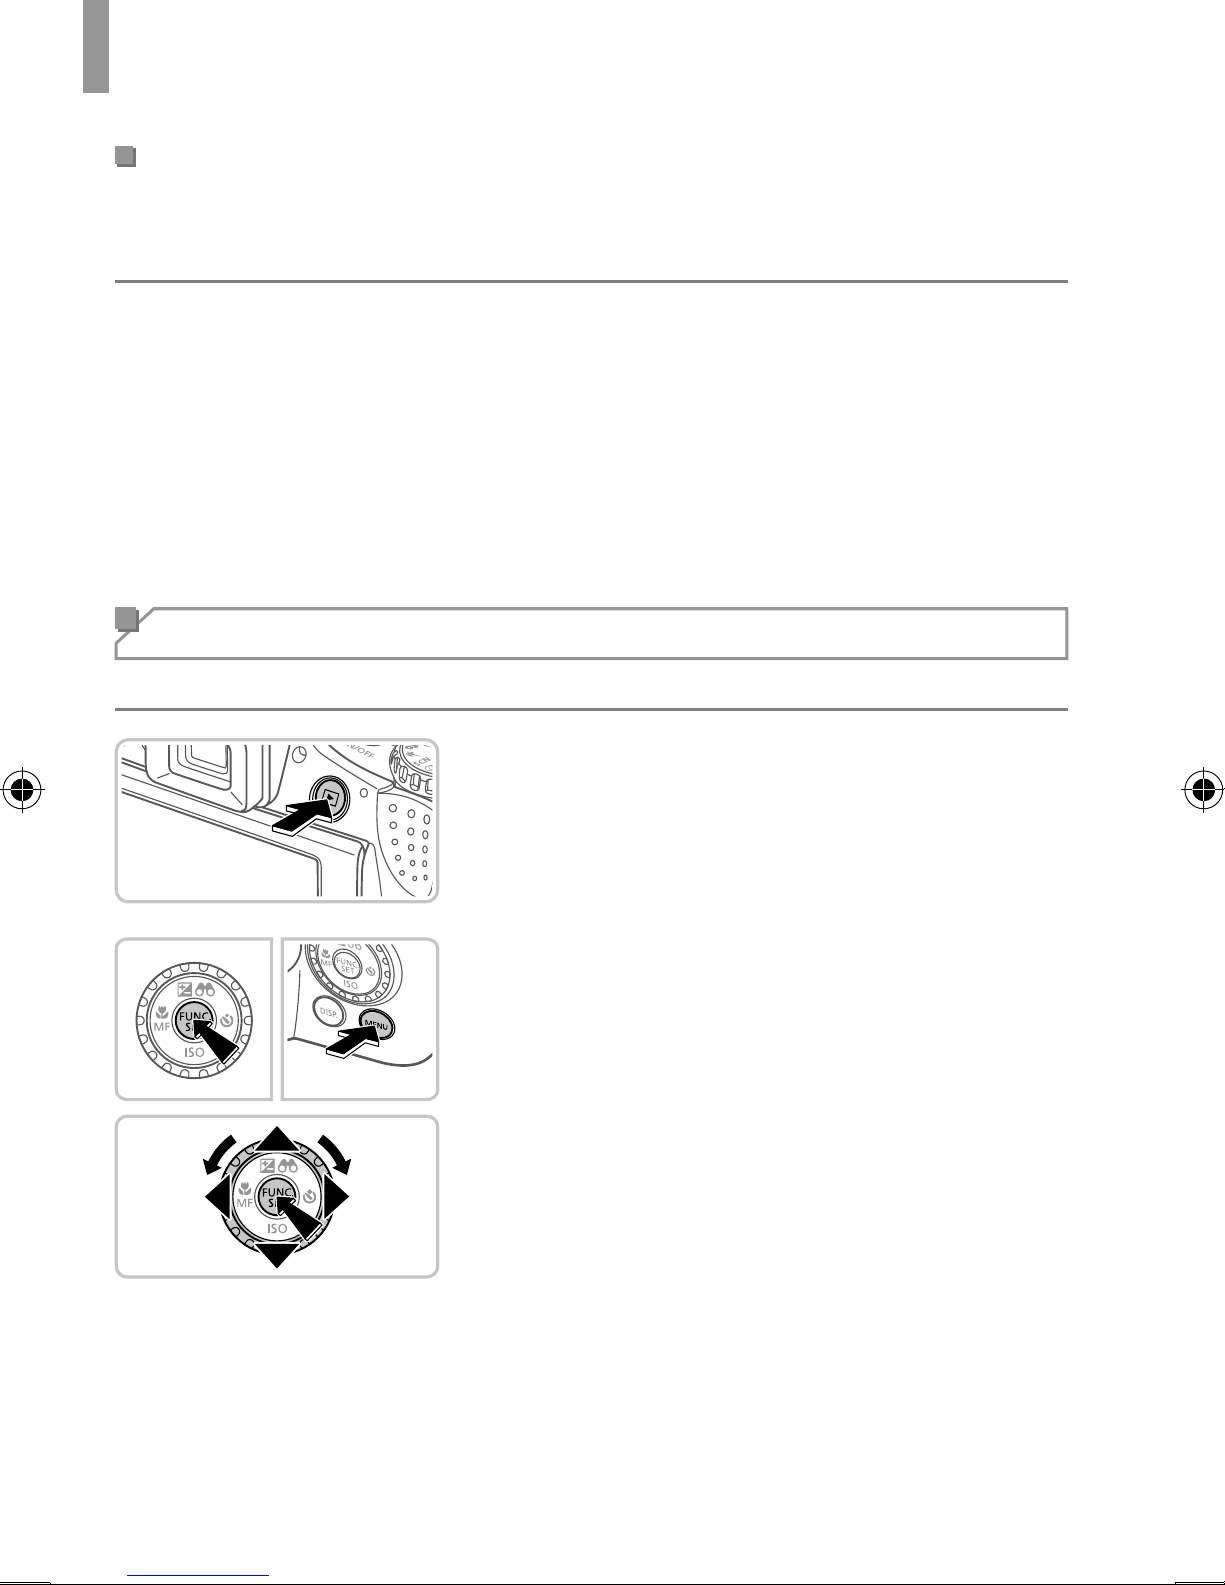
Préparatifs initiaux
Modifi cation de la date et de l’heure
Pour modifi er la date et l’heure une fois qu’elles ont été réglées, procédez
comme suit.
1 Appuyez sur la touche <n>.
2 Déplacez la commande de zoom pour choisir l’onglet [3].
3 Appuyez sur les touches <o><p> ou tournez la molette <5> pour
choisir [Date/Heure], puis appuyez sur la touche <m>.
4 Exécutez l’étape 2 de la section « Réglage de la date et de l’heure »
pour effectuer les réglages.
5 Appuyez sur la touche <n>.
Langue d’affi chage
Vous pouvez modifi er la langue d’affi chage selon vos besoins.
1 Activez le mode de lecture.
Appuyez sur la touche <1>.
2 Accédez à l’écran de réglage.
Appuyez sur la touche <m> et
maintenez-la enfoncée, puis appuyez
immédiatement sur la touche <n>.
Appuyez sur les touches
<o><p><q><r> ou tournez la molette
<5> pour choisir une langue, puis
appuyez sur la touche <m>.
6
Page 15
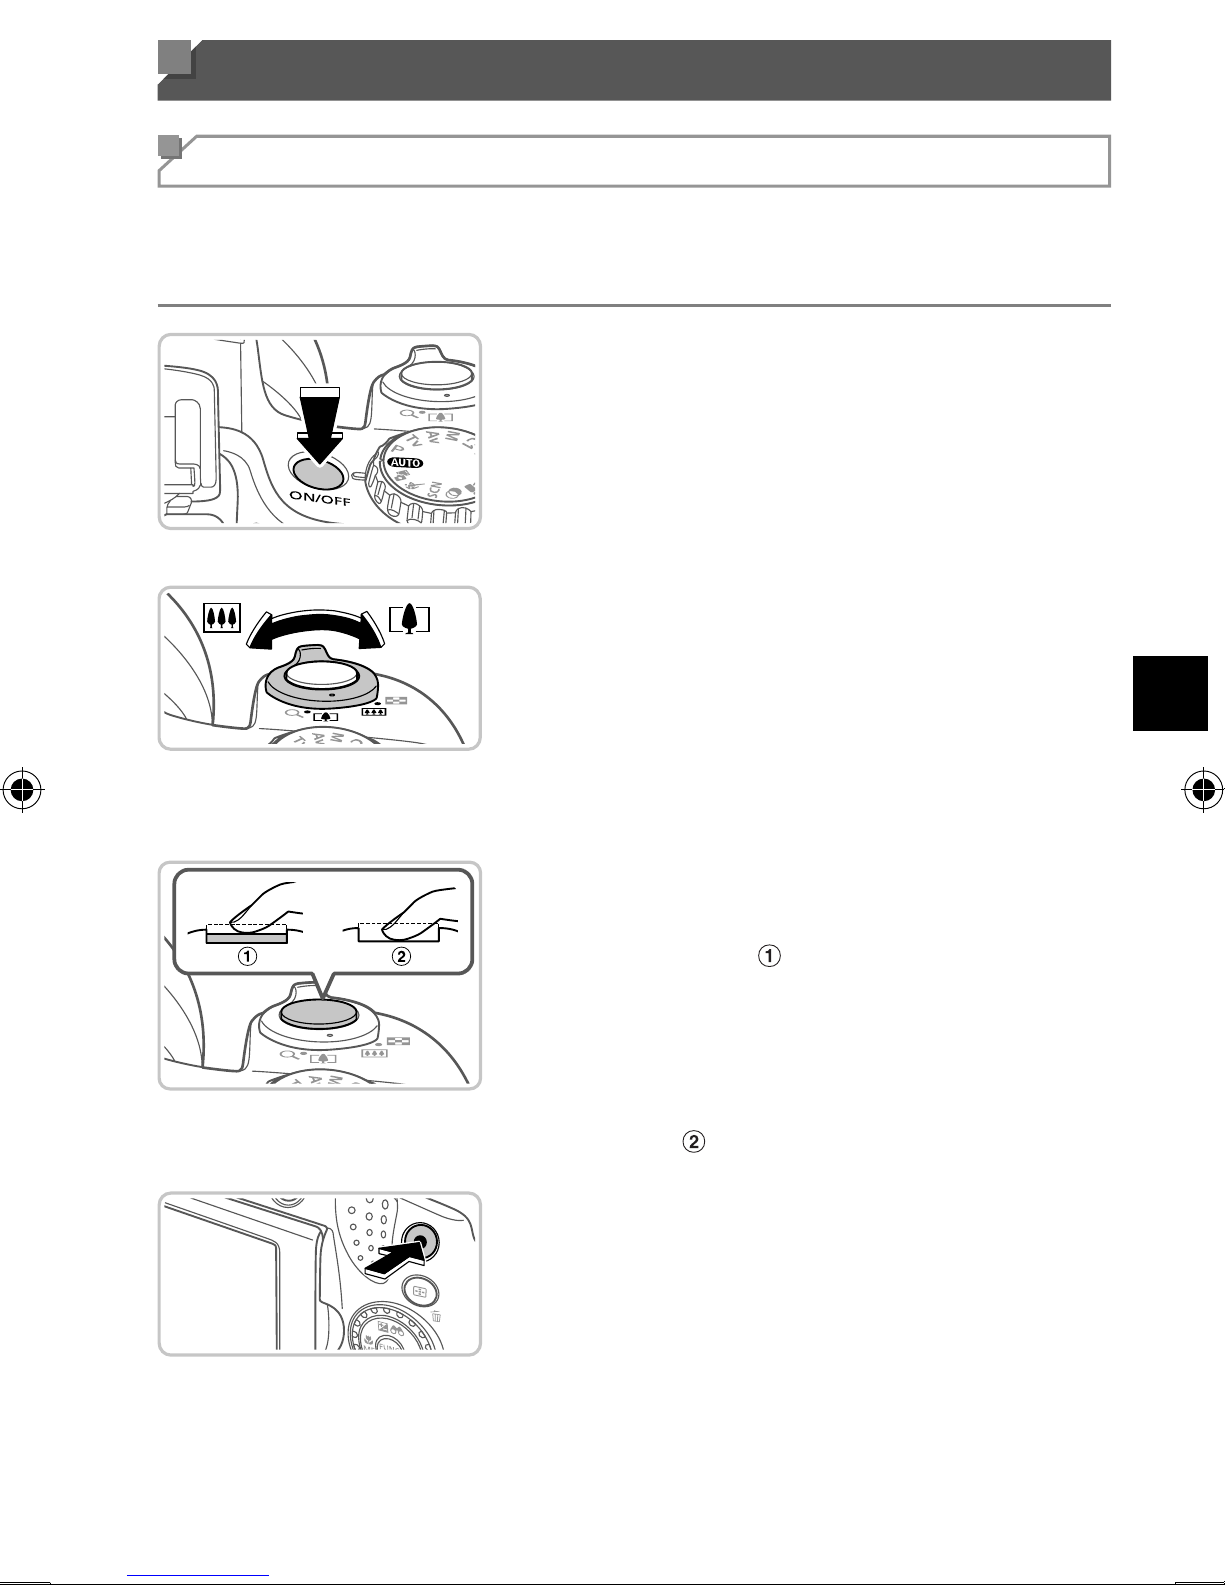
Test de l’appareil photo
Prise de vue
Pour une sélection entièrement automatique des réglages optima pour des
scènes spécifi ques, laissez l’appareil photo déterminer les conditions du
sujet et de prise de vue.
1 Mettez l’appareil photo
sous tension et passez en
mode <A>.
Appuyez sur la touche ON/OFF.
Positionnez la molette modes
sur <A>.
2 Composez la vue.
Pour faire un zoom avant et agrandir le
sujet, déplacez la commande de zoom
vers <i> (téléobjectif) tandis que
vous regardez l’écran et, pour faire un
zoom arrière, déplacez-la vers <j>
(grand angle).
3 Prenez des photos.
Appuyez légèrement sur le
déclencheur (
L’appareil photo émet deux bips après la
mise au point et des zones AF s’affi chent
pour indiquer les zones de l’image mises
au point. Appuyez sur le déclencheur
à fond (
).
Réalisez des vidéos.
Appuyez sur la touche vidéo pour
).
démarrer l’enregistrement et appuyez
à nouveau dessus pour l’arrêter.
7
Page 16
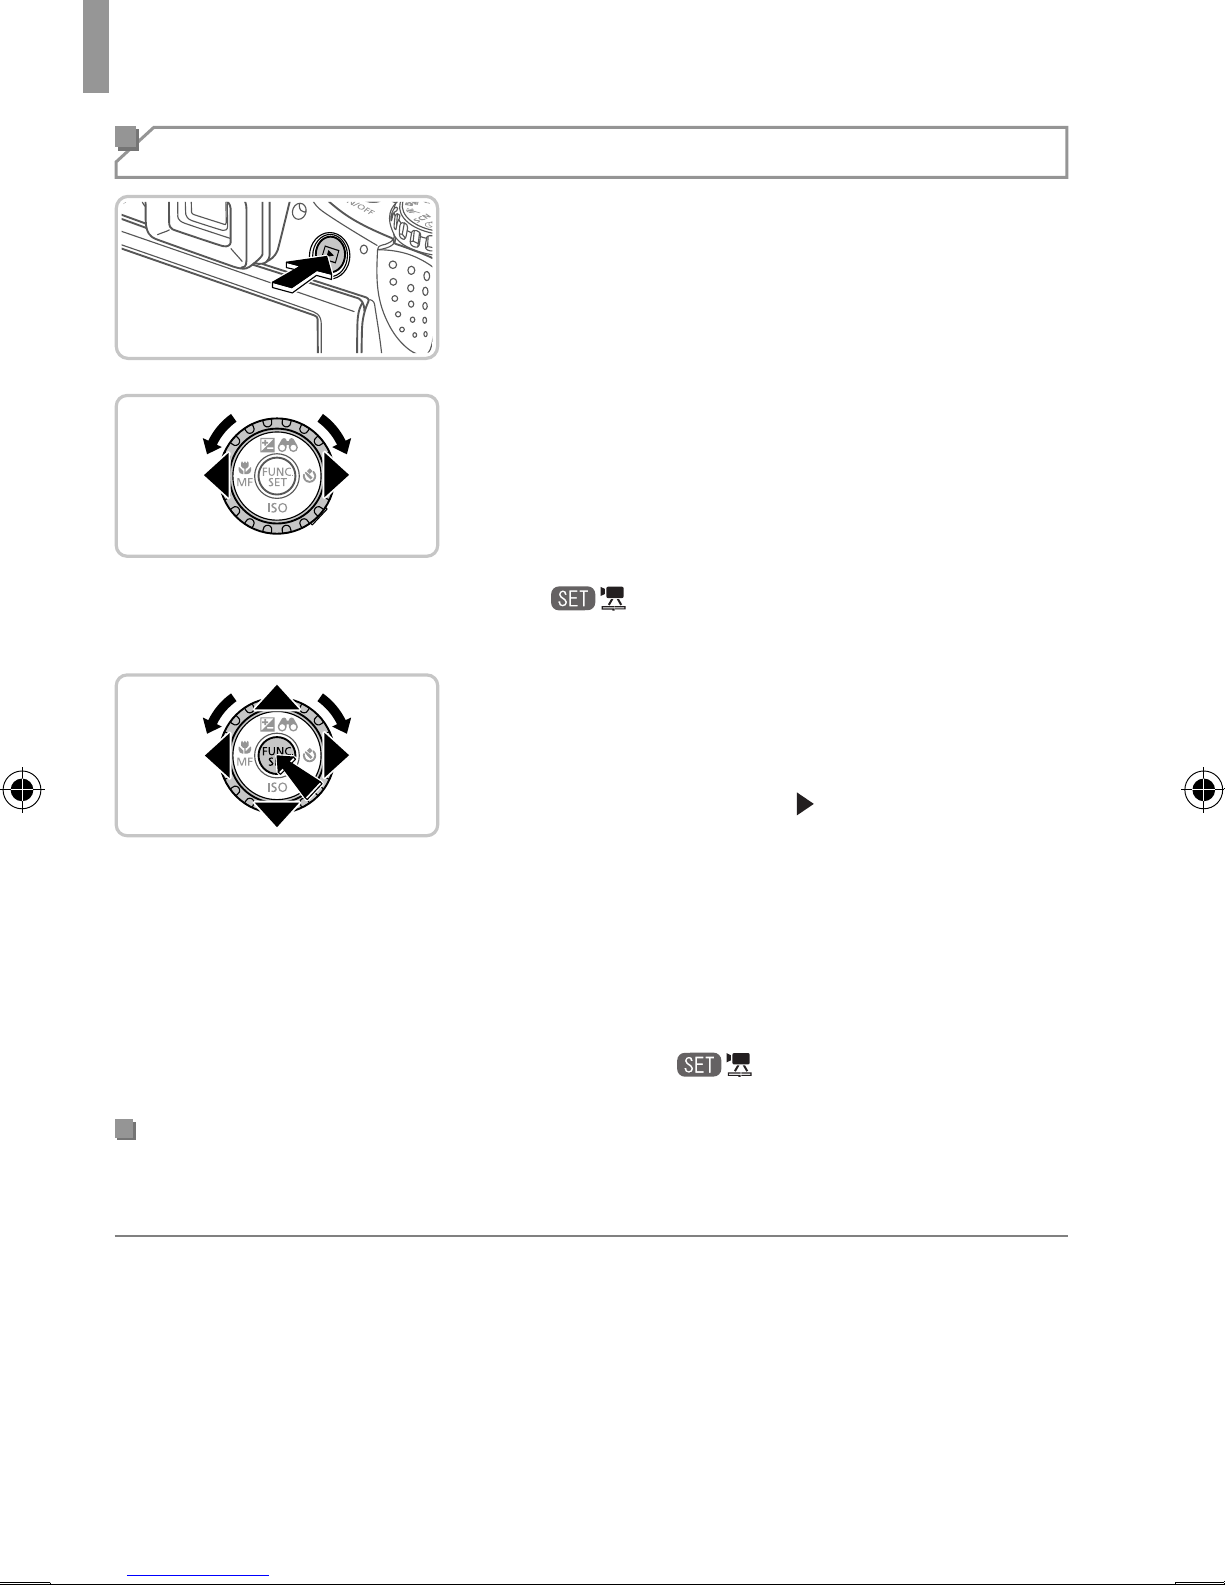
Test de l’appareil photo
Affi chage
1 Activez le mode de lecture.
Appuyez sur la touche <1>.
2 Parcourez vos photos.
Pour affi cher l’image précédente ou
suivante, appuyez sur les touches
<q><r> ou tournez la molette <5>.
Les vidéos sont identifi ées par une icône
[
l’étape 3.
]. Pour lire des vidéos, allez à
3 Lisez les vidéos.
Appuyez sur la touche <m> pour
accéder au panneau de commande des
vidéos, choisissez [
touches <q><r> ou tournez la molette
<5>), puis appuyez à nouveau sur la
touche <m>.
Pour régler le volume, appuyez sur les
touches <o><p>.
La lecture commence et, une fois la vidéo
terminée, [
] s’affi che.
Effacement des photos
Pour effacer la photo choisie à l’étape 2, procédez comme suit.
] (appuyez sur les
Veuillez noter qu’il est impossible de récupérer les photos effacées.
1 Appuyez sur la touche <a>.
2 Lorsque [Effacer?] s’affi che, appuyez sur les touches <q><r> ou
tournez la molette <5> pour choisir [Effacer], puis appuyez sur
la touche <m>.
8
Page 17
Union européenne (et Espace économique européen) uniquement.
Ces symboles indiquent que ce produit ne doit pas être mis
au rebut avec les ordures ménagères, comme le spécifi ent
la Directive européenne DEEE (2002/96/CE), la Directive
européenne relative à l'élimination des piles et des
accumulateurs usagés (2006/66/CE) et les lois en vigueur
dans votre pays, appliquant ces directives.
Si un symbole de toxicité chimique est imprimé sous le
symbole illustré ci-dessus conformément à la Directive relative aux piles et aux
accumulateurs, il indique la présence d'un métal lourd (Hg = mercure, Cd = cadmium,
Pb = plomb) dans la pile ou l'accumulateur à une concentration supérieure au seuil
applicable spécifi é par la Directive.
Ce produit doit être confi é à un point de collecte désigné, par exemple, chaque fois
que vous achetez un produit similaire neuf, ou à un point de collecte agréé pour
le recyclage des équipements électriques ou électroniques (EEE) et des piles et
accumulateurs. Le traitement inapproprié de ce type de déchet risque d'avoir des
répercussions sur l'environnement et la santé humaine, du fait de la présence de
substances potentiellement dangereuses généralement associées aux équipements
électriques ou électroniques.
Votre coopération envers la mise au rebut correcte de ce produit contribuera
à l'utilisation effi cace des ressources naturelles.
Pour de plus amples informations sur le recyclage de ce produit, veuillez contacter
vos services municipaux, votre éco-organisme ou les autorités locales. Vous pouvez
également vous rendre sur le site www.canon-europe.com/environment.
(Espace économique européen : Norvège, Islande et Liechtenstein)
ATTENTION
RISQUE D’EXPLOSION EN CAS D’UTILISATION DES BATTERIES NON
CONFORMES.
REPORTEZ-VOUS AUX RÉGLEMENTATIONS LOCALES POUR
L’ABANDON DES BATTERIES USAGÉES.
CANON INC.
30-2, Shimomaruko 3-chome, Ohta-ku, Tokyo 146-8501, Japan
CANON EUROPA N.V.
Bovenkerkerweg 59-61, 1185 XB Amstelveen, The Netherlands
© CANON INC. 2012 IMPRIMÉ EN UE
9
Page 18
ﻁﺎﻴﺘﺣﺍ
.ﺩﺭﺍﺩ ﺩﻮﺟﻭ ﺭﺎﺠﻔﻧﺍ ﺮﻄﺧ ،ﻥﺁ ﺐﺳﺎﻨﻣﺎﻧ ﻉﻮﻧ ﺎﺑ یﺮﺗﺎﺑ ﺾﻳﻮﻌﺗ ﺕﺭﻮﺻ ﺭﺩ
.ﺪﻳﺰﻳﺮﺑ ﺭﻭﺩ ﯽﻠﺤﻣ ﺕﺍﺭﺮﻘﻣ ﻭ ﻦﻴﻧﺍﻮﻗ ﻪﺑ ﻪﺟﻮﺗ ﺎﺑ ﺍﺭ ﻩﺪﺷ ﻩﺩﺎﻔﺘﺳﺍ یﺎﻫ یﺮﺗﺎﺑ
CANON INC.
30-2, Shimomaruko 3-chome, Ohta-ku, Tokyo 146-8501, Japan
CANON EUROPA N.V.
Bovenkerkerweg 59-61, 1185 XB Amstelveen, The Netherlands
ﺎﭘﻭﺭﺍ ﻪﻳﺩﺎﺤﺗﺍ پﺎﭼ © CANON INC. 2012
٩
Page 19
ﻦﻴﺑﺭﻭﺩ ﺶﻳﺎﻣﺯﺁ
ﻩﺪﻫﺎﺸﻣ
.ﺪﻳﻮﺷ ﺶﺨﭘ ﺖﻟﺎﺣ ﺩﺭﺍﻭ
.ﺪﻴﻨﮐ ﺖﮐﺮﺣ ﺩﻮﺧ ﺮﻳﻭﺎﺼﺗ ﻦﻴﺑ ﺭﺩ
<5> ﯽﺸﺧﺮﭼ ﺪﻴﻠﮐ ﺎﻳ ﺪﻴﻫﺩ ﺭﺎﺸﻓ ﺍﺭ <q><r>
.ﺪﻴﻧﺎﺧﺮﭽﺑ ﺍﺭ
.ﺪﻳﻭﺮﺑ ٣ ﻪﻠﺣﺮﻣ ﻪﺑ ،ﺎﻫ ﻢﻠﻴﻓ
.ﺪﻴﻨﮐ ﺶﺨﭘ ﺍﺭ ﺎﻫ ﻢﻠﻴﻓ
<q><r> یﺎﻫ ﻪﻤﮐﺩ) ﺪﻴﻨﮐ ﺏﺎﺨﺘﻧﺍ ﺍﺭ [
،(ﺪﻴﻧﺎﺧﺮﭽﺑ ﺍﺭ <5> ﯽﺸﺧﺮﭼ ﺪﻴﻠﮐ ﺎﻳ ﺪﻴﻫﺩ ﺭﺎﺸﻓ ﺍﺭ
] ،ﺪﻴﻫﺩ ﺭﺎﺸﻓ
١
z .ﺪﻴﻫﺩ ﺭﺎﺸﻓ ﺍﺭ <1> ﻪﻤﮐﺩ
٢
z یﺎﻫ ﻪﻤﮐﺩ ،یﺪﻌﺑ ﺎﻳ ﯽﻠﺒﻗ ﺮﻳﻮﺼﺗ ﻩﺪﻫﺎﺸﻣ یﺍﺮﺑ
z ﺶﺨﭘ یﺍﺮﺑ .ﺪﻧﻮﺷ ﯽﻣ ﺺﺨﺸﻣ [ ] ﺩﺎﻤﻧ ﺎﺑ ﺎﻫ ﻢﻠﻴﻓ
٣
z ﻢﻠﻴﻓ ﻝﺮﺘﻨﮐ ﻪﺤﻔﺻ ﻪﺑ ﯽﺳﺮﺘﺳﺩ یﺍﺮﺑ ﺍﺭ <m> ﻪﻤﮐﺩ
.ﺪﻴﻫﺩ ﺭﺎﺸﻓ ﻩﺭﺎﺑﻭﺩ ﺍﺭ <m> ﻪﻤﮐﺩ ﺲﭙﺳ ﻭ
z ﺍﺭ <o><p> یﺎﻫ ﻪﻤﮐﺩ ،ﺍﺪﺻ ﻥﺍﺰﻴﻣ ﻢﻴﻈﻨﺗ یﺍﺮﺑ
.ﺪﻴﻫﺩ ﺭﺎﺸﻓ
z [ ] ،ﻢﻠﻴﻓ ﻥﺎﻳﺎﭘ ﺯﺍ ﺲﭘ ﻭ ﺩﻮﺷ ﯽﻣ ﻉﻭﺮﺷ ﻥﻮﻨﮐﺍ ﺶﺨﭘ
.ﺩﻮﺷ ﯽﻣ ﻩﺩﺍﺩ ﺶﻳﺎﻤﻧ
ﺮﻳﻭﺎﺼﺗ ﻥﺩﺮﮐ کﺎﭘ
ﺪﻴﺷﺎﺑ ﻪﺘﺷﺍﺩ ﻪﺟﻮﺗ .ﺪﻴﻫﺩ ﻡﺎﺠﻧﺍ ﺍﺭ ﺮﻳﺯ یﺎﻫﺭﺎﮐ ،ﺪﻳﺩﺮﮐ ﺏﺎﺨﺘﻧﺍ ٢ ﻪﻠﺣﺮﻣ ﺭﺩ ﻪﮐ یﺮﻳﻮﺼﺗ ﻥﺩﺮﮐ کﺎﭘ یﺍﺮﺑ
.ﺩﺭﺍﺪﻧ ﺩﻮﺟﻭ ﻩﺪﺷ کﺎﭘ ﺮﻳﻭﺎﺼﺗ ﯽﺑﺎﻳﺯﺎﺑ ﻥﺎﮑﻣﺍ ﻪﮐ
.ﺪﻴﻫﺩ ﺭﺎﺸﻓ ﺍﺭ <a> ﻪﻤﮐﺩ
<5> ﯽﺸﺧﺮﭼ ﺪﻴﻠﮐ ﺎﻳ ﺪﻴﻫﺩ ﺭﺎﺸﻓ ﺍﺭ <q><r> یﺎﻫ ﻪﻤﮐﺩ ،ﺪﺷ ﻩﺩﺍﺩ ﺶﻳﺎﻤﻧ [؟ﺩﻮﺷ کﺎﭘ] ﯽﺘﻗﻭ ٢
.ﺪﻴﻫﺩ ﺭﺎﺸﻓ ﺍﺭ <m> ﻪﻤﮐﺩ ﺲﭙﺳ ﻭ ،ﺩﻮﺷ ﺏﺎﺨﺘﻧﺍ [ﻥﺩﺮﮐ کﺎﭘ] ﺎﺗ ﺪﻴﻧﺎﺧﺮﭽﺑ ﺍﺭ
١
٨
Page 20
ﻦﻴﺑﺭﻭﺩ ﺶﻳﺎﻣﺯﺁ
یﺭﺍﺩﺮﺑﺮﻳﻮﺼﺗ
ﻦﻴﺑﺭﻭﺩ ﻪﮐ ﺪﻴﻫﺩ ﻩﺯﺎﺟﺍ ﺖﺴﻴﻓﺎﮐ ﻂﻘﻓ ،ﺹﺎﺧ یﺎﻫ ﻪﻨﺤﺻ یﺍﺮﺑ ﻪﻨﻴﻬﺑ ﺕﺎﻤﻴﻈﻨﺗ ﺭﺎﮐﺩﻮﺧ ًﻼﻣﺎﮐ ﺏﺎﺨﺘﻧﺍ یﺍﺮﺑ
.ﺪﻨﮐ ﻦﻴﻴﻌﺗ ﺍﺭ یﺭﺍﺩﺮﺑﺮﻳﻮﺼﺗ ﻂﻳﺍﺮﺷ ﻭ ﻩژﻮﺳ
ﺖﻟﺎﺣ ﺩﺭﺍﻭ ﻭ ﺪﻴﻨﮐ ﻦﺷﻭﺭ ﺍﺭ ﻦﻴﺑﺭﻭﺩ ١
.ﺪﻳﻮﺷ <A>
z .ﺪﻴﻫﺩ ﺭﺎﺸﻓ ﺍﺭ ON/OFF ﻪﻤﮐﺩ
z .ﺪﻴﻫﺩ ﺭﺍﺮﻗ <A> یﻭﺭ ﺍﺭ ﺖﻟﺎﺣ ﯽﺸﺧﺮﭼ ﺪﻴﻠﮐ
.ﺪﻴﻨﮐ یﺪﻨﺑ ﺐﻴﮐﺮﺗ ﺍﺭ ﺮﻳﻮﺼﺗ
،ﺪﻴﻫﺩ ﺖﮐﺮﺣ (ﻪﻠﺗ) <i> ﻑﺮﻃ ﻪﺑ ﺍﺭ ﻡﻭﺯ ﻡﺮﻫﺍ ،ﺪﻴﻨﮐ
(ﺪﻳﺍﻭ) <j> ﻑﺮﻃ ﻪﺑ ﺍﺭ ﻥﺁ ،ﻩژﻮﺳ ﯽﻳﺎﻤﻨﮑﭼﻮﮐ یﺍﺮﺑ ﻭ
.ﺪﻴﻫﺩ ﺖﮐﺮﺣ
.ﺪﻳﺮﻴﮕﺑ ﺲﮑﻋ
ﻩﺪﺷ ﺱﻮﮐﻮﻓ ﯽﺣﺍﻮﻧ ﻥﺩﺍﺩ ﻥﺎﺸﻧ یﺍﺮﺑ AF یﺎﻫﺭﺩﺎﮐ ﻭ
ﻞﻣﺎﮐ ﺭﻮﻃ ﻪﺑ ﺍﺭ ﺮﺗﺎﺷ ﻪﻤﮐﺩ .ﺪﻧﻮﺷ ﯽﻣ ﻩﺩﺍﺩ ﺶﻳﺎﻤﻧ ﺮﻳﻮﺼﺗ
) ﺪﻴﻫﺩ ﺭﺎﺸﻓ
.(
.ﺪﻴﻨﮐ یﺭﺍﺩﺮﺒﻤﻠﻴﻓ
.ﺪﻴﻫﺩ ﺭﺎﺸﻓ ﺍﺭ ﻥﺁ ﻩﺭﺎﺑﻭﺩ ،یﺭﺍﺩﺮﺒﻤﻠﻴﻓ ﻒﻗﻮﺗ
٢
z ﯽﻣ ﻩﺎﮕﻧ ﻪﺤﻔﺻ ﻪﺑ ﻪﮐ ﺭﻮﻄﻧﺎﻤﻫ ،ﻩژﻮﺳ ﯽﻳﺎﻤﻨﮔﺭﺰﺑ یﺍﺮﺑ
٣
z .( ) ﺪﻴﻫﺩ ﺭﺎﺸﻓ ﯽﻣﺍﺭﺁ ﻪﺑ ﺍﺭ ﺮﺗﺎﺷ ﻪﻤﮐﺩ
z ،ﺪﻧﺯ ﯽﻣ ﻕﻮﺑ ﺭﺎﺑ ﻭﺩ ﻥﺩﺮﮐ ﺱﻮﮐﻮﻓ ﺯﺍ ﺪﻌﺑ ﻦﻴﺑﺭﻭﺩ
z یﺍﺮﺑ ﻭ ،ﺪﻴﻫﺩ ﺭﺎﺸﻓ یﺭﺍﺩﺮﺒﻤﻠﻴﻓ ﻉﻭﺮﺷ یﺍﺮﺑ ﺍﺭ ﻢﻠﻴﻓ ﻪﻤﮐﺩ
٧
Page 21
ﻪﻴﻟﻭﺍ یﺎﻫ یﺯﺎﺳ ﻩﺩﺎﻣﺁ
ﻥﺎﻣﺯ ﻭ ﺦﻳﺭﺎﺗ ﺮﻴﻴﻐﺗ
.ﺪﻴﻫﺩ ﻡﺎﺠﻧﺍ ﺍﺭ ﺮﻳﺯ یﺎﻫﺭﺎﮐ ،ﻪﻴﻟﻭﺍ ﻢﻴﻈﻨﺗ ﺯﺍ ﺲﭘ ﻥﺎﻣﺯ ﻭ ﺦﻳﺭﺎﺗ ﻢﻴﻈﻨﺗ یﺍﺮﺑ
.ﺪﻴﻫﺩ ﺭﺎﺸﻓ ﺍﺭ <n> ﻪﻤﮐﺩ
.ﺪﻴﻫﺩ ﺖﮐﺮﺣ [3] ﻪﻧﺎﺑﺯ ﺏﺎﺨﺘﻧﺍ یﺍﺮﺑ ﺍﺭ ﻡﻭﺯ ﻡﺮﻫﺍ ٢
[ﻥﺎﻣﺯ / ﺦﻳﺭﺎﺗ] ﺎﺗ ﺪﻴﻧﺎﺧﺮﭽﺑ ﺍﺭ <5> ﯽﺸﺧﺮﭼ ﺪﻴﻠﮐ ﺎﻳ ﺪﻴﻫﺩ ﺭﺎﺸﻓ ﺍﺭ <o><p> یﺎﻫ ﻪﻤﮐﺩ ٣
.ﺪﻴﻫﺩ ﺭﺎﺸﻓ ﺍﺭ <m> ﻪﻤﮐﺩ ﺲﭙﺳ ﻭ ،ﺩﻮﺷ ﺏﺎﺨﺘﻧﺍ
.ﺪﻴﻨﮐ یﻭﺮﻴﭘ ﺕﺎﻤﻴﻈﻨﺗ ﻡﺎﺠﻧﺍ یﺍﺮﺑ "ﻥﺎﻣﺯ ﻭ ﺦﻳﺭﺎﺗ ﻢﻴﻈﻨﺗ " ﺭﺩ ٢ ﻪﻠﺣﺮﻣ ﺯﺍ
.ﺪﻴﻫﺩ ﺭﺎﺸﻓ ﺍﺭ <n> ﻪﻤﮐﺩ ۵
١
۴
ﺶﻳﺎﻤﻧ ﻪﺤﻔﺻ ﻥﺎﺑﺯ
.ﺩﺍﺩ ﺮﻴﻴﻐﺗ ﻡﻭﺰﻟ ﺕﺭﻮﺻ ﺭﺩ ﻥﺍﻮﺗ ﯽﻣ ﺍﺭ ﺶﻳﺎﻤﻧ ﻪﺤﻔﺻ ﻥﺎﺑﺯ
.ﺪﻳﻮﺷ ﺶﺨﭘ ﺖﻟﺎﺣ ﺩﺭﺍﻭ
١
z .ﺪﻴﻫﺩ ﺭﺎﺸﻓ ﺍﺭ <1> ﻪﻤﮐﺩ
.ﺪﻴﻨﮐ ﺍﺪﻴﭘ ﯽﺳﺮﺘﺳﺩ ﺕﺎﻤﻴﻈﻨﺗ ﻪﺤﻔﺻ ﻪﺑ
.ﺪﻴﻫﺩ ﺭﺎﺸﻓ ﺍﺭ <n> ﻪﻤﮐﺩ
،ﺩﻮﺷ ﺏﺎﺨﺘﻧﺍ ﻥﺎﺑﺯ ﮏﻳ ﺎﺗ ﺪﻴﻧﺎﺧﺮﭽﺑ ﺍﺭ <5> ﯽﺸﺧﺮﭼ
.ﺪﻴﻫﺩ ﺭﺎﺸﻓ ﺍﺭ <m> ﻪﻤﮐﺩ ﺲﭙﺳ ﻭ
٢
z ﻪﻠﺻﺎﻓﻼﺑ ﺲﭙﺳ ﻭ ،ﺪﻳﺭﺍﺩ ﻪﮕﻧ ﻭ ﻩﺩﺍﺩ ﺭﺎﺸﻓ ﺍﺭ <m> ﻪﻤﮐﺩ
z ﺪﻴﻠﮐ ﺎﻳ ﺪﻴﻫﺩ ﺭﺎﺸﻓ ﺍﺭ <o><p><q><r> یﺎﻫ ﻪﻤﮐﺩ
۶
Page 22
ﻪﻴﻟﻭﺍ یﺎﻫ یﺯﺎﺳ ﻩﺩﺎﻣﺁ
) ﺪﻴﻧﺎﺧﺮﭽﺑ
.(
ﻪﺤﻔﺻ ﺯﺍ ﻩﺩﺎﻔﺘﺳﺍ
z ﺰﻨﻟ ﺖﻤﺳ ﻪﺑ ﻪﺟﺭﺩ ١٨٠ ﺍﺭ ﻥﺁ ﻭ ( ) ﺪﻴﻨﮐ ﺯﺎﺑ ﺍﺭ ﻪﺤﻔﺻ
) ﺪﻳﺪﻨﺒﺑ ﺖﻬﺟ ﻦﻳﺍ ﺭﺩ ﺍﺭ ﻪﺤﻔﺻ
٣
.ﺪﻴﻨﮐ ﻦﺷﻭﺭ ﺍﺭ ﻦﻴﺑﺭﻭﺩ
.ﺪﻴﻨﮐ ﻢﻴﻈﻨﺗ ﺍﺭ ﻥﺎﻣﺯ ﻭ ﺦﻳﺭﺎﺗ ٢
.ﺪﻴﻫﺩ ﺭﺎﺸﻓ
.ﺪﻴﻧﺎﺧﺮﭽﺑ ﺍﺭ <5> ﯽﺸﺧﺮﭼ ﺪﻴﻠﮐ ﺎﻳ ﺪﻴﻫﺩ ﺭﺎﺸﻓ ﺍﺭ
z .(
ﻥﺎﻣﺯ ﻭ ﺦﻳﺭﺎﺗ ﻢﻴﻈﻨﺗ
١
z .ﺪﻴﻫﺩ ﺭﺎﺸﻓ ﺍﺭ ON/OFF ﻪﻤﮐﺩ
W .ﺩﻮﺷ ﯽﻣ ﻩﺩﺍﺩ ﺶﻳﺎﻤﻧ [ﻥﺎﻣﺯ / ﺦﻳﺭﺎﺗ] ﻪﺤﻔﺻ
z ﻪﻨﻳﺰﮔ ﮏﻳ ﺏﺎﺨﺘﻧﺍ یﺍﺮﺑ ﺍﺭ <q><r> یﺎﻫ ﻪﻤﮐﺩ
z <o><p> یﺎﻫ ﻪﻤﮐﺩ ،ﻥﺎﻣﺯ ﻭ ﺦﻳﺭﺎﺗ ﻦﻴﻴﻌﺗ یﺍﺮﺑ
.ﺪﻴﻨﮐ ﻢﻴﻈﻨﺗ ﺍﺭ ﯽﻠﺤﻣ ﯽﻧﺎﻣﺯ ﻪﻘﻄﻨﻣ
ﺍﺭ <5> ﯽﺸﺧﺮﭼ ﺪﻴﻠﮐ ﺎﻳ ﺪﻴﻫﺩ ﺭﺎﺸﻓ ﺍﺭ <q><r>
.ﺪﻴﻧﺎﺧﺮﭽﺑ
.ﺩﻮﺷ ﯽﻤﻧ ﻩﺩﺍﺩ ﺶﻳﺎﻤﻧ ﺮﮕﻳﺩ ﻢﻴﻈﻨﺗ ﻪﺤﻔﺻ ،ﺪﻴﻳﺄﺗ ﻡﺎﻴﭘ ﻥﺪﺷ
ON/OFF
ﻪﻤﮐﺩ ،ﻦﻴﺑﺭﻭﺩ ﻥﺩﺮﮐ ﺵﻮﻣﺎﺧ یﺍﺮﺑ
z .ﺪﻴﻫﺩ ﺭﺎﺸﻓ ﺍﺭ <m> ﻪﻤﮐﺩ ،ﺭﺎﮐ ﻥﺎﻳﺎﭘ ﺯﺍ ﺲﭘ
٣
z یﺎﻫ ﻪﻤﮐﺩ ،ﺩﻮﺧ ﯽﻠﺤﻣ ﯽﻧﺎﻣﺯ ﻪﻘﻄﻨﻣ ﺏﺎﺨﺘﻧﺍ یﺍﺮﺑ
z ﺮﻫﺎﻇ ﺯﺍ ﺲﭘ .ﺪﻴﻫﺩ ﺭﺎﺸﻓ ﺍﺭ <m> ﻪﻤﮐﺩ ،ﺭﺎﮐ ﻥﺎﻳﺎﭘ ﺯﺍ ﺲﭘ
z .ﺪﻴﻫﺩ ﺭﺎﺸﻓ ﺍﺭ
۵
Page 23
ﻪﻴﻟﻭﺍ یﺎﻫ یﺯﺎﺳ ﻩﺩﺎﻣﺁ
ﻪﻈﻓﺎﺣ ﺕﺭﺎﮐ ﻭ یﺮﺗﺎﺑ ﻥﺩﺍﺩ ﺭﺍﺮﻗ
.ﺪﻴﻨﮐ ﺯﺎﺑ ﺍﺭ ﺵﻮﭘﺭﺩ
z .( ) ﺪﻴﻨﮐ ﺯﺎﺑ ﺍﺭ ﻥﺁ ﻭ ( ) ﺪﻴﻧﺍﺰﻐﻠﺑ ﺍﺭ ﺵﻮﭘﺭﺩ
.ﺪﻴﻫﺩ ﺭﺍﺮﻗ ﺩﻮﺧ یﺎﺟ ﺭﺩ ﺍﺭ یﺮﺗﺎﺑ
z یﺮﺗﺎﺑ ،ﻥﺎﮑﻴﭘ ﺖﻬﺟ ﺭﺩ یﺮﺗﺎﺑ ﻞﻔﻗ ﻥﺩﺍﺩ ﺭﺎﺸﻓ ﻡﺎﮕﻨﻫ ﺭﺩ
ﻞﺧﺍﺩ ﻪﺑ ﺍﺭ ﻥﺁ ﻭ ﺪﻴﻫﺩ ﺭﺍﺮﻗ ﻩﺪﺷ ﻩﺩﺍﺩ ﻥﺎﺸﻧ ﺕﺭﻮﺻ ﻪﺑ ﺍﺭ
.ﺩﺮﻴﮔ ﺭﺍﺮﻗ ﻩﺪﺷ ﻞﻔﻗ ﺖﻴﻌﺿﻭ ﺭﺩ ﻖﺗ یﺍﺪﺻ ﺎﺑ ﺎﺗ ﺪﻴﻫﺩ ﺭﺎﺸﻓ
z ﻥﺎﮑﻴﭘ ﺖﻬﺟ ﺭﺩ یﺮﺗﺎﺑ ﻞﻔﻗ ،یﺮﺗﺎﺑ ﻥﺩﺭﻭﺁ ﻥﻭﺮﻴﺑ یﺍﺮﺑ
.ﺪﻴﻫﺩ ﺭﺎﺸﻓ
ﯽﺳﺭﺮﺑ ﺍﺭ ﺕﺭﺎﮐ ﻦﺘﺷﻮﻧ ﺮﺑﺍﺮﺑ ﺭﺩ ﺖﻈﻓﺎﺤﻣ ﻪﻧﺎﺑﺯ
.ﺪﻴﻫﺩ ﺭﺍﺮﻗ ﺩﻮﺧ یﺎﺟ ﺭﺩ ﺍﺭ ﻪﻈﻓﺎﺣ ﺕﺭﺎﮐ ﻭ ﺪﻴﻨﮐ
١
٢
ﺎﻫ ﻪﻧﺎﻳﺎﭘ
٣
ﺖﻴﻌﺿﻭ ﺭﺩ ﻪﻧﺎﺑﺯ ﻪﮐ ﯽﻣﺎﮕﻨﻫ ﺭﺩ ﺪﻨﺘﺴﻫ ﻦﺘﺷﻮﻧ ﺮﺑﺍﺮﺑ ﺭﺩ
.ﺖﺴﻴﻧ ﺮﻳﺬﭘ ﻥﺎﮑﻣﺍ ،ﺩﺭﺍﺩ ﺭﺍﺮﻗ (ﻦﻴﻳﺎﭘ ﻑﺮﻃ ﻪﺑ) ﻩﺪﺷ ﻞﻔﻗ
ﺖﻴﻌﺿﻭ ﺭﺩ ﻖﺗ یﺍﺪﺻ ﺎﺑ ﺎﺗ ﺪﻴﻧﺍﺰﻐﻠﺑ ﻻﺎﺑ ﻑﺮﻃ ﻪﺑ ﺍﺭ ﻪﻧﺎﺑﺯ
.ﺩﺮﻴﮔ ﺭﺍﺮﻗ ﻩﺩﻮﺸﮔ ﻞﻔﻗ
.ﺩﺮﻴﮔ ﺭﺍﺮﻗ ﻩﺪﺷ ﻞﻔﻗ ﺖﻴﻌﺿﻭ ﺭﺩ ﻖﺗ یﺍﺪﺻ
.ﺪﻴﻨﮐ ﺎﻫﺭ ﺍﺭ ﻥﺁ ﻡﺍﺭﺁ ﺲﭙﺳ ﻭ ،ﺪﻳﻮﻨﺸﺑ ﻖﺗ یﺍﺪﺻ ﮏﻳ ﺎﺗ ﺪﻴﻫﺩ
.ﺪﻳﺪﻨﺒﺑ ﺍﺭ ﺵﻮﭘﺭﺩ
.ﺩﺮﻴﮔ ﺭﺍﺮﻗ ﻪﺘﺴﺑ ﺖﻴﻌﺿﻭ ﺭﺩ ﻖﺗ یﺍﺪﺻ ﺎﺑ ﺎﺗ ﺪﻴﻫﺩ
z ﺖﻈﻓﺎﺤﻣ ﻪﻧﺎﺑﺯ یﺍﺭﺍﺩ ﻪﮐ ﯽﻳﺎﻫ ﻪﻈﻓﺎﺣ ﺕﺭﺎﮐ یﻭﺭ ﻂﺒﺿ
z ﺎﺑ ﺎﺗ ﺪﻴﻫﺩ ﺭﺍﺮﻗ ﻩﺪﺷ ﻩﺩﺍﺩ ﻥﺎﺸﻧ ﺖﻬﺟ ﺭﺩ ﺍﺭ ﻪﻈﻓﺎﺣ ﺕﺭﺎﮐ
z ﺭﺎﺸﻓ ﻞﺧﺍﺩ ﻪﺑ ﺍﺭ ﻥﺁ ،ﻪﻈﻓﺎﺣ ﺕﺭﺎﮐ ﻥﺩﺭﻭﺁ ﻥﻭﺮﻴﺑ یﺍﺮﺑ
ﺐﺴﭼﺮﺑ
۴
z ﺭﺎﺸﻓ ﺍﺭ ﻥﺁ ﻭ ﺪﻳﺭﻭﺎﻴﺑ ﻦﻴﻳﺎﭘ ﻥﺎﮑﻴﭘ ﺖﻬﺟ ﺭﺩ ﺍﺭ ﺵﻮﭘﺭﺩ
۴
Page 24
ﺎﻤﻨﻫﺍﺭ یﺎﻫ ﻪﭼﺮﺘﻓﺩ ﻩﺪﻫﺎﺸﻣ
ﻩﺪﻫﺎﺸﻣ یﺍﺮﺑ .ﺖﺳﺍ DIGITAL CAMERA Manuals Disk یﺩ ﯽﺳ ﺭﺩ ﺮﻳﺯ یﺎﻤﻨﻫﺍﺭ یﺎﻫ ﻪﭼﺮﺘﻓﺩ
.ﺖﺳﺍ ﺯﺎﻴﻧ Adobe Reader ﻪﺑ ،PDF ﺖﻣﺮﻓ ﺎﺑ ﺎﻤﻨﻫﺍﺭ یﺎﻫ ﻪﭼﺮﺘﻓﺩ
ﻦﻴﺑﺭﻭﺩ ﺮﺑﺭﺎﮐ یﺎﻤﻨﻫﺍﺭ
.ﺪﻫﺩ ﯽﻣ ﺡﺮﺷ ﺍﺭ ﺮﻳﺯ ﺕﺎﻋﻮﺿﻮﻣ ﺎﻤﻨﻫﺍﺭ ﻦﻳﺍ
z ،ﻩﺪﺷ ﻪﺿﺮﻋ ﺭﺍﺰﻓﺍ ﻡﺮﻧ ﺐﺼﻧ ،ﺶﺨﭘ ،یﺭﺍﺩﺮﺑﺮﻳﻮﺼﺗ ﺎﺗ ﻥﺪﺷ ﻩﺩﺎﻣﺁ ﺯﺍ ،ﻦﻴﺑﺭﻭﺩ ﯽﻳﺍﺪﺘﺑﺍ ﻝﻮﺻﺍ
ﺮﻳﻭﺎﺼﺗ ﻥﺩﺮﮐ ﺩﺭﺍﻭ ﻭ
z ﻦﻴﺑﺭﻭﺩ یﺎﻫ ﯽﮔﮋﻳﻭ ﻡﺎﻤﺗ ﻩﺭﺎﺑﺭﺩ ،ﺎﻫ ﻞﻤﻌﻟﺍﺭﻮﺘﺳﺩ ﺮﻳﺎﺳ
ﺭﺍﺰﻓﺍ ﻡﺮﻧ یﺎﻤﻨﻫﺍﺭ
.ﺪﻫﺩ ﯽﻣ ﺡﺮﺷ ﺍﺭ ﻩﺪﺷ ﻪﺿﺮﻋ ﺭﺍﺰﻓﺍ ﻡﺮﻧ ﺯﺍ ﻩﺩﺎﻔﺘﺳﺍ ﻩﻮﻴﺷ ﺎﻤﻨﻫﺍﺭ ﻦﻳﺍ
z DIGITAL CAMERA Manuals Disk یﺩ ﯽﺳ
.ﺪﻴﻫﺩ ﺭﺍﺮﻗ ﺮﺗﻮﻴﭙﻣﺎﮐ ﻡﺍﺭ یﺩ ﯽﺳ ﻮﻳﺍﺭﺩ ﺭﺩ ﺍﺭ
z ﺶﻳﺎﻤﻧ یﺎﻫ ﻞﻤﻌﻟﺍﺭﻮﺘﺳﺩ ﺯﺍ ،ﺎﻤﻨﻫﺍﺭ ﻪﭼﺮﺘﻓﺩ ﻩﺪﻫﺎﺸﻣ یﺍﺮﺑ
.ﺪﻴﻨﮐ یﻭﺮﻴﭘ ﻩﺪﺷ ﻩﺩﺍﺩ
یﺎﺟ ﺭﺩ ﺍﺭ یﺮﺗﺎﺑ ﻭ ﺪﻴﻨﮐ ﺍﺪﺟ ﺍﺭ یﺮﺗﺎﺑ ﺵﻮﭘﺭﺩ
.ﺪﻴﻫﺩ ﺭﺍﺮﻗ ﺩﻮﺧ
ﺖﻤﺳ ﻪﺑ ﻥﺩﺍﺩ ﺭﺎﺸﻓ ﺎﺑ ﺍﺭ یﺮﺗﺎﺑ ،ﺪﻳﺩﺍﺩ ﺭﺍﺮﻗ ﺎﺘﺳﺍﺭ ﮏﻳ ﺭﺩ
.ﺪﻴﻫﺩ ﺭﺍﺮﻗ ﺩﻮﺧ یﺎﺟ ﺭﺩ (
) ﻦﻴﻳﺎﭘ ﺖﻤﺳ ﻪﺑ ﻭ ( ) ﻞﺧﺍﺩ
٢
.ﺪﻴﻨﮐ ژﺭﺎﺷ ﺍﺭ یﺮﺗﺎﺑ
ﻦﺷﻭﺭ ﯽﺠﻧﺭﺎﻧ ﮓﻧﺭ ﻪﺑ ﻍﺍﺮﭼ ،ﺪﻴﻳﺎﻤﻧ ﯽﻣ ﻞﺻﻭ ﻕﺮﺑ ﺰﻳﺮﭘ
.ﺩﻮﺷ ﯽﻣ
ﻪﻴﻟﻭﺍ یﺎﻫ یﺯﺎﺳ ﻩﺩﺎﻣﺁ
یﺮﺗﺎﺑ ﻥﺩﺮﮐ ژﺭﺎﺷ
١
z ﺍﺭ ﺭژﺭﺎﺷ ﻭ یﺮﺗﺎﺑ یﻭﺭ ▲ یﺎﻫ ﺖﻣﻼﻋ ﻪﮑﻨﻳﺍ ﺯﺍ ﺲﭘ
٢
z ﻪﺑ ﺍﺭ ﻢﻴﺳ ﻭ ﺪﻴﻨﮐ ﯽﻣ ﻞﺻﻭ ﺭژﺭﺎﺷ ﻪﺑ ﺍﺭ ﻕﺮﺑ ﻢﻴﺳ ﯽﺘﻗﻭ
ژﺭﺎﺷ ًﻼﻣﺎﮐ یﺮﺗﺎﺑ ﮏﻳ ﺎﺑ ﺩﻮﺟﻮﻣ ﻂﺒﺿ ﻥﺎﻣﺯ ﺎﻳ ﺮﻳﻭﺎﺼﺗ
ﻦﻴﺑﺭﻭﺩ ﺮﺑﺭﺎﮐ یﺎﻤﻨﻫﺍﺭ
ﺭﺩ ﺩﻮﺟﻮﻣ "ﺕﺎﺼﺨﺸﻣ" ﻪﺑ ،ﻩﺪﺷ
٣
z ﺍﺭ یﺮﺗﺎﺑ .ﺩﻮﺷ ﯽﻣ ﮓﻧﺭ ﺰﺒﺳ ﻍﺍﺮﭼ ،ژﺭﺎﺷ ﻥﺎﻳﺎﭘ ﺯﺍ ﺲﭘ
.ﺪﻴﻨﮐ ﺝﺭﺎﺧ
z ﺩﺍﺪﻌﺗ ﻭ ژﺭﺎﺷ ﻥﺎﻣﺯ ﻪﺑ ﻁﻮﺑﺮﻣ ﺕﺎﻴﺋﺰﺟ ﺯﺍ ﻉﻼﻃﺍ یﺍﺮﺑ
.ﺪﻴﻳﺎﻤﻧ ﻪﻌﺟﺍﺮﻣ
Page 25
یﺪﻨﺑ ﻪﺘﺴﺑ ﺕﺎﻳﻮﺘﺤﻣ
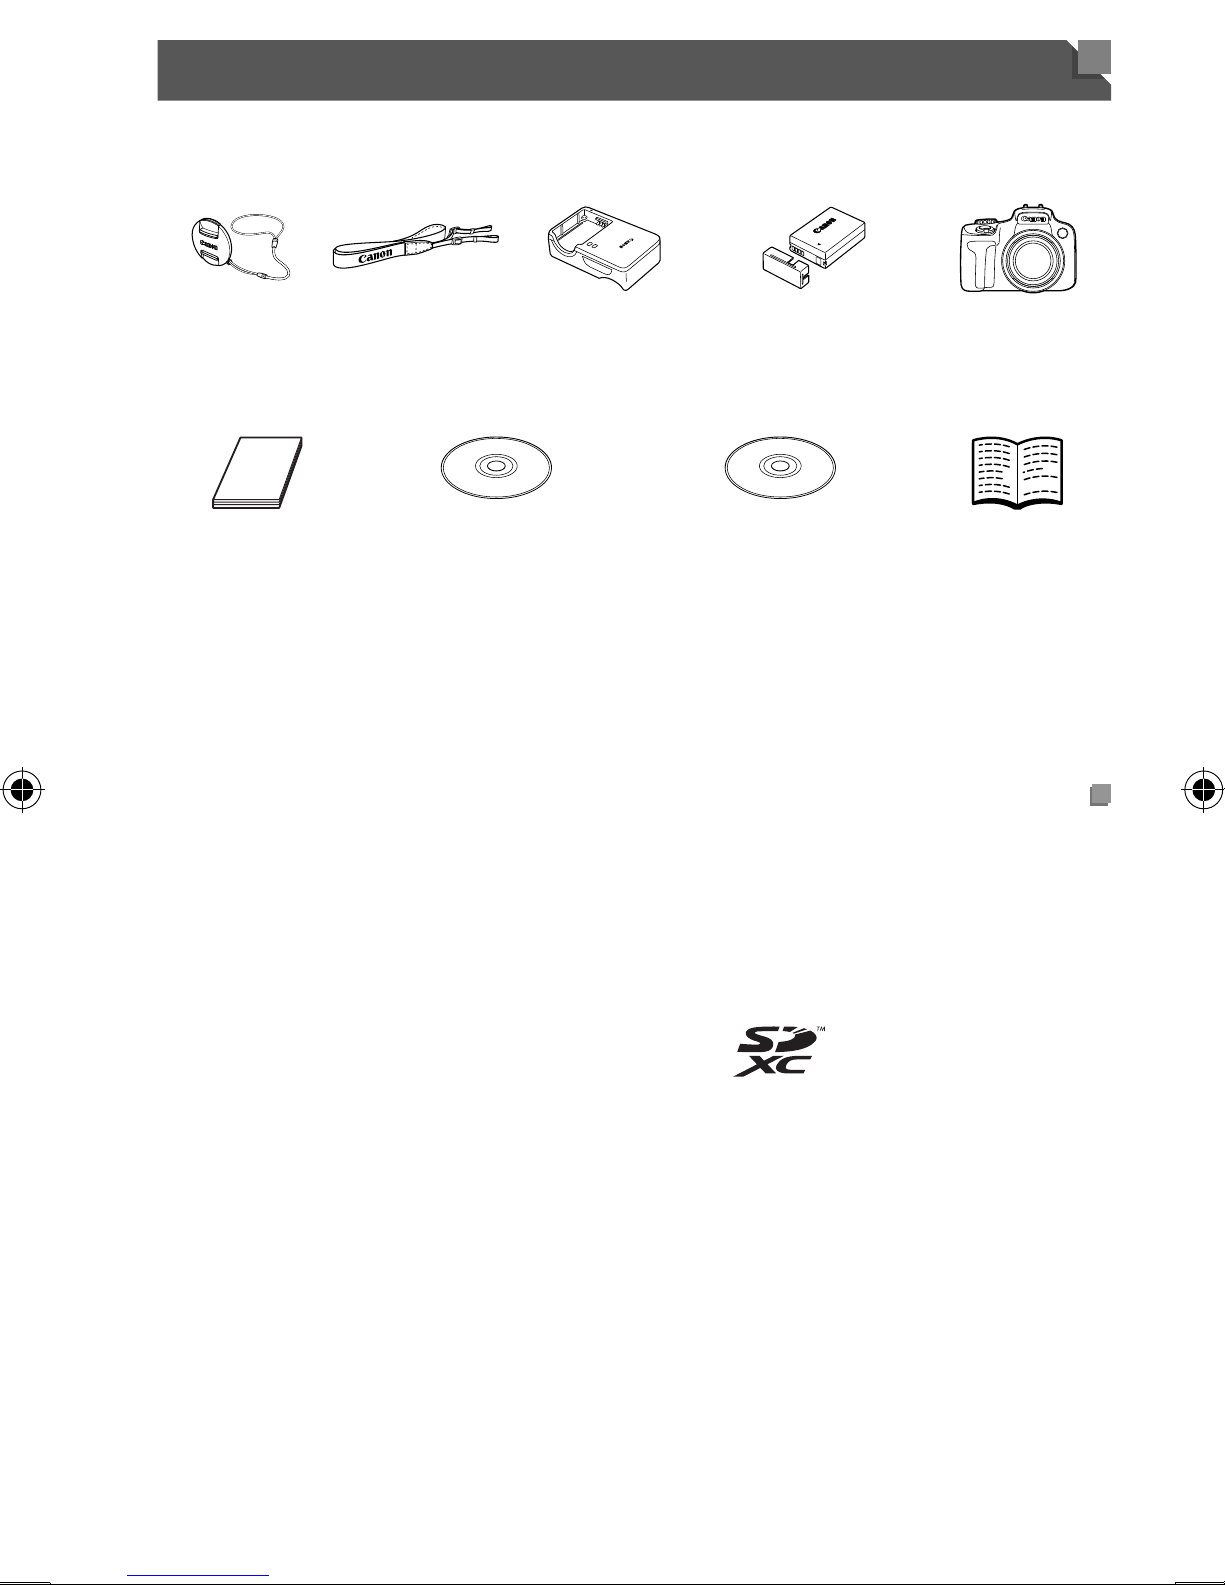
.ﺪﻨﺘﺴﻫ ﺩﻮﺟﻮﻣ یﺪﻨﺑ ﻪﺘﺴﺑ ﺭﺩ ﻡﻼﻗﺍ ﻦﻳﺍ ﻪﮐ ﺪﻳﻮﺷ ﻦﺌﻤﻄﻣ ،ﻩﺩﺎﻔﺘﺳﺍ ﺯﺍ ﻞﺒﻗ
.ﺪﻳﺮﻴﮕﺑ ﺱﺎﻤﺗ ﺩﻮﺧ ﻦﻴﺑﺭﻭﺩ ﻩﺪﻨﺷﻭﺮﻓ ﺎﺑ ،ﺖﺳﺍ ﻢﮐ یﺰﻴﭼ ﻪﮐ ﯽﺗﺭﻮﺻ ﺭﺩ
ﺰﻨﻟ ﮏﻫﻼﮐ
١*
(ﺪﻨﺑ ﺎﺑ)
ﺖﻧﺎﻤﺿ ﺡﺮﻃ ﻪﭼﺮﺘﻓﺩ
Canon
DIGITAL CAMERA Manuals Disk یﺩ ﯽﺳ ﺭﺩ
یﺍﺮﺑ ﻭ ،ﺪﻴﻨﮐ ﻪﻌﺟﺍﺮﻣ
ﯽﻧﺩﺮﮔ ﺪﻨﺑ
١*
NS-DC11
DIGITAL CAMERA یﺩ ﯽﺳ
٣*
Solution Disk
ﻦﻴﺑﺭﻭﺩ ﺮﺑﺭﺎﮐ یﺎﻤﻨﻫﺍﺭ
.ﺪﻴﻳﺎﻤﻧ ﻪﻌﺟﺍﺮﻣ
یﺮﺗﺎﺑ ﺭژﺭﺎﺷ
CB-2LCE
ﻪﺑ ،ﺐﺼﻧ یﺎﻫ ﻞﻤﻌﻟﺍﺭﻮﺘﺳﺩ ﺯﺍ ﯽﻫﺎﮔﺁ یﺍﺮﺑ .ﺖﺳﺍ ﺭﺍﺰﻓﺍ ﻡﺮﻧ یﻭﺎﺣ ٣*
ﺭﺍﺰﻓﺍ ﻡﺮﻧ یﺎﻤﻨﻫﺍﺭ
NB-10L یﺮﺗﺎﺑ ﻪﻋﻮﻤﺠﻣ
(ﻪﻧﺎﻳﺎﭘ ﺵﻮﭘﺭﺩ ﺎﺑ)
DIGITAL CAMERA یﺩ ﯽﺳ
٢*
Manuals Disk
ﻦﻴﺑﺭﻭﺩ ﺮﺑﺭﺎﮐ یﺎﻤﻨﻫﺍﺭ
ﻪﺑ ،ﻩﺩﺎﻔﺘﺳﺍ ﻪﺑ ﻁﻮﺑﺮﻣ یﺎﻫ ﻞﻤﻌﻟﺍﺭﻮﺘﺳﺩ ﺯﺍ ﯽﻫﺎﮔﺁ
ﻪﺑ ،ﻡﺯﺍﻮﻟ ﻥﺩﺮﮐ ﻞﺻﻭ ﻩﻮﻴﺷ ﺯﺍ ﻉﻼﻃﺍ یﺍﺮﺑ ١*
.ﺖﺳﺍ (٣
ﺭﺎﮐ ﻪﺑ ﻉﻭﺮﺷ یﺎﻤﻨﻫﺍﺭ
=) ﺎﻤﻨﻫﺍﺭ یﺎﻫ ﻪﭼﺮﺘﻓﺩ یﻭﺎﺣ ٢*
ﻦﻴﺑﺭﻭﺩ
(ﺎﻤﻨﻫﺍﺭ ﻦﻴﻤﻫ)
.ﺪﻴﻨﮐ ﻪﻌﺟﺍﺮﻣ
ﺭﺎﮔﺯﺎﺳ ﻪﻈﻓﺎﺣ یﺎﻫ ﺕﺭﺎﮐ
ﺯﺎﻴﻧ ﺱﺎﺳﺍ ﺮﺑ ﺍﺭ ﺮﻳﺯ ﻪﻈﻓﺎﺣ یﺎﻫ ﺕﺭﺎﮐ ﻉﺍﻮﻧﺍ ﺯﺍ ﯽﮑﻳ .ﺖﺳﺍ ﻩﺪﺸﻧ ﻪﺿﺮﻋ ﻦﻴﺑﺭﻭﺩ ﻩﺍﺮﻤﻫ ﻪﺑ ﻪﻈﻓﺎﺣ ﺕﺭﺎﮐ
یﺍﺮﺑ .ﺩﺮﮐ ﻩﺩﺎﻔﺘﺳﺍ ﻥﺍﻮﺗ ﯽﻣ ،ﺎﻬﻧﺁ ﺖﻴﻓﺮﻇ ﺯﺍ ﺮﻈﻨﻓﺮﺻ ،ﻪﻈﻓﺎﺣ یﺎﻫ ﺕﺭﺎﮐ ﻦﻳﺍ ﺯﺍ .ﺪﻴﻨﮐ یﺭﺍﺪﻳﺮﺧ ﺩﻮﺧ
"ﺕﺎﺼﺨﺸﻣ" ﻪﺑ ،ﻪﻈﻓﺎﺣ ﺕﺭﺎﮐ ﺮﻫ یﺍﺯﺍ ﺭﺩ ﻂﺒﺿ ﻥﺎﻣﺯ ﻭ ﺮﻳﻭﺎﺼﺗ ﺩﺍﺪﻌﺗ ﻪﺑ ﻁﻮﺑﺮﻣ ﺕﺎﻴﺋﺰﺟ ﺯﺍ ﻉﻼﻃﺍ
.ﺪﻴﻳﺎﻤﻧ ﻪﻌﺟﺍﺮﻣ
ﻦﻴﺑﺭﻭﺩ ﺮﺑﺭﺎﮐ یﺎﻤﻨﻫﺍﺭ
*
SD ﻪﻈﻓﺎﺣ یﺎﻫ ﺕﺭﺎﮐ
ﺭﺩ ﺩﻮﺟﻮﻣ
•
ﺕﺭﻮﺻ ﺭﺩ .ﺪﻨﮐ ﯽﻤﻧ ﻦﻴﻤﻀﺗ ﺍﺭ (ﻢﻴﺳ ﯽﺑ ﻝﺎﻘﺘﻧﺍ ﻞﻣﺎﺷ) Eye-Fi ﺕﺭﺎﮐ یﺎﻫﺩﺮﮑﻠﻤﻋ ﺯﺍ ﯽﻧﺎﺒﻴﺘﺸﭘ ﻦﻴﺑﺭﻭﺩ ﻦﻳﺍ
.ﺪﻳﺭﺍﺬﮕﺑ ﻥﺎﻴﻣ ﺭﺩ ﺕﺭﺎﮐ ﻩﺪﻧﺯﺎﺳ ﺎﺑ ﺍﺭ ﻥﺁ ًﺎﻔﻄﻟ ،Eye-Fi ﺕﺭﺎﮐ ﺎﺑ ﻞﮑﺸﻣ ﻦﺘﺷﺍﺩ
،ﻖﻃﺎﻨﻣ ﺎﻳ ﺎﻫﺭﻮﺸﮐ ﺯﺍ یﺭﺎﻴﺴﺑ ﺭﺩ Eye-Fi یﺎﻫ ﺕﺭﺎﮐ ﺯﺍ ﻩﺩﺎﻔﺘﺳﺍ یﺍﺮﺑ ﻪﮐ ﺪﻴﺷﺎﺑ ﻪﺘﺷﺍﺩ ﻪﺟﻮﺗ ﻦﻴﻨﭽﻤﻫ
ﺕﺭﺎﮐ ﺖﺴﻴﻧ ﺺﺨﺸﻣ ﻪﮐ ﯽﺗﺭﻮﺻ ﺭﺩ .ﺖﺴﻴﻧ ﺯﺎﺠﻣ ﺕﺭﺎﮐ ﺯﺍ ﻩﺩﺎﻔﺘﺳﺍ ،ﻪﻳﺪﻴﻳﺄﺗ ﻥﻭﺪﺑ .ﺖﺳﺍ ﻪﻳﺪﻴﻳﺄﺗ ﻪﺑ ﺯﺎﻴﻧ
.ﺪﻳﺭﺍﺬﮕﺑ ﻥﺎﻴﻣ ﺭﺩ ﺕﺭﺎﮐ ﻩﺪﻧﺯﺎﺳ ﺎﺑ ﺍﺭ ﻥﺁ ًﺎﻔﻄﻟ ،ﺮﻴﺧ ﺎﻳ ﺖﺳﺍ ﻩﺪﺷ ﺪﻴﻳﺄﺗ ﺮﻈﻧ ﺩﺭﻮﻣ ﻪﻴﺣﺎﻧ ﺭﺩ ﻩﺩﺎﻔﺘﺳﺍ یﺍﺮﺑ
*
SDHC ﻪﻈﻓﺎﺣ یﺎﻫ ﺕﺭﺎﮐ
*
SDXC ﻪﻈﻓﺎﺣ یﺎﻫ ﺕﺭﺎﮐ
Eye-Fi یﺎﻫ ﺕﺭﺎﮐ ﻩﺭﺎﺑﺭﺩ
•
•
•Eye-Fi یﺎﻫ ﺕﺭﺎﮐ
*.ﺪﻧﺍ ﻩﺪﺸﻧ ﺪﻴﻳﺄﺗ ﻦﻴﺑﺭﻭﺩ ﺎﺑ ﺭﺎﮐ یﺍﺮﺑ ﻪﻈﻓﺎﺣ یﺎﻫ ﺕﺭﺎﮐ ﺯﺍ ﯽﺧﺮﺑ ،ﺩﻮﺟﻭ ﻦﻳﺍ ﺎﺑ .ﺩﺭﺍﺩ ﺖﻘﺑﺎﻄﻣ SD ﺕﺎﺼﺨﺸﻣ ﺎﺑ
٢
Page 26
ﻪﻴﺒﻨﺗ
.ﺐﺳﺎﻨﻣ ﺮﻴﻏ ﻉﻮﻨﺑ ﺔﻳﺭﺎﻄﺒﻟﺍ ﻝﺍﺪﺒﺘﺳﺍ ﺔﻟﺎﺣ ﻲﻓ ﺭﺎﺠﻔﻧﻻﺍ ﺮﻄﺧ
.ﺔﻴﻠﺤﻤﻟﺍ ﺢﺋﺍﻮﻠﻟ ﺎًﻘﻓﻭ ﺔﻠﻤﻌﺘﺴﻤﻟﺍ ﺕﺎﻳﺭﺎﻄﺒﻟﺍ ﻦﻣ ﺺﻠﺨﺗ
CANON INC.
30-2, Shimomaruko 3-chome, Ohta-ku, Tokyo 146-8501, Japan
CANON EUROPA N.V.
Bovenkerkerweg 59-61, 1185 XB Amstelveen, The Netherlands
ﻲﺑﻭﺭﻭﻷﺍ ﺩﺎﺤﺗﻻﺍ ﻲﻓ ﻊﺒُﻃ © CANON INC. 2012
٩
Page 27
ﺝﺭﺎﺨﻟﺍ ﻲﻓ ﺍﺮﻴﻣﺎﻜﻟﺍ ﺔﺑﺮﺠﺗ
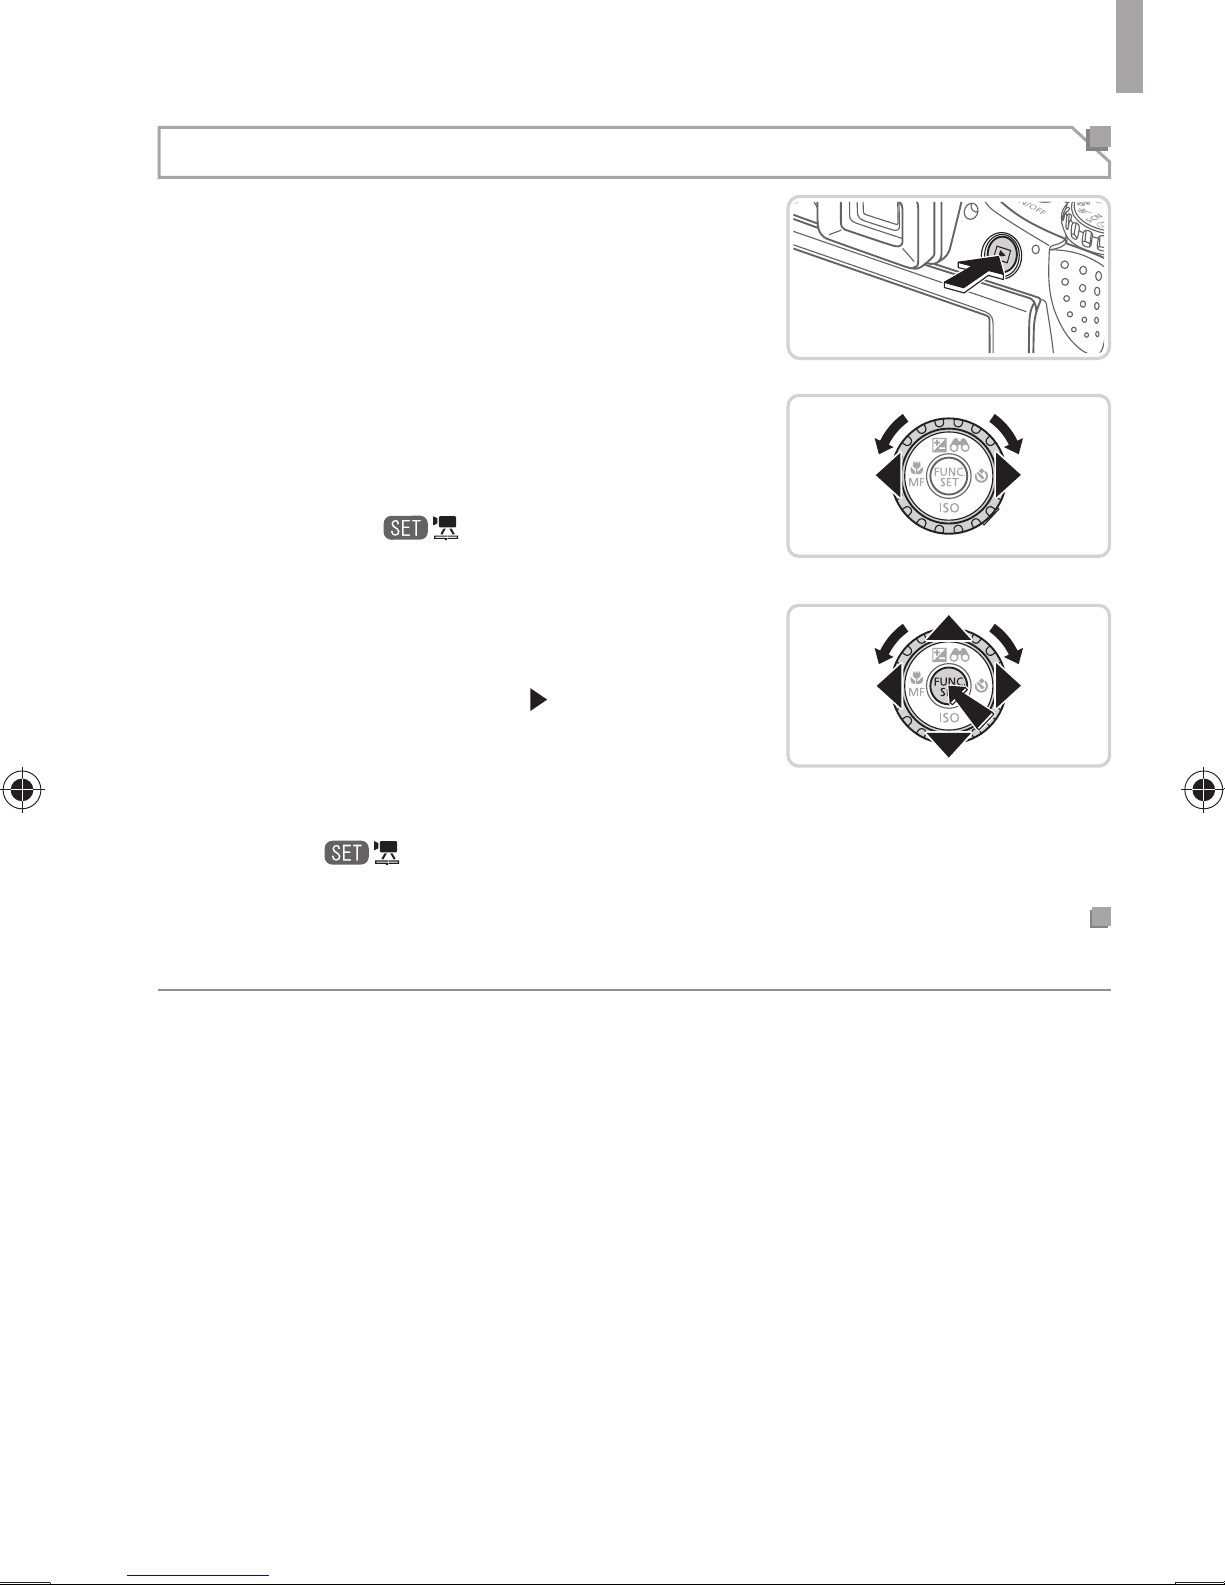
ﺽﺮﻌﻟﺍ
.ﻞﻴﻐﺸﺘﻟﺍ ﻂﻤﻧ ﻰﻟﺇ ﻝﻮﺧﺪﻟﺎﺑ ﻢﻗ
.ﺭﻮﺼﻟﺍ ﺽﺍﺮﻌﺘﺳﺎﺑ ﻢﻗ
.<5> ﺹﺮﻘﻟﺍ ﺭﺩﺃ ﻭﺃ <q><r>
.٣ ﺓﻮﻄﺨﻟﺍ ﻰﻟﺇ
.ﻡﻼﻓﻷﺍ ﻞﻴﻐﺸﺘﺑ ﻢﻗ
<q><r> ﻦﻳﺭﺰﻟﺍ ﻰﻠﻋ ﻂﻐﺿﺍ) [
<m> ﺭﺰﻟﺍ ﻰﻠﻋ ﻂﻐﺿﺍ ﻢﺛ ،(<5> ﺹﺮﻘﻟﺍ ﺭﺩﺃ ﻭﺃ
] ﺮﺘﺧﺍﻭ ،ﻢﻠﻴﻔﻟﺍ
.ﻯﺮﺧﺃ ًﺓﺮﻣ
١
z .<1> ﺭﺰﻟﺍ ﻰﻠﻋ ﻂﻐﺿﺍ
٢
z ﻦﻳﺭﺰﻟﺍ ﻰﻠﻋ ﻂﻐﺿﺍ ،ﺔﻴﻟﺎﺘﻟﺍ ﻭﺃ ﺔﻘﺑﺎﺴﻟﺍ ﺓﺭﻮﺼﻟﺍ ﺽﺮﻌﻟ
z ﻞﻘﺘﻧﺍ ،ﻡﻼﻓﻷﺍ ﻞﻴﻐﺸﺘﻟ .[ ] ﺰﻣﺮﻟﺎﺑ ﻡﻼﻓﻷﺍ ﺪﻳﺪﺤﺗ ﻢﺘﻳ
٣
z ﻲﻓ ﻢﻜﺤﺘﻟﺍ ﺔﺣﻮﻟ ﻰﻟﺇ ﻝﻮﺻﻮﻠﻟ <m> ﺭﺰﻟﺍ ﻰﻠﻋ ﻂﻐﺿﺍ
z .<o><p> ﻦﻳﺭﺰﻟﺍ ﻰﻠﻋ ﻂﻐﺿﺍ ،ﺕﻮﺼﻟﺍ ﻯﻮﺘﺴﻣ ﻂﺒﻀﻟ
z .ﻢﻠﻴﻔﻟﺍ ءﺎﻬﺘﻧﺍ ﺪﻌﺑ [ ] ﺽﺮﻋ ﻢﺘﻳﻭ ،ﻥﻵﺍ ﻞﻴﻐﺸﺘﻟﺍ ﺃﺪﺒﻳ
ﺭﻮﺼﻟﺍ ﺢﺴﻣ
.ﺎﻬﺤﺴﻣ ﻢﺘﻳ ﻲﺘﻟﺍ ﺭﻮﺼﻟﺍ ﺓﺩﺎﻌﺘﺳﺍ ﻦﻜﻤﻳ ﻻ ﻪﻧﺃ ﻆﺣﻻ .ﻲﻠﻳ ﺎﻤﺑ ﻢﻗ ،٢ ﺓﻮﻄﺨﻟﺍ ﻲﻓ ﺎﻬﺗﺮﺘﺧﺍ ﻲﺘﻟﺍ ﺓﺭﻮﺼﻟﺍ ﺢﺴﻤﻟ
.<a> ﺭﺰﻟﺍ ﻰﻠﻋ ﻂﻐﺿﺍ
،[ﺢﺴﻣﺍ] ﺭﺎﻴﺘﺧﻻ <5> ﺹﺮﻘﻟﺍ ﺭﺩﺃ ﻭﺃ <q><r> ﻦﻳﺭﺰﻟﺍ ﻰﻠﻋ ﻂﻐﺿﺍ ،[؟ﺢﺴﻣﺍ] ﺽﺮﻋ ﺪﻌﺑ
.<m> ﺭﺰﻟﺍ ﻰﻠﻋ ﻂﻐﺿﺍ ﻢﺛ
١
٢
٨
Page 28
ﺝﺭﺎﺨﻟﺍ ﻲﻓ ﺍﺮﻴﻣﺎﻜﻟﺍ ﺔﺑﺮﺠﺗ
ﺮﻳﻮﺼﺘﻟﺍ
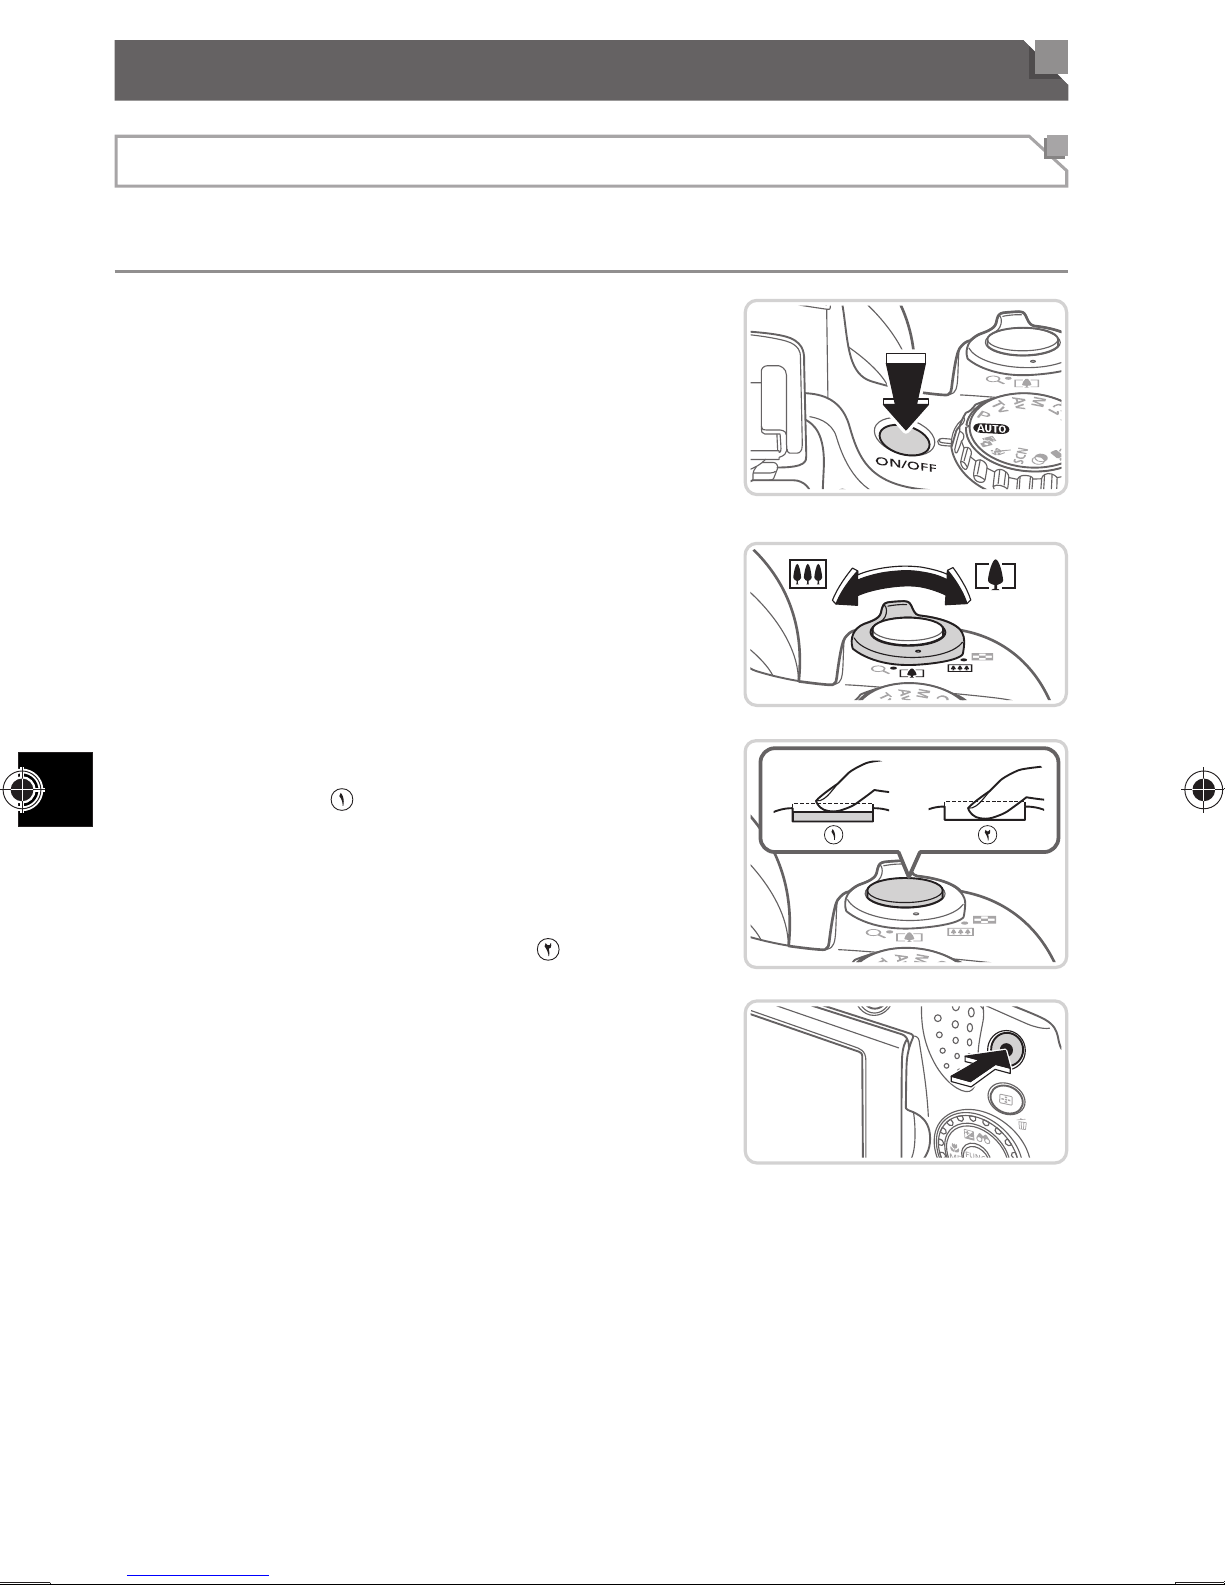
ﻑﺪﻬﻟﺍ ﺩﺪﺤﺗ ﺍﺮﻴﻣﺎﻜﻟﺍ ﻉﺩ ﻂﻘﻓ ،ﺓﺩﺪﺤﻣ ﺪﻫﺎﺸﻣ ﻲﻓ ﻰﻠﺜُﻤﻟﺍ ﺕﺍﺩﺍﺪﻋﻺﻟ ﻞﻣﺎﻛ ﻞﻜﺸﺑ ﻲﺋﺎﻘﻠﺗ ﺪﻳﺪﺤﺗ ﻰﻠﻋ ﻝﻮﺼﺤﻠﻟ
.ﺮﻳﻮﺼﺘﻟﺍ ﻑﻭﺮﻇﻭ
.<A> ﻂﻤﻨﻟﺍ ﻰﻟﺇ ﻝﻮﺧﺪﻟﺍﻭ ﺍﺮﻴﻣﺎﻜﻟﺍ ﻞﻴﻐﺸﺘﺑ ﻢﻗ
.ﺔﻄﻘﻠﻟﺍ ﺐﻴﻛﺮﺘﺑ ﻢﻗ
ﺮﻴﻐﺼﺘﻠﻟﻭ ،ﺔﺷﺎﺸﻠﻟ ﻚﺗﺪﻫﺎﺸﻣ ءﺎﻨﺛﺃ (ﺏﱠﺮﻘﻣ) <i> ﻩﺎﺠﺗ
.(ﺪﻌﺑ ﻦﻋ) <j> ﻩﺎﺠﺗ ﻪﻜﻳﺮﺤﺘﺑ ﻢﻗ ،ﻑﺪﻬﻟﺍ ﻦﻋ ﺍًﺪﻴﻌﺑ
.ﺔﺘﺑﺎﺜﻟﺍ ﺭﻮﺼﻟﺍ ﺮﻳﻮﺼﺘﺑ ﻢﻗ
ﺓﺩﻮﺟﻮﻤﻟﺍ ﺓﺭﻮﺼﻟﺍ ﻖﻃﺎﻨﻣ ﻰﻟﺇ ﺓﺭﺎﺷﻺﻟ AF ﺕﺍﺭﺎﻃﺇ ﺽﺮﻋ
١
z .ON/OFF ﺭﺰﻟﺍ ﻰﻠﻋ ﻂﻐﺿﺍ
z .<A> ﻰﻠﻋ ﻉﺎﺿﻭﻷﺍ ﺹﺮﻗ ﻦﻴﻴﻌﺘﺑ ﻢﻗ
٢
z ﺮﻴﻐﺼﺘﻟﺍ/ﺮﻴﺒﻜﺘﻟﺍ ﻉﺍﺭﺫ ﻚﻳﺮﺤﺘﺑ ﻢﻗ ،ﻪﻤﻴﺨﻀﺗﻭ ﻑﺪﻬﻟﺍ ﺮﻴﺒﻜﺘﻟ
٣
z .( ) ﻕﻼﻏﻹﺍ ﺭﺯ ﻰﻠﻋ ﻖﻓﺮﺑ ﻂﻐﺿﺍ
z ﻢﺘﻳﻭ ،ﺰﻴﻛﺮﺘﻟﺍ ﺪﻌﺑ ﻦﻴﺗﺮﻣ ﻪﻴﺒﻨﺗ ﺕﻮﺻ ﺍﺮﻴﻣﺎﻜﻟﺍ ﺭﺪﺼﺗ
ﻞﻔﺳﻷﺍ ﻰﻟﺇ ﻕﻼﻏﻹﺍ ﺭﺯ ﻰﻠﻋ ﻂﻐﺿﺍ .ﺰﻴﻛﺮﺘﻟﺍ ﻕﺎﻄﻧ ﻲﻓ
) ﻞﻣﺎﻜﻟﺎﺑ
.(
.ﻡﻼﻓﻷﺍ ﺮﻳﻮﺼﺘﺑ ﻢﻗ
.ﻑﺎﻘﻳﻺﻟ ﻯﺮﺧﺃ
z ﺓﺮﻣ ﻪﻴﻠﻋ ﻂﻐﺿﺍﻭ ،ﺮﻳﻮﺼﺘﻟﺍ ءﺪﺒﻟ ﻡﻼﻓﻷﺍ ﺭﺯ ﻰﻠﻋ ﻂﻐﺿﺍ
٧
Page 29
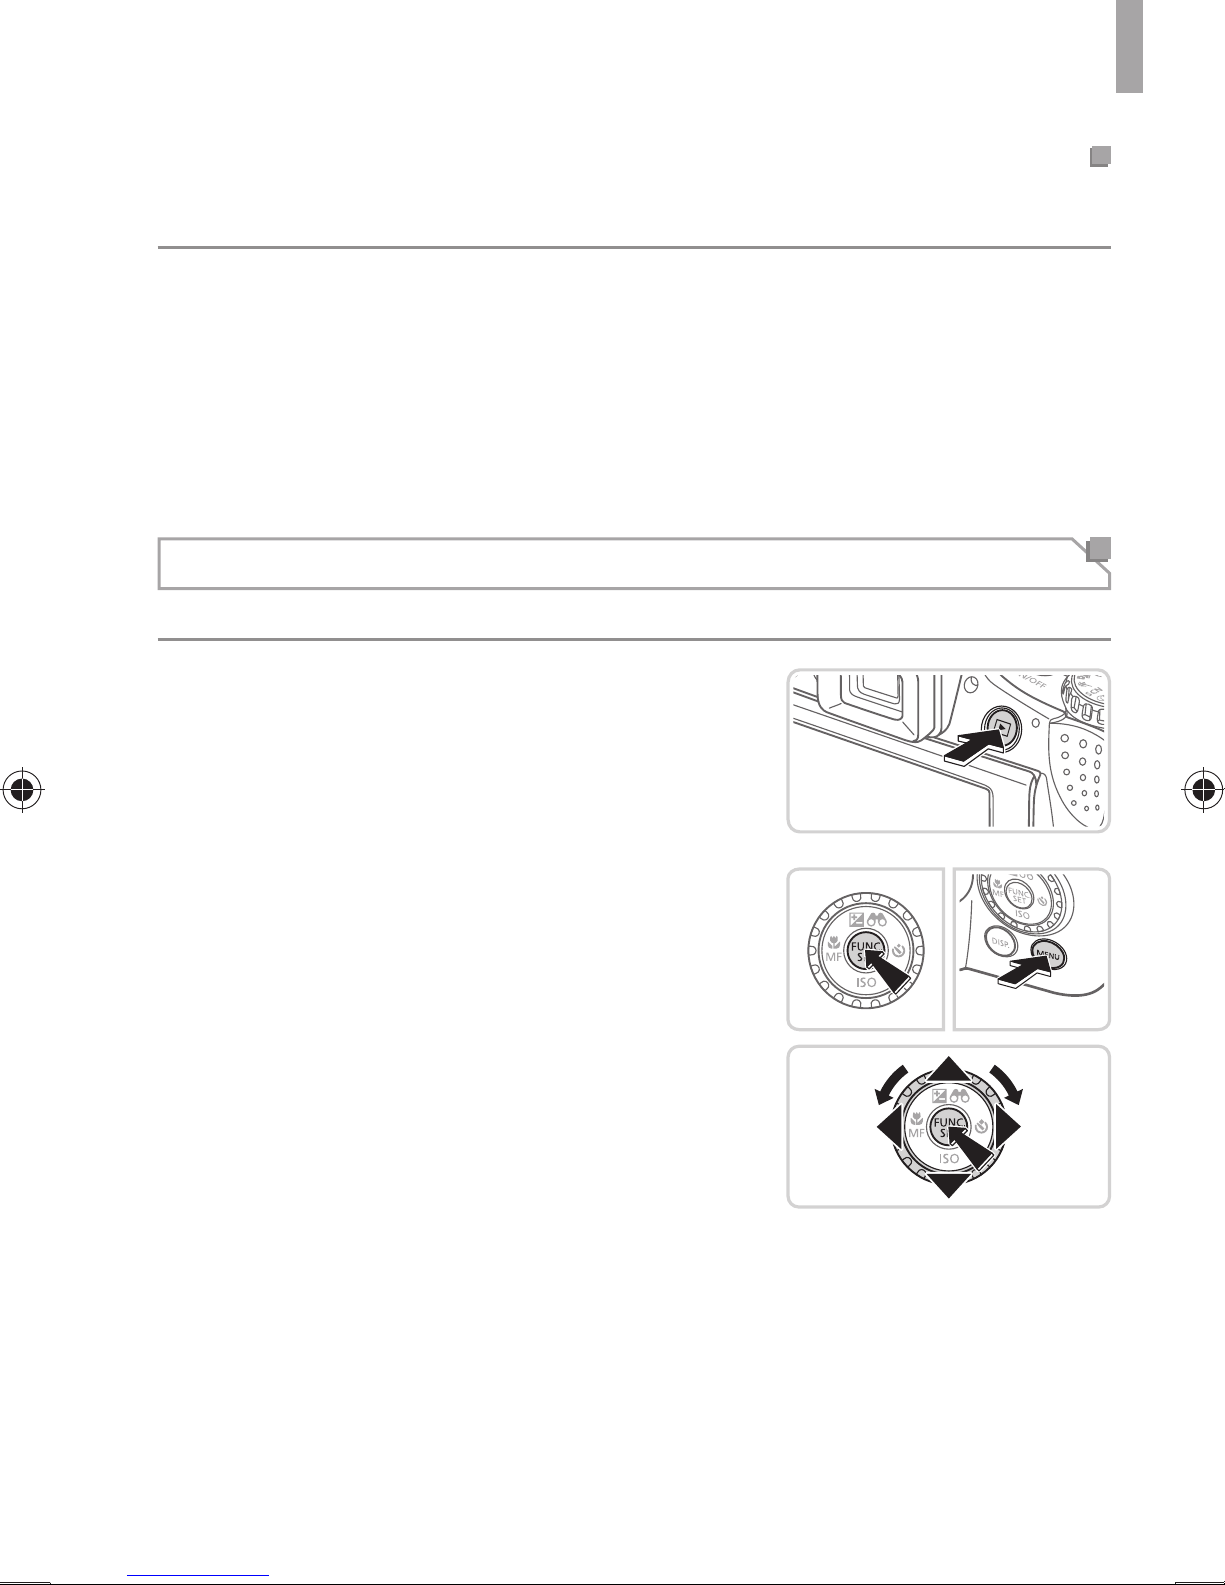
ﺔﻴﺋﺪﺒﻤﻟﺍ ﺕﺍﺰﻴﻬﺠﺘﻟﺍ
ﺦﻳﺭﺎﺘﻟﺍﻭ ﺖﻗﻮﻟﺍ ﺮﻴﻴﻐﺗ
.ﻲﻠﻳ ﺎﻤﺑ ﻢﻗ ،ﺎﻬﻨﻴﻴﻌﺗ ﺩﺮﺠﻤﺑ ﺖﻗﻮﻟﺍﻭ ﺦﻳﺭﺎﺘﻟﺍ ﻂﺒﻀﻟ
.<n> ﺭﺰﻟﺍ ﻰﻠﻋ ﻂﻐﺿﺍ
.[3] ﺐﻳﻮﺒﺘﻟﺍ ﺔﻣﻼﻋ ﺭﺎﻴﺘﺧﻻ ﺮﻴﻐﺼﺘﻟﺍ/ﺮﻴﺒﻜﺘﻟﺍ ﻉﺍﺭﺫ ﻚﻳﺮﺤﺘﺑ ﻢﻗ
ﻰﻠﻋ ﻂﻐﺿﺍ ﻢﺛ ،[ﺦﻳﺭﺎﺘﻟﺍ/ﺖﻗﻮﻟﺍ] ﺭﺎﻴﺘﺧﻻ <5> ﺹﺮﻘﻟﺍ ﺭﺩﺃ ﻭﺃ <o><p> ﻦﻳﺭﺰﻟﺍ ﻰﻠﻋ ﻂﻐﺿﺍ
.<m> ﺭﺰﻟﺍ
.ﺕﺍﺩﺍﺪﻋﻹﺍ ﻂﺒﻀﻟ "ﺦﻳﺭﺎﺘﻟﺍﻭ ﺖﻗﻮﻟﺍ ﻦﻴﻴﻌﺗ" ﻲﻓ ٢ ﺓﻮﻄﺨﻟﺍ ﻊﺒﺗﺍ
.<n> ﺭﺰﻟﺍ ﻰﻠﻋ ﻂﻐﺿﺍ
ﺽﺮﻌﻟﺍ ﺔﻐﻟ
.ﺔﺟﺎﺤﻟﺍ ﺐﺴﺣ ﺽﺮﻌﻟﺍ ﺔﻐﻟ ﺮﻴﻴﻐﺗ ﻦﻜﻤﻳ
.ﻞﻴﻐﺸﺘﻟﺍ ﻂﻤﻧ ﻰﻟﺇ ﻝﻮﺧﺪﻟﺎﺑ ﻢﻗ ١
z .<1> ﺭﺰﻟﺍ ﻰﻠﻋ ﻂﻐﺿﺍ
١
٢
٣
٤
٥
.ﺩﺍﺪﻋﻹﺍ ﺔﺷﺎﺷ ﻰﻟﺇ ﻝﻮﺻﻮﻟﺎﺑ ﻢﻗ ٢
.ﺭﻮﻔﻟﺍ ﻰﻠﻋ <n> ﺭﺰﻟﺍ
.<m> ﺭﺰﻟﺍ ﻰﻠﻋ ﻂﻐﺿﺍ ﻢﺛ ،ﺔﻐﻟ ﺭﺎﻴﺘﺧﻻ <5> ﺹﺮﻘﻟﺍ
z ﻰﻠﻋ ﻂﻐﺿﺍ ﻢﺛ ،<m> ﺭﺰﻟﺍ ﻰﻠﻋ ﺭﺍﺮﻤﺘﺳﻻﺍ ﻊﻣ ﻂﻐﺿﺍ
z ﺭﺩﺃ ﻭﺃ <o><p><q><r> ﺭﺍﺭﺯﻷﺍ ﻰﻠﻋ ﻂﻐﺿﺍ
٦
Page 30
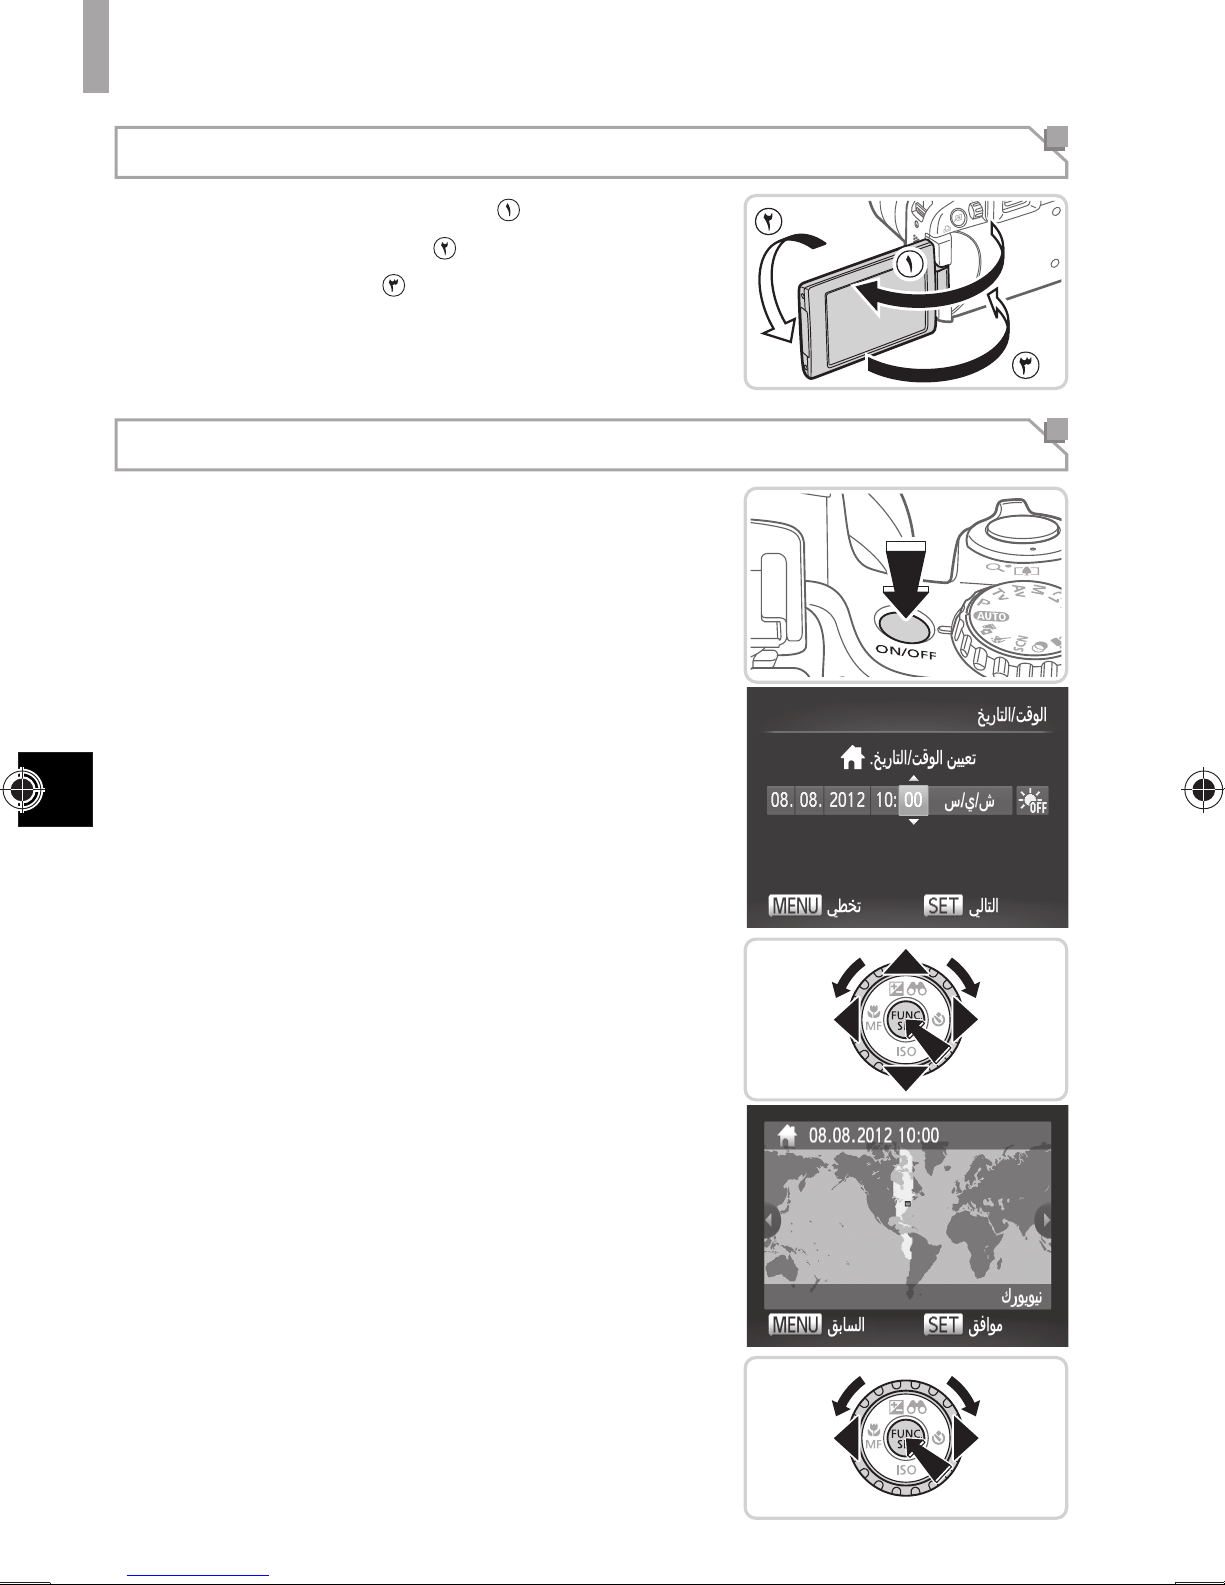
ﺔﻴﺋﺪﺒﻤﻟﺍ ﺕﺍﺰﻴﻬﺠﺘﻟﺍ
) ﺔﺟﺭﺩ ١٨٠ ﺔﻳﻭﺍﺰﺑ
.(
ﺔﺷﺎﺸﻟﺍ ﻡﺍﺪﺨﺘﺳﺍ
z ﺔﺳﺪﻌﻟﺍ ﻩﺎﺠﺗﺎﺑ ﻡﺎﻣﻸﻟ ﺎﻫﺮﻳﻭﺪﺘﺑ ﻢﻗ ﻢﺛ ،( ) ﺔﺷﺎﺸﻟﺍ ﺢﺘﻓﺍ
z .( ) ﻩﺎﺠﺗﻻﺍ ﺍﺬﻬﺑ ﺔﺷﺎﺸﻟﺍ ﻖﻠﻏﺃ
ﺦﻳﺭﺎﺘﻟﺍﻭ ﺖﻗﻮﻟﺍ ﻦﻴﻴﻌﺗ
.ﺍﺮﻴﻣﺎﻜﻟﺍ ﻞﻴﻐﺸﺘﺑ ﻢﻗ
z .ON/OFF ﺭﺰﻟﺍ ﻰﻠﻋ ﻂﻐﺿﺍ
W .[ﺦﻳﺭﺎﺘﻟﺍ/ﺖﻗﻮﻟﺍ] ﺔﺷﺎﺷ ﺽﺮﻋ ﻢﺘﻳ
.ﺦﻳﺭﺎﺘﻟﺍﻭ ﺖﻗﻮﻟﺍ ﻦﻴﻴﻌﺘﺑ ﻢﻗ
z .ﺕﺍﺭﺎﻴﺨﻟﺍ ﺪﺣﺃ ﺭﺎﻴﺘﺧﻻ <q><r> ﻦﻳﺭﺰﻟﺍ ﻰﻠﻋ ﻂﻐﺿﺍ
z <5> ﺹﺮﻘﻟﺍ ﺭﺩﺃ ﻭﺃ <o><p> ﻦﻳﺭﺰﻟﺍ ﻰﻠﻋ ﻂﻐﺿﺍ
.ﺦﻳﺭﺎﺘﻟﺍﻭ ﺖﻗﻮﻟﺍ ﺪﻳﺪﺤﺘﻟ
z .<m> ﺭﺰﻟﺍ ﻰﻠﻋ ﻂﻐﺿﺍ ،ءﺎﻬﺘﻧﻻﺍ ﺪﻨﻋ
١
٢
.ﺔﻴﻠﺤﻤﻟﺍ ﺔﻴﻨﻣﺰﻟﺍ ﺔﻘﻄﻨﻤﻟﺍ ﻦﻴﻴﻌﺘﺑ ﻢﻗ
.ﺔﻴﻠﺤﻤﻟﺍ ﺔﻴﻨﻣﺰﻟﺍ ﺔﻘﻄﻨﻤﻟﺍ ﺭﺎﻴﺘﺧﻻ
.ﻚﻟﺫ ﺪﻌﺑ ﺩﺍﺪﻋﻹﺍ ﺔﺷﺎﺷ ﺽﺮﻋ ﻢﺘﻳ ﻦﻟ ،ﺪﻴﻛﺄﺗ
٥
٣
z <5> ﺹﺮﻘﻟﺍ ﺭﺩﺃ ﻭﺃ <q><r> ﻦﻳﺭﺰﻟﺍ ﻰﻠﻋ ﻂﻐﺿﺍ
z ﺔﻟﺎﺳﺭ ﺭﻮﻬﻇ ﺪﻌﺑ .ءﺎﻬﺘﻧﻻﺍ ﺪﻨﻋ <m> ﺭﺰﻟﺍ ﻰﻠﻋ ﻂﻐﺿﺍ
z .ON/OFF ﺭﺰﻟﺍ ﻰﻠﻋ ﻂﻐﺿﺍ ،ﺍﺮﻴﻣﺎﻜﻟﺍ ﻞﻴﻐﺸﺗ ﻑﺎﻘﻳﻹ
Page 31
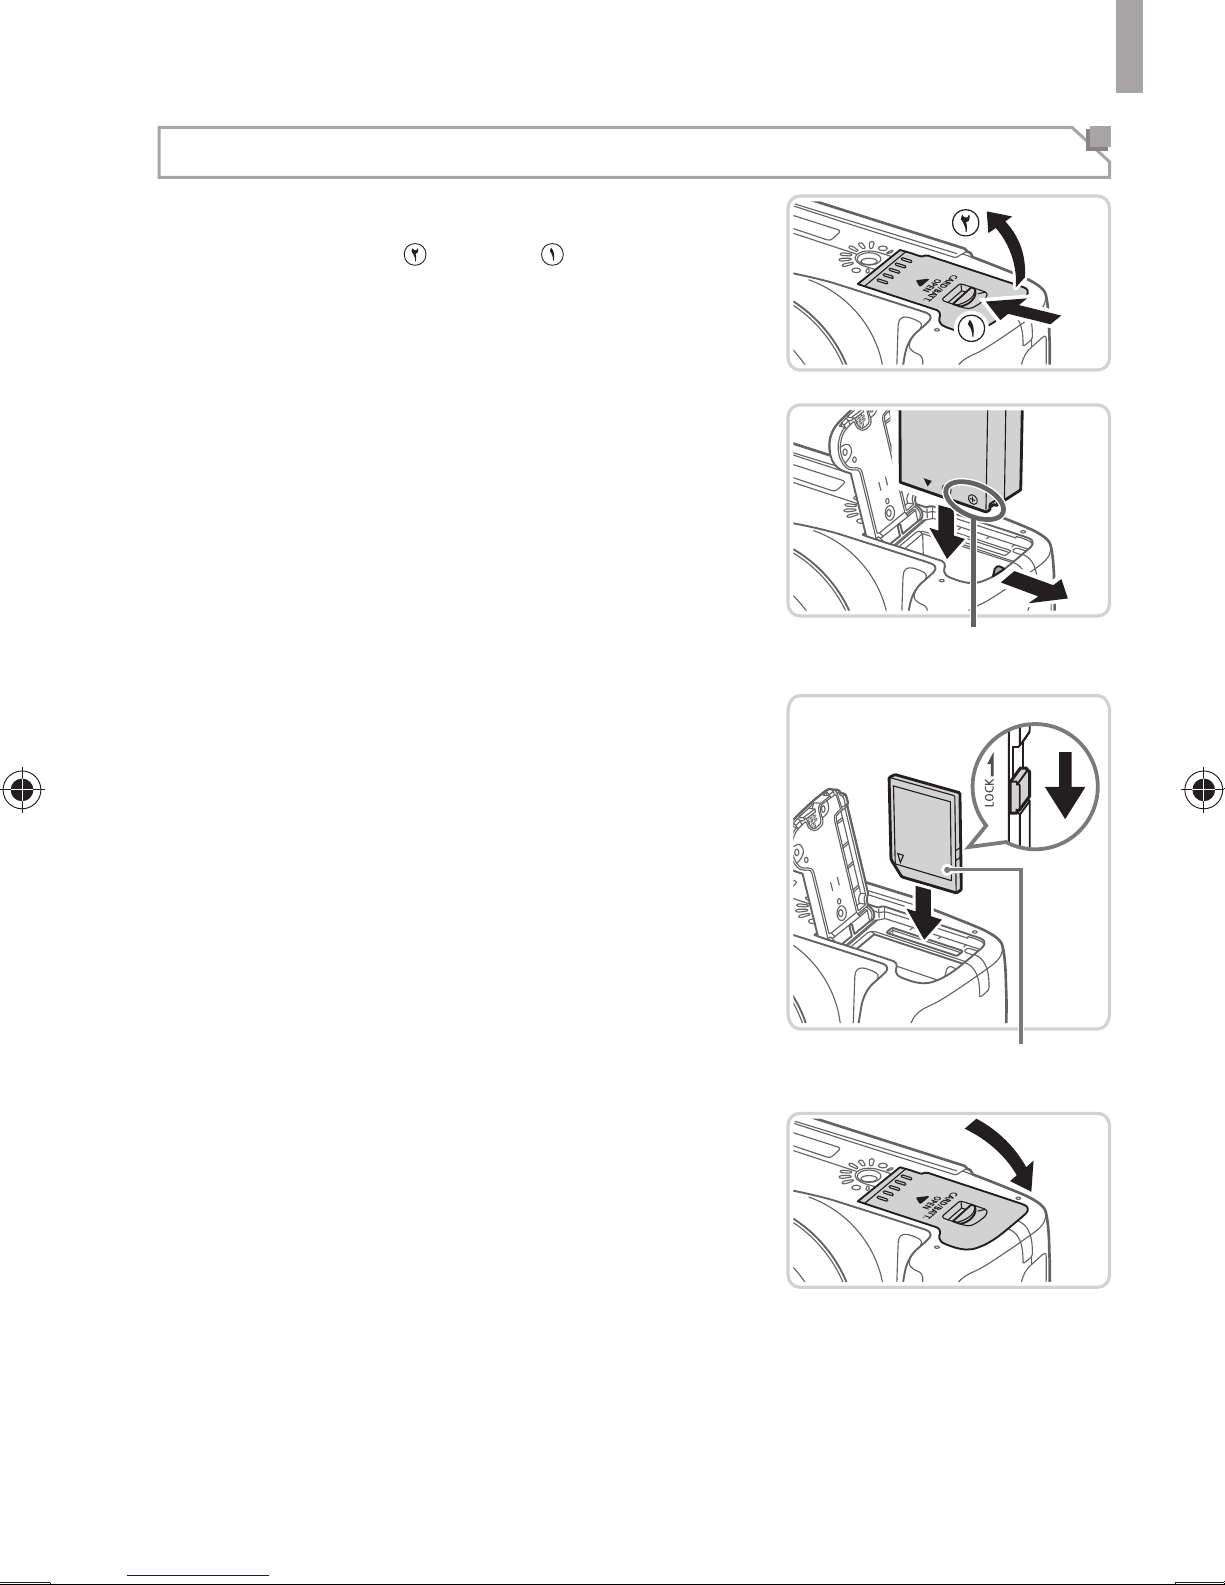
ﺓﺮﻛﺍﺬﻟﺍ ﺔﻗﺎﻄﺑﻭ ﺔﻳﺭﺎﻄﺒﻟﺍ ﺐﻴﻛﺮﺗ
.ءﺎﻄﻐﻟﺍ ﺢﺘﻓﺍ ١
.ﺔﻳﺭﺎﻄﺒﻟﺍ ﺐﻴﻛﺮﺘﺑ ﻢﻗ ٢
ﻊﺿﻮﻣ ﻲﻓ ﺮﻘﺘﺴﺗ ﻰﺘﺣ ﺎﻬﻌﻓﺩﺍﻭ ﺢﺿﻮﻣ ﻮﻫ ﺎﻤﻛ ﺔﻳﺭﺎﻄﺒﻟﺍ
.ﺓﺮﻘﻧ ﺕﻮﺻ ًﺓﺭﺪﺼﻣ ﻞﻔﻘﻟﺍ
.ﻢﻬﺴﻟﺍ ﻩﺎﺠﺗﺎﺑ
ﺔﻴﺋﺪﺒﻤﻟﺍ ﺕﺍﺰﻴﻬﺠﺘﻟﺍ
z .( ) ﻪﺤﺘﻓﺍ ﻢﺛ ،( ) ءﺎﻄﻐﻟﺍ ﺡﺯﺃ
z ﺐﻴﻛﺮﺘﺑ ﻢﻗ ،ﻢﻬﺴﻟﺍ ﻩﺎﺠﺗﺍ ﻲﻓ ﺔﻳﺭﺎﻄﺒﻟﺍ ﻞﻔﻗ ﻰﻠﻋ ﻂﻐﻀﻟﺍ ءﺎﻨﺛﺃ
z ﺔﻳﺭﺎﻄﺒﻟﺍ ﻞﻔﻗ ﺡﺎﺘﻔﻣ ﻰﻠﻋ ﻂﻐﺿﺍ ،ﺔﻳﺭﺎﻄﺒﻟﺍ ﺔﻟﺍﺯﻹﻭ
ﺔﻴﻓﺮﻄﻟﺍ ﺕﺎﻳﺎﻬﻨﻟﺍ
ﺔﻗﺎﻄﺑ ﻲﻓ ﺔﺑﺎﺘﻜﻟﺍ ﻦﻣ ﺔﻳﺎﻤﺤﻟﺍ ﻥﺎﺴﻟ ﻦﻣ ﻖﻘﺤﺗ ٣
.ﺎﻬﺒﻴﻛﺮﺘﺑ ﻢﻗ ﻢﺛ ،ﺓﺮﻛﺍﺬﻟﺍ
z ﻥﺎﺴﻠﺑ ﺓﺩﻭﺰﻤﻟﺍ ﺓﺮﻛﺍﺬﻟﺍ ﺕﺎﻗﺎﻄﺑ ﻰﻠﻋ ﻞﻴﺠﺴﺘﻟﺍ ﻦﻜﻤﻳ ﻻ
ﻞﻔﻘﻟﺍ ﻊﺿﻭ ﻲﻓ ﻥﺎﺴﻠﻟﺍ ﻥﻮﻜﻳ ﺎﻣﺪﻨﻋ ﺔﺑﺎﺘﻜﻟﺍ ﻦﻣ ﺔﻳﺎﻤﺤﻟﺍ
ﻊﺿﻮﻣ ﻲﻓ ﺮﻘﺘﺴﻳ ﻰﺘﺣ ﻰﻠﻋﻷ ﻥﺎﺴﻠﻟﺍ ﺡﺯﺃ .(ﻞﻔﺳﻷ)
.ﻞﻔﻘﻟﺍ ءﺎﻐﻟﺇ
z ﻰﺘﺣ ﺢﺿﻮﻣ ﻮﻫ ﺎﻤﻛ ﺔﻬﺟﻮﻣ ﺓﺮﻛﺍﺬﻟﺍ ﺔﻗﺎﻄﺑ ﺐﻴﻛﺮﺘﺑ ﻢﻗ
.ﺓﺮﻘﻧ ﺕﻮﺻ ًﺓﺭﺪﺼﻣ ﻞﻔﻘﻟﺍ ﻊﺿﻮﻣ ﻲﻓ ﺮﻘﺘﺴﺗ
z ،ﺓﺮﻘﻨﺑ ﺮﻌﺸﺗ ﻰﺘﺣ ﻞﺧﺍﺪﻟﺍ ﻰﻟﺇ ﺎﻬﻌﻓﺩﺍ ،ﺓﺮﻛﺍﺬﻟﺍ ﺔﻗﺎﻄﺑ ﺔﻟﺍﺯﻹ
.ءﻂﺒﺑ ﺎﻫﺭﺮﺣ ﻢﺛ
.ءﺎﻄﻐﻟﺍ ﻖﻠﻏﺃ ٤
z ﻲﻓ ﺮﻘﺘﺴﻳ ﻰﺘﺣ ﻪﻴﻠﻋ ﻂﻐﺿﺍﻭ ﻢﻬﺴﻟﺍ ﻩﺎﺠﺗﺎﺑ ءﺎﻄﻐﻟﺍ ﺾﻔﺨﺑ ﻢﻗ
.ﺓﺮﻘﻧ ﺕﻮﺻ ﺍًﺭﺪﺼﻣ ﻕﻼﻏﻹﺍ ﻊﺿﻮﻣ
ﻖﺼﻠﻤﻟﺍ
٤
Page 32
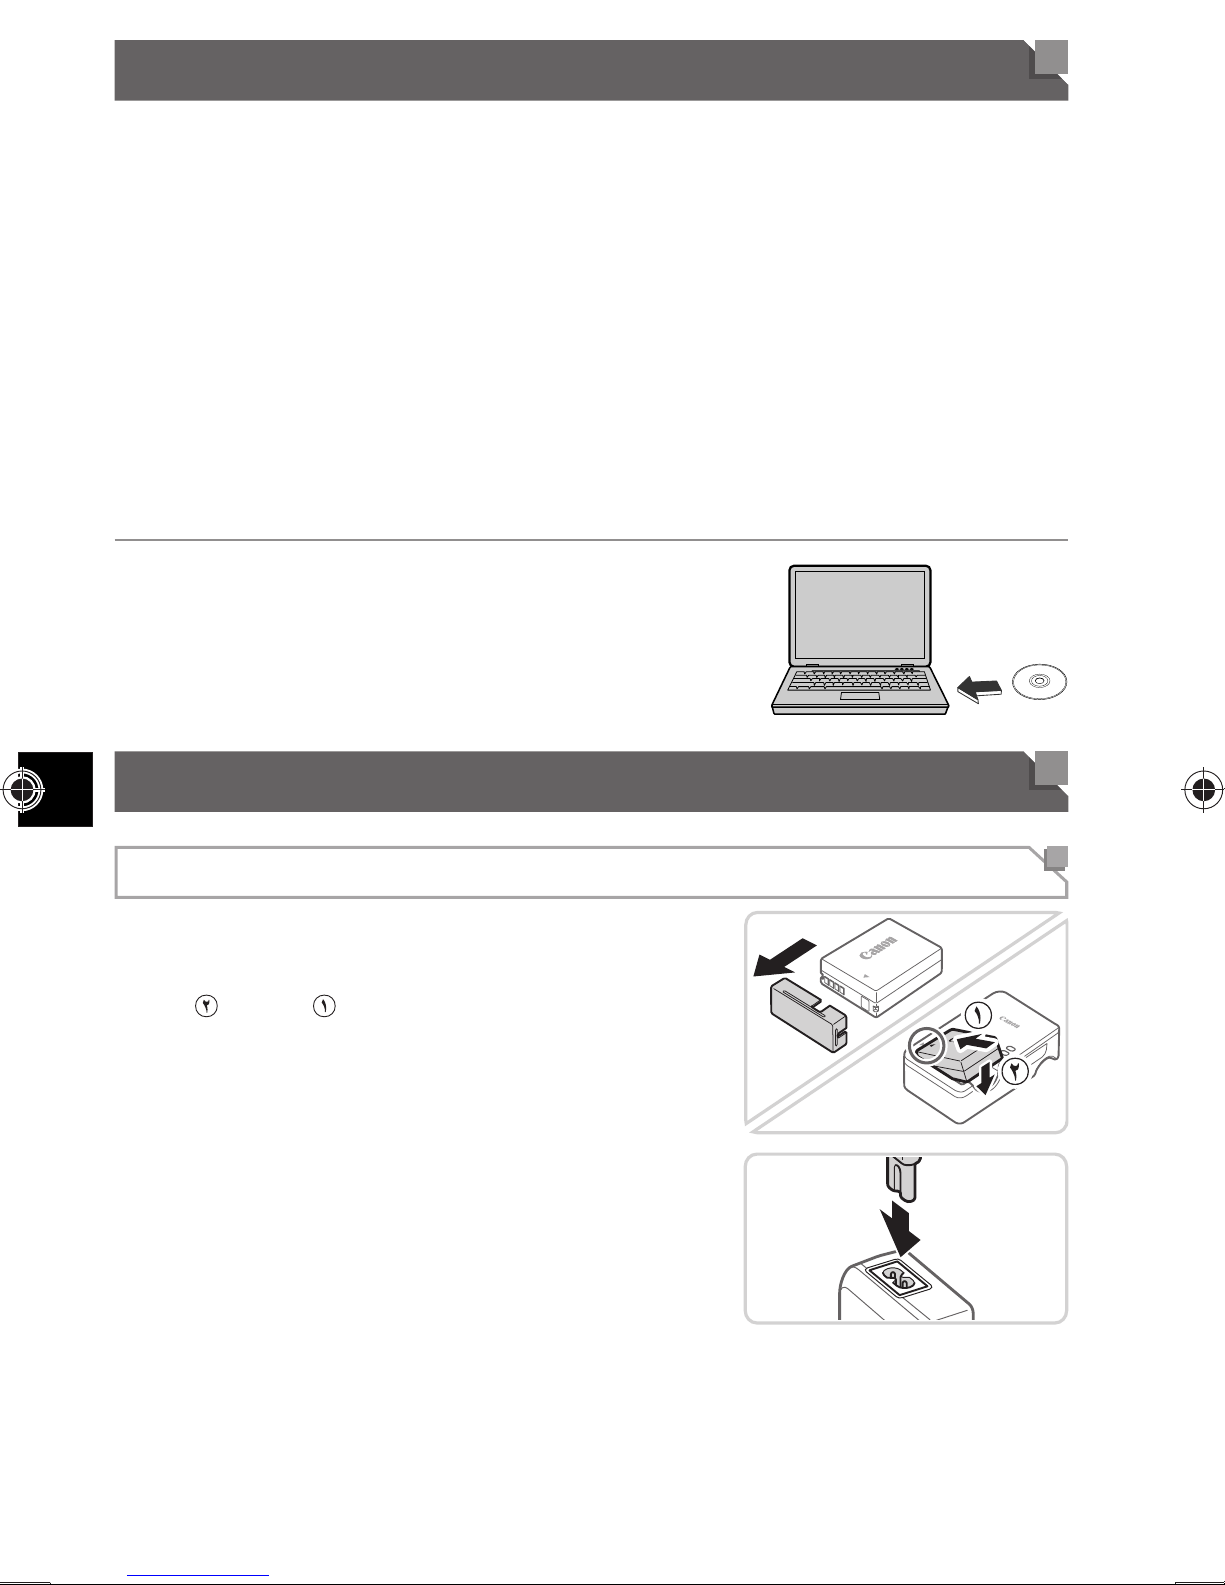
ﺔﻟﺩﻷﺍ ﺽﺮﻋ
ﺮﻴﻓﻮﺗ ﺐﺠﻳ .ﻦﻤﻀﻤﻟﺍ DIGITAL CAMERA Manuals Disk ﺹﺮﻘﻟﺍ ﻰﻠﻋ ﺔﻴﻟﺎﺘﻟﺍ ﺔﻟﺩﻷﺍ ﺮﻴﻓﻮﺗ ﻢﺘﻳ
.PDF ﻖﻴﺴﻨﺘﺑ ﺔﻋﻮﺿﻮﻤﻟﺍ ﺔﻟﺩﻷﺍ ﺽﺮﻌﻟ Adobe Reader ﺞﻣﺎﻧﺮﺑ
ﺍﺮﻴﻣﺎﻜﻟﺍ ﻡﺪﺨﺘﺴﻣ ﻞﻴﻟﺩ
.ﺔﻴﻟﺎﺘﻟﺍ ﺕﺎﻋﻮﺿﻮﻤﻟﺍ ﻞﻴﻟﺪﻟﺍ ﻝﻭﺎﻨﺘﻳ
.ﺮﺗﻮﻴﺒﻤﻜﻟﺍ ﺯﺎﻬﺠﺑ ﺔﻃﻮﻐﻀﻤﻟﺍ ﺹﺍﺮﻗﻷﺍ ﻙﺮﺤﻣ ﻲﻓ
ءﺪﺑ ،ﺍﺮﻴﻣﺎﻜﻟﺍ ﻡﺍﺪﺨﺘﺳﺍ ﺕﺎﻴﺳﺎﺳﺃ
ً
ﺭﻮﺼﻟﺍ ﺩﺍﺮﻴﺘﺳﺍ
z ﻰﺘﺣﻭ ﺔﻨﻤﻀﻤﻟﺍ ﺞﻣﺍﺮﺒﻟﺍ ﺖﻴﺒﺜﺗﻭ ،ﻞﻴﻐﺸﺘﻟﺍﻭ ،ﺮﻳﻮﺼﺘﻠﻟ ﺩﺍﺪﻌﺘﺳﻻﺍ ﻦﻣ ﺍ
z ﺍﺮﻴﻣﺎﻜﻟﺍ ﺺﺋﺎﺼﺧ ﻊﻴﻤﺟ ﻝﻮﺣ ﻯﺮﺧﺃ ﺕﺍﺩﺎﺷﺭﺇ
ﺞﻣﺍﺮﺒﻟﺍ ﻞﻴﻟﺩ
.ﺔﻨﻤﻀﻤﻟﺍ ﺞﻣﺍﺮﺒﻟﺍ ﻡﺍﺪﺨﺘﺳﺍ ﺔﻴﻔﻴﻛ ﻞﻴﻟﺪﻟﺍ ﺍﺬﻫ ﺢﺿﻮﻳ
z DIGITAL CAMERA Manuals Disk ﺹﺮﻘﻟﺍ ﻊﺿ
z .ﻞﻴﻟﺪﻟﺍ ﺽﺮﻌﻟ ﺔﺿﻭﺮﻌﻤﻟﺍ ﺕﺍﺩﺎﺷﺭﻹﺍ ﻊﺒﺗﺍ
ﺔﻴﺋﺪﺒﻤﻟﺍ ﺕﺍﺰﻴﻬﺠﺘﻟﺍ
ﺔﻳﺭﺎﻄﺒﻟﺍ ﻦﺤﺷ
.ﺔﻳﺭﺎﻄﺒﻟﺍ ﺐﻴﻛﺮﺘﺑ ﻢﻗ ﻢﺛ ،ﺔﻳﺭﺎﻄﺒﻟﺍ ءﺎﻄﻏ ﺔﻟﺍﺯﺈﺑ ﻢﻗ
z ،ﻦﺣﺎﺸﻟﺍﻭ ﺔﻳﺭﺎﻄﺒﻟﺍ ﻰﻠﻋ ﻦﻴﺗﺩﻮﺟﻮﻤﻟﺍ ▲ ﻦﻴﺘﻣﻼﻌﻟﺍ ﺓﺍﺫﺎﺤﻣ ﺪﻌﺑ
.( ) ﻞﻔﺳﻷﻭ ( ) ﻞﺧﺍﺪﻠﻟ ﺎﻬﻌﻓﺪﺑ ﺔﻳﺭﺎﻄﺒﻟﺍ ﺐﻴﻛﺮﺘﺑ ﻢﻗ
.ﺔﻳﺭﺎﻄﺒﻟﺍ ﻦﺤﺸﺑ ﻢﻗ
z ،ﺔﻗﺎﻄﻟﺍ ﺬﻔﻨﻤﺑ ﻪﻟﺎﺧﺩﺇﻭ ﻦﺣﺎﺸﻟﺎﺑ ﺔﻗﺎﻄﻟﺍ ﻚﻠﺳ ﻚﻠﻴﺻﻮﺗ ﺩﺮﺠﻤﺑ
.ﻲﻟﺎﻘﺗﺮﺒﻟﺍ ﻥﻮﻠﻟﺎﺑ ﺡﺎﺒﺼﻤﻟﺍ ءﻲﻀﻴﺳ
z ﻥﻮﻠﻟﺍ ﻰﻟﺇ ﺡﺎﺒﺼﻤﻟﺍ ﺓءﺎﺿﺇ ﻝﻮﺤﺘﺗ ،ﻦﺤﺸﻟﺍ ﻝﺎﻤﺘﻛﺍ ﺪﻌﺑ
.ﺔﻳﺭﺎﻄﺒﻟﺍ ﺔﻟﺍﺯﺈﺑ ﻢﻗ .ﺮﻀﺧﻷﺍ
z ﺕﺎﻄﻘﻠﻟﺍ ﺩﺪﻋﻭ ﻦﺤﺸﻟﺍ ﺖﻗﻭ ﻝﻮﺣ ﻞﻴﺻﺎﻔﺗ ﻰﻠﻋ ﻝﻮﺼﺤﻠﻟ
،ﻞﻣﺎﻜﻟﺎﺑ ﺔﻧﻮﺤﺸﻣ ﺔﻳﺭﺎﻄﺑ ﻊﻣ ﺮﻓﻮﺘﻤﻟﺍ ﻞﻴﺠﺴﺘﻟﺍ ﺖﻗﻭ ﻭﺃ
.
ﺍﺮﻴﻣﺎﻜﻟﺍ ﻡﺪﺨﺘﺴﻣ ﻞﻴﻟﺩ
ﻲﻓ "ﺕﺎﻔﺻﺍﻮﻤﻟﺍ" ﻊﺟﺍﺭ
١
٢
٣
Page 33
ﺓﻮﺒﻌﻟﺍ ﺕﺎﻳﻮﺘﺤﻣ
.ﺓﻮﺒﻌﻟﺍ ﻲﻓ ﺔﻨﻤﻀﻣ ﺔﻴﻟﺎﺘﻟﺍ ﺮﺻﺎﻨﻌﻟﺍ ﻥﺃ ﻦﻣ ﺪﻛﺄﺗ ،ﻡﺍﺪﺨﺘﺳﻻﺍ ﻞﺒﻗ
.ﺍﺮﻴﻣﺎﻜﻟﺍ ﻉﺯﻮﻤﺑ ﻞﺼﺗﺍ ،ﺎﻬﻨﻣ ﺎﻳﺃ ﺪﺠﺗ ﻢﻟ ﺍﺫﺇﻭ
ﺔﺳﺪﻌﻟﺍ ءﺎﻄﻏ
١*
(ﻁﺎﺑﺮﺑ ﺩﻭﺰﻣ)
ﻲﻤﻴﻠﻗﻹﺍ ﻥﺎﻤﻀﻟﺍ ﺞﻣﺎﻧﺮﺑ
Canon ﻦﻣ
DIGITAL CAMERA ﺹﺮﻘﻟﺍ ﻰﻠﻋ
،ﻡﺍﺪﺨﺘﺳﻻﺍ ﺕﺍﺩﺎﺷﺭﺇ ﻰﻠﻋ ﻝﻮﺼﺤﻠﻟﻭ ،
ﻖﻨﻌﻟﺍ ﻁﺎﺑﺭ
١*
NS-DC11
DIGITAL ﺹﺮﻗ
٣*
ﺔﻳﺭﺎﻄﺒﻟﺍ ﻦﺣﺎﺷ
CB-2LCE
CAMERA
Solution Disk
ﺍﺮﻴﻣﺎﻜﻟﺍ ﻡﺪﺨﺘﺴﻣ ﻞﻴﻟﺩ
ﺍﺮﻴﻣﺎﻜﻟﺍ ﻡﺪﺨﺘﺴﻣ ﻞﻴﻟﺩ
ﺔﻳﺭﺎﻄﺒﻟﺍ ﺔﻣﺰﺣ
ءﺎﻄﻐﺑ ﺓﺩﻭﺰﻣ) NB-10L
(ﺔﻴﻓﺮﻃ ﺔﻳﺎﻬﻧ
DIGITAL ﺹﺮﻗ
CAMERA
٢*
Manuals Disk
ﻊﺟﺍﺭ ،ﻖﻓﺮﻤﻟﺍ ﻝﻮﺣ ﺕﺍﺩﺎﺷﺭﺇ ﻰﻠﻋ ﻝﻮﺼﺤﻠﻟ ١*
ﻊﺟﺍﺭ ،ﺖﻴﺒﺜﺘﻟﺍ ﺕﺍﺩﺎﺷﺭﺇ ﻰﻠﻋ ﻝﻮﺼﺤﻠﻟ .ﺞﻣﺍﺮﺒﻟﺍ ﻰﻠﻋ ﻱﻮﺘﺤﻳ ٣*
ﻞﻴﻐﺸﺘﻟﺍ ءﺪﺑ ﻞﻴﻟﺩ
.Manuals Disk
=) ﺔﻟﺩﻷﺍ ﻰﻠﻋ ﻱﻮﺘﺤﻳ ٢*
.(٣
ﺍﺮﻴﻣﺎﻜﻟﺍ
(ﻞﻴﻟﺪﻟﺍ ﺍﺬﻫ)
ﺞﻣﺍﺮﺒﻟﺍ ﻞﻴﻟﺩ
.
ﻊﺟﺍﺭ
ﺔﻘﻓﺍﻮﺘﻤﻟﺍ ﺓﺮﻛﺍﺬﻟﺍ ﺕﺎﻗﺎﻄﺑ
ﺕﺎﻗﺎﻄﺑ ﻡﺍﺪﺨﺘﺳﺍ ﻦﻜﻤﻳ .ﺔﺟﺎﺤﻟﺍ ﺐﺴﺣ ﺔﻴﻟﺎﺘﻟﺍ ﺕﺎﻗﺎﻄﺒﻟﺍ ﻉﺍﻮﻧﺃ ﻯﺪﺣﺇ ءﺍﺮﺸﺑ ﻢﻗ .ﺔﻨﻤﻀﻣ ﺓﺮﻛﺍﺫ ﺔﻗﺎﻄﺑ ﺪﺟﻮﺗ ﻻ
ﺐﺴﺣ ﻞﻴﺠﺴﺘﻟﺍ ﺖﻗﻭﻭ ﺕﺎﻄﻘﻠﻟﺍ ﺩﺪﻋ ﻝﻮﺣ ﻞﻴﺻﺎﻔﺗ ﻰﻠﻋ ﻝﻮﺼﺤﻠﻟ .ﺔﻌﺴﻟﺍ ﻦﻋ ﺮﻈﻨﻟﺍ ﺾﻐﺑ ﺔﻴﻟﺎﺘﻟﺍ ﺓﺮﻛﺍﺬﻟﺍ
ﺍﺮﻴﻣﺎﻜﻟﺍ ﻡﺪﺨﺘﺴﻣ ﻞﻴﻟﺩ
.
ﻲﻓ "ﺕﺎﻔﺻﺍﻮﻤﻟﺍ" ﻊﺟﺍﺭ ،ﺓﺮﻛﺍﺬﻟﺍ ﺔﻗﺎﻄﺑ
*
SD ﺓﺮﻛﺍﺬﻟﺍ ﺕﺎﻗﺎﻄﺑ
•
ﺔﻠﻜﺸﻣ ﺔﻳﺃ ﺩﻮﺟﻭ ﺔﻟﺎﺣ ﻲﻓﻭ .(ﻲﻜﻠﺳﻼﻟﺍ ﻞﻘﻨﻟﺍ ﻚﻟﺫ ﻲﻓ ﺎﻤﺑ) Eye-Fi ﺔﻗﺎﻄﺑ ﻒﺋﺎﻇﻮﻟ ﺞﺘﻨﻤﻟﺍ ﺍﺬﻫ ﻢﻋﺩ ﻦﻤﻀﻧ ﻻ
.ﻖﻃﺎﻨﻤﻟﺍ ﻭﺃ ﻥﺍﺪﻠﺒﻟﺍ ﻦﻣ ﺪﻳﺪﻌﻟﺍ ﻲﻓ Eye-Fi ﺕﺎﻗﺎﻄﺑ ﻡﺍﺪﺨﺘﺳﻻ ﺔﻘﻓﺍﻮﻣ ﻰﻠﻋ ﻝﻮﺼﺤﻟﺍ ﺐﺠﻳ ﻪﻧﺃ ﺎًﻀﻳﺃ ﻆﺣﻻ
ﻡﺍﺪﺨﺘﺳﺍ ﻰﻠﻋ ﺔﻘﻓﺍﻮﻤﻟﺍ ﺖﻤﺗ ﻞﻫ ﺎًﺤﺿﺍﻭ ﻦﻜﻳ ﻢﻟ ﺍﺫﺇﻭ .ﺔﻘﻓﺍﻮﻣ ﻰﻠﻋ ﻝﻮﺼﺤﻟﺍ ﻥﻭﺪﺑ ﺔﻗﺎﻄﺒﻟﺍ ﻡﺍﺪﺨﺘﺳﺎﺑ ﺢﻤﺴُﻳ ﻻﻭ
*
SDHC ﺓﺮﻛﺍﺬﻟﺍ ﺕﺎﻗﺎﻄﺑ
*
SDXC ﺓﺮﻛﺍﺬﻟﺍ ﺕﺎﻗﺎﻄﺑ
•
•
•Eye-Fi ﺕﺎﻗﺎﻄﺑ
*.ﺍﺮﻴﻣﺎﻜﻟﺍ ﻩﺬﻫ ﻊﻣ ﻞﻤﻌﻠﻟ ﺓﺮﻛﺍﺬﻟﺍ ﺕﺎﻗﺎﻄﺑ ﻊﻴﻤﺟ ﺔﻗﺩﺎﺼﻣ ﻢﺘﻳ ﻢﻟ ،ﻚﻟﺫ ﻊﻣﻭ .SD ﺕﺎﻔﺻﺍﻮﻣ ﻊﻣ ﻖﻓﺍﻮﺘﺗ
Eye-Fi ﺕﺎﻗﺎﻄﺑ ﻝﻮﺣ ﺕﺎﻣﻮﻠﻌﻣ
.ﺔﻗﺎﻄﺒﻠﻟ ﺔﻌﱢﻨﺼﻤﻟﺍ ﺔﻬﺠﻟﺍ ﺔﻌﺟﺍﺮﻣ ءﺎﺟﺮﻟﺎﻓ ،Eye-Fi ﺔﻗﺎﻄﺒﺑ ﻖﻠﻌﺘﺗ
.ﺔﻗﺎﻄﺒﻠﻟ ﺔﻌﱢﻨﺼﻤﻟﺍ ﺔﻬﺠﻟﺍ ﺔﻌﺟﺍﺮﻣ ءﺎﺟﺮﻟﺎﻓ ،ﻻ ﻡﺃ ﺔﻘﻄﻨﻤﻟﺍ ﻲﻓ ﺔﻗﺎﻄﺒﻟﺍ
Page 34
ﺔﻴﺑﺮﻌﻟﺍ
ﻞﻴﻐﺸﺘﻟﺍ ءﺪﺑ ﻞﻴﻟﺩ
ﻰﺳﺭﺎﻓ
ﺭﺎﮐ ﻪﺑ ﻉﻭﺮﺷ یﺎﻤﻨﻫﺍﺭ
 Loading...