

Page 1

PUB. DIE-0501-000A
Guide for the EOS C700 models
CDX-36150
Codex Recorder for Canon EOS C700
Page 2

Table of Contents
2
Preparations 3
Attaching the CDX-36150 Recorder to the Camera 3
Removing the CDX-36150 Recorder 3
Powering the CDX-36150 Recorder 4
Initializing a Capture Drive 5
Recording 6
Video Configuration 6
Shooting frame rates during slow & fast motion 7
Main Recording Video Configuration and Video Output Configuration from
the SDI OUT Terminals 9
Main Recording Video Configuration and Video Output Configuration from the MON. Terminals and HDMI OUT
Terminal 10
Onscreen Displays 11
Sub Recording on a CFast or SD Card 11
Playing Back Recordings from the Capture Drive 12
Troubleshooting 14
Messages for the CDX-36150 Recorder 14
Abridged Specifications 15
Trademark Acknowledgements
• Names and products mentioned in the manual may be trademarks or registered trademarks of their respective
companies.
Page 3
Preparations
Preparations
This section explains how to attach the CDX-36150 Recorder to the EOS C700 / EOS C700 PL / EOS C700 GS
PL camera and remove it, and insert recording media (Codex Capture Drive 2.0) to the recorder and initialize
recording media.
For safety and maintenance instructions and detailed information about the recorder, refer to the CDX-36150
Recorder’s Getting Started Guide. ? indicates a reference to the relevant section in the camera’s
Instruction Manual (PDF file).
Attaching the CDX-36150 Recorder to the Camera
3
1 Press the
Q
button to turn off the camera.
2 Remove the battery adapter that comes attached to the
camera.
?
Removing an Extension Module
3 Attach the recorder to the camera.
?
• Follow steps 1 to 4 in the procedure to attach the recorder in
• Pull out the locking lever on the recorder to attach it to the
Installing an Extension Module
the same way explained for attaching a battery adapter.
camera.
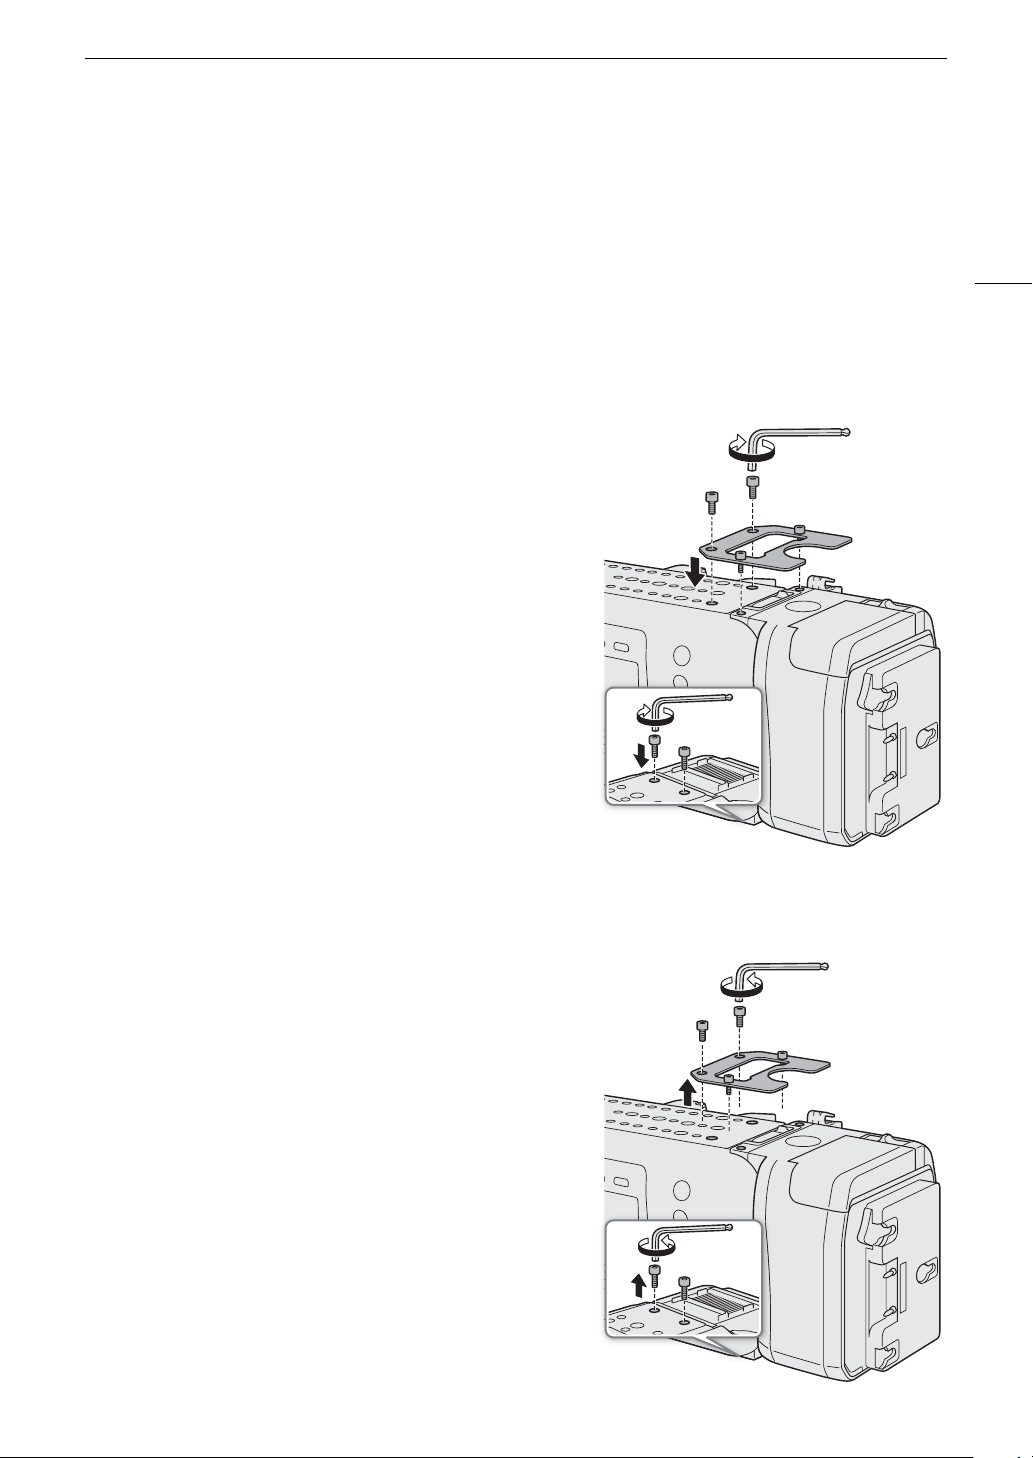
4 Attach the reinforcement plate (supplied with the camera)
to the recorder.
5 Using the hex wrenches supplied with the camera, fasten
the 6 fixation screws shown in the illustration (4 on top,
2 on the bottom) to secure the recorder in place.
• Use the 1/4" (0.64 cm) wrench for the 2 top plate screws
closer to the front of the camera and the M4 wrench for the
rest of the screws and bolts (top/bottom plates).
Removing the CDX-36150 Recorder
1 Press the
2 Remove all power sources connected to the recorder
(DC IN and battery).
3 Use the hex wrenches supplied with the camera to
remove the 6 screws shown in the illustration.
• Use the 1/4" (0.64 cm) wrench for the 2 top plate screws
closer to the front of the camera and the M4 wrench for the
rest of the screws and bolts (top/bottom plates).
4 Remove the reinforcement plate from the recorder.
5 Remove the recorder.
?
• Follow the procedure to remove the recorder in the same
way explained for removing the battery adapter.
• Pull out the locking lever on the recorder to remove it from
the camera.
Q
button to turn off the camera.
Removing an Extension Module
Page 4
Preparations
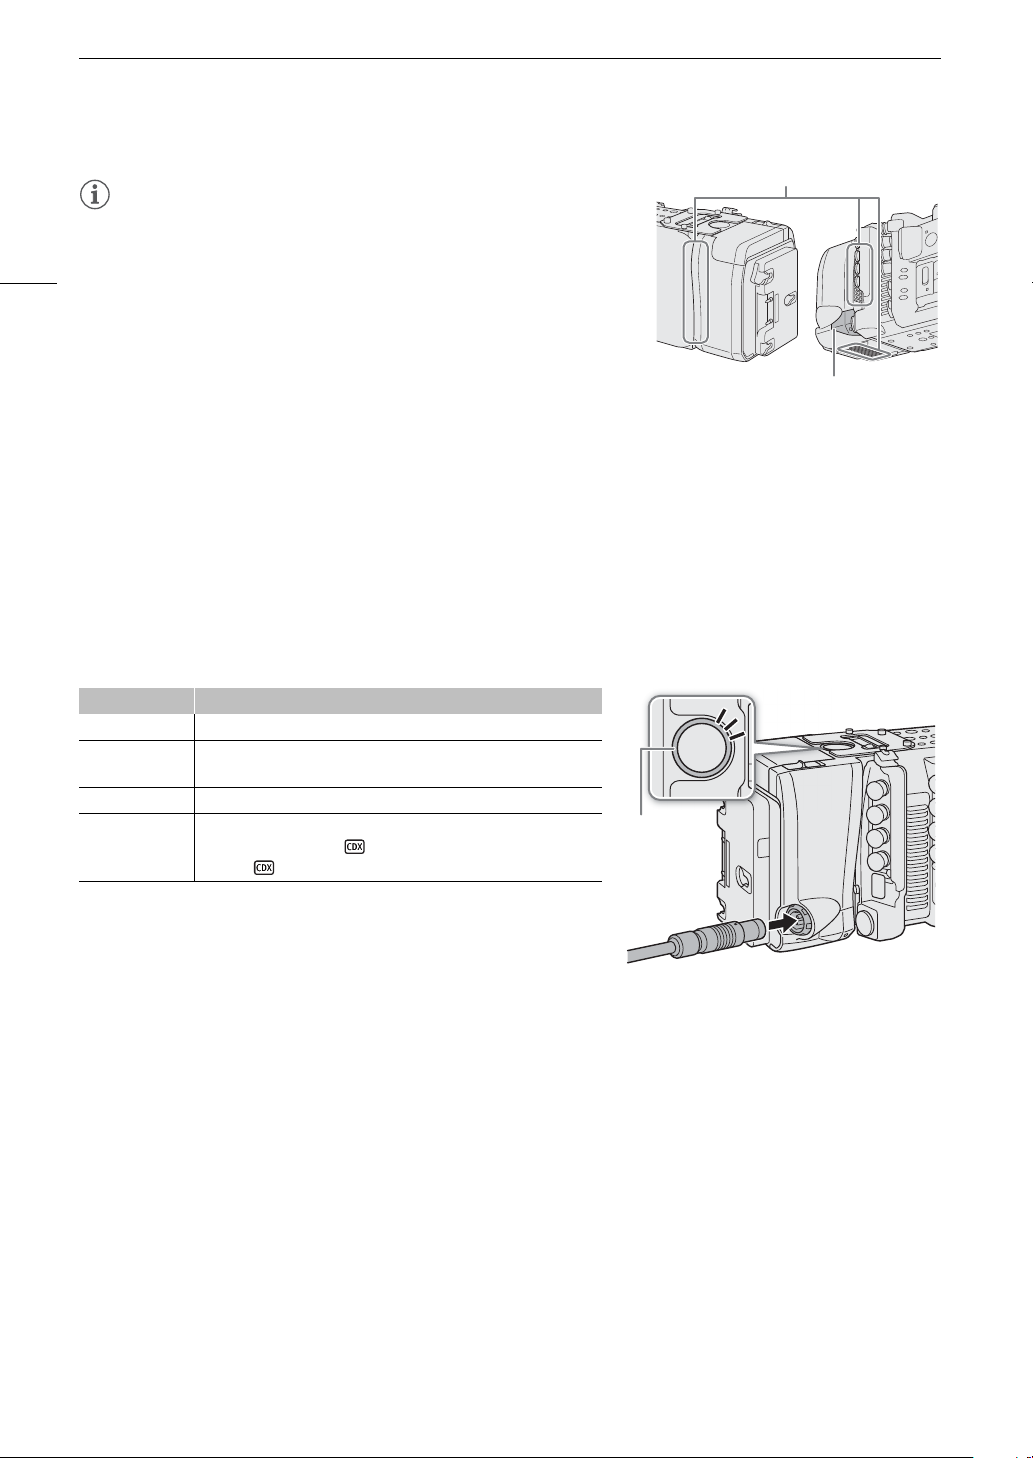
NOTES
Air vents
Cover
LED
• Be careful not to obstruct in any way the recorder’s air vents.
• To use the camera’s DC IN 12V terminal when the recorder is attached
4
to the camera, remove the cover next to the CDX-36150 Recorder’s
DC IN terminal.
Powering the CDX-36150 Recorder
Connect the power supply to the CDX-36150 Recorder before turning on the camera. While the CDX-36150
Recorder is docked with the camera, power is supplied to the camera from the power source connected to the
CDX-36150 Recorder. You can also connect a power source directly to the camera’s DC IN 12V terminal.
1 Press the camera’s Q button to turn off the camera.
2 Connect the power supply (DC IN or battery) to the recorder.
• Refer to the CDX-36150 Recorder’s Getting Started Guide.
3 Press the camera’s
• The LED on the top of the CDX-36150 Recorder will illuminate in different colors to indicate the recorder’s
status. Refer to the following table.
Q
button to turn on the camera.
CDX-36150 Recorder’s LED status
LED Recorder status
Blue Record standby mode.
Red
Green During playback.
Off
While recording, or the power level of the power source connected
to the CDX-36150 Recorder is low.
The camera is turned off or the main recording format is set to an
option other than [RAW ( Capture Drive)] or
[ProRes ( Capture Drive)].
You can press the button inside the ring to change the LED’s
brightness between 3 levels or to turn it off completely. Even when you
turn it off, the LED will illuminate in red if a low power warning is
triggered.
Page 5

Preparations
IMPORTANT
NOTES
Initializing a Capture Drive
For details about the recording media and how to insert a Capture Drive 2.0 into the recorder, refer to the CDX36150 Recorder’s Getting Started Guide. The first time you use a Capture Drive with the camera, initialize it first
using the camera’s menu.
1 Set the main recording format to [RAW ( Capture Drive)] or [ProRes ( Capture Drive)].
[Rec/Media Setup] (3) > [Main Rec Format] > [RAW ( Capture Drive)] or
[ProRes ( Capture Drive)]
?
Selecting the Main Recording Format
2 Initialize the Capture Drive in the recorder.
[Rec/Media Setup] (3) > [Initialize Media] > [ Capture Drive]
3 Camera menu: Press both [FORMAT] buttons simultaneously.
Monitoring menu: Select [OK] and then press SET.
?
• The Capture Drive will be initialized for use with the recording format selected in step 1.
• Initializing a Capture Drive will permanently erase all the data it contains. Lost data cannot be recovered. Make
sure you save important recordings in advance.
• Observe the following precautions while the camera is accessing the Capture Drive in the recorder. Failure to
do so may result in permanent data loss.
- Do not turn off the camera or recorder. Do not remove/disconnect the battery or other power source.
- Do not open the recorder’s Capture Drive bay.
Initializing Recording Media
5
• You can check the capacity and remaining available recording time of the Capture Drive on the
[MEDIA] screen.
• A Capture Drive cannot be used to record clips in different recording formats (RAW and ProRes).
• When you initialize a Capture Drive with the main recording format set to [ProRes ( Capture Drive)], the
recordable space will be reduced to approximately half of the Capture Drive's nominal capacity to ensure a
highly reliable format thanks to the use of multi-stream processing.
Page 6
Recording
Recording
After the recorder is ready and the Capture Drive has been initialized for use with the camera, you can use it to
record the camera’s RAW data. The selection of main recording format (including the recording media used) is
explained in the camera’s Instruction Manual. Recording is performed using the camera’s REC button, as
6
explained in the same chapter. ?
Recording Video
This section will cover only those aspects that are different from what is explained in the camera’s Instruction
Manual when using the CDX-36150 Recorder.
Before using the CDX-36150 Recorder to make important recordings for the first time, make test recordings
using the video configuration(s) you plan to use to check that the camera and recorder are operating correctly.
Video Configuration
The following video configuration combinations are available when using the CDX-36150 Recorder to record the
camera’s RAW data. The audio recorded will be 4-channel linear PCM audio (24 bit, 48 kHz).
?
Video Configuration
Available video configurations
Main recording format Resolution Codec Frame rate
[RAW ( Capture Drive)]
[ProRes ( Capture Drive)]
Z[ 4512x2376
] 4272x2376
Z[ 4512x1920
4096x2160
4096x2160
3840x2160
2048x1080
1920x1080
–
ProRes 422 HQ, 10 bit
ProRes 4444 XQ, 12 bit
ProRes 4444, 12 bit
ProRes 422 HQ, 10 bit
59.94P
50.00P
29.97P
25.00P
24.00P
23.98P
Page 7

Recording
Shooting frame rates during slow & fast motion
Available shooting frame rates vary depending on the [Frame Rate] setting selected in the video configuration.
The range of available shooting frame rates depends also on the resolution and codec used, as shown at the top
of the following tables ( = the shooting frame rates listed under the column are available).
Available shooting frame rates (RAW)
Resolution Available range
Z[ 4512x2376
] 4272x2376
Z[ 4512x1920
4096x2160
2048×1080 (cropped)*
[Frame Rate] setting Shooting frame rates
59.94P
29.97P
23.98P
24.00P
50.00P
25.00P
* Only when [S&F FPS] > [ACTIVATE] is set to [On (crop)].
1.00, 2.00, 3.00, 5.99, 14.99, 29.97, 59.94,
89.91
1.00, 2.00, 3.00, 5.99, 14.99, 29.97, 31.97,
35.96, 39.96, 43.96, 47.95, 51.95, 55.94, 59.94,
89.91
1.00, 2.00, 3.00, 5.99, 11.99, 23.98, 25.97,
27.97, 29.97, 31.97, 35.96, 39.96, 43.96, 47.95,
51.95, 55.94, 59.94, 71.93, 95.90
1.00, 2.00, 3.00, 6.00, 12.00, 24.00, 26.00,
28.00, 30.00, 32.00, 36.00, 40.00, 44.00, 48.00,
52.00, 56.00, 60.00, 72.00, 96.00
1.00, 5.00, 15.00, 25.00, 50.00, 54.00, 58.00,
75.00, 100.00
1.00, 5.00, 15.00, 25.00, 26.00, 28.00, 30.00,
34.00, 38.00, 42.00, 46.00, 50.00, 54.00, 58.00,
75.00, 100.00
119.88 149.85, 179.82, 209.79, 239.76
119.88 149.85, 179.82, 209.79, 239.76
119.88
120.00
– –
–
143.86, 167.83, 191.81, 215.78,
239.76
144.00, 168.00, 192.00, 216.00,
240.00
– 125.00, 150.00, 175.00, 200.00
– 125.00, 150.00, 175.00, 200.00
7
Page 8

Recording
Available shooting frame rates (ProRes)
Resolution Codec** Available range
4096x2160
8
3840x2160
2048x1080
1920x1080
2048x1080
1920x1080
2048x1080 (cropped)*
1920x1080 (cropped)*
[Frame Rate] setting Shooting frame rates
59.94P
29.97P
23.98P
24.00P
50.00P 1.00, 5.00, 15.00, 25.00, 50.00
25.00P
* Only when [S&F FPS] > [ACTIVATE] is set to [On (crop)].
** Selected with the [Rec/Media Setup] > [Bit Rate] setting.
ProRes 422 HQ
ProRes 4444 XQ
ProRes 4444
ProRes 422 HQ
ProRes 422 HQ
1.00, 2.00, 3.00, 5.99, 14.99,
29.97, 59.94
1.00, 2.00, 3.00, 5.99, 14.99,
29.97, 31.97, 35.96, 39.96,
43.96, 47.95, 51.95, 55.94,
59.94
1.00, 2.00, 3.00, 5.99, 11.99,
23.98, 25.97, 27.97, 29.97,
31.97, 35.96, 39.96, 43.96,
47.95, 51.95, 55.94, 59.94
1.00, 2.00, 3.00, 6.00, 12.00,
24.00, 26.00, 28.00, 30.00,
32.00, 36.00, 40.00, 44.00,
48.00, 52.00, 56.00, 60.00
1.00, 5.00, 15.00, 25.00, 26.00,
28.00, 30.00, 34.00, 38.00,
42.00, 46.00, 50.00
89.91, 119.88
89.91, 119.88
71.93, 95.90, 119.88
72.00, 96.00, 120.00
54.00, 58.00, 75.00,
100.00
54.00, 58.00, 75.00,
100.00
– –
– –
–
149.85, 179.82, 209.79,
239.76
149.85, 179.82, 209.79,
239.76
143.86, 167.83, 191.81,
215.78, 239.76
144.00, 168.00, 192.00,
216.00, 240.00
125.00, 150.00, 175.00,
200.00
125.00, 150.00, 175.00,
200.00
Page 9

Recording
Main Recording Video Configuration and Video Output Configuration from the SDI OUT Terminals
RGBA3/
RGBA7
Lower
left
Lower
left
3, 4
RGBA4/
RGBA8
Lower
right
Lower
right
Number of
terminals
required
4
2
4
2
1
4 3G
4 HD
4
2
Main recording video configuration Output from each terminal
[Main Rec Format]
1
[RAW
( Capture Drive)]
[ProRes
( Capture Drive)]
1
2
3
4
5
6
[Rec/Media Setup] > [Main Rec Format] setting.
The frame rate of the video output will be the same as that used for recording (except when slow & fast motion recording is
activated).
The color sampling will be determined by the option selected for the [Rec/Media Setup] > [Resolution/Sampling]
setting.
When only one or two SDI connections are required, the other SDI OUT terminals output the same signal as SDI OUT 1 (or SDI
OUT 1 and SDI OUT 2). This is indicated by the gray cells in the table.
Video will be output at a resolution of 4096x2160.
Only when the resolution is 1920x1080.
Resolution/
Color sampling
Z[ 4512x23765
] 4272x2376
5
Z[ 4512x19205
4096x2160
RAW
2048x1080 (cropped)
RAW
4096x2160
3840x2160
YCbCr 4:2:2, 10 bit
2048x1080
1920x1080
RGB 4:4:4, 12 bit
2048x1080
1920x1080
YCbCr 4:2:2, 10 bit
Frame rate2 SDI OUT 1 SDI OUT 2 SDI OUT 3 SDI OUT 4
60P to 120P
(120P inclusive)
30P to 60P
(60P inclusive)
RGBA1 RGBA2 RGBA3 RGBA4
Frame-sequential
RGBA1 RGBA2
Frame-sequential
30P or lower RGBA 1
120P to 240P
(240P inclusive)
60P to 120P
(120P inclusive)
60P or lower
30P to 60P
(60P inclusive)
RGBA1/
RGBA5
Frame-sequential
RGBA1/
RGBA3
RGBA1/
RGBA2
Upper
left
Frame-sequential
RGBA2/
RGBA6
RGBA2/
RGBA4
Square division (Quad HD)
Upper
right
Square division (Quad HD)
30P or lower
30P to 60P
(60P inclusive)
Upper
left
Upper
right
RGB 2
30P or lower RGB 1 3G
120P to 240P
(240P inclusive)
60P to 120P
(120P inclusive)
30P to 60P
(60P inclusive)
30P or lower,
6
, 50.00i6
59.94i
YCC1 YCC2 YCC3 YCC4
Frame-sequential
YCC1 YCC2
YCC 1
YCC 1 HD
Frame-sequential
Output
signal
3G
3G
Dual link
3G
3G
9
Page 10

Recording
Main Recording Video Configuration and Video Output Configuration from the MON. Terminals and HDMI OUT Terminal
10
[Main Rec Format]
[RAW ( Capture Drive)]
[ProRes ( Capture Drive)]
1
2
The frame rate of the video output will be the same as that used for recording (except when slow & fast motion recording is
activated).
3
Onscreen displays and assistance functions like peaking and zebra pattern can be output to an external monitor.
4
5
When [System Setup] > [Term. Output Setup] > [MON. Output] is set to [Off], the HDMI OUT output will change
depending on the capabilities of the monitor used. When [MON. Output] is set to a setting other than [Off], if the monitor
connected to the terminal does not support the video output configuration, video output from the HDMI OUT terminal will be
turned off.
The color sampling will be set automatically to YCbCr 4:2:2, 10 bit, YCbCr 4:4:4, 8 bit or RGB 4:4:4, 8 bit, depending on the
capabilities of the external monitor.
6
Main recording video configuration Video output configuration
MON. terminals
Frame
1
rate
2
Resolution
[MON. Output]
[2048x1080/
1920x1080]
3
4
[1920x1080]
4512x2376
4512x1920
4096x2160
2048x1080
YCbCr 4:2:2, 10 bit
2048x1080 (cropped)
59.94P
4272x2376
50.00P
29.97P
25.00P
24.00P
23.98P
4096x2160
3840x2160
2048x1080
1920x1080
[Rec/Media Setup] > [Main Rec Format] setting.
[System Setup] > [Term. Output Setup] > [MON. Output] setting.
[System Setup] > [Term. Output Setup] > [HDMI Max Res.] setting.
1920x1080
YCbCr 4:2:2, 10 bit
2048x1080
YCbCr 4:2:2, 10 bit
1920x1080
YCbCr 4:2:2, 10 bit
2048x1080
YCbCr 4:2:2, 10 bit
1920x1080
YCbCr 4:2:2, 10 bit
1920x1080
YCbCr 4:2:2, 10 bit
HDMI OUT terminal
[HDMI Max Res.]
[4096x2160/
3840x2160]
1920x1080,
720x480 (59.94P),
720x576 (50.00P)
4096x2160
3840x2160
1920x1080,
720x480 (59.94P),
720x576 (50.00P)
3, 5
6
[1920x1080]
1920x1080,
720x480
(59.94P),
720x576
(50.00P)
Page 11

Recording
NOTES
NOTES
2
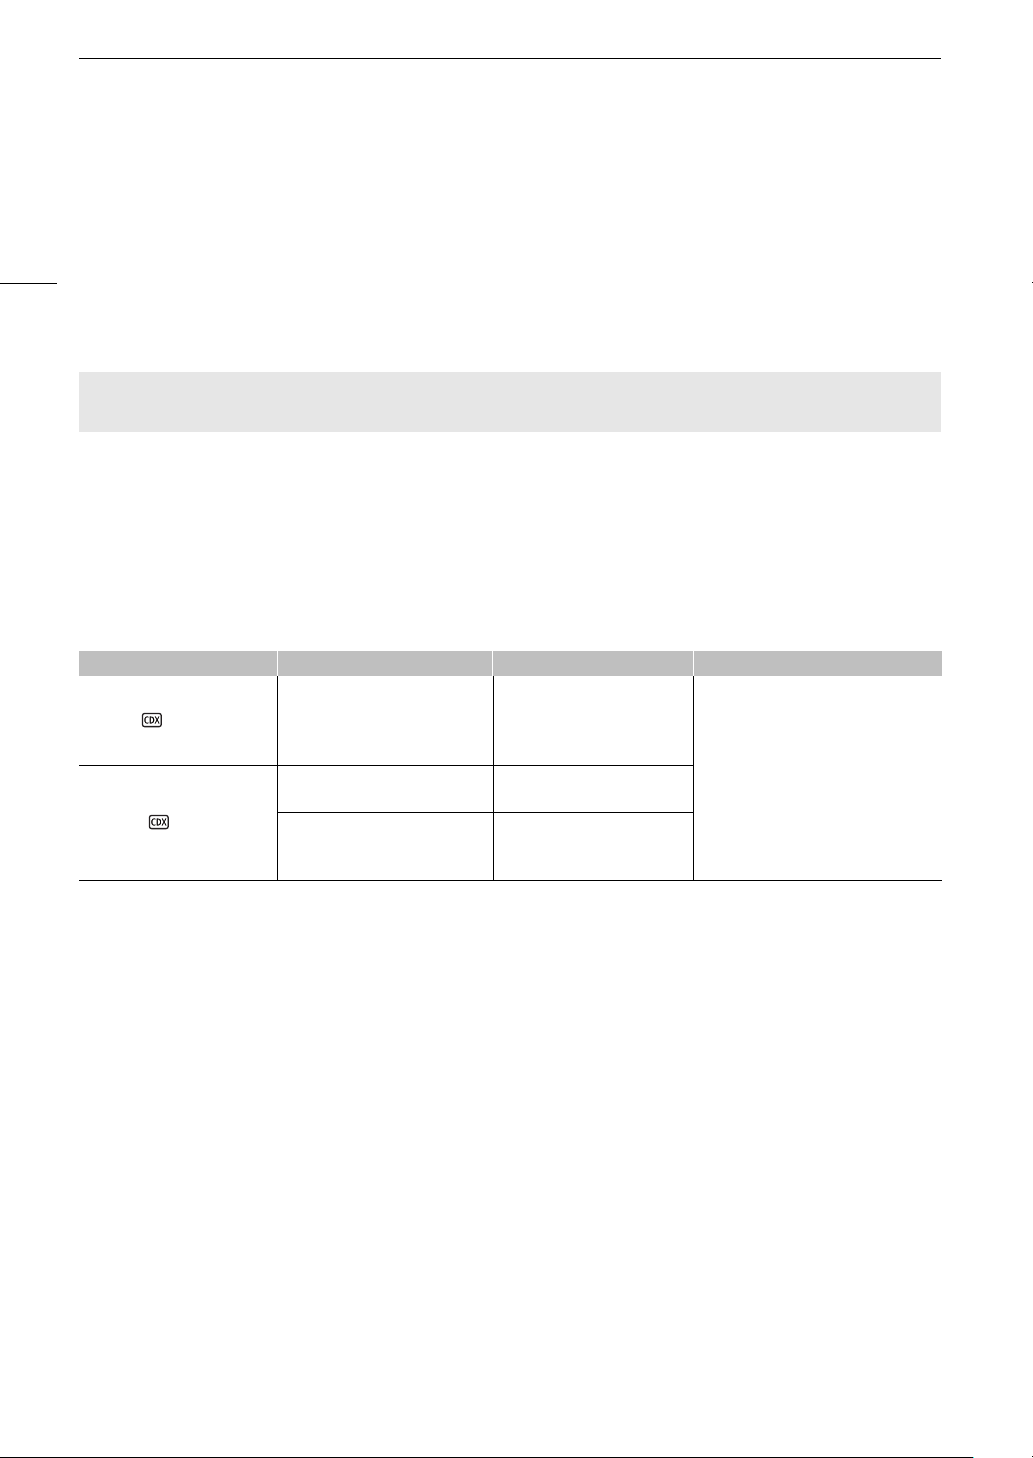
1
1 Capture Drive status: In green – can record; In
white – reading the Capture Drive.
(in red): No Capture Drive inserted or cannot
record on the Capture Drive.
Appears also at the bottom left corner of the
monitoring screen.
2 Power supply connected to the recorder
(voltage). Refer to the CDX-36150 Recorder’s
Getting Started Guide.
Appears also at the top right of the monitoring
screen.
1 Set the main recording format to [RAW ( Capture Drive)] or [ProRes ( Capture Drive)].
[Rec/Media Setup] (3) > [Main Rec Format] > [RAW ( Capture Drive)] or
[ProRes ( Capture Drive)]
?
Selecting the Main Recording Format
2 If necessary, select the desired system frequency.
?
Selecting the System Frequency
3 Select the desired frame rate. To use slow & fast motion recording, activate it and select also the
desired shooting frame rate.
?
• When the main recording format is set to [RAW ( Capture Drive)], a special gamma curve, optimized for
RAW video, will be used.
Selecting the Frame Rate
, ?
Slow & Fast Motion Recording
Onscreen Displays
See also ?
Onscreen Displays on the HOME Screen
, ?
Onscreen Displays on the Shooting Screen
11
.
Sub Recording on a CFast or SD Card
While using the CDX-36150 Recorder to record RAW data as the main recording, you can simultaneously have
the camera record a sub recording in XF-AVC format on a CFast card (XF-AVC Intra) or SD card (XF-AVC Proxy).
?
• When the main recording format is set to [RAW ( Capture Drive)] or [ProRes ( Capture Drive)] and the
• When the resolution of the main recording format is 4512x2376 or 4272x2376, you can display an onscreen
Simultaneous Sub Recordings
CDX-36150 Recorder is not docked with the camera, clips will not be recorded on the CFast card or SD card
even if simultaneous sub recording was activated. For this reason, even when the time code running mode is
set to [Regen.], the last time code recorded on the CFast or SD card will not be read.
marker that indicates the portion of the image being recorded as the sub recording.
?
Displaying Onscreen Markers
Page 12

Recording
NOTES
Playing Back Recordings from the Capture Drive
Press the camera’s PLAY button to set the camera in playback mode. If you were recording on the CDX-36150
Recorder, information about the last clip recorded on the Capture Drive will be displayed on the control display.
During the playback of RAW clips, the [Canon Log 2] gamma, [Cinema Gamut] color space and [Neutral] color
12
matrix will be used.
?
Playback
To switch to playback from the Capture Drive after playing back recordings from other recording media:
1 From the PLAY screen, select the Capture Drive as the recording media to play back.
?
Playback Video Configuration and Video Output Configuration by Terminal
Video configuration of the clip Video output configuration
[Playback Media]/
Resolution
[ Capture Drive (RAW)]
Z[ 4512x2376
Z[ 4512x1920
4096x2160
2048x1080 (cropped)
] 4272x2376
[ Capture Drive (ProRes)]
4096x2160
3840x2160
2048x1080
1920x1080
1
During the playback of sub recording (XF-AVC Proxy) clips, if the output of onscreen displays is activated for the MON. terminals,
the onscreen displays will be output also from the SDI OUT terminals.
2
3
4
5
[System Setup] > [Term. Output Setup] > [MON. Output] setting.
When [System Setup] > [Term. Output Setup] > [MON. Output] is set to [Off], the HDMI OUT output will change
depending on the capabilities of the monitor used. When [MON. Output] is set to a setting other than [Off], if the monitor
connected to the terminal does not support the video output configuration, video output from the HDMI OUT terminal will be
turned off.
The color sampling will be set automatically to YCbCr 4:2:2, 10 bit, YCbCr 4:4:4, 8 bit or RGB 4:4:4, 8 bit, depending on the
capabilities of the external monitor.
[System Setup] > [Term. Output Setup] > [HDMI Max Res.] setting.
Only available when [System Setup] > [Term. Output Setup] > [SDI OUT Output] is set to [Off].
[PB MEDIA] > [ Capture Drive (RAW)] or [ Capture Drive (ProRes)]
Selecting the Recording Media and Format to Play Back
MON. terminals HDMI OUT terminal
Frame
rate
59.94P
50.00P
29.97P
25.00P
24.00P
23.98P
SDI OUT terminals
2048x1080
YCbCr 4:2:2, 10 bit
4096x2160
YCbCr 4:2:2, 10 bit
3840x2160
YCbCr 4:2:2, 10 bit
2048x1080 /
RGB 4:4:4, 12 bit
YCbCr 4:2:2, 10 bit
1920x1080 /
RGB 4:4:4, 12 bit
YCbCr 4:2:2, 10 bit
1
YCbCr 4:2:2, 10 bit
YCbCr 4:2:2, 10 bit
YCbCr 4:2:2, 10 bit
YCbCr 4:2:2, 10 bit
YCbCr 4:2:2, 10 bit
YCbCr 4:2:2, 10 bit
[MON. Output]
[2048x1080/
1920x1080]
2048x1080
1920x1080
2048x1080
1920x1080
2048x1080
1920x1080
2
[1920x1080]
1920x1080
YCbCr 4:2:2, 10 bit
[HDMI Max Res.]
[4096x2160/
3840x2160]
–
4096x2160
3840x2160
1920x1080,
720x480 (59.94P),
720x576 (50.00P)
5
5
3
4
[1920x1080]
1920x1080,
720x480 (59.94P),
720x576 (50.00P)
• During the playback of RAW clips, if the camera’s onscreen displays are being output from the MON.
terminals, the onscreen displays will be superimposed also on video output from the SDI OUT terminals.
Page 13

Recording
• During the playback of RAW clips, the following onscreen displays will not appear on the monitoring screen.
- Shutter speed
-Aperture value
-ISO speed/gain
- Recording date/time
- Shooting frame rate
-Custom picture
- Relay recording icon
- $ mark/% mark
The following operations are available during playback from the Capture Drive in the CDX-36150 Recorder. For
details, refer to the camera’s Instruction Manual.
?
Clip/Photo Operations
Clip operations menu
Menu item
[Display Clip Info]
[Add $ Mark], [Delete $ Mark] - -
[Add % Mark], [Delete % Mark] - -
[Delete]
[Delete User Memo] - [Copy / File] - -
[Recover Clip] -
[FTP Transfer] - -
* [PB MEDIA] setting.
[ Capture Drive (RAW)] [ Capture Drive (ProRes)]
[Playback Media]*
13
Page 14

Troubleshooting
Troubleshooting
The messages that may appear when using the CDX-36150 Recorder/Capture Drive are, for the most part, the
same as the messages that appear when using a CFast card. In the case of the CDX-36150 Recorder/Capture
Drive, the icon will appear above the message.
14
?
List of Messages
Messages for the CDX-36150 Recorder
Capture Drive bay open.
- The recorder’s Capture Drive bay is open. Insert a Capture Drive and close the Capture Drive bay.
Media is not supported
- The Capture Drive inserted in the recorder is not compatible for use with the camera. Check the Capture Drive.
Page 15

Abridged Specifications
Abridged Specifications
This section presents only technical specifications that differ from those given in the camera’s Instruction Manual.
For a complete list of the camera’s specifications, refer to ?
System
•Recording System
Video: Cinema RAW, Apple ProRes
Audio compression: Linear PCM, 24 bit, 48 kHz, 4 channels
• Recording/Playback Signal
Cinema RAW:
Resolution: Z[ 4512x2376, ] 4272x2376, Z[ 4152x1920,
4096x2160, 2048x1080 (cropped)
Maximum frame rate: 240P
Apple ProRes:
Resolution: 4096x2160, 3840x2160, 2048x1080, 1920×1080, 2048x1080 (cropped),
1920x1080 (cropped)
Codec: Apple ProRes 4444 XQ, ProRes 4444, ProRes 422 HQ
Maximum frame rate: 240P
• Recording Media (not included)
Codex Capture Drive 2.0
• Approximate Recording Time (using a 2 TB Capture Drive 2.0, for reference only)
Main recording video configuration
Main recording format Resolution Frame rate*
4512x2376
4272x2376
[RAW ( Capture Drive)]
4512x1920
4096x2160
* When the frame rate is set to 29.97P or 25.00P, the approximate recording time will be about twice that for 59.97P or 50.00P,
respectively. When the frame rate is set to 23.98P, the approximate recording time will be at a par with that for 24.00P.
Specifications
59.94P 32 min.
24.00P 81 min.
50.00P 39 min.
59.94P 34 min.
24.00P 86 min.
50.00P 41 min.
59.94P 40 min.
24.00P 100 min.
50.00P 48 min.
59.94P 39 min.
24.00P 98 min.
50.00P 47 min.
.
Approximate recording time
15
Page 16

Abridged Specifications
16
Main recording video configuration
Main recording format Resolution/Codec Frame rate*
4096x2160
ProRes 422 HQ, 10 bit
3840x2160
ProRes 422 HQ, 10 bit
2048x1080
ProRes 4444 XQ, 12 bit
[ProRes ( Capture Drive)]
2048x1080
ProRes 422 HQ, 10 bit
1920x1080
ProRes 4444 XQ, 12 bit
1920x1080
ProRes 422 HQ, 10 bit
* When the frame rate is set to 29.97P or 25.00P, the approximate recording time will be about twice that for 59.97P or 50.00P,
respectively. When the frame rate is set to 23.98P, the approximate recording time will be at a par with that for 24.00P.
59.94P 67 min.
24.00P 169 min.
50.00P 81 min.
59.94P 72 min.
24.00P 180 min.
50.00P 86 min.
59.94P 113 min.
24.00P 282 min.
50.00P 135 min.
59.94P 254 min.
24.00P 636 min.
50.00P 305 min.
59.94P 129 min.
24.00P 322 min.
50.00P 154 min.
59.94P 290 min.
24.00P 726 min.
50.00P 348 min.
Approximate recording time
Weight and dimensions are approximate. Errors and omissions excepted.
The information in this guide is verified as of March 2017. Subject to change without notice.
Page 17

© CANON INC. 2017 PUB. DIE-0501-000A
CANON Europa N.V.
Bovenkerkerweg 59, 1185 XB Amstelveen, The Netherlands http://www.canon-europe.com
Canon Inc. 30-2, Shimomaruko 3-chome, Ohta-ku, Tokyo 146-8501, Japan
Visit your local Canon Web site to download the latest version of this guide.
USA http://pro.usa.canon.com
CANON U.S.A., INC.
http://pro.usa.canon.com/support
(855) CINE-EOS (855-246-3367)
(USA only)
UNITED KINGDOM
Canon UK Ltd
Unit 160, Centennial Park, Centennial Avenue,
Elstree, Hertfordshire, WD6 3SG
0844-369-0100
 Loading...