

Page 1
CD-R Print Guide
Table of Contents
Preface 1
Introduction 1
Printing on CD-Rs/DVD-Rs (CD-R Direct Print) 2
Items to Prepare 2
Cautions When Printing on CD-Rs/DVD-Rs 2
Attaching the CD-R Tray Feeder and CD-R Tray 3
Removing the CD-R Tray Feeder and CD-R Tray 5
Printing on CD-Rs/DVD-Rs - Windows 7
Printing on CD-Rs/DVD-Rs - Macintosh 9
Troubleshooting 12
Cannot print on CD-Rs or DVD-Rs 12
CD-R Printing Errors Displayed in Windows 13
CD-R Printing Errors Displayed in Macintosh 14
Printing Area 15
QA7-2877-V01
BE
Page 2

Page 3
1
Preface
Introduction
This CD-R Print Guide uses the following symbols to indicate important information. Always observe the
instructions indicated by these symbols.
Instructions that, if ignored, could result in death or serious personal injury caused by incorrect
operation of the equipment. These must be observed for safe operation.
Instructions that, if ignored, could result in personal injury or material damage caused by incorrect
operation of the equipment. These must be observed for safe operation.
Important
The printing quality on CD-R/DVD-R may vary depending on the media you use.
Also read the Safety Precautions in the User’s Guide. Observe the warnings and cautions to avoid
personal injury or damage to the printer.
Trademark Notices
•Canon® is a registered trademark of Canon Inc.
•BJ
™
is a trademark of Canon Inc.
•Microsoft® and Windows® are registered trademarks of Microsoft Corporation in the U.S. and other
countries.
• Apple, Mac, Macintosh are trademarks of Apple Computer, Inc., registered in the U.S. and other
countries.
• All other trademarks and registered trademarks appearing in this CD-R Print Guide are the property of
their respective owners.
Copyright ©2003 CANON INC.
All rights reserved. No part of this publication may be transmitted or copied in any form whatsoever
without the express written permission.
Page 4
2
Printing on CD-Rs/DVD-Rs
(CD-R Direct Print)
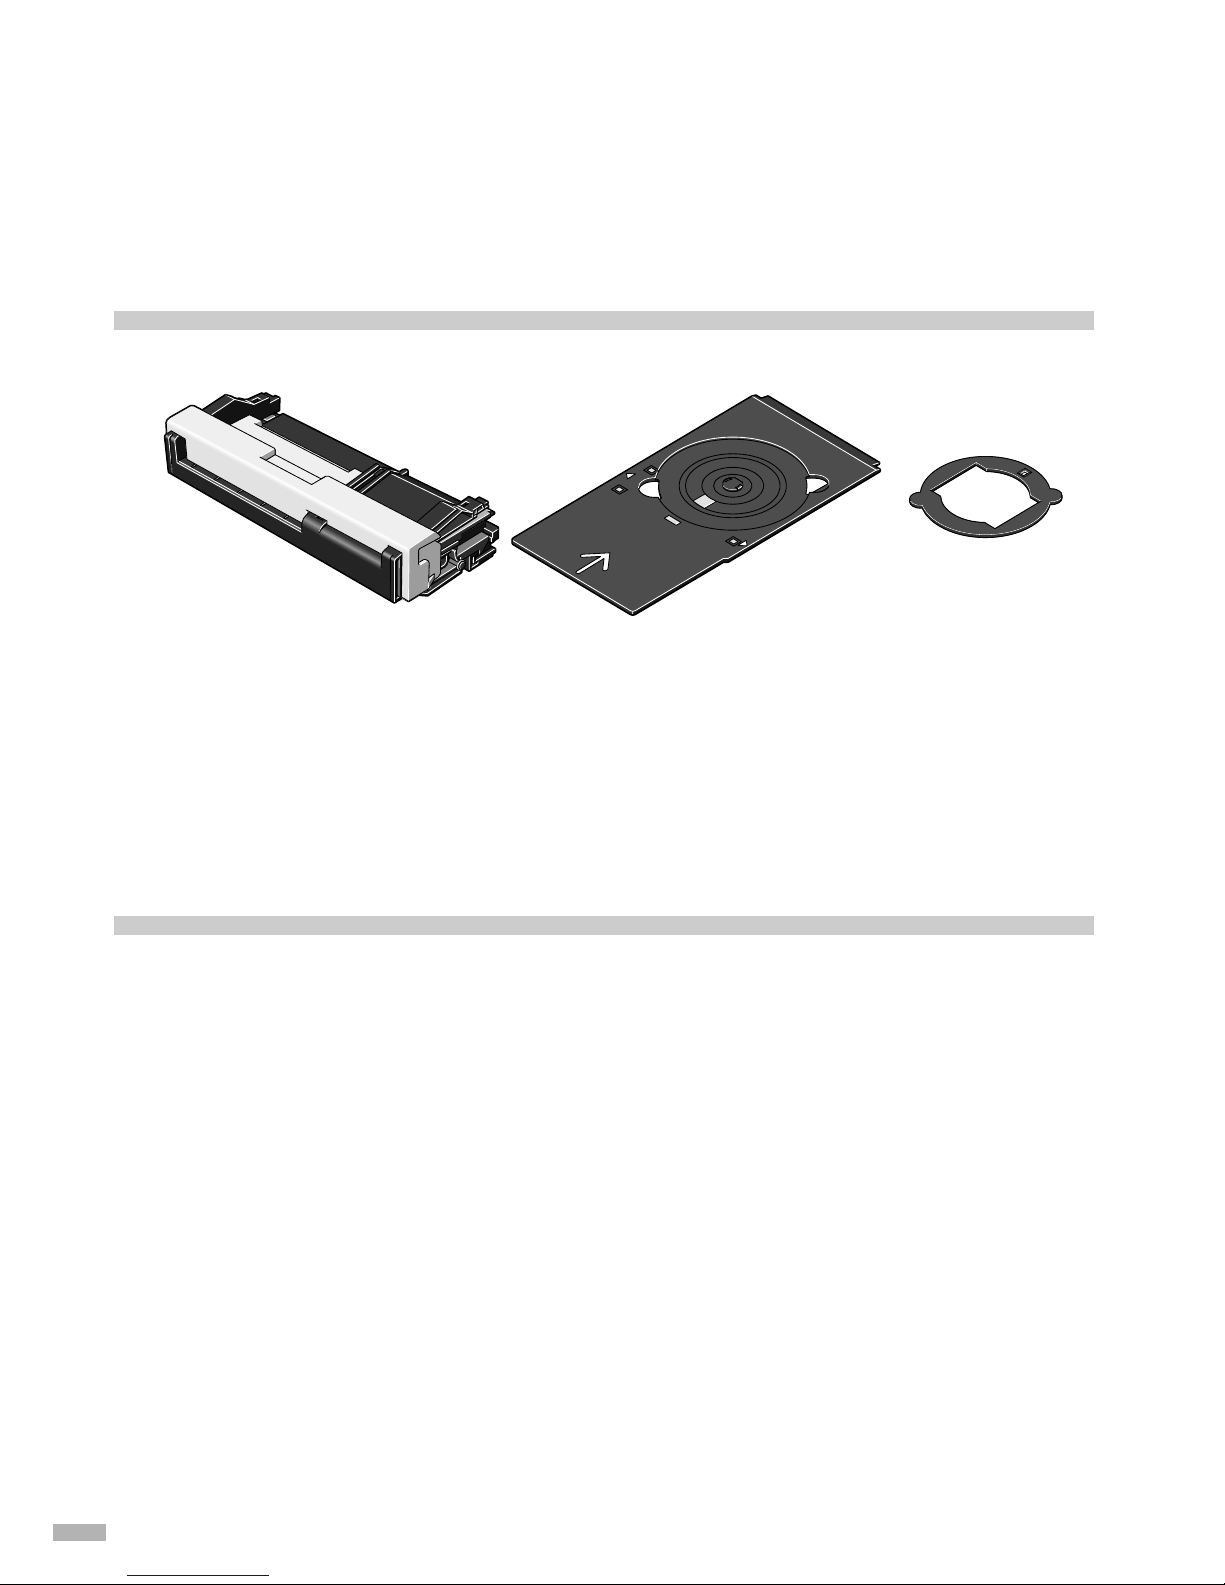
The CD-R tray feeder and tray (supplied) allow the printing of images on CD-Rs or DVD-Rs (printable discs).
The "CD-LabelPrint" software provided on the CD-ROM edits and further processes the images for printing.
Items to Prepare
The following items will be needed to print on CD-Rs or DVD-Rs:
CD-Rs or DVD-Rs (Printable Discs)
Prepare a 12 cm/8 cm size CD-R/DVD-R having a label surface that is compatible with ink-jet printing.
A "printable disc" differs from regular CD-Rs or DVD-Rs in that its printing surface has been specially
processed to be printed on by an ink-jet printer.
Cautions When Printing on CD-Rs/DVD-Rs
Read the following cautions and instructions when printing on CD-Rs or DVD-Rs:
• Hold CD-Rs/DVD-Rs by their edges. Take care not to touch the label surface (printing surface) and
recording surface.
• Do not print on the CD-Rs/DVD-Rs' recording surface. Doing so might prevent the reading of data
recorded on CD-Rs/DVD-Rs.
• Do not print on CD-Rs/DVD-Rs that are not compatible with ink-jet printing. The ink may not dry
and will prevent subsequent use.
• Only print on CD-Rs/DVD-Rs after having recorded data. Printing before recording data may result
in fingerprints, dirt or scratches on the CD-R/DVD-R causing recording errors.
• After printing, allow the printing surface to dry naturally. Avoid using hairdryers or direct sunlight to
dry the ink. Also, do not touch the printing surface until the ink has dried.
• Be sure to remove any dirt from the CD-R tray before placing CD-Rs/DVD-Rs on the CD-R tray.
Use of the CD-R tray in this state may scratch the recording surface of CD-Rs/DVD-Rs.
• Do not dirty or scratch the reflectors on the CD-R tray. If the reflectors on the CD-R tray become dirty
or scratched, wipe the reflector plate clean with a soft, dry cloth taking care not to scratch the plate.
• Do not attach the CD-R tray feeder and CD-R tray while the printer is in operation (power lamp is
blinking).
• The CD-R may become dirty if software other than CD-LabelPrint or Easy-PhotoPrint is used.
• Do not remove the CD-R Tray Feeder while printing on CD-R or DVD-R. Doing so may damage the
CD-R Tray Feeder or a CD-R/DVD-R.
CD-R tray feeder CD-R tray
8 cm CD-R adapter
(only when printing
on 8 cm CD-Rs)
Page 5
3
Attaching the CD-R Tray Feeder and CD-R Tray
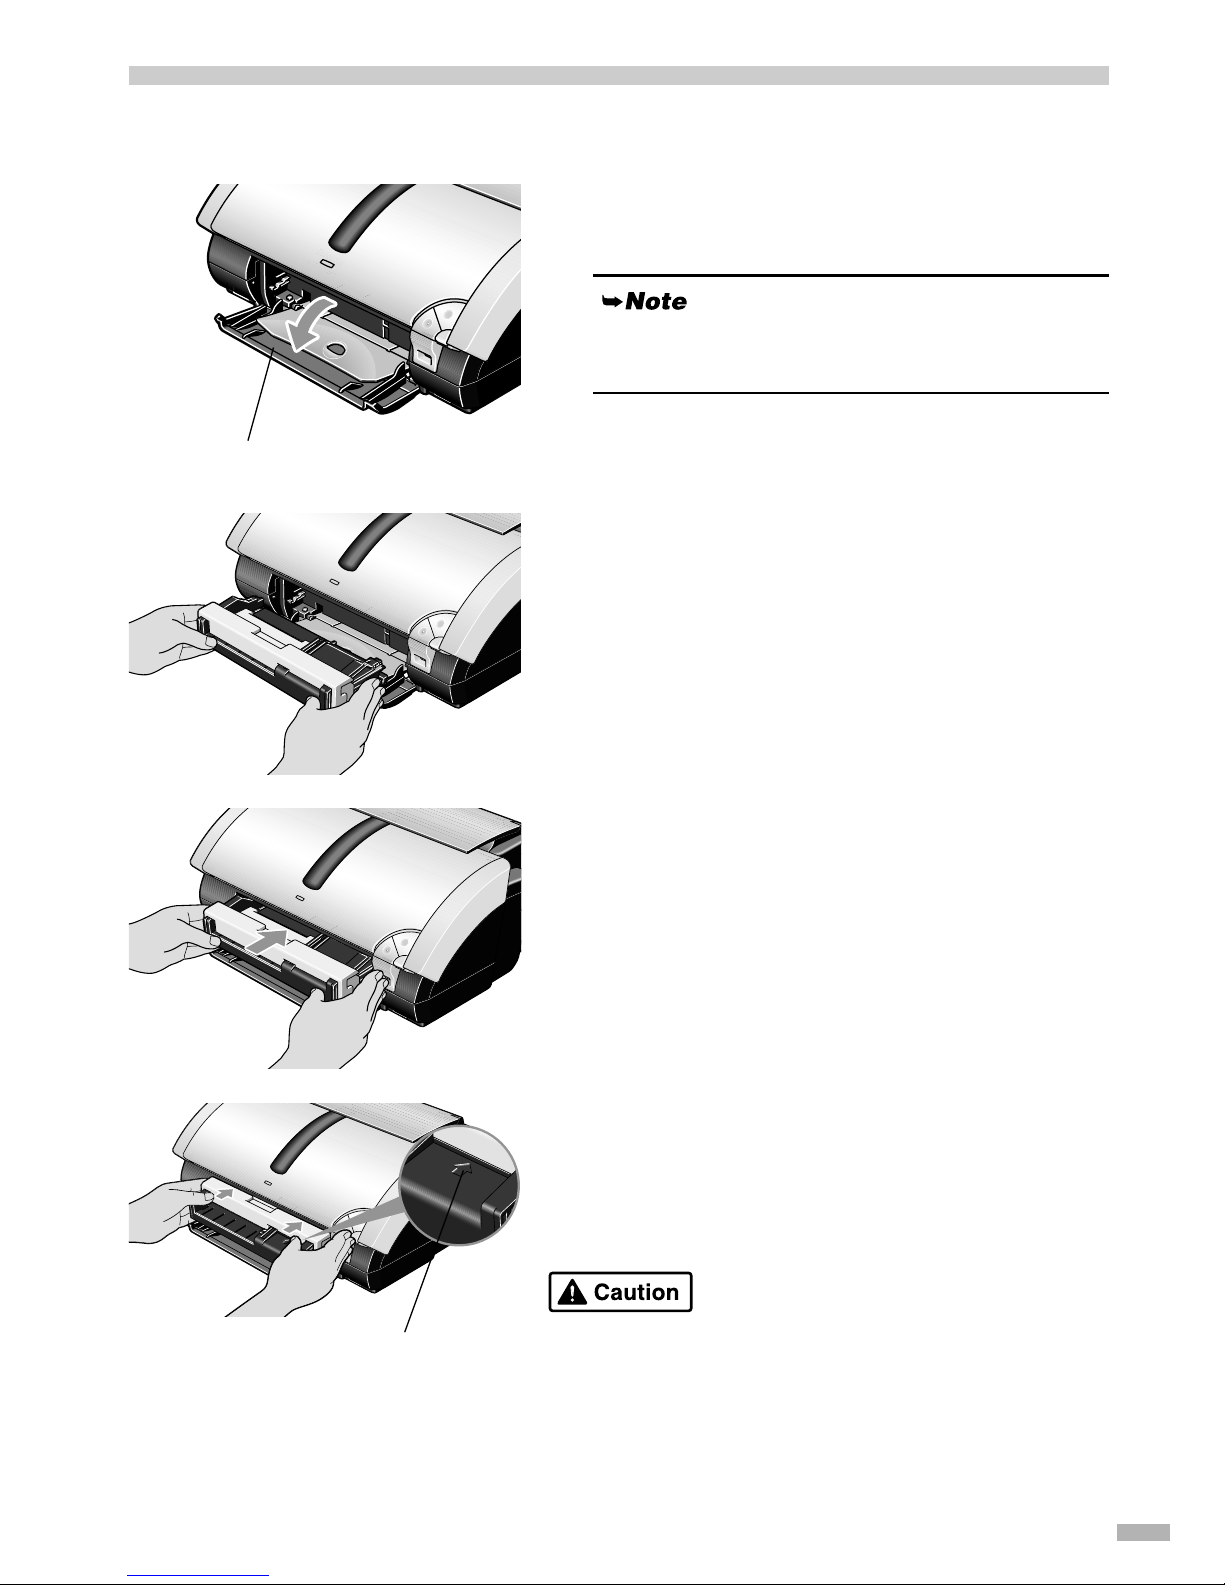
Attaching the CD-R tray feeder
1111
Pull down the paper output tray cover
forward to open.
2222
Place the CD-R tray feeder on the
paper output tray.
3333
Insert the CD-R tray feeder straight by
sliding it in until it clicks into place.
4444
Push in the slider on the CD-R tray
feeder.
Insert the slider completely. Failed to do so may damage CD-R
when printing.
Do not extend the paper output tray. Doing so will
prevent the attaching of the CD-R tray feeder.
Paper output tray cover
Insert the slider up to here.
Page 6
4
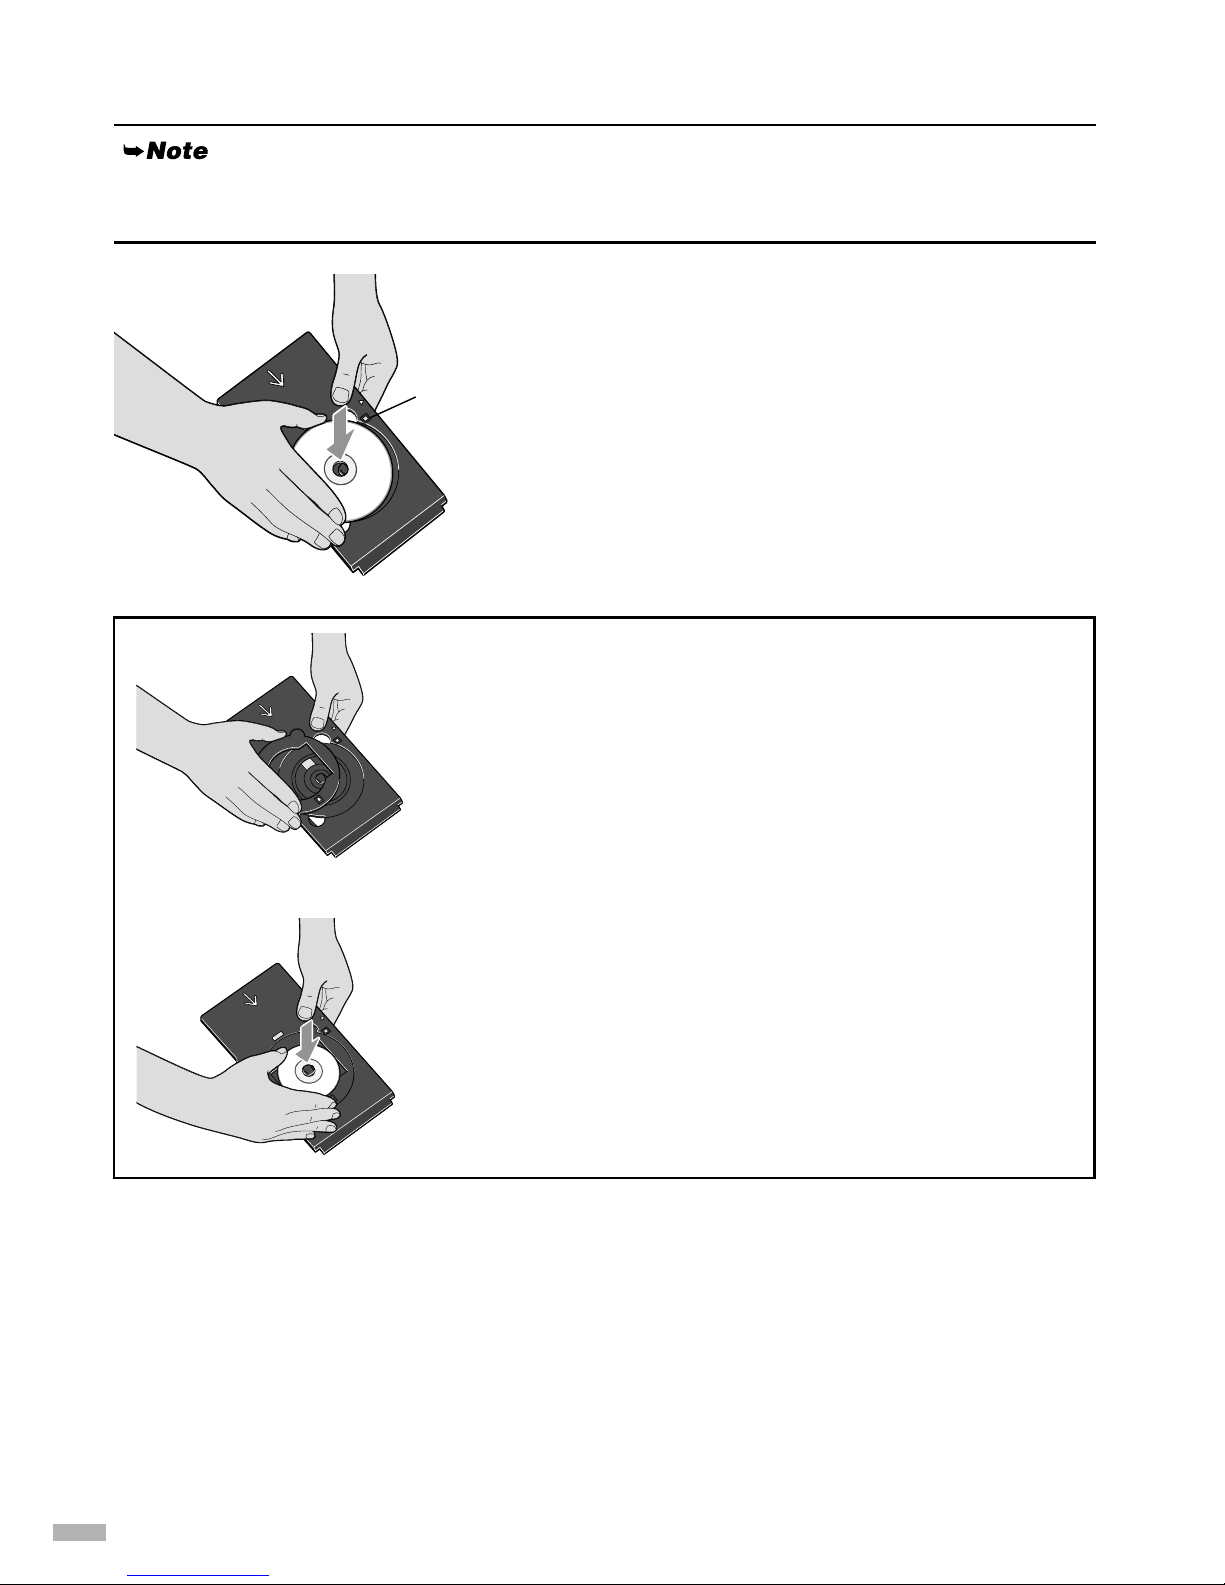
Placing the CD-R/DVD-R on the CD-R Tray
1111
Place the disc on the CD-R tray with the
printable surface facing up.
When placing the CD-R/DVD-R on the CD-R tray, do not touch the printing surface of the disc or the
reflectors on the CD-R tray.
Reflector
When printing on an 8 cm CD-R, attach the 8 cm CD-R
adapter (provided). Otherwise, printing quality will be
reduced and the CD-R might be damaged.
1111
Align the protrusions on both edges of the 8 cm
CD-R adapter with indentations on the CD-R
tray.
2222
Place the 8 cm CD-R on the CD-R tray with the
printing surface facing up.
Page 7
5
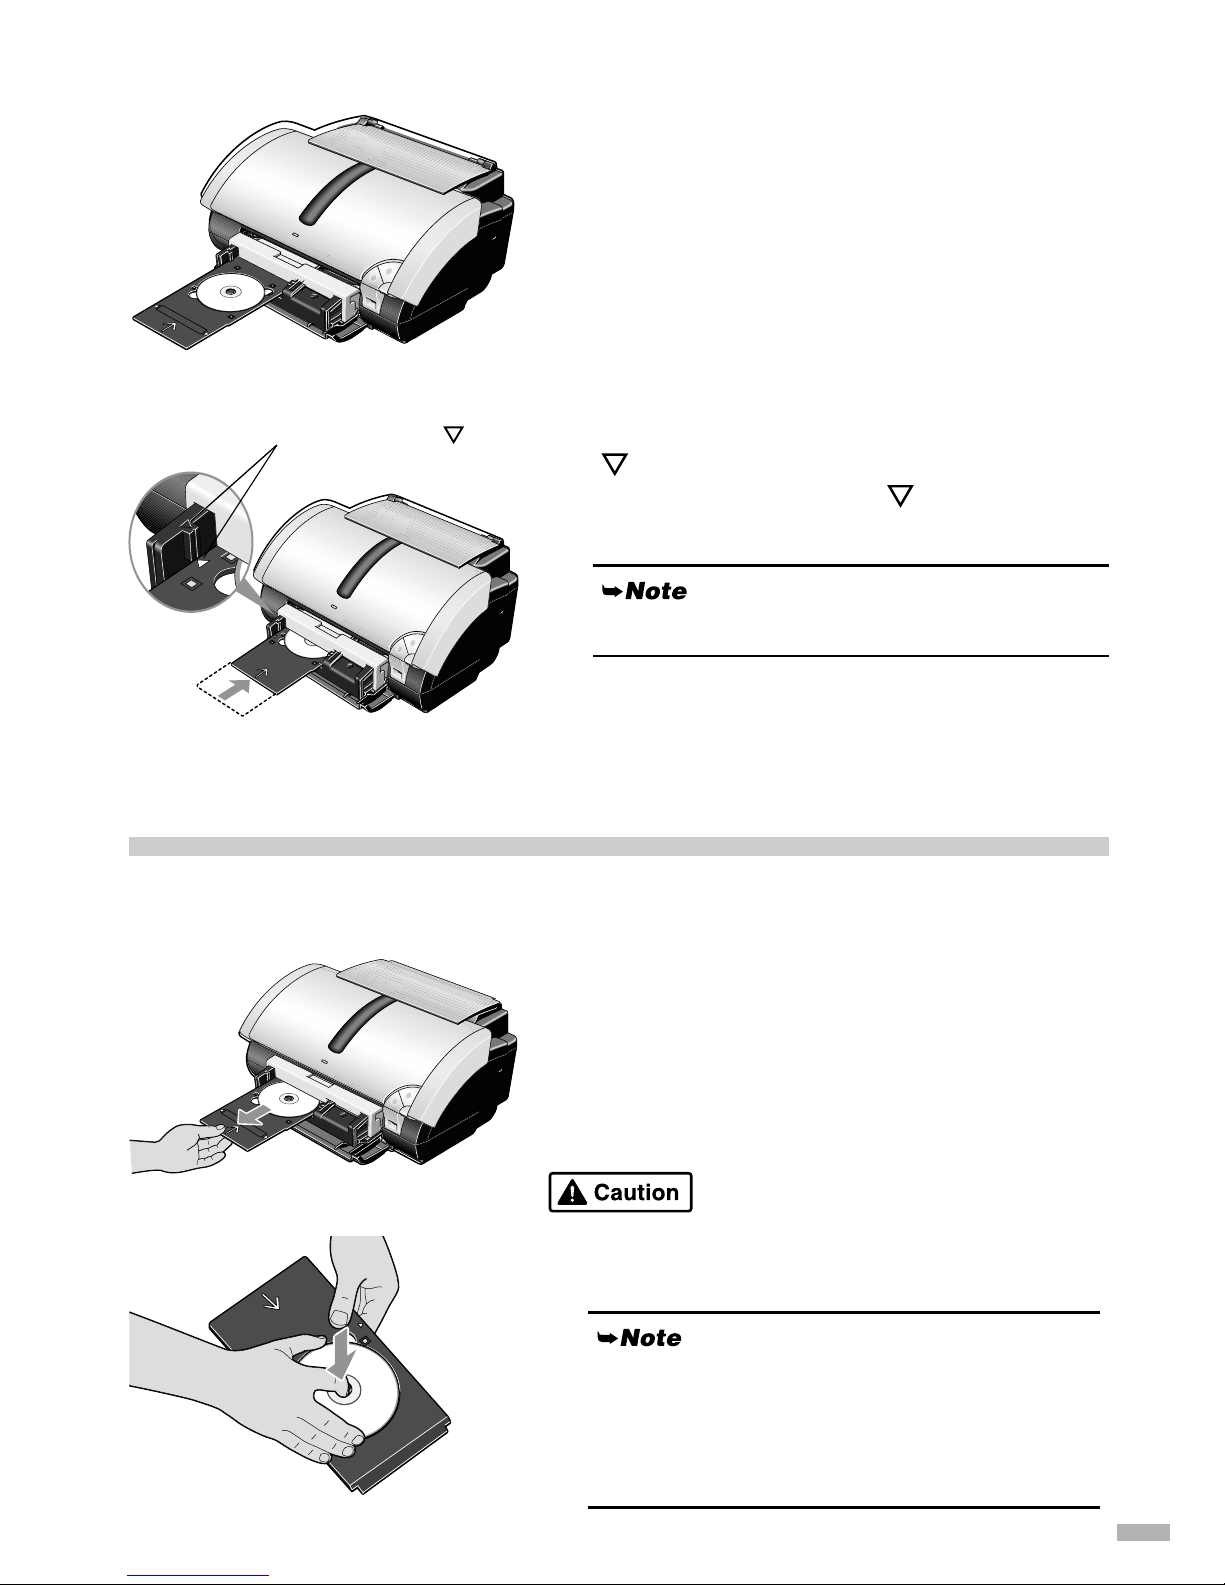
Placing the CD-R tray
1111
Place the CD-R tray on the CD-R tray
feeder.
2222
Insert the CD-R tray so that the arrow
( ) on the CD-R tray feeder is almost
aligned with the arrow ( ) on the CD-R
tray.
When printing on the CD-R, see "Printing on CD-Rs/
DVD-Rs." (See page 7 for Windows and page 9 for
Macintosh.)
Removing the CD-R Tray Feeder and CD-R Tray
Removing the CD-R tray
1111
Pull out the CD-R tray to remove it.
2222
Remove the CD-R/DVD-R.
Do not touch the printable surface when removing from the
tray.
Ensure that the CD-R tray does not exceed this point.
Align these two arrows ( ).
Allow the printing surface to dry sufficiently before
removing the disc. If printing on the CD-R tray, or on
the transparent sections on the inside and outside of the
CD-R/DVD-R, allow the printing surface to dry before
wiping.
Page 8
6
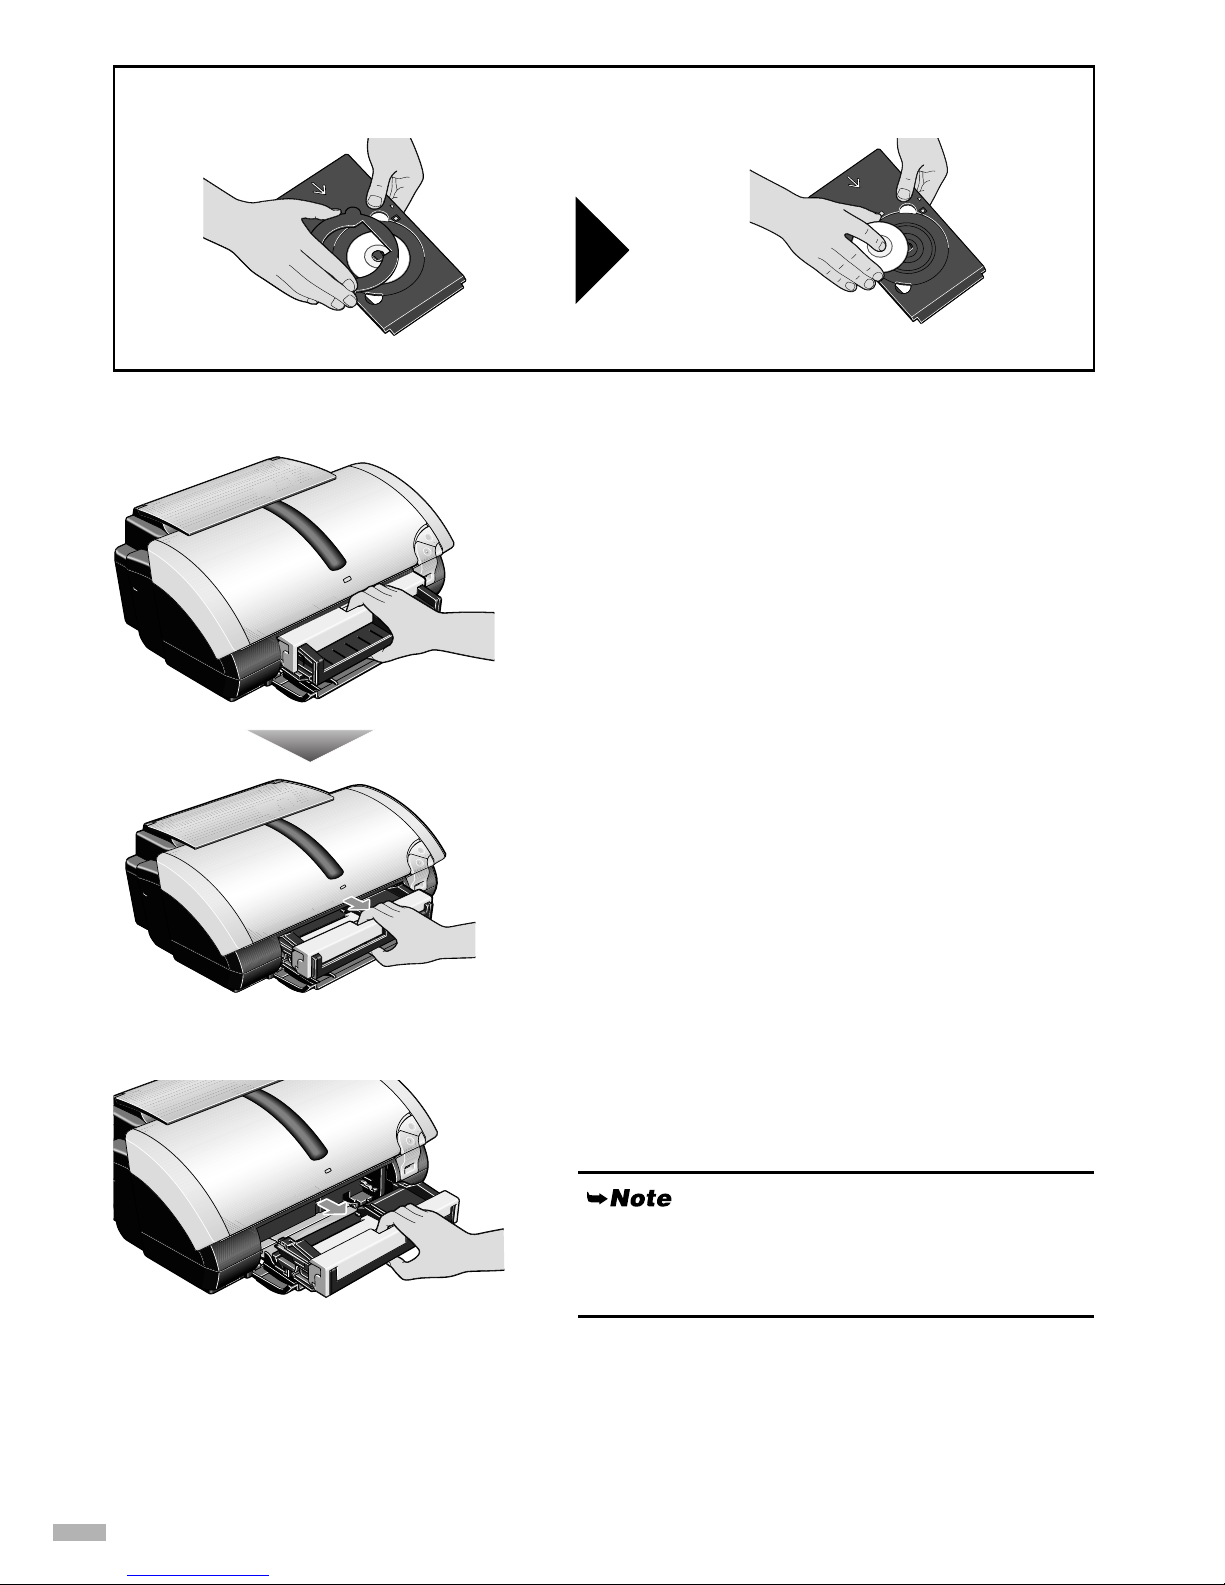
Removing the CD-R tray feeder
1111
Hook your fingers inside the groove on
the slider, and pull the slider in the
direction of the arrow.
2222
Remove the CD-R tray feeder from the
printer.
When removing the 8cm CD-R, remove the adapter first, and then remove the disc from the tray.
Be sure to perform steps 1 and 2 in order when
removing the CD-R tray feeder. Performing them at
once may result in damage to the CD-R tray feeder.
Page 9
7
Printing on CD-Rs/DVD-Rs - Windows
This section explains how to use CD-LabelPrint to print directly on 12 cm CD-Rs and DVD-Rs. Refer to the
CD-LabelPrint’s manual for more information about this procedure.
To access the manual from the
Start
menu, click
All Programs
(or
Programs
for Windows Me/Windows
2000/Windows 98),
CD-LabelPrint
, and select
Manual
.
Importing the image to print on the CD-R/DVD-R
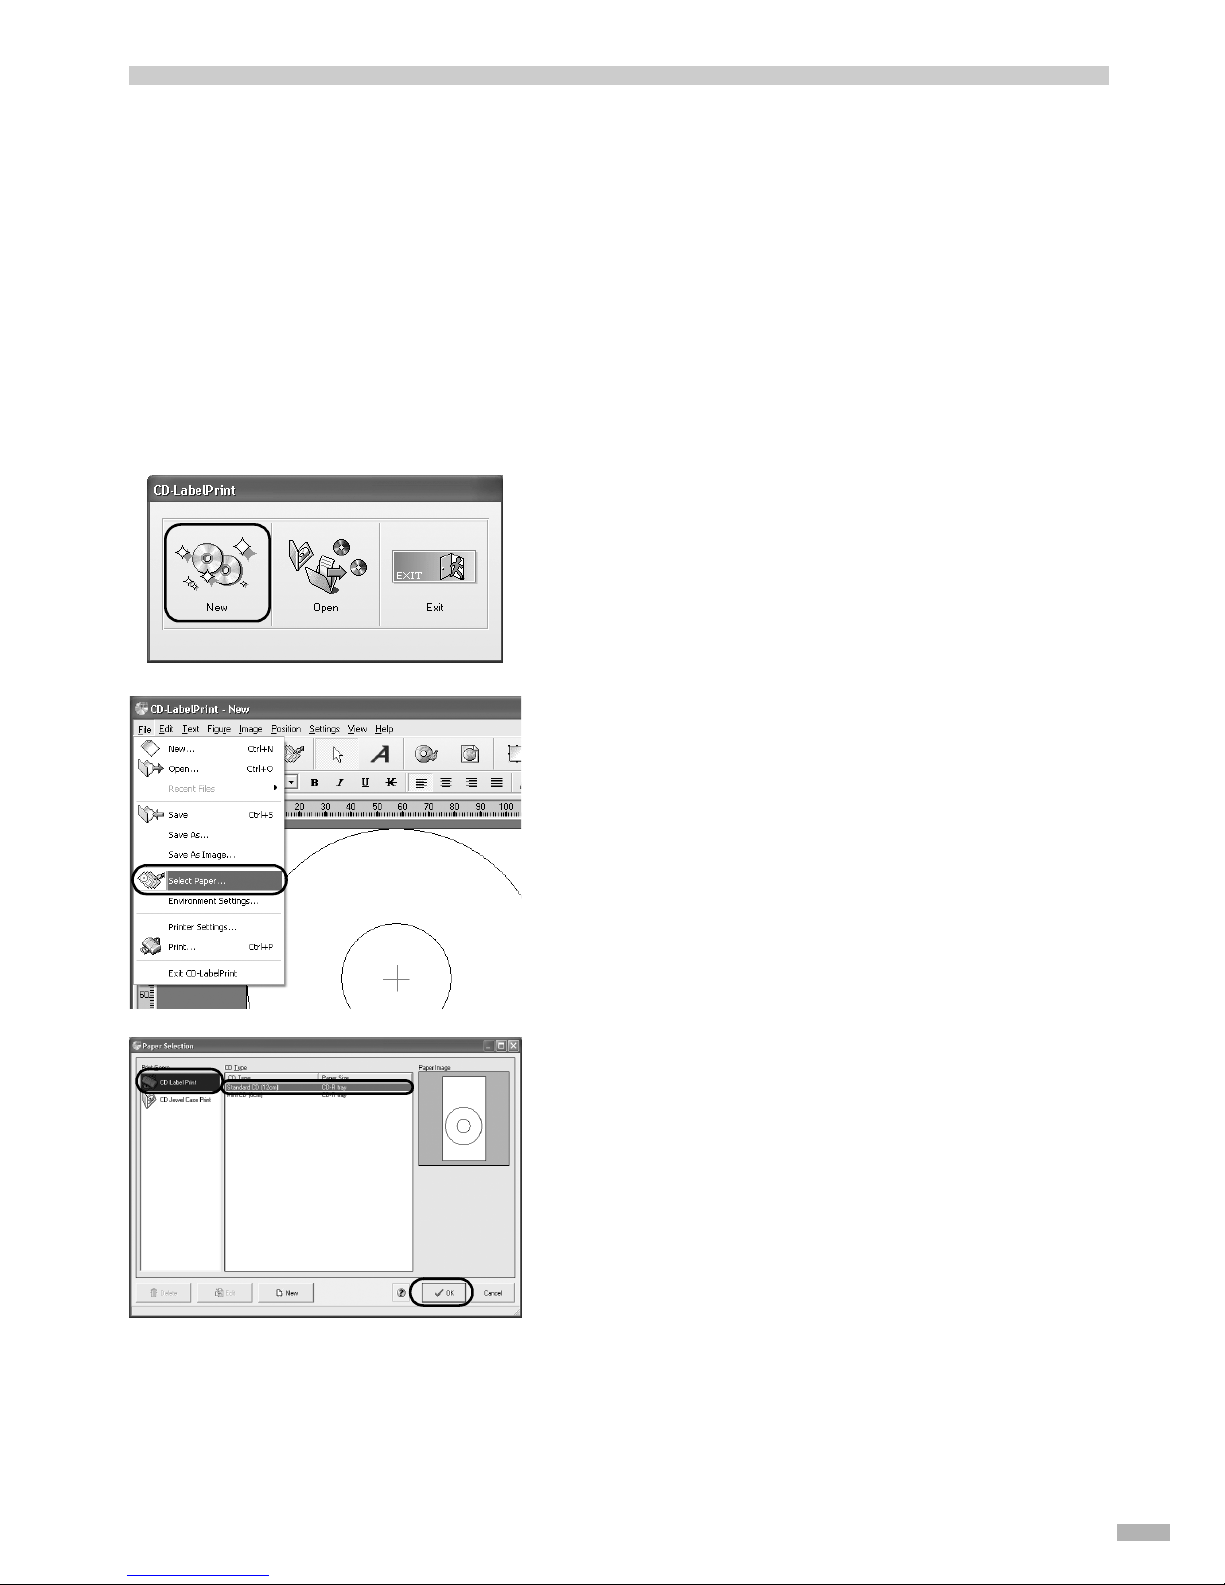
1111
Select All Programs (or Program),
CD-LabelPrint, and then CDLabelPrint to start CD-LabelPrint.
2222
Click New on the CD-LabelPrint menu.
3333
Open the File menu, and select Select
Paper.
The
Paper Selection
dialog box appears.
4444
Select CD-LabelPrint from Paper
Style, and then select Standard CD
(12cm) from CD Type.
5555
Click OK.
6666
Make any changes to the label image.
Page 10
8
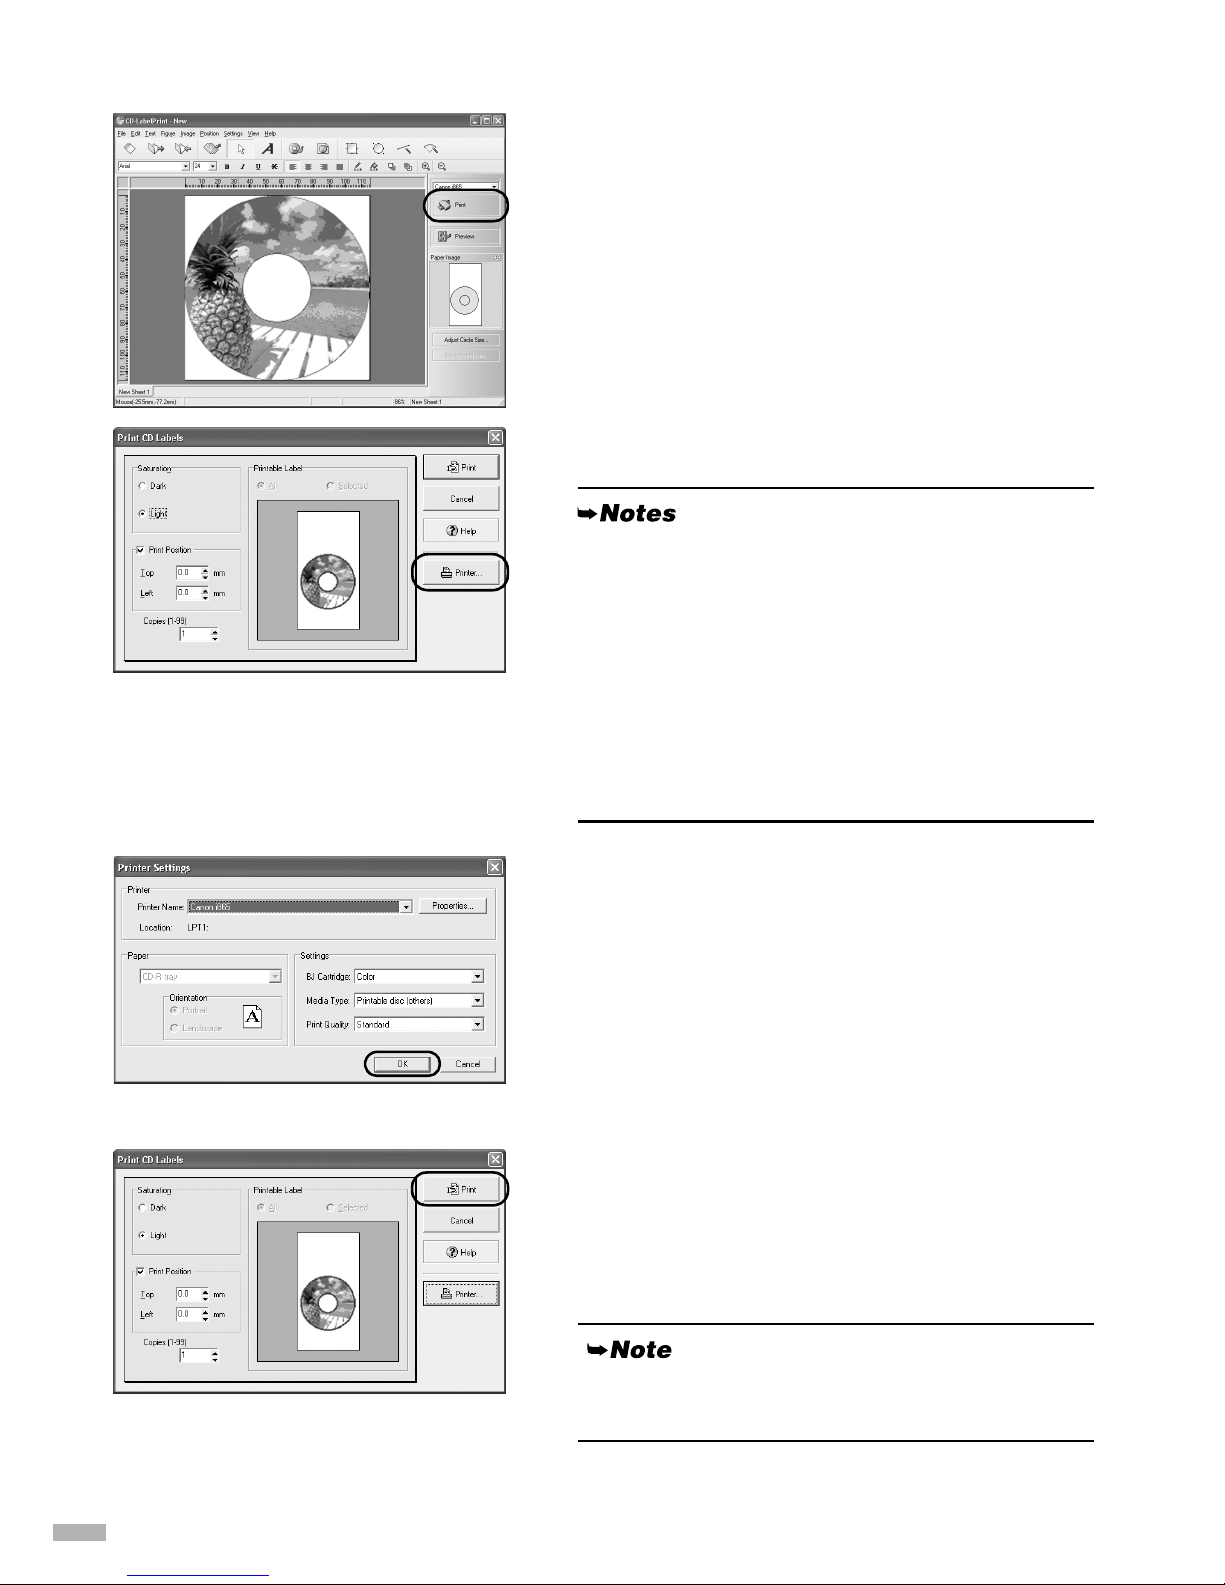
Printing on the CD-R/DVD-R
1111
Click Print.
The
Print CD Labels
dialog box appears.
2222
Click Printer....
3333
Set these items to correspond with the
CD-R/DVD-R and printing data.
Cartridge: Color
Media Type: Printable disc
(recommended) or
Printable disc (others)
Print Quality:High, Standard or Draft
4444
Click OK.
5555
When the Print CD Labels dialog box
appears, click Print.
6666
Read the message that appears and
then click OK.
•The Printable Label image on the Print CD
Labels dialog box shows the print image of the
CD-R tray (rectangle) and the CD-R (circles). The
leading edge of the CD-R tray is at the bottom of
the image.
• If the "[Dark]" setting produces unsatisfactory
results (e.g. if images are too dark or characters
appear blurred), select "[Light]". Print quality on
CD-R/DVD-R may vary depending on the media
you use.
Refer to the CD-LabelPrint’s manual for more
information about CD-LabelPrint.
Page 11
9
Printing on CD-Rs/DVD-Rs - Macintosh
This section explains how to use CD-LabelPrint to print directly on 12 cm CD-Rs and DVD-Rs. Refer to the
CD-LabelPrint’s manual for more information about this procedure.
To access the manual, double-click
Manual
in the
CD-LabelPrint
folder.
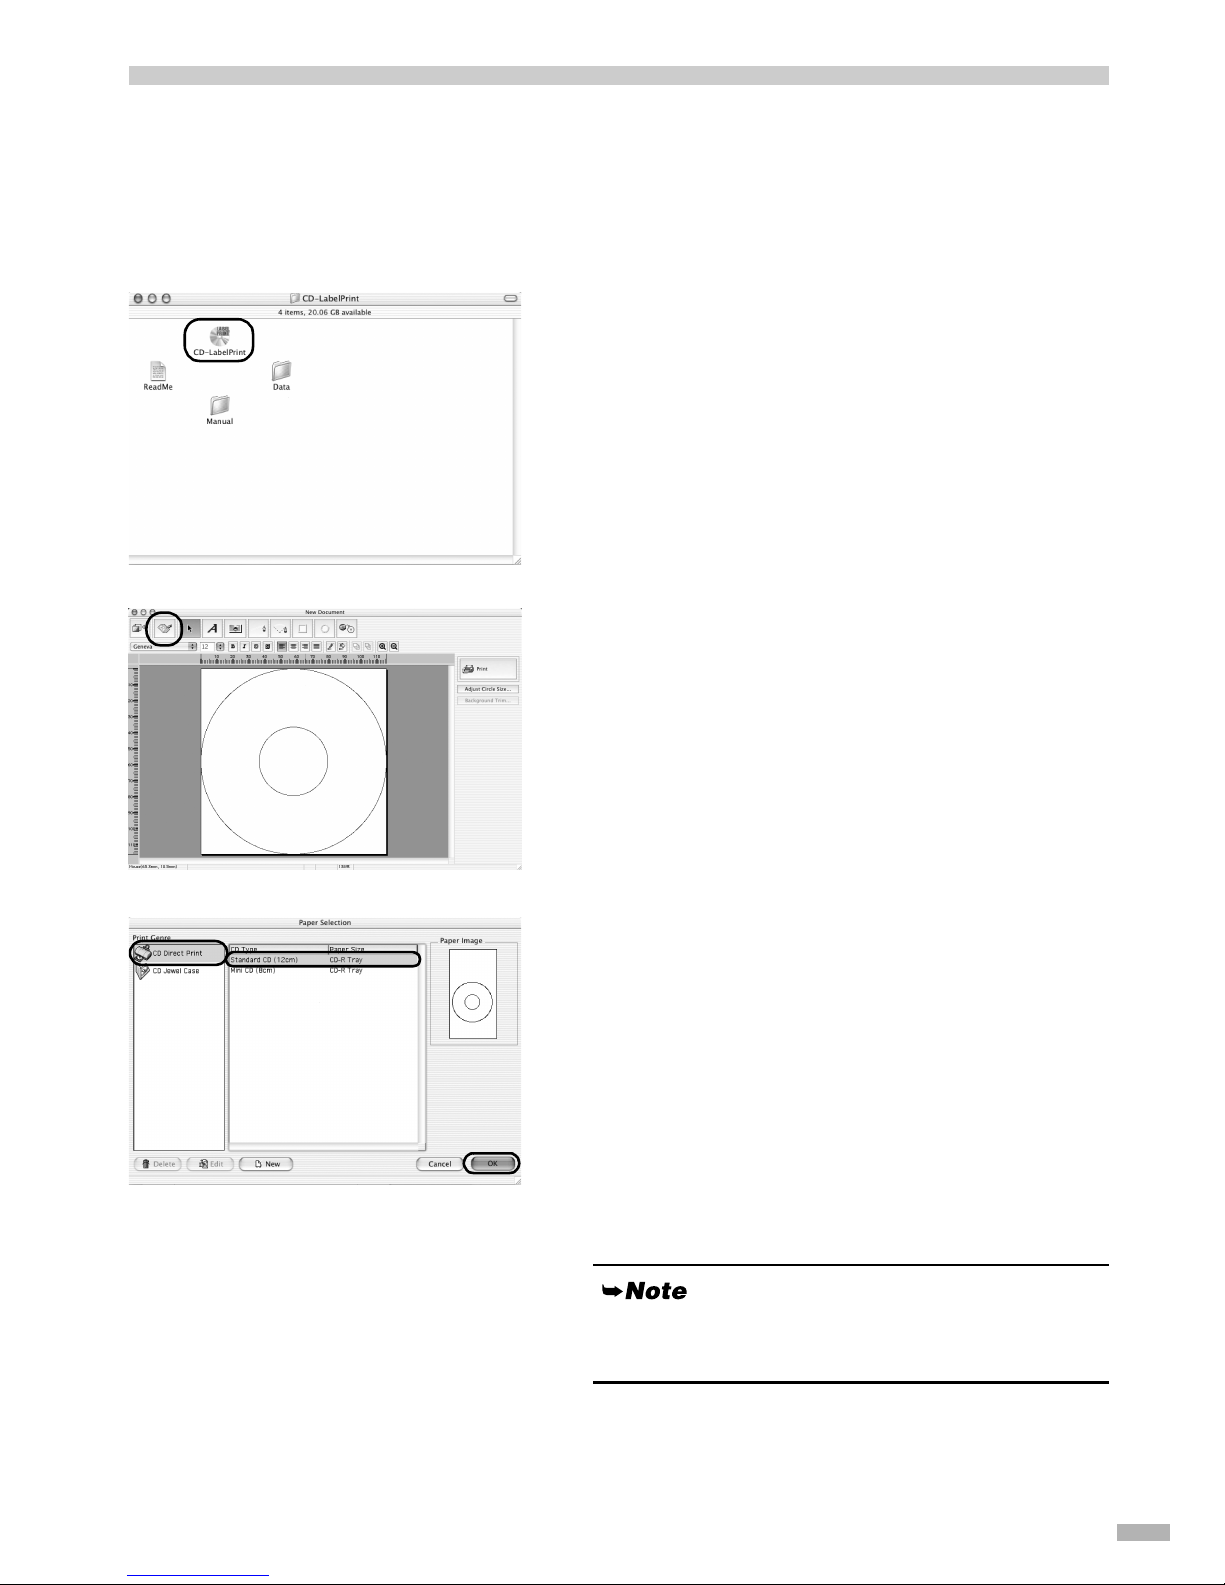
Importing the image to print on the CD-R/DVD-R
1111
Select Applications from the GO
menu. Double-click the CD-LabelPrint
folder, and then CD LabelPrint to start
CD LabelPrint.
2222
Click Paper Selection.
The
Paper Selection
dialog box opens.
3333
Select CD Direct Print from Print
Genre, and select Standard CD
(12cm) from CD Type.
4444
Click OK.
5555
Edit the label image.
For more information about how to edit the label
image, refer to the manual on CD-LabelPrint.
Page 12
10
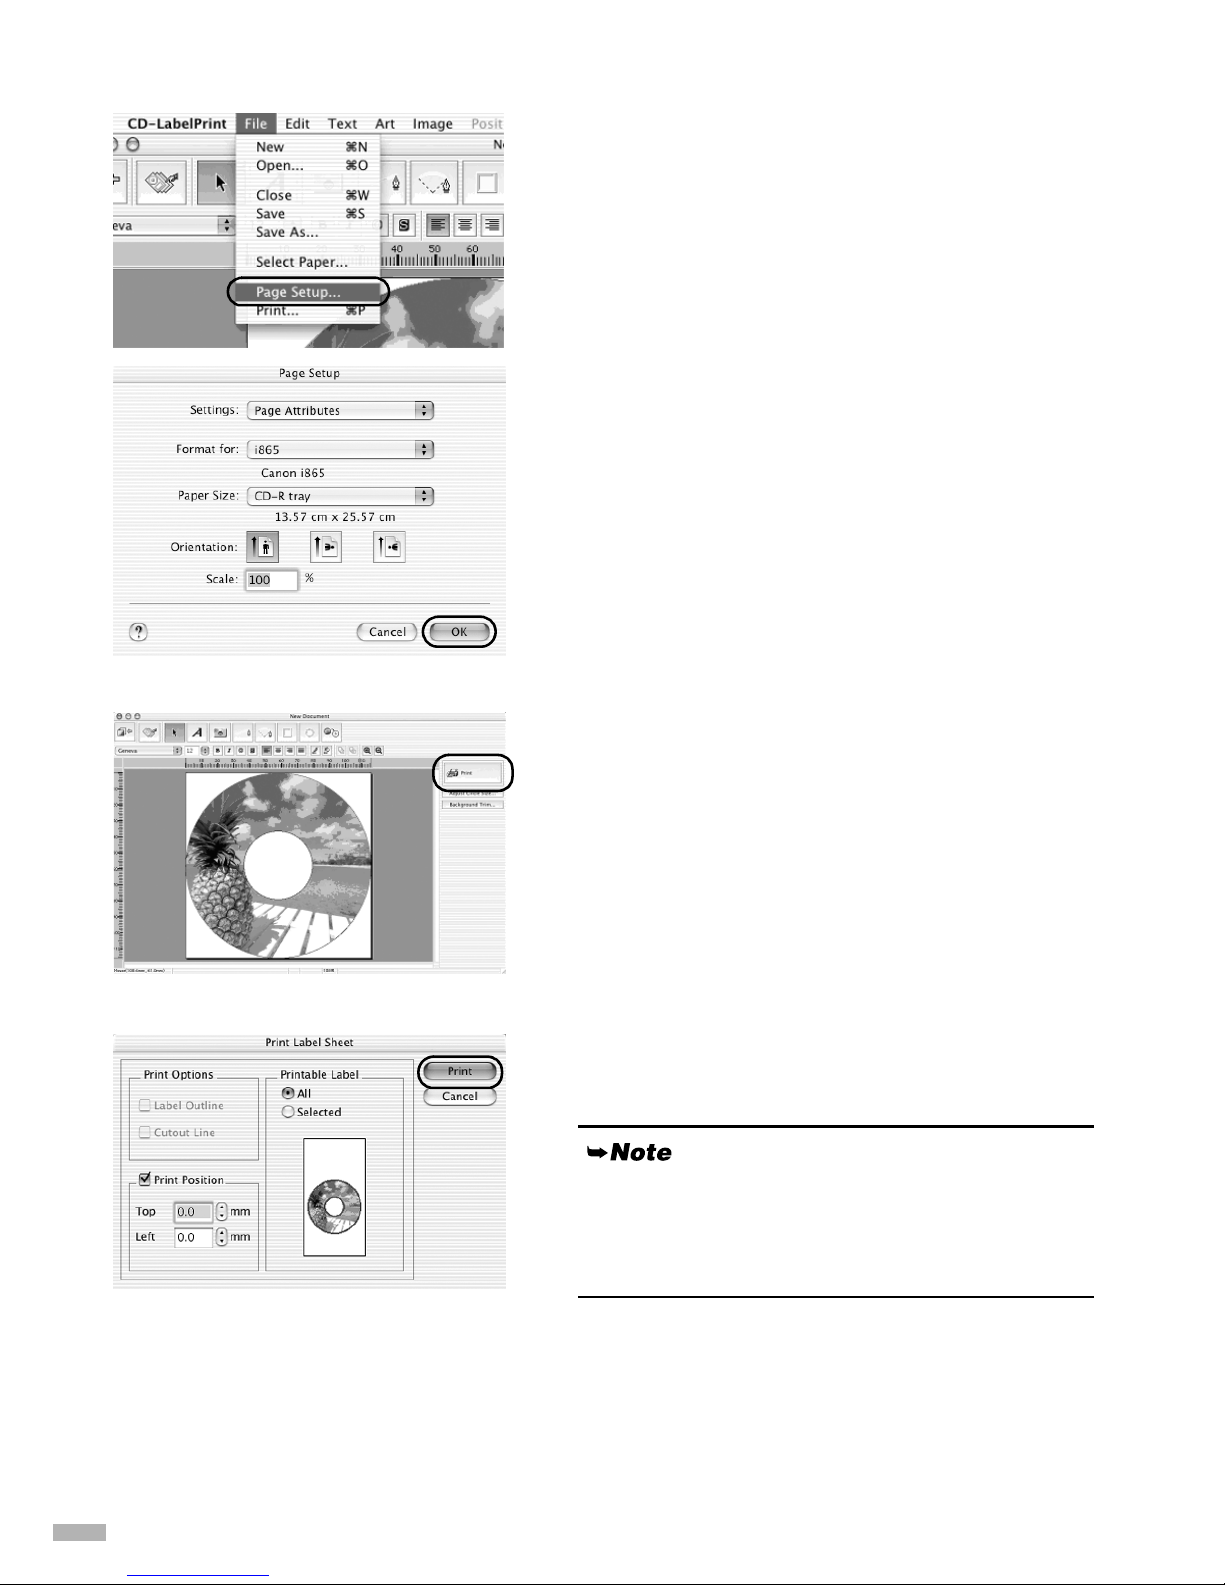
Printing on the CD-R/DVD-R
1111
Select Page Setup… in the File menu.
The Page Setup dialog box opens.
2222
Specify the required settings.
Format for : Select the printer
connected to your printer.
Paper Size : Select CD-R tray.
Orientation : Select the portrait icon.
Scale : Enter 100%.
3333
Click OK.
4444
Click Print.
The
Print Label Sheet
edit box opens.
5555
Confirm the changes you made, then
click Print.
6666
When the confirmation message
appears, click OK.
The
Print
dialog box opens.
The following dialog box shows the print image of
the CD-R tray (rectangle) and the CD-R (circles).
The leading edge of the CD-R tray is at the bottom
of the image.
Page 13
11
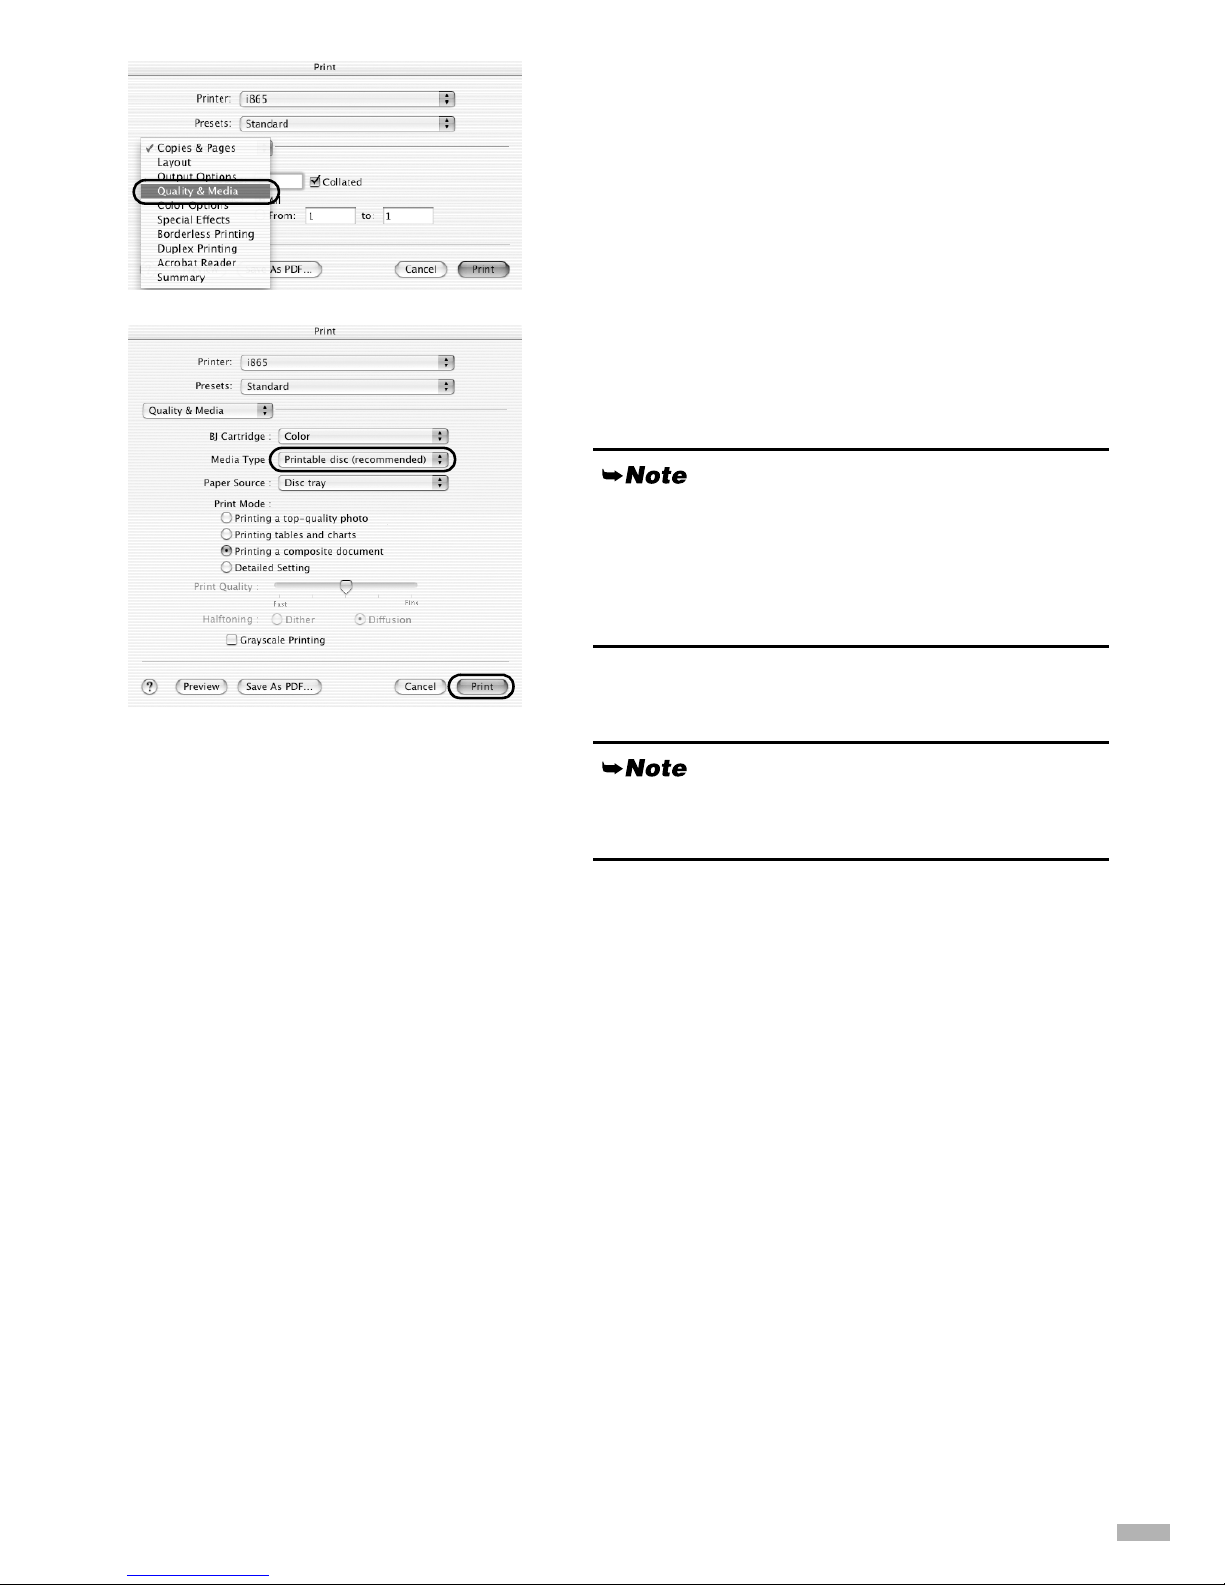
7777
Click the Quality & Media tab.
8888
Select Printable disc (recommended)
or Printable disc (others) from Media
Type.
9999
Click Print.
If the "Printable disc (recommended)" setting produces
unsatisfactory results (e.g. if images are too dark or
characters appear blurred), select "Printable disc
(others)". Print quality on CD-R/DVD-R may vary
depending on the media you use.
Refer to the CD-LabelPrint’s manual for details on CDLabelPrint.
Page 14
12
Troubleshooting
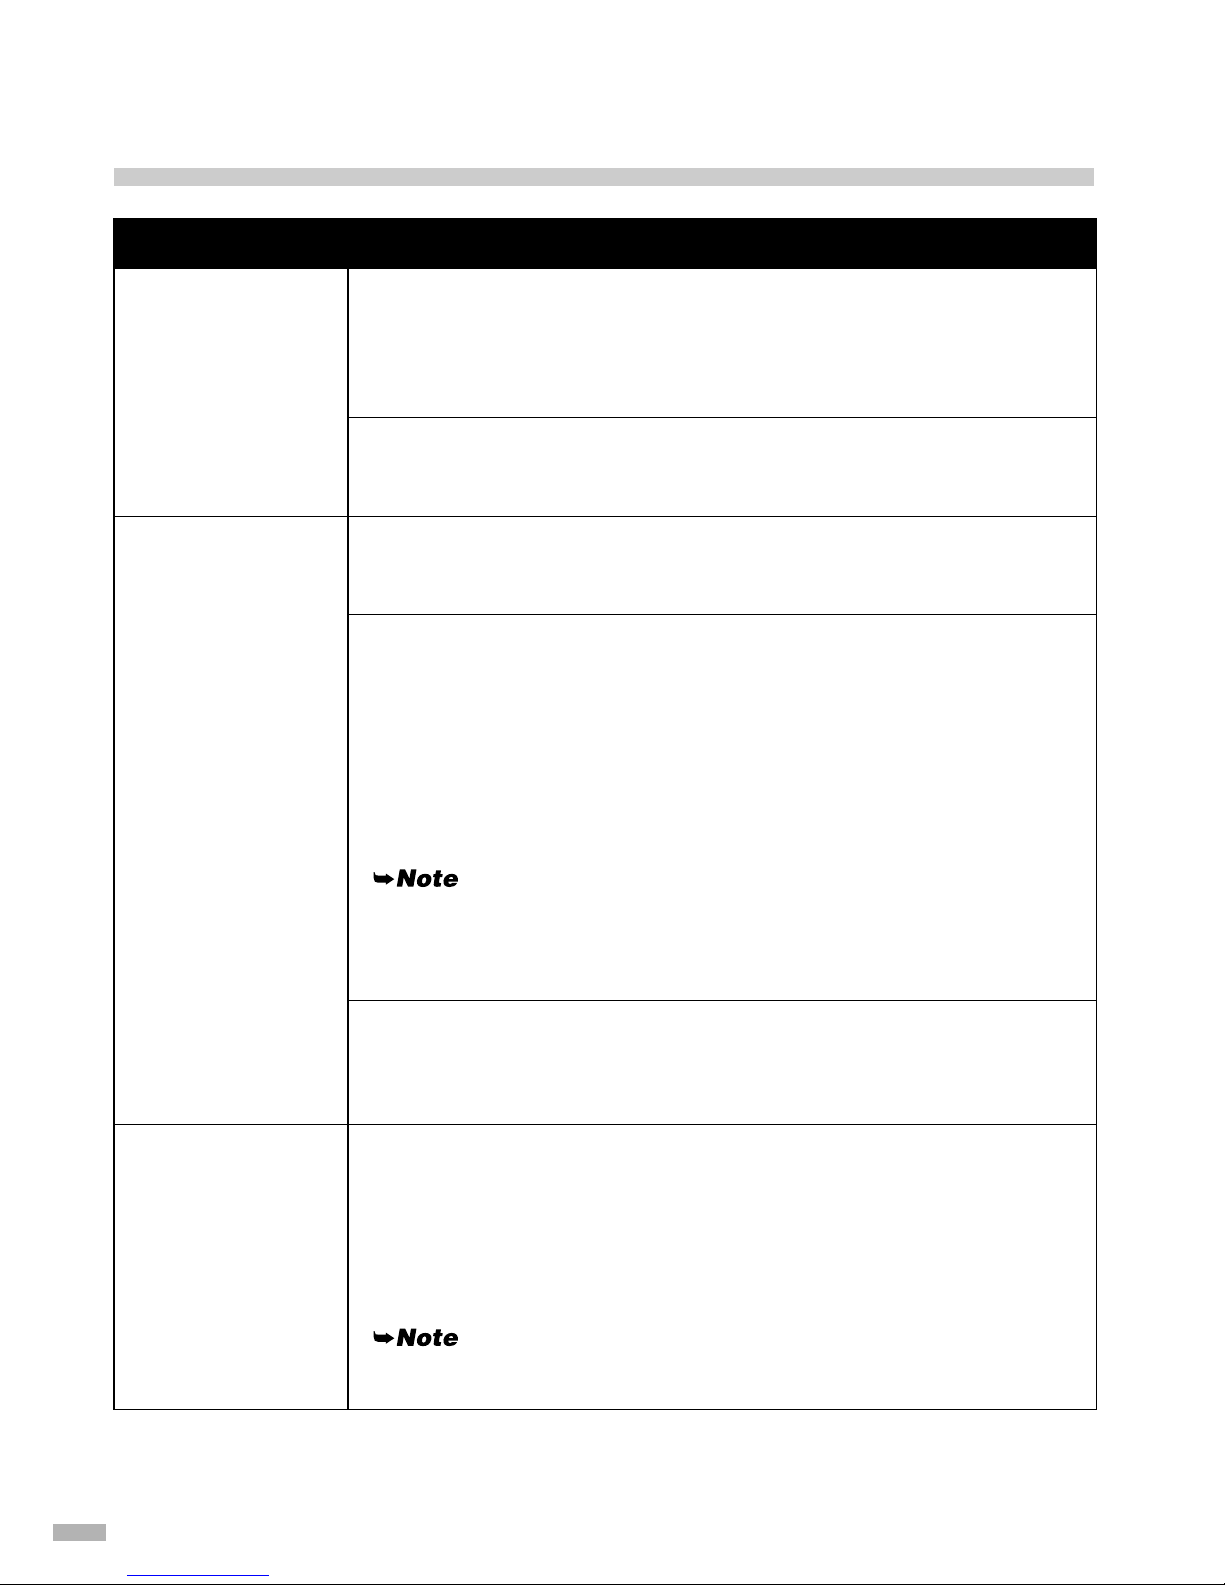
Cannot print on CD-Rs or DVD-Rs
Possible Cause Try This
CD-R direct print does
not begin
Ensure that the CD-R tray feeder, or the CD-R tray is properly installed.
Correctly install the CD-R tray feeder, or the CD-R tray, and then press the
RESUME/CANCEL button to restart the printing process. Please refer to
“Attaching the CD-R Tray Feeder and CD-R Tray” on page 3 for proper placing
operation.
Ensure that the CD-R, or the DVD-R is properly placed on the tray.
Correctly place the CD-R, or DVD-R on the CD-R tray, and press the
RESUME/CANCEL button. The printing process will be re-started.
CD-R tray is not being
fed
Check if you are printing on the printable disc.
Refer to “Cautions When Printing on CD-Rs/DVD-Rs” on page 2 to confirm that
the disc that you are using is printable.
Check if the printed CD-R, or the DVD-R is placed on the CD-R tray.
If a previously printed CD-R, or DVD-R is inserted, the CD-R tray may be
ejected. If this happens, clear the [Detects a printable disc on the CD-R tray]
check box from [Custom Settings] on the [Maintenance] tab, and print.
When printing is over, select the [Detects a printable disc on the CD-R tray]
check box.
If the check box is cleared, printing may begin without the CD-R/DVD-R
loaded. Selecting the check box prevents the CD-R tray from being falsely
printed.
If printing CD-R/DVD-R with [Detects a printable disc on the CD-R tray]
cleared, the printing may be started even if a CD-R, or DVD-R is not placed on
the CD-R tray. Selecting the check box prevents CD-R tray from being falsely
printed.
Check if the CD-R tray is properly placed.
Correctly place the CD-R tray, and push the RESUME/CANCEL button. The
printing will be re-started. Refer to “Attaching the CD-R Tray Feeder and CD-R
Tray” on page 3 for proper placing operation.
CD-R tray is jammed Do not remove the CD-R tray feeder, and perform the following operations.
1. Gently pull out the CD-R tray.
If the CD-R tray cannot be pulled out, press the Power button to turn off the
printer, then turn on the printer again. The CD-R tray will automatically be
ejected.
2. Place the CD-R tray again, and press the RESUME/CANCEL button. Be
careful not to remove CD-R tray feeder.
When placing the CD-R tray, refer to
“Attaching the CD-R Tray Feeder and CD-R
Tray” on page 3
for proper placing of a CD-R, or DVD-R on the CD-R tray.
Page 15
13
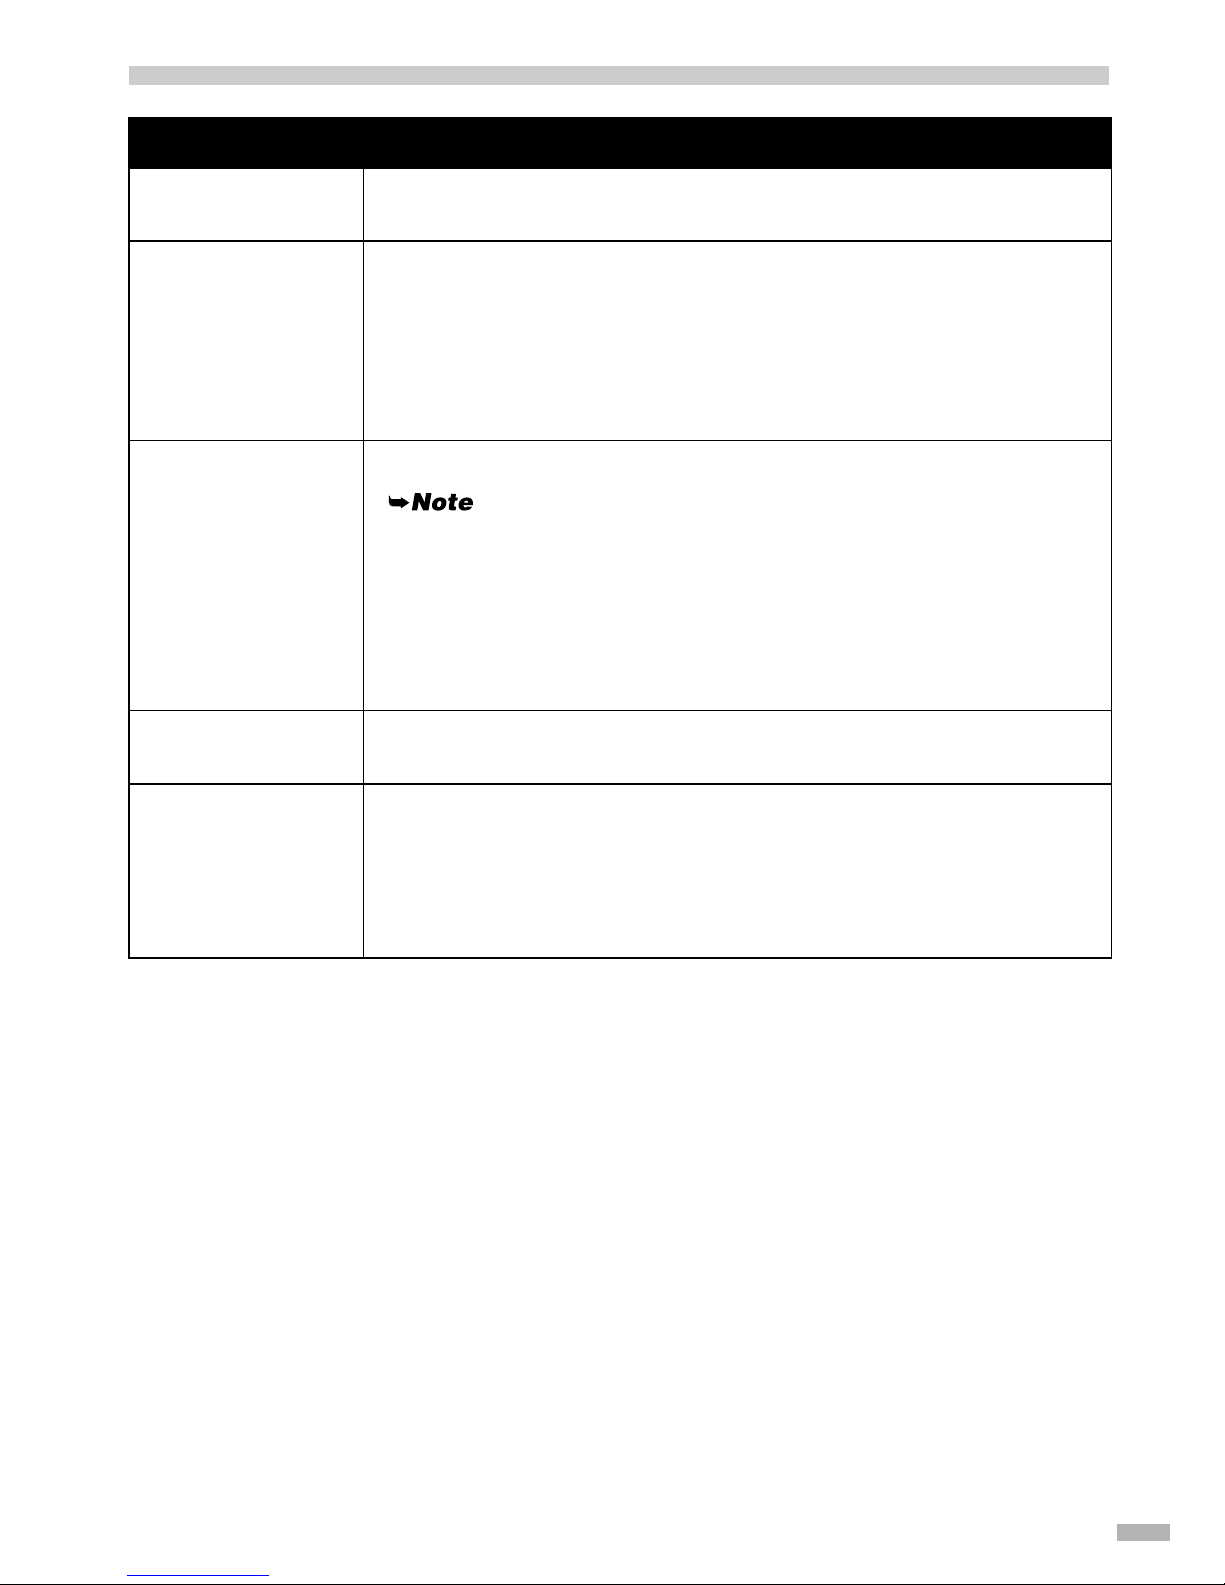
CD-R Printing Errors Displayed in Windows
Possible Cause Try This
CD-R tray or CD-R/
DVD-R not in place
Correctly attach the CD-R tray or load CD-R/DVD-R, and press the RESUME/
CANCEL button.
CD-R/DVD-R not
recognized correctly
Some CD-Rs/DVD-Rs are not recognized correctly. If this happens, click Detects a
printable disc on the CD-R tray at Custom Setting on the Maintenance tab to
clear the check box, and print.
When printing is over, select the Detects a printable disc on the CD-R tray check
box.
If the check box is cleared, printing may begin without the CD-R/DVD-R loaded.
Selecting the check box prevents the CD-R tray from getting dirty.
CD-R tray jammed Follow the procedure below to insert the CD-R tray again.
Do not remove the CD-R tray feeder. Otherwise, the CD-R tray can no longer be
pulled out.
1. Gently pull out the CD-R tray.
If the CD-R tray cannot be pulled out, press the POWER button to turn the
printer OFF then turn the printer back ON again. The CD-R tray will
automatically be ejected.
2. Place the CD-R tray again, and press the RESUME/CANCEL button.
CD-R tray feeder not
attached correctly
Attach the CD-R tray feeder correctly, and press the RESUME/CANCEL button.
CD-R tray feeder
loaded/removed during
printing
Remove the CD-R tray feeder, click the RESUME/CANCEL button, and then try
printing again.
See “Removing the CD-R Tray Feeder and CD-R Tray” on page 5.
Attach the CD-R tray feeder, press the RESUME/CANCEL button, and then try
printing again.
See “Attaching the CD-R Tray Feeder and CD-R Tray” on page 3.
Page 16
14
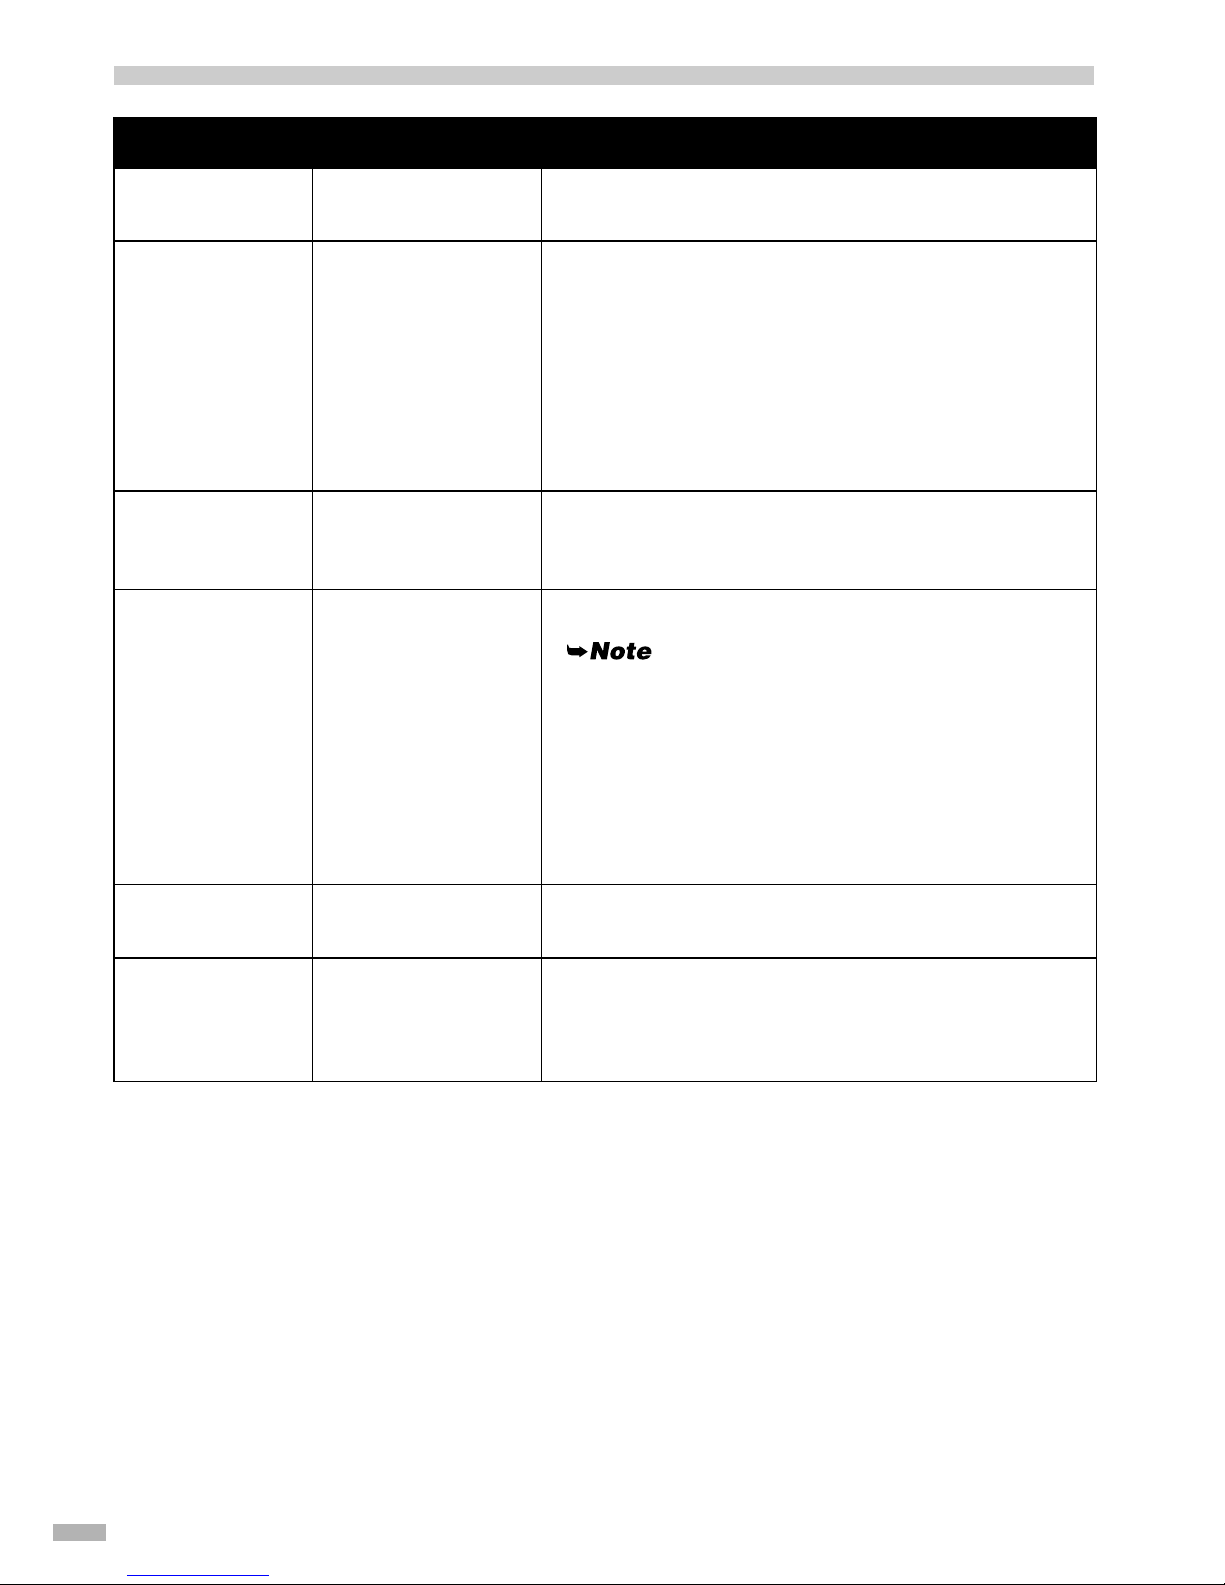
CD-R Printing Errors Displayed in Macintosh
Problem Possible Cause Try This
Macintosh
“Error No: 1001”
CD-R tray or CD-R/
DVD-R not in place
Correctly attach the CD-R tray or load CD-R/DVD-R, and
press the RESUME/CANCEL button.
Macintosh
“Error No: 1001”
CD-R/DVD-R not
recognized correctly
Some CD-Rs/DVD-Rs are not recognized correctly. If this
happens, click Detects a printable disc on the CD-R tray at
Custom Setting on BJ Printer Utility to clear the check
box, and print.
When printing is over, select the Detects a printable disc on
the CD-R tray check box.
If the check box is cleared, printing may begin without the
CD-R/DVD-R loaded. Selecting the check box prevents the
CD-R tray from getting dirty.
Macintosh
“Error No: 1002”
CD-R tray not in place Correctly place the CD-R/DVD-R on the CD-R tray, and
attach the CD-R tray again, and then press the RESUME/
CANCEL button.
Macintosh
“Error No: 1302”
CD-R tray jammed Follow the procedure below to insert the CD-R tray again.
Do not remove the CD-R tray feeder. Otherwise, the CDR tray can no longer be pulled out.
1. Gently pull out the CD-R tray.
If the CD-R tray cannot be pulled out, press the POWER
button to turn the printer OFF then turn the printer back
ON again. The CD-R tray will automatically be ejected.
2. Place the CD-R tray again, and press the RESUME/
CANCEL button.
Macintosh
“Error No: 1850”
CD-R tray feeder not
attached correctly
Attach the CD-R tray feeder correctly, and press the
RESUME/CANCEL button.
Macintosh
“Error No: 1851”
CR-R tray feeder
loaded/removed
during printing
Remove the CD-R tray feeder, click the RESUME/
CANCEL button, and then try printing again.
See “Removing the CD-R Tray Feeder and CD-R Tray” on
page 5
Page 17
15
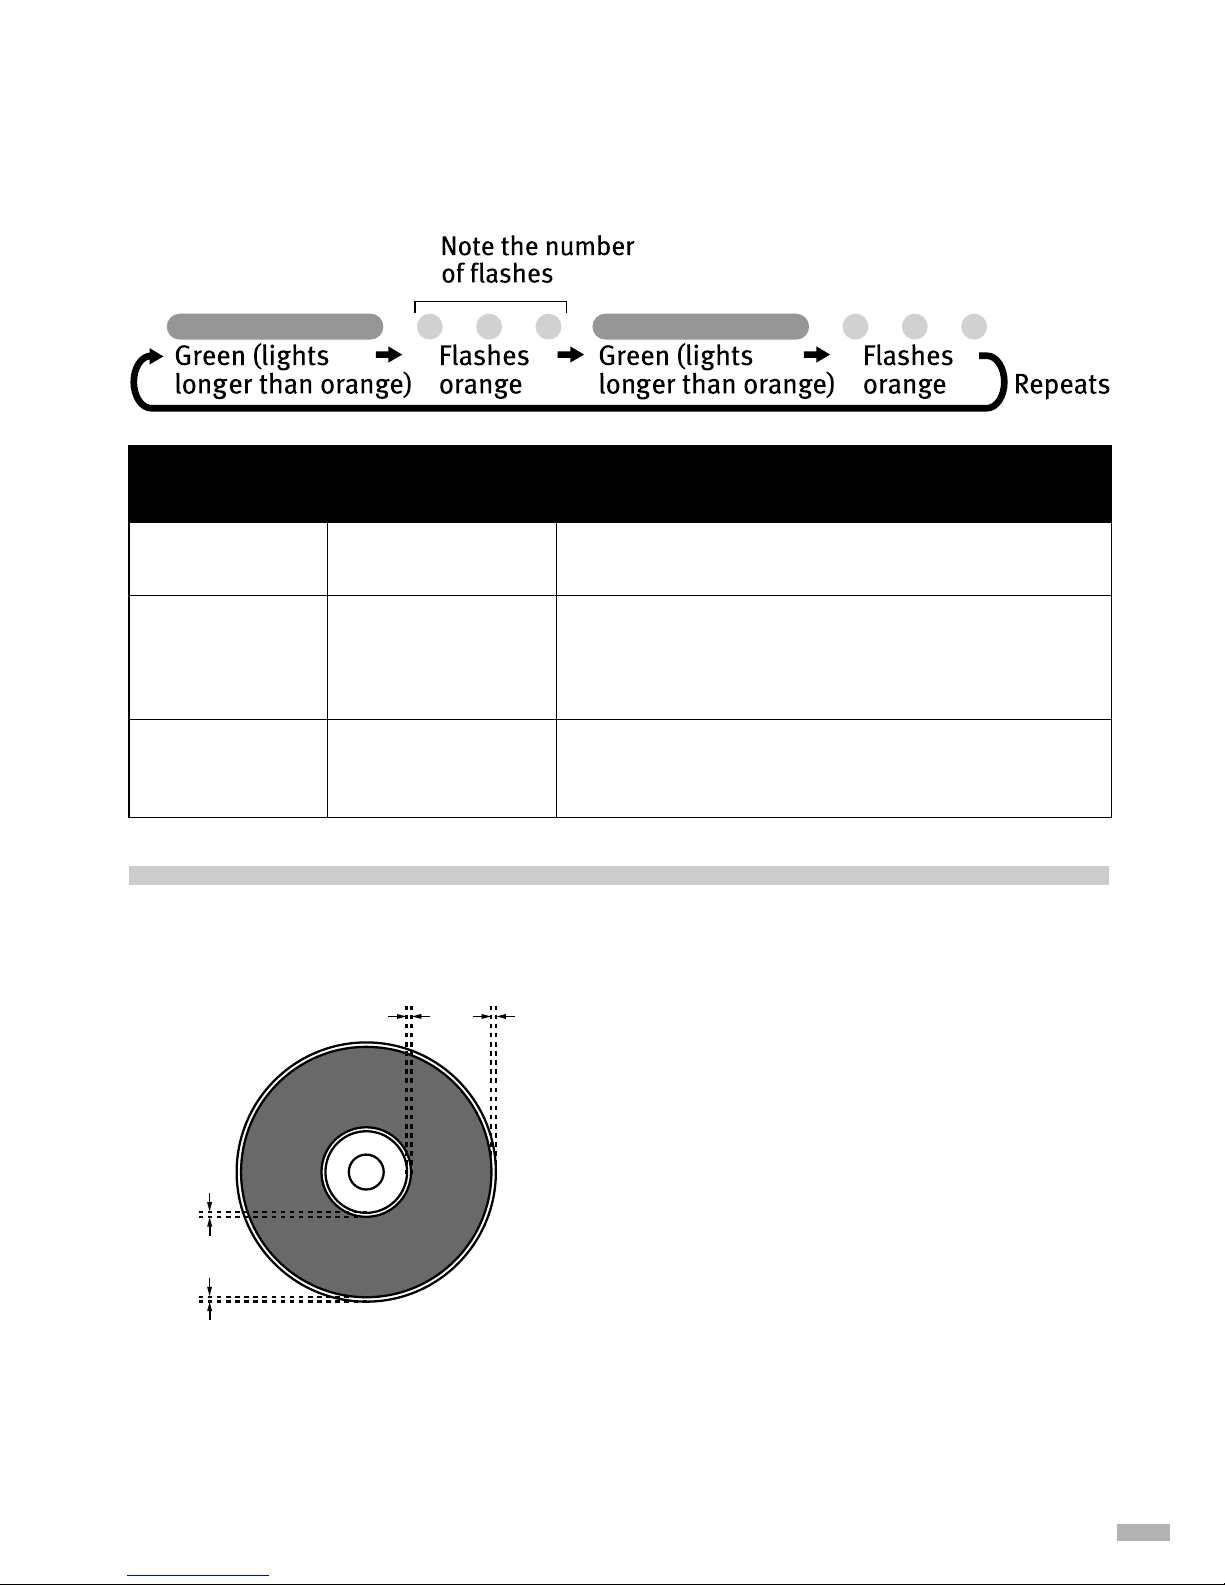
The POWER Lamp Flashes Orange
When a printer error occurs, the POWER lamp flashes. The number of flashes indicates the type of error.
Count the flashes and take the appropriate action to correct the error.
This section deals with errors on the CD-R tray only. For other errors, refer to the User’s Guide.
Printing Area
CD-R (12cm/8cm), DVD-R
CD-R (12cm/8cm), DVD-R, the printing area of the both
media is within the limits which are 1 millimeter away from
the internal & external diameters of the label.
Number of
flashes
Possible Cause Try Thi s
Two flashes CD-R Tray not in
place
Ensure that the CD-R/DVD-R is in place, insert the CD-R
Tray correctly, then press the RESUME/CANCEL button.
Six flashes CD-R tray feeder
installed/CD-R tray
feeder not installed
correctly
To print on a CD-R/DVD-R, install the CD-R tray feeder
properly, and press the RESUME/CANCEL button.
To print on paper rather than a CD-R/DVD-R, remove the
CD-R tray feeder, and press the RESUME/CANCEL button.
Seven flashes CD-R or DVD-R not
set
Ensure that the CD-R or DVD-R is set on the CD-R tray
properly. Reinstall the CD-R tray and press the RESUME/
CANCEL button.
1.0 mm1.0 mm
1.0 mm
1.0 mm
Page 18

16
Page 19

Page 20

CD-R Print Guide
Table of Contents
Preface 1
Printing on CD-Rs/DVD-Rs (CD-R Direct Print) 2
Troubleshooting 12
QA7-2877-V01 XXXXXXXX ©CANON INC.2003 PRINTED IN THAILAND
 Loading...