

Page 1
User’s Guide
for Macintosh
CanoScan Toolbox CS
Page 2

2CanoScan Toolbox CS
Trademarks
CanoScan is a trademark of Canon, Inc.
Macintosh, Power Macintosh, Mac OS are trademarks of Apple Computer Inc. registered in the United
States and other countries. iMac is a trademark of Apple Computer, Inc.
Adobe, Adobe Photoshop are trademarks of Adobe Systems Incorporated.
All other names are trademarks or registered trademarks of their respective companies.
Copyright
Copyright © CANON INC., 2000
This manual is copyrighted with all rights reserved. Under the copyright laws, no part of this publication
may be reproduced, transmitted, transcribed, stored in a retrieval system, or translated into any human or
computer language, in any form or by any means, without express written permission.
The contents of this manual are subject to change without notice.
Page 3

CanoScan Toolbox CS
3
Table of Contents
1 Introduction.......................................................................................................................4
About the CanoScan Toolbox CS ...................................................................................................4
Obtaining Customer Support .......................................................................................................... 4
2 Installing the CanoScan Toolbox CS ..............................................................................5
System Requirements. ................................................................................................................... 5
Installing the CanoScan Toolbox CS............................................................................................... 5
3 The CanoScan Toolbox CS Main Window ......................................................................6
4 Using the Scanner Button................................................................................................6
5 Selecting the Scanner ......................................................................................................6
6 Scanning ...........................................................................................................................7
7 Saving Scanned Images ..................................................................................................7
8 Opening Files....................................................................................................................8
Opening a Stored File..................................................................................................................... 8
Opening a New Image Window ......................................................................................................8
9 Faxing a Scanned Image..................................................................................................9
Setting the Fax Preferences ........................................................................................................... 9
Selecting the Fax Print Driver ......................................................................................................... 9
Scanning and Faxing a Document..................................................................................................9
10 Printing Copies of a Scanned Image ............................................................................10
Setting the Copy Preferences....................................................................................................... 10
Copying a Document .................................................................................................................... 10
11 Enhancing a Scanned Image.........................................................................................11
Cropping a Scanned Image ...........................................................................................................11
Changing the Image Viewing Size.................................................................................................11
Inverting Image Tones................................................................................................................... 12
Adjusting the Contrast and Brightness Settings ........................................................................... 12
Adjusting the Color Balance ......................................................................................................... 12
Sharpening an Image ................................................................................................................... 13
12 Editing a Scanned Image ...............................................................................................15
Resizing a Scanned Image........................................................................................................... 15
Rotating an Image ........................................................................................................................ 15
Flipping a Scanned Image ............................................................................................................ 16
Changing the Image Depth........................................................................................................... 16
Using Plug-in ................................................................................................................................ 17
Using the Editing Commands ....................................................................................................... 17
Using the Editing Tools ................................................................................................................. 18
Using the Color Pallet ................................................................................................................... 19
Selecting a Brush Size.................................................................................................................. 19
13 Working with Catalogs ...................................................................................................20
Creating a Catalog........................................................................................................................ 20
Saving an Image to a Catalog. ..................................................................................................... 20
Viewing an Image Catalog............................................................................................................ 20
Opening a Scanned Image from the Catalog ............................................................................... 21
14 Linking Applications to the Canoscan Toolbox CS.....................................................22
Page 4

4CanoScan Toolbox CS
1. Introduction
This User’s Guide describes the features and functions of the CanoScan Toolbox CS for Macintosh.
About the CanoScan Toolbox CS
The CanoScan Toolbox CS provides easy-to-use scanning and image editing functions you can use to
scan, edit and integrate digital images into a variety of applications (i.e., email, fax, desktop publishing,
word processing, etc.). You can also use the CanoScan Toolbox CS to instantly fax or copy scanned
documents with a click of the mouse. The advanced image enhancement features provided by the
CanoScan Toolbox CS let you adjust the color balance, contrast and brightness, image sharpness and
more, so you can create high-quality images.
In addition to the CanoScan ToolboxCS, the Canon Plug-in Module CS plug-in is also included in the
CanoScan Setup CD-ROM. It provides an interface to the scanner. The Canon Plug-in Module CS plug-in
launches when you click the Scan button from the CanoScan Toolbox CS. After the scan process is
complete, the plug-in closes and you are returned to the CanoScan Toolbox CS so you can edit, fax, copy
or integrate the image into other applications.
Obtaining Customer Support
If you are having problems setting up or running the CanoScan Toolbox CS, contact the Canon help desk
at one of the following locations:
CANON COMPUTER SYSTEMS, INC.
2995 Redhill Avenue
Costa Mesa, CA 92626, U.S.A.
1-800 OK CANON
http://www.ccsi.canon.com
CANON (UK) LTD.
Woodhatch, Reigate
Surrey RH2 8BF, United Kingdom
For technical support, please contact Canon
Helpdesk.
Helpdesk:
P.O. Box 431, Wallington, Surrey SM6 0XU
TEL: (08705) 143 723
FAX: (08705) 143 340
For sales enquiries: (0121) 666-6262
CANON FRANCE S.A.
17, quai du Président Paul-Doumer
92414 Courbevoie Cedex, France
Tél.01 4199 7777
Fax.01 4199 7951
Hotline:
Tél.01 4199 7070
CANON DEUTSCHLAND GmbH
Postfach 528, 47705 Krefeld, Germany
CANON- Hotline-Service
Customer Support: (0 21 51)349-555
Info-Desk: (0 21 51)349-566
Mailbox: (0 21 51)349-577
Telefax: (0 21 51)349-588
CANON ITALIA S.p.A
Palazzo L, Strada 6,
20089 Milanofiori-Rozzano (MI), Italy
TEL: 02/8248. 1
FAX: 02/8248. 4604
Pronto Canon 02/8249. 2000
http://www.canon.it
CANON OY AB
Kornetintie, 3, 00380 Helsinki, Finland
Puhelin: 010 544 20
Help Desk: 0600-0-22606 (maksu 14,80 mk/min)
Fax: 010 544 4571
CANON SVENSKA AB
Stensätravägen 13, S-127 88, Skärholmen
Sweden
CANON DANMARK
Vasekær 12, DK-2730 Herlev, Denmark
Hotline: 44 88 26 66
http://www.canon.dk
CANON NORGE AS
Hallagerbakken 110, Boks 33, Holmlia 1210 Oslo
12, Norway
Tlf: 2262 9321
FAX. 2262 0615
CANON BENELUX NEDERLAND N.V.
Neptunusstraat 1, 2132 JA Hoofddorp
The Netherlands
Tel: 023-5 670 123
Fax: 023-5 670 124
Helpdesk: 023-5 681 681
CANON BENELUX BELGIUM N.V./S.A.
Bessenveldstraat 7, 1831 Diegem, Belgium
Tel: 02 7220411
Fax: 02 7213274
Helpdesk: 02 7220404
CANON GmbH
Zetschegasse 11, 1232 Wien, Austria
CANON (SCHWEIZ) A.G.
Industriestrasse 12, CH-8305 Dietlikon
Switzerland
Tel: (01)835 61 61
Fax: (01)835 68 60
Hotline: 157 30 20
CANON ESPAÑA S.A.
C/Joaquin Costa No 41, 28002
Madrid, Spain
HelpDesk: 906-301255
Tel.: 91-5384500
Fax.: 91-4117780
CANON AUSTRALIA PTY. LTD.
1 Thomas Holt Drive, North Ryde, Sydney N.S.W.
2113, Australia
Info-Line: (02)9805 2864
CANON NEW ZEALAND LTD.
Fred Thomas Drive, Takapuna
P.O. Box 33-336 Auckland, New Zealand
Info-Line: 0900-522666
CANON HONGKONG CO., LTD.
9/F, The Hong Kong Club Building
3A Chater Road, Central, Hong Kong
Tel: (852)2739 0802
Fax: (852)2739 6428
CANON SINGAPORE PTE. LTD.
79 Anson Road #09-01/06
Singapore 079906
CANON MARKETING SERVICES PTE. LTD.
2, Alexandra Road, #04-01A
Delta House
Singapore 159919
Tel: 65 2735311
Fax: 65 2733317
CANON MARKETING (MALAYSIA) SDN. BHD.
Wisma General Lumber Block D. Peremba Square
Saujana Resort, Section U2, 40150 Shah Alam
Selangor Darui Ehsan, Malaysia
Tel: 603-744-6000
Fax: 603-745-0505
CANON MARKETING (THAILAND) CO.LTD.
2nd Floor, Indosuez House
152 Wireless Road, Bangkok 10330
Thailand
Tel: 66-2-6514000
Fax: 66-2-6514096
CANON MARKETING (PHILIPPINES) INC.
Marvin Plaza Building,
2153 Don Chino Roces Ave,
Makati City, Metro Manila, Philippines
Tel: 632-812-6047
Fax: 632-812-0067/810-9797
CANON CANADA, INC.
6390 Dixie Road Mississauga
Ontario L5T 1P7, Canada
1-800 OK CANON (652-2666)
http://www.canon.ca
CANON LATIN AMERICA, INC.
6505 Blue Lagoon Drive Suite 325
Miami, Florida 33126, U.S.A.
CANON EUROPA N.V.
P.O. Box 2262
1180 EG Amstelveen, The Netherlands
CANON INC.
30-2 Shimomaruko 3-chome, Ohta-ku
Tokyo 146-8501, Japan
Page 5

CanoScan Toolbox CS
5
2. Installing the CanoScan Toolbox CS
System Requirements
The following indicates the minimum CanoScan Toolbox CS system requirements:
Computers: Power Macintosh which standardly equips the proper interface for
connection with the scanner
(Macintosh compatibles are not supported)
System: Mac OS 8.5 or later
Memory Requirements: 32 MB or more (64 MB or more recommended)
Hard Disk Space: 50 MB (5 MB for the application and 40-50 MB to store scanned images)
Installing the CanoScan Toolbox CS
Installing the CanoScan Toolbox CS is very simple.
To install the CanoScan Toolbox CS:
1. Insert the CanoScan Setup CD-ROM accompanied with the scanner into your CD-ROM drive.
Inserting the Setup CD-ROM automatically diskplays the main menu.
2. Choose the Install the Software command from the main menu and select the CanoScan Toolbox
CS option.
3. Follow the on-screen instructions to complete the installation.
Where to locate the plug-in
You should locate the plug-in in the same folder where the CanoScan Toolbox CS locates.
When you install the plug-in with the CanoScan Setup CD-ROM, you should specify the folder name to
the place where the CanoScan Toolbox CS locates (usually CanoScan Toolbox).
Page 6
6CanoScan Toolbox CS
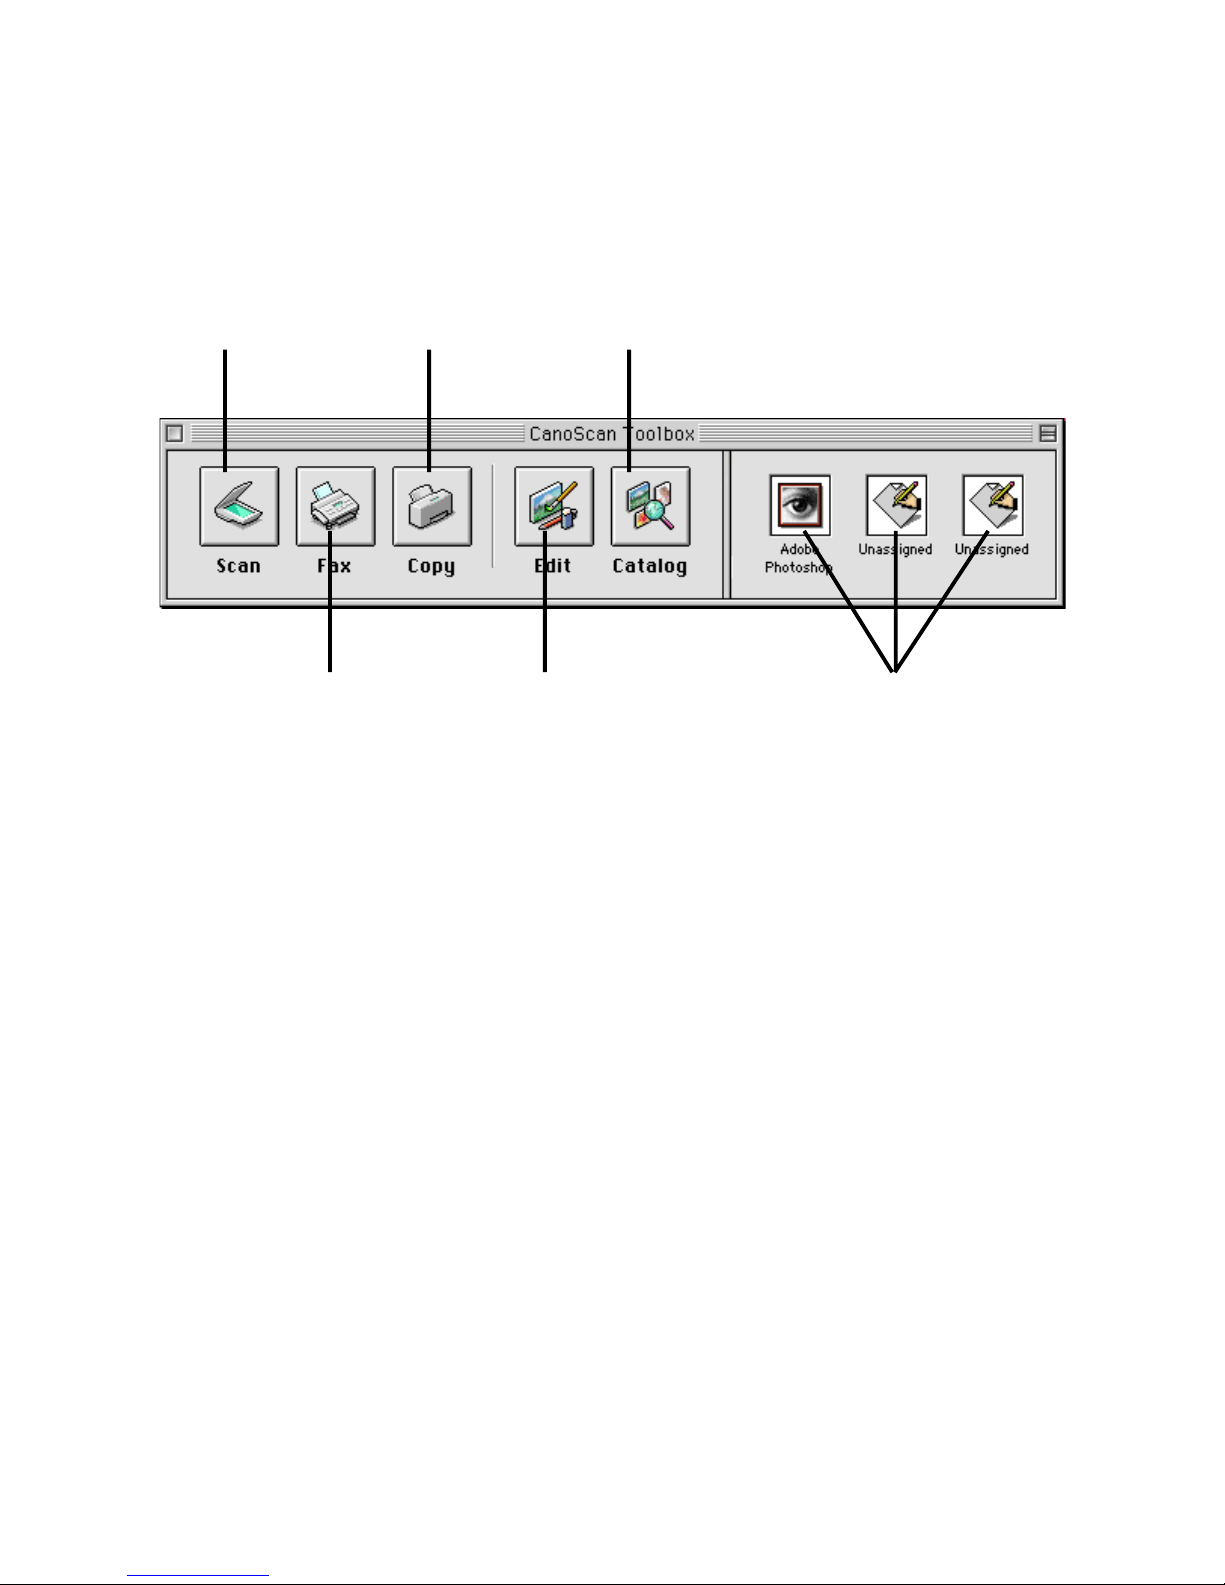
3. The CanoScan Toolbox CS Main Window
The first time you launch the CanoScan Toolbox CS, the CanoScan Toolbox CS Main window appears on
the desktop. You can hide the Main window by clicking the close box on the left-top of the window and
show it by using the CanoScan Toolbox command from the Window menu. The CanoScan Toolbox CS
Main window contains buttons you can use to control the CanoScan Toolbox CS features.
4. Using the Scanner Button
You can instantly access the CanoScan Toolbox CS from the scanner itself by pressing the button on the
front of the scanner.
If the CanoScan Toolbox CS is closed, pressing the start button on the front of the scanner launches the
CanoScan T oolbox CS.
5. Selecting the Scanner
When one or more scanners are connected to your computer, you can select which scanner to use with the
CanoScan T oolbox CS.
Select the scanner in the submenu of the Select Scanner command from the File menu.
Click on an Unassigned button to
specify an application you want to
access directly from the CanoScan
Toolbox
Click the Scan
button to launch
the Canon Plug-in
Module CS
Click the Copy
button to scan and
copy a document
Click the Catalog button to
open an image stored in a
catalog
Click the Fax
button to scan
and fax a
document
Click the Edit button
to open and use the
editing tools, brush
and color palettes
Page 7
CanoScan Toolbox CS
7
6. Scanning
Once the scanner is connected and the software is installed you are ready to scan. The scanning process is
very simple.
To scan a document:
1. Place the photo or document on the scanner as indicated in the scanner documentation.
2. Click on the Scan button from the Main window, or choose the New Scan command from the File
menu.
3. The Canon Plug-in Module CS opens so you can select your scan settings.
4. Click the Preview button to preview the scanning area.
5. Click the Scan button to scan the document. The plug-in closes and the scanned image appears in a
new CanoScan Toolbox Image window.
6. Choose the Save command from the File menu to save the scanned image.
7. Saving Scanned Images
You can save an image that you scan and/or edit in the CanoScan Toolbox CS.
To save an image for the first time:
1. Choose Save from the File menu.
2. Enter a file name and select the folder and drive in which you want to save the image.
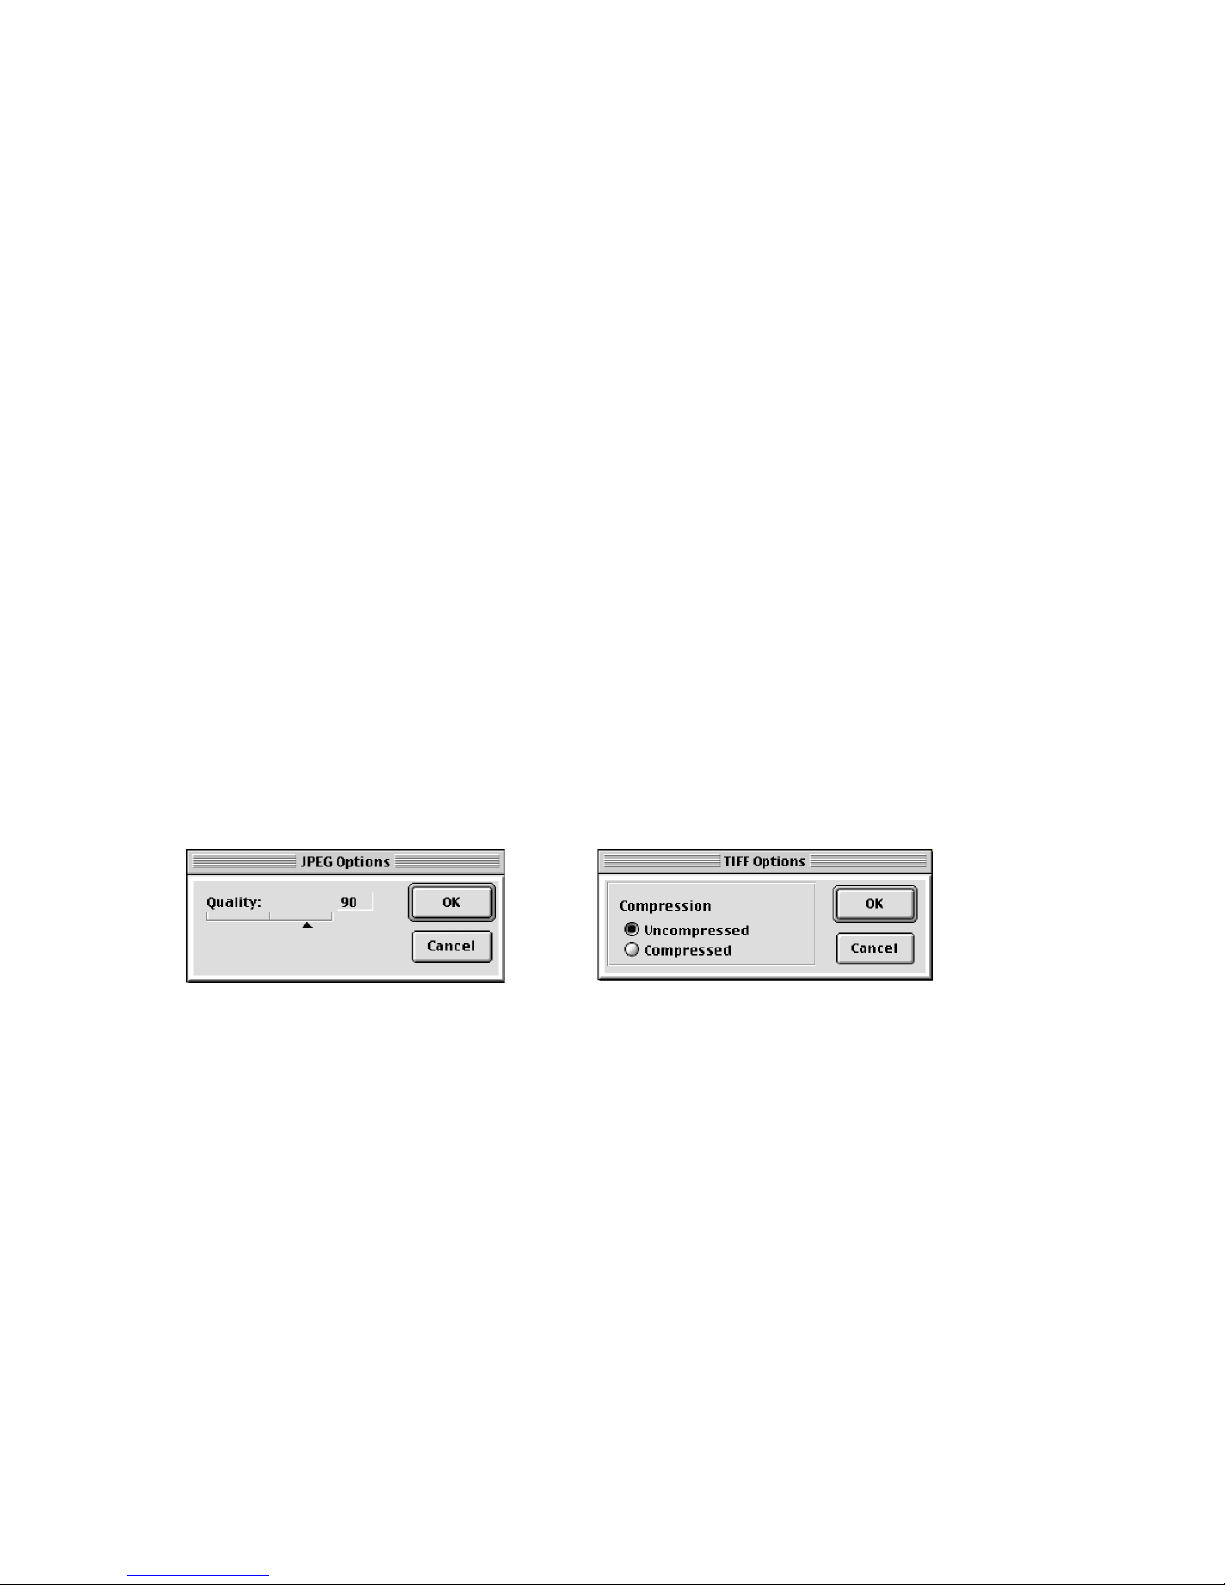
3. Specify the image format. When you choose JPEG or TIFF formats, an Options dialog box appears
so you can specify the compression level.
4. Click OK.
To save changes to an image that has already been saved on your computer, choose the Save command
from the File menu.
To save a file with a different name, to a different location or in a different file format, use the Save As
command.
Page 8

8CanoScan Toolbox CS
8. Opening Files
Opening a Stored File
You can store image files that you have scanned as well as other image files using the CanoScan Toolbox
CS.
To open a stored file:
1. Choose the Open Image command from the File menu, or click the Edit button in the CanoScan
Toolbox CS Main window. The Open Image dialog box appears.
2. Select the desired file and click the Open button. The selected file opens in an image window.
Opening a New Image Window
When you choose the New Image command from the File menu, an empty image window appears. You
can create a new image by pasting data into or drawing directly in the image window. The image window
remains Untitled until you save the data to a file.
Page 9
CanoScan Toolbox CS
9
9. Faxing a Scanned Image
Using the CanoScan Toolbox CS, your scanner and a computer-based fax application, you can fax
virtually anything from your computer.
Setting the Fax Preferences
To set the optimum scanning preferences for faxing:
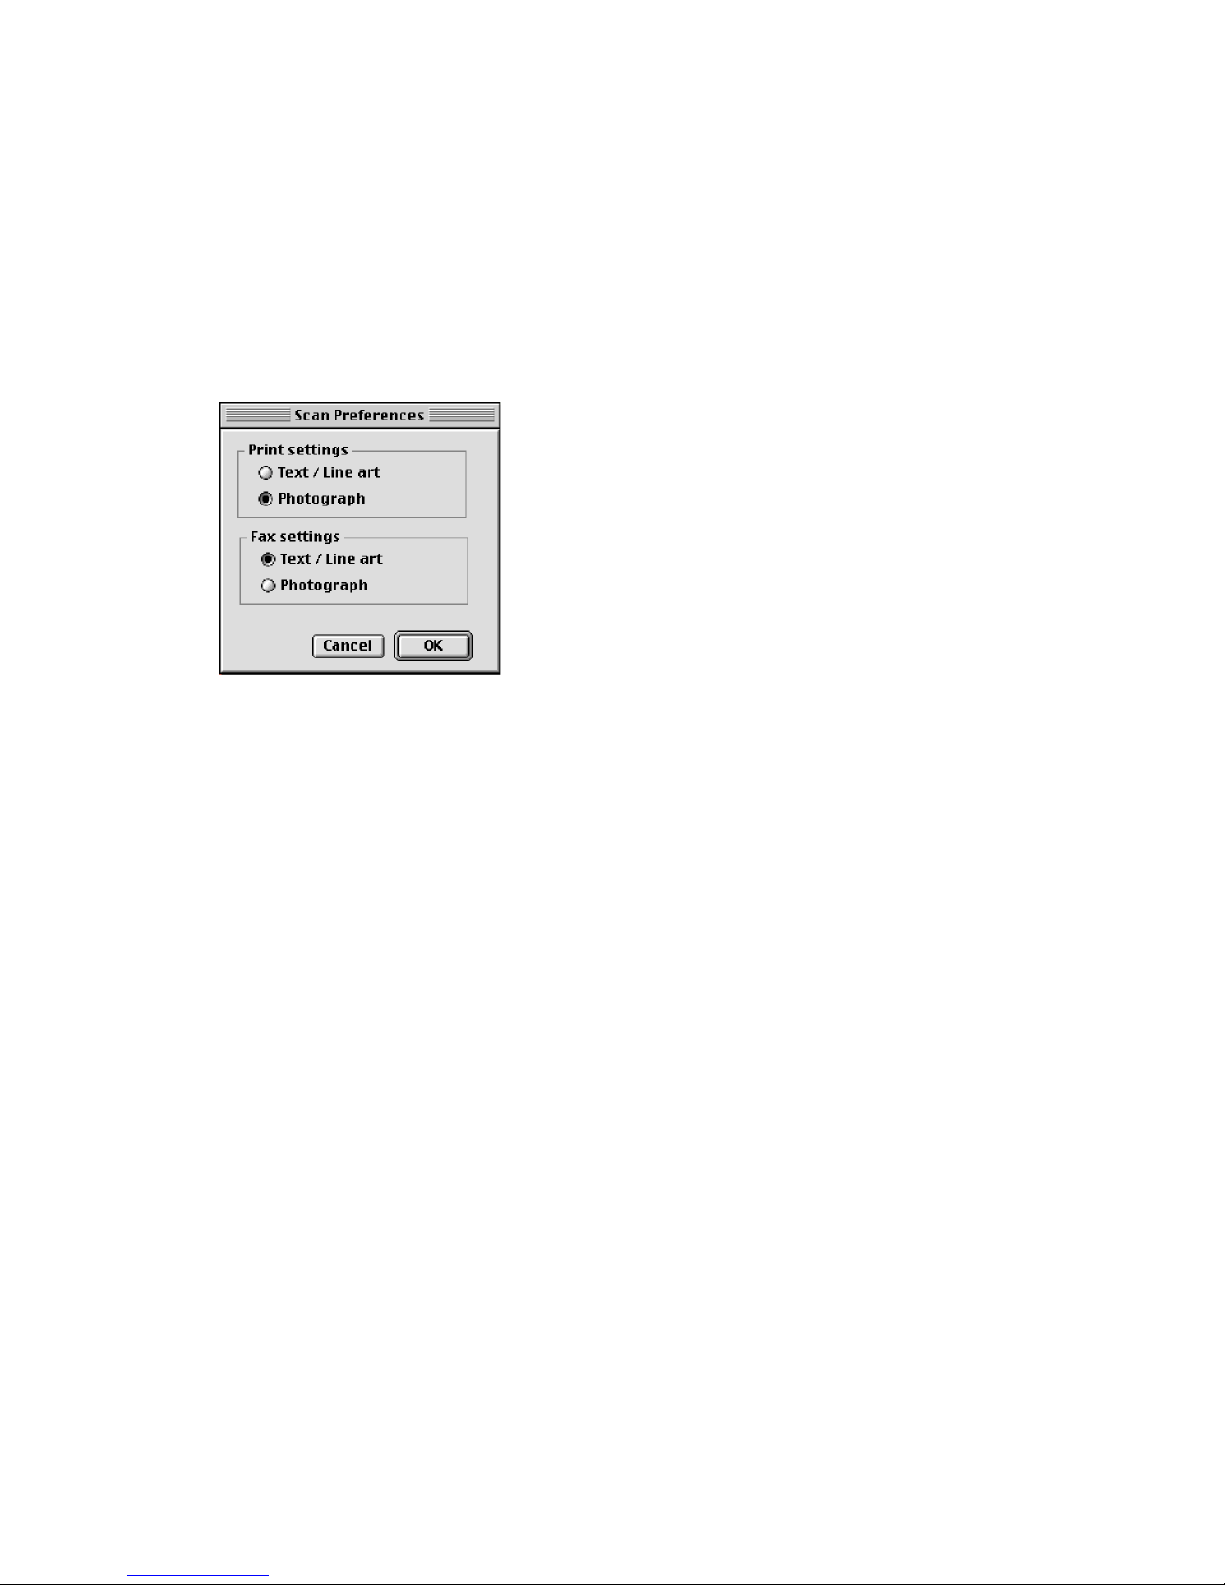
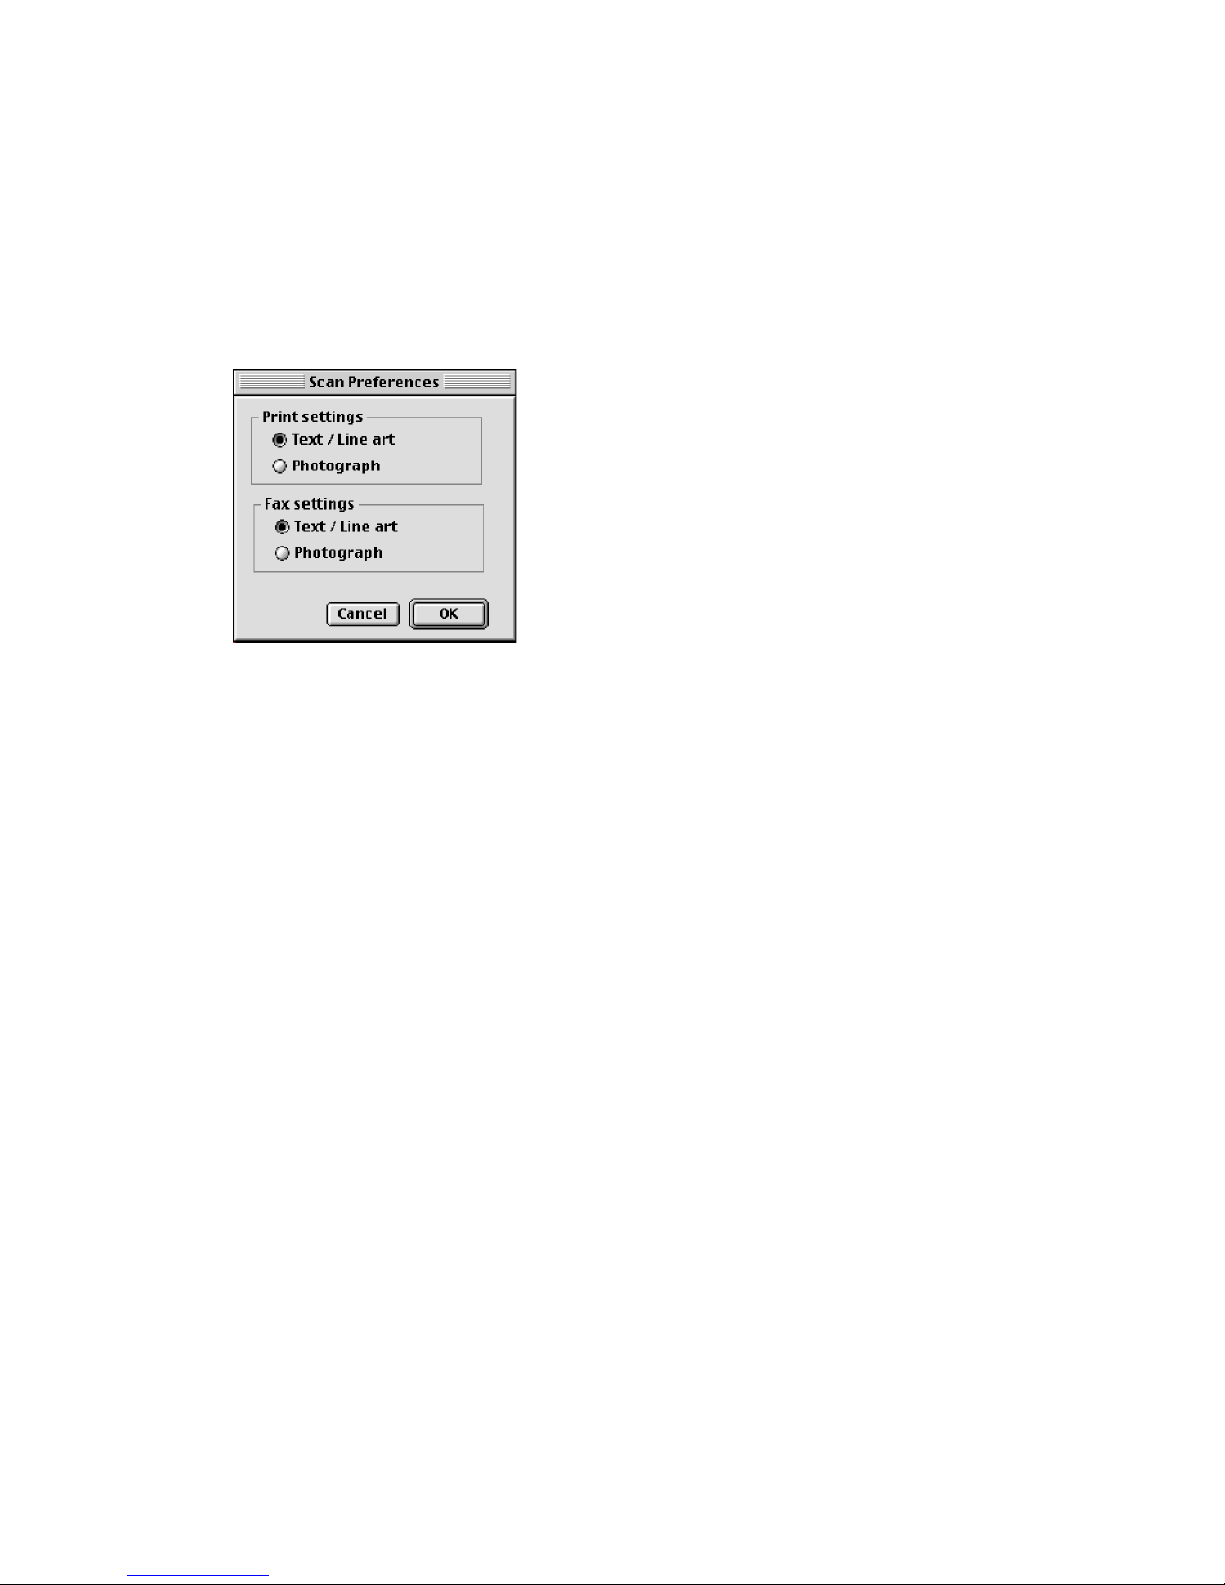
1. Choose Scan Preferences from the Edit menu.
2. Click the Text/Line art button in the Fax Settings area to fax text and line art documents, or click
the Photograph button to fax photos. Click OK.
Selecting the Fax Print Driver
To select the fax driver (only required the first time you fax from the CanoScan Toolbox CS):
1. Click on the Fax button from the CanoScan Toolbox CS Main window.
2. Locate the fax driver in the Select a Fax Driver dialog box, click to highlight the driver and click
Open.
To change the fax driver, delete the CanoScan Toolbox Prefs file in the Preferences folder in the System
Folder. Then set the new driver with the method above. Here, all other settings will be initialized.
Scanning and Faxing a Document
To scan and fax a document:
1. Place the document you want to fax in the scanner.
2. Click on the Fax button from the CanoScan Toolbox CS Main window.
3. The document is scanned. The selected fax driver launches the fax application so you can fax the
scanned document.
Page 10
10CanoScan Toolbox CS
10. Printing Copies of a Scanned Image
You can use your scanner and printer to make black and white or color copies of any scanned image.
Setting the Copy Preferences
To set the optimum scanning preferences for copying:
1. Choose Scan Preferences from the Edit menu.
2. Click the Text/Line art button in the Print Settings area to copy text and line art documents, or
Photograph button to copy photos. Click OK.
Copying a Document
To copy documents using your scanner and printer:
1. Place the image you want to copy in the scanner.
2. Click the Copy button in the CanoScan Toolbox CS Main window. The Print Job dialog box opens.
3. Enter the number of copies you want to print in the Copies field.
4. Specify a page range.
5. Choose the paper source to print from a different source.
6. Click the Print button. The image is scanned and the number specified copies are printed.
NOTE:
The information you enter in steps 3 through 5 above varies depending on the type of printer you
are using.
Page 11
CanoScan Toolbox CS
11
11. Enhancing a Scanned Image
The CanoScan Toolbox CS provides a wide variety of imaging tools you can use to modify and enhance
images you scan.
Cropping a Scanned Image
To crop an image:
1. Open the image you want to crop by choosing Open Image from the File menu, or click the Scan
button from the CanoScan Toolbox CS Main window.
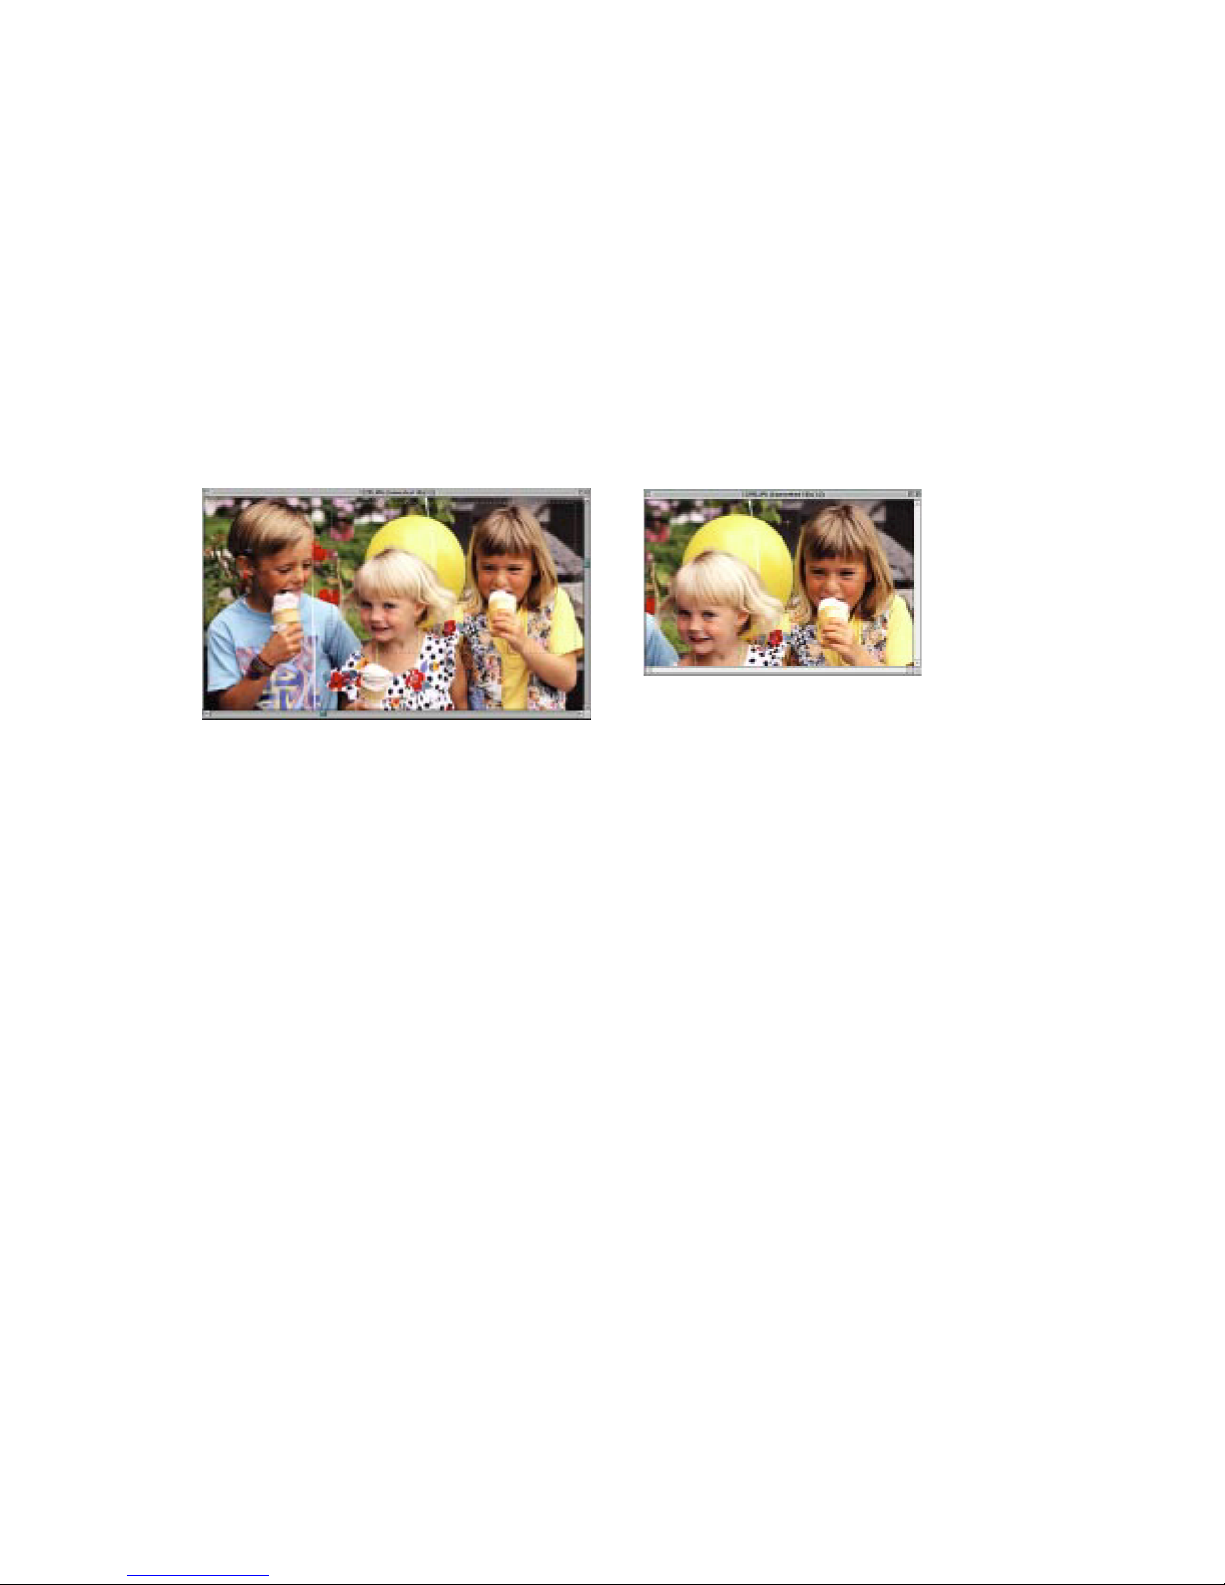
2. Select either the Rectangle Select tool (to select regular shapes) or the Lasso tool (to select
irregular shapes) from the editing toolbox and move the cursor over the image window.
3. Click and drag the cursor over the image, so the portion of the image you want to keep is contained
inside the selection area.
4. Choose Crop from the Image menu. The area outside of the selected portion of the image is
discarded.
Changing the Image Viewing Size
To change the image viewing size:
1. Open the image you want to view using the Open Image command from the File menu, or scan a
new image by clicking on the Scan button.
2. Choose the Zoom In or Zoom Out command from the Image menu, or click the Magnifier tool in
the Editing toolbox.
3. Position the cursor over the image window and click to enlarge the view (Zoom In) or press the
Option key and click the mouse to reduce the view (Zoom Out).
Zoom in on an image when you want to see more details in the image. Use the Zoom Out feature to see
more of the image.
NOTE:
Changing the image viewing size does NOT alter the actual image size. The zoom capabilities
only modify the image display.
Page 12
12CanoScan Toolbox CS
Inverting Image Tones
Inverting image tones makes a negative of the image.
To invert the tones in an image:
1. Open the image you want to invert using the Open Image command from the File menu, or scan a
new image by clicking on the Scan button.
2. Choose the Invert command from the Image menu.
Adjusting the Contrast and Brightness Settings
To adjust the contrast and brightness:
1. Open the image you want to adjust using the Open Image command from the File menu, or scan a
new image by clicking on the Scan button.
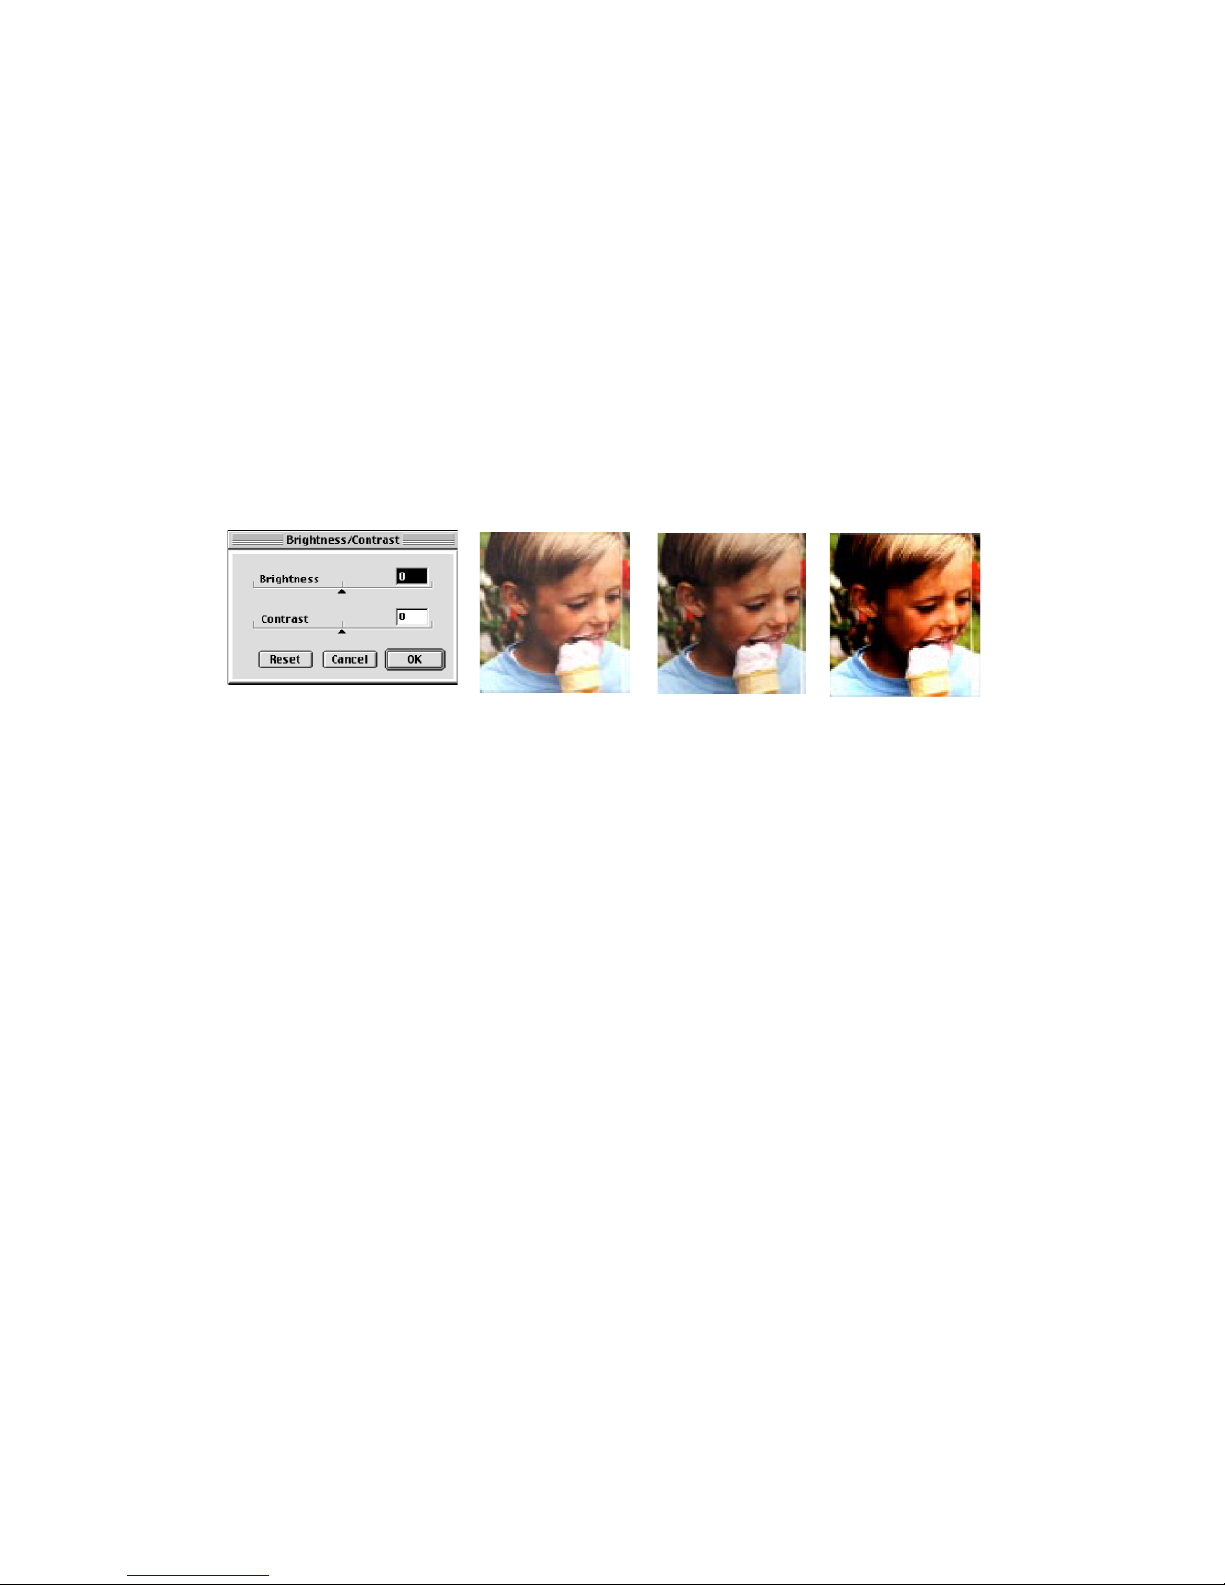
2. Choose Brightness/Contrast from the Image menu. The Brightness/Contrast dialog box displays.
3. Adjust the settings by moving the slider to the left or right, or by entering a number. Brightness
values range from -100 (dark) to 100 (light). Contrast values range from -100 (little contrast) to 100
(more contrast).
4. Click OK when you are finished, or Reset to return to the default image brightness and contrast
settings.
Adjusting the Color Balance
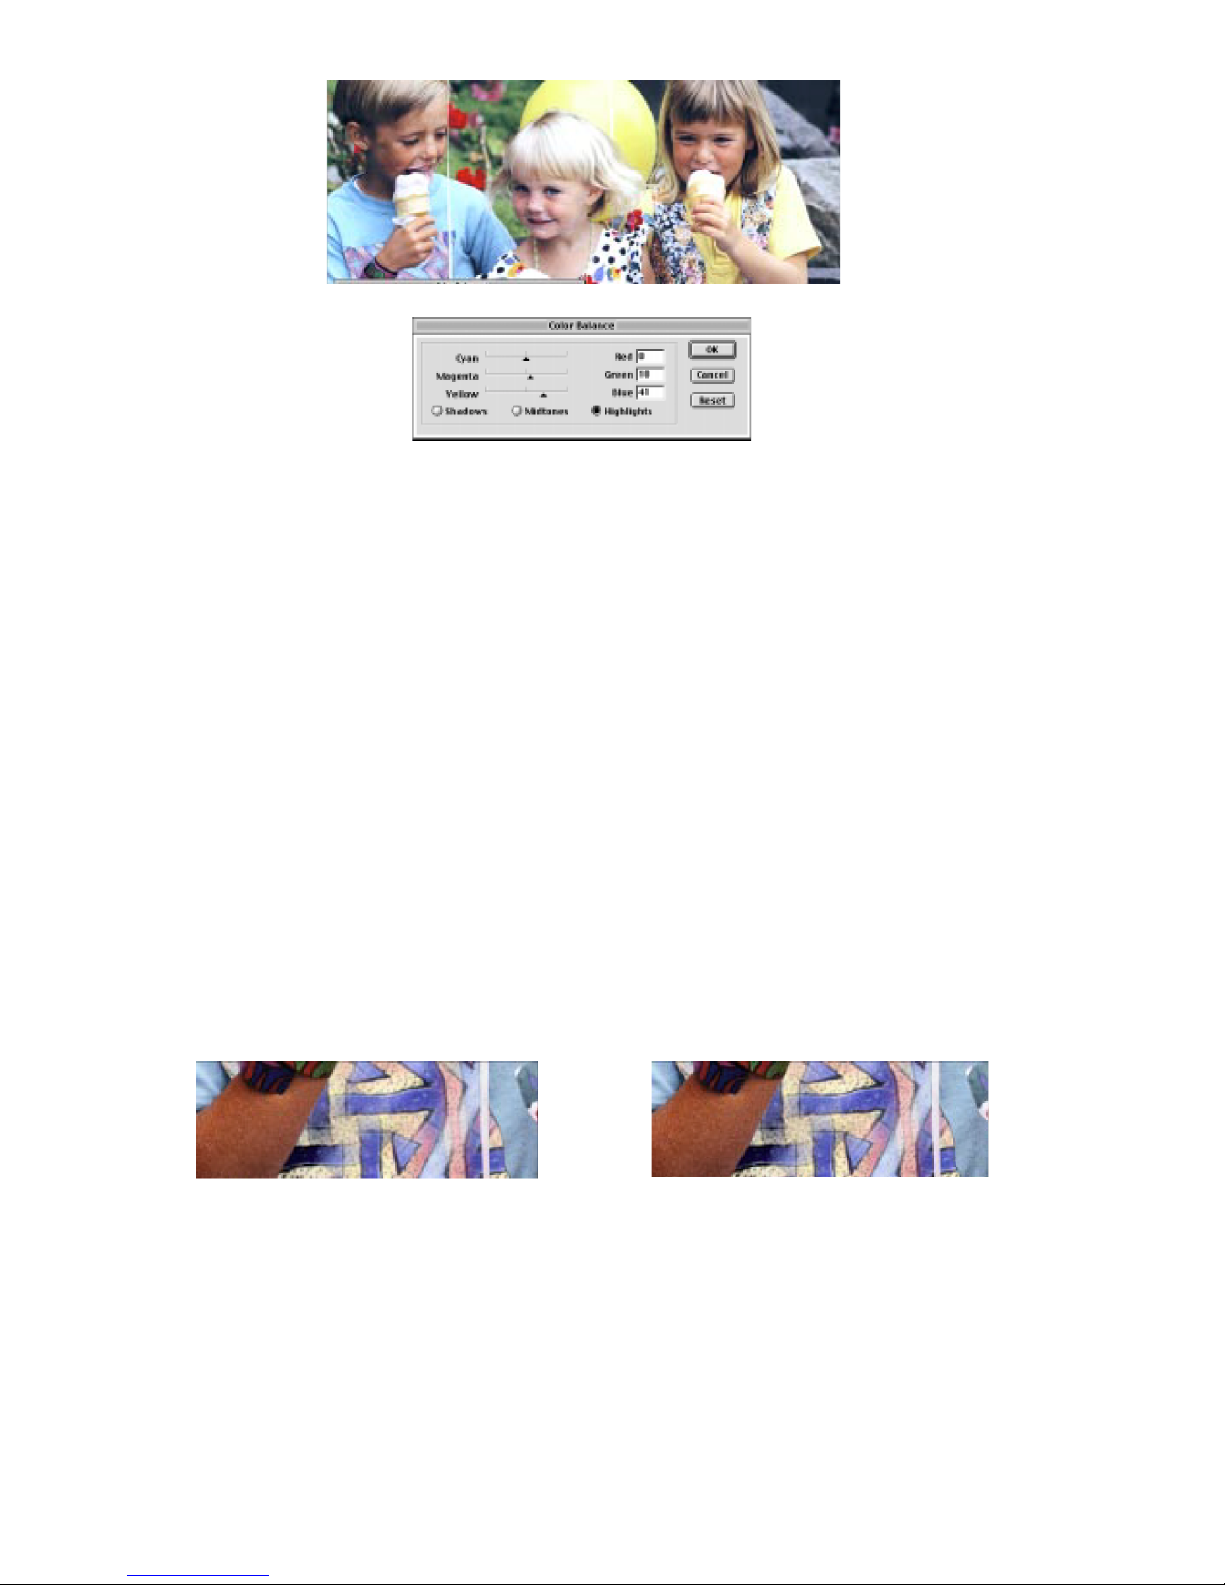
You can use the Color Balance feature to adjust the colors in an image.
To adjust the color balance of an image:
1. Open the image you want to adjust using the Open Image command from the File menu, or scan a
new image by clicking on the Scan button from CanoScan Toolbox CS Main window.
2. Choose the Color Balance command from the Image menu.
Page 13
CanoScan Toolbox CS
13
3. You can adjust the blue, red and yellow colors by moving the applicable slider to the left (to
decrease) or the right (to increase).
4. You adjust the color balance for specific color groups (i.e., modify the blue tones in the
shadows of an image) by clicking on one of the radio buttons and then moving the Cyan
slider.
5. Click OK when you are finished, or Reset to return to the default color balance settings.
Sharpening an Image
The CanoScan Toolbox CS Sharpen command has three options: A Little, A Lot and Unsharp
Masking.
To sharpen an image or a selected portion of an image:
1. Open the image you want to sharpen using the Open Image command from the File menu, or
scan a new image by clicking on the Scan button.
2. Click and hold the Sharpen command from the Image menu. Choose A Little from the
Sharpen submenu for a slight change, or choose A Lot for a significant change. The Sharpen
filter is automatically applied to the image.
To use the Unsharp Masking command:
1. Open the image you want to sharpen using the Open Image command from the File menu, or
scan a new image by clicking on the Scan button.
2. Click and hold the Sharpen command from the Image menu. Choose the Unsharp Masking
selection from the Sharpen submenu.
Sharpened - A Lot
Sharpened - A Little
Page 14

14CanoScan Toolbox CS
3. Specify the percentage of sharpening you want in the Amount field.
4. Enter a number in the Radius field to specify the distance (in pixels) from an edge you want to
sharpen. A low number indicates sharpening close to the image edges, and a higher number
indicates sharpening farther away.
5. Enter a number in the Threshold field to specify the level at which pixels are sharpened.
6. Click OK to sharpen the image.
Page 15

CanoScan Toolbox CS
15
12. Editing a Scanned Image
CanoScan Toolbox CS provides a wide variety of editing commands and tools you can use to modify
images.
Resizing a Scanned Image
Resizing an image changes the actual image size.
To resize an image:
1. Open the image you want to resize using the Open Image command from the File menu, or scan a
new image by clicking on the Scan button.
2. Choose Resize from the Image menu.
3. Choose the unit type (pixels, inches or centimeters).
4. Type the desired size in the New Size section of the dialog box. Check Preserve Aspect Ratio to
maintain the original image height and width ratio.
5. Click OK to resize the image.
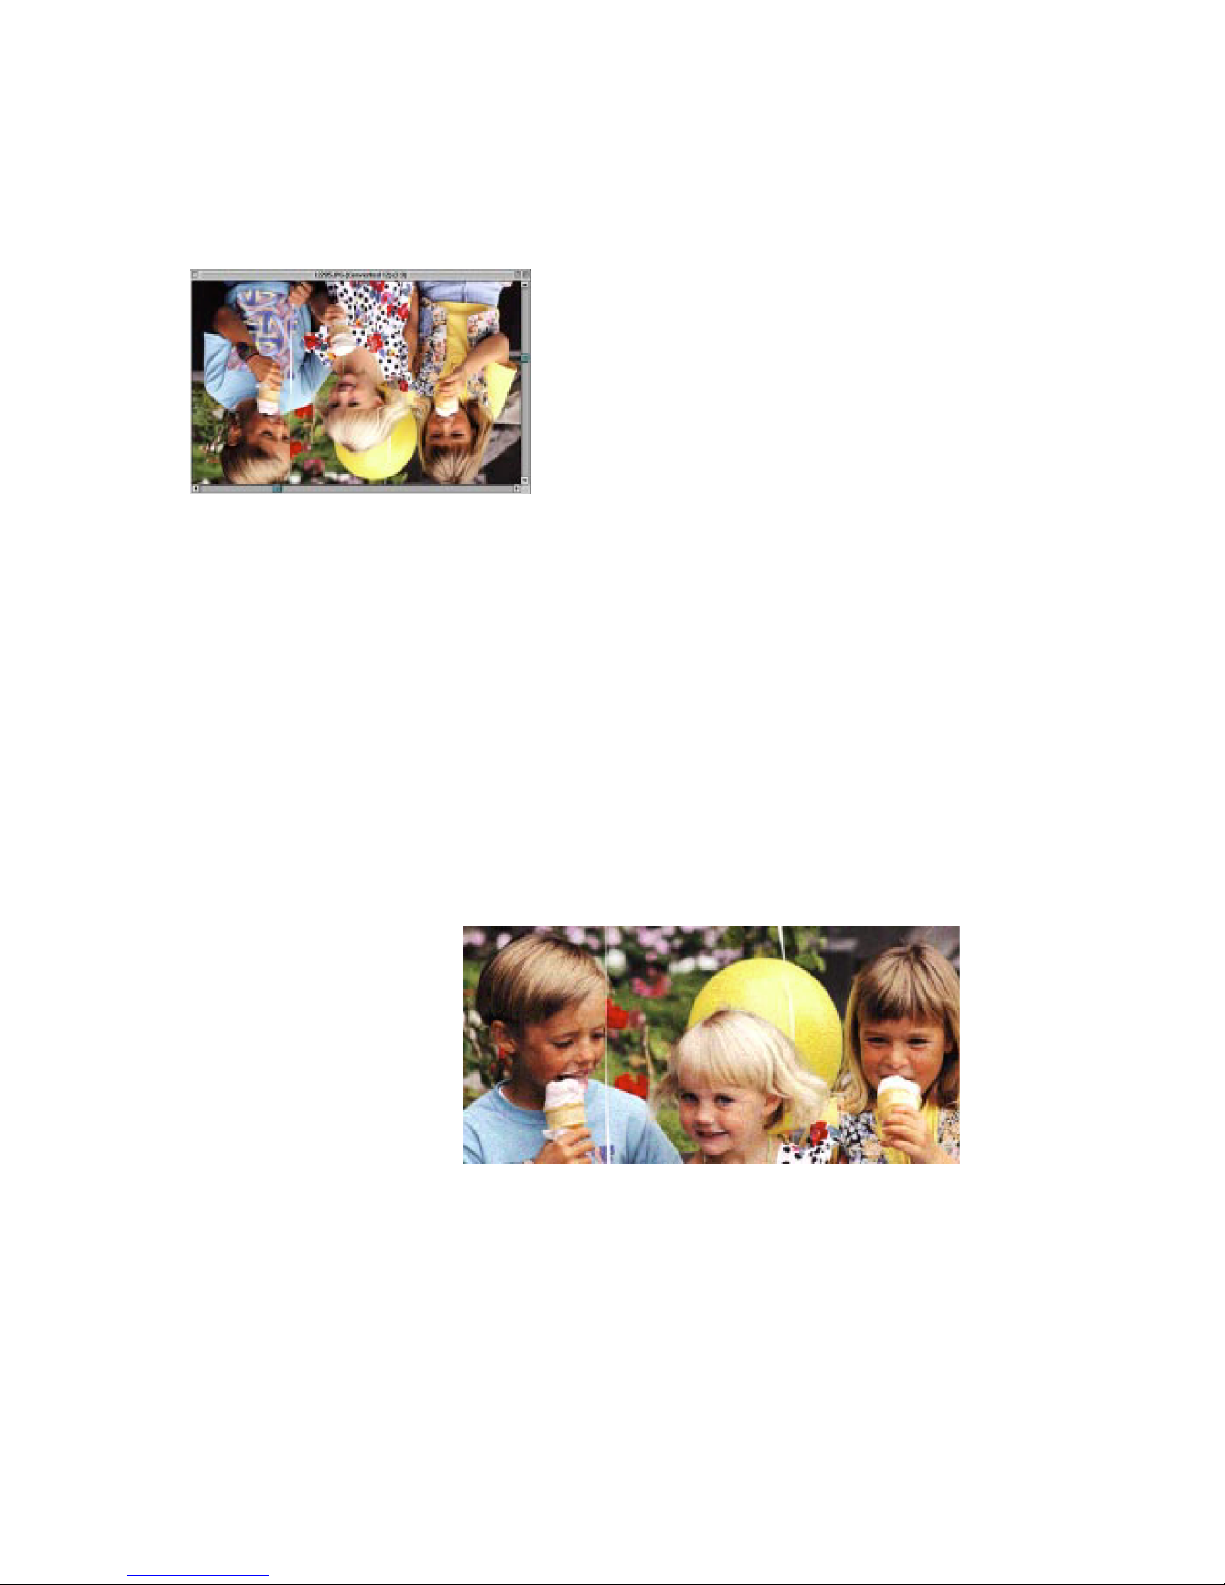
Rotating an Image
You can use the Rotate commands to rotate all or part of an image 90º, 180º or specify the degree of
rotation.
To rotate an image:
1. Open the image you want to rotate using the Open Image command from the File menu, or scan a
new image by clicking on the Scan button.
2. Choose the Rotate command from the Image menu. Select one of the following rotation options:
90º Left
90º Right
180º
Arbitrary Rotate (rotates the image to a specified setting)
Page 16
16CanoScan Toolbox CS
Flipping a Scanned Image
To flip an image or a selected portion of an image:
1. Open the image you want to flip using the Open Image command from the File menu, or scan a new
image by clicking on the Scan button.
2. Choose Flip from the Image menu, then select Vertical or Horizontal from the Flip submenu.
3. The image is automatically flipped.
Changing the Image Depth
You can change the actual image file size by changing the image depth.
NOTE:
Changing the image depth does NOT change the image dimensions. It changes the saved file size.
To change the image depth:
1. Open the image you want to change using the Open Image command from the File menu, or scan a
new image by clicking on the Scan button.
2. Choose the Image Depth command from the Image menu. Select one of the following image depth
options from the Image Depth submenu:
Millions of Colors
Thousand of Colors
256 System Colors
256 Custom Colors
256 Shades of Gray
16 Shades of Gray
Black and white
3. The image depth is automatically changed to reflect your selection.
Image depth reduced to 256 System Colors
Page 17

CanoScan Toolbox CS
17
Using Plug-in
You can utilize CanoScan Toolbox CS effectively by using various image adjusting and enhancing functions of Plug-in Module CS. Refer to the Plug-in Module CS User’s Guide bundled with your scanner for
its installation and functions.
Using the Editing Commands
The commands on the Edit menu allow you to cut, copy, paste, clear, select all, deselect, and set scanning
preferences for images.
Undo
To reverse the effects of a command you have selected, choose the Undo command.
Cut
To cut a portion of the image:
1. Select an area to cut using the select tool.
2. Choose the Cut command.
Copy
To copy a portion of the image:
1. Select an area to copy using the select tool.
2. Choose the Copy command.
Paste
To paste a selection onto the image:
1. Place the cursor where you want to put the selection.
2. Choose the Paste command.
Clear
To delete a portion of the image:
1. Select an area to delete by using the select tool.
2. Choose the Clear command.
Select All
To select everything in the image, choose the Select All command.
None
To deselect items you have selected using either the Lasso or Select tools, choose the None command.
Page 18
18CanoScan Toolbox CS
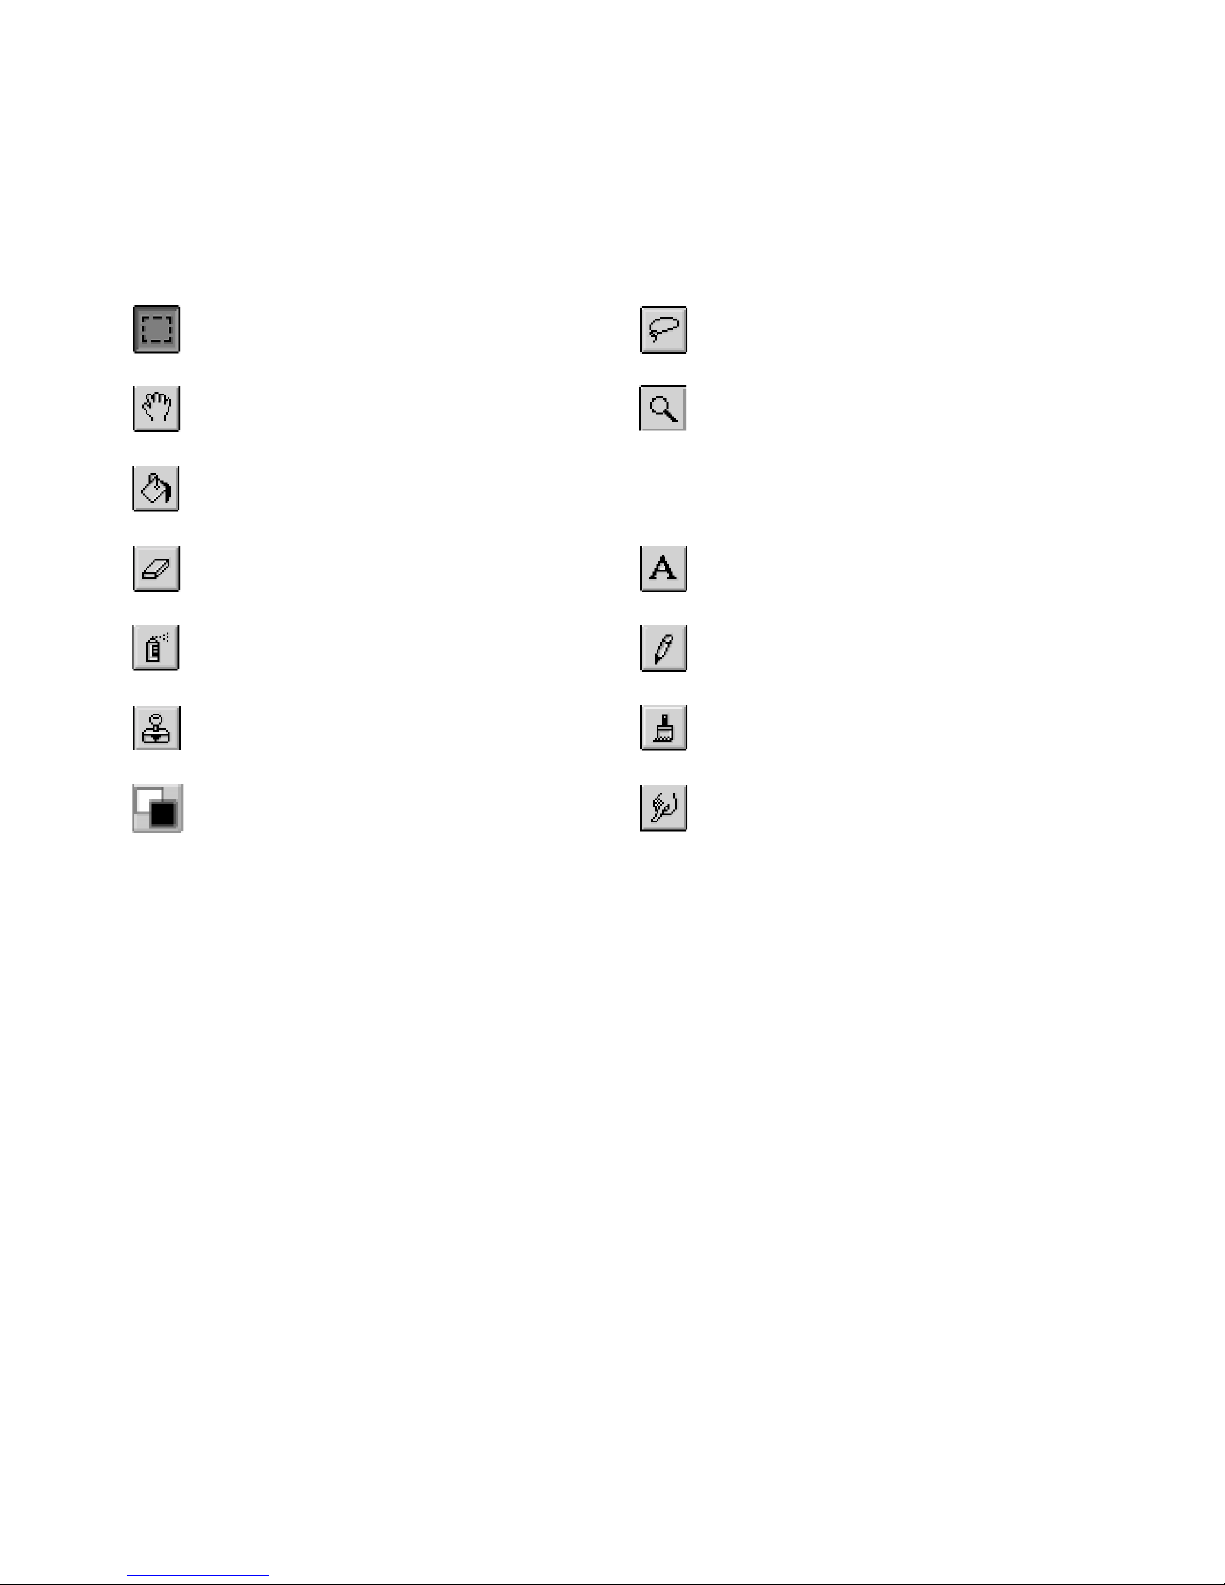
Using the Editing Tools
The CanoScan Toolbox CS editing tools appear when you open an image. You can also control the palette
display by using the Show/Hide Tools command from the Window menu.
To use an editing tool, click on the desired tool and then move your cursor over the image window. Notice
that the cursor changes shape to reflect the tool you have selected.
The image editing tools included with the CanoScan Toolbox CS are described below:
Smudge Tool: smears colors.
Rectangle Select Tool: defines a
rectangular area.
Hand Tool: moves a picture in
window.
Fill Tool: fills an area with color or
a tile pattern.
Eraser Tool: erases to the
background color.
Air Brush Tool: sprays smooth
color.
Clone Tool: paints with pixels
from another area.
Foreground/Background Color
Tool: replaces the foreground
color with the background color.
Lasso Tool: defines an irregular
area.
Magnify/Zoom Tool: changes
magnification level. Choosing
Actual Size from the Image menu
resets the image to the original
image size.
Text Tool: adds text to annotate
the picture.
Pencil Tool: draws freehand.
Paint Tool: paints freehand.
Page 19
CanoScan Toolbox CS
19
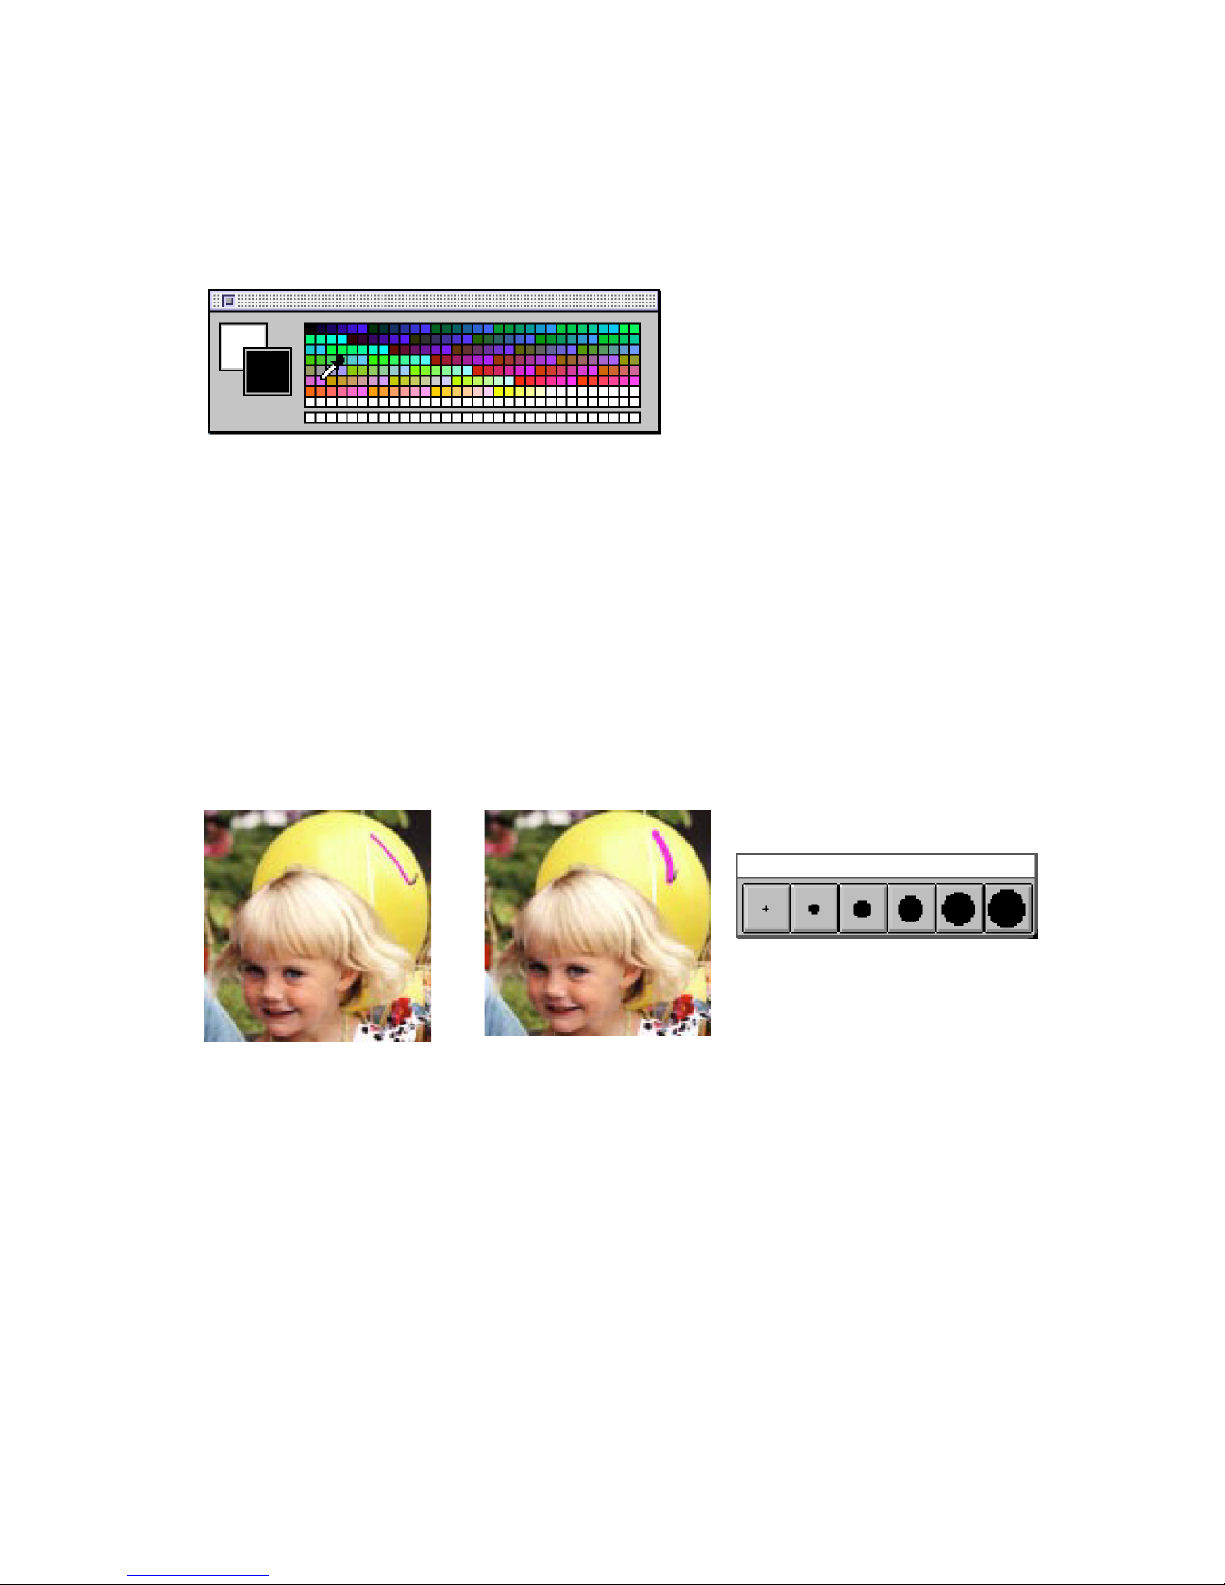
Using the Color Pallet
The CanoScan Toolbox CS color pallet appears when you open an image. You can also control the palette
display by using the Show/Hide Tools command from the Window menu.
To select a color from the color pallet to use with the Fill, Air Brush, Freehand Paint or Pencil tools:
1. Move your cursor over the desired color block and click.
2. Select the desired editing tool and start editing with the selected color.
Note that the selected color appears in the Foreground/Background Color tool.
Selecting a Brush Size
The CanoScan Toolbox CS Brush Size window appears when you open an image. You can also control
the palette display by using the Show/Hide Brushes command from the Window menu. The brush size
controls the width of the selected editing tool.
To select a different brush size, click on the desired size and then on the tool you want to use.
Brush palette
Larger brushSmall brush
Page 20
20CanoScan Toolbox CS
13. Working with Catalogs
Creating a Catalog
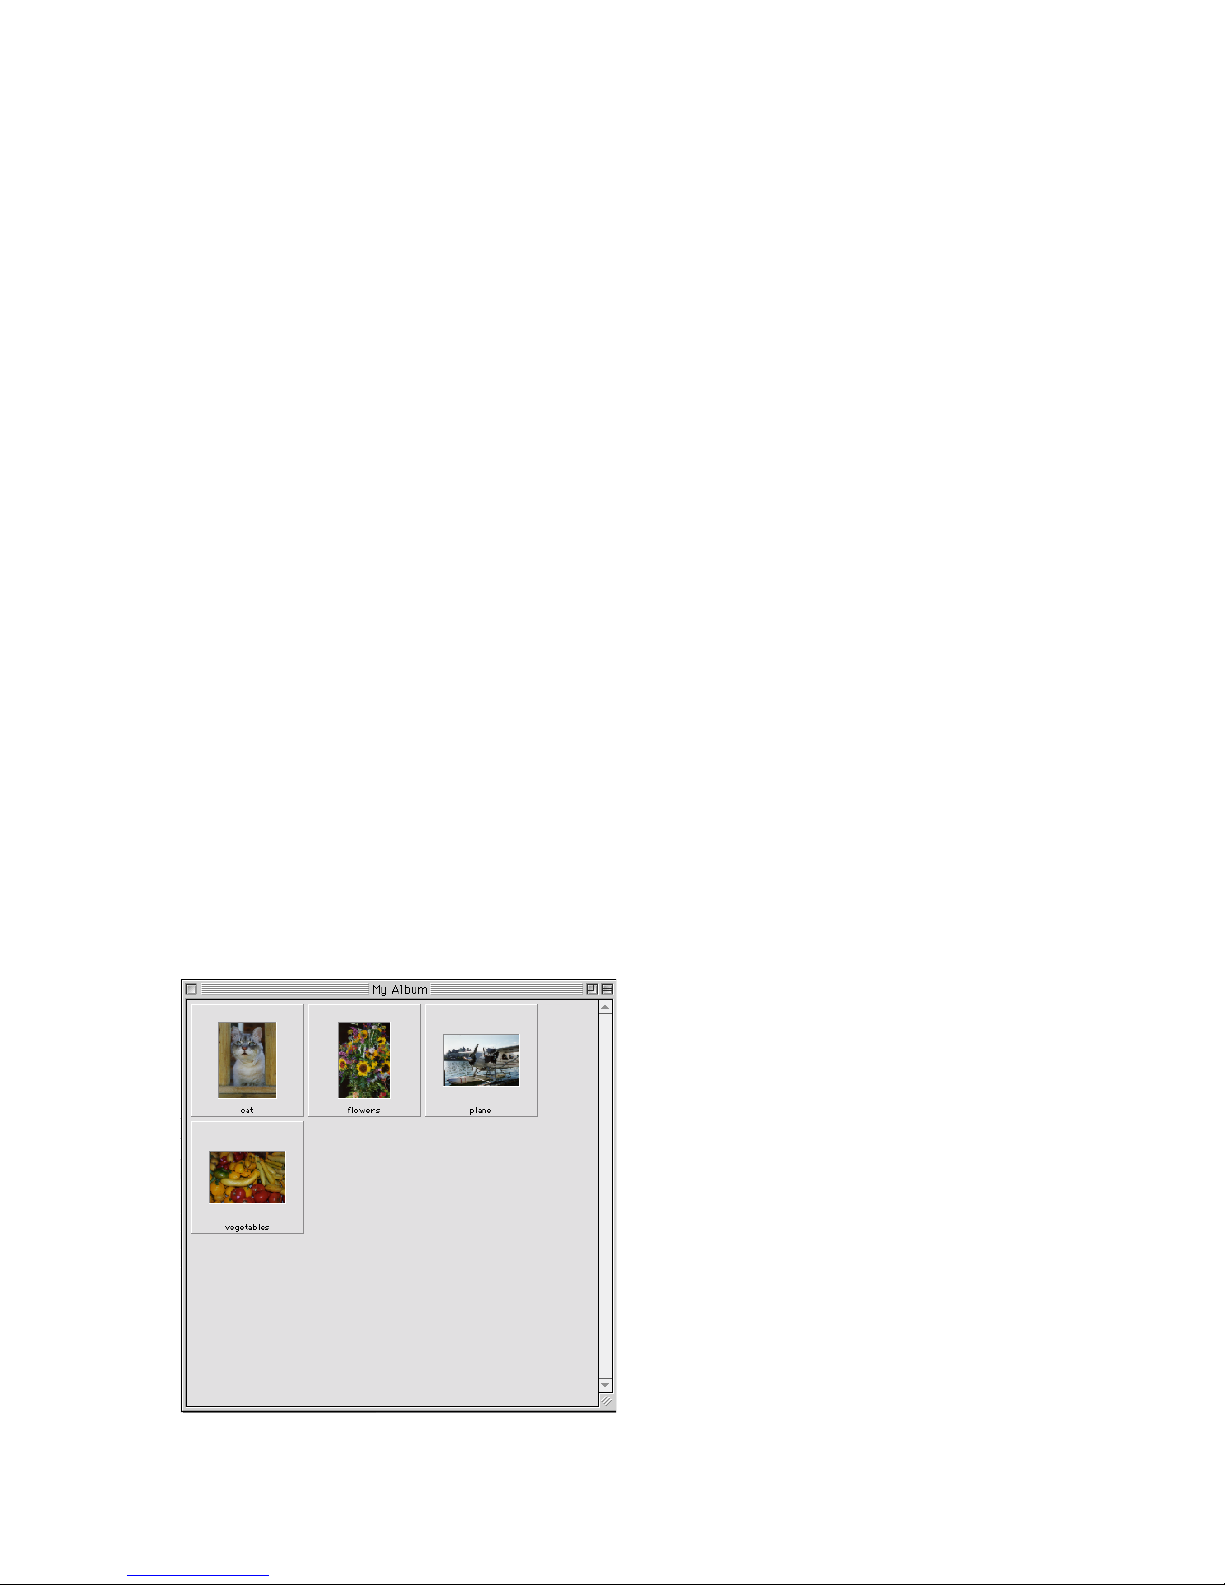
CanoScan Toolbox CS Catalogs are designed to let you look through many image files as you use a photo
album. When you open the catalog it displays all the images stored in the catalog in thumbnail form.
To create a catalog:
1. Choose New Catalog from the File menu, or click the Scan button to scan a new image. The New
Archive window appears.
2. Enter a catalog name.
3. Click the Create button. An empty catalog window opens. Now you can save related images to the
new catalog.
Saving an Image to a Catalog
To save an image to a catalog:
1. Create a new catalog.
2. Scan a new image or open a saved image.
3. Choose Save As from the File menu. Locate the catalog you created (catalogs appear as folders).
4. Double click to save the image in the catalog.
Viewing an Image Catalog
You can open a catalog so you can view and access the stored images.
To open a catalog window:
1. Choose Open Catalog from the File menu. The New Archive dialog box appears.
2. Select the desired catalog from the list box.
Page 21

CanoScan Toolbox CS
21
3. The selected catalog window opens displaying the images you have stored in the catalog in thumbnail form.
4. Choose the View By command from the Image menu to sort the thumbnails by name, type, date or
size.
Printing the Catalog View
You can print the open Catalog window to see all of the stored images in thumbnail format similar to a
traditional photographic contact sheet.
To print a catalog view:
1. Open the desired catalog window.
2. Choose the Print Catalog View command from the File menu.
3. Specify the number of copies to print and click the Print button.
Opening a Scanned Image from the Catalog
To open an image file you have stored in a catalog:
1. Open the catalog that contains the image you want to modify by choosing Open Catalog from the
File menu.
2. Double-click on the desired image to open the Image window. The Editing toolbox, Brush Size
pallet and Color Pallet windows open.
Page 22
22CanoScan Toolbox CS
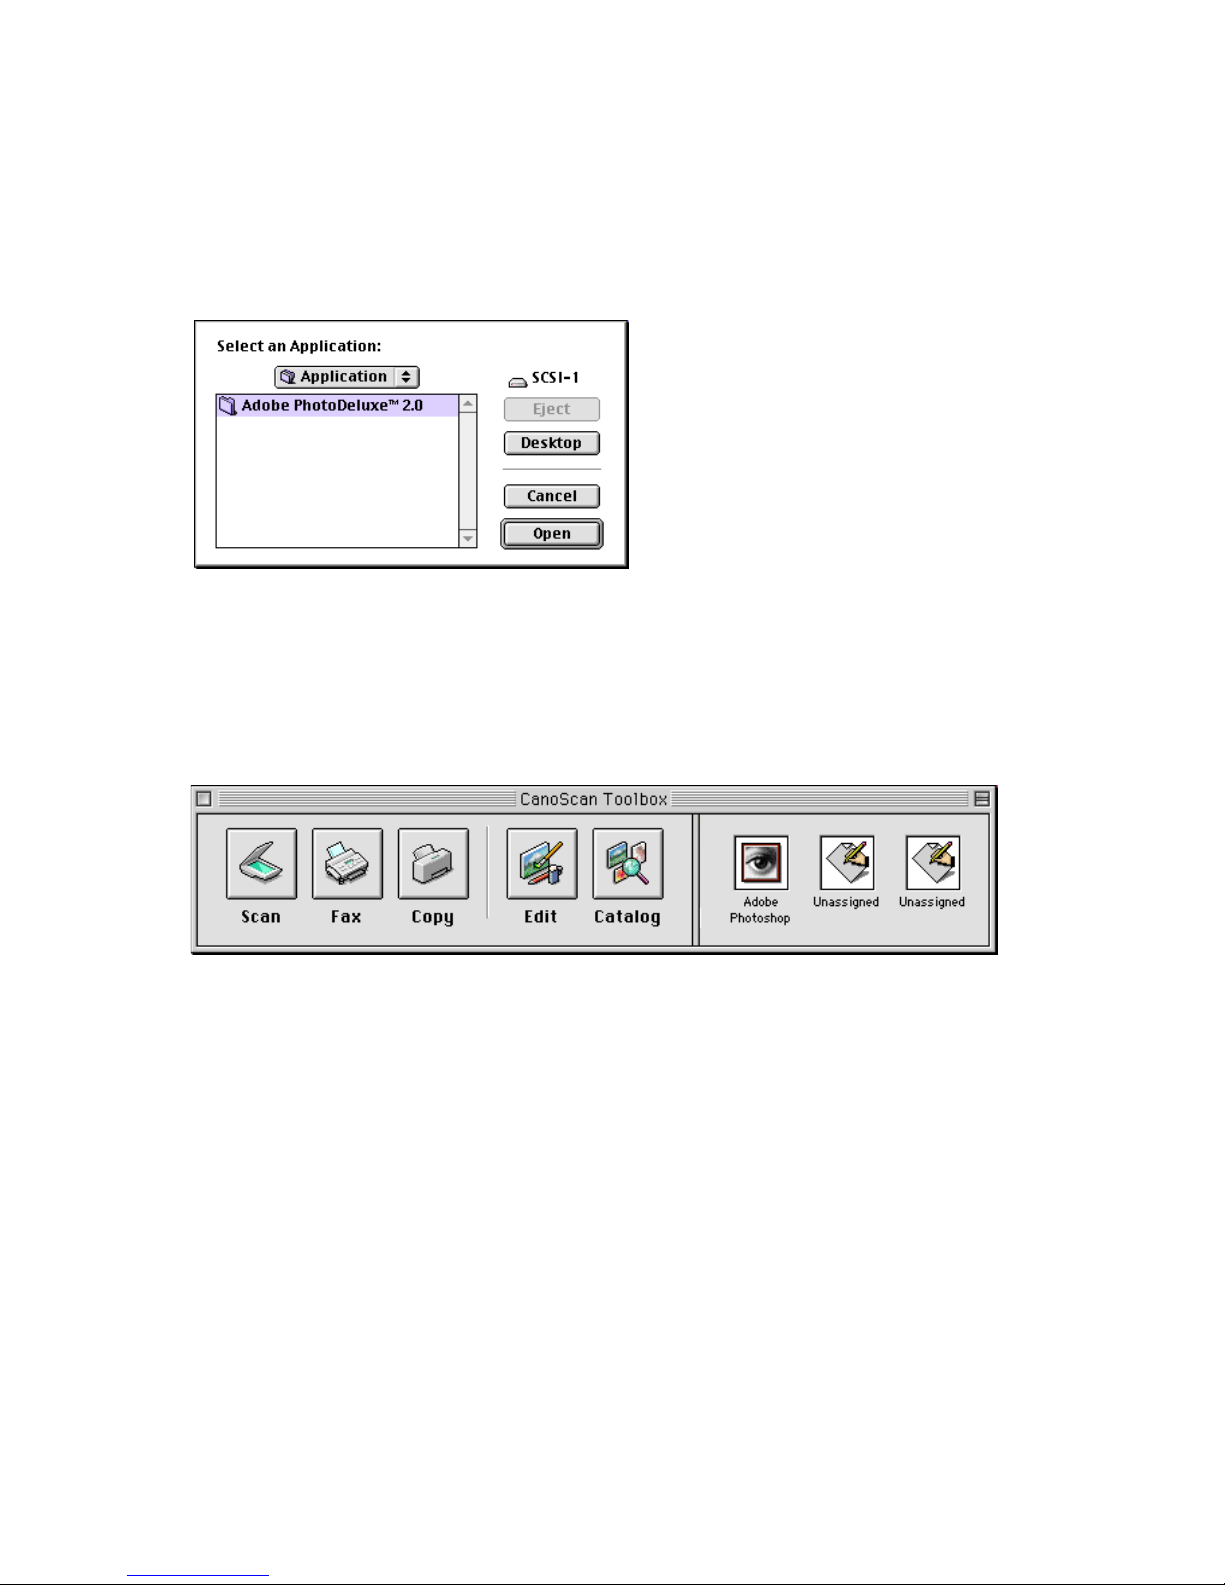
14. Linking Applications to the CanoScan Toolbox CS
You can link frequently used applications such as Optical Character Recognition (OCR), photo retouching
and Email applications to the CanoScan Toolbox CS Main window so you can access them from
the CanoScan Toolbox CS.
To link an application:
1. Click on one of the Unassigned buttons in the CanoScan Toolbox CS Main window.
2. Select the executable file for the application you want to include in the CanoScan Toolbox CS Main
window.
3. Click Select to add the application to the CanoScan Toolbox CS Main window.
The icon for the assigned application appears as a button in the CanoScan Toolbox CS Main window.
To access the application you assigned to the main button bar, drag an image in the album onto the application icon.
The application launches so you can work with the image.
I-OE-033AA
 Loading...