

Canon Printers, SELPHY ES Series, SELPHY CP series, PIXMA Series, SELPHY DS Series User Manual
...Page 1
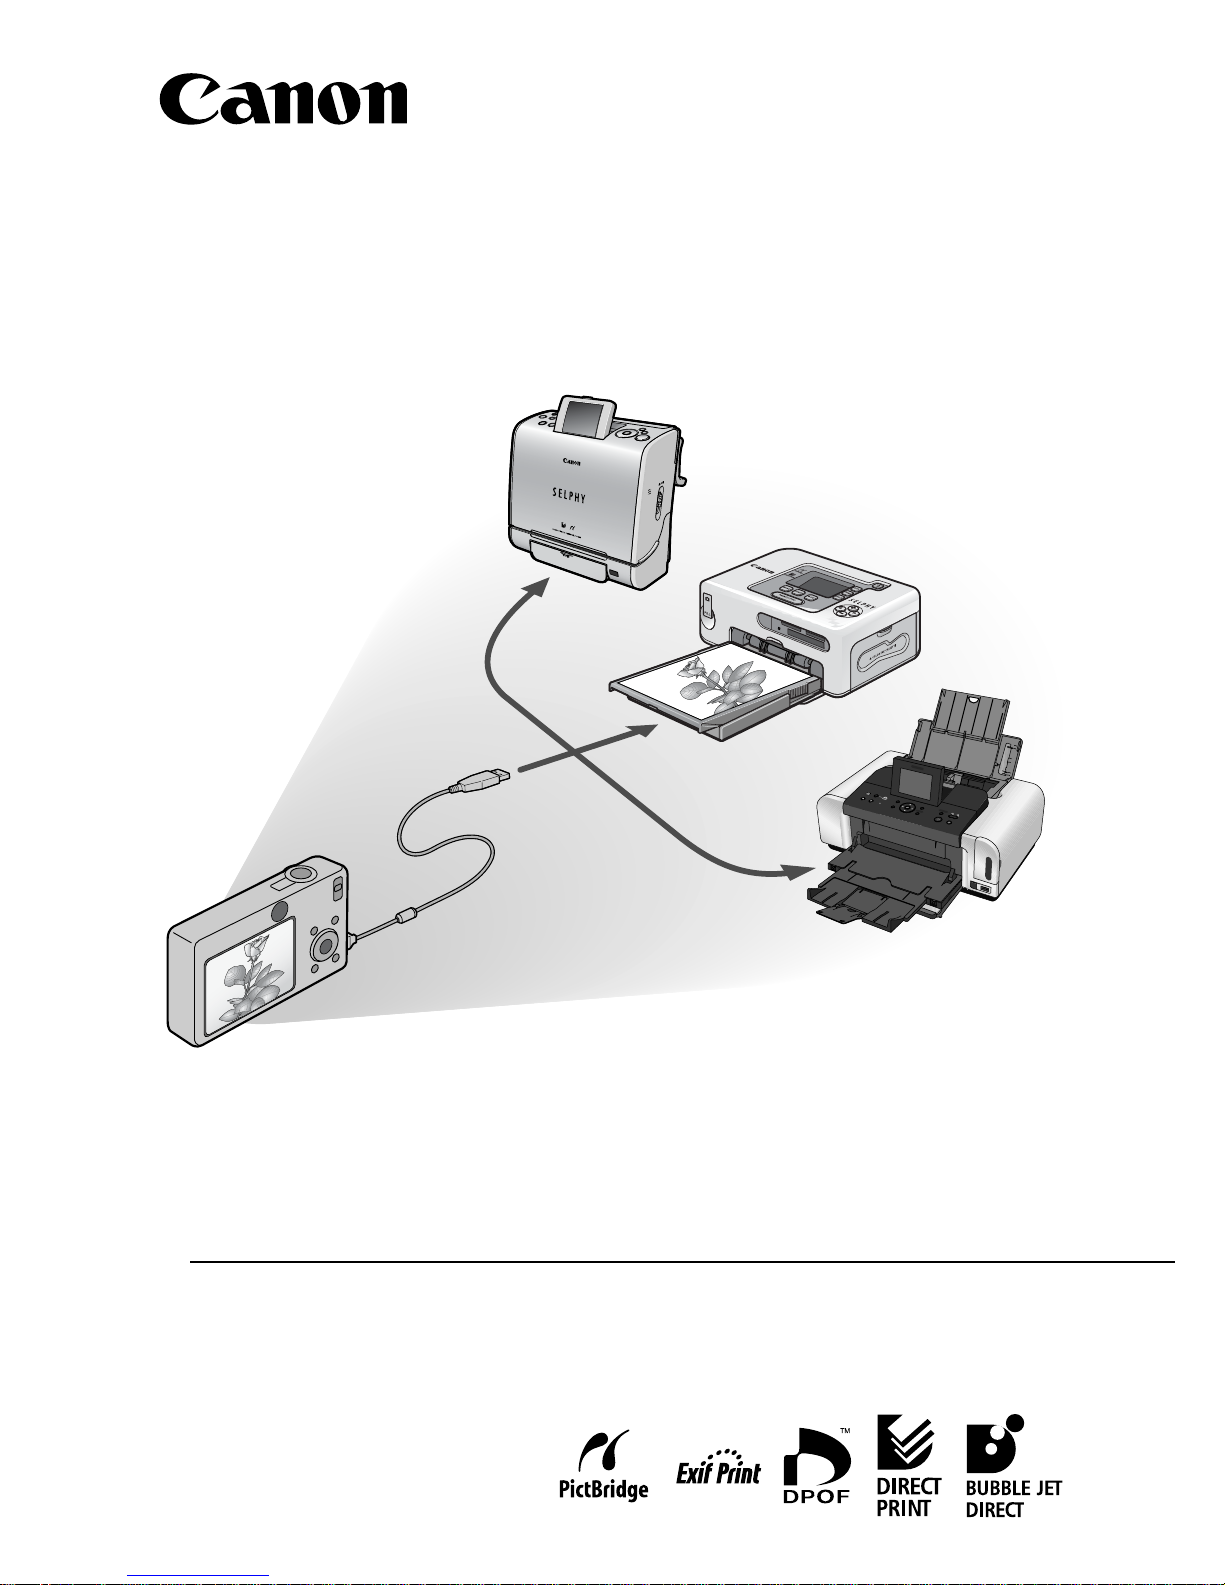
Direct Print User Guide
You don’t even need a computer !
Just connect your camera to your printer and print
Page 2
ENGLISH
Introduction
—
Confirm Your Printer Model and the Section that Applies to You
Operations differ according to your printer model.
According to the procedure below, confirm the section and page
you should read in this user guide.
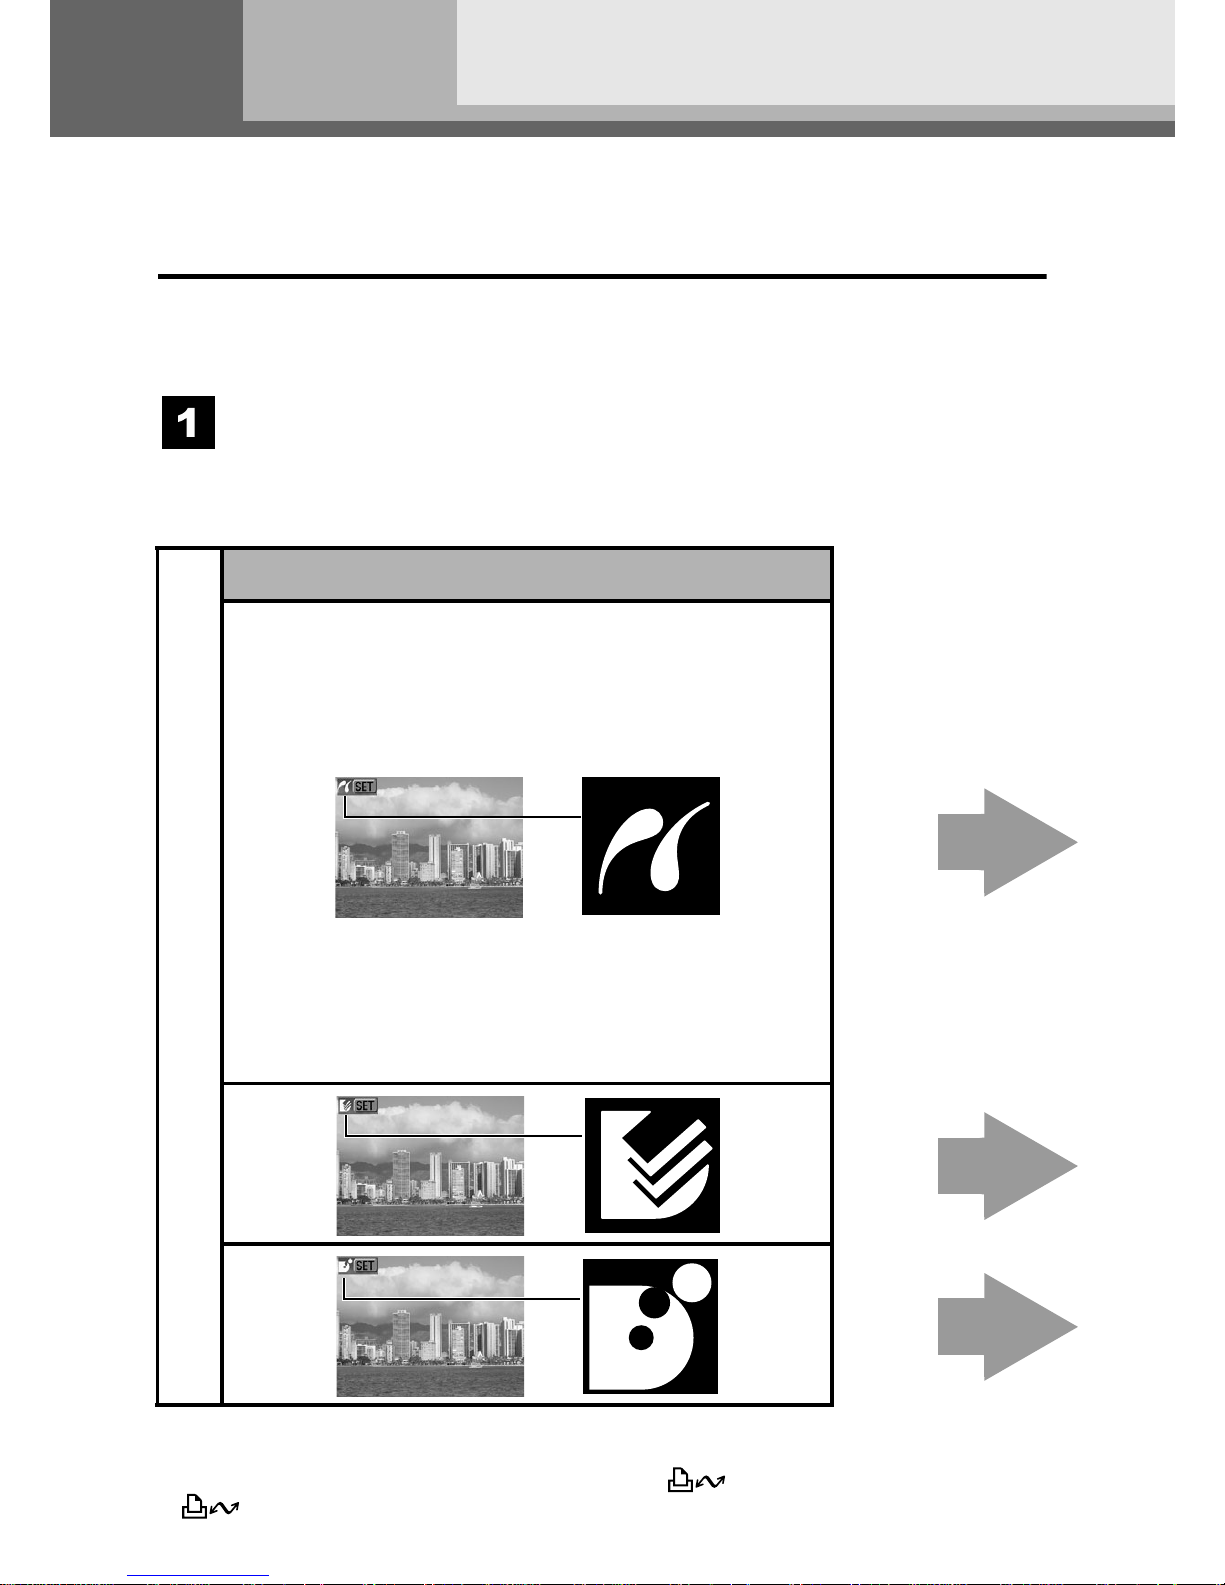
Connect the camera to the printer with an appropriate cable
and confirm the icon displayed in the camera's LCD monitor.
• For instructions on camera and printer connection methods,
please refer to page 8.
• If one of the aforementioned icons does not appear, the connected printer
cannot be used.
• When the printer is ready for printing, the button lights in blue. The
button blinks during printing.
Confirming the section that applies to you
Icons displayed in the camera's LCD monitor
Page 3
1
* Please also refer to the user guide that came with your printer.
Depending on the camera model, the screens that will be
displayed will vary. Moreover, available settings differ depending
on the printer model and the paper size (unavailable settings will
not appear in the menu). For details, refer to the user guide that
came with your printer.
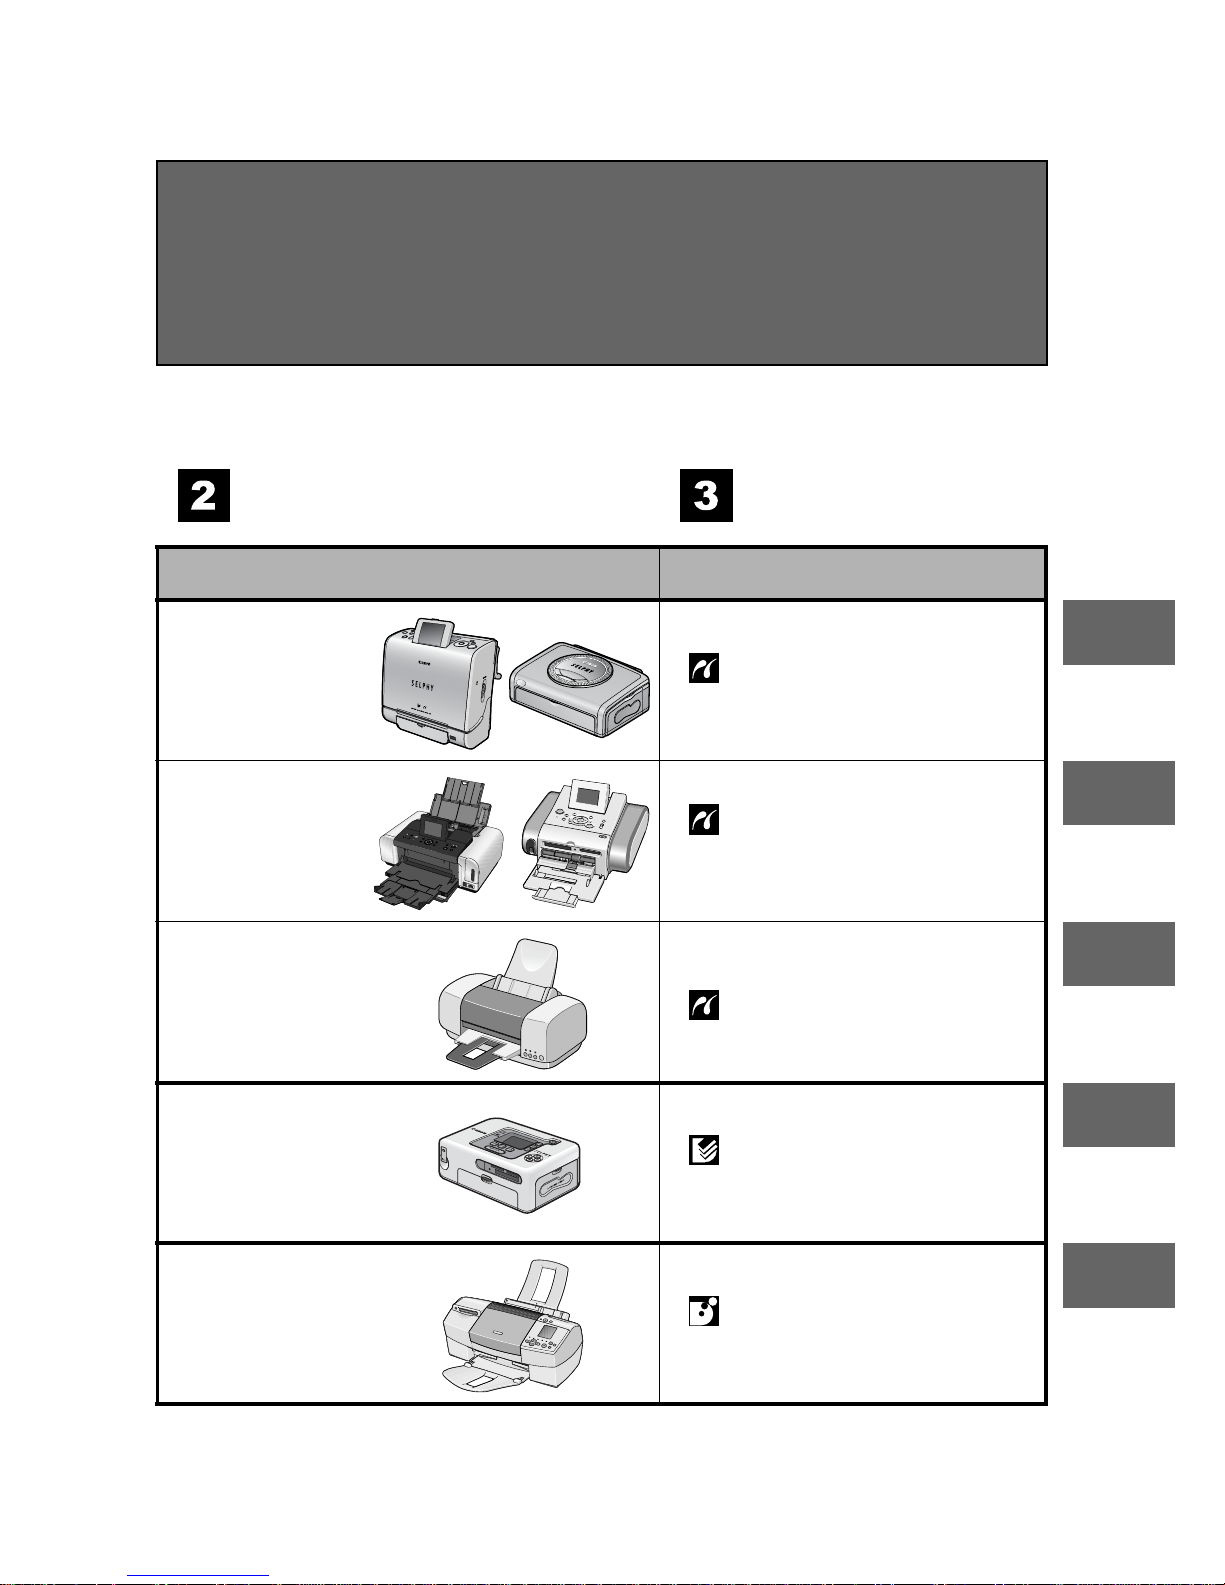
Confirm your printer
model.
Read the page
below.
Printer model
Refer to the sections indicated
SELPHY ES/
SELPHY CP
series
Page 10
" Printing with SELPHY ES
Series/SELPHY CP Series
Printers using PictBridge"
PIXMA/
SELPHY DS
series
Page 32
" Printing with Bubble Jet
Printers (PIXMA series/
SELPHY DS series) using
PictBridge"
Non-Canon
printers*
Page 52
" Printing with Non-Canon,
PictBridge Compliant Printers"
SELPHY CP
series
Page 53
" Printing with SELPHY CP
Series Printers using Canon
Direct Print"
Bubble Jet
printers
Page 71
" Printing with Bubble Jet
Printers using Bubble Jet
Direct"
Page 4
2
Copyright © 2006 Canon Inc. All rights reserved.
For the latest information regarding connections between Canon
printers and cameras, please refer to the following URL:
http://web.canon.jp/Imaging/BeBit-e.html
http://www.canon.com/pictbridge/
PictBridge Compliance
This camera complies with the industry standard “PictBridge”*.
This allows you to also connect your camera to non-Canon
PictBridge compliant printers and print images with simple
operations using the camera buttons.
* PictBridge: PictBridge is an industry standard for direct printing that
allows you to print images without using a computer by directly
connecting digital cameras and digital camcorders (hereafter “camera”)
to a printer, regardless of the devices’ brand and model.
Disclaimer
• No part of this guide may be reproduced, transmitted, transcribed, stored
in a retrieval system, or translated into any language in any form, by any
means, without the prior written permission of Canon.
• Canon reserves the right to change the specifications of the hardware
described herein at any time without prior notice.
• While every effort has been made to ensure that the information contained
in this guide is accurate and complete, no liability can be accepted for any
errors or omissions.
• Canon makes no warranties for damages resulting from corrupted or lost
data due to a mistaken operation or malfunction of the camera, the
software, the memory cards, personal computers, peripheral devices, or
use of non-Canon memory cards.
Page 5

3
Table of Contents
Direct Print . . . . . . . . . . . . . . . . . . . . . . . . . . . . . . . . . . . . . . . 6
Allows for Printing without the Use of a Computer . . . . 6
Various Printing Operations Can Be Performed . . . . . . . 6
You Can Also Perform the Following Printing Operations . . 7
Printing Movies (Movie Print) . . . . . . . . . . . . . . . . . . . . . . 7
Printing Multiple Images on a Sheet of Paper . . . . . . . . . 7
ID Photo Print. . . . . . . . . . . . . . . . . . . . . . . . . . . . . . . . . . 7
Connecting the Camera to the Printer. . . . . . . . . . . . . . . . . 8
Disconnecting the Camera and the Printer. . . . . . . . . . . . . 9
Printing with SELPHY ES Series/SELPHY CP Series
Printers using PictBridge . . . . . . . . . . . . . . . . . . . . . . . 10
Printing . . . . . . . . . . . . . . . . . . . . . . . . . . . . . . . . . . . . . . . 10
Easy Print. . . . . . . . . . . . . . . . . . . . . . . . . . . . . . . . . . . . 10
Print after Changing the Print Settings. . . . . . . . . . . . . . 11
Selecting Print Settings . . . . . . . . . . . . . . . . . . . . . . . . . . 13
Setting the Date and the File Number Printing Option. . 13
Setting the Print Effect . . . . . . . . . . . . . . . . . . . . . . . . . . 14
Setting the Number of Copies . . . . . . . . . . . . . . . . . . . . 14
Setting the Printing Area (Trimming) . . . . . . . . . . . . . . . 15
Selecting the Paper Settings . . . . . . . . . . . . . . . . . . . . . 19
Printing Multiple Images on a Sheet of Paper . . . . . . 21
Printing by Specifying the Print Size
(ID Photo Print) . . . . . . . . . . . . . . . . . . . . . . . . . . . . . 22
Printing Images in the Fixed Size . . . . . . . . . . . . . . . 24
Printing Movies (Movie Print) . . . . . . . . . . . . . . . . . . . . . 25
Single-frame . . . . . . . . . . . . . . . . . . . . . . . . . . . . . . . 25
Sequence-frame . . . . . . . . . . . . . . . . . . . . . . . . . . . . 26
Specifying and Printing Multiple Images
(Setting the DPOF Print Settings) . . . . . . . . . . . . . . . . . . 28
List of Messages . . . . . . . . . . . . . . . . . . . . . . . . . . . . . . . 31
Page 6
4
Printing with Bubble Jet Printers (PIXMA series/
SELPHY DS series) using PictBridge . . . . . . . . . . . . . 32
Printing . . . . . . . . . . . . . . . . . . . . . . . . . . . . . . . . . . . . . . . .32
Easy Print . . . . . . . . . . . . . . . . . . . . . . . . . . . . . . . . . . . .32
Print after Changing the Print Settings . . . . . . . . . . . . . .33
Selecting Print Settings. . . . . . . . . . . . . . . . . . . . . . . . . . .35
Setting the Date and the File Number Printing Option . .35
Setting the Print Effect. . . . . . . . . . . . . . . . . . . . . . . . . . .36
Setting the Number of Copies . . . . . . . . . . . . . . . . . . . . .37
Setting the Printing Area (Trimming) . . . . . . . . . . . . . . . .38
Selecting the Paper Settings . . . . . . . . . . . . . . . . . . . . . .42
Printing Multiple Images on a Sheet of Paper. . . . . . .44
Printing Movies (Movie Print) . . . . . . . . . . . . . . . . . . . . .46
Specifying and Printing Multiple Images
(Setting the DPOF Print Settings). . . . . . . . . . . . . . . . . . .47
List of Messages . . . . . . . . . . . . . . . . . . . . . . . . . . . . . . . .50
Printing with Non-Canon, PictBridge Compliant Printers. . 52
Printing . . . . . . . . . . . . . . . . . . . . . . . . . . . . . . . . . . . . . . . .52
Printing with SELPHY CP Series Printers using
Canon Direct Print. . . . . . . . . . . . . . . . . . . . . . . . . . . . . 53
Printing . . . . . . . . . . . . . . . . . . . . . . . . . . . . . . . . . . . . . . . .53
Easy Print . . . . . . . . . . . . . . . . . . . . . . . . . . . . . . . . . . . .53
Print after Changing the Print Settings . . . . . . . . . . . . . .54
Selecting Print Settings. . . . . . . . . . . . . . . . . . . . . . . . . . .55
Setting the Number of Copies . . . . . . . . . . . . . . . . . . . . .55
Setting the Print Style (Image, Borders and Date) . . . . .55
Setting the Printing Area (Trimming) . . . . . . . . . . . . . . . .57
Printing by Specifying the Print Size (ID Photo Print) . . .61
Printing Movies (Movie Print) . . . . . . . . . . . . . . . . . . . . .64
Single-frame . . . . . . . . . . . . . . . . . . . . . . . . . . . . . . . .64
Sequence-frame . . . . . . . . . . . . . . . . . . . . . . . . . . . . .65
Specifying and Printing Multiple Images
(Setting the DPOF Print Settings). . . . . . . . . . . . . . . . . . .67
List of Messages . . . . . . . . . . . . . . . . . . . . . . . . . . . . . . . .70
If you use Canon Compact Photo Printer SELPHY
CP730/CP720/CP710/CP510 . . . . . . . . . . . . . . . . . . . . . . 53
Page 7
5
Printing with Bubble Jet Printers using Bubble Jet Direct. . . 71
Printing . . . . . . . . . . . . . . . . . . . . . . . . . . . . . . . . . . . . . . . 71
Setting the Print Style . . . . . . . . . . . . . . . . . . . . . . . . . . 72
Settings that Can Be Set with the Camera . . . . . . . . . . . . 74
SELPHY ES Series/SELPHY CP Series Printers
using PictBridge . . . . . . . . . . . . . . . . . . . . . . . . . . . . . . 74
Bubble Jet Printers (PIXMA series/SELPHY DS series)
using PictBridge . . . . . . . . . . . . . . . . . . . . . . . . . . . . . . 75
SELPHY CP Series Printers using Canon Direct Print
Bubble Jet Printers using Bubble Jet Direct . . . . . . . 77
Page 8
6
Direct Print
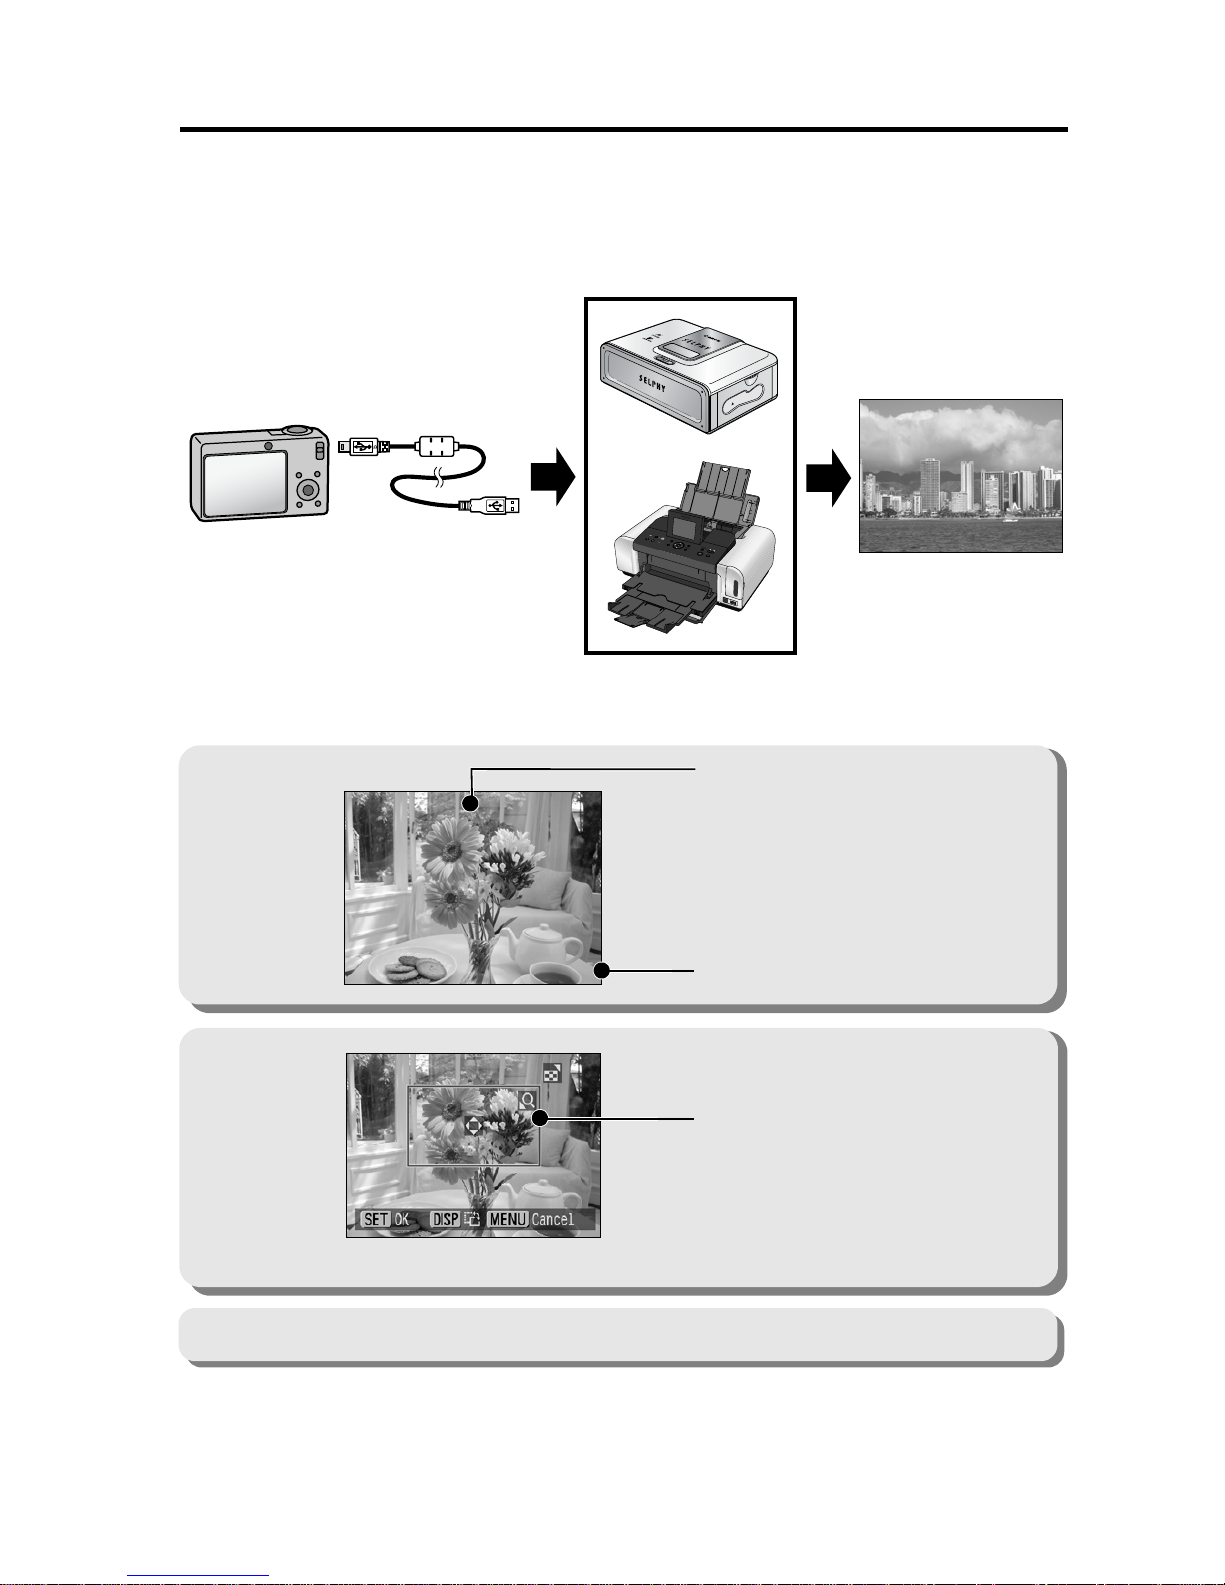
Allows for Printing without the Use of a Computer
Connect your camera to the printer with the appropriate cable.
Image selection and printing is operated from the camera.
Various Printing Operations Can Be Performed*
Multiple pictures can be printed at once. (DPOF print setting)
Prints to cover the entire
surface of the paper.
Or, prints with a border.
Add the date.
Specify which portion of
the image to print.
(Trimming)
09/09/2006
* Some settings may not be selectable for Non-Canon printers.
Page 9
7
You Can Also Perform the Following Printing Operations
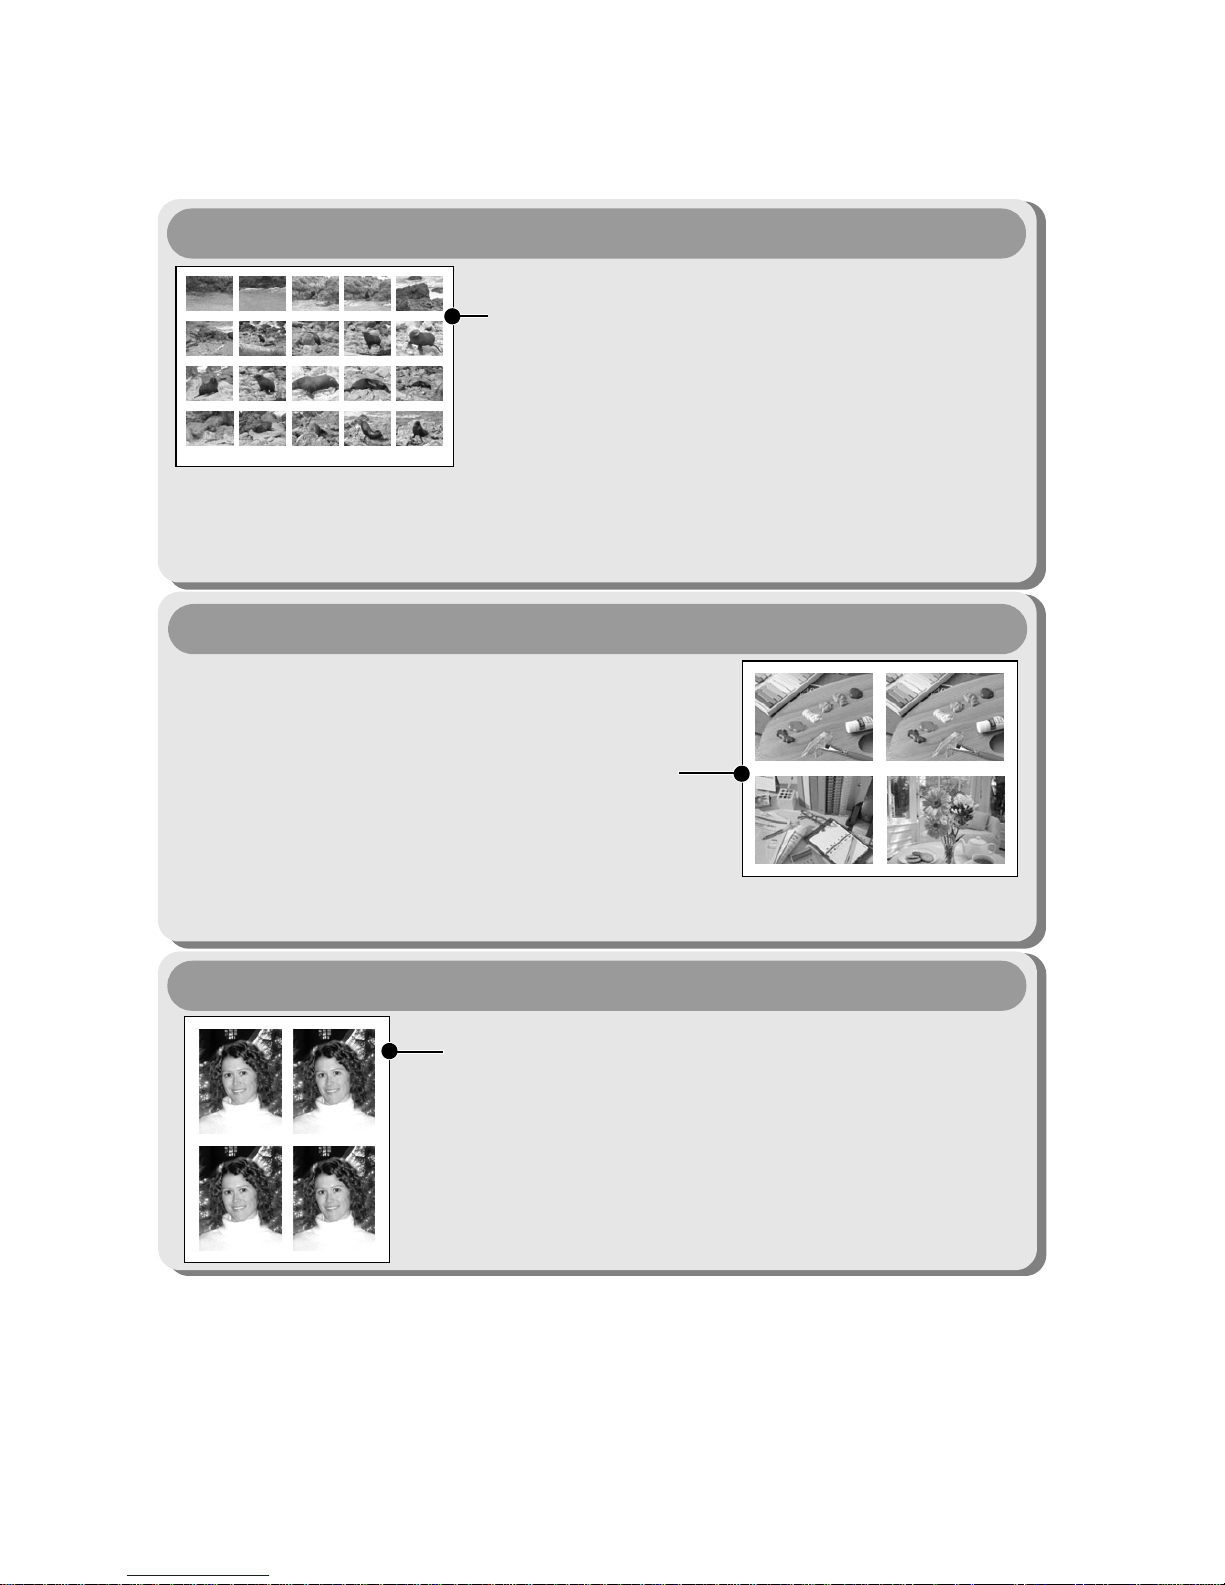
Printing Movies (Movie Print)
107-J006
6"25
12"50
18"75
1"25
7"50
13"75
20"00
2"50
8"75
15"00
21"25
3"75
10"00
16"25
22"50
5"00
11"25
17"50
23"75
You can print a single frame of movies or
extract movie frames at fairly regular intervals
and print them on a single sheet of paper
(pp. 25, 46, 64).
• Capable printers
Single-frame: Canon SELPHY ES Series/SELPHY CP Series Printers,
Printers using PictBridge (Including non-Canon printers)
Sequence-frame: Canon SELPHY ES Series/SELPHY CP Series Printers
Compositions of multiple images you specify
of the same dimensions can be printed on a
single sheet of paper (pp. 21, 44).
Moreover, the DPOF print setting* function
allows you to separately print different
images by specifying the number of frames
to be printed per image.
Printing Multiple Images on a Sheet of Paper
• Capable printers: Printers using PictBridge (Including non-Canon Printers)
(This function is not available on some printers.)
An image can be trimmed, laid out and printed
as ID photos (pp. 22, 61).
• Capable printers:Canon SELPHY ES
Series/SELPHY CP Series
Printers
ID Photo Print
Depending on the printer model, additional printing operations are available
as follows:
• Printing images in a fixed size (p. 24)
• Printing images with the shooting information (p. 43)
* DPOF print settings
This function allows you to preset the images and the number of copies using
the camera button controls. The settings are recorded to a memory card.
Please refer to the Camera User Guide for instructions on setting procedure.
This guide explains how to print images with DPOF print settings.
DPOF=Digital Print Order Format
Page 10
8
Connecting the Camera to the
Printer
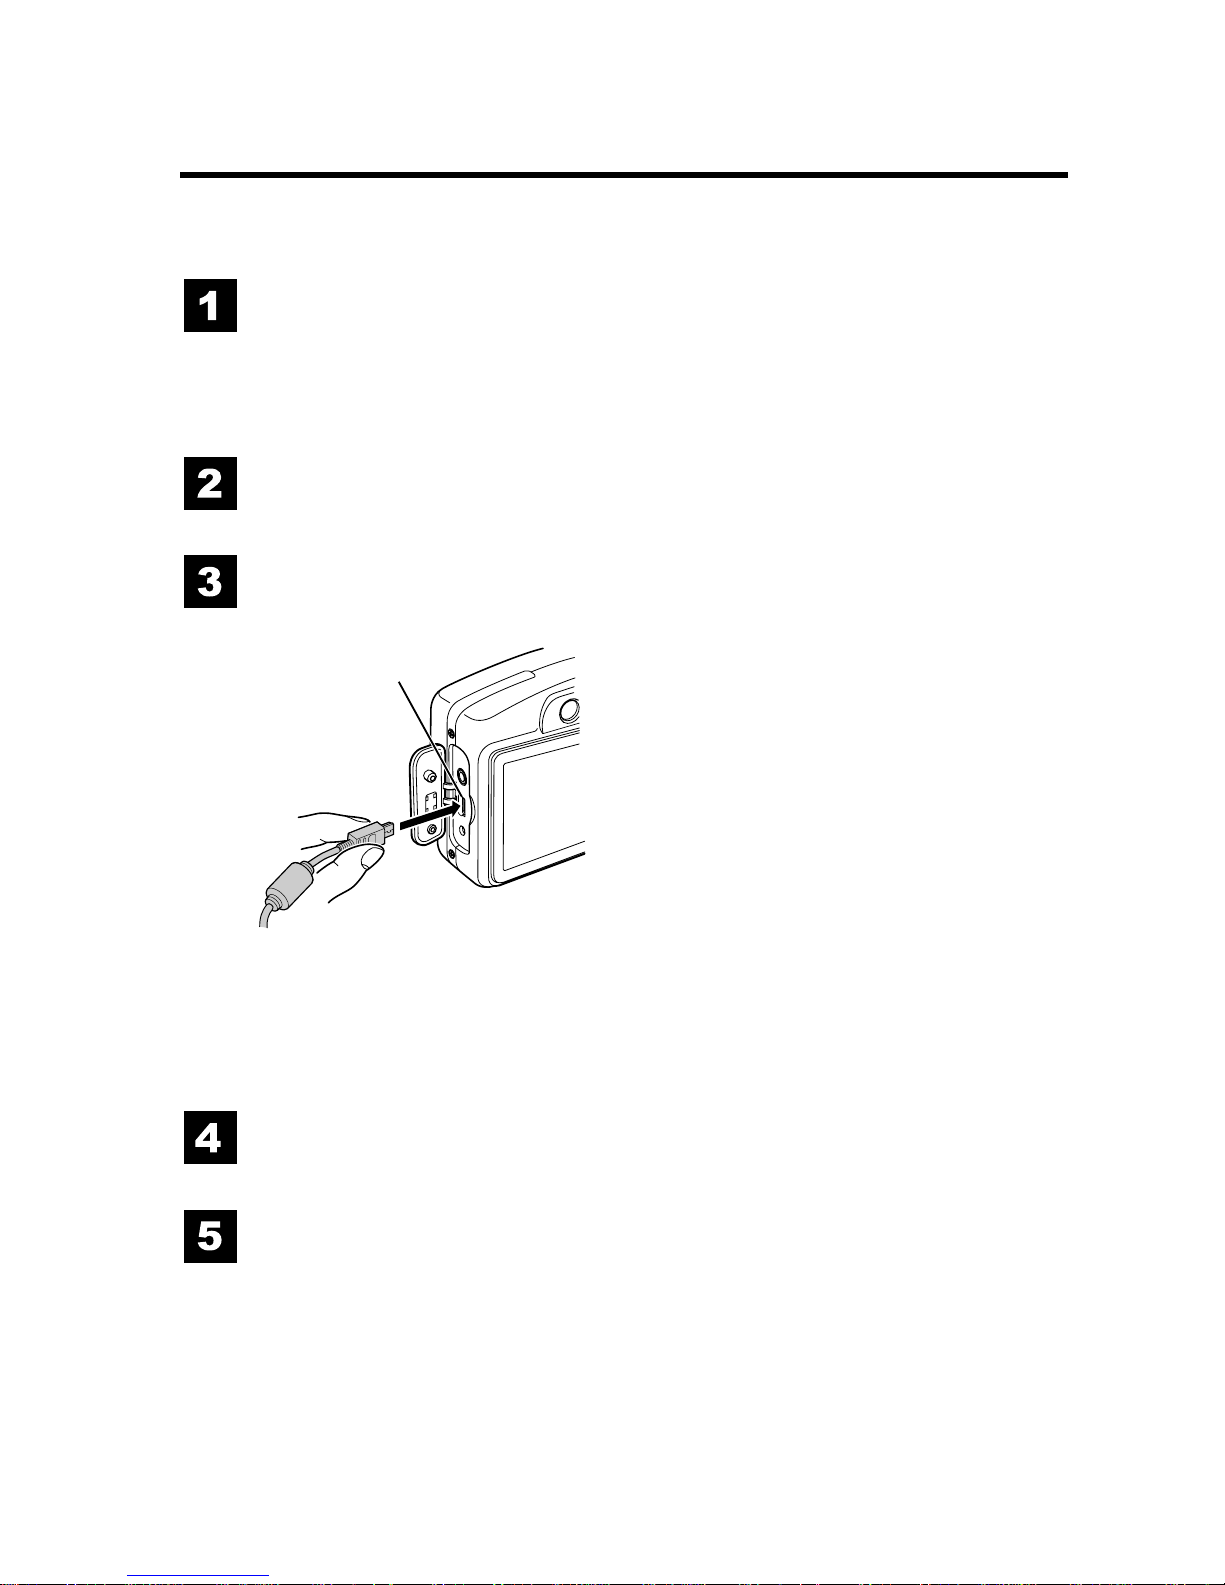
Connect the camera to the printer. For instructions on printer and
camera operation methods, refer to their respective user guides.
Set one of the following into the camera.
• Compact power adapter (sold separately)
• Fully charged battery
• New batteries
Place paper, ink cassette/cartridge, etc. into the
printer.
Connect the camera to the printer with the
appropriate interface cable supplied with the camera.
Some printers require specific connection cables which differ
from the above cable. Please refer to the printer’s user guide.
Turn the printer’s power on.
Set the camera to Playback mode and turn the
power on.
Depending on the camera model, the camera’s power will
automatically turn on when the printer’s power is turned on.
The following operations are not available during a camera/printer
connection.
• Language settings that use the SET button and the MENU button
(Depending on the camera model, use the SET button and the JUMP
button).
• Resetting the camera’s settings to default.
DIGITAL terminal
This illustration shows the PowerShot A710 IS as an example.
Camera: Connect the cable to
the DIGITAL terminal.
Printer: Refer to the printer’s
user guide.
Page 11

9
Disconnecting the Camera and the
Printer
Detach the cable from the printer.
Pull out the cable while holding the connector plug. Do not
pull out by the cable.
Turn the camera’s power off.
Detach the cable from the camera.
Pull out the cable while holding the connector plug. Do not
pull out by the cable.
Page 12
10
Printing
Easy Print
You can print images by pressing only one button after connecting
the camera to the printer.
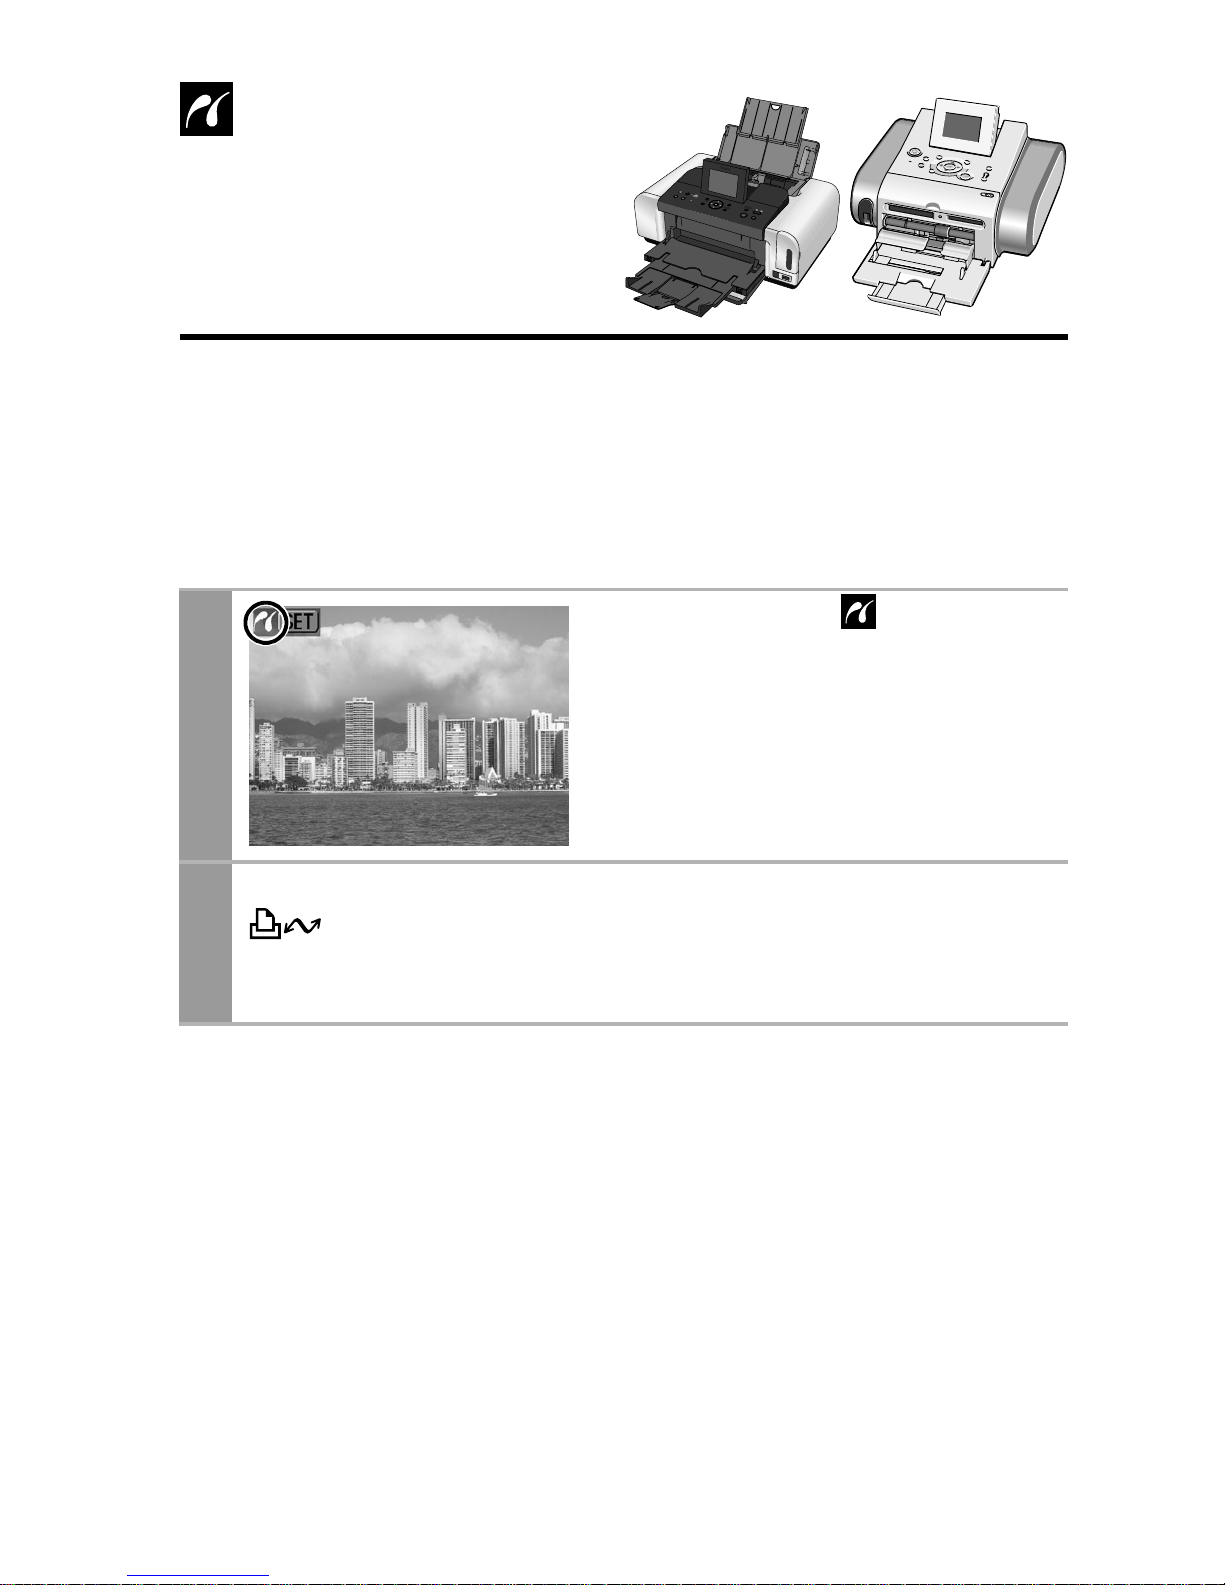
1
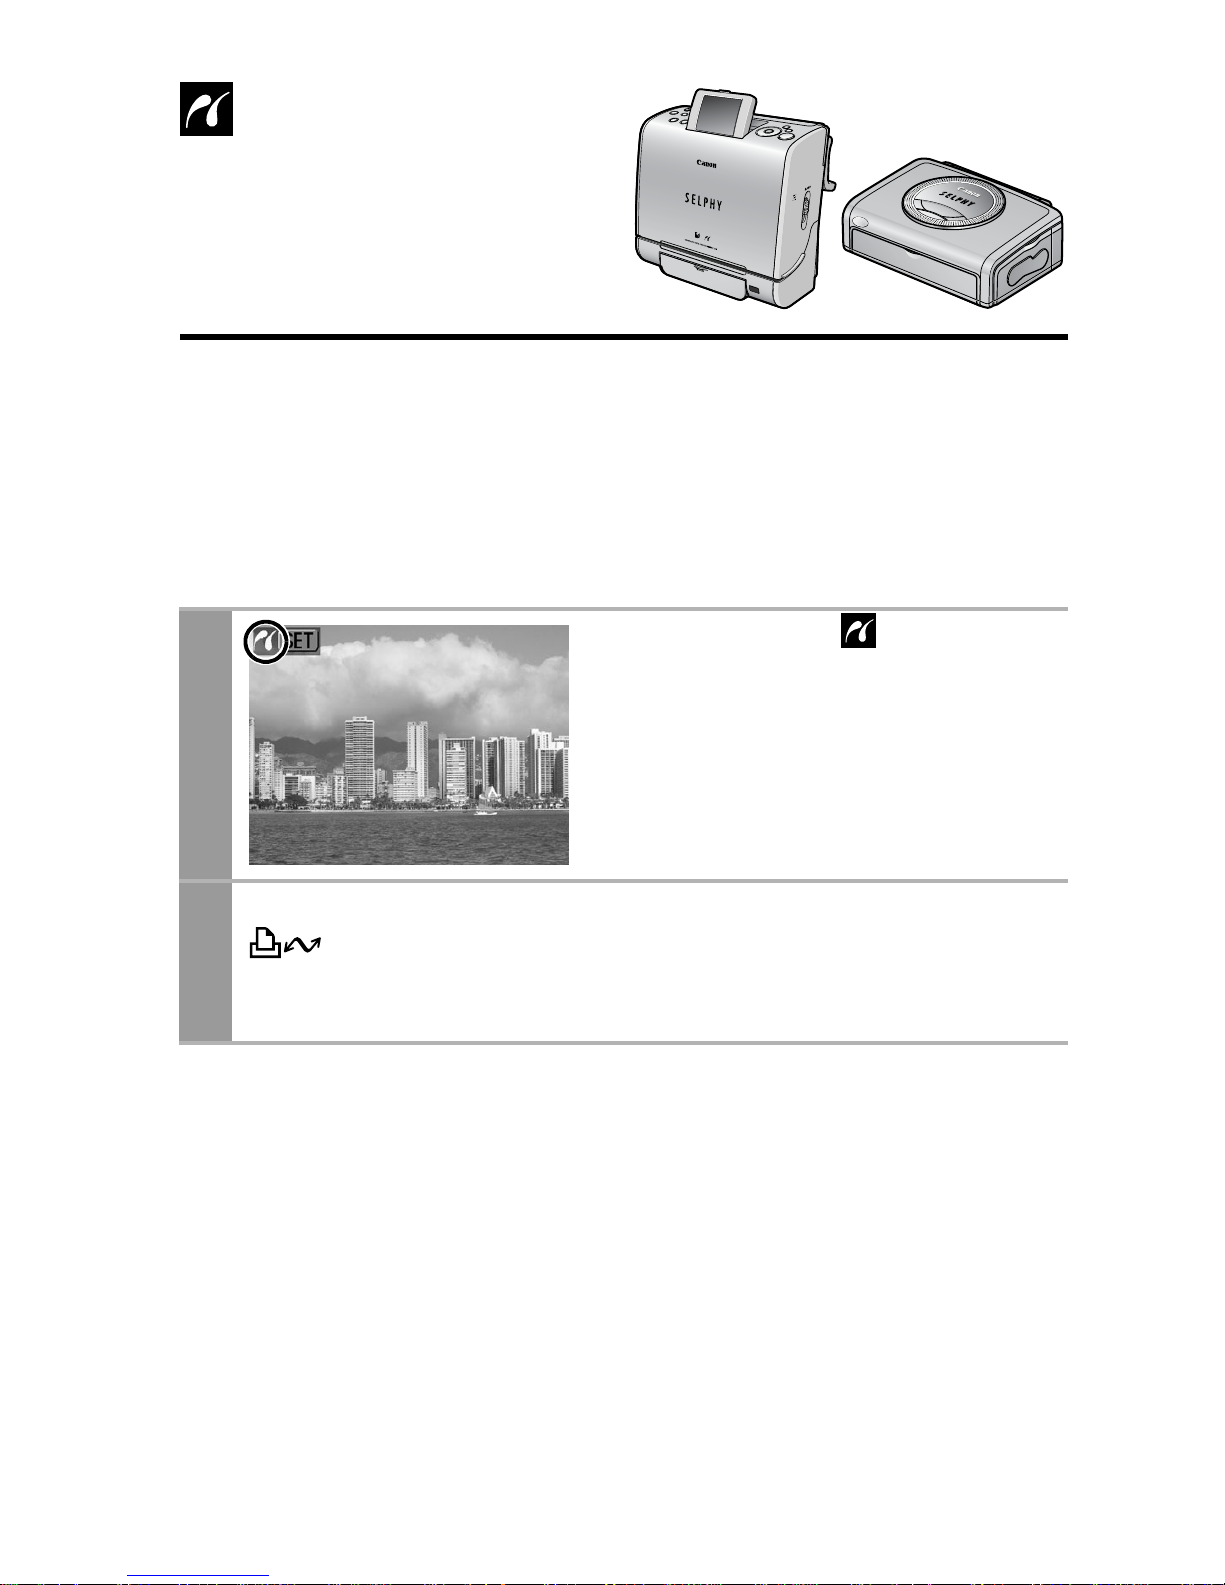
Make sure that displays in
the upper left corner of the
LCD monitor.
2
Display the images you wish to print and press the
button.
If you wish to change the print settings, see Print after
Changing the Print Settings (p. 11).
Printing with
SELPHY ES Series/
SELPHY CP Series
Printers using
PictBridge
Page 13
11
Print after Changing the Print Settings
You can change the print settings before printing.
1
Make sure that displays in
the upper left corner of the
LCD monitor.
If displays on the LCD monitor,
please refer to Printing with
SELPHY CP Series Printers using
Canon Direct Print (p. 53).
2
Display the images you wish
to print and press the SET
button.
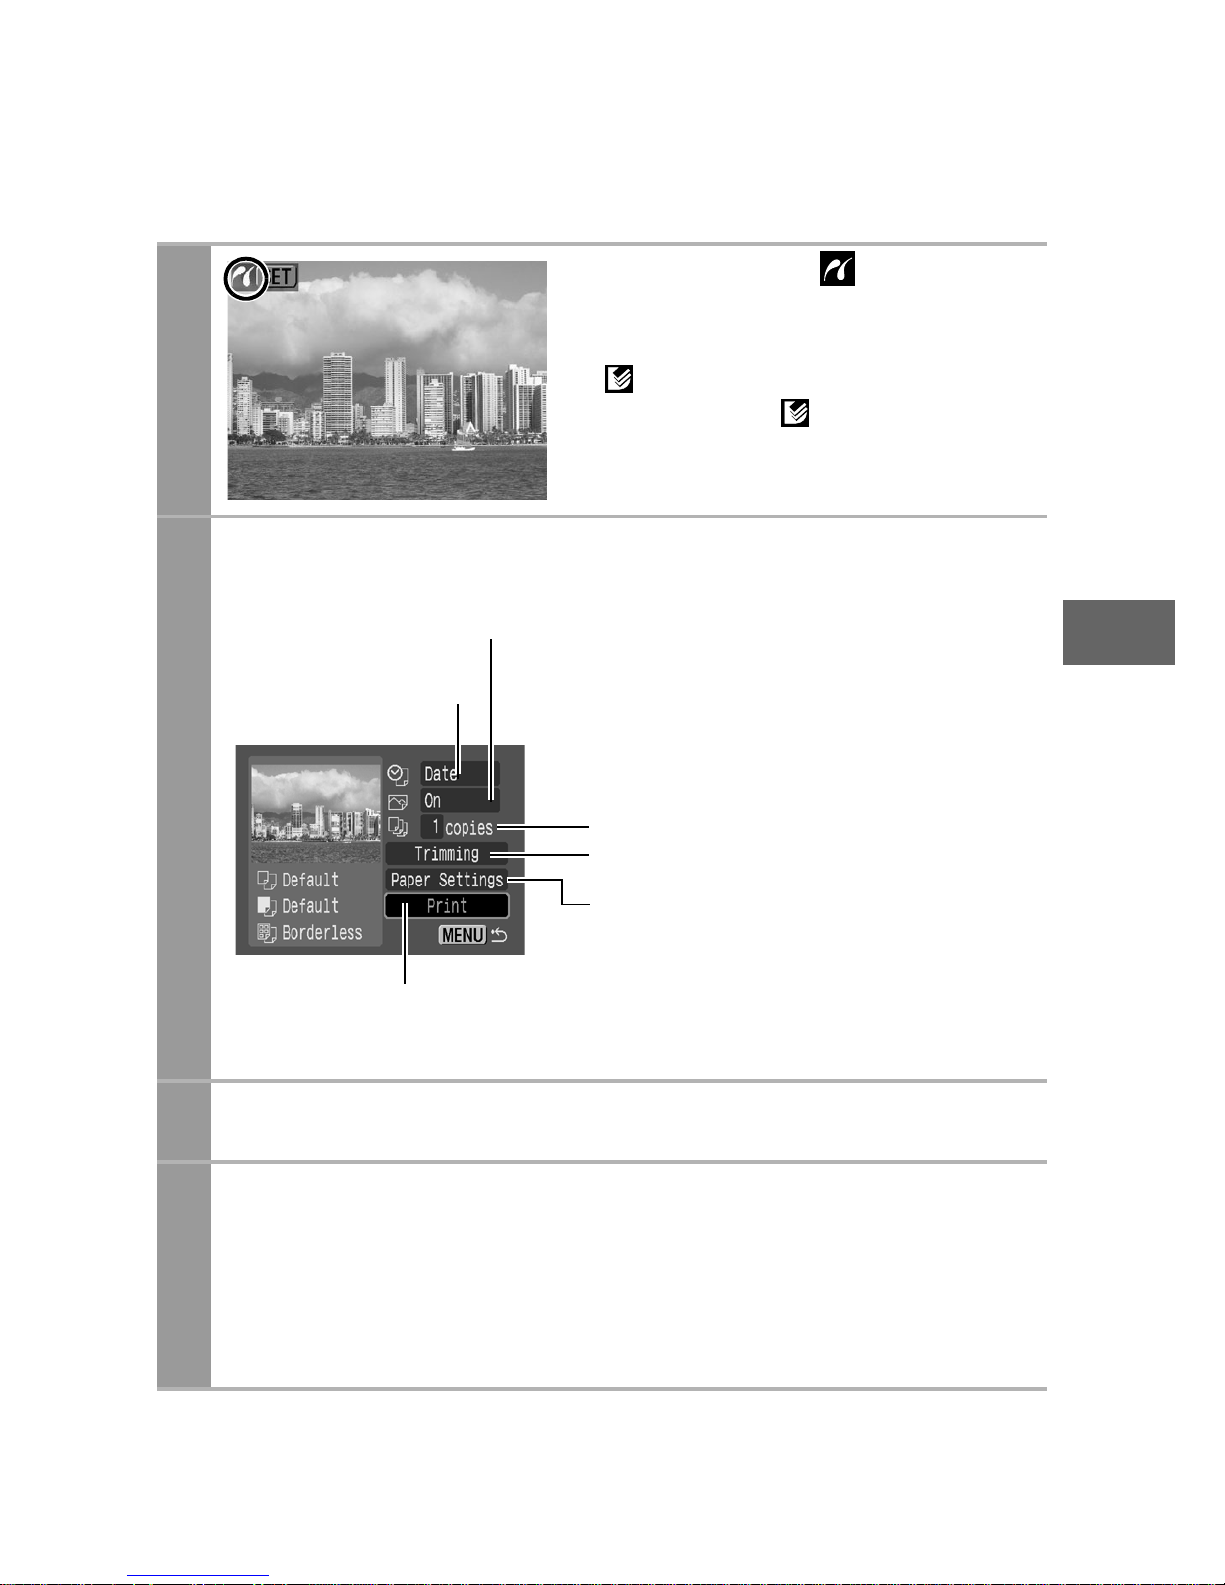
The print order screen appears.
3
Select print settings as needed.
4
Select [Print] and press the SET button.
• The image will start to print and, when it is completely
finished, the display will revert to the standard playback
mode.
• If you press the MENU button, the display will revert to the
standard playback mode and printing will not take place.
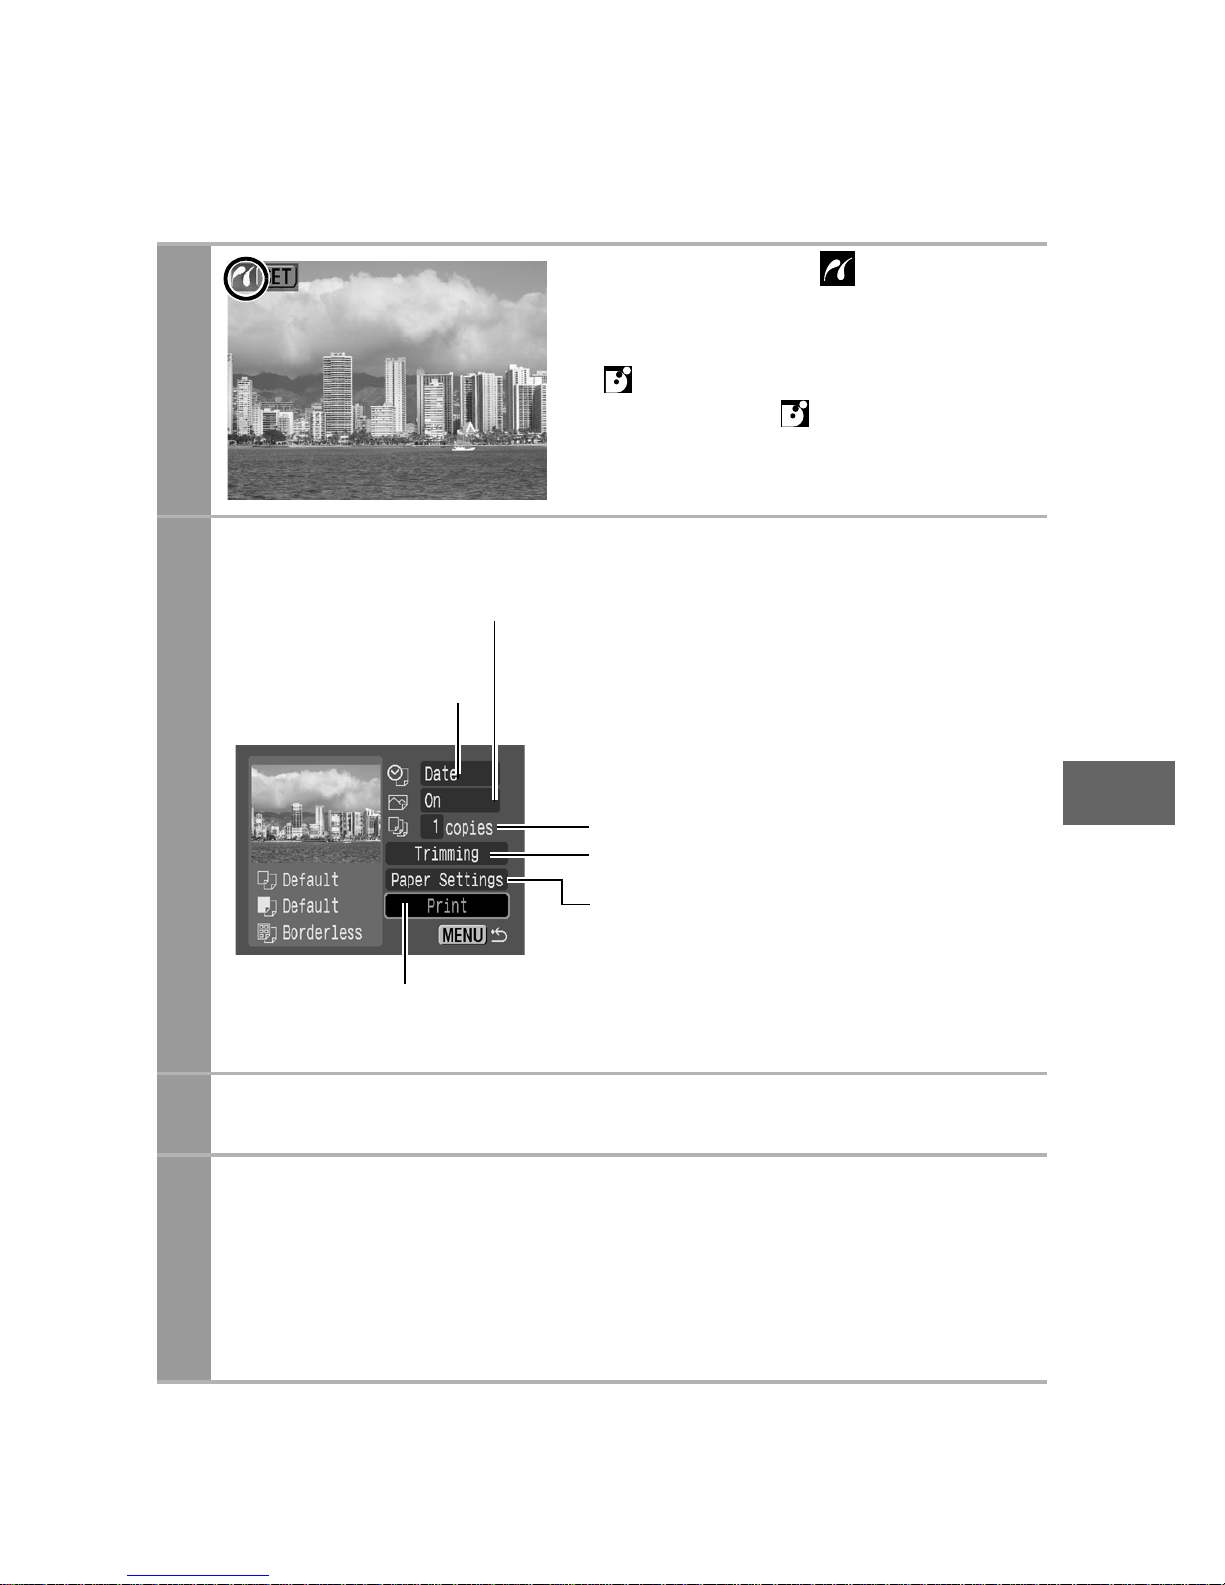
Sets the date
and the file number
for printing (p. 13)
Sets the print
effect (p. 14)
Sets the number of copies (p. 14)
Sets the trimming portion (p. 15)
Sets the paper size, type and layout
(p. 19)
Starts the printing process
Print Order Screen
Page 14
12
• You cannot print RAW images.
• It may not be possible to play back or print images shot with a
different camera.
• You may not be able to print if the memory card holds a large
number of images (about 1000).
Cancel Printing
• To cancel printing between images, press the SET button.
A confirmation dialog will display. Select [OK] and press the
SET button. The printer will stop printing the current image and
eject the paper.
Printing Errors
• An error message appears if an error occurs for some reason
during the printing process. When the error is resolved, printing
will automatically resume. If printing does not resume, select
[Continue] and press the SET button. If [Continue] cannot be
selected, select [Stop], press the SET button and restart the
print job. See List of Messages (p. 31) for details.
Page 15

13
Selecting Print Settings
Setting the Date and the File Number Printing
Option
Default Setting
• The Default option is a fixed setting of the printer.
• The [Date/File No.], [Print Effect], paper setting [Paper Size],
[Paper Type] and [Page Layout] options are available.
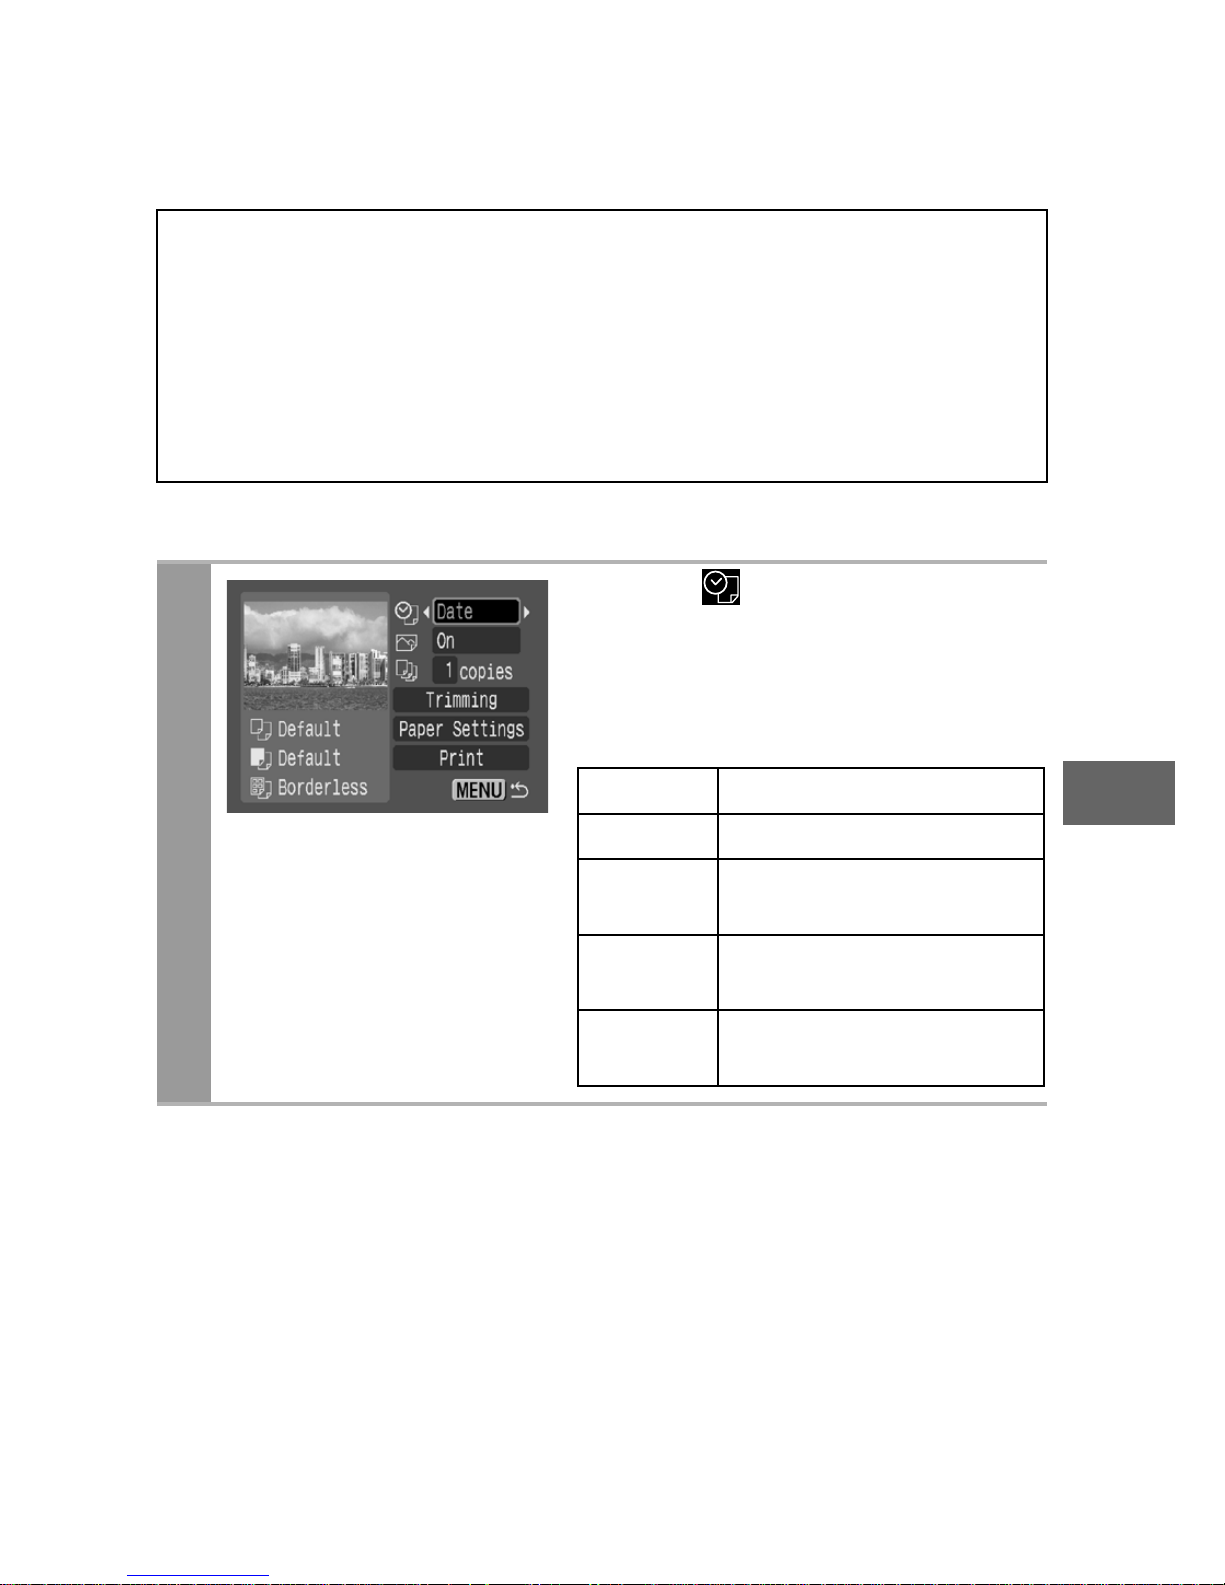
1
Select [ ], then select the
date and the file number
printing option.
You can set the date and the file
number printing as follows:
If you select an image which has had the shooting date embedded
in it using a camera with the Postcard Date Imprint mode, [ ] will
be set to [Off]. If you select [Date], [File No.] or [Both], the date/file
number will be printed on the embedded information which is also
printed.
Date Prints only the date.
File No. Prints only the file number.
Both
Prints both the date and the
file number.
Off
Prints neither date nor file
number.
Default
Prints using the default
setting.
Page 16
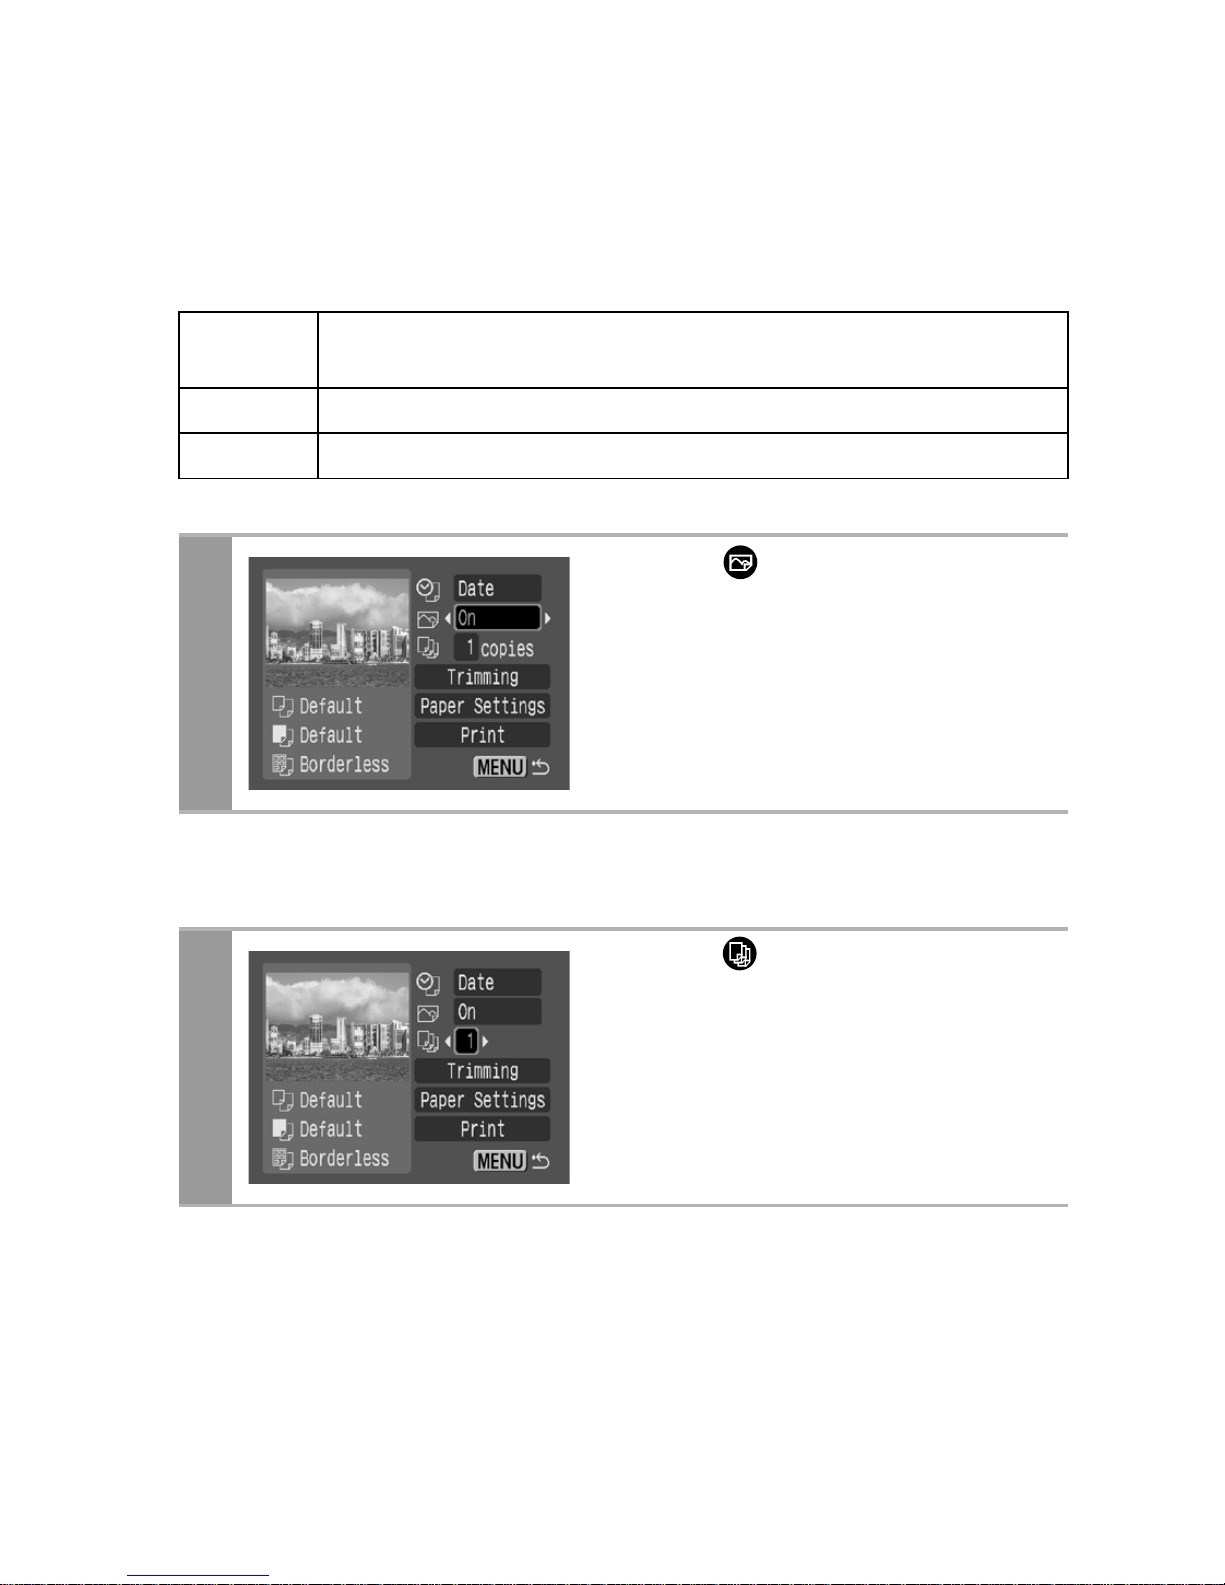
14
Setting the Print Effect
This function uses the camera’s shooting information to optimize
the image data, yielding high quality prints. You can select the
following print effects.
Setting the Number of Copies
On
Uses the camera’s shooting information to deliver optimum
prints.
Off Prints without any effects.
Default Print settings differ according to your printer model.
1
Select [ ] and choose a
print effect option.
1
Select [ ] and set the
number of prints.
1 to 99 copies can be set.
Page 17
15
Setting the Printing Area (Trimming)
You can specify a portion of the image for printing.
Please set [Paper Settings] (p. 19) before setting the trimming
settings. If [Paper Settings] is changed after having made the
trimming settings, you must select the settings again.
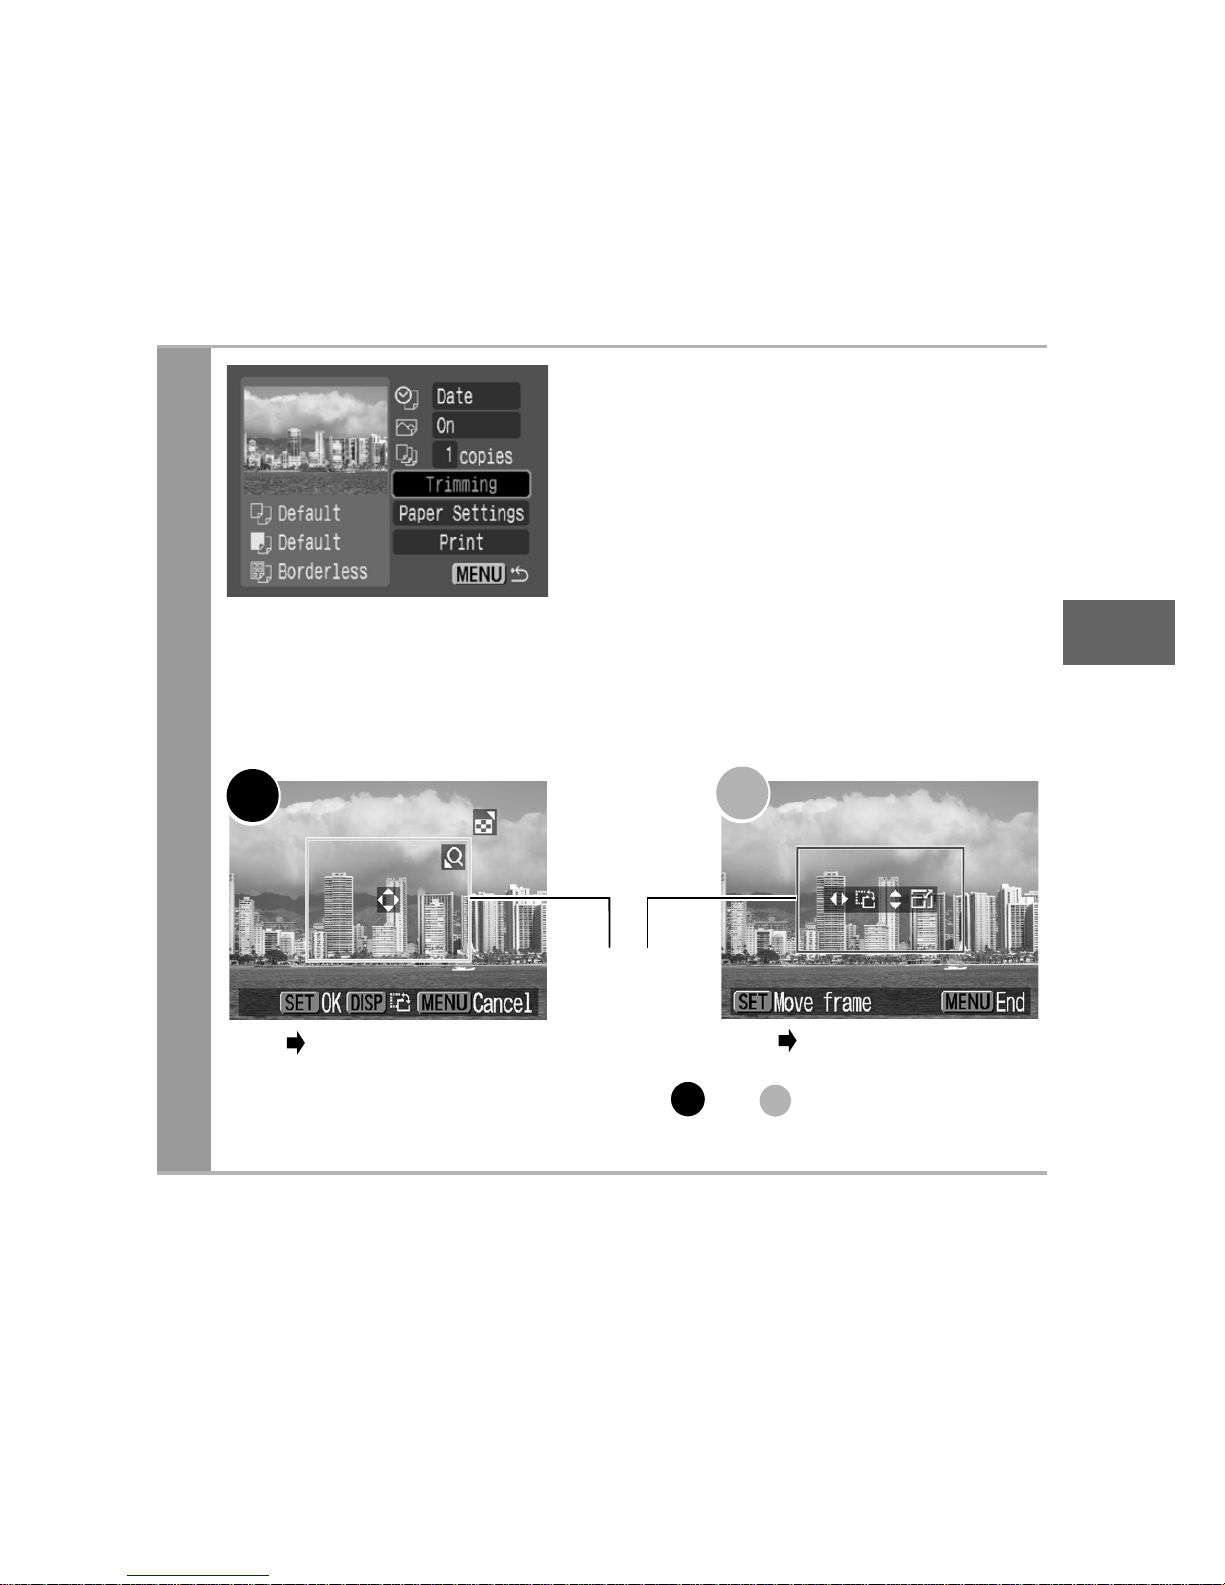
1
Select [Trimming] and press
the SET button.
The trimming frame will appear at
the center of the image. If a
trimming setting has already been
selected for the image, the frame
will appear around the previously
selected portion.
The trimming setting screen differs depending on the
camera model. Check which of the following screens
appear before selecting settings.
Steps 2a and 3a
Trimming Frame
Steps 2b and 3b
* Proceed to procedure or depending
on the display screen which appears.
a
b
a b
Page 18
16
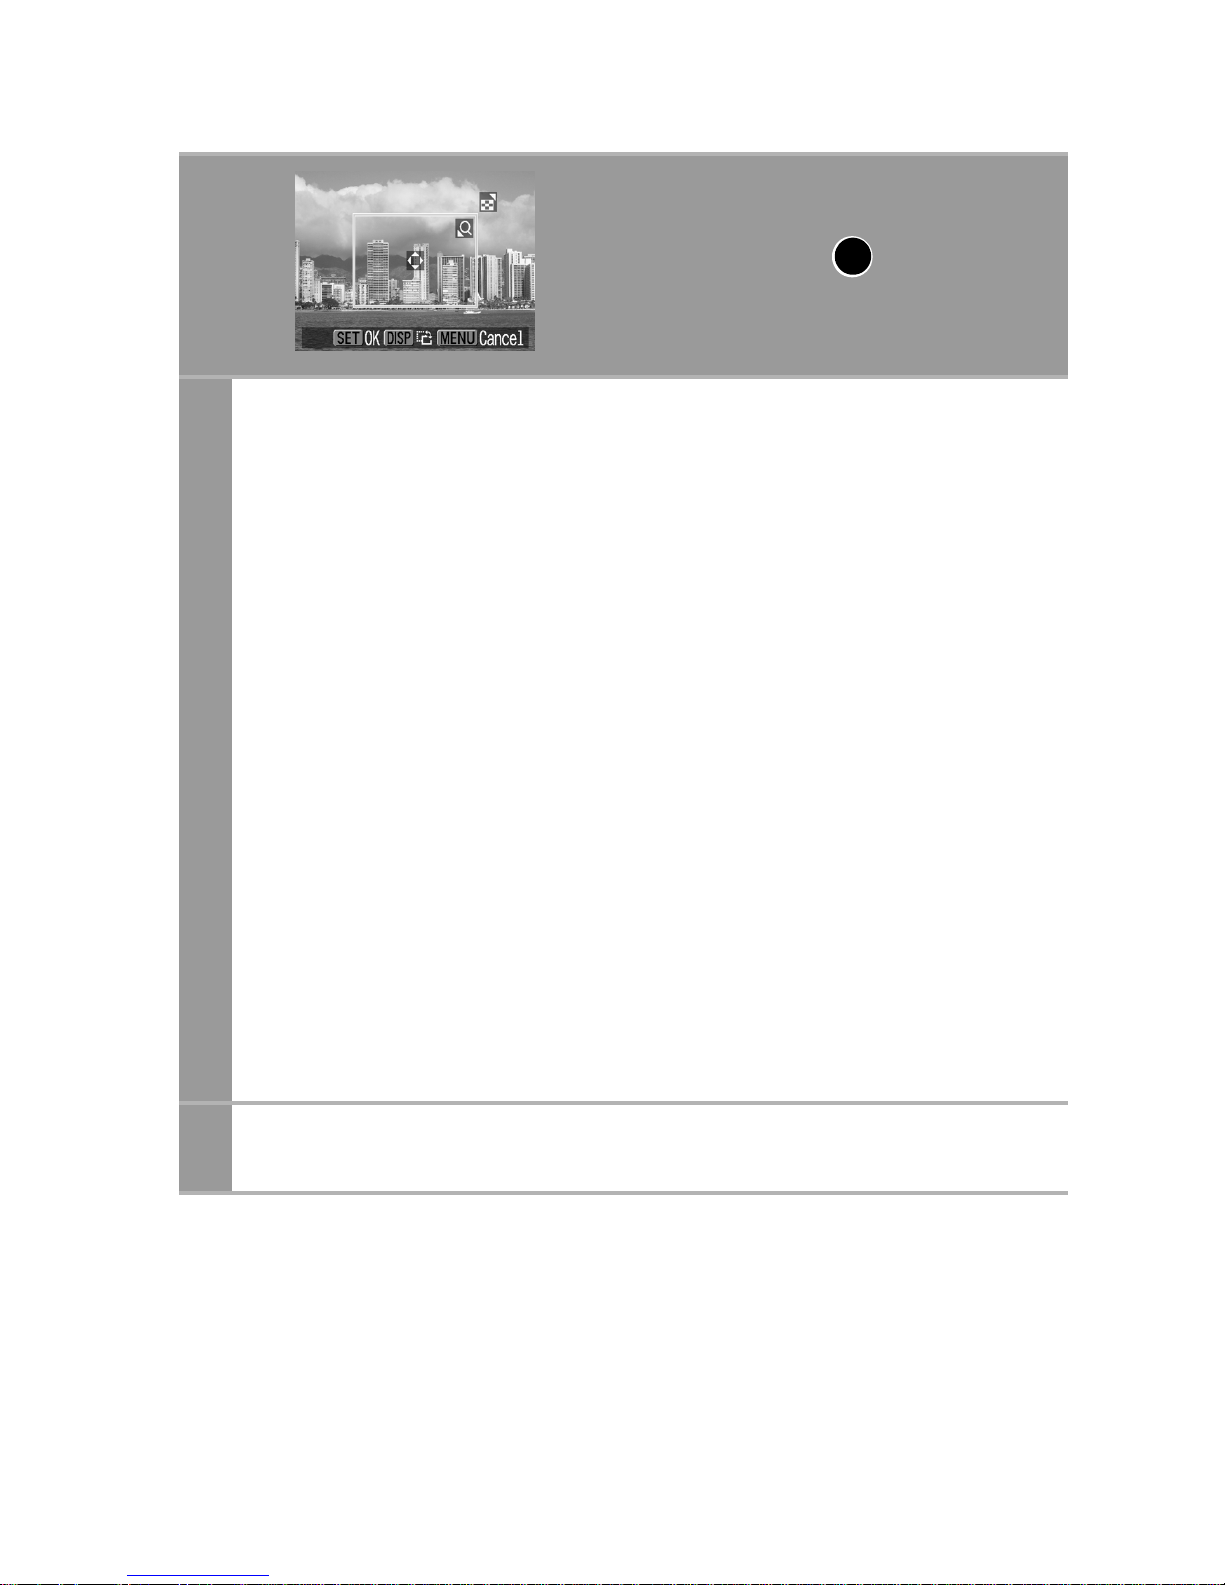
2a
Trim the image.
Changing the Size of the Trimming Frame
• Press the zoom lever or the zoom button to adjust the size of
the trimming frame.
• The trimming frame can be changed to a minimum selection
of approximately half the displayed image (in width and
height) or a maximum selection that is virtually the same size
as the image.
• Expanding the trimming frame beyond its maximum size
cancels the trimming setting.
• When printing an image that has been magnified using the
trimming option, the image quality may become coarser and
grainier depending on the level of magnification.
Moving the Trimming Frame
• Move the trimming frame using the omni selector or the up,
down, right and left buttons.
Rotating the Trimming Frame
• You can rotate the trimming frame by pressing the DISP. (or
DISPLAY) button.
3a
Press the SET button to close the setting menu.
Pressing the MENU button cancels the settings.
When screen displays
a
Page 19
17
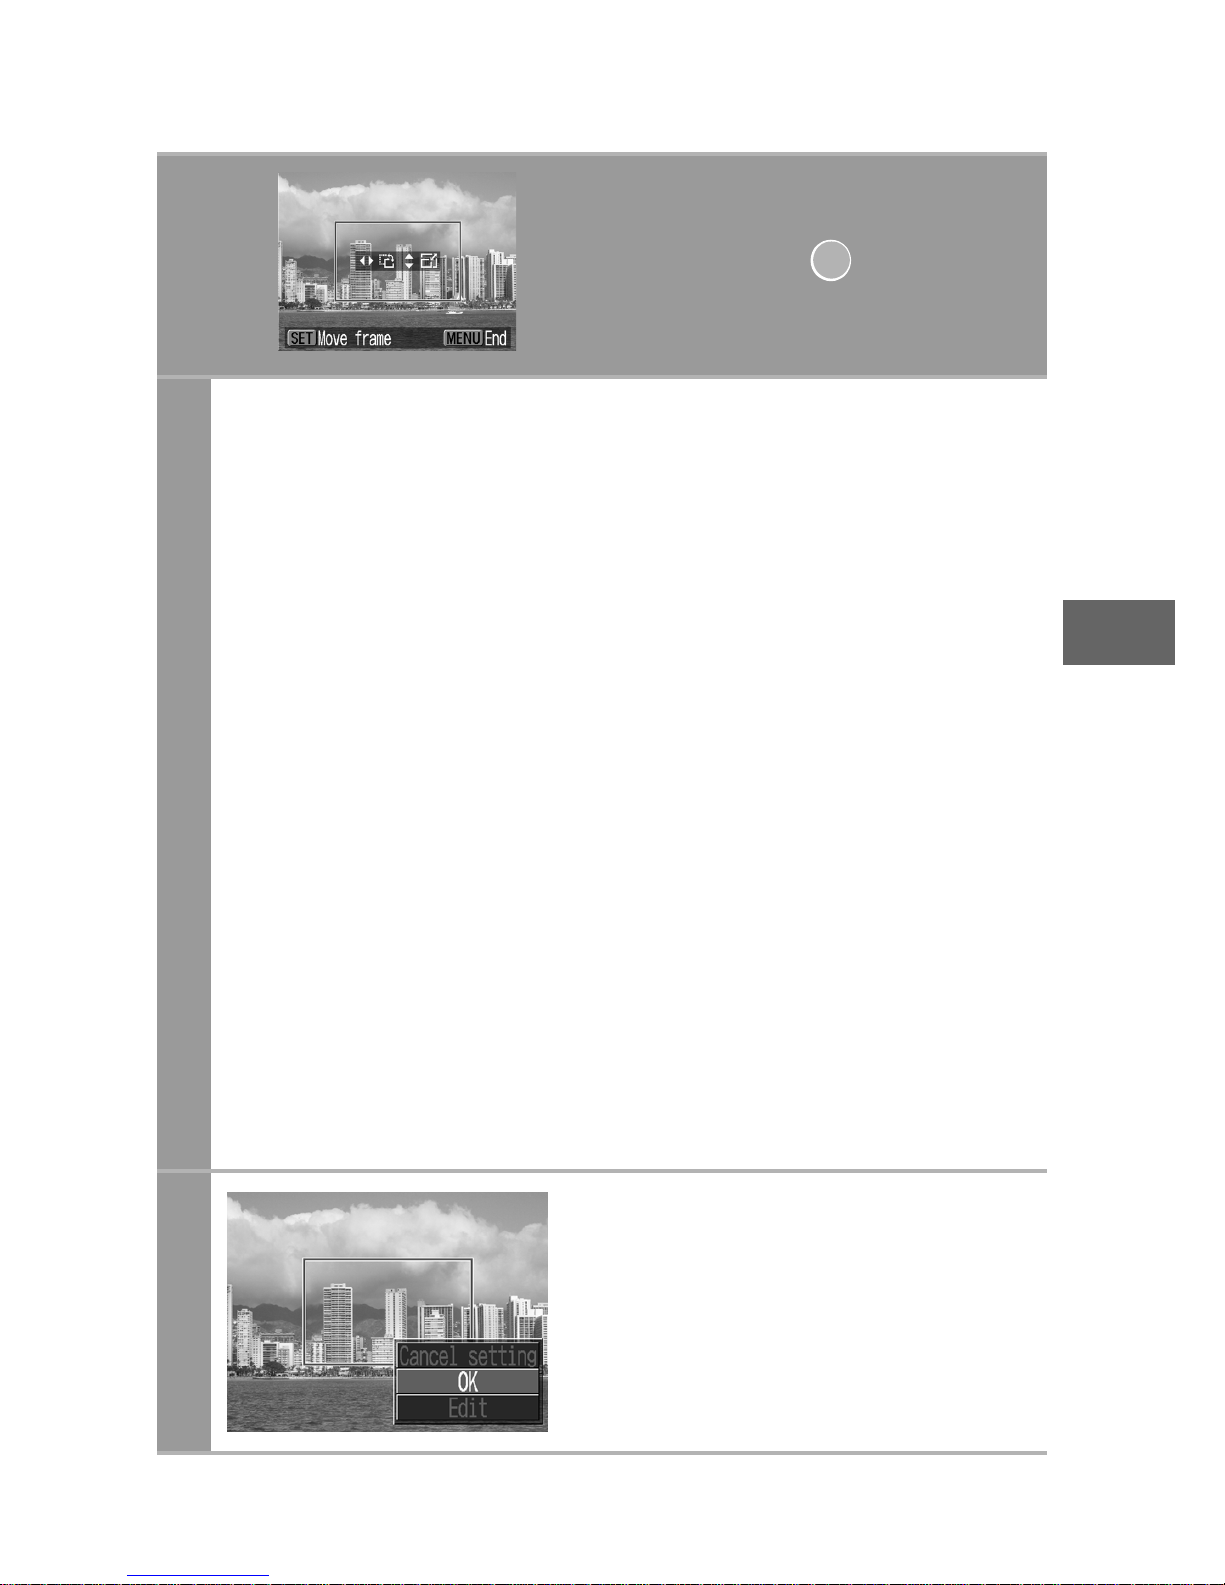
2b
Trim the image.
Changing the Size of the Trimming Frame
• Press the up and down buttons to adjust the size of the
trimming frame.
• The trimming frame can be changed to a minimum selection
of approximately half the displayed image (in width and
height) or a maximum selection that is virtually the same size
as the image.
• Expanding the trimming frame beyond its maximum size
cancels the trimming setting.
• When printing an image that has been magnified using the
trimming option, the image quality may become coarser and
grainier depending on the level of magnification.
Rotating the Trimming Frame
• You can rotate the trimming frame using the left and right
buttons.
Moving the Trimming Frame
• Press the SET button and use the up, down, right and left
buttons to move the trimming frame. Pressing the SET
button again allows you to change the size of the frame and
to rotate it.
3b
Press the MENU button,
select [OK] and press the
SET button.
Selecting [Cancel setting] cancels
the selected trimming setting. If
[Edit] is selected, the display
returns to the previous screen.
When screen displays
b
Page 20
18
• The trimming setting only applies to one image.
• The trimming setting is canceled with the following operations.
• When you set the trimming settings for another image.
• When you close the Print mode (when you turn the camera
power off, change the camera mode, or detach the
connection cable).
• The shooting date or part of the date which has been
embedded in images using a camera with the Postcard Date
Imprint mode may not be printed properly depending on the
trimming setting.
• The paper size and page layout settings determine the shape of
the trimming frame.
• Please use the LCD monitor to set the trimming settings. The
trimming frame may not display correctly on a TV screen.
Page 21
19
Selecting the Paper Settings
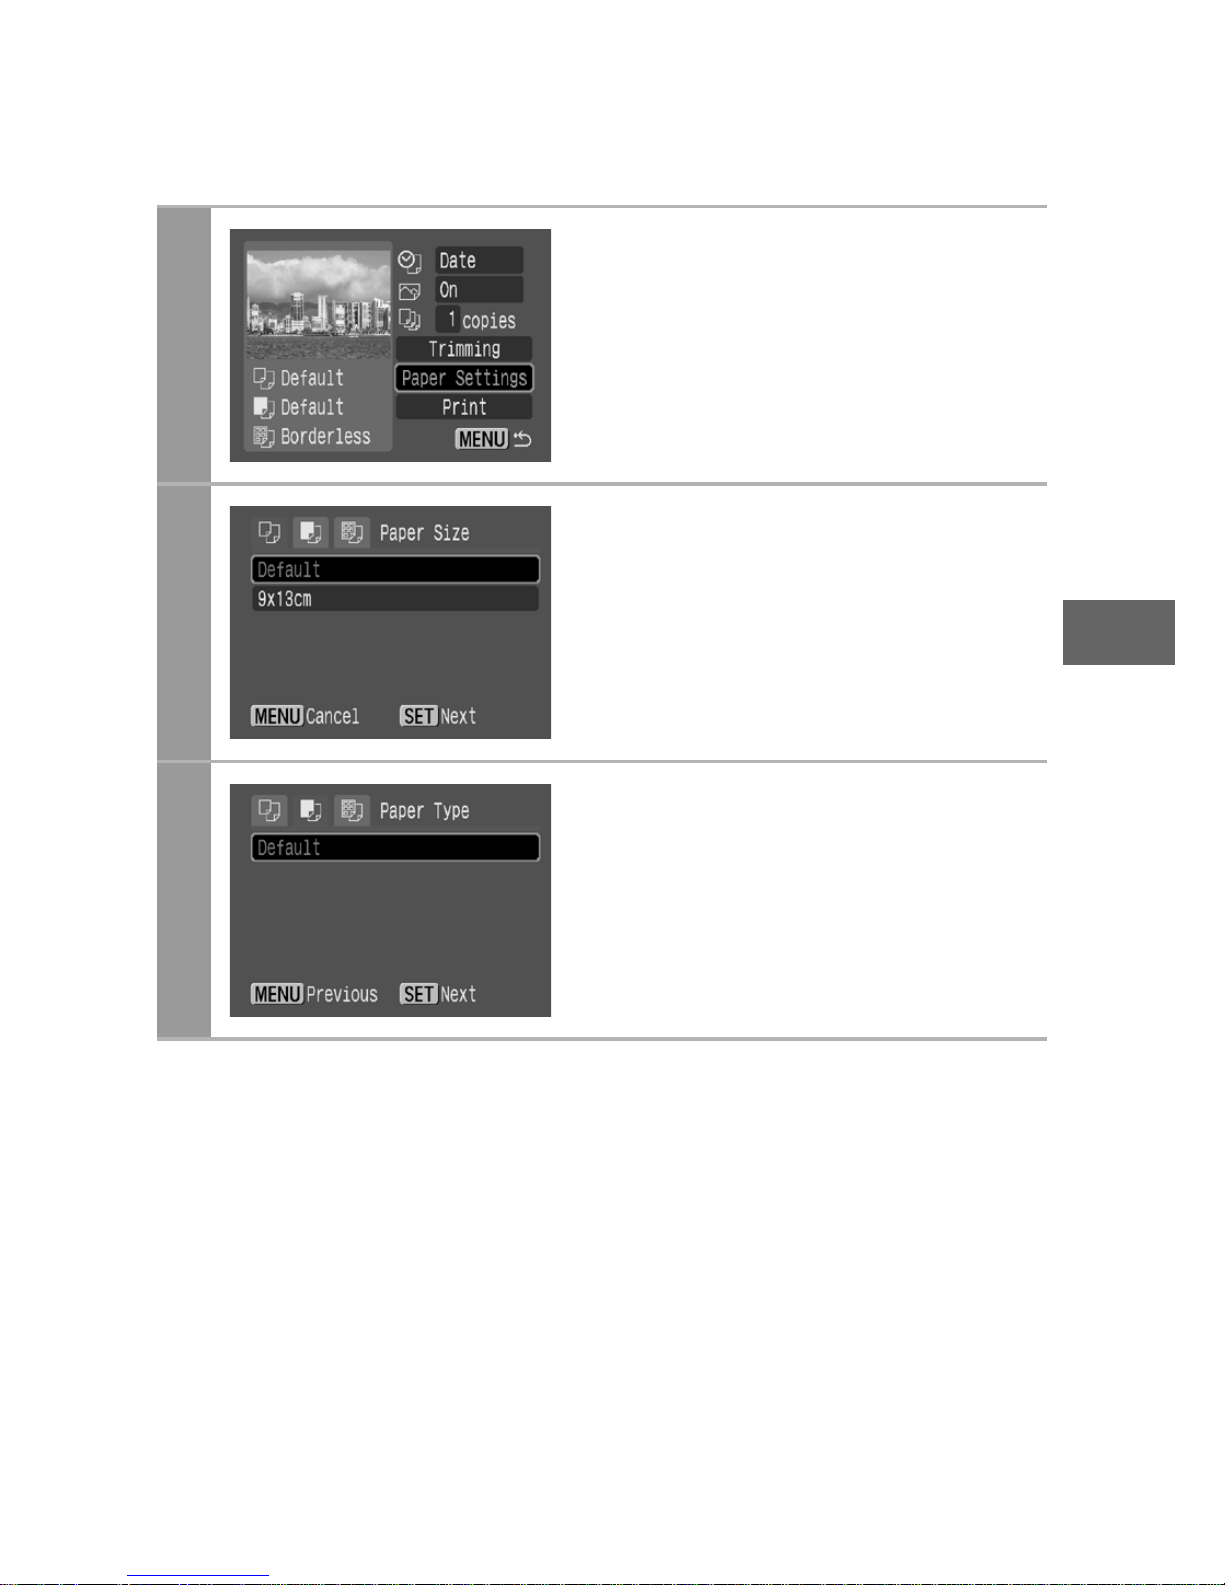
1
Select [Paper Settings] and
press the SET button.
The paper size setting screen
appears.
2
Select a paper size and press
the SET button.
The default settings and specified
paper cassette size are displayed.
The paper type setting screen
appears.
* Paper sizes vary according to region.
3
Press the SET button.
The page layout screen appears.
Page 22

20
4
Select a layout.
The following layout can be
selected.
* Card size paper only
Default Print settings differ
according to your printer
model.
Bordered Prints with a border.
Borderless Prints right to the edges
of the paper.
N-up Prints 2, 4 or (8*) images
on a single sheet of paper
(p. 21).
ID Photo Specifies the print size
and print portion of an
image or a whole image
as an ID photo (p. 22).
Fixed Size Prints by specifying the
print size of the image on
a sheet of paper (p. 24).
Page 23
21
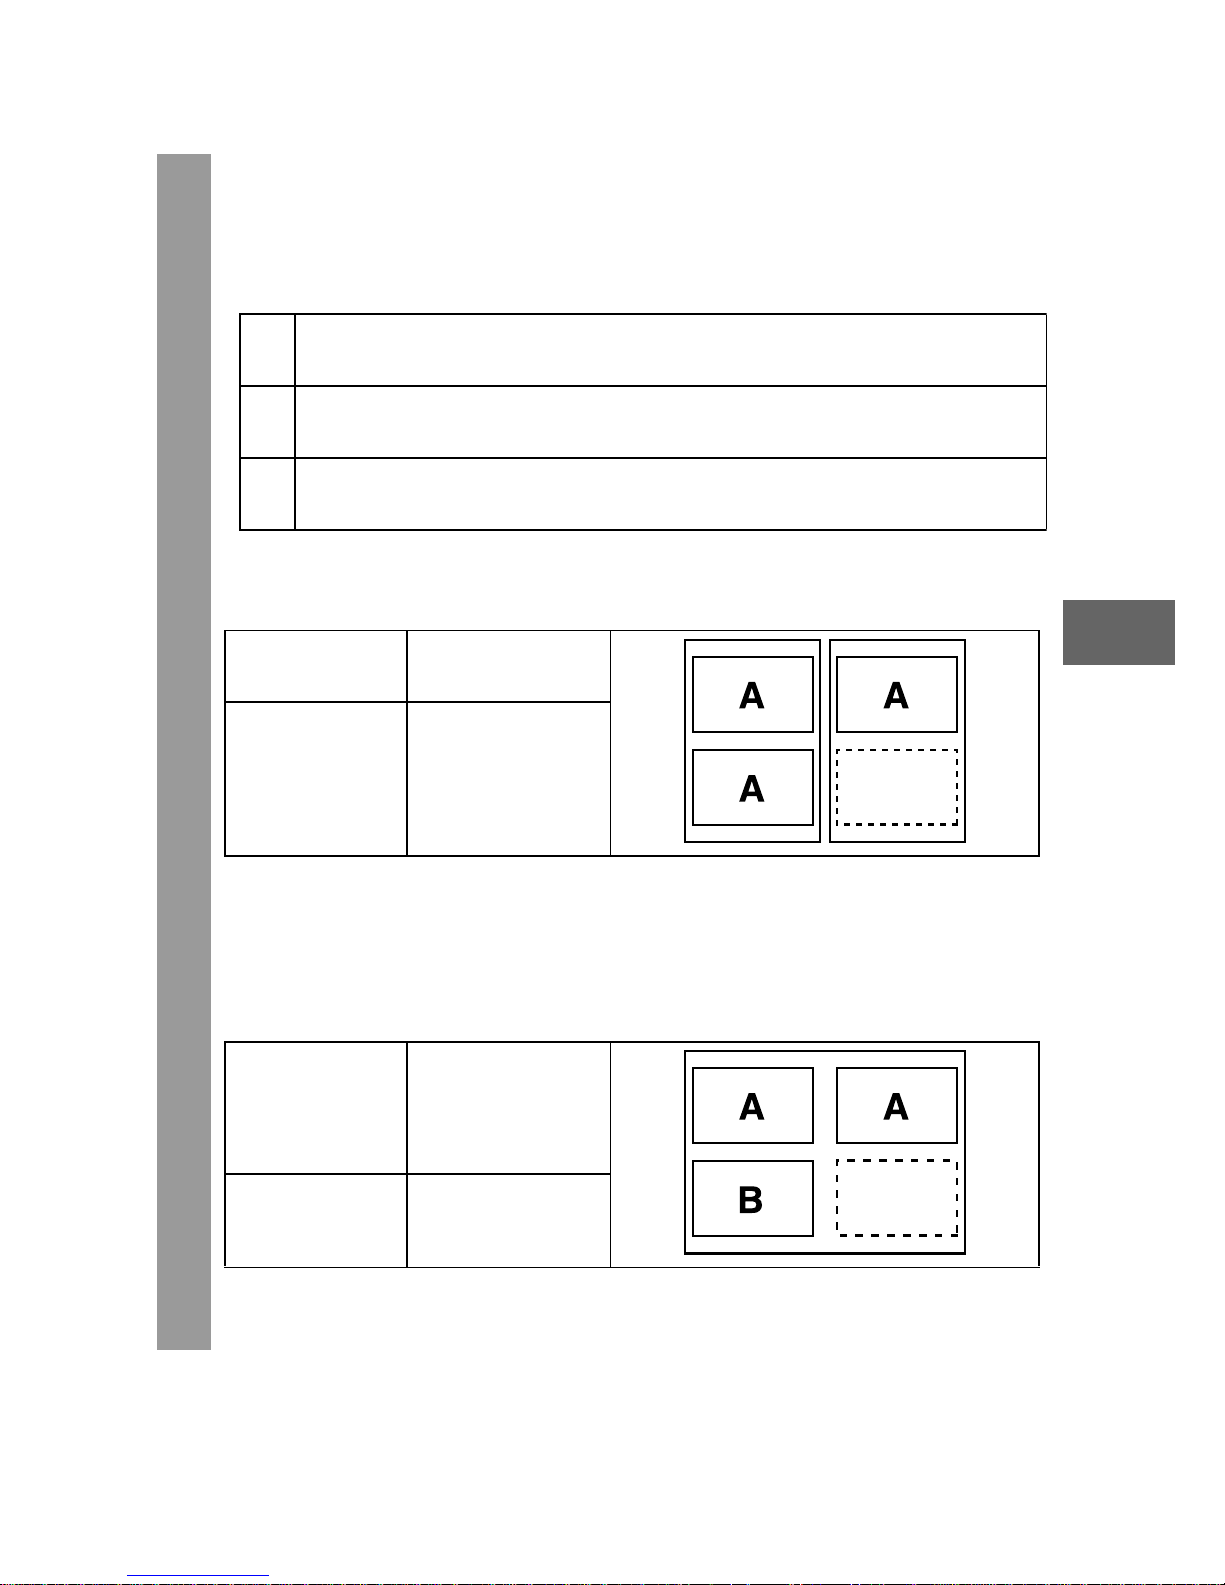
Printing Multiple Images on a Sheet of Paper
Selecting [N-up] in the layout setting (p. 20) will allow you to
specify the following layout settings.
* This option can only be selected when printing on card size paper.
[Printing example 1] Printing 3 copies of image A in 2-up
DPOF print setting (p. 28) allows you to separately print different
images by specifying the number of frames to be printed per image.
[Printing example 2] Printing 2 copies of image A and 1 copy of image
B in 4-up
* Please refer to the Camera User Guide for instructions on DPOF print
setting method.
2
2 images (height 2 x width 1) of the same dimensions are
arranged on a single sheet of paper.
4
4 images (height 2 x width 2) of the same dimensions are
arranged on a single sheet of paper.
8*
8 images (height 4 x width 2) of the same dimensions are
arranged on a single sheet of paper or a label sheet.
Number of
copies (p. 14)
Image A:
[3] copies
Layout 2
DPOF print
settings*
(p. 28)
Image A:
[2] copies
Image B:
[1] copies
Layout 4
Page 24
22
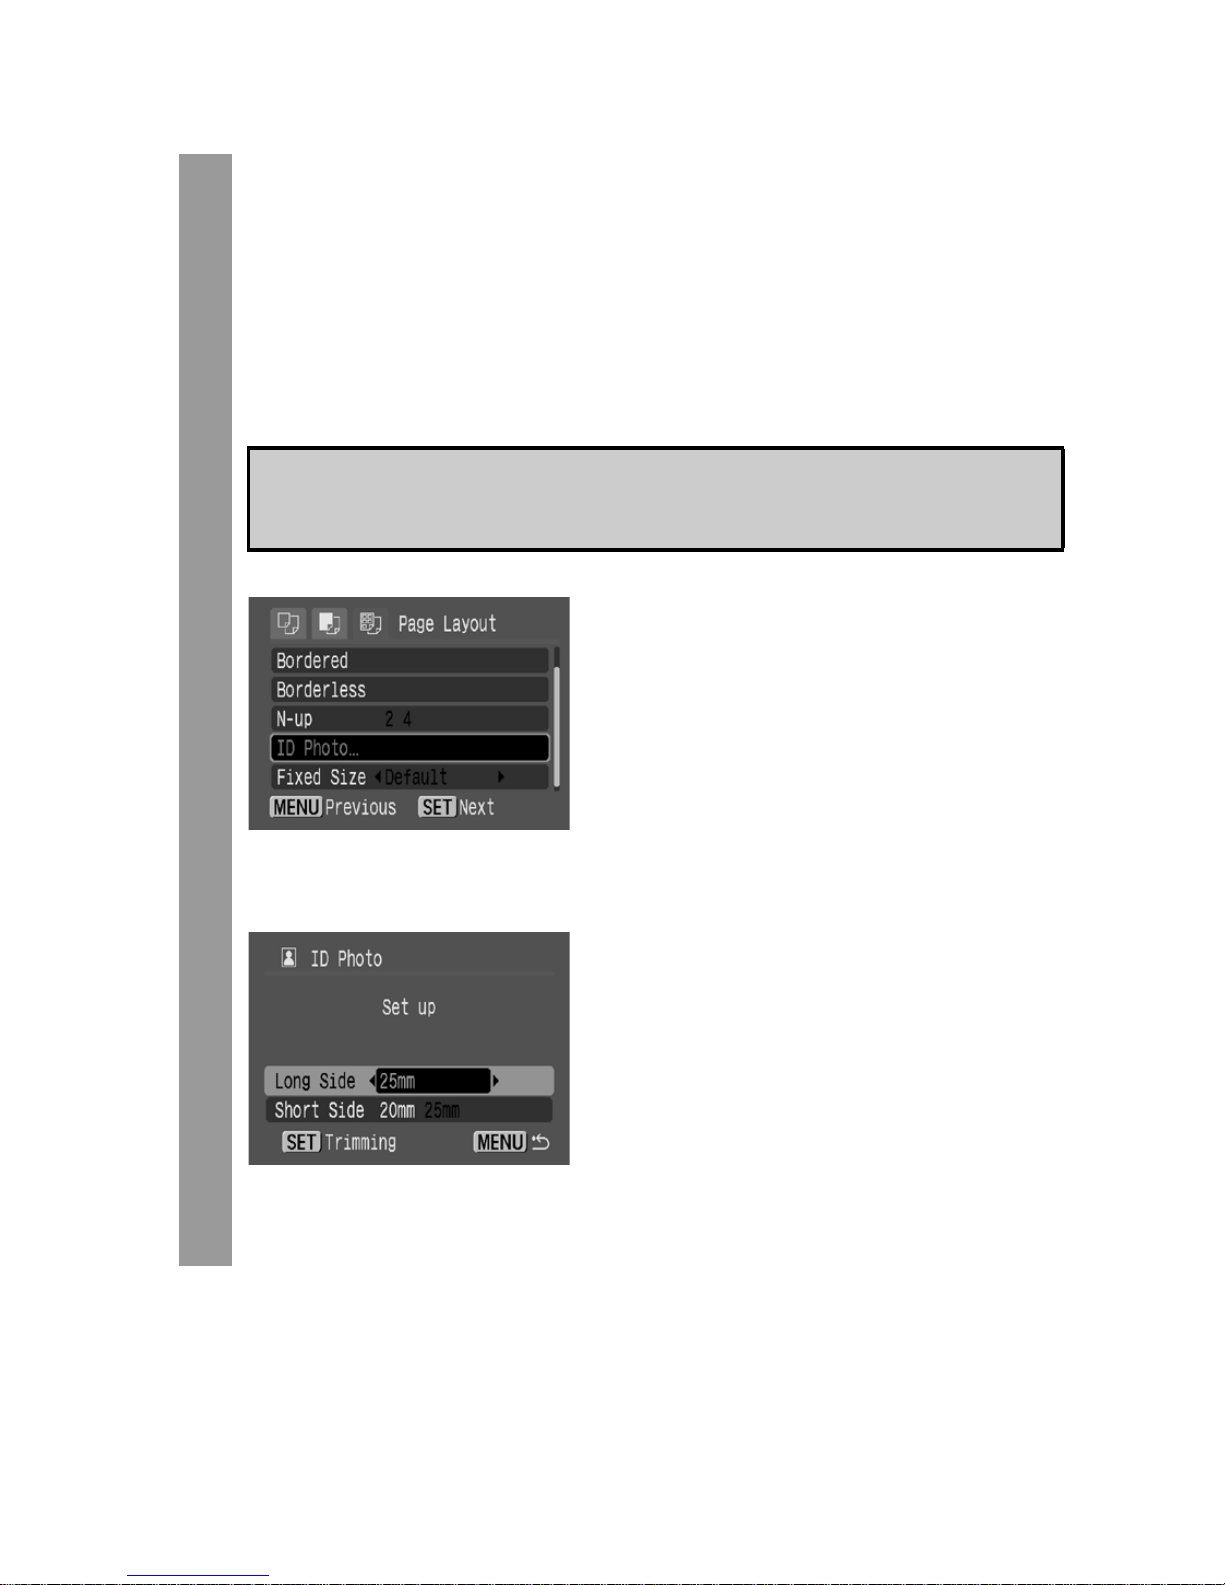
Printing by Specifying the Print Size (ID Photo Print)
Selecting [ID Photo] in the layout setting (p. 20) will allow you
to specify the print size and print portion of an image or a
whole image as an ID photo*.
* Images printed with the ID Photo Print function may not be allowed
as a formal certificate photo. Refer to the party (organization) or
administration requiring the photo.
Select [ID Photo], then press
the SET button.
T
Specify the print size by
selecting the length of the
long side and the short side,
then press the SET button.
Specify the size by selecting the
length of the long side first, then
the short side. See the next table
for selectable combinations of the
long side length and the short side
length.
The print size can be specified for only L (Large) resolution
images in the camera connected to the printer.
Page 25
23
T
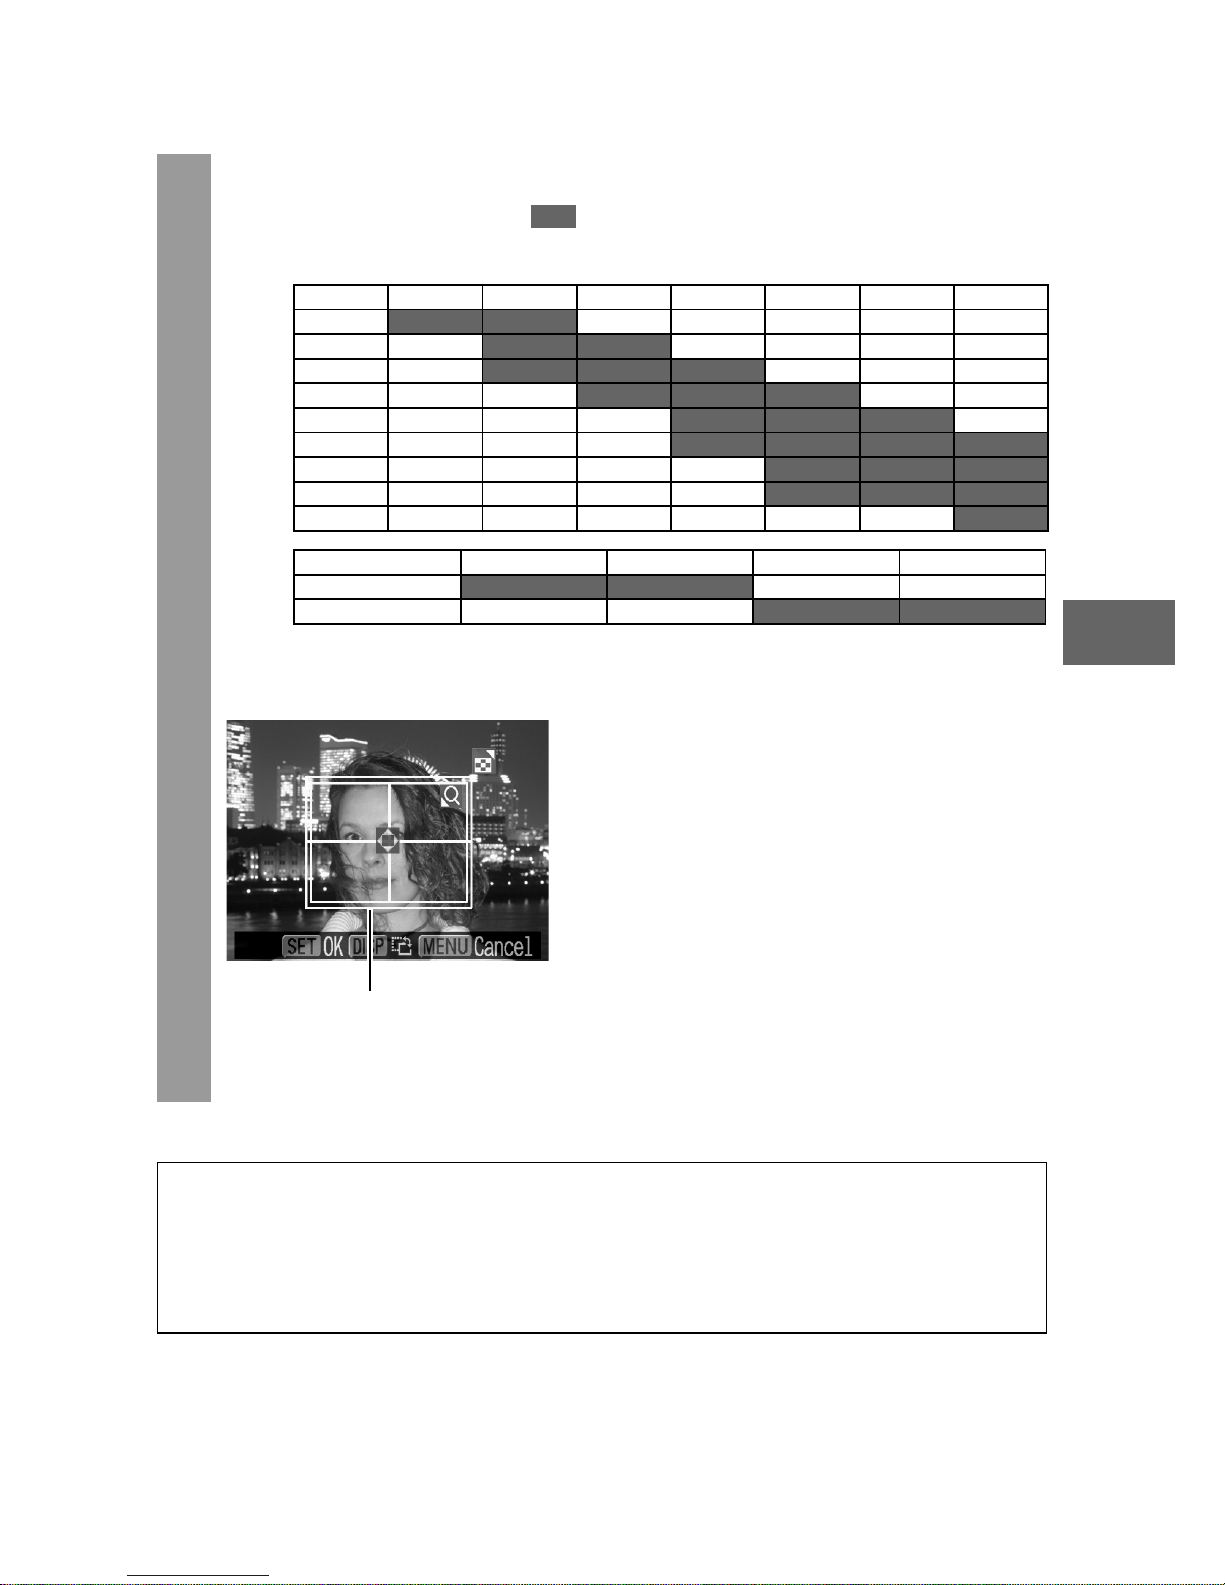
Trim the image to specify the
print area.
See Step 2 of Setting the Printing
Area (Trimming) (pp. 16, 17) on
how to trim the image.
The trimming setting screen differs
depending on the camera model.
Follow the steps according to the
screen that displays on your
camera.
• The shape of the trimming frame varies depending on the
specified print size.
• Use the LCD monitor to specify the print size settings. The
trimming frame may not display correctly on a TV screen.
1.4 inch 1.5 inch 1.8 inch 2.0 inch
1.8 inch
2.0 inch
z Selectable combination
: Available print size
20 mm 25 mm 30 mm 35 mm 40 mm 45 mm 50 mm
25 mm
30 mm
35 mm
40 mm
45 mm
50 mm
55 mm
60 mm
70 mm
Short Side
Long Side
Trimming Frame
Page 26
24
Printing Images in the Fixed Size
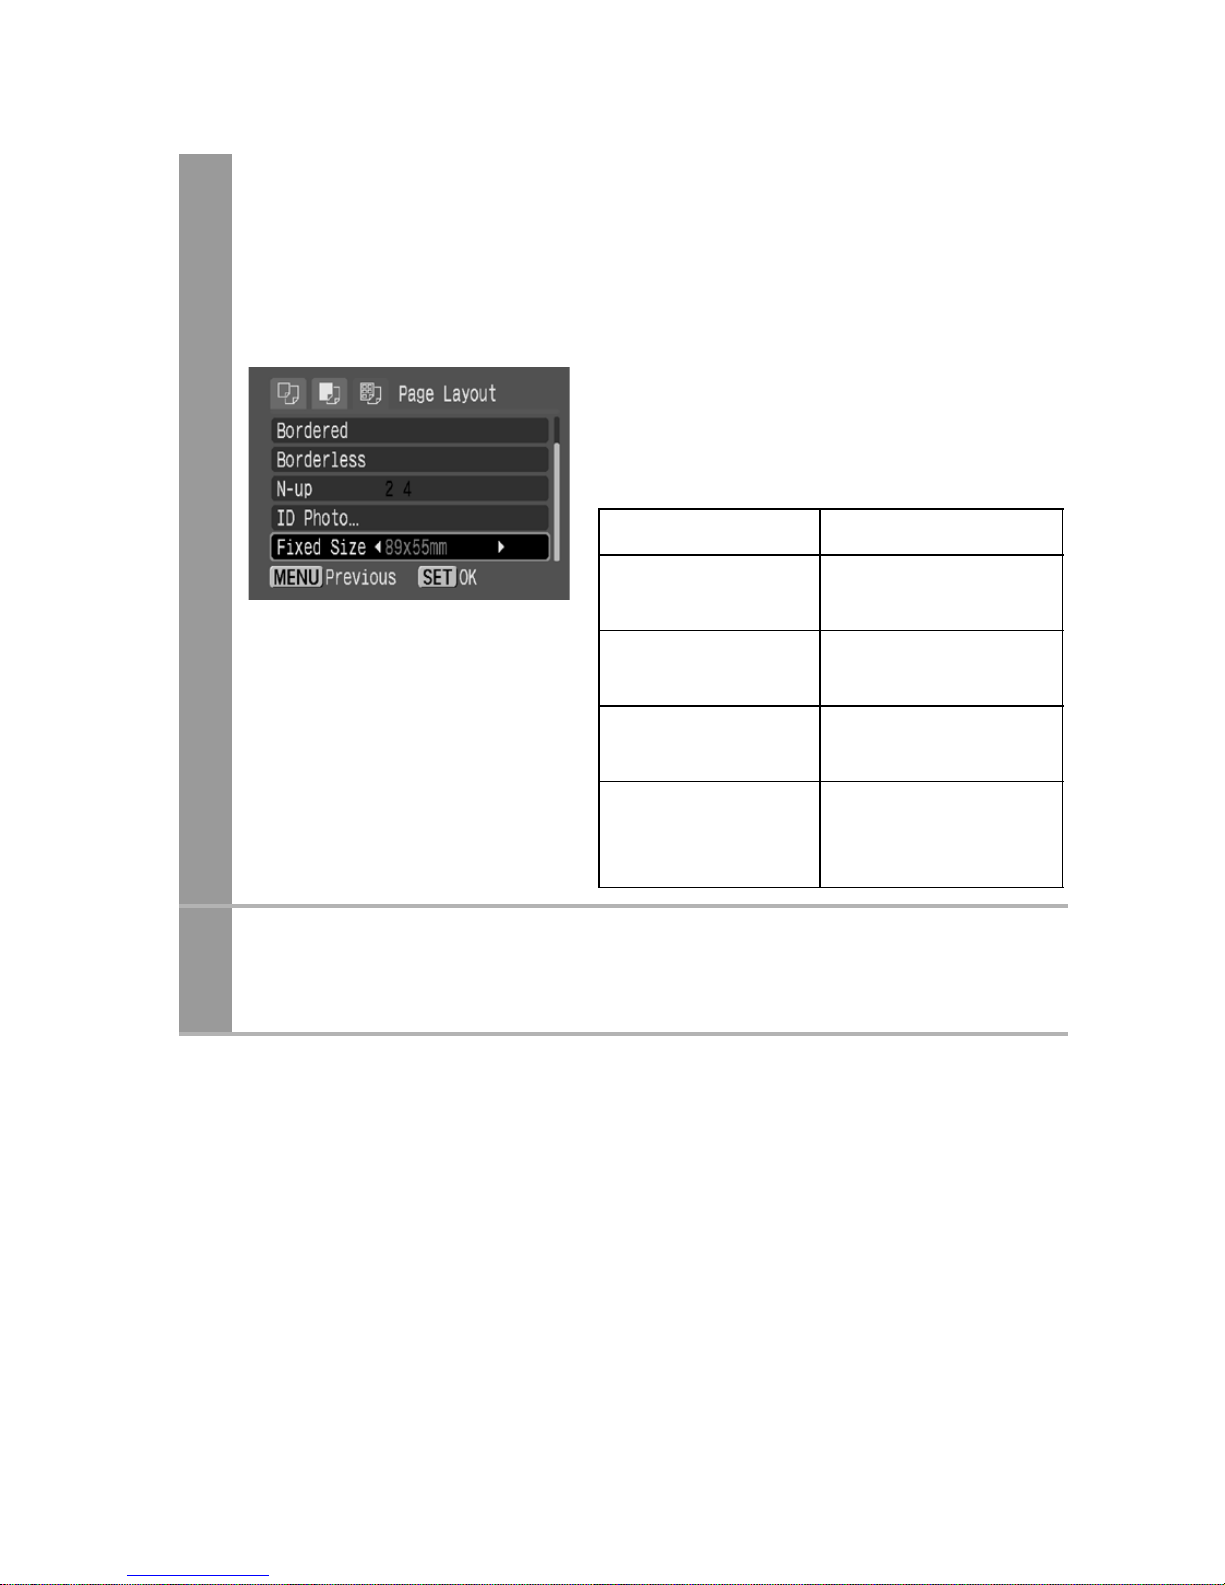
Selecting [Fixed Size] in the layout setting (p. 20) will allow
you to print by specifying the print size of the image on a
sheet of paper.
Select the fixed print size
required.
Depending on the paper size, you
can select print sizes as follows:
5
Select a layout and press the SET button. This
ends the paper settings operations.
The display returns to the print order screen.
Paper size Print size
Credit Card You cannot select
the print size.
9 × 13 cm
(L size)
89 mm × 55 mm
Default
10 × 14.8 cm
(Postcard size)
7 cm × 10 cm
Default
4 in. × 8 in./
10 × 20 cm
(Wide size)
4 in. × 6 in.
7 cm × 10 cm
Default
Page 27
25
Printing Movies (Movie Print)
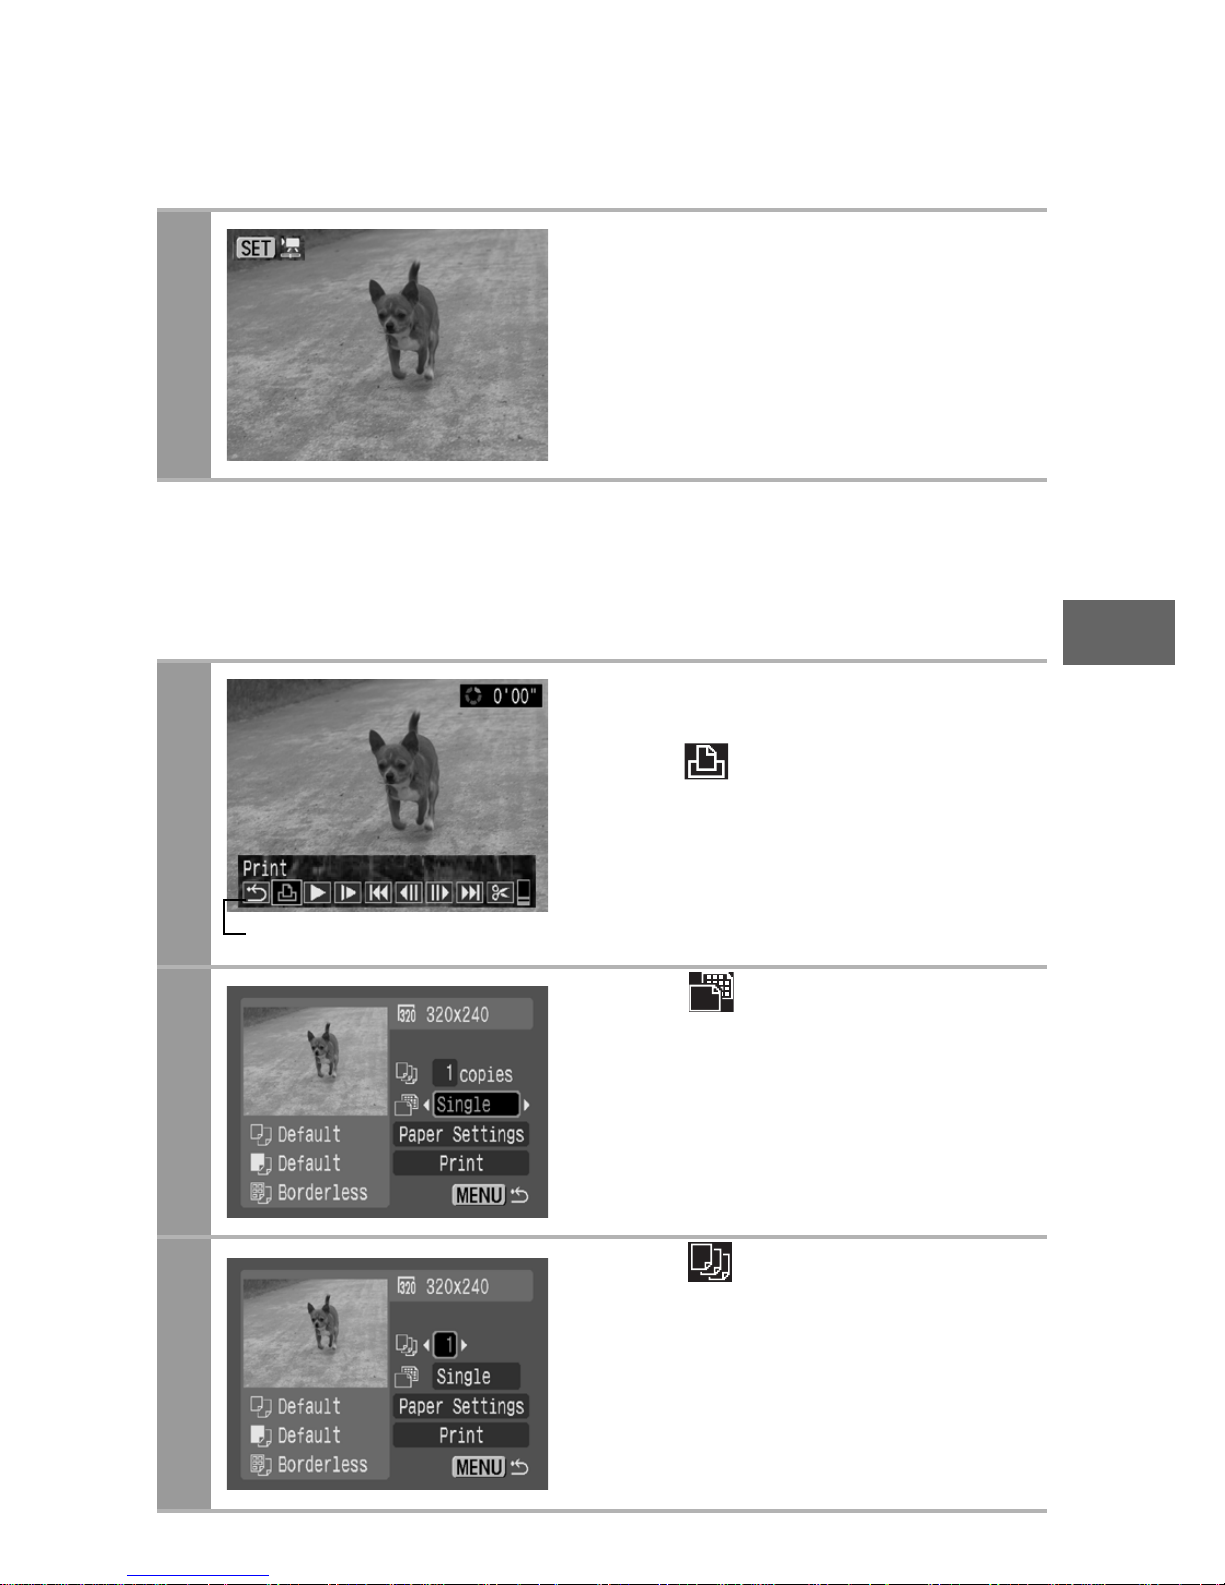
Single-frame
You can choose a single frame from a movie and print it on a sheet
of paper.
1
Select the movie you want to
print, then press the SET
button.
The movie control panel appears.
2
Display the frame you wish
to print on the LCD monitor,
select (Print), then press
the SET button.
Refer to Viewing Movies section of
the Camera User Guide on how to
display the movie frame you wish
to print.
3
Select and choose
[Single].
4
Select and set the
number of prints.
1 to 99 copies can be set.
Movie Control Panel
Page 28
26
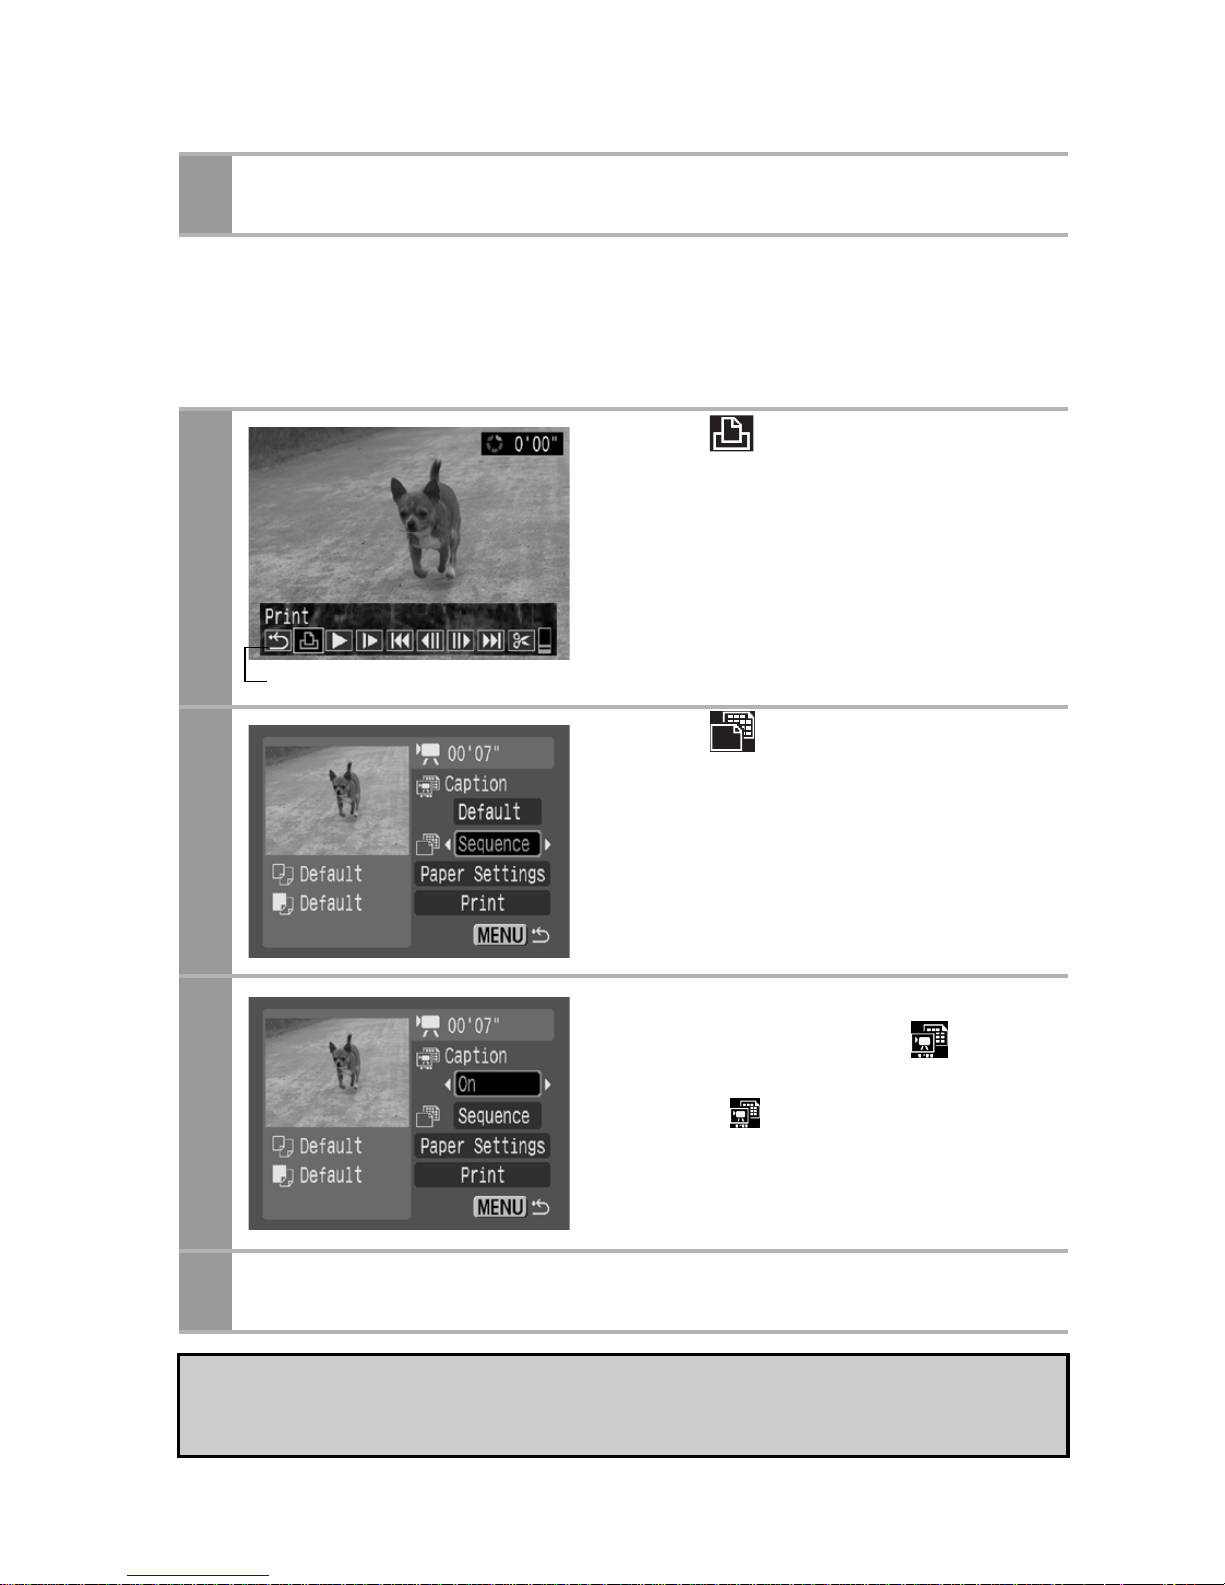
Sequence-frame
You can print movie frames selected automatically at fairly regular
intervals on a sheet of paper.
5
Select [Print] and press the SET button.
2
Select (Print) and press
the SET button.
3
Select and choose
[Sequence].
4
If necessary, select [On],
[Off] or [Default] in
(Caption).
If you set (Caption) to [On], you
can print the file number and the
elapsed time of the frame at the
same time.
5
Select [Print] and press the SET button.
It may not be possible to play back or print movies shot with a
different camera.
Movie Control Panel
Page 29
27
• If you press the button instead of the SET button in Step
1, movie print begins.
• The number of printed movie frames per sheet of paper with
[Sequence] is determined by the paper size shown as follows:
(Depending on the number of seconds in the movie, there are
cases when the number of frames indicated below will not be
printed.)
• Card size: 20 frames
• L size: 42 frames
• Postcard size: 63 frames
• Wide size: 84 frames
• Selecting [Paper Settings] and pressing the SET button in Step
4 will allow [Paper Size], [Paper Type], and [Page Layout]
(excluding [ID Photo]) to be selected.
However, [Page Layout] cannot be set (p. 26) when [Sequence]
is selected.
Page 30
28
Specifying and Printing Multiple Images
(Setting the DPOF Print Settings)
With the camera’s (Print) menu, you can specify and print
multiple images or all the images on a memory card. For
instructions on how to specify images, please refer to Setting the
DPOF Print Settings section of the Camera User Guide. In this
section, we will explain how to print images after specifying them.
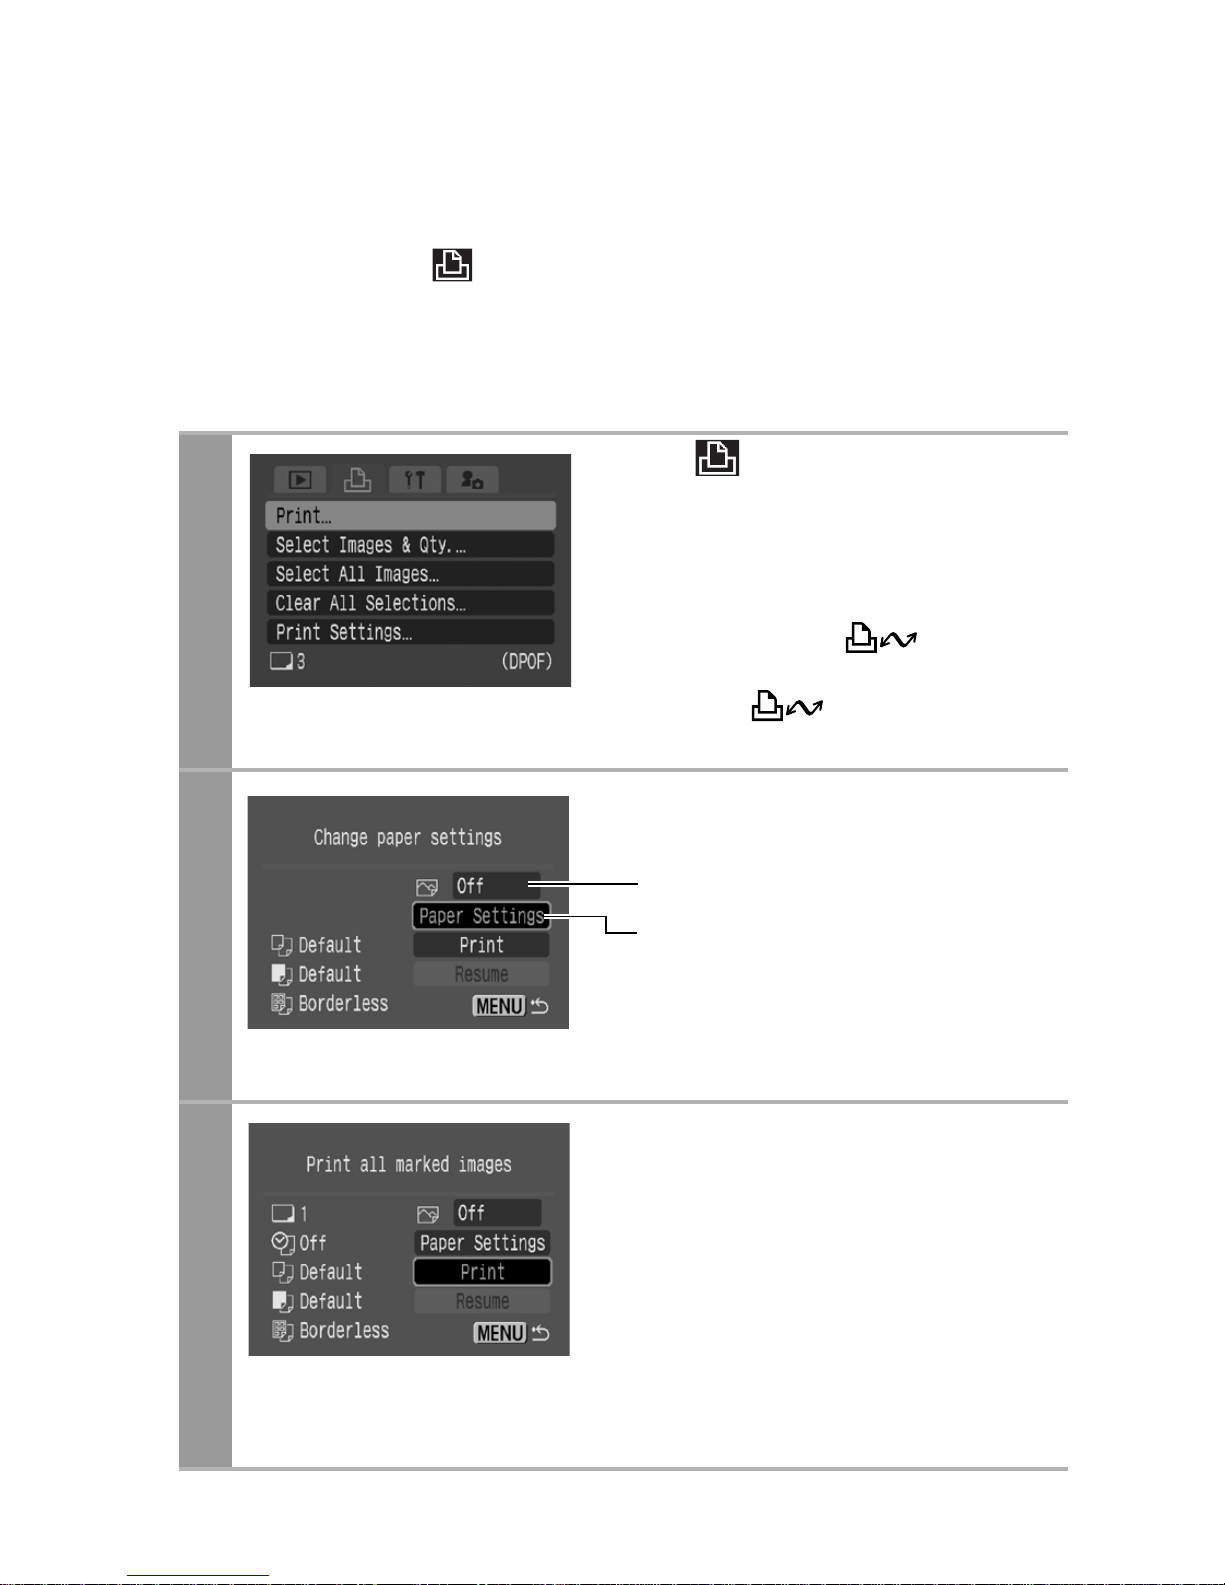
1
In the (Print) menu, select
[Print] and press the SET
button.
• When an image or images have
been specified (see the Camera
User Guide), the button will
light up blue. At this time, if you
press the button, the
screen for Step 2 will be displayed.
2
Set the print effect and paper
settings as required.
* [Page Layout] cannot be set in the
[Paper Settings] when [Index] is
selected in the [Print Settings] option
in Step 1.
3
Select [Print] and press the
SET button.
• The image will start to print and,
when it is completely finished, the
display will revert to the standard
playback mode.
• If the MENU button is pressed,
the display will revert to the
screen in Step 1 and printing will
not take place.
Sets the Print Effect (p. 14)
Selects the Paper Settings* (p. 19)
Page 31
29
• To print the date, set the [Date] setting in [Print Settings] on the
screen in Step 1 to [On]. You cannot set the date to print in
Step 2.
• When the print type is set to [Index], the [Date] and [File No.]
cannot be printed at the same time.
• The ID photo print function cannot be used.
• You cannot print movies.
• The maximum number of images printed on one page in the
Index print type depends on the selected paper size.
• Card size: 20 images
• L size: 42 images
• Postcard size: 63 images
• Wide size: 84 images
Page 32

30
Cancel Printing
• To cancel printing between images printed, press the SET
button. A confirmation dialog appears. Select [OK] and press
the SET button. The printer will stop printing the current image
and eject the paper.
Restarting Printing
• Select [Resume] and press the SET button. The remaining
images can be printed.
• Printing cannot be restarted under the following circumstances.
• If the print settings have been changed before restarting.
• If the image for which the print settings were set has been
deleted before restarting.
• If there is very little free space on the memory card when
printing is canceled, it may not be possible to restart printing.
• If printing is canceled because the camera battery is depleted, it
may not be possible to restart printing.
(Replace with a fully charged battery pack or new batteries,
then turn the camera power on again. If you intend to use an
extended period of time, you are recommended to power the
camera with a compact power adapter (sold separately).)
Printing Errors
• An error message appears if an error occurs for some reason
during the printing process. When the error is resolved, printing
will automatically resume. If printing does not resume, select
[Continue] and press the SET button. If [Continue] cannot be
selected, select [Stop], press the SET button and restart the
print job. See List of Messages (p. 31) for details.
Page 33
31
List of Messages
The following messages may appear on the camera’s LCD monitor
when an error occurs during a camera and printer connection.
(Depending on the printer model, some messages may not
display.)
Please refer to the printer’s user guide for solutions.
No Paper
Paper cassette is incorrectly inserted or out of
paper. Or the paper feed is not operating correctly.
No Ink
The ink cartridge has not been inserted or has run
out of ink.
Paper and ink do not
match
The paper and ink are from different sets.
Paper Jam The paper jammed during printing.
Print output tray is
full
Remove paper from the print output tray.
Paper Error The paper is not correctly set in the printer.
Cartridge not
compatible
Cartridge is not compatible.
Ink Error The ink cassette is experiencing a problem.
Recharge the printer
battery
The printer’s battery pack is depleted.
Readjust trimming
You attempted to print the image with a different
style than the one used when the trimming settings
were set.
Hardware Error
Check whether or not an error other than a paper
or ink error has occurred.
File Error
You tried to print an image that is not compatible
with PictBridge. Some images that have been
recorded with another camera or modified using a
computer cannot be printed.
Print error
There is an error in the settings. Turn off the printer
and turn it on again, then set the print settings
correctly.
Page 34
32
Printing
Easy Print
You can print images by pressing only one button after connecting
the camera to the printer.
1
Make sure that displays in
the upper left corner of the
LCD monitor.
2
Display the images you wish to print and press the
button.
If you wish to change the print settings, see Print after
Changing the Print Settings (p. 33).
Printing with
Bubble Jet Printers
(PIXMA series/
SELPHY DS series)
using
PictBridge
Page 35
33
Print after Changing the Print Settings
You can change the print settings before printing.
1
Make sure that displays in
the upper left corner of the
LCD monitor.
If displays on the LCD monitor,
please refer to Printing with
Bubble Jet Printers using Bubble
Jet Direct (p. 71).
2
Display the images you wish
to print and press the SET
button.
The print order screen appears.
3
Select print settings as needed.
4
Select [Print] and press the SET button.
• The image will start to print and, when it is completely
finished, the display will revert to the standard playback
mode.
• If you press the MENU button, the display will revert to the
standard playback mode and printing will not take place.
Sets the date and
the file number for
printing (p. 35)
Sets the print
effect (p. 36)
Sets the number of copies (p. 37)
Sets the trimming portion (p. 38)
Sets the paper size, type and layout
(p. 42)
Starts the printing process
Print Order Screen
Page 36
34
• You cannot print RAW images.
• It may not be possible to play back or print images shot with a
different camera.
• You may not be able to print if the memory card holds a large
number of images (about 1000).
Cancel Printing
• To cancel printing between images, press the SET button.
A confirmation dialog will display. Select [OK] and press the
SET button. The printer will stop printing the current image and
eject the paper.
Printing Errors
• An error message appears if an error occurs for some reason
during the printing process. When the error is resolved, printing
will automatically resume. If printing does not resume, select
[Continue] and press the SET button. If [Continue] cannot be
selected, select [Stop], press the SET button and restart the
print job. See List of Messages (p. 50) for details.
• On printers equipped with an operation panel, an error number
or message displays on the panel. Please refer to the printer
user guide for the remedies corresponding to the error numbers
or messages.
Page 37
35
Selecting Print Settings
Setting the Date and the File Number Printing Option
Default Setting
• The Default option is a fixed setting of the printer.
• The [Date/File No.], [Print Effect], paper setting [Paper Size],
[Paper Type] and [Page Layout] options are available.
• On printers equipped with an operation panel, you can change
the settings for those items set to [Default] using the printer's
operation panel.
1
Select [ ], then select the
date and the file number
printing option.
You can set the date and the file
number printing as follows:
Date Prints the date.
File No. Prints only the file number.
Both
Prints both the date and
the file number.
Off
Prints neither date nor file
number.
Default
Prints using the default
setting.
Page 38
36
Setting the Print Effect
This function uses the camera’s shooting information to optimize
the image data, yielding high quality prints. You can select the
following print effects.
If you select an image which has had the shooting date
embedded in it using a camera with the Postcard Date Imprint
mode, [ ] will be set to [Off]. If you select [Date], [File No.] or
[Both], the date/file number will be printed on the embedded
information which is also printed.
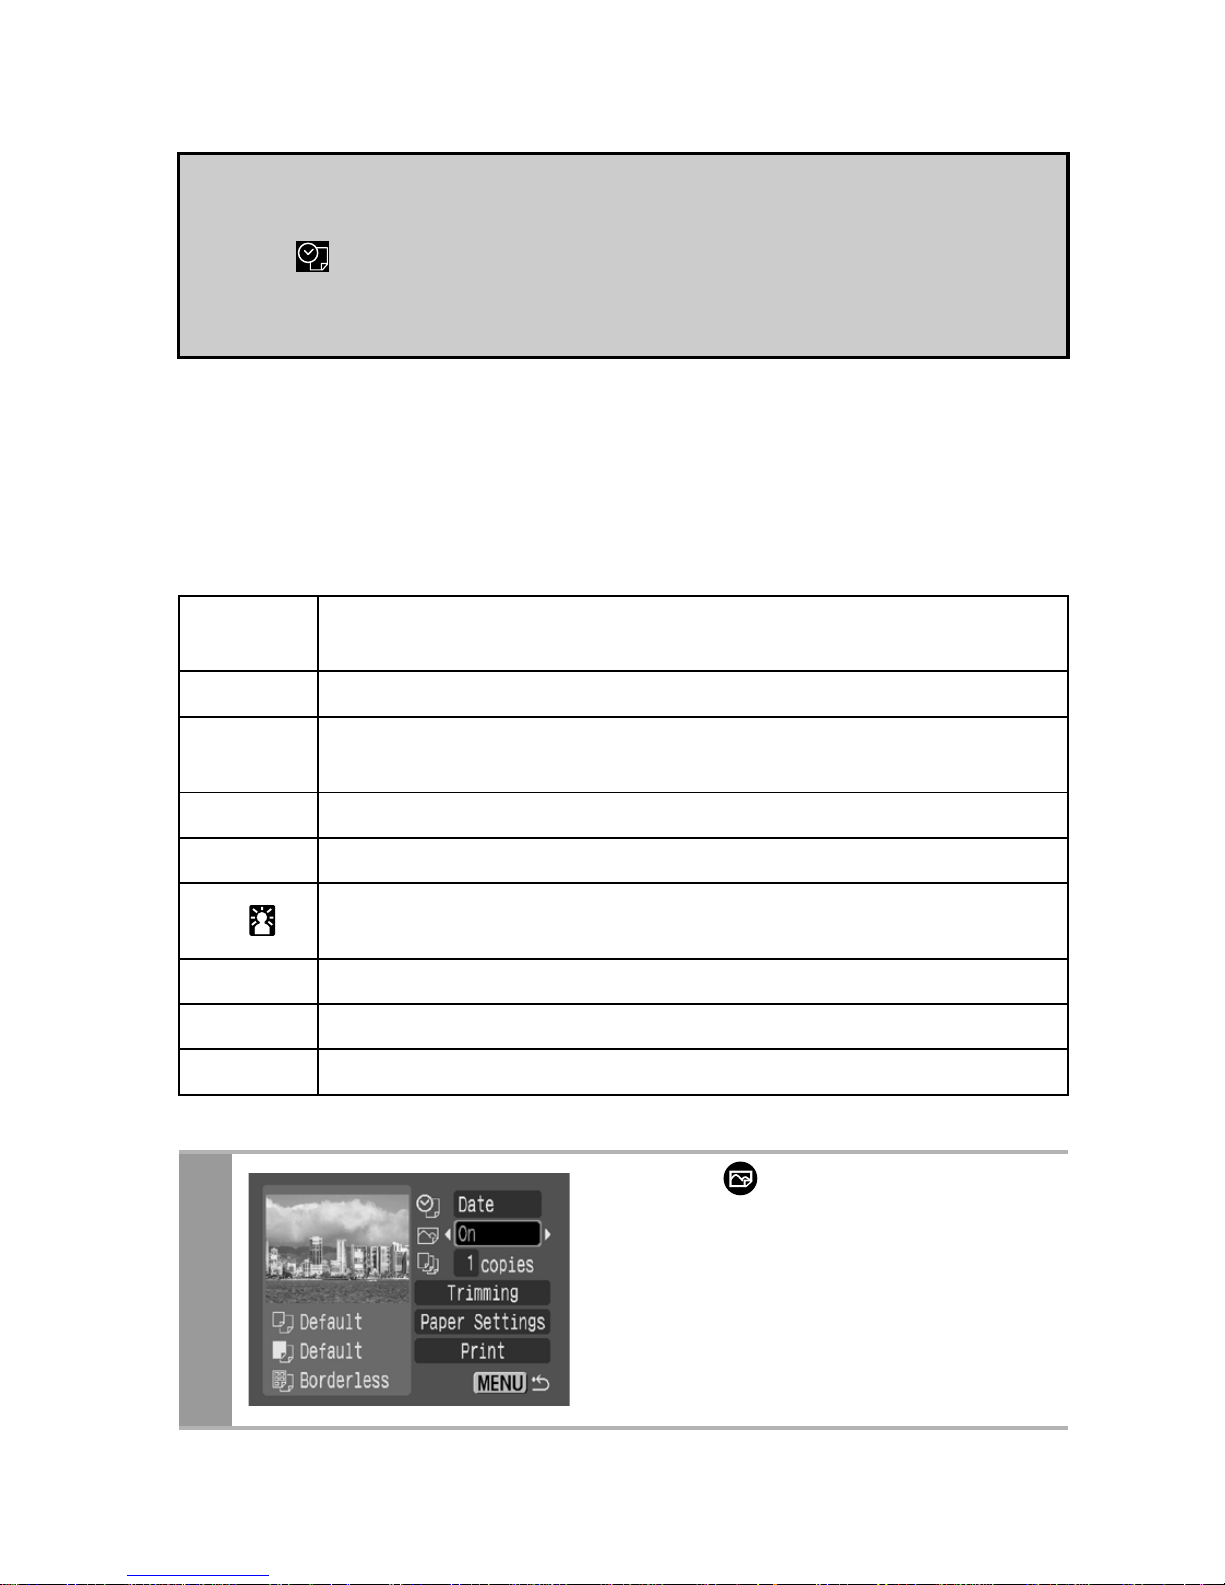
On
Uses the camera’s shooting information to deliver optimum
prints.
Off Prints without any effects.
Vivid
Prints more vibrant colors, such as the green of trees or the
blue of the sea or sky, than the [On] option.
NR Prints with a noise reduction effect.
Vivid+NR Prints using both the [Vivid] and [NR] options.
Face
Brightly prints a person’s face that has become dark because of
backlighting, etc.
Red-Eye1 Prints with red-eye color corrected.
Red-Eye2 Prints using 3 setting; [Face], [Red-Eye], and [NR]
Default Print settings differ according to your printer model.
1
Select [ ] and choose a
print effect option.
Page 39
37
Setting the Number of Copies
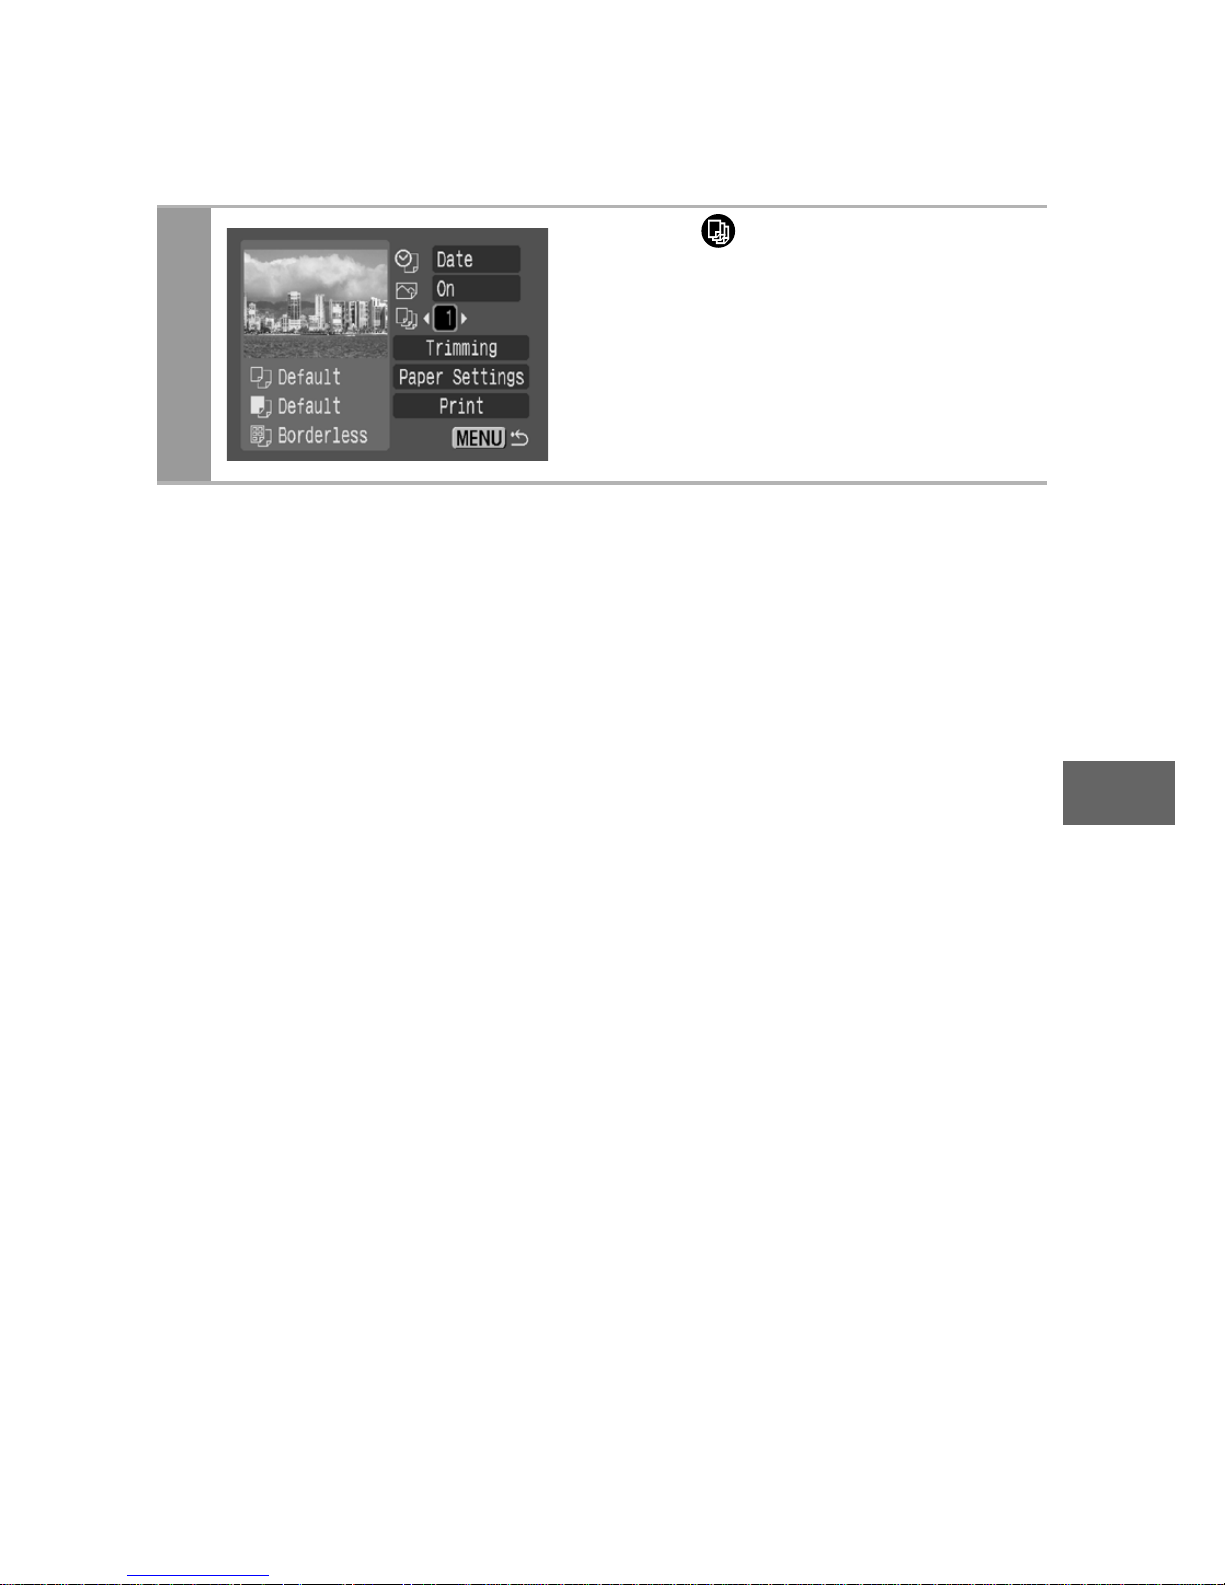
1
Select [ ] and set the
number of prints.
1 to 99 copies can be set.
Page 40
38
Setting the Printing Area (Trimming)
You can specify a portion of the image for printing.
Please set [Paper Settings] (p. 42) before setting the trimming
settings. If [Paper Settings] is changed after having made the
trimming settings, you must select the settings again.
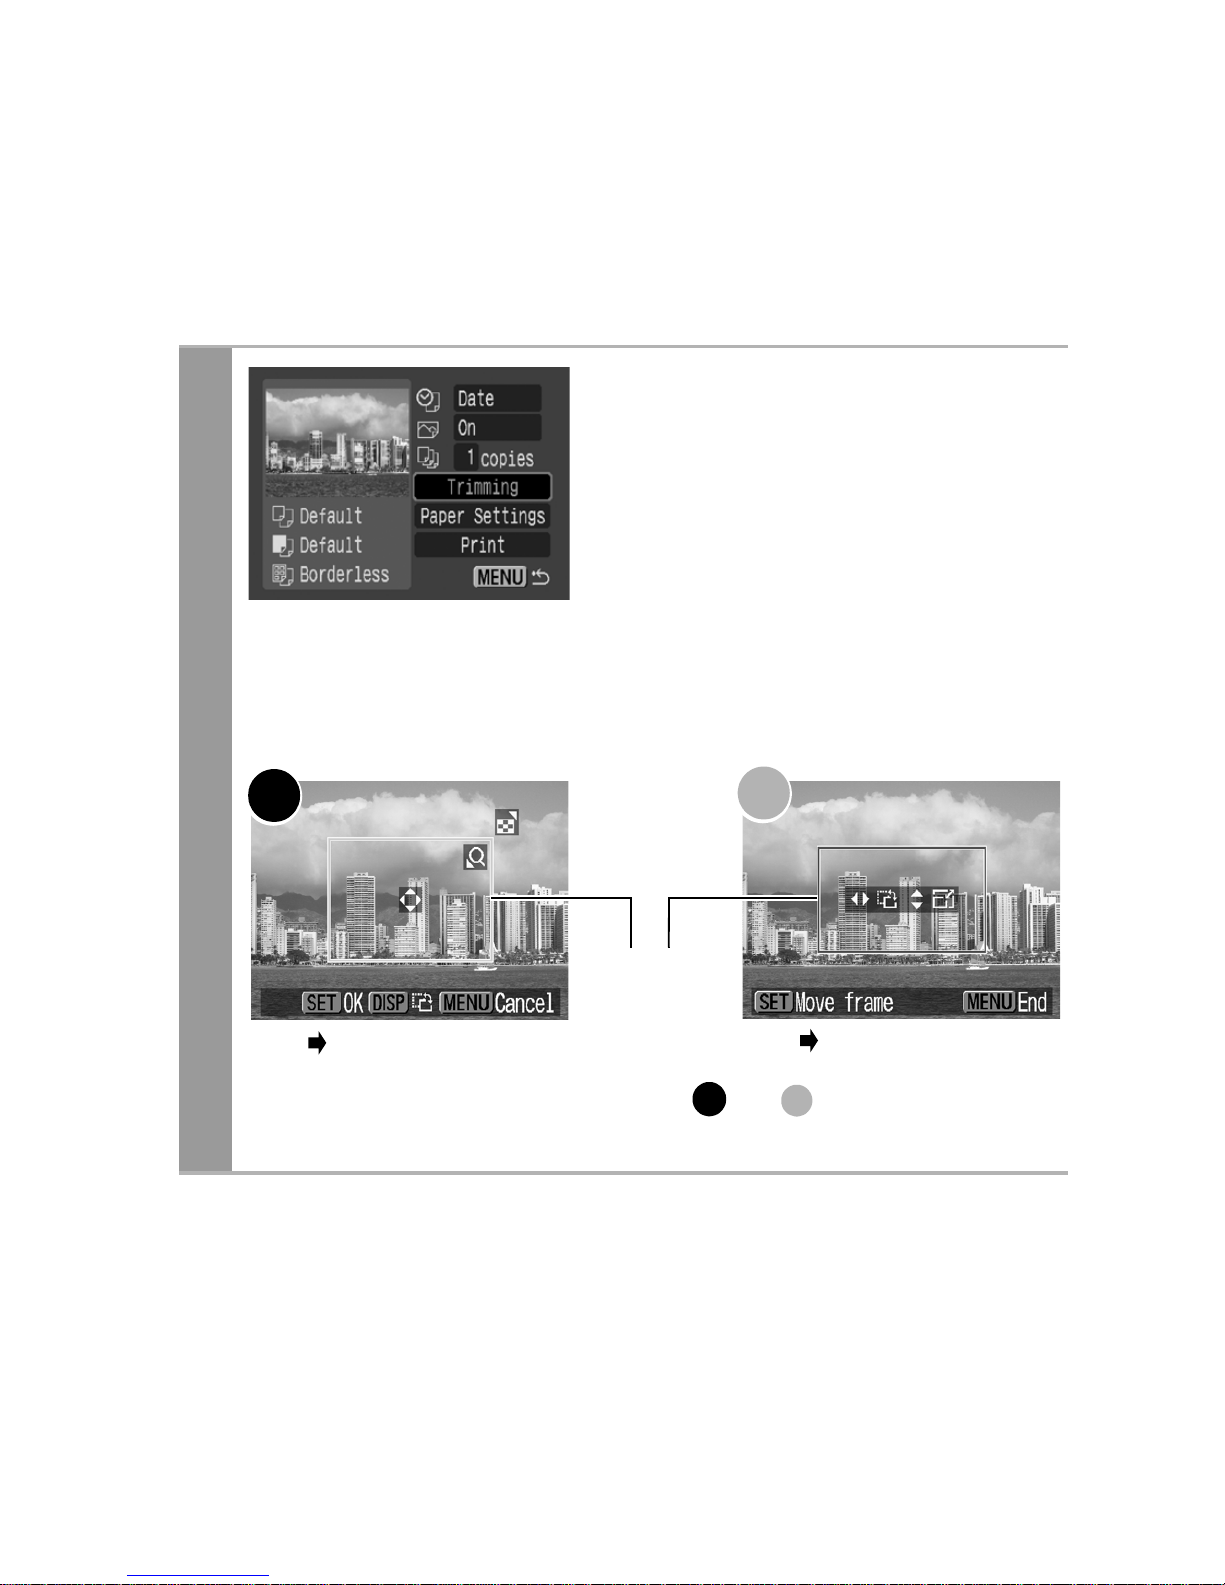
1
Select [Trimming] and press
the SET button.
The trimming frame will appear at
the center of the image. If a
trimming setting has already been
selected for the image, the frame
will appear around the previously
selected portion.
The trimming setting screen differs depending on the
camera model. Check which of the following screens
appear before selecting settings.
Steps 2a and 3a
Trimming Frame
Steps 2b and 3b
* Proceed to procedure or depending
on the display screen which appears.
a
b
a b
Page 41
39
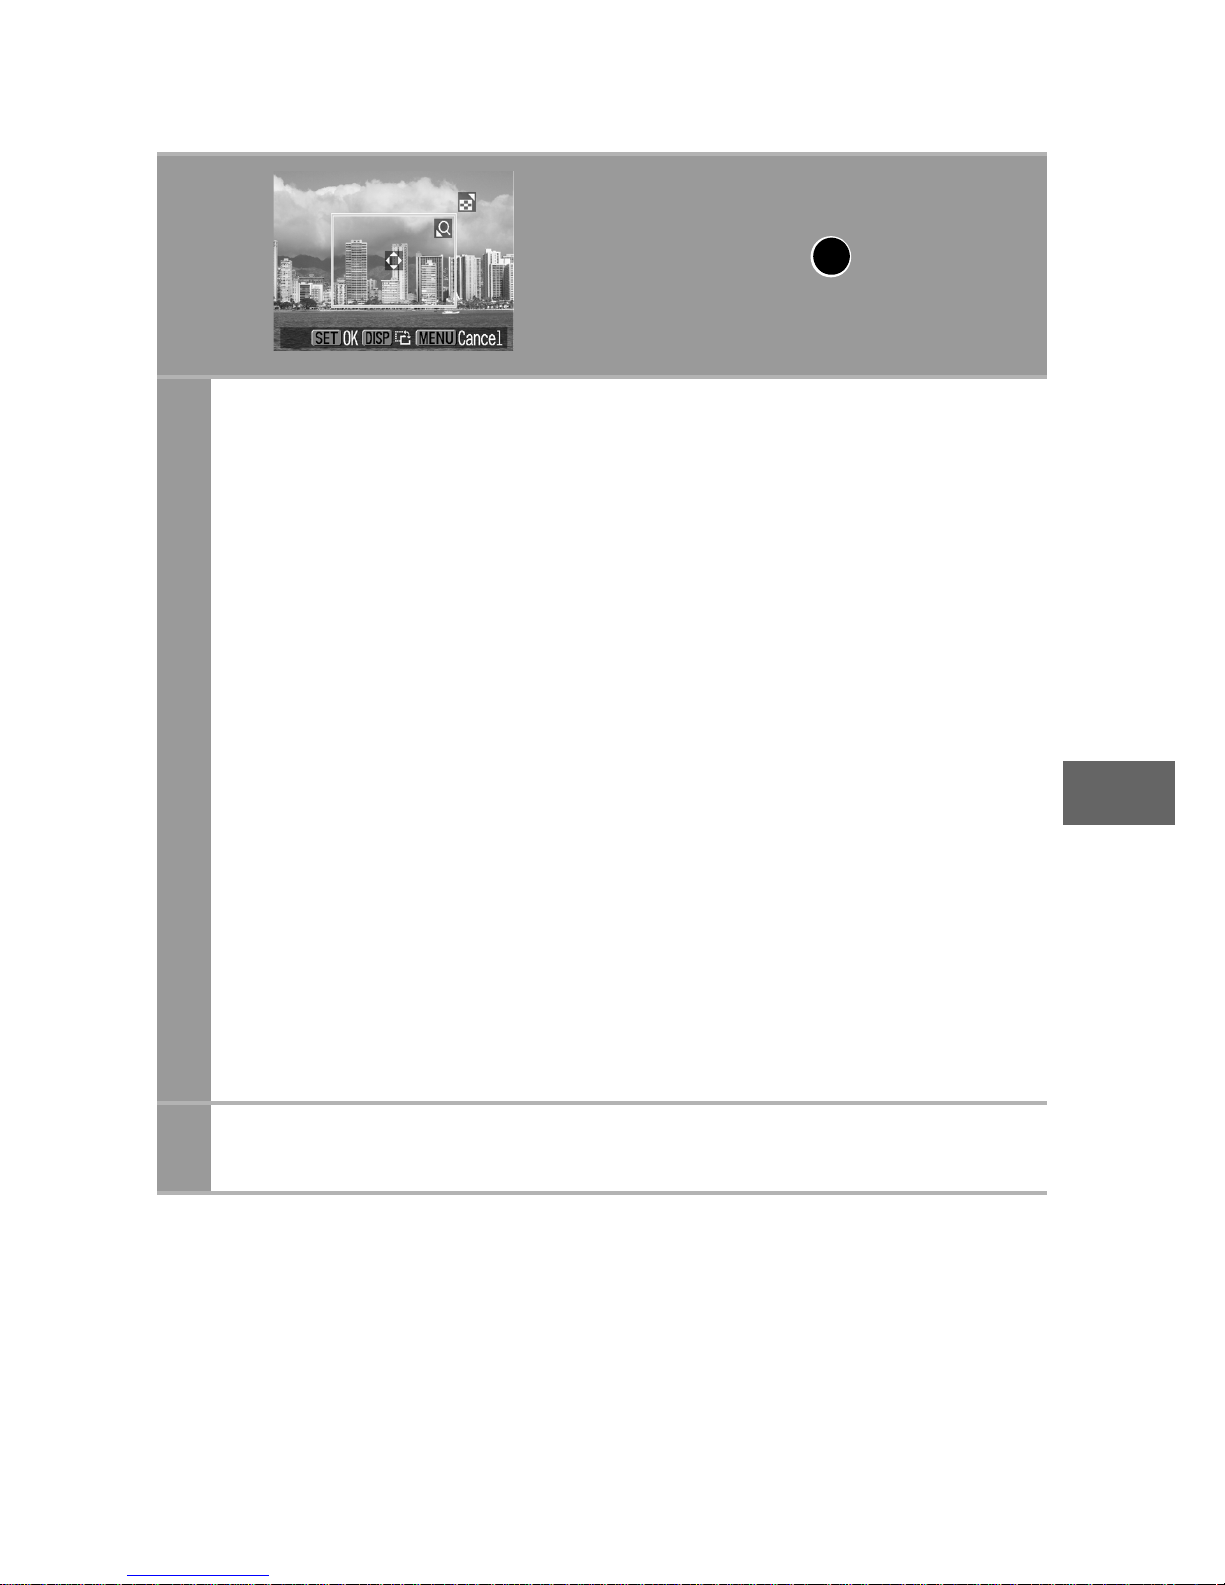
2a
Trim the image.
Changing the Size of the Trimming Frame
• Press the zoom lever or the zoom button to adjust the size of
the trimming frame.
• The trimming frame can be changed to a minimum selection
of approximately half the displayed image (in width and
height) or a maximum selection that is virtually the same size
as the image.
• Expanding the trimming frame beyond its maximum size
cancels the trimming setting.
• When printing an image that has been magnified using the
trimming option, the image quality may become coarser and
grainier depending on the level of magnification.
Moving the Trimming Frame
• Move the trimming frame using the omni selector or the up,
down, right and left buttons.
Rotating the Trimming Frame
• You can rotate the trimming frame by pressing the DISP. (or
DISPLAY) button.
3a
Press the SET button to close the setting menu.
Pressing the MENU button cancels the settings.
When screen displays
a
Page 42
40
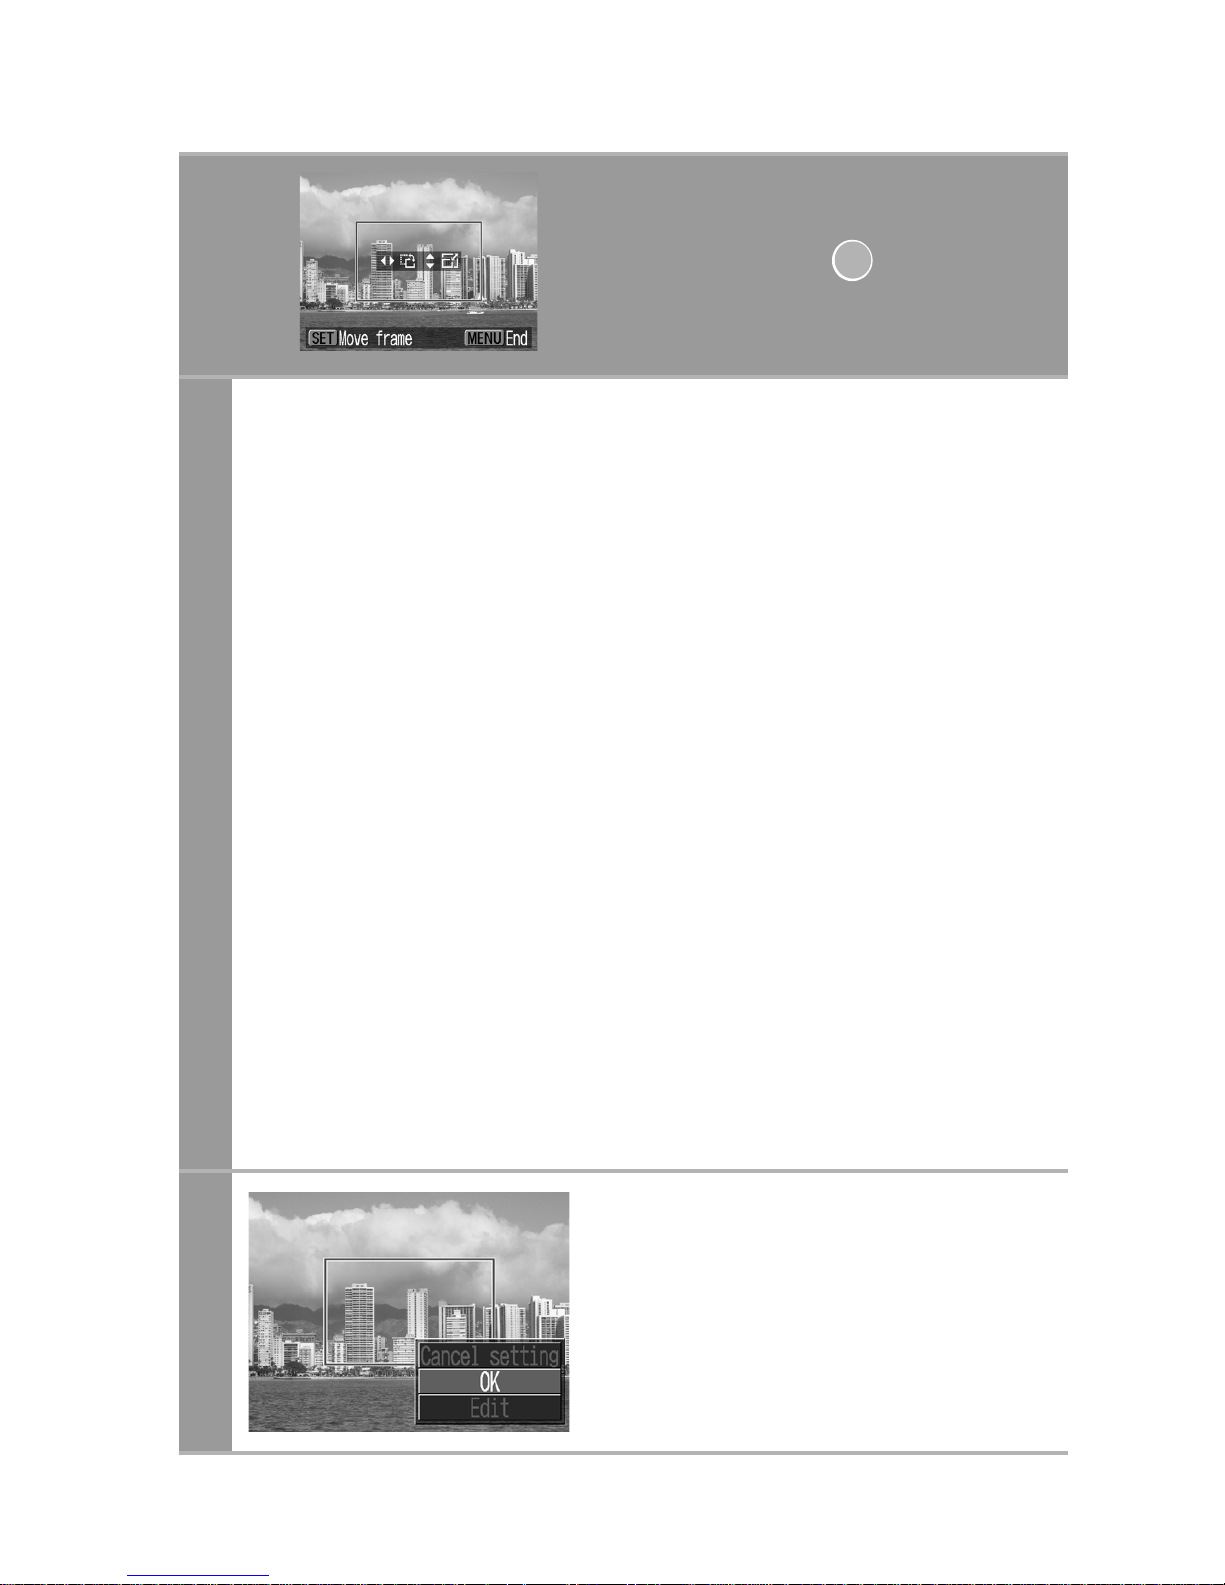
2b
Trim the image.
Changing the Size of the Trimming Frame
• Press the up and down buttons to adjust the size of the
trimming frame.
• The trimming frame can be changed to a minimum selection
of approximately half the displayed image (in width and
height) or a maximum selection that is virtually the same size
as the image.
• Expanding the trimming frame beyond its maximum size
cancels the trimming setting.
• When printing an image that has been magnified using the
trimming option, the image quality may become coarser and
grainier depending on the level of magnification.
Rotating the Trimming Frame
• You can rotate the trimming frame using the left and right
buttons.
Moving the Trimming Frame
• Press the SET button and use the up, down, right and left
buttons to move the trimming frame. Pressing the SET
button again allows you to change the size of the frame and
to rotate it.
3b
Press the MENU button,
select [OK] and press the
SET button.
Selecting [Cancel setting] cancels
the selected trimming setting. If
[Edit] is selected, the display
returns to the previous screen.
When screen displays
b
Page 43
41
• The trimming setting only applies to one image.
• The trimming setting is canceled with the following operations.
• When you set the trimming settings for another image.
• When you close the Print mode (when you turn the camera
power off, change the camera mode, or detach the
connection cable).
• The shooting date or part of the date which has been
embedded in images using a camera with the Postcard Date
Imprint mode may not be printed properly depending on the
trimming setting.
• The paper size and page layout settings determine the shape of
the trimming frame.
• Please use the LCD monitor to set the trimming settings. The
trimming frame may not display correctly on a TV screen.
Page 44
42
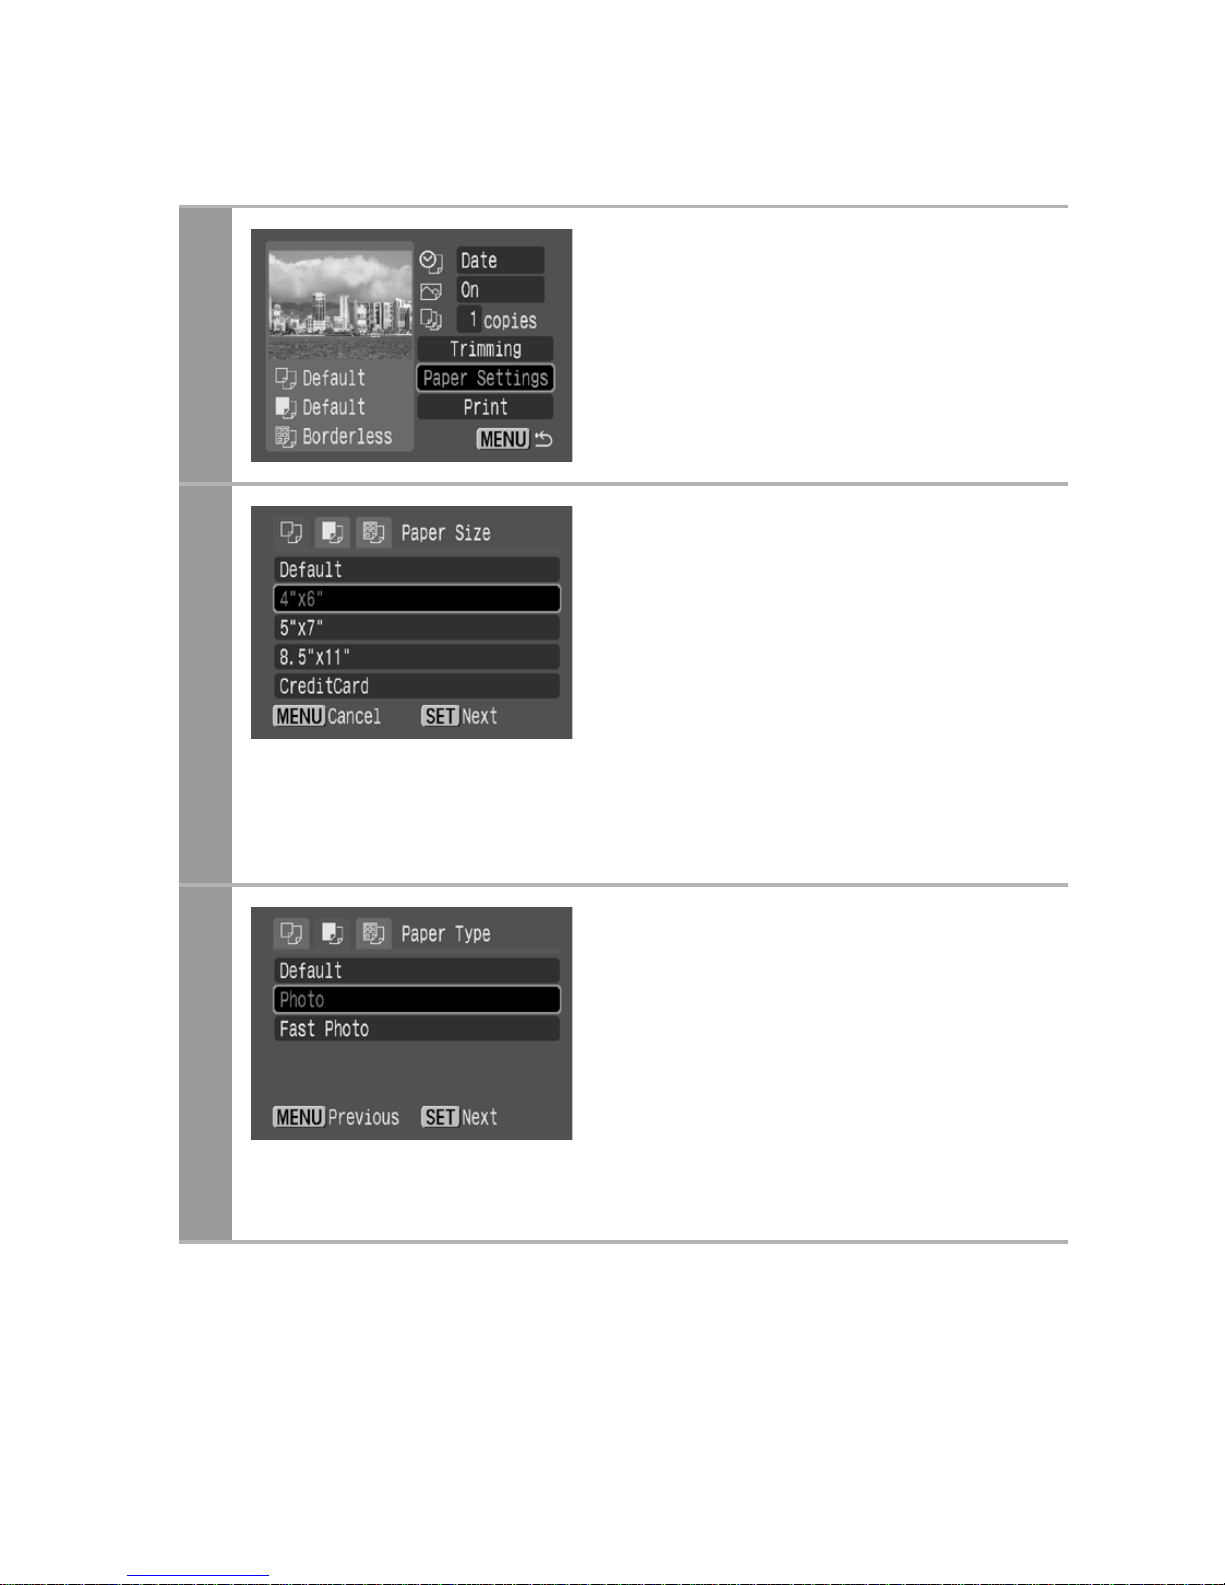
Selecting the Paper Settings
1
Select [Paper Settings] and
press the SET button.
The paper size setting screen
appears.
2
Select a paper size and press
the SET button.
The following paper sizes* are
available: 4" × 6", 5" × 7",
13 × 18 cm, 8.5" × 11", A4,
CreditCard, 8" × 10", 10" × 12", A3,
A3+/13" × 19", 14" × 17", 4" × 7.1"
and Default.
The paper type setting screen
appears.
* Paper sizes vary according to region.
3
Select a paper type and
press the SET button.
The following paper types are
available: Photo, Fast Photo, Fine
Art, Semi-gloss, Plain and Default.
Please refer to the printer user
guide for the kind of paper that may
be used for each paper type
setting.
The Page Layout screen appears.
Page 45
43
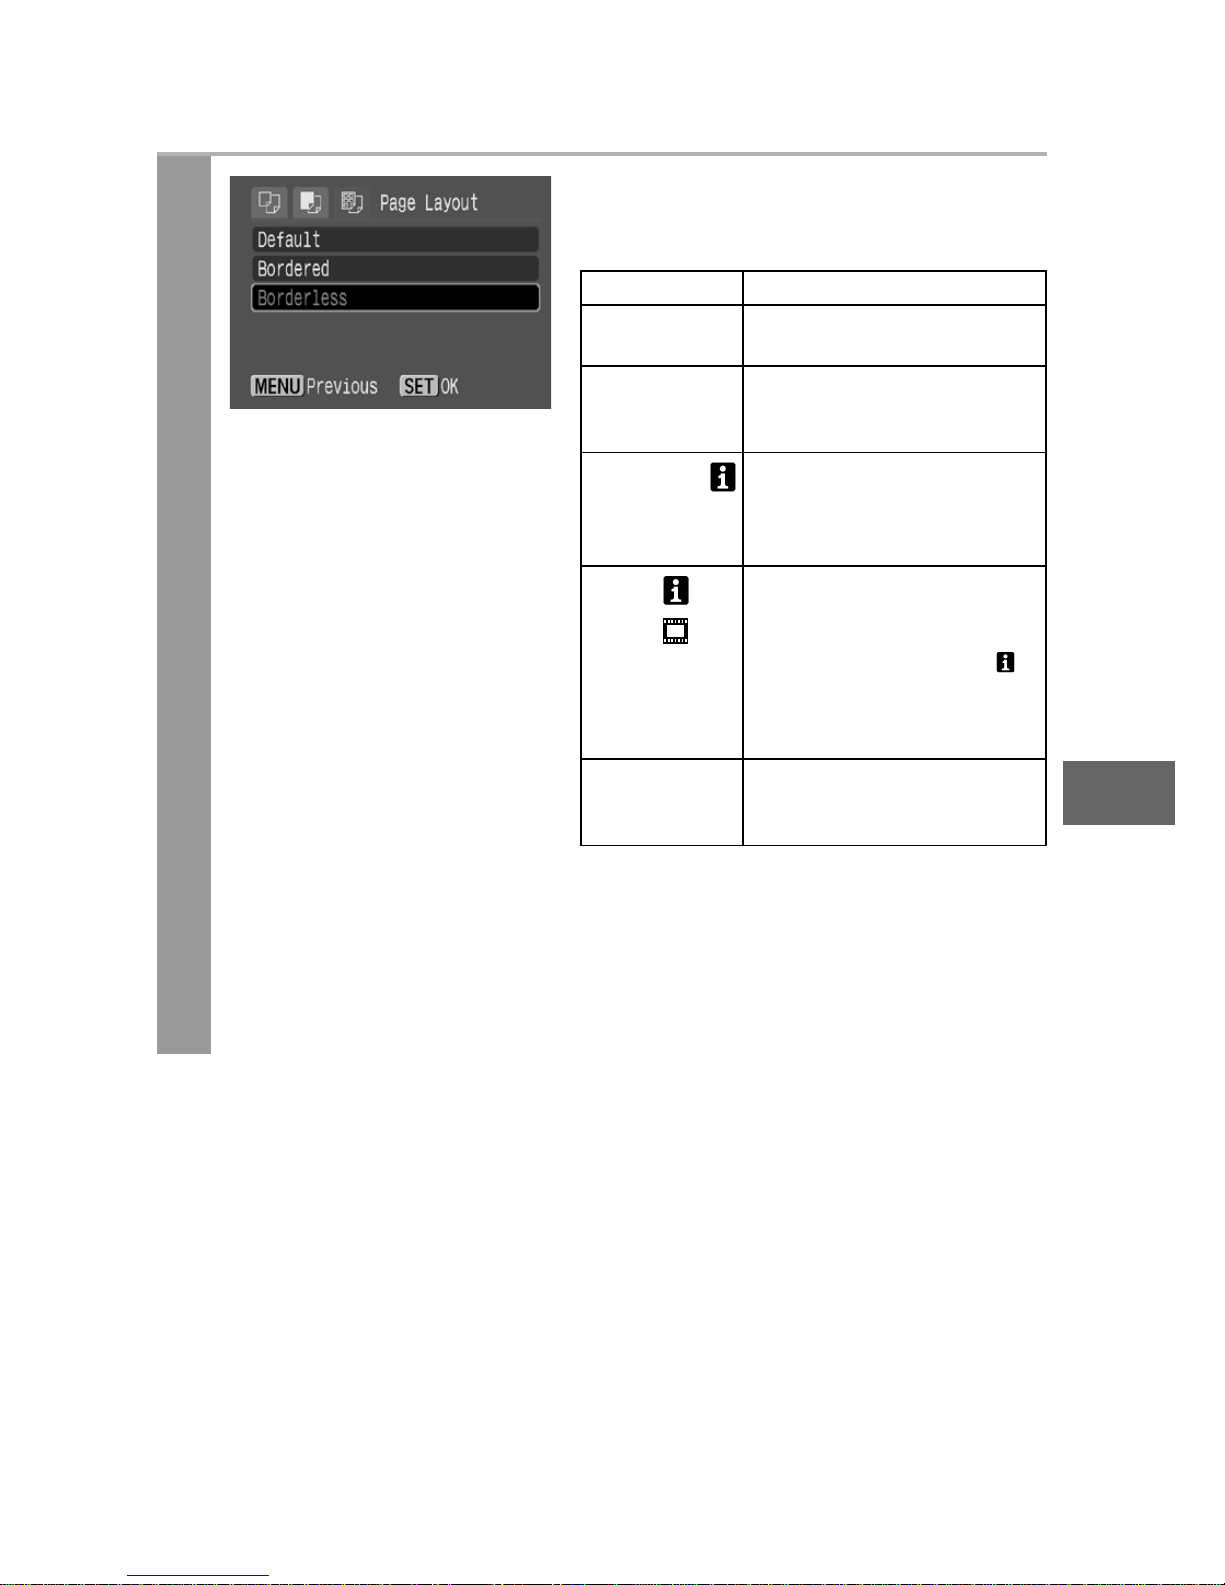
4
Select a layout.
The following layout can be
selected.
*1Appears only when using the auto
sheet feeder and you select [4" × 6"]
in [Paper Size].
*
2
Prints the camera name, shooting
mode, shutter speed, aperture value,
exposure compensation, ISO speed,
etc., from the Exif information.
Bordered Prints with a border.
Borderless Prints right to the edges
of the paper.
N-up*
1
Prints 2, 4, 9 or 16
images on a single sheet
of paper (p. 44).
Bordered
Prints the shooting
information*
2
onto a
blank sheet of paper
(size L or larger).
20-up
35-up
Prints images with DPOF
print setting at 20-up or
35-up, scaled down to A4
size paper. For [20-up ],
the shooting information*
2
will be printed next to the
image.
Default Print settings differ
according to your printer
model.
Page 46
44
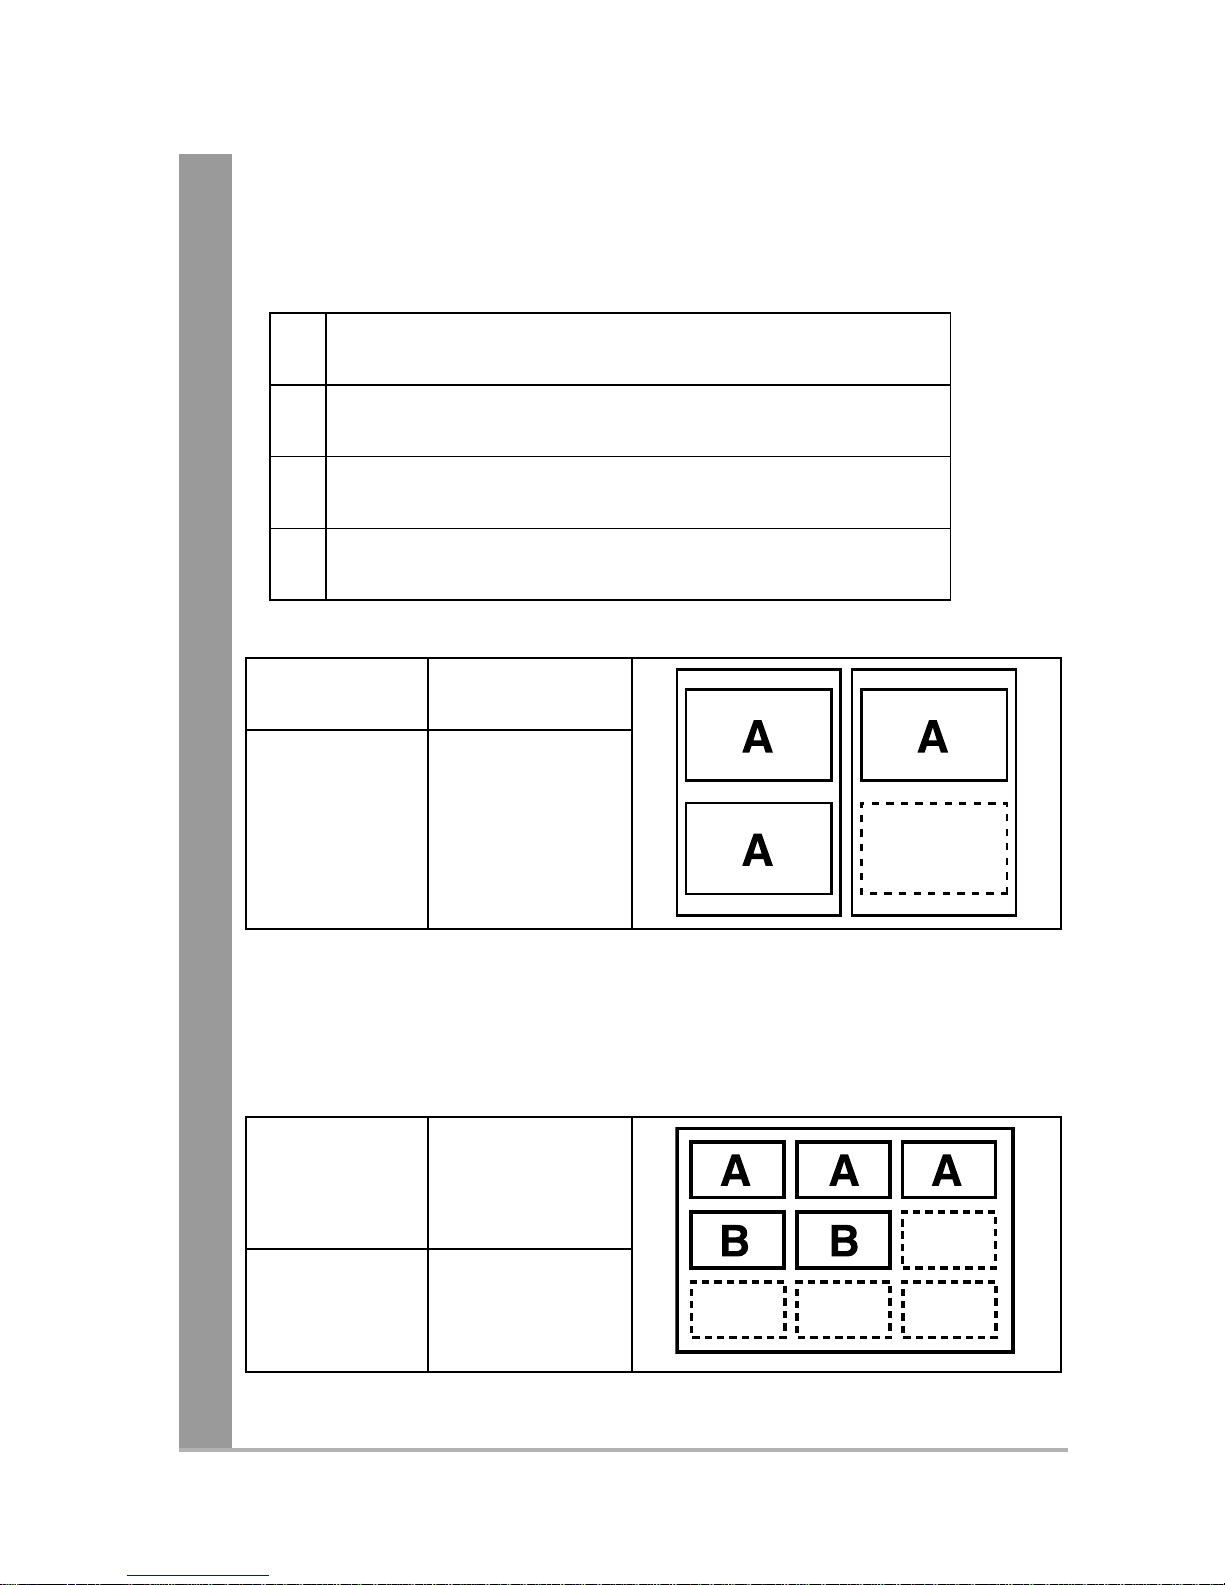
Printing Multiple Images on a Sheet of Paper
• Selecting [4" x 6"] in the paper size setting (p. 42) will allow
you to specify the following layout settings.
[Printing example 1] Printing 3 copies of image A in 2-up
DPOF print setting (p. 47) allows you to separately print different
images by specifying the number of frames to be printed per image.
[Printing example 2] Printing 3 copies of image A and 2 copies of
image B in 9-up
* Please refer to the Camera User Guide for instructions on DPOF print
setting methods.
2
2 images (height 2 x width 1) of the same
dimensions are arranged on a single sheet of paper.
4
4 images (height 2 x width 2) of the same
dimensions are arranged on a single sheet of paper.
9
9 images (height 3 x width 3) of the same
dimensions are arranged on a single sheet of paper.
16
16 images (height 4 x width 4) of the same
dimensions are arranged on a single sheet of paper.
Number of
copies (p. 37)
Image A:
[3] copies
Layout 2
DPOF print
settings*
(p. 47)
Image A:
[3] copies
Image B:
[2] copies
Layout 9
Page 47
45
5
Select a layout and press the SET button. This
ends the paper settings operations.
The display returns to the print order screen.
• Images will print with borders, even if [Borderless] was selected
with the camera in the following cases:
•When [Plain] is selected in the camera's [Paper Type] (cannot be
selected depending on the connected printer model).
•With printers equipped with an operation panel, when [Plain] is selected
with the printer and [Default] is selected in the camera's [Paper Type].
Page 48
46
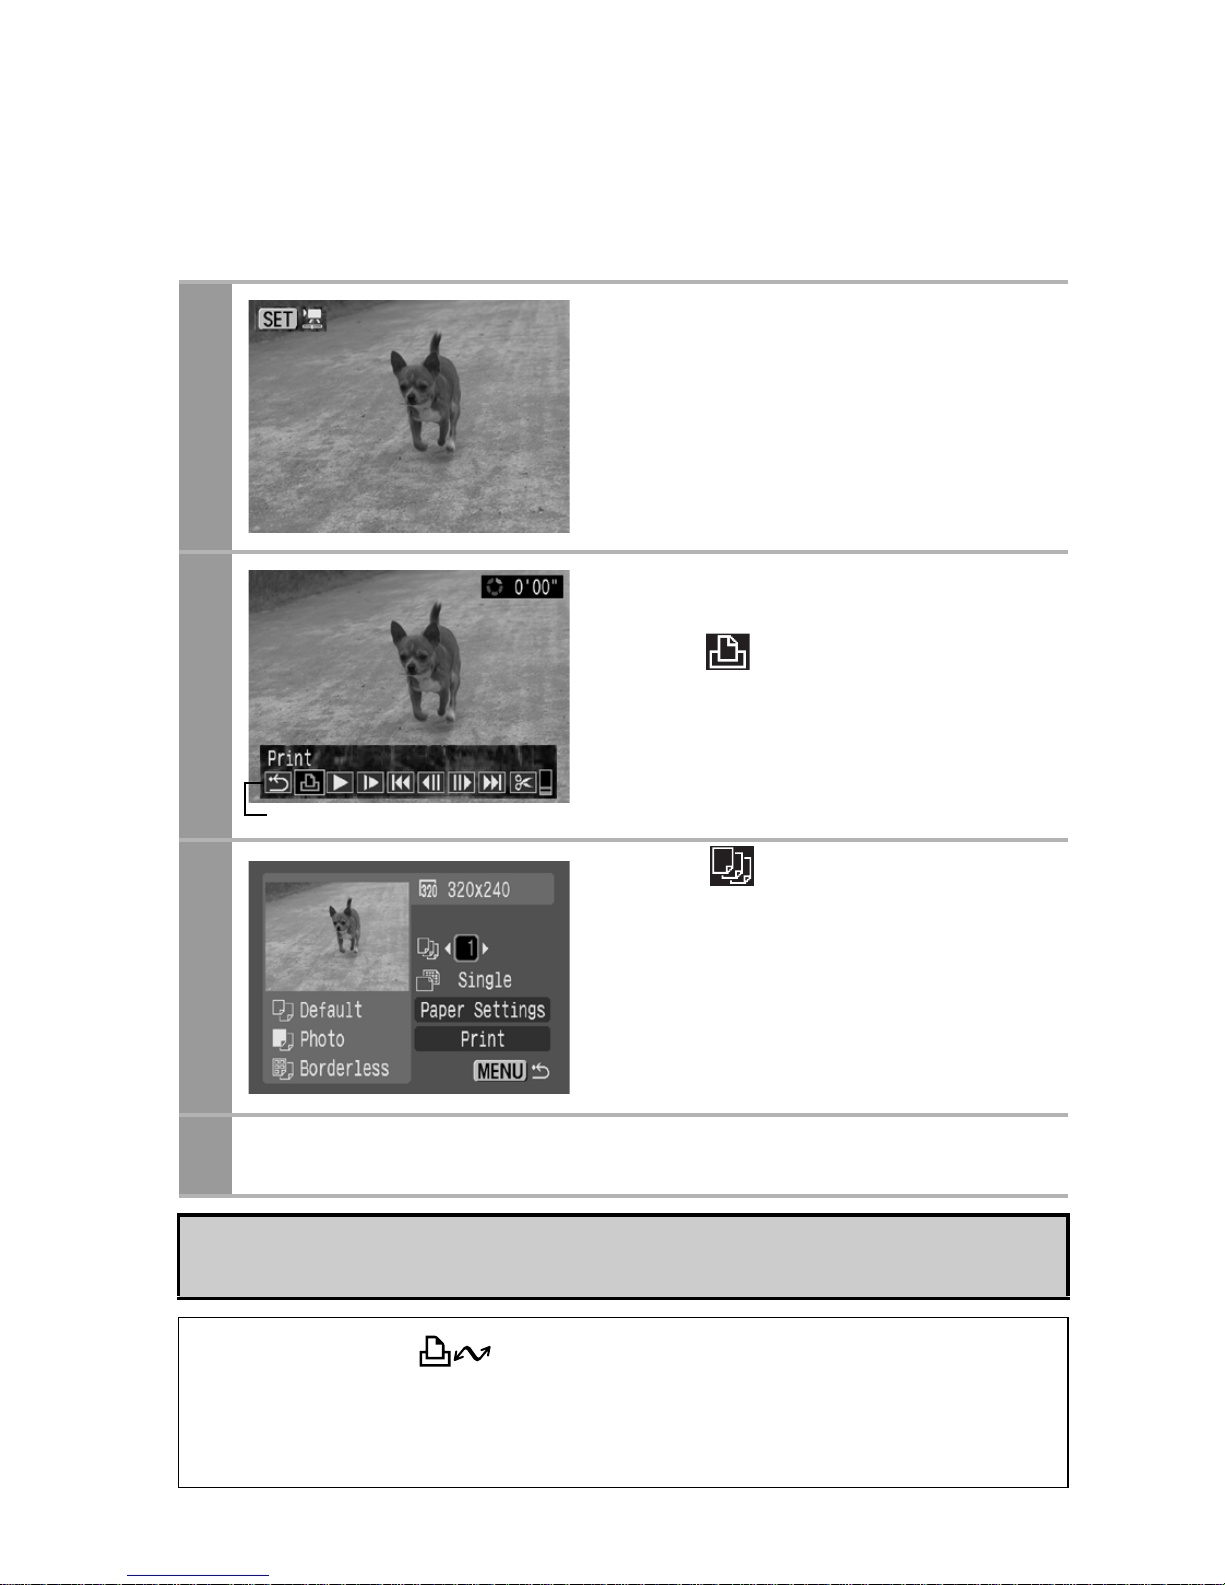
Printing Movies (Movie Print)
You can choose a single frame from a movie and print it on a sheet
of paper.
1
Select the movie you want to
print, then press the SET
button.
The movie control panel appears.
2
Display the frame you wish
to print on the LCD monitor,
select (Print), then press
the SET button.
Refer to Viewing Movies section of the
Camera User Guide on how to display
the movie frame you wish to print.
3
Select and set the
number of prints.
1 to 99 copies can be set.
4
Select [Print] and press the SET button.
It may not be possible to play back or print movies shot with a
different camera.
• If you press the button instead of the
SET
button in Step 1,
movie print begins.
• Selecting [Paper Settings] and pressing the
SET
button in Step 3 will
allow [Paper Size], [Paper Type] and [Page Layout] to be selected.
Movie Control Panel
Page 49
47
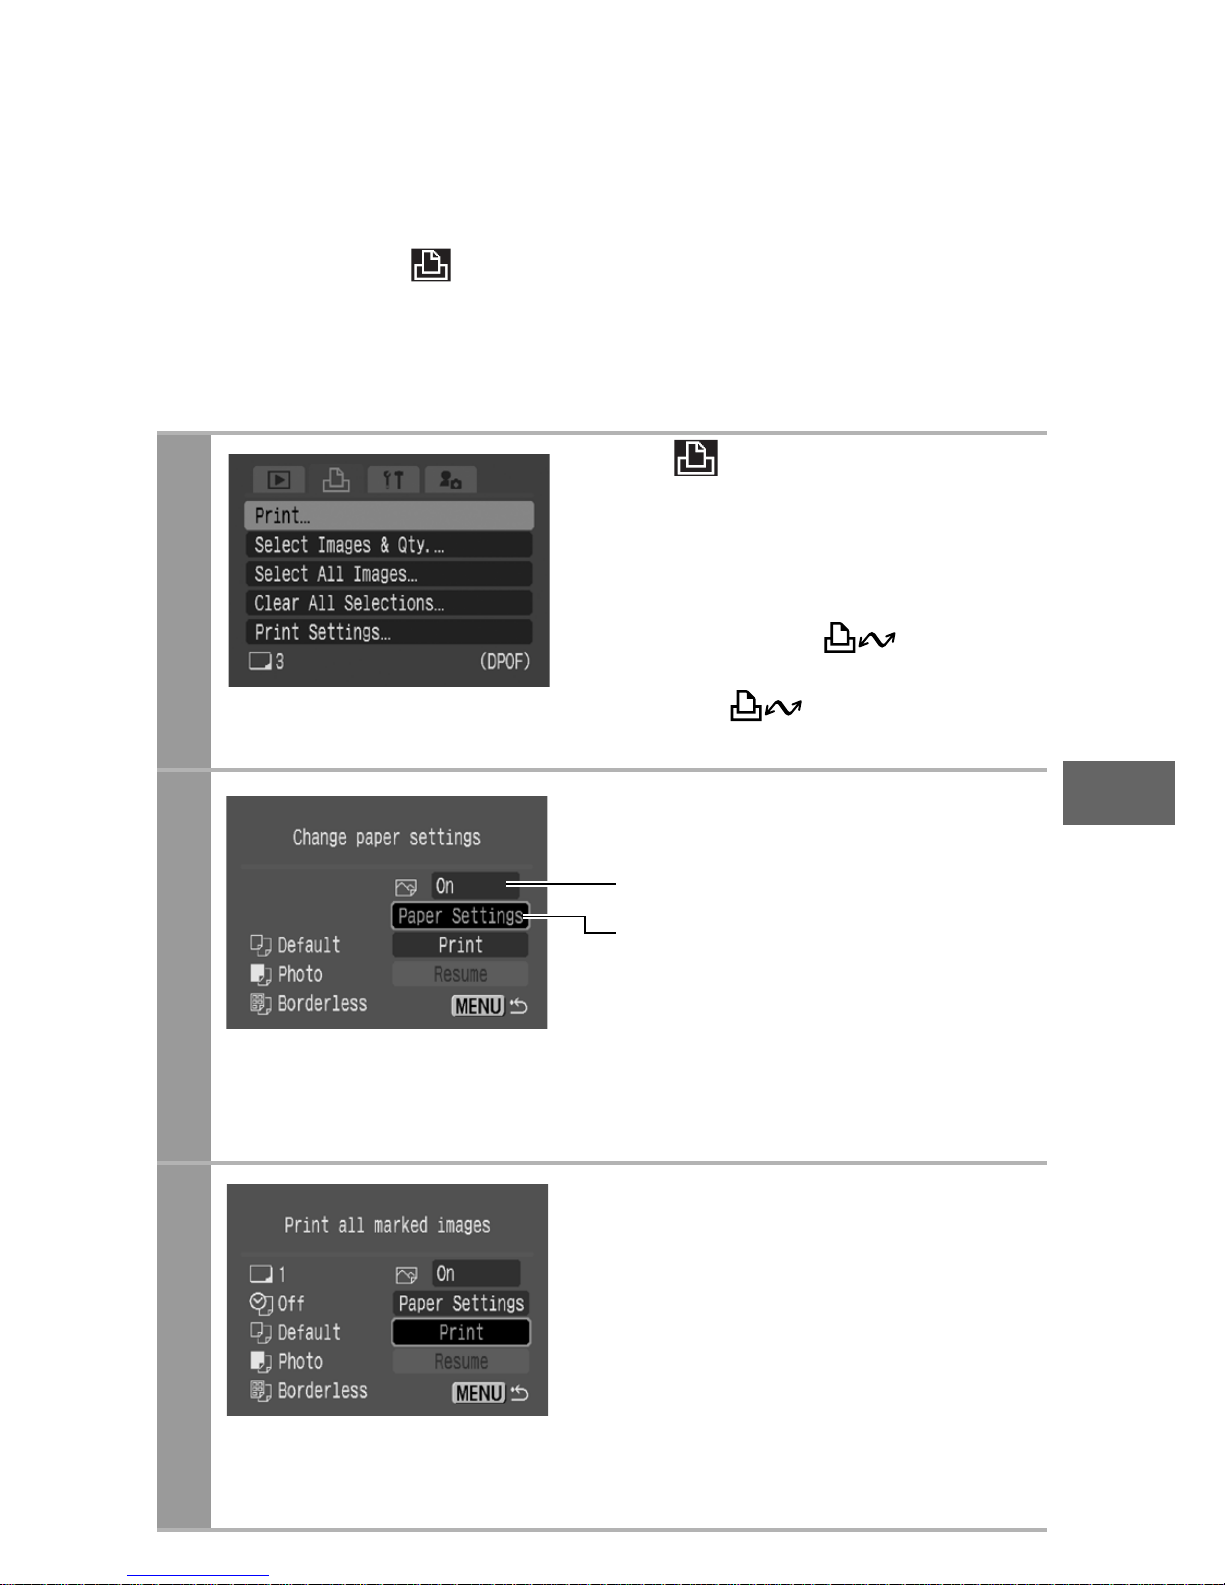
Specifying and Printing Multiple Images
(Setting the DPOF Print Settings)
With the camera’s (Print) menu, you can specify and print
multiple images or all the images on a memory card. For
instructions on how to specify images, please refer to Setting the
DPOF Print Settings section of the Camera User Guide. In this
section, we will explain how to print images after specifying them.
1
In the (Print) menu, select
[Print] and press the SET
button.
• When an image or images have
been specified (see the Camera
User Guide), the button will
light up blue. At this time, if you
press the button, the
screen for Step 2 will be displayed.
2
Set the print effect and paper
settings as required.
* [Page Layout] cannot be set in the
[Paper Settings] when [Index] is
selected in the [Print Settings] option
in Step 1. The A3 and A3+/13" × 19"
paper sizes cannot be selected,
either.
3
Select [Print] and press the
SET button.
• The image will start to print and,
when it is completely finished, the
display will revert to the standard
playback mode.
• If the MENU button is pressed,
the display will revert to the
screen in Step 1 and printing will
not take place.
Sets the Print Effect (p. 36)
Selects the Paper Settings* (p. 42)
Page 50
48
• To print the date, set the [Date] setting in [Print Settings] on the
screen in Step 1 to [On]. You cannot set the date in Step 2.
• When the print type is set to [Index], both the [Date] and [File
No.] cannot be printed depending on the printer.
• When the print type is set to [Standard], the [File No.] cannot be
printed.
• You cannot print movies.
Page 51
49
Cancel Printing
• Press the SET button to cancel while printing. A confirmation
dialog appears. Select [OK] and press the SET button. The
printer will stop printing the current image and eject the paper.
Restarting Printing
• Select [Resume] and press the SET button. The remaining
images can be printed.
• Printing cannot be restarted under the following circumstances.
• If the print settings have been changed before restarting.
• If the image for which the print settings were set has been
deleted before restarting.
• If there is very little free space on the memory card when
printing is canceled, it may not be possible to restart printing.
• If printing is canceled because the camera battery is depleted, it
may not be possible to restart printing.
(Replace with a fully charged battery pack or new batteries,
then turn the camera power on again. If you intend to use an
extended period of time, you are recommended to power the
camera with a compact power adapter (sold separately).)
Printing Errors
• An error message appears if an error occurs for some reason
during the printing process. When the error is resolved, printing
will automatically resume. If printing does not resume, select
[Continue] and press the SET button. If [Continue] cannot be
selected, select [Stop], press the SET button and restart the
print job. See List of Messages (p. 50) for details.
• On printers equipped with an operation panel, an error number
or message displays on the panel. Please refer to the printer
user guide for the remedies corresponding to the error numbers
or messages.
Page 52
50
List of Messages
The following messages may appear on the camera LCD monitor if
an error occurs during a camera and printer connection.
(Depending on the printer, some messages may not appear.)
• Please refer to the printer’s user guide for the appropriate
remedies.
: Printing restarts if you select [Continue] and press the SET
button. For the remedies to other messages that might
appear, refer to your printer’s user guide.
No Paper There is no paper set in the printer.
Paper Jam
The paper jammed during printing. Select [Stop] to
cancel printing. Remove the jammed paper, reset
some other paper in the printer, then print again.
Paper Error
Either the paper is not set correctly in the printer, or
the size of the paper is wrong. Also open the paper
output tray if it is closed.
No Ink
The ink tank has run out of ink or there is no ink
tank in the printer. The number of times that the
printer’s error lamp blinks, and the error message
displayed, will indicate the appropriate remedy for
the error. Please refer to the printer’s user guide for
the remedy.
Low ink level
The ink tank needs to be replaced soon. Prepare a
new ink tank. If you select [Continue] in the error
screen, you can restart printing.
Ink absorber full
You can restart printing if you select [Continue] in
the error screen. Please request replacement of the
ink absorber from your nearest Canon Customer
Support center listed in the contact list provided
with the printer or in the user guide. The ink
absorber cannot be replaced by the user.
Ink Error
There is a problem with the ink. If the printer’s error
lamp is blinking and an error message is displayed,
please refer to the printer’s user guide to ascertain
the problem and its remedy.
Page 53
51
Printer error
Disconnect the cable from the printer and turn off
the printer power. Then reconnect the cable and
turn on the printer. If the error persists, please
request a repair from your nearest Canon Customer
Support Center (listed in the contact list provided
with the printer).
Printer in use
The printer is in use now. The printer automatically
starts printing the images from the camera after
completing the current printing.
Paper lever error
Adjust the paper thickness lever to the proper
position.
Printer cover open Close the printer cover securely.
No print head
If the printer’s error lamp is blinking and an error
message is displayed, please refer to the printer’s
user guide to ascertain the problem and its remedy.
Hardware Error
If the printer’s error lamp is blinking and an error
message is displayed, please refer to the printer’s
user guide to ascertain the problem and its remedy.
File Error
You tried to print an image that is not compatible
with PictBridge. Some images that have been
recorded with another camera or modified using a
computer cannot be printed.
Incompatible paper
size
Paper of a different size than the specified paper
size is set to the printer. Select [Continue] on the
error screen to display the paper size setting
screen. Correct the paper size using the screen
(only the selectable paper sizes appear on the
screen).
Print error
Check that the correct paper size is selected. If this
error message appears even when the correct
paper size is set, turn off the printer, then turn it on
again. If the error persists, please request a repair
from your nearest Canon Customer Support Center
(listed in the contact list provided with the printer).
Check print
settings
Unprintable settings are included. Select [Continue]
on the error screen to display the print order screen.
Check the print settings (only the printable settings
appear on the screen), change the settings if
necessary, then print again.
Page 54
52
Printing
After this step, follow the procedures in the section Printing with
Bubble Jet Printers (PIXMA series/SELPHY DS series) using
PictBridge (p. 32) to print your images.
However, the following menu options cannot be set.
• Print Effect (p. 36):[Vivid], [NR], [Vivid+NR], [Face ], [RedEye1], [Red-Eye2]
• Paper Size (p. 42):[A3+/13" × 19"] and [5" × 7"/13 ×18cm]
1
Make sure that displays in
the upper left corner of the
LCD monitor.
Please also refer to the user guide that came with your printer.
Printing with Non-Canon,
PictBridge
Compliant Printers
Page 55
53
Printing
Easy Print
You can print images by pressing only one button after connecting
the camera to the printer.
If you use Canon Compact Photo Printer
SELPHY CP730/CP720/CP710/CP510
When printing, on wide-size paper, an image that has been shot
using a Canon digital camera’s (wide) size, select from
[Print Method] on the camera’s (Set up) menu.
After this, see Printing with SELPHY ES Series/SELPHY CP
Series Printers using PictBridge (p. 10).
1
Make sure that displays in
the upper left corner of the
LCD monitor.
2
Display the images you wish to print and press the
button.
If you wish to change the print settings, see Print after
Changing the Print Settings below.
Printing with SELPHY
CP Series Printers using
Canon Direct Print
Page 56
54
Print after Changing the Print Settings
You can change the print settings before printing.
1
Make sure that displays in
the upper left corner of the
LCD monitor.
If displays on the LCD monitor,
please refer to
Printing with
SELPHY ES Series/SELPHY CP
Series Printers using PictBridge
(p. 10).
2
Display the images you wish
to print and press the SET
button.
The print order screen appears.
3
Select print settings as required.
4
Select [Print] and press the SET button.
If you press the MENU button, the display will revert to the
standard playback mode and printing will not take place.
• You cannot print RAW images.
• It may not be possible to play back or print images shot with a
different camera.
Print Order Screen
Selects the Number of
Copies (p. 55)
Sets the Printing Area (Trimming)
(p. 57)
Sets the Print Style (p. 55)
Page 57
55
Selecting Print Settings
Setting the Number of Copies
Setting the Print Style (Image, Borders and Date)
You can select from among the following print styles.
* This option can only be selected when printing on card size paper.
Cancel Printing
• You cannot stop printing when printing only one copy of an
image. If you are printing more than one copy or more than one
image, you can cancel the rest of the printing by pressing the
SET button. Once the current print is finished, a confirmation
dialog appears. Select [OK] and press the SET button.
Printing Errors
• An error message appears if an error occurs for some reason
during the printing process. Select [Stop] or [Resume] and
press the SET button. See List of Messages (p. 70) for details.
The [Resume] option may not appear with some types of errors.
In that case, select [Stop].
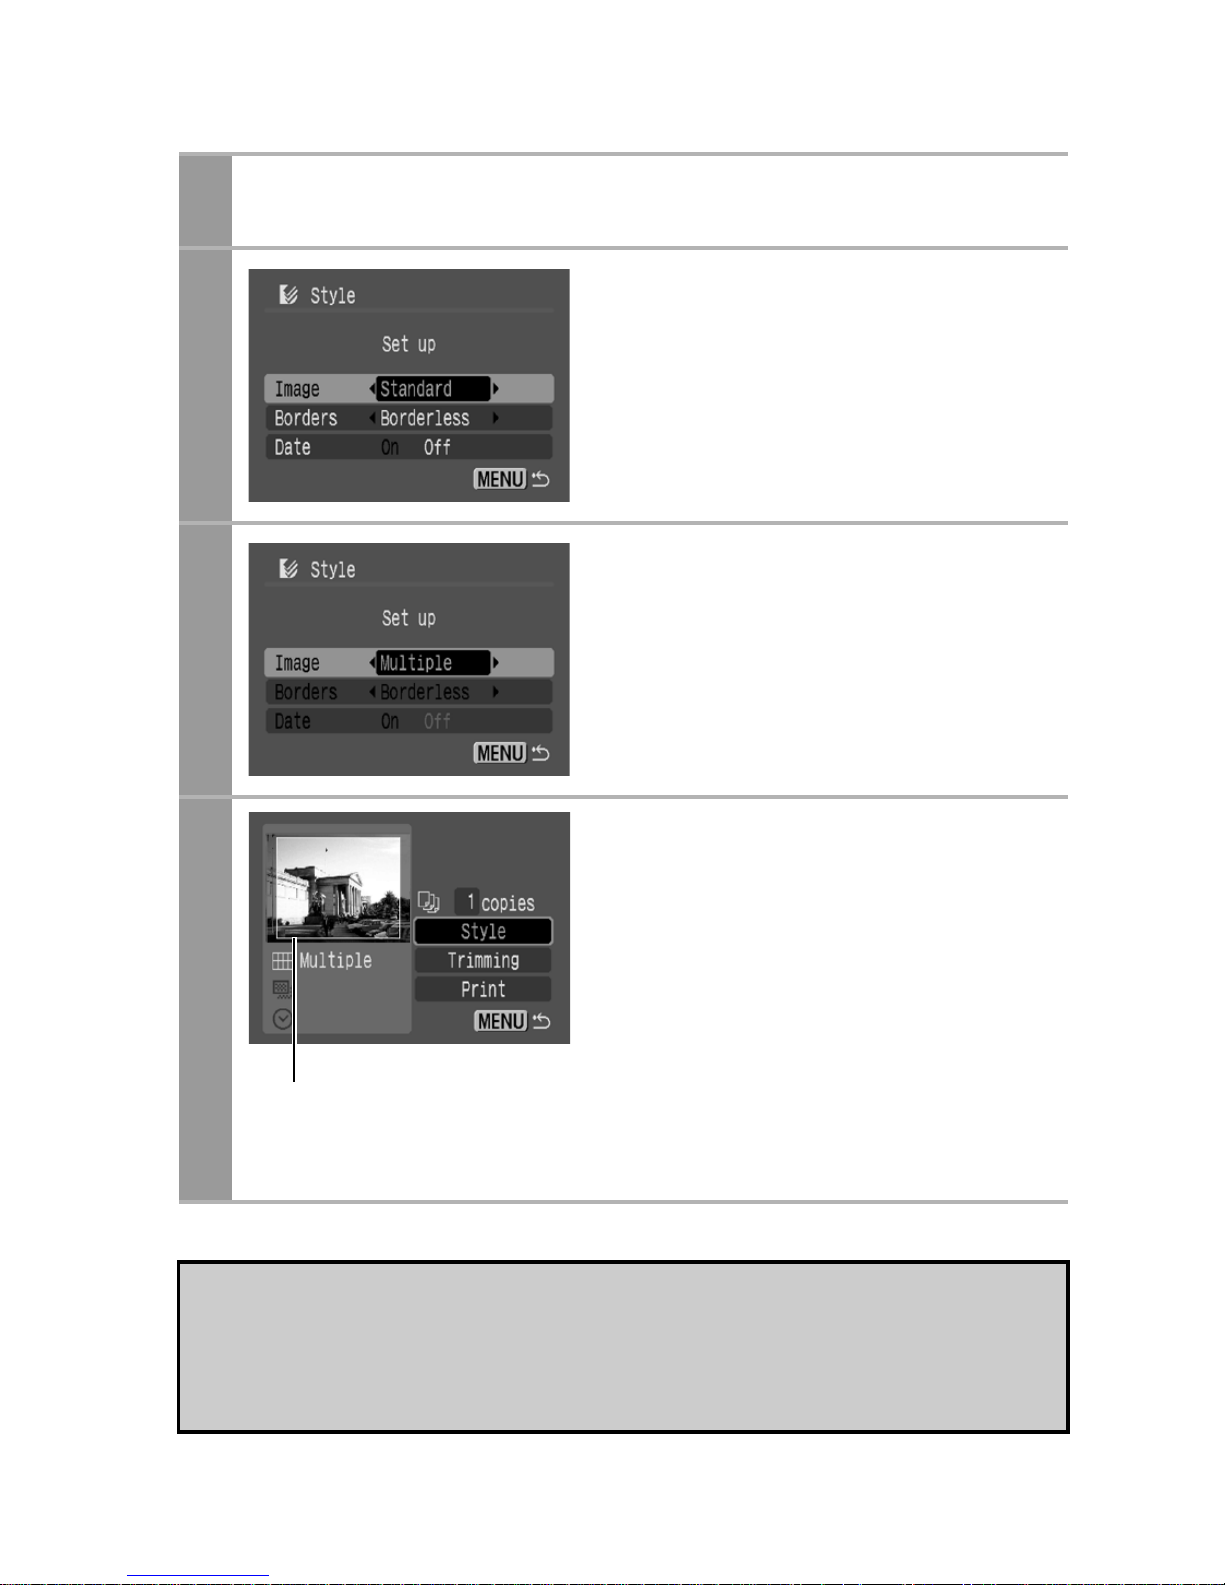
1
In the print order screen, select [ ] and set the
number of prints.
1 to 99 copies can be set.
Image
Standard Prints one image per page.
Multiple*
Prints eight copies of the same
image on one page.
ID Photo Prints a specified print size (p. 61).
Borders
Borderless Prints right to the edges of the paper.
Bordered Prints with a border.
Date
On Adds the date to the print.
Off Prints without the date.
Page 58
56
1
In the print order screen, select [Style] and press
the SET button.
2
Select [Image], [Borders], or
[Date].
3
Select settings as needed.
4
Press the MENU button to
end the setting selection
process.
With borderless or multiple prints,
the top, bottom and sides of the
image may be cropped slightly. If
you have not specified a trimming
setting, a frame will appear around
the area of the image that will be
printed, allowing you to check the
portion that will be cropped.
If you select an image which has had the shooting date
embedded in it using a camera with the Postcard Date Imprint
mode, [Date] in the [Style] menu will be set to [Off]. If you set
[Date] to [On], dates will appear twice on the printed image.
Print Area Frame
Page 59
57
Setting the Printing Area (Trimming)
You can specify which portion of an image gets printed.
Please set the Print Style (Image, Borders and Date) before setting
the trimming settings. If the print style is changed after having
made the trimming settings, you must select the settings again.
• When printing multiple prints, the [Borders] and the [Date]
cannot be set. (Images are printed without any date or borders.)
• Practically all of the image area displayed on the LCD monitor is
printed on bordered prints.
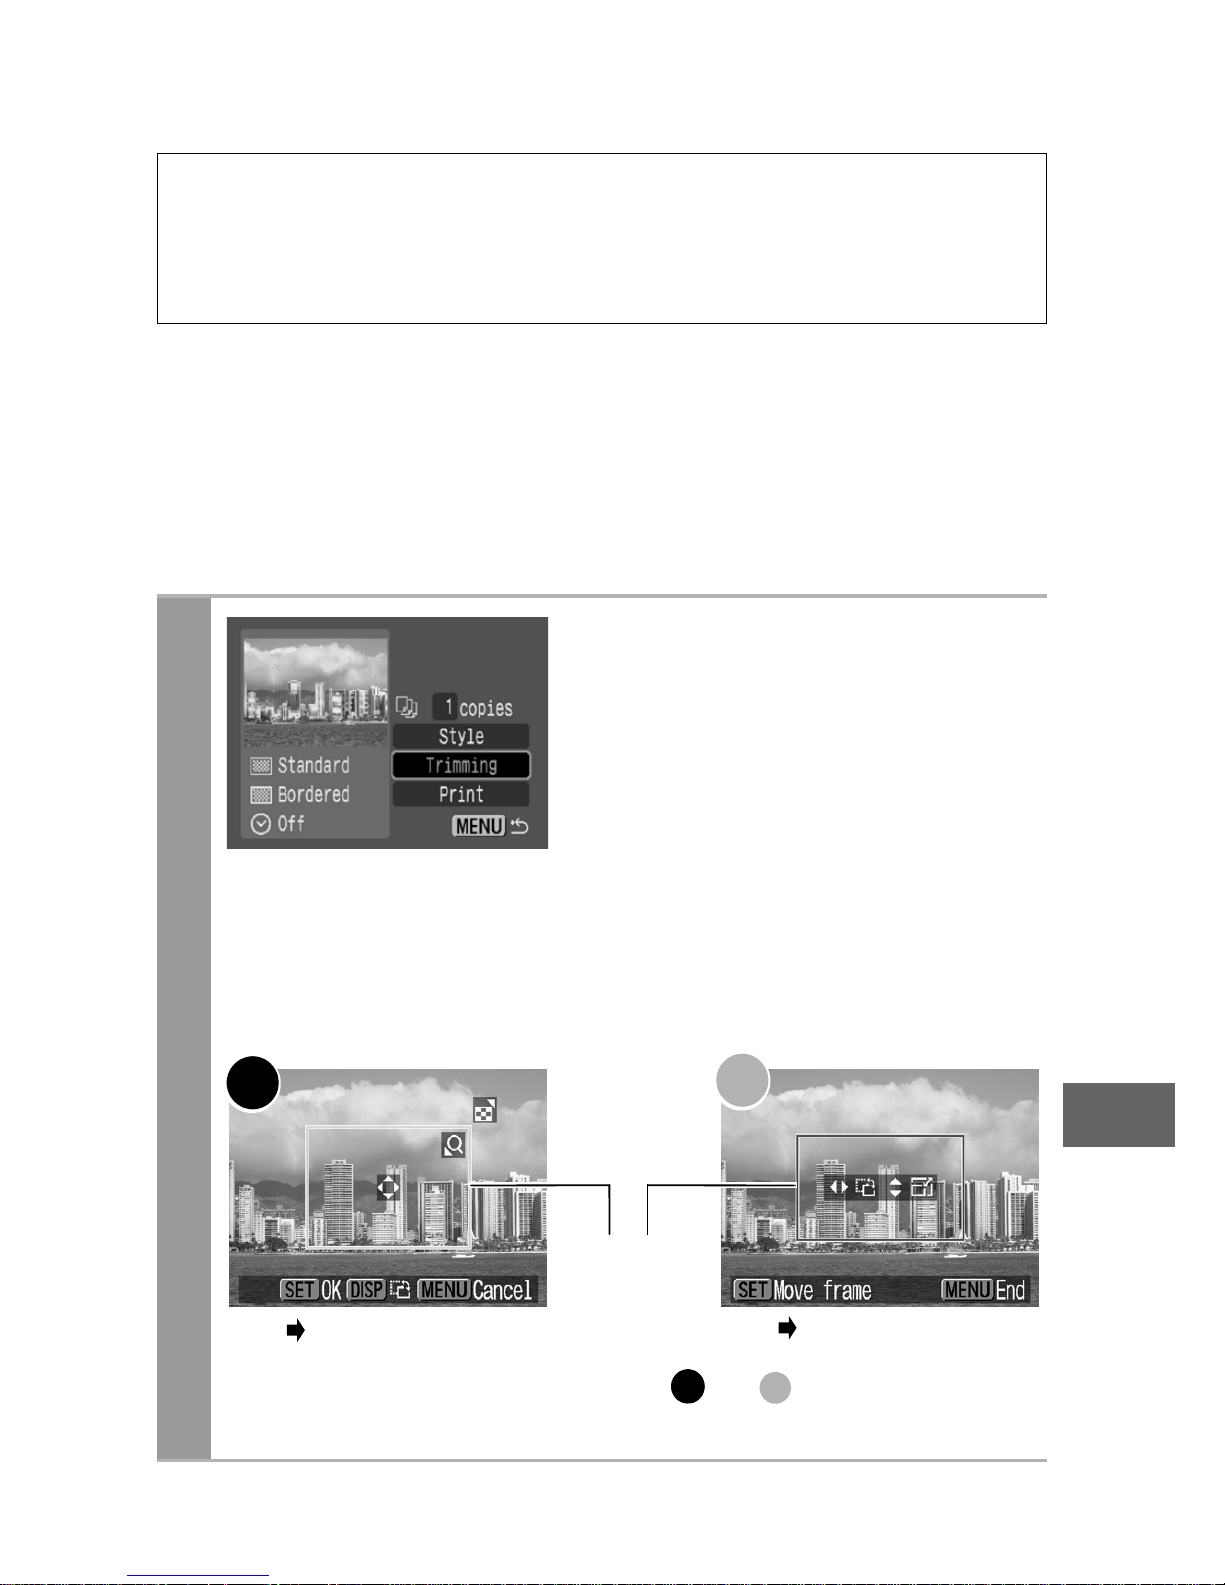
1
In the print order screen,
select [Trimming] and press
the SET button.
The trimming frame will appear at
the center of the image. If a
trimming setting has already been
selected for the image, the frame
will appear around the previously
selected portion.
The trimming setting screen differs depending on the
camera model. Check which of the following screens
appear before selecting settings.
Steps 2a and 3a
Trimming Frame
Steps 2b and 3b
* Proceed to procedure or depending
on the display screen which appears.
a
b
a b
Page 60
58
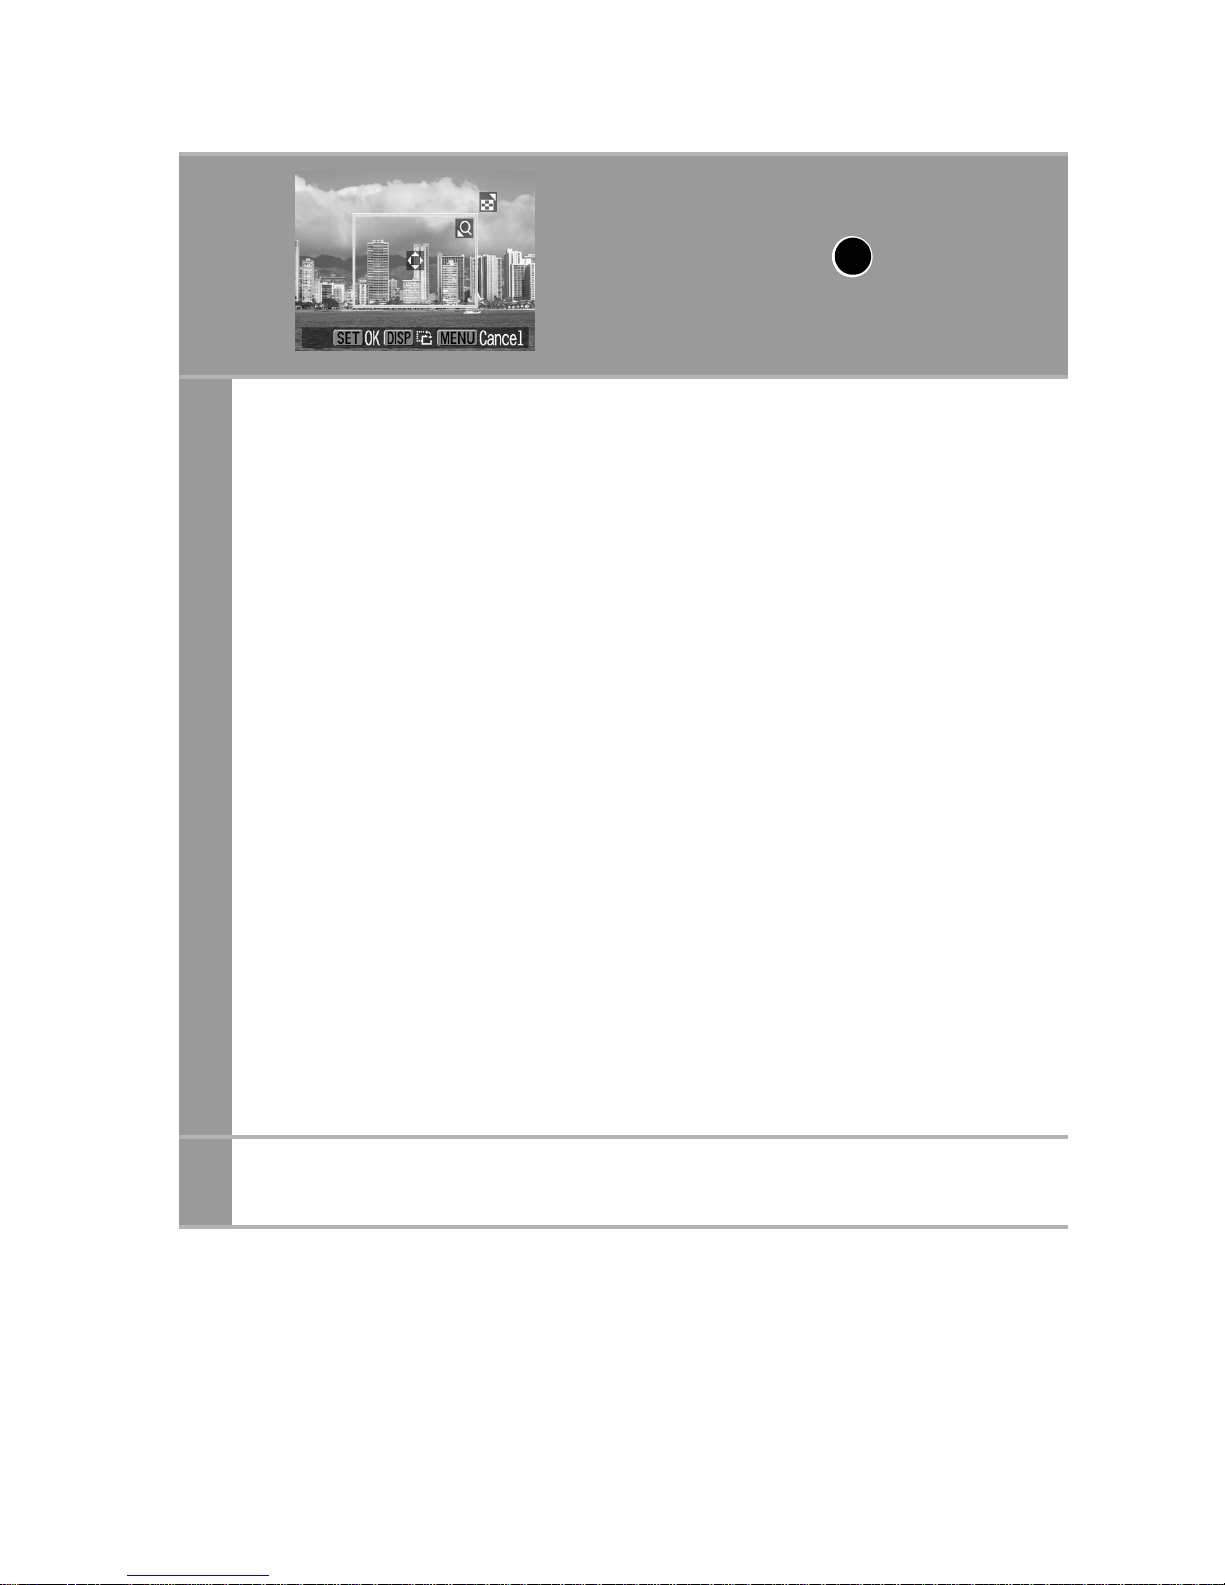
2a
Trim the image.
Changing the Size of the Trimming Frame
• Press the zoom lever or the zoom button to adjust the size of
the trimming frame.
• The trimming frame can be changed to a minimum selection
of approximately half the displayed image (in width and
height) or a maximum selection that is virtually the same size
as the image.
• Expanding the trimming frame beyond its maximum size
cancels the trimming setting.
• When printing an image that has been magnified using the
trimming option, the image quality may become coarser and
grainier depending on the level of magnification. If this
happens, the trimming frame displays in red.
Moving the Trimming Frame
• Move the trimming frame using the omni selector or the up,
down, right and left buttons.
Rotating the Trimming Frame
• You can rotate the trimming frame by pressing the DISP. (or
DISPLAY) button.
3a
Press the SET button to close the setting menu.
Pressing the MENU button cancels the settings.
When screen displays
a
Page 61
59
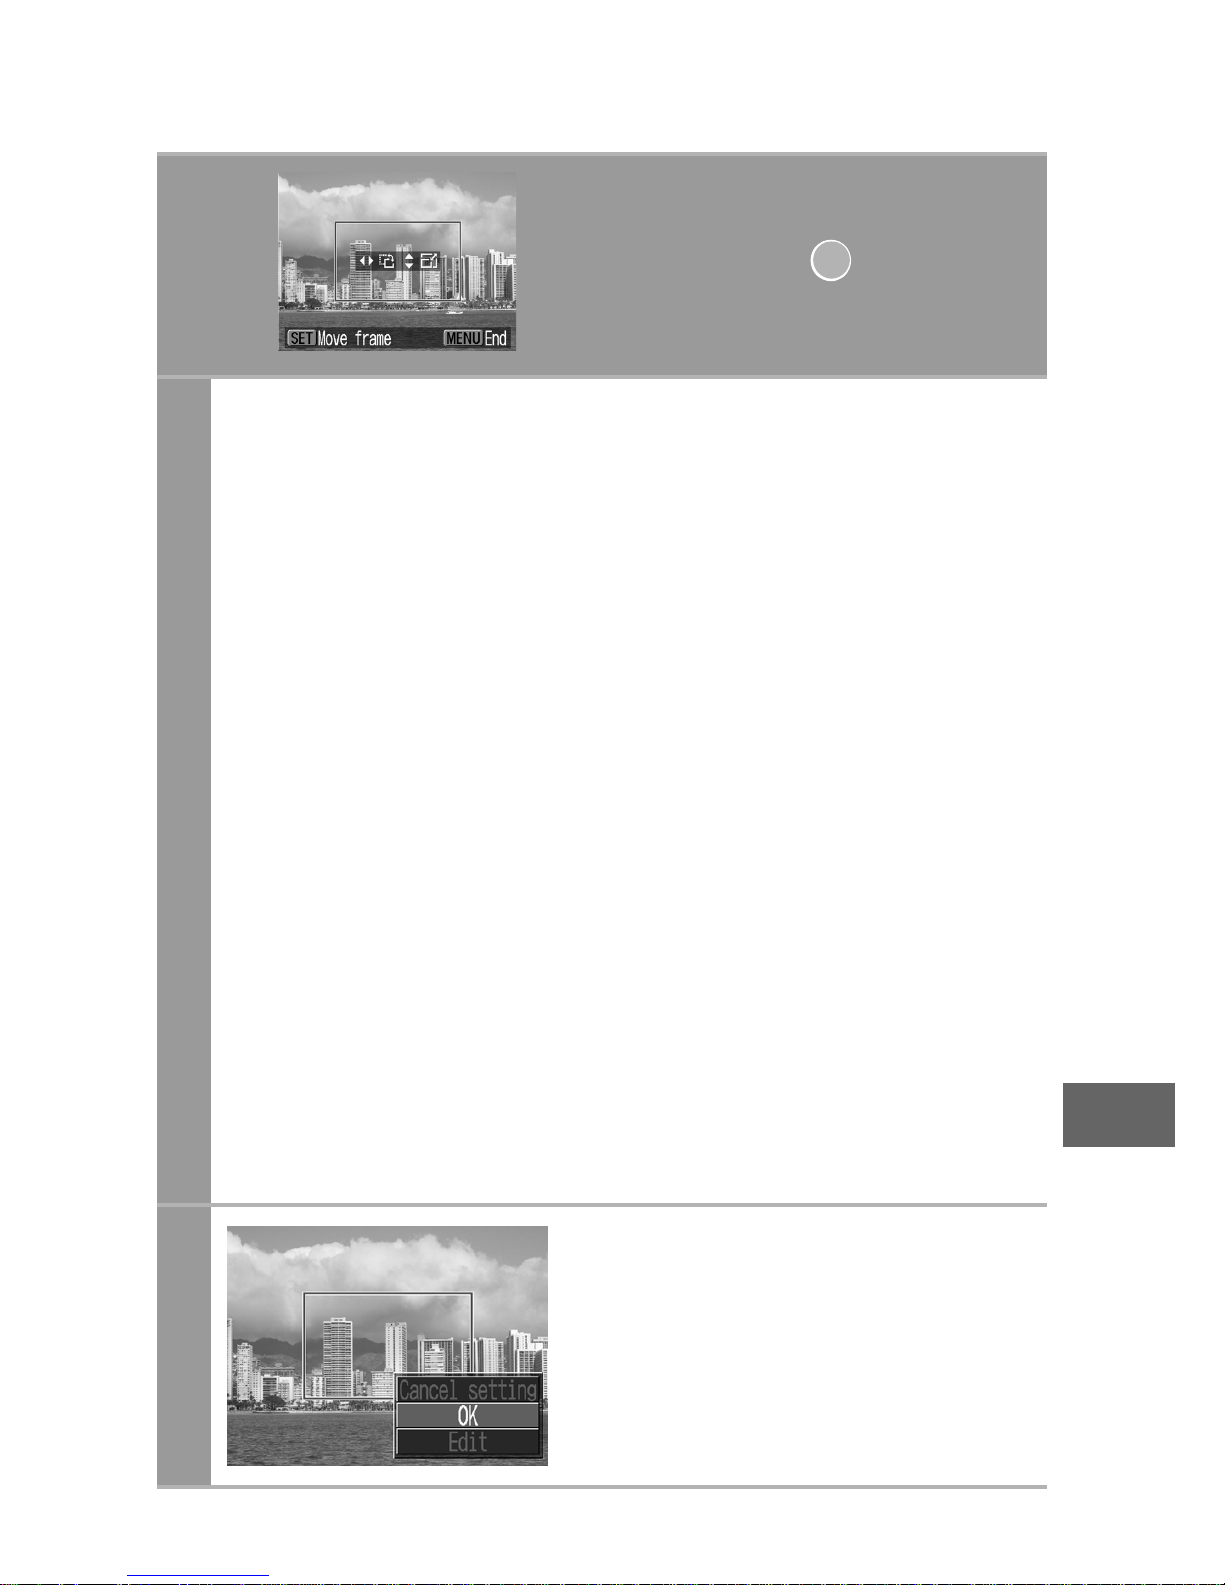
2b
Trim the image.
Changing the Size of the Trimming Frame
• Press the up and down buttons to adjust the size of the
trimming frame.
• The trimming frame can be changed to a minimum selection
of approximately half the displayed image (in width and
height) or a maximum selection that is virtually the same size
as the image.
• Expanding the trimming frame beyond its maximum size
cancels the trimming setting.
• When printing an image that has been magnified using the
trimming option, the image quality may become coarser and
grainier depending on the level of magnification. If this
happens, the trimming frame displays in red.
Rotating the Trimming Frame
• You can rotate the trimming frame using the left and right
buttons.
Moving the Trimming Frame
• Press the SET button and use the up, down, right and left
buttons to move the trimming frame. Pressing the SET
button again allows you to change the size of the frame and
to rotate it.
3b
Press the MENU button,
select [OK] and press the
SET button.
Selecting [Cancel setting] cancels
the selected trimming setting. If
[Edit] is selected, the display
returns to the previous screen.
When screen displays
b
Page 62
60
• The trimming setting only applies to one image.
• The trimming setting is canceled with the following operations.
• When you set the trimming settings for another image.
• When you close the Print mode (when you turn the camera
power off, change the camera mode, or detach the
connection cable).
• The shooting date or part of the date which has been
embedded in images using a camera with the Postcard Date
Imprint mode may not be printed properly depending on the
trimming setting.
• The selected image and border settings determine the shape of
the trimming frame.
• Please use the LCD monitor to set the trimming settings. The
trimming frame may not display correctly on a TV screen.
Page 63
61
Printing by Specifying the Print Size (ID Photo
Print)
You can specify the print size and print portion of an image or a
whole image as an ID photo*.
* Images printed with the ID Photo Print function may not be allowed as a
formal certificate photo. Refer to the party (organization) or administration
requiring the photo.
The print size can be specified for only L (Large) resolution
images in the camera connected to the printer.
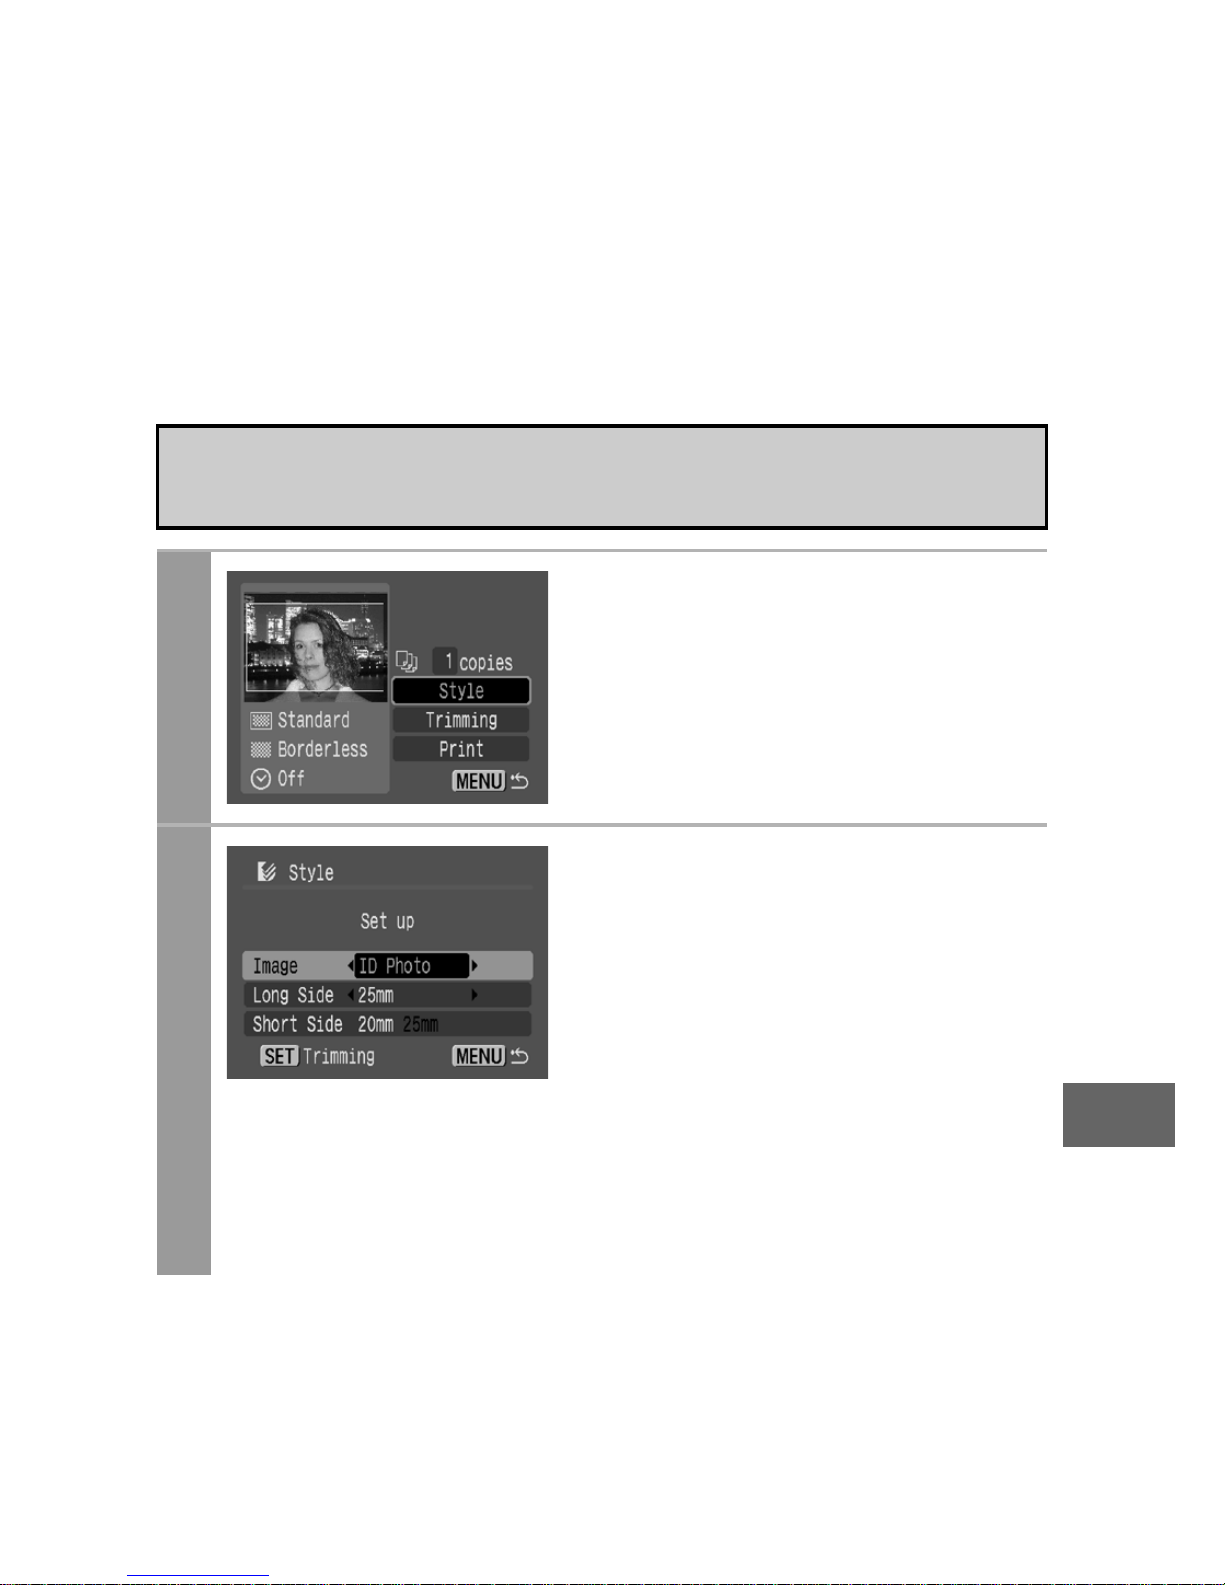
1
In the print order screen,
select [Style] and press the
SET button.
2
Select [Image], then select
[ID Photo]. Specify the print
size by selecting the length
of the long side and the short
side, then press the SET
button.
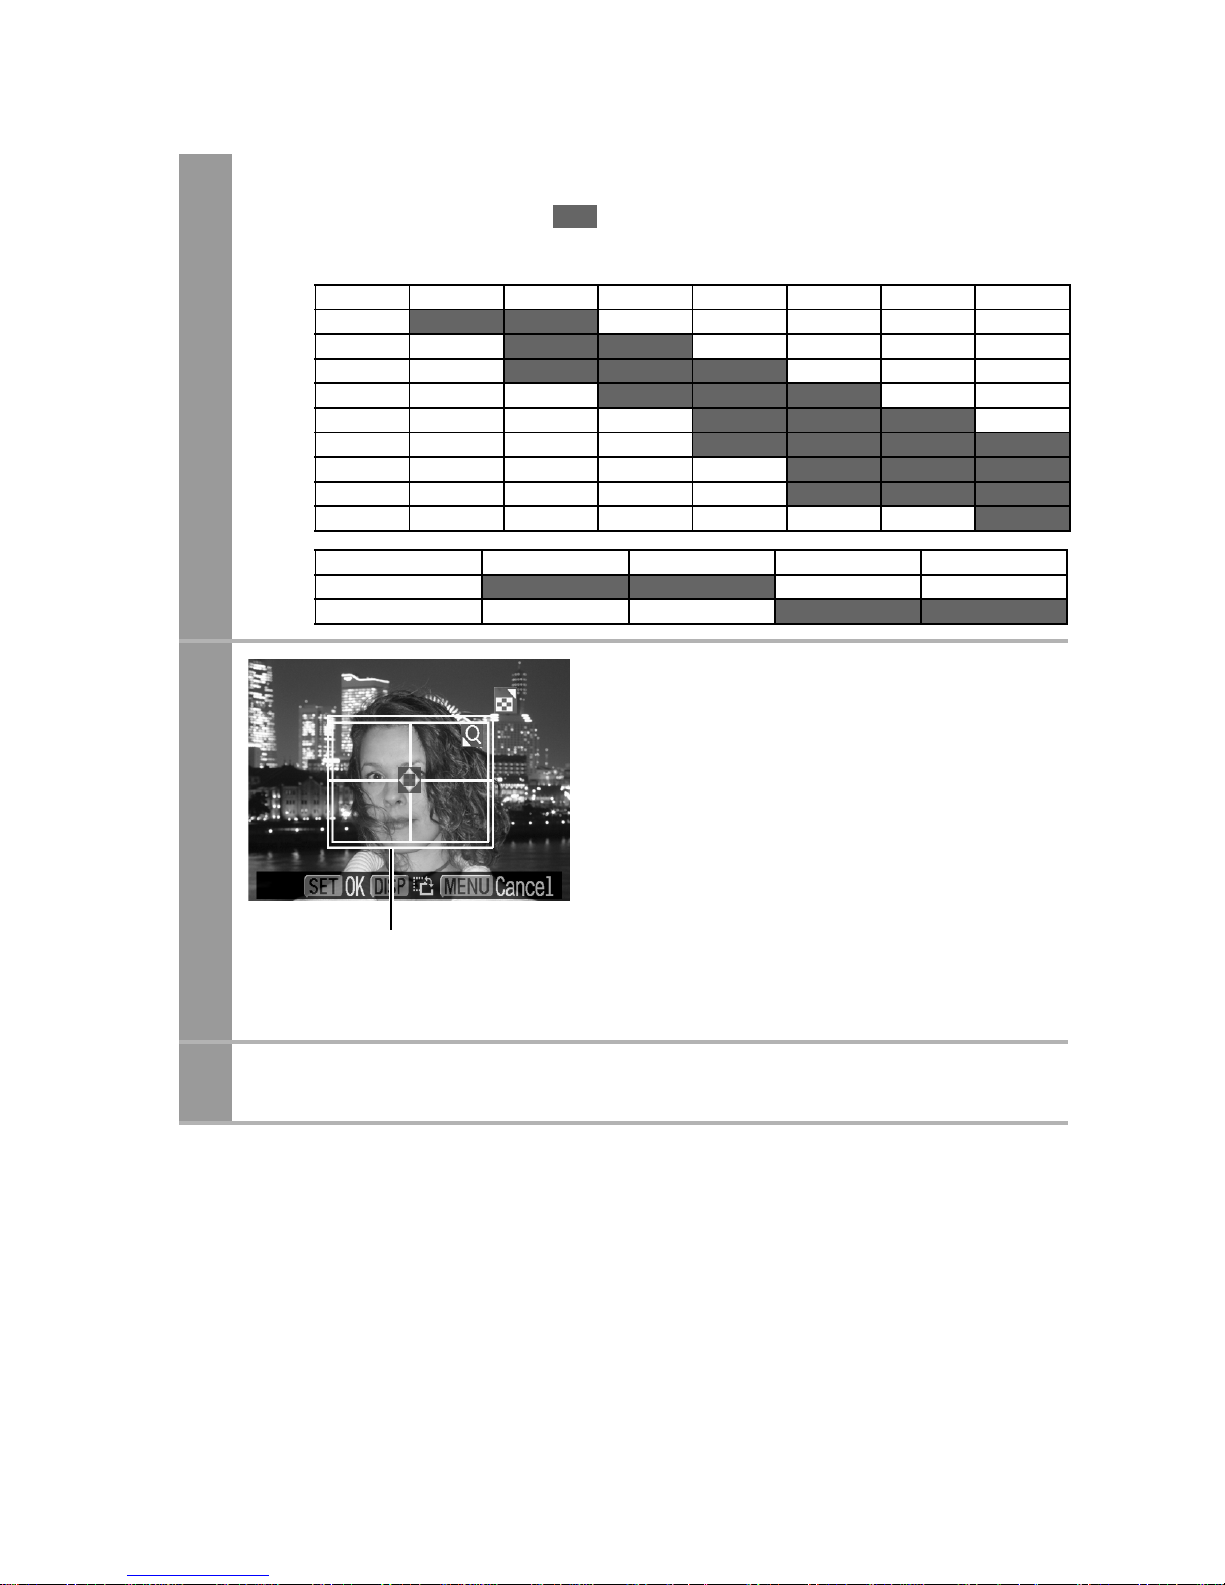
Specify the size by selecting the
length of the long side first, then
the short side. See the next table
for selectable combinations of the
long side length and the short side
length.
Page 64
62
3
Trim the image to specify the
print area.
See Step 2 of Setting the Printing
Area (Trimming) (pp. 58, 59) on
how to trim the image.
The trimming setting screen differs
depending on the camera model.
Follow the steps according to the
screen that displays on your
camera.
4
Press the SET button to close the setting menu.
1.4 inch 1.5 inch 1.8 inch 2.0 inch
1.8 inch
2.0 inch
z Selectable combination
: Available print size
20 mm 25 mm 30 mm 35 mm 40 mm 45 mm 50 mm
25 mm
30 mm
35 mm
40 mm
45 mm
50 mm
55 mm
60 mm
70 mm
Short Side
Long Side
Trimming Frame
Page 65
63
• The print size setting only applies to one image.
• The print size setting is canceled with the following operations:
• When you set the print size settings for another image.
• When you close the Print mode (when you turn the camera
power off, change the camera mode, or detach the
connection cable).
• The shape of the trimming frame varies depending on the
specified print size.
• Use the LCD monitor to specify the print size settings. The
trimming frame may not display correctly on a TV screen.
Page 66
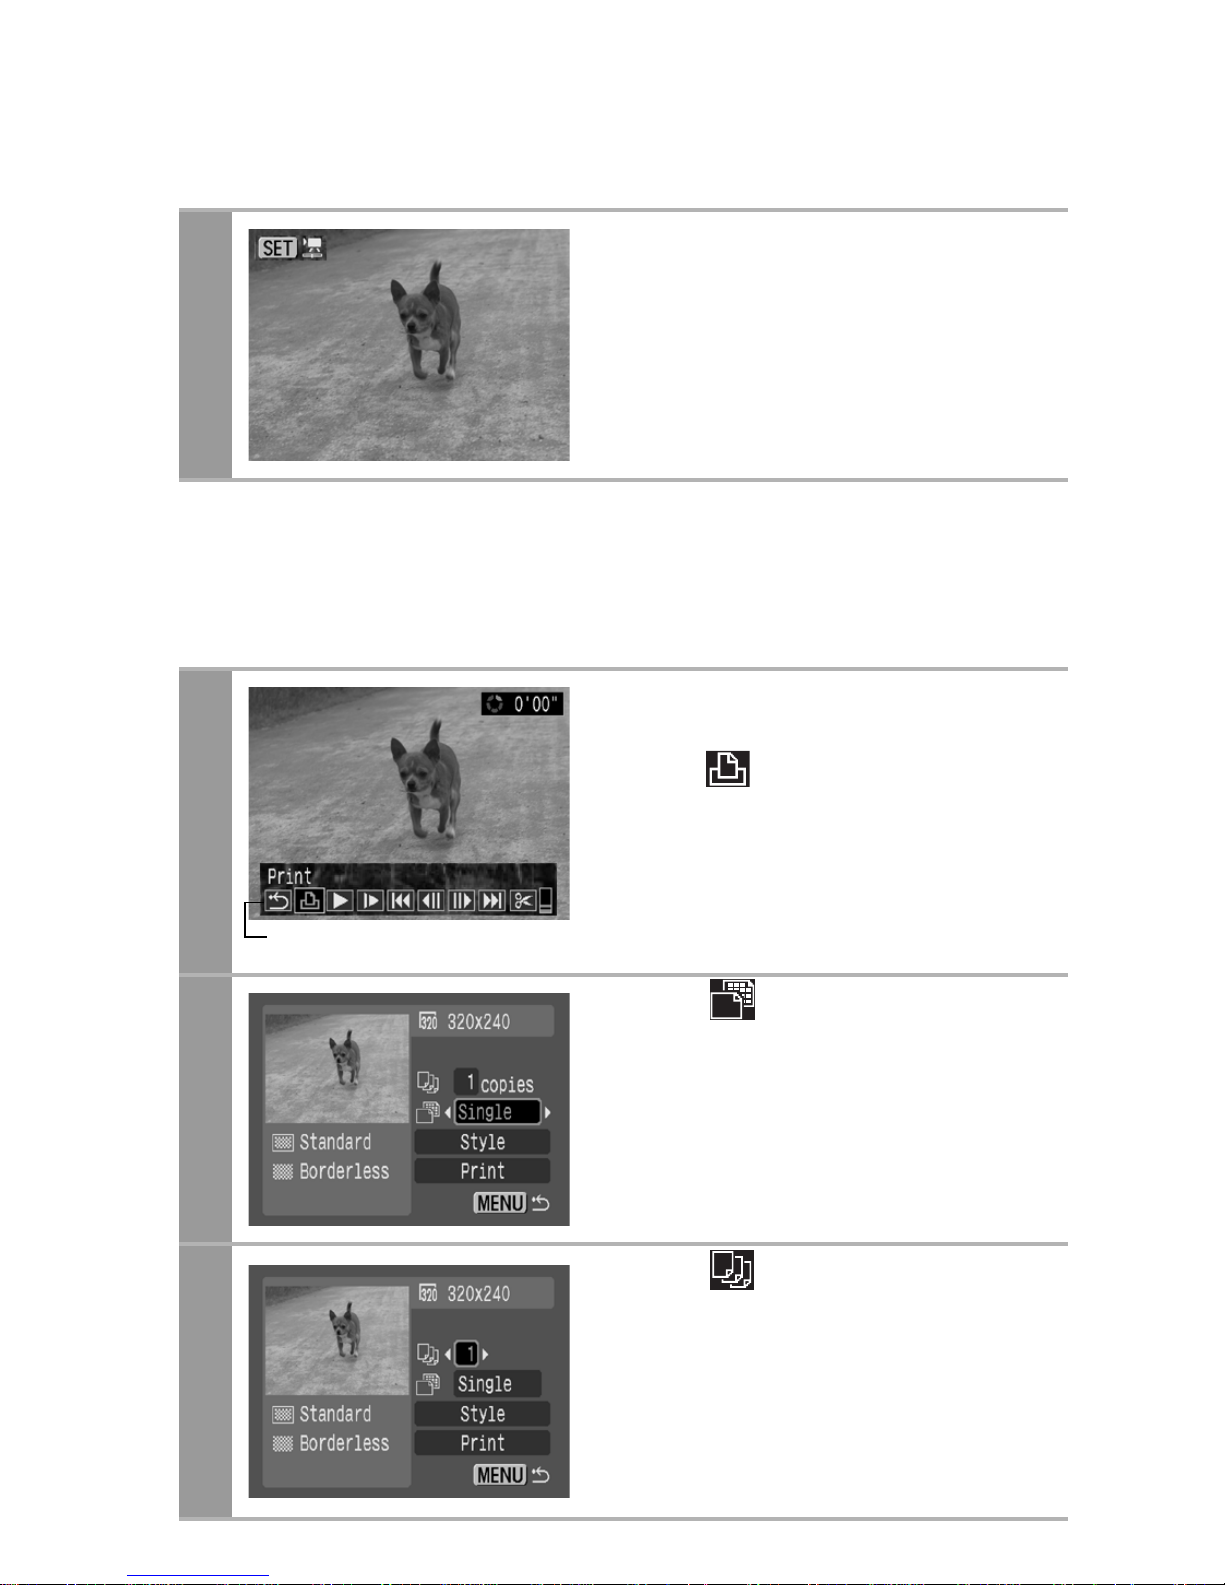
64
Printing Movies (Movie Print)
Single-frame
You can choose a single frame from a movie and print it on a sheet
of paper.
1
Select the movie you want to
print, then press the SET
button.
The movie control panel appears.
2
Display the frame you wish
to print on the LCD monitor,
select (Print), then press
the SET button.
Refer to Viewing Movies section of
the Camera User Guide on how to
display the movie frame you wish
to print.
3
Select and choose
[Single].
4
Select and set the
number of prints.
1 to 99 copies can be set.
Movie Control Panel
Page 67
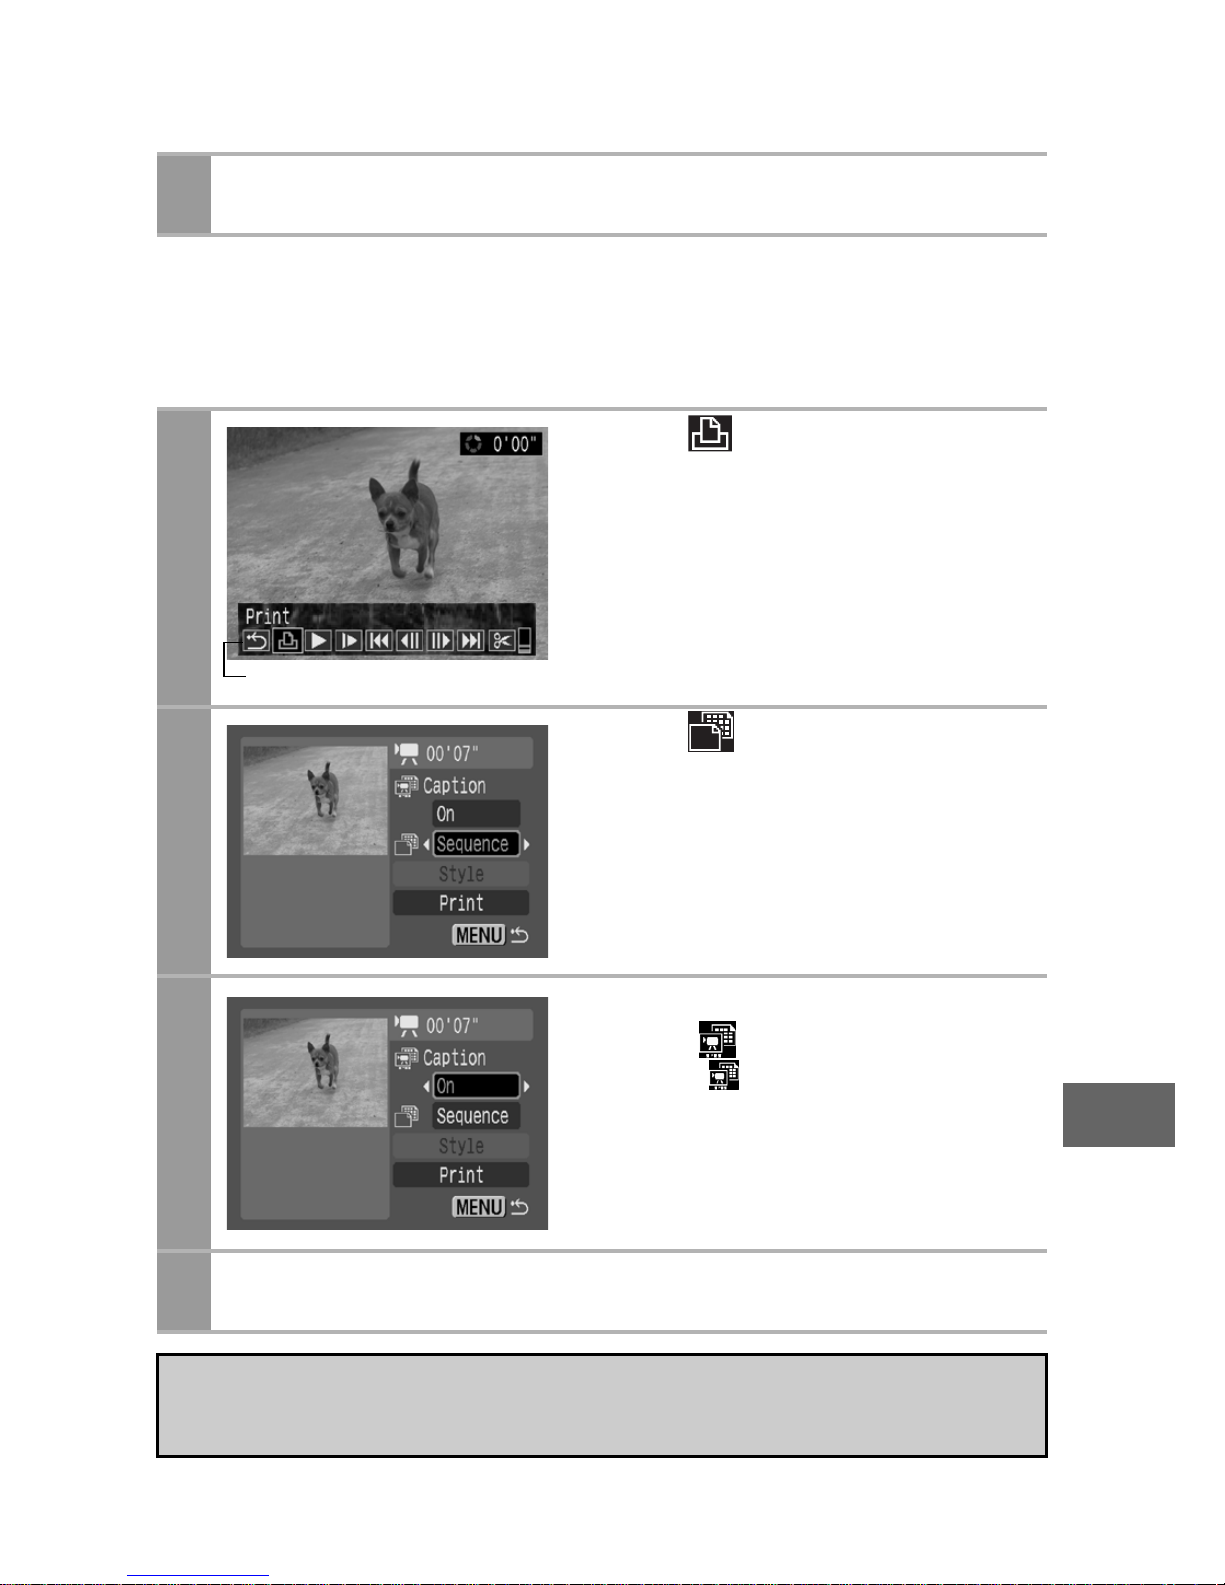
65
Sequence-frame
You can print movie frames selected automatically at fairly regular
intervals on a sheet of paper.
5
Select [Print] and press the SET button.
2
Select (Print) and press
the SET button.
3
Select and choose
[Sequence].
4
If necessary, select [On] or
[Off] in (Caption).
If you set (Caption) to [On], you
can print the file number and the
elapsed time of the frame at the
same time.
5
Select [Print] and press the SET button.
It may not be possible to play back or print movies shot with a
different camera.
Movie Control Panel
Page 68
66
• If you press the button instead of the SET button in Step
1, movie print begins.
• The number of printed movie frames per sheet of paper with
[Sequence] is determined by the paper size shown as follows:
(Depending on the number of seconds in the movie, there are
cases when the number of frames indicated below will not be
printed.)
• Card size: 20 frames
• L size: 42 frames
• Postcard size: 63 frames
• Wide size: 63 frames
• Selecting [Style] and pressing the SET button in Step 4 will
allow [Image] (excluding [ID Photo]) and [Borders] to be
selected.
However, [Style] cannot be set (p. 65) when [Sequence] is
selected.
Page 69
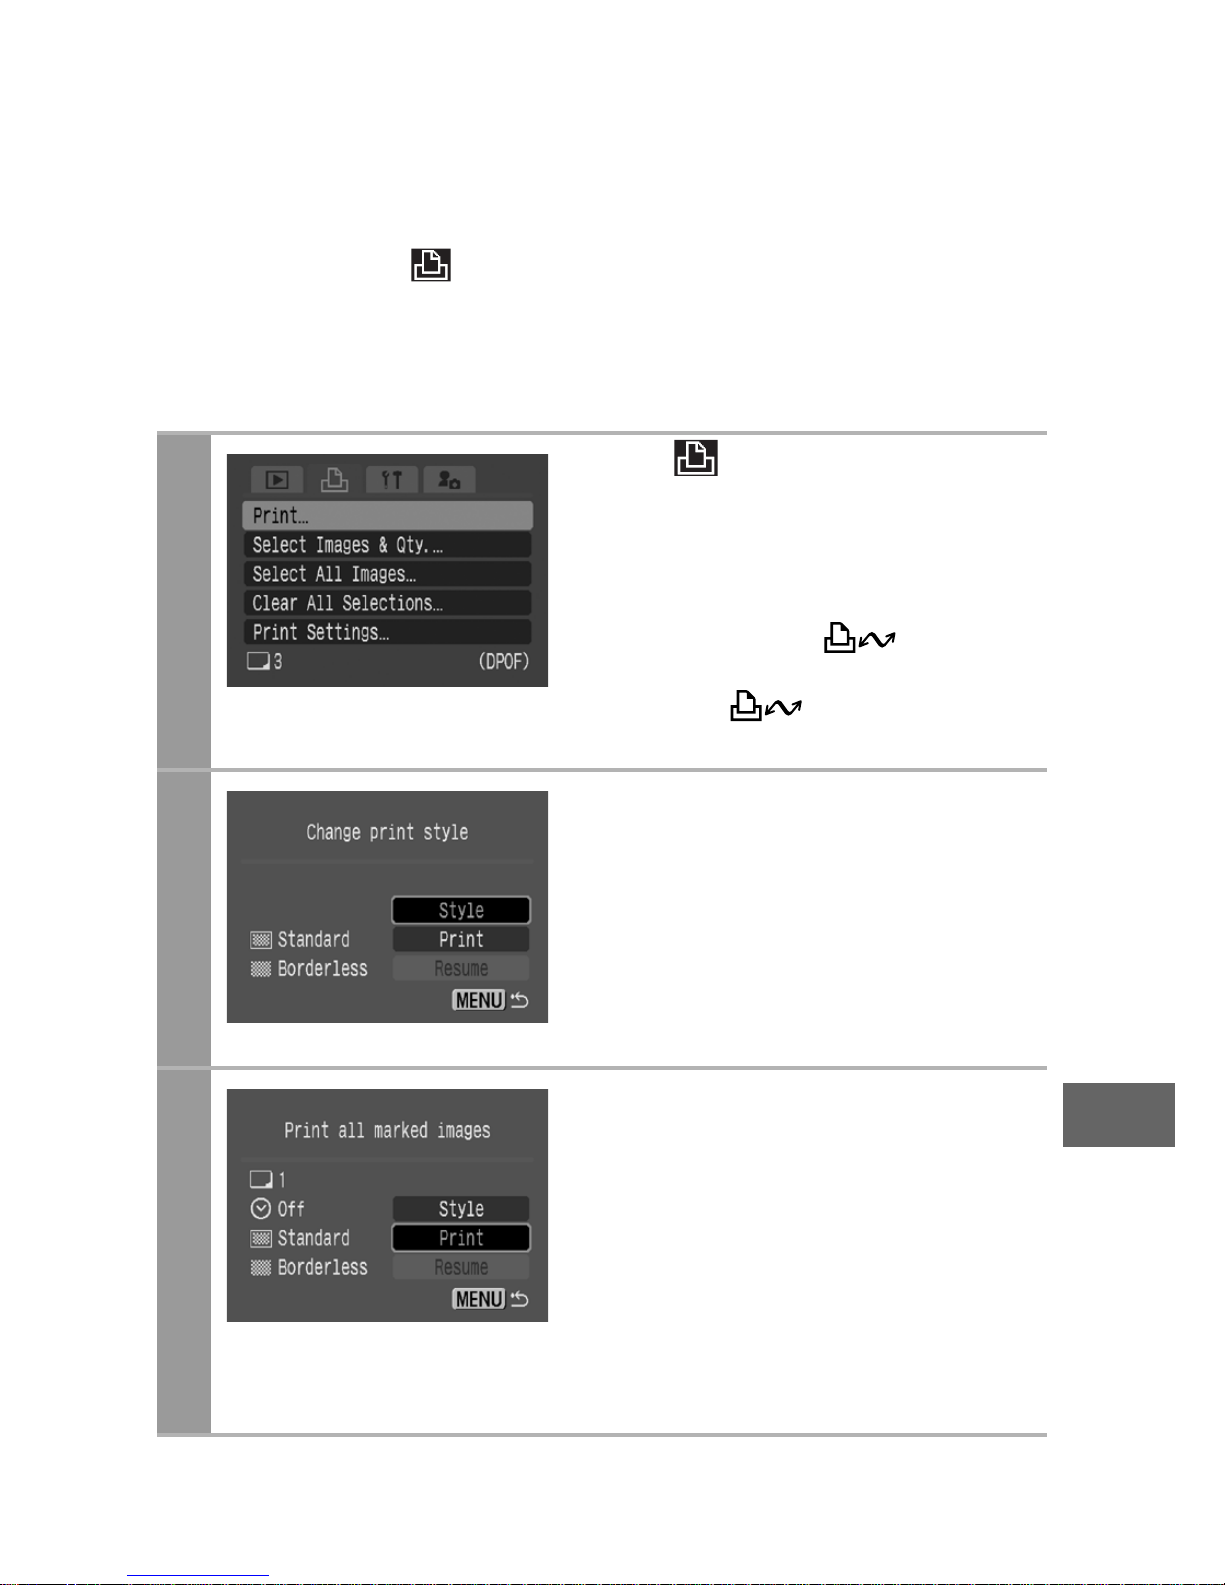
67
Specifying and Printing Multiple Images
(Setting the DPOF Print Settings)
With the camera’s (Print) menu, you can specify and print
multiple images or all the images on a memory card. For
instructions on how to specify images, please refer to Setting the
DPOF Print Settings section of the Camera User Guide. In this
section, we will explain how to print images after specifying them.
1
In the (Print) menu, select
[Print] and press the SET
button.
• When an image or images have
been specified (see the Camera
User Guide), the button will
light up blue. At this time, if you
press the button, the
screen for Step 2 will be displayed.
2
Set the print style settings as
required.
•See Setting the Print Style
(Image, Borders and Date)
(p. 55).
• A print style cannot be set if [Print
Settings] on the screen in Step 1
is set to [Index].
3
Select [Print] and press the
SET button.
• The image will start to print and,
when it is completely finished, the
display will revert to the standard
playback mode.
• If the MENU button is pressed,
the display will revert to the
screen in Step 1 and printing will
not take place.
Page 70
68
• To print the date, set the [Date] setting in [Print Settings] on the
screen in Step 1 to [On]. You cannot set the date to print with
the [Style] menu in Step 2.
• When the print type is set to [Index], the [Date] cannot be
printed.
• When the print type is set to [Standard], the [File No.] cannot be
printed.
• The ID photo print function cannot be used.
• The maximum number of images printed on one page in the
Index print type depends on the selected paper size.
• Card size: 20 images
• L size: 42 images
• Postcard size: 63 images
• Wide size: 63 images
Cancel Printing
• To cancel printing between images printed, press the SET
button.
Once the current print is completed, a confirmation dialog
appears. Select [OK] and press the SET button.
Restarting Printing
• Select [Resume] and press the SET button. The remaining
images can be printed.
• Printing cannot be restarted under the following circumstances.
• If the print settings have been changed before restarting.
• If the image for which the print settings were set has been
deleted before restarting.
• If there is very little free space on the memory card when
printing is canceled, it may not be possible to restart printing.
• If printing is canceled because the camera battery is depleted, it
may not be possible to restart printing.
(Replace with a fully charged battery pack or new batteries,
then turn the camera power on again. If you intend to use an
extended period of time, you are recommended to power the
camera with a compact power adapter (sold separately).)
Page 71
69
Printing Errors
• An error message appears if an error occurs for some reason
during the printing process. Select [Stop] or [Resume] and
press the SET button.
* The [Resume] option may not appear with some types of
errors. In that case, select [Stop].
Page 72
70
List of Messages
The following messages may appear on the camera’s LCD monitor
when an error occurs during a camera and printer connection.
(Depending on the printer model, some messages may not
display.)
• Please refer to the printer’s user guide for solutions.
No Paper
Paper cassette is incorrectly inserted or out of
paper. Or the paper feed is not operating correctly.
No Ink
The ink cartridge has not been inserted or has run
out of ink.
Incompatible paper
size
Wrong paper size is loaded in the printer.
Incompatible ink
size
Wrong ink cassette size is loaded in the printer.
Ink Cassette Error The ink cassette is experiencing a problem.
Paper and ink do not
match
The paper and ink are from different sets.
Paper Jam The paper jammed during printing.
Paper has been
changed
Paper was changed after the print style was
displayed.
Recharge the printer
battery
The printer’s battery pack is depleted.
Communication
Error
The printer is experiencing a data transmission
error.
Readjust trimming
You attempted to print the image with a different
style than the one used when the trimming settings
were set.
Cannot Print!
You attempted to print an image that was
photographed with another camera, one recorded
in a different data type, or one that has been edited
on a computer.
Could not print xx
images
You attempted to use the DPOF print settings to
print xx images that were photographed with
another camera, that have been recorded in a
different data type, or that have been edited on a
computer.
Page 73
71
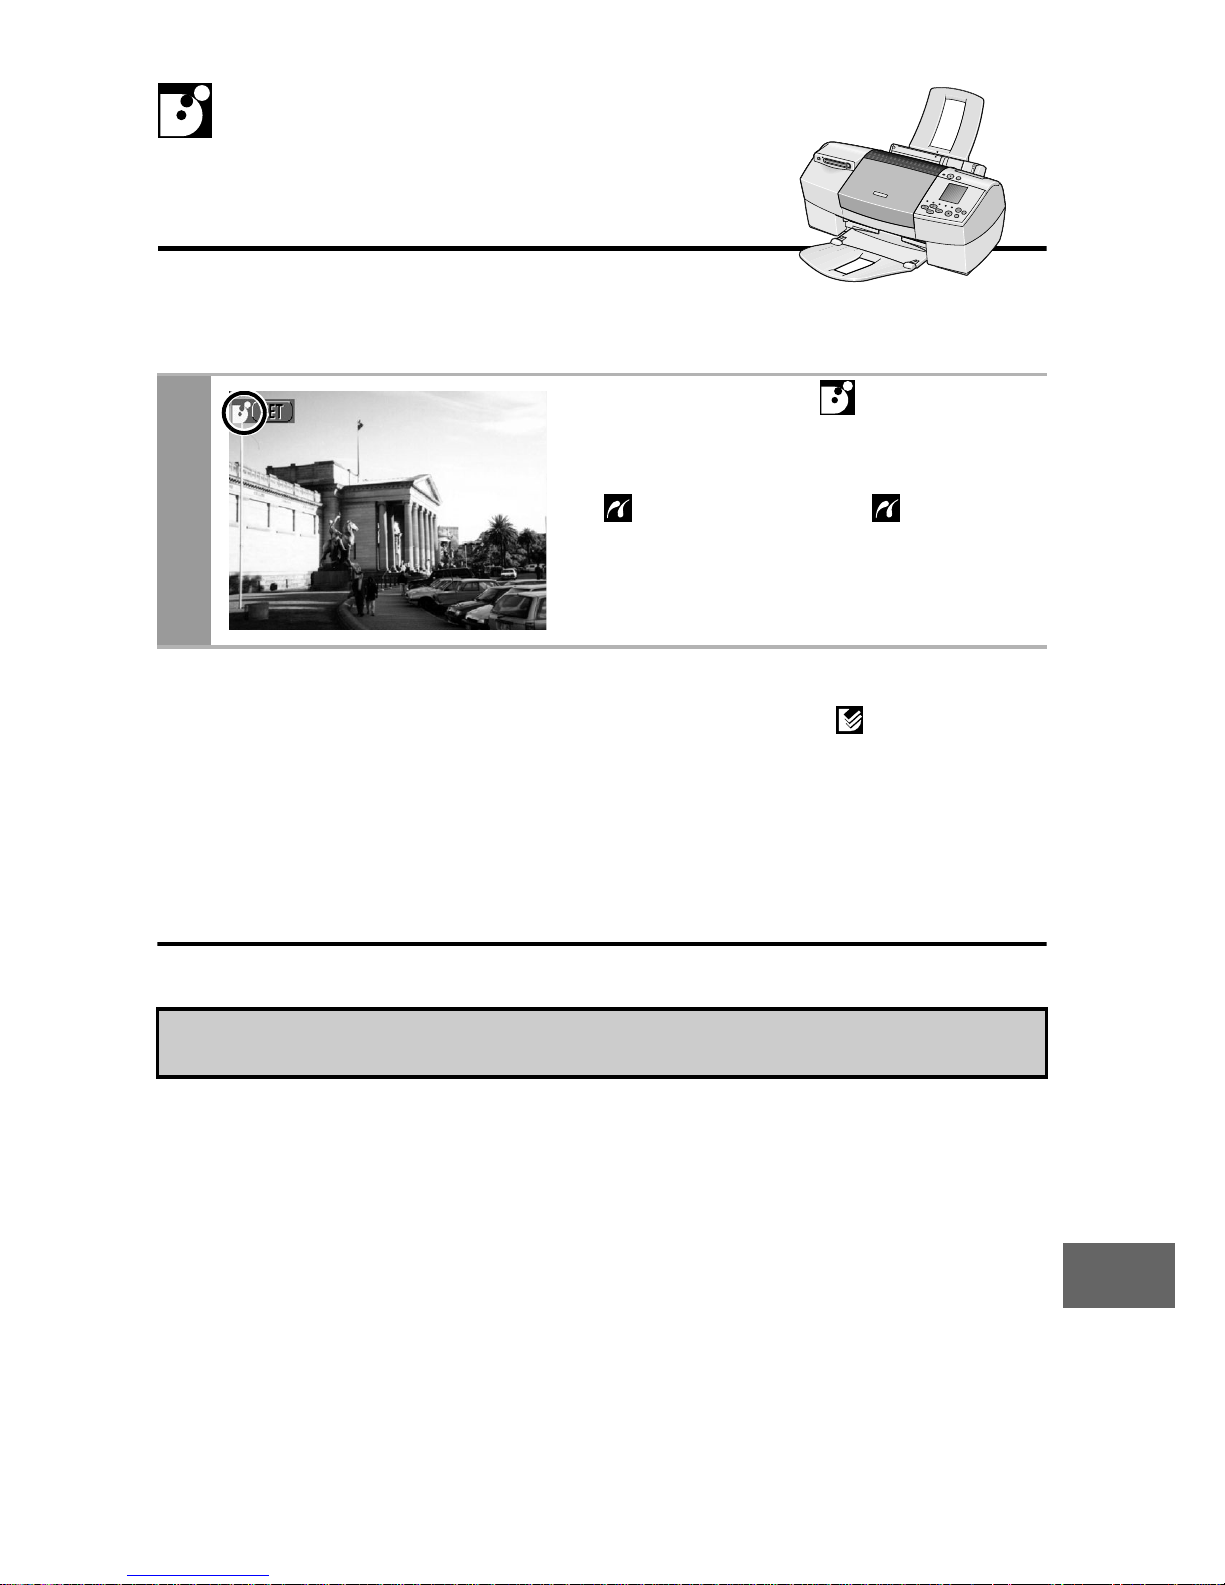
Printing
After this step, follow the procedures in the section Printing with
SELPHY CP Series Printers using Canon Direct Print (p. 53) to
print your images.
However, please note that some menus and precautions
differ, as listed below.
See pages 54 and 68.
1
Make sure that displays in
the upper left corner of the
LCD monitor.
If displays, refer to Printing
with Bubble Jet Printers (PIXMA
series/SELPHY DS series) using
PictBridge (p. 32).
• You cannot print movies or RAW images.
Printing with Bubble
Jet Printers using Bubble
J
et Direct
Page 74
72
See page 55.
Setting the Print Style
You can select from among the following print styles.
Cancel Printing
• To cancel printing between images printed, press the SET
button. A confirmation dialog appears. Select [OK] and press
the SET button.
The printer will stop printing the current image and eject the
paper.
Printing Errors
• An error message appears if an error occurs for some reason
during the printing process. When the error is resolved, printing
will automatically resume. If printing does not resume, select
[Continue] and press the SET button. If [Continue] cannot be
selected, select [Stop], press the SET button and restart the
print job.
• With printers equipped with an operation panel, the error
number displays on the panel. Please refer to the printer user
guide for the remedies corresponding to the error numbers.
Paper
Select the paper size from the following:
[Card #1], [Card #2], [Card #3], [LTR] or [A4].
For usable paper types, please refer to the
printer user guide.
Borders
Borderless Prints right to the edges of the paper.
Bordered Prints with a border.
Date
On Adds the date to the print.
Off Prints without the date.
Page 75
73
See page 68.
• The ID photo print function cannot be used.
• If you select an image which has had the shooting date
embedded in it using a camera with the Postcard Date Imprint
mode, [Date] in the [Style] menu will be set to [Off]. If you set
[Date] to [On], dates will appear twice on the printed image.
• To print the date, set the [Date] setting in [Print Settings] on the
screen in Step 1 to [On]. You cannot set the date to print with
the [Style] menu in Step 2.
• When the print type is set to [Index], the [Date] and [File No.]
cannot be printed at the same time.
• When the print type is set to [Standard], the [File No.] cannot be
printed.
• The ID photo print function cannot be used.
Page 76
74
Settings that Can Be Set with the
Camera
SELPHY ES Series/SELPHY CP Series
Printers using PictBridge
(When appears on the camera’s LCD monitor during a
connection)
*1
Compatible with SELPHY CP Series only.
*2
This option can only be selected when [CreditCard] size paper is set.
Print Options Selectable with the Camera
Date/File No.
Date
File No.
Both
Off
Default
Print Effect
Off
On
Default
Number of Prints 1 to 99
Trimming
Paper Settings
Paper Size
CreditCard
9 × 13 cm
10 × 14.8 cm
4" × 8" or 10 × 20 cm*
1
Default
Page Layout
Bordered
Borderless
N-up 2/4/(8*
2
)
ID Photo
Fixed Size
Default
Movies
(Movie Print)
Single
Sequence
Page 77
75
Bubble Jet Printers (PIXMA series/
SELPHY DS series) using PictBridge
(When appears on the camera’s LCD monitor during a
connection)
Print Options Selectable with the Camera
Date
Date
File No.
Both
Off
Default
Print Effect
Off
On
Vivid
NR
Vivid+NR
Face
Red-Eye1
Red-Eye2
Default
Number of Prints 1 to 99
Trimming
Movies (Movie Print)
Page 78
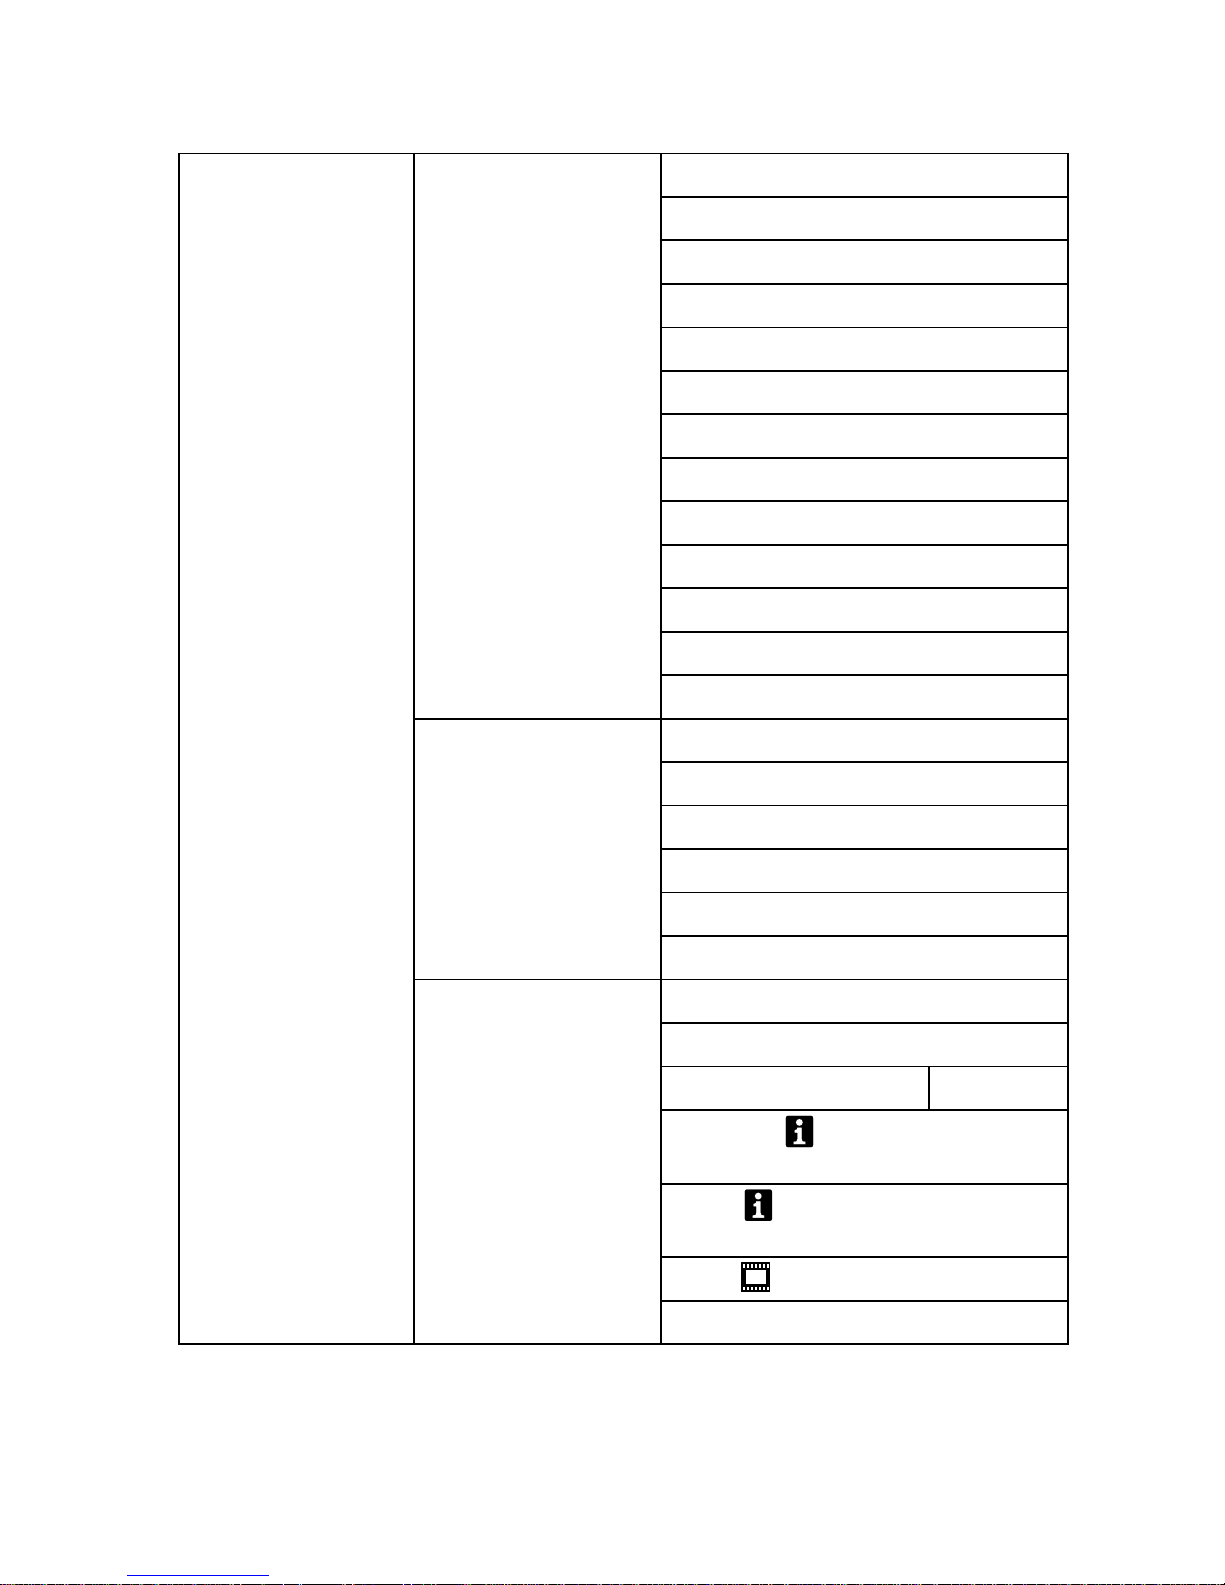
76
*1Paper sizes vary according to region.
*
2
This option can be specified by selecting [4" x 6"] in [Paper Size].
Paper Settings
Paper Size*
1
4" × 6"
13 × 18 cm
5" × 7"
A4
8.5" × 11"
CreditCard
8" × 10"
10" × 12"
A3
A3+/13" × 19"
14" × 17"
4" × 7.1"
Default
Paper Type
Photo
Fast Photo
Fine Art
Semi-gloss
Plain
Default
Page Layout
Bordered
Borderless
N-up*
2
2/4/9/16
Bordered (print with the
shooting information)
20-up (print with the shooting
information)
35-up
Default
Page 79
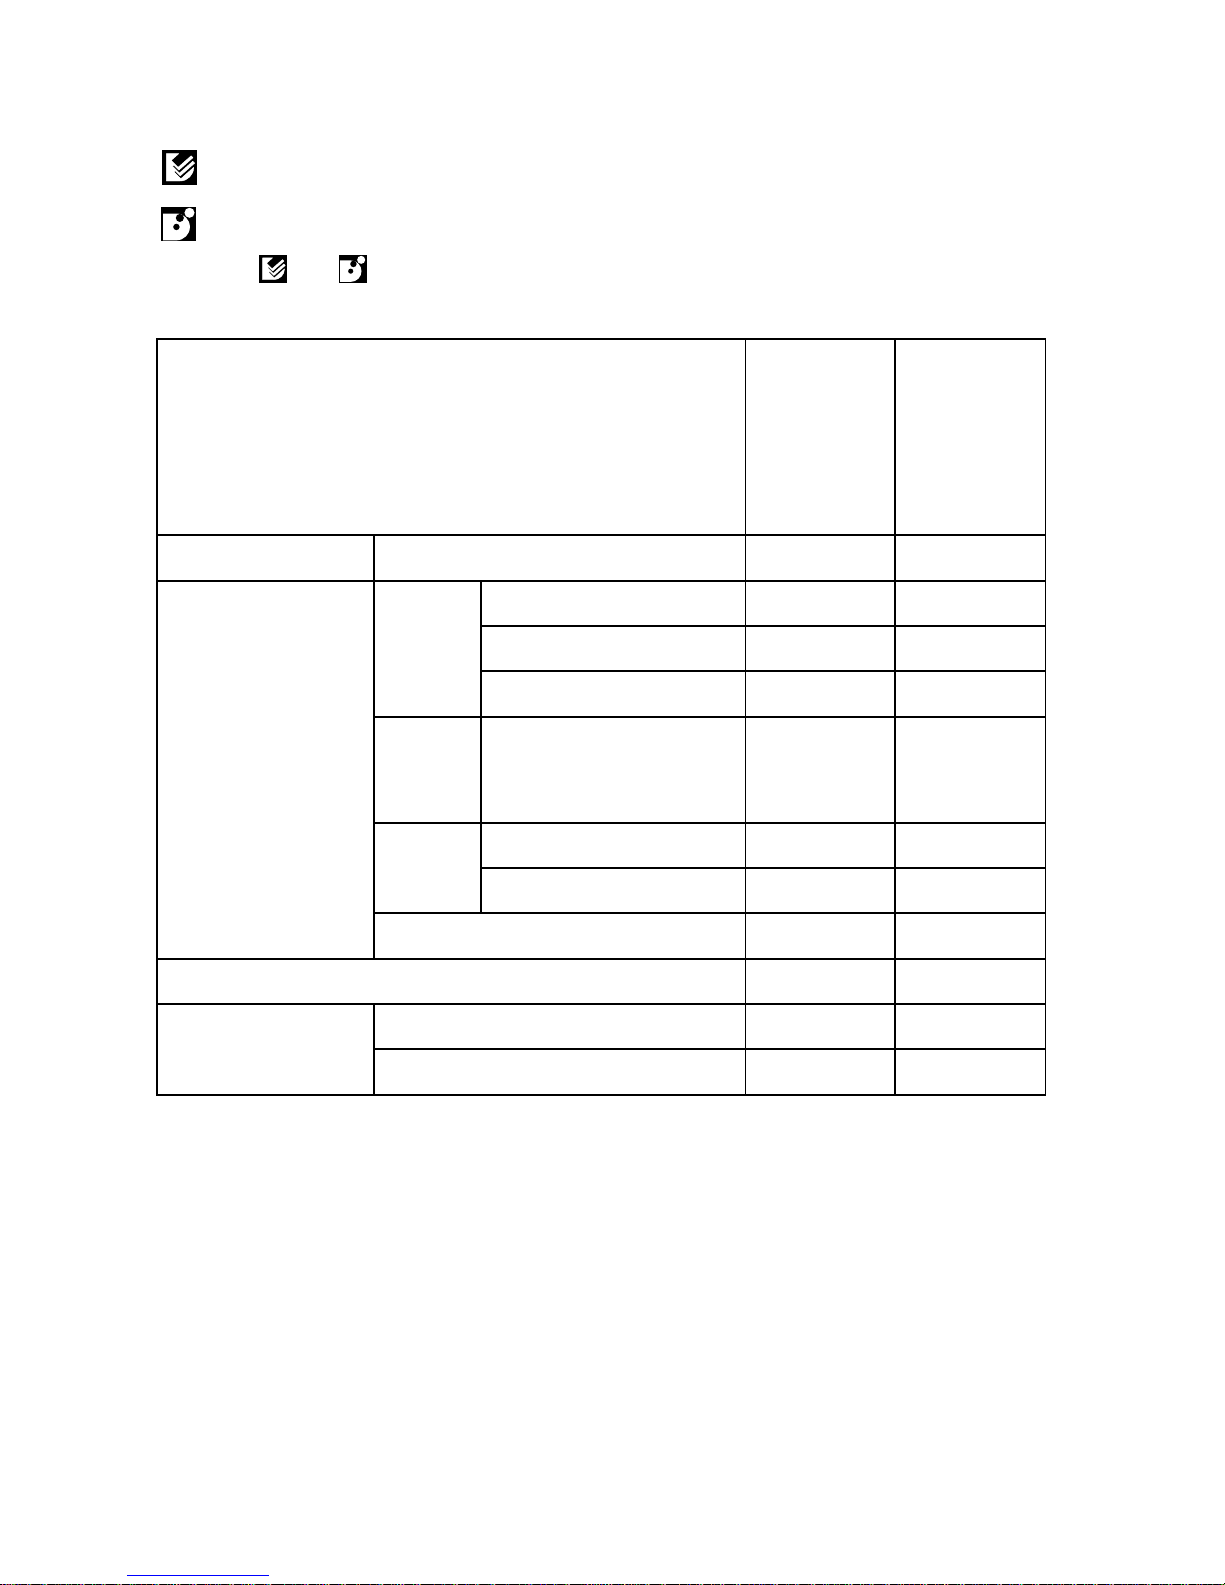
77
SELPHY CP Series Printers using Canon Direct Print
Bubble Jet Printers using Bubble Jet Direct
(When or appears on the camera’s LCD monitor during a
connection)
*1This option can only be selected when [CreditCard] size paper is set.
*
2
Paper size will be set automatically according to the paper cassette set to
the printer.
Print Options Selectable with the Camera
SELPHY
CP series
Printers
using
Canon
Direct Print
Bubble Jet
Printers
using
Bubble Jet
Direct
Number of Prints 1 to 99 {{
Style
Image
1 image { –
Multiple {*
1
–
ID Photo { –
Paper
Card #1, Card #2,
Card #3, Letter (LTR)
or A4
–*
2
{
Borders
Bordered {{
Borderless {{
Date {{
Trimming {{
Movies
(Movie Print)
Single { –
Sequence { –
Page 80

CEL-SF8VA211 © 2006 CANON INC.
 Loading...