

Page 1

S830D
Photo Printer
Quick Start Guide
Page 2

Canon S830D Photo Printer Quick Start Guide.
Copyright
This guide is copyrighted by Canon U.S.A., Inc. with all rights reserved. Under the copyright laws,
this guide may not be reproduced in any form, in whole or in part, without the prior written consent
of Canon U.S.A., Inc.
© 2002 Canon U.S.A., Inc.
Disclaimer
The purpose of this guide is to aid end users by summarizing pertinent information about your Canon
S830D Photo Printer. All statements, technical information and recommendations in this guide are
believed reliable, but the accuracy and completeness thereof are not guaranteed or warranted, and
they are not intended to be, nor should they be understood to be, representations or warranties
concerning the products described.
Specifications are subject to change without notice.
As an E
the E
NERGY STAR
NERGY STAR
partner, Canon U.S.A. Inc., has determined that this product meets
guidelines for energy efficiency.
All information regarding non-Canon products was compiled from publicly available information.
No representation is made regarding the accuracy thereof.
Trademarks
Canon is a registered trademark of Canon Inc. PhotoRecord is a trademark of Canon Information
Systems Research Australia. Macintosh, Mac and the Mac logo are registered trademarks of Apple
Computer, Inc., registered in the U.S. and other countries. CompactFlash is a trademark of SanDisk
Corporation. Memory Stick is a trademark of Sony Corporation. SmartMedia is a trademark of
Toshiba Corporation. Microdrive is a trademark of International Business Machines Corporation.
All other product and brand names are trademarks of their respective owners.
Canon U.S.A., Inc.
One Canon Plaza
Lake Success, NY 11042
Printed in Thailand
Page 3

Contents
Chapter 1: Basic Printing
What Is a Printer Driver? . . . . . . . . . . . . . . . . . . . . . . . . . . . . . . . . . . 1
Selecting the S830D Photo Printer for Use . . . . . . . . . . . . . . . . . . . 2
Using Specialty Media . . . . . . . . . . . . . . . . . . . . . . . . . . . . . . . . . . . 3
Cancelling a Print Job . . . . . . . . . . . . . . . . . . . . . . . . . . . . . . . . . . . . 7
Setting Driver Options . . . . . . . . . . . . . . . . . . . . . . . . . . . . . . . . . . . . 8
Changing the Page Setup . . . . . . . . . . . . . . . . . . . . . . . . . . . . . . . . . 9
Chapter 2: Advanced Print Features
Smoothing Rough or Jagged Edges . . . . . . . . . . . . . . . . . . . . . . . . 13
Optimizing Color Photographs . . . . . . . . . . . . . . . . . . . . . . . . . . . . 14
Adjusting Print Quality . . . . . . . . . . . . . . . . . . . . . . . . . . . . . . . . . . 16
Adjusting Color Balance, Brightness and Saturation . . . . . . . . . . 17
Saving and Recalling Driver Settings . . . . . . . . . . . . . . . . . . . . . . . 19
Chapter 3: Printing Without a Computer
Basic Operations . . . . . . . . . . . . . . . . . . . . . . . . . . . . . . . . . . . . . . . 21
Printing Photos . . . . . . . . . . . . . . . . . . . . . . . . . . . . . . . . . . . . . . . . 27
Print Options . . . . . . . . . . . . . . . . . . . . . . . . . . . . . . . . . . . . . . . . . . 28
Maintenance Procedures for Direct Printing . . . . . . . . . . . . . . . . . 32
Using the Memory Card Utility . . . . . . . . . . . . . . . . . . . . . . . . . . . . 34
Chapter 4: Printing Maintenance
Monitoring Ink Levels . . . . . . . . . . . . . . . . . . . . . . . . . . . . . . . . . . . 39
Replacing Ink Tanks . . . . . . . . . . . . . . . . . . . . . . . . . . . . . . . . . . . . 41
Aligning the Print Head . . . . . . . . . . . . . . . . . . . . . . . . . . . . . . . . . . 41
Printing a Nozzle Check Pattern . . . . . . . . . . . . . . . . . . . . . . . . . . . 43
Cleaning the Print Head . . . . . . . . . . . . . . . . . . . . . . . . . . . . . . . . . 45
Chapter 5: Using Your Photo Applications
What is Exif Print? . . . . . . . . . . . . . . . . . . . . . . . . . . . . . . . . . . . . . . 47
Installing the Photo Applications . . . . . . . . . . . . . . . . . . . . . . . . . . 48
Using the Photo Applications . . . . . . . . . . . . . . . . . . . . . . . . . . . . . 49
Using Easy-PhotoPrint for Windows . . . . . . . . . . . . . . . . . . . . . . . . 51
Printing on Canon Photo Paper Pro for Borderless Printing 4" x 6" . . . . 54
iii
Page 4

Contents
Chapter 6: Troubleshooting
Appendix
Tips for Troubleshooting . . . . . . . . . . . . . . . . . . . . . . . . . . . . . . . . . 57
Customer Care Center . . . . . . . . . . . . . . . . . . . . . . . . . . . . . . . . . . . 70
Installing the Printer Driver . . . . . . . . . . . . . . . . . . . . . . . . . . . . . . . 71
Uninstalling the Printer Driver . . . . . . . . . . . . . . . . . . . . . . . . . . . . 73
Registering Your Canon Product . . . . . . . . . . . . . . . . . . . . . . . . . . . 74
Safety Information . . . . . . . . . . . . . . . . . . . . . . . . . . . . . . . . . . . . . . 74
Regulatory Information . . . . . . . . . . . . . . . . . . . . . . . . . . . . . . . . . . 76
Product Specifications . . . . . . . . . . . . . . . . . . . . . . . . . . . . . . . . . . . 77
Limited Warranty—U.S. Only . . . . . . . . . . . . . . . . . . . . . . . . . . . . . . 78
Index
. . . . . . . . . . . . . . . . . . . . . . . . . . . . . . . . . . . . . . . . . . . . . . . . . . . . . . . . . . . . . 81
iv
Page 5
Chapter 1: Basic Printing
Congratulations on purchasing your new Canon® S830D Photo Printer!
This chapter describes basic features of your S830D Photo Printer and provides
instructions on how to set up and print documents and photographs.
The following topics are presented in this chapter:
What Is a Printer Driver?
•
•
Selecting the S830D Photo Printer for Use
•
Using Specialty Media
Cancelling a Print Job
•
•
Setting Driver Options
•
Changing the Page Setup
This Quick Start Guide describes some of the features of your
S830D Photo Printer and how to use them. For more detailed
information, view the
Software & User’s Guide CD-ROM.
Windows
described in this guide reflect Windows XP and may be and/
or look different for Windows 98, Me and Windows 2000.
Macintosh®:
captures described in this guide reflect Mac® OS 8.6 – 9.x,
and may be and/or look different for Mac OS X.
®
:
Driver features, instructions and screen captures
What Is a Printer Driver?
Most computers require special software to link the programs you use to create
documents or images with the printer. This special software, called a
driver
the printer can understand, and provides other handy features, such as
monitoring the levels of ink in the printer.
, converts the information from the software application into a format that
S830D User’s Guide
Driver features, instructions and screen
on the Setup
printer
1
Page 6

Basic Printing
Selecting the S830D Photo Printer for Use
If the S830D is the only printer connected to your computer, it will automatically
be used every time you print. However, if your computer has access to multiple
printers, you can set the S830D as the default (main) printer.
To set the S830D as the default printer in Windows®:
1.
Click
Start
, then:
•
Windows XP:
Printers and Faxes
•
Other Windows versions:
Select
.
Control Panel
Select
, then
Settings
Printers and Other Hardware
, then
Printers
, then
.
Right-click the
2.
The Canon S830D printer icon will now display with a check mark that
indicates it is the default printer.
Canon S830D
printer icon, then click
Set as Default Printer
.
To select the S830D from within a Windows application:
If another printer is set as the default printer, you can still select the Canon S830D
for a specific print job from within most applications.
Menus vary from application to application. Consult your
application’s user documentation if the Print option is not listed.
1.
From the
Select
2.
File
menu, click
Canon S830D
Print
.
from the list, then click OK.
To select the S830D in Mac® OS:
1.
Click
Apple
2.
Click the
default printer until another is selected.
, then
S830D
Chooser
printer icon. Close the Chooser. The S830D will remain the
.
2
Page 7

Basic Printing
Caring for Your Photographs
The Canon S830D Photo Printer will generate spectacular results for printing
photographs, especially when used with Canon specialty media. All images are
susceptible to fading over time, but proper care of prints made from your S830D
Photo Printer will ensure that print quality lasts long into the future.
Many environmental factors can impact how long a printout will last before
noticeable image fading occurs. Exposure to sunlight or other light sources,
humidity, temperature, exposure to cigarette smoke and ozone are just some of
the factors that can impact image permanence. While many of these variables
cannot be controlled, you can take basic measures to prolong image quality:
•
Use Canon Photo Paper Pro and genuine Canon inks. Try Canon Photo
Paper Pro or Canon Photo Paper Pro for Borderless Printing (4" x 6").
Both papers are specifically designed to work with genuine Canon inks.
•
Mount images under glass to reduce exposure to ozone, cigarette smoke and
other environmental factors that can degrade images.
•
Keep printed images out of direct sunlight or other intense light sources.
Using Specialty Media
For optimal results, Canon recommends that you use genuine Canon media with
your S830D Photo Printer. Be sure to follow all instructions on storing, handling
and printing on the media.
General Printing
For everyday paper printing, use Canon High Resolution Paper or plain paper
(17 to 28 lb.). Use standard #10 envelopes with your S830D Photo Printer.
3
Page 8

Basic Printing
Specialty Media
The specialty media available for use with the S830D include:
•
Canon Photo Paper Plus Glossy
•
Canon Matte Photo Paper
Canon Photo Paper Pro
•
•
Canon Photo Paper Pro 4" x 6"
•
Canon Photo Paper Pro for Borderless Printing 4" x 6"
Canon Glossy Photo Paper
•
•
Canon Glossy Photo Cards
Canon High Gloss Photo Film
•
•
Canon High Resolution Paper
•
Canon Transparencies
Canon Banner Paper
•
•
Canon T-Shirt Transfers
Media to Avoid
Never load the following types of media into your S830D Photo Printer. These
media could produce poor quality and jam or damage the printer:
Folded paper
•
Excessively curled or wrinkled paper
•
•
Damp paper
Excessively thin paper
•
Excessively thick paper
•
Paper with adhered photos, stickers, etc.
•
Envelopes with an embossed or treated surface
•
•
3-hole punched paper
Paper with any type of attached fasteners, ribbons, etc.
•
4
Page 9
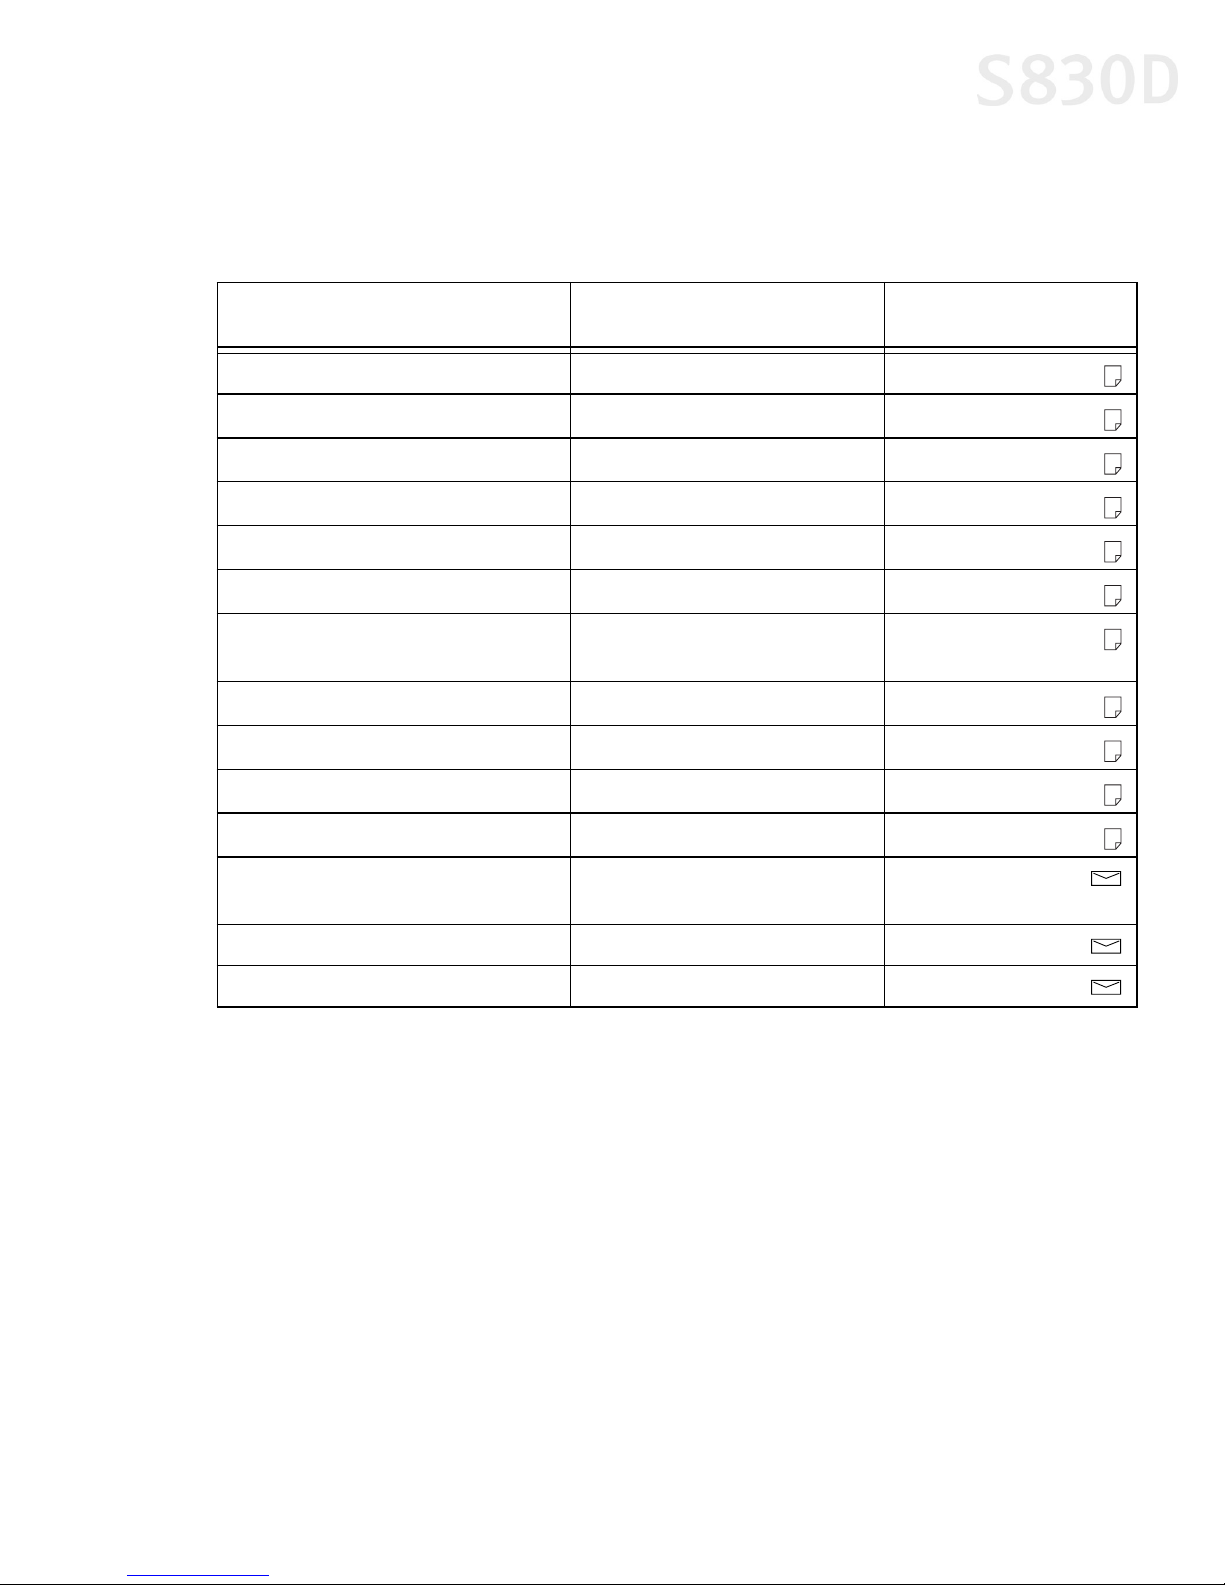
Printing on Thick Paper
Load Limit and Paper Thickness Lever Position
Basic Printing
Media Type Sheet Feeder
Load Limit
Photo Paper Plus Glossy
Matte Photo Paper
Plain paper
High Resolution Paper
Photo Paper Pro
Photo Paper Pro 4" x 6"
Photo Paper Pro for Borderless
Printing 4" x 6"
High Gloss Photo Film
Glossy Photo Paper
Glossy Photo Cards
Transparencies
Banner Paper
1 sheet
10 sheets
100 sheets (17 lb.)
80 sheets
1 sheet
20 sheets
20 sheets
1 sheet
1 sheet
20 sheets
30 sheets
1 sheet (can print up to 6
connected sheets)
Paper Thickness
Lever Position
Left
Left
Left
Left
Left
Left
Left
Left
Left
Left
Left
Right
T-Shirt Transfer
#10 Envelopes
1 sheet
10 envelope
Right
Right
5
Page 10
Basic Printing
Loading Media into the S830D
Follow these instructions and tips for loading media into the printer.
• To prevent paper jams, always fan the sheets and align the edges before you
load them into the printer.
• Handle media carefully by its edges.
• Never touch the print surface (the glossy or brighter white side of the sheets).
• Dirt or fingerprints on the print surface will adversely affect print quality.
• To prevent changes in color, never stack printed sheets after they have
been printed.
• Cover printed sheets with one sheet of plain paper to protect the printed
surface, even if you intend to store them in clear plastic folders.
For more information on loading media, see the S830D User’s Guide
on the Setup Software & User’s Guide CD-ROM.
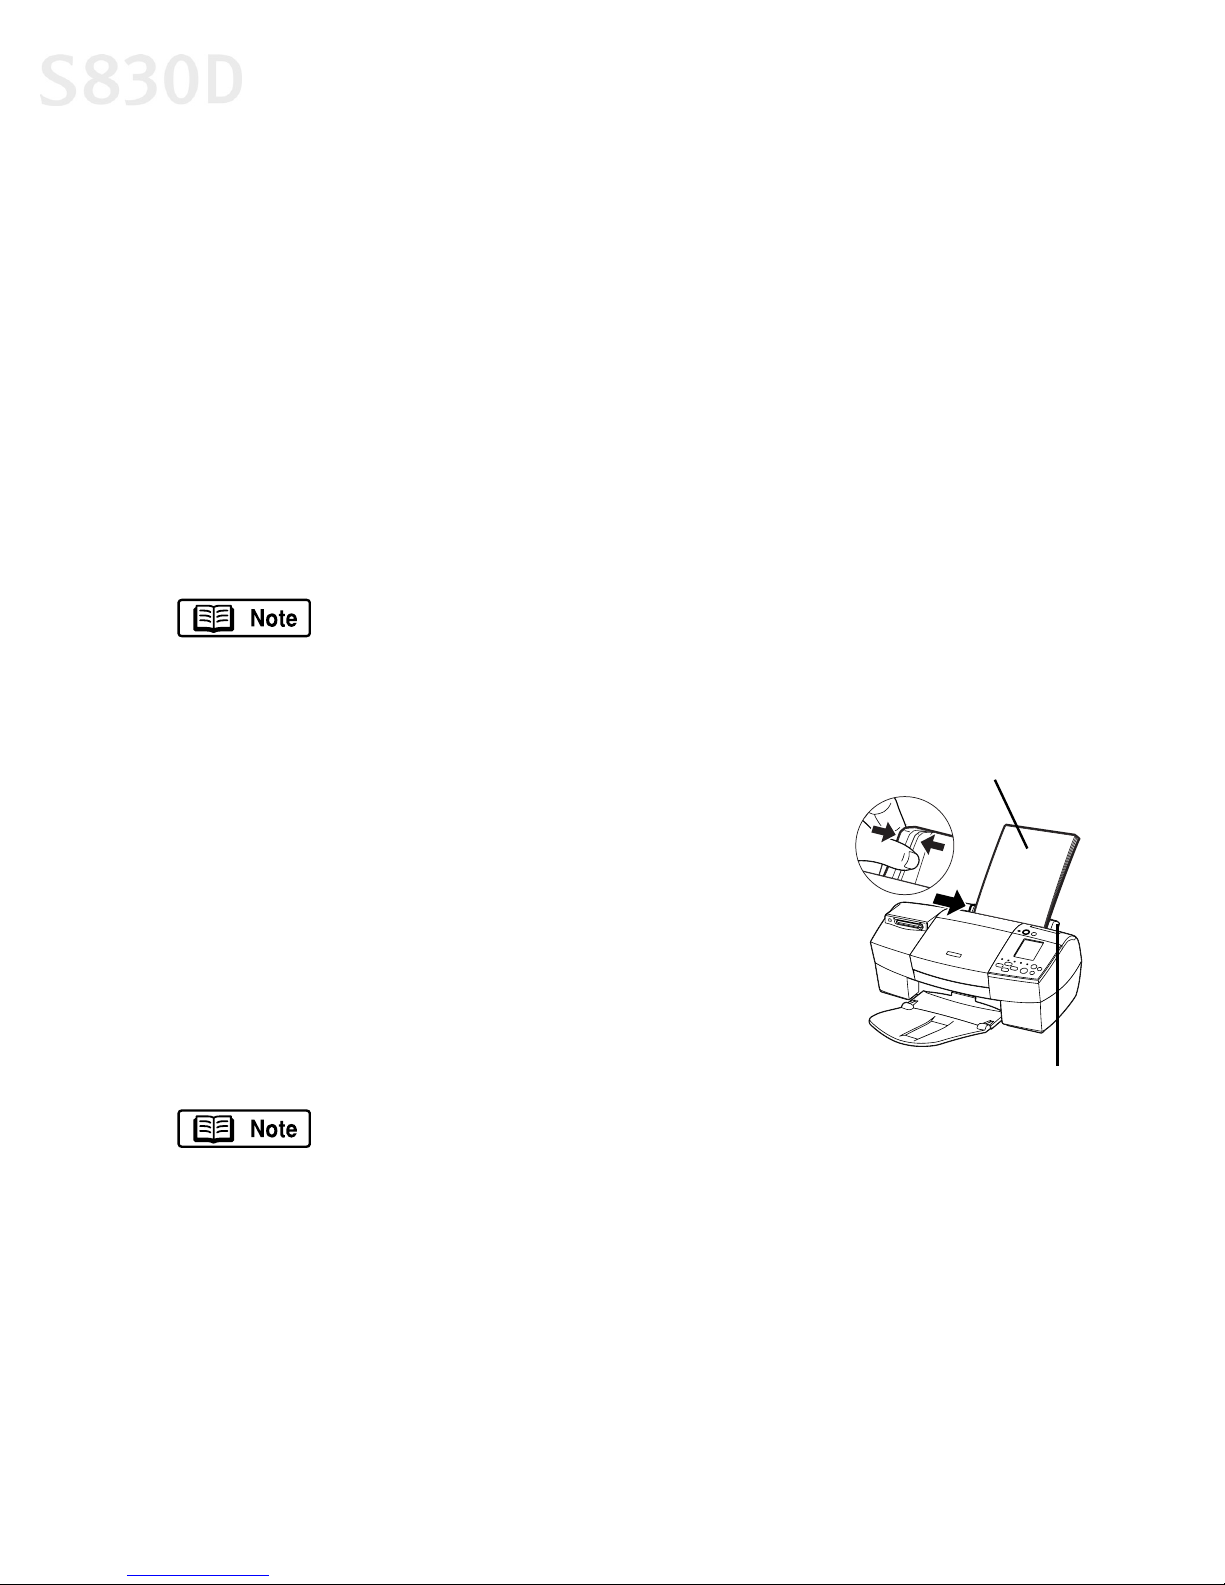
To load plain paper or other Canon media:
Make sure the paper thickness lever is set
1.
correctly for the media used.
2. Pinch and slide the paper guide completely to
the left.
3. Fan the edges of the sheets to remove static cling,
then tap the edges of the stack against a flat
surface so the stack is aligned.
4. Insert the media into the paper rest, with the
print side facing up.
Some specialty media have specific sides for printing. The print
side is usually the brighter white or glossier side of the page.
When using specialty media, ensure that the brighter/glossier
side faces up and avoid touching the print side.
Also, note the load limit for the media you are using and do not
exceed the limit.
Print side
Load limit mark
Always follow the specific media instructions packaged with your
media for complete details and ink drying times.
5. Slide the paper guide right to the edge of the media until firmly in place.
6
Page 11
Cancelling a Print Job
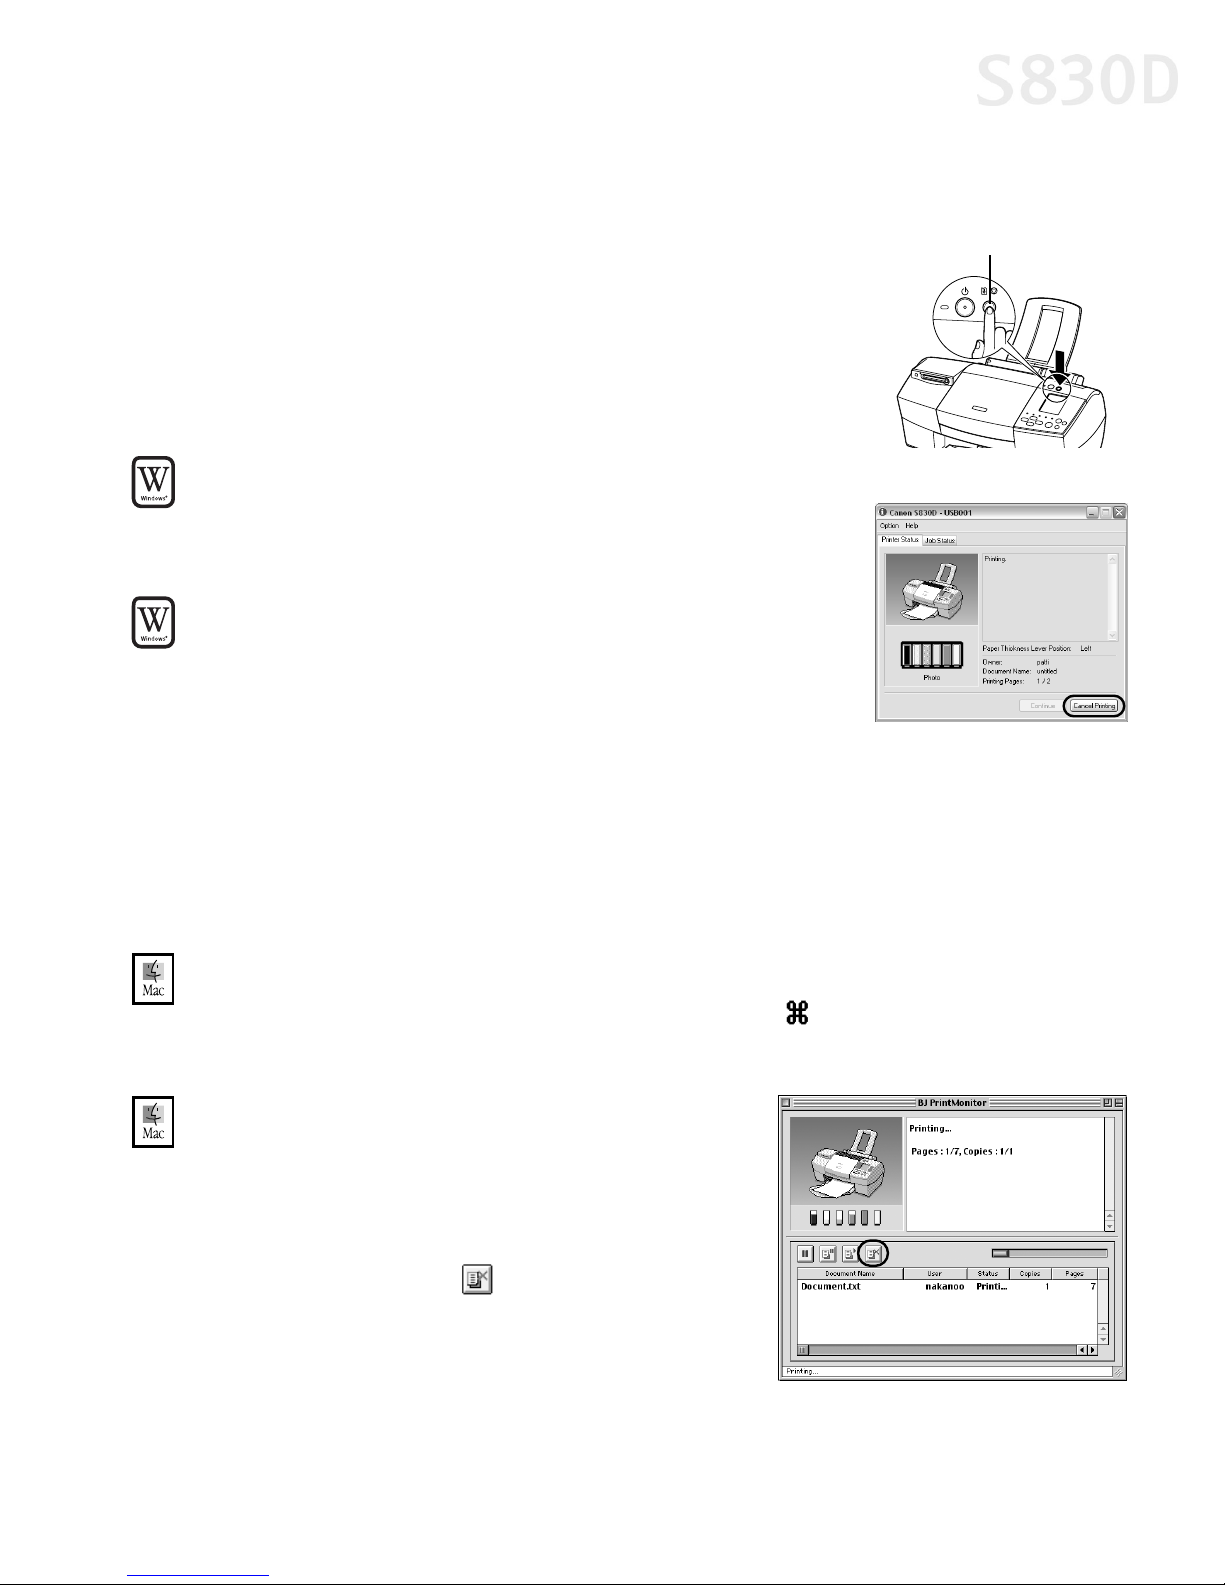
RESUME/CANCEL button
You can cancel a print job in progress in several ways:
To cancel a print job using the printer button:
After a print job has started, press the
RESUME/CANCEL button on the printer. The print
job will be cancelled.
To cancel a print job using the BJ Status Monitor:
Click Cancel Printing after the print job has started.
The print job will be cancelled and the paper ejected.
To cancel a print job from Windows:
Click Start, then:
1.
Basic Printing
• Windows XP: Select Control Panel, then
Printers and Other Hardware, then Printers and
Faxes.
• Other Windows versions: Select Settings, then Printers.
2. Double-click Canon S830D, click the document name, then click Delete. The
print job will be cancelled and the paper ejected.
To cancel a print job using Mac OS:
On your keyboard, press the Apple® Command key ( ) and the period key (.) at the
same time. The print job will be cancelled and the paper ejected.
To cancel a print job using the BJ Print Monitor:
Select the BJ Print Monitor in the
1.
Application menu.
2. Click the name of the print job you wish to
cancel, then click .
7
Page 12

Basic Printing
Setting Driver Options
The S830D printer driver can be customized to give you the best quality output.
This topic describes the main options. For more options, see the
S830D User’s Guide on the Setup Software & User’s Guide CD-ROM.
Print Mode
Your S830D Photo Printer offers the following modes of operation. Each mode
adjusts the driver settings for the type of project you are printing.
For Windows:
High For high quality when printing photos or color documents.
Standard For high quality when printing text.
Draft For printing text drafts at a faster speed.
Custom Allows for more precise control for finer details.
For Mac OS:
Text Use to print text documents.
Graphic Use to print documents that contain text and color photos,
business graphics, etc. The printer driver automatically
distinguishes between text and photos or graphics, and adjusts
the printing for the best results.
Photo Use to print photographs or color images.
Manual Use to save manually set options for later use.
The Print Mode will automatically change when you select a certain
Media Type, but you can select another print mode if desired.
8
Page 13
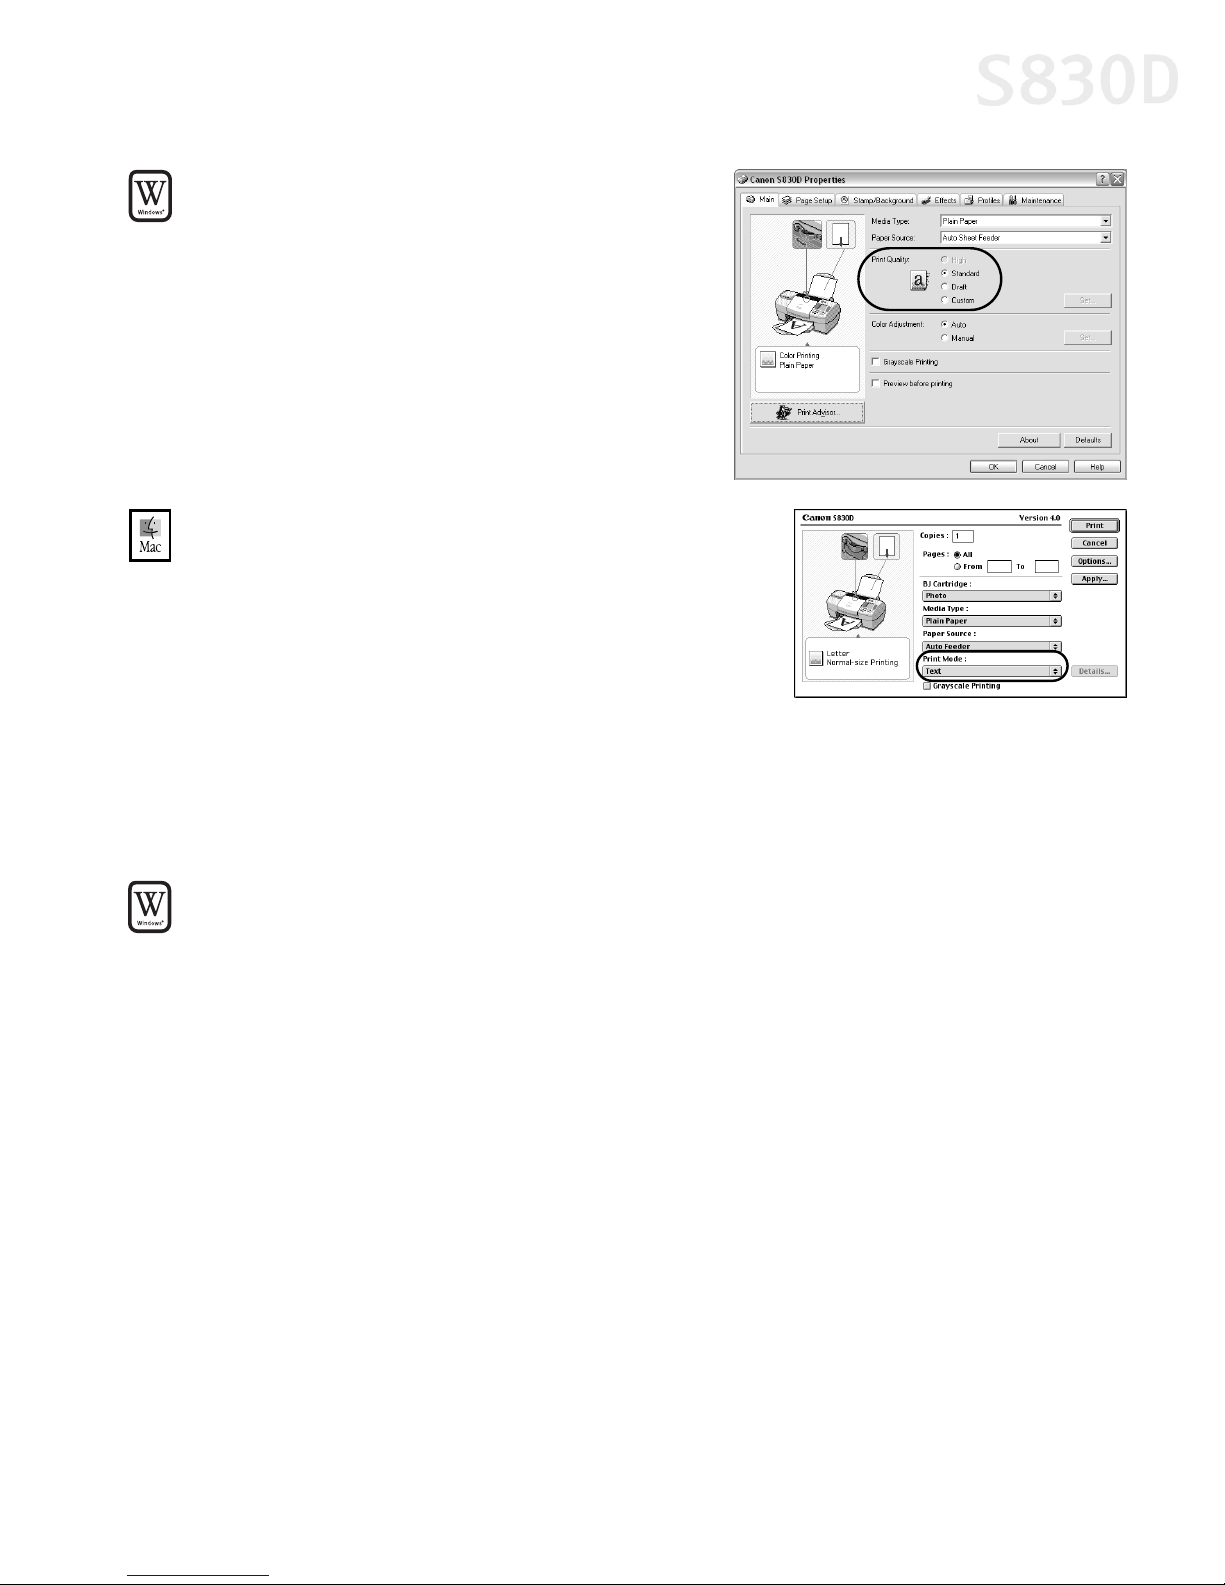
To set the print mode in Windows:
1. From an application File menu,
select Print.
2. Make sure Canon S830D is the selected
printer, then click Properties.
3. On the Main tab, click the Print Quality
that best describes your print job, then
click OK.
To set the print mode in Mac OS:
From a Macintosh application File menu,
1.
select Print.
2. Select the Print Mode from the drop-down
menu that best describes your print job.
Basic Printing
Changing the Page Setup
You can change how the image is printed without affecting the original image file.
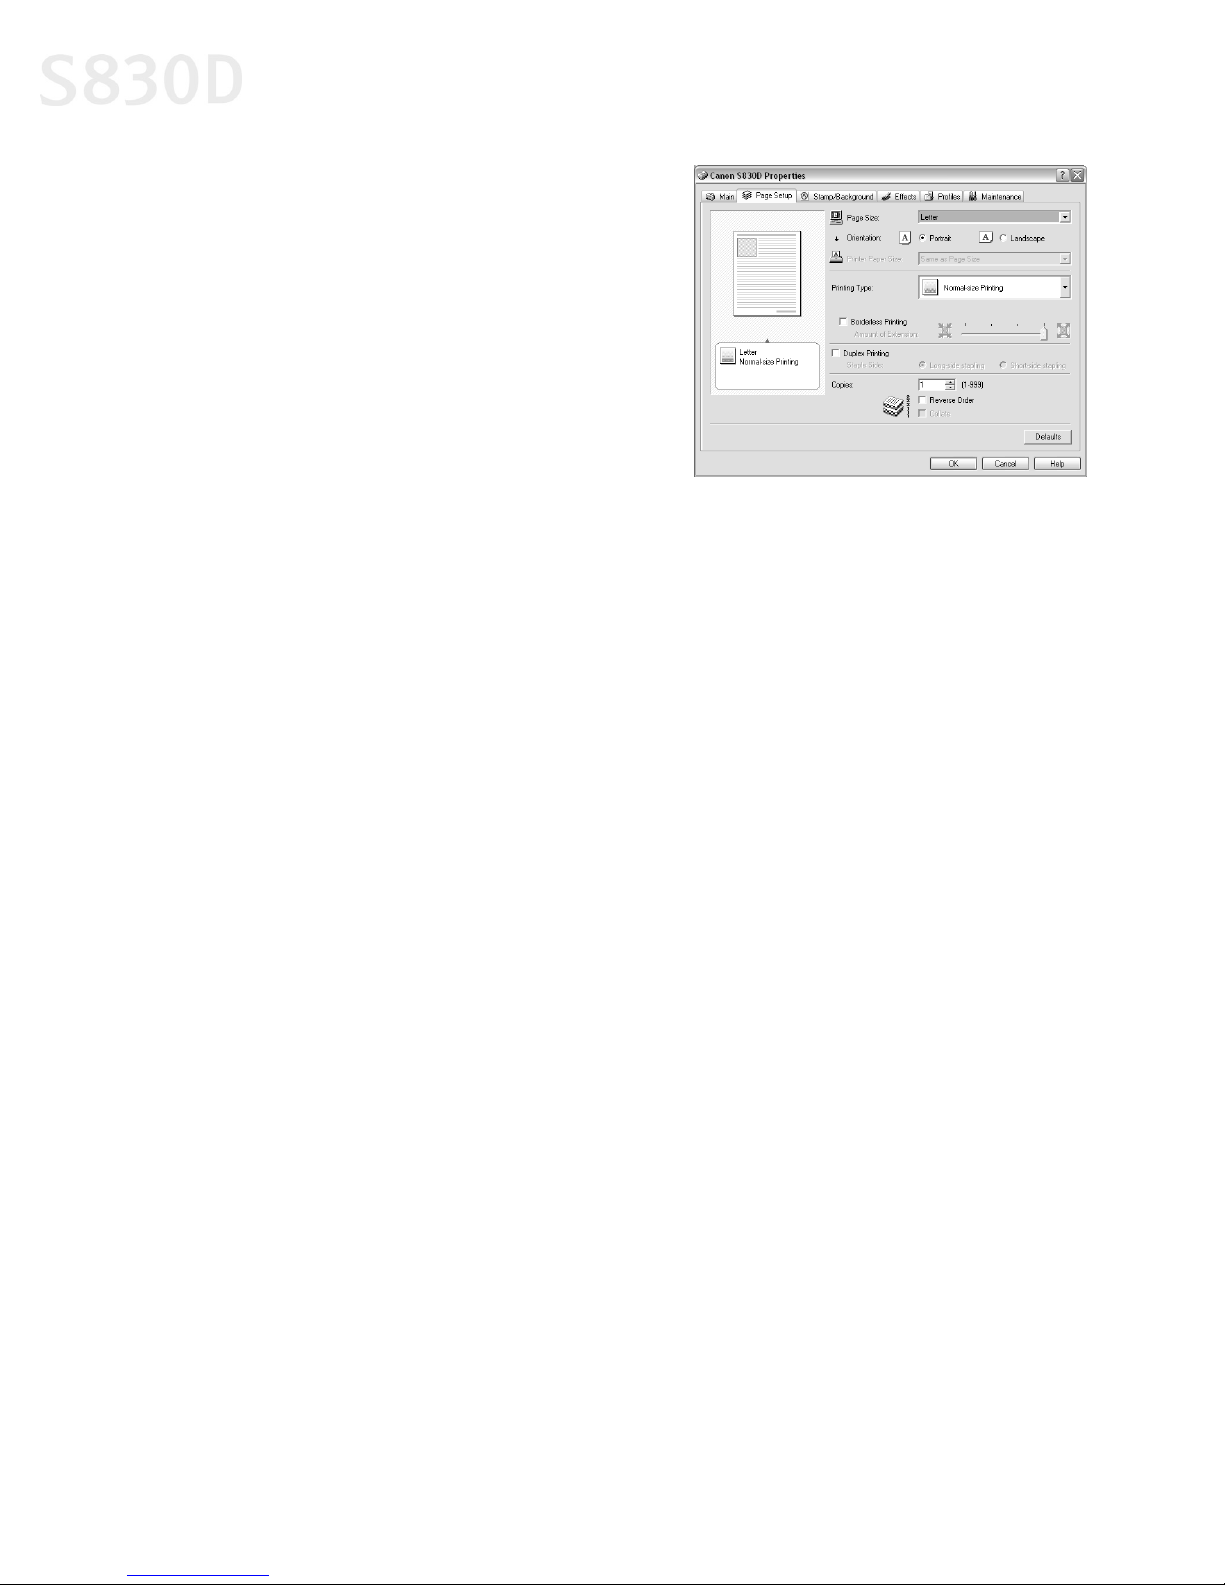
To change the page setup in Windows:
From an application File menu, select Print.
1.
2. With Canon S830D as the selected printer, click Properties.
3. Click the Page Setup tab. Here you can change the following options:
Page Size Defaults to the page size set in the original document, but can be changed.
Orientation Lets you select either portrait or landscape orientation.
9
Page 14
Basic Printing
Printer Paper Size The page size used by
the printer. This defaults to match the Page
Size. However, a different printer paper size
can be selected if a Printing Type other than
normal is selected (see below).
Printing Type Defaults to Normal-size
Printing. Click the drop-down arrow to
select one of these Printing Types:
Fit-to-Page Printing This option
automatically rescales the image to fit
into a specified page size.
Scaled Printing With this option you can set the scale of the printed image
down to 20% or up to 400% of the original.
Page Layout Printing Lets you set the number of pages to print on a single
sheet. Click Specify to set the number of pages to a sheet of paper (1 to 16),
the print order for those pages (left to right or right to left) and whether you
want to print a border around each page.
Poster Printing Lets you print an oversized image on multiple pages that
can then be manually joined together. Click Specify to set the image
divisions (how many tiles the image will break into).
Booklet Printing Data is printed in such a manner that pages can be
collated properly in the order of the page numbers when the printed sheets
are folded and stapled at the center.
Banner Printing Used for printing banners on special banner paper.
Borderless Printing Used for printing images that cover the entire surface
of the card without a white border. Use Canon Photo Paper Pro for
Borderless Printing with this feature.
Duplex Printing The document can be printed on both sides of the paper.
When printing is complete, reload paper properly, according to the displayed
message, then click OK. The document will be printed on the opposite side.
4. When done, click OK.
For more feature descriptions, see the S830D User’s Guide on the Setup Software
& User’s Guide CD-ROM or access the online help.
10
Page 15
Basic Printing
To change the page setup in Mac OS:
Make sure that S830D is the selected printer (from the Apple menu, select
1.
Chooser, then S830D).
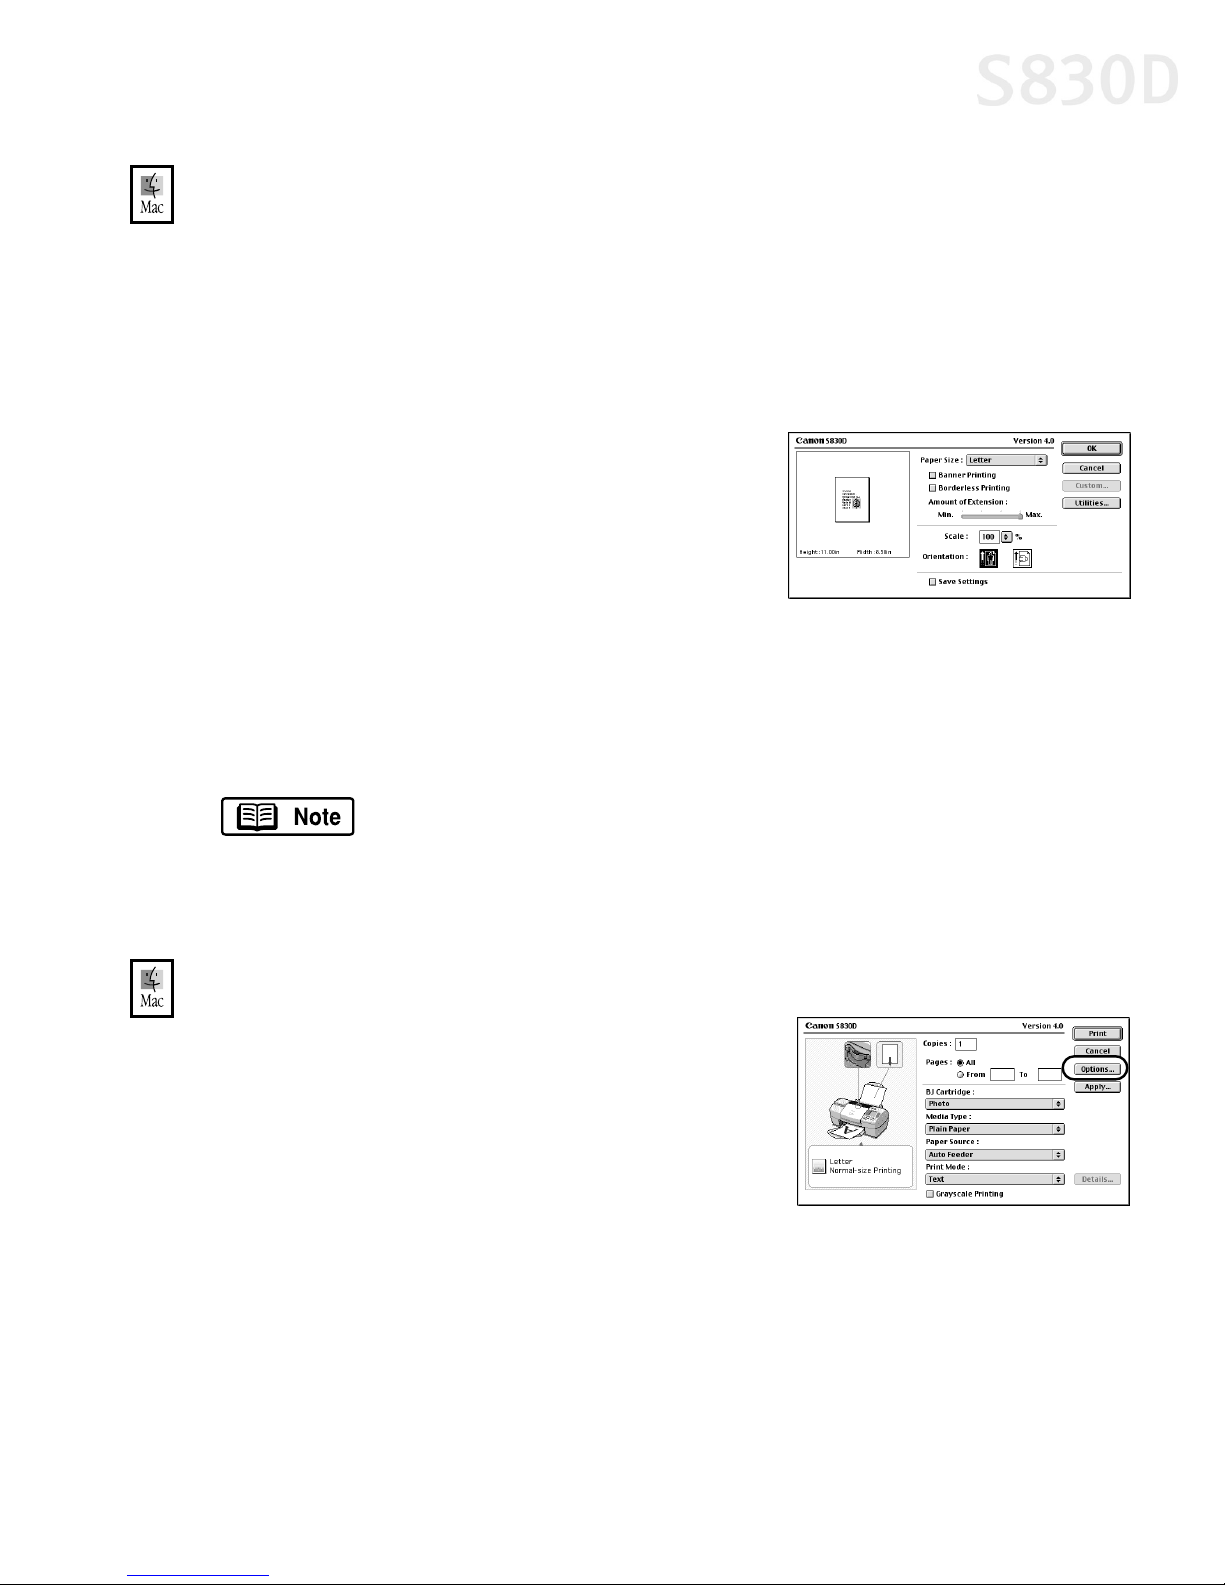
2. From an application File menu, click Page Setup. The Page Setup dialog box
will open.
3. From this dialog box, you can change the following:
• Select a paper size from the Paper Size
drop-down list. (If printing a banner, click
the Banner Printing checkbox, then
follow the on-screen instructions. If
printing on borderless paper, click the
Borderless Printing checkbox, then
follow the on-screen instructions.)
• Set a Scale percentage value between 50% and 200% to print the image in
a size different from the original document.
• Click an Orientation icon to change the page orientation.
To save these settings for the next print job, click the Save
Settings checkbox.
4. When done, click OK.
To change the page layout and print order in Mac OS:
Make sure that S830D is the selected printer.
1.
2. From an application File menu, click Print.
The Print dialog box will appear.
3. Click Options. The Options dialog box
will open.
11
Page 16
Basic Printing
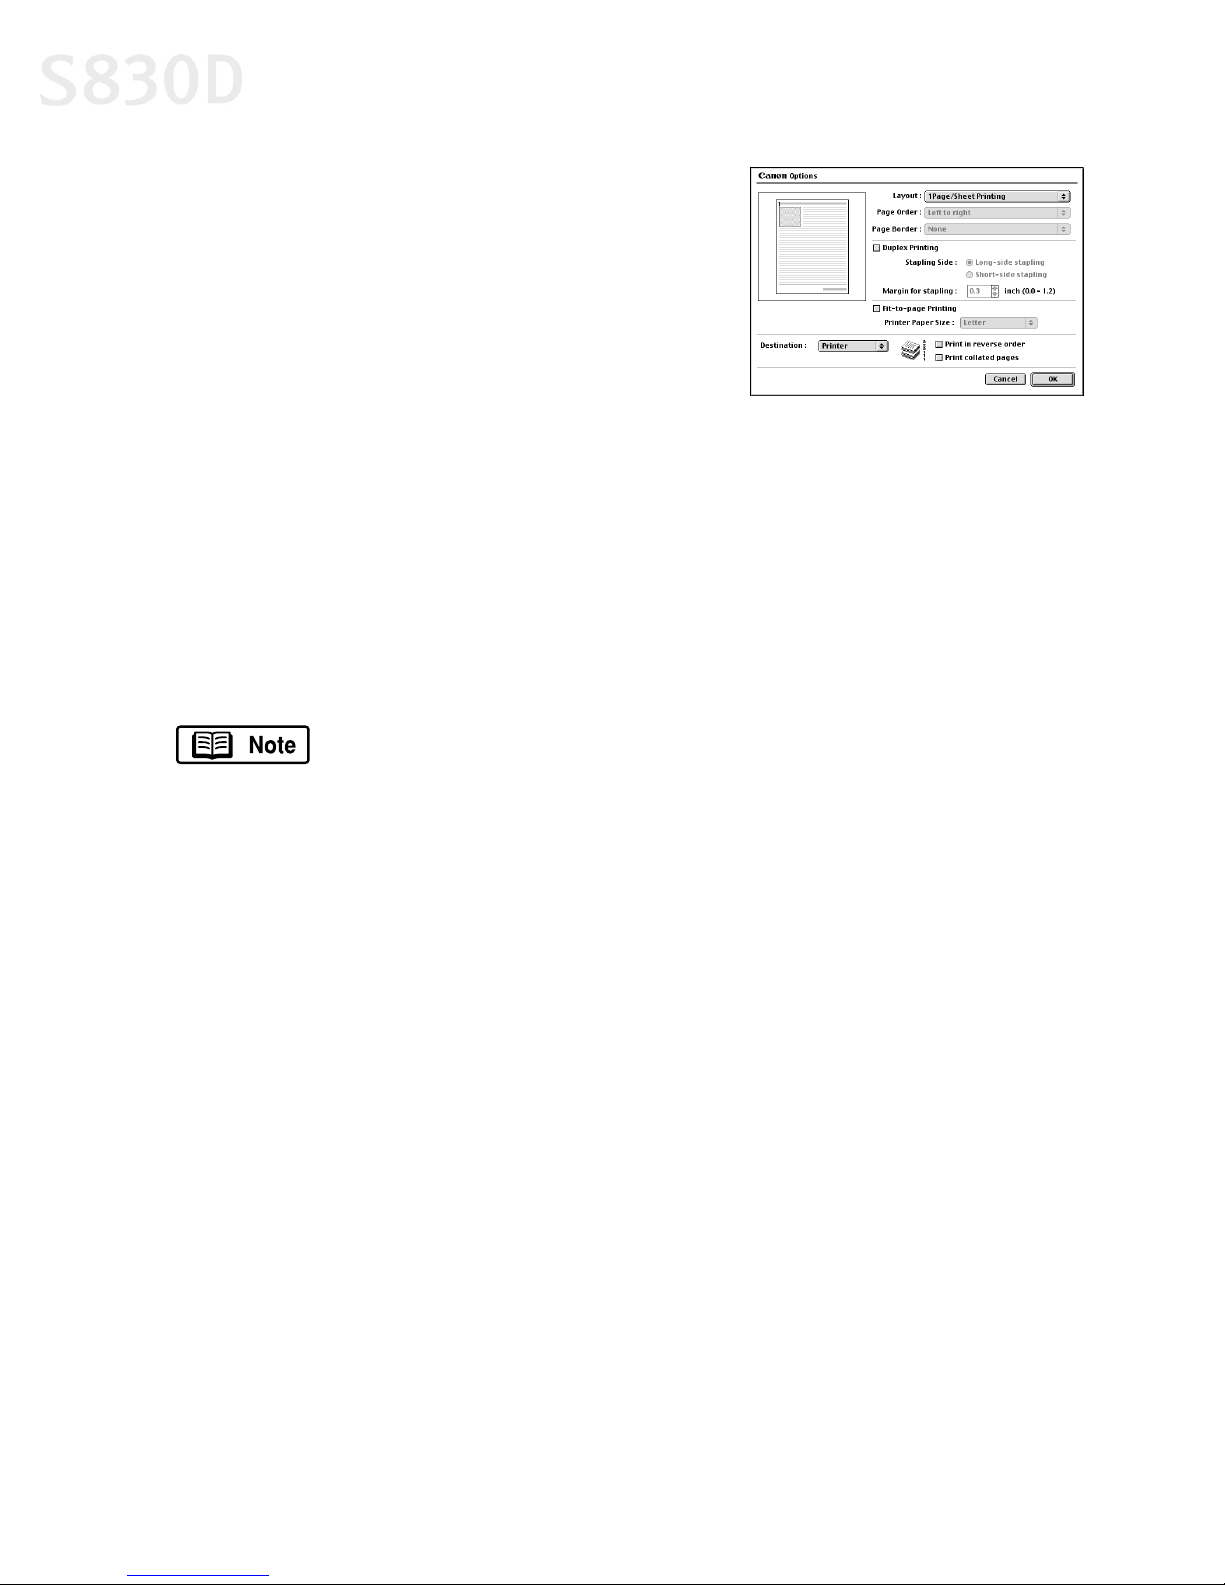
4. From the Options dialog box, you can enter
or change the following:
• Under Layout, click the drop-down arrow
to change the number of pages to print on
a sheet (from 1 Page up to 16 Pages).
• If the page layout is other than 1 Page, you
can select a different Page Order specific
to the selected page layout.
• If the page layout is other than 1 Page/Sheet Printing, you can also select
whether to print a Border around each page.
• To print in reverse order, check the Print in reverse order box.
• If you are printing more than one copy, check the Print collated pages box
to collate each copy instead of printing all of page 1, then all of page 2, etc.
5. When done, click OK.
For more information on printer driver features, see the S830D
User’s Guide on the Setup Software & User’s Guide CD-ROM,
or use the Mac Balloon Help.
12
Page 17
Chapter 2: Advanced Print
Features
This chapter provides information on how to use the S830D Photo Printer options
to enhance printed color images.
If your print results using pre-set print modes are unsatisfactory, you may be able
to improve the printing quality by:
• Smoothing Rough or Jagged Edges
• Optimizing Color Photographs
• Adjusting Print Quality
• Adjusting Color Balance, Brightness and Saturation
• Saving and Recalling Driver Settings
Smoothing Rough or Jagged Edges
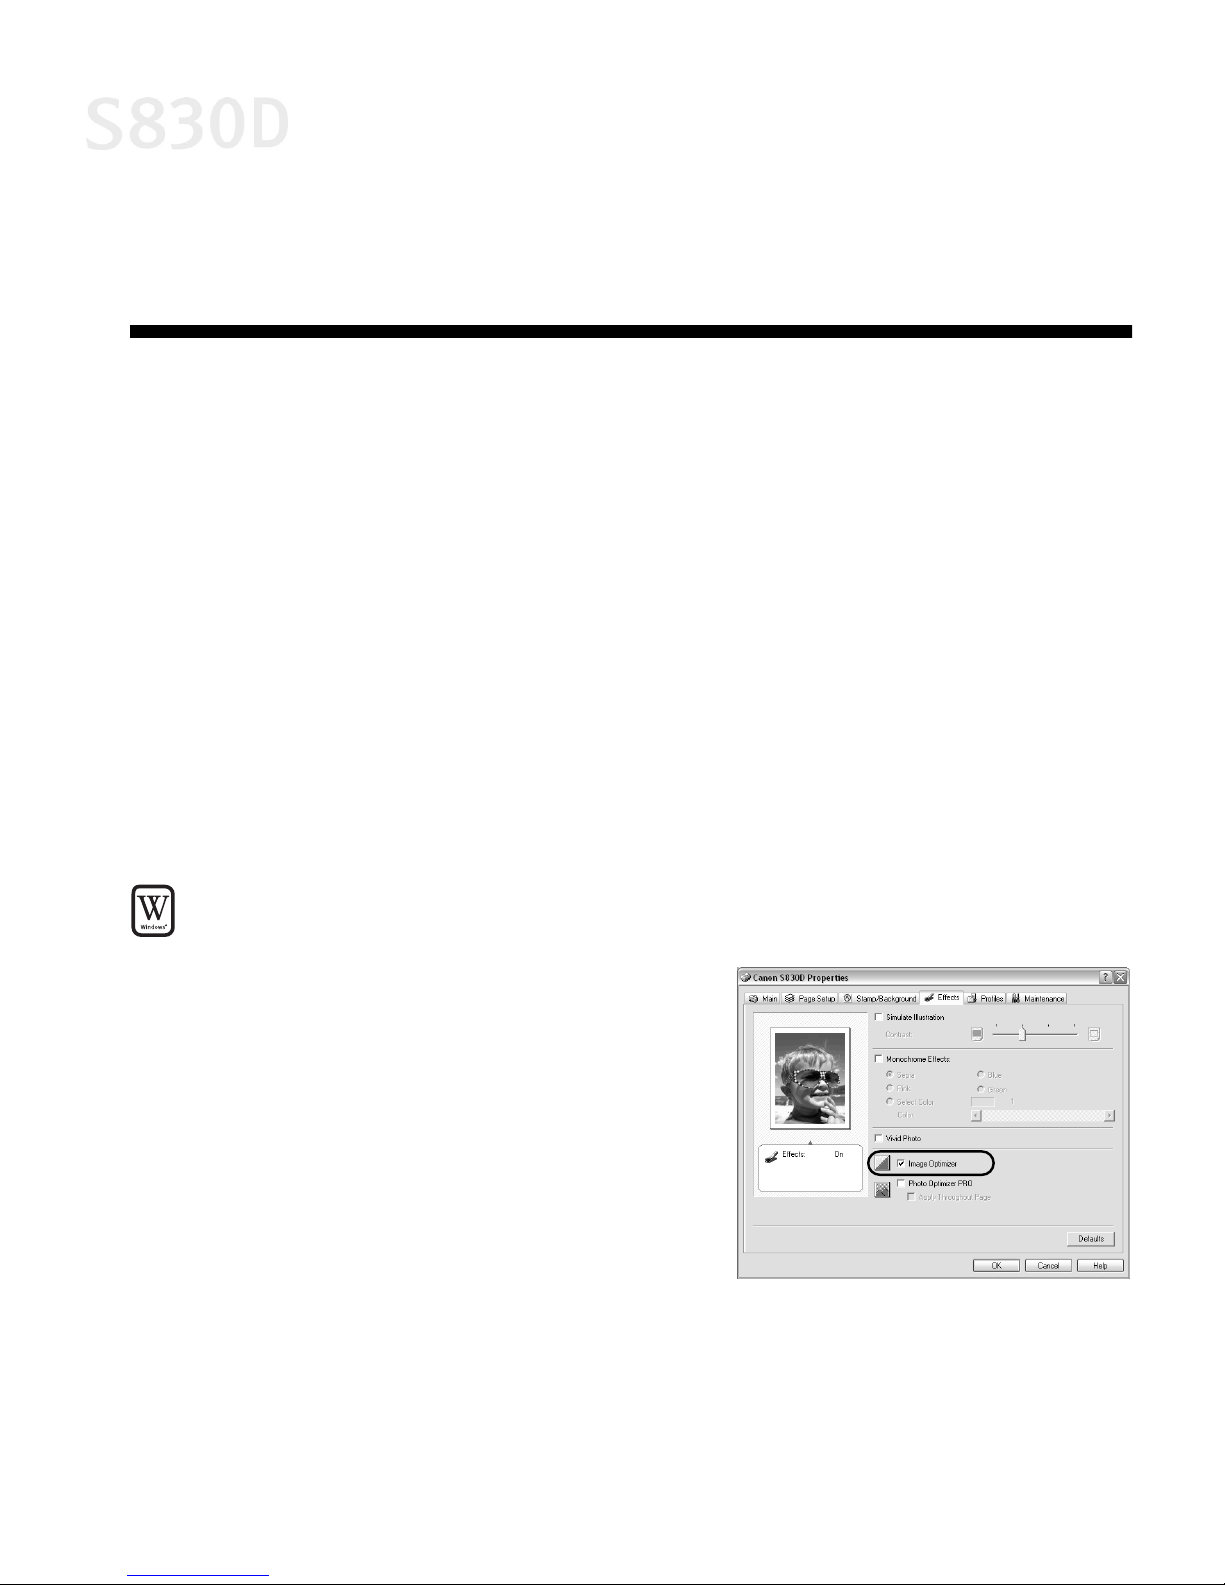
Use the Image Optimizer feature to smooth
rough or jagged images.
1. From an application File menu,
select Print.
2. Make sure Canon S830D is the selected
printer, then click Properties.
3. Select the Effects tab.
4. Click the Image Optimizer checkbox.
5. When done, click OK.
13
Page 18

Advanced Print Features
Optimizing Color Photographs
For realistic color reproduction, use the Photo Optimizer PRO feature.
Photo Optimizer PRO adjusts color automatically if the original image color
is unsatisfactory.
To optimize color photographs in Windows:
From an application File menu, select Print.
1.
2. Make sure Canon S830D is the selected printer, then click Properties.
3. On the Effects tab, click the Photo
Optimizer PRO checkbox. When Photo
Optimizer PRO is checked, the Apply
Throughout Page option becomes active.
Leave this box unchecked if you want the
S830D to optimize each image
individually. Select Apply Throughout
Page to automatically correct all images
with the same settings.
4. When done, click OK.
To optimize color photographs in Mac OS:
From an application File menu, select Print.
1.
2. Select Manual from the Print Mode drop-
down menu. Then click the Details button.
The Detailed Setting dialog box will open.
3. Select Special Effects in the left column, then
click the Photo Optimizer PRO checkbox.
4. If you want Photo Optimizer PRO to process the entire page, check Apply
Throughout Page. If you want only the photo image optimized, leave this box
unchecked.
5. Click OK.
14
Page 19
Advanced Print Features
Using the Vivid Photo Option
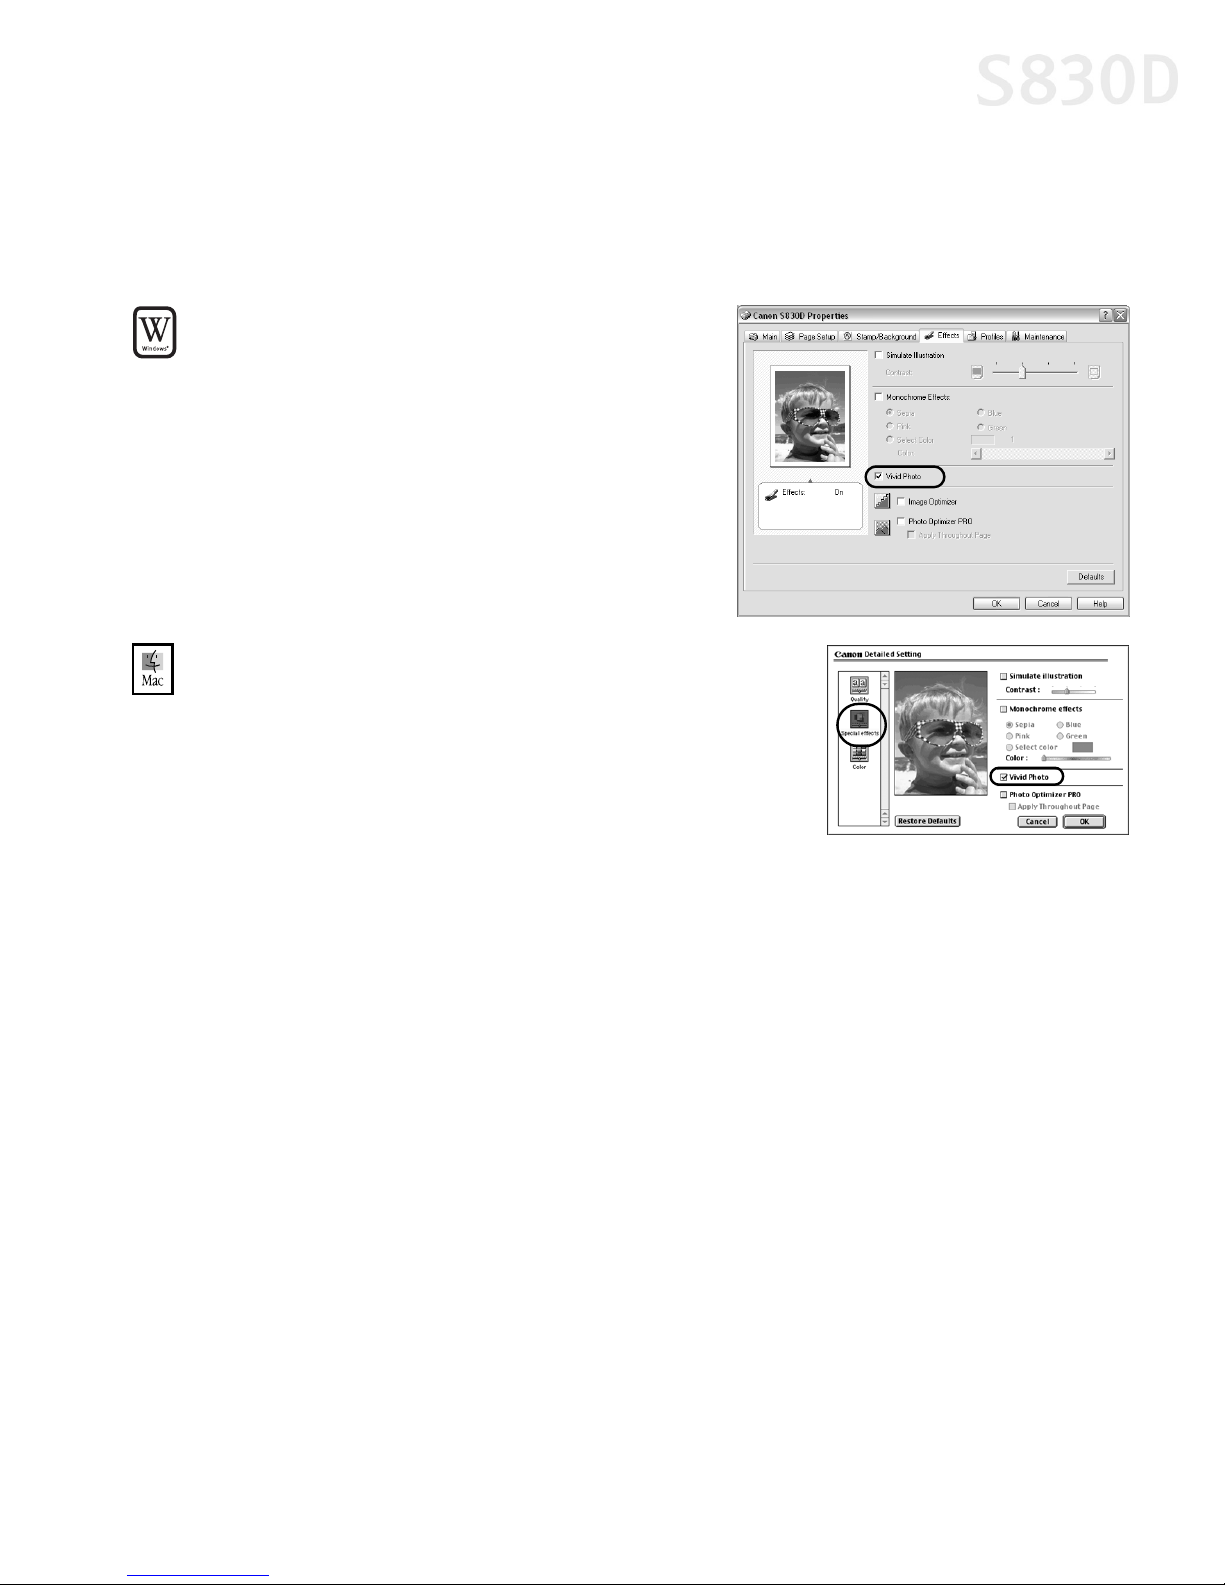
Vivid Photo intensifies background colors for fields, trees, oceans and skies,
while maintaining natural skin tones for any people in the images.
To use Vivid Photo in Windows:
Open the Properties dialog box, click the
Effects tab, and then click the Vivid Photo
checkbox.
To use Vivid Photo in Mac OS:
Open the Detailed Setting dialog box,
click the Special effects icon, and then
click the Vivid Photo checkbox.
15
Page 20
Advanced Print Features
Adjusting Print Quality
Features that affect the appearance and quality of your printed photos and
documents can be controlled with the printer driver.
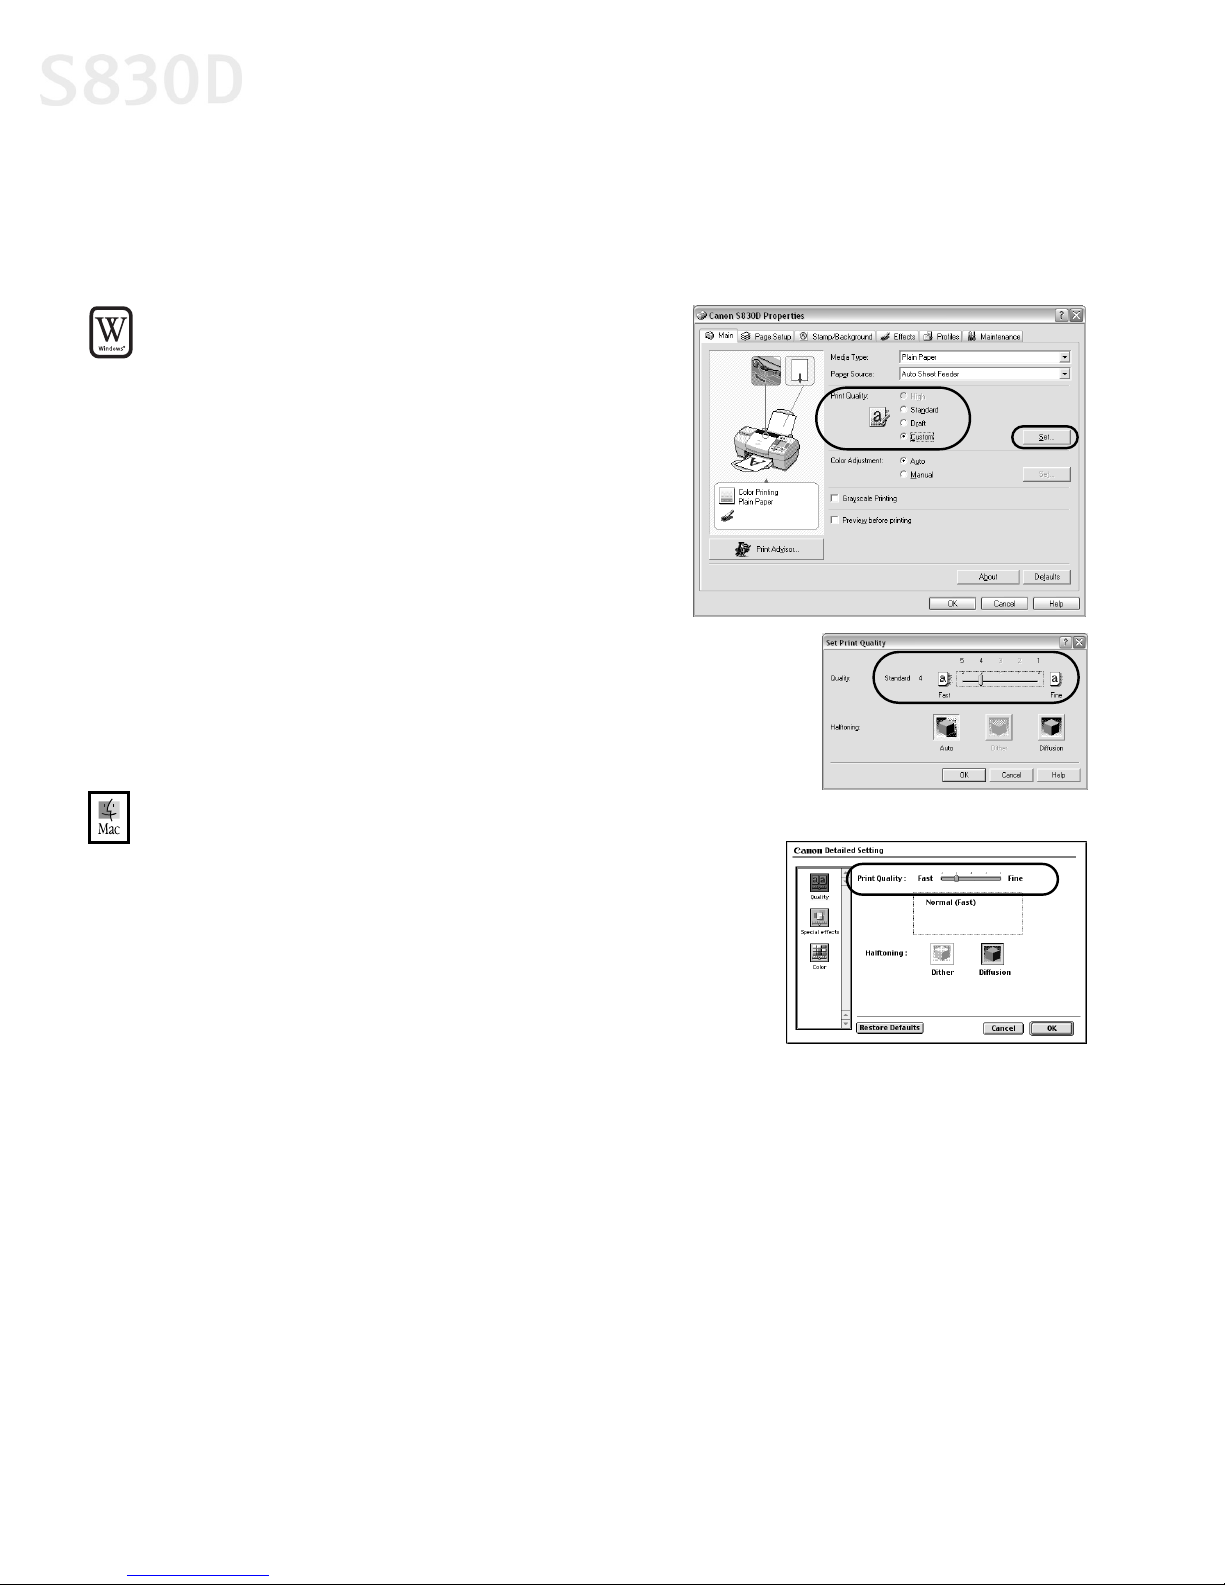
To adjust image quality in Windows:
From an application File menu,
1.
select Print.
2. Make sure that Canon S830D is the
selected printer, then click Properties.
3. On the Main tab, under Print Quality,
select Custom, then click Set.
4. Slide the Quality slide bar to Fine.
5. Click OK. The Set Print Quality dialog box closes.
6. Click OK.
To adjust image quality in Mac OS:
From an application File menu, select Print.
1.
2. Select Manual from the Print Mode drop-down
menu. Then click the Details button. The Detailed
Setting dialog box will appear.
3. Slide the Print Quality slide bar to the
Fine setting.
4. Click OK.
16
Page 21
Advanced Print Features
Adjusting Color Balance, Brightness and Saturation
You can enhance color printing by adjusting the color balance, output style
(saturation) and brightness.
To adjust color settings in Windows:
From an application File menu, select Print.
1.
2. With Canon S830D as the selected printer, click Properties.
To print in black only, check the Grayscale Printing box on the
Main tab. This will convert color images to grayscale when
printing, without changing the original colors in the document.
Then click OK, and skip to Step 9 on the following page.
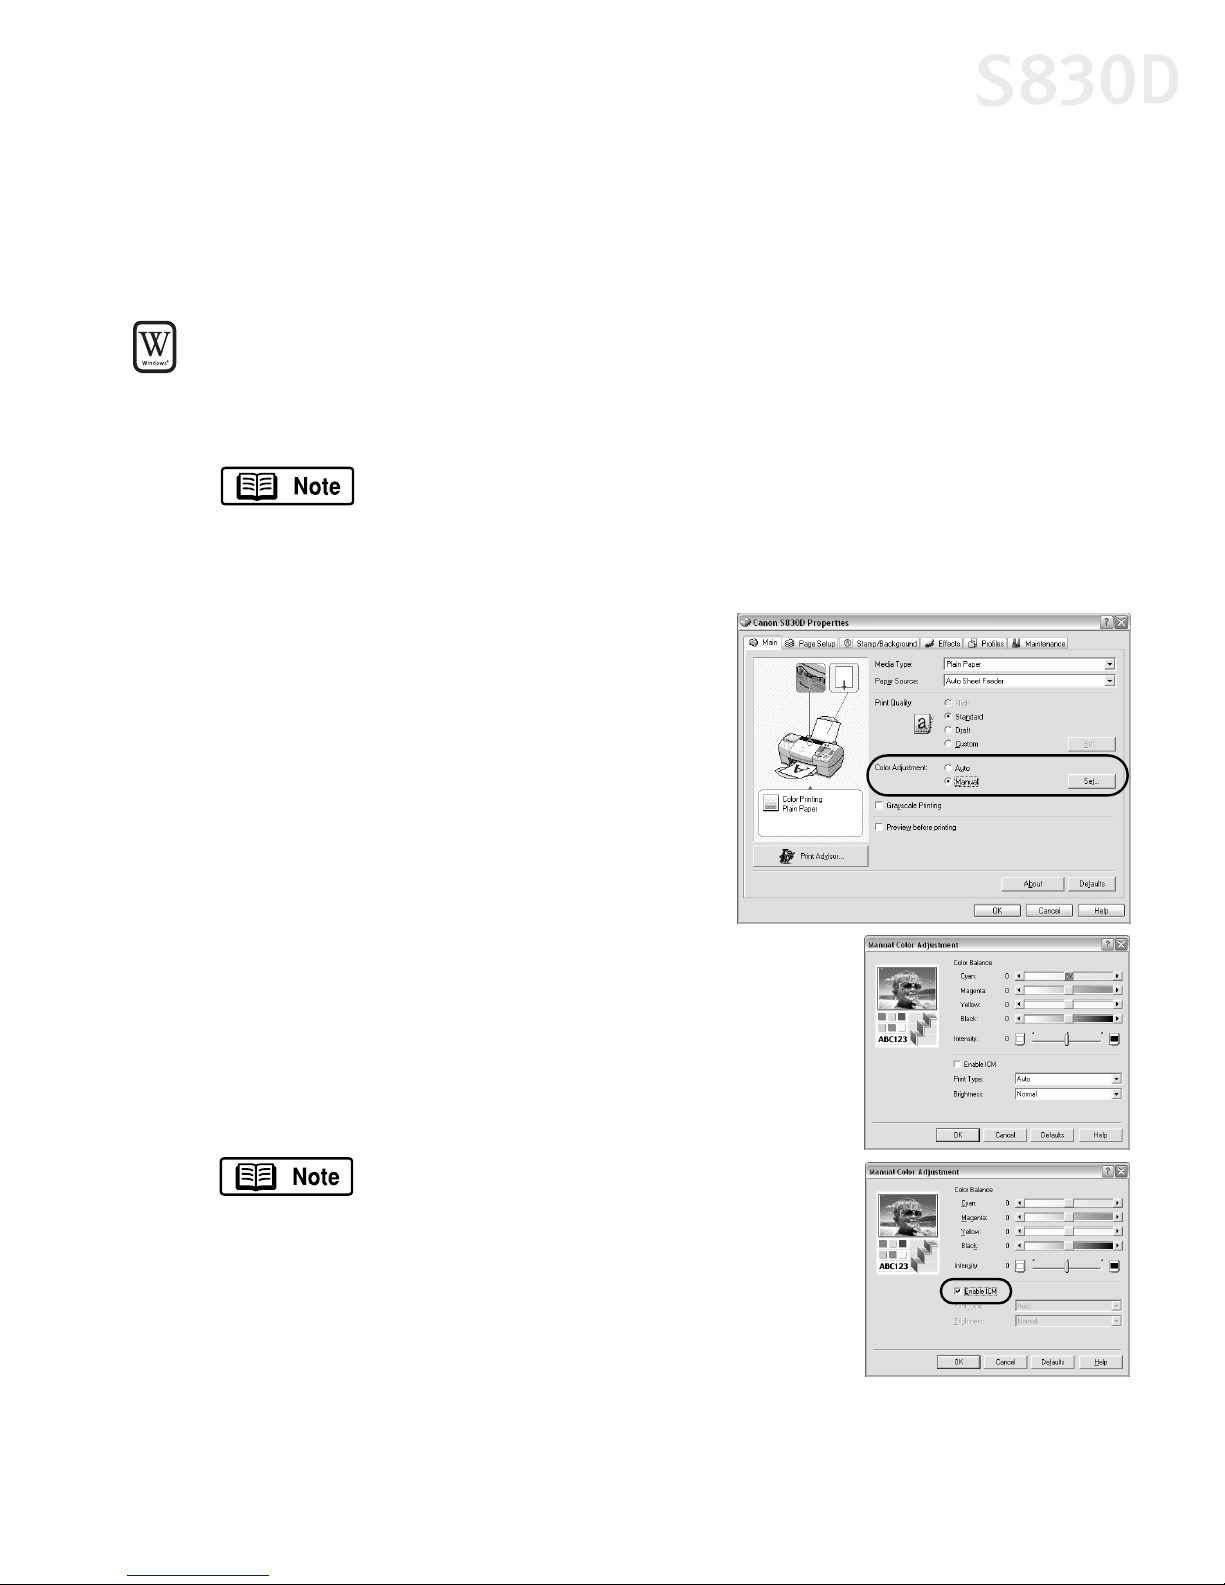
3. On the Main tab, under Color
Adjustment, select Manual. The Set
button will become active.
4. Click Set, and the Manual Color
Adjustment dialog box will open.
5. Click and drag the Color Balance slide
bar for each color to adjust the color settings. The
results will preview.
6. Click and drag the Intensity slide bar to change the
intensity (saturation) for the image. The results will
preview.
Image Color Management (ICM) is a
feature that automatically adjusts the
image colors. To use ICM for automatic
color adjustment, click the Enable ICM
checkbox.
Windows 98/Me users: All other
features on this tab (except Intensity)
will become inactive. If you enable ICM,
skip to Step 9 below.
17
Page 22
Advanced Print Features
7. Under Print Type, select Photo when printing photographs. This allows for a
wider range of tones. Set to Graphic when printing graphic images for crisper,
cleaner graphic images.
8. Select a Brightness setting to determine how light or dark the image will
appear when printed.
9. When done, click OK.
To adjust color settings in Mac OS:
From a Mac application, select File, then Print.
1.
2. Select Manual from the Print Mode drop-down
menu. Then click the Details button.
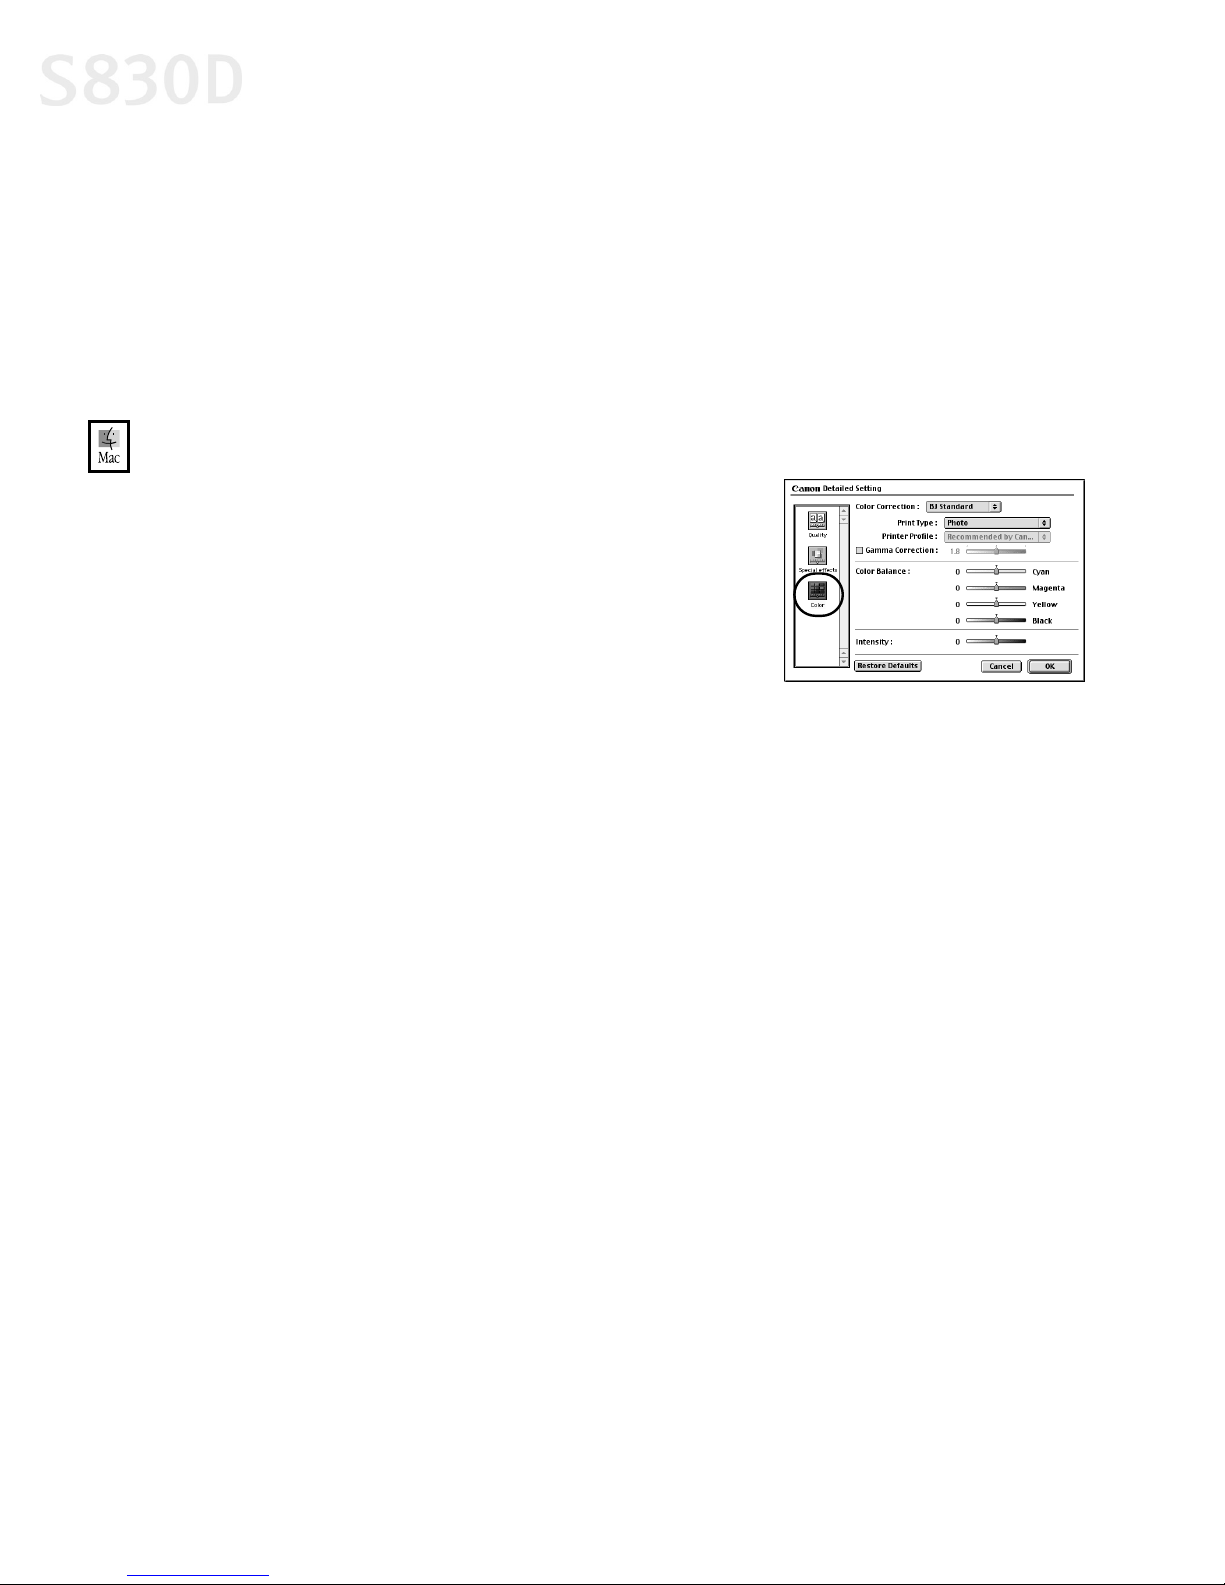
3. Click the Color icon.
4. Adjust the Color Correction, Gamma
Correction, Color Balance and Intensity
settings for your image.
5. Under Print Type, select Photo when printing photographs. This allows for a
wider range of tones. Set to Graphic when printing graphic images for crisper,
cleaner graphic images.
6. Click OK.
18
Page 23
Advanced Print Features
Saving and Recalling Driver Settings
You can assign a name to a combination of driver settings and recall them for
future use.
To save driver settings in Windows:
From an application File menu, select Print.
1.
2. With Canon S830D as the selected printer, click Properties.
3. Make the desired printer driver setting changes.
4. Without exiting the Properties dialog box, select the Profiles tab.
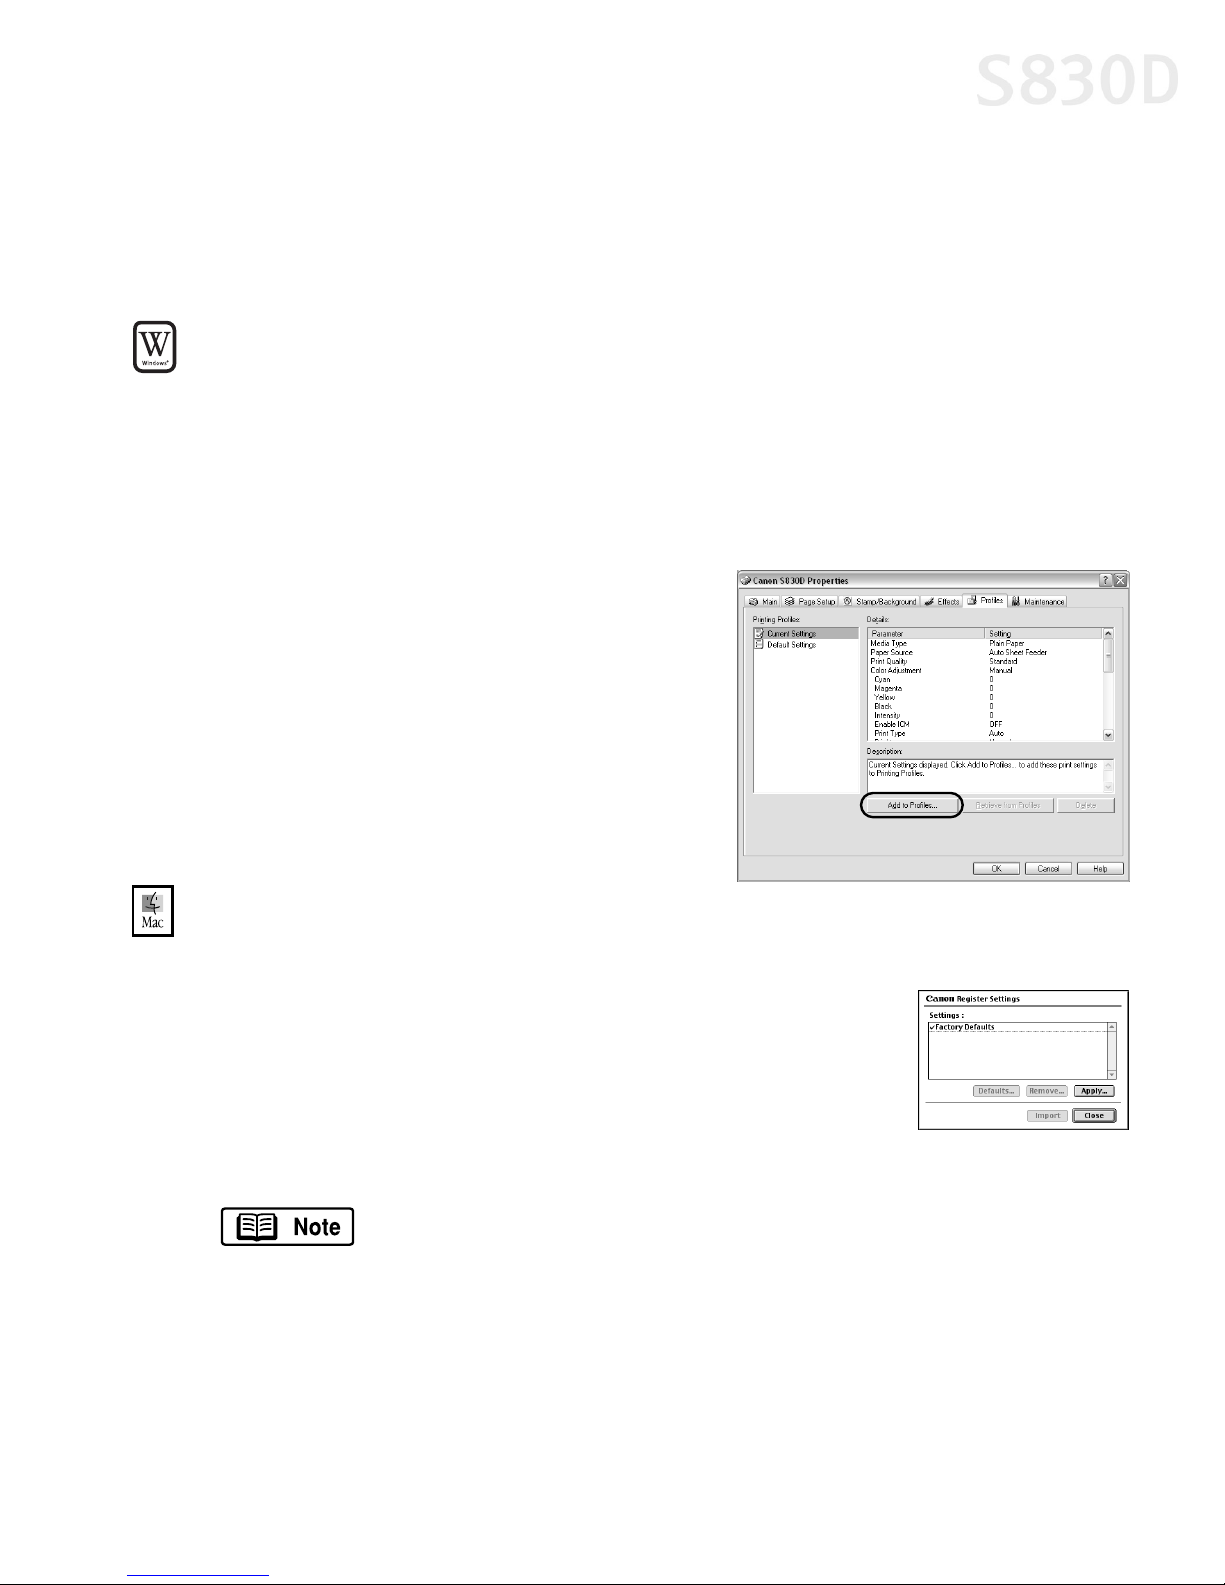
5. Click Add to Profiles, then type a name
for your settings in the Name field. You
can also select an icon for this profile.
6. Type a description of your settings.
7. Click OK.
To save driver settings in Mac OS:
From an application File menu, select Print.
1.
2. Click Apply. The Register Settings dialog box will appear.
3. Click Apply again.
4. Type a name for the setting, then click OK. The Register
Settings dialog box will reappear.
5. Click Close.
To save the new settings as the default setting for the Manual
icon, click on the name in the Settings list, then click Defaults.
19
Page 24
Advanced Print Features
To recall driver settings in Windows:
From an application File menu,
1.
select Print.
2. With Canon S830D as the selected
printer, click Properties.
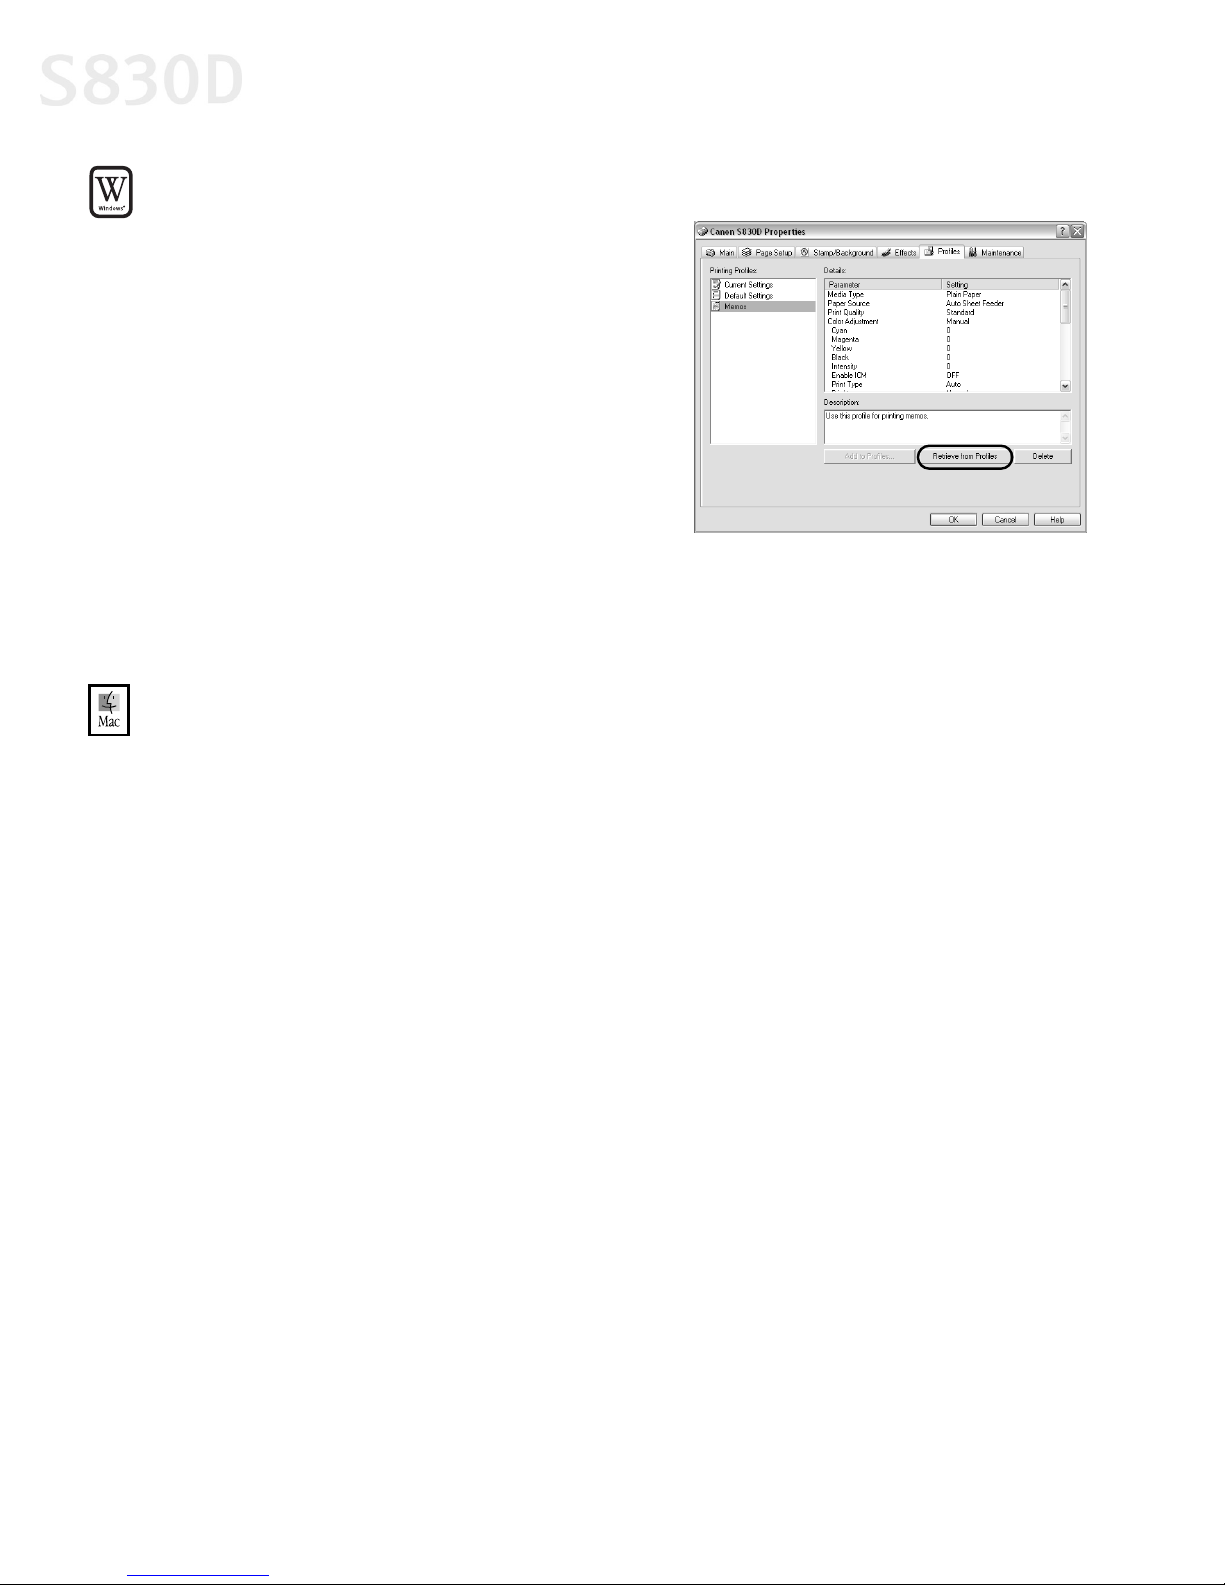
3. Select the Profiles tab.
4. Highlight the saved setting profile
you want to use.
5. Click Retrieve from Profiles, then click
OK to confirm the profile change. The
profile settings will become active.
6. Click OK again to close the Properties dialog box.
To recall driver settings in Mac OS:
From an application File menu, select Print.
1.
2. Click Apply, then select the name of your saved settings.
3. Click Defaults, then OK.
4. Click Import, then Close.
20
Page 25

Chapter 3: Printing
Without a Computer
This chapter describes how to use the printer without the computer to print
photos taken with a digital camera. The following topics are addressed:
• Basic Operations
• Printing Photos
• Print Options
• Maintenance Procedures for Direct Printing
• Using the Memory Card Utility
While the printer’s Operation Panel allows you to print without a computer,
you will need a computer if you plan to use the Memory Card Utility, which you
would install on your computer. Use this utility to perform several tasks
associated with using a memory card, such as selecting the application to be
started when the memory card is inserted and changing the read/write mode
of the memory card slot.
Basic Operations
The following section describes basic operations required for printing, including
how to use the printer’s Operation Panel, and how to use a memory card or attach
a digital camera to the printer.
21
Page 26
Printing Without a Computer
Operation Panel Names and Functions
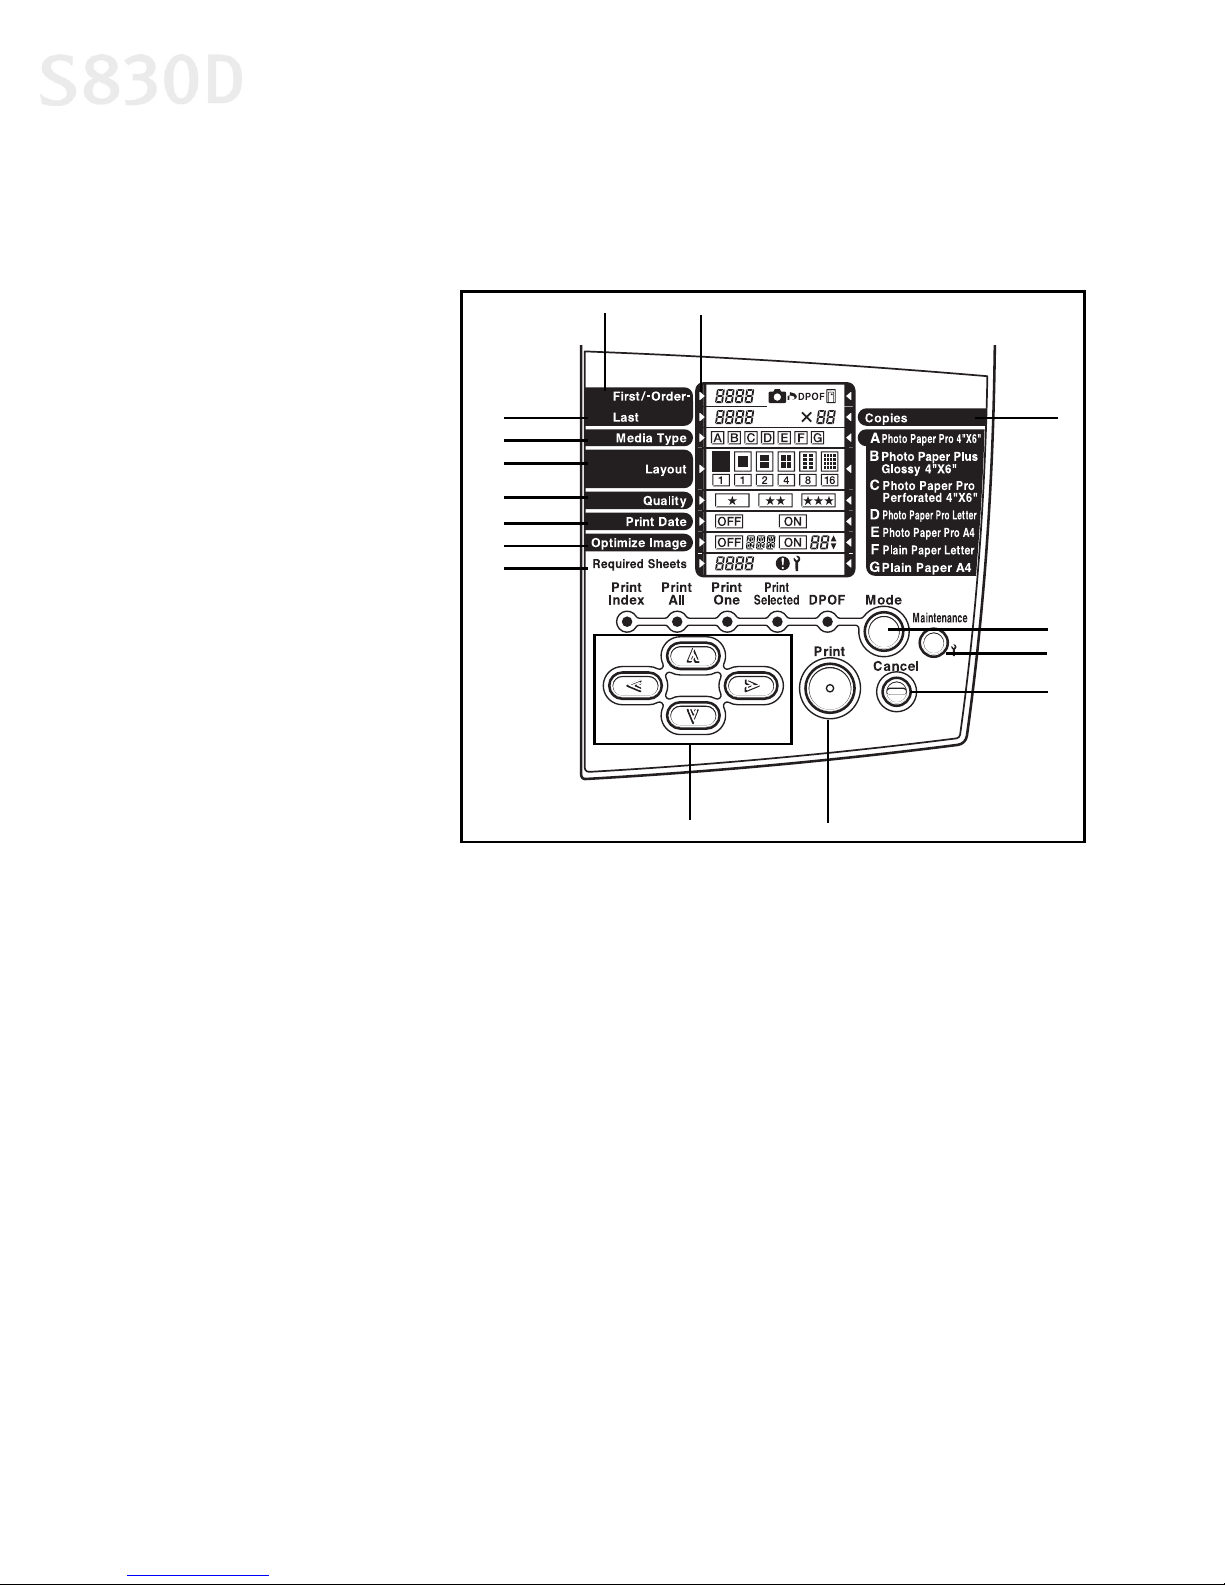
Shown below is the operations panel found on the printer. Become familiar with
various functions of the panel so you can prepare your photo for printing.
A) Last
When printing a
range of continuous
photo frames,
specify the number
of the last photo. For
specified frame
printing, specify the
number of the photo
to be printed.
B) Media Type
Specify the type of
media you plan to use.
C) Layout
Specify the number
of photos to be
printed on one
sheet.
A
B
C
D
E
G
H
F
K
L
M
N
O
I
J
D) Quality
Specify the print quality.
E) Print Date
Specify whether you wish to print the date when the photo was taken.
F) Optimize Image
Specify whether the photo is to be adjusted or corrected before printing.
G) Required Sheets
The number of sheets required for printing is displayed. During maintenance,
the step number is displayed. If an error occurs, the error number is displayed.
H) First/-Order-
When printing a range of continuous photo frames, specify the number of the
first photo. (When printing only one frame, specify the number of photo to be
printed.) For specified frame printing, the specified number (printing order)
is displayed.
22
Page 27
Printing Without a Computer
I) Cursor buttons
Press these buttons when setting various items.
J) Print button
Press this button to start printing or to apply the maintenance setting.
K) Cursor
The cursor’s position indicates which setting will be changed.
L) Copies
Specify the number of copies to be printed.
M) Mode button
Press this button to switch the print mode. See “Printing Photos” on page 27.
N) Maintenance button
Press this button to perform printer maintenance operations, such as print
head cleaning. See “Maintenance Procedures for Direct Printing” on page 32.
O) Cancel button
Press this button to stop printing or to stop maintenance.
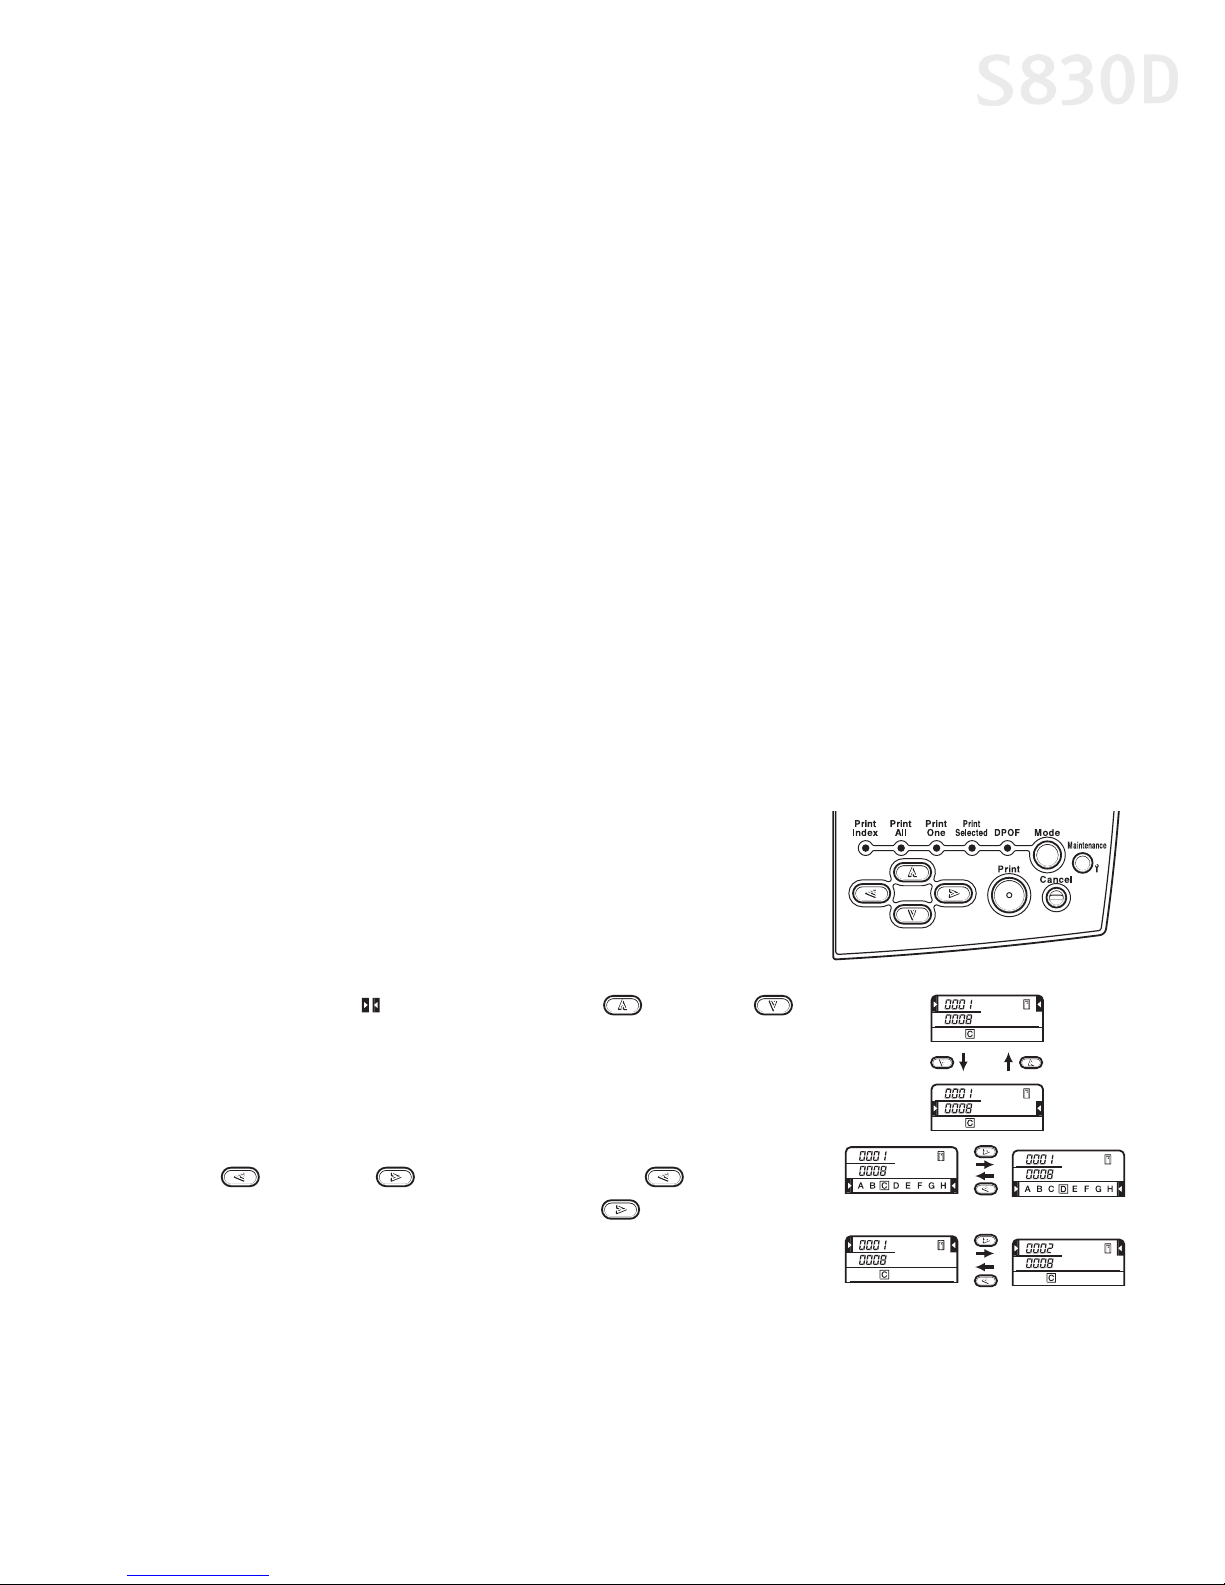
Operating the Cursor Buttons
Use the Cursor buttons to move between items on
the Operation Panel.
To move between items:
To move the (cursor), press the (up) and
(down) buttons.
To change a setting:
To change the photo number or a setting, press the
(left) and (right) buttons. The (left) button
decreases the photo number; the (right) button
increases the photo number.
23
Page 28

Printing Without a Computer
Using a Memory Card
This section describes how to insert a memory card and print photos directly from
the memory card. To use a digital camera, see “Using a Digital Camera” on
page 26 or refer to the Bubble Jet Direct Reference Manual.
Supported memory cards:
CompactFlash™ (Use the PC card adapter that comes with this printer)
•
• SmartMedia™
• Memory Stick™
• Secure Digital™ (SD) Card
• MultiMedia™ Card
• Microdrive™
• Flash ATA card PCMCIA Type (II)
Keep the following tips in mind:
• Format the memory card using your digital camera. This printer does not
support the computer’s unique format.
• Photos that have been edited with the computer may not print properly.
• Use a PC card adapter that is recommended by the memory card you use.
• Photos stored in memory cards that are not supported by the printer cannot
be read.
A Canon adapter for the CompactFlash card is included.
Other memory cards may require purchase of a different
PCMCIA adapter.
24
Page 29
Printing Without a Computer
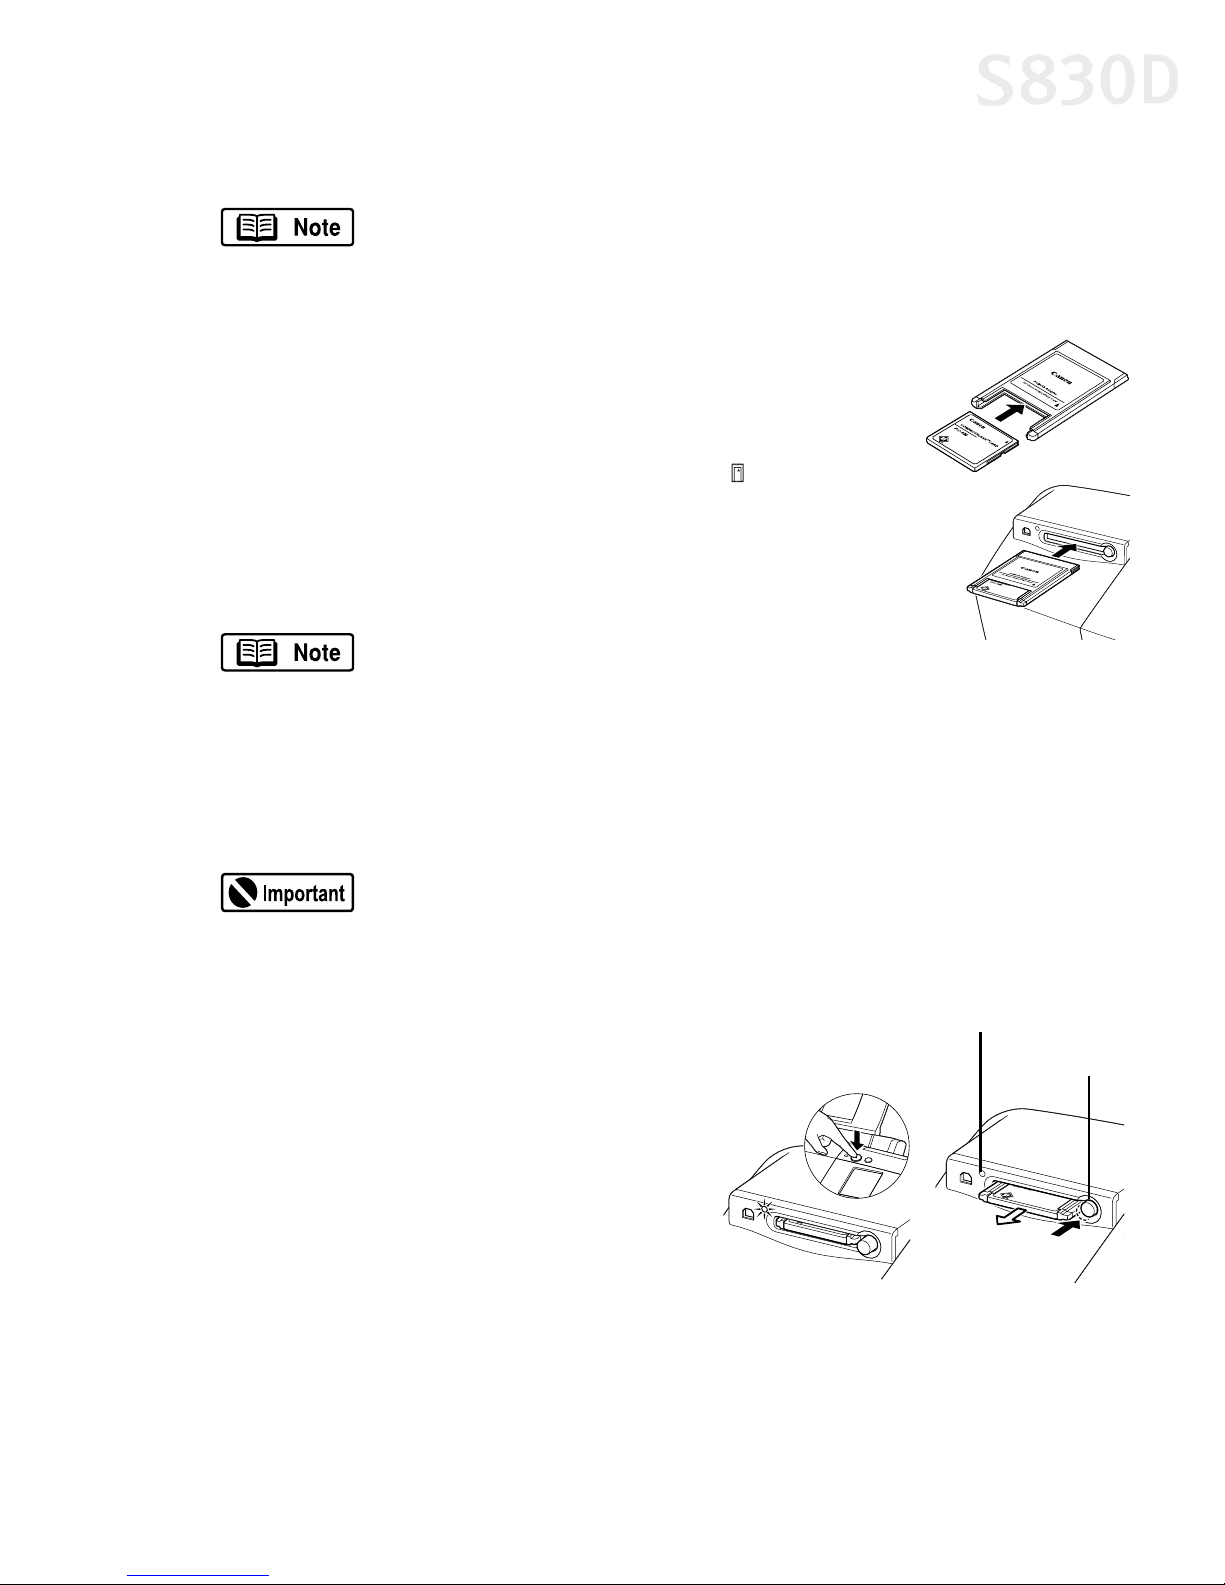
To use a memory card:
The following procedure is different if you are using a memory
card when the printer is connected to the computer. See the
S830D User’s Guide on the Setup Software & User’s Guide CD-ROM.
1. Turn on the printer.
2. Insert the memory card into the PC card adapter.
3. Insert the PC card adapter into the card slot all the
way. The indicator lamp will light and the mark will
display. If ‘AT’ is displayed on the panel, it indicates
that images will be corrected automatically when
you’re printing data in formats supporting Exif 2.2
(Exif Print).
If you use your computer to modify
content on the memory card, make sure
to print from the computer.
To eject the memory card:
Make sure the indicator lamp is not blinking.
1.
If you remove the memory card or switch off the power to the
printer while the indicator lamp is blinking, the data of the
memory card may be destroyed.
2. Press the printer POWER button to turn
off the printer.
3. Check that the indicator lamp is off, and
press the Eject button.
4. Pull out the PC card adapter.
Indicator lamp
Eject button
25
Page 30
Printing Without a Computer
Using a Digital Camera
You can print photos directly by connecting a compatible Canon digital camera that
has a direct printing function. If you connect the digital camera with a provided direct
interface cable, perform the print operations from the digital camera. For more
information, refer to the Bubble Jet Direct Reference Guide.
Supported Media Types for Digital Cameras
Paper Type Digital Camera Setting
Photo Paper Pro (4" x 6") Card #1
Photo Paper Plus Glossy (4" x 6") Card #2
Photo Paper Pro Perforated (4" x 6") Card #3
Photo Paper Pro Letter LTR
Photo Paper Pro A4 A4
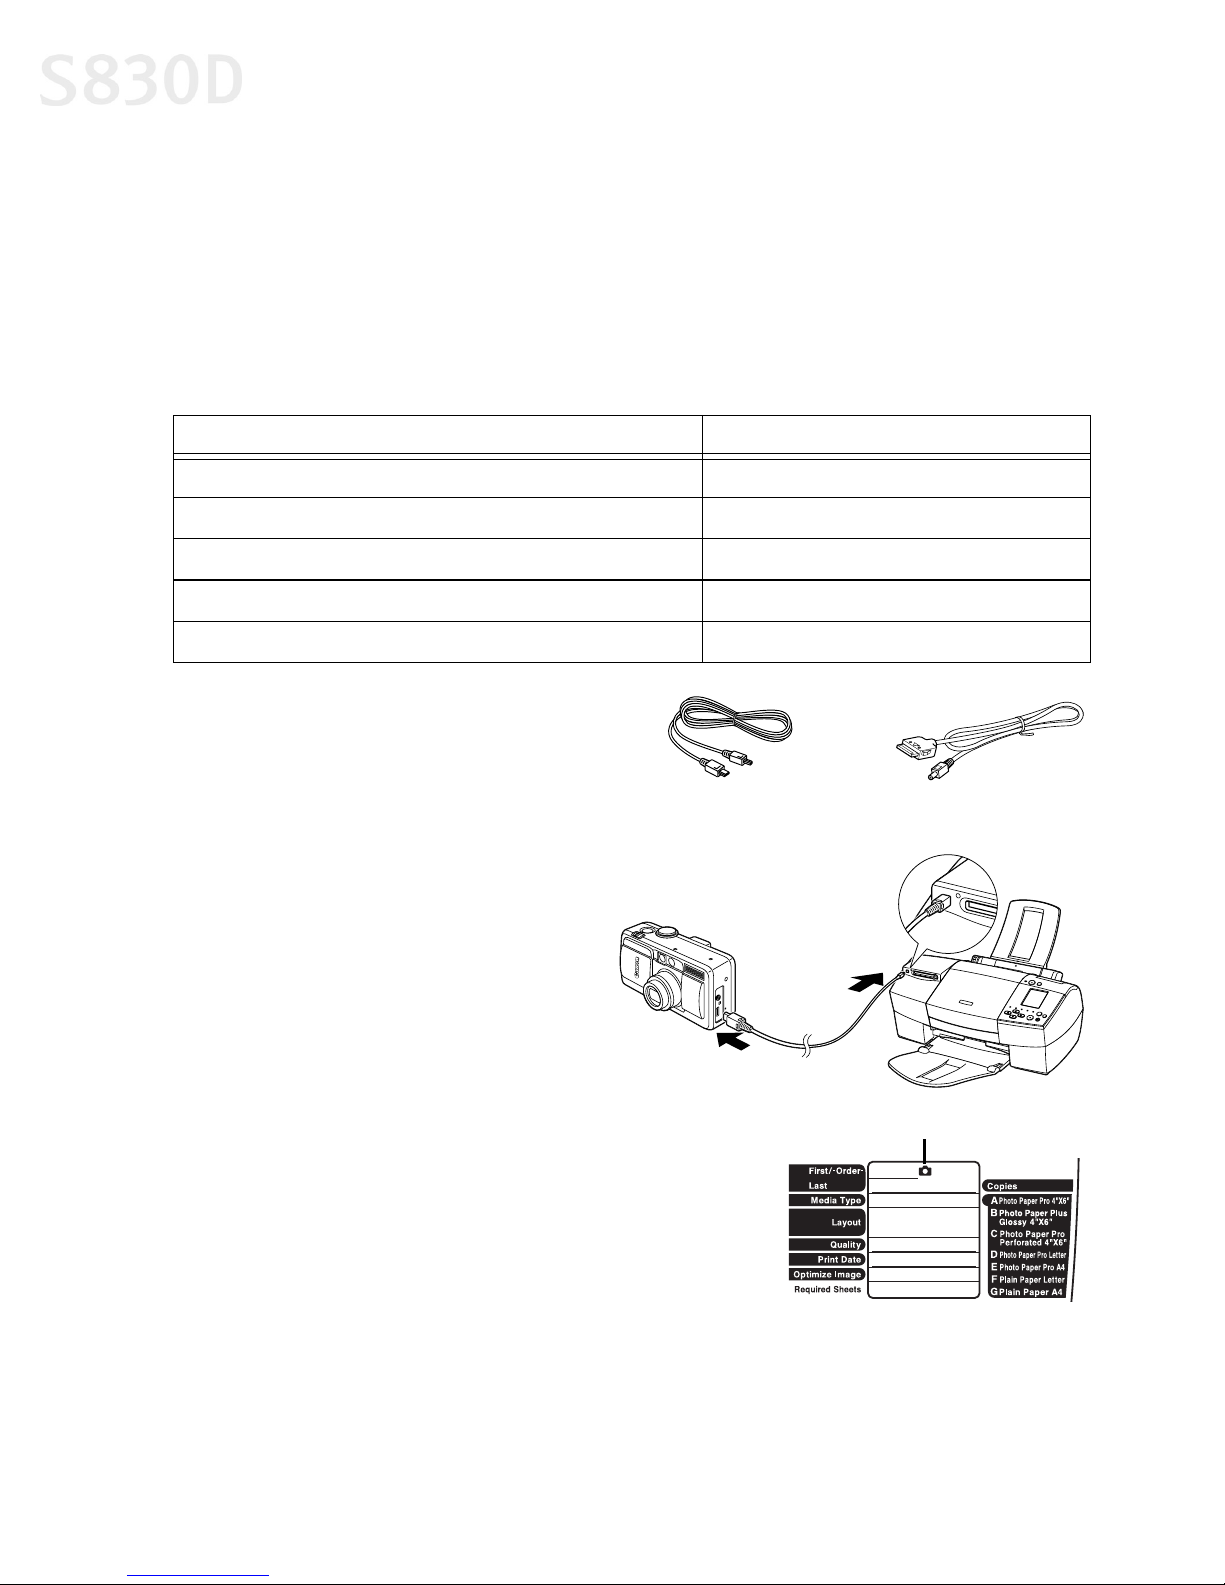
To use a digital camera:
1. Turn on the printer.
2. Connect the digital camera to the
printer using either of the cables
that come with the printer.
(To determine which cable to use
with your camera, see the
Jet Direct Reference Guide
Bubble
.)
3. Turn on the digital camera.
Direct Interface
Cable DIF-B100
Direct Interface
Cable DIF-B250
Camera mark
26
Page 31
4. The (camera) mark appears.
• The setting for communicating with this printer differs depending
• When printing photos from the digital camera, you will not be
• To remove the digital camera cable, disconnect the cable
Printing Photos
When printing without a computer, you can select from five modes: Index, All
Frames, Single Frame, Specified Frame and DPOF.
Printing Without a Computer
on the camera that you use. Refer to the instructions that come
with the digital camera or the Bubble Jet Direct Reference Guide.
able to use the Operation Panel. For instructions on printing
photos from the digital camera, see the Bubble Jet Direct
Reference Guide.
on the printer side and turn off the digital camera.
To print photos:
Insert the memory card.
1.
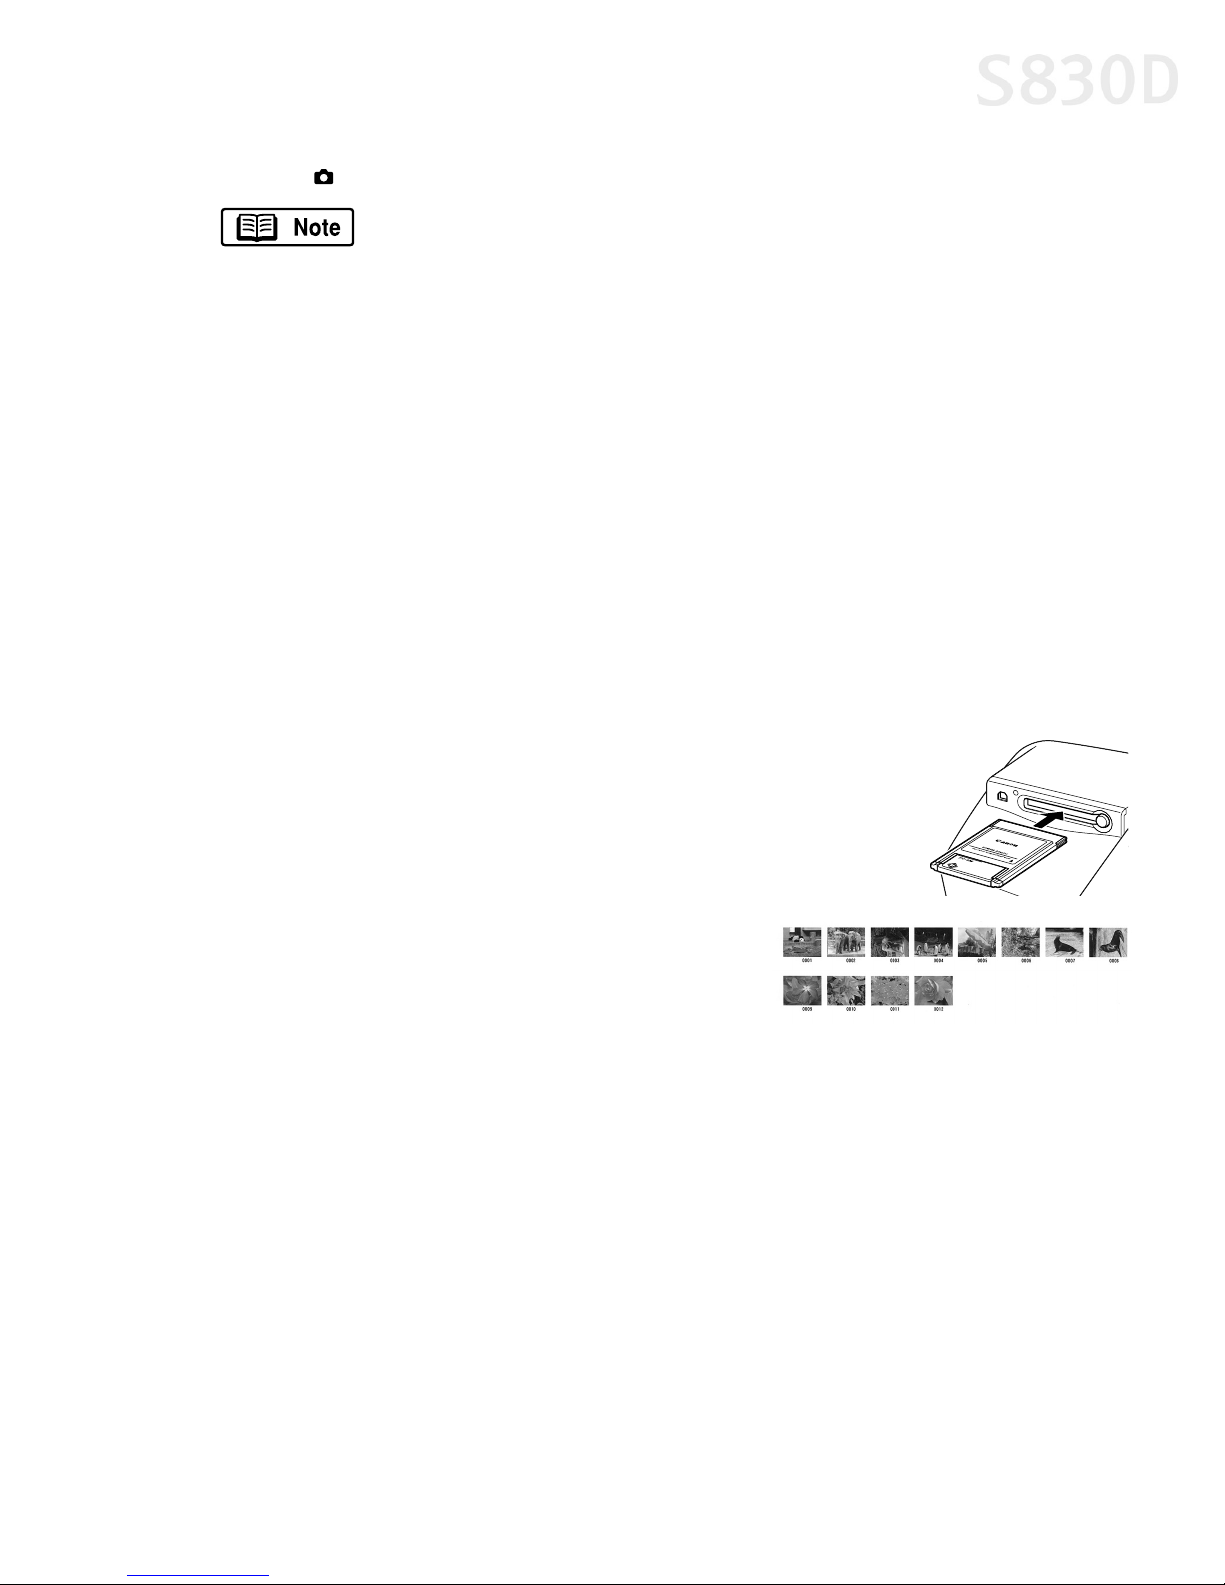
2. Press the Mode button, and select one of
the following printing methods:
• Index: Prints a list of the photos and
photo numbers (shown to the right)
stored on the memory card.
• All Frames: Prints all photos found on the memory card. You can also
specify a range to print only some of the photos.
• Single Frame: Allows you to select and print a single photo from the
memory card.
• Specified Frame: Allows you to specify up to 99 photos to be printed in
one batch.
• DPOF: If Digital Print Order Format (DPOF) settings are specified in the digital
camera, the printing begins automatically according to the specified settings.
27
Page 32
Printing Without a Computer
3. Set the paper type and the layout. See “Print
Options” on page 28.
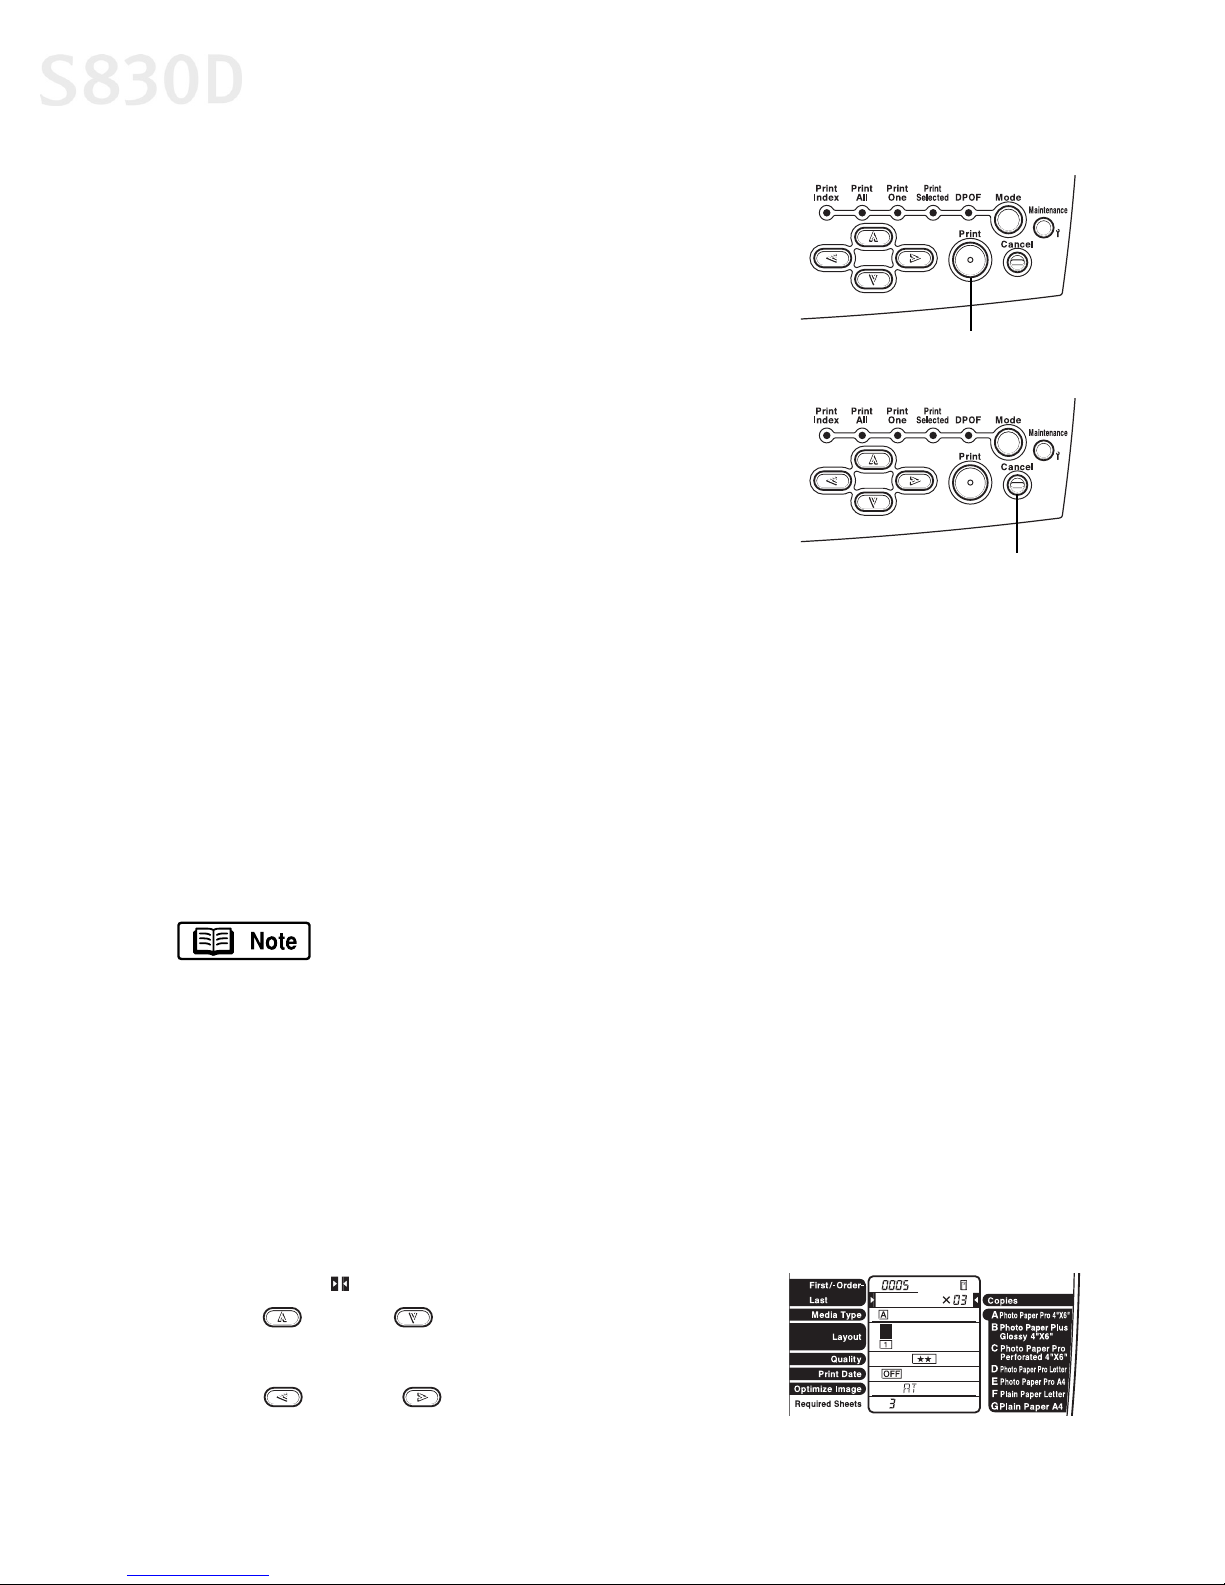
4. Load paper into the printer, and press the
Print button.
To stop printing:
Press the Cancel button on the Operation Panel.
•
Print Options
After you’ve selected the printing mode, you can set the type of paper and layout
to be used in printing, the number of print copies, photo correction, quality and
dated printing.
Setting the Number of Copies
Use this setting to choose the number of copies to print in Single Frame mode.
Print button
Cancel button
• Copies cannot be set in Index, All Frames, or Specified Frame mode.
• For DPOF mode, set Copies from the digital camera.
• Copies allows you to specify the number of copies for one
photo. The number of required sheets differs depending on
the setting in Layout. For example, if eight copies in Copies
and four patterns in one sheet in Layout are specified, two
sheets are needed to print.
To set single frame mode:
Move the (cursor) to Copies by pressing
1.
the (up) or (down) button.
2. Set the number of copies (up to 99) by pressing
the (left) or (right) button.
28
Page 33
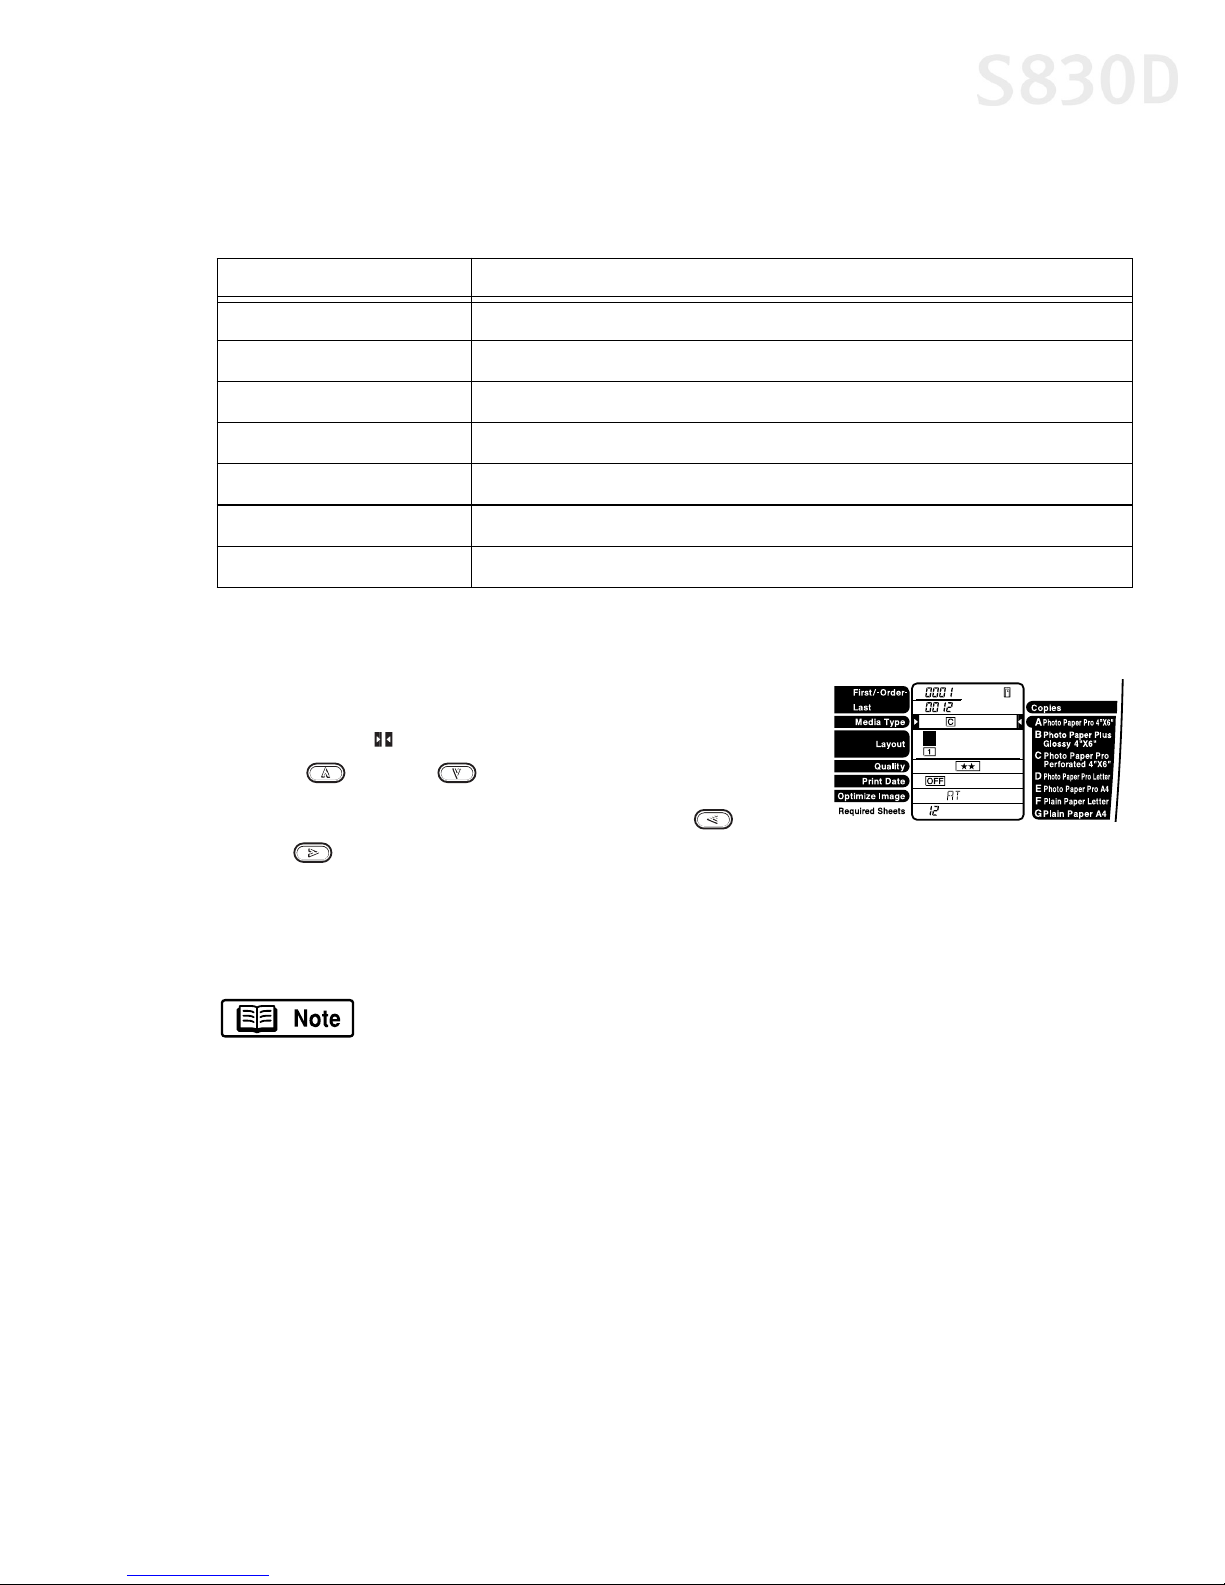
Setting the Media Type
You can select from the following media:
Operation Panel Display Media Name and Size
[A] Photo Paper Pro 4" x 6"
[B] Photo Paper Plus Glossy 4" x 6"
[C] Photo Paper Pro Perforated 4" x 6"
[D] Photo Paper Pro Letter
[E] Photo Paper Pro A4
[F] Plain Paper Letter
[G] Plain Paper A4
To set the media type:
Printing Without a Computer
Press the Mode button to select the desired print mode.
1.
2. Move the (cursor) to Media Type by pressing
the (up) or (down) button.
3. Select the media type by pressing the (left)
or (right) button.
Setting the Print Layout
You can set the number of photos (layout) to be printed on one sheet of paper.
• In Index mode, Layout cannot be set.
• In Single Frame mode, the same photo is lined up in the
specified layout and printed.
• In All Frames, Specified Frame and DPOF mode, the sections
containing no photos are left blank.
29
Page 34
Printing Without a Computer
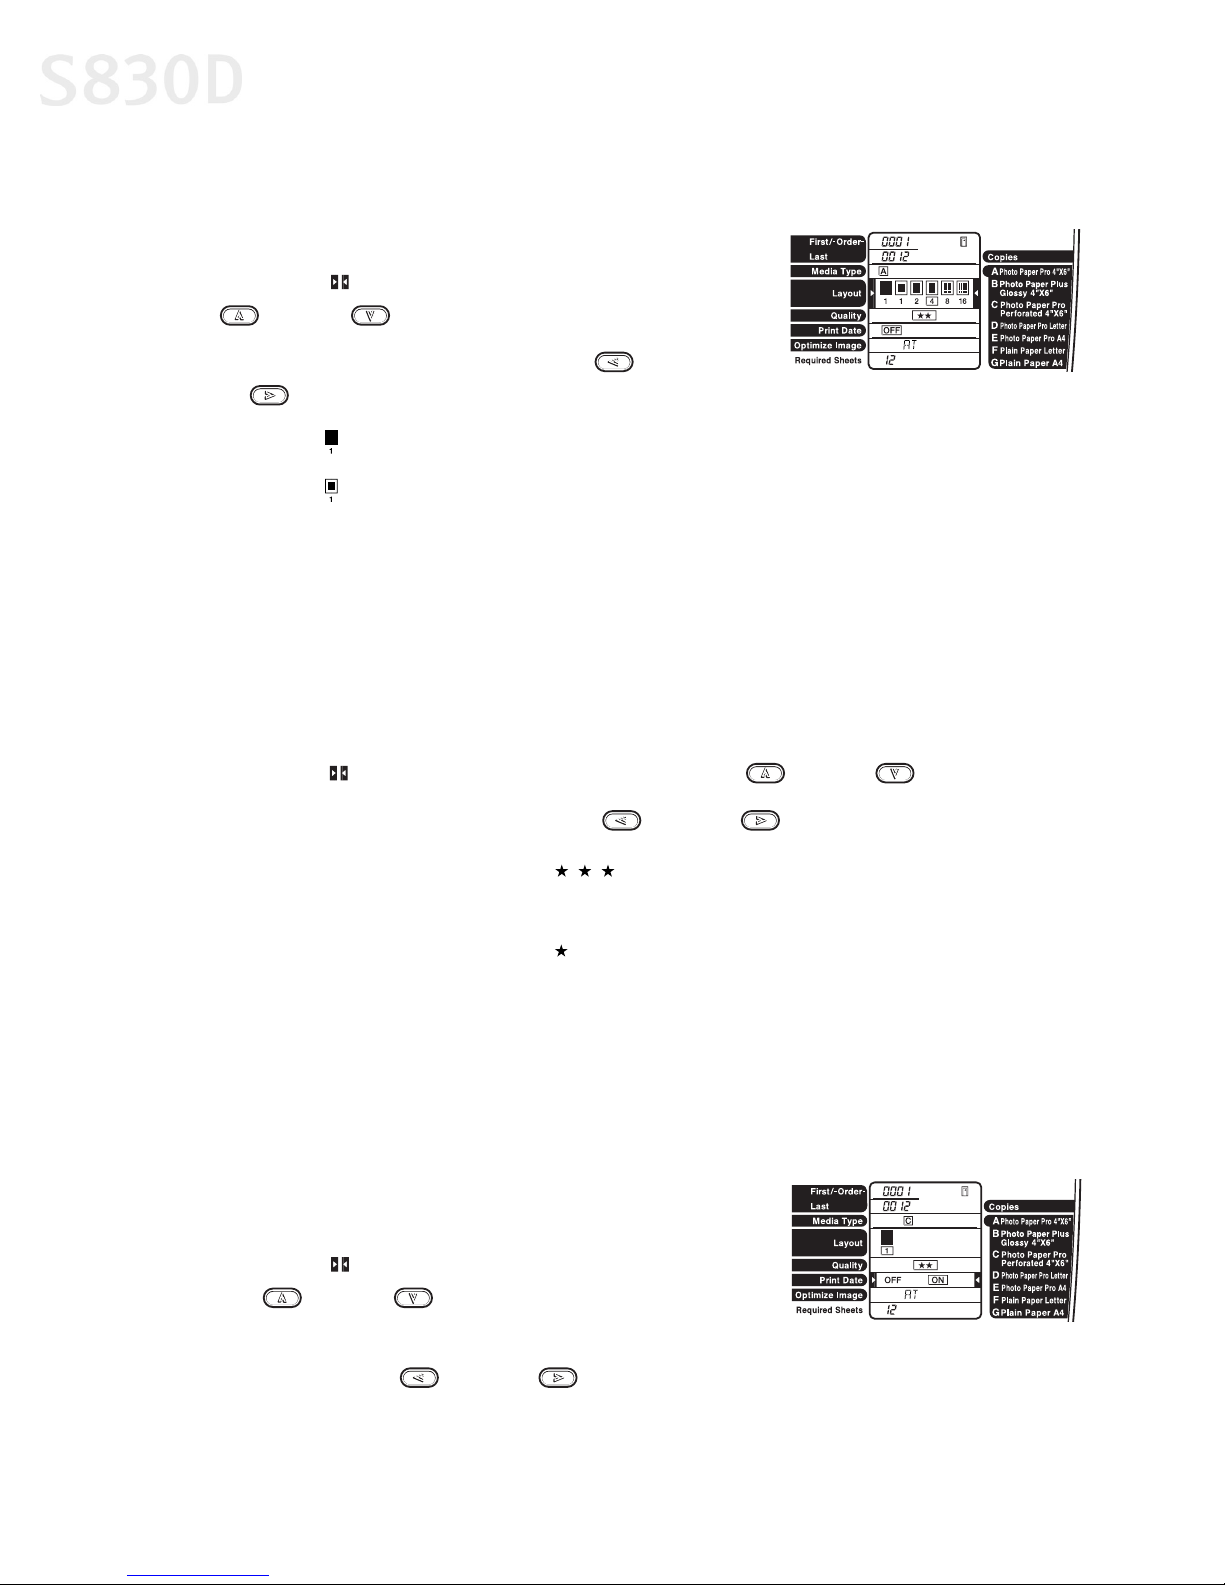
To set the print layout:
Press the Mode button to select the desired print mode.
1.
2. Move the (cursor) to Layout by pressing the
(up) or (down) button.
3. Select the layout by pressing the (left)
or (right) button.
• Select to print a borderless photo.
• Select to print a bordered photo.
Setting the Print Quality
You can set the print quality to be high or low.
To set the print quality:
Press the Mode button to select the desired print mode.
1.
2. Move the (cursor) to Quality by pressing the (up) or (down) button.
3. Select the quality by pressing the (left) or (right) button.
• When the number of stars ( ) is high, the photos will be printed with
optimal quality.
• When the number of stars ( ) is low, the photos will be printed quickly.
Printing the Date on Photos
You can print the date of when the photo was taken.
To print the date:
Press the Mode button to select the desired
1.
print mode.
2. Move the (cursor) to Print Date by pressing
the (up) or (down) button.
3. Select OFF (disable)/ON (enable) for date printing
by pressing the (left) or (right) button.
30
Page 35
Printing Without a Computer
Adjusting Photos
This function automatically corrects photos before printing them.
• If you’re printing images that support the Exif 2.2 standard,
the images will be corrected automatically.
• When image correction is performed, printing may take longer.
• Results may vary depending on the photo.
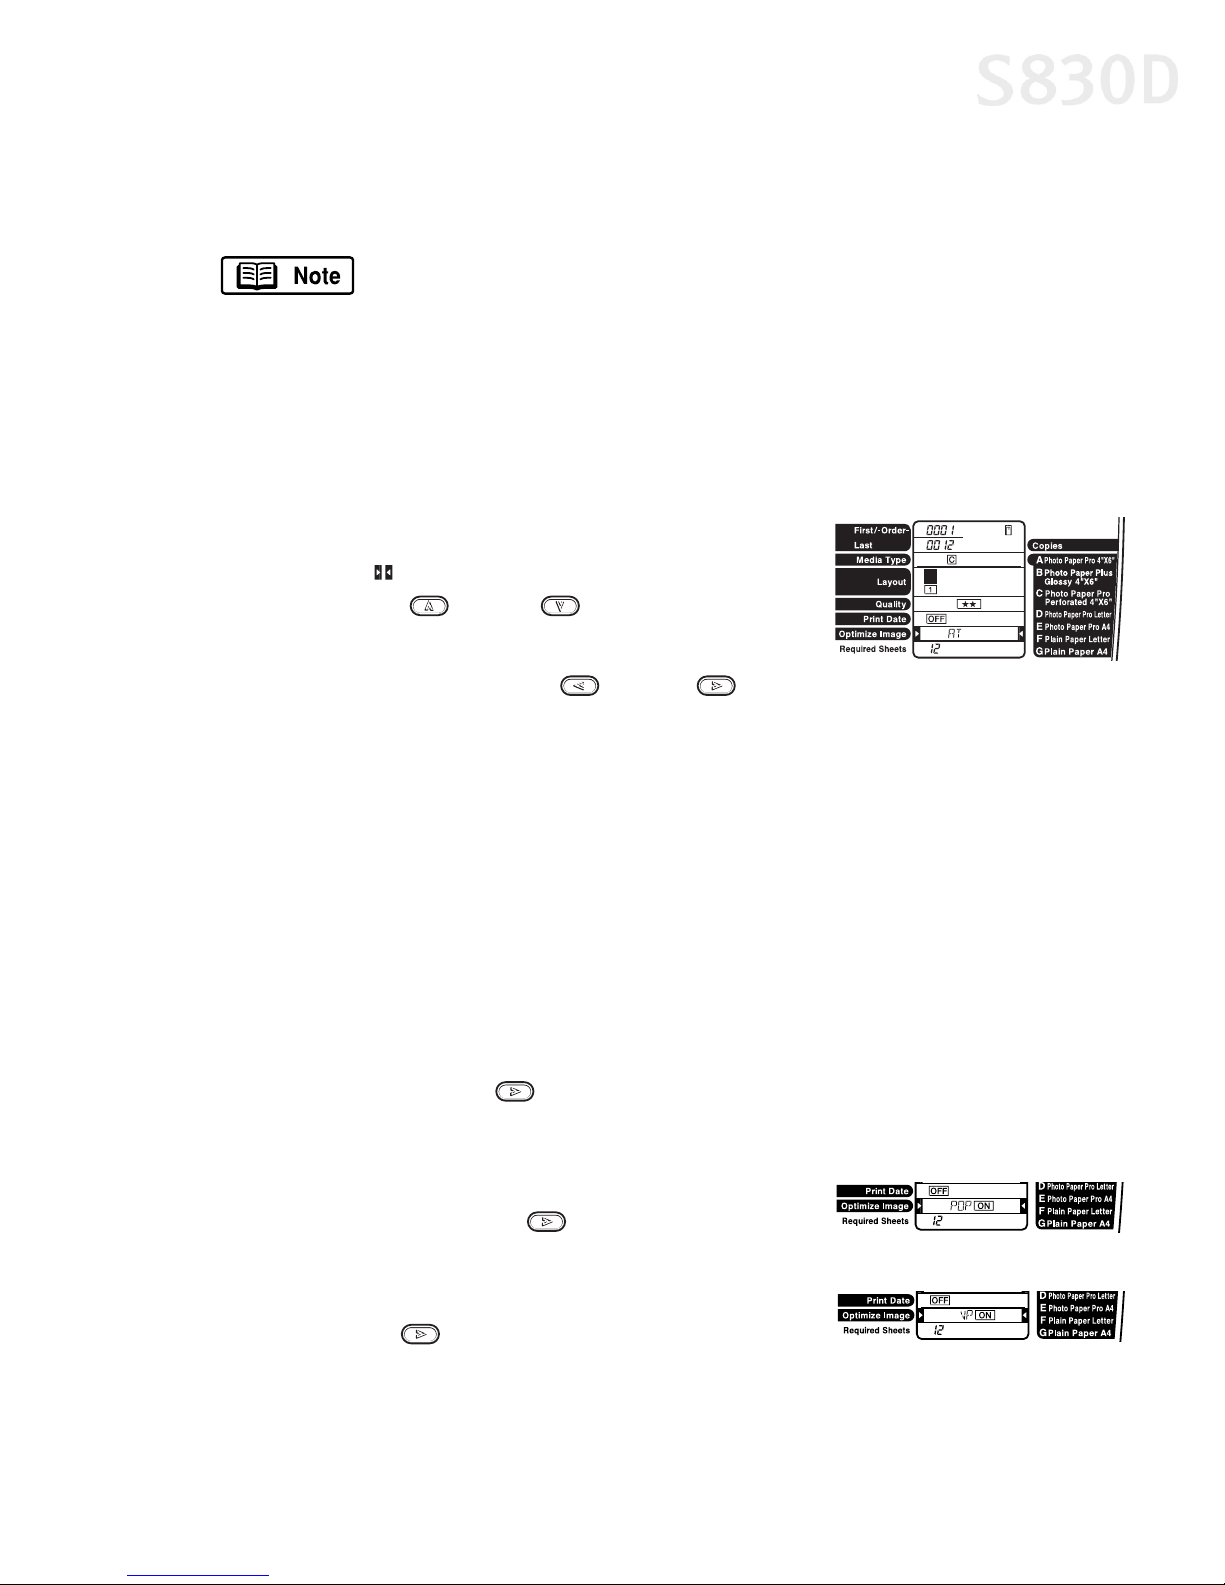
To adjust photos:
Press the Mode button to select the desired print mode.
1.
2. Move the (cursor) to Optimize Image by
pressing the (up) or (down) button.
3. Select OFF (disable)/ON (enable) for image
correction by pressing the (left) or (right)
button.
Advanced Photo Adjusting
For more detailed photo correction, two functions are performed:
• A correction for color fogginess and exposure (Photo Optimizer PRO).
• A correction for reproducing vivid colors (Vivid Photo).
To set only one correction function, follow the procedure below.
To do more detailed photo adjusting:
Repeatedly press the (right) button until you see ON next to Optimize Image.
1.
2. Do one of the following:
• To use only the Photo Optimizer PRO function,
repeatedly press the (right) button until
you see POP[ON] next to Optimize Image.
• To use only the Vivid Photo function, repeatedly
press the (right) button until you see
VP[ON] next to Optimize Image.
31
Page 36
Printing Without a Computer
Maintenance Procedures for Direct Printing
Printing a Nozzle Check Pattern
You can print a nozzle check pattern by pressing the RESUME/CANCEL button of
the printer.
1. Make sure the printer is on.
2. Load letter size paper.
3. Keep the RESUME/CANCEL button pressed down, and release it when the
power lamp blinks twice.
To print a nozzle check pattern:
Make sure the printer is on.
1.
2. Load letter size paper.
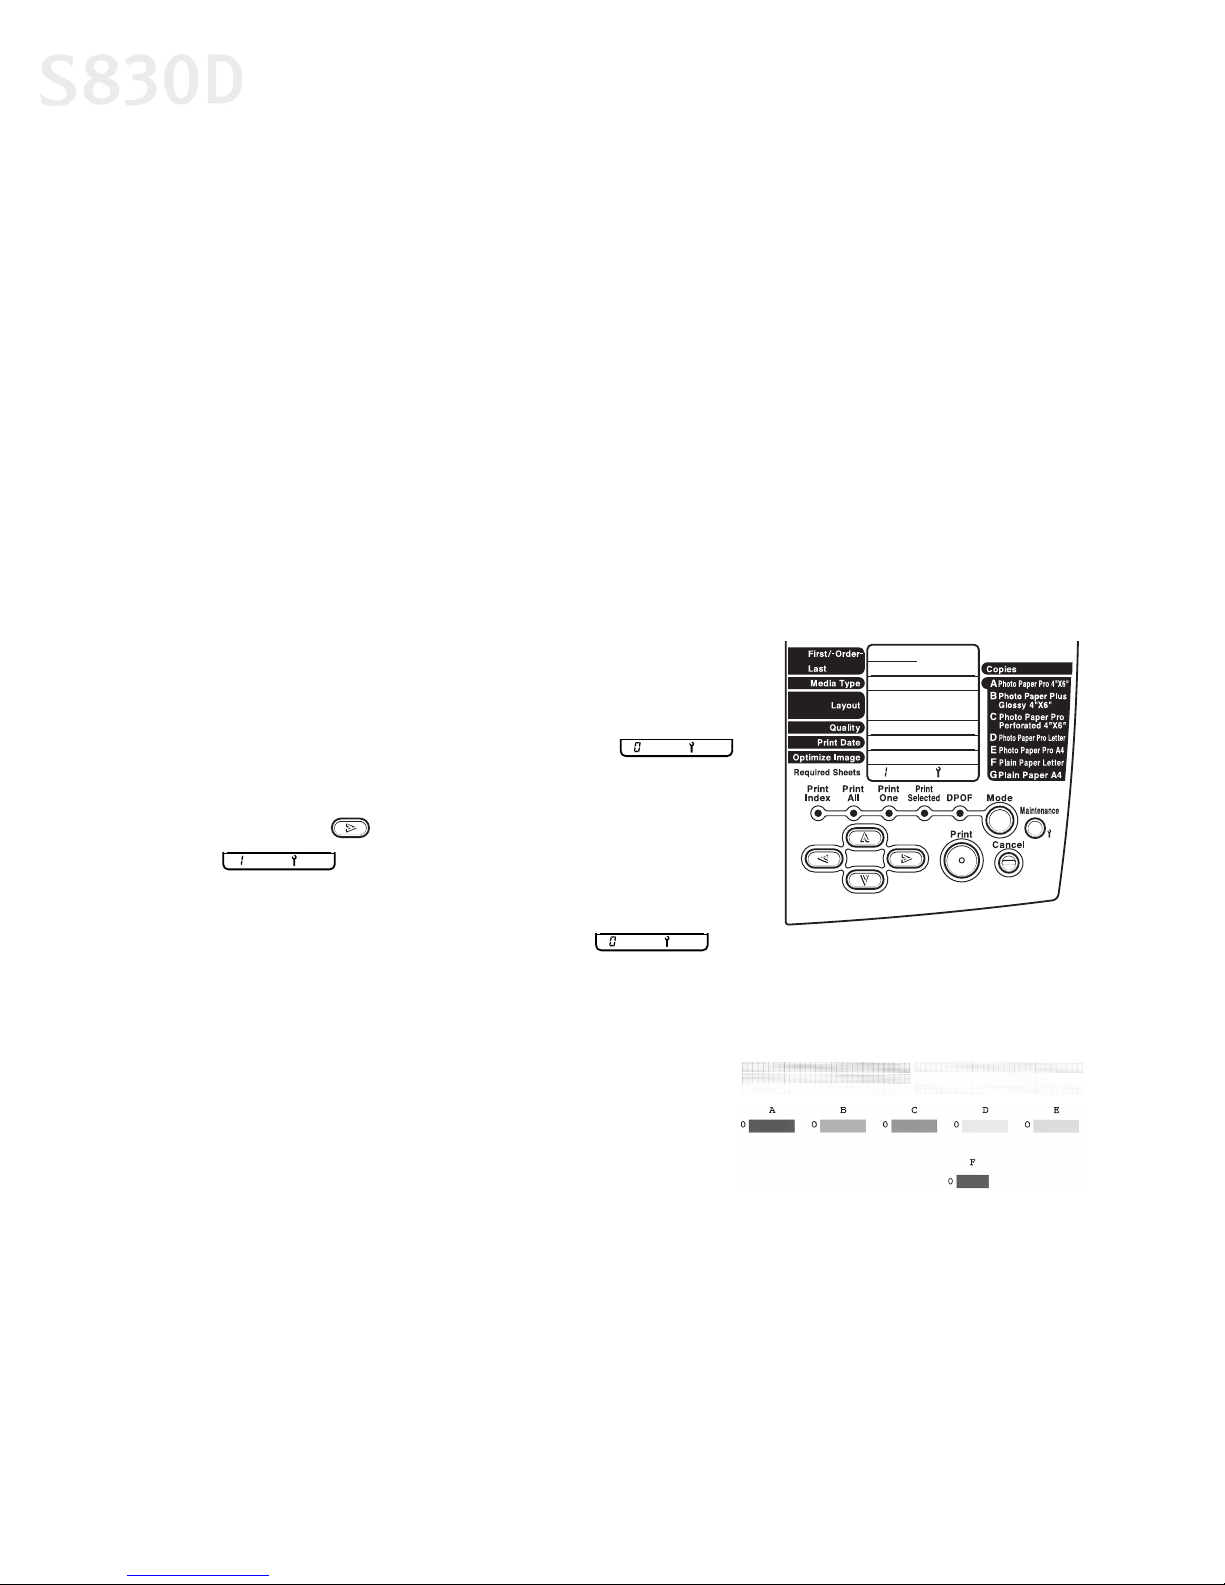
3. Press the Maintenance button. The
icon appears in Required Sheets.
4. Press the (right) button once. The
icon appears.
5. Press the Print button. Nozzle check pattern is
printed. When printing ends, the
icon appears.
6. Press the Maintenance button to exit.
7. Compare the nozzle check patterns.
• If the lines in the first pattern are broken,
the print head must be cleaned. See
“Cleaning the Print Head” on page 33.
• If the vertical lines in the second pattern
stand out, the print head position must be
aligned. See “Aligning the Print Head” on
page 41.
32
Page 37
Printing Without a Computer
Cleaning the Print Head
You can perform print head cleaning by making sure the printer is on, then keeping the
RESUME/CANCEL button pressed down. Release it when the power lamp blinks once.
To clean the print head from the Operation Panel:
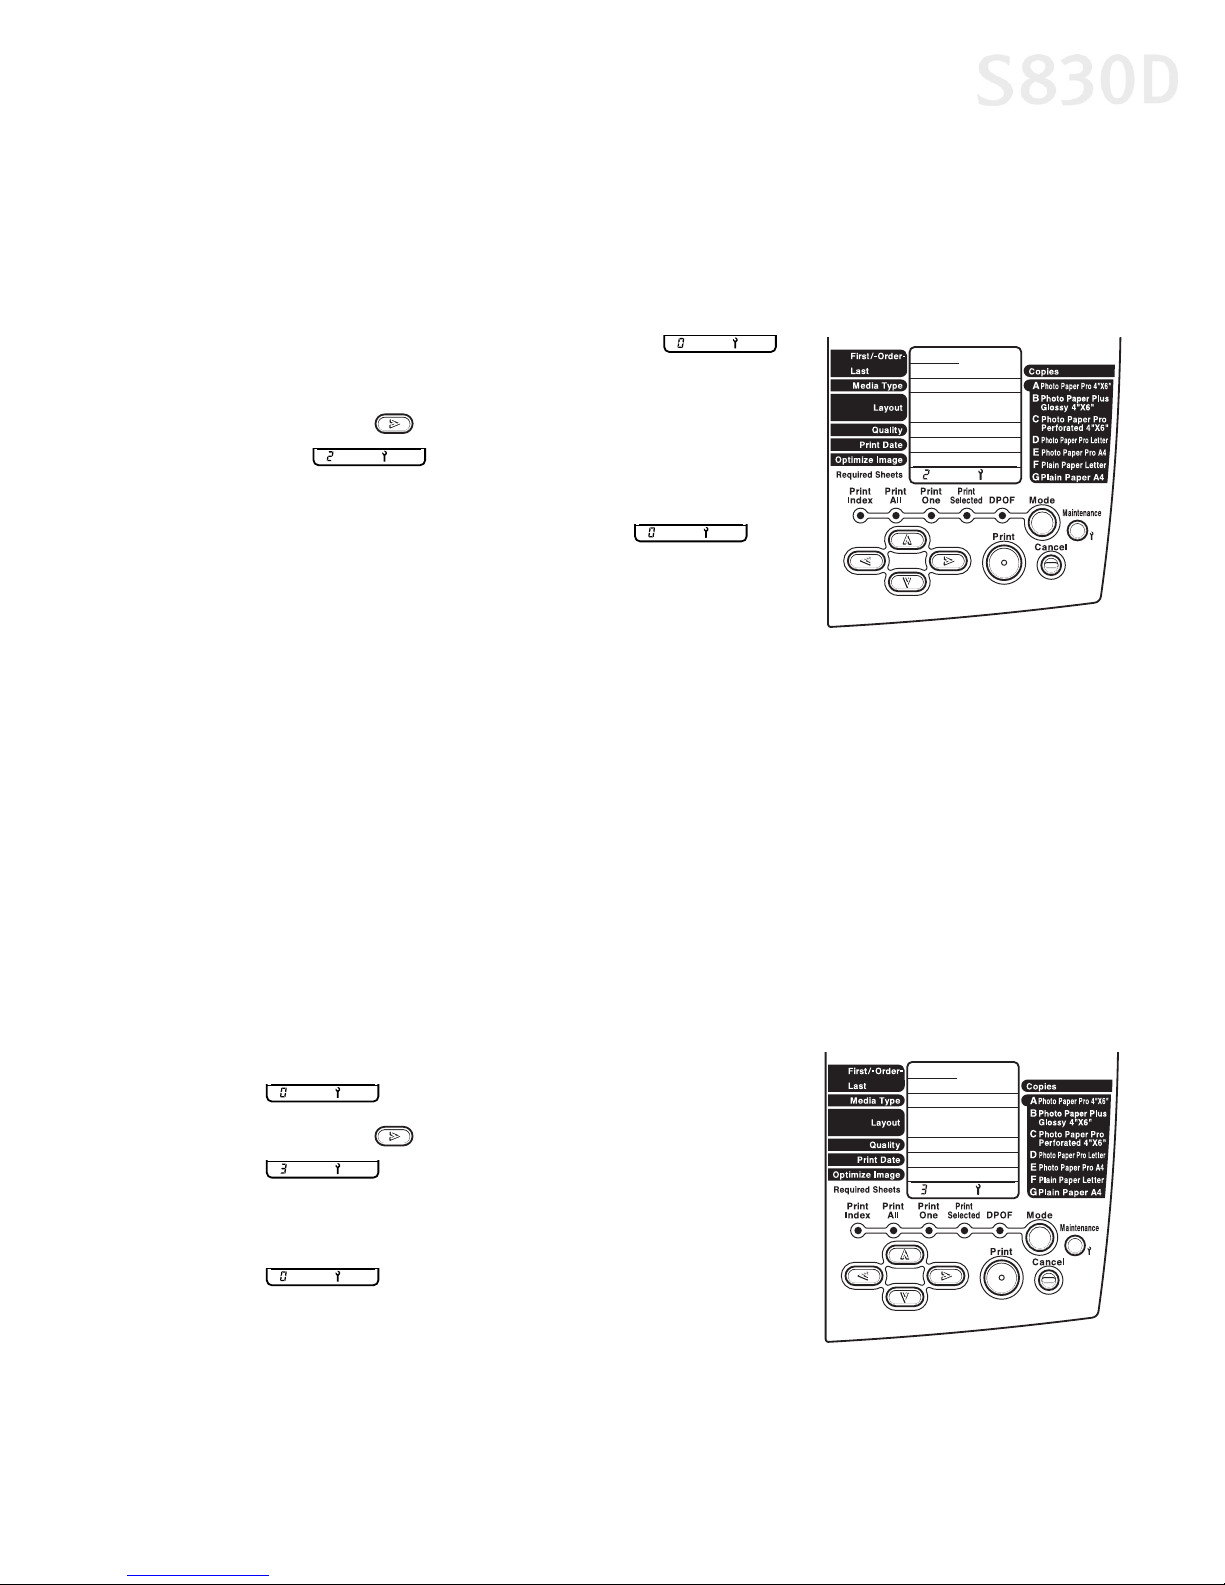
1. Press the Maintenance button. The
icon appears in Required Sheets.
2. Press the (right) button twice.
The icon is displayed.
3. Press the Print button. Print head cleaning
starts. When cleaning ends, the
icon appears.
4. Press the Maintenance button to exit.
5. Print a nozzle check pattern, and make sure
the pattern prints correctly. See “Printing a Nozzle Check Pattern” on
page 32.
• If there is no improvement, repeat head cleaning up to three times.
• If there is still no improvement, perform head refreshing. See “Refreshing
the Print Head” on page 33.
Refreshing the Print Head
If print head cleaning is not effective, perform print head refreshing, which is a
stronger cleaning process. Perform this operation only when necessary.
To refresh the print head:
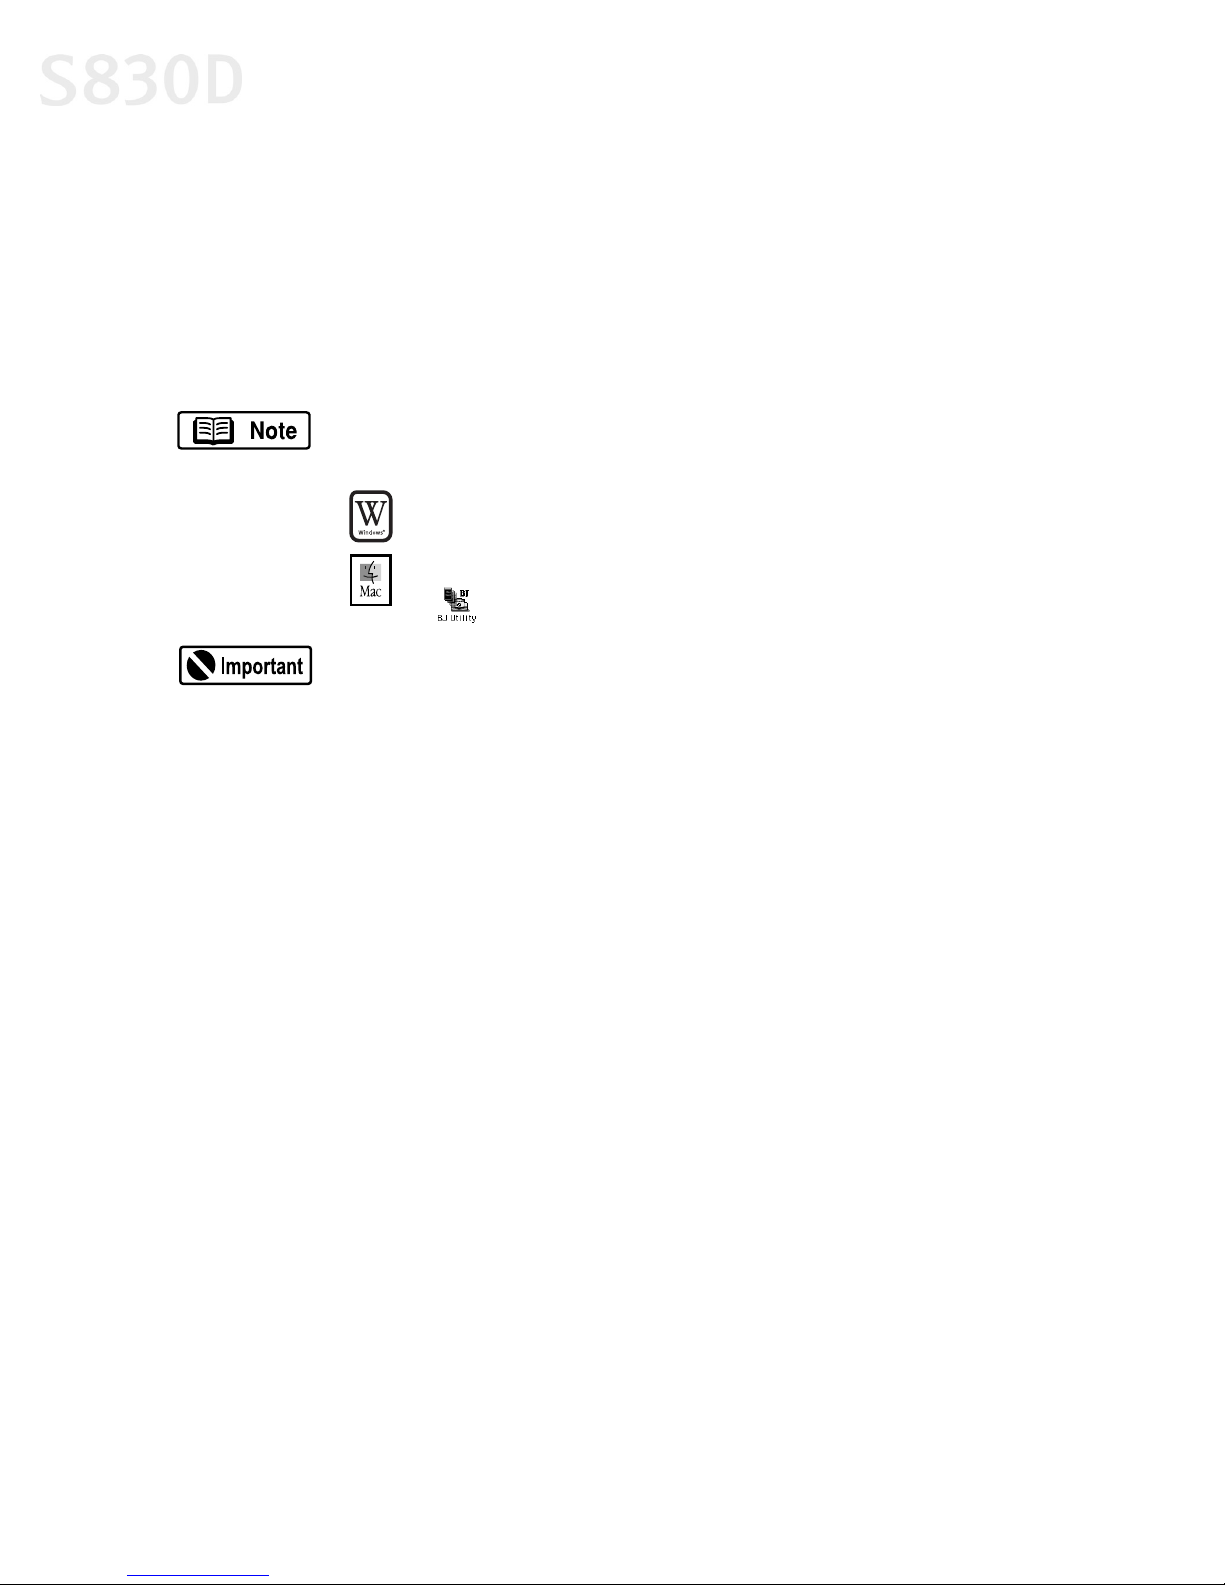
Press the Maintenance button. The
1.
icon appears in Required Sheets.
2. Press the (right) button three times. The
icon appears.
3. Press the Print button. Print head refreshing
starts. When refreshing is completed, the
icon is displayed.
4. Press the Maintenance button to exit.
5. Print a nozzle check pattern, and make sure
the pattern prints correctly. See “Printing a Nozzle Check Pattern” on
page 32.
33
Page 38
Printing Without a Computer
Using the Memory Card Utility
You’ll need your computer to use the Memory Card Utility. Use this utility to
change the settings when you insert a memory card or to change the read/write
mode of the card slot.
Normally, the Memory Card Utility starts automatically when you insert a memory
card. To start it manually, follow the instructions below.
If you eject a memory card while the access lamp is on or
blinking, the memory card may not operate properly.
Always use the Memory Card Utility to eject a memory card.
Before you eject a memory card, be sure to discard the
icon into the Trash.
When you select Change the drive’s read/write attribute and set
the Read/Write-Enabled Mode, note the following points:
• Change the write protection of the memory card to write-
enabled mode before inserting the memory card. If you insert
a write-protected card, the computer may not operate normally.
• If you change the contents of a memory card, you must format
the memory card with a digital camera, otherwise you may
not be able to take photographs. This printer supports only
the format used by the digital camera.
• If you change or manipulate the contents of a memory card
from a computer, be sure to print the contents from the
computer. If you print the contents from the Operation Panel,
the information may not print properly.
34
Page 39
Printing Without a Computer
To use the Memory Card Utility in Windows:
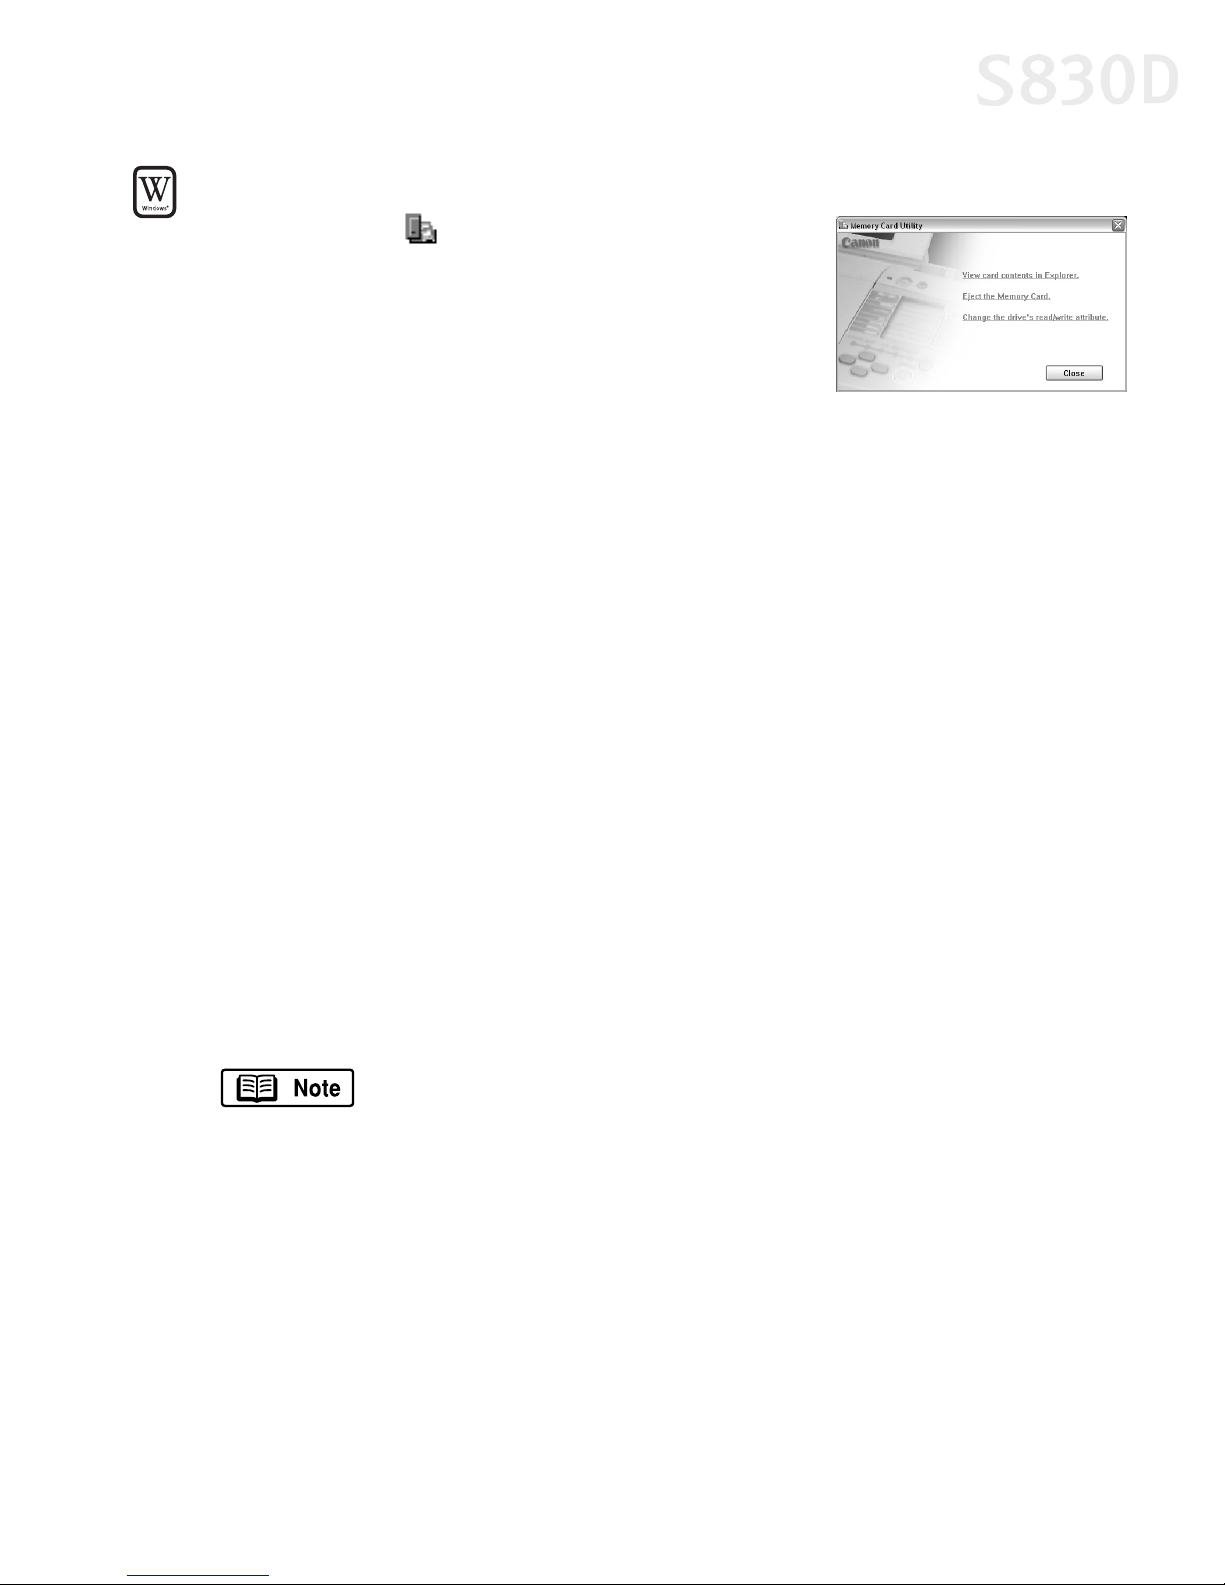
Double-click the icon on the right side of the task
bar. The Memory Card Utility will appear, allowing you
to select among these options:
View card contents in Explorer: Displays a list of
the files stored on the memory card within
Windows Explorer.
Eject the Memory Card: When selected, the indicator lamp starts blinking, a
message will appear, and the printer gets ready for memory card ejection.
When the indicator lamp goes off, press the Eject button and remove the
memory card.
Change the drive’s read/write attribute: Displays the USB Memory Card
Settings dialog box where you can change the mode (Read-only mode, or
Read/write mode) of the card slot by following the on-screen instructions. By
default, the mode is set to Read-only. Be sure to remove the memory card
before changing the mode by using Eject the Memory Card.
Close: Closes the Memory Card Utility.
The following additional options appear on all Windows operating systems
except Windows XP:
Start an application: Starts an application. Depending on the application, the
contents of the memory card may be displayed.
Auto-start an application when a card is inserted/Do nothing when a card is
inserted: Determines whether an application will start each time the memory
card is inserted.
You can set the application to be started in advance with the
Auto-Start Properties function.
Do not display this dialog when a card is inserted: When this checkbox is
selected, this screen is not displayed even when a memory card is inserted.
35
Page 40
Printing Without a Computer
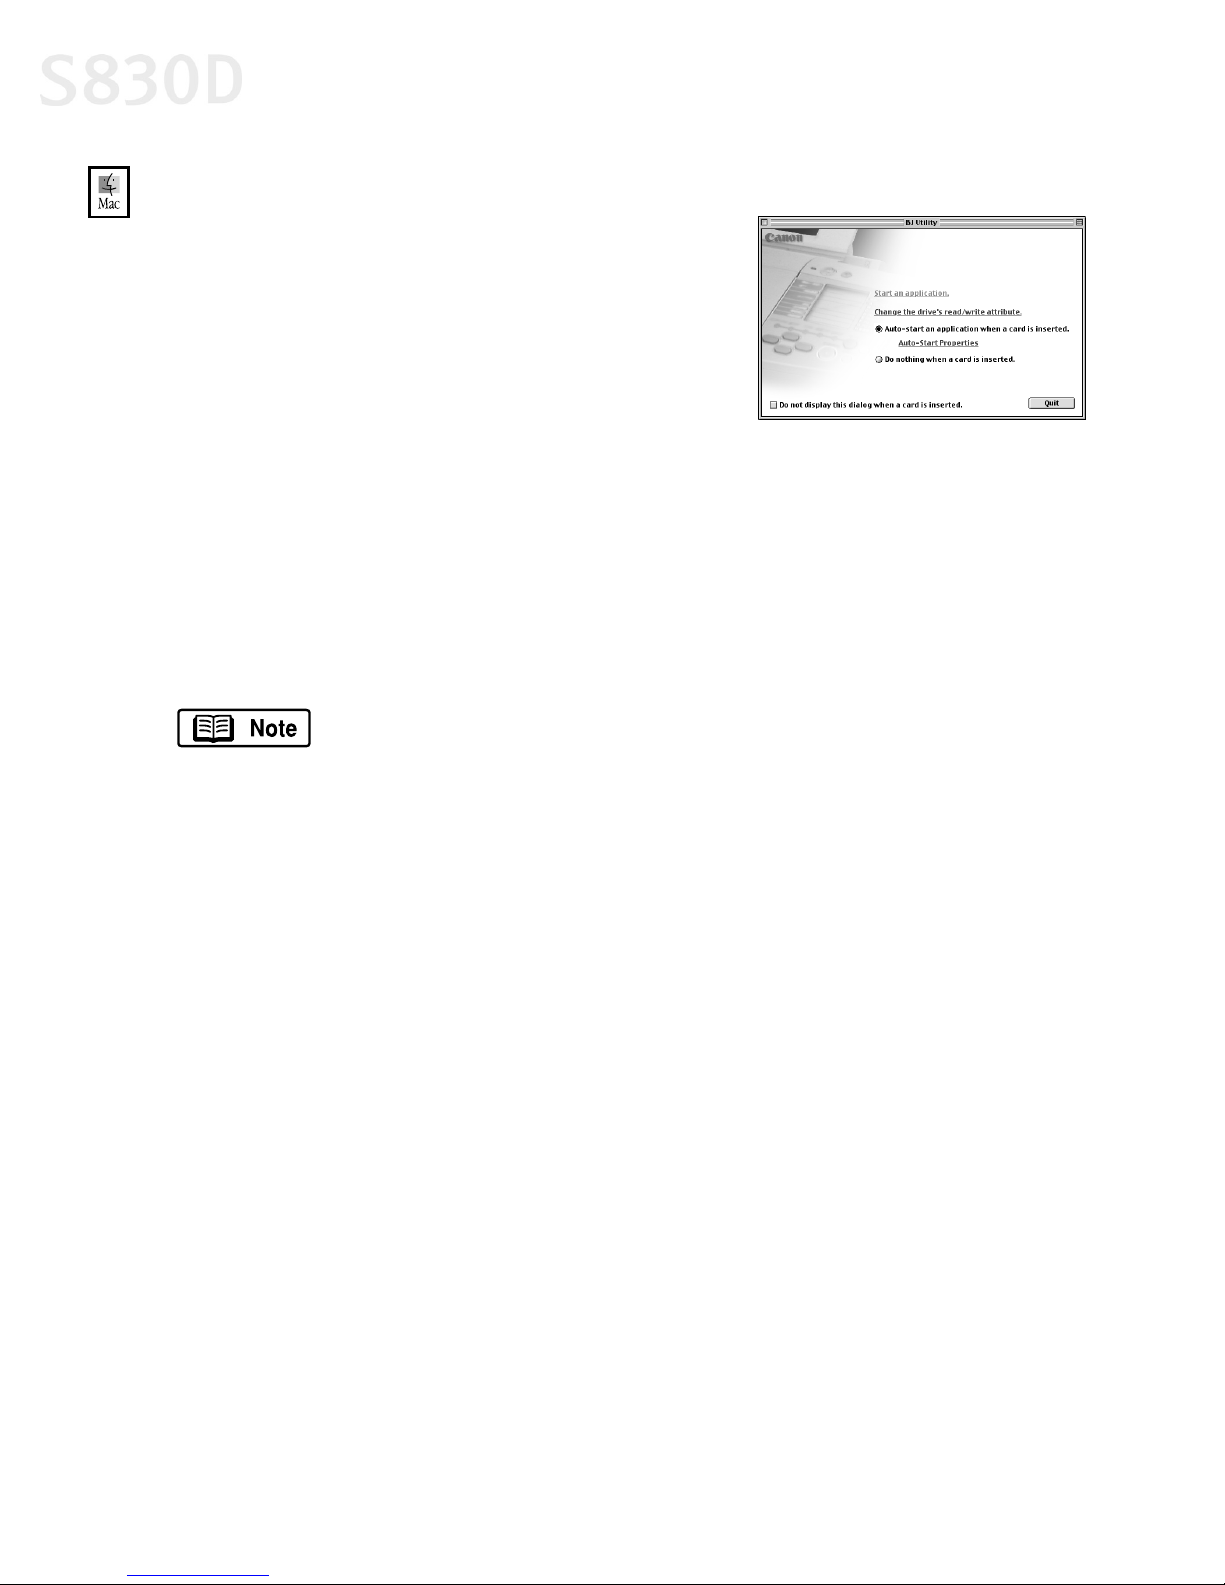
To use the Memory Card Utility in Mac OS:
In the Apple menu, select BJ Utility. The BJ Utility
will appear, allowing you to select among these
options:
Start an application: Starts an application.
Depending on the application, the contents
of the memory card may be displayed.
Change the drive’s read/write attribute:
Displays the Drive Settings dialog box where you can change the mode (Readonly mode or Read/write mode) of the card slot by following the on-screen
instructions. By default, the mode is set to Read-only. Be sure to eject the
memory card before you change the mode.
Auto-start an application when a card is inserted/Do nothing when a card is
inserted: Determines whether an application will start each time the memory
card is inserted.
You can set the application to be started in advance with the
Auto-Start Properties function.
Do not display this dialog when a card is inserted: When this checkbox is
selected, this screen is not displayed even when a memory card is inserted.
Quit: Closes the Memory Card Utility.
36
Page 41
Printing Without a Computer
Setting the Application to be Started
This section applies to all versions of the Windows operating
system except Windows XP.
Set the application to be started whenever a memory card is inserted or Start an
application is clicked.
To set the application to be started in Windows:
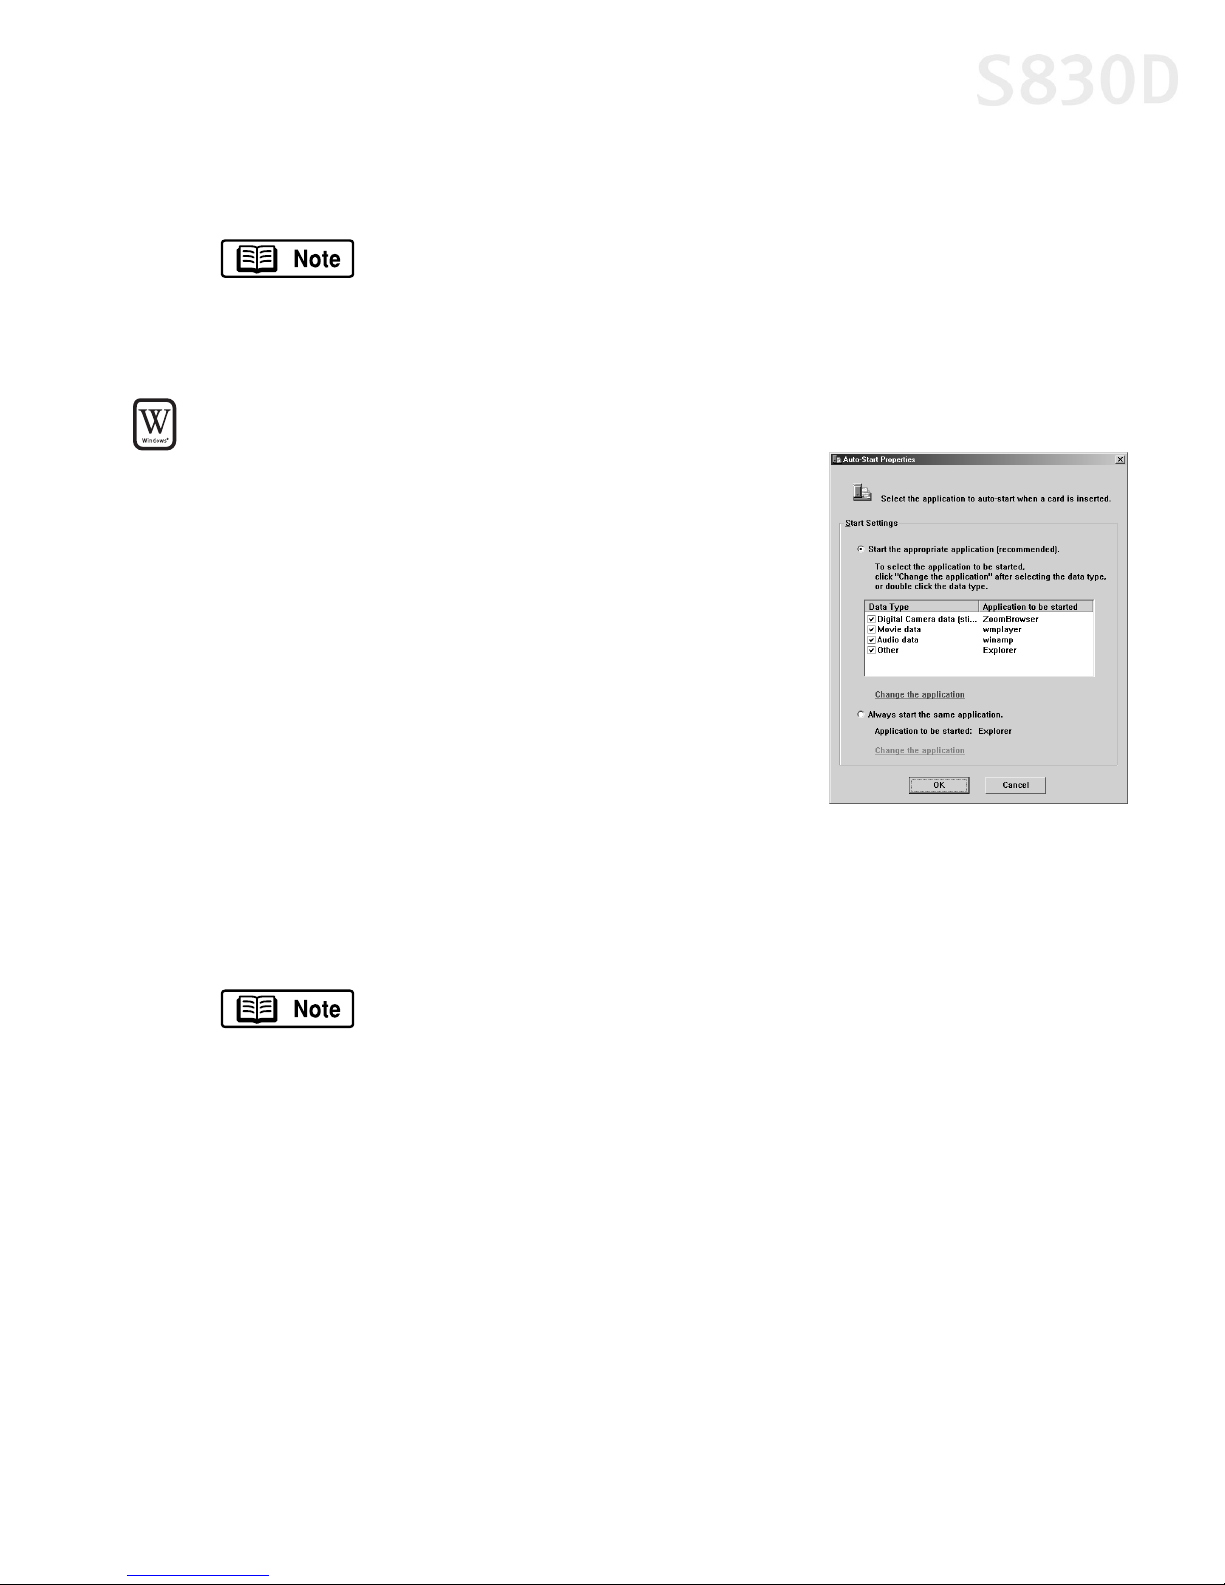
Open the Memory Card Startup Utility, and then
1.
click Auto-Start Properties. The Auto-Start
Properties dialog box will appear.
2. Specify Start Settings:
• Start the appropriate application
[recommended]: When you select this option,
the system automatically identifies the type
of data stored in the memory card and starts
the appropriate application. When this option
is not selected, the specified application is
not started even if the memory card contains
that type of data.
• Always start the same application: When you select this option, the system
always starts same application regardless of the type of data stored on the
memory card.
To change the application to be started, click the Change the
application button in the Auto-Start Properties dialog box, and
select the application to be started.
3. Click OK.
37
Page 42
Printing Without a Computer
To set the application to be started in Mac OS:
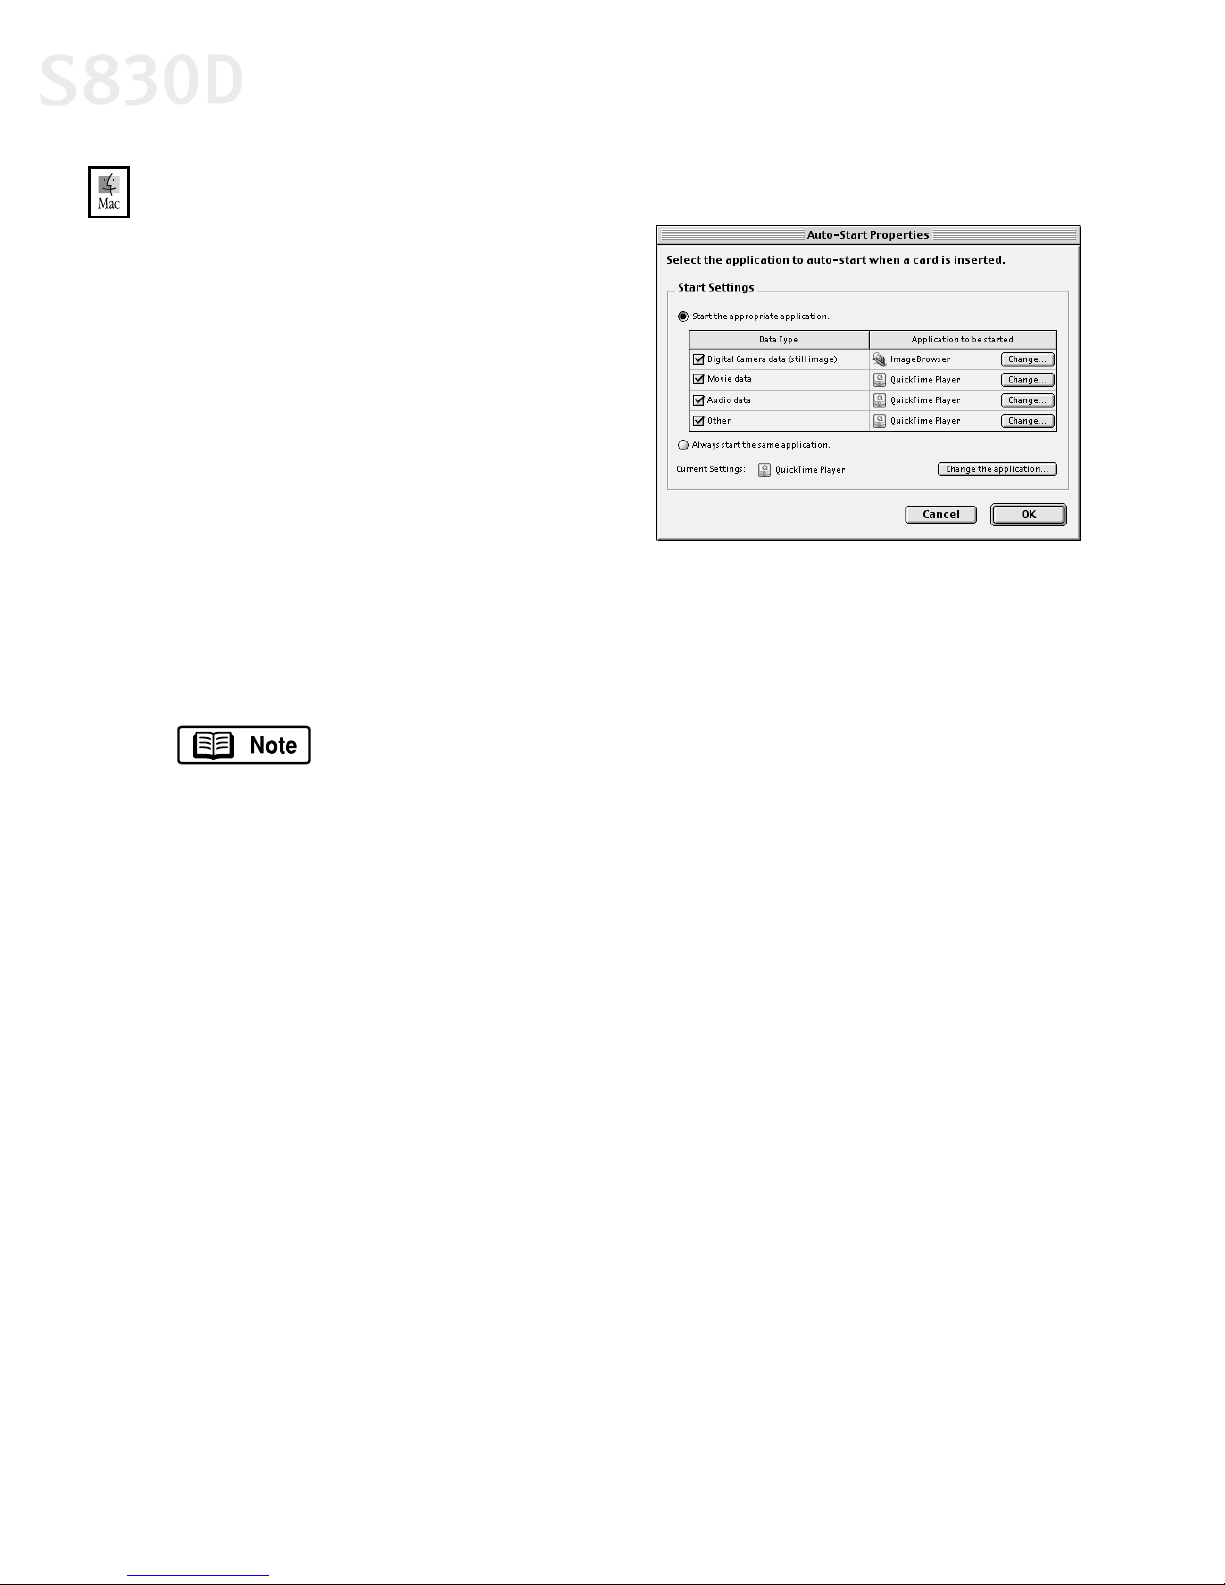
Open the BJ Utility, and click Auto-
1.
start Properties. The Auto-Start
Properties dialog box will appear.
2. Specify Start Settings:
• Start the appropriate
application: When you select
this option, the system
automatically identifies the type
of data stored in the memory
card and starts the appropriate
application.
• Always start the same application: When you select this option, the system
always starts same application regardless of the type of data stored on the
memory card.
3. Click OK.
To change the application to be started, click Change the
application in the Auto-Start Properties dialog box, and select the
application to be started.
38
Page 43

Chapter 4: Printing
Maintenance
This chapter provides information on how to care for the ink delivery system for
your Canon S830D Photo Printer. The following topics are addressed:
• Monitoring Ink Levels
• Replacing Ink Tanks
• Aligning the Print Head
• Printing a Nozzle Check Pattern
• Cleaning the Print Head
Monitoring Ink Levels
The print driver allows you to monitor the level of ink in each ink tank.
To monitor ink levels in Windows:
Click Start, then:
1.
• Windows XP: Select Control Panel, then Printers and Other Hardware, then
Printers and Faxes.
• Other Windows versions: Select Settings, then Printers.
2. Right-click the Canon S830D icon, then select Properties.
39
Page 44
Printing Maintenance
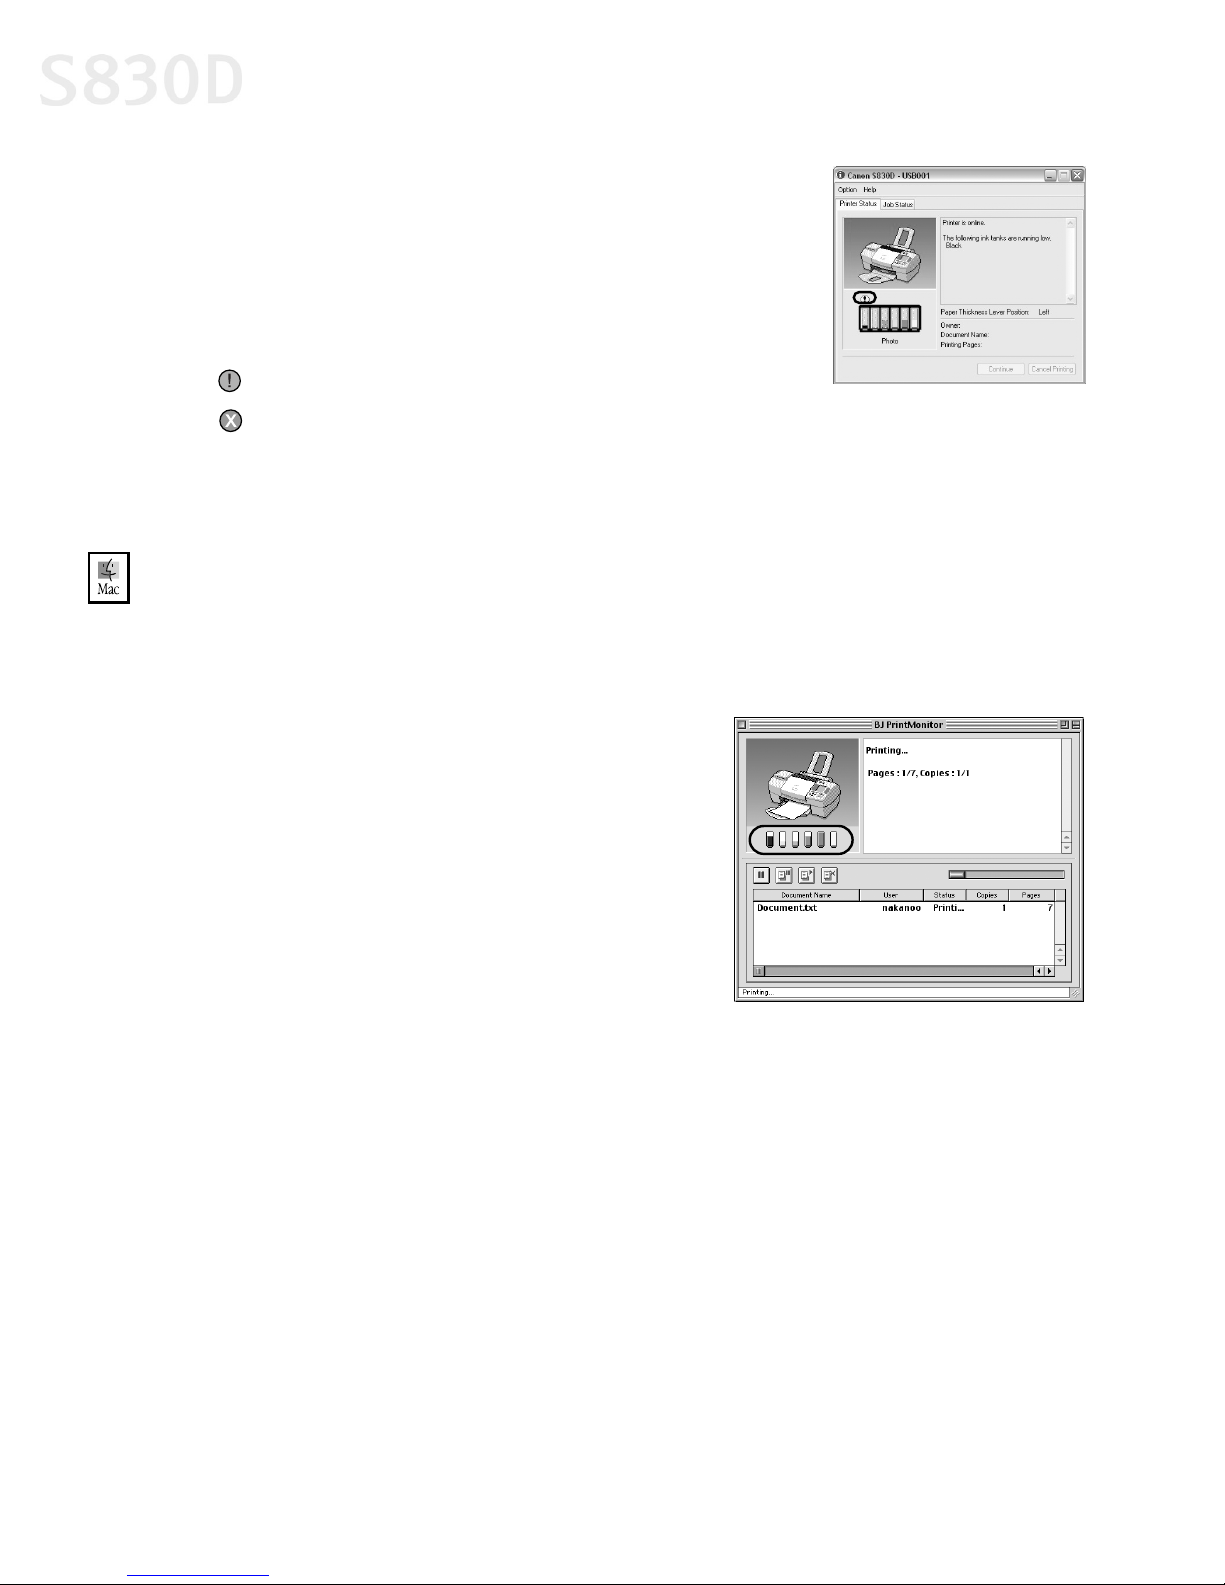
3. Select the Maintenance tab, then click Start Status
Monitor. The BJ Status Monitor window will appear.
The ink panel displays the ink levels for each tank.
The following icons appear when an ink tank is low
or has run out of ink:
Ink low. Replace ink tank as soon as possible.
Ink out. Replace ink tank immediately.
4. Click the close box on the top right of the window to close the BJ Status Monitor,
then click OK to close the Properties dialog box.
To monitor ink levels in Mac OS:
While you’re printing, the BJ Print Monitor can display ink levels, indicating when
they are running low. You must enable background printing to use the
BJ Print Monitor.
1. Select Chooser from the Apple menu.
2. Click the S830D printer icon and click the
Backgrounding button to the On position.
3. Close the Chooser.
4. After starting a print job, select BJ Print
Monitor in the Application menu. The
BJ Print Monitor opens. Here you can see
printer status and ink status with images.
40
Page 45
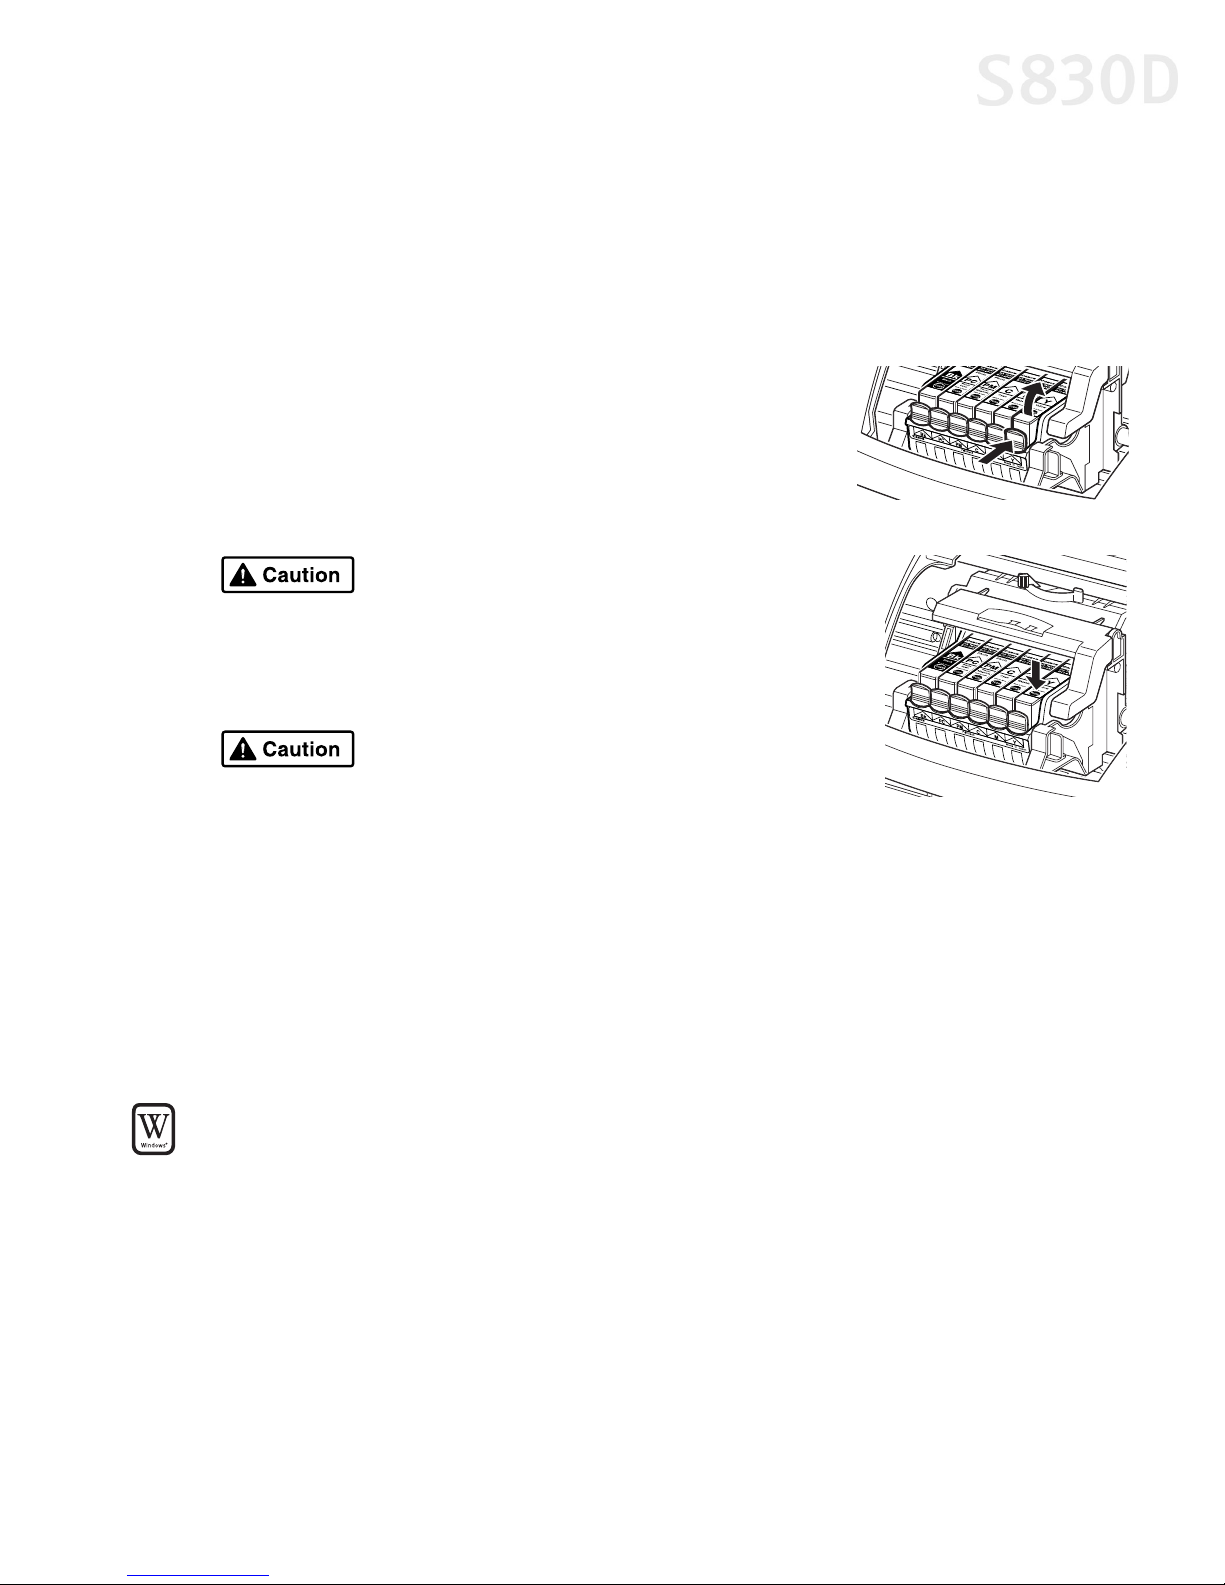
Replacing Ink Tanks
Follow these steps to replace an empty ink tank.
1. Turn on the printer, then open the front cover. The print head holder will
automatically move to the center.
2. Press the tab on the front of the ink tank, then
remove and discard the empty tank.
3. Remove the new ink tank from its package. Pull the
orange tape up, remove the wrapper and twist off
the orange protective cap.
To avoid spilling ink, never press on
the sides of an ink tank.
4. Holding the new ink tank at a slight angle, align it
with the correct color slot, then gently insert it.
Printing Maintenance
Do not force an ink tank into the print head.
If the ink tank does not go in smoothly,
realign it and try again until it does.
5. Press down on the ink tank until it clicks into place.
6. Close the front cover.
Aligning the Print Head
Before using the printer, align the print head to ensure the best quality printing.
To align the print head in Windows:
Make sure the printer is on and paper is loaded.
1.
2. Click Start, then:
• Windows XP: Select Control Panel, then Printers and Other Hardware, then
Printers and Faxes.
• Other Windows versions: Select Settings, then Printers.
3. Right-click the Canon S830D printer icon, then select Properties.
41
Page 46
Printing Maintenance
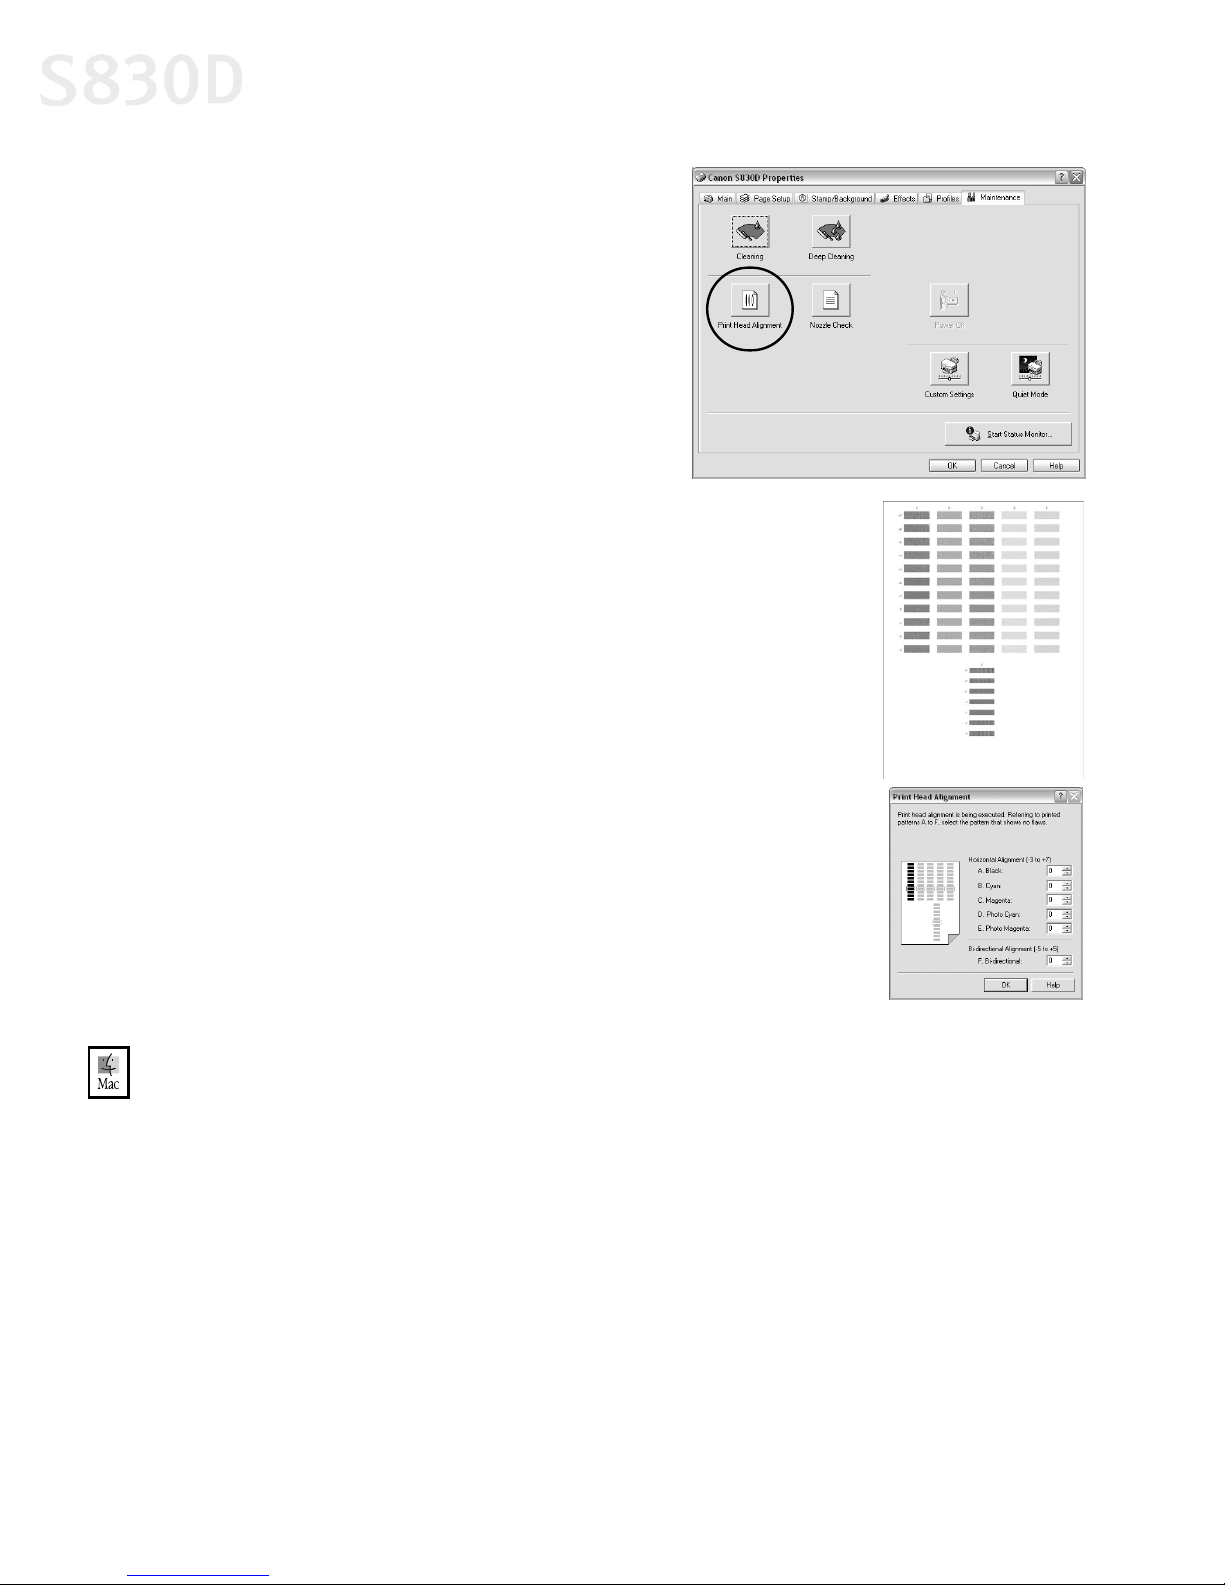
4. From the Maintenance tab, click the
Print Head Alignment button.
5. When prompted to print an alignment
test page, click OK.
6. If the pattern printed successfully,
click Yes.
7. Compare the different patterns for
each color on the printout.
Notice that most patterns have vertical
lines, but some in the middle look
smooth and uniform.
8. For each color on the test printout, enter
the number in the Print Head Alignment dialog box that
corresponds with the smoothest looking test pattern.
9. When finished, click OK.
To align the print head in Mac OS:
Make sure the printer is on and paper is loaded.
1.
2. From the File menu in a software application, click Page Setup.
3. Click the Utilities button.
42
Page 47
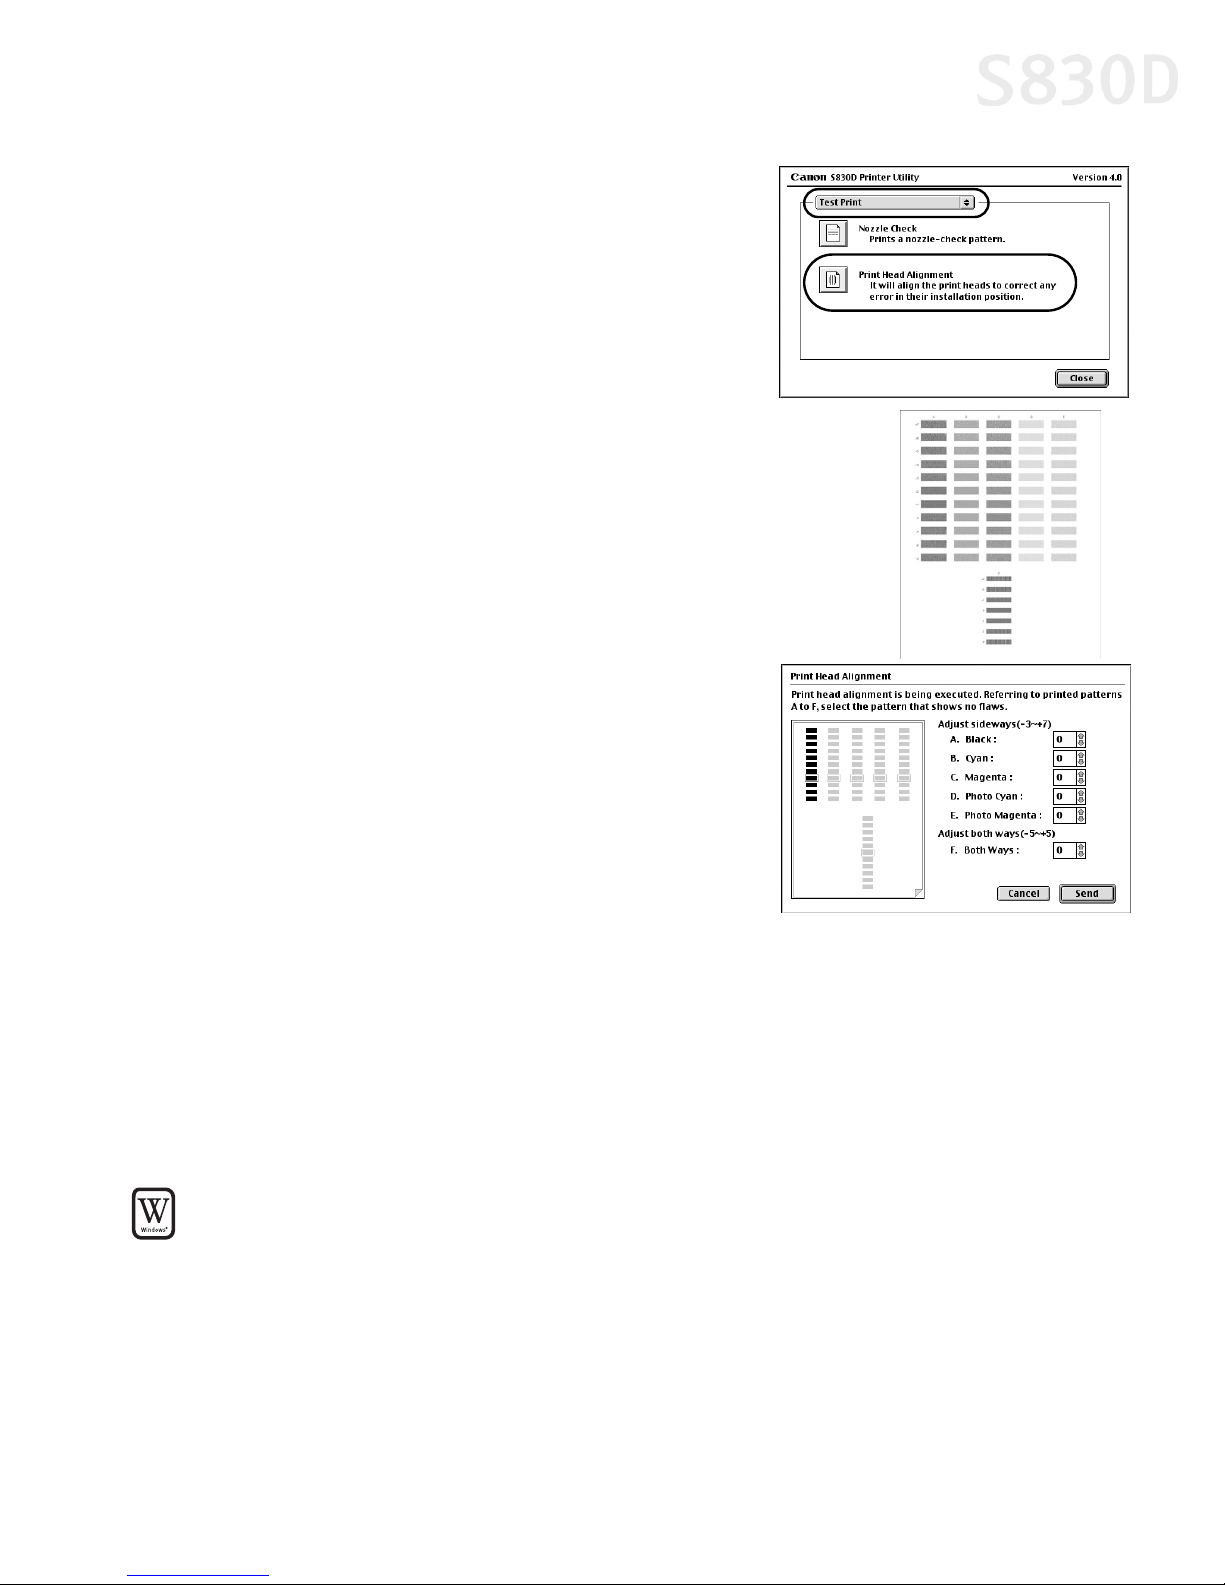
4. Select Test Print from the pull-down menu,
and click the Print Head Alignment button.
5. When prompted to print an alignment test
page, click OK.
6. Compare the different patterns for each color
on the printout.
Notice that most patterns have vertical lines, but
some in the middle look smooth and uniform.
7. For each color on the test printout, enter the
number in the Print Head Alignment dialog
box that corresponds with the smoothest
looking test pattern.
Printing Maintenance
8. When finished, click Send.
Printing a Nozzle Check Pattern
The contact area of the print head that discharges ink contains nozzles, tiny
openings from which the ink is sprayed. You may see faded or streaked colors and
text in your printed output if the nozzles are clogged or the print head is not
aligned. You can check for these problems by printing a nozzle check pattern.
To print a nozzle check pattern in Windows:
Make sure the printer is turned on.
1.
2. Click Start, then:
• Windows XP: Select Control Panel, then Printers and Other Hardware, then
Printers and Faxes.
• Other Windows versions: Select Settings, then Printers.
43
Page 48
Printing Maintenance
3. Right-click the Canon S830D printer icon and select Properties.
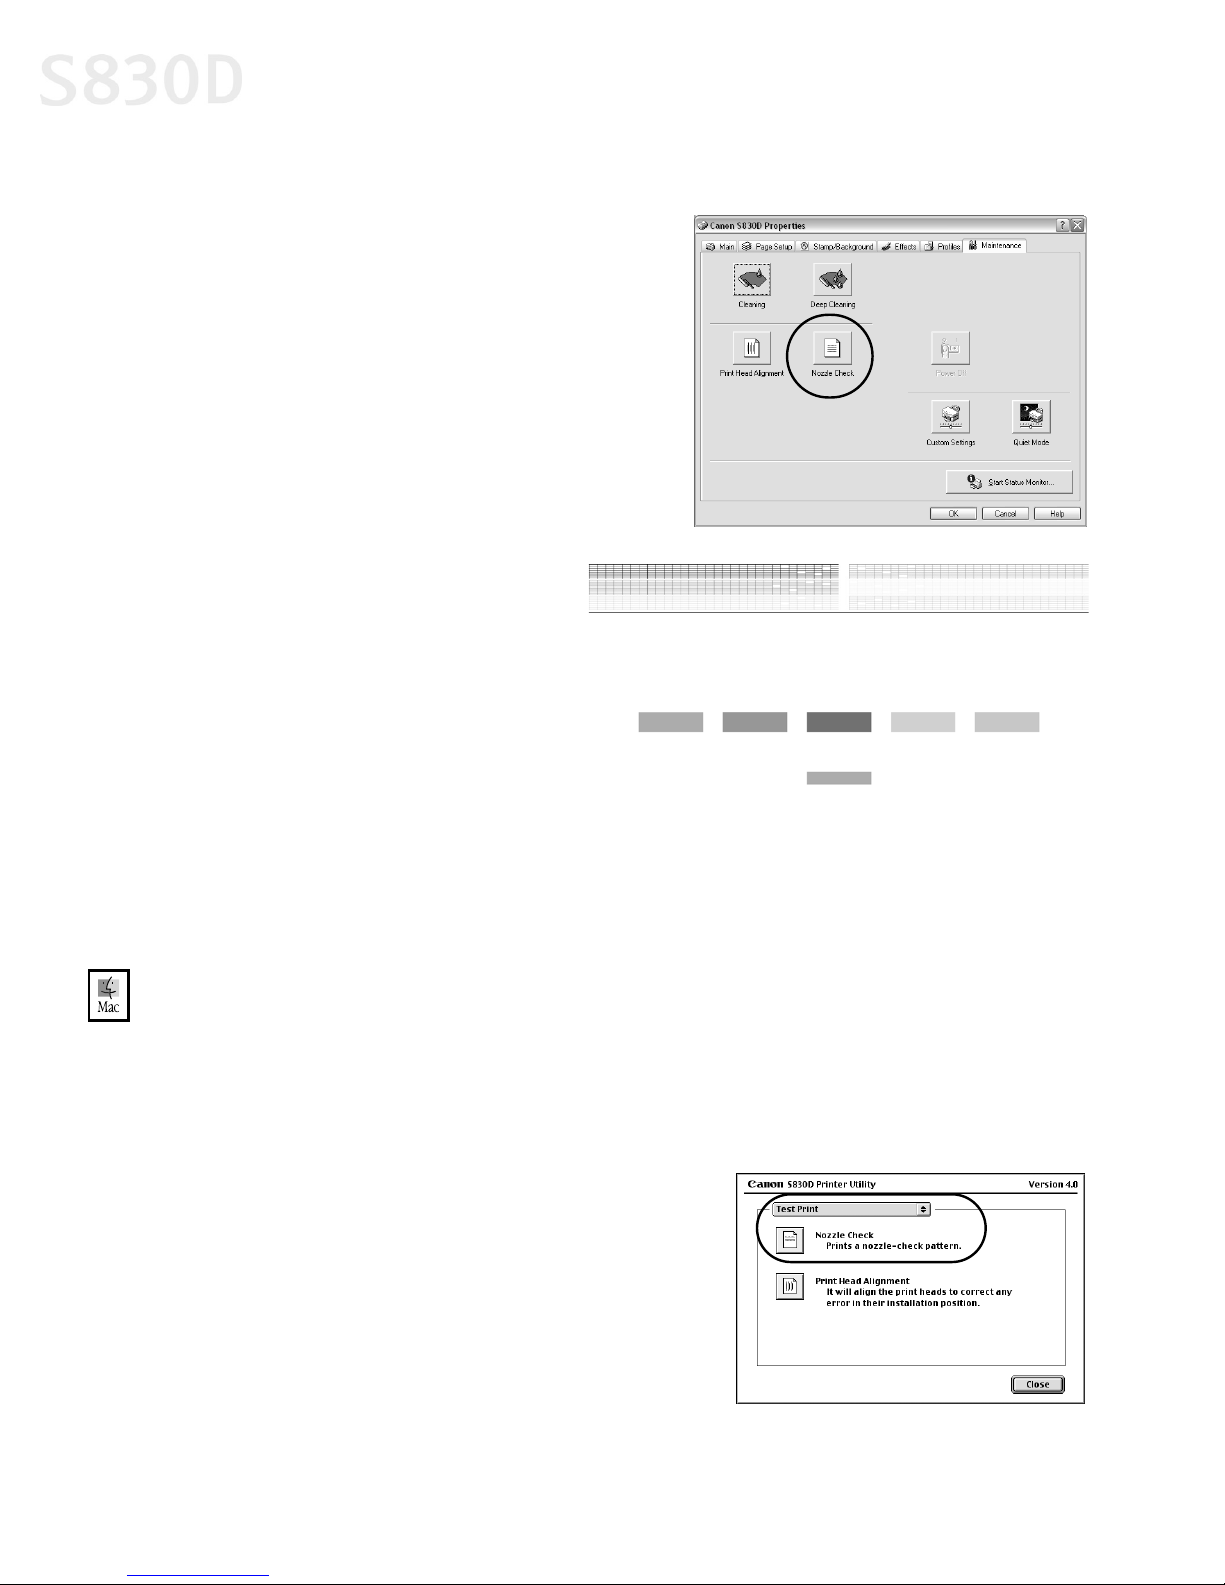
4. Click the Maintenance tab, then click the
Nozzle Check button.
5. Read the messages, then click OK. The
nozzle test pattern will print.
6. Check the nozzle check pattern.
• If the lines in the first pattern
are broken, the print head
must be cleaned. See
“Cleaning the Print Head” on
page 45.
• If the vertical lines in the
second pattern stand out, the
print head position must be
adjusted. See “Aligning the
Print Head” on page 41.
To print a nozzle check pattern in Mac OS:
Make sure the printer is on.
1.
2. In a software application, click File, then Page Setup.
3. Click Utilities. The Canon S830D Printer Utility dialog box will display.
4. Select Test Print from the drop-down
list. The test print options will display.
5. Click the Nozzle Check button.
Read the messages, then click OK.
The nozzle test pattern will print.
44
Page 49
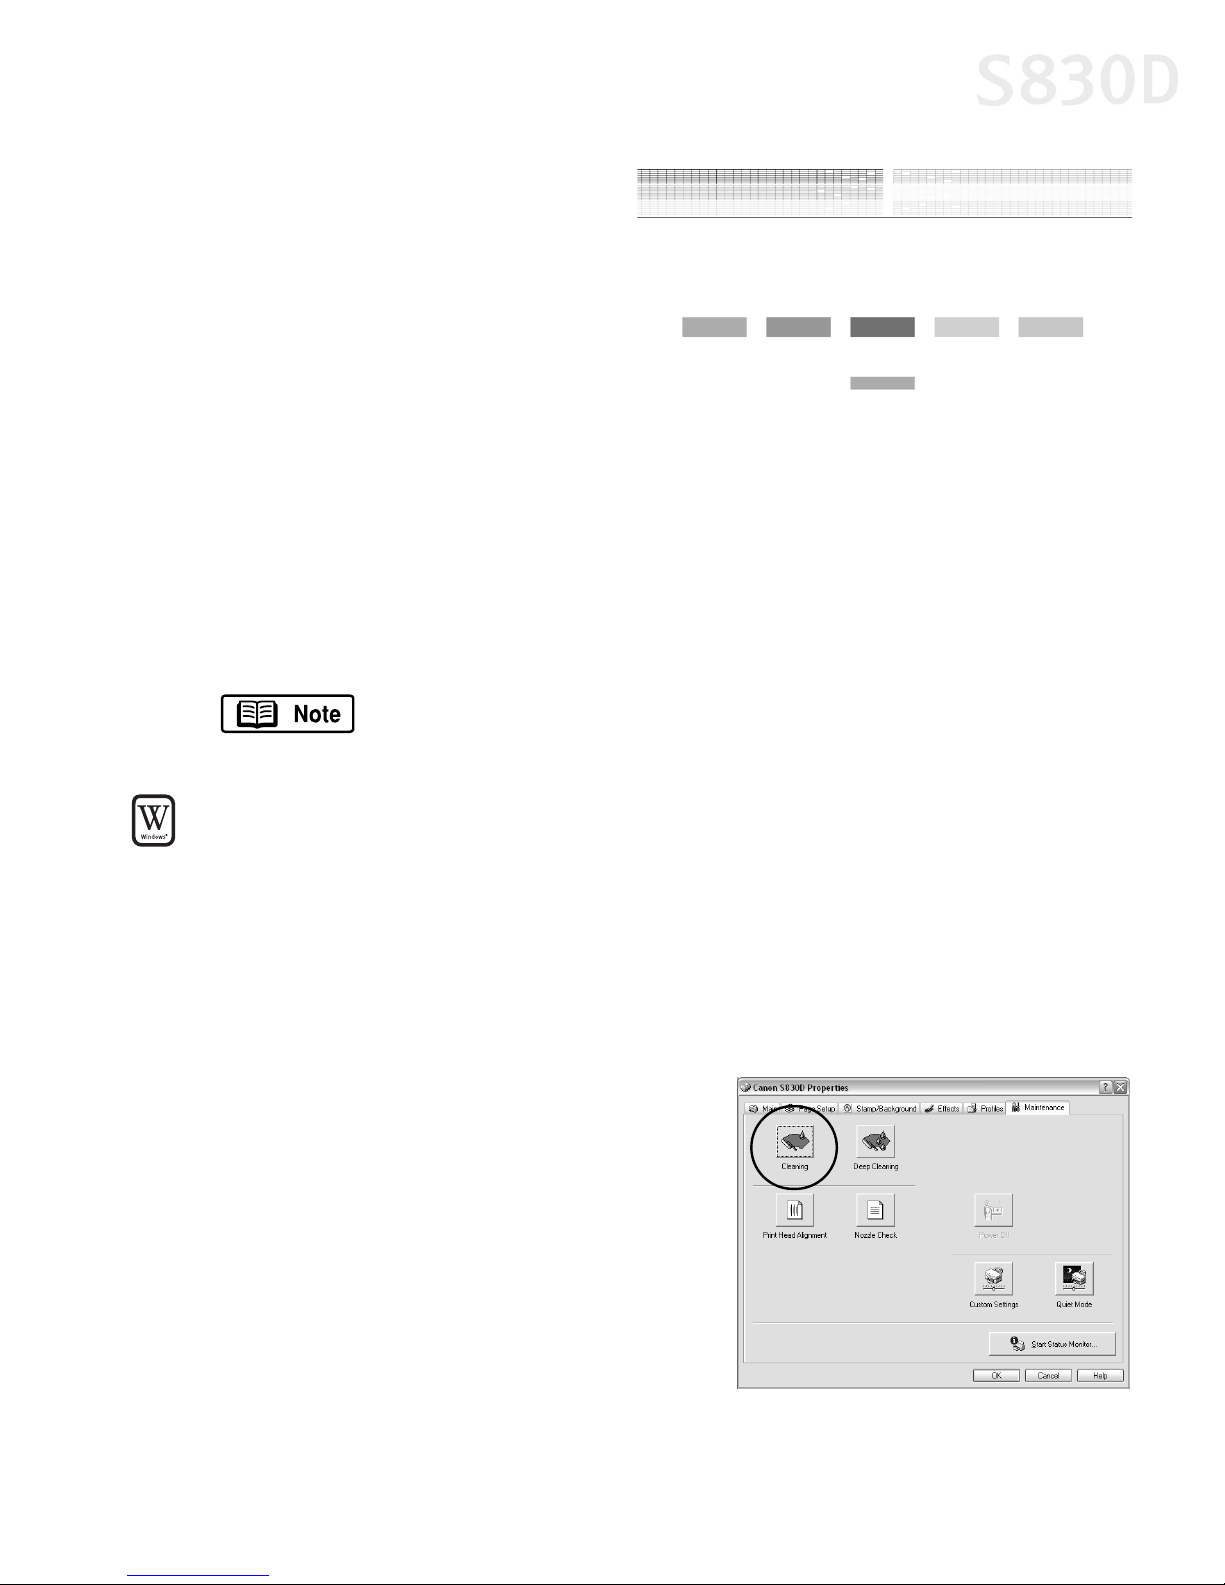
6. Check the nozzle check pattern.
If the lines in the first pattern are
broken, the print head must be
cleaned. See “Cleaning the Print
Head” for instructions.
If the vertical lines in the second
pattern stand out, the print head
position must be adjusted. See
“Aligning the Print Head” on
page 41 for instructions.
Cleaning the Print Head
If your printed output appears faded, streaked or scratchy, the print heads may
need to be cleaned. See the S830D User’s Guide on the Setup Software & User’s
Guide CD-ROM for additional corrective actions.
Printing Maintenance
Print head cleaning consumes ink. Avoid unnecessary cleaning.
To clean the print head in Windows:
1. Make sure the printer is turned on.
2. Click Start, then:
• Windows XP: Select Control Panel, then Printers and Other Hardware, then
Printers and Faxes.
• Other Windows versions: Select Settings, then Printers.
3. Right-click the Canon S830D printer icon,
then select Properties.
4. Click the Maintenance tab, then click the
Cleaning button.
5. Click OK.
The POWER lamp on the printer flashes
green during the cleaning process.
45
Page 50
Printing Maintenance
6. Print a nozzle check pattern to check the results of the print head cleaning.
See “Printing a Nozzle Check Pattern” on page 43 for instructions.
7. If there is no change after cleaning, check the amount of ink remaining. If an
ink tank is empty, replace it. See “Monitoring Ink Levels” on page 39 for
instructions on how to check ink tank levels.
To clean the print head in Mac OS:
Make sure the printer is on.
1.
2. In a software application, click File, then Page Setup.
3. Click Utilities. The Canon S830D Printer Utility dialog box will display.
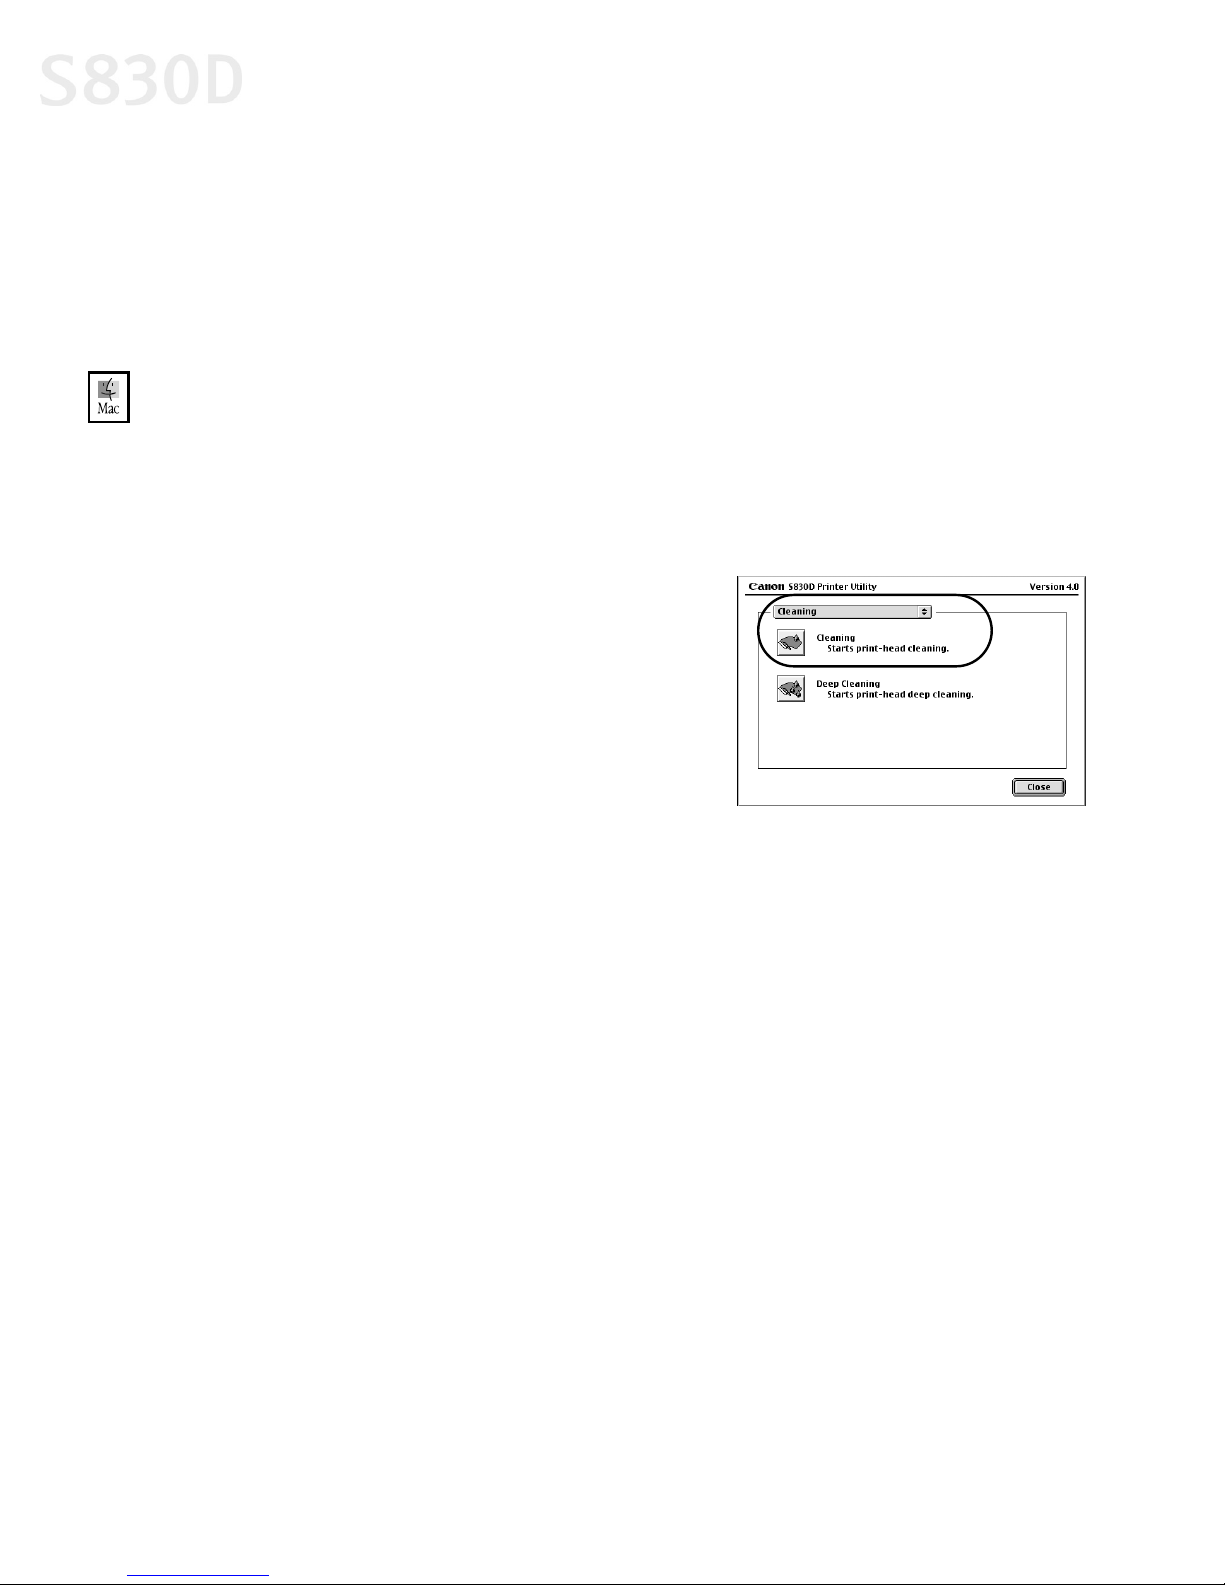
4. Select Cleaning from the drop-down list.
The cleaning options will display.
5. Click the Cleaning icon.
6. Read the message, then click OK.
7. Print a nozzle check pattern to check the
results of the print head cleaning. See
“Printing a Nozzle Check Pattern” on
page 43 for instructions.
46
Page 51

Chapter 5: Using Your
Photo Applications
Several photo applications come with your Canon S830D that make it easy to
organize, view, manipulate and print color photographs.
• Easy-PhotoPrint for Windows, which supports Exif 2.2, the new worldwide
standard for digital images, can be used to select, trim and lay out your
photos before printing. Easy-PhotoPrint can be used as a stand-alone
application, or with ZoomBrowser EX version 3.3 or later.
• A browser (ZoomBrowser EX for Windows and ImageBrowser for Mac OS)
provides easy viewing of photos and other images stored on your computer.
• PhotoRecord for Windows can be used to compile digital photos or images
into “album” layouts, or place multiple images on a single sheet for printing.
From PhotoRecord, you can also make high-quality color prints on Canon
specialty paper.
• PhotoStitch helps you to “stitch” together different parts of a single photo or
combine multiple related photos into a panoramic or fully assembled view.
This chapter provides a brief overview of the basic features available with these
applications, as well as procedures for printing on Canon Photo Paper Pro for
Borderless Printing 4" x 6" paper.
What is Exif Print?
The Canon S830D Photo Printer supports Exif 2.2, the new worldwide standard for
digital images. Canon is the first to implement this new standard in printers.
When taking a photograph using an Exif 2.2 (Exchangeable Image File Format)compatible camera, additional information, including the camera exposure and
color settings, is automatically recorded in the photograph’s digital file. When
you print these Exif Print-enhanced digital images on your Canon S830D Photo
Printer using the Easy-PhotoPrint software, they are optimized with more colors,
resulting in vibrant, true-to-life photographs.
47
Page 52
Using Your Photo Applications
Installing the Photo Applications
To install Easy-PhotoPrint, ZoomBrowser EX, PhotoRecord and PhotoStitch
in Windows:
Close any open applications.
1.
2. Insert the Setup Software & User’s Guide CD-ROM in the CD-ROM drive. The
installation screen will appear.
If the setup program does not run automatically, click Cancel,
then Exit. Then, from your program start menu, click Start, then
Run, then type D:\setup.exe, where D is your CD-ROM drive.
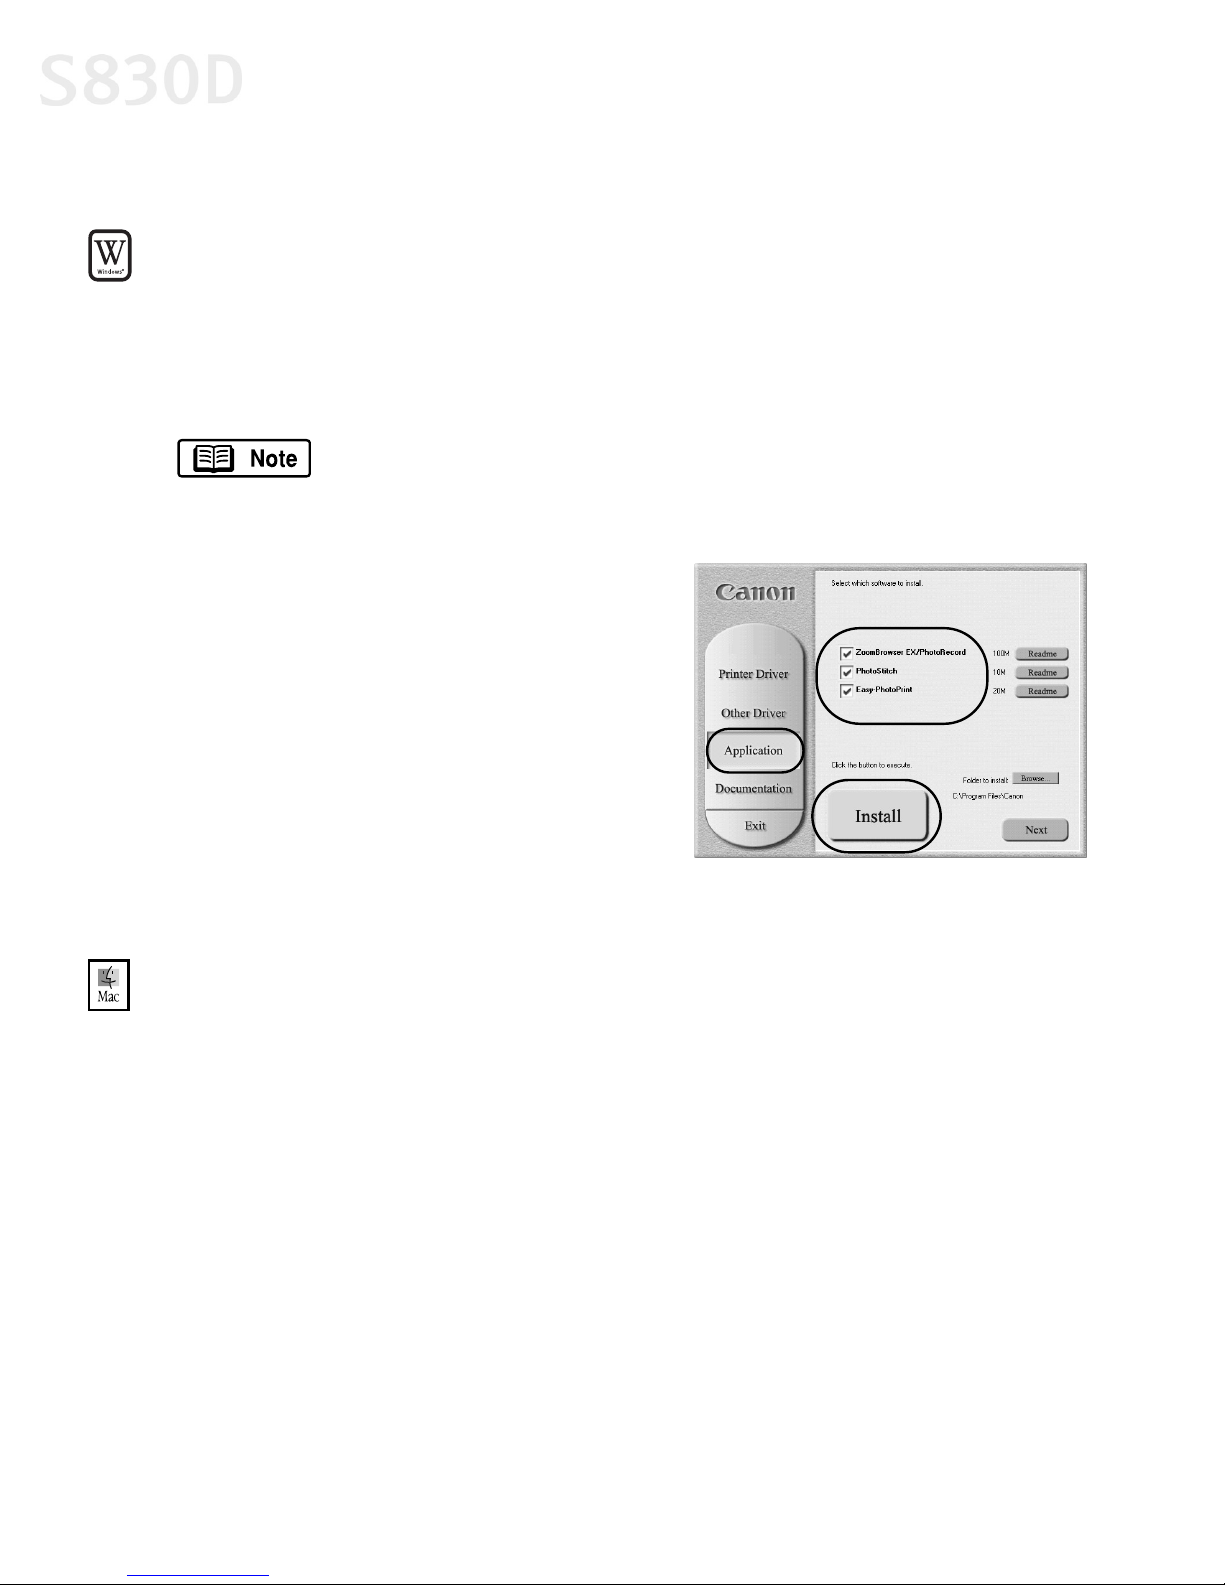
3. From the installation main menu, click
Application. The photo application
software options panel will appear.
4. Make sure all the installation options are
selected, then click Install.
5. Follow the on-screen instructions.
6. When the Terminate Installation dialog
box appears, click OK.
7. Restart your computer. The utilities will
not be fully functional until your computer has been restarted.
To install ImageBrowser and PhotoStitch in Mac OS:
1. Close any open applications.
2. Insert the Setup Software & User’s Guide CD-ROM in the CD-ROM drive.
Double-click the CANON_BJ icon on your desktop, then double-click the
Application folder.
3. Double-click the folder for the software you wish to install, then double-
click the Installer icon.
4. Read the License Agreement and click Agree.
5. Click Install. The Destination Folder dialog box will appear.
6. Select the destination folder, click Start, then follow the on-screen instructions.
7. When the Installation Has Finished dialog box appears, click OK.
8. Restart your computer. The utilities will not be fully functional until your
computer has been restarted.
48
Page 53
Using Your Photo Applications
Using the Photo Applications
Viewing Images with Easy-PhotoPrint, ZoomBrowser EX and
ImageBrowser
You can use ZoomBrowser EX (Windows) or ImageBrowser (Mac OS) to view or
organize digital images stored on your computer, or to view and copy from other
sources, such as digital cameras, scanners, Zip
With Easy-PhotoPrint (Windows) you can make high-quality photo-size or index
printouts of your digital pictures.
To open Easy-PhotoPrint directly:
To open Easy-PhotoPrint, click Start, then All Programs, then Canon Utilities. From
the Canon Utilities menu, click Easy-PhotoPrint, then Easy-PhotoPrint.
To open Easy-PhotoPrint from ZoomBrowser EX:
®
disks or CD-ROMs.
In ZoomBrowser EX, select the image you want to print.
1.
2. From the File menu, click Print, then Easy-PhotoPrint.
Easy-PhotoPrint is accessible with ZoomBrowser EX version 3.3
or later.
To open ZoomBrowser EX in Windows:
Make sure the images you want to view are on your hard drive or other
1.
accessible media.
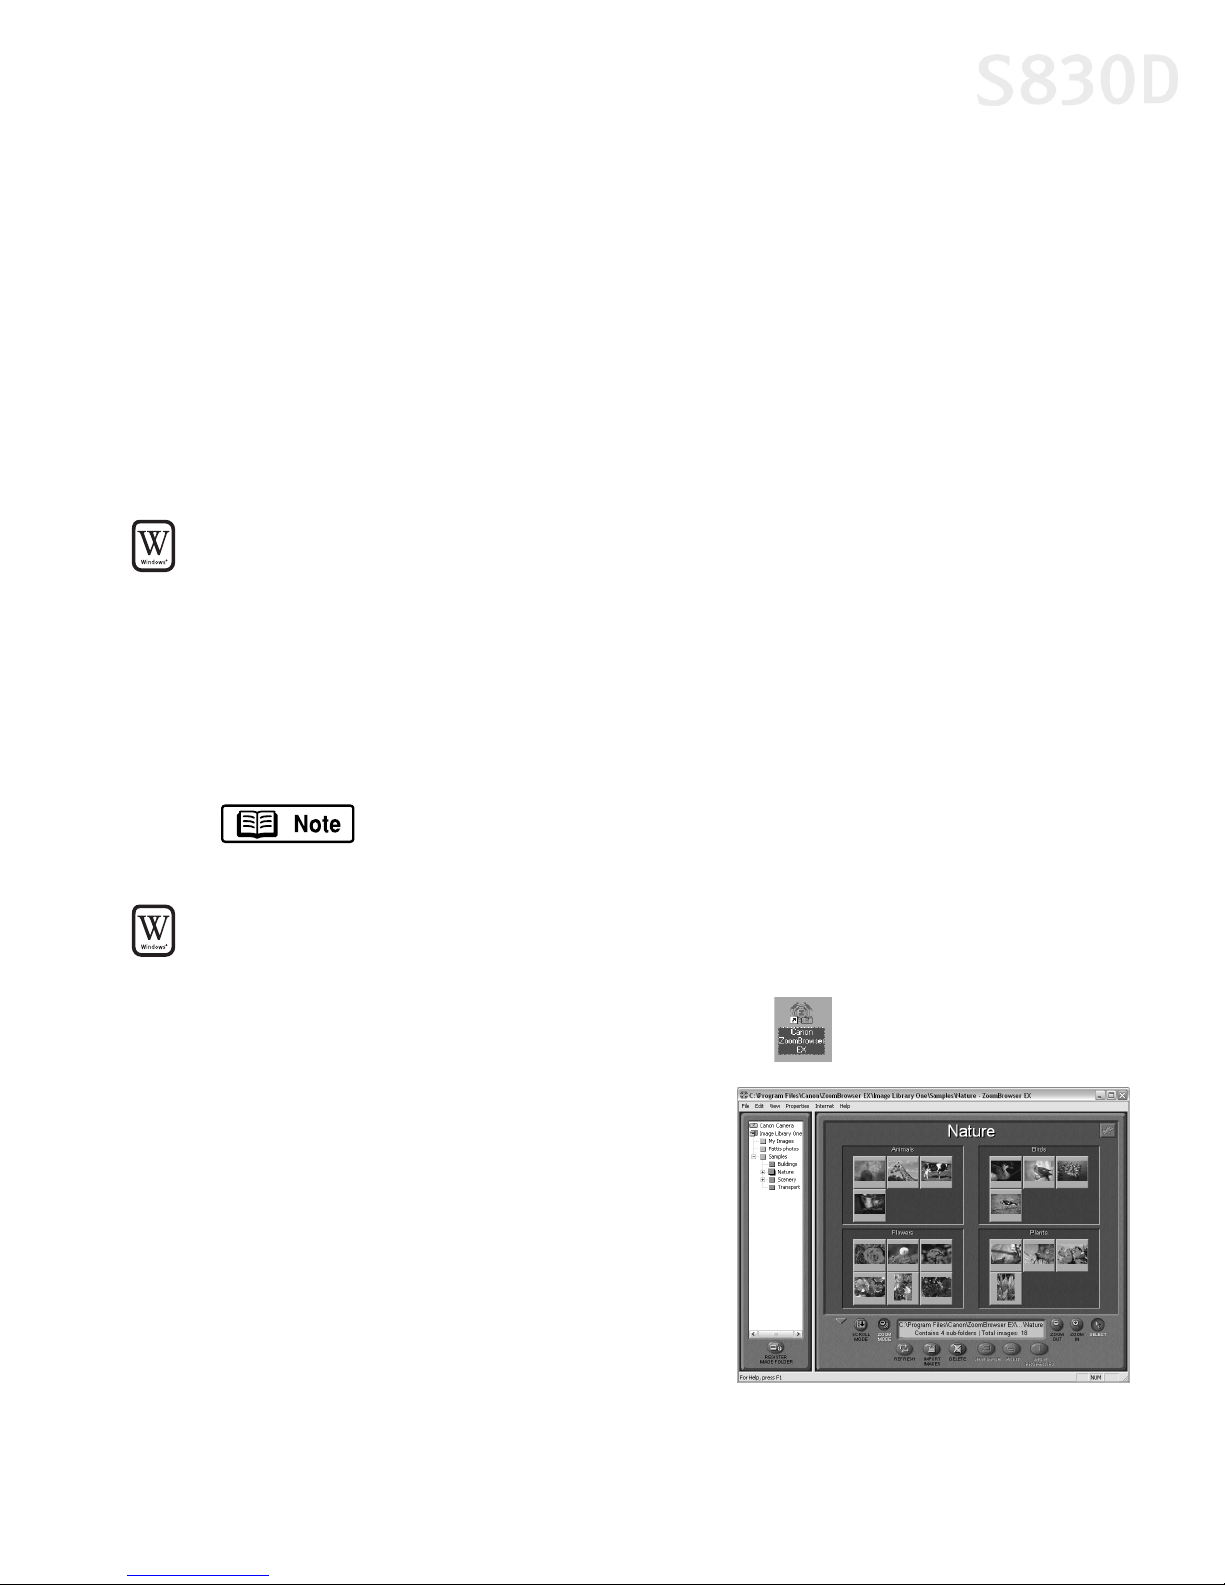
2. Double-click the Canon ZoomBrowser EX icon on the desktop.
3. From this window, you can:
Navigate through available files from
the panel on the left.
View thumbnail images in a folder in the
panel on the right.
Organize or delete files.
For a full description of all features and
options available, press F1 to view the
online help, or consult the Photo Application
Guide on your CD-ROM.
49
Page 54
Using Your Photo Applications
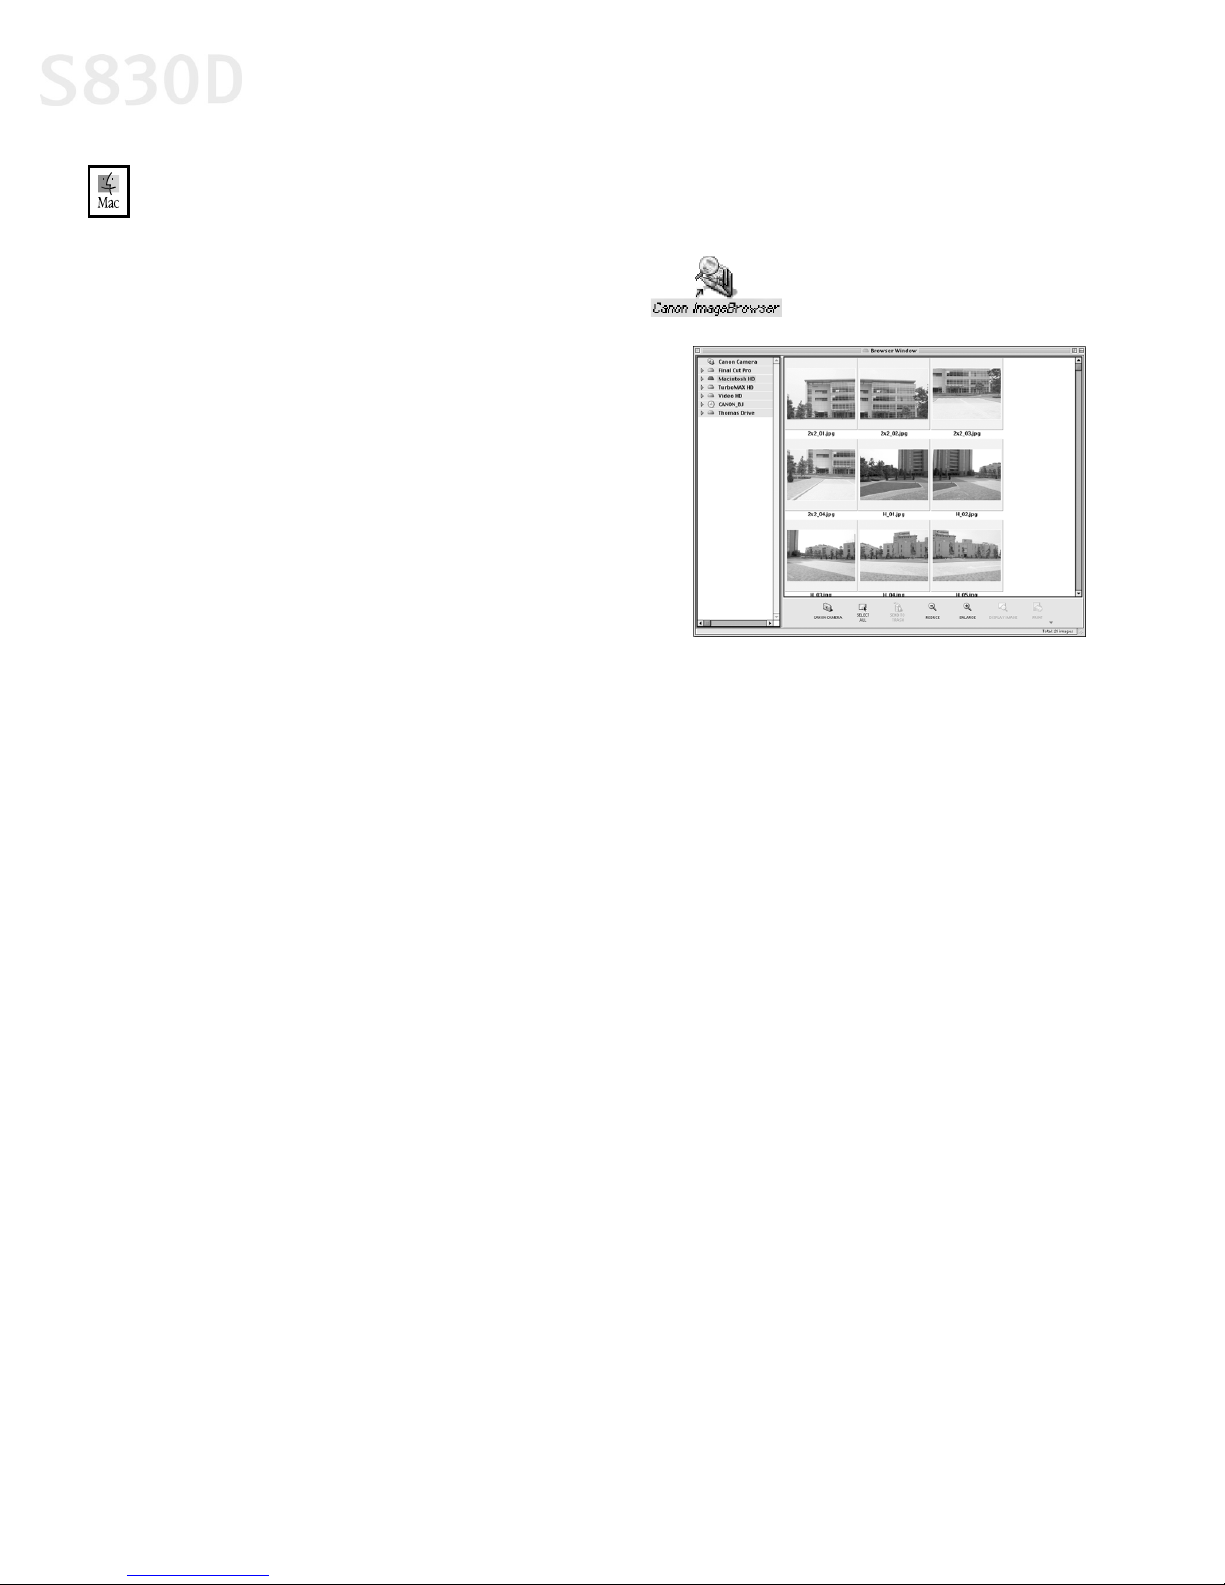
To open ImageBrowser in Mac OS:
Make sure the images you want to view are on your hard drive or other
1.
accessible media.
2. Double-click the Canon ImageBrowser icon on the desktop.
3. From this window you can:
Navigate through available files from
the panel on the left.
View thumbnail images in a folder in the
panel on the right.
Organize or delete files.
For a full description of all features and
options available, use Mac Balloon help, or
consult the Photo Application Guide on your
CD-ROM.
50
Page 55
Using Your Photo Applications
Using Easy-PhotoPrint for Windows
Easy-PhotoPrint is a software application that lets you lay out and trim your
photo-size or index pictures with the click of a mouse. With Easy-PhotoPrint, you
can specify different paper type settings for different printouts. When your photo
layout is complete, you can print and display your high-quality photos.
To use Easy-PhotoPrint:
Select the image you want to print either by navigating to the folder where
1.
your photos are stored or by selecting it directly from ZoomBrowser EX.
When Easy-PhotoPrint is started through ZoomBrowser EX, the
folder navigation window will not display.
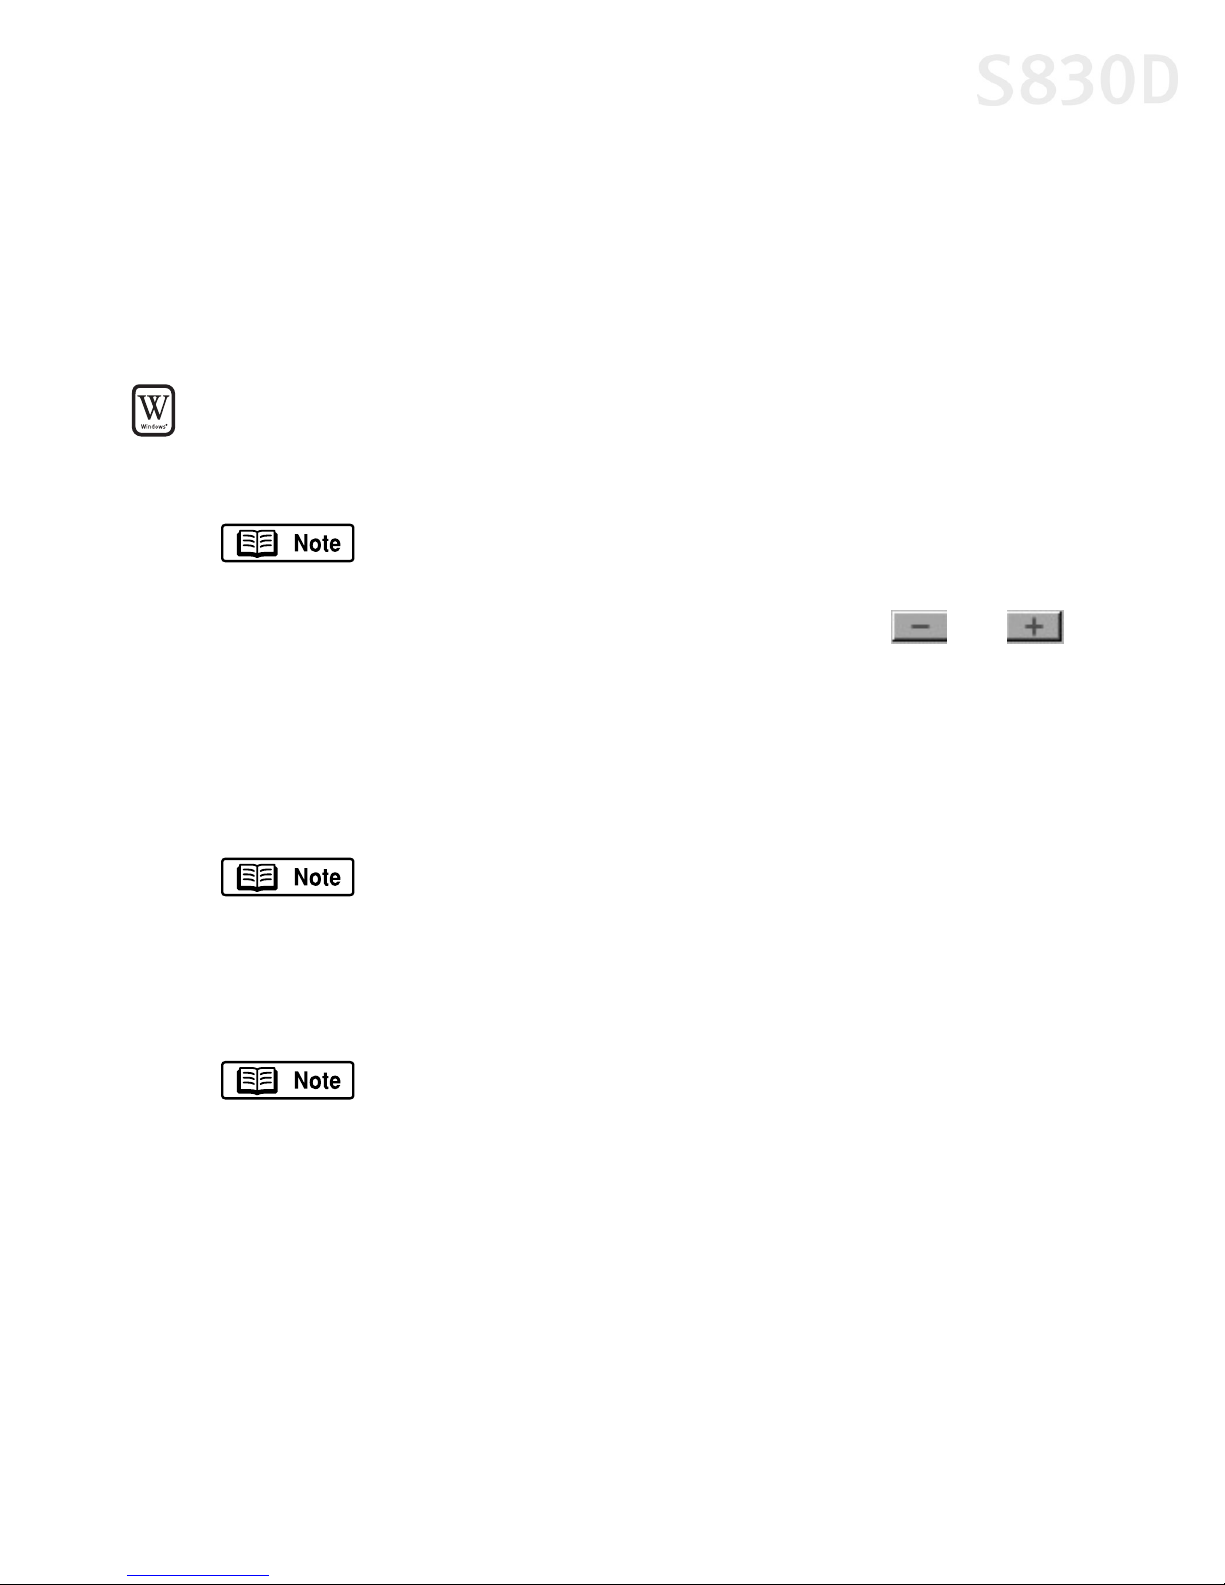
2. Click the thumbnail for the image you want to print. The and
buttons below the thumbnail will become active. Using these buttons, you
can increase or decrease the number of copies to be printed.
3. Click the Paper Selection tab, then select Canon S830D from the drop-down
menu.
4. Select the Paper Size and Media Type you will be using.
With your S830D printer, once a paper type is selected, the Vivid
Photo function becomes active. Select the Vivid Photo checkbox
for more vibrant photos.
5. Click the Layout/Print tab and select a layout. Layout options are limited by
paper type and paper size.
Above the image, you see four buttons. You can:
• Date stamp your image by clicking the Date button.
• Rotate your image 90 degrees clockwise or counterclockwise
by clicking the Rotate Right and Rotate Left buttons
• Trim the edges of your image by clicking the Trimming button.
6. When done, click Print.
51
Page 56
Using Your Photo Applications
To trim an image using Easy-PhotoPrint:
Select the image you want to trim.
1.
2. Click Trimming. The image will preview.
3. Adjust the position of the cropping area around the image.
4. When satisfied, click OK.
Using PhotoRecord for Windows
PhotoRecord is a software application that lets you create fun and unique photo
albums with the click of your mouse. You can import your photos or graphics from
your hard disk, digital camera or scanner, then, using the “drag and drop”
feature, you can arrange your album layout. You can rotate your pictures, add
captions, change page backgrounds or add a frame around each picture.
To use PhotoRecord:
Click Start, then All Programs, then Canon
1.
PhotoRecord, then PhotoRecord.
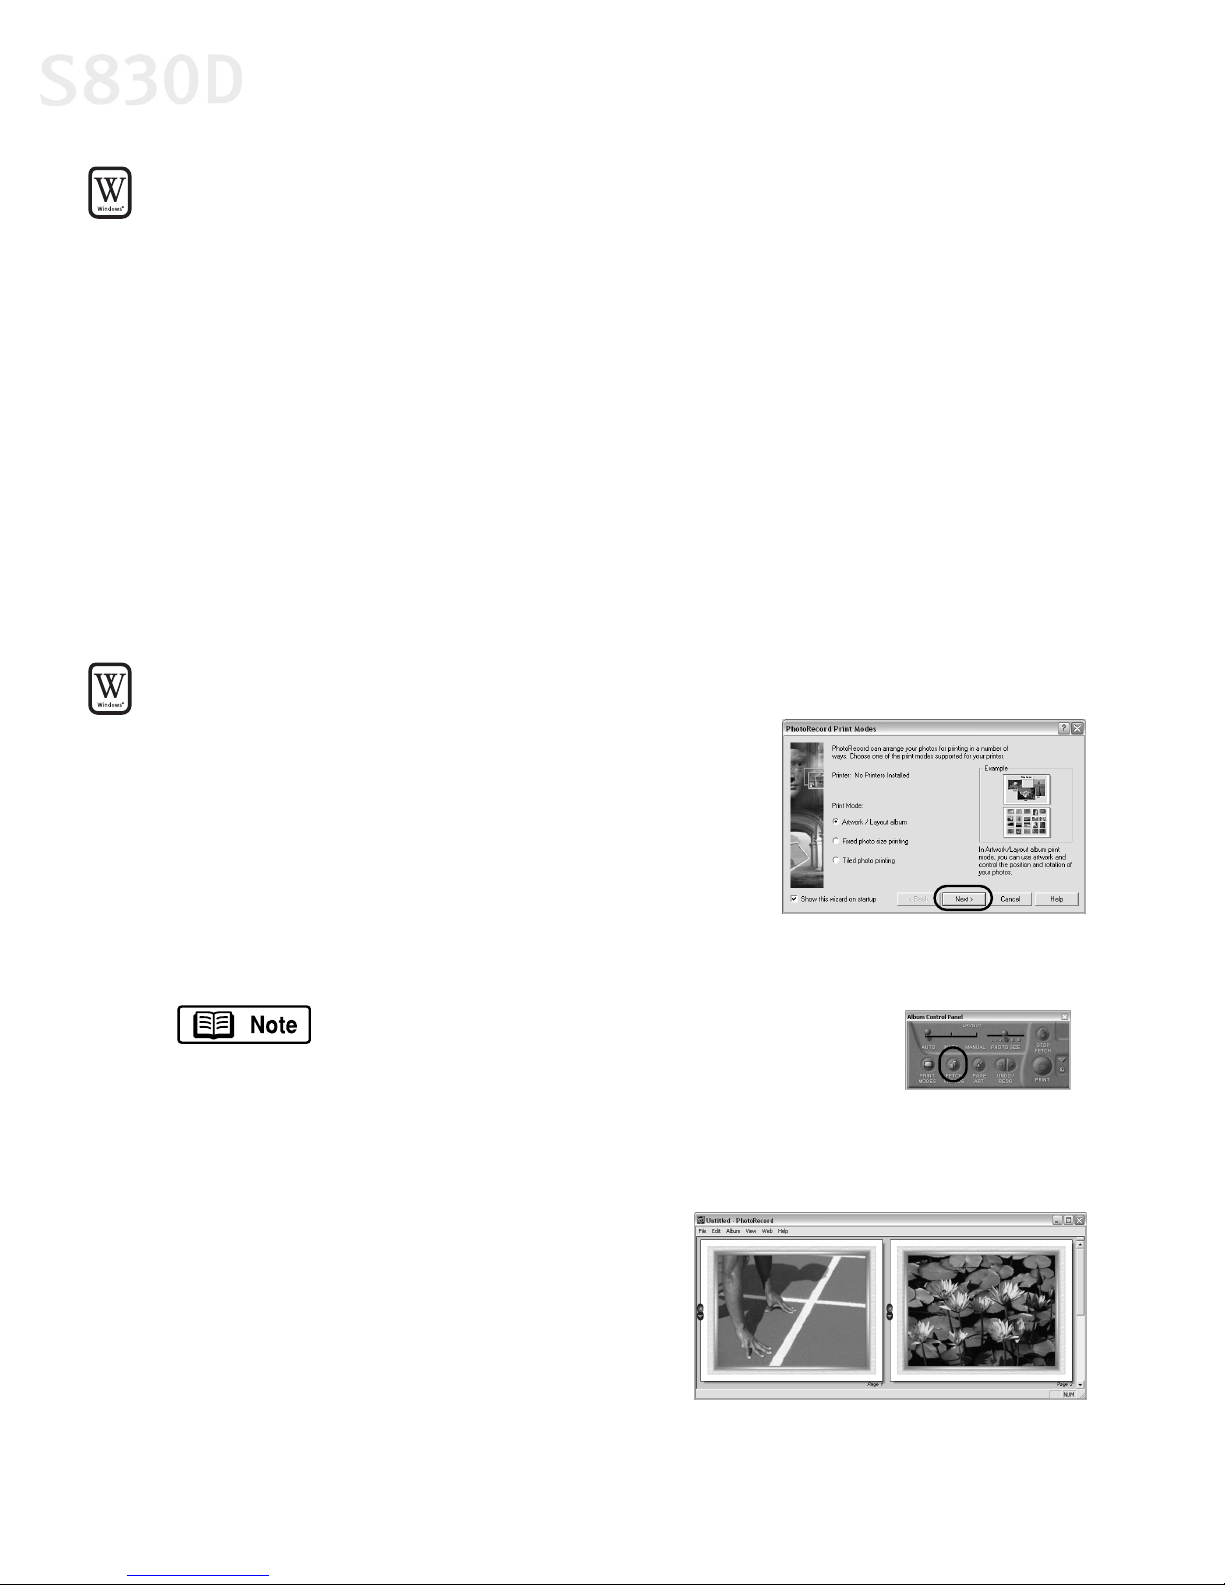
2. By default, the PhotoRecord Print Modes wizard
will appear.
You can use this wizard to select your settings,
or you can cancel the wizard.
3. Click File, then click Fetch Photos.
You can also use the Fetch Photos feature on
the Album Control Panel.
4. Navigate to the folder where your photos are stored and select the photos you
want to place into your album. Click Open.
5. Arrange the photos as you would like
them, or let the automatic layout feature
do it for you.
6. When you are ready to print, click Print on
the Album Control Panel.
52
Page 57
Using Your Photo Applications
Merging Multiple Images with PhotoStitch
With PhotoStitch, you can merge images in horizontal or vertical sequences, or
“stitch” together digital photos or image documents that have been shot or
scanned in sections. You can also use PhotoStitch to assemble a series of
overlapping images into a seamless panoramic view.
To merge images in Windows:
Make sure the images you want to view are on your hard drive or other
1.
accessible media.
2. Click Start, then All Programs, then Canon Utilities. Click PhotoStitch 3.1
from the Utilities menu, then click PhotoStitch from the final menu. The
PhotoStitch Launcher will appear.
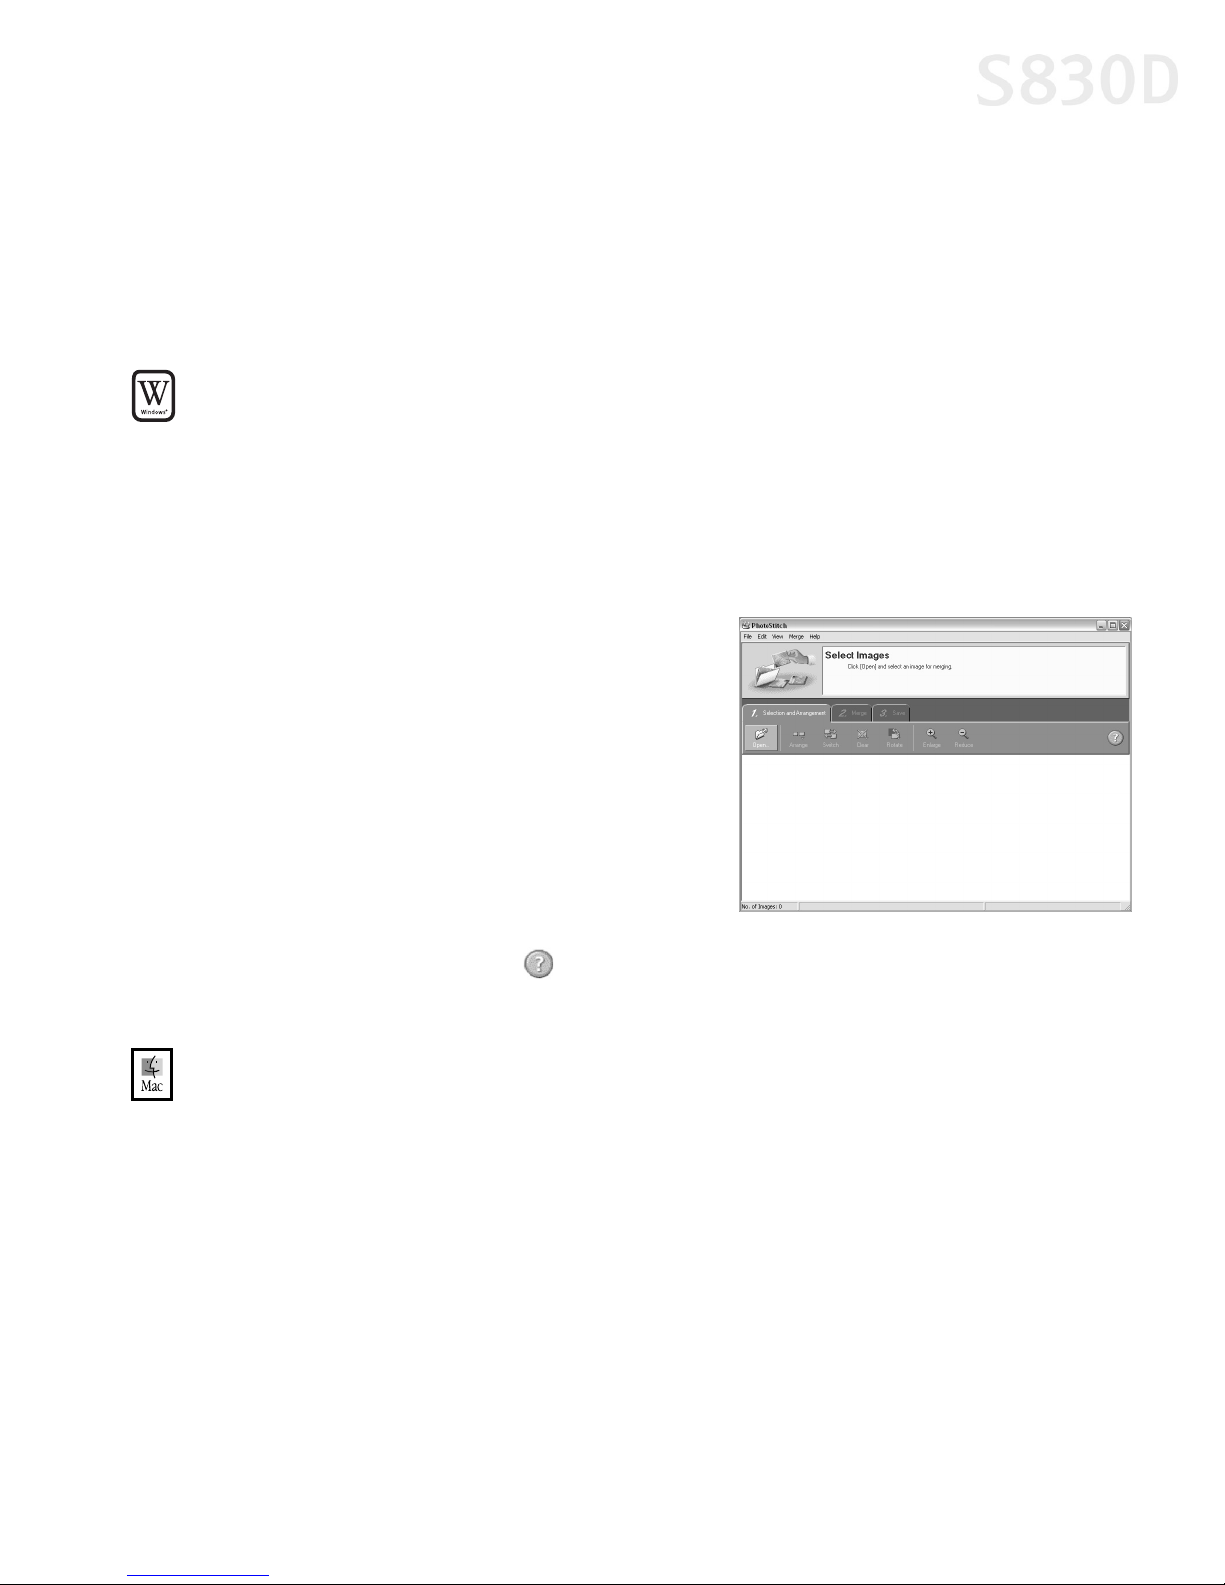
3. From this window, click the PhotoStitch
3.1 Merge Images icon. The main
window will appear.
4. Follow the on-screen instructions to
open files, and to arrange, stitch, rotate,
enlarge or reduce your images.
5. Once an image is saved, you can
preview and/or print it.
For a full description of all features and
options available, click the icon to view the online help, or consult the Photo
Application Guide on your CD-ROM.
To merge images in Mac OS:
Make sure the images you want to view are on your hard drive or other
1.
accessible media.
2. From within the ImageBrowser window (see “To open ImageBrowser in
Mac OS” on page 50), select one or more images. The images will highlight.
53
Page 58
Using Your Photo Applications
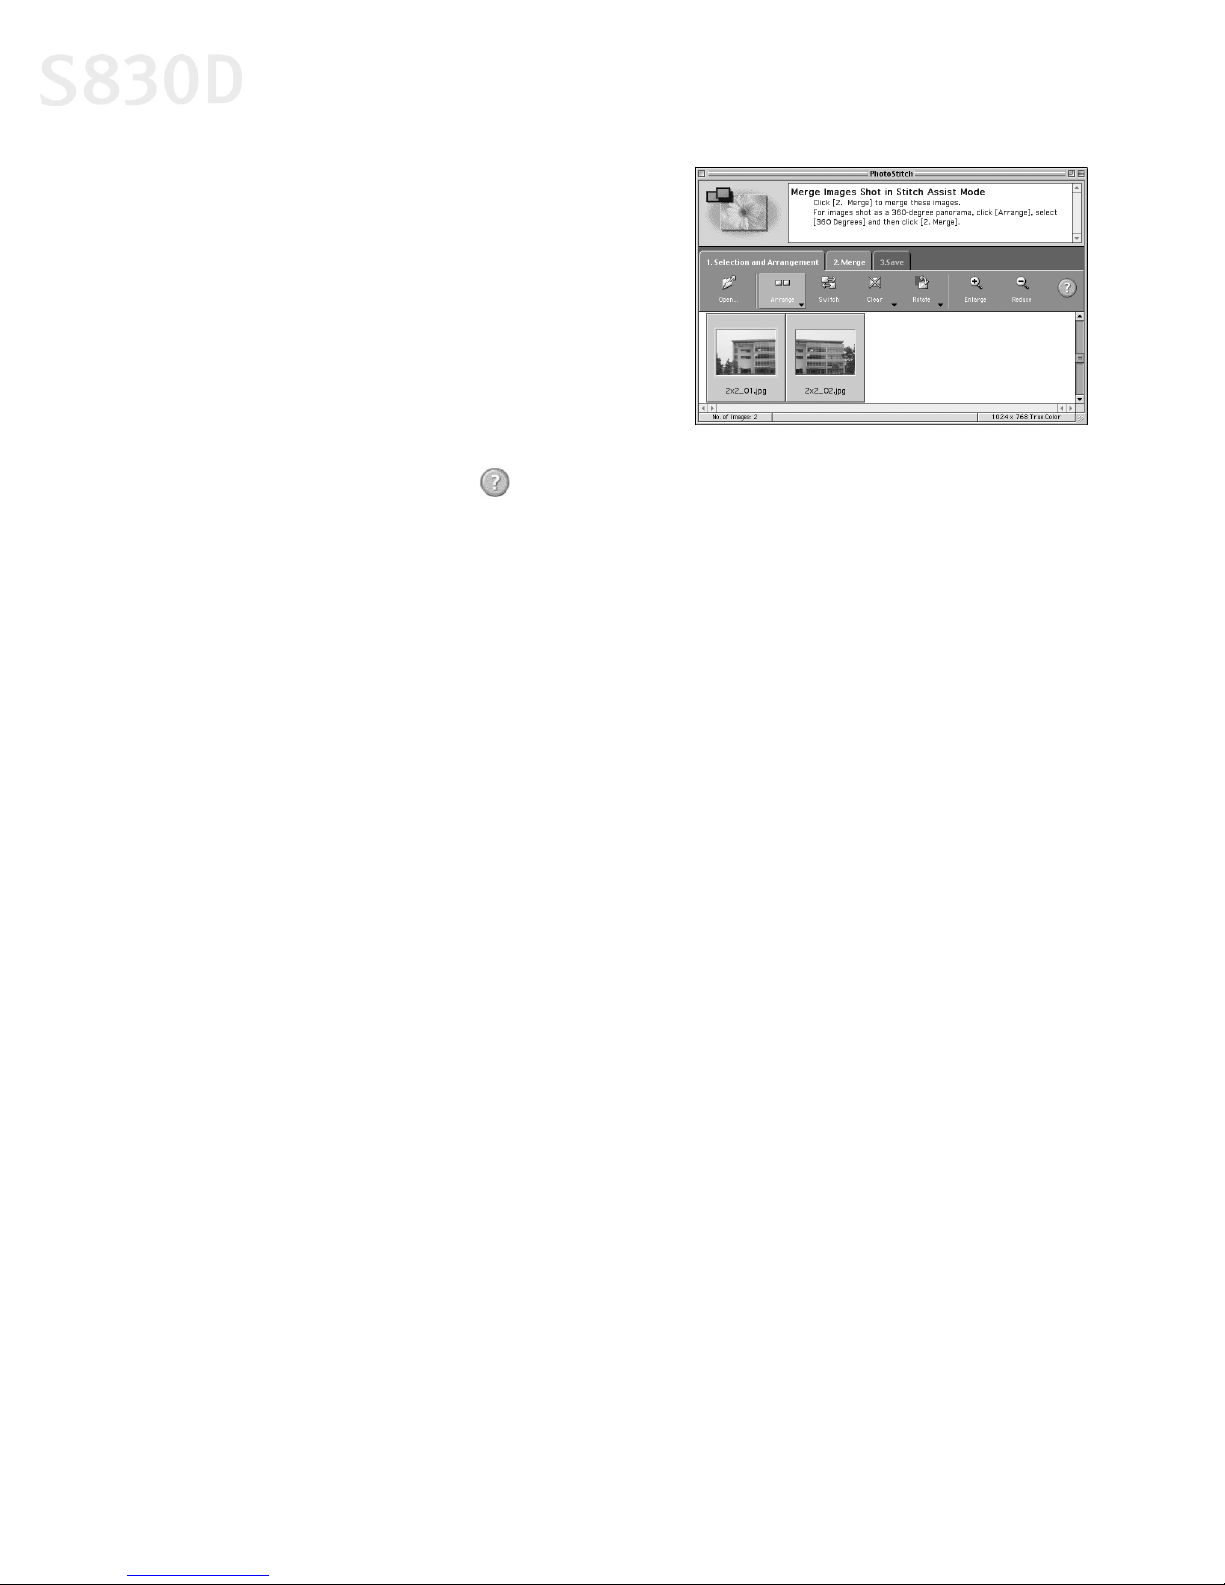
3. From the Edit menu, click PhotoStitch.
The PhotoStitch utility will appear.
4. Follow the on-screen instructions to
arrange, stitch, rotate, enlarge or reduce
your image.
5. Once an image is saved, you can
preview and/or print it.
For a full description of all features and
options available, click the icon to view
the online help, or consult the Photo
Application Guide on your CD-ROM.
Printing on Canon Photo Paper Pro for Borderless
Printing 4" x 6"
Included with your S830D is the Canon Photo Paper Pro for Borderless Printing
4" x 6" media. This paper is designed to let you print images that cover the entire
surface of the card without a white border.
This media is intended for use with Easy-PhotoPrint for Windows, PhotoRecord for
Windows, version 1.2 or later, or ImageBrowser for Mac OS, version 1.4 or later.
54
Page 59
Using Your Photo Applications
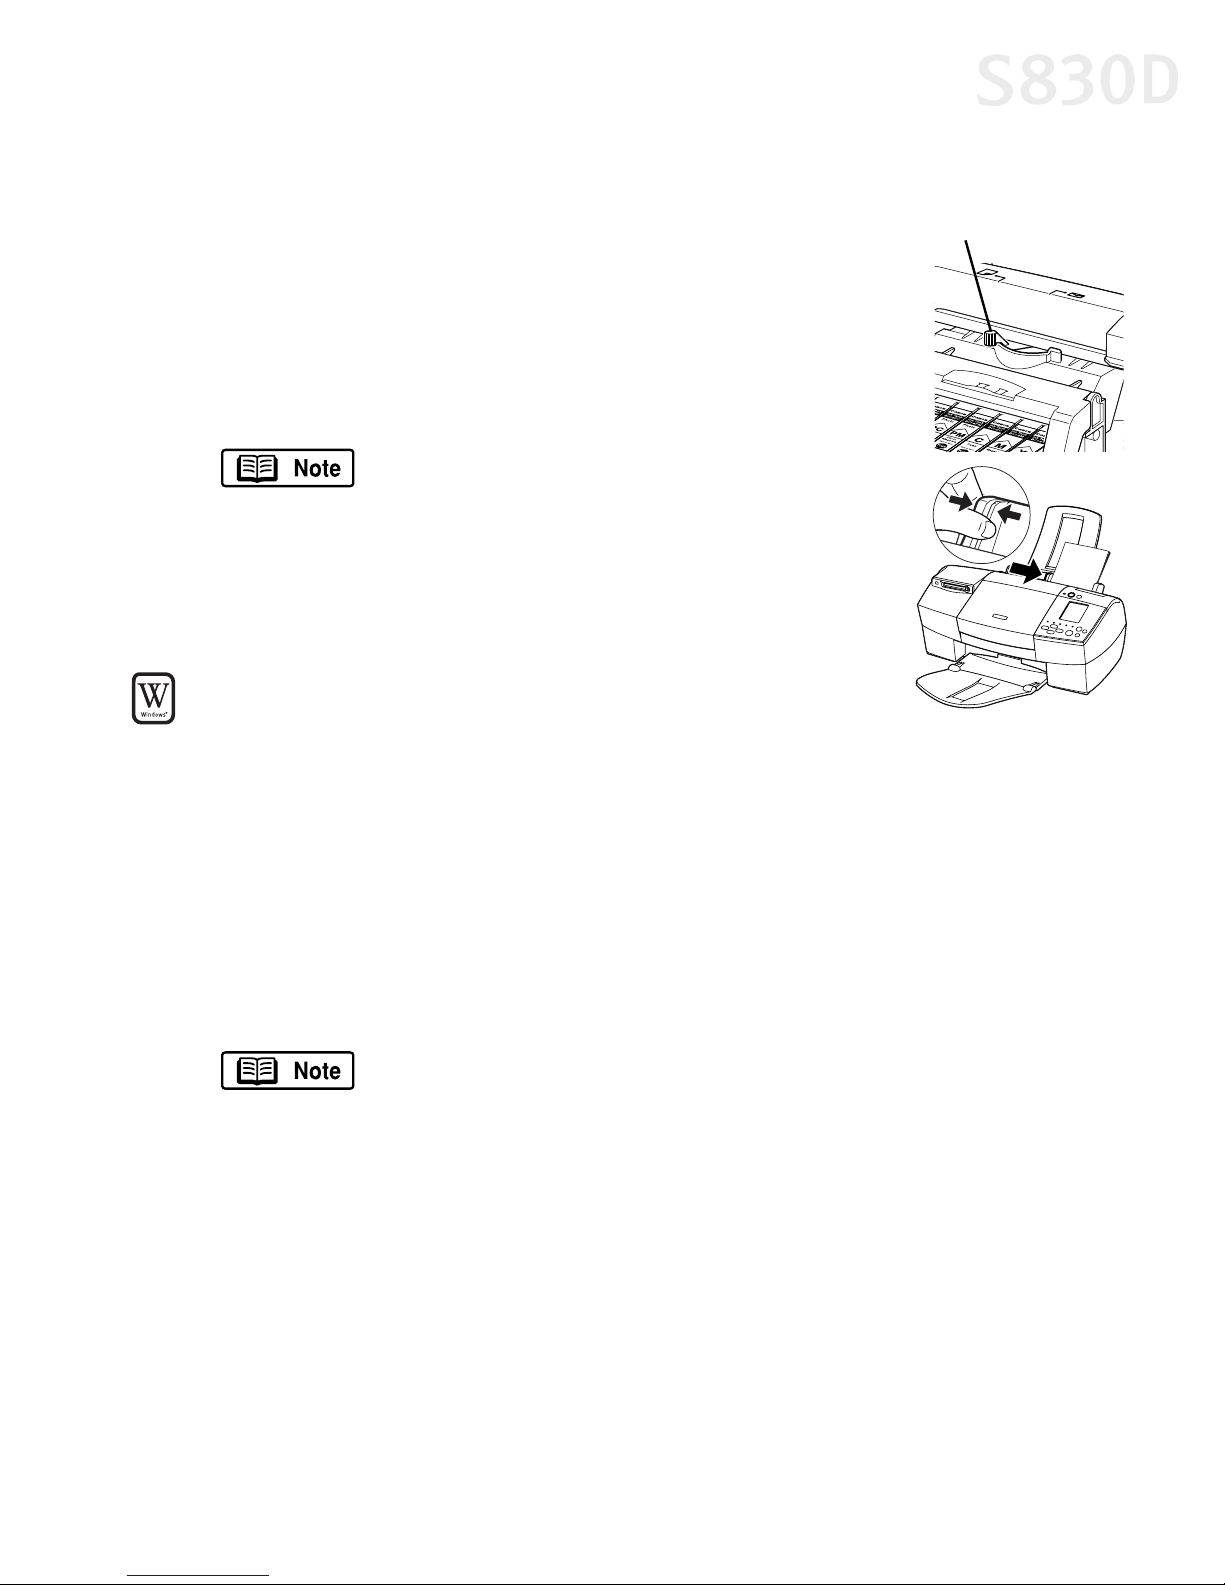
Paper thickness lever
To load Photo Paper Pro for Borderless Printing 4" x 6":
Set the paper thickness lever to the left.
1.
2. Slide the paper guide completely to the left.
3. With the glossy side facing up, insert a sheet of
borderless paper into the paper rest.
4. Slide the paper guide right to the edge of the paper.
You can load up to 20 sheets of
Canon Photo Paper Pro for
Borderless Printing 4" x 6" at a time.
To print with borderless paper for Windows:
1.
2. From ZoomBrowser EX, select the photo to be printed. To print images using
3. Click Print, then click Layout. The PhotoRecord Print Modes wizard
4. Select the desired printer, then select Borderless printing (Tiled photo) from
5. Click Next.
6. Specify Media Type, Paper Size and Orientation. The Preview area will show
Follow the procedures above to load the borderless
paper.
Easy-PhotoPrint for Windows, see “To Use Easy-PhotoPrint” on page 51.
will appear.
the Print Mode options.
The Borderless printing (Tiled photo) checkbox is available only
when you are using a printer which supports this feature.
the print image in relation to the paper.
7. Click Set Page Margins to widen or narrow the printing area, then click OK,
then Next.
8. Specify the number of photo tiles you want to place in a single page. Select
1 (1 row) when printing a photo with no margins. If you select the Automatic
55
Page 60

Using Your Photo Applications
clipping checkbox, PhotoRecord automatically resizes and clips the photos to
fit the specified photo size.
9. Click Finish. The photo will be automatically positioned to fit the paper
settings. Click Print to start printing.
In PhotoRecord, page backgrounds and photo frames are not
available when using the Borderless print (Tiled photo) mode.
However, you can add text blocks, clip your photos (with some
limitations), or specify print quality and number of copies to
print. You cannot resize your photos or modify the layout.
To print with borderless paper in Mac OS:
This section is for Mac OS 8.6 – 9.x operating systems only.
Follow the procedures above to load the borderless paper on page 55.
1.
2. From ImageBrowser, select the photo to be printed. Locate the Print button
along the bottom and click Print.
3. Select Layout printing. The Layout Options wizard will appear.
4. Select Tiled photo printing, then click Next.
5. Click Page setup. The Page Setup dialog box will appear.
6. Click Borderless Printing, then select 4 x 6 or Letter under Paper Size. Choose
your Orientation and click OK.
7. When the “You selected Borderless Printing” dialog box appears, click OK.
8. Specify the number of images you want to place in a single page. Select
1(1x1) when printing a photo with no margins. If you select the Automatic
Clipping checkbox, ImageBrowser automatically resizes and clips the photos
to fit the specified photo size.
9. Click OK. The photo will be automatically positioned to fit the paper settings.
Click Print to start printing.
56
Page 61
Chapter 6:
Troubleshooting
Tips for Troubleshooting
Troubleshooting usually falls into one of the following categories:
Printed Output The printed output is not coming out as
expected.
Installation The printer driver will not install properly.
Printer Hardware The printer is not working or not working
as expected.
Error Message You are getting an error message from the
software (displayed on the screen), the printer (indicated by
blinking lights), or the Operation Panel on the printer.
Customer Care Center Canon offers a full range of customer
technical support options.
If you encounter difficulties during installation or operation of your Canon S830D
Photo Printer, quickly scan all topics until you find a description that
approximates your difficulty. Go through the related solutions until you find one
that works.
57
Page 62
Troubleshooting
Troubleshooting Printed Output
Problem Possible Cause Try This
Poor print quality Print head clogged Verify that your print head is working properly by printing a Nozzle
Check Pattern. See “Printing a Nozzle Check Pattern” on page 43.
Try cleaning the print head. See “Cleaning the Print Head” on
page 45. If you do not see any improvements, try print head
cleaning three times. If there is still no improvement, perform a
deep print head cleaning using the Maintenance tab in your
printer driver for Windows and the printer utility for Mac OS.
Incorrect printer driver
settings
One or more ink tanks
are installed in the
wrong position or not
seated properly
Color settings need to
be adjusted
Low ink or ink tank
may need to be
replaced
Print head needs to be
aligned
Print head seated
incorrectly
Print head may need to
be replaced
Altering driver settings may improve the appearance of your printed
image. See “Setting Driver Options” on page 8 for instructions on
selecting the optimum print mode for your print job.
Verify that the ink tanks are in the correct color slot. Check that
they have been firmly seated. Press down on the ink tanks until
they click into place. See “Replacing Ink Tanks” on page 41.
You can enhance the color on your printout. See “Adjusting Color
Balance, Brightness and Saturation” on page 17.
Verify that you have sufficient ink in the ink tanks. See
“Monitoring Ink Levels” on page 39. If necessary, replace the ink
tanks. See “Replacing Ink Tanks” on page 41.
Perform print head alignment. See “Aligning the Print Head” on
page 41.
Reseat the print head. See the “
S830D User’s Guide
Perform multiple print head cleanings. See “Cleaning the Print
Head” on page 45. If problem persist, contact the Canon Customer
Care Center.
on the Setup Software & User’s Guide CD-ROM.
Easy Setup Instructions
” in the
Printout and
screen image
colors appear
differently
Incorrect printer driver
settings
One or more ink tanks
are installed in the
incorrect position or
not seated properly
Incorrect media type
setting or weight
58
Altering driver settings may improve the appearance of your printed
image. See “Setting Driver Options” on page 8 for instructions on
selecting the optimum print mode for your print job.
Verify that the ink tanks are in the correct color slot. Check that
they have been firmly seated. Press down on the ink tanks until
they click into place. See “Replacing Ink Tanks” on page 41.
Verify that your media is compatible and/or fit for your print job
and that the media you are using is selected in the driver. See
“Using Specialty Media” on page 3.
Page 63

Problem Possible Cause Try This
Troubleshooting
Banding appears
on printed image
or
White streaks are
in printout
Smudged or
smeared ink on
paper
Color(s) missing
on nozzle test
Print head needs to be
aligned
Print head nozzles
clogged
Use of low-quality
paper (plain paper,
copier paper, etc.)
Print head may need to
be replaced
Paper thickness lever
set incorrectly
Print head nozzles
clogged
Perform print head alignment. See “Aligning the Print Head” on
page 41.
Verify that your print head is working properly by printing a Nozzle
Check Pattern. See “Printing a Nozzle Check Pattern” on page 43.
Then try cleaning the print head. See “Cleaning the Print Head” on
page 45. If you do not see any improvements, try multiple print
head cleanings.
Use a higher grade of paper (e.g., Photo Paper Pro, Photo Paper
Plus Glossy, or High Resolution Paper).
Perform multiple print head cleanings. See “Cleaning the Print
Head” on page 45.
Verify that the paper thickness lever is set properly for the media
you’re using. See “Load Limit and Paper Thickness Lever Position”
on page 5.
Verify that your print head is working properly by printing a Nozzle
Check Pattern. See “Printing a Nozzle Check Pattern” on page 43.
Then try cleaning the print head. See “Cleaning the Print Head” on
page 45. If you do not see any improvements, try multiple print
head cleanings.
Meaningless
characters
printed
Low ink or ink tank
may need to be
replaced
Corrupted print
instructions are stored
in the printer buffer
Previous print job
paused before it was
finished
Incorrect printer driver
selected
Bad (corrupted) file Create the document again and print it. If it prints successfully,
Verify that you have sufficient ink in the ink tanks. See
“Monitoring Ink Levels” on page 39. If necessary, replace the ink
tanks. See “Replacing Ink Tanks” on page 41.
1. Turn the printer off to clear the printer buffer.
2. Turn the printer on again.
If a previous print job was paused before it was printed, turn the
printer and the computer off, then turn both back on again, or
cancel any print jobs using the BJ Status Monitor or BJ Print
Monitor. See “Cancelling a Print Job” on page 7.
Check the Printer dialog box to verify that the correct printer driver
is selected.
the original file was corrupted.
59
Page 64
Troubleshooting
Troubleshooting Installation
Problem Possible Cause Try This
Cannot install the
printer driver
Procedure followed
incorrectly
Previous version of
printer driver or same
printer driver already
installed on computer
Other applications
running in the
background
Installation not
starting automatically
when CD is inserted
into drive
See “Installing the Printer Driver” on page 71, or see the S830D
User’s Guide on the Setup Software & User’s Guide CD-ROM for
more information.
Always uninstall the previous version of the printer driver before
installing the new version. See “Uninstalling the Printer Driver”
on page 73.
Other open applications on your computer can interfere with the
installation routine. Close any software applications, including
any virus detection software, on your computer before
reinstalling the printer driver. See “Installing the Printer Driver”
on page 71.
WINDOWS
If printer driver installation did not start automatically
when you loaded the CD-ROM:
1. For Windows XP: Click Start, then My Computer, then
right-click the CD-ROM drive, then choose Explore
from the drop-down menu.
For other Windows versions: Double-click My
Computer on the Windows desktop, then right-click
the CD-ROM drive, then choose Explore from the
drop-down menu.
2. Double-click msetup.exe.
If you install the printer driver by clicking Start, then Run,
specify the correct CD-ROM drive and file name
(D:\msetup.exe, where D is the CD-ROM drive).
CD-ROM drive not
specified
60
Normally, after you insert the S830D CD-ROM the setup dialog
box displays automatically. If it does not:
WINDOWS
1. For Windows XP: Click Start, then My Computer, then
CD-ROM drive.
For other Windows versions: Double-click My
Computer on the Windows desktop, then double-click
the CD-ROM drive.
2. Double-click msetup.exe.
®
AC
OS
M
Double-click the CD-ROM icon on your desktop.
Page 65
Problem Possible Cause Try This
Troubleshooting
Cannot install the
printer driver
(continued)
CD-ROM drive not
working properly
Computer cannot
detect a printer port
WINDOWS
Use My Computer to confirm that the CD-ROM is
operating normally:
1. For Windows XP: Click Start, then My Computer, then
right-click the CD-ROM drive, then choose Explore
from the drop-down menu.
For other Windows versions: From the Desktop,
double-click My Computer, then right-click the
CD-ROM drive, then choose Explore from the dropdown menu.
2. If the files do not appear, refer to your Windows
documentation for more information.
MAC OS
Open the Apple System Profiler, click Devices and
Volumes, then verify that the CD-ROM icon appears.
Verify that the correct cable is connected to both your printer and
your computer, and that the connection is secure.
Ensure that the USB cable is connected directly to the computer,
bypassing any USB hubs.
Verify that the printer is turned on and the POWER lamp is a
steady (non-blinking) green.
Try plugging the USB cable into another USB port.
If this does not handle the problem, exit the installation
procedure and reinstall the software again.
Also see the S830D User’s Guide on the Setup Software & User’s
Guide CD-ROM for more information.
61
Page 66
Troubleshooting
Troubleshooting Printer Hardware
Problem Possible Cause Try This
Paper feeds
incorrectly
Paper jammed during
automatic feed
Paper loaded
incorrectly or exceeds
the load limit
Paper path obstructed Check and see if there are any obstructions blocking the paper
Gently pull the jammed paper out of the sheet feeder slot or the
paper output slot, whichever is easier. If the paper will not pull
out of the printer easily, do not force it.
If the paper tears and some of it is left in the printer, turn the
printer off, open the front cover, and remove the pieces of paper.
Reload paper into the automatic sheet feeder then press
RESUME/CANCEL button on the printer.
If you turn the printer off, your print job data will be lost. Print the
job again.
Verify that the stack of paper has been loaded correctly, not
exceeding the maximum load limit.
path. If so, remove the obstructions and try printing again.
62
Page 67
Problem Possible Cause Try This
Troubleshooting
Printer will not
print
Application error If this occurs in a specific application, try printing from another
application or contact the software manufacturer.
Previous print job
in queue
Printer not set as
default printer
Delete any existing print jobs in the printer queue.
INDOWS XP
W
1. To delete the print job from the printer queue, click
Start, then Control Panel, then Printers and Other
Hardware, then Printers and Faxes.
2. Double-click the Canon S830D printer icon. The
Print Manager window will appear.
3. Select the document in the printer queue to be
deleted, then press Delete to cancel the print job.
MAC OS
1. Open the BJ Print Monitor window (click Finder, then
BJ Print Monitor).
2. Highlight the job to be canceled.
3. Click the Stop Printing icon in the Print Queue
dialog box. The print job will be canceled and the
paper ejected.
Verify that your S830D is selected as the default printer. See
“Selecting the S830D Photo Printer for Use” on page 2.
Computer/printer
needs to be reset
Corrupt printer driver Uninstall and reinstall the driver.
Reboot the computer and/or reset the printer.
• To reboot, close all open applications, then restart the
computer.
• To reset the printer, turn it off, then back on.
63
Page 68

Troubleshooting
Problem Possible Cause Try This
Printer is not
responding
Power cable is not
securely connected
Printer is not turned on
or is not ready
Computer/printer
needs to be reset
Printer and computer
cabled together
incorrectly
Verify that the power cable is securely connected to the printer
and plugged into a working outlet.
Verify that the POWER lamp is on and glowing a steady green.
If the light is off, press the POWER button. The green light will
blink as the printer is warming up, then go to a steady (no blink)
state when the printer is ready.
If the POWER lamp is blinking green, this indicates that the
printer is warming up or is processing a print job.
If the POWER lamp blinks orange, or green and orange
alternately, see “Handling Error Messages” on page 66.
Reboot the computer and/or reset the printer.
• To reboot, close all open applications, then restart the
computer.
• To reset the printer, turn it off, then back on.
Reconnect the printer cable to the correct port, with the correct
cable. See the “Easy Setup Instructions” in the
Guide
on the Setup Software & User’s Guide CD-ROM.
Ensure that the USB cable is connected directly to the
computer, bypassing any USB hubs.
S830D User’s
Bad cable Replace the printer cable.
64
Page 69
Problem Possible Cause Try This
Troubleshooting
Printing is slow Incorrect printer driver
settings
Computer resources
are low or not enough
memory
Computer resources
are low or not enough
disk space
Altering driver settings may improve print speed. For example,
draft mode is faster than normal mode, but the quality of the
print is lower. See “Setting Driver Options” on page 8 on for
selecting the optimum print mode for a print job.
You may not have enough memory (RAM) on your computer.
Close any open applications that are not needed for printing.
If the problem persists, consider adding more memory to
your computer.
When a print job is sent to the printer, it first goes to a
temporary print spool. If the file is large and you have limited
disk space available, this can slow or stop printing.
WINDOWS
Delete all temporary files (.tmp).
If you have Windows 98 or later, you can also run the
Disk Cleanup utility.
WINDOWS XP
1. Click Start, then My Computer, then right click the
C: drive icon.
2. Click Properties from the drop-down menu.
3. Click the Disk Clean-up button.
4. Ensure that Temporary files is selected.
5. Click OK.
MAC OS
If you run out of disk space on your computer, copy any
unused files to a Zip disk or other removable media,
then delete the files from your hard disk by dragging
them into the trash.
For OS 8.6 – 9.x users: Allocate more memory to the
application.
Printer tried to
print but no ink
appears on paper
Ink tanks seated
improperly
Print head clogged Verify that the print head is working properly. See “Printing a
Check the ink tanks and reseat them if necessary. See
“Replacing Ink Tanks” on page 41.
Nozzle Check Pattern” on page 43 or “Cleaning the Print Head”
on page 45.
If necessary, perform multiple print head cleanings. See the
S830D User’s Guide
CD-ROM for more information.
on the Setup Software & User’s Guide
65
Page 70
Troubleshooting
Handling Error Messages
Problem Possible Cause Try This
Printer does not
print
When an error occurs, the POWER lamp blinks. Count the number of orange blinks
between each green blink to identify the problem:
Printer blinks green When the lamp blinks green, the printer is warming up or
is receiving print data from the computer. This is not an
error condition.
2 orange blinks
(paper is out, paper
jam or paper feed
error)
3 orange blinks
(paper jam)
4 orange blinks
(ink tank is out of ink)
5 orange blinks
(print head installed
incorrectly)
6 orange blinks
(print head not
installed)
Reload the paper correctly. See “Loading Media into the
S830D” on page 6 for how to load different types of media.
If the paper is jammed, see the troubleshooting topic,
“Paper feeds incorrectly” on page 62.
See the troubleshooting topic, “Paper feeds incorrectly” on
page 62.
Replace the empty ink tank. See “Monitoring Ink Levels” on
page 39 and “Replacing Ink Tanks” on page 41.
Reseat print head. See the S830 User’s Guide on the Setup
Software & User’s Guide CD-ROM for procedures.
Install the print head. If already installed, remove it, then
check the electrical contact area for any blockage or
protective tape. Re-install it when done. See the S830D
User’s Guide on the Setup Software & User’s Guide CD-ROM
on the CD-ROM for procedures. (Note: The printer will blink
only if it’s a self-test.)
7 orange blinks
(print head defective)
Printer blinks green
and orange alternately
(service error)
66
Make sure that you are using the print head designed
specifically for the S830D. Turn the printer off and on. If the
problem persists, contact the Customer Care Center.
If the printer starts blinking green and orange alternately,
turn the printer off, unplug it from the power outlet, and wait
a few minutes. Plug it into the power outlet again, turn on
the printer, then restart the print job. If the problem persists,
contact the Customer Care Center.
Page 71
Problem Possible Cause Try This
Troubleshooting
Low ink alert
displays in the
BJ Print Monitor
Error message
displays in the
BJ Status Monitor
One or more of the ink
tanks is low
Printer is out of paper,
ink is low, paper jam
When Backgrounding is turned on, you can confirm the low
ink alert in the BJ Print Monitor. (See “Monitoring Ink Levels”
on page 39.)
After the alert displays, you can continue printing for a short
time, but have a replacement ready to install.
WINDOWS
The low ink alert displays in the BJ Status Monitor.
See “Monitoring Ink Levels” on page 39.
MAC OS
The low ink alert displays in the BJ Print Monitor
before a print job starts. See “Monitoring Ink Levels”
on page 39.
WINDOWS
The BJ Status Monitor opens and displays a
message when an error occurs.
Read the error message, then click the Guide tab to
display more information about solving the problem.
AC OS
M
If Backgrounding is turned on with the Chooser, the
BJ Print Monitor displays an error.
Follow the instructions in the message to resolve
the problem.
See the S830D User’s Guide on the Setup Software
& User’s Guide CD-ROM for more information on
error messages.
System error
message displays
System error occurred If a system error occurs, printing stops.
INDOWS
W
A dialog box displays the error message. System
errors may include problems writing to USBPRN,
application errors, or general protection faults.
Make sure that the printer is turned on, the printer
and computer are connected securely, and that the
printer port is operating correctly.
AC OS
M
The error message contains an error code *XXX,
where * is a letter and XXX is a number, which
represents the cause of the error. Make sure that the
printer is turned on, the printer and computer are
connected securely, and that the printer port is
operating correctly.
67
Page 72
Troubleshooting
Handling Error Messages While Using the Operation Panel
If an error number is displayed on the Operation Panel, correct the error according
to the procedure below.
If the display or buttons on the Operation Panel are not operating
properly, even though an error is not displayed, turn off the printer,
unplug the power cord, and then turn on the printer again.
The color of the ink tank affected by the error can be checked in
Media Type. An error has occurred in the ink tank indicated by the
blinking position.
Error
Number
001 Printer is
002 Printer is not ready Wait until preparations are completed. Printing will start when
101 Ink level is low Prepare a replacement ink tank. Press the Print button to restart
102 Position of paper
103 Position of paper
201 Ink has run out Press the Cancel button to stop printing, and then replace the ink tank.
Problem Try This
Printing starts when printing from the computer is completed. Press
being used
thickness lever is
incorrect
thickness lever is
incorrect and ink
level is low
the Cancel button to stop printing.
preparations are completed.
printing even though the print level is low. Printing will start when the
ink tank is replaced. Press the Cancel button to stop printing.
Printing will start when you set the paper thickness lever to the correct
position. Press the Print button to start printing with paper thickness
lever position that is currently set. Press the Cancel button to stop
printing.
Prepare a replacement ink tank. Replace the ink tank, and set the
paper thickness lever to the correct position to start printing. Press the
Print button to restart printing under the current conditions.
Press the RESUME/CANCEL button on the printer to start printing
without any ink.
202 Waste ink tank
is full
301/302 No paper, paper
cannot be fed, or
paper jam
68
Press the RESUME/CANCEL button on the printer to restart printing.
Immediately contact the Canon Customer Care Center and request
replacement of the waste ink absorber.
Load paper correctly, and press the RESUME/CANCEL button on the printer
to start printing. If a sheet is jammed, remove the jammed sheet, load paper
correctly, and then press the RESUME/CANCEL button on the printer.
Page 73

Troubleshooting
Error
Number
401 Front cover
402 Print head is
611/612 Time Out is activated
802, 803,
809
Problem Try This
is open
not attached
during
communication with
the digital camera
OR
A message, to the
effect that the main
unit does not support
the digital camera,
is sent
Error occurred
in printer
Close the front cover to start printing.
Attach the print head. If the print head is attached, remove the print
head, make sure that the contact sections are clean, and then reattach
the print head.
Remove the connected cable to reset the error. Reconnect the cable to
the digital camera, and then start printing. For instructions on printing
from a digital camera, see the user’s guide that comes with the digital
camera.
Press the Cancel button to stop printing, turn off the printer, wait
awhile, and then turn on the power again. If the condition does not
improve, contact the store where you bought the printer or a nearby
repair center.
– E – Photo cannot be read
from memory card
(indicator lamp does
not go on)
Properly set a memory card that can be used. See “Using a Memory
Card” on page 24.
If a memory card is already set, eject the card, set it again, and check
that the indicator lamp goes on.
If the error is not corrected by the above procedure, turn off the printer,
unplug the power cord, and then turn on the power again.
69
Page 74

Troubleshooting
Customer Care Center
Canon offers a full range of customer technical support* options:
• For e-mail support, the latest driver downloads and answers to frequently
asked questions (www.canontechsupport.com)
• 24-hour, 7-day-a-week automated support for troubleshooting issues on
most current products (1-800-423-2366)
• 24-hour, Fax-On-Demand System for product specifications and technical
information (1-800-526-4345)
• Technical support, free of services charges, Monday – Saturday (excluding
holidays) for products still under warranty** (1-757-413-2848)
• Technical support Monday – Saturday (excluding holidays) for products no
longer under warranty, at $9.99 per incident (1-757-413-2848)
Within Canada, call for technical support 24 hours a day,
7 days a week (1-800-OK-CANON).
* Support program specifics are subject to change without notice.
** Refer to the product information starting on page 78 for warranty details.
70
Page 75
Appendix
The following topics are included in this appendix:
• Installing the Printer Driver
• Uninstalling the Printer Driver
• Registering Your Canon Product
• Safety Information
• Regulatory Information
• Product Specifications
• Limited Warranty—U.S. Only
Installing the Printer Driver
To install the printer driver in Windows:
When installing the printer driver in Windows XP/Windows 2000,
log on to the system as a member of the Administrators group.
Be sure the printer is off before continuing.
1.
2. Make sure the USB cable between the printer and computer is securely connected.
3. Turn the computer on, then insert the S830D Setup Software & User’s Guide
CD-ROM in the CD-ROM drive. The setup program should run automatically.
If the printer was turned on when the setup program ran, the
Add New Hardware Wizard will appear. Do NOT use the wizard—
click Cancel to close the dialog box and continue.
If the setup program does not run automatically, click Start, then
Run, then type D:\msetup.exe (where D is the CD-ROM drive).
71
Page 76
Appendix
4. Read the License Agreement, then click Yes if you agree.
5. When the main menu appears, make sure that the Printer Driver is selected,
6. When prompted, turn on the printer so the printer port (connection) can be
7. When the Terminate Installation dialog box appears, click OK.
If a message prompts you to restart Windows, remove the
CD-ROM, then click OK. After the computer restarts, re-insert the
CD-ROM and continue.
then click Install. The printer driver will load automatically.
automatically detected.
If your computer cannot detect a printer port, see the
troubleshooting tip for “Computer cannot detect a printer port”
on page 61.
8. Register your product by following the on-screen instructions.
9. Make sure Other Driver is selected, then proceed to install the Memory Card
Utility by following the on-screen instructions.
10.Make sure Applications is selected, then proceed to install the applications by
following the on-screen instructions. This may take a few minutes.
11.When the installation process has completed, you can view any electronic
documentation. If you do not wish to at this time, click Exit.
12.Click Yes if you are prompted to restart the computer.
To install the printer driver in Mac OS:
The printer driver that came with your printer supports
Mac OS 8.6 – 9.x. For Mac OS X driver and instructions, visit our
Web site: www.canontechsupport.com.
1. Be sure the printer is off before continuing.
2. Make sure the USB cable between the printer and computer is securely connected.
3. Close any open software applications.
4. Insert the S830D Setup Software & User’s Guide CD-ROM in the CD-ROM drive.
5. Open the printer driver folder on the CD-ROM.
6. Double-click the Installer icon.
72
Page 77
Appendix
7. Read the License Agreement, then click Accept if you agree.
8. Click Install. The the printer driver will load automatically.
If a “No other applications can be running...” message displays,
click Continue.
9. When the installation has completed, click Restart.
10.After the computer restarts, turn on your printer, select the Apple menu,
then Chooser.
11.Click the S830D icon in the Chooser.
To use the BJ Print Monitor, you must click the Backgrounding
button to the On position.
12.Close the Chooser.
13.Access the S830D Setup Software & User’s Guide CD-ROM and double-click the
Memory Card Utility folder.
14.Double-click the BJ Installer icon and follow the on-screen instructions.
Uninstalling the Printer Driver
To uninstall the printer driver in Windows:
Click Start, All Programs, then Canon S830D, then Uninstall.
1.
2. Click Yes to confirm that you want to uninstall the printer driver.
To uninstall the printer driver in Mac OS:
Insert the S830D Setup Software & User’s Guide CD-ROM in the CD-ROM drive.
1.
2. Double-click Printer Driver.
3. Double-click Installer.
4. Read the License Agreement, then click Accept if you agree.
5. Select Uninstall from the drop-down list.
6. Click Uninstall.
73
Page 78
Appendix
Registering Your Canon Product
To register your Canon product:
Visit www.registercanon.com and follow the on-screen instructions.
Safety Information
Warnings and Cautions
This guide uses the following icons to indicate situations that could cause damage or injury:
Always follow the instructions provided in Warnings to prevent potential serious personal
injury or death as a result of careless operation of the equipment.
Always follow the instructions provided in Cautions to prevent minor injuries to yourself or
damage to the equipment as a result of careless operation of the equipment.
Read and follow all of these cautions and warnings to help ensure the safe use of the printer. To reduce the
hazards of fire, personal injury, or damage to the printer, never attempt to use the printer in any way other than
the methods described in this guide.
Choosing a Location
Never place the printer near flammable solvents such as alcohol, thinner, etc. To help avoid
the hazards of fire or electric shock, keep all flammable liquids away from the printer.
• Never set the printer on a surface that is unstable or subject to excessive vibration. The printer could tip or fall
and cause injury.
• Never use the printer in a location that is subject to high humidity, dust, high temperatures, or direct sunlight.
• Set up and use the printer in a location where ambient temperature is within 41˚F–95˚F (5˚C–35˚C) and
10%–90% humidity with no condensation.
Never place the printer on a thick carpet or rug. Fibers or dust entering the printer could
cause a fire.
Keep the power outlet for the printer free of all obstacles so you can unplug the power
cord at any time. Such obstacles could prevent you from unplugging the printer when a
printer fault occurs and cause a fire or electric shock. The socket-outlet shall be installed
near the equipment and shall be easily accessible.
• Always carry the printer with both hands holding both ends of the printer. To avoid dropping the printer and
causing injury, always carry it carefully when moving it to another location.
74
Page 79
Appendix
Power Supply
Never attempt to plug the power cord into a power outlet when your hands are wet.
To avoid electric shock, make sure that your hands are dry.
• Always push the plug completely into the power outlet. A loose or poorly connected plug could cause a fire or
electric shock.
Never cut, modify, stretch, bend, or twist the power cord, or never place heavy objects on the
power cord. A power leak from a damaged power cord could cause a fire or electric shock.
Never plug the printer power cord into a power outlet (power board, double adapter, etc.)
that is shared by other devices or office equipment. To help prevent the hazards of fire or
electric shock, avoid overloading power points.
• Never use the printer if the power cord is bundled or knotted. To help prevent the hazards of fire or electric
shock, make sure the power cord is straight.
If you detect smoke, unusual odors, or strange noises around the printer, immediately
press the POWER button to turn off the printer and disconnect the power plug. To reduce
the risk of fire or electric shock, never use the printer under these conditions. Call the
Canon Customer Care Center.
• Always grasp the plug when you unplug the power cord. Pulling on the power cord could damage the cord and
cause a fire or electric shock.
Never use an extension cord. To help avoid a fire or electric shock, always plug the power
cord directly into the power outlet.
Never use a power supply voltage other than that supplied in the country where you
purchased the printer. Using incorrect voltage could cause a fire or electric shock.
The correct power supply voltage for this printer is AC 120V, 60 Hz.
Cleaning and Maintaining the Printer
• Use only a slightly damp cloth to clean the printer. Never use flammable solvents like alcohol, benzene,
thinner, etc. If a flammable solvent contacts an electrical component inside the printer, a fire or electric shock
could result.
• Always unplug the printer power cord before you clean the printer. If you mistakenly turn on the printer while
cleaning it, you could touch moving components inside the printer and suffer injury.
• Never attempt to disassemble or modify the printer. The printer contains high voltage components which
could cause a fire or serious electric shock.
Working Around the Printer
Never use flammable sprays near the printer. Gases in the spray could cause a fire or
electric shock if they come in contact with electrical components inside the printer.
Never insert your fingers or hands inside the printer while it is printing. The printer
contains moving parts which could cause injury.
75
Page 80
Appendix
Print Head and Ink Tanks
Never place anything on top of the printer, especially metal objects (paper clips, staples,
etc.), or containers with flammable solvents (alcohol, thinners, etc.) Objects falling into
the printer could cause a fire or electric shock.
If any foreign object, especially a piece of metal or liquid, falls into the printer,
immediately press the POWER button to turn off the printer, unplug the power cord, then
call the Customer Care Center. Continuing to use the printer after a foreign object has
fallen into it could cause a fire or electric shock.
For safety, always store print head and ink tanks out of the reach of small children.
If a child accidentally licks or ingests any ink, consult a physician immediately.
Never subject a print head or ink tank to shocks or excessive vibration. Shaking could
cause ink to leak and stain clothing and nearby surfaces.
Never touch the print head or electrical contacts on a print head immediately after
removing it from the printer. These metal parts become very hot during printing and could
cause minor burns.
Turning Off the Printer
To avoid printer malfunction always use the POWER button to turn the printer on and off. Never remove the power
cord from the power outlet until you have turned off the printer by pressing the POWER button. After the POWER
lamp goes out, you can unplug the power cord from the power outlet.
Using the Printer Near Appliances and Fluorescent Lamps
Allow at least 6 inches clearance between the printer and another appliance or a fluorescent lamp. Electrical
noise generated by a fluorescent lamp placed too close to the printer could cause the printer to malfunction.
Regulatory Information
Color Photo Printer Model: K10212 (S830D)
This equipment has been tested and found to comply with the limits for a
Class B digital device, pursuant to Part 15 of the FCC Rules. These limits are designed to provide reasonable
protection against harmful interference in a residential installation. This equipment generates, uses and can
radiate radio frequency energy and, if not installed and used in accordance with the instructions, may cause
harmful interference to radio communications. However, there is no guarantee that interference will not occur in
a particular installation. If this equipment does cause harmful interference to radio or television reception, which
can be determined by turning the equipment off and on, the user is encouraged to try to correct the interference
by one or more of the following measures:
• Reorient or relocate the receiving antenna.
• Increase the separation between the equipment and the receiver.
• Connect the equipment into an outlet on a circuit different from that to which the receiver is connected.
• Consult the dealer or an experienced radio/TV technician for help.
76
Page 81

Do not make any changes or modifications to the equipment unless otherwise specified in the guide. Should
such changes or modifications be made, you could be required to stop operation of the equipment.
Use of shielded cable is required to comply with Class B limits in Subpart B of Part 15 of FCC Rules.
Canon U.S.A., Inc.
One Canon Plaza, Lake Success, NY 11042, U.S.A.
1-516-328-5600
Canadian Radio Interference Regulations
This digital apparatus does not exceed Class B limits for radio noise emissions from a digital apparatus as set
out in the interference-causing equipment standard entitled “Digital Apparatus”, ICES-003 of the Industry of
Science Canada.
Cet appareil numérique respecte les limites de bruits radioléctiques applicables aux appareils numériques de
Classe B prescrites dans la norme sur le matériel brouilleur: “Appareils Numériques”, NMB-003 édicatée par
l’Industrie et Sciences Canada.
Product Specifications
Printing method: Bubble Jet on-demand
Printing resolution: Up to 2400 x 1200 dpi
Print speed: 4" x 6" photo print speed based on default mode driver setting using
Canon Photo Paper Pro for Borderless Printing 4" x 6" paper.
8" x 10" photo print speed based on default mode driver setting using
Canon Photo Paper Pro.
Color photo (4" x 6"): Approx. 1 minute
Color photo (8" x 10"): Approx. 2 minutes
Print direction: Bi-directional
Print width: 8.0 inches maximum (203.2 mm) (for borderless printing 8.5 inches/216.0 mm)
Resident print control mode: Canon extended mode
Receiver buffer: 80KB
Interface: USB Full Speed
Interface connector: USB standard Series B receptacle (USB Interface)
Recommended printer cable (USB):
Material: AWG28 (data wiring pair) or AWG20 to 28 (distribution pair)
Type: Twisted-pair shielded cable
Length: Up to 6.5 feet
Connectors: USB standard Series B pluggable
Acoustic noise level: Approx. 37 dB (A) (in the best quality mode)
Operating environment:
Temperature: 41°F to 95°F (5°C to 35°C)
Humidity: 10% to 90% RH (no condensation)
Storage environment:
Temperature: 32°F to 95°F (0°C to 35°C)
Humidity: 5% to 90% RH (no condensation)
Power supply: AC 120 V, 60 Hz
Power consumption:
Standby: Approx. 8 W
Printing: Approx. 29 W
Dimensions: (without a paper rest and paper output tray)
16.9" (W) x 11.6" (D) x 7.4" (H)
Appendix
(2.0 m)
77
Page 82

Appendix
Weight: Approx. 11 lb. (5.8 kg)
Feed method: Continuous feed through auto sheet feeder for Plain Paper, Envelopes,
Sheet feeder capacity (maximum):
Plain paper (17 lb.) 100 sheets
High Resolution Paper 80 sheets
Envelopes 10 envelopes
Photo Paper Plus Glossy 1 sheet
Photo Paper Plus Glossy 4" x 6" 20 sheets
Matte Photo Paper 10 sheets
Glossy Photo Paper 1 sheet
High Gloss Photo Film 1 sheet
Glossy Photo Cards 20 sheets
Photo Paper Pro 1 sheet
Photo Paper Pro for
Borderless Printing 4" x 6" 20 sheets
Photo Paper Pro 4" x 6" (Perforated) 20 sheets
Transparencies 30 sheets
T-Shirt Transfers 1 sheet
Banner Paper 1 sheet (can print up to 6 connected sheets)
Ordinary print media:
Regular size: Letter, Legal, 4" x 6", A4, A5, B5, US Com. #10, European DL envelopes
Custom size: Width: 3.54 to 8.5 in (90.0 to 215.9 mm)
Weight: Automatic feed: 17–28 lb. for non-Canon brand media
Graphic image printing:
Data format: Canon extended mode: raster image format
Resolution: Canon extended mode: 600, 1200, 2400 dpi
Print head: Nozzles: 1,536 (256 per color)
Ink tanks capacity (page):
Black (BCI-6BK): Approx. 620
Cyan (BCI-6C): Approx. 980
Magenta (BCI-6M): Approx. 740
Yellow (BCI-6Y): Approx. 480
Photo Cyan (BCI-6PC Photo): Approx. 430
Photo Magenta (BCI-6PM Photo): Approx. 280
Photo Paper Plus Glossy, Matte Photo Paper, High Resolution Paper,
Glossy Photo Paper, High Gloss Photo Film, Glossy Photo Cards,
Photo Paper Pro, Transparencies, T-Shirt Transfers, and Banner Paper
Height: 4.72 to 23.0 in (120.0 to 584.2 mm)
1
, approx. 1150
2
2
2
2
2
2
1
1500 characters per page, normal text, at standard and plain paper mode with Windows Me/Windows 98
2
Based on printing the ISO JIS-SCID No.5 pattern selecting Print a top-quality photo and plain paper in the Print Advisor
dialog box with Windows Me/Windows 98
Limited Warranty—U.S. Only
The limited warranty set forth below is given by Canon U.S.A., Inc. (“Canon”) with respect to the Canon brand
computer peripheral product (the “product”) that you have purchased, when purchased and used in the United
States. The product that you have purchased is the only product to which this warranty card and the limited
warranty provided by Canon and stated on the card apply.
78
Page 83

Appendix
Your product, when delivered to you in new condition in its original container, is warranted against defects in
materials or workmanship as follows: for a period of one (1) year from the date of original purchase, defective
parts or a defective product returned to a Canon repair facility or a Canon Authorized Service Facility (“ASF”) for
such product, as applicable, and proven to be defective upon inspection, will be exchanged for new or
comparable rebuilt parts, or a refurbished product, as determined by the Canon repair facility or the ASF.
Warranty repair or replacement shall not extend the original warranty period of the defective product. This
limited warranty does not cover any supplies or accessories, including without limitation, ink cartridges and ink
tanks, as to which there shall be no warranty or replacement.
This limited warranty shall only apply if the product is used in conjunction with compatible computer
equipment and compatible software, as to which items Canon shall have no responsibility.
Non-Canon brand equipment and software that may be distributed with the product are sold “as is,” without
warranty of any kind by Canon, including any implied warranty regarding merchantability or fitness for a
particular purpose, and all such warranties are disclaimed. The sole warranty, if any, with respect to such nonCanon brand items is given by the manufacturer or producer thereof.
This limited warranty covers all defects encountered in normal use of the product, and does not apply in the
following cases:
(a) Loss of or damage to the product due to abuse, mishandling, improper packaging by you, alteration,
accident, electrical current fluctuations, failure to follow operating, maintenance or environmental
instructions prescribed in Canon’s instruction manual, or service performed by other than a Canon repair
facility or an ASF.
(b) Use of parts or supplies (other than those sold by Canon) that cause damage to the product or cause
abnormally frequent service calls or service problems.
(c) If the product has had its serial number or dating altered or removed.
NO IMPLIED WARRANTY, INCLUDING ANY IMPLIED WARRANTY OF MERCHANTABILITY OR FITNESS FOR A
PARTICULAR PURPOSE, APPLIES TO THE PRODUCT AFTER THE APPLICABLE PERIOD OF THE EXPRESS LIMITED
WARRANTY STATED ABOVE, AND NO OTHER EXPRESS WARRANTY OR GUARANTY, EXCEPT AS MENTIONED ABOVE,
GIVEN BY ANY PERSON OR ENTITY WITH RESPECT TO THE PRODUCT SHALL BIND CANON. (SOME STATES DO NOT
ALLOW LIMITATIONS ON HOW LONG AN IMPLIED WARRANTY LASTS, SO THE ABOVE LIMITATION MAY NOT APPLY TO
YOU.) CANON SHALL NOT BE LIABLE FOR LOSS OF REVENUES OR PROFITS, INCONVENIENCE, EXPENSE FOR
SUBSTITUTE EQUIPMENT OR SERVICE, STORAGE CHARGES, LOSS OR CORRUPTION OF DATA, OR ANY OTHER
SPECIAL, INCIDENTAL OR CONSEQUENTIAL DAMAGES CAUSED BY THE USE OR MISUSE OF, OR INABILITY TO USE
THE PRODUCT, REGARDLESS OF THE LEGAL THEORY ON WHICH THE CLAIM IS BASED, AND EVEN IF CANON HAS
BEEN ADVISED OF THE POSSIBILITY OF SUCH DAMAGES. IN NO EVENT SHALL RECOVERY OF ANY KIND AGAINST
CANON BE GREATER IN AMOUNT THAN THE PURCHASE PRICE OF THE PRODUCT SOLD BY CANON WHICH CAUSED
THE ALLEGED DAMAGE.
WITHOUT LIMITING THE FOREGOING, YOU ASSUME ALL RISK AND LIABILITY FOR LOSS, DAMAGE OR INJURY TO
YOU AND YOUR PROPERTY AND TO OTHERS AND THEIR PROPERTY ARISING OUT OF USE OR MISUSE OF, OR
INABILITY TO USE THE PRODUCT NOT CAUSED DIRECTLY BY THE NEGLIGENCE OF CANON. (SOME STATES DO NOT
ALLOW THE EXCLUSION OR LIMITATION OF INCIDENTAL OR CONSEQUENTIAL DAMAGES, SO THE ABOVE
EXCLUSION OR LIMITATION MAY NOT APPLY TO YOU.) THIS LIMITED WARRANTY SHALL NOT EXTEND TO ANYONE
OTHER THAN THE ORIGINAL PURCHASER OF THE PRODUCT, OR THE PERSON FOR WHOM IT WAS PURCHASED AS A
GIFT, AND STATES YOUR EXCLUSIVE REMEDY.
79
Page 84

Appendix
Canon offers a full range of customer technical support* options:
• For e-mail technical support, the latest driver downloads and answers to frequently asked questions
(www.canontechsupport.com)
• 24-hour, 7-day-a-week, automated support for troubleshooting issues on most current products
(1-800-423-2366)
• 24-hour, Fax-On-Demand System for product specifications and technical information (1-800-526-4345)
• Technical support, free of service charges, Monday – Saturday (excluding holidays) for products still under
warranty** (1-757-413-2848)
• Technical support Monday – Saturday (excluding holidays) for products no longer under warranty, at $9.99 per
incident (1-757-413-2848)
If the problem can’t be corrected by using one of the above technical support options, you will be asked to follow the
applicable procedures for warranty service. Note that a dated proof of purchase (bill of sale) is required to verify
eligibility at the time of service. This requirement will be satisfied by providing a copy of your dated bill of sale. You will
also need to supply the product serial number.
Carry-In/Mail-In is a service program by which your defective product is repaired by an ASF. The name and telephone
number of the ASF(s) nearest to your location may be obtained from our Web site at: www.canontechsupport.com, or by
calling the Canon Customer Care Center at 1-800-423-2366. If shipping is involved, it is your responsibility to properly
package and send your defective product, together with your dated proof of purchase, a complete explanation of the
problem and a return address, to the ASF at your expense. Do not include any other items with your product. The
repair(s) covered by this limited warranty will be made and the product will be returned to you without charge by the
ASF. Repairs not covered under this limited warranty will be charged to you at such costs as each ASF may generally
establish from time to time.
InstantExchange is a warranty program that expedites, usually by the next business day,†† the exchange of a
defective product with a refurbished product. The refurbished product you receive will be covered by the balance of the
period remaining on your original limited warranty. Note that by using this service you will keep the replacement
product that is sent to you, and your originally purchased product shall become the property of Canon. InstantExchange
warranty program service is available only during the express limited-warranty period for your product and only in the
continental United States, Alaska and Hawaii during such period.
If the Canon Customer Care Center representative cannot correct the problem with your product over the telephone,
and you elect InstantExchange warranty program service, the representative will issue you a reference number upon
verification of warranty eligibility. You will be asked for information pertaining to your defective product and for a ship-to
location for the replacement product (street address only). You must also provide a major credit card number that will be
pre-authorized by Canon in an amount up to the cost of a new product at the time you elect InstantExchange warranty
program service. Your credit card number will be charged in an amount up to the cost of a new product (i) if you do not
return your defective product to a Canon repair facility by the date specified by Canon and in the manner described
below; (ii) if the defect(s) in the product is/are not covered by this limited warranty; or (iii) if the warranty period on the
product has expired or has not been sufficiently established by your supplying the appropriate documentation.
The Canon repair facility will ship out the replacement product via overnight courier, prepaid by Canon. After receipt
of the replacement product (with instructions and a pre-paid return waybill), follow the instructions to ship the defective
product to a Canon repair facility. You must return the defective product in the shipping carton in which the replacement
product was packed (be sure to retain your print head and ink tanks), and you must include the reference number, a
copy of your dated proof of purchase (bill of sale) and a complete explanation of the problem. Do not include any other
items in the return shipping container.
This limited warranty gives you specific legal rights, and you may also have other rights that vary from state to state.
Carry-In/Mail-In
InstantExchange
†
* Support program specifics are subject to change without notice.
** Refer to the individual product information for warranty details.
†
InstantExchange warranty program service is subject to availability of refurbished replacement units.
††
9 a.m.–5 p.m. (local), Monday–Friday (excluding holidays). The Canon Customer Care Center must receive pertinent
information by 3 p.m. (E.S.T.) to ensure next-business-day InstantExchange warranty program service (two-business-day
InstantExchange warranty service for Alaska and Hawaii). Canon does not guarantee next-business-day service in the event of
factors beyond Canon’s reasonable control.
80
Page 85

Index
A
adjusting
brightness
color balance............................................. 17
color saturation.......................................... 17
colors in photographs ................................. 14
print quality..........................................14, 16
advanced print features ................................. 13
aligning the print head................................... 41
All Frames print mode .................................... 27
AT symbol.................................................... 25
................................................. 17
B
borderless printing........................................ 54
brightness, adjusting..................................... 17
C
cables (DIF-B100, DIF-B250) ........................... 26
camera mark ................................................ 27
cancelling print jobs, how to ..............................7
cleaning the print head .................................. 45
color balance, adjusting................................. 17
color photographs, optimizing colors in............ 14
color saturation, adjusting.............................. 17
copies to be printed....................................... 28
creative media
how to load
Custom print mode...........................................8
customer care center, contacting..................... 70
..................................................6
D
default printer, setting......................................2
DIF-B100 cable ............................................. 26
DIF-B250 cable ............................................. 26
digital cameras............................................. 26
supported media types................................ 26
using........................................................ 26
DPOF print mode........................................... 27
Draft print mode ..............................................8
driver
definition of
installing .................................................. 71
recalling saved settings............................... 19
removing .................................................. 73
saving setting for future use......................... 19
setting options..............................................8
troubleshooting installation of ................60, 62
uninstalling............................................... 73
..................................................1
E
Easy-PhotoPrint
installing
opening .................................................... 49
using...................................................49, 51
edges, smoothing ......................................... 13
error messages, explanation of ....................... 58
Exchangeable Image File Format (Exif) .........31, 47
Exif 2.2.............................................25, 31, 47
Exif Print.................................................25, 47
.................................................. 48
F
fixing problems, how to.................................. 57
81
Page 86

Index
G
Graphic print mode.......................................... 8
H
High print mode .............................................. 8
I
Image Color Management (ICM) .......................17
ImageBrowser
installing
using ........................................................ 50
index prints ..................................................27
ink levels, monitoring............................... 24, 39
ink tanks
monitoring levels in
replacing ................................................... 41
installing
Easy-PhotoPrint
ImageBrowser ............................................48
photo applications ...................................... 48
PhotoRecord .............................................. 48
PhotoStitch................................................ 48
ZoomBrowser EX......................................... 48
................................................... 48
............................... 24, 39
.......................................... 48
L
loading
paper
.......................................................... 6
M
maintaining your printer ................................. 39
Manual print mode .......................................... 8
manually adjusting color settings..................... 17
media to avoid ................................................4
media type for direct printing .......................... 29
Memory Card Setup Utility .............................. 34
memory cards
ejecting
supported.................................................. 24
using ........................................................ 25
merging images ............................................ 53
Mode button.................................................27
monitoring ink levels................................ 24, 39
..................................................... 25
N
nozzle check pattern, printing ................... 32, 43
O
online product registration.............................. 74
Operation Panel
camera mark
Cancel button.............................................23
Copies ...................................................... 23
Cursor.......................................................23
Cursor button............................................. 22
First/-Order-............................................... 22
Last ..........................................................22
Layout....................................................... 22
Maintenance button ....................................23
Media Type ................................................22
Mode button .............................................. 23
names and functions ...................................22
operating the cursor.................................... 23
Optimize Image ..........................................22
Print button ............................................... 22
Print Date .................................................. 22
Quality ...................................................... 22
Required Sheets .........................................22
.............................................. 27
P
page setup .....................................................9
paper
general
how to choose.............................................. 4
how to load..................................................6
lever position for thick paper .......................... 5
photograph.................................................. 4
special ........................................................ 4
thick ...........................................................5
photo applications
installing
using ........................................................ 49
viewing images........................................... 49
Photo print mode............................................. 8
....................................................... 4
................................................... 48
82
Page 87

Index
photographs
caring for
optimizing color in...................................... 14
printing from a memory card ........................ 27
prolonging life of...........................................3
special paper for ...........................................4
PhotoRecord
installing
using........................................................ 52
PhotoStitch
installing
using........................................................ 53
print head
aligning
cleaning...............................................33, 45
refreshing ................................................. 33
print job
cancelling
print layout .................................................. 29
print mode
definition of
setting.........................................................8
print quality ................................................. 30
print quality, adjusting................................... 16
printer
cables
choosing......................................................2
maintaining your printer .............................. 39
setting as default ..........................................2
printer driver, definition of.................................1
printing
adjusting brightness
adjusting color balance ............................... 17
adjusting color saturation............................ 17
adjusting print quality................................. 16
date on photos........................................... 30
nozzle check pattern................................... 43
on Canon Photo Paper Pro for Borderless Printing
4" x 6"
on specialty media ........................................4
on thick paper...............................................5
photographs.............................................. 14
photos...................................................... 49
smoothing rough edges............................... 13
stopping from a memory card....................... 28
.....................................................3
.................................................. 48
.............................................47, 48
.................................................... 41
....................................................7
..................................................8
...................................................... 26
................................... 17
...................................................... 54
troubleshooting bad printouts...................... 58
troubleshooting problems with..................... 62
using Easy-PhotoPrint ................................. 49
without a computer..................................... 21
problems, what to do to fix ............................. 57
R
registering your product................................. 74
replacing empty ink tanks .............................. 41
S
safety information......................................... 74
scaled printing ............................................. 10
setting
print mode
Single Frame print mode ................................ 27
smoothing rough edges in images ................... 13
specialty media
how to load
printing on ...................................................4
types of .......................................................4
Specified Frame print mode ............................ 27
Standard print mode ........................................8
stopping print job, how to .................................7
...................................................8
..................................................6
T
tech support, how to contact........................... 70
Text print mode ...............................................8
thick paper
lever position
sizes of........................................................5
thick paper, printing on.....................................5
troubleshooting
error messages
installing the print driver ........................60, 62
printing problems....................................... 62
software installation problems ................60, 62
................................................5
.......................................... 58
U
uninstalling the print driver ............................ 73
83
Page 88

Index
V
viewing images .............................................49
Vivid Photo...................................................15
W
warranty ...................................................... 78
Z
ZoomBrowser EX ........................................... 48
installing ................................................... 47
using ........................................................ 49
viewing photos........................................... 49
84
 Loading...