

Page 1
User’s Guide
BUBBLE JET PRINTER
V1
Page 2

1
Table of Contents
Table of Contents
Introduction .....................................................................................................4
How to Use This Manual ................................................................................5
Safety Precautions .........................................................................................7
Printer Parts and Their Functions .................................................................12
Front View ...................................................................................................13
Rear View ....................................................................................................14
Inside the Printer .........................................................................................15
Operation Panel ..........................................................................................16
Printer Driver Functions (Windows) .............................................................17
Opening the Printer Properties Dialog Box ..................................................18
Printer Properties Dialog Box Description ...................................................20
BJ Status Monitor Functions ........................................................................34
Canceling a Print Job ..................................................................................37
Uninstalling Printer Drivers ..........................................................................38
Printer Driver Functions (Macintosh) ............................................................39
Description of Print Settings ........................................................................40
BJ Print Monitor ...........................................................................................56
Canceling a Print Job ..................................................................................58
Using the Printer with a Network .................................................................59
Page 3

2
Table of Contents
Uninstalling Printer Drivers ..........................................................................63
Routine Maintenance ....................................................................................64
When to Replace Ink Tank and Maintain Printhead ....................................65
Replacing an Ink Tank .................................................................................66
Printing the Nozzle Check Pattern ...............................................................71
Printhead Cleaning ......................................................................................75
Printhead Deep Cleaning ............................................................................78
Cleaning the Printer .....................................................................................80
Transporting the Printer ...............................................................................82
Printing Media ...............................................................................................86
Compatible Media Types .............................................................................87
Envelopes ....................................................................................................89
High Resolution Paper HR-101N .................................................................93
Glossy Photo Paper GP-301/GP-301N .......................................................95
High Gloss Photo Film HG-201 ...................................................................97
Glossy Photo Cards FM-101 .......................................................................99
Photo Paper Pro PR-101 ...........................................................................101
Photo Paper Pro PC-101S ........................................................................104
Transparencies CF-102 .............................................................................106
T-Shirt Transfers TR-201 ...........................................................................108
Banner Paper ............................................................................................110
Troubleshooting ..........................................................................................113
Cannot Install the Printer Driver ................................................................114
Print Quality is Poor or Contains Errors .....................................................116
Printer Does Not Start or Stops During Print Jobs ....................................134
Page 4

3
Table of Contents
Paper Does Not Feed Properly or Paper Jams .........................................140
The POWER Lamp Flashes Orange .........................................................143
An Error Message is Displayed on the Screen ..........................................146
Problems Unique to Windows ...................................................................157
Problems Unique to the Macintosh ...........................................................162
Appendix .....................................................................................................165
For Faster Printing ....................................................................................166
Specifications .............................................................................................169
Index ...........................................................................................................181
Page 5

4
Introduction
Introduction
Thank you for purchasing the Canon S520 Bubble Jet Printer. This User’s Guide provides
complete explanations of the features and functions of the printer.
This guide uses the following symbols to indicate important information. Always observe
these instructions.
Warning
➤ Instructions that, if ignored, could result in death or serious personal injury
caused by incorrect operation of the equipment.
These must be observed for safe operation.
Caution
➤ Instructions that, if ignored, could result in personal injury or material
damage caused by incorrect operation of the equipment.
These must be observed for safe operation.
Important
➤ Prohibited actions that, inadvertently performed, could result in equipment
damage, faults or impaired product quality.
These must be avoided for correct operation.
Information for Windows users only.
Information for Macintosh (USB users only).
Windows
Macintosh
Page 6
5
How to Use This Manual
How to Use This Manual
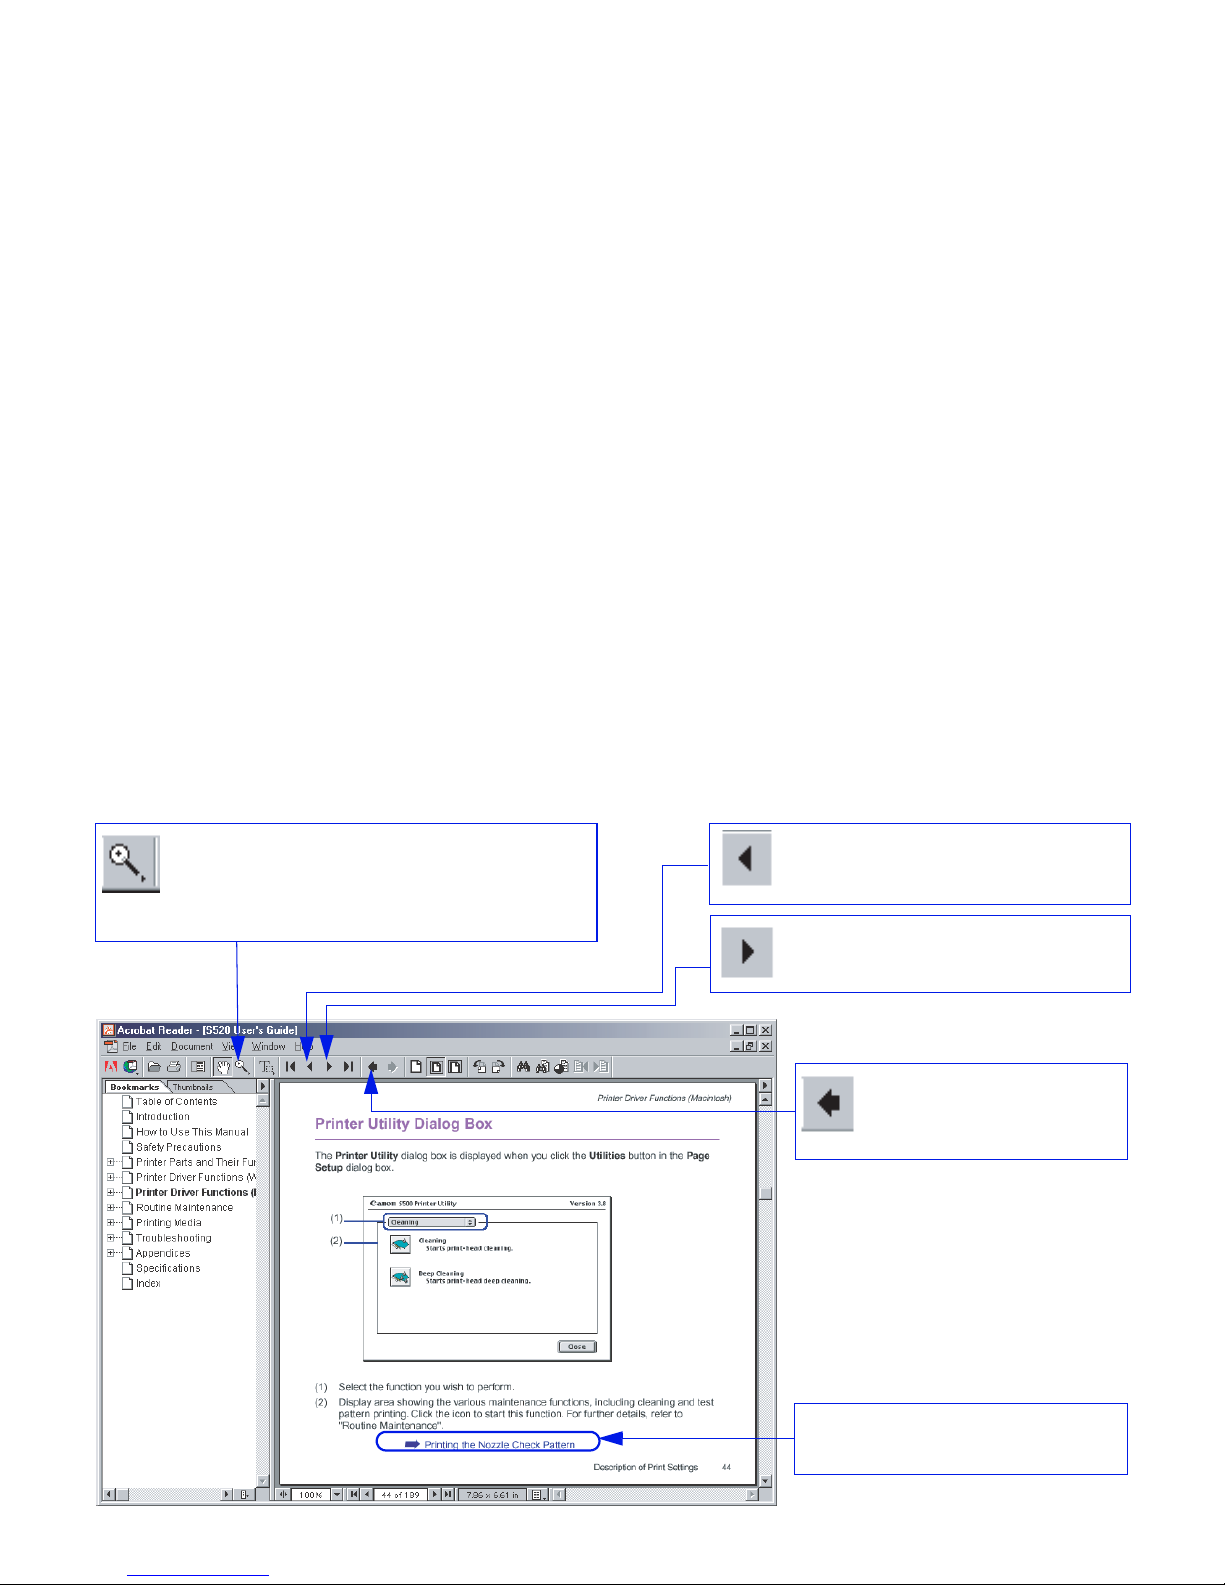
To view this User’s Guide, we recommend that you use Acrobat Reader 3.0 or later. The
screens shown below are for Acrobat Reader 4.0. Please note that screens displayed by
Acrobat Reader 3.0 or 5.0 are slightly different.
Use this button to enlarge the
viewing screen. Click this button in
the tool bar, then click within the
screen.
Displays the next page.
Returns to the page
you were previously
viewing.
Click to jump straight to this
page.
Displays the previous page.
Page 7

6
How to Use This Manual
Displays the table of contents.
Click the heading to jump to the topic.
Click the " " symbol to see the headings for each chapter.
Click the " " symbol to close the headings.
Use this button to
search for a word.
Page 8

7
Safety Precautions
Safety Precautions
Please read the safety warnings and cautions provided in this manual to ensure that you
use the printer safely. Do not attempt to use the printer in any way not described in this
manual.
Warning
➤ You may cause an electric shock/fire or damage the printer if you ignore
any of these safety precautions.
■ Choosing a location
Do not place the printer close to flammable solvents such as alcohol or thinners.
■ Power supply
Never attempt to plug in or unplug the printer from the power supply when your hands
are wet.
Always push the plug all the way into the power outlet.
Never damage, modify, stretch or excessively bend or twist the
power cord. Do not place heavy objects on the power cord.
Page 9
8
Safety Precautions
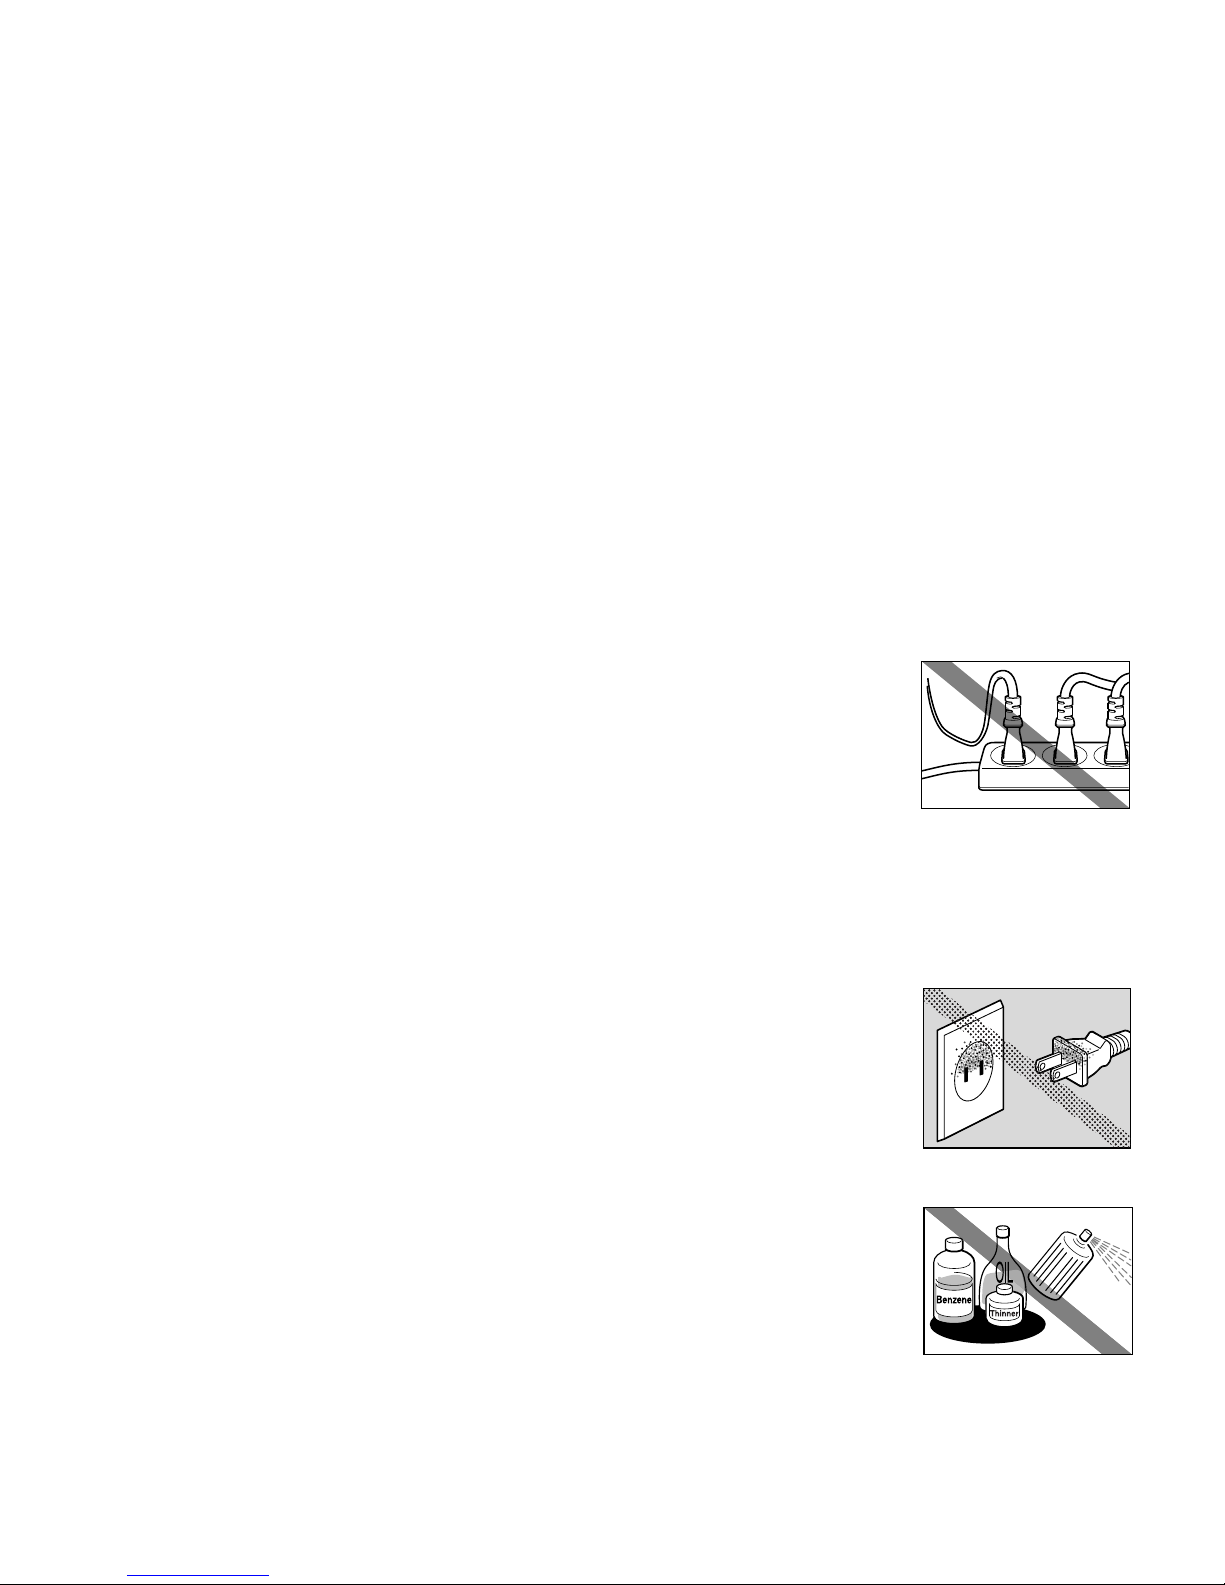
Never plug the printer into a power socket that is shared with other
equipment (extension lead, double adapter, etc.).
Never use the printer if the power cord is bundled or knotted.
If you detect smoke, unusual smells or strange noises around the printer, immediately
unplug the printer at the power supply and call for service.
Periodically, unplug the printer and use a dry cloth to wipe off any
dust or dirt that has collected on the plug and the power outlet. If the
printer is placed at a location exposed to a lot of dust, smoke or high
humidity, it may absorb moisture and cause insulation f ailure and fire.
■ Cleaning the printer
Use a damp cloth to clean the printer. Ne v er use flammable solvents
such as alcohol, benzene or thinners.
If flammable solv ents come in contact with electrical compon ents inside the printer ,
it could cause a fire or electric shock.
Always unplug the printer from the power outlet before cleaning the printer.
If you accidentally switch the printer on while cleaning it, you could injure yourself or damage the printer.
Page 10

9
Safety Precautions
■ Maintaining the printer
Do not attempt to disassemble or modify the printer . There are no user-serviceable parts
inside the printer.
The printer contains high-voltage componen ts. Ne ver attempt an y maintenance procedure no t described in
this guide.
■ Working around the printer
Do not use flammable sprays near the printer.
This could cause a fire or electric shock if the spray comes into contact with electrical components inside
the printer.
Never put your hands or fingers in the printer while it is printing.
Do not place metal objects (paper clips, staples, etc.) or containers of flammabl e
solvents (alcohol, thinners, etc.) on top of the printer.
If any foreign object (metal or liquid) falls into the printer, unplug the power cord and call
for service.
Caution
➤ You may cause injury or damage the printer if you ignore any of these
safety precautions.
Page 11
10
Safety Precautions
■ Choosing a location
Do not install the printer in a location that is unstable or subject to excessive vibration.
Do not install the printer in a location that is very humid or dusty, in direct sunlight,
outdoors, or close to a heating source.
To avoid the risk of fire or electric shock, install the printer in a location with an ambient temperat ure r ange
of 41°F to 95°F (5°C to 35°C) and humidity of 10% to 90% (condensation free).
Do not place the printer on a thick rug or carpet.
Ensure that the area around the power outlet is kept clear at all times
so you can easily unplug the power cord if necessary.
When moving the printer, hold it at both ends.
■ Power supply
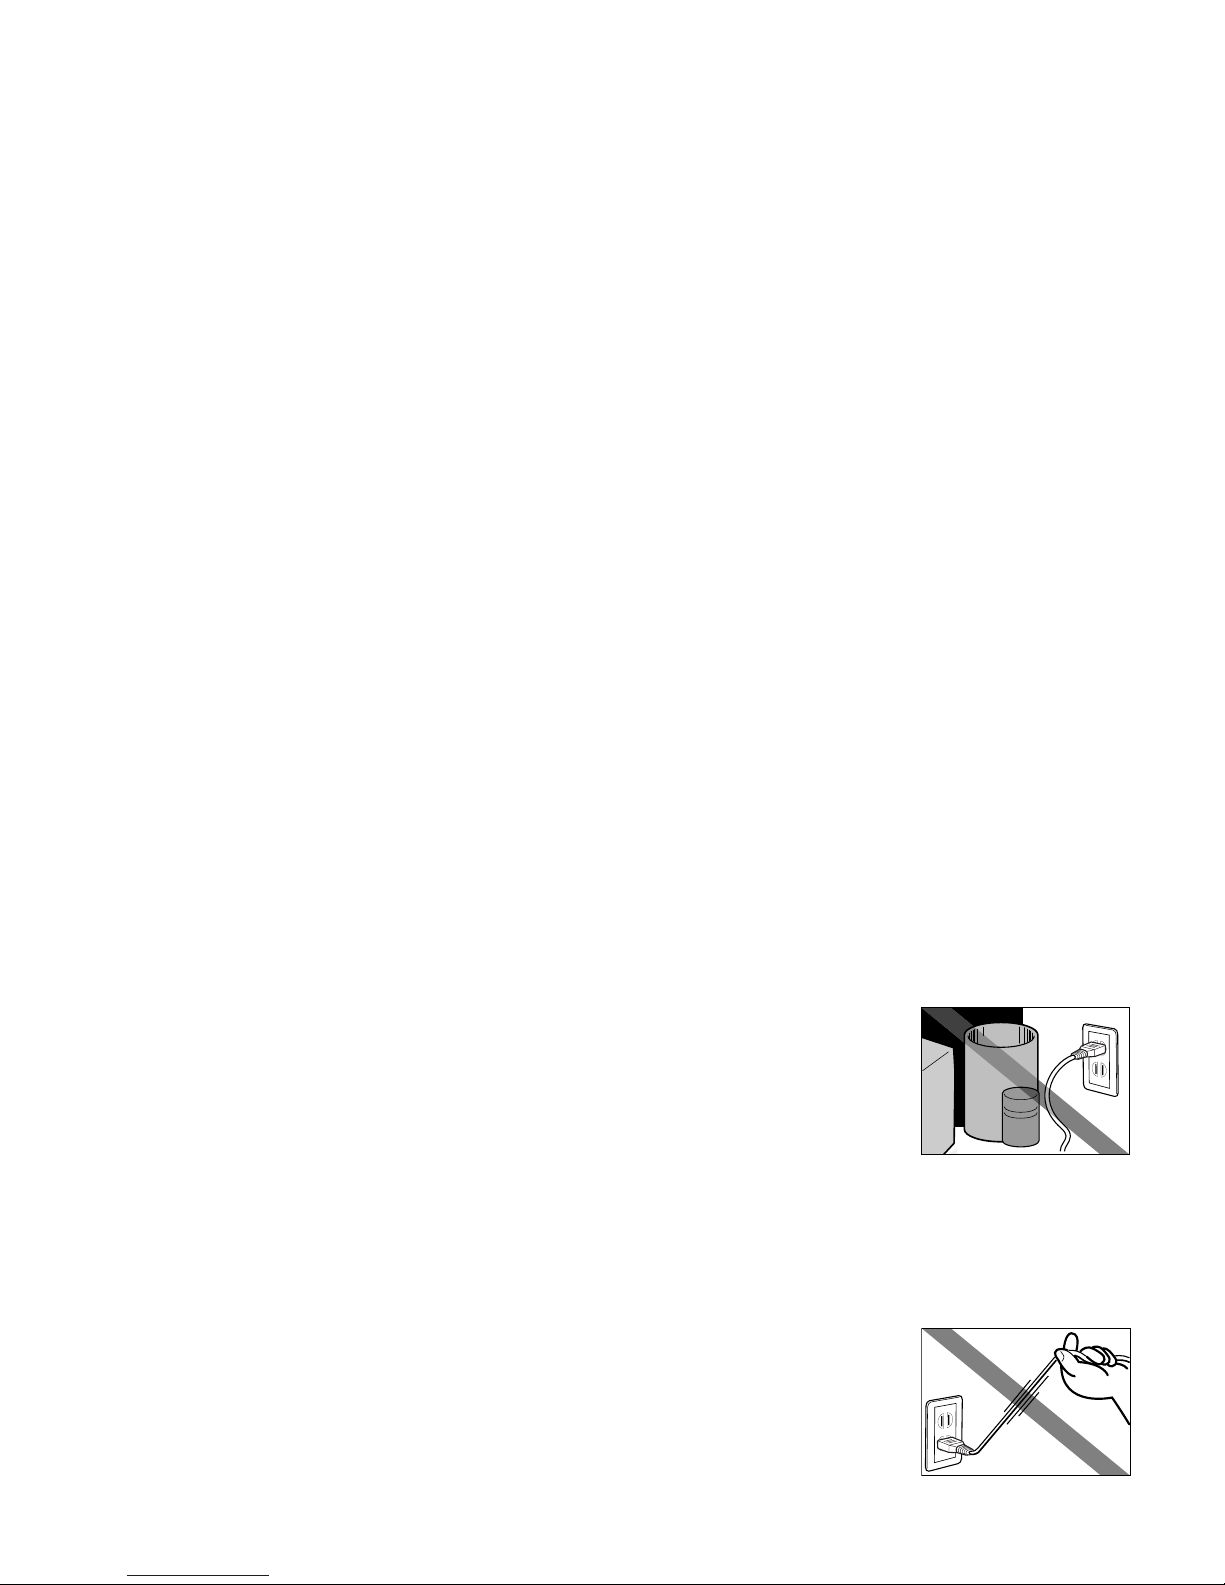
Never remove the plug by pulling on the cord.
Page 12

11
Safety Precautions
Do not use an extension cord.
If you do not intend to use the printer for a long period of time, unplug
it after turning it off.
Never use a power supply voltage other than that supplied in the
country of purchase.
The correct power supply voltages and frequencies are as follows:
USA/Canada: AC 120V, 60Hz
Europe: AC 230V
±
10%, 50Hz
Australia: AC 240V, 50Hz
■ Printheads and ink tanks
For safety reasons, store printheads and ink tanks out of the reach of small children.
If a child ingests any ink, consult a doctor immediately.
Do not shake printheads or ink tanks.
Ink may leak out and stain clothing or the surrounding area.
Never touch the electrical contacts on a printhead after printing.
The metal parts may be very hot and could cause burns.
Page 13

12
Printer Parts and Their Functions
Printer Parts and Their Functions
• Front View
• Rear View
• Inside the Printer
• Operation Panel
Page 14
Front View
13
Printer Parts and Their Functions
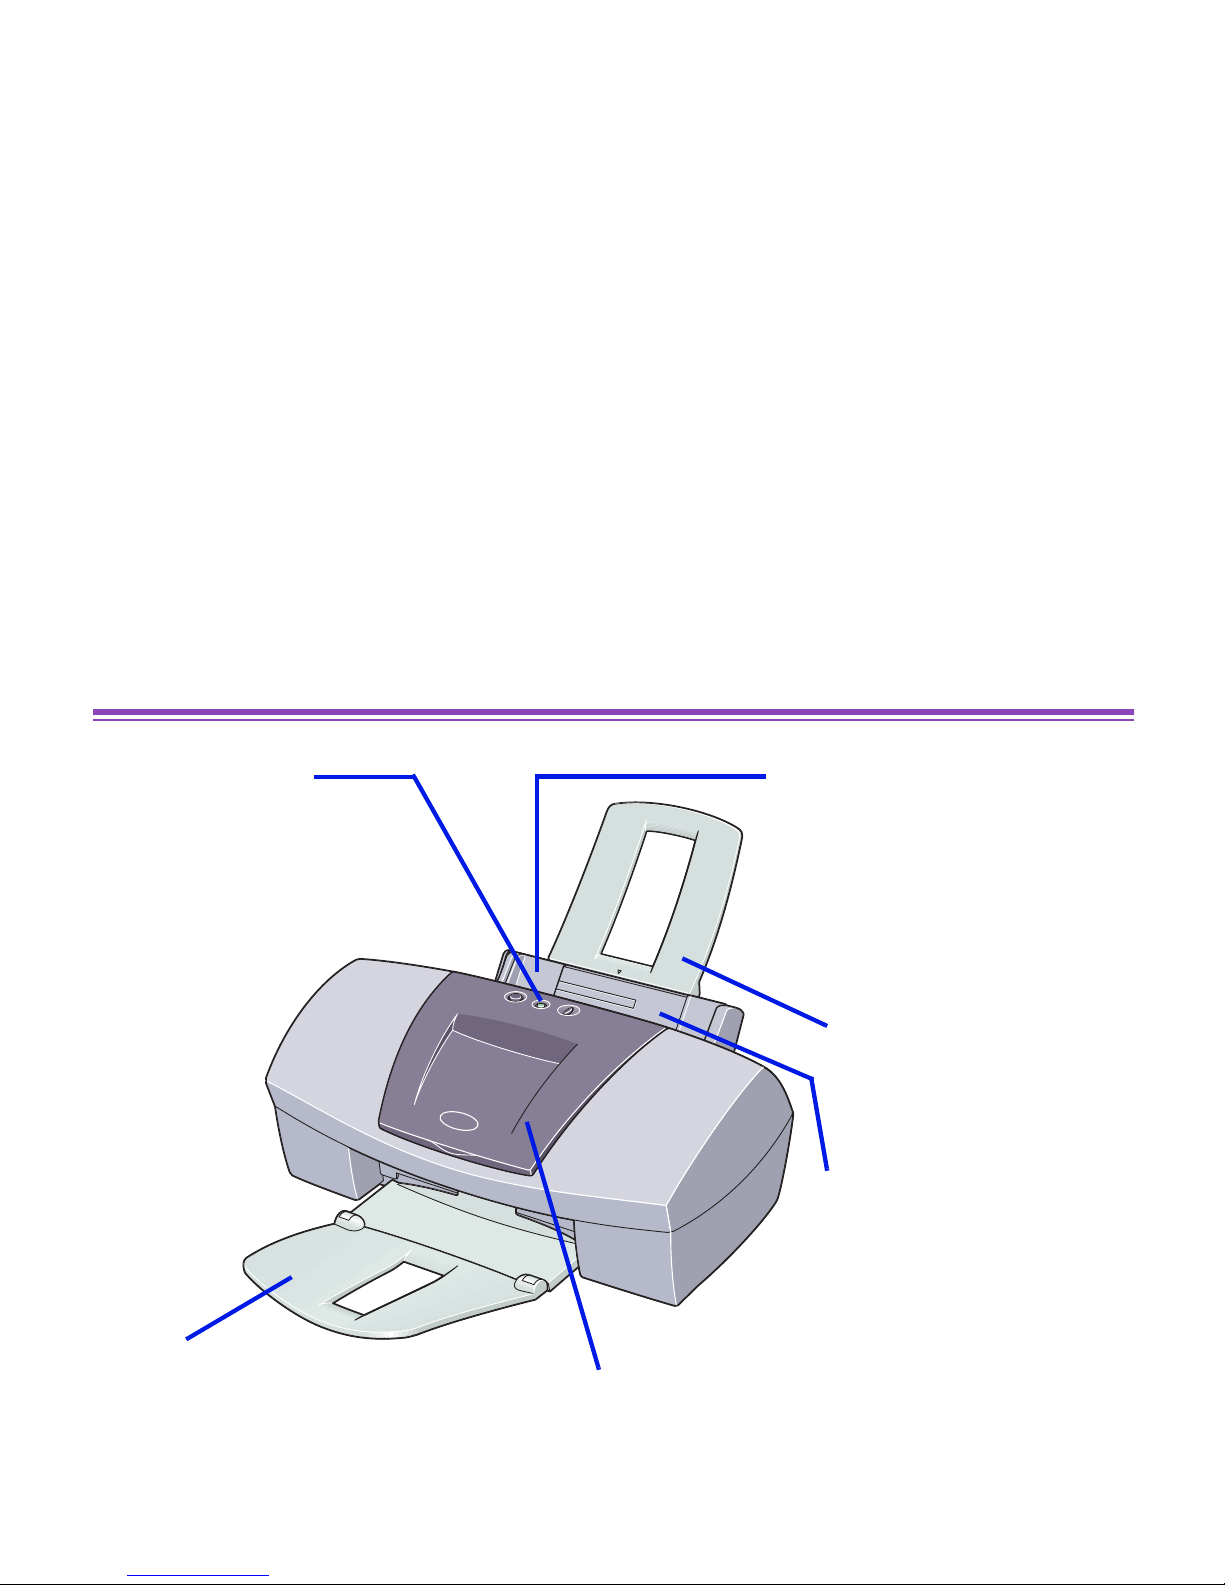
Front View
Paper guide
When loading paper,
ensure that the left edge
touches this guide.
To move the paper guide,
pinch the guide and slide in
the appropriate direction.
Paper rest
Sheet feeder
Load paper here.
Paper feeds
automatically, one
sheet at a time.
Front cover
Open to replace the
ink tanks or remove
jammed paper.
Paper output tray
Operation panel
For details, refer to
"Operation Panel."
Page 15
Rear View
14
Printer Parts and Their Functions
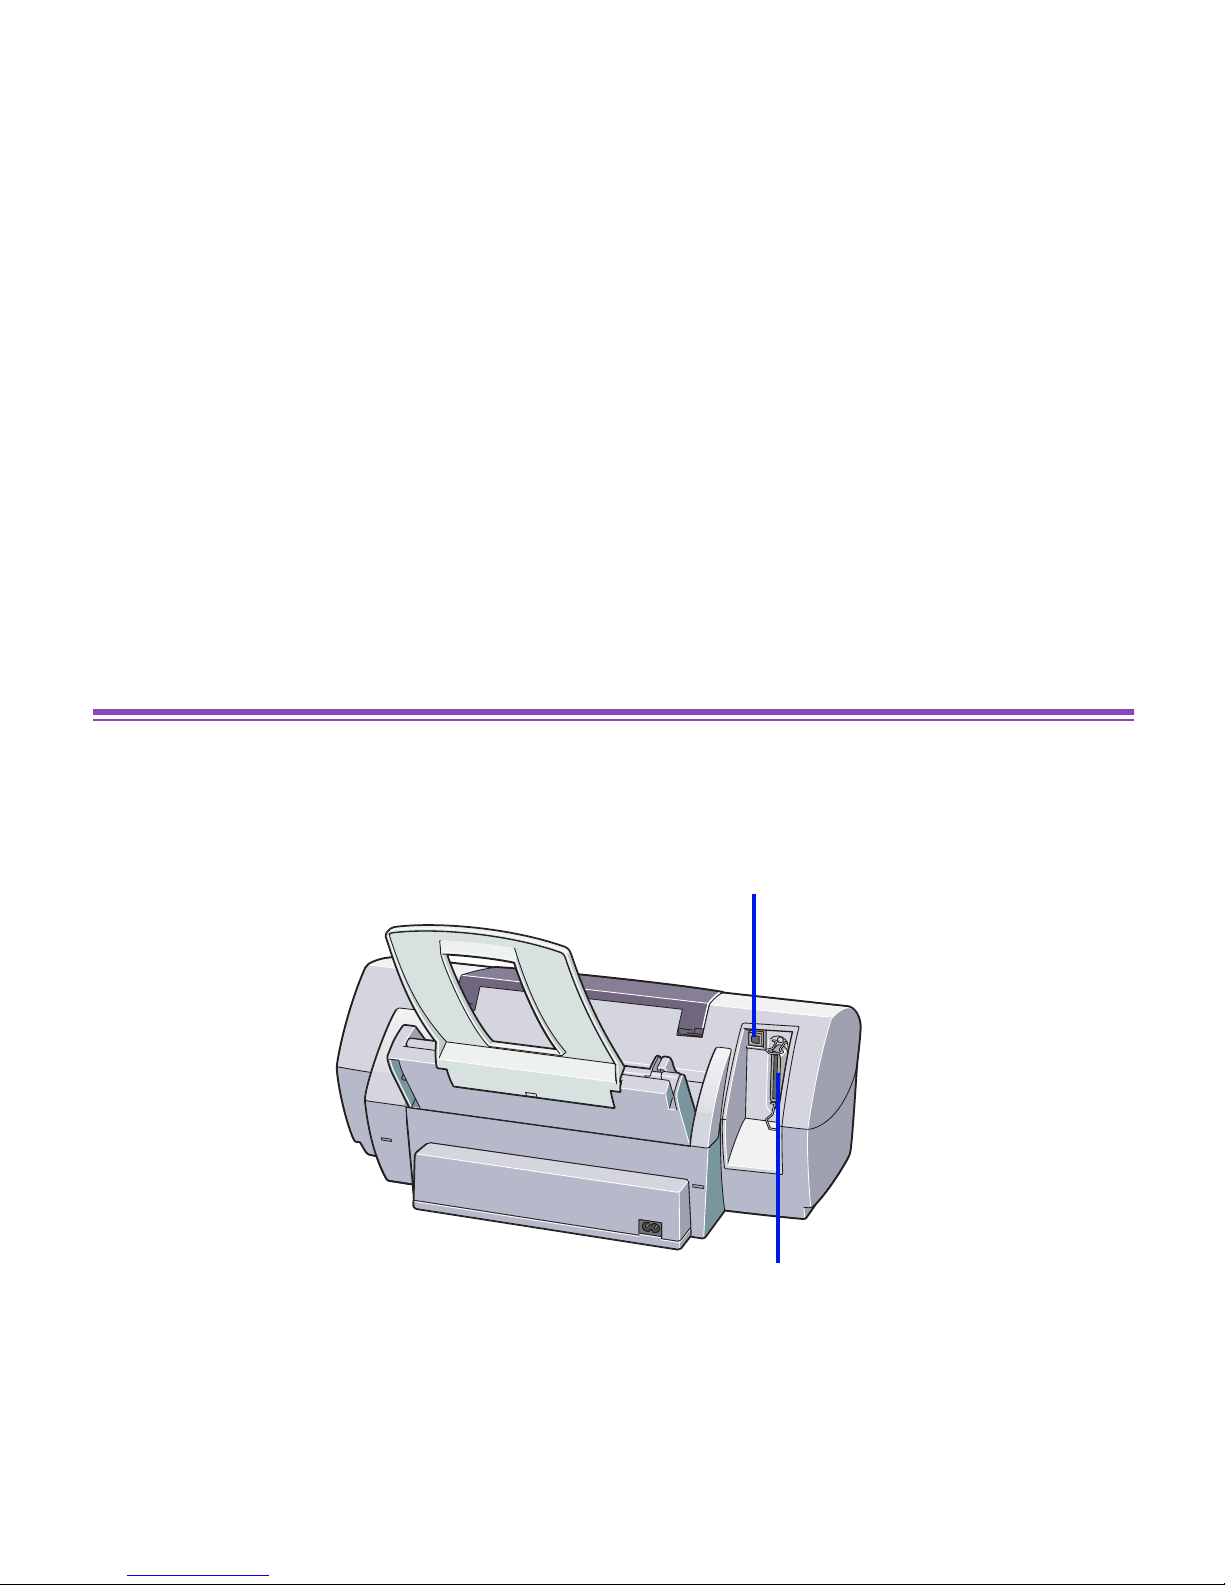
Rear View
USB port
Connects the printer to a
computer through a USB port.
Printer port (parallel)
Connects the printer to a
computer through a parallel port.
Page 16
Inside the Printer
15
Printer Parts and Their Functions
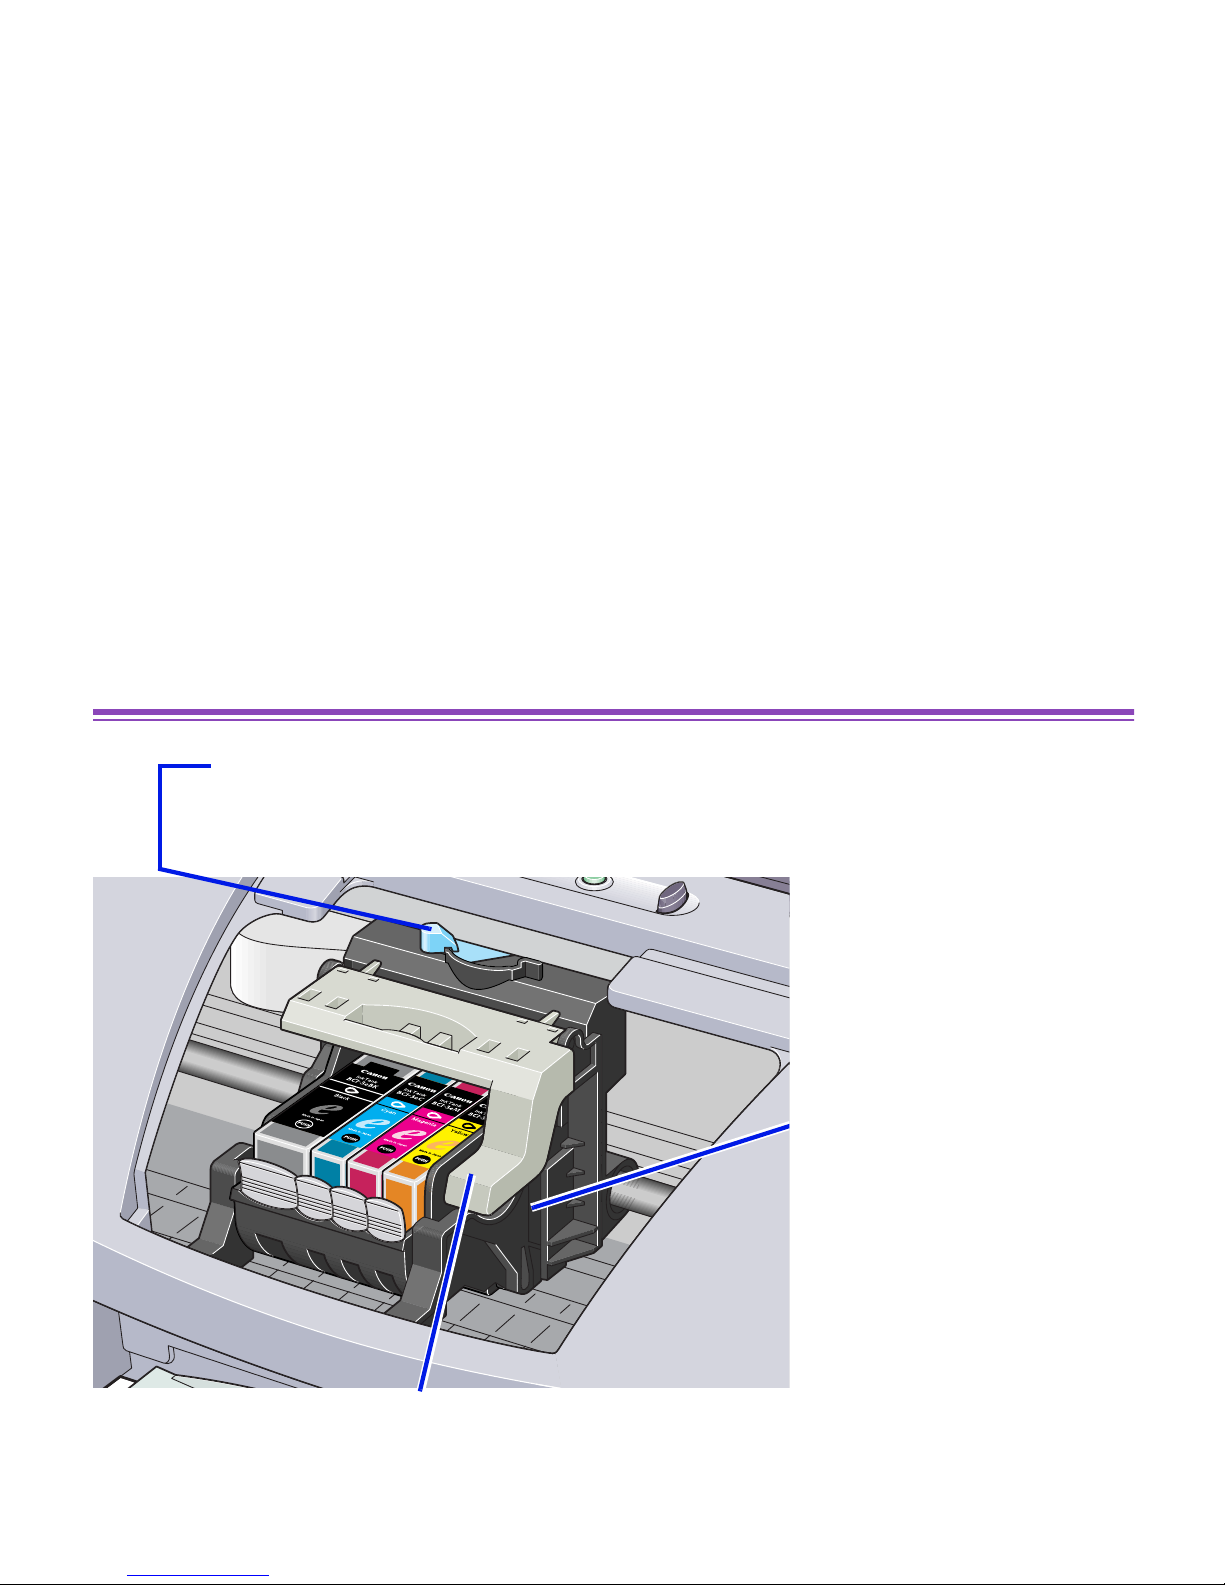
Inside the Printer
Printhead holder
Install the printhead here.
Printhead lock lever
Locks the printhead into the holder.
Once the printhead is installed, do not touch this lever.
Paper thickness lever
Adjusts the gap between the printhead and the surface of the printing paper.
Page 17
Operation Panel
16
Printer Parts and Their Functions
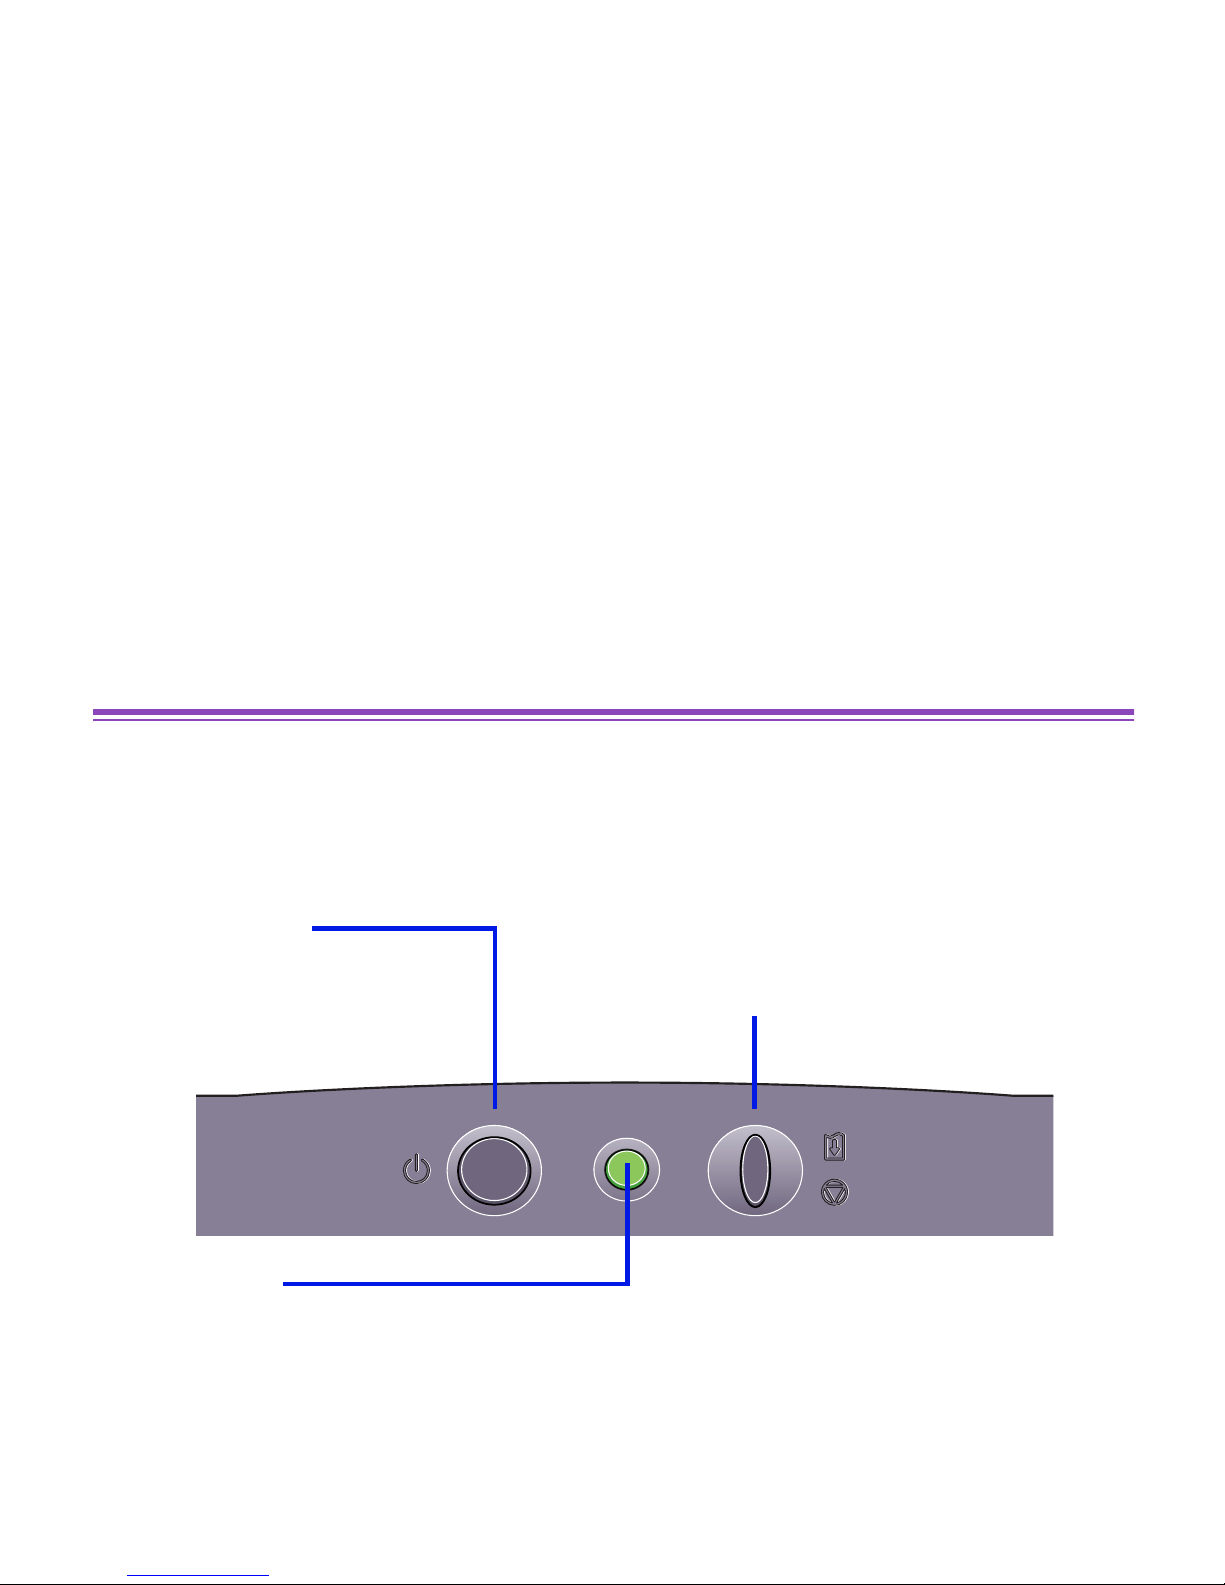
Operation Panel
PO WER lamp
Off: The printer is turned off.
Green: The printer is ready to print.
Flashing green: The printer is preparing to print, or is currently printing.
Flashing orange: An error has occurred and the printer is not ready to print.
Flashing orange and green alternately: an error has occurred that may require you to
contact a Customer Care Representative.
POWER button
Press to turn the printer
on or off. The printer will
initialize, then be ready
for printing.
RESUME/CANCEL button
Press to resume printing once an error has
been cleared. To cancel printing in
progress, press this button.
Page 18

17
Printer Driver Functions (Windows)
Printer Driver Functions (Windows)
• Opening the Printer Properties Dialog Box
• Printer Properties Dialog Box Description
• BJ Status Monitor Functions
• Canceling a Print Job
• Uninstalling Printer Drivers
Page 19

Opening the Printer Properties Dialog Box
18
Printer Driver Functions (Windows)
Opening the Printer Properties Dialog Box
The Printer Properties dialog box can be opened from either within an application, or
directly from the Windows Start menu.
■ Opening the Printer Properties dialog box from your application program
This method is generally used to specify printer settings just before printing. The
operations may vary slightly depending upon y our application program. This section
describes only the general procedure for opening the Printer Properties dialog box.
1
In your application, select the command to print a document.
The Print dialog bo x can usually be opened b y selecting Print from the File
menu.
2
Ensure that Canon S520 is selected in the Name field, then click the
Properties button.
The Printer Properties dialog box opens.
Note
➤ Depending upon your application program, the command and menu names
may differ, and there may be more steps involved in opening the Printer
Properties dialog box. For further details, see the user's manual for your
application.
Page 20

Opening the Printer Properties Dialog Box
19
Printer Driver Functions (Windows)
■ Opening the Printer Properties dialog box directly from the Start menu
This method is used for maintenance operations such as printhead cleaning, or to
specify printer settings common to all application programs.
When the Printer Properties dialog box is opened from the Start men u , additional tabs
appear, including the Details tab. These do not appear when the Printer Properties
dialog box is opened from within an application.
For further information about these additional tabs, refer to your Windows
documentation.
1
Click the Start button, then click Settings, then Printers.
For Windo ws XP, click Start, then click Control Panel, Printers and Other
Hardware, then Printers and F axes.
2
Click the Canon S520 icon.
3
Open the File menu and click:
• Windows Me/Windows 98/Windows 95 ➔ Properties
• Windows NT 4.0 ➔ Document Defaults
• Windows XP/Windows 2000 ➔ Printing Preferences
The Printer Properties dialog box opens.
Page 21
Printer Properties Dialog Box Description
20
Printer Driver Functions (Windows)
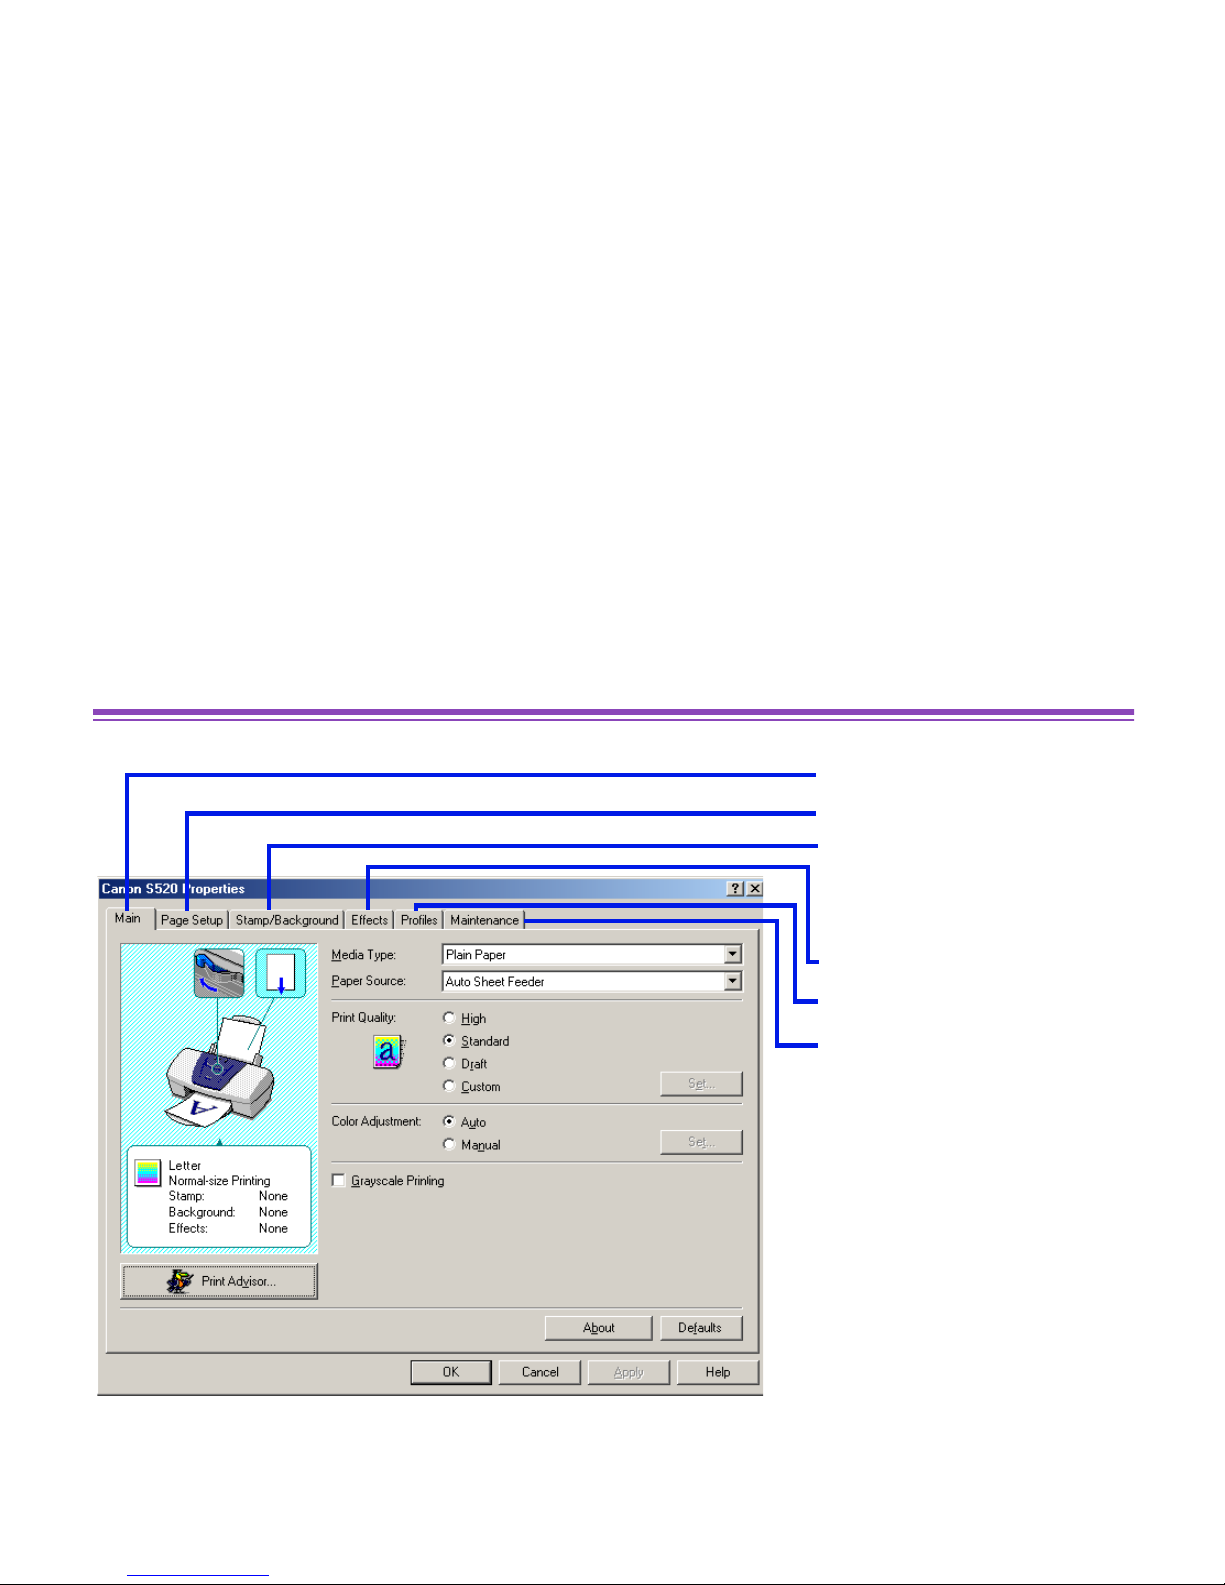
Printer Properties Dialog Box Description
Note
➤ The screens in this section refer to Windows Me/Windows 98/Windows 95
operation. The equivalent screens for Windows XP, Windows 2000 and
Windows NT 4.0 may look slightly different.
• Main Tab
• Page Setup Tab
• Stamp/Background
Tab (Not Available in
Windows NT 4.0)
• Effects Tab
• Profiles Tab
• Maintenance Tab
Page 22
Printer Properties Dialog Box Description
21
Printer Driver Functions (Windows)
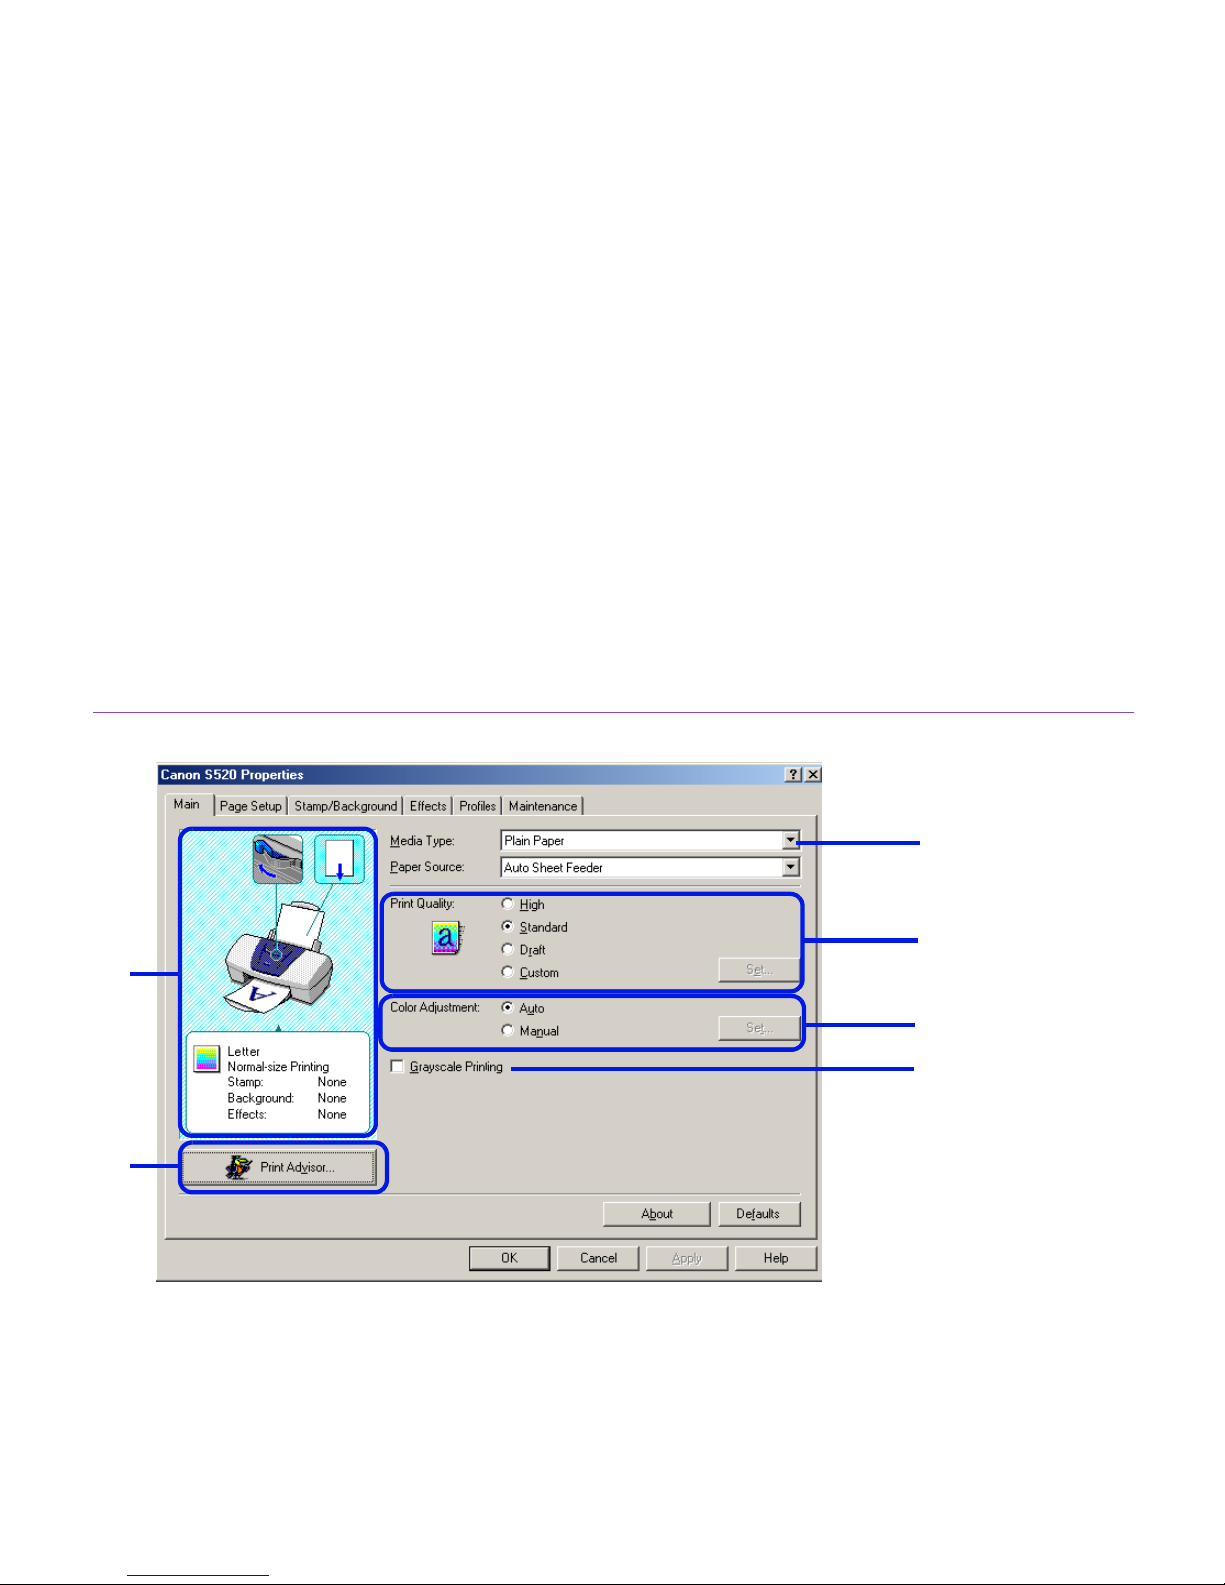
Main Tab
(1) Media Type
Ensure that this setting matches the type of media loaded in the printer.
(2) Print Quality
Select the print quality you require from among the different options . To select custom
Print Quality, select Custom, then click the Set button.
(6)
(5)
(4)
(1)
(2)
(3)
Page 23

Printer Properties Dialog Box Description
22
Printer Driver Functions (Windows)
(3) Color Adjustment
Select the method of color adjustment. To make detailed color adjustments, select
Manual, then click the Set button.
(4) Grayscale Printing
Select to print a grayscale v ersion of a color document.
(5) Print Advisor
Click to start the Print Advisor.
The Print Advisor simplifies configuration of the printer driver. By having the user
answer a series of questions, the Print Advisor automatically configures the printer
driver settings.
(6) Preview Area
Before printing, verify that settings such as the lever position are correct.
Note
➤ To see a description of any item in the Printer Properties dialog box, click
the mark, then click the desired item. To see a description of operating
procedures, click the Help button. If the button does not appear when using
Windows XP, Windows 2000 or Windows NT 4.0, click the Start button,
then select Programs, then Canon S520, then Guide.
Page 24
Printer Properties Dialog Box Description
23
Printer Driver Functions (Windows)
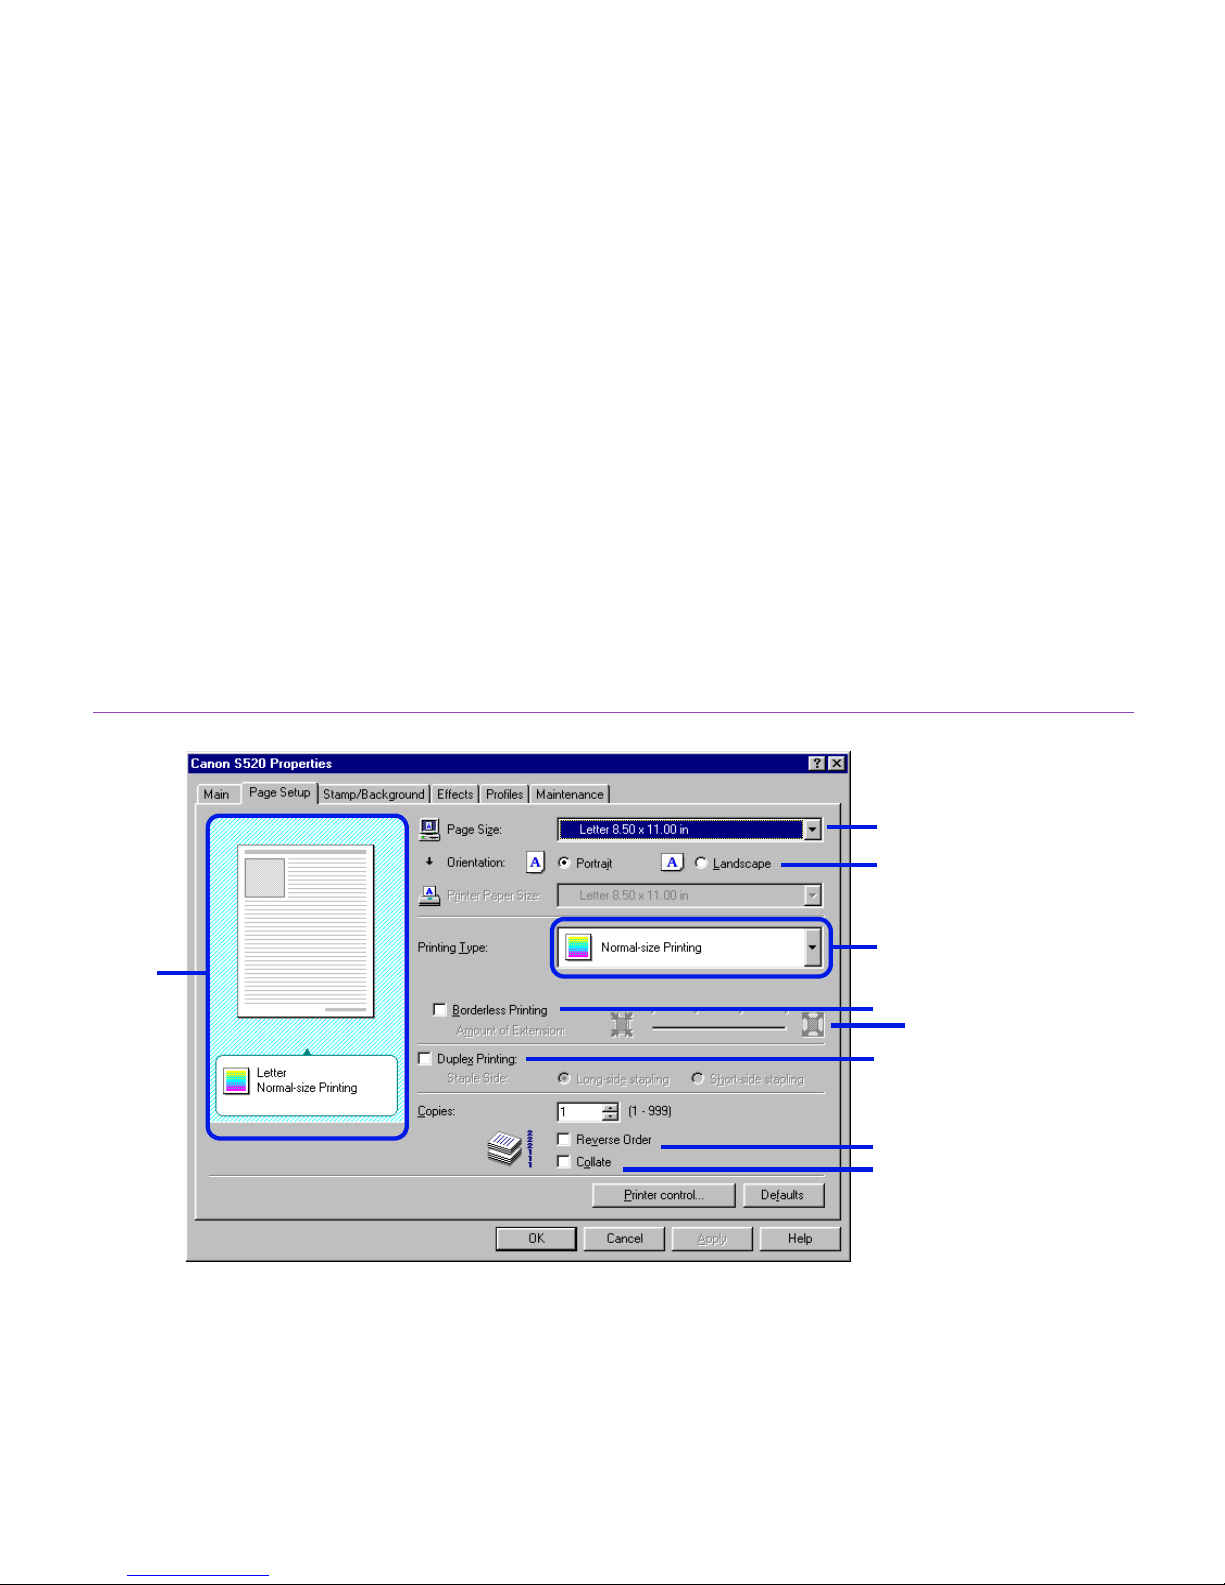
Page Setup Tab
(1) Page Size
Ensure that the correct paper size is selected.
(2) Orientation
Select landscape or portrait printing and ensure that it is the same orientation used in
the application.
(9)
(2)
(1)
(3)
(5)
(6)
(4)
(7)
(8)
Page 25

Printer Properties Dialog Box Description
24
Printer Driver Functions (Windows)
(3) Printing Type
Select the printing method from among the following.
Normal-size Printing The document is printed according to the original
dimensions. This setting is usually selected by default.
Fit-to-Page Printing The document is automatically resized to fit the paper size.
When using this function, ensure that you correctly specify
the Page Size and the Printer Paper Size.
Scaled Printing The document is resized when printed. When this is
selected, you can specify the Printer Paper Size and
Scaling.
Page Layout Printing Pages are reduced and printed so that 2 to 16 document
pages fit on each printed page.
Booklet Printing The multi-page document is printed so that two pages of the
document fit on each printed page. The print order is set
automatically. After the document is printed, you can create
a booklet by folding and saddle-stitching the document.
Poster Printing This enlarges and splits the print image across several
sheets of paper. The printed sheets can then be assembled
to make a large poster. (Not available in Windows NT 4.0)
Banner Printing Select this when printing on banner paper.
(4) Borderless Printing
The image is printed on the entire paper surface so that no margins are left on the four
sides of the paper. The media types available for Borderless Printing are PR-101 and
GP-301/GP-301N. For all other media types, the print quality may decrease.
(5) Amount of Extension
When you select Borderless Printing, the sections that extend beyond the paper are
not printed because the image is enlarged to a size slightly larger than the paper size.
Page 26

Printer Properties Dialog Box Description
25
Printer Driver Functions (Windows)
You can use the slider to adjust how much the image extends beyond the paper. It is
recommended that you normally set the slider to the right end. If you move the slider
to the left to reduce the extension amount, a border may appear.
(6) Duplex Printing
The document is printed on both sides of the paper. After printing one side, turn the
ejected page over and print on the other side.
(7) Reverse Order
Prints the document starting with the last page.
(8) Collate
Select to print multiple copies of the document one copy at a time.
(9) Preview Area
Verify the overall layout, stamps, background and other settings to be applied to the
print job.
Page 27
Printer Properties Dialog Box Description
26
Printer Driver Functions (Windows)
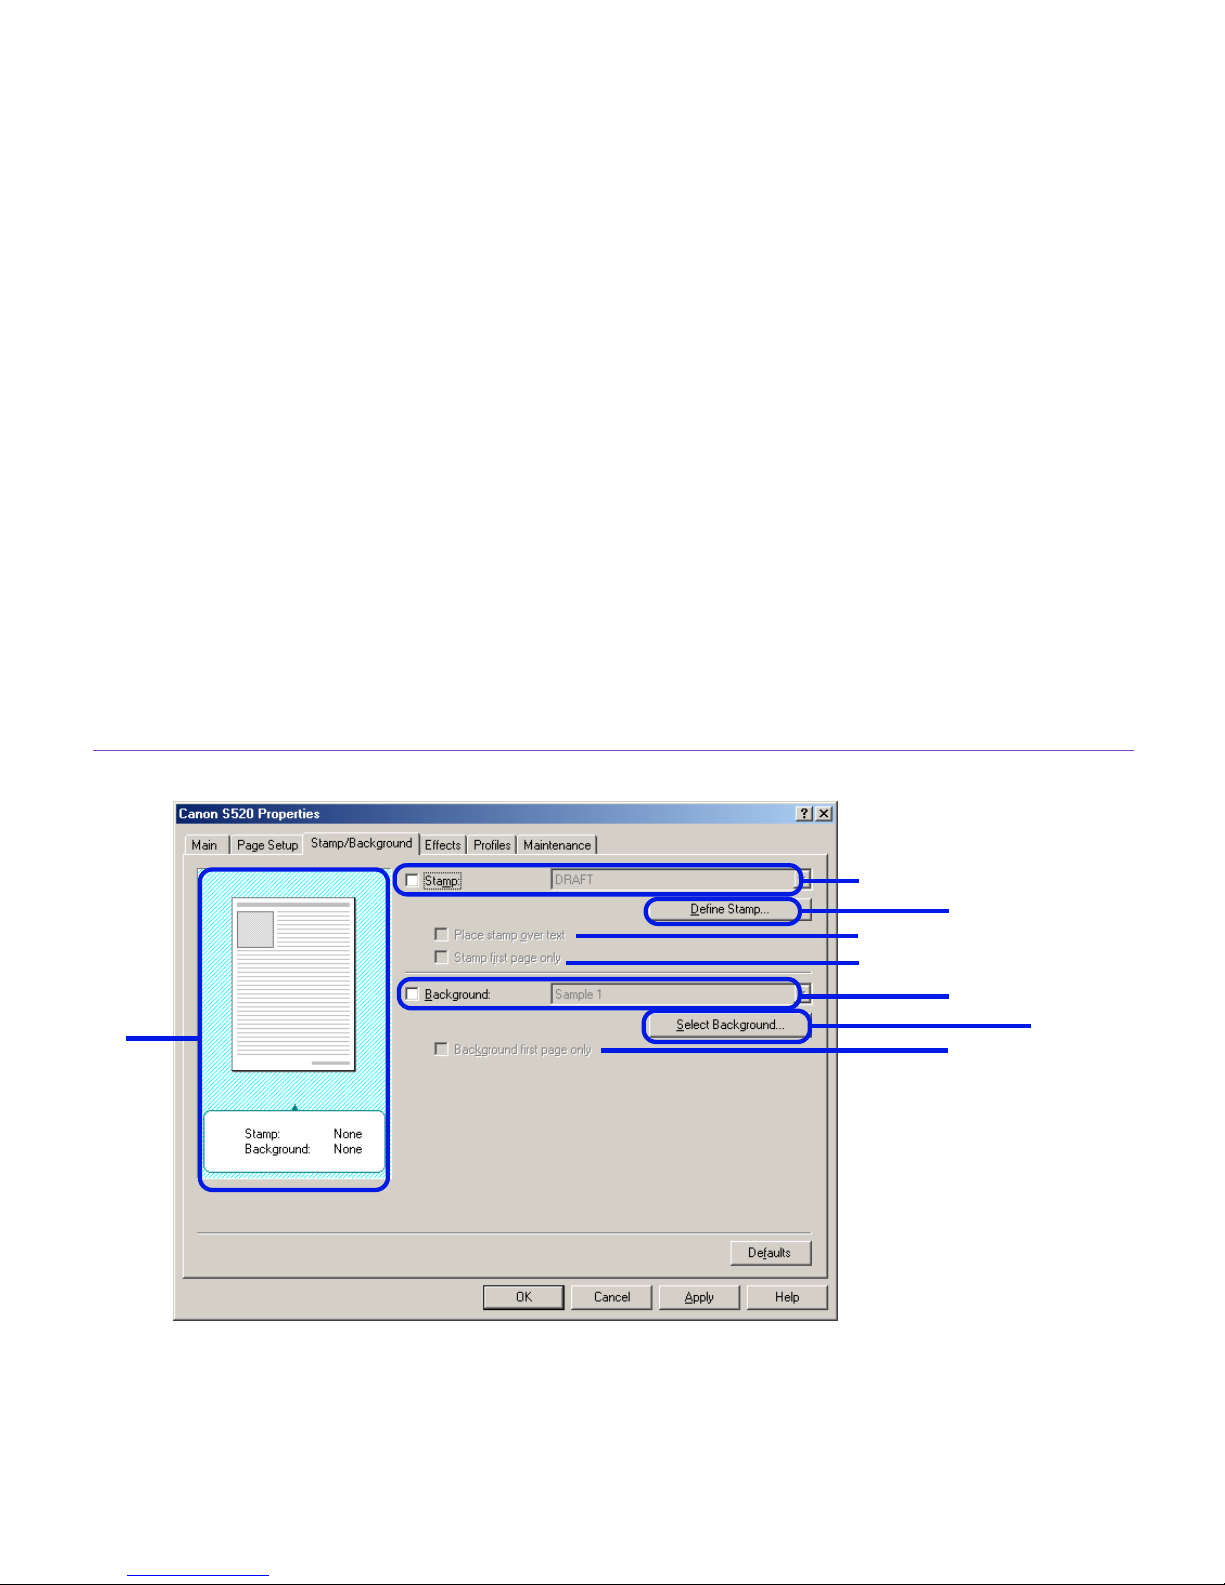
Stamp/Background Tab (Not Available in Windows NT
4.0)
(1) Stamp
Select the check box, then choose a stamp.
(2) Place stamp over text
When Stamp is checked, this option is active. When selected, the stamp is printed
over the print data.
(1)
(2)
(3)
(4)
(5)
(6)
(7)
(8)
Page 28

Printer Properties Dialog Box Description
27
Printer Driver Functions (Windows)
(3) Stamp first page only
Prints the stamp only on the first page.
(4) Define Stamp
This lets you create new stamps, or modify details of a selected stamp.
(5) Background
Select the check box, then choose t he background image you wish to use.
(6) Background first page only
Prints the background image only on the first page.
(7) Select Background
Click to select a new bac kground, or to display details of the background you have
selected.
(8) Preview Area
Page 29
Printer Properties Dialog Box Description
28
Printer Driver Functions (Windows)
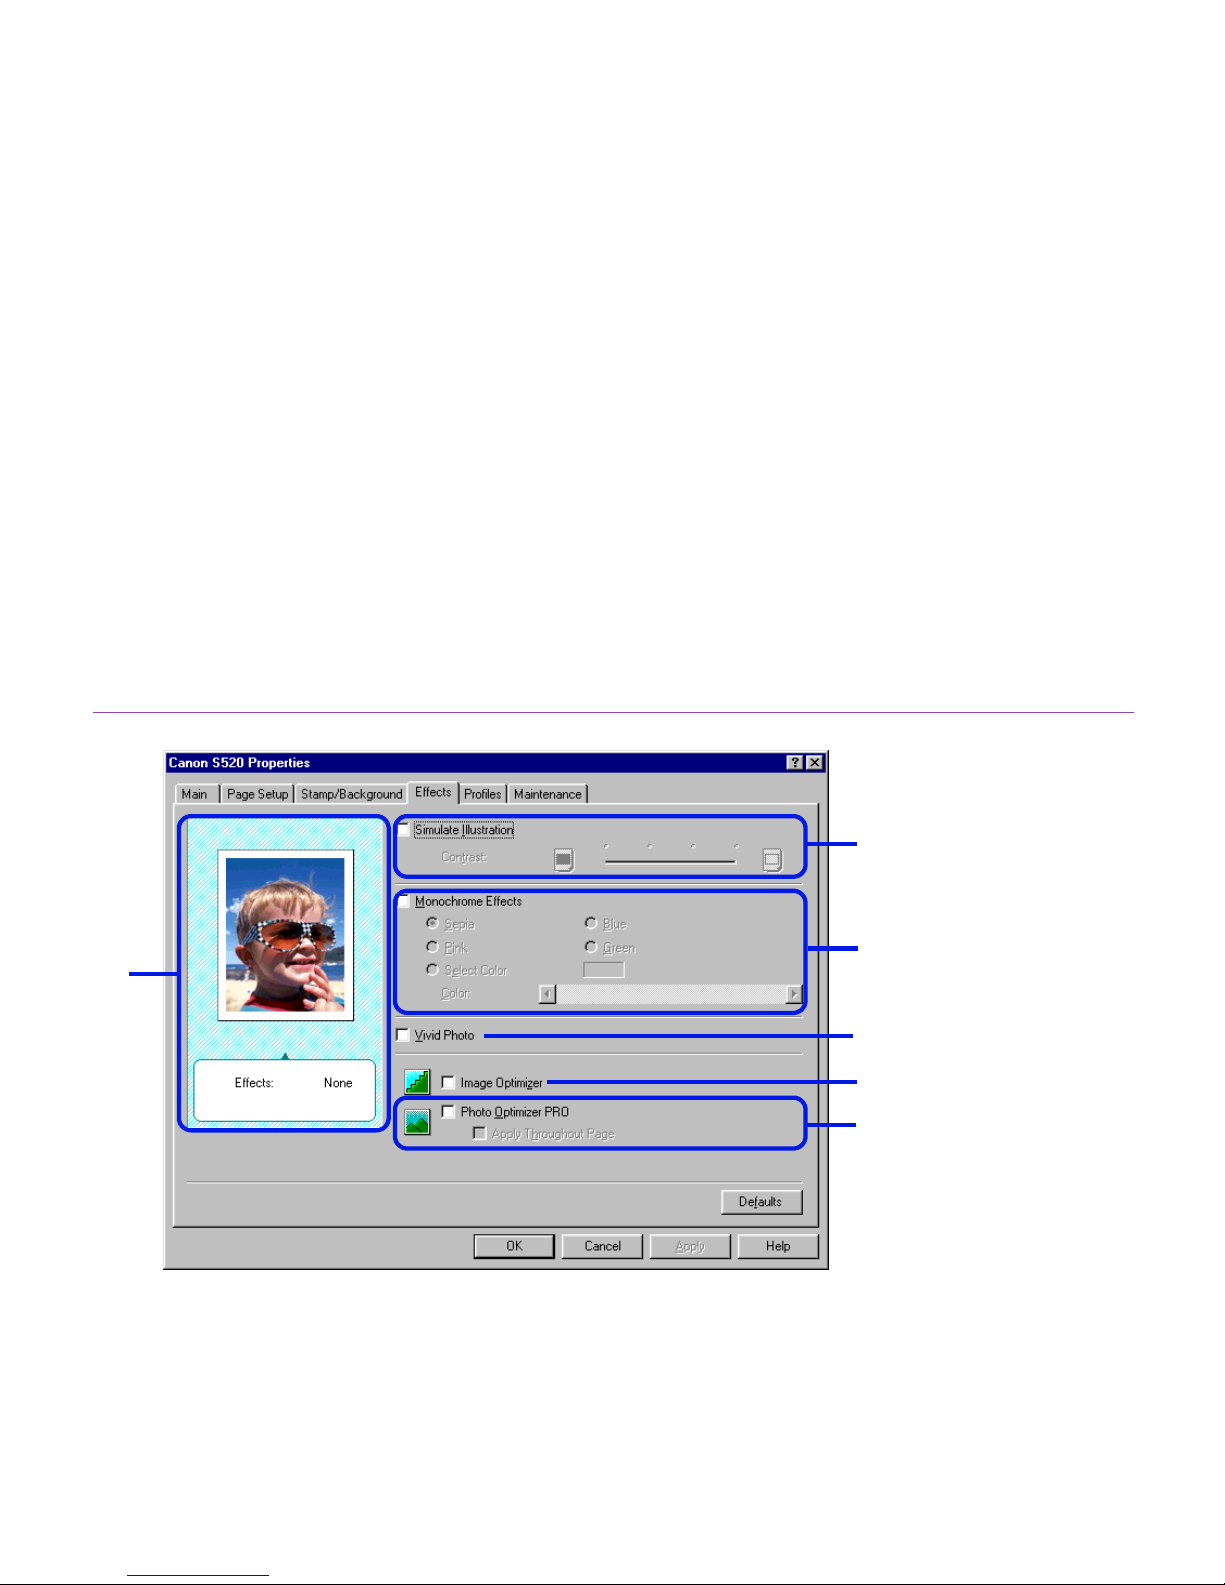
Effects Tab
(1) Simulate Illustration
This function lets you apply graphic effects to a color image without affecting the
original document. Select the check box, then adjust the brightness of the image with
the Contrast slider.
(6)
(1)
(2)
(5)
(3)
(4)
Page 30

Printer Properties Dialog Box Description
29
Printer Driver Functions (Windows)
(2) Monochrome Effects
Prints a color image in a single color. Select the chec k box, then choose a color or use
a custom color using Select Color.
(3) Vivid Photo
By using this function, you can reproduce breathtaking sceneries in which colors,
especially blues and greens, appear even more vibrant. A major feature of this
function is its ability to create vivid backgrounds for fields, trees, oceans, and sky,
while maintaining the natural skin tones of people who appear in the images.
(4) Image Optimizer
Improves the contours and jaggedness that occur when photographic or graphic
image data is enlarged within an application.
(5) Photo Optimizer PRO
Optimizes the color for images taken from a digital camera or scanner. It is especially
effective for images affected by color imbalance and over or under exposure.
When printing several images on one page, optimization is usually applied to each
image according to its requirements. However, if the image data has been
manipulated using cut and paste, rotation or other such operations, group optimization
of all images on the page is recommended. In such cases, select the Apply
Throughout Page check box.
(6) Preview Area
Page 31
Printer Properties Dialog Box Description
30
Printer Driver Functions (Windows)
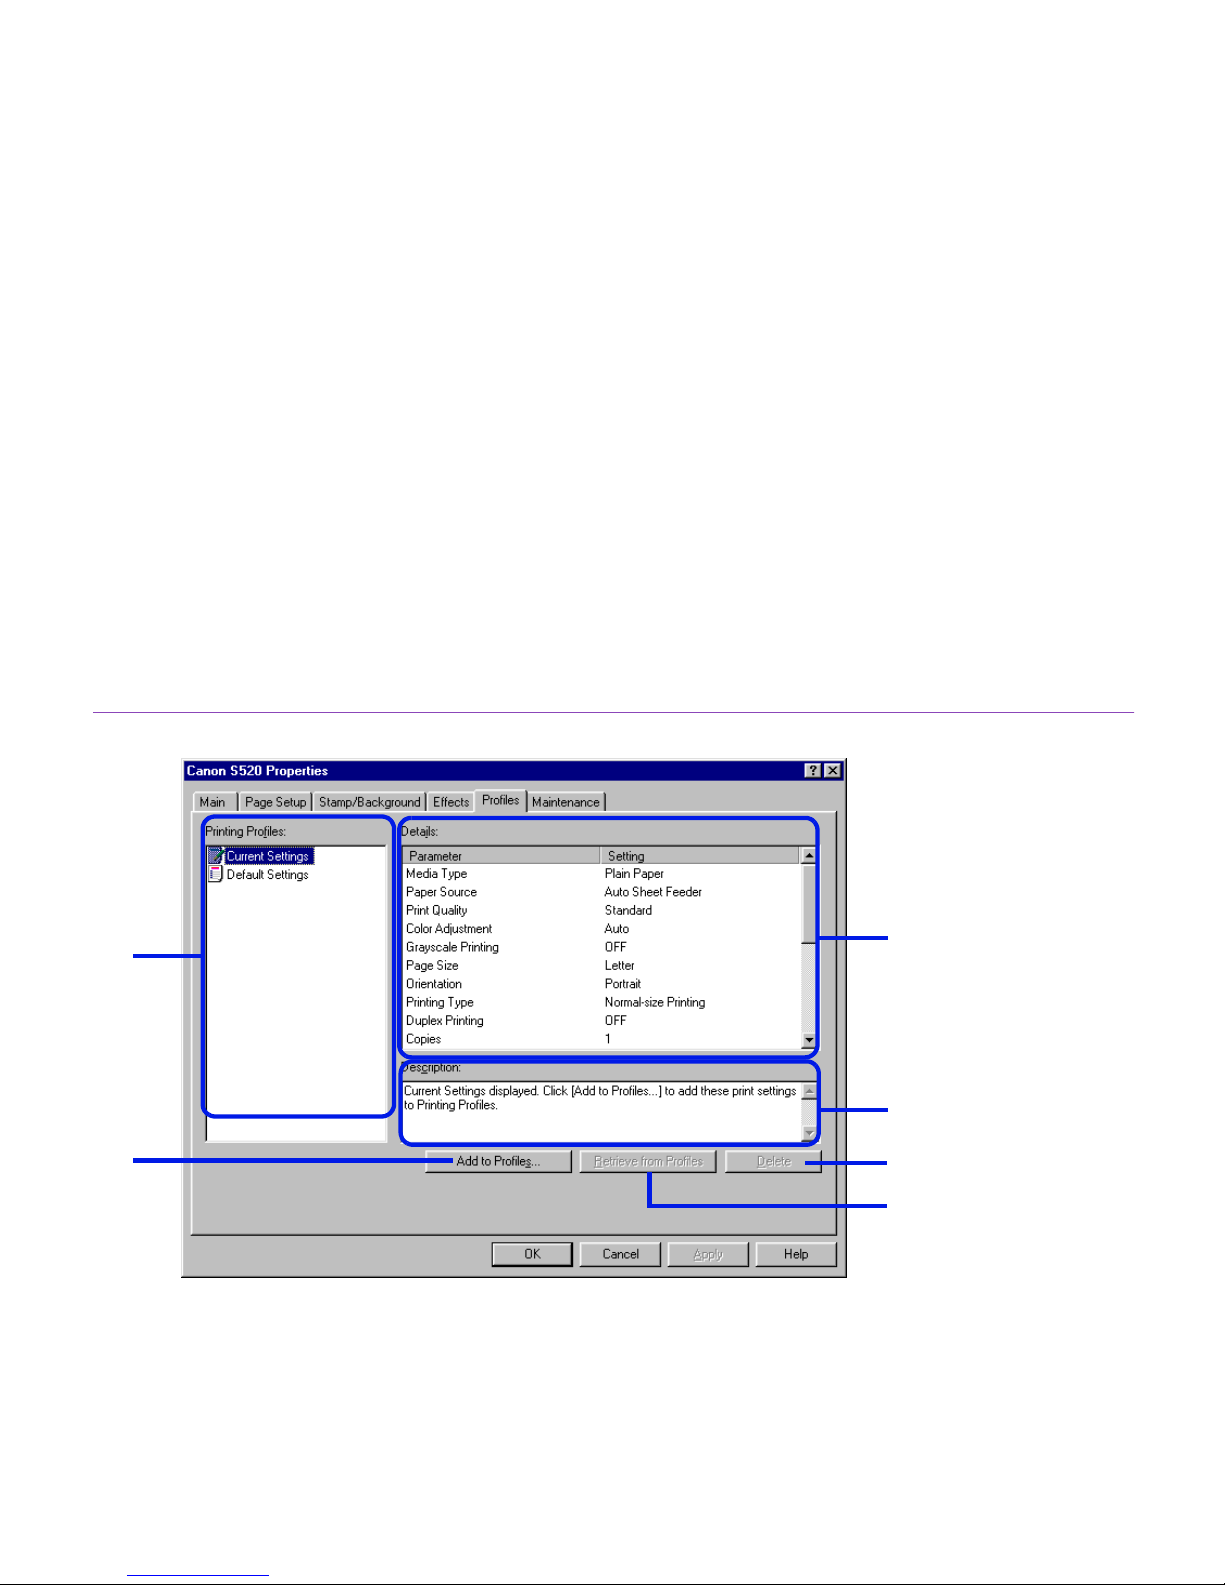
Profiles Tab
(1) Printing Profiles
This list displays the print settings currently registered in the Profiles tab.
The Current Settings profile contains the settings currently specified on the Main,
Page Setup and Effects tabs. The Default Settings profile contains the factory
default settings.
(1)
(4)
(2)
(3)
(6)
(5)
Page 32

Printer Properties Dialog Box Description
31
Printer Driver Functions (Windows)
(2) Details
Displays all the printer settings selected in Printing Profiles.
(3) Description
Displays a description of the printer settings selected in Printing Profiles. You can
enter the description when saving the printer settings.
(4) Add to Profiles
Click to save the settings currently specified on the Main, Page Setup and Effects
tabs. Select Current Settings in the Printing Profiles list, then click this button. The
Add to Profiles dialog box appears.
(5) Retrieve from Profiles
Click to activate registered printer settings. The contents of the Main, Page Setup and
Effects tabs are changed by selecting the printer settings in Printing Profiles, then
clicking this button. This button is disabled when Current Settings is selected.
(6) Delete
Click to delete unwanted printer settings. Select the unwanted item in the Printing
Profiles list, then click Delete. Current Settings and Default Settings cannot be
deleted.
Page 33
Printer Properties Dialog Box Description
32
Printer Driver Functions (Windows)
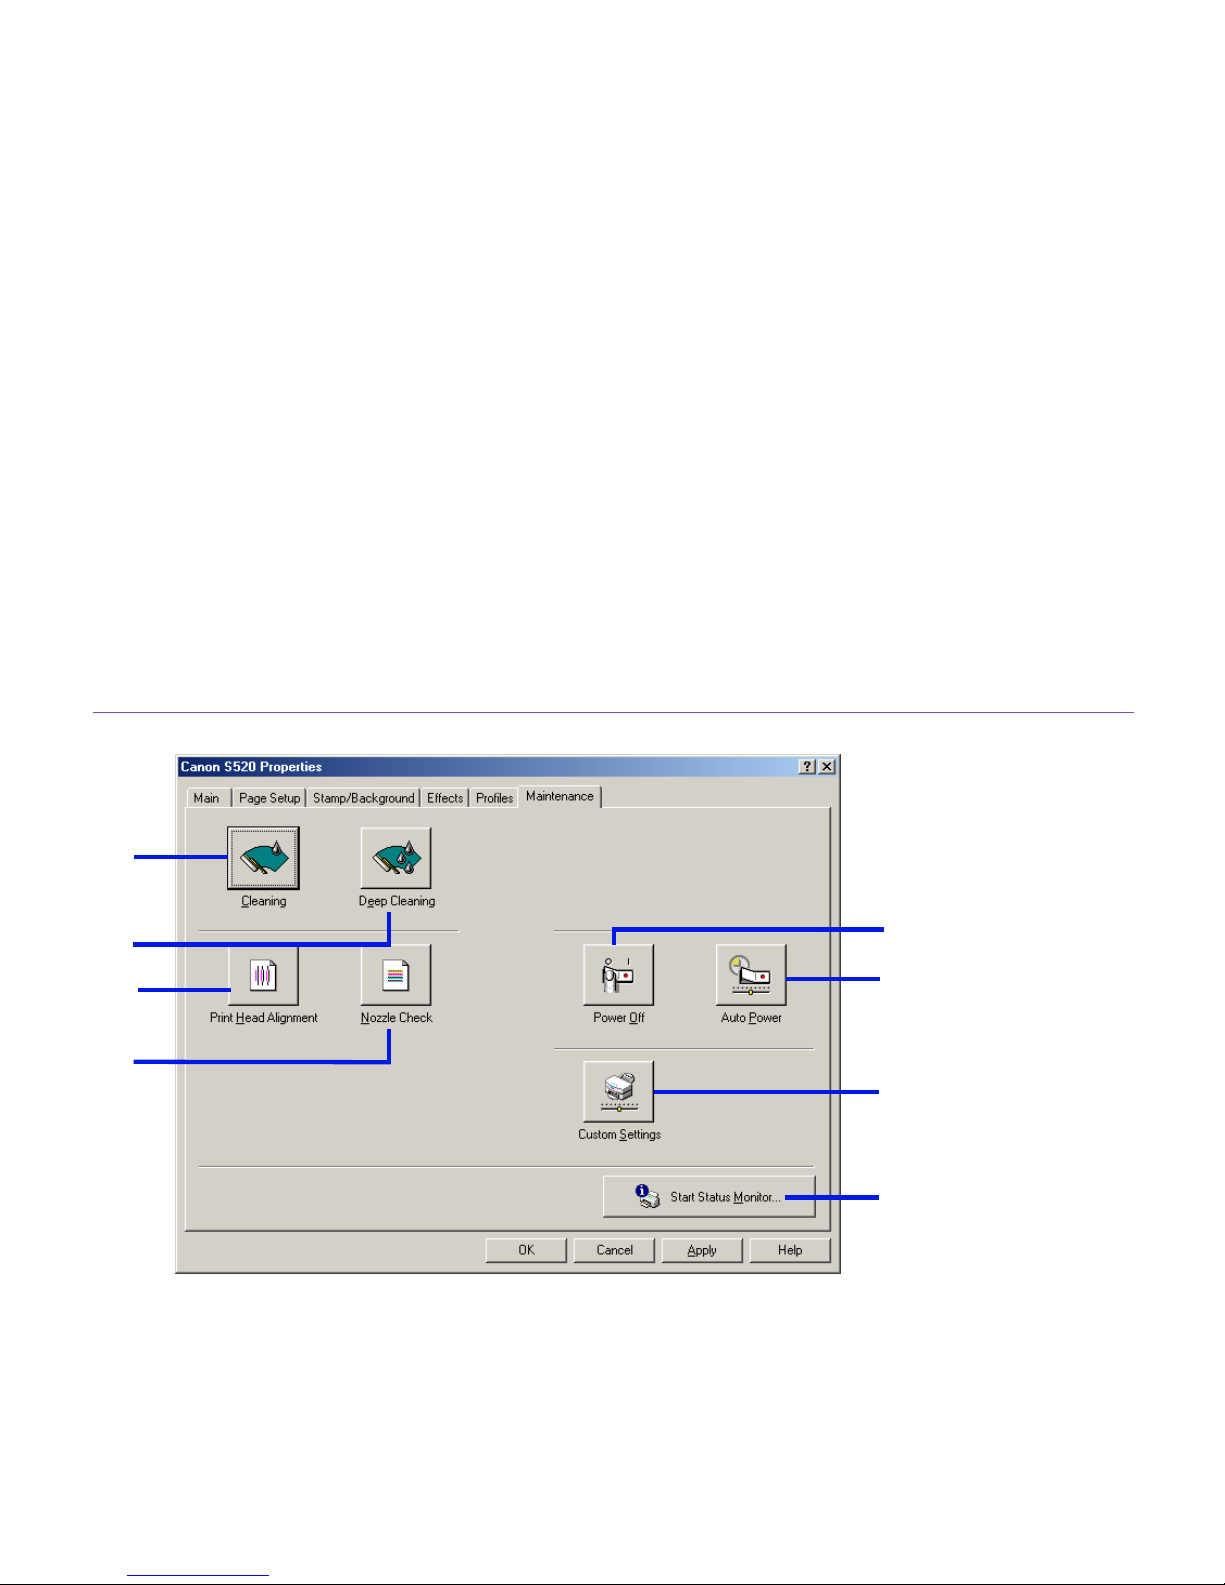
Maintenance Tab
(1) Cleaning
Click to start printhead cleaning.
(2) Deep Cleaning
Click to start printhead deep cleaning.
Use this function only if Cleaning has not improved print quality.
(1)
(2)
(4)
(5)
(7)
(8)
(6)
(3)
Page 34

Printer Properties Dialog Box Description
33
Printer Driver Functions (Windows)
(3) Printhead Alignment
Click to start the printhead alignment procedure. For details on printhead alignment,
refer to the printed Quick Start Guide.
(4) Nozzle Check
Click to start a nozzle check pattern. The nozzle check pattern ensures that the
printhead nozzles are ejecting ink properly . For details, refer to “Examining the Nozzle
Check Pattern.”
(5) Power Off
Click to turn the printer off.
(6) Auto Power
Click to enable the printer to turn off automatically when no data is sent to the printer
for a certain period of time, and to automatically turn the printer on again when data is
sent to the printer.
(7) Custom Settings
Click to modify the printer mode. Change the settings in the Custom Settings dialog
box, then click Send to change printer mode.
(8) Start Status Monitor
Click to start the BJ Status Monitor, which checks and reports the printer status and
the progress of printing jobs.
Page 35

BJ Status Monitor Functions
34
Printer Driver Functions (Windows)
BJ Status Monitor Functions
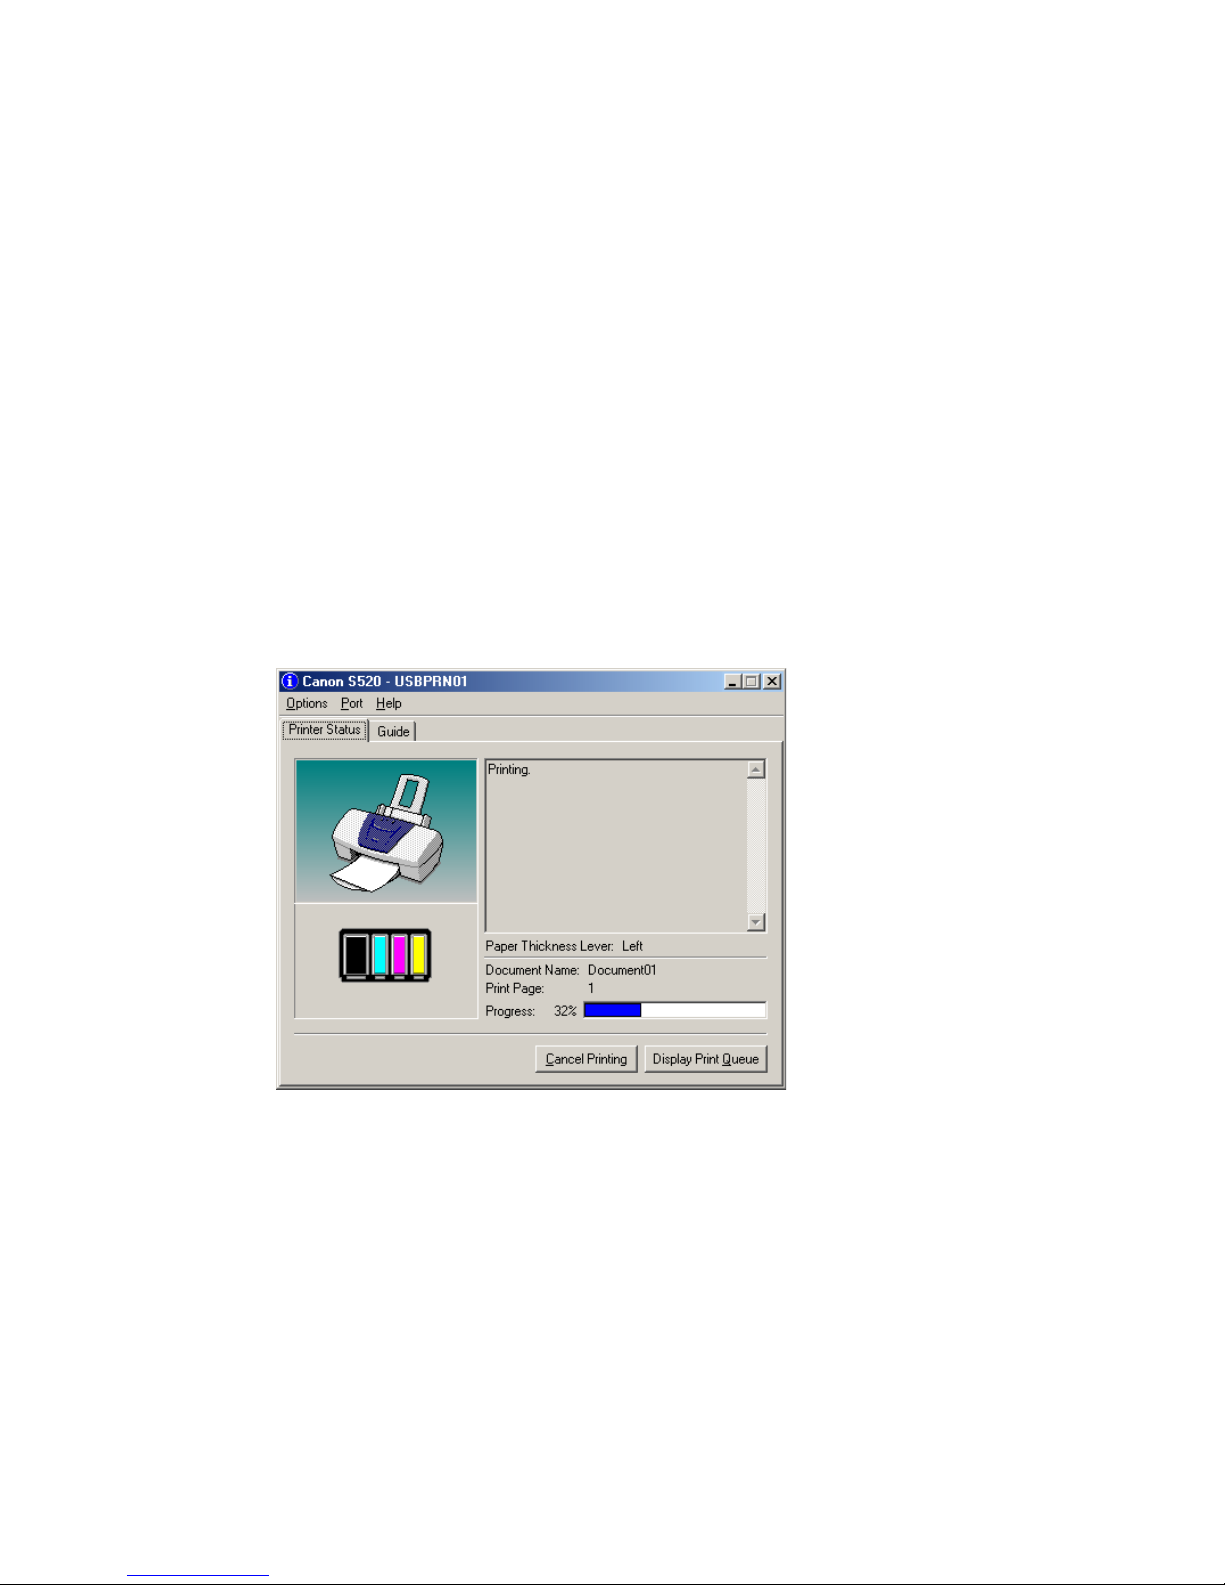
The BJ Status Monitor displays the status of the printer. If an error occurs, the status
monitor indicates the nature of the error and suggests an appropriate solution. The status
monitor also checks the ink tanks and displays a warning message when the ink is low.
■ Launching the BJ Status Monitor
The BJ Status Monitor launches automatically when data is sent to the printer. When
launched, the BJ Status Monitor appears as an icon on the taskbar.
1
Click the Canon BJ Status Monitor icon on the taskbar.
The BJ Status Monitor appears.
Page 36
BJ Status Monitor Functions
35
Printer Driver Functions (Windows)
Note
➤ To open the BJ Status Monitor when the printer is not printing, click the
Maintenance tab in the Printer Properties dialog box, then click Start
Status Monitor.
Page 37
BJ Status Monitor Functions
36
Printer Driver Functions (Windows)
■ When errors occur or ink runs low
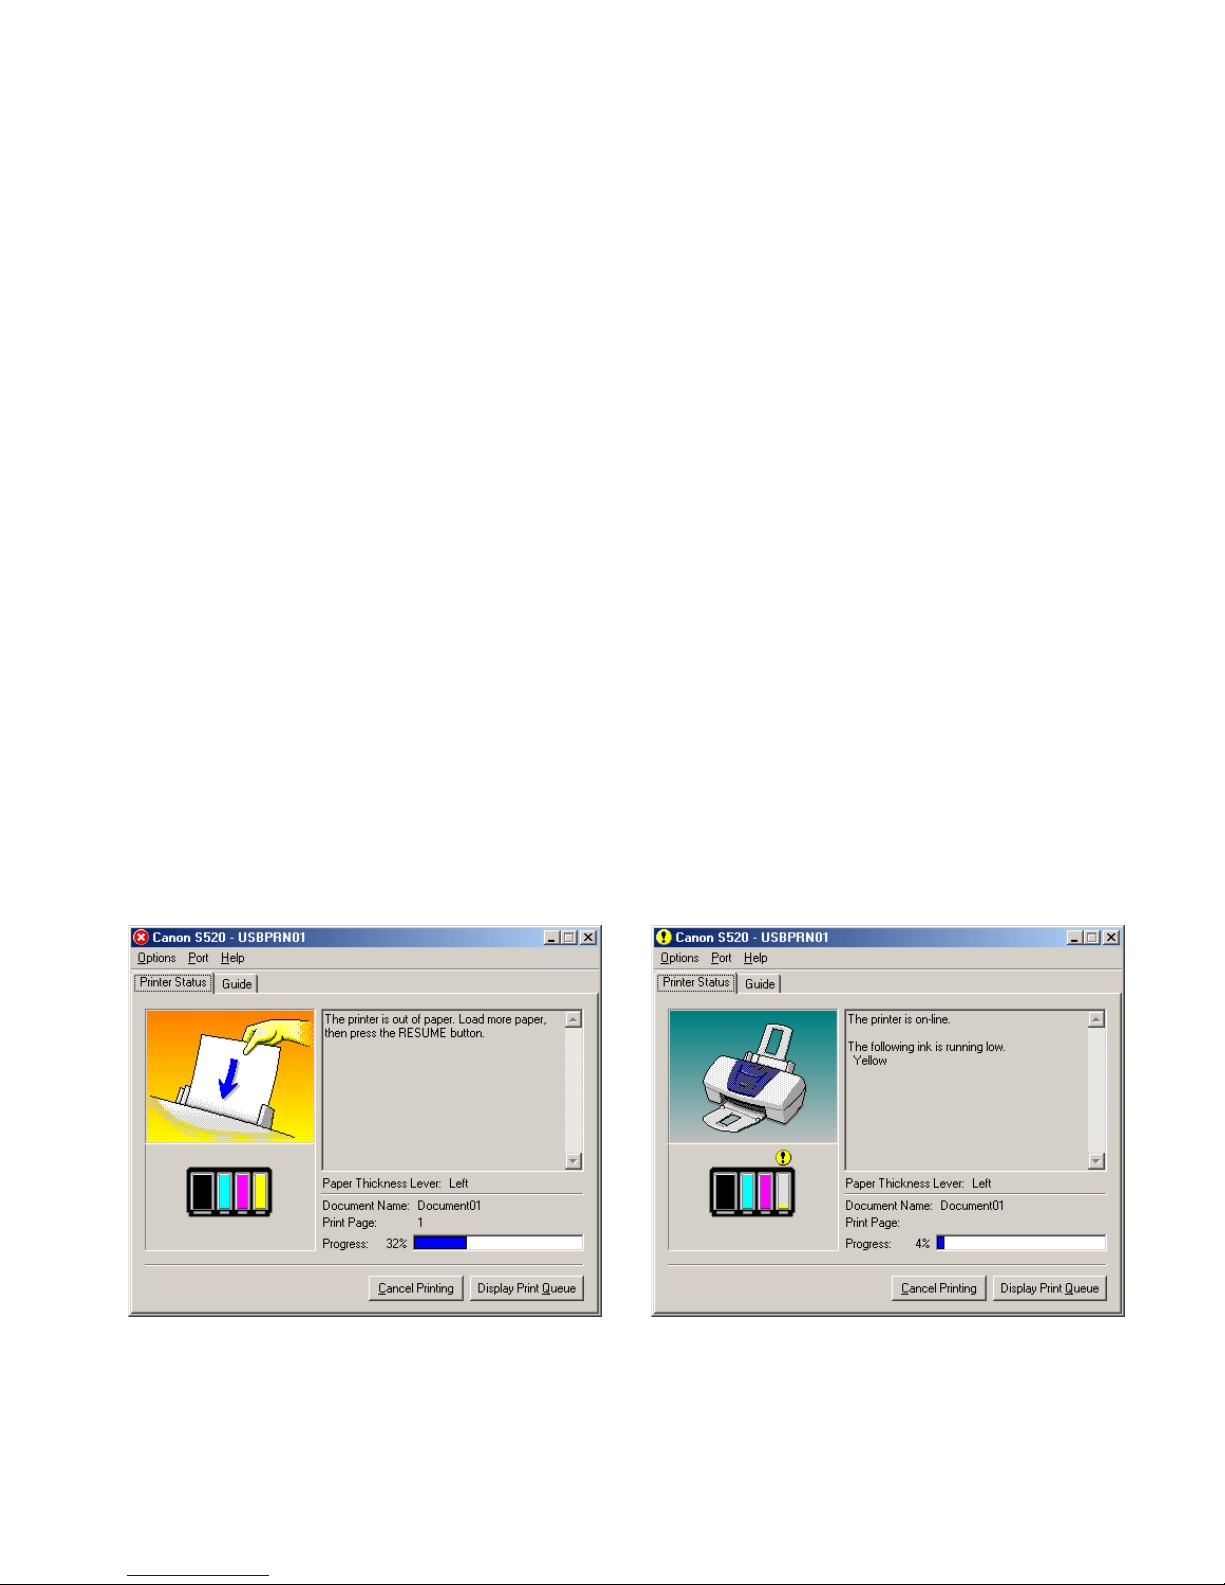
The BJ Status Monitor is automatically displayed when an error occurs, such as if the
printer runs out of paper or ink is low. In such cases, take the action described in the
Printer Status tab.
In Windows 95, Windows 98 or Windows Me, click the Guide tab and follow the
instructions on the screen.
Note
➤ For details on the BJ Status Monitor, click the Help menu, then click the
topic of interest.
When paper has run out: When the ink level is low:
Page 38
Canceling a Print Job
37
Printer Driver Functions (Windows)
Canceling a Print Job
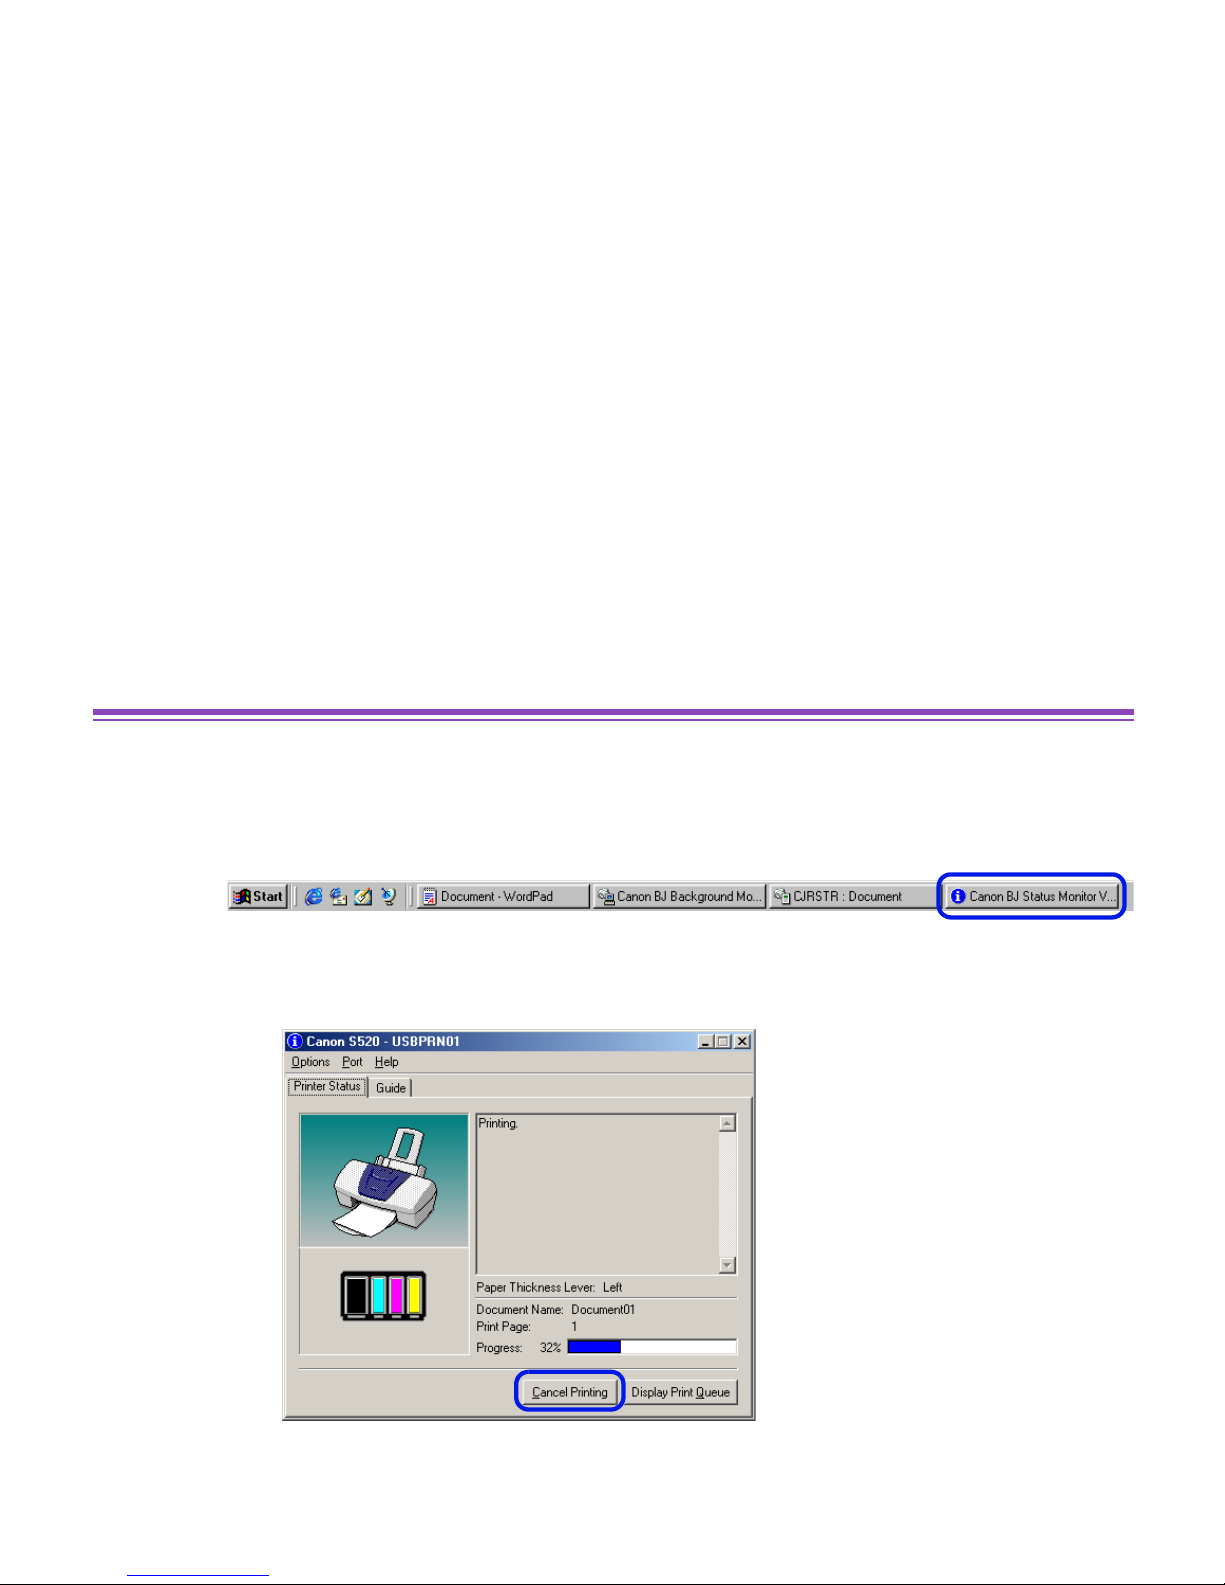
To cancel the current print job, first open the BJ Status Monitor.
1
Click the Canon BJ Status Monitor icon on the taskbar.
2
Click Cancel Printing.
Note
➤ If Cancel Printing is grayed out, press the RESUME/CANCEL button on
the printer to terminate the print job.
Page 39

Uninstalling Printer Drivers
38
Printer Driver Functions (Windows)
Uninstalling Printer Drivers
Use the Uninstaller to delete any unwanted printer drivers. This allo ws y ou to delete all files
associated with the printer driver at the same time.
1
Click the Start button, then click Programs, then Canon S520, then
Uninstall.
For Windows XP, click the Start button, then select All Programs, then
Canon S520, then Uninstall.
2
Click Yes when the confirmation message appears.
3
When all the files have been deleted, click OK.
Uninstalling the printer driver is complete.
If a message prompts you to restart your computer, click OK.
Note
➤ In Windows 95, Windows 98 or Windows Me, you can start the Uninstaller
by double-clicking Uninstall in the Canon S520 folder on the desktop.
Page 40

39
Printer Driver Functions (Macintosh)
Printer Driver Functions (Macintosh)
• Description of Print Settings
• BJ Print Monitor
• Canceling a Print Job
• Using the Printer with a Network
• Uninstalling Printer Drivers
Page 41
Description of Print Settings
40
Printer Driver Functions (Macintosh)
Description of Print Settings
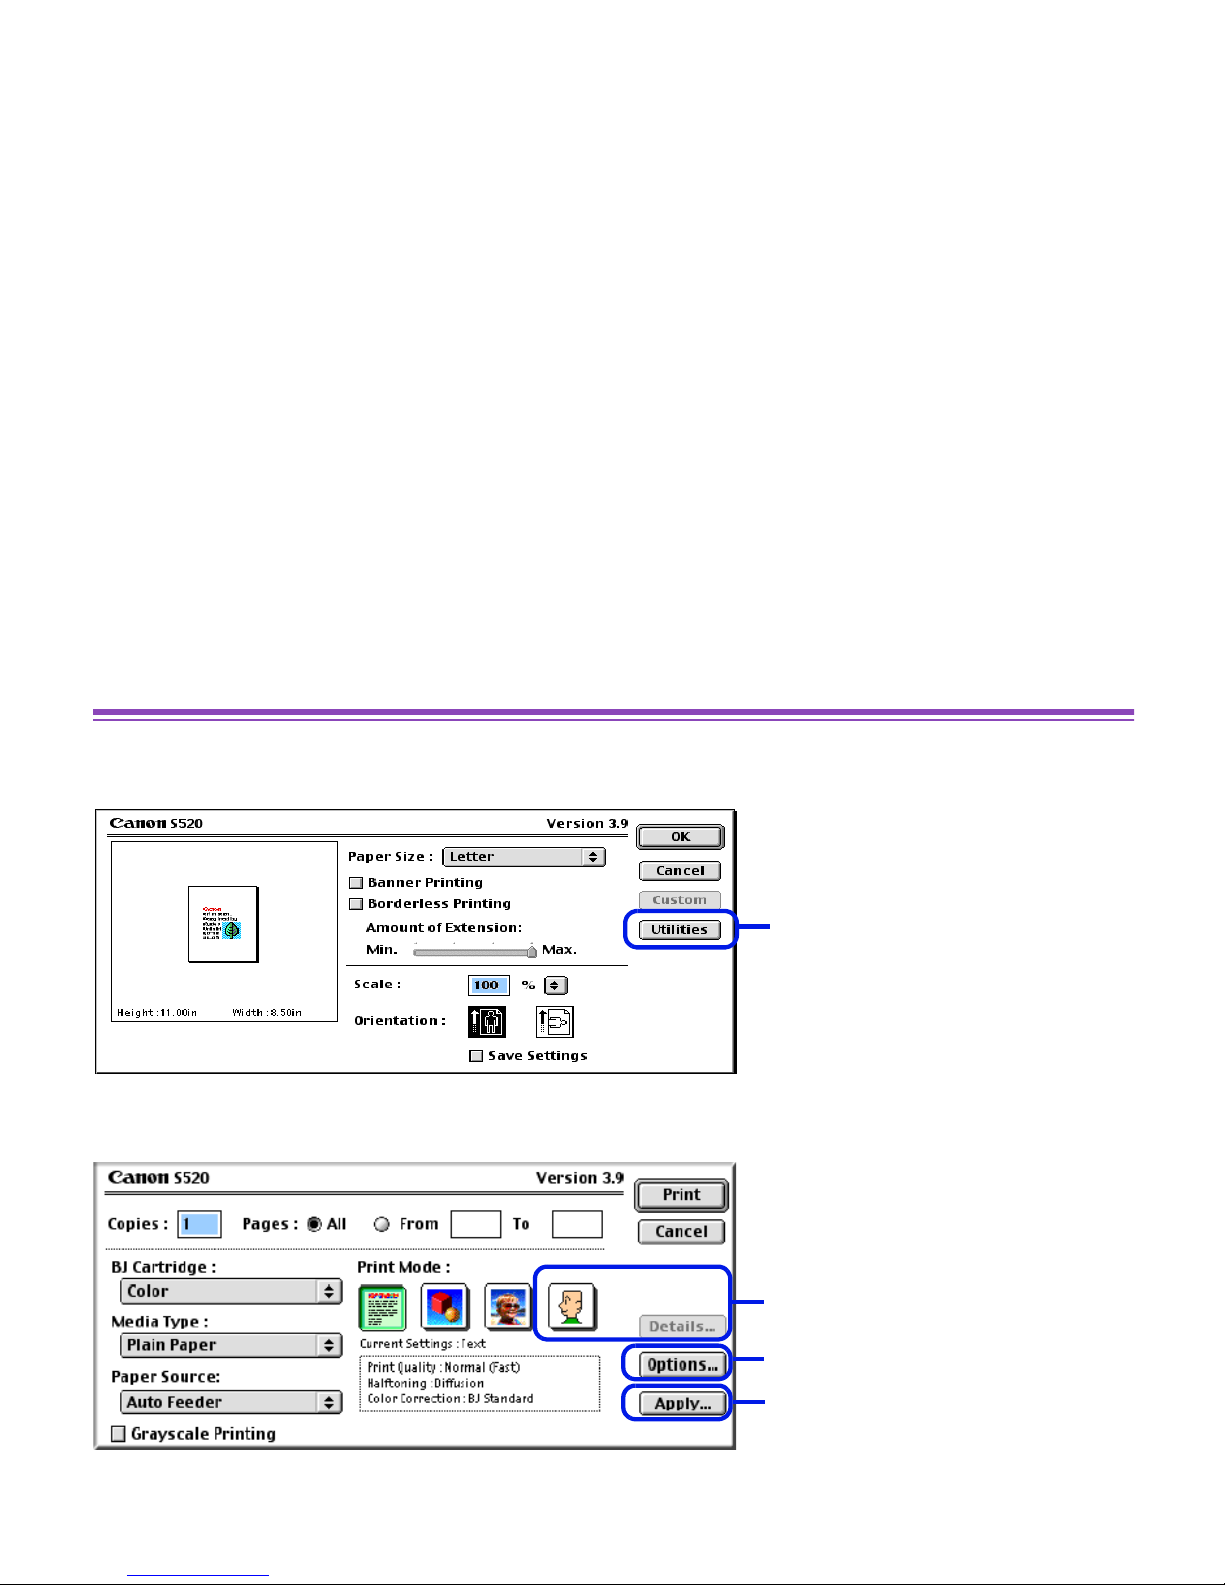
• Page Setup Dialog Box
• Printer Utility
Dialog Box
• Print Dialog Box
• Detailed Setting Dialog
Box
• Options Dialog Box
• Register Settings
Dialog Box
Page 42
Description of Print Settings
41
Printer Driver Functions (Macintosh)
Page Setup Dialog Box
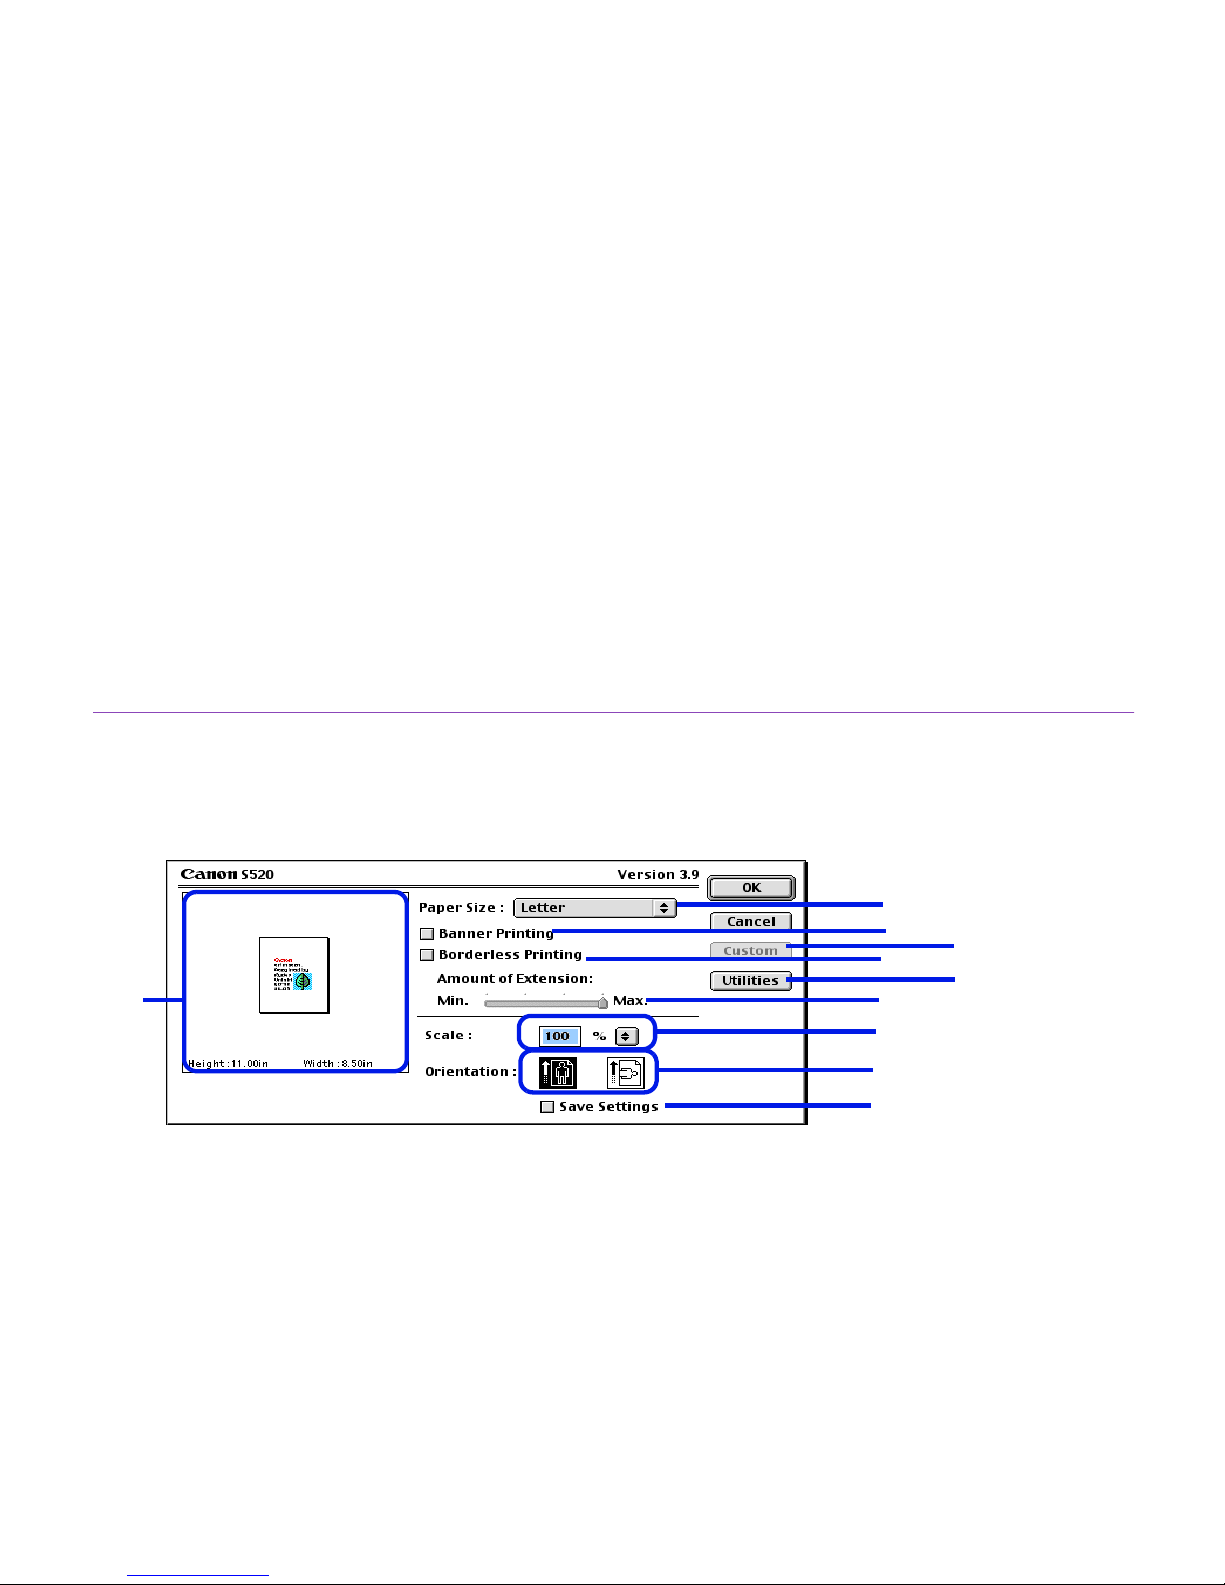
The Page Setup dialog box contains settings for the printed page, such as the size of the
print media used and the image printed. To open the Page Setup dialog box, click Page
Setup on the File menu in your application program.
(1) Paper Size
Select the size of the paper for the print job from the drop-down menu. To enter the
size manually, select Custom 1 to Custom 3, then click Custom.
(2) Banner Printing
Select this check box when printing on banner paper.
(3) Borderless Printing
The image is printed on the entire paper surface, so that no margins are left on the
four sides of the paper. The media types available for borderless printing are PR-101
and GP-301/GP-301N. For all other media types, the print quality may decrease.
(10)
(1)
(2)
(7)
(3)
(8)
(6)
(4)
(5)
(9)
Page 43

Description of Print Settings
42
Printer Driver Functions (Macintosh)
(4) Amount of Extension
When you select Borderless Printing, the sections that extend beyond the paper are
not printed because the image is enlarged to a size slightly larger than the paper size.
You can use the slider to adjust how much the image extends beyond the paper. It is
recommended that you normally set the slider to the right end. If you move the slider
to the left to reduce the extension amount, a border may appear.
(5) Scale
Specify the scaling percentage to resize the document for printing.
(6) Orientation
Select landscape or portrait printing.
(7) Custom
To customize a paper size, click the Custom button to open up the Paper Size
menu.The Custom dialog box lets you specify the length and width of the paper.
(8) Utilities
Click to open the Printer Utility dialog box for maintenance operations such as
printhead cleaning, nozzle check pattern printing and changing the print mode.
(9) Save Settings
Saves the settings specified in the Page Setup dialog box.
(10) Previe w Area
Shows how the document will print with the selected paper settings.
Page 44
Description of Print Settings
43
Printer Driver Functions (Macintosh)
Printer Utility Dialog Box
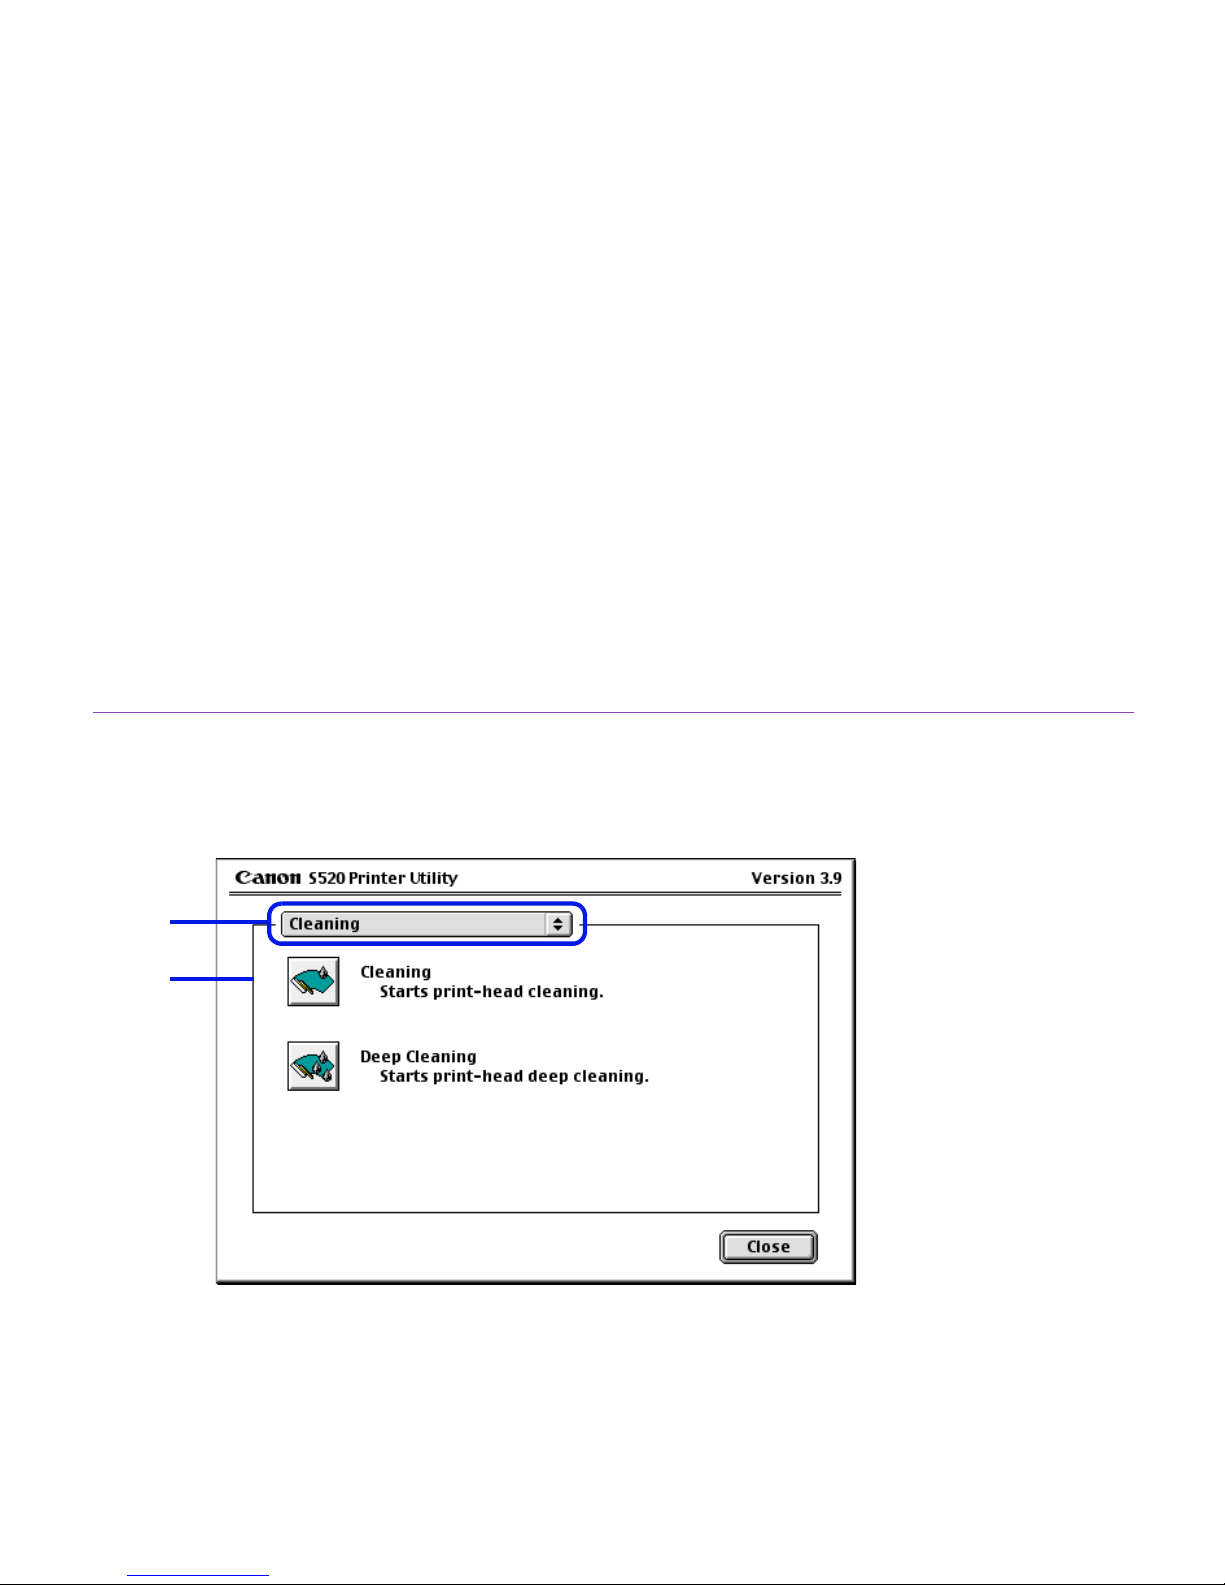
The Printer Utility dialog box is displayed when you click the Utilities button in the Page
Setup dialog box.
(1) Select the function you wish to perform.
(2) Display area showing the various maintenance functions, including cleaning and test
pattern printing. Click the icon to start this function. For further details, refer to
"Routine Maintenance."
➡
Printing the Nozzle Check Pattern
(1)
(2)
Page 45

Description of Print Settings
44
Printer Driver Functions (Macintosh)
➡
Printhead Cleaning
➡
Printhead Deep Cleaning
Note
➤ For information about printhead alignment, refer to the printed Quick Start
Guide.
Page 46
Description of Print Settings
45
Printer Driver Functions (Macintosh)
Print Dialog Box
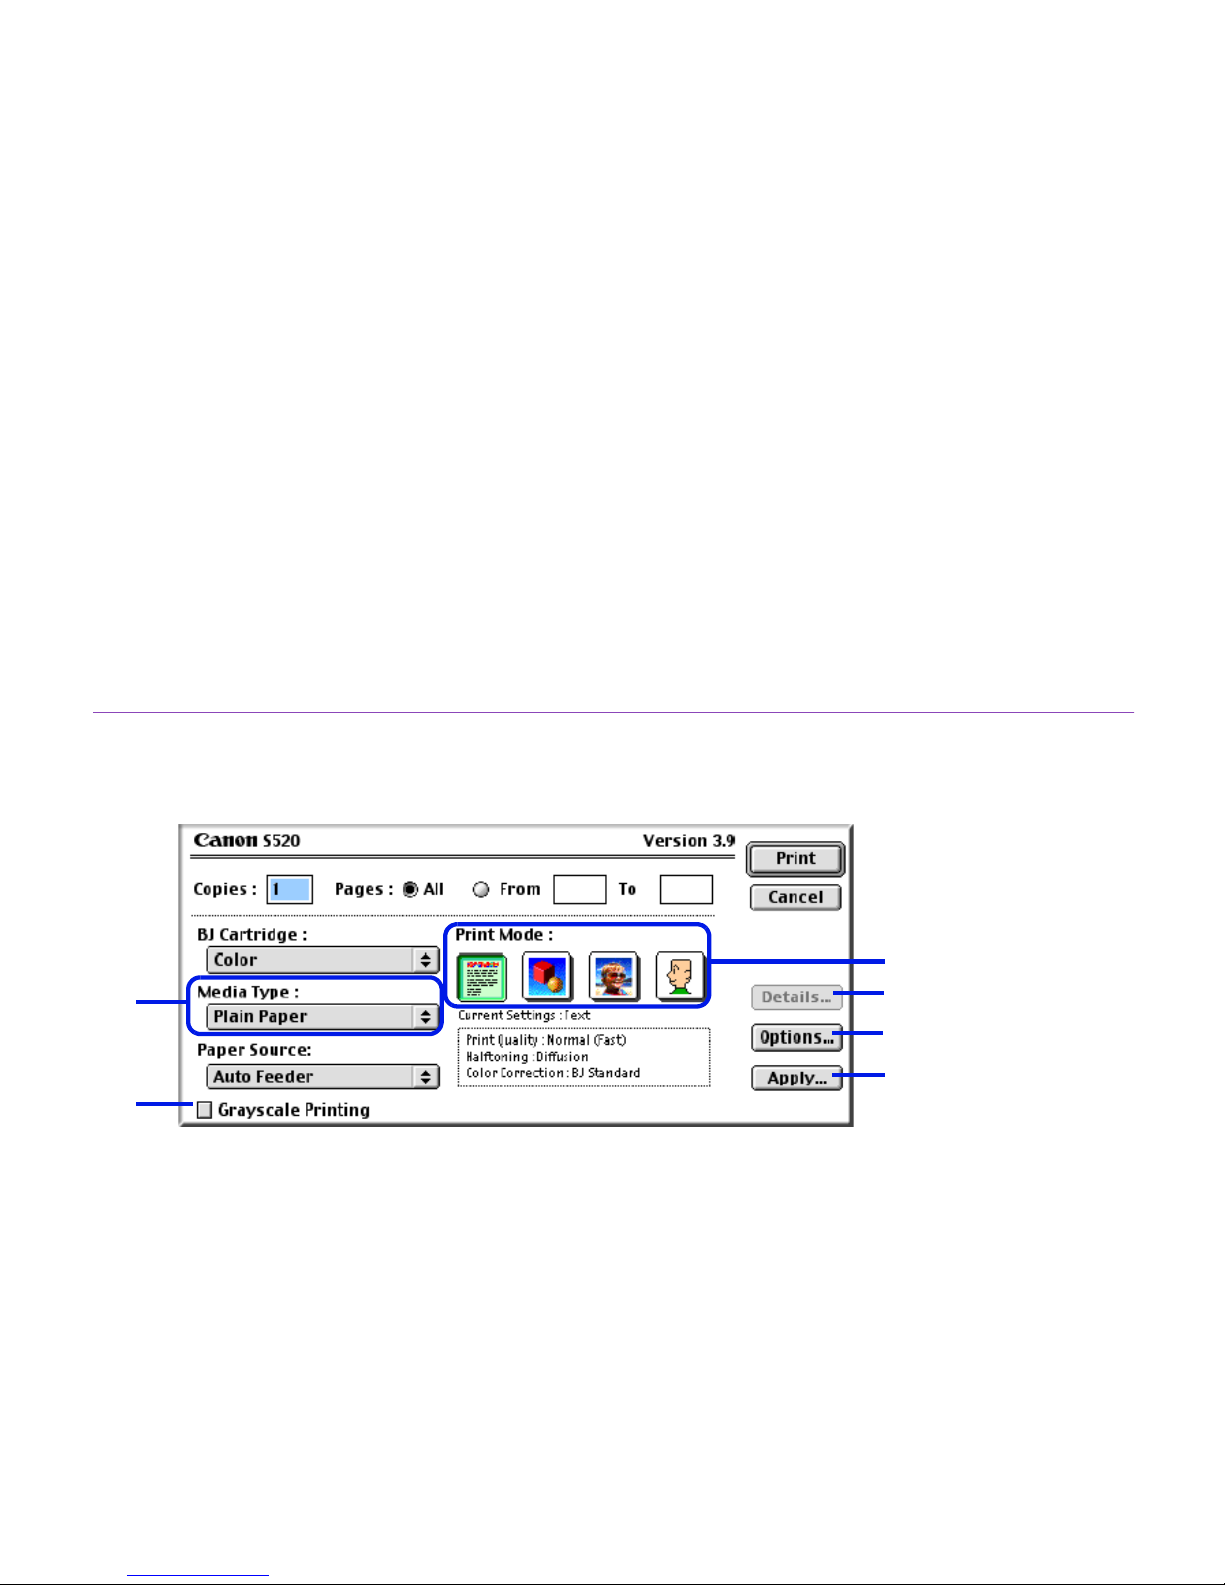
The Print dialog bo x specifies the media type and print settings to be used for y our print job.
To open the Print dialog box, click Print on the File menu in your application program.
(1) Media Type
Ensure that this setting matches the type of media loaded in the printer.
(2) Grayscale Printing
Select to print a grayscale v e rsion of a color document.
(3) Print Mode
Click the icon that most closely resembles your document and required print results.
(1)
(2)
(3)
(4)
(5)
(6)
Page 47

Description of Print Settings
46
Printer Driver Functions (Macintosh)
(4) Details
Manually set the print quality and color settings in the Detailed Setting Dialog Box.
(This option is only available if Manual print mode is selected.)
(5) Options
Specify the output destination, print order and page layout for the document you are
printing.
(6) Apply
Allows you to register print settings or implement a previously saved print setting.
Page 48
Description of Print Settings
47
Printer Driver Functions (Macintosh)
Detailed Setting Dialog Box
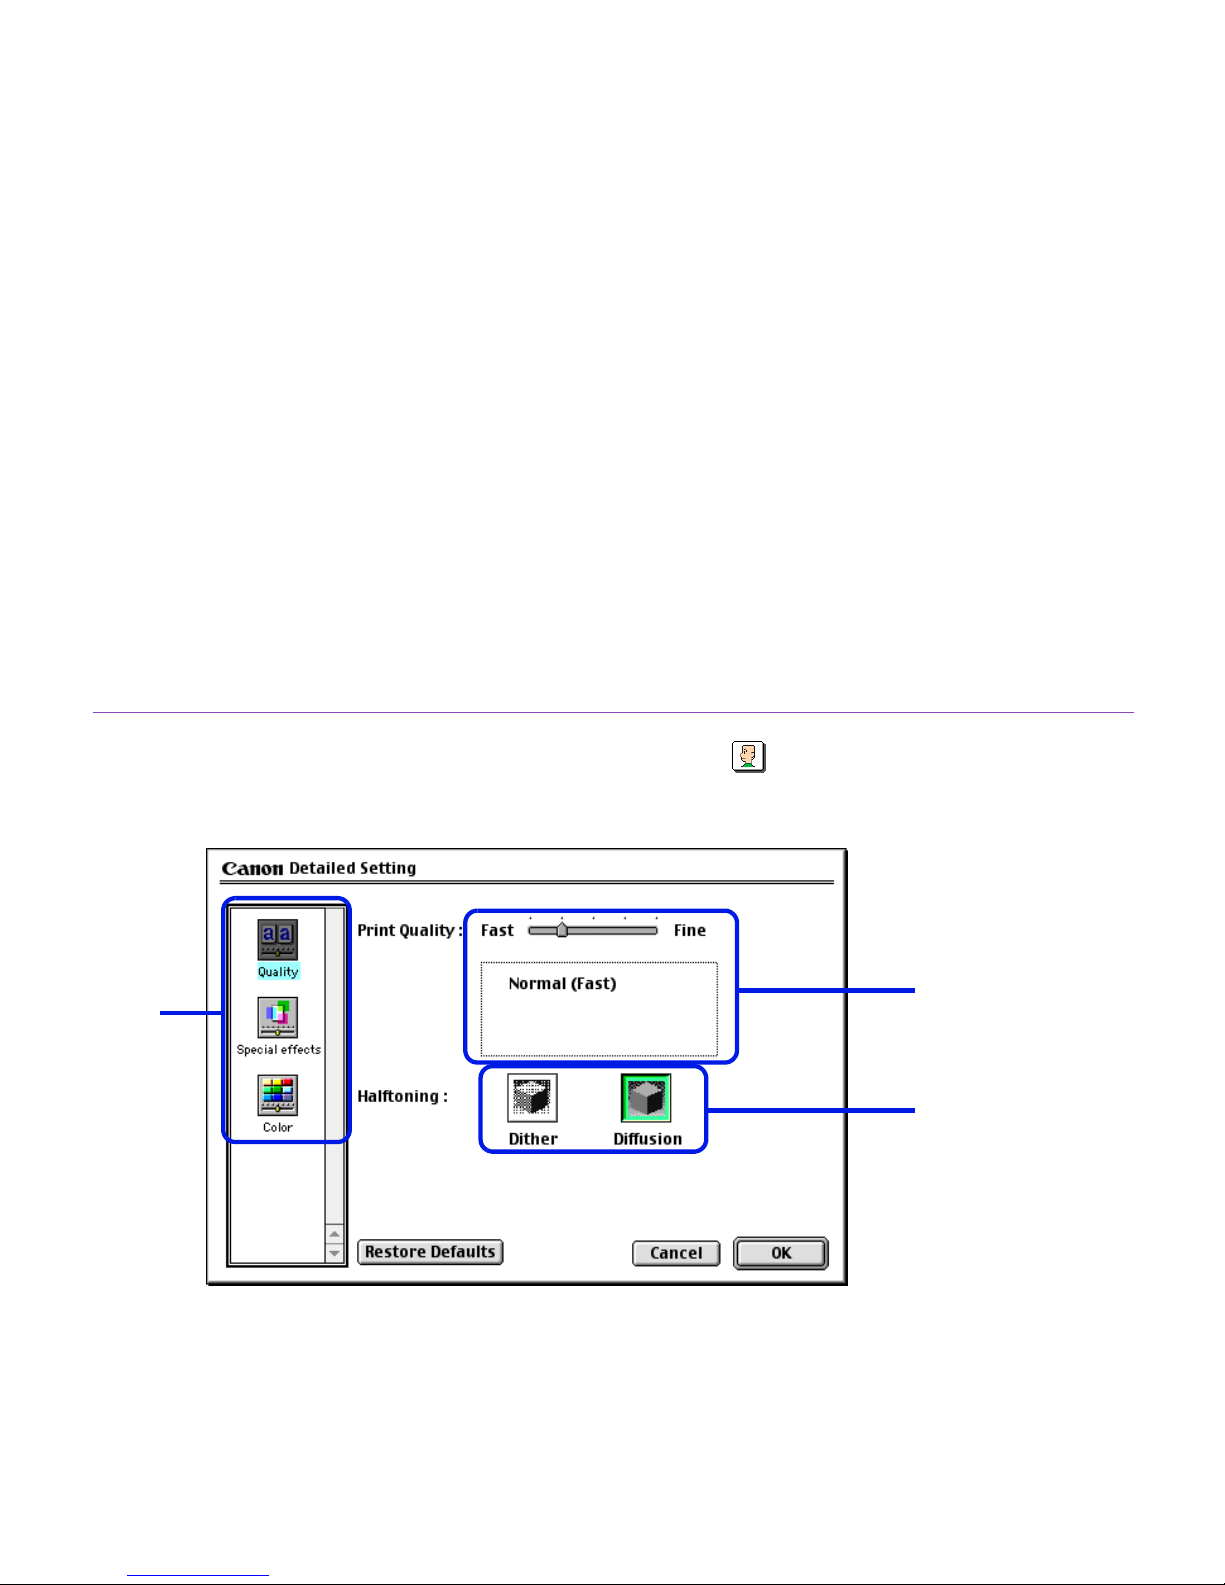
To open the Detailed Setting dialog box, select Manual in the Print dialog box, then
click Details.
(1) Panel display icons
Click these icons to switch between panels in the Detailed Setting dialog box.
(1)
(2)
(3)
Page 49

Description of Print Settings
48
Printer Driver Functions (Macintosh)
(2) Print Quality
Move the slider to adjust the balance between print quality and speed. Moving the
slider to the right enhances print quality, and moving it to the left increases printing
speed.
(3) Halftoning
Click either Dither or Diffusion ink dot configurations.
Page 50
Description of Print Settings
49
Printer Driver Functions (Macintosh)
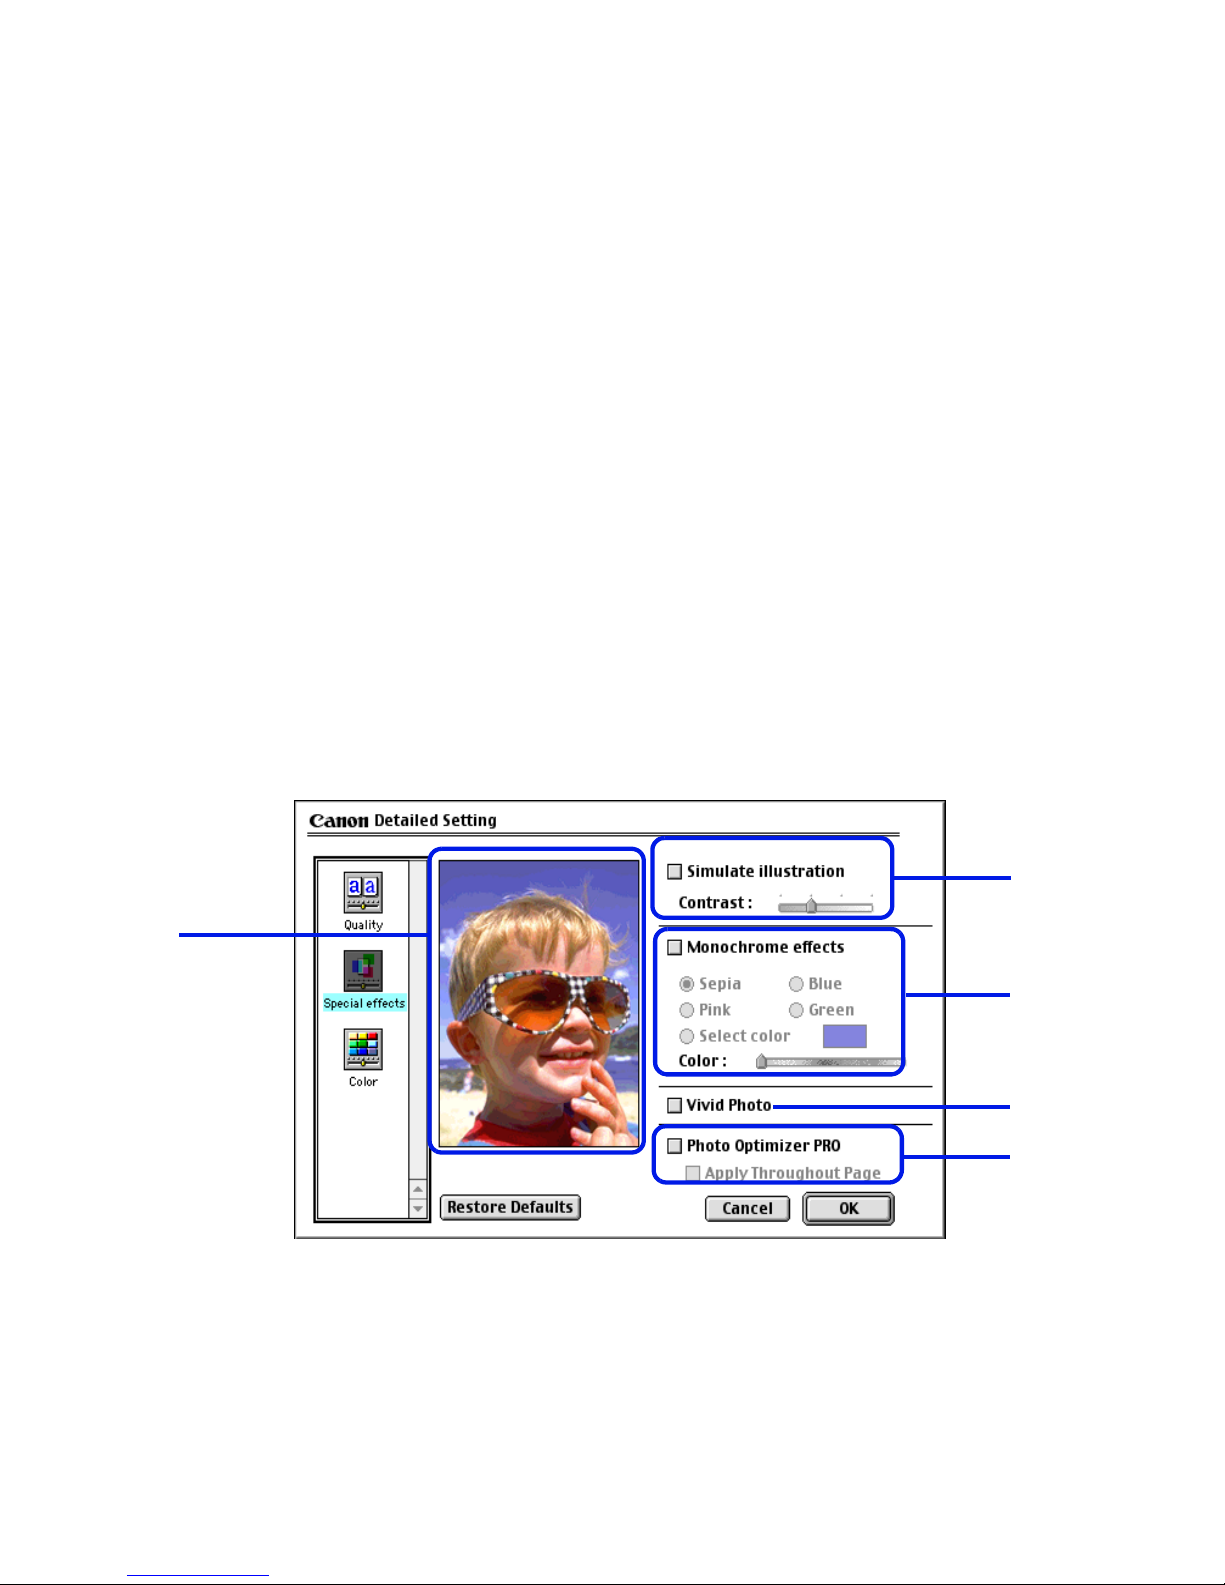
■ Special Effects Panel
To display the Special Effects panel, click the Special effects icon.
(1) Simulate illustration
This function lets you manipulate color image data to produce illustration effects.
Select the check box, then adjust the brightness of the image with the Contrast slider.
(5)
(1)
(2)
(3)
(4)
Page 51

Description of Print Settings
50
Printer Driver Functions (Macintosh)
(2) Monochrome effects
Prints a color image in a single color. Select the check box, then choose the color you
wish to use.
(3) Vivid Photo
With this function, you can reproduce breathtaking sceneries in which colors,
especially blues and greens, appear even more vibrant. A major feature of this
function is its ability to create vivid backgrounds for fields, trees, oceans, and sky,
while maintaining the natural skin tones of people who appear in the images.
(4) Photo Optimizer PRO
Optimizes the color for images taken from a digital camera or scanner. It is especially
effective for images affected by color imbalance and over- or under-exposure.
When printing several images on one page, optimization is usually applied to each
image according to its requirements. However, if the image data has been
manipulated using cut and paste, rotation or other such operations, group optimization
of all images on the page is recommended. In such cases, select the Apply
Throughout Page check box.
(5) Preview Area
Page 52
Description of Print Settings
51
Printer Driver Functions (Macintosh)
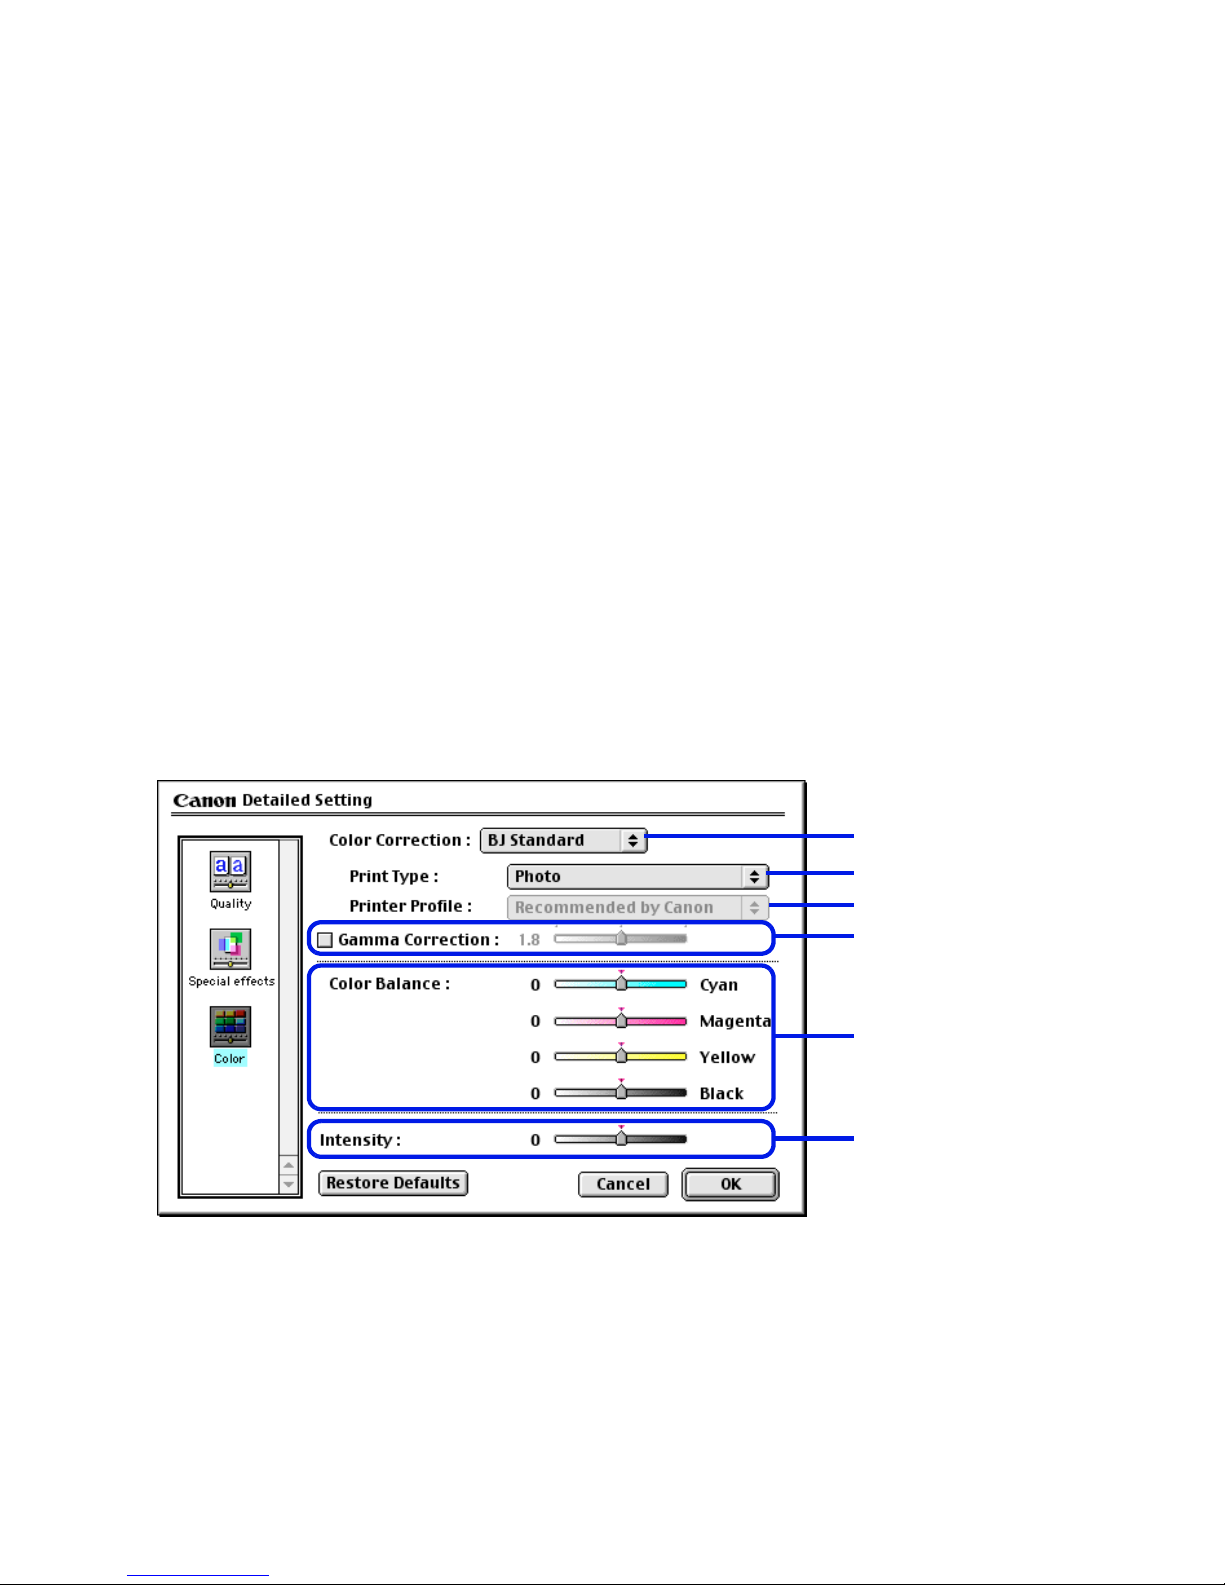
■ Color Panel
To display the Color panel, click the Color display icon.
(1) Color Correction
Select a color correction method: BJ Standard, ColorSync or None. BJ Standard is
usually the optimum color correction method for printing with a BJ printer. When
ColorSync is selected, you should also specify the Print Type and Printer Profile
settings.
(1)
(2)
(3)
(4)
(5)
(6)
Page 53

Description of Print Settings
52
Printer Driver Functions (Macintosh)
(2) Print Type
For printing that emphasizes intermediate colors, select Photo. For printing that
emphasizes the brightness of primary colors, select Graphics. For documents that
contain large amounts of a basic color, select Spot Color.
(3) Printer Profile
Select optimized color characteristics (a profile) for the media type and other factors.
(4) Gamma Correction
This function adjusts the contrast of colors other than black and white. To adjust the
contrast, select the check box, then move the slider. Moving the slider to the right
darkens the entire image while increasing contrast in the lighter areas and decreasing
contrast in the darker areas.
(5) Color Balance
Move the slider f or each color to adjust the balance of color intensity. Moving the slider
to the right intensifies the color.
(6) Intensity
Move the slider to adjust the print density. Moving the slider to the right increases the
density.
Page 54
Description of Print Settings
53
Printer Driver Functions (Macintosh)
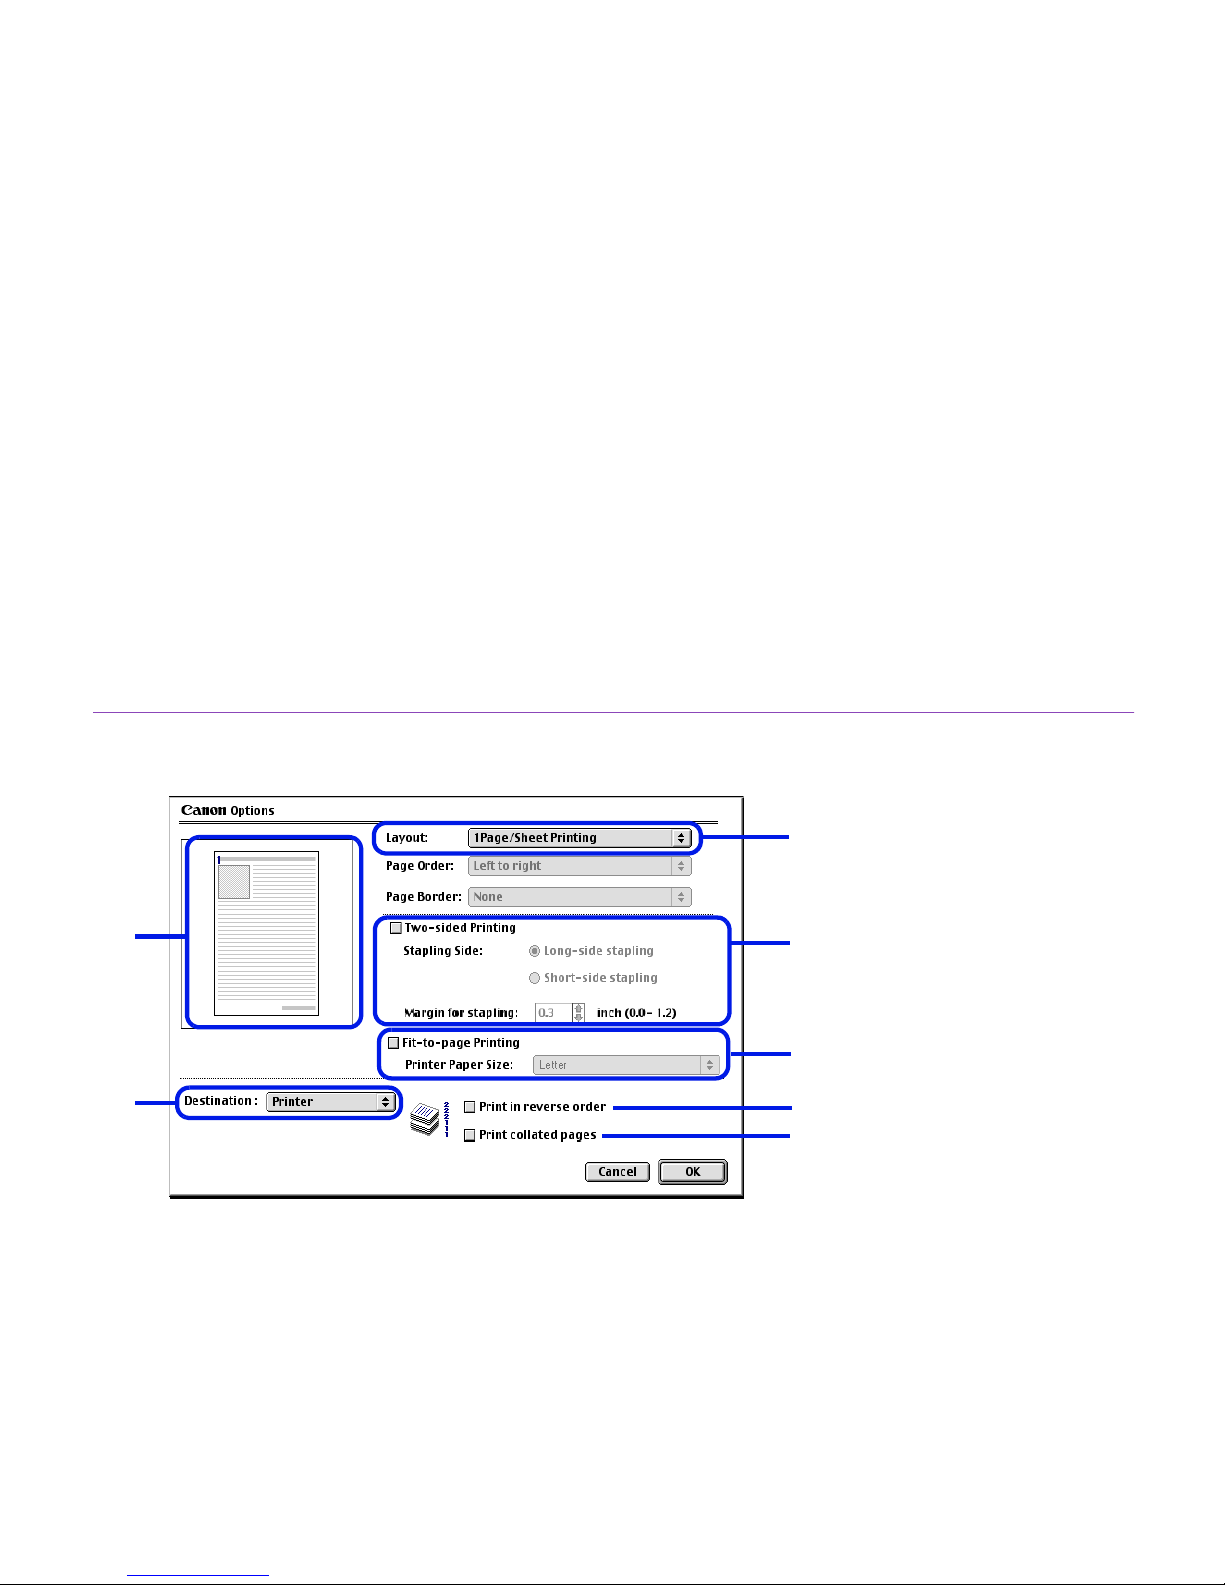
Options Dialog Box
To open the Options dialog box, click Options in the Print dialog box.
(1) Layout
Use this function to print more than one page on a single sheet of paper. Typically , this
is set to 1 Page/Sheet Printing. You can also enlarge printing so that a single page
spans multiple sheets of paper by using the Poster Printing feature. If you select
2Page/Sheet Printing or 4Page/Sheet Printing, you should also set Page Order to
specify the document page order for printing. The Border option allows you to print a
border around the individual document pages if desired.
(1)
(2)
(7)
(4)
(5)
(6)
(3)
Page 55

Description of Print Settings
54
Printer Driver Functions (Macintosh)
(2) Duplex Printing
The document is printed on both sides of the paper. After printing on one side, turn the
ejected page over and print on the other side.
(3) Fit-to-page Printing
Executes scaled printing automatically. When selected, you can specify the Printer
Paper Size. This fits the document paper size set in the application to the selected
paper size.
(4) Destination
Select the print output destination. Printer is the usual selection. To check the layout
or other image elements before printing, select Preview. To save the document as a
PICT file, select PICT File.
(5) Print in reverse order
Prints the document starting with the last page.
(6) Print collated pages
Prints multiple copies of the document one copy at a time.
(7) Preview Area
Page 56
Description of Print Settings
55
Printer Driver Functions (Macintosh)
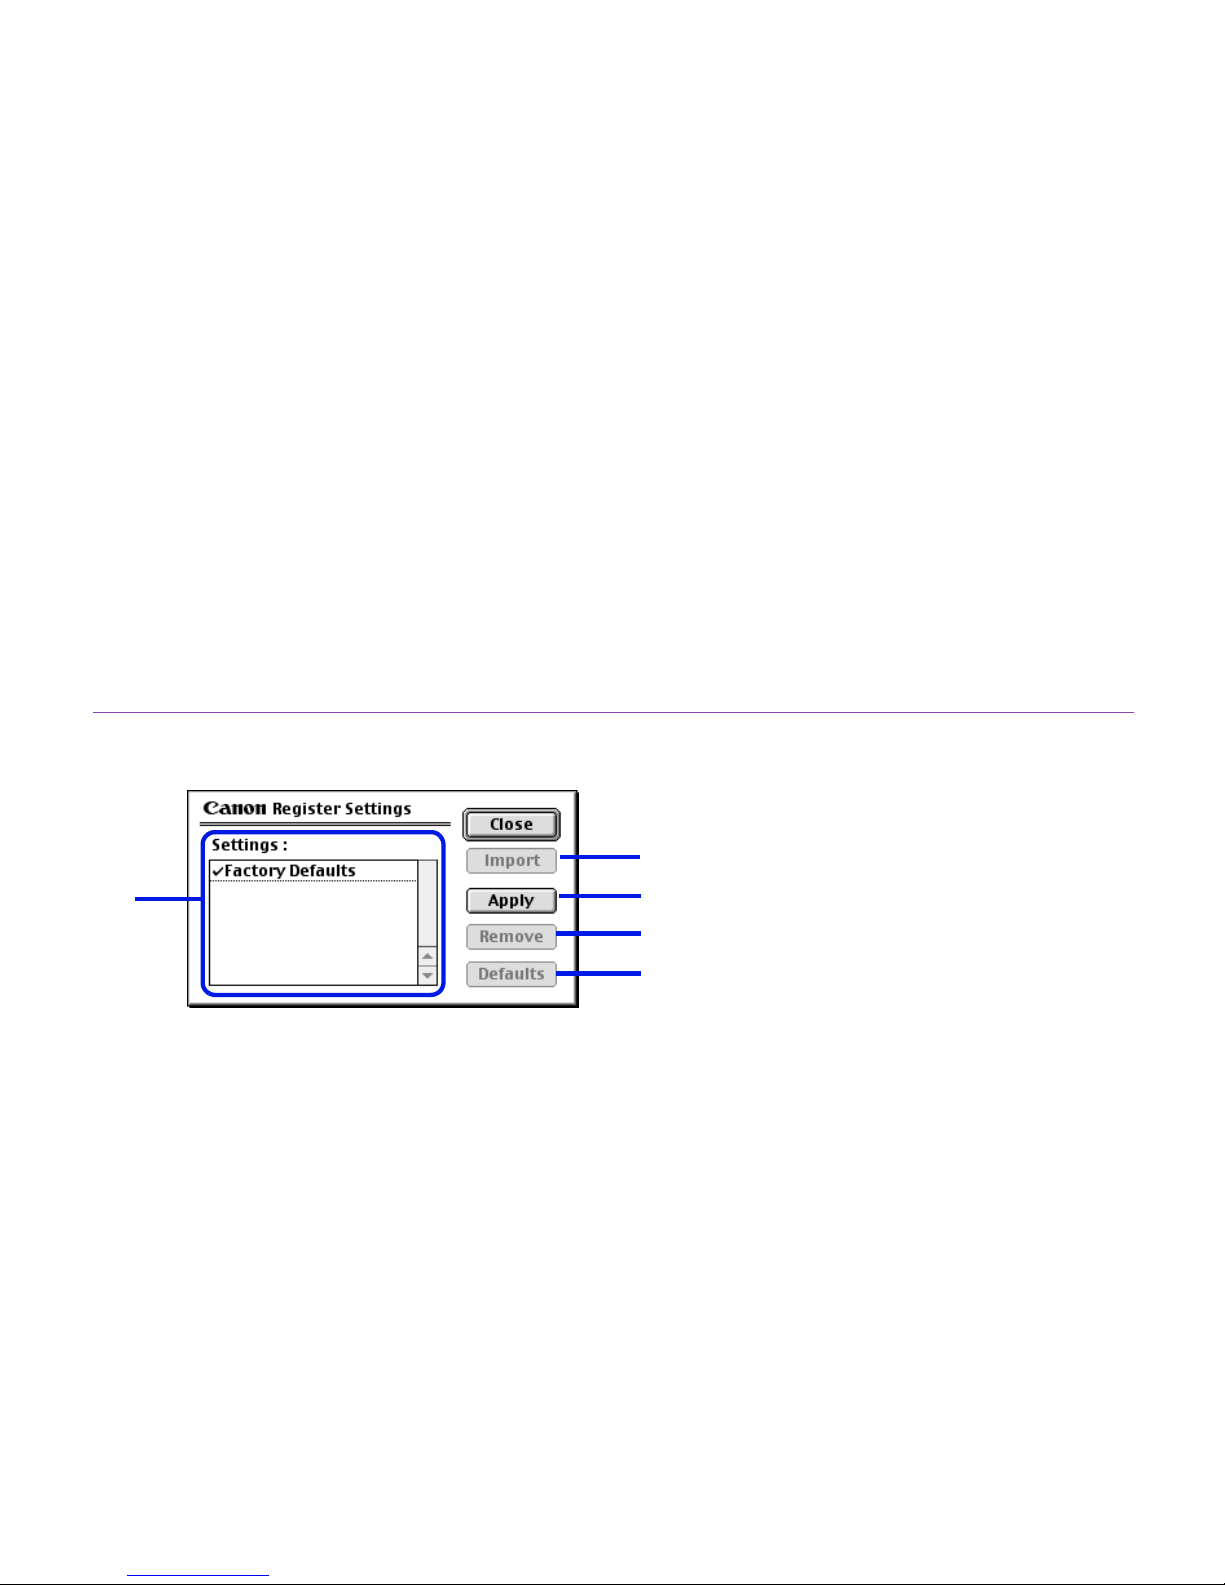
Register Settings Dialog Box
To open the Register Settings dialog box, click Apply in the Print dialog box.
(1) Settings
Displays a list of the registered print settings.
(2) Import
Imports a group of saved print settings. To use the settings, select the desired settings
in the Settings list, then click Import.
(3) Apply
Saves the settings currently specified in the Print dialog box. After clicking the button,
enter a name for the settings.
(4) Remove
Deletes unwanted print settings. Under Settings, select the settings you want to
delete, then click Remove.
(5) Defaults
Restores the selected print settings to defaults. A check mark appears next to the
selected print settings.
(1)
(2)
(3)
(4)
(5)
Page 57
BJ Print Monitor
56
Printer Driver Functions (Macintosh)
BJ Print Monitor
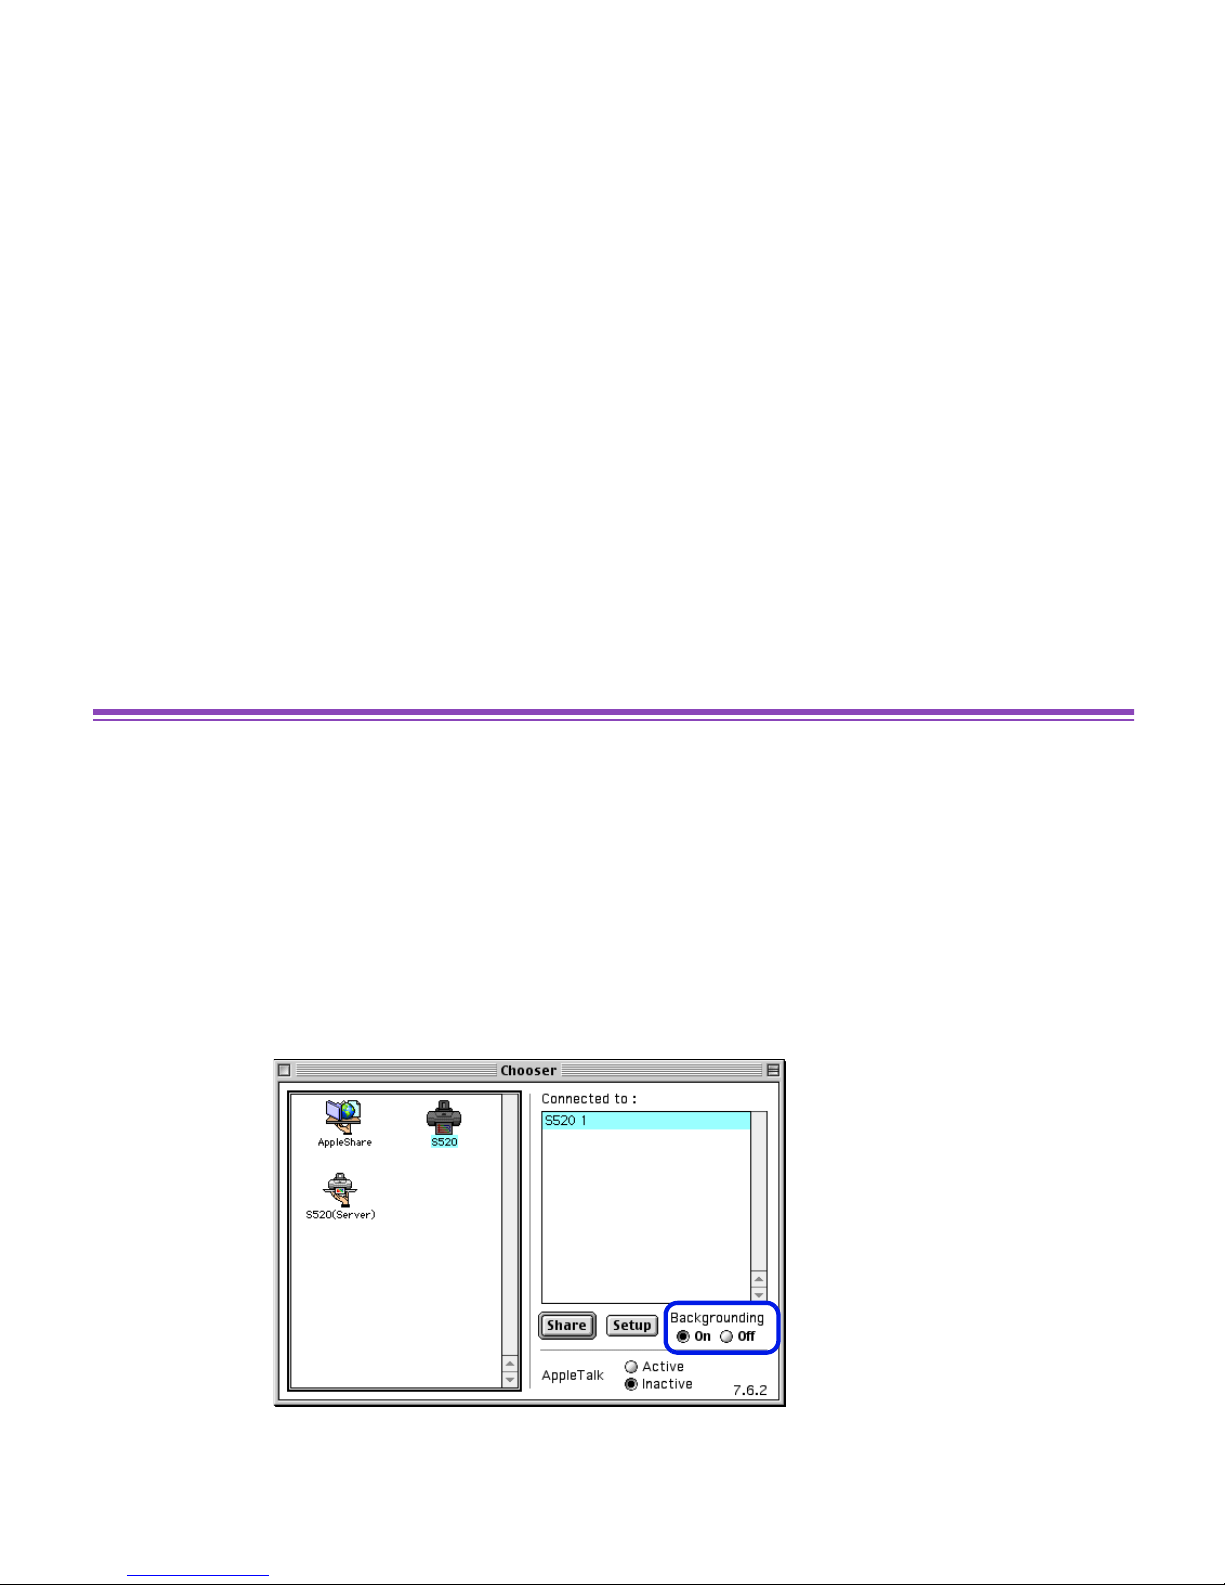
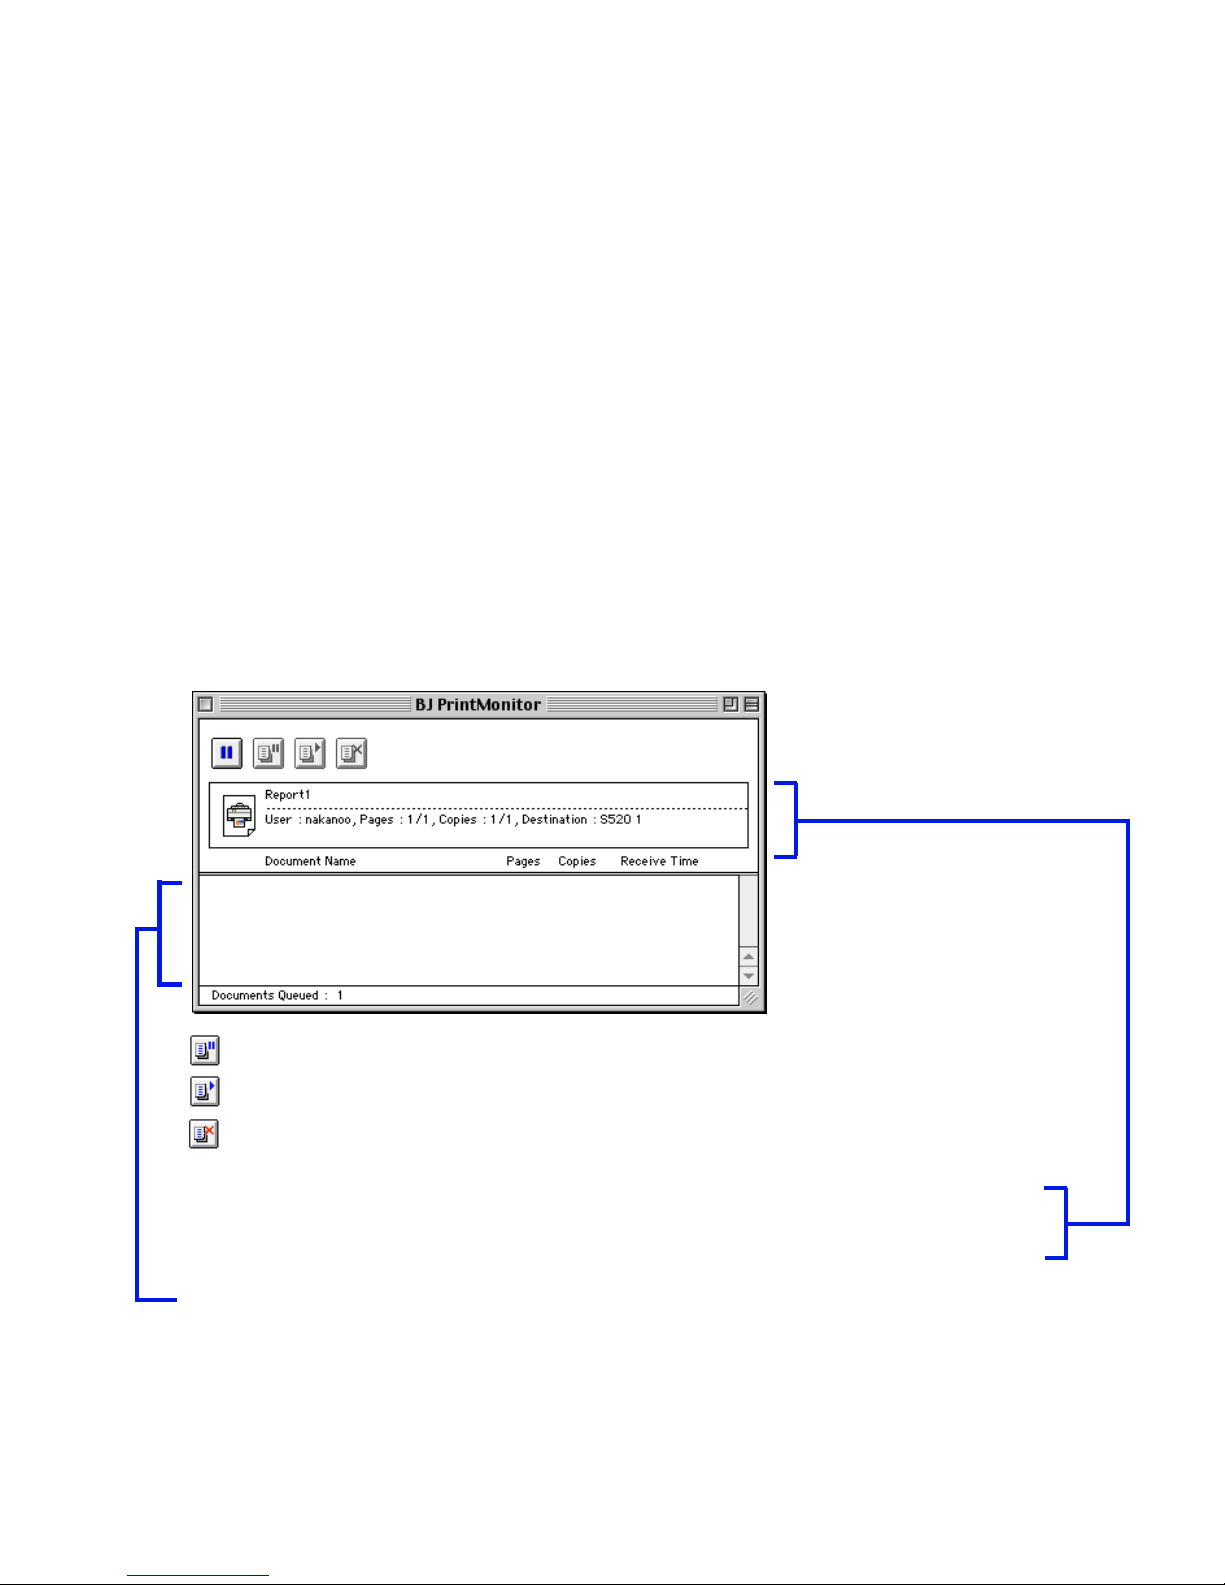
The BJ Print Monitor allows you to check the progress of print jobs. You can launch the BJ
Print Monitor if background printing is enabled in the Chooser utility.
■ Opening the BJ Print Monitor
1
Click Chooser on the Apple menu.
2
Set Backgrounding to On.
3
After starting a print job, click BJ Print Monitor in the Application menu.
The BJ Print Monitor launches.
Page 58
BJ Print Monitor
57
Printer Driver Functions (Macintosh)
■ BJ Print Monitor Functions
You can change the print order of documents queued f or printing in the BJ Print Monitor . To
change the print order, place the mouse pointer over the name of the document, hold the
mouse button down while dragging the document name to the new position, then release.
You cannot change the print order of a document already printing.
Note
➤ If you click Print on the File menu, you can print the PICT file saved under
Destination in the Option dialog box.
... Click to pause printing of the specified document.
... Click to resume printing.
... Click to cancel printing of the specified document.
Displays the printer status. If an error occurs, instructions on what to do are
displayed.
Displays the printer status and ink status with images.
Displays information about the documents queued for printing.
Page 59

Canceling a Print Job
58
Printer Driver Functions (Macintosh)
Canceling a Print Job
When the BJ Print Monitor is running, you can use it to cancel or suspend a current job.
1
Click BJ Print Monitor in the Application menu.
2
Click the name of the print job you want to cancel, then click .
The document selected in the Print Monitor is deleted from the print list and
the print job is canceled.
Note
➤ To suspend printing, click the name of the document being printed, then
click . To resume printing, click .
Page 60

Using the Printer with a Network
59
Printer Driver Functions (Macintosh)
Using the Printer with a Network
The printer can be used with an Ethernet network en vironment. Follow the steps described
below to connect the printer to the network.
■ Before Setting up the Printer
• Install the printer driver on each network computer that will use the printer. For
information on installation, refer to the printed Quick Start Guide.
• Use a USB cable to connect the printer to the computer that will function as the print
server.
■ Printer Setup
To use the printer on a network, first set up the print server, then set up each client
machine.
• Print server setup procedure
1
Click Chooser in the Apple menu.
2
Click Active next to AppleTalk.
3
Select the S520 icon, then select the printer name in Connected to.
Page 61

Using the Printer with a Network
60
Printer Driver Functions (Macintosh)
4
Click Share.
5
Confirm that S520 server is selected in Enter new print server name,
then click Send.
6
Confirm that the new print server name has been added to Current print
servers, then click Close.
7
Click the close box to close the Chooser.
• Client setup procedure
1
Click Chooser on the Apple menu.
2
Click Active next to AppleTalk.
3
Select the S520 (Server) icon, then select the printer server in Connected
to.
4
Click the close box to close the Chooser.
Page 62

Using the Printer with a Network
61
Printer Driver Functions (Macintosh)
■ Checking Print Status
• Checking print status from the print server
To check the status of a print job from the print server, start the BJ Print Monitor by
selecting BJ Print Monitor from the Application menu. To close the BJ Print Monitor,
click Close Status Window on the File menu.
• Checking print status from a client
To check the status of a print job from a client, start the BJ Status Monitor by clicking
the BJ Status Monitor icon in the BJ Extras folder. To close the BJ Status Monitor,
click Quit on the File menu.
• The BJ Print Monitor and BJ Status Monitor
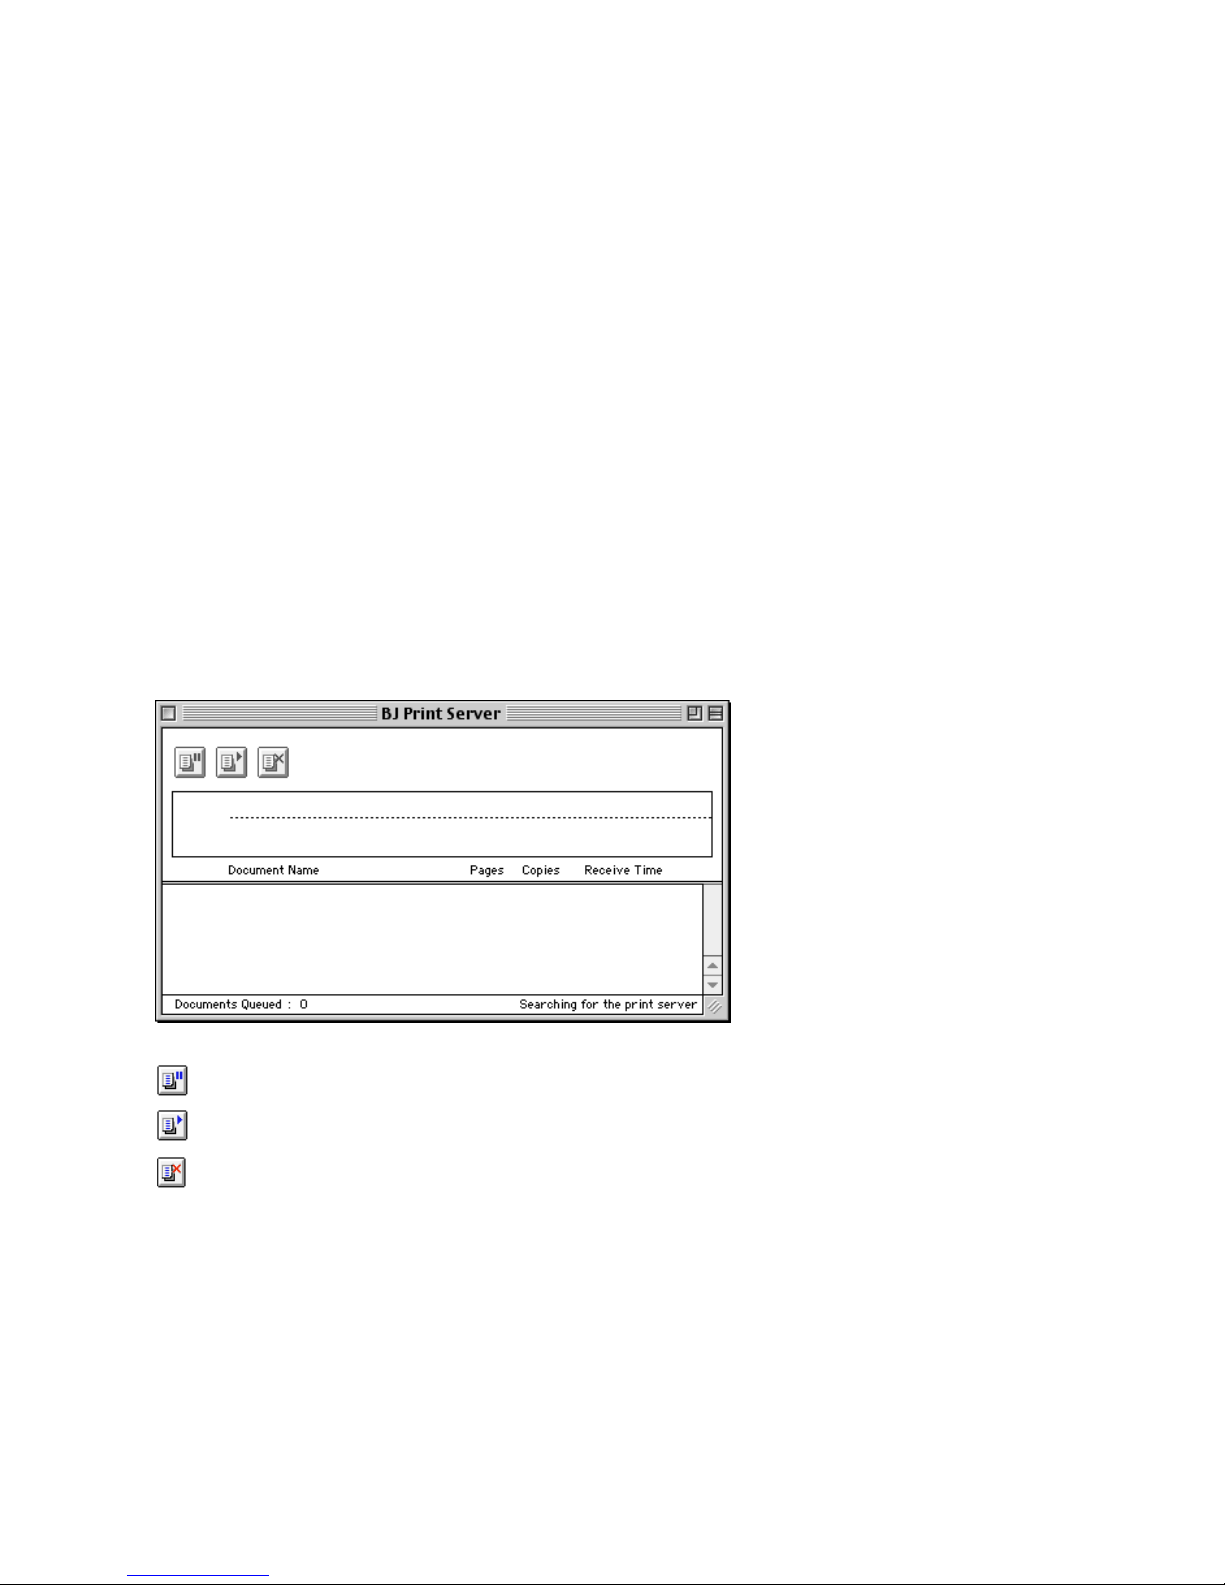
The BJ Print Monitor and the BJ Status Monitor both display a list of information
concerning documents queued for printing. This information includes the document
name, number of pages, number of copies and the time when the print job was
accepted. The total number of queued documents is also displayed. The BJ Print
Monitor allows you to change the print order of the queued documents.
➡
BJ Print Monitor Functions
➡
BJ Status Monitor Functions
Page 63
Using the Printer with a Network
62
Printer Driver Functions (Macintosh)
■ BJ Status Monitor Functions
....Click to pause printing of the specified document.
....Click to resume printing.
....Click to cancel printing of the specified document.
Note
➤ • You can determine the owner of a computer b y selecting the File Sharing
control panel and checking the Owner Name item.
• If you are using two or more print servers, you can switch between the BJ
Status Monitor displays. Click Print Server on the File menu, then select
the desired print server and click OK.
Page 64

Uninstalling Printer Drivers
63
Printer Driver Functions (Macintosh)
Uninstalling Printer Drivers
When a printer driver is no longer needed, use the Installer to delete all the program files
associated with it at the same time.
Before proceeding, ensure that y ou sav e any unsav ed files in currently running applications.
1
Insert the Setup Software & User's Guide CD-ROM, into the CD-ROM
drive.
2
Double-click the Printer Driver folder.
3
Double-click the Installer icon.
4
When the Software License Agreement is displayed, click Accept.
5
Select Uninstall from the popup menu, then click Uninstall.
Note
➤ If a warning message appears indicating that other applications are
running:
• Click Cancel and save the document(s) if there are any unsaved
documents open in the other applications.
• Click Continue to continue the uninstall operation.
6
After the uninstall is complete, a message appears prompting you to restart
your computer. Click Restart.
Page 65

64
Routine Maintenance
Routine Maintenance
• When to Replace Ink Tank and Maintain Printhead
• Replacing an Ink Tank
• Printing the Nozzle Check Pattern
• Printhead Cleaning
• Printhead Deep Cleaning
• Cleaning the Printer
• Transporting the Printer
Page 66

When to Replace Ink Tank and Maintain Printhead
65
Routine Maintenance
When to Replace Ink Tank and Maintain Printhead
The BJ Status Monitor (Windows) or the BJ Print Monitor (Macintosh) will initially advise
you of a low ink level. At this stage, you can still continue to print for a limited time.
Once an ink tank is empty, the BJ Status Monitor (Windows) or the BJ Print Monitor
(Macintosh) will tell you to replace the ink tank. Attempting to print causes the POWER
lamp to flash four times.
➡
Replacing an Ink Tank
If printing becomes faint or a specific color is no longer printing, even though there is still
enough ink, the printhead nozzles are probably clogged. Follow the procedures below to
clean the nozzles.
➡
Printing the Nozzle Check Pattern
If the print quality is poor
➡
Printhead Cleaning
If the problem remains
➡
Printhead Deep Cleaning
If printhead deep cleaning does not resolve the problem, the printhead may be worn out.
Contact a Customer Care representative.
Page 67

Replacing an Ink Tank
66
Routine Maintenance
Replacing an Ink Tank
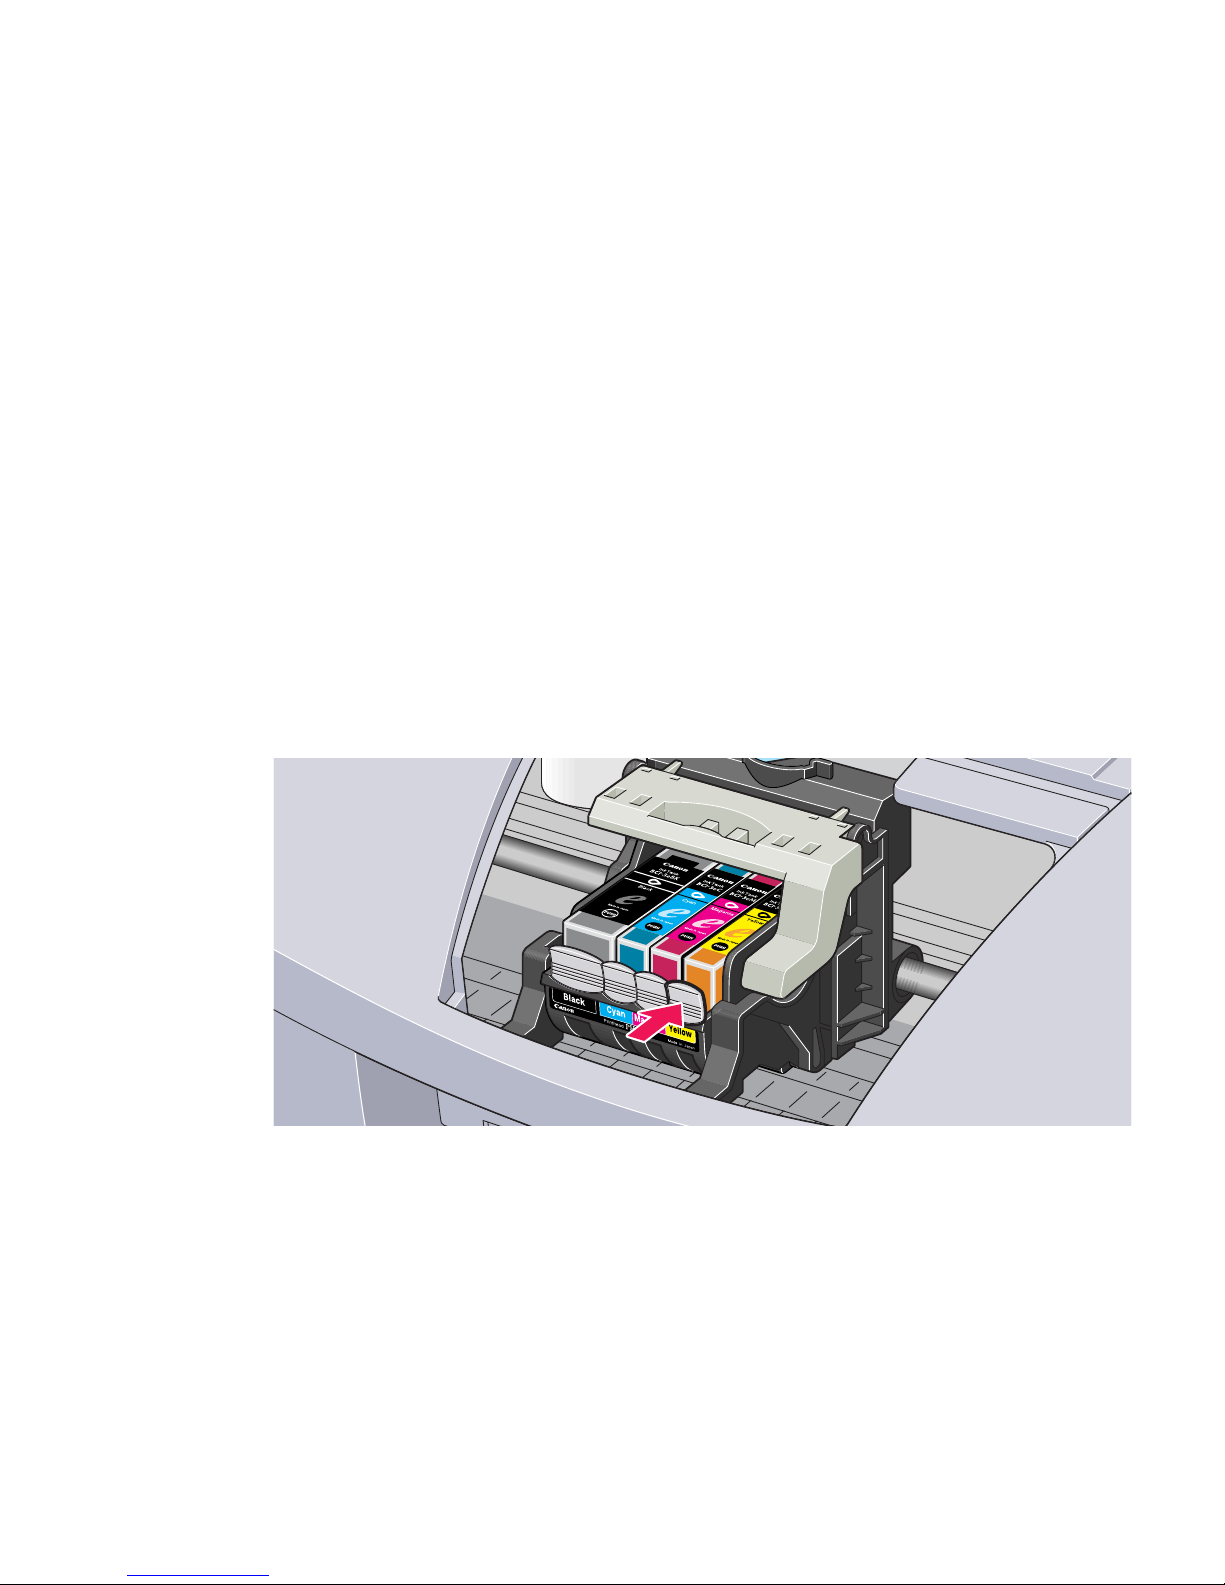
When replacing an ink tank, check the model number carefully. The printer will not print
properly if the wrong ink tank is used, or if it is installed incorrectly.
With this printer, ink tanks must be installed in the order indicated below, starting from the
right of the printhead.
• Yellow: BCI-3eY
• Magenta: BCI-3eM
• Cyan: BCI-3eC
• Black: BCI-3eBK
Note
➤ Damage caused by using a refilled cartridge is not covered by the Canon
warranty. Canon recommends using only original Canon ink tanks to
ensure the best quality.
1
Ensure that the printer is on, then open the front cover.
The printhead holder moves to the center.
Page 68
Replacing an Ink Tank
67
Routine Maintenance
2
Remove the empty ink tank.
Push the tab and remove the ink tank.
Do not touch the lock lever; remove only the ink tank.
Important
➤ • Handle ink tanks carefully to avoid staining clothing or the surrounding
area.
• Discard empty ink tanks according to the local laws and regulations
regarding disposal of consumables.
Page 69
Replacing an Ink Tank
68
Routine Maintenance
3
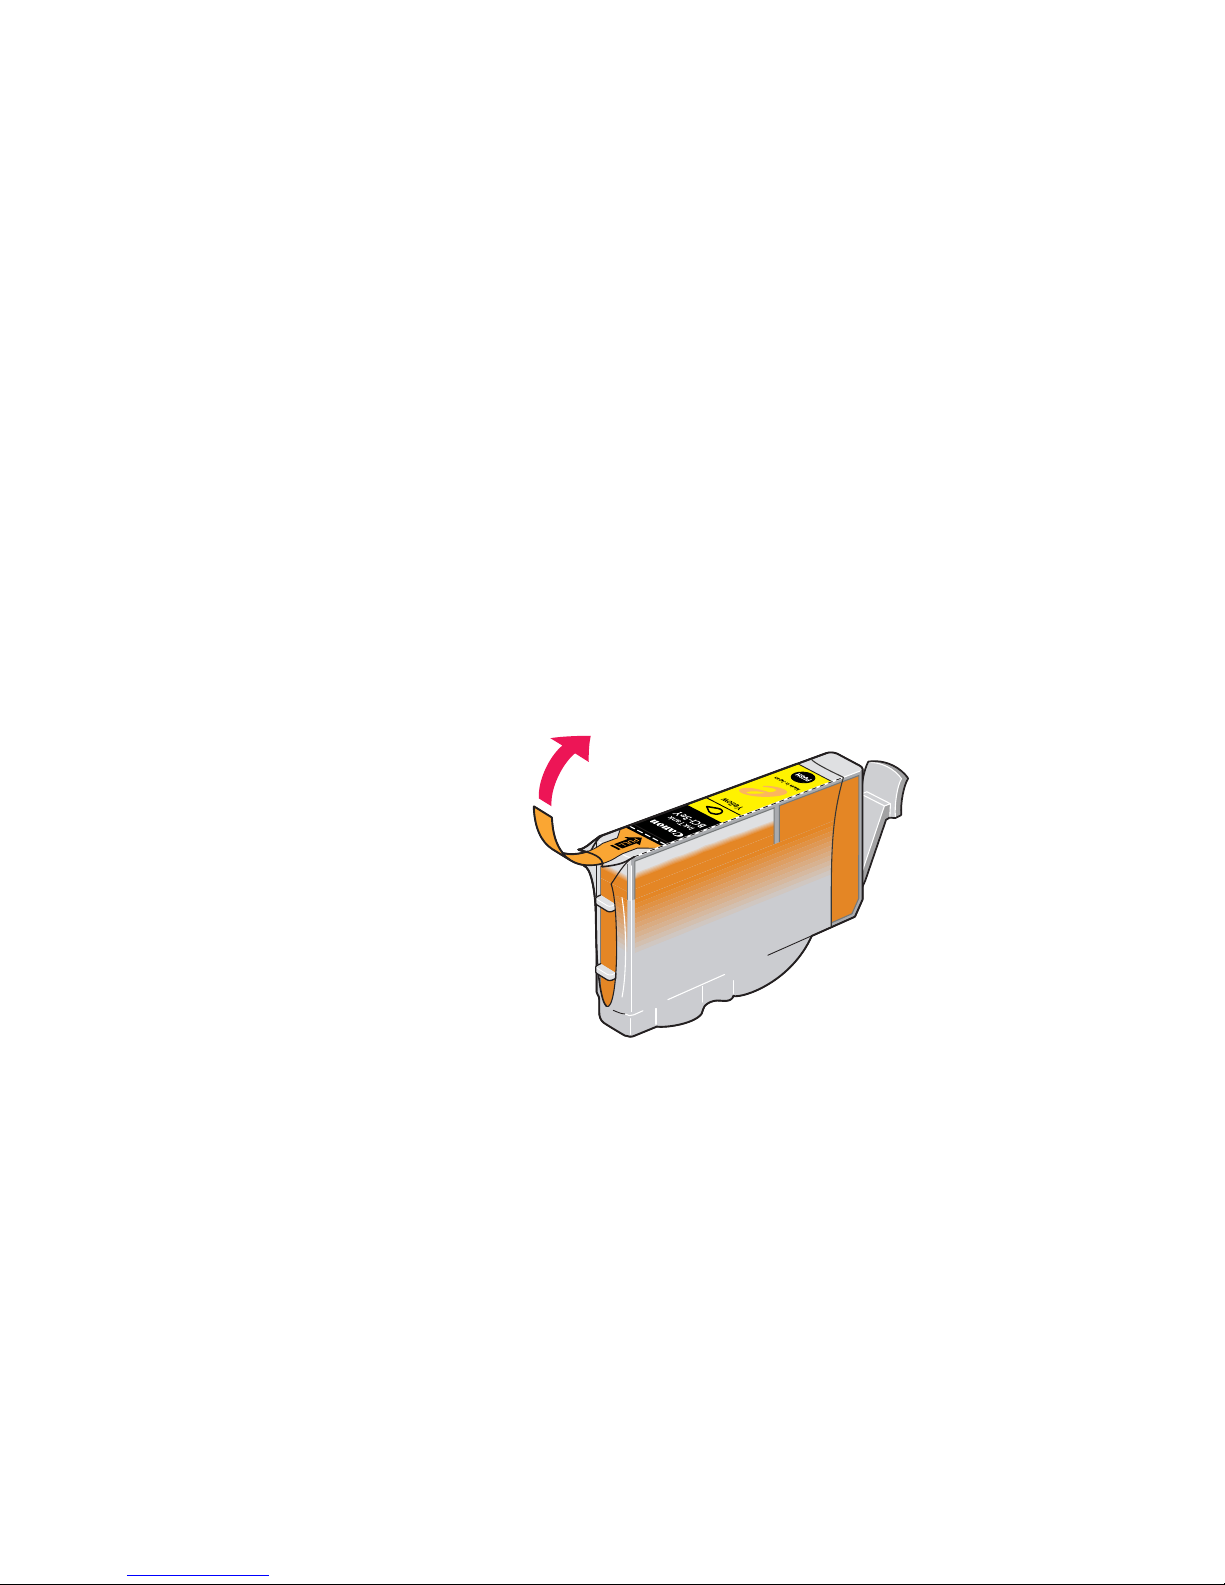
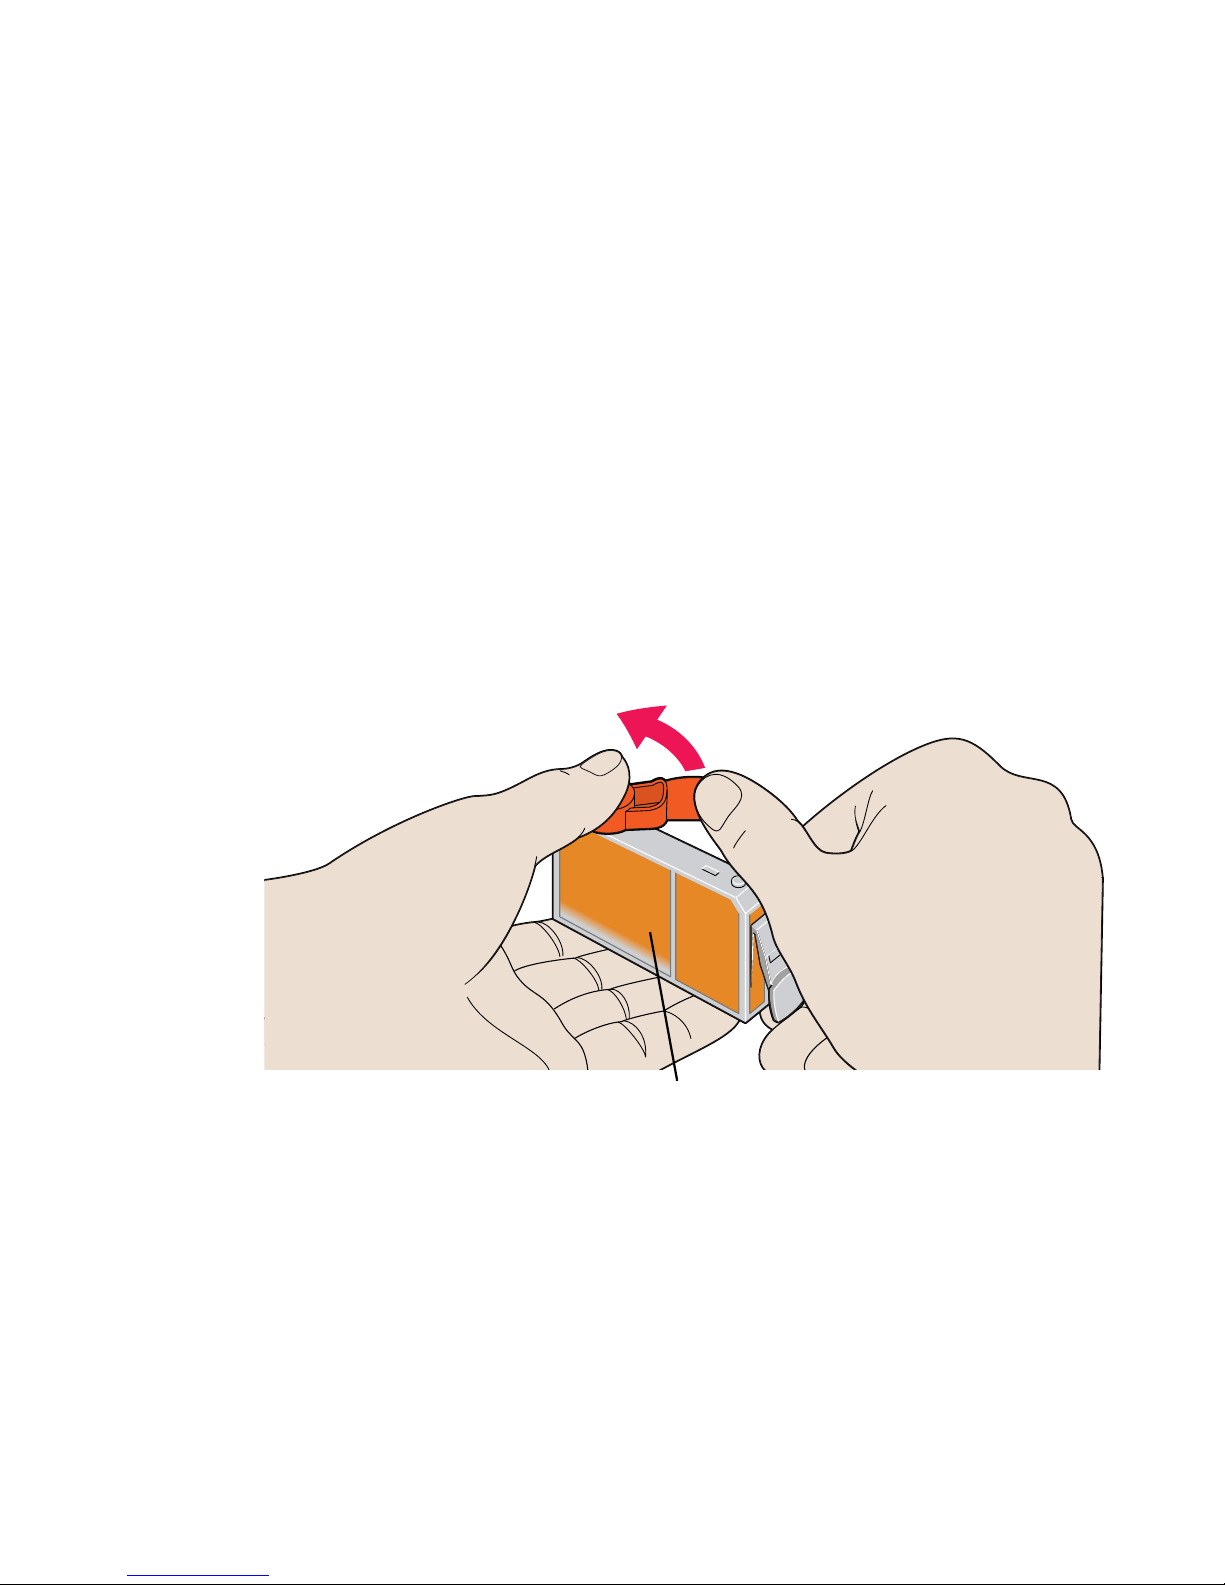
Unpack the new ink tank and pull off the orange tape.
Page 70
Replacing an Ink Tank
69
Routine Maintenance
4
Remove the orange protective cap from the bottom of the ink tank.
Important
➤ • Do not re-attach the protective cap once you have removed it.
• Once you have removed the protective cap, do not touch the open ink
port.
Nev e r press here!
Ink may squirt out of the tank.
Page 71
Replacing an Ink Tank
70
Routine Maintenance
5
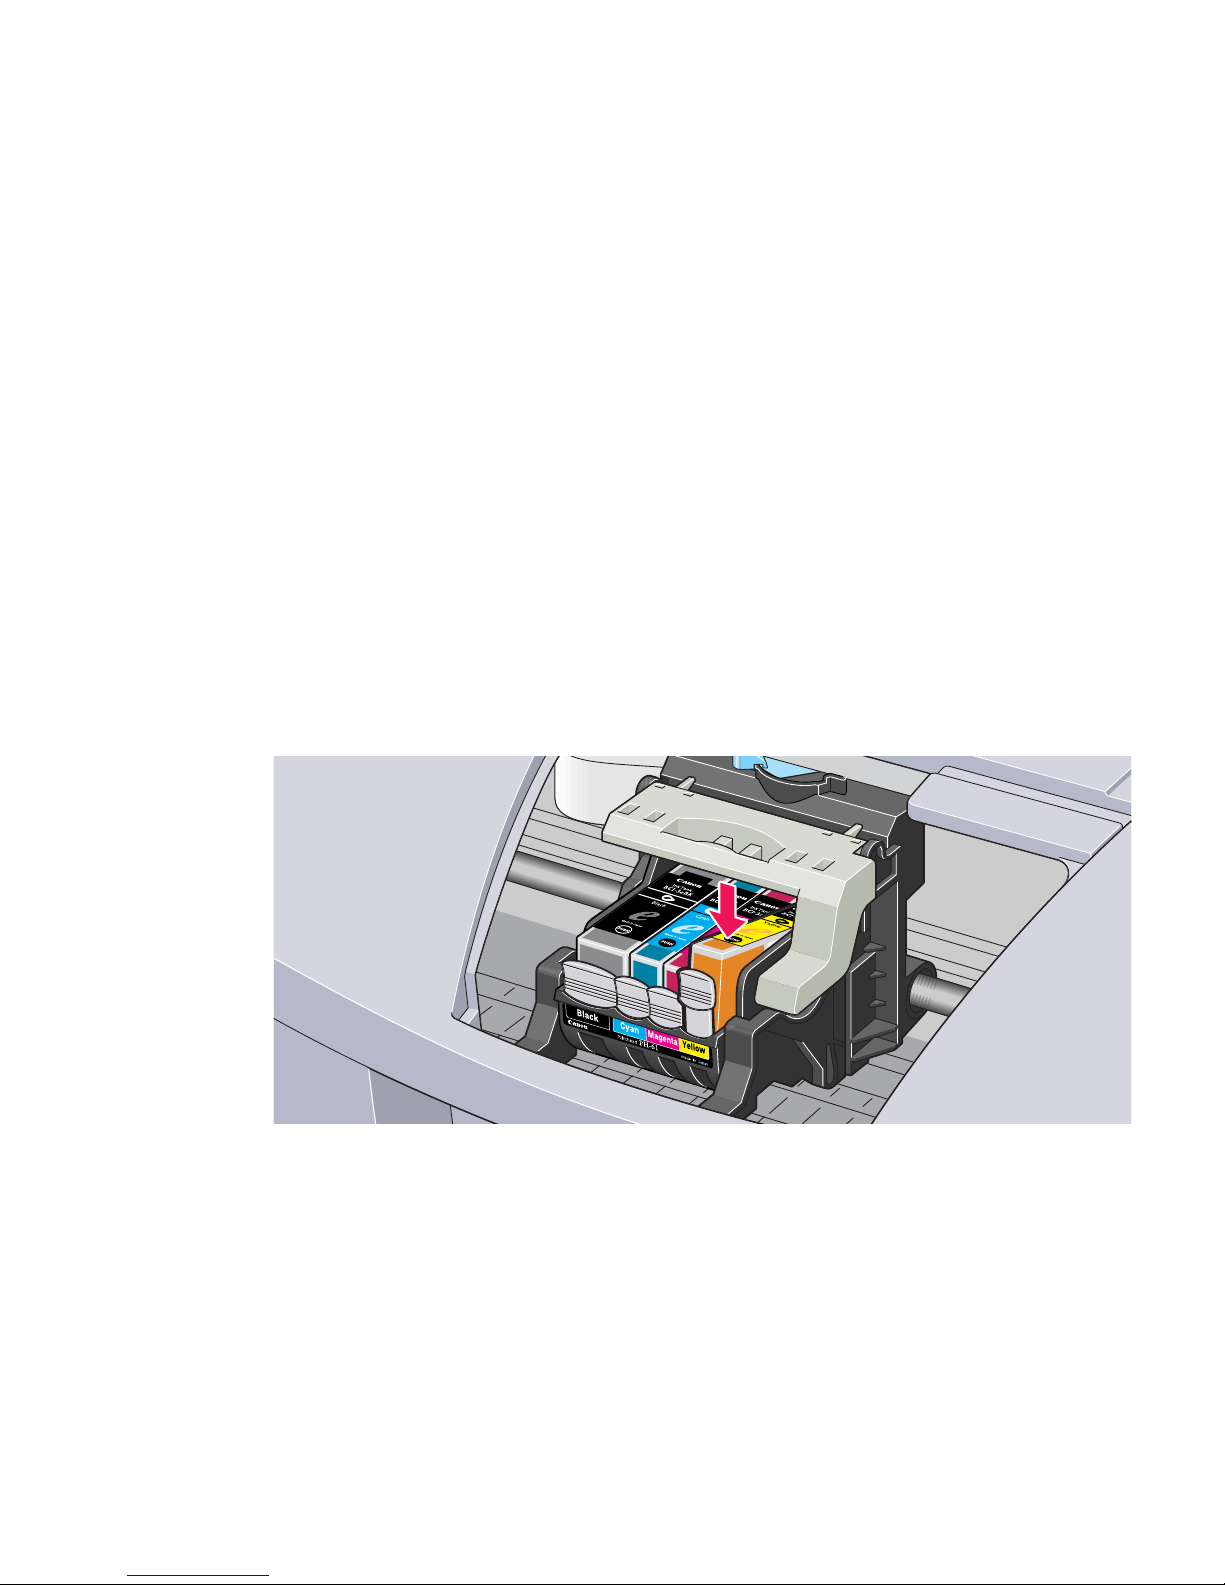
Insert the ink tank into the printhead holder.
Press on the "PUSH" mark until the ink tank snaps firmly into place.
6
Close the front cover.
The printhead holder moves to the right. The ink tank installation process is
now complete.
Note
➤ • To maintain optimal print quality, use an ink tank within six months of first
use.
• Once an ink tank has been used, do not remove it from the printer and
leave it out in the open. Lea ving an ink tank in the open will cause ink to dry ,
and the printer may not function properly when the ink tank is reinstalled.
Page 72

Printing the Nozzle Check Pattern
71
Routine Maintenance
Printing the Nozzle Check Pattern
Print the nozzle check pattern to determine whether the ink sprays normally from the
printhead nozzles, and to verify printhead alignment. Use this function when printed results
are blurred or the color is incorrect.
Nozzle check pattern printing can be executed from the Windows and Macintosh printer
drivers, or from the printer itself.
■ Printing the Nozzle Check Pattern from the Printer Drivers
Windows
1
With the printer on, load a sheet of letter-size or A4 paper in the printer.
2
Open the Printer Properties dialog box.
➡
Opening the Printer Properties Dialog Box
3
Click the Maintenance tab, then clic k the Nozzle Check icon.
4
When the confirmation message is displayed, click OK.
➡
Examining the Nozzle Check P attern
Page 73

Printing the Nozzle Check Pattern
72
Routine Maintenance
Macintosh
1
With the printer on, load a sheet plain letter-size paper in the printer.
2
Open the Page Setup dialog box.
The Page Setup dialog box can normally be opened by clicking Page
Setup on the File menu.
3
Click on Utilities to open the Printer Utilities dialog box.
4
Select T est Print from the drop-down menu, then click the Nozzle Check
icon.
5
When the confirmation message is displayed, click OK.
➡
Examining the Nozzle Check P attern
Page 74

Printing the Nozzle Check Pattern
73
Routine Maintenance
■ Printing the Nozzle Check Pattern through the Printer
1
With the printer on, load a sheet of letter-size or A4 paper in the printer.
2
Hold the RESUME/CANCEL button down until the POWER lamp flashes
twice.
➡
Examining the Nozzle Check P attern
Page 75
Printing the Nozzle Check Pattern
74
Routine Maintenance
■ Examining the Nozzle Check Pattern
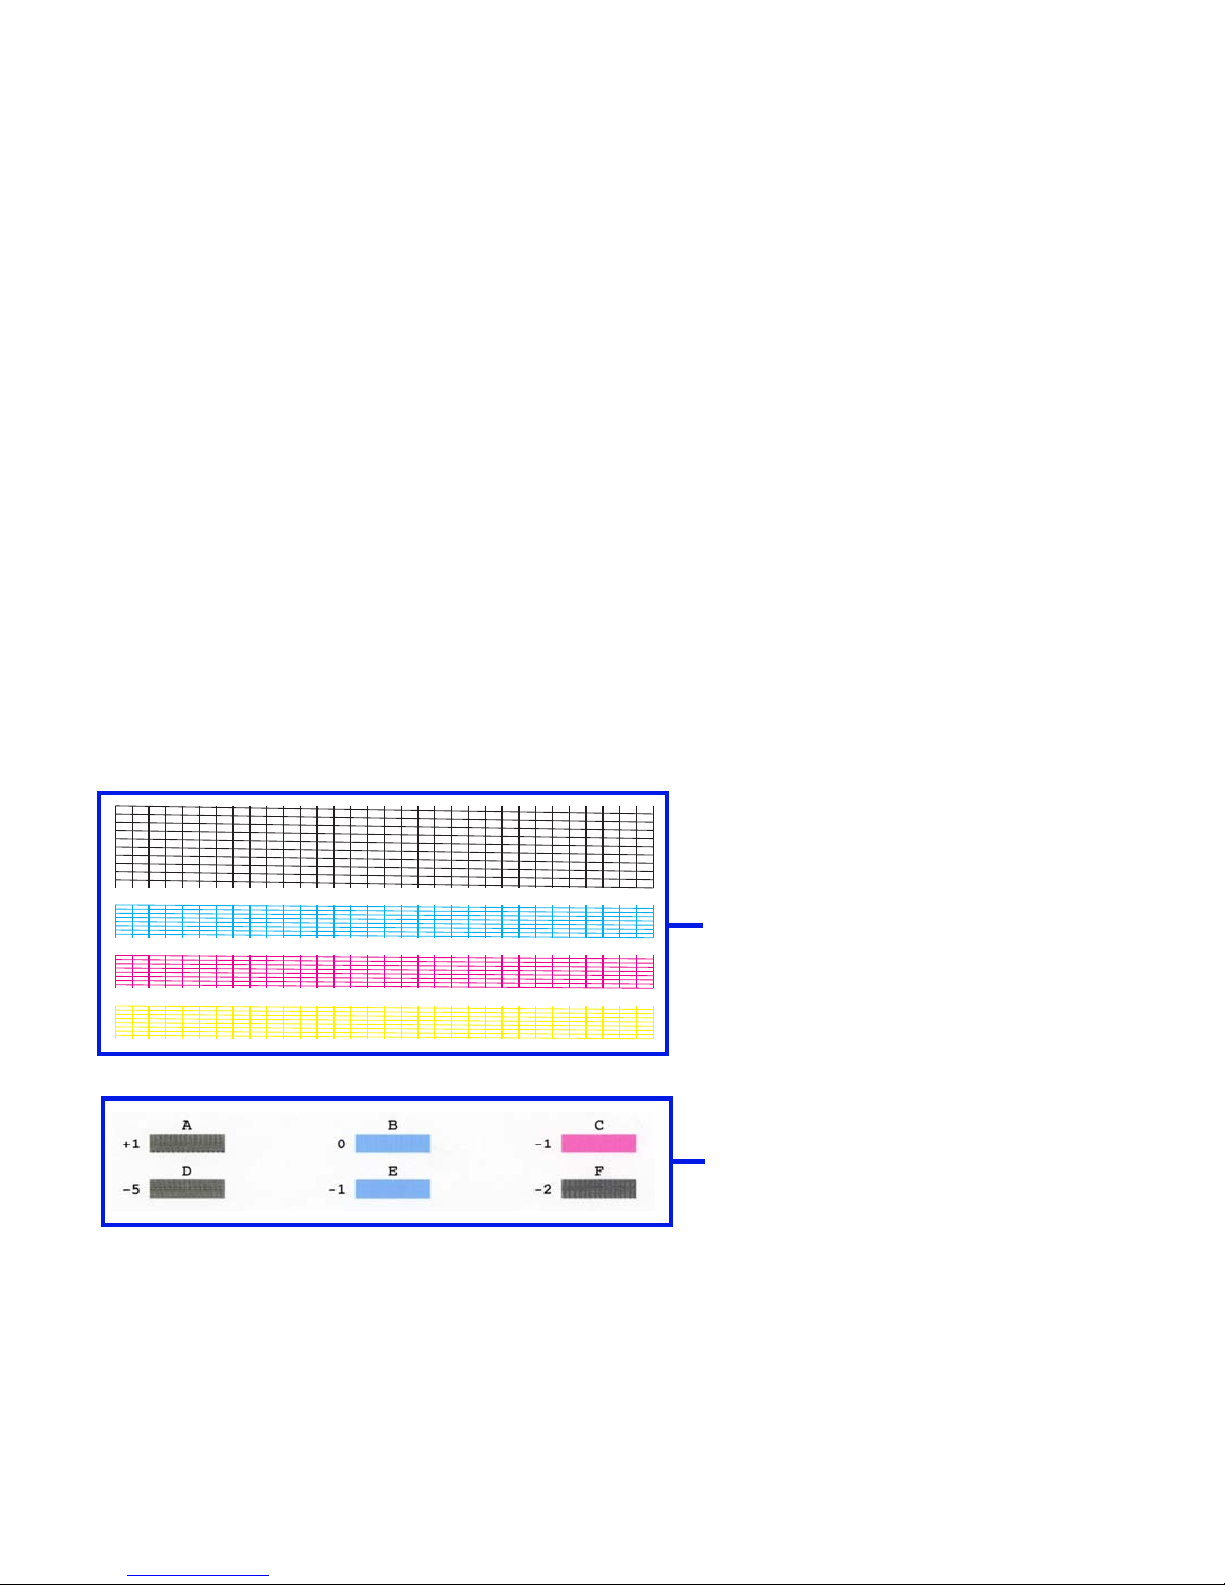
The nozzle check pattern should appear as follows when ink is discharged properly.
Examine the nozzle check pattern output by the printer.
Lines missing here indicate the
printhead requires cleaning.
Unevenness in these patterns
indicates the printhead requires
alignment.
Page 76

Printhead Cleaning
75
Routine Maintenance
Printhead Cleaning
Clean the printhead if you suspect that the nozzles might be clogged. Printhead cleaning
can be performed either from the printer drivers or from the printer itself.
Note
➤ Cleaning the printhead consumes ink, so perform printhead cleaning only
when necessary.
■ Cleaning the Printhead from the Printer Drivers
Windows
1
Ensure that the printer is on.
2
Open the Printer Properties Dialog Box.
➡
Opening the Printer Properties Dialog Box
3
Click the Maintenance tab, then clic k the Cleaning icon.
Page 77

Printhead Cleaning
76
Routine Maintenance
4
Select the ink nozzles to be cleaned, then click Execute.
All Colors: All nozzles
Black: Black ink nozzles
Color: Color ink nozzles
5
When the confirmation message is displayed, click OK.
Macintosh
1
Ensure that the printer is on.
2
Open the Page Setup dialog box.
The Page Setup dialog box can normally be opened by clicking Page
Setup on the File menu.
3
Click Utilities to open the Printer Utility dialog box.
4
Select Cleaning from the drop-down menu, then click the Cleaning icon.
Page 78

Printhead Cleaning
77
Routine Maintenance
5
Select the ink nozzles to be cleaned, then click OK.
All Colors: All nozzles
Black: Black ink nozzles
Color: Color ink nozzles
■ Cleaning the Printhead from the Printer
This operation cleans all nozzles, both blac k and color . Because this method also resets the
printer, any print data stored in the printer is lost.
1
Ensure that the printer is on.
2
Hold down the RESUME/CANCEL button until the POWER lamp flashes
once.
Now the POWER lamp starts flashing and printhead cleaning begins. Do not perform any
other operations until the printhead cleaning has finished. This takes about 40 seconds.
After printhead cleaning is complete, print the nozzle check pattern to verify that the
printhead is clean. If not, repeat printhead cleaning. If the printhead is still not clean after
the third cleaning, perform printhead deep cleaning.
➡
Printing the Nozzle Check Pattern
➡
Printhead Deep Cleaning
Page 79

Printhead Deep Cleaning
78
Routine Maintenance
Printhead Deep Cleaning
If print quality does not improve by standard printhead cleaning, try deep cleaning, which is
a more powerful process. Perform printhead deep cleaning from the printer driver.
Note
➤ Printhead deep cleaning consumes more ink than standard printhead
cleaning, so perform this procedure only when necessary.
Windows
1
Ensure that the printer is on.
2
Open the Printer Properties dialog box.
➡
Opening the Printer Properties Dialog Box
3
Click the Maintenance tab, then clic k the Deep Cleaning icon.
4
When the confirmation message is displayed, click OK.
Page 80

Printhead Deep Cleaning
79
Routine Maintenance
Macintosh
1
Ensure that the printer is on.
2
Open the Page Setup dialog box.
The Page Setup dialog box can normally be opened by clicking Page
Setup on the File menu.
3
Click the Utilities button to open the Printer Utility dialog box.
4
Select Cleaning from the drop-down menu, then click the Deep Cleaning
icon.
5
Click OK.
Now the POWER lamp starts flashing and printhead deep cleaning begins. This process
can take up to two minutes. The POWER lamp stops flashing when printhead cleaning is
complete.
After printhead deep cleaning finishes, print the nozzle check pattern to verify that the
printhead is clean. If not, check that there are sufficient ink levels in all ink tanks before
turning off the printer. Be sure to perf orm another printhead deep cleaning 24 hours after
turning off the printer.If the head is still not clean, the printhead may be worn out. In this
event, contact the Customer Care Center.
➡
Printing the Nozzle Check Pattern
Page 81

Cleaning the Printer
80
Routine Maintenance
Cleaning the Printer
During normal printing, ink and small scraps of paper accumulate in the printer. When the
accumulated debris becomes clearly visible, clean the printer by the following procedure.
1
Turn the printer off.
2
Ensure that the POWER lamp is off, then unplug the printer.
Caution
➤ Always ensure that you unplug the printer before cleaning the printer to
avoid an electric shock.
Page 82
Cleaning the Printer
81
Routine Maintenance
3
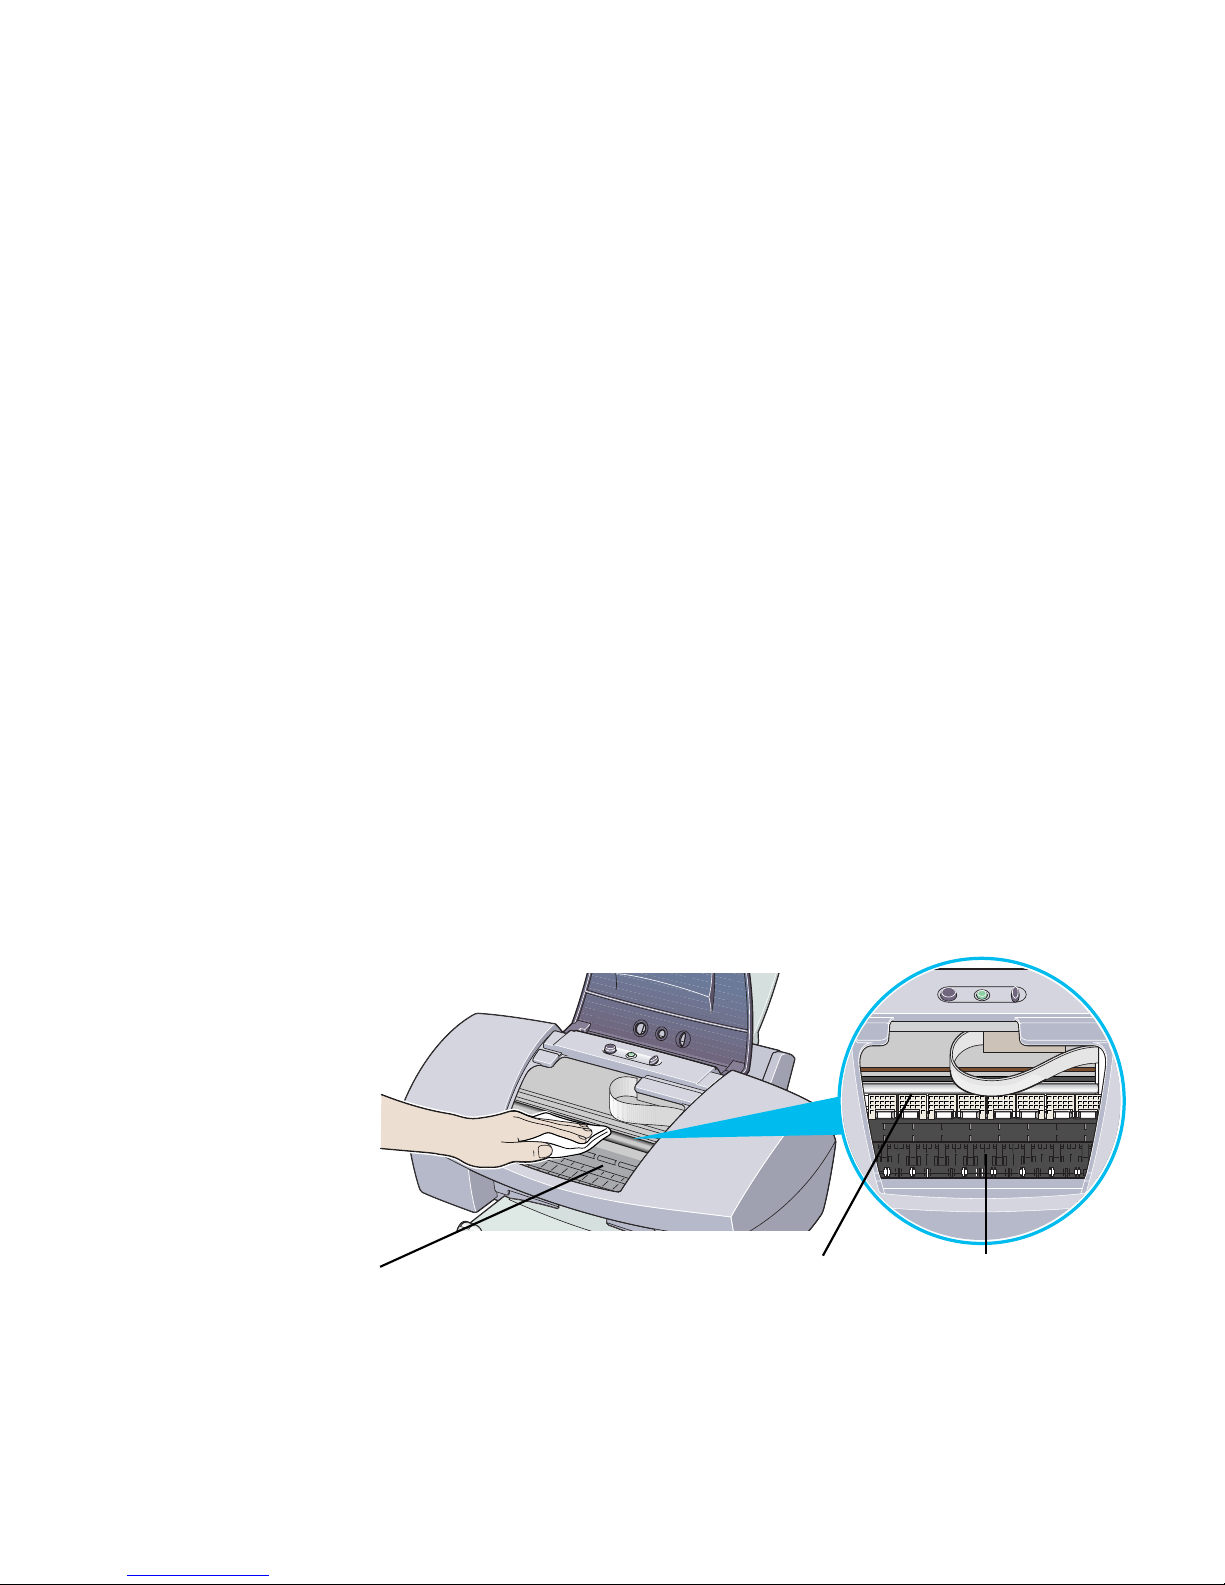
Open the front cover and wipe the interior of the printer with a dry cloth.
Wipe away any stray drops of ink, scraps of paper, and dust. Pay special
attention to cleaning the black panel, as it can easily become dirty. While
cleaning, be careful not to touch the ink absorber (sponge part). Never
touch any parts inside, such as the metal bar, and so on.
Warning
➤ Do not use any flammable solvents such as paint thinner, benzene or
alcohol.
Black panel
Metal bar
Ink absorber
Page 83

Transporting the Printer
82
Routine Maintenance
Transporting the Printer
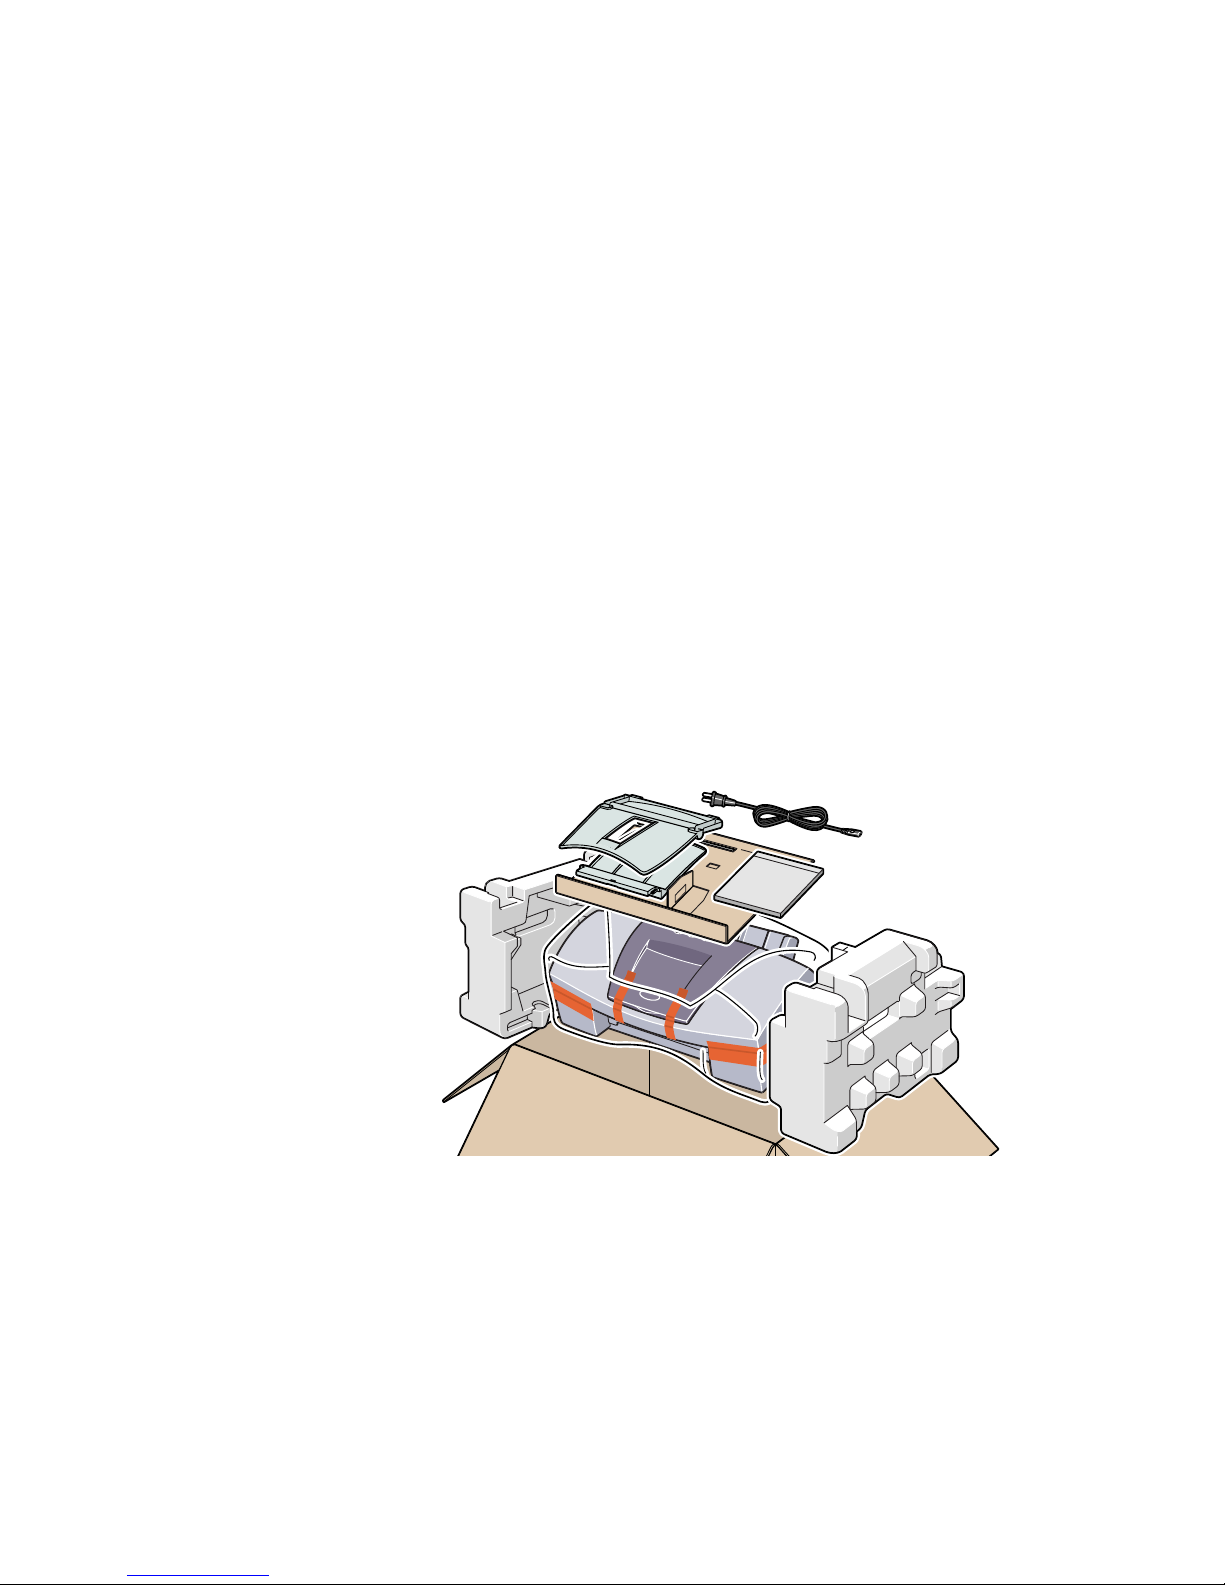
Pack the printer carefully in its original packing materials.
If you do not hav e the original packing materials, pac k the printer carefully and thoroughly in
protective material and place it inside a sturdy box.
1
Turn the printer off.
2
Ensure that the POWER lamp is off, then unplug the printer.
Important
➤ To protect the printer from damage, do not unplug the printer while the
POWER lamp is lit or flashing.
Page 84
Transporting the Printer
83
Routine Maintenance
3
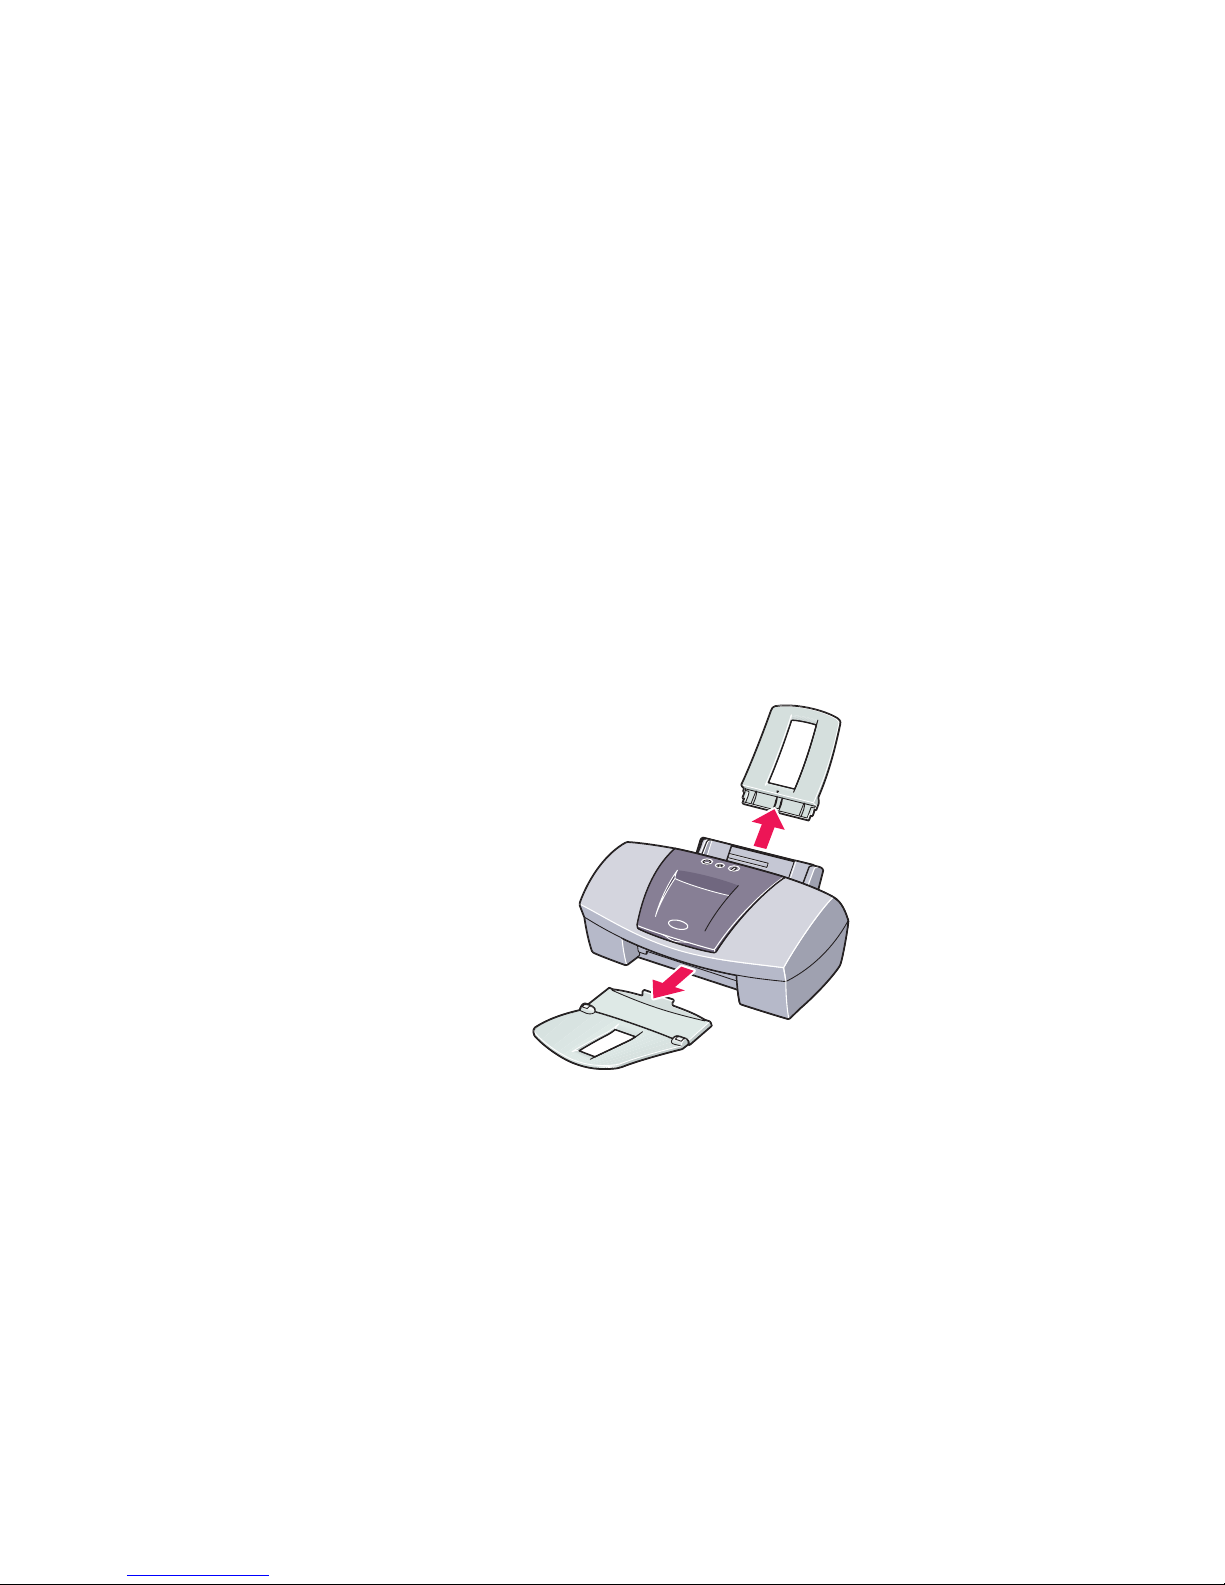
Remove the paper rest and the paper output tray.
4
Disconnect the printer cable from the computer and the printer, then
disconnect the power cord from the printer.
Page 85
Transporting the Printer
84
Routine Maintenance
5
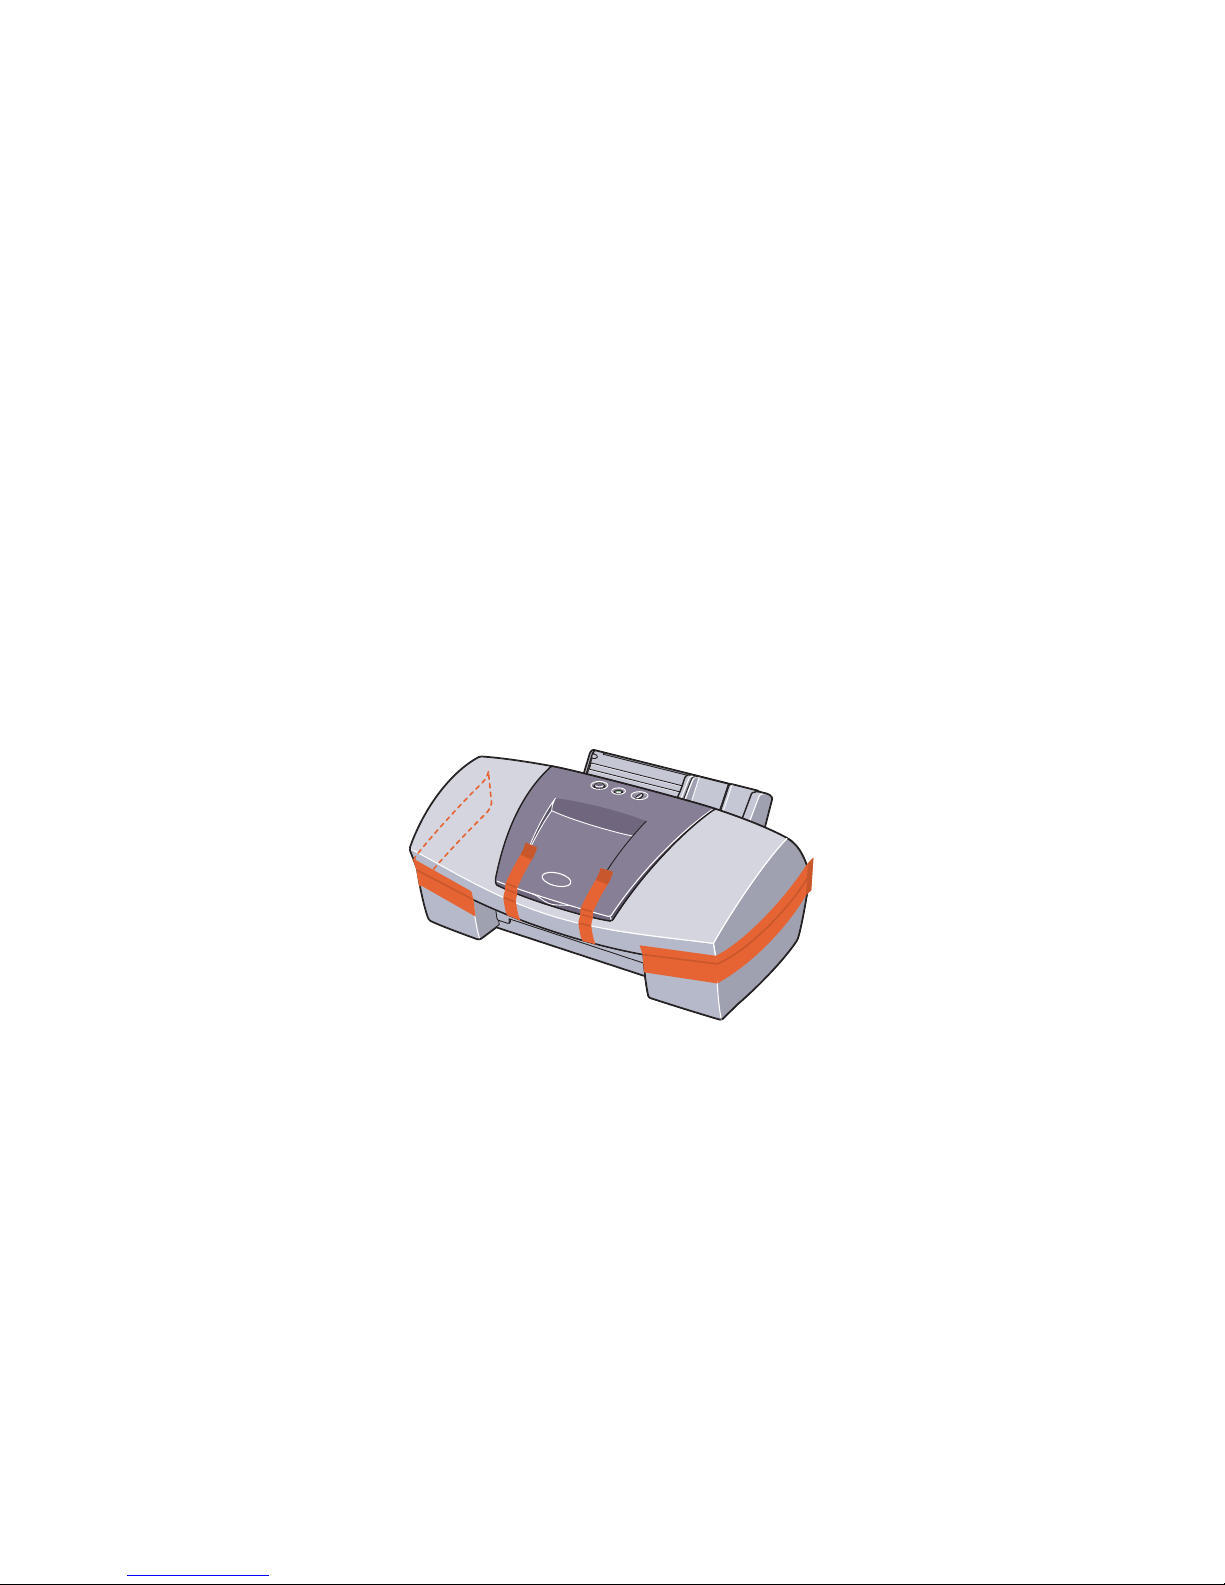
Secure the printer with adhesive tape as shown, then pack it in a plastic
bag.
Page 86
Transporting the Printer
85
Routine Maintenance
6
Attach protective material to both sides of the printer when packing the
printer.
Clearly label the box as "Fragile" if using a transport company.
Page 87

86
Printing Media
Printing Media
• Compatible Media Types
• Envelopes
• High Resolution Paper HR-101N
• Glossy Photo Paper GP-301/GP-301N
• High Gloss Photo Film HG-201
• Glossy Photo Cards FM-101
• Photo Paper Pro PR-101
• Photo Paper Pro PC-101S
• Transparencies CF-102
• T-Shirt Transfers TR-201
• Banner Paper
Page 88

Compatible Media Types
87
Printing Media
Compatible Media Types
You can use the following types of paper and other media.
■ Size
• Standard paper: From Legal size (8.5 x 14.0 in.) to A5 size (5.83 x 8.27 in.)
• Non-standard paper: From 3.54 x 4.72 in. to 8.5 x 23.0 in.
• Others: Envelopes (US Com. #10 and European DL)
Important
➤ Do not use the following types of paper. Using such paper will not only
produce unsatisfactory results, but can also cause the printer to jam or
malfunction.
• Folded, curled or wrinkled paper
• Wet paper
• Paper that is too thin (less than 17 lb.)
• Paper that is too thick* (more than 28 lb.)
• Picture postcards
• Postcards with an affixed photo or sticker
• Envelopes with a double flap
• Sealed enve lopes
• Envelopes with an embossed or treated surface
• Paper with holes (such as loose-leaf paper)
* non-Canon branded paper
Page 89

Compatible Media Types
88
Printing Media
■ Weight
17 to 28 lb.
Do not use paper heavier than this (except for supported Canon-brand media), as it
could jam in the printer.
■ Types
The following types of media can be used. F or more inf ormation about the media and the
printing methods, refer to the specific sections.
Plain paper: Refer to the printed Quick Start Guide.
➡
Envelopes
➡
High Resolution Paper HR-101N
➡
Glossy Photo Paper GP-301/GP-301N
➡
High Gloss Photo Film HG-201
➡
Glossy Photo Cards FM-101
➡
Photo Paper Pro PR-101
➡
Photo Paper Pro PC-101S
➡
Transparencies CF-102
➡
T-Shirt Transfers TR-201
➡
Banner Paper
Page 90
Envelopes
89
Printing Media
Envelopes
Use US Com. #10 or European DL size envelopes.
■ Preparation for Printing
1
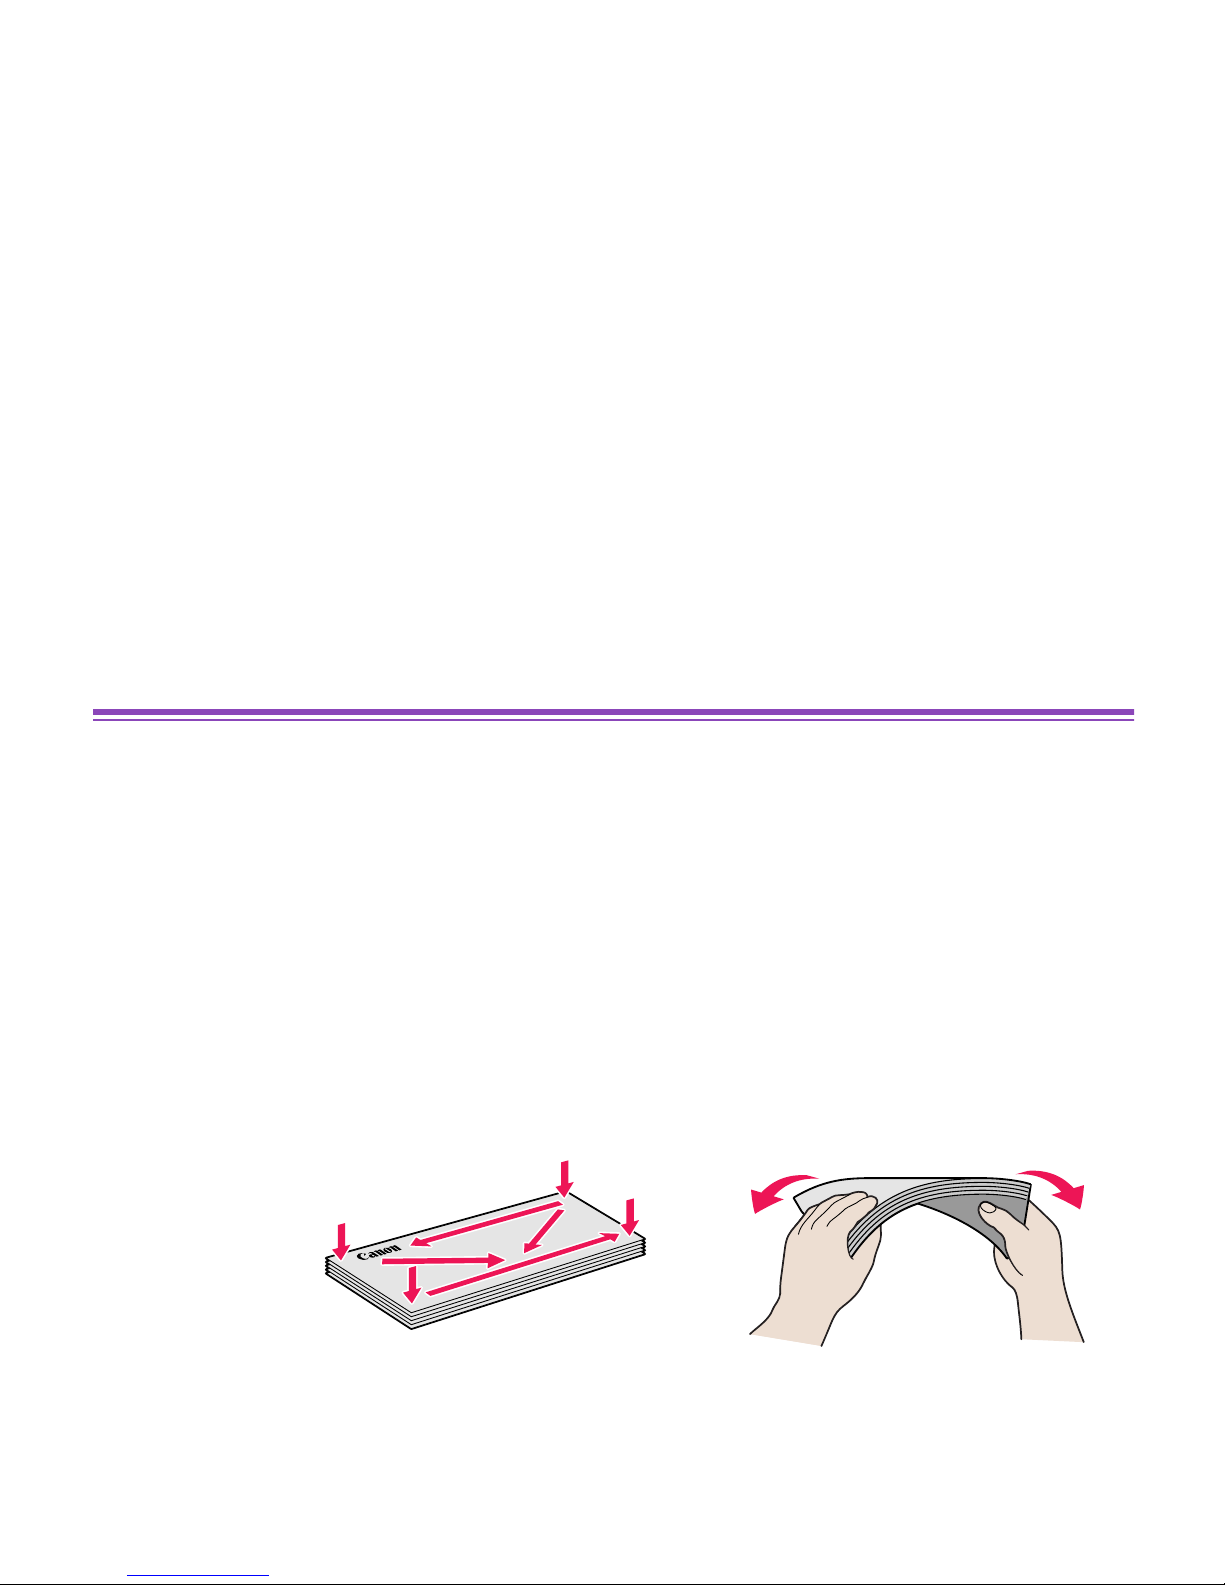
Press down on all four corners and edges of the envelopes to flatten them
as shown below.
2
If the envelopes are curled, hold the opposite corners and gently bend
them in the opposite direction.
Ensure that the flap of the envelope is perfectly straight.
Page 91
Envelopes
90
Printing Media
3
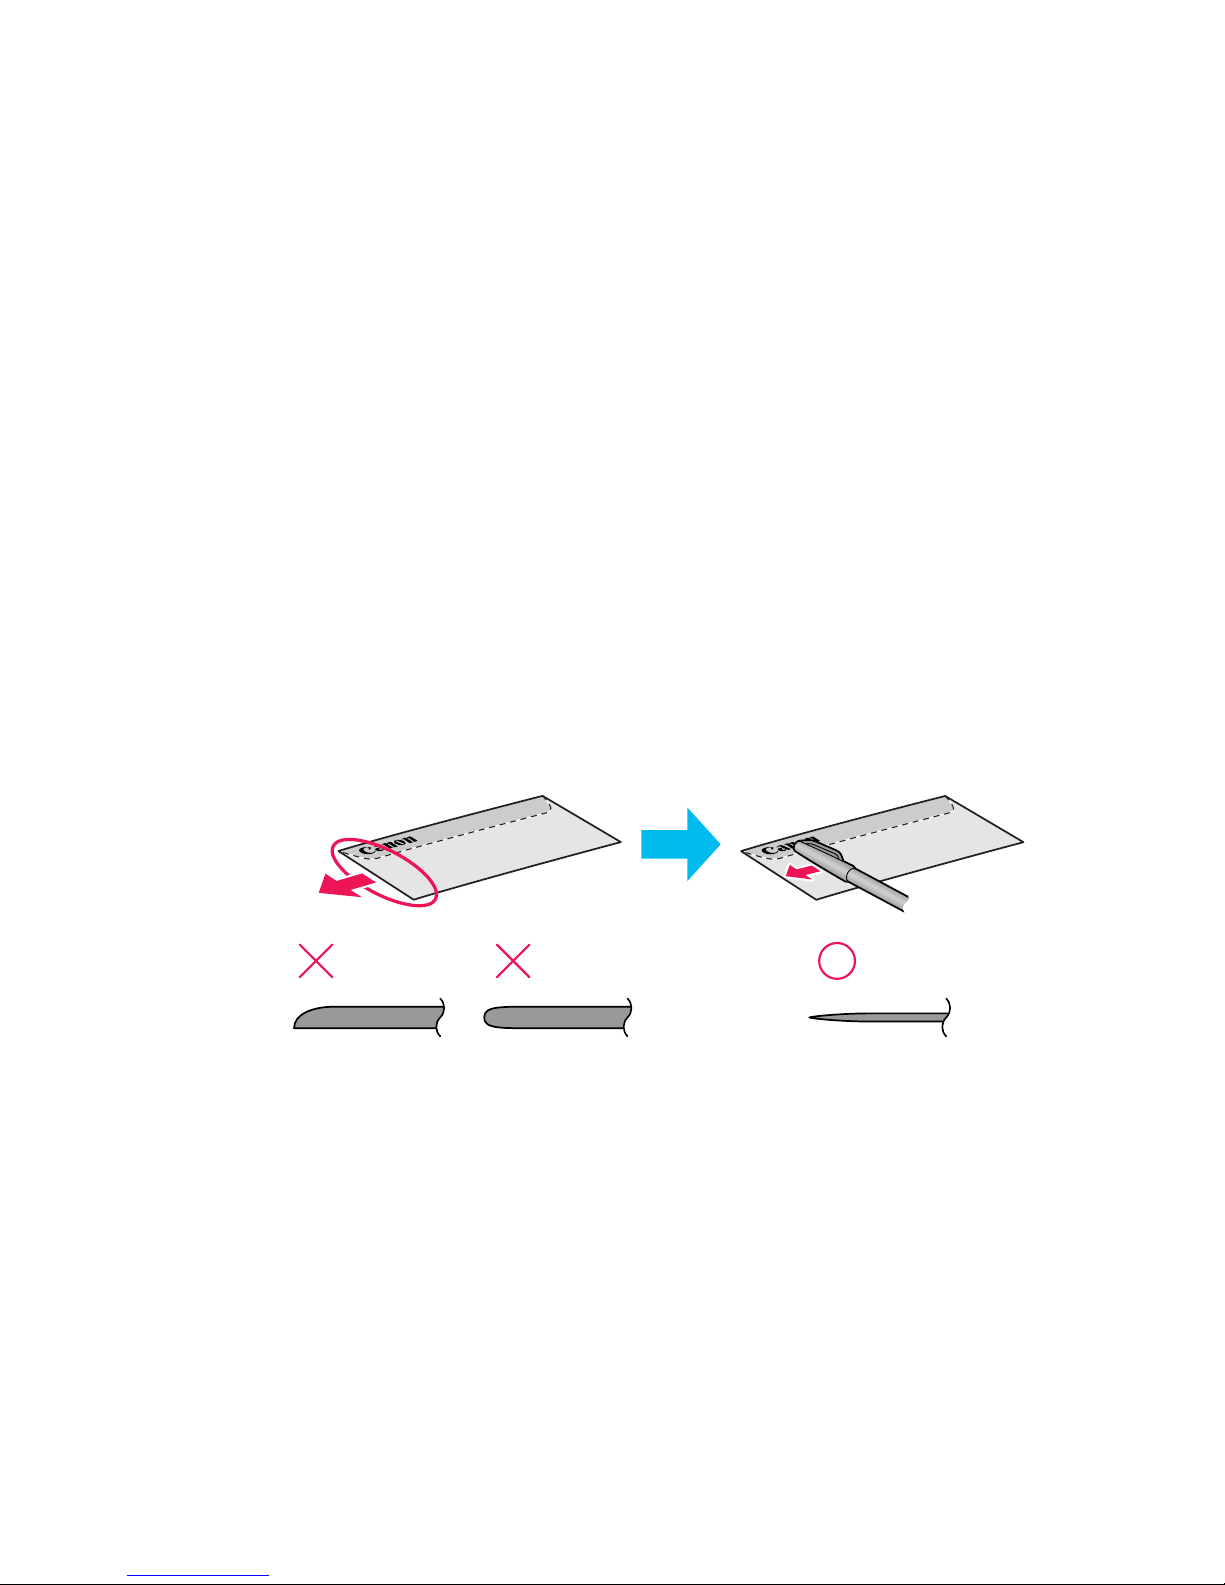
If the leading edge of an envelope is puff ed up or curled, use a pen to press
the envelope flat and sharpen the crease.
The above illustrations show a side view of the leading edge of the
envelope.
The envelopes may jam in the printer if they are not completely flat and the
edges are not aligned.
Ensure that no curl or puff exceeds 0.2 in.
■ Unsuitable Envelopes
• Envelopes with an embossed or treated surface
• Envelopes with a double flap or pressure seals
Press the envelope completely flat,
working from the middle to the edge.
Page 92
Envelopes
91
Printing Media
■ Loading
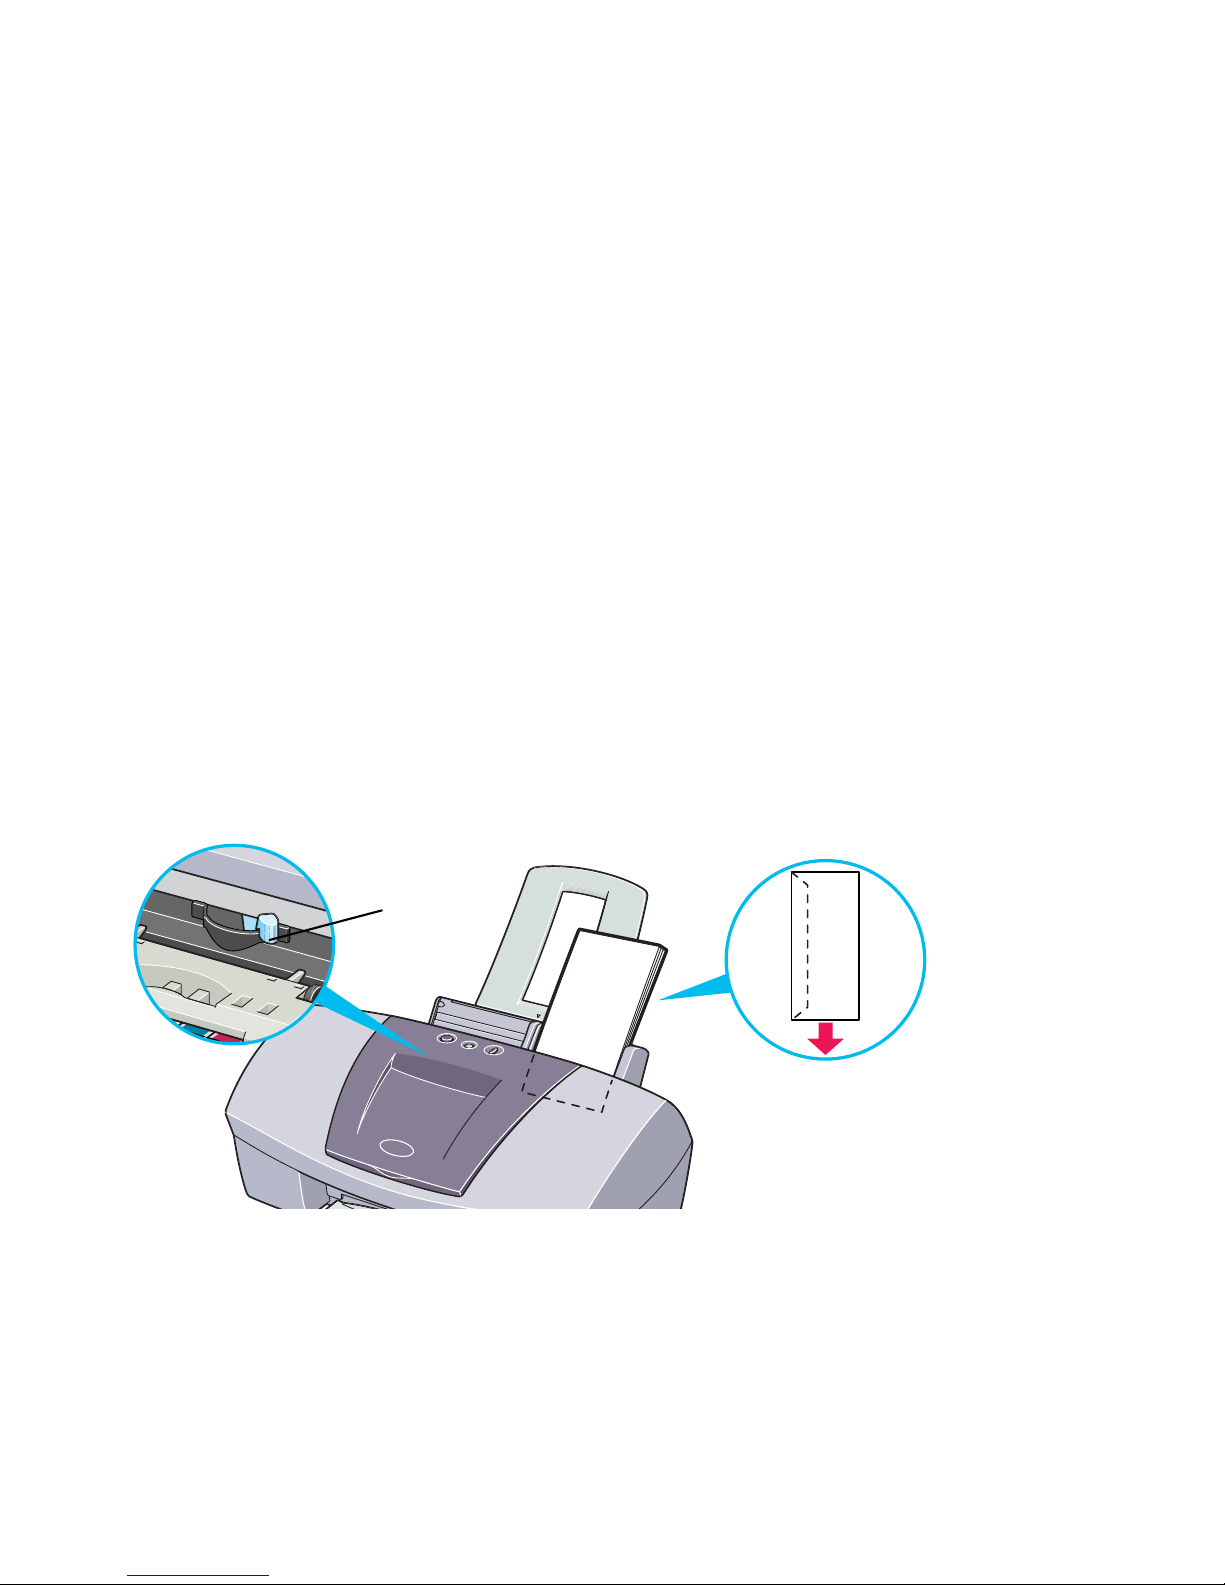
• Place envelopes lengthwise with the flap to the left and the address side facing up.
• Set the paper thickness lever to the right.
• Up to 10 envelopes can be loaded at once.
Note
➤ If the envelopes still do not feed properly even after removing curl, clean
the paper feed roller.
1
Ensure that the printer is on, and that no paper is loaded in the printer.
2
Hold down the RESUME/CANCEL button. When the POWER lamp
flashes three times release the RESUME/CANCEL button. The paper
roller will rotate ten times as it cleans. Repeat this operation three
times.
Paper
thickness
lev er
Page 93

Envelopes
92
Printing Media
3
Load a sheet of plain letter-size paper in the printer.
4
Press and hold the RESUME/CANCEL button. After the POWER lamp
flashes three times to feed the sheet release the RESUME/CANCEL
button. Repeat this three times.
If the printer still does not feed the envelopes through even after cleaning,
repeat Step 4 again.
■ Printer Driver Settings
• Media Type:Envelope
• Pag e Size: Select either #10 Env. or DL Env. , according to the envelope size you
are using.
• Orientation: Landscape
■ Handling of Printed Output
Remove each envelope as it is printed.
■ Printable Area
➡
Printing Area
Page 94
High Resolution Paper HR-101N
93
Printing Media
High Resolution Paper HR-101N
This type of paper provides better color reproduction than plain paper. It is suitable for
printing business documents that feature graphics, and for photographs.
■ Loading
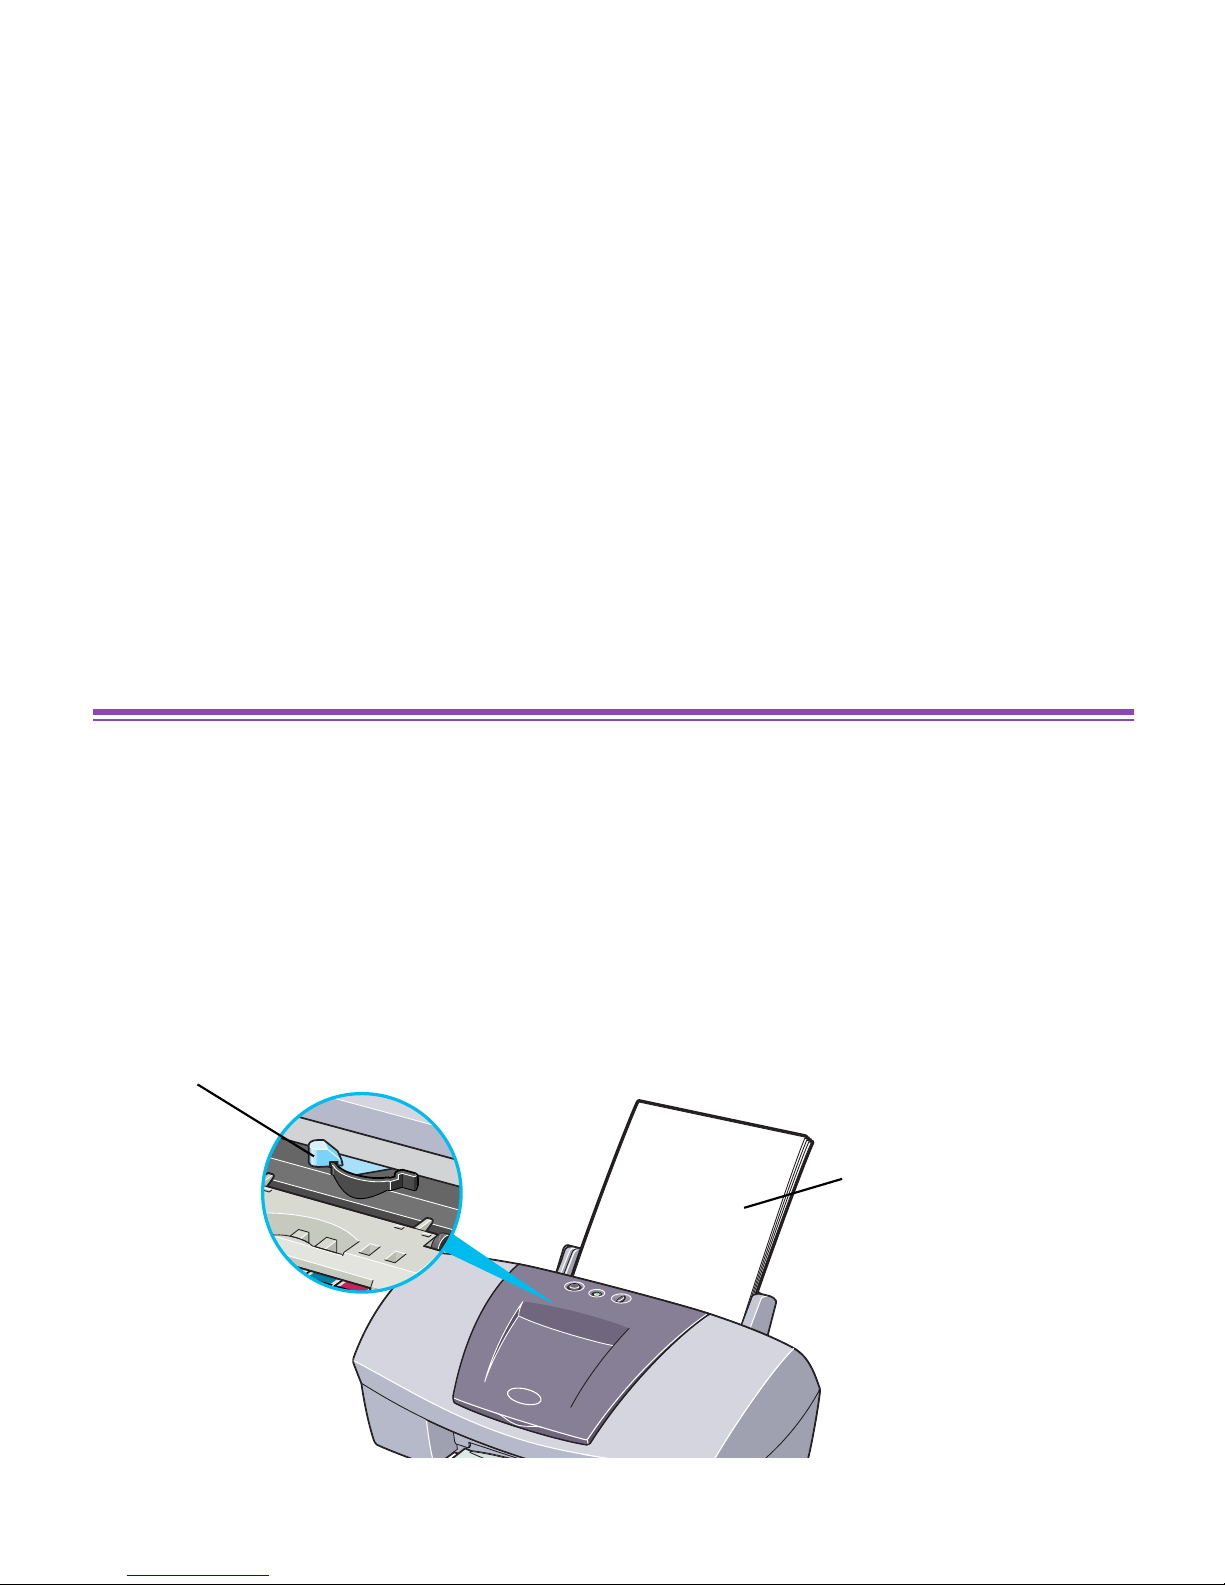
• Load the paper with the whiter side facing up.
• Set the paper thickness lever to the left.
• Do not load paper higher than the limit mark. A maximum of 80 sheets can be loaded.
Paper thickness lever
Print side
(whiter side)
Page 95

High Resolution Paper HR-101N
94
Printing Media
■ Printer Driver Settings
• Media Type: High Resolution Paper
• Pag e Size: Ensure that the setting matches the size set in the application.
■ Handling of Printed Output
Do not stack more than 50 sheets in the paper output tra y. If the output paper is curled, it
may pre v ent the ne xt sheet from being ejected. In this case, or if the ink tak es a long time
to dry, remove each sheet as soon as it is printed.
■ Printable Area
With some images, the trailing edge of the image may be blurred if printing extends into
the printable area. Canon recommends that you print within the printing area.
➡
Printing Area
Page 96
Glossy Photo Paper GP-301/GP-301N
95
Printing Media
Glossy Photo Paper GP-301/GP-301N
This media is still thicker than High Resolution Paper, with a glossy printing surface to
produce printouts close to photograph quality.
■ Loading
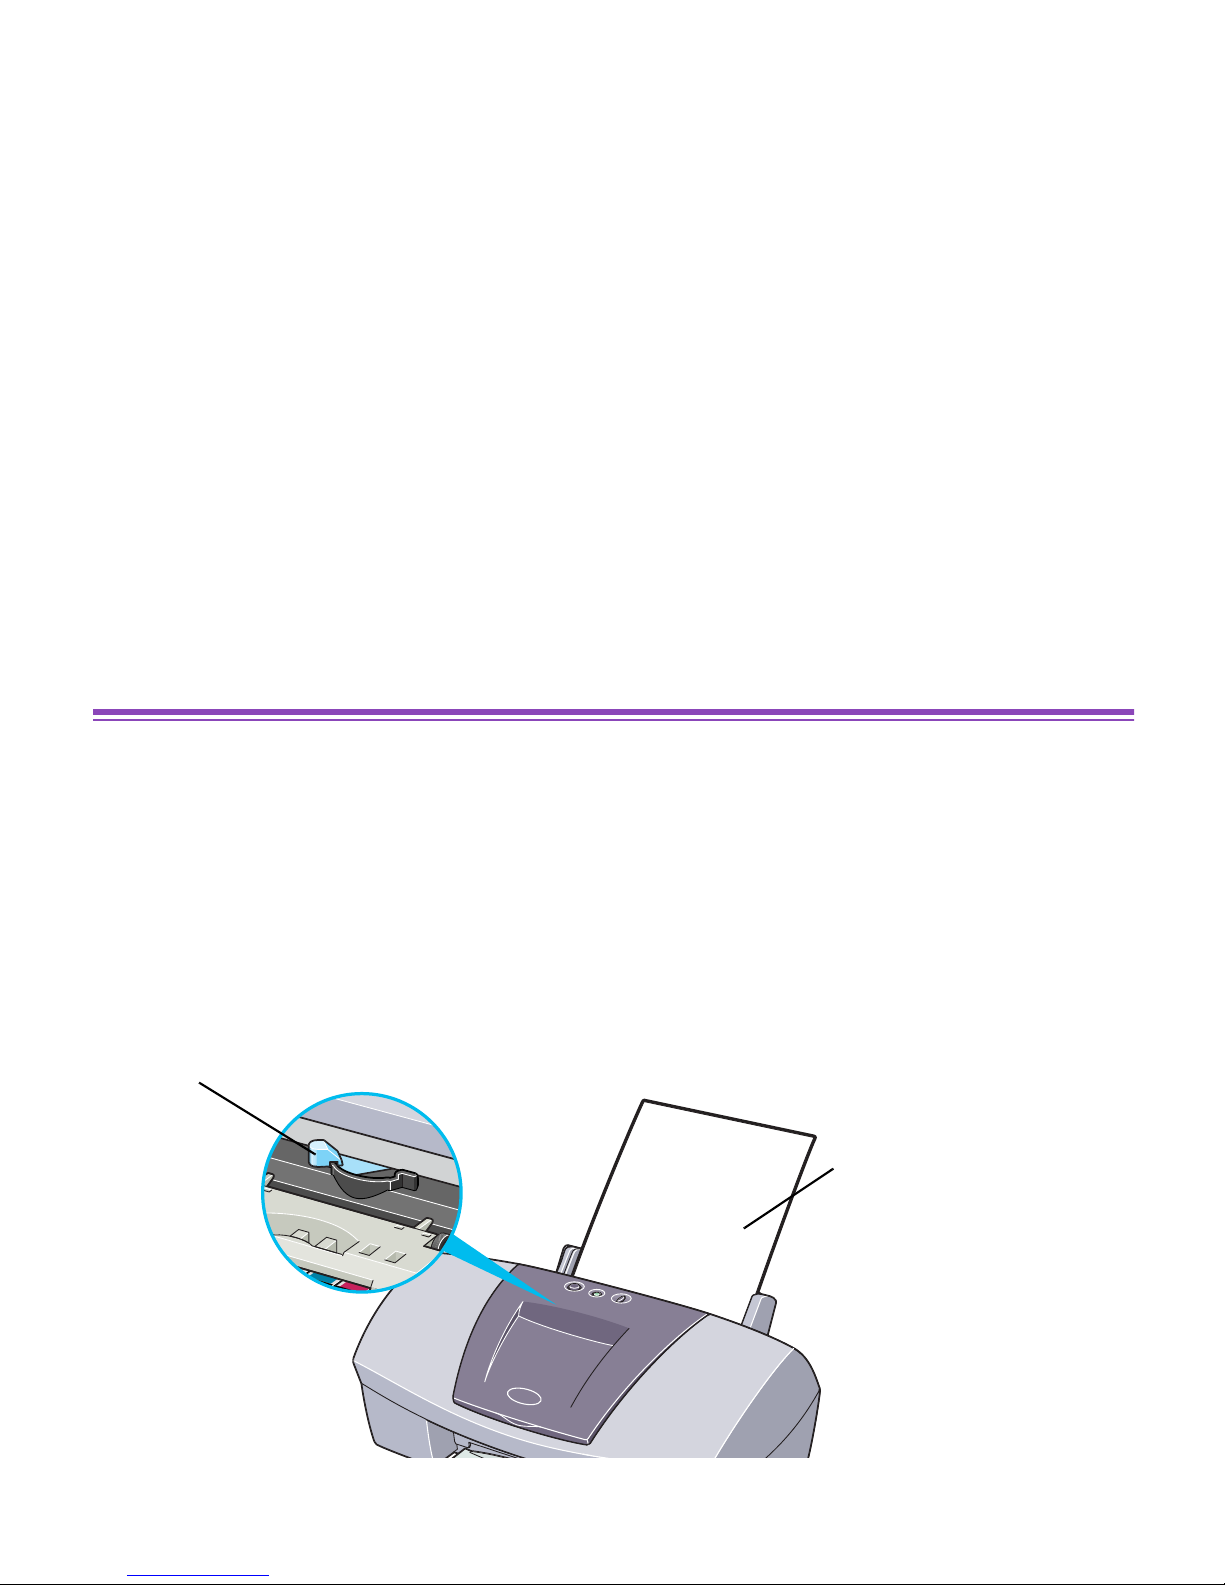
• Load only one sheet at a time.
• Load the paper with the whiter side facing up.
• Set the paper thickness lever to the left.
Paper thickness lever
Print side
(whiter side)
• Do not use the loading support sheet provided with the package.
Page 97

Glossy Photo Paper GP-301/GP-301N
96
Printing Media
■ Printer Driver Settings
• Media Type: Glossy Photo Paper
• Pag e Size: Ensure that the setting matches the size set in the application.
■ Handling of Printed Output
• Remove each sheet as soon as it is printed.
• Do not touch the printed surface until the ink is fixed (approximately two minutes).
■ Printable Area
With some images, the trailing edge of the image may be blurred if printing extends into
the printable area. Canon recommends that you print within the printing area.
➡
Printing Area
Note
➤ For photos and illustrations that you want to print with Borderless Printing,
create the document data by using the same size as the paper size, and
paste the data so that it fills the editing screen without leaving any margins.
If you are using an application that allows you to set margins, set the left,
right, top and bottom margins to 0 in. For instructions on setting margins,
refer to the application’s user manual.
Page 98
High Gloss Photo Film HG-201
97
Printing Media
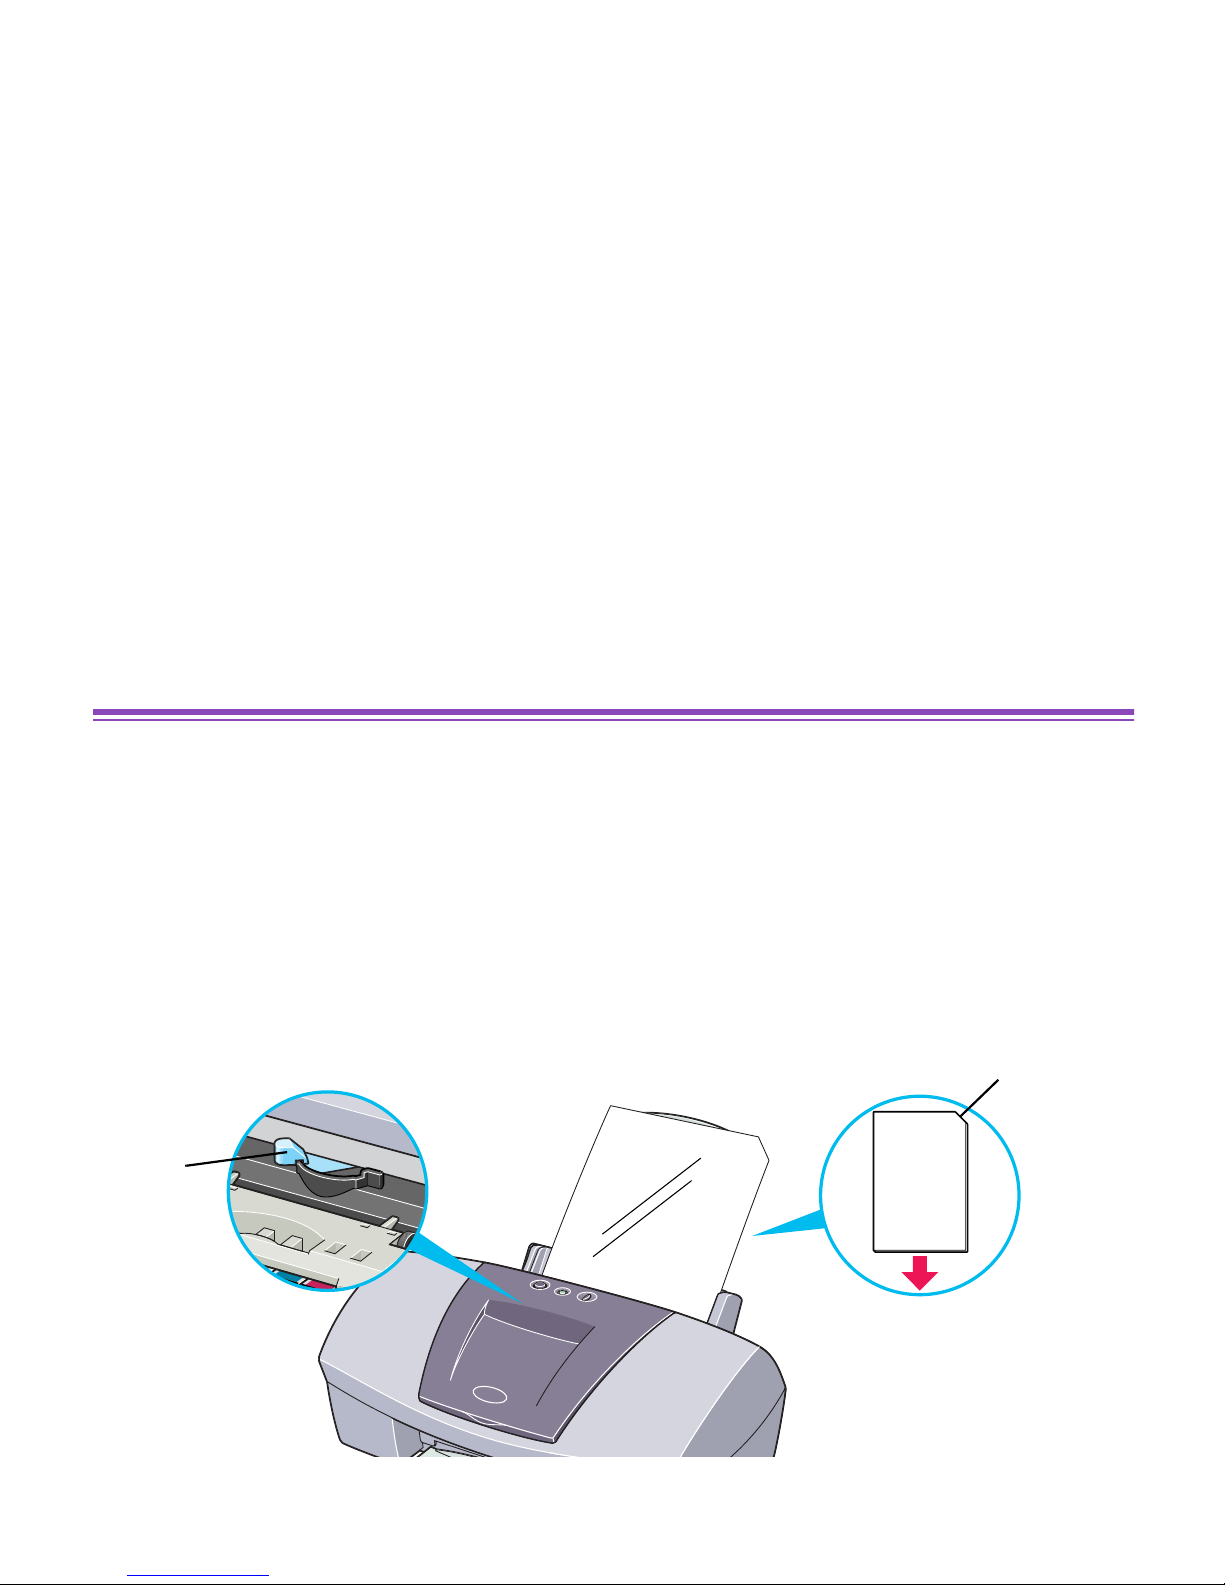
High Gloss Photo Film HG-201
This film has an extremely glossy surface, ideal for printing photographs with outstanding
results.
■ Loading
• Load only one sheet at a time.
• Load the film with the cut corner at the upper right.
• If the film is curled, flatten it by curling in the opposite direction.
• Set the paper thickness lever to the left.
Paper
thickness
lev er
Cut corner
Page 99

High Gloss Photo Film HG-201
98
Printing Media
■ Printer Driver Settings
• Media Type: High Gloss Photo Film
• Pag e Size: Ensure that the setting matches the size set in the application.
■ Handling of Printed Output
• Remove each sheet as soon as it is printed.
• Do not touch the printed surface until the ink is fixed.
■ Printable Area
With some images, the trailing edge of the image may be blurred if printing extends into
the printable area. Canon recommends that you print within the printing area.
➡
Printing Area
Page 100
Glossy Photo Cards FM-101
99
Printing Media
Glossy Photo Cards FM-101
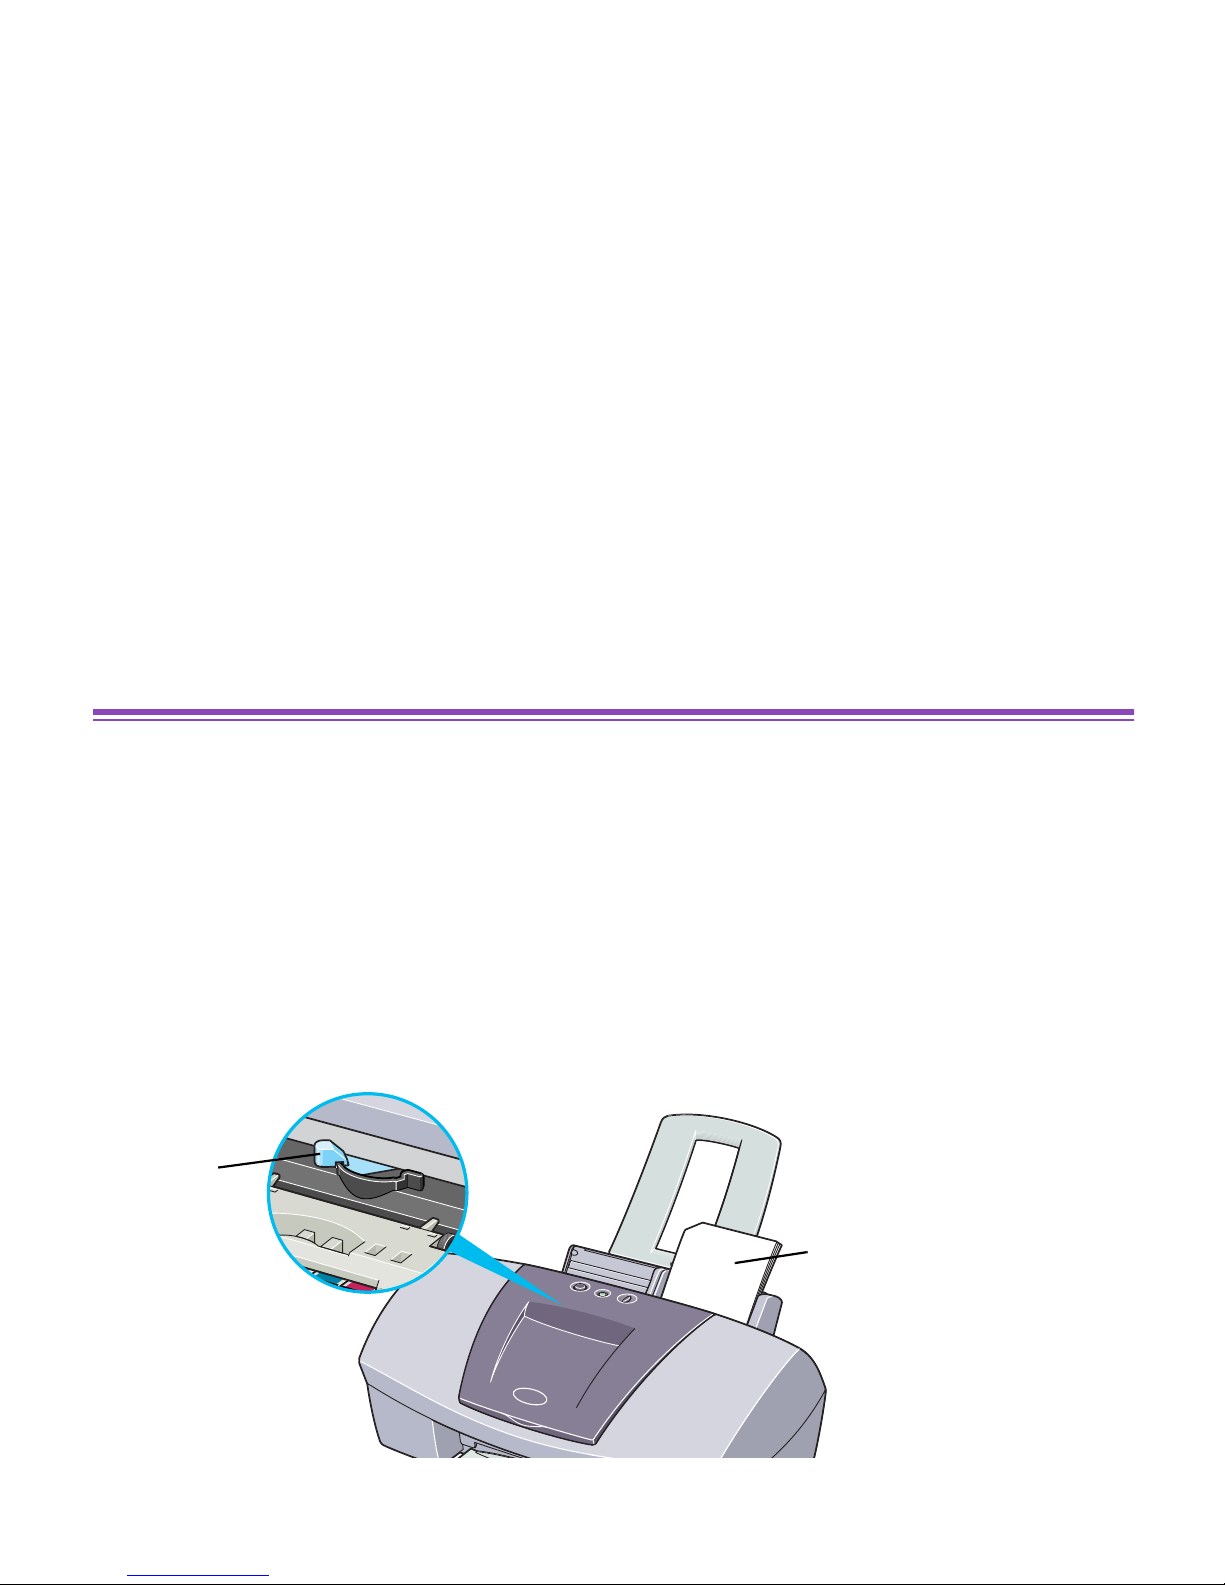
This photo-size paper is intended for printing images that cover the entire surface of the
card, without a white border. When printing, use the original application software,
ZoomBrowser EX/PhotoRecord (for Windows) or ImageBrowser (for Macintosh).
■ Loading
• Load the paper with the glossy side facing up.
• Set the paper thickness lever to the left.
• A maximum of 20 sheets can be loaded at once.
• Do not use the loading support sheet provided with the package.
Paper
thickness
lev er
Print side
(glossy side)
 Loading...