

Page 1
Page 2
Page 3

S500
™
Color Bubble Jet
™
Printer
Quick Start Guide
Page 4

Canon S500 Color Bubble Jet Printer QuickStart Guide.
CCooppyyrriigghhtt
This manual is copyrighted by Canon U.S.A. Inc. with all rights reserved. Under the copyright laws, this
manual may not be reproduced in any form, in whole or in part, without the prior written consent of Canon
U.S.A. Inc.
© 2001 Canon U.S.A. Inc.
DDiissccllaaiimmeerr
Canon U.S.A. Inc. has reviewed this manual thoroughly in order that it will be an easy to use guide to your
Canon S500 Color Bubble Jet Printer. All statements, technical information and recommendations in this
manual and in any guides or related documents are believed reliable, but the accuracy and completeness
thereof are not guaranteed or warranted, and they are not intended to be, nor should they be understood to
be, representation or warranties concerning the products described.
Specifications are subject to change without notice.
All print speeds based on draft mode. Print speed will vary depending on system configuration, software,
document complexity, print mode and page coverage.
As an
Energy Star partner, Canon U.S.A. Inc., has determined that this product meets the
Energy Star guidelines for energy efficiency.
All information regarding non-Canon products was compiled from publicly available information. No
representation is made regarding the accuracy thereof.
TTrraaddeemmaarrkkss
Canon and BJ are registered trademarks and Bubble Jet and S500 are trademarks of Canon Inc.
Canon U.S.A. Inc.
Digital Home and Personal Systems Division
2995 Redhill Avenue
Costa Mesa, CA 92626
PRINTED IN THAILAND
Part number 6861A002AA
Page 5

CCoonntteennttss
Chapter 1: Basic Printing
Turning Your Printer On and Off . . . . . . . . . . . . . . . . . . . . . . . . . . . . . 1
What Is a Printer Driver? . . . . . . . . . . . . . . . . . . . . . . . . . . . . . . . . . . 2
Selecting the S500 Printer for Use . . . . . . . . . . . . . . . . . . . . . . . . . . 2
Recommended Paper Use . . . . . . . . . . . . . . . . . . . . . . . . . . . . . . . . . 3
Loading Paper and Other Media . . . . . . . . . . . . . . . . . . . . . . . . . . . . 4
Cancelling a Print Job . . . . . . . . . . . . . . . . . . . . . . . . . . . . . . . . . . . . . 7
Chapter 2: Advanced Print Features
Improving Printed Images . . . . . . . . . . . . . . . . . . . . . . . . . . . . . . . . . 9
Adjusting Print Quality . . . . . . . . . . . . . . . . . . . . . . . . . . . . . . . . . . . . 9
Adjusting Color Balance, Intensity and Brightness . . . . . . . . . . . . . 12
Changing the Page Setup . . . . . . . . . . . . . . . . . . . . . . . . . . . . . . . . 14
Saving and Recalling Driver Settings . . . . . . . . . . . . . . . . . . . . . . . . 17
Chapter 3: Printing Maintenance
Monitoring Ink Levels . . . . . . . . . . . . . . . . . . . . . . . . . . . . . . . . . . . . 19
Replacing Ink Tanks . . . . . . . . . . . . . . . . . . . . . . . . . . . . . . . . . . . . . 20
Printing a Nozzle Check Pattern . . . . . . . . . . . . . . . . . . . . . . . . . . . . 20
Cleaning the Printhead . . . . . . . . . . . . . . . . . . . . . . . . . . . . . . . . . . 22
Aligning the Printhead . . . . . . . . . . . . . . . . . . . . . . . . . . . . . . . . . . . 23
Chapter 4: Troubleshooting
Tips for Troubleshooting . . . . . . . . . . . . . . . . . . . . . . . . . . . . . . . . . 25
Customer Care Center . . . . . . . . . . . . . . . . . . . . . . . . . . . . . . . . . . . 32
Chapter 5: The BJ Solution Software–Downloading Images
Minimum System Requirements . . . . . . . . . . . . . . . . . . . . . . . . . . . 34
Installing the BJ Solution Software . . . . . . . . . . . . . . . . . . . . . . . . . . .34
Accessing the Online Manual . . . . . . . . . . . . . . . . . . . . . . . . . . . . . . .35
Windows Users: Using Your Software . . . . . . . . . . . . . . . . . . . . . . . . .36
Windows Users: Uninstalling the Software . . . . . . . . . . . . . . . . . . . .38
Macintosh Users: Using Your Software . . . . . . . . . . . . . . . . . . . . . . . .38
Macintosh Users: Uninstalling the Software . . . . . . . . . . . . . . . . . . .40
iii
Page 6

Appendix
Installing the Printer Driver . . . . . . . . . . . . . . . . . . . . . . . . . . . . . . . 41
Uninstalling the Printer Driver . . . . . . . . . . . . . . . . . . . . . . . . . . . . 43
Registering Your Canon Product . . . . . . . . . . . . . . . . . . . . . . . . . . . 43
Safety Information . . . . . . . . . . . . . . . . . . . . . . . . . . . . . . . . . . . . . . 44
Regulatory Information . . . . . . . . . . . . . . . . . . . . . . . . . . . . . . . . . . 46
Product Specifications . . . . . . . . . . . . . . . . . . . . . . . . . . . . . . . . . . . 47
Limited Warranty—U.S. Only . . . . . . . . . . . . . . . . . . . . . . . . . . . . . . 49
Index . . . . . . . . . . . . . . . . . . . . . . . . . . . . . . . . . . . . . . . . . . . . . . . . . . . . . . . . . . . . . 53
iv
Contents
Page 7
CChhaapptteerr 11:: BBaassiicc PPrriinnttiinngg
Congratulations on purchasing your new Canon®S500 Color Bubble Jet
™
Printer!
With this printer, you can print basic business documents in color or black and
white, as well as print on a variety of specialty media, such as Canon High
Resolution Paper (ideal for business documents such as presentations that
include large numbers of color illustrations), Canon Glossy Photo Paper or
Canon Photo Paper Pro (for digital photographs) and Canon Transparencies (for
presentations). For a full list of the Canon specialty media that can be used with
your S500 printer, see “Specialty Media” on page 3.
This quick start guide describes some of the features of your S500
printer and how to use them. For more information, view and/or
print the S500 User’s Guide on the Setup Software & User’s Guide
CD-ROM.
Driver features and screen shots described in this guide reflect
Windows
®
98 and may be different for Windows NT®4.0 and
Windows 2000 users.
TTuurrnniinngg YYoouurr PPrriinntteerr OOnn aanndd OOffff
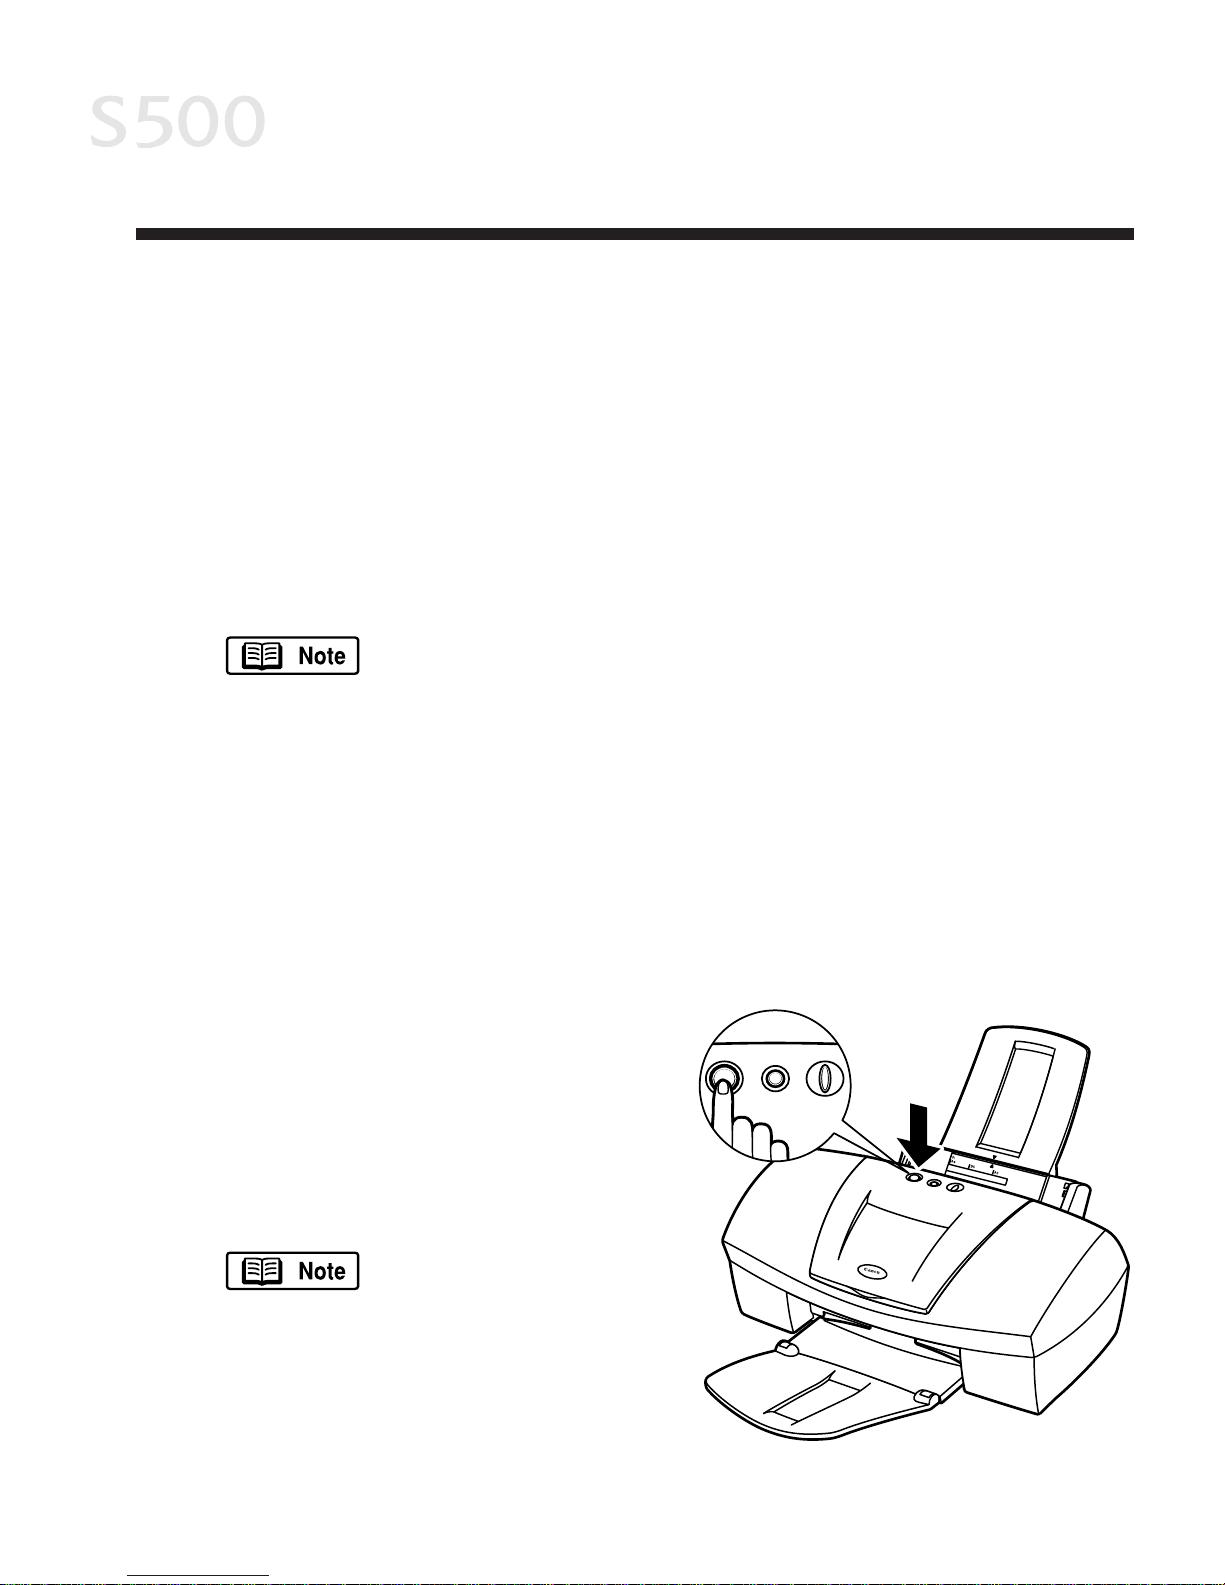
To turn your printer on or off, press the
POWER button.
The POWER lamp will flash green when
warming up or when a print job is
being sent to the printer. It will glow a
steady (non-flashing) green when the
printer is ready for use or when the
print job is complete.
If the POWER lamp
flashes orange, see
“Handling Error
Messages” beginning
on page 30.
11
Page 8

Basic Printing
22
WWhhaatt IIss aa PPrriinntteerr DDrriivveerr??
Most computers require special software to link the software applications you
use to create documents or images with your printer. This software, called a
printer driver, converts information from the application into a format that the
printer can understand. The Canon S500 printer driver also provides other
features such as monitoring the printer’s paper supply and ink levels.
SSeelleeccttiinngg tthhee SS550000 PPrriinntteerr ffoorr UUssee
If the S500 is the only printer connected to your computer, it will automatically
be set as the default (main) printer. However, if your computer has access to
multiple printers, you can set the S500 as the default printer.
TToo sseett tthhee SS550000 aass tthhee ddeeffaauulltt pprriinntteerr iinn WWiinnddoowwss®::
1. Click
SSttaarrtt
, then
SSeettttiinnggss
, then
PPrriinntteerrss
.
2. Right-click the Canon S500 printer icon, then click
SSeett aass DDeeffaauulltt
. The Canon
S500 printer icon will display a check mark indicating it is the default
printer.
TToo sseelleecctt tthhee SS550000 ffrroomm wwiitthhiinn aa WWiinnddoowwss aapppplliiccaattiioonn::
Even if another printer is set as the default printer, you can still select the Canon
S500 for a specific print job from within most Windows applications.
Menus vary between applications. Consult your application user
documentation if the Print option is not listed.
1. From the
FFiillee
menu, click
PPrriinntt
.
2. Select
CCaannoonn SS550000
from the Name drop-down list, then click
OOKK
.
TToo sseelleecctt tthhee SS550000 iinn MMaacc®OOSS::
1. Click
AAppppllee
, then
CChhoooosseerr
.
2. Click the
SS550000
printer icon. The S500 will remain the default printer until
another is selected.
Page 9

RReeccoommmmeennddeedd PPaappeerr UUssee
There are two steps recommended for getting the best output for your printed
documents:
• Set the printer thickness lever for the media used. (See “Load Limit and
Paper Thickness Lever Position” on page 4.)
• Select the correct media setting in the printer driver. (See “Chapter 2:
Advanced Print Features” on page 9.)
GGeenneerraall BBuussiinneessss PPrriinnttiinngg
For everyday paper printing, use plain paper (17 to 28 lb.). Use standard #10
envelopes with your S500 printer.
SSppeecciiaallttyy MMeeddiiaa
For optimum results, Canon recommends that you use genuine Canon media
with your S500 printer. Follow the instructions that come with any specialty
media on storing, handling and printing.
The specialty media available for use with the S500 include:
• Canon High Resolution Paper
• Canon Transparencies
• Canon Banner Paper
• Canon Glossy Photo Paper
• Canon Photo Paper Pro
• Canon Glossy Photo Cards
• Canon High Gloss Photo Film
• Canon T-Shirt Transfers
For instructions on loading and handling specialty media, see the
instructions that come with that media type or see the S500
User’s Guide on the Setup Software & User’s Guide CD-ROM.
Handle media carefully by its edges. Dirt or fingerprints on the
print surface will adversely affect print quality.
Basic Printing
33
Page 10
MMeeddiiaa ttoo AAvvooiidd
Do not use the following types of media with your S500 as they could produce
poor quality print images, or jam or damage the printer:
• Paper that is folded, excessively curled, wrinkled or wrapped
• Damp paper
• Excessively thin or thick paper
• Paper with pasted photos, stickers, etc.
• Envelopes with overlapping flaps or self-sealing flaps
• Tractor feed paper, perforated paper or 3-hole punched paper, or paper with
any type of attached fasteners, ribbons, etc.
LLooaaddiinngg PPaappeerr aanndd OOtthheerr MMeeddiiaa
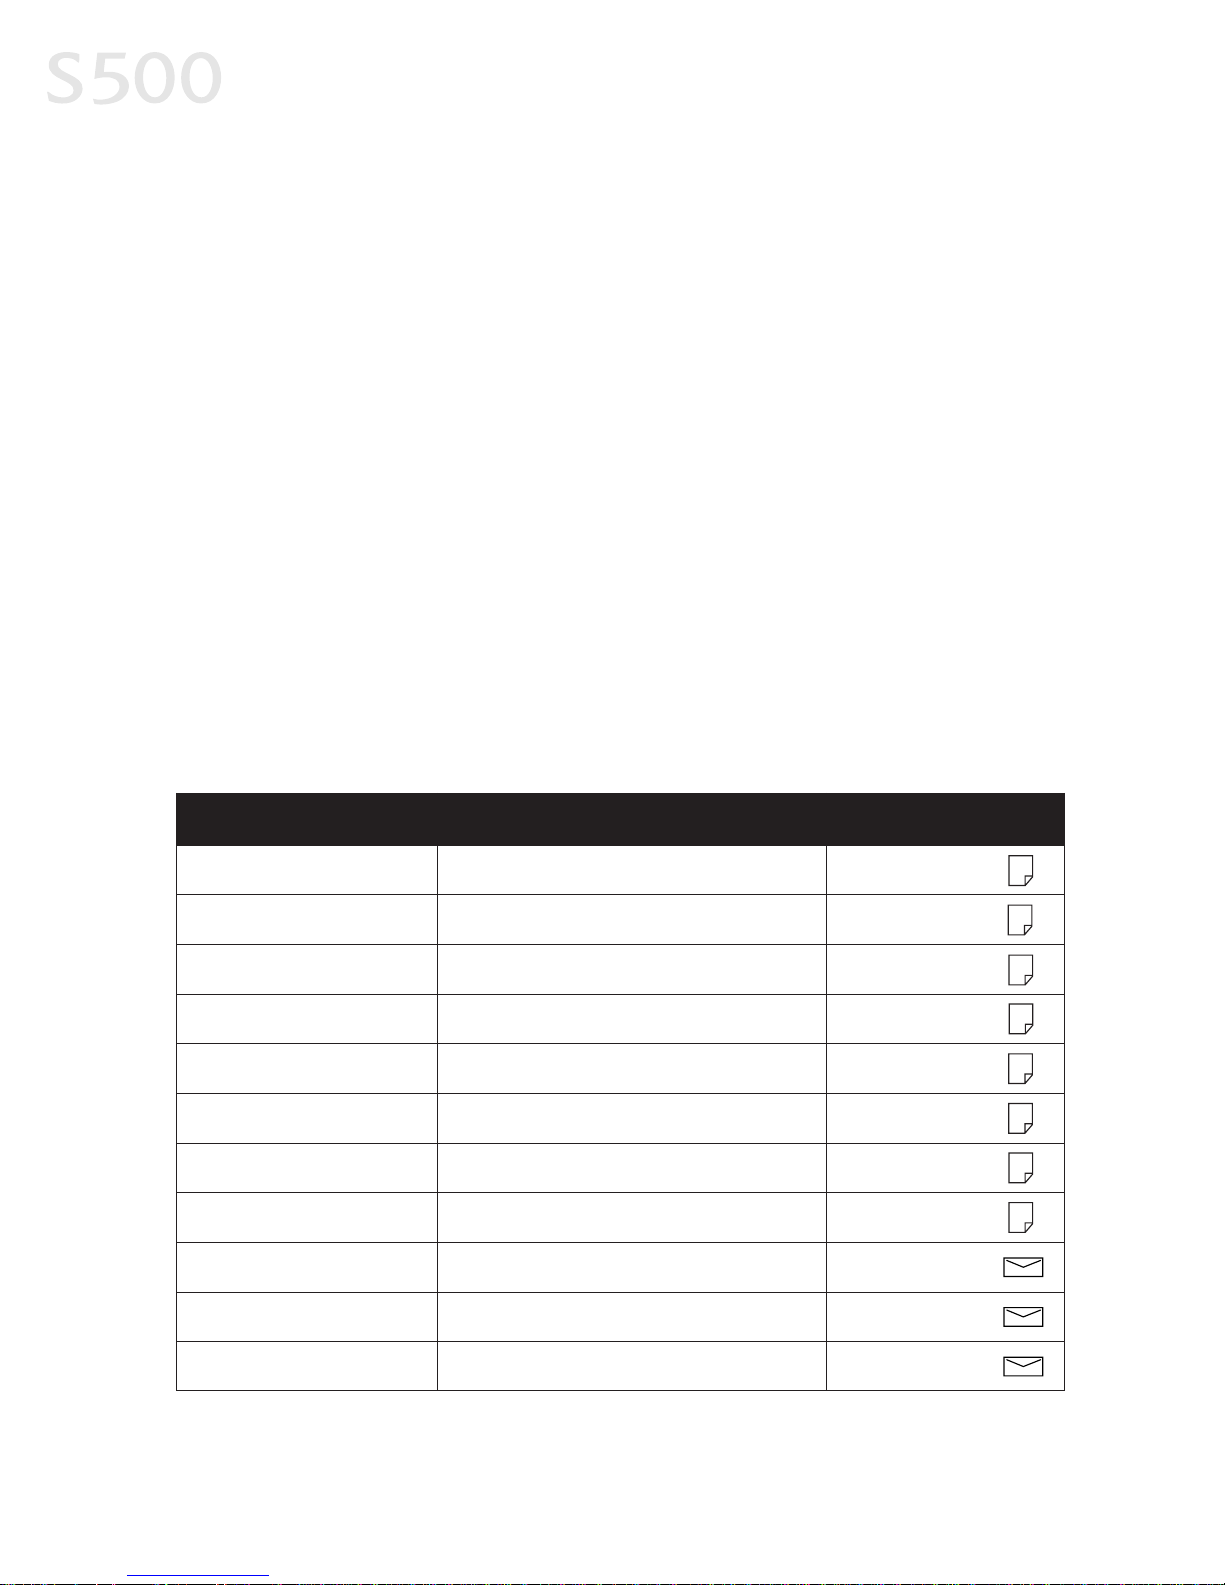
LLooaadd LLiimmiitt aanndd PPaappeerr TThhiicckknneessss LLeevveerr PPoossiittiioonn
Basic Printing
44
PPaappeerr TThhiicckknneessss
LLeevveerr PPoossiittiioonn
up to to 100 sheets (17 lbs.)
High Resolution Paper
Photo Paper Pro
Photo Paper Pro (4 x 6)
High Gloss Photo Film
Glossy Photo Paper
Glossy Photo Cards
Transparencies
#10 envelopes
Banner paper
T-Shirt Transfers
MMeeddiiaa TTyyppee PPaappeerr RReesstt LLooaadd LLiimmiitt
Plain paper Left
up to 10 sheets Left
up to 80 sheets Left
Left
up to 20 sheets Left
1 sheet
1 sheet Left
up to 20 sheets Left
up to 30 sheets
up to 10 envelopes
1 sheet (print up to 6 connected sheets)
1 sheet
Left
Right
Right
Right
Page 11
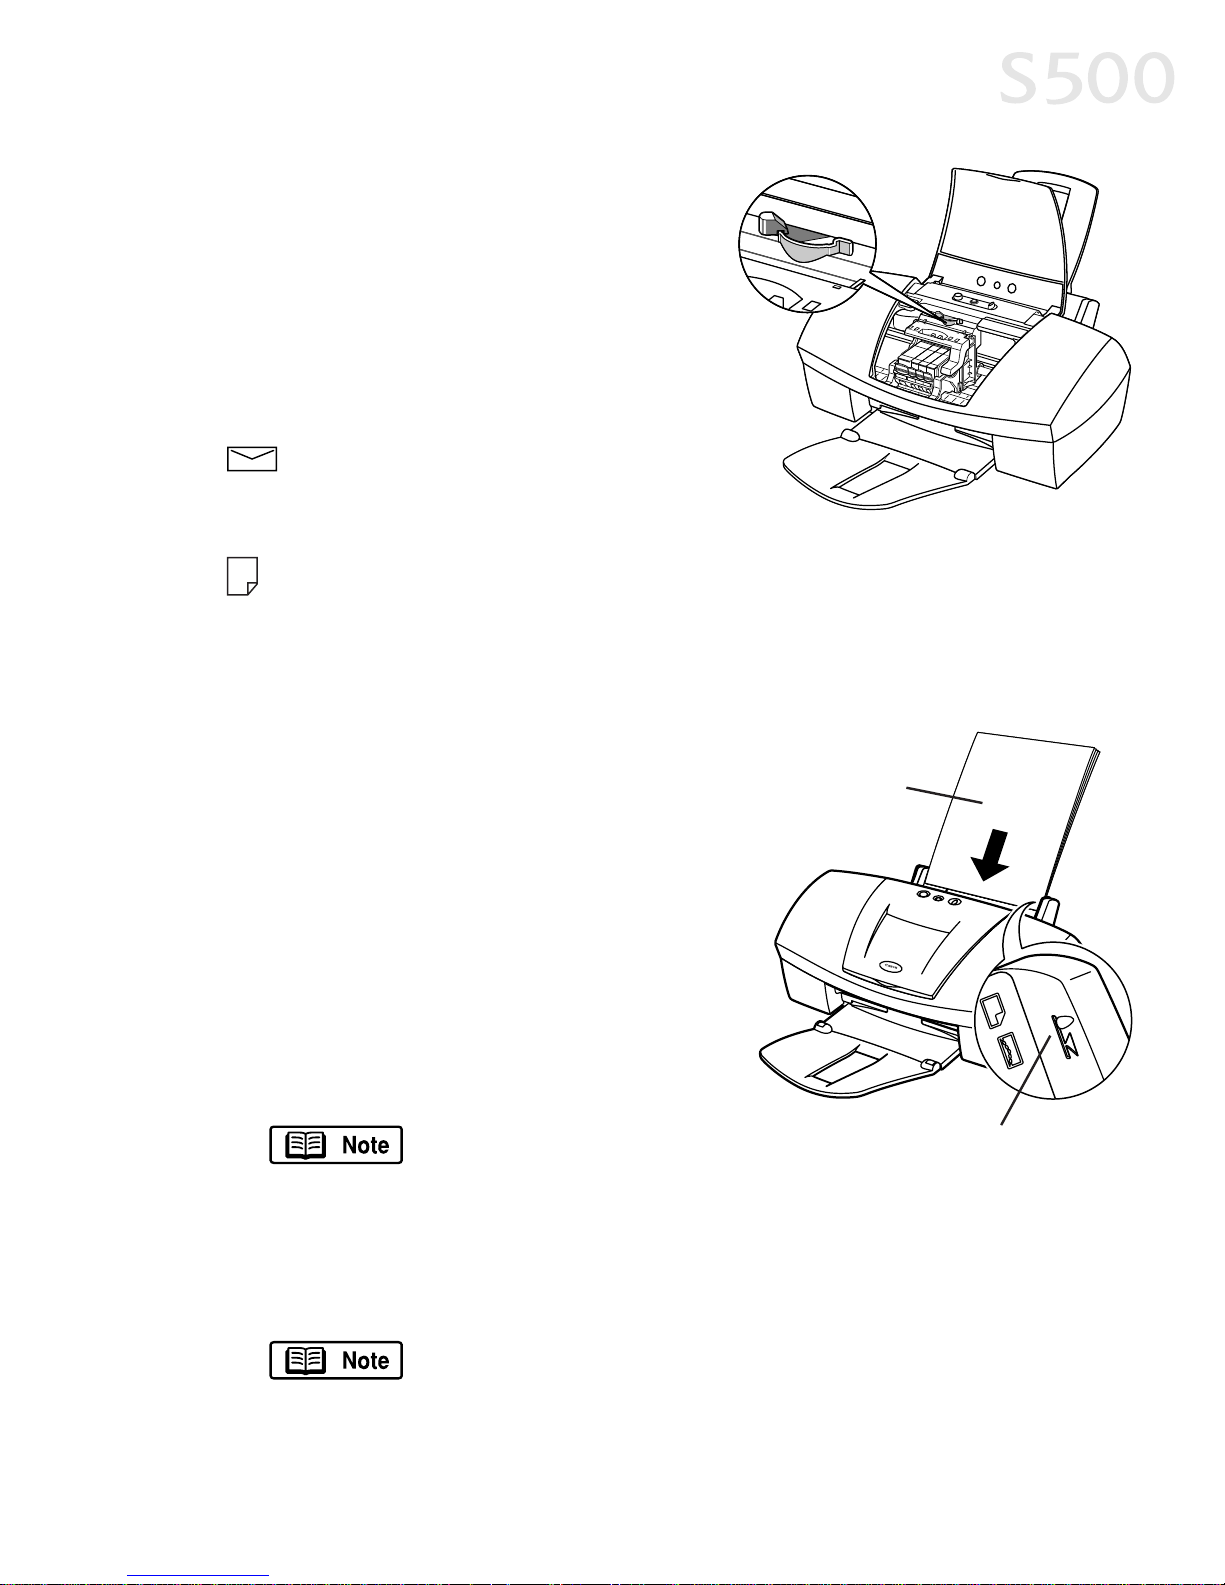
The S500 can print on paper ranging from
standard copier paper (usually 17–28 lb.)
to specialty media paper and envelopes.
The paper thickness lever is located inside
the front cover, on the printhead holder. It
controls the paper feed for the type and
weight of the media on which you are
printing.
For envelopes (see “To load
envelopes:” on page 6), banners and
T-Shirt Transfers.
For regular paper and other media with a left position in the table (see
“Load Limit and Paper Thickness Lever Position” on page 4).
Use the chart on the previous page to ensure that the paper thickness lever is
set correctly for the type of media you are using.
TToo llooaadd ppaappeerr oorr ootthheerr mmeeddiiaa::
1. Make sure the paper thickness lever is
set correctly for the media used.
2. Slide the paper guide completely to the left.
3. Fan the edges of the sheets to remove
static cling and avoid paper jams, then
tap the edges of the stack against a flat
surface so the stack is aligned.
4. Insert the media into the paper rest,
with the print side facing up.
Some papers, especially
specialty media, have
specific sides for printing. The print side is usually the glossier
side or the brighter white side. When using specialty media,
do not touch the print side.
5. Slide the paper guide to the edge of the media until it is firmly in place.
You can load up to 100 sheets of plain (17 lb.) paper or 80
sheets of Canon High Resolution Paper in the paper rest at one
time. Never load the paper above the load limit mark.
Basic Printing
55
Print side
Load limit mark
Page 12
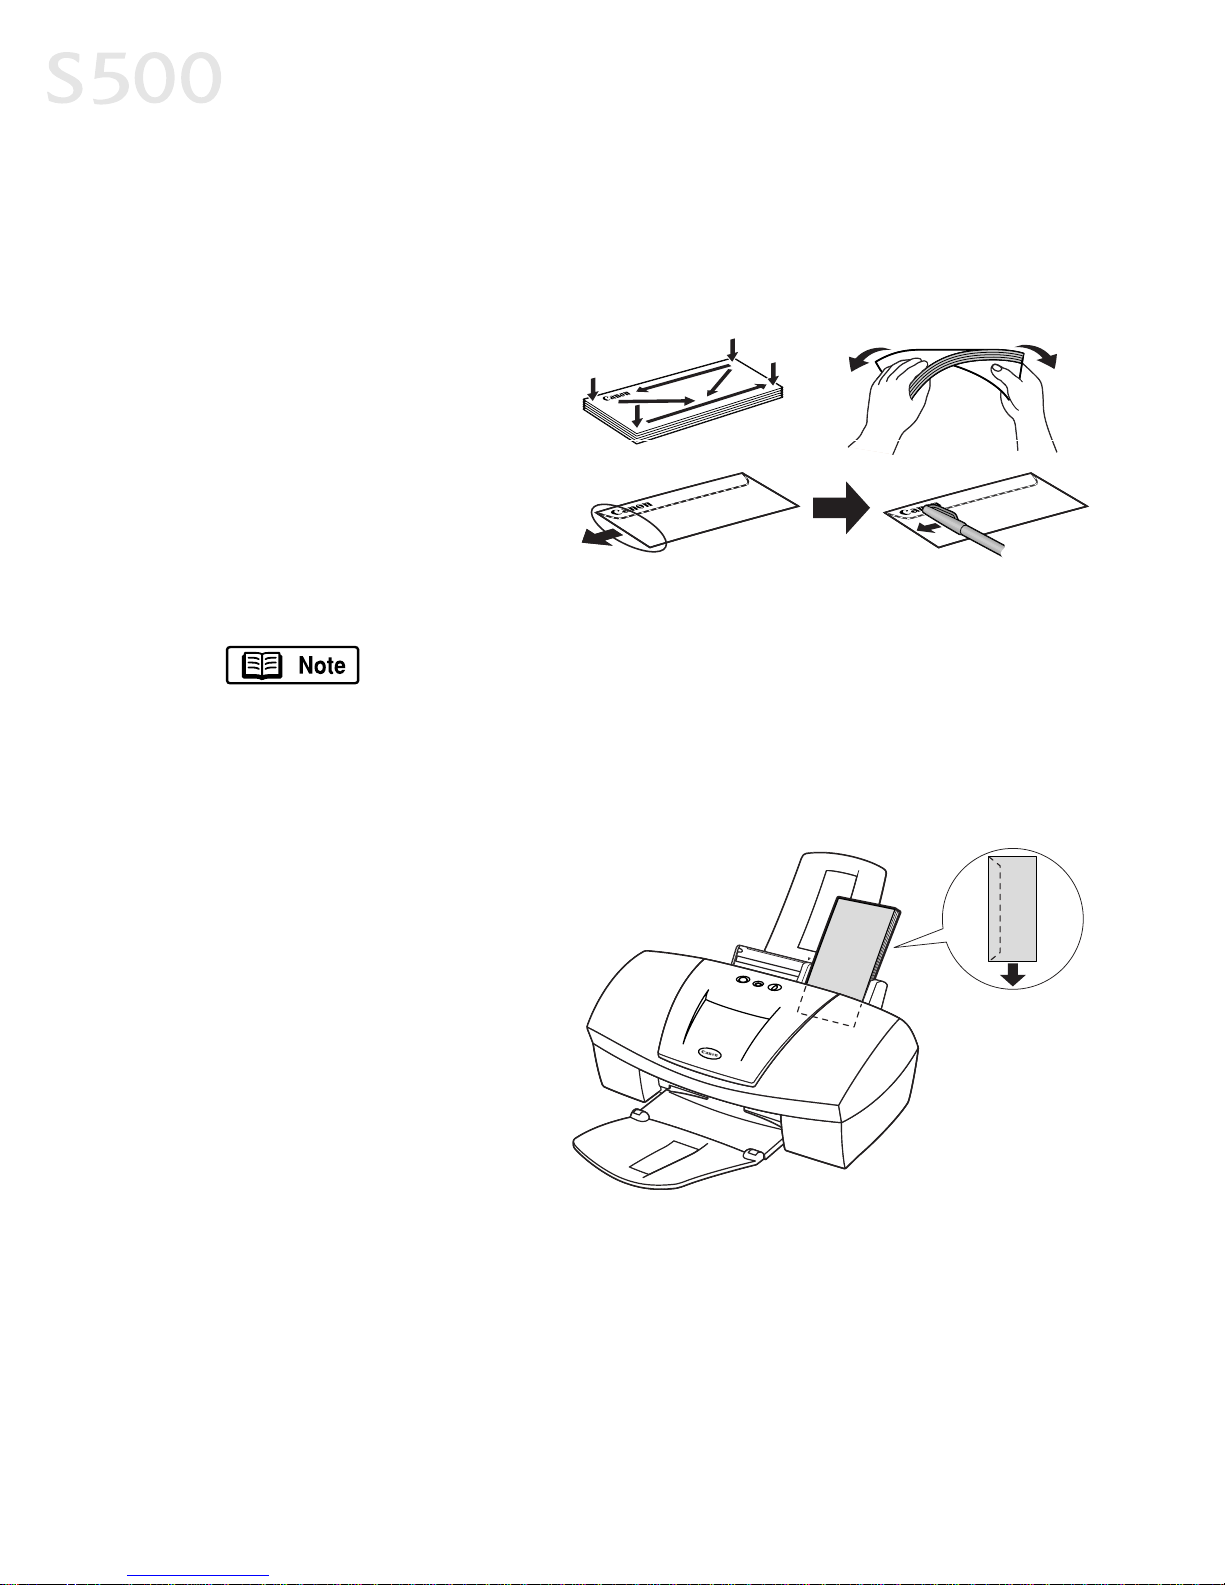
TToo llooaadd eennvveellooppeess::
1. Lift the cover and set the paper thickness lever to the envelope mark. Close
the cover.
2. Slide the paper feed guide to the left.
3. Press down on the corners
and sides of the envelopes
to make them as flat as
possible by expelling all of
the air.
To avoid paper jams, make
sure envelopes are flat
before you load them into
the paper tray.
Make sure that none of the flaps overlap. If the envelope
edges are not flat, crease them with the side of a pen.
Do not allow more than 10 envelopes to stack on the paper
output tray.
4. With the address side facing
up and pointed in the
direction shown in the
illustration, align the stack
with the right side of the
paper rest, then insert the
stack into the printer.
5. Slide the paper guide to the
edge of the envelopes until it
is firmly in place.
Basic Printing
66
Flap side of envelope faces down
Page 13
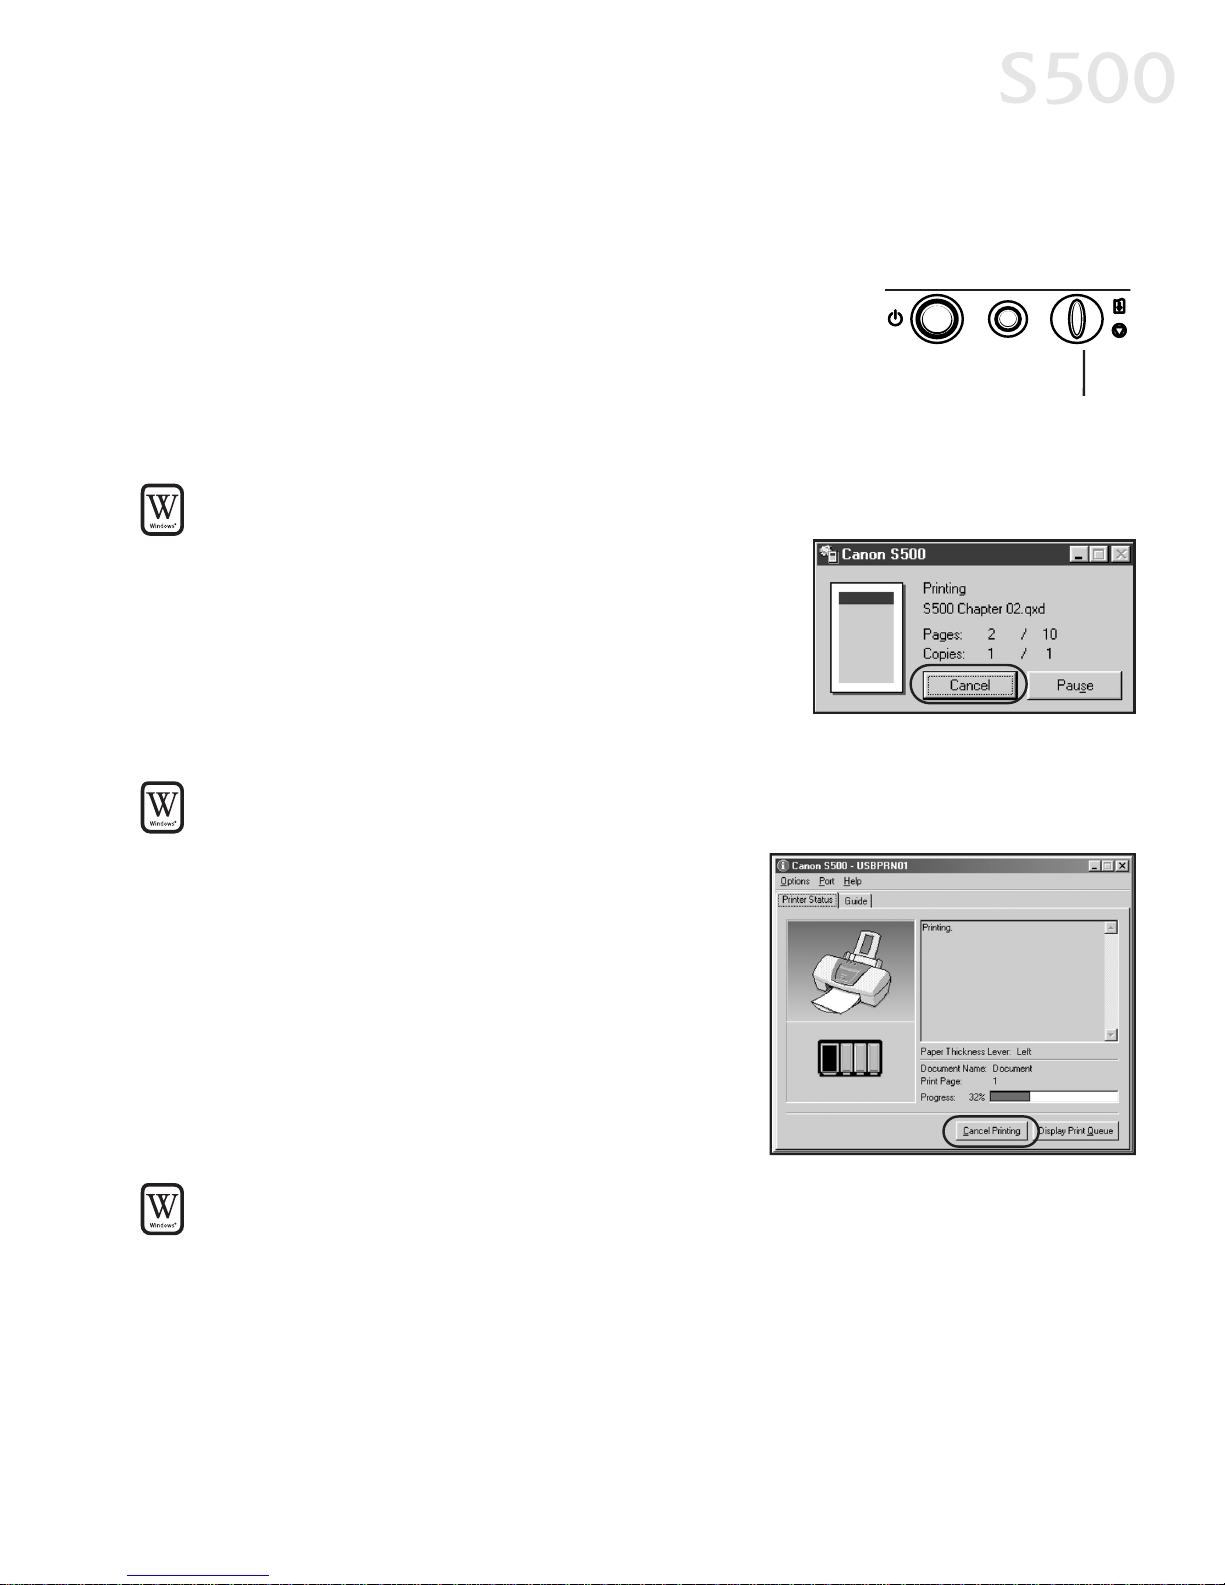
CCaanncceelllliinngg aa PPrriinntt JJoobb
There are several ways to cancel a print job in progress:
TToo ccaanncceell aa pprriinntt jjoobb ffrroomm tthhee pprriinntteerr::
While a job is printing, press the
RREESSUUMMEE//CCAANNCCEELL
button on the printer. The print job will be cancelled
and the paper ejected.
TToo ccaanncceell aa pprriinntt jjoobb ffrroomm tthhee SS550000 pprriinntt
ddiiaalloogg bbooxx::
When a job is printing on the S500, a print status
dialog box displays on your screen.
Click
CCaanncceell
at any time while this dialog box is
open to cancel the current print job. The print job
will be cancelled and the paper ejected.
TToo ccaanncceell aa pprriinntt jjoobb ffrroomm tthhee PPrriinntteerr SSttaattuuss MMoonniittoorr::
1. Click
SSttaarrtt
, then
SSeettttiinnggss
, then
PPrriinntteerrss
.
2. Right-click
CCaannoonn SS550000
, then click
PPrrooppeerrttiieess
.
3. Select the
MMaaiinntteennaannccee
tab, then click the
SSttaarrtt SSttaattuuss MMoonniittoorr
button.
4. Click
CCaanncceell PPrriinnttiinngg
.
The print job will be cancelled and the paper
ejected.
TToo ccaanncceell aa pprriinntt jjoobb ffrroomm WWiinnddoowwss::
1. Click
SSttaarrtt
, then
SSeettttiinnggss
, then
PPrriinntteerrss
.
2. Double-click
CCaannoonn SS550000,,
click the print job, then press the
DDeelleettee
key.
The print job will be cancelled and the paper ejected.
Basic Printing
77
RESUME/CANCEL button
Page 14
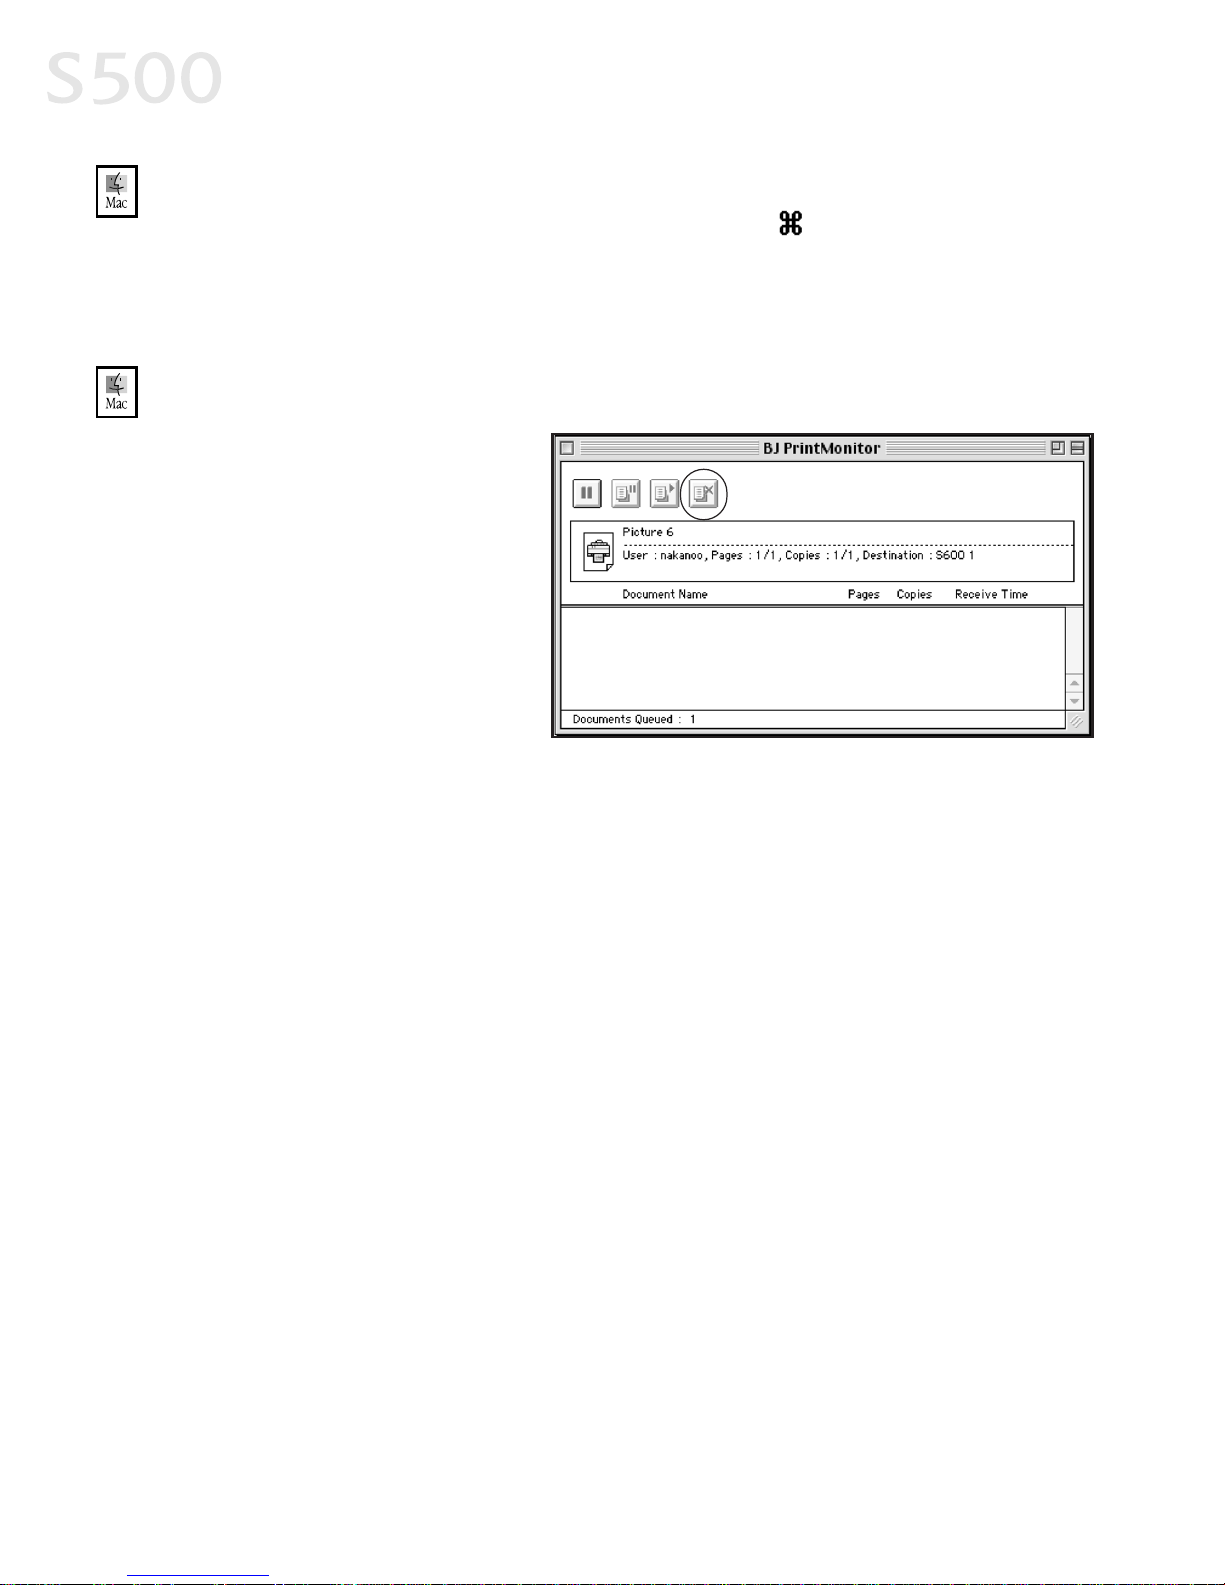
TToo ccaanncceell aa pprriinntt jjoobb iinn MMaacc OOSS wwhheenn uussiinngg ffoorreeggrroouunndd pprriinnttiinngg::
On your keyboard, press the Apple
™
CCoommmmaanndd
key ( ) and the period key ( . )
at the same time.
The print job will be cancelled and the paper ejected.
TToo ccaanncceell aa pprriinntt jjoobb iinn MMaacc OOSS wwhheenn uussiinngg bbaacckkggrroouunndd pprriinnttiinngg::
1. While a job is printing, go
to the BJ Print Monitor
window (click
FFiinnddeerr
, then
BBJJ PPrriinntt MMoonniittoorr
).
2. Highlight the job to be
cancelled.
3. Click the
SSttoopp PPrriinnttiinngg
icon
in the Print Queue dialog
box.
The print job will be cancelled
and the paper ejected.
Basic Printing
88
Page 15
CChhaapptteerr 22:: AAddvvaanncceedd PPrriinntt
FFeeaattuurreess
IImmpprroovviinngg PPrriinntteedd IImmaaggeess
Two important factors control the quality and output of your printed images:
PPaappeerr aanndd IInnkk
Using recommended paper or specialty media for printing
graphic images or photographs can significantly improve the quality of your
printout. (See “Recommended Paper Use” on page 3.) Also, always use the
specific Canon inks for your S500 printer, as noted on the inside back cover.
PPrriinntteerr DDrriivveerr SSeettttiinnggss
There is a variety of settings you can use to enhance
the quality of the print, the colors and the way in which the document
comes out of the printer.
Many of these features are covered in this chapter. For more
information, see the S500 User’s Guide on the Setup Software
& User’s Guide CD-ROM, or access the online help:
While in the Properties window, press the
FF11
key, or click in
the upper right corner then click the feature you want to know
more about, or click the button when displayed.
Turn Bubble Help on by selecting
HHeellpp
, then
SShhooww BBuubbbbllee
HHeellpp
.
AAddjjuussttiinngg PPrriinntt QQuuaalliittyy
Two of the features that affect the appearance and quality of your printed
documents can be controlled with the printer driver.
MMeeddiiaa TTyyppee
The S500 automatically adjusts printer settings to improve
print quality based on the media type (plain paper, Glossy Photo Paper, etc.)
you select.
PPrriinntt QQuuaalliittyy
When you select a media type, print quality is automatically
set for that media. You can change print quality settings if desired.
99
Page 16
Advanced Print Features
1100
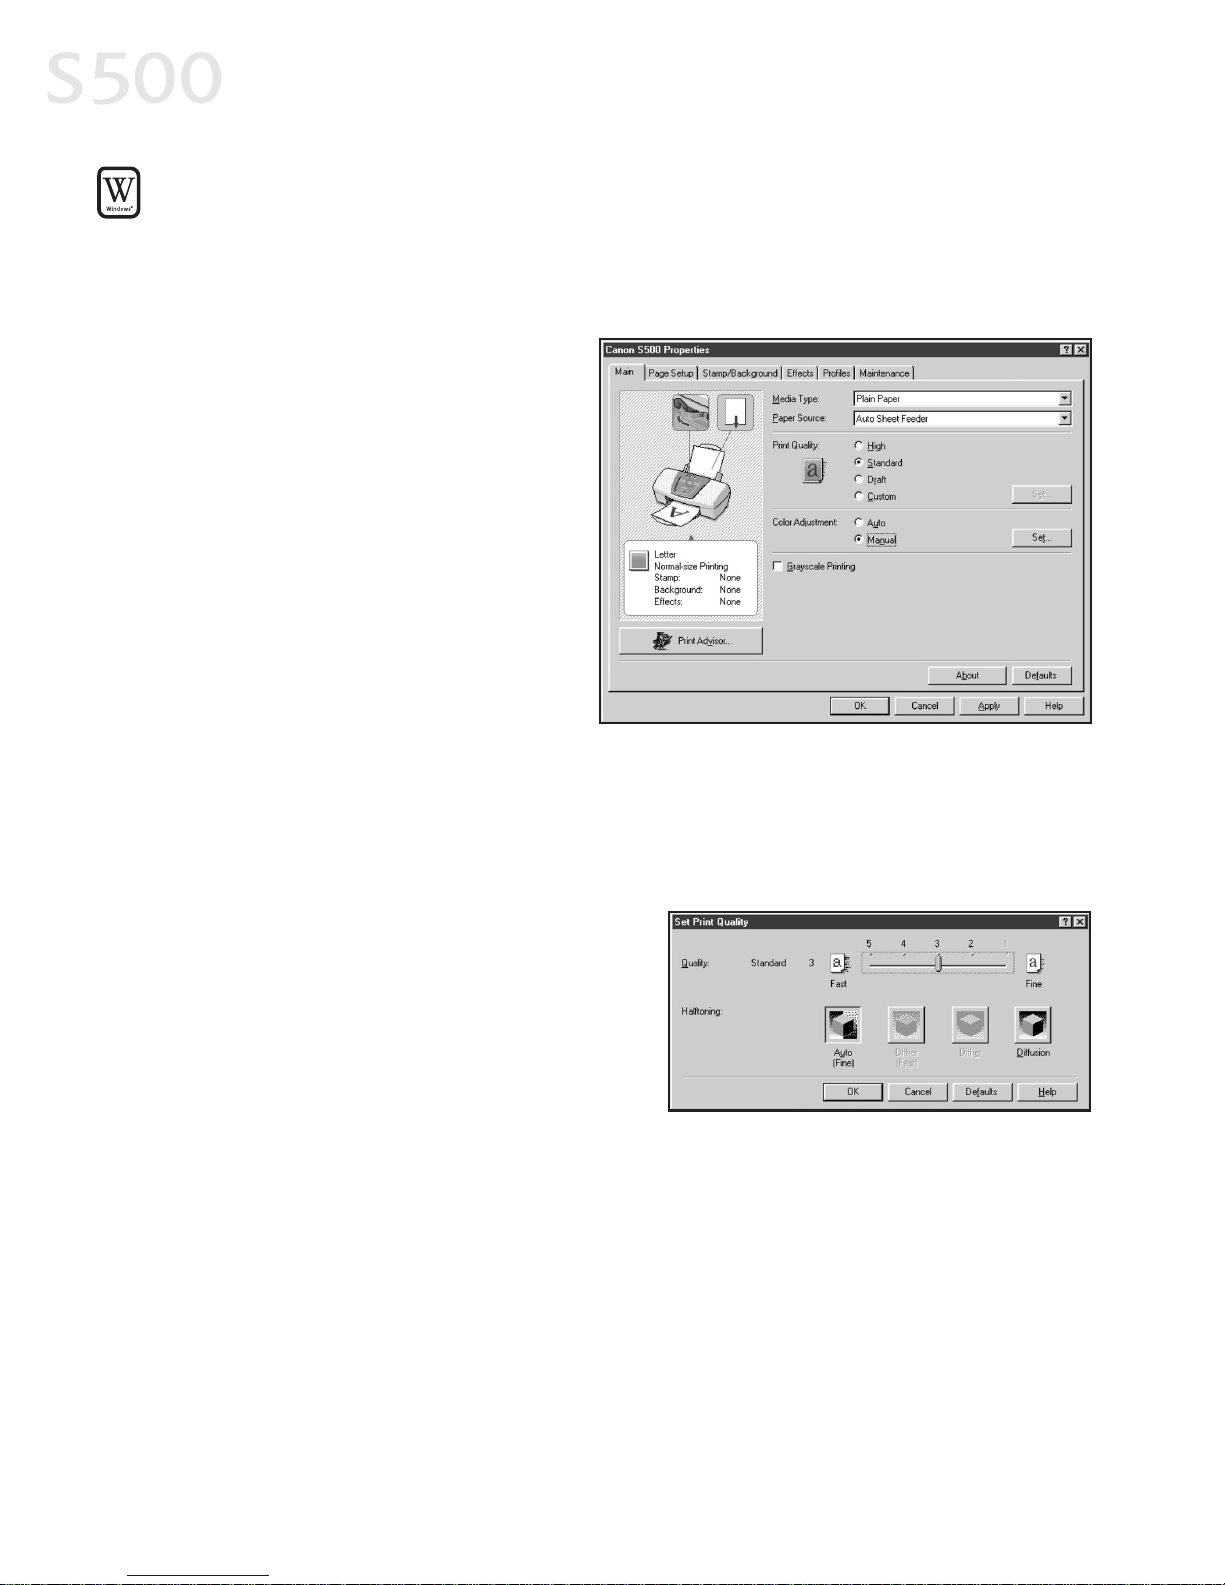
TToo mmaannuuaallllyy aaddjjuusstt pprriinntt qquuaalliittyy sseettttiinnggss iinn WWiinnddoowwss::
1. From an application
FFiillee
menu, select
PPrriinntt
.
2. With
CCaannoonn SS550000
as the selected printer, click
PPrrooppeerrttiieess
. The S500
Properties window will open to the Main tab.
3. Select the appropriate
MMeeddiiaa
TTyyppee
from the drop-down
menu.
4. Each media type has a default
quality, but you can select a
different
PPrriinntt QQuuaalliittyy
:
HHiigghh
For high quality when
printing a color document.
SSttaannddaarrdd
For high quality
when printing text.
DDrraafftt
For printing text drafts
at a faster speed.
CCuussttoomm
Allows for more precise control.
If you select
CCuussttoomm
, the Set button becomes active. Click
SSeett
to open the
Set Print Quality dialog box. There are two features you can control:
PPrriinntt QQuuaalliittyy
The printer driver
provides five settings for custom
print quality, ranging from
FFaasstt
at the far left (prints at 600 dpi,
which means faster printing and
less ink) to
FFiinnee
, which prints at
2400 x 1200 dpi.
HHaallffttoonniinngg
This controls the
pattern in which the ink is laid
down during printing for
graphic images.
5. When done, click
OOKK
.
Page 17
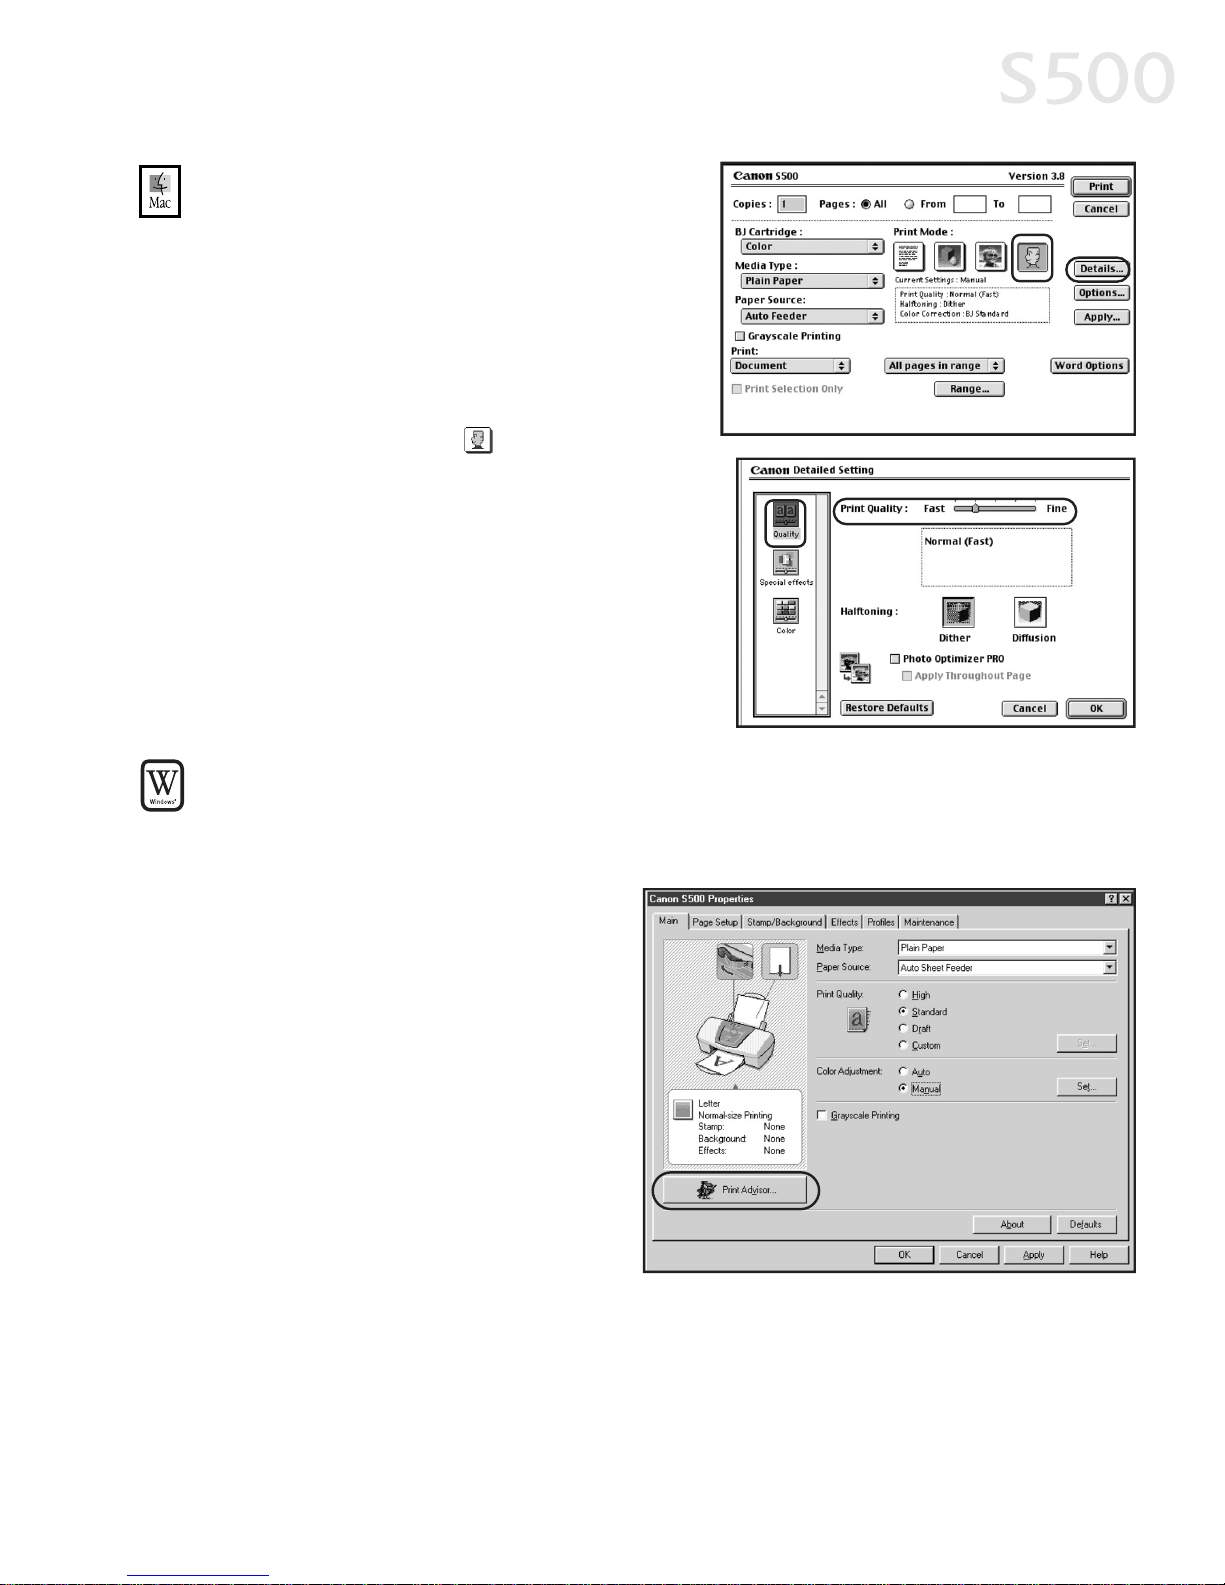
TToo mmaannuuaallllyy aaddjjuusstt pprriinntt qquuaalliittyy
sseettttiinnggss iinn MMaacc OOSS::
1. Make sure that the
SS550000
is the
selected printer (from the
AAppppllee
menu, select
CChhoooosseerr
, then
SS550000
).
2. From an application
FFiillee
menu, click
PPrriinntt
.
3. Click the
MMaannuuaall
print mode icon,
then click the
DDeettaaiillss
button. The
Detailed Setting dialog box will open.
Make sure
QQuuaalliittyy
is selected.
4. Click and drag the
PPrriinntt QQuuaalliittyy
slide
bar to select your preferred output
quality.
5. When done, click
OOKK
, then
PPrriinntt
.
TToo sseelleecctt bbeesstt pprriinntt qquuaalliittyy wwiitthh tthhee PPrriinntt AAddvviissoorr wwiizzaarrdd::
Print Advisor is a wizard that helps you select the most optimum media type and
print quality for your print job.
1. From an application
FFiillee
menu, select
PPrriinntt
.
2. With
CCaannoonn SS550000
as the
selected printer, click
PPrrooppeerrttiieess
. The S500
Properties window will open
to the Main tab.
3. Click the
PPrriinntt AAddvviissoorr
button.
The wizard dialog box will
open.
4. Follow the on-screen
instructions to select the
optimum output type, media
and settings for your print job.
5. Click
OOKK
to save the setting and close the S500 Properties window.
Advanced Print Features
1111
Page 18
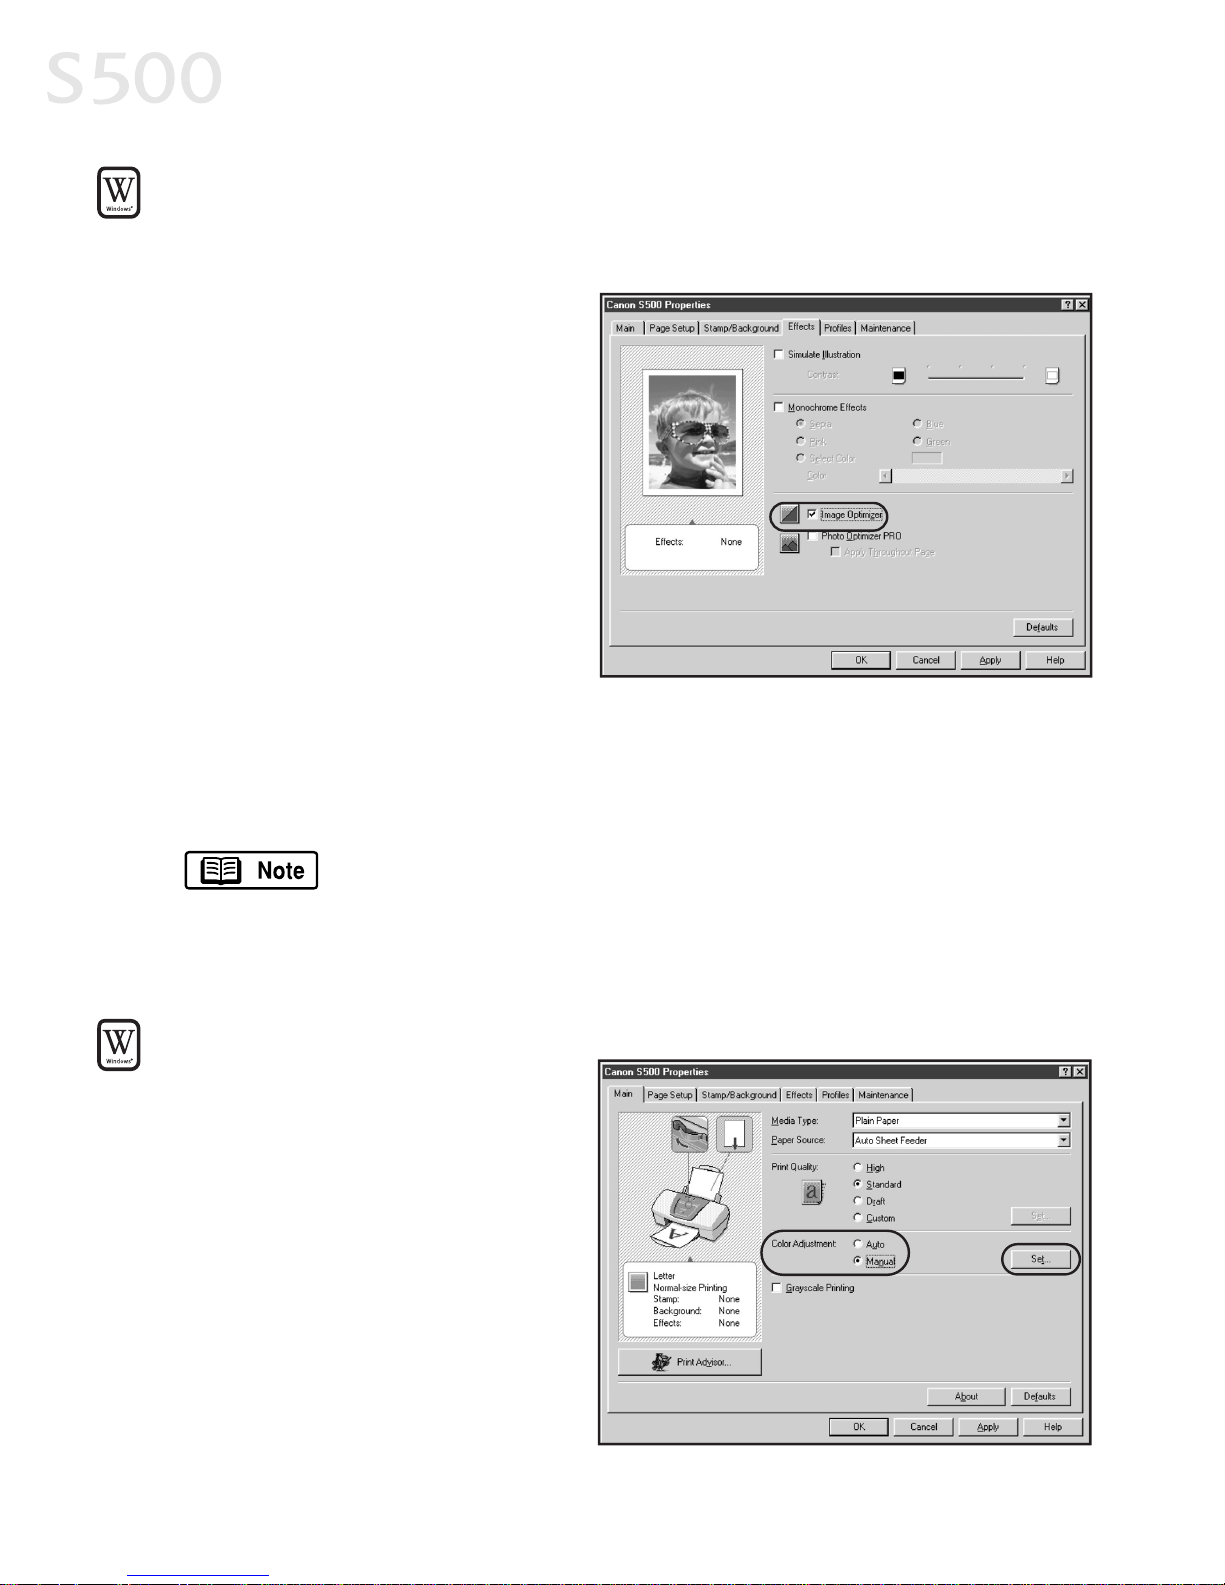
TToo aauuttoommaattiiccaallllyy mmaakkee iimmaaggeess mmoorree ssmmooootthh iinn WWiinnddoowwss::
Image Optimizer smoothes jagged edges formed when enlarging a photo or
graphic from its original size. It is most effective when used with low-resolution
images.
1. From an application
FFiillee
menu,
select
PPrriinntt
.
2. With
CCaannoonn SS550000
as the
selected printer, click
PPrrooppeerrttiieess
.
3. Click the
EEffffeeccttss
tab, then click
the
IImmaaggee OOppttiimmiizzeerr
check box.
4. Click
OOKK
to save this setting
and close the S500 Properties
window.
AAddjjuussttiinngg CCoolloorr BBaallaannccee,, IInntteennssiittyy aanndd BBrriigghhttnneessss
You can enhance color printing by adjusting the color balance, intensity
(saturation) and brightness.
For more information on these settings, see the S500 User’s Guide
on the Setup Software & User’s Guide CD-ROM, or access the
online help (press
FF11
or click in Windows; turn on Bubble Help in
Mac) while in the printer driver interface.
TToo mmaannuuaallllyy aaddjjuusstt ccoolloorr
sseettttiinnggss iinn WWiinnddoowwss::
1. From an application
FFiillee
menu,
select
PPrriinntt
.
2. With
CCaannoonn SS550000
as the
selected printer, click
PPrrooppeerrttiieess
.
3. On the
MMaaiinn
tab, under
CCoolloorr
AAddjjuussttmmeenntt
, select
MMaannuuaall
.
The Set button will become active.
4. Click
SSeett
, and the Manual
Color Adjustment dialog box
will open.
Advanced Print Features
1122
Page 19
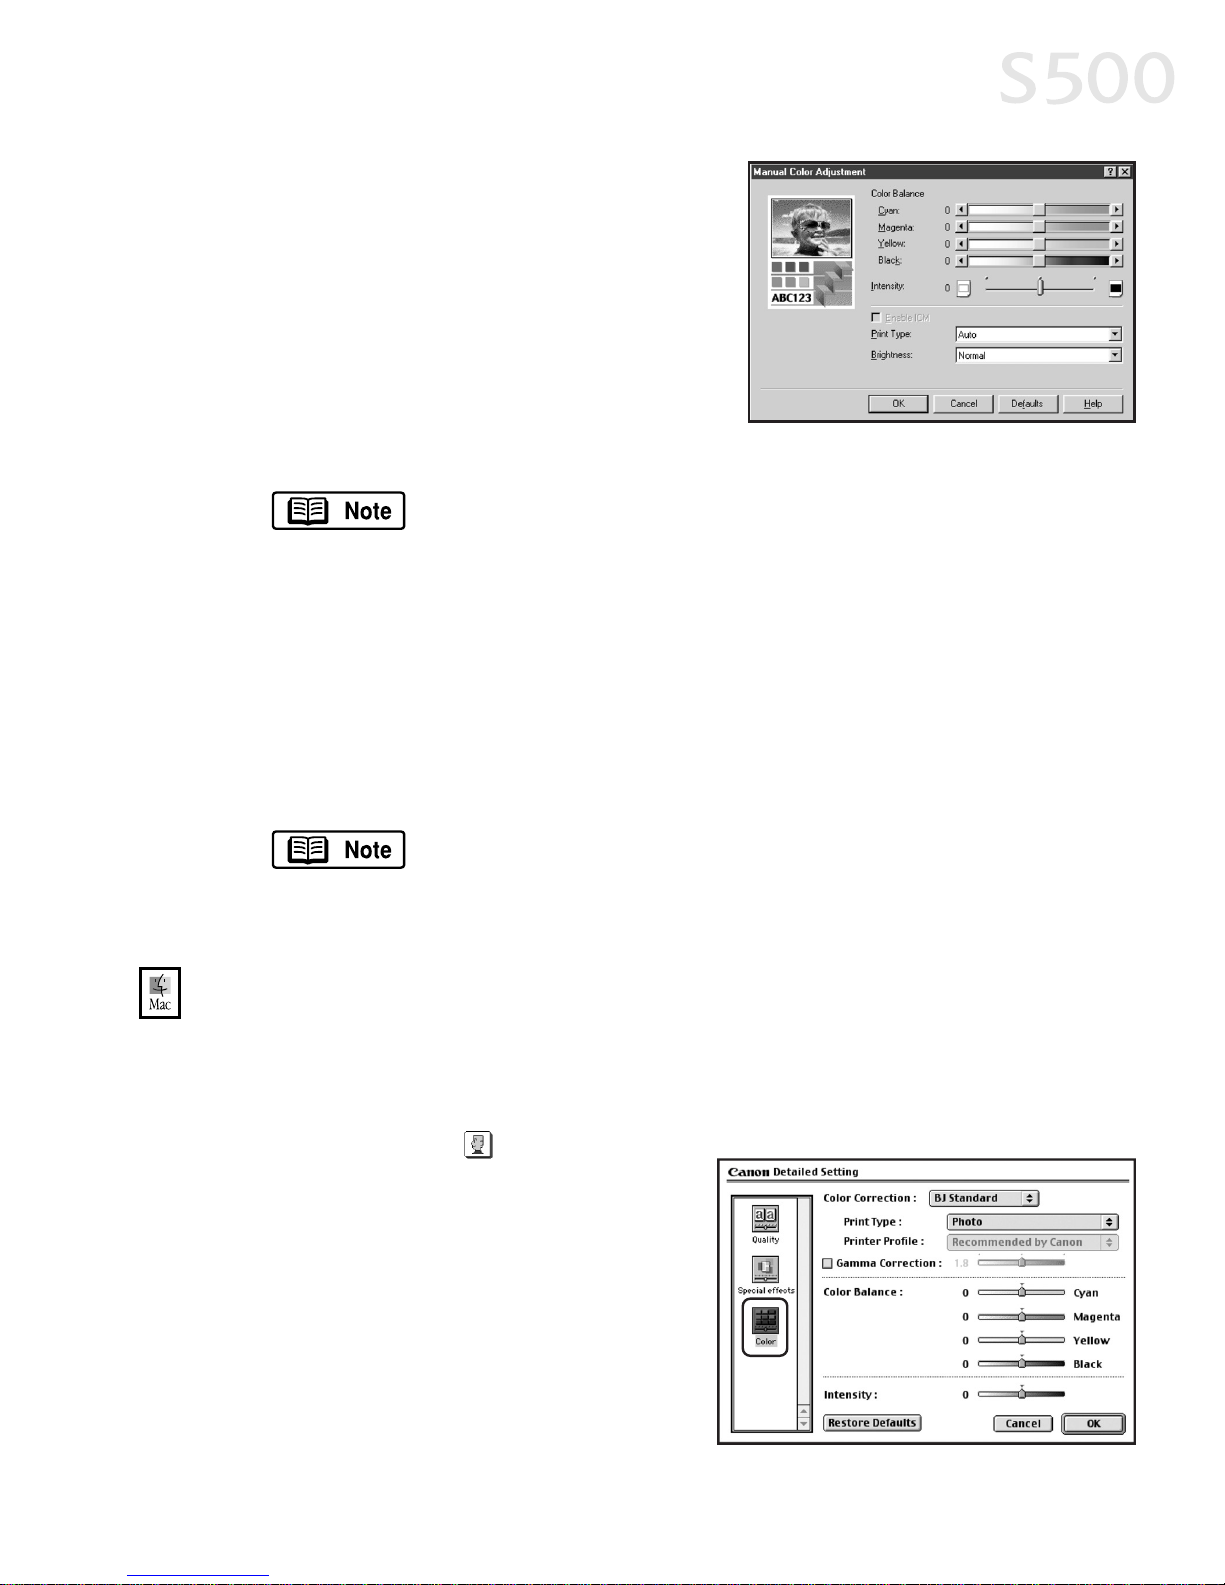
5. Click and drag the
CCoolloorr BBaallaannccee
slide
bar for each color to adjust the color
settings. The results will preview.
6. Click and drag the
IInntteennssiittyy
slide bar to
change the intensity (saturation) for the
image. The results will preview.
7.
IImmaaggee CCoolloorr MMaannaaggeemmeenntt ((IICCMM))
is a
feature that automatically adjusts the
image colors. (This feature is only available in Windows 98, Me and 2000).
To use ICM for automatic color adjustment, click the
EEnnaabbllee
IICCMM
check box. All other features on this tab (except Intensity)
will become inactive.
8. Under
PPrriinntt TTyyppee
, select
PPhhoottoo
when printing photographs. This allows for a
wider range of tones. Set to
GGrraapphhiicc
when printing graphic images for
crisper, cleaner graphic images.
9. Select a
BBrriigghhttnneessss
setting to determine how light or dark the image will
appear when printed.
10. When done, click
OOKK
.
To print in black only, check the
GGrraayyssccaallee PPrriinnttiinngg
box. This
will convert color images to grayscale when printing, without
changing the original colors in the document.
TToo mmaannuuaallllyy aaddjjuusstt ccoolloorr sseettttiinnggss iinn MMaacc OOSS::
1. Make sure that the
SS550000
is the selected printer. (From the
AAppppllee
menu,
select
CChhoooosseerr
, then
SS550000
.)
2. From an application
FFiillee
menu, click
PPrriinntt
.
3. Click the
MMaannuuaall
print mode icon,
then click
DDeettaaiillss
.
4. Click the
CCoolloorr
icon.
5. Adjust the
CCoolloorr CCoorrrreeccttiioonn, PPrriinntt
TTyyppee, GGaammmmaa CCoorrrreeccttiioonn, CCoolloorr
BBaallaannccee
and
IInntteennssiittyy
settings for
your image.
6. When done, click
OOKK
, then
PPrriinntt
.
Advanced Print Features
1133
Page 20
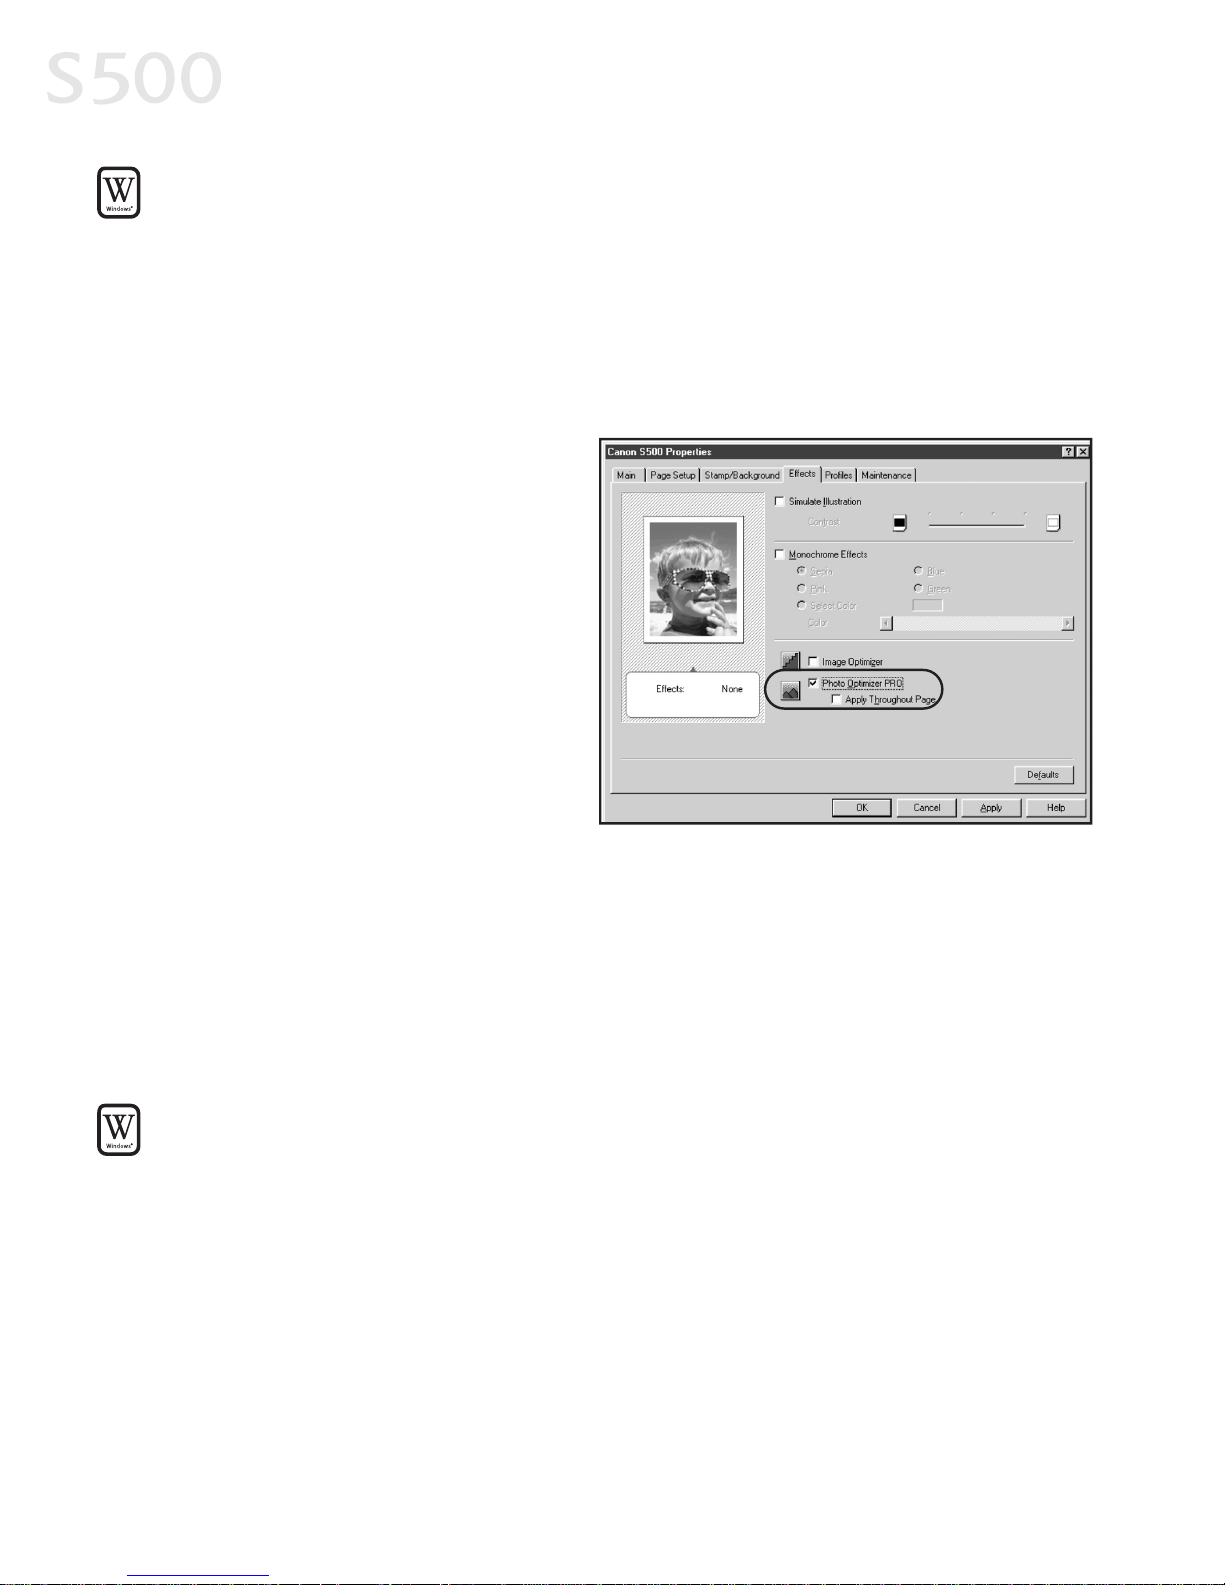
TToo aauuttoommaattiiccaallllyy ooppttiimmiizzee tthhee iimmaaggee iinn WWiinnddoowwss::
Photo Optimizer PRO automatically adjusts a photographic image created with a
digital camera. Use this feature to compensate for unsatisfactory color balance and
over- or under-exposure before printing.
1. From an application
FFiillee
menu, select
PPrriinntt
.
2. With
CCaannoonn SS550000
as the selected printer, click
PPrrooppeerrttiieess
.
3. Select the
EEffffeeccttss
tab.
4. Click to check the
PPhhoottoo
OOppttiimmiizzeerr PPRROO
check box.
When
PPhhoottoo OOppttiimmiizzeerr PPRROO
is checked, the
AAppppllyy
TThhrroouugghhoouutt PPaaggee
option
becomes active. If this box is
left unchecked, the S500 will
optimize each image
individually. If checked, all
images will be automatically
corrected with the same
settings.
5. When done, click
OOKK
.
CChhaannggiinngg tthhee PPaaggee SSeettuupp
You can change how the image is printed without affecting the original image
file.
TToo cchhaannggee ppaaggee sseettuupp iinn WWiinnddoowwss::
1. From an application
FFiillee
menu, select
PPrriinntt
.
2. With
CCaannoonn SS550000
as the selected printer, click
PPrrooppeerrttiieess
.
3. Click the
PPaaggee SSeettuupp
tab.
4. From this tab, you can change the following options:
PPaaggee SSiizzee
Defaults to the page size set in the original document, but can
be changed.
OOrriieennttaattiioonn
Lets you select either portrait or landscape orientation.
Advanced Print Features
1144
Page 21
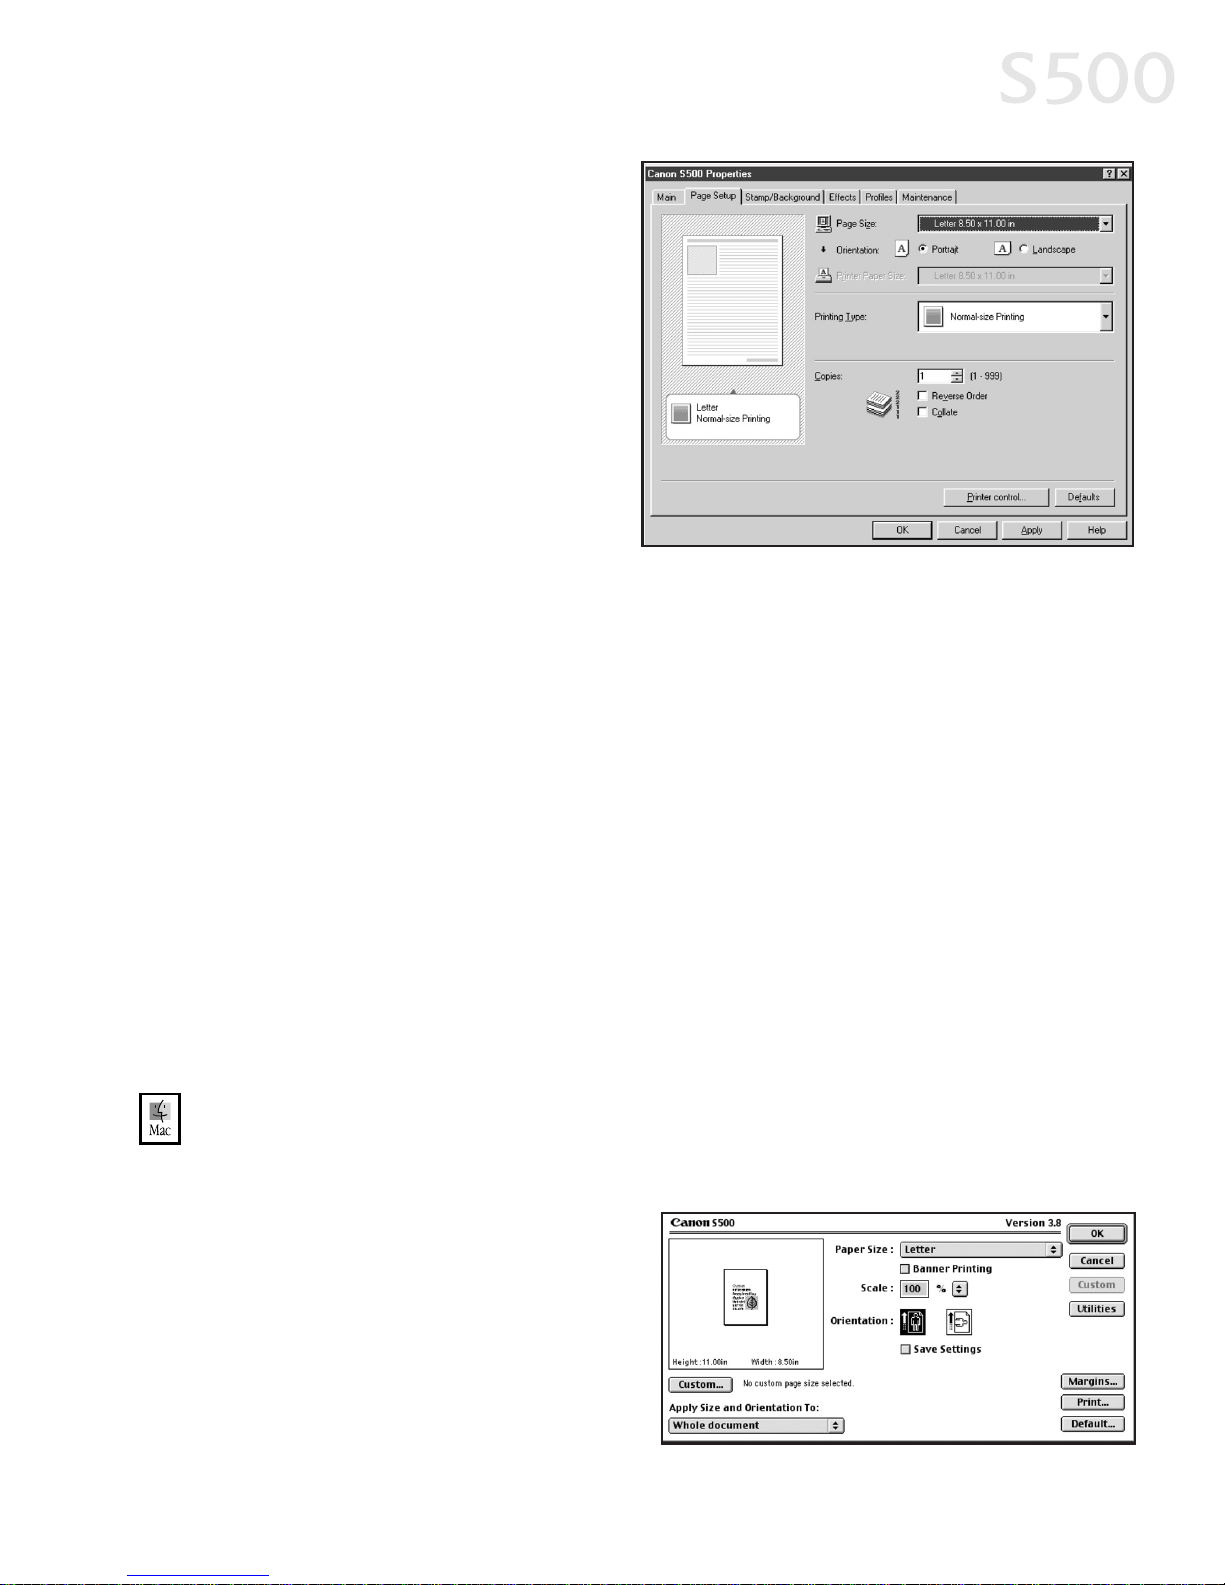
PPrriinntteerr PPaappeerr SSiizzee
The page
size used by the printer. This
defaults to match the page
size. However, a different
printer paper size can be
selected if a Printing Type
other than normal is selected
(see below).
PPrriinnttiinngg TTyyppee
Defaults to
Normal-size Printing. Click the
drop-down arrow to select a
different
PPrriinnttiinngg TTyyppee
:
SSccaalleedd PPrriinnttiinngg
With this option you can set the scale of the printed
image down to 20% or up to 400% of the original.
PPaaggee LLaayyoouutt PPrriinnttiinngg
Lets you set the number of pages to print on a
single sheet. Click
SSppeecciiffyy
to set the number of pages to a sheet of
paper (1 to 16), the print order for those pages (left to right or right to
left) and whether you want to print a border around each page.
PPoosstteerr PPrriinnttiinngg
Lets you print an oversized image on multiple pages that
can then be manually joined together. Click
SSppeecciiffyy
to set the image
divisions (how many tiles the image will break up into).
BBaannnneerr PPrriinnttiinngg
Used for printing banners on special banner paper.
5. When done, click
OOKK
.
For more feature descriptions, see the S500 User’s Guide on the Setup Software
& User’s Guide CD-ROM or access the online help.
TToo cchhaannggee ppaaggee sseettuupp iinn MMaacc OOSS::
1. Make sure that
SS550000
is the selected printer (from the
AAppppllee
menu, select
CChhoooosseerr
, then
SS550000
).
2. From an application
FFiillee
menu,
click
PPaaggee SSeettuupp
. The Page
Setup dialog box will open.
3. From this dialog box, you can
change the following:
Advanced Print Features
1155
Page 22
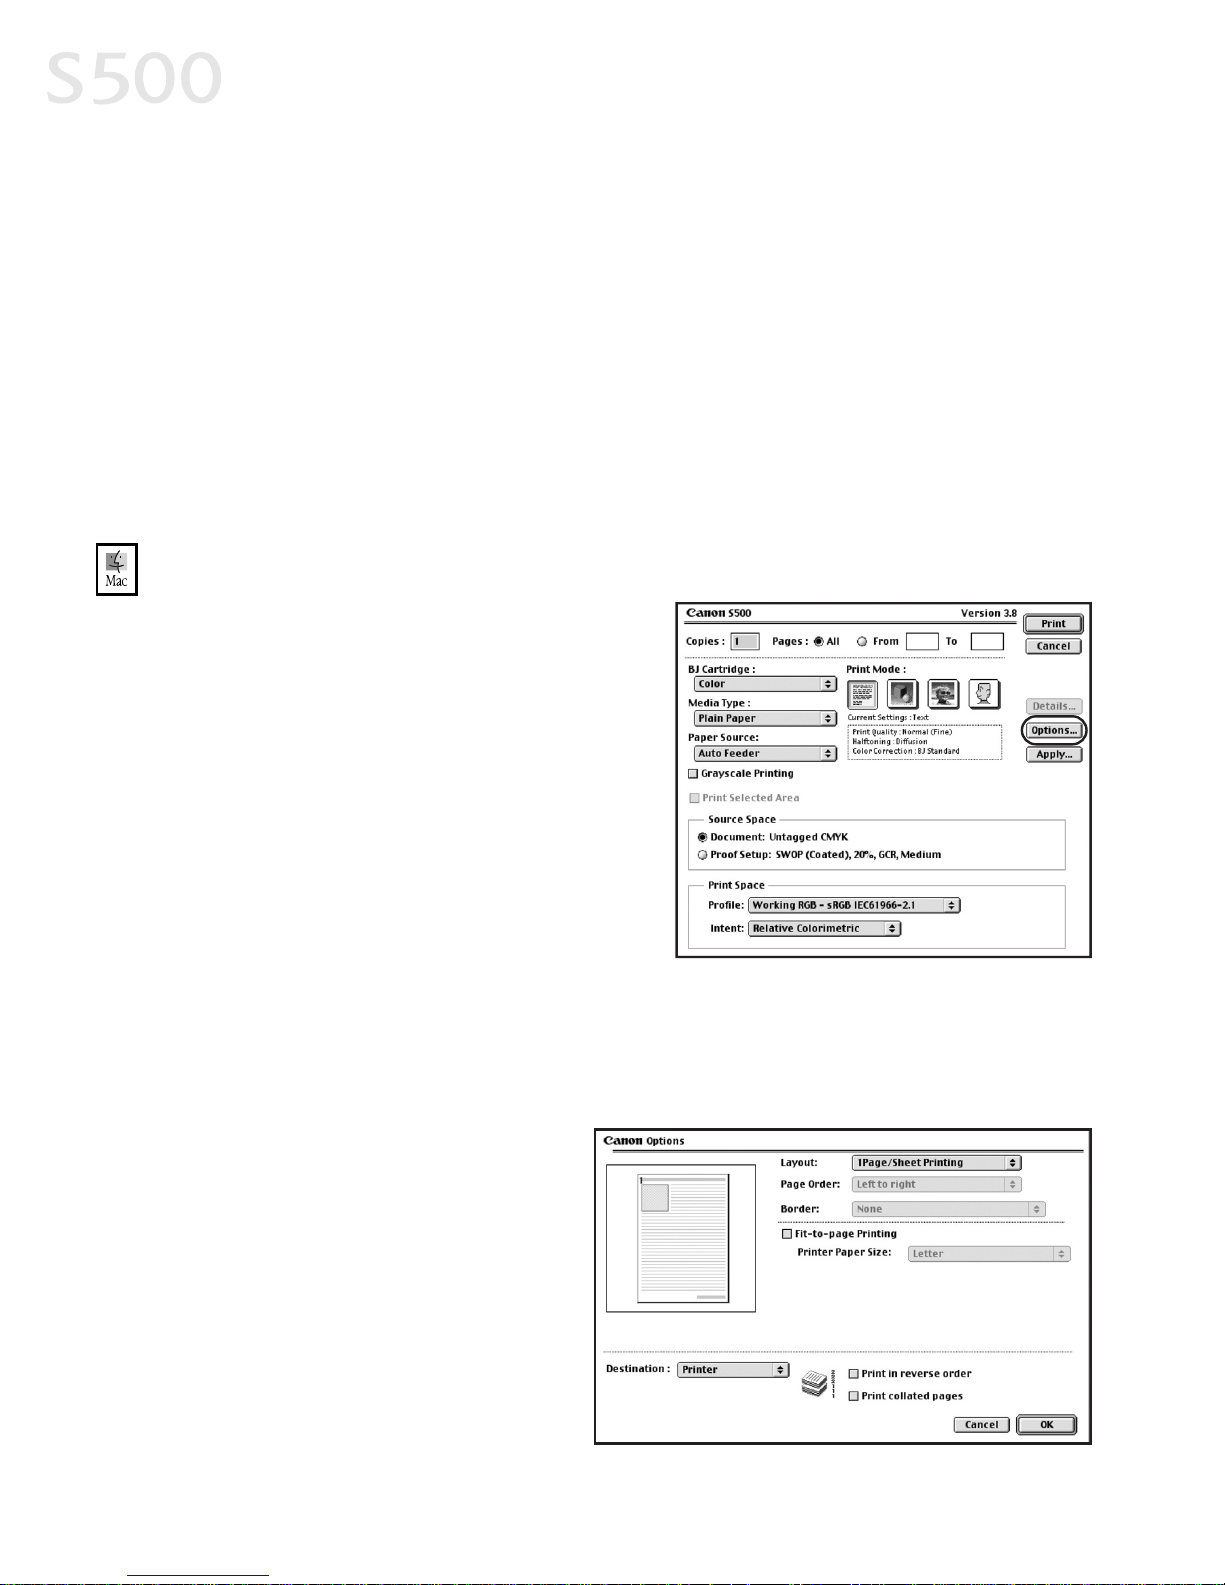
• Select a paper size from the
PPaappeerr SSiizzee
drop-down list. (If printing a
banner, click to check the
BBaannnneerr PPrriinnttiinngg
check box, then follow the on-
screen instructions.)
• Set a
SSccaallee
percentage value between 50% and 200% to print the image
in a size different from the original document.
• Click an
OOrriieennttaattiioonn
icon to change the page orientation.
4. To save these settings for the next print job, click the
SSaavvee SSeettttiinnggss
check
box.
5. When done, click
PPrriinntt
.
TToo cchhaannggee ppaaggee llaayyoouutt aanndd pprriinntt oorrddeerr iinn MMaacc OOSS::
1. Make sure that
SS550000
is the selected
printer (from the
AAppppllee
menu, select
CChhoooosseerr
, then
SS550000
).
2. From an application
FFiillee
menu, click
PPrriinntt
. The Print window will appear.
3. Click
OOppttiioonnss
. The Options dialog
box will open.
4. From the Options dialog box, you can
enter or change the following:
• To print in reverse order, check
the
PPrriinntt iinn rreevveerrssee oorrddeerr
box.
• If you are printing more than one copy, check the
PPrriinntt ccoollllaatteedd ppaaggeess
box to collate each copy instead of printing all of page 1, then all of page
2, etc.
• Under
LLaayyoouutt
, click the
drop-down arrow to
change the number of
pages to print on a sheet
(1 Page up to 16 Page).
• If the page layout is other
than 1 Page, you can
select a different
PPaaggee
OOrrddeerr
specific to the
selected page layout.
Advanced Print Features
1166
Page 23
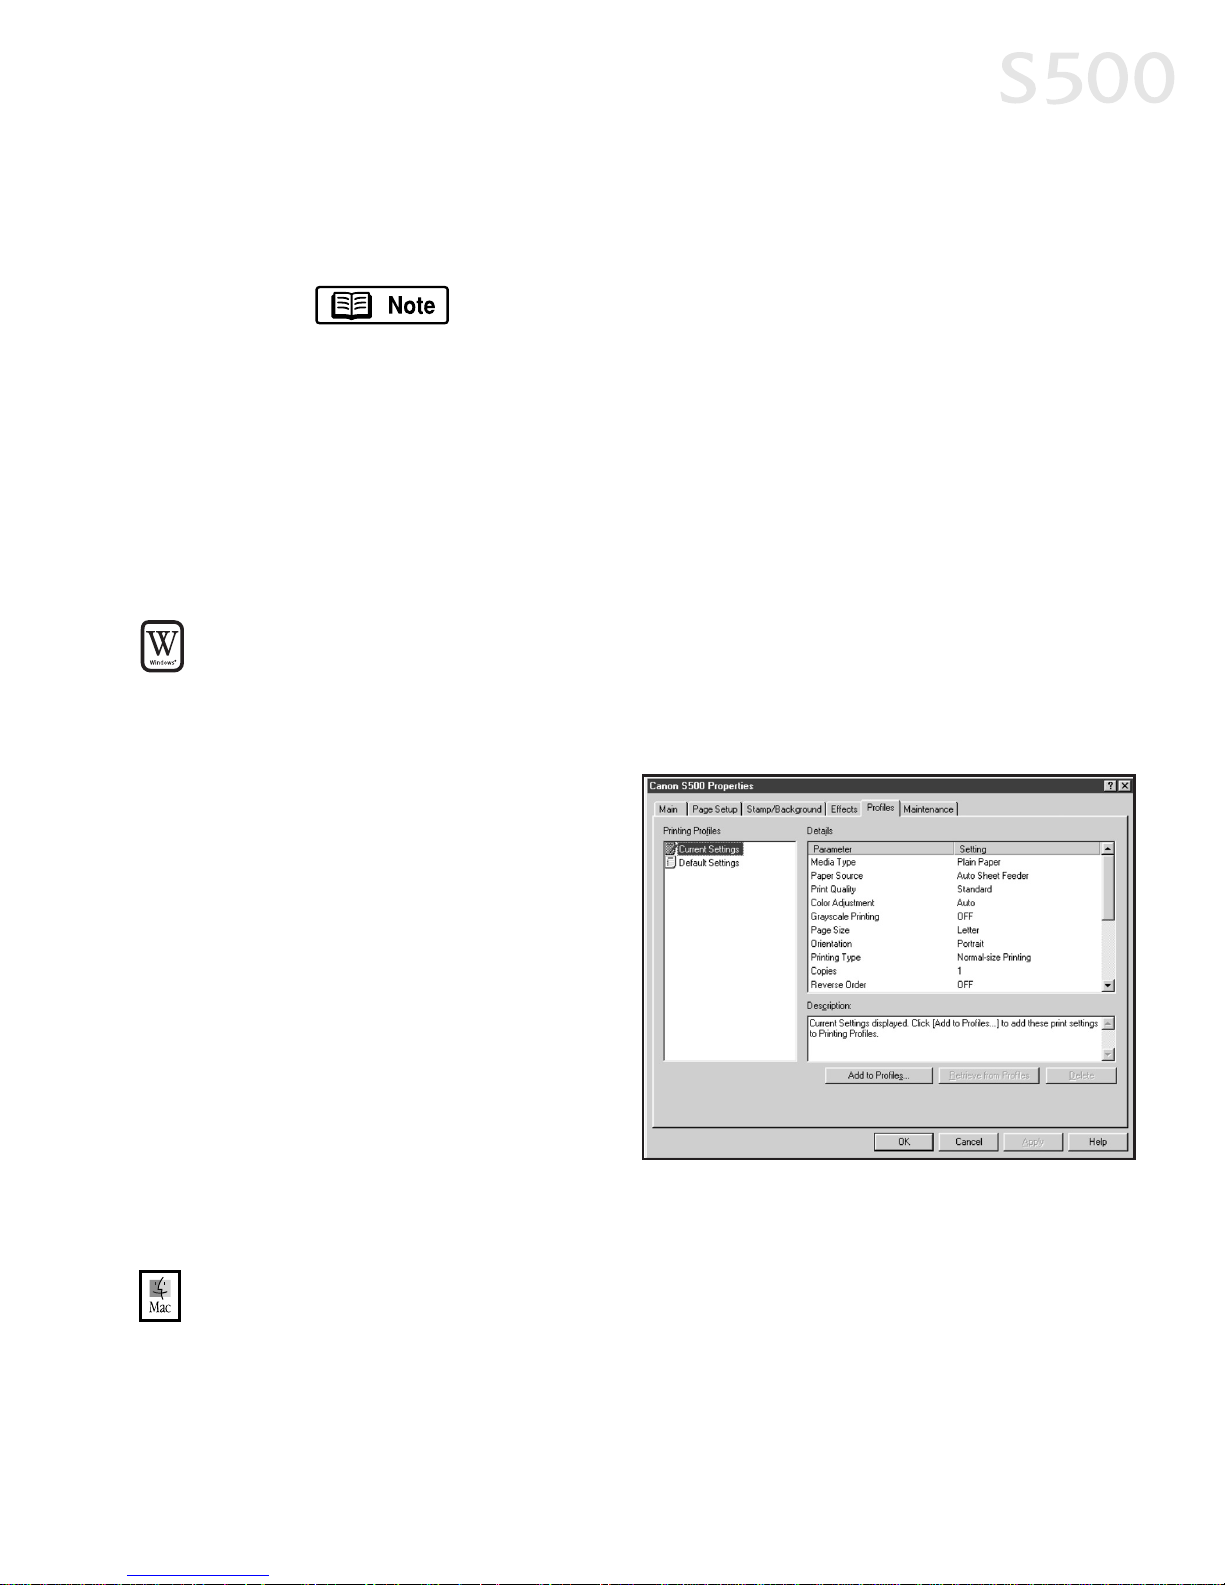
• If the page layout is other than 1 Page/Sheet Printing, you can also
select whether to print a
BBoorrddeerr
around each page.
5. When done, click
OOKK
, then
PPrriinntt
.
For more information on printer driver features, see the
S500 User’s Guide on the Setup Software & User’s Guide
CD-ROM, or use the Mac Bubble Help.
SSaavviinngg aanndd RReeccaalllliinngg DDrriivveerr SSeettttiinnggss
When you change printer driver settings for a specific print job, such as printing
black and white photos, or printing documents with a special background, you
can save and name these settings for future use on other similar print jobs.
TToo ssaavvee ddrriivveerr sseettttiinnggss iinn WWiinnddoowwss::
1. From an application
FFiillee
menu, select
PPrriinntt
.
2. With
CCaannoonn SS550000
as the selected printer, click
PPrrooppeerrttiieess
.
3. Make the desired printer
driver setting changes.
4. Without exiting the Properties
window, select the
PPrrooffiilleess
tab.
5. Click
AAdddd ttoo PPrrooffiilleess
, then
type a name for your settings
in the
NNaammee
field. You can
also select an icon for this
profile.
6. Type a description of your
settings.
7. Click
SSaavvee
.
TToo ssaavvee ddrriivveerr sseettttiinnggss iinn MMaacc OOSS::
1. From an application
FFiillee
menu, select
PPrriinntt
. The Print window will appear.
2. Make the desired printer driver setting changes.
3. From the Print window, click
AAppppllyy
. The Register Settings dialog will open.
Advanced Print Features
1177
Page 24
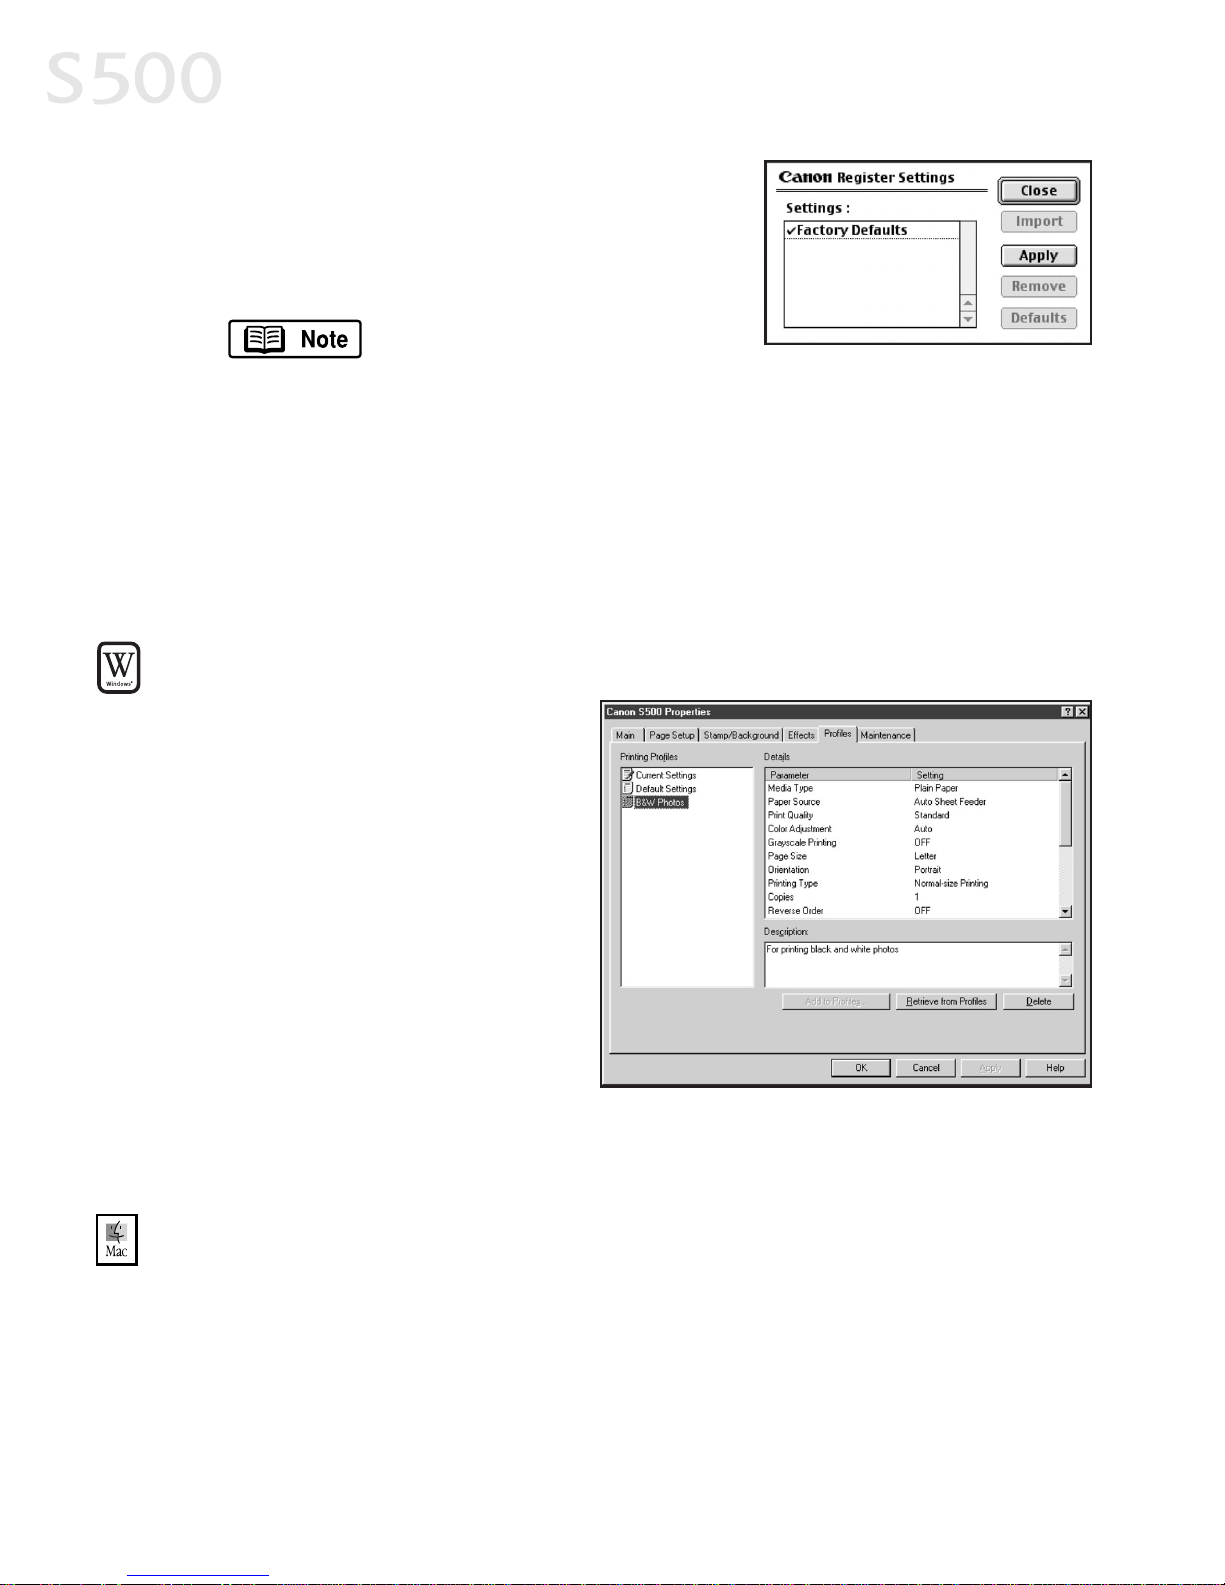
4. Click
AAppppllyy
again, then type a name for the
settings.
5. Click
OOKK
. The Register Settings window will
reappear.
To save the new settings as
your default settings for the
Manual icon, click the name in the
SSeettttiinnggss
list, then click
DDeeffaauulltt
.
See the S500 User’s Guide on the Setup Software & User’s
Guide CD-ROM for instructions on removing manual settings
and restoring default settings.
6. When done, click
CClloossee
.
TToo rreettrriieevvee aa ssaavveedd sseettttiinngg pprrooffiillee iinn WWiinnddoowwss::
1. From an application
FFiillee
menu, select
PPrriinntt
.
2. With
CCaannoonn SS550000
as the
selected printer, click
PPrrooppeerrttiieess
.
3. Select the
PPrrooffiilleess
tab.
4. Highlight the saved setting
profile you want to use.
5. Click
RReettrriieevvee ffrroomm PPrrooffiilleess
,
then click
OOKK
to confirm the
profile change. The profile
settings will become active.
6. Click
OOKK
again to close the window.
TToo rreeccaallll ddrriivveerr sseettttiinnggss iinn MMaacc OOSS::
1. From an application
FFiillee
menu, select
PPrriinntt
.
2. Click
AAppppllyy
, then select the name of your saved settings.
3. Click
DDeeffaauullttss
, then
OOKK
.
4. Click
IImmppoorrtt
, then
CClloossee
.
Advanced Print Features
1188
Page 25
CChhaapptteerr 33:: PPrriinnttiinngg
MMaaiinntteennaannccee
MMoonniittoorriinngg IInnkk LLeevveellss
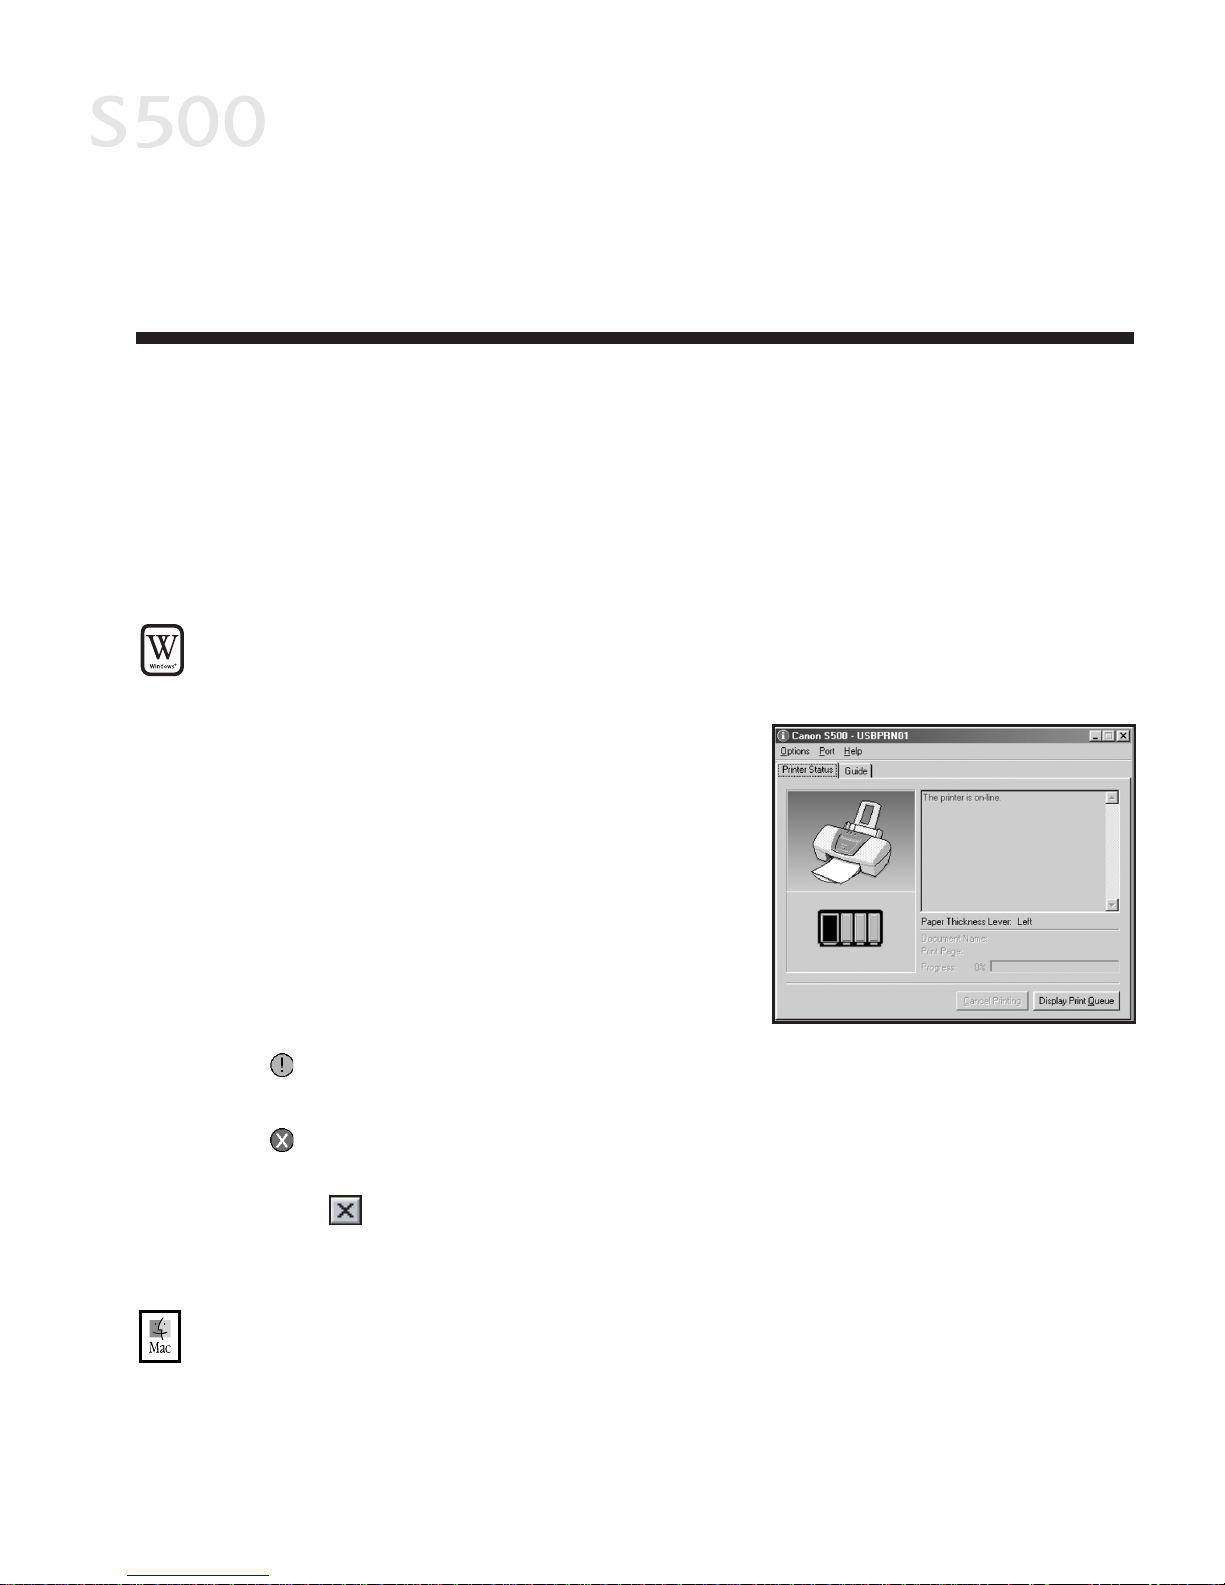
The print driver allows you to monitor the level of ink in each ink tank.
TToo cchheecckk iinnkk lleevveellss iinn WWiinnddoowwss::
1. With the printer on, click
SSttaarrtt
, then
SSeettttiinnggss
, then
PPrriinntteerrss
.
2. Right-click the
CCaannoonn SS550000
icon, then
select
PPrrooppeerrttiieess
.
3. Select the
MMaaiinntteennaannccee
tab, then click
SSttaarrtt SSttaattuuss MMoonniittoorr
. The Canon S500
Status Monitor window will appear.
The Ink panel displays the ink levels for
each tank.
The following icons appear when an ink
tank is low or has run out of ink:
Ink low. Replace ink tank as
soon as possible.
Ink out. Replace ink tank
immediately.
4. Click on the top right of the window to close the Status Monitor, then
click
OOKK
to close the Properties window.
TToo cchheecckk iinnkk lleevveellss iinn MMaacc OOSS::
The S500 Print Monitor can display ink levels when they are running low if you
have enabled backgrounding printing in the Choose option. See the S500 User’s
1199
Page 26
Printing Maintenance
2200
Guide on the Setup Software and User’s Guide CD-ROM for more information
about this feature.
By default,
BBaacckkggrroouunnddiinnggisOOffff
.
RReeppllaacciinngg IInnkk TTaannkkss
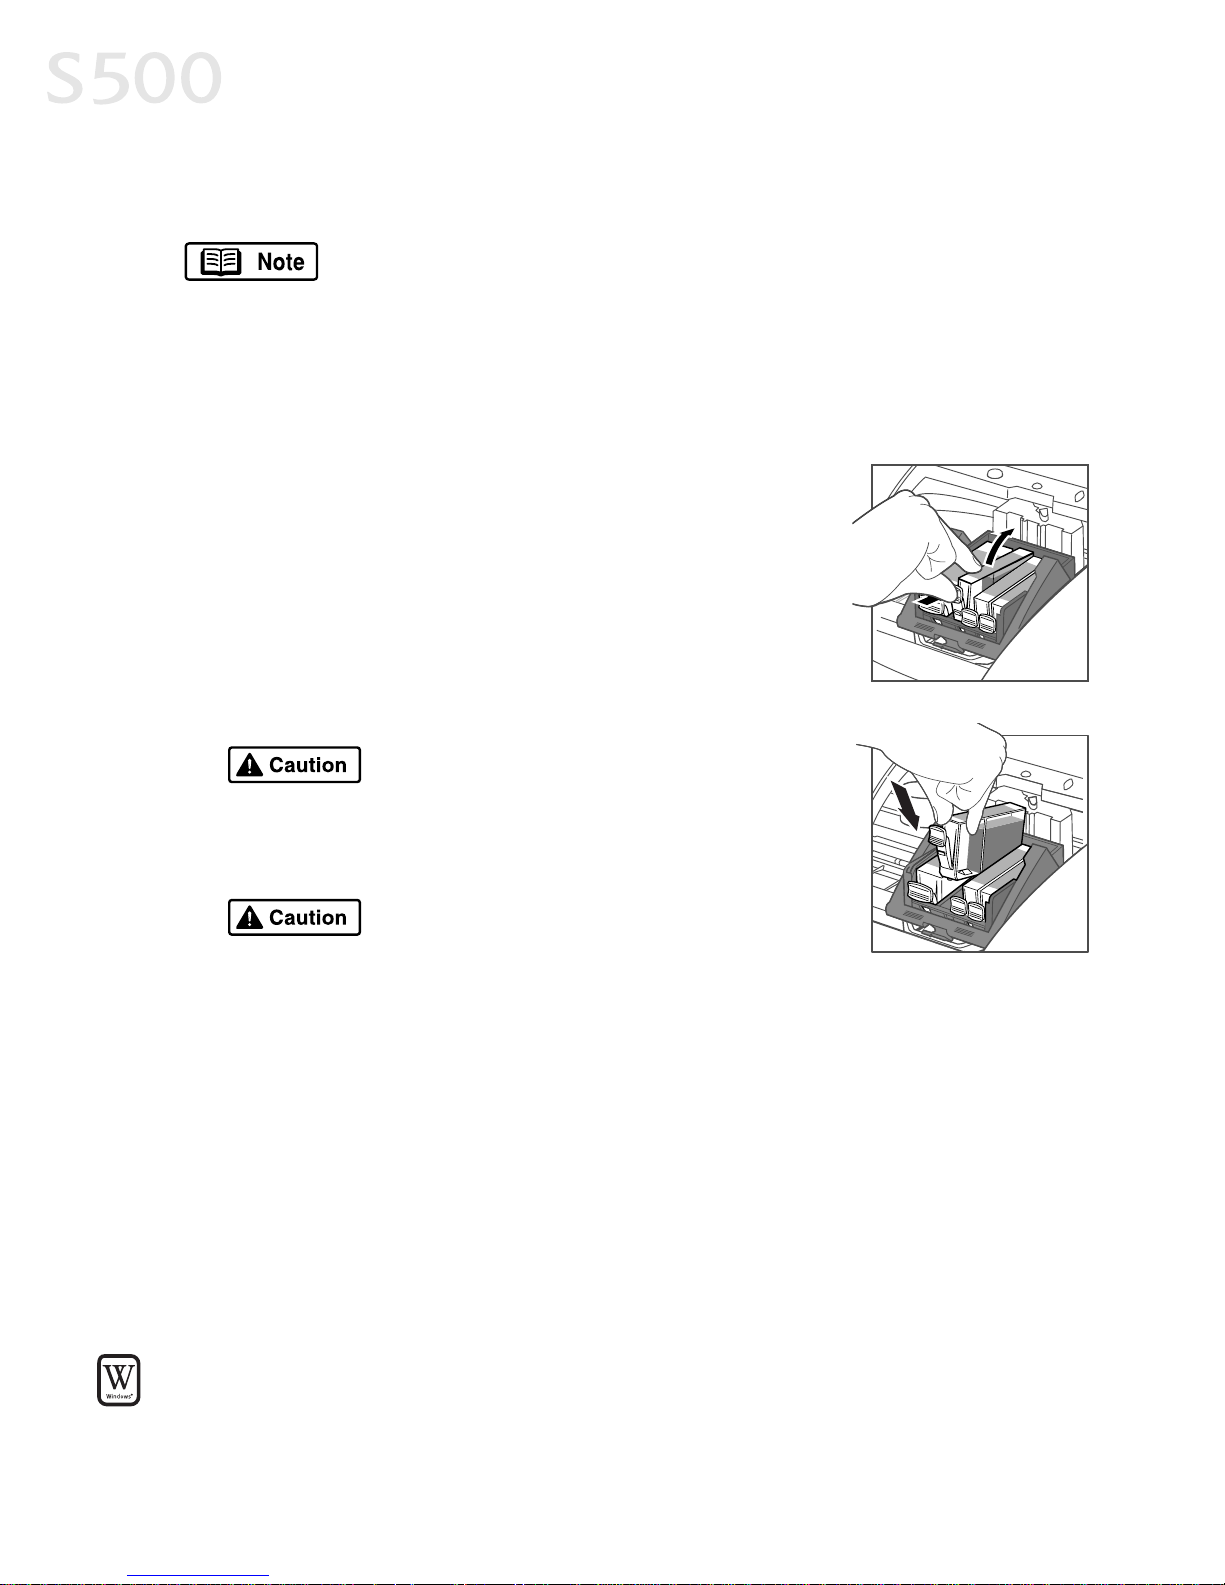
TToo rreeppllaaccee aann eemmppttyy iinnkk ttaannkk::
1. With the printer on, open the front cover. The
printhead holder will automatically move to the
center.
2. Press the tab on the front of the empty ink tank,
then remove and discard the empty tank.
3. Remove the new ink tank from its package. Pull the
orange tape up, remove the wrapper and twist off
the orange protective cap.
To avoid spilling ink, never press on
the sides of an ink tank.
4. Holding the new ink tank at a slight angle, align it
with the correct color slot, then gently insert it.
Do not force an ink tank into the
printhead. If the ink tank does not go
in smoothly, realign it, then try again.
5. Press down on the ink tank until it clicks into place.
6. Close the front cover.
PPrriinnttiinngg aa NNoozzzzllee CChheecckk PPaatttteerrnn
The printhead discharges ink through nozzles—tiny openings from which the ink
is sprayed. If faded or streaked colors and text appear on your output when you
print, some of the nozzles may be clogged. You can check for this problem by
printing a nozzle check pattern.
TToo pprriinntt aa nnoozzzzllee cchheecckk ppaatttteerrnn iinn WWiinnddoowwss::
1. Make sure the printer is on and paper loaded.
Page 27
2. Click
SSttaarrtt
, then
SSeettttiinnggss
, then
PPrriinntteerrss
.
3. Right-click the
CCaannoonn SS550000
printer icon, then select
PPrrooppeerrttiieess
.
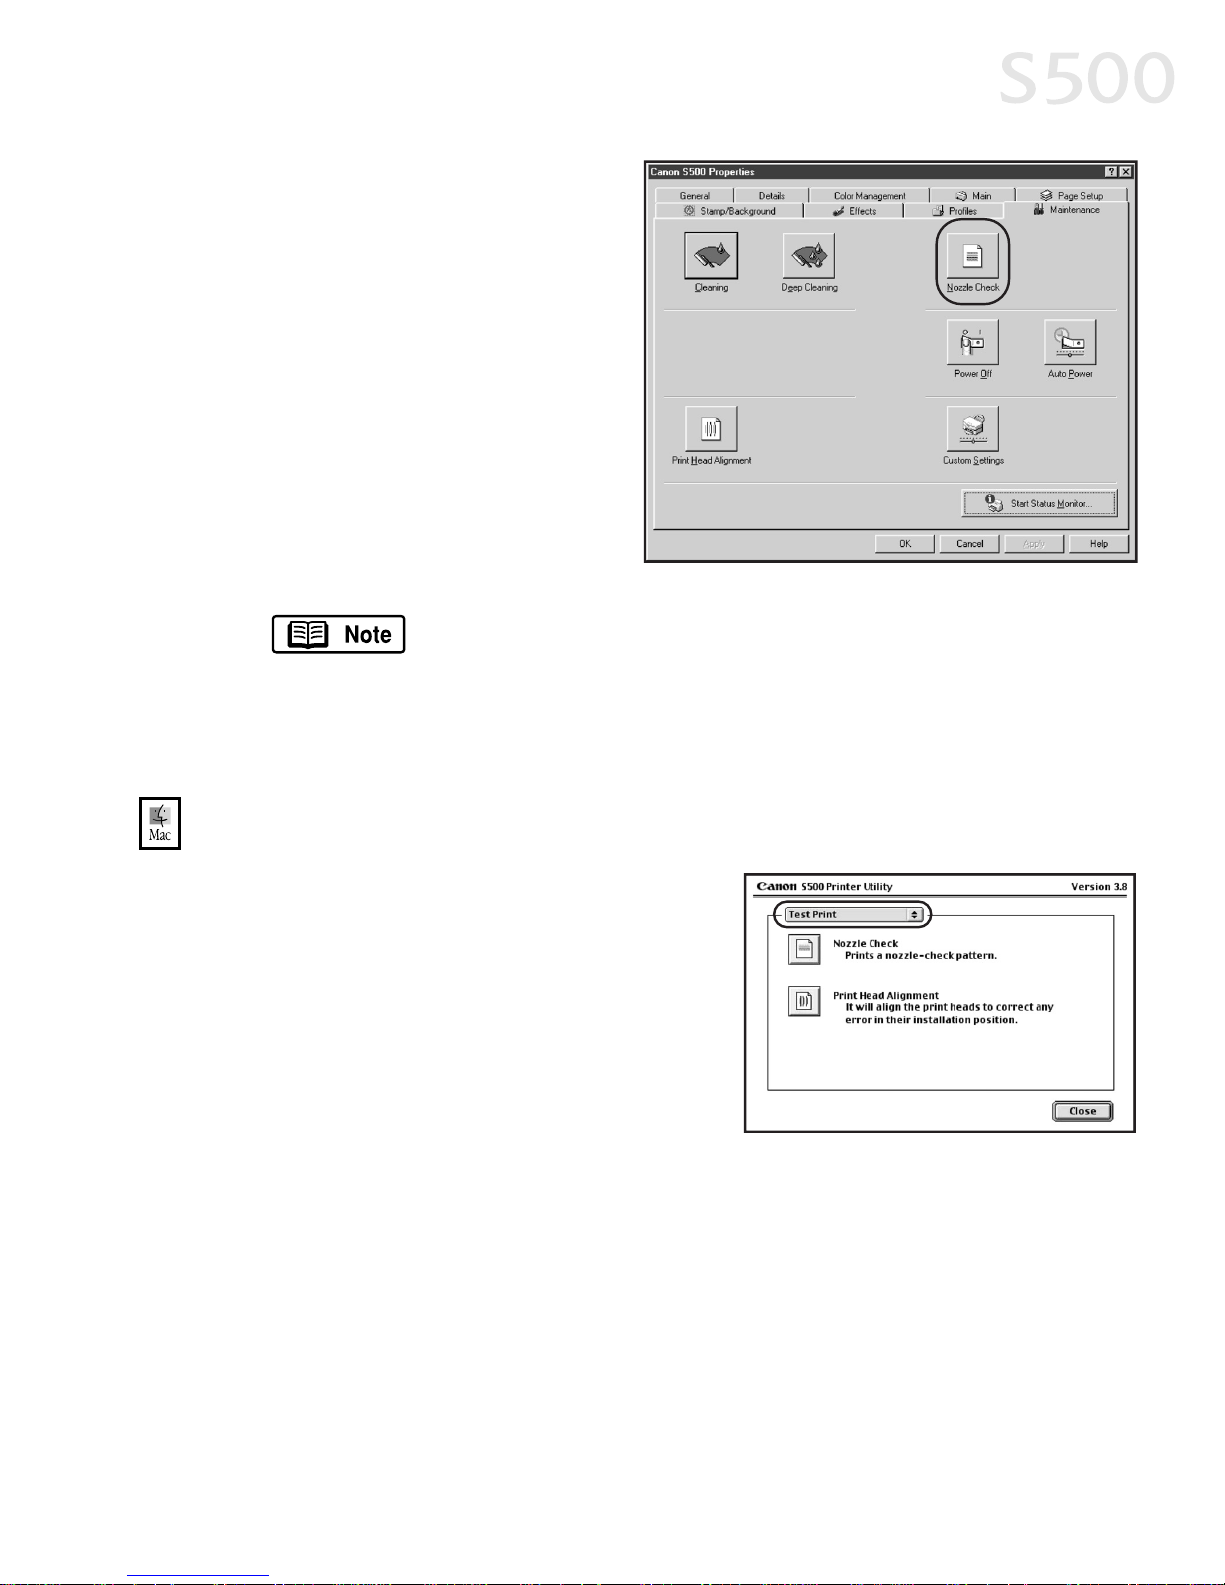
4. Click the
MMaaiinntteennaannccee
tab,
then click the
NNoozzzzllee CChheecckk
button.
5. Click
OOKK
to start the nozzle
test. The nozzle test pattern
will print.
The Maintenance tab may vary for Windows NT 4.0 and
Windows 2000.
6. Check the printed nozzle check pattern. If part of the top pattern is missing,
see “Cleaning the Printhead” on page 22 for procedures.
TToo pprriinntt aa nnoozzzzllee cchheecckk ppaatttteerrnn iinn MMaacc OOSS::
1. Make sure the printer is on and paper
loaded.
2. In a software application, click
FFiillee
,
then
PPaaggee SSeettuupp
.
3. Click
UUttiilliittiieess
. The Canon S500 Printer
Utility window will appear.
4. Select
TTeesstt PPrriinntt
from the drop-down
menu.
5. Click the
NNoozzzzllee CChheecckk
button. When
prompted, click
OOKK
. The nozzle test pattern will print.
6. When done, click
CClloossee
.
7. Check the printed nozzle check pattern. If part of the top pattern is missing,
see “Cleaning the Printhead” on page 22 for procedures.
Printing Maintenance
2211
Page 28
CClleeaanniinngg tthhee PPrriinntthheeaadd
If your printed output appears faded, streaked or scratchy, the printhead may
need to be cleaned or aligned. See the S500 User’s Guide on the Setup
Software & User’s Guide CD-ROM for additional corrective actions.
Printhead cleaning consumes ink. Avoid unnecessary cleaning.
TToo cclleeaann tthhee pprriinntthheeaadd iinn
WWiinnddoowwss::
1. With the printer on, click
SSttaarrtt
, then
SSeettttiinnggss
, then
PPrriinntteerrss
.
2. Right-click the
CCaannoonn SS550000
printer icon, then select
PPrrooppeerrttiieess
.
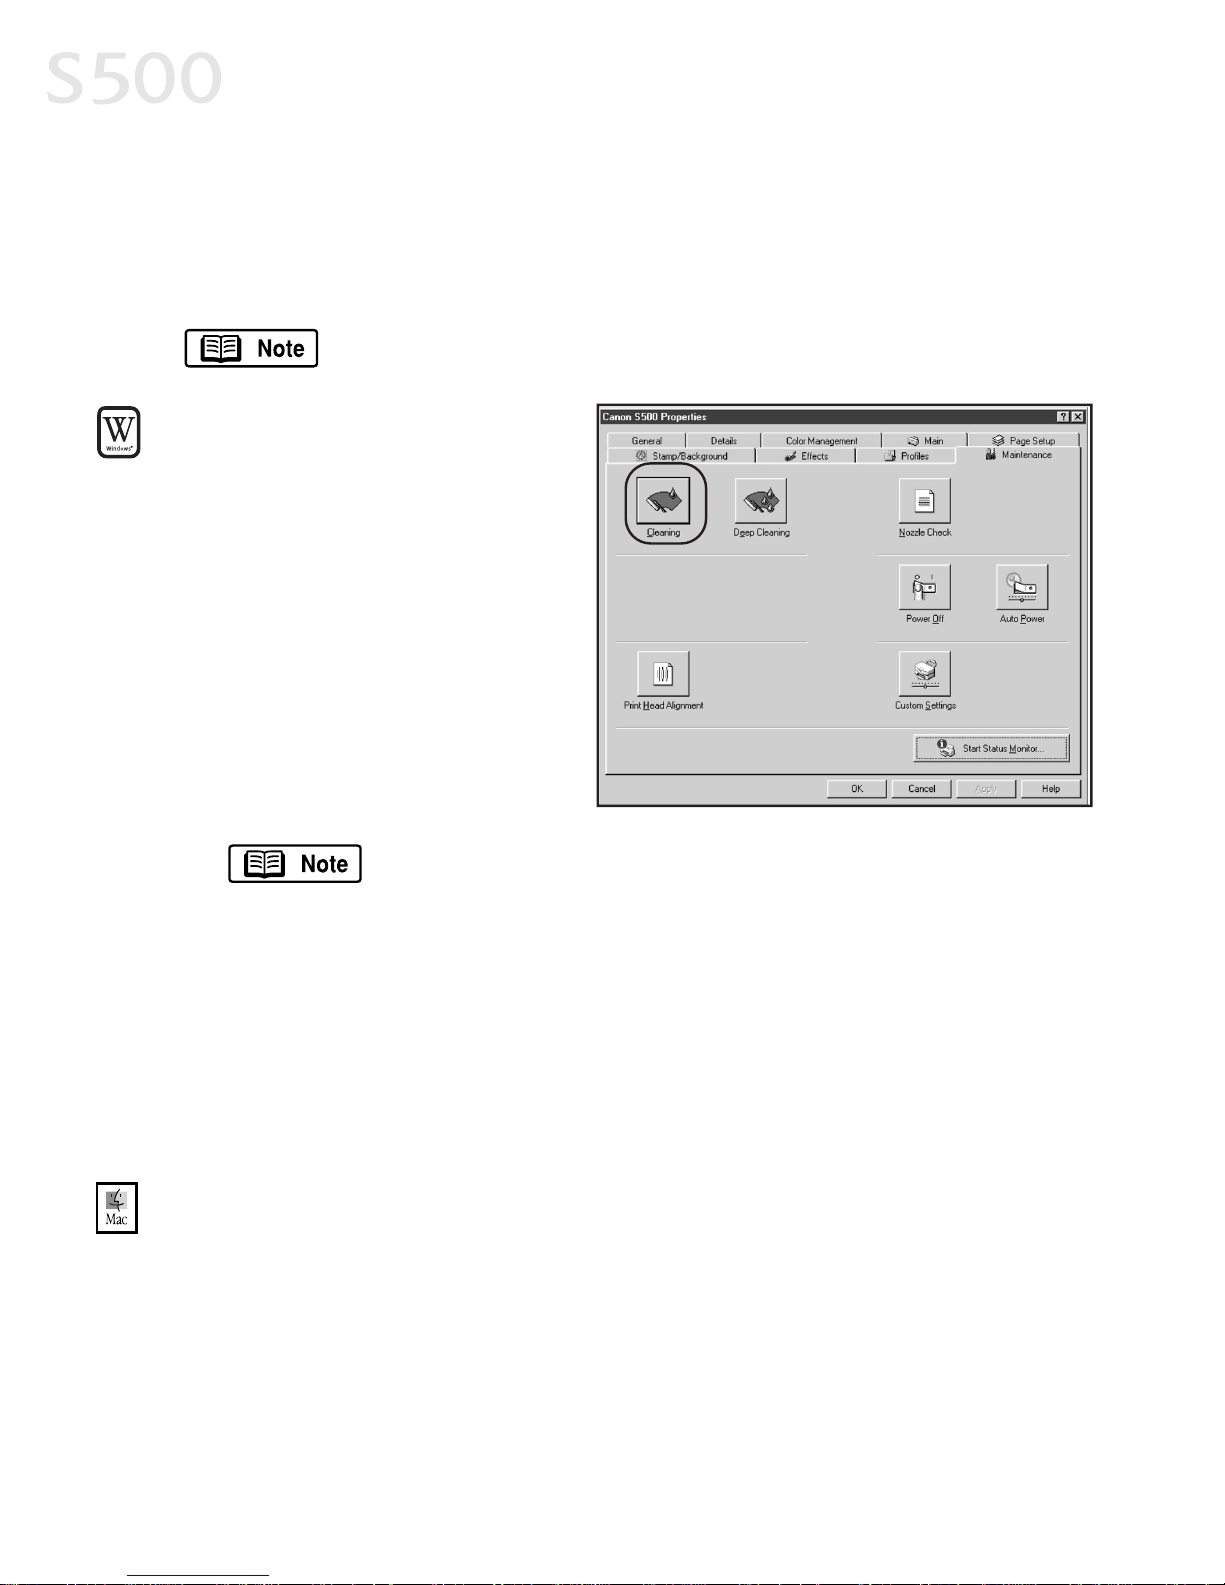
3. Click the
MMaaiinntteennaannccee
tab,
then click the
CClleeaanniinngg
button. The printer will clean
the printhead.
The Maintenance tab and procedures may vary for Windows NT
4.0 and Windows 2000. Follow the instructions when
prompted.
4. Click
OOKK
to close the window.
5. After the cleaning, print a nozzle check pattern to check the results. See
“Printing a Nozzle Check Pattern” on page 20.
6. If there is no change after cleaning, check the amount of ink remaining. If an
ink tank is empty, replace it. See “Monitoring Ink Levels” on page 19.
TToo cclleeaann tthhee pprriinntthheeaadd iinn MMaacc OOSS::
1. Make sure the printer is on.
2. In a software application, click
FFiillee
, then
PPaaggee SSeettuupp
.
3. Click
UUttiilliittiieess
. The Canon S500 Printer Utility window will appear.
4. Click the
CClleeaanniinngg
button.
Printing Maintenance
2222
Page 29
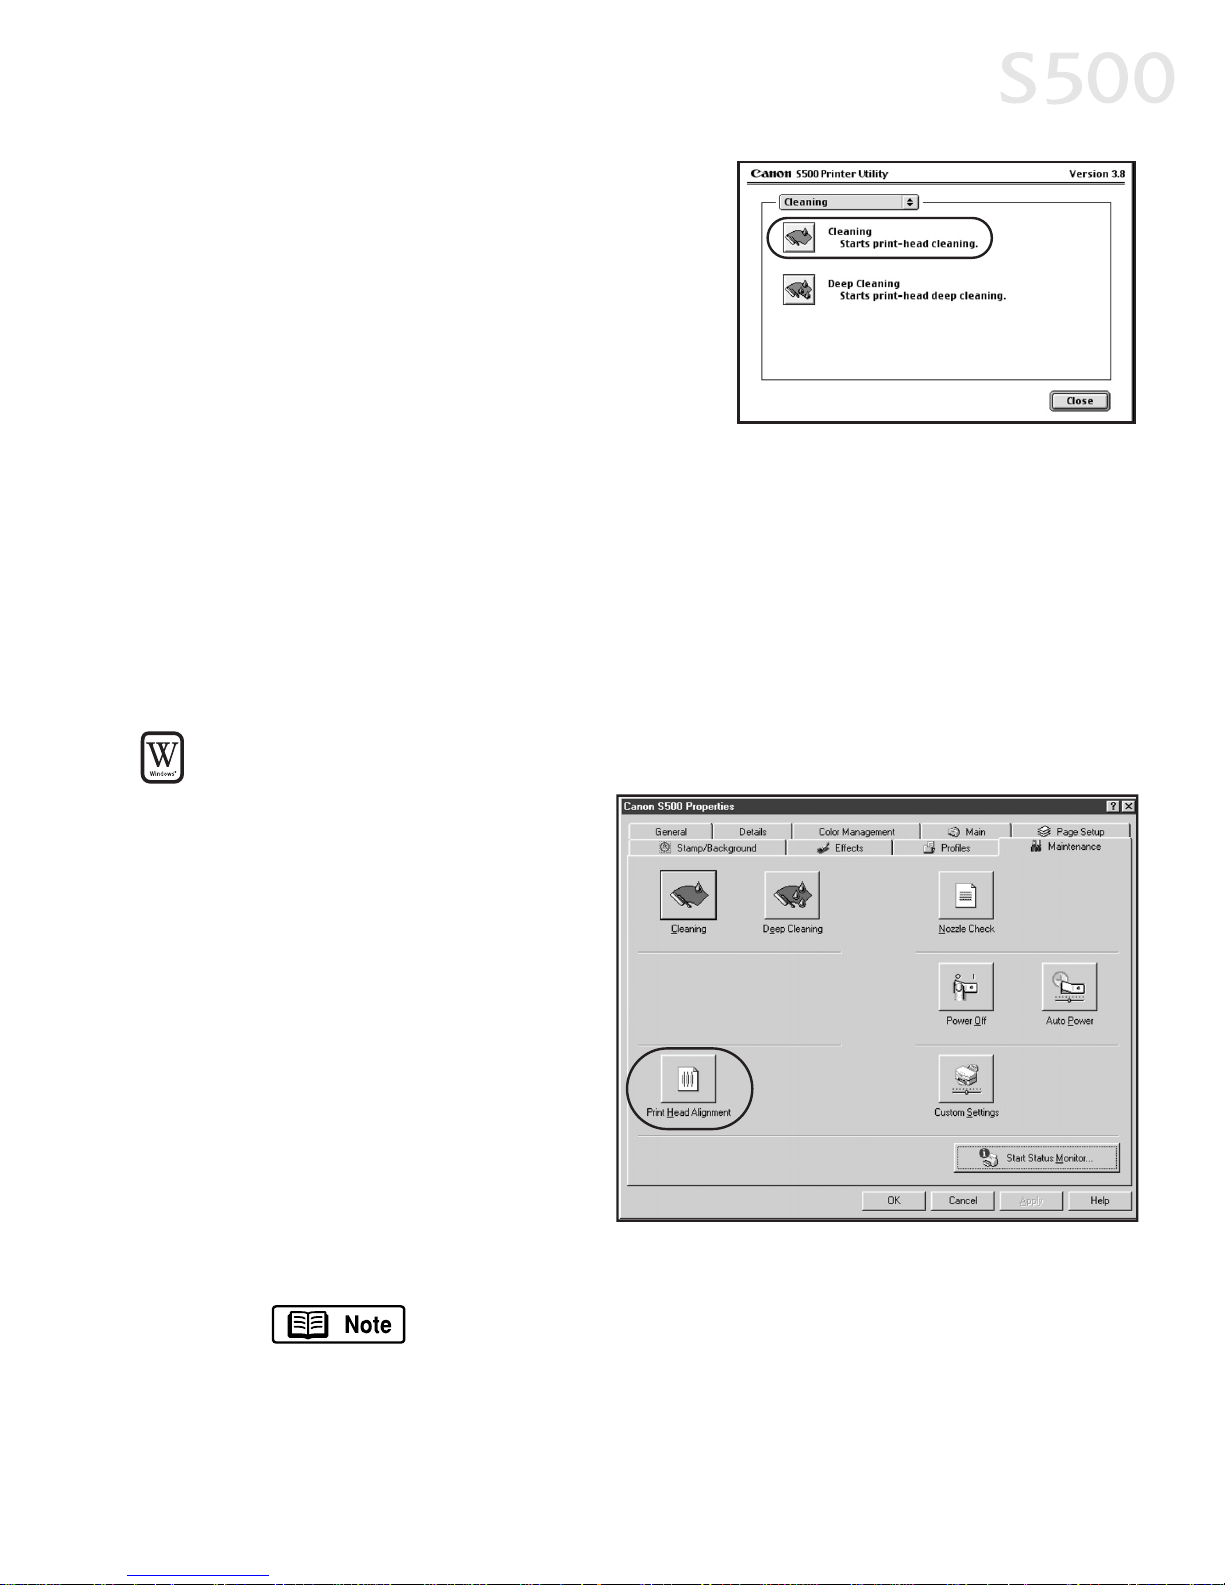
5. Select the colors to be cleaned, then
click
OOKK
. The printer will clean the
printhead.
6. When done, click
CClloossee
.
7. After the cleaning, print a nozzle check
pattern to check the results. See
“Printing a Nozzle Check Pattern” on
page 20.
8. If there is no change after cleaning, check the amount of ink remaining. If an
ink tank is empty, replace it. See “Monitoring Ink Levels” on page 19.
AAlliiggnniinngg tthhee PPrriinntthheeaadd
Sometimes printed output can be faded or unclear because the printhead needs
to be aligned.
TToo aalliiggnn tthhee pprriinntthheeaadd iinn WWiinnddoowwss::
1. Make sure the printer is on
and paper loaded.
2. Click
SSttaarrtt
, then
SSeettttiinnggss
,
then
PPrriinntteerrss
.
3. Right-click the
CCaannoonn SS550000
printer icon, then select
PPrrooppeerrttiieess
.
4. Click the
MMaaiinntteennaannccee
tab,
then click the
PPrriinntt HHeeaadd
AAlliiggnnmmeenntt
button.
5. When asked to start
printhead alignment,
click
OOKK
.
6. Follow the on-screen instructions to complete printhead alignment.
The Maintenance tab and procedures may vary for Windows NT
4.0 and Windows 2000. Follow the instructions when
prompted.
7. When printhead alignment is complete, click
OOKK
to close the window.
Printing Maintenance
2233
Page 30
TToo aalliiggnn tthhee pprriinntthheeaadd iinn MMaacc OOSS::
1. Make sure the printer is on and paper loaded.
2. From the
FFiillee
menu in a software application, click
PPaaggee SSeettuupp
.
3. Click the
UUttiilliittiieess
button.
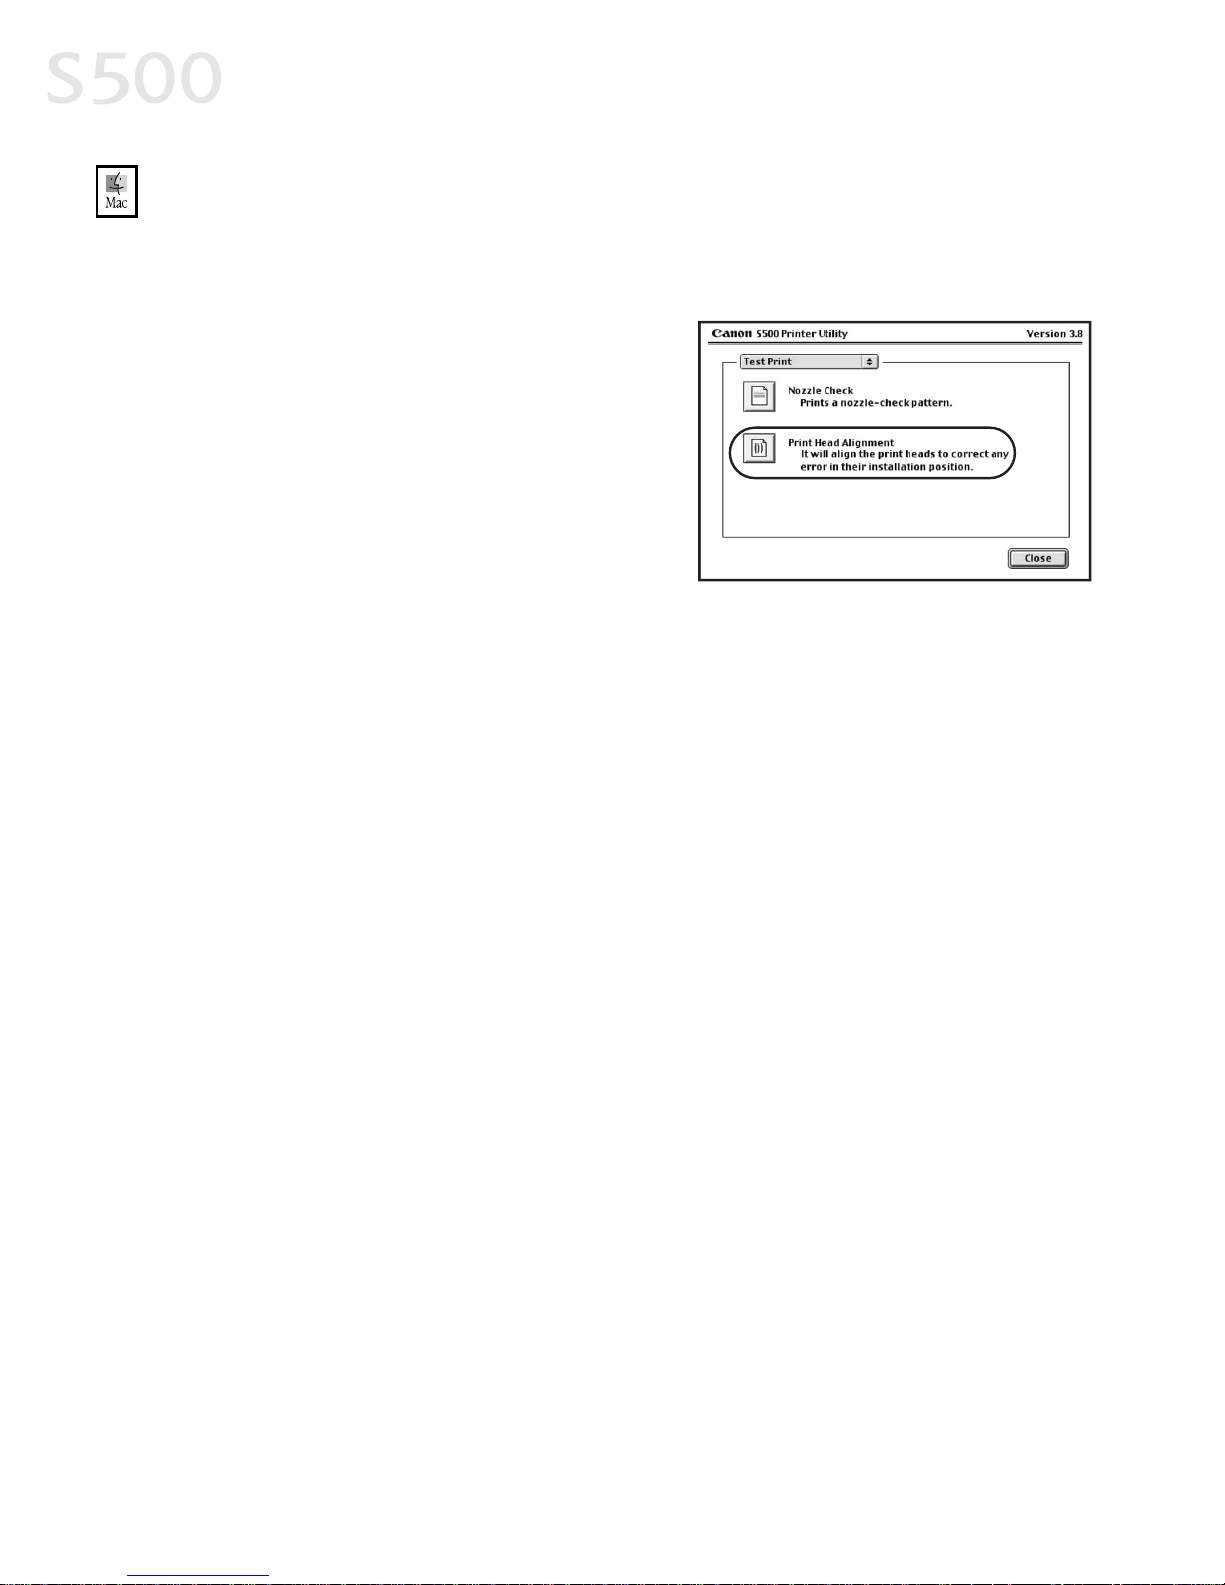
4. Click the down-arrow to select
TTeesstt
PPrriinntt
.
5. Click the
PPrriinntt HHeeaadd AAlliiggnnmmeenntt
icon.
6. Follow the on-screen instructions to
complete printhead alignment.
7. After each printhead alignment pattern
check, click
SSeenndd
.
8. When printhead alignment is complete, click
CClloossee
.
Printing Maintenance
2244
Page 31
CChhaapptteerr 44::
TTrroouubblleesshhoooottiinngg
TTiippss ffoorr TTrroouubblleesshhoooottiinngg
Troubleshooting usually falls into one of the following categories:
IInnssttaallllaattiioonn
The printer driver will not install properly.
PPrriinntteerr HHaarrddwwaarree
The printer is not working or not working as expected.
PPrriinntteedd OOuuttppuutt
The printed output is not coming out as expected.
EErrrroorr MMeessssaaggee
You are getting an error message from the software (displayed
on the screen) or the printer (indicated by a flashing lamp).
CCuussttoommeerr CCaarree CCeenntteerr
Canon offers a full range of customer technical support options.
If you encounter difficulties during installation or operation of your Canon S500
printer, quickly scan all topics until you find a description that approximates
your difficulty. Go through the related solutions until you find one that works.
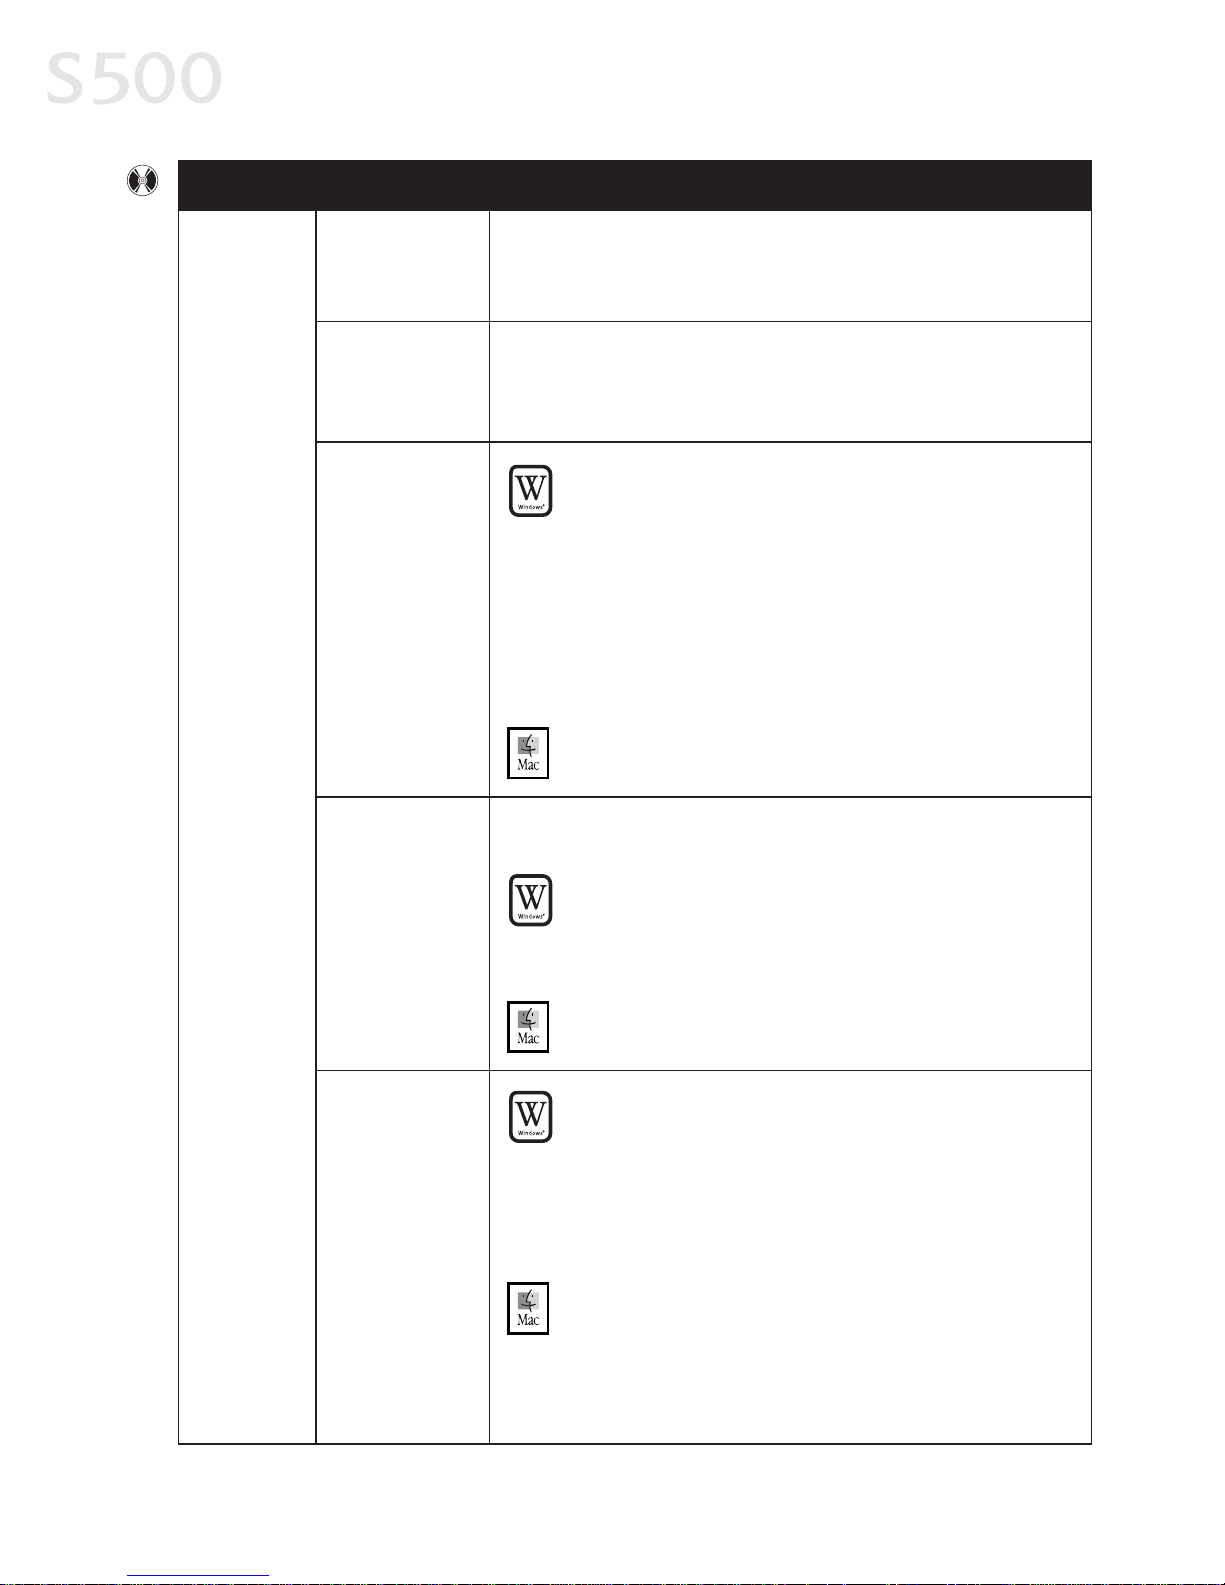
TTrroouubblleesshhoooottiinngg IInnssttaallllaattiioonn
Try ThisPossible CauseProblem
Cannot
install the
printer driver
Procedure not
followed correctly
See “Installing the Printer Driver” on page 41.
2255
Page 32
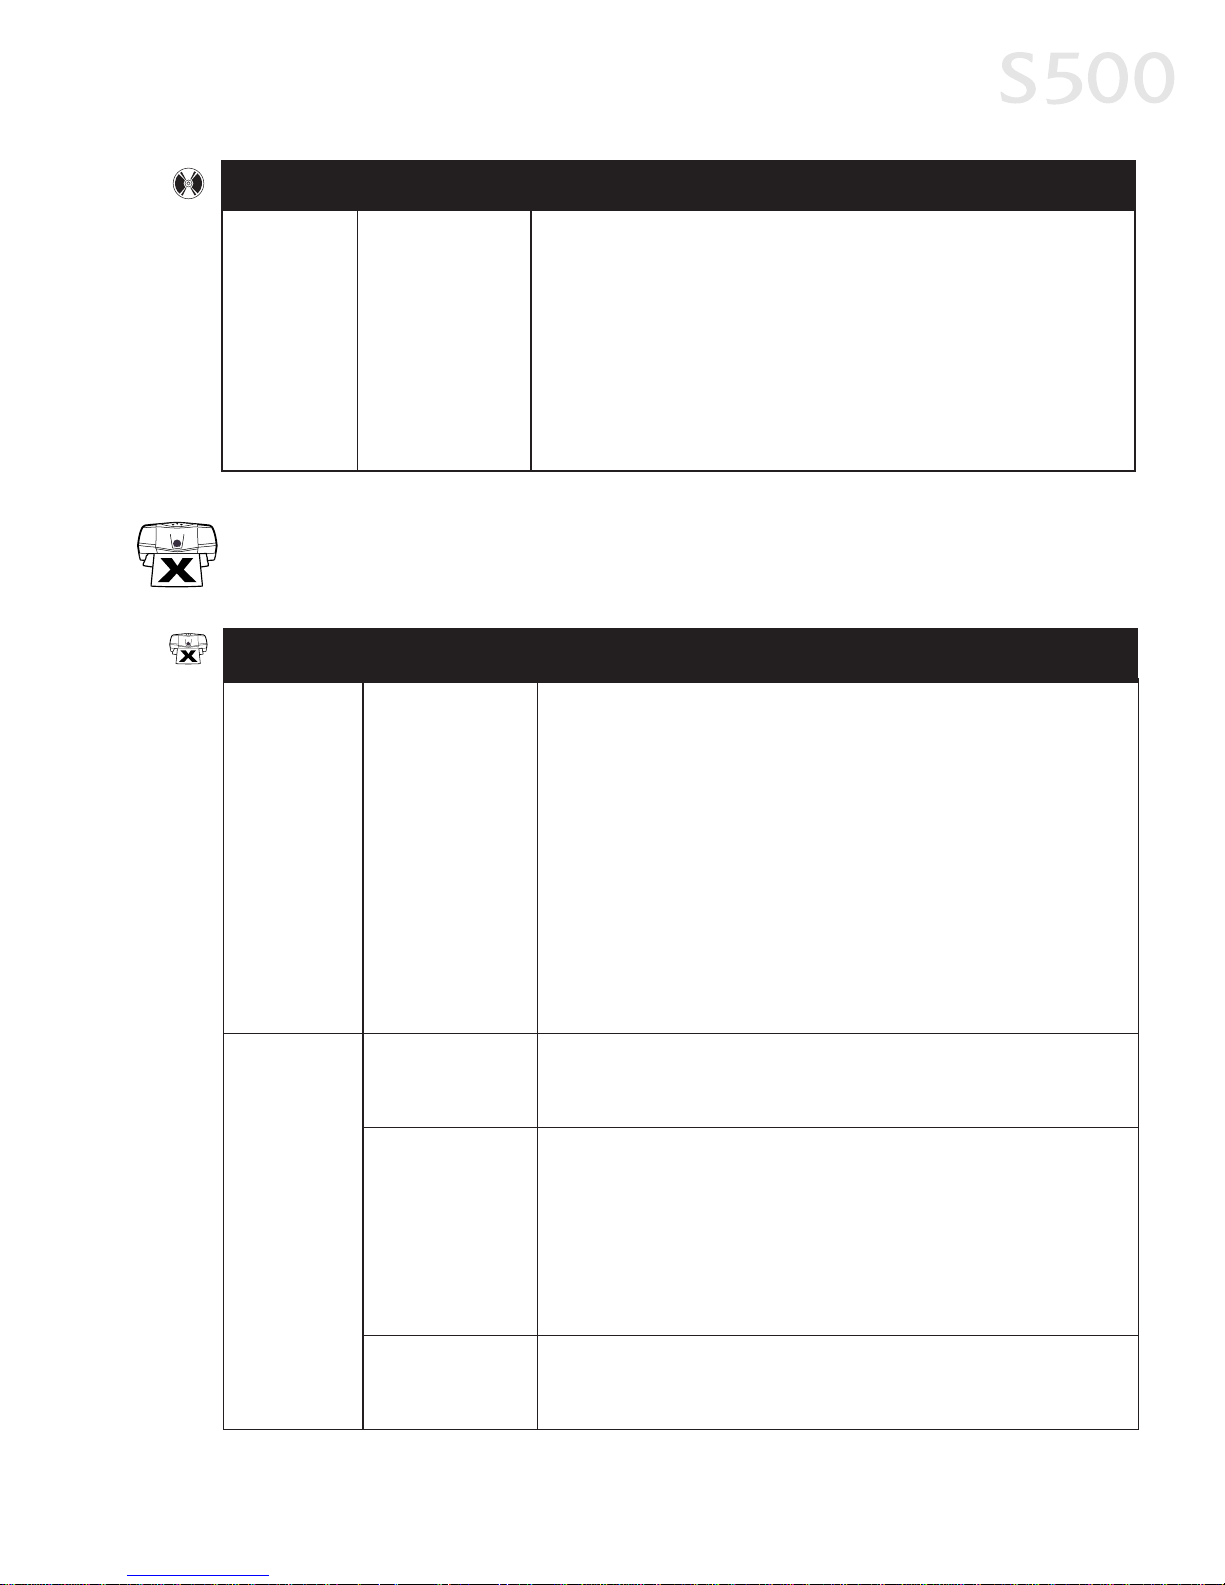
Troubleshooting
Problem Possible Cause Try This
Always uninstall the previous version of the printer driver before
installing the new version. See “Uninstalling the Printer Driver” on
page 43.
Previous or same
printer driver
version already
installed
Other
applications
running in the
background
Other open applications on your computer can interfere with the
installation routine. Close all open software applications before
reinstalling the printer driver. See “Installing the Printer Driver” on
page 41.
Installation not
starting
automatically
when CD is
inserted into
drive
WW
IINNDDOOWWSS
If printer driver installation did not start automatically when
you loaded the CD-ROM:
1. Double-click
MMyy CCoommppuutteerr
on the Windows desktop, then
double-click the
CCDD--RROOMM ddrriivvee
.
2. Double-click
mmsseettuupp..eexxee
.
If you install the printer driver by clicking
SSttaarrtt
, then
RRuunn
,
specify the correct CD-ROM drive and file name
(
xx::\\mmsseettuupp..eexxee
, where
xx
is the CD-ROM drive).
MM
AACC
OOSS
Double-click the
CCDD--RROOMM
icon on your desktop.
CD-ROM drive not
specified
Normally, after you insert the S500 CD-ROM, the setup window
displays automatically. If it does not:
WW
IINNDDOOWWSS
1. Double-click
MMyy CCoommppuutteerr
on the Windows desktop, then
double-click the
CCDD--RROOMM ddrriivvee
.
2. Double-click
mmsseettuupp..eexxee
.
MM
AACC
OOSS
Double-click the
CCDD--RROOMM
icon on your desktop.
CD-ROM drive not
working properly
WW
IINNDDOOWWSS
Use Windows Explorer to confirm that the CD-ROM is operating
normally:
1. From the desktop, double-click
MMyy CCoommppuutteerr
, then
CCDD--RROOMM
.
2. If the files do not appear, refer to your Windows
documentation for more information.
MM
AACC
OOSS
Open the
AAppppllee SSyysstteemm PPrrooffiilleerr
, click
DDeevviicceess
and
VVoolluummeess
,
then open the CD-ROM.
Cannot
install the
printer driver
(continued)
2266
Page 33
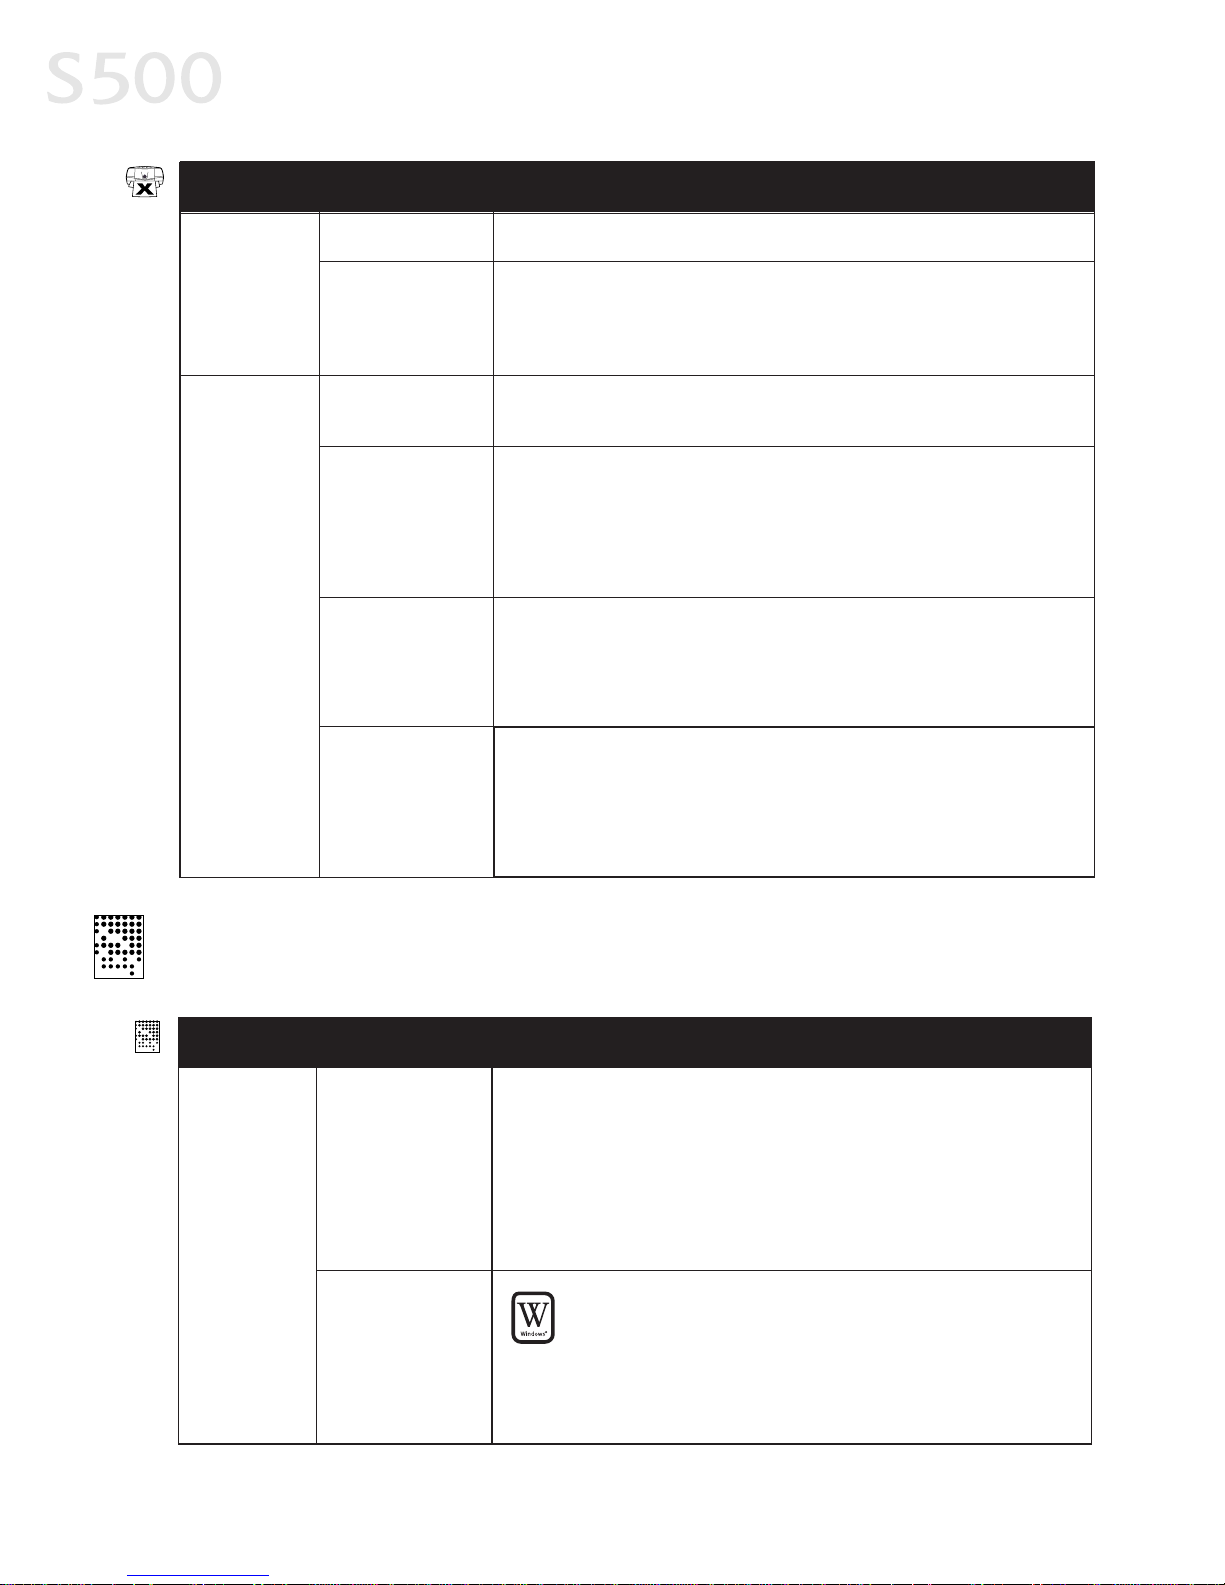
Troubleshooting
2277
Possible Cause
Problem
Try This
Cannot
install the
printer driver
(continued)
Computer cannot
detect a printer
port
Verify that the correct cable (USB or parallel) is connected to both
your printer and your computer, and that the connection is secure.
Verify that the computer is turned on and the POWER lamp is a steady
(non-flashing) green.
If this does not solve the problem, exit the installation procedure,
turn off the printer, restart the computer and reinstall the software.
The installer will prompt you when to turn the printer back on.
Problem Possible Cause Try This
Paper jams in
the printer
Media jammed
during paper feed
1. Gently pull the jammed paper out of the paper output tray or the
paper rest, whichever is easier.
If the paper tears and some is left in the printer, turn the printer
off, open the front cover, and remove the pieces. If you cannot
reach or remove the torn paper, do not attempt to disassemble the
printer yourself. Contact the Customer Care Center.
2. Reload paper into the paper rest, then press the RESUME/CANCEL
button on the printer.
You will need to reprint the page that jammed.
If you turn the printer off, your print job data will be lost. Print the job
again.
Use a standard paper size whenever possible to prevent jams.
Printer is not
responding
Power cord not
securely
connected
Verify that the power cord is securely connected to the printer and
plugged into a working outlet.
Printer is not set
as default, is not
turned on, or is
not ready
Verify that the Canon S500 printer is the default printer.
Verify that the printer is on. If the POWER lamp is off, press the
POWER button. The lamp will flash green as the printer warms up,
then go to a steady (no flash) green when the printer is ready.
Flashing green can also indicate the printer is processing a print job.
If the POWER lamp flashes orange, or green and orange alternately,
see “Handling Error Messages” on page 30.
Printer/computer
incorrectly
connected
Reconnect the printer cable to the correct port, with the correct cable.
TTrroouubblleesshhoooottiinngg PPrriinntteerr HHaarrddwwaarree
Page 34
Troubleshooting
2288
Printer is not
responding
(continued)
Problem Possible Cause Try This
Bad cable Replace the printer cable.
Computer and/or
printer needs to
be reset
Reboot the computer and/or reset the printer.
1. To reboot the computer, close all open applications, then restart.
2. To reset the printer, turn it off, then on again.
Ink tanks are not
seated properly
Printer tried
to print but
no ink on
paper
Check the ink tanks, and reseat them if necessary. See “Replacing Ink
Tanks” on page 20.
Printhead
clogged
Verify that the printhead is working properly. See “Printing a Nozzle
Check Pattern” on page 20 or “Cleaning the Printhead” on page 22.
If necessary, perform multiple printhead cleanings. If print quality
does not improve, try deep cleaning. Perform printhead deep
cleaning from the printer driver.
Ink tanks may
need to be
replaced
Verify that you have sufficient ink in the ink tanks. See “Monitoring
Ink Levels” on page 19.
If necessary, replace the ink tanks. See “Replacing Ink Tanks” on
page 20.
Printhead may
need to be
replaced
Verify that the printhead is working properly. See “Printing a Nozzle
Check Pattern” on page 20 or “Cleaning the Printhead” on page 22.
If necessary, perform multiple printhead cleanings. See “Cleaning the
Printhead” on page 22. If the printhead is still not working properly,
contact the Customer Care Center.
Problem
Possible Cause Try This
Printed
colors are
incorrect
One or more ink
tanks installed in
the wrong
position
Verify that each ink tank is lined up with the correct color label in
the printhead. For more information, see “Replacing InkTanks” on
page 20.
If ink tanks were placed in the incorrect color slots in the printhead,
after switching the tanks to their correct slots, perform at least two
printhead cleanings to remove the incorrect residual colors from the
printhead. For procedures, see “Cleaning the Printhead” on page 22.
Incorrect Color
Adjustment
setting
WW
IINNDDOOWWSS
1. On the
MMaaiinn
tab of the S500 Properties window, confirm
that Color Adjustment is set to
AAuuttoo
.
2. If
MMaannuuaall
is set, click the
DDeeffaauullttss
button on the Manual
Color Adjustment window.
TTrroouubblleesshhoooottiinngg PPrriinntteedd OOuuttppuutt
Page 35
Troubleshooting
2299
Try ThisProblem Possible Cause
Printed
colors are
incorrect
(continued)
Print Mode is
improperly set
MM
AACC
OOSS
In the Print dialog box, select the appropriate
PPrriinntt MMooddee
setting.
Incorrect media
type
WW
IINNDDOOWWSS
On the
MMaaiinn
tab of the S500 Properties window, confirm that
the
MMeeddiiaa TTyyppee
selected matches the paper loaded.
MM
AACC
OOSS
In the Print dialog box, confirm that the
MMeeddiiaa TTyyppee
selected
matches the paper loaded.
Print Quality is
improperly set
WW
IINNDDOOWWSS
On the
MMaaiinn
tab of the S500 Properties window, select the
appropriate Print Quality setting:
HHiigghh, SSttaannddaarrdd, DDrraafftt
or
CCuussttoomm
.
MM
AACC
OOSS
In the
PPrriinntt
dialog box, select the
MMaannuuaall
icon, then click the
DDeettaaiillss
button. In the Detailed Setting window, slide the
PPrriinntt
QQuuaalliittyy
bar to select your preferred output quality.
Printed
output is
faded or
unclear
Media not loaded
print side up
Check that your media is placed in the printer facing in the correct
direction. See “Loading Paper and Other Media” on page 4.
Low ink Verify that you have sufficient ink in the ink tanks. See “Monitoring
Ink Levels” on page 19.
Verify that the printhead is working properly. See “Printing a Nozzle
Check Pattern” on page 20 and “Cleaning the Printhead” on page 22.
If necessary, perform multiple printhead cleanings. See the S500
User’s Guide on the Setup Software & User’s Guide CD-ROM for more
information.
Printhead nozzles
clogged or
damaged
Ink tanks are not
seated properly
Check the ink tanks, and reseat them if necessary. See “Replacing Ink
Tanks” on page 20.
Printhead needs
to be aligned
Perform printhead alignment. See "Aligning the Printhead" on
page 23.
1. Turn the printer off to clear the printer buffer.
2. Cancel the print job from the computer. See “Cancelling a Print
Job” on page 7.
3. Turn the printer on again.
Meaningless
characters
printed
Corrupted print
instructions are
stored in the
printer buffer
Printer/computer
not securely
connected
Check the cable connections between the printer and the computer to
verify that they are securely connected.
Page 36
Troubleshooting
3300
Meaningless
characters
printed
(continued)
Try This
Previous print job
paused before it
was finished
If a previous print job was paused before it was printed, turn the
printer and the computer off, then back on again, or
WW
IINNDDOOWWSS
1. Click
SSttaarrtt
, then
SSeettttiinnggss
, then
PPrriinntteerrss
.
2. Double-click
CCaannoonn SS550000
and cancel any unfinished print
jobs.
MM
AACC
OOSS
On your keyboard, press the Apple Command key ( ) and
the period key (.) at the same time. The print job will be
cancelled and the paper ejected.
Check the Printer window to verify that the correct printer driver is
selected.
Incorrect printer
driver selected
Bad (corrupted)
file
Create the document again and print it. If it prints successfully, the
original file was corrupted.
Extended Capabilities (Parallel) Port, or ECP, provides faster data
transfer between the computer and the printer. If the ECP setting is
incorrect, it could result in incorrect print information going to the
printer. See the S500 User’s Guide on the Setup Software & User’s
Guide CD-ROM for instructions on how to check ECP settings and
reconfigure if needed.
ECP mode not set
Problem Possible Cause
Problem
When a printer error occurs, the POWER lamp flashes orange between green flashes. Count
the number of orange flashes to determine and resolve the problem:
Printer does
not print/
flashing lamp
on printer
Possible Cause Try This
Alternately
flashes green and
orange (service
error)
1. Remove the paper from the printer, switch the printer off, then
unplug it.
2. Reconnect the printer power and turn it back on.
If the same error message persists after restarting the printer, contact
the Customer Care Center.
2 orange flashes
(paper is out or
not feeding
correctly)
If no paper is loaded in the paper rest, or if paper is not loaded
correctly, reload the paper correctly then press the RESUME/CANCEL
button on the printer. See “Loading Paper and Other Media” on page
4 for how to load different types of media.
HHaannddlliinngg EErrrroorr MMeessssaaggeess
Page 37
Troubleshooting
3311
Problem
Printer does
not print/
flashing lamp
on printer
(continued)
3 orange flashes
(paper jam)
See the troubleshooting topic “Paper jams in the printer” on page 27.
7 orange flashes
(defective
printhead)
Remove and re-install the printhead.
Also ensure that the protective tape has been removed.
If re-installing the printhead does not resolve the problem, contact
the Customer Care Center to replace it with a new one.
8 orange flashes
(waste tank
almost full)
The printer has a built-in waste ink tank to hold the ink consumed
during printhead cleaning. Press the RESUME/CANCEL button to
restart printing, then contact the Customer Care Center to have the
waste ink tank replaced immediately.
Printer flashes
green only
When the lamp flashes green, the printer is warming up or is
receiving print data from the computer. This is not an error condition.
Possible Cause
Try This
When Backgrounding is turned on, you can confirm the low ink alert
in the BJ Print Monitor. See the S500 User’s Guide on the Setup
Software & User’s Guide CD-ROM for more information on using the
BJ Print Monitor.
After the alert displays, you can continue printing for a short time,
but have a replacement ready to install.
WW
IINNDDOOWWSS
The low ink alert displays in the BJ Status Monitor. Click the
Ink Information tab to determine which ink tank is low.
MM
AACC
OOSS
The low ink alert displays in a status dialog before a print job
starts.
One or more of
the ink tanks is
low
Error
message
displays in
the BJ Status
Monitor
Printer is out of
paper
Ink is low
Paper jam
Printhead
installed
incorrectly
WW
IINNDDOOWWSS
The BJ Status Monitor opens and displays a message when an
error occurs.
Read the error message, then click the
GGuuiiddee
tab to display
more information about solving the problem.
MM
AACC
OOSS
If Backgrounding is turned on with the Chooser, the BJ Print
Monitor displays an error.
Follow the instructions in the message to resolve the problem.
See the S500 User’s Guide on the Setup Software & User’s
Guide CD-ROM for more information on error messages.
One of the ink tanks is empty. Replace it. See “Monitoring Ink Levels”
on page 19 and “Replacing Ink Tanks” on page 20 for more
information.
4 orange flashes
(empty ink tank)
Low ink alert
displays in
the BJ Print
Monitor
Page 38
CCuussttoommeerr CCaarree CCeenntteerr
Canon offers a full range of customer technical support* options:
• For e-mail support, the latest driver downloads and answers to frequently
asked questions (
wwwwww..uussaa..ccaannoonn..ccoomm
)
• 24-hour, 7-day-a-week automated support for troubleshooting issues on
most current products (
11--880000--442233--22336666
)
• 24-hour, Fax-On-Demand System for product specifications and technical
information (
11--880000--552266--44334455
)
• Free technical support Monday–Saturday (excluding holidays) for products
still under warranty** (
11--775577--441133--22884488
)
• Technical support 7 days a week (excluding holidays) for products no longer
under warranty, at $9.99 per call (
11--775577--441133--22884488
)
Within Canada, call for technical support 24 hours a day, 7
days a week (
11--880000--OOKK--CCAANNOONN
).
* Support program specifics are subject to change without notice.
** Refer to the product information starting on page 49 for warranty details.
Troubleshooting
3322
Problem
Possible Cause
Try This
System error
message
displays
System error
occurred
If a system error occurs, printing stops.
WW
IINNDDOOWWSS
A window displays the error message. System errors may
include problems writing to LPT1 or USBPRN, application
errors, or general protection faults. Make sure that the printer
is turned on, the printer and computer are connected securely,
and that the printer port is operating correctly.
MM
AACC
OOSS
The error message contains an error code *XXX, where * is a
letter and XXX is a number, which represents the cause of the
error. Make sure that the printer is turned on, the printer and
computer are connected securely, and that the printer port is
operating correctly.
Page 39

CChhaapptteerr 55::
TThhee BBJJ SSoolluuttiioonn SSooffttwwaarree––
DDoowwnnllooaaddiinngg IImmaaggeess
The BJ Solution software—a fun way to view, organize, adjust, and print
images—includes ZoomBrowser EX and PhotoRecord (for Windows) and
ImageBrowser (for Macintosh) and PhotoStitch (for Windows/Macintosh).
EEaassyy--ttoo--uussee ffeeaattuurreess iinncclluuddee::
• Move, copy, or delete images stored on computer disks.
• Crop images and adjust colors with simple editing tools.
• View all files within a specified folder simultaneously; zoom in and out for
easier visual searches.
• View your files in chronological order via the “time tunnel” window.
• Display images one-by-one at full-screen size using the slide show function.
• Merge a series of images into a panoramic view using the PhotoStitch
feature.
• Produce photo-like prints using Canon Photo Paper Pro or Canon Specialty
Paper. (See “Recommended Paper Use” on page 3.) Print multiple images on
a single sheet, and add customized borders and background designs. Even
add titles and insert text in images and on pages. Or use a printing utility,
PhotoRecord, to create your own personal album.
3333
Page 40

Chapter 5
3344
MMiinniimmuumm SSyysstteemm RReeqquuiirreemmeennttss
WWiinnddoowwss
• Pentium 133 MHz, Windows 95/98 (32 MB RAM), Windows 2000/Windows
NT 4.0 (64 MB RAM)
MMaacciinnttoosshh
• Mac OS 8.1 or higher, 20 MB RAM
IInnssttaalllliinngg tthhee BBJJ SSoolluuttiioonn SSooffttwwaarree
TToo IInnssttaallll tthhee BBJJ SSoolluuttiioonn SSooffttwwaarree iinn WWiinnddoowwss::
Driver features and screen shots described in this chapter, reflect
Windows 98 and may be different for Windows 2000 and Windows
NT 4.0 users.
1. Close any open software applications.
2. Insert the BJ Solution CD in the CD-ROM drive. The Choose Destination
Location dialog box will open. Click Next. To choose another installation
folder, click Browse, then OK.
If the setup program does not run automatically, click Cancel,
then Exit. Click Start, then Run, and type x:\setup.exe, where
x is your CD-ROM drive.
3. Select the software to be installed. Click Next. Follow the on-screen instructions.
4. When the Setup Complete dialog box appears, click Finish.
TToo IInnssttaallll tthhee BBJJ SSoolluuttiioonn SSooffttwwaarree iinn MMaacciinnttoosshh::
1. Close any open software applications and insert the BJ Solution CD in the
CD-ROM drive.
2. Double-click the CanonBJSD icon on your desktop. Double-click Install.
3. Select the software to be installed, then click Install. The Choose a Folder
dialog box will open.
Page 41

4. Select the destination folder, then click Choose. Follow the
on-screen instructions.
5. When the Installation Has Finished dialog box appears, click OK.
AAcccceessssiinngg tthhee OOnnlliinnee MMaannuuaall
The BJ Solution CD includes an electronic manual that is viewable with Adobe
®
Acrobat Reader 4.0. Follow the instructions below to install Acrobat Reader,
which will enable you to view or print the BJ Solution User’s Manual.
TToo iinnssttaallll AAddoobbee AAccrroobbaatt RReeaaddeerr iinn WWiinnddoowwss::
1. On your computer, insert the BJ Solution CD in the CD-ROM drive. The
BJ Solution installer program will begin. Click Cancel, then Exit Setup.
2. Click Start, then Run, then type x:\readme\english\acrobat\ar405eng.exe,
where x is your CD-ROM drive. Follow the on-screen instructions.
TToo vviieeww tthhee mmaannuuaall iinn WWiinnddoowwss::
1. Insert the CD in the CD-ROM drive.
2. The BJ Solution installer program will begin. Click Cancel, then Exit Setup.
3. Click Start, then Run, then type x:\readme\english\bj_solution_disk_manual.pdf,
where x is your CD-ROM drive. Click OK.
TToo iinnssttaallll AAddoobbee AAccrroobbaatt RReeaaddeerr iinn MMaacciinnttoosshh::
1. On your computer, insert the BJ Solution CD in the CD-ROM drive.
2. From your desktop, double-click the CanonBJSD icon, then click Readme,
English, Acrobat, Reader Installer. Follow the on-screen instructions.
TToo vviieeww tthhee mmaannuuaall iinn MMaacciinnttoosshh::
1. Insert the CD in the CD-ROM drive.
2. From your desktop, double-click the CanonBJSD icon. Double-click Readme,
English, BJ_Solution_Disk-Manual.pdf.
Chapter 5
3355
Page 42
WWiinnddoowwss UUsseerrss:: UUssiinngg YYoouurr SSooffttwwaarree
IInn tthhiiss sseeccttiioonn yyoouu’’llll lleeaarrnn hhooww ttoo::
• Start ZoomBrowser EX
• Print on Canon Photo Paper Pro
• Merge photos to create a panoramic view
SSttaarrttiinngg ZZoooommBBrroowwsseerr EEXX
TToo SSttaarrtt ZZoooommBBrroowwsseerr EEXX::
1. Make sure the images are on your hard drive or other accessible media.
2. Double-click the Canon ZoomBrowser EX icon on the desktop to start
the program.
If the Canon ZoomBrowser EX icon does not appear on the
desktop, click Start, Programs, Canon Utilities, ZoomBrowser EX,
then ZoomBrowser EX.
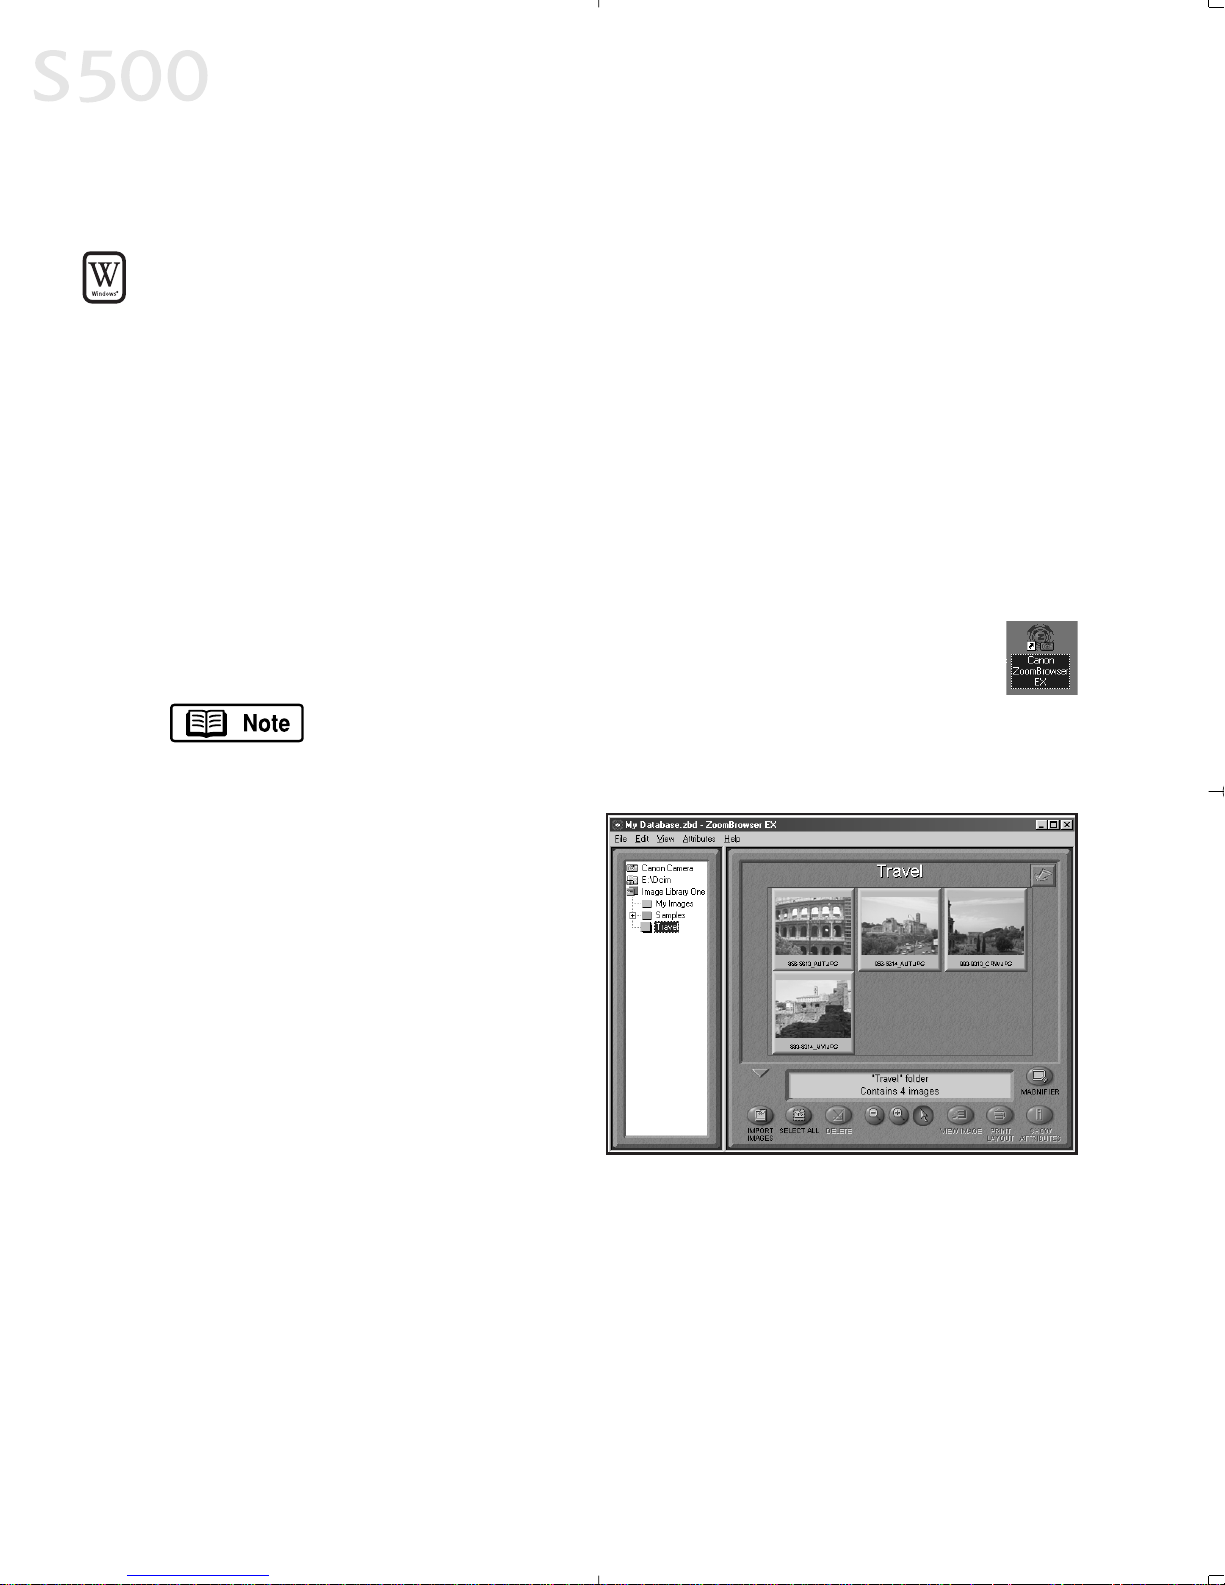
3. From the File menu, select Add
Image Library. Identify where the
images are stored, and click OK.
The images will display as
thumbnails.
PPrriinnttiinngg oonn CCaannoonn PPhhoottoo PPaappeerr PPrroo
TToo pprriinntt oonn CCaannoonn PPhhoottoo PPaappeerr PPrroo::
1. Select a folder or images for printing from the ZoomBrowser EX Display
window and click Print Layout to start the PhotoRecord program. The
selected images will display automatically.
Chapter 5
3366
Page 43
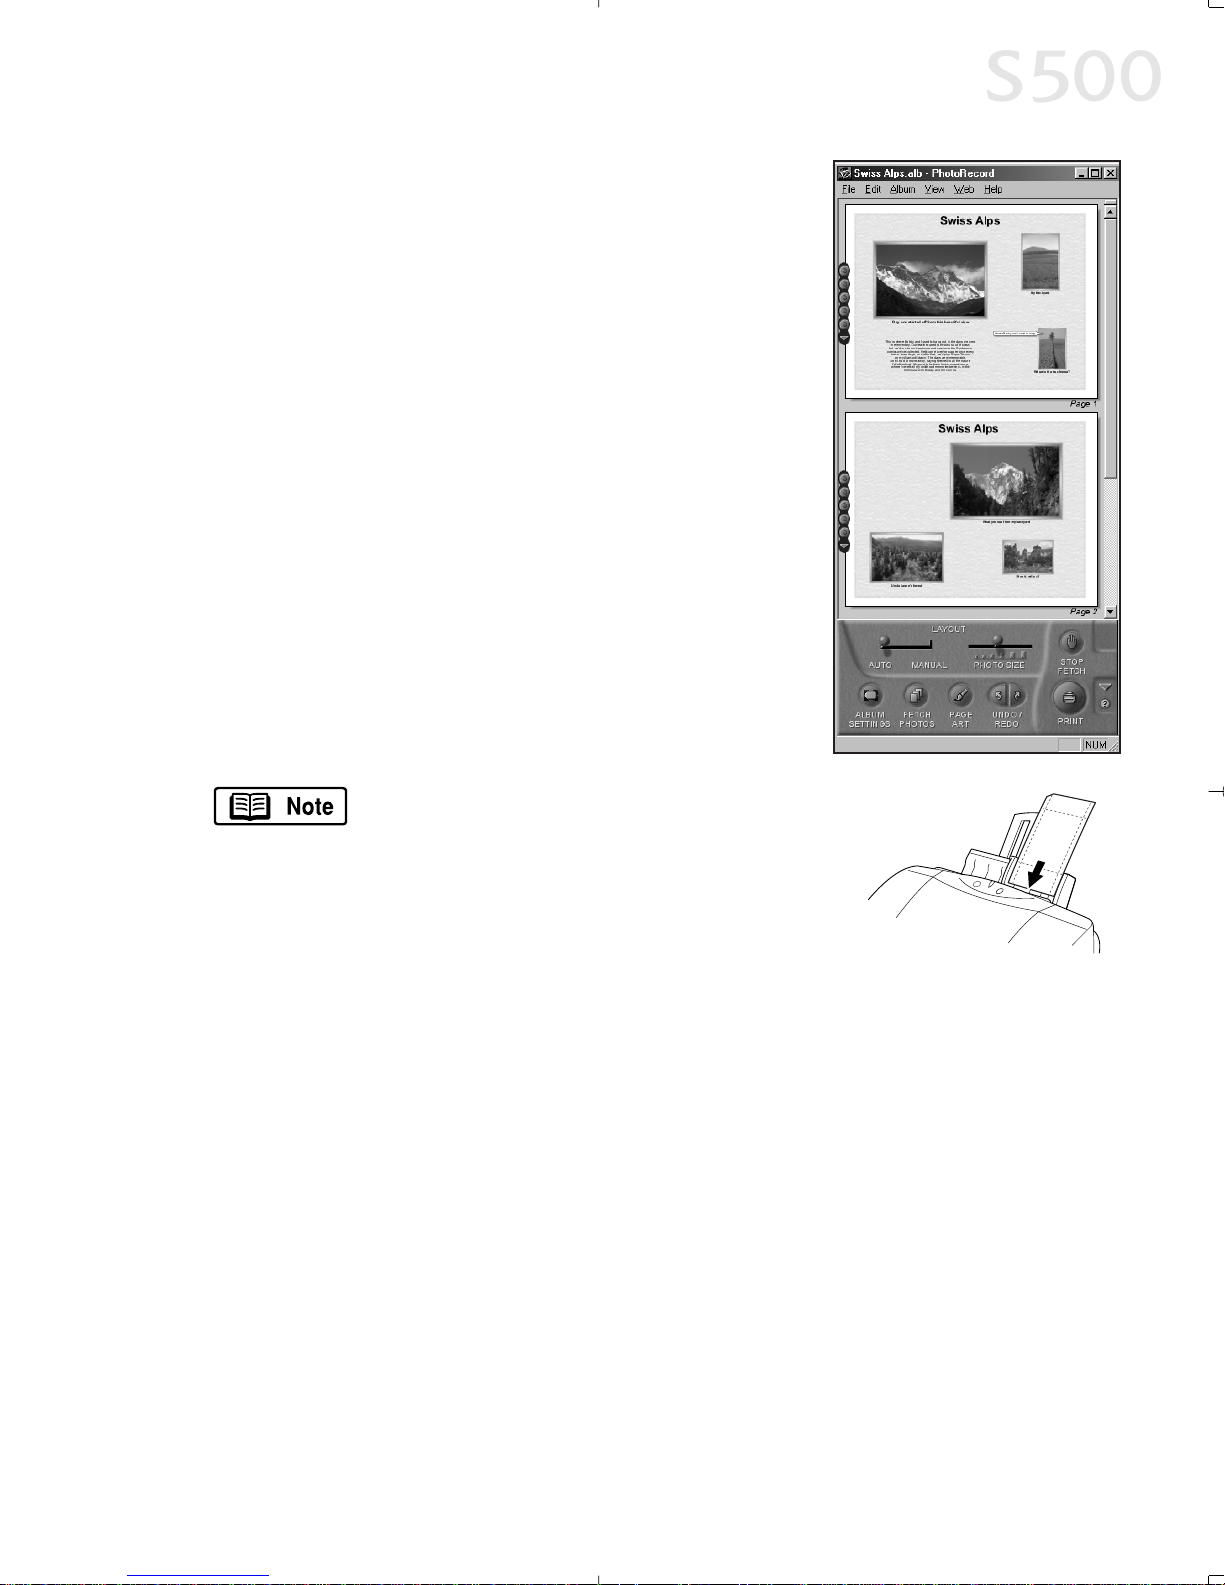
2. From the PhotoRecord window, you can drag
images to change the layout, input descriptive
text or captions, or add images.
3. Click Album Settings. The Album Settings dialog
box will appear.
4. Make sure the Canon S500 is the selected printer.
5. Under Album Type, select Canon perforated paper
printing. Canon Photo Paper Pro 4 x 6 will become
the default media. The results will preview,
click OK.
6. Load a sheet of Canon Photo Paper Pro into the
paper tray, then click Instant Print.
When using Canon Photo Paper Pro 4 x 6, insert
the sheets in the direction shown and print on
the glossier side. When finished, remove
perforated edges. The results look just like a
photograph.
Remember, when handling specialty media
papers, always follow the instructions
included with the media for the best printing
results. See page 3 for a list of other fun-touse Canon Specialty Papers.
MMeerrggiinngg PPhhoottooss ttoo CCrreeaattee aa PPaannoorraammiicc VViieeww
You can merge a series of overlapping images into a seamless panoramic view.
TToo ccrreeaattee aa ppaannoorraammiicc vviieeww::
1. Select the images in the ZoomBrowser window, then click Select All.
The images will highlight. From the Edit menu, select PhotoStitch. The
PhotoStitch program will start.
Chapter 5
3377
Page 44
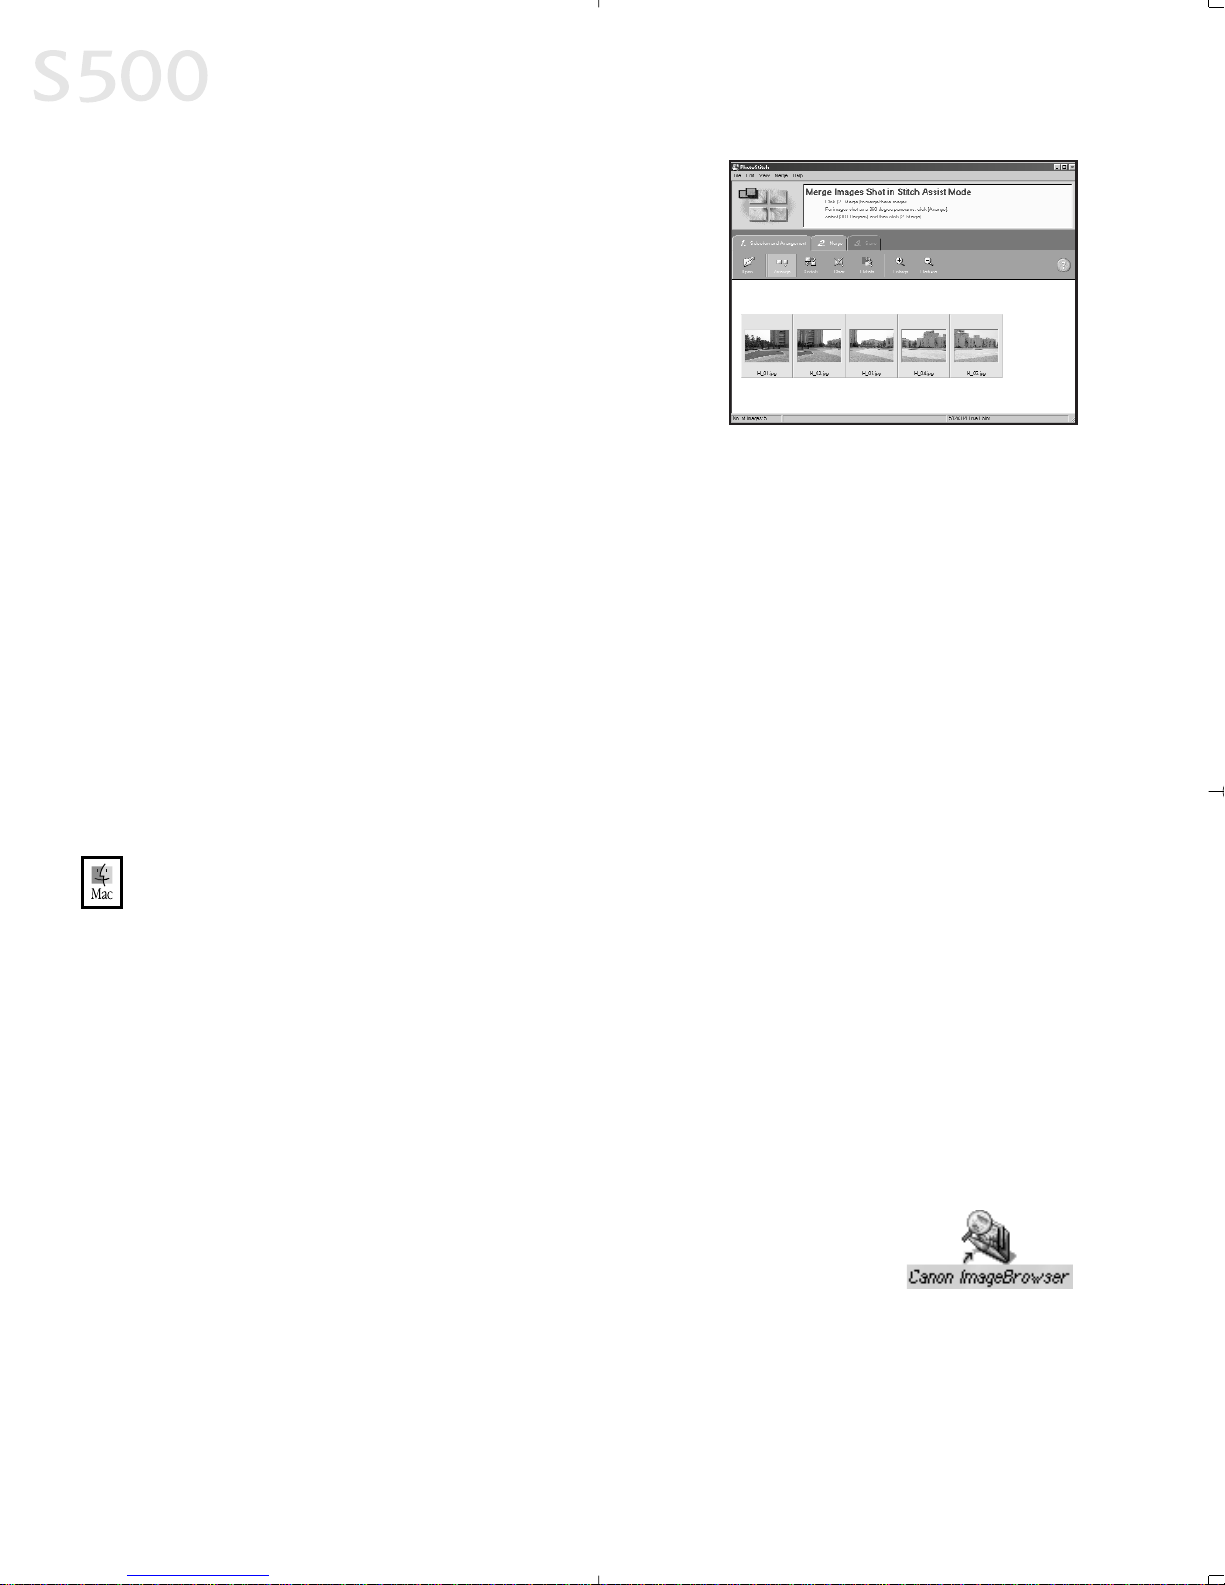
2. Follow the on-screen instructions to arrange,
stitch, rotate, enlarge, or reduce your image.
WWiinnddoowwss UUsseerrss:: UUnniinnssttaalllliinngg tthhee BBJJ SSoolluuttiioonn SSooffttwwaarree
TToo uunniinnssttaallll tthhee BBJJ SSoolluuttiioonn SSooffttwwaarree iinn WWiinnddoowwss::
• Click Start, Programs. Click Canon Utilities, ZoomBrowser EX, then
ZoomBrowser Uninstall, and follow the on-screen instructions.
• Click Start, Programs. Click Canon Utilities, PhotoStitch, then PhotoStitch
Uninstall, and follow the on-screen instructions.
MMaacciinnttoosshh UUsseerrss:: UUssiinngg YYoouurr SSooffttwwaarree
IInn tthhiiss sseeccttiioonn yyoouu’’llll lleeaarrnn hhooww ttoo::
• Start ImageBrowser
• Print on Canon Photo Paper Pro
• Merge photos to create a panoramic view
SSttaarrttiinngg IImmaaggeeBBrroowwsseerr
TToo SSttaarrtt IImmaaggeeBBrroowwsseerr EEXX::
1. Make sure the images are on your hard drive or other
accessible media.
2. Double-click the Canon ImageBrowser icon on the desktop
to start the program.
Chapter 5
3388
Page 45
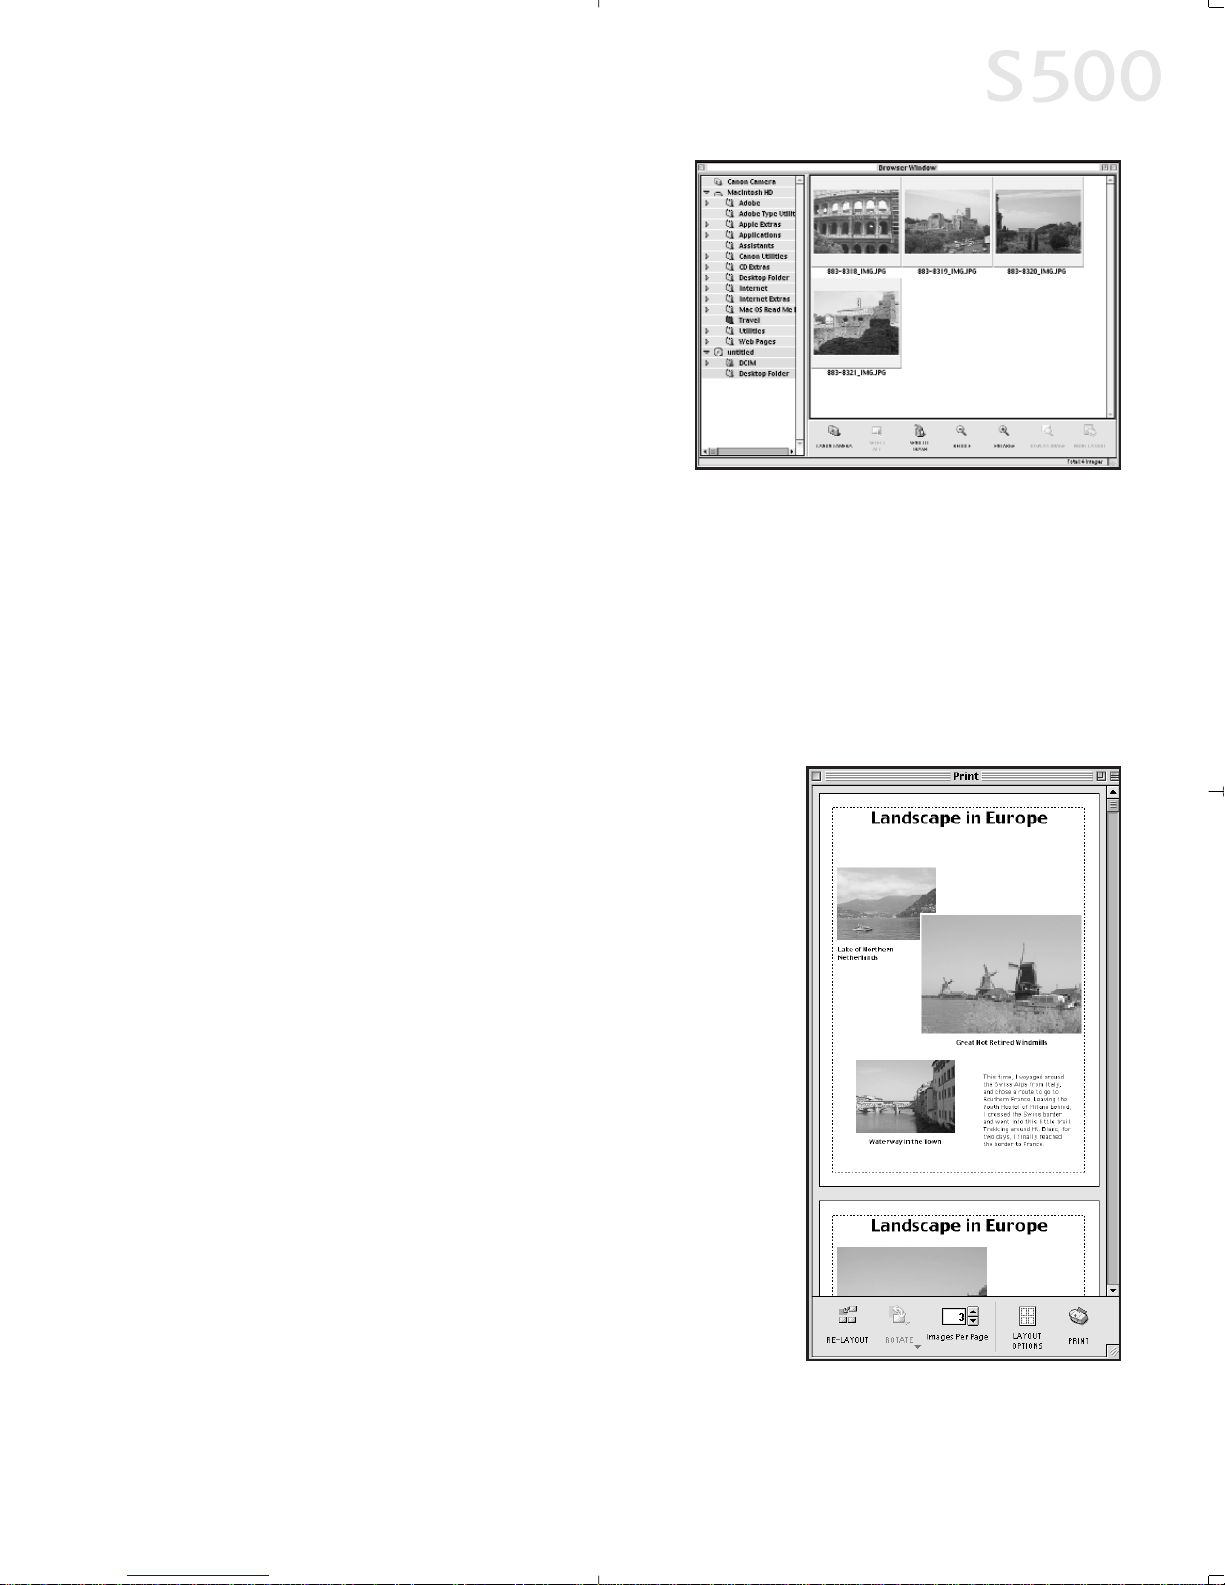
3. Double-click the folder for the device
containing your images in the
Browser window. The images will
display as thumbnails.
PPrriinnttiinngg oonn CCaannoonn PPhhoottoo PPaappeerr PPrroo
TToo pprriinntt oonn CCaannoonn PPhhoottoo PPaappeerr PPrroo::
1. Select the images you desire to print, then click Print Layout. The selected
images will display automatically.
2. From the Browser window, you can drag images to change the layout, input
descriptive text or captions, or add images.
3. Click Layout Options in the Print window.
The Layout Options dialog box will open.
4. Under Layout Type, select Canon perforated
paper. Canon Photo Paper Pro 4 x 6 will
become the default media. Results will
preview, then click OK.
5. The Paper Registration dialog box will open.
Click OK.
6. In the Page Setup dialog box, select the Paper
Size menu and select Custom 1 - 3.
7. Click Custom. The Custom dialog box will open.
Type the Photo Paper Pro values found in the
Paper Registration dialog box. Click Apply. Make
sure to save your setting for future use.
8. Click OK in the Page Setup dialog box.
The paper size is registered.
Chapter 5
3399
Page 46
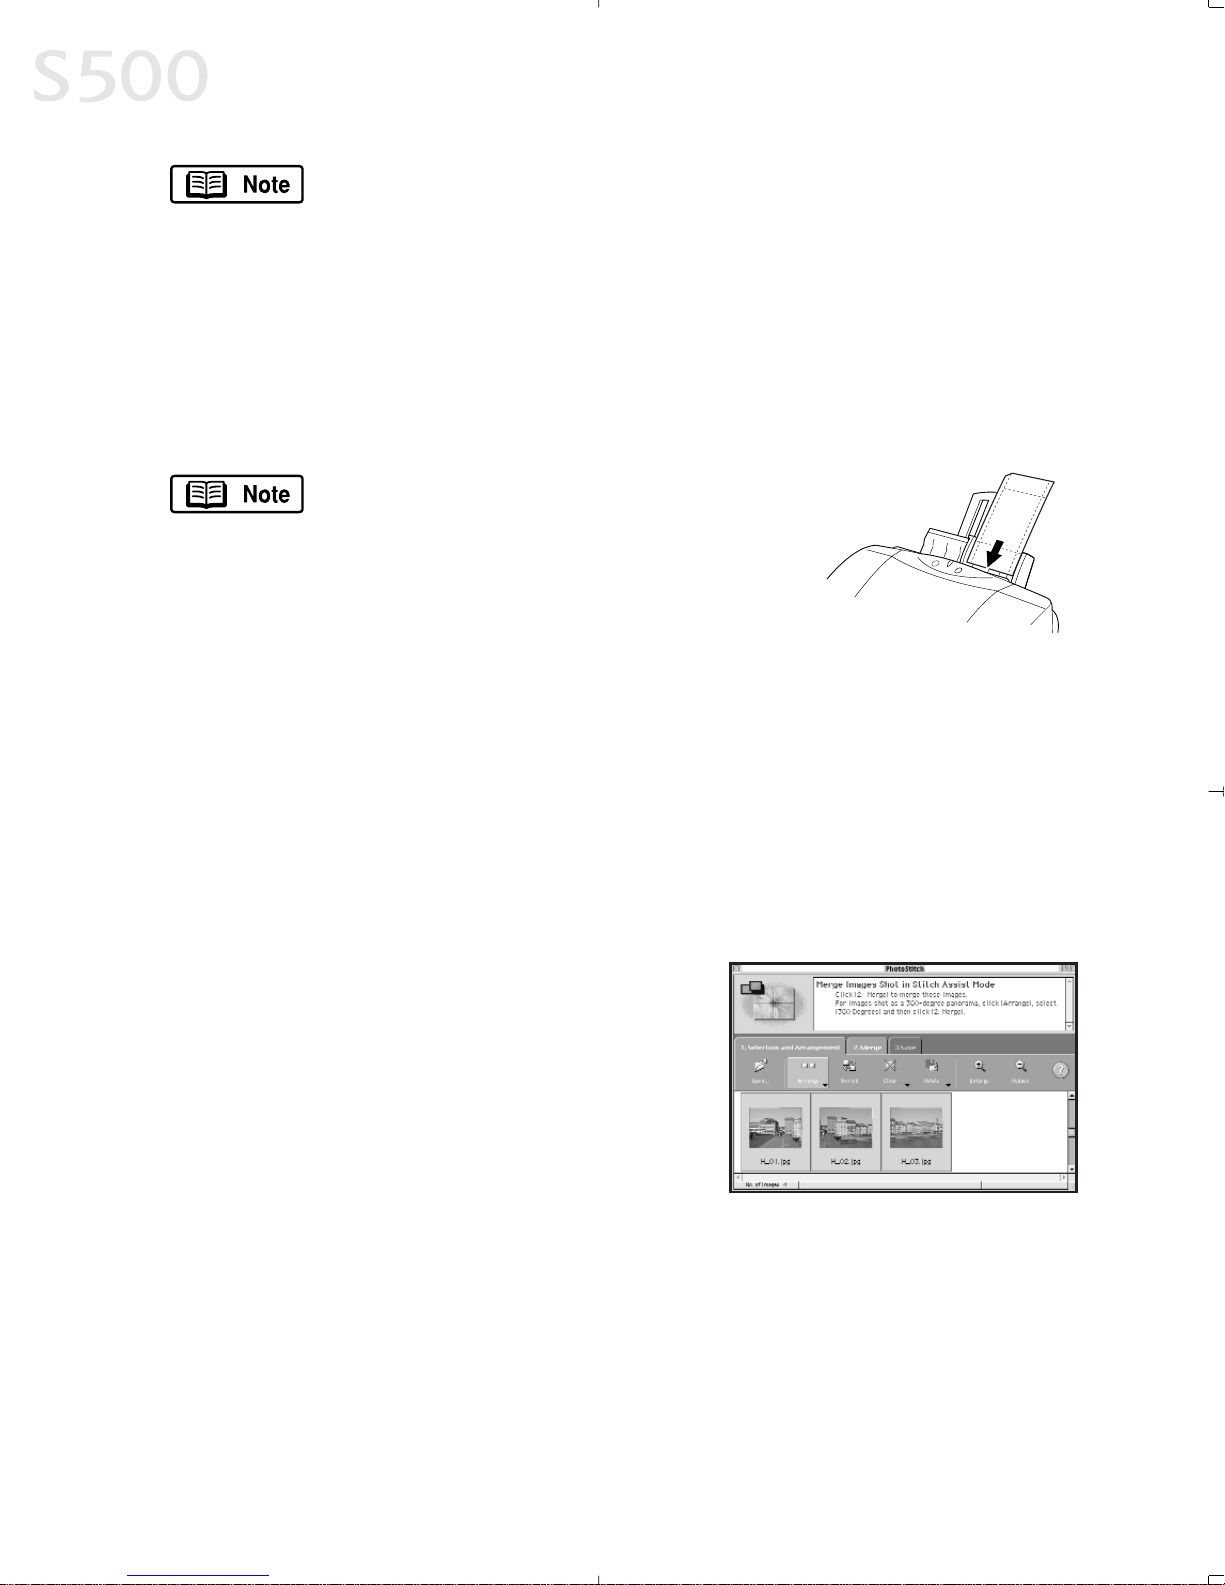
Now that Canon Photo Paper Pro has been registered, you can
simply select this custom paper size in the Page Setup dialog box
for future use.
9. Click Print. The printer driver setup screen will open.
10. Load a sheet of Canon Photo Paper Pro into the paper tray. Click Print.
When using Canon Photo Paper Pro 4 x 6, insert the sheets in the direction
shown and print on the glossier side. When finished, remove perforated
edges. The results look just like a photograph.
Remember, when handling specialty media
papers, always follow the instructions
included with the media for the best printing
results. See page 3 for a list of other fun-touse Canon Specialty Papers.
MMeerrggiinngg PPhhoottooss ttoo CCrreeaattee aa PPaannoorraammiicc VViieeww
You can merge a series of overlapping images into a seamless panoramic view.
TToo ccrreeaattee aa ppaannoorraammiicc vviieeww::
1. Select the images in the Browser window, then click Select All. The images
will highlight. In the Edit menu, select PhotoStitch. The PhotoStitch
program will start.
2. Follow the on-screen instructions to arrange,
stitch, rotate, enlarge, or reduce your image.
MMaacciinnttoosshh UUsseerrss:: UUnniinnssttaalllliinngg tthhee BBJJ SSoolluuttiioonn SSooffttwwaarree
TToo uunniinnssttaallll tthhee BBJJ SSoolluuttiioonn SSooffttwwaarree iinn MMaacciinnttoosshh::
• Drag its folders to the Trash icon located on your desktop.
Chapter 5
4400
Page 47
AAppppeennddiixx
IInnssttaalllliinngg tthhee PPrriinntteerr DDrriivveerr
If you are re-installing the printer driver, first follow the uninstall procedures on
page 43 to remove the existing printer driver before you re-install.
TToo iinnssttaallll tthhee pprriinntteerr ddrriivveerr iinn WWiinnddoowwss::
For Windows NT 4.0 or Windows 2000, refer to the README.TXT file
on the S500 Setup Software & User’s Guide CD-ROM.
1. Turn the printer off.
2. Make sure the cable between the printer and computer (USB or parallel) is
securely connected.
3. Turn the computer on, and close any open software applications. Insert the
S500 Setup Software & User’s Guide CD-ROM in the CD-ROM drive. The
setup program should run automatically.
If the printer was on when the setup program started, the Add
New Hardware Wizard will appear. Do NOT use the wizard—
click
CCaanncceell
to close the window and continue.
4. If the setup program does not run automatically, click
SSttaarrtt
, then
RRuunn
, then
type
xx::\\mmsseettuupp..eexxee
(where xxis the CD-ROM drive).
5. Read the Welcome screen, then click
NNeexxtt
. Read the License Agreement,
then click
YYeess
. When the main menu appears, click
IInnssttaallll SSooffttwwaarree
.
6. If a message prompts you to restart Windows, remove the CD-ROM, then
click
OOKK
. After the computer restarts, re-insert the CD-ROM and continue.
7. Click
SSttaarrtt
. (If the Printer Driver button is not red, select
PPrriinntteerr DDrriivveerr
, then
click
SSttaarrtt
.) The printer driver will start loading automatically.
8. TURN THE PRINTER ON so the printer port can be automatically detected. The
software will begin identifying the printer port being used.
4411
Page 48
Appendix
4422
If your computer cannot detect a printer port, see the tip,
“Computer cannot detect a printer port” on page 27.
9. When the Terminate Installation window appears, click
OOKK
. If you are
prompted to restart the computer, click
YYeess
. When the installation process
has completed, click
EExxiitt
.
10. Align the printhead. (See “Aligning the Printhead” on page 23.)
TToo iinnssttaallll tthhee pprriinntteerr ddrriivveerr iinn MMaacc OOSS::
1. Insert the S500 Setup Software & User’s Guide CD-ROM in the CD-ROM
drive.
2. Open the Printer Driver folder on the CD-ROM, then double-click the
IInnssttaalllleerr
icon.
3. Read the License Agreement, then click
AAcccceepptt
.
4. Click
IInnssttaallll
. The printer driver will load automatically.
If the message “No other applications can be running...” displays,
click
CCoonnttiinnuuee
.
5. When the installation process is complete, click
RReessttaarrtt
.
6. After the computer restarts, TURN THE PRINTER ON.
7. Select the
AAppppllee
menu, then
CChhoooosseerr
.
8. Click the
SS550000
icon in the Chooser.
To use the BJ Print Monitor, click the
BBaacckkggrroouunnddiinngg
button to
the
OOnn
position. For instructions on using this feature, see
the S500 User’s Guide on the Setup Software & User’s Guide
CD-ROM.
9. Close the Chooser.
10. Align the printhead. (See “Aligning the Printhead” on page 23.)
Page 49

UUnniinnssttaalllliinngg tthhee PPrriinntteerr DDrriivveerr
TToo uunniinnssttaallll tthhee pprriinntteerr ddrriivveerr iinn WWiinnddoowwss::
1. Click
SSttaarrtt
, then
PPrrooggrraammss
, then
CCaannoonn SS550000
.
2. Click
UUnniinnssttaallll
.
3. Click
YYeess
to confirm that you want to uninstall the printer driver.
4. Restart your computer.
TToo uunniinnssttaallll tthhee pprriinntteerr ddrriivveerr iinn MMaacc OOSS::
1. Insert the S500 Setup Software & User’s Guide CD-ROM in the CD-ROM
drive, then click the
CCDD--RROOMM
icon.
2. Double-click
IInnssttaalllleerr
.
3. Read the License Agreement, then click
AAcccceepptt
.
4. Select
UUnniinnssttaallll
from the drop-down list at the top left of the dialog box,
then click the
UUnniinnssttaallll
button on the bottom right.
5. Follow the on-screen instructions.
6. When the uninstall is complete, click
QQuuiitt
.
7. Click
RReessttaarrtt
when prompted to restart your computer.
RReeggiisstteerriinngg YYoouurr CCaannoonn PPrroodduucctt
TToo rreeggiisstteerr yyoouurr CCaannoonn PPrroodduucctt iinn WWiinnddoowwss::
1. Insert the S500 Setup Software & User’s Guide CD-ROM in the
CD-ROM drive.
2. When the Canon installation screen launches, click
IInnssttaallll SSooffttwwaarree
.
3. Click
UUttiilliittiieess
, then
PPrroodduucctt RReeggiissttrraattiioonn
.
4. Click
PPrroodduucctt RReeggiissttrraattiioonn
.
5. Follow the on-screen instructions to register your product. Note that
the serial number is located on the inside of the printer, to the right of
the printhead.
Appendix
4433
Page 50
TToo rreeggiisstteerr yyoouurr CCaannoonn PPrroodduucctt iinn MMaacciinnttoosshh::
1. Insert the S500 Setup Software & User’s Guide CD-ROM in the CD-ROM drive.
2. From the Canon BJ window, double-click the Product Registration icon.
3. Click the Register Now button and follow the on-screen instructions to
register your product. The serial number is located on the inside of the
printer, to the right of the printhead.
SSaaffeettyy IInnffoorrmmaattiioonn
WWaarrnniinnggss aanndd CCaauuttiioonnss
This guide uses the following icons to indicate situations that could cause damage or injury:
Always follow the instructions provided in Warnings to prevent potential or serious personal
injury or death as a result of careless operation of the equipment.
Always follow the instructions provided in Cautions to prevent minor injuries to yourself or
damage to the equipment as a result of careless operation of the equipment.
Read and follow all of these cautions and warnings to ensure the safe use of the printer. To avoid the hazards
of fire, personal injury, or damage to the printer, never attempt to use the printer in any way other than the
methods described in this guide.
CChhoooossiinngg aa LLooccaattiioonn
Never place the printer near flammable solvents such as alcohol, thinner, etc. To avoid the
hazards of fire or electric shock, keep all flammable liquids away from the printer.
• Never set the printer on a surface that is unstable or subject to excessive vibration. The printer could tip or
fall and cause injury.
• Never use the printer in a location that is subject to high humidity, dust, high temperatures, or direct
sunlight.
• Set up and use the printer in a location where ambient temperature is within 41°F–95°F (5°C–35°C) and
10%–90% humidity with no condensation.
Never place the printer on a thick carpet or rug. Fibers or dust entering the printer could cause
a fire.
Keep the power outlet for the printer free of all obstacles so you can unplug the power cord at
any time. Such obstacles could prevent you from unplugging the printer when a printer fault
occurs and cause a fire or electric shock. The socket-outlet shall be installed near the
equipment and shall be easily accessible.
• Always carry the printer with both hands holding both ends of the printer. To avoid dropping the printer
and causing injury, always carry it carefully when moving it to another location.
Appendix
4444
Page 51
PPoowweerr SSuuppppllyy
Never attempt to plug the power cord into a power outlet when your hands are wet. To avoid
electric shock, make sure that your hands are dry.
• Always push the plug completely into the power outlet. A loose or poorly connected plug could cause a fire
or electric shock.
Never cut, modify, stretch, bend, or twist the power cord, and never place heavy objects on the
power cord. A power leak from a damaged power cord could cause a fire or electric shock.
Never plug the printer power cord into a power outlet (power board, double adapter, etc.) that
is shared by other devices or office equipment. To prevent the hazards of fire or electric shock,
avoid overloading power points.
• Never use the printer if the power cord is bundled or knotted. To prevent the hazards of fire or electric
shock, make sure the power cord is straight.
If you detect smoke, unusual odors, or strange noises around the printer, immediately press
the POWER button to turn off the printer and disconnect the power plug. To avoid fire or electric
shock, never use the printer under these conditions. Call the Customer Care Center.
• Always grasp the plug when you unplug the power cord. Pulling on the power cord could damage the cord
and cause a fire or electric shock.
Never use an extension cord. To avoid a fire or electric shock, always plug the power cord
directly into the power outlet.
Never use a power supply voltage other than that supplied in the country where you purchased
the printer. Using incorrect voltage could cause a fire or electric shock. The correct power
supply voltage for this printer is AC 120V, 60 Hz.
CClleeaanniinngg aanndd MMaaiinnttaaiinniinngg tthhee PPrriinntteerr
Use only a slightly damp cloth to clean the printer. Never use flammable solvents like alcohol,
benzene, thinner, etc. If a flammable solvent contacts an electrical component inside the
printer, a fire or electric shock could result.
Always unplug the printer power cord before you clean the printer. If you mistakenly turn on
the printer while cleaning it, you could touch moving components inside the printer and suffer
injury.
Never attempt to disassemble or modify the printer. The printer contains high voltage
components which could cause a fire or serious electric shock.
WWoorrkkiinngg AArroouunndd tthhee PPrriinntteerr
Never use flammable sprays near the printer. Gases in the spray could cause a fire or electric
shock if they come in contact with electrical components inside the printer.
Never insert your fingers or hands inside the printer while it is printing. The printer contains
moving parts which could cause injury.
Never place anything on top of the printer, especially metal objects (paper clips, staples, etc.),
or containers with flammable solvents (alcohol, thinners, etc.) Objects falling into the printer
could cause a fire or electric shock.
Appendix
4455
Page 52
If any foreign object, especially a piece of metal or liquid, falls into the printer, immediately
press the POWER button to turn off the printer, unplug the power cord, then call the Customer
Care Center. Continuing to use the printer after a foreign object has fallen into it could cause a
fire or electric shock.
PPrriinntthheeaadd aanndd IInnkk TTaannkkss
For safety, always store printhead and ink tanks out of the reach of small children. If a child
accidentally licks or ingests any ink, consult a physician immediately.
Never subject a printhead or ink tank to shocks or excessive vibration. Shaking could cause ink
to leak and stain clothing.
Never touch the printhead or electrical contacts on a printhead immediately after removing it
from the printer. These metal parts become very hot during printing and could cause minor
burns.
TTuurrnniinngg tthhee PPrriinntteerr OOffff
• To avoid printer malfunction always use the POWER button to turn the printer on and off. Never remove the
power cord from the power outlet until you have turned off the printer by pressing the POWER button. After
the POWER lamp goes out, you can unplug the power cord from the power outlet.
UUssiinngg tthhee PPrriinntteerr NNeeaarr AApppplliiaanncceess aanndd FFlluuoorreesscceenntt LLaammppss
• Allow at least 6 inches clearance between the printer and another appliance or a fluorescent lamp.
Electrical noise generated by a fluorescent lamp placed too close to the printer could cause the printer to
malfunction.
RReegguullaattoorryy IInnffoorrmmaattiioonn
CCoolloorr PPrriinntteerr MMooddeell KK1100220066 ((SS550000))
This device complies with Part 15 of the FCC Rules. Operation is subject to the following two conditions: (1)
This device may not cause harmful interference, and (2) this device must accept any interference received,
including interference that may cause undesired operation.
Note: This equipment has been tested and found to comply with the limits for a Class B digital device,
pursuant to Part 15 of the FCC Rules. These limits are designed to provide reasonable protection against
harmful interference in a residential installation. This equipment generates, uses and can radiate radio
frequency energy and, if not installed and used in accordance with the instructions, may cause harmful
interference to radio communications. However, there is no guarantee that interference will not occur in a
particular installation. If this equipment does cause harmful interference to radio or television reception,
which can be determined by turning the equipment off and on, the user is encouraged to try to correct the
interference by one or more of the following measures:
• Reorient or relocate the receiving antenna.
• Increase the separation between the equipment and receiver.
• Connect the equipment into an outlet on a circuit different from that to which the receiver is connected.
• Consult the dealer or an experienced radio/TV technician for help.
Appendix
4466
Page 53

Use of a shielded cable is required to comply with Class B limits in Subpart B of Part 15 of the FCC Rules.
Do not make any changes or modifications to the equipment unless otherwise specified in the manual. If such
changes or modifications should be made, you could be required to stop operation of the equipment.
Canon U.S.A. Inc.
Digital Home and Personal Systems Division
2995 Red Hill Avenue
Costa Mesa, CA 92626
1-800-423-2366
CCaannaaddiiaann RRaaddiioo IInntteerrffeerreennccee RReegguullaattiioonnss
This digital apparatus does not exceed Class B limits for radio noise emissions from a digital apparatus as set out
in the interference-causing equipment standard entitled “Digital Apparatus”, ICES-003 of the Industry Canada.
Cet appareil numérique respecte les limites de bruits radio éléctiques applicables aux appareils numériques
de Classe B prescrites dans la norme sur le matériel brouilleur: “Appareils Numériques”, NMB-003 édictée par
l’Industrie Canada.
PPrroodduucctt SSppeecciiffiiccaattiioonnss
SSyysstteemm RReeqquuiirreemmeennttss
WWiinnddoowwss 9955//9988::
486 processor; 16 MB RAM; 40 MB free hard disk space
WWiinnddoowwss MMee::
Pentium
®
processor, 150MHz; 32 MB RAM; 40 MB free hard disk space
WWiinnddoowwss 22000000::
Pentium processor, 133MHz or faster; 32 MB RAM for Professional, 64MB RAM
for Server; 25 MB free hard disk space
WWiinnddoowwss NNTT 44..00::
Pentium processor; 16 MB RAM; 25 MB free hard disk space
MMaacciinnttoosshh::
OS 8.5-9.x; USB port; 12 MB RAM; 30 MB free hard disk space
The BJ Status Monitor cannot be used when the printer is
used in a network operating environment.
PPrriinnttiinngg mmeetthhoodd::
Bubble Jet on-demand
PPrriinnttiinngg rreessoolluuttiioonn::
Print Quality (media) Horizontal x Vertical
High (specialty media) 2400 x 1200 dpi
PPrriinntt ssppeeeedd::
(All print speeds are based on draft mode. Print speeds will vary depending on
system configuration, software, document complexity, print mode and page
coverage.):
Black printing, high: 12 ppm
Color printing, high: 8 ppm
PPrriinntt ddiirreeccttiioonn::
Bi-directional
PPrriinntt wwiiddtthh::
8.0 inches max. (203 mm)
IInntteerrffaaccee ((ppaarraalllleell))::
IEEE 1284-compatible
IInntteerrffaaccee ((UUSSBB))::
USB 1.1-compatible
IInntteerrffaaccee ccoonnnneeccttoorr ((ppaarraalllleell))::
Amphenol 57-40360 or equivalent
IInntteerrffaaccee ccoonnnneeccttoorr ((UUSSBB))::
USB standard Series B receptacle
RReeccoommmmeennddeedd pprriinntteerr ccaabbllee ((ppaarraalllleell))::
MMaatteerriiaall::
AWG28 or larger
TTyyppee::
Twisted-pair shielded cable
LLeennggtthh::
Up to 6.5 feet (2.0 m)
CCoonnnneeccttoorrss::
Amphenol 30360 or equivalent
Appendix
4477
Page 54

RReeccoommmmeennddeedd pprriinntteerr ccaabbllee ((UUSSBB))::
MMaatteerriiaall::
AWG28 (data wiring pair) or AWG20 to 28 (distribution pair)
TTyyppee::
Twisted-pair shielded cable
LLeennggtthh::
Up to 16.4 feet (5.0 m)
CCoonnnneeccttoorrss::
USB standard Series B pluggable
AAccoouussttiicc nnooiissee lleevveell::
Approx. 43 dB in the best print quality mode (per ISO 9296)
OOppeerraattiinngg eennvviirroonnmmeenntt::
Temperature: 41°F to 95°F (5°C to 35°C)
Humidity: 10% to 90% (no condensation)
SSttoorraaggee eennvviirroonnmmeenntt::
Temperature: 32°F to 95°F (0°C to 35°C)
Humidity: 5% to 90% (no condensation)
PPoowweerr ssuuppppllyy::
AC 120 V, 60 Hz
PPoowweerr ccoonnssuummppttiioonn::
Off: Approx. 1.5 W (to shut down completely, disconnect power cord)
Standby: Approx. 3 W
Printing: Approx. 25 W
DDiimmeennssiioonnss::
(with paper rest and paper output tray retracted)
16.9" (W) x 11.6" (D) x 7" (H)
WWeeiigghhtt::
Approx. 11 lb. (5 kg)
FFeeeedd mmeetthhoodd::
Continuous feed through auto sheet feeder for High Resolution Paper, plain
paper, envelopes, Transparencies, Glossy Photo Paper, Gloss Photo Film,
Glossy Photo Cards, Banner Paper, T-Shirt Transfers
SShheeeett ffeeeeddeerr ccaappaacciittyy::
PPllaaiinn ppaappeerr ((1177 llbb..))
100 sheets max.
HHiigghh RReessoolluuttiioonn PPaappeerr
80 sheets max.
EEnnvveellooppeess
10 envelopes max.
TTrraannssppaarreenncciieess
30 sheets max.
GGlloossssyy PPhhoottoo PPaappeerr
10 sheets max.
HHiigghh GGlloossss PPhhoottoo FFiillmm
1 sheet
GGlloossssyy PPhhoottoo CCaarrddss
20 sheets max.
BBaannnneerr PPaappeerr
1 sheet (can print up to 6 connected sheets)
PPhhoottoo PPaappeerr PPrroo
1 sheet
TT--SShhiirrtt TTrraannssffeerrss
1 sheet
OOrrddiinnaarryy pprriinntt mmeeddiiaa::
Weight: 17–28 lb.
Regular size: Letter, Legal, and standard #10 envelopes
Custom size: 3.54" to 8.5" (W) x 4.72" x 23" (H)
GGrraapphhiicc iimmaaggee pprriinnttiinngg::
Data format: Canon extended mode; raster image format
Resolution: Canon extended mode; 600, 1200, 2400 dpi
PPrriinntthheeaadd::
Black nozzles: 320 (600 dpi)
Color nozzles: 256 (1200 dpi)
IInnkk TTaannkk BBCCII--33ee::
Ink colors: Black, Cyan, Magenta, Yellow
BBllaacckk iinnkk ttaannkk ccaappaacciittyy::
Approx. 695 sheets (1500 characters per page, normal text)
IInnkk ttaannkk ccaappaacciittiieess::
(Based on ISO JIS-SCID No. 5 Pattern on plain paper with Plain Paper selected
for the Media Type in the Windows ME, Windows 98 and Windows 95 printer
driver for this printer)
Black: Approx. 1250 sheets
Cyan: Approx. 460 sheets
Magenta: Approx. 395 sheets
Yellow: Approx. 300 sheets
RReessiiddeenntt pprriinntt ccoonnttrrooll mmooddee::
Canon extended mode
RReecceeiivveerr bbuuffffeerr::
62KB
Appendix
4488
Page 55

LLiimmiitteedd WWaarrrraannttyy——UU..SS.. OOnnllyy
The limited warranty set forth below is given by Canon U.S.A. Inc. (“Canon”) with respect to the Canon brand
computer peripheral product (the “product”) that you have purchased, when purchased and used in the United
States. The product that you have purchased is the only product to which this warranty card and the limited
warranty provided by Canon and stated on the card apply.
Your product, when delivered to you in new condition in its original container, is warranted against defects in
materials or workmanship as follows: for a period of one (1) year from the date of original purchase, defective
parts or a defective product returned to a Canon repair facility or a Canon Authorized Service Facility (“ASF”)
for such product, as applicable, and proven to be defective upon inspection, will be exchanged for new or
comparable rebuilt parts, or a refurbished product, as determined by the Canon repair facility or the ASF.
Warranty repair or replacement shall not extend the original warranty period of the defective product. This
limited warranty does not cover any supplies or accessories, including without limitation, ink tanks, as to
which there shall be no warranty or replacement.
This limited warranty shall only apply if the product is used in conjunction with compatible computer
equipment and compatible software, as to which items Canon shall have no responsibility.
Non-Canon brand equipment and software that may be distributed with the product are sold “as is,” without
warranty of any kind by Canon, including any implied warranty regarding merchantability or fitness for a
particular purpose, and all such warranties are disclaimed. The sole warranty, if any, with respect to such nonCanon brand items is given by the manufacturer or producer thereof.
This limited warranty covers all defects encountered in normal use of the product, and does not apply in the
following cases:
(a) Loss of or damage to the product due to abuse, mishandling, improper packaging by you, alteration,
accident, electrical current fluctuations, failure to follow operating, maintenance or environmental
instructions prescribed in Canon’s instruction manual, or service performed by other than a Canon repair
facility or an ASF.
(b) Use of parts or supplies (other than those sold by Canon) that cause damage to the product or cause
abnormally frequent service calls or service problems.
(c) If the product has had its serial number or dating altered or removed.
NO IMPLIED WARRANTY, INCLUDING ANY IMPLIED WARRANTY OF MERCHANTABILITY OR FITNESS FOR A
PARTICULAR PURPOSE, APPLIES TO THE PRODUCT AFTER THE APPLICABLE PERIOD OF THE EXPRESS LIMITED
WARRANTY STATED ABOVE, AND NO OTHER EXPRESS WARRANTY OR GUARANTY, EXCEPT AS MENTIONED ABOVE,
GIVEN BY ANY PERSON OR ENTITY WITH RESPECT TO THE PRODUCT SHALL BIND CANON. (SOME STATES DO NOT
ALLOW LIMITATIONS ON HOW LONG AN IMPLIED WARRANTY LASTS, SO THE ABOVE LIMITATION MAY NOT APPLY
TO YOU.) CANON SHALL NOT BE LIABLE FOR LOSS OF REVENUES OR PROFITS, INCONVENIENCE, EXPENSE FOR
SUBSTITUTE EQUIPMENT OR SERVICE, STORAGE CHARGES, LOSS OR CORRUPTION OF DATA, OR ANY OTHER
SPECIAL, INCIDENTAL OR CONSEQUENTIAL DAMAGES CAUSED BY THE USE OR MISUSE OF, OR INABILITY TO USE
THE PRODUCT, REGARDLESS OF THE LEGAL THEORY ON WHICH THE CLAIM IS BASED, AND EVEN IF CANON HAS
BEEN ADVISED OF THE POSSIBILITY OF SUCH DAMAGES. IN NO EVENT SHALL RECOVERY OF ANY KIND AGAINST
CANON BE GREATER IN AMOUNT THAN THE PURCHASE PRICE OF THE PRODUCT SOLD BY CANON WHICH CAUSED
THE ALLEGED DAMAGE.
WITHOUT LIMITING THE FOREGOING, YOU ASSUME ALL RISK AND LIABILITY FOR LOSS, DAMAGE OR INJURY TO
YOU AND YOUR PROPERTY AND TO OTHERS AND THEIR PROPERTY ARISING OUT OF USE OR MISUSE OF, OR
INABILITY TO USE THE PRODUCT NOT CAUSED DIRECTLY BY THE NEGLIGENCE OF CANON. (SOME STATES DO NOT
ALLOW THE EXCLUSION OR LIMITATION OF INCIDENTAL OR CONSEQUENTIAL DAMAGES, SO THE ABOVE
EXCLUSION OR LIMITATION MAY NOT APPLY TO YOU.) THIS LIMITED WARRANTY SHALL NOT EXTEND TO ANYONE
OTHER THAN THE ORIGINAL PURCHASER OF THE PRODUCT, OR THE PERSON FOR WHOM IT WAS PURCHASED AS
A GIFT, AND STATES YOUR EXCLUSIVE REMEDY.
Appendix
4499
Page 56

Canon offers a full range of customer technical support* options:
For e-mail technical support, the latest driver downloads and answers to frequently asked questions
((wwwwww..uussaa..ccaannoonn..ccoomm))
24-hour, 7-day-a-week, automated support for troubleshooting issues on most current products
((11--880000--442233--22336666))
24-hour, Fax-On-Demand System for product specifications and technical information
((11--880000--552266--44334455))
Free technical support Monday—Saturday (excluding holidays) for products still under warranty
((11--775577--441133--22884488))
Technical support 7 days a week (excluding holidays) for products no longer under warranty, at $9.99 per call
((11--775577--441133--22884488))
If the problem can’t be corrected by using one of the above technical support options, you will be asked to
follow the applicable procedures for warranty service.
NNoottee tthhaatt aa ddaatteedd pprrooooff ooff ppuurrcchhaassee ((bbiillll ooff ssaallee)) iiss
rreeqquuiirreedd ttoo vveerriiffyy eelliiggiibbiilliittyy aatt tthhee ttiimmee ooff sseerrvviiccee.. TThhiiss rreeqquuiirreemmeenntt wwiillll bbee ssaattiissffiieedd bbyy pprroovviiddiinngg aa ccooppyy ooff
yyoouurr ddaatteedd bbiillll ooff ssaallee.. YYoouu wwiillll aallssoo nneeeedd ttoo ssuuppppllyy tthhee pprroodduucctt sseerriiaall nnuummbbeerr..
CCaarrrryy--IInn//MMaaiill--IInn
Carry-In/Mail-In is a service program by which your defective product is repaired by an ASF. The name and
telephone number of the ASF(s) nearest to your location may be obtained from our Web site at:
www.usa.canon.com, or by calling the Canon Customer Care Center at 1-800-423-2366. If shipping is involved,
it is your responsibility to properly package and send your defective product, together with your dated proof of
purchase, a complete explanation of the problem and a return address, to the ASF at your expense. Do not
include any other items with your product. The repair(s) covered by this limited warranty will be made and the
product will be returned to you without charge by the ASF. Repairs not covered under this limited warranty will
be charged to you at such costs as each ASF may generally establish from time to time.
IInnssttaannttEExxcchhaannggee††
InstantExchange is a warranty program that expedites, usually by the next business day,†† the exchange of a
defective product with a refurbished product. The refurbished product you receive will be covered by the
balance of the period remaining on your original limited warranty.
NNoottee tthhaatt bbyy uussiinngg tthhiiss sseerrvviiccee yyoouu wwiillll kkeeeepp
tthhee rreeppllaacceemmeenntt pprroodduucctt tthhaatt iiss sseenntt ttoo yyoouu,, aanndd yyoouurr oorriiggiinnaallllyy ppuurrcchhaasseedd pprroodduucctt sshhaallll bbeeccoommee tthhee pprrooppeerrttyy
ooff CCaannoonn
. InstantExchange warranty program service is available only during the express limited-warranty
period for your product and only in the continental United States, Alaska and Hawaii during such period.
If the Canon Customer Care Center representative cannot correct the problem with your product over the
telephone, and you elect InstantExchange warranty program service, the representative will issue you a
reference number upon verification of warranty eligibility. You will be asked for information pertaining to your
defective product and for a ship-to location for the replacement product (street address only). You must also
provide a major credit card number that will be pre-authorized by Canon in an amount up to the cost of a new
product at the time you elect InstantExchange warranty program service.
YYoouurr ccrreeddiitt ccaarrdd nnuummbbeerr wwiillll bbee
cchhaarrggeedd iinn aann aammoouunntt uupp ttoo tthhee ccoosstt ooff aa nneeww pprroodduucctt
(i) if you do not return your defective product to a Canon
repair facility by the date specified by Canon and in the manner described below; (ii) if the defect(s) in the
product is/are not covered by this limited warranty; or (iii) if the warranty period on the product has expired or
has not been sufficiently established by your supplying the appropriate documentation.
The Canon repair facility will ship out the replacement product via overnight courier, prepaid by Canon. After
receipt of the replacement product (with instructions and a pre-paid return waybill), follow the instructions to
ship the defective product to a Canon repair facility. You must return the defective product in the shipping
carton in which the replacement product was packed (be sure to retain your printhead and ink tanks), and you
must include the reference number,
aa ccooppyy ooff yyoouurr ddaatteedd pprrooooff ooff ppuurrcchhaassee
(bill of sale) and a complete
explanation of the problem.
DDoo nnoott iinncclluuddee aannyy ootthheerr iitteemmss iinn tthhee rreettuurrnn sshhiippppiinngg ccoonnttaaiinneerr
.
Appendix
5500
Page 57

This limited warranty gives you specific legal rights, and you may also have other rights that vary from state
to state.
* Support program specifics are subject to change without notice.
† InstantExchange warranty program service is subject to availability of refurbished replacement units.
†† 9 a.m.–5 p.m. (local), Monday–Friday (excluding holidays). The Canon Customer Care Center must receive pertinent
information by 3 p.m. (E.S.T.) to ensure next-business-day InstantExchange warranty program service (two-business-day
InstantExchange warranty service for Alaska and Hawaii). Canon does not guarantee next-business-day service in the event
of factors beyond Canon’s reasonable control.
Appendix
5511
Page 58

Appendix
5522
Page 59

AA
adjusting
brightness . . . . . . . . . . . . . . . . . . . . . . . . . . . 12
color balance . . . . . . . . . . . . . . . . . . . . . . . . . 12
color saturation . . . . . . . . . . . . . . . . . . . . . . . 12
paper thickness lever . . . . . . . . . . . . . . . . . . . 4
print quality . . . . . . . . . . . . . . . . . . . . . . . . . . . 9
advanced print features . . . . . . . . . . . . . . . . . . . 9
aligning the printhead . . . . . . . . . . . . . . . . . . . 23
auto feed paper limits . . . . . . . . . . . . . . . . . . . . 4
auto sheet feeder . . . . . . . . . . . . . . . . . . . . . . . . 5
avoiding paper jams . . . . . . . . . . . . . . . . . . . . . . 5
BB
BJ Solution Software . . . . . . . . . . . . . . . . . . . . .33
brightness, adjusting . . . . . . . . . . . . . . . . . . . 12
CC
cancelling print jobs . . . . . . . . . . . . . . . . . . . . 7-8
checking ink levels . . . . . . . . . . . . . . . . . . . . . . 19
cleaning the printhead . . . . . . . . . . . . . . . . . . . 22
color balance, adjusting . . . . . . . . . . . . . . . . . . 12
color saturation, adjusting . . . . . . . . . . . . . . . . 12
customer care center, contacting . . . . . . . . . . . 32
DD
default printer, setting . . . . . . . . . . . . . . . . . . . . 2
driver
definition of . . . . . . . . . . . . . . . . . . . . . . . . . . . 2
installing . . . . . . . . . . . . . . . . . . . . . . . . . . . . 41
recalling saved settings . . . . . . . . . . . . . 17, 18
removing . . . . . . . . . . . . . . . . . . . . . . . . . . . . 43
saving settings for future use . . . . . . . . . . . . 17
troubleshooting installation of . . . . . . . . . . . 25
uninstalling . . . . . . . . . . . . . . . . . . . . . . . . . . 43
EE
edges, smoothing . . . . . . . . . . . . . . . . . . . . . . . 12
envelopes, how to load . . . . . . . . . . . . . . . . . . . 6
error messages . . . . . . . . . . . . . . . . . . . . . . 30-32
FF
fixing problems, how to . . . . . . . . . . . . . . . . . . 25
GG
graphics, improving quality . . . . . . . . . . . . 10-14
grayscale . . . . . . . . . . . . . . . . . . . . . . . . . . . . . 13
II
ImageBrowser . . . . . . . . . . . . . . . . . . . . . . . . . .38
Image Color Management (ICM) . . . . . . . . . . . . 13
Image Optimizer . . . . . . . . . . . . . . . . . . . . . . . . 12
improving enlarged graphics . . . . . . . . . . . . . . 12
improving print quality . . . . . . . . . . . . . . . . . . . . 9
ink tanks
monitoring levels in . . . . . . . . . . . . . . . . . . . . 19
replacing . . . . . . . . . . . . . . . . . . . . . . . . . . . . 20
installing the BJ Solution Software . . . . . . . . . .34
installing the printer driver . . . . . . . . . . . . . 41-42
LL
loading envelopes . . . . . . . . . . . . . . . . . . . . . . . 6
loading paper and other media . . . . . . . . . . . . . 5
MM
manually adjusting color settings . . . . . . . . . . 12
media
loading . . . . . . . . . . . . . . . . . . . . . . . . . . . . . . 5
to avoid . . . . . . . . . . . . . . . . . . . . . . . . . . . . . . 4
types of . . . . . . . . . . . . . . . . . . . . . . . . . . . . . . 3
monitoring ink levels . . . . . . . . . . . . . . . . . . . . 19
5533
IInnddeexx
Page 60

Index
5544
NN
nozzle check pattern, printing . . . . . . . . . . . . . 20
OO
online manual/BJ Solution Software . . . . . . . . .35
online product registration . . . . . . . . . . . . . 43-44
PP
panoramic view . . . . . . . . . . . . . . . . . . . . . .37, 40
page setup . . . . . . . . . . . . . . . . . . . . . . . . . 14, 15
paper
how many sheets can be used in auto feeder . . . 4
loading . . . . . . . . . . . . . . . . . . . . . . . . . . . . . . 5
paper jams, avoiding . . . . . . . . . . . . . . . . . . . . . 5
paper thickness lever . . . . . . . . . . . . . . . . . . . 4, 5
paper types to avoid . . . . . . . . . . . . . . . . . . . . . . 4
perforated paper . . . . . . . . . . . . . . . . . .37, 39, 40
photos, improving quality when printing . . 13, 14
Photo Paper Pro . . . . . . . . . . . . . . . . . . .33, 36-40
POWER button . . . . . . . . . . . . . . . . . . . . . . . . . . 1
POWER lamp . . . . . . . . . . . . . . . . . . . 1, 25, 30-31
powering up the printer . . . . . . . . . . . . . . . . . . . 1
print job, cancelling . . . . . . . . . . . . . . . . . . . . 7-8
print quality
adjusting . . . . . . . . . . . . . . . . . . . . . . . . . . . . 10
controlling . . . . . . . . . . . . . . . . . . . . . . . . . . . . 9
printer
choosing . . . . . . . . . . . . . . . . . . . . . . . . . . . . . 2
setting as default . . . . . . . . . . . . . . . . . . . . . . . 2
printer driver, definition of . . . . . . . . . . . . . . . . . 2
printhead alignment . . . . . . . . . . . . . . . . . 22, 23
printhead cleaning . . . . . . . . . . . . . . . . . . . . . . 22
printing
adjusting brightness . . . . . . . . . . . . . . . . . . . 12
adjusting color balance . . . . . . . . . . . . . . . . . 12
adjusting color saturation . . . . . . . . . . . . . . . 12
nozzle check pattern . . . . . . . . . . . . . . . . . . . 20
smoothing rough edges . . . . . . . . . . . . . . . . 12
troubleshooting . . . . . . . . . . . . . . . . . . . . 27-30
printing color images in grayscale . . . . . . . . . . 13
problems, what to do to fix . . . . . . . . . . . . . . . 25
product registration . . . . . . . . . . . . . . . . . . . . . 43
QQ
quality of printing . . . . . . . . . . . . . . . . . . . . . . . . 9
RR
registering your product . . . . . . . . . . . . . . . . . . 43
replacing empty ink tanks . . . . . . . . . . . . . . . . 20
SS
safety information . . . . . . . . . . . . . . . . . . . . 44-46
scaled printing . . . . . . . . . . . . . . . . . . . . . . 16, 17
smoothing rough edges in images . . . . . . . . . . 12
stopping a print job, how to . . . . . . . . . . . . . . 7-8
support . . . . . . . . . . . . . . . . . . . . . . . . . . . 32, 50
system requirements . . . . . . . . . . . . . . . . .34, 47
TT
tech support, how to contact . . . . . . . . . . . 32, 50
thick paper, lever position for . . . . . . . . . . . . . . 5
troubleshooting
error messages . . . . . . . . . . . . . . . . . . . . 30-32
installation . . . . . . . . . . . . . . . . . . . . . . . . 25-27
installing the printer driver . . . . . . . . . . . 41-42
printer hardware . . . . . . . . . . . . . . . . . . . 27-28
software installation problems . . . . . . . . 25-27
turning your printer on and off . . . . . . . . . . . . . . 1
UU
uninstalling the BJ Solution Software . . . . .38, 40
uninstalling the printer driver . . . . . . . . . . . . . 43
WW
warranty . . . . . . . . . . . . . . . . . . . . . . . . . . . 49-51
ZZ
ZoomBrowser EX . . . . . . . . . . . . . . . . . . . . . . . .36
Page 61

5555
Page 62

5566
Page 63
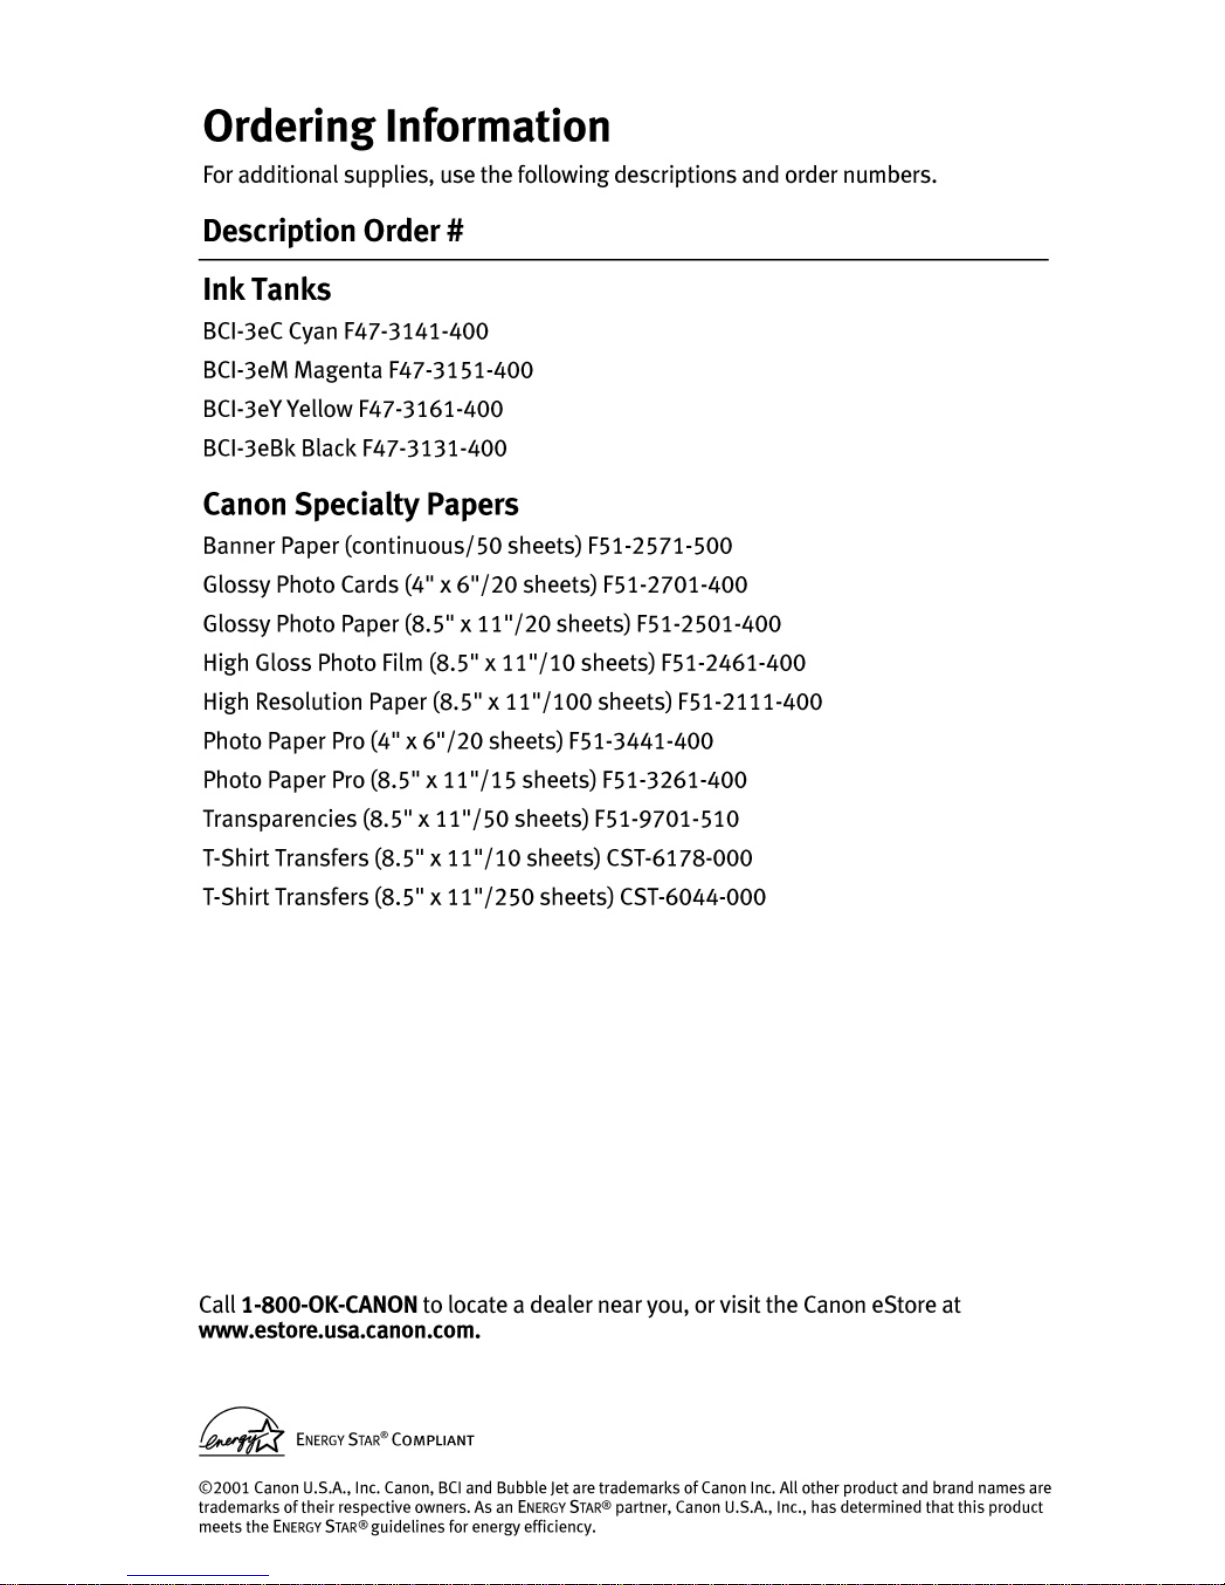
Page 64
 Loading...