

Page 1
BJC-6000 Series Setup Instructions
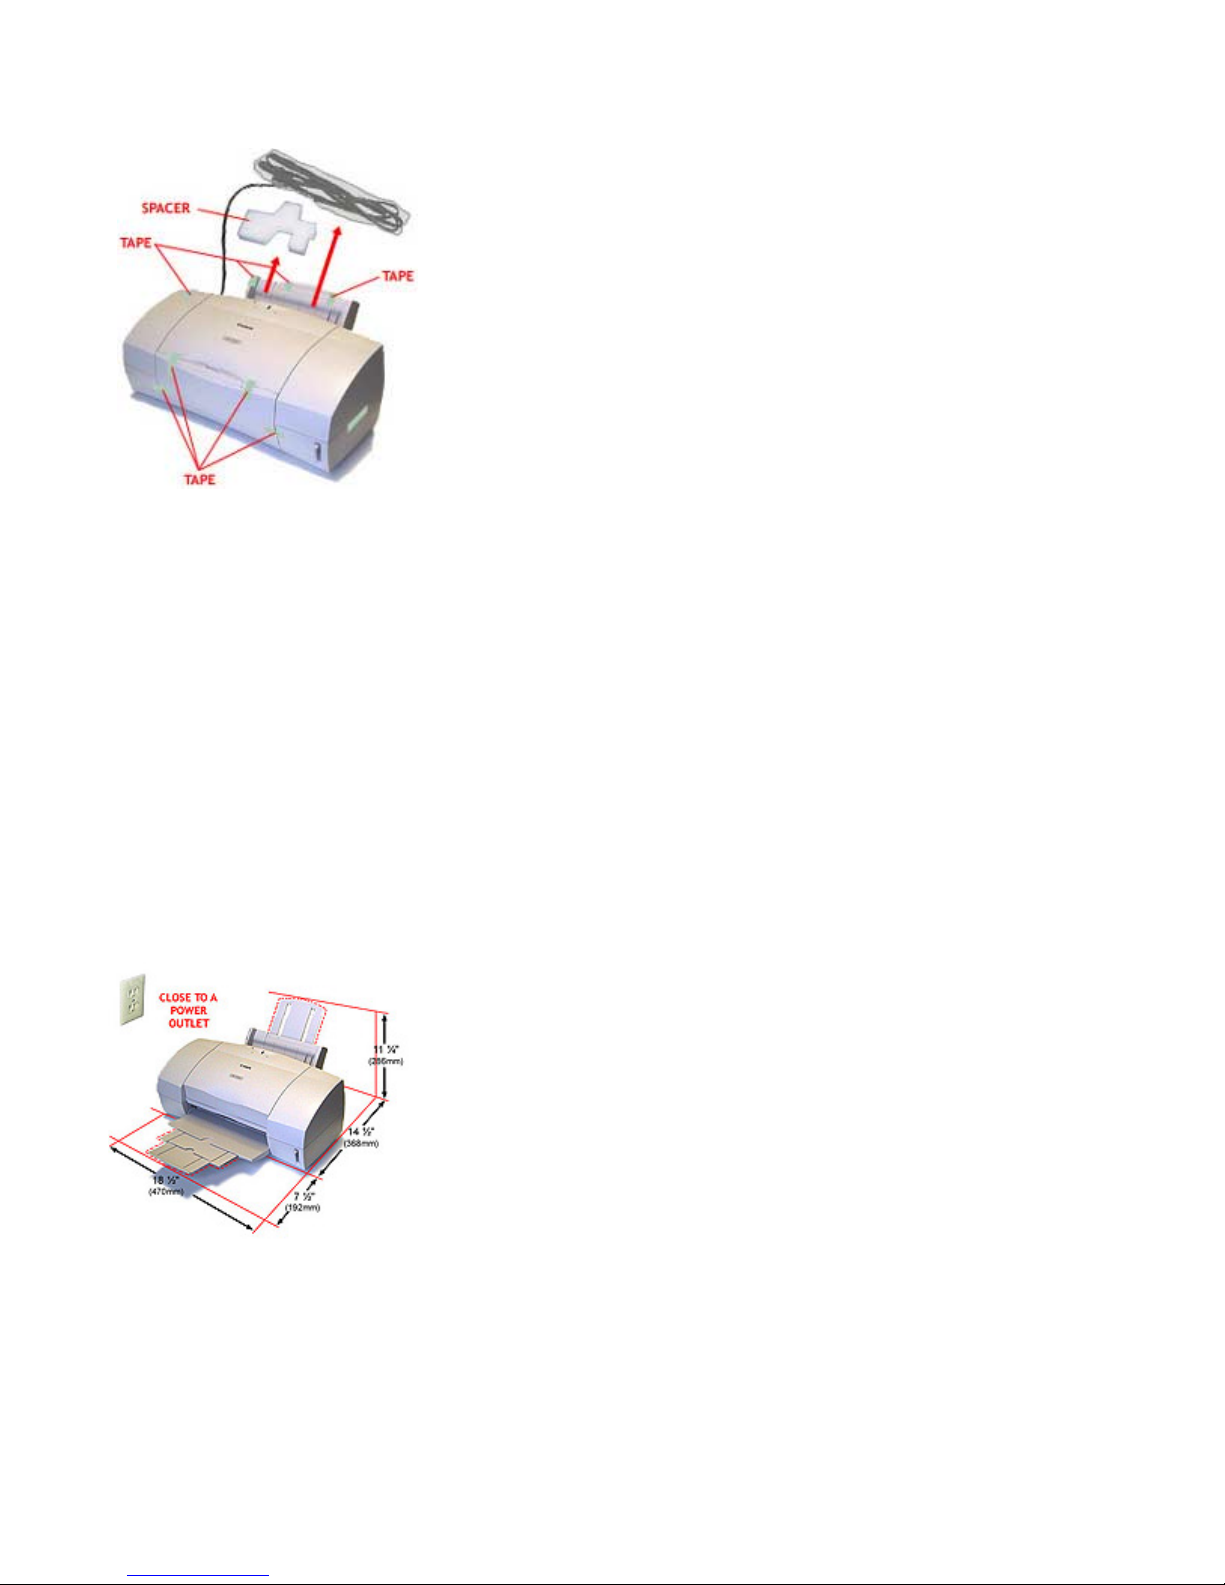
Step 1: Remove All Shipping Tape and Protective Materials
Note that tape may not be in the exact locations shown here.
Remove all tape and material from the front, back, and inside of the printer.
Make sure you have these items:
• BC-31 Color BJ Cartridge
• BC-30 Black BJ Cartridge
• Documentation kit (User's Manual, Warranty Card, Registration Card)
• Canon Creative Pro CD packet
• Printer cab le (not included)
Check the outside of your box for other contents.
Important! Save the box and shipping materials. You may need them later if you have to transpor t the
printer.
Step 2: Select a Location for the Printer
• Choose a flat sturdy surface with enough space around the printer to store and feed paper.
• Avoid placing the printer in direct sunlight.
• Fully extend the paper support and paper output tray to ensure enough spac e is available for proper
operation.
• Make sure you have enough room to manually feed single sheets of paper from the back of the printer
• Always lift the printer by gripping both sides.
Page 2
Step 3: Connect The Printer To The Computer
Important! Make sure the printer and your computer are turned off.
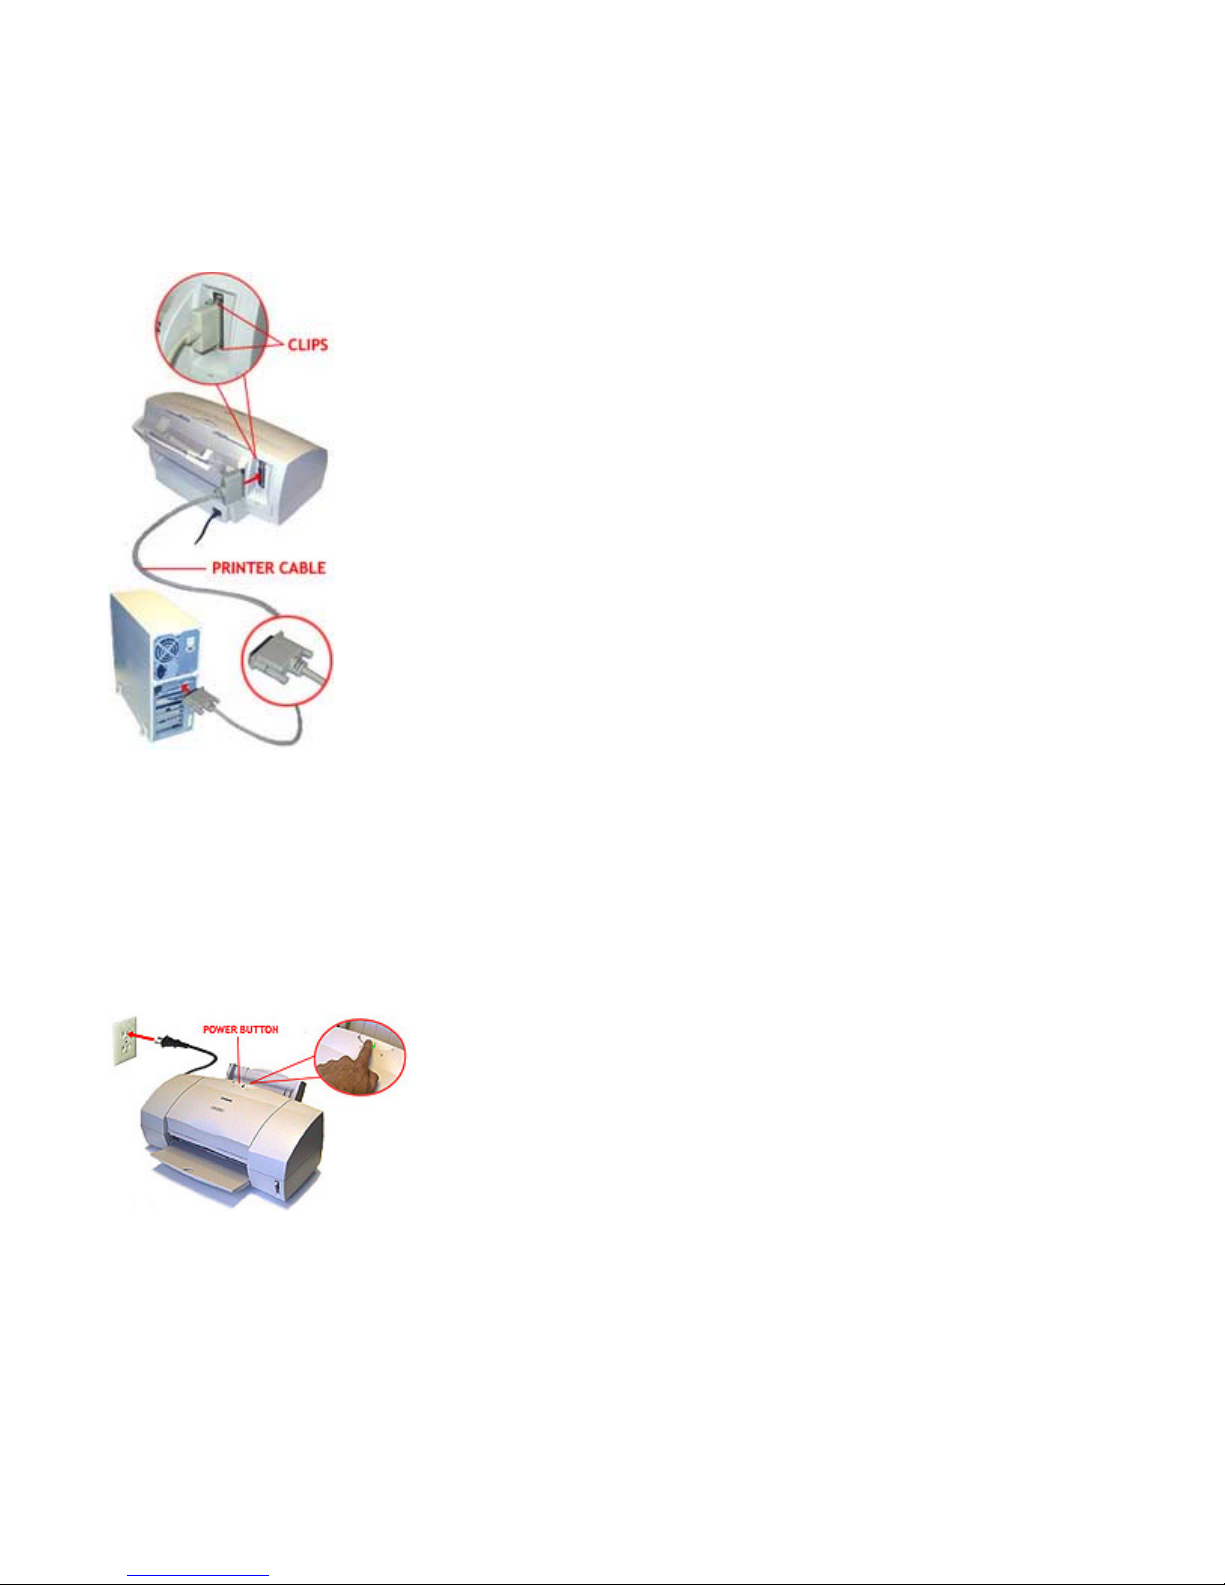
1. Connect a parallel cable to the printer.
• You need to purchase a par allel cable from your dealer.
• The cable must be a Centronics-compatible, bi-directional cable (IEEE 1284-compliant).
2. Then connect the cable to your computer's parallel port..
Step 4: Plug In The Printer
1. Plug the printer into a properly grounded AC outlet.
You can plug the power cord from the printer into either a wall outlet or a power sur ge protector.
Important! Never turn off the printer using a power s trip.
2. Turn on the printer.
Press the POWER button to turn on the printer. The printer beeps once and the POWER light starts to flash.
Page 3
Step 5: Install The BC-31 Color BJ Cartridge
Important! Spilled ink can stain any surface. Open BJ cartridges and Ink Tanks very carefully to
protect against spilled ink.
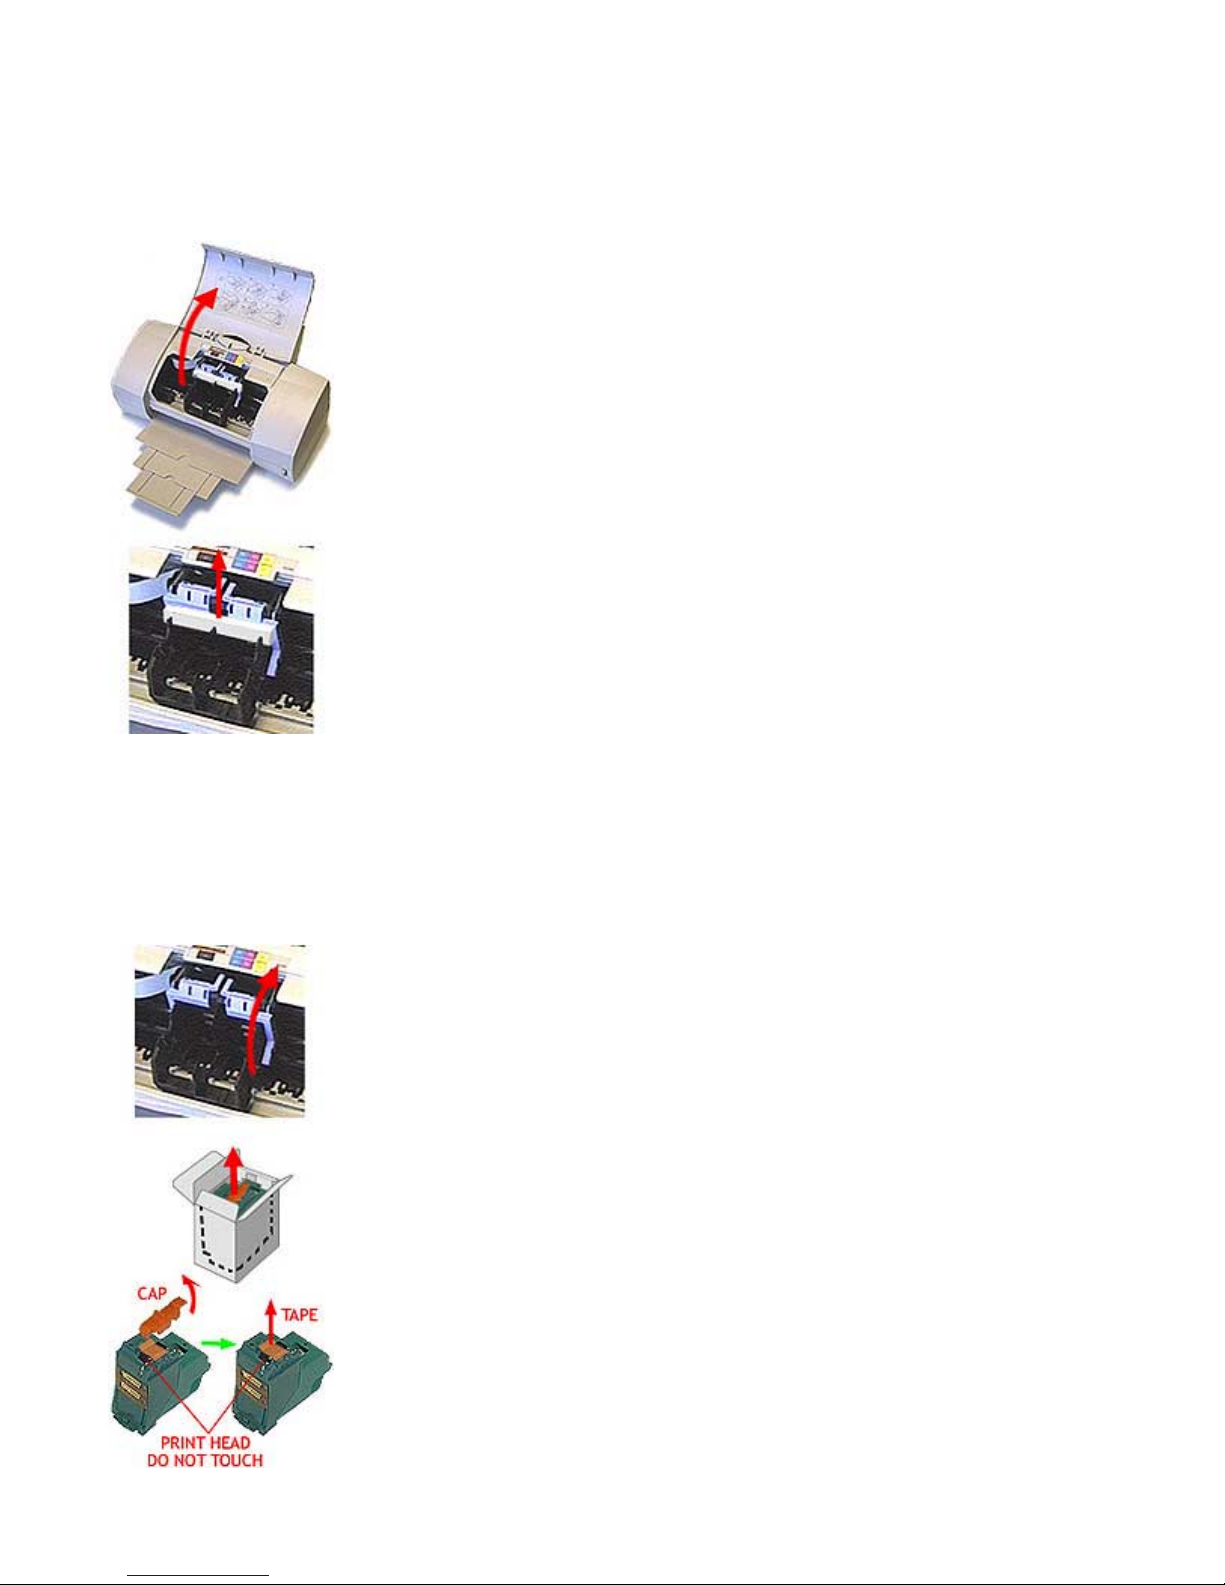
1. Lower the paper output tray and lift up the front cover.
The cartridge holder moves to the center of the printer.
2. Remove the shipping material and tape from the cartridge holder.
• Remove the protective cover.
• Remove tape from the lef t and right side of the cartridge holder.
3. Raise the blue lock lever on the right side of the cartridge holder.
The cartridge holder moves to the center of the printer.
Page 4
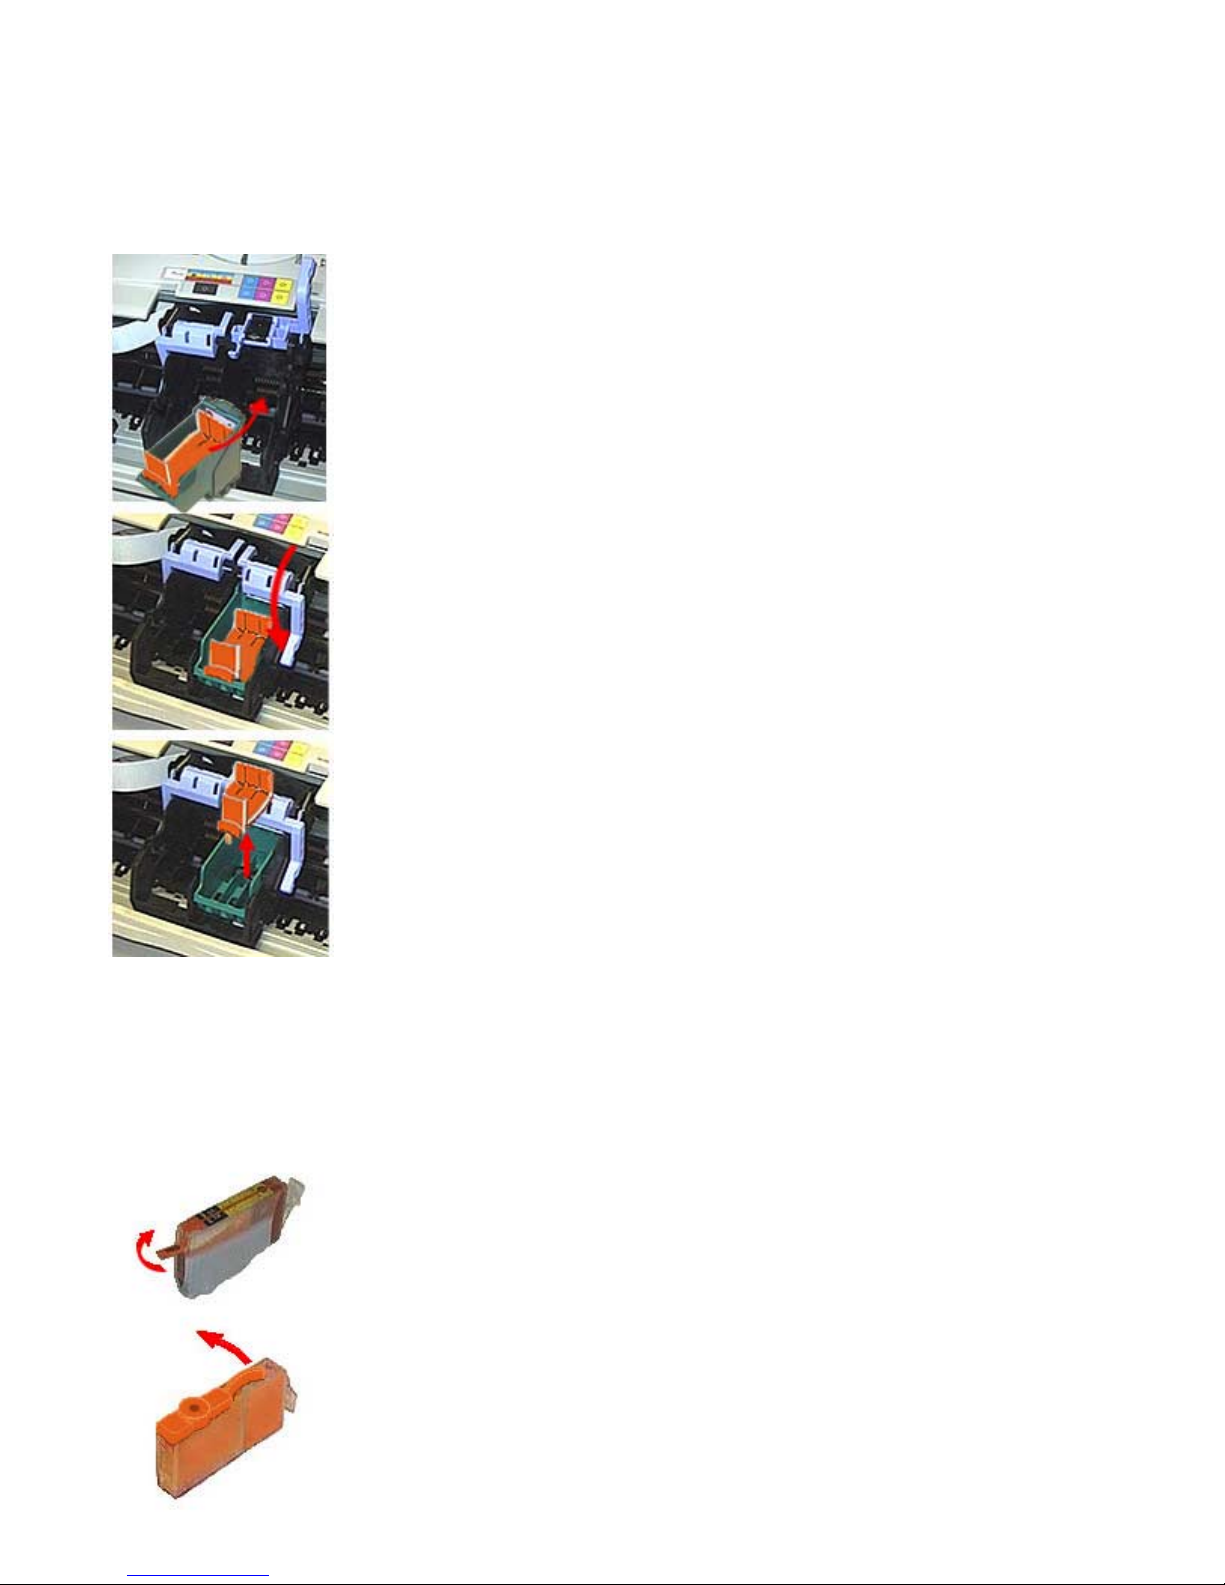
4. Remove the BC-31 Color BJ Cartridge from its box.
Remove the orange protective cap from the print head, and the n remove the orange tape.
Do not attempt to replace the ca p on a BJ cartridge.
5. Insert the BJ cartridge.
• Set the BC-31 Color BJ cartridge into the right slot of the cartridge holder.
• Lower the blue loc k leve r on the right side of the holder until it loc ks into place.
• Remove the empty protec tive tanks one by one from inside the BJ cartridge; press the tab on each tank to
release it.
6. Prepare the Ink Tank.
• Start with the BCI-3Y (Yellow) Ink Tank.
• Pull up the orange tape to break the se al of the clear film.
• Remove the film.
• Push the lever on the protective orange cap in the direction of the arrow and gently twist it off.
• To prevent spilling ink, do not apply force when twist ing off the cap. Use firm even pressure and twist
slowly.
Page 5
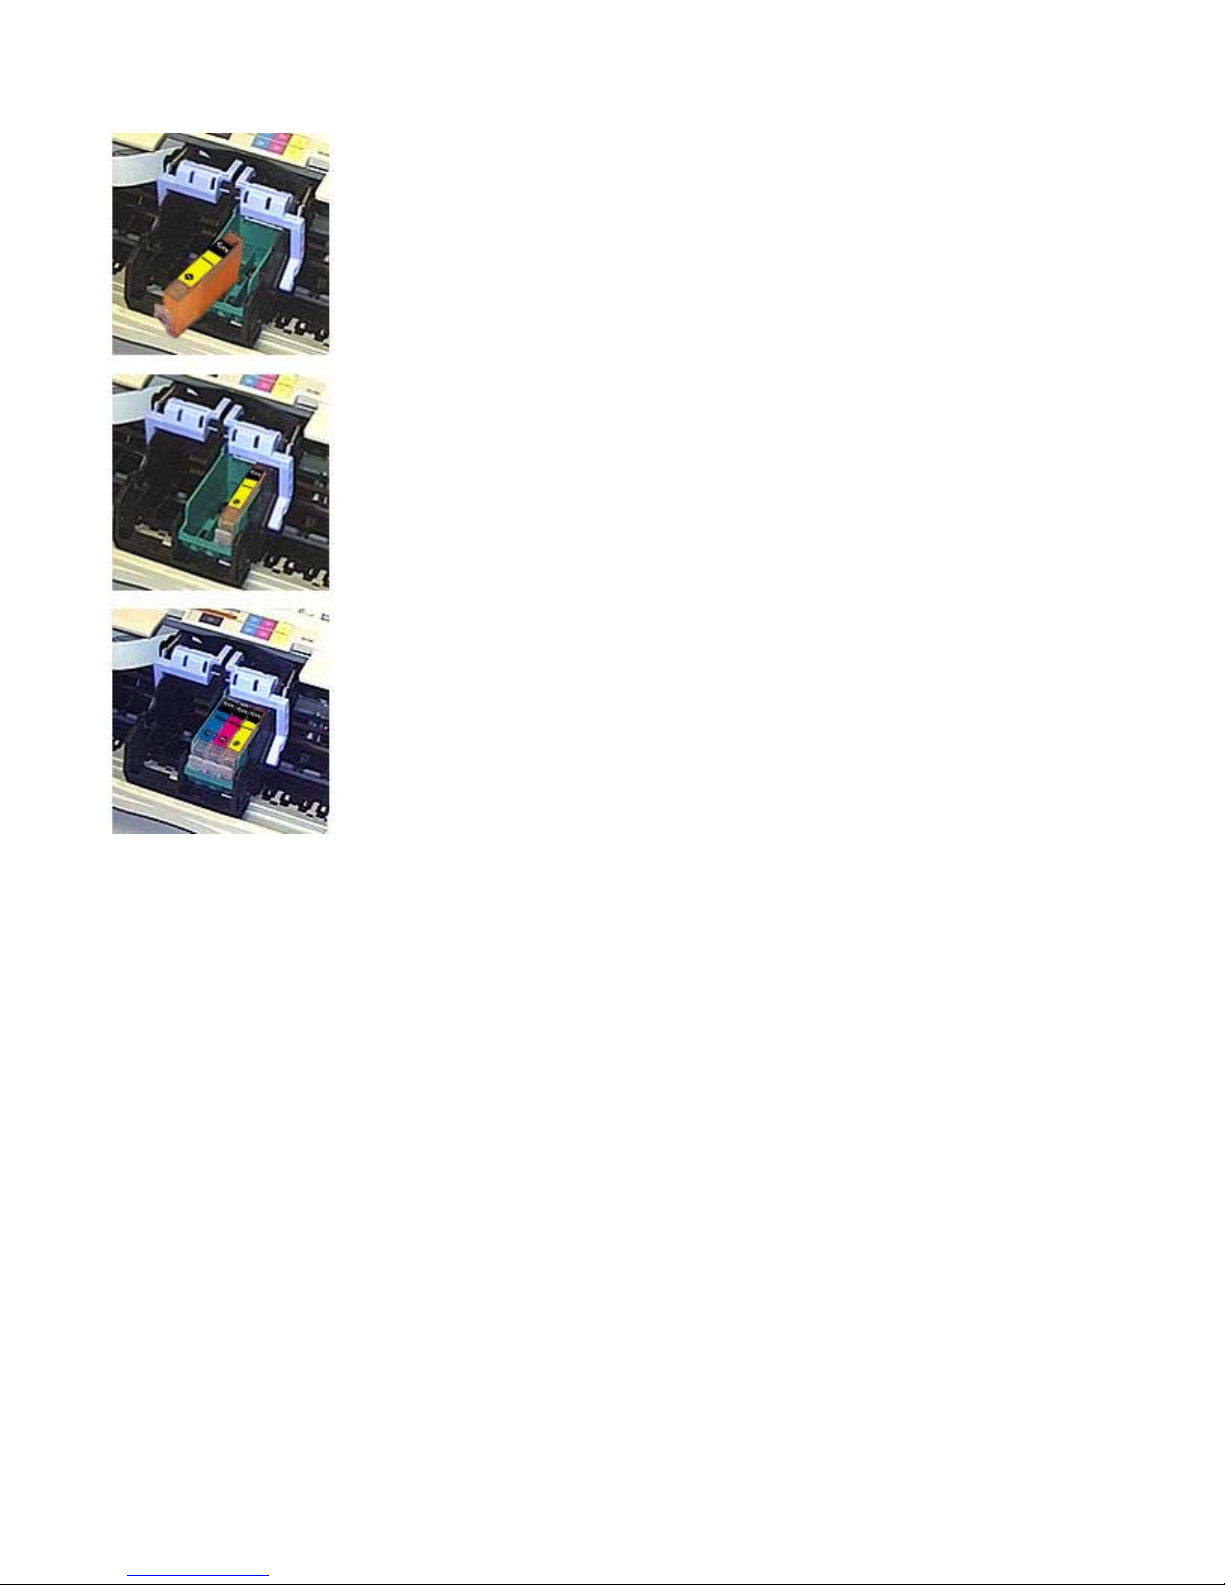
7. Insert the Ink Tank.
• Insert the BCI-3Y (Yellow) Ink Tank into the first slot on the right side of the BJ cartridge.
• Gently press down on the top of the Ink Tank until it locks into place.
8. Insert the other Ink Tanks.
• Repeat steps 6 and 7 for the BCI-3M (Magenta) and BCI-3C (Cyan) Ink Tanks.
• Insert the magenta tank into the center slot and the cyan tank into the left slot.
Page 6
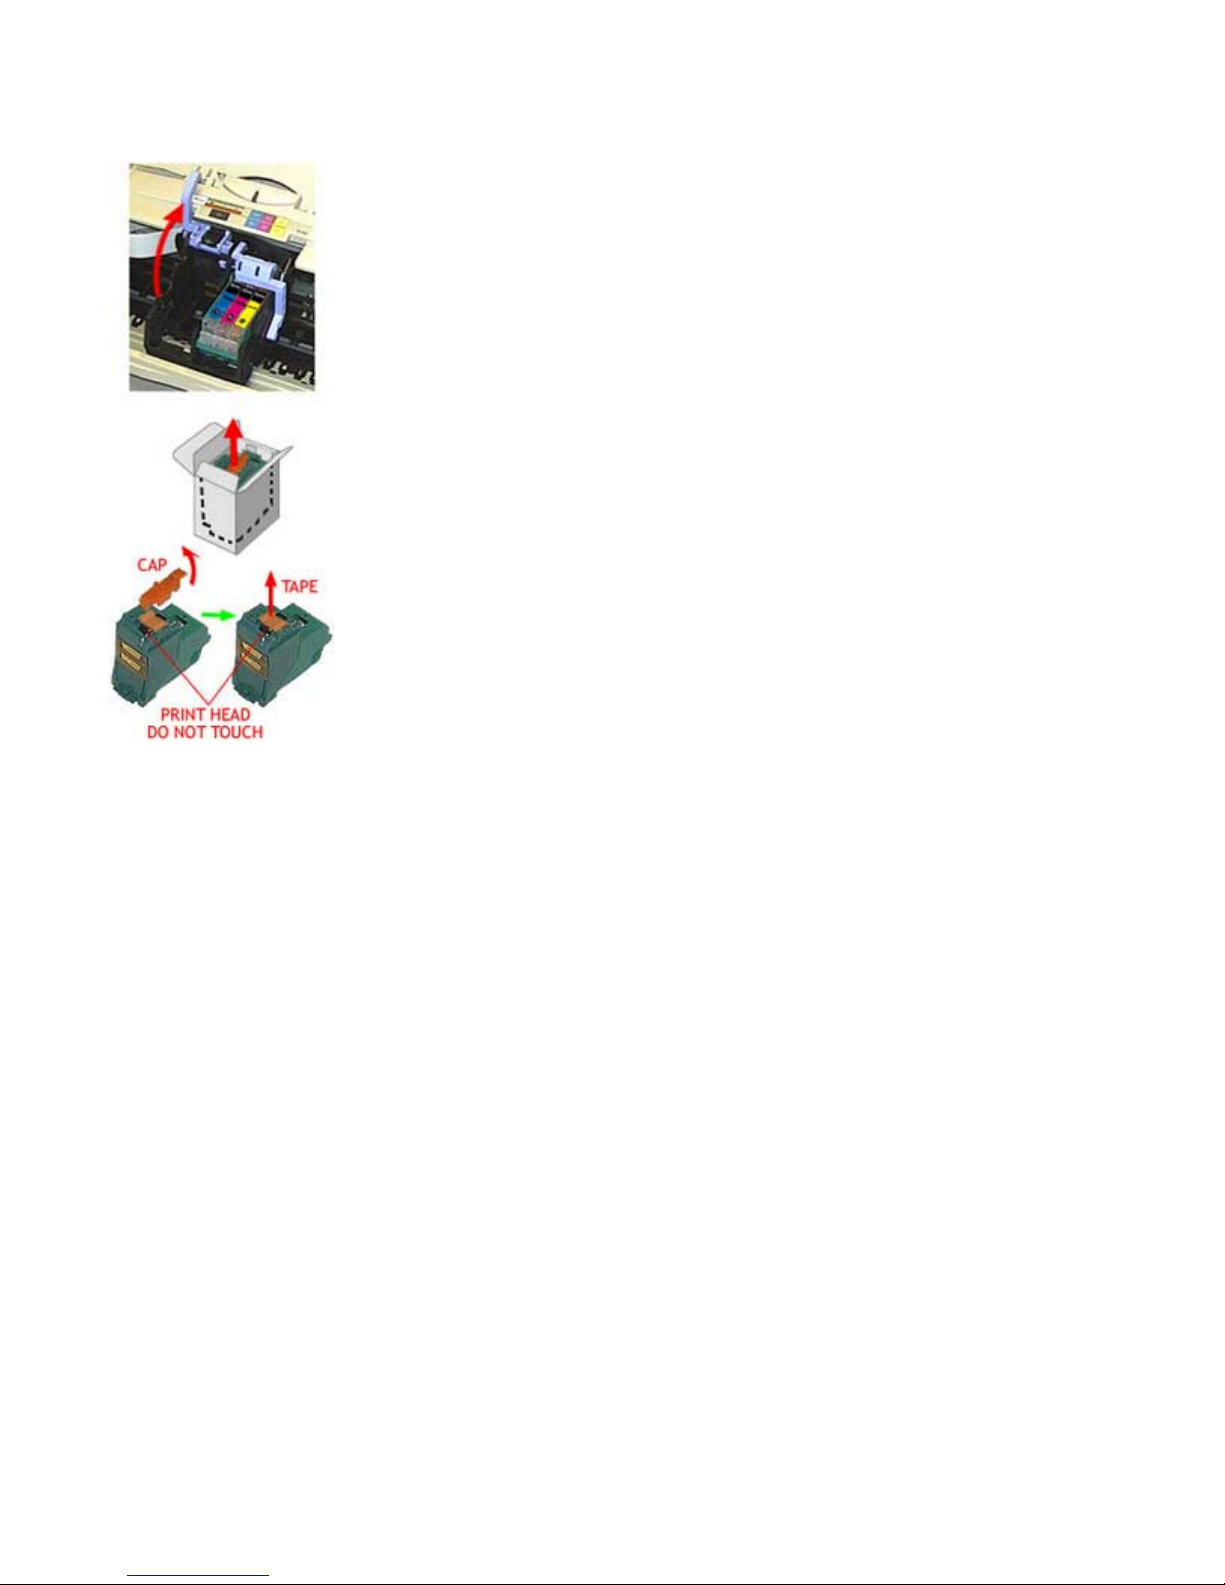
Step 6: Instal l The BC-30 Black BJ Cartridge
1. Raise the blue lock lever on the left side of the cartridge holder.
2. Remove the BC-30 Black BJ Cartridge from its box.
• Remove the orange protective cap from the print head, and then remove the orange tape .
• Do not attempt to replace the ca p on a BJ cartridge.
Page 7
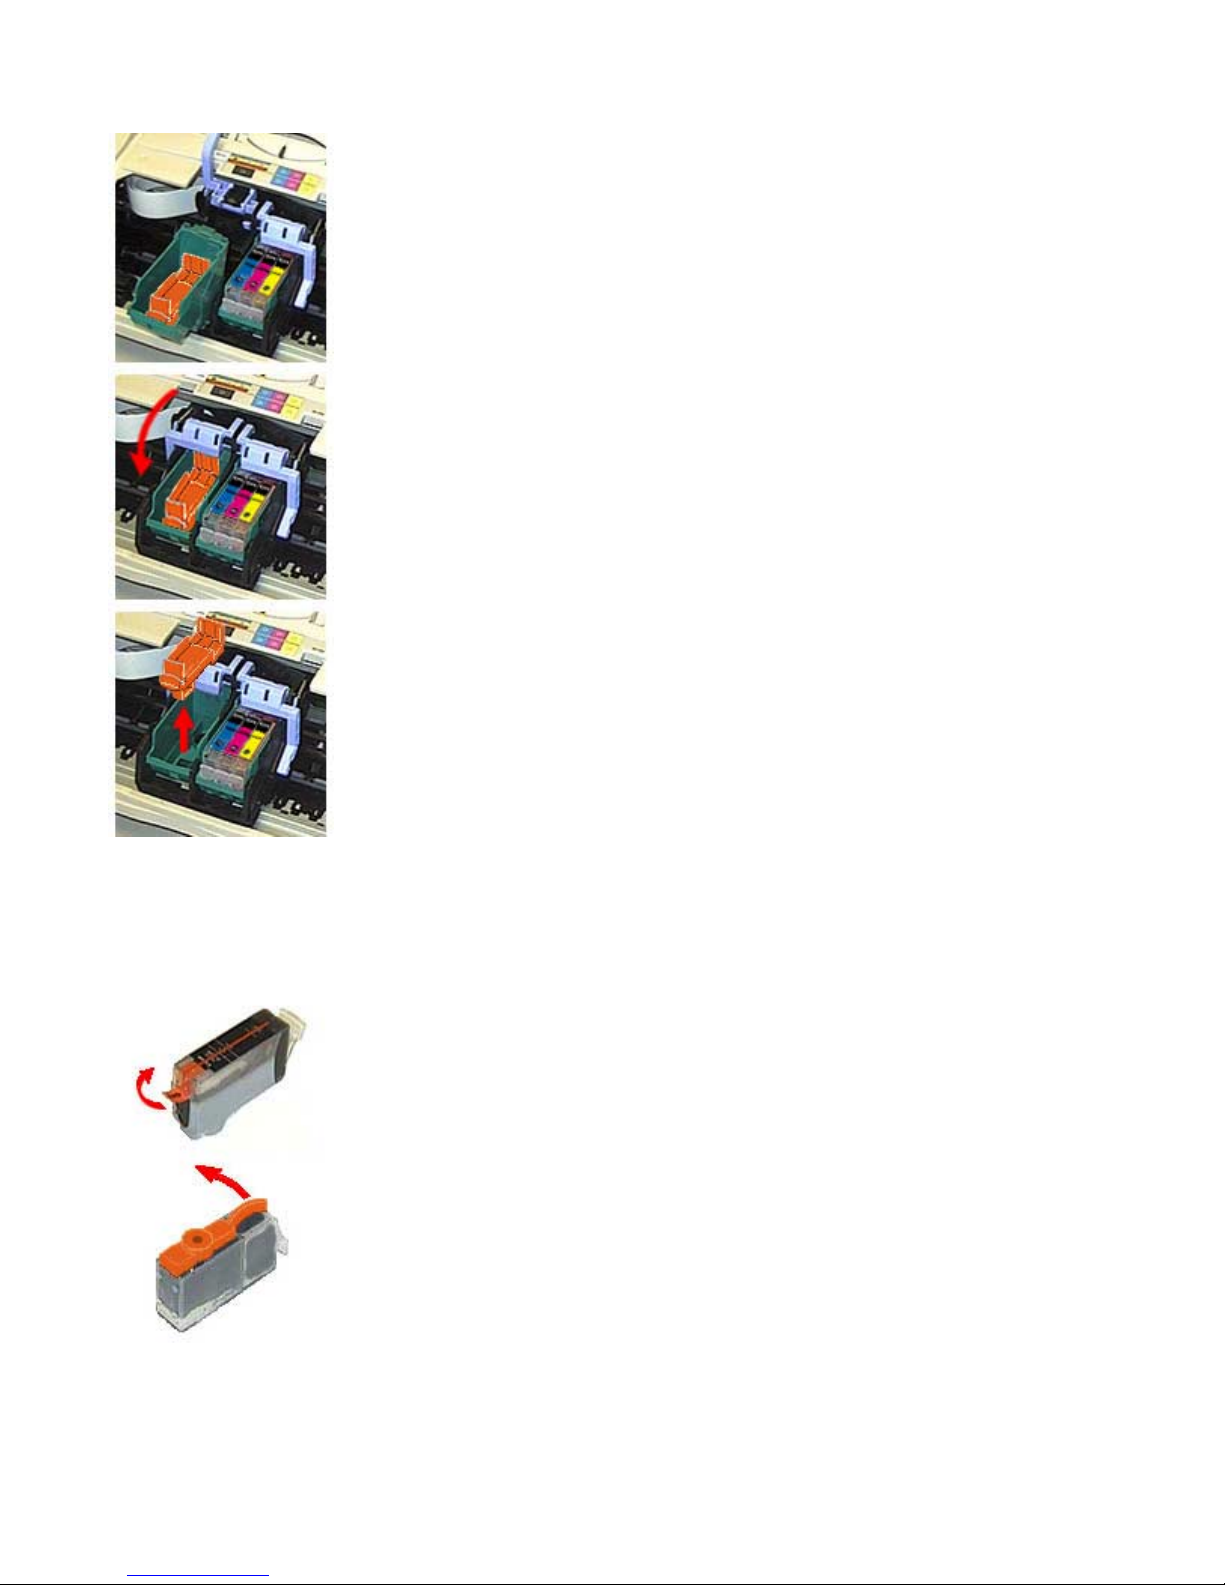
3. Insert the BJ cartridge.
• Set the BC-30 Black BJ cartridge into the left slot of the cartridge holder.
• Lower the blue loc k leve r on the left side of the holder until it loc ks into place.
• Remove the protective tank fr om inside the BJ cartridge.
4. Prepare the Ink Tank.
• Pull up the orange tape to break the seal of the clear film. Remove the film.
• Push the lever on the protective orange cap in the direction of the arrow and gently twist it off.
• To prevent spilling ink, do not apply force when twist ing off the cap. Use firm even pressure and twist
slowly.
Page 8
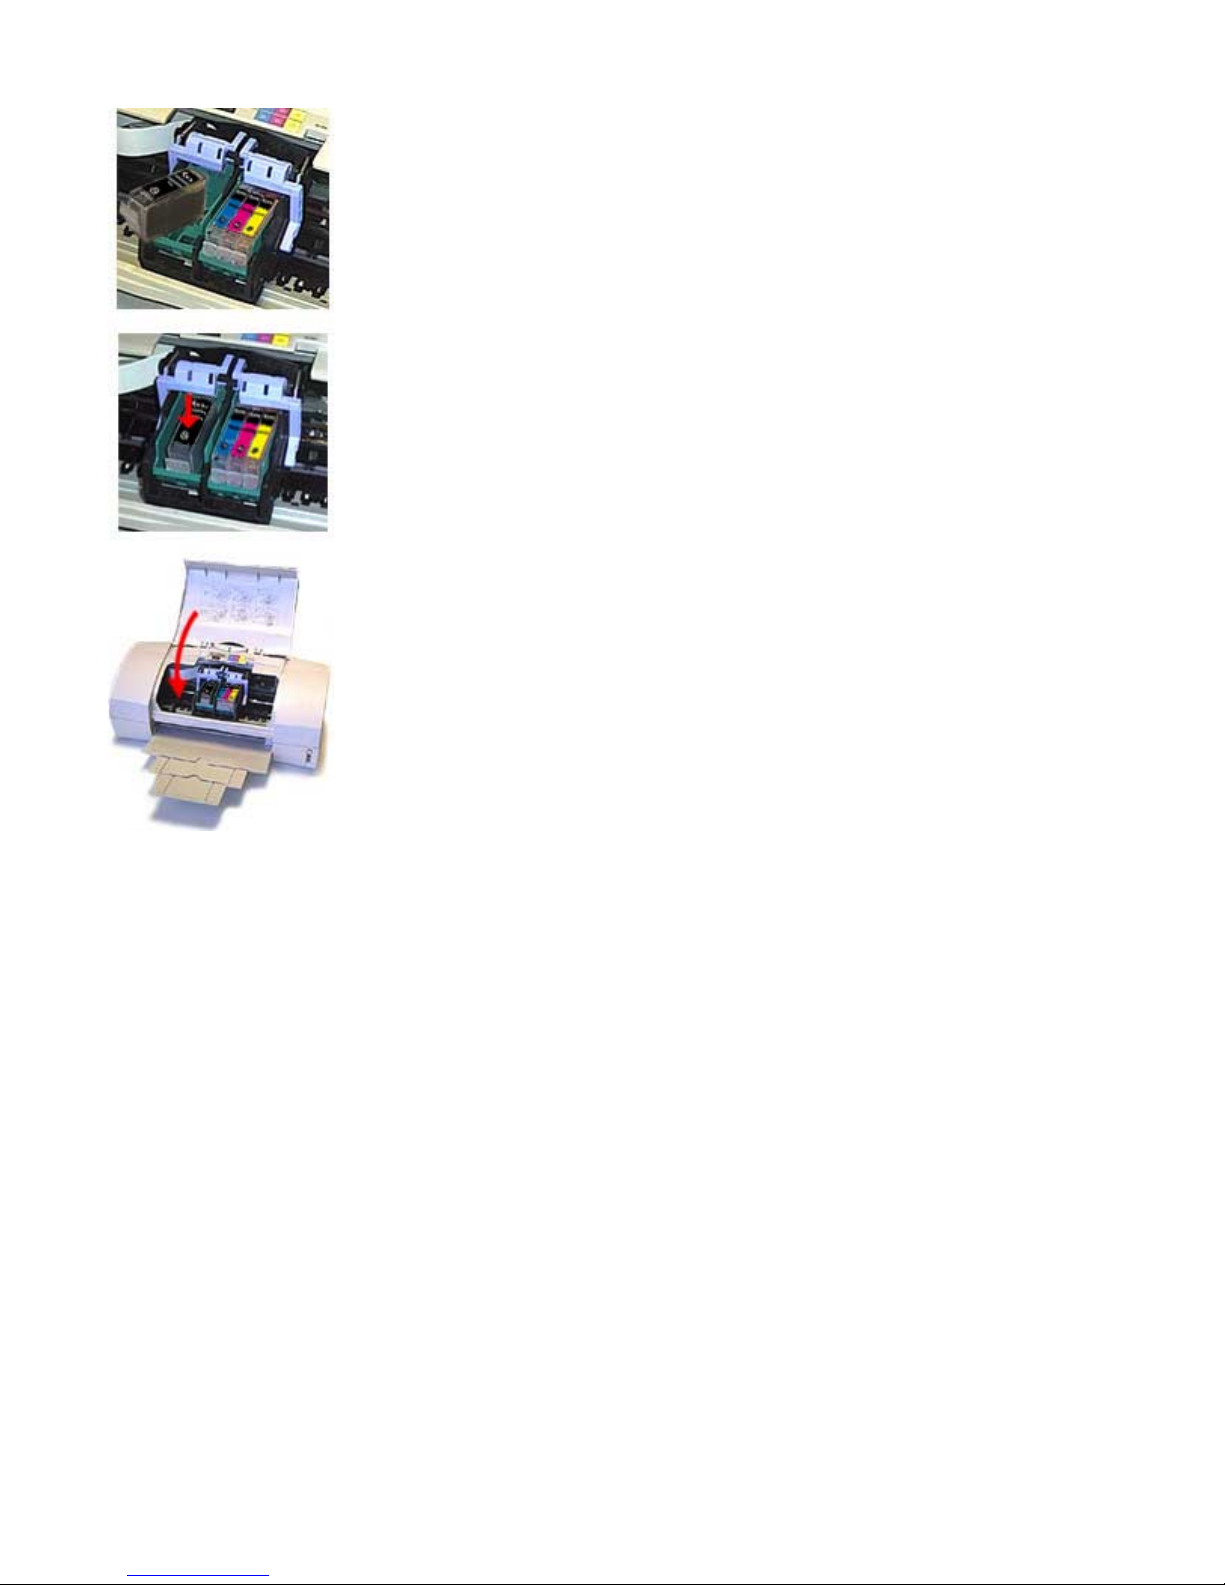
5. Insert the Ink Tank.
• Insert the BCI-3BK (Black) Ink Tank into the slot in the BJ cartridge.
• Gently press down on the top of the Ink Tank until it locks into place.
6. Close the front cover.
After you close the front cover, you will hear t he cartridge holder return to the home position.
The printer automatically cleans the print heads.
Page 9
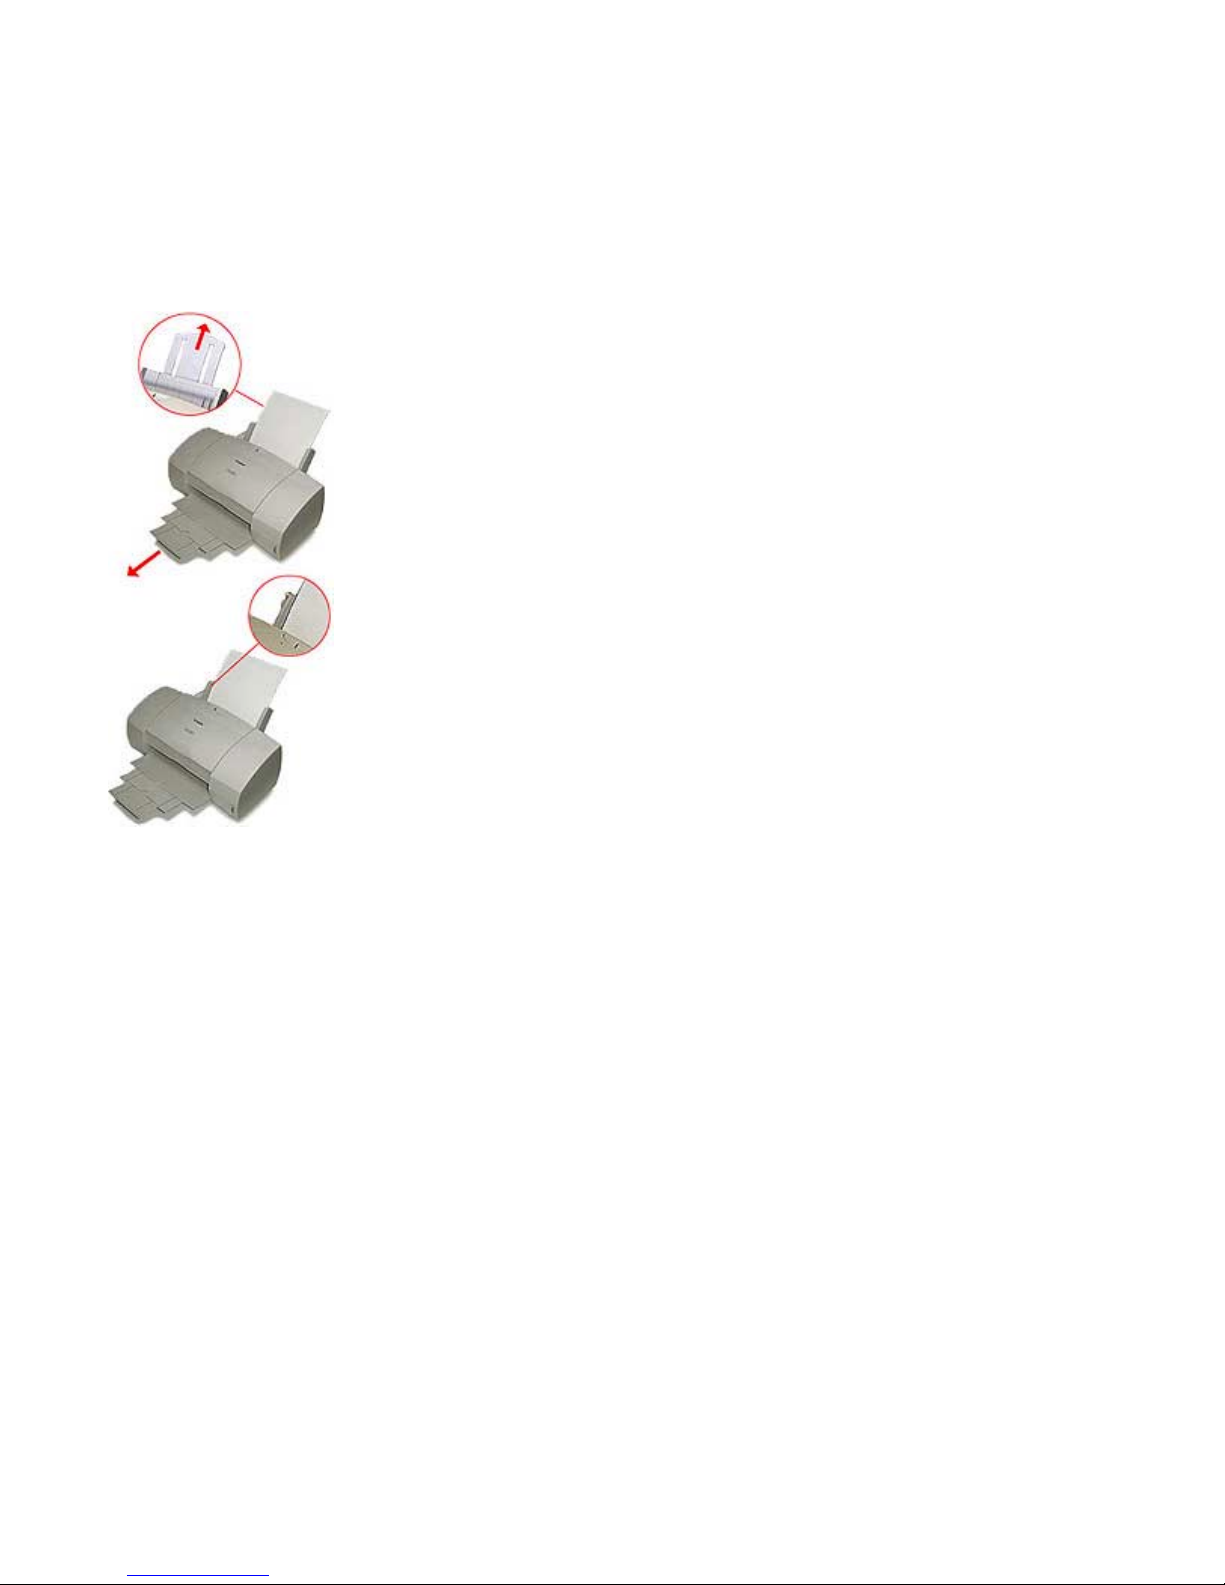
Step 7: Load Paper
1. Pull up the paper support; then lower the paper output tray and pull it all the way out.
Move the paper guide to the left to match the width of your paper.
2. Fan a stack of paper and slide it into the sheet feeder until it stops.
• Adjust the paper guide snug to the edge of the stack.
• The sheet feeder holds up to 130 sheets of paper.
• Make sure the stack of paper does not excee d the limit mark and tab.
Page 10

Step 8: Install The Printer Driver
Important! You must install the B J C-6000 Series Printer Driver for Window s . The printer driver controls the
communication between th e pr inter and your computer. Installing your prin ter dr iver is easy. Use the Canon Creative Pro
CD-ROM and follow these simple bjc 6000s teps for one of the following operating systems:
Printer Setup for Windows 98/ Windows 95/ NT 4.0
Starting your System
Start your system in this order:
1. Make sure your computer is turned off.
2. Check that the printer is connected to the computer.
3. Make sure the printer is turned on.
4. Now turn on the computer.
Starting Windows Printer Setup
If you see a "New Hardware Found", "Update Device Driver Wizard" or "Add New Hardware Wizard" screen, click Cancel.
(Click whatever you need to until you return to the Windows Desktop.)
3. When you see the Windows Desktop, f ol low these bjc6000steps:
1. Insert the Canon Creative Pro CD-ROM into your CD-ROM drive.
o If Setup starts automatically, go to 3.
o If Setup doesn't start, from the taskbar, click Start and then Run.
1. Type D:\SETUP (where D: is yo ur CD-ROM drive - most CD-ROM drives ar e D: or E: - try
D: first; if you see an error message, try E:). Then click OK.
2. Follow the on-screen instructions. Be sure to wait for Windows to complete each operation.
Click OK to restart your computer.
Note: The next time you start your computer, you may s ee the "New Hardwar e Found" screen. Wa it a fe w
seconds while the system updates itself; the scr een will disappear.
Printer Setup for Windows 3.1
Starting your System
Turn on your printer, and then turn on your computer.
Starting Windows 3.1
Be sure to wait for Windows to complete each operation.
1. Insert the CD-ROM labeled Canon Creative Pro into your CD-ROM drive.
2. From Program Manager, select Run in the File menu.
3. Type D:\SETUP (where D: is your CD-ROM drive). Then click OK.
4. Follow the on-screen instructions.(Select BJC-6000 Series from the list of printers.)
5. When complete, restart Windows.
 Loading...