

Page 1
QuickGuide to Canon
320EX Speedlite Features
The purpose of this QuickGuide is to provide a concise
review of how to operate the basic features and functions
of the Canon 320EX Speedlite. Unless otherwise noted,
the following instructions require your 320EX Speedlite to
be mounted to your camera’s hot shoe. This will allow your
camera to communicate with the 320EX and for you to
make ash settings with the camera’s menu system.
E-TTL II Auto Flash Set-up
For cameras with built-in ash:
1. Press the camera Menu button.
2. Select the rst Shooting Menu (rst camera icon on the
left).
3. Select [Flash control] or [External Speedlite control].
4. Select [External ash func. setting]. Press Set.
5. Set [Flash mode] to [E-TTL II]
This step is not necessary for cameras that have no built-in
ash. It is also not necessary if you have not previously
changed the default ash settings on your camera.
Camera Exposure Mode Settings
The 320EX will function in any of the camera exposure
modes listed below. The maximum shutter speed at which
your camera can synchronize with the ash exposure is
represented by “1/x sec” (such as 1/200th second on EOS
Rebel models).
1 2 3
Mode Shutter speed Aperture
Full Auto, P,
A-DEP
Set automatically (1/x sec. – 1/60 sec.) Automatic
TV Set manually (1/x sec. – 30 sec.) Automatic
AV Set automatically (1/x sec. – 30 sec.) Manual
M Set manually (1/x sec. – 30 sec., Bulb) Manual
The mode you choose will depend mainly on the balance
you prefer between the ash exposure and ambient
light exposure. Longer shutter speeds will allow longer
ambient light exposures to help prevent dark backgrounds;
however, long exposures also risk blur from subject or
camera motion. Smaller apertures provide more depthof-eld but require more ash power and reduce the
maximum ash range.
Flash Coverage
The ash head can be manually extended or retracted to
better match the ash coverage to the camera and lens in
use. Refer to the table below for recommended settings.
Camera type Flash Head Normal Head Extended
APS-C size sensor
(Rebel series, 60D, 7D)
15mm or longer lens 32mm or longer
lens
Full-frame sensor
(EOS 5D & 1Ds series)
24mm or longer lens 50mm or longer
lens
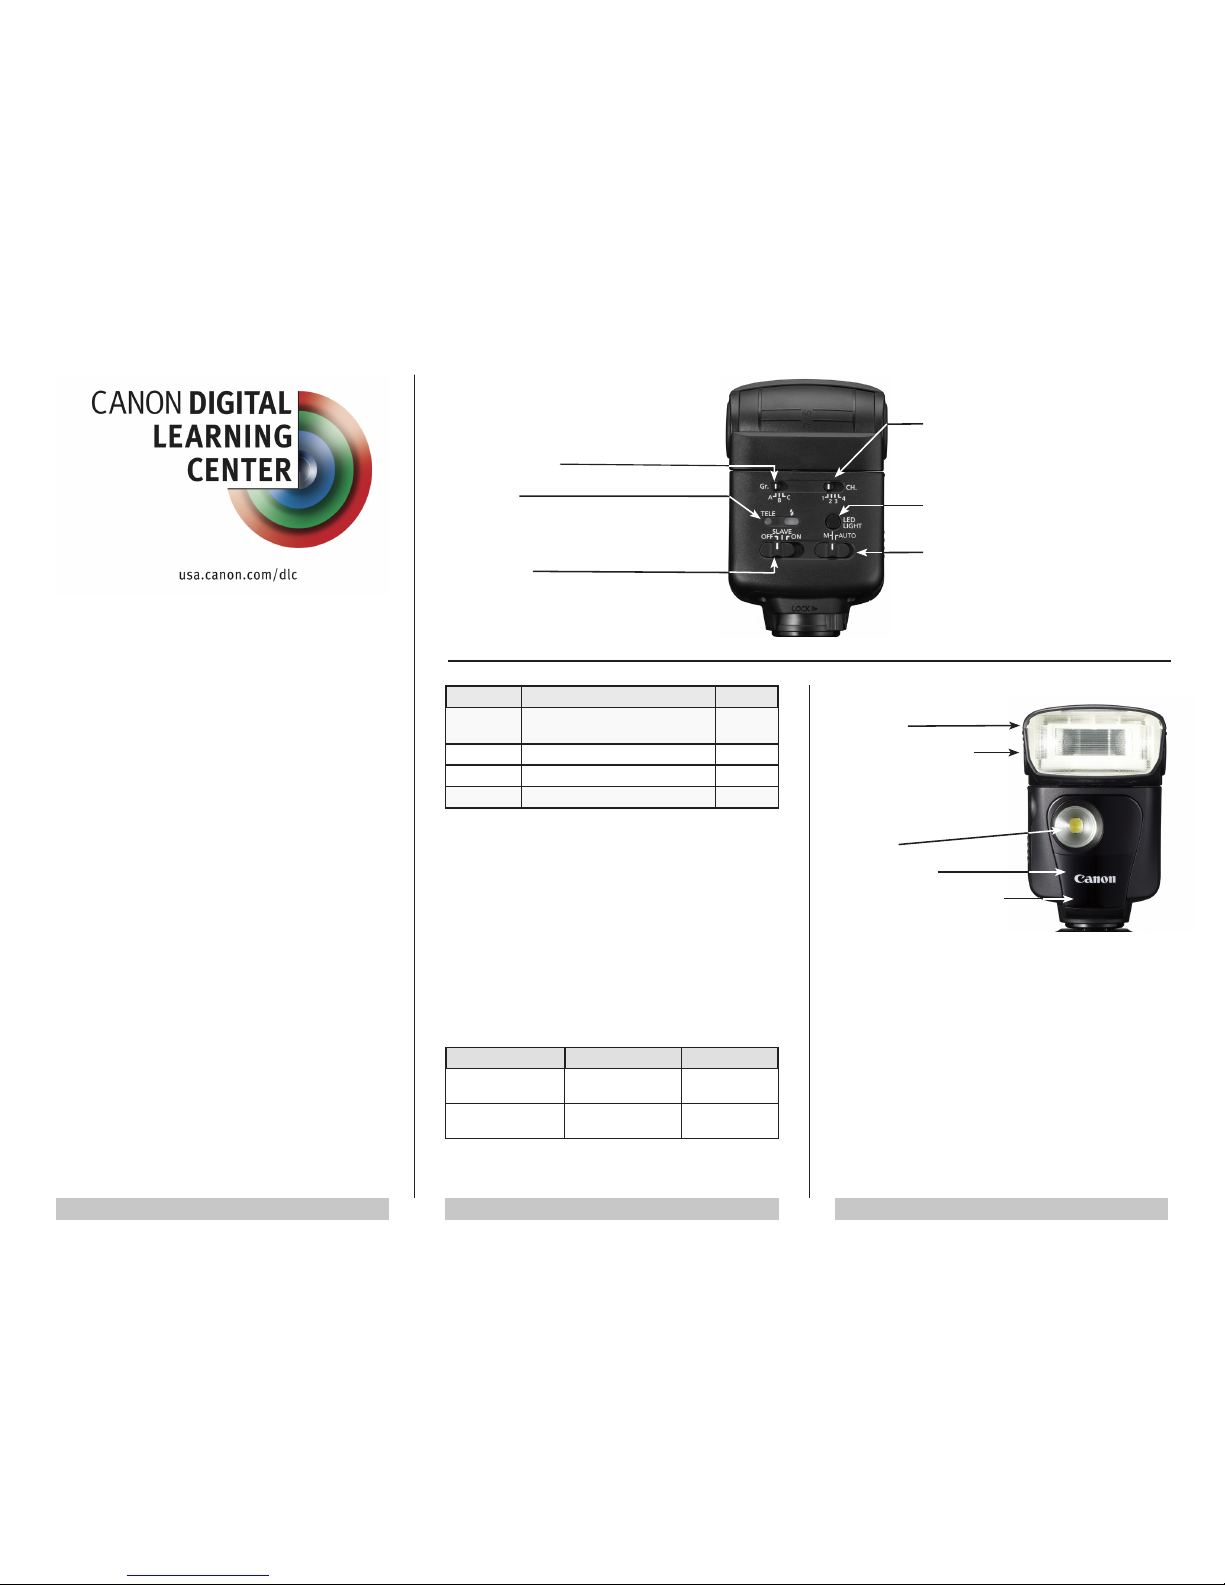
Key Features and Controls (front)
Flash head
Remote release button
Allows remote triggering of
cameras compatible with the
RC-1, RC-5, or RC-6 Remote
Controllers*
LED light
Wireless sensor
Remote control transmitter
* EOS Digital Rebel; Rebel XT, XTi; Rebel XSi; Rebel T1i, T2i,
T3i; EOS 7D, EOS 5D Mark II (as of mid-2011).
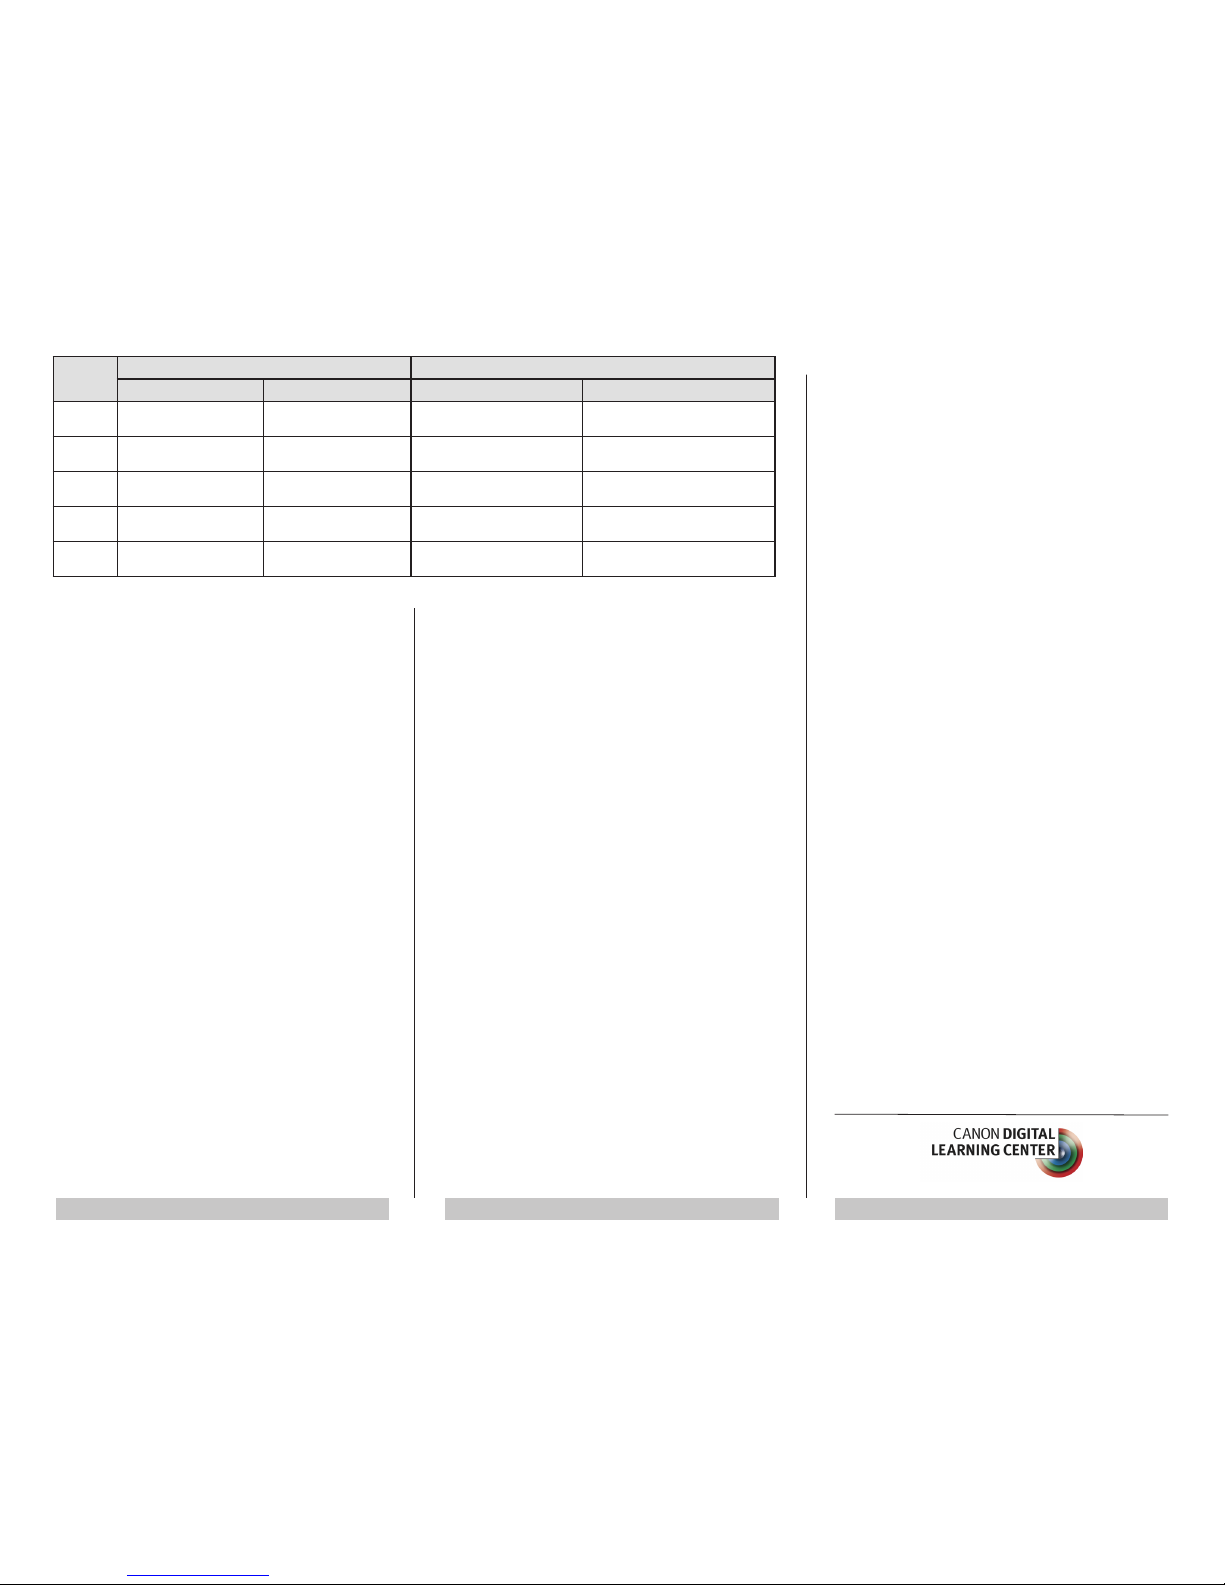
E-TTL II Flash Range
The ash range will vary depending on the ISO setting,
angle of coverage, and maximum aperture of your lens. If
you see a blinking <> icon in your viewnder then your
subject is too far away. You should either move closer or
increase the ISO. The table on the reverse side provides
a guide to minimum and maximum shooting ranges for the
EF-S 18-55mm f/3.5-5.6 IS zoom. Do not use the 320EX in
the extended position at a focal length of 18mm or less, or
the edges of the frame will be darker than the center.
Key Features and Controls (back)
Firing group selection switch Assigns ring
group when 320EX is combined with other
wireless Speedlites
TELE lamp
Glows steadily when the ash coverage
matches the lens coverage. Blinks when
coverage is too narrow for lens coverage.
Power switch
On turns on power
Slave is for wireless operation
Off shuts off power.
Channel selection switch
Assigns ring channel for wireless
operation. Slave ash channel must match
master ash channel.
Manual LED light button
Press and hold until the LED light turns on.
LED light switch
Set to M to enable Manual activation of
LED light. Set to Auto with EOS models
having auto LED illumination function,
such as Rebel T3 and T3i.
Page 2
4 5 6
LED Light
The built-in LED light provides continuous illumination. This
is particularly useful when shooting video, as a modeling
light, or as an AF assist beam (with Live View). The LED
light can provide up to 3.5 hours of illumination with four
fully-charged AA batteries. It will automatically shut off after
60 minutes of idle use to conserve battery power. If battery
power is low the LED Light will not turn on, even if the ash
ready light is lit, in which case you should replace the batteries.
Manual Flash Set-up
You can manually adjust the ash output from full 1/1
to 1/64th power by using the External Flash Menu on
compatible EOS SLRs*. The lower the ash output, the
shorter the maximum range and the closer the minimum
distance. The higher the ash output, the greater the
maximum range. Use a hand-held ash meter or trial-anderror to determine the correct aperture for a given ash-tosubject distance. Once set, the exposure will remain the
same as long as the distance and ash power level remain
the same.
1. Press the camera Menu button*.
2. Select the rst Shooting Menu (rst camera icon on the
left).
3. Select [Flash control] or [External Speedlite control].
4. Select [External ash func. setting]. Press Set.
5. Scroll down to Manual ash. Press Set.
6. Select Flash output. Press Set.
7. Select the ash output you want. Press Set.
* Cameras with External Flash Menu: EOS 40D~60D, Rebel XS/
XSi, T1i, T2i, T3, T3i, EOS 7D, 5D Mark II, EOS-1D Mark III /
Mark IV, EOS-1Ds Mark III
Wireless E-TTL Flash Operation
The “Slave” function allows the ash to be triggered
wirelessly when used off-camera with an EOS DSLR or
Speedlite with master ash function. The slave ash must
be positioned off-camera and must be within a range of 33
feet (10 meters) from the master ash unit.
The 320EX can be assigned to any one of four channels
and three groups. The channel setting (1, 2, 3 or 4) must
match the channel setting on the camera or master unit.
The group setting (A, B or C) is important only if you
are using more than one Speedlite, in which case you
must assign them to the same group if you want equally
distributed output or different groups if you want unequally
distributed (ratio) output.
1. Set the camera, ST-E2 transmitter or 580EX II
Speedlite as the master unit.
2. Set the 320EX as the slave unit by moving the power
switch to <SLAVE>.
3. Set the transmission channel to the same channel as
the master unit.
4. Set the ring group (if using more than one slave).
5. Attach the 320EX to the mini-stand (provided with
the ash case) and position the ash. When outdoors
you must have the wireless sensor aimed toward the
master unit. When indoors the sensor will usually
react to reections from nearby walls.
6. Release the shutter.
Wireless Shutter Release
The ash release function uses the 320EX’s built-in
infrared transmitter to trigger compatible cameras* with a
2-second delay. You can choose whether to use the 320EX
as a wireless trigger only or whether to also use it as a
wirelessly triggered slave ash.
To trigger camera only:
1. Set the camera to Remote/Self-Timer mode.
2. Set the 320EX power switch to <ON>
3. Point the remote control transmitter on the front of
the 320EX toward the camera, then press the remote
release button. The shutter will release two seconds
later. The 320EX will not re.
To trigger camera + wireless ash:
1. The camera must have a "master unit" triggering
device for Wireless E-TTL ash mounted and active..
2. Set the 320EX power switch to <SLAVE>.
4. Set the camera to Remote/Self-Timer mode.
3. Point the remote control transmitter toward the front of
the camera, then press the remote release button. The
camera will re two seconds later, which allows time
to reposition the 320EX to illuminate the subject. The
master ash will trigger the 320EX you’re holding.
Auto Power Off
The 320EX will automatically shut off after 90 seconds of
idle use to save battery power. Press the camera’s shutter
button to turn the unit on again. When using the 320EX as
a wireless slave you may wish to cancel the auto power off
function by pressing the [✻] button on your camera.
AF-Assist Beam
To facilitate autofocus for dark scenes, the ash may re
repeatedly when you press the camera’s shutter button
halfway. Its maximum AF-Assist range is approximately
2.3 - 13.1 ft., depending on the ISO setting and maximum
aperture of your lens.
* EOS Digital Rebel; Rebel XT, XTi; Rebel XSi; Rebel T1i, T2i,
T3i; EOS 7D, EOS 5D Mark II (as of mid-2011).
ISO Head in Normal Position Head in Extended Position
18mm 55mm 18mm 55mm
100 1 – 6.9 m
3.3 – 22.6 ft
1 – 4.3 m
3.3 – 14.1 ft
— 1 – 5.7 m
3.3 – 18.7 ft
200 1 – 9.7 m
3.3 – 31.8 ft
1 – 6.1 m
3.3 – 20 ft
— 1 – 8.1 m
3.3 – 26.6 ft
400 1 – 13.7 m
3.3 – 44.9 ft
1 – 8.6 m
3.3 – 28.2 ft
— 1 – 11.4 m
3.3 – 37.4 ft
800 1.2 – 19.4 m
3.9 – 63.6 ft
1 – 12.1 m
3.3 – 39.7 ft
— 1 – 16.2 m
3.3 – 53.1 ft
1600 1.7 – 27.4 m
5.6 – 89.9 ft
1 – 17.1 m
3.3 – 56.1 ft
— 1 – 22.9 m
3.3 – 75.1 ft
 Loading...