

Page 1
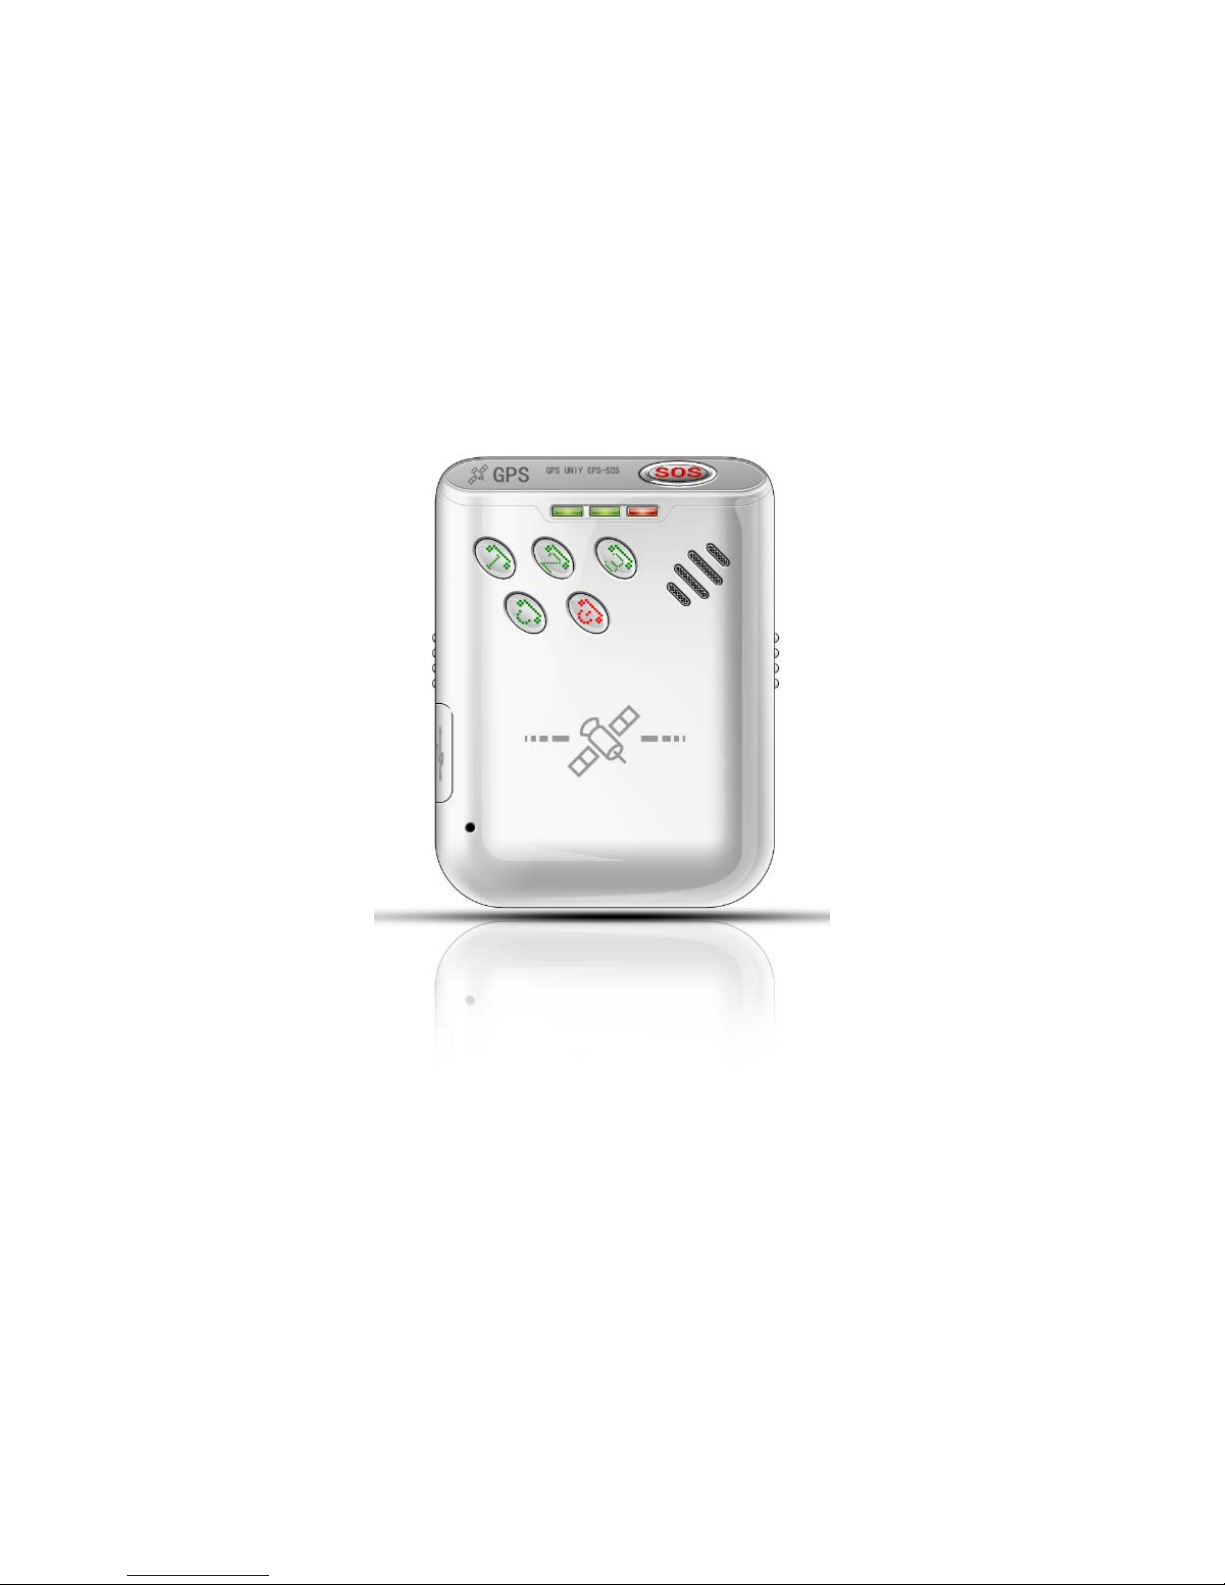
PT-911
GPS Personal Tracker
USER MANUAL
V6.1
Updated on 2010/06/28
Page 2

Contents
1 Product Overview 3
2 For Your Safety 3
3 PT-911 Parameters&Panel Description 4
4 Getting Started 6
4.1 Hardware and Accessories 6
4.2 Light and Button Functionality 6
4.3 First Use 7
4.4 Operation Instructions 8
5 SMS Command 10
5.1 Basic SMS Commands 10
5.1.1 Return the location of the tracker 10
5.1.2 Set Interval for automatic timed report 10
5.1.3 Stop automatic timed report 11
5.1.4 SOS/Call 1/Call 2/Call 3 11
5.2 GPRS Setting by SMS 12
5.2.1 Set APN 12
5.2.2 Set IP Address and Port 12
6 SMS Command List 12
7 Appendix 1 15
8 Appendix 2—Preset APN list 15
Page 3

1 Product Overview
PT-911 provides peace of mind by showing you with your mobile phone or PC
the location of your targets via SMS or GPRS.
PT-911 has the following features
Tracking via SMS or GPRS (TCP)
Current location report
Tracking by time interval
Two-way conversation
SOS alert
Geo-fencing control
Low battery alert
Speeding alert
Four buttons for making phone call and/or sending message
Removable and rechargeable internal battery
Built-in speaker and microphone
Alert when PT-911 enter/exits GPS blind area
Live Voice monitoring
2 For Your Safety
Read these simple guidelines. Not following them may be dangerous or illegal.
Read the full user manual
for more information.
Switch on Safely- Do not switch on PT-911 when wireless phone use is
prohibited or when it may cause interference or danger.
Switch off in Hospitals– Follow any restrictions. Switch PT-911 off near
medical equipment.
Switch off in Aircraft – Follow any restrictions. Wireless devices can cause
interference in aircraft.
Switch off when refueling
–
Do not use PT-911 when at a refueling point. Do
Page 4

not use near fuels or chemicals.
Water Resistance –PT-911 is not water resistant. Keep it dry. Use waterproof
bag if necessary.
3 PT-911 Parameters&Panel Description
Item Specification
Charging
Voltage
Internal Battery Rechargeable and removable 830 mAh battery (3.7V)
Dimension
Weight
DC 5V/500mA (Micro USB port)
Operating
temperature
Humidity 5% to 95% Non-condensing
GSM module GSM 900/1800/1900Mhz
GPS Chipset latest GPS (AGPS)
GPS Sensitivity -158Db
GPS Frequency L1, 1575.42 MHz
C/A Code 1.023 MHz chip rate
Channels 20 channel all-in-view tracking
Position
Accuracy
Velocity
Accuracy
Time Accuracy 1 us synchronized to GPS time
Default datum WGS-84
Reacquisition 0.1 sec., average
Hot start 1 sec., average
-20° to 55° C
10 meters, 2D RMS
0.1 m/s
Warm start 38 sec., average
Cold start 42 sec., average
Altitude Limit 18,000 meters (60,000 feet) max.
Velocity Limit 515 meters/seco nd (1000 knots) max.
Acceleration
Limit
Jerk Limit 20 m/sec
Less than 4g
Page 5
Work time 60 hours in sleep mode and 10 hours in normal mode
LED 3 LEDs showing power, GPS, GSM status and other operation
status.
Button
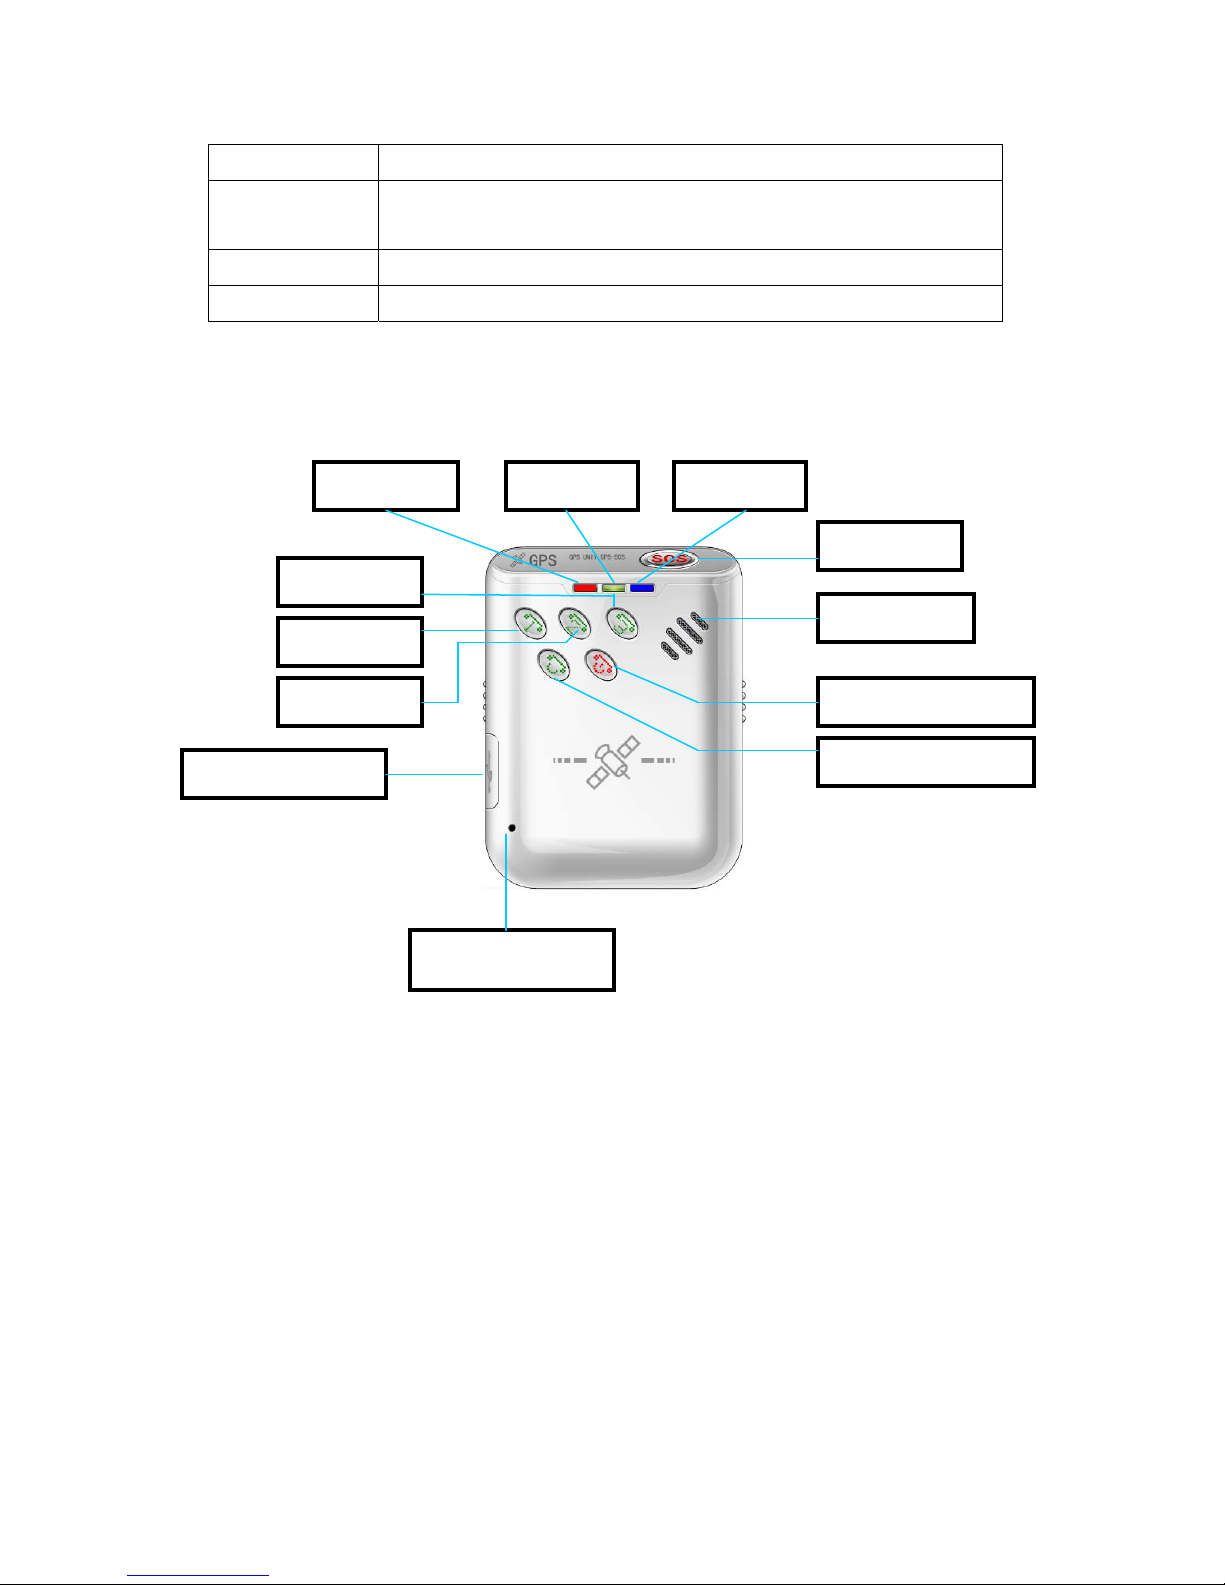
Panel Description
COM Port/Charger
Power LED GPS LED
Quick Dial 3
Quick Dial 1
Quick Dial 2
Microphone
GSM LED
SOS Button
Speaker
Hangup/Power Key
Answer Button
Page 6

4 Getting Started
4.1 Hardware and Accessories
USB Power Cable
User Manual
Other document or software if required
4.2 Light and Button Functionality
PT-911 has four buttons and three LED lights with three different colors to
indicate the status of the unit.
Red LED indicating power status
Off Power is off / charging is complete /
working
Flashing(on for 0.01sec and off for 2.99
Low power
sec)
On Charging
Green LED-indicating GPS status
Off GPS power off
Flashing(on for 0.01 second and off for
GPS power on and fix
2.99 seconds)
Flashing(on for 1 second and off for 2
GPS power on and no fix
seconds)
Blue LED-indicating GSM status
On One call is coming in / one call is
being made
Flashing (on for 0.01 second and off for
2.99 seconds)
Flashing (on for 1 second and off for 2 PT-911 is not connected to the GSM
PT-911 is connected to GSM
network
Page 7

seconds) network
Power Button To turn on/off
SOS Button Press SOS button to make a phone
call and/or send an SMS to the
preset phone number.
1 Button Press 1 button to make a phone call
and/or send an SMS to the preset
phone number.
2 Button Press 2 button to make a phone call
and/or send an SMS to the preset
phone number.
3 Button Press 3 button to make a phone call
and/or send an SMS to the preset
phone number.
4.3 First Use
Ensure that PT-911 has a working SIM installed
Check that the SIM has not run out of credit
Check that the SIM Lock code is turned off
Use some other mobile phone to comfirm that the PIN code han not been
set ,and that it can dail out and receive telephone calls,and that it can connet
to internet by GPRS.
Charge the battery for at least 3 hours in power-off status using the wall
charger or car charger. Red light is on during charging and is off when
charging is complete.
Page 8
4.4 Operation Instructions
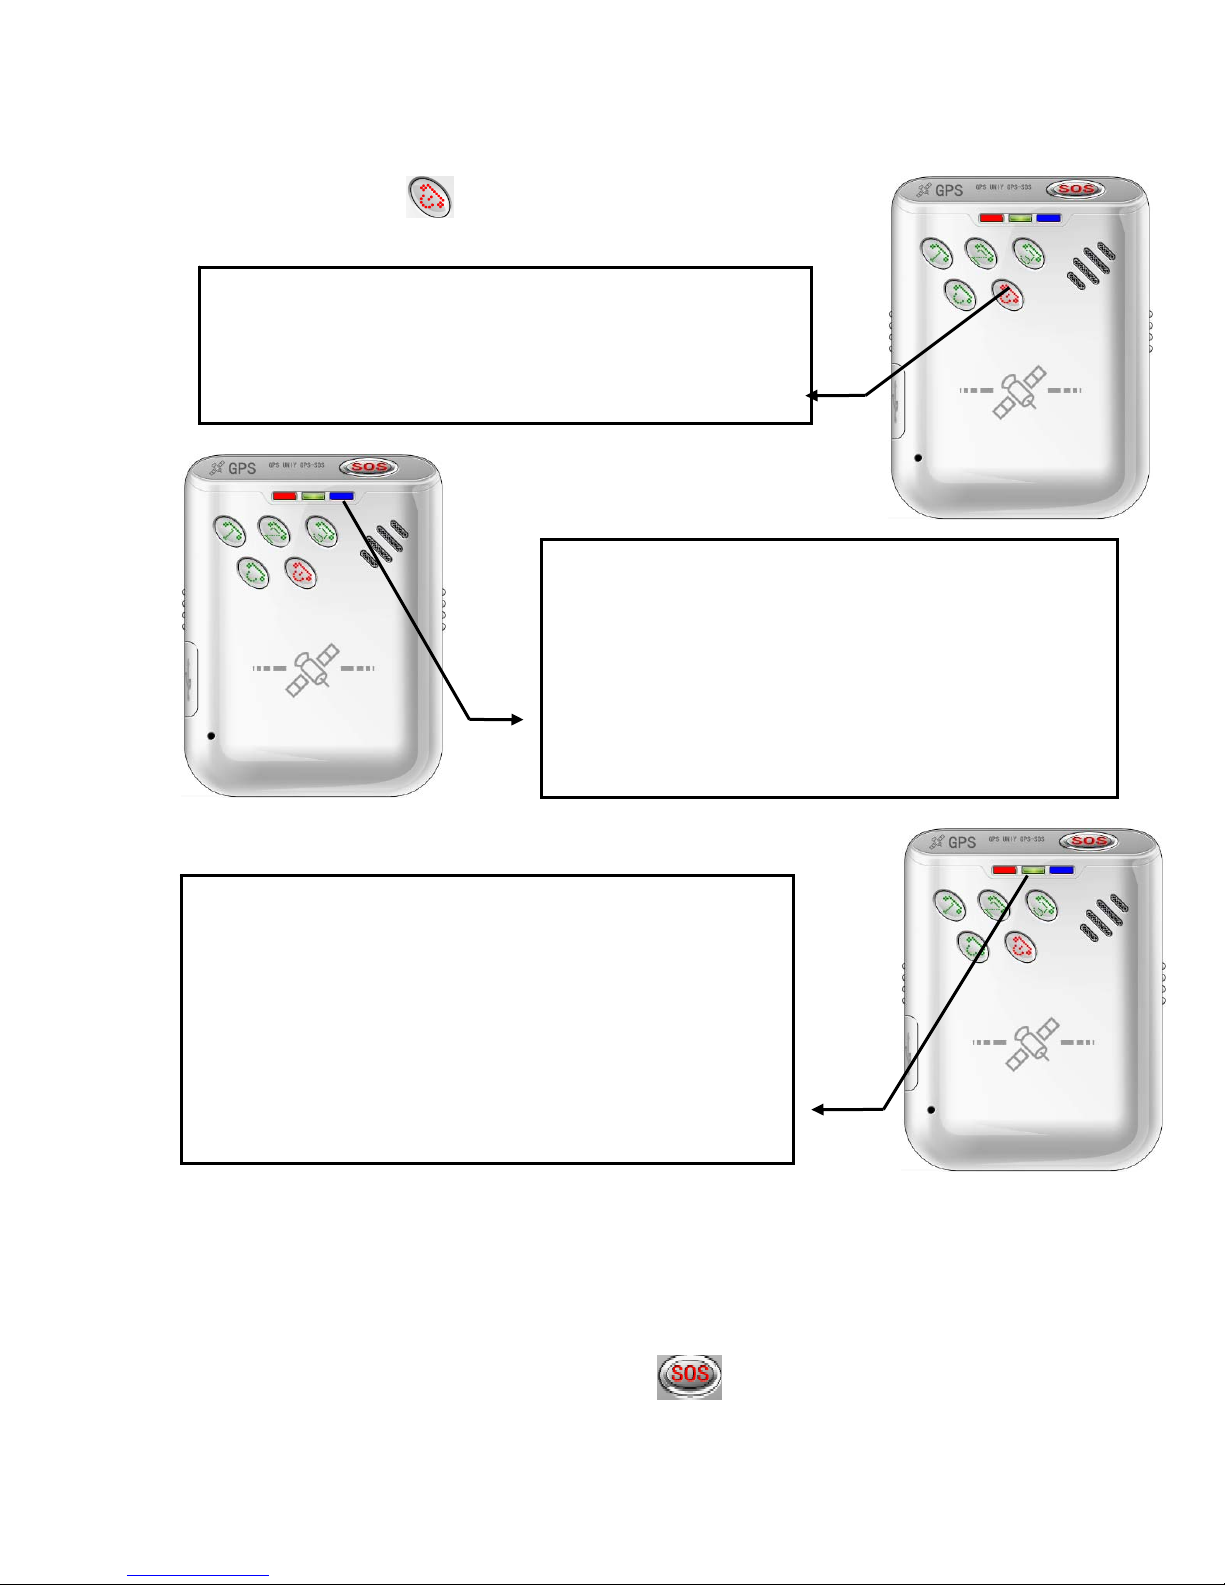
(1) Power On/Off
Power On:
Step 1. When it is off, press the power button
for 5 second to switch on the power.
Step 2. After power on, GSM LED will light on
first (on 1 second and off 2 seconds for
searching GSM network, or on 0.01
second and off 2.99 seconds after get
GSM network).
Step 3. Some 10 seconds later, GPS LED starts to
flash (on 1 second and off 2 seconds for
searching GPS, or on 0.01 second and off
2.99 seconds after GPS fixed). By then,
the device is ready to work.
Power Off:
When it is on, press the power button for 3 seconds to switch off the power;
Power/GPS/GSM LED will shut off right now. By then, the device is turned off.
(2) SOS Emergency Help Function
When SOS button is long pressed, PT-911 will send a SMS message and make
Page 9

phone call for emergency help. The phone number can be set by the users.
When 1 2 3 button is long pressed, PT-911 will make normal phone call. The
phone number can be set by users. The phone number list call be set by sms
command.
(3) Conversation Function
Call In: One can make phone call to PT-911 by simply dialing the SIM card
number.
To receive the incoming phone call.
To refuse the incoming phone call.
Call Out: PT-911 has four speed dial; you can long press preset 4 sets of phone
(4)Connect to www.imecare.com
PT-911 will connect to www.imecare.com automatically per 5 mins to report
it’s position info and fetch the new configeration. Ensure that PT-911 has been
registered on the www.imecare.com.
Step1. Register your PT-911 device on www.imecare.com to get username and
password. The device IMEI number is required. The IMEI number is printed on
the back of PT-911.
Step2. Check preset APNs list(Appendix 2)
If your GSM operator’s APN is not in this list, please set APN by sms (Prefrence
5.2.1)
Step3. when APN is set, PT-911 will connect to www.imecare.com
per 5 mins to report it’s pos info to center. You can login www.imecare.com
sit to trace the PT-911.
automatically
web
Page 10

5 SMS Command
PT-911 will only accept commands from a user with the correct
password.Commands with wrong password are ignored. The default
password is 000000.
5.1 Basic SMS Commands
5.1.1 Return the location of the tracker
Description: To know the location of your PT-911, send an SMS or make a
telephone call directly to PT-911 and it will report its location by SMS.
Command: W<password>,<000>
Notes: The default password is 000000.
Example:
SMS sent: W000000,000
SMS received:
W00,000,$GPRMC,034522,662,A,2232,3126,N,11359,3061,E,000.0,000.0,2412
09,,,A*6E
To get PT-911’s location by another easier way:
(a) Call PT-911 using your mobile phone
(b) After listening to the ring for 10 - 20 seconds, hang up the phone.
(c) Then, in about 15 seconds, your mobile phone will receive an SMS with
longitude and latitude.
5.1.2 Set Interval for automatic timed report
Description: Automatic timed reports will be sent to your mobile phone according
to the time interval you
set.
Command: W<password>,002,XXX
Notes: XXX is the interval in minute. If XXX=000 it will stop tracking
Example:
Page 11

SMS sent: W000000,002,005
SMS received: W01,002
5.1.3 Stop automatic timed report
Command: W<password>,002,000
Example:
SMS sent: W000000,002,000
SMS received: W01,002
5.1.4 SOS/Call 1/Call 2/Call 3
Description: To authorize a mobile phone number for the SOS, 1, 2 or 3 button.
When the button is pressed,
a message will be sent and/or simultaneously a call will be made to the
authorized number.
Command: W<password>,003,F,P, <telephone number>
Notes:
(a) F =0, cancel this function
=1, set send SMS to the preset number
=2, set call the preset number
=3, set send SMS and also Call the preset number
P =1, set a authorized number for SOS button
=2, set a authorized number for 1 button
=3, set a authorized number for 2 button
=4, set a authorized number for 3 button
(b) When one of the buttons is pressed and a call is made, you can call and talk
with the tracker-holder.
(c) Press END button to hang up the call or cancel a calling
Page 12

Example:
SMS sent: W000000,003,3,1,123456789
SMS received: W01,003
Meaning: When the SOS button is pressed, PT-911 will send an SMS to
telephone number “123456789”
and also make a phone call to it.
When a call is coming in, the blue light is on. Press ACCEPT button to receive
the incoming call and then
talk with the caller. To complete the conversation, hang up the call by pressing
END button.
5.2 GPRS Settings by SMS
Tracking via GPRS, you should set IP, Port and APN for PT-911
Ensure that your SIM card in PT-911 supports GPRS connection prior to setting.
5.2.1 Set APN
Command: W<password>,011,APN,APN Name,APN Password
Note: If no APN name and password required, input APN only.
Example: W000000,011,CMNET,,
PT-911 will reply with an SMS (like ‘W01,011’) to confirm this setting.
5.2.2 Set Time Interval for Sending GPRS Packet
Command: W<password>,014,time interval(in unit of 10 seconds)
Example: W000000,014,00003
PT-911 will send a GPRS package every 30 seconds
6 Command List
Remarks: ****** is user’s password and the default password is 000000.
Description Command Remarks
Get current location W******,000 Get current location of 007
Change user’s password W******,001,###### ****** is old password
Page 13

###### is new password
max 8 characters.
Set interval for automatic timed
report
Set preset phone number for SOS
button
Set over speed alert
When PT-911 speeds higher
than the preset value, it will
send one over speed alert to
the SOS preset number.
Set Geo-fence alert
When PT-911 moves out of
preset scope, it will send one
Geo-fence SMS to the SOS
preset number.
Extend Settings W******,008,ABCDEFG A=0, turn off the function of sending
W******,002,XXX XXX is the interval in minute. If
XXX=000 it will stop tracking
W******,003,F,P,T F=0, to turn off this fuction;
F=1, set sending SMS;
F=2, set calling preset phone number;
F=3, set SMS and calling (default)
P=1, set a authorized number for SOS
button
P=2, set a authorized number for 1
button
P=3, set a authorized number for 2
button
P=4, set a authorized number for 3
button
T: Preset phone number. Max. 16
digits
W******,005,XX XX (the preset value of speed)
=00 , to turn off this function
=[01, 20] (unit: 10Km/h)
For example, W000000,005,08, it will
sent alert when it is over 80Km/h
W******,006,XX XX ( preset distance to original place )
=00, to turn off this function
=01, 30m
=02, 50m
=03, 100m
=04, 200m
=05, 300m
=06, 500m
=07, 1000m
=08, 2000m
an
SMS location report to the authorized
phone number when it makes a call to
007.
A=1, turn on the function of sending
an
SMS location report to the authorized
phone number when it makes a call to
PT-911.
B=0, reserved
B=1, location data complies with
NMEA 0183 GPRMC protocol.
Page 14

For example:
$GPRMC,072414.000,V,3114.3763,N,
12131.3255,E,0.00,0.00,050805,*00
C=0, turn off the function to
automatically hang up an incoming
call.
C=1, turn on the function to
automatically hang up an incoming
call
after 4 - 5 rings.
D=0, Turn off the function of sending
an SMS when PT-911 is turned on.
D=1, Turn on the function of sending
an SMS to SOS number when PT-911
is turned on.
E=0, reserved
E=1, PT-911 shuts down automatically
when the power voltage lower than
3V.
F=0, Turn off the alert when PT-911
enters GPS blind area.
F=1, Turn on the alert when PT-911
enters GPS blind area. SMS is to be
sent to SOS number
G=0, 3 LED lights work normally
G=1, 3 LED lights stop flashing when
PT-911 working.
(default value is:
ABCDEFG=10100100 )
Presetting by SMS for GPRS tracking (Ensure that your SIM card supports GPRS connection prior to setting)
Set ID for PT-911 W******,010,ID PT-911 ID must not over 14 digits.
Set APN W******,011,APN,APN Name,APN
Password
Set IP Address and Port W******,012,IP,Port IP: xxx.xxx.xxx.xxx
Enable GPRS Tracking
Function
Set Time Interval for
Sending GPRS Packet
W******,013,X X=0, turn off GPRS tracking
W******,014,XXXXX XXXXX should be in five digitals and
If no APN name and password
required, just insert APN only;
APN defaulted as ‘CMNET’;
APN+APN name + password not
over 39 characters.
Port: [1,65534]
(default);
X=1, enable TCP
in unit of 10 seconds.
XXXXX=00000, to turn off this
function;
Page 15

XXXXX=00001~65535, time interval
for sending GPRS packet and in unit
of 10 seconds.
For more information regarding GPRS settings please refer to <GPRS Communication Protocol>
Presetting by SMS forHTTP tracking (Ensure that your SIM card supports GPRS connection prior to setting)
Set HTTP username and
password
Set Time Interval for
Sending HTTP Packet
Set phone number for
wiretapping
Set time zone difference W******,032,T T=0, to turn off this function
Set character for SOS alert
message
Get version and serial
number
Get IMEI W******,601 To get IMEI
W******,040,HTTP Name,HTTP
Password
W******,015,XXXXX XXXXX should be in five digitals and
W******,030,T T is the telephone number for
W******,033,P,Char P is the button number. P=1, 2, or 3.
W******,600 To get version and serial number of
Set HTTP Username and Password
for http report
in unit of 10 seconds.
XXXXX=00000, to turn off this
function;
XXXXX=00001~65535, time interval
for sending HTTP packet and in unit
of 10 seconds.
wiretapping and max. 16 digits
T=[-720, 720] to set time difference
in
minute to GMT. Default value is
GMT
For those ahead of GMT, just input
the time difference in minute directly.
For example, W000000,032,120
‘-‘is required for those behind GMT.
For example, W000000,032,-120.
P=1, SOS button
P=2, 1 button
P=3, 2 button
P=4, 3 button
Char is the character in SOS
message and max 32 characters
current firmware
Page 16

Appedix 1
Format of SMS reply: W**,###
** Reply number
### Command number
Reply number:
00: Get location succeed
01: Setting succeed
02: Setting failed
03: Format error
04: Password error
05: Command error
06: Change password error
07: Parameter error
08: No GPS data
09: Protocol not support
10: Over speed
11: Geo-Fence
12: GPS no fix
13: Port open failed
14: Timeout
15: Reject
16: Get GPS data failed
17: Allocate memory failed
18: Automatic alert
19: GPRS login
Page 17

Appedix 2
Mobile Operator APN preset by 007
# China Mobile
# China Unicom
# Albania, vodafone AL
# Argentina, Movistar
# Argentina, Personal
# Austria, A1
# Austria, T-Mobile A
# Austria, telering
# Australia, Optus
# Australia, Telstra Mobile
# Australia, 3
# Australia, vodafone AU
# Azerbaijan, AZE ACELL
# Bangladesh, GramenPhone
# Belarus, Velcom
# Belarus, MTS
# Belgium, BASE
# Belgium, Mobistar
# Belgium, Proximus
# Botswana, MASCOM
# Brazil, Claro
# Brazil, Oi
# Brazil, TIM BRASIL
# Bulgaria, BG GLOBUL
# Bulgaria, M-Tel BG
# Cameroon, MTN CAM
# Canada, Fido
# Canada, ROGERS
# Chile, ENTEL
# Costa Rica, I.C.E.
# Croatia, T-Mobile
# Croatia, VIPnet
# Czech Republic, T-Mobile CZ
# Denmark, TDC MOBIL
# Denmark, TELIA DK
# Dominican, orange
# Egypt, Vodafone EG
# Egypt, MobiNiL
# Estonia, EE EMT
# Finland, DNA
# Finland, FI Elisa
# Finland, FI SONERA
# France, Bouygues FR
# France, Orange F
# France, SFR FR
# Ghana, Areeba
# Ghana, Onetouch
# Ghana, Tigo
# Germany, Vodafone.de
# Germany, E-Plus
# Germany, O2-de
Page 18

# Germany, T-Mobile D
# Greece, COSMOTE GR
# Greece, vodafone GR
# Hong Kong, CSL
# Hong Kong, New World
# Hong Kong, SmarToneVodafone
# Hong Kong, 3 HK
# Hungary, H pannon
# Hungary, T-Mobile H
# Hungary, vodafone HU
# Iceland, Siminn
# India, Airtel
# India, BPL MOBILE
# India, IDEA
# India, MTNL
# Indonesia, XL
# Indonesia, INDOSAT
# Indonesia, Telkomsel
# Ireland, METEOR IRL
# Ireland, O2 IRL
# Ireland, vodafone IRL
# Israel, Cellcom
# Israel, Orange
# Italy, TIM IT
# Italy, vodafone IT
# Italy, WIND IT
# Jamaica, Digicel
# Kazakhstan, Beeline KZ
# Kenya, Safaricom
# Latvia, LMT LV
# Latvia, TELE2 LV
# Lebanon, Alfa
# Lithuania, LT BITE GSM
# Lithuania, OMNITEL LT
# Lithuania, TELE2
# Luxembourg, L LUXGSM
# Luxembourg, L TANGO
# Luxembourg, L VOX
# Malaysia, MY CELCOM
# Malaysia, DiGi
# Malaysia, MY MAXIS
# Malta, go mobile
# Malta, vodafone MT
# Mexico, TELCEL
# Moldova, MOLDCELL MD
# Morocco, MEDITEL
# Nepal, Mero Mobile
# Netherlands, KPN NL
# Netherlands, Orange NL
# Netherlands, T-Mobile NL
# Netherlands, Vodafone NL
# New Zealand, vodafone NZ
# Nigeria, MTN NG
# Norway, N NetCom
# Norway, N Telenor
Page 19

# Pakistan, Mobilink
# Pakistan, Telenor PK
# Pakistan, PK-UFONE
# Philippines, Globe Telecom
# Philippines, SMART
# Poland, Era
# Poland, Orange PL
# Poland, Plus
# Portugal, Optimus P
# Portugal, TMN P
# Portugal, vodafone P
# Qatar, Qat-Qtel
# Congo Dem. Rep, Vodacom CD
# Romania, RO ORANGE
# Romania, RO Vodafone
# Russia, Beeline RUS
# Russia, MegaFon RUS
# Russia, MOTIV RUS
# Russia, MTS RUS
# Russia, NTC RUS
# Russia, TELE2 RUS
# Russia, Utel RUS
# Saudi Arabia, STC
# Singapore, SSTARHUB
# South Africa, Cell C
# South Africa, MTN-SA
# South Africa, VodaCom-SA
# Spain, vodafone ES
# Sri Lanka, SRI DIALOG
# Sri Lanka, Mobitel
# Sweden, TELIA SE
# Sweden, Telenor SE
# Switzerland, Sunrise
# Switzerland, ORANGE
# Switzerland, Swisscom
# Taiwan, ChungHwa
# Taiwan, FarEasTone
# Taiwan, KG Telecom
# Thailand, AIS GSM
# Thailand, DTAC
# United Arab Emirates, ETISALAT
# Uganda, MTN
# United Kingdom, Orange UK
# United Kingdom, T-Mobile UK
# United Kingdom, Vodafone UK
# United Kingdom, O2 UK
# Ukraine, Beeline
# Ukraine, Kyivstar
# United States, AT&T
# United States, T-Mobile
# Uruguay, Movistar
# Venezuela, Digitel
 Loading...