

Page 1
KOOKPLATEN
GEBRUIKSAANWIJZING
TABLES DE CUISSON
NOTICE D’EMPLOI
HOBS
USER INSTRUCTIONS
NL
NL BE GB
FR
GBIE
Page 2
2
AANWIJZIGEN VOOR DE INSTALLATEUR
INSTALLATIE
De installatie is de verantwoording van de koper. De fabrikant is vrijgesteld van deze
verantwoordelijkheid. Als de service dients wordt ingeschakeld voor een defect ontstaan
door foutieve installatie valt dit niet onder de garantie.
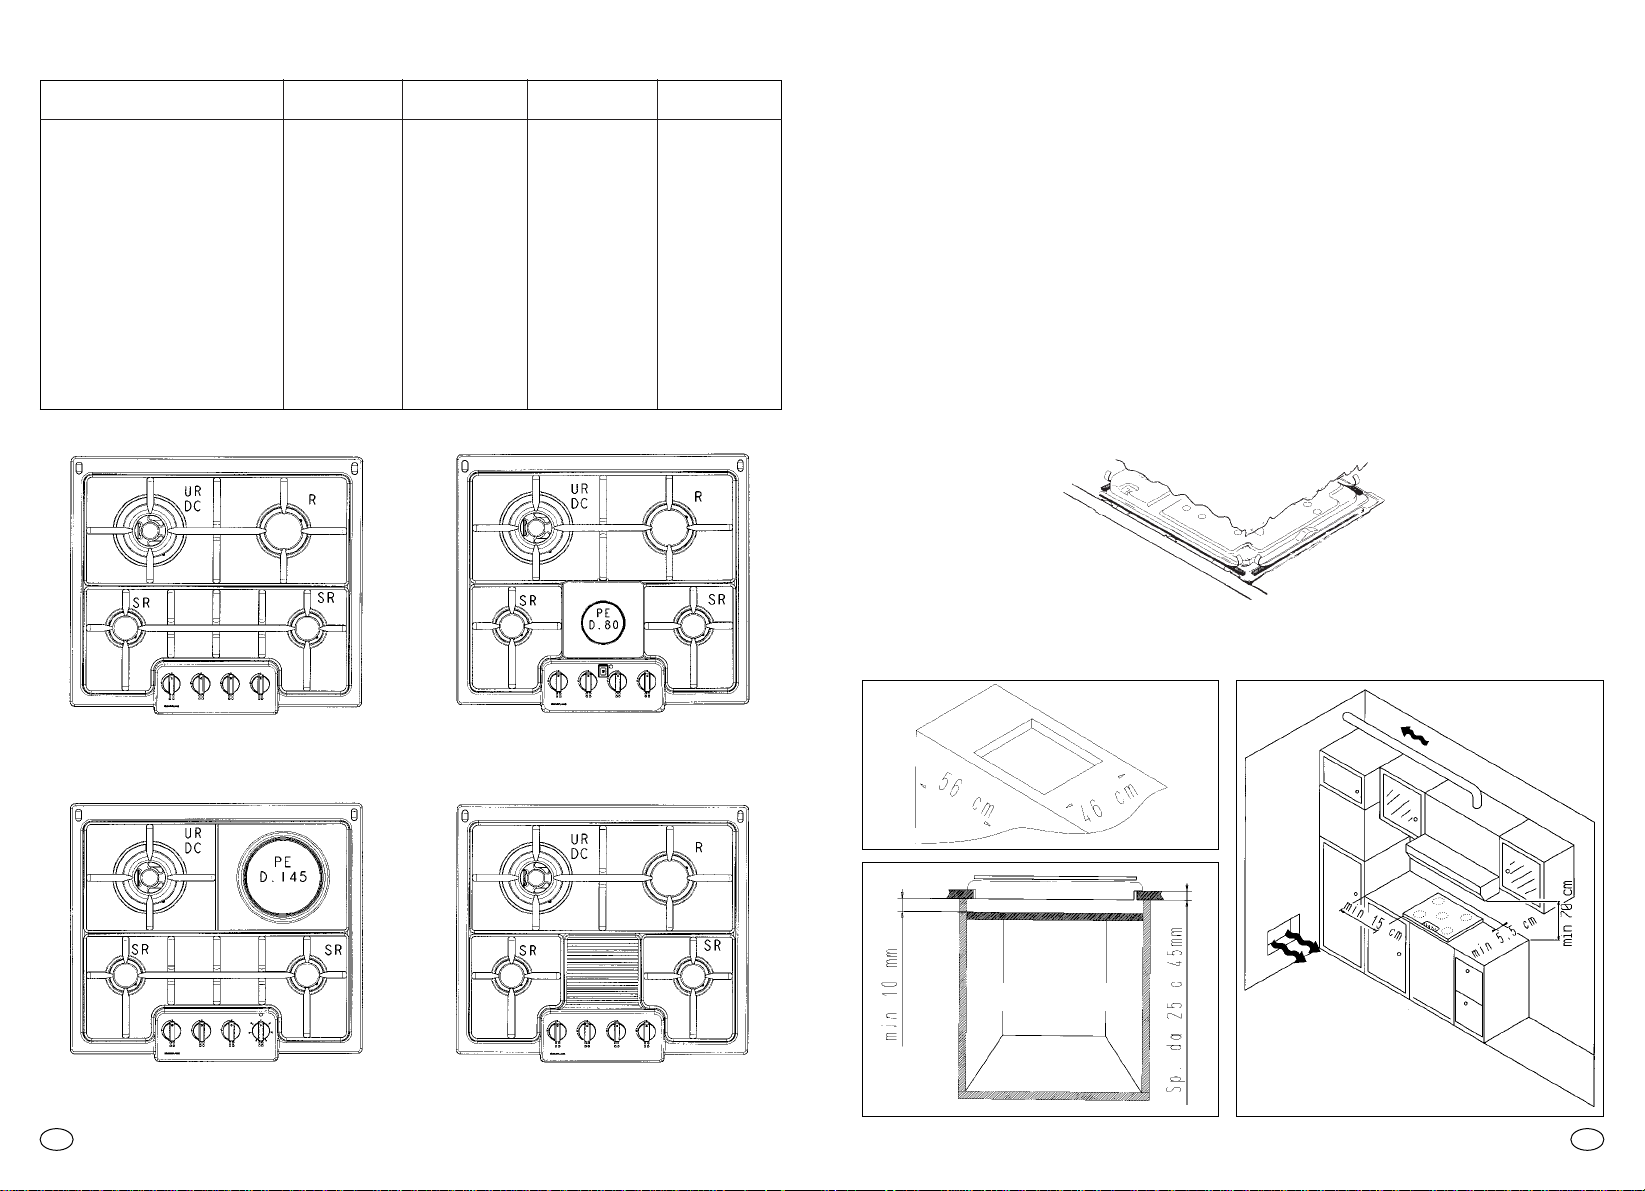
Deze inbouwkookplaten zijn bestemd voor installatie in een werkblad dat bestand is
tegen temperaturen van 100 °C en een dikte hebben tussen 25 en 45 mm. Voor de
inbouwmaat dient u zich te houden aan de maten zoals aangegeven in figuur 1.
De kookplaat dient zo te worden ingebouwd dat er aan de linker- en rechterzijde minstens 15 cm. ruimte is tussen kookplaat en kasten of verticale panelen. De afstand tussen kookplaat en
achterwand dient minstens 5,5 cm. te zijn (fig. 2).
De afstand tussen de kookplaat en ieder ander apparaat erboven (bijv. een afzuigkap)
mag nooit kleiner zijn dan 70 cm. (fig. 2)
Wanneer er een ruimte is tussen de inbouw kookplaat en de ruimte daaronder moet er
een scheidingsplaat van isolatiemateriaal geplaatst worden (bijvoorbeeld hout). Tussen
de scheidingsplaat en de bodem van de lade moet een ruimte zitten van minsten 10
mm (Fig. 3).
Belangrijk- op onderstaande tekening kunt u zien hoe de afdichtingskit moet worden aangebracht.
Het vastzetten in het meubel geschiedt door de bijgeleverde bevestigingsbeugels die
aan de onderzijde op de daarvoor bestemde plaats worden vastgedraaid.
NL
Fig. 1
Fig. 2
Fig. 3
1
TECHNISCHE GEGEVENS
* (NL) Fabrieksopgave - NL cat. II2L3B/P ** (BE) Fabrieksopgave - BE cat. II2E+3+
Kookplaten A B C D
Tabel 1
Kookzones 4 gas 4 gas 3 gas 4 gas
– 1
elektrisch
1
elektrisch
–
Type verwijzing (Type) PL03/PL04 PL03/PL04 PL03/PL04 PL03/PL04
Vlambeveiliging - / ja - / ja - / ja - / ja
Dubbelrings workbrander DC ø 110 mm 1 1 - 1
Extra grote brander UR ø 110 mm 1 - 1 Aantal branders normaal SR ø 51mm 2 2 2 2
Aantal branders groot R ø 71 mm 1 1 - 1
Grill bakplaat - - - 1
Elektrische plaat PE - 1 1 Vermogen gas installatie:
- G20/20 mbar ** (METANO) 8,95 kW 8,95 kW 6,3 kW 8,95 kW
- G25/25 mbar * (METANO) 8,5 kW 8,5 kW 6 kW 8,5 kW
- G30/28-30 mbar (GPL) 649 g/h 649 g/h 456 g/h 649 g/h
Installatie klasse 3 3 3 3
Spanning/frequentie 230V/50Hz 230V/50Hz 230V/50Hz 230V/50Hz
Vermogen elektrische installatie - 450W 1400W Vonkonsteking ja ja ja ja
Afmeting mm. 590x510 590x510 590x510 590x510
D
B
C
A
Dit apparaat is uitsluitend ontwikkeld voor huishoudelijk gebruik.
NL
Page 3
4
Deze instructies zijn bedoeld voor personen die zijn geautoriseerd de apparaten
te installeren volgens de normen. Welke ook intreden mogen doen bij elektrische
apparatuur.
Op de vangschaal is aangegeven voor welke type gas dit apparaat geschikt is. Zie ook
het typeplaatje.
Het is echter wel mogelijk ander soorten gas te gebruiken nadat enkele eenvoudige
aanpassingen zijn uitgevoerd. (Zie instructies in volgende alinea’s).
Het aansluiten van het apparaat op het gasnet of gasflessen dient te geschieden volgens de wettelijk geldende voorschriften. Eerst dient men te controleren of het apparaat afgesteld is voor de gebruikte gassoort. Als dit niet het geval is, volg dan
de
aanwijzingen in hoofdstuk «Aanpassing aan diverse gassoorten». Indien men ge
bruik
maakt van gasflessen dient men een drukregelaar te gebruiken die aan de wettelijke
voorschriften voldoet.
Belangrijk: Controleer, voor een veilig en optimaal gebruik en levensduur van het apparaat, of de gasdruk overeenkomt met de waarden in de tabel op pagina 6.
Gebruik uitsluitend slangen en afdichtingsrubbertjes die volgens de geldende voorschriften zijn goedgekeurd.
Controleer bij aansluiting van de kookplaat op het gasnet dat de flexibele gasslang
maximaal een afstand van twee meter mag overbruggen.
Belangrijk: controleer nadat u alle installatie handelingen heeft verricht de aansluitpunten op een goede afsluiting. Gebruik hiervoor een zeepsopje. Nooit een
vlam. Controleer ook of de flexibele slang niet in aanraking komt met bewegende
delen van de keukenmeubelen zoals een lade zodat de slang wordt beschadigd.
AANSLUITEN (GAS GEDEELTE)
NL
AANSLUITEN (ELEKTRISCHE GEDEELTE)
Controleer of de gegevens op het typeplaatje op het apparaat, die zich bevindt aan
de binnenzijde onder in de kookplaat, en verzeker u er vervolgens van dat dit overeenkomt met de plaatselijk geldende normen nodig voor een goed functioneren.
Voordat u het apparaat aansluit controleer of het goed is geaard.
De aarding van het apparaat is wettelijk verplicht. De fabrikant is niet verantwoordelijk
voor eventuele materiële of persoonlijke schade als gevolg van foutieve installaltie.
Voor apparaten zonder stekker dient u een stekker op het aansluitsnoer te monteren
die het vermogen als aangegeven op het typje plaatje kan verwerken. De aarde kabel
is uitgevoerd in groengeel.
De kabel moet altijd bereikbaar zijn.
Wanneer er een beschadiging is opgetreden aan het netsnoer dient deze vervangen te
worden door een erkende reparateur, om onnodige risico’s te vermijden.
De aarde-draad (groen en geel van kleur) moet ten minste 10 mm langer zijn dan de
beide andere draden. De doorsnee van de kabel moet in een goede verhouding staan
tot de maximale aansluitwaarde van de kookplaat. Zie voor de netspanningsgegevens
het typeplaatje op de kookplaat en controleer of het nieuwe netsnoer van het type
H05V2V2F is.
3
DE OMGEVING VOOR INSTALLATIE
Een gaskookplaat produceert tijdens het gebruik warmte en vocht in de ruimte waarin
deze is geïn
stalleerd. Wilt u zeker zijn van een goede ventilatie
van de ruimte open
daar dan de ventilatieroosters
(fig. 2) of installeer een afzuigkap met een afvoer.
Bij een intensief en langdurig gebruik van het apparaat kan het nodig zijn extra te
ventileren door
bijvoorbeeld een raam open te zetten of de afzuig
kap op de hoogste
stand te zetten. Bij een kook
plaat met vlambeveiliging dient de ventilatieopening
(fig. 2)
minimaal 200 cm
2
te zijn.
In het geval dat er geen mogelijkheid is om een afzuigkap te installeren, is het nodig
een elektrische ventilator te plaatsen, met afvoer of in het raam. Deze ventilator moet
geschikt zijn voor een keuken en een capaciteit hebben van 3 tot 5 maal het volume
van de keuken per uur. De installateur dient zich te houden aan de geldende wetgeving.
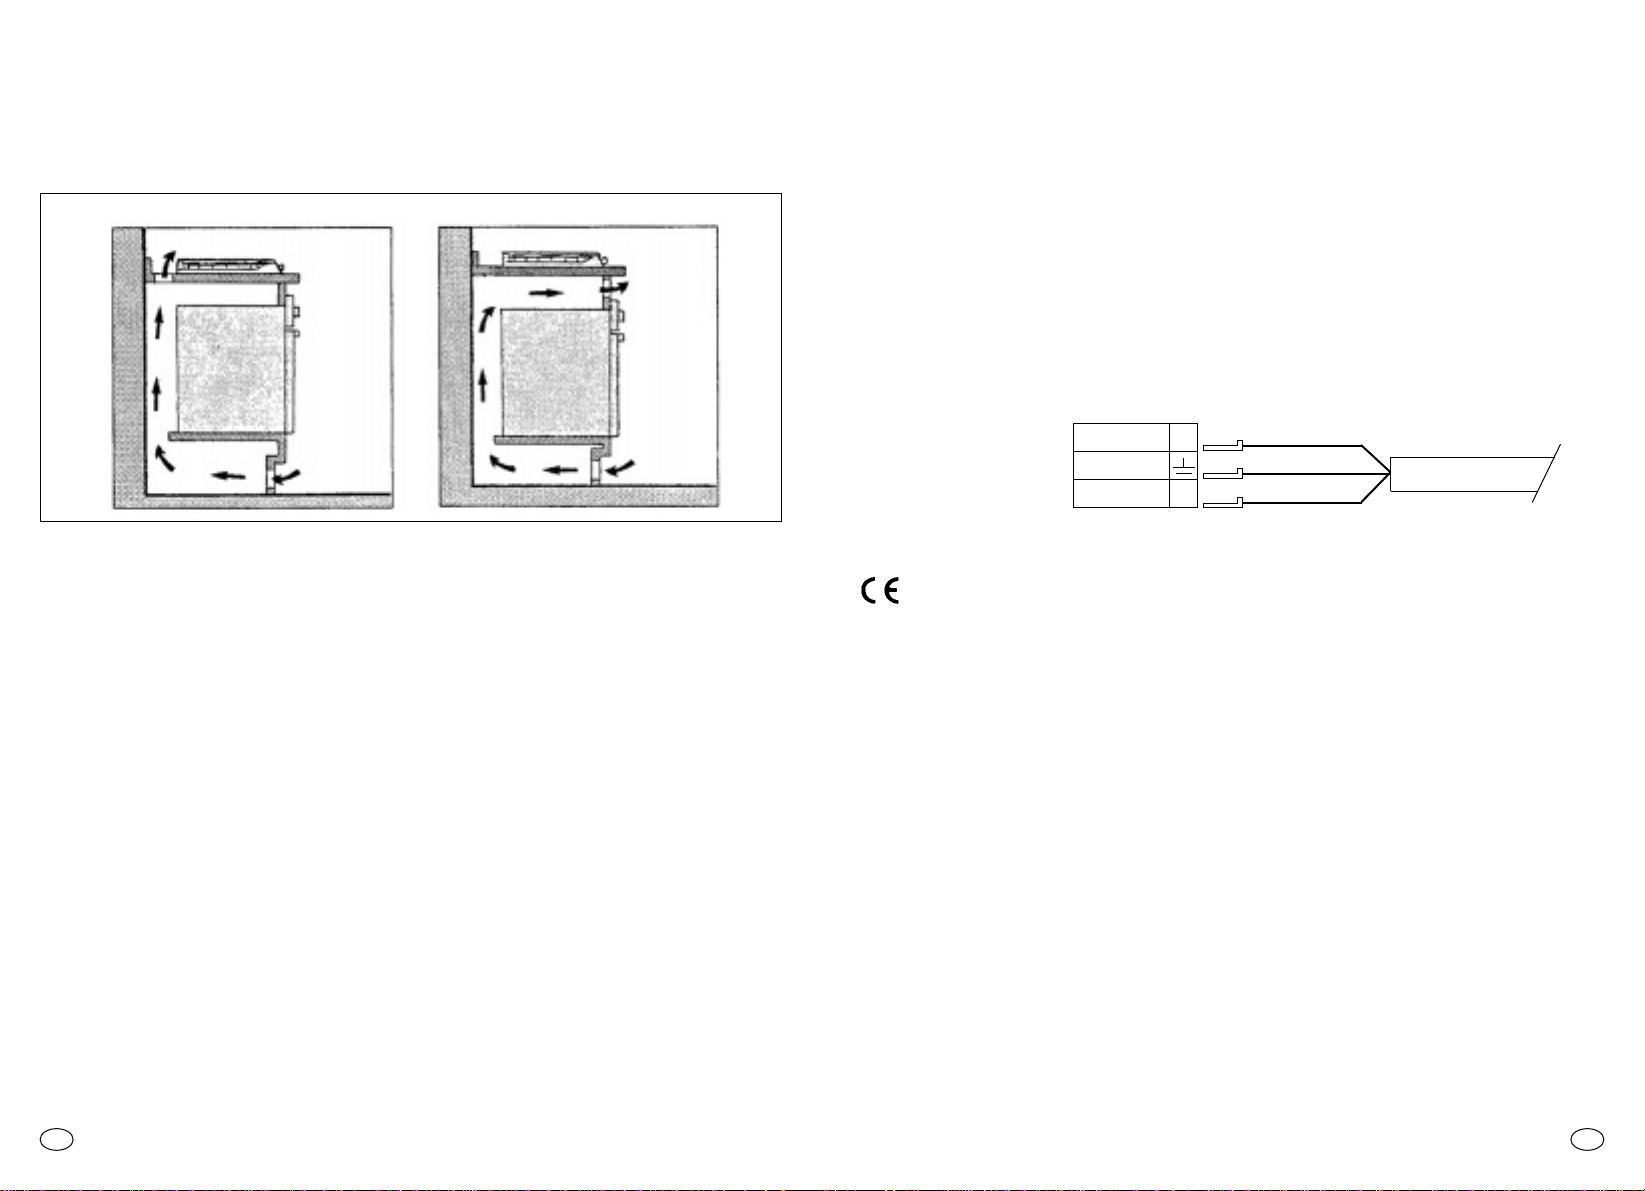
Wanneer de kookplaat geïnstalleerd wordt boven een oven zonder mantelkoeling, is
het aan te bevelen dat er ventilatieopeningen worden gemaakt om een goede ventilatie
te waarborgen.
De afmeting van deze opening dient ten minste 300 cm
2
te zijn met plaatsing zoals is
weergegeven in fig. 4.
FIG. 4
60 Cm
2
240 Cm
2
120 Cm
2
180 Cm
2
NL
ONDERSTROOM
L
GEAARD
NEUTRAAL N
HOOFDAANVOER
BRUINE DRAAD
GROEN/GELE DRAAD
BLAUWE DRAAD
ELECTRICITEITSKABEL
Conformiteitsverklaring. Dit apparaat, het gedeelte dat wordt aangesloten op het lichtnet, is conform de richtlijnen van de CEE 89/109.
Het apparaat is conform de Europese richtlijnen 89/336/CEE, 90/396/CEE,
73/23/CEE en daaropvolgende modificaties.
Page 4
6
Fig. 7 Fig. 8
BRANDERDEKSEL
BRUNDERVOET
AFSTELBUISJE
SCHROEFJE
KLEINE
NORMAAL
GROTE
DUBBELRINGS
EXTRA GROTE
VISBRANDER
Voor maten (x) zie tabel gasverbruik
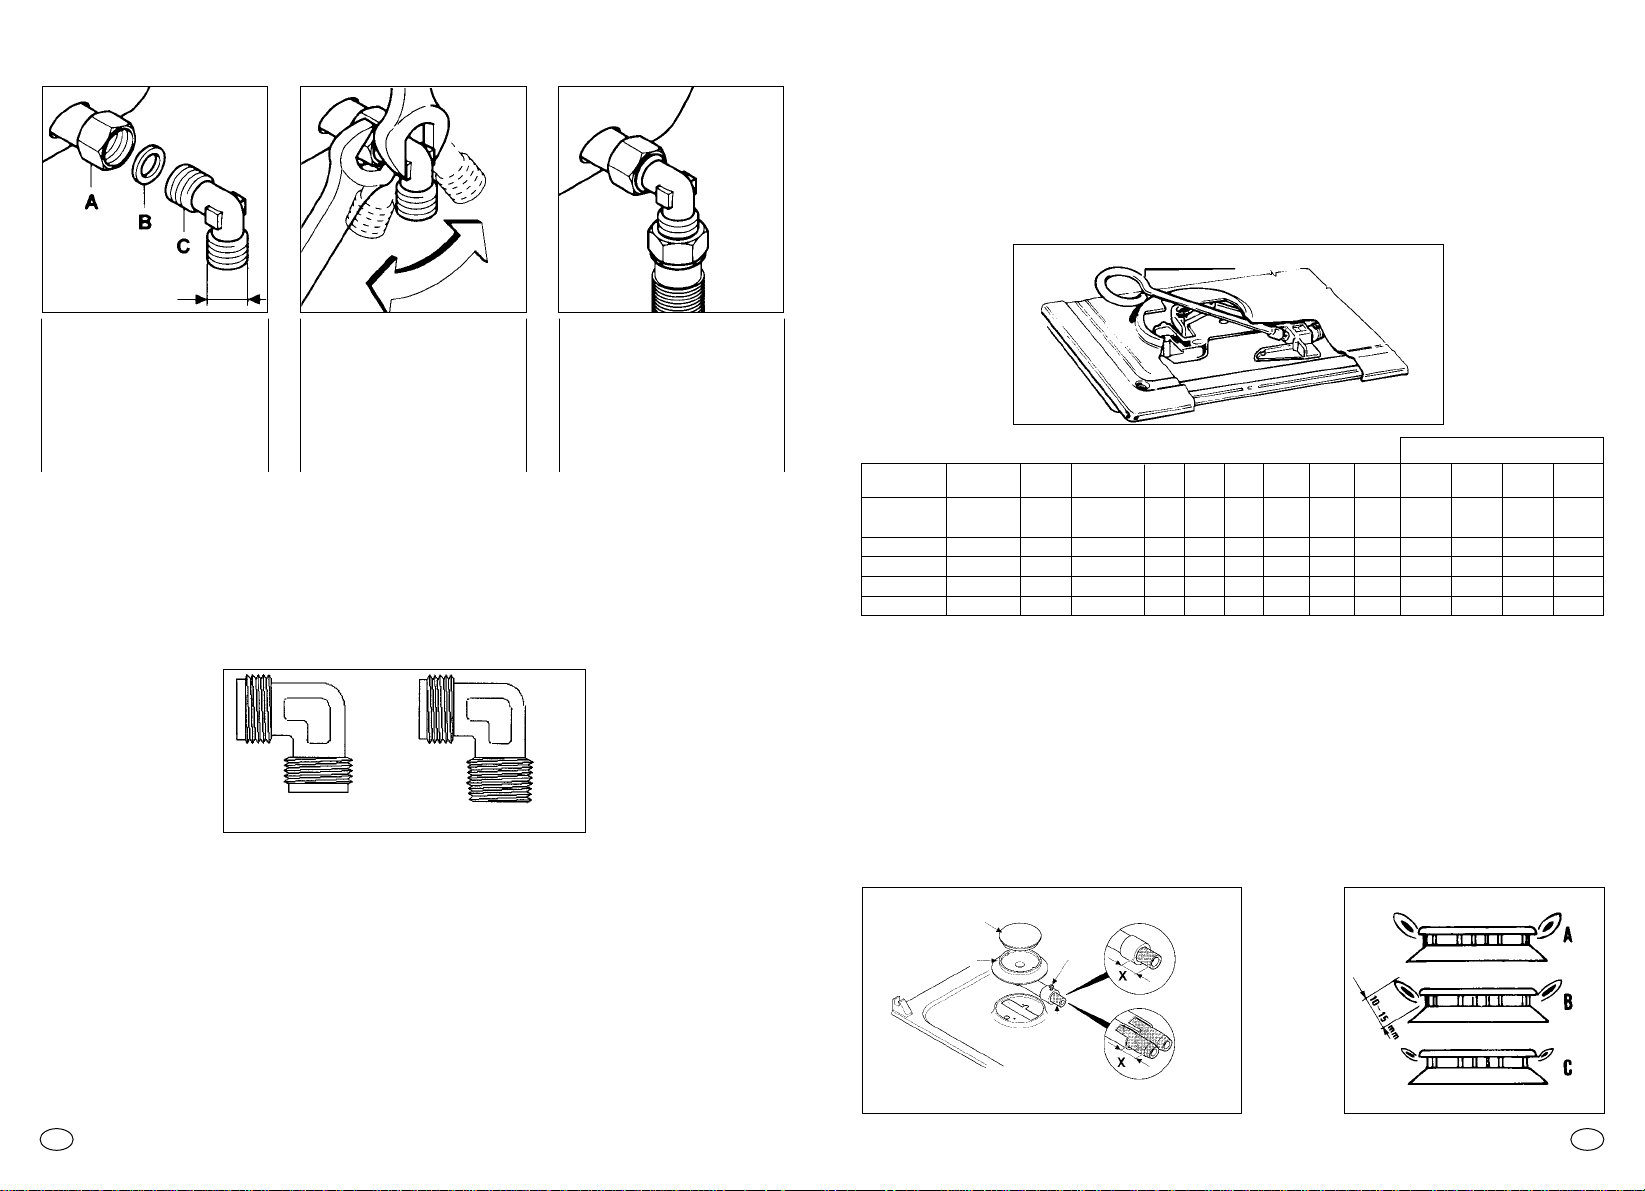
AFSTELLING VAN DE BRANDERS
Wanneer de branders zijn verwisseld, is het noodzakelijk de afstelling van de branders
opnieuw uit te voeren door te beginnen vanuit stand “X” zoals in de tabel “gasverbruik”
fig.7. Waarschuwing: de waarde van stand “X” is afhankelijk de brander en het type gas
dat wordt gebruikt.
Een goede gasvlam heeft een middelmatige lengte (fig. 8B), teveel aan lucht veroorzaakt dat de vlam te kort wordt en felle kleuren laat zien (fig. 8C): trek in dit geval de
buis voor de toevoer iets uit het branderhuis.
Bij een tekort aan lucht zal de vlam zwak en lang worden (fig. 8A) Hiervoor dient u de
toevoerbuis juist iets terug te drukken het branderhuis in. Na de goede stand te hebben
gekozen kunt u de buis vastzetten door de schroef aan te draaien (fig. 7).
afstelbuisje
4 mm
2 mm
13 mm
15 mm
Werkende
brander
groot
normaal
dubbelrings
extra grote
Ø 1/100 mm
inspuitstuk
120
93
2x94
2x94
Ø 1/100 mm
inspuitstuk
80
61
2x65
2x65
Qn
kW
2,65
1,5
3,3
3,3
l/h
G20
252
143
314
314
g/h
G30
193
109
238
238
g/h
G31
189
107
236
236
Qn
kW
2,5
1,45
3,1
3,1
l/h
G25
277
161
343
343
Qmin.
kW
0,650
0,380
0,900
0,900
afstelbuisje
4 mm
2 mm
13 mm
15 mm
afstelbuisje
2 mm
5 mm
0 mm
0 mm
G20 G30 G25 G31
G30
G31
G20/G25
G20 20mbar
G30 29mbar
G31 37mbar
G25
Afstand «X» aan de hand van het type gas
Tabel gasverbruik 1W = 0,860 kcal/h
afstel-
buisje
5 mm
7 mm
15 mm
15 mm
NLNL
5
1) Draai de onderdelen vast volgens de tekening.
A) Gasbuis
B) Pakking
C)
Draaibare gasnippel
2) Draai de nippel in
de gewenste richting
en draai vervolgens
met de steksleutels
stevig vast.
3) Verbindt de gasnippel aan de toevoer
(buis/of slang).
Let op
Sommige modellen zijn uitgevoerd met zowel de conische als cylindrische aansluiting
voor de gastoevoer. Selecteer het juiste type voor uw aansluiting.
Om schade aan de kookplaat te voorkomen, dient de installatie te gebeuren volgens
deze volgorde:
Fig. 5
A B
Cylindrische
Conische
AANPASSEN AAN DIVERSE SOORTEN GAS
Om de kookplaat aan een andere gassoort aan te passen, dient u de volgende handelingen uit te voeren.
— verwijder pannendrager en branders
— gebruik de bijgeleverde pijpsleutel om via de opening (fig. 6) van de branders bij
de branderbasis te komen
—
draai de inspuiter los en vervang deze door het passende type (zie tabel gasverbruik)
— Stel de brander af.
Fig. 6
Page 5
8
GEBRUIK VAN DE ELEKTRISCHE KOOKZONES
Positie
0 UIT
1 ZEER LAAG Bordenwarmen, smelten van boter en chocolade...
2 LAAG Opwarmen van kleine hoeveelheden en malen van sauzen...
3 ZACHT Koken van zachte groente, fruit. Aan de kook houden van water...
4 GEMIDDELD Doorkoken van groente, pasta en bereiden van vis...
5 HOOG Vlees braden...
6 ZEER HOOG Aan de kook brengen. Braden en frituren...
Als na verloop van tijd de gaskranen moeilijk vast te draaien zijn, is het noodzakelijk
deze te smeren. Dit kan enkel worden uitgevoerd door een erkende technicus.
Sommige kookplaten zijn uitgerust met een kleine grill bakplaat. Deze is enkel te gebruiken boven de medium brander.
De kookplaten die zijn voorzien van een kleine elektrische plaat (ø 80 mm) hebben ook
een gietijzeren plaat. Deze is alleen te gebruiken in combinatie met de elektrische
plaat. Deze gietijzeren plaat mag nimmer worden gebruikt boven de gasbranders.
Waarschuwing: Gebruik de elektrische plaat pas na het lezen van de paragraaf over
de keuze van pannen in “Het gebruik van elektrische kookplaten”.
GEBRUIK VAN ELEKTRISCHE KOOKZONES
Om de elektrische kookzones aan te zetten, is het voldoende om de knop op de
gewenste kookstand te zetten. Voor optimale prestaties met een minimum aan energieverbruik kunt u de volgende tabel raadplegen.
NLNL
7
Als u deze aanpassingen heeft afgerond verwijder dan het etiket met de gaswaarden en vervang deze door een etiket met de juiste waarden.
INSTRUCTIES VOOR GEBRUIK
Dit apparaat is ontwikkeld en geproduceerd voor koken bij huishoudelijk gebruik. Elke
andere vorm van gebruik is onjuist en derhalve gevaarlijk.
De fabrikant kan niet aansprakelijk worden gesteld voor eventuele schade veroorzaakt
door onjuist, onredelijk en onverantwoord gebruik.
GEBRUIK VAN DE GASBRANDERS
Om de brander aan te steken (bij versie zonder vonkontsteking) houdt u eerst een vlam
bij de brander en drukt u de knop naar beneden en draait u de knop tegen de wijzers
van de klok in tot maximum.
Als u de branders lange tijd niet gebruikt heeft, kan het zijn dat er een beetje lucht
in de gasbuizen zit. Houdt er rekening mee dat de onsteking dan iets langer kan duren.
Voor apparaten met een elektronische onsteking geldt het volgende:
• Druk en draai de knop tegen de klok in naar het * symbool.
• Onsteekt de brander door het indrukken van een ontstekingsknop.
Bij een kookplaat met een automatische ontsteking hoeft u slechts de knop in te
drukken en vervolgens naar het * symbool te draaien.
De vonkontsteking werkt continu zolang de knop wordt ingedrukt.
Wanneer de vlam niet binnen 5 seconden is ontstoken draai de knop terug naar nul
en herhaal de procedure.
Voor modellen uitgevoerd met een veiligheidsventiel, welke de gastoevoer afsluit wanneer de vlam gedoofd is, worden de branders op dezelfde manier ontstoken. Het is
belangrijk om de knop 5 seconden in gedrukt te houden nadat de vlam ontstoken is.
Daarna zal de vlam blijven branden.
LET OP:
Voordat de kookplaat wordt gebruikt dient u er zeker van te zijn dat de
branders en branderdeksels op een correcte wijze zijn geplaatst.
Voor optimaal gebruik van de branders raden wij u aan pannen te gebruiken die
bij de branders passen. Zie figuur op pagina 1
Brander rechtsvoor diameter 12 tot 18 cm
Brander linksvoor diameter 12 tot 18 cm
Brander rechtsachter diameter 18 tot 24 cm
Brander linksachter diameter 24 tot 26 cm
In het geval dat u kleinere pannen wilt gebruiken, dient u zich er van te verzekeren
dat u de vlam zo instelt dat deze net de onderzijde van de pan raakt. Het gebruik van
holle of bolle pannen wordt ernstig afgeraden.
WAARSCHUWING: in het geval dat de vlam een keer te groot wordt, draai dan
de knop dicht en wacht minstens 1 minuut alvorens u de gaspit weer ontsteekt.
Voordat u de glasdeksel (optioneel) sluit, dient u zich er van te verzekeren dat de branders uit en volledig afgekoeld zijn. Dit om breuk door een thermische schok te voorkomen.
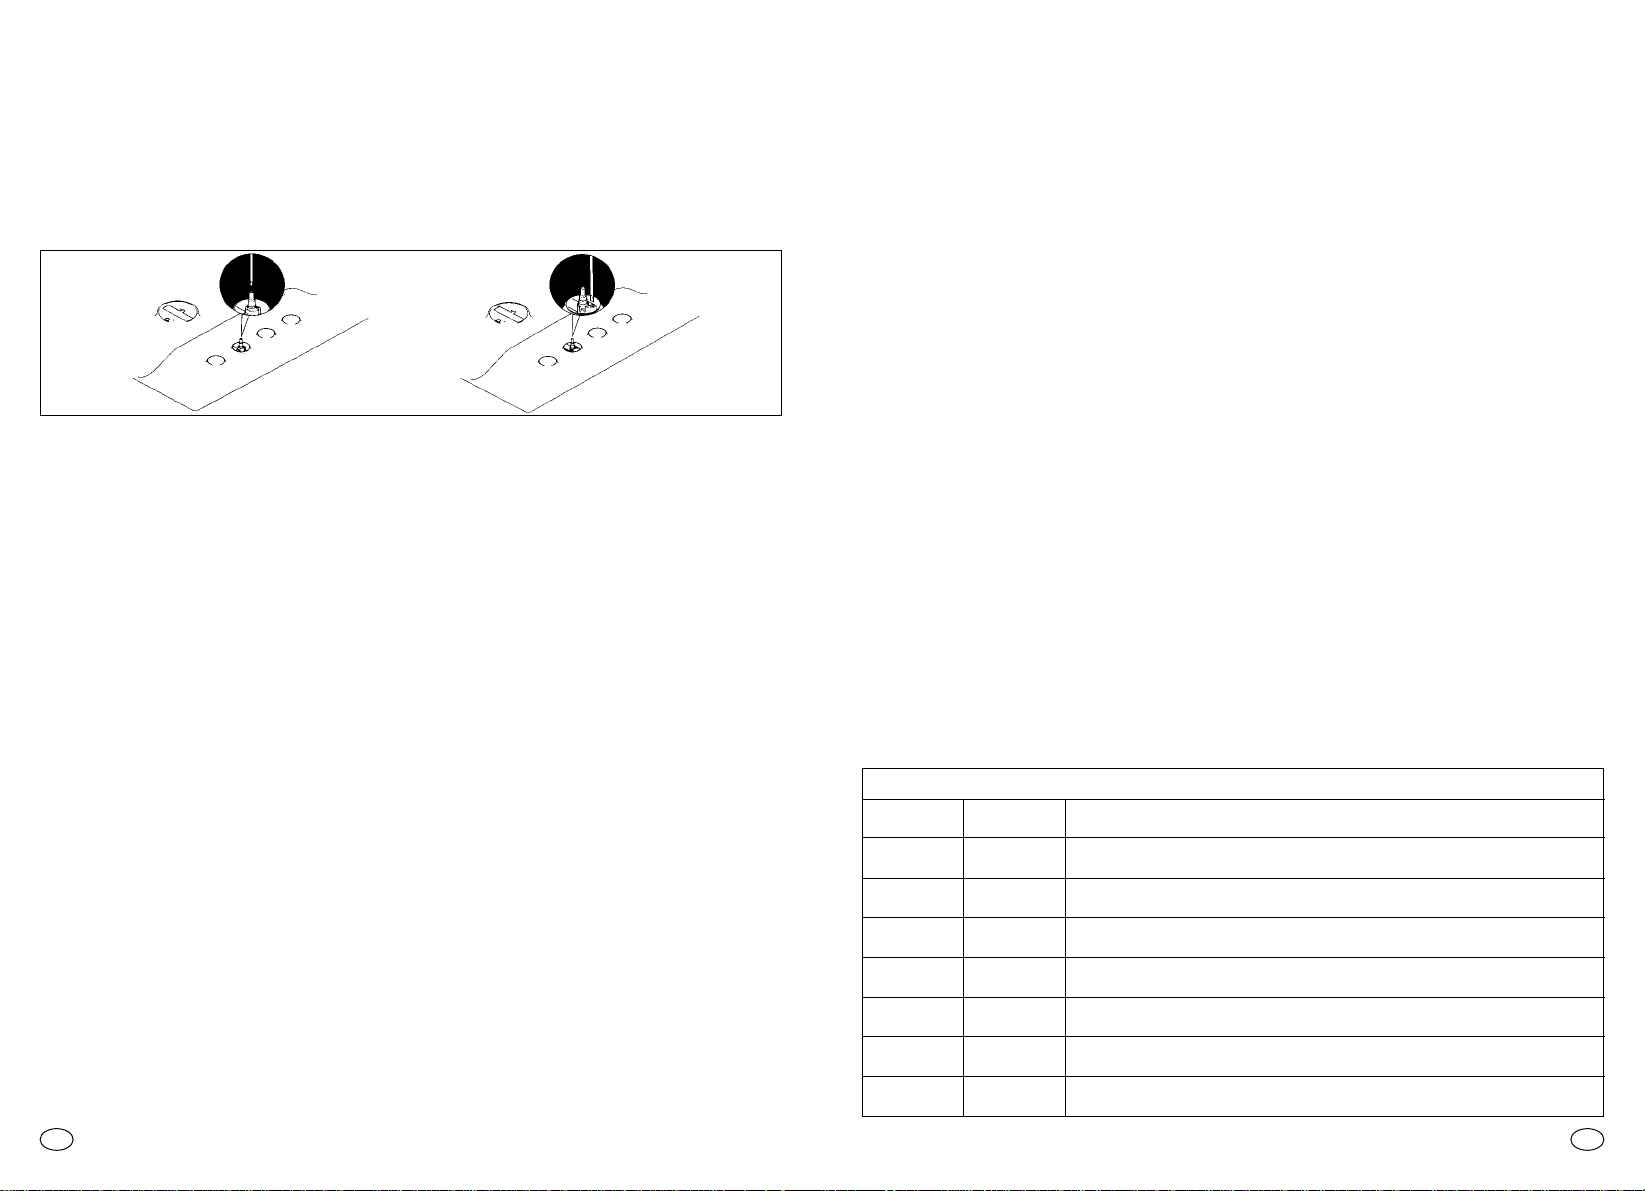
DE LAAGSTANDAFSTELLING
Steek de brander aan en draai de knop op de laagste positie en verwijder de knop.
Vervolgens kunt u met een kleine schroevedraaier een schroefje bovenop de gaskraan
draaien (fig. 9). Tegen de wijzers van de klok in voor een hogere gastoevoer, met de
wijzers van de klok mee voor een lagere gastoevoer. Probeer een vlam van 3 á 4 mm.
te krijgen. Bij gebruik van flessengas (Butaan of LPG) moet de schoef van de laagste
stand met de klok mee tot het einde worden aangedraaid.
Afstelschroefje laagstand van de branders
Fig. 9
Page 6
9
NLNL
10
TECHNISCHE DIENST
Het kan natuurlijk gebeuren dat er met uw kookplaat iets niet in orde is. Alvorens de
service dients te bellen (in het geval dat de kookplaat niet goed werkt):
— controleer of de stekker juist is aangesloten en in het stopcontact zit;
— controleer of de gastoevoer goed is.
In het geval dat er iets niet functioneert, haal dan de stroom van het apparaat. Maak
het apparaat in geen geval open maar neem contact op met de Technische dienst.
Het apparaat is voorzien van een standaard garantie certificaat. Dit geeft u, in combinatie met de aankoopnota, recht op één jaar volledige garantie.
AFDEKPLAAT
De afdekplaat is beschikbaar als accessoire. Voor de Nederlandse markt geldt dat de
afdekplaat beperkt leverbaar is, informeer bij uw dealer.
Voordat u de afdekplaat sluit, dient u zich er van te verzekeren dat de kookzones
uit zijn en volledig zijn afgekoeld. Dit ter voorkoming om glasbreuk door een
thermische schok te voorkomen. Indien u knoeit op de afdekplaat, moet u dit van
de afdekplaat verwijderen voordat deze wordt geopend.
De frabrikant is niet verantwoordelijk voor mogelijke fouten in de gebruiksaanwijzing veroorzaakt door drukof zetfouten. De fabrikant behoudt zich het recht voor de produkten tussentijds te wijzigen indien zij dit
nodig of nuttig acht.
Deze gebruiksaanwijzing is beschikbaar in Duitse versie.
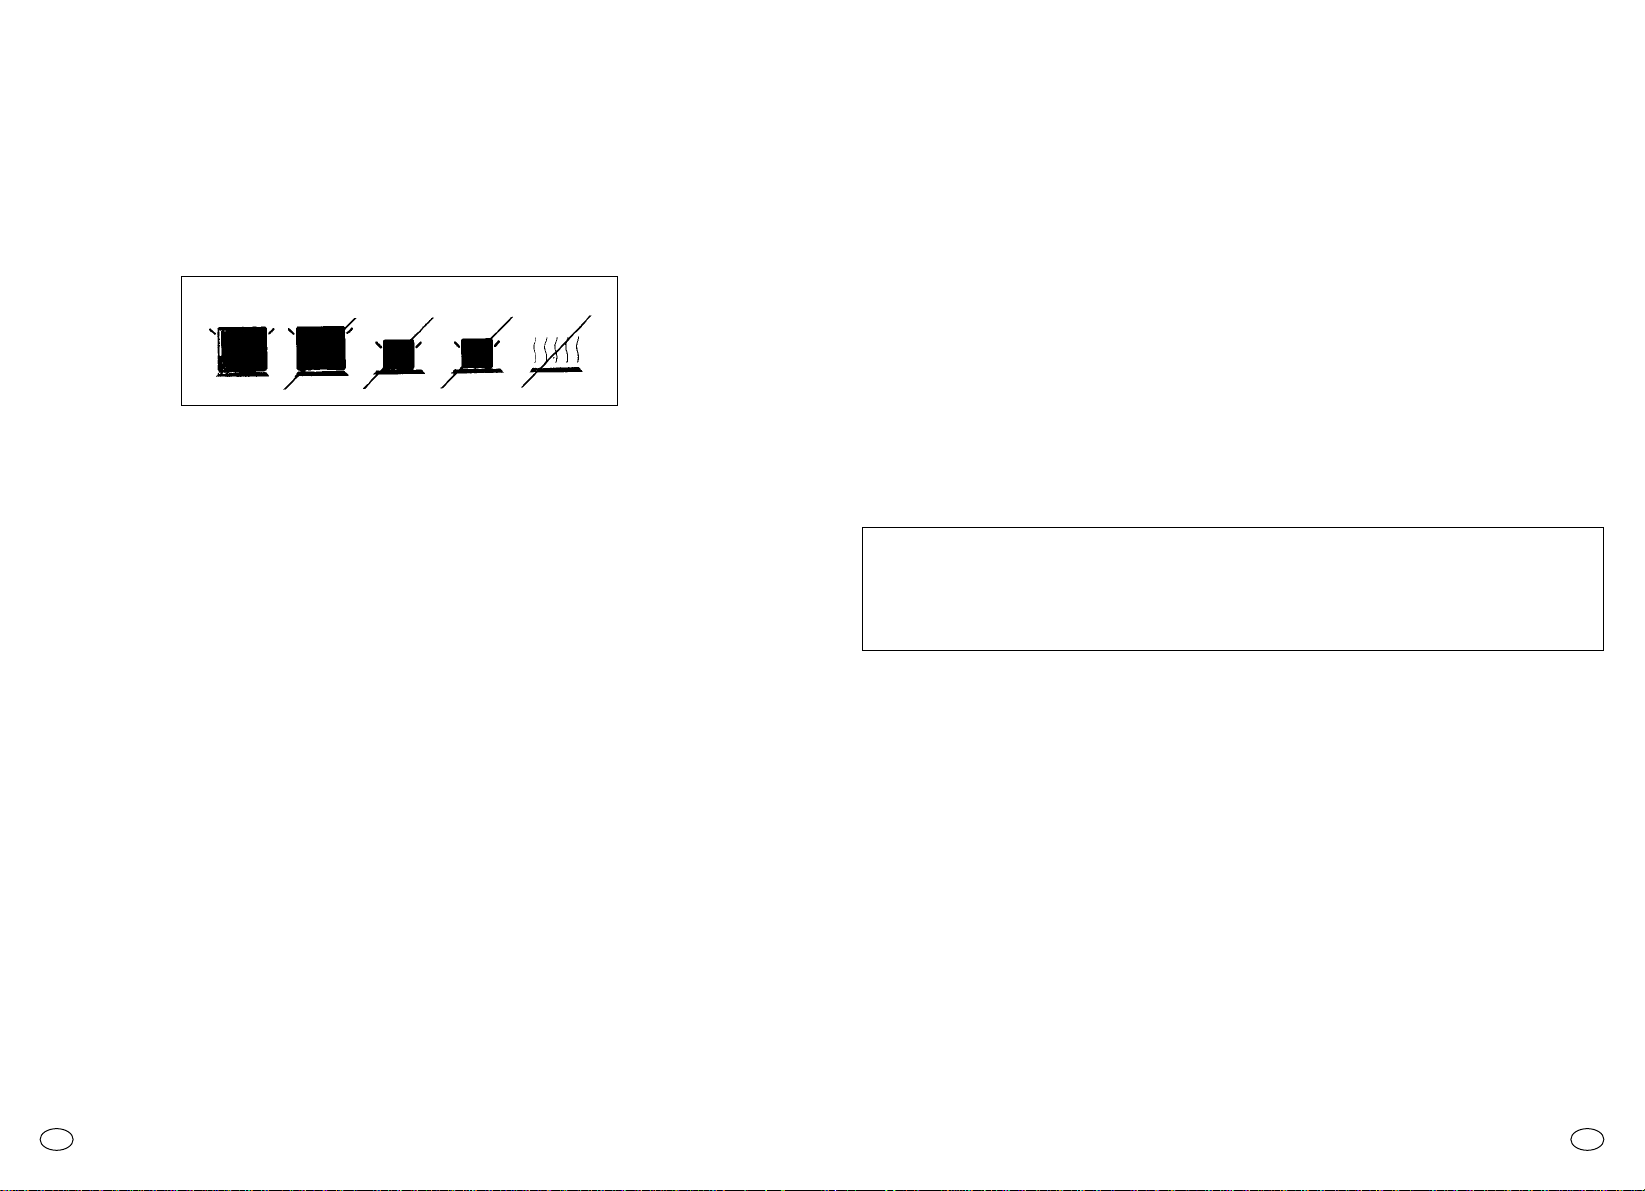
Fig. 10
JA NEE NEE NEE NEE
Wanneer de electrische plaat in gebruik is zal een indicatielampje blyven branden.
De extra elektrische plaat (ø 80 mm) kan aan en uit gezet worden door het indrukken
van de knop 0/I. De plaat heeft geen variabele vermogensstanden.
Bij het gebruik van de elektrische kookzones raden wij u aan pannen te gebruiken met
een vlakke bodem en een diameter die overeenkomt met die van de gekozen kookzone. Zeker geen kleinere diameter gebruiken (fig. 10). Wij raden u aan de bodem van
de pan goed te drogen bij eventueel overkoken. Laat nooit een kookzone aanstaan
zonder pan of met een lege pan.
ONDERHOUD EN REINIGEN
Voordat u gaat demonteren of schoonmaken dient u de stroomvoorziening af te sluiten
door de stekker uit het stopcontact te halen of de stroomtoevoer via de zekering af te
sluiten. Zorg ervoor dat het apparaat volledig is afgekoeld.
Reinig de geëmailleerde, verchroomde en geverfde delen met handwarm water en
met een niet agressieve allesreiniger.
Gebruik voor de roestvrijstalen delen een rvs reiniger die gewoon in de winkel verkrijgbaar is.
Aluminium kunt u het beste reinigen door eerst met een met olie doordrenkte doek te
poetsen en dit vervolgens met een alcoholhoudend middel af te nemen.
Gebruik tijdens het schoonmaken nooit: schuurmiddelen, bijtende schoonmaakmiddelen, bleekmiddel of zuren.
Voorkom dat er op de geëmaillerde, roestvrijstalen of geverfde delen zuren blijven liggen (azijn, citroensap etc.)
De brandervoet kunt u reinigen met water en allesreinger. Als u de oorspronkelijk glans
terug wilt krijgen, kunt u een speciaal schoonmaakmiddel voor aluminiumlegeringen
gebruiken.
De branderdeksel, gemaakt van staal met emaille, kunt u reinigen in warm water met
reinigingsmiddel. U dient alle aangekoekte deeltjes te verwijderen die onregelmatigheid
in de vlam kunnen veroorzaken.
Na het reinigen moeten brandervoet en branderdeksel goed worden gedroogd. Let hierbij
op de de buisjes in de brandervoet. Zet daarna de branders zorgvuldig op hun plaats.
LET OP: Zorg er voor dat na het schoonmaken de branders op de juiste plaats
zitten en dat de branderdeksel goed op de brandervoet zit. Dit om een slecht
vlambeeld en schade aan de brandervoet te voorkomen.
Page 7

12
ISTRUCTION D’INSTALLATION
INSTALLATION
L’installation est à la charge de l’acheteur. Le constructeur est exempté de ce service.
Toute intervention demandée au constructeur à la suite d’une erreur d’installation n’est
pas comprise dans la garantie.
Les tables de cuisson et d’encastrement sont prévus pour l’installation en tops réalisés
avec n’importe quel matériau, à condition qu’il puisse résister à une température de
100°C et qu’il ait une épaisseur variant de 25 à 45 mm. Les dimensions du four pour
encastrement doivent respecter les dimensions indiquées Fig. 1.
Si le plan de cuisson est installé entre les parois d’un meuble, la distance entre cellesci et les bords de l’appareil sera d’au moins de 15 cm; il en est de même pour la distance qui le séparera de la paroi postérieure 5,5 cm. (fig. 2).
La distance entre la table de cuisson et tout autre élément ou appareil électroménager
(par exemple une hotte aspirante) ne doit pas être inférieure à 70 cm (fig.2).
Si sous la table de cuisson est présent un vide (accessible): il est nécessaire d’insérer
une cloison isolante de séparation entre le dessous de caisson et au dessus du vide.
Celle-ci doit être au moins à 10 mm du fond du caisson (Fig. 3).
Important - Appliquer le joint comme indiqué sur le dessin ci-dessous.
La fixation au meuble s’obtient au moyen de pattes de fixation qui sont livrés comme
accessoires. Dans la partie inférieure de la caissette se trouvent déjà des orifices
dans lesquels les
pattes de fixation seront vissés.
FR
Fig. 1
Fig. 2
Fig. 3
11
CARACTERISTIQUES TECHNIQUES
* Prédisposition de l’usine FR cat. II2E + 3 +
Plans de cuisson A B C D
Tab.1
Feux 4 à gaz 4 à gaz 3 à gaz 4 à gaz
– 1
électrique
1
électrique
–
Référence de modéle (Type) PL03/PL04 PL03/PL04 PL03/PL04 PL03/PL04
Sécurité gaz - /oui - / oui - / oui - / oui
Double brûleur DC ø 110 mm 1 1 - 1
Grand brûleur UR ø 110 mm 1 - 1 Brûleur semi-rapide SR ø 51mm 2 2 2 2
Brûleur rapide R ø 71 mm 1 1 - 1
Plaque à grillade - - - 1
Plaque électrique PE - 1 1 Puissance gaz installé:
- G20/20 mbar * 8,95 kW 8,95 kW 6,3 kW 8,95 kW
- G30/28-30 mbar 649 g/h 649 g/h 456 g/h 649 g/h
Classe d’installation 3 3 3 3
Alimentation 230V/50Hz 230V/50Hz 230V/50Hz 230V/50Hz
Puissance électr. - 450W 1400W Allumage électronique oui oui oui oui
Dimension appareil (l x p) mm. 590x510 590x510 590x510 590x510
D
B
C
A
Cet appareil a été conçu pour une utilisation de type non professionnel.
FR
vide accessible
Page 8

14
Si le cordon de raccordement électrique est endommagé, il doit être remplacé par une
personne qualifiée afin d’éviter tout risque éventuel.
Le fil de terre (de couleurs “vert et jaune”) doit mesurer au moins 10 mm de plus que
les fils “neutre” et “plus”.
La section du câble utilisé doit être en adéquation avec la puissance électrique absorbée de la table de cuisson.
Vérifiez les détails concernant la puissance sur la plaquette signalétique, et assurezvous que le cordon de raccordement est de TYPE H05V2V2F.
Déclaration de conformité. Cet appareil, dans sa partie destinée a être en contact
avec des substances alimentaires est conforme aux prescriptions de la direction CEE 89/109.
Appareils conformes aux directives européennes 89/336/CEE, 90/396/CEE,
73/23/CEE et modifications successives.
PHASE L
TERRE
NEUTRE N
RESEAU
D’ALIMENTATION
ELECTRIQUE
MARRON
JAUNE/VERT
BLEU
CABLE
D’ALIMENTATION
Les instructions concernent le personnel préposé à l’installation de l’appareil, conformément aux normes en vigueur. Toutes les interventions doivent être effectuées sur
l’équipement débranché électriquement.
Sur le plan de travail, des plaquettes indiquent le type de gaz pour lequel l’appareil a
été préparé.
Toutefois, on peut utiliser d’autres types de gaz; il suffit simplement d’effectuer les
adaptations suivantes: (voir indications dans les paragraphes suivants).
Le raccordement de l’appareil du tuyau à la bouteille de gaz doit être effectué sui
vant
les prescriptions des normes en vigueur; avant tout il faudra vérifier si l’appareil
est ré-
glé pour le type de gaz choisi pour l’alimentation. En cas contraire, effectuer
les opérations indiquées au paragraphe «Adaptation aux differents types de gaz». Si l’appareil
est alimenté par du gaz liquide provenant de bouteille, utiliser des régu
lateurs de pression conformément aux normes en vigueur.
Important: pour un fonctionnement avec le maximum de sécurité, pour une utilisation appropriée de l’énergie et une plus longue durée de vie de l’appareil, vérifier la
pression d’alimentation par rapport aux valeurs indiquées sur le tableau page 16.
Utiliser exclusivement des tuyaux et des joints d’étanchéité conformes
à la norme en vigueur .
Au moment du raccordement de la table de cuisson à l’arrivée de gaz, si vous utilisez
un tuyau flexible, vérifiez que le tuyau ne mesure pas plus de 2 mètres.
Important: lorsque l’installation est achevée, contrôler l’étanchéité de tous les
raccords en utilisant une solution savonneuse; ne jamais utiliser de flamme.
S’assurer de plus que le tuyau flexible ne puisse être en contact avec une partie
mobile d’un meuble (ex. 1 tiroir) et qu’il ne soit pas situé à proximité d’un matériau susceptible de la détériorer.
RACCORDEMENT (ALIMENTATION GAZ)
FR
13
LOCAL D’INSTALLATION
L’utilisation d’un appareil de cuisson à gaz produit de la chaleur et de l’humidité dans la
pièce dans laquelle il est installé. S’assurer d’une bonne aération dans la pièce en maintenant ouvert les accès de ventilation ou bien en installant une hotte d’aspiration avec
un conduit d’évacuation (fig. 2).
Une utilisation intensive et prolongée de l’appareil peut nécessité une aération supplémentaire, par exemple
l’ouverture d’une fenêtre ou d’une aération plus efficace
en augmentant la puissance d’aspiration mécanique si elle existe dans le cas où l’appareil est dépourvu d’un thermocouple (dispositif de sécurité); la prise de ventilation (fig. 2) devra être
de 200 cm
2
minimum.
Dans le cas où il serait impossible d’installer une hotte, il faut utiliser un électro-ventilateur appliqué à la paroi extérieure ou à la fenêtre de la pièce.
Ce ventilateur doit avoir une puissance suffisante pour
garantir le renouvellement de l’air,
soit 3 à 5 fois le volume de la pièce par heure.
L’installateur doit se tenir aux normes en vigueur.
Si la table de cuisson est installée au-dessus d’un four non équipé d’un système de refroidissement, nous vous recommandons de créer des ouvertures dans le meuble d’encastrement afin de permettre une bonne circulation d’air.
La taille de ces ouvertures doit être d’au moins 300 cm2et placées comme indiquée en fig. 4.
RACCORDEMENT (PARTIE ÉLECTRIQUE)
Contrôler les données reportées sur la plaquette de l’appareil, située sur la partie inférieure a l’extérieure du caisson, puis vérifier la tension nominale du réseau et de la
puissance qui doit être appropriée à son fonctionnement.
Avant d’effectuer le raccordement, vérifier l’efficience de l’installation de mise à la terre.
La mise à la terre de l’appareil est obligatoire suivant la loi. Le constructeur décline
toute responsabilité en cas de dommages aux personnes ou aux choses, provoqués
par la non-observation de cette norme.
Sur les modèles dépourvus de fiche, monter, sur le câble, une fiche standardisée à
même de supporter la charge indiquée sur la plaquette.
Le conducteur de terre du câble est coloré en jaune et en vert. Dans tous les cas, la
prise de courant doit être accessible.
Pour réaliser une connexion fixe au réseau, interposer entre l’appareil et le réseau un
dispositif omnipolaire de coupure, en respectant une distance des contacts d’au
moins 3 mm.
FR
FIG. 4
60 Cm
2
240 Cm
2
120 Cm
2
180 Cm
2
Page 9

RÉGLAGE MINIMUM DE LA FLAMME
Allumer les brûleurs en plaçant le robinet sur la position minimum et enlever le bouton (il suffit de l’extraire car il est monté par pression).
Au moyen d’un petit tournevis, agir sur la vis de réglage du robinet (Fig. 9) dans le sens
contraire à celui des aiguilles d’une montre pour augmenter le débit de gaz, dans le sens
des aiguilles d’une montre pour le diminuer, jusqu’à obtenir une flamme de 3 ou 4 mm.
Dans le cas d’une utilisation de gaz butane/propane (gaz en bouteille)- la vis de réglage de
la flamme (ralenti) doit être vissée (dans le sens des aiguilles d’une montre) complètement.
Vis de réglage minimum du robinet (en fonction des modèles)
16
Fig. 9
Fig. 7 Fig. 8
BRULEUR
VENTURI
TUBE DE
REGLADE D’AIR
VIS DE
FIXATION
PETIT
RAPIDE
SEMI-RAPIDE
DOUBLE
GRAND
POISSONNIÈRE
Pour les dimensions ‘X’ voir le tableau des consommations de gaz
REGLAGE DES BRÛLEURS GAZ
En cas de changement des injecteurs, il est nécessaire de régler le débit d’air en gardant la
valeur “X” et en vous référant au tableau “consommation gaz” fig 7.
Attention: la valeur de réglage “ X “ varie en fonction de la taille du brûleur gaz et du gaz utilisé. Une bonne flamme doit avoir une taille moyenne (fig.8B).
Trop d’air entrainerait une flamme trop courte et avec des couleurs différentes (fig.8C) : dans
ce cas, il est nécessaire de fermer la bague de réglage d’air en l’éloignant du brûleur gaz.
Si le mélange est insuffisant en air, la flamme sera longue et fine (fig. 8A) : dans ce cas, il est
nécessaire de rapprocher la bague de réglage d’air du corps du brûleur.
Pour ajuster la bague d’air, déserrer la vis qui se trouve sur la bague. Enfin, lorsque le débit
d’air est bien réglé, verrouiller la bague grâce à cette même vis. (fig. 7).
FR
reglage
d’air
4 mm
2 mm
13 mm
15 mm
Brûleur
rapide
semi rapide
double brûleur
grand
Ø injecteur
1/100 mm
120
93
2x94
2x94
Ø
injecteur
1/100 mm
80
61
2x65
2x65
Qn
kW
2,65
1,5
3,3
3,3
l/h
G20
252
143
314
314
g/h
G30
193
109
238
238
g/h
G31
189
107
236
236
Qn
kW
2,5
1,45
3,1
3,1
l/h
G25
277
161
343
343
Qmin.
kW
0,650
0,380
0,900
0,900
reglage
d’air
4 mm
2 mm
13 mm
15 mm
reglage
d’air
2 mm
5 mm
0 mm
0 mm
G20 G30 G25 G31
G30
G31
G20/G25
G20 20mbar
G30 29mbar
G31 37mbar
G25
Cote «X» suivant
le type de gaz
Tableau des consommations de gaz 1W = 0,860 kcal/h
reglage
d’air
5 mm
7 mm
15 mm
15 mm
15
ADAPTATION AUX DIFFÉRENTS TYPES DE GAZ
Pour adapter la table de cuisson à un type de gaz autre que celui pour lequel elle a
été prépare, suivre dans l’ordre les opérations suivantes:
— enlever la grille et le brûleur
— introduire une clé à tête hexagonale en tube dans le support du brûleur (Fig. 6) (la
clé est fournie en tant qu’accessoire de la table de cuisson).
— dévisser l’injecteur et le remplacer par celui qui est adapté au type de gaz disponi-
ble (voir le tableau des consommations du gaz).
— effectuer le réglage du brûleur.
A) Visser les pièces en
suivant la séquence
illustrée
A) Tuyau rampe
B) Joint
C) Raccord orientable
2) Serrer à fond les
raccords au moyen
des clés à tête hexagonale; pendant le
serrage ne pas oublier
d’orienter le raccord
dans la direction désirée.
3) Raccorder le rac cord C au réseau d’alimentation du gaz au
moyen du tuyau rigide
en cuivre ou flexible
en acier.
CONIQUE
Attention
Certains modèles sont équipés de systèmes coniques et cylindriques pour le raccordement au gaz. Sélectionnez le type adéquat pour un raccordement optimal.
Afin d’éviter tout dommage sur votre table de cuisson, merci de procéder à son installation conformément au schéma suivant:
CYLINDRIQUE Fig. 5
A B
FR
Clè hexagonale
Fig. 6
Page 10

18
Fig. 10
OUÍ NON NON NON NON
L’allumage de la plaque est indiquée par le voyant.
La plaque électrique additionnelle (Ø 80 mm) lorsqu’elle est présente, est mise en marche et/ou hors circuit, en pressant sur le bouton 0/I. Cette plaque électrique a une puissance de chauffe fixe pré-établie.
Sur les plaques électriques il est recommandé d’utiliser exclusivement des récipients
dont le fond est parfaitement plat et dont le diamètre est proche de celui de la plaque
choisie, ou inférieur au diamètre de cette plaque (fig. 10). Bien sécher le fond des récipients, ne pas laisser déborder le contenu lors de l’ébullition et ne jamais laisser les
plaques allumées sans casserole ou à casserole vide.
PUISSANCE DES PLAQUES AUX DIFFERENTES POSITIONS DES MANETTES
Positions
0 STOP
1 TRES LENT Maintient les plats au chaud, beurre fondu, chocolat...
2 LENT Cuisson a feu lent, béchamel, daube, riz au lait, oeufs sur le plat...
3 MODERE Légumes secs, surgelés, fruit, eau bouillante...
4 MOYEN Pommes vapeur, légumes frais, pâtes, crêpes, poisson...
5 FORT Cuisson plus forte, omelettes, bifteck..
6 VIF Bifteck, côtelettes, fritures...
Remarque: Dans le cas d’une extinction accidentelle de la flamme du brûleur, fermer la manette de commande et renouveler l’allumage seulement aprés 1 minute.
Avant de fermer le couvercle, pour protéger le cristal trempé contre les chocs thermiques, attendre que les plaques électriques ou les brûleurs soient refroidis.
Si après quelque temps, les manettes deviennent difficile à tourner, il sera nécessaire
de les lubrifier. Une telle opération doit être effectuée par un Professionnel.
Certains modèles sont équipés d’une petite plaque spéciale “grillade”. Cet accessoire
ne doit être utilisé que sur un brûleur de taille moyenne appelé “semi-rapide”.
Les tables de cuisson équipées d’une petite plaque électrique additionnelle (Ø 80 mm)
sont aussi équipées d’un cadre en fonte à utiliser uniquement avec la plaque électrique. Le cadre en fonte ne doit pas être utilisé avec un brûleur gaz.
Attention: n’utilisez la plaque électrique qu’après avoir lu le paragraphe relatif au choix
des récipients à utiliser sur les “plaques électriques” spécifiquement.
UTILISATION DES PLAQUES ÉLECTRIQUES
Pour un meilleur fonctionnement en économisant l’énergie, régler la position des manettes des plaques électriques suivant les conseils indiqués au tableau suivant:
FR
17
Après avoir effectué le réglage du gaz, substituer sur la plaque de votre appareil
l’ancienne
étiquette par la nouvelle correspondant au gaz installé.
INSTRUCTIONS POUR L’UTILISATEUR
UTILISATION DE LA TABLE DE CUISSON
Cet appareil ne doit servir qu’à l’usage prévu, c’est-à-dire pour la cuisson et l’utilisation
ménagère. Tout autre usage est abusif donc dangereux.
Le constructeur n’est pas responsable des dommages provoqués par un mauvais usage,
par une utilisation abusive, erronée ou déraisonnable.
UTILISATION DES BRÛLEURS
Pour allumer les brûleurs du plan de cuisson, approcher une flamme sur le brûleur puis
appuyer et tourner le bouton correspondant vers la gauche jusqu’à la position maximum.
Si les brûleurs ne sont pas utilisés pendant plusieurs jours, attendre quelques secondes avant d’allumer le gaz pour permettre de purger l’air des tuyaux.
Pour les modèles équipés d’allumage électronique, procéder comme suit:
— appuyer et tourner la manette dans le sens contraire des aiguilles d’une montre jusqu’à la petite étoile
★
.
— actionner l’allumage en appuyant sur la touche correspondante.
Pour les tables de cuisson équipés d’un allumage automatique, il suffit d’appuyer et de
tourner la manette jusqu’à la petite étoile
★
.
Le système d’allumage produira des étincelles tant la manette sera enfoncée.
Si la flamme ne s’obtient pas dans les 5 secondes, ramener la manette à la position 0 et
répéter l’opération.
Pour les modèles équipés d’un système à sécurité (qui interrompt l’arrivée du gaz en
cas d’extinction accidentelle de la flamme), l’allumage des brûleurs s’effectue comme
décrit ci-dessus, en faisant attention à maintenir appuyé à fond la manette pendant
environ 5-6 secondes après l’allumage de la flamme.
Ces quelques secondes permettent au dispositif de sécurité de s’amorcer et la flamme
restera permanente.
ATTENTION:
Vérifiez que les brûleurs et chapeaux de brûleurs sont installés cor-
rectement. Leur bon positionnement assure une combustion parfaite.
Pour une meilleure utilisation des brûleurs il est recommandé d’utiliser des casseroles à fond plat dont le diamètre du fond est approprié à la plaque choisie (voir figure
page 11).
— Brûleur avant droit de 12 à 18 cm.
— Brûleur avant gauche de 12 à 18 cm.
— Brûleur arriére droit de 18 à 24 cm.
— Brûleur arriére gauche de 24 à 26 cm.
Dans le cas de poêles ou de casseroles de petits diametres (cafetière, théière, etc...)
régler la puissance du brûleur en s’assurant que la flamme chauffe le fond de la casserole sans “déborder”. Il ne faut pas utiliser de casseroles à fond concave ou convexe.
FR
Page 11

20
Grilles et brûleurs chromés
Les grilles et brûleurs chromés ont tendance à noircir à l’usage.
C’est un phénomène normal et inévitable, mais il ne met absolument pas en danger
les fonctionnalités de la table de cuisson.
Cependant, les pièces de rechanges sont disponibles, sur demande, auprès de votre
revendeur ou de notre service après-vente.
COUVERCLE
Le couvercle est disponible sur demande comme accessoire optionel.
Le constructeur ne répond pas d’éventuelles inexactitudes imputables à des erreurs d’impression ou de
transcription contenues dans cet opuscule. Le constructeur se réserve le droit de modifier les produits en
cas de nécessité, même dans l’intérèt de l’utilisation, sans causer de préjudices aux caractéristiques de
fonctionnement et de sécurité des appareils.
Avant de fermer le couvercle et afin de protéger des chocs thermiques, il faut absolument attendre que les plaques électriques et les brûleurs soient refroidis.
Tout produit du à un eventuel débordement doit être retiré du couvercle avant de
l’ouvrir.
FR
19
ENTRETIEN ET NETTOYAGE
Avant d’effectuer toute opération, débrancher la fiche de la prise ou couper le courant à
partir de l’interrupteur général de l’installation électrique. Avant d’effectuer le nettoyage, il est necessaire a
ttendre le complet refroidissement de l’appareil, choisi laver les
parties émaillées, peintes ou chromées avec de l’eau tiède et savonneuse ou avec
un détergent liquide non corrosif.
Pour les parties en acier utiliser de l’alcool ou les solutions se trouvant en commerce.
Pour les panneaux et les profilés en aluminium, utiliser du coton ou un linge imbibé
d’huile de vaseline ou d’arachides. Nettoyer et passer un chiffon imbibé d’alcool.
Pendant le nettoyage ne jamais utiliser d’abrasifs, de produits corrosifs, d’eau de Javel
ou d’acides.
Eviter de laisser sur les parties émaillées, peintes ou en acier inox, des substances
acides ou alcalines jus de citron, acétone, vinaigre, etc.).
Nettoyer les brûleurs à l’eau savonneuse: pour leur redonner leur brillant d’origine, il
suffit de les nettoyer avec un produit spécial pour les alliages d’aluminium.
Après le nettoyage sécher parfaitement les brûleurs et les remettre dans leur siège.
Il faut absolument contrôler que le remontage soit parfait car une mauvaise position des pièces peut causer de graves anomalies dans la combustion.
ASSISTANCE TECHNIQUE
Avant d’appeler le Service d’Assistance Technique
Si la table de cuisson ne fonctionne pas, nous vous conseillons de:
— vérifier que la fiche soit bien introduite dans la prise de courant;
— vérifier que l’arrivée de gaz soit régulière.
Si la cause du disfonctionnement n’est pas trouvée:
— éteindre l’appareil ne pas y toucher et appeler le Service d’Assistance Technique.
L’appareil est accompagné par un certificat de garantie qui permet de jouir gratuitement du Service d’Assistance Technique.
FR
Page 12

22
INSTRUCTIONS FOR THE INSTALLER
INSTALLATION
The Purchaser is responsible for the installation of the hob. The Manufacturer does not
accept any responsibility for any damage or loss resulting from incorrect installation,
and as such this will not covered by the Manufacturer’s Guarantee.
The hob may be installed in any worktop which is heat resistant to a temperature of
100° C, and has a thickness of 25 - 45 mm. The dimensions of the insert to be cut out
of the worktop are in shown in Fig. 1.
If the Hob is fitted next to a cabinet on either side, the distance between the Hob and the
cabinet must be at least 15 cm (see Fig. 2); while the distance between the hob and the
rear wall must be at least 5,5 cm.
The distance between the hob and any other unit or appliance above it (e.g. An extractor hood) must be no less than 70 cm (fig.2).
When there is an accessible space between the built-in hob and the cavity below, a dividing wall made of insulating material should be inserted (wood or a similar material).
The wall should be at least 10 mm away from bottom of the drawer. (fig. 3)
Important - The diagram below shows how the sealant should be applied.
The Hob unit is fitted by attaching the Fixing Clamps supplied, using the holes at the base
of the unit.
GBIE
Fig. 1
Fig. 2
Fig. 3
21
TECHNICAL CHARACTERISTICS
* Manufacturer setting IE cat. II2H3 + GB cat. II2H3 +
Cooking hobs A B C D
Tab.1
Burners 4 gas 4 gas 3 gas 4 gas
– 1 electric 1 electric –
Reference type (Type) PL03/PL04 PL03/PL04 PL03/PL04 PL03/PL04
Gas safety device - / yes - / yes - / yes - / yes
Double ring burner DC ø 110 mm 1 1 - 1
Maxi burner UR ø 110 mm 1 - 1 Medium burner SR ø 51mm 2 2 2 2
Large burner R ø 71 mm 1 1 - 1
Steak griddle - - - 1
Electric hotplate/ring PE - 1 1 Power of gas installed:
- G20/20 mbar * (METANO) 8,95 kW 8,95 kW 6,3 kW 8,95 kW
- G30/28-30 mbar (GPL) 649 g/h 649 g/h 456 g/h 649 g/h
Installation class 3 3 3 3
Supply Voltage 230V/50Hz 230V/50Hz 230V/50Hz 230V/50Hz
Installed electric power - 450W 1400W Electric ignition yes yes yes yes
Product size mm. 590x510 590x510 590x510 590x510
D
B
C
A
This appliance has been designed for non-professional, i.e. domestic, use.
GB IE
accessible space
Page 13

2423
FOR U.K. ONLY
INSTRUCTIONS FOR THE INSTALLER
The following information is intended for qualified and competant persons only who will
ensure that your appliance is installed correctly. All current legislation concerning the installation of Gas appliances must be observed by the installer*
* For the U.K. only - By law, the gas installation/commissioning must be carried out by a
«Corgi», registered installer.
This appliance must be installed in accordance with applicable regulations and should only be
used in well-ventilated locations. Before using this appliance carefully study the instruction book.
Suitable location
A gas-powered cooking appliance produces heat and humidity in the area in which it is
installed. For this reason you should ensure good ventilation either by keeping all natural air passages open or by installing an extractor hood with an exhaust flue. Intensive
and prolonged use of the appliance may require extra ventilation, such the opening of a
window or an increase in speed of the electric fan, if you have one.
If a hood cannot be installed, an electric fan should be fitted to an outside wall or window as long there are air vents in the area.
The electric fan should be able to carry out a complete change of air in the kitchen 3-5
times every hour. The installer should follow the relavant national standards.
If the hob is fitted above an oven which is not equipped with fan cooling system it is recommended that openings are created within the built in furniture to ensure correct air
circulation.
The size of these openings must be at least 300 cm
2
and placed as shown in fig. 4.
ELECTRICAL CONNECTION (FOR U.K. ONLY)
Warning - this appliance must be earthed
This appliance is designed for domestic use only. Connection to the mains supply must
be made by a competant electrician, ensuring that all current regulations concerning
such installations are observed.
The appliance must only be connected to a suitably rated spur point, a 3 pin 13 amp
plug/socket is not suitable. A double pole switch must be provided and the circuit must
have appropriate fuse protection. Further details of the power requirement of the individual product will be found in the users’ instruction and on the appliance rating plate.
In
the case of built-in product you are advised, should you wish to use a longer cable than
the one supplied, that a suitably rated heat resistant type must be used.
The wiring must be connected to the mains supply as follows:
CONNECT TO SPUR TERMINAL
Green & Yellow Wire Earth Connection
Blue Wire Neutral Connection
Brown Wire Live Connection
Note: We do not advocate the use of earth leakage devices with electric cooking appliances installed to spur points because of the «nuisance tripping» which may occur. You are
again reminded that the appliance must be correctly earthed, the manufacturer declines any responsibility for any event occurring as a result of incorrect electrical installation.
FIG. 4
60 Cm
2
240 Cm
2
120 Cm
2
180 Cm
2
GB IE GB IE
Declaration of compliance: This equipment, in the parts intended to come into con-
tact with food, complies with the regulations laid down in EEC directives 89/109.
This appliance complies with directive 89/336/EEC, 73/23/EEC, 90/396/EEC and
the following changes.
GAS CONNECTION (FOR U.K. ONLY)
The labels on the Hob indicate the types of gas that can be used.
It is possible to use other types of gas after carrying out simple modifications.
Warning: If gas can be smelt in the vicinity of this appliance turn off the gas supply to the
appliance and call the engineer directly. Do not search for a leak with a naked flame.
Page 14

25
LIVE L
EARTH
NEUTRAL N
MAINS
SUPPLY
BROWN WIRE
GREEN/YELLOW WIRE
BLUE WIRE
POWER
CABLE
These instructions are for Fitters qualified for installation of equipment in line with the
relevant national standard. All work must be carried out with the electricity supply disconnected.
The rating plate on the hob shows the type of gas with which it is designed to be used.
It is possible to use other types of gas after carrying out some simple modifications.
(See the instructions in the following paragraphs).
connection to the mains gas supply or gas cylinder should be carried out according to
the relevant national standards, after having checked that it is regulated for the type of
gas with which it will be supplied. If it is not correctly regulated follow the instructions in
the paragraph entitlet «Adaption for different types of gas». For liquid gas (cylinder
gas) use pressure regulators which comply with the relevant national standards.
N.B.: for safe operation, economic use of energy and to ensure greater durability
of the
appliance, make sure that the supply pressure conforms with the values shown
in the
table on page 27.
Use only pipes, washers and sealing washers which comply with the relevant national
standards.
When connecting the hob to the gas supply via use of flexible hoses please ensure
that the maximum distance covered by the hose does not exceed 2 metres.
N.B.: carry out a final check for leaks on the pipework using a soapy solution.
Never use a flame. Also, make sure that the flexible pipe cannot come into contact with a movlng part of
the cabinet (eg, a drawer) and that it is not situa
ted
where it could be damaged.
GAS CONNECTION
GBIE
26
ADAPTING THE HOB TO DIFFERENT TYPES OF GAS
To adapt the Hob for use with different types of gas, carry out the following instructions:
— remove the grids and burners
— insert the hexagonal spanner (supplied) into the burner support (Fig. 6)
— unscrew the injector and replace it with one suitable for the gas to be used (see
Table of gas consumption)
— carry out regulation of the burner.
A) As illustrated, assemble parts in sequence:
A) fixed pipe
B) washer
C) Elbow fitting with
tapered thred
connection
2) Tighten the joints
with the Spanners,
remembering to twist
the pipes into position.
3) Attach fitting C to
mains gas supply using rigid copper pipe
or flexible steel pipe.
IEGB
Please note
Some models are equipped with both conical and cylindrical connectors for gas supply.
Please select the type which is correct for the supply concerned.
To prevent any potential damage to the hob please carry out the installation following
this sequence:
Fig. 5
A B
Hexagonal spanner
Fig. 6
GB IE
Cylindrical
(but connector)
Tapered thread conical
ELECTRICAL CONNECTION
Check the data on the rating plate, located on the outside of the unit, to ensure that the
supply and input voltage are suitable.
Before connection, check the earthing system.
By Law, this appliance must be earthed. If this regulation is not complied with, the
Manufacturer will not be responsible for any damage caused to persons or property.
If a plug is not already attached, fit a plug appropriate to the load indicated on the rating
plate. The earth wire is coloured yellow/green. The plug should always be accessible.
Where the Hob is connected direct to the electricity supply, a circuit breaker must be
fitted with at least a 3 mm contact spacing when in the open position.
If the power supply cord is damaged this is to be replaced by a qualified engineer so as
to prevent any potential risk.
The earth wire (green a yellow coloured) must be at least 10 mm longer than the live
and neutral wires.
The section of the cable used must be of the correct size in relation to the absorbed
power of the hob.
Please check rating plate for the power details and ensure that the power supply cord
is of the TYPE H05V2V2F.
Page 15

REGULATING THE MINIMUM FLAME
After lighting the burners, turn the control knob to the minimum setting and then remove the knob (this can easily be removed by apply a gentle pressure).
Using a small «Terminal» type screwdriver the regulating screw can be adjusted as in
Fig. 9. Turning the screw clockwise reduces the gas flow, whilst turning it anticlockwise
increases the flow – Use this adjustment to obtain a flame of approximately 3 to 4 mm
in length and then replace the control knob.
When the gas supply available is LPG (Bottle gas)- the screw to set the idle flame must
be turned (clockwise) to the end stop.
Screws regulating
(for differend models)
27
Fig. 9
Fig. 7 Fig. 8
BURNER
BURNER CAP
AIR REGULATION
SCREW
FIXING
SCREW
SMALL
MEDIUM
LARGE
DOUBLE RING
MAXI
FISH
For dimensions «X» see table of gas consumption
SETTING OF THE GAS BURNERS
When the jets have been changed it is necessary to set the correct air gap by keeping
to the setting “X” as shown in the table “ gas consumption” fig 7. Warning the value of ‘
X ‘ setting varies in relation to the size of gas burner and type of gas chosen.
A good flame must be of medium length (fig.8B), excessive air will cause the flame to
be short and with sharp colour (fig.8C): in this case it is necessary to extend out the tube for the air setting from the burner body, if there is insufficient air the flame will appear weak and long (fig. 8A): in this case push the tube of the air setting back into the
burner body. To adjust the air setting tube loosen the retaining screw.
Once the air is correctly set secure the screw over the tube ( fig. 7).
air
regul.
4 mm
2 mm
13 mm
15 mm
Working
burner
large
medium
double ring
maxi
Ø injector
1/100 mm
120
93
2x94
2x94
Ø injector
1/100 mm
80
61
2x65
2x65
Qn
kW
2,65
1,5
3,3
3,3
l/h
G20
252
143
314
314
g/h
G30
193
109
238
238
g/h
G31
189
107
236
236
Qn
kW
2,5
1,45
3,1
3,1
l/h
G25
277
161
343
343
Qmin.
kW
0,650
0,380
0,900
0,900
air
regul.
4 mm
2 mm
13 mm
15 mm
air
regul.
2 mm
5 mm
0 mm
0 mm
G20 G30 G25 G31
G30
G31
G20/G25
G20 20mbar
G30 29mbar
G31 37mbar
G25
Quota «X» depending on type of gas
Table of gas consumption 1W = 0,860 kcal/h
air
regul.
5 mm
7 mm
15 mm
15 mm
GBIE
28
When you have carried out the new gas regulation, replace the old gas rating plate on your appliance with one (supplied with hob) suitable for the type of gas for
which it has been regulated.
USE OF HOB
USER INSTRUCTIONS
This appliance must only be used for the purpose for which it is intended, domestic
cooking, and any other use will be considered improper and could therefore be dangerous. The Manufacturer will not be responsible for any damage or loss resulting from
improper use.
USING THE GAS BURNER
To ignite the burners, place a lighted taper close to the burner, press in and turn the
control knob anti-clockwise.
If the burners have not been used for a couple of days, wait for a few seconds before
lighting the burner, this will allow any air present in the pipes to escape.
For appliances fitted with electronic ignition carry out the following:
• push in and turn the knob anticlockwise to the
★
symbol.
• ignite the burner by pressing the sparker button.
For hobs fitted with automatic ignition simply push in and turn the knob to the
★
sym-
bol.
The ignition system will continue to generate sparks as long as the gas tap is being
pressed.
If the burner is not ignited within 5 seconds, turn the knob to the 0 position and repeat
the operation.
For models fitted with a safety tap (which cuts-off the flow of gas if the flame is accidentally extinguished) the burners are ignited ad described above, but care must be
taken to keep the knob pressed in for 5 or 6 seconds after the flame is ignited.
ATTENTION:
Prior to switching on the gas hob ensure that the burners and bur-
ner caps are correctly placed within their position.
GENERAL ADVICE
For the best results, the flat-bottomed pans size should match the gas burner size as
follows. See fig. pag. 21.
— Front right burner from 12 to 18 cm.
— Front left burner from 12 to 18 cm.
— Back right burner from 18 to 24 cm.
— Back left burner from 24 to 26 cm.
For smaller containers the gas burner should be regulated so that the flame does not
overlap the base of the pan. Vessels with concave or convex base should not be used.
WARNING: If a burner is accidentally extinguehed, turn the knob to the off position and do not attempt to re-ignite if for at least 1 minute.
To protect the glass lid from damage and in the interests of safety, the burners/plates
must be turned off and the burner/pan support/plate area must be cool before closing
the lid down.
GB IE
Page 16

29
Fig. 10
YES NO NO NO NO
A neon indicator light adjacent to the control knob will glow when the electric plate is
in use.
The additional electric hotplate/ring (ø 80 mm) where featured is turned on and off by
pressing 0/I button,this hotplate has a fixed heat setting.
Only pans which have smooth flat bases should be used on the electric hotplates. The
size of the pan should be as close as possible to the diameter of the hotplate, and never smaller (see Fig. 10). The base of the pan should be dry and spillages should be
avoided. Empty pans should not be left on the plates, nor should the plates left switched
on without a pan.
POWER OUTPUT - ELECTRIC HOTPLATES
Setting
0 OFF
1 VERY LOW Warming dishes & melting butter and chocolate
2 LOW Simmering, sauces, stews, milk puddings, poached eggs
3 MODERATE Vegetables, frozen foods, boiling water
4 MEDIUM Fresh Vegetables, pasta, fish, pancakes.
5 HIGH Omelettes, steaks
6 VERY HIGH Chops
If over the years the gas taps become stiff to turn it is necessary to lubricate them.
Such operation must be carried out only by qualified Service Engineers.
Some model are equipped with a small steak griddle. This is only to be used over the
medium size burner SEMIRAPID.
The hobs equipped with the additional small electric ring (ø 80 mm) also feature a cast
iron frame to be used only in conjiunction with the electric ring.The cast iron frame
must not be used over the gas burners.
Warning use the electric ring/hotplate only after reading the paragraph related to choice of pans specifically with reference to “Use of electric hotplates”.
USE OF ELECTRIC HOTPLATES
For the best use of the electric hotplates and to minimise energy consumption, the following recommendations should be noted.
GBIE
30
MAINTENANCE AND CLEANING
Before cleaning the Hob, ensure the appliance has cooled down. Remove the plug from
the socket or (if connected directly) switch off the electricity supply.
When cleaning the enamelled, varnished or chrome sections, use warm soapy water
or a non caustic detergent. For stainless steel use an appropriate cleaning solution.
Hotplates should only be cleaned with a cotton cloth coated with vaseline or seed oil.
Never use abrasives, corrosive detergents, bleaching agents or acids. Avoid any acid
or alkaline substances (lemon, juice, vinegar etc.) on the enamelled, varnisched or stainless steel sections.
The burners can be cleaned with soapy water. To restore their original shine, use a
household stainless steel cleaner. After cleaning, dry the burners and replace.
It is important the Burners are replaced correctly.
AFTERCARE
Before calling out a Service Engineer please check the following:
— that the plug is correctly inserted and fused;
— that the gas supply is not faulty.
If the fault cannot be identified:
switch off the appliance — do not tamper with it — call the Aftercare Service Centre.
GB IE
Chromed grids and burners
Chromed grids and burners have the tendency to dark with the use.
This is a normal and inevitable phenomenon, but it doesn’t jeopardize absolutely the
functionality of the hob.
In anycase from our after sales service centre the spare parts are available.
COVER
The cover is available as optional accessory.
Before closing the cover, to protect it from excessive temperature changes, always
wait until the burners or plates have completely cooled down.
Any spillages should be removed from the cover before opening it.
The Manufacturer will not be responsible for any inaccuracy resulting from printing or transcript errors contained in this brochure. We reserve the right to carry out modifications to products as required, including
the interests of consumption, without prejiudice to the characteristics relating to safety or function.
Page 17

Grafica RB 04/2003 - Cod. 41007425 - Imprimè en Italie
 Loading...