

Page 1
Zmywarki
Dishwasher
Afwasmachine
Geschirrspüler
Lavavajillas
Máquina de Lavar Loiça
Lave-vaisselle
Instalacja - obs∏uga i
konserwacja
Installation - Use Maintenance
Installatie Gebruiksaanwijzing
Installation Bedienungsanleitung
Instalación - Uso Mantenimiento
Instalação - Utilização Manutenção
Installation - Usage Entretien
2
23
45
65
86
107
128
PL
EN
NL
DE
ES
PT
FR
Page 2
3
Uwagi dotyczàce bezpiecznego stosowania
Nale˝y dok∏adnie zapoznaç si´ z zaleceniami zawartymi w niniejszej instrukcji,
gdy˝ mówià one o bezpieczeƒstwie instalowania, eksploatacji i konserwacji
niniejszego urzàdzenia, jak równie˝ dostarczajà po˝ytecznych wskazówek do jak
najlepszego korzystania ze zmywarki.
Nale˝y zachowaç niniejszà ksià˝eczk´, by móc skorzystaç z niej w razie potrzeby.
Korzystanie z dowolnego urzàdzenia elektrycznego wymaga stosowania si´ do
podstawowych regu∏ bezpieczeƒstwa.
W szczególnoÊci:
- Nie wolno dotykaç urzàdzenia mokrymi lub wilgotnymi d∏oƒmi ani stopami.
- Nie wolno obs∏ugiwaç urzàdzenia stojàc boso.
- Nie pociàgaç za kabel zasilajàcy przy od∏àczaniu urzàdzenia od zasilania
elektrycznego
-Nie wystawiaç urzàdzenia na dzia∏anie czynników atmosferycznych
(deszczu, s∏oƒca, itd...)
- Nie pozwalaç dzieciom ani osobom niekompetentnym na korzystanie z
urzàdzenia bez nadzoru.
- W przypadku niedopasowania wtyczki urzàdzenia do gniazdka nale˝y poprosiç
osob´ wykwalifikowanà o wymian´ wtyczki na innà, w∏aÊciwà. Osoba ta przede
wszystkim powinna upewniç si´, ˝e przekrój przewodów we wtyczce odpowiada
mocy pobieranej przez urzàdzenie.
- Sprawdziç czy urzàdzenie nie przygniata kabla zasilajàcego w energi´
elektrycznà.
- JeÊli w mieszkaniu zainstalowana jest instalacja zmi´kczania wody nie
zachodzi potrzeba dodawania soli do zmi´kczacza zainstalowanego w zmywarce.
- Zmywarka jest zaprojektowana do zmywania naczyƒ i garnków u˝ywanych w
gospodarstwie domowym. Przedmiotów zanieczyszczonych benzynà, farbà,
opi∏kami stali lub ˝elaza, chemicznymi produktami wywo∏ujàcymi korozj´, o
odczynie kwaÊnym lub zasadowym, nie wolno zmywaç w zmywarce.
- Urzàdzenie niniejsze wykonane jest z materia∏ów nadajàcych si´ do ponownego
u˝ytku.
- W razie koniecznoÊci wymiany kabla zasilania zmywarki nale˝y zwróciç si´ do
upowa˝nionego Serwisu Technicznego o dokonanie takiej wymiany.
- Niniejsze urzàdzenie mo˝e byç wykorzystywane jedynie do u˝ytku domowego.
- Zabrania si´ stosowania adapterów, rozdzielaczy, przed∏u˝aczy.
- W przypadku awarii lub nieprawid∏owego dzia∏ania urzàdzenia nale˝y je
wy∏àczyç, zamknàç kurek dop∏ywu wody i nie korzystaç z urzàdzenia.
W sprawie ewentualnych napraw nale˝y zwracaç si´ wy∏àcznie do
Autoryzowanego Serwisu (adresy serwisów napraw umieszczone sà na karcie
gwarancyjnej).
Niestosowanie si´ do powy˝szych zasad mo˝e naraziç na niebezpieczeƒstwo
U˝ytkownika.
-Nie wolno piç wody pozosta∏ej w zmywarce lub w umytych naczyniach po
zakoƒczeniu pracy urzàdzenia.
- Nie wolno siadaç na zmywarce ani opieraç si´ o nià gdy˝ mo˝e to spowodowaç
wywrócenie jej.
- No˝e i nakrycia sà lepiej umyte jeÊli umieszcza si´ je w koszyku z ràczkami
zwróconymi ku do∏owi. Jednak aby uniknàç zranienia ostrymi koƒcami lub ostrzami
mo˝na je umieÊciç ràczkami ku górze.
Spis treÊci
Uwagi dotyczàce bezpiecznego stosowania
Instalacja
Otwieranie drzwiczek
Regulacja zmi´kczania wody
Regulacja koszyka górnego
Wype∏nianie zmywarki naczyniami
Zmywanie 1/2 za∏adunku, koszyk górny
Ogólny program porównawczy
Za∏adunek Êrodka myjàcego i wyb∏yszczajàcego
Czyszczenie filtrów
Rady praktyczne
Czyszczenie na zewnàtrz i konserwacja zmywarki
Usuwanie drobnych usterek
23
1
4
5
Rys. A
2
stronie 3
stronie 4
stronie 6
stronie 7
stronie 9
stronie 10
stronie 14
stronie 15
stronie 15
stronie 17
stronie 18
stronie 19
stronie 21
Page 3
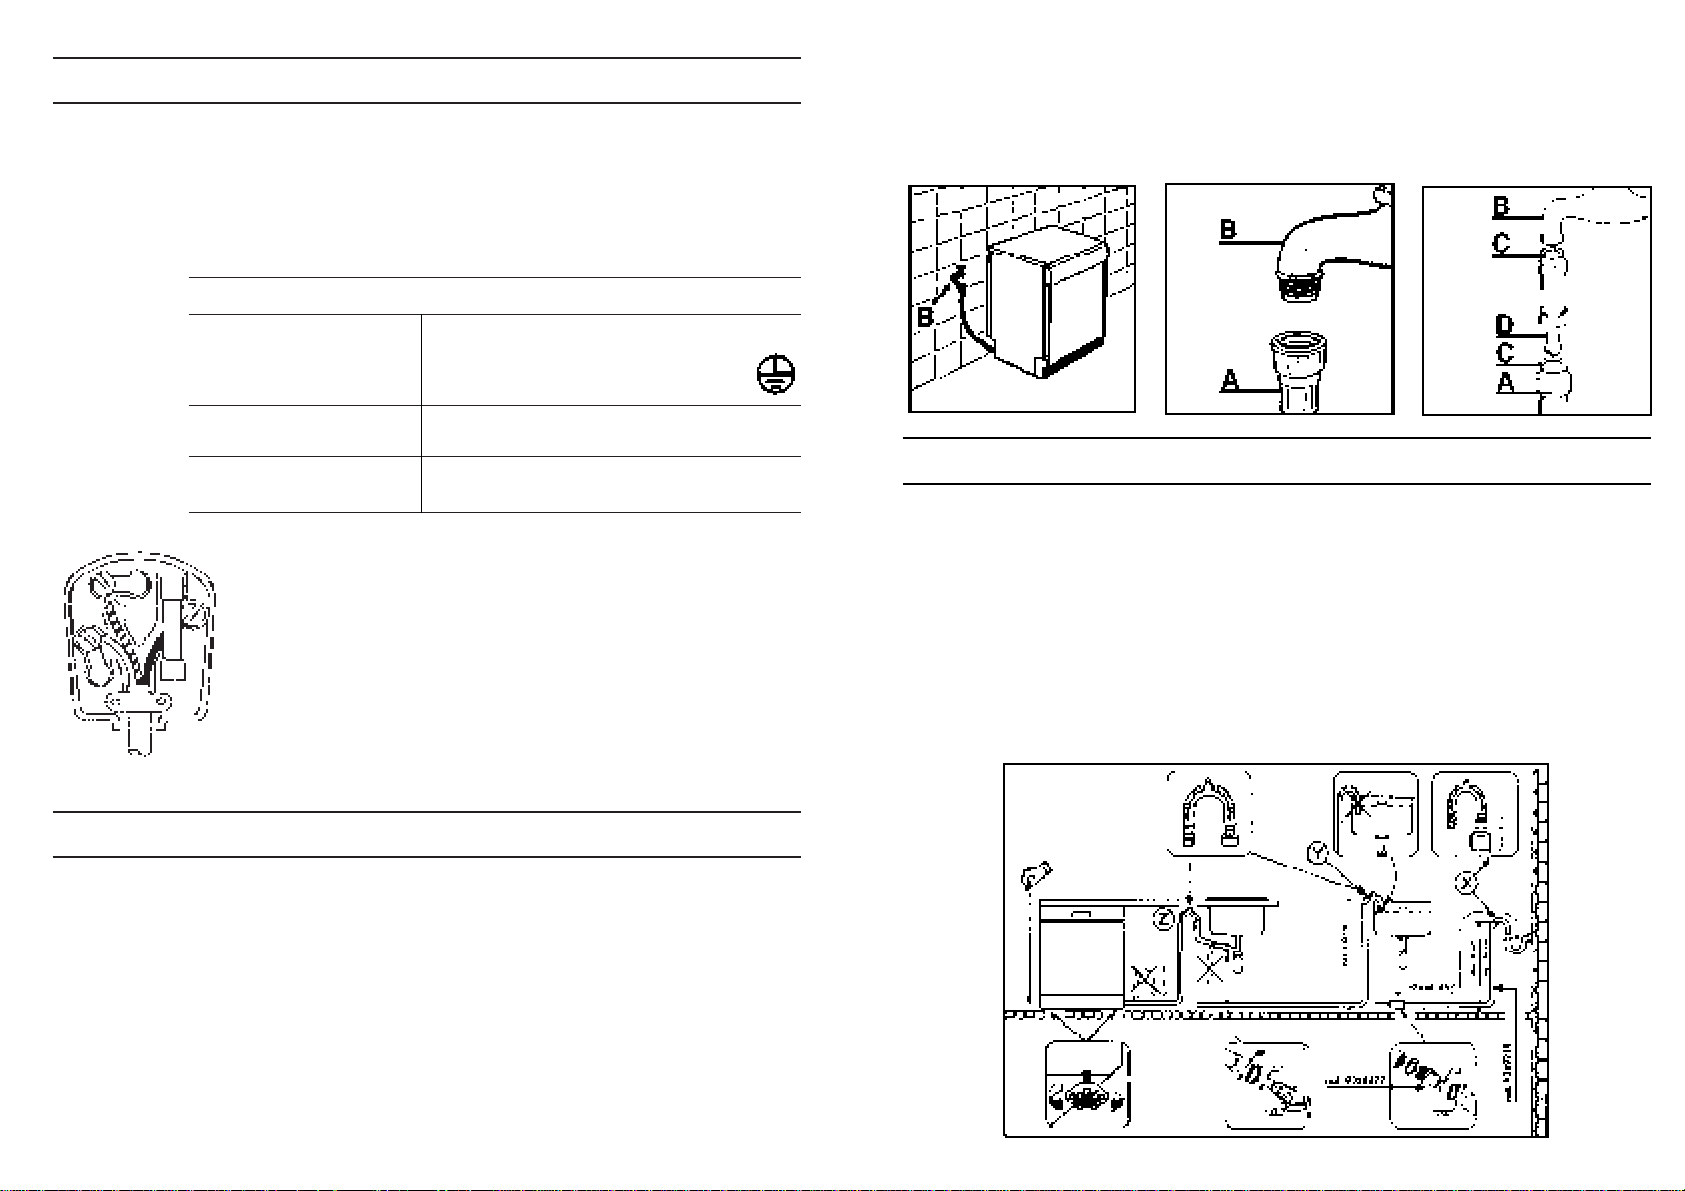
Do∏àczenie do odp∏ywu
Nale˝y do∏àczyç przewód odp∏ywowy do kanalizacji, uwa˝ajàc aby go nie zgiàç,
poniewa˝ mog∏oby to zak∏óciç odp∏yw (Rys. 4).
Przewód odp∏ywowy zamocowany na sta∏e powinien mieç co najmniej 4 cm
Êrednicy wewn´trznej i koƒczyç si´ na wysokoÊci co najmniej 40 cm. Aby uniknàç
nieprzyjemnych zapachów zaleca si´ zainstalowanie syfonu (Rys. 4x).
W razie potrzeby mo˝liwe jest przed∏u˝enie przewodu odp∏ywowego nawet o
2,6 m, przy czym wtedy jego koƒcówka musi znajdowaç si´ na wysokoÊci
najwy˝ej 85 cm nad pod∏ogà. Nale˝y skorzystaç z elementów przed∏u˝ajàcych
Nr 9269214 i ze z∏àczki Nr 9264427.
Zagi´tà koƒcówk´ przewodu odp∏ywowego mo˝na zawiesiç na kraw´dzi zlewu
(koƒcówka nie powinna byç zanurzona) co nie dopuszcza do powstania efektu
syfonowego podczas zmywania. (Rys. 4y).
W przypadku instalowania
zmywarki pod blatem
kuchennym kolanko przewodu
powinno zostaç zamocow
ane bezpoÊrednio pod p∏ytà
w miejscu po∏o˝onym
mo˝liwie jak najwy˝ej
(Rys. 4z).
Podczas instalacji urzàdzenia
nale˝y upewniç si´, ˝e
przewody - zasilajàcy i
odp∏ywowy - nie sà za∏amane.
5
W tym przypadku filtr “D” nale˝y za∏o˝yç pomi´dzy króçcem
doprowadzajàcym wod´ o gwincie 3/4” “B” a przewodem zasilania w wod´
“A”, nie zapominajàc o za∏o˝eniu uszczelek “C”.
JeÊli urzàdzenie pod∏àczone jest do nowej instalacji wodnej lub do instalacji
nie b´dàcej w u˝yciu od d∏u˝szego czasu, zanim za∏o˝ymy przewód zasilania
w wod´ nale˝y umo˝liwiç swobodny sp∏yw wody przez kilka minut. Unikniemy
wtedy osadzania si´ piasku lub rdzy, mogàcych zatkaç filtr wejÊciowy wody.
123
4
4
INSTALACJA (uwagi techniczne)
Po wyj´ciu zmywarki z opakowania nale˝y sprawdziç,
czy urzàdzenie jest prawid∏owo wypoziomowane, co
zapewnia odpowiednia regulacja nó˝ek, nie
dopuszczajàca do powstania przechy∏u zmywarki.
JeÊli zachodzi koniecznoÊç r´cznego przetransportowania
zmywarki wyj´tej z opakowania nie nale˝y chwytaç za
dolnà cz´Êç drzwiczek lecz lekko je uchyliç i unieÊç
zmywark´ chwytajàc za górnà p∏yt´ urzàdzenia.
Wa˝ne! W przypadku instalowania zmywarki na
pod∏odze przykrytej chodnikami lub wyk∏adzinà
dywanowà nale˝y sprawdziç czy nie sà zatkane otwory
wentylacyjne znajdujàce si´ u podstawy urzàdzenia.
Ponadto powinien byç zapewniony ∏atwy dost´p do
wtyczki urzàdzenia równie˝ po jego zainstalowaniu.
Zasilanie elektryczne
Urzàdzenie zgodne jest z wymaganiami bezpieczeƒstwa przewidzianymi przez
POLSKÑ NORM¢. Pe∏ne uziemienie urzàdzenia zapewnia wtyczka z bolcem
uziemiajàcym.
Przed wykonaniem pod∏àczenia nale˝y sprawdziç:
1) ZgodnoÊç napi´ç znamionowych urzàdzenia
2) ZgodnoÊç przekrojów przewodów zasilajàcych
3) ZgodnoÊç doboru zabezpieczeƒ zgodnie z obowiàzujàcymi przepisami
W przypadku braku pod∏àczenia do przewodu ochronnego mo˝e nastàpiç
pora˝enie u˝ytkownika zmywarki.
CE Producent nie ponosi ˝adnej odpowiedzialnoÊci za ewentualne szkody
wyrzàdzone ludziom i przedmiotom wynik∏e z nieprawid∏owego do∏àczenia
do instalacji uziemiajàcej.
Instalacja wodna
Elastyczne przewody odp∏ywowe i zasilajàce mogà byç skierowane w lewo lub w
prawo.
Zmywark´ mo˝na do∏àczyç do instalacji wody zimnej lub ciep∏ej pod
warunkiem, ˝e temperatura wody nie przekracza 60°C.
CiÊnienie wody nie powinno wahaç si´ w wi´kszym zakresie ni˝ pomi´dzy
wartoÊcià minimalnà 0,08 MPa a wartoÊcià maksymalnà 0,8 MPa.
Przed przewodem dop∏ywowym do zmywarki nale˝y zainstalowaç zawór
odcinajàcy, co pozwoli odizolowaç urzàdzenie od instalacji wodnej w okresach
niekorzystania ze zmywarki (Rys. 1B). Zmywarka wyposa˝ona jest w króciec
gwintowany 3/4” s∏u˝àcy do do∏àczania do zasilania wodnego (Rys. 2). Przewód
zasilania w wod´ “A” nale˝y nakr´ciç na kurek doprowadzajàcy wod´ “B” za
pomocà z∏àczki 3/4” przy czym nale˝y sprawdziç, czy po∏àczenie jest szczelne. W
razie potrzeby mo˝na przed∏u˝yç przewód dop∏ywowy nawet o 1,5 m, u˝ywajàc
elementu przed∏u˝ajàcego art. 9225014. Nale˝y poprosiç Dzia∏ Serwisowy o
za∏o˝enie filtru “D” , art. 9226085, na wejÊciu wody jeÊli zawiera ona domieszki
wapienne lub piaskowe (Rys. 3).
Page 4
Poziom regulacji zmi´kczacza wody
W poni˝szej tabeli nale˝y odszukaç poziom odpowiadajàcy twardoÊci wody i
wskazówki dotyczàce niezb´dnych operacji regulacyjnych:
7
Zamykanie drzwiczek
W∏o˝yç do Êrodka koszyki wype∏nione naczyniami do zmywania.
Sprawdziç czy talerze lub garnki nie przeszkadzajà w swobodnym obrocie
ramion spryskujàcych. Zamknàç drzwiczki i zablokowaç je mocno.
Regulacja zmi´kczania wody
Woda, w zale˝noÊci od lokalizacji, zawiera sole wapnia i inne sole mineralne
osadzajàce si´ na naczyniach i pozostawiajàce bia∏e plamy.
Im wi´cej tych soli tym woda jest “twardsza”.
Zmywarka do naczyƒ wyposa˝ona jest w zmi´kczacz, który wykorzystujàc sól
regeneracyjnà, zaprojektowanà specjalnie dla tych urzàdzeƒ, dostarcza wody
pozbawionej wapnia (mi´kkiej) do zmywania naczyƒ. Zmi´kczacz mo˝e
skutecznie oddzia∏ywaç na wod´, której twardoÊç osiàga wartoÊç do ponad
60°fH (w skali francuskiej), 33°dH (w skali niemieckiej), za poÊrednictwem 5
poziomów regulacji. W odpowiedniej instytucji zapewniajàcej zasilanie w wod´,
znajdujàcej si´ na terenie zamieszkania mo˝na dowiedzieç si´, jaki jest poziom
twardoÊci wody.
* Zmi´kczacz fabrycznie ustawiany jest na poziomie 2, gdy˝ poziom ten
Poziom
0
1
*2
3
4
TwardoÊç
wody
°fH stopnie
francuskie
0-9
10-30
31-40
41-50
51-60
TwardoÊç
wody
°dH stopnie
niemieckie
0-5
6-16
17-22
23-27
28-33
Wykorzysta-
nie
soli
regenera-
cyjnej
NIE
TAK
TAK
TAK
TAK
Regulacja
zmi´kczacza
BRAK
pozycja N.1
pozycja N.2
pozycja N.3
pozycja N.4
Przybli˝ona
liczba
zmywaƒ
50
40
30
20
zadowala wi´kszoÊç klientów.
JeÊli lokalna woda nale˝y do poziomu 0 –
wtedy nie wyst´puje potrzeba stosowania
soli regeneracyjnej ani dokonywania
regulacji gdy˝ woda ta ju˝ jest mi´kka.
W zale˝noÊci od poziomu przyporzàdkowania
miejscowej wody nale˝y w nast´pujàcy
sposób wyregulowaç zmi´kczacz:
- wyjàç dolny koszyk, odkr´ciç i wyjàç
korek pojemnika na sól generacyjnà
znajdujàcy si´ na dnie pojemnika (Rys. A”1”);
- pos∏ugujàc si´ Êrubokr´tem lub koƒcem
no˝a ustawiç ˝àdanà pozycj´ wybieraka.
Uwaga: W modelach wyposa˝onych w elektroniczny programator nale˝y skorzystaç
z do∏àczonego wykazu programów.
TYP 1
TYP 2
6
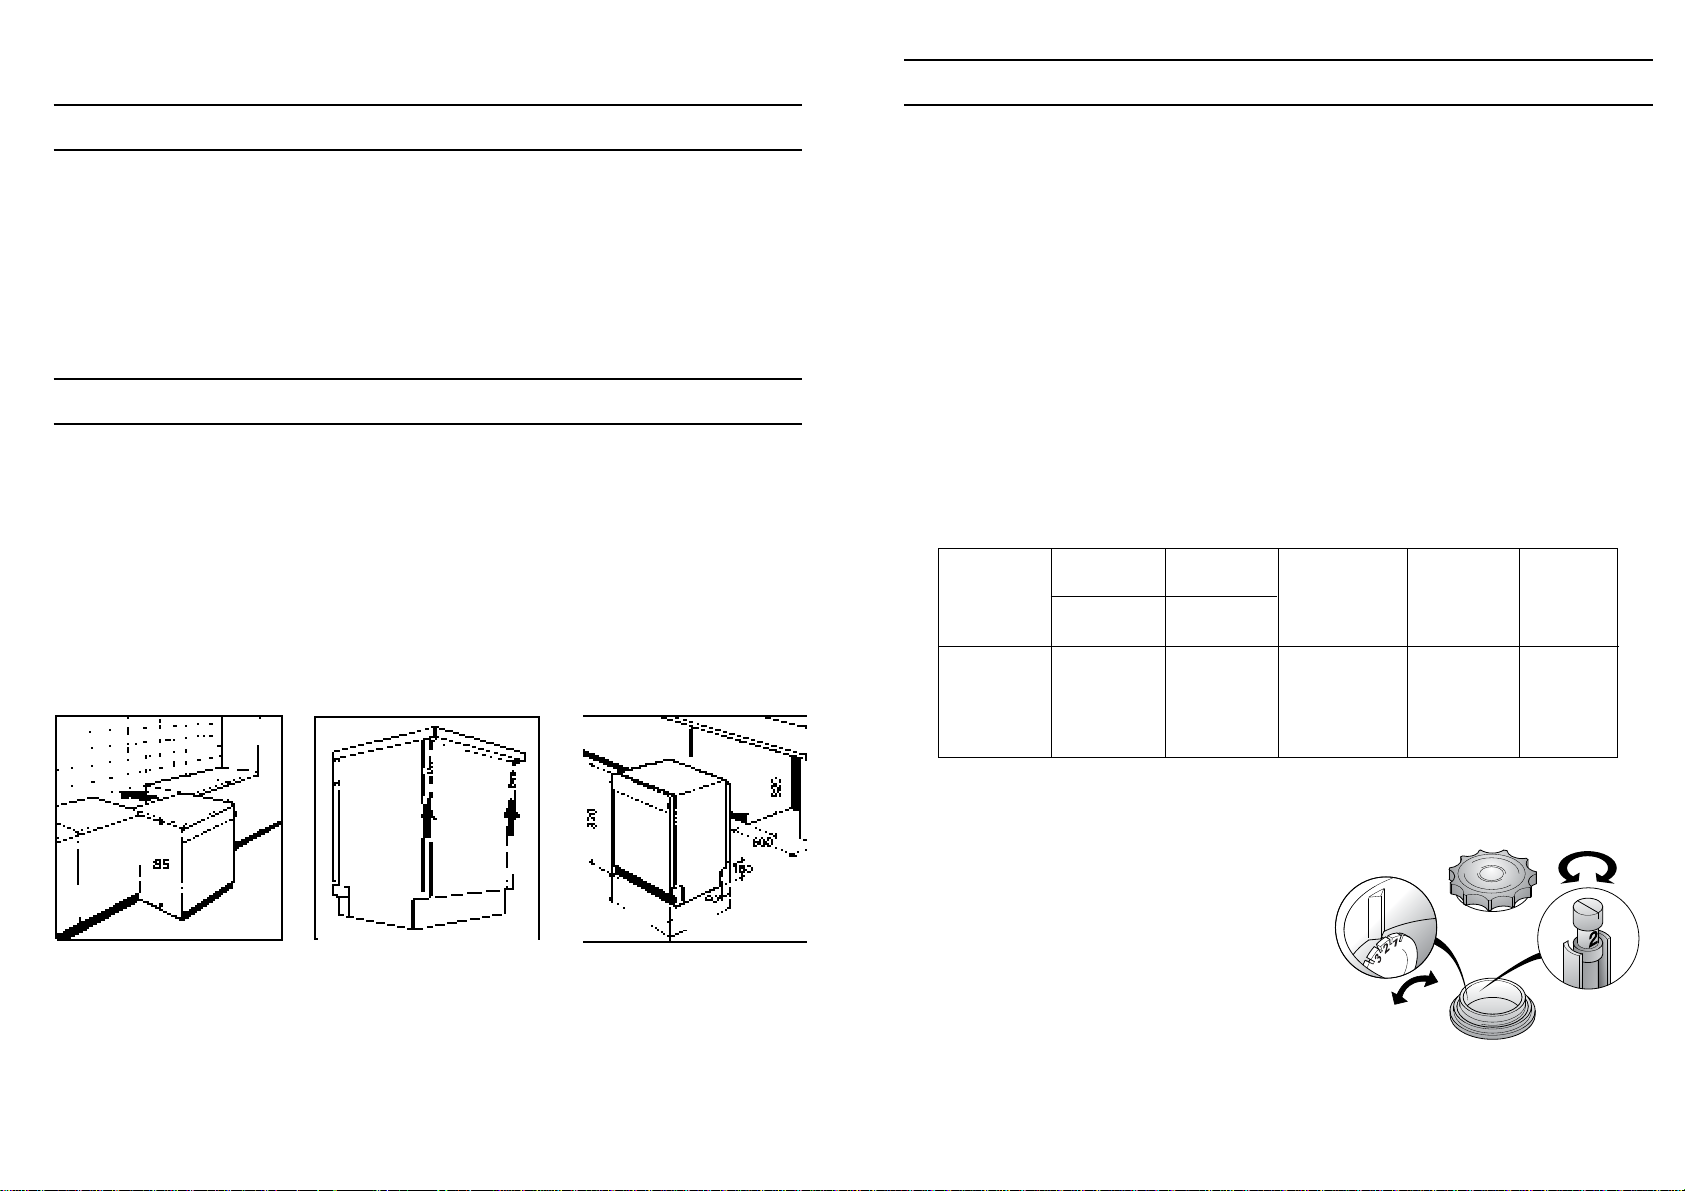
Instalacja w kuchniach komponowanych
Ustawianie obok siebie
Zmywarka ma wysokoÊç modu∏owà 85 cm i dlatego mo˝na jà ustawiaç obok
mebli o analogicznej wysokoÊci, stanowiàcych elementy nowoczesnej kuchni.
W celu dok∏adnego wyrównania wysokoÊci blatów nale˝y manewrowaç
regulowanymi nó˝kami.
Blat wykonany z wysokowytrzyma∏ego laminatu mo˝na wykorzystywaç bez
˝adnych dodatkowych czynnoÊci przygotowawczych poniewa˝ jest on
odporny na dzia∏anie wysokich temperatur, na Êcieranie i na plamy (Rys. 5).
G∏´bokoÊç blatu mo˝na ∏atwo regulowaç w zakresie 25 mm, za ka˝dym
razem zmieniajàc jà o 5mm, a˝ do ostatecznego wyrównania do g∏´bokoÊci
sàsiednich szafek.
Regulacja ta odbywa si´ za pomocà 2 Êrub umieszczonych z ty∏u zmywarki,
które mocowane sà w wymaganej pozycji (Rys. 6).
Wstawianie pod p∏yt´ roboczà kuchni
Nowoczesne kuchnie zestawiane majà jednà p∏yt´ roboczà pod którà wstawiane
sà podstawowe szafki i urzàdzenia domowego u˝ytku.
W tym przypadku wystarczy zdjàç blat, odkr´cajàc Êruby znajdujàce si´ pod
nim w jego tylnej cz´Êci (Rys. 6).
WysokoÊç zmywarki zmniejsza si´ wtedy do 82 cm, zgodnie z normami
mi´dzynarodowymi (ISO) i zmywarka mieÊci si´ bez trudu pod ciàg∏à
powierzchnià blatu kuchennego (Rys. 7).
Panele (tylko dla niektórych modeli)
W modelach wyposa˝onych w t´ opcj´ ramy opasujàce drzwiczki pozwalajà
na wstawienie p∏yt dekoracyjnych o gruboÊci do 5 mm charakteryzujàcych
si´ nast´pujàcymi wymiarami:
szerokoÊç 591 ± 1 mm wysokoÊç 597 ± 1 mm
Otwieranie drzwiczek
W∏o˝yç d∏oƒ we wg∏´bienie i nacisnàç ku górze.
JeÊli drzwiczki zostanà otwarte podczas pracy zmywarki, zabezpieczenie
elektryczne spowoduje automatyczne przerwanie wykonywania
zaprogramowanych funkcji.
Nie nale˝y otwieraç drzwiczek zmywarki w trakcie jej pracy gdy˝ zak∏óca to
normalne jej funkcjonowanie.
7
597
556/563
5
6
Page 5
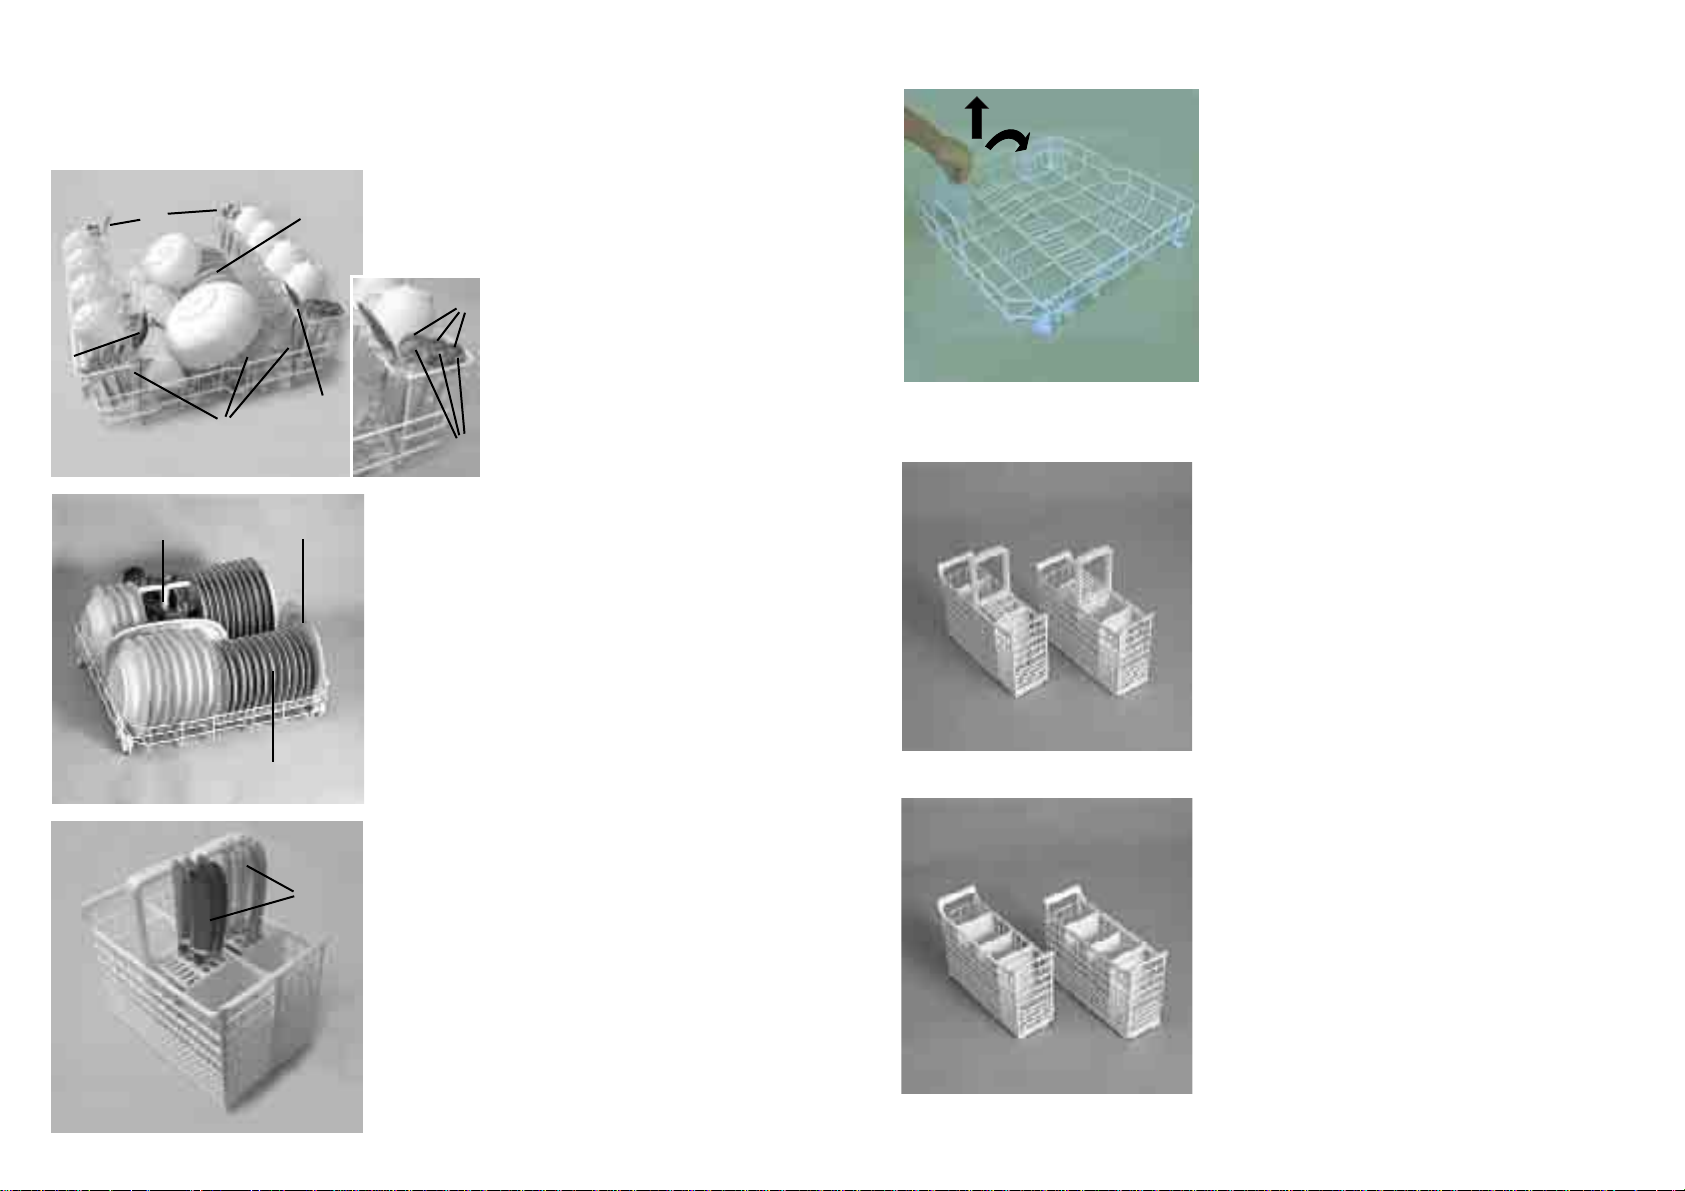
Regulacja koszyka górnego (tylko w niektórych modelach)
Gdy najcz´Êciej u˝ywamy talerzy o Êrednicy od 27 do 31 cm nale˝y wk∏adaç
je do koszyka dolnego po ustawieniu koszyka górnego w jednej z dwóch pozycji –
tej wy˝szej, post´pujàc w sposób nast´pujàcy: (W zale˝noÊci od modelu)
Typ : "A"
1)Obróciç na zewnàtrz zapadki przednie "A".
2)Wyjàç koszyk i ustawiç go w pozycji wy˝szej.
3)Przywróciç zapadkom "A" pierwotne po∏o˝enie.
Operacja ta pozwala za∏adowaç do koszyka górnego naczynia o Êrednicy
przekraczajàcej 20 cm lecz nie pozwala w górnym po∏o˝eniu wykorzystywaç
ruchomych podpórek.
9
a
b
a
b
1
2
3
Typ : "B"
1) Wyciàgnij górny kosz.
2) Nast´pnie uchwyç kosz z obu stron i lekko unieÊ go ku górze (Rys. 1).
Operacja ta pozwala za∏adowaç do koszyka górnego naczynia o Êrednicy
przekraczajàcej 20 cm lecz nie pozwala w górnym po∏o˝eniu wykorzystywaç
ruchomych podpórek.
WYREGULUJ KOSZ W DOLNEJ POZYCJI:
1) Uchwyç kosz z obu stron i lekko unieÊ go ku górze (Rys. 2a).
2) Nast´pnie zwolnij powoli uchwyt pozostawiajàc kosz we w∏aÊciwej pozycji
(Rys. 2b).
UWAGA: NIGDY NIE NALE˚Y PODNOSIå LUB OPUSZCZAå KOSZA CHWYTAJÑC
GO WY¸ÑCZNIE Z JEDNEJ STRONY(Rys. 3)
UWAGA: Zaleca si´ wyregulowaç kosz przed za∏adowaniem naczyƒ.
A
A
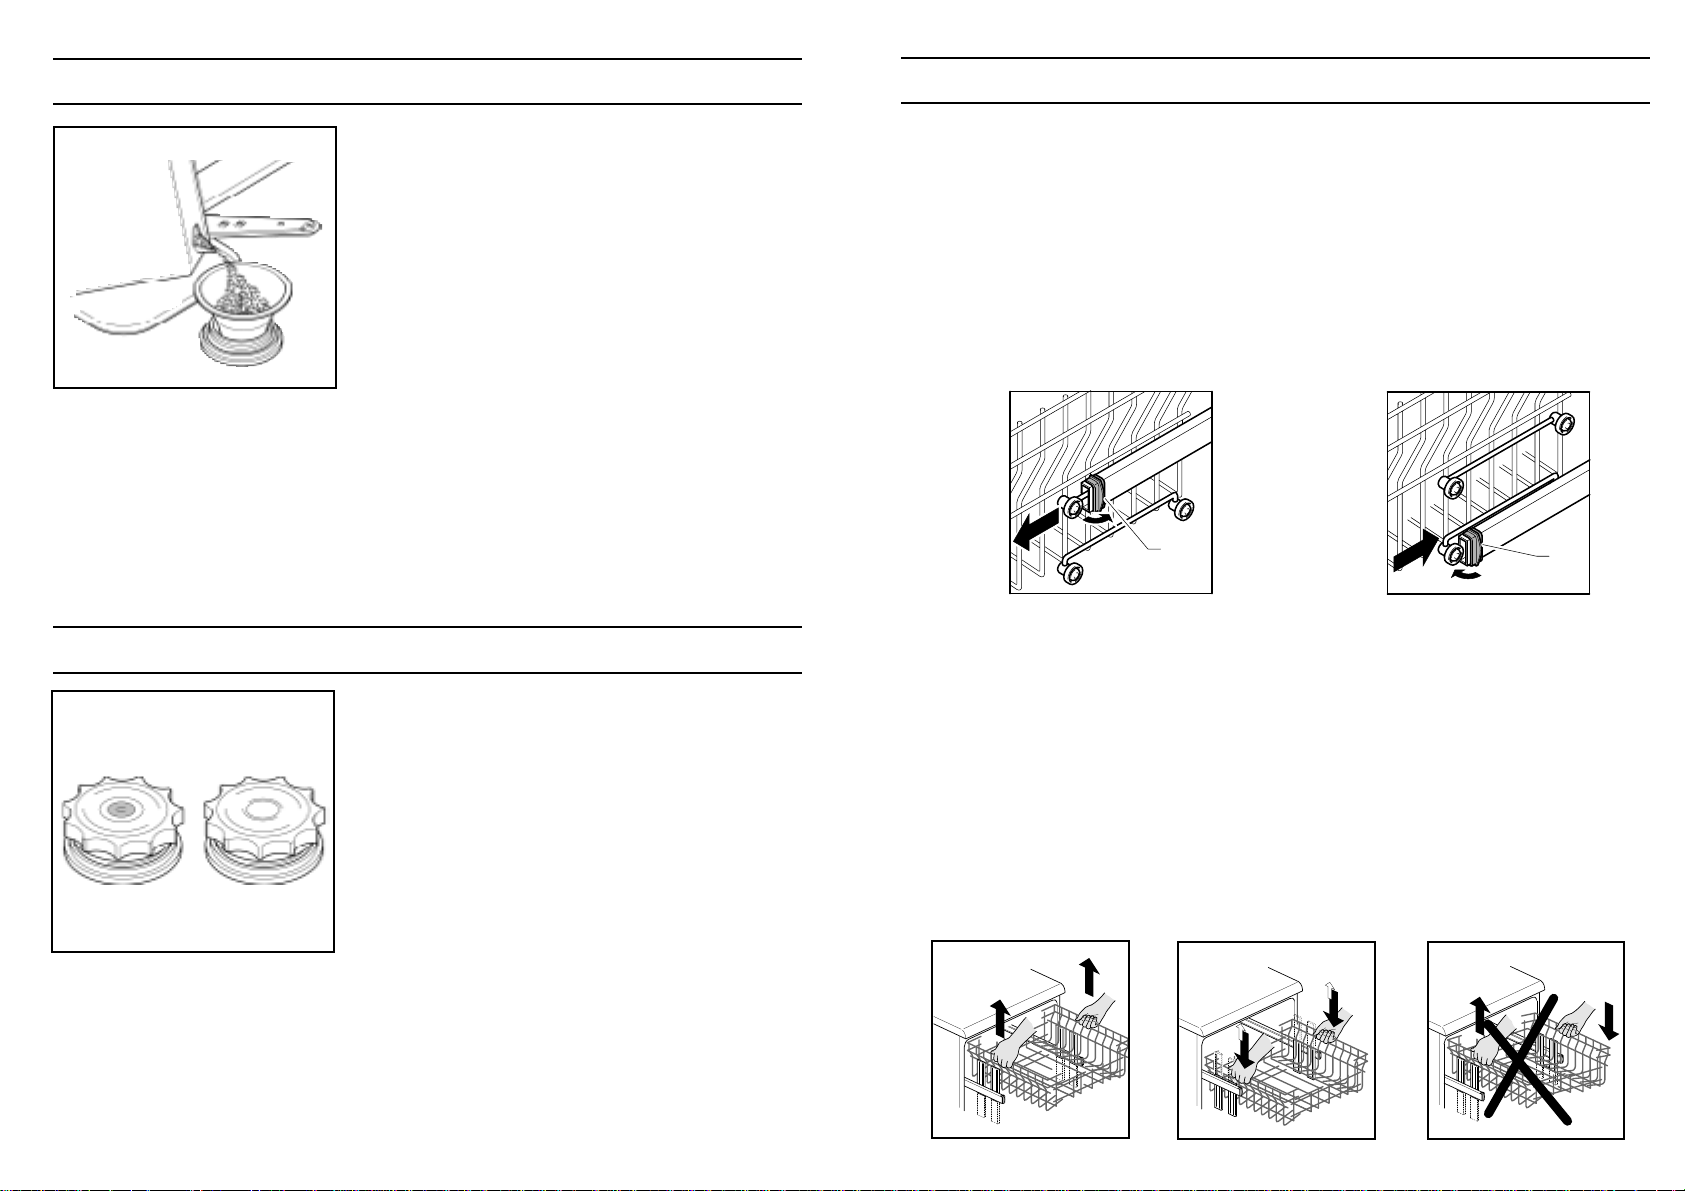
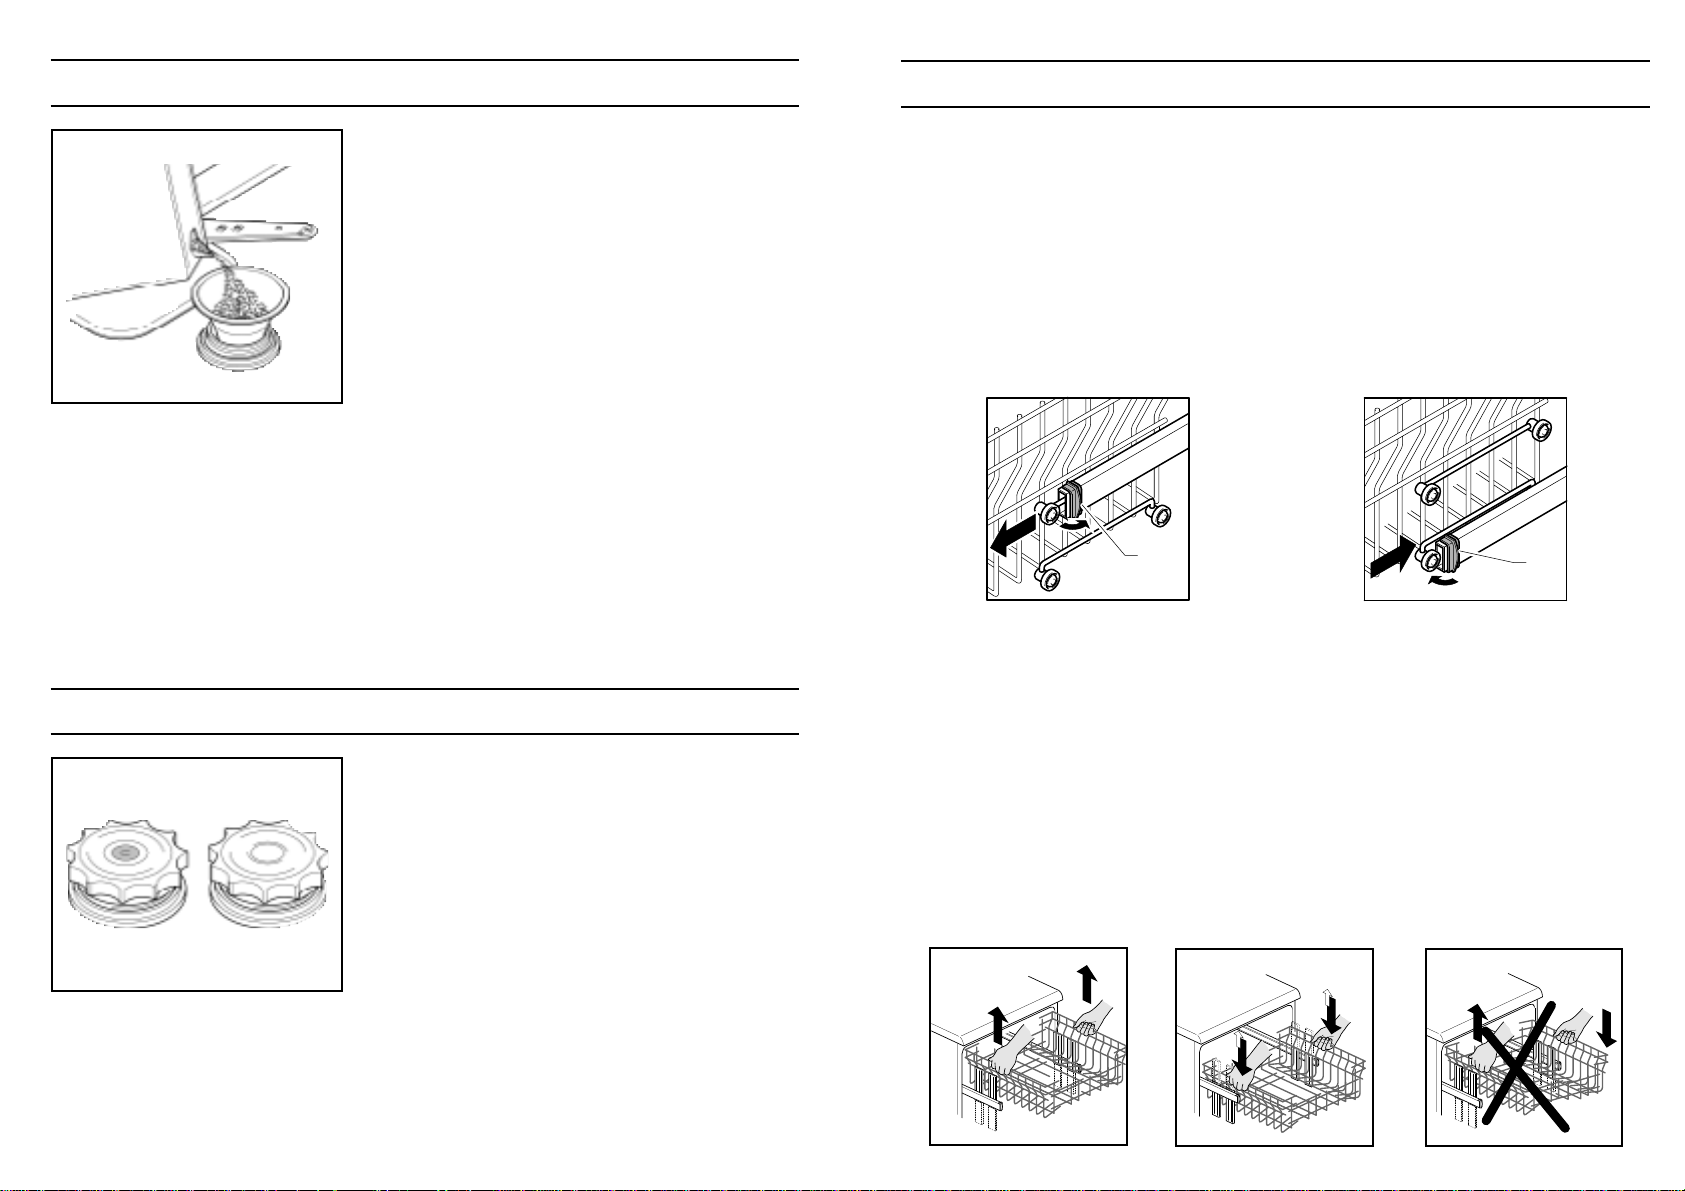
Nape∏nianie solà
Zmywarka wyposa˝ona jest w zmi´kczacz, który
usuwa z wody mogàcy osadzaç si´ wapieƒ, co
pogarsza warunki pracy.
Na dnie maszyny umieszczony jest zbiornik na sól
s∏u˝àcà do regeneracji zmi´kczacza.
Mas´ filtrujàcà instalacji oczyszczania nale˝y
odnawiaç za pomocà soli regeneracyjnej
przeznaczonej wy∏àcznie do zmi´kczaczy w
zmywarkach.
Inne rodzaje soli, zawierajàce istotne iloÊci
substancji nierozpuszczalnych, wraz z up∏ywem
czasu mog∏yby uczyniç nieefektywnym dzia∏anie
uk∏adu zmi´kczania.
Aby nape∏niç pojemnik solà nale˝y odkr´ciç
korek pojemnika znajdujàcy si´ na dnie pojemnika.
Podczas operacji nape∏niania mo˝e wydostaç si´ na zewnàtrz niewielka iloÊç
wody, mimo to nale˝y kontynuowaç nasypywanie soli mieszajàc ∏y˝eczkà a˝ do
ca∏kowitego wype∏nienia pojemnika. Po zakoƒczeniu tej operacji oczyÊciç
siatk´ zbierajàc resztki soli i zakr´ciç korek. JeÊli w danej chwili nie ma ˝adnego
zmywania nale˝y uruchomiç program zmywania wst´pnego na zimno, aby
rozlany roztwór soli zosta∏ usuni´ty ze zmywarki. Pojemnik na sól ma pojemnoÊç od
1,5 do 1,8 kg soli: aby do maksimum wykorzystaç urzàdzenie nale˝y okresowo
wype∏niaç pojemnik zgodnie z zasadami regulacji zmi´kczacza zmywarki.
Wa˝ne: Przy pierwszym uruchomieniu zmywarki nale˝y nape∏niç zbiornik solà, a
nast´pnie koniecznie dolaç do pe∏na wody do zbiornika na sól.
8
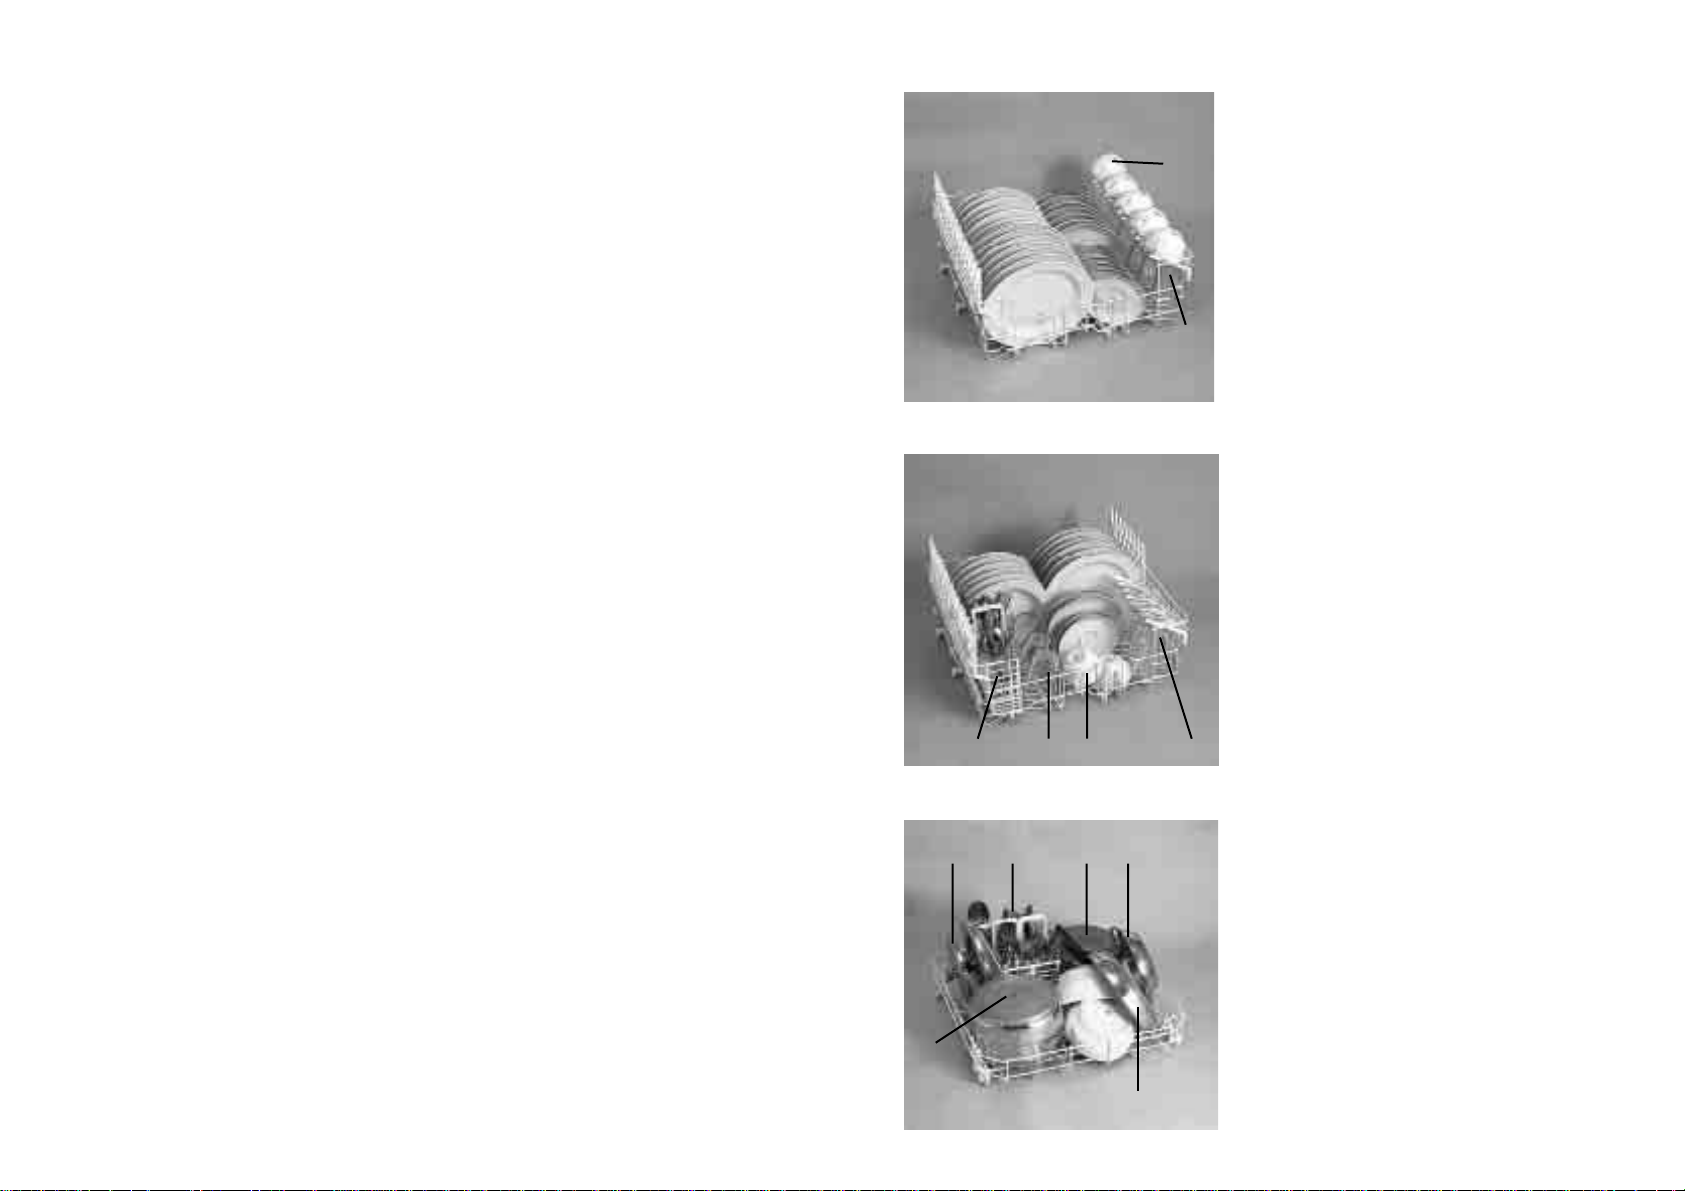
Wskaênik nape∏nienia soli
Niektóre modele wyposa˝one sà we wskaêniki
sygnalizujàce brak soli. Sygnalizacja taka
mo˝e odbywaç si´ w dwojaki sposób:
- elektryczna lampka na tablicy rozdzielczej
urzàdzenia zapala si´ wtedy, gdy nale˝y
nape∏niç pojemnik solà.
- korek zamykajàcy z ruchomym wskaênikiem
koloru zielonego; pozostaje tak d∏ugo
widoczny dopóki w pojemniku jest
wystarczajàca iloÊç roztworu soli do
regeneracji zmi´kczacza. JeÊli w korku
zamykajàcym powierzchnia zielonego kó∏ka
zmniejsza si´, nale˝y uzupe∏niç zbiornik solà.
Inne modele dostarczane sà z korkiem zaÊlepionym, wtedy nale˝y okresowo
kontrolowaç poziom soli w zale˝noÊci od regulacji instalacji zmi´kczacza.
Wa˝ne: Naczynia pokryte bia∏ymi plamami stanowià istotnà informacj´ o
braku soli.
Page 6
11
Standardowe, codzienne ustawienie naczyƒ
w koszyku ukazane jest na Rys. 1, 2 i 3.
Koszyk górny (Rys. 1)
A = talerze g∏´bokie
B = talerze p∏ytkie
C = talerzyki deserowe
D = podstawki
E = fili˝anki
F = szklanki
Koszyk górny (Rys. 2)
A = talerze g∏´bokie
B = talerze p∏ytkie
C = talerzyki deserowe
D = podstawki
E = fili˝anki
F = kieliszki
G = szklanki
H = pó∏ koszyka na nakrycia
Koszyk dolny (Rys. 3)
A = garnek Êredni
B = garnek du˝y
C = patelnia
D = pokrywki
E = wazy na zup´, pó∏miski
F = nakrycia
G = rondle, tortownice
Racjonalne i poprawne u∏o˝enie naczyƒ
jest podstawowym warunkiem uzyskania
nienagannych wyników zmywania.
1
2
3
A
B
C
D
FE
GH
DF AG
E
B
C
A
B
C
D
E
F
10
Wype∏nianie zmywarki naczyniami
Aby rezultaty zmywania by∏y niezmiennie doskona∏e nale˝y usunàç z talerzy
najwi´ksze resztki jedzenia (koÊci, oÊci, wyka∏aczki, resztki mi´sa i warzyw,
skórki owoców) by nie dopuÊciç do zatkania filtrów, przewodu odp∏ywowego
i dysz ramienia spryskujàcego, co powoduje zmniejszenie sprawnoÊci
zmywania. Nie jest konieczne p∏ukanie naczyƒ przed umieszczeniem ich w
zmywarce.
JeÊli garnki i patelnie sà szczególnie zabrudzone resztkami przypalonych
potraw, radzimy je zamoczyç przed zmywaniem.
Wykorzystanie koszyka górnego
Koszyk górny jest wyposa˝ony w ruchome podpórki zawieszone na kraw´dzi
bocznej, które mogà zajmowaç dwie pozycje: górnà i dolnà. W pozycji
dolnej podpórki s∏u˝à do umieszczenia na nich fili˝anek herbaty, kawy,
d∏ugich no˝y i chochli. Na koƒcach podpórek mo˝na zawiesiç szklanki w
pozycji pionowej:
Pod spodem mo˝na umieÊciç szklanki, fili˝anki, talerzyki i talerzyki deserowe.
Gdy podpórki zajmujà górnà pozycj´ umo˝liwiajà one umieszczenie na nich
p∏ytkich i g∏´bokich talerzy.
Nale˝y zachowaç uwag´ podczas wk∏adania g∏´bokich i p∏ytkich talerzy w
pozycji pionowej - trzeba u∏o˝yç je tak, aby wg∏´bieniami by∏y zwrócone w
kierunku obrotu maszyny, przy czym zawsze nale˝y zostawiç wolne miejsce
pomi´dzy talerzami aby mog∏a mi´dzy nimi krà˝yç swobodnie woda.
Aby do maksimum wykorzystaç pojemnoÊç koszyka radzimy pogrupowaç
talerze wed∏ug ich kszta∏tu.
Talerze mo˝na u∏o˝yç w jednym rz´dzie (Rys. 1) lub w dwóch rz´dach (Rys. 2).
Radzimy umieszczaç talerze o du˝ych rozmiarach i Êrednicy równej oko∏o 270
mm nieznacznie pochylone do przodu tak, aby ∏atwiej mo˝na by∏o wstawiç
koszyk do wn´trza zmywarki.
W koszyku górnym mo˝na umieÊciç ró˝ne naczynia, takie jak salaterki i wazy
z tworzywa, które najlepiej jest zablokowaç aby strumieƒ wody nie przewróci∏
ich.
Koszyk górny zosta∏ pomyÊlany tak, aby zapewniona by∏a maksymalna
elastycznoÊç wykorzystania. Mo˝e on byç wype∏niony samymi talerzami
umieszczonymi w dwóch rz´dach, w iloÊci 24 sztuk maksimum, szklankami w
pi´ciu rz´dach, w iloÊci 30 sztuk maksimum lub ró˝nymi naczyniami.
Wykorzystanie koszyka dolnego
W dolnym koszyku umieszcza si´ garnki, patelnie, wazy na zup´, salaterki,
pokrywki, pó∏miski, talerze p∏ytkie i g∏´bokie oraz chochle.
Nakrycia powinno si´ wk∏adaç ràczkà skierowanà ku do∏owi w przeznaczonym
do tego celu pojemniku plastykowym, który nale˝y umieÊciç z kolei w koszyku
dolnym (Rys. 3) upewniajàc si´, ˝e nie przeszkadza on w swobodnym obrocie
ramienia spryskujàcego.
Page 7
Uwaga (Rys. 7)
Dolny kosz wyposa˝ony jest w swojej
przedniej cz´Êci w dwa rz´dy drabinek,
które mo˝na opuszczaç w sposób bardzo
∏atwy i szybki. U∏atwia to wk∏adanie
salaterek, rondli i pokrywek.
(Tylko w niektórych modelach)
ABY OPUÂCIå DRABINKI:
1) Lekko unieÊ drabinki i pozwól aby
zaj´∏y w∏aÊciwe po∏o˝enie.
2) Ponowne uniesienie sprowadza je do
po∏o˝enia pionowego.
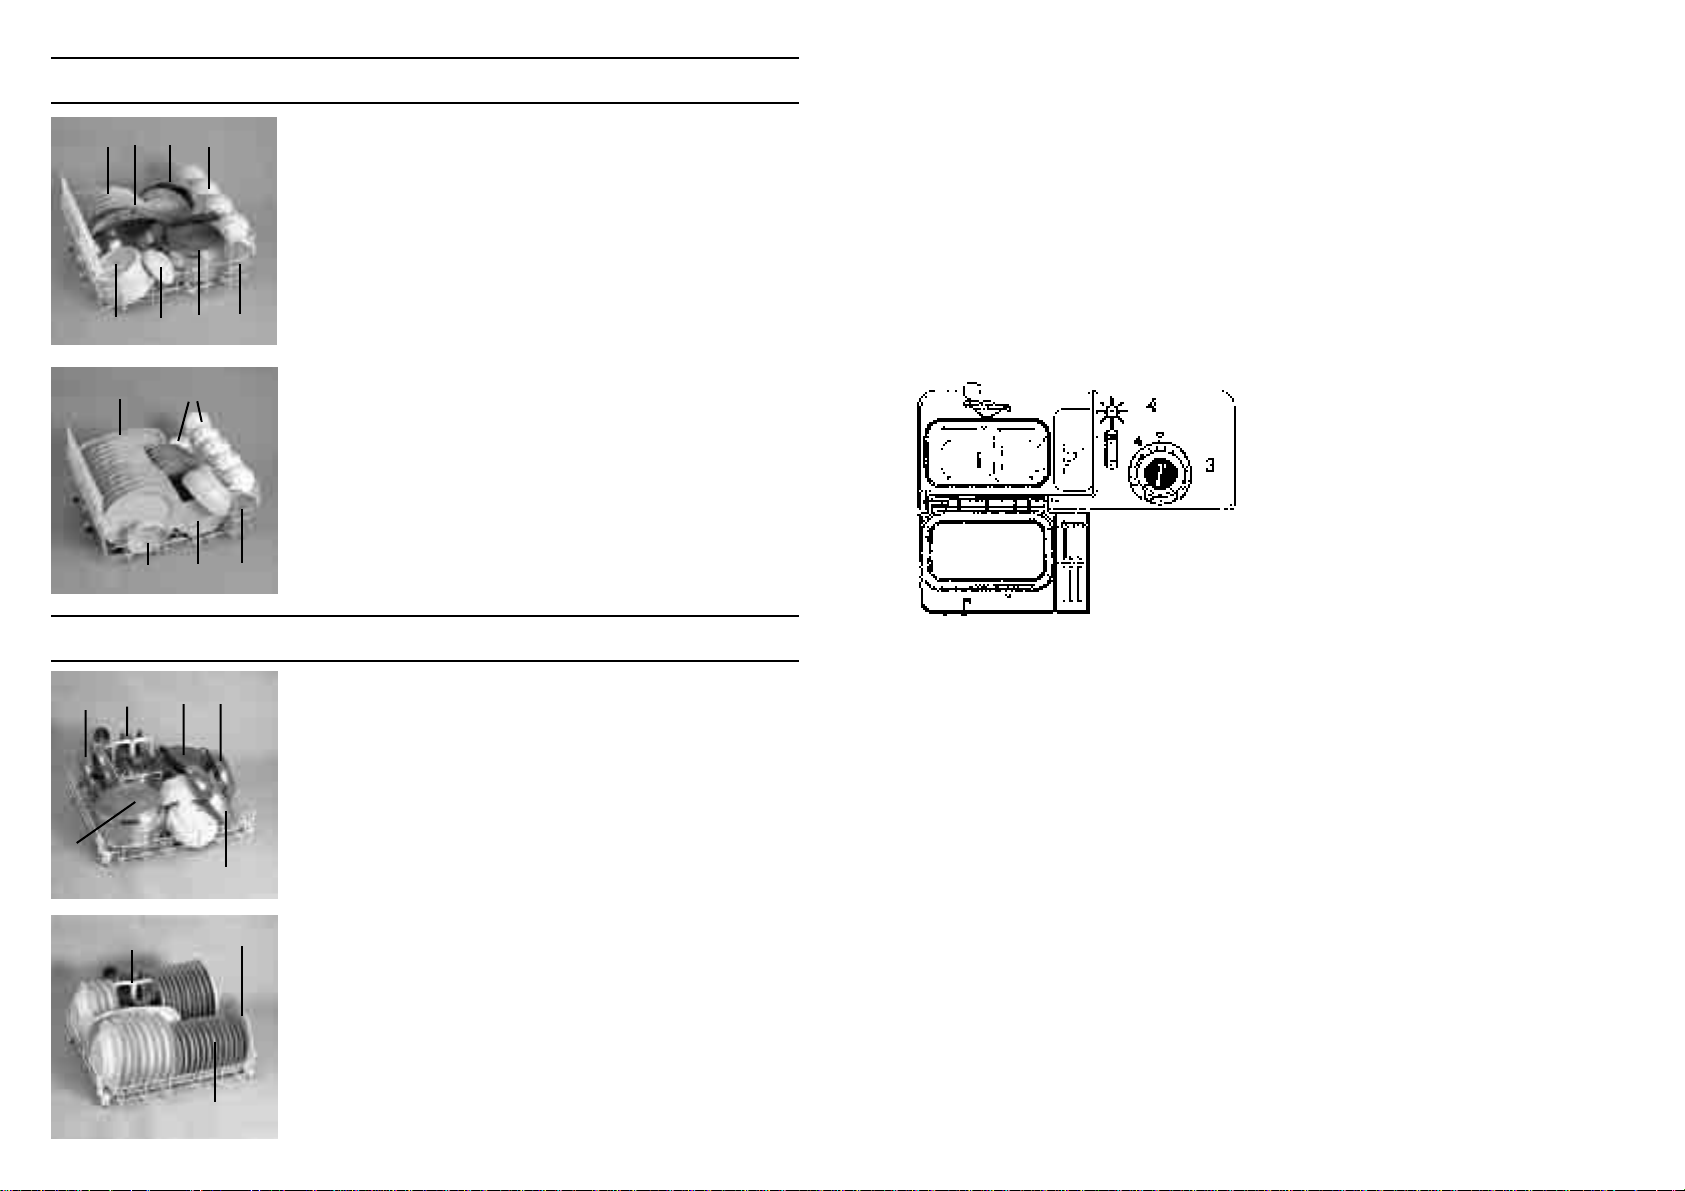
Koszyk na nakrycia (Rys. 8)
Koszyk na nakrycia sk∏ada si´ z dwóch
rozdzielnych cz´Êci dajàcych ró˝ne
mo˝liwoÊci za∏adunku.
Rozdzia∏ koszyka na dwie po∏ówki
odbywa si´ przez przesuwanie w kierunku
poziomym dwóch elementów, jednego
wzgl´dem drugiego i w celu ponownego
zaczepienia - w kierunku przeciwnym.
Niektóre modele wyposa˝one sà w
koszyk na nakrycia bez przegródek
Êrodkowych.
13
8
1
2
7
12
Koszyk dolny (Rys. 5)
M = 8+4 talerzy g∏´bokich
N = 11 + 1 talerzy p∏ytkich
O = 12 talerzyków deserowych
P = pó∏misek
Q = nakrycia
Koszyk na sztuçce (Rys. 6)
UmieÊciç pó∏eczk´ w pozycji poziomej i
w∏o˝yç 6 + 6 no˝y(R); do pozosta∏ych
przegródek w∏o˝yç sztuçce ràczkami do
do∏u. Nale˝y zwróciç uwag´, aby nie
umieszczaç wi´cej ni˝ dwa rodzaje
sztuçców w tej samej przegródce.
Koszyk na sztuçce bez pó∏eczek
UmieÊciç pozosta∏e sztuçce uwa˝ajàc,
aby wi´cej ni˝ dwa rodzaje nie znalaz∏i
si´ w tej samej przegródce.
Przyk∏adowe u∏o˝enie 12 nakryç (Zgodnie z normà EN 50242)
W∏aÊciwy za∏adunek pokazany jest na Rys. 4 dla koszyka górnego, na Rys. 5
dla koszyka dolnego i na Rys. 6 dla koszyka na nakrycia.
Koszyk górny (Rys. 4)
A = 5+5+2 szklanek
B = 12 podstawek
C = 4+4+4 fili˝anki
D = ma∏a waza
E = Êrednia waza
F = du˝a waza
G = 1+1 widelce
H = 1+1 ∏y˝ki pó∏miskowe
I = 3+3+3+3 ∏y˝ki
L = 3+3+3+3 ∏y˝eczki do herbaty
QN
M
P
O
M
N
R
A
F
C
C
C
G
B
E
D
H
H
L
I
4
5
6
Page 8
15
Ogólny program porównawczy
(patrz tabela programów zmywania)
Za∏adunek Êrodka myjàcego i
wyb∏yszczajàcego
Niezb´dne jest stosowanie Êrodka myjàcego w proszku, p∏ynnego lub w
pastylkach - przeznaczonego specjalnie do zmywarek do naczyƒ.
Ârodki nie dostosowane do zmywarek (na przyk∏ad przeznaczone do zmywania
r´cznego) nie zawierajà odpowiednich sk∏adników do mycia maszynowego i
nie pozwalajà na poprawne funkcjonowanie zmywarki.
Zmywanie normalne
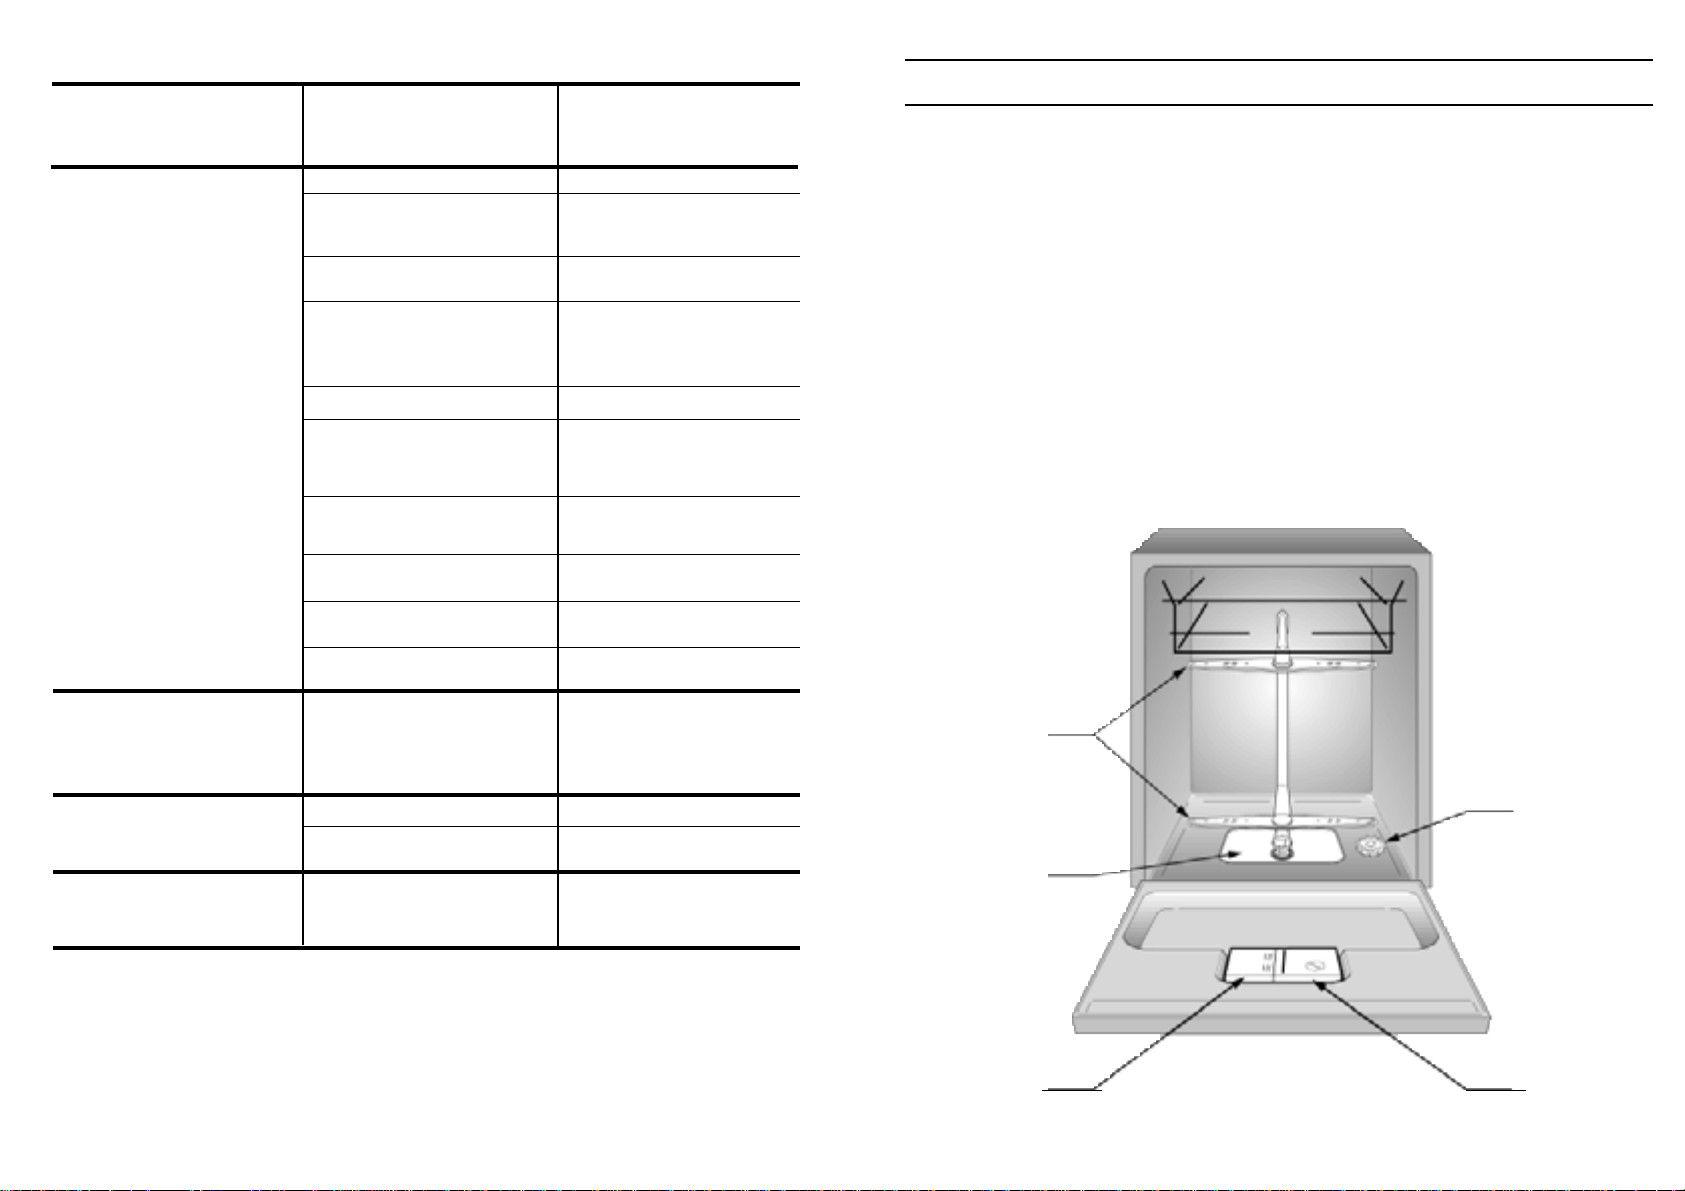
Pojemnik na Êrodek myjàcy znajduje si´ po
wewn´trznej stronie drzwiczek (Rys. A „2”).
JeÊli pokrywka pojemnika jest zamkni´ta,
wystarczy nacisnàç przycisk; po zakoƒczeniu
ka˝dego programu zmywania pokrywka
jest zawsze otwarta, gotowa do
nast´pnego wykorzystania.
Dawki Êrodka myjàcego sà ró˝ne w
zale˝noÊci od stopnia zabrudzenia i
rodzaju naczyƒ. Zaleca si´ umieÊciç w
pojemniku (1) od 20 do 30 gr Êrodka
myjàcego.
Po wlaniu Êrodka do pojemnika nale˝y zamknàç pokrywk´.
Poniewa˝ nie wszystkie Êrodki myjàce sà jednakowe, nale˝y równie˝ zapoznaç si´ z
instrukcjà podanà na opakowaniu. Przypominamy, ˝e niewystarczajàce iloÊci
Êrodka myjàcego mogà niedostatecznie usunàç brud, podczas gdy nadmierna
dawka Êrodka myjàcego nie tylko nie poprawia wyników zmywania, lecz
ponadto jest zb´dnym marnotrawstwem.
Odpowiednie dawkowanie Êrodka do zmywania stanowi wk∏ad w ochron´
Ârodowiska.
Zmywanie z zamaczaniem (tylko w niektórych modelach)
W przypadku, gdy stosujemy program intensywny nale˝y równie˝ dodaç
porcj´ Êrodka myjàcego, w iloÊci 20 gr (1 ∏y˝ka do zupy), do pojemnika na
Êrodek do zmywania wst´pnego (2).
1/2 za∏adunku mieszanego (Rys. 1)
A = szklanki
B = fili˝anki
C = talerze g∏´bokie
D = talerze p∏ytkie
E = talerzyki deserowe
F = podstawki
G = garnek
H = pokrywka
I = patelnia
L = Êrednia waza
M = ma∏a waza
1/2 za∏adunku standardowego (Rys. 2)
A = 6 szklanek
B = 5+1 fili˝anek
C = pó∏misek
D = 6 talerzy g∏´bokich
E = 6 talerzy p∏ytkich
F = 6 tlerzyków deserowych
G = 6 podstawek
H = Êrednia waza
I = ma∏a waza
Nakrycia powinno si´ umieszczaç w przeznaczonym do
tego celu koszyku plastikowym.
Podczas zmywania normalnego nale˝y go wstawiç w
przeznaczone dla niego miejsce w koszyku dolnym.
Zmywanie 1/2 za∏adunku, koszyk górny
(tylko w niektórych modelach)
14
Q
N
M
P
O
M
N
4
D
FAG
E
B
C
3
AG
M
L
B
H
D
C
E
I
F
1
AGI
BC
F
E
H
D
2
Zmywanie 1/2 za∏adunku, koszyk dolny
(tylko w niektórych modelach)
Koszyk dolny (Rys. 3)
A = garnek Êredni
B = garnek du˝y
C = patelnia
D = pokrywki
E = wazy na zup´, pó∏miski
F = nakrycia
G = rondle, tortownice
Racjonalne i poprawne u∏o˝enie naczyƒ jest podstawowym
warunkiem uzyskania nienagannych wyników zmywania.
Koszyk dolny (Rys. 4)
M = 8+4 talerzy g∏´bokich
N = 11 + 1 talerzy p∏ytkich
O = 12 talerzyków deserowych
P = pó∏misek
Q = nakrycia
Page 9

17
Na uk∏ad filtrujàcy (Rys. A „4”) sk∏adajà si´:
Ma∏y pojemnik centralny zatrzymujàcy wi´ksze
czàstki.
P∏ytka filtrujàca wod´ do zmywania w
sposób ciàg∏y.
Mikrofiltr umieszczony pod p∏ytkà,
przechwytujàcy nawet najdrobniejsze
czàstki brudu, zapewniajàc w ten sposób
doskona∏e wyp∏ukanie.
Aby uzyskiwaç niezmiennie nienaganne
wyniki zmywania przed ka˝dym zmywaniem
nale˝y koniecznie kontrolowaç i czyÊciç filtry.
Aby wyjàç zespó∏ filtrujàcy wystarczy
jedynie uchwyciç za ràczk´ i obróciç jà w
kierunku przeciwnym do kierunku ruchu
wskazówek zegara (Rys. 1).
Pojemnik centralny mo˝na wyjàç, co u∏atwi
operacje czyszczenia (Rys. 2).
Nale˝y wyjàç p∏ytk´ filtru (Rys. 3) i umyç
wszystko w strumieniu bie˝àcej wody,
pos∏ugujàc si´ ewentualnie szczoteczkà.
Dla modelu wyposa˝onego w samooczy-
szczajàcy si´ mikrofiltr konserwacja
ogranicza si´ do sprawdzenia zespo∏u
filtrujàcego, które mo˝na wykonywaç co 15
dni.
Zaleca si´ mimo wszystko po ka˝dym
zmywaniu sprawdzaç, czy pojemnik
centralny i p∏ytka nie sà zatkane.
Uwaga: Po oczyszczeniu filtrów nale˝y
sprawdziç, czy sà one poprawnie
po∏àczone ze sobà i czy p∏ytka jest
idealnie umieszczona na dnie zmywarki.
Nale˝y dok∏adnie wkr´ciç filtr w p∏ytk´,
obracajàc nim w kierunku zgodnym z
kierunkiem ruchu wskazówek zegara
poniewa˝ niedok∏adne po∏àczenie zespo∏u
filtrujàcego mo˝e ujemnie wp∏ynàç na
prac´ zmywarki.
Wa˝ne: Nie wolno u˝ywaç zmywarki bez
filtrów.
Czyszczenie filtrów
1
2
3
16
3
4
3
Za∏adunek Êrodka nab∏yszczajàcego
Po prawej stronie pojemnika na Êrodek
myjàcy znajduje si´ pojemnik na
dodatek do p∏ukania, o obj´toÊci oko∏o
130 ml (Rys. A „3”).
Obróciç korek (3) w kierunku
przeciwnym do kierunku ruchu
wskazówek zegara i wlaç p∏yn a˝ osiàgnie
on do wskazany poziom maksymalny.
P∏yn ten zostanie wykorzystany podczas
wielu zmywaƒ. Zakr´ciç korek.
Ârodek ten jest automatycznie
dodawany podczas ostatniej operacji
p∏ukania, zapewnia szybkie wysychanie
naczyƒ i nie dopuszcza do tworzenia si´
na nich bia∏ych plam.
Nale˝y zawsze u˝ywaç Êrodka do p∏ukania
przystosowanego do automatycznego
zmywania.
Mo˝liwe jest skontrolowanie poziomu
Êrodka w pojemniku za pomocà
wskaênika optycznego, umieszczonego
w Êrodku dystrybutora (4).
Regulacja dozowania Êrodka do
p∏ukania w zakresie od 1 do 6
Uk∏ad regulacji znajduje si´ pod korkiem
(3) i mo˝na nim obracaç u˝ywajàc
monety. Zalecanà pozycj´ wskazuje
liczba 3.
ObecnoÊç wapnia w wodzie objawia si´
przez obecnoÊç kamienia kot∏owego lub
przez s∏abszy stopieƒ wysuszenia.
Z tego powodu wa˝na jest regulacja
zu˝ycia produktu p∏ukania majàca na
celu uzyskanie optymalnych parametrów.
W przypadku, gdy po zakoƒczeniu
zmywania na naczyniach widoczne sà
smugi, nale˝y zmniejszyç nastaw´
regulacji o jednà pozycj´.
W przypadku gdy na naczyniach
widoczne sà bia∏e plamy lub aureole,
nale˝y o jednà pozycj´ zwi´kszyç nastaw´
regulacji.
Pe∏ny Pusty
Odblask ciemny Odblask jasny
Page 10
19
Czyszczenie na zewnàtrz i konserwacja zmywarki
Obudow´ zewn´trznà mo˝na czyÊciç Êrodkiem do mycia powierzchni
emaliowanych, nie zawierajàcym cz´Êci ciernych.
Zmywarka nie wymaga ˝adnej specjalnej konserwacji, gdy˝ zbiornik myjàcy jest
samooczyszczajàcy si´. Nale˝y okresowo, za pomocà wilgotnej gàbki, czyÊciç
uszczelk´ gumowà w drzwiczkach aby wyeliminowaç ewentualne Êlady
odpadków lub Êrodka do p∏ukania.
Aby w pe∏ni zagwarantowaç usuwanie drobnych osadów wapienia lub brudu
zaleca si´ dokonywaç okresowo pe∏nego zmywania poprzez wlewanie na dno
pojemnika szklanki octu i ustawienie programatora na zmywanie delikatne.
JeÊli mimo normalnego czyszczenia p∏ytki i filtru zauwa˝amy, ˝e naczynia lub
garnki nie sà wystarczajàco dobrze zmyte lub wyp∏ukane, nale˝y sprawdziç czy
otwory w obrotowych ramionach spryskujàcych (Rys. A „5”) nie sà zatkane.
JeÊli wymagajà one czyszczenia nale˝y dokonaç tego w sposób nast´pujàcy:
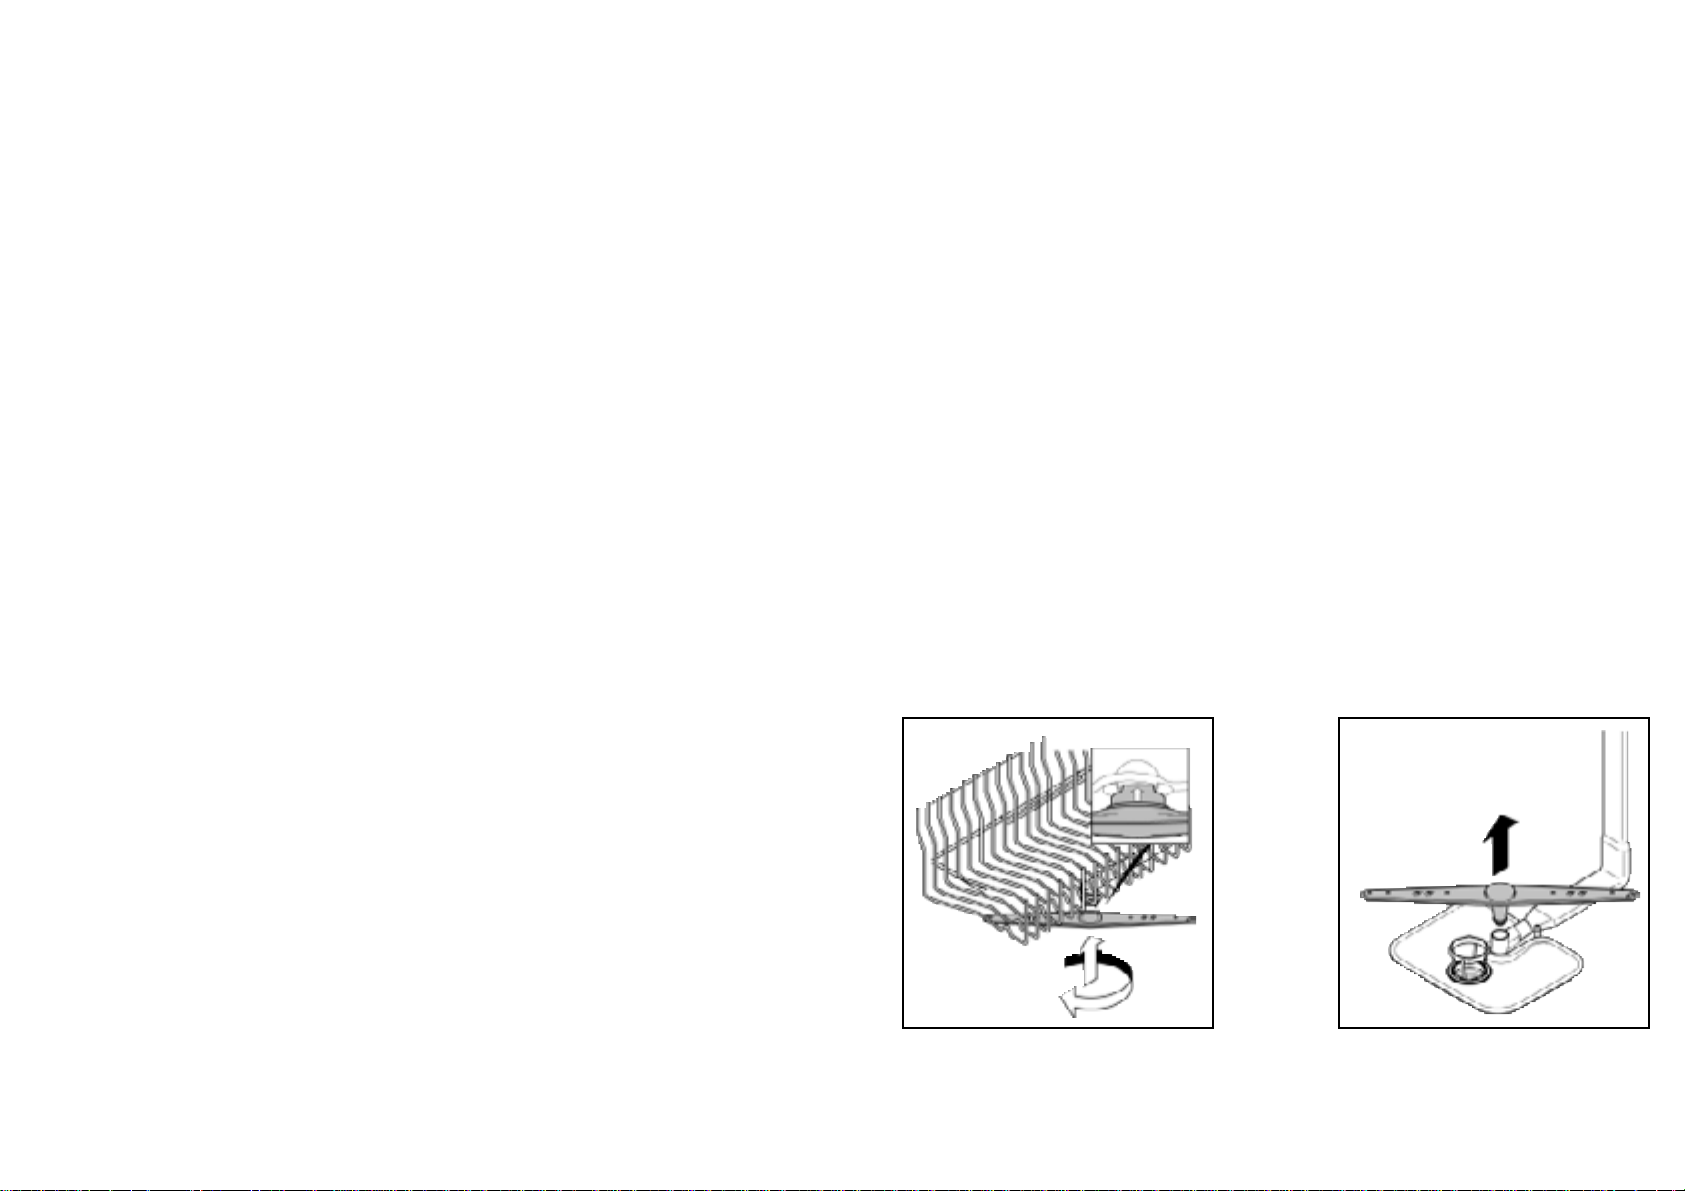
Aby zdjàç rami´ górne nale˝y obróciç ramieniem myjàcym a˝ wpust ustawi si´ w
pozycji ukazanej przez strza∏k´ (Rys. 1b). Nale˝y popchnàç je ku górze i
utrzymujàc nacisk odkr´ciç obracajàc nim w kierunku zgodnym z kierunkiem
ruchu wskazówek zegara (Rys. 1) (aby je za∏o˝yç nale˝y powtórzyç te operacj´
lecz obróciç w kierunku przeciwnym), podczas gdy rami´ dolne mo˝na zdjàç
pociàgajàc je po prostu ku górze (Rys. 2).
- Umyç ramiona obrotowe pod strumieniem wody usuwajàc odpadki zatykajàce
dysze.
- Na zakoƒczenie operacji umieÊciç ramiona obrotowe ponownie w tej samej
pozycji, pami´tajàc aby w przypadku ramienia górnego wpust znalaz∏ si´ we
w∏aÊciwej pozycji, dokr´cajàc go do oporu.
1 2
1b
18
Rady praktyczne
Wybór programu
Niniejsza zmywarka oferuje szerokà gam´ programów zmywania, przystosowanych do
ró˝nego stopnia zabrudzenia i do ró˝nych rodzajów naczyƒ. Aby wybraç najbardziej
odpowiedni program nale˝y zapoznaç si´ z za∏àczonà “LISTÑ PROGRAMÓW”.
Zalecenia na zakoƒczenie programu
Aby uniknàç ewentualnych Êladów kropli spadajàcych z koszyka górnego, nale˝y tu˝ po
zmywaniu wyjmowaç w pierwszej kolejnoÊci koszyk dolny.
JeÊli pozostawimy na jakiÊ czas naczynia w zmywarce nale˝y lekko uchyliç drzwiczki aby
u∏atwiç krà˝enie powietrza i poprawiç warunki wysychania.
Jak OSZCZ¢DZAå
1) W przypadkach, gdy chcemy zmywaç przy pe∏nym za∏adunku, ∏adowanie zmywarki
nale˝y wykonywaç tu˝ po zakoƒczeniu ka˝dego posi∏ku, z ewentualnym uruchomieniem
programu ZMYWANIE WST¢PNE NA ZIMNO, majàcym na celu zmi´kczenie brudu i
odrzucenie najwi´kszych kawa∏ków przed ka˝dym nast´pnym za∏adunkiem, w
oczekiwaniu na wykonanie pe∏nego cyklu zmywania.
2) W przypadku niezbyt silnego zabrudzenia naczyƒ lub ma∏ego stopnia wype∏nienia
koszyków nale˝y wybraç program OSZCZ¢DNY, post´pujàc zgodnie ze wskazówkami
zawartymi w liÊcie programów.
Jak post´powaç, by uzyskaç mo˝liwie najlepsze rezultaty zmywania:
1) Uk∏adaç naczynia otworami ku do∏owi.
2) W miar´ mo˝liwoÊci nie dopuszczaç do wzajemnego dotykania si´ ró˝nych sztuk
naczyƒ; poprawne ich rozmieszczenie zapewni najlepsze wyniki zmywania.
3) Przed u∏o˝eniem naczyƒ w maszynie nale˝y wyjàç resztki jedzenia (koÊci, oÊci, resztki
mi´sa i warzyw, skórki z owoców, niedopa∏ki papierosów, itd...) które mog∏yby zatkaç filtr
i dysze ramienia myjàcego.
4) Po u∏o˝eniu naczyƒ, sprawdziç, czy rami´ spryskujàce obraca si´ bez przeszkód.
5) Garnki i inne urzàdzenia kuchenne na których pozostajà przypalone lub przylegaj àce
mocno resztki jedzenia nale˝y zamoczyç w wodzie z dodatkiem Êrodka myjàcego do
zmywarek.
6) Aby najlepiej umyç zastaw´ srebrnà nale˝y:
a) op∏ukaç jà natychmiast po posi∏ku, szczególnie jeÊli u˝ywano jej z majonezem, jajkami,
rybà, itd...
b) nie rozpryskiwaç na niej Êrodków myjàcych
c) nie pozostawiaç jej w stycznoÊci z innymi metalami.
Co ROBIå, jeÊli:
1) W przypadku gdy trzeba zatrzymaç zmywark´ i otworzyç drzwiczki aby do∏o˝yç naczyƒ
do zmywania, podczas gdy urzàdzenie znajduje si´ w Êrodkowej fazie zmywania, mo˝na
otworzyç drzwiczki dopiero po wciÊni´ciu przycisku O/I (Start/Stop).
Po otwarciu drzwiczek nale˝y poczekaç 3 minuty przed ponownym uruchomieniem
maszyny.
Czego NIE WOLNO zmywaç
Nale˝y pami´taç, ˝e nie wszystkie naczynia przystosowane sà do zmywania w
zmywarce, odradzamy wstawianie cz´Êci wykonanych z materia∏ów termoplastycznych,
pokrywek z ràczkà drewnianà lub z tworzywa, garnków z d rewnianymi ràczkami, naczyƒ
aluminiowych, z kryszta∏u lub ze szk∏a o∏owiowego, o ile nie jest to oddzielnie wskazane.
Niektóre motywy dekoracyjne majà tendencj´ do blakni´cia, dlatego zalecamy zmyç
kilkakrotnie jednà sztuk´ w zmywarce i dopiero po upewnieniu si´, ˝e nie nast´puje
odbarwienie zmywaç ca∏y komplet.
Ponadto zalecamy aby nie zmywaç zastawy srebrnej razem z zastawà ze stali
oksydowanej aby nie nastàpi∏a pomi´dzy nimi reakcja chemiczna.
WA˚NE
Gdy kupujemy nowe naczynia nale˝y zawsze upewniç si´, czy mo˝na je zmywaç w
zmywarkach.
Page 11

21
NIEPRAWID¸OWOÂCI PRZYCZYNY ÂRODKI ZARADCZE
Usuwanie drobnych usterek
Uwaga!
Przed wyj´ciem dowolnej cz´Êci:
1. Pokr´t∏o ustawiç w pozycji STOP.
2. Wyjàç wtyczk´ z gniazdka sieciowego.
JeÊli zmywarka nie dzia∏a, z pomocà wezwanego technika serwisowego
wykonaç nast´pujàce czynnoÊci sprawdzajàce:
1 - Maszyna nie dzia∏a dla
˝adnego programu
2 – Maszyna nie pobiera wody
3 – Maszyna nie odprowadza
wody
4 – Maszyna odprowadza
wod´ w sposób ciàg∏y
5 – Nie obraca si´ rami´
obrotowe
6 – W maszynach
elektronicznych bez
wyÊwietlacza migoczà lampka
sygnalizacyjna „eco” i lampka
sygnalizacyjna „No1” oraz
s∏ychaç sygna∏ dêwi´kowy.
èle wetkni´ta wtyczka sieciowa
Nie wciÊni´ty przycisk O/I
(Start/Stop)
Drzwiczki otwarte
Brak zasilania w energi´
Patrz przyczyny Nr 1
Zamkni´ty kurek z wodà
èle ustawiony programator
Zagi´ty przewód zasilajàcy
Zatkany filtr przewodu zasilania
w wod´
Zatkany filtr
Zagi´ty przewód odp∏ywowy
wody
Nieprawid∏owe przed∏u˝enie
przewodu odp∏ywowego wody
Przewód odp∏ywowy
skierowany do rury w Êcianie nie
ma odpowietrzenia
Przewód w po∏o˝eniu zbyt niskim
Zbyt du˝o Êrodka myjàcego
JakiÊ przedmiot przeszkadza w
obrocie ramienia
P∏ytka filtrujàca i filtr zatkane
przez nieczystoÊci
Zamkni´ty kurek dop∏ywu wody
Wetknàç wtyczk´
Wcisnàç przycisk Start/Stop
Zamknàç drzwiczki
Sprawdziç
Skontrolowaç
Otworzyç kurek
Ustawiç poprawnie programator
Wyprostowaç przewód.
OczyÊciç filtr umieszczony na
zakoƒczeniu przewodu
zasilania w wod´
OczyÊciç filtr
Wyprostowaç przewód.
Podczas przed∏u˝ania przewodu
odp∏ywowego post´powaç
zgodnie z instrukcjà
Wezwaç wykwalifikowanego
technika
UnieÊç do 40 cm koƒcówk´
przewodu odp∏ywowego.
Zmniejszyç iloÊç Êrodka myjàcego.
Zastosowaç specjalny Êrodek myjàcy.
Skontrolowaç
OczyÊciç p∏ytk´ i filtr
Wy∏àczyç maszyn´. Otworzyç
kurek. Ponownie w∏àczyç cykl
prania
20
Grza∏ka podgrzewajàca wod´ wykonana jest ze specjalnej stali nierdzewnej.
Mo˝e ona po pewnym czasie zmieniç kolor, co nie ma ˝adnego znaczenia dla jej
dzia∏ania.
Wanna zmywarki jak te˝ wewn´trzna strona drzwiczek wykonane sà ze stali
nierdzewnej. JeÊli mimo to zauwa˝ymy plamy tlenków, to pochodzà one
jedynie z nadmiernego wyst´powania w wodzie soli ˝elaza. W celu usuni´cia
plam, zaleca si´ zastosowaç Êrodek cierny o bardzo drobnej ziarnistoÊci. Nie
nale˝y stosowaç substancji zawierajàcych chlor ani druciaków
PO U˚YCIU
Po ka˝dym zmywaniu nale˝y zamknàç kurek doprowadzajàcy wod´ aby odciàç
zmywark´ od instalacji wodnej i przycisnàç przycisk Start/Stop, co zapewni
odci´cie jej od zasilania elektrycznego.
JeÊli zmywarka ma pozostawaç przez d∏u˝szy czas bezczynna, konieczne jest
wykonanie nast´pujàcych czynnoÊci:
1. Wykonaç program zmywania bez ∏adowania naczyƒ, lecz ze Êrodkiem
myjàcym, co pozwoli odt∏uÊciç maszyn´.
2. Wyjàç wtyczk´ z gniazdka sieciowego.
3. Zamknàç kurek wejÊciowy wody.
4. Wype∏niç odpowiedni pojemnik Êrodkiem do p∏ukania.
5. Pozostawiç drzwiczki uchylone.
6. Pozostawiç czyste wn´trze zmywarki.
7. JeÊli maszyna pozostawiona jest w pomieszczeniu, w którym temperatura jest
ni˝sza ni˝ 0°C, woda pozosta∏a w przewodach mo˝e zamarznàç. Dlatego te˝
nale˝y doprowadziç temperatur´ otoczenia do wartoÊci wy˝szej od 0°C i
poczekaç oko∏o 24 godzin na ponowne uruchomienie maszyny.
Page 12
23
Contents
Safety advice
Setting up, installation
Opening the door
Water softener unit
Adjusting the upper basket
Loading the dishes
Half load washing
Information for test laboratories
Loading the detergent and rinse aid
Cleaning the filters
Some practical hints
Routine cleaning and maintenance
Identifying minor faults
page 24
page 25
page 28
page 29
page 31
page 32
page 36
page 37
page 37
page 39
page 40
page 41
page 43
23
1
4
5
Fig. A
Uwaga: Gdy jedna z cytowanych powy˝ej nieprawid∏owoÊci jest powodem z∏ego zmywania lub
niewystarczajàcego p∏ukania, niezb´dne jest r´czne zebranie brudów z naczyƒ gdy˝ operacja
koƒcowa spowoduje wyschni´cie zabrudzeƒ, których kolejne zmywanie w zmywarce nie by∏oby
w stanie oczyÊciç.
JeÊli z∏e dzia∏anie zmywarki utrzymuje si´, nale˝y zwróciç si´ do Dzia∏u Serwisowego podajàc
nazw´ modelu zmywarki, umieszczonà na tabliczce znamionowej znajdujàcej si´ po wewn´trznej
stronie drzwiczek, w cz´Êci górnej, lub na egzemplarzu gwarancji. Informacje te umo˝liwià
dokonanie szybszego i skuteczniejszego serwisu.
Producent zrzeka si´ wszelkiej odpowiedzialnoÊci za b∏´dy w druku niniejszej instrukcji. Ponadto
zastrzega sobie prawo wprowadzania zmian które uzna za u˝yteczne bez pogorszenia
podstawowych charakterystyk.
NIEPRAWID¸OWOÂCI PRZYCZYNY ÂRODKI ZARADCZE
7 – W maszynach elektronicznych
z wyÊwietlaczem pojawia si´ na
wyÊwietlaczu napis „E1” oraz
s∏ychaç sygna∏ dêwi´kowy.
8 – Naczynia sà zmyte tylko
cz´Êciowo
9 – ObecnoÊç bia∏ych plam na
naczyniach
10 Ha∏as podczas zmywania
11 – Naczynia nie sà dok∏adnie
wysuszone
Zamkni´ty kurek dop∏ywu wody
Patrz przyczyny Nr 5
Dno garnków nie jest dok∏adnie
umyte
Brzeg garnków nie jest
dok∏adnie umyty
Dysze ramion spryskujàcych
cz´Êciowo zatkane
Naczynia nie sà dobrze
roz∏o˝one
Koƒcówka przewodu
odp∏ywowego zanurzona jest w
wodzie
Ârodek myjàcy nie jest
prawid∏owo dawkowany, jest
stary lub zbrylony.
Korek pojemnika z solà nie jest
dok∏adnie zakr´cony.
Wybrany program zmywania jest
zbyt s∏aby.
Naczynia w koszyku dolnym nie
sà umyte.
Woda zasilajàca jest szczególnie
twarda.
Naczynia uderzajà o siebie.
Obrotowe ramiona myjàce
uderzajà o naczynia.
Brak obiegu powietrza
Wy∏àczyç maszyn´. Otworzyç
kurek. Ponownie w∏àczyç cykl
prania.
Skontrolowaç
Zbyt uporczywie przyczepione
resztki jedzenia, które nale˝y zdjàç
przed zmywaniem w zmywarce
Lepiej u∏o˝yç garnki
Zdemontowaç ramiona
spryskujàce odkr´cajàc mocujàcà
nakr´tki mocujàce zgodnie z
kierunkiem ruchu wskazówek
zegara i umyç je pod kranem.
Nie uk∏adaç naczyƒ zbyt ciasno
Koƒcówka przewodu
odp∏ywowego nie powinna
dotykaç powierzchni wody
odprowadzanej.
Zwi´kszyç dawk´ zale˝nie od
stopnia zabrudzenia lub wymieniç
Êrodek myjàcy.
Dokr´ciç do oporu.
Wybraç program bardziej
skuteczny.
Wy∏àczyç przycisk po∏owicznego
za∏adunku.
Sprawdziç poziom soli i Êrodka do
p∏ukania oraz wyregulowaç
dawkowanie, jeÊli
nieprawid∏owoÊç utrzymuje si´,
poprosiç Dzia∏ Serwisowy o
interwencj´.
Lepiej je rozmieÊciç w koszykach.
Lepiej u∏o˝yç naczynia.
Pozostawiç drzwiczki maszyny
uchylone po zakoƒczeniu
programu zmywania co poprawi
warunki naturalnego wysychania.
22
Page 13

25
INSTALLATION (Technical notes)
After unpacking, adjust the height of the dishwasher.
For the dishwasher to work correctly it must be level.
Adjust the feet so that the machine does not tilt by more
than 2 degrees. If it you need to move the machine after
removing the packaging, do not try to lift it by the bottom
of the door. Follow the instructions in figure. Open the
door slightly and lift the machine by holding on the top.
Important: when the appliance is located on a
carpet floor, attention must be paid to ensure that
there is no obstruction to the bottom vents.
Make sure that the plug on the appliance remains
accessible after installation.
This appliance complies with Directives
89/336/EEC, 73/23/EEC and following changes.
Electrical connection
This appliance complies with all the international safety standards and is fitted with a
3 pin plug with earth connection to ensure complete earthing of the product.
In the absence of adequate earthing you will notice that when touching the metal
parts of your appliance an electrical dispersion can be felt due to the presence of a
radio interference suppressor.
Before connecting the appliance to the mains supply it is important to ensure:
– That the supply socket is properly earthed.
– That your electricity supply is capable of meeting the consumption requirements
listed on the rating plate of your appliance.
Important: manufacturer declines all responsibility for any damages due to
nonearthing of the machine.
24
Safety Instructions
Please read the instructions in this booklet carefully because they contain important
information on how to install, use and maintain your dishwasher safely as well as
containing useful tips on how to make the most of it.
Keep this booklet safe for future reference.
There are certain basic safety rules which are valid for any domestic appliance. They
are the following:
- never touch the appliance when your hands or feet are wet or damp
- do not use when your feet are bare
- do not remove the plug from the mains supply socket by pulling the mains cable or
the machine itself
-do not leave the appliance exposed to the elements (rain, sun etc)
- do not let children (or others incapable of operating it) use the machine without
supervision
-make sure that the plug fitted to the machine is compatible with the power supply
socket. If it is not, get a suitably qualified person to fit the correct type, and to make
sure that the cables to the mains socket are able to cope with the power rating of
the appliance
- ensure that the dishwasher does not crush power cables
-if there is a water softening device installed in the home there is no need to add
salt to the water softener fitted in the dishwasher
- the dishwasher is designed for normal kitchen utensils.
Objects that have been contamined by petrol, paint, traces of steel or iron,
corrosive chemicals, acids or alkalis must not be washed in the dishwasher
- if you wish to dispose of an old dishwasher be careful to remove the door to
eliminate the risk of children becoming trapped inside it
- the dishwasher has been made from materials which can be recycled so that it can
be disposed of in an environmentally friendly way
- in general it is not advisable to use adaptors, multiple plugs and/or extension
cables
-Water left in the machine or on the dishes at the end of the wash programme
should not be swallowed.
- Leaning or sitting on the open door of the dishwasher could cause it to tip over.
- Cutlery is washed best if it is placed in the basket with the handles downwards;
however, to avoid any injury from blades or sharp points, it can be placed with the
handles upwards.
- Should it be necessary to replace the supply cord, call the Service Department.
- This appliance is be designed for domestic use only.
If the appliance breaks down or stops working properly , switch it off, turn of f the water
supply and do not tamper with it. Repair work should only be carried out by an
approved service agent and only genuine spare parts should be fitted. Any failure to
follow the above advice may have serious consequences for the safety of the appliance.
Page 14
27
The filter D must be inserted between the tap B and the inlet hose A, remembering
to fit the washer C.
If the dishwasher is connected to new pipes or to pipes which have not been in use
for a long time run water through for a few minutes before connecting the inlet hose.
In this way no deposits of sand or rust will clog up the water inflow filter.
Connecting the outlet hose
The outlet hose should disharge into a standpipe, making sure that there are no kinks
(fig. 4).
The standpipe must be at least 40 cm above floor level and it must have an internal
diameter of at least 4 cm. It is advisable to fit an anti-odour air trap (fig. 4 x).
If necessary the outlet hose can be extended up to 2,6 m, provided that it is kept at
a maximum height of 85 cm above floor level.
The hose can be hooked over the side of the sink (it must not be immersed in water,
in order to prevent water from being syphoned back to the machine when this is in
operation) (fig. 4 y).
When installing the appliance under a worktop the hose pipe clamp must be attached
to the wall in the highest possible position under the worktop (fig. 4 z).
Check that there are no kinks in the inlet and outlet hoses.
123
4
Plug your dishwasher into the power socket.
If the plug we supply does not fit
• CUT IT OFF AND DESTROY IT!
You can't use it on other appliances, and the exposed wires could be
dangerous if anyone plugged it in.
• Fit a suitable plug, as follows:
Connect to the terminal in the plug
green and yellow wire marked with the letter E,
OR marked with the Earth symbol,
OR coloured green,
OR coloured green and yellow.
blue wire marked N
OR coloured black.
brown wire marked L
OR coloured red.
"WARNING"
THIS APPLIANCE MUST BE EARTHED
Fuses and plugs
This appliance should be used only on a
socket with a minimum rating of 13 Amp.
Our ready-fitted plug is already equipped
with a 13 amp fuse which is BS 1362 ASTA approved.
Any replacement should be exactly the same.
If the fuse cover is lost, do not use the plug until it is replaced.
A correct replacement fuse cover (obtainable from your dealer
or Electricity Board) must be the same colour as shown or
named on the insert on the base of the plug.
For U.K. only
26
Water connection
The inlet and drain hoses can be directed to left or right.
The dishwasher can be connected to either cold or hot water, as long as it is
no hotter than 60 °C.
Water pressure must be between 0,08 MPa and 0,8 MPa. If the pressure is below
the minimum consult our service department for advice.
The inlet hose must be connected to a tap so that the water supply can be cut off
when the machine is not in use (fig.1 B).
The dishwasher is fitted with 3/4" threaded connector (fig. 2).
Connect inlet hose A to water tap B with a 3/4" attachment making sure that it has
been properly tightened.
If it is necessary to lengthen the inlet pipe, an extension pipe can be fitted.
If limescale deposits or sand are present in the water, it is advisable to obtain the
appropriate filter, art. 9226085, from the Service Centre (fig. 3).
Page 15
29
Regulating the water softener
The table below lists different degrees of water hardness with the corresponding setting
for the softener unit.
Closing the door
Place the baskets in the machine.
Make sure that both the spray arms are free to rotate and are not obstructed by
cutlery, crockery or pans. Close the door, pressing on it to make sure it is firmly shut.
Water softener unit
Depending on the source of the supply, water contains varying amounts of limestone
and minerals which are deposited on the dishes leaving whitish stains and marks.
The higher the level of these minerals present in the water, the harder the water is.
The dishwasher is fitted with a water softener unit which, through the use of special
regenerating salt, supplies softened water for washing the dishes. The softener unit
can treat water with a hardness of up to 60°fH (French grading) or 33°dH (German
grading) through five different settings.
The degree of hardness of your water can be obtained from your water supply
company.
Level
0
1
*2
3
4
Water
hardness
°fH
(french)
0-9
10-30
31-40
41-50
51-60
Water
hardness
°dH
(German)
0-5
6-16
17-22
23-27
28-33
Use of
regenerating
salt
NO
YES
YES
YES
YES
Water
softener
setting
FREE
position N.1
position N.2
position N.3
position N.4
N°
of
washes
50
40
30
20
- *The water softener unit is set in the factory
at level 2, as this is suitable for the majority
of users.
If your water is at level 0, you need not use
any regenerating salt, nor need you make
any adjustment, as your water is soft.
According to the degree of hardness of
your water, regulate the softener unit in the
following way:
- remove the lower rack. Unscrew and remove
the cap from the salt dispenser located in
the bottom of the tub (Fig. A“1”);
-Turn the selector screw to the required
position with a screwdriver or a knife.
N.B.: For models fitted with electronic programmer refer to the programme list
enclosed.
TYPE 1
TYPE 2
28
Installation in fitted kitchens
Fitting between existing cabinets
The height of the dishwasher, 85 cm, has been designed in order to allow the machine
to be fitted between existing cabinets of the same height in modern fitted kitchens.
The feet can be adjusted so that correct height is reached.
The laminated top of the machine does not require any particular care since it is
heatproof, scratchproof and stainproof (fig. 5).
The work top can be easily adjusted to line it with the top of existing cabinets; this is
done by moving it by 5 mm each time up to a maximum of 25 mm.
To adjust it, unscrew the two screws at the back and fix the top in the position
required (fig. 6).
Underneath existing work top (when fitting beneath a work top)
In most modern fitted kitchens there is only one single work top under which cabinets
and electrical appliances are fitted.
In this case remove the work top of the dishwasher by unscrewing the screws under
the rear edge of the top (fig. 6).
The height will then be reduced to 82 cm, as scheduled by the International
Regulations (ISO) and the dishwasher will fit perfectly under the kitchen working top
(fig. 7).
Fitting panels (some models only)
The frames around the door, allow decorative panels to be fitted, up to 5 mm thick,
and with the following dimensions:
width 591 mm ± 1 height 597 mm ± 1
Opening the door
Put your hand into the recess and push upwards.
If the machine comes open while it is working, an electrical safety device
automatically switches everything off.
For the machine to work properly, the door should not be opened while it is in
operation.
7
598
556/563
5
6
Page 16
Adjustment of the upper basket (some models only)
If 27 cm to 31 cm plates are normally used, load them onto the lower basket after the
upper basket has been placed in its upper position and proceed as detailed below
(According to the models):
Type “A”:
1) Turn the front stops A outwards;
2) Take out the basket and remount it in the upper position;
3) Replace the blocks A in their original position.
Dishes that are bigger than 20 cm in diameter can no longer be loaded onto the
upper basket and the mobile supports cannot be used when the basket is in the
upper position.
A
A
Type “B”:
1) Pull out the upper basket;
2) Then grasp the basket from both sides and lift it upwards (fig. 1).
Dishes that are bigger than 20 cm in diameter can no longer be loaded onto the
upper basket and the mobile supports cannot be used when the basket is in the
upper position.
ADJUST BASKET TO THE LOWER POSITION:
1) Grasp the basket from both sides and lift slightly upwards (fig. 2a);
2) Then slowly release into the correct position (fig. 2b) .
N. B. : NEVER LIFT OR LOWER THE BASKET BY ONE SIDE ONLY (fig.3).
Attention :
It is advisable to adjust the basket before loading the dishes.
a
b
a
b
1
2
3
31
30
Loading the salt
The dishwasher is fitted with a softener which
clears the water of lime which could cause scale
and damage the dishwasher.
On the bottom of the machine there is a container
for the salt for regenerating the softener.
The filter medium of the softening plant must be
reactivated with dishwasher water softener
regenerating salt.
Other types of salt contain small quantities of
insoluble particles which over a long period of
time may affect and deteriorate the softener
performance.
To add salt, unscrew the cap of the container on
the bottom and then refill the container.
During this operation a little water will overflow; but keep adding salt until the container
is full. When the container is full, clean the thread of salt residue and retighten the
tap.
If the dishwasher is not required straightaway, set the Prewash programme so that
the salt solution which has overflowed is discharged from the washing tank.
The salt dispenser has a capacity of between 1.5 and 1.8 kg and, for efficient use of
the appliance, it should be refilled from time to time according to the regulation of the
water softener unit.
Important: it is necessary to add water until the container overflows. Only
install the dishwasher after completely filling the salt container.
Salt loading indicator
Some models are provided with an indicator light
which signals salt consumption. The signal will
appear according to one of two systems:
– an indicator light on the control panel which
will light up when it is necessary to reload the
salt container;
– the salt container cap with a green mobile light
which remains visible as long as there is
enough salt for regeneration purposes. When
the green surface is depressed inside the cap,
more salt must be loaded.
Other models are provided with a blind cap. In this case, the salt level must be
checked periodically, according to the regulation of the water softener unit.
Important: the appearance of white stains on dishes is generally an important sign
that the salt container needs filling.
Page 17
33
A standard daily load is represented in Figs.
1, 2 and 3.
Upper basket (Fig. 1)
A = soup plates
B = dinner plates
C = dessert plates
D = saucers
E = cups
F = glasses
Upper basket (Fig. 2)
A = soup plates
B = dinner plates
C = dessert plates
D = saucers
E = cups
F = glasses with stems
G = glasses
H = single section cutlery basket
Lower basket (Fig. 3)
A = medium-sized saucepan
B = large saucepan
C = frying pan
D = lids
E = tureens, serving dishes
F = cutlery
G = oven dishes
Please load the dishwasher sensibly to
ensure the best wash results.
1
2
3
A
B
C
D
FE
GH
DF AG
E
B
C
A
B
C
D
E
F
32
Loading dishes
To load dishes
For good wash performance remove any debris from the dishes (bones, tooth picks,
the remains of meat and vegetables) to avoid blocking the filters, water outlet and
washing arm nozzles and, as a result, reducing washing efficiency.
Try not to rinse the dishes before loading them into the dishwasher.
If saucepans and oven dishes are encrusted with the remains of burnt or roast food,
it is advisable to leave them to soak before washing.
Using the upper basket
The upper basket is provided with mobile racks hooked to the sides of the basket
which can be regulated in two positions: upright and lowered. In the lowered position
the racks may be used for tea and coffee cups, kitchen knives and ladles. Glasses
with stems may be safely hung on the ends of the racks.
Glasses, cups, saucers and dessert plates may be loaded under the racks.
Soup plates and ordinary plates may be loaded with the rack in the upright position.
Plates should be loaded vertically with the underside of the plate towards the back of
the dishwasher with a space between each plate to allow water to pass freely.
It is advisable to load plates of the same size together in order to utilize maximum
basket capacity.
Plates may be loaded in a single row (Fig. 1) or on both rows (Fig. 2).
It is advisable to load large plates (approx. 27 or more cm) slightly tilted towards the
rear to facilitate introduction of the basket into the machine.
Salad bowls and plastic bowls may also be loaded on the upper basket. It is advisable
to block these in place so that the jets of water do not make them overturn.
The upper basket has been designed to offer maximum flexibility in use and can be
loaded with up to 24 plates on two rows, up to 30 glasses on five rows or a mixed
load.
Using the lower basket
Saucepans, oven dishes, tureens, salad bowls, lids, serving dishes, dinner plates,
soup plates and ladles can be loaded on the lower basket.
Place the cutlery in the plastic cutlery holder with the handles pointing upwards.
Place the cutlery holder on the lower basket (fig. 3), making sure that the cutlery does
not get in the way of the rotating arms.
Page 18
35
Important (fig. 7)
The lower basket has two rows of racks at
the front that can be lowered in a very simple
and rapid way to allow easier loading of
salad bowls, saucepans and lids.
(Some models only)
TO LOWER THE RACKS :
1) Lift the racks slightly upward and let them
drop to the correct position;
2) Lifting again is enough them to bring
them to a vertical position.
Cutlery basket (fig. 8)
The cutlery basket is made with two detachable parts which will enable various loading options.
The two parts can be detached by sliding the
left section away from the right section.
On some models the cutlery basket does not
have central dividers.
1
2
7
8
12 international place load (Ref. EN 50242).
Correct loading for the upper basket is indicated in Fig. 4 and for the lower basket
in Fig. 5. Fig. 6 cutlery basket.
QN
M
P
O
M
N
R
A
F
C
C
C
G
B
E
D
H
H
L
I
4
5
6
Lower basket (Fig. 5)
M = 8 + 4 soup plates
N = 11 + 1 dinner plates
O = 12 dessert plates
P = serving dish
Q = cutlery
Cutlery basket (fig. 6)
Place the side racks in the lower position
and fill with 6 + 6 knives(R); in the spaces
left insert cutlery with the handles down.
Take care not to load more than two different
types of cutlery in the same compartment.
Cutlery basket without side racks
Insert the remaining cutlery, taking care not
to load more than two different types of
cutlery in the same compartment.
Upper basket (Fig. 4)
A = 5 + 5 + 2 glasses
B = 12 saucers
C = 4 + 4 + 4 cups
D = small bowl
E = medium bowl
F = large bowl
G = 1 + 1 forks
H = 1 + 1 serving spoons
I = 3 + 3 + 3 + 3 dessert spoons
L = 3 + 3 + 3 + 3 teaspoons
34
Page 19
37
Information for the test laboratories.
General programme comparison
(see programmes selection)
Loading the detergent and the rinse aid.
Filling the detergent container
It is essential to use a detergent that is specifically designed for dishwashers
either in powder, liquid or tablet form.
Unsuitable detergents (like those for washing up by hand) do not contain the proper
ingredients for use in a dishwasher and stop the dishwasher from working correctly.
Normal wash
The detergent container is inside the door
(fig. A “2”). If the lid of the container is closed
press the button to open.
At the end of every wash cycle the lid is
always open and ready for the next time the
dishwasher is used.
The amount of detergent to be used varies
according to how dirty the dishes are and on
the type of dishes to be washed.
We advise using 20-30 gr of detergent in the
wash section of detergent compartment (1).
After pouring the detergent into the
container close the lid.
Since not all detergents are the same the instructions on the boxes of detergent can
vary. We should just like to remind users that too little detergent does not clean the
dishes properly whilst too much detergent will not produce better results and is also
a waste. Do not use an excessive amount of detergent and help limit damage to the
environment at the same time.
Wash with soaking cycle (some models only)
(Prewash)
If setting the Universal intensive wash programme, a second dose of about 20 gr
of detergent (1 table-spoon) must be added to the machine in the prewash section of
detergent compartment (2).
36
Half load wash upper basket (some models only)
Half load wash lower basket (some models only)
Q
N
M
P
O
M
N
4
D
FAG
E
B
C
3
AG
M
L
B
H
D
C
E
I
F
1
AGI
BC
F
E
H
D
2
1/2 mixed load (fig. 1)
A = glasses
B = cups
C = soup plates
D = dinner plates
E = dessert plates
F = saucers
G = saucepan
H = lid
I = Irying pan
L = medium bowl
M = small bowl
1/2 load standard (fig. 2)
A = 6 glasses
B = 5 + 1 cups
C = serving dish
D = 6 soup plates
E =6 dinner plates
F =6 dessert plates
G =6 saucers
H = medium bowl
I = small bowl
Place the cutlery in the plastic cutlery holder on the lower basket.
Lower basket (fig. 3)
A = medium-sized saucepan
B = large saucepan
C = frying pan
D = lids
E =tureens, serving dishes
F = cutlery
G = oven dishes
Please load the dishwasher sensibly to ensure the best wash
results.
Lower basket (fig. 4)
M = 8 + 4 soup plates
N = 11 + 1 dinner plates
O = 12 dessert plates
P = serving dish
Q = cutlery
Page 20
39
The filter system (fig.A “4”) consists of:
a central container that traps the larger
particles.
a flat gauze that continuously filters the
wash water
a micro filter, located beneath the gauze,
that traps the tiniest particles ensuring a
perfect rinse.
To achieve excellent results every time, the
filters should be checked and cleaned after
each wash.
To remove the filter unit, simply turn the
handle anticlockwise (fig. 1).
For ease of cleaning, the central container is
removable (fig. 2).
Remove the gauze filter (fig.3) and wash the
whole unit under a jet of water. If necessary
a small brush can be used.
With the Self-cleaning Micro filter, maintenance is reduced and the filter unit need only
be checked every two weeks. Nevertheless,
after each wash it is advisable to check that
the central container and the gauze filter are
not clogged.
NB: after cleaning the filters, make sure
that they are correctly reassembled and
that the gauze filter is properly positioned
at the bottom of the dishwasher.
Make sure that the filter is screwed back,
clockwise, into the gauze, as poor
seating of the filter unit could have an
adverse effect on the efficiency of the
appliance.
Warning: never use the dishwasher
without the filters.
Cleaning the filters
1
2
3
38
3
4
3
Filling the rinse aid container
The rinse aid container can be found to the
right of the detergent container: it has a
capacity of about 130 ml (Fig A"3"). Turn the
cap (3) anticlockwise and pour enough liquid
to last several washes, up to the maximum
level shown. Replace the cap.
The rinse aid, which is automatically
released during the last rinsing cycle, helps
the dishes to dry quickly and prevents spots
and stains forming.
It is always advisable to use rinse aid.
Check the rinse aid level through the indicator
eye which is situated in the centre of the
dispenser (4).
Regulating the rinse aid from 1 to 6
The regulator is placed under the cap (3) and
can be turned using a coin. The recommended
position is 3.
The limestone content of the water considerably
affects the formation of limescale and the
drying performance.
It is therefore important to regulate the
quantity of rinse aid to achieve good
washing results.
If, after the wash, streaks occur on the
dishes, decrease the amount by one position.
If whitish spots occur, increase the amount
by one position.
FULL EMPTY
dark light
Page 21
41
Cleaning and maintenance
The outside of the cabinet can be cleaned with a non-abrasive cleaning agent
suitable for a gloss finish.
The dishwasher does not require special maintenance, because the tank is selfcleaning. Regularly wipe the door gasket with a damp cloth to remove any food
remains or rinse aid. It is advisable to remove limestone deposits or dirt periodically,
by doing an empty wash; pour a glass of vinegar on the bottom of the tank and select
the light wash.
If, in spite of the routine cleaning of the filters, you notice that the dishes or pans are
not properly washed or rinsed, check that all the spray heads on the rotor arms
(fig. A“5”) are clear.
If they are blocked, clean them in the following way:
To remove the upper rotor arm, turn it until it lines up with the stop marked by the
arrow (fig. 1b). Push it upwards and, keeping it pushed in, unscrew it in a clockwise
direction. To reassemble it repeat the same operation, but turn it anticlockwise.
The lower rotor arm can be removed simply by pulling it upwards (fig. 2).
• wash the rotor arms under a jet of water to clear any blockage in the spray heads.
• When you have finished, refit the rotor arms in the same position, remembering to
re-align the arrow and screw into position.
1 2
1b
40
Practical hints
Selecting the programme
This dishwasher offers you a wide range of wash programmes so that you can choose
the most suitable according to the type of dishes and how dirty they are.
Refer to the PROGRAMME LIST to choose the most suitable programme.
Useful hints
In order to avoid any dripping from the top rack, remove the lower rack first.
If the dishes are to be left in the machine for some time, leave the door ajar, to let
some air circulate and to improve the drying performance.
How to make SAVINGS
1) If you want the dishwasher to give a complete wash, place the dishes in the
dishwasher at the end of each meal and if necessary turn on the COLD PRE-WASH
cycle to soften the food remains and remove bigger particles of food from the new
load of dishes. When the dishwasher is full start the complete wash cycle programme.
2) If the dishes are not very dirty or if the baskets are not very full select an
ECONOMY programme, following the instructions in the program list.
How to get really good wash RESULTS
1) Place the dishes face downwards.
2) Try to place the dishes in such a way that they are not touching one another. If
they are loaded properly you will get better results.
3) Before placing the dishes in the dishwasher remove any remaining food (bones,
shells, pieces of meat or vegetables, coffee grounds, skin of fruit, cigarette ash etc.
that could clog up the outflow and the washing arm jets.
4) After loading the dishes check that the washing arms can rotate freely.
5) Pans and other dishes that have particularly stubborn food particles or remnants
of burnt food should be left to soak in water with dishwasher detergent.
6) To wash silver properly:
a) rinse the silver immediately after use, especially if it has been used for mayonnaise,
eggs, fish etc.
b) do not sprinkle detergent onto it
c) keep it separate from other metals
What to DO if
1) You want to stop the dishwasher to put in more dishes whilst it is in the middle of
a wash.
Open the door only after pressing the O/I button so that the dishwasher is in OFF.
After closing the door, wait 3 minutes before starting up the machine again.
What not to wash
It should also be remembered that not all dishes are suitable for washing in a
dishwasher.
We advise against using the dishwasher to wash items in thermoplastic, cutlery with
wooden or plastic handles, saucepans with wooden handles, items in aluminium,
crystal, leaded glass unless otherwise stated.
Certain decorations may fade. It is therefore a good idea before loading the whole
batch to wash just one of the items first so as to be sure that others like it will not fade.
It is also a good idea not to put silver cutlery with non-stainless steel handles into the
dishwasher as there could be a chemical reaction between them.
IMPORTANT
When buying new crockery or cutlery always make sure that they are suitable for
washing in a dishwasher.
Page 22

43
Identifying minor faults
Warning!
Before removing any panel: 1. Turn the knob to STOP.
2. Pull the electric plug out.
Should the dishwasher fail to operate, before contacting the Service Centre, make the
following checks:
42
The water heater element is made of a special stainless steel which after a while may
change colour; this does not in any way affect its performance or its working life.
Both the door lining and the tank lining are in stainless steel; however, should spots
caused by oxidation occur, this is probably due to a high level of iron salts presents
in the water. The spots can be removed with a mild abrasive agent; never use
chlorine based materials, steel wool, etc.
WHEN CYCLE IS FINISHED
After every wash it is essential to turn off water supply and to switch off the machine
by pressing the On/Off button to the off position. If the machine is not going to be
used for some time, it is advisable to follow these rules:
1. do an empty wash with detergent in order to clean the machine of any deposits.
2. pull out the electric plug.
3. turn off the water tap.
4. fill the rinse aid container.
5. Ieave the door ajar.
6. Keep the inside of the machine clean.
7. If the machine is left in places where the temperature is below 0°C any water left
inside the pipes may freeze. Wait until the temperature rises above zero and then
wait for about 24 hours before starting up the dishwasher.
FAULT CAUSE REMEDY
1 - Machine completely dead
2 - Machine does not
draw water
3 - Machine does not
discharge water
4 - Machine discharges water
continuously
5 - Spray arms are not heard
to rotate
6 - On electronic appliances
without a display: “eco”indicator light and indicator light
“No.1” with audible signal
are heard.
7 -
On electronic appliances with
a display: “E1” appears on the
display with audible signal.
Plug is not connected to wall
socket
O/I button has not been pressed
Door is open
No electricity
See causes for no. 1
Water tap is turned off
Programme selector is not at
correct position
The inlet hose is bent
The inlet hose filter is not
correctly connected
Filter is dirty
Outlet hose is kinked
The outlet hose extension is
not correctly connected
The outlet connection on the
wall is pointing downwards not
upwards
Position of outlet hose is too
low
Excessive amount of detergent
Item prevents arms from rotating
Plate and cup filter very dirty
Water inlet tap turned off
Water inlet tap turned off
Connect electric plug
Press button
Close door
Check the fuse in the plug and
the electricity supply
Check
Turn water tap on
Turn programme selector to
correct position
Eliminate the bends in the hose
Clean the filter at the end of the
hose
Clean filter
Straighten outlet hose
Follow the instructions for
connecting the outlet hose
carefully
Call a qualified technician
Lift outlet hose to at least 40 cm
above floor level
Reduce amount of detergent
Use suitable detergent
Check
Clean plate and cup filter
Switch off the appliance.
Turn on the tap.
Re-set the cycle.
Switch off the appliance.
Turn on the tap.
Re-set the cycle.
Page 23
44
N.B.: Should any of the situations occur and should the machine give a bad wash performance,
it is necessary to remove the deposits from the dishes by hand since the final drying cycle hardens the
deposits which a second wash in the machine would not be able to remove.
If the malfunction continues contact a Service Centre quoting the serial number of the dishwasher.
This is found on the plaque on the inside of the dishwasher door at the top or on the guarantee.
This information will make it possible to take more effective action more quickly.
The manufacturers decline any responsability for any printing mistakes in this instruction booklet. They also reserve the right to modify their
own appliances as necessary without altering the essential characteristics.
FAULT CAUSE REMEDY
8 - Load of dishes is only
partially washed
9 - Presence of white spots
on dishes
10 -Noise during wash
11 - The dishes are not
completely dry
See causes for no. 5
Bottom of saucepans have not
been washed well
Edge of saucepans have not
been washed well
Spray arms are partially blocked
The dishes have not been
properly loaded
The end of the outlet hose is in
the water
The incorrect amount of
detergent has been measured
out; the detergent is old and hard
The wash programme is not
thorough enough
The lower basket dishes have
not been washed
Water is too hard
The dishes knock against one
another
The revolving arms knock against
the dishes
Inadequate air flow
Check
Burnt on food remains must
be soaked before putting pans
in dishwasher
Reposition saucepans
Remove spray arms by
unscrewing ring nuts clockwise
and wash under running water
Do not place the dishes too
closely together
The end of the outlet hose
must not come into contact
with the outflow water
Increase the measure
according to how dirty the
dishes are and change detergent
Choose a more vigorous
programme
Depress half load button
Check salt and rinse aid level
and regulate amount.
Should the fault persist,
Contact Service Centre
Load dishes better onto the
basket
Load dishes better
Leave the dishwasher door ajar
at the end of the wash program
to allow the dishes to dry naturally
45
Inhoud
Veiligheidsvoorschriften
Opzet en installatie
Openen van de deur
Wateronthardingssysteem
Instellen van het bovenrek
Laden van de vaatwasser
Halfgeladen wassen
Informatie voor de testlaboratoria
Invoeren van wasmiddel en spoelmiddel
Schoonmaak van de filters
Algemene aanwijzingen
Regelmatige schoonmaak en onderhoud
Herkennen van kleine fouten
pagina 46
pagina 47
pagina 49
pagina 50
pagina 52
pagina 53
pagina 57
pagina 58
pagina 58
pagina 60
pagina 61
pagina 62
pagina 64
23
1
4
5
Fig. A
Page 24
47
INSTALLATIE (Technische beschrijving)
Stel na het verwijderen van de verpakking de juiste
hoogte in.
Voor een goede werking is het belangrijk dat de
afwasmachine vlak staat opgesteld: dit doet u door de
beide voorpootjes zo af te stellen dat de machine niet
meer dan 2 graden naar één kant helt.
Indien het nodig is om de onverpakte machine met de
hand te verplaatsen, grijp de deur dan niet onderaan
beet, maar doe zoals aangegeven in fig.; open de deur
een stukje en til de afwasmachine op aan het
bovenblad.
Als u het apparaat op een ondergrond met een
hoogpolig tapijt zet, controleer dan of de opening
aan de onderkant vrij blijft.
Zorg ervoor dat de stekker van het apparaat
toegankelijk blijft na de installatie.
Elektrische aansluiting
De machine moet worden aangesloten op een wandcontactdoos met randaarde,
gezekerd conform de waarden aangegeven op het typeplaatje van de machine.
Raadpleeg, in geval van twijfel, uw elektricïen of installateur.
Let op: de fabrikant kan niet aansprakelijk worden gesteld voor schade en storingen
aan het apparaat of andere goederen die ontstaan door het niet nakomen van de
installatievoorschriften.
Dit apparaat voldoet aan de EEC richtlijnen 89/336, 73/23 en eventuele
wijzigingen.
Watertoevoer
De aan-en afvoerbuizen voor het water kunt u naar keuze naar rechts of links
draaien.
De afwasmachine mag naar keuze worden aangesloten op eenkoude of een
warme leiding, mits de temperatuur niet boven de 60°C komt.
De waterdruk moet liggen tussen minimaal 0,08 MPa en maximaal 0,8 MPa. Als de
waterdruk onder het minimum zakt, raadpleeg dan onze technische dienst.
Tussen de waterleiding en de afwasmachine moet zich een kraan bevinden, zodat
de toevoer kan worden afgesloten wanneer de afwasmachine niet in werking is (fig. 1 B).
De afwasmachine is voorzien van een "druk-vaste" waterslang "A" met een 3/4
aansluitnippel voor aansluiting op de afsluitkraan "B" (fig. 2).
Bevestig de toevoerslang "A" aan de waterkraan "B" en controleer of deze goed vastzit.
Indien het nodig is de toevoerslang te verlengen is er een slang verkrijgbaar,
art. 9225014. De lengte is 1,5 m.
46
Veiligheidsvoorschriften
Wilt u de instructies in deze gebruiksaanwijzing zorgvuldig doorlezen, want het bevat
niet alleen aanwijzingen m.b.t. veiligheid bij installatie, gebruik en onderhoud, maar
ook een aantal belangrijke tips voor het dagelijks gebruik van de machine.
Bewaar daarom dit boekje zorgvuldig.
Bij het gebruik van ongeacht welk elektrisch huishoudelijk apparaat moet een
aantal elementaire veiligheidsvoorschriften in acht worden genomen:
- Zorg altijd voor een goed geïsoleerde ondergrond als u het apparaat bedient.
- Stel de machine nooit in werking op een natte bodem.
- Geen verlengsnoeren en meervoudige contactdozen gebruiken, zeker niet in
vochtige ruimtes. Indien dit onvermijdelijk is wees dan extra voorzichtig.
- Als u de stekker uit het stopcontact wilt halen, trekt u dan wel aan de stekker zelf.
Nooit aan de kabel trekken! Probeer nooit de stekker eruit te trekken door de
machine te verplaatsen.
- De machine dient op een veilige plaats te staan. Niet aan extreme dingen
blootstellen zoals sterke zonneschijn of regen.
- Controleer of het apparaat niet op elektriciteitskabels staat.
- Als uw woning is uitgerust met een waterontharder of de waterhardheid is laag,
dan is het niet nodig waterontharder toe te voegen.
- De afwasautomaat is ingesteld op gebruikelijke huishoudelijke chemicaliën.
Voorwerpen die in aanraking zijn gekomen met petroleum, verf of alkalische zuren
mogen niet in de afwasmachine gewassen worden.
- De afwasautomaat is samengesteld uit materialen die gerecycled kunnen worden
zodat deze bij afdanking op een milieuvriendelijke manier kunnen worden verwerkt.
- Kinderen buiten bereik van de machine houden.
Als u de elektrische aansluiting wilt veranderen kunt u dat alleen door
gekwalificeerde vakmensen laten verrichten.
-U mag alleen reinigingsmiddel gebruiken dat geschikt is voor een afwasautomaat.
- Uw automaat is alleen geschikt voor het wassen van afwas van huishoudelijke
aard, u kunt uw afwasautomaat niet ergens anders voor gebruiken!
- Controleer of de op het apparaat aangegeven waarden voor netspanning en
frequentie overeenkomen met de netspanning en frequentie in uw huis.
- De reinigingsmiddelen die u voor uw afwasautomaat gebruikt zijn niet geschikt
voor inwendig gebruik. Houd ook daarom deze middelen ver weg van kinderen.
- De machine en de afwas aan het eind van het programma behoren niet doordrenkt
te zijn van water.
- Leunen of zitten op de open deur van de vaatwasser is niet aan te raden, de deur
kan afbreken.
- Bestek wordt het best gewassen wanneer het met het handvat naar beneden in
het bestekrekje wordt geplaatst. Om verwondingen van scherpe messen en punten te voorkomen kan het betreffende bestek met het handvat naar boven worden
geplaatst.
Indien het nodig is de aanvoerslang te vervangen, dient u contact op te nemen met
de service afdeling.In geval van storing of niet goed functioneren: machine
uitschakelen en waterkraan afsluiten. Doet u zelf verder niets maar neem contact op
met onze service dienst!
Raadpleeg bij storingen altijd de service dienst. Alleen dan bent u verzekerd van de
nodige deskundigheid en het gebruik van originele onderdelen.
Wij verzoeken u vriendelijk de bovenstaande regels zorgvuldig in acht te nemen
omdat anders de veiligheid bij het gebruik van de machine nadelig beinvloed zou
kunnen worden.
Page 25

49
Installatie in een ingebouwde keuken
De hoogte van 85 cm is speciaal ontworpen zodat deze afwasmachine ook in te
bouwen is in een bestaande moderne keuken. Met de verstelbare pootjes kan de
juiste hoogte gerealiseerd worden.
Het laminaat bovenblad behoeft geen enkele zorg daar deze hittebestendig, krasvast
en vlekvrij is (fig. 5).
Ook het bovenblad kan nog iets in hoogte versteld worden om het evenredig te laten
lopen met het werkblad in de keuken.
Dit kan gerealiseerd worden door de twee schroeven aan de achterkant los te
draaien en weer vast te schroeven wanneer de gewenste hoogte bereikt is (fig. 6).
Het bovenblad kan elke keer met 5 mm versteld worden tot een max. van 25 mm.
Onder of tussenbouw (Wanneer het onder een werkblad is geplaatst)
Uw afwasmachine kan in elke standaard keuken worden ingebouwd.
In dit geval dient u slechts het bovenblad af te nemen door de twee schroeven los te
draaien zoals figuur 6 aangeeft.
De hoogte wordt hierdoor tot 82 cm terug gebracht.
Alleen wanneer u de hoogte van uw machine maximaal wilt verkleinen dient u de
twee achterste schroeven te verwijderen (fig. 7).
Het aanbrengen van decorplaten (alleen sommige modellen)
Enkele modellen zijn uitgerust met sierlijsten om de deur waardoor decor-platen
gemakkelijk aangebracht kunnen worden. De decorplaten kunnen een dikte tot
5 mm hebben en moeten onderstaande afmetingen hebben.
breedte 591 mm ± 1 hoogte 597 mm ± 1
Openen van de deur
Steek uw hand in de opening en druk omhoog.
Als de deur wordt geopend terwijl de machine in werking is zorgt een elektrische
zekering ervoor dat alle functies automatisch worden onderbroken.
Om een correcte werking te garanderen dient u het apparaat niet te openen als
het in werking is.
7
598
556/563
5
6
48
Als de afwasmachine wordt aangesloten op een nieuwe waterkraan, of eentje die al
lang niet meer in gebruik is, laat dan het water een paar minuten uit de kraan
stromen voordat u de toevoerslang bevestigd. Op deze manier voorkomt u ophoping
van zand of roest in de filter.
Aansluiting op de afvoerleiding
De afvoerslang moet worden aangesloten op de ingebouwde, permanente
afvoerbuis. Controleer bij deze bevestiging of er geen knik in de afvoerslang zit (fig. 4).
De afvoerbuis mag niet hoger dan 40 cm vanaf het vloerniveau zijn en moet een
minimale doorsnede van 4 cm hebben. Om onaangename geuren te voorkomen is
het aan te bevelen voor de afvoerslang een zwanehals te gebruiken.
Wanneer noodzakelijk kan de afvoerslang verlengd worden tot een totale lengte van
2.6 m mits u een hoogte van 85 cm boven het vloerniveau in acht neemt.
De afvoerslang kan ook in een wasbak gelegd worden (om te voorkomen dat het
waswater niet terug loopt, mag de afvoerslang niet in water gelegd worden) (fig. 4).
Wanneer het apparaat onder een werkblad geplaatst wordt, moet de afvoerbuisklem
zo hoog mogelijk geplaatst worden onder het werkblad.
Controleer of er geen knikken in de toevoer- of afvoerslang zitten.
Voor het verlengen van de toevoerslang kan een verlengstuk gebruikt worden.
123
4
Page 26

Het vullen van het zoutreservoir
De afwasmachine is uitgerust met een
automatische waterverzachter die de harde
bestanddelen aan het water onttrekt.
Hard water laat witachtige vlekken op het servies
achter.
Op de bodem van de vaatwasser bevindt zich het
zoutreservoir voor de regeneratie van de
wasverzachter. Het is aan te bevelen slechts het
speciale regenereerzout voor afwasautomaten te
gebruiken.
Ander zout bevat kleine hoeveelheden onoplosbare
deeltjes, die na verloop van tijd de automatische
waterverzachter aantasten en verslechteren.
Schroef het dekseltje van het reservoir los.
Bij de eerste vulling het reservoir eerst met water vullen en daarna het zout erin gieten
tot het reservoir vol is. Het is normaal dat tijdens het bijvullen wat water over loopt.
Verwijder de zoutresten en draai het dekseltje er weer vast op. Als de afwasmachine
niet direkt gebruikt hoeft te worden, schakel dan het programma "voorwas" in, zodat de
zoutoplossing die overloopt meteen door water wordt weggespoeld.
De inhoud van de ontharder is tussen de 1,5 en 1,8 kg, om de ontharder efficiënt te
laten werken, moet het apparaat van tijd tot tijd gevuld worden met neutraliserend
zout, naar gelang het water-onthardingssysteem.
Belangrijk: Vul de eerste keer het zoutreservoir met water voor het met
regenereerzout te vullen. Laad de afwasmachine nadat het zoutreservoir is bijgevuld.
51
Zout indicator
Sommige modellen zijn uitgevoerd met een
zoutindicator.
Het signaal kan op twee manieren verschijnen:
– een lichtje op het controlepaneel gaat branden
als het zoutreservoir bijgevuld moet worden.
– Op de deksel van het zoutreservoir blijft een
groen balletje zichtbaar als het genoeg
regenereerzout bevat. Het groene balletje
verdwijnt wanneer er een tekort aan
regenereerzout is.
Sommige modellen hebbeneen ondoorschijnend
dekseltje, in deze gevallen moet de hoeveelheid
neutraliserend zout periodiek bekeken worden
tevens naar gelang van het wateronthardingssysteem.
Belangrijk: Witte vlekken op het servies geven
aan dat het zoutreservoir aangevuld moet worden.
Gebruik van het wateronthardingssysteem
In de tabel hieronder zijn de verschillende graden weergegeven die corresponderen
met de positiezetting van het systeem.
50
Sluiten van de deur
Breng de mandjes op hun plaats.
Zorg ervoor dat beide wassproeiers vrij kunnen draaien en er geen bestek, pannen
of borden in de weg staan.
Sluit de deur en blokkeer hem door hem aan te drukken.
Wateronthardingssysteem
Naar gelang de bron van de wateraansluiting, bevat het water zouten en mineralen
die vlekken en beschadigingen aan kunnen brengen op de vaat. Hoe meer van deze
zouten en mineralen in het water aanwezig zijn, des te harder het water is.
De vaatwasser heeft een wateronthardingssysteem, wat met neutraliserend zout het
water onthardt voor het in de vaatwasser komt. Het systeem kan water met hardheid
tot 60 fH (Franse weergave) of 33 dH (Duitse weergave) neutraliseren door vijf
verschillende posities. De hoogte van de hardheid van uw water kunt u opvragen bij
het Waterschap.
Niveau
0
1
*2
3
4
Hardheid
fH
0-9
10-30
31-40
41-50
51-60
Hardheid
dH
0-5
6-16
17-22
23-27
28-33
Gebruik van
neutraliserend
zout
NEE
JA
JA
JA
JA
Water-
onthardings-
positie
VRIJ
Positie N.1
Positie N.2
Positie N.3
Positie N.4
Na aantal
wassen
50
40
30
20
Wanneer uw waterhardheid 0 is, hoeft u geen
neutraliserend zout te gebruiken of gebruik te
maken van het onthardingssysteem.
Naar gelang de mate van de hardheid van uw
water, kunt u het wateronthardings-syteem op
de volgende manier instellen.
-Verwijder het onderste rek. Schroef het
dekseltje van de zoutverdeler, deze verdeler
zit op de bodem van de kuip (fig. A“1”).
- Draai de positieknop naar de gewenste stand
met een schroevendraaier of met een mes.
N.B. Voor modellen die zijn uitgerust met een elektronisch programma dient u
de bijgesloten programmalijst te hanteren
* Positie 2 van het wateronthardingssysteem, waar de machine standaard op is
ingesteld, is de meest gangbare positie voor de meeste gebruikers.
TYPE 1
TYPE 2
Page 27

53
De belading
Het laden van het apparaat
Voor een goed wasresultaat is het belangrijk eerst de grove etensresten zoals pitten,
botjes en schillen te verwijderen.
Zo wordt vermeden dat het filter verstopt raakt en het afwasresultaat nadelig
beïnvloed wordt.
Het is daarentegen niet altijd nodig het vuile servies eerst af te spoelen onder de
kraan.
Als pannen en ovenschalen zijn aangekoekt of aangebrand is het aan te raden deze
eerst in een sopje te laten weken.
Het laden van de bovenkorf
De bovenkorf is uitgerust met uitschuifbare rails en kan door middel van de wieltjes
op twee verschillende hoogtes geplaatst worden al naar gelang de hoogte van het
serviesgoed.
Let op dat de wieltjes goed in de rails lopen.
Op de bovenkorf plaatst men klein en middelmatig serviesgoed zoals glazen, kleine
bordjes, kopjes, lage kommetjes en lichte plastic voorwerpen die tegen hitte bestand
zijn.
De bovenkorf heeft aan de linkerkant een rekje waarop lage kopjes en keukengerei
geplaatst kunnen worden.
Glazen, kopjes, lage kommetjes en kleine bordjes kunnen onder het rekje geplaatst
worden.
Glazen op een voetje kunnen veilig aan de uiteinden van het rekje geplaatst worden.
Soepborden en platte borden kunnen naast het rekje geplaatst worden in één rij
(fig. 1) of in twee rijen naast elkaar (fig. 2).
Borden worden met hun bovenkant naar voren geplaatst en met de achterkant van
de borden gericht naar de achterkant van de afwasautomaat. Kopjes en bakjes
worden altijd met de opening naar beneden geplaatst. Grote borden moeten altijd
iets schuiner geplaatst worden, zodat deze ook in de machine passen.
Voor een goed wasresultaat is het van belang om enige ruimte tussen de borden te
bewaren. Voor een optimale korfindeling is het aan te raden de borden op grootte te
sorteren.
Plastic bakjes en schalen kunnen ook in de bovenste korf geplaatst worden. Het is
aan te raden deze vast te zetten tussen het andere serviesgoed, zodat deze niet
door hun lichte gewicht omver gesproeid worden.
De bovenste korf is ontworpen voor maximale flexibiliteit in gebruik en kan beladen
worden met 24 borden in twee rijen of 30 glazen in vijf rijen, of een combinatie
hiervan.
Het laden van de onderkorf
Pannen, deksels, ovenschalen, saladeschalen, soepterrines, platte borden,
dessertborden, soepborden, kommen en soeplepels kunnen in de onderste korf
geplaatst worden.
Plaats het bestek in het daarvoor bestemde plastic rekje. Plaats het bestekrekje
vervolgens in de onderste korf (fig. 3) en controleer dat er geen uitstekende
bestekdelen zijn die het draaien van de spoelarm verhinderen.
52
Het verstellen van de bovenste korf (alleen sommige modellen)
Borden met een doorsnee van 27 tot 31 cm moeten in de onderste korf geplaatst
worden nadat de bovenste korf in de hoogste positie versteld is. Dit gaat als volgt
(Voor de modellen):
Type “A”:
1) Draai het voorste hendeltje A naar buiten;
2) Neem de korf eruit en plaats het in de hoogste positie;
3) Plaats het hendeltje A terug in de oorspronkelijk positie.
Borden die groter zijn dan 20 cm ø kunnen niet geplaatst worden in de bovenste korf
en de "wijnglashouders" kunnen niet in de hoogste positie gebruikt worden als ook
de korf in de hoogste positie staat.
A
A
Type “B”:
1) Schuif de bovenkorf uit;
2) Pak de bovenkorf aan de zijkanten vast en verplaats deze naar boven (fig. 1).
Borden die groter zijn dan 20 cm ø kunnen niet geplaatst worden in de bovenste korf
en de "wijnglashouders" kunnen niet in de hoogste positie gebruikt worden als ook
de korf in de hoogste positie staat.
HET VERSTELLEN VAN DE BOVENKORF NAAR DE LAGERE POSITIE:
1) Pak de bovenkorf aan de zijkanten vast en til deze lichtjes op (fig. 2a);
2) Daarna voorzichtig loslaten in de goede positie (fig. 2b).
LET OP “TIL DE KORF NOOIT AAN ÉÉN ZIJKANT OP (fig. 3).
Waarschuwing:
Het is raadzaam de korf te verstellen voordat u deze inlaadt.
a
b
a
b
1
2
3
Page 28

54
Een standaard dagelijkse belading wordt
weergegeven in de figuren 1, 2 en 3.
Bovenkorf (fig. 1)
A = Soepborden
B = Platte borden
C = Dessert borden
D = Lage kommetjes
E = Kopjes
F = Glazen
Bovenkorf (fig. 2)
A = Soepborden
B = Platte borden
C = Dessert borden
D = Lage kommetjes
E = Kopjes
F = Glazen op voetje
G = Glazen
H = Eéndelige bestekkorf
Onderkorf (fig. 3)
A = Pan
B = Grote pan
C = Frituurpan
D = Deksels
E = Borden
F = Bestek
G = Ovenschalen
Het efficiënt beladen van de afwasmachine
is essentieel voor een goed wasresultaat.
1
2
3
A
B
C
D
FE
GH
DF AG
E
B
C
A
B
C
D
E
F
55
12 Internationale couverts (ref. EN 50242)
Figuur 4 laat de juiste belading van de bovenkorf zien en figuur 5 van de onderkorf.
Fig. 6 bestekkorf.
Bovenkorf (fig. 4)
A = 5 + 5 + 2 glazen
B = 12 lage kommetjes
C = 4 + 4 + 4 kopjes
D = Kleine schaal
E = Normale schaal
F = Grote schaal
G = 1 + 1 vorken
H = 1 + 1 lepels
I = 3 + 3 + 3 + 3 dessertlepels
L = 3 + 3 + 3 + 3 theelepels
Onderkorf (fig. 5)
M = 8 + 4 soepborden
N = 11 + 1 platte borden
O = 12 dessert bordjes
P = Dienblad
Q = Bestek
Bestekkorf (fig. 6)
Plaats de zijrekken in de onderste positie en
vul deze met 6 + 6 messen (R); plaats in de
overgebleven ruimte bestek met de handgrepen
naar beneden.
Let op dat u niet meer dan twee besteksoorten
in hetzelfde bakje plaatst.
Bestekkorf zonder zijrekken
Plaats het overgebleven bestek in de bakjes.
Let op dat u niet meer dan twee soorten
bestek in hetzelfde bakje plaatst.
QN
M
P
O
M
N
R
A
F
C
C
C
G
B
E
D
H
H
L
I
4
5
6
Page 29

57
1/2 gemengde belading (fig. 1)
A = glazen
B = kopjes
C = soepborden
D = platte borden
E = dessert borden
F = sauskommetjes
G = steelpan
H = deksel
I = braadpan
L = middelgrote kom
M = kleine kom
1/2 standaard belading (fig. 2)
A = 6 glazen
B = 5 + 1 kopjes
C = dienblad
D = 6 soepborden
E =6 platte borden
F =6 dessert borden
G =6 sauskommetjes
H = middelgrote kom
I = kleine kom
Verplaats de uitneembare bestekhouder van de onderste korf
naar de bovenste korf.
Onderkorf (fig. 3)
A = Pan
B = Grote pan
C = Frituurpan
D = Deksels
E = Borden
F = Bestek
G = Ovenschalen
Het efficiënt beladen van de afwasmachine is essentieel voor
een goed wasresultaat.
Onderkorf (fig. 4)
M = 8 + 4 soepborden
N = 11 + 1 platte borden
O = 12 dessert bordjes
P = Dienblad
Q = Bestek
Halve lading bovenste korf (alleen sommige modellen)
56
Opmerking (fig. 7)
De onderkorf heeft twee rijen rekjes aan de
voorkant, die op een gemakkelijke en snelle
manier verlaagd kunnen worden. Hierdoor
kan men o.a. saladeschalen, soepterrines
en deksels makkelijker plaatsen.
(Alleen sommige modellen)
HET VERPLAATSEN VAN DE REKKEN
1) Til de rekjes lichtjes omhoog en laat deze
vallen in de goede positie;
2) Door deze weer omhoog te tillen komt
deze in een verticale positie.
Bestekkorf (fig. 8)
De bestekkorf is uitgerust in twee te scheiden
delen, die verschillende beladingen mogelijk
maken.
De twee delen kunnen gescheiden worden
door het linkerdeel van het rechterdeel af te
schuiven.
In sommige modellen heeft het bestekbakje
een extra houder om klein bestek in op te
hangen.
1
2
7
8
Q
N
M
P
O
M
N
4
D
FAG
E
B
C
3
AG
M
L
B
H
D
C
E
I
F
1
AGI
BC
F
E
H
D
2
Halve lading onderste korf (alleen sommige modellen)
Page 30

59
3
4
3
Spoelglansmiddel
Aan de rechterkant van het afwasmiddelbakje
bevindt zich het tankje voor het spoelglansmiddel
(Dit tankje kan ± 130 ml naglansmiddel
bevatten) (fig. A"3"). Draai de dop (3) tegen
de klok in en schenk de vloeistof, die
meerdere wasbeurten mee gaat, tot aan het
maximum niveau. Plaats de dop terug. Het
naglansmiddel wordt door de machine
automatisch tijdens de spoelingen opgenomen;
maak altijd gebruik van naglansmiddel dat
geschikt is voor afwasautomaten.
Het niveau van de vloeistof in het tankje kan
gemakkelijk gecontroleerd worden.
Zwart gekleurd doorkijkglas in het midden
van de injector geeft aan of het tankje vol is,
terwijl een wit gekleurd glas aangeeft dat het
tankje leeg is.
Het afstellen van de naglansmiddel
injector van 1 tot 6
De instelling zit onder de dop (3) en kan
gedraaid worden m.b.v. een muntstuk. Wij
raden stand 3 aan.
De hoeveelheid aanwezige kalk in het water
bepaalt de mate van kalkafzetting en
drogingsgraad. Het is daarom belangrijk de
hoeveelheid toe te dienen naglansmiddel te
kunnen regelen om steeds optimale resultaten
te verkrijgen.
Mocht het vaatwerk aan het einde van het
programma strepen vertonen dan moet de
afstelling met één streep terug gebracht
worden. In het geval waarbij kringen of
witachtige vlekken te zien zijn dan de
afstelling met één streep verhogen.
vol leeg
donker licht
58
Informatie voor de testlaboratoria.
Algemene programma vergelijking
(Zie programma keuze)
Invoer van afwasmiddelen spoelmiddel
Het wasmiddelbakje vullen
Het is noodzakelijk een wasmiddel te gebruiken, dat speciaal bestemd is voor
afwas-machines ofwel in poedervorm, vloeibaar of in een tablet.
Niet geschikte afwasmiddelen (zoals afwasmiddel voor handafwas) bevatten niet de
juiste ingrediënten voor gebruik in een afwasautomaat waardoor de afwasautomaat
niet goed zal werken.
Normale was
Het wasmiddelbakje bevindt zich aan de
binnenkant van de deur (fig. A "2"). Als het
klepje van het wasmiddelbakje gesloten is
druk dan op het knopje om deze te openen.
Aan het eind van elk programma is dit klepje
altijd open en is hierdoor gereed voor een
volgende keer dat de afwasmachine gebruikt
wordt.
De hoeveelheid wasmiddel dat nodig is
varieert en is afhankelijk van de vuiltegraad
en het soort servies dat gewassen moet
worden. Wij adviseren een gebruik van
20-30 gr per wasbeurt in het wasgedeelte
van het wasmiddelbakje (1).
Als het wasmiddel in het wasmiddelbakje
zit, sluit dan het wasmiddelbakje door het
klepje dicht te doen.
Omdat niet alle afwasmiddelen hetzelfde zijn kan de hoeveelheid variëren. Te weinig
wasmiddel kan tot gevolg hebben dat het servies niet goed schoon wordt, maar met
teveel wasmiddel krijgt u geen betere resultaten en verspilt u wasmiddel.
Gebruik dus geen overdadige hoeveelheid wasmiddel en spaar hiermee het milieu.
Wassen met voorwas (alleen sommige modellen)
Als u het Universeel intensief programma gebruikt moet u nog eens 20 gr (= 1 eetlepel)
afwasmiddel toevoegen in het voorwasgedeelte van het wasmiddelbakje (2).
Page 31

6160
Het filtersysteem (figuur A“4”) bestaat uit:
- Een centrale houder die de grotere
vuildeeltjes van de vaat trapsgewijs
sorteert.
- Een platte zeef die het spoelwater
voortdurend filtert.
- Een micro filter onder de platte zeef dat
de kleinste onzuiverheden uit het water
haalt en zorgt voor een perfecte spoeling.
Om optimale resultaten te bereiken moeten
de filters gecontroleerd worden na elke was.
Om de filters te verwijderen, draai het
handvat tegen de klok in (fig.1). Om het
schoonmaken te vergemakkelijken is de
centrale houder verwijderbaar (fig.2).
Verwijder de platte zeef (fig. 3) en spoel het
gehele onderdeel met water, indien nodig
kan hierbij een klein borsteltje gebruikt
worden.
Het zelfreinigende microfilter hoeft maar
een keer in de twee weken te worden
gecontroleerd. Niettemin is het aan te raden
na elke wasbeurt de centrale houder en de
zeef te controleren op eventuele verstoppingen.
NB: Na het schoonmaken van de filters,
controleer of ze correct zijn schoongemaakt
en teruggeplaatst, voornamelijk de zeef,
of deze op de juiste plaats zit onder in de
vaatwasser.
Zorg dat het filter teruggedraaid is, met
de klok mee. Niet goed teruggeplaatste
onderdelen kunnen een omgekeerd effect
geven op de werking.
Waarschuwing: Gebruik de vaatwasser
nooit zonder de filters.
Schoonmaak van de filters
1
2
3
Algemene aanwijzingen
Programma keuze
Deze afwasmachine biedt een groot scala van afwasprogramma's, zodat u voor elke
soort afwas, dus voor elk soort servies en voor elke vuiltegraad, een geschikt
programma kunt vinden.
Gebruik de afwasprogrammatabel voor het kiezen van het meest geschikte
programma.
Raadgevingen, voor na het afwassen
– Om het druppelen vanaf het bovenrek te voorkomen is het raadzaam na
beeindiging van het programma eerst het onderrek leeg te halen.
– Mocht de vaat na beëindiging niet meteen uit de machine gehaald worden dan raden
wij u aan de deur op een kier te zetten, om een nog betere droging te verkrijgen.
Hoe u kunt BESPAREN
1) Als u alleen de afwasmachine wilt gebruiken als deze vol beladen is, plaats dan
na elke maaltijd het servies in de korven en gebruik wanneer nodig het koude
voorspoelprogramma.
Als de afwasmachine uiteindelijk vol is stel dan het gewenste programma in.
2) Als het servies niet erg vuil is of als de afwasmachine nog niet helemaal vol is,
gebruik dan de Economy-toets bij de programma's waarbij dit mogelijk is (zie
afwasprogrammatabel).
Hoe goede WASRESULTATEN te verkrijgen
1) Plaats de kopjes, bakjes en pannen altijd met de bovenkant naar beneden.
2) Plaats het servies zo dat het niet tegen elkaar staat en de waterstraal overal kan
komen. Door de korven goed in te richten worden er betere resultaten behaald.
3) Verwijder alle grove etensresten (bonen, botten, groenteresten, fruitschillen of
sigaretten) die verstoppingen kunnen veroorzaken.
4) Controleer na het laden van uw afwasautomaat of de sproeiarmen vrij kunnen
draaien.
5) Laat aangekoekt servies of pannen eerst enige tijd in een sopje weken, eventueel
met wasmiddel voor de afwasmachine.
6) Het afwassen van zilver:
a) spoel het zilver direct na gebruik af, vooral als het is gebruikt voor mayonaise,
eieren etc.
b) strooi er geen afwasmiddel overheen
c) houd het gescheiden van andere metalen voorwerpen.
Wat te doen als
1) U de afwasmachine wilt stopzetten om bijv. er nog iets in te zetten en het
wasprogramma wilt onderbreken.
Open de deur na de O/I knop uit te drukken zodat het programma stopt. Wacht na
het sluiten van de deur 3 minuten voordat u de afwasmachine weer aanzet.
Wat niet geschikt is voor de machine-afwas:
Niet al het servies is geschikt voor machine-afwas:
Het is af te raden bepaalde voorwerpen in de afwasmachine te wassen zoals: PVC
voorwerpen, bestek met houten of plastic handgrepen, sausschaal met houten
handgreep, voorwerpen van aluminium of kristalhoudend glas, tenzij anders
aangegeven.
Bepaalde decoraties kunnen verbleken, daarom kunt u eerst beter een exemplaar
enkele malen machinaal wassen om er zeker van te zijn dat de decoratie niet verbleekt.
Het is verstandig zilver en metalen bestek niet bij elkaar te zetten om eventuele chemische reacties te voorkomen.
BELANGRIJK:
Let bij de aankoop van servies of bestek of deze geschikt zijn voor machinaal
afwassen.
Page 32

63
Het verwarmingselement is vervaardigd van een speciaal soort roestvrijstaal dat met
het gebruik zal verkleuren. Dit verschijnsel heeft geen consequenties voor de
werking van het element.
De binnendeur en kuip zijn ook van roestvrijstaal. Eventuele oxidatieverschijnselen
kunnen afkomstig zijn van een grote concentratie ijzerzouten in het water.
Roestende bestekheften of bevestigingsschroeven in handvatten van pannen
kunnen ook een lichte roestvorming veroorzaken. Deze vlekken kunnen met een licht
schuurmiddel verwijderd worden: maak nooit gebruik van chloorhoudende middelen
of ijzeren pannensponzen.
NA HET WASSEN
Indien de machine meerdere dagen niet gebruikt wordt, is het raadzaam de volgende
punten in acht te nemen.
1. Draai een programma af zonder afwas, maar met afwasmiddel om de machine te
ontvetten.
2. Trek de stekker uit het stopcontact.
3. Draai de waterkraan dicht.
4. Vul het glansmiddelreservoir.
5. Zet de deur op een kier.
6. Houd de binnenkant van de afwasmachine schoon.
7. Als de afwasmachine is opgesteld waar een omgevingstemperatuur beneden 0°C
behaald kan worden, dan kan het achtergebleven water in de slangen bevriezen.
Wacht dan met het aanzetten van de afwasmachine tot de temperatuur weer
boven het vriespunt is en wacht dan nog een uur voordat u de afwasmachine weer
aanzet.
62
Onderhoud
Behandel de buitenmantel af en toe met b.v. autowas en werk beschadigingen van
de lak meteen bij.
Neem de rubberen deurafdichting af en toe af met een natte doek.
Mocht er naglansmiddel gemorst worden tijdens het vullen neem het dan met een
doekje meteen op.
Kleine lichte kalkafzettingen kunnen verwijderd worden door regelmatig op de bodem
van de machine 1 glas azijn te gieten en de machine het programma voor fijn
serviesgoed af te laten werken.
Wanneer, ondanks regelmatig schoonmaak van de filters, de vaat niet goed schoon
wordt, dient u de sproeikoppen op de roterende armen onder in de machine te
controleren of deze schoon zijn (fig. A “5”). Wanneer deze geblokkeerd zijn maak
deze dan schoon op de volgende manier:
Om de bovenste roterende arm te verwijderen, draai deze tot de gemarkeerde stop
bij de pijl (fig. 1b). Druk de arm voorzichtig naar beneden en draai het met de klok
mee. Om deze arm weer terug te plaatsen voer dezelfde handeling uit maar draai nu
in tegengestelde richting. De onderste roterende arm kan verwijderd worden door het
omhoog te trekken (fig. 2).
- Spoel de roterende armen met water om blokkades in de sproeikoppen te
verwijderen.
-Wanneer de roterende armen zijn schoongemaakt zet deze dan weer in dezelfde
positie terug in de machine. Vergeet niet de bovenste arm te draaien vanaf de pijl
tot de voormalige positie.
1 2
1b
Page 33

64
Herkennen van kleine fouten
Raadpleeg bij storingen altijd eerst de fabrikant, zij zijn immers de specialisten!
Kontroleer echter eerst onderstaande punten:
• Is de zekering van het stroomnet in orde?
• Is de deur goed gesloten?
• Is de aan/uit-toets wel ingeschakeld?
• Zit de stekker in het stopkontakt?
• Staat de waterkraan wel open?
• Zit er een knik in de afvoerslang?
• Is het filter wel schoon?
• Draaien de sproei-armen vrij?
• Is het glansmiddelreservoir gevuld?
• De borden in de onderkorf zijn niet schoon
gemaakt. Druk de toets in voor halve lading.
• Elektrische apparaten zonder display: Eco-
indicatie lampje nr.1 met geluidssignaal.
• Schakel de machine uit. Watertoevoer
aanzetten. Reset het programma.
• Elektrische apparaten met display: "E1" is te
zien in het scherm met geluidssignaal.
Schakel de machine uit. Watertoevoer
aanzetten. Reset het programma.
65
Inhaltsverzeichnis
Sicherheitsvorschriften
Installation und Inbetriebnahme
Tür öffnen
Wasserenthärter
Oberkorb verstellen
Geschirr einordnen
Oberkorbspülen
Informationen für Labortests
Spülmittel und Klarspüler einfüllen
Filterreinigung
Praktische Hinweise
Wartung und Pflege
Fehlersuche
Seite 66
Seite 67
Seite 69
Seite 70
Seite 72
Seite 73
Seite 77
Seite 78
Seite 78
Seite 80
Seite 81
Seite 82
Seite 84
23
1
4
5
Fig. A
Page 34

67
INSTALLATION (Technische Anweisungen)
Vergessen Sie nicht, nach dem Auspacken die Höhe
des Gerätes zu regulieren.
Die ordnungsgemäße Funktion des Gerätes ist von
einem möglichst geraden Stand abhängig. Eventuelle
Unebenheiten können über die Stellfüße ausgeglichen
werden. Die Neigung des Gerätes sollte nicht mehr als
2 Grad betragen.
Sollte es erforderlich werden, das Gerät nach dem
Auspacken manuell zu bewegen, greifen Sie für den
Transport keinesfalls unter die Tür. Gehen Sie vor, wie
in der Abb. gezeigt:
Öffnen Sie die Tür einen Spalt und heben Sie das Gerät
an, indem Sie unter den oberen Maschinenrand fassen.
Wichtig! Falls Sie das Gerät auf einen Teppich oder Teppichboden aufstellen,
achten Sie darauf, daß die Lufteinlässe am Boden des Gerätes nicht verstopft
werden.
Bitte stellen Sie sicher, daß der Netzstecker auch nach der installation
zugänglich ist.
Vorkontrollen
Das Gerät entspricht den Sicherheitsnormen. Es ist mit einem Schuko- Stecker mit
Erdung versehen.
Diese Schutzmaßnahme ist nur dann wirkungsvoll, wenn auch die Elektroinstallation
im Hause eine einwandfreie Erdung hat.
Ist die Elektroinstallation nicht, oder nur unzureichend geerdet, kann auf den MetallTeilen des Gerätes Elektrizität spürbar sein.
Bitte führen Sie unbedingt vor Inbetriebnahme des Gerätes folgende Kontrollen
durch:
1. Prüfen Sie, ob die Steckdose wirksam geerdet ist.
2. Prüfen Sie, ob die Elektroinstallation einwandfrei ist und der Leistung des Gerätes
entspricht.
Das Gerät entspricht den europäischen Richtlinien 89/336/ECC,
73/23/ECC und deren nachträglichen Änderungen.
Wasseranschluß
Die Anordunung der Schläuche für den Zu- und Ablauf des Wassers kann wahlweise
nach rechts oder links erfolgen.
Der Geschirrspüler kann nach Bedarf sowohl an einem Kalt- als auch an einem
Warmwasseranschluß angeschlossen werden. Die Temperatur des Warmwassers
darf 60°C nicht überschreiten.
Der Wasserdruck muß zwischen 0,08 MPa und 0,8 MPa liegen.
Sollte er unter dem angegebenen Mindestdruck liegen, bitten Sie Ihren
Kundendienst um Rat.
Am oberen Ende des Zulaufschlauches sollte ein Absperrhahn angebracht sein,
damit die Maschine bei Nichtgebrauch vom Wassernetz getrennt werden kann (Abb.
1) Der Geschirrspüler wird mit einem Zulaufschlauch mit 3/4" Gewindering geliefert
(Abb. 2). Sollte der Zulaufschlauch verlängert werden, bestellen Sie den 1,5 m
langen Verlängerungsschlauch Art.-Nr. 9225014.1
Der Zulaufschlauch "A" muß auf den Wasserhahn "B" mit 3/4 Gewindering
aufgeschraubt werden. Achten Sie darauf, daß das Gewinde fest angezogen wird.
66
Sicherheitsvorschriften
Lesen Sie bitte die Anweisungen dieses Heftes aufmerksam durch. Es enthält
wichtige Hinweise zur sicheren Installation, zur Bedienung, zur Pflege und zur
optimalen Verwendung der Spülmaschine.
Bewahren Sie das Heft zu einer späteren Nutzung sorgfältig auf.
Für den Gebrauch eines jeden elektrischen Haushaltsgerätes müssen eine Reihe
von elementaren Sicherheitsvorschriften beachtet werden.
Beherzigen Sie vor allem:
– Vergewissern Sie sich vor der Inbetriebnahme, daß die Aufstell- und
Anschlußanweisungen bei der Installation befolgt wurden
– Veränderungen in der Verkabelung oder im Anschluß dürfen nur vom Fachmann
vorgenommen werden
– Kinder können die Gefahren, die von Elektrogeräten ausgehen, nicht erkennen.
Sorgen Sie dafür, daß sie nicht unbeaufsichtigt am Gerät herumspielen
– Elektrische Großgeräte sollten möglichst nicht an Verlängerungen oder
Mehrfachsteckdosen angeschlossen werden
– Den Netzstecker niemals am Kabel aus der Steckdose ziehen, sondern am
Stecker selbst
–Vergewissern Sie sich, daß das Gerät das Netzkabel nicht einklemmt oder
verknickt
– Ist in Ihrer Wohnung ein System zur Wasserenthärtung vorhanden, so brauchen
Sie kein Salz in den Wasserenthärter der Spülmaschine zu geben
– Die Spülmaschine ist zum Spülen von Küchengeräten und Geschirr vogesehen.
Mit Benzin, Lack, Stahl- oder Eisenresten verschmutzte Gegenstände, sowie
Werkzeuge, die mit ätzenden Chemikalien, Säuren oder alkalischen Substanzen
in Berührung gekommen sind, gehören nicht in die Spülmaschine
–Wenn das Gerät einmal ausgedient hat, entsorgen Sie es bitte ordnungsgemäß
über Ihren Fachhändler oder die kommunalen Entsorgungseinrichtungen
– Dieses Gerät ist mit recyclebaren Materialien hergestellt und kann umweltfreundlich
entsorgt werden.
– Schalten Sie das Gerät im Falle von Störungen oder Fehlfunktionen aus, ziehen
Sie den Netzstecker und schließen Sie die Wasserzufuhr.
– Das Wasser, das im Gerät stehen bleibt, ist zum Trinken nicht geeignet.
– Stützen Sie sich oder setzen Sie sich niemals auf die offene Tür, da das Gerät
umkippen könnte.
– Bessere Spülergebnisse beim Besteck erzielen Sie, wenn Sie das Besteck mit den
Griffen nach unten in den Besteckkorb stellen. Um das Verletzungsrisiko durch
Messer oder spitzes Besteck zu reduzieren, können Sie jedoch das Besteck auch
mit den Griffen nach oben einordnen.
– Falls das Netzkabel ersetzt werden sollte, wenden Sie sich bitte an den zuständigen
Technischen Kundendienst.
Dieses Gerät ist nur zum häuslichen Gebrauch bestimmt.
Unternehmen Sie nichts auf eigene Faust! Benachrichtigen Sie unseren
Kundendienst!
Wenden Sie sich immer an den Kundendienst. Nur so können Sie sicher sein, daß
Original-Austauschteile verwendet werden.
Bitte beachten Sie diese Regeln sorgfältig, denn die Nichtbeachtung kann die
Sicherheit des Gerätes beeinträchtigen.
Page 35

Anschluß an den Wasserablauf
Das Schlauchende in dem festen Ablauf befestigen. Der Schlauch darf nicht geknickt
werden, damit der Wasserablauf nicht verhindert wird (Abb. 4).
Das Innendurchmesser des Ablaufrohres muß mindestens 4 cm betragen und bei
einer Höhe von mindestens 40 cm liegen. Es wird empfohlen, einen Siphon zu
verwenden (Abb. 4 x).
Falls erforderlich kann der Ablaufschlauch bis zu 2,6 m verlängert werden, wobei die
Höhe vom Boden mindestens 85 cm betragen muß. Bei Bedarf bestellen Sie den
Verlängerungsschlauch Art.-Nr. 9269214 und das dazugehörige Verbindungsstück
Art.-Nr. 9264427.Das gebogene Schlauchende kann auch am Spülbeckenrand
eingehängt werden. Achten Sie darauf, daß der Schlauch nicht im Wasser getaucht
wird, um einen Rücklauf des Wassers beim Spülen zu verhindern (Abb. 4 y).
Soll das Gerät untergebaut werden, muß der Krümmer des Ablaufschlauches direkt
unter der Arbeitsplatte an der höchstmögliche Stelle angebracht werden (Abb. 4 z).
69
Wie man die Geschirrspülautomaten den
modernen Küchen anpassen kann
Beistellen
Der Geschirrspülautomat wird mit der Normhöhe - 85 cm hergestellt und kann daher
an die modernen Küchenmöbel gleicher Höhe angebaut werden.
Um das Gerät genau auszurichten, regulieren Sie die Stellfüße. Die Abdeckplatte ist
eine widerstandsfähige Arbeitsplatte aus Kunststoff. Sie ist hitzebeständig und
kratzfest, fleckenabstossend und leicht abwaschbar (Abb. 5).
Die Arbeitsplatte ist in der Tiefe bis zu 25 mm in jeweils 5 mm Abschnitten zu
verschieben.
Dazu werden die zwei hinteren Schrauben gelöst und in der gewünschten Position
wieder verschraubt (Abb. 6).
Unterbauen
Die obere Arbeitsfläche des Geschirrspülers kann ganz abgenommen werden,
wodurch sich die Höhe auf 82 cm reduziert (Abb. 7).
Lösen Sie die beiden hinteren Schrauben (Abb. 6). Gemäß den internationalen
Normen kann der Spülautomat somit einwandfrei untergebaut werden.
Dekorfähig (nur bei einigen Modellen)
Die Dekorrahmen ermöglichen die Verwendung von Dekorplatten bis zu 5 mm.
Dicke, mit folgenden Maßen:
Breite 591 mm ± 1 Höhe 597 mm ± 1
Öffnen der Tür
Ziehen Sie die Griffmulde nach oben.
Sollte sich die Tür während des Spülvorganges öffnen oder geöffnet werden,
unterbricht eine elektrische Sicherung automatisch alle Funktionen des Gerätes.
Dennoch sollten Sie darauf achten, daß die Tür geschlossen bleibt, während
der Geschirrspüler arbeitet.
7
598
556/563
5
6
68
Falls das Zulaufwasser sehr kalkhaltig ist, empfehlen wir, beim Kundendienst einen
zusätzlichen Filter Artikel 9226085 anzufordern. Der Filter "D" wird zwischen dem
Absperrhahn "B" und dem Wasserschlauch "A" eingesetzt und zwar so, daß die
Gummidichtung "C" dazwischen liegt (Abb. 3).
Wird das Gerät an einem neuen oder an einem seit längerer Zeit nicht mehr
gebrauchten Wasseranschluß angeschlossen, so sollte das Wasser einige Minuten
abfließen, bevor der Zulaufschlauch angeschlossen wird. Somit wird verhindert, daß
Sand- oder Rostpartikeln den Wasserfilter verstopfen.
123
4
Überprüfen Sie bei der
Installation, daß weder der
Zu- noch der Ablaufschlauch
geknickt sind.
Für Geräte mit Waterblock
erkundige Sie sich bitte bei
Ihrem GIAS-Kundendienst,
da keine handelsübliche
Verlängerung benutzt werden
kann.
Page 36

Einfüllen des Salzes
71
Salz-Nachfüllanzeige
Einige Modelle sind mit Salzkontrollanzeigen
versehen. Diese Anzeige kann auf zwei Arten
geschehen:
- elektrische Kontrollanzeige auf dem
Bedienfeld, leuchtet auf, wenn der Salzbehälter
nachgefüllt werden muß;
-Verschlußschraube mit beweglichem grünen
Kontrollanzeiger; dieser bleibt sichtbar, solange
die Salzlösung zum Regenerieren des
Enthärters ausreichend ist. Wenn sich die grüne
Anzeigenfläche in der Verschlußschraube
senkt, muß Salz nachgefüllt werden.
Andere Modelle werden mit Blindstopfen ausgestattet. In diesem Fall muß das Salzniveau
regelmäßig kontrolliert und je nach Einstellung der Enthärteranlage bei Bedarf nachgefüllt
werden.
Wichtig: Weißliche Ablagerungen auf Ihrem Geschirr sind generell ein Zeichen für
fehlendes Salz.
Enthärtereinstellung am Salzbehälter
In der nachfolgenden Tabelle finden Sie die Enthärtereinstellungen entsprechend den
verschiedenen Härtegraden des Wassers.
70
Schließen der Tür
Schieben Sie zunächst die Geschirrkörbe ganz in die Maschine.
Versichern Sie sich, daß die Rotation der beiden Sprüharme nicht durch das
Geschirrgut blockiert wird.
Schließen Sie danach die Tür, die Sie durch leichten Druck verriegeln können.
Wasserenthärter
Das Wasser enthält kalkhaltige Salze und Mineralien in je nach Wohngebieten
unterschiedlich hoher Menge. Diese Substanzen setzen sich auf dem Geschirr ab
und hinterlassen Flecken und weißliche Ablagerungen.
Je höher der Anteil dieser Salzverbindungen im Wasser ist, desto höher ist der
Härtegrad des Wassers.
Ihr Gerät ist mit einer Wasserenthärtungsanlage ausgestattet, die unter Einsatz
spezieller regenerierender Spülmaschinensalze “weiches”, d.h. kalkfreies Wasser für
jeden Spülgang liefert. Der Enthärter kann Wasser bis zu 60°fH (französische
Härtegrade) bzw. 33°dH (deutsche Härtegrade) aufbereiten und läßt sich in 5
unterschiedlichen Stufen einstellen.
Auskunft über die Wasserhärte Ihres Wohngebietes erhalten Sie jederzeit bei Ihrem
zuständigem Wasserwerk.
Stufe
0
1
*2
3
4
Wasser-
härte
°fH franz.
Härtegrade
0-9
10-30
31-40
41-50
51-60
Wasser-
härte
°dH deutsche
Härtegrade
0-5
6-16
17-22
23-27
28-33
Verwendung
von regen.
Salzen
NEIN
JA
JA
JA
JA
Einstellung
des
Enthärters
NEIN
Pos. N.1
Pos. N.2
Pos. N.3
Pos. N.4
Anzahl
Spülgänge
ca.
50
40
30
20
* Der Enthärter ist werksseitig auf der Stufe 2 eingestellt und damit den Bedürfnissen
der meisten Haushalte entsprechend.
Wenn Ihr Wasser in den unter 0 genannten Härtebereich fällt, brauchen Sie weder
regenerierende Salze zu verwenden, noch andere Einstellungen vorzunehmen, da
das Wasser ausreichend “weich” ist.
Achtung: Für Geräte mit elektronischer Programmiereinheit vergleichen Sie
bitte die beigefügte Programmtabelle.
Regulieren Sie den Wasserenthärter je nach
Härtestufe Ihres Wassers wie folgt:
- nehmen Sie den unteren Geschirrkorb heraus
und entfernen Sie den Schraubverschluß
des Salzbehälters im Boden des Gerätes
(Abb. A “1”)
- drehen Sie mit Hilfe eines Schraubenziehers
oder eines Messers den Wahlschalter auf
die gewünschte Position.
Während des Nachfüllens wird ein wenig Wasser überlaufen, füllen Sie weiter Salz nach, bis
der Behälter wieder ganz aufgefüllt ist und vermischen Sie dabei das Gemisch mit einem
Löffel. Im Anschluß an das Nachfüllen des Salzes müssen Salzreste vom Gewinde entfernt
werden. Danach Verschlußkappe wieder zudrehen.
Wenn Sie die Spülmaschine nicht sofort wieder benutzen, aktivieren Sie bitte einmal das
Vorspülprogramm mit klarem Wasser, damit die übergelaufene Salzlösung aus dem Gerät
gespült wird.
Der Behälter faßt ca. 1,5 – 1,8 kg Salz. Um das Gerät effizient zu nutzen, muß der
Salzbehälter regelmäßig, je nach Einstellung der Enthärteranlage häufiger oder seltener,
nachgefüllt werden.
Wichtig: Nur bei der Installation des Gerätes muß nach dem vollständigen Auffüllen
des Salzbehälters solange Wasser zugegeben werden, bis der Behälter überläuft.
Ihr Geschirrspüler ist mit einem Enthärter
ausgerüstet, der dem Wasser den Kalk entzieht,
der sonst zu Verkrustungen oder Beschädigungen
des Gerätes führt.
Der Filter des Enthärters muß mit einem
Spezialsalz zur Entkalkung von Spülmaschinen
versorgt werden.
Andere Salze enthalten unlösliche Anteile, die
mit der Zeit die Funktion des Wasserenthärters
beeinträchtigen können.
Zum Einfüllen des Salzes drehen Sie den
Verschluß des im Boden des Gerätes befindlichen
Salzbehälters auf.
TYPE 1
TYPE 2
Page 37

73
Einordnen des Geschirrs
Allgemeines
Um stets optimale Spülergebnisse zu erzielen, ist es ratsam, vorab gröbere
Speisereste (Knochen, Zahnstocher, Fleisch- und. Gemüsereste, Obstkerne) vom
Geschirr zu entfernen, da sie sich sonst im Filter, im Wasserablauf oder in den
Sprüharmen festsetzen und so zu einer Reduzierung der Reinigungsqualität führen
können.
Das Geschirr braucht nicht vorgespült zu werden.
Durch starkes Braten oder angebrannte Speisereste stark verkrustete Töpfe und
Pfannen sollten vor dem eigentlichen Spülvorgang vorgeweicht werden.
Beladen des oberen Geschirrkorbes
Die klappbaren Geschirrablagen des oberen Geschirrkorbes ermöglichen eine
flexible Nutzung des Raumangebots. Waagerecht gestellt finden Tee- und
Kaffeetassen, lange Messer und Schöpfkellen auf ihnen Platz. An den Rändern der
Ablage können Kelchgläser eingehängt werden. Unterhalb der Ablage können Sie
Gläser, Tassen, Untertassen und Dessertteller in den Geschirrkorb einordnen.
Stellen Sie die bewegliche Ablage senkrecht, so passen flache und tiefe Teller in den
oberen Korb. Die letzteren sortieren Sie bitte immer so ein, daß sie mit den
Innenseiten nach vorne zeigen. Achten Sie auch darauf, daß zwischen den Tellern
immer soviel Platz bleibt, daß das Wasser die gesamte Fläche erreichen kann.
Um den Innenraum optimal zu nutzen, sortieren Sie die Teller nach Form und
Durchmesser. Sie können die Teller in nur einer Reihe (Zeichnung 1) oder auch in
zwei Reihen (Zeichnung 2) einsortieren. Größere Teller mit einem Durchmesser ab
270 mm sind leicht geneigt, mit der Innenseite nach vorne zeigend, in den Korb
einzustellen. Im oberen Geschirrkorb kann auch Spülgut wie Salatschüsseln und
Plastikbehälter Platz finden. Sie sollten jedoch für einen sicheren Halt dieser
Geschirrteile sorgen, damit sie nicht durch den Druck der Wasserstrahlen bewegt
werden können. Der obere Geschirrkorb bietet alle Eigenschaften, die zu einer
möglichst flexiblen Nutzung erforderlich sind. Sie können ihn in zwei Reihen mit bis
zu 24 Tellern bestücken, oder mit Gläsern in 5 Reihen mit bis zu 30 Stück je
Spülgang oder natürlich auch mit gemischtem Spülgut.
Beladen des unteren Geschirrkorbes
Im unteren Korb können Sie Töpfe, Pfannen, Suppenschüsseln, Servierplatten,
Salatschüsseln, Deckel, flache und tiefe Teller und Kellen unterbringen.
Stellen Sie das Besteck mit den Griffen nach unten in den dafür vorgesehenen
Plastikbehälter, der dann in den unteren Geschirrkorb gestellt wird. Achten Sie
darauf, daß das Besteck die Rotation der Sprüharme nicht hindert.
72
Einstellung der Höhe des oberen Geschirrkorbes
(nur bei einigen Modellen)
Teller zwischen 27 cm und 31 cm Durchmesser werden in den unteren Geschirrkorb
eingeordnet. Hierzu muß der Geschirrkorb folgendermaßen bis zur höchsten
Position verstellt werden (Bezüglich des Models):
Type “A”:
1) Drehen Sie die vorderen Stopper "A" nach außen;
2) Ziehen Sie den Geschirrkorb heraus und schieben Sie ihn in die oberste Position
wieder ein;
3) Bringen Sie die Stopper wieder in die ursprüngliche Position zurück.
In dieser Einstellung kann der obere Korb nur mit Geschirr bis 20 cm Durchmesser
beladen werden; die klappbaren Geschirrablagen können nicht nach oben geklappt werden.
A
A
Type “B”:
1) Den oberen Korb herausziehen;
2) Dann den Korb an beiden Seiten halten und hochziehen (fig. 1).
In dieser Einstellung kann der obere Korb nur mit Geschirr bis 20 cm Durchmesser
beladen werden; die klappbaren Geschirrablagen können nicht nach oben geklappt werden.
VERSTELLUNG IN DIE UNTERE POSITION:
1) Den Korb an beiden Seiten halten und leicht nach oben ziehen (fig. 2a);
2) Dann langsam den Korb in die korrekte Position führen (fig. 2b).
N. B. : NIEMALS DEN KORB NUR AUF EINER SEITE VERSTELLEN! (fig. 3).
Achtung: Wir empfehlen den Korb im leeren Zustand zu verstellen!
a
b
a
b
1
2
3
Page 38

74
Die normale Befüllung der Geschirrkörbe
ersehen Sie bitte aus den Zeichnungen 1, 2
und 3.
oberer Geschirrkorb (Zeichnung 1)
A = tiefe Teller
B = flache Teller
C = Dessertteller
D = Untertassen
E = Tassen
F = Gläser
oberer Geschirrkorb (Zeichnung 2)
A = tiefe Teller
B = flache Teller
C = Dessertteller
D = Untertassen
E = Tassen
F = Kelchgläser
G = Gläser
H = Besteckkorb
unterer Geschirrkorb (Zeichnung 3)
A = mittlere Töpfe
B = große Töpfe
C = Pfannen
D = Deckel
E = Suppenschüsseln
F = Besteck
G = Bratpfannen, Kasserollen
Die richtige und rationelle Bestückung der
Geschirrkörbe ist die Voraussetzung für ein
optimales Spülergebnis.
1
2
3
A
B
C
D
FE
GH
DF AG
E
B
C
A
B
C
D
E
F
QN
M
P
O
M
N
R
A
F
C
C
C
G
B
E
D
H
H
L
I
4
5
6
75
unterer Geschirrkorb (Zeichnung 5)
M = 8 + 4 tiefe Teller
N = 11 + 1 flache Teller
O = 12 Dessertteller
P = Servierplatten
Q = Besteck
Besteckkorb (Zeichnung 6)
Die beiden heruntergelassenen Halteklappen
bieten Platz für jeweils 6 + 6 Messer (R); das
restliche Besteck wird in die übrigen Fächer
mit den Griffen nach unten so verteilt, daß
nicht mehr als zwei gleiche Besteckteile in
dasselbe Fach eingeordnet werden.
Besteckkorb ohne halteklappen
Das restliche Besteck so verteilen, daß nicht
mehr als zwei gleiche Besteckteile in
dasselbe Fach eingeordnet werden.
Beladung von 12 Normgedecken gemäß (Norm EN 50242)
Das korrekte Anordnen des Geschirrs ersehen Sie bitte für den oberen
Geschirrkorb aus der Zeichnung 4, für den unteren Geschirrkorb aus der
Zeichnung 5, und für den Besteckkorb aus der Zeichnung 6.
oberer Geschirrkorb
(Zeichnung 4)
A = 5 + 5 + 2 Gläser
B = 12 Untertassen
C = 4 + 4 + 4 Tassen
D = Kleine Schalen
E = Mittlere Schalen
F = Große Schalen
G = 1 + 1 Gabeln
H = 1 + 1 Servierlöfel
I = 3 + 3 + 3 + 3
Dessertlöffel
L = 3 + 3 + 3 + 3 Teelöffelchen
Page 39

77
Gemischte Beladung 1/2 (Abb. 1)
A = Gläser
B = Tassen
C = tiefe Teller
D = flache Teller
E = Dessertteller
F = Untertassen
G =Topf
H = Deckel
I = Pfanne
L = mittelgroße Schale
M = kleine Schale
Standardbeladung 1/2 (Abb. 2)
A = 6 Gläser
B = 5 + 1 Tassen
C = Servierteller
D = 6 tiefe Teller
E =6 flache Teller
F =6 Dessertteller
G =6 Untertassen
H = mittelgroße Schale
I = kleine Schale
Das Besteck wird in den dazu vorgesehenen Besteckkorb im
unteren Geschirrkorb eingeordnet.
unterer Geschirrkorb (Abb. 3)
A = mittlere Töpfe
B = große Töpfe
C = Pfannen
D = Deckel
E = Suppenschüsseln
F = Besteck
G = Bratpfannen, Kasserollen
Die richtige und rationelle Bestückung der Geschirrkörbe ist
die Voraussetzung für ein optimales Spülergebnis.
unterer Geschirrkorb (Abb. 4)
M = 8 + 4 tiefe Teller
N = 11 + 1 flache Teller
O = 12 Dessertteller
P = Servierplatten
Q = Besteck
Sparspülprogramm 1/2 - Beladung Oberkorb (nur bei einigen Modellen)
76
Achtung (Zeichnung 7)
Der untere Korb hat vorne 2 Halterungen für
Teller, die schnell und einfach für die
Beladung mit größeren Teilen (z.B. Pfannen,
Salatschüsseln...) verstellt werden können.
(Nur bei einigen Modellen)
DIESE HALTERUNGEN LASSEN SICH
WIE FOLGT VERSTELLEN:
1) Die Halterung leicht hochziehen und dann
in die korrekte Position herunterlassen;
2) Die Halterung in die senkrechte Position
hochziehen.
Besteckkorb (Zeichnung 8)
Der Besteckkorb besteht aus zwei trennbaren
Teilen und bietet somit verschiedene
Beladungsmöglichkeiten.
Die beiden Teile lassen sich durch
entgegengesetztes Auseinanderschieben
trennen. Durch Ineinanderschieben der
beiden Hälften wird der Besteckkorb wieder
zusammengefügt.
Bei einigen Modellen ist der Besteckkorb
nicht mit den schwenkbaren Halteklappen
ausgestattet.
1
2
7
8
Q
N
M
P
O
M
N
4
D
FAG
E
B
C
3
AG
M
L
B
H
D
C
E
I
F
1
AGI
BC
F
E
H
D
2
Sparspülprogramm 1/2 - Beladung Unterkorb (nur bei einigen Modellen)
Page 40

79
3
4
3
Klarspülmittel einfüllen
In der Innentür rechts vom Spülmittelbehälter
befindet sich der Klarspülmittelbehälter, der
130 ml Inhalt faßt. (Abb. A"3").
Drehen Sie den Schraubverschluß (3) gegen
den Uhrzeigersinn und füllen Sie den
Klarspüler bis zur Markierung MAX ein.
Drehen Sie dann den Schraubverschluß
wieder zu. Die benötigte Menge des
Klarspülers wird beim letzten Spülen
automatisch zugegeben, ein voller Behälter
reicht für mehrere Male. Das Klarspülmittel
erleichtert die Trocknung des Geschirrs und
vermeidet die Bildung von Flecken und
matten Ablagerungen.
Benutzen Sie nur Klarspülmittel für Geschirrspülautomaten. Das Niveau des Klarspülmittels kann durch die Füllstandanzeige
kontrolliert werden, die zwischen Spülmittelbehälter und Schraubverschluß liegt (4).
Regulierung der Klarspülmitteldosis
1 bis 6
Die Regulierungsscheibe liegt unter dem
Verschluß (3) und kann mit Hilfe einer
Münze gedreht werden. Die empfohlene
Position ist 3. Der Kalkgehalt des Wassers
kann zu Ablagerungen auf den Heizstäben
führen und so das Trocknen beeinträchtigen.
Wenn das Geschirr gestreift erscheinen sollte,
so ist eine niedrigere Position zu wählen und
wenn es Flecken oder weiße Spuren
aufweist, so wähle man eine höhere
Position.
VOLL LEER
dunkel hell
78
Informationen für Normtests
Normprogramm allgemein
(siehe Programmtabelle)
Spülmittel und Klarspüler einfüllen
Spülmittel einfüllen
Spülmittel fürs Spülen mit der Hand eignen sich nicht für die Spülmaschine, da
wichtige Bestandteile fehlen, die für beste Spülergebnisse notwendig sind.
Außerdem beeinträchtigen sie den korrekten Betrieb der Spülmaschine.
Normales Spülen
Der Spülmittelbehälter befindet sich im
Türinneren (Abb. A "2"). Zum Öffnen des
Deckels reicht ein leichter Druck auf dem
Verschlußhaken. Am Ende eines jeden
Spülgangs bleibt der Deckel geöffnet und ist
somit sofort wieder betriebsbereit.
Die Spülmitteldosis kann je nach Art und
Verschmutzungsgrad des Geschirrs variieren.
Empfohlen wird eine Menge zwischen 20
und 30 gr Spülmittel, das in die
Spülmittelkammer (1) für den Hauptspülgang
eingefüllt wird.
Nach dem Einfüllen schließen Sie den
Deckel des Spülmittelbehälters.
Bitte beachten Sie auch die Dosierungsanweisungen des Spülmittelherstellers auf
der Verpackung. Eine unzureichende Menge
beeinträchtigt das Spülergebnis, und eine zu
hohe Dosierung bedeutet nur Verschwendung - das Resultat wird dadurch nicht
verbessert.
Eine richtige Dosierung ist zudem ein wichtiger Beitrag zum Umweltschutz.
Spülen mit vorherigem Einweichen (nur bei einigen Modellen)
Falls Sie das Intensiv-Spülprogramm verwenden, müssen Sie zusätzlich einen
Eßlöffel Spülmittel in die Spülmittelkammer für den Vorspülgang (2) geben.
Page 41

81
Praktische Hinweise
Programmwahl
Diese Geschirrspülmaschine bietet eine breite Auswahl an verschiedenen
Spülprogrammen für jede Art von Geschirr und Verschmutzungsgrad. Bitte wählen
Sie das entsprechende Programm aus der mitgelieferten Programm-Tabelle aus.
Nach dem Programmende ist es empfehlenswert, erst den unteren Geschirrkorb
herauszuziehen, damit keine Wassertropfen vom oberen zum unteren Korb herabtropfen.
Bleibt das Geschirr nach dem Spülen noch eine gewisse Zeit im Gerät, sollte die Tür
einen Spalt geöffnet werden.
Das Trockenergebnis wird so verbessert.
Hinweise zum SPAREN
1) Um zu sparen, sollte die Spülmaschine immer komplett befüllt werden, bevor gespült
wird. Das Geschirr wird jeweils nach dem Essen in die Spülmaschine gefüllt, bis diese
voll ist. Eventuell kann zwischen den Beladungen ein KALTES VORSPÜLPROGRAMM
durchgeführt werden, um die gröbsten Speisereste einzuweichen und zu entfernen.
2) Bei nicht sehr verschmutztem Geschirr oder nicht voller Ladung wählen Sie das
SPAR-PROGRAMM.
Hinweise zur Optimierung der SPÜLERGEBNISSE
1) Töpfe und anderes Geschirr mit der Innenseite nach unten einordnen.
2) Vermeiden Sie das Aufeinanderstapeln und ordnen Sie das Geschirr möglichst in
den dafür vorgesehenen Ladebereichen. Eine korrekte Beladung verbessert das
Spülergebnis.
3) Um optimale Spülresultate zu erhalten, sind erst die gröbsten Speisereste (z.B.
Knochen, Gräten, Fleisch- oder Gemüsereste, Kaffeesatz, Obstschalen oder- kerne,
Zigarettenasche usw.) zu entfernen, da sonst die Abflußöffnung und die Düsen der
Sprüharme verstopft werden könnten.
4) Kontrollieren Sie, ob sich nach dem Geschirreinfüllen die Sprüharme frei drehen
lassen.
5) Töpfe und anderes großes Geschirr mit sehr hartnäckigen oder angebrannten
Speiseresten erst mit Wasser und Spülmittel einweichen.
6) Beim Spülen von Silber ist folgendes zu beachten:
a) unmittelbar nach der Benutzung vorspülen, vor allem bei fetten Speiseresten
(Majonnaise, Eier, Fisch usw.)
b) Silbergeschirr nicht mit Spülmittel beträufeln
c) Kontakt mit anderen Metallen vermeiden.
UNTERBRECHEN des Programmes
1) Sollte die Tür wahrend des Programmablaufs zur weiteren Beladung geöffnet
werden, drücken Sie immer zuerst die EIN/AUS-Taste. Das Programm darf erst 3
Minuten nach dem Schließen der Tür wieder gestartet werden.
Spülmaschinenfestes Geschirr
Nicht alle Geschirrarten eignen sich zum Spülen in einer Spülmaschine. So dürfen
z.B. Geschirrteile aus Kunststoff, Besteck mit Holz- oder Kunststoffgriffen, Töpfe mit
Holzgriffen, Geschirr aus Aluminium, Bleikristall oder verbleitem Glas nur dann in die
Maschine eingefüllt werden, wenn sie spülmaschinenfest sind.
Bei manchen Geschirrarten kann das Dekor nach häufigerem Gebrauch verblassen.
Vergewissern Sie sich, daß das Dekor spülmaschinenfest ist, indem Sie erst ein
Geschirrteil einige Male in der Maschine spülen und es dann mit den übrigen Teilen
auf seine Farbechtheit vergleichen.
Spülen Sie Silberbesteck nicht zusammen mit Stahlbesteck, um eine chemische
Reaktion der beiden Metalle zu vermeiden.
WICHTIG
Beim Kauf von neuem Geschirr vergewissern Sie sich immer, daß es spülmaschinenfest ist.
80
Das Filtersystem (Abb. A“4”) besteht aus:
- dem zentralen Filterkorb zum Auffangen
von groben Teilchen
- der Siebplatte zum ständigen Filtern des
Spülwassers
- dem Mikrofilter unterhalb der Siebplatte,
der auch die kleinsten Schmutzpartikelchen
auffängt und so eine optimale Spülung
garantiert.
Um stets beste Spülergebnisse zu erzielen,
ist es ratsam, das Filtersystem vor jeder
Benutzung zu kontrollieren und zu reinigen.
Der Filtersatz läßt sich durch Drehen gegen
den Uhrzeigersinn leicht herausziehen (Abb.
1). Der zentrale Filterkorb ist herausnehmbar,
um die Reinigung zu erleichtern (Abb. 2).
Ziehen Sie schließlich die Siebplatte aus der
Bodenwanne heraus wie in der Abb. 3
ersichtlich. Spülen Sie alle Teile gründlich
unter fließendem Wasser und reinigen Sie
diese eventuell mit einer Bürste.
Dank des selbstreinigenden Mikrofilters ist
die Wartung reduziert, und die Überprüfung
der Filteranlage braucht nur alle 14 Tage
vorgenommen zu werden. Trotzdem ist es
anzuraten, nach jeder Benutzung zu
kontrollieren, ob der zentrale Filtersatz und
die Siebplatte nicht verstopft sind.
Achtung: Versichern Sie sich nach der
Reinigung der Filter, daß sie untereinander
richtig befestigt sind und daß die
Siebplatte genau in der Bodenwanne
eingesetzt ist. Achten Sie darauf, den
Filtereinsatz im Uhrzeigersinn in die
Siebplatte wieder sorgfältig einzuführen.
Ein ungenaues Einsetzen des Filtersatzes
kann den Betrieb der Maschine
beeinträchtigen.
Wichtig: Benutzen Sie die Spülmaschine
niemals ohne Filter.
Filterreinigung
1
2
3
Page 42

83
LÄNGERE NICHTBENUTZUNG
Wenn die Spülmaschine längere Zeit unbenutzt bleiben soll, empfehlen wir das
folgende Vorgehen:
1. Um Fettreste zu entfernen, ein Spülprogramm ohne Geschirr aber mit Spülmittel
laufen lassen.
2. Stecker aus der Steckdose ziehen.
3. Wasserhahn schließen.
4. Klarspülmittelbehälter füllen.
5. Tür ein wenig öffnen.
6. Halten Sie das Innengehäuse immer sauber.
7. Steht das Gerät in einem Raum mit Temperatur unter 0°C, so kann das
Restwasser in den Schläuchen gefrieren. In diesem Fall sollte zuerst die
Raumtemperatur erhöht und die Spülmaschine erst nach 24 Stunden in Betrieb
gesetzt werden.
Wichtig:
Eine reibungslose Funktion kann nur bei genauer Einhaltung der
Bedienungsanleitung und ordentlicher Wartung gewährleistet werden. Es kann
keine Garantie für Defekte übernommen werden, die auf einer Nichtbeachtung
der Anweisungen für Bedienung oder Wartung beruhen.
82
Äußere Reinigung und Pflege
Das Gehäuse kann mit Lackpolitur (nicht kratzend) gereinigt werden.
Der Innenbehälter bedarf keiner besonderen Reinigung.
Kalk oder Speisereste werden durch einen Spülgang im Feinprogramm entfernt,
indem ein Glas Weinessig zugefügt wird.
Sollte das Geschirr trotz regelmäßiger Reinigung der Filter schlechte
Spülergebnisse aufweisen, überprüfen Sie, daß die Sprüharme (Abb. A5) nicht von
Schmutzpartikeln verstopft sind. Sollte dies nicht der Fall sein, reinigen Sie die
Sprüharme wie folgt:
Um den oberen Sprüharm abzunehmen, drehen Sie ihn bis zur Stop-Position, die
durch einen Pfeil gekennzeichnet ist (Abb. 1b). Drücken Sie den Sprüharm nach
oben und drehen Sie ihn gleichzeitig im Uhrzeigersinn (Abb. 1). Um den Sprüharm
wieder zu montieren, wiederholen Sie den Vorgang, drehen Sie ihn dabei jedoch
gegen den Uhrzeigersinn.
Der untere Sprüharm läßt sich durch einfaches Ziehen nach oben abnehmen (Abb. 2)
- Spülen Sie die Sprüharme unter fließendem Wasser und befreien Sie diese von
Speiseresten und sonstigen Rückständen.
- Danach montieren Sie die beiden Sprüharme in das Gerät. Achten Sie beim
oberen Sprüharm darauf, daß er bis zur Stop-Position gedreht wird und schrauben
Sie ihn fest.
Die Wasserheizung aus Edelstahl kann mit der Zeit eine andere Farbe annehmen.
Dadurch wird die Funktion nicht beeinträchtigt.
Die Spülkammer und Innentür ist ebenfalls aus Edelstahl.
Sollten hieran Oxidationserscheinungen auftreten, so sind diese z.B. durch
eisenhaltiges Wasser hervorgerufen.
Die Flecken sind mit handelsüblichen Edelstahl-Reinigern zu entfernen (keine
Stahlwolle benutzen).
1 2
1b
Page 43

8584
Fehlersuche
Kleine Störungen selbst beheben!
Achtung - Sollte Ihr Geschirrspüler einmal nicht zu Ihrer Zufriedenheit arbeiten,
kontrollieren Sie die folgenden Punkte, bevor Sie den Kundendienst rufen:
FEHLER GRUND FEHLER-BESEITIGUNG
1-Die Programme
funktionieren nicht
2-Es läuft kein Wasser ein
3 -Das Wasser läuft nicht ab
4-Wasser läuft ständig ein
5-Man hört nicht, daß sich
die Sprüharme drehen
Stecker nicht richtig in der
Steckdose
Ein/Aus-Taste nicht gedrückt
Kein Strom vorhanden
Sicherung defekt
Tür nicht fest verschlossen
Siehe Gründe 1)
Wasserhahn geschlossen
Programmwähler nicht richtig
eingestellt
Der Zulaufschlauch ist geknickt
Der Filter des Zulaufschlauches
ist verstopft
Filter verstopft oder verschmutzt
Ablaufschlauch geknickt
Die Verlängerung des
Ablaufschlauches ist nicht
ordnungsgemäß angebracht
Keine Entlüftung des
Ablaufanschlusses in der Wand
Ablaufschlauch zu tief
Übermäßige Spülmittel-Zugabe
Ein Stück des Spülguts blockiert
den Sprüharm
Filterplatte oder Filter stark
verschmutzt
Stecker in die Steckdose
Ein/Aus-Taste betätigen
Kontrollieren
Kontrollieren
Tür schließen
Kontrollieren
Wasserhahn öffnen
Programmwähler genau
einstellen
Knicke beseitigen
Filter reinigen
Filter säubern
Knick oder Biegung aus dem
Ablaufschlauch entfernen
Achten Sie auf einen korrekten
Anschluß des Ablaufschlauches
Wenden Sie sich an einen
Fachmann
Ablaufschlauch mindenstens 40
cm über dem Boden anbringen
Weniger Spülmittel zugeben
Kontrollieren
Filterplatte und Filter säubern
Läßt sich der Fehler nicht beheben, wenden Sie sich bitte an den Technischen Kundendienst .
Geben Sie dabei das Maschinenmodell laut Typenschild (im oberen Bereich der Innentür) oder
Garantieschein an, um eine schnelle und effektive Hilfe zu ermöglichen.
FEHLER GRUND FEHLER-BESEITIGUNG
6 - Bei den elektronischen
Geräten ohne Display: Die
Leuchten “eco” und “1”
blinken und das Signal
ertönt
7 - Bei den elektronischen
Geräten mit Display: “E1”
wird angezeigt und das
Signal ertönt
8 - Das Spülgut wird nur zum
Teil gespült
9 - Weiße Flecken auf dem
Spülgut
10 - Spülmittel wird nicht
ganz eingespült
11 - Geräusche während des
Spülgangs
12 - Geschirr wird nicht
richtig trocken
Der Wasserhahn ist gesperrt
Der Wasserhahn ist gesperrt.
Siehe Gründe 5)
Das Geschirr ist zu dicht
angeordnet
Das Ende des Ablaufschlauches
liegt im Wasser
Spülmittel ist nicht richtig
dosiert, verklumpt oder hart
Der Deckel des Salzbehälters ist
nicht richtig geschlossen
Das gewählte Spülprogramm ist
nicht angemessen
Geschirr im unteren Korb ist
nicht gespült
Wasser besonders hart
Spülmittel verklumpt oder feucht
Netzwasserdruck wegen Fremdablagerungen zu niedrig
Das Geschirr klappert
Sprüharme klappern gegen das
Geschirr
Keine Lüftung
Schalten Sie das Gerät aus.
Öffnen Sie den Wasserhahn.
Stellen Sie das Programm noch
einmal ein.
Schalten Sie das Gerät aus.
Öffnen Sie den Wasserhahn.
Stellen Sie das Programm noch
einmal ein.
Kontrollieren
Geschirr richtig anordnen
Der Ablaufschlauch darf nicht im
Wasser liegen
Dosis erhöhen u. ggf. neues
Spülmittel benutzen
Deckel festschrauben
Wählen Sie ein intensiveres
Programm
Taste 1/2 zurückdrücken
Klarspüler kontrollieren bzw.
regulieren
Anderes oder trockenes
Spülmittel verwenden (Spülmittel
an einem trockenen Ort
aufbewahren)
Reinigen des im Zulaufschlauch
vorhandenen Filters
Geschirr richtig anordnen
Geschirr richtig anordnen
Tür am Ende des Spülgangs
offen lassen, um die natürliche
Trocknung zu fördern
Page 44

87
Instrucciones para un uso seguro
Le rogamos lea atentamente las advertencias contenidas en el presente libro porque
reportan importantes indicaciones en lo que respecta a la seguridad de instalación,
de uso, de mantenimiento y algunos consejos útiles para mejorar la utilización del
lavavajillas.
Conserve con cuidado este libro para cualquier ulterior consulta.
El uso de cualquier aparato eléctrico comporta tener en cuenta algunas reglas
fundamentales, en particular:
– no tocar el aparato con las manos o los pies mojados o húmedos
– no utilizar el aparato con los pies descalzos
– no utilizar, si no es con mucha cautela, alargos en el cuarto de baño o ducha.
– no estirar el cable de alimentación, o del aparato, para desconectar el enchufe de
la toma de corriente.
– no dejar expuesto el aparato a los agentes atmosféricos (lluvia, sol, etc...)
– no permitir que el aparato sea utilizado por niños o personas no capacitadas, sin
vigilancia.
– en caso de incompatibilidad entre la toma de corriente y el enchufe del aparato,
sustituir la toma por personal especializado. Este último deberá comprobar que la
sección de los cables sea la idónea para la potencia absorbida.
– tener cuidado que la instalación no aplaste, roce o deteriore el cable de alimentación.
– Si la instalación de la habitación está provista con un descalcificador de agua no
es necesario añadir la sal en el contenedor montado al efecto en el lavavajillas.
– el lavavajillas está proyectado para el lavado de utensilios domésticos normales.
Objetos contaminados de gasolina, pintura, restos o virutas de hierro o metálicas,
productos químicos corrosivos, ácidos o alcalinos no deben ser lavados en el
lavavajillas.
– si se quiere eliminar un lavavajillas viejo se debe tener cuidado de eliminar el cierre
de la puerta para evitar que los niños puedan quedar encerrados en la máquina.
– este aparato está fabricado con materiales reciclables para permitir una correcta
chatarrización.
– este aparato deberá destinarse únicamente al uso doméstico.
– en caso que fuera necesaria la sustitución del cable de alimentación del aparato,
dirijase al Servicio de Asistencia Técnica autorizado.
– en general, no es aconsejable el uso de adaptadores, tomas múltiples y/o alargos.
En caso de daños y/o mal fúncionamiento del aparato, desconectarlo, cerrar el
grifo del agua y no tocar el electrodoméstico.
Para eventuales reparaciones remitirse a un Centro de Asistencia Técnica y
solicitar la utilización de recambios originales.
El no cumplimiento de todo lo arriba indicado puede comprometer la seguridad del
aparato.
– No se debe beber el agua que resta en el aparato en la vajilla al final de los pro-
gramas de lavado
– Apoyarse o sentarse sobre la puerta abierta del lavavajillas, puede causar su vuelco.
– Los cuchillos y cubiertos, obtienen un mejor lavado si se sitúan en el cesto con los
mangos hacia abajo, aunque a fin de evitar cualquier herida con las puntas o las
hojas, puede disponerlos con los mangos hacia arriba.
86
Indice
Prescripciones de seguridad
Puesta en Marcha, instalación
Apertura de la puerta
Sistema de la regulación de la descalcificación del agua
Regulación del cesto superior
Carga del lavavajillas
Lavado con media carga
Información para los laboratorios de pruebas
Carga de detergente y abrillantador
Limpieza del filtro
Consejos prácticos
Limpieza y manutención ordinaria
Búsqueda de pequeñas anomalías
pág. 87
pág. 88
pág. 90
pág. 91
pág. 93
pág. 94
pág. 98
pág. 99
pág. 99
pág. 101
pág. 102
pág. 103
pág. 105
23
1
4
5
Fig. A
Page 45

8988
INSTALACION (NOTAS TÉCNICAS)
Después del desembalaje, proceder a la regulación en
altura del lavavajillas.
Para un correcto funcionamiento es importante que el
lavavajillas esté bien nivelado, regulando los pies de
forma que una eventual inclinación del aparato no
supere los 2 grados.
En caso de que fuera necesario transportar manualmente
la máquina desembalada, no coger la puerta por la parte
inferior, proceder como en la figura; abrir ligeramente la
puerta y elevar la máquina cogiéndola por la parte superior.
Si se va a instalar el aparato sobre una alfombra o
moqueta, es necesario tener cuidado para evitar
que se obstruyan las rejillas de ventilación situadas
en la base del lavavajillas.
Asegurese de poder acceder al enchufe del aparato incluso despues de la instalacion.
Alimentación eléctrica
El aparato cumple las normas de seguridad de la CEE y está provisto de clavija
tripolar que asegura su completa puesta a tierra. La completa seguridad depende
también de la correcta puesta a tierra de la instalación eléctrica de la casa.
La falta de una buena instalación puede provocar una leve difusión de corriente a
través de las partes metálicas del lavavajillas debido a la presencia del filtro anti
radiointerferencias.
En consecuencia, antes de conectar eléctricamente el lavavajillas, verificar:
1. Que la toma tenga una correcta conexión a tierra.
2. Que la capacidad amperimétrica del contador eléctrico sea apta para la absorción
indicada en los datos de la placa del lavavajillas.
La firma fabricante no se responsabiliza de posibles daños a personas o cosas,
producidos por la falta de conexión de la toma de tierra.
Estos aparatos cumplen con las Directivas EEC 89/336, EEC 73/23 y
modificaciónes siguientes.
Alimentación hidráulica
Los tubos de carga y descarga pueden ser orientados indistintamente hacia la
derecha o la izquierda.
El lavavajillas puede ser conectado a la instalación de agua fría o caliente,
siempre que ésta no supere a los 60°C.
La presíon hidráulica debe estar comprendida entre un mínimo de 0,08 MPa y un
máximo de 0,8 MPa. Para presiones inferiores diríjarse al Centro de Asistencia.
Es necesario un grifo en el extremo del tubo de carga para aislar la máquina de la
red cuando no está en funcionamiento (fig. 1) El lavavajillas está dotado de un tubo
para la toma de agua que acaba en un codo de 3/4" (fig. 2). Si es necesario, alargue el tubo de carga, utilice el alargo Art. 9225014 de 1,5 m de longitud.
El tubo entrada agua "A" debe ser enroscado a un grifo o toma de agua "B" de rosca
3/4", asegurándose que la tuerca esté bien apretada.
Si el agua de la red presentase resíduos calcáreos o arenilla, es aconsejable
colocar un filtro como accesorio. Este filtro "D" va colocado entre la toma de agua
de 3/4" "B" y el tubo de entrada "A". No olvidar de colocar la guarnición "C".
Si la máquina va a ser conectada a una nueva instalación o a una instalación que
ha estado inutilizada por largo tiempo, es aconsejable dejar correr el agua algunos
minutos antes de colocar el tubo de entrada de agua. De esta manera, se evitará
que los residuos materiales o de óxido depositados en la tubería obturen el filtro de
entrada agua.
Instalación salida de agua
Colocar el tubo en la instalación de salida, evitando pliegues o arrugas (fig. 4).
El tubo de desague fijo debe tener un diámetro interior de al menos 4 cm, y debe
estar colocado a una altura mínima de 40 cm Se recomienda colocar un sifón
contra malos olores (fig. 4 x).
Si fuera necesario, se puede alargar el tubo de salida hasta 2,6 m, pero
manteniéndolo siempre a una altura máxima de 85 cm del suelo.
Utilizar alargo Art. 9269214 y codo Art. 9264427.
La extremidad curvada del tubo puede ser apoyada en el borde de un lavadero
(el extremo no debe permanecer inmerso en el agua, para evitar efectos de sifón
durante el lavado. Fig. 4 y).
En el caso de una instalación bajo un plano continuo, la curva debe ser fijada
inmediatamente debajo del citado plano, en el punto más alto posible (figura 4 z).
Al instalar la máquina, debe controlarse que los tubos de carga y descarga no estén
doblados.
123
4
Page 46

9190
Instalación en cocinas modulares
Acoplamiento
El lavavajillas tiene la altura modular de 85 cm y por consiguiente puede ser
acoplado a los muebles de las modernas cocinas modulares de análoga altura. Para
una perfecta alineación, maniobrar en los pies regulables.
La tapa superior es de laminado de alta resistencia que puede utilizarse sin
ninguna particular precaución ya que es resistente al calor, a la abrasión y es
anti-manchas (fig. 5).
La profundidad de la tapa superior se puede regular facilmente hasta 25 mm para
alinearlo al plano de los muebles adyacentes.
Para su regulación, destornillar los 2 tornillos posteriores y fijarlos en la posición
deseada (fig. 6).
Encastre (Para su colocación debajo de la encimera)
Las cocinas modulares más modernas tienen un plano de trabajo único, bajo el que
son encastrados los muebles y los electrodomésticos. En este caso basta quitar la
tapa superior, sacando los tornillos que se encuentran bajo el mismo en la parte
posterior (fig. 6).
La altura se reduce de esta forma a 82 cm, tal como está previsto en las Normas
Internacionales (ISO) y el lavavajillas se encastra perfectamente bajo el plano
contínuo de la cocina (fig. 7).
Panelabilidad (sólo en algunos modelos)
Los perfiles que hay en la puerta, permiten la colocación de paneles de espesor
máximo de 5 mm y con las siguientes medidas,
ancho: 591 mm ± 1 alto: 597 mm ± 1
Apertura de la puerta
Introducir la mano en la cavidad de apertura y presionar hacia arriba.
Si la puerta se abre durante el funcionamiento de la máquina, un sistema de
seguridad eléctrico hace que todas las funciones se interrumpan automáticamente.
Evitar abrir la puerta del lavavajillas mientras éste funcione.
7
598
556/563
5
6
Regulación descalcificación del agua con
el descalcificador
En la siguiente tabla encontrará la correspondencia entre la dureza del agua de la red
a tratar y el nivel de regulación del descalcificador.
Para cerrar la puerta
Introducir los cestos.
Verificar que todas las aspas de lavado puedan girar y no hayan cubiertos,
cacerolas o platos que impidan su rotación.
Cerrar la puerta y presionar con fuerza hasta el cierre del dispositivo de seguridad.
Sistema de regulación de la descalcificación
del agua
El agua contiene de forma variable, según la localidad, sales calcáreas y minerales
que se depositan en la vajilla dejando manchas blanquecinas.
Cuanto más elevado sea el contenido de estas sales, mayor es la dureza del agua.
El lavavajillas contiene un descalcificador que, utilizando sales regenerantes
especiales para lavavajillas, permite lavar la vajilla con agua sin agentes clacáreos.
El descalcificador puede tratar agua con una dureza hasta 60°fH (grados franceses)
33°dH (grados alemanes) a través de cinco niveles de regulación.
Puede solicitar el grado de dureza de su agua al Ente distribuidor de su zona.
Nivel
0
1
*2
3
4
Dureza
del agua
°fH grados
franceses
0-9
10-30
31-40
41-50
51-60
Dureza
del agua
°dH grados
alemanes
0-5
6-16
17-22
23-27
28-33
Uso
Sal
Regenerante
NO
SI
SI
SI
SI
Regulación
de descal-
cificación
LIBERA
posición N.1
posición N.2
posición N.3
posición N.4
N°
lavados
approximados
50
40
30
20
* El descalcificador está regulado en el nivel 2, en cuanto satisface a la mayoría de
usuarios.
- Si su agua posee el nivel 0 no es necesaria
la utilización de sales regenerantes ni
efectuar alguna regulación por cuanto el
agua ya es dulce.
- Según el nivel de dureza de su agua debe
regular el descalcificador de la siguiente
manera:
- Extraer el cesto inferior, desenrroscar y
extraer el tapón del depósito de sal
regenerante situado el la parte inferior de la
cuba (fig A”1”).
- Girar el selector hasta evidenciar la
posición deseada con la ayuda de un
destornillador o un cuchillo.
N.B.: Para los modelos con programador electrónico, consultar la tabla de
programas adjunta.
TIPO 1
TIPO 2
Page 47

Cargar la sal
El lavavajillas está provisto de un descalcificador
que depura el agua de la cal que podría
inscrustarse y dañarlo.
En la parte inferior de la máquina esta situado el
depósito de la sal. La sal sirve para regenerar el
aparato descalcificador.
La masa filtrante del sistema de depuración
debe ser reactivada con sal de "regeneración"
para descalcificadores de lavavajillas.Otros
tipos de sal contienen sensibles porcentajes de
sustancias insolubles que con el tiempo podrían
hacer ineficiente la instalación de descalcificación.
Para la introducción de la sal, desenroscar el tapón del depósito que se encuentra
en la parte inferior. Después llenar el depósito.
Durante esta operación saldrá un poco de agua, aun así continue echando sal hasta
llenarlo. Una vez lleno, limpiar la rosca de granos de sal y roscar el tapón. Si no debe
efectuarse a continuación ningún lavado, colocar el programa Prelavado frio para
que la solución salina derramada se desagüe. El contenedor tiene una capacidad de
cerca de 1,5-1,8 kg de sal y, para una eficaz utilización del aparato, es necesario
rellenarlo periódicamente según la regulación del nivel de descalcificación elegido.
Importante:Después de haber instalado el lavavajillas, y haber llenado
el depósito de sal, es necesario añadir agua hasta llenar completamente
el deposito. Esta operación solo es preciso realizarla la primera vez.
9392
Indicador del llenado de sal
Algunos modelos están dotados de pilotos
indicadores del agotamiento de la sal.
La señalización puede venir con dos sistemas:
– piloto eléctrico en el cuadro de mandos, que se
enciende cuando es necesario rellenar el
contenedor de la sal;
– tapón de cierre con piloto móvil de color verde;
éste queda a la vista hasta que la solución
salina es suficiente para la regeneración del
depurador.
Si la superficie verde se baja en el tapón de
cierre, debe rellenarse de sal.
Otros modelos están construidos con tapón ciego, en tal caso, es oportuno controlar
periódicamente el nivel de sal, según la regulación del nivel de descalcificación elegido.
Importante: la aparición de manchas blanquecinas en la vajilla es generalmente un
índice importante de falta de sal.
Regulación del cesto superior (sólo en los modelos predispuestos)
Utilizando habitualmente platos de 27 a 31 cm de diámetro cargarlos en el cesto
inferior después de haber colocado el superior en la posición más alta, procediendo
del siguiente modo (Según los modelos):
Tipo “A”:
1) girar el cierre anterior «A» hacia el exterior;
2) sacar el cesto y situarlo en la posición más alta;
3) volver el cierre «A» a la posición original.
Con esta operación en el cesto superior no se puede cargar vajilla con diámetro
superior a 20 cm y no se pueden utilizar los soportes móviles en la posición alta.
A
A
Tipo “B”:
1) Extraer el cesto superior;
2) Sujetar el cesto a ambos lados y levantarlo hacia arriba (fig. 1).
Con esta operación en el cesto superior no se puede cargar vajilla con diámetro
superior a 20 cm y no se pueden utilizar los soportes móviles en la posición alta.
PARA LLEVARLO DE NUEVO HACIA LA POSICIÓN BAJA:
1) Sujetar el cesto a ambos lados y levantarlo ligeramente hacia arriba (fig. 2a);
2) Dejar caer lentamente el cesto acompañándolo (fig. 2b).
N. B. : NO LEBANTAR O BAJAR NUNCA EL CESTO DE UN SOLO LATERAL (fig. 3).
Atención: Es aconsejable efectuar la regulación del cesto antes de la carga de las vajillas.
a
b
a
b
1
2
3
Page 48

95
Carga diaria estándar representada en las
fig. 1, 2 y 3.
cesto superior (fig. 1)
A = platos hondos
B = platos llanos
C = platos de postre
D = platos de las tazas
E = tazas
F = vasos
cesto superior (fig. 2)
A = platos hondos
B = platos llanos
C = platos de postre
D = platos de las tazas
E = tazas
F = copas
G = vasos
H = 1/2 cesto para los cubiertos
cesto inferior (fig. 3)
A = cacerola media
B = cacerola grande
C = sartén
D = tapas
E = soperas, fuentes
F = cubiertos
G = cazuelas llanas, cazuelas de barro
Una posición racional y correcta de la vajilla
es condición esencial para un buen resultado
en el lavado.
1
2
3
94
Colocar la vajilla
Colocación de la vajilla
Para garantizar plenamente un óptimo resultado en el lavado, conviene quitar primero los residuos de comida más grandes (huesos, espinas, palillos, trozos de
carne o verduras, pieles de fruta, etc.) de la vajilla para evitar que se atasquen los
filtros, el desague y los rociadores de los brazos de lavado, con la consiguiente
disminución en la eficacia del lavado.
Evitar enjuagar la vajilla antes de colocarla en la máquina.
En caso de residuos de comida quemados o asados muy incrustados, en cacerolas
y sartenes, se aconseja ponerlas en remojo antes del lavado.
Uso del cesto superior
El cesto superior esta dotado de unos soportes móviles fijados al panel lateral, y que
pueden adoptar dos posiciones: levantada y bajada. En posición bajada los soportes
sirven para poner tazas de té, café, cuchillos largos y cucharones. En los extremos
de tales soportes se pueden colgar los vasos con forma de copa.
Por debajo de ellos, se pueden poner los vasos pequeños, tazas, los platos de las
tazas y los de postre.
En posición levantada, los soportes permiten el alojamiento de los platos llanos y
hondos.
Estos ultimos se colocan en posición vertical con el lado cóncavo dirigido hacia el
interior, y dejando siempre un espacio entre plato y plato para que el agua pueda
pasar sin dificultad.
Para aprovechar al máximo la capacidad del cesto se aconseja reagrupar los platos
que sean iguales. Los platos pueden colocarse en una sola fila (fig. 1), o en las dos
(fig. 2).
Es aconsejable colocar los platos grandes, con un diámetro de unos 270 mm, un
poco inclinados hacia el interior y así poder meter el cesto sin problemas.
En el cesto superior pueden colocarse también elementos como ensaladeras y
cuencos de plástico, que se recomienda fijar para que no se den la vuelta con la
presión de los chorros de agua.
El cesto superior ha sido estudiado para poder ofrecer la máxima flexibilidad de uso.
Éste puede llenarse únicamente con platos, colocados en doble fila hasta un
máximo de 24 piezas, únicamente con vasos, en cinco filas hasta un máximo de 30
piezas, o bien con una carga mixta.
Uso del cesto inferior
En el cesto inferior se colocan las cacerolas, sartenes, soperas, ensaladeras, tapas,
fuentes, platos planos, platos hondos y cucharones.
Los cubiertos se colocarán con el mango hacia abajo en el depósito contenedor de
plástico que después se introducirá en el cesto inferior (fig. 3) asegurándose que no
bloqueen la rotación del rociador.
A
B
C
D
FE
GH
DF AG
E
B
C
A
B
C
D
E
F
Page 49

97
Atenciòn (fig. 7)
El cesto inferior posee las dos guías
anteriores de soporte que pueden ser
bajadas de manera simple y rápida,
permitiéndo cargar más facilmente
ensaladeras, cacerolas y cubiertos.
(Sólo en los modelos predispuestos)
PARA BAJAR LOS SOPORTES POCEDER
DE LAS SIGUIENTE MANERA :
1) Tirarlos ligeramente hacia arriba y dejarlos
caer;
2) Para elevarlos basta con llevarlos de
nuevo a la posición vertical.
cesto de cubiertos (fig. 8)
El cesto para los cubiertos está compuesto
de dos partes divisibles, para poder ofrecer
distintas posibilidades de carga.
La división en dos del cesto se obtiene
haciendo correr en sentido horizontal las
dos partes, una respecto de la otra y
viceversa para reengancharlo.
Algunos modelos están provistos del cesto
porta cubiertos sin tapa central.
1
2
7
8
QN
M
P
O
M
N
R
A
F
C
C
C
G
B
E
D
H
H
L
I
4
5
6
96
cesto inferior (fig. 5)
M = 8 + 4 platos hondos
N = 11 + 1 platos llanos
O = 12 platos de postre
P = fuentes
Q = cubiertos
cesto de cubiertos (fig. 6)
En las dos rejillas abatibles bajadas introducir
n° 6 + 6 cuchillos(R); en los compartimentos
sobrantes alojar los cubiertos con los
mangos hacia abajo, teniendo cuidado de
no introducir más de dos cubiertos idénticos
por compartimento.
cesto de cubiertos sin tapa central
Introducir los restantes cubiertos teniendo
cuidado de no introducir más de dos cubiertos
idénticos por compartimento.
(Segun EN 50242).
La correcta disposición de la carga es la que se indica en la fig. 4 para el cesto
superior, en la fig. 5 para el cesto inferior y en la fig. 6 para el cesto de cubiertos .
cesto superior (fig. 4)
A = 5 + 5 + 2 vasos
B = 12 platos para tazas
C = 4 + 4 + 4 tazas
D = copa pequeña
E = copa media
F = copa grande
G = 1 + 1 cuchillos
H = 1 + 1 cucharas de servicio
I = 3 + 3 + 3 + 3
cucharas de café
L = 3+3+3+3 cucharas de postre
Page 50

9998
Lavado 1/2 carga cesto superior (sólo en los modelos predispuestos)
Información para laboratorios de prueba
Programa comparativo general
(ver tabla programas de lavado)
Carga de detergente y abrillantador
Carga del detergente
Es indispensable utilizar un detergente específico en polvo, líquido o en
pastillas para el lavado de vajillas. No deben emplearse detergentes para el
lavado de la ropa. Detergentes no idóneos (como los de uso para lavado a mano),
no contienen los ingredientes adaptados al lavado en lavavajillas e impiden el
correcto funcionamiento de la máquina.
Lavado normal
La caja para el detergente de lavado está
situada en el interior de la puerta (fig. A "2").
Si la tapa del contenedor resultase cerrada,
para abrirla basta accionar sobre el pulsante
de enganche: al término de cualquier
programa de lavado la puerta debe estar
siempre abierta, y lista para su sucesiva
utilización.
La dosis de detergente puede variar en función del grado de suciedad y tipo de vajilla.
Nosotros le aconsejamos utilizar de 20 ÷ 30
gr de detergente en la cubeta lavado (1).
Después de haber vertido el detergente en
el contenedor volver a cerrar la puerta.
Puesto que los detergentes no son todos
iguales, consulte las instrucciones del fabricante.
Recordamos que una cantidad insuficiente de detergente provoca una incompleta
eliminación de la suciedad, mientras, un exceso de detergente, no sólo no mejora el
resultado del lavado, sino además, representa un despilfarro.
No excederse en el uso de detergente representa una contribución al
mantenimiento del medio ambiente.
Lavado con suavizante
(sólo en los modelos predispuestos)
En caso de programa universal intensivo, hay que añadir en la máquina una
segunda dosis de detergente, unos 20 gramos (1 cucharada sopera) en la cubeta
prelavado (2).
1/2 carga mixta (fig. 1)
A = vasos
B = tazas
C = platos hondos
D = platos llanos
E = platos de pastre
F = platos de tazas
G = olla
H = tapa
I = sarten
L = copa mediana
M = copa pequeña
1/2 carga standard (fig. 2)
A = 6 vasos
B = 5 + 1 tazas
C = fuente
D = 6 platos hondos
E =6 platos llanos
F =6 platos de pastre
G =6 platos de tazas
H = copa mediana
I = copa pequeña
Los cubiertos deberán colocarse en el contenedor
apropiado situado en el cesto inferior.
cesto inferior (fig. 3)
A = cacerola media
B = cacerola grande
C = sartén
D = tapas
E = soperas, fuentes
F = cubiertos
G = cazuelas llanas, cazuelas de barro
Una posición racional y correcta de la vajilla es condición
esencial para un buen resultado en el lavado.
cesto inferior (fig. 4)
M = 8 + 4 platos hondos
N = 11 + 1 platos llanos
O = 12 platos de postre
P = fuentes
Q = cubiertos
Lavado 1/2 carga cesto inferior (sólo en los modelos predispuestos)
Q
N
M
P
O
M
N
4
D
FAG
E
B
C
3
AG
M
L
B
H
D
C
E
I
F
1
AGI
BC
F
E
H
D
2
Page 51

101100
3
4
3
Carga del abrillantador
A la derecha del recipiente detergente se
encuentra el del abrillantador para el aclarado cuya capacidad es de 130 ml
aproximadamente (fig. A "3"). Haga rodar el
tapón (3) en sentido antihorario y vierta el
líquido, que servirà para numerosos
lavados, hasta el nivel máximo indicado.
Cierre nuevamente el tapón.
Este aditivo se introduce automáticamente
en la última fase del aclarado y favorece un
rápido secado de la vajilla evitando que se
formen manchas o sedimentos opacos.
Utilizar siempre aditivos especiales para
lavavajillas automáticos.
Es posible controlar el nivel del abrillantador
por medio del visualizador óptico situado
entre del distribuidor (4).
Regulación del abrillantador de
1 a 6
El regulador está situado bajo el tapón (3) y
se puede manipular con una moneda.
Se aconseja la posición 3.
El contenido calcáreo del agua repercute
notablemente tanto en la formación de incrustaciones como en el grado de secado.
Es muy importante regular la dosificación
del abrillantador para conseguir óptimos
resultados.
En caso de que la vajilla presente estrías
al finalizar el lavado, disminuir la dosis en
una posición. Si la vajilla presenta manchas
o rastros blanquecinos, aumentarla un poco.
El sistema filtrante (fig A“4”) está constituido
de:
Un contenedor central, que retiene las
particulas más gruesas de suciedad
Una placa que filtra continuamente el agua
Un microfiltro situado debajo de la placa
que impide el paso de las partículas de
suciedad más pequeñas asegurando así un
alcarado perfecto.
Para lograr siempre los mejores resultados
hay que controlar la limpieza de los filtros
antes de cada lavado.
Para extraer el sistema filtrante basta
levantarlo estirando del mismo (fig. 1).
El contenedor central puede ser extraído
para facilitar las operaciones de limpieza
(fig. 2).
Extraer la placa (fig. 3) y lavarlo bajo un
chorro de agua ayudándose eventualmente
con un cepillo.
Con el microfiltro autolimpiante, la
manutención es mínimo y la revisión del
grupo de filtros puede realizarse cada 15
días.
No obstante se aconseja controlar, después
de cada lavado la parte central para
cerciorarse que no quede atascada.
Atención:
Una vez limpiados los filtros, debe
asegurarse que los mismos hayan sido
acoplados correctamente y que la placa
se encuentre perfectamente colocada en
el fondo del lavavajillas.
Importante: no usar el lavavajillas sin el
filtro.
LLENO VACIO
reflejo oscuro reflejo claro
Limpieza del filtro
1
2
3
Page 52

103102
Consejos prácticos
Selección del programa
Este lavavajillas le ofrece una amplia gama de programas de lavado que se adaptan
a las varias exigencias de suciedad y vajilla a tratar.
Consulte “LA LISTADE PROGRAMAS” adjunta para la selección del programa más
adecuado.
Sugerencias al finalizar el programa
Para evitar posibles derrames del cesto superior, sacar primero el cesto inferior.
Si se ha de dejar la vajilla en la máquina durante un cierto tiempo, entreabrir la
puerta para favorecer la circulación del aire y mejorar el ulterior secado.
Qué hacer para ahorrar
1) En el caso que se desee lavar a plena carga, reponer la vajilla en la máquina
apenas terminada la comida, poniendo en marcha lo más pronto posible,
efectuando eventualmente el programa PRELAVADO FRIO para reblandecer la
suciedad y eliminar los residuos mayores entre una carga y otra en espera de
continuar el programa de lavado completo.
2) En presencia de suciedad poco consistente o del cesto no muy cargado seleccionar
un programa ECONOMICO siguiendo las indicaciones de la lista de programas.
Qué hacer para obtener óptimos resultados de lavado
1) Colocar la vajilla con la boca vuelta hacia abajo.
2) A ser posible evitar que la vajilla esté en contacto una contra la otra, una
correcta colocación le dará mejores resultados de lavado.
3) Antes de colocar la vajilla en la máquina, eliminar los residuos de comida (huesecillos,
espinas, residuos de carne o verdura, residuos de café, peladuras de fruta, ceniza
de cigarrillos, etc.) que puedan obturar las salidas de los brazos rociadores de lavado.
4) Después de haber colocado la vajilla, verificar que los brazos de lavado pueden
girar libremente.
5) Las ollas y otra vajilla que presentan residuos de comida muy tenaces o
requemadas, deberán ser puestas en remojo con agua y detergente para
lavavajillas.
6) Para el perfecto lavado de la plata es necesario:
a) aclarar apenas usada, sobre todo si ha estado empleada para mayonesa, huevos,
pescados, etc.
b) no rociarla con detergente
c) no ponerla en contacto con otros metales.
Qué hacer si
1) En el caso que se deba cerrar la máquina y abrir la puerta para introducir alguna
otra vajilla para lavar cuando el aparato está en la fase central de lavado, efectuar la
apertura sólo después de haber desconectado la máquina, accionando la tecla O/I.
Después de cerrar la puerta, esperar 3 minutos antes de recomenzar el lavado.
Qué cosa no se debe lavar si
En primer lugar es bueno recordar que no todo tipo de vajilla puede ser lavado en el
lavavajillas; se desaconseja introducir piezas en material termoplástico, cubiertos
con mando de madera o plástico, pucheros con asas de madera, vajilla de aluminio,
de cristal o vidrio aplomado si no está específicamente indicado.
Ciertas decoraciones pueden tender a decolorarse, por tanto, se aconseja efectuar
el lavado en máquina varias veces de una sola pieza y sólo después de comprobar
que no se decolora, lavar la totalidad de las piezas.
Por otro lado es aconsejable no lavar cubiertos de plata con cubiertos de acero para
evitar que se produzca una reacción química entre ambas.
Importante
Cuando se compre nueva vajilla cerciorarse siempre que es idónea para su lavado
en lavavajillas.
Limpieza exterior y mantenimiento
La chapa exterior puede limpiarse con producto especial para superficies
esmaltadas, siempre que no sea abrasivo.
El lavavajillas no requiere ningún mantenimento especial, ya que la cuba de lavado
es autolimpiante. Periódicamente limpiar la guarnición de goma de la puerta, con un
paño húmedo eliminando cuidadosamente cualquier resíduo de alimentos o
abrillantador. Para garantizar una mejor eliminación de pequeños depósitos
calcáceros o de suciedad, se aconseja realizar periódicamente un lavado completo
vertiendo previamente un vaso de vinagre en el interior del lavavajillas y hacer el
programa delicado. Si a pesar de la normal limpieza de placa y filtro, se notasen
vajillas o cacerolas insuficientemente lavadas o aclaradas, se debe controlar que
todos los rociadores de los brazos (fig. A“5”) estén libres de restos de suciedad.
Si este no fuese el motivo, proceder a su limpieza de la siguiente forma:
Para extraer el brazo superior, es necesario girarlo hasta llevarlo a la posición de
“tope” señalada por la flecha (fig. 1b), empuje hacia arriba y manteniéndolo
apretado girar en sentido horario (fig. 1). Para montarlo, repita la operación, pero
girando en sentido contrario a las agujas del reloj.
El aspersor inferior, se extrae simplemente estirando hacia arriba (fig. 2).
- Lavar el aspersor bajo un chorro de agua eliminando de suciedad los inyectores
obstruidos.
- Al término de la operación, monte de nuevo los aspersores en la idéntica posición.
1 2
1b
Page 53

105104
La resistencia para el calentamiento del agua está construída en un especial acero
inoxidable. Después de algún tiempo puede coger una coloración diferente que no
influye en sus prestaciones, sino que simplemente es un ajuste del metal.
Tanto la cuba como el interior de la puerta son de acero inoxidable. Si se produjeran
manchas de óxido, ello se debería únicamente a una fuerte presencia de sales de
hierro en el agua. Para quitar estas manchas se aconseja el uso de un abrasivo de
grano fino. No utilizar nunca substancias con cloro, cepillos de acero, etc.
DESPUES DEL USO
Después de cada lavado cerrar perfectamente el grifo del agua, para aislar el
lavavajillas de la red hidráulica de alimentación y desconectar el mando paro/marcha
para aislar la máquina de la red eléctrica. Si el lavavajillas debe permanecer parado
largo tiempo, aconsejamos las siguientes operaciones:
1. realizar un programa de lavado sin vajilla, pero con detergente, para desengrasar
la máquina.
2. desenchufar la toma corriente
3. cerrar el grifo del agua
4. rellenar el recipiente del abrillantador
5. dejar la puerta ligeramente abierta.
6. Dejar el interior de la máquina limpio.
7. Si la máquina se encuentra en un ambiente donde la temperatura es inferior a
0°C, el agua residual de los conductos puede congelarse. Por eso se debe
trasladar la máquina a un lugar donde la temperatura ambiente sea superior a
0°C y esperar 24 horas antes de ponerla en marcha.
ANOMALIA CAUSA REMEDIO
Búsqueda de pequeñas anomalías
Importante.
Antes de quitar cualquier panel: 1. Poner el mando en STOP.
2. Desconectar la clavija.
Si el lavavajillas no funcionase, antes de llamar al Servicio Asistencia Técnica, realizar los siguientes
controles:
1 - No funciona en ningún
programa
2 - No entra agua
3 - No desagua
4 - Desagua
continuamente
5 - No se oye ruido del giro
de las aspas
6 - En los lavavajillas
electrónicos sin visor: "Eco" y
indicador N "1" intermitente
con señal acústica
7 - En los lavavajillas
electrónicos con visor:
"indicación E1" en el visor con
señal acústica
Clavija no enchufada
Tecla O/I desconectada
Puerta abierta
Falta energía eléctrica
Ver causa 1
Grifo cerrado
Programador mal seleccionado
El tubo de entrada agua tiene un
pliegue
El filtro del tubo entrada agua está
sucio
Filtro sucio
Tubo desagüe doblado
La prolongación del tubo de
desagüe no es correcta
El desagüe de la pared no permite
un respiradero con el tubo de
desagüe de la máquina
Tubo desagüe en posición
demasiado baja
Excesiva carga detergente
Algún objeto que impide rotación
aspas
Placa filtrante y filtro sucios
Grifo del agua cerrado
Grifo del agua cerrado
Enchufar
Conectar
Cerrar puerta
Verificar
Verificar
Abrir
Seleccionar bien
Eliminar el pliegue del tubo
Limpiar el filtro colocado al extremo
del tubo
Limpiar filtro
Desdoblar
Seguir exactamente las
instrucciones para la instalación
del tubo de desagüe
Consultar a un técnico cualificado
Alzar tubo desagüe minimo
40 cm del suelo
Reducir dosis
Colocar bien
Limpiar placa y filtro
Apagar el lavavajillas
Abrir el grifo
Reintroducir el ciclo
Apagar el lavavajillas
Abrir el grifo
Reintroducir el ciclo
Page 54

106
NOTA: Si algún inconveniente de los citados provocase un mal lavado o un insuficiente aclarado, es
necesario remover manualmente la suciedad de la vajilla, ya que la fase final del secado provocaria el
desecado de la suciedad que, en un segundo lavado, la máquina no tiene la posibilidad de sacar.
Si la avería persiste llamar al centro de asistencia, comunicando el modelo de lavavajillas indicado sobre
la placa de características colocada en el interior de la puerta, en la parte superior o sobre la tarjeta de
garantía. Indicando toda la información obtendrá una intervención más rápida y eficaz.
El Fabricante declina cualquier responsabilidad por posibles errores de imprenta contenidos en el presente libro. Se
reserva, además, el derecho de de aportar modificaciones que sean útiles a los propios productos sin comprometer las
caracteristicas esenciales.
ANOMALIA CAUSA REMEDIO
8-Si lava solo parcialmente
9-Manchas blancas en la
vajilla
10 - Ruido durante el lavado
11 - La vajilla no está
perfectamente seca
Ver causa 5
Fondo de cacerolas no
perfectamente limpio
Borde cacerolas no perfectamente
limpio
Rociadores parcialmente
obturados
La vajilla no está colocada
correctamente
El extremo del tubo de desagüe está
inmerso en el agua
El detergente no está dosificado
adecuadamente, es viejo y/o está
endurecido
La tapa del contenedor de la sal no
está bien cerrada
El programa de lavado elegido es
muy suave
Vajillas cesto inferior no lavadas
Agua de red con excesiva
dureza
La vajilla golpea entre sí
Los brazos girantes golpean sobre
la vajilla
Falta de circulación de aire
Comprobar
Costras demasiado tenaces
Ablandar antes lavado
Colocar mejor
Desmontar y limpiar los brazos de
lavado
No acercar excesivamente la vajilla
una contra la otra
La extremidad del tubo desagüe no
debe tocar el agua
desaguada
Adecuar la dosis en función de la
cantidad de suciedad o sustituir el
producto
Enroscarla hasta el fondo
Elegir un programa más
enérgico
Desinsertar tecla media carga
Controlar nivel sal y abrillantador
y regular dosificacion
Si la anomalia persiste, solicitar
intervencion Asistencia Técnica
Adecuar mejor la vajilla en el cesto
Colocar mejor la vajilla
Dejar entreabierta la puerta de la
máquina al final del programa de
lavado para favorecer el secado
natural
SERVICIO POST VENTA
☎
902. 100. 150
107
Índice
Dispositivo de segurança
Regulação, instalação
Abertura da porta
Unidade amaciadora da água
Ajuste do cesto superior
Colocação da loiça na máquina
Programa de meia carga
Informações para os laboratórios de ensaio
Colocação do detergente e do abrilhantador
Limpeza dos filtros
Algumas sugestões práticas
Operações de limpeza e de manutenção de rotina
Detecção de pequenas avarias
página 108
página 109
página 111
página 112
página 114
página 115
página 119
página 120
página 120
página 122
página 123
página 124
página 126
23
1
4
5
Fig. A
Page 55

109
INSTALAÇÃO (Observações técnicas)
Depois de desembalar a máquina de lavar loiça regule
a sua altura, voltando, em seguida, a aparafusar a
porca de aperto até esta ficar encostada ao fundo da
máquina, bloqueando assim o respectivo pé na posição
ajustada.
Para que a sua máquina funcione em condições, é
condição essencial esta estar perfeitamente nivelada,
pelo que deverá regular os pés acima referidos de
modo a que a máquina não apresente uma inclinação
superior a 2 graus.
Atenção: Se o electrodoméstico for instalado num
local alcatifado, deverá assegurar-se de que as
aberturas de ventilação inferiores não fiquem
tapadas ou obstruídas.
Certifique-se que a tomada esteja num local accessivel após a instalação da
maquina de lavar loiça.
Alimentação de corrente
Esta máquina está em conformidade com as normas internacionais de segurança
emitidas pelas entidades normativas, e está equipada com uma ficha de três pólos,
com pólo de terra, assegurando desta forma uma total ligação à terra do aparelho.
A eficácia da segurança fica, assim, subordinada à correcta ligação à terra da
instalação eléctrica de sua casa.
Em caso de ausência de uma ligação adequada à terra, notará que, quando tocar nas
peças metálicas da sua máquina, sentirá uma ligeira descarga de energia eléctrica,
provocada pela presença de um supressor de interferências rádio. Antes de ligar a
sua máquina à instalação de alimentação eléctrica, deverá assegurar-se de que:
— a tomada está devidamente ligada à terra;
— a alimentação de corrente de que dispõe é suficiente para fazer frente ao consumo
indicado na placa de características da sua máquina.
Atenção: O fabricante declina toda e qualquer responsabilidade por quaisquer
danos ou avarias provocados por uma ligação incorrecta à terra da sua máquina.
Este aparelho está em conformidade com as directivas europeias
89/336/CEE, 73/23/CEE e respectivas alterações posteriores.
Ligação à rede de alimentação de água
As mangueiras de entrada e de esgoto de água tanto podem ficar voltadas para a
esquerda, como para a direita.
A máquina de lavar loiça tanto pode ser ligada à rede de alimentação de água
fria, como de água quente, desde que esta não atinja uma temperatura superior
a 60°C.
A pressão da água deve estar entre 0,08 e 0,8 MPa. Se a água estiver abaixo de
minimo, contacte o nosso serviço de assistência técnica.
A mangueira de entrada de água deverá ser ligada a uma torneira, de modo a ser
possível cortar a alimentação de água sempre que a máquina não estiver em
funcionamento (vide fig. 1 B). A máquina de lavar dispõe de um tubo de ligação
roscado de 3/4" (vide fig. 2).
Se for necessário prolongar a mangueira de entrada de água deverá utilizar a peça de
prolongamento com a referência 9225014, com um comprimento de 1,5 m.
108
Instruções de segurança
Por favor leia atentamente o presente manual de instruções. Além de incluir alguns
conselhos úteis, ele contém instruções importantes sobre a segurança da
instalação, a utilização e a manutenção da máquina de lavar loiça.
Conserve este manual num lugar seguro e à mão para o poder consultar sempre que
necessário.
Existem algumas regras de segurança básicas a serem observadas durante o
manuseamento de qualquer electrodoméstico:
– nunca toque no equipamento com as mãos ou os pés molhados ou húmidos;
– não utilize os seus electrodomésticos quando estiver descalça;
– nunca puxe pelo cabo ou pelo próprio electrodoméstico para desligar a ficha do
electrodoméstico da tomada;
– proteja o seu electrodoméstico dos elementos atmosféricos (chuva, sol, etc.);
– não deixe que crianças (ou adultos incapazes de operarem com electrodomésticos)
usem os equipamentos sem supervisão;
– certifique-se de que a ficha instalada no cabo do seu electrodoméstico é compatível
com a tomada de alimentação de corrente. Se não for, peça a uma pessoa
devidamente qualificada que instale uma ficha do tipo correcto e que verifique se
os cabos de ligação à tomada de alimentação de corrente se adequam à
potência nominal do equipamento;
– certifique-se que o aparelho não esteja sobre o cabo de alimentação;
–se a sua casa estiver equipada com uma instalação de descalcificação da água
não será necessário adicionar sal ao dispositivo de descalcificação com que a
máquina está equipada;
–a máquina de lavar loiça está protegida para a lavagem normal dos utensílios
domésticos. Nesta máquina não podem ser lavados objectos contaminados por
gasolina, verniz, resíduos de aço ou de ferro, produtos químicos corrosivos,
ácidos ou alcalinos;
– sempre que se queira desfazer de uma máquina de lavar loiça antiga, tenha o
cuidado de lhe retirar a fechadura da porta antes, para evitar que crianças se
possam fechar na máquina;
– este aparelho é fabricado com materiais recicláveis.
– evite recorrer a adaptadores, fichas múltiplas e/ou cabos de extensão.
–Aágua que fica na máquina ou na loiça a seguir à lavagem não deve ser bebida.
–Nunca se encoste nem se sente na porta da máquina, pois corre o risco de a fazer
tombar.
– Os talheres ficarão mais bem lavados se forem colocados no respectivo cesto,
com os cabos para baixo; no entanto, e para evitar ferimentos ou danos, também
os poderá colocar no cesto ao contrário, isto é, com os cabos para cima.
– Este electrodomestico foi concebido ara uso doméstico.
Em caso de necessidade de substitução do cabo de alimentação, contacte o
Departamento de Manutenção.
Se a sua máquina se avariar ou deixar de trabalhar correctamente desligue-a, feche
a alimentação de água e não tente repará-la. Qualquer trabalho de reparação
deverá ser sempre feito por um técnico autorizado, devendo sempre ser instaladas
peças sobressalentes originais. O incumprimento desta norma poderá acarretar
sérias consequências para a segurança dos equipamentos.
Page 56

Ligação ao sistema de esgoto de água
Ligue a mangueira de esgoto de água ao sistema de esgoto de água, tendo o
cuidado de não deixar que a mangueira fique torcida (fig. 4).
O sistema de esgoto fixo deverá ter um diâmetro interno de, pelo menos, 4 cm,
devendo ficar a uma altura mínima do chão de 40 cm.
Recomendamos a utilização de sifões anti-odores (fig. 4 x).
Se necessário, poderá prolongar a mangueira de esgoto da água até ao máximo de
2,6 m de comprimento, tendo porém o cuidade de nunca colocar a mangueira a uma
altura superior a 85 cm do chão. Se necessitar de prolongar a mangueira de esgoto
utilize a peça de prolongamento com a referência 9269214 e a peça de união com
a referência 9264427. A extremidade curva da mangueira de esgoto poderá ser
apoiada à borda de um lavatório (a fim de evitar o refluxo da água durante o
programa de lavagem,
deverá sempre certificar-se
de que a extremidade da
mangueira não se encontra
dentro de água. Vide a fig. 4 y).
Sempre que a máquina seja
instalada sob uma bancada
continua a curva deverá ser
fixada imediatamente abaixo
da bancada, num ponto o
mais alto possível (fig. 4 z).
Ao proceder à instalação da
máquina certifique-se sempre de que nem a mangueira
de entrada de água nem a
de esgoto de água fiquem
dobradas ou torcidas.
111
Instalação da sua máquina em cozinhas
modulares
Justaposição
A altura desta máquina (85 cm) foi estudada de modo a permitir a justaposição
perfeita da máquina entre equipamentos já existentes, nas modernas cozinhas
modulares. Aaltura dos pés da máquina pode ser regulada, a fim de permitir o juste
da posição correcta.
O topo da máquina, feito de laminado de alta resistência, não carece de qualquer
cuidado especial, pois é à prova de calor, de nódoas e de abrasão (vide fig. 5).
O topo da máquina, passível de ser utilizado como bancada de trabalho, pode ser
facilmente ajustado, de modo a ficar perfeitamente alinhado com o topo dos
restantes equipamentos; de facto, ele pode ser deslocado 5 mm de cada vez, até
um máximo de 25 mm. Para tal, há que desaparafusar os dois parafusos existentes
na parte de trás e fixar o topo na posição pretendida (vide fig. 6).
Incorporação (Quando a máquina for instalada por baixo de uma bancada de trabalho)
As cozinhas modernas dispõem normalmente de uma bancada de trabalho única,
sob a qual se introduzem os móveis básicos e os electrodomésticos.
Nesse caso, basta retirar o topo (bancada de trabalho) da sua máquina, desaparafusando,
para o efeito, os parafusos situados por baixo da extremidade posterior do topo (vide
fig. 6).
A máquina passará então a ter uma altura de 82 cm, conforme estipulado nas
normas internacionais (ISO), encastrando-se perfeitamente sob a bancada de
trabalho contínua da cozinha (vide fig. 7).
Adaptação de painéis (para alguns modelos)
Os perfis existentes à volta da porta permitem a montagem de painéis decorativos,
com uma espessura máxima de 5 mm, com as seguintes dimensões:
Largura: 591 mm ± 1 Altura: 597 mm ± 1
Abertura da porta
Introduza a sua mão na cavidade e puxe para cima.
Se a máquina for aberta durante o seu funcionamento, é automaticamente activado
um dispositivo eléctrico de segurança que suspende imediatamente todas as funções
da máquina. Para que a máquina possa funcionar devidamente, dever-se-á
evitar abrir a porta da máquina durante o funcionamento da mesma.
7
598
556/563
5
6
110
Amangueira de admissão A deve ser aparafusada à torneira de alimentação de água
B com uma ligação de 3/4". Certifique-se de que o anel de aperto fique bem apertado.
O tubo de ligação deverá ficar bem apertado, a fim de evitar fugas de água.
Se a água da sua zona for muito calcária (muito dura) recomendamos a obtenção de
um filtro (número de ref.a 9226085) junto dos Serviços de Assistência Técnica, o qual
deverá ser montado entre a torneira de alimentação de água B de 3/4" e a mangueira
de entrada de água A, de modo a que a anilha de borracha C fique entre eles (fig. 3).
Se a máquina for ligada a uma instalação de alimentação de água nova ou que tenha
estado sem ser utilizada durante um certo tempo, será recomendável deixar correr a
água durante alguns minutos antes de ligar as mangueiras de admissão de água da
máquina. Evita-se assim que eventuais depósitos de areia ou de ferrugem possam
entupir o filtro de admissão de água.
123
4
Page 57

Colocação do sal na máquina
A máquina dispõe de um descalcificador que
remove o calcário da água, o qual é responsável
pela formação de incrustações e por eventuais
danos na loiça.
No fundo da máquina existe um reservatório
para o sal, que serve para regenerar o sistema
de descalcificação.
A massa filtrante do sistema de descalcificação
deve ser reactivada com sal próprio para
regeneração do sistema de descalcificação de
máquinas de lavar loiça.
Outros tipos de sal contêm pequenas quantidades
de partículas insolúveis, que a longo prazo
podem afectar e deteriorar a acção do amaciador.
Para colocar o sal no reservatório, situado no fundo da máquina, deverá desaparafusar
a respectiva tampa, e encher então o reservatório.
É natural que, durante esta operação, transborde uma pequena quantidade de água;
continue a deitar o sal até o reservatório ficar cheio, mexendo a mistura com uma colher.
Isto feito, limpe eventuais restos de sal que tenham ficado na rosca e volte a
aparafusar a tampa.
Se a máquina de lavar não for utilizada imediatamente, execute o programa de
pré-lavagem a frio, a fim de remover eventuais resíduos de sal que tenham ficado
no interior da máquina.
A capacidade do dispensador de sal varia entre 1,5 e 1,8 kg e, para assegurar uma
prestação mais eficaz da máquina, deverá acrescentar-lhe sal de tempos a tempos,
de acordo com a regulação ajustada para a unidade amaciadora da água.
Atenção: Quando a máquina é posta em funcionamento pela primeira vez, depois
de ter enchido completamente o reservatório de sal é necessário juntar água até o
conteúdo do reservatório transbordar. Esta operação, porém, só deverá ser
efectuada quando a máquina for posta em funcionamento pela primeira vez.
113
Regulação do amaciador da água
Atabela que se segue apresenta diversos graus de dureza da água e a regulação da
unidade amaciadora indicada a cada grau de dureza.
112
Fecho da porta da máquina
Introduza os cestos para a loiça na máquina.
Assegure-se de que ambos os braços rotativos de lavagem se podem movimentar
livremente, não ficando o seu movimento obstruído por talheres, loiça ou tachos e
panelas. Feche a porta, exercendo uma certa pressão sobre ela, de modo a ficar
bem fechada.
Unidade amaciadora da água
Dependendo da origem da água abastecida, esta poderá caracterizar-se por diferentes
teores de calcário e de minerais, que se depositam na loiça, deixando manchas e
marcas esbranquiçadas.
Quanto mais elevado for o teor destes minerais na água, tanto mais dura será a água.
A máquina de lavar loiça está equipada com uma unidade amaciadora da água que,
mediante a utilização de um sal regenerador especial, alimenta água previamente
amaciada à máquina, para a lavagem da loiça. A unidade amaciadora está apta a
tratar água com um grau de dureza de, no máximo, 60º fH (graduação francesa) ou
de 33º dH (graduação alemã), dispondo de 5 posições de regulação diferentes.
Para saber qual o grau de dureza da água da sua zona, contacte a entidade
responsável pelo abastecimento da mesma, a qual lhe poderá dar a informação
pretendida.
Nivel
0
1
*2
3
4
Dureza da
água ºfH
(graduação
francesa)
0-9
10-30
31-40
41-50
51-60
Dureza da
água ºdH
(graduação
alemã)
0-5
6-16
17-22
23-27
28-33
Utilização
de sal
regenerador
NAO
SIM
SIM
SIM
SIM
Regulação do
amaciador
da água
LIVRE
posição N.1
posição N.2
posição N.3
posição N.4
Quantidade
de lavagens
50
40
30
20
*Aunidade amaciadora da água vem regulada de fábrica para o nível 2, na medida em
que esta é a regulação mais apropriada para uma maior quantidade de utilizadores.
Se o grau de dureza da água da sua zona corresponder a 0, não terá de utilizar sal
regenerador nem terá de proceder a qualquer ajuste, pois a água que lhe é fornecida
é uma água macia. Dependendo do grau de dureza da água que lhe é abastecida,
deverá regular a unidade amaciador da seguinte forma:
N.B.: Para modelos equipados com programador electronico é favor referir à
lsta de programa em anexo.
- Remova o cesto inferior da máquina. Desaperte e
remova a tampa que cobre o dispensador de sal,
colocado no fundo da cuba (fig. A“1”)
- Servindo-se de uma chave de fendas ou de uma
faca, rode o parafuso de regulação para a
posição pretendida.
Indicador da quantidade de sal
Alguns modelos dispõem de um indicador
luminoso que assinala o consumo de sal.
Este indicador iluminar-se-á segundo um dos
dois sistemas abaixo indicados:
– um indicador luminoso no painel de controlo
que se ilumina quando é necessário voltar a
colocar sal na máquina;
– a tampa do reservatório de sal tem um indicador móvel de cor verde que se
mantém visível enquanto o sal contido no reservatório for suficiente para a
regeneração da água. Quando a superfície verde estiver metida para dentro da
tampa será necessário colocar mais sal na máquina.
Outros modelos estão equipados com uma tampa opaca; nesse caso, deverá
proceder periodicamente à verificação do nível de sal, de acordo com a regulação
ajustada para a unidade amaciadora da água.
Importante: Em geral, o aparecimento de manchas brancas na loiça é um sinal
importante de que é necessário colocar mais sal na máquina.
TIPO 1
TIPO 2
Page 58

115
Carregamento da máquina
Carregamento da loiça
Afim de garantir os melhores resultados de lavagem e de evitar que os filtros, as
saídas de despejo de água e os orifícios dos braços rotativos de lavagem fiquem
bloqueados e prejudiquem a qualidade da lavagem é fundamental remover os restos
de comida dos pratos (ossos, palitos, os restos de carne e de vegetais).
Evite passar a loiça por água antes de a colocar na máquina.
Se os tachos, as panelas e os pratos de ir ao forno se apresentarem muito sujos,
com restos de comida agarrados, será aconselhável pô-los de molho antes de os
meter na máquina.
Como usar o cesto superior
O cesto superior dispõe de duas prateleiras móveis, presas às partes laterais do
cesto, e que podem ser colocadas em duas posições: ao alto ou deitadas. Quando
estão deitadas estas duas prateleiras podem ser utilizadas para colocar chávenas
de chá ou de café, facas e talheres de cozinha. Os copos de pé podem ser
pendurados nas extremidades das prateleiras com toda a segurança.
Por baixo destas prateleiras podem ser colocados copos, chávenas, pires e pratos
de sobremesa.
Os pratos de sopa e os pratos rasos poderão ser colocados com as prateleiras ao
alto.
Os pratos deverão ser colocados na vertical, com a parte de trás virada para o fundo
da máquina, devendo ser deixado espaço suficiente entre os pratos para que a água
circule livremente.
A fim de tirar o melhor proveito possível da capacidade do cesto será aconselhável
colocar os pratos do mesmo tamanho uns ao pé dos outros.
Os pratos tanto poderão ser colocados numa fila única (fig. 1) como em duas filas
(fig. 2).
Os pratos maiores (com um diâmetro de aproximadamente 270 mm) deverão ser
colocados ligeiramente inclinados para trás a fim de facilitar a introdução do cesto
na máquina.
As saladeiras e outras taças ou caixas de plástico deverão também ser colocadas
no cesto superior. Convém colocá-las de modo a que os jactos de água não as
virem.
O cesto superior foi concebido de modo a proporcionar uma grande flexibilidade de
utilização, podendo levar o máximo de 24 pratos em duas filas, o máximo de 30
copos em cinco filas ou uma carga mista.
Como usar o cesto inferior
No cesto inferior deverão ser colocados tachos e panelas, pratos de ir ao forno,
terrinas, saladeiras, tampas, travessas, pratos rasos, pratos de sopa e talheres de
cozinha (conchas, colheres de pau, etc.).
Arrume os talheres no respectivo recipiente de plástico, com o cabo para baixo.
Coloque o recipiente para os talheres no cesto inferior da máquina (fig. 3),
assegurando-se de que não esteja a impedir o movimento dos braços rotativos.
114
Regulação do cesto superior (só nos modelos preparados para esse efeito)
Se usa habitualmente pratos com um diâmetro entre os 27 cm e os 31 cm, coloqueos no cesto inferior, depois de ter previamente colocado o cesto superior na posição
mais alta, para o que deverá proceder da seguinte forma (Acordando para os modelos):
Tipo “A”:
1) Rode os dispositivos de fixação anteriores A para fora;
2) Retire o cesto e volte a montá-lo na posição mais alta;
3) Volte a colocar os dispositivos de fixação A na posição original.
Com o cesto superior nesta posição, não é possível colocar no referido cesto loiça
ou utensílios de cozinha de diâmetro superior a 20 cm. Além disso, e estando o
cesto superior nesta posição, também não será possível utilizar os suportes móveis
na posição mais alta.
A
A
Tipo “B”:
1) Puxe o cesto superior;
2) Aperte o cesto para ambos os lados e levante-o para cima (fig. 1).
Com o cesto superior nesta posição, não é possível colocar no referido cesto loiça
ou utensílios de cozinha de diâmetro superior a 20 cm. Além disso, e estando o
cesto superior nesta posição, também não será possível utilizar os suportes móveis
na posição mais alta.
AJUSTE O CESTO PARA UMA POSIÇÃO INFERIOR:
1) Aperte o cesto para ambos os lados e levante-o levemente para cima (fig. 2a);
2) Calmamente coloque a posição correta (fig. 2b).
N. B. : NUNCA LEVANTE NEM BAIXE O CESTO POR UM LADO SÓ (fig. 3).
Atenção: É aconselhável ajustar o cesto, antes de o carregar.
a
b
a
b
1
2
3
Page 59

116
Um carregamento diário standard é representado nas figuras 1, 2 e 3.
Cesto superior (fig. 1)
A = Pratos de sopa
B = Pratos rasos
C = Pratos de sobremesa
D = Pires
E = Chávenas
F = Copos
Cesto superior (fig. 2)
A = Pratos de sopa
B = Pratos rasos
C = Pratos de sobremesa
D = Pires
E = Chávenas
F = Copos com pé
G = Copos
H = Cesto de um compartimento
para talheres
Cesto inferior (fig. 3)
A = Panela de tamanho médio
B = Panela de tamanho grande
C = Frigideira
D =Tampas
E = Terrinas, travessas
F =Talheres
G = Pratos de ir ao forno
Para se obterem os melhores resultados de
lavagem é condição essencial carregar a
loiça na máquina de forma correcta e
racional.
1
2
3
A
B
C
D
FE
GH
DF AG
E
B
C
A
B
C
D
E
F
QN
M
P
O
M
N
R
A
F
C
C
C
G
B
E
D
H
H
L
I
4
5
6
117
Cesto inferior (fig. 5)
M = 8 + 4 pratos de sopa
N = 11 + 1 pratos rasos
O = 12 pratos de sobremesa
P = Travessa
Q =Talheres
Cesto para talheres (fig. 6)
Coloque os compartimentos laterais na
posição inferior e encha-os com 6+6 facas;
no espaço restante coloque talheres, com o
cabo virado para baixo, tendo o cuidado de
não colocar dois diferentes tipos de talheres
no mesmo compartimento.
Cesto para talheres sem compartimentos
laterais
Coloque os restantes talheres, tendo o
cuidado de não colocar diferentes tipos de
talheres no mesmo compartimento.
(Normas EN 50242).
A figura 4 apresenta o modo correcto de carregar o cesto superior e a figura 5
indica o modo correcto de carregar o cesto inferior. Fig. 6 - Cesto para talheres.
Cesto superior (fig. 4)
A = 5 + 5 + 2 copos
B = 12 pires
C = 4 + 4 + 4 chávenas
D = Taça pequena
E = Taça média
F = Taça grande
G = 1 + 1 garfos
H = 1 + 1 colheres grandes
I = 3+3+3+3
colheres de sobremesa
L = 3+3+3+3 colheres de chá
Page 60

119
1/2 carregamento misto (fig. 1)
A = copos
B = chávenas de café ou de chá
C = pratos de sopa
D = pratos rasos
E = pratos de fruta
F = pires de café, chá, etc.
G = tachos com cabo
H = tampas
I = frigideiras
L = taças mèdias
M = taças pequenas
1/2 carregamento standard (fig. 2)
A = 6 copos
B = 5 + 1 chávenas de café ou de chá
C = travessas
D = 6 pratos de sopa
E =6 pratos rasos
F =6 pratos de fruta
G =6 pires de café ou de chá
H = taças mèdias
I = taças pequenas
Os talheres deverão ser colocados dentro do cesto, em
plástico, o qual por sua vez se encontra no cesto inferior.
Cesto inferior (fig. 3)
A = Panela de tamanho médio
B = Panela de tamanho grande
C = Frigideira
D =Tampas
E = Terrinas, travessas
F =Talheres
G = Pratos de ir ao forno
Para se obterem os melhores resultados de lavagem é
condição essencial carregar a loiça na máquina de forma
correcta e racional.
Cesto inferior (fig. 4)
M = 8 + 4 pratos de sopa
N = 11 + 1 pratos rasos
O = 12 pratos de sobremesa
P = Travessa
Q =Talheres
118
Atenção (fig. 7)
O cesto inferior tem duas filas de prateleiras
dianteiras que podem ser colocadas numa
posição inferior que muito fácil e rápidamente
permite colocar a carga de taças de salada,
panelas e tampas.
(Só nos modelos preparados para esse efeito)
PRATELEIRAS INFERIORES:
1) Levante as prateleiras para cima e deixeas descair na posição correcta;
2) Levantado depois, é o suficiente para as
levar para a posição vertical.
Cesto para talheres (fig. 8)
O cesto para talheres é composto por duas
partes destacáveis que possibilitam vários
tipos de carregamento dos talheres. As duas
partes podem ser separadas deslizando a
secção esquerda em sentido contrário da
secção direita.
Em alguns modelos, o cesto dos talheres
não está equipado com divisórias centrais.
1
2
7
8
Q
N
M
P
O
M
N
4
D
FAG
E
B
C
3
AG
M
L
B
H
D
C
E
I
F
1
AGI
BC
F
E
H
D
2
Cesto inferior para lavagem de 1/2 carregamento
(só nos modelos preparados para esse efeito)
Cesto superior para lavagem de 1/2 carregamento
(só nos modelos preparados para esse efeito)
Page 61

121
3
4
3
Colocação do aditivo (abrilhantador)
O compartimento para aditivos encontra-se
do lado direito do compartimento para
detergente, e tem capacidade para aproximadamente 130 ml de líquido (fig. A "3").
Rode a tampa (3) no sentido inverso dos
ponteiros do relogio e coloque o liquido
(preparado para durar várias lavagens) até
ao nivel máximo. Recoloque a tampa.
O aditivo, que é automaticamente despejado
durante o último ciclo de enxaguamento,
contribui para uma secagem mais rápida da
loiça, prevenindo a formação de manchas e
a acumulação de resíduos opacos.
O nível do aditivo pode ser controlado
através do visor situado no centro do
dispositivo (4).
Regulação do doseamento do
aditivo de 1 a 6
O regulador encontra-se sob a tampa (3)
(Use uma moeda para o rodar).
A posição aconselhada é a 3.
O teor de calcário da água manifesta-se
quer através da presença de incrustações,
quer através do grau de secagem.
É fundamental regular o doseamento do
aditivo de forma conveniente, para que os
resultados sejam sempre os melhores.
Se a loiça parecer estar riscada, dever-se-á
seleccionar uma posição mais baixa, e, se a
loiça apresentar manchas ou resíduos
brancos, dever-se-á seleccionar uma
posição mais elevada.
120
Informações para os laboratórios de ensaio
Programa comparativo geral
(vide selecção de programas)
Colocação do detergente e do abrilhantador
Colocação do detergente
É de grande importância utilizar um detergente específico para máquinas de
lavar loiça, quer seja em pó, líquido ou em forma de pastilhas.
Os detergentes que não são adequados para as máquinas de lavar loiça (como, por
exemplo, os detergentes para a lavagem de loiça à mão) não contêm os ingredientes
adequados à lavagem de loiça na máquina e impedem o correcto funcionamento da
máquina.
Lavagem normal
O recipiente para o detergente para a lavagem
encontra-se do lado de dentro da porta
(fig. A "2"). Se, por qualquer motivo, a tampa
do recipiente ficar fechada, para a abrir basta
agir sobre o botão de fecho. No fim dos
programas de lavagem a tampa fica sempre
aberta, pronta para a utilização seguinte.
A dose de detergente pode variar em função
do grau de sujidade e do tipo de loiça a lavar.
Em geral, recomendamos a utilização de 20 +
30 gr de detergente na secção de lavagem do
compartimento do detergente (1).
Depois de ter deitado o detergente no respectivo recipiente, tape-o com a
respectiva tampa.
Como os detergentes não são todos iguais, consulte também as instruções inscritas
na embalagem do detergente. Recordamos que uma quantidade insuficiente de
detergente provoca uma má remoção da sujidade, enquanto que uma quantidade
excessiva de detergente, além de não melhorar os resultados da lavagem,
representa um desperdício.
A utilização das quantidades adequadas de detergente - nem detergente em
excesso nem detergente a menos - representa um contributo para a defesa do
meio ambiente.
Lavagem intensiva (para alguns modelos)
Se escolher o programa de lavagem intensivo universal há que acrescentar uma
quantidade adicional de detergente (20 gr - cerca de 1 colher de sopa) na secção de
pré-lavagem do compartimento do detergente (2).
CHEIO VAZIO
escuro claro
Page 62

123
Conselhos práticos
Selecção do programa
Esta máquina de lavar loiça coloca à sua disposição uma vasta gama de programas de
lavagem que se adaptam às várias exigências de sujidade e de tipos de loiça a lavar.
Consulte a “Tabela de Programas” anexa ao presente manual para escolher o programa que
melhor se adapte às suas necessidades.
Sugestões úteis
Ao descarregar a máquina, comece por descarregar a loiça do cesto inferior, pois evitará
assim que caiam eventuais gotas do cesto superior para o inferior. Se pretender deixar a loiça
na máquina durante algum tempo, abra ligeiramente a porta, permitindo assim a circulação
do ar e favorecendo a secagem da loiça.
Como ECONOMIZAR água, detergente e energia:
1) Se só quiser lavar a loiça quando a máquina estiver completamente cheia, coloque a loiça
na máquina a seguir a cada refeição, até que a máquina fique cheia. Se quiser, e para
remover a maior sujidade da loiça e não deixar os restos de comida secarem até à lavagem,
efectue uma PRÉ-LAVAGEM A FRIO. Assim, só terá de programar a máquina para uma
lavagem completa quando ela estiver cheia de loiça.
2) Se a loiça não estiver muito suja, ou se quiser lavar a loiça sem que a máquina esteja
completamente cheia, opte pelo programa ECONÓMICO.
Reja-se pelas indicações constantes da Tabela de Programas.
Como obter os melhores RESULTADOS de lavagem:
1) Coloque a loiça na máquina com as aberturas voltadas para baixo.
2) Se possível, evite que as peças de loiça e os utensílios fiquem encostados uns aos outros.
Uma arrumação correcta da loiça contribuirá para a obtenção dos melhores resultados possíveis.
3) Antes de meter a loiça na máquina remova os restos de comida (ossos, espinhas de peixe,
restos de carne ou de legumes, resíduos de café, cascas de fruta, cinza de cigarros, etc.) que
poderiam entupir o sistema de despejo da máquina e os bicos de aspersão dos braços
rotativos da máquina.
4) Depois de meter a loiça na máquina, assegure-se que os braços rotativos não fiquem
presos, podendo girar livremente.
5) Os tachos, as panelas e os outros utensílos que apresentem restos de comida muito
agarrados ou queimados deverão ser postos de molho com água e detergente para a máquina.
6) Para que as pratas fiquem perfeitamente lavadas na máquina será necessário:
a) Passá-las por água imediatamente a seguir a serem utilizadas, em especial se tiverem sido
utilizadas para servir ou comer pratos com molhos (mayonnaise, etc.), ovos, peixe, etc.;
b) não lhes deitar detergente directamente para cima;
c) não as deixar entrar em contacto com outros metais.
Como FAZER se:
1) Tiver de parar a máquina e abrir a porta para introduzir mais loiça a lavar durante a fase
central da lavagem: desligue a máquina com o botão de ligar/desligar O/I, abra a porta e
coloque a loiça a lavar na máquina. Volte a fechar a porta e espere 3 minutos antes de voltar
a ligar a máquina com o botão de ligar/desligar O/I.
Loiça e utensílios que não devem ser lavados na máquina:
É sempre bom recordar que nem todos os tipos de loiça e de utensílios podem ser lavados
na máquina. Os objectos e utensílios de termoplástico, que disponham de pegas de madeira
ou de plástico, os tachos com pegas de madeira, os utensílios em alumínio, de cristal ou de
vidro de chumbo só poderão ser lavados na máquina se o respectivo fabricante assim o indicar.
Como as decorações de alguns tipos de loiça têm tendência para desaparecer na máquina,
será recomendável experimentar primeiro lavar uma só peça desse serviço. Só depois de se
certificar de que a decoração não sai ou não perde cor se a loiça for lavada na máquina é que
deverá lavar todo o serviço na máquina.
Nunca lave objectos de prata em conjunto com objectos de aço inoxidável: A reacção química
que se desencadeia pelo contacto dos dois tipos de metal poderá danificar irremediavelmente
os objectos.
IMPORTANTE:
Antes de lavar pela primeira vez um objecto ou utensílio novo na máquina deverá certificar-se
de que o mesmo pode realmente ser lavado na máquina.
122
O conjunto de filtragem (fig. A“4”) é constituído
pelos seguintes elementos:
um recipiente central, que retém as partículas
de sujidade de maiores dimensões, um crivo
plano, que filtra continuamente a água da
lavagem, um microfiltro, instalado por baixo
do crivo, que retém as partículas de dimensões
mais reduzidas, assegurando um enxaguamento
perfeito da loiça.
Para assegurar sempre a obtenção de excelentes
resultados da lavagem, deverá verificar e limpar os
filtro a seguir a cada lavagem.
Para remover o conjunto de filtragem terá
apenas de rodar a respectiva pega no sentido
contrário ao dos ponteiros do relógio (fig. 1).
Para maior facilidade de limpeza, o recipiente
central pode ser retirado (fig. 2).
Remova o crivo (fig. 3) e lave todo o conjunto
debaixo de um jacto de água limpa. Se necessário,
poderá servir-se de uma escova pequena para
limpar melhor o filtro.
No caso dos modelos equipados com o
microfiltro autolimpante, a manutenção do
conjunto de filtragem torna-se ainda mais
simples, só sendo necessário verificar este
conjunto de filtragem de duas em duas
semanas. No entanto, a seguir a cada lavagem
será conveniente certificar-se de que o
recipiente central do conjunto de filtragem e o
crivo não estão entupidos.
NOTA: Depois de limpar os diversos
componentes do conjunto de filtragem
deverá sempre certificar-se de que os voltou
a montar devidamente e de que o crivo ficou
correctamente instalado, de forma a ficar
perfeitamente encaixado, no fundo da cuba da
máquina.
Deverá igualmente certificar-se de que o
conjunto de filtragem ficou devidamente
aparafusado (não se esqueça de que, para o
aparafusar, terá de o rodar no sentido dos
ponteiros do relógio), na medida em que
uma instalação errada ou incorrecta do
conjunto de filtragem prejudica a eficácia
da máquina de lavar loiça.
Atenção: Nunca utilize a máquina de lavar
loiça sem os filtros estarem instalados.
Limpeza dos filtros
1
2
3
Page 63

125
A resistência de aquecimento da água é feita de um aço inoxidável especial, o qual,
passado algum tempo, pode mudar de cor; isto não afecta de modo algum nem a
sua operação, nem a sua vida útil.
Tanto o revestimento interior da porta, como o revestimento interior da máquina são
feitos de aço inoxidável; no entanto, se surgirem manchas de oxidação, tal ficará
provavelmente a dever-se ao elevado teor de sais de ferro da água. Estas manchas
poderão ser removidas com um detergente ligeiramente abrasivo; nunca utilize
produtos à base de cloro, de palha de aço, etc.
MANUTENÇÃO (depois de concluído o ciclo de lavagem)
Depois de concluído qualquer ciclo de lavagem, é essencial fechar a alimentação de
água e desligar a máquina com a tecla de ligar/desligar. Se não pretender utilizar a
sua máquina durante algum tempo, é conveniente observar as seguintes regras:
1. Execute um ciclo de lavagem com a máquina vazia, mas com detergente, a fim
de limpar eventuais depósitos existentes na máquina.
2. Desligue a ficha do cabo de alimentação eléctrica da máquina da tomada de
alimentação de corrente.
3. Feche a tomeira de alimentação de água.
4. Encha o reservatório do aditivo de lavagem.
5. Deixe a porta aberta.
6. Deixe o interior da máquina limpo.
7. Sempre que a máquina ficar num ambiente com temperaturas inferiores a 0°C, a
água que fica nas mangueiras e no interior dos sistemas da máquina poderá congelar.
Nesse caso, e antes de colocar a máquina novamente em funcionamento, deverá
fazer com que a temperatura ambiente suba acima dos 0°C e esperar 24 horas
antes de ligar a máquina.
124
Limpeza e manutenção
O exterior da máquina pode ser limpo com um produto de limpeza não abrasivo,
adequado à limpeza de superfícies esmaltadas.
A sua máquina de lavar loiça não requer cuidados especiais de manutenção, pois o
seu interior é autolimpante. Limpe regularmente a guarnição de borracha da porta
com um pano húmido, a fim de remover eventuais restos de comida ou de aditivo.
Recomenda-se que proceda à remoção periódica de eventuais depósitos de
calcário ou de lixo, procedendo a uma lavagem com a máquina vazia. Nesse caso,
deite um copo de vinagre no fundo do interior da máquina, e seleccione um programa
de lavagem delicada.
Se, tendo procedido previamente à limpeza do filtro, a loiça e as panelas parecerem
não ter sido devidamente lavadas ou enxaguadas, verifique se todos os orifícios dos
braços rotativos de lavagem (fig. A "5") se encontram desobstruídos, isto é, se não
estão tapados por restos de comida.
Se os orifícios estiverem obstruídos, proceda da seguinte forma:
Para remover o braço rotativo superior terá de o rodar até ficar alinhado com a paragem
indicada pela seta (fig. 1b). Em seguida, empurre-o para cima e, mantendo-o
empurrado para cima, rode-o no sentido dos ponteiros do relógio para o desaparafusar.
Para o voltar a montar, execute estas operações certificando-se porém de que,
desta vez, roda o braço rotativo no sentido contrário ao dos ponteiros do relógio
(para o aparafusar). Para remover o braço rotativo inferior basta puxá-lo para cima
(fig. 2).
-Uma vez desmontados os braços rotativos, lave-os debaixo de um jacto de água
limpa para eliminar qualquer obstrução dos orifícios de pulverização de água.
- Depois de os ter lavado, volte a colocar os braços rotativos na mesma posição,
não se esquecendo de colocar o braço rotativo superior na posição de paragem e
de o aparafusar completamente.
1 2
1b
Page 64

127126
AVARIA CAUSA PROVÁVEL ACÇÃO NECESSÁRIA
Detecção de pequenas avarias
Atenção:
Antes de remover qualquer cesto deverá sempre: 1. Rodar o selector de programas até
à posição STOP.
2. Desligar a ficha do cabo de alimentação de corrente da tomada.
Se a sua máquina não funcionar em condições, ou se deixar totalmente de funcionar, agradecemos que, antes de contactar os Serviços de Assistência Técnica, proceda às seguintes
verificações:
1 - A máquina não funciona
2 - A máquina não mete água
3 - A máquina não despeja água
4 - A máquina despeja água
constantemente
5 - Não se ouvem os braços rot.
de lavagem rodar
6 - Nas máquinas equipadas com
unidade electrónica amaciadora
sem mostrador: indicador
luminoso “eco” e indicador
luminoso “nº 1”, acompanhados
por um sinal sonoro.
7- Nas máquinas equipadas com
unidade electrónica amaciadora
com mostrador: no mostrador é
apresentada a indicação “E1”,
acompanhada por um sinal
sonoro
A máquina não está ligada
à corrente
A tecla de ligar / desligar
não foi premida
Porta mal fechada
Falha de alimentação de
corrente
Vide ponto (1)
Torneira fechada
Selecção incorrecta de
programa
Mangueira de admissão
dobrada ou torcida
O filtro existente na mangueira de
admissão está entupido
Mangueira de esgoto dobrada
ou torcida
Filtro obstruído
Mangueira de descarga com
extensão incorrecta
O respiradouro do sistema de
descarga na parede não está ao ar
Mangueira de esgoto numa
posição demasiado baixa
Quantidade excessiva
de detergente
Movimento dos braços impedido
por algum objecto
Placa / parte central do filtro
muito sujos
Torneira de admissão
de água fechada
Torneira de admissão
de água fechada
Ligue a máquina à corrente
Pressione a tecla
Feche a porta
Verifique
Verifique
Abra a torneira
Volte a seleccionar o programa
Endireite-a
Limpe o filtro colocado
na extremidade da mangueira
de admissão
Endireite a mangueira
Verifique filtro
Siga rigorosamente as instruções
relativas à ligação da mangueira de
descarga
Consulte um técnico qualificado
A mangueira tem de estar a uma
altura mínima de 40 cm
Reduza quantidade.
Use detergente próprio
Verifique
Verifique
Desligue a máquina.
Abra a torneira.
Volte a reiniciar o ciclo de lavagem.
Desligue a máquina.
Abra a torneira.
Volte a reiniciar o ciclo de lavagem.
AVARIA CAUSA PROVÁVEL ACÇÃO NECESSÁRIA
N.B.: Se, em consequência de alguma das situações acima descritas, a máquina não lavar devidamente a loiça, será necessário remover manualmente os depósitos eventualmente existentes na loiça, pois o
ciclo final de secagem endurece esses depósitos, sendo assim impossível serem removidos através de
uma nova lavagem na máquina.
Se, depois de efectuadas as verificações acima referidas, a máquina continuar a não trabalhar em
devidas condições ou continuar avariada, agradecemos que entre em contacto com o Centro de
Assitência Técnica mais próximo. Ao fazê-lo, deverá indicar o modelo da sua máquina, que consta quer
da placa de características colocada na parte de dentro da porta, em cima, quer do certificado de
garantia ou da factura. O fornecimento destas informações permite resolver mais rapidamente o seu
problema.
Salvaguardam-se erros e alterações!
O fabricante declina toda e qualquer responsabilidade por quaisquer gralhas, incorrecções ou erros deste
manual de instruções. O fabricante reserva-se ainda o direito de proceder a quaisquer alterações ou
modificações nos aparelhos, conforme necessário, sem alterar as suas características essenciais.
Salvaguardam-se erros e alterações!
8 - A loiça colocada na máquina
só está parcialmente lavada
9 - A loiça apresenta manchas
brancas
10 - A máquina faz muito barulho
durante a lavagem
11 -Aloiça não ficou bem seca
Vide ponto (5)
Fundo das panelas não foi
devidamente lavado
Bordas das panelas mal lavadas
Braços de lavagem
parcialmente obstruídos
Loiça mal arrumada
Extremidade da mangueira de
descarga imersa em água
Quantidade de detergente mal
doseada, detergente já velho ou
endurecido
A tampa do recipiente para o sal não
ficou bem fechada
O programa de lavagem
seleccionado é demasiado suave
A loiça colocada no cesto
inferior não foi lavada
Água demasiado dura
Os objectos a lavar batem uns
contra os outros
Os braços rotativos batem de
encontro à loiça
Má circulação de ar
Verifique
Restos de comida presos ao fundo
devem ser amolecidos antes da
lavagem
Coloque-as noutra posição
Retire braços, soltando porcas de
fixação e lavando-os sob jacto de
água
Não encoste os objectos uns aos
outros
A extremidade da mangueira de
descarga não deve ficar a tocar na
água que foi despejada
Aumente a quantidade de
detergente utilizada em função da
sujidade da loiça ou substitua o
detergente
Aparafuse a tampa até ao fim
Escolha um programa mais
enérgico
Prima a tecla de meia carga
Verifique o nível de sal e aditivo.
Caso as manchas não
desapareçam,
contacte os Serv. de Ass. Técnica
Arrume melhor a loiça
Arrume melhor a loiça
Abra ligeiramente a porta da
máquina no fim do programa a fim
de favorecer a circulação do ar
Page 65

129
Conseils de sécurité
Lire attentivement les instructions contenues dans ce livret car elles donnent
d'importantes indications sur la sécurité d'installation, d'utilisation et de maintenance
ainsi que quelques conseils utiles pour mieux utiliser le lave-vaisselle.
Conserver avec soin ce livret pour toute consultation ultérieure.
L'emploi de n'importe quel appareil électrique comporte l'observation de règles
fondamentales.
En particulier:
– Ne pas toucher l'appareil avec les mains ou pieds mouillés ou humides
– Ne pas utiliser l'appareil pieds nus
– Ne pas tirer sur le câble d'alimentation de l'appareil pour débrancher la prise du
courant
– Ne pas laisser exposer l'appareil à des agents atmosphériques (pluie, soleil etc...)
– Ne pas permettre que l'appareil soit utilisé par des enfants sans surveillance
– Le socle ainsi que la prise mâle de l'appareil doivent correspondre à la puissance
maximum absorbée par l'appareil.
En cas de nécessité de remplacement de l'un ou de l'autre de ces éléments, faire
effectuer la modification par un professionel patenté.
– S'assurer que l'appareil n'écrase pas le fil électrique d'alimentation
– S'il y a une installation d'adoucissement de l'eau dans l'habitation, il n'est pas
nécessaire d'ajouter de sel dans l'adoucisseur monté dans le lave-vaisselle
– Le lave-vaisselle est conçu pour laver des ustensiles domestiques normaux. Les
objets contaminés par de l'essence, de la peinture, des restes d'acier ou de fer,
des produits chimiques corrosifs, acides ou alcalins ne doivent pas être lavés en
machine
– Si l'on veut se débarrasser d'un vieux lave-vaisselle, enlever le système de
fermeture de la porte pour que les enfants ne puissent pas s'enfermer dans la
machine.
– Cet appareil est fabriqué avec des matériaux recyclables pour permettre de les
éliminer avec facilité
– L'utilisation de prises multiples et/ou rallonges est déconseillée et dégage le
constructeur de toutes responsabilités.
– Si le remplacement du câble d'alimentation s'avère nécessaire, l'opération doit
être réalisée par le Service Après-vente.
A la fin du programme de lavage, l’eau résiduelle dans l’appareil ou sur la vaisselle,
ne doit pas être consommée.
S’appuyer ou s’asseoir sur la porte ouverte du lave vaisselle risque d’entraîner son
basculement.
La coutellerie est mieux lavée si les manches sont positionnés vers le bas dans le
panier à couverts.
Cet appareil devra être destiné uniquement à l'utilisation à usage domestique.
En cas de panne et/ou de mauvais fonctionnement de l'appareil, l'éteindre, fermer le
robinet d'arrivée d'eau et ne pas ouvrir l'appareil.
Appelez le service après vente de votre revendeur en lui précisant bien le type de
votre appareil.
Le non respect des prescriptions énoncées ci-dessus peut compromettre la sécurité
de l'appareil.
128
Indice
Conseils de sécurité
Mise en marche, installation
Ouverture de porte
Adoucisseur d’eau
Réglage du panier supérieur
Chargement de la vaisselle
Lavage demi charge
Information pour les tests laboratoire
Chargement de la lessive et du produit de rinçage
Nettoyage des filtres
Quelques conseils pratiques
Entretien et nettoyage courants
Identification des anomalies mineures
pag. 129
pag. 130
pag. 132
pag. 133
pag. 135
pag. 136
pag. 140
pag. 141
pag. 141
pag. 144
pag. 144
pag. 145
pag. 147
23
1
4
5
Fig. A
Page 66

Raccordement à la vidange
Pour la vidange, introduire le tuyau dans l'installation de vidange, en prenant soin
de ne pas le plier car l'écoulement des eaux s'en trouverait perturbé (fig. 4).
Le tuyau de vidange fixe doit avoir au moins un diamètre intérieur de 4 cm et doit être
placé à une hauteur minimum de 40 cm. Pour éviter les odeurs, nous recommandons
de prévoir un siphon (fig. 4x).
Si nécessaire il est possible de rallonger le tube de vidange jusqu'à 2,6 mètres en
le maintenant cependant à une hauteur maximum de 85 cm du sol.
Utiliser le prolongateur pièce No. 9269214 et le raccord pièce No. 9264427.
L'extrémité recourbée du tuyau de vidange peut être accrochée au bord d'un évier,
(l'extrémité ne doit pas
rester immergée) pour
éviter le siphonnage de
l'appareil pendant le
programme de lavage (fig.
4y).
En cas d'installation sous
un dessus continu, le
coude doit être fixé immédiatement sous le dessus
au point le plus haut
possible (fig. 4z).
Pendant l'installation de la
machine, contrôler que les
tubes de remplissage et
de vidange ne sont pas
pliés.
131130
INSTALLATION (Remarques techniques)
Après le déballage, régler la hauteur du lave-vaisselle.
Pour un fonctionnement parfait, il est important que le
lave-vaisselle soit à niveau, en règlant les pieds de
façon à ce qu'une éventuelle inclinaison ne dépasse
pas 2 degrés.
Dans le cas où vous devez transporter de façon
manuelle la machine sans emballage, ne pas prendre la
porte par le bas, mais faire comme dans le schéma;
ouvrir légèrement la porte et soulever l'appareil en
utilisant le top supérieur.
Les ouvertures à la base de l'appareil ne doivent en
aucun cas être obstruées par des tapis, moquette
ou autre objets.
À l'installation il est important de verifier que la prise soit facilement accessible.
Alimentation Electrique
L'appareil est conforme aux exigences de sécurité prévues par les différents instituts
de Normes, et c'est la prise tripolaire avec un pôle de terre qui assure la mise à la
terre complète de l'appareil.
L'efficacité de la sécurité est donc subordonnée à la mise à la terre correcte de votre
propre installation.
En cas d'absence d'un branchement efficace de la mise à la terre, il peut subvenir
une légère dispersion de courant sur les parties métalliques de la machine, due à la
présence d'un filtre antiparasite radio.
Par conséquent, avant de brancher la machine sur le circuit électrique s'assurer:
1) Que la prise murale est correctement reliée à la terre.
2) Que le réglage du contacteur électrique correspond bien à la puissance absorbée
indiquée sur la plaque signalétique du lave-vaisselle.
Le constructeur décline toute responsabilité pour des dommages éventuels
survenus aux personnes et aux biens imputables à un mauvais raccordement
de la ligne de terre.
Cet appareil est conforme aux directives 89/336/EEC, 73/23/EEC et
modifications successives.
Branchement Hydraulique
Les tuyaux de vidange et de remplissage peuvent être orientés de façon indifférente vers la droite ou vers la gauche.
Le lave-vaisselle peut-être relié de façon indifférente à l'eau froide ou chaude
à condition que la température ne dépasse pas les 60°C.
La pression hydraulique doit être comprise d'un minimum de 0,08 MPa à un
maximum de 0,8 MPa. Pour des pressions inférieures, nous vous conseillons de
demander des instructions à notre service Après-vente.
Il est nécessaire de prévoir un robinet en amont du tube de chargement pour isoler
la machine du système hydraulique, quand celle-ci ne fonctionne pas (Fig. 1B), le
lave vaisselle est doté d'un tuyau pour la prise d'eau avec un embout fileté 3/4" (Fig. 2).
Le tuyau d'alimentation "A" devra être vissé à un robinet d'eau "B" à l'aide de l'attache 3/4" en s'assurant que le collier est bien serré.
Si nécessaire il est possible de rallonger le tube de vidange jusqu'à 1,5 m utiliser le
prolongateur art. 9225014.
Il est conseillé de placer un filtre "D" d'entrée d'eau si celle-ci présente des résidus
calcaires ou sablonneux (Fig. 3).
Dans ce cas le filtre "D" doit être placé entre la prise d'eau 3/4" "B" et le tuyau
d'alimentation "A", ne pas oublier de mettre les joints "C".
Si la machine est branchée à des tuyauteries neuves, ou qui n'ont pas été utilisées
pendant une longue période, faire couler l'eau pendant quelques minutes avant de
brancher le tuyau d'alimentation. On évitera ainsi la formation de dépôts de sable ou
de rouille qui pourraient boucher le filtre d'entrée de l'eau.
123
4
Page 67

Réglage de l’adoucisseur d’eau
Dans le tableau ci-dessous sont indiqués les différents degrés de dureté de l’eau avec
les positions de réglage de l’adoucisseur correspondantes.
133132
Installation dans un ensemble
de cuisine moderne
Juxtaposition
Le lave-vaisselle a été étudié avec une hauteur standard de 85 cm et peut être ainsi
placé entre des meubles de cuisine moderne d'une même hauteur. Pour obtenir un
alignement parfait, agir sur les pieds réglables.
Le plan supérieur est un vrai plan de travail en plastique laminé de haute résistance.
(Fig. 5).
Il est facilement réglable en profondeur jusqu'à 25 mm, en le déplaçant de 5 en
5 mm pour l'aligner sur le plan des meubles adjacents.
Pour le réglage, dévisser les 2 vis arrière et fixer le plan dans la position voulue. (Fig. 6).
Encastrement (Installation sous un plan de travail)
Les ensembles de cuisine moderne ont un plan de travail unique sous lequel
viennent s'insérer les meubles de base et les appareils ménagers.
Dans ce cas, il suffit de retirer le plan de travail en dévissant les vis qui se trouvent
au-dessous et à l'arrière (Fig. 6).
La hauteur est ainsi réduite à 82 cm comme prévue dans la norme internationale
(ISO), et le lave-vaisselle vient s'intégrer parfaitement sous le plan (Fig. 7).
Habillage (seulement sur quelques modèles)
Les cornières autour de la porte, permettent l'insertion de panneaux décoratifs d'une
épaisseur allant jusqu'à 5 mm et de dimensions suivantes:
Largeur 591 mm. ± 1 Hauteur 597 mm. ± 1
Ouverture de la porte
Mettre la main dans le creux, et appuyer vers le haut.
Si la porte s'ouvre durant le fonctionnement de l'appareil, une sécurité électrique
permet d'interrompre automatiquement les fonctions préétablies.
Pour une utilisation correcte ne pas ouvrir la porte du lave-vaisselle pendant
son fonctionnement.
7
598
556/563
Fermeture de la porte
Mettre les paniers.
Vérifier que les plats ou casseroles ne gênent pas les rampes avants et s'assurer
que celles-ci tournent librement.
Fermer la porte et la bloquer avec force.
Adoucisseur d’eau
Selon la source d’approvisionnement, l’eau contient des quantités variables de
calcaire et de minéraux qui se déposent sur la vaisselle en laissant des taches et des
marques blanchâtres.
Plus la densité de minéraux dans l’eau est élevée, plus celle-ci est dure.
Le lave vaisselle est équipé d’un dispositif d’adoucisseur d’eau qui, avec l’utilisation
du sel régénérant, fournit de l’eau douce pour laver la vaisselle.
L’adoucisseur d’eau peut traiter de l’eau d’une dureté allant jusqu’à 60°Fh
(graduation française) ou 33°Dh (graduation germanique) à partir de cinq positions
de réglage différentes.
Le degré de dureté de votre eau peut vous être communiqué par votre fournisseur d’eau.
5
6
* L’adoucisseur d’eau est réglé en usine sur le niveau 2, adapté à la majorité des cas.
Si votre eau est au niveau 0, vous ne devez
pas utiliser de sel régénérant, ni effectuer de
réglage car votre eau est douce.
Selon le degré de dureté de votre eau,
procédez au réglage de l’adoucisseur d’eau
comme suit :
Retirez le panier inférieur. Dévissez et ôtez
le bouchon du réservoir à sel situé en bas de
la cuve (Fig.A’’1’’)
Tournez la visse de réglage sur la position
requise avec un tournevis ou un couteau.
N.B.: Pour les modéles équipés d'un programmateur électronique reportez
vous à la liste des programmes incluse.
Niveau
0
1
*2
3
4
Dureté
de l'eau
°fH
(France)
0-9
10-30
31-40
41-50
51-60
Dureté
de l'eau
°dH
(Allemagne)
0-5
6-16
17-22
23-27
28-33
Utilisation
de sel
régénérant
NO
OUI
OUI
OUI
OUI
Position du
bouton de réglage
de l'adoucisseur
d'eau
LIBRE
position N.1
position N.2
position N.3
position N.4
N°
de
lavages
50
40
30
20
TYPE 1
TYPE 2
Page 68

Chargement du sel
Le lave-vaisselle est pourvu d'un adoucisseur qui
purifie l'eau du calcaire pouvant incruster et
endommager le lave-vaisselle.
Sur le fond de la machine se trouve le bac à sel
pour la régénération de l'adoucisseur d'eau.
Les résines de l'adoucisseur d'eau doivent être
régénérés par le sel régénérant.
Autres types de sel contenant de sensibles
percentages de substances insolubles qui
pourraient avec le temps rendre inèfficace le
système de l'adoucisseur.
Pour introduire le sel, dévisser le bouchon du bac.
Pendant l'opération de remplissage un peu d'eau débordera: continuez à verser le
sel jusqu'à ce que le réservoir soit plein (mélanger à l'aide d'une cuillère).
Après cette opération nettoyer le filetage en enlevant les résidus de sel; revisser le
bouchon.
Si vous n'avez aucun lavage à faire immédiatement, mettre en route le programme
Prélavage froid de façon à ce que la solution saline ayant débordé soit vidangée par
la machine.
Pour une utilisation optimale de l’appareil, le réservoir à sel, dont la capacité varie de
1,5 à 1,8 kg, doit être rempli de temps en temps en fonction du réglage opéré sur
l’adoucisseur d’eau.
Important: Ce n'est qu'au cours de la phase d'installation de la machine à laver
la vaisselle qu'il faudra, après avoir remplí complètement le bac à sel, ajouter
de l'eau jusqu'à ce qu'elle déborde du bac.
135134
Indicateur de remplissage du sel
Certains modèles sont pourvus de voyant lumineux
indiquant le manque de sel. Il y a deux systèmes
d'indication:
– voyant électrique sur le tableau de bord qui
s'allume quand il faut remplir le réservoir à sel;
– bouchon de fermeture avec voyant mobile vert;
ce voyant est visible tant que la solution saline
est suffisante pour la régénération de
l'adoucisseur. Remplir le bac à sel quand la
surface verte diminue dans le bouchon de
l'adoucisseur.
D’autres modèles sont équipés d’un couvercle opaque, dans ce cas le niveau de sel
doit être contrôlé régulièrement, la consommation de sel dépendant du réglage
opéré sur l’adoucisseur d’eau.
Important: la vaisselle tachée de blanc est généralement une indication importante
d'absence de sel.
Réglage du panier supérieur (seulement sur quelques modèles)
Quand on utilise habituellement des assiettes de 27 à 31 cm de diamètre, charger
celles-ci dans le panier inférieur après avoir mis le panier supérieur à sa position la
plus haute en procédant comme suit (Selon les modèles):
Type “A”:
1) Faire tourner les butées avant "A" vers l'extérieur;
2) Dégager le panier et le remonter à sa position la plus haute;
3) Remettre les butées "A" dans leur position d'origine.
Cette opération permet de charger dans le panier supérieur de la vaisselle d'un
diamètre de plus de 20 cm et ne permet pas d'utiliser les supports mobiles en
position haute.
A
A
a
b
a
b
1
2
3
Type “B”:
1) Faire glisser le panier supérieur vers l’exterieur;
2) Saisir le panier des deux les côtés et le tirer vers le haut (fig. 1).
Cette opération permet de charger dans le panier supérieur de la vaisselle d'un
diamètre de plus de 20 cm et ne permet pas d'utiliser les supports mobiles en
position haute.
POUR REMETTRE LE PANIER EN POSITION BASSE :
1) Saisir le panier des deux les côtés et le tirer légèrement vers le haut (fig. 2a);
2) Laisser retomber le panier en l'accompagnant lentement (fig. 2b).
N. B.: NE JAMAIS SOULEVER OU BAISSER LE PANIER D'UN SEUL CÔTÉ (fig 3).
ATTENTION :
Nous vous conseillons d’effectuer le réglage du panier avant de charger la vaisselle.
Page 69

137
Un chargement standard journalier est
indiqué fig. 1, 2 et 3.
panier supérieur (fig. 1)
A = assiettes creuses
B = assiettes plates
C = assiettes à dessert
D = soucoupes
E = tasses
F = verres
panier supérieur (fig. 2)
A = assiettes creuses
B = assiettes plates
C = assiettes à dessert
D = soucoupes
E = tasses
F = verres à pied
G = verres
H = demi panier couverts
panier inférieur (fig. 3)
A = casserole moyenne
B = casserole grande
C = poêle
D = couvercles
E = soupières, plats
F = couverts
G = plats à rôtis
Le rangement rationnel et correct de la
vaisselle est la condition essentielle pour
obtenir un excellent lavage.
1
2
3
136
Charger la vaisselle
Chargement de la vaisselle
Pour garantir constamment d'excellents résultats de lavage, éliminer la plus grosse
partie des restes (os, arêtes, curedents, restes de viande et de légumes, peaux de
fruits, etc.) afin d'éviter d'obstruer les filtres, la vidange et les gicleurs des bras de
lavage, causant la diminution de l'efficacité de lavage.
Eviter de rincer la vaisselle avant de la placer dans la machine.
Si les poêles et les casseroles sont excessivement incrustées de restes de mets
brûlés, nous vous conseillons de les laisser tremper avant le lavage.
Utilisation du panier supérieur
Le panier supérieur est pourvu de supports mobiles accrochés au bord latéral et
pouvant occuper deux positions: haute et basse. Sur la position basse les supports
servent pour recevoir les tasses à thé, à café, les couteaux longs et les louches. Aux
extrémités des supports, vous pouvez suspendre les verres à pied.
En-dessous vous pouvez ranger les verres, les tasses, les soucoupes et les
assiettes à dessert.
Quand les supports occupent la position haute, ils permettent de placer les assiettes
plates et creuses.
Ayez soin de placer les assiettes creuses verticalement et en tournant leur partie
concave vers l'avant de la machine; laisser toujours de l'espace entre chaque
assiette pour que l'eau circule librement.
Pour exploiter au maximum la capacité du panier nous vous conseillons de grouper
les assiettes de même forme.
Les assiettes peuvent être placées sur une seule rangée (fig. 1) ou sur les deux
rangées (fig. 2). Nous vous conseillons de ranger les plats de grande dimension,
dont le diamètre est d'environ 270 mm, légèrement inclinés vers l'avant de façon à
favoriser l'introduction du panier à l'intérieur de la machine.
Dans le panier supérieur vous pouvez ranger différente vaisselle comme le saladier
et les bols en plastique qu'il vaut mieux bloquer afin d'éviter que les jets d'eau ne les
renversent.
Le panier supérieur a été conçu pour permettre une souplesse maximum
d'utilisation. Il peut n'être chargé qu'avec des assiettes placées sur deux rangées, 24
pièces maximum, avec des verres sur cinq rangées, 30 pièces maximum, ou bien
avec de la vaisselle mixte.
Utilisation du panier inférieur
Dans le panier inférieur vous placerez les casseroles, les poêles, les soupières, les
saladiers, les couvercles, les plats, les assiettes plates et creuses et les louches.
Les couverts doivent être placés manche vers le bas dans le panier à couverts, que
l'on placera à son tour dans le panier inférieur (fig. 3) en s'assurant qu'il n'entrave
pas la rotation des bras de lavage.
A
B
C
D
FE
GH
DF AG
E
B
C
A
B
C
D
E
F
Page 70

139138
Attention (fig. 7)
Le panier inférieur est équipé de deux
rangées de picots rabattables qui peuvent
être baissé de manière très simple et rapide.
Cela permet de charger saladiers, casseroles
et couvercles plus aisément.
(Seulement sur quelques modèles)
POUR BAISSER CES PICOTS RABA TTABLES,
PROCÉDER DE LA MANIÈRE SUIVANTE:
1) Les tirer légèrement vers le haut et les
laisser retomber;
2) Pour les relever il suffit de les reporter en
position verticale.
panier à couverts (fig. 8)
Le panier à couverts est formé de deux
parties offrant ainsi différentes possibilités
de chargement .
La séparation en deux parties du panier se
fait en faisant glisser, dans le sens horizontal,
les deux parties l'une par rapport à l'autre et
vice versa pour les ré-enclencher.
Sur certains modèles le panier à couverts ne
possède pas de support spécifique pour les
couverts en argent.
1
2
7
8
QN
M
P
O
M
N
R
A
F
C
C
C
G
B
E
D
H
H
L
I
4
5
6
panier inférieur (fig. 5)
M = 8 + 4 assiettes creuses
N = 11 + 1 assiettes plates
O = 12 assiettes à dessert
P = plat
Q = couverts
panier à couverts (fig. 6)
Disposer 6+6 couteaux (R) dans les grilles.
Dans les autres compartiments, mettre les
autres couverts manche vers le bas; éviter
de mettre plus de deux couverts identiques
dans le même compartiment.
panier à couverts sans grille centrale
Ranger le restant des couverts en ayant soin
de ne pas mettre plus de deux couverts
identiques dans le même compartiment.
Chargement standard 12 couverts internationaux (conformément à EN 50242).
Le rangement correct du chargement est indiqué fig. 4 pour le panier supérieur et
fig. 5 pour le panier inférieur. Fig. 6 panier à couverts.
panier supérieur (fig. 4)
A = 5 + 5 + 2 verres
B = 12 soucoupes
C = 4 + 4 + 4 tasses
D = coupe petite
E = coupe moyenne
F = coupe grande
G = 1 + 1 fourchette
H = 1 + 1 cuillère à soupe
I = 3+3+3+3
cuillère à dessert
L = 3+3+3+3 cuillère à café
Page 71

141140
Information pour les essais en laboratoire
Programme comparatif général
(voir liste des programmes de lavage)
Chargement de la lessive et du produit de rinçage
Chargement de la lessive
Il est indispensable d'utiliser de la lessive en poudre, liquide ou en pastilles
spécialement destiné aux machines à laver la vaisselle.
Les lessives non adaptées (comme cettes pour le lavage à la main) ne contiennent
pas les ingrédients appropriés au lavage en machine et empêchent le fonctionnement
correct de l'appareil.
Lavage normal
La boîte à produits se trouve à l'intérieur de la
porte (fig. A "2"). Si le couvercle du récipient
est fermé, pour l'ouvrir il suffit d'appuyer sur le
bouton d'accrochage: à la fin de chaque
programme de lavage, le couvercle est
toujours ouvert, prêt pour l'utilisation suivante.
Les doses de lessive peuvent varier selon le
degré de salissure et le type de vaisselle.
Nous conseillons de verser de 20 à 30 gr de
lessive dans le bac "lavage" (1).
Après avoir versé la lessive dans la boîte à produits, fermer le couvercle.
Comme les lessives ne sont pas toutes de même nature, consulter aussi les
instructions sur les emballages.
Nous rappelons que des quantités insuffisantes de lessive peuvent éliminer la saleté
de façon incomplète, tandis qu'une dose excessive de lessive, non seulement
n'améliore pas les résultats de lavage, mais est un gaspillage.
Ne pas exagérer dans l'utilisation de la lessive, c'est contribuer à limiter la
pollution de l'environnement.
Lavage précédé d'un prélavage (seulement sur quelques modèles)
Dans le cas où l'on utilise le programme intensif il faut également mettre une dose
de lessive, 20 grammes (1 cuillère à soupe) dans le bac "prélavage" (2).
1/2 charge mixte (fig. 1)
A = verres
B = tasses
C = assiettes creuses
D = assiettes plates
E = assiettes à dessert
F = soucoupes
G =casserole
H =couvercle
I = poéle
L = coupe moyenne
M = petite coupe
1/2 charge standard (fig. 2)
A = 6 verres
B = 5 + 1 tasses
C = plat
D = 6 assiettes creuses
E =6 assiettes plates
F =6 assiettes à dessert
G =6 soucoupes
H = coupe moyenne
I = petite coupe
Les couverts doivent être placés dans le panier à couverts
prévu a cet effet. Il devra être remis dans son emplacement
d'origine, soit dans le panier inférieur, en cycle de lavage normal.
panier inférieur (fig. 3)
A = casserole moyenne
B = casserole grande
C = poêle
D = couvercles
E = soupières, plats
F = couverts
G = plats à rôtis
Le rangement rationnel et correct de la vaisselle est la
condition essentielle pour obtenir un excellent lavage.
panier inférieur (fig. 4)
M = 8 + 4 assiettes creuses
N = 11 + 1 assiettes plates
O = 12 assiettes à dessert
P = plat
Q = couverts
Lavage 1/2 charge panier supérieur (seulement sur quelques modèles)
Q
N
M
P
O
M
N
4
D
FAG
E
B
C
3
AG
M
L
B
H
D
C
E
I
F
1
AGI
BC
F
E
H
D
2
Lavage 1/2 charge panier inférieur (seulement sur quelques modèles)
Page 72

143142
3
4
3
Chargement produit de rinçage
Ala droite du bac à lessive se trouve le
réservoir du produit de rinçage qui a une
capacité d'environ 130 ml (Fig. A "3").
Tourner le couvercle dans le sens contraire
des aiguilles d'une montre (3) et verser le
liquide, qui servira pour plusieurs cycles de
lavage, jusqu'au niveau maxi comme indiqué.
Refermer le couvercle.
Cet additif qui est introduit automatiquement
à la dernière opération de rinçage, assure le
séchage rapide de la vaisselle et évite la
formation sur celle-ci de taches blanchâtres.
Utiliser toujours un produit de rinçage
adapté au lave-vaisselle automatique.
Il est possible de contrôler le niveau du
produit de rinçage au moyen du voyant optique placé au centre du distributeur (4).
Réglage de dosage du produit de
rinçage de 1 à 6
Le réglage est situé sous le couvercle (3) et
peut être réglé au moyen d'une pièce de
monnaie. La position conseillée est 3.
La présence de calcaire dans l'eau se
manifeste soit par la présence d'incrustation,
soit par le degré de séchage.
C'est pourquoi il est important de régler le
débit du produit de rinçage pour obtenir des
prestations optimales.
Dans le cas où la vaisselle présente des
dépôts à la fin du lavage, diminuer le
réglage d'une position.
Dans le cas de vaisselle présentant des
marques ou auréoles blanchâtres, augmenter
le réglage d'une position.
Le système de filtrage (fig. A’’4’’) est constitué
par: un réservoir central qui retient les
grosses particules.
Une plaque métallique qui filtre continuellement
l’eau de lavage.
un micro filtre autonettoyant, situé sous la
plaque métallique, qui piège les micro
salissures pour garantir un rinçage parfait.
Afin d’obtenir d’excellents résultats de
lavage dans le temps, les filtres doivent être
contrôlés et nettoyés après chaque lavage.
Pour retirer le micro filtre, il vous suffit de
tourner la poignée dans le sens contraire
des aiguilles d’une montre (fig.1).
Pour un entretien facilité, le réservoir central
est amovible (fig.2).
Retirer la plaque métallique (fig.3) et laver
l’ensemble du système de filtrage sous le
robinet d’eau.
Si nécessaire, une petite brosse peut être
utilisée.
L’entretien du micro filtre autonettoyant
est limité , un contrôle, toutes les deux
semaines d’utilisation, est suffisant.
Néanmoins, après chaque lavage il est
recommandé de vérifier que le réservoir
central et la plaque métallique ne sont pas
obstrués.
NB: après le nettoyage des filtres,
assurez vous qu’ils sont correctement
replacés et que la plaque métallique est
correctement mise au fond de la cuve du
lave vaisselle.
Assurez vous que le micro filtre est bien
revissé, dans le sens des aiguilles d’une
montre, car une mauvaise mise en place
peut entraîner une perte d’efficacité de
l’appareil.
Attention: ne jamais se servir de l’appareil
sans les filtres.
PLEIN VIDE
Reflet sombre Reflet clair
Nettoyage des filtres
1
2
3
Page 73

145144
Conseils pratiques
Choix du programme
Ce lave-vaisselle offre une vaste choix de programmes de lavage adaptés aux
différentes exigences de saleté et de vaisselle à laver.
Consulter la "LISTE DES PROGRAMMES" ci-jointe pour choisir le programme le
plus adapté.
Suggestions à la fin du programme
Pour éviter d'éventuelles projections de gouttelettes provenant du panier supérieur,
retirer d'abord le panier inférieur.
Si vous laissez la vaisselle encore quelques temps dans la machine, ouvrez légèrement la porte pour favoriser la circulation de l'air et améliorer encore le séchage.
Que faire pour ECONOMISER
1) Au cas où l'on voudrait laver à pleine charge, ranger la vaisselle dans le
lavevaisselle dès que le repas est terminé et en effectuant éventuellement le
programme PRELAVAGE FROID pour ramollir la saleté et éliminer les résidus les
plus gros entre chaque charge-ment en attendant d'effectuer le programme de
lavage complet.
2) En présence de saleté peu consistante ou de paniers peu chargés, sélectionner
le programme ECONOMIQUE en suivant les instructions indiquées dans la liste des
programmes.
Que faire pour avoir d'excellents résultats de lavage
1) Ranger la vaisselle avec l'ouverture tournée vers le bas.
2) Si possible, éviter que les différentes pièces se touchent; une installation correcte
donnera de meilleurs résultats de lavage.
3) A vant de ranger la vaisselle dans la machine, enlever les résidus de nourriture (os,
arêtes, restes de viande ou de légumes, résidus de café, épluchures de fruits, cendres
de cigarettes, etc...) qui pourraient boucher le filtre et les orifices des bras de lavage.
4) Après avoir rangé la vaisselle, vérifier que les bras de lavage tournent sans obstacle.
5) Les casseroles et autre ustensiles qui présentent des résidus de nourriture très
tenaces ou brûlés devront être mis à tremper dans de l'eau avec de la lessive pour
lave-vaisselle.
6) Pour un lavage parfait de l'argenterie, il faut:
a) la rincer dès qu'on a fini de l'utiliser, surtout si on l'a utilisée avec de la mayonnaise,
des œufs, du poisson, etc...
b) ne pas l'asperger de lessive
c) ne pas la mettre en contact avec d'autres matériaux.
Que faire si
1) Si vous désirez ajouter de la vaisselle lors du lavage, veuillez appuyer sur la touche O/I.
Attendre 3 minutes avant de faire repartir la machine.
Ce qu'on ne doit pas laver
Il est bon également de se rappeler que toute la vaisselle n'est pas adaptée au
lavage en machine; nous déconseillons de mettre des pièces en matériau
thermoplastique, des couverts à poignée en bois ou en plastique, des casseroles à
poignée en bois, de la vaisselle en aluminium, en cristal ou en verre plombé si ce
n'est pas spécifiquement indiqué.
Certaines décorations tendent à s'estomper, par conséquent nous conseillons de
laver plusieurs fois en machine une seule pièce et, seulement après s'être assuré
qu'elle ne se décolore pas, d'y mettre tout le chargement.
Nous conseillons en outre de ne pas laver de couverts en argent avec des couverts
en acier oxydable pour éviter qu'il ne se produise de réaction chimique entre eux.
IMPORTANT
Quand on achète de la vaisselle neuve, s'assurer toujours qu'elle est adaptée au
lavage en machine.
Nettoyage externe et entretien
La carrosserie externe peut être nettoyée avec un produit pour surface émaillée non
abrasif.
Le lave-vaisselle ne réclame aucun entretien spécial car la cuve de lavage est
autonettoyante. Nettoyer périodiquement le joint en caoutchouc de la porte avec un
chiffon humide de façon à éliminer éventuellement les traces de déchets ou de
produit de rinçage.
Pour mieux garantir l'évacuation des petits dépôts de calcaire ou de déchets, il est
conseillé de procéder périodiquement à un lavage complet en versant auparavant un
verre de vinaigre dans le fond de la cuve et en positionnant le bouton du programmateur sur lavage délicat.
Si, malgré le nettoyage normal de la plaque et du filtre vous notez que la vaisselle
ou les casseroles sont insuffisamment lavées ou rincées, contrôler que les orifices
des bras rotatifs (fig.A"5") sont propres.
Si cela est nécessaire, nettoyer les de la façon suivante:
Pour démonter le bras supérieur, tournez le jusqu’à ce qu’il s’aligne avec le marquage
stop inscrit sur la flèche (fig.1b). Poussez le vers le haut en le maintenant enfoncé
puis dévissez le dans le sens des aiguilles d’une montre (fig.1).
Pour le remonter procédez de la même manière, mais en le vissant dans le sens
contraire des aiguilles d’une montre.
Le bras de lavage inférieur peut être démonté facilement en le tirant vers le haut
(fig.2).
Passez le bras de lavage sous un robinet d’eau pour éliminer toute saleté.
Ensuite, replacez le bras de lavage dans la même position, en pensant à positionner
le bras supérieur en face du marquage stop.
1 2
1b
Page 74

147146
La résistance de chauffage de l'eau est réalisée en acier inoxydable spécial.
Elle peut présenter, au bout de quelques temps, une coloration sans importance pour
son aspect et sa fiabilité.
La cuve, ainsi que la contre-porte sont en acier inoxydable. Si toutefois vous devez
constater des taches d'oxydation, celles-ci seraient imputables seulement à une
présence importante de sels de fer en suspension dans l'eau. Pour retirer les taches,
il est conseillé d'employer un abrasif à grains très fins. Ne pas utiliser de substance
chlorée ou de laine d'acier. Le lave-vaisselle possède un adoucisseur et il est
conseillé l'usage de sel pour éviter la formation de dépôt blanchâtre sur la vaisselle.
En cas de présence de taches blanchâtres, il est conseillé avant tout d'intervenir sur
le réglage du produit de rinçage en l'augmentant d'une unité.
APRES L'UTILISATION
Après chaque lavage, fermer le robinet d'eau pour isoler le lave-vaisselle de
l'installation hydraulique d'alimentation et appuyer sur la touche Marche/Arrêt pour
arrêter le fonctionnement de la machine.
Si la machine doit rester inutilisée un certain temps, il est nécessaire de procéder aux
opérations suivantes:
1. Exécuter un programme de lavage sans vaisselle avec lessive pour dégraisser la
machine.
2. Débrancher la prise électrique.
3. Fermer le robinet d'eau.
4. Remplir le réservoir du produit de rinçage.
5. Laisser la porte légèrement ouverte.
6. Laisser l'intérieur de la machine propre.
7. Si la machine est laissée dans des pièces où la température est inférieure à 0°C,
l'eau restant dans les tuyauteries risque de geler. Par conséquent, porter la
température ambiante à plus de 0°C et attendre environ 24 heures avant d'activer
la machine.
ANOMALIES CAUSES REMEDES
Identification d’anomalies mineures
Attention!
Avant de retirer n’importe quel panneau:
1. Positionner le bouton sur STOP.
2. Débrancher la prise électrique.
Si votre lave-vaisselle ne fonctionne pas, avant d’appeler votre revendeur faire les
contrôles suivants:
1 - La machine ne fonctionne
sur aucun programme
2 - La machine ne prend
pas l’eau
3 - La machine ne vidange pas
4 - La machine vidange
en permanence
5 - Si les bras de lavage ne
tournent pas
6 - Sur les appareils électroniques
sans afficheur:
les indicateurs lumineux
"eco" et "No 1" avec un
signal sonore audible
7 - Sur les appareils électroniques
avec afficheur:
"E1" s'affiche avec un signal
sonore audible
Prise de courant mal branchée
Touche M/A non appuyée
Pas de courant
Porte ouverte
Voir causes du N. 1
Robinet d’eau fermé
Programmateur mal positionné
Le tuyau d’alimentation est plié
Le filtre du tuyau d’alimentation
est bouché
Filtre bouché
Tuyau de vidange plié
La rallonge du tuyau de vidange
n’est pas la bonne
La vidange murale n’a pas
d’évent à air
Tuyau en position trop basse
Quantité excessive de lessive
Une pièce de vaisselle
empêche la rotation
La plaque filtrante et le filtre
sont bouchés par des impuretés
Arrivée d'eau fermée
Arrivée d'eau fermée
Brancher la prise
Appuyer sur la touche
Contrôler
Fermer la porte
Contrôler
Ouvrir le robinet
Positionner correctement le
programmateur
Déplier le tuyau
Nettoyer le filtre situé à
l’extremité du tuyau d’alimentation
Nettoyer le filtre
Redresser le tuyau
Suivre attentivement les
instructions pour le branchement
du tuyau de vidange
Consulter un technicien qualifié
Réhausser le tuyau de vidange
à 40 cm.
Réduire la quantité de lessive
Contrôler
Nettoyer la plaque et le filtre
Arrêtez l'appareil
Ouvrir le robinet
Réactivez le cycle
Arrêtez l'appareil
Ouvrir le robinet
Réactivez le cycle
Page 75

Page 76

Page 77

Z zastrzezeniem prawa do modyfikacji technicznych i ewentualnych bäëdów
drukarskich.
The manufacturer declines all responsibility in the event of any printing mistakes in this
booklet. The manufacturer also reserves the right to make appropriate modifications to its
products without changing the essential characteristics.
Wij stellen ons niet aansprakelijk voor eventuele drukfouten. Kleine veranderingen en
technische ontuikklingen zijn voorbehouden.
Wir schileßen die Haftung für alle evtl. Druckfehler aus. Kleinere Änderungen und
technische Weiterentwicklungen im Detail vorbehalten.
La firma fabricante declina toda responsabilitad por los posibles errores de impresión que
puedan haber en este libreto. Asimismo, se reserva el derecho de efectuar las modificaciones que se consideren ùtiles a sus propios productos sin comprometer las caraterìsticas esenciales.
O modelo e caracteristicas indicados nesta folha podem ser alterados sem qualquer aviso.
Le constructeur décline toute responsabilité pour les éventuelles erreurs d’imprimerie
contenues dans le présent mode d’emploi. Il se réserve en outre le droit d’apporter toutes
modifications qui se révèleraient utiles à ses propes produits sans pour autant en
compromettre les caractéristiques essentielles.
03.03 - 41002157.B - Printed in Italy - Imprimé en Italie
PL
EN
NL
DE
ES
PT
FR
 Loading...