

Page 1
E
D
C
B
55584
CL N° REV. DATE
SPECIFICATION
GENERAL TOLERANCE
ISO 2768 - m
BASE CODE
06.08.19 Y.GÜLTÜRK
A
Fonksiyonlardaki enerji deklerasyonu güncellendi/Energy declaration has been updated on functions.
-
TREATMENT
WEIGHT SCALE
-
MATERIAL
ALL RIGHTS RESERVED, THE REPRODUCTION OF ANY PART
WITHOUT OUR WRITTEN CONSENT IS FORBIDDEN
MATERIALS IN COMPLIANCE WITH REQUIREMENTS
OF EU DIRECTIVE 2002/95/CE + AMENDMENTS
-
SIZE
DATE SIGNATURE
03.05.2019
03.05.2019
CANDY HOB
FR
A4
DRAWN
CHECKED
35
C.FİDANCI
FOR
REPLACE No ORIGIN CL No Class Specification
------------
RELEASE LEVEL
PRODUCTION RELEASED
MODIFY DESCRIPTION
PROPERTY OF
NAME
-
USER MANUEL C HNPTF03 STM
(LOCAL LANGUAGE)
USER MANUEL C HNPTF03 STM
PART CODE
42831662
------------
xxxxx
MODIFIED BY
SHEET
1/1
SC 000-000
Page 2
OVENS
USER INSTRUCTIONS
FORNI
ISTRUZIONI PER L'USO
PEČICE
NAVODILA ZA UPORABO
EN
IT
SL
02
11
20
CANDY HOOVER GROUP S.R.L. • Via Comolli 16 • 20861 Brugherio (MB) - Italy
Page 3

Safety Indications
• During cooking, moisture may condense inside the oven cavity or on the glass of the door. This is a
normal condition. To reduce this effect, wait 10-15 minutes after turning on the power before putting food
inside the oven. In any case, the condensation disappears when the oven reaches the cooking
temperature.
• Cook the vegetables in a container with a lid instead of an open tray.
•Avoidleavingfood inside the oven after cooking for more than 15/20 minutes.
• WARNING: the appliance and accessible parts become hot during use. Be careful not to touch any hot
parts.
•WARNING: the accessible parts can become hot when the oven is in use. Children must be kept at a
safe distance.
•WARNING: ensure that the appliance is switched off before replacing the bulb, to avoid the possibility of
electric shocks.
•WARNING:before initiating the automatic cleaning cycle:
- Clean the oven door;
- Remove large or coarse food residues from the inside of the oven using a damp sponge. Do not use
detergents;
- Remove all accessories and the sliding rack kit (where present);
- Do not place tea towels
• In ovens with meat probe it is necessary, before making the cleaning cycle, close the hole with the nut
provided.Alwaysclose the hole with the nut when the meat probe is not used.
• Children under 8 must be kept at a safe distance from the appliance if not continuously supervised.
• Children must not play with the appliance. The appliance can be used by those aged 8 or over and by
those with limited physical, sensorial or mental capacities, without experience or knowledge of the
product, only if supervised or provided with instruction as to the operation of the appliance, in a safe way
with awareness of the possible risks.
• Cleaning and maintenance should not be carried out by unsupervised children.
• Do not use rough or abrasive materials or sharp metal scrapers to clean the oven door glasses, as they
can scratch the surface and cause the glass to shatter.
• The oven must be switched off before removing the removable parts and, after cleaning, reassemble
them according the instructions.
• Only use the meat probe recommended for this oven.
• Do not use a steam cleaner for cleaning operations.
• Connect a plug to the supply cable that is able to bear the voltage, current and load indicated on the tag
and having the earth contact. The socket must be suitable for the load indicated on the tag and must be
having the earth contact connected and in operation. The earth conductor is yellow-green in colour. This
operation should be carried out by a suitably qualified professional. In case of incompatibility between the
socket and the appliance plug, ask a qualified electrician to substitute the socket with another suitable
type. The plug and the socket must be conformed to the current norms of the installation country.
Connection to the power source can also be made by placing an omnipolar breaker between the
appliance and the power source that can bear the maximum connected load and that is in line with
current legislation. The yellow-green earth cable should not be interrupted by the breaker. The socket or
omnipolar breaker used for the connection should be easily accessible when the appliance is installed.
• The disconnection may be achieved by having the plug accessible or by incorporating a switch in the
fixed wiring in accordance with the wiring rules.
• If the power cable is damaged, it must be substituted with a cable or special bundle available from the
manufacturer or by contacting the customer service department.
• The type of power cable must be H05V2V2-F.
• Failure to comply with the above can compromise the safety of the appliance and invalidate the
guarantee.
•Anyexcess of spilled material should be removed before cleaning.
• During the pyrolytic cleaning process, surfaces can heat upmore than usual, childrenmust therefore be
kept at a safe distance.
• The appliance must not be installed behind a decorative door in order to avoid overheating.
• When you place the shelf inside, make sure that the stop is directed upwards and in the back of the
cavity.
The shelf must be inserted completely into the cavity
• WARNING: Do not line the oven walls with aluminum foil or single-use protection available from stores.
Aluminum foil or any other protection, in direct contact with the hot enamel, risk melting and deteriorating
the enamel of the insides.
• WARNING: Never remove the oven door seal.
• No additional operation/setting is required in order to operate the appliance at the rated frequencies.
EN 02
Page 4

Summary
General Instructions
4
Product Description
5
Use of the Oven
6
1.1 Safety indications
1.2 Electrical safety
1.3 Recommendations
1.4 Installation
1.5 Waste management
1.6 Conformity declaration
2.1 Overview
2.2 Accessories
2.3 First use
3.1 Display description
3.2 Cooking Modes
3.3 Using The Steam Function
Oven Cleaning and Maintenance
8
Troubleshooting
10
4.1 General notes on cleaning
4.2 Pyrolysis
4.3 Aquactiva Function
4.4 Maintenance
• Removal and cleaning of grills
• Removal of the oven window
• Removal and cleaning of the glass door
• Changing the bulb
5.1 F.A.Q.
EN 03
Page 5
1. General Instructions
We thank you for choosingone ofour products. For the best resultswith youroven, you should read
this manual carefully and retain it for future reference. Before installing the oven, take note of the
serial number so that you can give it to customer service staff if any repairs are required. Having
removed the oven from its packaging, check that ithas not been damagedduring transportation. If
you have doubts, do not use the oven and refer to a qualified technician for advice. Keep all of the
packaging material (plastic bags, polystyrene, nails) out of the reach of children. When the oven is
switched on for the first time, strong smelling smoke can develop, which is caused by the glue on
the insulationpanels surroundingthe oven heating for the firsttime. This is absolutelynormal and,if
it occurs, you should wait for the smoke to dissipate before putting food in the oven. The
manufacturer accepts no responsibility in caseswhere the instructions contained in thisdocument
are not observed.
NOTE: the oven functions, properties and accessories cited in this manual will vary, depending on
the modelyouhave purchased.
1.1 Safety Indications
Only usethe oven for its intended purpose, thatis only for the cooking
of foods; any other use, for example as a heat source, is considered
improper and therefore dangerous. The manufacturer cannot be held
responsible for any damage resulting from improper, incorrect or
unreasonable usage.
The use of any electrical appliance implies the observance of some
fundamental rules:
- do notpull onthe power cable todisconnect the plug fromthe socket;
- do nottouch theappliance with wet ordamp hands or feet;
- ingeneral theuse of adaptors, multiplesockets andextension cables
is not recommended;
- in case of malfunction and/or poor operation, switch offthe appliance
and do nottamper withit.
1.2 Electrical Safety
ENSURE THAT AN ELECTRICIAN OR QUALIFIED TECHNICIAN
MAKES THE ELECTRICAL CONNECTIONS. The power supply to
which the oven is connected must conform with the laws in force in the
country of installation. The manufacturer accepts no responsibility for
any damage caused by the failure to observe these instructions. The
oven must be connected to an electrical supply with an earthed wall
outlet or a disconnector with multiple poles, depending on the laws in
force in the country of installation. The electrical supply should be
protected with suitable fuses and the cables used must have a
transverse section thatcan ensurecorrect supply to theoven.
CONNECTION
The ovenis suppliedwith a power cablethat shouldonly be connected
to an electrical supply with 220-240 Vac 50 Hz power between the
phases or between the phase and neutral. Before the oven is
connected to theelectrical supply, it isimportant tocheck:
- power voltageindicated onthe gauge;
- the settingof thedisconnector.
The grounding wire connected to the oven's earth terminal must be
connected to theearth terminalof the power supply.
WARNING
Before connecting the oven to the power supply, ask a qualified
electrician to check the continuity ofthe powersupply's earthterminal.
The manufacturer accepts no responsibility for any accidents or other
problems causedby failureto connect the ovento theearth terminal or
by an earthconnection thathas defective continuity.
NOTE: as the oven could require maintenance work, it is advisable to
keep anotherwall socket available so that the oven can be connected
to thisif it is removed from the space in which it is installed. The power
cable must only be substituted by technical service staff or by
technicians withequivalent qualifications.
1.4 Installation
The manufacturers have no obligation to carry this out. If the
assistance of the manufacturer is required to rectify faults arising from
incorrect installation, this assistance is not covered by the guarantee.
The installation instructions for professionally qualified personnel
must be followed. Incorrect installation may cause harm or injury to
people, animals or belongings. The manufacturer cannot be held
responsible forsuch harmor injury.
The oven can be located high in a column or under a worktop. Before
fixing, you must ensure good ventilation in the oven space to allow
proper circulation of the fresh air required for cooling and protecting
the internal parts. Makethe openingsspecified onlast page according
to the typeof fitting.
1.5 Waste management and environmental protection
This appliance is labelled in accordance with European
Directive 2012/19/EU regarding electric and electronic
appliances (WEEE). The WEEE contain both polluting
substances (that can have a negative effect on the
environment) and base elements (that can be reused). It
is important that the WEEE undergo specific treatments to
correctly remove and dispose of the pollutants and
recover all the materials. Individuals can play an important role in
ensuring that the WEEE do not become an environmental problem; it
is essential tofollow afew basic rules:
- the WEEEshould notbe treated as domesticwaste;
- the WEEE should be taken to dedicated collection areas managed
by the towncouncil ora registered company.
In many countries, domestic collections may be available for large
WEEEs. When you buy a new appliance, the old one can be returned
to the vendor who must acceptit freeof chargeas a one-off, aslong as
the appliance is of an equivalent type and has the same functions as
the purchased appliance.
SAVINGAND RESPECTINGTHE ENVIRONMENT
Where possible, avoid pre-heating the oven and always try to fill it.
Open the oven door as infrequently as possible, because heat from
the cavity disperses every time it is opened. For a significant energy
saving, switch off the oven between 5 and 10 minutes before the
planned end of the cooking time, and use the residual heat that the
oven continues to generate. Keep the seals clean and in order, to
avoid any heat dispersal outside of the cavity. If you have an electric
contract withan hourlytariff, the "delayedcooking" programmemakes
energy saving more simple, moving the cooking process to start at the
reduced tariff timeslot.
1.3 Recommendations
After each use of the oven, a minimum of cleaning will help keep the
oven perfectly clean.
Do not line the oven walls with aluminium foil or single-use protection
available from stores.Aluminium foil or any other protection, in direct
contact with the hot enamel, risks melting and deteriorating the
enamel of the insides. In order to prevent excessive dirtying of your
oven and the resulting strong smokey smells, we recommend not
using the oven at very high temperature. It is better to extend the
cooking time and lower the temperature a little. In addition to the
accessories supplied with the oven, we advise you only use dishes
and baking mouldsresistant tovery high temperatures.
1.6 Declaration of compliance
Asapplicable, the parts of this appliance are compliant to:
REGULATION(EC) No 1935/2004 on materials and articles intended
to come intocontact withfood;
COMMISSION REGULATION (EC) No 2023/2006 on good
manufacturing pratice for materials and articles intended come into
contact with food.
By placing the mark on this product, we are confirming
compliance to all relevant European safety, health and environmental
requirements whichare applicablein legislationfor thisproduct.
EN 04
Page 6
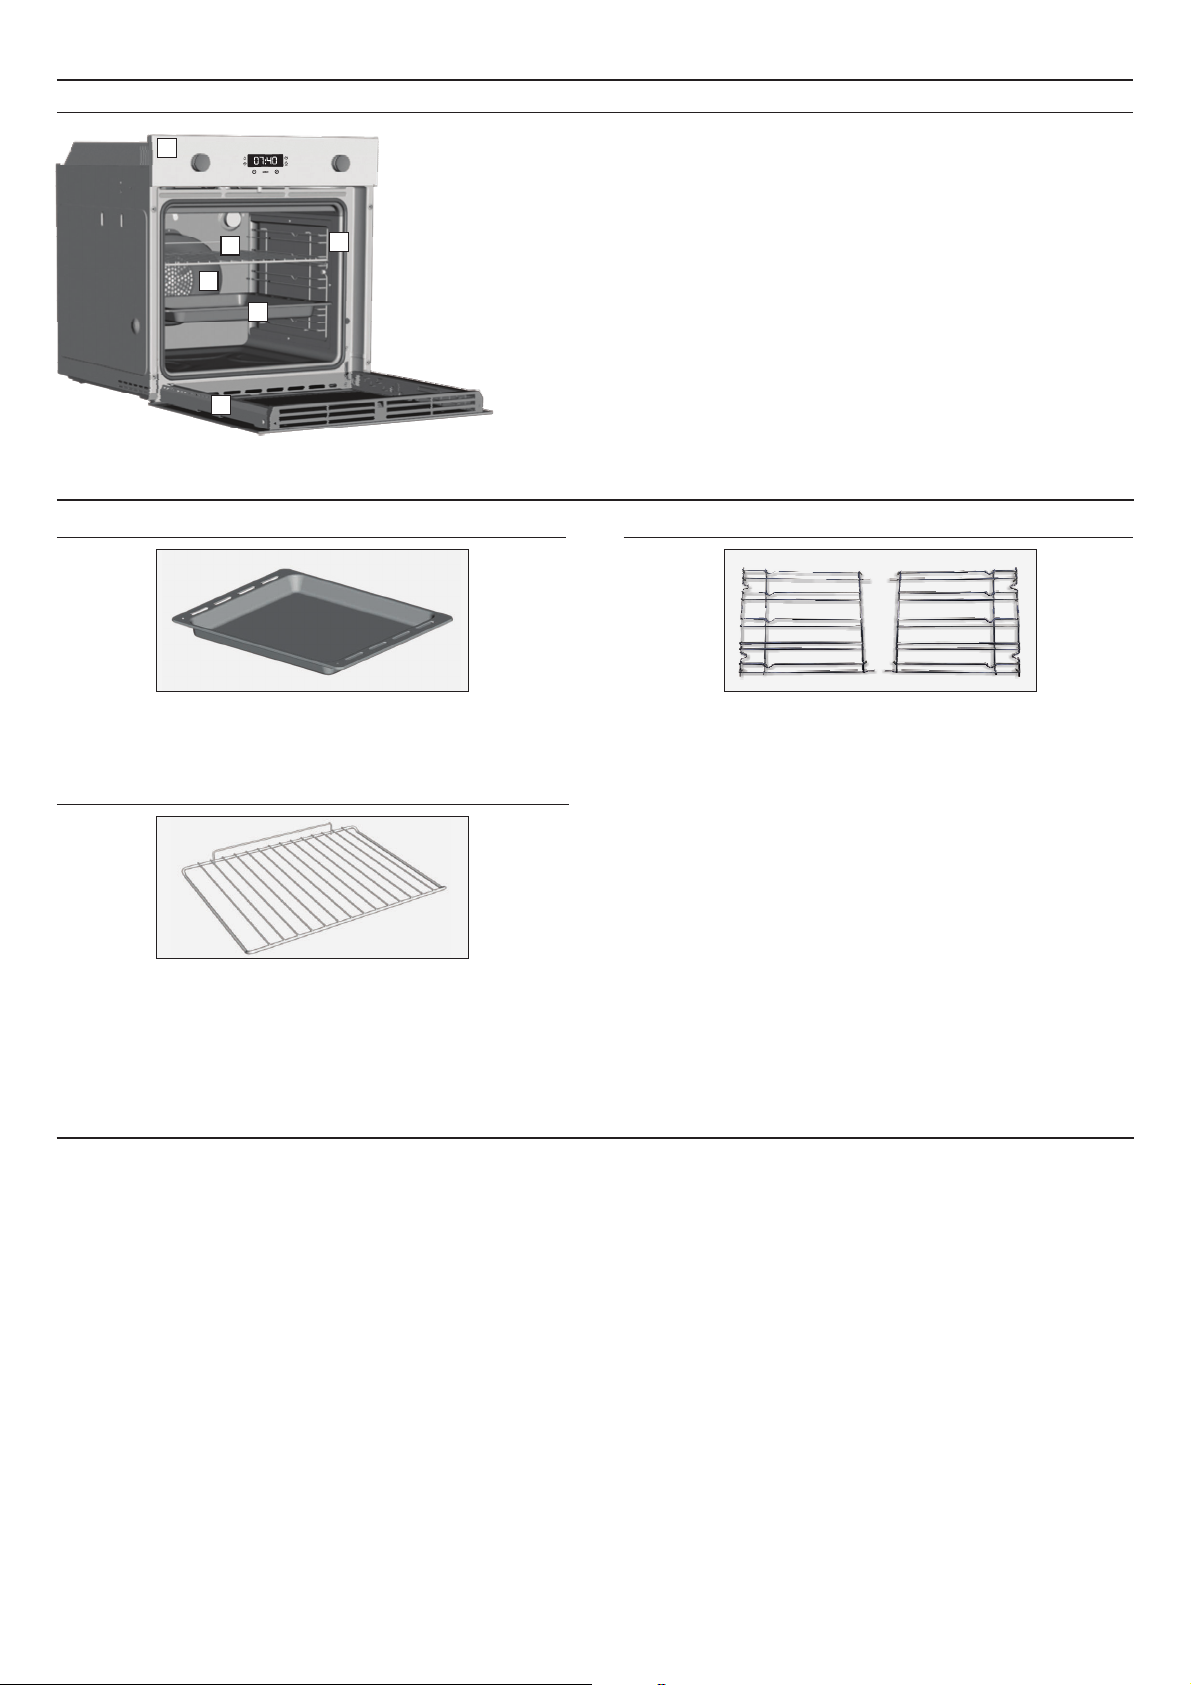
2. Product Description
2.1 Overview
1
3
5
4
6
2.2 Accessories
1. Control panel
2. Shelf positions (lateral wire grid if included)
2
3. Metal grill
4. Drip pan
5. Fan (behind the steel plate)
6. Oven door
1 Drip pan
Collects the residuesthat dripduring the cooking offoods on the grills.
2 Metal grill
Holds baking trays and plates.
3 Lateral wire grids
Lateral wire gridif included.
2.3 First Use
PRELIMINARYCLEANING
Clean the oven before using for the first time. Wipe over external surfaces with a damp soft cloth. Wash all accessories and wipe inside the
oven with asolution of hot water and washing upliquid. Set the empty oven to the maximumtemperature and leave on for about 1hour, this
will remove any lingeringsmells of newness.
EN 05
Page 7
3. Use of the Oven
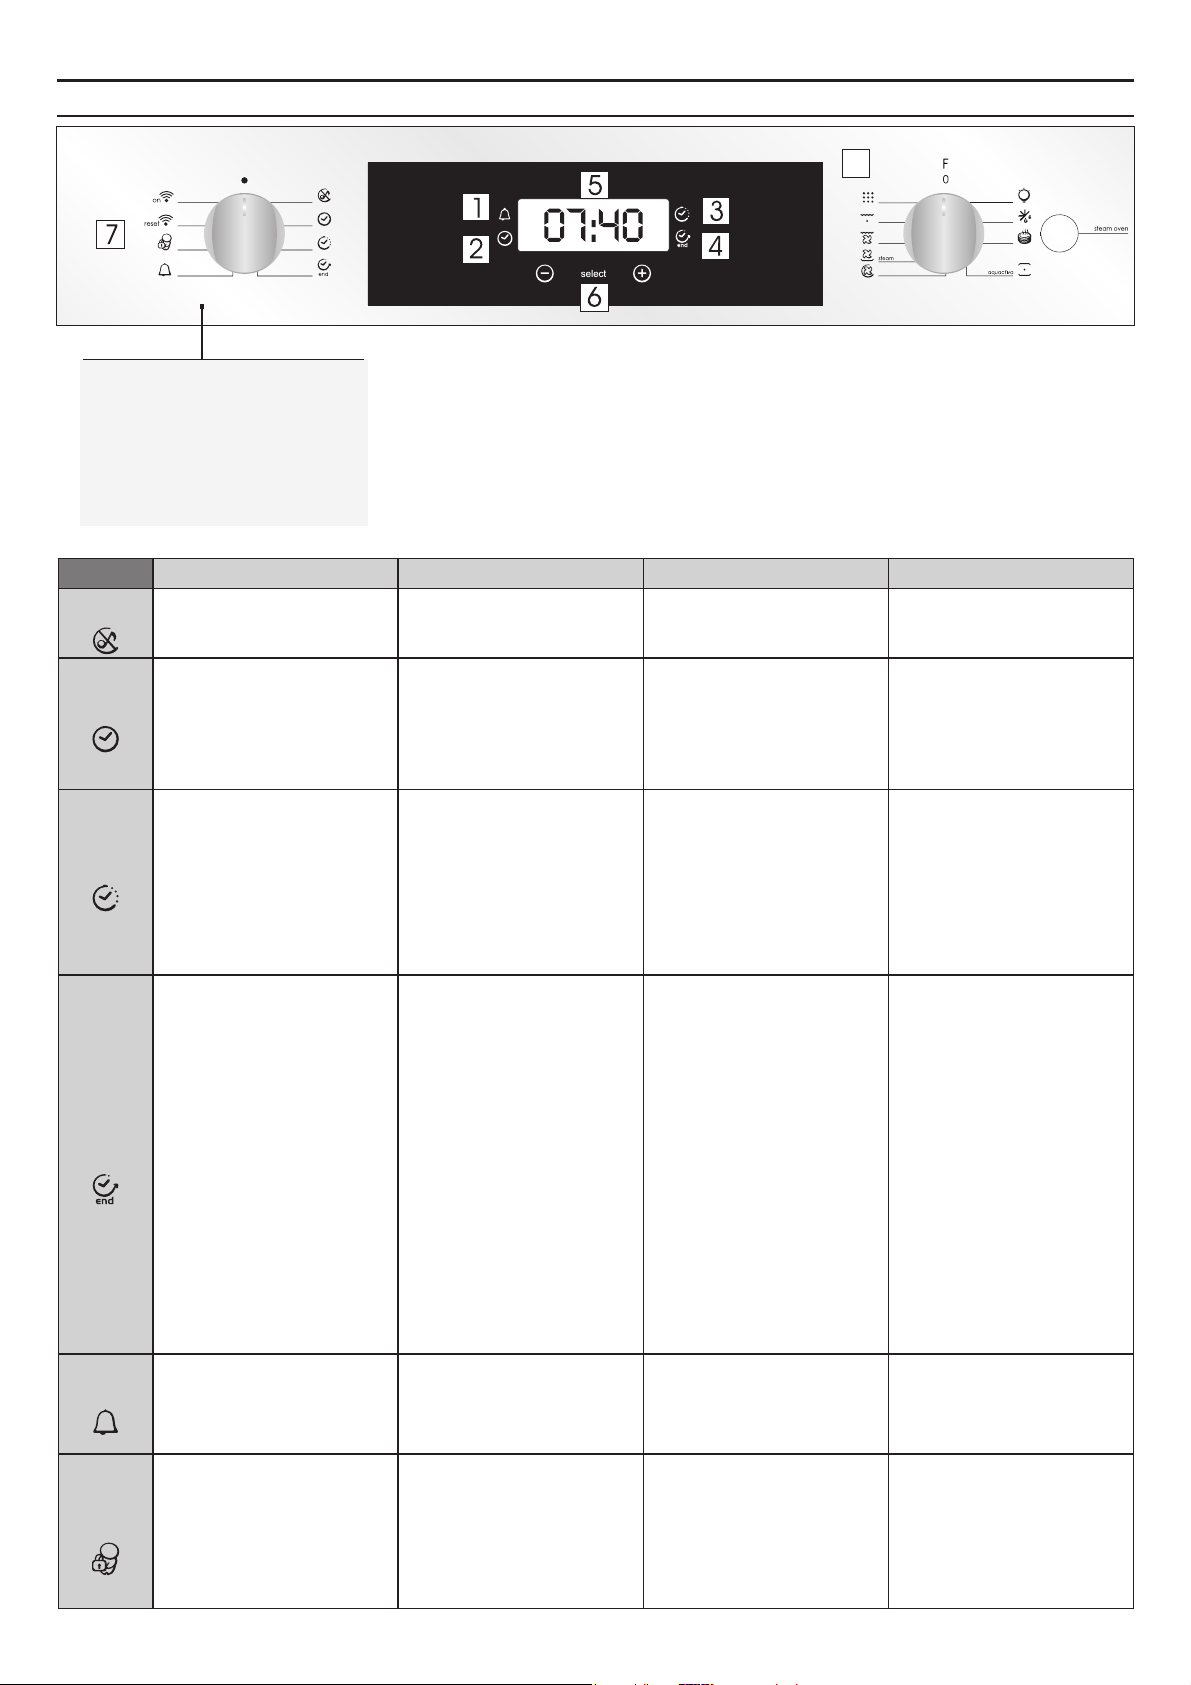
3.1 Display description
1. Minute minder
2. Clock setting
3. Cooking time
4. End of cooking
5. Temperature or clock display
6. LCD display adjustment controls
7. Thermostat selector knob
8. Function selector knob
8
WARNING : the first operation to carry out after the oven has
been installedor following the interruption of power supply (this
is recognizable the display pulsating and showing ) is
setting the correcttime. Thisis achievedas follows.
•Push the centralbutton.
•Set time with"-" "+" buttons.
•Release allbuttons.
ATTENTION:The ovenwill onlyoperate providing the clockis set.
12:00
FUNCTION
SILENCE
MODE
SET
THE TIME
COOKING
DURATION
END OF
COOKING
HOW TO ACTIVATE HOW TO DEACTIVATE WHAT IT DOES WHY IT IS NEEDED
• Rotate the left function selector
to the position " Silence mode “
• Rotate the left function
selector to the position “Set the
time”.
• Use the buttons " + " or " - " to
set the time
• Turn the right function selector
to a cooking function
• Rotate the left function selector
to the position "Cooking Time
Duration”
• Set the time of cooking by
using buttons " + " and " - "
• Lighting Auto appears
• Turn the right function selector
to a cooking function
• Rotate the left function
selector to the position "End of
cooking"
• Set the end time of cooking by
using buttons " + " and " - "
• Lighting Auto appears
• Rotate the function selector to
the position OFF.
• Rotate the function
selector to the position
OFF.
•When the cooking time has
elapsed, the oven switch off
automatically and the alarm rings
for few seconds To stop the
cooking functions early,
turn the function control to OFF or
set the time on 00.00; by rotating
the function selector to Cooking
Time Duration and by using the
buttons " + " and " - “
• When the cooking time has
elapsed, the oven switch off
automatically.
• To stop the cooking functions
early, turn the function control to
OFF
• Enables you to turn off the
sound of the minute minder.
• Enables you to set the
time which appears on
the display
• It allows to preset the cooking
time required for the recipe
chosen.
• When the cooking time is set,
turn the function selector toOFF to
go back to actual time.
• To view the cooking time
selected, turn the left function
selector to Cooking Time duration.
• It allows to preset the end of
cooking time you want.
• When the cooking time is set,
turn the function selector to OFF
to go back to actual time.
• To view the cooking time
selected, turn the left function
selector to End of cooking Time
• To turn off the sound of the
minute minder
• To set the time
NB : Set the time when you first
install your oven or just after a
black out (the clock is showing a
pulsating 12.00)
• For cooking the desired
recipes.
•This function is normally used with
the COOKING DURATION function
•For example, the desired food
needs to cook for 45 minutes and I
want it to be ready for 12.30; in this
case: at the end of the set time, the
oven automatically switches off and
an alarm sounds. Select the desired
cooking function. Set the cooking
duration to 45 minutes (“-” “+”). Set
the end of cooking to 12:30 (“-” “+”).
Cooking will automatically begin at
11:45 (12:30 minus 45 minutes), at
the end of the set cooking time, the
oven will automatically switch off.
WARNING: by setting only the end
of cooking time, and not the
cooking duration, the oven will
immediately switch on and switch
off at the end of the set cooking
time.
MINUTE
MINDER
CHILD
SAFETY
LOCK
• Turn the left function selector to
the position Minute Minder.
• Set the time of cooking by
using buttons “+”and “-”
• Turn the left function selector
to the position Child lock.
• Press the button " + " during 5
seconds
• Child lock is available when "
STOP " appears on display
• Set the time on 00.00 by
turning the left function selector
to the position Minute Minder,
and using the button " - “
• Turn back the left function
selector to Child lock and press
button " + " during 5 seconds.
• Indication STOP disappears.
EN 06
•Emits an audible signal at the
end of a set time.
•During operation, the display
shows the remaining time.
• The oven cannot be used.
• Allow to use the oven as
alarm even if the oven is
switch off
• This function is useful when
there are children in the house.
Page 8

3.2 Cooking Modes
Function
Dial
*
*
T °C
default
220
180
T °C
range
60 ÷ 6060
50 ÷ 280
50 ÷ 240
Function (Depends on the oven model)
LAMP: Turns on the oven light.
DEFROST: When the dial is set to this position. The fan circulates air at room temperature around
the frozen food so that it defrosts in a few minutes without the protein content of the food being
changed oraltered.
KEEP WARM: This is recommended to reheat precooked foodstuff, positioning the shelf on the
second level from top, or to defrost bread pizza or pastry by positioning the shelf on the lower level.
The temperature is preset in 60°C constant, no regulation is possible.
CONVENTIONAL: Both top and bottom heating elements are used. Preheat the oven for about ten
minutes. This method is ideal for all traditional roasting and baking. For seizing red meats, roast
beef, leg of lamb, game, bread, foil wrapped food (papillotes), flaky pastry. Place the food and its
dish on ashelf inmid position.
MULTI – LEVEL: We recommend you use this method for poultry, pastries, fish and vegetables.
Heat penetrates into the food better and both the cooking and preheating times are reduced. You
can cook different foods at the same time with or without the same preparation in one or more
positions. This cookingmethod gives even heatdistribution andthe smellsare notmixed.
Allow about tenminutes extrawhen cooking foods atthe same time.
210
50 ÷ 230
210 50 ÷ 230
200
L3
150 ÷ 220
L1 ÷ L5
BOTTOM HEATING + FAN: The bottom heating element is used with the fan circulating the air
inside the oven.This method is idealfor juicyfruit flans, tarts,quiches andpâté.
It prevents food from drying and encourages rising in cakes, bread dough and other bottom-cooked
food.
Place the shelfin thebottom position.
BOTTOM HEATING + FAN + STEAM : The hot air is distributed to different shelves, making this
function ideal for cooking different types of food at the same time, without ever mixing flavours and
smells. By pressing the STEAM button, the steam option works with traditional heat, thus ensuring
the best tasteand texturefor your dishes andperfect leavening.
This mode is suitable for cooking puff pastries, yeast-based desserts, bread and pizza, roasted
meat, and fish.
GRILL + FAN : use theturbo-grill with the doorclosed.
The top heating element is used with the fan circulating the air inside the oven. Preheating is
necessary for red meats but not for white meats. Ideal for cooking thick food items, whole pieces
such as roast pork, poultry, etc. Place the food to be grilled directly on the shelf centrally, at the
middle level.Slide thedrip tray under theshelf tocollect the juices. Makesure thatthe food is nottoo
close to thegrill. Turnthe food over halfwaythrough cooking.
GRILL : usethe grill with thedoor closed.
The top heating element is used alone and you can adjust the temperature. Five minutes
preheating is required to get the elements red-hot. Success is guaranteed for grills, kebabs and
gratin dishes. White meats should be put at a distance from the grill; the cooking time is longer, but
the meat will be tastier. You can put red meats and fish fillets on the shelf with the drip tray
underneath. The ovenhas two grill positions:
Grill: 2140 W Barbecue: 3340W
ECO
*Tested in accordance with the CENELEC EN 60350-1 used for definition of energy class.
ECO: 90min
SUPER: 120min
WIFI ON: Oven allows wfconnecton.
WIFI RESET:It allowswfconnectonto berestarted.
EN 07
PYROLYSIS
Page 9
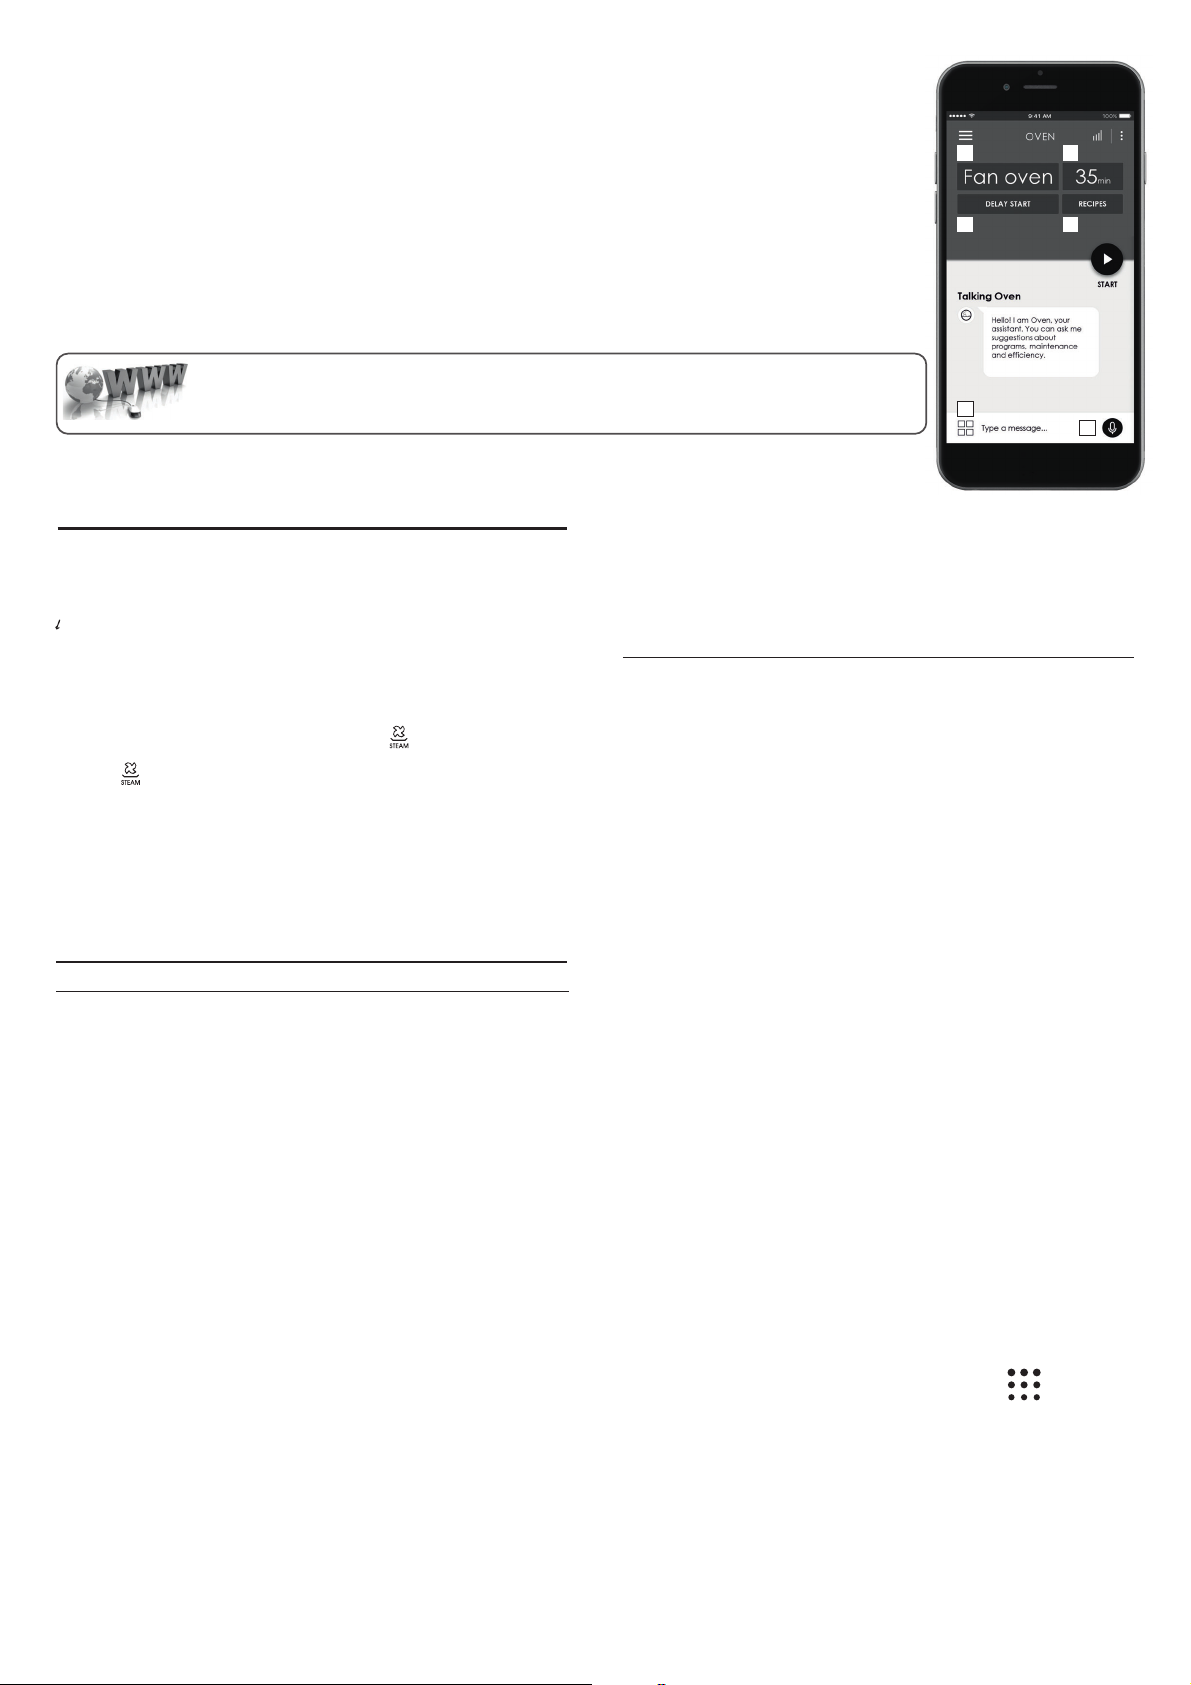
WIFI FUNCTION
For all the detals related tothe lnk between app and product,refer to theQuck Gude.
The Quck Gude savalable on: go.candy-group.com/candy-ov
WFhas two dfferent postons on the cookng selector:
•WFon: WFsswtched on only f the oven s already enrolled to your dev
remote.
•WFreset: After leavng the selector on WFreset for 30”, Bluetooth wll swtchonandyouwll be able to enroll the oven to your
devce wthn 5’.
If the enrollment s successful, the oven wll be controlled by remote and the WFcon wll swtch on. If the enrollment s
unsuccessful, WFwll swtchoffandtheovenwll be reset.
To proceed wth a new enrollment the cookng program selector has to be turned outfrom WFreset poston and moved aganont.
Note: Install the App on yourdevce before startng enrollng
Note: The devce where the App snstalled must have Bluetooth actvated
Note: For both WFpostons, the touchbuttons do notwork.
Note: It smportant to establsh a good W-Fsgnal strength between the home router and theapplance. When the oven s tryng to
connect torouter the con wll blnk 3” on and 1” off, when ts alreadyconnected the con wll swtch on.
CANDY SIMPLY-FI:
For detailed information about HOW TO CONNECT your simply-Fi appliance and HOW TO USE it at its
best, go to http://www.candysimplyfi.com
1. Program selecton / 2. Program duraton / 3. Cookng start settng / 4- Dedcated recpes selecton / 5. Offlne and vocal
assstant / 6. Tps, suggestons and onlne user manual
ce. In ths postontheovenwll be only controlled by
1 2
3 4
6
5
3.3 Using The Steam Function
Steam function lets you have better hummidity during cooking cycle. We
recommend alternating steamcooking withtraditional cooking.
WARNING:Risk ofburn anddamage to theappliance.
Released steam cancause burns:
Open the oven door carrefully to avoid injury after using a cooking
function with steam.
1. Open theoven door
2. Fillthe cavity bottom using max. 150 ml water. Fillthe cavity bottom with
water only whenthe ovenis cold.
3. Put foodin theappliance and closethe ovendoor.
4. Set thefunction youprefer to cookwith steam.
5. Press the steam oven button. The steam oven button works with the
function.
6. Turn theknob forthe temperature toselect atemperature.
CAUTION: Do not refill the cavity bottom with water during cooking or
when the ovenis hot.
7. To turn the appliance off switch the function and temperature knob to
zero positions.
8. Remove water from the cavity bottom. Clean the drip tray after every
cooking cycle. Pleasesee chapter4.1 for cleaninginstrucitons.
4. Oven cleaning and maintenance
4.1 General notes on cleaning
The lifecycle of the appliance can be extended through regular
cleaning. Waitfor the oven tocool beforecarrying out manual cleaning
operations. Never use abrasive detergents, steel wool or sharp
objects for cleaning, so as to not irreparably damage the enamelled
parts. Use onlywater, soap orbleach-based detergents(ammonia).
GLASS PARTS
It is advisable to clean the glass window with absorbent kitchen towel
after everyuse of the oven. To remove more obstinate stains, youcan
use a detergent-soaked sponge, well wrung out, and then rinse with
water.
OVEN WINDOW SEAL
If dirty, theseal canbe cleanedwith aslightly damp sponge.
ACCESSORIES
Clean accessories with a wet, soapy sponge before rinsing and drying
them: avoid usingabrasive detergents.
DRIP PAN
After using the grill,remove thepan fromthe oven. Pour the hot fatinto
a container andwash thepan in hot water, using a spongeand
washing-up liquid.
If greasy residues remain, immerse the pan in water and detergent.
Alternatively, you can wash the pan in the dishwasher or use a
commercial oven detergent.Never puta dirty pan backinto the oven.
STAINLESSSTEEL OR ALUMINIUMAPPLIANCES
Clean the ovendoor witha damp cloth orsponge only.
Dry it witha softcloth.
Do not use steelwool, acidsor abrasive materials as they candamage
the oven surface. Clean the oven control panel with the same
precautions.
CLEANING THE CAVITY BOTTOM
Follow these steps to clean the limestone residue from the cavity
bottom.
It is recommended to clean thecavity bottomafter 5-10steam cooking
cycles.
1. Pour 300ml ofwhite vinegar into thecavity bottom.
NOTE: Type ofvinegar:%5
2. Wait for30 minutesat roomtemperature.
3. Clean theoven usingsoft cloth and water.
4.2 Pyrolysis
The oven is equipped with a pyrolyser cleaning system, which
destroys food residues at high temperature. The operation is carried
out automatically by means of the programmer. The resulting fumes
are rendered “clean” by passing over a Pyrolyser wich starts as soon
as cooking begins. As very high temperatures are required by the
Pyrolyser, the oven door is fitted with a safety lock. The pyrolyser can
be stopped at any time. The door cannot be opened until the safety
lock is displayed.
NOTE : If a hob has been fitted above the oven, never use the gas
burners or the electric hot-plates while the Pyrolyser is working, this
will prevent thehob fromoverheating.
TWO PYROLYTIC CYCLEare pre-set:
ECO PYROCLEAN : Cleans a moderately stained oven. Operates for
a period of90 minutes.
SUPER PYROCLEAN : Cleansa heavilystained oven.Operates for a
period of 120minutes.
Never use commercially available cleaning products on a Pyrolytic
oven!
Tip : Carrying out Pyrolytic cleaning immediately after cooking allows
you to takeadvantage ofresidual heat, thus savingenergy.
Before executing apyrolytic cycle:
•Remove all the accessories from the oven becausethey are not
able to tolerate the high temperatures used during the pyrolytic
cleaning cycle ; in particular removing grids, side racks and the
telescopic guides (refer to the chapter REMOVING GRIDS AND
SIDE RACKS) . In ovens with meat probe it is necessary, before
making the cleaningcycle ,close thehole withthe nutprovided.
•Remove any large spillages or stains as it would take too long to
destroy them. Also excessively large amounts of grease could
ignite when subject to the very high temperatures of the
Pyrolytic cycle.
•Close the ovendoor.
•Excess spillage mustbe removedbefore cleaning.
• Clean theoven door;
• Remove large or coarse food residues from the inside of the
oven using adamp sponge.Do notuse detergents;
• Remove all accessories and the sliding rack kit (where
present);
• Do notplace teatowels.
Using the pyroliticcycle:
1- Rotate the function selector to the position " ". On the
display, appears the indication " ECO " or " SUP ". The preset time is
90 min, this can be varied from 90min (Eco mode) to 120 min (Sup
mode) via the programmer (setting button "+"or"-").Iftheoven is
very dirty, itis recommend o increase the time to 120min, ifthe ovenis
moderately dirty reducethe cleaningcycle time to 90min.
2- It is possible to defer the start time of the pyroclean cycle by
changing theEND timevia theprogrammer.
3- After few minutes, when the oven reaches a high temperature, the
door locks automatically. The pyroclean cycle can be stopped at any
time by turning the function selector back to '0' (the word OFF will be
displayed for3 seconds).
EN 08
Page 10

4 - Once the pyroclean cycle is finished, the pyrolysis will switch off
LOW-E
automatically. On the display appears the indication "END" until the
door is lockedthen "0--n".
5- You can turn the function selector back to" 0 " but if the temperaure
is still high, the "0--n " indication appears to inform that the door is
locked.
Use of thepyrolytic cyclein Touch Control ovens:
1- Rotate the function selector into position pyrolisys. The display will
show either "ECO"or "SUP“
2- The pre-set time is 90 minutes but it can bevaried from90 min.(Eco
mode) to120 min. (Sup mode) using the programmer (" +" or "-" key).
If the oven is very dirty, the time should be increased to 120 min., while
if the ovenis onlya slightly dirty, reduce thecleaning cycle to 90min.
4.3 Aquactiva Function
The Aquactiva procedure uses steam to help remove remaining
fat and food particlesfrom the oven.
1. Pour 300 ml of water into the Aquactiva container at the bottom
of the oven.
2. Set the ovenfunction to Static( )or Bottom ( )heater
3. Set the temperatureto theAquactiva icon
4.Allow the program to operatefor 30 minutes.
5. After 30 minutes switch off the program and allow the oven to
cool down.
6. When the appliance is cool, clean the inner surfaces of the oven
with a cloth.
Warning:
Make sure that theappliance is cool before youtouch it.
Care must be takenwith all hot surfaces asthere is arisk ofburns.
Use distilled or drinkablewater.
REMOVALAND CLEANINGOF THEGLASS DOOR
1. Open theoven door.
2.3.4. Lock the hinges, remove the screws and remove the upper
metal cover bypulling itupwards.
5.6. Remove theglass, carefully extracting it from the oven door (NB:
in pyrolytic ovens, also remove the second and third glass (if
present)).
7. At the end of cleaning or substitution, reassemble the parts in
reverse order.
On all glass, the indication "Pyro" must be legible and positioned on
the left side of the door,close tothe left-hand lateral hinge. In this way,
the printed labelof thefirst glass will beinside the door.
1.
2.
3.
300 ml
4.4 Maintenance
REMOVAL ANDCLEANING OFTHE SIDE RACKS
1. Unscrew the boltin an anti-clockwise direction.
2. Remove the sideracks by pulling them towardsyou.
3. Clean the side racks in a dishwasher or with a wet sponge and
then dry them immediately.
4. Having cleaned the side racks, putthem backin andreinsert the
bolts, ensuring that theyare fully tightened.
A
4.
5.
6.
1
2
3
7.
REMOVAL OF THEOVEN DOOR
1. Open the frontwindow.
2. Open the clamps of the hinge housing on the right and left side
of the front windowby pushing them downwards.
3. Replace the windowby carrying out the procedurein reverse.
EN 09
Page 11

CHANGING THE BULB
1. Disconnect theoven fromthe mains supply.
2. Undo theglass cover, unscrewthe bulband replace it witha new bulb ofthe same type.
3. Once thedefective bulbis replaced, replace theglass cover.
5. Troubleshooting
5.1 FAQ
PROBLEM POSSIBLE CAUSE SOLUTION
The oven does not heat up
The oven does not heat up
The oven does not heat up
No reaction of the touch user
interface
The clock is not set Set the clock
The child lock is on
A cooking function and temperature has
not been set
Steam and condensation on the user
interface panel
Deactivate the child lock
Ensure that the necessary settings are
correct
Clean with a microfiber cloth the user
interface panel to remove the
condensation layer
EN 10
Page 12

Indicazioni di Sicurezza
• Durante la cottura l'umidità può condensarsi all'interno della cavità o sul vetro della porta. È normale.
Per ridurre questo effetto, attendere 10-15 minuti dopo l'accensione prima di mettere il cibo all'internodel
forno. In ogni caso, la condensa scompare quando il forno raggiunge la temperatura di cottura.
• Cuocere le verdure in un contenitore con un coperchio invecedi un vassoio aperto.
• Evitare di lasciare il cibo all'interno del forno dopo la cottura per un periodo superiore a 15/20 minuti.
• ATTENZIONE: l'apparecchio e le parti accessibili diventano calde durante l'uso. Prestare attenzione a
non toccare le parti calde.
• ATTENZIONE: le parti accessibili possono diventare molto calde quando si utilizza il forno. I bambini
devono essere tenuti a distanza di sicurezza.
• L'apparecchio può essere usato da bambini dagli 8 anni in su e persone con ridotte capacità fisiche,
sensoriali o mentali o senza esperienza e conoscenza del prodotto se supervisionate o dando loro
istruzioni riguardo al funzionamento dell'apparecchio in maniera sicura e coscente del rischio possibile.
• I bambini non dovrebbero giocare con l'apparecchio.
• La pulizia e la manutenzione non dovrebbero essere fatte da bambini senza supervisione
• Durante l’uso l’apparecchio diventa molto caldo. Si dovrebbe fare attenzione a non toccare gli elementi
riscaldanti all’interno del forno.
• ATTENZIONE: Le parti accessibili possono diventare molto calde durante l’uso. I bambini dovrebbero
essere tenuti a distanza.
• Non usare per la pulizia materiali ruvidi abrasivi o raschietti metallici affilati per pulire le porte di vetro del
forno dato che possono graffiare la superficie e causare la frantumazione del vetro.
• Spegnere il forno prima di rimuovere lo schermo di protezione e, dopo la pulizia, rimontarlo secondo le
istruzioni.
• Usare solo la sonda termica raccomandata per questo forno.
• Non utilizzare un pulitore a vapore.
• Collegare al cavo di alimentazione una spina dimensionata per la tensione, la corrente e la potenza
indicate nella targhetta e dotata del contatto di terra. La presa deve essere dimensionata per la potenza
indicata sulla targhetta e deve avere il contatto di terra collegato e funzionante. Il conduttore di terra è
giallo-verde. Questa operazione deve essere eseguita solo da un tecnico adeguatamenteaddestrato. In
caso di incompatibilità tra presa e spina dell'elettrodomestico, richiedere ad un tecnico specializzato di
sostituire la presa con un'altra di tipo compatibile. La spina e la presa devono essere conformi alle
normative attuali del paese di installazione. Il collegamento alla rete di alimentazione può essere
effettuato anche collocando un interruttore automatico onnipolare tra l'elettrodomestico e la rete di
alimentazione, in grado di supportare il carico massimo collegato, in linea con la legislazione corrente. Il
cavo di terra giallo-verde non deve essere interrotto dall'interruttore automatico. La presa o l'interruttore
automatico onnipolare utilizzati per ilcollegamento devono essere facilmente accessibili al momento del
montaggio dell'elettrodomestico.
• La disconnessione può essere eseguita con la spina accessibile o aggiungendo un interruttore sul
cablaggio fisso, nel rispetto delle normative relative ai cablaggi.
• Se il cavo di alimentazione si danneggia, deve essere sostituito con un cavo o uno speciale fascio di
cavi disponibile presso il produttore o contattando il reparto assistenza al cliente.
• Il cavo di alimentazione deve essere di tipo H05V2V2-F.
• Il mancato rispetto di quanto indicato sopra può compromettere la sicurezza dell'elettrodomestico e
rendere nulla la garanzia.
• Qualsiasi materiale fuoriuscito in eccesso deve essere tolto prima della pulizia.
• Durante il processo di pulizia pirolitico, le superfici possono surriscaldarsi più del normale: mantenere
sempre i bambini a distanza di sicurezza;
•L’elettrodomestico non deve essere installato dietro a una porta a scopo ornamentale per evitarne il
surriscaldamento.
• Quando si posiziona uno scaffale all’interno, accertarsi che il blocco sia rivolto verso l’alto e nella parte
posteriore della guida.
Lo scaffale deve essere inserito completamente nella guida
• AVVERTENZA: Non coprire le pareti del forno con fogli di alluminio o protezioni monouso disponibili in
commercio. I fogli di alluminio o le altre protezioni, se a diretto contatto con lo smalto caldo, rischiano di
fondersi e di danneggiare lo smalto interno stesso.
•AVVERTENZA:Non togliere mai la guarnizione della porta del forno.
• Il funzionamento dell'elettrodomestico alle frequenze nominali non richiede alcuna operazione o
impostazione.
IT 11
Page 13

Sommario
Avvertenze Generali
13
Descrizione del Prodotto
14
Utilizzo del Forno
15
1.1 Suggerimenti sulla sicurezza
1.2 Sicurezza elettrica
1.3 Raccomandazioni
1.4 Installazione
1.5 Gestione dei rifiuti
1.6 Dichiarazione di conformità
2.1 Panoramica
2.2 Accessori
2.3 Primo utilizzo
3.1 Descrizione del display
3.2 Modalità di cottura
3.3 Uso della funzione a vapore
Pulizia e Manutenzione del Forno
17
Risoluzione dei problemi
19
Garanzie
4.1.Note generiche di pulizia
4.2 Pirolisi
La Funzione
4.3 Aquactiva
4.4 Manutenzione
• Rimozione e pulizia delle griglie
• Rimozione dello sportello del forno
• Rimozione e pulizia della porta in vetro
• Sostituzione della lampadina
5.1 F.A.Q.
19
IT 12
Page 14

1. Avvertenze Generali
Vi ringraziamo per aver scelto uno dei nostri prodotti. Per utilizzare il forno in modo ottimale è
consigliabile leggere con attenzione questo manuale e conservarlo con cura per ogni ulteriore
consultazione. Prima di installare il forno, prendere nota del numero di serie in modo da poterlo
comunicare al personale del servizio di assistenza in caso di richiesta di intervento. Dopo aver
rimosso il forno dall’imballaggio, verificare chenon abbia subito danni durante iltrasporto. In caso
di dubbi, non utilizzare il forno e richiedere l’assistenza di un tecnico qualificato. Tenere tutto il
materiale da imballaggio (sacchetti di plastica, polistirolo, chiodi) fuori dalla portata dei bambini.
Alla prima accensione del forno può svilupparsi fumo di odore acre, causato dal primo
riscaldamento del collante dei pannelli d’isolamento avvolgenti il forno: si tratta di un fenomeno
assolutamente normale e, in caso si verificasse, occorre attendere lacessazione delfumo primadi
introdurre le vivande. Il produttore declina ogni responsabilità in caso di mancata osservanza delle
istruzioni contenutein questodocumento.
NOTA:le funzioni,le proprietàe gliaccessori deiforni citati in questomanuale possono variare aseconda dei modelli.
1.1 Suggerimenti sulla Sicurezza
Utilizzare il forno solo per lo scopo per cui è stato progettato, ossia
solo per la cottura di alimenti; qualsiasi altro utilizzo, ad esempio
come fonte di riscaldamento, è considerato improprio e quindi
pericoloso. Il costruttore non può essere considerato responsabile
per eventuali danniderivanti dausi impropri, erronei edirragionevoli.
L’uso di un qualsiasi apparecchio elettrico comporta l’osservanza di
alcune regole fondamentali:
- non tirare il cavo di alimentazione per staccare la spina della presa di
corrente;
- non toccarel’apparecchio conmani o piedi bagnatio umidi;
- in generale è sconsigliabile l’uso di adattatori, prese multiple e
prolunghe;
- in caso di guasto e/o cattivo funzionamento dell’apparecchio,
spegnerlo enon manometterlo.
1.2 Sicurezza Elettrica
FARE EFFETTUARE I COLLEGAMENTI ELETTRICI AD
UN’ELETTRICISTAO TECNICO QUALIFICATO.
La rete di alimentazione a cui viene collegato il forno deve essere
conforme con le normative in vigore nel paese di installazione. Il
produttore declina ogni responsabilità per eventuali danni derivanti
dalla mancata osservanza di tali disposizioni. Il forno deve essere
collegato alla rete elettrica tramite una presa a muro con messa a
terra o tramite un sezionatore con più poli, a seconda delle
disposizioni in vigore nel paese di installazione. La rete elettrica deve
essere protetta mediante fusibiliidonei edevono essere utilizzati cavi
con una sezione trasversale idonea a garantire una corretta
alimentazione delforno.
COLLEGAMENTO
Il forno viene fornito con un cavo di alimentazione che deve essere
collegato solo a una rete elettrica con una tensione di 230 VCA tra le
fasi o tra la fase e il neutro. Prima di collegare il forno alla rete
elettrica, è indispensabilecontrollare:
- la tensionedi alimentazioneindicata sul misuratore;
- l’impostazione delsezionatore.
Il filo di messa a terra collegato al morsetto di terra del forno deve
essere collegato almorsetto diterra della rete elettrica.
ATTENZIONE
Prima dicollegare ilforno alla rete elettrica,far controllarela continuità
della messa a terra della rete elettrica ad un elettricista qualificato. Il
produttore declina ogni responsabilità per eventuali incidenti o altri
problemi derivanti dal mancato collegamento a terra del forno o dal
suo collegamento aduna messaa terra con unacontinuità difettosa.
NOTA: poiché il forno potrebbe richiedere interventi di assistenza, è
consigliabile prevedere la disponibilità di un’ulteriore presa a muro a
cui collegare il forno dopo che è stato rimosso dallo spazio in cui è
stato installato. Il cavodi alimentazionedeve esseresostituito solo dal
personale dell’assistenza tecnica o da tecnici con qualifiche
analoghe.
1.3 Raccomandazioni
Dopo l’uso sono sufficienti alcune semplici operazioni di pulizia per
mantenere il forno perfettamente pulito. Non rivestire le pareti del
forno con fogli d’alluminio da cucina o fogli monouso commerciali,
perché potrebbero fondersi a contatto con le superfici in smalto caldo
e danneggiarele superficiin smalto all’interno delforno. Perevitare di
sporcare eccessivamente il forno e prevenire la di usione di fumo
maleodorante, è consigliabile non utilizzare il forno a temperature
molto alte. E’ generalmente preferibile imposta- re un tempo di
cottura più lungo e utilizzare una temperatura più bassa. Oltre agli
accessori forniti con il forno, è consigliabile utilizzare piatti e teglie
resistenti alle altetemperature.
ff
1.4 Installazione
Il produttore non è obbligato ad occuparsi dell’installazione. Gli
eventuali interventidi assistenza, necessari per correggere problemi
dovuti ad un’errata installazione, non sono coperti da garanzia.
L’installazione deve essere effettuata da un tecnico qualificato e in
conformità con queste istruzioni. Un’installazione impropria potrebbe
causare infortuni alle persone, agli animali domestici o danni alle
attrezzature. Il produttore declina ogni responsabilità per eventuali
lesioni odanni dovuti ad un’erratainstallazione.
Il forno può essere installato sopra una colonna o sotto a un piano di
lavoro. Prima di fissare in posizione il forno, verificare che lo spazio
attorno allo stesso sia sufficiente a garantire la circolazione del flusso
di aria fresco necessario a garantire il raffreddamento del forno e la
sicurezza dei componenti interni. Realizzare le aperture indicate
nell’ultima pagina delmanuale, aseconda del tipo di installazione.
1.5 Gestione dei rifiuti e rispetto dell’ambiente
Questo apparecchio è contrassegnato in conformità alla
Direttiva europea 2012/19/EU sulle apparecchiature
elettriche ed elettroniche (WEEE). I WEEE contengono
sia sostanze inquinanti (che possono provocare
conseguenze negative sull’ambiente) che componenti di
base (che possono essere riutilizzati). E’ importante che i
e smaltire correttamente tutti gli inquinanti e recuperare tutti i materiali.
I singoli possono giocare un ruolo importante nell’assicurare che i
WEEE non diventino un problema ambientale; è essenziale seguire
alcune regole di base:
- i WEEE nondevono esseretrattati comerifiuti domestici;
- i WEEE devono essere portati ai punti di raccolta appositi gestiti dal
comune o da societàregistrate.
In molti paesi, per i WEEE di grandi dimensioni, potrebbe essere
presente la raccolta domestica. Quando si acquista un nuovo
apparecchio, quello vecchio potrebbe essere restituito al rivenditore
che deve acquisirlo gratuitamente su base singola, sempre che
l’apparecchio sia del tipo equivalente e abbia le stesse funzioni di
quello acquistato.
RISPARMIAREE RISPETTARE L’AMBIENTE
Ove possibile, evitare di pre-riscaldare il forno e cercare sempre di
riempirlo. Aprire la porta del forno quanto necessario, perché vi sono
dispersioni di calore ogni volta che viene aperta. Per risparmiare molta
energia sarà su ciente spegnere il forno dai 5 ai 10 minuti prima della
fine del tempo di cottura pianificato, e servirsi del calore che il forno
continua a generare. Tenere le guarnizioni pulite e in ordine, per evitare
eventuali dispersioni di energia. Se si dispone di un contratto di
energia elettrica a tariffa oraria, il programma “cottura ritardata”
renderà più semplice il risparmio spostando l’avvio del programma
negli orari a tariffaridotta.
WEEE siano soggetti a trattamenti specifici per rimuovere
ffi
1.6 Dichiarazione di conformità
Laddove applicabili,le parti di questo elettrodomestico sono conformi
a: REGOLAMENTO (CE) No 1935/2004 riguardante i materiali e gli
oggetti destinati a venire a contatto con i prodotti alimentari;
REGOLAMENTO DELLA COMMISSIONE (CE) No 2023/2006
riguardante le buone pratiche di fabbricazione dei materiali e degli
oggetti destinati avenire acontatto con i prodottialimentari.
Apponendo la marcatura su questo prodotto, dichiariamo, sotto
la nostra responsabilità, di ottemperare a tutti i requisiti relativi alla
tutela di sicurezza, salute e ambiente previsti dalla legislazione
europea inessere perquesto prodotto.
IT 13
Page 15

2. Descrizione del Prodotto
2.1 Panoramica
1
3
5
4
6
2
1. Pannello di controllo
2. Posizioni ripiani (castelletto se previsto)
3. Griglia metallica
4. Leccarda
5. Ventola (dietro alla piastra di acciaio)
6. Porta forno
2.2 Accessories
1 Leccarda
Raccoglie iresidui che gocciolano durante la cottura di alimenti con i grill.
3 Griglie a filo laterale
Griglia laterale seinclusa.
2 Griglia metallica
Sostiene teglie e piatti.
2.3 Primo utilizzo
PULIZIAPRELIMINARE
Pulire sempre il fornoprima di utilizzarlo per laprima volta. Pulire le superficiesterne conun panno morbido leggermente inumidito.
Lavare tutti gli accessorie pulire l’interno del fornocon del detergente per piattied acquacalda. Verificareche il fornosia vuoto,impostare la
temperatura massima e lasciarloacceso per almeno 1 ora,così da rimuovere tutti gliodori normalmente presenti neiforni nuovi.
IT 14
Page 16

3. Utilizzo del Forno
3.1 Descrizione del display
8
ATTENZIONE: la prima operazione da eseguire dopo
1- Timer contaminuti
2- Regolazione dell'ora
3- Tempo di cotturaFine cottura
4- Display temperatura e tempo
5- Comandi di regolazione del display LCD
6- Manopola del termostato
7- Manopola del selettore di funzione
FUNZIONE COME SI ATTIVA COME SI DISATTIVA COSA FA A COSA SERVE
MODALITA'
SILENZIOSA
IMPOSTAZIONE
DELL'OROLOGIO
•Ruotare la manopola del
programmatoresulla “Modalità
Silenziosa”.
•Impostare la manopola sulla
posizione “Impostazione
dell’orologio”.
•Usare i tasti “-” e “+” per
impostare l’ora.
•Ruotare la manopola sulla
posizione Off.
•Ruotare la manopola sulla
posizione Off.
l’installazione o dopo una interruzione di corrente (tali situazioni
si riconoscono perchè sul dispay lampeggia l’ora è la
regolazione dell’ora, comedi seguitodescritto.
•Premere il tastocentrale 4volte.
•Imposta l'ora con i tasti "- " "+".
•Lasciare i tasti.
ATTENZIONE: Il forno funziona solo se impostato in modalità
manuale ocottura programmata.
•Permette di spegnere il suono
del timer.
•Permette di regolare l’ora che
appare sul display.
•Questa funzione è utilizzata
per spegnere il suono del timer.
•Questa funzione permette di
regolare l’ora utilizzando i tasti “-” e
“+”.
NOTA: impostare l’ora al momento
dell’installazione del vostro forno o
subito dopo un’interruzione di
corrente (12:00 lampeggia sullo
schermo.
12:00 )
DURATA
COTTURA
FINE
COTTURA
TIMER
BLOCCO
BAMBINO
•Selezionare una funzione di
cottura.
•Impostare la manopola del
programmatore sulla durata di
cottura.
•Regolare il tempo di cottura
utilizzando i tasti “-” e “+”.
•Autodisplay si illumina.
•Selezionare una funzione di
cottura.
•Regolare la manopola sulla
posizione di Fine di cottura.
•Regolare l’ora di fine cottura
utilizzando i tasti “+” e “-”.
•Autodisplay si illumina.
•Regolare la manopola del
programmatore sulla posizione
Timer.
•Regolare il tempo di cottura
utilizzando i tasti “+” e “-”.
•Regolare la manopola del
programmatore sulla posizione
Sicurezza bambini.
•Premere sul tasto “+” per 5
secondi. •L’indicazione sul display
•La sicurezza bambini è in
funzione quando sul display
appare STOP.
•Una volta che il tempo è
trascorso, il forno viene
automaticamente disattivato. Per
fermare la cottura
anticipatamente, si deve
impostare la manopola delle
funzioni su Off, o regolare il
tempo di cottura su 00:00,
posizionando la manopola sulla
Durata di cottura e utilizzando i
tasti “-” “+”.
•Quando la cottura è terminata,
il forno si spegne
automaticamente. Per bloccare
la cottura anticipatamente,
ruotare la manopola delle
funzioni su Off.
•Regolare il tempo su 00:00,
posizionando la manopola del
programma- tore sulla
posizione Timer e utilizzando i
tasti “+” e “-”.
•Riposizionare la manopola
sulla funzione Sicurezza
bambini e premere il tasto “+”
per 5 secondi.
sparisce.
• Permette di regolare il tempo di
cottura.
Quando il tempo di cottura è
regolato, posizionare la
manopola su Off per ritornare alla
visualizzazione dell’ora attuale.
Per visualizzare l’ora selezionata,
posizionare il selettore delle
funzioni di sinistra su Durata di
cottura.
•Permette di memorizzare l’ora
di fine cottura.
•Quando l’ora di fine cottura è
regolata, ruotare il selettore di
funzione su Off per ritornare
all’ora attuale.
•Per vedere il tempo di cottura
selezionato, ruotare il selettore
di funzione di sinistra sulla
posizione Fine di cottura.
•Questa funzione attiva un
allarme sonoro di qualche
secondo alla fine del tempo
impostato.
• Il forno non può essere
utilizzato.
• Quando il tempo di cottura è
finito, la cottura si arresta
automaticamente e l’allarme
suona per qualche secondo.
•Questa funzione è anche
utilizzata per le cotture che
possonoessere programmate in
anticipo.
•Ad esempio, il cibo desiderato
deve cuocere per 45 minuti e
desidero che sia pronto per le
12.30; in tal caso: al termine
della durata impostata il forno si
spegne automaticamente ed
avvisa con un segnale sonoro.
Selezionare la funzione di
cottura desiderata. Impostare la
durata cottura a 45 minuti (“-”
“+”). Impostare la fine cottura
alle ore 12:30 (“-” “+”). La
cottura avrà automaticamente
inizio alle 11:45 (12:30 meno 45
minuti), all’ora impostata come
fine cottura il forno si spegne
automaticamente.
• L’allarme sonoro funziona
indipendentemente dal fatto che
il forno sia acceso.
• Questa funzione è utile
quando ci sono dei bambini in
casa.
IT 15
Page 17

3.2 Modalità di cottura
Manopola
commutatore
*
*
T °C
predefinito
220
180
Intervallo
di T°
60 ÷ 6060
50 ÷ 280
50 ÷ 240
Funzione (a seconda del modello)
LAMPADA: accende la luce interna.
SCONGELAMENTO: questa posizione permette di far circolare l’aria a temperatura ambiente intorno al
cibo surgelato facendolo così scongelare in pochi minuti senza modificare od alterare il contenuto
proteico.
RISCALDAMENTO: Questa modalità è quella consigliata per riscaldare alimenti pre-cotti (che devono
essere posizionati sul secondo ripiano in basso dall'alto) o per scongelare pasta o pizza congelata (in
questo caso ènecessario utilizzareil ripiano piùbasso).
La temperatura èpreimpostata su60°C e nonpuò esseremodificata.
STATICO: sono in funzione le resistenze superiore e inferiore. È la cottura tradizionale, ottima per
arrostire cosciotti, selvaggina,ideale per biscotti, meleal forno eper renderei cibi moltocroccanti.
COTTURA MULTILIVELLO: l’aria calda viene ripartita sui diversi ripiani. E’ ideale per cuocere
contemporaneamente diversi tipi di cibo (carne, pesce), senza miscelare sapori e odori. Cottura delicata indicata per pandi spagna, torte Margherita,pasta sfoglia, ecc...
210
50 ÷ 230
210 50 ÷ 230
200
L3
150 ÷ 220
L1 ÷ L5
ECO
RESISTENZAINFERIORE VENTILATA: adattaper cotturedelicate (torte-soufflè).
RESISTENZAINFERIORE VENTILATA+ STEAM:L’aria calda viene ripartita sudiversi ripiani,rendendo
questa funzione l’ideale percuocere contemporaneamentediversi tipidi cibo,senza mai miscelare sapori
e odori. Premendo il tasto STEAM, l’opzione del vapore lavora in armonia con il calore tradizionale
garantendo ai tuoipiatti ilmassimo gusto, unaperfetta lievitazionee la miglioreconsistenza.
Questa modalità è adatta alla cottura di sfogliatine, dolci a base di lievito, pane e pizza, carne e pesce
arrostiti.
GRILL VENTILATO: l'utilizzo del turbo-grill richiede la porta chiusa. Utilizzando la ventilazione e la
resistenza grill contemporaneamente, si cuociono perfettamente grandi porzioni di cibo, come arrosti,
pollame, ecc.
Mettere la griglia a metà del forno e posizionare la leccarda sotto di essa per raccogliere i grassi.
Assicuratevi che ilcibo nonsia troppo vicinoal grill.Girare la carne a metàcottura.
GRILL: Grigliatura tradizionale a porta chiusa: con questa funzione viene inserita la resistenza del grill.
Ottima nella cotturadi carnidi medio epiccolo spessore (salsicce, costine,bacon).
ECO: 90min
SUPER: 120min
PIROLISI
ACCENSIONE WIFI: l forno consentela connessone WF.
RESET WIFI: consentelravvo della connessone WF.
* Programma di prova secondo CENELEC EN 60350-1 utilizzato per la definizione della classe energetica.
IT 16
Page 18

FUNZIONE WIFI
Per nformazondettaglate sul collegamentotra l'appe l prodotto,fare rfermento allaGuda rapda.
La Guda rapdaè dsponble su: .go.candy-group.com/candy-ov
WFha duedverse poszonsul selettoredella cottura:
• Attvazone WF: la funzone WFsattva solo se l forno è gà regstrato sul dspostvo. In questa poszone, l forno sarà
controllato solo daremoto.
• ResetWF: lascando l selettore nella poszone dreset WFper 30 second,sattva la funzone Bluetoothche consente d
regstrare l forno suldspostvo entro5 mnut.
Se la regstrazone avvene correttamente, l forno sarà controllato da remoto e l'cona WFsaccenderà. Se la regstrazone
non avvene correttamente,la funzone WFsdsattverà everrà eseguto l resetdel forno.
Per procedere con una nuova regstrazone, ruotare l selettore del programma dcottura nella poszone dreset WFe
rprstnare laposzone.
Nota: nstallare l'appsul dspostvo prma davvare laregstrazone
Nota: sul dspostvo ncuènstallata l'appè necessaroattvare lafunzone Bluetooth
Nota: per entrambele poszonWFpulsanttattl
Nota: èmportante che l segnale WFtra l router domestco e l'elettrodomestco sa potente. Quando l forno tenta d
collegarsal router, l'cona lampeggarmanendo accesa per 3 seconde spenta per 1 secondo; se è gà collegato, l'cona s
accende.
non funzonano.
1 2
3 4
CANDY SIMPLY-FI:
per informazioni dettagliate sulla MODALITÀ DI CONNESSIONE all'elettrodomestico Simply-Fi e per
ottimizzare l'UTILIZZO, accederea http://www.candysimplyfi.com
1. Selezone programma / 2. Durata programma / 3. Impostazone nzo cottura / 4. Selezone stovgle dedcate /
5. Assstente vocale e offlne / 6. Consgl, suggermente manuale utente onlne
3.3 Uso della funzione a vapore
La funzione a vapore permette di ottenere una maggiore umidità durante il
processo di cottura. Si consiglia di alternare cotture con vapore a cotture
tradizionali.
AVVERTENZA: Rischio di ustione e di danneggiamento
dell'elettrodomestico
Utilizzo della funzione a vapore
Il vapore emesso può causare ustioni: Al fine di evitare lesioni, dopo aver
utilizzato la funzione di cottura al vapore, aprire lo sportello con attenzione.
1.Aprire losportello delforno
2. Riempireil fondo dello scomparto conmassimo 150 ml d'acqua. Riempire
il fondo dello scomparto d'acqua solo quando il forno è freddo.
3. Inserire gli alimenti nell'elettrodomestico e chiudere lo sportello del forno.
4. Impostare la funzione desiderata per cuocere a vapore.
5. Premere il pulsante del forno a vapore per attivare la funzione di cottura a
vapore.
6. Ruotare la manopola per selezionare una temperatura.
ATTENZIONE: Non riempire il fondo dello scomparto durante la cottura o
quando il forno è caldo.
7. Per spegnere l'elettrodomestico premere il pulsante di funzione e ruotare
la manopola della temperatura fino alla posizione "zero".
8. Rimuovere l'acqua dal fondo dello scomparto. Pulire lo sgocciolatoio
dopo ogni ciclo di cottura. Per le istruzioni di pulizia, vedere il capitolo 4.1.
4. Pulizia e manutenzione del forno
4.1 Note generiche di pulizia
La vita di servizio dell’apparecchio si allunga se questo viene pulito ad intervalli
regolari. Attendere che il forno si ra reddi prima di e ettuare le operazioni di
pulizia manuali. Non utilizzare mai detergenti abrasivi, pagliette di ferro o
oggetti appuntiti per lapulizia, pernon danneggiare in modo irreparabile le parti
smaltate.Utilizzare solo acqua, sapone o detergenti a base di candeggina
(ammoniaca).
PARTIIN VETRO
E’ consigliabile pulire lo sportello in vetro con carta assorbente da cucina dopo
ogni utilizzo del forno. Per rimuovere le macchie piùostinate, è possibile anche
utilizzare una spugna imbevuta di detergente ben strizzata e sciacquare con
acqua.
GUARNIZIONE DELLO SPORTELLO DEL FORNO
Se sporca, la guarnizione può essere pulita con una spugna leggermente
inumidita.
ACCESSORI
Pulire gli accessori con una spugna imbevuta con acqua e sapone, sciacquarli
e asciugarli : evitare di usaredetergenti abrasivi.
GOCCIOLATOIO
Dopo aver utilizzato la griglia, rimuovere il gocciolatoio dal forno. Versare il
grasso caldo in un contenitore elavare il gocciolatoio in acqua calda utilizzando
una spugna e del detersivo peri piatti.
Qualora restassero residui di grasso, immergere il gocciolatoio in acqua e
sapone. In alternativa, è possibile lavare il gocciolatoio in lavastoviglie o
utilizzare un detergente speciale per forni. Non reinserire mai un gocciolatoio
sporco nel forno.
ELETTRODOMESTICI INALLUMINIO OACCIAIO INOX
Pulire lo sportello del forno solocon un panno umido o una spugna.
Asciugare con un panno morbido.
Non utilizzare spugne di ferro e materiali acidi o abrasivi, in quanto potrebbero
danneggiare la superficie del forno.
Pulire il pannello dei comandi delforno seguendo le stesse precauzioni.
PULIRE ILFONDO DELLO SCOMPARTO
Seguire queste istruzioni per rimuovere i residui di calcare dal fondo dello
scomparto.
ffff
Si consiglia di pulire il fondodello scomparto dopo 5-10 cicli di cottura a vapore.
1. Versare 100 ml di aceto bianco nelfondo dello scomparto.
NOTA:Tipo diaceto: %5
2. Far riposare per 30 minutia temperatura ambiente.
3. Pulire il forno utilizzando acquae un panno morbido.
4.2 Pirolisi
È possibile configurare il forno in modo che esegua automaticamente la
pulizia. Le due opzioni disponibili sono ECO e SUPER. **L'opzione può
essere configurata solo sui forni dotati di tale funzione. Il forno è dotato di
un sistema di pulizia con pirolizzatore ad alta temperatura che distrugge i
residui di cibo. L'operazione viene eseguita automaticamente tramite il
programmatore. I fumi risultanti vengono “puliti” perché vengono
convogliati attraverso un pirolizzatore che si avvia al momento dell'inizio
della cottura. Sullo sportello di questo tipo di forni, viene installata una
chiusura di sicurezza, a causa del fatto che il pirolizzatore lavora a
temperature molto elevate. Il pirolizzatore può essere arrestato in
qualsiasi momento: tuttavia, non è possibile aprire lo sportello finché non
scompare l'icona dellachiusura disicurezza della porta.
NOTA:se il forno èposto sottoun piano cottura, nonutilizzare ibruciatori a
gas o le piastre elettriche mentre il pirolizzatore è in funzione, per evitare
che le piastre si surriscaldino eccessivamente. Sono disponibili due
CICLI PIROLITICI pre-programmati:
•CICLO PIROLITICO ECO: questo ciclo consente di pulire i forni
moderatamente sporchi edha unadurata di 90minuti.
•CICLO PIROLITICO SUPER: questo ciclo è indicato per i forni
particolarmente sporchi edha unadurata di 120minuti.
Non utilizzare detergenti commerciali per pulire i forni pirolitici.
Suggerimento: l'esecuzione del ciclo pirolitico al termine di un ciclo di
cottura, consente disfruttare ilcalore residuo edi risparmiare energia.
Prima di eseguireun ciclopirolitico:
•Rimuovere tutti gli accessori dal forno perché non sono in grado di
tollerare le temperature elevate utilizzate durante il ciclo di pulizia
pirolitico; in particolare rimuovere le griglie e il castelletto (rimando
al capitolo RIMOZIONE GRIGLIE E CASTELLETTO). Nei forni dotati
di sonda carne è necessario, prima di effettuare il ciclo di pulizia,
chiudere il forocon ildado fornito indotazione.
•Rimuovere tutte le tracce di grasso e le macchie estese che
potrebbero richiedere troppo tempoper essererimosse. Questotipo
di macchie potrebbero incendiarsi a causa delle temperature
estremamente elevate delciclo pirolitico.
•Chiudere lo sportellodel forno.
•Se il forno è eccessivamente sporco, questo deve essere rimosso
prima della pulizia.
• Pulire laporta delforno.
• Con una spugna umida togliere dall’interno del forno i residui più
consistenti. Non usaredetergenti.
• Estrarre tuttigli accessorie il kitguide scorrevoli(se presente);
• Non lasciarestrofinacci opresine sulla maniglia.
Utilizzo del ciclopirolitico:
1 - Ruotare il selettore di funzione sulla posizione " ". Sul display,
appare l’indicazione "ECO" o "SUP".Il tempopreimpostato è 90min. epuò
essere variato da 90 min. (modalità Eco) a 120min. (modalità Sup)
attraverso il programmatore (tasti " +" o " -" ). Se il forno è molto sporco, è
raccomandato aumentare il tempo a 120min., se il forno è poco sporco
ridurre il tempoper ilciclo di puliziaa 90min.
2- È possibile differire l’ora di inizio del ciclo di pirolisi variando il tempo di
fine attraverso ilprogrammatore.
3- Dopo pochi minuti, quando il fornoha raggiuntouna temperatura alta, la
porta si chiude automaticamente. Il ciclo di pulizia pirolitica può essere
fermato in qualunquemomento riportandoil selettore difunzione su“0”.
IT 17
6
5
Page 19

4- Una volta che il ciclo di pulizia pirolitica è terminato, la pirolisi si
LOW-E
spegnerà automaticamente. Sul display apparirà l’indicazione " END" e,
sino a quandola portaè bloccata, "0 -- n "
5- Riportare il selettoredi funzionesu " 0 ",se latemperatura èancora alta,
l’indicazione " 0- -n " appareper informareche la portaè bloccata.
Utilizzo del ciclopirolitico neiforni Touch Control:
1- Ruotare il selettore di funzione sulla posizione. Sul display, appare
l’indicazione " ECO"o "SUP“
2- Il tempo preimpostato è 90 minuti e può essere variato da 90 min.
(modalità Eco) a 120min. (modalità Sup), attraverso il programmatore
(tasti "+" o "-" ). Se il fornoè molto sporco, è racco- mandato aumentare il
tempo a 120min., mentre se il forno è poco sporco ridurre il tempo per il
ciclo di puliziaa 90 min.
RIMOZIONE E PULIZIADELLAPORTAIN VETRO
1.Aprile la porta delforno.
2.3.4. Bloccarele cerniere, rimuovere le viti e rimuovere la copertura
metallica superiore tirandola versol’alto.
5.6. Rimuovere il vetro, estraendolo con molta cura, dalla controporta
del forno (NB: nei forni pirolitici, rimuovere anche il secondo e terzo
vetro (se presente)).
7. Al termine della pulizia o sostituzione riassemblare le parti
nell’ordine opposto alla rimozione.
Su tutti i vetri, l’indicazione ”Low-E” deve essere correttamente
leggibile e posizionata sul lato sinistrodella porta, vicino alla cerniera
laterale sinistra. In questo modo, l’etichetta stampata del primo vetro
rimarrà interna allaporta.
4.3 AquactivaLa Funzione
La procedura “ ” utilizza il vapore per facilitare la
rimozione dalforno delgrasso edei pezzidi cibo rimasti.
1. Inserire 300 ml di acqua distillata o potabile nel contenitore dell’
AQUACTIVAsul fondodel forno
2. Impostare la funzionedel fornosu Statico ( ) o su Riscaldamento
( ) dal basso
3. Impostare latemperatura sull'icona ( )AQUACTIVA
4. Lasciar funzionarel'elettrodomestico per30 minuti
5. Disattivare lamacchina elasciare che si raffreddi
Una volta che l'elettrodomestico si è raffreddato, pulire la superfice
interna del fornocon unostraccio
Attenzione
Assicurarsi che l'elettrodomestico sia freddo prima di toccarlo, c'è il
rischio di scottarsi.
Utilizzare acquadistillata opotabile.
AQUACTIVA
300 ml
1.
2.
3.
4.
4.4 Manutenzione
RIMOZIONE E PULIZIADELLE GRIGLIE
1. Svitare insenso antiorarioi dadi zigrinati.
2. Rimuovere legriglie tirandoleverso se stessi.
3. Pulire le griglielavandole inlavastoviglie ocon unaspugna bagnata
e asciugandole subito dopo.
4. Dopo aver pulito le griglie, installarle nuovamente, fissando i dadi
zigrinati.
A
RIMOZIONE DELLO SPORTELLODEL FORNO
1.Aprire lo sportello anteriore.
2. Aprire i morsetti dell’alloggiamento della cerniera sul lato destro e
sinistro dello sportello anteriore, premendoli verso ilbasso.
3. Installare nuovamente lo sportello eseguendo la procedura
all’inverso.
5.
6.
1
2
3
7.
IT 18
Page 20

SOSTITUZIONE DELLA LAMPADINA
1. Scollegare ilforno allarete.
2.Allentare la copertura invetro, svitare la lampadinae sostituirlacon unanuova dellostesso modello.
3. Una voltasostituita lalampadina difettosa, riavvitare lacopertura in vetro.
5. Risoluzione dei Problemi
5.1 FAQ
PROBLEMA POSSIBILE CAUSA SOLUZIONE
Il forno non si scalda
Il forno non si scalda
Il forno non si scalda
Nessuna reazione quando si usa
l'interfaccia utente di tipo touch
L’orologio non è impostato Impostare l’orologio
Il blocco bambini è attivo
Le regolazioni necessarie
non sono impostate
Vapore e condensa sul pannello
interfaccia utente
Pulire con un panno in microfibra il pannello
Disattivare il blocco bambini
Assicurarsi che le impostazioni
necessarie siano corrette
interfaccia utente per togliere lo strato di
condensa.
6. Garanzie
Il prodotto è garantito, oltre che ai sensi di legge, alle condizioni e nei termini riportati sul certificato di garanzia convenzionale inserito nel
prodotto. Il certificato dovrà essere conservato e mostrato al nostro Centro diAssistenza Tecnica Autorizzato, in caso di necessità, insieme
allo scontrino comprovante l'acquistodell'elettrodomestico. Puoi consultare le condizionidi garanzia anche sul nostrosito internet.
Per ottenere assistenza compila l'apposito form on-line oppure contattaci al numero che trovi indicato nella pagina di assistenza del nostro
sito internet.
IT 19
Page 21

Varnostna Navodila
• Med kuhanjem lahko vlaga kondenzra znotraj odprtne pečce alna steklu vrat. To je normalno stanje.
Za zmanjšanje tega učnka počakajte 10-15 mnut po vklopu napajanja, preden hrano vstavtevpečco. V
vsakem prmeru kondenzacja zgne, ko pečca doseže temperaturo za kuhanje.
• Zelenjavo kuhajte v posods pokrovom, namesto na odprtem pekaču.
• Izogbajte se temu, da bhrano puščalvpečcza več kot 15/20 mnut po kuhanju.
• OPOZORILO: Aparat n njegovdostopndelse med uporabo segrejejo. Pazte, da se ne dotaknete
grelcev!
• OPOZORILO: med delovanjem pečce, se njenzpostavljendellahko zelo segrejejo. Zato poskrbte,
da bodo tedaj otrocvarno oddaljen.
• Otroc, starejšod 8 let, ter osebe z zmanjšanmfzčnm, zaznavnmalumskmsposobnostmal
pomanjkljvmzkušnjamter znanjem lahko uporabljajo aparat le pod nadzorom oseb, kso odgovorne
za njhovo varnost, nkso jh seznanlz varno uporabo aparata terle v prmeru, da razumejo tveganje, k
je s tem povezano.
• Otrocse ne smejo gratz aparatom.
• Otroclahko sodelujejo prčščenju n vzdrževalnh delh le pod nadzorom odraslh.
POZOR: Dostopndelse med uporabo zelo segrejejo. Pazte, da se majhnotrocne prblžajo!
• Ne uporabljajte grobh aljedkhčstl alostrh kovnskh strgal za čščenje vrat pečce, saj blahko
opraskalpovršno, zaradtakh poškodb pa blahko steklo počlo.
• Pred odstranjevanjem zaščte morate pečco zklopt;počščenju zaščto namestte nazaj, kot je to
pojasnjeno v navodlh za uporabo.
• Uporabljajte samo temperaturno sondo, kje namenjena uporabv tej pečc.
• Prčščenju ne uporabljajte aparatov za čščenje s paro.
•Vtkač napajalnega kabla prkloptevvtčnco, kzpolnjuje zahteve glede napetost, toka nmoč,kso
navedene na oznaknaprave, vtčnca pa mora bttudustrezno ozemljena. Vtčnca mora zagotavljat
ustrezno moč, kje navedena na oznaknaprave, btmora ozemljena n v brezhbnem stanju. Kabel za
ozemljtev je rumeno-zelene barve. Prklop naprave mora zvestustrezno usposobljena oseba. Če
vtčnca nvtkač nsta združljva, naj ustrezno usposobljenelektro-servser zamenja vtčnco s takšno, k
se bo prlegala vt
kaču. Vtčnca nvtkač morata zpolnjevatveljavne norme v držav, kjer bo naprava
prklopljena v omrežje. Prklop v elektrčno omrežje je možno zvesttudtako, da je napajanje urejeno
preko ustrezne varovalke, vgrajene med napravo nvr napajanja, kzagotavlja, da obrementev omrežja
ne presega predpsane zakonodaje. Rumeno-zelenega kabla ndovoljeno preknjatz varovalko.
Vtčnca alvarovalka, kje vgrajena med vtčnco n napravo, morata po namesttvnaprave ostat
enostavno dostopn.
•Prekntev napajanja mora btmožna bodsz odklopom vtkača zvtčnce, ozroma preko dodatno
vgrajenega stkala, nameščenega skladno s pravlelektro-stroke.
•Če je napajalnk kabel poškodovan, ga je potrebno nadomesttz novmalposebnm kablom, kje na
voljo prprozvajalcu, lahko pa tudkontaktrate oddelek za podporo kupcem.
•Napajalnkabel mora btvrste H05V2V2-F.
•Neupoštevanje zgornjh predpsov lahko negatvno vplva na varno uporabo naprave ter znčgarancjo.
•Pred čščenjem morate morebtne ostanke žvl najprej odstrant.
•Med postopkom proltskega čščenja se površne naprave segrejejo bolj kot občajno, zato se tedaj
otroc
ne smejo prblževat.
•Naprave ndovoljeno namesttza dekoratvnmvrat,scer lahko prde do pregrevanja.
•Prvstavljanju polc se preprčajte, da je zaustavljalnk na zadnjstrann obrnjen navzgor.
Polco morate vstavtdo konca
• OPOZORILO: Na stene pečce nkolne nameščajte alumnjaste folje alzaščte za enkratno uporabo,
kje na voljo v trgovnah. Alumnjasta folja alkaterakoldruga zaščta lahko ob neposrednem stku z
vročo emajlrano oblogo povzroč, da se slednja stalalpoškoduje.
• OPOZORILO: Nkolne odstranjujte vratnega tesnla.
• Za delovanje aparata na nazvn
frekvencnso potrebne dodatne operacje oz nastavtve.
SL 20
Page 22

Povzetek
Splošna navodila
22
Opis izdelka
23
Uporaba pečice
24
1.1 Varnostna navodila
1.2 Električna varnost
1.3 Priporočila
1.4 Namestitev
1.5 Upravljanje z odpadki
1.6 Izjava o skladnosti
2.1 Pregled
2.2 Dodatna oprema
2.3 Prva uporaba
3.1 Opis prikazovalnika
3.2 Na ini kuhanjač
3.3 Uporaba parne funkcije
Čiščenje in vzdrževanje pečice
26
Odpravljanje težav
28
4.1 Splošni napotki za čiščenje
4.2 Piroliza
4.3 Funkcija Aquactiva
4.4 Vzdrževanje
• Odstranitev okna pečice
• Odstranjevanje in čiščenje stranskih nosilcev
• Odstranitev in čiščenje steklenih vrat
5 .1 Po gosta vprašanja
SL 21
Page 23

1. Splošna Opozorila
Pozorno preberite navodila, da boste lahko izrabili vse možnosti, ki vam jih ponuja pečica.
Priporočamo, da navodila za priključitev in uporabo shranite. Pred vgradnjo pečice si zapišite
serijsko številko, sajjo bostepotrebovali, ko boste potrebovalipomoč pooblaščenega servisa.
Ko dobite svojo novo pečico, se najprej prepričajte, da med transportom ni prišlo do poškodb. Če je
pečica poškodovana, se takoj obrnite na prodajalca. Če niste prepričani, se posvetujte s
strokovnjakom. Odstranite vso embalažo in jo odnesite na ustrezno odlagališče. Pazite, da
predvsem plastične vrečke,polistirol inžeblji ne pridejo vroke majhnim otrokom.
Proizvajalec ne prevzema odgovornosti za morebitno škodo ali poškodbe, če ta navodila niso bila
upoštevana!
Opomba: Funkcije, lastnosti in oprema pečice, navedeni v tem priročniku, se lahko spreminjajo
odvisno od modelapečice.
1.1 Varnostni Indikacije
Pečico uporabljajte le za predvideni namen, ki je samo kuhanje živil;
vsa drugauporaba, na primer kot virtoplote, se šteje kot nepravilnain
zato nevarna. Proizvajalec ne prevzema odgovornosti za morebitno
škodo, do katere pride zaradi nepravilne, neustrezne ali nerazumne
uporabe.
Uporaba kakršne koli električne naprave pomeni spoštovanje
nekaterih temeljnih pravil:
- Ne vleciteza napajalnikabel, da odstranite vtičiz vtičnice;
-Aparata se ne dotikajtez vlažnimi rokami alinogami;
- Na splošno uporaba adapterjev, več vtičnic in podaljškov ni
priporočljiva;
- V primeru okvare in/ali slabega delovanja, aparat izklopite in ga ne
spreminjajte.
1.2 Električna varnost
ZAGOTOVITE, DA ELEKTRIČNE POVEZAVE VZPOSTAVI
ELEKTRIČARALI USPOSOBLJENTEHNIK.
Napajanje, s katerim je povezana pečica, mora biti v skladu z zakoni,
ki veljajo v državi namestitve. Proizvajalec ne prevzema odgovornosti
za škodo, ki nastane zaradi neupoštevanja teh navodil. Pečica mora
biti priključen na električno oskrbo z ozemljeno vtičnico ali
odklopnikom z več poli, odvisno od zakonov, ki veljajo v državi
namestitve. Napajanje mora biti zaščiteno zustreznimi varovalkamiin
uporabljeni kabli morajo imeti prečni prerez, ki lahko zagotovi
ustrezno napajanje pečice.
PRIKLJUČEVANJE
Pečica je dostavljena z napajalnim kablom, ki ga lahko povežete le z
električnim napajanjem z 220- 240 Vac 50 Hz moči med fazami ali
med fazo in nevtralnim vodom. Pred povezavo pečice z električnim
napajanjem, jepomembno, dapreverite:
- Moč napetosti,ki jenavedena na merilniku;
- Nastavitev odklopnika.
Ozemljitveni kabel priključen na ozemljitveni priključek pečice mora
biti povezan zozemljitvenim priključkomnapajanja.
OPOZORILO
Pred priključitvijo pečice na električno omrežje, se posvetujte z
električarjem, da preverite kontinuiteto oskrbe ozemljitvenega
priključka napajanja. Proizvajalecne prevzemaodgovornosti za
morebitne nesreče ali druge težave, ki jih povzroči neupoštevanje
povezave pečice na ozemljitveni priključek ali ozemljeno povezavo, ki
ima moteno kontinuiteto.
OPOMBA: Ker so na pečici lahko potrebna vzdrževalna dela je
priporočljivo, da imate na voljo drugo stensko vtičnico, da lahko
pečico povežete z le-to, če jo odstranite iz prostora, v katerega je
nameščena. Napajalni kabel lahko zamenja samo osebje tehničnega
servisa s kablomz enakovrednimikvalifikacijami.
1.4 Namestitev In Priklju itevč
Za priklju itev aparata in morebitno vgradnjo poskrbi kupec in ni
odgovornost proizvajalca. Morebitni posegi s strani pooblaš enega
servisa niso vklju eni v garancijo. Elektri na inštalacija, na katero bo
aparat priklju en, mora biti urejena v skladu z veljavnimi lokalnimi
predpisi inv skladuz navodili
proizvajalca, zato priporo amo, da vam elektri no inštalacijo pred
priklju itvijo aparata pregledajo usposobljeni strokovnjaki. Morebitna
napa na priklju itev in namestitev lahko povzro i poškodbe oseb,
žživali ali premo enja. Proizvajalec in prodajalec ne prevzemata
odgovornosti za morebitne poškodbe oseb in/ali nastalo materialno
škodo, do katere bi prišlo zaradi napa ne priklju itve in/ali vgradnje
aparata.
Dovoljena je vgradnja pe ice pod delovni pult ali v nišo v visoki
kuhinjski omarici. Zagotoviti morate ustrezno kro enje zraka, ki je
potrebno za hlajenje in zaš ito delov v notranjosti. Upoštevajte mere,
ki so navedenena skicina zadnji strani tehnavodil.
č
č
čč
č
čč
č
čč č
čč
č
ž
č
1.5 Ravnanje z odpadki in okoljske zaščita
Ta naprava je označena v skladu z določili Evropske
direktive 2012/17/EU o odpadni električni in elektronski
opremi (OEEO). OEEO so tako snovi, ki onesnažujejo
okolje (lahko negativno učinkujejo na okolje) kot osnovni
sestavni deli (ki jih je možno ponovno uporabiti).
Pomembno je pravilno ravnati z OEEO, da pravilno
okolje, ter obnovimoin recikliramovse materiale.
Kot posamezniki lahko pomembno vplivamo na to, da OEEO ne
postane okoljska težava;upoštevati moramole nekaj osnovnih pravil:
• Z OEEOne smemoravnati kotz ostalimihišnimi odpadki.
• OEEO moramo odnestiv ustreznecentre zazbiranje odpadkov, kijih
upravlja občina ali pooblaščeno podjetje. V več državah imajo urejen
prevzem večjih kosovOEEO nadomu.
• Ob nakupu nove lahko staro napravo vrnemo prodajalcu, ki jo je
dolžen brezplačno prevzeti na osnovi ena za eno, če je oprema enake
vrste in imaenake funkcijekot dobavljena.
PRIHRANEK NAENERGIJI INSPOŠTOVANJEDO OKOLJA
Če je le mogoče, se izognite predgrevanju pečice in pečico kar se da
napolnite z živili. Vrata pečice odpirajte kar se da poredko, saj ob
vsakem odpiranju toplota uhaja iz pečice. Občutno boste prihranili na
energiji, če boste pečico izklopili 5 do 10 minut pred predvidenim
koncem pečenja in izrabili preostanek toplote, ki je še v pečici. Tesnila
naj bodo vedno čista in nepoškodovana, da preprečite morebitno
uhajanje toplote iz pečice. Če imate na izbiro tudi časovna obdobja z
nižjo ceno električne energije, s pomočjo programa za zamik vklopa
začetka pečenja enostavno prihranite, če pečenje zamaknete na čas,
ko je električnaenergija cenejša.
odstranimo in zavržemo vse snovi, ki onesnažujejo,
1.3 Priporo ilač
•Priporo amo, da po vsakiuporabi na hitro o istite pe ico.ččč
•Sten pe ice ne oblagajte z alu-folijo ali v oblogami za enkratno
uporabo, ki so na voljo v trgovinah, saj bi se te snovi lahko stalile ob
stiku z vro im emajlom,kar bipoškodovalo emajl.
•Ne nastavljajte previsoke temperature, saj se bo tako pe ica manj
umazala in se ne bo razvijal dim. Bolje je, da nekoliko zni ate
temperaturo in podaljšate as pe enja.
•Tablica s podatki jeob strani pe ice.č
• V pe ici poleg prilo ene opremeuporabljajte samoustrezne peka e,
odporne nazelo visoketemperature.
č
č
č
ž
čč
čž č
1.6 Izjava O Skladnosti
Deli tega aparata so skladni z naslednjimi predpisi: UREDBA(ES) št.
1935/2004 omaterialih inizdelkih, namenjenihza stikz živili;
UREDBA KOMISIJE (ES) št. 2023/2006 o dobri proizvodni praksi za
materiale in izdelke,namenjene zastik z živili.
Z oznako na tem proizvodu izjavljamo, na lastno odgovornost,
da je proizvod skladen z vsemi evropskimi zahtevami o varnosti,
zdravju in varstvuokolja, kise v zakonodaji nanašajona ta izdelek.
SL 22
Page 24

2. Opis izdelka
2.1 Pregled
1
3
5
4
2
1. Krmilna plošča
2. Položaji police (prečna žična rešetka, če je priložena)
3. Kovinska rešetka
4. Ponev
5. Ventilator (za jekleno ploščo)
6. Vrata pečice
6
2.2 Dodatna oprema (odvisno od modela)
1 Ponev
Globji pekač je namenjenlovljenju maščobe,ki medpeko nažaru.
2 Kovinska rešetka
3 Stranska žice mreže
Bočni žice mreže,če sovključeni.
Na rešetko postavite različne pekače.
2.3 Prvo Upotreba
Pred prvo uporabopečico očistite.
• Obrišitevse zunanjepovršine z vlažno krpo.
• Operitevso opremoin obrišite notranjost pečicez raztopino vode indetergenta za pomivanje posode.
• Vklopiteprazno pečicoza približno 1 urona najvišjo temperaturo, daodstranite vonj po novem.Pred temposkrbite za zračenjeprostora!
SL 23
Page 25

3. Uporaba pečice
3.1 Opis zaslona (na dotik, dvojni predel)
1. Odštevalna ura
2. Nastavitev ure
3. Čas pečenja
4. Konec pečenja
5. Prikaz temperature ali ure
6. Kontrole za nastavljanje LCD zaslona
7. Izbirni gumb termostata
8. Izbirni gumb funkcije
8
OPOZORILO:ko je pečica vgrajena in priklopljena na električno omrežje, oziroma po
vsakem izpadu električne energije (na to vas opozori utripanje vrednosti 12:00 na
prikazovalniku) morate nastavititočen čas.Tonaredite nanaslednji način:
• 4-krat pritisnitena srednjotipko
• S pomojčotipko "-" "+" nastavite točen čas.
• Sprostite pritiskna vsetipke.
POZOR: Pečica delujele, če je nastavljenaura.
FUNKCIJA
TIHI NAČIN
NASTAVITE
ČAS
TRAJANJE
PEČENJA
KONEC
PEČENJA
ŠTEVEC
MINUT
ZAKLEPANJE
ZA VARNOST
OTROK
AKTIVIRANJE DEAKTIVIRANJE
• Levi gumb za izbiro funkcije
pečice obrnite na »Silence
mode« (Tihi način)
• Obrnite levi gumb za izbiro
funkcije v položaj
»Set the time« (Nastavi- tev
časa).
• Čas nastavite z gumboma +«+
ali »-«.
•2-krat pritisnite na srednji
gumb.
•S pomočjo tipk "-" or "+"
nastavite želeno trajanje
pečenja.
• Sprostite pritisk na vse tipke
Izberite funkcjio pečenja s
pomočjo stikala za izbiranje
funkcij pečice.
•3-krat pritisnite na srednjo
tipko
• S pomočjo tipk "-" "+"
nastavite čas, ko želite,
da se pečica izklopi.
• Sprostite pritisk na vse tipke
• Izberite funkcjio pečenja s
pomočjo stikala za izbiranje
funkcij pečice
• 1-krat pritisnite na srednji gumb
S pomočjo tipk "-" "+" nastavite
želeni čas Sprostite pritisk na
vse tipke
•Funkcijo Zaklepanja za varnost
otrok aktivirate tako, da vsaj 5
sekund pritiskate na tipko Set
(+). Od tega trenutka dalje so
vse druge funkcije zaklenjene,
na prikazovalniku pa izmenično
utripa STOP oz. nastavljeni čas.
• Gumb za izbiro funkcije pečice
obrnite na položaj OFF (Izklop).
• Gumb za izbiro funkcije pečice
obrnite na položaj OFF (Izklop).
• Ko preteče nastavljeni čas, se
pečica samodejno izklopi. Če
želite predčasno prekiniti
pečenje, ali obrnite stikalo za
izbiranje funkcij na 0, ali pa
nastavite čas na 0:00 (s
pomočjo tipke SELECT in tipk "-"
"+")
• Ob nastavljenem času se
pečica izklopi. Če želite
predčasno prekiniti pečenje, ali
obrnite stikalo za izbiranje
funkcij na 0.
• Ko preteče nastavljeni čas, se
oglasi zvočni signal (po
določenem času sam utihne,
lahko pa ga predčasno izklopite
s pritiskom na tipko SELECT.
• Funkcijo zaklepanja za varnost
otrok lahko deaktivirate tako, da
ponovno vsaj 5 sekund
pritiskate na tipko Set (+). S tem
prekličete zaklepanje in lahko
ponovno izbirate vse funkcije.
DELOVANJE NAMEN
• Omogoča izklop zvoka
minutnega opomnika.
• Omogoča nastavitev
časa, ki je prikazan na zaslonu.
• Omogoča, da nastavite
ustrezno trajanje pečenja za
izbrano jed.
• Če želite preveriti, koliko časa
je še ostalo do konca pečenja,
2-krat pritisnite na tipko
SELECT.
• Če želite spremeniti
nastavljeno trajanje pečenja,
pritisnite tipko SELECT in tipke
"-" "+"
• Omogoča vam, da določite čas
izklopa pečice.
• Če želite preveriti nastavljeni
čas za izklop pečice, 3-krat
pritisnite na srednjo tipko.
• Če želite spremeniti nastavljeni
čas, pritisnite tipko SELECT in
tipke "-" "+“
•Po preteku nastavljenega
časa se oglasi zvočni signal.
•Med odštevanjem je na
prikazovalniku prikazan čas do
izteka nastavljenega časa.
• Če želite izklopiti zvok
minutnega opomnika
• Za nastavitev časa
Opomba: Čas nastavite ob
prvem nameščanju pečice ali
po izpadu napajanja (ura
prikazuje utripajoč čas 12.00)
• Zvočni signal izklopite s
pritiskom na katerokoli tipko.
S pritiskom na srednjo tipko
prikličete nazaj funkcijo ure.
•Ta funkcija se običajno uporablja v
kombinaciji s funkcijo »trajanje
pečenja«. Če na primer želite, da se
jed peče 45 minut, radi pa bi, da je
gotova ob 12:30, enostavno izberete
želeno funkcijo, nastavite čas za
trajanje pečenja na 45 minut, nato
pa še čas konec pečenja na 12:30.
Ob nastavljenem času za izklop, se
pečica samodejno izklopi, na kar
vas opozori zvočni signal.
Pečenje se samodejno začne ob
11:45 (12:30 minus 45 minut) in se
nadaljuje do časa, nastavljenega za
konec pečenja, nato pa se pečica
samodejno izklopi.
OPOZORILO.
Če nastavite samo čas za KONEC
PEČENJA, ne da bi določili trajanje
pečenja, se pečica takoj vklopi in se
nato izklopi ob času, nastavljenem
za konec pečenja.
• Programsko uro na pečici
lahko uporabljate kot običajno
kuhinjsko uro (aktivirate jo lahko
ne glede na to, če pečico
uporabljate ali ne).
SL 24
Page 26

3.2 Načini pečenja
Funkcije
*
*
T °C
privzeto
220
180
Gumb
termost.
60 ÷ 6060
50 ÷ 280
50 ÷ 240
Funkcije
Za prižiganje luči v pečici
Samodejno se aktivira tudi ventilator za hlajenje (modeli z ventilatorjem)
ODMRZOVANJE:Okoli živila kroži zrak sobne temperature; tako seživilo hitro odtali z ohranjanjem vseh
lastnosti živila.
OHRANJANJE TOPLOTE: Ta način je primeren za pogrevanje kuhanih jedi. Jed postavite na drugo
višino šteto od zgoraj. Primeren je tudi za odtaljevanje kruha, piz in peciva – živilo postavite na spodnjo
višino. Prednastavljena jetemperatura 60°C,ki je nimogoče spreminjati.
KONVEKCIJA: Delujeta spodnji in zgornji grelec;ta funkcija je primerna za tradicionalni način peke in jo
priporočamo za pekokrač,divjačine, peciva,keksov,jabolk ter zavse jedi, ki jihželite hrustljavo zapeči.
NA VEČ NIVOJIH: Delujeta oba grelca ter ventilator, tako da vroč zrak kroži v pečici. Ta način
priporočamo za peko perutnine, sladic, rib in zelenjave. Enakomerna temperatura v notranjosti skrajša
čas pečenja in predhodnega segrevanja pečice. Naenkrat lahko pečete različne jedi; vonji se ne bodo
pomešali. Če pečeteveč jedi hkrati, pečenjepodaljšajte za približno10 minut.
210
50 ÷ 230
210 50 ÷ 230
200
L3
150 ÷ 220
L1 ÷ L5
ECO
SPODNJI GRELNIK + VENTILATOR (a): Pečico segreva spodnji grelec, vroč zrak pa zahvaljujoč
ventilatorju kroži vnotranjosti pečice.Funkcija je namenjenapeki občutljivihjedi (pite -narastki). Jedse ne
izsuši in bolje naraste, predvsem to velja za kolače, kruh in druge jedi, ki se morajo segrevati od spodaj.
Pekač potisnite vspodnjo višinovodila.
SPODNJI GRELNIK + VENTILATOR + PARA : Vroči zrak se razporedi na različnih ravneh, zaradi česar je
ta funkcija idealna za sočasno pečenje različnih vrst hrane, brez kakršnega koli mešanja okusov in vonjav. S
pritiskom tipke "PARA" deluje funkcija pare v kombinaciji s klasično toploto, kar zagotavlja jedem najboljši
okus, popolnovzhajanje innajboljšo čvrstost.
Ta načinje primeren za pečenje peciva iz listnatega in kvašenega testa, kruhain pice,mesa inrib v pečici.
ŽAR + VENTILATOR :(a) pri zaprtih vratih pečice Grelec segreva zrak, ki s pomočjo ventilatorja kroži
okoli živila. Za rdeče meso je potrebno predhodno ogrevanje pečice. Ta funkcija je primerna za peko
debelejših kosov mesa, a pazite, da živilo ni preblizu grelca. Ta način je primeren za tudi za peko večje
količine perutnine, klobas, rdečega mesa... Postavite živilo na sredino rešetke, v srednji višini ter
podstavite pekač zalovljenje maščobe.Na polovici predvidenegačasa pečenjaživilo obrnite.
ŽAR: P.ri zaprtih vratih pečice Ta funkcija je primerna za peko tanjših kosov mesa. Nastavljanje
temperature ni mogoče. Najprej pečico segrevajte 5 minut, nato postavite jed vanjo. Primerno za peko
kebaba, mesa na žaru, gratiniranje .. Belo meso naj bo od grelca bolj oddaljeno, peče se dlje časa, a bo
bolj okusno. Rdečemeso aliribe pecite narešetki, podkatero potisnete pekačza lovljenje maščobe.
ECO: 90min
SUPER: 120min
.
PIROLIZA
VKLOPLJEN WIFI: Pečca omogoča brezžčno povezavo wf.
WIFI RESET:Omogoča ponovnzagon brezžčne povezave wf.
*Testni program skladno s CENELEC za določanje energijskega razreda.EN 60350-1
SL 25
Page 27

FUNKCIJA WIFI
Za vse podrobnosto povezavmed aplkacjo nzdelkom glejte Htra navod
Htra navodla so navoljo na POVEZAVI.
Funkcja WFma dvarazlčna položaja na stkalu kuhanja:
• Vklopljen WF: WFje vklopljen samo, če je pečca že vpsana v vašo napravo. Na tem položaju bo pečca vodena samo
daljnsko.
•WFreset: Ko stkalo nastavte na WFreset za30”, se bo vklopl Bluetooth n pečco bostelahko vpsalv svojo napravo v roku 5’.
Če je vps uspešen, boste pečco upravljaldaljnsko nkona WFse bovklopla.
Če pa je vps neuspešen, sebo WFzklopln pečca se boresetrala.
Za ponovnvps je trebastkalo za program kuhanja umaknts položaja WFreset n ga ponovno vrntnanj.
Opomba: Nasvojo napravo predprčetkom vpsa namestte aplkacjo
Opomba: Naprava,na katero nameščateaplkacjo, mora metaktvran Bluetooth
Opomba: Naobeh položajhWFgumbna dotk nedelujejo.
Opomba: Pomembno je vzpostavtdober sgnal W-Fmed domačm usmerjevalnkom n aparatom.
Ko se pečca poskuša povezatz usmerjevalnkom, kona utrpa s3” vklopom n1”zklopom, ko jepovezana, pa jekona vklopljena.
CANDY SIMPLY-FI:
Za podrobne informacije KAKO POVEZATI vaš simply-Fi aparat in KAKO GA UPORABLJATI,
pojdite na http://www.candysimplyfi.com
1. Izbra programa / 2. Čas trajanja programa / 3. Nastavtev začetka kuhanja / 4- Izbra dodeljenega recepta /
5. Brez povezave n glasovna pomoč / 6. Nasvet, namgn spletna navodla za uporabo
la.
3.3 Uporaba parne funkcije
Parna funkcija zagotavlja večjo vlažnost med ciklom peke. Svetujemo
vam izmenično uporaboparnega inklasičnega pečenja.
OPOZORILO: Nevarnost opeklinin poškodbaparata.
Sproščena para lahkopovzroči opekline:
Po uporabi funkcije peke s paro bodite previdni pri odpiranju vrat
pečice, da seizognete poškodbam.
1. Odprite vratapečice.
2. Napolnite dno notranjosti z najv. 150 ml vode. Dno notranjosti lahko
napolnite zvodo samo,ko jepečica hladna.
3. Postavite hranov aparatin zaprite vrata pečice.
4. Nastavite želenofunkcijo zapeko s paro.
5. Pritisnite gumb za parno pečico. Gumb za parno pečico deluje s
funkcijo.
6. Zavrtite gumbza temperaturoin izberite temperaturo.
PREVIDNO: Ne polnite dna notranjosti z vodo med peko ali ko je
pečica vroča.
7. Če želite izklopiti aparat, preklopite gumba za funkcijo in
temperaturo v ničelnipoložaj.
8. Odstranite vodo iz dna notranjosti. Očistite odcejalnik po vsakem
pečenju. Glejte poglavje4.1, kjerso navedena navodila začiščenje.
4. Čiščenje in vzdrževanje pečice
4.1 Splošni napotki za čiščenje
Življenjski cikel aparata se lahko podaljša z rednim čiščenjem. Pred
izvajanjem čiščenja počakajte, da se pečica ohladi. Za čiščenje nikoli
ne uporabljajte abrazivnih čistil, jeklene volne ali ostrih predmetov, saj
lahko nepopravljivo poškodujete emajlirane dele. Uporabljajte samo
vodo, mila alidetergente naosnovi belila (amoniak).
STEKLENI DELI
Priporočamo, da stekleno okno po vsaki uporabi pečice očistite z
vpojno kuhinjsko brisačo. Če želite odstraniti bolj trdovratne madeže,
lahko uporabite dobro ožeto gobo, namočeno v detergent, in nato
sperite z vodo.
TESNILO OKNA PEČICE
Če je umazano,lahko tesniloočistite z vlažno gobo.
DODATNAOPREMA
Pred spiranjem in sušenjem očistitedodatke z vlažno gobico zmilom:
izogibajte seuporabi abrazivnihdetergentov.
ODCEJALNAPOSODA
Po uporabi žara odstranite posodo iz pečice. Vlijte vročo maščobo v
zbiralno posodo in pomijte posodo v vroči vodi z gobo in tekočim
detergentom za pomivanjeposode.
Če se mastni ostanki ne odstranijo, potopite posodo v vodo in
detergent. Posodo lahko pomijete tudi v pomivalnem stroju ali pa
uporabite komercialni detergent za pečice. Ne vstavljajte umazane
posode nazaj vpečico.
APARATI IZ NERJAVNEGAJEKLAALI ALUMINIJA
Vratapečice čistitesamo zvlažno krpoali gobo.
Posušite jih zmehko krpo.
Ne uporabljajtejeklene volne,kislin ali abrazivnih materialov, sajlahko
poškodujejo površino pečice. Pri čiščenju upravljalne plošče pečice
upoštevajte iste varnostneukrepe.
ČIŠČENJE DNA NOTRANJOSTI
Za odstranitev apnenčastih ostankov z dna notranjosti opravite
naslednje korake.
Priporočamo, da očistitedno notranjostipo 5–10 ciklih pekes paro.
1. Nalijte 300ml belegakisa v dno notranjosti.
OPOMBA: Vrsta kisa:5 %
2. Počakajte 30minut prisobni temperaturi.
3. Očistite pečicoz mehkokrpo in vodo.
4.2 Piroliza
Pečica je opremljen s sistemom pirolitskega čiščenja,ki uniči ostanke
hrane pri visokitemperaturi.
Postopek se izvaja samodejno s krmilnikom. Nastali plini se »očistijo«
s prehajanjem preko naprave za pirolizo, ki se zažene takoj, ko se
začne kuhanje. Ker so za pirolizo potrebne zelo visoke temperature,
so vrata pečice opremljena z varnostno ključavnico. Pirolizo lahko
kadarkoli ustavite.
Vratni možnoodpreti, doklerse neprikaže varnostna ključavnica.
OPOMBA: Če je nad pečico vgrajena kuhalna plošča, nikoli ne
uporabljajte gorilnikov ali električnih plošč med delovanjem pirolize, s
tem boste kuhalnoploščo zaščitilipred pregrevanjem.
Prednastavljena staDVACIKLA PIROLIZE:
ECO PYROCLEAN : Očisti zmerno umazano pečico. Deluje v
obdobju 90minut. SUPERPYROCLEAN :
Očisti močno umazano pečico. Deluje v obdobju 120 minut. Pri pečici
s pirolitskim čiščenjem nikoli ne uporabljajte komercialno dostopnih
čistilnih sredstev!
Nasvet: Izvajanje pirolitskega čiščenja takoj po kuhanju vam
omogoča, da izkoristite preostalo toploto, kar posledično pomeni
prihranek energije.
Pred izvedbo pirolitskegacikla:
Odstranite vse dodatke iz pečice, saj ne prenašajo visoke
temperature, ki se uporablja med ciklom pirolitskega čiščenja;
zlasti odstranjevanjerešetk, stranskihvodil inteleskopskih vodil
(glejte poglavje ODSTRANJEVANJE REŠETK IN STRANSKIH
VODIL). Pri pečicah s sondo za meso, morate pred ciklom
čiščenja zapreti odprtinos priloženomatico.
• Odstranite vsa večja razlitja ali madeže, saj bi njihovo
uničevanje trajalopredolgo. Pretiranovelike količinemaščobe bi
se tudi lahko vnele ob izpostavljenosti zelo visokim
temperaturam ciklapirolitskega čiščenja.
•Zaprite vrata pečice.
•Pred čiščenjem jetreba odstranitirazlito tekočino.
•Čiščenje vrat pečice;
•Odstrani velike ali grobe ostanke hrane iz notranjosti pečice z
vlažno gobico. Neuporabljajte detergentov;
•Odstranite vse dodatke in komplet drsnih vodil ( e je
nameš en);
č
•Ne postavljajte kuhinjskihkrp.
1 2
3 4
6
5
č
SL 26
Page 28

4.3 Funkcija Aquactiva
LOW-E
Postopek olajša odstranjevanje maščobe in ostankov
živil iz pečices pomočjopare.
1. V posodo na dnu pečicevlijte 300 ml vode.AQUACTIVA
2. Izberite funkcijo pečice Statična pečica ali Gretje
spodaj.
3. Temperaturonastavite na ikono .AQUACTIVA ( )
4. Pečica najdeluje 30minut.
5. Po 30minutah izklopitepečico in počakajte, dase ohladi.
6. Ko jepečica hladna,s krpo obrišite površinev notranjosti.
Opozorilo: Preden se dotaknete pečice, se prepričajte, da se je
ohladila. Dokler je pečica še vroča, bodite zelo previdni, da se ne
opečete. Za tapostopek uporabljajtedestilirano ali pitno vodo.
AQUACTIVA
() ()
300 ml
ODSTRANITEV IN ČIŠČENJESTEKLENIH VRAT
1. Odprite vratapečice.
2.3.4. Zapahnite tečaje, odstranite vijake in odstranite zgornji kovinski
pokrov tako, daga povlečetenavzgor.
5.6. Odstranite steklo, pazljivo ga povlecite iz vrat pečice (opomba: v
pirolitičnih pečicah odstranite tudi drugo in tretje steklo (če je
nameščeno)).
7. Ob koncu čiščenja ali zamenjave sestavite dele v obratnem
vrstnem redu.
Na vseh steklih mora biti oznaka »Pyro« čitljiva in nameščena na levi
strani vrat, v bližini levega stranskega tečaja. Na ta način bo
natisnjena etiketaprvega steklabila nanotranji stranivrat.
1.
2.
4.4 Vzdrževanje
DEMONTÁŽA ČIŠTĚNÍ BOČNIC
1. Odšroubujte šroub protisměru hodin.
2. Vyjmětebočnice vytažením směrem ksobě.
3. Vyčistětebočnice vmyčce nanádobí nebo mokrou houbičkou a
poté je ihned vysušte.
4. Po vyčištění dejte bočnice zpět, nasaďte zpět šrouby a pevně je
utáhněte.
A
ODSTRANITEV OKNA PEČICE
1. Odprite sprednje okno.
2. Odprite spojke ohišja tečajev na desni in levi strani
sprednjega okna tako, da jih potisnete navzdol.
3. Okno znova namestite z izvedbo postopka v obratnem
vrstnem redu.
3.
4.
5.
6.
1
2
3
7.
SL 27
Page 29

ZAMENJAVA ŽARNICE
1. Pečico izključite iz napajanja.
2. Odvijte stekleni pokrov, odvijte žarnico in jo nadomestite z novo žarnico istega tipa.
3. Ko ste pokvarjeno žarnico zamenjali, znova namestite stekleni pokrov.
5.
Odpravljanje težav
5.1
Pogosto zastavljena vprašanja
TEŽAVA MOŽNI VZROK REŠITEV
Pečica se ne segreje.
Pečica se ne segreje.
Pečica se ne segreje.
Ni odziva uporabniškega
vmesnika na dotik.
Ura ni nastavljena. Nastavite uro.
Varovalo za otroke je vklopljeno.
Funkcija kuhanja in temperature ni določena.
Para in kondenzacija na plošči uporabniškega
vmesnika.
Izklopite varovalo za otroke.
Preverite, ali so nastavitve pravilne.
Ploščo uporabniškega vmesnika očistite s
krpo iz mikrovlaken, da odstranite
kondenzacijsko plast.
SL 28
Page 30

INSTALLATION EN
Opening/Apertura/Odprtina
560 mm
460mm x 15 mm
INSTALLAZIONE IT
VGRADNJA PEČICE SL
560 mm
560 mm
590 mm
A
560 mm x 45 mm
Ifthe mounting ofthe plinthdoesnot allowaircirculation, to
GB
A
obtain the maximum performance of the oven it is necessary to
create an opening of 500x10 mm or thesame surfacein 5.000
2
mm
Se il montaggio delplinto nonconsente lacircolazione
IT
A
dell'aria, per ottenere le massime prestazioni del forno è
necessario creare un'apertura di 500x10 mm o la stessa
superficiein 5.000mm
2
580 mm
546 mm
22 mm
If the furniture is coverage with a bottom at the back part, provide
GB
an opening for the power supply cable.
Se il mobile ha un fondo posteriore, praticare un foro per il passaggio
IT
del cavo di alimentazione.
Če je omarica na zadnji strani zaprta, naredite odprtino za napajalni
SL
kabel.
Če namestitev podstavka ne omogočakroženja zraka,
SL
A
morate ustvariti odprtino z merami 500 x 10 mm ali enako
površino 5000 mm , da zagotovite najboljše delovanje pečice.
2
595 mm
595 mm
GB
If the oven does not have a cooling fan, create an opening
460 mm x 15 mm
Se il forno non dispone di una ventola di raffreddamento,
IT
lasciare uno spazio 460 mm x 15 mm
Čepečica nimahladilnegaventilatorja, napraviteustreznoodprtino
SL
460mm x15mm
mm
560
mm
560
mm
600
A
Opening/Apertura/Odprtina
560 mm x 45 mm
EN
The manufacturer will not beresponsible for any inaccuracy resultingfrom printing or transcript errorscontained in this brochure. We reserve theright to carry out modificationsto products as
required, including theinterests of consumption,without prejudice to thecharacteristics relating to safetyor function.
IT
Il produttore declina ogni responsabilità per inesattezze contenute nel documento stampato per errori di trascrizione contenuti in questa brochure. Inoltre, si riserva il diritto di apportare
modifiche al prodotto,nell'interesse dei consumatori,senza alcun pregiudizio perla sua sicurezza funzionalità.
SL
Proizvajalec neprevzema odgovornostiza morebitne tiskarske napake v tej knjižici. Pridržuje sipravico dosprememb naaparatu brez predhodnega obvestila vključno s porabo, ki nevplivajo
na varnost alidelovanje pečice.
o
o
42831662 • 70 gr - A4 • 07.2019 • Rev_A
 Loading...