

Page 1
CANDY ELETTRODOMESTICI - Via Privata Eden Fumagalli - 20047 Brugherio Milano Italy
Page 2

AVVERTENZE GENERALI
Vi ringraziamo per aver scelto uno dei nostri prodotti, per ottenere da questo elettrodomestico le migliori prestazioni consigliamo di:
• Leggere attentamente le avvertenze contenute nel presente libretto.
• Conservare con cura questo libretto per ogni ulteriore consultazione.
Durante l’uso il forno diventa caldo, fare attenzione a non toccare gli elementi riscaldanti all’interno del forno.
Alla prima accensione del forno può svilupparsi fumo di odore acre, causato dal primo riscaldamento del collante dei pannelli d’isolamento avvolgenti il forno. Si tratta di un fenomeno assolutamente normale e, in caso si verificasse, occorre attendere la cessazione
del fumo prima di introdurre le vivande.
Il forno è per sua natura un apparecchio che diventa caldo, in modo particolare in corrispondenza del cristallo porta. È buona norma
quindi impedire che i bambini possano avvicinarsi al forno quando è in funzione, in particolare quando funziona il grill.
DICHIARAZIONE DI CONFORMITA
• Questa apparecchiatura nelle parti destinate a venire a contatto con sostanze alimentari, è conforme alla prescrizione
della dir. CEE 89/109 e al D.L. di attuazione N° 108 del
25/01/92.
Apparecchio conforme alle Direttive Europee 89/336/CEE,
73/23/CEE e successive modifiche
INFORMAZIONI SULLA SICUREZZA
• Questo apparecchio dovrà essere destinato solo all’uso per il
quale è stato espressamente concepito, e cioè per la cottura
di alimenti. Ogni altro uso (ad esempio riscaldamento ambiente)
è da considerarsi improprio e quindi pericoloso. Il costruttore
non può essere considerato responsabile per eventuali danni
derivanti da usi impropri, erronei ed irragionevoli.
• Durante l'uso il forno diventa caldo, fare attenzione a non
toccare gli elementi riscaldanti all'interno del forno . É buona
norma quindi impedire che i bambini possano avvicinarsi al
forno quando é in funzione.
• L’uso di un qualsiasi apparecchio elettrico comporta l’osservanza
di alcune regole fondamentali. In particolare:
- non tirare il cavo di alimentazione per staccare la spina dalla
presa di corrente.
- non toccare l’apparecchio con mani o piedi bagnati o umidi
- non usare l’apparecchio a piedi nudi.
- non permettere che l’apparecchio sia usato dai bambini
o da incapaci, senza sorveglianza.
- in generale è sconsigliabile l’uso di adattatori, prese multiple
e prolunghe.
- In caso di guasto e/o di cattivo funzionamento dell’apparecchio,
spegnerlo e non manometterlo.
• In caso di danneggiamento del cavo, provveder e tempestiva-
mente alla sua sostituzione secondo le seguendi indicazioni:
aprire il coperchio morsettiera, togliere il cavo di alimentazione
e sostituirlo con uno corrispondente,
H05V2V2-F)
Tale operazione dovrà essere eseguita da personale professionalmente qualificato. Il conduttore di terra (giallo-verde), deve
obbligatoriamente essere più lungo di circa 10 mm. rispetto
ai conduttori di linea.
Per l’eventuale riparazione rivolgersi solamente ad un centro
di assistenza tecnica autorizzato e richiedere l’utilizzo di ricambi originali.
Il mancato rispetto di quanto sopra può compromettere la
sicurezza dell’apparecchio.
• Il forno possiede delle caratteristiche tecniche ben definite e
perció non potrete apportare modifiche.
• Non utilizzate mai macchine a vapore o ad alta pressione per
la pulizia del forno.
• Non mettete alcun prodotto infiammabile nel forno. Potrebbe
incendiarsi se il forno venissa acceso accidentalmente.
• Non appogiatevi e non fate sedere i bambini sulla porta del
forno.
• Usate gli appositi guanti da forno per introdurre ed estrarre
dal forno recipienti, cibi ed accessori.
e adeguato alla portata dell’apparecchio.
(tipo H05RR-F, H05VV-F,
INSTALLAZIONE
L’installazione è a carico dell’acquirente e la Casa Costruttrice
è esonerata da questo servizio, gli eventuali interventi richiesti
alla Casa Costruttrice che dipendono da una errata installazione
non sono compresi nella garanzia.
L’installazione deve essere effettuata secondo le istruzioni da
personale professionalmente qualificato. Una errata installazione
può causare danni a persone, animali o cose, nei confronti dei
quali il costruttore non può essere considerato responsabile.
Il mobile nel quale il forno deve essere incassato deve essere
realizzato con materiali resistenti al calore.
Il forno puó essere incassato sia sotto un piano di cottura
sia in colonna.
Prima del fissaggio : é indispensabile assicurare una buona
aerazione del vano di incasso al fine di permettere una buona
circolazione dell'aria necessaria al raffreddamento ed alla
protezione dei meccanismi interni. Bisogna quindi praticare aperture
(vedere ultima pagina).
COLLEGAMENTO ELETTRICO
L'INSTALLAZIONE DEL FORNO DEVE ESSERE EFFETTUATA
DA UN INSTALLATORE AUTORIZZATO O DA UN TECNICO
QUALIFICATO.
L'installazione di questo apparecchio deve essere effettuata in
conformità delle Norme vigenti.
La casa costruttrice, declina ogni responsabilità in caso di mancato
rispetto delle suddette norme.
Importante: la casa costruttrice resta sollevata da ogni responsabilità
per eventuali danni a persone o cose, derivanti dal mancato
allacciamento della linea di terra.
Il forno è conforme ai requisiti di sicurezza previsti dalle norme
e deve essere munito di spina tripolare con polo di terra che
assicura la completa messa a terra.
L'efficacia della sicurezza è comunque subordinata anche alla
corretta messa a terra del vostro impianto. Pertanto, prima di
alimentare elettricamente il forno accertarsi che la
presa abbia un corretto collegamento di messa a terra e che la
portata amperometrica del contatore elettrico risulti idonea per
l'assorbimento indicato dai dati di targa del forno.
Nota: non dimenticate che l'apparecchio potrebbe aver bisogno
di manutenzione da parte dell'assistenza tecnica. Ponete quindi
la presa di corrente in una posizione facilmente accessibile.
Questo apparecchio é venduto provvisto di cordone di alimentazione e deve essere utilizzato esclusivamente con una tensione
di 230 Volts.
Attenzione: nel caso si desideri realizzare una connessione
fissa alla rete, si dovrà interporre tra l'apparecchio e la rete, un
dispositivo omnipolare di interruzione con distanza dei contatti
di almeno 3 mm. Il cavo di terra non deve essere interrotto
dall'interruttore.
RACCOMANDAZIONI
• Dopo ogni utilizzo, eseguire la manutenzione favorirà una
perfetta pulizia.
• Non rivestire mai le pareti del forno con alluminio o con altri
materiali simili. Si rischia di bruciare il foglio d'alluminio e di
danneggiare le pareti del forno.
• É consigliato di non utilizzare il forno alle alte temperature per
non rischiare di provocare fumo e odori. É dunque meglio
allungare il tempo di cottura e abbassare leggermente la
temperatura.
• Utilizzare solo dei piatti che resistano alle alte temperature.
FAR VERIFICARE L'EFFICIENZA DELL'IMPIANTO DI MESSA
A TERRA.
La sostituzione del cordone di alimentazione deve essere effettuata
dal servizio di assistenza tecnica o da personale altamente
qualificato, in conformità alle caratteristiche d'origine.
Prima di effettuare qualsiasi operazione di smontaggio, si deve
staccare la spina dalla presa di corrente o togliere corrente a
mezzo dell'interruttore generale dell'impianto elettrico.
1 IT
Page 3
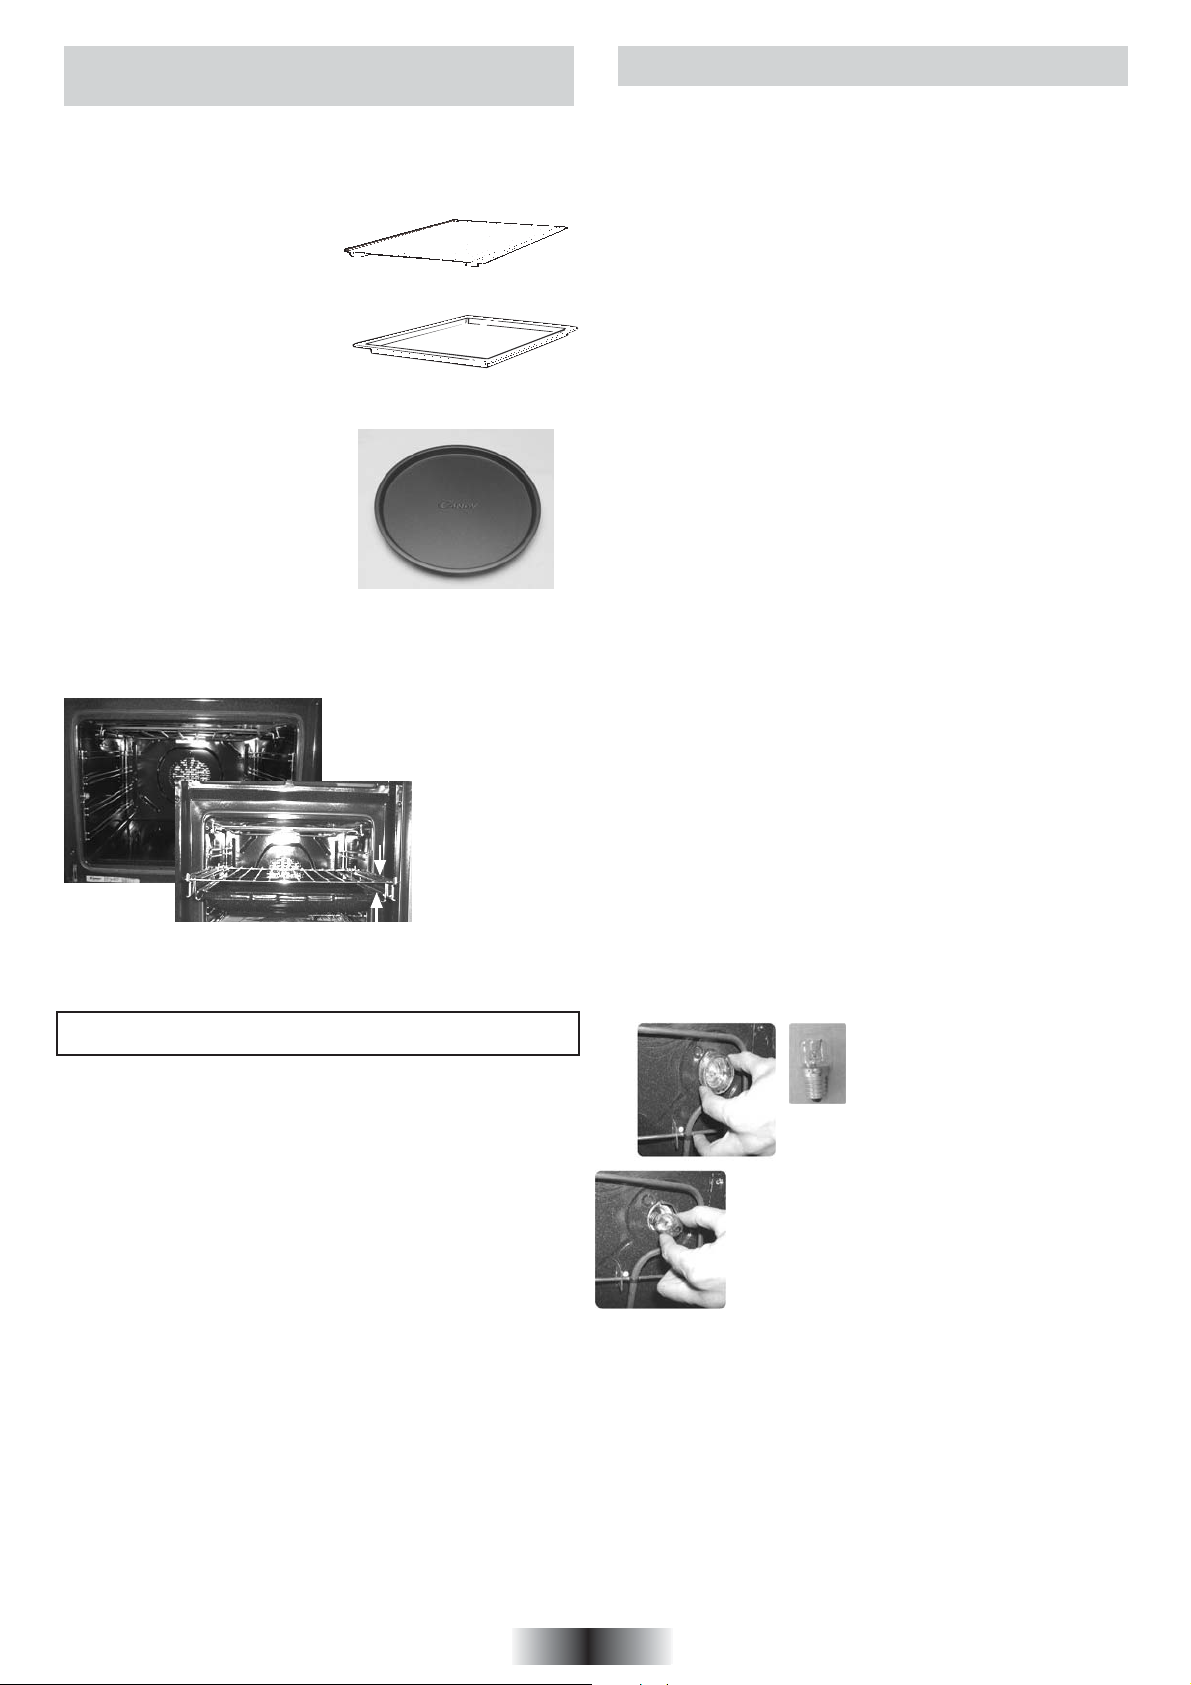
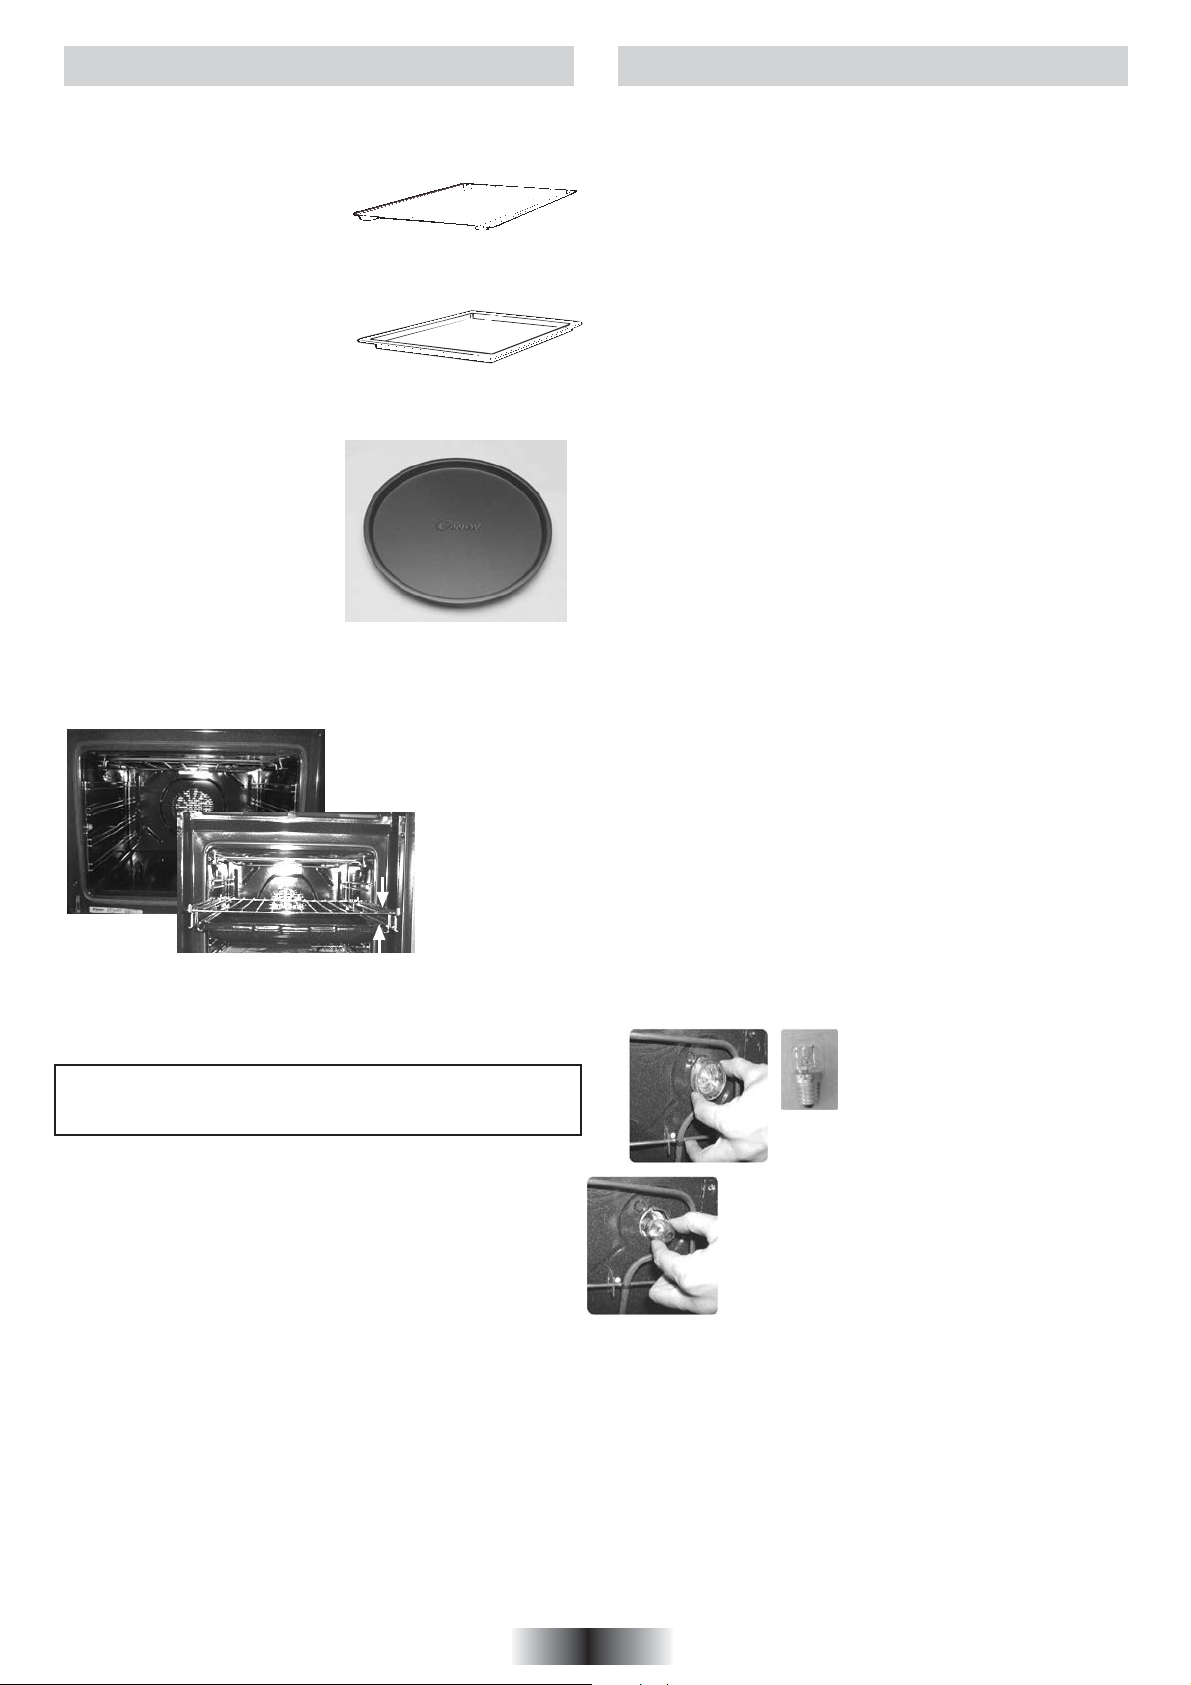
DOTAZIONE DEL FORNO (variabile in base
al modello)
Prima di utilizzare gli accessori del forno per la prima volta
è necessario pulirli. Per questa operazione si consiglia di
utilizzare una spugna. Successivamente risciacquare ed
asciugare gli accessori.
La griglia serve da sopporto per
teglie, pirofile, stampi per i dolci.
Serve per le grigliate di carne
poiché sostiene anche la leccarda
che raccoglie i grassi che colano.
La leccarda serve a raccogliere
grassi che colano durante la cottura
con il grill.
Non usare mai la leccarda per cuocere gli arrosti perché ne
risulterebbe un eccessivo sviluppo di fumo e vapori e il forno si
sporcherebbe inutilmente.
Pizza set é l'idéale per la cottura
delle pizze. Il set deve essere
utilizzato in abbinamento alla
funzione Pizza.
GUIDA TELESCOPICA
Estrarre i bracci telescopici e posizionare la griglia porta leccarda
“C” dietro al fermo griglia nella parte frontale.
Completare con l'inserimento della leccarda “D”.
MANUTENZIONE DEL FORNO
• Prima di effettuare la pulizia attendere che l'apparecchio si
raffreddi.
• Non usare mai prodotti abrasivi, pagliette metalliche o oggetti
taglienti che potrebbero danneggiare lo smalto e l'acciaio.
• Usare semplicemente acqua saponata o prodotti a base di
ammoniaca.
IL FORNO
La pulizia del forno è molto importante e deve essere effettuata
ogni volta che questo viene usato. Infatti, sulle pareti si depositano
grassi sciolti durante la cottura che potrebbero, alla successiva
accensione, produrre odori sgradevoli che nuocerebbero al buon
esito della cottura. Per la pulizia usare acqua calda e detersivo,
sciacquando accuratamente.
LE PARTI IN VETRO
Alla fine di ogni utilizzo del forno, asciugate con carta assorbente.
Se gli schizzi sono troppo grandi, pulite con una spugna ed un
detergente. Sciacquate ed asciugate.
Non usare mai prodotti abrasivi o oggetti taglienti.
GLI ACCESSORI
Pulire con una spugna imbevuta d'acqua saponata. Risciacquare
e asciugare. Non usare prodotti abrasivi.
LA TEGLIA DEL PIZZA SET
La superficie è rivestita in un materiale antiaderente facile da
pulire e lavabile in lavastoviglie.
Non usare mai prodotti abrasivi o oggetti taglienti, questi
rovinerebbero in modo definitivo il rivestimento antiaderente.
C
D
Gli accessori devono essere tolti dal forno se non vengono
utilizzati.
LA LECCARDA
Dopo aver grigliato, estrarre la leccarda dal forno. Abbiate cura
di svuotarla in un recipiente a parte, lavare e risciaquare con
dell'acqua calda e una spugna imbevuta di detersivo.
Lasciarla a riposo con uno strato d'acqua e detergente per
ammorbidire le incrostazioni.
Puo anche essere lavata, in lavastoviglie o con prodotti reperibili
in commercio.
Non lasciare mai la leccarda sporca all'interno del forno.
LUCE FORNO
Staccare la spina di alimentazione prima di ogni operazione di
pulizia o di sostituzione della lampadina.
La lampadina e il bulbo protettivo sono realizzati con un materiale
resistente alle alte temperature.
Per la sostituzione della lampadina
difettosa, è sufficiente smontare il
bulbo in vetro,
- togliere la lampadina,
- sostituirla con una lampadina
identica e, riavvitare il bulbo in vetro
che serve come protezione.
2 IT
Page 4

SERVIZIO ASSISTENZA CLIENTI
CERTIFICATO DI GARANZIA CONVENZIONALE: cosa fare?
Il Suo prodotto è garantito, alle condizioni e nei termini riportati
sul certificato inserito nel prodotto ed in base alle previsioni del
decreto legislativo 24/02, nonché del decreto legislativo 6 settembre
2005, n. 206, per un periodo di 24 mesi decorrenti dalla data di
consegna del bene.
Così come riportato nei testi dei Decreti Legislativi citati, il certificato
di garanzia dovrà essere da Lei conservato, debitamente compilato,
per essere mostrato al Servizio Assistenza Tecnica Autorizzato,
in caso di necessità, unitamente ad un documento fiscalmente
valido rilasciato dal rivenditore al momento dell’acquisto (bolla di
consegna, fattura, scontrino fiscale, altro) sul quale siano indicati
il nominativo del rivenditore, la data di consegna, gli estremi
identificativi del prodotto ed il prezzo di cessione.
Resta pure inteso che, salvo prova contraria, poiché si presume
che i difetti di conformità che si manifestano entro sei mesi dalla
consegna del bene esistessero già a tale data, a meno che tale
ipotesi sia incompatibile con la natura del bene o con la natura
del difetto di conformità, il Servizio di Assistenza Tecnica Autorizzato
Gias, verificato il diritto all’intervento, lo effettuerà senza addebitare
il diritto fisso di intervento a domicilio, la manodopera ed i ricambi.
Per contro, nel successivo periodo di diciotto mesi di vigenza della
garanzia, sarà invece onere del consumatore che intenda fruire
dei rimedi accordati dalla garanzia stessa provare l’esistenza del
difetto di conformità del bene sin dal momento della consegna;
nel caso in cui il consumatore non fosse in grado di fornire detta
prova, non potranno essere applicate le condizioni di garanzia
previste e pertanto il Servizio di Assistenza Tecnica Autorizzato
Gias effettuerà l’intervento addebitando al consumatore tutti i costi
relativi.
Questo elettrodomestico è marcato conformemente
alla Direttiva Europea 2002/96/CE sui rifiuti da
apparecchiature elettriche ed elettroniche (WEEE).
Assicurandovi che questo prodotto sia smaltito
correttamente, aiuterete ad evitare possibili
conseguenze negative all’ambiente e alla salutedelle
persone, che potrebbero verificarsi a causa d’un
errato trattamento di questo prodotto giunto a fine vita. Il simbolo
sul prodotto indica che questo apparecchio non può essere
trattato come un normale rifiuto domestico; dovrà invece essere
consegnato al punto più vicino di raccolta per il riciclo delle
apparecchiature elettriche ed elettroniche. Lo smaltimento deve
essere effettuato in accordo con le regole ambientali vigenti per
lo smaltimento dei rifiuti. Per informazioni più dettagliate sul
trattamento, recupero e riciclo di questo prodotto, per favore
contattare l’ufficio pubblico di competenza (del dipartimento
ecologia e ambiente), o il vostro servizio di raccolta rifiuti a
domicilio, o il negozio dove avete acquistato il prodotto.
ESTENSIONE DELLA GARANZIA FINO A 5 ANNI : come?
Le ricordiamo inoltre che sullo stesso certificato di garanzia
convenzionale Lei troverà le informazioni ed i documenti necessari
per prolungare la garanzia dell’apparecchio sino a 5 anni e così,
in caso di guasto, non pagare il diritto fisso di intervento a domicilio,
la manodopera ed i ricambi.
Per qualsiasi informazione necessitasse, La preghiamo rivolgersi
al numero telefonico del Servizio Clienti 0392086811.
ANOMALIE E MALFUNZIONAMENTI: a chi rivolgersi ?
Per qualsiasi necessità il centro assistenza autorizzato è a Sua
completa disposizione per fornirLe i chiarimenti necessari;
comunque qualora il Suo prodotto presenti anomalie o mal
funzionamenti, prima di rivolgersi al Servizio Assistenza Autorizzato,
consigliamo vivamente di effettuare i controlli indicati sopra.
UN SOLO NUMERO TELEFONICO PER OTTENERE ASSISTENZA.
Qualora il problema dovesse persistere, componendo il “Numero
Utile” sotto indicato, sarà messo in contatto direttamente con il
dell’operatore telefonico utilizzato. Dettagli sono presenti sul sito
internet www.candy-group.com
MATRICOLA DEL PRODOTTO. Dove si trova?
E’ indispensabile che comunichi al Servizio Assistenza Tecnica
Autorizzato la sigla del prodotto ed il numero di matricola (16
caratteri che iniziano con la cifra 3) che troverà sul certificato di
garanzia oppure sulla targa matricola del prodotto (figura in ultima
pagina). In questo modo Lei potrà contribuire ad evitare trasferte
inutili del tecnico, risparmiando oltretutto i relativi costi.
Servizio Assistenza Tecnica Autorizzato
che opera nella Sua zona di residenza.
Attenzione, la chiamata è a pagamento;
il costo verrà comunicato, tramite
messaggio vocale, dal Servizio clienti
3 IT
Page 5
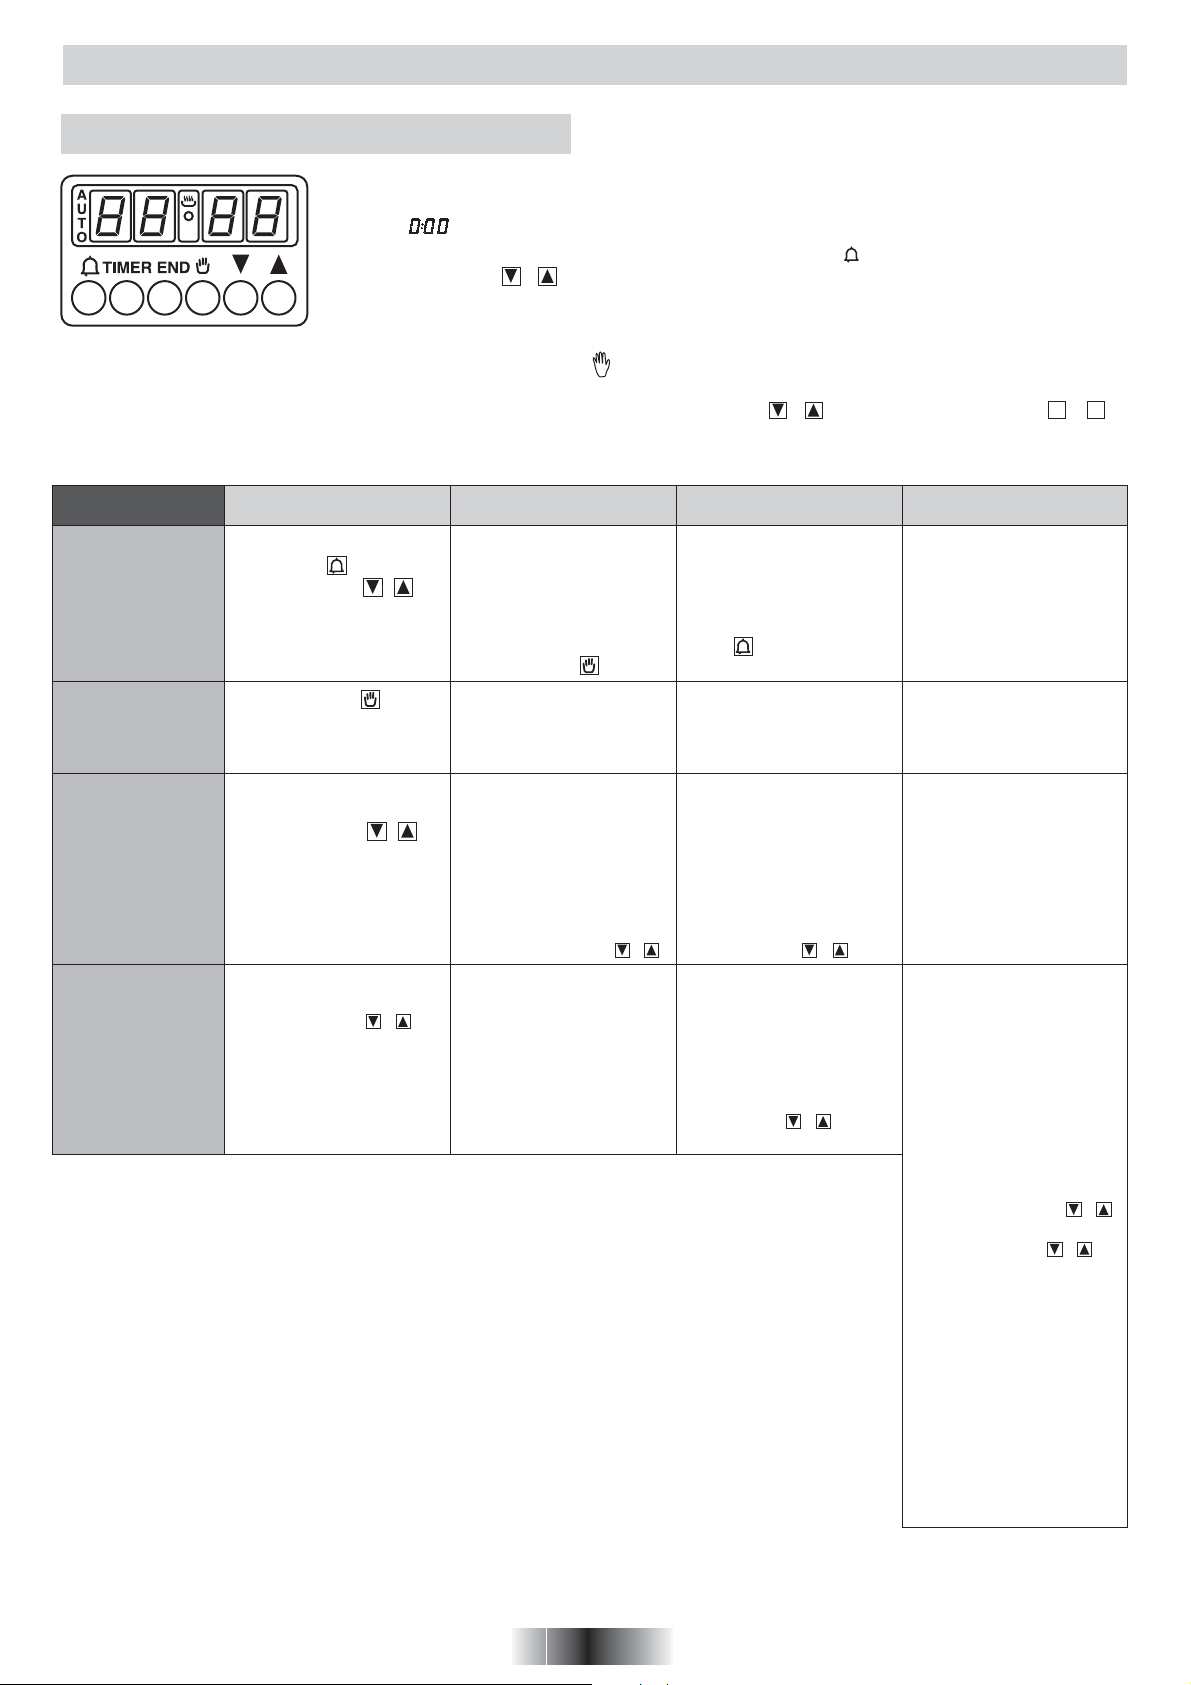
USO DEL PROGRAMMATORE ELETTRONICO
REGOLAZIONE ORA
ATTENZIONE: la prima operazione da eseguire dopo l’installazione o dopo una
interruzione di corrente (tali situazioni si riconoscono perchè sul dispay lampeggia
l’ora ) è la regolazione dell’ora, come di seguito descritto.
• Premere e tenere premuto i tasti TIMER e END (oppure e TIMER su alcuni modelli)
• Premere i tasti o per regolare l’ora
• Lasciare i tasti
ATTENZIONE: il forno funziona solo se impostato in manuale o cottura programmata
N.B.: per regolare le varie funzioni del forno, in alcuni modelli compaiono i simboli o . in altri modelli abbiamo + o -
FUNZIONE COME SI ATTIVA COME SI SPEGNE COSA FA A COSA SERVE
CONTAMINUTI
FUNZIONAMENTO
MANUALE
DURATA
COTTURA
FINE
COTTURA
• Premere e tenere premuto il tasto
• Premere i tasti o per
regolare la durata
• Lasciare i tasti
• Premere tasto
• Selezionare la funzione di
cottura con la manopola
commutatore
• Premere e tenere premuto il tasto TIMER
• Premere i tasti o per
regolare la durata
• Lasciare i tasti
• Selezionare la funzione
di cottura con la manopola commutatore
• Premere e tenere premuto il tasto END
• Premere i tasti o per
regolare l’ora di fine
cottura
• Lasciare i tasti
• Selezionare la funzione di
cottura con la manopola
commutatore
• Al termine della durata impostata la funzione si spegne da sola ed avvisa con
un segnale sonoro (il segnale sonoro si ferma da
solo; per fermarlo subito
premere il tasto )
• Riportare manopola commutatore in posizione
O.
• Al termine della durata
impostata il forno si
spegne da solo; se deve
essere fermato prima si
deve portare la manopola
commutatore in posizione O oppure portare
a 0:00 la durata della cottura (tasti TIMER e o ).
• All’ora impostata il forno
si spegne da solo; se deve essere fermato prima
è necessario portare la
manopola commutatore
in posizione O.
• Da un segnale sonoro al
termine di un tempo stabilito
• Per visualizzare il tempo
rimanente premere il
tasto
• Permette il funzionamento del forno
• Permette di impostare la
durata della cottura del
cibo inserito nel forno
• Per visualizzare il tempo
rimanente premere il tasto TIMER.
• Per modificare il tempo
rimanente premere il tasto TIMER + o
• Permette di memorizzare
l’ora di fine cottura
• Per visualizzare l’ora programmata premere il
tasto END
• Per modificare l’ora programmata premere i
tasti END + o
• Permette di utilizzare il
programmatore del forno
come una sveglia (può
essere usato con forno
funzionante o spento.
• Realizzare le cotture
volute
• Al termine della durata
impostata il forno si spegne automaticamente ed
avvisa con un segnale
sonoro.
• Tipicamente si utilizza
questa funzione con la
funzione DURATA COTTURA – ad esempio il
cibo desiderato deve cuocere per 45 minuti e desidero che sia pronto per le
ore 12:30; in tal caso
Selezionare la funzione di
cottura desiderata
Impostare la durata cottura
a 45 minuti (Timer + o )
Impostare la fine cottura alle
ore 12:30 (End + o )
la cottura avrà automaticamente inizio alle 11:45
(12:30 meno 45 minuti),
all’ora impostata come fine
cottura il forno si spegne
automaticamente.
ATTENZIONE: impostando
solo la fine cottura e non la
durata della cottura, il
forno si accenderà subito e
si spegnerà all’ora di fine
cottura impostata
4 IT
Page 6
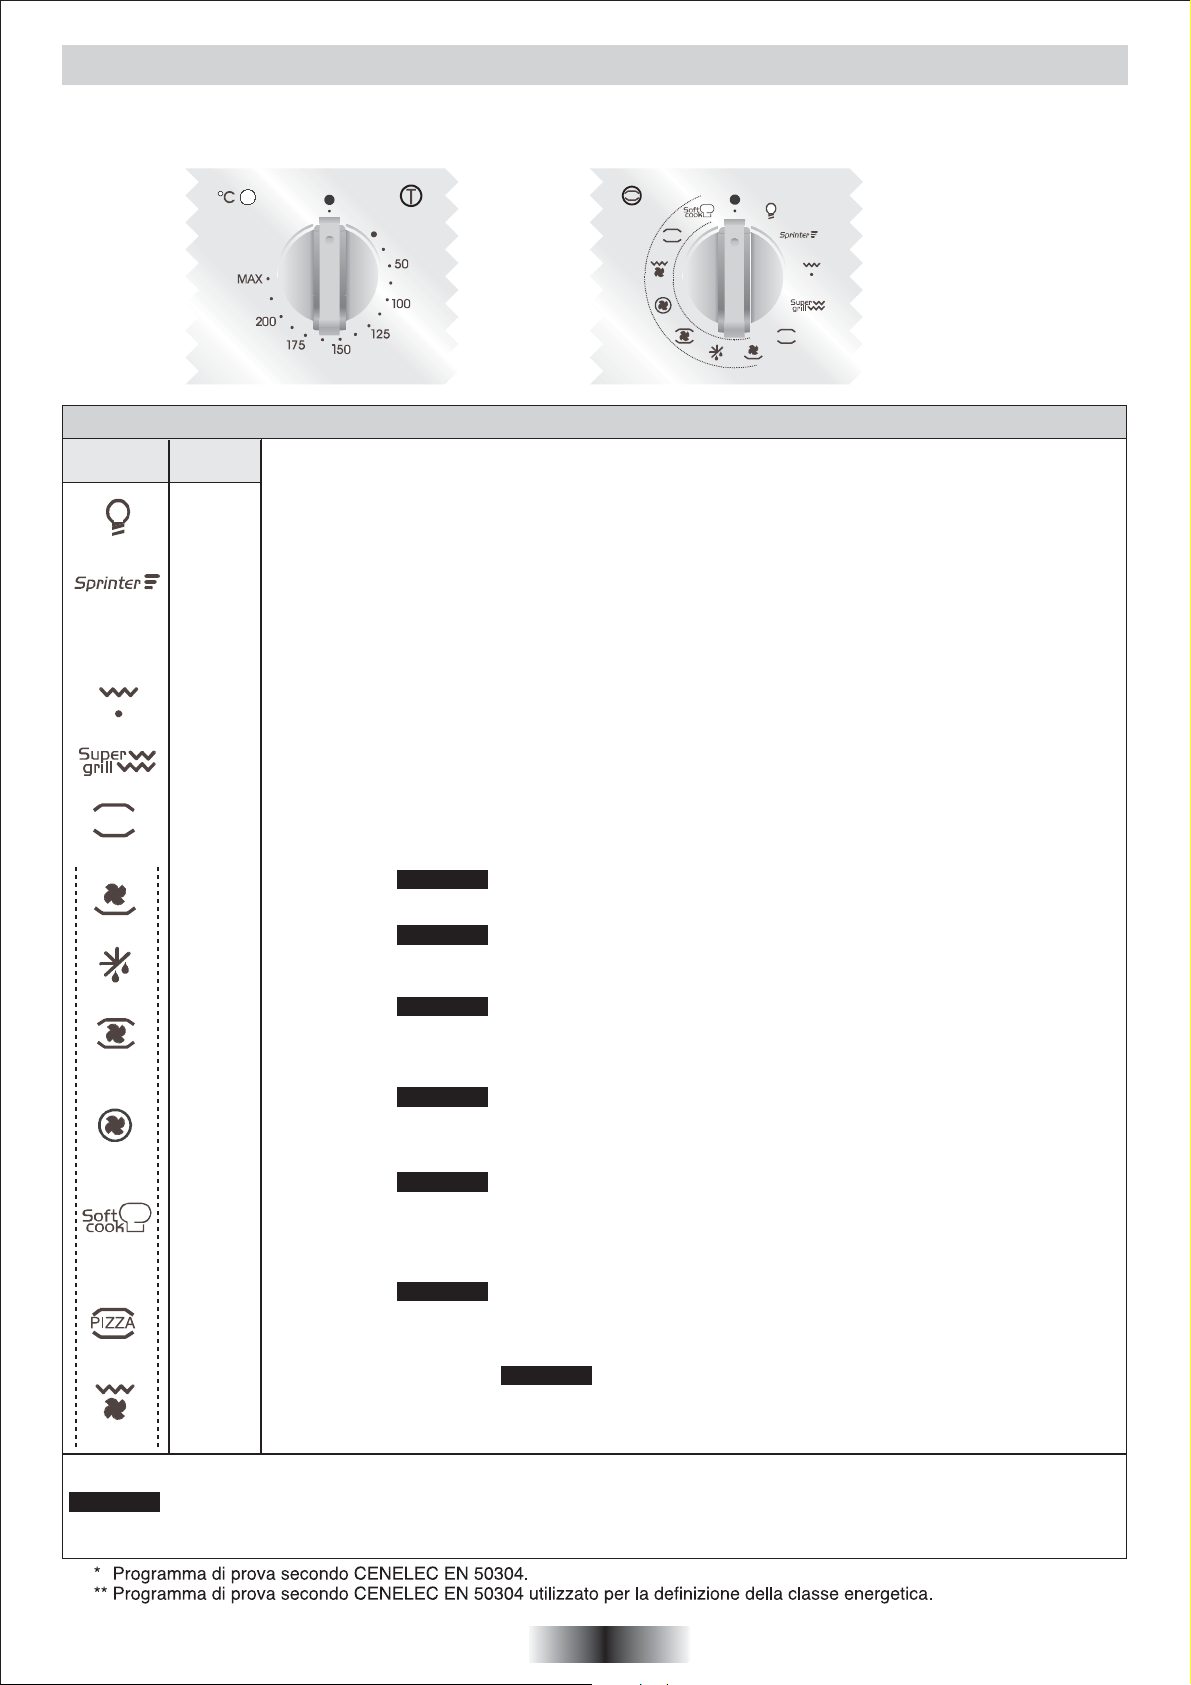
ISTRUZIONI PER L’USO
La nostra gamma comprende estetiche diverse con colori diversi. Per poter individuare le caratteristiche tecniche e funzionali
relative al modello del forno che avete appena acquistato seguite gli schemi sotto riportati.
Durante il funzionamento del forno la luce interna rimane accesa.
Manopola
termostato
Descrizione dei comandi
Manopola
commutatore
Manopola
termostato
50 ÷ MAX
50 ÷ MAX
50 ÷ MAX
**
50 ÷ MAX
Esempio manopola
commutatore
12 posizioni*
PIZZA
*secondo modello
Funzione secondo modello
Accende la luce interna. Viene inserito anche il ventilatore di raffreddamento (solo per i modelli raffreddati).
Sprinter
Questa posizione permette un preriscaldamento rapido del forno. Una volta impostata questa funzione consente
un'immediato riscaldamento del forno (ad es. 8 minuti per raggiungere 200°C), la temperatura desiderata puó essere
impostata tramite l'apposita manopola. Il termine della fase di preriscaldamento è indicato tramite la spia del termostato
"°C" che si spegne. Una volta conclusa questa fase è possibile selezionare la funzione di cottura desiderata ed inserire
le pietanze da cucinare. Prestare attenzione a non inserire alimenti nel forno durante la fase di preriscaldamento
rischierebbero di subire danni.
Grigliatura tradizionale a porta chiusa
In questa posizione viene inserita la resistenza del grill. Ottima nella cottura di carni di medie e piccolo spessore (salsicce,
costine, bacon).
Super Grill
Questa funzione consente di selezionare il livello di doratura del cibo o di gratinare le pietanze a fine cottura. La funzione
Super Grill infatti è caratterizzata da un incremento di potenza pari al 50% rispetto alla funzione grill standard.
Convezione naturale
Sono in funzione le resistenze superiore e inferiore. È la cottura tradizionale, ottima per arrostire cosciotti, selvaggina,
ideale per biscotti, mele al forno e per rendere i cibi molto croccanti.
50 ÷ MAX
*
50 ÷ MAX
50 ÷ MAX
50 ÷ MAX
50 ÷ MAX
50 ÷ 200
Suola ventilata
Adatta per cotture delicate (torte-soufflè).
Scongelamento
Questa posizione permette di far circolare l’aria a temperatura ambiente intorno al cibo surgelato facendolo così scongelare
in pochi minuti senza modificare od alterare il contenuto proteico.
Forno ventilato
Sono in funzione entrambe le resistenze insieme con la ventilazione. Questa funzione é raccomandata per pollame,
pasticceria, pesce e verdure. Grazie alla circolazione forzata il calore penetra meglio nel cibo ed il tempo di cottura e di
riscaldamento è inferiore.
Forno ventilato
Sono in funzione la resistenza circolare insieme con la ventilazione. L’aria calda, viene ripartita sui diversi ripiani; è l’ideale
per cuocere contemporaneamente diversi tipi di cibo (carne, pesce), senza miscelare sapori e odori. Cottura delicata indicata per pan di Spagna, torte Margherita, pasta sfoglia, ecc...
Soft Cook
Soft cook è la funzione ideale per la pasticceria ed il pane. Grazie alla velocità ridotta della ventola, questa funzione
aumenta l'umidità presente all'interno del forno. Una maggiore umidità crea le condizioni di cottura ideali per quegli
alimenti che hanno bisogno di mantenere una consistenza elastica mentre cuociono (es. torte, pane, biscotti) e, di
conseguenza, per non sbriciolarsi.
Funzione pizza
Il calore avvolgente in questa funzione ricrea un ambiente simile a quello dei forni a legna di pizzeria.
Questa funzione devere essere utilizzata in abbinamento con il Pizza set. La teglia del Pizza set è rivestita di un materiale
ideale per l'ottimizzazione dei risultati di cottura.
Grill ventilato a porta chiusa
L’aria, riscaldata dalla resistenza grill, viene aspirata dal ventilatore che la riversa sulle vivande alla temperatura desiderata
tra 50 e 200°C. Il grill ventilato sostituisce egregiamente il girarrosto e garantisce ottimi risultati con pollame, salsicce e
carni rosse, anche in quantità rilevante.
VARIO FAN
VARIO FAN
VARIO FAN
VARIO FAN
VARIO FAN
VARIO FAN
VARIO FAN
VARIO FAN
Vario Fan é l'esclusivo sistema di funzionamento sviluppato da Candy per ottimizzare i risultati di cottura, la gestione della temperatura
e la gestione dell'umidità. Il sistema Vario Fan modifica automaticamente la velocità di rotazione della ventola per tutte le cotture in
multifunzione. Questo sistema si attiva automaticamente tutte le volte che viene selezionata una funzione all'interno dell'area tratteggiata
sul pannello di controllo.
5 IT
Page 7

TABELLA TEMPI DI COTTURA
I tempi suggeriti nelle seguenti tabelle sono indicativi, infatti possono variare secondo la qualità, la freschezza, la dimensione e lo
spessore degli alimenti e secondo il vostro gusto. Lasciare sempre riposare per alcuni minuti prima di servire, perché tutti gli alimenti
continuano a cuocere dopo averli tolti dal forno.
CONSIGLIO UTILE: Per non rendere le superfici troppo secche
Posizione ripiani
è consigliato abbassare la temperatura e allungare i tempi di
cottura.
Forno elettrico statico Forno elettrico ventilato
Pietanza Quantità Ripiano Tempera-
Tem po
di cottura
in minuti
ratura
forno
RipianoTempe-
Tem po
di cottura
in minuti
tura forno
Osservazioni
• Pasta
Lasagne Kg 3,5 2 70 ÷ 75 220 2 60 ÷ 65 200
Cannelloni Kg 1,8 2 50 ÷ 60 220 2 40 ÷ 50 200
Pasta al forno Kg 2,5 2 55 ÷ 60 220 2 45 ÷ 50 200
Inserire le lasagne nel forno freddo
Inserire i cannelloni nel forno freddo
Inserire la pasta al forno nel forno freddo
• Paste salate
Preparate la pasta a forma di pagnotta e
Pane
Kg 1
di pasta
2
35
prerisc.10
200 2
30 ÷ 35
prerisc.10
Pizze Kg 1 1 190 1 19025 ÷ 35 20 ÷ 25
Pasta sfoglia
Vol au vent
(Surgelati)
Focaccia
(n° 4)
n° 24 1 220 2 20030 ÷ 35 25 ÷ 30
gr. 200
di pasta cad.
2
200 2 18025 ÷ 30 20 ÷ 25
180
incidere con un coltello una croce sulla parte
superiore della forma. Lasciare lievitare
a temperatura ambiente almeno 2 ore,
ugere la leccarda e posizionate la forma
bene al centro della stessa.
Preriscaldate per 15 min. il forno preparate
le pizze nella leccarda smaltata con pomodori, mozzarella e prosciutto, olio, sale,
origano
Disponete 24 vol au vent nella leccarda
e cuocete.
Preriscaldate per 15 min., ungere la teglia
del forno, disporre le 4 focacce oliate e
salate prima di infornare, lascire lievitare a
temperatura ambiente per almeno 2 ore.
• Carne
Tutte le carni possono essere cotte in recipiente con bordo basso o bordo alto.
È consigliabile coprire il recipiente a bordo basso con un coperchio per evitare di sporcare il forno con schizzi del condimento.
Le carni coperte risultano più morbide e succose, mentre quelle scoperte risultano più croccanti.
I tempi indicati valgono per cotture con recipiente coperto o scoperto.
Roastbeef
intero
Kg 1 3 220 3 20070 ÷ 80 50 ÷ 60
Disporre la carne in una teglia Pirex a bordo
alto con sale pepe. Voltare a metà cottura
Arrosto di maiale
arrotolato
Arrosto di vitello
arrotolato
Arrosto di manzo
filetto
Kg 1 2 220 2 200100 ÷ 110 80 ÷ 90
Kg 1,3 1 220 2 20090 ÷ 110 90 ÷ 100
Kg 1 2 220 2 20080 ÷ 90 80 ÷ 90
• Pesci
Trota 3 intere / Kg 1 2 220 2 20040 ÷ 45 35 ÷ 40
Salmone
700 g a fette
2,5 cm s.p.
2 220 2 20030 ÷ 35 30 ÷ 25
Sogliola Filetti / Kg 1 2 220 2 20040 ÷ 45 35 ÷ 40
Orata 2 intere 2 220 2 20040 ÷ 45 35 ÷ 40
6 IT
Disporre la carne in una teglia Pirex a bordo
alto con sale pepe. Voltare a metà cottura
Cuocere come sopra
Cuocere come sopra
Cuocere le trote coperte con olio, sale e
cipolle in teglia Pirex.
Cuocere il salmone non coperto in teglia
Pirex con sale, pepe e olio.
Cuocete la sogliola con sale e un cucchiaio
d’olio.
Cuocere in recipiente coperto le orate con
olio e sale
Page 8
TABELLA TEMPI DI COTTURA
Forno elettrico statico Forno elettrico ventilato
Pietanza Quantità Ripiano Tempera-
Tem po
di cottura
in minuti
ratura
forno
RipianoTempe-
• Pollame, Coniglio
Faraona Kg 1-1,3 2 60 ÷ 80 220 2 60 ÷ 70 200
Pollo Kg 1,5-1,7 2 110 ÷ 120 220 2 100 ÷ 110 200
Coniglio a pezzi Kg 1-1,2 2 55 ÷ 65 220 2 50 ÷ 60 200
• Dolci, Torte
Torta cacao scatola 1 55 180 1 50 160
Torta margherita scatola 1 55 175 1 40 ÷ 45 160
Torta di carote scatola 1 65 180 1 50 ÷ 60 160
Torta crostata
albicocca
700 gr 1 40 200 2 30 ÷ 35 180
• Verdura
Finocchi 800 gr 1 70 ÷ 80 220 1 60 ÷ 70 200
Zucchine 800 gr 1 70 220 1 60 ÷ 70 200
Patate 800 gr 2 60 ÷ 65 220 2 60 ÷ 65 200
Carote 800 gr 1 80 ÷ 85 220 1 70 ÷ 80 200
• Frutta
Mele intere Kg 1 1 45 ÷ 55 220 2 45 ÷ 55 200
Pere Kg 1 1 45 ÷ 55 220 2 45 ÷ 55 200
Pesche Kg 1 1 45 ÷ 55 220 2 45 ÷ 55 200
• Cottura a grill
La cottura con il grill deve essere eseguita ponendo il cibo sotto il grill elettrico. Attenzione: durante il funzionamento il grill diventa di colore
rosso vivo. La leccarda deve essere inserita sotto la griglia per raccogliere i sughi.
Pane carrè
tostato
4 fette 4 5 (5 prerisc.) grill 4 5 (10 prerisc.) grill
Toasts farciti 4 3 10 (5 prerisc.) grill 3
Salsiccie n°6 / Kg 0,9 4
Costate di manzo n°4 / Kg 1,5 4
Coscie di pollo n°4 / Kg 1,5 3
25/30
(5 prerisc.)
25
(5 prerisc.)
50/60
(5 prerisc.)
grill 4
grill 4
grill 3
Tem po
di cottura
in minuti
5/8
(10 prerisc.)
15/20
(10 prerisc.)
15/20
(10 prerisc.)
50/60
(10 prerisc.)
tura forno
grill
grill
grill
grill
Osservazioni
Sistemare la faraona in teglia Pirex o
ceramica a bordo alto condita con aromi
naturali e pochissimo olio.
Come per la faraona
Mettete i pezzi di uguali dimensioni nella
leccarda smaltata, condite con aromi
naturali. se necessario voltate i pezzi.
In teglia per torte Ø 22. Prerisc. per 10 min.
In teglia per torte Ø 22. Prerisc. per 10 min.
In teglia per torte Ø 22. Prerisc. per 10 min.
In teglia per torte Ø 22. Prerisc. per 10 min.
Disponete i finocchi tagliati in 4 parti e
coperti in teglia di Pirex con burro e sale e
possibilmente con la parte interna verso
l’alto
Affettate le zucchine e cuocete in teglia
Pirex coperte con burro e sale
Tagliate le patate in parti uguali e cuocetele
coperte con olio, sale e origano o rosmarino
in teglia Pirex.
Tagliate le carote a fettine, copritele e
cuocetele in teglia Pirex.
Cuocere la frutta in teglia di Pirex o ceramica
non coperta. Lasciare raffreddare in forno.
Come sopra
Come sopra
Inserire il pane carrè sulla griglia supporto.
Dopo la 1° cottura capovolgere fino a cottura
ultimata.
Inserire i toasts sulla griglia supporto
leccarda; dopo la prima brunitura
capovolgere i toasts fino a brunitura ultimata.
Tagliare le salsiccie a metà e disporle sulla
griglia, con la parte interna verso l’alto. A
metà cottura capovolgere le salsiccie fino
a cottura ultimata. Avvertenza: Ogni tanto
controllate visivamente l’uniformità di
cottura. Nel caso di disuniformità intercambiare quelle cotte con quelle meno cotte.
Disporre le fette bene sotto l’azione del grill
e voltarle due volte.
Condite con aromi naturali e voltatele ogni
tanto.
7 IT
Page 9

GENERAL WARNINGS
Thank you for choosing one of our products. To get the most out of your oven we recommend that you:
• Read the notes in this manual carefully: they contain important instructions on how to install, use and service this oven safely.
• Keep this booklet in a safe place for easy, future reference.
All accessible parts are hot when the appliance is in operation, take care to not touch these elements.
When the oven is first switched on it may give out acrid smelling fumes. This is because the bonding agent for insulating panels around
the oven has been heated up for the first time.
This is a completely normal, if it does occur you merely have to wait for the fumes to clear before putting the food into the oven.
An oven by its very nature becomes very hot. Especially the glass of the oven door.
Do not allow children to go near the oven when it is hot, especially when the grill is on.
DECLARATION OF COMPLIANCE
• The parts of this appliance that may come into contact with
foodstuffs comply with the provisions of EEC Directive 89/109.
This appliances complies with Directives 89/336/EEC,
73/23/EEC and following changes.
SAFETY HINTS
• The oven must be used only for the purpose for which it was
designed: it must only be used for cooking food. Any other use,
e.g. as a form of heating, is an improper use of the oven and is
therefore dangerous.
• The manufacturers cannot be held responsible for any damage
caused by improper, incorrect or unreasonable use.
• During the use the oven becomes warm; please do not touch
the heating elements inside the oven. Therefore it is better to
prevent children to stay near the oven when it is working.
When using any electrical appliance you must follow a few basic
rules.
- Do not pull on the power cable to remove the plug from the
socket.
- Do not touch the oven with wet or damp hands or feet.
- Do not use the oven unless you are wearing something on
your feet.
- Do not allow children or irresponsible people to use the
oven unless they are carefully supervised.
- It is not generally a good idea to use adapters, multiple sockets
for several plugs or cable extensions.
- If the oven breaks down or develops a fault switch it off at the
mains and do not touch it.
• If the cable is damaged it must be replaced promptly. When
replacing the cable, follow these instructions. Remove the power
cable and replace it with one of the HO5RR-F, H05VV-F,
H05V2V2-F type. The cable must be able to bear electrical
current required by the oven. Cable replacement must be carried
out by properly qualified technicians.
The earthing cable (yellow-green) must be 10 mm longer than
the power cable.
Use only an approved service centre for repairs and ensure
that only original parts are used.
If the above instructions are not adhered to the manufacturers
cannot guarantee the safety of the oven.
• The oven you have just acquired has the described technical
characteristics and you must not make any modifications to it.
• Never use a steam or high-pressure spray to clean the oven.
• Do not store flammable products in the oven; they can catch
fire if the oven comes on accidentally.
• Do not press on and do not let children sit on the oven door.
• Use kitchen oven gloves, when putting into or removing a dish
from the oven.
RECOMMENDATIONS
• After each use of the oven, a minimum of cleaning will help
keep the oven perfectly clean.
• Do not line the oven walls with aluminium foil or single-use
protection available from stores. Aluminium foil or any other
protection, in direct contact with the hot enamel, risks melting
and deteriorating the enamel of the insides.
• In order to prevent excessive dirtying of your oven and the
resulting strong smoky smells, we recommend not using the
oven at too high a temperature. It is better to extend the cooking
time and lower the temperature a little.
• In addition to the accessories supplied with the oven, only use
dishes and baking moulds resistant to very high temperatures.
INSTALLATION
Installation is the customer’s responsibility. The manufacturers
have no obligation to carry this out. If the assistance of the
manufacturer is required to rectify faults arising from incorrect
installation, this assistance is not covered by the guarantee.
The installation instructions for professionally qualified personnel
must be followed. Incorrect installation may cause harm or injury
to people, animals or belongings. The manufacturer cannot be
held responsible for such harm or injury.
The kitchen unit in which the oven is to be fitted must be made
of material resistant to temperatures of at least 70°C.
The oven can be located high in a column or under a worktop.
Before fixing: you must ensure good ventilation in the oven space
to allow proper circulation of the fresh air required for cooling and
protecting the internal parts. Make the openings specified on last
page according to the type of fitting.
ELECTRICAL CONNECTION
THE ELECTRICAL CONNECTION SHOULD BE CARRIED OUT
BY AN APPROVED CONTRACTOR OR TECHNICIAN WITH
SIMILAR QUALIFICATIONS.
The installation receiving the appliance must comply with the
standard in force in the installation country.
The manufacturer does not accept any responsibility if this provision
is not complied with.
Connection to the network must be by earthed socket outlet, or
by means of a multipole circuit-breaker having a distance between
contacts of at least 3 mm.
The installation must be protected by suitable fuses, and have
wires with a large enough cross-section to supply the oven normally.
CONNECTION:
The oven is fitted with a power lead for connecting exclusively to
a voltage of 230 V AC across the phases or across phase and
neutral.
Connection must be carried out having first checked:
. the supply voltage indicated on the meter,
. the circuit-breaker setting.
The lead protection wire (green/yellow) connected to the earth
terminal of the oven must be connected to the earth terminal of
the installation.
Caution:
. Have the earth continuity of the installation checked by an
electrician before making the connection.
. The manufacturer will not be liable for any incident, or the
possible consequences that may arise from the use of the
oven not earthed, or connected to an earth with defective
continuity.
NB:
Do not forget that the oven may require after-sales service.
Also, locate the socket outlet so that the oven can be connected
once it is removed from its space.
Power supply cable
please have this done by the after-sales service or by someone
with similar qualifications.
:
if the power supply cable has to be changed,
8 GB
Page 10
OVEN EQUIPMENT ACCORDING TO THE MODEL
CLEANING THE OVEN
It is necessary to do an initial cleaning of the equipment before
the first use of each of them. Wash them with a sponge. Rinse
and dry off.
The grate supports baking-pans,
heat-resistant pans and dice for
sweets.
It is proper for grilled meat
because of it sustains the pan that picks up the straining fats.
The drip tray catches the juices
from grilled foods.
Never use he drip tray as a roasting tray as fat deposits can be
quickly spread throughout the oven, which produces excess
smoke.
The pizza set is designed for
pizza cooking. In order to obtain
the best results the set must be
used together with Pizza
function.
Telescopic guide
Extract the telescopic supports and put the grate (C) for pan
behind the lock grate in the frontal part.
Complete inserting the pan (D).
C
.Wait for the oven to cool down before doing any cleaning by
hand.
. Never clean your oven with abrasive cleaners, wire wool or
sharp objects, or the enamel may be damaged beyond repair.
. Only use soapy water or bleach (ammonia) cleaners.
THE OVEN
It is very important to clean the oven each time that it is used.
Melted fat is deposited on the sides of the oven during cooking.
The next time the oven is used this fat could cause unpleasant
odours and might even jeopardise the success of the cooking.
Use water and detergent to clean; rinse out thoroughly.
GLASS PARTS
We recommend you wipe clean the glass door with absorbent
kitchen paper every time you use the oven. If the spattering is
heavy, then you can clean with a well squeezed sponge and
detergent, and rinse. Never use abrasive cleaners or sharp
objects.
ACCESSORIES
Clean them with a sponge soaked in soapy water. Rinse with
clean water and dry off. Avoid abrasive cleaners.
PIZZA SET PAN
Pizza set pan surface is dressed with non-stick material. The nonstick coating renders the Pizza Set easy to clean. It can be washed
in dishwasher.
Never use abrasive products or sharp objects; these would ruin
in definitive way the non-stick coating.
C
D
When the oven is in use, any unused accessories should be
removed from the oven.
DRIP TRAY
After grilling, remove the drip tray from the oven. Take care to
pour the warm grease into a container. Wash and rinse the drip
tray in hot water with a sponge soaked in washing up liquid.
If residues remain attached, soak them off in water and detergent.
It can also go in a dish washer or be cleaned with a commercial
oven cleaner.
Never placer a soiled drip tray in the oven.
OVEN LIGHTING
Disconnect the power supply from the oven before cleaning or
replacing the lamp.
The bulb and its cover are made of material resistant to high
temperatures.
To change a defective bulb, just
. unscrew the glass cover,
. unscrew the bulb,
. replace it with the same type,
. after replacing the defective bulb,
. screw back the protective glass
cover.
9 GB
Page 11
SERVICE CENTRE
Before calling the Service Centre.
If the oven is not working, we recommend that:
• you check that the oven is properly plugged into the power
supply.
If the cause of the fault cannot be detected:
disconnect the oven from the mains, do not touch the oven and
call the after sales service.
Before calling the Service Centre remember to make a note of
the serial number on the serial number specifications plate.
The oven is supplied with a guarantee certificate that ensures that
it will be repaired free of charge by the Service Centre whilst under
guarantee.
This appliance is marked according to the
European directive 2002/96/EC on Waste
Electrical and Electronic Equipment (WEEE).
By ensuring this product is disposed of
correctly, you will help prevent potential
negative consequences for the environment
caused by inappropriate waste handling of this product.
The symbol on the product indicates that this
product may not be treated as household waste.
Instead it shall be handed over to the applicable collection point
for the recycling of electrical and electronic equipment Disposal
must be carried out in accordance with local environmental
regulations for waste disposal.
For more detailed information about treatment, recovery and
recycling of this product, please contact your local city office,
your household waste disposal service or the shop where you
purchased the product.
and human health, which could otherwise be
10 GB
Page 12
USE OF THE ELECTRONIC PROGRAMMER
SETTING THE CORRECT TIME
WARNING : the first operation to carry out after the oven has been
installed or following the interruption of power supply (this
is recognizable the display pulsating and showing )
is setting the correct time. This is achieved as follows
• Press and hold the TIMER and END buttons ( and TIMER on some
models
• Set time with buttons
• Release all buttons
ATTENTION the oven only operates if set on manual function or preset time.
N.B.: on some models the symbols are replaced by + and - .
FUNCTION
MINUTE MINDER
MANUAL
FUNCTION
COOKING
TIME
END OF
COOKING
HOW TO ACTIVATE IT HOW TO SWITCH IT OFF WHAT IT DOES WHAT IT IS FOR
• Press and hold the
button
• Press the buttons or
to set the required time
• Release all the buttons
• Press the button
• Set the cooking function
with the oven function
selector
• Press and hold the
TIMER button
• Press the buttons or
to set the lenght of cooking required
• Release all buttons
• Set the cooking function with
the oven function selector
• Press and hold the END
button
• Press the buttons
to set the time at which you
wish the oven to switch off
• Release the buttons
• Set the cooking function
with the oven function
selector
• When the set time as
elapsed an audible alarm
is activated (this alarm will
stop on its own, however
it can be stopped
immediately by pressing
the button)
• Turn the oven function
selector to position O.
• When the time is elapsed
the oven will switch off
automatically. Should you
wish to stop cooking
earlier either turn the
function selector to 0, or
set time to 0:00
(TIMER and buttons)
• At the time set, the oven
will switch off. To switch
off manually, turn the
oven function selector
to position O.
• Sounds an alarm at the
end of the set time.
• To check how long is
left to run press the
button
• Enables you to operate
the oven.
• It allows to preset the
cooking time required
for the recipe chosen
• To check how long is
left to run press the
TIMER button.
• To alter/change the
preset time press
TIMER and buttons
• Enables you to set the
end of cooking time
• To check the preset
time press the END
button
• To modify the preset
time press buttons
END +
• Allows to use the oven as
alarm clock (could be
activated either with
operating the oven or
with out operating the
oven)
• For cooking the desired
recipes
• At the end of the
cooking set time,
the oven will switch
off automatically and an
audible alarm will ring.
• This function is typically
used with “cooking time”
function. For example
if the dish has to be cooked
for 45 minutes and needs
to be ready by 12:30,
simply select the required
function, set the cooking
time to 45 minutes and the
end of cooking time to
12:30.
• Cooking will start automatically at 11:45 (12:30
minus 45 mins) and will
continue until the pre-set
end-of-cooking-time, when
the oven will switch itself
off automatically.
WARNING.
If the END of cooking is
selected without setting
the length of cooking time,
the oven will start cooking
immediately and it will
stop at the END of
cooking time set.
11 GB
Page 13
OPERATING INSTRUCTIONS
Our range includes many different styles and colours. To find the technical specifications and functions of the model which
you have bought, study the diagrams below.
During oven operation the internal lamp is on.
Thermostat
control knob
Function
selector knob
Thermostat
control knob
50 ÷ MAX
50 ÷ MAX
50 ÷ MAX
Example
Function selector
control knob
PIZZA
12 positions*
*according to model
Function according to model
Turns on the oven light
This will automatically activate the cooling fan (on fan cooled models only)
Sprinter
This position speeds up oven preheating time. Once it has been chosen it allows an immediate oven heating (ex. It takes
8 minutes to reach 200°C). It is possible to set the wished temperature through the temperature knob. The end of
preheating phase is shown through the control panel led marked with "°C". Preheating cycle ends when the "°C" led is
switched off and it is possible to select the function of wished cooking. It is mandatory to not insert food while the preheating
cycle is working. Food could be damaged.
Door closed Grilling
The setting of this function switches on the infrared grill element.
This function is ideal for cooking meats of medium thickness (sausages and bacon).
Super Grill
This function allows to set food crunchiness. The Super Grill function is characterized by a 50% power increase in
comparison to the standard grill.
**
50 ÷ MAX
50 ÷ MAX
*
50 ÷ MAX
50 ÷ MAX
50 ÷ MAX
50 ÷ MAX
Natural convection
Bottom and top oven elements are used. This is the traditional form of baking and roasting. It is ideal for roasting joints
of meat and game, baking biscuits and apples and making the food nice and crunchy.
Fan plus lower element
This function is ideal for delicate dishes (pies-souffle).
Defrosting
When the dial is set to this position. The fan circulates air at room temperature around the, frozen food so that it defrosts
in a few minutes without the protein content of the food being changed or altered.
Fan oven
Upper and lower element are working together with the fan.
This function is recommended for poultry, confectionery, fish and vegetables.
The forced air circulation improves heating distribution reducing cooking time cycle.
Fan oven
The circular heating element and the ventilation system are working.
Hot air is divided on the different ledges; it is the ideal to contemporarily cook different types of food (meat, fish) without
mixing tastes and odours. This cooking is suitable for bakery and confectionery.
Soft Cook
Soft Cook is the function for the confectionery and the bread. Thanks to its reduced fan speed, this function increases
oven internal damp. The increased damp creates the ideal conditions of cooking for those foods that need to maintain
an elastic consistence while they are cooking (ex. cakes, bread, biscuits) avoiding surface breakages.
Function Pizza
This function with hot air circulated in the oven ensure perfect result for dishes such as pizza or focaccia.
This function must to be used with Pizza Set. The baking-pan of Pizza set is dressed with ideal material for optimizing
the cooking results.
VARIO FAN
VARIO FAN
VARIO FAN
VARIO FAN
VARIO FAN
VARIO FAN
VARIO FAN
VARIO FAN
Door closed fan grill
50 ÷ 200
Vario Fan is the exclusive system developed by Candy to optimize the cooking results, temperature management and damp management.
The Vario Fan system is a self-activating system that changes automatically fan speed when a fan function is chosen: the fan functions
are the one inside the outlined area on control panel.
The air is heated by the grill element and the fan blows the air onto the food at the required temperature. This ranges
from 50°C to 200°C. The grill/fan is an excellent alternative to roasting on the spit. It is ideal for roasting even large
quantities of poultry, sausages and red meats.
* Tested in accordance with the CENELEC EN 50304.
** Tested in accordance with the CENELEC EN 50304 used for definition of energy class.
12 GB
Page 14
TABLES OF COOKING TIMES
The overall suggested cooking times set out below are intended as a rough guide only. They may in fact vary according to the quality,
the freshness, the size and the thickness of the food cooked and of course cooking time is also partly a matter of taste. Let the food
stand for a few minutes before serving because the ingredients continue cooking after they
have been removed from the oven.
HANDY TIP: Lower the temperature so as to avoid the
surface of the food becoming hard and dry.
Static electric oven Electric fan oven
Food Quantity Shelf Oven
Time
of cooking
in minutes
tempe-
rature
Shelf Time
of cooking
in minutes
• Pasta
Lasagne Kg 3,5 2 70 ÷ 75 220 2 60 ÷ 65 200
Cannelloni Kg 1,8 2 50 ÷ 60 220 2 40 ÷ 50 200
Oven baked pasta Kg 2,5 2 55 ÷ 60 220 2 45 ÷ 50 200
• Baking (not cakes)
Bread
Kg 1
di pasta
2
35
10 (pre-heating)
200 2
30 ÷ 35
10
(pre-heating)
Oven
tempe-
rature
180
Shelf position
Remarks
Put the lasagne into an unheated oven
Put the cannelloni into an unheated oven
Put the oven baked pasta into an unhea-
ted oven
Form the dough into a loaf and make a
cross with a knife on top of the dough leave
the dought to rise for at least 2 hours.
Grease the baking tin and put the dough in
the middle of it.
Pizza Kg 1 1 190 1 19025 ÷ 35 20 ÷ 25
Pastry (frozen)
vol au vents
Focaccia
(n° 4)
n° 24 1 220 2 20030 ÷ 35 25 ÷ 30
gr. 200
of dough each
2
200 2 18025 ÷ 30 20 ÷ 25
• Meat
All meats can be roasted in shallow or deep roasting trays.
It is advisable to cover the shallow trays to avoid splattering the sides of the oven with grease.
The roasting times are the same whether the meat has been covered up or not.
Whole joint of
beef
Joint of
deboned
Joint of
deboned veal
Joint of
fillet of beef
Kg 1 3 220 3 20070 ÷ 80 50 ÷ 60
Kg 1 2 220 2 200100 ÷ 110 80 ÷ 90
Kg 1,3 1 220 2 20090 ÷ 110 90 ÷ 100
Kg 1 2 220 2 20080 ÷ 90 80 ÷ 90
• Fish
Trout
Salmon
3 whole trout
or / Kg 1
700 g
2,5 cm slice
2 220 2 20040 ÷ 45 35 ÷ 40
2 220 2 20030 ÷ 35 30 ÷ 25
Sole Kg 1 2 220 2 20040 ÷ 45 35 ÷ 40
Bream 2 whole ones 2 220 2 20040 ÷ 45 35 ÷ 40
Warm the oven for 15 minutes and place
the pizzas on the greased baking tray.
Garnish them with tomatoes, mozzarella,
ham, oil, salt and origano.
Place 24 vol au vents in the oven and
bake.
Warm the oven for 15 minutes, grease the
baking tray, season the 4 focaccia with oil
and salt and leave them to
rise at room temperature for at least 2 hours
before putting them in the oven.
Put the meat into a deep Pyrex dish and
season with salt and pepper; turn the meat
half way through cooking.
Cook the meat in a covered Pyrex dish with
herbs, spice, oil and butter.
Cook as indicated above.
Cook as indicated above.
Cover the trout with salt, oil and onions and
cook in a Pyrex dish.
Cook the salmon in an open Pyrex dish with
salt, pepper and oil.
Cook the sole with salt and a spoonful of
oil.
Cook the bream in oil and salt in a covered
dish.
13 GB
Page 15
TABLES OF COOKING TIMES
Static electric oven Electric fan oven
Food Quantity Shelf Oven
• Rabbits and Poultry
Guinea fowl Kg 1-1,3 2 60 ÷ 80 220 2 60 ÷ 70 200
chicken Kg 1,5-1,7 2 110 ÷ 120 220 2 100 ÷ 110 200
Rabbit pieces Kg 1-1,2 2 55 ÷ 65 220 2 50 ÷ 60 200
• Cakes
Coconut cake
baked in a tin
Sponge cake
Carrot cake baked
in a tin
Apricot pie
700 gr 1 40 200 2 30 ÷ 35 180
1 55 180 1 50 160
1 55 175 1 40 ÷ 45 160
1 65 180 1 50 ÷ 60 160
• Vegetable
Time
of cooking
in minutes
tempe-
rature
Shelf Time
of cooking
in minutes
Oven
tempe-
rature
Remarks
Place the guinea fowl in a deep Pyrex or
pottery dish with very little oil and season with
herbs and spices.
Follow the procedure for cooking the guinea
fowl.
Put all the pieces of the same size in the
glazed tray. Season with herbs and spices.
Turn the pieces as and when required.
Use a tin that is 22 cm deep. Pre-heat for
10 mins.
Use a tin that is 22 cm deep. Pre-heat for
10 mins.
Use a tin that is 22 cm deep. Pre-heat for
10 mins.
Use a tin that is 22 cm deep. Pre-heat for
10 mins.
Cut the fennel into four pieces, add butter,
Fennel 800 gr 1 70 ÷ 80 220 1 60 ÷ 70 200
Courgettes 800 gr 1 70 220 1 60 ÷ 70 200
Potatoes 800 gr 2 60 ÷ 65 220 2 60 ÷ 65 200
Carrots 800 gr 1 80 ÷ 85 220 1 70 ÷ 80 200
salt and potatoes if required and place in
a Pyrex face up. Cover the dish.
Slice the courgettes, place in a Pyrex
dish and add butter and salt.
Cut the potatoes into equal parts and place
in a Pyrex dish. Season with salt, origano
and rosemary. Cook in oil.
Slice the carrots, place in a Pyrex dish and
cook.
• Fruit
Whole apples Kg 1 1 45 ÷ 55 220 2 45 ÷ 55 200
Pears Kg 1 1 45 ÷ 55 220 2 45 ÷ 55 200
Peaches Kg 1 1 45 ÷ 55 220 2 45 ÷ 55 200
Bake the fruit in an open Pyrex or earthenware dish. Leave it to cool inside the oven.
Follow procedure above.
Follow procedure above.
• Grilling
Place the food to be grilled underneath the infra-red grill. Warning: When the grill is on it takes on a bright red colour. Place the tray
underneath the grill to collect juices and fat from the food being grilled.
Lay the bread on the grill tray. When one
Squares of bread
for toasting
Toasted
sandwiches
4 pieces 4
43
Sausages n°6 / Kg 0,9 4
Ribs of beef n°4 / Kg 1,5 4
Chicken legs n°4 / Kg 1,5 3
5
(5 to heat up grill)
10
(10 to heat up grill)
25/30
(5 to heat up grill)
25
(5 to heat up grill)
50/60
(5 to heat up grill)
grill 4
grill 3
grill 4
grill 4
grill 3
5
(10 to heat up grill)
5/8
(10 to heat up grill)
15/20
(10 to heat up grill)
15/20
(10 to heat up grill)
50/60
(10 to heat up grill)
grill
grill
grill
grill
grill
side of the bread has been toasted, turn
over and toast the other side. Remember:
keep the toast warm at the bottom of the
oven until you are ready to serve it.
Lay the bread on the grill tray. When one
side of the sandwich has been toasted, turn
over and toast the other side.
Cut the sausages in half and lay them face
down on the grill. Half way through grilling
turn them over. Every so often, check that
they are being cooked equally all over. (If
this is not happening, turn and reposition
the ones being cooked ether less or more
than the others.
Make sure that the ribs of beef are exposed
to the full effect on the main grill.
Turn them over twice during grilling.
14 GB
Page 16

INSTRUCCIONES GENERALES
Le agradecemos que haya elegido uno de nuestros productos. Para obtener de este electrodoméstico las mejores prestaciones
aconsejamos:
• Leer atentamente las advertencias contenidas en el presente manual.
• Conservar con cuidado este manual para cualquier consulta posterior.
Cuando el aparato està en funcionamento todos sus elementos assessibles, estan calientes. Por ello, tenga cuidado de no tocar estos
elementos.
Durante la primera puesta en funcionamiento del horno puede producirse un humo de olor acre causado por el primer calentamiento
del pegamento de los paneles de aislamiento que envuelven el horno. Se trata de un fenómeno absolutamente normal y, en caso de
verificarse, es preciso esperar a la extinción del humo antes de introducir los alimentos.
Por su naturaleza el horno es un aparato que se calienta, de modo particular el cristal de la puerta. Es aconsejable pues impedir que
los niños puedan acercarse al horno cuando se encuentre en funcionamiento, especialmente cuando está en márcha el grill.
DECLARACIÓN DE CONFORMIDAD
• Este aparato, en las partes destinadas a estar en contacto
con los alimentos cumple la Directiva CEE 89/109.
Este aparato cumple las Directivas Europeas 89/336/CEE,
73/23/CEE y sucesivas modificationes.
INFORMACIÓN SOBRE SEGURIDAD
• Este aparato deberá destinarse únicamente al uso para el cual
ha sido especialmente concebido, es decir, para la cocción de
alimentos.
• Cualquier otro uso (por ejemplo, calentamiento a temperatura
ambiente) debe considerarse impropio, y por lo tanto peligroso.
• El fabricante declina toda responsabilidad por los posibles daños
causados por el uso impropio, erróneo e irracional del aparato.
• Durante el uso, el horno se calienta, por lo que debe prestarse
atención para no tocar los elementos calefactores que se
encuentran en su interior. Es conveniente impedir que los niños
puedan acercarse al horno mientras está en funcionamiento.
• El uso de cualquier aparato eléctrico comporta la observación
de algunas reglas fundamentales. En particular:
- No tire del cable de alimentación para desenchufar el aparato.
- No toque el aparato con las manos o los pies húmedos o mojados.
- No utilice el aparato si no lleva calzado.
- No deje que los niños o las personas incapacitadas usen el
aparato sin vigilancia.
- No utilice adaptadores, ladrones ni alargadores.
- En caso de avería o de mal funcionamiento del aparato, apáguelo
y no lo manipule.
En caso de deterioro del cable, sustitúyalo inmediatamente con
arreglo a las siguientes indicaciones: saque el cable de alimentación
y sustitúyalo por uno (tipo HO5RR-F, H05VV-F, H05V2V2-F) y
adecuado a la potencia del aparato.
Esta operación deberá realizarla un técnico especializado. El hilo
de tierra (amarillo-verde) debe ser obligatoriamente 10 mm más
largo que los conductores de línea.
En caso de que el aparato precise ser reparado, diríjase únicamente
a un centro de asistencia técnica autorizado y exija piezas de
recambio originales.
No observar todo lo mencionado puede comprometer la seguridad
del aparato.
• El horno que acaba de adquirir posee unas características
técnicas definidas que en ningún caso podrán ser modificadas.
• No utilice nunca un limpiador a vapor o de alta presión para
limpiar el horno.
• No guarde productos inflamables dentro del horno; podrían
prender si alguien pusiera en marcha involuntariamente el horno.
• No se apoye ni deje sentarse a los niños encima de la puerta
del horno.
• Utilice guantes térmicos de cocina para introducir o retirar un
plato del horno.
RECOMENDACIONES
• Después de cada utilización, limpie el horno superficialmente.
Ello le permitirá obtener unos resultados perfectos cuando lo
limpie a fondo.
• No cubra las paredes del horno con papel de aluminio o con
protecciones desechables que se venden en las tiendas.
El papel de aluminio o cualquier otra protección en contacto directo
con el esmalte caliente podría fundirse y deteriorar el esmalte de
la mufla.
• Para evitar que su horno se ensucie demasiado y que desprenda
fuertes olores de humos, recomendamos no utilizarlo a una
temperatura demasiado elevada. Es preferible alargar el tiempo
de cocción y bajar un poco la temperatura.
• Aparte de los accesorios suministrados con el horno, le
aconsejamos que utilice solamente fuentes y moldes de repostería
resistentes a temperaturas muy elevadas.
INSTALACIÓN
La instalación corre a cargo del comprador y el Fabricante queda
exento de este servicio; eventuales intervenciones requeridas a
la Casa Constructora que dependan de una instalación incorrenta
no están incluidas en la Garantia.
La instalación debe ser efectuada según las instrucciones por
personal profesionalmente cualificado. Una instalación errónea
puede causar daños a personas, animales o cosas, de los cuales
el fabricante no puede ser considerado responsable.
El mueble donde se debe empotrar el horno debe estar fabricado
de un material resistente a una temperatura de 70°C como mínimo.
Se pued puede e colocar el horno en un lugar alto dentro de
una columna o empotrarlo debajo de una superficie de trabajo.
Antes de fijarlo: es imprescindible garantizar una buena ventilación
del hueco donde quede empotrado para permitir una buena
circulación del aire fresco necesario para la refrigeración y para
la protección de los órganos interiores. Para ello, realice las
oberturas especificadas en la última página según el tipo de
empotramiento.
CONEXIÓN ELÉCTRICA
LA CONEXIÓN ELÉCTRICA DEBE SER REALIZADA POR UN
INSTALADOR HOMOLOGADO O POR UN TÉCNICO DE
CALIFICACIÓN SIMILAR.
La instalación del aparato debe cumplir la normativa en vigor del
país de instalación. El fabricante declina cualquier responsabilidad
en caso de incumplimiento de esta exigencia.
La conexión a la red debe efectuarse a través de una toma de
corriente con toma de tierra, o mediante un dispositivo con corte
omnipolar que tenga una distancia de obertura de los contactos
de al menos 3 mm.
Es obligatorio que la instalación quede protegida con los fusibles
adecuados, debiendo incluir unos cables con sección suficiente
para alimentar el aparato con toda normalidad.
CONEXIÓN:
Este aparato está equipado con un cable de alimentación que
permite su conexión exclusivamente con una tensión de 230 V~
entre fases o entre fase y neutro.
La conexión se deberá realizar después de haber comprobado:
• la tensión de alimentación indicada en el contador,
• el ajuste del disyuntor.
El hilo de protección del cable (verde/amarillo) conectado al
terminal de tierra del aparato debe estar conectado al terminal
de tierra de la instalación.
Atención:
. Un profesional deberá comprobar la continuidad de la tierra
de la instalación antes de proceder a la conexión.
. Declinamos toda responsabilidad ante cualquier incidente
y sus posibles consecuencias que pudieran producirse
debido a la utilización de un aparato no conectado a tierra,
o conectado a una tierra cuya continuidad sea defectuosa.
NOTA:
de manera que pueda enchufar el horno cuando lo haya sacado
del hueco donde está empotrado, por ejemplo en caso de tener
que sacarlo ante una posible intervención del servicio de asistencia
técnica.
Cable de alimentación:
cambiarlo, le aconsejamos que recurra al servicio de asistencia
técnica o a una persona de calificación similar para realizar
dicha operación.
15 ES
Recuerde que la toma de corriente debe quedar colocada
En el caso de que sea necesario
Page 17

EQUIPAMIENTO DEL HORNO segùn modelo
Realice una limpieza de los accesorios antes de la primera
utilización del horno. Limpielos con una esponja empapada
con agua jabonosa. Enjuaguelos con agua limpia y séquelos.
La rejilla sirve de soporte para
tarteras, platos de cristal refractario,
moldes para postres.
Es útil para las parrilladas de carne,
ya que también actúa como soporte
de la bandeja que recoge las
grasas que gotean.
La grasera sirve para recoger el
jugo de las parrilladas.
No utilice nunca la grasera como
fuente para asar. Ello provocaría
emanación de humos, salpicaduras
de grasa y un ensuciameniento
rapido.
El Set para Pizza es ideal para
cocinar pizzas. El set debe
utilizarse de forma combinada con
la función Pizza.
GUÍA TELESCÓPICA
Extraer los brazos telescópicos y situar la rejilla porta-bandeja
C detrás de la puerta de la rejilla en la parte frontal.
Completar con la introducción de la bandeja D.
MANTENIMIENTO DEL HORNO
• Espere a que el horno se haya enfriado antes de realizar
una operación de limpieza manual.
• No utilice nunca productos abrasivos, esponjas metálicas
u objetos cortantes para limpiar su horno, porque el esmalte
resultaría irremediablemente dañado.
• Utilice solamente agua jabonosa o productos líquidos con
amoniaco.
EL HORNO
La limpieza del horno es muy importante y debe ser efectuada
cada vez que éste es utilizado. En las parades se depositan
grasas derretidas durante la cocción que podrían, en el sucesivo
encendido, producir olores desagradables que afectarían a la
cocción. Para la limpieza utilizar agua caliente y jabón, aclarando
cuidadosamente.
LAS PARTES ACRISTALADAS - Después de cada utilización
del horno, le aconsejamos que seque el cristal de la puerta del
horno con un papel absorbente. Si las salpicaduras son demasiado
importantes, puede limpiarlas después con una esponja bien
escurrida y un producto detergente, enjuagando a continuación.
No utilice nunca productos abrasivos u objetos cortante.
LOS ACCESORIOS
Límpielos con una esponja empapada con agua jabonosa.
Enjuáguelos con agua limpia y séquelos. Evite los productos
abrasivos.
EL PLATO DEL SET PARA PIZZA
La superficie está revestida de un material antiadherente fácil de
limpiar y lavable en lavavajillas.
No usar nunca productos abrasivos u objetos cortantes, ya que
estos arruinarían de modo definitivo el revestimiento antiadherente.
C
D
Durante la utilización del horno, los accesorios que no utilice
deben ser retirados del mismo.
LA GRASERA - Después de una parrillada, saque del horno la
grasera. Tenga la precaución de reservar las grasas en un
recipiente. Limpie y enjuague la grasera con agua caliente y utilice
una esponja empapada con producto detergente. Si los residuos
permanecen pegados, déjela en remojo con agua y añádale un
producto detergente. También se puede lavar en el lavaplatos o
con otros productos que encontrará en las tiendas.
No vuelva a colocar nunca la grasera sucia en el horno.
ILUMINACIÓN DEL HORNO - Antes de cualquier operación de
limpieza o de reemplazo, desenchufe el aparato de la alimentación.
La bombilla, así como su protector, están fabricados en un material
resistente a las altas temperaturas.
Para cambiar una bombilla
defectuosa, bastará con:
. desmontar el protector de cristal
destornillándolo
.desenroscar la bombilla,
. cambiarla por un modelo idéntico
. Después de haber cambiado la
bombilla defectuosa, vuelva a
montar el protector atornillándolo
de nuevo
.
16 ES
Page 18

ASISTENCIA TÉCNICA
En caso de incorrecto funcionamiento del horno le aconsejamos:
— verificar la buena conexión del enchufe en la toma de corriente.
En caso de que no se determine la causa del mal funcionamiento:
apagar el aparato sin manipularlo y llamar al Servicio de Asistencia
Técnica. Antes de llamar al Centro de Asistencia recuerde tomar
nota del número de matrícula situado en la tarjeta matrícula del
producto (Fig. última página).
El aparato está dotado de un certificado de garantía que le permite
disponer del Servicio Asistencia Técnica.
Este electrodomestico está marcado conforme
a la directiva Europea 2002/96/CE sobre los
residuos de aparatos eléctricos y electrónicos
(WEEE).
Asegurándose que este producto ha sido
eliminado correctamente, ayudará a evitar
posibles consecuencias negativas en el ambiente
y la salud de las personas, que pudiera verificarse
por causa de un anómalo tratamiento de este
El simbolo sobre el producto indica que este aparato no puede
ser tratado como un residuo doméstico normal, en su ligar deberá
ser entregado al centro de recogidas para reciclaje de aparatos
eléctricos y electrónicos.
La eliminación debe ser efectuada de acuerdo con las reglas
medioambientales vigentes para el tratamiento de los residuos.
Para informacion más detallada sobre el tratamiento, recuperación
y reciclaje de este producto, por favor contacte con la oficina
compentente (del departamento de ecología y mediomabiente),
o su servicio de recogida a domicilio si lo hubiera o el punto de
venta donde compró el producto.
producto
17 ES
Page 19

USO DEL PROGRAMADOR ELECTRÓNICO
AJUSTE DE LA HORA
ATENCIÓN: la primera operación que hay que efectuar después
de la instalación o después de una interrupción de la corriente
(este tipo de situaciones se reconocen al observar que en la pantalla de visualización parpadea la hora ) es el ajuste de la
hora, como se indica a continuación:
• Pulse y mantenga pulsadas las teclas TIMER o END ( o TIMER en
algunos modelos)
• Pulse las teclas o para ajustar la hora
• Suelte las teclas
ATENCIÓN: El horno funciona sólo si selecciona en modo manual o cocción programada
NOTA: Para ajustar las diversas funciones del horno, en algunos modelos aparecen los símbolos
o , en otros modelos aparecen + o - .
FUNCIÓN
MINUTERO
FUNCIÓN
MANUAL
DURACIÓN DE
LA COCCIÓN
FIN DE LA
COCCIÓN
MODO DE
ACTIVACIÓN
• Pulse y mantenga pulsada
la tecla
• Pulse las teclas o
para ajustar la duración
• Suelte las teclas
• Pulse la tecla
• Seleccione la función de
cocción con el mando
selector de función
• Pulse y mantenga pulsada
la tecla TIMER
• Pulse las teclas o
para el ajuste de la
duración
• Suelte las teclas
• Seleccione la función de
cocción con el mando
selector de función
• Pulse y mantenga pulsada
la tecla END
• Pulse las teclas o para
ajustar la hora del fin de
cocción.
• Suelte las teclas
• Seleccione la función de
cocción con el mando
selector de función
MODO DE
DESCONEXIÓN
• Cuando transcurre el
tiempo seleccionado, el
funcionamiento se para
solo y avisa con una señal
acústica (la señal acústica
se para sola; para inter-
rumpirlo inmediatamente
pulse la tecla )
• Situar el mando selector
de función en la
posición O.
• Cuando transcurre el
tiempo seleccionado, el
horno se desconecta solo;
párelo antes de situar
el mando selector de
función en la posición O ó
ajuste a 0:00 el tiempo de
la cocción (teclas
TIMER o ).
• A la hora seleccionada el
horno se desconectará
solo; si desea inter-
rumpirlo, situer antes
el mando selector de
función en la posición O.
FUNCIONAMIENTO FINALIDAD
• Emite una señal acústica
finalizado el tiempo
establecido
• Para visualizar el tiempo
restante pulse la tecla
• Permite el funcionamiento del horno
• Permite seleccionar el
tiempo de cocción del
alimento introducido en el
horno.
• Para visualizar el tiempo
restante pulse la tecla
TIMER.
• Para modificar el tiempo
restante, pulse la tecla
TIMER+ o
• Permite memorizar la hora
de fin de la cocción.
• Para visualizar la hora
programada, pulse la tecla
END
• Para modificar la hora
programada, pulse las
teclas END + o
• Permite utilizar el programador del horno a modo
de alarma (puede utilizarse
con horno en funcionamiento o desconectado).
• Efectúe las cocciones
deseadas
• Cuando termina el tiempo
seleccionado, el horno se
desconecta automáticamente y avisa emitiendo
una señal acústica.
• Normalmente se utiliza
esta función con la finalidad de DURACIÓN DE LA
COCCIÓN. A modo de
ejemplo: el alimento debe
cocinarse durante 45
minutos y deseo que esté
listo para las 12:30; en tal
caso:
Seleccione la función de
cocción deseada.
Ajuste el tiempo de la
cocción en 45 minutos
(TIMER + o )
Ajuste el fin de la cocción
a las 12:20 h. (END + o )
La cocción comenzará
automáticamente a las
11:45 h (12:30, menos 45
minutos), y a la hora
seleccionada como fin de
la cocción el horno se
desconectará automáticamente.
ATENCIÓN: Si selecciona
únicamente el fin de
cocción sin el tiempo de
cocción, el horno se
conectará inmediatamente y se desconectará
a la hora de fin de la
cocción seleccionada.
18 ES
Page 20

INSTRUCCIONES DE USO
Nuestra gama comprende estéticas distintas con colores distintos. Para poder individuar las caracteristicas técnicas y
funcionales relativas al modelo del horno que acaba de comprar siga los esquemas abajo indicados.
Mando
termostato
Mando
selector
termostato
50 ÷ MAX
50 ÷ MAX
50 ÷ MAX
**
50 ÷ MAX
50 ÷ MAX
Mando
Ejemplo de mando
selector de función
(commutador 12 posiciones*)
PIZZA
* según modelo
Función según modelo
Conecta la luz interior
Está integrado también el ventilador de enfriamiento (sólo para los modelos con refrigeración).
Sprinter
Esta posición permite un precalentamiento rápido del horno. Una vez seleccionada esta función, se consigue un inmediato
calentamiento del horno (p.ej: tarda 8 minutos en alcanzar 200°C), y la temperatura deseada puede seleccionarse
mediante el botón correspondiente. El fin de la fase de precalentamiento se indica al apagarse el piloto del termostato
"°C". Una vez concluida esta fase, es posible seleccionar la función de cocción deseada e introducir los alimentos que
se van a cocinar. Tener cuidado de no introducir alimentos en el horno durante la fase de precalentamiento, ya que estos
podrían resultar dañados.
Grill tradicional con puerta cerrada
En esta posición, entra en funcionamiento la resistencia del grill a infrarrojos. Óptima en la cocción de carnes de medio
o pequeño espesor (salchichas, bacon, costillas, etc.).
Super Gril
Esta función permite seleccionar el nivel de dorado de la comida o gratinar los alimentos al término de la cocción. La
función Super Grill se caracteriza por un aumento de potencia equivalente al 50% respecto a la función grill estándar.
Convección natural
Funcionan la resistencia inferior y la resistencia superior del horno. Es la cocción tradicional, ideal para cocinar asados,
caza, galletas, manzanas al horno y para conseguir alimentos crujientes.
Base ventilada
Adaptada para cocciones delicadas (pastelería-soufflé, etc).
VARIO FAN
*
VARIO FAN
Descongelación
Esta posición permite la circulación del aire a temperatura ambiente alrededor del alimento congelado, descongelándolo
en pocos minutos sin modificar ni alterar su contenido proteínico.
Horno ventilado
50 ÷ MAX
50 ÷ MAX
50 ÷ MAX
50 ÷ MAX
50 ÷ 200
Vario Fan es el exclusivo sistema de funcionamiento desarrollado por Candy para optimizar los resultados de cocción, la regulación
de la temperatura y la regulación de la humedad. El sistema Vario Fan modifica automáticamente la velocidad de rotación del ventilador
para todo tipo de cocciones en multifunción. Este sistema se activa automáticamente cada vez que es seleccionada una función en
el interior del área descrita en el panel de control.
ambas resistencias y la ventilación están en funcionamiento. Esta función se recomienda para aves de corral, pasteles,
pescado y verduras. Gracias a la circulación forzada, el calor penetra mejor en la comida, con lo que el tiempo de cocción
y de calentamiento es inferior.
Horno ventilado
la resistencia circular y la ventilación están en funcionamiento.
El aire caliente se distribuye por los diversos compartimentos; es ideal para cocinar simultáneamente diversos tipos de
comida (carne, pescado) sin mezclar sabores ni olores. Cocción delicada indicada para bizcocho, tarta Margarita y
hojaldre
Soft Cook
Soft cook es la función ideal para pasteles y pan. Gracias a la reducida velocidad del ventilador, esta función aumenta
la humedad presente en el interior del horno. Una mayor humedad crea las condiciones de cocción ideales para aquellos
alimentos que necesariamente deben mantener una consistencia elástica mientras están cociendo (ej. tartas, pan,
galletas) a fin de no desmenuzarse.
Modalidad pizza
El calor envolvente en esta modalidad genera un ambiente similar al de los hornos de leña de las pizzerías.
Esta función debe utilizarse de forma combinada con el set para Pizza. La plancha del set para Pizza está revestida
de un material ideal a fin de optimizar los resultados de cocción.
Grill ventilado con puerta cerrada
El aire calentado por la resistencia grill, es aspirado por el ventilador que lo vuelve a ampujar sobre los alimentos a
la temperatura deseada entre 50° y 200°C. El grill ventilado sustituye perfectamente el asador y garantiza óptimos
resultados con pollo, salchichas y carnes rojas, incluso en cantidades relevantes.
VARIO FAN
VARIO FAN
VARIO FAN
VARIO FAN
VARIO FAN
VARIO FAN
* Programa de prueba según CENELEC EN 50 304
** Programa de prueba según CENELEC EN 50 304 utilizado para la definición de la clase energética
19 ES
Page 21

TABLAS DE TIEMPOS DE COCCIÓN
Los tiempos sugeridos en las tablas siguientes son indicativos y pueden variar según la calidad, frescura, dimensión y espesor de los
alimentos y según su gusto. Dejar siempre reposar durante unos minutos antes de servir, ya que todos los alimentos siguen cociéndose
tras extraerlos del horno.
Posición de las repisas
CONSEJO ÚTIL: Apagar el horno al menos 10 minutos antes del tiempo indicado dejando los
alimentos en el interior del mismo. Ello le permitirá ahorrar energiá y completar la cocción según
sus gustos. Para no secar demasiado las superficies es indispensable bajar la temperatura.
Horno Eléctrico Estático Horno Eléctrico Ventilado
Plato Cantidad Estante Tempe-
• Pasta
Lasañas Kg 3,5 2 70 ÷ 75 220 2 60 ÷ 65 200
Canelones Kg 1,8 2 50 ÷ 60 220 2 40 ÷ 50 200
Pasta al horno Kg 2,5 2 55 ÷ 60 220 2 45 ÷ 50 200
• Pastas saladas
Pan
Kg 1
pasta
2
Tiempo de
cocción en
minutos
35
precal.10
ratura
Estante Tiempo de
horno
200 2
cocción en
minutos
30 ÷ 35
precal.10
Tempe-
ratura
horno
180
Observaciones
Introduzca la lasaña en el horno frío.
Introduzca la canelones en el horno frío.
Introduzca la pasta en el horno frío.
Preparar la pasta en forma redonda e incida
con un cuchillo una cruz sobre la parte
superior de la forma. Dejar a temperatura
ambiente al menos 2 horas, untar la grasera
y situar la forma en el centro de la misma.
Precalentar durante 15 minutos el horno.
Pizza Kg 1 1 190 1 19025 ÷ 35 20 ÷ 25
Hojaldre n. 24
vol au vent
Focaccia
(n° 4)
n° 24 1 220 2 20030 ÷ 35 25 ÷ 30
gr. 200
di pasta cad.
2
200 2 18025 ÷ 30 20 ÷ 25
Preparar la pizza en la grasera esmaltada
con tomates, mozzarella y jamón, aceite,
sal, orégano.
Situar 24 vol au vent en la grasera y cocer.
Precalentar durante 15 minutos el horno.
Dejar a temperatura ambiente al menos 2
horas, untar la grasera y situar la forma en
el centro de la misma.
• Carne
Todas las carnes pueden ser cocidas en recipientes de borde bajo o borde alto.
Es aconsejable cubrir el recipiente de borde bajo con una tapa para evitar ensuciar el horno con salpicaduras del condimento.
Las carnes cubiertas resultan más blandas y jugosas, mientras que las descubiertas resultan más crujientes.
Los tiempos indicados valen para cocciones con recipiente cubierto o descubierto.
Roastbeef
entero
Solomillo de
cerdo enrollado
Solomillo de
ternera enrollado
Solomillo de buey
filete
Kg 1 3 220 3 20070 ÷ 80 50 ÷ 60
Kg 1 2 220 2 200100 ÷ 110 80 ÷ 90
Kg 1,3 1 220 2 20090 ÷ 110 90 ÷ 100
Kg 1 2 220 2 20080 ÷ 90 80 ÷ 90
Situar la carne en una bandeja Pirex de
borde alto con sal y pimienta. Dele la vuelta
a mitad cocción.
Cocer la carne en bandeja Pirex cubierta
con sal, pimienta, aromas naturales, aceite
y mantequilla.
Cocer como arriba.
Cocer como arriba.
• Pescado
Trucha 3 enteras / Kg 1 2 220 2 20040 ÷ 45 35 ÷ 40
Salmon
700 g a rodajas
de 2,5 cm esp.
2220220030 ÷ 35 30 ÷ 25
Lenguado Filetes / Kg 1 2 220 2 20040 ÷ 45 35 ÷ 40
Dorada 2 enteras 2 220 2 20040 ÷ 45 35 ÷ 40
Cocer las truchas cubiertas aceite, sal y
cebollas en bandejas de Pirex.
Cocer el salmón no tapado en bandeja
Pirex con sal, pimienta y aceite.
Cocer el lenguado con sal y una cuchara
de aceite.
Cocer las doradas en recipiente cubierto
con aceite y sal.
20 ES
Page 22

TABLAS DE TIEMPOS DE COCCIÓN
Horno Eléctrico Estático Horno Eléctrico Ventilado
Plato Cantidad Estante Tempe-
• Aves, Conejo
Pintada Kg 1-1,3 2 60 ÷ 80 220 2 60 ÷ 70 200
Tiempo de
cocción en
minutos
ratura
horno
Estante Tiempo de
cocción en
minutos
Tempe-
ratura
horno
Observaciones
Coloque la pintada en bandeja Pirex o
cerámica de borde alto condimentado con
aromas naturales y poquísimo aceite.
Pollo Kg 1,5-1,7 2 110 ÷ 120 220 2 100 ÷ 110 200
Conejo troceado Kg 1-1,2 2 55 ÷ 65 220 2 50 ÷ 60 200
Como para la pintada.
Trocear el conejo en partes iguales y
situarlas en la grasera esmaltada,
condimente con aromas naturales. Si fuera
necesario darle la vuelta.
• Dulces, Pasteles
Pastel cacao en bote scatola 1 55 180 1 50 160
Pastel Margarita
en bote
Pastel de zanahorias
en bote
Torta crostata
albicocca
scatola 1 55 175 1 40 ÷ 45 160
scatola 1 65 180 1 50 ÷ 60 160
700 gr 1 40 200 2 30 ÷ 35 180
En bandeja para pasteles Ø 22. Prec.
durante 10 min.
En bandeja para pasteles Ø 22. Prec.
durante 10 min.
En bandeja para pasteles Ø 22. Prec.
durante 10 min.
En bandeja para pasteles Ø 22. Prec.
durante 10 min.
• Verdura
Colocar los hinojos cortados en 4 partes y
Hinojos 800 gr 1 70 ÷ 80 220 1 60 ÷ 70 200
Calabacín 800 gr 1 70 220 1 60 ÷ 70 200
Patatas 800 gr 2 60 ÷ 65 220 2 60 ÷ 65 200
Zanahorias 800 gr 1 80 ÷ 85 220 1 70 ÷ 80 200
tapados en bandeja Pirex, con mantequilla
y sal y preferiblemente con la parte interna
hacia arriba.
Rabanar los calabacines y cocer en bandeja
Pirex, cubiertas con mantequilla y sal.
Cortar las patatas en partes iguales y
cocerlas cubiertas con aceite, sal y orégano
o romero en bandeja Pirex.
Cortar las zanahorias y cocerlas cubiertas
en bandeja Pirex.
• Fruta
Manzanas enteras Kg 1 1 45 ÷ 55 220 2 45 ÷ 55 200
Peras Kg 1 1 45 ÷ 55 220 2 45 ÷ 55 200
Molocotones Kg 1 1 45 ÷ 55 220 2 45 ÷ 55 200
Cocer la fruta en bandeja de Pirex o
cerámica no cubierta. Dejar enfriar en horno.
Como arriba.
Como arriba.
• Cocción al grill
La cocción al grill debe ser realizada colocando el alimento bajo el grill eléctrico a rayos infrarrojos. Atención: durante el funcionamiento
el grill está al rojo vivo. La grasera debe ser colocada bajo la rejilla para recoger las salsas.
Introducir el pan de molde sobre la parrilla
Pan de molde
tostado
4 rebanadas
4 5 (5 precal.) grill 4 5 (10 precal.) grill
Bikinis 4 3 10 (5 precal.) grill 3
Salchichas n°6 / Kg 0,9 4
Costillas de buey n°4 / Kg 1,5 4
Muslos de pollo n°4 / Kg 1,5 3
25/30
(5 precal.)
25
(5 precal.)
50/60
(5 precal.)
grill 4
grill 4
grill 3
5/8
(10 precal.)
15/20
(10 precal.)
15/20
(10 precal.)
50/60
(10 precal.)
soporte. Tras la 1a cocción dar la vuelta
hasta ultimar la cocción. Advertencia:
mantener el pan de molde en calinete en
el fondo del horno antes de servir.
Introducir los bikins sobre la parrilla soporte
grasera; tras la 1a bruñidura dar la vuelta
grill
al bikini hasta ultimar la bruñidera.
Cortar las salchichas por la mitad y
disponerlas sobre la parrilla, con la parte
interna hacia arriba. A mitad cocción dar la
vuelta a las salchichas hasta ultimar la
cocción. Advertencia: De vez en cuando
grill
controlar visualmente la uniformidad de la
cocción. En caso de desuniformidad
intercambiar las cocidas con las menos
cocidas.
Disponer las piezas debajo de la acción
grill
del grill grande y darles la vueltas dos veces.
Condimente con aromas naturales y darles
grill
la vuelta de vez en cuando.
21 ES
Page 23

ALGEMENE WAARSCHUWINGEN
Lees deze handleiding aandachtig. Hierin treff u betangrijke gegevens aan omtrent installatie, gebruik en onderhoud. Bewaar deze
handleiding voor eventuele toekomstige raadpleging.
De eerste keer dat de oven in werking wordt gesteld, kan er een stinkende walm vrijkomen. Dit is te wijten aan de eerste verhitting
van de lijm op de isolatiepanelen rond de oven. Dit is volkomen normaal. Wij raden u aan uw oven eerst een half uur op vol vermogen
aan te zetten om deze walm uit de oven te verwijderen. Wacht u tot de walm verdwijnt, alvorens u het voedsel in de oven plaatst.
Bij een ingeschakelde oven wordt het glas van de deur behoorlijk warm. Zorg er derhalve voor dat kinderen niet in de buurt van de
oven komen, vooral wanneer de grill aan staat.
CONFORMITEITSVERKLARING
• De onderdelen van dit apparaat die in contact kunnen komen
met voedsel, voldoen aan de Europese richtlijn 89/109/EEG.
Dit apparaat voldoet aan de Europese richtlijnen
89/336/EEG, 73/23/EEG en hun amendementen.
VEILIGHEIDSVOORSCHRIFTEN
• Gebruik de oven alleen voor de toepassing waarvoor hij is
bedoeld: het bereiden van voedsel.
Elk ander gebruik, bijv. als verwarming, is verkeerd gebruik van
de oven en is daarmee ook gevaarlijk.
• De fabrikant is niet aansprakelijk voor schades als gevolg van
een verkeerde toepassing van dit apparaat, of van onjuist of
onredelijk gebruik.
• Tijdens het gebruik wordt de oven heet; raakt u aub de elementen
aan de binnenkant van de oven niet aan. Daarom raden wij aan
om kinderen niet in de buurt van een werkende oven te laten.
Neem bij de omgang met elektrische apparaten altijd de volgende
standaardregels in acht.
- Trek nooit aan het netsnoer om de stekker uit het stopcontact
te halen.
- Raak de oven nooit aan met natte handen of voeten.
- Bedek altijd uw voeten als u de oven gebruikt.
- Laat kinderen of onverantwoordelijke personen nooit zonder
toezicht de oven gebruiken.
- Gebruik geen elektrische adapters, verdeeldozen en/of
verlengsnoeren.
- Als de oven defect raakt of niet meer werkt, schakel dan de
stroom uit en raak hem niet aan.
• Een beschadigd netsnoer moet u onmiddellijk vervangen.
Neem bij het vervangen van de kabel de volgende voorschriften
in acht.
Vervang het netsnoer alleen door een kabel van het type HO5RRF, H05VV-F of H05V2V2-F. De kabel moet geschikt zijn om het
maximale stroomverbruik van de oven te leveren. Alleen een
gekwalificeerde elektromonteur mag het netsnoer vervangen.
De aardleiding (geel-groen) moet 10 mm langer zijn dan de
stroomleidingen.
Reparaties mogen alleen met de originele reserveonderdelen
worden uitgevoerd door een erkende servicewerkplaats. Als de
hierboven genoemde voorschriften niet worden nageleefd, kan
de fabrikant de veiligheid van de oven niet langer garanderen.
• De oven wordt geleverd met de aangegeven technische
kenmerken die u niet mag wijzigen.
• Gebruik nooit een hogedruk- of stoomreiniger om de oven schoon
te maken.
• Bewaar nooit brandbare producten in de oven; deze kunnen in
brand vliegen als de oven per ongeluk wordt ingeschakeld.
• Leun nooit op de ovendeur, en laat kinderen niet op de ovendeur
zitten.
• Gebruik ovenhandschoenen om gerechten in de oven te plaatsen
en er weer uit te halen.
AANBEVELINGEN
• Maak de oven na elk gebruik meteen schoon, zo voorkomt u
het aankoeken van vuilresten.
• Bedek de wanden van de oven nooit met aluminiumfolie of met
wegwerpproducten om de oven schoon te houden. Aluminiumfolie
en andere producten kunnen smelten als ze in aanraking komen
met de hete ovenwanden, en kunnen de emaillaag aantasten.
• Om rookgeuren en sterke vervuiling van uw oven te voorkomen,
raden we u aan om de oventemperatuur niet te hoog in te stellen.
U kunt beter kiezen voor een iets langere bereidingstijd bij een
lagere temperatuur.
• Naast de meegeleverde accessoires, raden we u aan om alleen
ovenservies en bakvormen te gebruiken die bestand zijn tegen
zeer hoge temperaturen.
INSTALLEREN
Het installeren is de verantwoordelijkheid van de klant. De
fabrikant is niet verplicht om het product te installeren. Als de hulp
van de fabrikant wordt ingeroepen om problemen te verhelpen die
zijn ontstaan door verkeerd installeren, dan vallen deze
werkzaamheden niet onder de garantie.
Neem de installatievoorschriften in acht en schakel zo nodig
gekwalificeerde vakmensen in. Een verkeerde installatie kan
materiële schade veroorzaken of letsel aan mens en dier. De
fabrikant kan niet aansprakelijk worden gesteld voor dergelijke
schade of dergelijk letsel.
Het keukenmeubel waar de oven in wordt geplaatst, moet bestand
zijn tegen temperaturen van minimaal 70 °C.
De oven is zowel geschikt voor plaatsing in een kolom als onder
een werkblad.
Voor de montage: zorg voor voldoende ventilatie in de inbouwruimte
voor de oven, zodat er genoeg frisse lucht kan circuleren om de
oven te koelen en om de inwendige delen te beschermen. Breng
de openingen aan zoals die op de laatste pagina zijn getekend bij
de montagewijze die u toepast.
ELEKTRISCHE AANSLUITING
DE ELEKTRISCHE AANSLUITING MOET WORDEN GEMAAKT
DOOR EEN ERKEND INSTALLATEUR OF DOOR EEN
GEKWALIFICEERDE ELEKTROMONTEUR.
De elektrische installatie waar het apparaat op wordt aangesloten,
moet aan alle wettelijke voorschriften voldoen.
De fabrikant is niet aansprakelijk voor de gevolgen van het niet
naleven van dit voorschrift.
De elektrische aansluiting dient een geaarde contactdoos te zijn,
of een meerpolige stroomonderbreker met een vrije contactafstand
van minimaal 3 mm.
De elektrische installatie moet afdoende zijn gezekerd, en de
elektriciteitsdraden dienen een diameter te hebben die groot
genoeg is om het maximale stroomverbruik van de oven
probleemloos te kunnen leveren.
AANSLUITINGEN:
De oven is voorzien van een netsnoer om aan te sluiten op een
netspanning van 230 V AC tussen twee fasen of tussen de
faseleiding en de neutrale leiding.
Controleer voor het aansluiten eerst het volgende:
. de netspanning die op de stroomverbruikmeter in de meterkast
staat vermeld,
. de schakelstand van de stroomonderbreker.
Sluit de aarddraad (groen/geel) die met de aardaansluiting van
de oven is verbonden, aan op het aardcontact van de
netspanningsvoorziening.
Pas op:
. Laat voor het aansluiten door een elektricien controleren of
de aarding van de netspanningsvoorziening in orde is.
. De fabrikant kan niet aansprakelijk worden gesteld voor
incidenten die het gevolg zijn van het ontbreken van een
aardaansluiting of van het aansluiten van de oven op een
defecte aardaansluiting.
Let op: Houd bij plaatsing rekening met het onderhoud van
de oven. En plaats de contactdoos op een dusdanige plaats
dat de oven ook kan worden aangesloten als hij is verwijderd.
Netsnoer: Het netsnoer mag alleen worden vervangen in onze
servicewerkplaats of door een erkende reparateur.
22 NL
Page 24

OVENUITRUSTING (afhankelijk van het model)
DE OVEN SCHOONMAKEN
Reinig de uitrusting voor het eerste gebruik. Neem ze af met
een sponsje. Spoel ze schoon en maak ze droog.
Het rooster ondersteund de bakplaat,
hitte bestendige pannen en bakblikken.
Het is geschikt voor gegrild vlees
omdat het de plaat ondersteund
en het vet opvangt.
De lekbak
opvangen van de jus bij het grillen.
Hij staat op het rooster of schuift in
de rails. Deze wordt slechts gebruikt
in de modus Grillen, Draaispit of
Turbogrill. Voor alle andere bakwijzen moet u deze uit de oven
halen. De lekbak nooit als bakschaal gebruiken, er kan zich
rookontwikkeling, vetverspreiding en een snelle vervuiling van de
oven voordoen
De pizza set is ontwikkeld voor het
bakken van een pizza. Voor het
beste resultaat moet u deze gebruiken
in combinatie met de Pizza functie.
Telescoop geleiders
- Trek de telescoop geleiders uit en plaats het rooster (C) voor de
plaat achter het roosterslot in het voorste gedeelte. Plaats het
plaat (D).
is bestemd voor het
.
Wacht tot de oven is afgekoeld voordat u hem schoonmaakt.
. Gebruik nooit schuurmiddelen, staalwol of scherpe
voorwerpen om de oven te reinigen, dit kan het email
permanent beschadigen.
. Reinig de oven alleen met een sopje of met een speciale
ovenreiniger.
DE OVEN
Het is heel belangrijk de oven schoon te maken na iedere keer
dat u de oven heeft gebruikt. Vetten, die aan de wanden van de
oven zijn blijven zitten, kunnen de volgende keer dat u de oven
gebruikt, voor nare geurtjes zorgen of zelfs het kookresultaat
beïnvloeden.
Gebruik het water met een geschikt schoonmaakmiddel om de
oven schoon te maken; veRwijder de zeepresten grondig.
GLAZEN ONDERDELEN
We raden u aan om na elk gebruik de glazen ovendeur met
absorberend keukenpapier schoon te vegen. Zitten er veel
vetspatten op het raam, reinig het glas dan met een goed
uitgeknepen spons met wat zeep. Gebruik nooit schuurmiddelen
of scherpe voorwerpen.
BAKPLAAT VOOR PIZZA
Deze is voorzien van een anti aanbaklaag. De anti aanbaklaag
zorgt ervoor dat de plaat eenvoudig te reinigen is. Hij kan in de
vaatwasser.
Gebruik nooit schurende of scherpe producten; deze zouden de
antiaanbaklaag beschadigen.
C
D
Tijdens het gebruik van de oven moet u alle niet-gebruikte
ovenaccessoires uit de oven verwijderen.
DE ACCESSOIRES
Reinig deze met een sopje en een spons. Spoel ze schoon en
maak ze droog. Gebruik nooit schuurmiddelen.
LEKBAK
Verwijder de lekbak na het grillen uit de oven. Vang het warme
vet ergens in op, voordat u het in de afvalbak gooit. Was de lekbak
met heet water en een spons met afwasmiddel, en spoel hem
om.
Blijven er resten achter, laat ze dan weken in een sopje.
U kunt hem ook in de vaatwasser reinigen of een speciale
ovenreiniger gebruiken.
Zet nooit een vervuilde lekbak weer terug in de oven.
OVENVERLICHTING
Trek de stekker van de oven uit het stopcontact of schakel de
stroom uit voordat u de lamp schoonmaakt of vervangt.
De lamp en het lichtvenster zijn bestand tegen hoge temperaturen.
Vervang een defecte lamp als volgt
- schroef het lichtvenster los,
- schroef de lamp eruit,
- vervang de lamp door een lamp met
dezelfde kenmerken,
- schroef na het vervangen van de
defecte lamp het lichtvenster weer vast.
23 NL
Page 25

SERVICE-WERKPLAATS
Controleer eerst de volgende punten voordat u contact opneemt
met de service-werkplaats.
Als de oven het niet doet, controleer dan:
o of de stekker van de oven correct is aangesloten en of de
stroomvoorziening werkt.
Handel als volgt als u de oorzaak van de storing niet kunt vinden:
trek de stekker van de oven uit het stopcontact of schakel de
stroomtoevoer uit, raak de oven niet aan en bel onze klantenservice.
De oven wordt geleverd met een garantiebewijs
waarmee u reparaties die onder de garantie
vallen gratis kunt laten uitvoeren door onze
klantenservice.
Op dit apparaat staat het merkteken van de
Europese richtlijn 2002/96/EG over de
afvalverwerking van elektrische en elektronische
apparatuur (WEEE).
Door dit apparaat volgens de richtlijnen af te voeren, voorkomt
u mogelijke milieuschade en aantasting van de gezondheid van
mens en dier als gevolg van het op onjuiste wijze afdanken van
dit product.
Dit symbool op het product geeft aan dat het geen restafval is.
Lever het apparaat in bij uw leverancier of bij de milieustraat van
uw gemeente, zodat het als elektrisch en elektronisch afval kan
worden gerecycled. Volg de locale wet- en regelgeving op voor
het aanbieden van dit apparaat aan de afvalverwerking.
Als u meer informatie wilt over verwerking, hergebruik en recycling
van dit product, neem dan contact op met uw gemeente, met uw
afvalinzamelaar of met de winkel waar u het product heeft gekocht.
24 NL
Page 26

ELEKTRONISCHE PROGRAMMA'S GEBRUIKEN
DE JUISTE TIJD INSTELLEN
WAARSCHUWING: Na installatie van de oven en na het
onderbreken van de voeding (dit is te herkennen aan de
knipperende cijfers op het scherm) dient u eerst de juiste
tijd in te stellen.
Dit gebeurt als volgt:
• Houd de TIMER- en de END-knop ingedrukt. ( + TIMER
modellen
• Stel de tijd in met de knoppen .
• Laat alle knoppen los.
WAARSCHUWING: De oven werkt alleen in de handmatige modus of indien er een tijd is
ingesteld.
N.B.: Op sommige modellen worden de symbolen aangeduid met + en - .
op bepaalde
FUNCTIE
WEKKER.
HANDMATIGE
BEDIENING
BAKTIJD
EINDE
BAKTIJD
HOE TE ACTIVEREN HOE UIT TE SCHAKELEN WERKING DOEL
• Houd de knop
ingedrukt.
• Druk op de knoppen
om de gewenste tijd in te
stellen.
• Laat alle knoppen los.
• Druk op de knop .
• Stel de kookfunctie in met
de selectieknop voor de
ovenfunctie.
• Houd de TIMER-knop
ingedrukt.
• Druk op de knoppen
om de vereiste kooktijd in
te stellen.
• Laat alle knoppen los.
• Stel de kookfunctie in met
de selectieknop voor de
ovenfunctie.
• Houd de END-knop
ingedrukt.
• Druk op de knoppen
om het tijdstip in te stellen
waarop de oven moet
worden uitgeschakeld.
• Laat de knoppen los.
• Stel de kookfunctie in met
de selectieknop voor de
ovenfunctie.
• Wanneer de ingestelde tijd
is verstreken, klinkt er een
hoorbaar alarm (dit alarm
stopt vanzelf - u kunt het
alarm echter direct stoppen
door op te drukken).
• Draai de selectieknop
voor de ovenfunctie naar
positie O.
•Wanneer de ingestelde tijd
is verstreken, wordt de oven
automatisch uitgeschakeld.
Indien u het koken eerder
wilt afbreken, zet u de
selectieknop voor de
ovenfunctie op positie O of
stelt u de tijd in op 0.00 (de
knoppen TIMER en ).
• De oven wordt uitgeschakeld op het ingestelde tijdstip.
• Om de oven handmatig
uit te schakelen, zet u de
selectieknop voor de
ovenfunctie op positie O.
• Activeert een alarm nadat
de ingestelde tijd
verstreken is.
• Om te controleren hoeveel
tijd er nog resteert, drukt u
op de knop .
• Schakelt de ovenbediening
in.
• Hiermee kunt u de vereiste
kooktijd voor het gekozen
gerecht van tevoren instellen.
• Om te controleren hoeveel
tijd er nog resteert, drukt u
op de TIMER-knop.
• Om de ingestelde tijd te
wijzigen, drukt u op de
TIMER-knop. Verander de
instelling door op te
drukken.
• Voor het instellen van de
kookwekker.
• Om de ingestelde tijd te
controleren, drukt u op de
END-knop.
• Om de ingestelde tijd te
wijzigen, drukt u
tegelijkertijd op de ENDknop en .
• Hiermee kunt u de oven
als alarmklok gebruiken
(zelfs indien u de oven niet
gebruikt).
• Voor het maken van de
gewenste gerechten.
• Wanneer de kooktijd
verstreken is, wordt de
oven automatisch
uitgeschakeld en klinkt er
een alarm.
• Deze functie wordt als
‘baktijd’ functie gebruikt.
Als een gerecht bijvoorbeeld 45 minuten in de
oven moet en om ongeveer 12.30 uur klaar moet
zijn, kies dan de vereiste
functie, stel de baktijd op
45 minuten in en het eind
van de baktijd op 12.30
uur.
De oven wordt dan automatisch om 11.45 uur
ingeschakeld (12.30 uur
minus 45 minuten) tot
het ingestelde eind van
de baktijd waarop de
oven automatisch
uitgeschakeld wordt.
WAARSCHUWING.
Indien het EINDE van de
kooktijd wordt ingesteld
zonder de tijdsduur zelf in
te stellen, wordt de oven
meteen ingeschakeld. De
oven stopt vervolgens aan
het EINDE van de
ingestelde kooktijd.
25 NL
Page 27

INSTRUCTIES VOOR HET GEBRUIK VAN DE OVEN
Ons assortiment bestaat uit meerdere stijlen en kleuren. Om de technische specificaties en functies van het model welke u
heeft aangeschaft te kunnen vinden, dient u naar onderstaande diagrammen te kijken.
De ovenverlichting zal gaan branden zodra de oven is ingeschakeld.
Temperatuurskeuze-knop
Functiekeuze-
knob
Temperatuurskeuze-knop
50 ÷ MAX
50 ÷ MAX
50 ÷ MAX
**
50 ÷ MAX
Functiekeuze-knop
Voorbeeld knop
PIZZA
12 posities knop
volgens model
Functie (volgens model)
Dit schakeld de ovenverlichting in. Ditz al automatisch de koelventilator inschakelen (alleen op modellen met mantelkoeling).
Sprinter
Deze positie versnelt de opwarmtijd van de oven. Als het is geselecteerd zal de oven meteen gaan verwarmen (het duurt
8 min om 200°C te bereiken) U kunt de gewenste temperatuur instellen dmv de temperatuurknop.
Het einde van de voorverwarmfase is zichtbaar op het bedieningspaneel dmv het lampje "°C". Het voorverwarmen is
beëindigd als het lampje "°C" uit gaat en het mogelijk is om de gewenste kookfunctie in te stellen. U mag NOOIT voedsel
in de oven doen als deze nog aan het voorverwarmen is.
Grillen met gesloten deur
De keuze van deze functie schakelt het infrarood grillelement in.
Deze functie is speciaal geschikt voor het bereiden van vleesgerechten.
Super Grill
Met deze functie kunt u voedsel krokant een krokant laagje geven. De Super Grill functie heeft 50% meer vermogen in
vergelijking tot een normale gril.
Conventioneel gebruik
Hierbij werken de verwarmingselementen aan de boven- en onderkant.
Dit is de traditionele manier van bereiding van voedsel. Ideaal om te braden, wildgerechten te bereiden, koekjes en
appelbollen te bakken en om te bereiken dat het voedsel knapperig blijft.
PIZZ
50 ÷ MAX
*
50 ÷ MAX
50 ÷ MAX
50 ÷ MAX
50 ÷ MAX
50 ÷ 200
Onderwarmte plus ventilator
Deze functie is speciaal geschikt voor delicate gerechte zoals taart, cake en souffle.
Ontdooien
Deze stand laat lucht op kamertemperatuur rond het diepvriesprodukt circuleren, zodat het in enkele minuten ontdooid
is, zonder de proteïne samenstelling te wijzigen of te schaden.
Geventileerde oven
Boven en onder elementen werken samen met de ventilator.
Deze functie wordt geadviseerd voor gevogelte, vis en groente.
De geforceerde hete lucht circulatie verbetert de warmte verdeling en verminderd de kooktijd.
Geventileerde oven
het verwarmingselement en het ventilatie systeem werken.
Hetelucht is verdeeld over de verschillende richels; het is de ideale manier om verschillende soorten voedsel te bereiden
(vlees,vis) zonder dat de smaken en geuren zich mixen.
Soft Cook
Zachte kook functie is voor banket en brood. Met dank aan de verlaagde ventilatorsnelheid, verhogen de interne dampen.
Dit zorgt voor optimale condities voor het koken/bakken van voedsel dat elastisch moet blijven.
Bijv: Cake en brood.
Pizzafunctie
Met deze functie wordt dezelfde warmte afgegeven als bij de traditionele houtoven waarin pizza’s worden gebakken.
Deze functie met gebruikt worden samen met de Pizza Set. De plaat van de pizza set is ideaal voor het optimaliseren
van het beste kookresultaat.
Geventileerd grillen met gesloten deur
De, door het verwarmingselement van de grill, verhitte lucht wordt gecirculeerd door de ventilator, die deze verspreid
over het voedsel bij temperaturen van 50 tot 200°. De geventileerde grill vervangt het spit en zorgt,
zelfs bij grote hoeveelheden, voor optimale resultaten bij kipgerechten, worst en rood vlees.
VARIO VENTALATIE
VARIO VENTALATIE
VARIO VENTALATIE
VARIO VENTALATIE
VARIO VENTALATIE
VARIO VENTALATIE
VARIO VENTALATIE
VARIO VENTALATIE
Vario Ventilatie is een exclusief sijsteem ontwikkeld bij Candy om het kookresultaat, temperatuur en luchtmanagement te optimaliseren.
Het Vario ventilatiesysteem is een zelfactiverend systeem welke automatisch de ventilator snelheid veranderd als de functie is
geselecteerd.
* Testprogramma volgens norm CENELEC EN 50304.
** Testprogramma volgens norm CENELEC EN 50304 ter bepaling van de energie efficiency klasse
26 NL
Page 28

BAKTIJDEN EN-TEMPERATUREN VOOR STATISCHE OVEN
Gerecht Hoeveelheid Niveau rooster Baktijd
Oven °C van onderaf
Gebak
Licht deeg: Soezen 175 1° Niveau 40-50
Taart 170 1° Niveau 30
Zandtaartdeeg: Vruchtentaart 180-190 1° Niveau 20-30
Gistdeeg: Taart 160 1° Niveau 40-45
Tulband 160 1° Niveau 40-45
Chocoladetaart 160 1° Niveau 25-35
Bladerdeeg: Bladerdeegpastel 200 1° Niveau 20
Vlees
Roast-beef 1.5 kg 190 1° Niveau 90
Kalfsvlees 1 kg 150-160 1° Niveau 120-150
Kalfsfricandeau 2 kg 170-190 1° Niveau 60-90
Lamsvlees 1.5 kg 150-160 1° Niveau 60-75
Reeragout 1.5 kg 200 1° Niveau 90
Wild Zwijnragout 1.5 kg 190 1° Niveau 120
Gevogelte Gebraden duiven 150-150 1° Niveau 45
Kalkoen 2 kg 150 1° Niveau 180-240
Gans 4 kg 160 1° Niveau 240-270
Eend 2.5 kg 175 1° Niveau 90-150
Kip 1.5 kg 170 1° Niveau 60-80
Vis Forel 200 1° Niveau 15-25
Diversen Lasagne 200 1° Niveau 40
Soufflè 180-200 1° Niveau 20
Beignets 200 1° Niveau 20
Pizza 200 1° Niveau 20
27 NL
Page 29

BAKTIJDEN EN-TEMPERATUREN VOOR GEVENTILEERDE OVEN
Gerecht Hoeveelheid Oven °C Niveau rooster Baktijd
van onderaf
Gebak Soezen 175 2° Niveau 45
Licht deeg: Taart 170 2° Niveau 40
Zandtaartdeeg: Appeltaart 200 2° Niveau 35
Gistdeeg: Cake 170 2° Niveau 35
Koekjes 180 2° Niveau 25
Bladerdeeg: Biscuits 200 2° Niveau 20
Vlees
Varkensvlees Gebraden 1 kg 220 2° Niveau 90
Karbonade 1 kg 200 1° Niveau 60
Haas 1 kg 200 1° Niveau 60
Gehaktballetjes 1 kg 180 2° Niveau 65
Worstjes 1.5 kg 170 1° Niveau 45
Rundvlees: Bout 1 kg 220 1° Niveau 95
Haas 1 kg 220 1° Niveau 75
Roast-beef 1 kg 240 2° Niveau 45
Stoofpot 1 kg 230 1° Niveau 45
Kalfsvlees: Bout 1 kg 200 1° Niveau 95
Gebraden 1 kg 180 2° Niveau 90
Rollade 2 kg 180 1° Niveau 100
Borst 1 kg 180 1° Niveau 60
Lamsvlees: Bout 1 kg 200 2° Niveau 95
Schouder 1 kg 175 1° Niveau 70
Schapenvlees: Schouder 1 kg 180 1° Niveau 85
Bout 1.5 kg 200 1° Niveau 90
Borst 1.5 kg 180 1° Niveau 70
Wild: Gebraden fazant 1 kg 200 1° Niveau 70
Haasgebraad 2 kg 175 1° Niveau 75
Konijn 1 kg 175 1° Niveau 75
Gevogelte Kalkoen 1.5 kg 180 2° Niveau 70
Parelhoen 1 kg 180 2° Niveau 65
Eend 2 kg 180 1° Niveau 90
Kip 1 kg 175 2° Niveau 75
Pikante kip 1 kg 200 1° Niveau 75
Vis Brasem 1.5 kg 180 1° Niveau 45
Gegratineerde
zeetong 1 kg 200 1° Niveau 25
Diversen Lasagne 200 2° Niveau 40
Cannelloni 200 2° Niveau 40
Pizza 200 1/2° Niveau 45
Pudding 175 1° Niveau 45
Beignet 175 2° Niveau 20
Soufflé 175 1° Niveau 35
Appelbollen 180 1° Niveau 60
28 NL
Page 30

ALLGEMEINE HINWEISE
Herzlichen Glückwunsch! Sie haben ein hochwertiges Qualitätsprodukt erworben. Damit Ihr Gerät stets zu Ihrer Zufriedenheit arbeitet,
raten wir Ihnen folgendes:
• Lesen Sie dieses Heft aufmerksam durch: es enthält wichtige Hinweise zur korrekten
Benutzung Ihres Gerätes
• Bewahren Sie diese Bedienungsanleitung zur späteren Benutzung sorgfältig auf.
Bei der ersten Inbetriebnahme kann es zu Rauchentwicklung und beißendem Geruch kommen. Hierbei handelt es sich um einen ganz
normalen Vorgang, der auf die erste Erwärmung des Isolierplattenklebers zurückzuführen ist, welcher zur Verkleidung des Backofens
verwendet wurde. Warten Sie mit dem Einschieben der Speisen, bis kein Rauch mehr vorhanden ist.
Die Backofentür wird während des Betriebes naturgemäß heiß. Achten Sie bitte darauf, daß Kinder sich nicht in der Nähe des Backofens
aufhalten, besonders wenn der Grill in Betrieb ist.
KONFORMITÄTSERKLÄRUNG:
• Dieses Gerät entspricht der EU-Vorschrift 89/109 für die
Bereiche, die mit Lebensmitteln in Berührung kommen.
Das Gerät entspricht den EU-Normen 89/336/EEG, 73/23/EEG
und deren nachträglichen Änderungen.
SICHERHEITSHINWEISE
Dieses Gerät darf ausschließlich für den Zweck eingesetzt
werden, für den es hergestellt wurde, nämlich die Zubereitung
von Speisen.
Während des Betriebs wird der Backofen heiß. Berühren Sie
nicht die Heizelemente im Inneren des Backraums.
Jede andere Anwendung (beispielsweise das Heizen von
Räumen) ist deshalb als zweckentfremdet zu betrachten und
demzufolge gefährlich. Der Hersteller kann für eventuelle
Schäden, die auf einen ungeeigneten, fehlerhaften und
unvernünftigen Einsatz zurückzuführen sind, nicht verantwortlich
gemacht werden.
Der Backofen wird während des Betriebs naturgemäß heiß. Achten
Sie darauf, die Heizelemente im Inneren nicht zu berühren. Es
empfiehlt sich, Kinder daran zu hindern, sich in der Nähe des
Backofens aufzuhalten, wenn dieser in Betrieb ist.
Die Verwendung jedes elektrischen Gerätes erfordert die
Beachtung einiger grundsätzlichen Regeln. Das sind
insbesondere:
- Das Gerät nicht mit nassen oder feuchten Händen oder Füßen
berühren.
- Das Gerät nicht barfuß bedienen.
- Verhindern Sie, dass Kinder oder unfähige Personen
unbeaufsichtigt am Gerät hantieren.
- Im Allgemeinen ist die Benutzund von Verlängerungskabeln
bzw. Mehrfachsteckern oder Adaptern nicht zu empfehlen.
- Bei Ausfällen und/oder Funktionsstörungen ist das Gerät
abzuschalten. Versuchen Sie nicht, den Fehler auf eigene
Faust zu beheben.
- Bei Beschädigung des Zuleitungskabels ist dieses so schnell
wie möglich auszutauschen. Dies ist ausschließlich durch
qualifiziertes Fachpersonal durchzuführen, unter Beachtung
folgender Hinweise: Blechschutzdeckel abnehmen, Kabel
abschrauben und durch ein anderes (Typ HO5RR-F, H05VV-F,
H05V2V2-F) ersetzen. Das Kabel muss der Leistung des
Gerätes entsprechen. Der Erdleiter (gelb-grün) muss
vorschriftsgemäß 10 mm länger sein als die Hauptleiter.
Bei einer erforderlichen Reparatur wenden Sie sich bitte an
Ihren zuständigen Werkskundendienst und verlangen Sie die
Verwendung von Original-Ersatzteilen.
Die Missachtung der vorgenannten Hinweise kann die Sicherheit
des Gerätes beeinträchtigen.
- Der Ofen, den Sie erworben haben, zeichnet sich durch
bestimmte technische Eigenschaften aus; auf keinen Fall
dürfen Änderungen an der Ausstattung vorgenommen werden.
- Benutzen Sie niemals Dampf- oder Hochdruckvorrichtungen
zum Reinigen des Ofens!
- Lagern Sie keine entflammbaren Gegenstände im Ofen; sie
könnten verbrennen, wenn der Ofen unbeabsichtigt eingeschaltet wird!
- Stützen Sie sich nicht an der Ofentür ab und stellen Sie sicher,
dass keine Kinder sich darauf setzen!
- Benutzen Sie Küchenhandschuhe, wenn Sie Gerichte in den
Ofen stellen oder daraus herausnehmen!
EMPFEHLUNGEN
• Den Ofen nach jeder Benutzung reinigen - dies begünstigt die
vollständige Reinigung.
• Um eine übermäßige Verschmutzung des Ofens sowie den
daraus resultierenden starken Rauchdunst zu vermeiden,
empfehlen wir Ihnen, den Ofen nicht bei zu hohen
Temperaturen zu nutzen. Es ist günstiger, die Garzeit zu
verlängern und die Temperatur ein wenig zu senken.
• Wir empfehlen Ihnen, außer den mitgelieferten Zubehörteilen
nur Bleche und Backformen zu verwenden, die sehr hohen
Temperaturen widerstehen.
• Niemals die Backofenwände mit Aluminiumpapier ausschlagen.
Das in direktem Kontakt mit den erhitzten Teilen stehende
Aluminiumpapier könnte schmelzen und das Email des Muffels
zerstören.
INSTALLATION
Der Einbau erfolgt auf Kosten des Endverbrauchers. Der Hersteller
ist von diesem Dienst entbunden. Eventuell an den Hersteller
herangetragene Ansprüche, die auf einen falschen Einbau
zurückgehen, sind von jeder Garantieleistung ausgeschlossen.
Der Einbau muss entsprechend der Anleitung und durch qualifiziertes
Fachpersonal erfolgen. Durch einen falschen Einbau können
Schäden an Personen, Tieren oder Sachen verursacht werden,
für die der Hersteller nicht verantwortlich gemacht werden kann.
Das Möbelstück, welches den Ofen aufnehmen soll, muss
hitzebeständig sein.
Der Ofen kann in einen säulenförmigen Hohlraum oder unter
eine Arbeitsfläche eingebaut werden.
Vor dem festen Einbau des Ofens: Bei jedem Einbau muss
sichergestellt werden, dass der Ofenraum gut gelüftet wird, damit
die Kaltluftzufuhr zur Kühlung und zum Schutz der
Innenflächen des Ofens gewährleistet werden kann. Bohren Sie
hierfür
(s. letzte Seite) je nach Einbauweise die entsprechenden
Öffnungen ein.
ELEKTRISCHER ANSCHLUSS
DER ELEKTRISCHE ANSCHLUSS MUSS VON EINEM
ZUGELASSENEN ELEKTRIKER ODER EINEM ÄHNLICH
QUALIFIZIERTEN TECHNIKER HERGESTELLT WERDEN.
Die Hausinstallation, an die das Gerät angeschlossen wird, muss
entsprechend den geltenden Normen des Landes ausgeführt
werden, wo dieses zum Einsatz kommt.
Der Hersteller lehnt jegliche Verantwortung für Schäden ab, die
auf Missachtung dieser Bestimmung zurückzuführen sind.
Der Anschluss an die Stromversorgung muss über eine geerdete
Wandsteckdose oder mittels eines omnipolaren Ausschalters mit
einem Öffnungsabstand zwischen den Kontakten von
mindestens 3 mm hergestellt werden.
Der elektrische Anschluss muss durch geeignete Sicherungen
geschützt sein; der Kabelquerschnitt muss groß genug sein, um
eine ordnungsgemäße Stromversorgung des Gerätes zu
ermöglichen.
ANSCHLUSS: Der Ofen ist mit einem Versorgungskabel
ausgestattet, das ausschließlich für eine Spannung von 230 V
WS zwischen den Phasen oder zwischen Phase und Nulleiter
geeignet ist.
Der Anschluss muss entsprechend der Skizze auf der nächsten
Seite ausgeführt werden, nachdem
• die auf dem Zähler angezeigten Einspeisespannung
• und die Auslegung des Ausschalters für den Stromkreis
geprüft worden sind.
Der gelb-grüne Erdungskabel, das an einem Ende an den
Erdungskontakt des Gerätes angeschlossen ist, muss am anderen
Ende mit dem Erdungskontakt der Stromquelle verbunden
sein.
Warnung:
• Vor der Inbetriebnahme lassen Sie die Kontinuität der
Erdverbindung von einem Elektriker überprüfen!
• Der Hersteller kann nicht für Unfälle oder Schäden haftbar
gemacht werden, die auf fehlende oder unsachgemäße bzw.
unterbrochene Erdung zurückzuführen sind.
HINWEIS: Bitte beachten Sie, dass der Ofen ggf. auch einmal
instandgesetzt oder gewartet werden muss. Um diese Arbeiten
zu erleichtern, sorgen Sie dafür, dass die Steckdose sich an
einer Stelle befindet, wo es möglich ist, den Ofen zu bewegen,
ohne die Stromversorgung unterbrechen zu müssen.
Stromkabel: Das Stromkabel darf ausschließlich durch unseren
Kundendienst oder durch einen qualifizierten Servicetechniker
ausgewechselt werden.
29 DE
Page 31

BACKOFENZUBEHÖR (je nach Modell)
REINIGUNG UND WARTUNG
Bevor das Zubehör benutzt wird, sollte es gewaschen werden.
Verwenden Sie hierfür einen feuchten Schwamm. Spülen Sie
anschließend mit Wasser aus und trocknen Sie das Zubehör
sorgfältig ab.
Der Gitterrost dient zum Abstellen
von Kuchenformen, Auflaufformen
und Ähnlichem.
Außerdem ist er auch zum Grillen von Fleischstücken geeignet,
da die Fettpfanne darunter eingehängt werden kann.
Der Soßenfänger ist zum
Auffangen des Saftes der
Grillstücke bestimmt.
Er kann auf den Rost gestellt, unter ihn geschoben oder auf die
Bodenplatte gestellt werden. Den Soßenfänger niemals als
Unterlage zum Braten verwenden.
Dies würde Rauchentwicklung und Fettspritzer und damit eine
schnelle Verschmutzung des Ofens verursachen.
Das Pizza-Set ist ideal zum
Pizzabacken. Das Set muss
zusammen mit dem
Backprogramm Pizza verwendet
werden.
Teleskopschiene
Ziehen Sie die Teleskoparme heraus und setzen Sie den Gitterrost
C für die Fettpfanne hinter den Gitterstopper an der Frontseite
ein. Hängen Sie schließlich auch die Fettpfanne D ein.
• Vor dem Reinigen lassen Sie den Backofen abkühlen.
• Benutzen Sie zum Reinigen niemals aggressive
Reinigungsmittel, Scheuerkissen, harte Bürsten oder scharfe
Gegenstände, denn diese könnten die Emailleoberfläche
dauerhaft beschädigen.
• Verwenden Sie lediglich eine Seifenlösung oder Bleichmittel
(Ammoniak).
• Legen Sie die Ofenwände nie mit Aluminiumfolie aus, da
es dadurch zu einem Hitzestau kommt, der die Emaille
permanent schädigen könnte.
DER BACKOFEN
Der Backofen sollte nach jedem Gebrauch sorgfältig gereinigt
werden, da die Fettpartikeln, die beim Backen und Braten sich
auf den Innenwänden abgesetzt haben, unangenehme Gerüche
hervorrufen und somit das Backergebnis beeinträchtigen können.
Zur Reinigung benutzen Sie bitte warmes Wasser und einen
milden Reiniger.
GLASSCHEIBE
Glasscheibe nach jeder Benutzung mit Küchenpapier innen
abwischen. Sind Flecken vorhanden, Scheibe mit Schwamm und
Glasreiniger säubern, dann mit klarem Wasser spülen und
trockenwischen. Keine scheuernden Reinigungsmittel oder scharfen
Gegenstände verwenden.
ZUBEHÖR
Benutzen Sie einen Schwamm und Seifenlösung. Ausspülen und
trockenwischen. Keine scheuernden Mittel verwenden.
DAS PIZZABLECH
Die Oberfläche des Pizzablechs ist antihaftbeschichtet und
deshalb leicht zu reinigen. Die Pizzaform kann auch in der
Spülmaschine gespült werden.
Verwenden Sie bitte niemals scharfe Gegenstände oder
Scheuermittel, da diese die Antihaftbeschichtung unwiederbringlich
beschädigen würden.
C
D
Während der Nutzung des Ofens müssen die nicht
gebrauchten Zubehörteile aus dem Ofen entfernt werden.
AUFFANGSCHALE
Entfernen Sie nach dem Grillen die Auffangschale vom Ofen und
gießen Sie das Fett in einen Behälter. Reinigen und spülen Sie
die Fettpfanne mit sehr heißem Wasser, verwenden Sie dabei
einen Schwamm und Spülmittel. Bei hartnäckigen oder
angebrannten Speiserückständen Fettpfanne in heißer
Waschmittellauge einweichen.
Die Auffangschale ist spülmaschinenfest; sie kann auch mit einem
handelsüblichen Ofenreiniger gereinigt werden.
Bewahren Sie die verschmutzte Auffangschale nicht im Backofen
auf.
OFENBELEUCHTUNG
Vor dem Reinigen oder dem Auswechseln der Ofenlampe
muss die Stromversorgung ausgeschaltet und der Stecker
vom Netz getrennt werden!
Die Lampe und ihr Gehäuse bestehen aus einem hitzebeständigen
Material.
Zum Auswechseln einer defekten oder
durchgebrannten Lampe, entfernen Sie
einfach das Glasgehäuse.
• Schrauben Sie die defekte Lampe ab.
• Ersetzen Sie sie mit einer neuen gleichen
Typs,
• und schrauben Sie nach dem Auswechseln
den Schutzdeckel wieder an.
30 DE
Page 32

TECHNISCHER KUNDENDIENST
Sollte Ihr Backofen einmal nicht richtig funktionieren, prüfen Sie
zuerst, ob die Stromversorgung gewährleistet ist.
Ist die Ursache der Fehlfunktion nicht ausfindig zu machen,
wenden Sie sich bitte an Ihren zuständigen Werkskundendienst
unter Angabe des Modells und der Seriennummer, die auf dem
Typenschild angegeben sind. Auf Ihr Gerät gewähren wir eine
Garantie von 24 Monaten ab Kaufdatum. Bewahren Sie Ihre
Kaufrechnung sorgfältig auf und legen Sie sie bei Bedarf als
Garantienachweis dem Kundendienst vor. Die
Garantiebedingungen sind im beigefügten Serviceheft
angegeben.
Dieses Elektrohaushaltsgerät ist entsprechend
der EU-Richtlinie 2002/96/CE über Elektro- und
Elektronik-Altgeräte (WEEE) gekennzeichnet.
Bitte sorgen Sie dafür, dass das Gerät
ordnungsgemäß entsorgt wird, damit mögliche
negative Auswirkungen auf Umwelt und
Gesundheit vermieden werden, die bei einer
unsachgemäßen Entsorgung des Altgerätes
entstehen könnten.
Das Symbol auf dem Produkt bedeutet, dass dieses Gerät nicht
in den normalen Haushaltsmüll gehört, sondern den jeweiligen
kommunalen Rücknahmesystemen für Elektro- und ElektronikAltgeräte übergeben werden muss. Die Entsorgung muss im
Einklang mit den geltenden Umweltrichtlinien für die
Abfallentsorgung erfolgen.
Für nähere Informationen über Entsorgung und Recycling dieses
Produktes wenden Sie sich bitte an Ihre kommunale Einrichtung
(Umweltamt) oder an die Abfallentsorgungsgesellschaft Ihrer
Stadt bzw. an Ihren Händler.
31 DE
Page 33

GEBRAUCH DES ELEKTRONISCHEN PROGRAMMIERERS
EINSTELLUNG DER RICHTIGEN UHRZEIT
HINWEIS: Das erste, was nach der Installation des Ofens oder nach
der Unterbrechung der Stromversorgung (die am blinkenden Display
mir der Anzeige zu erkennen ist) gemacht werden muss, ist die
Einstellung der korrekten Uhrzeit.
Dazu müssen Sie wie folgt vorgehen:
• Die Knöpfe TIMER + END drücken und gedrückt halten. ( + TIMER
einigen Modellen)
• Die Zeit mit den Knöpfen und einstellen.
• Alle Knöpfe loslassen.
ACHTUNG: Der Ofen arbeitet nur, wenn er auf manuelle Funktion eingestellt ist oder eine
bestimmte Backzeit programmiert worden ist.
HINWEIS: Bei einigen Modellen stehen anstelle der Symbole die Zeichen + und - .
FUNKTION EINSCHALTEN AUSSCHALTEN FUNKTION NÜTZLICH FÜR
bei
MANUELLER
BETRIEB
MANUELLE
FUKTIONS-
EINSTELLUNG
BACKDAUER
BACKZEITENDE
• Den Knopf drücken und
gedrückt halten.
• Die Knöpfe drücken,
um die erforderliche
Backzeit einzustellen.
• Alle Knöpfe loslassen.
• Drücken Sie den Knopf .
• Wählen Sie die Backfunktion mit dem entsprechenden Kontrollknebel für die
Backofenfunktion.
• Den Knopf TIMER drücken
und gedrückt halten.
• Die Knöpfe drücken,
um die erforderliche
Backzeit einzustellen.
• Alle Knöpfe loslassen.
• Stellen Sie die Backfunktion mit dem entsprechenden Kontrollknebel für die
Backfunktion.
• Den Knopf END drücken
und gedrückt halten.
• Die Knöpfe drücken,
um den Zeitpunkt zu
wählen, wenn Sie möchten, dass der Ofen sich
abschaltet.
• Knöpfe loslassen.
• Wählen Sie die Backfunktion mit dem entsprechenden Kontrollknebel für
die Backofenfunktion.
• Wenn die eingestellte
Backzeit abgelaufen ist,
wird ein akustisches Signal
aktiviert (dieser Alarm hört
von alleine auf, er kann
jedoch sofort ausgeschaltet
werden, wenn man auf
drückt).
• Drehen Sie den
Kontrollknebel für die
Backfunktion bis zur
gewünschten Position O.
Wenn die eingestellte Zeit
abgelaufen ist, schaltet sich
der Ofen automatisch ab.
Wenn Sie den Backvorgang
vorzeitig ab- bzw. unterbrechen möchten, drehen Sie
den Knebel zum Auswählen
der Ofenfunktion bis zur
Position
die programmierte Zeit auf
0.00 (Knöpfe TIMER und
.
• Zum eingestellten Zeit-
•Wenn Sie den Ofen
O oder stellen Sie
punkt wird der Ofen sich
automatisch abschalten.
manuell ausschalten
möchten, drehen Sie den
Knebel zur Einstellung der
Ofenfunktion auf Position
O.
• Aktiviert einen Alarm am
Ende der eingestellten
Backzeit.
• Um die Restzeit zu
erfahren, drücken Sie den
Knopf .
• Es ermöglicht den
Gebrauch des Ofens.
• Es ermöglicht Ihnen,
die für das gewählte
Rezept erforderliche
Backzeit vorzuprogrammieren.
• Um die Restzeit zu
erfahren, drücken Sie den
Knopf TIMER.
• Um die eingestellte Zeit
zu ändern, drücken Sie
den Knopf TIMER und
nehmen Sie die neue
Einstellung durch Betätigung der Knöpfe vor.
• Es ermöglicht die Einstellung der Backendzeit.
• Um die voreingestellte Zeit
zu überprüfen, drücken Sie
den Knopf END.
• Um die voreingestellte Zeit
zu ändern, drücken Sie den
Knopf END und die Knöpfe
gleichzeitig.
• Es ermöglicht Ihnen, das
Signal als Erinnerungsfunktion zu benutzen (auch
wenn den Ofen nicht zum
Backen verwendet wird)
• Zum Zubereiten der
gewünschten Rezepte.
• Bei Erreichen der
eingestellten Backzeit
schaltet sich der Ofen
automatisch ab und ein
akustisches Signal ertönt.
• Diese Funktion wird
zusammen mit der Backdauer benutzt. Z.B. soll
Ihre Speise 45 Minuten
backen und um 12:30
fertig sein. Wählen Sie
zuerst die Backfunktion,
dann Backzeitdauer 45
Minuten einstellen, dann
Backzeitende 12:30
eingeben. Der Backofen
startet automatisch um
11:45 (12:30 minus 45
Min.) und schaltet sich
dann zu der eingestellten
Zeit ab.
ACHTUNG:
Wenn nur die Backendzeit, nicht jedoch die
Dauer der Backzeit
eingestellt worden ist,
setzt sich der Ofen sofort
in Betrieb und schaltet
sich bei Erreichen der
eingestellten Backendzeit ab.
32 DE
Page 34

BEDIENUNGSANLEITUNG
Unsere Backöfen sind in unterschiedlichen Modellen mit unterschiedlichem Design und Farben erhältlich. Vergleichen Sie das
Schaltbrett Ihres Modells mit den untenstehenden Zeichnungen, um die richtige Beschreibung der Eigenschaften und
Leistungsmerkmale Ihres Backofens ausfindig zu machen.
Temperaturschalter
Kontroll
knebel
Backfunktion
Thermostat-
knebel
50 ÷ MAX
50 ÷ MAX
50 ÷ MAX
**
50 ÷ MAX
Beispiel Schalterknopf
12-Positionen-Schalter*
PIZZA
(Je nach Modell)
Funktion (Je nach Modell)
Damit wird die Innenbeleuchtung eingeschaltet. Damit wird das Kühlgebläse aktiviert (nur bei Backöfen mit Kühlungssystem)
Sprinter - Diese Einstellung beschleunigt das Vorheizen des Backofens. Wenn die Funktion eingestellt ist, wird der
Backofen sofort aufgeheizt (er braucht z.B. 8 Minuten bis 200°C). Die gewünschte Temperatur kann mit dem
Temperaturwahlschalter eingestellt werden. Das Ende der Vorheizphase wird durch das Erlöschen der Thermostatleuchte
"°C" angezeigt. Nach Ende der Vorheizphase kann die gewünschte Backfunktion gewählt und die Speise in den Backofen
gegeben werden. Vermeiden Sie es, die Speise bereits während der Aufheizphase in den Backofen zu geben, da sonst
das Gericht nicht gelingen würde.
Grill bei geschlossener Tür
Beim Auswählen dieser Funktion wird die Infrarot-Grillheizung eingeschaltet. Diese Funktion ist ideal zul Braten von
Fleischstücken mittlerer Größe (z.B. Würste und Bacon).
Super Grill
Mit dieser Funktion kann der Bräunungsgrad der Speise gewählt werden oder das Gericht am Ende des Backvorgangs
überbacken werden. Die Funktion Super Grill arbeitet mit 50% mehr Leistung als der Standard-Grill.
Ober-/Unterhitze
Es sind die obere und die untere Heizung eingeschaltet. Es ist die traditionelle Art zu garen, ausgezeichnet geeignet zum
Braten von Keulen, Wildbret, ideal für Plätzchen und Kekse, und für alle Speisen, die knusprig werden sollen.
50 ÷ MAX
*
50 ÷ MAX
50 ÷ MAX
50 ÷ MAX
50 ÷ MAX
50 ÷ 200
Umluft mit Unterhitze
Diese Funktion ist ideal für empfindlichen Speisen (Soufflés, kuchen).
Auftauen
In dieser Einstellung erfolgt eine Luftzirkulation bei Raumtemperatur zum Auftauen von Tiefkühlkost in wenigen Minuten,
ohne eine Veränderung des Proteingehalts herbeizuführen.
Ober-/Unterhitze mit Ventilator
Diese Funktion ist für Geflügel, Fisch, Gemüse und Gebäck zu empfehlen.
Dank der Umluft dringt die Hitze besser in die Speise ein, so dass die Temperatur niedriger und die Garzeit kürzer werden.
Die Rundheizung und der Ventilator sind im Betrieb
Die heiße Luft wird in die verschiedenen Ebenen verteilt. Ideal, um gleichzeitig unterschiedliche Gerichte zuzubereiten
(Fleisch, Fisch) ohne dass sich Aromen und Geschmack vermischen.
Sanftes Backen, geeignet für Biskuit und Blätterteig.
Soft Cook
Soft Cook ist die ideale Funktion für Backwaren und Brot. Dank der reduzierten Geschwindigkeit des Ventilators wird die
Feuchtigkeit im Backraum erhöht. Das bietet optimale Backverhältnisse für alle Speisen, die beim Garen eine geschmeidige
Konsistenz bewahren sollen und nicht zerbröseln dürfen (wie z.B. Kuchen, Brot, Gebäck).
Pizza backen
Die umfassende Hitze dieser Funktion reproduziert im Backofen ähnliche Bedingungen wie im Holzofen einer Pizzeria.
Diese Funktion muss zusammen mit dem Pizza-Set verwendet werden. Das Pizzablech ist mit einem besonderen Material
beschichtet, das optimale Backergebnisse gewährleistet.
Turbogrill bei geschlossener Tür
Die durch die Heizung erhitzte Luft wird vom Ventilator angesaugt und über die Speisen bei der gewünschten Temperatur
zwischen 50°C und 200°C verteilt. Der Umluft-Grill eignet sich ausgezeichnet für das Braten von Geflügel,
Würsten und Fleisch auch in größeren Mengen anstelle des Drehspießes.
VARIO FAN
VARIO FAN
VARIO FAN
VARIO FAN
VARIO FAN
VARIO FAN
VARIO FAN
Vario Fan ist das exklusive, von Candy entwickelte Backsystem, das die Backergebnisse, die Temperatur und die Feuchtigkeit im
VARIO FAN
* Prüfprogramm gemäß CENELEC EN 50304
** Prüfprogramm gemäß CENELEC EN 50304 zur Feststellung der Energieeffzienzklasse
Backofen optimiert. Das System Vario Fan verändert automatisch die Drehgeschwindigkeit des Ventilators bei allen MultifunktionsBackprogrammen. Das System wird automatisch aktiviert, sobald eine Funktion aus dem gestrichelten Bereich des Schaltbretts gewählt
wird.
33 DE
Page 35

GARZEITEN
Die in dieser Tabelle angegebenen Garzeiten dienen als Richtwerte. Diese können je nach Qualität, Frische und Größe der zuzubereitenden
Speisen sowie nach Ihrem persönlichen Geschmack variieren.
Schalten Sie den Backofen etwa 10 Minuten vor der angegebenen
Stellung der SchienenEIN RATSCHLAG:
Zeit aus und lassen Sie die Speisen bei ausgeschaltetem Ofen
weiter garen. So sparen Sie nicht nur Strom, sondern Sie können
den Garpunkt nach Ihrem Geschmack bestimmen.
KONVENTIONELLER BACKOFEN
Speise Menge Gltter-
rost
Garzeit
Min.
Tempera-
tur °C
MULTIFUNKTIONSBACKOFEN
Gltter-
rost
Garzeit
Min.
Tempera-
tur °C
• Nudeln
Lasagne Kg 3,5 2 70 - 75 220 2 60 - 65 200
Cannelloni Kg 1,8 2 50 - 60 220 2 40 - 50 200
Nudelauflauf Kg 2,5 2 55 - 60 220 2 45 - 50 200
• Teigwaren
Brot Kg 1 2
35 + 10
vorheizen
200 2
30 - 35
10 vorheizen
180
Pizza Kg 1 1 190 1 19025 - 35 20 - 25
Anmerkungen
Kein Vorheizen
Kein Vorheizen
Kein Vorheizen
Schneiden Sie ein Kreuz in den zum Laib
geformten Teig. Mindestens 2 Stunden
gehen lassen. Teig in die Mitte des gut
gefetteten Backblechs legen
Backofen 15 Min. vorheizen
Blätterteig 24 Stk 1 220 2 20030 - 35 25 - 30
Rührteig
(Marmorkuchen)
Mürbeteig
(Obstkuchen)
1
1
180 1 16055 50
200 2 18040 30-35
Form mit 22 cm Ø: 10 Minuten vorheizen
Form mit 22 cm Ø: 10 Minuten vorheizen
• Fleisch
Fleisch können Sie sowohl in hohen Brätern als auch in niedrigen Bratpfannen
braten. Niedrige Bräter sollten abgedeckt werden, damit keine Soßen- und Fettspritzer den Backofeninnenraum übermäßig verschmutzen.
So bleibt das Fleisch außerdem saftig und zart. Ohne Deckel ist das Fleisch dagegen kroß und knusprig. Die angegebene Zeiten gelten
fürs Braten mit oder ohne Deckel.
Roastbeef Kg 1 3 220 3 20070 - 80 50 - 60
Schweinebraten Kg 1 2 220 2 200100 - 110 80 - 90
Kalbsrollbraten Kg 1,3 1 220 2 20090 - 110 90 - 100
Rinderbraten 2 220 2 20080 - 90 80 - 90
Kg 1
Fleisch in einem hohen Bräter braten.
Einmal wenden.
Bratform abdecken.
s. oben
s. oben
• Fisch
Forelle Kg 1 2 220 2 20040 - 45 35 - 40
Abgedeckt backen.
Lachsfilet
700 gr.
2,5 cm dick
2 220 2 20030 - 35 30 - 25
Schollenfilet Kg 1 2 220 2 20040 - 45 35 - 40
Goldbrasse 2 Stk. 2 220 2 20040 - 45 35 - 40
34 DE
Nicht abdecken.
Abgedeckt backen.
Page 36

GARZEITTABELLE
MULTIFUNKTIONSBACKOFENKONVENTIONELLER BACKOFEN
Speise Menge Gltter-
rost
• Geflügel
Ente/Gans 1,3 Kg. 2 60 - 80 220 2 60 - 70 200
Huhn 1,5 Kg. 2 110 - 120 220 2 100 - 110 200
• Grillen
Legen Sie das Grillgut unter den Infrarotgrill. Achtung: die Grillheizung wird glühend rot. Zum Auffangen von Fett und Bratensaft schieben
Sie die Fettpfanne unter das Grillgut.
Toastbrot 4 Sch 4
Garzeit
Min.
5
5 vorheizen
Tempera-
tur °C
grill 4
rost
Garzeit
Min.
5
10 vorheizen
Tempera-
tur °C
grill
AnmerkungenGltter-
Toastbrot auf den Rost legen. Von beiden
Seiten grillen. Vor dem Servieren auf dem
Backofenboden warmhalten.
Bratwurst 5 St. 4
Kotelett 4 St. 4
25 - 30
5 vorheizen
25
5 vorheizen
grill 4
grill 4
15 - 20
10 vorheizen
15 - 20
10 vorheizen
grill
grill
Beim Grillen ab und zu wenden.
35 DE
Page 37

INSTRUCTIONS GENERALES
— Lire attentivement les instructions contenues dans cette brochure, elles fournissent d’importantes indications sur la sécurité d’installation,
l’emploi du four et son entretien.
— Conserver soigneusement cette notice d’utilisation pour toutes consultations ultérieures.
— Après avoir déballé votre four, vérifier que l’appareil est complet.
— Les emballages comme le plastique, le polystyrène, peuvent constituer un danger pour les enfants. Ne pas les laisser à leur portée.
ATTENTION
Lors de la première utilisation du four, il peut se produire un dégagement de fumée âcre provoqué par la premier échauffement du
collant des panneaux d’isolation enveloppant le four. Ce phénomène est normal. Attendez que la fumée cesse avant de cuire des
aliments. Lorsque le four est en fonctionnement, la porte en verre est particulièrement chaude, les éléments chauffants sont brûlants ;
nous recommandons donc de ne pas toucher. Eloigner les jeunes enfants.
ATTENTION: La tension et la fréquence d’alimentation sont indiquées sur la plaque signalétique (illustration dernière page).
Faites appel à un professionnel pour l’installation de votre four.
DECLARATION DE CONFORMITÉ:
• Les parties de cet appareil pouvant être en contact avec des
substances alimentaires sont conformes à la prescription de
la Dir. CEE 89/109.
Cet appareil est conforme aux directives 89/336/CEE,
73/23/CEE et modifications successives.
CONSIGNES DE SECURITE
Cet appareil est conçu pour cuire des aliments. Tout autre
utilisation (exemple chauffage d’appoint) doit être considéré
comme impropre. Le constructeur ne peut être tenu comme
responsable en cas de dommages liés à une mauvaise utilisation
ou à des modifications techniques du produit.
Lorsque le four est en fonctionnement, toutes les parties accessibles
sont chaudes, nous recommandons de ne pas toucher. Eloigner
les jeunes enfants. Le risque est important surtout quand le gril
est utilisé.
L’emploi d’un appareil électrique nécessite quelques règles de
sécurité.
- Ne pas tirer sur le fil électrique pour débrancher la prise.
- Ne pas toucher l’appareil avec les pieds ou les mains mouillés.
- Evitez d’utiliser l’appareil pieds nus.
- Veillez à ne pas laisser les enfants en bas âge manipuler le four.
L’utilisation de multiprises et de rallonges pour raccorder votre
appareil est fortement déconseillé. En cas de panne ou de mauvais
fonctionnement il faut éteindre le four avant de le démonter. En
cas de détérioration du fil électrique, remplacez-le rapidement en
suivant les indications suivantes: ôtez le fil d’alimentation électrique
et remplacez-le par un du type H05RR-F, H05VV-F, H05V2V2F
adapté à la puissance de l’appareil. Vous veillerez à ce que cette
opération soit effectuée par un centre technique agréé. Pour
l’utilisateur c’est la certitude d’obtenir des pièces de rechange
d’origine. Le non-respect de ces règles peut compromettre la
sécurité de l’appareil.
• Le four que vous venez d'acquérir possède des caractéristiques
techniques définies et en aucun cas vous ne pourrez apporter
des modifications sur cet appareil.
• Votre four est équipé d'une porte intégrant plusieurs vitrages
permettant d'éviter tout risque de brûlure en fonctionnement.
Néanmoins nous recommandons d'éloigner les jeunes enfants,
notamment lors de cycles de nettoyage Pyrolyse.
• Avant de réaliser une pyrolyse, enlever les débordements
importants ou les gros déchets. En effet, des résidus gras en
quantité élevée sont susceptibles de s'enflammer sous l'action
de la chaleur intense que dégage la pyrolyse.
• Ne jamais utiliser de nettoyeur vapeur ou à haute pression pour
le nettoyage du four.
• Si votre four présente un défaut quelconque, ne pas le brancher
ou le débrancher de l'alimentation générale et faire appel
directement à un service technique agréé pour le constructeur.
• Ne pas stocker de produits inflammables dans le four; ils
pourraient s'enflammer lors d'une mise en route involontaire du
four.
• Ne pas s'appuyer et ne pas laisser les enfants s'asseoir sur la
porte du four.
• Utiliser des gants thermiques de cuisine, pour enfourner ou pour
retirer un plat du four.
RECOMMANDATIONS
• Après chaque utilisation du four, réaliser un petit entretien qui
favorisera le nettoyage parfait du four.
• Ne pas tapisser les parois du four avec des feuilles en aluminium
ou des protections jetables du commerce. La feuille d'aluminium
ou toute autre protection, en contact direct avec l'émail chauffé,
risque de fondre et de détériorer l'émail du moufle.
• Afin d'éviter les salissures excessives de votre four ainsi que les
fortes odeurs de fumées pouvant en résulter, nous recommandons
de ne pas utiliser le four à trop forte température.
Il est préférable de rallonger le temps de cuisson et de baisser
un peu la température.
• En plus des accessoires fournis avec le four, nous vous conseillons
de n'utiliser que des plats, des moules à pâtisserie résistants à
de très hautes températures (ex. en terre).
INSTALLATION
La mise en service de l’appareil est à la charge de l’acheteur, le
constructeur est dégagé de ce service. Les pannes liées à une
mauvaise installation ne seront pas couvertes par la garantie.
Une mauvaise installation peut provoquer des dommages aux
personnes, aux animaux domestiques; dans ce cas la responsabilité
du constructeur ne peut être engagée.
IMPORTANT: L'INSTALLATION DU FOUR DOIT ÊTRE
REALISEE PAR UN INSTALLATEUR AGREE OU UN
TECHNICIEN DE QUALIFICATION SIMILAIRE.
Le meuble dans lequel le four doit être encastré, doit être réalisé
en matériaux résistant à une température minimale de 70°C.
Le four peut être placé en hauteur dans une colonne ou
enchâssé sous un plan de travail.
Avant sa fixation: il est indispensable d'assurer une bonne
aération dans la niche d'encastrement afin de permettre la bonne
circulation de l'air frais nécessaire au refroidissement
et à la protection des organes intérieurs. Pour cela, réaliser les
ouvertures spécifiées selon le type d'encastrement (dernière page).
RACCORDEMENT ELECTRIQUE
LE BRANCHEMENT ELECTRIQUE DOIT ÊTRE REALISE PAR
UN INSTALLATEUR AGREE OU UN TECHNICIEN DE QUALIFICATION SIMILAIRE.
• L'installation recevant l'appareil doit être conforme à NFC 15100.
Le constructeur décline toute responsabilité en cas de non respect
de cette exigence.
• Le raccordement au réseau doit être effectué par une prise de
courant avec prise de terre, ou par l'intermédiaire d'un dispositif
à coupure omnipolaire ayant une distance d'ouverture des contacts
d'au moins 3 mm.
• L'installation doit obligatoirement être protégée par des fusibles
appropriés, et comporter des fils d'une section suffisante pour
alimenter normalement l'appareil.
RACCORDEMENT: cet appareil est équipé d'un cordon
d'alimentation permettant le raccordement exclusivement sous
une tension de 230 V~ entre phases ou entre phase et neutre.
• Le raccordement devra être effectué après avoir vérifié:
. la tension d'alimentation indiquée au compteur,
. le réglage du disjoncteur.
• Le fil de protection du cordon (vert/jaune) relié à la borne Terre
de l'appareil doit être relié à la borne Terre de l'installation.
Attention :
. Faire vérifier par un professionnel la continuité de la terre de
l'installation avant de procéder au raccordement.
. Notre responsabilité ne saurait être engagée pour tout incident,
ou ses conséquences éventuelles qui pourraient survenir à
l'usage d'un appareil non relié à la terre, ou relié à une terre dont
la continuité serait défectueuse.
Ne pas oublier que l'appareil peut nécessiter une opération
NOTA:
de S.A.V. Aussi, placez la prise de courant de façon à pouvoir
brancher le four une fois sorti de sa niche.
Câble d'alimentation: si le changement du câble d'alimentation
s'avère nécessaire, nous vous demandons de faire réaliser cette
opération par le service après-vente ou une personne de qualification similaire.
36 FR
Page 38

EQUIPEMENT DU FOUR
EQUIPEMENT DIFFERENT SELON LE TYPE DE FOUR
Avant la première utilisation des différents accessoires, nous
recommandons un nettoyage avec une éponge additionnée
de produit lessiviel, suivi d'un rinçage et d'un séchage.
La grille sert de support aux
moules et aux plats. Elle sert
également à recevoir les grillades
puisqu'elle est équipée de rails pour
maintenir le plat récolte sauce
dessous, pour la récupération des
graisses.
Le plat récolte-sauce est destiné
à recevoir le jus des grillades.
Ne jamais utiliser ce plat comme
plat à rôtir, il en résulterait des
dégagements
projections de graisse et un
encrassement rapide du four.
Le set Pizza est l'idéal pour la
cuisson de pizza. Le set doit être
utilisé avec le mode de cuisson
Pizza.
GUIDES TELESCOPIQUES
Extraire les bras téléscopiques et positionner la grille porte plat
“C”, complèter avec la mise en place du plat récolte-sauce “D”.
de fumée, des
ENTRETIEN GENERAL DU FOUR
• Attendre le refroidissement du four, avant de réaliser une
opération de nettoyage manuel.
• Ne jamais utiliser de produits abrasifs, d’éponges métalliques
ou d’objets tranchants pour nettoyer le four, l’émail serait
irrémédiablement abîmé.
• N’utiliser que de l’eau savonneuse ou des produits liquides
ammoniaqués.
LE FOUR
Le nettoyage du four est très important et doit être effectué après
chaque utilisation. En effet, les graisses brûlées pendant la cuisson
se déposent sur les parois et pourraient, la fois suivante, dégager
des odeurs désagréables qui nuiraient au bon résultat de la
cuisson. Pour nettoyer l’enceinte du four, utiliser de l’eau chaude
avec des produits détergents, et rincer soigneusement.
LES PARTIES VITREES
A la fin de chaque utilisation, essuyer avec un papier absorbant.
Si les projections sont trop importantes, nettoyer avec une éponge
et un produit détergent. N’utiliser jamais de produits abrasifs ou
d’objets tranchants.
LES ACCESSOIRES
Nettoyer avec une éponge imbibée d’eau savonneuse. Rincer
avec de l’eau propre et sècher. Eviter les produits abrasifs.
LE PLAT DU SET PIZZA
La superficie du plat est revêtue d'un matériau antiadhérent facile
à nettoyer et lavable dans le lave-vaisselle.
Ne pas utiliser de produits abrasifs ou d'objets tranchants, qui
endommageraient définitivement le revêtement antiadhérent.
C
D
Pendant l’utilisation du four, les accessoires non utilisés
doivent être retirés du four.
LE PLAT RECOLTE-SAUCE
Après une grillade, retirer le plat récolte-sauce du four. Prendre
soin de reverser les graisses (tièdes) dans l’évier. Laver et rincer
le plat récolte-sauce dans de l’eau chaude, avec une éponge
imbibée de produit lessiviel. Si les résidus restent collés, le faire
tremper dans de l’eau et un produit détergent. Il peut aussi être
nettoyé dans un lave-vaisselle ou avec un produit du commerce.
Ne jamais replacer le plat récolte-sauce encrassé dans un four.
ECLAIRAGE DU FOUR
Pour changer l’ampoule d’éclairage du four veillez à débrancher
électriquement le four. Les ampoules de four sont spécifiques,
elles sont conçues pour résister à une température élevée.
Pour la substitution de l'ampoule défectueuse, il vous suffit de:
• démonter le cache en verre en le
dévissant,
• dévisser l'ampoule,
• la remplacer par un modèle identique,
• après remplacement de l'ampoule
défectueuse, remonter le cache verre
qui sert de protection en le revissant.
37 FR
Page 39

ASSISTANCE TECHNIQUE
En cas de de mauvais fonctionnement, vérifier si la prise est
branchée. Après ces vérifications, adressez vous à votre revendeur
ou prévenez directement notre service technique qui interviendra
dans les plus brefs délais. Veiller à ce que le coupon de garantie
fourni avec le produit soit correctement rempli, avec la date d’achat
du four.
Cet appareil est commercialisé en accord avec
la directive européenne 2002/96/CE sur les
déchets des équipements électriques et
électroniques (DEEE).
En vous assurant que ce produit est correctement
recyclé, vous participez à la prévention des
conséquences négatives sur l’environnement et
la santé publique qui pourrait être causé par une
Le symbole sur ce produit indique qu’il ne doit pas être traité
comme un déchet ménager. Il doit être rapporté jusqu’à un point
de recyclage des déchets électriques et électroniques.
La collecte de ce produit doit se faire en accord avec les
réglementations environnementales concernant la mise au rebut
de ce type de déchets.
Pour plus d’information au sujet du traitement, de la collecte et
du recyclage de ce produit, merci de contacter votre mairie, votre
centre de traitement des déchets ou le magasin où vous avez
acheté ce produit.
mise au rebut inappropriée de ce produit.
38 FR
Page 40

UTILISATION DU PROGRAMMATEUR ÉLECTRONIQUE
REGLAGE DE L’HEURE
ATTENTION: la première opération à exécuter après l’installation
ou après une coupure de courant (de telles situations se reconnaissent parce que l’afficheur est sur et clignote) est
le réglage de l’heure, procéder comme décrit ci-dessous :
• Appuyer et maintenir appuyer sur les touches TIMER et END. (
et TIMER sur quelques modèles)
• Appuyer sur les touches ou pour régler l’heure
• Relâcher les touches
ATTENTION: le four fonctionne seulement s’il est sur la position manuelle ou cuisson
programmée
N.B.: pour régler les différentes fonctions du four, sur quelques modèles apparaissent les
symboles ou , pour les autres modèles nous avons + o -
FONCTION
MINUTEUR
FONCTIONNE-
MENT MANUEL
TEMPS
DE CUISSON
HEURE DE FIN
DE CUISSON
COMMENT
L’UTILISER
• Appuyer et maintenir appuyé sur la touche
• Appuyer sur les touches
ou pour régler la dureé
• Relâcher les touches.
• On met les points en fin de
phrase partout ou nulle part.
Pas une fois de temps en temps
• Appuyer sur la touche
• Sélectionner la fonction de
cuisson avec le bouton de
sélection
• Appuyer et maintenir
appuyer sur la touche
TIMER
• Appuyer sur les touches
ou pour régler la durée
• Relâcher les touches
• Choisir la fonction de
cuisson avec le bouton de
sélection
• Appuyer et maintenir
appuyer sur la touche END
• Appuyer sur les touches
ou pour régler la durée
• Relâcher les touches
• Choisir la fonction de
cuisson avec le bouton de
sélection
COMMENT
L’ARRETER
• A la fin de la durée
sélectionnée, le minuteur
se coupe et un signal
sonore retentit (il s’arrête
automatiquement, mais
pour le stopper de suite,
appuyer sur la touche )
• Ramener le bouton de
sélection en position
O.
• A la fin du temps de cuisson, le four sera automatiquement mis hors fonction.
Si vous souhaitez arr
la cuisson avant, vous
pouvez soit positionner
le bouton de selection sur
O, soit régler le temps de
cuisson à 0:00. (touches
TIMER+ et )
• A l’heure sélectionnée le
four s’éteint tout seul; pour
l’arrêter en avant il est
nécessaire de porter le
bouton de sélection en
position O.
eter
BUT
•Emission d’un signal
sonore à la fin d’un temps
sélectionné
• Pour visualiser le temps
restant appuyer sur la
touche
• Faire fonctionner le four
• Sélectionner la durée de
la cuisson des alimentes
dans le four
• Pour visualiser le temps
restant appuyer la touche
TIMER.
• Pour modifier le temps
restant appuyer la touche
TIMER + ou
• Mémoriser l’heure de fin
de cuisson
• Pour visualiser l’heure
appuyer sur la touche END
• Pour modifier l’heure
sélectionnée appuyer sur
les touche END + ou
À QUOI
SERT-IL ?
•Il permet d’utiliser le
programmateur du four
comme un rêveil-mémoire
(il peut être utilisé avec le
four allumé ou éteint).
• Réaliser les cuisson
désirées
•Quand le temps de
cuisson est écoulé, la
cuisson s’arrête automatiquement et l’alarme sonne
quelques secondes.
• Cette fonction est utilisée
pour des cuissons que
l’on peut programmer à
l’avance. Par exemple,
votre plat doit cuire 45 mn
et être prêt à 12:30;
réglez alors simplement la
durée sur 45 mn et l’heure
de fin de cuisson sur
12:30.
La cuisson commencera
automatiquement à
11:45 (12:30 moins 45
mn) et continuera
jusqu’à ce que l’heure de
fin de cuisson soit
atteinte.
A ce moment, le four
s’arrêtera automatiquement
39 FR
Page 41

INSTRUCTIONS POUR L’UTILISATION
Notre gamme de four est composée de modèles avec des caractéristiques, des esthétiques et des coloris différents. Veuillez
vous reporter à la rubrique correspondante au modèle que vous avez achetez.
Manette
thermostat
Manette des
fonctions
PIZZA
thermostat
50 ÷ MAX
50 ÷ MAX
50 ÷ MAX
**
50 ÷ MAX
50 ÷ MAX
*
50 ÷ MAX
50 ÷ MAX
50 ÷ MAX
50 ÷ MAX
50 ÷ 200
Manette
Exemple
manette sélecteur
de fonctions
PIZZA
(12 positions*)
* selon modèle
Fonction selon modèle
Allumage de l’éclairage du four.
Mise en marche de la turbine de refroidissement (seulement pour les modèles ventilés).
Sprinter
Cette fonction permet une montée en température rapide pendant le préchauffage. Une fois sélectionnée, la montée en
température s’effectue très rapidement (ex. 8 minutes pour atteindre 200°C), la température désirée étant réglée par la
manette du thermostat. Lorsque le cycle préchauffage est terminé, le voyant du thermostat “°C” devient fixe, choisir alors
la fonction cuisson nécessaire pour le mets à cuire. Pendant la phase de préchauffage, nous recommandons de ne pas
enfourner les aliments à cuire, ils en subiraient des dommages.
Gril traditionnel (l’utilisation du gril se fait porte fermée)
Utilisation de la résistance du gril à rayons infrarouges.
Excellente pour la cuisson de viandes de petites et moyennes épaisseurs (grillades, brochettes) ou pour le gratinage.
Super Gril
Cette fonction permet de sélectionner le niveau de grillade de l’aliment ou de gratinage du mets en fin de cuisson. La
fonction Super Gril est caractérisée par un supplément de puissance égal à 50% par rapport au gril traditionnel.
Convection naturelle
Mise en fonctionnement des deux résistances.
La convection naturelle est utilisée pour cuire des viandes rouges, tartes salées.
Sole ventilée
Utilisation de la resistance de sole et de la turbine qui brasse l’air dans l’enceinte du four. Cette fonction est recommandée
pour la cuisson des tartes à fruits juteux, les tourtes, les quiches et les patés.
Décongélation
Cette position permet la circulation de l’air à la température ambiante tout autour de l’aliment surgelé en le décongelant
rapidement.
Four ventilé
Utilisation simutanée des résistances avec la turbine qui brasse l’air dans l’enceinte du four. Fonction recommandée
pour les volailles, les pâtisseries, les poissons, les légumes .... La chaleur pénètre mieux à l’intérieur du mets à cuire et
réduit le temps de cuisson.
Four ventilé
Utilisation simultanée de la résistance circulaire et de la turbine. L’air chaud est réparti de façon homogène, idéal pour
réaliser des cuissons combinées avec préparations identiques ou non sur un ou deux gradins, sans mélange d’odeurs.
Recommandé pour les cuissons délicates comme le pain, les pâtisseries.
Soft Cook
Soft cook est la fonction idéale pour la pâtisserie et le pain. Grâce à la vitesse réduite de la turbine, cette fonction augmente
l’humidité présente dans l’enceinte du four. Une humidité supplémentaire crée des conditions de cuisson idéale pour les
aliments qui ont besoin de maintenir une consistance élastique pendant leur cuisson (ex: tourtes, pain, biscuit) et de ce
fait évite une surcuisson.
Fonction Pizza
La forte chaleur produite par la fonction Pizza est très proche de celle d’un feu de bois dans un four à pizza traditionnel.
Cette fonction doit être utilisée avec le Set Pizza comme accessoire. Le plat du Set Pizza est revêtu d’un matériau idéal
pour la réussite des cuissons de Pizza.
Gril ventilé (l’utilisation du gril se fait porte fermée)
L’air est chauffé par la résistance du gril entre 50 et 200°C. Le ventilateur crée des flux d’air autour des aliments pour
mieux griller et gratiner.
TURBINE A VITESSE VARIABLE
TURBINE A VITESSE VARIABLE
TURBINE A VITESSE VARIABLE
TURBINE A VITESSE VARIABLE
TURBINE A VITESSE VARIABLE
TURBINE A VITESSE VARIABLE
TURBINE A VITESSE VARIABLE
TURBINE A VITESSE VARIABLE
* Programme testé selon le CENELEC, norme européenne EN 50304
** Programme testé selon le CENELEC, norme européenne EN 50304 qui définit la classe énergétique.
système de fonctionnement du four pour optimiser les résultats de cuisson, la gestion de la température ainsi
que la gestion de l’humidité. Le système “Turbine à vitesse variable” modifie automatiquement la vitesse de rotation de la turbine pour
toutes les cuissons multifonctions. Ce système s’active automatiquement toutes les fois qu’une fonction est sélectionnée à l’intérieur
de la partie représentée en pointillé sur le tableau de bord.
40 FR
Page 42

TEMPS DE CUISSON
Les temps de cuisson sont donnés à titre indicatif et peuvent varier selon la nature de l’aliment son poids, son volume, et bien entendu
selon votre goût.
CONSIGNES UTILES:
Sur les temps donnés, vous pouvez arrêter votre four 10 minutes
avant la fin de la cuisson afin de bénéficier de la chaleur résiduelle
pour continuer à cuire tout en économisant de l’énergie.
Four en convection naturelle Four en chaleur tournante
Préparations Quantité Niveau Tempé-
Temps de
cuisson en
minutes
rature
four
Niveau Tempé-
Temps de
cuisson en
minutes
rature
four
• Viandes
Roastbeef Kg 1 3 70 ÷ 80 220 3 50 ÷ 60 200
Rôti de porc Kg 1 2 100 ÷ 110 220 2 80 ÷ 90 200
Rôti de veau Kg 1,3 1 90 ÷ 100 220 2 90 ÷ 100 200
Rôti de boeuf Kg 1 2 80 ÷ 90 220 2 80 ÷ 90 200
• Poissons
Truite Kg 1 2 40 ÷ 45 220 2 35 ÷ 40 200
Saumon
700 g 2,5 cm
épaisseur
2 30 ÷ 35 220 2 30 ÷ 35 200
Niveau de gradin
Observations
Disposer la viande dans un plat pyrex à
hauts rebords, salé et poivré.
Disposer le rôti de porc dans un plat pyrex
avec de l’huile et du beurre.
Pour le rôti de veau idem.
Pour le rôti de boeuf idem.
Truite: cuire la truite couverte, avec du sel
et du poivre dans un plat pyrex.
Saumon: même type de cuisson non
couverte.
Sole filet / kg 1 2 40 ÷ 45 220 2 35 ÷ 40 200
Dorade 2 entières 2 40 ÷ 45 220 2 35 ÷ 40 200
• Volailles, lapin
Pintade Kg 1/1,3 2 60 ÷ 85 220 2 60 ÷ 70 200
Poulet kg 1,5-1,7 2 110 ÷ 120 220 2 100 ÷ 110 200
Lapin kg 1/1,2 2 55 ÷ 65 220 2 50 ÷ 60 200
• Gateaux
Gâteau au
chocolat
1 55 180 1 50 160
Tarte aux abricots 1 40 200 2 30 ÷ 35 180
• Légumes
Fenouil 800 gr. 1 70 ÷ 80 220 1 60 ÷ 70 200
Courgettes 800 gr. 1 70 220 1 60 ÷ 70 200
Pommes de terre 800 gr. 2 60 ÷ 65 220 2 60 ÷ 65 200
Carottes 800 gr. 1 80 ÷ 85 220 1 70 ÷ 80 200
Sole: cuire avec du sel + cuillère d’huile.
Daurade: cuire avec couvercle de l’huile
et du sel.
Volailles et pintade: plat pyrex ou en terre,
assaisonné avec très peu d’huile.
Pour le poulet idem.
Lapin: le couper en morceau. Les mettre
dans le lèchefrite avec des aromates.
Moule à tarte de 22 cm de diamètre.
Préchauffage de 10 minutes.
Moule à tarte de 22 cm de diamètre.
Préchauffage de 10 minutes
Disposer le fenouil coupé en 4 dans un plat
en pyrex, avec un couvercle. Ajoutezy du beurre et du sel. Faites revenir le
fenouil en retournant les morceaux dans le plat.
Pour les courgettes, coupez les en tranches.
Pour les pommes de terre, coupez les de
façon égale et faites les cuire dans un plat
en pyrex avec du sel, de l’origan, et du
romarin.
Pour les carottes coupez les en rondelles
puis les disposer dans un plat pyrex non
couvert.
41 FR
Page 43

TEMPS DE CUISSON
Four en convection naturelle Four en chaleur tournante
Préparations Quantité Niveau Tempé-
• Fruits
Pommes entières
Kg 1 1 45 ÷ 55 220 2 45 ÷ 55 200
Poires Kg 1 1 45 ÷ 55 220 2 45 ÷ 55 200
Pêches Kg 1 1 45 ÷ 55 220 2 45 ÷ 55 200
• Cuisson gril
Pendant la cuisson au gril la résistance devient rouge vive. Ce phénomène est normal.
Toasts
4 tranches 4 5 (5 Préchauf.) gril 4 5 (5 Préchauf.) gril
Croques monsieur n. 4 3 5 (5 Préchauf.) gril 3
Saucisses n. 6/kg 0,9 4
Côte de boeuf n. 4/kg 1,5 4
Cuisses de poulet n. 4/kg 1,5 3
Temps de
cuisson en
minutes
25/30
(5 Préchauf.)
25
(5 Préchauf.)
50/60
(5 Préchauf.)
rature
four
gril 4
gril 4
gril 3
Niveau Tempé-
Temps de
cuisson en
minutes
5/8
(5 Préchauf.)
15/20
(5 Préchauf.)
15/20
(5 Préchauf.)
50/60
(5 Préchauf.)
rature
four
gril
gril
gril
gril
Observations
Mettez les fruits dans un plat pyrex sans
les recouvrir. Une fois cuits laissez-les
refroidir dans le four.
Mettre les tranches de pain de mie sous le
gril. Dès que les tranches sont dorées
retournez les. Eteignez le gril pour les
maintenir au chaud.
Couper les saucisses en deux disposées
sous le gril. Retournez les saucisses pour
les cuire de l’autre côté.
Disposez la côte de boeuf sous le gril et
retournez la jusqu’à la cuisson désirée.
Aromatiser selon votre goût.
Cuisses de poulet: aromatisez selon votre
goût.
42 FR
Page 44

INDICAÇÕES DE CARÁCTER GERAL
Obrigado por ter optado por um dos nossos produtos. Para tirar o maior proveito possível do seu forno, recomendamos que:
Leia atentamente este manual de instruções de utilização; ele contém instruções importantes sobre a instalação, a utilização e a
manutenção seguras deste forno.
Mantenha este manual de instruções à mão, num local seguro, para o poder consultar sempre que necessário.
Quando o forno for ligado pela primeira vez, ele poderá emitir fumo com um cheiro acre. Isto fica a dever-se ao facto de o agente
aglutinante dos painéis de isolamento existentes à volta do forno ter sido aquecido pela primeira vez. Trata-se de um facto absolutamente
normal; se ele ocorrer, terá apenas de esperar que o fumo se dissipe antes de introduzir os alimentos no forno.
Devido à sua natureza, um forno aquece muito, em especial a sua porta de vidro.
Por isso, não permita que crianças se aproximem do forno quando ele estiver quente e, em particular, quando o grelhador estiver ligado.
DECLARAÇÃO DE CONFORMIDADE:
• Os componentes utilizados neste electrodoméstico que podem
entrar em contacto com géneros alimentares satisfazem o
disposto na directiva da CEE 89/109.
Além disso, este electrodoméstico satisfaz o disposto nas
directivas da CEE 89/336/CEE, 73/23/CEE e alterações
subsequentes das mesmas.
INFORMAÇÃO SOBRE SEGURANÇA
O forno só deverá ser utilizado para o fim para que foi concebido,
ou seja, o forno só deverá ser utilizado para cozinhar alimentos.
Todo e qualquer outro tipo de utilização, como, por exemplo,
para aquecer o ambiente, é considerada uma forma imprópria
de utilizar o forno e, consequentemente, é considerada perigosa.
O fabricante declina toda e qualquer responsabilidade por
quaisquer danos provocados por uma utilização imprópria,
incorrecta ou irrazoável do forno.
Durante a sua utilização, o forno aquece bastante, pelo que deve
ter cuidado para não tocar nos elementos de aquecimento
existentes no interior do forno. Além disso, deve sempre impedir
as crianças de se aproximarem do forno quando ele está em
funcionamento.
Sempre que utilizar um aparelho eléctrico, deverá observar
determinadas regras básicas.
Não puxe pelo cabo para desligar a ficha do aparelho da
tomada de alimentação de energia.
Não toque no forno com mãos ou pés molhados ou húmidos.
Nunca utilize o forno quando estiver descalço.
Não permita que crianças ou adultos irresponsáveis utilizem o
forno, salvo sob a supervisão de alguém responsável.
Normalmente nunca é boa ideia utilizar adaptadores, fichas
múltiplas e extensões.
Se o forno se avariar ou ficar defeituoso, desligue-o, retirando a
ficha do respectivo cabo de alimentação de energia da tomada,
e não lhe toque.
Se o cabo de alimentação de energia apresentar qualquer tipo
de dano, ele terá de ser imediatamente substituído. Ao proceder
à substituição do cabo siga estas instruções.
Desmonte o cabo de alimentação de energia danificado e substituao por um HO5RR-F, H05VV-F, H05V2V2-F apto a suportar a
corrente eléctrica de que o forno necessita. A substituição do
cabo deverá ser sempre levada a cabo por um técnico devidamente
qualificado.
O cabo de ligação à terra (amarelo/verde) tem de ter um
comprimento 10 mm superior ao comprimento do cabo de
alimentação de energia.
Sempre que o seu forno necessitar de ser reparado, recorra
exclusivamente a um serviço de assistência técnica aprovado;
certifique-se sempre de que só são utilizadas peças sobressalentes
originais. Se estas instruções não forem cumpridas, o fabricante
não poderá assegurar a segurança do forno.
O forno que acaba de adquirir tem características técnicas bem
definidas e, por isso, não pode sofrer quaisquer modificações.
Nunca limpar o forno com aparelhos a vapor ou a alta pressão.
Se o forno apresentar qualquer avaria, não o ligar ou desligálo
da corrente e contactar directamente os serviços técnicos acreditados pelo fabricante.
Não guardar produtos inflamáveis no forno; podem inflamar-se
por activação involuntária do forno.
Não se apoie nem deixe que as crianças se sentem na porta do
forno.
Utilizar luvas térmicas de cozinha, para introduzir ou retirar qualquer
recipiente do forno.
RECOMENDAÇÕES
• Sempre que o forno for utilizado, fazer uma pequena limpeza
para que este se mantenha em perfeitas condições.
• Não forrar as paredes do forno com folha de alumínio ou com
qualquer protecção descartável vulgarmente à venda, pois pode
fundir em contacto directo com o esmalte quente e danificar o
forno.
• Para evitar que o forno se suje excessivamente e também o
fumo e cheiro que daí podem resultar, não o usar a temperaturas
demasiado altas. É preferível demorar mais o tempo e baixar um
pouco o nível térmico.
• Para além dos acessórios fornecidos conjuntamente com o
forno, aconselhamos a utilizar apenas recipientes resistentes a
altas temperaturas
.
INSTALAÇÃO
Compete ao cliente proceder à instalação do forno. O fabricante
não tem qualquer obrigação de proceder à instalação do forno.
Se for necessária assistência técnica do fabricante para repar
avarias ou defeitos resultantes de uma instalação incorrecta do
forno, esta assistência técnica não está coberta pela garantia.
A instalção deve ser efectuada segundo as instruções dos técnicos
qualificados. Uma instalação incorrecta do forno pode causar
danos em pessoas, animais ou objectos. Neste caso, o fabricante
não poderá ser responsabilizado por esses danos.
O móvel em que o forno vai ser encastrado devem ser resistente
a temperaturas de 70°C no mínimo.
O forno pode ser encaixado por baixo de uma bancada ou
colocado em plano superior em coluna adequada.
Antes da fixação fixação: É indispensável certificar-se de que
o nicho de encastramento tem bom arejamento, para circulação
do ar frio necessário à refrigeração e à protecção dos
órgãos internos. Para isso, fazer a uma abertura própria, conforme
indicado da última página, consoante com o tipo de encastramento.
LIGAÇÃO ELÉCTRICA
A LIGAÇÃO ELÉCTRICA DO FORNO DEVE SER EFECTUADA
POR UM INSTALADOR ACREDITADO OU POR UM TÉCNICO
COM QUALIFICAÇÃO SEMELHANTE.
A instalação eléctrica a que o forno vai ser ligado deve estar de
acordo com as normas vigentes no país de instalação.
O fabricante declina a sua responsabilidade em caso de
incumprimento desta exigência.
A ligação à rede deve ser feita através de tomada de corrente com
ligação à terra ou através de um dispositivo de corte omnipolar,
com uma distância de abertura dos contactos de pelo menos 3mm.
A instalação deve obrigatoriamente ser protegida por fusíveis
apropriados e possuir fios com secção suficiente para a alimentação
normal do aparelho
LIGAÇÃO: este forno tem um cabo de alimentação que permite
apenas a sua ligação a corrente de 230 V~, entre fases ou entre
fase e neutro. O cabo de ligação à terra, amarelo/verde, não
deverá ser ligado/desligado pelo interruptor de ligar/desligar acima
referido. Quer a tomada, quer o interruptor de ligar/desligar
utilizados para a ligação à rede de energia deverão estar colocados
de forma a poderem ser acedidos com facilidade depois do forno
ter sido instalado.
Importante: Durante a instalação do forno, coloque o cabo de
alimentação de energia de modo a que não fique submetido a
temperaturas superiores a 50ºC em nenhum ponto da sua
extensão.
O forno satisfaz as normas e requisitos de segurança das entidades
reguladoras competentes. O forno só poderá ser utilizado com
segurança se tiver sido ligado à terra conforme estipulado nos
requisitos legais em vigor relativos à segurança das instalações
eléctricas.
O fabricante não poderá ser responsabilizado por qualquer
tipo de danos ou injúrias provocados em pessoas, animais
ou objectos resultantes de uma má ligação do forno à terra,
ou mesmo da sua falta de ligação à terra.
43 PT
Page 45

EQUIPAMENTO DO FORNO (segundo o modelo)
LIMPEZA DO FORNO
Antes de usar o equipamento do seu forno pela primeira vez,
tem de o limpar. Lave-o com uma esponja. Passe por água
limpa e seque.
A prateleira de grade serve de
suporte para formas, pratos próprios
para ir ao forno, forminhas para
doces. Além disso, também pode
ser utilizada para grelhar carne,
na medida em que tem suportes
próprios para fixar a pingadeira, que
se destina a recolher os sucos e as
gorduras que escorrem durante a
cozedura.
A pingadeira apanha os sucos
provenientes dos alimentos
grelhados.
O conjunto de piza é o ideal para
a cozedura de pizas. Este conjunto
deve ser utilizado em conjunto com
a função Pizza.
ge.
GUIA TELESCÓPICA
Extraia os braços telescópicos e introduza a prateleira de grade
C por trás do dispositivo de bloqueio da prateleira de grade, na
parte da frente. Em seguida, introduza a pingadeira D na prateleira
de grade.
· Espere sempre que o forno arrefeça antes de o limpar à
mão.
· Nunca utilize produtos abrasivos, palha de aço ou objectos
afiados para limpar o forno, pois, se o fizer, o esmalte poderá
ficar danificado sem possibilidade de reparação.
· Utilize exclusivamente uma solução de água e detergente
ou produtos de limpeza à base de amónia.
O FORNO
É muito importante limpar o forno a seguir a cada utilização. A
gordura derretida deposita-se nas paredes do forno durante a
cozedura dos alimentos. Da próxima vez que o forno for utilizado,
essa gordura poderá dar azo a cheiros desagradáveis, podendo,
inclusive, pôr em perigo o êxito dos seus cozinhados. Limpe as
paredes do forno com água quente com detergente ; passe
cuidadosamente por água, para remover todos os traços de
detergente.
COMPONENTES DE VIDRO
A seguir a cada utilização do forno, limpe a porta de vidro do forno
com papel de cozinha absorvente. Se a porta estiver muito suja
ou salpicada, pode lavar o vidro da porta com uma esponja
humedecida em água e detergente e bem torcida; em seguida,
limpe com água limpa para remover todos os restos de detergente.
Nunca utilize produtos abrasivos ou objectos afiados.
ACESSÓRIOS
Limpe-os com uma esponja embebida numa solução de água e
detergente. Passe por água limpa e seque. Evite utilizar produtos
de limpeza abrasivos.
O TABULEIRO DO CONJUNTO DE PIZA
A superfície deste tabuleiro está revestida com um material
antiaderente e fácil de limpar; este tabuleiro pode ser lavado na
máquina de lavar loiça.
Nunca utilize produtos abrasivos nem objectos afiados para
remover resíduos ou sujidade do tabuleiro; se o fizer, poderá
danificar permanentemente o revestimento do tabuleiro.
C
D
Sempre que o forno estiver a ser utilizado, todo e qualquer
acessório que não seja necessário deve ser retirado do
interior do forno.
PINGADEIRA
Depois de grelhar alimentos no forno, retire a pingadeira do interior
do forno. Não se esqueça de deitar a gordura quente para um
recipiente. Lave e enxagúe a pingadeira em água quente, com
uma esponja embebida em água com detergente.
Se permanecerem resíduos agarrados, ponha a pingadeira de
molho em água com detergente.
A pingadeira também pode ser lavada na máquina de lavar loiça
ou ser limpa com um produto de limpeza especial para fornos, à
venda no mercado.
Nunca coloque no forno uma pingadeira que esteja suja.
LUZ INTERIOR DO FORNO
Antes de limpar a lâmpada do forno ou de proceder à sua
substituição, não se esqueça de desligar o forno da corrente,
retirando a ficha do respectivo cabo de alimentação de energia
da tomada.
Tanto a lâmpada como a respectiva protecção são feitas de
material resistente a temperaturas elevadas.
Como proceder à substituição
de uma lâmpada fundida
· desenrosque a protecção de vidro,
· desenrosque a lâmpada,
· substitua a lâmpada por uma do
mesmo tipo,
· depois de proceder à substituição
da lâmpada volte a enroscar a
protecção de vidro.
44 PT
Page 46

ASSISTÊNCIA TÉCNICA
Antes de entrar em contacto com a Assistência Técnica.
Se o forno não trabalhar, recomendamos que:
· se certifique de que o forno está correctamente ligado à fonte
de alimentação de energia.
Se lhe for impossível detectar a causa da avaria:
desligue o forno da alimentação de energia, retirando a ficha do
respectivo cabo de alimentação da tomada, não toque no forno
e entre em contacto com a Assistência Técnica.
Antes de entrar em contacto com a Assistência Técnica não
se esqueça de tomar nota do número de série do seu forno,
que está inscrito na placa de características do mesmo.
O forno está coberto por uma garantia que garante que, durante
o prazo de vigência da garantia, ele será gratuitamente reparado
pela Assistência Técnica do fabricante ou por ele recomendado.
Este electrodoméstico está marcado em
conformidade com o disposto na directiva
comunitária 2002/96/CE relativa aos resíduos
de equipamentos eléctricos e electrónicos
(REEE).
Ao assegurar que este produto é eliminado
correctamente, estará a ajudar a prevenir as
potenciais consequências negativas para o
ambiente e para a saúde pública resultantes
O símbolo no produto indica que este produto não pode ser
eliminado com os resíduos domésticos.
De facto, ele tem de ser entregue nos pontos de recolha
apropriados, para reciclagem de equipamentos eléctricos e
electrónicos. A eliminação deste produto tem de ser efectuada
em conformidade com a legislação local sobre eliminação de
resíduos.
Para informações mais detalhadas sobre o tratamento, a
recuperação e a reciclagem deste produto, agradecemos que
entre em contacto com as entidades responsáveis do seu
município, com o seu serviço de eliminação de resíduos
domésticos ou com o estabelecimento em que este produto foi
adquirido.
de uma eliminação incorrecta deste produto.
45 PT
Page 47

UTILIZAÇÃO DO PROGRAMADOR ELECTRÓNICO
ACERTAR O RELÓGIO
ATENÇÃO: a primeira operação que deve ser levada a cabo após
a instalação do forno ou após um corte de energia (facilmente
detectado no display onde pisca ) é o acertar das horas.
Proceda da seguinte forma.
• Mantenha pressionados os botões TIMER e END. ( e TIMER em
alguns modelos)
• Seleccione a hora com os botões .
• Solte todos os botões.
ATENÇÃO o forno só funciona se estiver seleccionada a função manual ou após o acertar
da hora.
NOTA em alguns modelos os símblos são substituídos por + e - .
FUNÇÕES COMO SELECCIONAR COMO DESLIGAR O QUE FAZ? PARA QUE SERVE
CONTAMINUTOS
FUNÇÃO
MANUAL
SELECÇÃO
DA DURAÇÃO
DO TEMPO
DE COZEDURA
FIM DO
TEMPO DE
COZEDURA
• Mantenha pressionado o
botão .
• Pressione os botões
para seleccionar o tempo
desejado.
• Solte todos os botões.
• Pressione o botão .
• Seleccione a função de
cozedura através do botão
de selecção de funções.
• Mantenha pressionado o
botão TIMER,
• Pressione os botões
para seleccionar a duração
do tempo de cozedura
desejada.
• Solte todos os botões.
• Seleccione a função de
cozedura através do botão
de seleccção de funções.
• Mantenha pressionado o
botão END.
• Pressione os botões
para seleccionar a hora a
que deseja que o forno se
desligue.
• Solte os botões.
• Seleccione a função de
cozedura através do botão
de seleccção de funções.
• Quando o tempo termina
um sinal sonoro é emitido
(este sinal sonoro parará
por si só, contudo pode ser
parado imediatamente
pressionando ).
• Coloque o botão de
seleccção de funções na
posição O.
• Quando o tempo selec-
cionado terminar o forno
desligar-se-à automaticamente.
• Caso deseje terminar a
cozedura mais cedo
coloque o botão de
selecção de funções na
posição ) ou seleccione o
tempo para 0.00 (botões
TIMER e ).
• Na hora seleccionada o
forno desligar-se-à.
•Para desligar manualmente seleccione no
selector de funções a
posição 0.
• Um sinal sonoro é emitido
no final do tempo seleccionado.
• Para verificar quanto
tempo resta até ao fim do
tempo seleccionado
pressione o botão .
• Forno disponível para
utilização
• É possível verificar qual o
tempo seleccionado para
o prato escolhido.
• Para verificar quanto
tempo resta até ao fim do
tempo seleccionado
pressione o botão TIMER.
• Para alterar o tempo se-
leccionado pressione o
botão TIMER e seleccione
o novo tempo pressionando .
• È possível seleccionar a
hora de fim de cozedura.
• Para verificar a hora seleccionada pressione o botão
END.
• Para alterar a hora seleccionada pressione o botão
END em conjunto com
.
• É possivel utilizar o forno
como relógio com alarme
(mesmo sem o forno estar
ligado para cozinhar).
• Para cozinhar os pratos
desejados
• No final do tempo seleccionado o forno desligarse-à automaticamente e
será emitido um sinal
sonoro.
• Normalmente esta função
é usada em conjunto com
a função de duração do
tempo de cozedura.
Por exemplo um cozinhado que demore 45 minutos
e deva estar pronto às
12:30 h.
Neste caso proceda da
seguinte forma:
Seleccione a duração do
tempo de cozedura de 45
minutos (TIMER e ).
Seleccione a hora de fim de
cozedura para as 12:30
(END e ).
Seleccione a função de
cozedura através do
botão de seleccção de
funções.
Às 11:45 o forno começará a funcionar e desligarse-à automaticamente ao
fim de 45 minutos.
ATENÇÃO
Se a hora de fim de cozedura é seleccionada (através do botão END) sem
que seja seleccionada a
duração do tempo de cozedura, o forno começará
a funcionar de imediato e
desligar-se-à à hora
seleccionada.
46 PT
Page 48

INSTRUÇÕES DE OPERAÇÃO
A nossa gama de produtos inclui diversos estilos e cores. Para identificar as especificações técnicas e as funções do modelo
que adquiriu, consulte os diagramas que se seguem.
Botão de
controlo do
termostáto
Botão de
selecção
da função
Botão de
controlo do
termostáto
50 ÷ MAX
50 ÷ MAX
50 ÷ MAX
Exemplo de
botão de comando
PIZZA
Botão de regulação de
12 posições*
* varia conforme o modelo
A função varia conforme o modelo
Acende a luz interna do forno.
Activará automaticamente a ventoínha de refrigeração (apenas para modelos com ventoínha de refrigeração).
Sprinter Esta posição regula um aquecimento prévio rápido do forno. Uma vez seleccionada esta função, o forno é
imediatamente aquecido (sendo necessários apenas 8 minutos, por exemplo, para aquecer o forno a 200°C); a temperatura
pretendida pode ser regulada com o botão de regulação da temperatura. O fim da fase de aquecimento prévio é assinalado
pelo apagamento do indicador luminoso do termóstato "°C". Concluída esta fase, pode seleccionar a função de cozedura
pretendida e introduzir no forno os alimentos a cozinhar. Preste atenção, para não introduzir os alimentos no forno
durante a fase de aquecimento prévio, pois, se o fizer, os alimentos podem ficar estragados.
Grelhados - porta fechada O interruptor da opção de grelhados, funciona a infra-vermelhos. Esta função é ideal para
cozinhar carnes de maior espessura (salsichas e bacon).
Super Grill
Esta função permite seleccionar o nível de tostado dos alimentos ou gratinar os pratos confeccionados, depois de
cozinhados. A função Super Grill pauta-se por uma potência superior em 50% à da função Grill normal.
**
50 ÷ MAX
50 ÷ MAX
*
50 ÷ MAX
50 ÷ MAX
50 ÷ MAX
50 ÷ MAX
50 ÷ 200
Convecção natural Neste modo de operação são usadas as duas resistências inferior e superior. Trata-se da forma
convencional de assar e cozinhar. É a forma ideal de assar carne e caça, cozer biscoitos e assar maçãs; com este modo
de operação os alimentos ficam com bom aspecto e estaladiços.
Baixo elemento com maior ventilação
Esta função é ideal para travessas delicadas (tarteiras, travessa para “souffle”).
Descongelação Se o botão de selecção de funções estiver colocado nesta posição, a ventoinha
circula o ar à temperatura ambiente à volta dos alimentos congelados, fazendo com que fiquem descongelados em
alguns minutos sem que o teor de proteínas dos alimentos sofra qualquer alteração.
Forno ventilado As duas resistências (superior e inferior) e a ventoinha estão em funcionamento.
Esta função é recomendada para a cozedura de aves, pastelaria, peixe e legumes.
Graças à circulação forçada do ar, o calor penetra melhor nos alimentos, dando azo a uma redução tanto do tempo de
cozedura, como do tempo de aquecimento.
Forno ventilado A resistência e o sistema de ventilação estão em funcionamento.
O ar quente é distribuído pelas diferentes prateleiras; trata-se do modo ideal para cozinhar simultaneamente diversos
tipos de alimentos (carne, peixe), sem misturar os sabores nem os aromas.
Cozedura delicada, indicada para a confecção de bolos e pastelaria, como, por exemplo, o Pão-de-Ló e a massa folhada
Soft Cook A função Soft cook é a ideal para a confecção de bolos, artigos de pastelaria e pão.
Graças à velocidade reduzida da ventoinha, esta função aumenta a humidade existente no interior do forno. Um teor
de humidade mais elevado cria as condições ideais para os alimentos que têm necessidade de manter uma consistência
elástica durante a sua cozedura (como é o caso, por exemplo, das tartes, dos bolos, do pão e dos biscoitos), evitando,
desta forma, que a sua superfície se quebre.
Modo de cozedura de pizas O calor intenso produzido durante este modo de cozedura é similar ao
produzido nos fornos de lenha tradicionais, especiais para a cozedura de pizas. Esta função deve ser utilizada em
conjunto com o conjunto de piza. O tabuleiro do conjunto de piza está revestido com um material ideal para assegurar
a obtenção dos melhores resultados de cozedura possíveis.
Porta fechada - grelhado ventilado
O ar é aquecido pela resistência do grelhador e a ventoinha sopra o ar para os alimentos à temperatura necessária.
Esta temperatura estende-se dos 50°C aos 200°C. A função de grelhador com ventoinha é uma excelente alternativa a
assar alimentos no espeto. É, aliás, a função ideal para assar mesmo grandes quantidades de aves, salsichas e carnes
vermelhas.
VARIO FAN
VARIO FAN
VARIO FAN
VARIO FAN
VARIO FAN
VARIO FAN
VARIO FAN
VARIO FAN
O sistema Vario Fan é o sistema exclusivo de funcionamento, desenvolvido pela Candy, para optimizar os resultados da cozedura,
a gestão da temperatura e a gestão da humidade. O sistema Vario Fan modifica automaticamente a velocidade de rotação para todas
as cozeduras no modo de operação multifunções. Este sistema é automaticamente activado sempre que é seleccionada uma das
funções que está indicada no interior da área tracejada do painel de comandos.
** Programa testado de acordo com o CENELEC EN 50304
** Programa testado de acordo com o CENELEC EN 50304 utilizado por definição na classe energética.
47 PT
Page 49

TABELAS DE TEMPOS DE COZEDURA
Os tempos sugeridos nas tabelas que se seguem revestem-se de mero carácter orientativo, podendo variar em função da qualidade,
da frescura, da dimensão e da espessura dos alimentos e ainda segundo o seu gosto pessoal. Deixe sempre os alimentos cozinhados
repousarem alguns minutos antes de os servir, pois todos os alimentos continuam a cozer depois de serem retirados do forno.
Conselhos úteis
Desligue o forno pelo menos 10 minutos antes do tempo indicado,
Posição da prateleira
deixando os alimentos no seu interior. Esta medida, além do mais,
permitir-lhe-á poupar energia e completar a cozedura a seu gosto.
Para que a superfície dos alimentos não fique demasiado seca
é indispensável reduzir a temperatura.
Forno eléctrico estático Forno com ventoinha eléctrico
Alimentos Quantidade Nível Tempera-
Tempo de
cozedura
em minutos
ratura
do forno
NívelTempe-
Tempo de
cozedura
em minutos
tura
Observações
doforno
• Massas
Lasanha Kg 3,5 2 70 - 75 220 2 60 - 65 200
Cannellonis Kg 1,8 2 50 - 60 220 2 40 - 50 200
Massa cozinhada
no forno
Kg 2,5 2 55 - 60 220 2 45 - 50 200
Coloque a lasanha no forno quando ele
estiver frio
Coloque a lasanha no forno quando ele
estiver frio
Coloque a lasanha no forno quando ele
estiver frio
• Pão, pizzas
Dê a forma de um pão à massa e faça uma
Pão
Kg 1
de massa
2
35
prerisc.10
200 2
30 - 35
prerisc.10
Pizzas Kg 1 1 190 1 19025 - 35 20 - 25
Pastéis
(congelados
vol au vents)
n° 24
unids.
1 220 2 20030 - 35 25 - 30
gr. 200
4 fogaças
de massa
2
200 2 18025 - 30 20 - 25
cada
180
cruz com uma faca no topo. Deixe a massa
levedar durante, pelo menos, 2 horas. Unte
a forma e coloque a massa do pão no
medio dela
Aqueça previamente o forno durante 15
minutos e coloque as pizzas numa forma
previamente untada. Guarneça a base da
pizza com tomate, queijo, fiambre, óleo,
sal e oregãos.
Coloque os 24 vol au vents no forno e
deixe-os cozinhar
Aqueça previamente o forno durante 15
minutos, unte a forma, tempera as 4 fogaças
com óleo e sal e deixe-as levedar, à
temperatura ambiente, durante pelo menos
2 horas antes de as colocar no forno
• Carne
Todos os tipos de carne podem ser cozinhados em recipientes tanto de bordos altos como de bordos baixos. Se optar por um recipiente de
bordos baixos, é aconselhável tapá-lo, a fim de evitar que o forno fique sujo com os salpicos dos condimentos utilizados no tempero da
carne. As carnes confeccionadas em recipientes cobertos ficam mais macias e com mais sucos, enquanto que as carnes cozinhadas em
recipientes descobertos resultam mais tostadas. Os tempos de cozedura indicados aplicam-se tanto à cozedura em recipientes cobertos
como à cozedura em recipientes descobertos.
Peça de vaca
inteira
Lombo de porco
assado
Lombo de vitela
assado
Kg 1 3 220 3 20070 - 80 50 - 60
Kg 1 2 220 2 200100 - 110 80 - 90
Kg 1,3 1 220 2 20090 - 110 90 - 100
Coloque a carne num pirex de bordo alto
com sal e pimenta. Vire a carne a meio da
cozedura.
Tempere a carne com sal, pimenta, óleo,
manteiga e temperos naturais e leve-a ao
forno num pirex tapado.
Idem.
Lombo de vaca
assado
Kg 1 2 220 2 20080 - 90 80 - 90
• Peixe
Truta 3 interas / Kg 1 2 220 2 20040 - 45 35 - 40
700 gr. em
Salmão
postas de 2,5 cm
cm de espessura
2 220 2 20030 - 35 30 - 25
Solha Filetes / Kg 1 2 220 2 20040 - 45 35 - 40
Dourada 2 inteiras 2 220 2 20040 - 45 35 - 40
48 PT
Idem.
Cozinhe as trutas num pirex, coberto, com
óleo, sal e cebolas.
Cozinhe o salmão num pirex sem tampa,
com sal, pimenta e óleo.
Cozinhe a solha temperada com sal e 1
colher de óleo.
Cozinhe em recipiente coberto, com óleo
e sal.
Page 50

TABELAS DE TEMPOS DE COZEDURA
Forno eléctrico estático Forno com ventoinha eléctrico
Alimentos Quantidade Nível Tempera-
Tempo de
cozedura
em minutos
ratura
do forno
NívelTempe-
• Avex, coelho
Galinha Kg 1-1,3 2 60 - 80 220 2 60 - 70 200
Tempo de
cozedura
em minutos
tura
doforno
Observações
Tempere a galinha com condimentos
naturais e muito pouco óleo e coloque-a
num pirex de bordos altos.
Frango Kg 1,5-1,7 2 110 - 120 220 2 100 - 110 200
Coelho aos
pedaços
Kg 1-1,2 2 55 - 65 220 2 50 - 60 200
• Doces e pastelaria
Tarte de chocolate
na forma
Torta de cenoura
na forma
Torte de fruta
(damascos ou
alperces)
1 55 180 1 50 160
1 55 175 1 40 - 45 160
1700 gr 40 200 2 30 - 35 180
• Legumes
Funcho 800 gr 1 70 - 80 220 1 60 - 70 200
Abobrinha 800 gr 1 70 220 1 60 - 70 200
Batatas 800 gr 2 60 - 65 220 2 60 - 65 200
Cenouras 800 gr 1 80 - 85 220 1 70 - 80 200
• Fruta
Maçãs inteiras Kg 1 1 45 - 55 220 2 45 - 55 200
Pêras Kg 1 1 45 - 55 220 2 45 - 55 200
Pêssegos Kg 1 1 45 - 55 220 2 45 - 55 200
• Grelhados
Pão de forma
tostado
Tostas recheadas
Salsichas
Entrecosto
Coxas de frango
4 fatias 4
43
n°6 / Kg 0,9 4
n°4 / Kg 1,5 4
n°4 / Kg 1,5 3
5 (pré-aqec.:
5 min.)
10 (pré-aqec.:
5 min.)
25/30
(pré-aqec.:
5 min.)
25 (pré-aqec.:
5 min.)
50/60
(pré-aqec.:
5 min.)
Grelhador 4 Grelhador
Grelhador 3 Grelhador
Grelhador 4 Grelhador
5 (pré-aqec.:
10 min.)
5/8 (pré-aqec.:
10 min.)
15/12
(pré-aqec.:
10 min.)
15/20
Grelhador 4 Grelhador
(pré-aqec.:
5 min.)
Grelhador 3
50/60
(pré-aqec.:
Grelhador
10 min.)
Idem.
Coloque os pedaços de coelho, de
dimensões semelhantes, na pìingadeira e
tempere com condimentos naturais. Se
necessário, vire a carne a meio da
cozedura.
Em forma de tarte de 22 cm de Ø. Aqueça
previamente o forno (10 min.).
Em forma de tarte de 22 cm de Ø. Aqueça
previamente o forno (10 min.).
Em forma de tarte de 22 cm de Ø. Aqueça
previamente o forno (10 min.).
Coloque o funcho partido em 4 bocados
com a parte de dentro voltada para cima,
tem-perados com manteiga e sal num pirex
e cubra.
Corte em fatias e coza num pirex, cobertas,
com manteiga e sal.
Corte em bocados iguais e cozinhe num
pirex coberto com óleo, sal, oregãos ou
rosmaninho
Corte às rode-las, e cozinhe num pirex
tapado.
Cozinhe num pirex ou recipiente cerâmico,
sem tapar. Deixe arrefecer no forno.
Idem.
Idem.
Coloque o pão sobre a grelha. Volte as
fatias a meio. Atenção: deixe o pão ficar
no fundo do forno, a repousar, antes de
servir (forno desligado).
Coloque as tostas sobre a grelha apoiada
na pingadeira: volte-as quando ficarem
douradas.
Corte-as ao meio e coloque-as sobre a
grelha (parte de dentro voltada para cima).
Volte a meio da cozedura. Atenção: convém
controlar visualmente a uniformidade da
cozedura. Se esta não se apresentar
uniforme, troque a posição das salsichas
mais passadas com as menos passadas.
Certifique-se de que o entrecosto está
exposto aos efeitos totais do grelhador
principal.
Tempere com condimentos naturais e volte
de vez em quando.
49 PT
Page 51

04-2007 • Cod. 41024452
 Loading...