

Page 1

OVENS
USER INSTRUCTIONS
GB
CANDY ELETTRODOMESTICI - Via Privata Eden Fumagalli - 20047 Brugherio Milano Italy
Page 2
1. GENERAL WARNINGS
• Read the instructions carefully to make the most of your oven. We recommend you keep the instructions for installation and use for
later reference, and before installing the oven, note its serial number below in case you need to get help from the after-sales service.
• When you have unpacked the oven, make sure that it has not
been damaged in any way. If you have any doubts at all, do not
use it: contact a professionally qualified person. Keep packing
materials such as plastic bags, polystyrene, or nails out of the
reach of children because they are dangerous for children.
The company shall not be liable if the instr uctions
provided in this document are not complied with.
1.1 DECLARATION OF COMPLIANCE
• The parts of this appliance that may come into contact with
foodstuffs comply with the provisions of EEC Directive 89/109.
Appliance complies with European Directives 73/23/EEC and
89/336/EEC, replaced by 2006/95/EC and 2004/108/EC, and
following changes.
1.2 SAFETY HINTS
• The oven must be used only for the purpose for which it was
designed: it must only be used for cooking food.
Any other use, e.g. as a form of heating, is an improper use of
the oven and is therefore dangerous.
• The manufacturers cannot be held responsible for any damage
caused by improper, incorrect or unreasonable use.
- All accessible parts are hot when the appliance is in operation,
take care to not touch these elements.When the oven is first
switched on it may give out acrid smelling fumes. This is because
the bonding agent for insulating panels around the oven has been
heated up for the first time.This is a completely normal, if it does
occur you merely have to wait for the fumes to clear before putting
the food into the oven.
• An oven by its very nature becomes very hot, especially the
glass of the oven door. Do not allow children to go near the oven
when it is hot, especially when the grill is on.
When using any electrical appliance you must follow a
few basic rules.
- Do not pull on the power cable to remove the plug from the
socket.
- Do not touch the oven with wet or damp hands or feet.
- Do not use the oven unless you are wearing something on
your feet.
- It is not generally a good idea to use adapters, multiple sockets
for several plugs or cable extensions.
- If the oven breaks down or develops a fault switch it off at the
mains and do not touch it.
• If the cable is damaged it must be replaced promptly.
When replacing the cable, follow these instructions.
Remove the power cable and replace it with one of the HO5RR-
F, H05VV-F, H05V2V2-F type. The cable must be able to bear
the electrical current required by the oven. Cable replacement
must be carried out by properly qualified technicians. The earthing
cable (yellow-green) must be 10 mm longer than the power cable.
Use only an approved service centre for repairs and ensure that
only original parts are used. If the above instructions are not
adhered to the manufacturers cannot guarantee the safety of the
oven.
• The oven you have just acquired has the described technical
characteristics and you must not make any modifications to it.
• Never use a steam or high-pressure spray to clean the oven.
• Do not store flammable products in the oven; they can catch
fire if the oven comes on accidentally.
• Do not press on and do not let children sit on the oven door.
• Use kitchen oven gloves, when putting into or removing a dish
from the oven.
• This appliance is not intended for use by persons (including
children) with reduced physical, sensory or mental capabilities,
or lack of experience and knowledge, unless they have been
given supervision or instruction concerning use of the appliance
by a person responsible for their safety.
• Children should be supervised to ensure that they do not play
with the appliance.
1.3 RECOMMENDATIONS
• After each use of the oven, a minimum of cleaning will help keep
the oven perfectly clean.
• In order to prevent excessive dirtying of your oven and the
resulting strong smoky smells, we recommend not using the oven
at too high a temperature. It is better to extend the cooking time
and lower the temperature a little.
• In addition to the accessories supplied with the oven, we advise
you only use dishes and baking moulds resistant to very high
temperatures.
• Do not line the oven walls with aluminium foil or single-use
protection available from stores. Aluminium foil or any other
protection, in direct contact with the hot enamel, risks melting
and deteriorating the enamel of the insides.
1.4 INSTALLATION
Installation is the customer’s responsibility. The manufacturers
have no obligation to carry this out. If the assistance of the
manufacturer is required to rectify faults arising from incorrect
installation, this assistance is not covered by the guarantee.
The installation instructions for professionally qualified personal
must be followed. Incorrect installation may cause harm or injury
to people, animals or belongings. The manufacturer cannot be
held responsible for such harm or injury.
The kitchen unit in which the oven is to be fitted must be made
of material resistant to temperatures of at least 70°C.
The oven can be located high in a column or under a worktop.
Before fixing: you must ensure good ventilation in the oven space
to allow proper circulation of the fresh air required for cooling and
protecting the internal parts. Make the openings specified on last
page according to the type of fitting.
1.5 ELECTRICAL CONNECTION
THE ELECTRICAL CONNECTION SHOULD BE CARRIED OUT
BY AN APPROVED CONTRACTOR OR TECHNICIAN WITH
SIMILAR QUALIFICATIONS.
The installation receiving the appliance must comply with the
standard in force in the installation country.
The manufacturer does not accept any responsibility if this provision
is not complied with.
Connection to the network must be by earthed socket outlet, or
by means of a multipole circuit-breaker.
The installation must be protected by suitable fuses, and have
wires with a large enough cross-section to supply the oven normally.
CONNECTION:
The oven is fitted with a power lead for connecting exclusively to
a voltage of 230 V AC across the phases or across phase and
neutral.
Connection must be carried out having first checked:
. the supply voltage indicated on the meter,
. the circuit-breaker setting.
The lead protection wire (green/yellow) connected to the earth
terminal of the oven must be connected to the earth terminal of
the installation.
Caution:
. Have the earth continuity of the installation checked by
an electrician before making the connection.
. The manufacturer will not be liable for any incident, or
the possible consequences that may arise from the use of
the oven not earthed, or connected to an earth with defective
continuity.
NB: Do not forget that the oven may require after-sales service.
Also, locate the socket outlet so that the oven can be connected
once it is removed from its space.
Power supply cable: if the power supply cable has to be changed,
please have this done by the after-sales service or by someone
with similar qualifications.
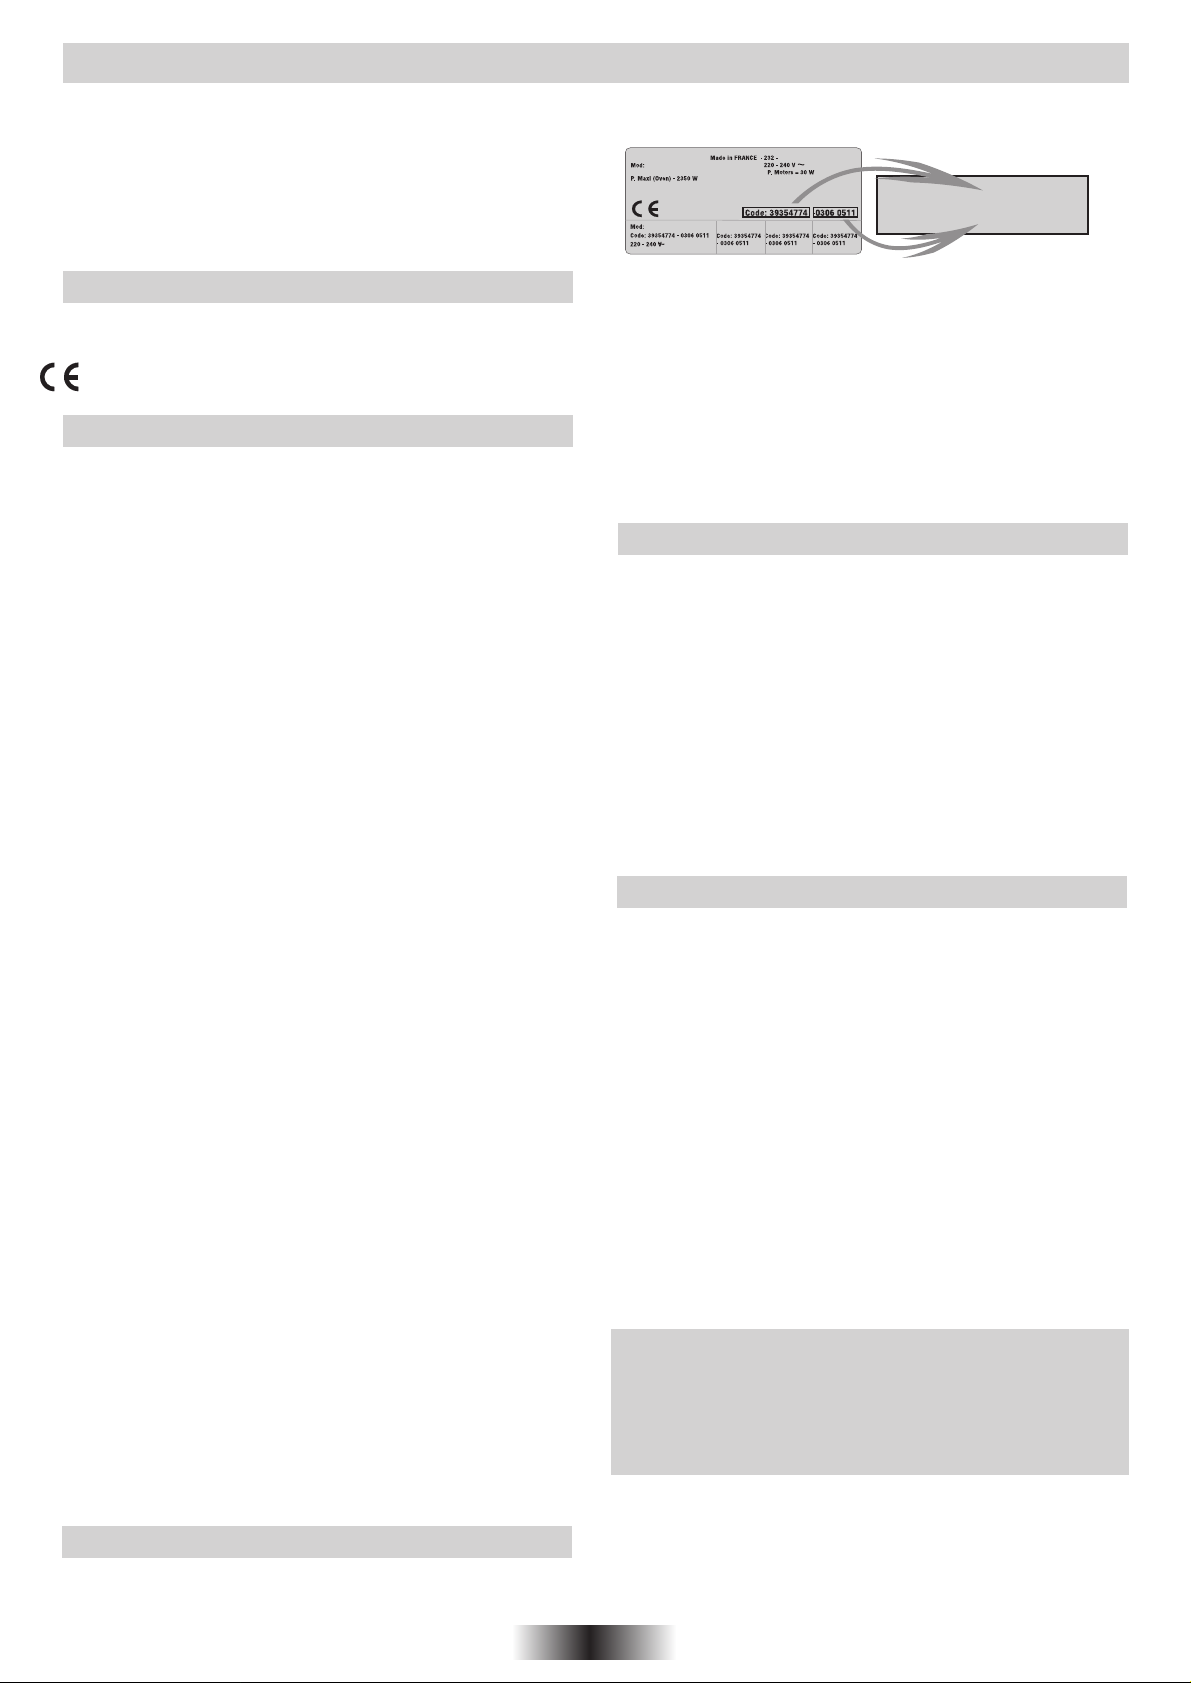
Identification plate (located
on the side of the oven)
Product code : ...................
Serial number : ..................
2 GB
Page 3
2.1 OVEN EQUIPMENT (according to model)
2.4 CLEANING THE OVEN : PYROLYSIS
It is necessary to do an initial cleaning of the equipment before
the first use of each of them. Wash them with a sponge. Rinse
and dry off.
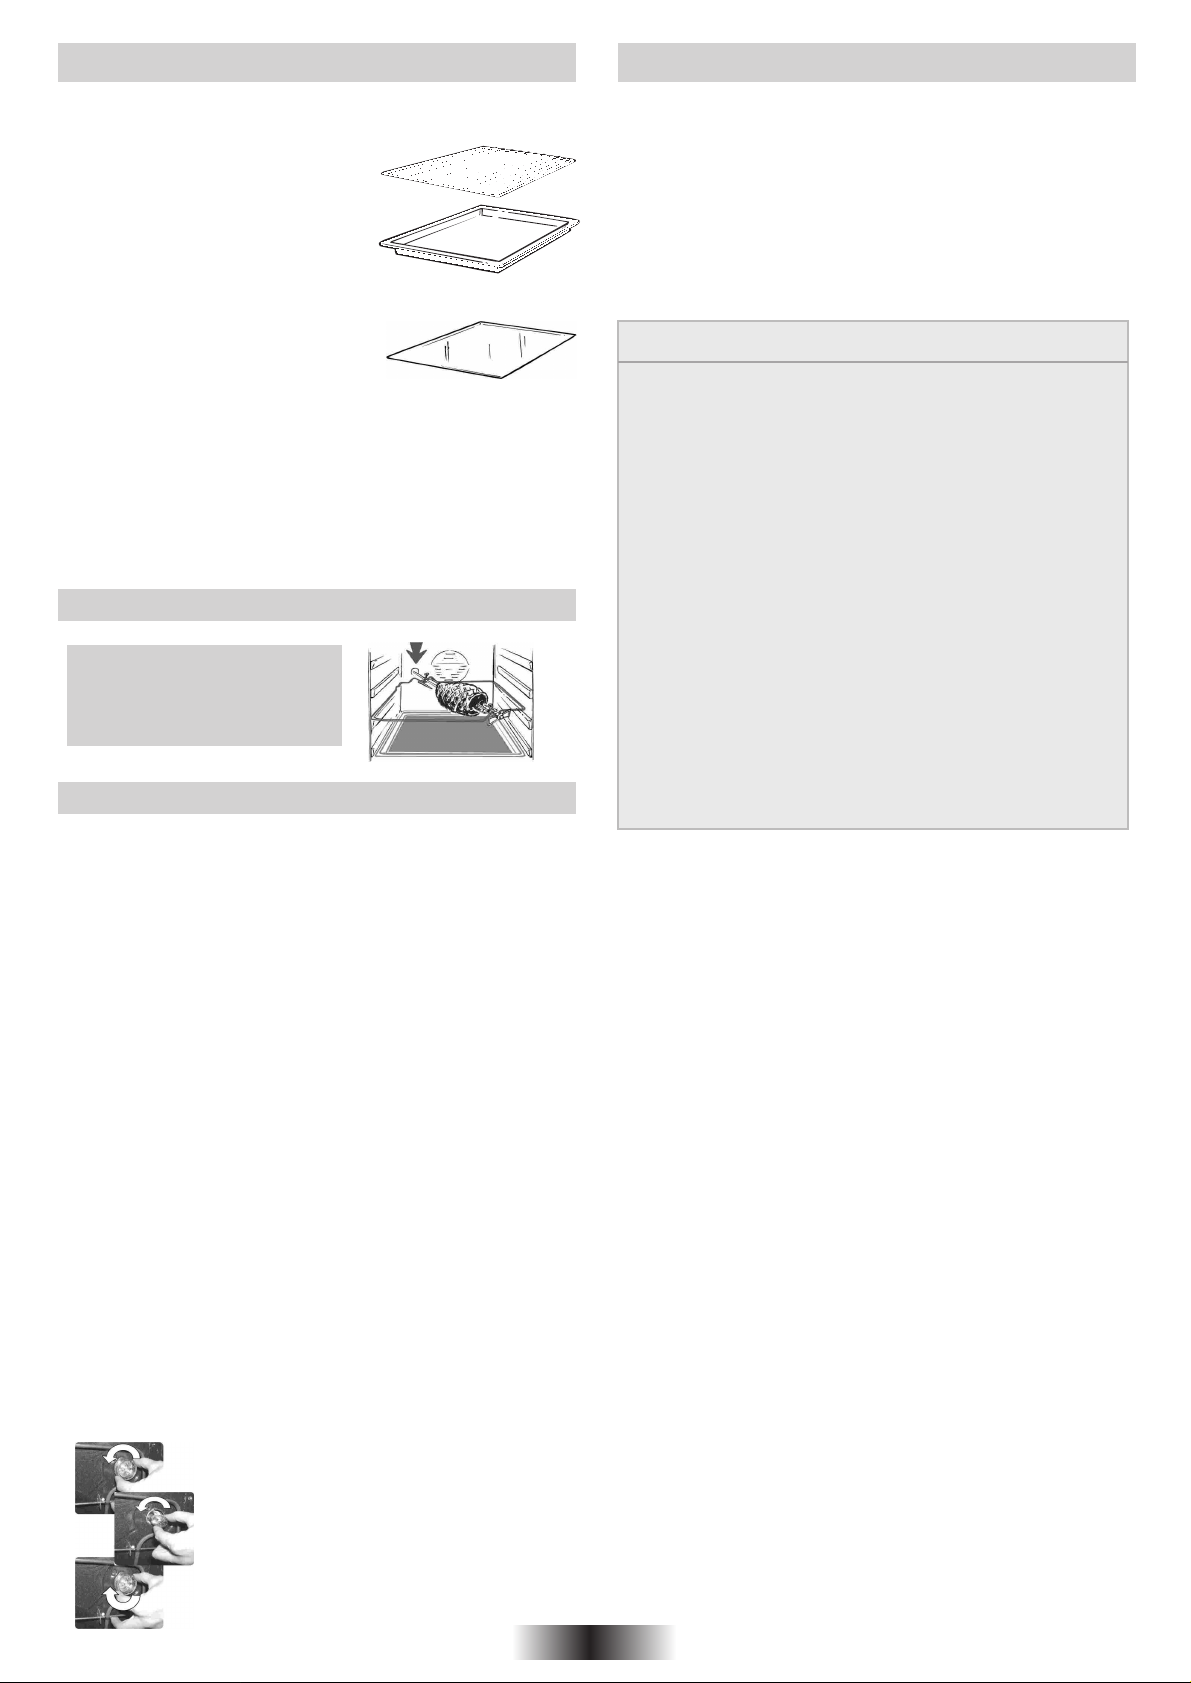
The simple shelf can take moulds
and dishes.
The drip tray catches the juices from
grilled foods.
Never use the drip tray as a roasting
tray as this creates smoke and fat will
spatter your oven making it dirty.
The pastry tray must be placed on
the shelf. It is for cooking small
pastries like choux, biscuits,
meringues, etc...
Never place the pastry tray directly on
the oven bottom.
The Grill pan can be used for all types
of grilling and is also suitable for toasting.
The grill pan is supplied with a
detechable handle inside the oven.
Do no leave the handle inside the oven.
When the oven is in use, any unused accessories should be
removed from the oven.
2.2 THE TURNSPIT (according to the model)
No preheating is required for
Rotisserie cooking.
Rotisserie cooking is done
with the door closed.
2.3 CLEANING AND MAINTENANCE
. Wait for the oven to cool down before doing any
cleaning by hand.
. Never clean your oven with abrasive cleaners, wire
wool or sharp objects, or the enamel may be damaged
beyond repair.
. Only use soapy water or bleach (ammonia) cleaners.
THE OVEN - It is very important to clean the oven each time that
it is used. Melted fat is deposited on the sides of the oven during
cooking. The next time the oven is used this fat could cause
unpleasant odours and might even jeopardise the success of the
cooking. Use water and detergent to clean; rinse out thoroughly.
GLASS PARTS - Wipe and clean the glass door with absorbent
kitchen paper every time you use the oven. If the spattering is
heavy, then you can clean with a well squeezed sponge and
detergent, and rinse. Never use abrasive cleaners or sharp objects.
ACCESSORIES - Clean them with a sponge soaked in soapy water.
Rinse with clean water and dry off. Avoid abrasive cleaners.
DRIP TRA Y - After grilling, remove the drip tray from the oven. Take
care to pour the warm grease into a container. Wash and rinse the
drip tray in hot water with a sponge soaked in washing up liquid.
If residues remain attached, soak them off in water and detergent.
It can also go in a dish washer or be cleaned with a commercial
oven cleaner. Never place a soiled drip tray in the oven.
OVEN LIGHTING
Disconnect the power supply from the oven before cleaning
or replacing the lamp.
The bulb and its cover are made of material resistant to high
temperatures.
Bulb characteristics: 230 V AC - 25W - E 14 base -
Temperature 300°C
To change a defective bulb, just
. unscrew the glass cover,
. unscrew the bulb,
. replace it with the same type:
seeccharacteristics above,
. after replacing the defective bulb, screw
back the protective glass cover.
Pyrolysis is a cleaning method that uses high temperatures to
destroy dirt.
The resulting smoke is cleaned by the passage of a catalyser.The
oven door is provided with a safety lock that prevents it being
opened during pyrolysis due to the necessity of high temperatures.
The pyrolysis cycle may result in a slight odour in the kitchen
which will be more or less noticeable depending on the latter’s
aeration.
IMPORTANT:
Before carrying out pyrolysis:
• Take all accessories out of the oven as they will be damaged
in the high pyrolysis temperatures;
• Clean away all excess food spills or large scraps of food
which would take too long to be destroyed. Effectively, large
amounts of grease may catch fire under the intense heat
emitted by pyrolysis.
• Close the oven door.
• If you have an hob top installed above the oven, never use
the gas burners or the electric plates during pyrolysis to avoid
excessive heating of the oven’s control panel.
It is strongly advised not to use detergents or any other
recommended product for cleaning ovens.
Open the oven door.
Pyrolysis leaves a white residue on the oven walls. Wait for the
oven to cool completely then clean the inside of the oven with
a damp sponge to wipe off the residue.
Remarks:
• you will save energy by cleaning directly after cooking
thus making use of the residual heat in the oven.
The pyrolysis oven is fitted with a cooling fan which protects the
control panel and electronics from heat damage. It begins when
the pyrolysis cycle reaches high temperatures and continues to
rotate after the oven has been switch off until the centre oven
temperature is high.
1. Rotate the function selector to the position P.
On the display, appears the indication « ECO » or « SUP ».
2. The preset time is 1.30 hrs, this can be varied from 1.30 hrs
(Eco mode) to 2 hrs (Sup mode) via the programmer (buttons
« + » or « - »). If the oven is very dirty, it is recommend to increase
the time to 2 hrs, if the oven is moderately dirty reduce the cleaning
cycle time to 1.30 hr.
3. It is possible to defer the start time of the pyroclean cycle by
changing the END time via the programmer.
4. After few minutes, when the oven reaches a high temperature,
the door locks automatically.
5. The pyroclean cycle can be stopped at any time by turning the
function selector back to ‘0’ (the word OFF will be displayed for
3 seconds).
6. Once the pyroclean cycle is finished, the pyrolysis will switch
off automatically. On the display appears the indication « END »
until the door is locked then « 0- - n »
7. You can turn the function selector back to « 0 » but if the
temperaure is still high, the « 0- - n » indication appears to inform
that the door is locked.
3 GB
Page 4
2.5 SERVICE CENTRE
Before calling the Service Centre
If the oven is not working, we recommend that:
• you check that the oven is properly plugged into the power
supply.
If the cause of the fault cannot be detected:
disconnect the oven from the mains, do not touch the oven and
call the after sales service.
Before calling the Service Centre remember to make a note
of the serial number on the specifications plate.
The oven is supplied with a guarantee certificate that ensures that
it will be repaired free of charge by the Service Centre whilst
under guarantee.
This appliance is marked according to the
European directive 2002/96/EC on Waste
Electrical and Electronic Equipment (WEEE).
By ensuring this product is disposed of correctly,
you will help prevent potential negative
consequences for the environment and human
health, which could otherwise be caused by
inappropriate waste handling of this product.
The symbol on the product indicates that this
product may not be treated as household waste.
Instead it shall be handed over to the applicable collection point
for the recycling of electrical and electronic equipment
Disposal must be carried out in accordance with local
environmental regulations for waste disposal.
For more detailed information about treatment, recovery and
recycling of this product, please contact your local city office,
your household waste disposal service or the shop where you
purchased the product.
4 GB
Page 5
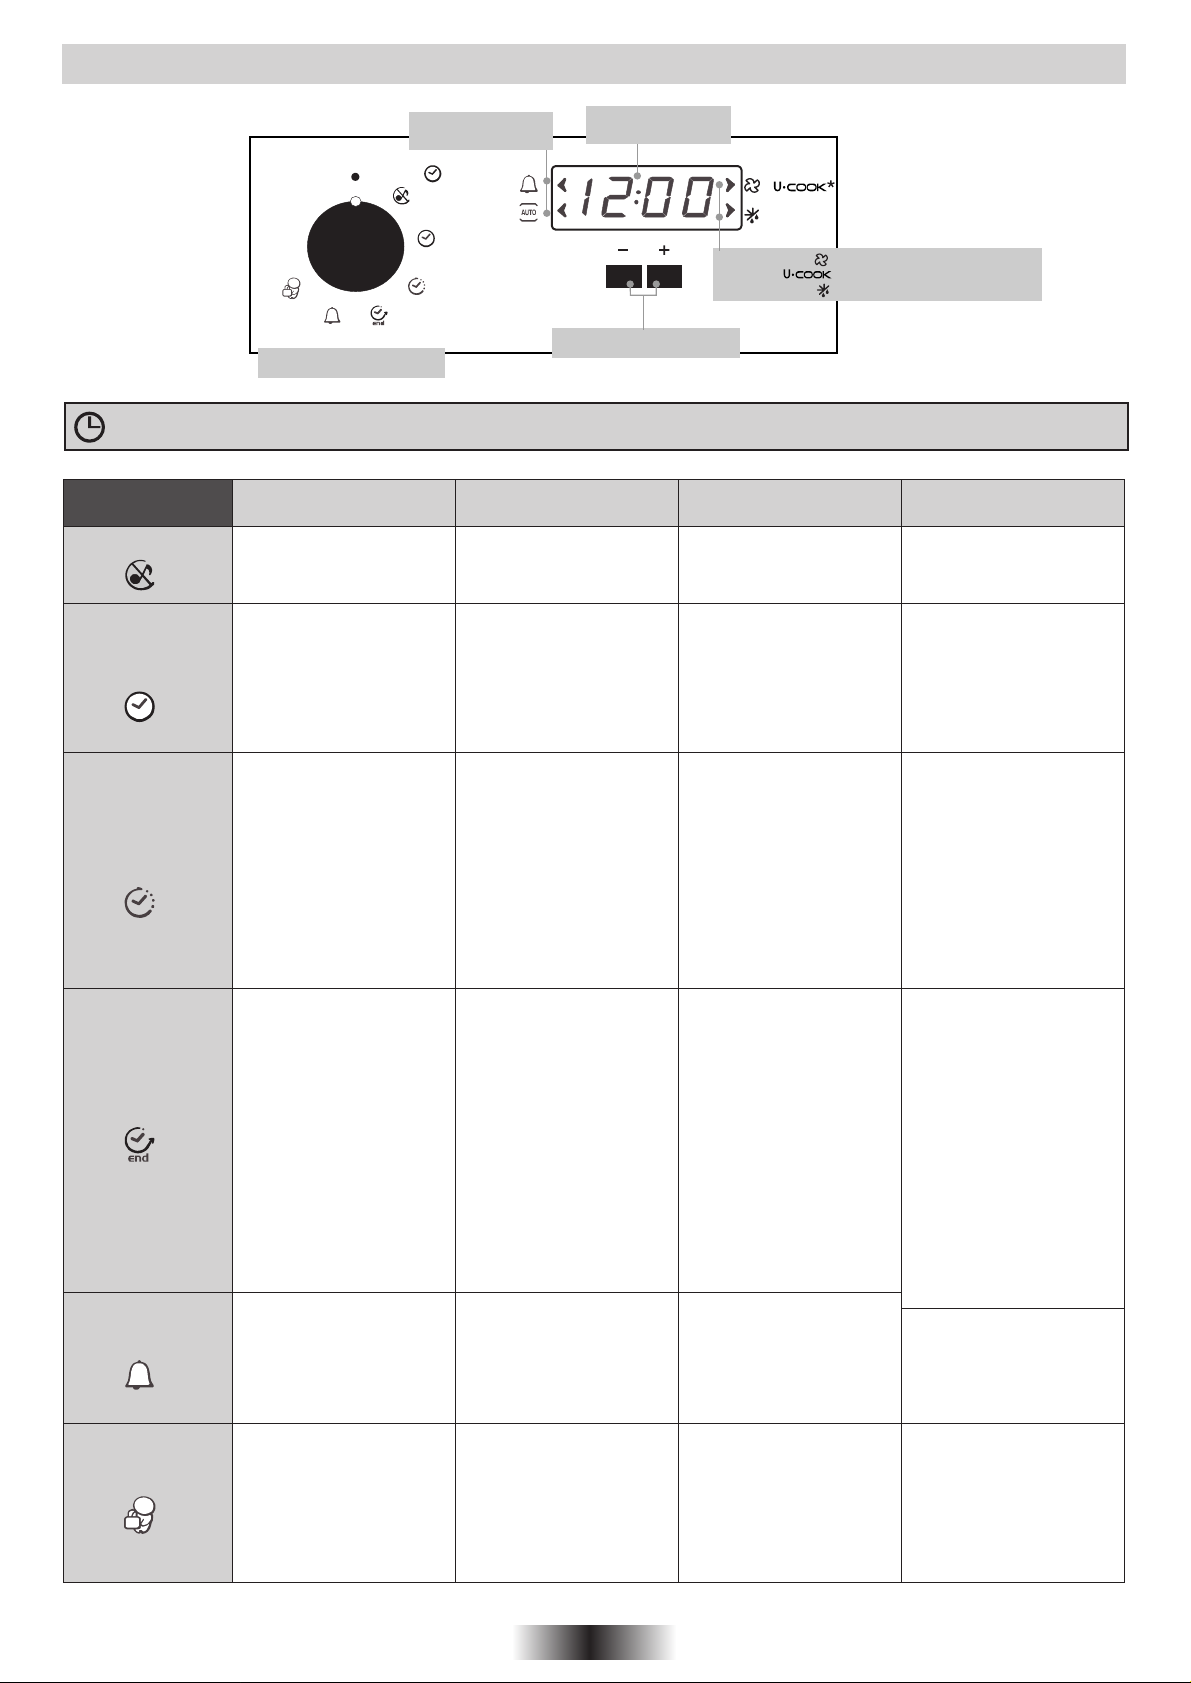
3.1 USE THE ELECTRONIC PROGRAMMER
WARNING !
FUNCTION
SILENCE MODE
SET THE TIME
Lights : Minute
minder / Auto
Function Timer knob
The first operation to carry out after the oven has been installed or following the interruption of power
supply (this is recognizable the display pulsating and showing12:00) is setting the correct time.
HOW TO ACTIVATE
IT?
•
Rotate the left function
selector to the position
" Silence mode "
•
Rotate the left function
selector to the position
“Set the time
•
Use the buttons " + " or
" - " to set the time
”.
HOW TO SWITCH
IT OFF?
•
Rotate the function
selector to the position
OFF.
•
Rotate the function
selector to the position
OFF.
Time /
Temperature
Setting buttons
•
•
/
Lights : Function with fan
Function with vario fan
Defrost
*according to the model
WHAT IT DOES ? WHAT IT IS FOR ?
•
Enables you to turn off the
sound of the minute
minder
Enables you to set the
time which appears on the
display
T o turn of f the sound of the
minute minder
•
To set the time
NB : Set the time when
you first install your oven
or just after a black out
(the clock is showing a
pulsating 12.00)
COOKING TIME
DURATION
END OF
COOKING TIME
MINUTE MINDER
•
Turn the right function
selector to a cooking
function
•
Rotate the left function
selector to the position
"Cooking Time Duration"
•
Set the time of cooking
by using buttons " + " and
" - "
•
Lighting Auto appears
•
Turn the right function
selector to a cooking
function
•
Rotate the left function
selector to the position
"End of cooking"
•
Set the end time of
cooking by using buttons
" + " and " - "
•
Lighting Auto appears.
•
Turn the left function
selector to the position
Minute Minder.
•
Set the time of cooking
by using buttons " + " and
" - "
•
When the cooking time has
elapsed, the oven switch off
automatically and the alarm
rings for few seconds
To stop the cooking
functions early, turn the
function control to OFF or
set the time on 00.00 ; by
rotating the function selector
to Cooking Time Duration
and by using the buttons "
+ " and " - "
•
When the cooking time
has elapsed, the oven
switch off automatically.
•
To stop the cooking
functions early, turn the
function control to OFF
•
Set the time on 00.00 by
turning the left function
selector to the position
Minute Minder, and using
the button " - "
•
It allows to preset the
cooking time required for
the recipe chosen.
• When the cooking time is
set, turn the function
selector to OFF to go back
to actual time.
• To view the cooking time
selected, turn the left
function selector to
Cooking Time duration
•
It allows to preset the end
of cooking time you want.
•
When the cooking time is
set, turn the function
selector to OFF to go back
to actual time.
•
To view the cooking time
selected, turn the left
function selector to End of
cooking Time
•
Sounds an alarm at a few
seconds at the end of the
set time
•
For cooking the desired
recipes
.
•
This function is used for
cooking we want to program
in advance. For example,
your recipe needs to be
cooked 45 min and to be
ready at 12.30pm ; simply
set the cooking time
duration on 45 min and the
end of cooking time on
12.30pm.
The cooking will start
automatically at 11.45
(12.30 minus 45 min) and
will continue until the preset end of cooking time,
then the oven will switch
itself off automatically
•
Allow to use the oven as
alarm even if the oven is
switch off
CHILD LOCK
•
Turn the left function
selector to the position
Child lock.
Press the button " + "
during 3 seconds
•
Child lock is available
when " STOP " appears
on display
•
Turn back the left function
selector to Child lock and
press button " + " during 3
seconds
• Indication STOP
disappears
5 GB
•
The oven cannot be used
•
Useful especially when
children are at home
Page 6
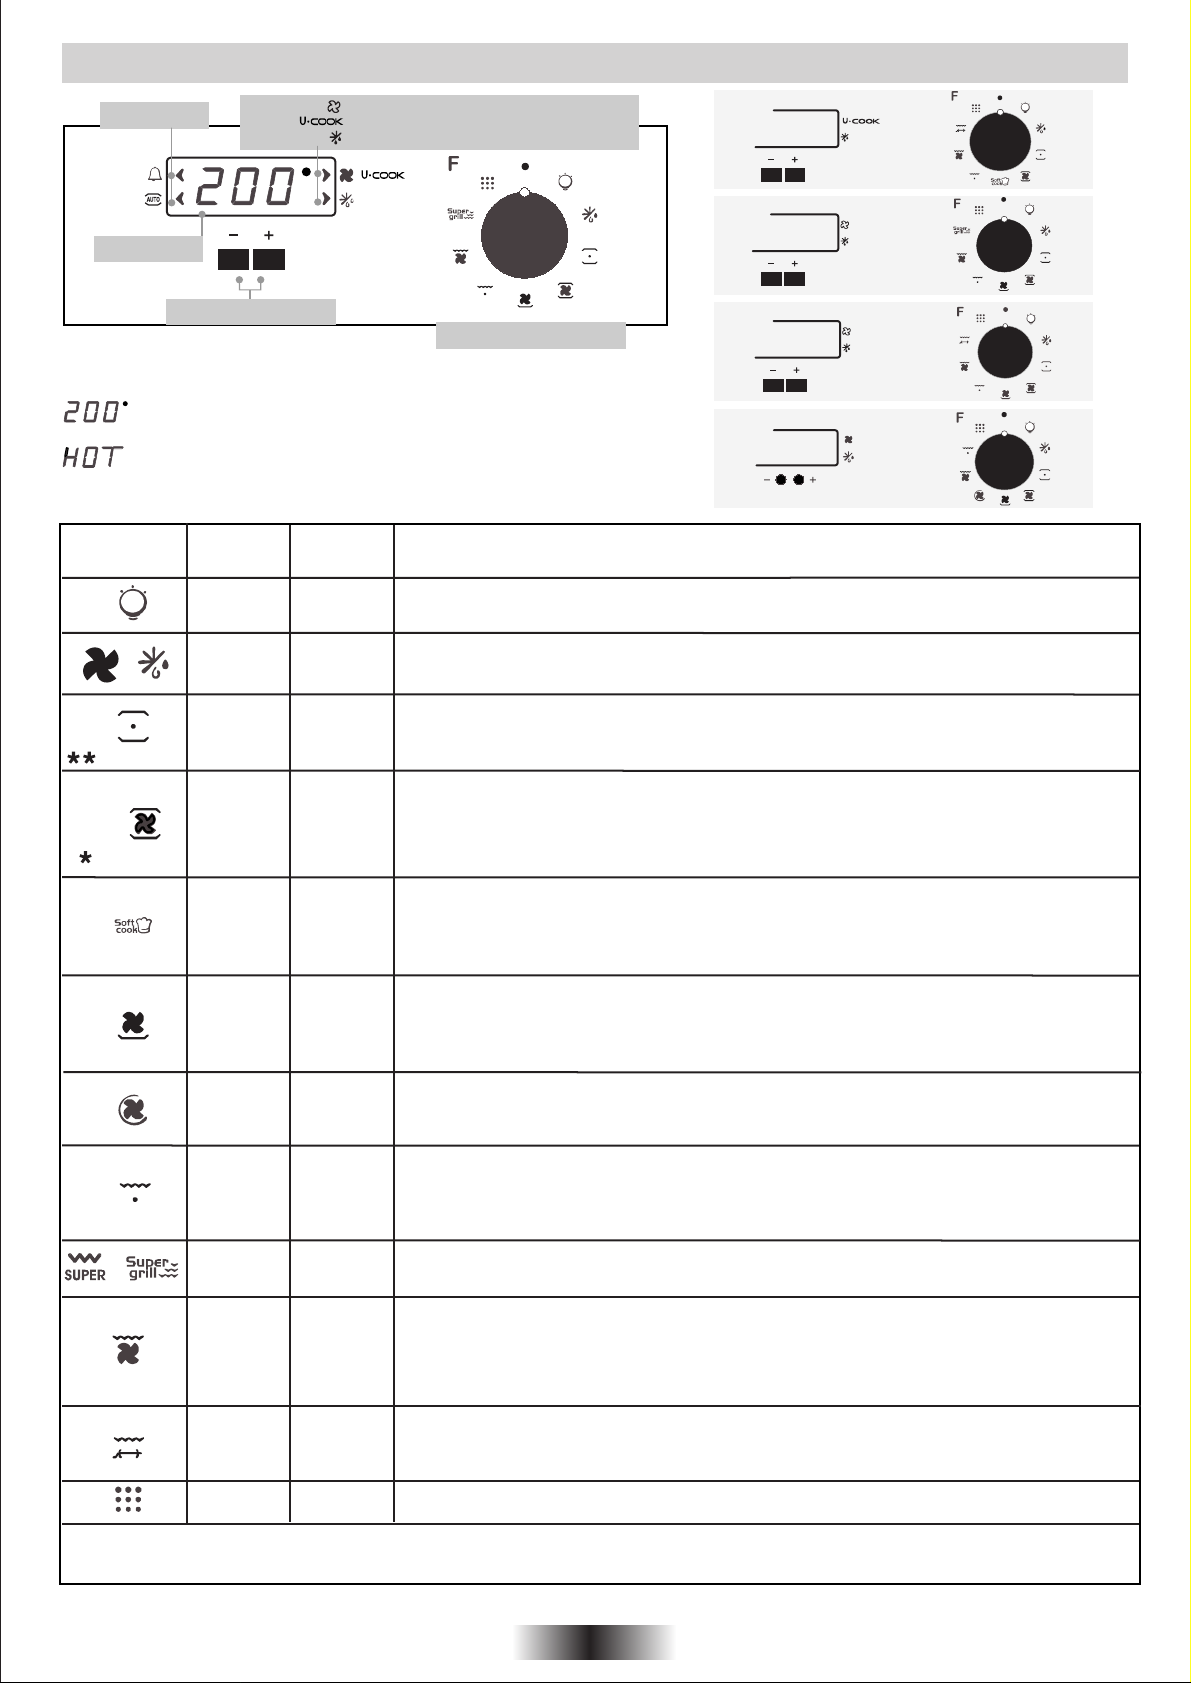
3.2 OPERATING INSTRUCTIONS
Light Auto
Temperature
Setting buttons
*according to the model
The Led “°” of the temperature indicator pulsates until the pre-set
temperature is not reached.
When a cooking program is finished, if the oven is still hot, « HOT »
appears on the display, alternately with the time displays, even if the
two function selectors are switched on OFF.
Function
dial
T °C
pre-set
220
210
210
Level 5
Lights : Function with Fan
Function with VARIOFAN
Defrost
*
Function selector knob*
T°C
setting
Turns on the oven light
Defrosting - When the dial is set to this position. The fan circulates air at room temperature around the
frozen food so that it defrosts in a few minutes without the protein content of the food being changed or
altered.
CONVENTIONAL COOKING - Both top and bottom heating elements are used. Preheat the oven for
50 ÷ 280
50 ÷ 240
50 ÷ 240210
50 ÷ 240
50 ÷ 240180
1 ÷ 5
about ten minutes. This method is ideal for all traditional roasting and baking. For seizing red meats,
roast beef, leg of lamb, game, bread, foil wrapped food (papillotes), flaky pastry. Place the food and its
dish on a shelf in mid position.
FAN COOKING (a)
We recommend you use this method for poultry, pastries, fish and vegetables. Heat penetrates into the
food better and both the cooking and preheating times are reduced. You can cook different foods at the
same time with or without the same preparation in one or more positions. This cooking method gives even
heat distribution and the smells are not mixed. Allow about ten minutes extra when cooking foods at the
same time.
Soft Cook (a)
Soft Cook is the function for the confectionery and the bread. Thanks to its reduced fan speed, this function
increases oven internal damp. The increased damp creates the ideal conditions of cooking for those foods
that need to maintain an elastic consistence while they are cooking (ex. cakes, bread, biscuits) avoiding
surface breakages.
FAN + LOWER ELEMENT (a)
The bottom heating element is used with the fan circulating the air inside the oven. This method is ideal
for juicy fruit flans, tarts, quiches and pâté.
It prevents food from drying and encourages rising in cakes, bread dough and other bottom-cooked food.
Place the shelf in the bottom position.
FAN OVEN
Air that has been heated is blown by the fan onto the different levels. It is ideal for cooking different types
of food at the same time (e.g. meat and fish) without mixing tastes and smell. It cooks very gently and
is ideal for sponge cakes, pastries, etc...
GRILL: use the grill with the door closed.
The top heating element is used alone and you can adjust the temperature. Five minutes preheating is
required to get the elements red-hot. Success is guaranteed for grills, kebabs and gratin dishes. White
meats should be put at a distance from the grill; the cooking time is longer, but the meat will be tastier.
You can put red meats and fish fillets on the shelf with the drip tray underneath.
Function according to the model
Level 5 1 ÷ 5
210
Level 5
(a) on some models : function with “Vario Fan” is the exclusive system developed by Candy to optimize the cooking results, temperature management
and damp management. The Vario Fan system is a self-activating system that changes automatically fan speed when a fan function is chosen: the
fan functions are the one inside the outlined area on control panel.
180 ÷ 230
1 ÷ 5
SUPER GRILL: the oven has two grill positions
Grill : 2140 W Grill SUPER : 3340 W
FAN ASSISTED GRILL (a): use the turbo-grill with the door closed.
The top heating element is used with the fan circulating the air inside the oven. Preheating is necessary
for red meats but not for white meats. Ideal for cooking thick food items, whole pieces such as roast pork,
poultry, etc. Place the food to be grilled directly on the shelf centrally, at the middle level. Slide the drip
tray under the shelf to collect the juices. Make sure that the food is not too close to the grill. Turn the
food over halfway through cooking.
ROTISSERIE: use the turnspit with the door closed.
The top heating element is used with the turnspit rotating the food to be cooked. The heating temperature
can be adjusted as required. The turnspit is best used for medium-sized items.
Ideal for rediscovering the taste of traditional roast. No preheating is required for turnspit cooking.
Pyrolyse
* Tested in accordance with the CENELEC EN 50304 - ** Tested in accordance with the CENELEC EN 50304 used for definition of energy class.
6 GB
Page 7
4.1 COOKING TIPS
Temperatures and cooking times are given for information only to facilitate using the oven.
Personal experience should then let you adapt these settings to your taste and habits.
Remember that cooking at higher temperatures causes more spattering, and the oven can become dirty and smokey. It is better to
slightly reduce the cooking temperature, even if it means increasing the cooking time.
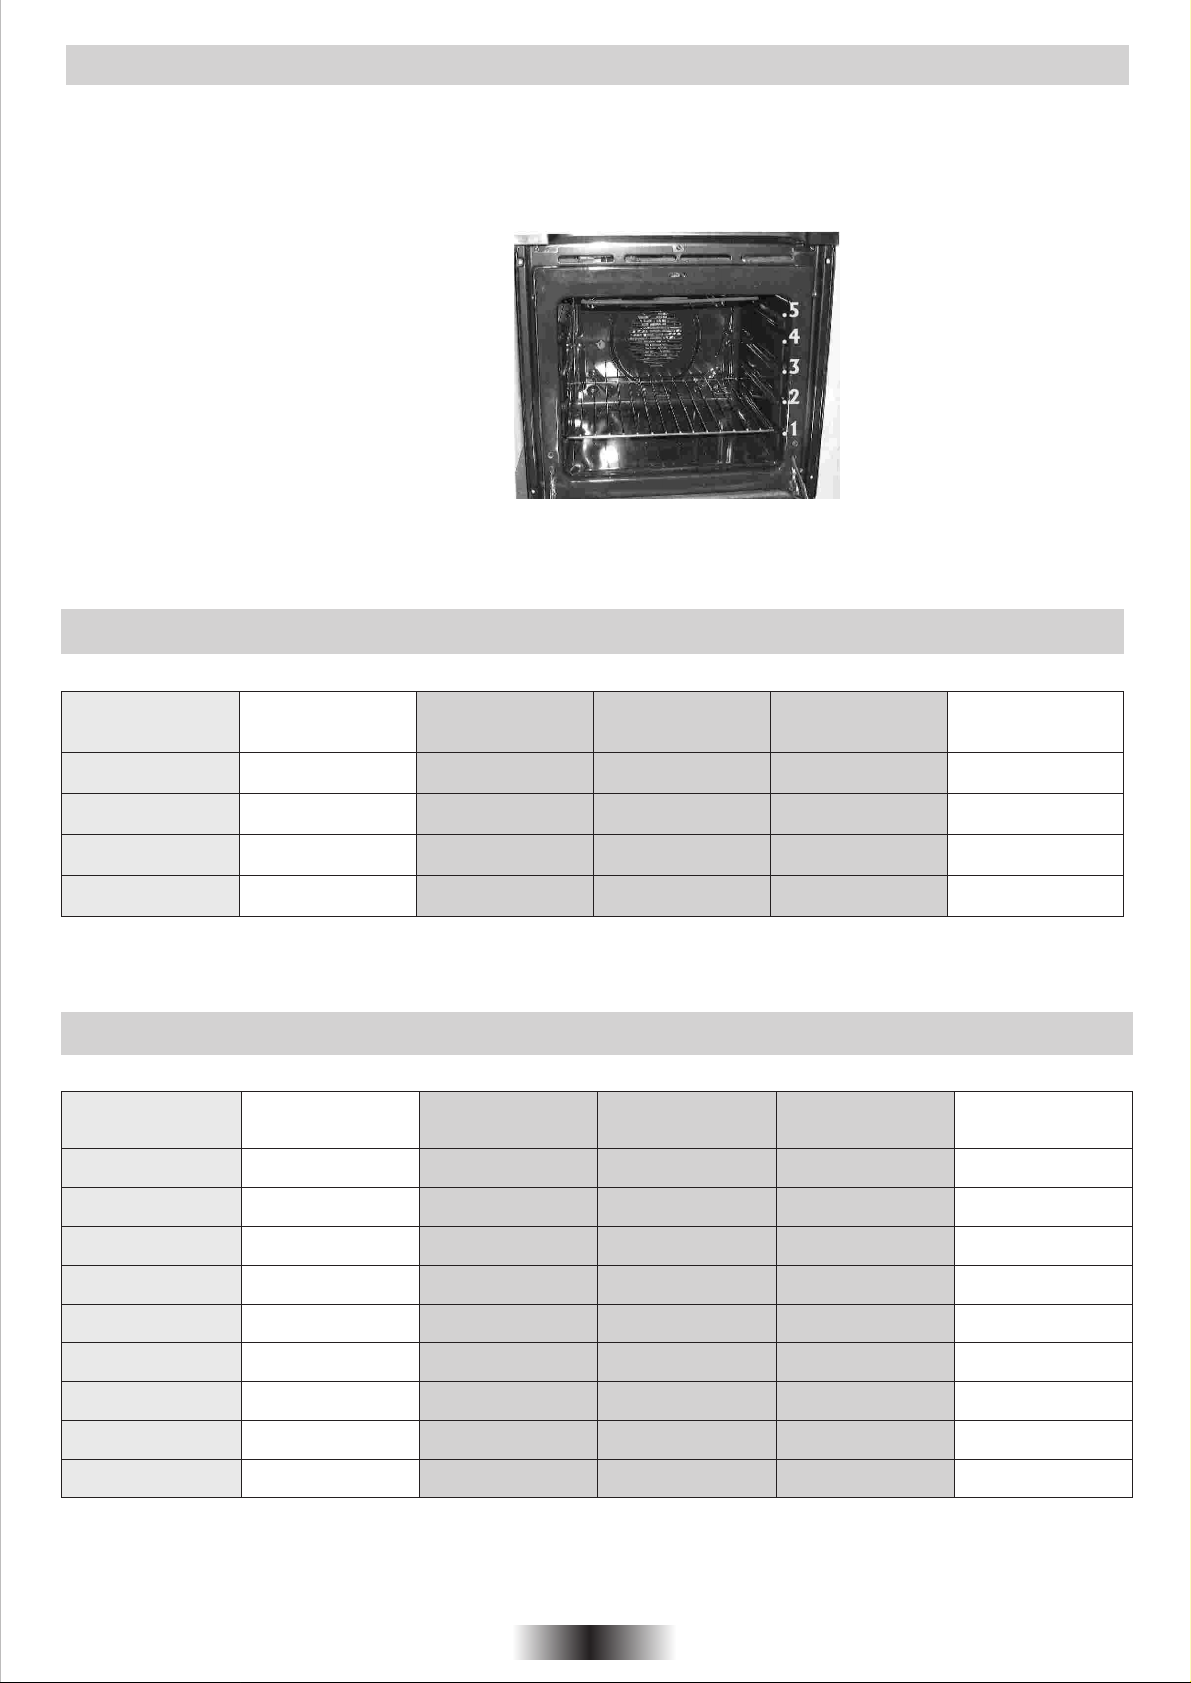
The sides of the oven are equipped
with different positions numbered
from the bottom.
4.2 FISH
Recipes
Cooking
method
Quantity
Cooking
°C
Cooking
time
Tilefish or bream Conv cooking 1kg whole 220° C 130 min
Monk fish or Salmon Conv cooking 1kg braised 220° C 130 min
Fillet of sole 160° C 115-20 min6 pieces
Fan cooking
Grilled fish Grill 6 fillets 275° C 42x5 min
4.3 VEGETABLES - OTHERS
Recipes
Braised cabbage Conv cooking for 6 200-220° C
Pâté en croûte 200-220° C 1 hour/kg
Chicory with gruyere for 6 25-30 min
Potatoes in their
jackets
Soufflé
savoury/sweet
Stuffed tomatoes Fan cooking 6-8 pieces 200-220° C
Cooking
method
Conv cooking
Fan cooking
Fan cooking
Fan cooking
Quantity
for 6
Cooking
°C
180-200° C
200-220° about 1 hourfor 6
180-200° C 50-60 min
Cooking
time
1 hour
40-45 min
Shelf level
Tips
Ø 22
Leek flan Fan + lower element 220° C 35-40 min
Quiche Lorraine for 6 45-50 minFan + lower element
Toast with crottin* Turbo grill 6 pieces 210° C
All the cooking was done at shelf position "1" except cooking marked thus "*", which requires cooking at a middle position.
for 6
7 GB
220° C
3 min to toast one
side + 4 min/crottin
Flat steak pan
Page 8
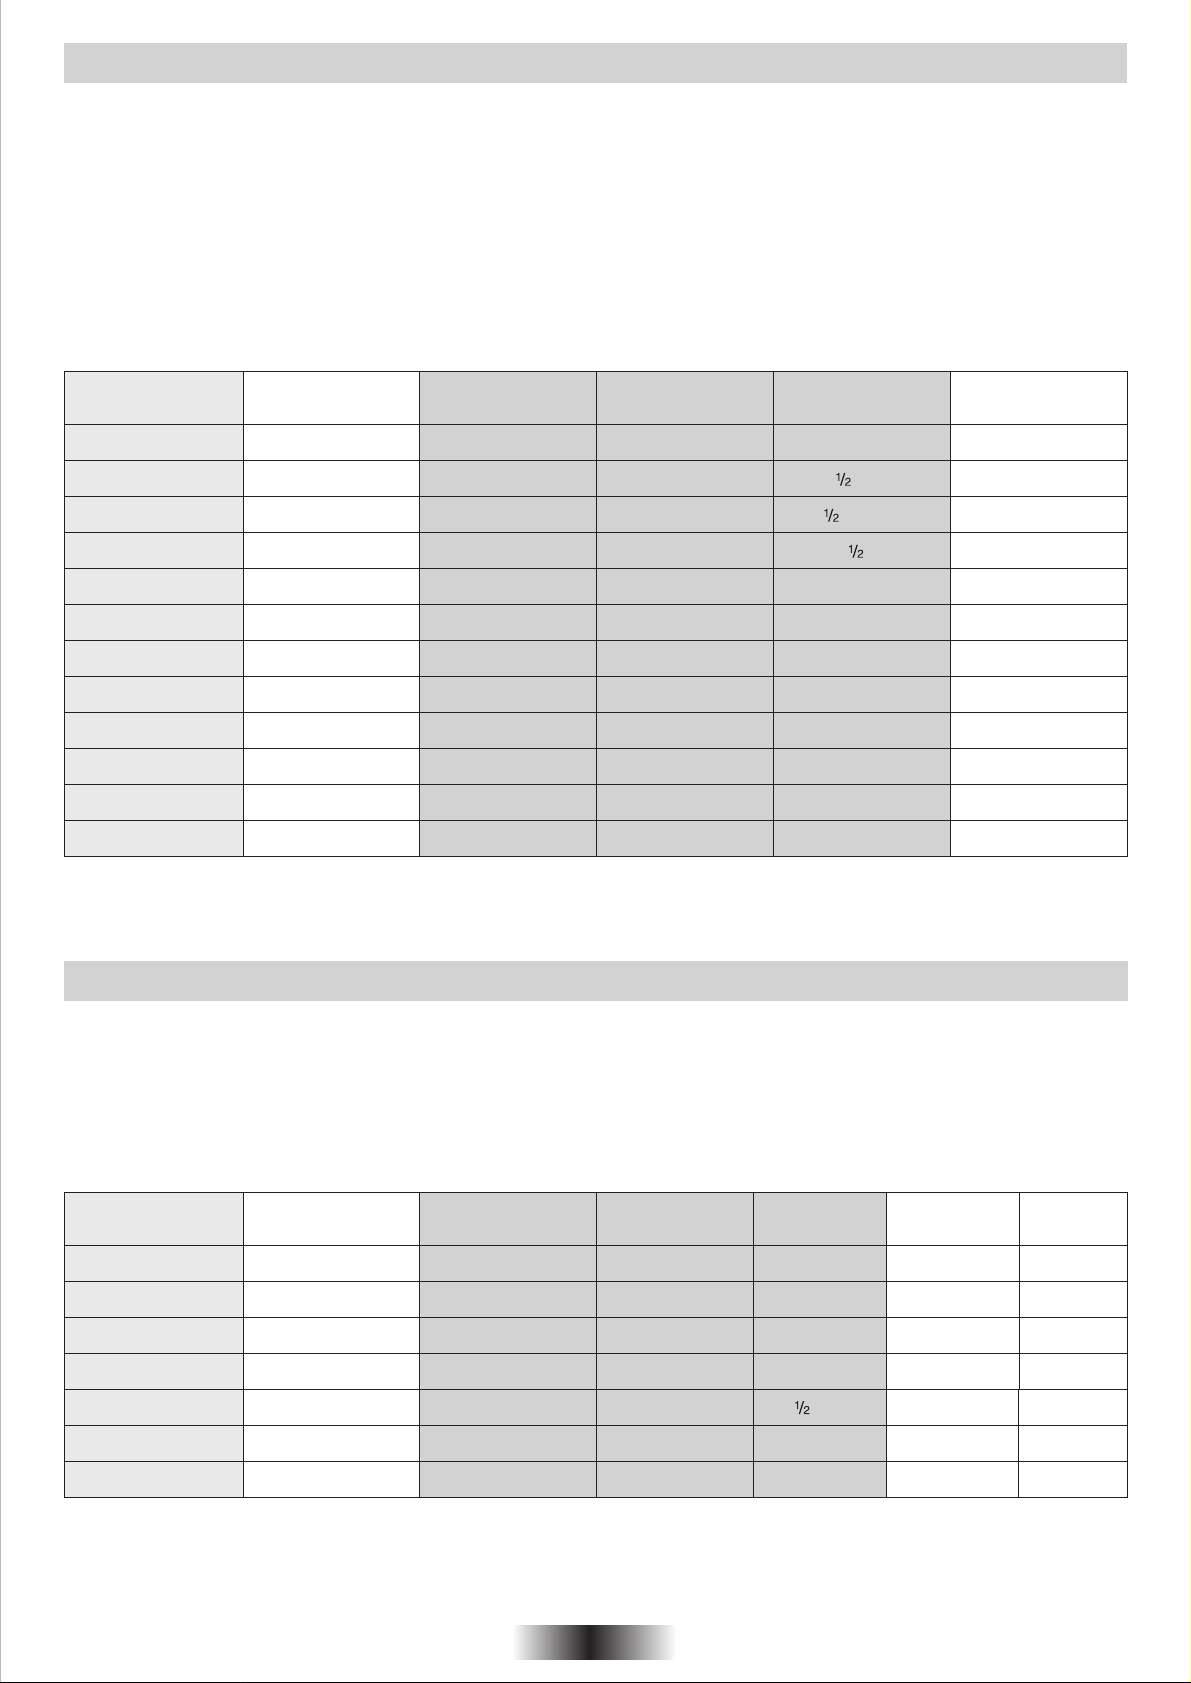
4.4 MEAT
It is better not to salt meats until after cooking as salt encourages the meat to spatter fat. This will dirty the oven and make a lot of smoke.
Joints of white meat, pork, veal, lamb and fish can be put into the oven cold. The cooking time is longer than in a preheated oven, but
it cooks through to the centre better as the heat has more time to penetrate the joint.
Correct preheating is the basis of successful red meat cookery.
GRILLS
• Before loading the grill: remove the meat from the refrigerator a few hours before grilling. Lay it on several layers of kitchen paper:
this improves seizing, making it tastier and avoids it staying cold at the centre.
Add pepper and spices to the meat before grilling, but add any salt after cooking. This way it will seize better and stay juicy. Baste all
the food to be cooked with a little oil. This is best done with a wide flat basting brush. Then sprinkle with more pepper and herbs (thyme,
etc.).
• During cooking: never pierce the food during cooking even when you turn it. This lets the juice out and it becomes dry.
Recipes
Beef with carrots Conv cooking for 6 200-220° C
Duck Conv cooking 1,5 kg 200-220° C 1 hours
Turkey 5/6 kg 2 - 3 hours
Goose 160-180° C 2 - 2 hours3/4 kg
Leg of lamb 200-220° C 15 min/pound
Roast chicken Conv cooking 1/1,5 kg 220° C
Roast beef Conv cooking 240° C 15 min/pound
Roast rabbit 800-1 kg 50-60 minsFan cooking
Beef Rotisserie 1kg 275° C 15-20 min
Lamb / Mutton 1 kg 20-25 minRotisserie
Kebabs 275° C 2x8 minGrill
Pork chop Grill 6 pieces 275° C 2x8 min
* All cooking was done at shelf position "1".
Cooking
method
Conv cooking
Conv cooking
Conv cooking
Quantity
6 pieces
Cooking
°C
160-180° C
200-220° C
275° C
Cooking
time
about 1 hours
about 1 hour
Tips
No preheat
No preheat
Turn over in mid
cooking
Turn over in mid
cooking
4.5 BAKING
Avoid using shiny tins, they reflect the heat and can spoil your cakes. If your cakes brown too quickly, cover them with grease-proof
paper or aluminium foil. Caution: the correct way to use foil is with the shiny side in towards the cake. If not the heat is reflected by the
shiny surface and does not penetrate the food. Avoid opening the door during the first 20 to 25 minutes of cooking: soufflés, brioches,
sponge cakes, etc. will tend to fall. You can check if cakes are done by pricking the centre with a knife blade or metal knitting needle.
If the blade comes out nice and dry, your cake is ready and you can stop cooking. If the blade comes out moist or with bits of cake
attached, continue baking but slightly lower the thermostat so that it is finished off without burning.
Recipes
Brioche 200° C 40-40 minFan cooking 800 grs 1
Pastry base 20-30 min
Meringues Fan+Lower element* 1 tray 80-85° C
Fruit tart Fan+Lower element* for 6 220° C 35-40 min
St Honoré
* with fan and lower element, we recommend preheating with fan cooking to save time.
Cooking
method
Fan cooking
Fan cooking 180-200° C
Fan cooking
Quantity
for 6 Ø 271
6 pieces
6 pieces 30-35 minFan+Lower element*
Cooking
°C
190° CChoux pastry 40 pieces 35 min
200° C 15-20 min
190° C
Cooking
time
4 hours
TipsShelf level
2 trays1 / 3
1Puff pastry
1
1
11
e.g.
Bouchée
Ø profiteroles
8 GB
Page 9
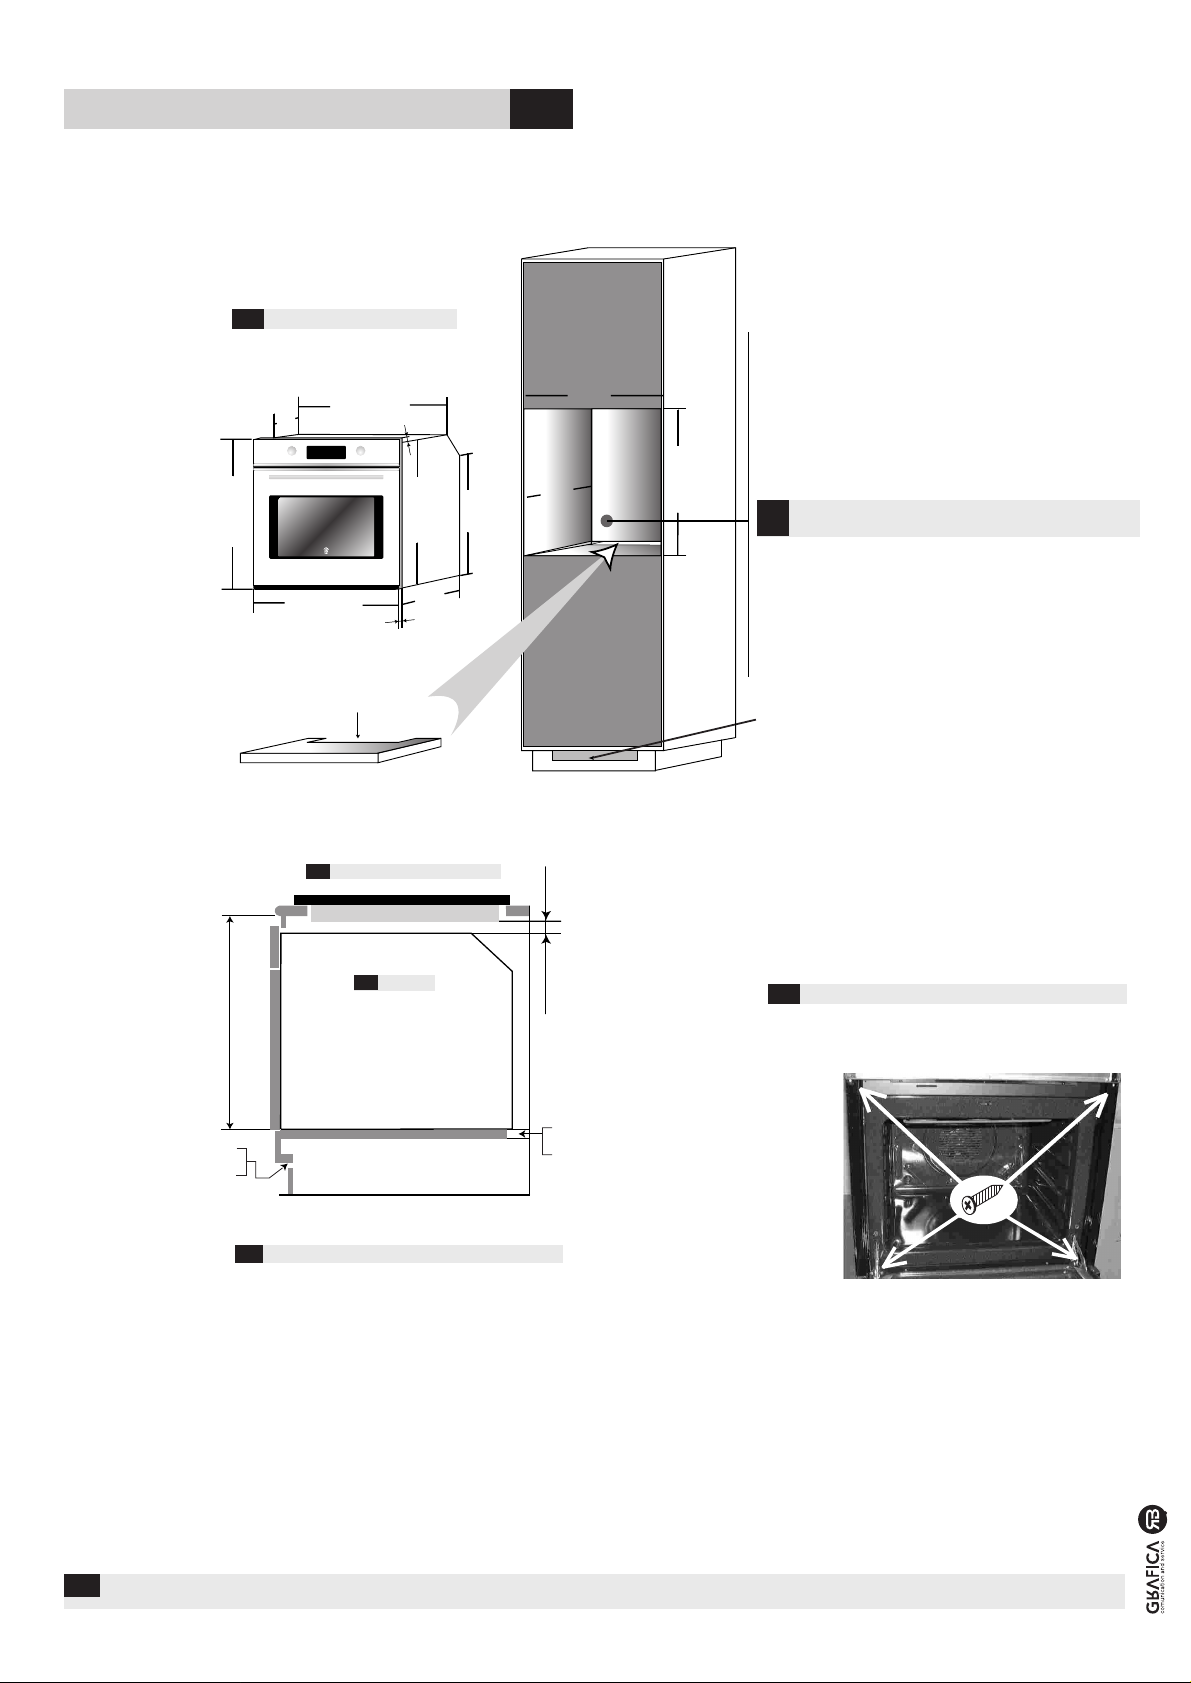
INSTALLATION (dimensions mm) GB
ES
Oven in column
GB
590
401
557
596
500 X 50
GB
Top
24
560
15
580
481
577
550
mini
If the furniture is equipped with a bottom at the back
GB
part: provide an opening for the power supply cable.
540
500x10
10 mini
595 mini
500 X 10
GB
GB
Oven fitted under worktop
Oven
500 X 50
GB
Fixing in the location
03-2009 • Cod. 44005152
The manufacturer will not be responsible for any inaccuracy resulting from printing or transcript errors contained in this brochure. We reserve the right to carry out
GB
modifications to products as required, including the interests of consumption, without prejudice to the characteristics relating to safety or function.
 Loading...