

Page 1

FORNI
ISTRUZIONI PER L’USO
OVENS
USER INSTRUCTIONS
HORNOS EMPOTRABLES
INSTRUCCIONES DE USO
OVEN
GEBRUIKSAANWIJZING
EINBAUBACKKÖFEN
BEDIENUNGSANLEITUNG
FOURS ENCASTRABLES
NOTICE D’EMPLOI ET D’INSTALLATION
FORNOS
MANUAL DE INSTRUÇÕES DE UTILIZAÇÃO
IT
GB
ES
NL
DE
FR
PT
Духовые шкафы
Инстукции для пользователей
PIEKARNIKI DO ZABUDOWY
INSTRUKJA OBSŁUGI
NAVODILO ZA UPORABO
VEČNAMENSKE VGRADNE PEČICE
RU
PL
SI
CANDY HOOVER GROUP S.R.L. • Via Privata Eden Fumagalli • 20047 Brugherio Milano Italy
Page 2

AVVERTENZE GENERALI
Vi ringraziamo per aver scelto uno dei nostri prodotti, per ottenere da questo elettrodomestico le migliori prestazioni consigliamo di:
• Leggere attentamente le avvertenze contenute nel presente libretto.
• Conservare con cura questo libretto per ogni ulteriore consultazione.
Durante l’uso il forno diventa caldo, fare attenzione a non toccare gli elementi riscaldanti
Alla prima accensione del forno può svilupparsi fumo di odore acre, causato dal primo riscaldamento del collante dei pannelli d’isolamento
avvolgenti il forno. Si tratta di un fenomeno assolutamente normale e, in caso si verificasse, occorre attendere la cessazione del fumo prima di
introdurre le vivande.
Il forno è
che i bambini possano avvicinarsi al forno quando è in funzione, in particolare quando funziona il grill.
per sua natura un apparecchio che diventa caldo, in modo particolare in corrispondenza del cristallo porta. È buona norma quindi impedire
all’interno del forno.
DICHIARAZIONE DI CONFORMITÀ
Questa apparecchiatura nelle parti destinate a venire a contatto con
sostanze alimentari, è
89/109 e al D.L. di attuazione N° 108 del 25/01/92.
Apparecchio conforme alle Direttive Europee 73/23/CEE e
89/336/CEE, sostituite rispettivamente da 2006/95/CE e
2004/108/CE, e successive modifiche.
conforme alla prescrizione della dir. CEE
INFORMAZIONI SULLA SICUREZZA
•Questo apparecchio dovrà essere destinato solo all’uso per il quale è
stato espressamente concepito, e cioè per la cottura di alimenti.
Ogni altro uso (ad esempio riscaldamento ambiente) è da considerarsi
improprio e quindi pericoloso. Il costruttore non può essere considerato
responsabile per eventuali danni derivanti da usi impropri, erronei ed
irragionevoli.
•L’uso di un qualsiasi apparecchio elettrico comporta
l’osservanza di alcune regole fondamentali.
In particolare:
-non tirare il cavo di alimentazione per staccare la spina dalla presa di
corrente
-non toccare l’apparecchio con mani o piedi bagnati o umidi
-non usare l’apparecchio a piedi nudi
-non permettere che l’apparecchio sia usato dai bambini o da
incapaci, senza sorveglianza
-in generale è sconsigliabile l’uso di adattatori, prese multiple e
prolunghe.
- In caso di guasto e/o di cattivo funzionamento dell’apparecchio,
spegnerlo e non manometterlo.
•In caso di danneggiamento del cavo, provvedere tempestivamente alla
sua sostituzione secondo le seguendi indicazioni:
aprire il coperchio morsettiera, togliere il cavo di alimentazione e
sostituirlo con uno corrispondente, (tipo H05RR-F, H05VVF, H05V2V2F) e adeguato alla portata dell’apparecchio.
Tale operazione dovrà essere eseguita da personale professionalmente
qualificato. Il conduttore di terra (giallo-verde), deve obbligatoriamente
essere più lungo di circa 10 mm rispetto ai conduttori di linea.
Per l’eventuale riparazione rivolgersi solamente ad un centro di
assistenza
Il mancato rispetto di quanto sopra può compromettere la sicurezza
dell’apparecchio.
•Questo apparecchio non è destinato ad essere usato da bambini e
persone incapaci o inesperte all'uso del prodotto, a meno che non
vengano sorvegliate o istruite riguardo all'uso dell'apparecchio da una
persona
•Sorvegliare i bambini in modo tale da assicurarsi che non giochino con
l'apparecchio.
•Non rivestire le pareti del forno con fogli d'alluminio da cucina o
fogli monouso commerciali, perche potrebbero fondersi a contatto
con le superfici in smalto caldo e danneggiare le superfici in smalto
all'interno del forno.
tecnica autorizzato e richiedere l’utilizzo di ricambi originali.
responsabile della loro sicurezza.
INSTALLAZIONE
L’installazione è a carico dell’acquirente e la Casa Costruttrice è
esonerata da questo servizio; gli eventuali interventi richiesti alla
Casa Costruttrice che dipendono da una errata installazione non sono
compresi nella garanzia.
L’installazione deve essere effettuata secondo le istruzioni da
personale professionalmente qualificato. Una errata installazione può
causare danni a persone,
costruttore non può essere considerato responsabile.
animali o cose, nei confronti dei quali il
INSERIMENTO DEL MOBILE
Inserire l’apparecchio nel vano del mobile (sottopiano o in colonna). Il
fissaggio si esegue con 4 viti attraverso i fori della cornice, visibili
aprendo la porta.(vedere ultima pagina). Per consentire la migliore
aerazione del mobile, i forni devono essere incassati rispettando le
misure e le distanze indicate nella figura in ultima
Nota: per i forni da abbinamento con piano cottura è indispensabile
rispettare le istruzioni contenute nel libretto allegato all’
apparecchiatura da abbinare.
pagina.
IMPORTANTE
Per garantire un buon funzionamento dell’apparecchio da incasso è
necessario che il mobile sia di caratteristiche adatte. I pannelli dei
mobili adiacenti il forno dovranno essere in materiale resistente al
calore. In particolare nel caso di mobili
dovranno essere resistenti alla temperatura di 120°C: materiali
plastici o collanti non resistenti a questa temperatura sono causa di
deformazioni o scollature. In conformità alle norme di sicurezza, una
volta incassato l’apparecchio, non debbono essere possibili eventuali
contatti con le parti elettriche. Tutte le parti che
protezione debbono essere fissate in modo tale da non poter essere
tolta senza l’aiuto di qualche utensile.
Per garantire una buona areazione è necessario eliminare la
parete posteriore del vano; inoltre il pianale di appoggio deve
avere una luce posteriore di almeno 45 mm.
in legno impiallicciato le colle
ALLACCIAMENTO ELETTRICO
Inserire la spina in una presa di corrente munita di un terzo contatto
corrispondente alla presa di terra,
efficiente.
Per i modelli sprovvisti di spina, montare sul cavo una spina
normalizzata che sia in grado di sopportare il carico indicato in targa. Il
conduttore di messa a terra e contraddistinto dai colori giallo-verde.
Tale operazione dovrà essere eseguita da personale professionalmente qualificato.
caso di incompatibilità tra la presa e la spina dell’apparecchio fare
In
sostituire la presa con altra di tipo adatto, da personale professionalmente qualificato. Si può effettuare anche l’allacciamento alla rete
interponendo tra l’apparecchio e la rete un interruttore omnipolare
dimensionato al carico e rispondente alle norme in vigore. Il cavo
terra giallo-verde non deve essere interrotto dall’interruttore. La presa
o l’interruttore omnipolare usati per l’allacciamento devono essere
facilmente accessibili ad elettrodomestico installato.
Importante: in fase di installazione, posizionare il cavo di
alimentazione in modo che in nessun punto si raggiungano
temperature superiori di 50°C alla temperatura ambiente.
L’apparecchio è conforme ai
normativi. La sicurezza elettrica di questo apparecchio è assicurata
soltanto quando lo stesso è correttamente collegato ad un efficace
impianto di messa a terra come previsto dalle vigenti norme di
sicurezza elettrica, (in caso di dubbio, richiedere un controllo accurato
dell’impianto da parte di
Importante: la ditta costruttrice resta sollevata da ogni
responsabilità per eventuali danni a persone o cose, derivanti
dal mancato allacciamento della linea di terra.
ATTENZIONE: la tensione e la frequenza di alimentazione sono
indicate in targa matricola (figura in ultima pagina). Verificare
che la portata elettrica dell’impianto e delle
siano adeguate alla potenza massima dell’apparecchio indicate
in targa. In caso di dubbio rivolgersi ad una persona
professionalmente qualificata.
personale professionalmente qualificato).
che deve essere collegata in modo
requisiti di sicurezza previsti dagli istituti
prese di corrente
DOTAZIONE DEL FORNO (secondo modello)
Prima di utilizzare gli accessori
necessario pulirli. Per questa operazione si consiglia di utilizzare
una spugna. Successivamente risciacquare ed asciugare gli
accessori.
La griglia semplice serve da supporto
per teglie, pirofile, stampi per i dolci.
La griglia porta-piatto serve in
particolare per le grigliate di carne
poiché sostiene anche la leccarda che
raccoglie i grassi che colano.
Grazie ai loro profili speciali, le griglie
restano sempre in orizzontale, anche
quando vengono estratte verso
l'esterno.
che i tegami scivolino o si ribaltino.
Non c'é nessun rischio quindi
03 IT
del forno per la prima volta è
assicurano la
di
Page 3

La leccarda serve a raccogliere i grassi che colano durante la cottura con il grill. Deve essere utilizzata solamente con il
grill, il girarrosto o il turbo girarrosto, secondo il modello.
Attenzione: in tutti gli altri modi di cottura, la leccarda deve essere tolta dal forno.
Non usare mai la leccarda per
si sporcherebbe inultimente.
cuocere gli arrosti perché ne risulterebbe un eccessivo sviluppo di fumo e vapori e il forno
Pizza set é l'idéale per la cottura delle
pizze. Il set deve essere utilizzato in
abbinamento alla funzione Pizza.
Gli accessori devono essere tolti dal forno se non vengono utilizzati.
CONSIGLI UTILI
GRIGLIE FORNO - SISTEMA DI ARRESTO
Il forno è dotato di un nuovo sistema di
arresto griglie. Questo sistema consente
di estrarre le griglie quasi completamente
senza che queste fuoriescano dal forno
mantenendole perfettamente in piano,
consentendo di verificare e mescolare il
cibo con la massima tranquillità e
sicurezza.
Per estrarre le griglie è sufficiente, come indicato sul disegno, alzarle,
prendendole dalla parte anteriore e tirarle.
LA COTTURA AL GRILL
Questo tipo di cottura consente la doratura rapida dei cibi. A questo
scopo consigliamo di inserire la griglia generalmente nel 3° o 4°
ripiano, secondo le dimensioni dei cibi (Fig. pag. 8). Quasi tutte le
carni possono essere cotte al grill, fanno eccezione alcune carni
magre di selvaggina ed i polpettoni.
al grill vanno leggermente unti con olio.
La carne ed il pesce da cucinare
Secondo modello pacchetto di funzioni
del sistema
I forni sono dotati di controllo elettronico della ventilazione
di cottura, brevettato VarioFan; il sistema cambia automaticamente la
velocità della ventola del multifunzione per ottimizzare le correnti
d'aria e la temperatura interna della cavità mentre il forno sta
cucinando.
Tutti i forni sono dotati di funzione ,
permettendo una gestione della distribuzione di umidità e
temperatura. Riduce la perdita
donando morbidezza e fragranza alle pietanze. Una
cottura cosi delicata è indicata sopratutto per il pane e la
pasticceria.
Riduce il tempo di preriscaldamento dei forni: sono
sufficienti solo 8 minuti per raggiungere i 200°C.
Offre la possibilità di personalizzare il livello e l'intensità gr
di grigliatura,
multifunzione tradizionale.
La nuova porta ”WIDE DOOR” ha un'ampia superficie in vetro che
assicura una più facile pulizia e un miglior isolamento termico.
fino al 50% in più rispetto ad un forno
degli alimenti fino al 50%,
SECONDO MODELLO
E’ un sistema che si sostituisce all’illuminazione con tradizionali
lampadine ad incandescenza; nella controporta del forno, completamente
in vetro temprato, sono stati inseriti 14 Led, di altissima qualità a luce
bianca, che illuminano l’interno del forno con una luce diffusa permettendo
una visione della cottura senza ombre, su più livelli.
Il
design creato per il supporto dei 14 Led regala un elegante effetto high-
tech
Vantaggi del sistema :
•Visibilità forno ottimale,
•Durata prolungata nel tempo,
•Consumo energetico estremamemente
basso -95% dei tradizionali sistemi di illuminazione forni,
•Elevato rendimento,
•Design high tech.
“Apparecchio con luce LED bianca di classe 1M secondo la IEC 60825- 1:1993 +
A1:1997 + A2:2001 (equivalente a EN 60825-1: 1994 + A1:2002 + A2:2001) ;
massima potenza ottica emessa =459nm < 150uW. Non osservare direttamente con
strumenti ottici.”
La griglia piatta da combinare con la
leccarda per tutti i tipi di grigliate. Una
presina è fornita per permettere di estrarre
l’insieme dal forno senza scottarsi.
Non lasciare mai la presina nel forno.
TEMPI DI COTTURA
Alle pagine 8-9 riportiamo una tabella indicativa dove sono indicati
tempi e temperature consigliati per le prime cotture.Ad esperienza
acquisita potrete variare a vostro piacimento i valori riportati nella
tabella stessa.
FORNO AUTOPULENTE CATALITICO
Speciali pannelli autopulenti ricoperti da uno smalto a struttura
microporosa, offerti come accessori opzionali per tutti i modelli,
eliminano la pulizia manuale del forno.
I grassi proiettati sulle pareti durante la cottura, vengono decomposti
dallo smalto, mediante un processo catalitico di ossidazione e
trasformati in prodotti gassosi.
Schizzi eccessivi di grasso possono
l’autopulizia. Tale caratteristica può essere ripristinata mediante un
riscaldamento per circa 10-20 minuti del forno vuoto impostando la
manopola forno in corrispondenza della massima temperatura.
Non usare prodotti abrasivi, pagliette metalliche, oggetti appuntiti,
panni ruvidi, prodotti chimici o detersivi che possono danneggiare
irrimediabilmente lo smalto.
Si consiglia inoltre di utilizzare pentole a bordi alti nel caso di cotture di
vivande particolarmente grasse (arrosti, ecc.) e di usare la leccarda
quando si esegue la cottura al grill.
Qualora, per particolari condizioni di sporco, non fosse sufficiente
l’azione precedente, si consiglia di intervenire asportando i grassi con
panno morbido od una spugna inumiditi con acqua calda.
un
La porosità dello smalto è fondamentale per garantire l’azione
autopulente.
N.B.: Tutti i pannelli autopulenti in commercio hanno un’efficacia di
rendimento di circa 300 ore di funzionamento forno. Dopo tale limite i
pannelli dovrebbero essere sostituiti.
ostruire i pori e quindi impedire
PULIZIA E MANUTENZIONE
Per la pulizia dei vetri della porta del forno non utilizzare materiali
abrasivi raschietti o oggetti che possono graffiare la superficie del
vetro.
Non utilizzare getti di vapore per la pulizia dell’apparecchio. Pulire le
superfici in acciaio inox e smaltate con acqua tiepida e sapone,
oppure con appositi prodotti in commercio,
l’uso di polveri abrasive che danneggerebbero le superfici e le parti
estetiche.
La pulizia del forno è molto importante e deve essere effettuata ogni
volta che questo viene usato. Infatti, sulle pareti si depositano grassi
sciolti durante la cottura che potrebbero, alla successiva accensione,
produrre odori sgradevoli che nuocerebbero
cottura. Per la pulizia usare acqua calda e detersivo, sciacquando
accuratamente.
Per eliminare questo fastidioso intervento, su tutti i modelli possono
essere inseriti pannelli autopulenti, offerti come accessori opzionali:
vedere apposito paragrafo«FORNO AUTOPULENTE CATALITICO »
Usare detersivi e pagliette d’acciaio per le griglie inox. La pulizia delle
superfici
superfici sono fredde. Eventuali rotture dovute alla non osservanza di
questa regola elementare non rientrano nei termini di garanzia.
La lampada forno può essere sostituita disinserendo elettricamente
l’apparecchio e svitando l’ampolla che la racchiude, sostituendo la
lampada non funzionante con una analoga resistente
temperature.
in cristallo temperato deve essere eseguita quando le
evitando assolutamente
al buon esito della
alle alte
04 IT
Page 4

SERVIZIO ASSISTENZA CLIENTI
CERTIFICATO DI GARANZIA CONVENZIONALE: cosa fare?
Il Suo prodotto è garantito, alle condizioni e nei termini riportati sul
certificato inserito nel prodotto ed in base alle previsioni del
decreto legislativo 24/02, nonché del decreto legislativo 6
settembre 2005, n. 206, per un periodo di 24 mesi decorrenti dalla
data di consegna
Così come riportato nei testi dei Decreti Legislativi citati, il
certificato di garanzia dovrà essere da Lei cons ervato,
debitamente compilato, per essere mostrato al Servizio
Assistenza Tecnica Autorizzato, in caso di necessità, unitamente
ad un documento fiscalmente valido rilasciato dal rivenditore al
momento dell’acquisto (bolla di consegna, fattura, scontrino
fiscale, altro) sul quale siano indicati il nominativo del rivenditore,
la data di consegna, gli estremi identificativi del prodotto ed il
prezzo di cessione. Resta pure inteso che, salvo prova contraria,
poiché si presume che i difetti di conformità che si manifestano
entro sei mesi dalla consegna del bene esistessero già
a meno che tale ipotesi sia incompatibile con la natura del bene o
con la natura del difetto di conformità, il Servizio diAssistenza
Tecnica Autorizzato Gias, verificato il diritto all’intervento, lo
effettuerà senza addebitare il diritto fisso di intervento a domicilio,
la manodopera ed i ricambi. Per
diciotto mesi di vigenza della garanzia, sarà invece onere del
consumatore che intenda fruire dei rimedi accordati dalla garanzia
stessa provare l’esistenza del difetto di conformità del bene sin dal
momento della consegna; nel caso in cui il consumatore non fosse
in grado di fornire detta
condizioni di garanzia previste e pertanto il Servizio di Assistenza
Tecnica Autorizzato Gias effettuerà l’intervento addebitando al
consumatore tutti i costi
relativi.
ESTENSIONE DELLA GARANZIA FINO A 5 ANNI: come?
Le ricordiamo inoltre che sullo stesso certificato di garanzia
convenzionale Lei troverà le informazioni ed i
necessari per prolungare la garanzia dell’apparecchio sino a 5
anni e così, in caso di guasto, non pagare il diritto fisso di
intervento a domicilio, la manodopera ed i ricambi.
Per qualsiasi informazione necessitasse, La preghiamo rivolgersi
al numero telefonico del Servizio Clienti 199.12.13.14.
ANOMALIE E MALFUNZIONAMENTI: a chi rivolgersi?
Per
qualsiasi necessità il centro assistenza autorizzato è a Sua
completa disposizione per fornirLe i chiarimenti necessari;
comunque qualora il Suo prodotto presenti anomalie o mal
funzionamenti, prima di rivolgersi al Servizio Assistenza
Autorizzato, consigliamo vivamente di effettuare i controlli indicati
sopra.
UN SOLO NUMERO TELEFONICO PER OTTENERE
ASSISTENZA
Qualora il problema dovesse
Utile” sotto indicato, sarà messo in contatto direttamente con il
dell’operatore telefonico utilizzato. Dettagli sono presenti sul sito
internet www.candy-group.com
MATRICOLA
E’ indispensabile che comunichi al Servizio Assistenza Tecnica
Autorizzato la sigla del prodotto ed il numero di matricola (16
caratteri che iniziano con la cifra 3) che troverà sul certificato di
garanzia oppure sulla targa matricola del prodotto (figura in ultima
pagina). In questo modo Lei
inutili del tecnico, risparmiando oltretutto i relativi costi.
del bene.
a tale data,
contro, nel successivo periodo di
prova, non potranno essere applicate le
documenti
persistere, componendo il “Numero
ServizioAssistenza TecnicaAutorizzato
che opera nella Sua zona di residenza.
Attenzione, la chiamata è a pagamento;
il costo verrà comunicato, tramite
messaggio vocale, dal Servizio clienti
DEL PRODOTTO. Dove si trova?
potrà contribuire ad evitare trasferte
Questo elettrodomestico è marcato
conformemente alla Direttiva Europea
2002/96/CE sui rifiuti da apparecchiature
elettriche ed elettroniche (WEEE).
Assicurandovi che questo prodotto sia smaltito
correttamente, aiuterete ad evitare possibili
conseguenze negative all’ambiente e alla salute
delle persone, che potrebbero verificarsi a causa
di un errato trattamento di questo prodotto giunto a fine
simbolo sul prodotto indica che questo apparecchio non può
essere trattato come un normale rifiuto domestico; dovrà
invece essere consegnato al punto più vicino di raccolta per il
riciclo delle apparecchiature elettriche ed elettroniche. Lo
smaltimento deve essere effettuato in accordo con le regole
ambientali vigenti per lo smaltimento
informazioni più dettagliate sul trattamento, recupero e riciclo
di questo prodotto, per favore contattare l’ufficio pubblico di
competenza (del dipartimento ecologia e ambiente), o il vostro
servizio di raccolta rifiuti a domicilio, o il negozio dove avete
acquistato il prodotto.
dei rifiuti. Per
vita. Il
05 IT
Page 5

USO DEL CONTAMINUTI USO DEL TEMPORIZZATORE
Per selezionare il tempo prescelto, ruotare
la manopola di un giro completo, quindi
ritornare con l’indice nella posizione
corrispondente al tempo desiderato. Allo
scadere del tempo, entrerà in azione la
suoneria per alcuni secondi.
IMPOSTAZIONE OROLOGIO ANALOGICO
Ad ogni pressione della manopola la lancetta dei minuti avanza di un minuto, tenendo premuta
la manopola le lancette avanzano rapidamente.
Lancetta ore Lancetta minuti Manopola a pulsante
USO DEL PROGRAMMATORE ELETTRONICO
FUNZIONE
CONTAMINUTI
FUNZIONAMENTO
MANUALE
DURATA
COTTURA
FINE
COTTURA
BLOCCO
BAMBINO
COME SI ATTIVA
•
Premere il tasto centrale
1 volta.
•Premere i tasti o
per regolare la durata
•Lasciare i tasti
Premere il tasto centrale
•
1 volta.
•Selezionare la funzione
di cottura con la
manopola commutatore
Premere il tasto centrale
•
2 volte
•Premere i tasti o
per regolare la durata
•Lasciare i tasti
•Selezionare la funzione
di cottura con la
manopola commutatore
Premere il tasto centrale
•
3 volte
•Premere i tasti o
per regolare l’ora di fine
cottura
•Lasciare i tasti
•Selezionare la funzione
di cottura con la
manopola commutatore
•Tenere premuto per
5 secondi il tasto (+),
fino a che compare il
simbolo . Da
questo momento tutte
le funzioni sono
bloccate.
COME SI SPEGNE COSA FA A COSA SERVE
•Al termine della durata
impostata la funzione si
spegne da sola ed avvisa
con un segnale sonoro (il
segnale sonoro si ferma da
Dopo 7 minuti
solo; per
fermarlo subito premere
il tasto) SELECT.
•Riportare manopola
commutatore in posizione
O.
•Al termine della durata
impostata il forno si spegne
da solo; se deve essere
fermato prima si deve
portare la manopola
commutatore in posizione
O oppure portare a 0:00 la
durata della cottura
(tasti SELECT e o ).
•All’ora impostata il forno
si spegne da solo; se deve
essere fermato prima
è necessario portare la
manopola commutatore
in posizione O.
REGOLAZIONE ORA
ATTENZIONE: la prima operazione da eseguire dopo l’installazione o dopo
una interruzione di corrente (tali situazioni si riconoscono perchè sul
dispay lampeggia l’ora
descritto.
•Premere il tasto centrale 1 volta. L1, L2, L3 IMPOSTA SEGNALE ACUSTICO
• l'ora con i tasti ▼ ▲ •Premere il tasto centrale 5 volta
Imposta
•Lasciare i tasti. •Imposta l'ora con i tasti ▼ ▲
12:00 ) è la regolazione dell’ora, come di seguito
Con questo meccanismo è possibile
programmare la durata espressa in
02
minuti della cottura e quindi lo
30
spegnimento
termine del tempo desiderato (max. 120
40
minuti).
50
Allo scadere del tempo prescelto, la
automatico del forno al
manopola raggiungerà la posizione di
suoneria O in corrispondenza della qua
110
120
100
90
80
70
10
60
le i l forno s i spegne automaticamente.
Il forno può essere acceso solo impostando un tempo di cottura
o girando la manopola in
•Da un segnale sonoro al
termine di un tempo
stabilito
•Durante il funzionamento
il display visualizza il
tempo rimanente:
Sec.
•Permette il
funzionamento del forno
•Permette di impostare la
durata della cottura del
cibo inserito nel forno
•Per visualizzare il tempo
rimanente premere il
tasto SELECT.
•Per modificare il tempo
rimanente premere il
tasto SELECT + o
•Permette di
memorizzare l’ora di fine
cottura
•Per visualizzare l’ora
programmata p
tasto centrale 3 volte
•Per modificare l’ora
programmata premere i
tasti SELECT + o
•Lasciare i tasti.
posizione .
min.,
remere il
•Permette di utilizzare il
programmatore del forno
come una sveglia (può
essere usato con forno
funzionante o spento.
•Realizzare le cotture
volute
•Per interrompere
premere un tasto qualsiasi.
Premere il tasto centrale
per tornare alla funzione
orologio.
•Tipicamente si utilizza questa
funzione con la funzione
DURATA COTTURA–ad
esempio il cibo desiderato
deve cuocere per 45 minuti e
desidero che sia pronto per le
ore 12:30; in tal caso:
•Al termine della durata
impostata il forno si spegne
automaticamente ed avvisa
con un segnale sonoro.
Selezionare la funzione di
cottura desiderata
Impostare la durata cottura
a 45 minuti ( o )
Impostare la
ore 12:30 ( o )
La cottura avrà automaticamente inizio alle
11:45 (12:30 meno 45
minuti), all’ora impostata
come fine cottura il forno si
spegne automaticamente.
ATTENZIONE: impostando
solo la fine cottura e non la
durata della cottura, il
forno si accenderà subito e
si spegnerà all’ora di fine
cottura impostata
fine cottura alle
il segnale
ATTENZIONE: il forno funziona solo se impostato in manuale o cottura programmata
N.B.: per regolare le varie
funzioni del forno, in alcuni modelli compaiono i simboli o in altri modelli
abbiamo - o +
06 IT
Page 6

USO DEL PROGRAMMATORE ANALOGICO
Luce
Luce
indicazione
durata
indicazione
d'avvio
REGOLAZIONE DELL'ORARIO
•Premere e mantenere premuto per 4 secondi il bottone di
impostazione. Il display mostrerà la scritta "SET". Verrà emesso un
segnale sonoro.
•Impostare l'orario premendo il bottone. La rotazione del bottone farà
avanzare il programmatore di minuto in minuto. Mantenerlo premuto
per un avanzamento rapido.
FUNZIONE
MANUALE
TIMER
max 90 min.
"BEL”
TEMPO DI
COTTURA
max 24 H
"DUR"
Visualizzazione comandi
COME ATTIVARLA COME DISATTIVARLA COSA SUCCEDE A COSA SERVE
• Può essere impostata solo
con una funzione di cottura
attiva. Non si imposta l'orario.
• Premere due volte il
bottone di impostazione. Il
display mostrerà "BEL"
seguito da "---".
• Impostare il tempo di
cottura attraverso la
rotazione del bottone di
impostazione.
• La prima operazione è
quella di selezionare la
funzione di cottura e la
temperatura richiesta.
• Premere una volta il
bottone di impostazione.
Il display mostrerà "DUR"
e la durata di cottura
lampeggerà.
• Impostare la durata
desiderata ruotando il
bottone di impostazione. Il
tempo rimanente è
mostrato and the
indicator light is lit up.
Pulsante
impostazioni
Duration
Nessun'altra operazione deve essere fatta nei 4
altrimenti verrano cancellate le impostazioni appena inserite.
La durata e l'orario compariranno sul display automaticamente
• Mantenere la manopola
sulla posizione di Stop.
• Durante il conto alla rovescia,
il display mostra in
continuazione il tempo residuo
in minuti ed in secondi. Alla
fine del conto alla rovescia , il
display mostrerà "000"
lampeggiante e verrà emesso
un segnale sonoro di fine
cotttura. Per terminare il
suono, premere il bottone di
impostazione.
In ogni
momento è possibile
modificare o cancellare il
tempo impostato.
• Quando il conto alla
rovescia termina, il display
mostrerà END, la luce
dell'indicatore della durata
lampeggerà e il fonro si
spegnerà
automaticamente.Verrà
emesso un segnale sonoro
di fine cottura.Per farlo
smettere premere il bottone
SET. Premere una seconda
volta se si desidera far
ricominciare la cottura se
necessario. Impostare su
stop le manopole di
controllo.E' possibile
durante il funzionamento del
forno cancellare o
modificare la durata della
cottura.
secondi successivi,
• Il forno si può utilizzare. • Cucinare la ricetta
desiderata con un
funzionamento manuale.
• Viene emesso un
segnale una volta
trascorso il tempo
• Può essere utilizzato per
impostare un tempo anche
se il forno è spento.
impostato.
• Permette di
preselezionare il tempo di
cottura necessarioe
specifico per l'alimento
scelto.
• Alla fine del tempo di
cottura impostato, il forno
si spegnerà
automaticamente e verrà
emesso un segnale
sonoro.
FULLY
AUTOMATIC
COOKING
Maxi Pause
Time 24 H
DISPLAY
"PAU"
• Innanzitutto slezionare la
temperatura e la funzione di
cottura richiesta.
•Premere una volta per la
durata. Seguire le stesse
istruzioni come paragrafo
sopra "Tempo Cottura-DUR"
•Premere una seconda volta,
il display mostrerà "PAU"
seguito da "---", la luce
dell'indicatore STAR inizierà a
lampeggiare.
-Impostare il tempo di pausa
prima di far
Durante la puasa, il forno
mostrerà in modo continuo il
tempo rimanente della pausa,
entrambi gli indicatori di
START e STOP sono accesi.
Quando il conto alla rovescia
finirà, il forno inizierà al
cottura e la sola luce
dell'indicatore di STOP
rimarrà accessa.
partire la cottura.
• Alla fine del tempo di
cottura il forno si spegnerà
automaticamente e verrà
emesso un segnale di fine
cottura. Per terminare il
segnale, premere il
bottone SET. Premere una
seconda volta se volete far
ripartire la cottura.
Ruotare la manopola
sulla posizione di stop.
E' possibile durante il
funzionamento del
forno,annullare o
modificare sia il tempo di
pausa che la durata di
cottura.
07 IT
• Permette la
programmazione del forno
in modo che l'alimento sia
pronto al momento
Es: sono le 10,00, il cibo
deve essere cucinato per
45 min e deve essere
pronto alle 12,00.
1, selezionare la funzione
desiderata e
la
temperatura.
2, impostare la durata a 45
min.
3, impostare la pausa a 75
min (10H/11H15). Il forno
rimarrà in pausa dalle
10,00 alle 11,15; quando
inizierà la cottura che
terminerà
automaticamente alle
12,00.
Page 7

UTILIZZO DEL PROGRAMMATORE ELETTRONICO (Type A)
U
6
COOK
U
/
1
Luce: Timer /
Modalità automatica
Manopola di selezione
9
programmatore
Display per
temperatura o orologio
Bottoni di regolazione
7
Luce: Funzione con ventola
Funzione con ventola a sistema variabile
2
Modalità scongelamento
Attenzione! La prima operazione da fare dopo l’installazione o dopo l'interruzione di corrente (situazioni di questo tipo
possono essere riconosciute in quanto il display è acceso e lampeggia 12:00) è
Il Led " ° " della temperatura lampeggia fino a che la temperatura visualizzata non è stata raggiunta
Quando un programma è finito, se il forno è ancora caldo, il display mostra "HOT", in alternanza con il tempo e anche se le
maniglie sono posizionate su "OFF”
COOK
8
Manopola di selezione funzione
*
3
5
1.Luce: Timer / Modalità automatica
2.Luce
3.Funzione con ventola
4.Funzione con ventola a sistema
variabile
5.Modalità scongelamento
6.Display per temperatura o
orologio
7.Bottoni di regolazione
8.Manopola di selezione funzione
9.Manopola di selezione
programmatore
4
* secondo modello
l'impostazione del tempo.
FUNZIONI
Modalità silenziosa
Impostazione
dell’orologio
Durata di cottura
Fine di cottura
TIMER
Sicurezza
bambini
COME SI UTILIZZANO? COME SI DISATTIVANO? COSA FA A COSA SERVE?
•Ruotare la manopola del
programmatore sulla
“Modali tà Silenziosa”
• Impostare la manopola
sulla posizione
“impostazione
dell’orologio”
• Usare i tasti + e per impostare l'ora.
• Selezionare una funzione
di cucina
• Impostare la manopola del
programmatore sulla
durata di cottura
•
Regolare il tempo di
cottura utilizzando
i tasti + e -.
• Auto display si illumina.
• Selezionare una funzione
di cottura.
• Regolare la manopola sulla
posizione Fine di cottura.
• Regolare l’ora di fine
cottura utilizzando i
tasti + e -.
• Auto display si illumina
• Regolare la manopola del
programmatore sulla
posizione TIMER.
• Regolare il tempo di
cottura utilizzando i tasti + e -.
•Regolare la manopola del
programmatore sulla
posizione Sicurezza Bambini.
• Premere sul tasto + per 3
secondi.
• La sicurezza bambini è in
funzione quando sul display
appare STOP.
• Ruotare la manopola sulla
posizione off
• Ruotare la manopola sulla
posizione off
• Una volta che il tempo è
trascorso, il forno viene
automaticamente disattivato.
Per fermare la cottura prima,
si deve impostare la
manopola delle funzioni su
OFF, o regolare il tempo di
cottura su 00:00,
posizionando la manopola
sulla Durata della cottura e
utilizzando il tasto + e -.
• Quando la cottura è
terminata, il forno si
spegne automaticamente.
Per bloccare la cottura
anticipatamente, ruotare
la manopola delle funzioni
su OFF.
• Regolare il tempo su 00:00,
posizionando la manopola
del programmatore sulla
posizione TIMER, ed
utilizzando i tasti + e -.
• Riposizionare la manopola
sulla funzione Sicurezza
bambini e premere il tasto
– per 3 secondi.
• L’indicazione sul display
sparisce.
• Permette di spegnere il
suono del timer
• Permette di regolare l’ora
che appare
• Permette di regolare il
tempo di cottura.
• Quando il tempo di cottura
è regolato, posizionare la
manopola su OFF per
ritornare alla visualizzazione
dell’ora attuale.
• Per visualizzare l’ora
selezionata, posizionare il
selettore delle funzioni di
sinistra su Durata
• Permette di regolare l’ora
di fine cottura.
•
Quando l’ora di fine cottura
è regolata, ruotare il
selettore di funzione su
OFF per ritornare all’ora
attuale.
• Per vedere il tempo di
cottura selezionato, ruotare
il selezionatore di funzione
di sinistra sulla posizione
Fine di cottura.
• Questa funzione attiva un
allarme sonoro di qualche
secondo alla fine del
tempo impostato.
• Il forno non può essere
utilizzato
sul display
di cottura.
• Questa funzione è
utilizzata per spegnere il
suono del timer
• Questa funzione vi
permette di regolare l’ora
utilizzando i tasti + e –
Nota: impostare l’ora al
momento dell'installazione
del vostro forno o
subito dopo un’interruzione
di corrente (12:00
lampeggia sullo schermo).
• Quando
è finito, la cottura si
arresta automaticamente
e l'allarme suona per
qualche secondo.
• Questa funzione è anche
utilizzata per le cotture che
possono essere programmate
in anticipo. Ad esempio, se il
tuo piatto deve essere
cucinato per 45 minuti e deve
essere pronto alle 12.30:
impostare semplicemente la
durata di 45 minuti e l'ora di
Fine cottura alle 12:30.
La cottura inizierà automaticamente alle
meno45min) e proseguirà fino
a che l'ora di fine cottura è
stata raggiunta.
A questo punto il forno si
spegnerà automaticamente.
• Utile per ricordare,
l’allarme sonoro funziona
indipendentemente dal
fatto che il forno sia acceso.
•Questa funzione è utile
quando ci sono dei
bambini in casa.
il tempo di cottura
11:45 (12:30
08 IT
Page 8

ISTRUZIONI PER L’USO
Temperatura
Manopola
commutatore
proposta
e regolazione
(Type A)
Manopola
termostato
FUNZIONE
Accende la luce interna.
Scongelamento
Questa posizione permette di far circolare l’aria a temperatura ambiente intorno al cibo
surgelato facendolo così scongelare in pochi minuti senza modificare od alterare il
contenuto proteico.
Sprinter
Questa posizione permette un preriscaldamento rapido del forno. Una volta impostata
questa funzione consente un'immediato riscaldamento del forno (ad es. 8 minuti per
raggiungere 200°C), la temperatura desiderata può essere impostata tramite l'apposita
manopola. Il termine della fase di preriscaldamento è indicato tramite la spia del termostato
"°C" che si
cottura desiderata ed inserire le pietanze da cucinare. Prestare attenzione a non inserire
alimenti nel forno durante la fase di preriscaldamento rischierebbero di subire danni.
Convezione naturale
Sono in funzione le resistenze superiore e inferiore.
È la cottura tradizionale, ottima per arrostire cosciotti, selvaggina, ideale per
mele al forno e per rendere i cibi molto croccanti
spegne. Una volta conclusa questa fase è possibile selezionare la funzione di
biscotti,
Livello 4
1 ÷ 4
Livello 4
1 ÷ 4
Forno ventilato
L’aria calda, viene ripartita sui diversi ripiani; è l’ideale per cuocere contemporaneament
e diversi tipi di cibo (carne, pesce), senza miscelare sapori e odori. Cottura delicata indicata per pan di Spagna, torte Margherita, pasta sfoglia, ecc...
SOFT COOK (a)
Soft cook è la funzione ideale per la pasticceria ed il pane.
della ventola, questa funzione aumenta l'umidità presente all'interno del forno. Una
maggiore umidità crea le condizioni di cottura ideali per quegli alimenti che hanno
bisogno di mantenere una consistenza elastica mentre cuociono (es. torte, pane,
biscotti) e, di conseguenza, per non sbriciolarsi.
Suola ventilata
per cotture delicate (torte-soufflè).
Adatta
Grigliatura tradizionale a porta chiusa
In questa posizione viene inserita la resistenza del grill. Ottima nella cottura di carni di
medie e piccolo spessore (salsicce, costine, bacon).
SUPER GRILL: il forno ha
Grill Grill : 2200 W Grill Super : 3000 W
TURBO-GRILL (a) : l'utilizzo del turbo-grill richiede la porta chiusa.
Utilizzando la ventilazione e la resistenza cielo contemporaneamente.
Si cuociono perfettamente grandi
griglia a metà del forno e posizione la leccarda sotto di essa per raccogliere i grassi.
Assicuratevi che il cibo non sia troppo vicino al grill. Girate la carne a metà cottura.
due posizioni
pezzi di cibo, come arrosti, pollame, ecc.. Mettete la
Grazie alla velocità ridotta
Livello 4
1 ÷ 4
(a) SU ALCUNI MODELLI - Funzione con VARIO FAN : Vano Fan é l'esclusivo sistema di funzionamento sviluppato da Candy per ottimizzare i
risultati di cottura, la gestione della temperatura e la gestione dell'umidità. Il sistema Vario Fan modifica automaticamente la velocità di
rotazione della ventola per tutte le cotture in
funzione all'interno dell'area tratteggiata sul pannello di controllo.
Grill più girarrosto
Inserimento resistenza grill e motorino girarrosto.
Serve per
Funzione pizza
Il calore avvolgente in questa funzione ricrea un ambiente simile a quello
dei forni a legna di pizzeria.
multifunzione. Questo sistema si attiva automaticamente tutte le volte che viene selezionata una
effettuare cotture allo spiedo.
* Programma di prova secondo CENELEC EN 50304
** Programma di prova secondo CENELEC EN 50304 utilizzato per la definizione della classe energetica.
09 IT
Page 9

TABELLA TEMPI DI COTTURA
I tempi suggeriti nelle seguenti tabelle sono indicativi, infatti possono variare secondo la qualità, la freschezza, la dimensione e lo spessore degli
alimenti e secondo il vostro gusto. Lasciare sempre riposare per alcuni minuti prima di servire, perché tutti gli alimenti continuano a cuocere dopo
averli tolti dal forno.
CONSIGLIO UTILE: Per non rendere le superfici troppo secche è
consigliato abbassare la temperatura e allungare i tempi di cottura.
Forno elettrico statico Forno elettrico ventilato
Pietanza
Quantità
Ripiano
Tempo
di cottura
in minuti
Tempe-
ratura
forno
• Pasta
Lasagne
Cannelloni
Pasta al forno
Kg 3,5
Kg 1,8
Kg 2,5
22
22
22
70 ÷ 75
50 ÷ 60
55 ÷ 60
220
220
220
• Paste salate
Pane
Pizze
Pasta sfoglia
Vol au vent
Focaccia
(n° 4)
(Surgelati)
Kg 1
di pasta
Kg 1
n° 24
gr. 200
di pasta cad
22
35
prerisc.10
25 ÷ 35
30 ÷ 35
25 ÷ 30
200
190
220
200
Ripiano
11
21
22
Posizione ripiani
Tempo
di cottura
in minuti
Tempe-
ratura
forno
60 ÷ 65
40 ÷ 50
45 ÷ 50
30 ÷ 35
prerisc.10
20 ÷ 25
25 ÷ 30
20 ÷ 25
200
200
200
180
190
200
180
4
3
2
1
Osservazioni
Inserire le lasagne nel forno freddo
Inserire i cannelloni nel forno freddo
Inserire la pasta al forno nel forno
Preparate la pasta a forma di pagnotta e
incidere con un coltello una croce sulla
parte superiore della forma. Lasciare
lievitare a temperatura ambiente almeno 2
ore, ungere la leccarda e posizionate la
forma bene al centro della stessa.
Preriscaldate per 15min. il forno e
preparate le pizze nella leccarda
smaltata con pomodori, mozzarella e
prosciutto, olio, sale, origano
Disponete 24 vol au vent nella leccarda
e cuocete.
Preriscaldate per 15 min., ungere la teglia
del forno, disporre le 4 focacce oliate e
salate prima di infornare, lasciare lievitare
a temperatura ambiente per almeno 2 ore
• Carne
Tutte le carni possono essere cotte in recipiente con bordo basso o bordo alto.
È consigliabile coprire il recipiente a bordo basso con un coperchio per evitare di sporcare il forno con schizzi del condimento.
Le carni coperte risultano più morbide e succose, mentre quelle scoperte risultano più croccanti.
I tempi indicati
Roastbeef
intero
Arrosto di maiale
arrotolato
Arrosto di vitello
arrotolato
Arrosto di manzo
filetto
• Fish
• Pesci
Trota
Salmone
Sogliola
Orata
valgono per cotture con recipiente coperto o scoperto.
Kg 1
Kg 1
Kg 1,3
Kg 1
3 intere/Kg 1
700 g a fette
2,5 cm s.p.
Filetti / Kg 1
2 intere
70 ÷ 80
100 ÷ 110
90 ÷ 110
80 ÷ 90
40 ÷ 45
30 ÷ 35
40 ÷ 45
40 ÷ 45 220
220
220
220
220
220
220
220
Disporre la carne in una teglia Pirex a
33
22
21
22
22
22
22
22
50 ÷ 60
80 ÷ 90
90 ÷ 100
80 ÷ 90
35 ÷ 40
30 ÷ 25
35 ÷ 40
35 ÷ 40
200
bordo alto con sale pepe. Voltare a
metà cottura
Cuocere come sopra
200
Cuocere come sopra
200
Cuocere come sopra
200
Cuocere le trote coperte con olio, sale e
200
cipolle in teglia Pirex.
Cuocere il salmone non coperto in teglia
200
Pirex con sale, pepe e olio.
Cuocete la sogliola con sale e un
200
cucchiaio d’olio.
Cuocere in recipiente coperto le orate con
200
olio e sale
10 IT
Page 10

TABELLA TEMPI DI COTTURA
Forno elettrico statico Forno elettrico ventilato
Pietanza
Quantità
Ripiano
Tempo
di cottura
in minuti
Tempe-
ratura
forno
Ripiano
Tempo
di cottura
in minuti
Tempe-
ratura
forno
Osservazioni
• Pollame, Coniglio
Faraona
Pollo
Coniglio a pezzi
Kg 1-1,3
Kg 1,5-1,7
Kg 1-1,2
22
22
22
60 ÷ 80
110 ÷ 120
55 ÷ 65
220
220
220
60 ÷ 70
100 ÷ 110
50 ÷ 60
200
200
200
Sistemare la faraona in teglia Pirex o
ceramica a bordo alto condita con aromi
naturali e pochissimo olio.
Come per la faraona
Mettete i pezzi di uguali dimensioni nella
leccarda smaltata, condite con aromi
naturali. Se necessario voltate i pezzi.
• Dolci, Torte
Torta cacao
Torta margherita
Torta di carote
Torta crostata
albicocca
Scatola
Scatola
Scatola
700 gr
1
1
1
1
55
55
65
40
180
175
180
200
1
1
1
2
50
40 ÷ 45
50 ÷ 60
30 ÷ 35
160
160
160
180
In teglia per torte Ø 22. Prerisc. per 10
min.
In teglia per torte Ø 22. Prerisc. per 10
min.
In teglia per torte Ø 22. Prerisc. per 10
min.
In teglia per torte Ø 22. Prerisc. per 10
min.
• Verdura
Disponete i finocchi tagliati in 4 parti e
Finocchi
Zucchine
Patate
Carote
800 gr
800 gr
800 gr
800 gr
1
1
2
1
70 ÷ 80
70
60 ÷ 65
80 ÷ 85
220
220
220
220
1
1
2
1
60 ÷ 70
60 ÷ 70
60 ÷ 65
70 ÷ 80
200
200
200
200
coperti in teglia di Pirex
e possibilmente con la parte interna
verso l’alto
Affettate le zucchine e cuocete in teglia
Pirex coperte con burro e sale
Tagliate le patate in parti uguali e
cuocetele coperte con olio, sale e
origano o rosmarino in teglia Pirex.
Tagliate le carote a fettine, copritele e
cuocetele
in teglia Pirex.
con burro e sale
• Frutta
Mele intere
Pere
Pesche
Kg 1
Kg 1
Kg 1
1
1
1
45 ÷ 55
45 ÷ 55
45 ÷ 55
220
220
220
2
2
2
45 ÷ 55
45 ÷ 55
45 ÷ 55
200
200
200
Cuocere la frutta in teglia di Pirex o ceramica
non coperta. Lasciare raffreddare in forno.
Come sopra
Come sopra
• Cottura a grill
La cottura con il grill deve essere eseguita ponendo il cibo sotto il grill elettrico. Attenzione: durante il funzionamento il grill diventa di colore rosso vivo. La
leccarda deve essere inserita sotto la griglia per raccogliere i sughi.
Pane carrè
tostato
Toasts farciti
Salsiccie
Costate di manzo
Coscie di pollo
4 fette
4
n°6 / Kg 0,9
n°4 / Kg 1,5
n°4 / Kg 1,5
Inserire il pane carrè sulla griglia supporto.
44
5 (5 prerisc.)
10 (5 prerisc.)
33
44
44
33
25/30
(5 prerisc.)
25
(5 prerisc.)
50/60
(5 prerisc.)
Grill Grill
Grill Grill
Grill Grill
Grill Grill
Grill Grill
5 (10 prerisc.)
5/8
(10 prerisc.)
15/20
(10 prerisc.)
15/20
(10 prerisc.)
50/60
(10 prerisc.)
Dopo la 1° cottura capovolgere fino a
cottura ultimata.
Inserire i toasts sulla griglia supporto
leccarda;dopo la prima brunitura
capovolgere i toasts fino a brunitura ultimata.
Tagliare le salsiccie a metà e disporle sulla
griglia, con la parte interna verso l’alto. A metà
cottura capovolgere le salsiccie fino a cottura
ultimata. Avvertenza: ogni tanto controllate
visivamente l’uniformità di cottura. Nel
di disuniformità intercambiare quelle cotte
con quelle meno cotte.
Disporre le fette bene sotto l’azione del grill
e voltarle due volte.
Condite con aromi naturali e voltatele ogni
tanto.
11 IT
caso
Page 11

GENERAL WARNINGS
Thank you for choosing one of our products. To get the most out of your oven we recommend that you:
• Read the notes in this manual carefully: they contain important instructions on how to install, use and service this oven safely.
• Keep this booklet in a safe place for easy,
All accessible parts are hot when the appliance is in operation, take care to not touch these elements.
When the oven is first switched on it may give out acrid smelling fumes. This is because the bonding agent for insulating panels around the oven
has been heated up for
the first time.
This is a completely normal, if it does occur you merely have to wait for the fumes to clear before putting the food into the oven.
An oven by its very nature becomes very hot. Especially the glass of the oven door.
Do not allow children to go near
the oven when it is hot, especially when the grill is on.
DECLARATION OF COMPLIANCE
The parts of this appliance that may come into contact with foodstuffs
comply with the provisions of EEC Directive 89/109.
Appliance complies with European Directives 73/23/EEC and
89/336/EEC, replaced by 2006/95/EC and 2004/108/EC, and
subsequent amendments.
When you have unpacked the oven, make sure that it has not been
damaged in any way. If you have any doubts at all, do not use it:
contact a professionally qualified person. Keep packing materials
such as plastic bags, polystyrene, or nails out of the reach of children
because they
are dangerous for children.
SAFETY HINTS
•The oven must be used only for the purpose for which it was designed:
it must only be used for cooking food. Any other use, e.g. as a form of
heating, is an improper use of the oven and is therefore dangerous.
•The manufacturers cannot be held responsible for any damage
caused by improper, incorrect or unreasonable use. When using any
electrical appliance you must follow a few basic rules.
– Do not pull on the power cable to remove the plug from the socket.
– Do not touch the oven with wet or damp hands or feet.
– Do not use the
– Do not allow children or irresponsible people to use the oven unless
they are carefully supervised.
– It is not generally a good idea to use adapters, multiple sockets for
several plugs and cable extensions.
– If the oven breaks down or
and do not touch it.
•If the cable is at all damaged it must be replaced promptly.
When replacing the cable, follow these instructions. Remove the
power cable and replace it with one of the H05RRF, H05VV-F,
H05V2V2-F type. The cable must be
required by the oven. Cable replacement must be carried out by
properly qualified technicians. The earthing cable (yellow-green) must
be 10 mm longer than the power cable.
Use only an approved service centre for repairs and ensure that only
original parts are used. If the
manufacturers cannot guarantee the safety of the oven.
•This appliance is not intended for use by persons (including children)
with reduced physical, sensory or mental capabilities, or lack of
experience and knowledge, unless they have been given supervision
or instruction concerning use of the
for their safety.
•Children should be supervised to ensure that they do not play with the
appliance.
•Do not line the oven walls with aluminium foil or single-use
protection available from stores. Aluminium foil or any other
protection, in direct contact with the hot enamel, risks
and deteriorating the enamel of the insides.
oven unless you are wearing something on your feet.
develops a fault switch it off at the mains
above instructions are not adhered to the
appliance by a person responsible
INSTALLATION
Installation is the customer’s responsibility. The manufacturers have
no obligation to carry this out. If the assistance of the manufacturer is
required to rectify faults arising from incorrect installation, this
assistance is not covered by the guarantee.
The installation instructions for professionally qualified personal must
be followed. Incorrect installation may cause
animals or belongings. The manufacturer cannot be held responsible
for such harm or injury.
FITTING THE OVEN INTO THE KITCHEN UNIT
Fit the oven into the space provided in the kitchen unit; it may be fitted
underneath a work top or into an upright cupboard. Fix the oven in
position by screwing into place, using the four fixing holes in the frame.
(Fig.on last page).
To locate the fixing holes, open the
oven door and look inside.To allow
future reference.
able to bear the electrical current
melting
harm or injury to people,
adequate ventilation, the measurements and distances indicated in
the diagram on last page must be adhered to when fixing the oven.
Note: For ovens that are combined with a hob unit the instructions
contained in the manual for the hob unit must be followed.
IMPORTANT
If the oven is to work properly, the kitchen housing must be suitable.
The panels of the kitchen unit that are next to the oven must be made
of a heat resistant
veneered wood can withstand temperatures of at least 120 °C.
Plastics or glues that cannot withstand such temperatures will melt
and deform the unit. Once the oven has been lodged inside the unit,
the electrical parts must be completely insulated. This
requirement. All guards must be firmly fixed into place so that it is
impossible to remove them without using special tools.
Remove the back of the kitchen unit to ensure an adequate
current of air circulates around the oven. The hob must have a
rear gap of
material. Ensure that the glues of units made of
is a legal safety
at least 45 mm.
CONNECTING TO THE POWER SUPPLY
Plug into the power supply. Ensure first that there is a third contact that
earthing for the oven. The oven must be properly earthed.
acts as
If the model of oven is not fitted with a plug, fit a standard plug to the
power cable. It must be able to bear the power supply indicated on the
specifications plate. The earthing cable is yellowgreen. The plug must
be fitted by a properly qualified person. If the socket and the plug are
incompatible the socket must be changed by a properly qualified
person.A properly qualified person must also ensure that the power
cables can carry the current required to operate the oven.
An ON/OFF switch may also be connected
connections must take account of the current supplied and must
comply with current legal requirements. The yellow-green earthing
cable must not be governed by the ON/OFF switch. The socket or the
ON/OFF switch used for connecting to the power supply must be
easily accessible when
Important: During installation, position the power cable in such a way
that it will not be subjected to temperatures of above 50°C at any point.
The oven complies with safety standards set by the regulatory bodies.
The oven is safe to use only if it has
compliance with current legal requirements on wiring safety. You must
ensure that the oven has been adequately earthed.
The manufacturers cannot be held responsible for any harm or
injury to persons, animals or belongings caused by failure to
properly earth the oven.
WARNING: the voltage and the supply
the rating plate (fig. on last page).
The cabling and wiring system must be able to bear the maximum
electric power required by the oven. This is indicated on the
specifications plate. If you are in any doubt at all, use the services of a
professionally qualified
the oven has been installed.
person.
to the power supply. The
been adequately earthed in
frequency are showed on
OVEN EQUIPMENT (according to the model)
It is necessary to do an initial cleaning of the equipment before
the first use of each of them.Wash them with a sponge. Rinse and
dry off.
The simple shelf can take moulds
and dishes.
The tray holder shelf is especially
good for grilling things. Use it with the
drip tray.
The special profile of the shelves
means they stay horizontal even when
pulled right out. There is no risk of a
dish sliding or spilling.
12 GB
Page 12

The drip tray catches the juices from grilled foods. It is only used with the Grill, Rotisserie, or Fan Assisted Grill ;
remove it from the oven for other cooking methods.
Never use the drip tray as a roasting tray as this creates smoke and fat will spatter your oven
making it dirty.
The pizza set is designed for pizza
cooking. In order to obtain the best
results the set must be used together
with Pizza function.
The tray holder
The tray holder shelf is ideal for grilling. Use it in
conjunction with the drip tray. A handle is included
to assist in moving the
Do no leave the handle inside the oven.
USEFUL TIPS
SHELF SAFETY SYSTEM
The oven features a new shelf safety
system.
This allows you to pull out the oven
shelves when inspecting the food
without danger of food spillages or
shelves falling accidentally out of the
oven.
To remove the shelves pull out and lift.
GRILLING
Grilling makes it possible to give food a rich brown colour quickly.
For browning we recommend that you insert the grill onto the
fourth level, depending on the proportions of the food (see fig.
page 7).
Almost all food can be cooked under the grill except for very lean
game and
meat rolls.
Meat and fish that are going to be grilled should first be lightly
doused with oil.
The MODELS
Ovens have an electronic control of the fan speed, called
and patented VARIOFAN. During the cooking, this system changes
automatically the speed of the fan (in multifunction mode)
optimize the air flow and the internal temperature in the cavity of the
oven.
Some ovens are equipped with the new doorj " WIDE DOOR " which
has a bigger window area, this allows better maintenance and a
improved thermal insulation.
All ovens feature the function.
This allows a management of the distribution of moisture
and temperature. It reduces the loss of humidity of the 50
%, which guarantees the food remains tender and tastes
better. This a delicate cooking is recommended for the
baking of the bread and pastry.
It reduces the time of preheating of ovens: only 8 minutes
to reach 200 degrees Celsius.
It gives the possibility of setting level and
grilling, up to 50 % more power in comparison with a
traditional multifunction oven.
in order to
intensity of
According to the model
Is an illumination system which replaces the traditional « light bulb ».
14 LED lights are integrated within the door. These produce white high
quality illumination which enables to view the inside of the oven with
clarity without any shadows on all the shelves.
Advantages :
System, besides providing excellent illumination inside the
oven, lasts longer than the traditional light bulb its easier and to
maintain and most of all saves energy.
• Optimum view
• Long life illumination
• Very low energy consumption, -95% in
comparison with the traditional
illumination High
“Appliance with white light LED of the 1M Class according to IEC
60825- 1:1993 + A1: 1997 + A2: 2001 (equivalent to EN 60825-1: 1994
+ A1: 2002 + A2: 2001); the maximum light power
150uW.
Not observed directly with optical instruments. “
emitted l 459nm <
both accessories safely.
COOKING TIME
For recommended cooking times and temperatures the first time you
use the oven, refer to the tables on pages 7, 8. You may then wish to
vary these times and settings in the light of your own experience.
SELF-CLEANING OVEN WITH CATALYTIC
Special self-cleaning panels covered in a micro-porous coating are
available as optional extras for all models. If they are fitted, the oven
no longer needs to be cleaned by hand.
The fat that is splattered onto the sides of the oven during roasting is
eliminated by the microporous coating which breaks
catalysis and transforms it into gas.
Excessive splattering may nevertheless block the pores and therefore
hinder self-cleaning. The self-cleaning capacity may be restored by
switching on the empty oven to maximum for about 10-20 minutes.
Do not use abrasive products, metal cleaning wads, sharp objects,
rough cloths, or
permanently damage the catalytic lining.
It is a good idea to use deep roasting trays to roast fatty foods such as
joints of meat etc. and to put a tray underneath the grill to catch surplus
fat.If the walls of the oven are so thickly
catalytic lining is no longer effective remove surplus grease with a soft
cloth or sponge soaked in hot water.
The lining must be porous for self-cleaning to be effective.
N.B.: All catalytic linings currently on the market have a working life of
about 300 hours. They
hours.
chemical products and detergents that may
coated in grease that the
should therefore be replaced after about 300
the fat down by
CLEANING AND MAINTENANCE
Never use a steam or high pressure spray to clean the appliance.
Never use abrasive cleaners, wire wool or sharp objects to clean the
glass oven door.
Clean the stainless steel and enamelled surfaces with warm, soapy
water or with suitable brand products. On no account use abrasive
powders that may damage
It is very important to clean the oven each time that it is used. Melted
fat is deposited on the sides of the oven during cooking. The next time
the oven is used this fat could cause unpleasant odours and might
even jeopardise the
detergent to clean; rinse out thoroughly.
To make this chore unnecessary all models can be lined with catalytic
self-cleaning panels: these are supplied as an optional extra (see the
section SELF-CLEANING OVEN WITH CATALYTIC LINING).
Use detergents and abrasive metal pads like «brillo pads»
stainless steel grills.
The glass surfaces as the top, oven door and warming compartment
door must be cleaned when they are cold. Damage that occurs to
them because this rule was not adhered to are not covered by the
guarantee.
To replace the interior light:
• switch off the mains
identical bulb that can withstand very high temperatures
surfaces and ruin the oven’s appearance.
success of the cooking. Use hot water and
for the
power supply and unscrew bulb. Replace with an
SERVICE CENTRE
Before calling the Service Centre
If the oven is not working, we recommend that:
you check that the oven is properly plugged into the power supply.
If the cause of the fault cannot be detected:
disconnect the oven from the mains, do not touch the oven and call the
after sales service.
calling the Service Centre remember to make a note of the
Before
serial number on the specifications plate (see fig. On last page).
The oven is supplied with a guarantee certificate that ensures that it
will be repaired free of charge by the Service Centre
13 GB
Page 13

USING THE MINUTE TIMER USING THE END OF COOKING TIMER
To set the cooking time, turn dial one
complete revolution and then position the
index to the required time. When the time
has lapsed, the signal will ring for a few
seconds.
Analog Timer Setting
When you push the knob, the minute arrow goes one minute forward. If you keep the knob
pressed, the arrows move quickly forward.
Hours hand Minutes hand Push Knob
USE OF THE ELECTRONIC PROGRAMMER
FUNCTION
MINUTE
MINDER
MANUAL
FUNCTION
COOKING
TIME
HOW TO ACTIVATE IT
•Push the central button
1 times
•Press the buttons or
to set the required time
•Release all the buttons
Push the central button
•
1 times
•Set the cooking function
with the oven function
selector
•
Push the central button
2 times
•Press the buttons or
to set the lenght of
cooking required
•Release all buttons
•Set the cooking function
with the oven function
selector
HOWTO SWITCH ITOFF WHAT IT DOES WHAT IT IS FOR
•When the set time as
elapsed an audible alarm
is activated (this alarm will
stop on its own, after
7 minutes however it can be
stopped immediately by
pressing the button) SELECT.
•Turn the oven function
selector to position O.
•When the time is elapsed
the oven will switch off
automatically. Should you
wish to stop cooking earlier
either turn the function
selector to 0, or set time
to 0:00 (SELECT and
buttons)
10
70
20
30
40
50
60
011
100
210
90
80
•Sounds an alarm at the
end of the set time.
•During the process, the
display shows the
remaining time: min, sec.
•Enables you to operate
the oven.
•It allows to preset the
cooking time required
for the recipe chosen
•To check how long is left
to run press the SELECT
button 2 Times.
•To alter/change the
preset time press SELECT
and buttons
This control enables to set the desired
cooking time (max. 120 min.) the oven
will automatically switch off at the end of
the set time.
The timer will count down from the set
time return to the O position and switch
off automatically.
For normal use of oven set the timer to
the position.
To set the oven ensure the timer is not
on the O position.
•Allows to use the oven as
alarm clock (could be
activated either with
operating the oven or with
out operating the oven)
•For cooking the desired
recipes
•Push any button to stop
the signal. Push the central
button to return to the clock
function
•At the time set, the oven
will switch off. To switch
off manually, turn the oven
function selector to
position O.
•Child Lock function is
deactivated by touching
touchpad Set (+) again for a
minimum of 5 seconds until
Child Lock symbol switches
off. From this moment on all
functions are selectable again.
END OF
COOKING
KEY LOCK
Push the central button
•
3 times
•Press the buttons
to set the time at which
you wish the oven to
switch off
•Release the buttons
•Set the cooking function
with the oven function
selector
•Child Lock function is
activated by touching Set (+)
for a minimum of 5 seconds
until the Child Lock symbol
is displayed. From this
moment on all other function
are locked.
SETTING THE CORRECT TIME
WARNING : the first operation to carry out after the oven has been installed
or following the interruption of power supply (this is recognizable the
display pulsating and showing
achieved as follows
•Push the central button 1 times
•Set time with ▲ buttons.
•Release all buttons.
ATTENTION the oven only operates if set on manual function or preset time.
N.B.: on some models the symbols are replaced by - and + .
▼
12:00 ) is setting the correct time. This is
L1, L2, L3 SET ACUSTIC SIGNAL
• Push the central button 5 times.
• Set time with buttons.
• Release all buttons.
14 GB
•Enables you to set the
end of cooking time
•To check the preset time
p
ush the central button
3 times
•To modify the preset
time press buttons
SELECT +
the
▼ ▲
•This function is typically used
with “cooking time” function.
For example if the dish has to
be cooked for 45 minutes and
needs to be ready by 12:30,
simply select the required
function, set the cooking time
to 45 minutes and the end of
cooking time to 12:30.
•At the end
time, the oven will switch off
automatically and an audible
alarm will ring.
•Cooking will start
automatically at 11:45 (12:30
minus 45 mins) and will
continue until the pre-set endof-cooking-time, when the
oven will switch itself off
automatically.
WARNING.
If the END of cooking is
selected without setting
length of cooking time, the
oven will start cooking
immediately and it will stop
at the END of cooking time
set.
of the cooking set
the
Page 14
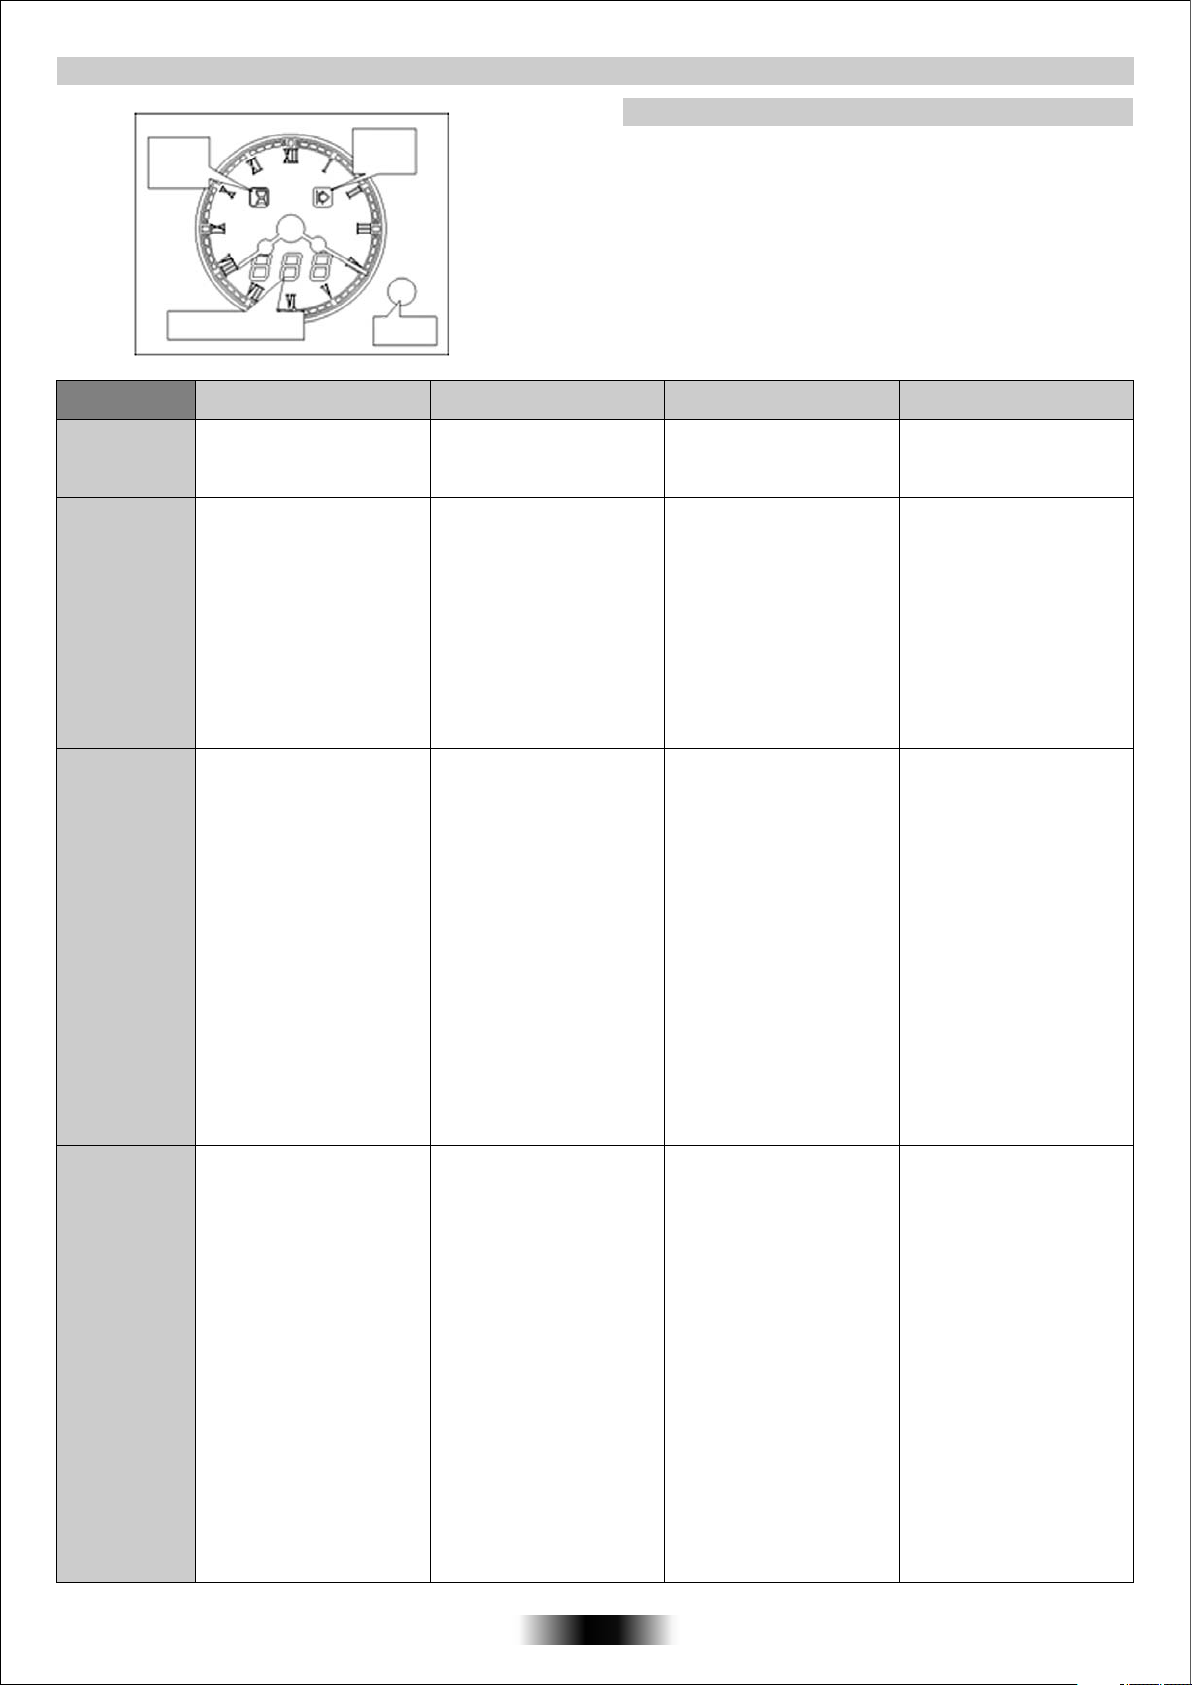
USE OF ANALOGUE CLOCK/PROGRAMMER
Start
Duration
indicator
light
indicator
light
SETTING THE TIME OF DAY
• Press and, for 4 seconds, hold on the setting button pressed. The
display will show "SET". The buzzer emits a signal.
• Set the time of day pressing the button. The rotation movement
advance the minute with 1 minute steps. Maintain it pressed for an
automatic fast advance.
Display of the
commands
FUNCTION HOW TO ACTIVATE IT
MANUAL
FUNCTION
MINUTE MINDER
maxi 90 min.
DISPLAY
"BEL”
• It can be set only with a
cooking mode. No setting on
the timer.
• Press two times the setting
button, the display will show
"BEL" followed by "---".
• Set a time by turning the
setting button.
• First of all, select the
cooking function and the
temperature required.
• Press one time the
setting button. The display
shows "DUR" and the
Duration indicator light
flashes.
COOKING TIME
maxi 24 H
DISPLAY
"DUR"
• Set the duration required
by turning the setting
button. The remaining time
is displayed and the
Duration indicator light is lit
up.
• First of all, select the
temperature and the
cooking function required.
• Press one time to set a
duration. Follow the
instructions above "Cooking
FULLY
AUTOMATIC
COOKING
Maxi Pause
Time 24 H
DISPLAY
"PAU"
time - Dur”
• Press a second time, the
display shows "PAU"
followed by "---", the Start
indicator light flashes.
- Set the pause time before
starting
pause, the oven does not
cook, the display shows
continuously the remaining
pause length, both the Start
and Stop indicator lights are
lit-up. When the countdown
expires, the oven will start to
cook, only the Stop indicator
light is lit-up.
the oven. During the
Setting
button
HOW TO SWITCH IT OFF WHAT IT DOES WHAT IT IS FOR
• Turn back to the stop
position the control knobs.
• During the countdown, the
display shows continuously
the remaining time in minute
and then in seconds. At the
end of the countdown, the
display shows
and the buzzer emits the
end signal. To silence it,
press the setting button. At
any time, it is possible to
modify or to cancel the
minute minder.
• When the countdown
expires, the display shows
"END", the Duration
indicator light flashes and
the oven cuts off
automatically. The buzzer
emits the end of cook
signal. To silence it, press
the setting button. Press a
second time if you want to
restart the cooking, if
necessary.
Turn back to stop
position the control
knobs.
It is possible during the
functionning of the oven to
cancel or to modify the
cooking duration.
• At the end of cooking
time, the oven will switch
off automatically. The
buzzer emits the end of
cook signal. To silence it,
press the setting button.
Press a second time, if
you want to restart the
cooking, if necessary.
Turn back to stop position
the control knobs.
It is possible
functionning of the oven to
cancel or to modify either
the pause time or the
cooking duration.
"000" flashing
during the
Any operation must
be done in the 4 seconds, otherwise it is
cancelled.
A duration or a time can be displayed by default, not take into
account it.
• It allows you to operate the
oven.
• A signal is emitted at the
end of the set time.
• It allows you to preset the
cooking time required for
the recipe chosen.
• For cooking the desired
recipes.
• Allows you to use the oven
as alarm even
switch off.
if the oven is
• At the end of the cooking
time setted, the oven will
switch off automatically
and
an audible signal will
emit.
• Allows you to programme
the oven so that the recipe
is ready at the desired
time.
Ej : the time of day is 10H.
the recipes ahs to be
cooked for
45 min and
needs to be ready at 12 H.
1. select the requierd
function and the
temperature. 2. set a 45
min duration, 3. set the
time pause 75 min
(10H/11H15). The oven
will be in pause from 10H
to 11H15 ; it will start the
cooking at 11h15 and
will
stop automatically at 12H.
15 GB
Page 15

USE THE ELECTRONIC PROGRAMMER (Type A)
WARNING !
The Led “°” of the temperature indicator pulsates until the pre-set temperature is not reached.
HOT : When a cooking program is finished, if the oven is still hot, « HOT » appears on the display, alternately with the time
displays, even if the two function selectors are switched on OFF.
The first operation to carry out after the oven has been installed or following the interruption of power supply
(this is recognizable the display pulsating and showing12:00) is setting the correct time.
1. Minute Minder or Auto light
2. Lights
3. Function with fan
4. Function with VARIOFAN
5. Defrost
6. Display for Temperature or Time
7. Setting buttons
8. Function selector knob
9. Function Timer knob
* according to the model
FUNCTION HOW TO ACTIVATE IT?
SILENCE MODE
SET THE TIME
COOKING TIME
DURATION
END OF
COOKING TIME
MINUTEMINDER
CHILD LOCK
• Rotate the left function
selector to the position
" Silence mode “
• Rotate the left function
selector to the position
“Set the time”.
• Use
the buttons " + " or
" - " to set the time
• Turn the right function
selector to a cooking
function
• Rotate the left function
selector to the position
"Cooking Time Duration"
• Set the time of cooking
by using buttons " + " and
" - "
• Lighting Auto appears
• Turn the right function
selector to a
function
• Rotate the left function
selector to the position
"End of cooking"
• Set the end time of
cooking by using buttons
" + " and " - "
• Lighting Auto appears
• Turn the left function
selector to the position
Minute Minder
• Set the time of cooking
by using buttons “+”and “-”
• Turn the left function
selector to the position
Child lock.
Press the button " + "
during 3 seconds
• Child lock is available
when " STOP " appears
on display
cooking
HOW TO SWITCH IT OFF? WHAT IT DOES ? WHAT IT IS FOR ?
• Rotate the function
selector to the position
OFF.
• Rotate the function
selector to the position
OFF.
•When the cooking time has
elapsed, the oven switch off
automatically and the alarm
rings for few seconds To stop
the cooking functions early,
turn the function control to
OFF or set the time on 00.00;
by rotating the function
selector to Cooking Time
Duration and by using the
buttons " + " and " - “
• When the cooking time
has elapsed, the oven
switch off automatically.
• To stop the cooking
functions early, turn the
function control to OFF
• Set the time on 00.00 by
turning the left function
selector to the position
Minute Minder, and
the button " - “
• Turn back the left function
selector to Child lock and
press button " + " during 3
seconds
• Indication STOP
disappears
using
• Enables you to turn off the
sound of the minute
minder
• Enables you to set the
time which appears on the
display
• It allows to preset the
cooking time
the recipe chosen.
• When the cooking time is
set, turn the function
selector toOFF to go back
to actual time.
• To view the cooking time
selected, turn the left
function selector to
Cooking Time duration.
• It allows to preset the end
of cooking time you want.
• When the cooking time is
set, turn the
selector to OFF to go back
to actual time.
• To view the cooking time
selected, turn the left
function selector to End of
cooking Time
• Sounds an alarm at a few
seconds at the end of the
set time
• The oven cannot be used
required for
function
• To turn off the sound of the
minute minder
• To set the time
NB : Set the time when
you first install your oven
or just after a black out
(the clock is showing a
pulsating 12.00)
• For cooking the desired
recipes
• This function is used for
cooking we want to program
in advance. For example,
your recipe needs to be
cooked 45 min and to be
ready at 12.30pm ; simply
set the cooking time
duration on 45 min and the
end of cooking time on
12.30pm.
The cooking will start
automatically at 11.45
(12.30 minus 45
will continue until the preset
end of cooking time,
then the oven will switch
itself off automatically
• Allow to use the oven as
alarm even if the oven is
switch off
Useful especially when
children are at home
min) and
16 GB
Page 16

* Tested in accordance with the CENELEC EN 50304.
** Tested in accordance with the CENELEC EN 50304 used for definition of energy class.
17 GB
Page 17

TABLES OF COOKING TIMES
The overall suggested cooking times set out below are intended as a rough guide only. They may in fact vary according to the quality, the freshness,
the size and the thickness of the food cooked and of course cooking time is also partly a matter of taste. Let the food stand
serving because the ingredients continue cooking after they have been removed from the oven.
for a few minutes before
HANDY TIP: Lower the temperature so as to avoid the surface of the
food becoming hard and dry.
Static electric oven
Food
Quantity
Shelf
Time
of cooking
in minutes
Oven
tempe-
rature
• Pasta
Lasagne
Cannelloni
Oven baked
pasta
Kg 3,5
Kg 1,8
Kg 2,5
22
22
22
70 ÷ 75
50 ÷ 60
55 ÷ 60
220
220
220
• Baking (not cakes)
Bread
Pizza
Pastry (frozen)
vol au vents
Focaccia
(n° 4)
Kg 1
di pasta
Kg 1
n° 24
gr. 200 of
dough each
22
35
10
(pre-heating)
25 ÷ 35
30 ÷ 35
25 ÷ 30
200
190
220
200
• Meat
Electric fan oven
Shelf
of cooking
in minutes
(pre-heating)
11
21
22
Shelf position
Time
60 ÷ 65
40 ÷ 50
45 ÷ 50
30 ÷ 35
10
20 ÷ 25
25 ÷ 30
20 ÷ 25
Oven
tempe-
rature
200
200
200
180
190
200
180
Remarks
Put the lasagne into an unheated oven
Put the cannelloni
Put the oven baked pasta into an
unheated oven
Form the dough into a loaf and make a
cross with a knife on top of the dough
leave the dought to rise for at least 2
hours. Grease the baking tin and put the
dough in the middle of it.
Warm the oven for 15 minutes and
place the pizzas
tray. Garnish them with tomatoes,
mozzarella, ham, oil, salt and origano.
Place 24 vol au vents in the oven and
bake.
Warm the oven for 15 minutes, grease
the baking tray, season the 4 focaccia
with oil and salt and leave them to rise at
room temperature for
before put ting them in the oven.
into an unheated
on the greased baking
at least 2 hours
4
3
2
1
All meats can be roasted in shallow or deep roasting trays.
It is advisable to cover the shallow trays to avoid splattering the sides of the oven with grease.
The roasting times are the same whether the meat has been covered up or not.
Whole joint of
beef
Joint of
deboned
Joint of
deboned veal
Joint of
fillet of beef
• Fish
• Fish
Trout
Salmon
Sole
Bream
Kg 1
Kg 1
Kg 1,3
Kg 1
3 whole trout
or / Kg 1
700 g
2,5 cm slice
Kg 1
2 whole ones
70 ÷ 80
100 ÷ 110
90 ÷ 110
80 ÷ 90
40 ÷ 45
30 ÷ 35
40 ÷ 45
40 ÷ 45 220
220
220
220
220
220
220
220
33
22
21
22
22
22
22
22
50 ÷ 60
80 ÷ 90
90 ÷ 100
80 ÷ 90
35 ÷ 40
30 ÷ 25
35 ÷ 40
35 ÷ 40
200
200
200
200
200
200
200
200
Put the meat into a deep Pyrex dish and
season with salt and pepper; turn the
meat half way through cooking.
Cook the meat in a covered Pyrex dish
with herbs, spice, oil and butter.
Cook as indicated above
Cook as
Cover the trout with salt, oil and onions
and cook in a Pyrex dish.
Cook the salmon in an open Pyrex dish
with salt, pepper and oil.
Cook the sole with salt and a spoonful
of oil.
Cook the bream in oil and salt in a
covered dish.
indicated above.
18 GB
Page 18

TABLES OF COOKING TIMES
Electric fan oven
Shelf
of cooking
in minutes
Time
Oven
tempe-
rature
Remarks
Food
Quantity
Static electric oven
Shelf
Time
of cooking
in minutes
Oven
tempe-
rature
• Rabbits and Poultry
Guinea fowl
Chicken
Rabbit pieces
Kg 1-1,3
Kg 1,5-1,7
Kg 1-1,2
22
22
22
60 ÷ 80
110 ÷ 120
55 ÷ 65
220
220
220
60 ÷ 70
100 ÷ 110
50 ÷ 60
200
200
200
Place the guinea fowl in a deep Pyrex or
pottery dish with very little oil and
season with herbs and spices.
Follow the procedure for cooking the
guinea fowl.
Put all the pieces of the same size in the
glazed tray.Season with herbs and spices.
Turn the pieces as and when required.
• Cakes
Coconut cake
baked in a tin
Sponge cake
Carrot cake
baked in a tin
Apricot pie
700 gr
1
1
1
1
55
55
65
40
180
175
180
200
1
1
1
2
50
40 ÷ 45
50 ÷ 60
30 ÷ 35
160
160
160
180
Use a tin that is 22 cm deep. Pre-heat for
10 mins.
Use a tin that is 22 cm deep. Pre-heat for
10 mins.
Use a tin that is 22 cm
10 mins.
Use a tin that is 22 cm deep. Pre-heat for
10 mins.
deep. Pre-heat for
• Vegetable
Cut the fennel into four pieces, add
Fennel
Courgettes
Potatoes
Carrots
800 gr
800 gr
800 gr
800 gr
1
1
2
1
70 ÷ 80
70
60 ÷ 65
80 ÷ 85
220
220
220
220
1
1
2
1
60 ÷ 70
60 ÷ 70
60 ÷ 65
70 ÷ 80
200
200
200
200
butter, salt and potatoes if required and
place in a Pyrex face up. Cover the dish.
Slice the courgettes, place in a Pyrex
dish and add butter and salt.
Cut the potatoes into equal parts and
place in a Pyrex dish. Season with salt,
origano and rosemary. Cook in oil.
Slice the carrots, place in a Pyrex dish and
cook.
• Fruit
Whole apples
Pears
Peaches
Kg 1
Kg 1
Kg 1
1
1
1
45 ÷ 55
45 ÷ 55
45 ÷ 55
220
220
220
2
2
2
45 ÷ 55
45 ÷ 55
45 ÷ 55
200
200
200
Bake the fruit in an open Pyrex or earthenware dish. Leave it to cool inside the oven.
Follow procedure above.
Follow procedure above.
• Grilling
Place the food to be grilled underneath the infra-red grill. Warning: When the grill is on it takes on a bright red colour. Place the tray underneath the grill to
collect juices and fat from the food being grilled.
Squares of
bread for
toasting
Toasted
sandwiches
Sausages
Ribs of beef
Chicken legs
4 pieces
4
n°6 / Kg 0,9
n°4 / Kg 1,5
n°4 / Kg 1,5
5
(5 to heat up
44
grill)
Grill Grill
10
(10 to heat up
33
grill)
Grill Grill
25/30
(5 to heat up
44
44
33
grill)
25 (5 to
heat up grill)
50/60 (5 to
heat up
grill)
Grill Grill
Grill Grill
Grill Grill
5
(10 to heat up
grill)
5/8
(10 to heat up
grill)
15/20
(10 to heat up
grill)
15/20 (10 to
heat up grill)
50/60 (10 to
heat up grill)
Lay the bread on the grill tray. When one
side of the bread has been toasted, turn
over and toast the other side. Remember:
keep the toast warm at the bottom of the
oven until you are ready to serve it.
Lay the bread on the grill tray. When one
side
of the sandwich has been toasted, turn
over and toast the other side.
Cut the sausages in half and lay them face
down on the grill. Half way through grilling
turn them over. Every so often, check that
they are being cooked equally all over. (If
this is not happening, turn
the ones being cooked ether less or more
than the others.
Make sure that the ribs of beef are exposed
to the full effect on the main grill.
Turn them over twice during grilling
and reposition
This appliance is marked according to the European directive 2002/96/EC on Waste Electrical and Electronic Equipment (WEEE). By
ensuring this product is disposed of correctly, you will help prevent potential negative consequences for the environment and human
health, which could otherwise be caused by inappropriate waste handling of this product.
The
symbol on the product indicates that this product may not be treated as household waste. Instead it shall be handed over tothe
applicablecollection point for the recycling of electrical and electronic equipment Disposal must be carried out in accordance with local
environmental regulations for waste disposal. For more detailed information about
please contact your local city office, your household waste disposal service or the shop where you purchased the product.
treatment, recovery and recycling of this product,
19 GB
Page 19

INSTRUCCIONES GENERALES
Le agradecemos que haya elegido uno de nuestros productos. Para obtener de este electrodoméstico las mejores prestaciones aconsejamos:
• Leer atentamente las advertencias contenidas en el presente manual.
• Conservar con cuidado este manual para cualquier consulta posterior.
Cuando el aparato està en funcionamento todos sus elementos assessibles, estan calientes. Por ello,
Durante la primera puesta en funcionamiento del horno puede producirse un humo de olor acre causado por el primer calentamiento del pegamento
de los paneles de aislamiento que envuelven el horno. Se trata de un fenómeno absolutamente normal y, en caso de verificarse, es
a la extinción del humo antes de introducir los alimentos.
Por su naturaleza el horno es un aparato que se calienta, de modo particular el cristal de la puerta. Es aconsejable pues impedir que los niños
puedan acercarse al horno cuando se encuentre en funcionamiento, especialmente cuando está en
tenga cuidado de no tocar estos elementos.
preciso esperar
márcha el grill.
DECLARACIÓN DE CONFORMIDAD
Este aparato, en las partes destinadas a estar en contacto con los
alimentos cumple la Directiva CEE 89/109.
Aparato confrome a la Directiva Europea 73/23/CEE e
89/336/CEE, sustituida respectivamente de 2006/95/CE y
2004/108/CE, y sucesivas modificaciones.
INFORMACIÓN SOBRE SEGURIDAD
•Este aparato deberá destinarse únicamente al uso para el cual ha
sido especialmente concebido, es decir, para la cocción de alimentos.
Cualquier otro uso (por ejemplo, calentamiento a temperatura
ambiente) debe considerarse impropio, y por lo tanto peligroso.
El fabricante declina toda responsabilidad por los posibles daños
causados por el uso impropio,
•El uso de cualquier aparato eléctrico comporta la observación de
algunas reglas fundamentales. En particular:
— No tire del cable de alimentación para desenchufar el aparato.
— No toque el aparato con las manos o los pies húmedos o mojados.
— No utilice el aparato si no
— No deje que los niños o las personas incapacitadas usen el aparato
sin vigilancia.
— No utilice adaptadores, ladrones ni alargadores.
— En caso de avería o de mal funcionamiento del aparato, apáguelo y
no lo manipule.
•En caso de deterioro del cable, sustitúyalo inmediatamente con
arreglo a las siguientes
— saque el cable de alimentación y sustitúyalo por uno (tipo H05RRF, H05VV-F, H05V2V2-F) y adecuado a la potencia del aparato.
— esta operación deberá realizarla un técnico especializado. El hilo
de tierra (amarillo-verde) debe ser obligatoriamente 10 mm más largo
que los conductores de línea.
En caso de que
un centro de asistencia técnica autorizado y exija piezas de recambio
originales.
No observar todo lo mencionado puede comprometer la seguridad del
aparato.
•Este aparato no esta destinado a ser usado por niños, personas
discapacitadas o inexpertas en su uso a no ser que
instruidas sobre el uso del aparato por una persona responsable de
su seguridad.
•Vigile a los niños de manera que se asegure que no juegan con el
aparato.
•No forrar las paredes del horno con aluminio u otras
protecciones disponibles en tiendas. El aluminio o los
protectores, en contacto
derretirse y deteriorar el esmalte del interior.
el aparato precise ser reparado, diríjase únicamente a
erróneo e irracional del aparato.
lleva calzado.
indicaciones:
sean vigiladas o
directo con el esmalte caliente puede
INSTALACIÓN
La instalación corre a cargo del comprador y el Fabricante queda
exento de este servicio; eventuales intervenciones requeridas a la
Casa Constructora que dependan de una instalación incorrenta no
están incluidas en la Garantia.
La instalación debe ser efectuada según las instrucciones por
personal profesionalmente cualificado. Una instalación errónea
puede causar
fabricante no puede ser considerado responsable.
daños a personas, animales o cosas, de los cuales el
INTRODUCCIÓN DEL MUEBLE
Introduzca el aparato en el hueco del mueble (bajo encimera o en
columna). El horno se fija introduciendo 4 tornillos en los agujeros del
marco, visibles al abrir la puerta.
Con el objeto de permitir una mejor ventilación del mueble, empotre el
horno respetando las medidas y las distancias indicadas en
página.
Nota: Para los hornos que deban acoplarse a una encimera, resulta
indispensable respetar las instrucciones contenidas en el manual
adjunto al aparato a acoplar.
la última
IMPORTANTE
Para garantizar un correcto funcionamiento del aparato encastrable,
es necesario que el mueble tenga las características adecuadas. Los
paneles de los muebles adyacentes al horno deberán ser de un
material resistente al calor. En el
chapada, el encolado deberá resistir una temperatura de 120°C: los
materiales plásticos o encolados que no resistan esta temperatura
pueden deformarse o despegarse.
De acuerdo con las normas de seguridad, una vez empotrado el
aparato no deben existir contactos con las piezas eléctricas. Todas
piezas protectoras deben fijarse de manera que no puedan
las
sacarse sin la ayuda de un utensilio.
Para garantizar una buena ventilación debe eliminarse la pared
posterior del hueco, y el panel de apoyo debe tener una apertura
mínima de 45 mm.
caso de los muebles de madera
CONEXIÓN ELÉCTRICA
Enchufe la clavija en una base provista de un tercer contacto
correspondiente a
correctamente.
En los modelos desprovistos de clavija, monte una clavija estándar en
el cable capaz de soportar la carga indicada en la placa de
características. El hilo de tierra es de color amarillo-verde. Esta
operación deberá realizarla un técnico especializado.
En caso de que
haga que un técnico especializado le cambie la base por otra
adecuada.
También puede efectuar la conexión a la red intercalando entre el
aparato y la red un interruptor omnipolar, preparado para la carga y
con arreglo a las normas vigentes. El
debe quedar interrumpido por el interruptor.
La base o el interruptor omnipolar utilizados para la conexión deben
estar situados en un lugar fácilmente accesible y cerca del
electrodoméstico instalado.
Importante: en la fase de instalación, coloque el cable de
alimentación de manera que en ningún punto alcance
temperatura superior a los 50 °C a temperatura ambiente.
El aparato cumple los requisitos de seguridad previstos por los
institutos normativos. Sólo se garantiza la seguridad eléctrica de este
aparato si ha sido conectado correctamente a una instalación de toma
de tierra eficaz, con arreglo a lo dispuesto en las
seguridad eléctrica, (en caso de duda, exija un control exhaustivo de
la instalación por parte de un técnico especializado). El fabricante
declina toda responsabilidad por los posibles daños causados por la
falta de conexión a tierra de la instalación.
Importante: el fabricante queda exento de cualquier responsabilidad
por los posibles daños personales o materiales causados por la falta
de conexión a tierra.
ATENCIÓN: La tensión y frecuencia de alimentación están
indicadas en la tarjeta de matrícula (en la última página).
Compruebe que la capacidad eléctrica de la instalación de las bases
sean adecuadas para la potencia máxima del aparato,
placa de características. En caso de duda, diríjase a un técnico
cualificado.
la toma de tierra, la cual deberá conectarse
la base y la clavija del aparato sean incompatibles,
hilo de tierra amarilloverde no
normas vigentes de
EQUIPAMIENTO DEL HORNO - según el modelo -
Es necesario limpiar el equipamiento del horno antes de su primer
uso. Limpie con una esponja, y séquelo.
La rejilla simple sirve de soporte para los moldes y las fuentes.
La rejilla para sostener las fuentes sirve más especialmente para
colocar las parrilladas. Debe utilizarse
junto con la bandeja que recoge el jugo
de cocción (grasera).
Gracias a su perfil especial, las rejillas
permanecen en horizontal hasta el
tope. No hay ningún riesgo de
deslizamiento o de desbordamiento de
la fuente.
20 ES
una
indicada en la
Page 20

La grasera sirve para recoger el jugo de las parrilladas. Sólo se debe utilizar en modo Grill, Asador o Turbogrill (según el
modelo). Para los otros modos de cocción, retírela del horno.
No utilice nunca la grasera como fuente para asar. Ello provocaría emanación de humos, salpicaduras de grasa y un
ensuciamiento rápido
El Set para Pizza es ideal para cocinar
pizzas. El set debe utilizarse de forma
combinada con la función Pizza.
Durante la utilización del horno, los accesorios que no
CONSEJOS ÚTILES
REJILLAS HORNO - SISTEMA DE SUJECIÓN
El horno está dotado de un nuevo sistema
de sujeción de las rejillas.
Este sistema permite extraer las rejillas
casi por completo sin que caigan y
manteniéndolas perfectamente en plano,
permitiendo verificar y mezclar los
alimentos con la máxima tranqu-ilidad y
seguridad.
Para extraer las rejillas es suficiente, como
se indica en
el dibujo, levantarlas,
cogiéndolas por la parte anterior y tirar de ellas.
LA COCCIÓN AL GRILL
Este tipo de cocción permite el dorado rápido de los alimentos. Con
este fin, le aconsejamos introducir la rejilla generalmente en el 3° o 4°
estante, según las dimensiones de los alimentos. (pág. 24) Casi todas
las carnes pueden ser cocidas al grill, excepto algunas carnes tiernas
de caza y albóndigas.
La carne y el pescado para cocinar al grill deben ser ligeramente
untados con aceite.
Los modelos
Los hornos tienen un control electrónico de la velocidad
del ventilador que está patentado por Candy y que se llama
VARIOFAN. Durante la cocción, este sistema cambia
automáticamente la velocidad del ventilador (en el modo
multifunción) para optimizar el flujo de
aire y la temperature interna
del horno.
Todos los hornos tienen la función .
Esta función permite la distribución de la humedad y de la
temperatura. Reduce la perdida de humedad en un 50 %,
lo que garantiza un alimento más sabroso y
tierno. Esta
función es recomendada para cocinar pasteles y pan.
La función Sprinter reduce el tiempo de calentamiento del
horno; en sólo 8 minutos alcanza 200°.
La función Supergrill dá la posibilidad de aumentar la
intensidad del tostado. La
potencia Supergrill se
incrementa un 50% respecto a un grill convencional.
Algunos hornos vienen equipados con la nueva contrapuerta de
cristal la cual tiene una mayor área de cristal y permite un mejor
aislamiento.
SEGÙN MODELOS
Es un sistema de iluminación que reemplaza a la tradicional lámpara. 14
luces LED´s están integrados en el interior de la puertas. Estas producen
una luz blanca de calidad la cual permite ver el interior del horno con
claridad sin ningún tipo de sombra en las diferentes alturas o baldas del
horno.
Ventajas:
El sistema , además de ofrecer una excelente iluminación
dentro del horno, duramucho más tiempo que la bombilla tradicional
y consume mucho menos, por lo que
ahorra energía.
- Visión óptima
- Gran vida útil
- Consumo muy bajo de energía, -95 %
en comparación con la tradicional iluminación.
El electrodoméstico que lleva
60825-1:1993 + A1: 1997 + A2: 2001 (equivalente a EN 60825-1: 1994 +
A1: 2002 + A2: 2001); la potencia de luz máxima que emite 459nm
<150uW. No observado directamente con los instrumentos ópticos.
un LED blanco de la 1M Clase según IEC
La bandeja del horno.
La bandeja del horno es ideal para asar.
Úselo junto con la bandeja de goteo. Un
pomo o manivela viene incluido para ayudar a
mover los accesorios de manera segura. No
deje este pomo o manivela dentro del horno.
utilice deben ser retirados del mismo.
TIEMPOS DE COCCIÓN
En las págs. 24 y 25 mostramos una tabla indicativa de los tiempos y
temperaturas aconsejados para las primeras cocciones. Con la
experiencia podrá variar a su gusto los valores mostrados en la tabla.
HORNO AUTOLIMPIANTE CATALÍTICO
Los paneles especiales autolimpiantes recubiertos por un esmalte con
estructura microporosa (ofrecidos como accesorios opcionales en unos
modelos o de serie en otros) eliminan la limpieza manual del horno.
Las grasas proyectadas sobre las paredes durante la cocción, son
descompuestas por el esmalte, mediante un proceso catalítico de
oxidación y son
Salpicaduras excesivas de grasa pueden obstruir los poros y por
consiguiente impedir la autolimpieza, tal característica puedé ser
restablecidá mediante un calentamiento de unos 10-20 minutos del
horno vacío programándo el horno a la máxima temperatura. No usar
productos abrasivos, barillas metálicas, objetos de punta, paños
rugosos,
irremediablemente el esmalte.
transformados en productos gasos.
productos químicos o jabones que puedieran dañar
LIMPIEZA Y MANTENIMIENTO
No utilice productos abrasivos, estropajo u objetos dentados para limpiar
los cristales de la puerta del horno.
No utilice vapor o pulverizadores de alta presión para limpiar el aparato.
Limpiar las superficies de acero inox y esmaltadas con agua templada y
jabón, o con productos específicos de comercios especializados,
evitando absolutamente el
superficies y partes estéticas.
La limpieza del horno es muy importante y debe ser efectuada cada vez
que éste es utilizado. En las paredes se depositan grasas derretidas
durante la cocción que podrían, en el sucesivo encendido, producir olores
desagradables que afectarían a la
caliente y jabón, aclarando cuidadosamente.
Para eliminar esta tarea, las paredes del horno pueden ser revestidas
con paneles autolimpiantes especiales, accesorios opcionales en
algunos modelos: ver parágrafo específico “HORNO
AUTOLIMPIANTECATALÍTICO”
Utilizar jabón y barillas de acero para las rejillas inox. La limpieza de las
superficies de
estén frias. Eventuales roturas debidas a la no observación de esta regla
elemental no están cubiertos por la garantia.
La bombilla del horno puede ser sustituida desconectando eléctricamente
el aparato y destornillando la ampolla que la encierta, sustituyendo la
bombilla por una análoga
Se aconseja además utilizar fuentes con bordes altos en el caso de
cocciones de alimentos particularmente grasos (asados, etc) y utilizar la
grasera al realizar la cocción al grill.
Para el caso que, por condiciones particulares de suciedad, no fuera
suficiente la acción precedente, se aconseja apartar
paño mullido o una esponja humedecidos con agua caliente. La porosidad
del esmalte es fundamental para garantizar la acción autolimpiante.
N.B. Todos los paneles autolimpiantes comercializados en el mercado
tienen una eficacia de rendimiento de aproximadamente 300 horas de
funcionamiento del horno. Pasado dicho límite los paneles
sustituidos.
cristal templado debe ser efectuada cuando las superficies
uso de polvos abrasivos que dañarían las
cocción. Para la limpieza utilizar agua
resistente a altas temperaturas.
las grasas con un
ASISTENCIA TÉCNICA
En caso de incorrecto funcionamiento del horno le aconsejamos:
—verificar la buena conexión del enchufe en la toma de corriente.
En caso de que no se determine la causa del mal funcionamiento:
apagar el aparato sin manipularlo y llamar al Servicio de Asistencia
Técnica. Antes de llamar al Centro de Asistencia recuerde
del número de matrícula situado en la tarjeta matrícula del producto
(Fig. última página).
El aparato está dotado de un certificado de garantía que le permite
disponer del Servicio Asistencia Técnica.
21 ES
deberían ser
tomar nota
Page 21

USO DEL MINUTERO USO DEL TEMPORIZADOR
Para seleccionar el tiempo elegido, gire el
mando una vuelta completa y después
vuelva a ajustar la marca en la posición
correspondiente al tiempo deseado. Una
vez transcurrido el tiempo seleccionado
se emitirá una señal acústica durante
algunos segundos.
10
120
110
100
90
cocción o girando el mando
80
70
60
Con este mecanismo es posible
programar la duración exacta en minutos
02
de
30
40
50
la cocción y, por tanto, la desconexión
automática del horno (máx.120 minutos)
Una vez transcurrido el tiempo
seleccionado el mando alcanzará la
posición de señal acústica O, a partir de
la cual el horno se desconectará
automáticamente.
Únicamente se podrá conectar el
horno seleccionando un tiempo de
a la posición
EL PROGRAMADOR ANALÖGICO
Cuando presiona el mando, el indicador del minuto (flecha) avanza un minuto.
Si mantiene el mando presionado, el indicador del minuto avanza.
Aiguilles des heures Aiguilles des minutes Manettes de sélection
USO DEL PROGRAMADOR ELECTRÓNICO
FUNCIÓN
MINUTERO
FUNCIÓN
MANUAL
DURACIÓN DE
LA COCCIÓN
FIN DE LA
COCCIÓN
BLOQUEO
PARA NIÑOS:
MODO DE ACTIVACIÓN
•Pulse el botón central
1 vez
•Pulse las teclas o
para ajustar la duración
•Suelte las teclas
Pulse el botón central
•
1 vez
•Seleccione la función de
cocción con el mando
selector de función
Pulse el botón central
•
2 veces
•Pulse las teclas o
para el ajuste de la
duración
•Suelte las teclas
•Seleccione
la función de
cocción con el mando
selector de función
Pulse el botón central
•
3 veces
•Pulse las teclas o
para ajustar la hora del
fin de cocción.
•Suelte las teclas
•Seleccione la función de
cocción con el mando
selector de función
Para activar la función del “Bloqueo
para niños”, se debe pulsar “Set
(+)” durante un mínimo de 5
segundos, hasta que aparezca el
símbolo del A partir de este
momento, todas las demás
funciones están bloqueadas.
MODO DE DESCONEXIÓN
•Cuando transcurre el
tiempo seleccionado, el
funcionamiento se para
solo y avisa con una señal
acústica (la señal acústica
se para sola;
minutos
inmediatamente
pulse la tecla SELECT
Después de 7
para interrumpirlo
•Situar el mando selector
de función en la posición O.
•Cuando transcurre el
tiempo seleccionado, el
horno se desconecta solo;
párelo antes de situer el
mando selector de función
en la posición O ó ajuste a
0:00 el tiempo de la
cocción (teclas SELECT
).
o
•A la hora seleccionada el
horno se desconectará
solo; si desea interrumpirlo,
situer antes el mando
selector de función en la
posición O.
Para desactivar la función del “Bloqueo
para niños”, se debe pulsar
nuevamente “Set (+)” durante un
mínimo de 5 segundos, hasta que el
símbolo del desaparezca. A partir
de este momento, todas las funciones
están disponibles.
FUNCIONAMIENTO FINALIDAD
•Emite una señal
acústica finalizado el
tiempo establecido
•Durante el
funcionamiento, la
pantalla muestra el
tiempo restante: min.,
Seg.
•Permite el
funcionamiento del horno
•Permite seleccionar el tiempo
de cocción del alimento
introducido en el horno.
•Para visualizar el tiempo
restante pulse la tecla SELECT.
•Para modificar el tiempo
restante, pulse la tecla
SELECT+ o
•Permite memorizar la
hora de fin de la cocción.
•Para visualizar la hora
programada,
botón central 3
Pulse el
veces
•Para modificar la hora
programada, pulse las
teclas END + o
AJUSTE DE LA HORA
ATENCIÓN: la primera operación que hay que efectuar después de la
instalación o después de una interrupción de la corriente (este tipo de
situaciones se reconocen al observar que en la pantalla de visualización
parpadea la hora
•Pulse el botón central 1 vez. L1, L2, L3 AJUSTAR SEÑAL ACÚSTICA
•Ajustar la hora con los botones ▼ ▲ . •Pulse el botón central 5 vez.
•Suelte las teclas. •Ajustar la hora con los botones ▼ ▲ .
ATENCIÓN: El horno funciona sólo si selecciona en modo manual o cocción programada
NOTA: Para ajustar las diversas funciones del horno, en algunos modelos aparecen los símbolos o ,
en otros modelos aparecen - o + .
12:00 ) es el ajuste de la hora, como se indica a continuación:
•Suelte las teclas.
•Permite utilizar el
programador del horno a
modo de alarma (puede
utilizarse con horno en
funcionamiento o
desconectado)
•Efectúe las cocciones
deseadas
•Para detener la señal,
pulse cualquier tecla.
Pulse el botón central
para volver a la función
de reloj.
Normalmente se utiliza esta
función con la finalidad de
DURACIÓN DE LA COCCIÓN
A modo de ejemplo: el alimento
debe cocinarse durante 45
minutos y deseo que esté listo
para las 12:30; en tal caso
Seleccione la función de
cocción deseada. Ajuste el
tiempo de la cocción en 45
minutos (
Ajuste el fin de la cocción a
las 12:20 h. ( o )
•Cuando termina el tiempo
seleccionado, el horno se
desconecta automáticamente y avisa emitiendo
una señal acústica
La cocción comenzará automáticamente a las11:45 h
(12:30, menos 45minutos), y
a la hora seleccionada como
fin de la cocción el horno se
desconectará automáticamente. ATENCIÓN: Si
selecciona únicamente el fin
de cocción sin el tiempo de
cocción, el horno se
conectará inmediatamente y
se desconectará a la hora de
fin de la cocción seleccionada
o )
22 ES
Page 22

USO DEL PROGRAMADOR ANALÓGICO
Luz del
indicador
de Duración
Luz del
indicador
de Inicio
CONFIGURACIÓN DE LA HORA
• Pulsar y, durante 4 segundos, mantener pulsado el botón de
configuración. La pantalla mostrará "SET". Sonará un zumbido.
• Configuración de la hora pulsando el botón. El avance de
minutos es de uno en uno. Mantener pulsado para un avance
automático rápido.
Pantalla de comandos
FUNCIÓN CÓMO ACTIVARLO
• Sólo se puede configurar
MANUAL
MINUTERO
máx 90 min.
MUESTRA LA
PAL ABRA
"BEL"
con modo cocina. No
dispone de configuración
para el temporizador.
•. Pulsar dos veces el botón
de configuración, la pantalla
mostrará "BEL" seguido de
"---".
• Configurar una hora
girando el mando de
configuración.
• Antes de nada,
seleccionar la función de
cocción y la temperatura
necesaria.
• Presionar una vez el
TIEMPO DE
COCCIÓN
max 24 H
MUESTRA
"DUR"
botón de configuración.
La pantalla mostrará
"DUR" y la luz de
indicador de Duración
parpadeará. . Configurar
la duración necesaria
girando el mando de
configuración. Se
muestra el tiempo
restante y se enciende
la luz del indicador de
Duración.
Mando de
configuración
Todas las operaciones han de realizarse en 4 segundos
acción de cancelará.
La duración o el tiempo pueden mostrarse por defecto, no lo tenga
en cuenta.
CÓMO DESCONECTARLO QuÉ HACE PARA QuÉ SIRVE
• Colocar de nuevo las
manecillas en la posición de
Stop.
• Durante la cuenta atrás la
pantalla muestra
continuamente el tiempo
restante en minutos y luego en
segundos. Al final de la cuenta
atrás la pantalla muestra
parpadeando "000" y emite
una señal sonora que indica el
final. Para silenciarlo, pulsar el
botón de configuración. El
minutero puede modificarse o
cancelarse
•Cuando finaliza la cuenta
atrás la pantalla muestra
"END", la luz que indica la
duración parpadea y el
horno deja de funcionar de
forma automática. emite un
señal sonora que indica
final de la cocción. Para
silenciarlo basta con pulsar
el botón de configuración. Si
fuese necesario, pulsar una
segunda vez para reiniciar
la cocción.
Poner nuevamente los
mandos en stop.
El ciclo de cocción se puede
moficiar o cancelar durante
el funcionamiento del horno.
en todo momento.
• Permite el funcionamiento
del horno.
• Emite una señal al final del
tiempo programado.
• Permite preseleccionar el
tiempo de cocción
necesario según la receta
elegida.
el
• Cocinar las recetas
deseadas.
• Permite utilizar el horno
como alarma aunque el
horno esté desconectado.
• Al final del período de
cocción configurado el
horno se desconecta de
forma automática y emite
una señal sonora.
o la
COCINADO
AUTOMÁTICO
Tiempo de Parada
Máx 24 H
MUESTRA
"PAU"
• Antes de nada, seleccionar
la función de cocción y la
temperatura necesaria.
• Pulsar una vez para
configurar la duración. Seguir
las instrucciones anteriores
sobre "Tiempo de cocción Dur”
• Pulsar una segunda vez, la
pantalla muestra "PAU"
seguido de"---", la luz
indicadora de Inicio parpadea.
• Configurar el tiempo de
parada antes de iniciar el
horno. Durante la pausa el
horno no cocina, la pantalla
muestra continuamente la
duración de la pausa restante,
los indicadores de Inicio y
Stop se mantienen
encendidos. Cuando finaliza
la cuenta atrás el horno
empieza de nuevo a cocinar y
sólo se ilumina la luz
indicador de Stop.
del
• Cuando finaliza el
período de cocción el
horno deja de funcionar de
forma automática. Emite
un señal sonora que indica
el final de la cocción. Para
silenciarlo basta con
pulsar el botón de
configuración. En caso de
necesitar reiniciar la
cocción, pulsar una
segunda vez.
Poner los mandos en stop.
El
ciclo de cocción se
puede cancelar, modificar
e incluso parar durante el
funcionamiento del horno
23 ES
• Permite programar el
horno de forma que la
receta esté preparada
para la hora deseada.
Ej: son las 10H. La receta
requiere una cocción de
45 min y tiene que estar
lista para las 12H.
1. seleccionar la función y
la temperatura deseada. 2.
configurar una duración de
45 min, 3. configurar
tiempo de parada de 75
min. (10H/11H15). El
horno empezará a trabajar
a las 11,15 y parará
automáticamente a las
12H.
Page 23

USO DEL PROGRAMADOR ELECTRONICO (Type A)
U
6
COOK
U
/
1
Luz
Minutero/Auto
Función temporizador
9
Display para
temperatura o tiempo
Teclas para pulsar
7
Luz: Función con ventilador
Función con VARIOFAN
Descongelación
2
CUIDADO! Una vez se realice la instalación, lo primero que hay que hacer es poner la hora correcta (esto lo
podremos reconocer pulsando el Display y viendo 12:00 parpadeando).
El Led ”°” indicador de la temperatura parpadea mientras que no llega a la temperatura programada.
HOT: Cuando el programa de cocción se termina y el horno sigue caliente, en el display aparece la palabra HOT, junto con
el tiempo , aunque los 2 mandos de selección de función están apagados.
FUNCIÓN MODO DE ACTIVACIÓN
MODO SILENCIO
PONER EN
HORA
• Gire el mando del tiempo
hasta la posición “Modo
Silencio”
• Gire el mando de tiempo
hasta la opción de poner
en hora (reloj)
• Utilice los botones “+” o
“-” para fijar la hora
MODO DE DESCONEXIÓN
• Gire el mando del tiempo
hasta la posición OFF
• Gire el mando del
temporizador hasta la
posición OFF.
COOK
8
Selección de función
*
3
5
1. Luz Minutero/Auto
2. Luz
3. Función con ventilador
4. Función con VARIOFAN
5. Descongelación
6. Display para temperatura o tiempo
7. Teclas para pulsar
8. Selección de función
9. Función temporizador
4
* según modelo
FUNCIONAMIENTO FINALIDAD
• Da opción a quitar el
sonido del minutero.
• Da opción a fijar la hora
que aparece en el Display
• Qui tar el sonido del
minutero.
• Poner en hora
NB: ponga la hora una vez
que instale el horno o
antes de apagarlo (el reloj
aparecerá parpadeando
12.00)
DURACIÓN DE
LA COCCIÓN
FIN DE
COCCIÓN
MINUTERO
BLOQUEO
SEGURIDAD
• Gire el mando derecho
selector
la función deseada.
• Gire el mando izquierdo
temporizador hasta la
posición “duración de la
cocción”
• Ponga el tiempo de
cocción usando los
botones “+” y “-”.
• Gire el mando derecho
hasta la función de
cocción deseada
• Gire el mando izquierdo
hasta la posición fin de
cocción
• Fije la hora final de
cocción usando
botones “+” y “-”
• Aparece la Luz Auto
• Gire el mando izquierdo
hasta la posición del
minutero (campana)
•Ponga el tiempo de cocinado
usando los botones “+” y “-”.
• Gire el mando izquierdo
hasta la posición del
candado. Presione el
botón “+” durante 3
segundos
• El horno se habrá
bloqueado cuando en el
display aparezca “STOP”.
de función hasta
los
• Cuando el tiempo de
cocción ha pasado, el horno
se apaga automáticamente
y la alarma suena durante
unos segundos. Para
desconectar la función de
cocción, gire el
derecho hasta la opción OFF
o ponga el tiempo a 00.00;
girando el mando izquierdo o
pulsando las opciones“+”y“-”.
• Cuando finaliza el tiempo
de cocción, el horno se
apaga automáticamente.
• Para desconectar la
función de cocción, gire el
mando derecho hasta la
opción OFF.
• Ponga la hora en 00.00
girando el mando izquierdo
hasta el minutero, usando
el botón “-”
• Gire el mando izquierdo
hasta la posición del
candado. Presione el
botón “+” durante 3
segundos.
• La palabra STOP
desaparece
mando
• Permite prefijar el tiempo
cocción requerido para la
receta escogida.
• Cuando se fija la duración
de la cocción, gire el mando
izquierdo para volver a la
hora real.
• Para ver el tiempo de
cocción que se ha
seleccionado, gire el mando
izquierdo hasta la opción de
duración de la cocción
• Permite programar el fin
de cocción deseado.
• Cuando se fija la duración
de la cocción, gire el mando
izquierdo para volver a la
hora real.
• Para ver el tiempo de
cocción que se ha
seleccionado, gire el mando
izquierdo hasta la opción
de fin de cocción
• La alarma suena durante
unos segundos cuando
llega la hora fijada
• El horno no se puede usar
• Para cocinar las recetas
deseadas
• Esta función se usa para
programar de antemano lo
que queremos cocinar. Por
ejemplo, si su receta
necesita un cocinado de 45
min y tiene que estar listo para
las 12.30 del mediodía, s
implemente, ponga duración
de la cocción 45 min y que
finalice a las 12.30.
De esta forma, el horno
comenzara a cocinar a las
11.45 y seguirá en
funcionamiento hasta la
hora final programada,
luego el horno se apagará
automáticamente.
• Permite usar el horno
como alarma incluso si
está apagado
• Es una función útil
especialmente cuando hay
niños en casa
24 ES
Page 24

INSTRUCCIONES DE USO
Temperaturas
Mando
selector
predeterminadas
y reglaje para el
programador
electrónico
(Type A)
Mando
termostato
FUNCIÓN
Conecta la luz interior
DESCONGELACIÓN
Funcionamiento de la turbina de cocción que hace circular el aire dentro del espacio
del horno. Ideal para realizar una descongelación previa a una cocción.
Sprinter
Esta posición permite un precalentamiento rápido del horno. Una vez seleccionada esta función,
se consigue un inmediato calentamiento del horno (p.ej: tarda 8 minutos en alcanzar 200°C), y la
temperatura deseada puede seleccionarse mediante el botón correspondiente. El fin de la fase
de precalentamiento se indica al apagarse el piloto
fase, es posible seleccionar la función de cocción deseada e introducir los alimentos que se van a
cocinar. Tener cuidado de no introducir alimentos en el horno durante la fase de
precalentamiento, ya que estos podrían resultar dañados.
Convección natural
Funcionan la resistencia inferior y la resistencia superior del horno. Es la cocción
tradicional, ideal para cocinar asados, caza, galletas, manzanas
conseguir alimentos crujientes.
CALOR CIRCULANTE (a)
Utilización simultánea de la resistencia inferior, superior y de la turbina que hace circular
el aire dentro del espacio del horno. Función recomendada para las aves, la repostería,
los pescados, las verduras... El calor penetra mejor dentro del alimento a cocer
reduciendo el tiempo de cocción, así como el tiempo de precalentamiento. Se pueden
realizar cocciones combinadas con preparaciones idénticas o distintas en uno o dos
niveles. Este modo de cocción garantiza una distribución homogénea del calor y no
mezcla los olores. Para una cocción combinada se deben prever unos diez minutos
SOFT COOK (a)
Soft cook es la
esta función aumenta la humedad presente en el interior del horno. Una mayor humedad crea las
condiciones de cocción ideales para aquellos alimentos que necesariamente deben mantener
una consistencia elástica mientras están cociendo (ej. tartas, pan, galletas)
desmenuzarse.
función ideal para pasteles y pan. Gracias a la reducida velocidad del ventilador,
del termostato "°C". Una vez concluida esta
al horno y para
más.
a fin de no
Nivel 4
Nivel 4
Nivel 4
RESISTENCIA INFERIOR CIRCULANTE (a)
Utilización de la resistencia inferior más la turbina que hace circular el aire dentro del
espacio del horno. Ideal para hacer tartas de frutas jugosas, tortadas, quiches, pasteles.
Evita que se sequen los alimentos y favorece la subida de bizcochos, masa de pan y
otras cocciones
GRILL: El grill debe utilizarse con la puerta cerrada.
Utilización de la resistencia superior con posibilidad de ajustar la temperatura. Es
necesario un precalentamiento de 5 minutos para que la resistencia se ponga al rojo.
Éxito seguro con las parrilladas, las brochetas
deben alejarse del grill, porque aunque así se alargará el tiempo de cocción, la carne
quedará más sabrosa. Las carnes rojas y los filetes de pescado se pueden colocar
encima de la rejilla colocando debajo la grasera.
SUPER GRILL: el horno tiene dos posiciones Grill
Grill : 2200 W Grill SUPER : 3000 W
TURBOGRILL (a) : La función turbogrill debe utilizarse
Utilización de la resistencia superior más la turbina que hace circular el aire dentro del
espacio del horno. Se requiere un precalentamiento para las carnes rojas pero no para
las carnes blancas. Ideal para las cocciones de volumen grueso, piezas enteras como
cerdo asado, las aves,
en el centro del horno, a un nivel medio. Coloque la grasera debajo de la rejilla para
que las grasas caigan dentro. Asegúrese de que la comida no quede demasiado cerca
del grill. En la mitad de la cocción, gire
realizadas por debajo. Coloque la rejilla en la ranura inferior.
y los gratinados. Las carnes blancas
con la puerta cerrada.
etc. Coloque el plato que quiera cocer directamente en la rejilla
la pieza que esté cociendo.
Grill asador rotativo
Resistencia grill y motor asador. Sirve para realizar asados.
Modalidad pizza
El calor envolvente en esta modalidad genera un ambiente similar al de los hornos de
leña de las pizzerías.
(a) SEGÚN EL MODELO, Función con VARIO FAN : Fan es el exclusivo sistema de funcionamiento desarrollado porCandy para optimizar los
resultados de cocción, la regulación de
rotación del ventilador para todo tipo de cocciones en multifunción. Este sistema se activa automáticamente cada vez que es seleccionada una función
en el interior del área descrita en el panel de control.
la temperatura y la regulación de la humedad. El sistema Vario Fan modifica automáticamente la velocidad de
* Programa de prueba según CENELEC EN 50 304
** Programa de prueba según CENELEC EN 50 304 utilizado para la definición de la clase energética
25 ES
Page 25

TABLAS DE TIEMPOS DE COCCIÓN
Los tiempos sugeridos en las tablas siguientes son indicativos y pueden variar según la calidad, frescura, dimensión y espesor de los alimentos y
según su gusto. Dejar siempre reposar durante unos minutos antes de servir, ya que todos los alimentos siguen cociéndose tras extraerlos del
horno
CONSEJO ÚTIL: Apagar el horno al menos 10 minutos antes del
tiempo indicado dejando los alimentos en el interior del mismo. Ello le
permitirá ahorrar energiá y completar la cocción según sus gustos.
Para no secar demasiado las superficies es indispensable bajar la
temperatura.
Posición de las repisas
Horno Eléctrico Estático Horno Eléctrico Ventilado
Plato
Cantidad
Estante
Tiempo de
cocción en
minutos
Tempe-
ratura
horno
Estante
Tiempo de
cocción en
minutos
Tempe-
ratura
horno
Observaciones
• Pasta
Lasañas
Canelones
Pasta al horno
Kg 3,5
Kg 1,8
Kg 2,5
2 2
2 2
2 2
70 ÷ 75
50 ÷ 60
55 ÷ 60
220
220
220
60 ÷ 65
40 ÷ 50
45 ÷ 50
200
200
200
Introduzca la lasaña en el horno frío.
Introduzca la canelones en el horno frío.
Introduzca la pasta en el horno frío.
• Pastas saladas
Preparar la pasta en forma redonda e
incida con un cuchillo una cruz sobre la
parte superior de la forma.
Dejar a temperatura ambiente al menos
2 horas, untar la grasera y situar la
forma en el centro
Precalentar durante 15 minutos el
horno. Preparar la pizza en la grasera
esmaltada con tomates, mozzarella y
jamón, aceite, sal, orégano.
Situar 24 vol au vent en la grasera y
cocer
Precalentar durante 15 minutos el
horno. Dejar a temperatura ambiente al
menos 2 horas, untar la grasera y
la forma en el centro de la misma.
de la misma.
Pan
Pizza
Hojaldre n. 24
vol au vent
Focaccia
(n° 4)
Kg 1
pasta
Kg 1
n° 24
gr. 200
di pasta cad.
2 2
35
prerisc.10
25 ÷ 35
30 ÷ 35
25 ÷ 30
200
190
220
200
30 ÷ 35
prerisc.10
11
21
22
20 ÷ 25
25 ÷ 30
20 ÷ 25
180
190
200
180
• Carne
Todas las carnes pueden ser cocidas en recipientes de borde bajo o borde alto.
Es aconsejable cubrir el recipiente de borde bajo con una tapa para evitar ensuciar el horno con salpicaduras del condimento.
Las carnes cubiertas resultan más blandas y jugosas, mientras que las descubiertas resultan más crujientes.
Los tiempos indicados
Roastbeef
entero
Solomillo de
cerdo enrollado
Solomillo de
ternera
enrollado
valen para cocciones con recipiente cubierto o descubierto.
Kg 1
Kg 1
Kg 1,3
70 ÷ 80
100 ÷ 110
90 ÷ 110
220
220
220
33
22
21
50 ÷ 60
80 ÷ 90
90 ÷ 100
200
200
200
Situar la carne en una bandeja Pirex de
borde alto con sal y pimienta.
Dele la vuelta a mitad cocción.
Cocer la carne en bandeja Pirex
cubierta con sal,pimienta,aromas
naturales,aceite y mantequilla.
Cocer como arriba
4
3
2
1
situar
Solomillo de
buey filete
• Fish
• Pescado
Trucha
Salmon
Lenguado
Dorada
Kg 1
3 enteras/
Kg 1
700 g a rodajas
de 2,5 cm esp.
Filetes / Kg 1
2 enteras
80 ÷ 90
40 ÷ 45
30 ÷ 35
40 ÷ 45
220
220
220
220
40 ÷ 45 220
26 ES
22
22
22
22
22
80 ÷ 90
35 ÷ 40
30 ÷ 25
35 ÷ 40
35 ÷ 40
Cocer como arriba.
200
Cocer las truchas cubiertas aceite, sal
200
cebollas en bandejas de Pirex.
Cocer el salmón no tapado en bandeja
200
Pirex con sal, pimienta y aceite
Cocer el lenguado con sal y una
200
cuchara de aceite.
Cocer las doradas en recipiente
200
cubierto con aceite y sal.
y
Page 26

TABLAS DE TIEMPOS DE COCCIÓN
Horno Eléctrico Estático Horno Eléctrico Ventilado
Plato
Cantidad
Estante
Tiempo de
cocción en
minutos
Tempe-
ratura
horno
Estante
Tiempo de
cocción en
minutos
Tempe-
ratura
horno
Observaciones
• Aves, Conejo
Coloque la pintada en bandeja Pirex o
Pintada
Pollo
Conejo troceado
Kg 1-1,3
Kg 1,5-1,7
Kg 1-1,2
22
22
22
60 ÷ 80
110 ÷ 120
55 ÷ 65
220
220
220
60 ÷ 70
100 ÷ 110
50 ÷ 60
200
200
200
cerámica de borde alto condimentado con
aromas naturales y poquísimo aceite.
Como para la pintada.
Trocear el conejo en partes iguales y
situarlas en la grasera esmaltada,
condi-mente con aromas naturales.
Si fuera necesario darle la vuelta
• Dulces, Pasteles
Pastel cacao en
bote
Pastel Margarita
en bote
Pastel de
zanahorias en bote
Torta crostata
albicocca
Scatola
Scatola
Scatola
700 gr
1
1
1
1
55
55
65
40
180
175
180
200
1
1
1
2
50
40 ÷ 45
50 ÷ 60
30 ÷ 35
160
160
160
180
En bandeja para pasteles Ø 22. Prec.
durante 10 min.
En bandeja para pasteles Ø 22. Prec.
durante 10 min.
En bandeja para pasteles Ø 22. Prec.
durante 10 min.
En bandeja para pasteles Ø 22. Prec.
durante 10 min.
• Verdura
Colocar los hinojos cortados en 4
Hinojos
Calabacín
Patatas
Zanahorias
800 gr
800 gr
800 gr
800 gr
1
1
2
1
70 ÷ 80
70
60 ÷ 65
80 ÷ 85
220
220
220
220
1
1
2
1
60 ÷ 70
60 ÷ 70
60 ÷ 65
70 ÷ 80
200
200
200
200
partes y tapados en bandeja Pirex,con
mantequilla y sal y preferiblemente con
la parte interna hacia arriba.
Rabanar los calabacines y cocer en bandeja
Pirex, cubiertas con mantequilla y sal.
Cortar las patatas en partes iguales y
cocerlas cubiertas con aceite, sal y
orégano o romero en bandeja Pirex.
Cortar las zanahorias y cocerlas
ubiertas en bandeja Pirex.
• Fruta
Manzanas
enteras
Peras
Molocotones
Kg 1
Kg 1
Kg 1
1
1
1
45 ÷ 55
45 ÷ 55
45 ÷ 55
220
220
220
2
2
2
45 ÷ 55
45 ÷ 55
45 ÷ 55
200
200
200
Cocer la fruta en bandeja de Pirex o cerámica
no cubierta. Dejar enfriar en horno.
Como arriba.
Como arriba.
• Cocción al grill
La cocción al grill debe ser realizada colocando el alimento bajo el grill eléctrico a rayos infrarrojos. Atención: durante el funcionamiento el grill está al rojo
vivo. La grasera debe ser colocada bajo la rejilla para recoger las salsas.
Introducir el pan de molde sobre la parrilla
Pan de molde
tostado
Bikinis
Salchichas
Costillas de buey
Muslos de pollo
4 rebanadas
4
n°6 / Kg 0,9
n°4 / Kg 1,5
n°4 / Kg 1,5
44
33
44
44
33
5
(5 precal.)
10
(5 precal.)
25/30
(5 precal.)
25
(5 precal.)
50/60
(5 precal.)
Grill Grill
Grill Grill
Grill Grill
Grill Grill
Grill Grill
5
(10 precal.)
5/8
(10 precal.)
15/20
(10 precal.)
15/20
(10 precal.)
50/60
(10 precal.)
soporte. Tras la 1a cocción dar la vuelta hasta
ultimar la cocción. Advertencia:mantener el
pan de molde en calinete en el fondo del
horno antes de servir.
Introducir los bikins sobre la parrilla soporte
grasera; tras la 1a bruñidura dar la vuelta al
bikini hasta ultimar la bruñidera.
Cortar las salchichas por la mitad y disponerlas
sobre la parrilla, con la parte interna hacia
arriba. A mitad cocción dar la vuelta a las
salchichas hasta ultimar la cocción.
Advertencia: De vez en cuando controlar
visualmente la uniformidad de la cocción. En
caso de desuniformidad intercambiar las
cocidas con las
Disponer las piezas debajo de la acción del
grill grande y darles la vueltas dos veces.
Condimente con aromas naturales y darles
la vuelta de vez en cuando.
menos cocidas
Este electrodomestico está marcado conforme a la directiva Europea 2002/96/CE sobre los residuos de aparatos eléctricos y electrónicos
(WEEE). Asegurándose que este producto ha sido eliminado correctamente, ayudará a evitar posibles consecuencias negativas en el
ambiente y la salud de las personas, que pudiera verificarse por causa de un anómalo tratamiento
producto indica que este aparato no puede ser tratado como un residuo doméstico normal, en su ligar deberá ser entregado al centro de
recogidas para reciclaje de aparatos eléctricos y electrónicos. La eliminación debe ser efectuada de acuerdo con las reglas
medioambientales vigentes
reciclaje de este producto, por favor contacte con la oficina compentente (del departamento de ecología y mediomabiente), o su servicio de
recogida a domicilio si lo hubiera o el punto de venta donde compró el producto.
para el tratamiento de los residuos. Para informacion más detallada sobre el tratamiento, recuperación y
de este producto El simbolo sobre el
27 ES
Page 27

ALGEMENE AANWIJZINGEN
Lees deze handleiding aandachtig. Hierin treff u betangrijke gegevens aan omtrent installatie, gebruik en onderhoud. Bewaar deze handleiding voor
eventuele toekomstige raadpleging.
De eerste keer dat de oven in werking wordt gesteld, kan er een stinkende walm vrijkomen. Dit is te wijten aan de eerste verhitting van de lijm op de
isolatiepanelen rond de oven. Dit is volkomen normaal. Wij raden u aan uw oven eerst een half uur op vol vermogen aan te zetten om deze walm uit
de oven te verwijderen. Wacht u tot de walm verdwijnt, alvorens u het voedsel in de oven plaatst.
Bij een ingeschakelde oven wordt
vooral wanneer de grill aan staat.
het glas van de deur behoorlijk warm. Zorg er derhalve voor dat kinderen niet in de buurt van de oven komen,
LEES DEZE HANDLEIDING AANDACHTIG
De onderdelen, die in contact komen met voedsel voldoen aan de
EEC richtlijn 89/109.
Dit apparaat voldoet aan de Europese Richtlijnen 73/23/EEC en
89/336/EEC, vervangen
eventuele wijzigingen Verzeker u ervan dat de oven niet is
beschadigd. Indien u hieraan twijfelt, dient u de oven niet te gebruiken
en direct contact op te nemen met de leverancier. Houdt u het
verpakkingsmateriaal van de oven (plastic zakjes, piepschuim en
karton) uit de
opleveren voor kinderen.
buurt van kinderen. Dit materiaal kan een gevaar
door 2006/95/EC and 2004/108/EC en
VEILIGHEIDSVOORSCHRIFTEN
•Het apparaat dient uitsluitend gebruikt te worden voor het doel,
waarvoor het is ontworpen, d.w.z. het bereiden van voedsel. Elk ander
doel, bijvoorbeeld als verwarming, is onjuist gebruik van de oven en
gevaarlijk.
De fabrikant is niet verantwoordelijk voor mogelijke schade ten gevolge
van een onjuist, verkeerd of onverstanding gebruik van de
•Bij het gebruik van elk elektrische apparaat dienen verschillende
regels in acht genomen te worden:
- Trek niet aan de kabel om de stekker uit het stopcontact te halen;
- Raak het apparaat niet met vochtige of natte handen of voeten aan;
- Gebruik het apparaat niet indien u geen
- Zorg ervoor dat kinderen en/of onbevoegde personen het apparaat niet
zonder toezicht gebruiken;
- Gebruik geen adapters, tussenverbindingen en/of verlengsnoeren;
- Zet het apparaat bij hapering of siechte werking af en ga er niet aan
sieutelen.
De kabel dient bij beschadiging direct vervangen te worden en wel op de
volgende
- Haal de stekker uit het stopcontact of schakel de gehele elektrische
installatie uit;
- Verwijder de kabel en vervang hem door een even lange nieuwe, (van
het type H05RR-F, H05VV-F, H05V2V2-F). Deze kabel moet geschikt
zijn voor het vermogen van het apparaat;
- Dit dient door een technische specialist uitgevoerd
- De aarde-draad (geel/groen) moet 10 mm langer zijn dan de andere
draden.
•Voor reparaties aan het apparaat dient u zich uitsluitend tot een officiële
technische service te wenden, alwaar u originele onderdelen kunt
bestellen. Indien al hetgeen hierboven niet in acht wordt genomen, kan
de veiligheid van het
•Het gebruik van dit apparaat is niet bedoeld voor personen (inclusief
kinderen) met verminderde lichamelijke, zintuiglijke of geestelijke
capaciteiten of tekort van ervaring en kennis, tenzij er toezicht of
instructie is van een persoon die verantwoordelijk is voor hun veiligheid.
•Kinderen moeten in de gaten worden gehouden worden,
van te zijn dat ze niet met het apparaat gaan spelen.
•Bedek de wanden van de oven nooit met aluminiumfolie of met
wegwerpproducten om de oven schoon te houden. Aluminiumfolie
en andere producten kunnen smelten als ze in aanraking komen
met de hete ovenwanden, en kunnen de emaillaag
wijze:
apparaat niet gegarandeerd worden.
schoeisel draagt;
oven.
te worden;
om er zeker
aantasten.
INSTALLATIE
De installatie valt onder de verantwoording van de koper zelf. De
fabrikant is voor de installatie niet verantwoordelijk. Eventuele
bijstand van de fabrikant bij onjuiste installatie valt niet onder de
garantie. De oven dient door een technisch bevoegd persoon
geïnstalleerd te worden volgens de installatie instructies. De fabrikant
is niet verantwoordelijk
schade ten gevolge van een onjuiste installatie.
voor eventuele persoonlijke of materiële
INBOUW VAN DE OVEN
Plaats de oven in de daarvoor bestemde opening: onder het aanrecht
of in kolomopstelling. De oven wordt vast gezet door de vier
schroeven in de gaten in de rand vast te draaien. U kunt de schroeven
zien, wanneer u de deur opent. Voor een goede ventilatie dienen bij
het inbouwen van
en afstanden in acht te worden genomen.
Opmerking: Bij ovens die onder een kookplaat aangebracht worden,
dient men de aanwijzingen in de handleiding voor de kookplaat op te
volgen.
de oven de op de laatste pagina aangegeven maten
BELANGRIJK
De inbouwkast dient geschikt te zijn voor inbouw van het apparaat
teneinde een goede werking te kunnen garanderen. De panelen van
de kasten naast de oven dienen warmtebestendig te zijn. Bij kasten
met houtfineer dient de lijm een temperatuur
weerstaan. Plastic of gelijmde materialen, die niet bestending zijn
tegen deze temperatuur kunnen vervormd worden of loslaten.
Volgens de veiligheidsnormen dient het ingebouwde apparaat niet in
contact te komen met elektrische onderdelen.
Alle beveiligingsonderdelen dienen zodanig aangebracht te zijn, dat
zij niet zonder gereedschap verwijderd kunnen
Teneinde een goede ventilatie te garanderen, dient de
achterwand van de inbouwope- ning verwijderd te worden. Het
voetstuk dient een opening van minstens 45 mm te hebben.
van 120°C te kunnen
worden.
ELEKTRISCHE AANSLUITING
Steek de stekker in een correct geïnstalleerd geaard stopcontact. Bij
modellen zonder stekker dient met een standaardstekker aan te
brengen, die geschikt is voor het op het typeplaatje vermelde
vermogen. De aarddraad is geel/groen. Deze verbinding dient door
een technisch
stopcontact en de stekker niet op elkaar afgestemd zijn, laat dan een
technisch bevoegd persoon een ander stopcontact installeren. Deze
dient ook na te gaan of de draaddoor- snede van het stopcontact
geschikt is voor het door het apparaat opgenomen vermogen.
Aansluiting kan ook
(aan/uit) schakelaar te plaatsen tussen het elektrische net en het
apparaat, die aan de geldende normen voldoet. Zorg ervoor dat de
(geel/groen) geaarde kabel de schakelaar niet raakt. Het stopcontact
of de meerpolige schakelaar dienen op een gemakkelijk toegankelijke
plaats bij de oven gemonteerd te worden.
Belangrijk: Zorg er bij de installatie voor dat de voedingskabel
nergens warmer kan worden dan 50°C. De oven voldoet aan de
veiligheidseisen als voorzien in de normen van de desbetreffende
instituten. De elektrische veiligheid wordt uitsluitend gegarandeerd
indien het apparaart op de juiste wijze met een doelmatige
aardingsinstallatie is verbonden ingevolge
elektrische veiligheid. Ga na of aan deze fundamentele veiligheidseis
is voldaan en laat de installatie, ingeval van twijfel, grondig nakijken
door een installateur.
Ga na of het elektrische vermogen van de stopcontacten
overeenkomt met het maximum vermogen van het apparaat, zoals is
aangegeven op het typeplaatje. Haal
technisch bevoegd persoon bij.
De fabrikant is niet verantwoordelijk voor eventuele persoonlijke
of materiële schade als gevolg van de nietaarding van de
installatie.
ATTENTIE: De spanning en energieverbruik staan vermeld op de
modelsticker (laatste pagina).
bevoegd persoon uitgevoerd te worden. Indien het
plaatsvinden door een geschikte meerpolige
de huidige normen m.b.t.
er, in geval van twijfel, een
UITRUSTING VAN DE OVEN Afhankelijk van het model
Maak voor het gebruik de accessoires eerst schoon, spoel ze af met
water en maak ze goed droog.
Het eenvoudige rooster dient als
steun voor vormen en schotels.
Het schotelrooster di ent meer
bepaald voor het grillen. Dit wordt
meestal samen met de lekbak
gebruikt.
Dankzij hun speciaal profiel blijven
ze steeds horizontaal, zelfs
wanneer ze maximaal uitgetrokken
zijn. Er bestaat geen enkel risico op
het schuiven of overlappen van de
gerechten.
28 NL
Page 28
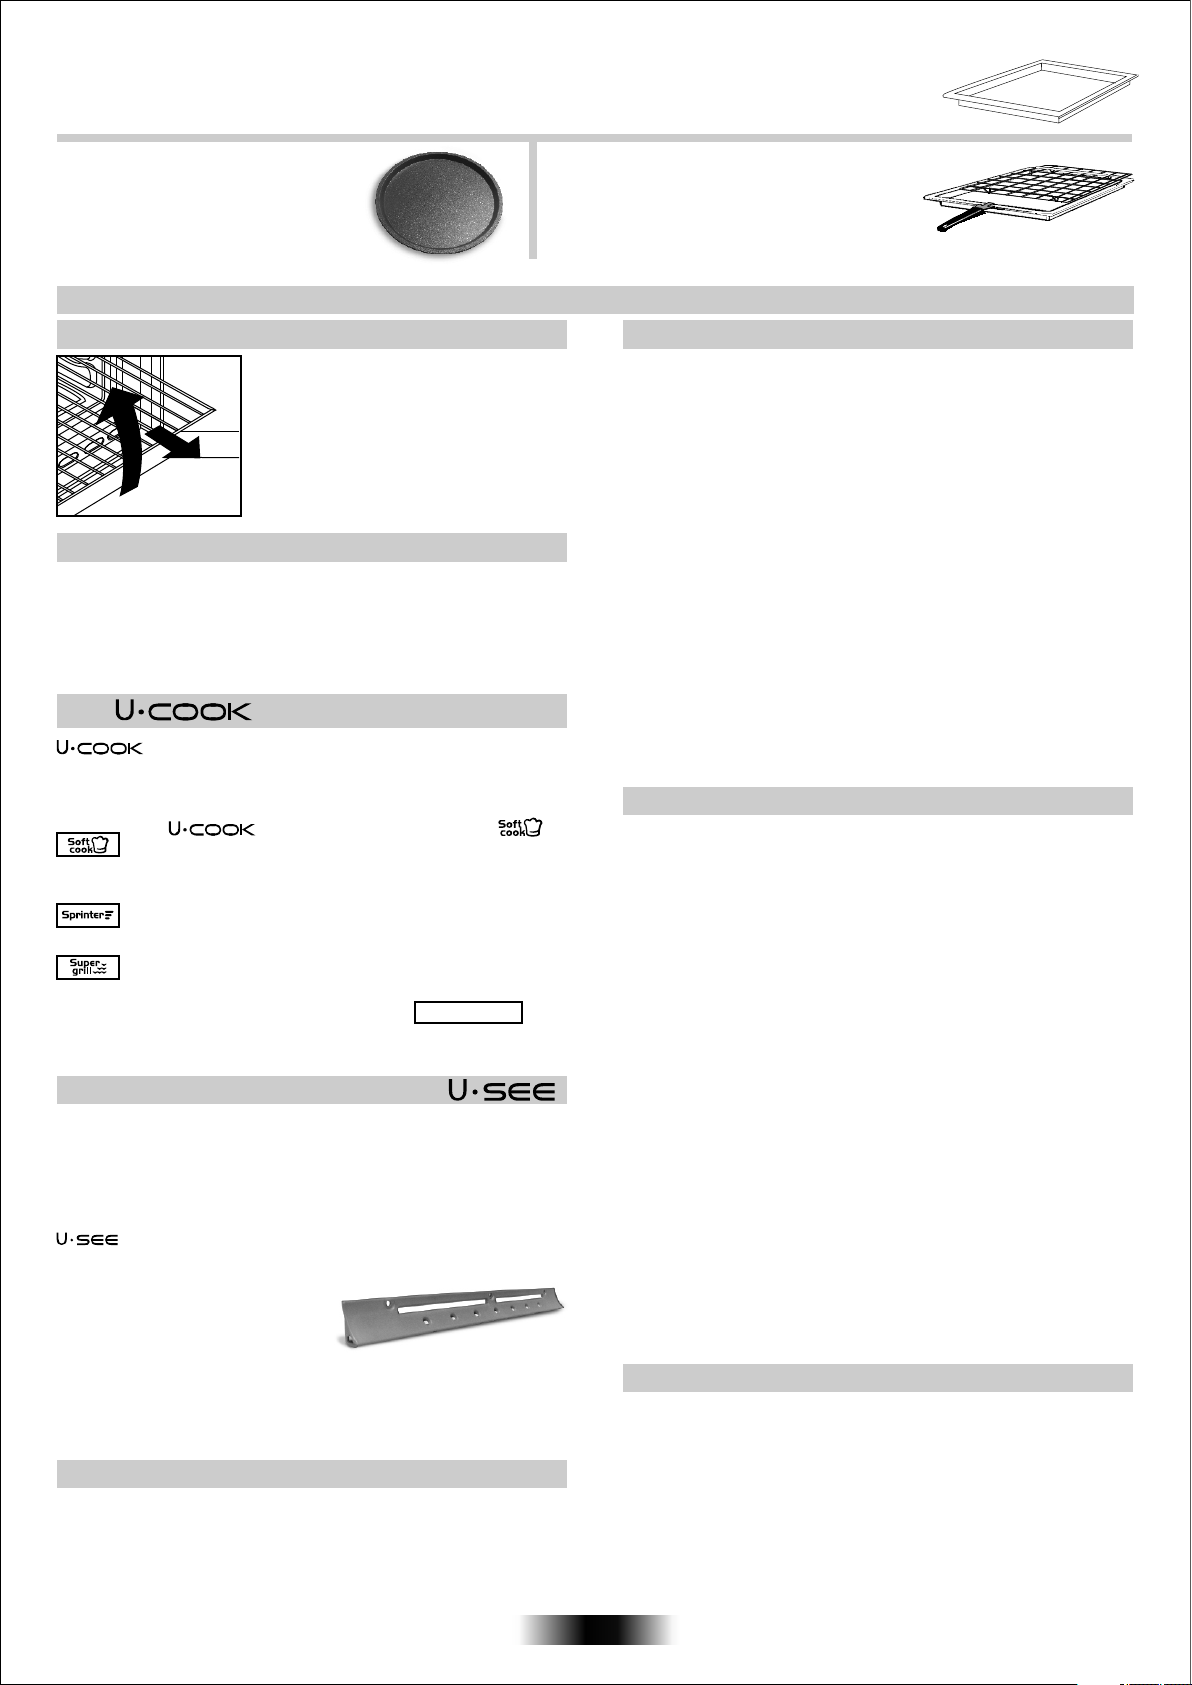
De Lekbak is bestemd voor het opvangen van de jus bij het grillen. Deze wordt slechts gebruikt in de modus Grillen,
Draaispit of Turbogrill, afhankelijk van het model. Voor alle andere bakwijzen moet u deze uit de oven halen. De lekbak
nooit als bakschaal gebruiken, er kan zich rookontwikkeling, vetverspreiding en
een snelle vervuiling van de oven
voordoen.
De pizza set is ontwikkeld voor het
bakken van een pizza. Voor het beste
resultaat moet u deze gebruiken in
combinatie met de Pizza functie
De grillpan wordt in combinatie met de lekbak
gebruikt voor alle soorten grillgerechten. Een
handgreep wordt meegeleverd om het geheel uit
de oven te kunnen nemen zonder dat u zich
brandt. Laat de handgreep nooit in de oven
Wanneer u de oven gebruikt, moet u alle niet benutte accessoires uit de
NUTTIGE TIPS
VEILIGHEIDSSYSTEEM VOOR DE ROOSTERS
Deze oven is uitgerust met een nieuw
veiligheidssysteem voor het uitrekken van de
roosters. Dit systeem stelt u in staat om de
roosters naar voren te trekken zonder het
gevaar op te lopen, dat het rooster of het
bereide voedsel per ongeluk uit de oven
vallen. Om de roosters uit de
dient u deze naar voren te trekken en lets op
te tillen
oven te halen,
GRILLEREN
Grilleren maakt het mogelijk het voedsel snel een diepe bruine kleur te
geven. Afhankelijk van de grootte van uw gerecht raden wij u aan dit op het
vierde niveau te zetten.
Bijna elk voedsel kan worden bereid onder de grill afgezien van erg mager
vlees of.een rollade. Vlees en vis dat
tebestrijken met olie.
u gaat grillen, dient u eerst licht
De Modellen
ovens hebben
snelheid, genaamd VARIOVAN. Tijden s het koken word de sneldheid van
de ventilator automatisch aangepast (multifunctionmode) om zo de
luchtstroom en temperatuur in de ovenruimte te optimaliseren
Alle ovens hebben de Softcook functie Dit
regeld de temperatuur en vochtgehalte. Het reduceerd het
verlies van 50%, dit garandeerd dat het voedsel luchtiger is en
beter smaakt.
Dit is een delicate kookmethode en uitermate geschikt voor
het bakken van brood en gebak.
Dit geeft de mogelijkheid om het ñivo van grillen in te
tot 50% meer vermogen in vergelijking met de traditionele
multifunctionele oven.
Sommige ovens ziijn voorzien van de nieuwe deur WIDE DOOR deze
heeft een groter venster voor makkelijk onderhoud en een betere
thermische isolatie.
een electronisch gecontroleerde ventilator
stellen,
AFHANKELIJK VAN MODEL:
Dit is een nieuw verlichtings systeem deze vervangt de traditionele
verlichting.
14 LED lampjes zitten geintegreerd in de deur. Deze produceren witte
hoogwaardige verlichting welke er voor zorgt dat u goed in de oven kunt
kijken, helder en zonder schaduw.
Voordelen :
Systeem, afgezien van het perfect verlichten van de oven is de
levernsduur langer, makkelijk te onderhouden en bespaard het ook nog
eens energie.
- Perfect zicht
- Langere levensduur
- Erg laag energieverbruik, -95%
vergeleken met de traditionele
Verlichting
“Apparaten met witte LED verlichting van 1M
1:1993 + A1: 1997 + A2: 2001 (gelijkwaarig aan EN 60825-1: 1994 + A1:
2002 + A2: 2001); maximale afgifte licht sterkte 459nm < 150uW. Niet
rechtstreeks waargenomen met optische instrumenten.
Klasse volgens IEC 60825-
KOOKTIJDEN
Op pagina 32 en 33 vindt u de aanbevolen kooktijden en temperaturen.
Houdt u deze gegevens aan als u de eerste keer een gerecht gaat
bereiden in uw oven. U kunt deze tijden en temperaturen echter
aanpassen aan uw eigen ervaringen. Wij raden u aan uw oven eerst een
half uur
op vol vermogen aan te zetten om onprettige luchtjes uit de oven te
verwijderen.
oven verwijderen.
ZELFREINIGENDE OVENWANDEN
Als extra optie zijn voor alle modellen speciale zelfreinigende
ovenwanden met een micro-poreuse beschermlaag verkrijgbaar Met
deze ovenwanden hoeft u uw oven niet meer met de hand schoon te
maken. Het vet dat tijdens het bereiden van uw voedsel tegen de
wanden aan komt, wordt door de micro-poreuse beschermlaag
afgebroken en
de katalytische wanden zetten het om in gas.
Bovenmatig spatten kan desondanks de poriën verstoppen en
daardoor de zelfreiniging hinderen. Dit kan worden hersteld door de
lege oven ongeveer 10-20 minuten op de maximum temperatuur aan
te zetten.
Gebruik geen bijtende middelen, metalen sponsjes, scherpe
voorwerpen, ruwe doeken of chemische schoonmaakmiddelen,
deze
kunnen permanente schade toebrengen aan de katalytische wanden.
Wij raden u aan om diepe bakplaten te gebruiken of een vangschaal
onder de grill te plaatsen, wanneer u vettig voedsel bereid. Indien de
wanden zodanig met vet zijn bedekt, dat de katalytische reining niet
langer effectief is, dient u dit
vet met een zachte doek of spons
doordrenkt in heet water schoon te maken. De wanden moet poreus
gehouden worden voor een doelmatige reiniging.
N.B.: Alle zelfreinigende ovenwanden, die momenteel verkrijgbaar
zijn hebben een levensduur van ongeveer 300 uur. U dient deze dus
na ongeveer 300 uur te vervangen..
SCHOONMAKEN EN ONDERHOUD
DE GLAZEN ONDERDELEN
Wij bevelen u aan om na elk gebruik het glas van de ovendeur schoon te
maken d.m.v. absorberend papier. Indien er teveel vetspatten op zitten
kan u deze nadien met een uitgewrongen spons en een
schoonmaakmiddel reinigen en daarna spoelen. Nooit schuurmiddelen
of snijdende voorwerpen gebruiken. U mag
hogedrukreiniger gebruiken om de oven schoon te maken. Laat het
apparaat eerst afkoelen alvorens het schoon te maken; haal vervolgens
de stekker uit het stopcontact of sluit de elektriciteit af middels de
hoofdschakelaar. Maak de roestvrijstalen en geëmaillerde delen schoon
met warm water en niet bijtende of
schuurmiddelen, bijtende wasmiddelen, bleekmiddelen of zuren om het
apparaat schoon te maken. Het is heel belangrijk de oven schoon te
maken na iedere keer dat u de oven heeft gebruikt. Vetten, die aan de
wanden van de oven zijn blijven zitten, kunnen de volgende keer dat
oven gebruikt, voor nare geurtjes zorgen of zelfs het kookresultaat
beïnvloeden.
Gebruik heet water met een geschikt schoonmaakmiddel om de oven
schoon te maken; vewijder de zeepresten grondig. De oven kan ook
uitgerust worden met zelfreinigende ovenwanden, zodat het
bovenstaande onnodig wordt. (Zie hiervoor het volgende hoofdstuk).
Gebruik voor
schoonmaakmiddel en schuursponsje. De glazen oppervlakken dient u
schoon te maken, wanneer deze koud zijn. Schade aan de glazen delen
vallen niet onder de garantie indien u het bovenstaande niet in acht
neemt.
Om het binnenlichtje te vervangen dient u: de stekker uit het
te halen of de elektriciteit af te sluiten en de oude lamp te vervangen door
een soortgelijke nieuwe lamp.
het schoonmaken van de roestvrijstalen grill een
nooit een stoomreiniger of
vloeibare zeep. Gebruik geen
u de
stopcontact
SERVICE DIENST
Alvorens u de Service Dienst belt
Indien de oven niet werkt, raden wij u aan:
— na te gaan of het apparaat goed is aangesloten. Indien u de oorzaak
niet kunt ontdekken:
— haal de stekker uit het stopcontact of sluit de elektriciteit van de oven af
middels de hoofdschakelaar
— gebruik de
— bel de Service Dienst
Noteert u, voordat u de Service Dienst belt, het typenummer van uw oven
(zie binnenzijde van de ovendeur) Bij de oven zit een garantiecertificaat,
welke u recht geeft op één jaar garantie vanaf de datum van
oven niet meer en ga er niet zelf aan sleutelen
aankoop
29 NL
Page 29
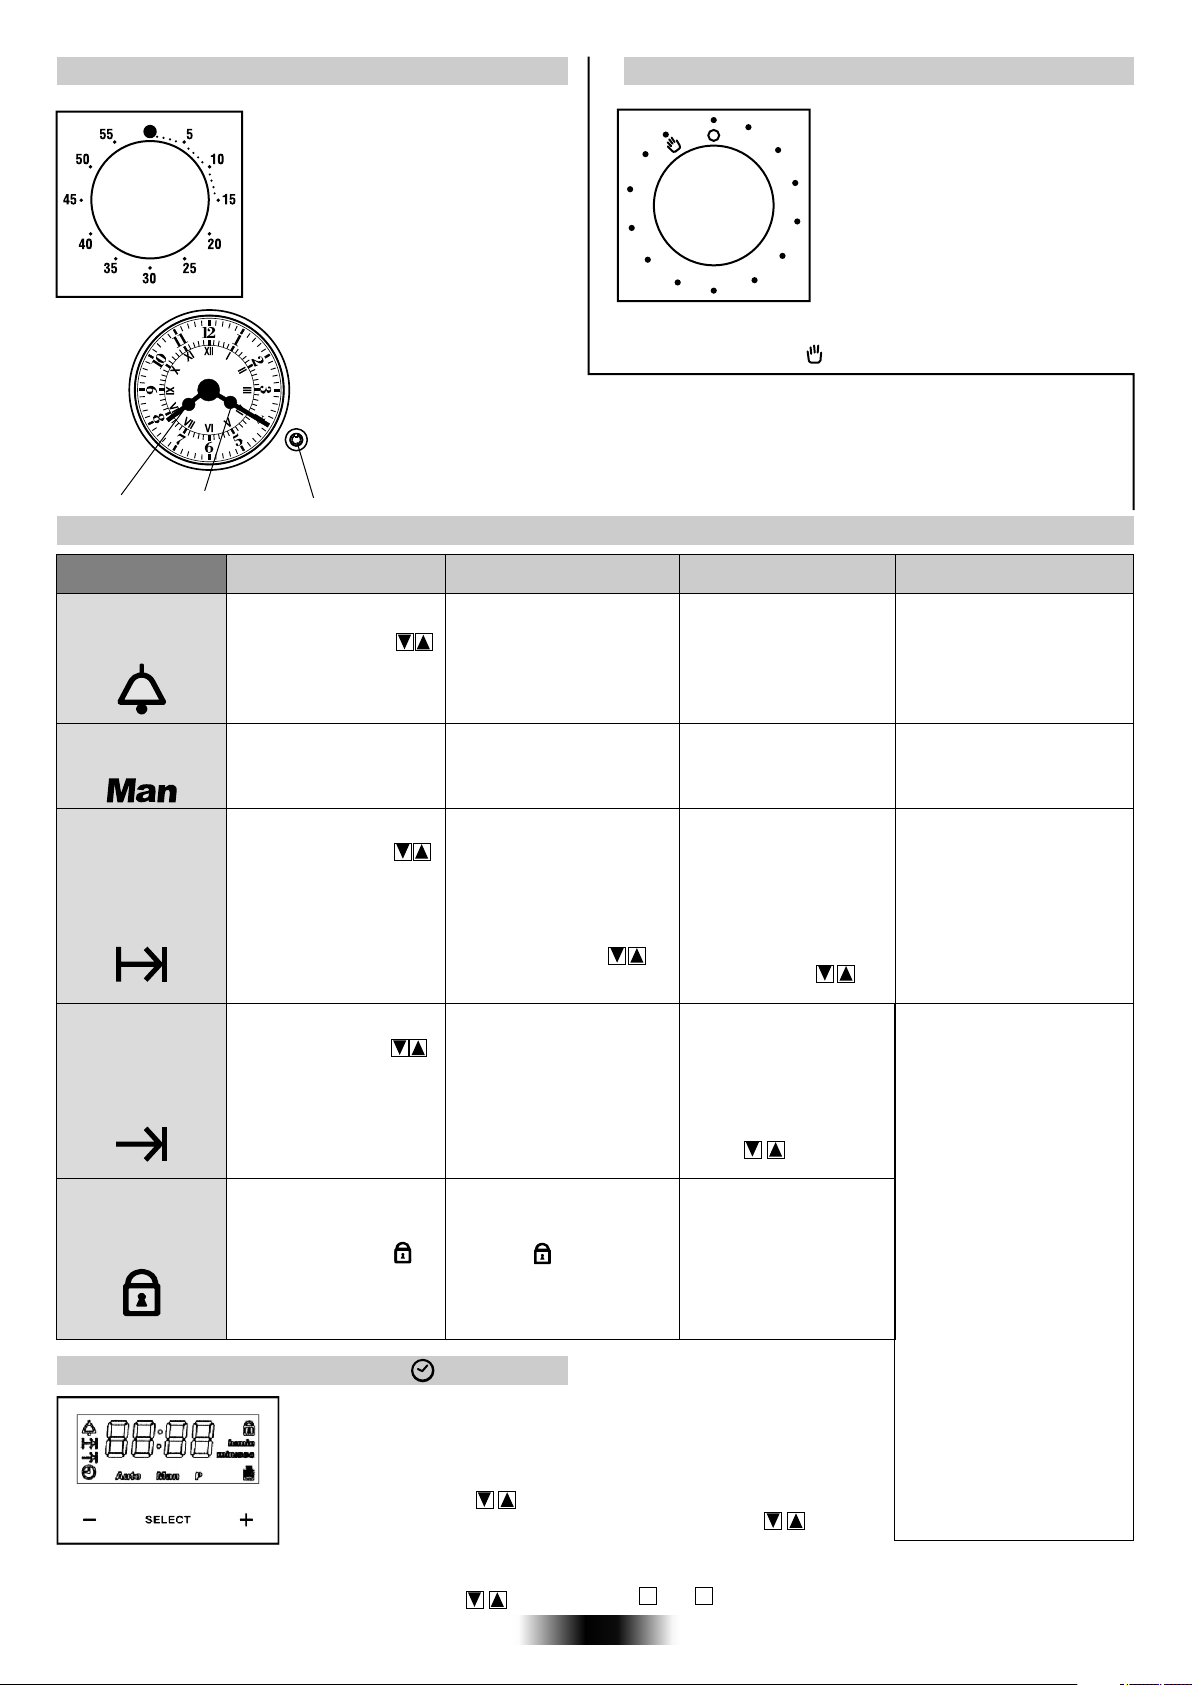
GEBRUIK VAN DE KOOKWEKKER GEBRUIK VAN DE TIMER MET UITSCHAKELFUNCTIE
U stelt de kookwekker in door deze eerst
een maal compleet om te draaien (met de
klok mee).
Draai de schakelaar vervolgens terug
naar de gewenste positie/tijd.
Zodra de ingestelde tijd is overschreden,
gaat er gedurende enkele seconden een
geluidssignaal .
120
110
100
90
80
70
10
60
02
30
40
50
kookwekker is ingesteld
wijzersymbool is gezet
Analog Timer Setting
When you push the knob, the minute arrow goes one minute forward. If you keep the knob
pressed, the arrows move quickly forward.
Uren wijzer Minuten wijzer Druk knop
ELEKTRONISCHE PROGRAMMA'S GEBRUIKEN
FUNCTIE
WEKKER
HANDMATIGE
BEDIENING
BAKTIJD
EINDE
BAKTIJD
KINDERSLOT
HOE TE ACTIVEREN
•Druk 4 keer op de
centrale knop
•Druk op de knoppen
om de gewenste tijd in te
stellen.
•Laat alle knoppen los.
•Druk 4 keer op de
centrale knop
•Stel de kookfunctie in
met de selectieknop voor
de ovenfunctie.
•Druk 2 keer op de
centrale knop
•Druk op de knoppen
om de vereiste kooktijd in
te stellen.
•Laat alle knoppen los.
•Stel de kookfunctie in
met de selectieknop voor
de ovenfunctie.
•Druk 3 keer op de
centrale knop
•Druk op de knoppen
om het tijdstip in te stellen
waarop de oven moet
worden uitgeschakeld.
•Laat de knoppen los.
•Stel de kookfunctie in
met de selectieknop voor
de ovenfunctie.
•Druk op Set (+)
gedurende een vijftal
seconden tot het
kinderslot symbool
verschijnt. Alle functies
zijn nu vergrendeld.
HOE UIT TE SCHAKELEN
•Wanneer de ingestelde tijd
is verstreken, klinkt er een
hoorbaar alarm (dit alarm
stopt vanzelf - u kunt het
alarm echter direct stoppen
door op SELECT te drukken).
Na 7 minuten
•Draai de selectieknop
voor de ovenfunctie naar
positie O.
•Wanneer de ingestelde tijd
is verstreken, wordt de oven
automatisch uitgeschakeld.
Indien u het koken eerder
wilt afbreken, zet u de
selectieknop voor de
ovenfunctie op positie O of
stelt u de tijd in op 0.00 (de
knoppen SELECT en )
•De oven wordt
uitgeschakeld op het
ingestelde tijdstip.
•Om de oven handmatig
uit te schakelen, zet u de
selectieknop voor de
ovenfunctie op positie O.
•Druk opnieuw op Set (+)
gedurende een vijftal
seconden tot het kinderslot
symbool verdwijnt. Alle
functies zijn nu opnieuw
beschikbaar.
WERKING DOEL
•Activeert een alarm
nadat de ingestelde tijd
verstreken is.
•Tijdens het programma
zal het display de
resterende tijd
weergeven: min, sec.
•Schakelt de
ovenbediening in.
•Hiermee kunt u de vereiste
kooktijd voor het gekozen
gerecht van tevoren instellen
•Om te controleren hoeveel
tijd er nog resteert, drukt u
op de SELECT-knop.
•Om de ingestelde tijd te
wijzigen, drukt u op de
SELECT-knop. Verander de
instelling door op te
drukken.
•Voor het instellen van de
kookwekker.
•Om de ingestelde tijd te
controleren, Druk 3 keer
op de centrale knop.
•Om de ingestelde tijd te
wijzigen, drukt u
tegelijkertijd op de SELECT
knop en .
DE JUISTE TIJD INSTELLEN
WAARSCHUWING: Na installatie van de oven en na het onderbreken van
de voeding (dit is te herkennen aan de knipperende cijfers
scherm) dient u eerst de juiste tijd in te stellen.
Dit gebeurt als volgt:
•Druk 4 keer op de centrale knop. L1, L2, L3 INSTELLEN GELUIDSSIGNAAL
Instellen
• de tijd in met de
•Laat alle knoppen los. •Instellen de tijd in met de knoppen.
knoppen. •Druk 1 keer op de centrale knop.
•Laat alle knoppen los.
WAARSCHUWING: De oven werkt alleen in de handmatige modus of indien er een tijd is ingesteld.
N.B.: Op sommige modellen worden de symbolen aangeduid met - en + .
12:00 op het
Con questo meccanismo è possibile
programmare la durata espressa in
minuti della cottura e quindi lo
spegnimento automatico del forno al
termine del tempo desiderato (max. 120
minuti).
Allo scadere del tempo prescelto, la
manopola raggiungerà la posizione di
suoneria O in corrispondenza della qua
le i l forno s i spegne automaticamente.
De oven werkt alleen wanneer de
of indien de timer op de positie van het
•Hiermee kunt u de oven
als alarmklok gebruiken
(zelfs indien u de oven
niet gebruikt).
•Voor het maken van de
gewenste gerechten.
•Druk op een willekeurige
knop om het signaal te
beëindigen. Druk op de
centrale knop om terug te
keren naar de klok functie.
•Deze functie wordt als ‘baktijd’
functie gebruikt.Als een gerecht
bijvoorbeeld 45 minuten in de
oven moet en om ongeveer
12.30 uur klaar moet zijn, kies
dan de vereiste functie, stel de
baktijd op 45 minuten in en het
eind van de baktijd op 12.30 uur
•Wanneer de kooktijd
verstreken is, wordt
automatisch uitgeschakeld en
klinkt er een alarm.
De oven wordt dan automatisch
om 11.45 uur ingeschakeld
(12.30 uur minus 45 minuten)
tot het ingestelde eind van de
baktijd waarop de oven
automatisch uitgeschakeld
wordt.
WAARSCHUWING:
Indien het EINDE van de
kooktijd wordt ingesteld
zonder de tijdsduur zelf in te
stellen, wordt
ingeschakeld. De oven stopt
vervolgens aan het EINDE
van de ingestelde kooktijd.
de oven
de oven meteen
30 NL
Page 30
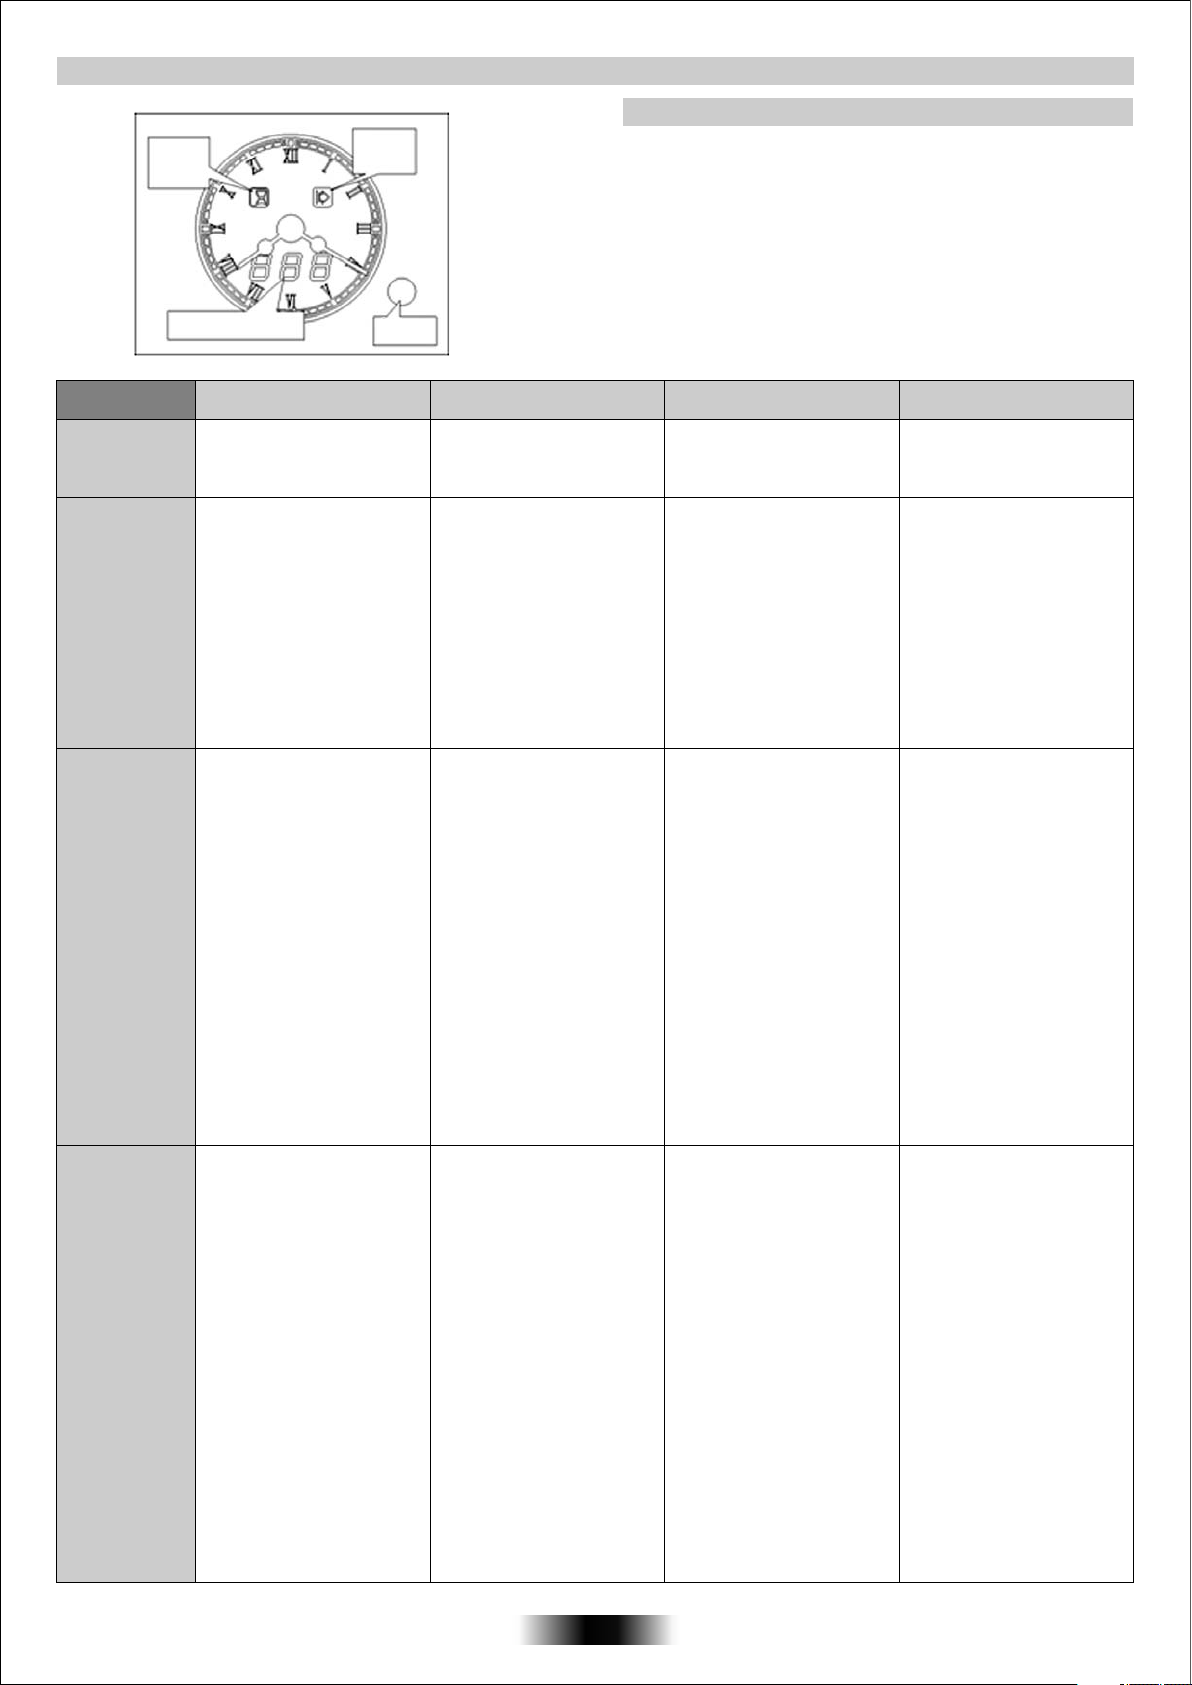
DE ANALOGE KLOK/PROGRAMMA'S GEBRUIKEN
Lampje
Lampje
duur van
de cyclus
begin van
de cyclus
INSTELLING VAN DE TIJD
•Druk de instelknop gedurende 4 seconden in. Op de
programmator verschijnt "SET". U hoort een bieptoon.
•Pas het uur aan door op de knop te drukken. De wijzer gaat
minuut per minuut vooruit; voor een snellere voortgang houdt u de
instelknop ingedrukt.
Affichering van de
verschillende bedieningen
FUNCTIE
MANUEEL
TIMER
maxi 90 min.
AFFICHERING
"BEL”
KOOKTIJD
maxi 24 u
AFFICHERING
"DUR"
Instelknop
HOE GEBRUIKEN?
• Dit is slechts mogelijk in
kookmode. Geen regeling
op de programmator
• Druk twee maal op de
instelknop, u ziet "BEL"
gevolgd door "---”
• Stel een tijd in door aan de
knop te draaien
• Voor elke handeling,
kiest u de temperatuur en
de gewenste functie.
• Druk een keer op de
instelknop. De indicatie
"Dur" wordt weergegeven
en het duurlampje gaat
knipperen.
• Stel de gewenste duurtijd
in door aan de knop te
draaien.
De resterende tijd wordt
weergegeven en het
duurlampje gaat vast aan.
Elke handeling moet binnen de 4 seconden worden uitgevoerd,
anders wordt ze geannuleerd.
Een tijdsduur of een pauze kunnen geafficheerd worden, hier
hoeft u geen rekening mee te houden.
HOE STOPPEN?
• Zet de bedieningsknoppen
op stop
• Tijdens het aftellen, ziet u
de resterende tijd in
minuten. eenmaal de laatste
minuut afgelopen is, zult u
de tijd in seconden zien. Op
het einde zult
en een bieptoon horen. Om
deze te stoppen, drukt u op
de knop. Het is op elk
moment mogelijk om de
timer te stoppen of te
wijzigen.
u "000" zien
• Als de tijd om is, zal de
programmator "End" laten
zien, het duurlampje gaat
knipperen en de oven
wordt automatisch
stopgezet. Een beltoon
klinkt om u te
waarschuwen. Om deze te
stoppen, drukt u op de
instelknop. Druk een
tweede keer om het
kookproces terug op te
starten, als dat
nodig zou
zijn.
Zet de functiewijzers op
stop.
DOEL? WAAROM?
• De oven laten werken • De gewenste kookfuncties
• Een belsignaal instellen op
het einde van de tijd.
• De duurtijd van het koken
selecteren.
handmatig kiezen.
• Dit dient slechts als
geheugensteun. Er
verandert niets aan
functioneren van de oven.
het
• Wanneer de kooktijd
afgelopen is, wordt de
oven automatisch
stopgezet en hoort u een
belsignaal om u te
waarschuwen.
UITGESTELDE
MODUS
Maxi pauzetijd
24 min.
AFFICHERING
"PAU"
• Voor u begint, kiest u de
temperatuur en de
gewenste functie.
• Druk een keer om de
duurtijd te regelen; zie
hierboven.
• Druk een tweede keer, dan
ziet u "PAU", gevolgd door "-
--", het startlampje knippert
en u kunt de wachttijd voor
het starten van de oven
instellen.
wachttijd, is de oven in
waakstand en de duur- en
startlampjes branden.
Eenmaal de wachttijd
beëindigd is start de oven
het kookproces en enkel het
duurlampje blijft branden.
Gedurende de
• De oven stopt
automatisch als de
kookduur is afgelopen.
Een belsignaal weerklinkt
om u te waarschuwen. Om
dit signaal te stoppen,
drukt u op de instelknop.
Druk een tweede keer, om
het kookproces te
herstarten, indien nodig.
Zet de functiewijzers op
stop
Het is mogelijk om tijdens
het kookproces de
wachttijd of de kooktijd te
veranderen of te
annuleren. Opgepast, als
u de wachttijd annuleert,
zal de oven automatisch
opstarten.
31 NL
• Laat toe om een
kookproces te
programmeren zodat het
koken klaar is op het
gewenste uur.
Voorbeeld: het is nu 10u.
Het gerecht moet 45
minuten koken en moet
om
12u klaar zijn. 1, kies
een kookfunctie en
temperatuur
2. Stel de kookduur in op
45min
3. Regel de wachttijd op
75min (10u tot 11u15). De
oven zal wachten tot
11u15, dan opstarten en
na 45min, dus om 12u
automatisch stoppen.
Page 31
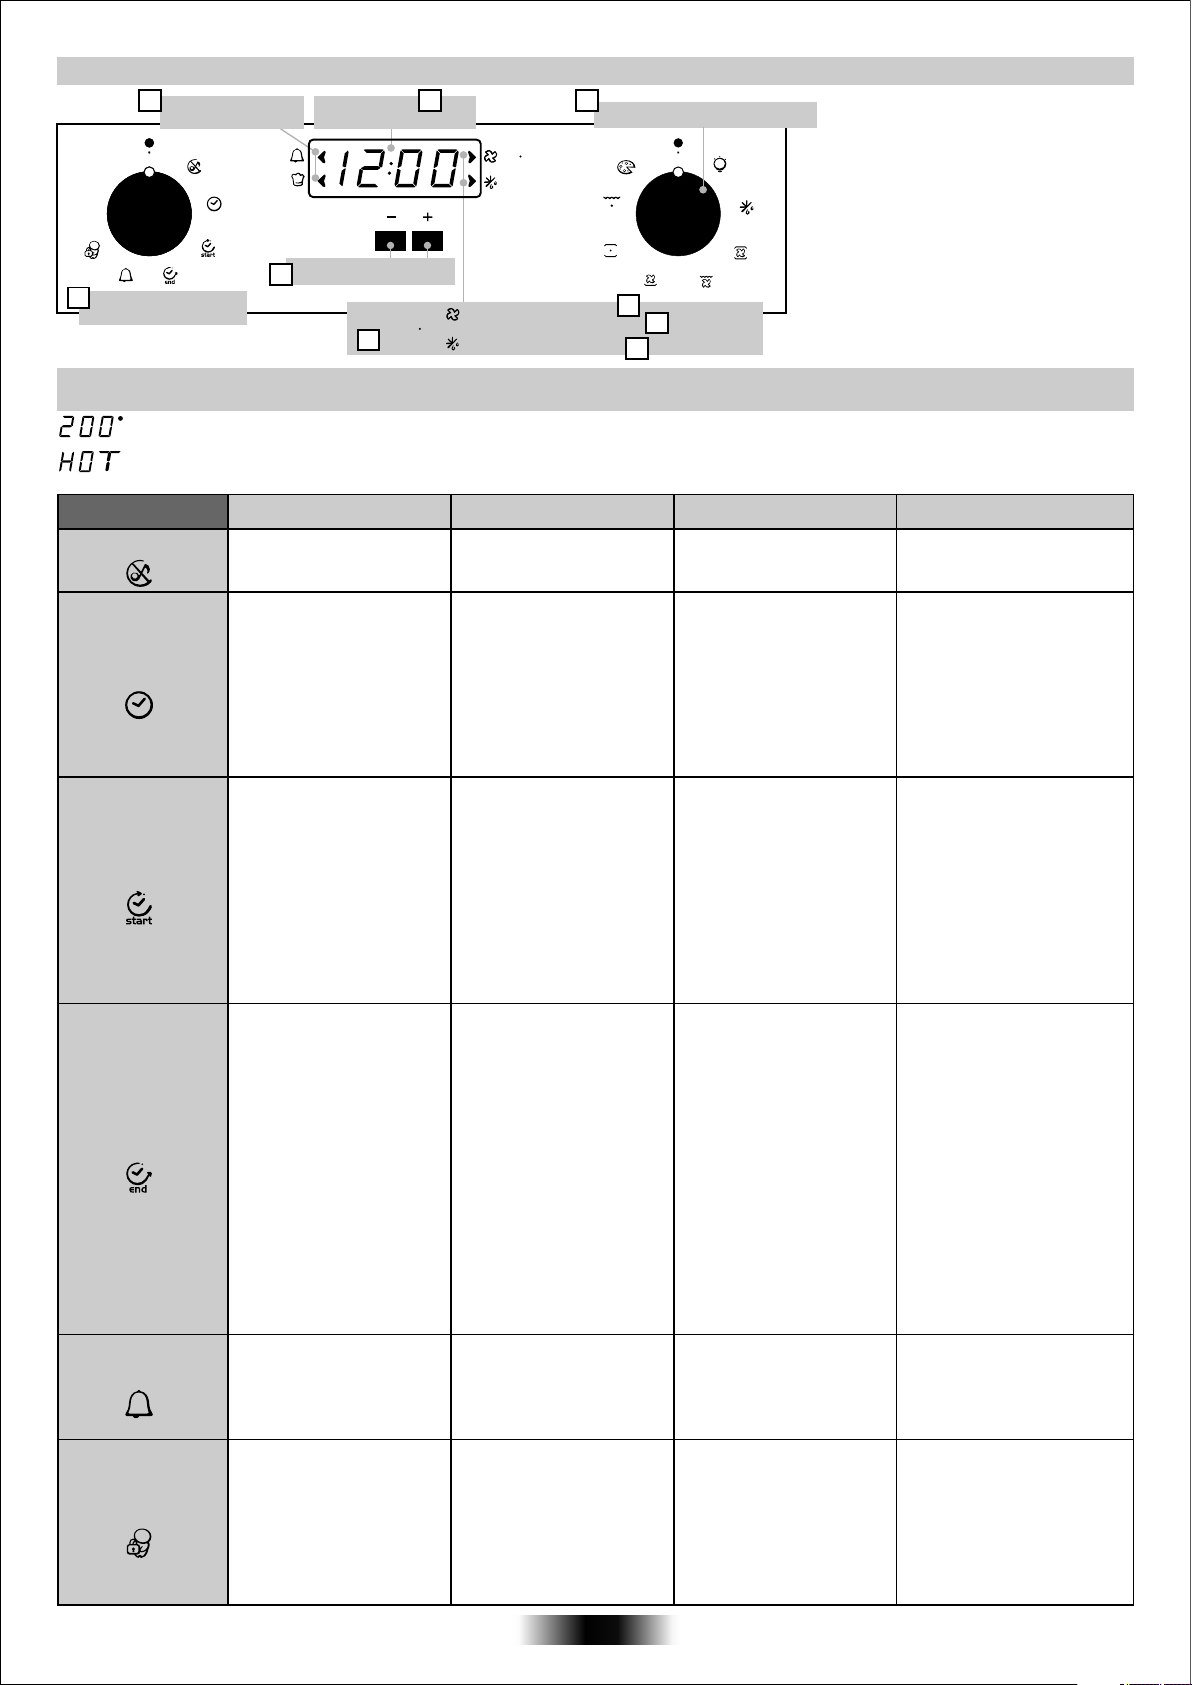
GEBRUIK VAN HET ELECTRONISCHE PROGRAMMA (Type A)
U
6
COOK
U
/
Tijd keuze knop
9
1
Kookwekker of
Auto lampje
Display for
temperatuur en tijd.
Instel toetsen
7
Verlichting: Functie met ventilator
Functie met VARIOVAN
2
Ontdooien
LET OP! Het eerste wat u moet doen als de oven is geinstalleerd of na een stroomstoring is de tijd instellen (dit kunt u
herkennen aan de knipperende 12:00)
Het lampje “ ° ” van de temperatuur indicatie knippert totdat de ingestelde temperatuur is bereikt.
HOT: Als het kookprogramma is beeindigd en de oven nog heet is zal << HOT>> in het diplay verschijnen, afgewisseld met
de tijd, ook als de twee keuze knoppen op uit staan.
FUNCTIE
Stille stand
Tijd instellen
HOE IN WERKING
STELLEN?
• Draai de linker keuze knop
naar de "Stille stand”
• Draai de linker keuze knop
op de positie "tijd instellen"
• gebruik de "+" en "- "
in te stellen.
om
HOE UITSCHAKELEN?
• Draai de keuze knop naar
de UIT positie
• Draai de keuzee knop
naar de UIT positie
COOK
8
Functie keuze knop*
*
3
5
4
WAT DOET HET?
• Mogelijkheid tot
uitschakelen van het
geluid van de kookwekker
• Instellen van de tijd welke
op het display verschijnt
1. Kookwekker of Auto lampje
2. Verlichting
3. Functie met ventilator
4. Functie met VARIOVAN
5. Ontdooien
6. Display for temperatuur en tijd.
7. Instel toetsen
8. Functie keuze knop
9. Tijd keuze knop
* afhankelijk van model
WAAR IS HET
VOOR BEDOELD?
• Het uitschakelen van het
geluid van de kookwekker
• Om de tijd in te stellen.
Tip. Stel altijd eerst de tijd
in als de oven is
geinstalleerd of na een
stroomstoring
(knipperende 12:00)
Kooktijd instellen
Kooktijd einde
Kookwekker
• Draai de rechter keuze
knop naar een
kookfunctie.
de linker keuze knop
• Draai
naar de positie "kooktijd
instellen"
• Stel de kooktijd in dmv de
"+"en de "-".
• Lampje Auto gaat branden
• Draai de rechterknop
een kookfunctie.
• Draai de linkerknop op
"Kooktijd einde"
• Stel de tijd in dmv de "+"en
de "-"
• het lampje auto gaat
branden.
• Draai de linker knop op de
"kookwekker"
• Stel de tijd in met de "+'en
de "-”
op
• Als de kooktijd is
schakeld de oven
automatisch uit en gaat er
een aantal seconden een
alarm klinken.
Om het koken vroegtijdig te
beeindigen, stel de tijd in op
00:00 door de linkerknop
naar “kooktijd instellen” te
draaien en met de “+”en “-”
in te stellen.
• Als de ingestelde tijd
verstreken is gaat de oven
automatisch uit.
• Om het programma
vroegtijdig te stoppen
draaid u de knop naar UIT.
• Stel de tijd op 00:00 in
door de linker knop op
"kookwekker" te draaien
en gebruik de "+"en "-”
verstreken
• Instellen van de kooktijd
bij een gekozen recept.
• Als de kooktijd is ingesteld
kunt u de actuele tijd weer
zien door rechterknop op
UIT te zetten
• Mogelijkheid tot instellen
van de eindtijd van een
programma.
• Om de kooktijd te bekijken
draaid u de knop naar
"Kooktijd einde”
• Laat een alarm klinken
voor een paar seconden
aan het einde van de
ingestelde tijd.
• Voor het koken van de
gewenste recepten
• Deze functie is bedoeld
om vooruit te plannen.
Biiv.
het gerecht moet 45 min
koken en klaar zijn om
12:30; u stelt de kooktijd
in op 45 min en de Kooktijd
einde om 12:30.
Het koken begint dan
automatisch om 11:45 en
zal stoppen als de
gewenste kooktijd voorbij
is en vervolgens gaat de
oven automatisch
• Gebruik maken van de
oven als alarm terwijl de
oven uitgeschakeld is.
uit
Kinderslot
• Draai de linker knop naar
"kinderslot" Druk
vervolgens 3 sec. op de
"+" toets.
• kinderslot actief STOP
verschijnt in het display
• Draai de linker knop naar
"kinderslot" Druk
vervolgens 3 sec. op de
"+" toets.
• STOP verdwijnt in het
display
32 NL
• De oven kan niet gebruikt
worden.
• Handig en veilig als er
kinderen in huis zijn.
Page 32
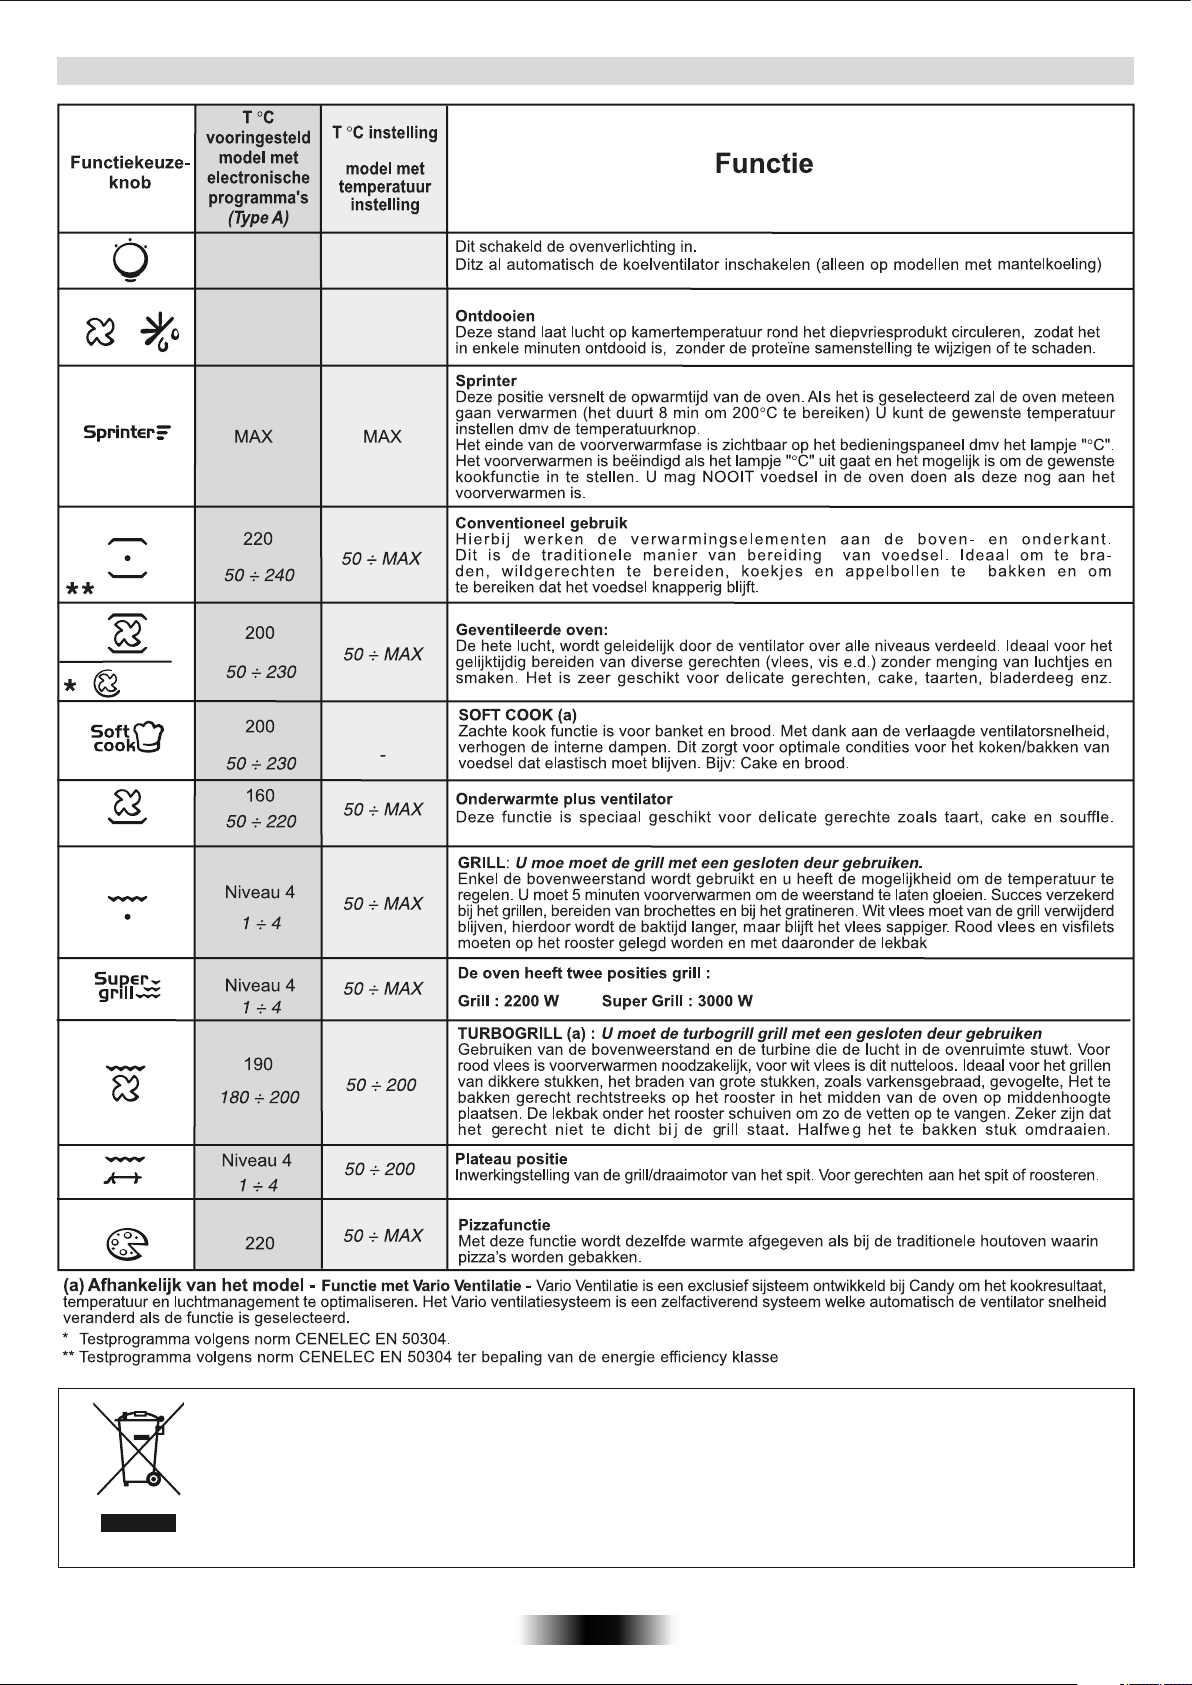
INSTRUCTIES VOOR HET GEBRUIK VAN DE OVEN
Dit apparat voldoet aan de Europese richtlijnen 2002/96/EC voor elektrische en elektrnische afval. Door dit apparat
correct te verwijderen, help u het potenti le negatieve gevolg voor de omgeving en menselijke gezondheid te
voorkomen, welke anders door onjuiste verwijdering zou kunnen worden veroorzaakt. Het symbool op het product
duidt aan dat dit
het verzamelpunt voor de recycling moet in overennstemming met plaatselijke milieuvoorschriften voor
afvalverwerking uitgevoerd dit product, neemt u contact op met uw gemeenlijke reiningingsdienst of de dealer waar
u het apparaat heeft gekocht.
product niet behandeld zal woorden als huishuidelijk afval. In plaats daarvan zal het apparaat naar
ë
33 NL
Page 33
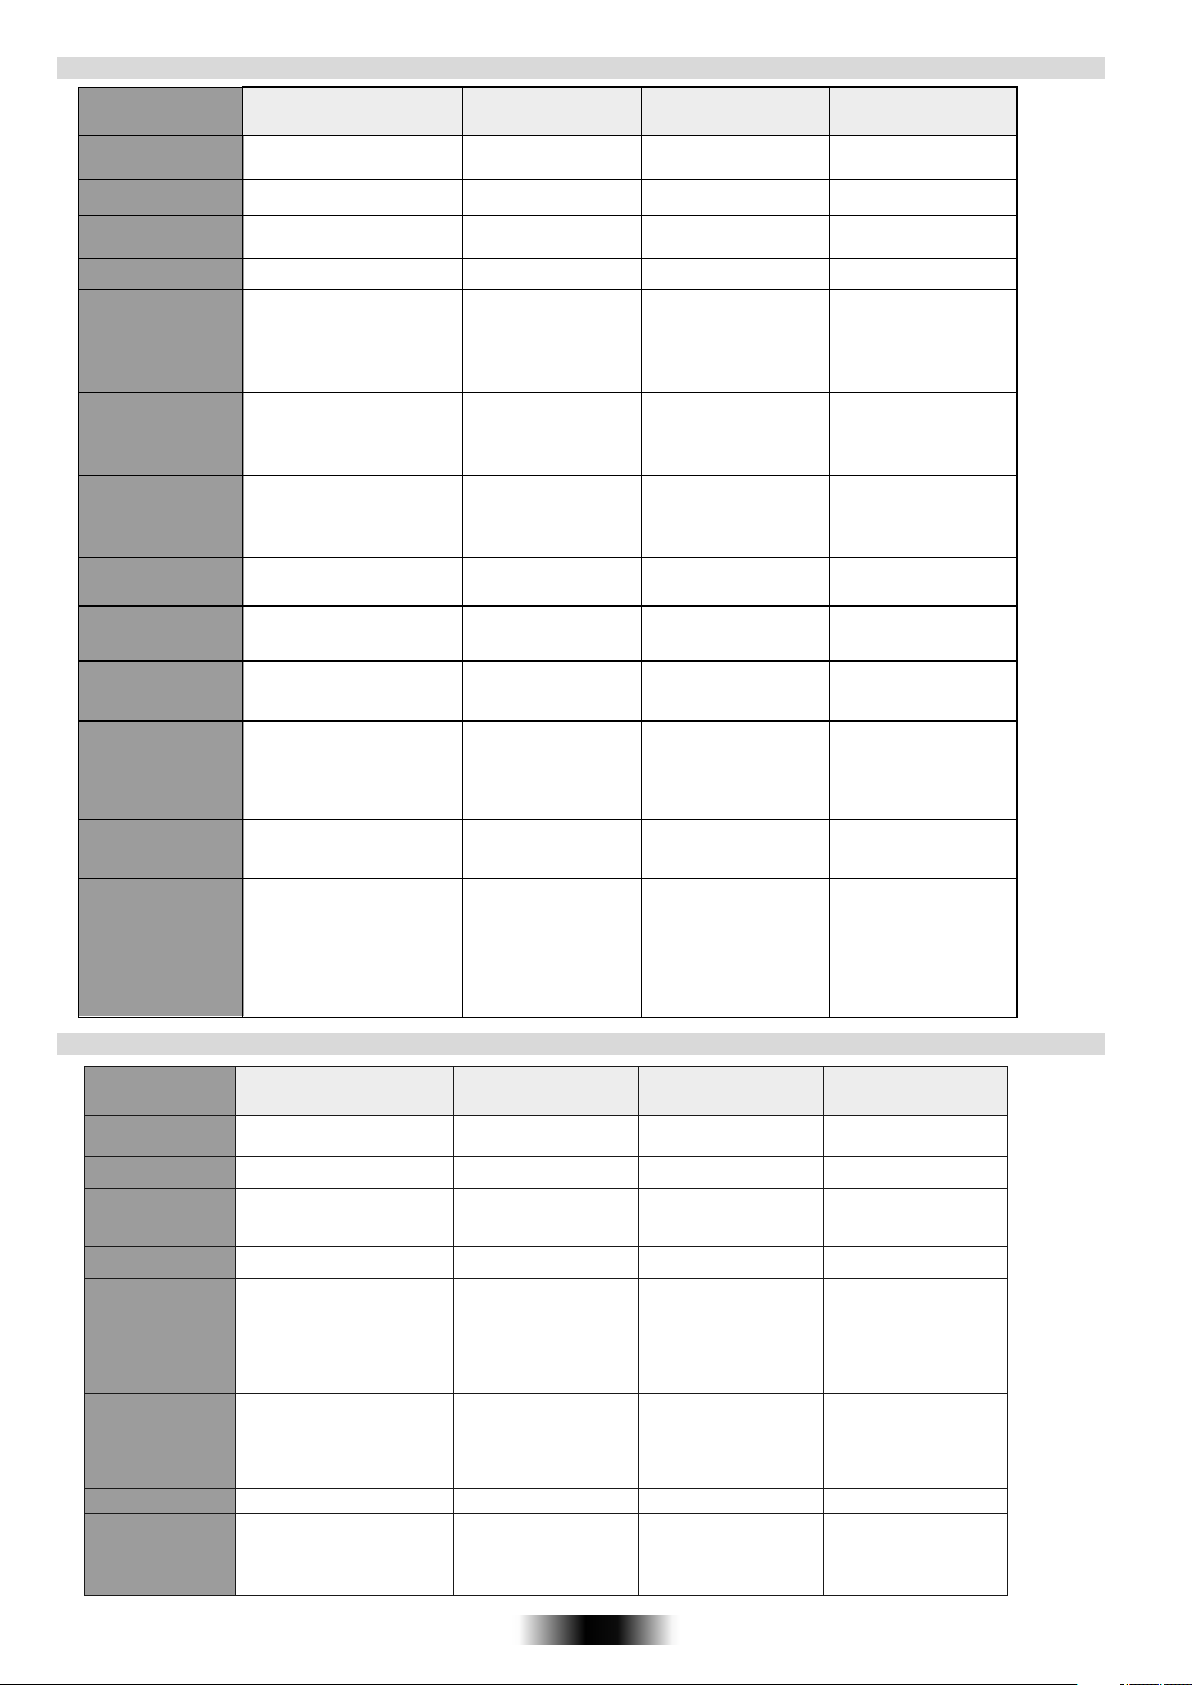
BAKTIJDEN EN-TEMPERATUREN VOOR GEVENTILEERDE OVEN
Gerecht
Gebak
Licht deeg:
Zandtaartdeeg:
Gistdeeg:
Bladerdeeg:
Vlees
Varkensvlees
Rundvlees:
Kalfsvlees:
Lamsvlees:
Schapenvlees:
Wild:
Gevogelte
Vis
Diversen
Soezen
Taart
Appeltaart
Cake
Koekjes
Biscuits
Gebraden
Karbonade
Haas
Gehaktballetjes
Worstjes
Bout
Haas
Roast-beef
Stoofpot
Bout
Gebraden
Rollade
Borst
Bout
Schouder
Schouder
Bout
Borst
Gebraden fazant
Haasgebraad
Konijn
Kalkoen
Parelhoen
Eend
Kip
Pikante kip
Brasem
Gegratineerde
zeetong
Lasagne
Cannelloni
Pizza
Pudding
Beignet
Soufflé
Appelbollen
1 kg
1 kg
1 kg
1 kg
1.5 kg
1 kg
1 kg
1 kg
1 kg
1 kg
1 kg
2 kg
1 kg
1 kg
1 kg
1 kg
1.5 kg
1.5 kg
1 kg
2 kg
1 kg
1.5 kg
1 kg
2 kg
1 kg
1 kg
1.5 kg
1 kg
Hoeveelheid
Oven °C
175
170
200
170
180
200
220
200
200
180
170
220
220
240
230
200
180
180
180
200
175
180
200
180
200
175
175
180
180
180
175
200
180
200
200
200
200
175
175
175
180
Niveau rooster
van onderaf
2° Niveau
2° Niveau
2° Niveau
2° Niveau
2° Niveau
2° Niveau
2° Niveau
1° Niveau
1° Niveau
2° Niveau
1° Niveau
1° Niveau
1° Niveau
2° Niveau
1° Niveau
1° Niveau
2° Niveau
1° Niveau
1° Niveau
2° Niveau
1° Niveau
1° Niveau
1° Niveau
1° Niveau
1° Niveau
1° Niveau
1° Niveau
2° Niveau
2° Niveau
1° Niveau
2° Niveau
1° Niveau
1° Niveau
1°
Niveau
2° Niveau
2° Niveau
1/2° Niveau
1° Niveau
2° Niveau
1° Niveau
1° Niveau
Baktijd
40-50
30
35
35
25
20
90
60
60
65
45
95
75
45
45
95
90
100
60
95
70
85
90
70
70
75
75
70
65
90
75
75
45
25
40
40
45
45
20
35
60
BAKTIJDEN EN-TEMPERATUREN VOOR STATISCHE OVEN
Gerecht
Gebak
Licht deeg:
Zandtaartdeeg:
Gistdeeg:
Bladerdeeg:
Vlees:
Gevogelte:
Vis:
Diversen:
Soezen
Taar t
Vruchtentaart
Taar t
Tulband
Chocoladetaart
Bladerdeegpastel
Roast-beef
Kalfsvlees
Kalfsfricandeau
Lamsvlees
Reeragout
Wild Zwijnragout
Gebraden duiven
Kalkoen 2 kg
Gans 4 kg
Eend 2.5 kg
Kip 1.5 kg
Forel
Lasagne
Soufflè
Beignets
Pizza
1.5 kg
1 kg
2 kg
1.5 kg
1.5 kg
1.5 kg
Hoeveelheid
Oven °C
175
170
180-190
160
160
160
200
190
35 NL
150-160
170-190
150-160
200
190
150-150
150
160
175
170
200
200
180-200
200
200
Niveau rooster
van onderaf
1° Niveau
1° Niveau
1° Niveau
1° Niveau
1° Niveau
1° Niveau
1° Niveau
1° Niveau
1° Niveau
1° Niveau
1° Niveau
1° Niveau
1° Niveau
1° Niveau
1° Niveau
1° Niveau
1° Niveau
1° Niveau
1° Niveau
1° Niveau
1° Niveau
1° Niveau
1° Niveau
Baktijd
40-50
30
20-30
40-45
40-45
25-35
20
90
120-150
60-90
60-75
90
120
45
180-240
240-270
90-150
60-80
15-25
40
20
20
20
34 NL
Page 34

ALLGEMEINE HINWEISE
Herzlichen Glückwunsch! Sie haben ein hochwertiges Qualitätsprodukt erworben. Damit Ihr Gerät stets zu Ihrer Zufriedenheit arbeitet, raten wir
Ihnen folgendes:
• Lesen Sie dieses Heft aufmerksam durch: es enthält wichtige Hinweise zur korrekten Benutzung Ihres Gerätes
• Bewahren Sie diese Bedienungsanleitung zur späteren Benutzung sorgfältig auf.
Bei der ersten Inbetriebnahme kann es
Vorgang, der auf die erste Erwärmung des Isolierplattenklebers zurückzuführen ist, welcher zur Verkleidung des Backofens verwendet wurde.
Warten Sie mi t dem Einschieben der Speisen, bis kein Rauch mehr vorhanden ist. Die Backofentür wird während des Betriebes
Achten Sie bitte darauf, daß Kinder sich nicht in der Nähe des Backofens aufhalten, besonders wenn der Grill in Betrieb ist.
KONFORMITÄTSERKLÄRUNG:
•Dieses Gerät entspricht der EU-Vorschrift 89/109 für die Bereiche,
die mit Lebensmitteln in Berührung kommen.
Das Gerät entspricht den Europäischen Richtlinien 73/23/CEE
und 89/336/CEE, ersetzt durch 2006/95/CE bzw.
und deren nachträglichen Veränderungen
SICHERHEITSHINWEISE
•Dieses Gerät darf ausschließlich für den Zweck eingesetzt werden, für
den es hergestellt wurde, nämlich die Zubereitung von Speisen.
Jede andere Anwendung (beispielsweise das Heizen von Räumen) ist
deshalb als zweckentfremdet zu betrachten und demzufolge gefährlich.
Der Hersteller kann für eventuelle Schäden, die auf einen
ungeeigneten, fehlerhaften und unvernünftigen Einsatz
zurückzuführen
Die Verwendung jedes elektrischen Gerätes erfordert die Beachtung
einiger grundsätzlichen Regeln. Das sind insbesondere:
- das Gerät nicht mit nassen oder feuchten Händen oder Füßen
berühren.
- das Gerät nicht barfuß bedienen
- verhindern Sie, daß Kinder oder unfähige Personen unbeaufsichtigt
am Gerät hantieren
- bei Ausfällen und/oder Funktionsstörungen
abzuschalten. Versuchen Sie nicht, den Fehler auf eigene Faust zu
beheben.
- Bei Beschädigung des Zuleitungskabels ist dieses so schnell wie
möglich auszutauschen. Dies ist ausschließlich durch qualifiziertes
Fachpersonal durchzuführen, unter Beachtung folgender Hinweise:
Blechschutzdeckel abnehmen, Kabel abschrauben und durch ein
anderes (Typ H05RR-F, H05VVF, H05V2V2-F) ersetzen. Das
muß der Leistung des Gerätes entsprechen. Der Erdleiter (gelb-grün)
muß vorschriftsgemäß 10 mm länger sein als die Hauptleiter. Bei einer
erforderlichen Reparatur wenden Sie sich bitte an Ihren zuständigen
Werkskundendienst und verlangen Sie die Verwendung von OriginalErsatzteilen.
Die Mißachtung der vorgenannten Hinweise kann die Sicherheit des
Gerätes beeinträchtigen.
•Kinder oder
geistigen Fähigkeiten oder mit ungenügenden Kenntnissen und
Erfahrung dürfen nur dann das Gerät benutzen, wenn sie beaufsichtigt
werden oder hinreichend Anweisungen zur sicheren Behandlung des
Gerätes durch eine für ihre Sicherheit verantwortliche Person erhalten
haben.
•Kinder sind zu beaufsichtigen, um sicher zu stellen, dass sie nicht
dem Gerät spielen.
•Linieren sie die ofen wande mit aluminiumfolie. Aluminiumfolie
oder jeder andere schutz, im direkten kontakt mit dem heisen
email, vermeidet, dass das email im inneren(innenseiten) des
ofens beschadigt wird.
sind, nicht verantwortlich gemacht werden.
Personen mit eingeschränkten körperlichen oder
INSTALLATION
Der Einbau erfolgt auf Kosten des Endverbrauchers. Der Hersteller ist
von diesem Dienst entbunden. Eventu ell an den Hersteller
herangetragene Ansprüche, die auf einen falschen Einbau
zurückgehen, sind von jeder Garantieleistung ausgeschlossen. Der
Einbaumuß entsprechend der Anleitung und durch qualifiziertes
Fachpersonal erfolgen. Durch einen falschen Einbau können
Schäden an Personen, Tieren oder
der Hersteller nicht verantwortlich gemacht werden kann.
EINBAU IN DEN SCHRANK
Das Gerät in den Schrank an den vorgesehenen Platz einsetzen
(unterhalb der Kochfläche bzw. einzeln in separater Nische). Die
Befestigung erfolgt durch 4 Schrauben, die in die entsprechenden
Bohrungen des Rahmens eingesetzt werden, welche beim Öffnen der
Backofentür sichtbar werden.(Abbildung aufder Letzten Seite). Damit
eine gute Belüftung gewährleistet ist, muß der
Einhaltung der auf letzten Seite angegebenen Abstände installiert
werden.
zu Rauchentwicklung und beißendem Geruch kommen. Hierbei handelt es sich um einen ganz normalen
naturgemäß heiß.
Hinweis: Bei Backöfen, die in Kombination mit Kochmulden oder
Ceranfeldern eingebaut werden, sind unbedingt die
Montageanweisungen zu beachten, die mit den Kochfeldern
mitgeliefert sind.
2004/108/CE,
WICHTIG:
Damit eine einwandfreie Funktion des Einbaugerätes gewährleistet
ist, muß der Umbauschrank unbedingt über entsprechende
Eigenschaften verfügen. Die Wände der am Backofen angrenzenden
Schränke müssen aus hitzebeständigem Material sein. Insbesondere
bei Schränken aus Furnierholz müssen die verwendeten Klebstoffe
Temperaturen bis
Kunststoffe oder die Kleber solche Temperaturen nicht stand, so sind
Verformungen und Entleimungen die Folge. Gemäß der
Sicherheitsnormen dürfen nach dem Einbau eventuelle Berührungen
mit elektrischen Teilen nicht möglich sein. Sämtliche der Sicherheit
dienende Teile müssen so befestigt sein, daß sie sich ohne
Werkzeuge
Zur Gewährleistung einer guten Belüftung ist die hintere Wand
der Einbaunische zu entfernen. Außerdem muß die
Auflagefläche über einen hinteren Freiraum von mindestens 45
mm verfügen.
zu 120°C widerstehen können: halten die
nicht entfernen lassen.
ELEKTRISCHER ANSCHLUß
ist das Gerät
Kabel
mit
In der Bundesrepublik Deutschland ist der Backofen direkt an die
Herdaschlussdose anzuschließen. Der elektrische Anschluß darf
ausschließlich durch qualifiziertes Fachpersonal (Elektroinstallateur)
erfolgen.
Beim direkten Anschluß ans Netz ist darauf zu achten, daß zwischen
dem Gerät und dem Versorgungsnetz ein der Last entsprechender,
genormter Mehrfachschalter eingebaut wird. Der
bei dem eingebauten Gerät jederzeit leicht zugänglich sein.
Wichtig: Bei der Installation ist darauf zu achten, daß das
Versorgungskabel an keiner Stelle einer Temperatur von über 50°C
ausgesetzt wird.
Das Gerät entspricht den Sicherheitsvorschriften derNormanstalten.
Die elektrische Sicherheit dieses Gerätes ist nur dann gewährleistet,
wenn es vorschriftsgemäß an einen einwandfrei
Erdleiter angeschlossen ist, in Übereinstimmung mit den für die
elektrische Sicherheit geltenden Normen.
Diese für die Sicherheit grundsätzliche Voraussetzung muß überprüft
werden, und im Zweifelsfall ist eine sorgfältige Kontrolle der Anlage
durch geschultes Fachpersonal vorzunehmen. Es ist die elektrische
Belastung der Anlage und Steckdose zu überprüfen, um
festzustellen, ob diese
maximale Leistung geeignet sind. Im Zweifelsfall einen
Elektroinstallateur zu Rate ziehen.
Wichtig: Der Hersteller kann für eventuelle Schäden, die auf eine
fehlende oder fehlerhafte Erdung zurückzuführen sind, nicht zur
Verantwortung gezogen werden.
ACHTUNG:
Die Spannung und die Versorgungsfrequenz sind auf dem
Matrikelschild angegeben (Abbildung auf der
für die auf dem Leistungsschild angegebene
Netzanschluß muß
funktionierenden
letzten Seite).
OFENAUSSTATTUNG (Je nach Modell)
Vor der ersten Benutzung des Zubehörs, reinigen Sie jedes Teil mit
einem feuchten Schwamm und trocknen Sie es dann mit einem Tuch.
Der einfache Rost dient als Unterlage
Sachen verursacht werden, für die
Backofen unter
für Bleche und Backformen.
Der Grillrost ist vorrangig zum Ablegen
von Grillstücken vorgesehen. Er wird
zusammen mit dem Soßenfänger
verwendet. Dank ihres speziellen
Profils bleiben die Roste immer
waagerecht, auch wenn sie bis
zumAnschlag herausgezogen werden.
DieGerichte können nicht
herunterrutschen oder überlaufen
35 DE
Page 35
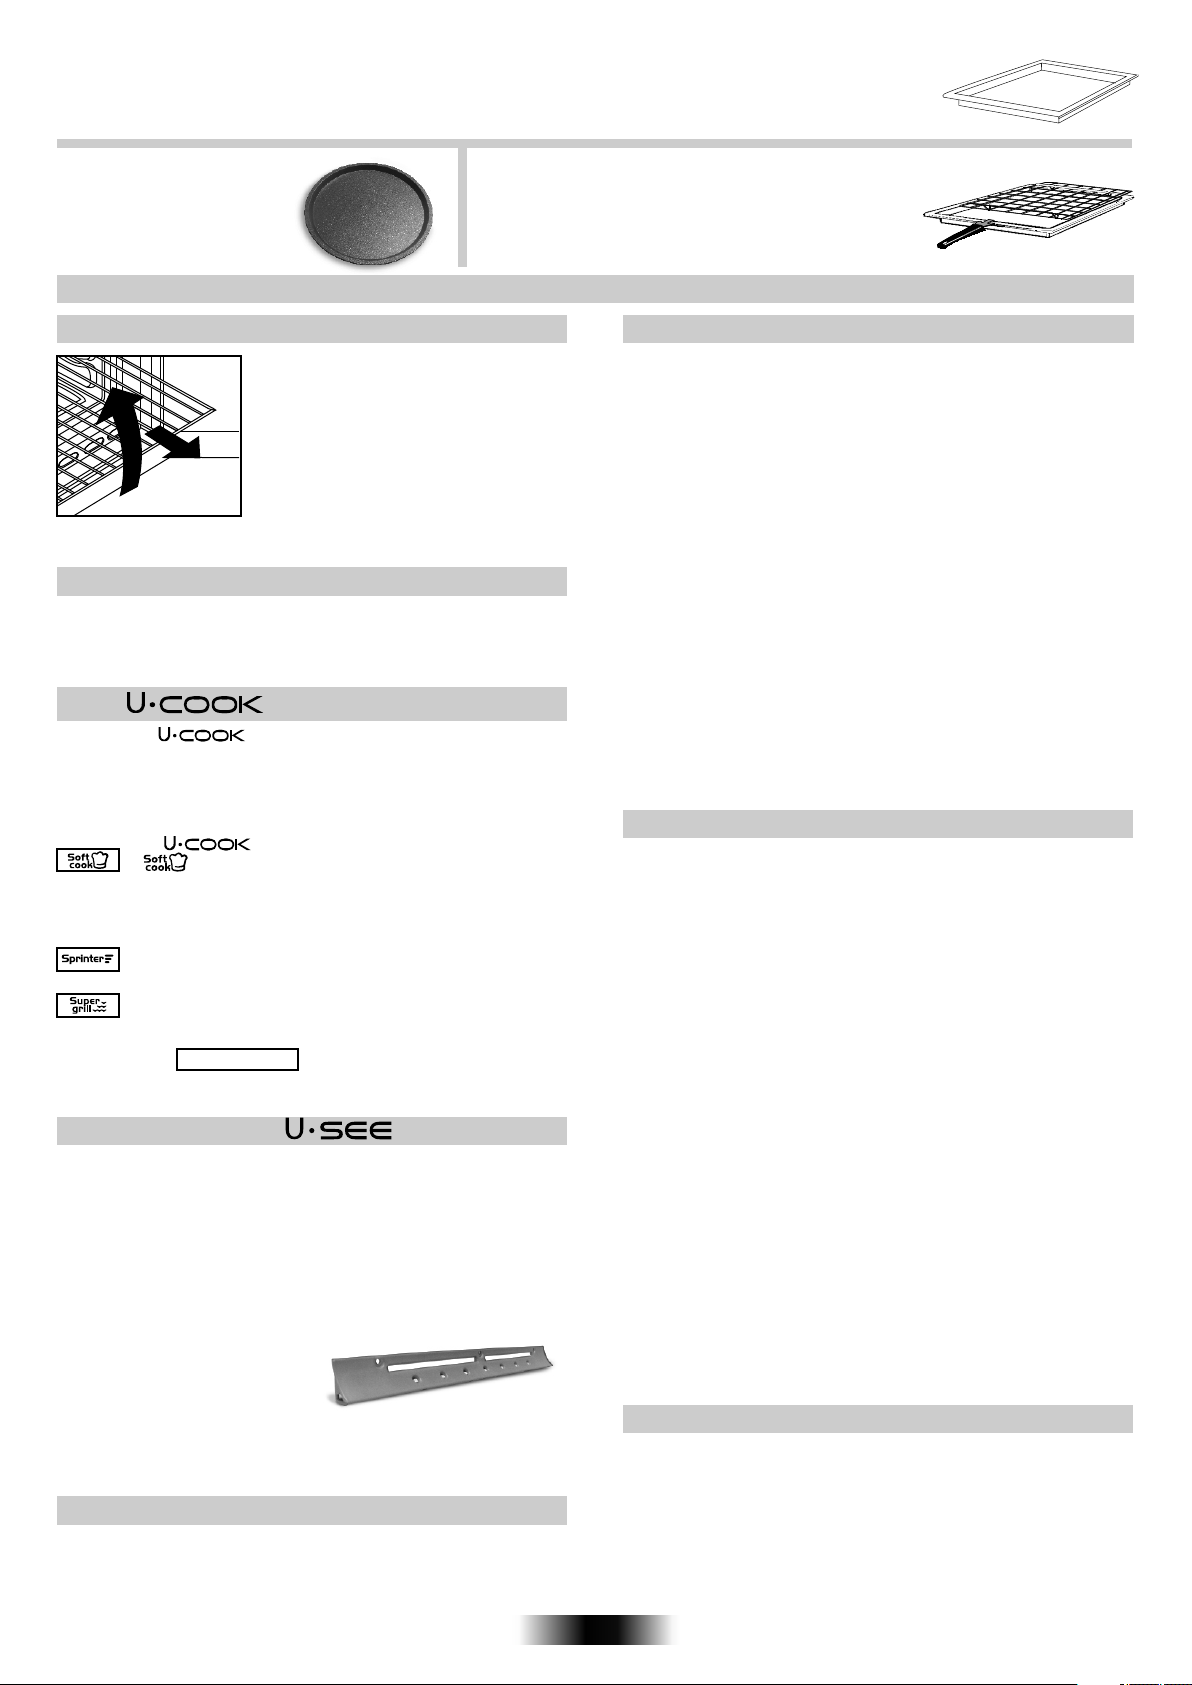
Der Soßenfänger ist zum Auffangen des Saftes der Grillstücke bestimmt.
Er kann auf den Rost gestellt, unter ihn geschoben oder auf die Bodenplatte gestellt werden. Den Soßenfänger niemals
als Unterlage zum Braten verwenden.
Dies würde Rauchentwicklung und Fettspritzer und damit eine schnelle Verschmutzung des Ofens verursachen.
Gitter mit Aufnahme Das Gitter mit Aufnahme für die
Das Pizza-Set ist ideal zum
Pizzabacken.
Das Set muss zusammen mit
dem Backprogramm.
Fettpfanne ist ideal zum Grillen. Verwenden Sie es hierzu in
Kombination mit der Fettpfanne. Ein Griff ist mit dem
Gittermitgeliefert, damit beide Zubehörteile sicher ein-und
ausgezogen werden können. Lassen Sie bitte den Griff nicht
im Backofen, wenn dieser im Betrieb ist.
EINIGE NÜTZLICHE HINWEISE
KIPPGESICHERTE GITTERROSTE
Ihr Backofen ist mit besonders geformten
Gleitschienen ausgestattet. Die Gitterroste
können fast vollständig aus dem Back ofen
herausgezogen werden, ohne daß sie nach
unten kippen.
Dank der speziellen Gleitschienen bleiben die
Roste sicher in der Waagerechten, und Sie
können die Speisen umrühren oder deren
Garpunkt feststellen. Um die Gitterroste ganz
angehoben und an der Vorderseite herausgezogen werden, wie in der
herauszunehmen,
nebenstehenden Abbildung dargestellt.
müssen diese leicht
GRILLEN
Zum Grillen empfehlen wir, das Grillgut je nach Größe auf den 3. Oder 4.
Gitterrost von unten zu schieben (s. Abb. 2 Seite 40). Fast alle
Fleischsorten eignen sich zum Grillen, mit Ausnahme von sehr magerem
Wild. Vor dem Grillen sollte das Grillgut ein wenig mit Öl oder Fett
bestrichen werden.
The MODELS
Die Modelle verfügen über ein patentiertes System zur
elektronischen Steuerung des Umluftventilators, das so genannte
VARIOFAN. Während des Backens wählt das System automatisch die
geeignete Geschwindigkeit für den Ventilator (im Multifunktionsbetrieb),
um die Umwälzung der Umluft
optimieren.
50% reduziert, so dass die Speisen zarter und saftiger gelingen. Diese
sanfte Art zu garen ist
Kuchen und Gebäck.
Multifunktionsbacköfen erreicht werden kann. Einige Backöfen sind mit
der neuen Tür WIDE DOOR ausgestattet, welche ein größeres
Sichtfenster besitzt und somit eine leichtere Wartung und bessere
Wärmeisolierung gewährleistet.
Alle Modelle verfügen über die Funktion Softcook
. Diese ermöglicht ein optimales Verhältnis zwischen
Temperatur und Feuchtigkeit. Der Feuchtigkeitsverlust wird um
besonders empfehlenswert zum Backen von Brot,
Dank dieser Funktion wird die Dauer des Vorheizens r
eduziert: der Backofen erreicht in nur 8 Minuten 200°C.
Diese Eigenschaft ermöglicht es, den
Intensität des Grills zu wählen, wobei bis zu 50% mehr
Leistung im Vergleich zu herkömmlichen
und somit die Temperatur im Garraum zu
Leistungsgrad und die
Beleuchtungssystem - je nach Modell
Das ist ein Beleuchtungssystem, das die traditionelle Glühbirne ersetzt.
14 LED-Leuchten sind in der Backofentür integriert. Das erzeugte Licht ist
sehr hell und ermöglicht eine fast schattenfreie Sicht auf allen Ebenen im
Backofeninneren.
Die Vorteile:
neben der herausragenden Qualität und Intensität der Beleuchtung, bietet das
System auch eine längere Lebensdauer im Vergleich zu
herkömmlichen Backofenlampen, ist außerdem leicht zu reinigen und vor allem
sehr sparsam im Energieverbrauch.
- optimale Übersicht auf allen Backofenebenen
- zuverlässige Funktion und lange Lebensdauer
- hohe Helligkeit bei sehr niedriger
Energieverbrauch,
95% weniger alsherkömmliche
Backofenbeleuchtung
- leicht zu reinigen
“ Das Gerät ist ausgestattet mit weißem LED-Licht der Klasse 1M gemäß IEC
60825-1:1993 + A1:1997 + A2:2001 (entspricht EN 60825-1: 1994 + A1:2002 +
A2:2001): max. optische Ausgangsleistung 459nm < 150μW. Nicht mit
optischen Instrumenten direkt anschauen.”
U.SEE
bis zu
GARZEITEN
Auf Seite 40 bis 41 finden Sie eine Tabelle, in der Richtzeiten und
Temperaturen zum Braten und Backen verschiedener Speisen
angegeben sind. Durch Ihre persönliche Erfahrung werden Sie diese
Angaben entsprechend Ihrem Geschmack und Ihren Gewohnheiten
anpassen können.
KATALYTISCHES SELBSTREINIGUNGSSET
Der Reinigungsset ist als Zubehör für alle Backöfen erhältlich. Dank
der selbstreinigenden Einsätze für die Innenwände des Backofens
wird das mühselige Reinigen von Hand überflüssig. Die Fett-, Öl-,
Fleischsaft- und Soßenspritzer im Backraum werden durch ein
katalytisches Verfahren während des Backens zersetzt und in
gasförmige Verbindungen umgewandelt. Die MikroporenBeschichtung der
Einsätze kann durch größere Fettspritzer verstopft
und die selbstreinigende Wirkung dadurch vermindert werden. Dies
läßt sich jedoch sehr einfach beheben, indem der leere Backofen auf
höchste Hitze eingestellt und ca. 10 bis 20 Minuten lang aufgeheizt
wird. Benutzen Sie keine scheuernden oder ätzenden Mittel, auch
keine Stahlwolle, Schaber oder spitzen
Gegenstände. Chemische
Reinigungsmittel können die Poren des Emailüberzugs verstopfen
und so die Reinigungswirkung verhindern. Zum Brate n von
besonders großen bzw. Fetthaltigen Bratenstücken ist es ratsam,
einen hohen Bräter zu benutzen. Beim Grillen empfiehlt es sich, die
Fettpfanne zumAuffangen der Bratflüssigkeit zu benutzen.Entfernen
Sie eventuelle Überlaufreste oder Fettrückstände mit einem feuchten
oder Schwamm. Die Emailbeschichtung muß immer porös
Lappen
bleiben, damit die Reinigungswirkung optimal gewährleistet ist.
HINWEIS: Alle handelsüblichen Selbstreinigungssysteme haben eine
begrenzte Leistungsdauer. Nach ca. 300 Betriebsstunden des
Backofens sollte Ihr Reinigungsset ausgetauscht werden.
REINIGUNG UND WARTUNG
DICHTUNG DER OFENTÜR
Wenn es notwendig ist, sie zu reinigen, benutzen Sie dabei einen feuchten
Schwamm, den Sie vorher in heiße Seifenlösung eingetaucht haben.
Spülen Sie die Dichtungen mit klarem Wasser und trocknen Sie sie. Der
Grillrost ist vorrangig zumAblegen vo n Grillstücken vorgesehen.
Benutzen Sie niemals Dampf-oder Hochdruckvorr ichtungen zum
Reinigen
aus Edelstahl mit einfachem Seifenwasser oder mit den handelsüblichen
Reinigungsmitteln. Vermeiden Sie unbedingt den Gebrauch von
scheuernden Reinigungsmitteln in Pulverform, da diese die Emaille des
Backofens und die äußeren Zierteile beschädigen können. Der Backofen
sollte nach jedem Gebrauch sorgfältig gereinigt werden, da
Fettpartikeln, die beim Backen und Braten sich auf den Innenwänden
abgesetzt haben, unangenehme Gerüche hervorrufen und somit das
Backergebnis beeinträchtigen können. Zur Reinigung benutzen Sie bitte
warmes Wasser und einen milden Reiniger.
Für alle unseren Backöfen ist ein besonderes Reinigungsset als Zubehör
erhältlich, der Ihnen das mühselige Reinigen von Hand
aus selbstreinigende Einsätzen, die mit einer speziellen Emaille
beschichtet sind und an den Innenwänden des Backofens befestigt
werden. Siehe hierzu den Absatz “Katalytisches Selbstreinigungsset” Für
die Gitterroste benutzen Sie ein handelsübliches Reinigungsmi t tel und
Stahlwol le. DieOberflächen aus Spiegelglas dürfen erst dann gereinigt
werden, wenn sie
die Mißachtung dieser grundsätzlichen Regel zurückzuführen sind, fallen
nicht unter die Garantie.
Zum Austauschen der Innenlampe ist der Backofen von der
Stromversorgung zu trennen. Schrauben Sie die Glasschutzhülle der
Lampe ab und ersetzen Sie die Birne mit einer ähnlichen Typs, die
ebenfalls hitzebeständig ist.
des Ofens! Reinigen Sie alle emaillierten Oberflächen oder Teile
erspart. Es besteht
vollständig abgekühlt sind. Eventuelle Schäden, die auf
TECHNISCHER KUNDENDIENST
Sollte Ihr Backofen einmal nicht richtig funktionieren, prüfen Sie zuerst, ob
die Stromversorgung gewährleistet ist. Ist die Uhrsache der Fehlfunktion
nicht ausfindig zu machen, wenden Sie sich bitte an Ihren zuständigen
Werkskundendienst unter Angabe des Modells und der Seriennummer,
die auf dem Typenschild angegeben sind (s. Abb. 4 letzten Seite). Auf
Gerät gewähren wir eine Garantie von 24 Monaten ab Kaufdatum.
Bewahren Sie Ihre Kaufrechnung sorgfältig auf und legen Sie sie bei
Bedarf als Garantienachweis dem Kundendienst vor. Die
Garantiebedingungen sind im beigefügten Serviceheft angegeben.
36 DE
die
Ihr
Page 36
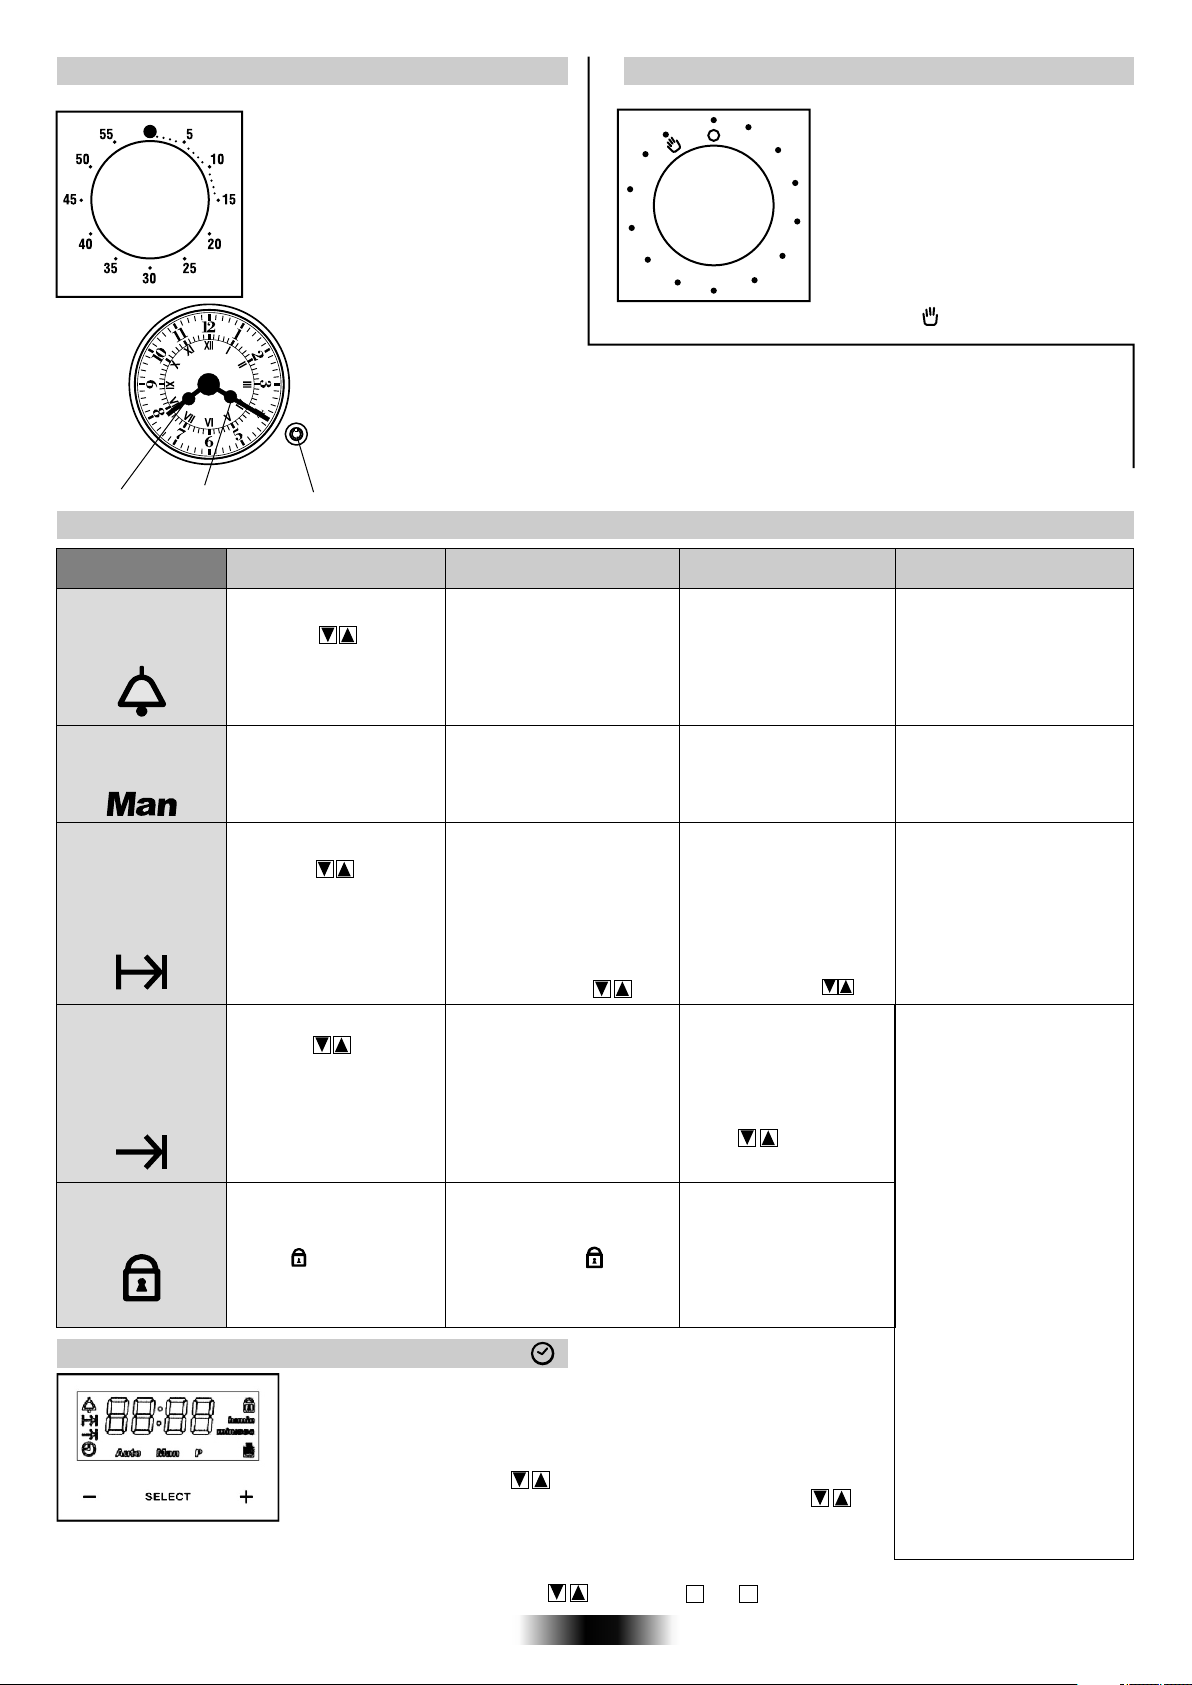
MINUTENZÄHLER BENUTZUNG DES TIMERS FÜR BACKZEITENDE
Um den Minutenzähler einzustellen,
drehen Sie den Knopf einmal im
Uhrzeigersinn um eine ganze Umdrehung
bis zum Anschlag und stellen Sie diesen
dann zurück auf die gewünschte Zeit.
Wenn die Zeit abgelaufen ist, ertönt einige
Sekunden lang ein akustisches Signal.
120
110
100
90
80
70
10
60
Diese Funktion ermöglicht es, die
benötigte Garzeit einzustellen (maximal
02
120 Minuten).
30
abgelaufen, schaltet sich der Backofen
automatisch ab. Der Timer zählt die Zeit
40
rückwärts, geht auf O zurück und
50
schaltet den Backofen automatisch aus.
Der Ofen setzt sich erst in Betrieb, wenn
die Backzeit eingestellt ist, oder wenn
der TIMER auf manuelle Funktion
eingestellt ist .
Analoge Programmierung
Durch Drücken der Taste bewegt sich der Pfeil um jeweils eine Minute vor.
Durch längeres Gedrückthalten bewegt er sich schneller vor.
Stundenzeiger Minutenzeiger Versenkknebel
GEBRAUCH DES ELEKTRONISCHEN PROGRAMMIERERS
FUNKTION
MANUELLER
BETRIEB
MANUELLE
FUKTIONS-
EINSTELLUNG
BACKDAUER
BACKZEITENDE
KINDERSICHERUNG
EINSCHALTEN
Drücken Sie den mittleren
•
Knopf einmal
•Die Knöpfe drücken,
um die erforderliche Backzeit
einzustellen.
•Alle Knöpfe loslassen.
•
Drücken Sie den mittleren
Knopf einmal
•Wählen Sie die Backfunktion
mit dem entsprechenden
Kontrollknebel für die
Backofenfunktion.
Drücken Sie den mittleren
•
Knopf zweimal
•Die Knöpfe drücken,
um die erforderliche Backzeit
einzustellen.
•Alle Knöpfe loslassen.
•Stellen Sie die Backfunktion
mit dem entsprechenden
Kontrollknebel für die
Backfunktion.
•
Drücken Sie den mittleren
Knopf dreimal
•Die Knöpfe drücken,um
den Zeitpunkt zu wählen,
wenn Sie möchten,
Ofen sich abschaltet.
•Knöpfe loslassen.
•Wählen Sie die Backfunktion
mit dem entsprechenden
Kontrollknebel für die
Backofenfunktion
Die Kindersicherung wird
aktiviert wenn Sie mindestens 5
Sekunden lang die Taste Set (+)
gedrückt halten und bis das
Symbol der Kindersicherung
auf dem Display erscheint. Von
diesem Moment an ist die
Bedienung aller anderen
Funktionen gesperrt.
dass der
AUSSCHALTEN FUNKTION
•Wenn die eingestellte
Backzeit abgelaufen ist, wird
ein akustisches Signal aktiviert
(dieser Alarm hört von alleine
ach 7 minuten
auf, ner kann
jedoch sofort Bausgeschaltet
werden, wenn man auf
SELECT drückt).
•Drehen Sie den Kontrollknebel
für die Backfunktion bis zur
gewünschten Position O.
•Wenn die eingestellte Zeit
abgelaufen ist, schaltet sich der
Ofen automatisch ab.Wenn Sie
den Backvorgang vorzeitig
ab-bzw.unterbrechen möchten,
drehen Sie den
Auswählen der Ofenfunktion bis
zur Position O oder stellen Sie
die programmierte Zeit auf 0.00
(Knöpfe SELECT und
•Zum eingestellten Zeitpunkt
wird der Ofen sich automatisch
abschalten.
•Wenn Sie den Ofen manuell
ausschalten möchten, drehen
Sie den Knebel zur Einstellung
der Ofenfunktion auf Position
O.
Die Kindersicherung wird
deaktiviert wenn Sie mindestens 5
Sekunden lang die Taste Set (+)
gedrückt halten und bis das Symbol
der Kindersicherung auf dem
Display erlischt. Von diesem
Moment an ist die Bedienung aller
anderen Funktionen aktiv.
Knebel zum
•Aktiviert einen Alarm am
Ende der eingestellten
Backzeit.
•Während dessen zeigt das
Display die verbleibende
Zeit an: min, sec
•Es ermöglicht den
Gebrauch des Ofens.
•Es ermöglicht Ihnen,die für
das gewählte Rezept erforderl
iche Backzeit vorzu-programmieren.
•Um die Restzei t zu erfahren
drücken Sie den Knopf
SELECT ZWEIMAL.
•Um die eingestellte Zeit zu
ändern, drücken Sie den
TIMER und nehmen Sie die
neue Einstellung durch
Betätigung der Knöpfe vor
•Es ermöglicht die
Einstellung der Backendzeit.
•Um die voreingestellte Zeit
zu überprüfen,
den mittleren Knopf dreimal
•Um die voreingestellte Zeit
zu ändern, drücken Sie den
Knopf SELECT und die
Knöpfe
gleichzeitig.
Knopf
Drücken Sie
EINSTELLUNG DER RICHTIGEN UHRZEIT
HINWEIS: Das erste, was nach der Installation des Ofens oder nach der
Unterbrechung der Stromversorgung (die am blinkenden Display mir der
Anzeige 12:00 zu erkennen ist) gemacht werden muss, ist die Einstellung der
korrekten Uhrzeit.
•Drücken Sie den mittleren Knopf einmal 1.
•Einstellen Sie die Zeit mit den Tasten ein. •Drücken Sie den mittleren Knopf einmal 5.
•Alle Knöpfe loslassen. •Einstellen Sie die Zeit mit den Tasten ein.
ACHTUNG: Der Ofen arbeitet nur, wenn er auf manuelle Funktion eingestellt ist oder eine bestimmte
Backzeit programmiert worden ist.
HINWEIS: Bei einigen Modellen stehen anstelle der Symbole die Zeichen - und + .
L1, L2, L3 EINSTELLEN AKUSTISCHES SIGNAL
•Alle Knöpfe loslassen.
Ist die eingestellteGarzeit
NÜTZLICH FÜR
•Es ermöglicht Ihnen, das
Signal als Erinnerungsfunktion
zu benutzen (auch wenn den
Ofen nicht zum Backen
verwendet wird)
•Zum Zubereiten der
gewünschten Rezepte
• Drücken Sie einen Knopf, um
das Signal zu beenden.
Drücken Sie den mittleren
Knopf, um zur Uhr-Funktion
zu gelangen.
•Diese Funktion wird
zusammen mit der Backdauer
benutzt. Z.B. Soll Ihre Speise
45 Minuten backen und um
12:30 fertig sein. Wählen Sie
zuerst die Backfunktion, dann
Backzeitdauer 45 Minuten
einstellen, dann Backzeitende
12:30 eingeben.
•Bei Erreichen der
eingestellten Backzeit schaltet
sich der Ofen automatisch ab
und ein akustisches Signal
ertönt.
Der Backofen startet
um 11:45 (12:30 minus 45
Min.) und schaltet sich dann
zu der eingestellten Zeit ab.
ACHTUNG:
Wenn nur die Backendzeit,
nicht jedoch die
Dauer der Backzeit
eingestellt worden ist,
setzt sich der Ofen sofort
in Betrieb und schaltet
sich bei Erreichen der
eingestellten Backendzeit
ab.
automatisch
37 DE
Page 37
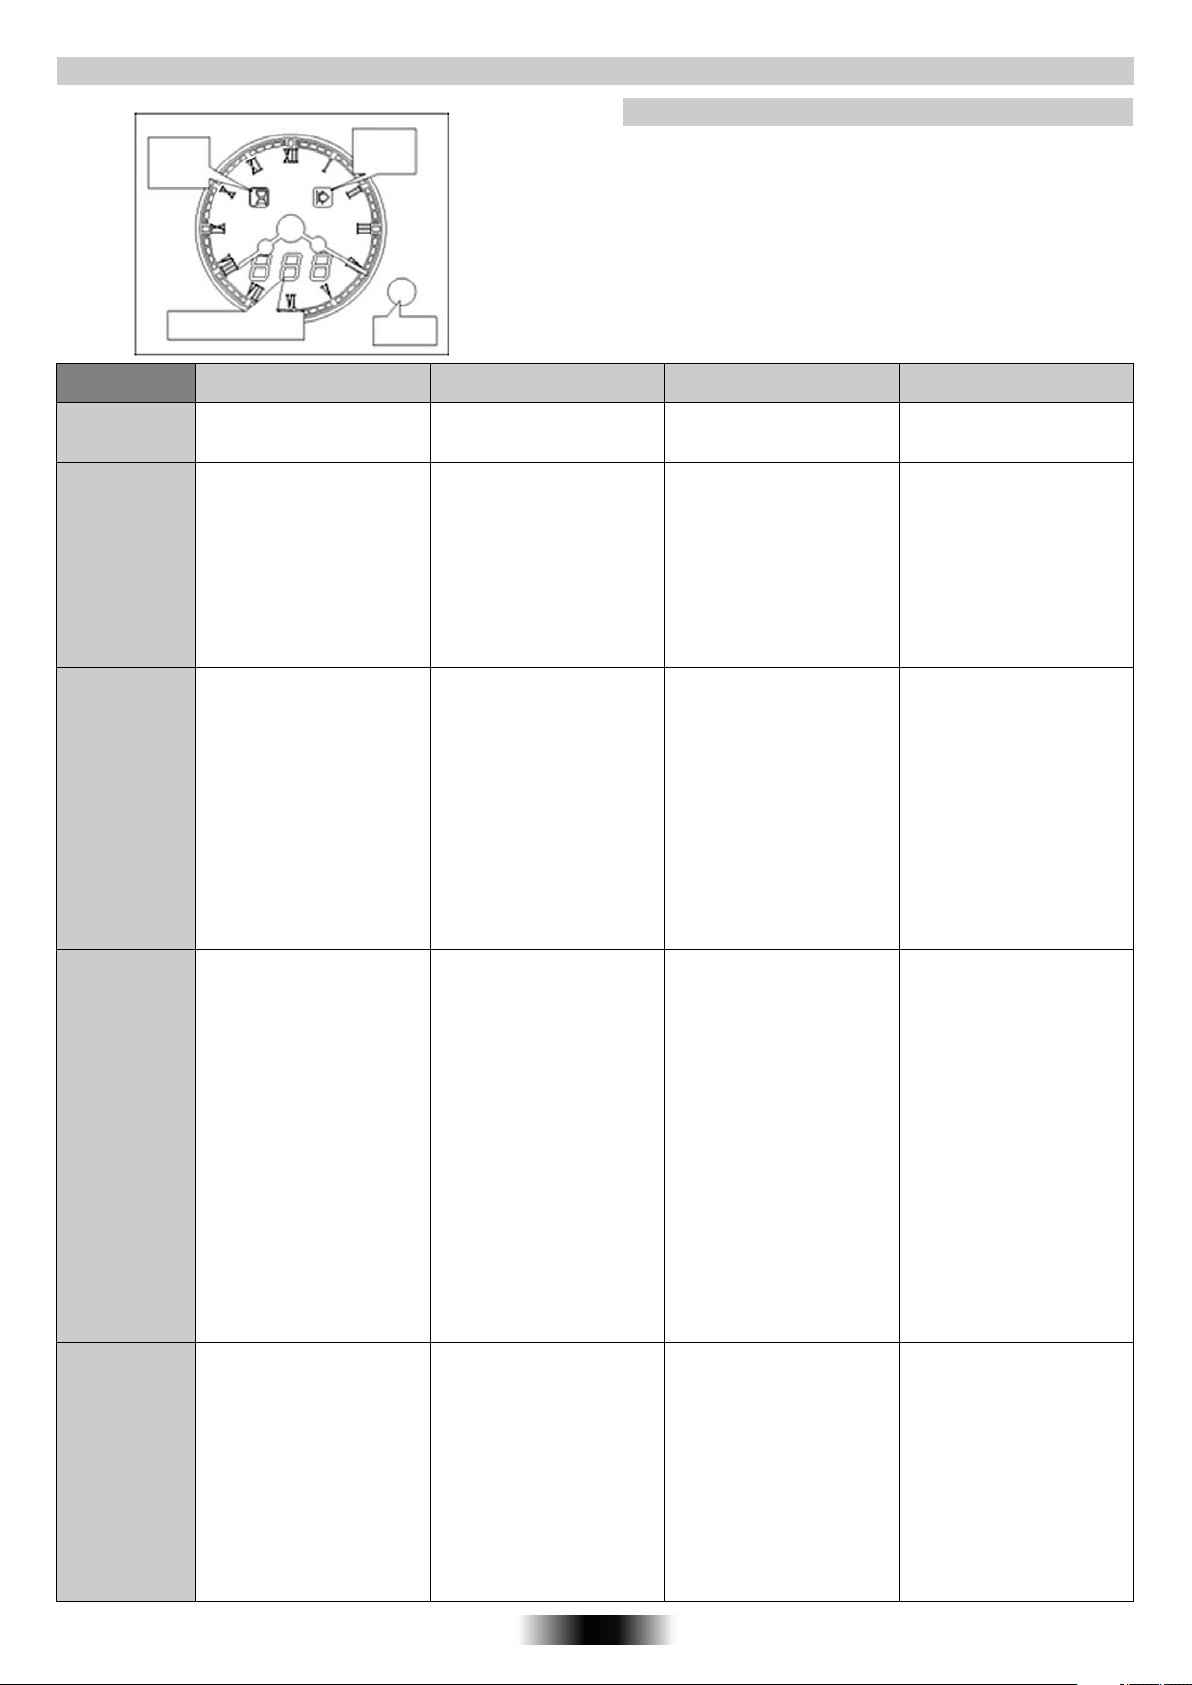
GEBRAUCH DER ANALOGEN UHR/ PROGRAMMIERER
Dauer
Kontrollleuchte
Start
Kontrollleuchte
•Halten Sie den Knopf für ca. 4 Sekunden gedrückt. Die Anzeige
zeigt "SET" an und das Gerät gibt ein akustisches Signal.
• Durch wiederholtes Drücken des Knopfes stellen Sie die Zeit in
Minutenschritten ein. Längeres Drücken erzeugt einen
schnelleren Fortlauf.
Die Einstellung muss innerhalb von 4 Sekunden nach Drücken
des Knopfes erfolgen, da sich die Anzeige sonst zurücksetzt.
EINSTELLUNG DER UHRZEIT
FUNKTION
MANUELL
ZEIT-
ERINNERUNG
max 90 min.
"BEL”
ZEITVOREIN-
STELLUNG
max 24 H
"DUR"
Automatisches
Kochen
Max Pausenzeit
24 H
Anzeige
"PAU"
Befehlsanzeige
Einstelltaste
ZU AKTIVIEREN DURCH
• Kann nur im
Zusammenhang mit einer
Garfunktion genutzt werden.
• Drücken Sie den Knopf "Set"
zwei Mal, so dass "BEL" und
darauf folgend "---" angezeigt
wird.
•Stellen Sie nun die
gewünschte Zeitdauer mit
Hilfe des Knopfes ein.
• Zuerst wählen Sie die
gewünschte Garfunktion und temperatur.
•Drücken Sie einmalig den SetKnopf. Auf der Anzeige
erscheint "DUR" und die
Zahlen blinken.
•Geben Sie die gwünschte
Garzeit ein. Die verbleibende
Zeit wird angezeigt.
•Zuerst wählen Sie die gewünschte
Garfunktion und -temperatur.
•Drücken Sie den Knopf, um die
Gardauer einzustellen. Folgen Sie
der obigen Anleitung
"Zeitvoreinstellung - Dur"
•Drücken Sie den Knopf ein
zweites Mal, so dass auf der
Anzeige "PAU" erscheint. Nach der
Anzeige "---" leuchtet die
Startanzeige.
•Stellen Sie die Pausierzeit ein,
bevor Sie
anstellen soll. Während dieser
Pause heizt der Ofen nicht. Auf der
Anzeige ist kontinuierlich die
verbleibende Pausenlänge
angezeigt.
•Die Start und Stop-Anzeige
leuchtet. Ist die Pausenzeit vorbei,
beginnt der Ofen erneut zu heizen.
Hierbei ist nur die Stop-Anzeige
erleuchtet.
den Ofen sich wieder
Falls eine bereits voreingestellte Zeit aufleuchtet, kann diese
ignoriert werden.
AUSSCHALTEN DURCH WAS PASSIERT ZWECK
• Zurückschalten des
Bedienknopfes auf die StopPosition.
• Während des Zeitablaufs, wird
kontinuierlich die verbleibende
Restzeit in Minuten und
Sekunden angezeigt. Am Ende
der eingestellten Zeitspanne, wird
blinkend "000" angezeigt und ein
akustisches Signal ertönt. Zur
Beendigung drücken Sie den
Set-Knopf. Eine Modifizierung
oder Beendigung der Einstellung
ist jedezeit möglich.
• Wenn die Zeit abgelaufen ist,
wird "END" angezeigt, die
Anzeige blinkt und der Ofen
schaltet sich automatisch aus.
Das akustische Signal ertönt und
kann durch Drücken des SetKnopfes beendet werden. Falls
notwendig starten Sie die
Kochzeit erneut, indem Sie ein
zweites Mal den Knopf bedienen.
Stellen Sie den Kontrollknopf
auf die Stopposition.
zurück
Auch während des Betriebs des
Ofens ist eine Beendigung oder
Modifizierung der Zeiteinstellung
möglich.
• Am Ende der Kochzeit,
schaltet sich der Ofen
automatisch aus. Ein
akustisches Signal ertönt. Um
dieses zu beenden, drücken
Sie den Set-Knopf. Drücken
Sie ein zweites Mal, um den
Ofen wieder zu starten. Stellen
Sie den Bedienknopf auf die
Stop-Position zurück. Auch
während des Ofenbetriebs ist
eine Modifizierung und
Beendigung der
Pauseneinstellung möglich.
• Manuelle Nutzung des
Ofens ohne Programmierung.
• Ein akustisches
Erinnerungssignal ertönt nach
Ablauf der eingestellten Zeit.
• Diese Funktion ermöglicht
eine Voreinstellung der
Gardauer.
• Ermöglicht eine
Zeiteinstellung, so dass der
Ofenbetrieb nach einer Pause
wieder aufgenommen wird,
damit das Gericht zur
gewünschten Zeit fertig ist.
• Zum Garen des
gewünschten Gerichts.
• Ermöglicht es, den Ofen als
Wecker zu nutzen, ohne dass
dieser eingeschaltet sein
muss.
• Am Ende der eingestellten
Garzdauer, stellt sich der
Ofen automatisch aus und ein
akustisches Signal ertönt.
Bsp: Es ist 10 Uhr. Das Gericht
soll für 45 Min im Ofen gegart
werden. Es soll um 12 Uhr
fertig sein.
1. Wählen Sie die
Garfunktion und -temperatur.
2. Legen Sie eine Kochzeit von
45 Min fest.
3. Stellen Sie eine Pausenzeit
von 75 Min ein (10 Uhr/11:15
Uhr). Der Ofen wird von 10:00-
11.15 Uhr pausieren. Um 11.15
Uhr springt der Ofen
automatisch an und heizt bis
12:00 Uhr und stellt sich dann
automatisch aus.
gewünschte
Pyrolyse Modus
- Für Details
Kapitel Pyrolyse
Der Pyrolysemodus ist auf eine
Dauer von 90 Min voreingestellt,
kann aber zwischen 90 und 120
Min eingestellt werden.
- Stellen Sie den Bedienknopf auf
Pyrolyse.
- Richten Sie die Dauer nach
dem Verschmutzungsgrad. Diese
Funktion kann mit der
Startzeitvorwahl kombiniert
werden. Dafür das Gerät lt.
obiger Anweisung programmieren
bevor Sie den
einstellen.
Pyrolysemodus
Ist das
Pyrolysereinigungsprogramm
abgelaufen, erscheint auf der
Anzeige "END". Die Zeitanzeige
blinkt, und der Ofen schaltet sich
automatisch aus. Ein akustisches
Signal ertönt. Um es zu beenden,
drücken Sie den Set-Knopf.
Drücken Sie diesen ein zweites
Mal, um den Pyrolysemodus
erneut zu starten falls notwendig.
Stellen Sie den Bedienknopf
die Stop-Position.
auf
38 DE
• Pyrolitische Selbstreinigung
des Backraums in versch.
Längen je nach
Verschmutzungs-grad.
•Nach Ablauf des
Reinigungsprogramms schaltet
sich der Ofen automatisch aus
und ein akustisches Signal
ertönt.
Page 38
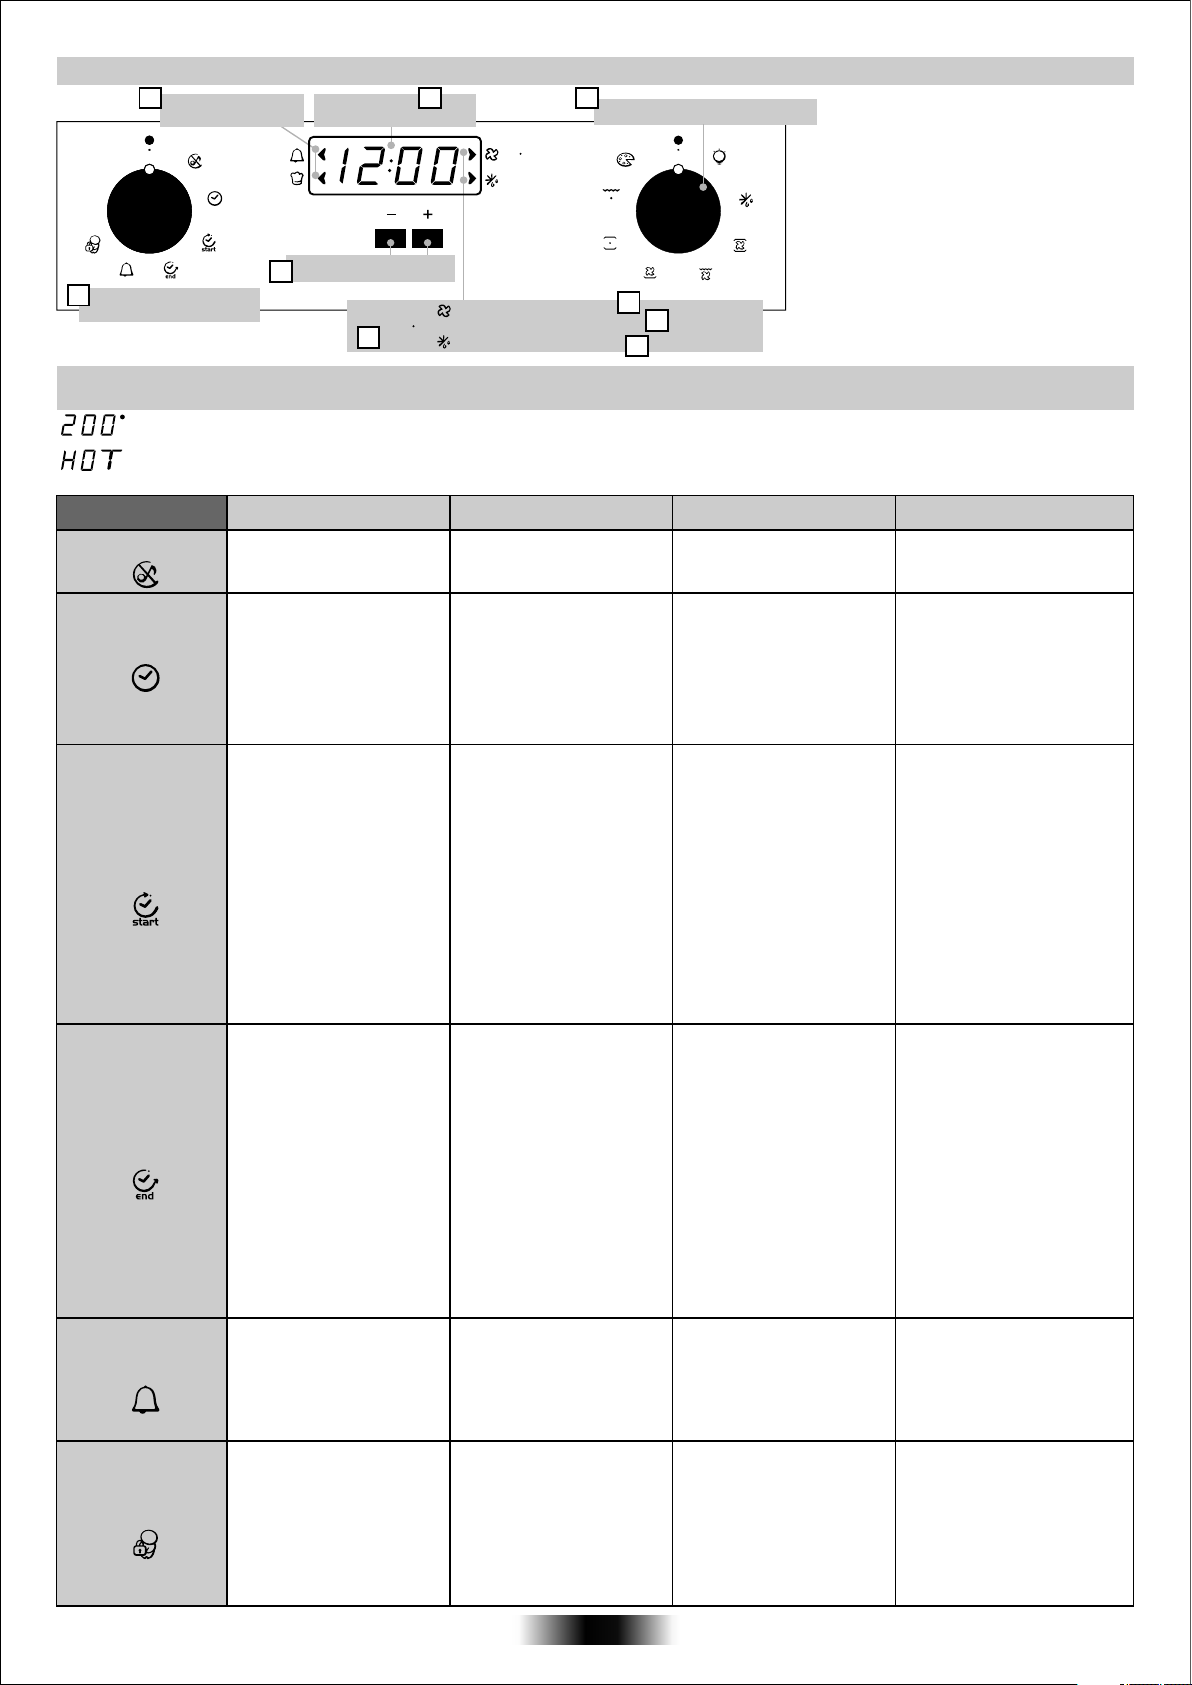
BEDIENUNG DER ELEKTRONISCHEN PROGRAMMIEREINHEIT (Type A)
U
6
COOK
U
/
1
Anzeige Minutenzähler
bzw. Anzeige AUTO
Wahlschalter
9
Funktionen und Backzeit
Anzeige für
Temperatur bzw.Uhrzeit
Einstelltasten
7
Anzeigen: Umluft mit Ventilator
Umluft mit VARIOFAN
2
Abtauen
WICHTIG! Nach der Installation des Gerätes und nach einem eventuellen Stromausfall (erkennbar durch die blinkende
Anzeige 12:00 im Display) muss zuerst die aktuelle Uhrzeit eingestellt werden.
Die LED-Leuchte “ ° “ der Temperaturanzeige blinkt im Display, bis die eingestellte Temperatur erreicht worden ist.
Wenn der Backofen nach dem Ende eines Backprogramms noch heiß ist, erscheint im Display die Aufschrift HOT abwechselnd
zu der Uhrzeit, selbst wenn die beiden Wahlschalter auf OFF eingestellt sind.
FUNKTION
Signal aus
Uhrzeit
ZUM AKTIVIEREN
• Drehen Sie linken den
Wahlschalter der
Funktionen auf „Signal aus“
• Drehen Sie den linken
Wahlschalter für die das
Symbol „Zei tvorwahl“
• Drücken Sie die
Einstelltasten “+“ bzw. “-“
um die Zeit einzustellen
ZUM AUSSCHALTEN AUSWIRKUNG
• Drehen Sie den
Wahlschalter der
Funktionen au OFF
• Drehen Sie den
Wahlschalter der
Funktionen au OFF
COOK
8
Wahlschalter für Betriebsarten
*
3
4
5
• Schaltet den Signalton
des Minutenzählers aus
•
Stellt die im Display
angezeigte Uhrzeit
1. Anzeige Minutenzähler bzw.
Anzeige AUTO (automatischer Betrieb)
2. Anzeigen
3. Umluft mit Ventilator
4. Umluft mit VARIOFAN
5. Abtauen
6. Anzeige für Temperatur bzw. Uhrzeit
7. Einstelltasten
8. Wahlschalter für Betriebsarten
9. Wahlschalter Funktionen und
Backzeit
* je nach modell
DIENT ZU:
• Zum Ausschalten des
Signaltons des
Minutenzählers
• Zum Einstellen der Uhrzeit
HINWEIS:
Die Uhrzeit muss nach der
Erstinstallation und nach
einem St romaus f a l l
(Anzeige 12:00 blinkt)
eingestellt werden
dauer des
backvorgangs
Backzeitende
Minutenzähler
Kindersicherung
• Drehen Sie den rechten
Wahlschal ter auf die
gewünschte Betriebsart
• Drehen Sie den linken
Wahlschalter auf das Symbol
„Backdauer“
• Stellen Sie die Dauer durch
Betätigen der Ta s t en “+“ bzw.
“-“ ein
• Die Anzeige „AUTO“(automatischer Betrieb)leuchtet auf
• Drehen Sie den rechten
Wahlschalter auf die
gewünschte Betriebsart
• Drehen Sie den linken
Wahlschalter
Symbol „Backzeitende“
• Stellen Sie die Zeit durch
Betätigen der Tasten “+“
bzw. “-“ ein
• Die Anzeige „AUTO“
(automatischer Betrieb)
leuchtet auf
• Drehen Sie den linken
Wahlschalter auf das
Symbol Minutenzähler
• Stellen Sie die Zeit durch
Betätigen der Tasten “+“ bzw.
“-“ ein
• Drehen Sie den linken
Wahlschalter auf das
Symbol Kindersicherung
• Drücken Sie die Taste “+“
3 Sekunden lang.
• Die Kindersicherung ist
aktiv, wenn im Display die
Aufschrift „STOP“ erscheint
auf das
• Is t die Backdauer
abgelaufen, schaltet sich der
Backofen automatisch aus
und der Summer ertönt einige
Sekunden
Backofen vorher
auszuschalten, drehen Sie
den linken Schalter auf OFF
oder stellen Sie die Zeit auf
00.00 durch Drehen des
Schalters auf das Symbol
„Backdauer“ und durch
Betätigen der Einstelltaste “-“
• Wenn die Backzeit zu
Ende ist, schaltet sich der
Backofen automatisch aus
und der Summer ertönt
einige Sekunden lang. Um
den Backofen vorher
auszuschalten, drehen Sie
den linken Schalter auf
OF
• Stellen Sie die Zeit auf
00.00 durch Drehen des
Schalters auf das Symbol
„ Minutenzähler“ und durch
Betätigen der Einstelltaste
“-“
• Drehen Sie den linken
Wahlschalter auf das
Symbol Kindersicherung
und drehen Sie die Taste
“+“ 3 Sekunden lang
• Die Anzeige STOP im
Display erlischt
lang. Um den
• Ermöglicht die
Voreinstellung der
Backdauer für das
ausgewählte Rezept.
• Nach erfolgter Einstellung
drehen sie den
Funktionsschalter auf OFF
um zur aktuellen Uhrzeit
zurückzukehren.
• Um die eingestellte
Backzeit anzuzeigen,
drehen Sie den linken
Funktionsschalter auf das
Symbol Backdauer
• Ermöglicht die Einstellung
des Backzeitendes nach
Wunsch
• Nach erfolgter Einstellung
drehen sie den
Funktionsschalter auf OFF
um zur aktuellen Uhrzeit
zurückzukehren.
• Um die eingestell te
Backzeit anzuzeigen,
drehen Sie den linken
Funktionsschalter
Symbol Backzeitende
• Es ertönt ein kurzer
Signalton am Ende der
eingestellten Zeit
• Der Backkofen kann nicht
eingeschaltet werden
auf das
• Zum Backen mit
festgelegter Backdauer
• Diese Funktion dient zur
Programmierung einer
Startzeitvorwahl.Wenn Ihr
Rezept z.B. 45 Min
gebacken werden soll und
um 12:30 Uhr fertig sein
soll, stellen Sie einfach die
Backdauer auf 45 Min und
das Backzeitende auf
12:30 Uhr. Der Backofen
wird um 11:45 Uhr
automatisch starten und
sich nach 45 Minuten
automatisch ausschalten
• Ermöglicht die Nutzung
des Timers als
Minutenzähler selbst wenn
der Backofen
ausgeschaltet ist
• Nützlich vor allem wenn
Kinder im Haus sind
39 DE
Page 39
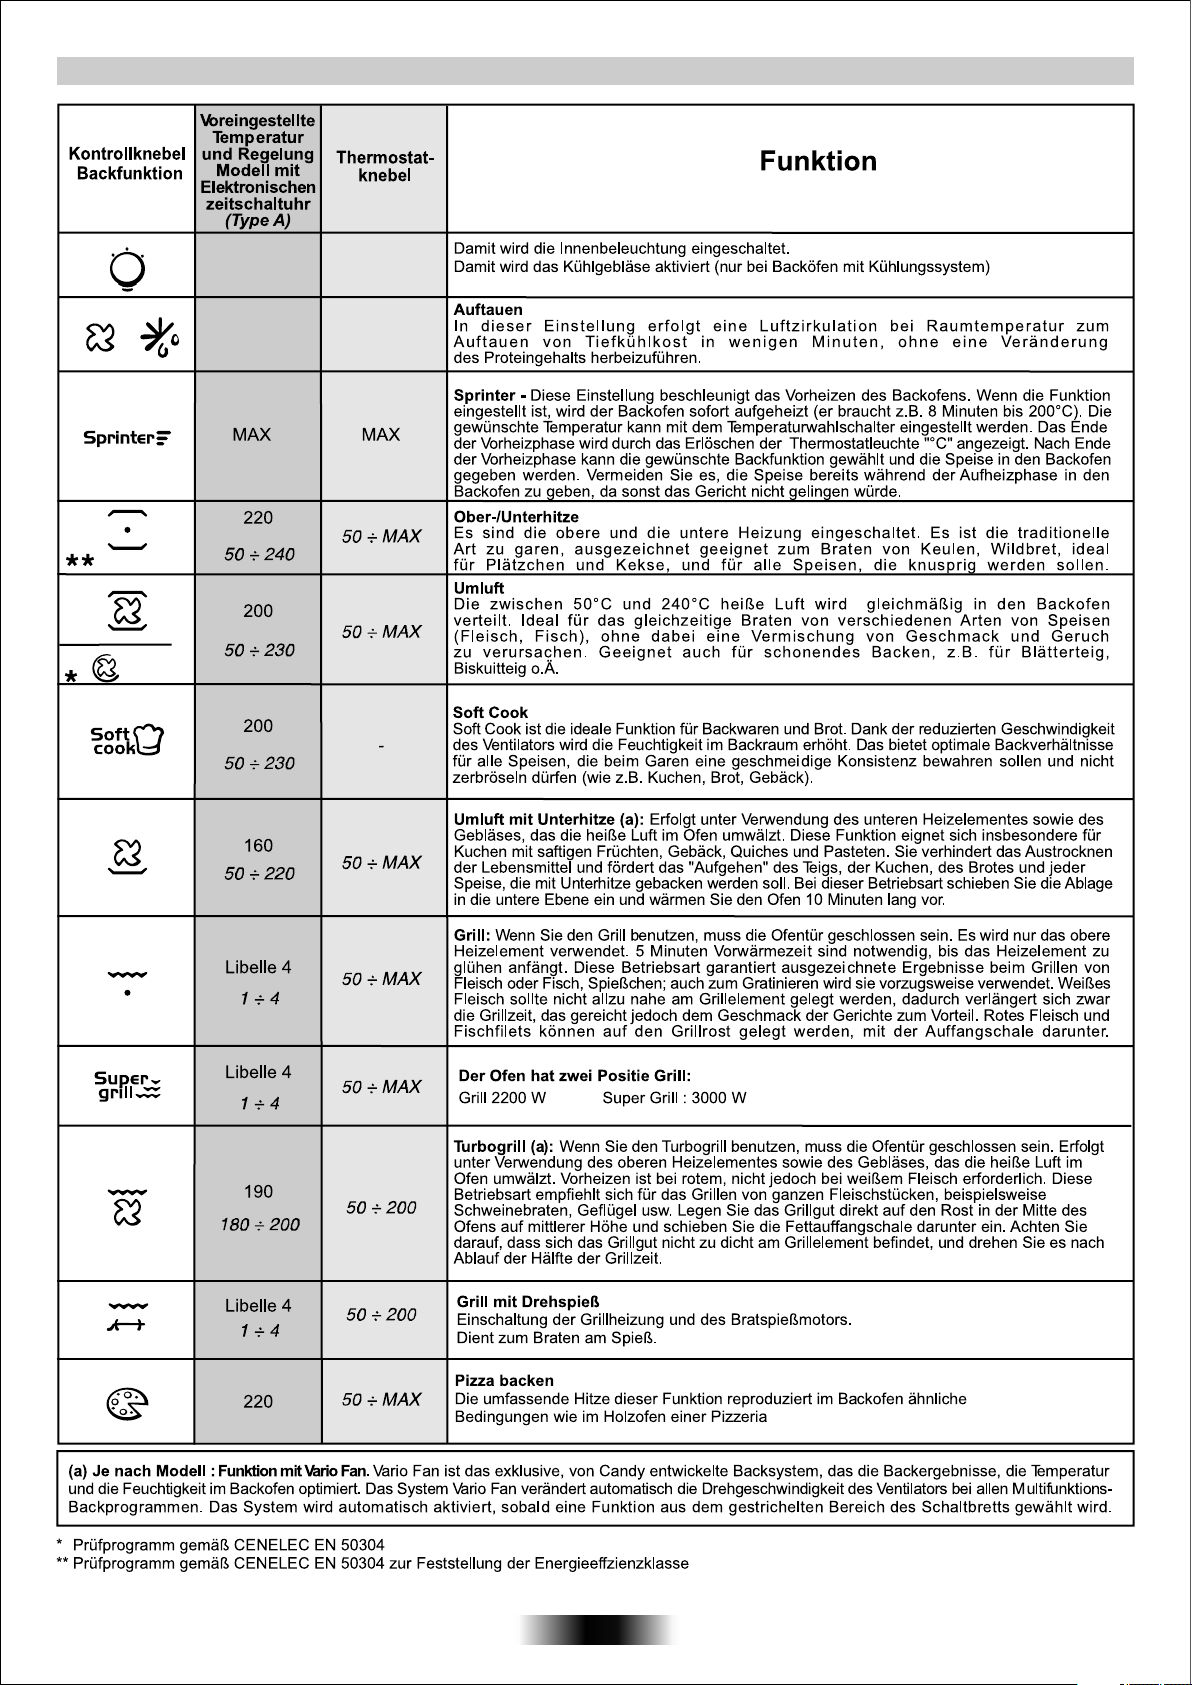
BEDIENUNGSANLEITUNG
40 DE
Page 40
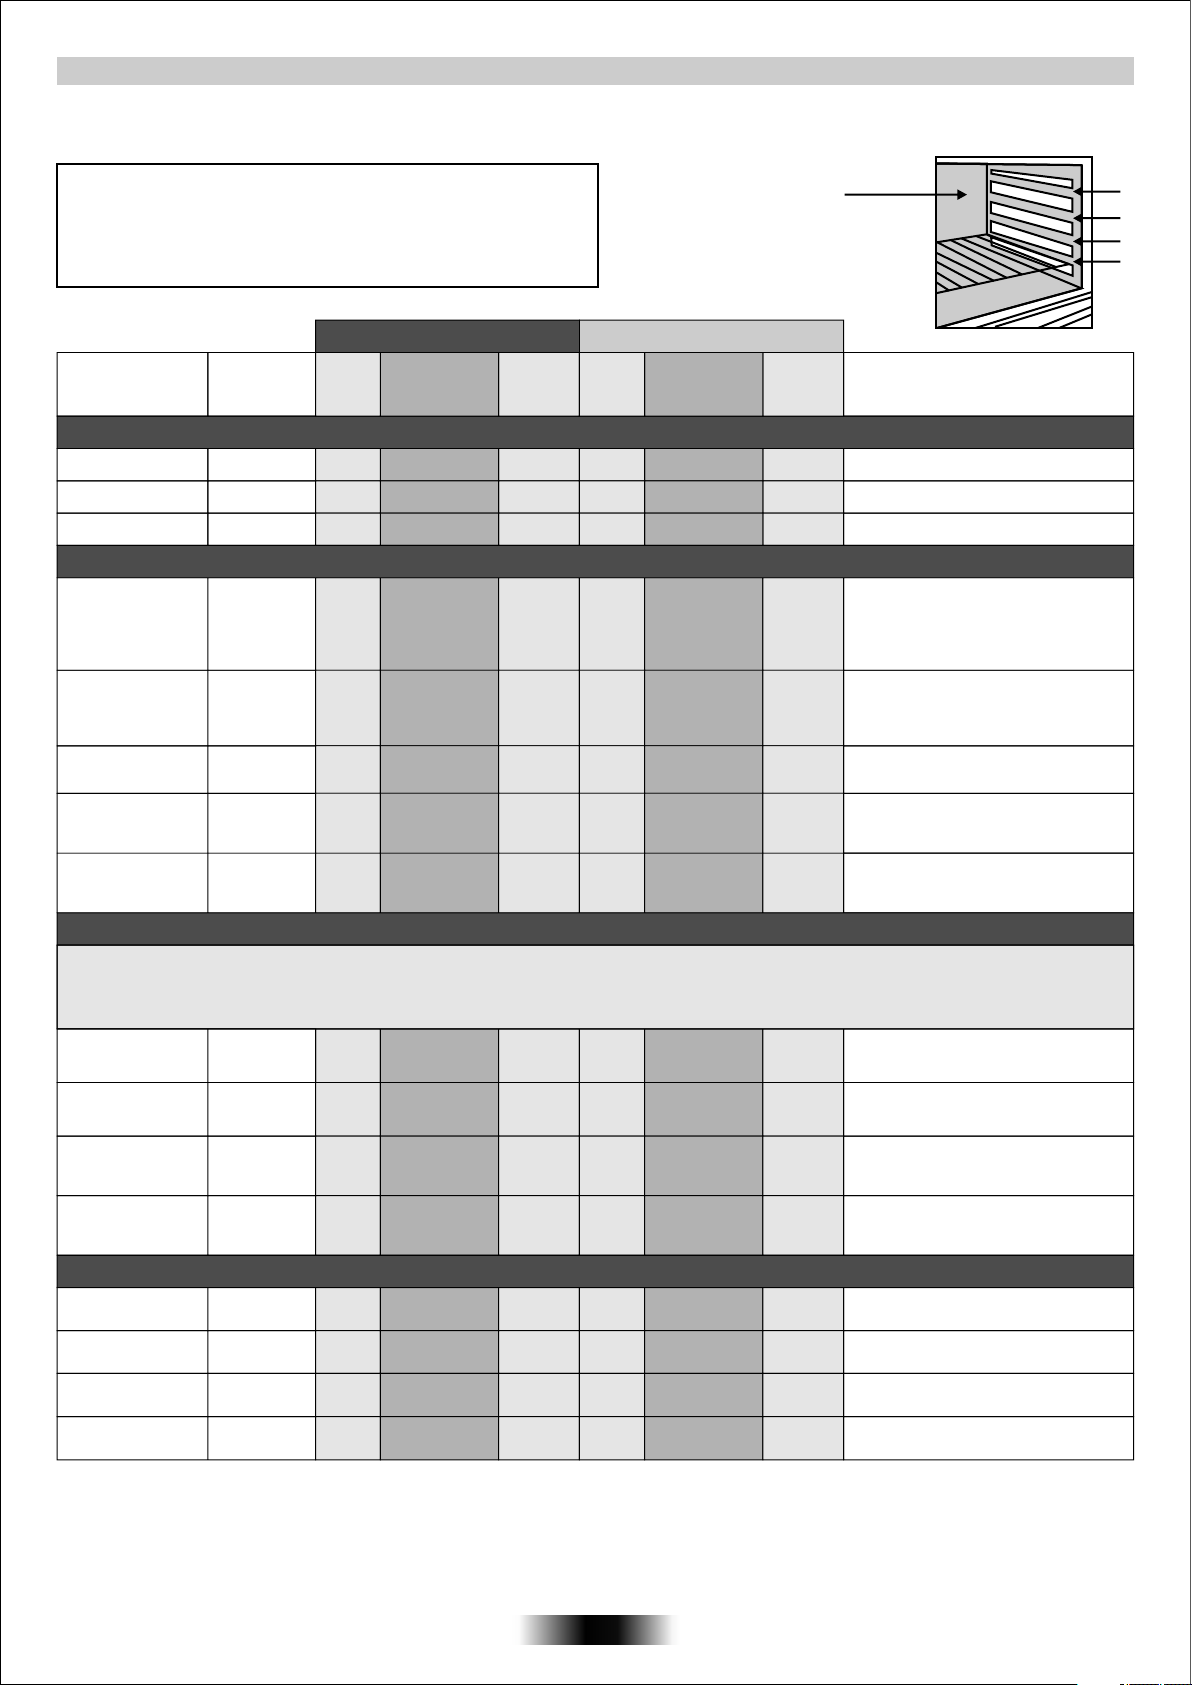
GARZEITEN
Die in dieser Tabelle angegebenen Garzeiten dienen als Richtwerte. Diese können je nach Qualität, Frische und Größe der zuzubereitenden
Speisen sowie nach Ihrem persönlichen Geschmack variieren.
EIN RATSCHLAG:
Schalten Sie den Backofen etwa 10 Minuten vor der angegebenen
Zeit aus und lassen Sie die Speisen bei ausgeschaltetem Ofen weiter
garen. So sparen Sie nicht nur Strom, sondern Sie können den
Garpunkt nach Ihrem Geschmack bestimmen
Konventioneller Backofen Multifunktionsbackofen
Speise
Menge
Gltter-
rost
Garzeit
Min.
Tempera-
tur °C
• Nudeln
Lasagne
Cannelloni
Nudelauflauf
Kg 3,5
Kg 1,8
Kg 2,5
22
22
22
70 ÷ 75
50 ÷ 60
55 ÷ 60
220
220
220
• Teigwaren
Brot
Pizza
Kg 1
Kg 1
22
35 - 10
vorheizen
25 ÷ 35
200
190
Gltter-
rost
11
Stellung der Schienen
Garzeit
Min.
60 ÷ 65
40 ÷ 50
45 ÷ 50
30 - 35
10 vorheizen
20 ÷ 25
Tempera-
tur °C
200
200
200
180
190
4
3
2
1
Anmerkungen
Kein Vorheizen
Kein Vorheizen
Kein Vorheizen
Schneiden Sie ein Kreuz in den zum
Laib geformten Teig. Mindestens 2
Stunden gehen lassen. Teig in die Mitte
des gut gefetteten Backblechs legen
Backofen 15 Min. Vorheizen
Blätterteig
Rührteig
(Marmorkuchen)
Mürbeteig
(Obstkuchen)
24 Stk
30 ÷ 35
1
1
55
40
220
180
200
21
1
2
25 ÷ 30
50
30-35
200
160
180
Form mit 22 cm Ø: 10 Minuten
vorheizen
Form mit 22 cm Ø: 10 Minuten
vorheizen
• Fleisch
Fleisch können Sie sowohl in hohen Brätern als auch in niedrigen Bratpfannen braten.
Niedrige Bräter sollten abgedeckt werden, damit keine Soßen- und Fettspritzer den Backofeninnenraum übermäßig verschmutzen.
So bleibt das Fleisch außerdem saftig und zart. Ohne Deckel ist das Fleisch dagegen kroß und knusprig. Die angegebene Zeiten gelten
fürs Braten mit oder
Roastbeef
Schweinebraten
Kalbsrollbraten
Rinderbraten
• Fish
• Fisch
Forelle
Lachsfilet
Schollenfilet
ohne Deckel.
Kg 1
Kg 1
Kg 1,3
Kg 1
Kg 1
700 gr.
2,5 cm dick
Kg 1
70 ÷ 80
100 ÷ 110
90 ÷ 110
80 ÷ 90
40 ÷ 45
30 ÷ 35
40 ÷ 45
220
220
220
220
220
220
220
33
22
21
22
22
22
22
50 ÷ 60
80 ÷ 90
90 ÷ 100
80 ÷ 90
35 ÷ 40
30 ÷ 25
35 ÷ 40
200
Fleisch in einem hohen Bräter braten.
Einmal wenden.
Bratform abdecken.
200
s. Oben
200
s. Oben
200
200
200
200
Abgedeckt backen.
Nicht abdecken.
Goldbrasse
2 Stk.
40 ÷ 45 220
41 DE
22
35 ÷ 40
200
Abgedeckt backen.
Page 41
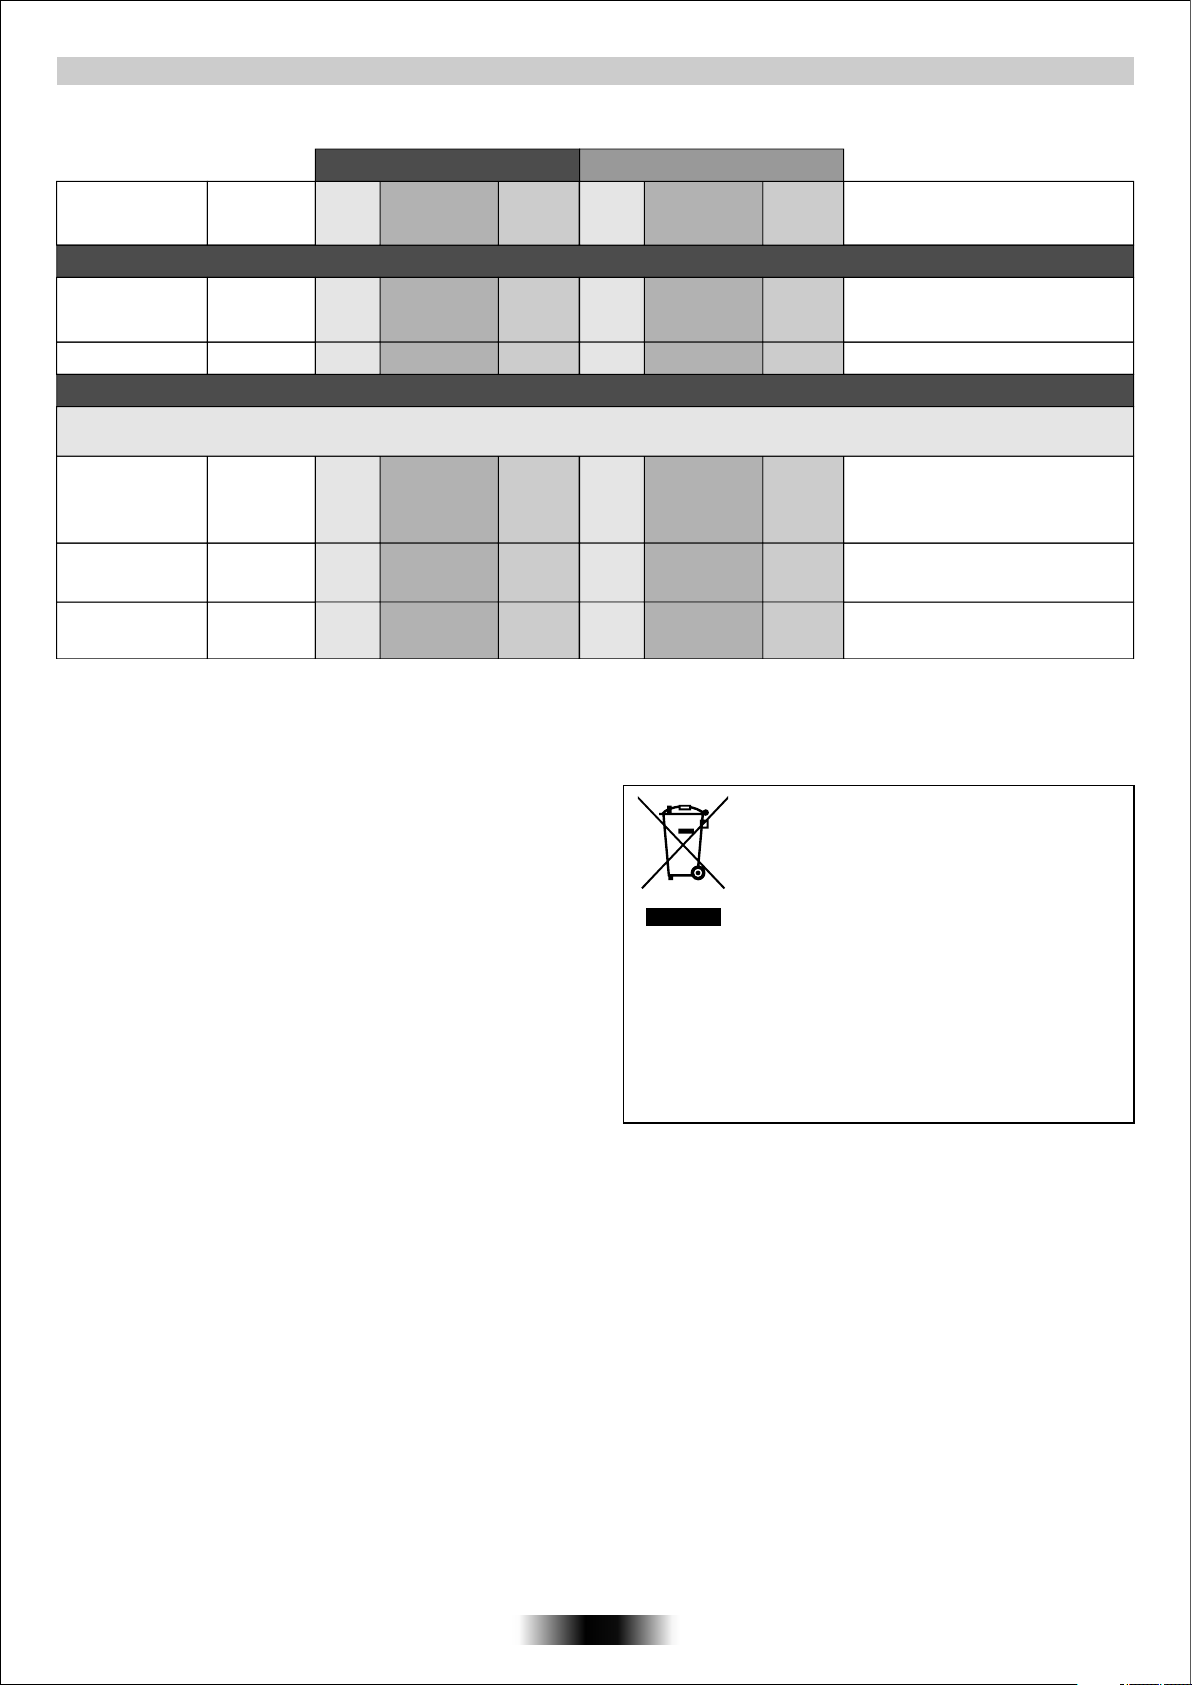
GARZEITTABELLE
Konventioneller Backofen Multifunktionsbackofen
Speise
Menge
Gltter-
rost
Garzeit
Min.
Tempera-
tur °C
Gltter-
rost
Garzeit
Min.
Tempera-
tur °C
Anmerkungen
• Geflügel
Ente/Gans
Huhn
1,3 Kg.
1,5 Kg.
22
22
60 ÷ 80
110 ÷ 120
220
220
60 ÷ 70
100 ÷ 110
200
200
• Grillen
Legen Sie das Grillgut unter den Infrarotgrill. Achtung: die Grillheizung wird glühend rot. Zum Auffangen von Fett und Bratensaft schieben Sie die
Fettpfanne unter das Grillgut.
Toastbrot
Bratwurst
Kotelett
4 Sch
5 St.
4 St.
44
44
44
5
5 vorheizen
25 - 30
5 vorheizen
25
5 vorheizen
Grill Grill
Grill Grill
Grill Grill
5
10 vorheizen
15 - 20
10 vorheizen
15 - 20
10 vorheizen
Toastbrot auf den Rost legen. Von beiden
Seiten grillen. Vor dem Servieren auf dem
Backofenboden warmhalten
Beim Grillen ab und zu wenden.
Dieses Elektrohaushaltsgerät ist entsprechend der EURichtlinie 2002/96/CE über Elektro- und ElektronikAltgeräte (WEEE) gekennzeichnet. Bitte sorgen Sie
dafür, dass das Gerät ordnungsgemäß entsorgt wird,
damit mögliche negative Auswirkungen auf Umwelt und
Gesundheit vermieden werden, die bei einer
unsachgemäßen Entsorgung des Altgerätes entstehen
Das Symbol auf dem Produkt bedeutet, dass dieses Gerät
normalen Hausmüll gehört, sondern den jeweiligen kommunalen
Rücknahmesystemen für Elektro-und Elektronik-Altgeräte übergeben
werden muss. Die Entsorgung muss im Einklang mit den geltenden
Umweltrichtlinien für die Abfallentsorgung erfolgen. Für nähere
Informationen über Entsorgung und Recycling dieses Produktes
wenden Sie sich bitte an Ihre kommunalen Einrichtungen (Umwelt
amt) oderandie
Ihren Händler.
könnten.
nicht in den
Abfallentsorgungsgesellschaft Ihrer Stadt bzw. an
42 DE
Page 42

INSTRUCTIONS GENERALES
— Lire attentivement les instructions contenues dans cette brochure, elles fournissent d’importantes indications sur la sécurité d’installation,
l’emploi du four et son entretien.
— Conserver soigneusement cette notice d’utilisation pour toutes consultations ultérieures.
— Après avoir déballé votre four, vérifier que l’appareil est complet.
— Les emballages comme le plastique, le polystyrène,
ATTENTION
Lors de la première utilisation du four, il peut se produire un dégagement de fumée âcre provoqué par le premier échauffement du collant des
panneaux d’isolation enveloppant le four. Ce phénomène est normal. Attendez que la fumée
Lorsque le four est en fonctionnement, la porte en verre est particulièrement chaude. ll est donc nécessaire que les enfants ne la touchent pas. Le
risque est important surtout quand le gril est utilisé.
peuvent constituer un danger pour les enfants. Ne pas les laisser à leur portée.
cesse avant de cuire des aliments.
ATTENTION: La tension et la fréquence d’alimentation sont indiquées sur la
à un professionnel pour l’installation de votre four.
DECLARATION DE CONFORMITÉ:
• Les parties de cet appareil pouvant être en contact avec des
substances alimentaires sont conformes à la prescription de la dir.
CEE 89/109
Cet appareil est conforme aux Directives Européennes
73/23/EEC et 89/336/CEE, remplacées par 2006/95/EC
2004/108/EC, et les modifications successives.
et
Dans le cas de meubles en bois plaqué, les colles doivent résister à
une température de 120°C sinon il y a un risque de décollement ou de
déformations. Conformément aux normes de sécurité, une fois
encastré, aucun contact ne doit être possible avec les parties
électriques.
Toutes les parties qui assurent la protection doivent être fixées de
façon à ne pas pouvoir être enlevées sans outil. Pour garantir une
bonne aération, retirer la paroi arrière du meuble.
CONSIGNES DE SECURITE
Cet appareil est conçu pour cuire des aliments. Tout autre utilisation
(exemple chauffage d’appoint) doit être considéré comme impropre.
Le constructeur ne peut être tenu comme responsable en cas de
dommages liés à une mauvaise utilisation ou a des modifications
techniques du produit.
L’emploi d’un appareil électrique nécessite quelques règles de
sécurité.
- Ne pas tirer sur le fil électrique pour débrancher la prise.
-Ne pas toucher l’appareil avec les pieds ou les mains mouillés.
-Evitez d’utiliser l’appareil pieds nus.
-Veillez à ne pas laisser les enfants en bas âge manipuler le four.
L’utilisation de multiprises et de rallonges pour raccorder votre appareil
est fortement
fonctionnement il faut éteindre le four avant de le démonter. En cas de
détérioration du fil électrique, remplacez-le rapidement en suivant les
indications suivantes: ôtez le fil d’alimentation électrique et remplacezle par un (du type H05RR-F, H05VV-F, H05V2V2F) adapté à la
puissance
effectuée par un centre technique agréé. Pour l’utilisateur c’est la
certitude d’obtenir des pièces de rechange d’origine. Le non-respect
de ces règles peut compromettre la sécurité de l’appareil.
•Cet appareil n’est pas destiné à être utilisé par des personnes
(notamment les
connaissance sur l’utilisation du produit, à moins qu’elles ne soient
surveillées, ou instruites sur l’utilisation de l’appareil, par une personne
responsable de leur sécurité.
•Surveillez les enfants pour être sûr qu’ils ne jouent ğas avec l’appareil
•Ne pas tapisser les parois du four avec des feuilles
ou des protections jetables du commerce. La feuille d'aluminium
ou toute autre protection, en contact direct avec l'email chauffe,
risque de fondre et de deteriorer l'email du moufle..
déconseillé. En cas de panne ou de mauvais
de l’appareil. Vous veillerez à ce que cette opération soit
enfants) incapables, irresponsable ou sans
en aluminium
INSTALLATION
La mise en service de l’appareil est à la charge de l’acheteur, le
constructeur est dégagé de ce service. Les pannes liées à une
mauvaise installation ne seront pas couvertes par la garantie. Une
mauvaise installation peut provoquer des dommages aux personnes,
aux animaux domestiques; dans ce cas la responsabilité du
contructeur ne peut être engagée.
MISE EN PLACE DU FOUR DANS SON MEUBLE
Une fois le four inséré dans son meuble, I’ancrage se fait par 4 vis
visibles en ouvrant la porte du four.
Pour permettre une meilleure aération du meuble, les fours doivent
être encastrés conformément aux mesures et distances indiquées sur
l’illustration de la dernière page.
N.B.: Pour
indispensable de respecter les instructions contenues dans la
brochure jointe à l’appareil à associer.
les fours à associer avec des plaques de cuisson, il est
IMPORTANT
Le meuble qui va supporter le four doit avoir des caractéristiques
appropriés. Les panneaux du meuble doivent pouvoir résister à la
chaleur.
Brancher la fiche dans une prise de courant équipée d’un troisième
contact correspondant à la prise de terre. Montez sur le fil une prise
normaliséé capable de supporter la charge indiquée sur la plaquette.
Le fil conducteur de masse à la terre est identifié par les couleurs
jaune et verte. Veiller
supporter toute la puissance absorbée par le four. Si votre installation
électrique n’est pas conforme faites la modifier par un électricien afin
de prévenir tous risques. On peut également effectuer le
branchement au réscau en interposant entre l’appareil et le réseau un
interrupteur omnipolaire dimensionnée en fonction de la charge et
conforme aux normes en vigueur. Le fil de terre jaune et vert ne doit
pas être interrompu par l’interrupteur. La prise et l’interrupteur
omnipolaire utilisés doivent être facilement accessibles une fois
l’appareil électroménager installé.
Une fois installé le fil d’alimentation doit être positionné de manière a
ce que sa température ne dépasse pas de 50°C la température
ambiante.
L’appareil est conforme aux exigences de sécurité prévues par les
organismes qui établissent les normes. La sécurité électrique de cet
appareil n’est assurée que si il est
respectant les normes de sécurité électrique en vigueur.
Le constructeur ne peut être tenu comme responsable des
dommages résultant du manque de mise à la terre de l’installation.
Avant la première utilisation des différents accessoires, nous
recommandons un nettoyage avec une éponge additionnée de
produit lessiviel, suivi d'un rinçage et d'un séchage.
La grille simple sert de support aux
moules et aux plats.
La grille porte-plat sert plus
particulièrement à recevoir les grillades.
Elle est à associer au plat récolte sauce.
Grâce à leur profil spécial, les grilles
restent à l'horizontale jusqu'en butée.
Aucun risque de glissement ou de
débordement du plat.
Le
recevoir le jus des grillades. Il n'est à
utiliser qu'en mode grilloir, Tournebroche
ou Turbogril (selon modèle de four).
Attention : en cuisson autre que les modes Grilloir,Tournebroche, et
Turbo-gril, le plat récolte-sauce doit être retiré du four.
Ne jamais utiliser le plat récolte-sauce comme plat à rôtir, il en
résulterait des dégagements de fumée, des projections de graisse et
un encrassement rapide du four.
43 FR
plaque signalétique (illustration dernière page). Faites appel
ALIMENTATION ELECTRIQUE
à ce que votre installation soit capable de
IMPORTANT
correctement installé tout en
EQUIPEMENT DU FOUR
EQUIPEMENT DIFFERENT SELON LE TYPE DE FOUR
plat récolte-sauce est destiné à
Page 43
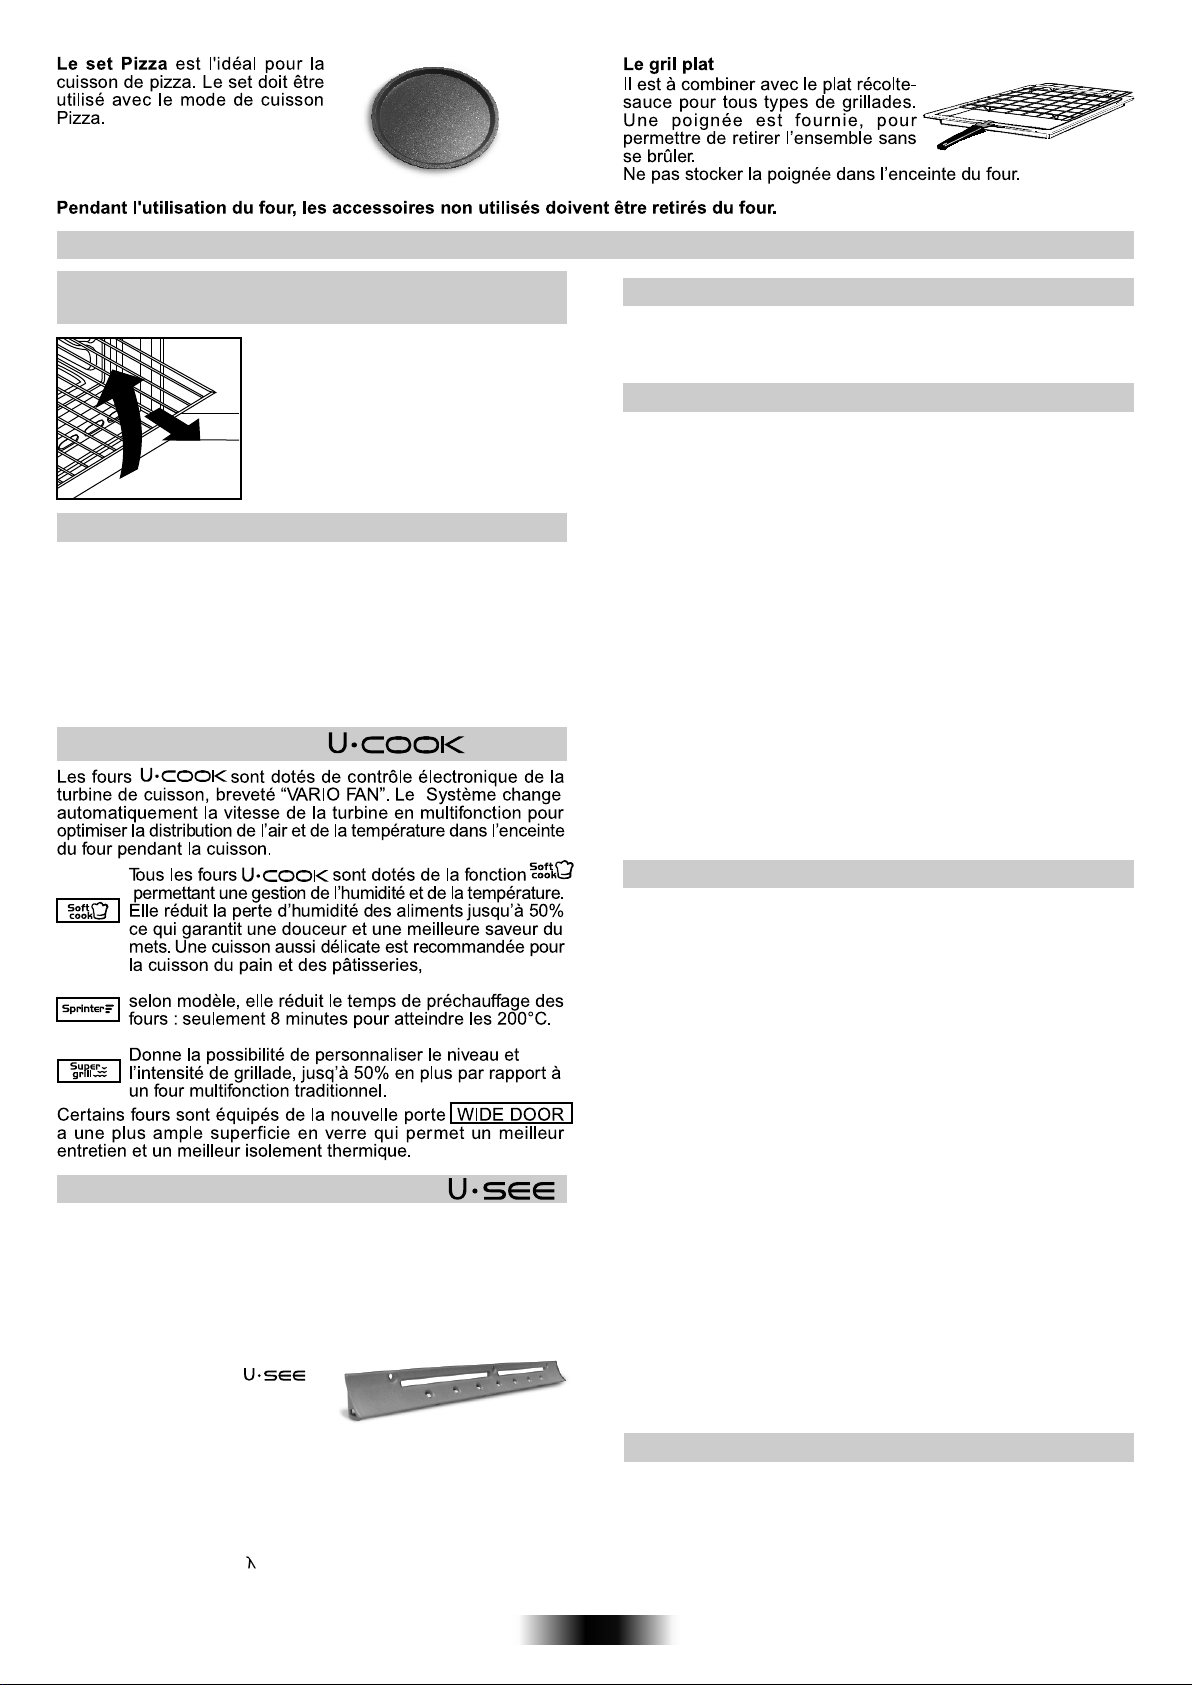
CONSIGNES UTILES
GRILLES DU FOUR, NOUVEAU SYSTÈME
D’ARRÊT
Tous les fours bénéficient d’un nouveau
système d’arrêt des grilles. Ce système
permet de sortir complètement la grille en
totale sécurité. Parfaitement bloquée elle
ne peut pas basculer vers l’avant malgré la
présence d’un poids important. Plus
stables,ces grilles assurent une plus
grande sécurité et tranquillité.
LA CUISSON AU GRIL
Le préchauffage est superflu. La cuisson peut se faire porte close et
les aliments doivent être placés par rapport au gril en fonction des
résultats que l’on souhaite obtenir.
— Plus près pour les aliments dorés en surface et saignants.
— Plus loin pour les aliments bien cuits à l’intérieur.
Le lèchefrite
Ne jamais utiliser le lèchefrite comme plat à rotir, il en résulterait
dégagements de fumée, des projections de graisse et un
encrassement rapide du four.
permet la récupération du jus.
Selon modèle Le PACK
TEMPS DE CUISSON
Dans les pages 48, 49 un tableau récapitulatif indique les temps
de cuisson et les températures selon les préparations.
FOUR AUTONETTOYANT PAR CATALYSE
Les panneaux autonettoyants à émail microporeux disponibles en
option évite le
Pendant la cuisson les projections de graisse sont “l’absorbées”
par les parois catalytiques. La graisse est ensuite détruite par
oxydation en devenant de la poussière. En cas de cuisson
particulièrement grasse, il peut arrivér que la graisse bouche les
pores de l’émail. Pour détruire un surplus de
fonctionnement votre four à vide sur la position maximale de
température pendant environ 10 à 20 minutes.
Ne jamais utiliser de grattoir, de produit chimique pour nettoyer la
catalyse. Utilisez plutôt de l’eau chaude et une éponge.
Si jamais vous cuisinez un plat très gras ou une viande
utiliser un plat avec de grands rebords pour limiter les projections
de graisse.
La porosité de la catalyse est primordiale pour vous assurer un
nettoyage optimal.
N.B.: Les panneaux autonettoyants ont une durée de
fonctionnement d’environ 300 heures. En cas de baisse
d’efficacité il est alors possible de les
nettoyage manuel du four.
graisse mettez en
au gril,
changer.
Selon modèle
système d'éclairage qui remplace la traditionnelle "lampe à
incandescence".
Dans la contreporte du four sont insérés 14 Leds, de haute qualité à
lumière blanche, qui illuminent la cavité avec une lumière diffuse
permettant une vision de la cuisson sans ombre, sur plusieurs
niveaux.
Le design créé pour le support des
14 Leds
Avantages du système
Visibilité optimale des plats
- Fiabilité de fonctionnement
- Durée de vie prolongée
- Consommation énergétique extrêmement basse " - 95 % " par
rapport au système traditionnel d'éclairage du four - Rendement élevé
et Facilité d'entretien.
« Les appareils dotés de LED blanches de
IEC 60825-1:1993 +A1: 1997 + A2: 2001 (équivalente à la norme EN
60825-1: 1994 +A1: 2002 +A2:2001); la puissance maximale
lumineuse émise est de 459nm < 150uW. Donnée non observée
directement avec des instruments optiques. »
offre un élégant effet high-tech.
classe 1M selon la norme
CONSEILS DE NETTOYAGE ET D’ENTRETIEN
Pour nettoyer les surfaces en inox et en émail, utilisez de l’eau
tiède légèrement savonneuse. Vous pouvez utiliser un produit
adapté au nettoyage de ce type de surface. Eviter absolument les
produits
En cas de salissures tenaces, évitez d’utiliser des ustensiles
susceptibles de rayer irrémédiablement la surface de votre four. Il
est conseillé de nettoyer régulièrement l’intérieur de votre four
après chaque cuisson.
Si vous ne respectez pas le nettoyage de votre four après chaque
cuisson vous aurez une odeur désagréable, et les projections de
graisse seront encore plus difficiles à enlever. Pour l’intérieur du
four utiliser de l’eau chaude avec une éponge grattoir. Il existe
dans le commerce des produits adaptés au nettoyage du four. Le
nettoyage du four est fastidieux. Il existe en option
autonettoyants spéciaux avec un émail microporeux qui peuvent
s’adapter sur les fours (voir paragraphe four autonettoyant par
catalyse).
Pour nettoyer les grilles inox, utilisez une éponge avec grattoir.
Attendre que la surface soit froide avant de la nettoyer. L’utilisation
d’eau froide au contact de la vitre chaude peut briser
cela devait arriver la garantie ne couvrirait pas ce dommage. Pour
changer l’ampoule d’éclairage du four veillez à débrancher
électriquement le four. Les ampoules de four sont spécifiques,
elles sont conçues pour résister à une température élevée.
abrasifs qui pourraient endommager la surface du four.
des panneaux
la vitre. Si
ASSISTANCE TECHNIQUE
En cas de de mauvais fonctionnement, vérifier si la prise est
branchée. Après ces vérifications, adressez vous à votre
revendeur ou prévenez directement notre service technique qui
interviendra dans les plus brefs délais. Veiller à ce que le coupon
de garantie fourni avec le produit soit correctement rempli, avec la
date d’achat du four.
44 FR
Page 44
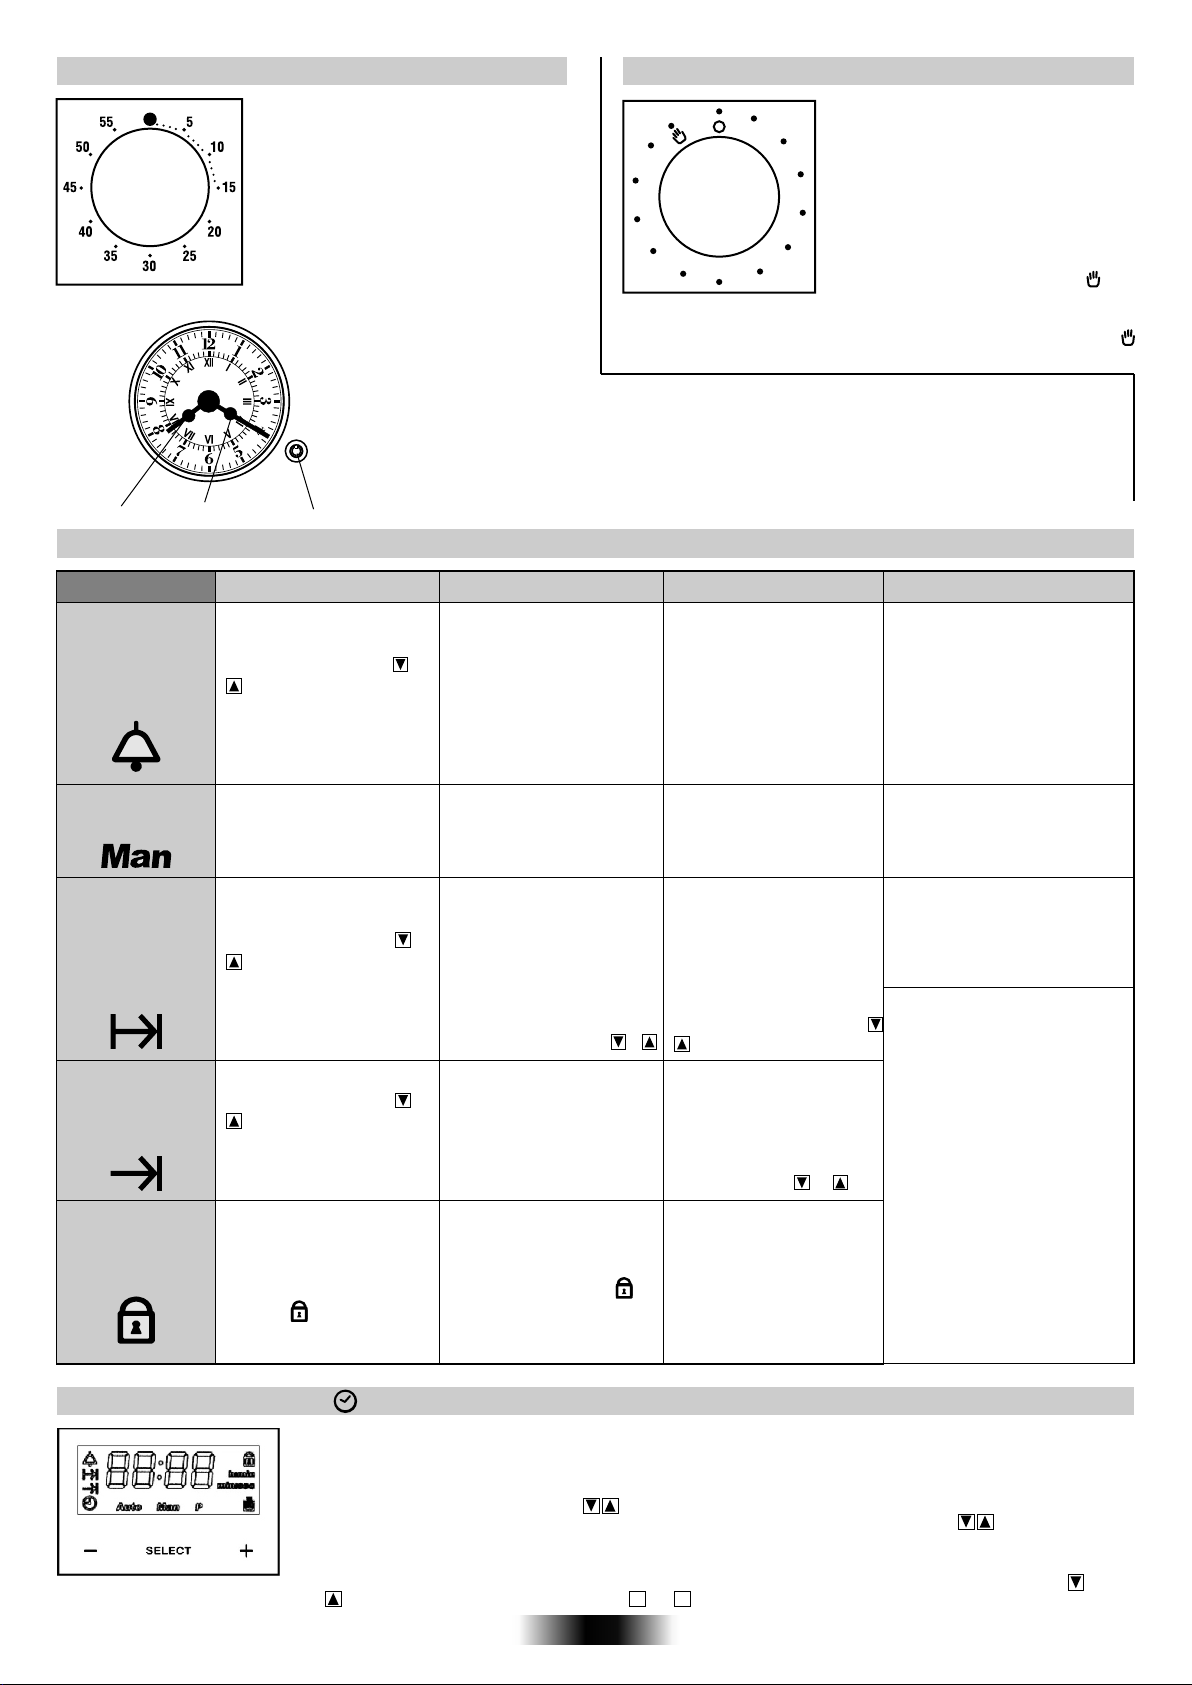
UTILISATION DU MINUTEUR SONORE
UTILISATION DU MINUTEUR COUPE-CIRCUIT
Pour sélectionner le temps de cuisson
tournez le bouton sur le temps désiré. Dès
que le temps de cuisson est écoulé une
sonneriere retentit. Il ne vous reste plus
qu'à couper manuellement le four.
UTILISATION DU PROGRAMMATEUR A AIGUILLE
Lorsque vous poussez la manette. L'aiguille de l'horloge se déplace d'une minute.
Lorsque vous maintenez la manette appuyée, elle se déplace rapidement dans le
sens des aiguilles d'une montre.
Aiguille des heures
Aiguille des minutes
Bouton de réglage
UTILISATION DU PROGRAMMATEUR ÉLECTRONIQUE
FONCTION
MINUTEUR
FONCTIONNEMENT
MANUEL
TEMPS
DE CUISSON
HEURE DE FIN
DE CUISSON
SECURITE
ENFANT
COMMENT L’UTILISER
•Appuyer 1 foi sur la touche
centrale.
•Appuyer sur les touches ou
pour régler la dureé
•Relâcher les touches.
•Appuyer 1 foi sur la touche
centrale.
•Sélectionner la fonctionde
cuisson avec le bouton de
sélection
•
Appuyer 2 fois sur la touche
centrale.
•Appuyer sur les touches ou
pour régler la durée
•Relâcher les touches
•Choisir la fonction de cuisson
avec le bouton de sélection
3 fois
•
•Appuyer sur les touches ou
pour régler la durée
•Relâcher les touches
•Choisir la fonction de cuisson
avec le bouton de sélection
•Vous activez la sécurité
enfants en pressant la
touche « °C/set » pendant
au moins 5 secondes,
jusqu’à l’apparition du
symbole à l’écran. A
partir de cet instant, toutes
les fonctions sont bloquées.
COMMENT L’ARRETER
•A la fin de la durée
sélectionnée, le minuteur se
coupe et un signal sonore
retentit (il s'arrête automatique-
Après 7 minutes
ment,
mais pour le stopper de
suite, appuyer sur la touche
SELECT
•Ramener le bouton de
sélection en position O.
•A la fin du temps de cuisson,
lefoursera automatiquementmis
horsfonction. Si vous souhaitez
arreter la cuisson avant, vous
pouvez soit positionner le
bouton de selection sur o, soit
régler le temps de cuisson à
0:00. (touches SELECT+ et )
•A l'heure sélectionnée le four
s'éteint tout seul; pour l'arrêter
en avant il est nécessaire de
porter le bouton de sélection en
position O.
•Vous désactivez la sécurité
enfants en pressant la touche
« °C/set » pendant au moins 5
secondes, jusqu’à la
disparition du symbole à
l’écran. A partir de cet instant,
toutes les fonctions sont à
nouveau utilisables.
10
20
110
120
100
90
80
70
06
30
40
5
0
BUT
•Emission d'un signal sonore à
la fin d'un temps sélectionné
•Durant l'utilisation, l'écran
affiche le temps restant :
sec.
•Faire fonctionner le four
•Sélectionner la durée de la
cuisson des alimentes dans le
four
•Pour visualiser le temps
restant appuyer la touche
SELECT.
•Pour modifier le temps restant
appuyer la touche SELECT +
ou
•Mémoriser l'heure de fin de
cuisson
•Pour visualiser l'heure
•Pour modifier l'heure
sélectionnée appuyer
touche SELECT + ou
Il est possible de programmer la durée
de la cuisson et l'extinction automatique
du four (max. 120 minutes).
A l'expiration du temps désigné, la
manette sera en position O, une
sonnerie retentira et le four s'arrêtera
automatiquement.
Si l'on souhaite utiliser le four sans
programmer d'arrêt automatique,
positionner la manette en position
Le tour peut être allumé seulement en
sélectionnant un temps de cuisson
ou en tournant le bouton en position
.
Á QUOI SERT-IL ?
•II permet d'utiliser le programmateur du four comme un rêveilmémoire
(il peut être utilisé avec le four
min,
allumé ou éteint).
•Réaliser les cuisson désirées
•Pour arrêter le signal, appuyer sur
l'une des touches au choix.
Appuyer sur la touche centrale
pour retourner à la fonction horloge.
•Cette fonction est utilisée pour des
cuissons que l'on peut programmer
à l'avance. Par exemple, votre plat
doit cuire 45 mn et être prêt à 12:30;
réglez alors simplement la durée sur
45 mn et l'heure de fin de cuisson
3 fois
sur 12:30.
•Quand le temps de cuisson est
sur les
écoulé, la cuisson
s'arrête automati
quemen et l'alarme sonne quelques
secondes.
La cuisson commencera automatiquement à 11:45 (12:30 moins
45 mn) et continuera jusqu'à ce
que l'heure de fin de cuisson soit
atteinte.
A ce moment, le tour s'arrêtera
automatiq uement
REGLAGE DE L'HEURE
ATTENTION: la première opération à exécuter après l'installation ou après une coupure de courant (de
telles situations se reconnaissent parce que le atticheur est sur
comme décrit ci-dessus
•Appuyer 1 foi sur la touche centrale. L1, L2, L3 RÉGLER SIGNAL ACOUSTIQUE
•Régler l'heure à l'aide des boutons . •Appuyer 5 foi sur la touche centrale.
•Relâcher les touches. •Régler l'heure à l'aide des boutons .
•Relâcher les touches.
ATTENTION: le tour tonctionne seulement s'il est sur la position manuelle ou cuisson programmée
N.B. : pour régler les dittérentes tonctions du tour, sur quelques modèles apparaissent les symboles ou
, pour les autres modèles nous avons - o +
12:00 et clignote)est réglage de l'heure,
45 FR
Page 45
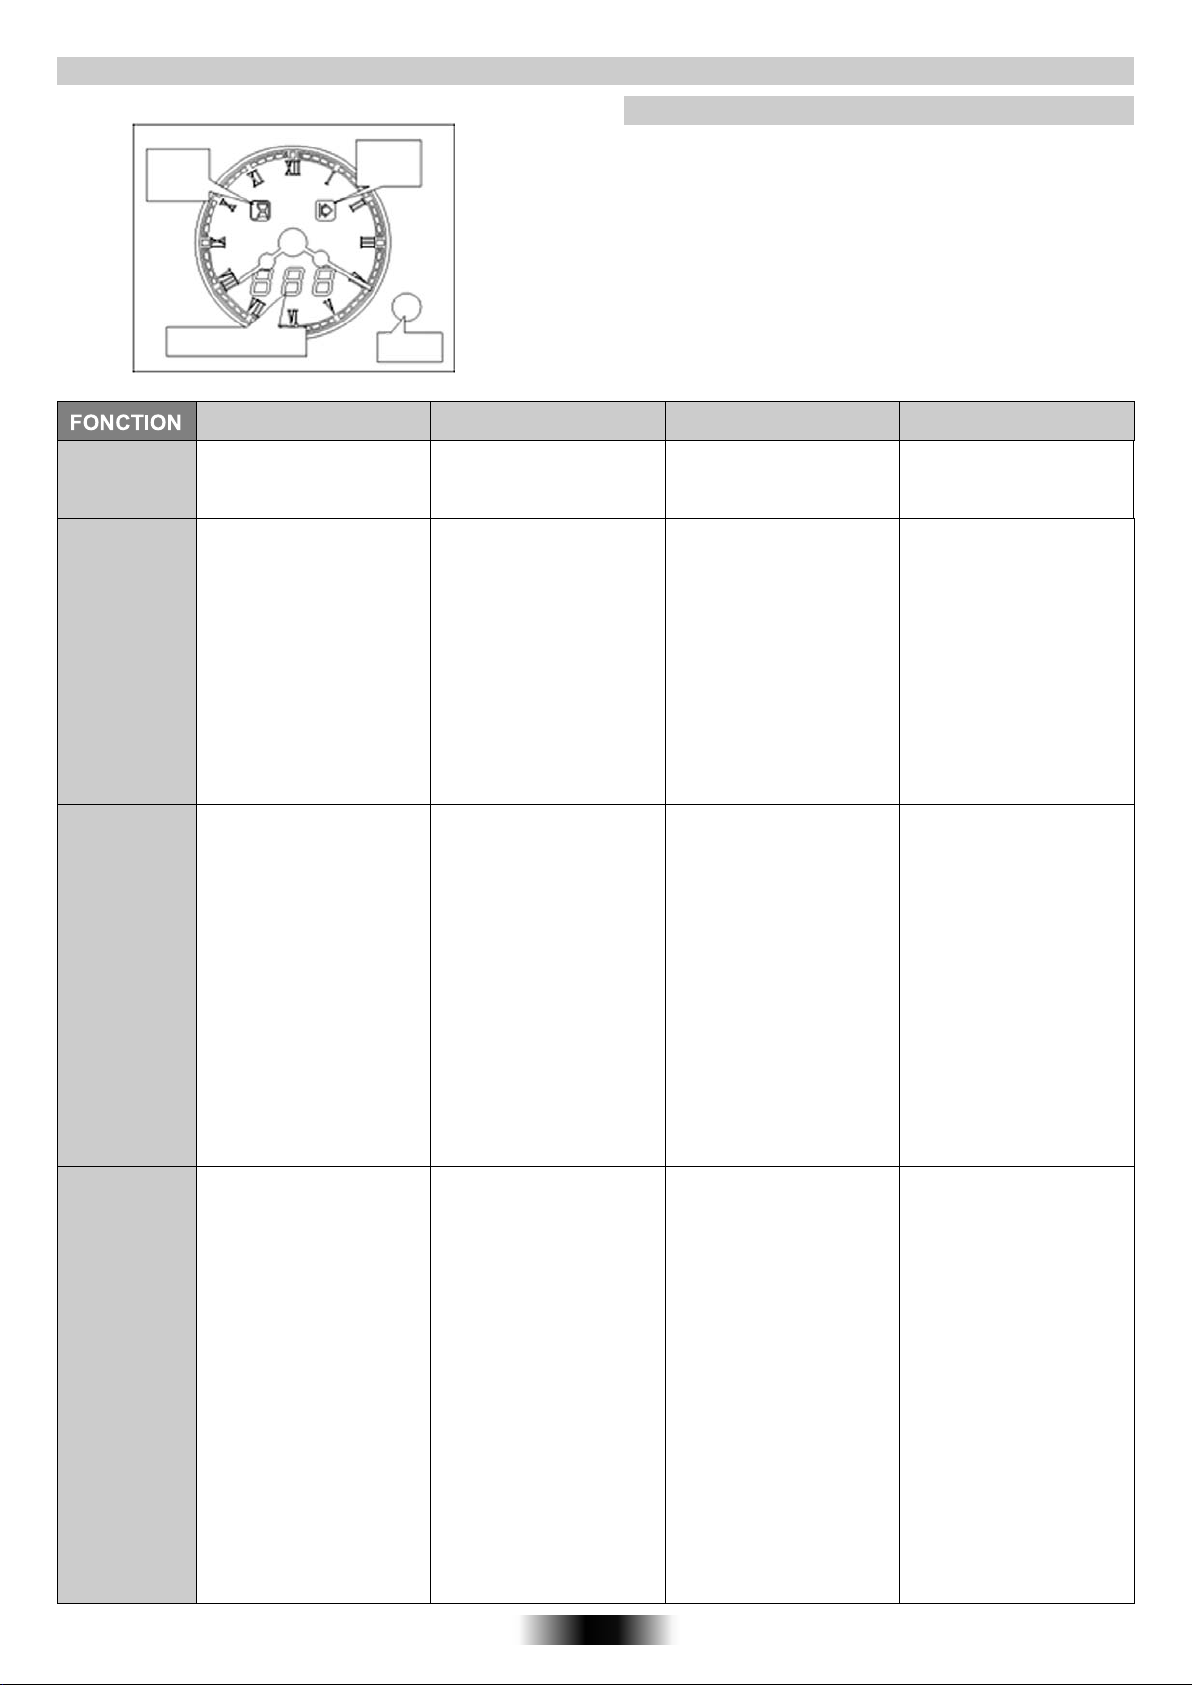
UTILISATION DU PROGRAMMATEUR A AIGUILLE
Voyant
Durée de
cycle
Voyant
Départ de
cycle
REGLAGE DE L’HEURE
• Appuyer et, pendant 4 secondes, maintenir appuyé le bouton de
réglage. Le programmateur affiche "SET". Un bip sonore retentit.
• Ajuster l'heure du jour en appuyant sur le bouton. L'avance de
l'aiguille se fait minute par minute, pour une avance plus rapide,
maintenir appuyée sur le bouton de réglage.
MANUEL
MINUTEUR
maxi 90 min.
AFFICHAGE
"BEL”
TEMPS DE
CUISSON
maxi 24 H
AFFICHAGE
"DUR"
Toute opération
doit être réalisée dans les 4 secondes, sinon elle
est annulée.
Affichage des différentes
commandes
Bouton de
réglage
Une durée ou un temps de pause peuvent s'afficher, ne pas en
tenir compte.
COMMENT L'UTILISER COMMENT L'ARRETER BUT A QUOI SERT-IL ?
• Il n'est possible qu'en mode
cuisson. Aucun réglage sur le
programmateur.
• Appuyer deux fois sur le
bouton de réglage,
l'afficheur indique "BEL"
suivi de "---".
• Régler un temps en
tournant le bouton.
• Avant toute opération,
choisir la température et la
fonction désirée.
• Appuyer une fois sur le
bouton de réglage.
L'indication "Dur" s'affi-che
et le voyant durée clignote.
• Régler la durée nécessaire en tournant le
bouton.
Le temps restant est
affiché et le voyant durée
devient fixe.
• Ramener les manettes de
fonction sur Stop.
• Durant le décompte,
l'afficheur indique le temps
restant en minute, une fois la
dernière minute écoulée,
s'affiche alors le temps
restant en secondes. A la fin
du temps, l'afficheur indique
"000" et un bip sonore
retentit pour vous avertir.
Pour le couper, appuyer sur
le bouton. A tout moment, il
est possible d'annuler ou de
modifier la minuterie.
• Une fois le temps écoulé,
le programmateur affiche
"End", le voyant durée
clignote et le four est
automatiquement stoppé.
Une sonnerie retentit pour
vous avertir. Pour la
couper, appuyer sur le
bouton de réglage.
Appuyer une seconde fois,
pour relancer la cuisson, si
nécessaire.
• Ramener les manettes
de fonction
sur arrêt.
• Faire fonctionner le four. • Réaliser les cuissons
• Une sonnerie retentit à la
fin du temps.
• Sélectionner la durée de
cuisson des aliments.
désirées manuellement.
• Il ne sert que d'aide
mémoire. Il n'a aucune
incidence
fonctionnement du four.
• Quand le temps de
cuisson est écoulé, le four
se coupe automatiquement et une sonnerie
retentit pour vous avertir.
sur le
MODE DIFFERE
Tem ps de
pause maxi
24 min.
AFFICHAGE
"PAU"
• Avant de commencer,
choisir la température et la
fonction désirée.
• Appuyer une fois pour
régler une durée, voir cidessus.
• Appuyer une deuxième
fois, alors s'affiche "PAU"
suivi de "---", le voyant
départ clignote, régler le
temps de pause avant le
démarrage du four. Durant
la pause, le four
veille, les voyants durée et
départ sont fixes. Une fois le
temps de pause terminé, le
four démarre sa cuisson,
seul le voyant durée reste
affiché.
est en
• Le four se coupe
automatiquement une fois
que la durée de cuisson
est écoulée. Une sonnerie
retentit pour vous avertir.
Pour la couper, appuyer
sur le bouton de réglage.
Appuyer une seconde fois,
pour relancer la cuisson, si
nécessaire.
Ramener les manettes
de fonction sur arrêt.
Il est possible en cours
de
cuisson de modifier ou
d'annuler soit le temps de
pause soit la durée de
cuisson. Attention en cas
d'annulation du temps de
pause, le four demarrera
automatiquement.
46 FR
• Permet de programmer
une cuisson de manière à
ce que le mets soit prêt à
l'heure désirée.
Ex : l'heure du moment
est
10H.
Le mets désiré doit cuire
45 minutes et doit être cuit
pour 12 H.
1. choisir un mode de
cuisson et une
température. 2. Régler une
durée de cuisson de 45
minutes. 3. Régler un
temps de pause de 75
minutes (10H/11H15).
Le four sera en pause de
10H à
11h15 ; il démarrera
sa cuisson à 11H15 et se
coupera automatiquement
à 12H.
Page 46
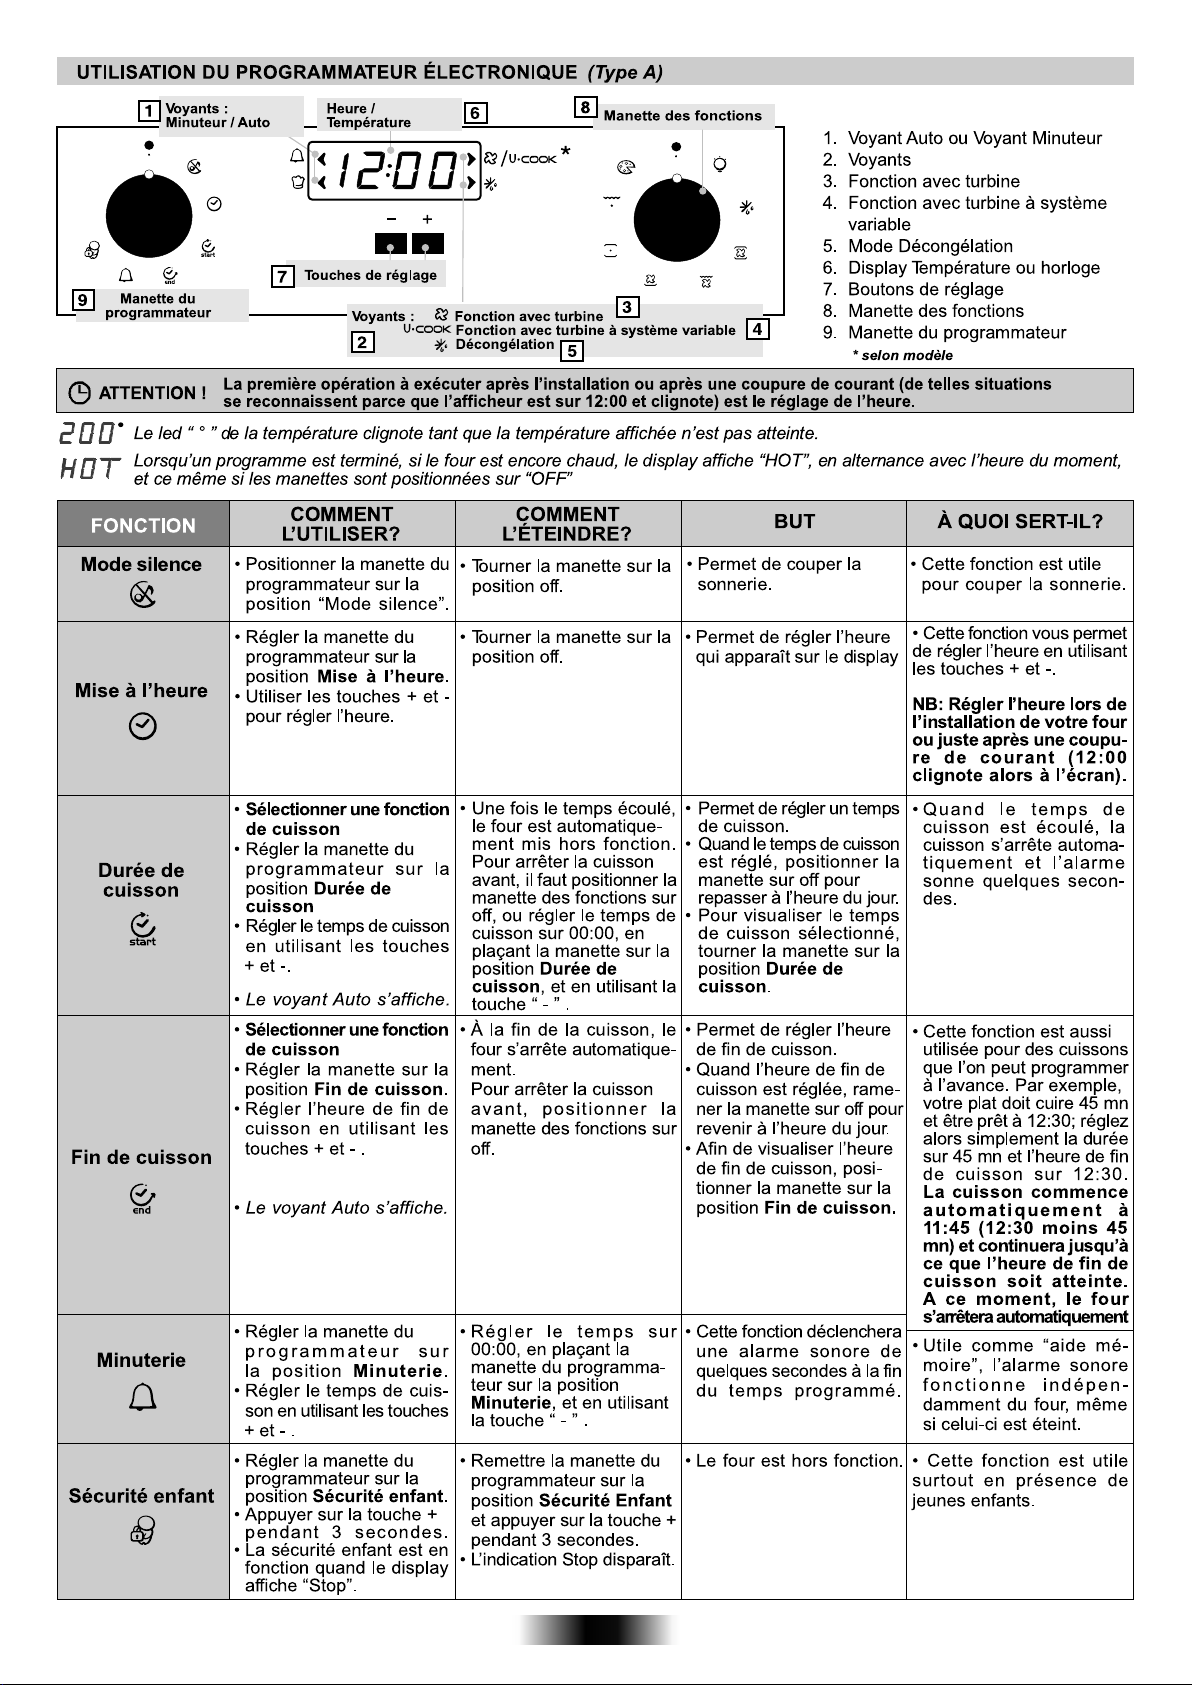
47 FR
Page 47
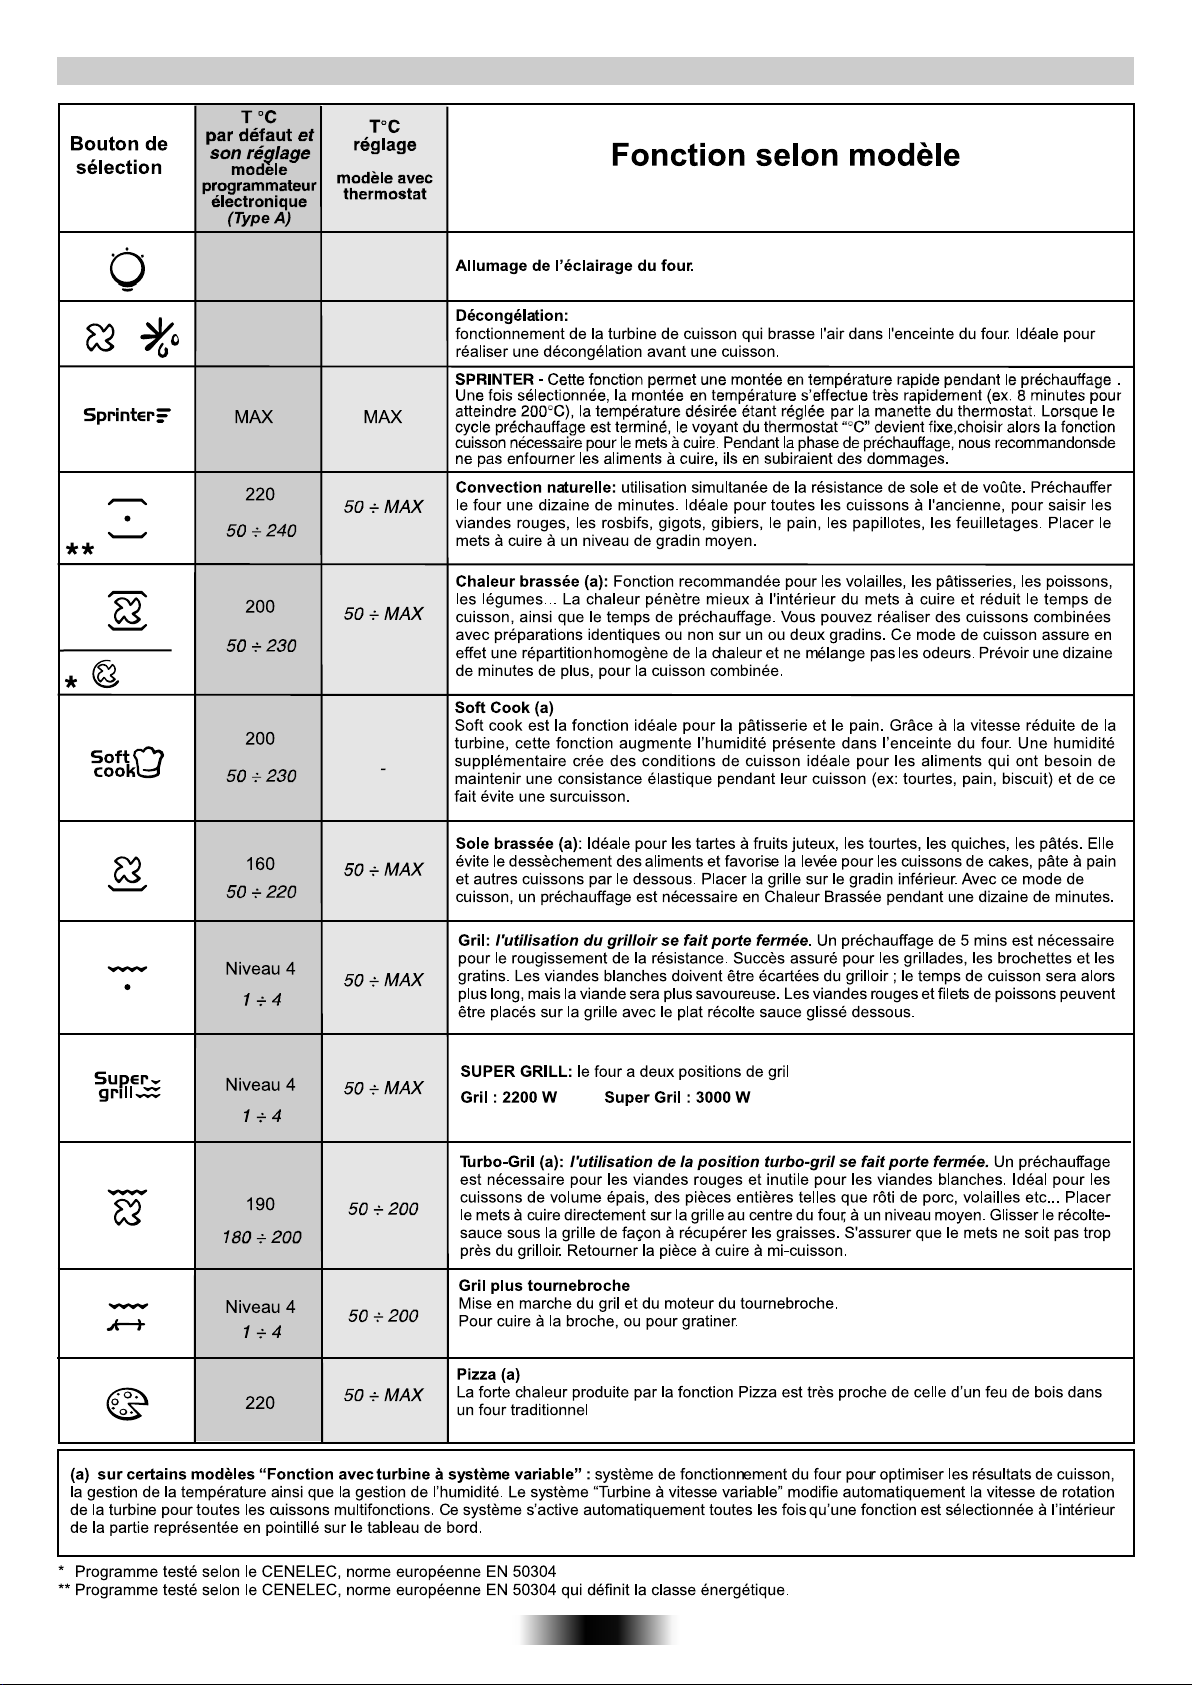
INSTRUCTIONS POUR L’UTILISATION
48 FR
Page 48
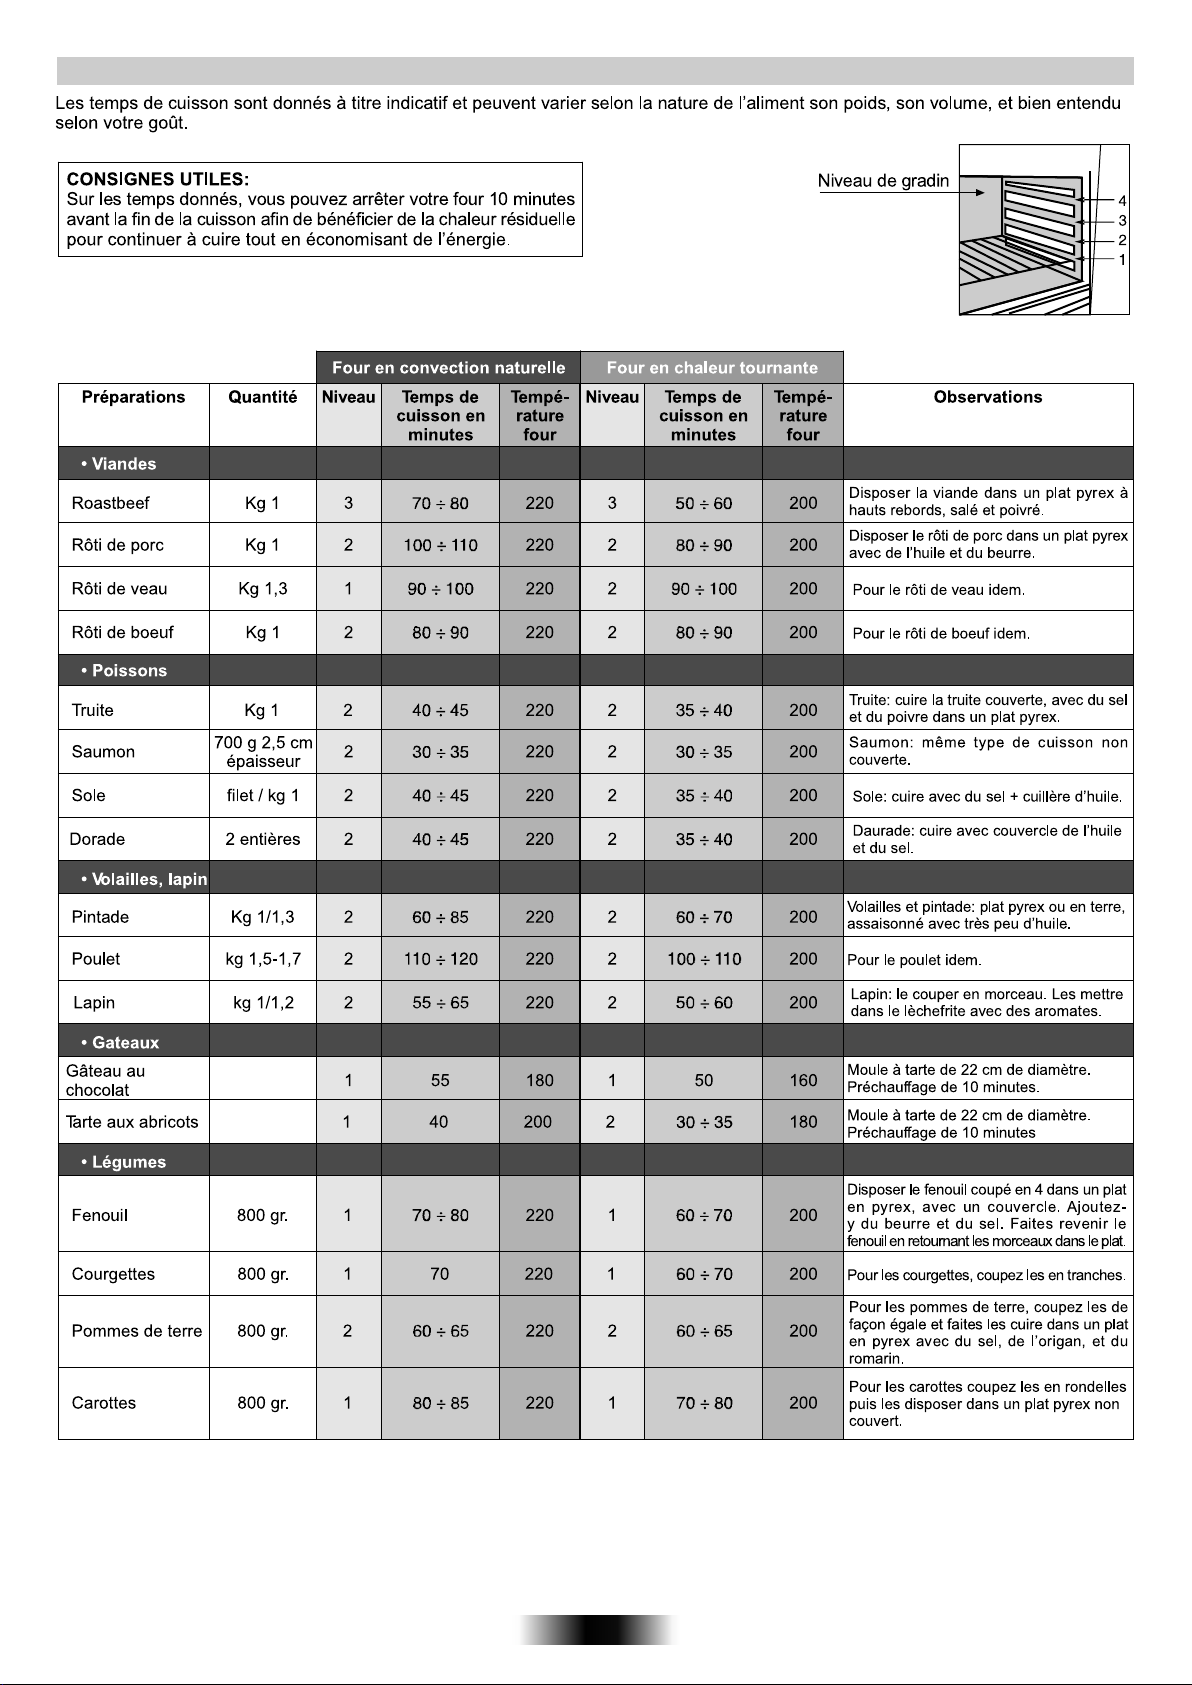
TEMPS DE CUISSON
49 FR
Page 49
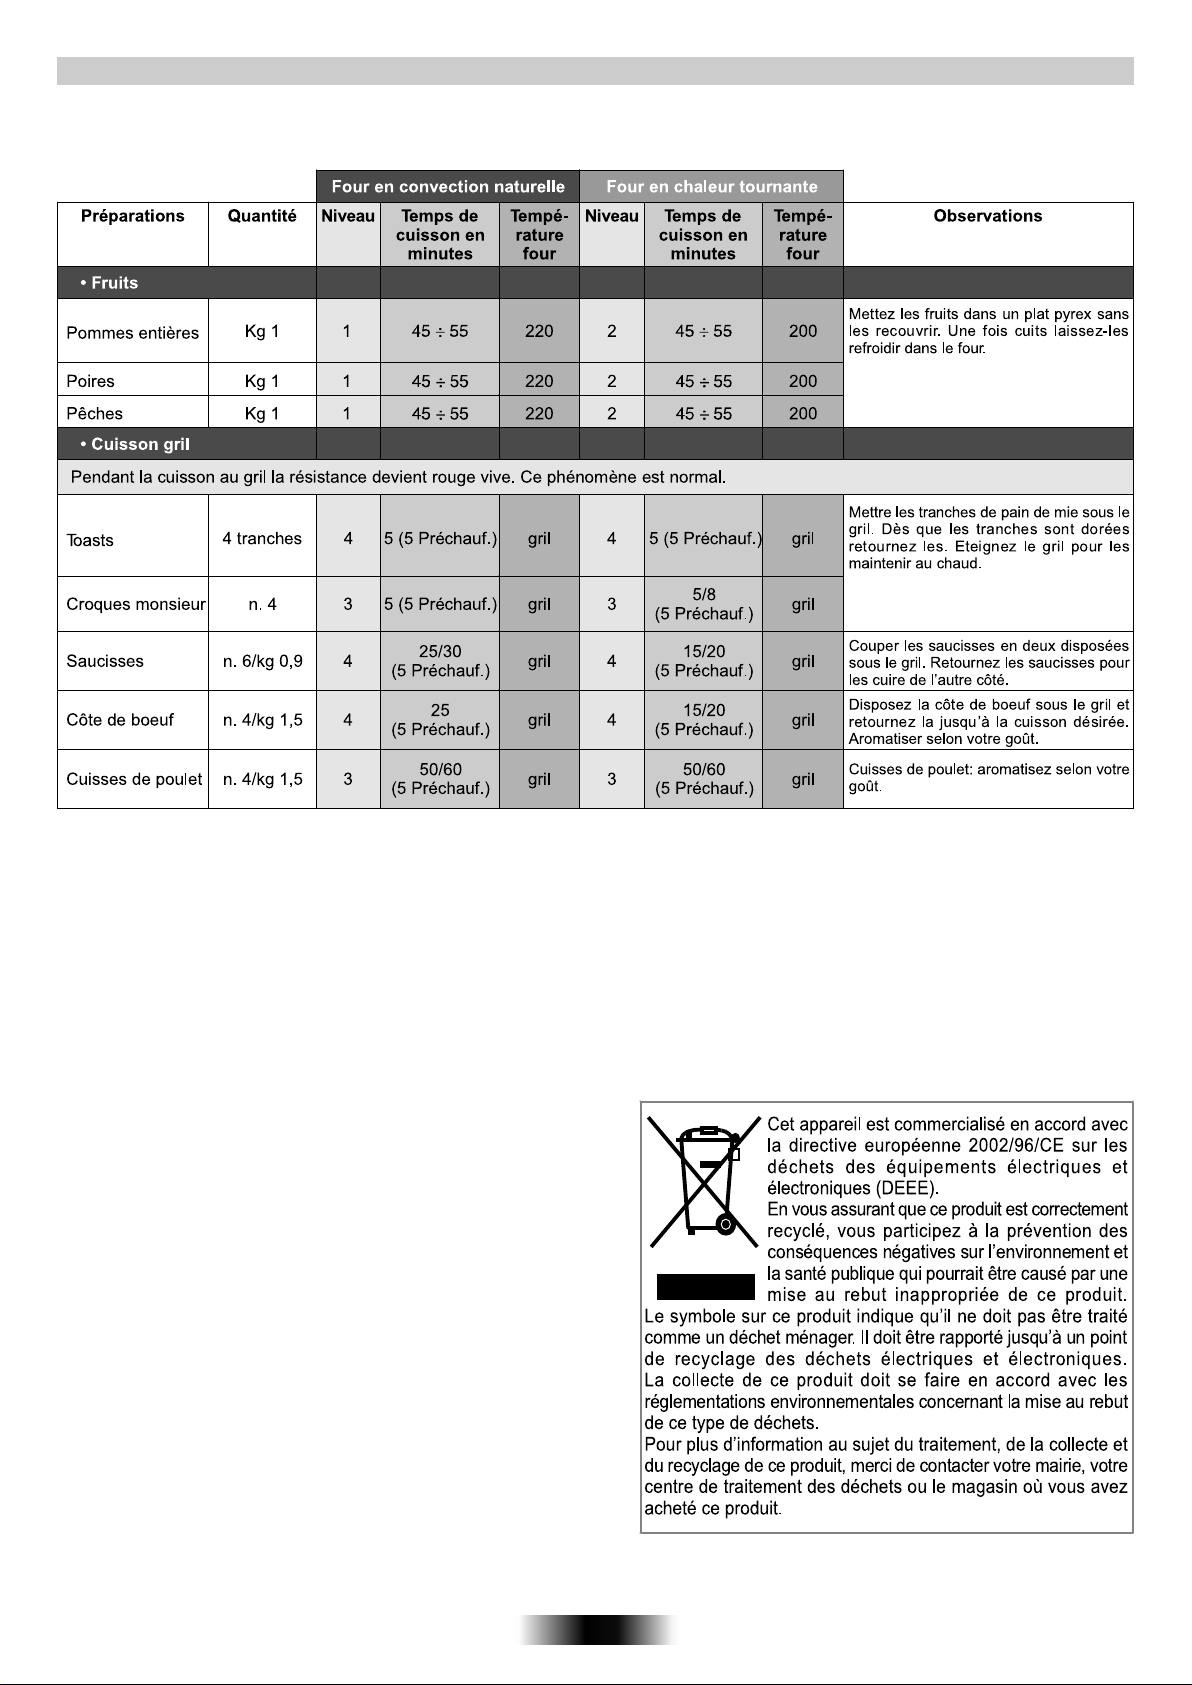
TEMPS DE CUISSON
50 FR
Page 50

INDICAÇÕES DE CARÁCTER GERAL
Obrigado por ter optado por um dos nossos produtos. Para tirar o maior proveito possível do seu forno, recomendamos que:
Leia atentamente este manual de instruções de utilização; ele contém instruções importantes sobre a instalação, a utilização e a manutenção
seguras deste forno.
Mantenha este manual de instruções à mão, num local
Quando o forno for ligado pela primeira vez, ele poderá emitir fumo com um cheiro acre. Isto fica a dever-se ao facto de o agente aglutinante dos
painéis de isolamento existentes à volta do forno ter sido aquecido pela primeira vez. Trata-se de
terá apenas de esperar que o fumo se dissipe antes de introduzir os alimentos no forno.
Devido à sua natureza, um forno aquece muito, em especial a sua porta de vidro.
Por isso, não permita que crianças se aproximem do forno quando ele estiver
seguro, para o poder consultar sempre que necessário.
um facto absolutamente normal; se ele ocorrer,
quente e, em particular, quando o grelhador estiver ligado.
DECLARAÇÃO DE CONFORMIDADE:
Os componentes utilizados neste electrodoméstico que podem entrar
em contacto com géneros alimentares satisfazem o disposto na
directiva da CEE 89/109.
Este aparelho está em conformidade com as Directivas
Europeias 73/23/EEC e 89/336/EEC, substituídas pelas
2006/95/EC e 2004/108/EC, e respectivas alterações posteriores.
Depois de ter retirado o seu forno da embalagem, certifiquese de que
ele não apresenta qualquer tipo de danos. Se tiver qualquer dúvida,
não o utilize e entre em contacto com um técnico qualificado.
Mantenha os materiais utilizados na embalagem, como, por exemplo,
sacos de plástico, poliestireno ou pregos, fora do
alcance das
crianças; estes materiais podem constituir fontes de perigo para as
crianças.
INFORMAÇÃO SOBRE SEGURANÇA
O forno só deverá ser utilizado para o fim para que foi concebido, ou seja,
o forno só deverá ser utilizado para cozinhar alimentos. Todo e qualquer
outro tipo de utilização, como, por exemplo, para aquecer o ambiente, é
considerada uma forma imprópria de utilizar o forno e,
consequentemente, é considerada
qualquer responsabilidade por quaisquer danos provocados por uma
utilização imprópria, incorrecta ou irrazoável do forno.
Sempre que utilizar um aparelho eléctrico, deverá observar determinadas
regras básicas.
Não puxe pelo cabo para desligar a ficha do aparelho da tomada de
alimentação de energia.
Não toque no forno
o forno quando est iver descalço. Não permita que crianças ou adultos
irresponsáveis utilizem o forno, salvo sob a supervisão de alguém
responsável. Normalmente nunca é boa ideia utilizar adaptadores, fichas
múltiplas e extensões.
Se o forno se avariar ou ficar defeituoso,
respectivo cabo de alimentação de energia da tomada, e não lhe toque.
Se o cabo de alimentação de energia apresentar qualquer tipo de dano,
ele terá de ser imediatamente substituído. Ao proceder à substituição do
cabo siga estas instruções.
Desmonte o cabo de alimentação de energia
um H05RR-F, H05VV-F, H05V2V2-F apto a suportar a corrente eléctrica
de que o forno necessita. A substituição do cabo deverá ser sempre
levada a cabo por um técnico devidamente qualificado.
O cabo de ligação à terra (amarelo/verde) tem de ter um comprimento 10
mm superior ao comprimento
que o seu forno necessitar de ser reparado, recorra exclusivamente a um
serviço de assistência técnica aprovado; certifique-se sempre de que só
são utilizadas peças sobressalentes originais. Se estas instruções não
forem cumpridas, o fabricante não poderá assegurar a segurança do
forno.
•Este aparelho não
pessoas incapazes ou inexperientes no que toca à utilização do produto,
excepto se forem devidamente supervisionadas ou instruídas sobre a
utilização do aparelho por uma pessoa responsável pela sua segurança.
•As crianças devem ser vigiadas de modo a assegurar que não brinquem
com o aparelho.
•Nunca forre as paredes do forno com papel de alumínio ou com o
material descartável de protecção, como o que se encontra à venda
no mercado. O papel de alumínio, bem como qualquer outro tipo de
protecção, quando colocado em contacto directo com o esmalte
quente, corre o
interior do forno.
com mãos ou pés molhados ou húmidos. Nunca utilize
está indicado para ser utilizado por crianças e por
risco de se derreter e de deteriorar o esmalte do
perigosa. O fabricante declina toda e
desligue-o, retirando a ficha do
danificado e substitua-o por
do cabo de alimentação de energia. Sempre
INSTALAÇÃO
Compete ao cliente proceder à instalação do forno. O fabricante não
tem qualquer obrigação de proceder à instalação do forno. Se for
necessária assistência técnica do fabricante para repar avarias ou
defeitos resultantes de uma instalação incorrecta do forno, esta
assistência técnica não está coberta pela garantia. Ainstalção deve
ser efectuada
instalação incorrecta do forno pode causar danos em pessoas,
animais ou objectos. Neste caso, o fabricante não poderá ser
responsabilizado por esses danos.
segundo as instruções dos técnicos qualificados. Uma
MONTAGEM DO FORNO
Monte o forno no espaço previsto na cozinha para esse efeito; o forno
poderá ser montado sob uma bancada ou num
Monte o forno na posição devida, aparafusando-o nessa posição; a
armação do forno dispõe de quattro orifícios previstos para a fixação
do forno.
Para localizar estes orifícios deverá abrir a porta do forno e olhar para
o interior do mesmo.
Ao proceder àmontagem do forno, e para assegurar uma ventilação
adequada do mesmo, deverá respeitar as dimensões e distâncias
indicadas no diagrama da ultima pagina.
Nota: No caso dos fornos combinados com uma placa, as instruções
de montagem do manual da placa terão de ser seguidas.
armário vertical.
IMPORTANTE
Para que este forno possa trabalhar nas devidas condições, será
necessário que o local onde ele vai ser montado seja apropriado. Os
painéis dos armários de cozinha situados de um lado e do outro do
forno deverão ser
feitos de um material resistente ao calor. Certifiquese de que as colas dos armários feitos de madeira folheada estejam
aptas a suportar temperaturas de, pelo menos, 120°C. Tanto os
plásticos como as colas que não estejam aptos a suportar estas
temperaturas se derreterão, provocando a deformação do armário.
Depois do
forno ter sido alojado no interior do armário, os
componentes eléctricos terão de ser totalmente isolados. Este
requisito é um requisito de segurança legal. Todas as protecções
deverão estar firmemente montadas, de modo a ser impossível
proceder à sua remoção sem recorrer a ferramentas especiais.
Remova o painel de trás do
armário de cozinha em que o forno vai ser
montado, a fim de assegurar a circulação de uma corrente de ar
adequada à volta do forno. O forno deverá ter um vão na parte de trás
de, pelo menos, 45 mm.
LIGAÇÃO DO FORNO À REDE DE
ALIMENTAÇÃO DE ENERGIA
Ligue a ficha do cabo de alimentação de energia à tomada. Primeiro,
porém, deverá certificar-se de que existe um terceiro contacto que
actua como ligação do forno à terra. O forno terá de ser devidamente
ligado à terra. Se o modelo de forno que adquiriu não estiver
com uma ficha, monte uma ficha padrão no cabo de alimentação de
energia. Esta ficha deverá estar apta a suportar a alimentação de
energia constante da placa de características. O cabo de ligação à
terra é amarelo/verde. A ficha deverá ser montada por um técnico
qualificado. Se a ficha
do cabo e a tomada forem incompatíveis,
deverá mandar proceder à substituição da tomada por um técnico
devidamente qualificado.
Se assim o quiser, poderá igualmente instalar um interruptor de
ligar/desligar, à alimentação de energia. As ligações terão de ter em
consideração a corrente alimentada e deverão satisfazer os
requisitos legais em
vigor.
EQUIPAMENTO DO FORNO (de acordo com modelo)
É necessário efectuar uma limpeza do equipamento antes da
primeira utilização. Lave com uma esponja, enxague
A grelha simples serve de suporte
para formas, travessas, etc.
A grelha porta-recipientes serve
mais particularmente para grelhados;
associa-se ao tabuleiro de recolha de
sucos.
Devido ao seu perfil especial, as
grelhas permanecem na horizontal
mesmo quando puxadas ao máximo
para o exterior, pelo que não existe
qualquer risco do recipiente que
contêm escorregar ou transbordar.
51 PT
equipado
e seque.
Page 51
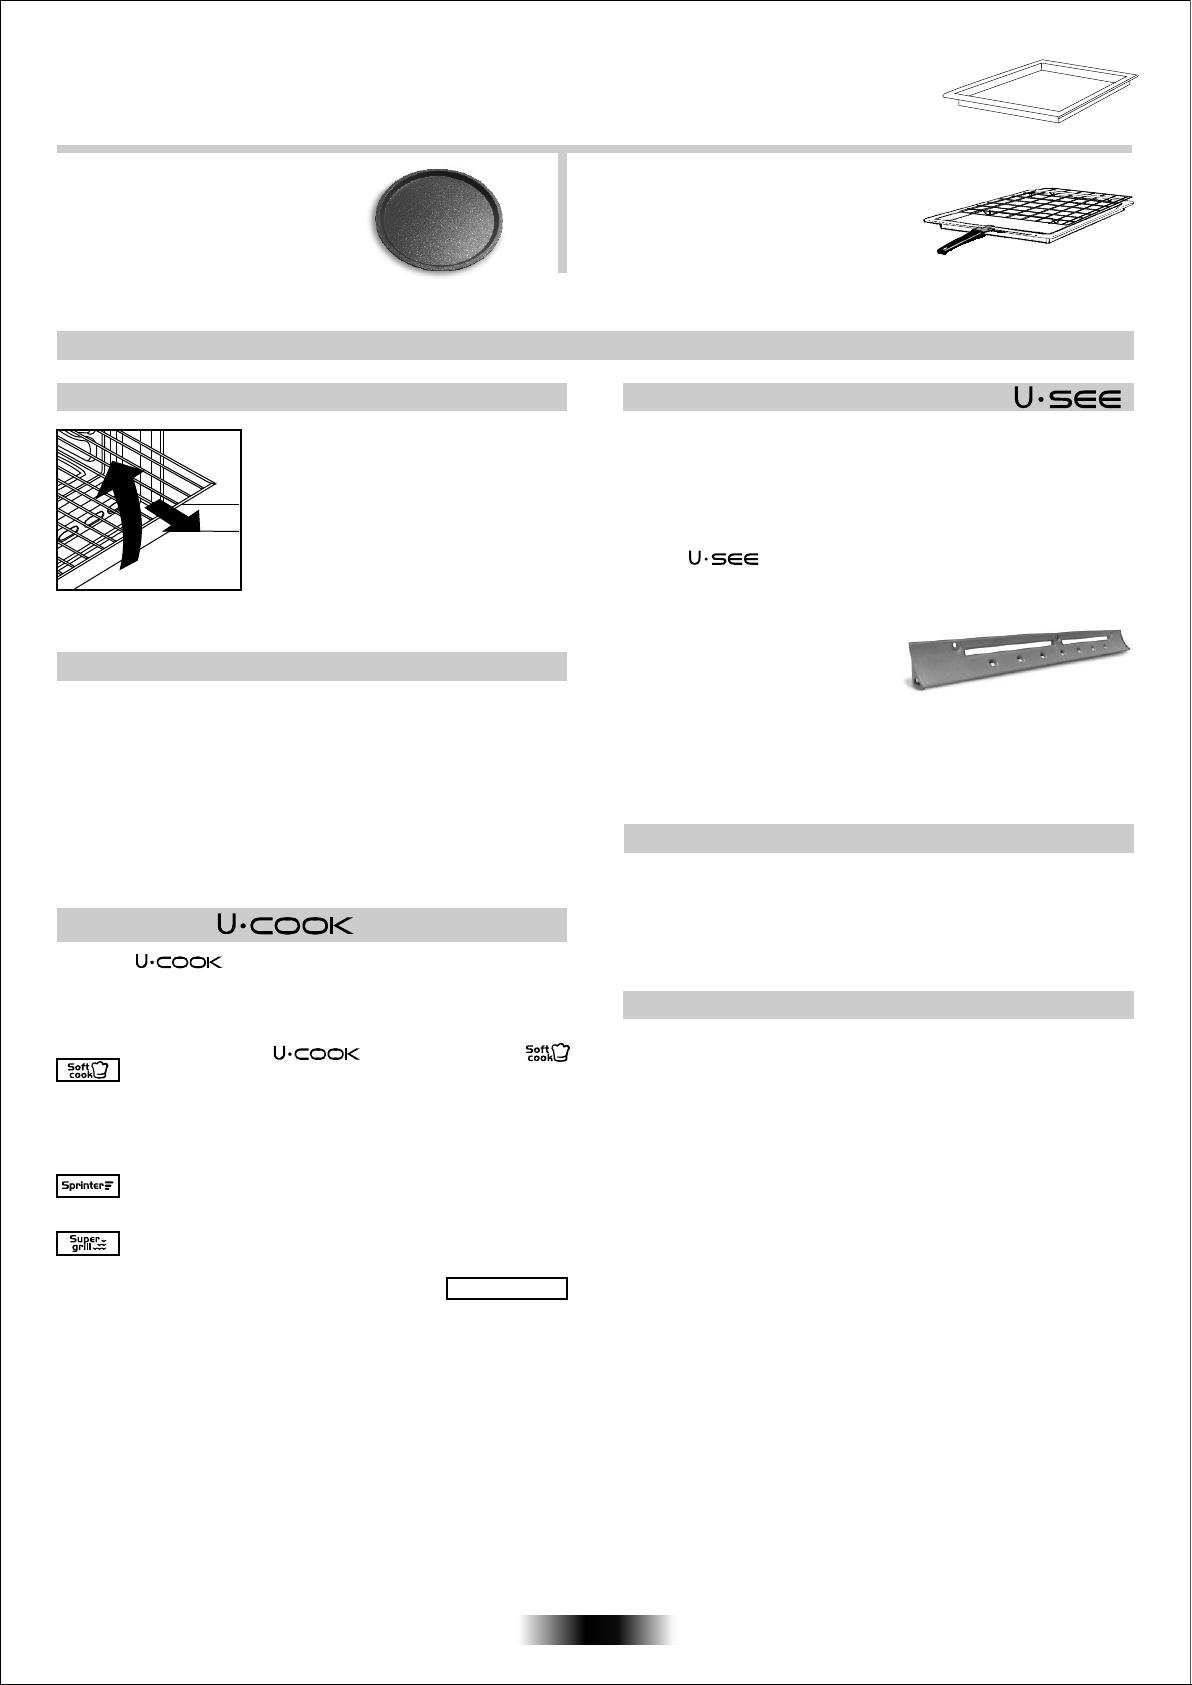
O tabuleiro buleiro de recolha de sucos serve para aparar o suco dos grelhados. Pode ser colocado por cima da grelha
ou introduzido nas calhas. Só se utiliza com o Grelhador, o Espeto ou o Turbogrelhador. Nos outros modos de cozedura
deve ser retirado do forno. Nunca utilizar este tabuleiro como
fumos, e rapidamente sujaria o forno.
recipiente para assar, pois causaria salpicos de gordura e
O conjunto de piza é o ideal para a
cozedura de pizas. Este conjunto deve
ser utilizado em conjunto com a função
Pizza
Durante a utilização do forno, os acessórios não usados devem ser retirados
SUGESTÕES ÚTEIS
SISTEMA DE SEGURANÇA DAS PRATELEIRAS
O forno dispõe de um novo sistema de
segurança das prateleiras.
Graças a este sistema, pode puxar as
prateleiras para fora, quando pretender
inspeccionar os alimentos que está a
cozinhar, sem correr o risco de que a
comida caia ou de que as prateleiras se
desencaixem acidentalmente das paredes
do forno,
prateleiras totalmente, terá de as puxar
para fora e de as levantar.
tombando. Para remover as
GRELHAR
O grelhador do forno permite-lhe cozinhar rapidamente os alimentos,
dando-lhes um atraente tom acastanhado. Para gratinar os
alimentos, recomendamos que coloque a prateleira no quarto nível;
este posicionamento da prateleira dependerá naturalmente da
quantidade de alimentos, pelo que recomendamos que consulte a fig.
na página 57.
Quase todos os alimentos podem
excepção de caça muito magra e de rolos de carne. As carnes e os
peixes a serem grelhados deverão ser previamente ligeiramente
untados com óleo ou outra gordura.
ser cozinhados com o grelhador, à
OS MODELS
Os fornos possuem um controlo electrónico da velocidade
da ventilação, chamada VARIOFAN. Durante a cozedura, o sistema muda
automaticamente a velocidade da ventilação (no modo multifunções) para
optimizar a circulação do ar e a temperatura interna na cavidade do forno.
Todos os fornos possuem a função
Esta permite a gestão e a distribuição da mistura e da
temperatura. Reduz a perda de humidade em 50%,
garante que os alimentos não perdem a suavidade e
saibem melhor. Este
recomendado para cozer pão e pastas.
Reduz o tempo do pré-aquecimento do forno: atinge 200
graus Celsius em apenas 8 minutos.
Dá a possibilidade de pré seleccionar o
intensidade do grelhador, até 50% mais potência em
comparação com um forno multifunções tradicional.
Alguns modelos estão equipados com a nova porta WlDE DOOR
que possui uma área de janela maior, permitindo uma manutenção
mais fácil e um melhor isolamento térmico.
modo delicado de cozedura é
nível e a
O suporte do tabuleiro; O suporte do
tabuleiro (prateleira) é indicado para
grelhados. Utilize a junção com a pingadeira.
Está incluida uma pega para ajudar a mover
em segurança ambos os acessórios. Não
deixe a pega dentro do forno.
do forno.
De acordo com o modelo
Um sistema de iluminação subsititui a tradicional lâmpada. 14 luzes
em LED estão integrados na parte interior da porta. Estas produzem
iluminação branca e de elevada qualidade o que permitem a
visualização do interior do forno com claridez e sem sombras em
todas as prateleiras.
Vantagens:
Sistema , além de fornecer excelente iluminação no interior
do forno, duram mais que a lâmpada tradicional, e acima de tudo
consumem menos energia.
- Excelente visualização
- Iluminação de longa duração
- Consumo muito baixo de energia,
-95% em compração com a
iluminação tradicional.
Elevada
-
“Electrodoméstico com luzes brancas por LED de classe 1M de
acordo com IEC 60825-1:1993 + A1: 1997 + A2: 2001(equivalente a
EN 60825- 1: 1994 + A1: 2002 + A2: 2001); a potência máxima de luz
emitida 459nm < 150uW. Não observar directamente com
instrumentos ópticos.”
TEMPOS DE COZEDURA
Para saber quais os tempos de
cozinhar os alimentos, quando utilizar o forno pela primeira vez,
recomendamos que consulte as tabelas constantes na páginas 57,
58. Quando adquirir mais experiência do modo de funcionamento do
seu forno, poderá querer alterar os tempos indicados segundo o seu
gosto.
cozedura recomendados para
Forno auto-limpante com revestimento catalítico
Tem à sua disposição, como acessórios extra, painéis especiais,
auto-limpantes, revestidos por uma camada micro-porosa. Estes
painéis existem para todos os modelos. Uma vez instalados estes
painéis, deixa de ser necessário limpar manualmente o interior do
forno.
A gordura que salta para as paredes laterais do forno quando são
assados ou
porosa, que decompõe a gordura por meio de catálise e a transforma
em gás.
No entanto, um excesso de salpicos de gordura poderá entupir os
poros e, por isso, impedir a auto-limpeza. Para repor a capacidade
auto-limpante, basta ligar o forno vazio à temperatura máxima,
durante cerca de 10 a 20 minutos.
Nunca utilize produtos abrasivos, esfregões de metal, objectos
afiados, panos rugosos ou produtos químicos ou detergentes que
possam danificar permanentemente o revestimento catalítico do seu
forno.
Quando pretender assar alimentos gordos, o ideal será utilizar
tabuleiros de paredes altas e colocar um tabuleiro por baixo
para apanhar a gordura excessiva.
Se as paredes interiores do forno estiverem coberta por uma camada
de gordura tão espessa que o revestimento catalítico já não é eficaz,
remova o excesso de gordura com um pano macio ou uma esponja
embebido(a) em água quente.
Para que a limpeza automática
é necessário que o revestimento catalítico do interior do forno esteja
poroso.
N.B.: Todos os revestimentos catalíticos actualmente disponíveis no
mercado têm uma vida útil de cerca de 300 horas. Por isso, deverão
ser substituídas de 300 em 300 horas de utilização.
grelhados alimentos é eliminada pela camada micro-
possa ser levada a cabo com eficácia
da grelha,
52 PT
Page 52

LIMPEZA E MANUTENÇÃO
Sempre que o forno for utilizado, aconselhamos a limpar o vidro da
porta com papel absorvente. Se houver demasiados salpicos, pode
limpar depois com uma esponja seca e detergente. Nunca util izar
produtos abrasivos ou objectos cortantes. Nunca limpar o forno com
aparelhos a vapor ou a alta pressão. Limpe as
inoxidável e esmaltadas com água morna, na qual diluiu uma
pequena quantidade de detergente ou com produtos indicados para a
limpeza dessas superfícies. Nunca utilize produtos abrasivos que
poderão danificar as superfícies e arruinar o aspecto do seu forno. É
muito importante limpar o forno a seguir
A gordura derretida deposita-se nas paredes do forno durante a
cozedura dos alimentos.
Da próxima vez que o forno for utilizado, essa gordura poderá dar azo
a cheiros desagradáveis, podendo, inclusive, pôr em perigo o êxito
dos seus cozinhados. Limpe as paredes do forno com água quente
com detergente;
todos os traços de detergente. Para que esta tarefa seja
desnecessária, todos osmodelos poderão ser equipados com painéis
catalíticos auto-limpantes: estes painéis são fornecidos como um
extra (consulte o ponto intitulado FORNO AUTOLIMPANTE COM
REVESTIMENTO CATALÍTICO) . Para limpar as grelhas de aço
inoxidável
metal, do tipo dos “Bravo”. As superfícies em vidro, como a parte de
cima, a porta do forno e a porta da estufa, terão de ser limpas depois
de estarem frias. O incumprimento desta regra poderá danificar essas
superfícies. Esse tipo de danos não
proceder para substituir a luz interior do forno: desligue o forno da
corrente e desatarraxe a lâmpada. Substitua-a por uma lâmpada
idêntica que possa suportar temperaturas muito elevadas.
passe cuidadosamente por água, para remover
poderá utilizar detergentes e esfregões abrasivos de
a cada utilização.
está coberto pela garantia. Como
superfícies de aço
Este electrodoméstico está marcado de acordo com
o disposto na directiva europeia 2002/96/CE relativa
aos resíduos de equipamentos eléctricos e
electrónicos (REEE).
Ao assegurar que este produto seja correctamente
eliminado, estará a prevenir eventuais
consequências negativas para o ambiente e para a
tratamento incorrecto deste produto, quando eliminado.
O símbolo patente neste produto indica que ele não pode ser
tratado como lixo doméstico. Em vez disso, deve ser entregue no
centro de recolha apropriado, para reciclagem do equipamento
eléctrico e electrónico.
A eliminação deste produto deve ser levada a cabo de acordo com
regulamentos localmente aplicáveis à eliminação e ao
os
tratamento de lixo e resíduos.
Para obter informações mais detalhadas sobre o tratamento, a
recuperação e a reciclagem deste produto, agradecemos que entre
em contacto com a entidade municipal competente, com o serviço
de eliminação de lixos e resíduos ou com o estabelecimento
comercial
saúde, que, de outra forma, poderiam resultar de um
onde adquiriu o produto.
ASSISTÊNCIA TÉCNICA
Antes de telefonar para a assistência técnica Se o forno não estiver a
trabalhar, recomendamos que:
- verifique se o forno está devidamente ligado à corrente (ficha
correctamente introduzida na tomada).
Se lhe for impossível detectar a causa da avaria: desligue o forno da
corrente, não o tente reparar e ligue para
técnica.
Antes de ligar para os serviços de assistência técnica, porém, tome
nota do número de série do forno, constante da respectiva placa de
características (vide a figura na ultima página ).
os serviços de assistência
CONDIÇÕES DE GARANTIA
Este electrodoméstico está abrangido por uma Garantia. Para
beneficiar desta garantia deverá apresentar o certificado de “Garantia
Internacional”, devidamente preenchido com o nome e morada do
consumidor final, modelo e número de série do aparelho, e data de
compra, além de devidamente autenticado pelo lojista. Este
documento ficará sempre na posse
Durante o período de Garantia os Serviços de Assistência Técnica
efectuarão a reparação de qualquer deficiência no funcionamento do
aparelho resultante de defeito de fabrico.
A Garantia não inclui deslocações a casa do cliente, que serão
debitadas de acordo com a taxa de deslocação em vigor a cada
momento.
mês de vigência da Garantia, que será gratuita.
A Garantia não inclui:
– Anomalias ocasionadas por mau trato, negligência ou manipulação
contrária às instruções contidas no manual, modificação ou
incorporação de peças de procedência diferente da do aparelho,
aplicadas por serviços técnicos
–Defeitos provocados por curto-circuito ou injúria mecânica.
–Qualquer serviço de instalação ou explicação do funcionamento do
aparelho em casa do cliente.
–Indemnizações por danos pessoais ou materiais causados directa
ou indirectamente.
–Troca do aparelho.
Exceptua-se a 1ª deslocação, se se efectuar no primeiro
do consumidor.
não autorizados.
Serviço Pós-Venda
Com o objectivo de satisfazer cada vez mais o consumidor final,
colocamos à vossa disposição a
Técnica, com pessoal técnico devidamente Especializado.
nossa Rede Nacional de Assistência
53 PT
Page 53
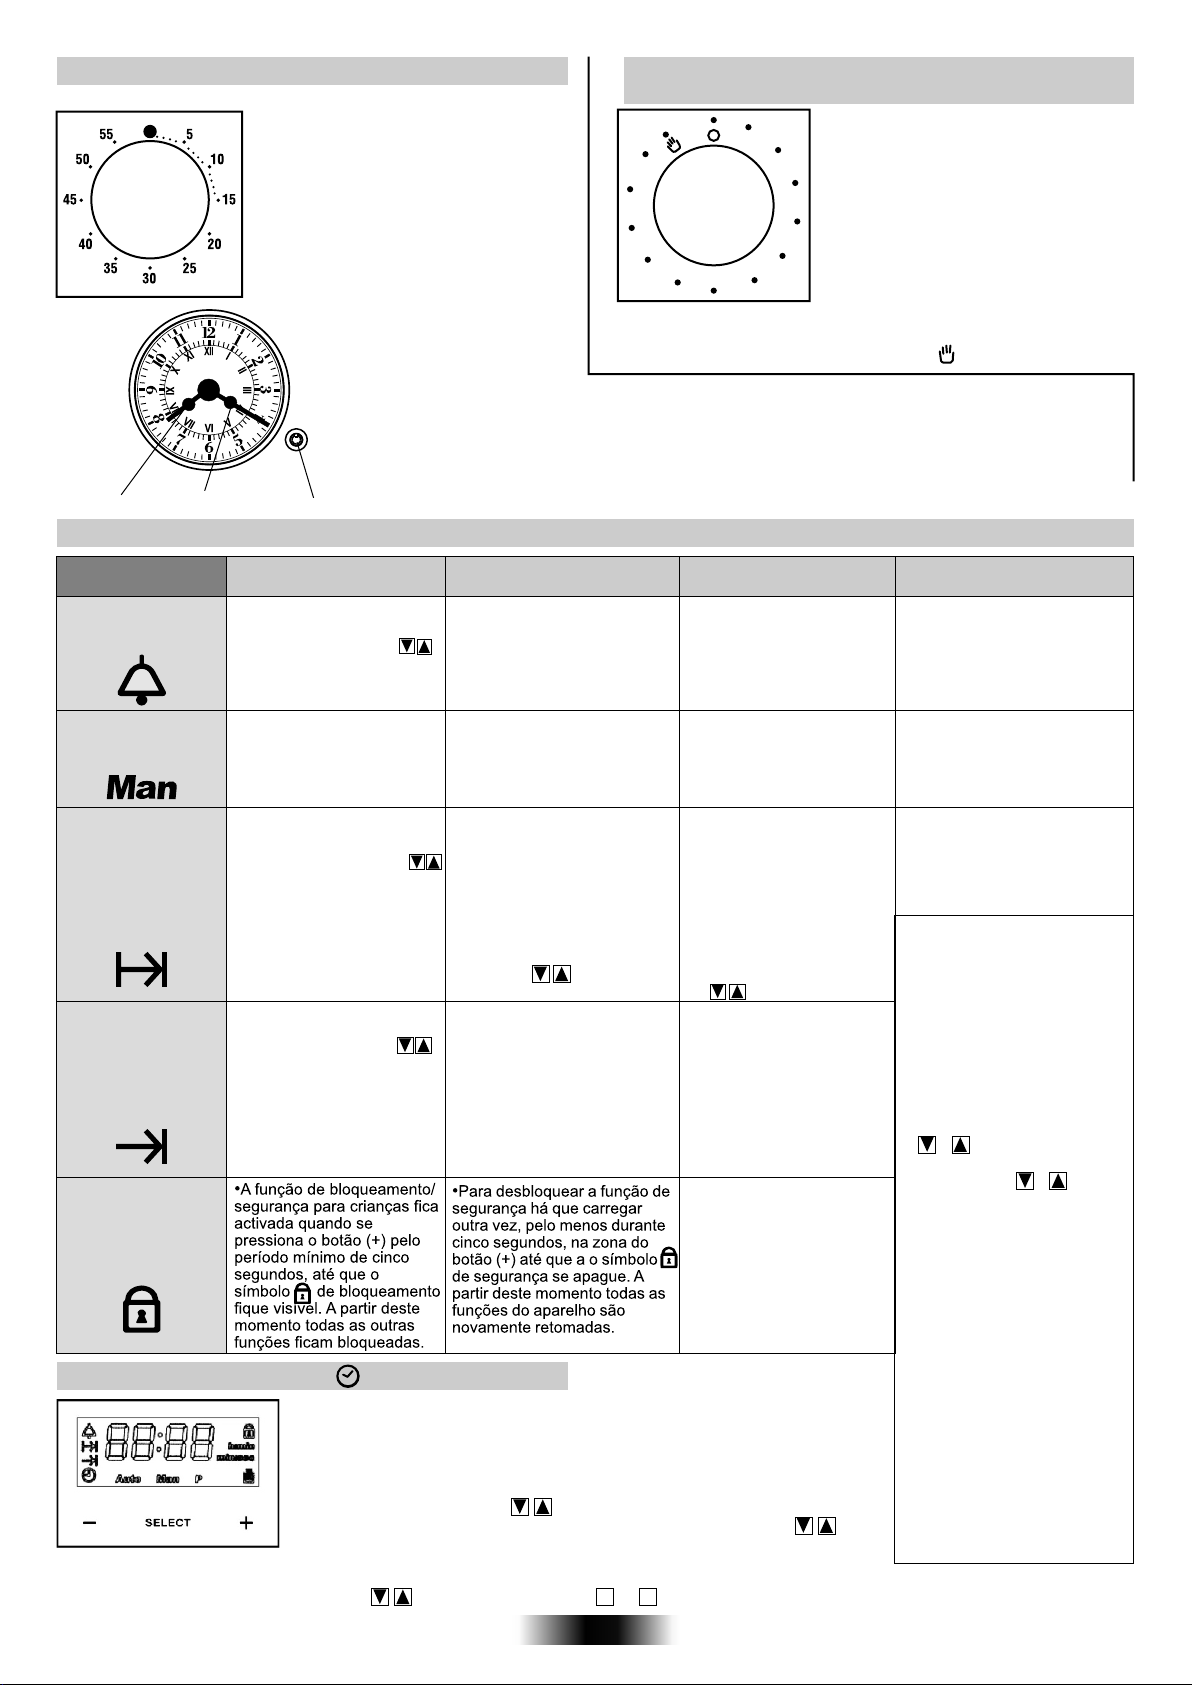
UTILIZAÇÃO DO CONTA MINUTOS
Para seleccionar o tempo desejado, rode
totalmente o botão no sentido dos
ponteiros do relógio e em seguida volte a
rodar no sentido inverso, até ao tempo
desejado.
No fim do tempo seleccionado, será
emitido um sinal sonoro durante alguns
Segundos.
UTILIZAÇÃO DO PROGRAMADOR DE FIM
DE COZEDURA
Este controlo dá-lhe a possibilidade de
escolher o tempo de cozedura
02
pretende, desligando automaticamente
30
o forno uma vez terminado o tempo
seleccionado (máx. 120 min). Uma vez
40
terminado o tempo seleccionado o
50
programador volta à posição 0 e um sinal
sonoro informa que o forno se desligará
automaticamente.
120
110
100
90
80
70
10
60
que
O forno apenas funcionará depois de seleccionar o tempo ou
com o programador
DEFINIÇÕES DO PROGRAMADOR ANALÓGICO
Quando pressiona o botão, a seta dos minutos avança um minuto. Se manter o
botão pressionado, a seta move-se rápidamente.
Horas (mão)
Minutos (mão)
Botão pressão
UTILIZAÇÃO DO PROGRAMADOR ELECTRÓNICO
FUNÇÕES
CONTAMINUTOS
FUNÇÃO
MANUAL
SELECÇÃO
DA DURAÇÃO
DO TEMPO
DE COZEDURA
FIM DO
TEMPO DE
COZEDURA
SEGURANÇA
PARA
CRIANÇAS
COMO SELECCIONAR
•Pressione 1 vez o botão
central
•Pressione os botões
para seleccionar o tempo
desejado.
•Solte todos os botões.
•Pressione 1 vez o botão
central
•Seleccione a função de
cozedura através do
botão de selecção de
funções.
•Pressione 2 vezes o
botão central
•Pressione os botões
para seleccionar a
duração do tempo de
cozedura desejada.
•Solte todos os botões.
•Seleccione a função de
cozedura através do botão
de seleccção de funções.
•Pressione 3 vezes o botão
central
•Pressione os botões
para seleccionar a hora a
que deseja que o forno se
desligue.
•Solte os botões.
•Seleccione a função de
cozedura através do botão de
seleccção de funções.
COMO DESLIGAR
•Quando o tempo termina um
sinal sonoro é emitido (este
sinal sonoro parará por si só,
Após 7 minutos contudo pode
ser parado imediatamente
pressionando SELECT).
•Coloque o botão de
seleccção de funções na
posição O.
•Quando o tempo seleccionado
terminar o forno desligar-se-à
automaticamente.
•Caso deseje terminar a
cozedura mais cedo coloque o
botão de selecção de funções
na posição ) ou seleccione o
tempo para
SELECT e ).
• Na hora seleccionada o
forno desligar-se-à.
•Para desligar
manualmente seleccione
no selector de funções a
posição 0.
0.00 (botões
ACERTAR O RELÓGIO
ATENÇÃO: a primeira operação que deve ser levada a cabo após a
instalação do forno ou após um corte de energia (facilmente detectado no
display onde pisca ) é o acertar das horas. Proceda da seguinte
forma.
•Pressione 1 vez o botão central. L1, L2, L3 AJUSTAR SINAL ACÚSTICO
•Ajustar a hora com os botões . •Pressione 5 vez o botão central.
•Solte todos os botões. •Ajustar a hora com os botões .
ATENÇÃO o forno só funciona se
NOTA em alguns modelos os símblos são substituídos por - e + .
estiver seleccionada a função manual ou após o acertar da hora.
12:00
•Solte todos os botões.
na posição (símbolo ).
O QUE FAZ?
•Um sinal sonoro é
emitido no final do tempo
seleccionado.
•Durante o processo, o
visor mostra o tempo
remanescente: min, sec.
• Forno disponível para
utilização
•É possível verificar qual o
tempo seleccionado para o
prato escolhido.
•Para verificar quanto tempo
resta até ao fim do tempo
seleccionado pressione o
botão SELECT.
•Para alterar o tempo
seleccionado pressione o
botão SELECT e seleccione
o novo tempo pressionan
do .
•È possível seleccionar a
hora de fim de cozedura.
•Para verificar a hora
seleccionada Pressione
3 vezes o botão central
•Para alterar a hora
seleccionada pressione
o botão SELECT em
conjunto com
A COSA SERVE
• É possivel utilizar o forno
como relógio com alarme
(mesmo sem o forno estar
ligado para cozinhar).
•Para cozinhar os pratos
desejados
•Pressione qualquer botão
para parar o sinal. Pressione
o botão central para voltar
à função de relógio.
•Normalmente esta função é
usada em conjunto com a
função de duração do tempo
de cozedura. Por exemplo um
cozinhado que demore 45
minutos e deva estar pronto
às 12:30 h.
Neste caso proceda da
seguinte forma: Seleccione a
duração do tempo de
cozedura de 45 minutos
( e
). Seleccione
a hora de fim de cozedura
para as 12:30 ( e ).
•No final do tempo seleccionado
o forno desligarse-à
automaticamente e será
emitido um sinal sonoro.
Seleccione a função de
cozedura através do botão de
seleccção de funções.
Às 11:45 o forno
funcionar e desligarse-à
automaticamente ao fim de
45 minutos.
ATENÇÃO:Se a hora de fim
de cozedura é seleccionada
sem que seja seleccionada a
duração do tempo de
cozedura, o forno começará
a funcionar de imediato e
desligar-se-à à hora
seleccionada.
começará a
54 PT
Page 54
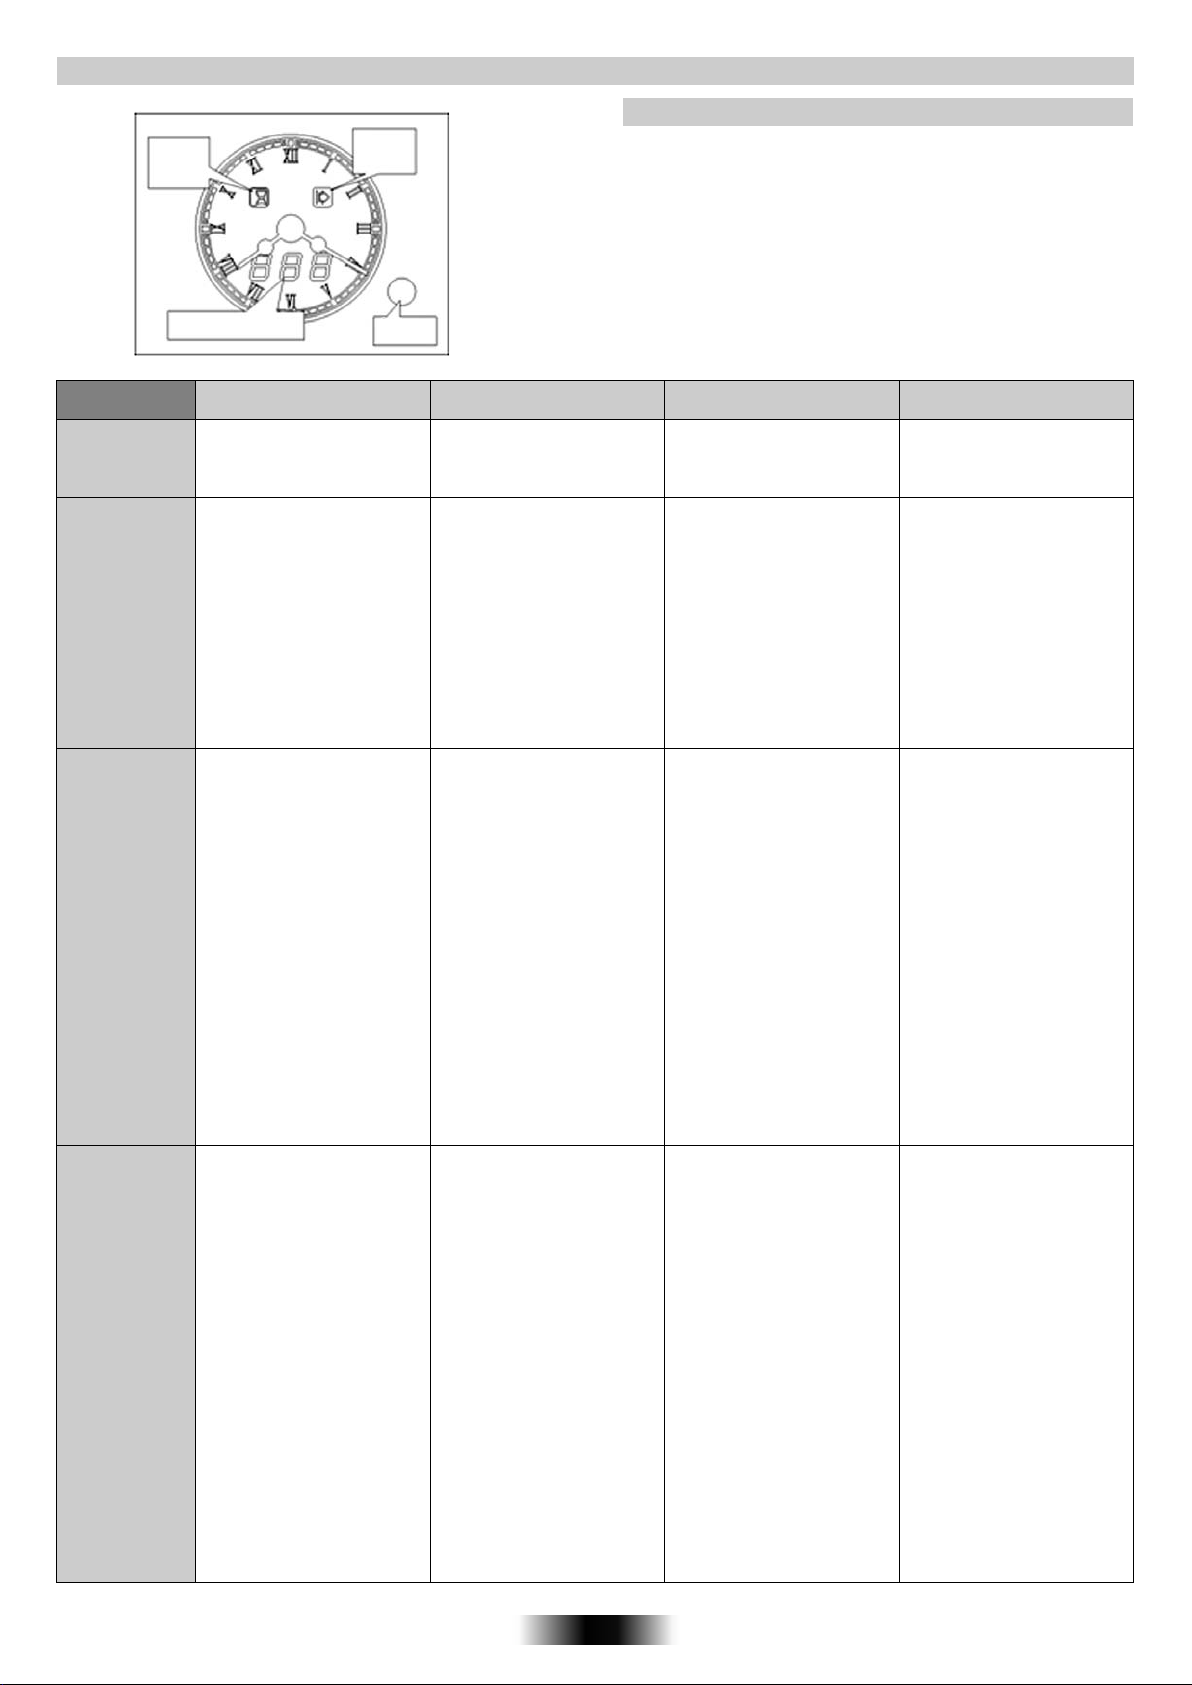
UTILIZAÇÃO RELÓGIO ANALÓGICO / PROGRAMADOR
Indicador
luminoso
de duração
Visor dos comandos
Indicador
luminoso
de inicio
Botão de
Programação
•Pressione, durante 4 segundos, o botão de programação. O
visor mostrará "SET". Um sinal sonoro emite um sinal.
•Seleccione a hora pressionando o botão. O movimento de
rotação avança 1 minuto. Mantenha-o pressionado para um
automático e rápido avanço.
Cada operação deverá ser realizada em 4 segundos, senão será
cancelada.
A
de ter em linha de conta.
ACERTAR O RELÓGIO
duração ou a hora pode ser visualizada por defeito, não a deve
FUNÇÃO COMO SELECCIONAR
MANUAL
CONTA-MINUTOS
max. 90 min.
VISOR
"BEL”
•Pode ser definido apenas
um modo de cozedura. Não
se acerta o relógio.
• Pressione duas vezes o
botão de programação, o
visor mostrará "BEL",
seguido por: "---".
• Defina uma hora rodando
o botão de programação.
• . Seleccione primeiro a
função de cozedura e a
temperatura desejada.
• Pressione uma vez o
botão de programação. O
visor mostra "DUR" e o
indicador luminoso
DURAÇÂO fica
SELECÇÃO DO
TEMPO DE
COZEDURA
max 24 H
VISOR
"DUR"
intermitente.
• Seleccione a duração
pretendida rodando o
botão de programação. O
tempo remanescente é
indicado e o indicador
luminoso de
Duração está
aceso.
COMO DESLIGAR O QUE FAZ PARA QUE SERVE
• Volte o selector do forno
para a posição "stop".
• Durante a contagem
decrescente, o visor, mostra
continuamente o tempo
remanescente em minutos e
depois em segundos. No
final da contagem o visor
mostra "000"
emite um sinal sonoro. Este
sinal sonoro parará por si
só, contudo pode ser
parado automáticamente
pressionado o botão de
programação.
alternado e
• No final do tempo
seleccionado, o visor
mostra "END", o indicador
luminoso Duração fica
intermitente e o forno
• Permite-lhe funcionar com
o forno.
• Um sinal sonoro é emitido
no final do tempo
seleccionado.
• Permite pre-definir o
tempo de cozedura para a
receita seleccionada.
• Para cozinhar os pratos
desejados.
• É possível ligar o forno
como relógio com alarme,
mesmo sem o forno estar
ligado para
cozinhar.
• No final do tempo
seleccionado o forno
desligar-se-à
automáticamante sendo
emito um sinal sonoro.
desliga-se
automáticamente. Um sinal
sonoro é emitido, para o
desligar pressione o botão
de programação. Caso
deseje reniciar a cozedura,
volte a pressionar o botão
de programação. Rode o
selector do
forno para a
posição stop. É possível
cancelar ou modificar a
duração da cozedura
durante a operação do
forno.
INICIO E FIM
DO TEMPO DE
COZEDURA
Max Pause
Time 24 H
VISOR
"PAU"
• Seleccione primeiro a
função de cozedura e a
temperatura desejada.
• Pressione uma vez para
seleccionar a duração. Siga
as instruções em cima
"Selecção do tempo de
Cozedura - "DUR".
• Pressione uma segunda
vez, o visor mostrará "PAU"
seguido de "----", o indicador
de inicio ficará intermitente.
• Seleccione o tempo de
pausa antes de iniciar o forno.
Durante a pausa, o forno não
cozinha, o visor mostra
contínuamente a duração do
tempo remanescente de
pausa, ambos os indicadores
luminosos, Start e Stop estão
ligados. Quando a contagem
termina, o forno iniciará a
cozedura e apenas o
indicador stop fica iluminado.
• No final do tempo de
cozedura seleccionado, o
forno irá desligar-se-à
automaticamente e será
emitido um sinal sonoro.
Para silenciar o sinal
sonoro pressione o botão
de programação.
Pressione segunda vez,
se desejar reiniciar a
cozedura. Rode o selector
do forno para a posição
stop. É possível cancelar
ou
modificar a duração da
cozedura durante a
operação do forno.
55 PT
• Permite programar o
forno para que a receita
esteja pronta à hora
desejada.
Exemplo. São 10H da
manhã. A receita tem que
estar a cozinhar durante
45 min e necessita de
estar pronta às 12H.
1. Seleccione a função
e a
temperatura desejada,
2. programe uma duração
de 45 min, 3. programe o
tempo de pausa de 75 min
(10H/11H15). O forno
ficará em pausa durante
as 10H e as 11H15,
iniciará a cozedura às
11H15 e desliga
automaticamente às 12H
Page 55
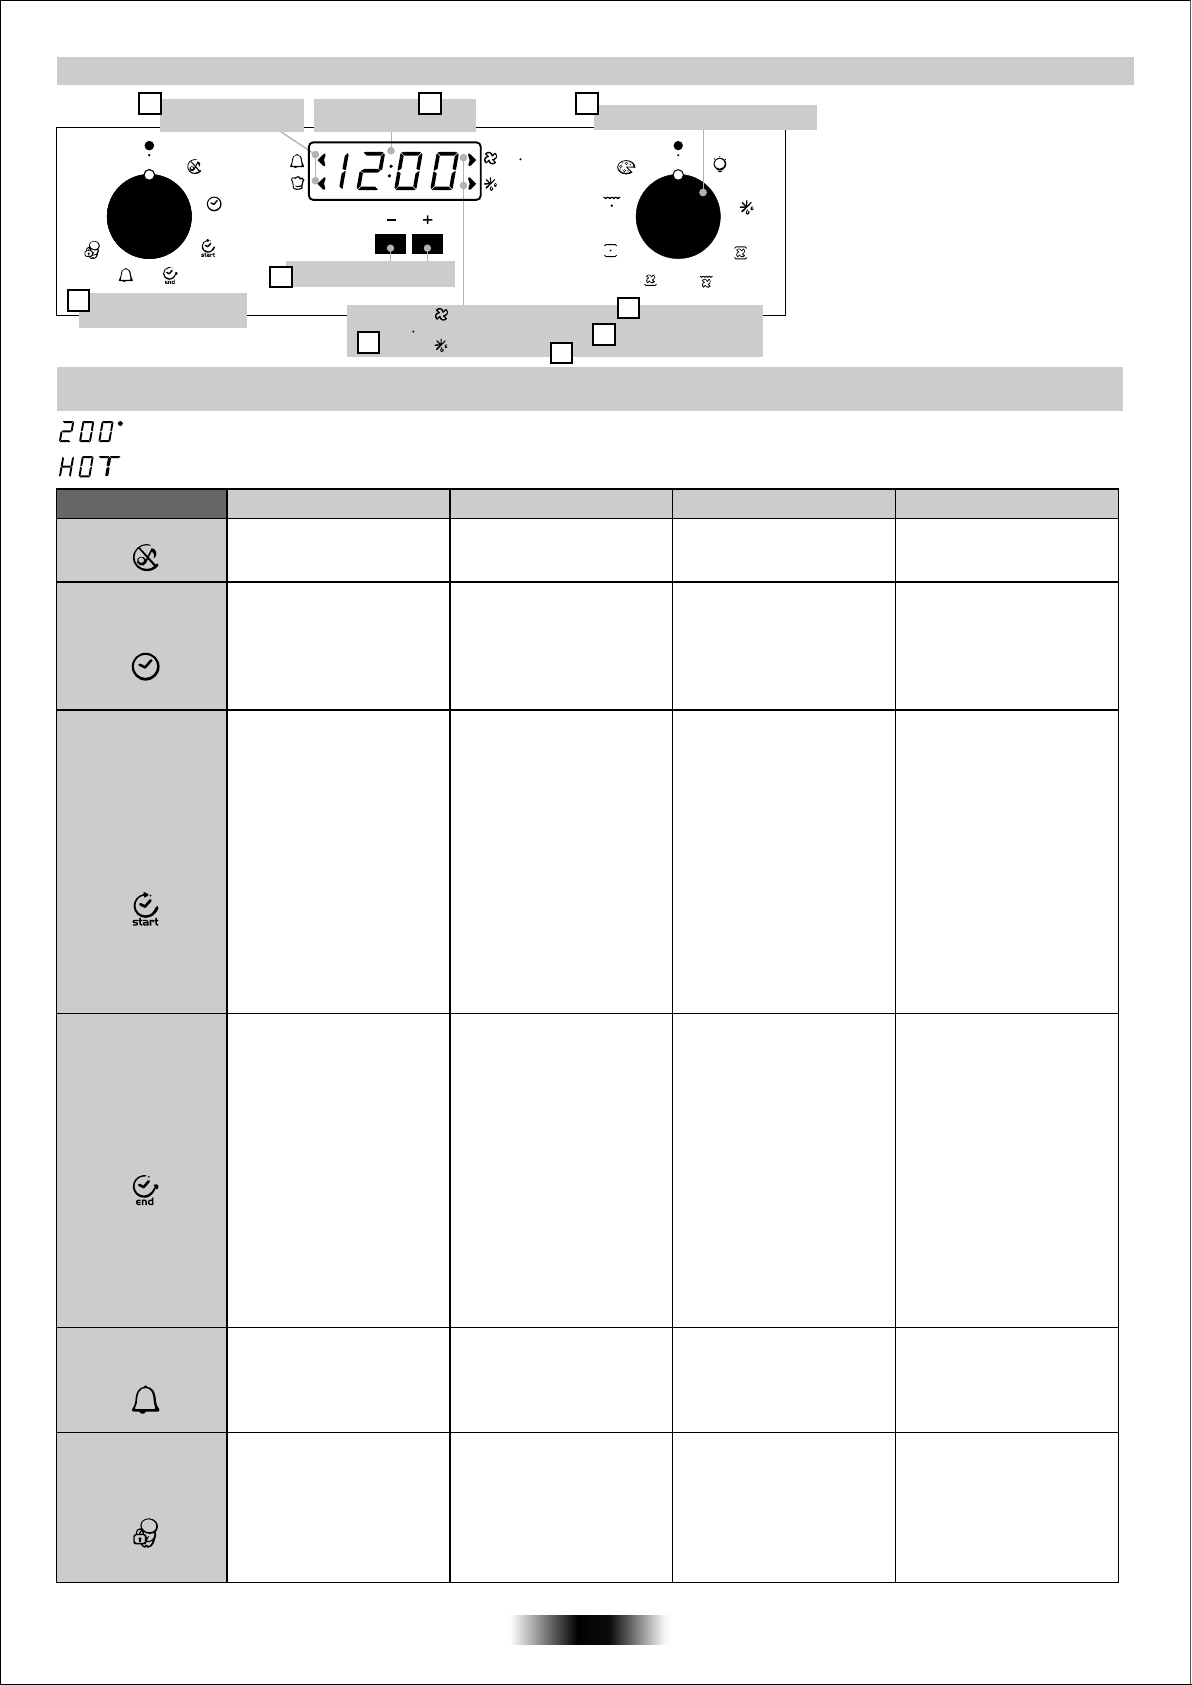
UTILIZAÇÃO DO PROGRAMADOR ELECTRÓNICO (Type A)
U
6
COOK
U
/
1
Botão selector de
9
funções*
Luzes: conta
minutos /automático
7
Relógio /
Temperatura
Botões de regulamento
Luzes: Função com ventilação
Função VARIOFAN
2
Descongelar
AVISO! A primeira operação a efectuar, após o forno ser instalado ou após uma interrupção de fornecimento
de energia (é indicado pelo visor, que mostrará 12:00 a piscar) é programar a hora correcta.
O indicador luminoso da temperatura irá piscar até a temperatura programada ser atingida.
HOT Quente: quando um programa de cozedura termina, se o forno ainda estiver quente, será visível a palavra “HOT” no
visor, em alternância com a hora, mesmo que o selector de programas esteja na posição OFF (desligado).
FUNÇÕES COMO ACTIVAR?
MODO SILENCIOSO
PROGRAMAR
A HORA
DURAÇÃO DO
TEMPO DE
COZEDURA
FIM DO TEMPO
DE COZEDURA
CONTA
MINUTOS
BLOQUEIO
PARACRIANÇAS
• Rode o selector de
funções (esquerdo) para
a posição modo silencioso
• Rode o selector de
funções (esquerdo) para
a posição programar a
hora
• Utilize os botões “+” ou
acertar a hora
“-“ para
• Rode o selector de funções
(direito) para
uma função de cozedura.
•Rode o selector de funções
(esquerdo) para a posição
“duração do tempo de
cozedura”
• Programe a duração do
tempo de cozedura utilizando
os botões “+” e “-“
• Os indicadores luminosos
AUTO (Automático) acendem
• Rode o selector de
funções (direito) para a
posição de uma função de
cozedura.
• Rode o selector de
funções (esquerdo) para a
posição “fim do tempo de
cozedura”
• Programe a hora utilizando
os botões “+” e “-“
• Os indicadores luminosos
AUTO (Automát ico)
acendem
• Rode o selector de funções
(esquerdo) para a posição
Minute Minder (Conta Minutos).
•Programe o tempo de
cozedura utilizando os botões
“+” e “-“
• Rode o selector de
funções (esquerdo) para a
posição Bloqueio para
crianças. Pressione o botão
“+” durante 3 segundos.
• Bloqueio de crianças está
activado quando a palavra
“STOP” aparece no visor
a posição de
COMO DESLIGAR?
• Rode o selector de
funções para a posição
OFF.
• Rode o selector de
funções para a posição
OFF.
•Quando a duração do tempo
de cozedura termina,
desl iga- se automáticamente
e um alarme sonoro soará
durante alguns segundos.
Para desligar a duração do
tempo de cozedura antes do
programado, rode o selector
de funções para a posição
OFF ou programe o relógio
para 00.00 rodando o selector
de funções (esquerdo) para a
posição duração do tempo
de
cozedura e utilizando os
botões “+” e “-“
• Quando o relógio atinge a
hora do fim da cozedura, o
fornodesliga-se
automáticamente.
• Para desligar a função,
rode o selector de funções
para a posição OFF.
• Programe o relógio para
00.00, rodando o selector
de funções (esquerdo)
para a posição OFF e
utilizando o botão “-“
• Rode o selector de
funções para a posição
OFF e Pressione o botão
“+” durante 3 segundos.
A indicação“STOP”
•
desaparece
COOK
8
Botão de selecção
*
4
5
o forno
1. Luzes: conta minutos /automático
2. Luzes
3. Função com ventilação
4. Função VARIOFAN
5. Descongelar
6. Relógio / Temperatura
7. Botões de regulamento
8. Botão de selecção
9. Botão selector de funções *
3
*de acordo com o modelo
O QUE FAZ? PARA QUE SERVE?
• Permite desligar o sinal
sonoro do contaminutos
• Permite acertar a hora do
relógio que é visivel no
mostrador
•Permite programar a
duração do tempo de
cozedura para a
escolhida.
•Quando a duração do tempo
de cozedura foi prédefinido,
rode o selector para a
posição OFF para voltar à
hora actual.
•Para visualizar a duração do
tempo de cozedura
selecccionada, rode o
selector de funções
(esquerdo) para a posição
duração do tempo de
cozedura.
• Permite programar a hora
de terminar a cozedura
pretendida.
• Quando a função “fim do
tempo de cozedura” foi
pré-definido, rode o
selector para a posição
OFF para voltar à hora
actual.
• Para visualizar a duração
do tempo de cozedura
selecccionada, rode o
selector de funções
(esquerdo) para a posição
duração do tempo
cozedura.
• Soará um sinal sonoro
durante alguns segundos
no final do tempo
programado
•O forno não pode ser
utilizado
receita
de
• Desliga o sinal sonoro do
conta minutos
• Acerta a hora
NB: Programe e hora
quando o forno for
instalado ou quando
falta a luz (o relógio
mostrará 12.00 a piscar)
• Para cozinhar as receitas
desejados
• Esta função é utilizada para
cozinhar quando se pretende
programar antecipadamente.
Por exemplo, a receita
necessita de estar a
cozinhar durante 45 min.,
e estar pronta às 12:30 pm.
O cozinhado irá iniciar
automáticamente às
11:45 (12:30 menos 45
min) e irá terminar
apenas na hora prédefinida
como “Fim de
Tempo de Cozedura”,
depois o forno desligarseà automáticamente.
• Permite utilizar o alarme
do forno mesmo quando
este está desligado
• Especialmante uti lize
quando as crianças estão
em casa
56 PT
Page 56
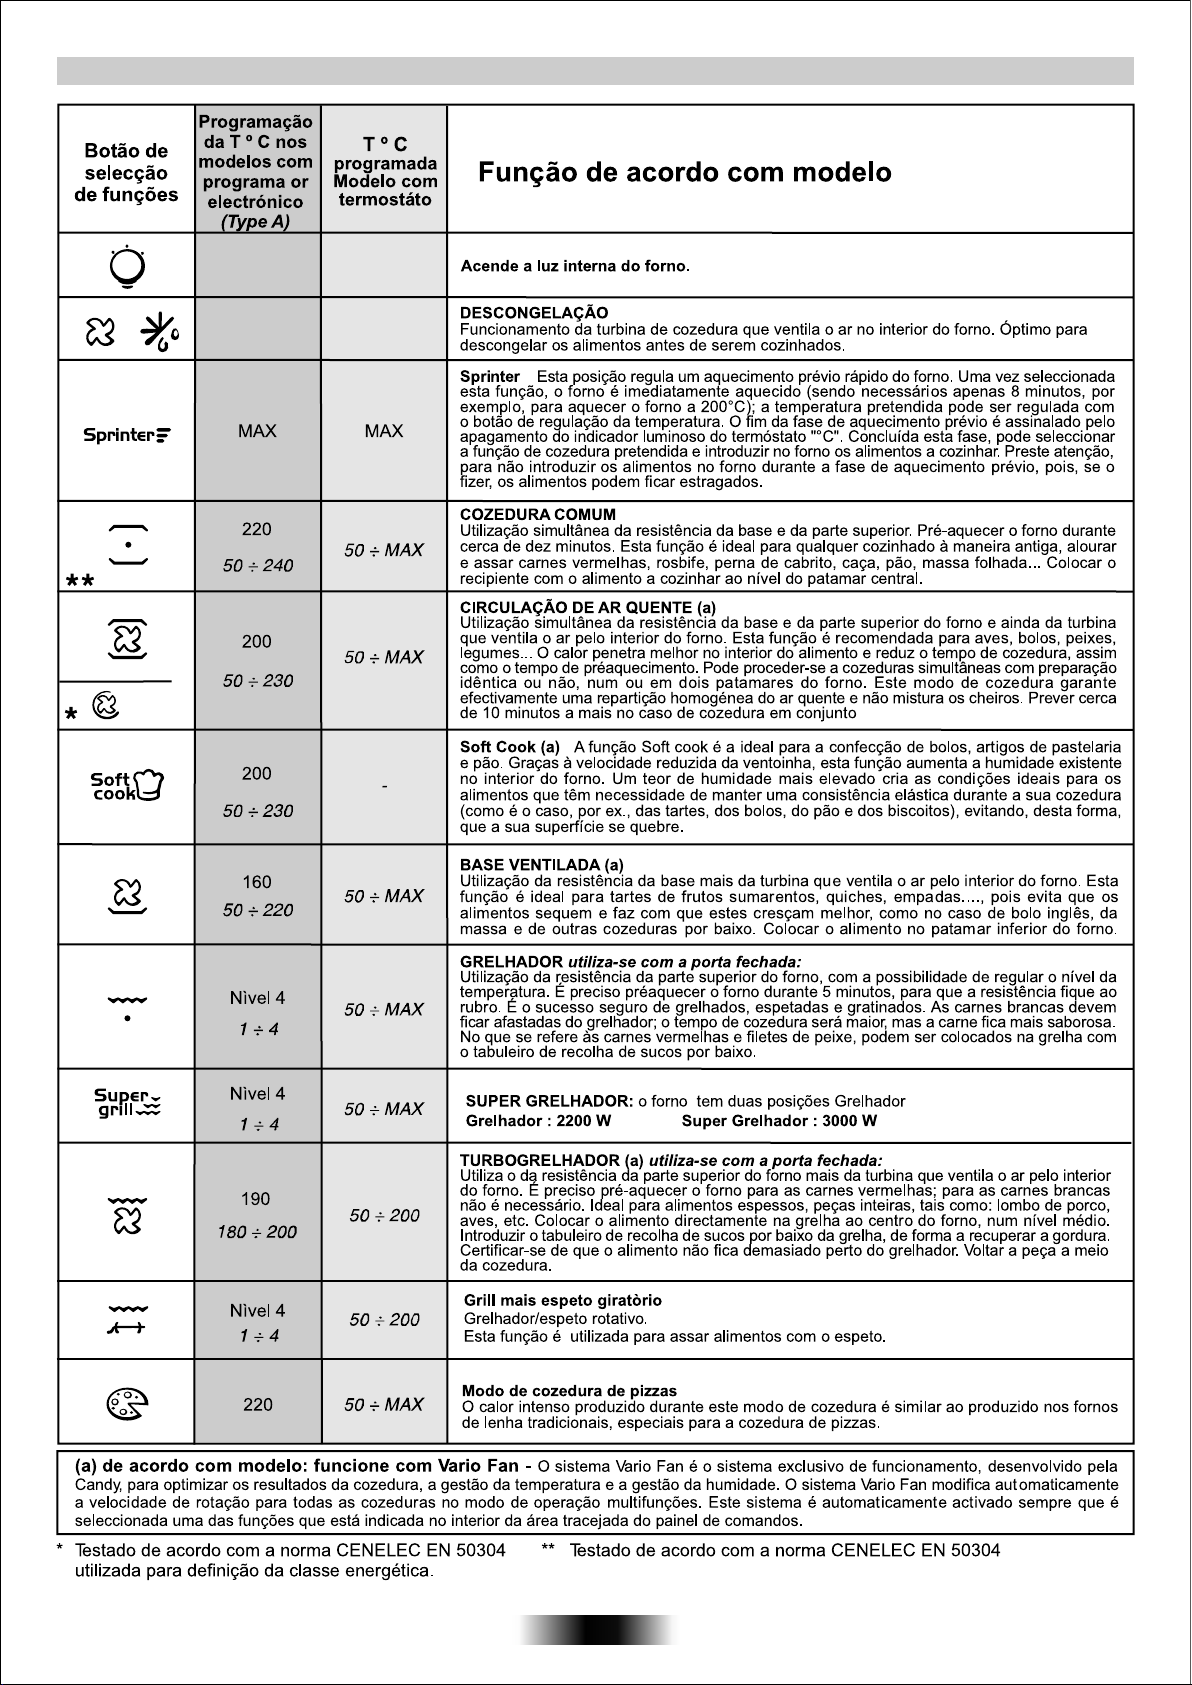
INSTRUÇÕES DE OPERAÇÃO
57 PT
Page 57
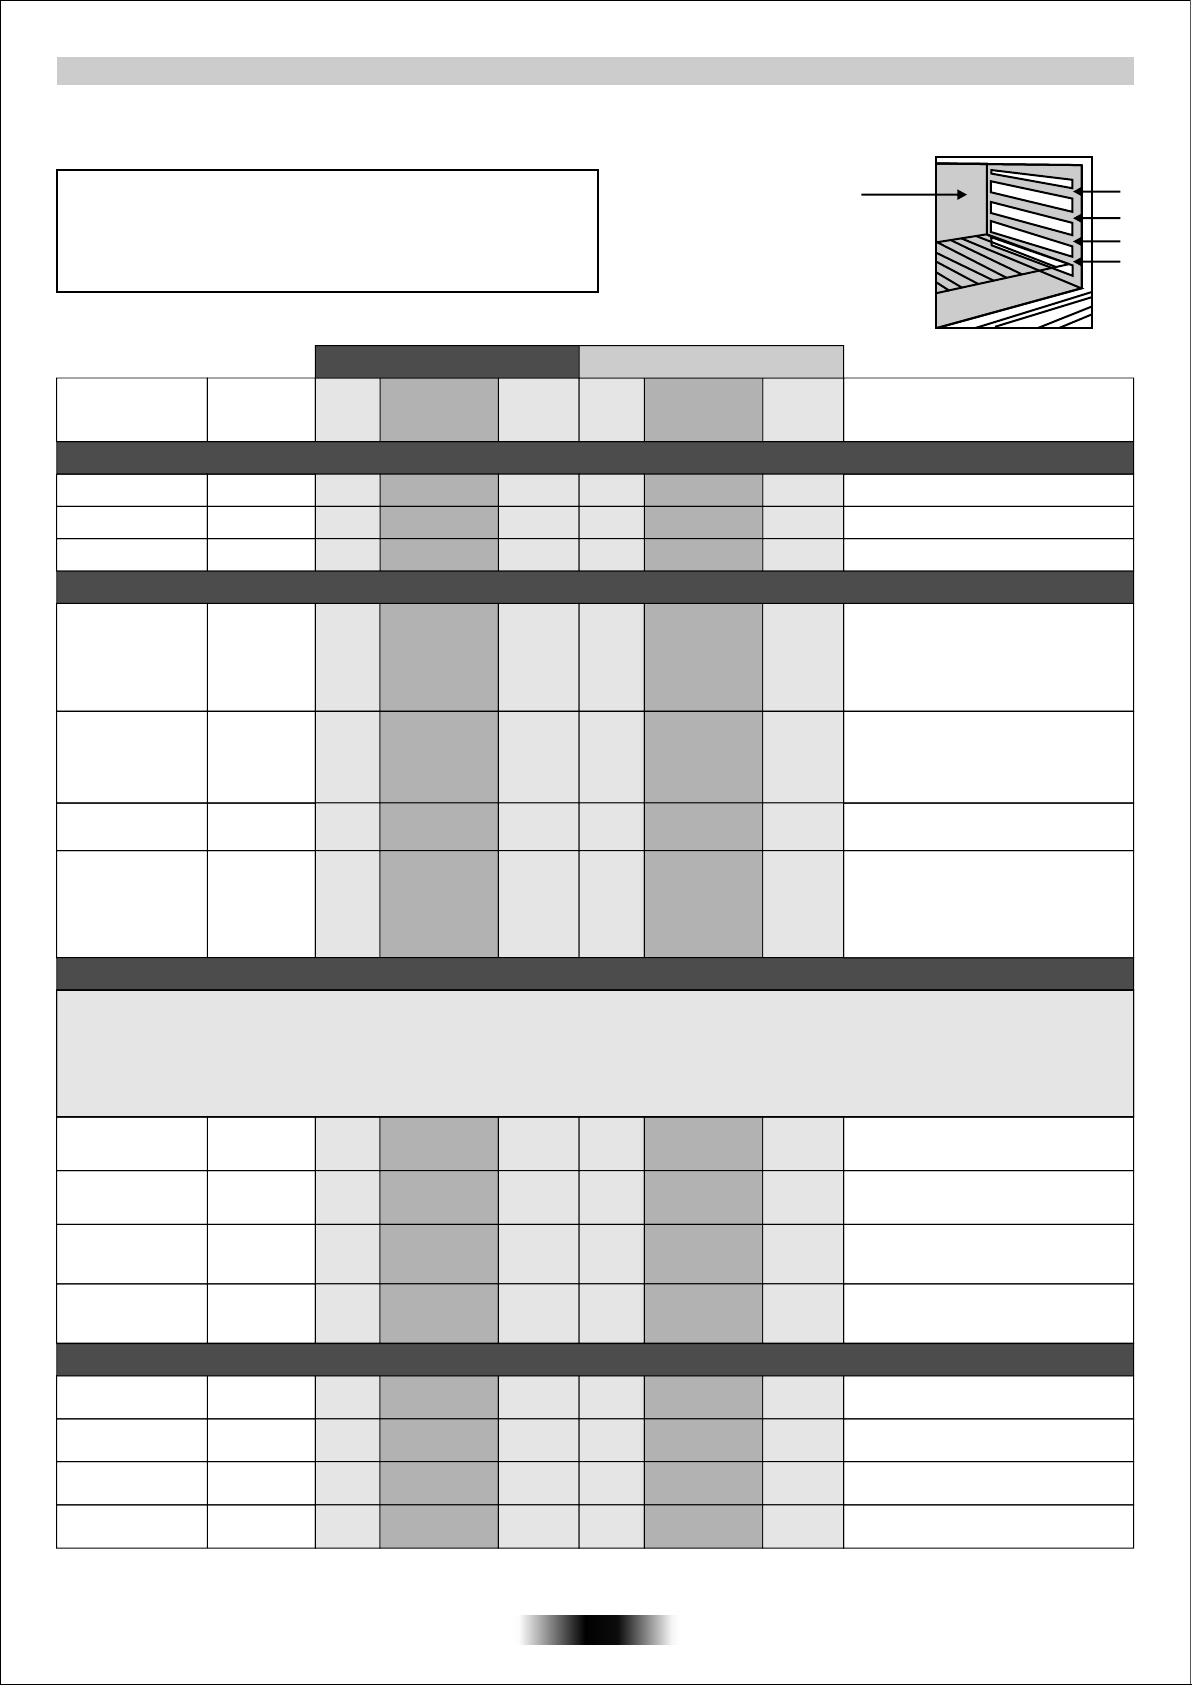
TABELAS DE TEMPOS DE COZEDURA
Os tempos sugeridos nas tabelas que se seguem revestem-se de mero carácter orientativo, podendo variar em função da qualidade, da frescura,
da dimensão e da espessura dos alimentos e ainda segundo o seu gosto pessoal. Deixe sempre os alimentos cozinhados repousarem alguns
minutos antes de os servir, pois todos os alimentos
continuam a cozer depois de serem retirados do forno
Conselhos úteis:Desligue o forno pelo menos 10 minutos antes do
tempo indicado, deixando os alimentos no seu interior. Esta medida,
além do mais, permitir-lhe-á poupar energia e completar a cozedura
a seu gosto. Para que a superfície dos alimentos não fique
demasiado seca é indispensável reduzir a temperatura.
Forno eléctrico estático
Alimentos
Quantidade
Nível
Tempo de
cozedura
em minutos
Tempe-
ratura
do forno
• Massas
Lasanha
Cannellonis
Massa cozinhada
no forno
Kg 3,5
Kg 1,8
Kg 2,5
22
22
22
70 ÷ 75
50 ÷ 60
55 ÷ 60
220
220
220
• Pão, pizzas
Pão
Pizzas
Pastéis
(congelados
vol au vents)
4 fogaças
Kg 1
de massa
Kg 1
n° 24
unids.
gr. 200
de massa
cada
22
35
prerisc.10
25 ÷ 35
30 ÷ 35
25 ÷ 30
200
190
220
200
• Carne
Posição da prateleira
Forno com ventoinha eléctrico
Nível
11
21
22
Tempo de
cozedura
em minutos
60 ÷ 65
40 ÷ 50
45 ÷ 50
30 ÷ 35
prerisc.10
20 ÷ 25
25 ÷ 30
20 ÷ 25
Tempe-
ratura
do forno
200
200
200
180
190
200
180
Observações
Coloque a lasanha no forno quando ele
estiver frio
Coloque a lasanha no forno quando ele
estiver frio
Coloque a lasanha no forno quando ele
estiver frio
Dê a forma de umpão à massa e faça
uma cruz com uma faca no topo. Deixe
a massa levedar durante, pelo menos,
2 horas. Unte a forma e coloque a
massa do pão
Aqueça previamente o forno durante 15
minutos e coloque as pizzas numa
forma previamente untada. Guarneça a
base da pizza com tomate, queijo,
fiambre, óleo, sal e oregãos.
Coloque os 24 vol au vents no forno e
deixe-os cozinhar
Aqueça previamente o forno durante 15
minutos, unte a forma,
fogaças com óleo e sal e deixe-as
levedar, à temperatura ambiente,
durante pelo menos 2 horas antes de
as colocar no forno
no medio dela
tempera as 4
4
3
2
1
Todos os tipos de carne podem ser cozinhados em recipientes tanto de bordos altos como de bordos baixos. Se optar por um recipiente
de bordos baixos, é aconselhável tapá-lo, a fim de evitar que o forno fique sujo com os salpicos dos condimentos utilizados no tempero
da carne. As carnes confeccionadas
em recipientes descobertos resultam mais tostadas. Os tempos de cozedura indicados aplicam-se tanto à cozedura em recipientes
cobertos como à cozedura em recipientes descobertos.
Peça de vaca
inteira
Lombo de porco
assado
Lombo de vitela
assado
Lombo de vaca
assado
• Fish
• Peixe
Truta
Salmão
Solha
Dourada
Kg 1
Kg 1
Kg 1,3
Kg 1
3 interas/Kg 1
700 gr. em
postas de 2,5 cm
cm de espessura
Filetes / Kg 1
2 inteiras
em recipientes cobertos ficam mais macias e com mais sucos, enquanto que as carnes cozinhadas
Coloque a carne num pirex de bordo
70 ÷ 80
100 ÷ 110
90 ÷ 110
80 ÷ 90
40 ÷ 45
30 ÷ 35
40 ÷ 45
40 ÷ 45 220
220
220
220
220
220
220
220
33
22
21
22
22
22
22
22
50 ÷ 60
80 ÷ 90
90 ÷ 100
80 ÷ 90
35 ÷ 40
30 ÷ 25
35 ÷ 40
35 ÷ 40
200
alto com sal e pimenta. Vire a carne a
meio da cozedura.
Tempere a carne com sal, pimenta,
manteiga e temperos naturais e
óleo,
200
leve-a ao forno num pirex tapado.
Idem.
200
Idem.
200
Cozinhe as trutas num pirex, coberto,
200
com óleo, sal e cebolas.
Cozinhe o salmão num pirex sem
200
tampa, com sal, pimenta e óleo.
Cozinhe a solha temperada com sal e
200
1 colher de óleo.
Cozinhe em recipiente coberto, com óleo
200
sal.
e
58 PT
Page 58
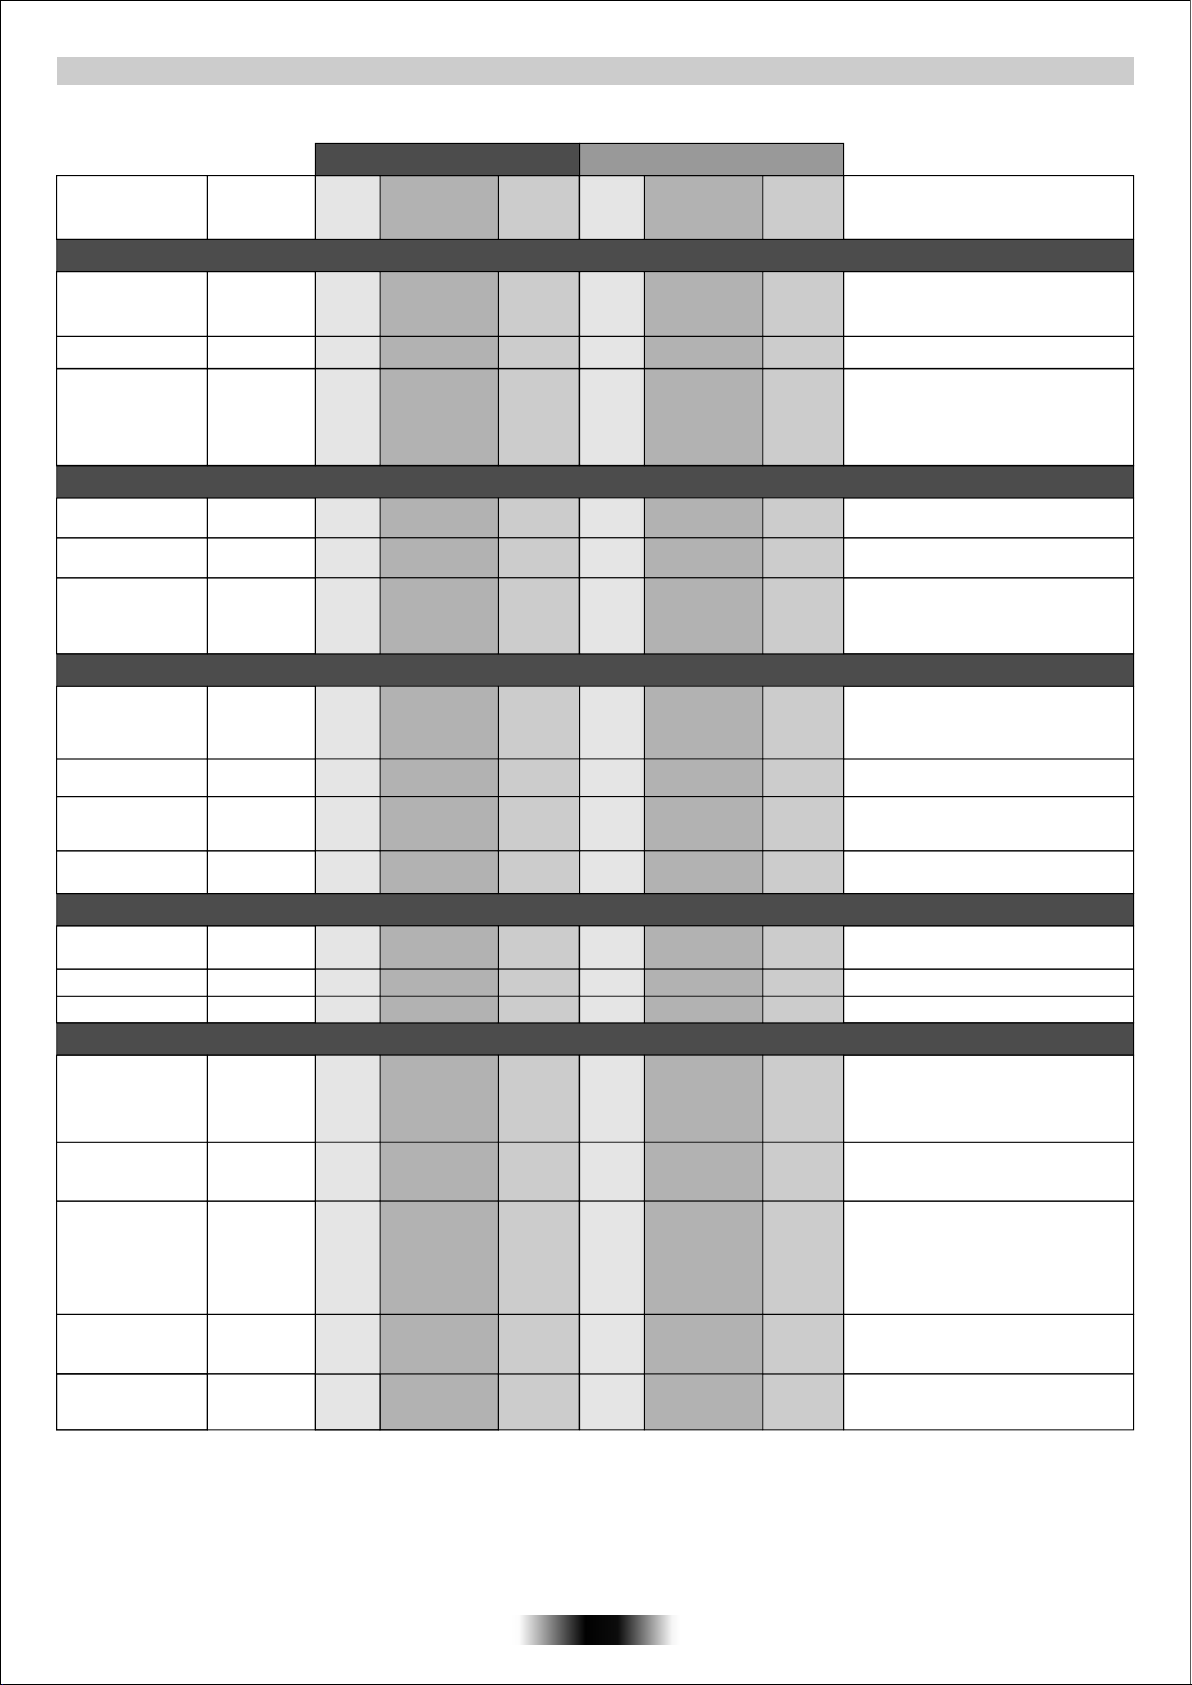
TABELAS DE TEMPOS DE COZEDURA
Forno eléctrico estático Forno com ventoinha eléctrico
Alimentos
Quantidade
Nível
Tempo de
cozedura
em minutos
• Avex, coelho
Galinha
Frango
Coelho aos
pedaços
Kg 1-1,3
Kg 1,5-1,7
Kg 1-1,2
22
22
22
60 ÷ 80
110 ÷ 120
55 ÷ 65
• Doces e pastelaria
Tart e de chocolate
na forma
Tort a de cenoura
na forma
Torte de fruta
(damascos ou
alperces)
700 gr
1
1
1
55
55
65
Tempe-
ratura
do forno
220
220
220
180
175
180
Nível
1
1
1
Tempo de
cozedura
em minutos
60 ÷ 70
100 ÷ 110
50 ÷ 60
50
40 ÷ 45
50 ÷ 60
Tempe-
ratura
do forno
200
200
200
160
160
160
Observações
Tempere a galinha com condimentos
naturais e muito pouco óleo e coloquea num pirex de bordos altos
Idem.
Coloque os pedaços de coelho, de
dimensões semelhantes, na
pìingadeira e tempere com
condimentos naturais. Se necessário,
vire a carne a meio da cozedura.
Em forma de tarte de 22 cm de Ø.
Aqueça
previamente o forno (10 min.).
Em forma de tarte de 22 cm de Ø.
Aqueça previamente o forno (10 min.).
Em forma de tarte de 22 cm de Ø.
Aqueça previamente o forno (10 min.).
• Legumes
Funcho
Abobrinha
Batatas
Cenouras
• Fruta
Maçãs inteiras
Pêras
Pêssegos
• Grelhados
Pão de forma
tostado
Tostas
recheadas
Salsichas
Entrecosto
Coxas de frango
800 gr
800 gr
800 gr
800 gr
Kg 1
Kg 1
Kg 1
4 fatias
4
n°6 / Kg 0,9
n°4 / Kg 1,5
n°4 / Kg 1,5
Coloque o funcho partido em 4 bocados
1
1
2
1
1
1
1
44
70 ÷ 80
70
60 ÷ 65
80 ÷ 85
45 ÷ 55
45 ÷ 55
45 ÷ 55
5 (pré-aqec.:
5 min.)
10 (pré-aqec.:
33
44
5 min.)
25/30
(pré-aqec.:
5 min.)
25 (pré-aqec.:
44
33
5 min.)
50/60 (pré-
aqec.:5 min.)
220
220
220
220
220
220
220
Grelhador Grelhador
Grelhador Grelhador
Grelhador Grelhador
1
1
2
1
2
2
2
5 (pré-aqec.:
5/8 (pré-aqec.:
(pré-aqec.:
60 ÷ 70
60 ÷ 70
60 ÷ 65
70 ÷ 80
45 ÷ 55
45 ÷ 55
45 ÷ 55
10 min.)
10 min.)
15/12
200
200
200
200
200
200
200
10 min.)
Grelhador Grelhador
Grelhador
15/20
(pré-aqec.:
min.)
5
50/60
(pré-aqec.:
10 min.)
Grelhador
com a parte de dentro voltada para
cima, tem-perados com
num pirex e cubra.
Corte em fatias e coza num pirex,
cobertas, com manteiga e sal.
Corte em bocados iguais e cozinhe
num pirex coberto com óleo, sal,
oregãos ou rosmaninho
Corte às rode-las, e cozinhe num pirex
tapado.
Cozinhe num pirex ou recipiente cerâmico,
sem tapar. Deixe arrefecer no forno.
Idem.
Idem.
Coloque o pão sobre a grelha. Volte as
fatias a meio. Atenção: deixe o pão ficar no
fundo do forno, a repousar, antes de servir
(forno desligado).
Coloque as tostas sobre a grelha apoiada
na pingadeira: volte-as quando ficarem
douradas.
Corte-as ao meio e coloque-as sobre a
grelha (parte de dentro voltada
Volte ameio da cozedura. Atenção: convém
controlar visualmente a uniformidade da
cozedura. Se esta não se apresentar
uniforme, troque a posição das salsichas
mais passadas com as menos passadas.
Certifique-se de que o entrecosto está
exposto aos efeitos totais do grelhador
principal.
Tempere com condimentos naturais e volte
de vez
manteiga e sal
para cima).
em quando.
59 PT
Page 59
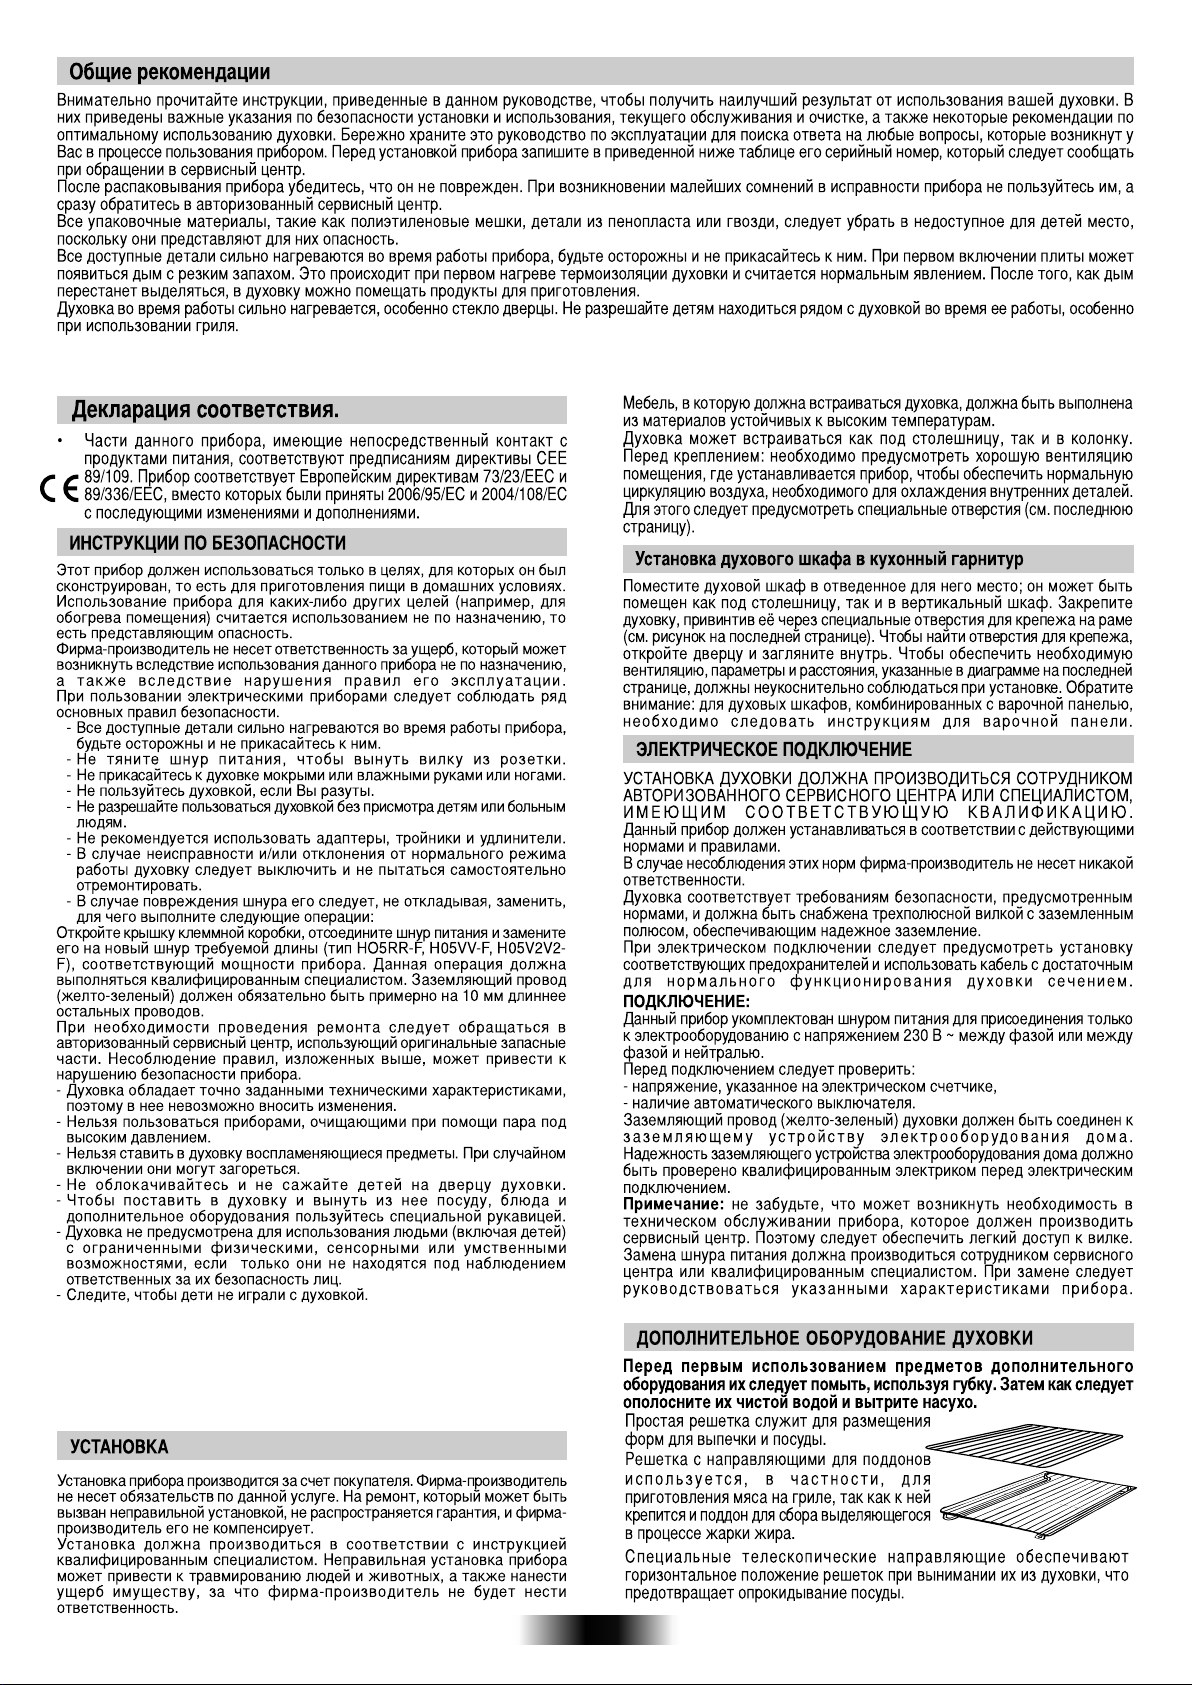
В соответствии с требованиями Федерального закона № 261-ФЗ от 23.11.09 и Постановлением Правительства РФ № 1222 от 31.12.09г., настоящий
товар снабжен информацией на русском языке о классе энергетической эффективности в виде специальной этикетки, которая должна быть
размещена на лицевой части прибора в месте продажи потребителям.
•Не
покрывайте внутренние поверхности духовки алюминиевой
фольгой и другими одноразовыми упаковочными материалами,
которые продаются в хозяйственных магазинах. Алюминиевая
фольга или другой упаковочный материал при контакте с
горячей эмалированной поверхностью духовки может
расплавиться и повредить внутреннюю эмалированную
поверхность духовки.
I класс защиты от поражения током.
60 RU
Page 60
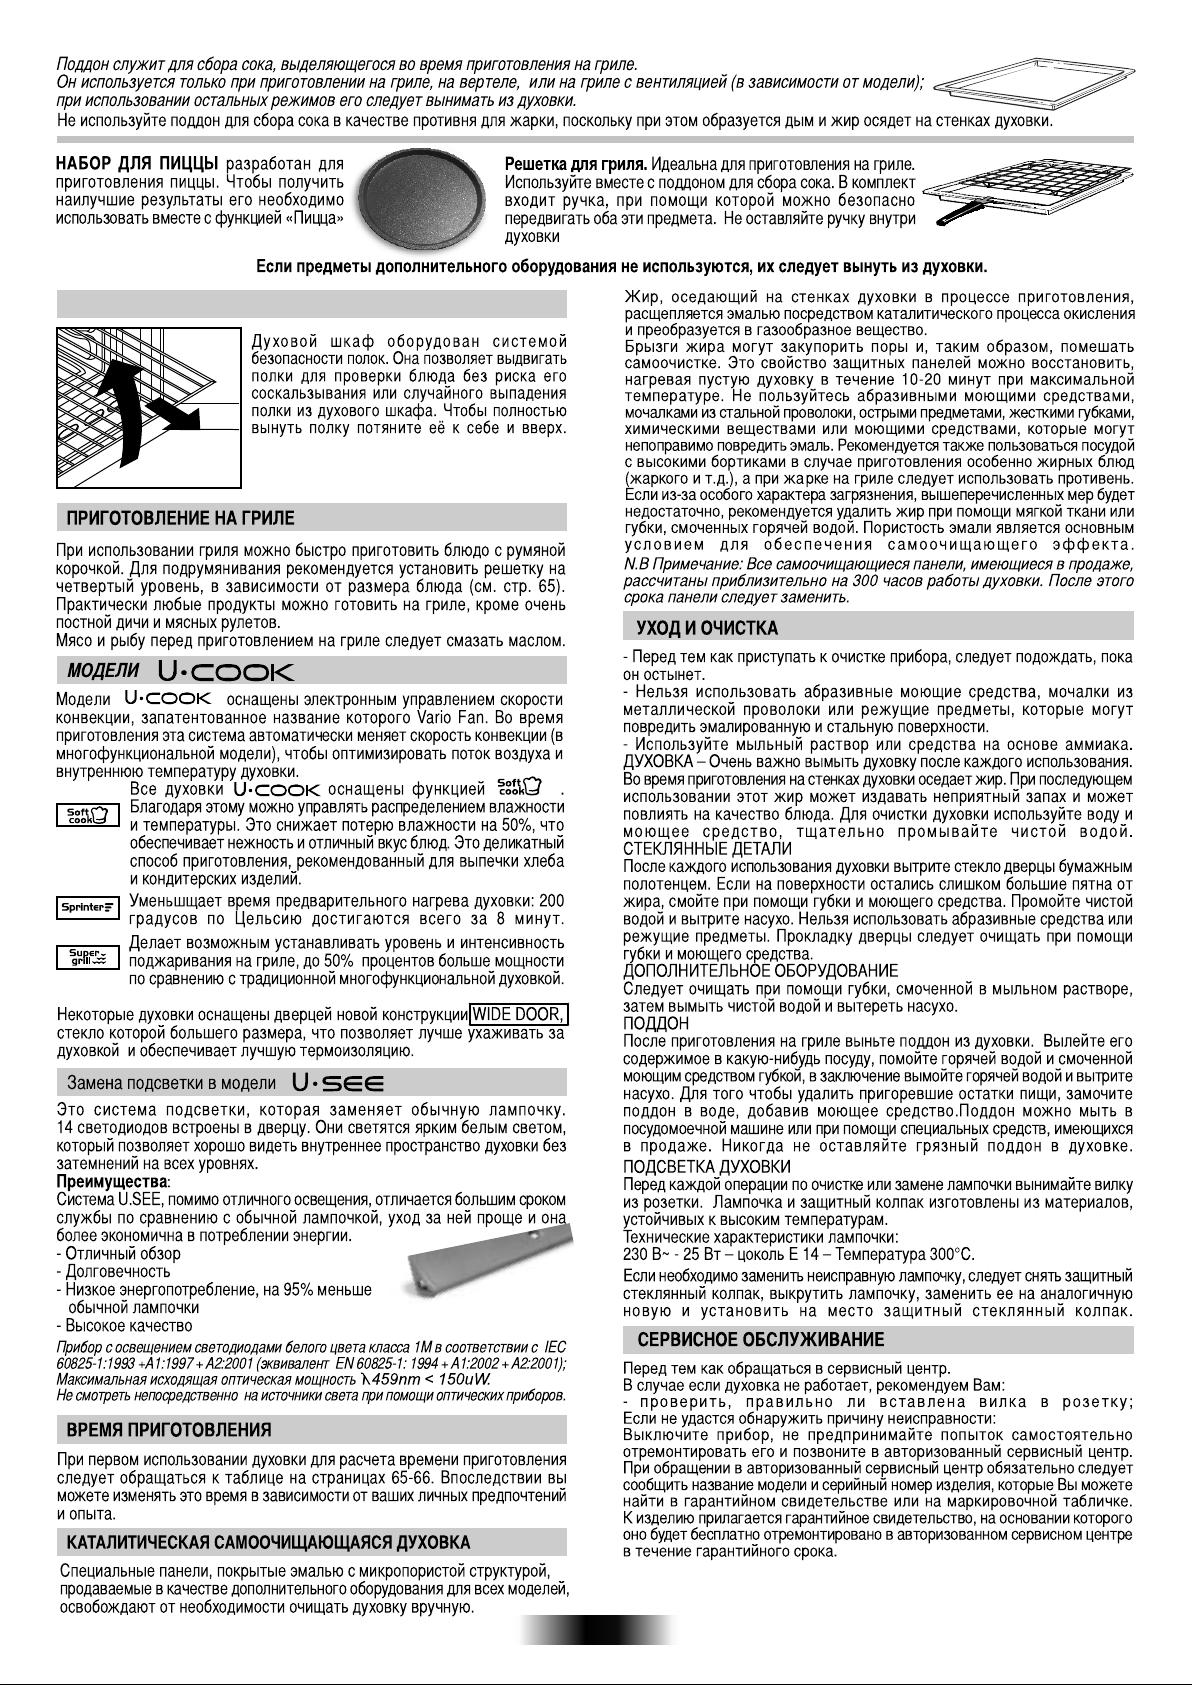
СИСТЕМА БЕЗОПАСНОСТИ ПОЛОК
Серийный номер состоит из 16 цифр. Первые 8 цифр код модели.
Следующие 4 цифры дата производства (год, неделя). Последние 4
цифры заводские номера.
61 RU
Page 61
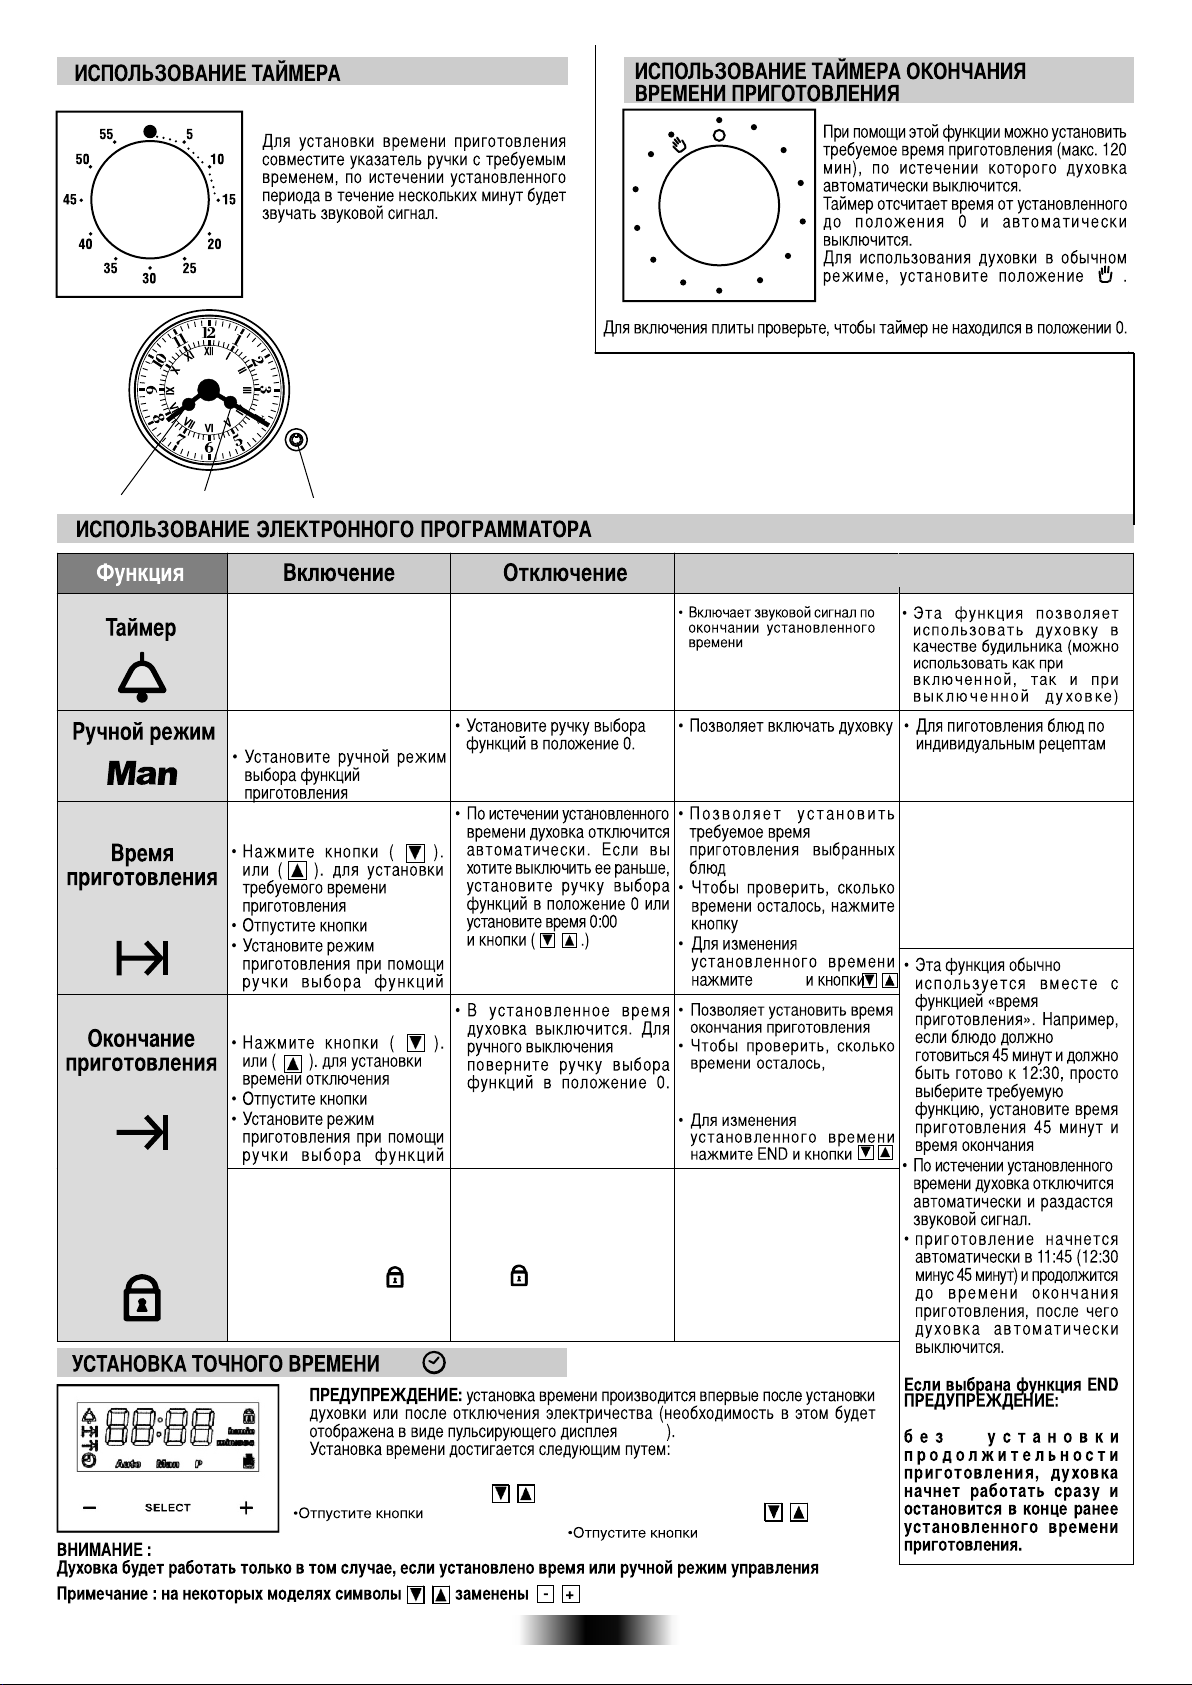
Часовая стрелка Минутная стрелка Кнопка
• Нажмите центральную
кнопку 1 раза
• Нажмите центральную
кнопку 1 раза
10
70
20
30
40
50
60
011
100
210
90
80
Установка аналогового программатора:
Когда вы нажимаете на кнопку ,минутная стрелка сдвигается на одну
минуту вперед. Если вы будете удерживать кнопку нажатой, стрелки
начнут двигаться вперед быстро.
Что выполняет Для чего
• Когда установленное время
истечет, раздастся звуковой
сигнал. По истечении 7 минут
сигнал прекратится автоматически,
он также может быть остановлен
нажатием кнопки Select.
• В ходе процесса на дисплее
отражается оставшееся время:
мин., Сек.
Защита от
детей
• Нажмите центральную кнопку
2 раза
• Нажмите центральную кнопку
3 раза
•Режим защиты от детей
включается удерживанием
кнопки Set (+) на
протяжении минимум 5
секунд до тех пор,
не загорится значок . С
этого момента все
остальные функции будут
заблокированы.
пока
SELECT
•Режим Защиты от детей
отключается также
удерживанием кнопки Set
(+) на протяжении минимум
5 секунд до тех пор, пока
значок не пропадет. С
этого момента все функции
снова будут доступны для
выбора.
•Для прекращения сигнала
нажмите любую кнопку.
Нажмите центральную кнопку,
чтобы вернуться к функции
часов
SELECT
SELECT
Нажмите центральную
кнопку 3 раза
12:00
•Нажмите центральную кнопку 1 раза L1, L2, L3 НАСТРОЙКА ЗВУКОВОЙ СИГНАЛ
•Настройка время кнопками . •Нажмит е центральную кнопку 5 раза
•Настройка время кнопками .
62 RU
Page 62
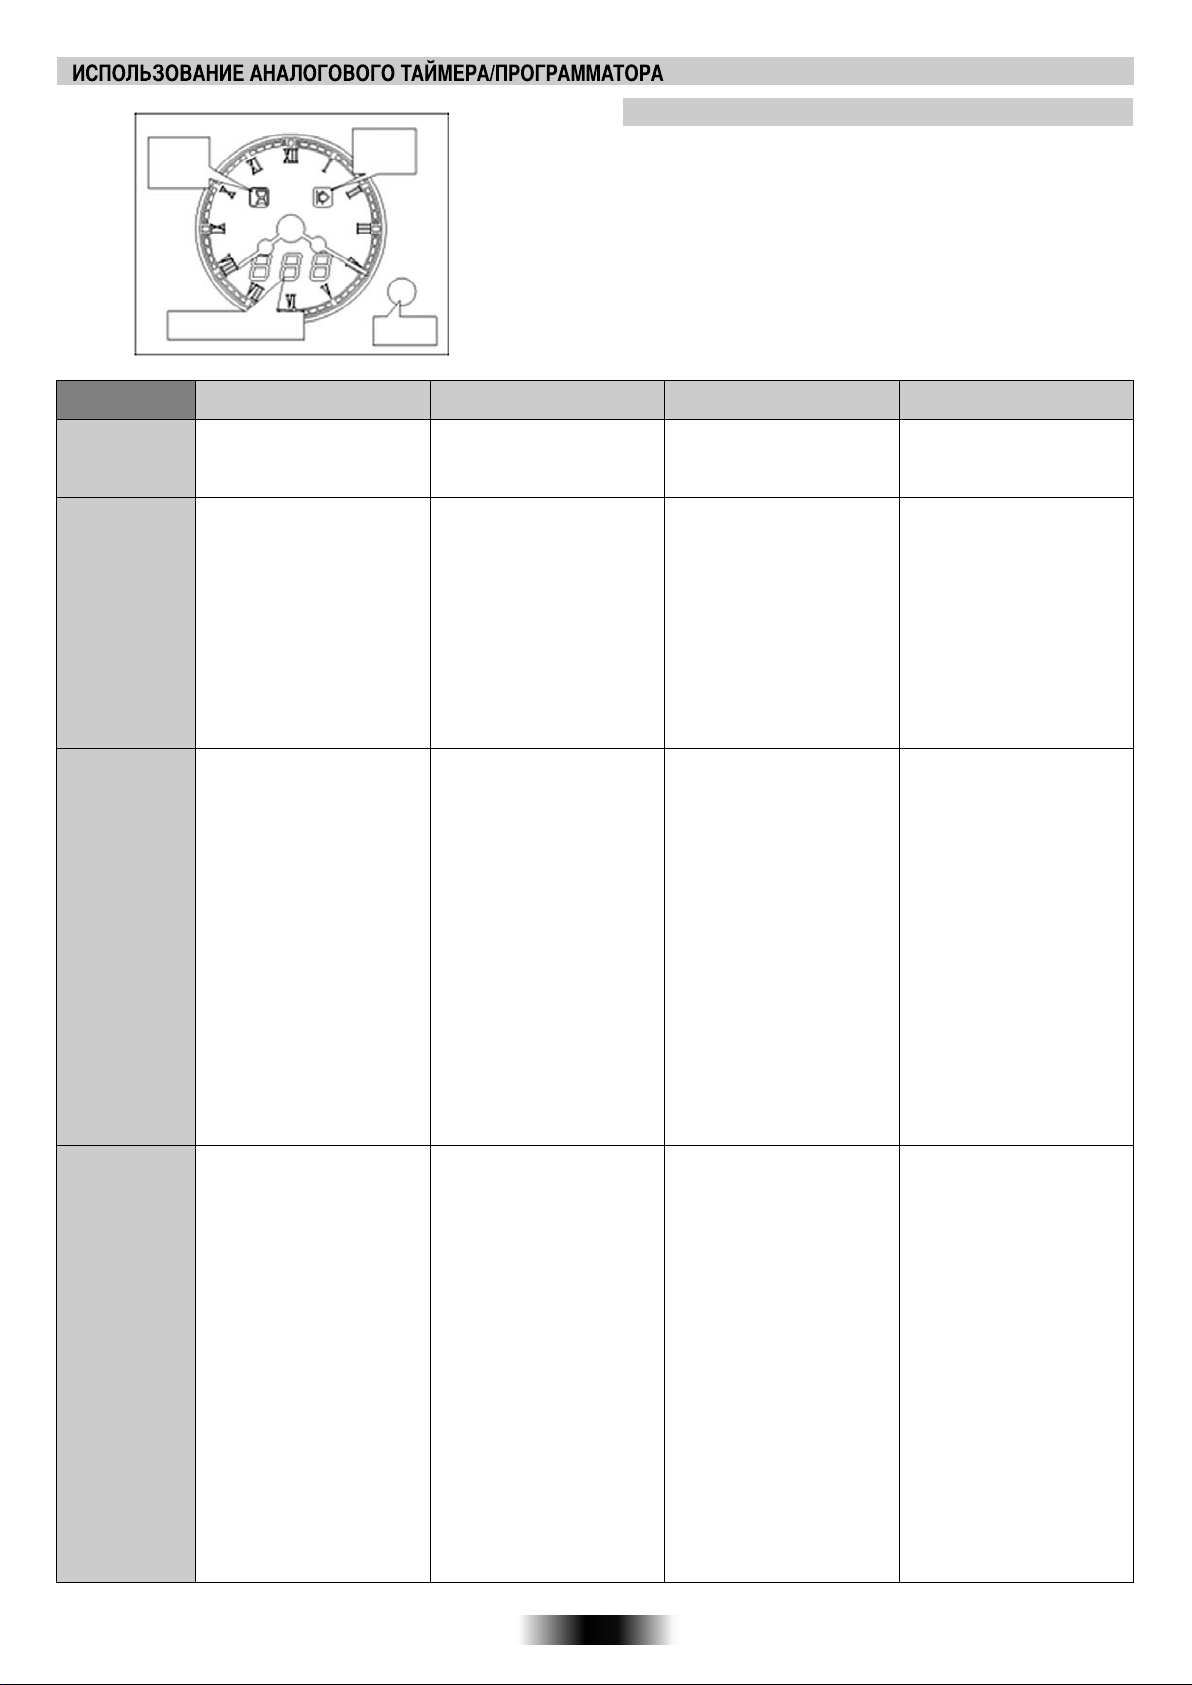
Индикатор
времени
Индикатор
начала
УСТАНОВКА ТЕКУЩЕГО ВРЕМЕНИ
•Нажмите кнопку установки и удерживайте ее в нажатом
положении в течение 4 с. На дисплее появляется "SET"
(УСТАНОВКА). Подается звуковой сигнал.
• Установите текущее время с помощью нажатия кнопки.
Вращение кнопки увеличивает время шагами по 1 минуте. Для
быстрого увеличения установки удерживайте кнопку в нажатом
положении.
Отображение команд
ФУНКЦИЯ Как ее активировать
РУЧНОЕ
УПРАВЛЕНИЕ
• Она может быть выбрана
только вместе с режимом
приготовления пищи. Без
установок таймера.
• Нажмите кнопку
НАПОМИНАНИЕ
ОБ ОСТАВШЕМСЯ
ВРЕМЕНИ
макс. 90 мин.
установки два раза, на
дисплее отображается
"BEL" и "---".
• Установите время с
помощью вращения
кнопки установки.
НА ДИСПЛЕЕ
ОТОБРАЖАЕТСЯ
"BEL" (ЗВОНОК)
• . Прежде всего,
выберите функцию
приготовления пищи и
нужную температуру.
ВРЕМЯ
ПРИГОТОВЛЕНИЯ
ПИЩИ
макс. 24 часа
НА ДИСПЛЕЕ
ОТОБРАЖАЕТСЯ
"DUR"
(ПРОДОЛЖИТЕЛЬНОСТЬ)
• Нажмите кнопку
установки один раз. На
дисплее отображается
"DUR", и мигает
индикатор
продолжительности.
• Выберите нужную
продолжительность с
помощью вращения
кнопки установки. На
дисплее отображается
оставшееся время, и
загорается индикатор
продолжительности.
Кнопка
установки
Все операции должны выполняться в течение
противном случае они отменяются.
Продолжительность или текущее время могут
отображаться по умолчанию, не принимайте это во внимание.
Как ее выключить Что она выполняет Для чего она нужна
• Верните ручки
регулировки в положение
"стоп".
• Во время выполнения
обратного отсчета времени на
дисплее постоянно
отображается оставшееся время
в минутах и в секундах. После
окончания обратного отсчета
времени на дисплее начинает
мигать "000", и подается
звуковой сигнал окончания
цикла. Чтобы отключить его,
нажмите кнопку установки. Вы
можете в любое время изменить
или отменить установку
напоминания об
времени.
• После окончания периода
обратного отсчета времени
на дисплее отображается
"END" (ОКОНЧАНИЕ),
начинает мигать индик атор
продолжительности, и печь
автоматически выключается.
Подается звуковой сигнал
окончания приготовления
пищи. Чтобы выключить его,
нажмите кнопку установки.
Если вы хотите снова начать
приготовления пищи,
нажмите кнопку установки
еще раз. Верните ручки
регулировки в положение
"стоп". Вы
или изменить время
приготовления пищи во
время работы печи.
оставшемся
можете отменить
• Она позволяет вам
управлять работой печи.
• В конце заданного
интервала времени
подается звуковой сигнал.
• Позволяет вам задать
время приготовления
пищи, необходимое для
выбранного рецепта.
• Для приготовления пищи
с использованием нужных
рецептов
• Позволяет вам
использовать печь в
качестве
сигнализирующего
устройства, даже если
печь выключена.
• После окончания
заданного периода
времени приготовления
пищи печь
автоматически
выключается, и подается
звуковой сигнал.
4 секунд. В
ПРИГОТОВЛЕНИЕ
ПИЩИ В
ПОЛНОСТЬЮ
АВТОМАТИЧЕСКОМ
РЕЖИМЕ
Максимальное
время паузы
24 часа
НА ДИСПЛЕЕ
ОТОБРАЖАЕТСЯ
"PAU" (ПАУЗА)
• Прежде всего, выберите
нужную температуру и
функцию приготовления пищи.
• Нажмите один раз для
установки продолжительности.
Выполните приведенные выше
инструкции "Время
приготовления пищи Продолжительность"
• Нажмите второй раз, на
дисплее отображается "PAU"
(ПАУЗА) и "---", начинает
мигать индикатор запуска.
- Перед тем как включить печь,
установите продолжительность
паузы. Во время паузы
не готовится, на дисплее
постоянно отображается
оставшееся время паузы, и
горят индикаторы "пуск" и
"стоп". После окончания
периода обратного отсчета
начинается приготовление
пищи, и горит только
индикатор "стоп".
пища
•В конце заданного периода
времени приготовления
пищи печь автоматически
выключается. Подается
звуковой сигнал окончания
приготовления пищи, и печь
автоматически
выключается. Подается
звуковой сигнал. Чтобы
выключить звуковой сигнал,
нажмите кнопку установки.
Нажмите кнопку еще раз,
если вы хотите снова начать
приготовление пищи.
Установите ручки
регулировки в положение
"стоп".
Во время приготовления
пищи вы
или изменить установку
продолжительности паузы
или продолжительности
приготовления пищи.
можете отменить
63 RU
• Позволяет вам
запрограммировать печь
таким образом, чтобы
приготовление пищи по
выбранному рецепту
началось в нужное
время.
Например : задержка
времени 10 часов.
Пища должна готовиться
в течение 45 мин., и
должна быть готова в 12
часов.
1. Выберите нужную
функцию и температуру.
2. Установите
продолжительность,
равную 45 минут. 3.
Установите
паузу, равную
75 минут (10H/11H15).
Печь будет находиться в
режиме паузы от 10
часов до 11 часов 15
минут; в 11 часов 15
минут она включится, и
автоматически
выключится в 12 часов.
Page 63
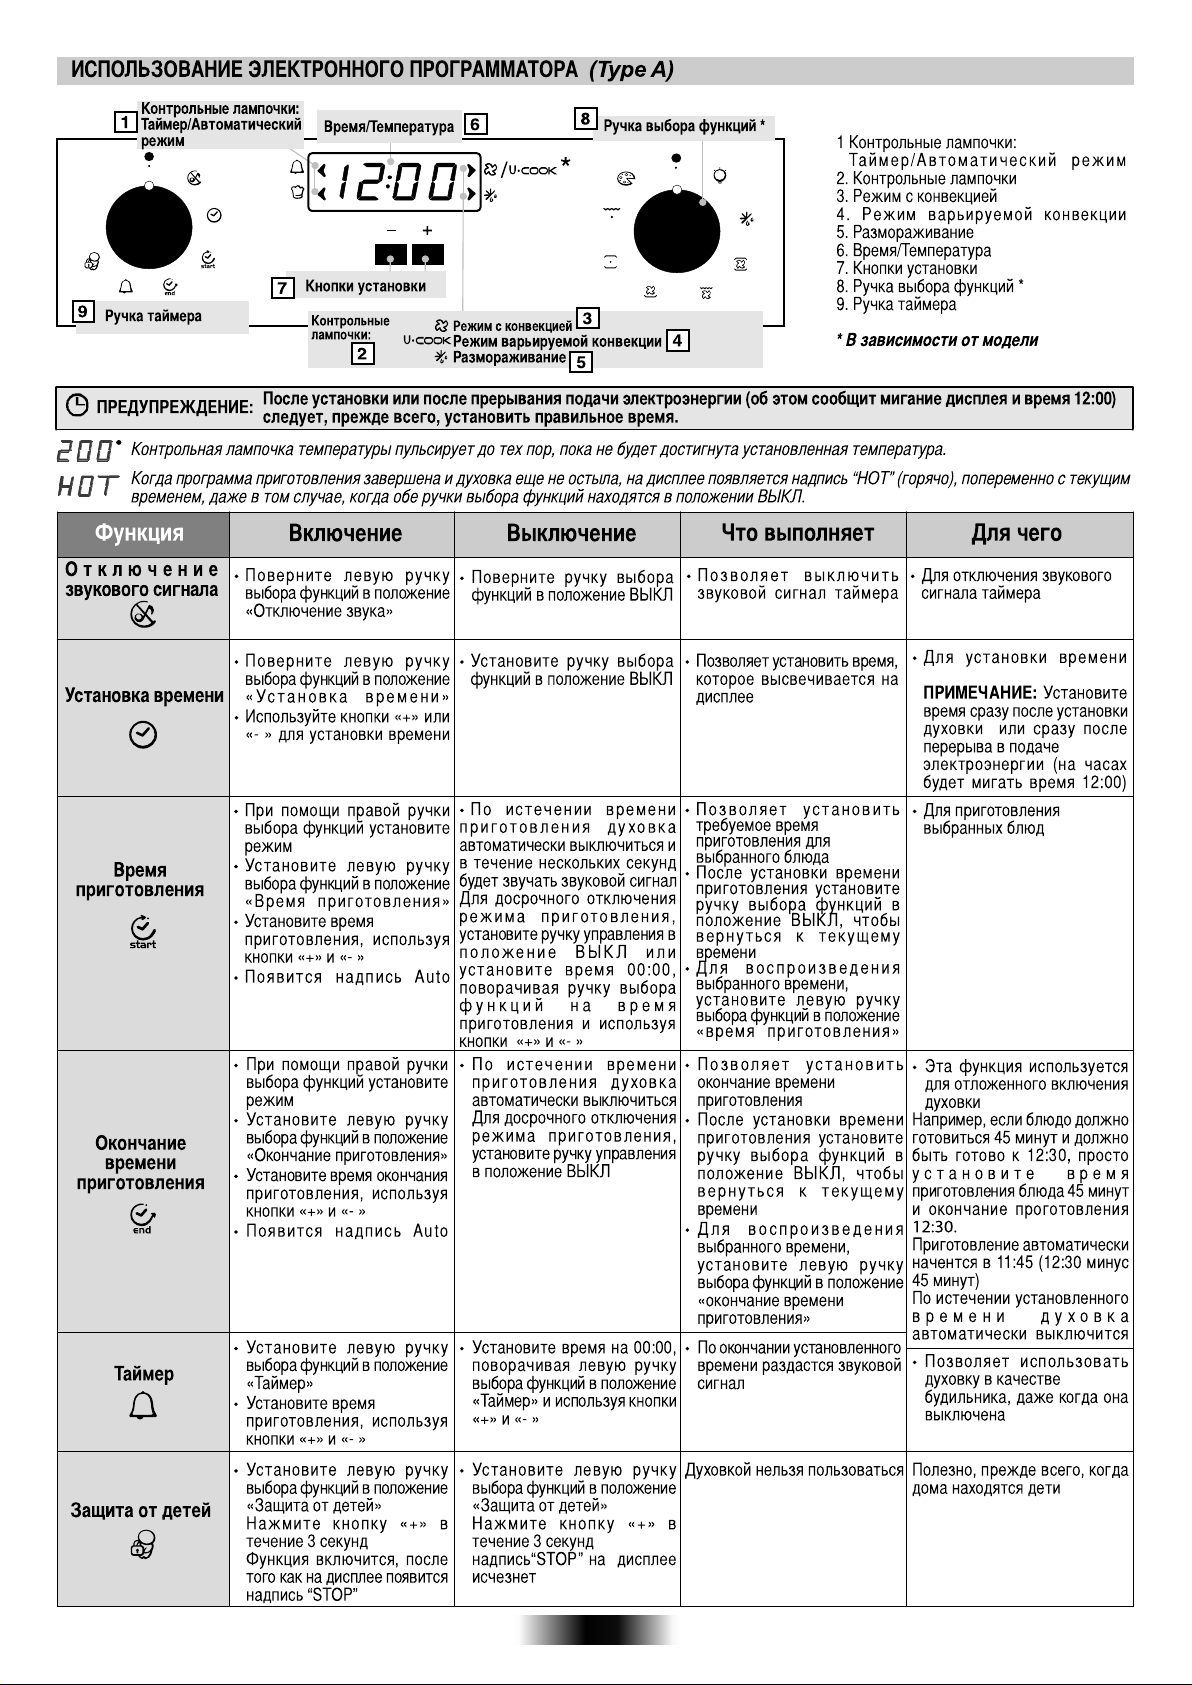
64 RU
Page 64
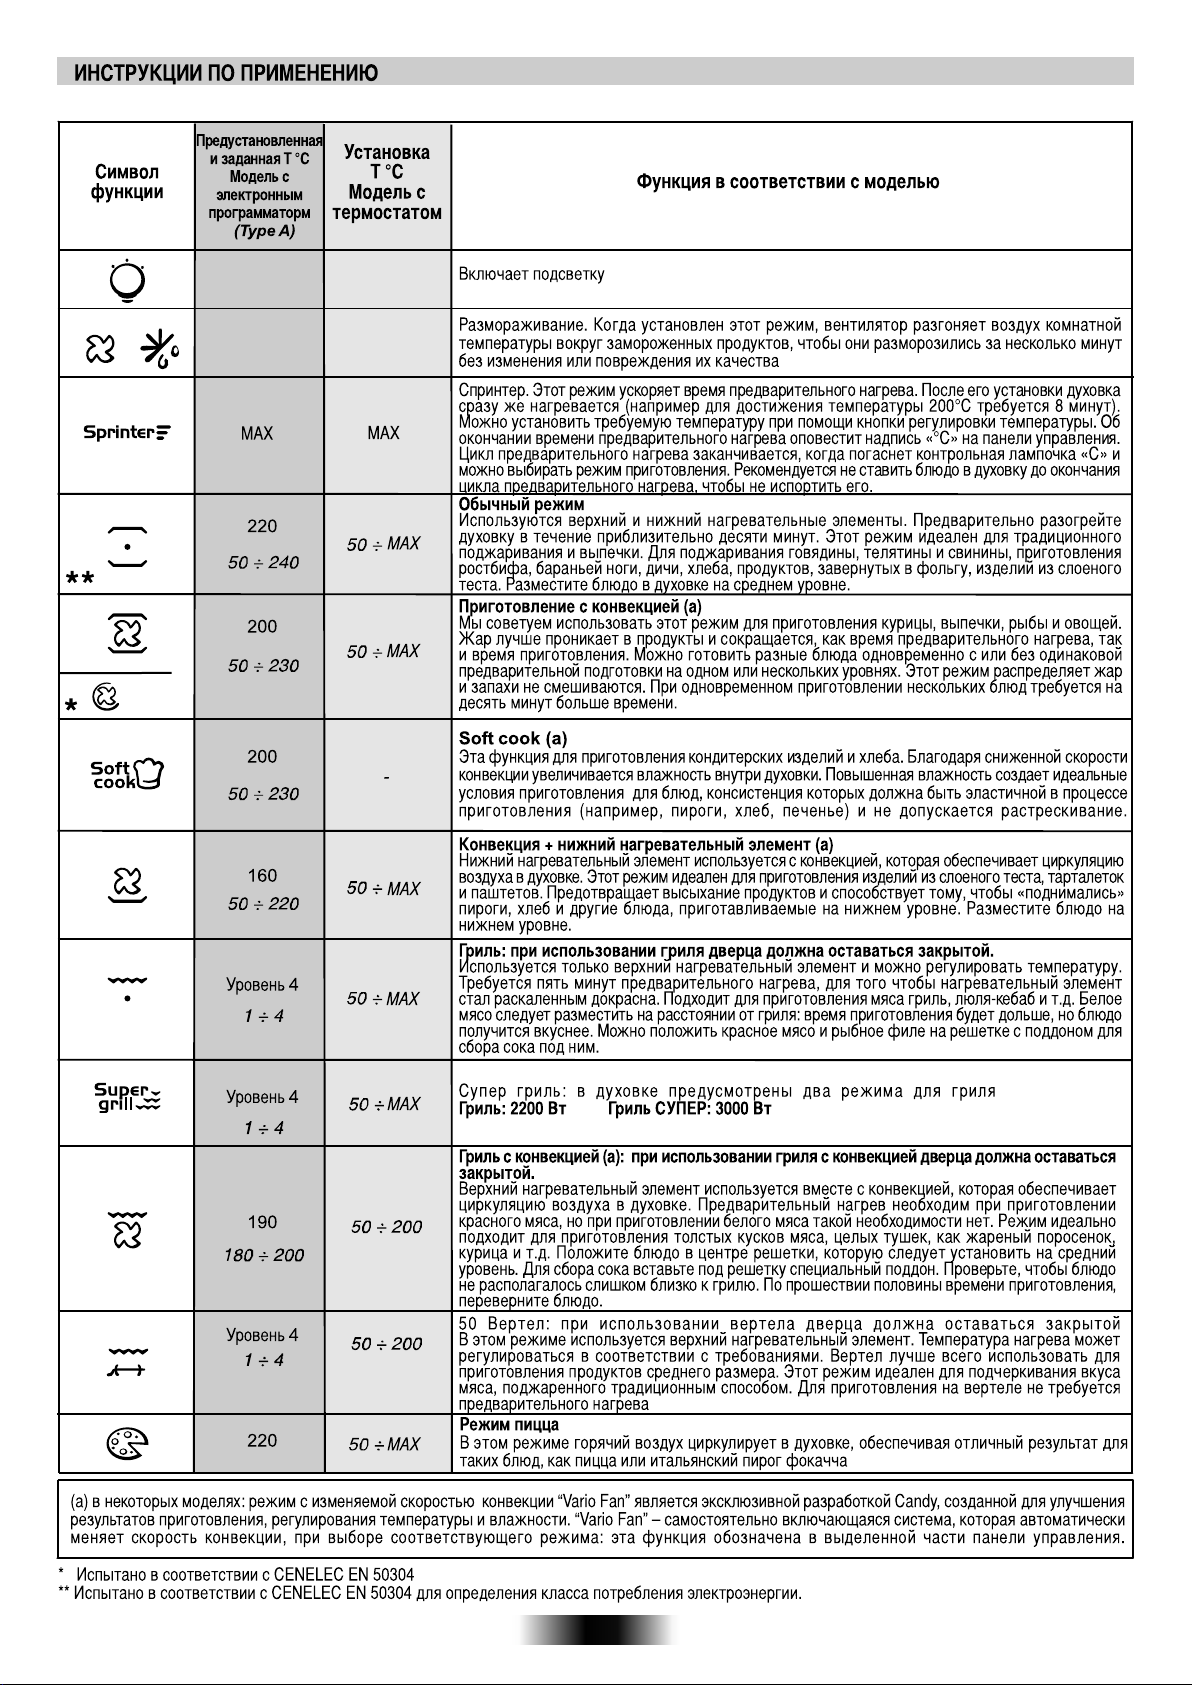
65 RU
Page 65
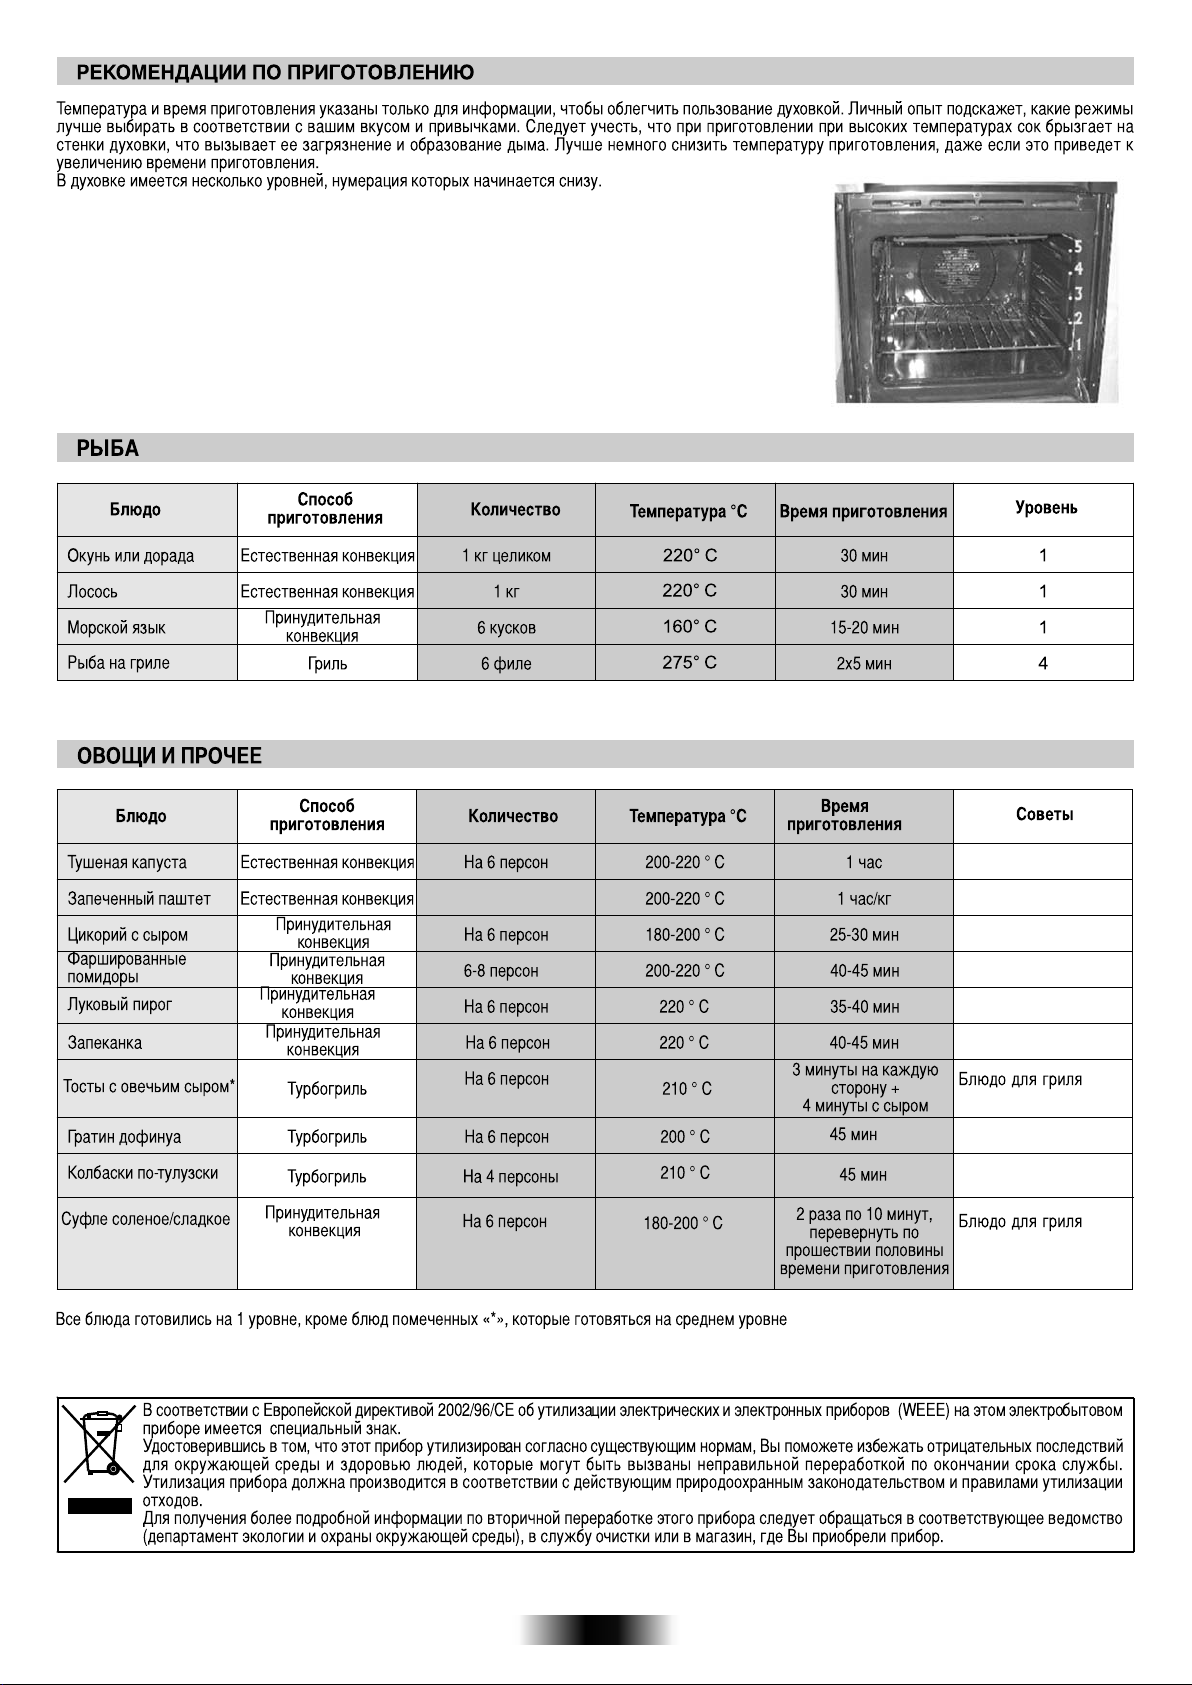
66 RU
Page 66
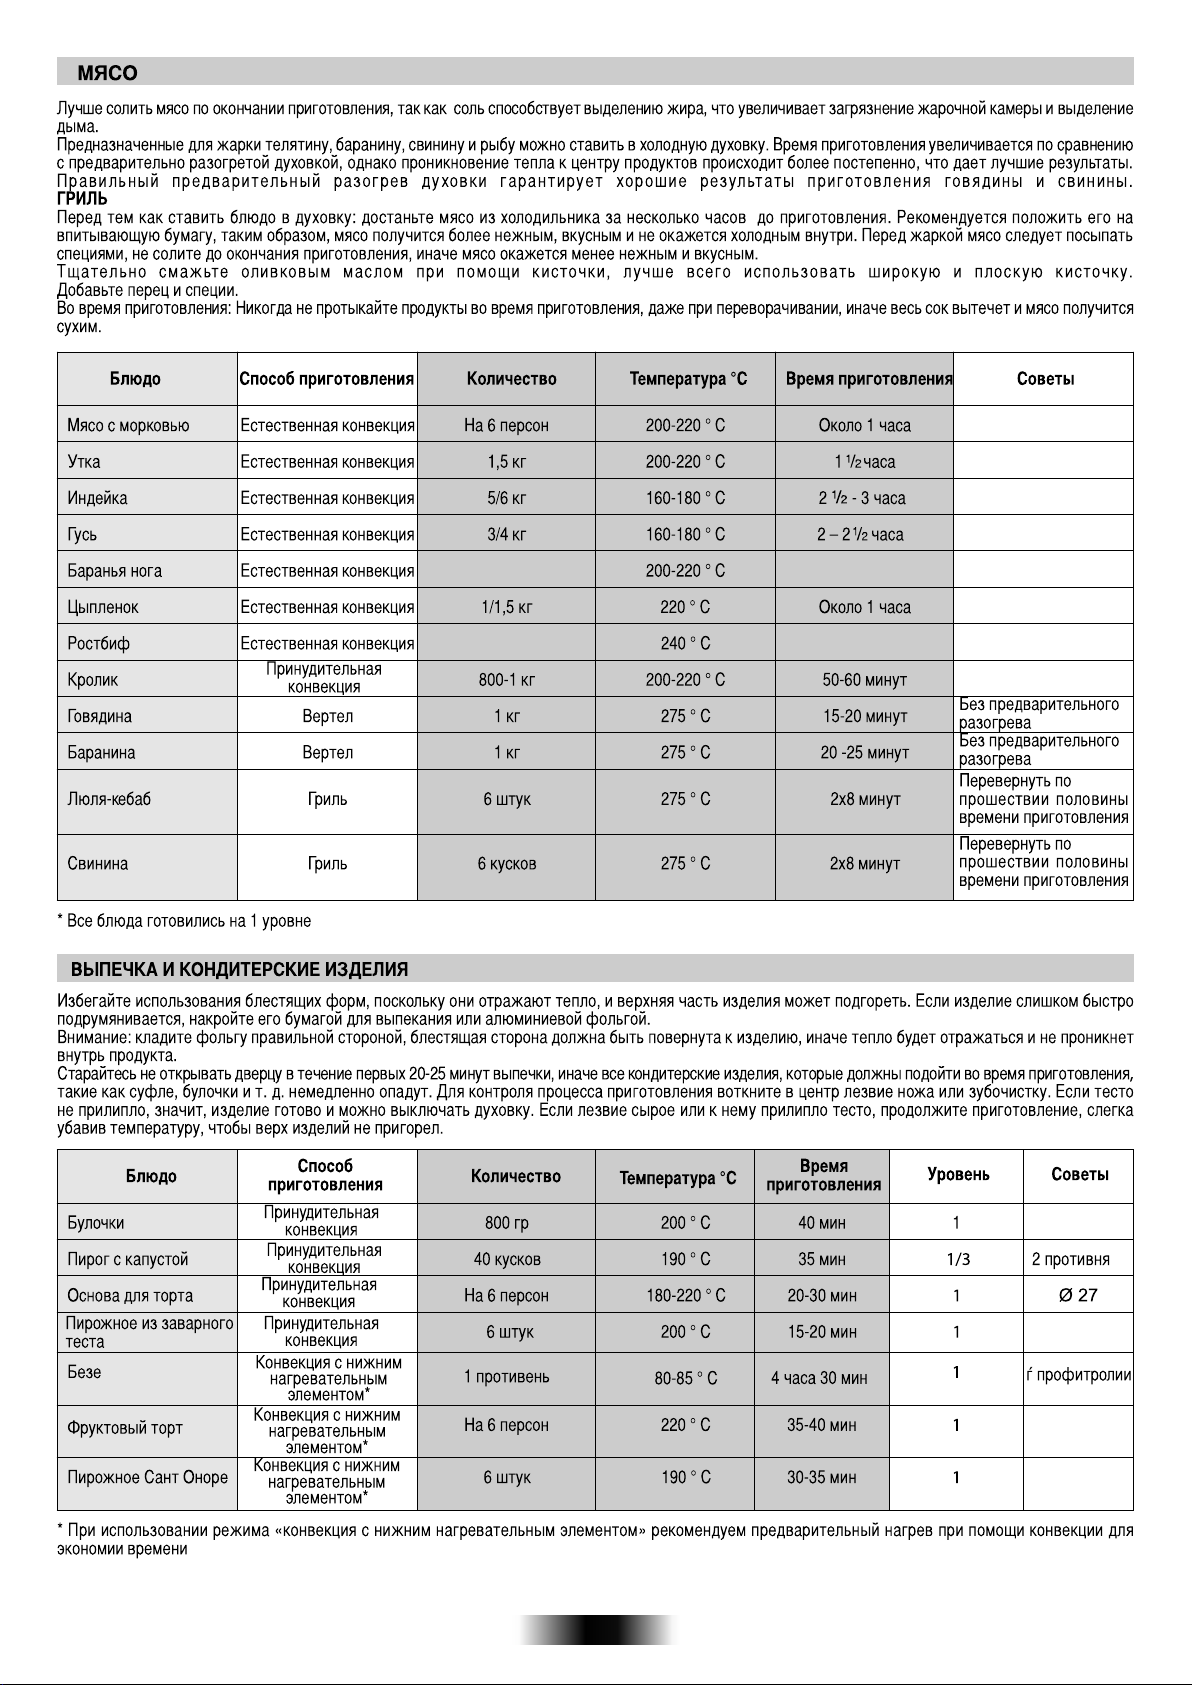
10 минут/кг*
10 минут/кг*
67 RU
Page 67
•Nie należy wykładać ścianek piekarnika folią aluminiową lub
jednorazowymi materiałami ochronnymi dostępnymi w sklepach. Użyta
folia aluminiowa lub inne materiały ochronne w zetknięciu z gorącą
emalią mogą spowodować nadtopienie się i pogorszenie jakości
emaliowanych ścianek wnętrza piekarnika.
68 PL
Page 68
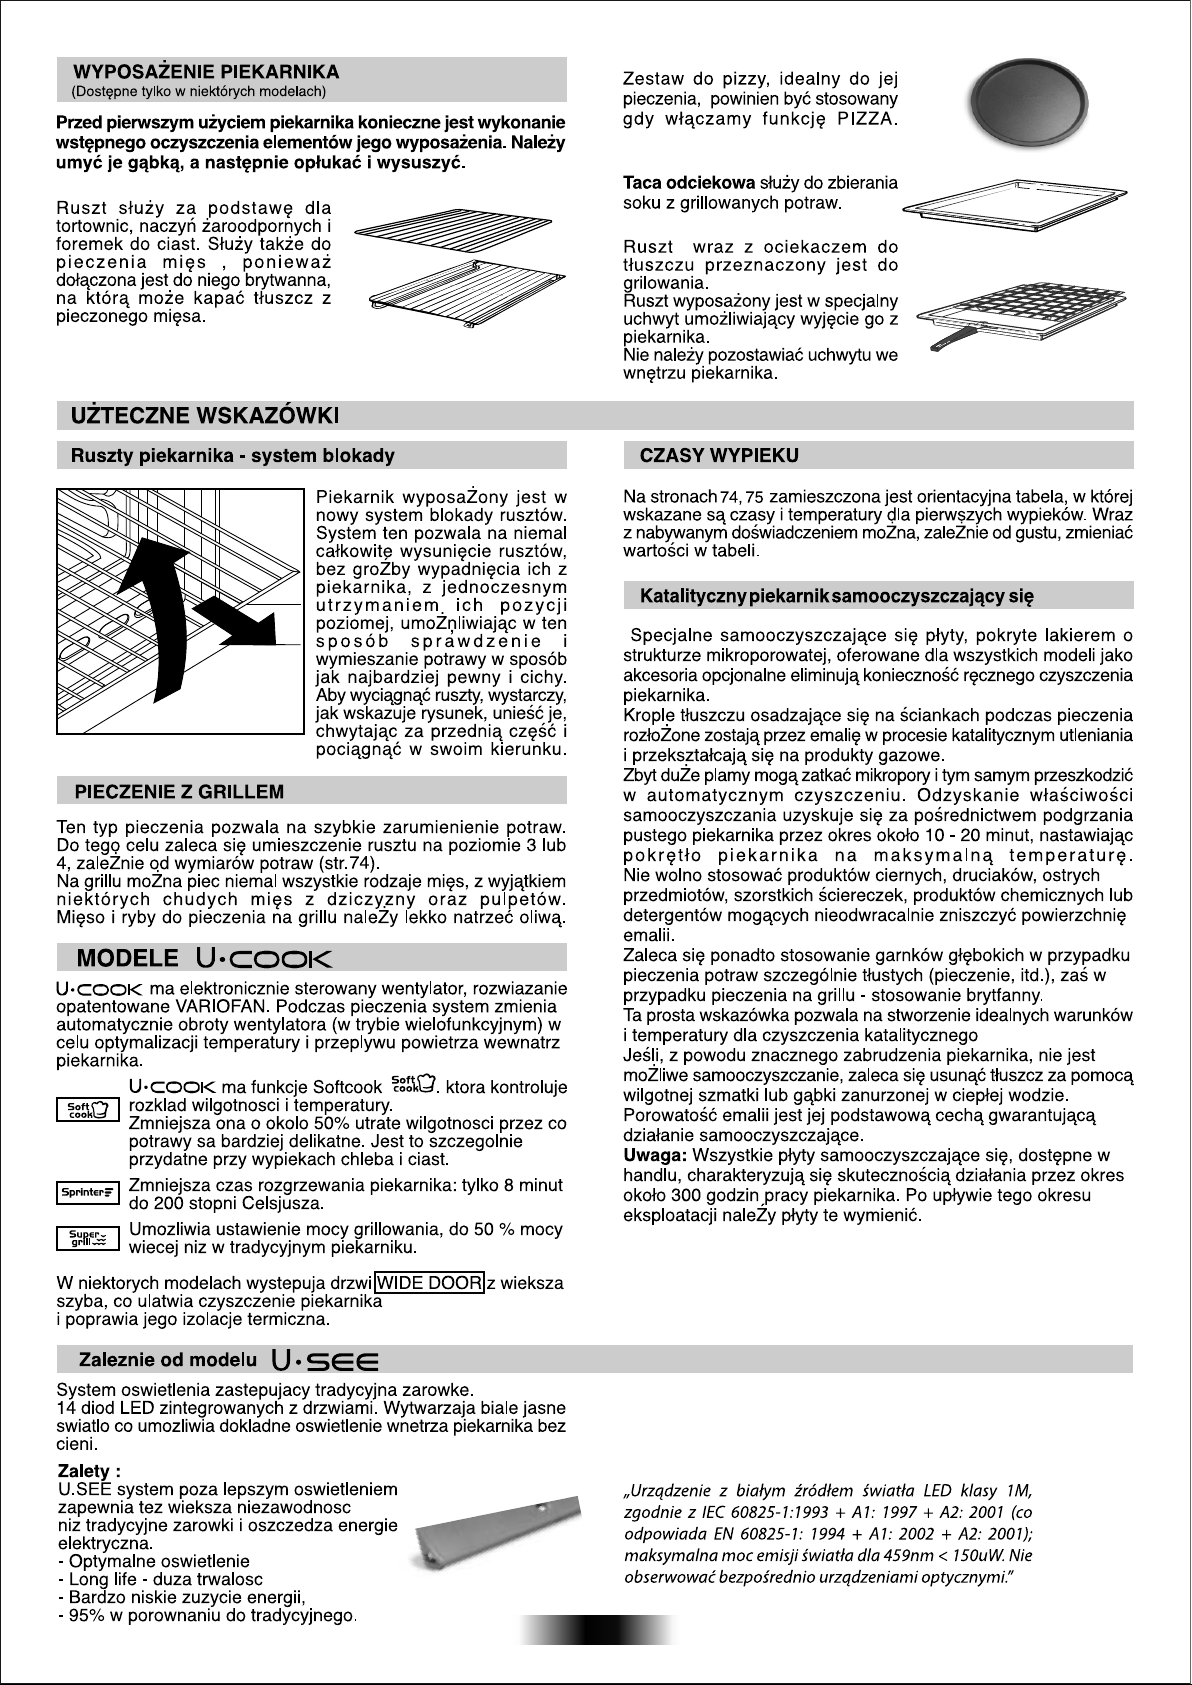
69 PL
Page 69
70 PL
Page 70
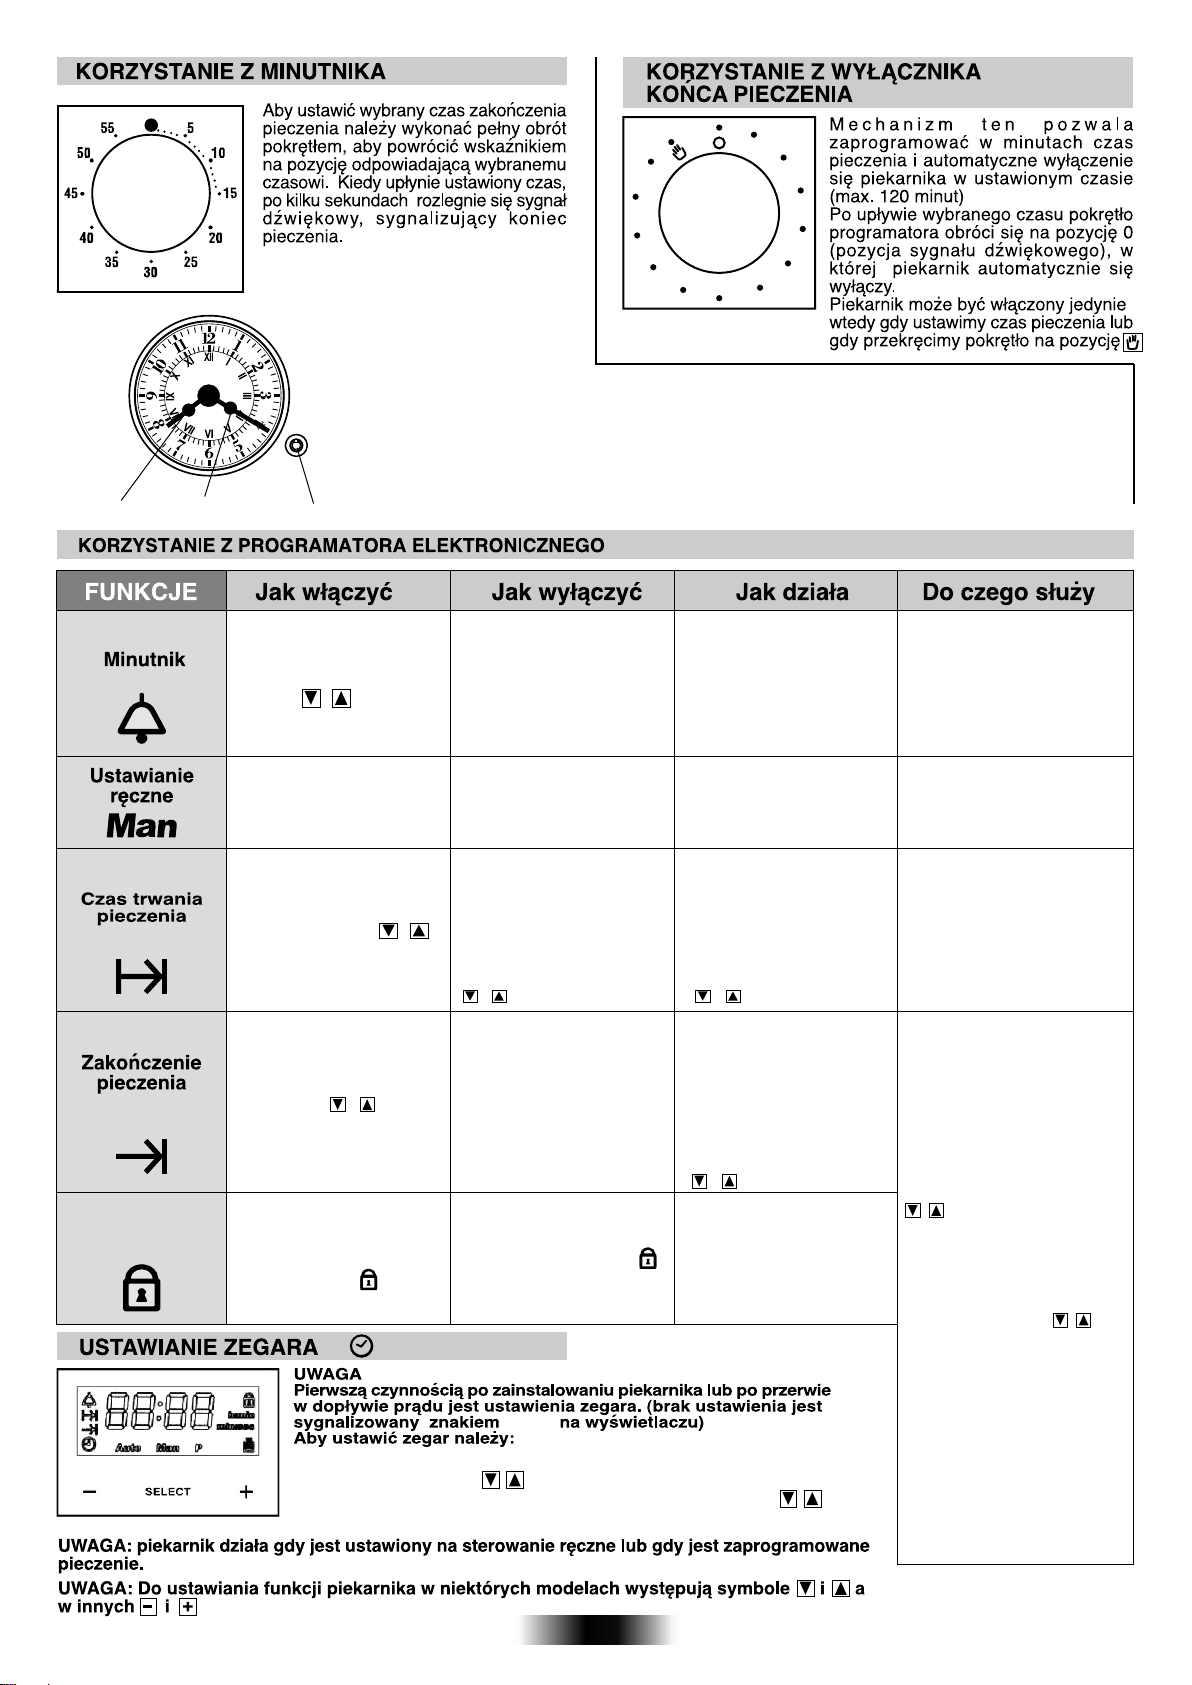
Wskazówka
godzinowa
Wskazówka
minutowa
Nacisnąć
pokrętło
10
20
120
011
100
90
80
70
30
40
50
60
Ustawienia analogowego programatora
Po naciśnięciu pokrętła, wskazówka przesunie się o minutę do przodu.
Jeżeli przytrzymamy wciśnięte pokrętło dłużej, wskazówka będzie
przesuwała się szybciej do przodu.
ZABEZPIECZENIE
PRZED
DZIEĆMI
•Wcisnąć przycisk środkowy
(centralny) 1 raz
•Ustawić czas trwania
pieczenia wciskając
Przyciski i
• Zwolnić przyciski.
•Wcisnąć przycisk środkowy
(centralny) 1 raz
• Wybrać funkcję pieczenia
obracając pokrętłem
wyboru funkcji.
• Wcisnąć przycisk
środkowy (centralny) 2 razy
• Ustawić czas trwania
pieczenia przyciskiem
• Zwolnić przyciski I
• Wybrać funkcję za
pomocą pokrętła wyboru
funkcji
•Wcisnąć przycisk środkowy
(centralny) 3 razy
• Ustawić godzinę
zakończenia pieczenia
przyciskami i
• Zwolnić przyciski
• Wybrać funkcję pieczenia
za pomocą pokrętła wyboru
funkcji.
•Zabezpieczenie aktywuje
się przytrzymując przez
minimum 5 sekund pole
(+) aż do wyświetlenia się
znaku blokady . Od tej
chwili wszystkie funkcje są
zablokowane.
•Wcisnąć przycisk środkowy (centralny) 1 raz L1, L2, L3 NASTAW SYGNAŁ AKUSTYCZNY
•Nastaw godzinę przyciskami . •Wcisnąć przycisk środkowy (centralny) 5 raz.
•Zwolnić przyciski. •Nastaw godzinę przyciskami .
• Po zakończeniu ustawionego
czasu, funkcja sama się
wyłączy i rozlegnie się sygnał
dźwiękowy, który wyłączy się
po chwili. Aby
wyłączyć natychmiast sygnał
dźwiękowy należy wcisnąć
przycisk SELECT
• Obrócić pokrętło wyboru
funkcji na pozycj 0.
• Po zakończeniu
ustawionego czasu piekarnik
sam się wyłączy.
• Jeśli trzeba wyłączyć
piekarnik wcześniej należy
obrócić pokrętło wyboru
funkcji na pozycję 0 lub
ustawić czas pieczenia na
0:00(przyciskami SELECT
I
• O ustawionej godzinie
piekarnik sam się wyłączy
• Jeśli trzeba
wcześniej należy ustawić
pokrętło wyboru funkcji na
pozycję 0
Po 7 minutach.
go wyłączyć
•Zabezpieczenie wyłącza się
przytrzymując przez minimum
5 sekund pole (+) aż do
zniknięcia znaku blokady .
Od tej chwili wszystkie funkcje
sterowania są odblokowane.
12:00
•Zwolnić przyciski.
• Po zakończeniu
ustawionego czasu rozlega
się sygnał dźwiękowy
• Podczas pracy wyświetlacz
pokazuje pozostały czas:
min. , sek.
• Uruchamia funkcje
piekarnika
• Pozwala ustawić czas
trwania pieczenia
• Aby pokazać czas
pozostały do końca
pieczenia należy wcisnąć
przycisk SELECT 2
• Aby zmienić czas pozostały
do końca pieczenia należy
wcisnąć przycisk SELECET
İ
• Ustawia godzinę końca
pieczenia.
• Aby pokazać
zaprogramowaną godzinę
należy Wcisnąć przycisk
środkowy (centralny) 3 razy
• Aby zmienić
zaprogramowaną godzinę
wcisnąć przycisk SELECT+
İ
Razy
• Pozwala na użycie
programatora jako budzika.
Można go używać przy
włączonym lub wyłączonym
piekarniku.
• Realizuje przebieg
wybranych funkcji
• Aby wyłączyć sygnał (alarm)
wcisnąć jakikolwiek przycisk.
Aby przywrócić działanie
zegara wcisnąc przycisk
śrdkowy (centralny)
Zwykle używa się tej funkcji
razem z funkcją Czas trwania
pieczenia: np. potrawa ma się
piec przez 45 min. i chcemy,
żeby była gotowa o godz.
12:30. A zatem należy:
-Wybrać odpowiednią funkcję
pieczenia
-Ustawić czas trwania
pieczenia na 45 mm (Timer+
i )
Po zakończeniu ustawionego
•
czasu piekarnik wyłączy się i
rozlegnie się sygnał
dźwiękowy.
- Ustawić koniec pieczenia na
godz. 12:30 (END + i
Pieczenie wyłączy się
automatycznie o godz. 11:45
(12:30 - 45 min.) O
ustawionej godzinie końca
pieczenia piekarnik
automatycznie się wyłączy.
UWAGA
Jeśli ustawimy tylko koniec
pieczenia, bez czasu trwania
pieczenia, piekarnik włączy
się natychmiast i wyłączy o
ustawionej godzinie.
71 PL
Page 71
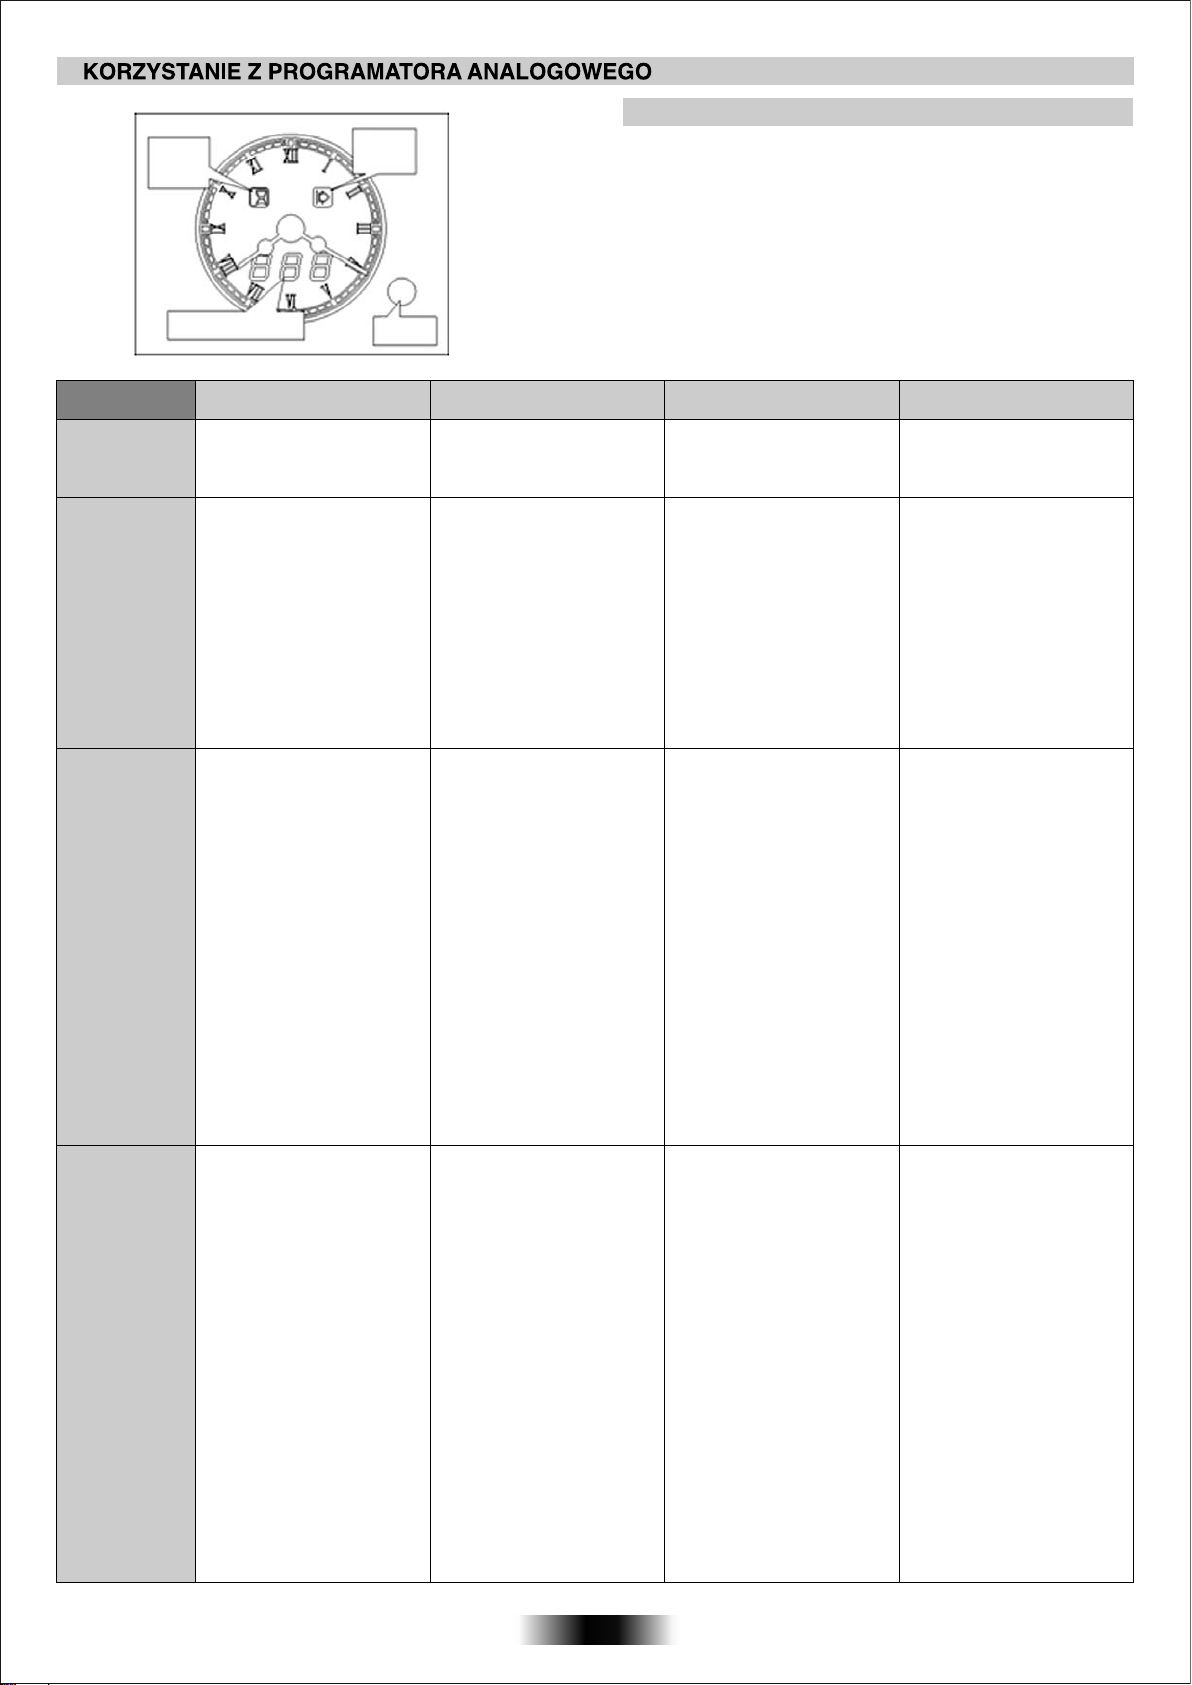
Kontrolka
czasu
trwania
Kontrolka
startu
USTAWIENIE AKTUALNEGO CZASU
• Nacisnąć i, przez 4 sekundy, przytrzymać wciśnięty przycisk
ustawień. Na wyświetlaczu pojawi się "SET". Brzęczyk wyemituje
sygnał dźwiękowy.
• Ustawić aktualny czas naciskając na przycisk ustawień. Ruch
obrotowy odbywa się w odstępie minutowym. W celu
automatycznego przyspieszenia ruchu obrotowego, należy
przytrzymać przycisk w stanie wciśniętym.
Wyświetlacz poleceń
FUNKCJA URUCHOMIENIE
TRYB
RĘCZNY
• Możliwy do ustawienia
wyłącznie w trybie pieczenia.
Bez żadnych ustawień na
programatorze.
• Nacisnąć dwa razy
przycisk ustawień, na
wyświetlaczu pojawi się
MINUTNIK
max 90 min.
symbol "BEL" i "---".
• Ustawić czas obracając
przycisk ustawień.
WYŚWIETLANY
SYMBOL
"BEL"
• Przede wszystkim,
należy wybrać wymaganą
funkcję pieczenia i
temperaturę.
• Nacisnąć jednokrotnie na
przycisk ustawień. Na
wyświetlaczu pojawi się
"DUR" i zacznie pulsować
CZAS PIECZENIA
max 24 h
WYŚWIETLANY
SYMBOL
"DUR"
wskaźnik czasu pieczenia.
• Ustawić wymagany czas
pieczenia obracając
przyciskiem ustawień. Na
wyświetlaczu pojawi się
pozostały czas, a
wskaźnik czasu pieczenia
zapali się.
Przycisk
ustawień
WYŁĄCZENIE DZIAŁANIE PRZEZNACZENIE
• Ustawić wszystkie pokrętła
w położeniu początkowym.
• W trakcie odliczania czasu, na
wyświetlaczu wyświetlany jest
w sposób ciągły pozostały czas
w minutach, a potem w
sekundach. Po zakończeniu
odliczania, na wyświetlaczu
pojawi się pulsujące "000" i
wyemitowany zostanie sygnał
dźwiękowy. Aby wyłączyć
sygnał dźwiękowy, należy
nacisnąć przycisk ustawień. W
dowolnym czasie, można
zmodyfikować lub anulować
ustawienie minutnika.
• Po zakończeniu odliczania
czasu pieczenia, na
wyświetlaczu pojawi się "END",
wskaźnik czasu pieczenia
zacznie pulsować i piekarnik
wyłączy się automatycznie.
Brzęczyk wyemituje sygnał
dźwiękowy zakończenia
pieczenia. Aby wyłączyć sygnał
dźwiękowy, należy nacisnąć
przycisk ustawień.
W razie potrzeby, nacisnąć po
raz drugi przycisk ustawień w
celu ponownego uruchomienia
piekarnika.
Ustawić pokrętła sterujące
położeniu początkowym.
Podczas pracy piekarnika
istnieje możliwość
zmodyfikowania lub
anulowania czasu pieczenia.
Każda operacja musi być wykonana
w ciągu 4 sekund, w przeciwnym
razie będzie anulowana.
Czas może być wyświetlany jako wartość domyślna, nie należy tego
brać pod uwagę.
• Umożliwia ręczne
sterowanie piekarnikiem.
• Po upływie ustawionego
czasu, emitowany jest
sygnał dźwiękowy.
• Do przyrządzania potraw
według własnych przepisów.
• Umożliwia używanie
piekarnika tak jak budzika,
nawet przy wyłączonym
piekarniku.
• Umożliwia ustawienie
czasu pieczenia
wymaganego dla potrawy
przyrządzanej według
wybranego przepisu.
w
• Po upływie ustawionego
czasu pieczenia, piekarnik
wyłączy się automatycznie
i zostanie wyemitowany
sygnał dźwiękowy.
PIECZENIE
AUTOMATYCZNE
Max czas
oczekiwania 24 h
WYŚWIETLANY
SYMBOL
"PAU"
• Przede wszystkim, należy
wybrać wymaganą temperaturę i
funkcję pieczenia.
. Nacisnąć jednokrotnie przycisk
w celu ustawienia czasu
pieczenia. Postępować zgodnie z
powyższymi instrukcjami dla
"Czasu pieczenia - Dur".
• Nacisnąć po raz drugi przycisk
ustawień, na wyświetlaczu pojawi
się symbol "PAU" i "---", wskaźnik
rozpoczęcia pieczenia zacznie
pulsować.
- Ustawić czas
rozpoczęcie pieczenia. W czasie
oczekiwania, piekarnik nie
piecze, na wyświetlaczu w
sposób ciągły wyświetlany jest
pozostały czas oczekiwania na
rozpoczęcie pieczenia, zarówno
wskaźnik rozpoczęcia jak i
zakończenia pieczenia są
zapalone. Po upływie czasu
oczekiwania, piekarnik
rozpoczyna pieczenie, jedynie
wskaźnik zakończenia pieczenia
pozostaje zapalony.
oczekiwania na
• Po zakończeniu czasu
pieczenia, piekarnik wyłączy
się automatycznie. Brzęczyk
wyemituje sygnał
dźwiękowy zakończenia
pieczenia. Aby wyłączyć
sygnał dźwiękowy, należy
nacisnąć przycisk ustawień.
W razie potrzeby, nacisnąć
po raz drugi przycisk
ustawień w celu ponownego
uruchomienia piekarnika.
Ustawić pokrętła sterujące
w położeniu
początkowym.
Podczas pracy piekarnika
istnieje możliwość
zmodyfikowania lub
anulowania zarówno
czasu
oczekiwania jak też czasu
pieczenia.
72 PL
• Umożliwia
zaprogramowanie
piekarnika tak, aby
potrawa była gotowa w
wymaganym czasie.
Przykład : Jest godzina
10:00.
Potrawa wymaga pieczenia
przez 45 minut i musi być
gotowa na godzinę 12:00.
1. Wybrać wymaganą funkcję
i temperaturę. 2. Ustawić
czas pieczenia na 45 minut,
3. Ustawić czas oczekiwania
na 75 minut (10:00/11:15).
Piekarnik będzie oczekiwał
na uruchomienie od 10:00 do
11:15; Pieczenie rozpocznie
11:15 i zakończy się
się o
automatycznie o 12:00.
Page 72
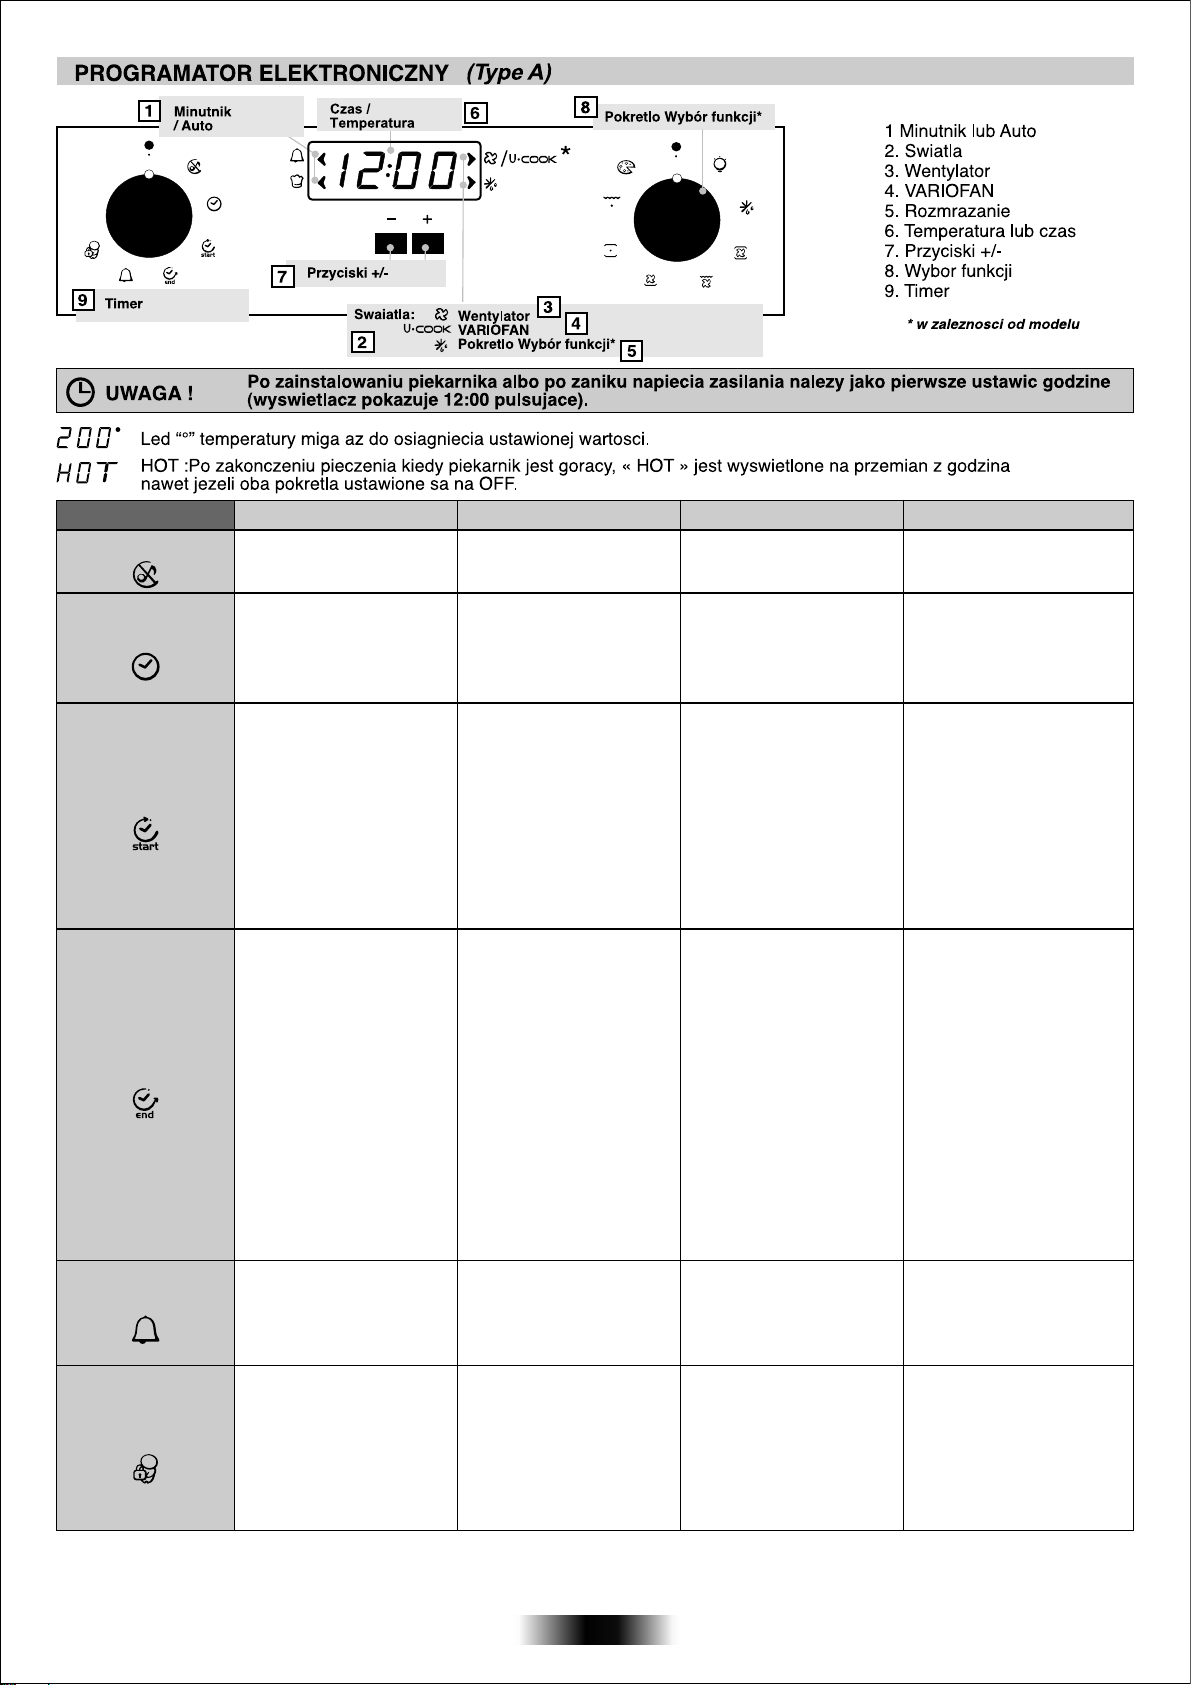
FUNKCJA
CICHY
JAK URUCHOMIC?
• Obroc lewe pokretlo
w pozycje "Cichy”
JAK WYLACZYC? CO ONA ROBI? DO CZEGO SLUZY?
• Obroc pokretlo do
pozycji OFF.
• Wylacza dzwiek
minutnika
• Wylacza dzwiek minutnika
USTAW. GODZ.
CZAS
PIECZENIA
CZAS
KONCA PIECZ.
• Obrocic lewe pokretlo
do pozycji
" Ustawienie godziny",
• Ustaw godzine " + "
•
Obroc prawe pokretlo
do pozycji
pieczenia
•
Obroc lewe pokretlo
do pozycji
"Czas pieczenia"
• Ustaw za pomoca
" + " j" -"
• Miga Auto
•
Obroc prawe pokretlo
do pozycji pieczenia
• Obroc lewe pokretlo
do pozycji
"Koniec pieczenia"
• Ustaw za pomoca
" + " i" -"
•Miga Auto.
pozycji OFF.
• Po zakonczeniu pieczenia
piekarnik wylacza sie
automa tycznie i rozlega sie
kilkusekundowy sygnal
W celu wczesniejszego
zakonczenia pieczenia
ustaw programator na OFF
i ustaw czas na 00:00.
• • Po zakonczeniu pieczenia
piekarnik wylacza sie
automatycznie.
W celu wczesniejszego
zakonczenia pieczenia
obroc pokretlo na OFF
• Ustawia godzine• Obroc pokretlo do
• Umozliwia ustawienie czasu
pieczenia wedlug przepisu.
Po ustawieniu czasu obroc
•
programator na OFF
a pokaze sie godzina.
• Día sprawdzenia
ustawionegó czasu obroc
pokretlo na Czas Pieczenia.
•
Umozliwia ustawienie
czasu pieczenia.
•Po ustawieniu czasu
obroc programator na
OFF a pokaze sie godzina.
D
•la sprawdzenia
ustawionego czasu obroc
pokretlo na czas konca
pieczenia.
• Ustawia godzine
UWAGA : konieczne
po zainstalowaniu
plekarnika
• Do ustwienia czasu
wedlug przepisu.
• oFunkcja przydatna do
programowania pieczenia.
Na przyklad, czas pieczenia
45min, danie ma byc gotowe
na 12.30 Ustaw czas
pieczenia na 45min i czas
konca pieczenia na 12,30.
Pieczenie rozpocznie sie
automatycznie
(12.30 minus 45 min) i
zakonczy o
z wybranymi ustawieniami
po czym piekarnik wylaczy sie.
11.45
12,30 zgodnie
MINUTNIK
ZABEZPIECZ.
•
Obroc lewe pokretlo
do pozycji Minutnik
•Ustaw za pomoca
+ -
““i ““
• • Obroc lewe pokretlo do
pozycji Zabezpieczenie.
Przytrzymaj" + " przez 3
sekundy.
Zabezpieczenie jest
aktywne przy STOP na
wyswietlaczu.
•
Przy pokretle w pozycji
Minutnik wyzeruj za
“-”
pomoca
• Obroc lewe pokretlo do
pozycji Zabezpiecz,
Przytrzymaj " + " przez 3 s
ekundy
• Komunikat STOP zniknie
73 PL
• Rozlega sie na kilka
sekund alarm po uplywie
ustawionego czasu.
• Nie mozna uruchomtc
• Piekarnik mozna uzyc jako
alarm nawet jezell jest
wylaczony.
• Zabezpieczenie przed
dziecmi
Page 73
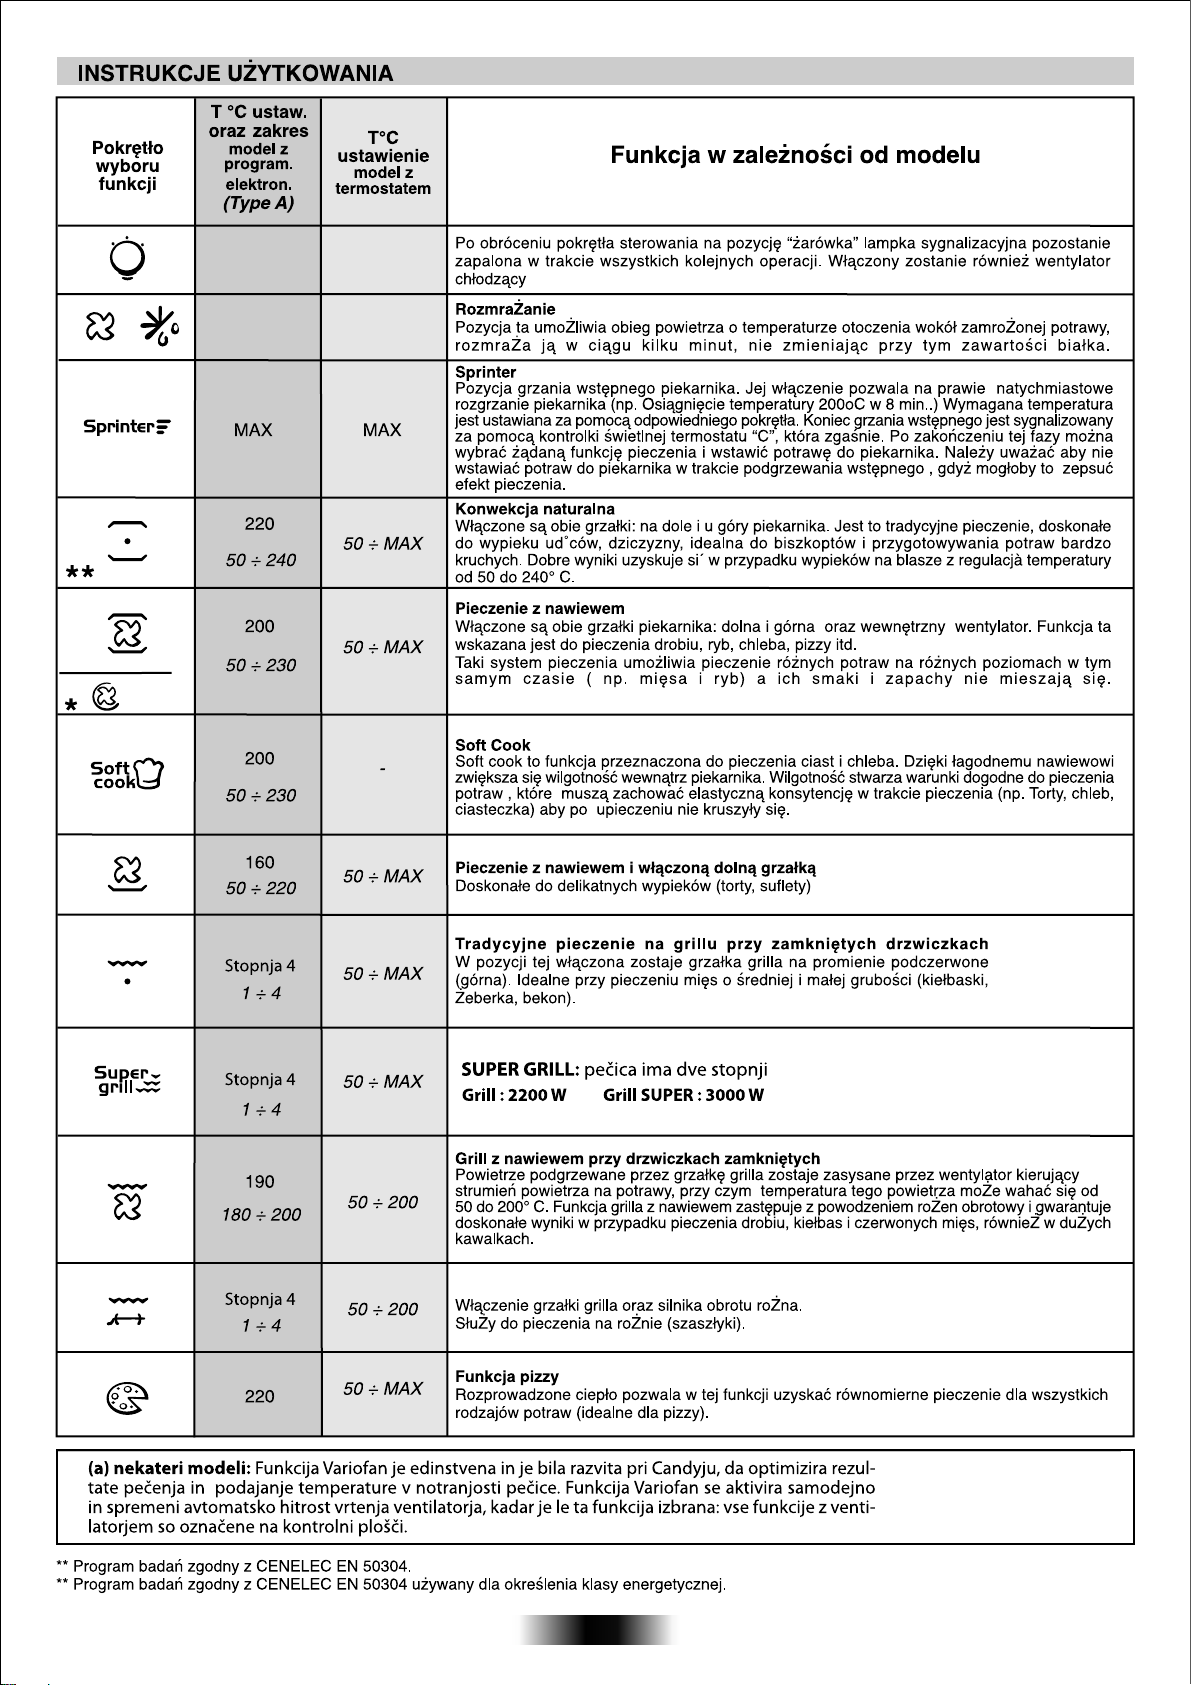
74 PL
Page 74
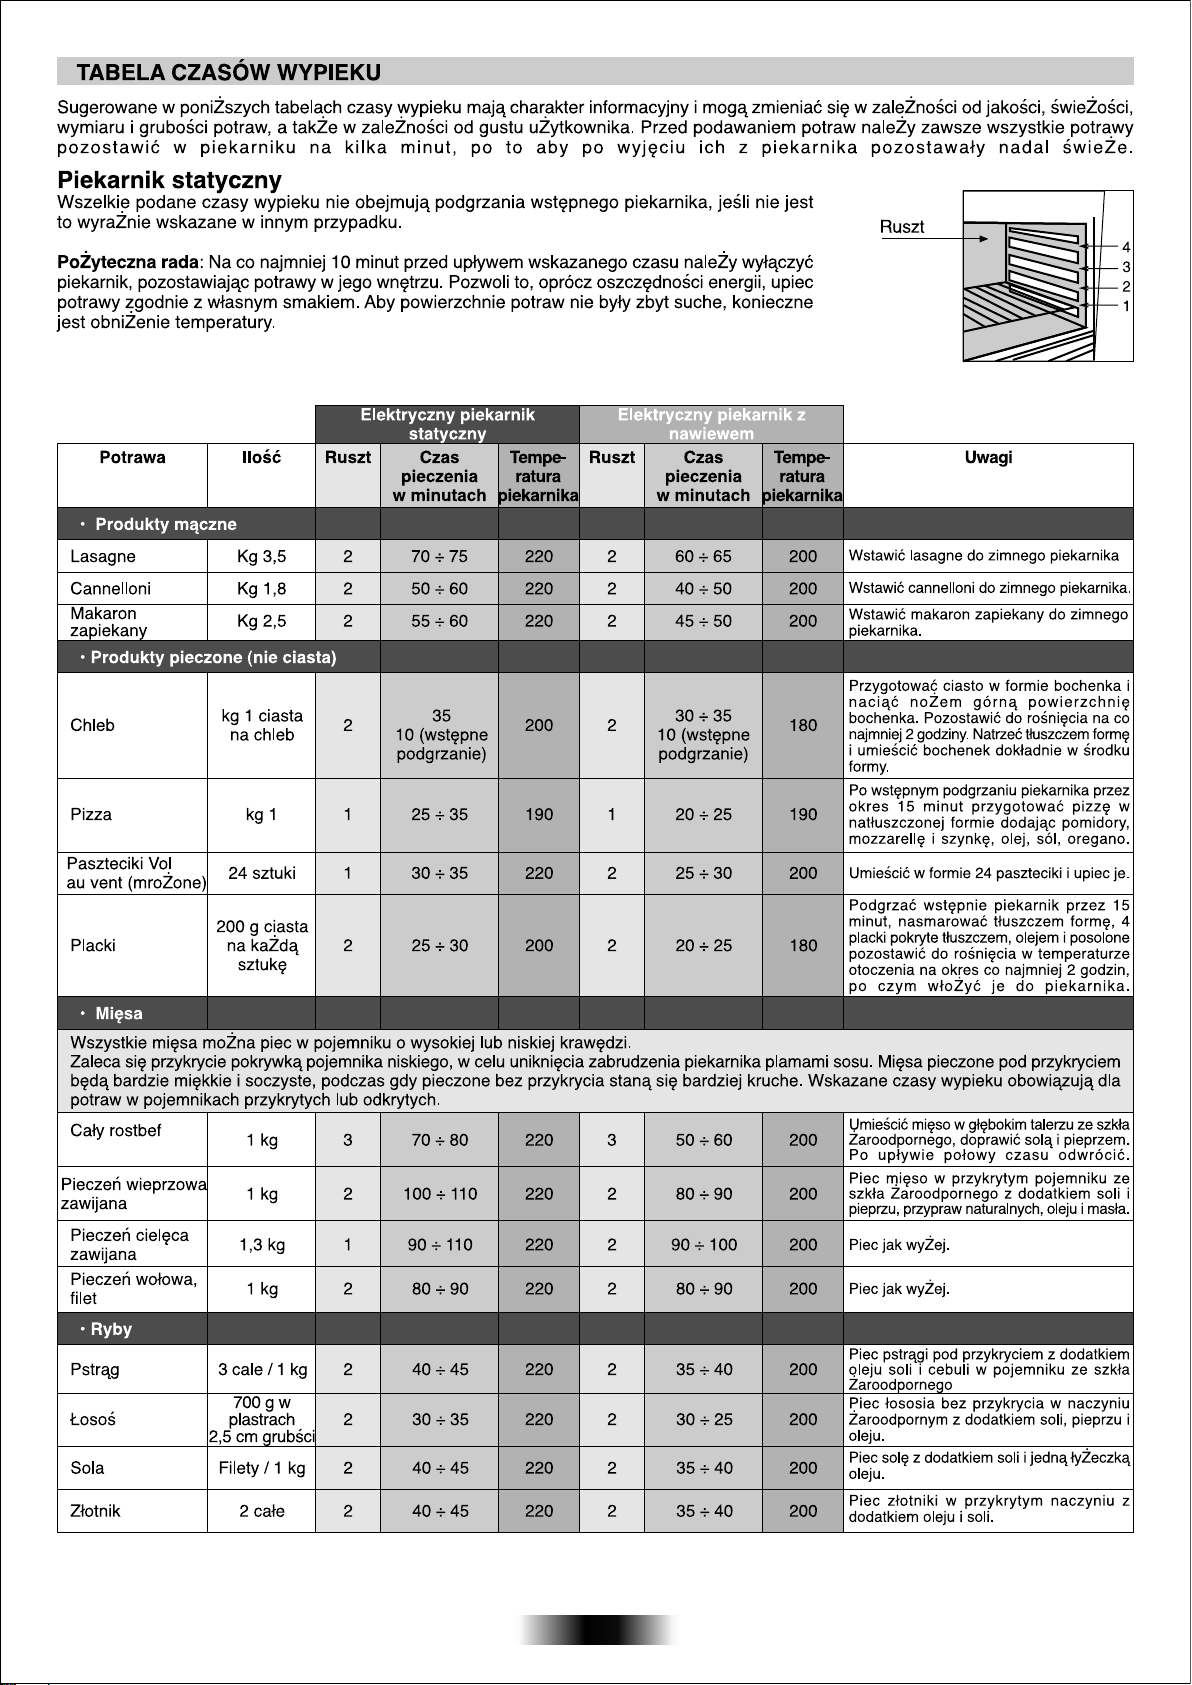
75 PL
Page 75
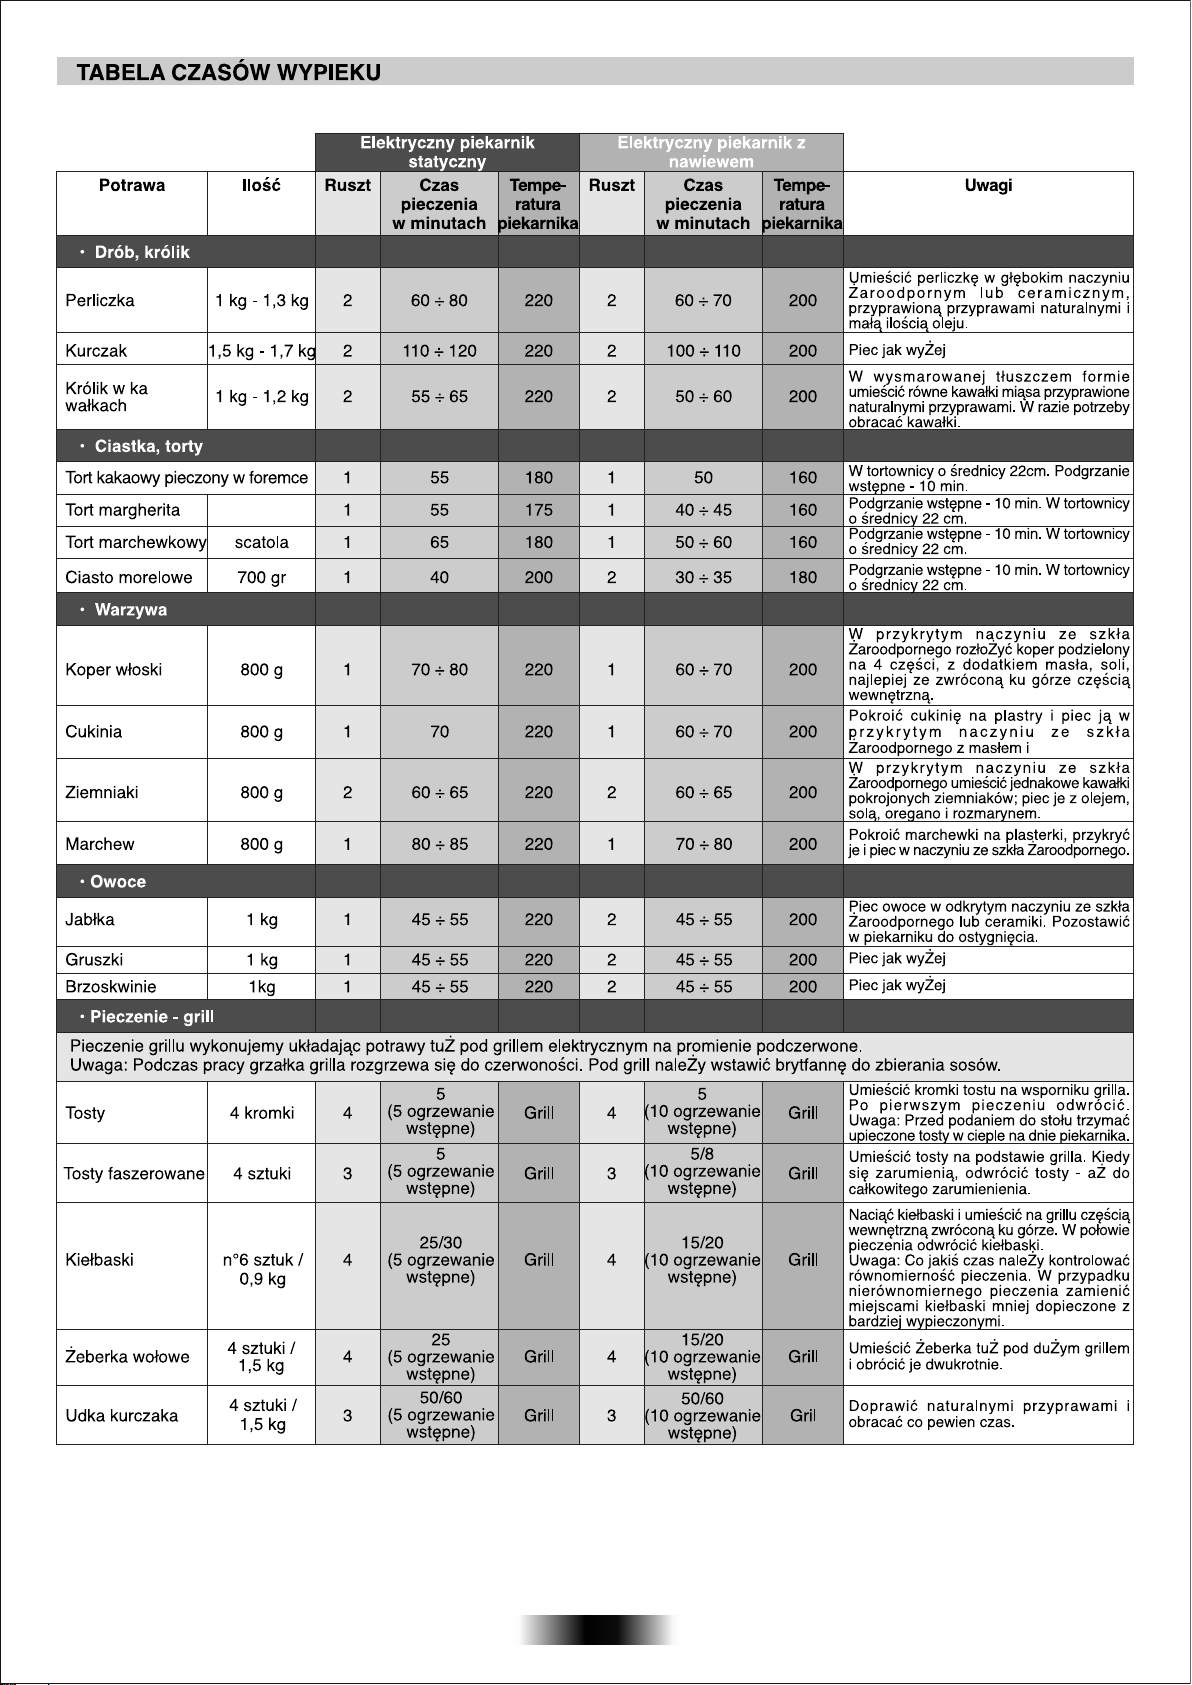
76 PL
Page 76

SPLOŠNA OPOZORILA
Hvala, da ste izbrali enega naših izdelkov! Da boste lahko izrabili vse možnosti, ki vam jih ponuja pečica, priporočamo naslednje:
• Pozorno preberite navodila; v njih so pomembna navodila za varno vgradnjo, priključitev, uporabo in vzdrževanje pečice.
• Priporočamo, da navodila shranite, saj jih boste morda še potrebovali.
Pečica se med delovanjem zelo segreje, zato bodite previdni in se ne dotikajte vročih delov.
Ob prvem segrevanju boste morda zaznali neprijeten vonj. To je posledica veziv za izolacijske plošče in je popolnoma normalen pojav.
Počakajte, da hlapi izginejo, potem pa
Pečica se med delovanjem zelo segreje, med drugim tudi steklo na vratih.
Pazite na otroke, predvsem če je vklopljen grelec za žar.
lahko postavite jed v pečico.
IZJAVA O SKLADNOSTI
Deli aparata, ki pridejo v stik z živili, so izdelani skladno z veljavnimi
evropskimi predpisi (smernica CEE 89/109).
Aparat je izdelan v skladu z evropskima smernicama
73/23/CEE in 89/336/CEE, nadomestno 2006/95/EC in
2004/108/ EC ter nadaljnjimi spremembami.
Ko dobite svojo novo pečIco, se najprej prepričajte, da med
transportom ni prišLo do
takoj obrnite na prodajalca. če niste prepričani, se posvetujte s
strokovnjakom. Pazite, da embalaža, na primer plastične vrečke,
polistirol ali žeblji, ne pridejo v roke otrok, saj so lahko zelo nevarni
zanje.
poškodb. če je pečIca poškodovana, se
VARNOSTNI NAPOTKI
• Pečica je izdelana le za pečenje in kuhanje jedi v gospodinjstvu.
Uporaba pečice v kakršnekoli druge namene je (npr. za segrevanje
prostora) je neprimerna in zaradi tega tudi nevarna.
• Proizvajalec in prodajalec ne prevzemata odgovornosti za morebitne
poškodbe oseb in/ali materialno škodo, ki bi nastala zaradi neprimerne,
napačne in
električnega aparata morate upoštevati naslednja osnovna varnostna
pravila:
-Ne vlecite priključnega kabla, če želite iztakniti vtikač iz vtičnice, pač
pa primite za vtikač in ga lepo iztaknite iz vtičnice.
-Ne dotikajte se aparata, če imate vlažne roke ali noge.
-Ne dotikajte se aparata, če ste bosi.
-Ne dovolite otrokom ali nesamostojnim osebam, da uporabljajo
aparat brez nadzora.
-Priključitev aparata na električno omrežje preko adapterjev, podaljškov
in razdelilcev ni priporočljiva.
- V primeru okvare in/ali slabega delovanja aparat takoj izklopite in ga
ne uporabljajte naprej.
- Če se poškoduje priključni kabel, ga morate takoj zamenjati.
Odstranite poškodovani priključni kabel in
H05RRF, H05VV-F, H05V2V2-F ustrezne dolžine in preseka Kabel
mora biti sposoben prenesti obremenitev. Priključnega kabla ne
menjajte sami, pač pa naj vam ga zamenja ustrezno usposobljen
strokovnjak! Pripominjamo, da mora biti vodnik za ozemljitev (rumen
zelen) obvezno za 10 mm daljši od vodnikov za priključitev
omrežje.
Za morebitna popravila se obrnite na enega od naših pooblaščenih
serviserjev ter ob morebitni zamenjavi posameznih elementov vedno
zahtevajte vgradnjo originalnih Candyjevih rezervnih delov.
Neupoštevanje zgornjih navodil lahko vpliva na varno delovanje
aparata.
• Pečice ne smejo uporabljati otroci ali osebe zmanjšanimi fizičnimi,
zaznavnimi ali umskimi sposobnostmi, s pomanjkljivimi
znanjem, razen pod nadzorom oseb, ki so odgovorne za njihovo
varnost in ki so jim način uporabe ustrezno razložili.
• Otrokom ne smete dovoliti, da se igrajo s pečico. Sten pečice ne
oblagajte z alu-folijo ali v oblogami za enkratno uporabo, ki so na
voljo v trgovinah, saj bi
emajlom, kar bi poškodovalo emajl.
nespametne uporabe pečice. Pri uporabi kakršnega koli
ga zamenjajte s kablom tipa
na električno
izkušnjami ali
se te snovi lahko stalile ob stiku z vročim
NAMESTITEV IN PRIKLJUČITEV
Za priključitev aparata in morebitno vgradnjo poskrbi kupec in ni
odgovornost proizvajalca. Morebitni posegi s strani pooblaščenega
servisa niso vključeni v garancijo. Električna inštalacija, na katero bo
aparat priključen, mora biti urejena v skladu z veljavnimi lokalnimi
predpisi in v skladu z navodili proizvajalca, zato priporočamo, da vam
električno inštalacijo pred
strokovnjaki. Morebitna škoda, ki bi nastala zaradi napačne priključitve
in/ali namestitve aparata, ni zajeta v garancijo. Priključitev in namestitev
aparata morajo v izvesti v skladu z navodili ustrezno usposobljeni
strokovnjaki.
Morebitna napačna priključitev in namestitev lahko povzroči poškodbe
oseb, živali ali premoženja.
Proizvajalec in prodajalec ne prevzemata
poškodbe oseb in/ali nastalo materialno škodo, do katere bi prišlo zaradi
napačne priključitve in/ali vgradnje aparata.
priključitvijo aparata pregledajo usposobljeni
odgovornosti za morebitne
VGRADNJA PEČICE V KUHINJSKI NIZ
Dovoljena je vgradnja pečice pod delovni pult ali v nišo v visoki
kuhinjski omarici. Pečico pritrdite s pomočjo vijakov skozi luknje na
ohišju (gl. sliko na zadnji strani).
Odprite vrata pečice in poiščite luknje. Zagotoviti morate ustrezno
zračenje; upoštevajte mere, ki so navedene na skici na zadnji strani
teh navodil.
Opomba:
navodila, ki so bila priložena kuhalni plošči!
Če kombinirate pečico in kuhalno ploščo, upoštevajte tudi
POMEMBNI NAPOTKI
Za brezhibno delovanje mora biti pečica vgrajena v ustrezno nišo.
Stranice kuhinjskih omaric poleg pečice morajo biti izdelane iz na
vročino odpornih materialov. Prepričajte se, da lepilo, uporabljeno pri
izdelavi omarice, prenese temperaturo vsaj 120 C; plastika ali lepila, ki
ne prenesejo tako visokih temperatur, se bi stalili, omarica pa bi
deformirala. Po vgradnji pečice v nišo morajo biti vsi električni deli
povsem izolirani; to zahtevajo veljavni predpisi. Vsa varovala morajo
biti trdno pritrjena, tako da jih je nemogoče odstraniti brez uporabe
posebnih orodij.
Odstranite hrbtno stranico s kuhinjske omarice, da omogočite
kroženje zraka okoli pečice. Kuhalna plošča nad njo mora
oddaljena vsaj 45 mm.
PRIKLJUČITEV PEČICE NA ELEKTRIČNO OMREŽJE
Pečico priključite na ozemljeno vtičnico, ali preko ustreznega
večpolnega stikala, zaščiteno z ustreznimi varovalkami. Pečica mora
biti pravilno ozemljena!
Nekateri modeli niso opremljeni z vtičem. Na priključni kabel takih
modelov pritrdite vtič, ki bo ustrezal priključni moči aparata. Priključna
moč aparata je navedena na napisni ploščici s tehničnimi podatki, ki je
pritrjena na aparatu. Ozemljitveni kabel je zeleno-rumene barve.
Če vtičnica v zidu ne ustreza vtiču, jo morate zamenjati z ustrezno.
Vsako tako delo sme opraviti le ustrezno usposobljen strokovnjak. Ta
mora ob zamenjavi tudi pregledati, če presek kablov v vtičnici ustreza
skupni priključni moči vašega aparata.
Aparat lahko priključite na omrežje
priključni kabel in električno omrežje vgraditi večpolno stikalo
ustrezne moči, ki mora imeti razmik med kontakti najmanj 3 mm.
Vgraditi smete le tako stikalo, ki ustreza vsem varnostnim predpisom.
Ozemljitveni kabel ne sme biti prekinjen s stikalom. Vtičnica ali direktni
priključek morata biti nameščena tako, da
tudi po izvršeni vgradnji.
tudi direktno, vendar morate med
sta enostavno dosegljiva
OPREMA PEČICE (odvisno od modela)
Pred prvo uporabo pečice očistite vse površine z blago raztopino
čistila, nato pa z gobico izperite površine s čisto vodo in jih
obrišite s suho krpo.
Na rešetko postavite različne pekače.
Ta rešetka je zelo primerna za
pripravljanje jedi na žaru. Pod njo
podstavite pekač za lovljenje
maščobe.
Posebna oblika rešetko zagotavlja,
da ostanejo v vodoravnem položaju
tudi če so delno izvlečene iz pečice
tako ni nevarnosti, da bi pekač
zdrsnil z rešetke.
77 SI
se
biti
Page 77
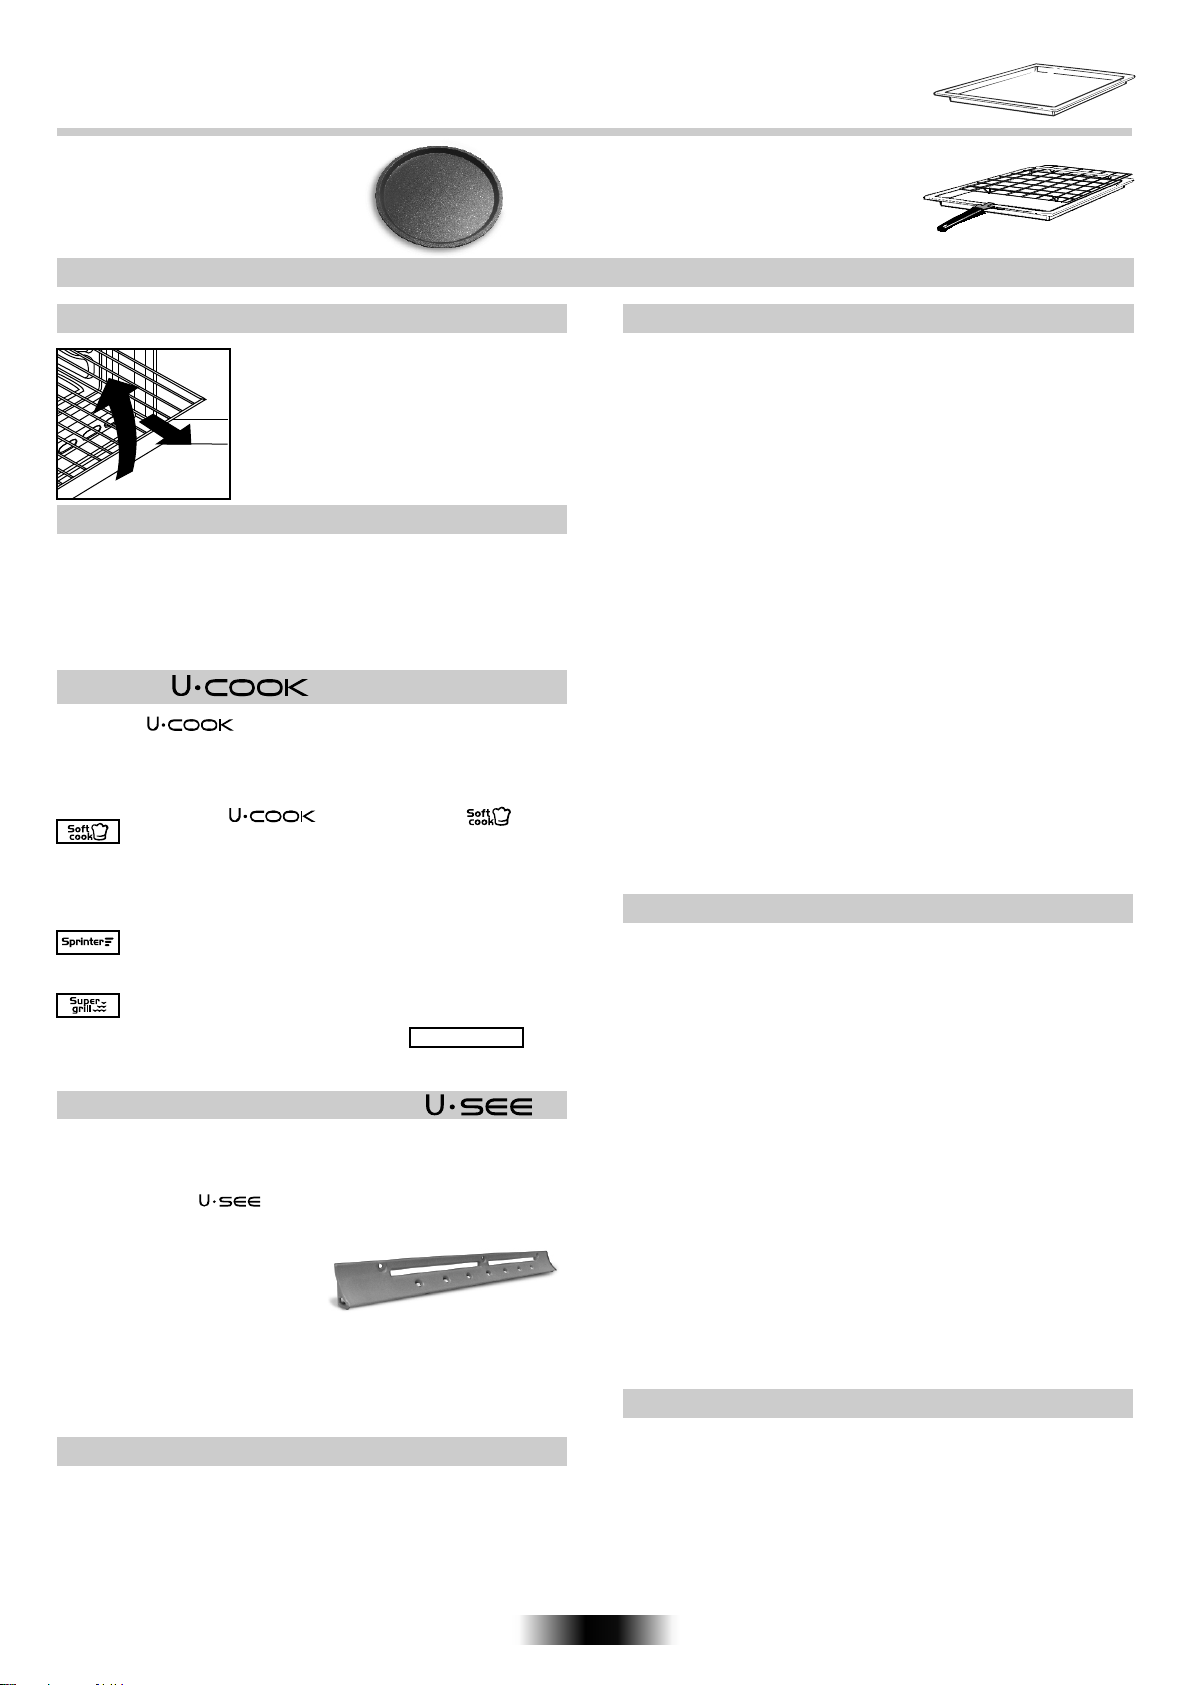
Globji pekač je namenjen lovljenju maščobe, ki med peko na žaru ali ražnju (odvisno od modela) kaplja iz mesa. Ne
uporabljajte ga za peko pečenk, saj bi se maščoba v tem primeru razpršila po vsej pečici, se začela žgati in pojavil bi
se dim.
Pekač za pizzo zagotavlja najboljše
rezultate ob uporabi funkcije Pizza.
Nosilec pekača je idealen za peko na žaru;
uporabljate ga skupaj s pekačem za lovljenje
maščobe. Opremljen je z ročajem za lažje rokovanje
z obema pekačema. Ročaj je snemljiv, ne puščajte
ga v pečici!
KORISTNI NASVETI
NEKAJ KORISTNIH NASVETOV
Pečica ima vgrajen nov sistem za blokiranje
nosilnih rešetk. Ta sistem omogoča, da
nosilne rešetke med preverjanjem jedi
izvlečete iz pečice, brez nevarnosti, da bi
povsem zdrsnile iz vodil.
Če želite rešetko odstraniti iz pečice, jo
izvlečete ter nekoliko privzdignete.
ŽAR
S pomočjo žara se živilo hitro zapeče in dobi lepo rjavo barvo.
Priporočamo, da pekač potisnete v 4. višino odvisno seveda od
količine.
Razen zelo puste divjačine in mesnih štruc lahko vsa druga živila
pripravljate na ta način.
Meso in ribe, ki jih boste spekli na ta način, narahlo namažite z
oljem.
MODELI
Pri pečicah elektronika nadzira hitrost ventilatorja ta
patentirani sistem se imenuje VARIOFAN. Med pečenjem se hitrost
ventilatorja samodejno prilagaja in s tem optimizira kroženje zraka
ter temperaturo v notranjosti pečice.
Vse pečice imajo tudi funkcijo . Ta
omogoča uravnavanje vlažnosti in temperature in za 50
% zmanjša izgubo vlage, tako da ostane živilo bolj
mehko in boljšega okusa. Ta nežni način priporočamo za
kruha in peciva.
peko
Skrajša čas predhodnega segrevanja pečice: ta se samo
v 8 minutah segreje na 200 stopinj C.
Omogoča nastavljanje stopnje intenzivnosti žara in je
50 % močnejši v primerjavi s klasičnimi pečicami.
Nekatere pečice so opremljene z novimi vrati z
večjim oknom, kar olajša vzdrževanje in izboljša termično izolacijo.
WIDE DOOR
za
Odvisno od modela:
Ta sistem osvetlitve nadomešča klasično žarnico. V vratih pečice je 14
svetilnih diod, ki zagotavljajo kakovostno osvetlitev celotne pečice,
brez senčnih delov.
Prednosti sistema so, razen odlične osvetlitve pečice, dolga
življenjska doba, lažje vzdrževanje in predvsem prihranek energije.
• odlična vidljivost
• dolga življenjska doba
• zelo majhna poraba energije, 95 % v primerjavi z običajnim
načinom osvetlitve.
”Aparati z belimi LED razreda 1M
skladno z IEC 60825-1: 1993 +A1: 1997 + A2: 2001 (enakovredno EN
60825-1; 1994 +A1: 2002 +A2), največja svetilna moč 459nm < 150
uW. Ne opazovati neposredno z optičnimi inštrumenti.”
l
SAMOČISTILNA KATALITSKA OBLOGA PEČICE
Če se želite izogniti neprijetnemu čiščenju notranjih sten pečice,
vam dodatno za vse vrste pečic nudimo samočistilne obloge
prevlečene s posebnim mikroporoznim premazom. Če so te
nameščene, ročno čiščenje pečice ni več potrebno.
Premaz na samočistilnih oblogah razgradi s posebnim katalitičnim
postopkom maščobo, ki se med peko nabira na oblogah.
Prekomerno
tega, ker prekomerno zapre pore, prepreči samočistilni učinek.
Samočistilni učinek lahko dosežete ponovno, če za 10 do 20 minut
vključite prazno pečico. Gumb termostata morate pri tem naravnati na
najvišjo temperaturo.
Samočistilnih sten ne smete čistiti z ostrimi, grobimi in/ali najedajočimi
čistili ali
tem nepopravljivo poškodujete samočistilni premaz.
Priporočamo, da pečete mastne jedi v posodah z visokim robom, ko
tudi, da pri peki jedi na žaru uporabljate pladenj za prestrezanje
maščob.
Ti enostavni postopki in visoka temperatura omogočajo, da se v pečici
odvija samočistilni postopek.
V primeru, da so samočistilne obloge izjemno umazane, in se z
opisanimi postopki ne bi dovolj očistile, jih obrišite še z vlažno krpo
namočeno v topli vodi.
Samočistilno funkcijo vam zagotavlja poroznost premaza.
Pomembno!
Vse samočistilne obloge, ki jih dobite v prosti prodaji, imajo
zagotovljeno učinkovitost delovanja v vključeni pečici približno
300 ur. Po preteku tega časa morate samočistilne obloge
nadomestiti z novimi.
nabiranje maščob na samočistilnih oblogah lahko zaradi
čistilnimi sredstvi (n.pr.: vimom, grobimi mrežicami itd.), ker s
ČIŠČENJE IN VZDRŽEVANJE PEČICE
Zunanje površine iz nerjavečega inox jekla in lakirane ali emajlirane
površine očistite z mlačno milnico ali pa z namenskimi čistili za
tovrstno čiščenje, ki jih dobite v prosti prodaji. Zgoraj navedenih
površin v nobenem primeru ne smete čistiti z abrazivnimi praški, ker
bi jih s tem poškodovali. Čiščenje pečice je zelo
morate očistiti po vsaki uporabi. Na stenah pečice se nabirajo
raztopljene maščobe, ki lahko ob naslednji uporabi povzročijo
neprijeten vonj in morda tudi slab izid peke. Notranje stene pečice
očistite s toplo vodo z dodatkom detergenta. Stene pečice nato
pomijte še s čisto vodo in jih obrišite. Neprijetnemu
sten pečice se lahko izognete, če jih obložite s posebnimi
samočistilnimi oblogami ki so zaščitene z mikroporoznim premazom.
Samočistilne obloge lahko nabavite posebej. Več informacij o
samočistilnih oblogah pa lahko najdete v poglavju''Samočistilna
katalitična pečica''. Nosilne rešetke pečice čistite z ustreznimi
detergenti in mrežicami iz inoxa. Vrata pečice iz
smete čistiti šele, ko so hladna. Morebitne poškodbe steklenih vrat
(razbitje stekla), ki bi nastale pri čiščenju zaradi neupoštevanja
zgoraj navedenega navodila, niso zajete v garancijo!Če želite
zamenjati žarnico v pečici, morate pečico najprej ločiti od
električnega omrežja. Odvijte zaščitni pokrovček in zamenjate
pregorelo žarnico z žarnico enake
na visoke temperature.
vrste. Žarnica mora biti odporna
pomembno. Pečico
čiščenju notranjih
kaljenega stekla
SERVISIRANJE
TRAJANJE PEČENJA
Ko začnete uporabljati svojo novo pečico, si pomagajte z
razpredelnico v tej knjižici. Na osnovi izkušenj boste nato nastavitve
prilagodili svojemu okusu.
Če pečica ne deluje, se najprej prepričajte, da je pravilno priključena
na električno omrežje.
Če vam ne uspe odpraviti nepravilnosti v delovanju, izključite pečico iz
električnega omrežja in pokličite pooblaščeni servis. Pred tem si
zabeležite serijsko številko, ki je navedena na tablici s podatki
(gl. sliko na zadnji strani).
Pečici je
servis v garancijskem roku popravilo opravil brezplačno.
priložen garancijski list, ki zagotavlja, da bo pooblaščeni
78 SI
Page 78
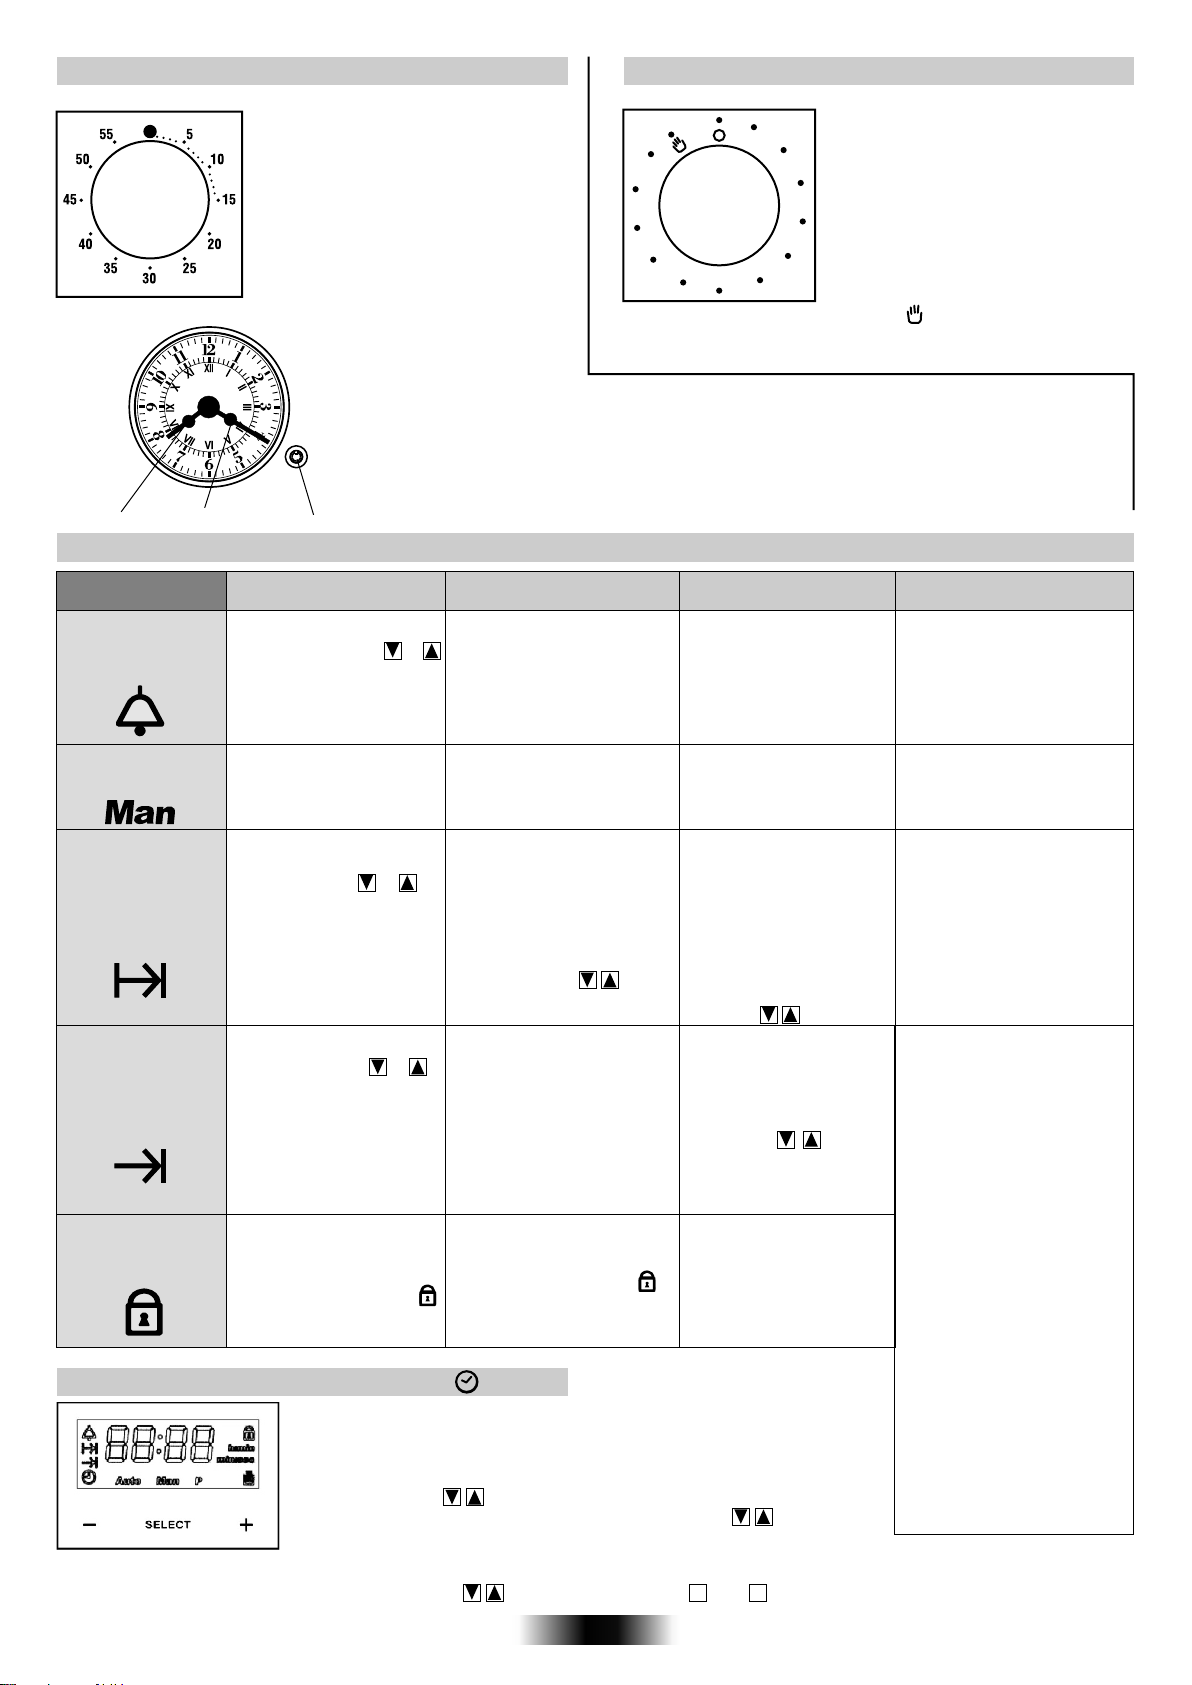
UPORABA ŠTEVCA MINUT (KUHINJSKE URE) NASTAVLJANJE TRAJANJA PEČENJA
Gumb zavrtite za cel krog in ga nato
obrnite tako, da bo oznaka kazala želeni
čas. Ko preteče nastavljeni čas, se za
nekaj sekund oglasi zvonec.
210
011
100
90
80
10
70
Nastavljanje analogne ure
Ob pritisku na gumb se minutni kazalec premakne za eno minuto naprej. Če ohranite
pritisk na tipko, se kazalec hitro premika naprej.
Urni kazalec
Minutni kazalec
Gumb
UPORABA ELEKTRONSKE PROGRAMSKE URE
FUNKCIJA AKTIVIRANJE
ŠTEVE
MINUT
ROČNO
UPRAVLJANJE
TRAJANJE
PEČENJA
KONEC
PEČENJA
VAROVALO ZA
OTROKE
•Pritiskajte na tipko.
•S pomočjo tipke ali
nastavite ustrezen čas.
•Sprostite pritisk na vse
tipke.
•Pritisnite na tipko.
•Z gumbom za izbiranje
funkcij pečice izberite
želeno funkcijo pečice.
•Pritiskajte na tipko za
programsko uro TIMER.
•S pomočjo tipke ali
nastavite ustrezno trajanje
pečenja za jed, ki jo
pripravljate.
•Sprostite pritisk na vse tipke.
•Z gumbom za izbiranje
funkcij pečice izberite
ustrezen način pečenja.
•Pritiskajte na tipko END.
S pomočjo tipke ali
nastavite čas, ko naj se
pečica izklopi.
Sprostite pritisk na vse
tipke.
Z gumbom za izbiranje
funkcij pečice izberite
ustrezen načni pečenja.
•Funkcijo aktiviramo tako, da
se vsaj 5 sekund dotikamo
tipke Set (+), dokler se na
prikazovalniku ne prikaže
simbol varovala za otroke.
Zdaj so vse druge funkcije
onemogočene (zaklenjene).
DEAKTIVIRANJE DELOVANJE
•Ko preteče nastavljeni čas,
se oglasi zvočni signal (čez
čas signal samodejno utihne,
če pa ga želite utišati takoj,
pritisnite na tipko
•Gumb za izbiranje funkcij
pečice obrnite na O.
•Ko preteče nastavljeni čas,
se pečica samodejno izklopi.
Če želite predčasno prekiniti
pečenje, obrnite gumb za
izbiranje funkcij na 0, ali pa
nastavite čas trajanja
pečenja 0:00
(tipke TIMER in
•Ob nastavljenem času se
pečica samodejno izklopi.
Če želite pečico predčasno
ročno izklopiti, obrnite
gumb za izbiranje funkcij
na O.
•Funkcijo deaktiviramo tako, da
se znova vsaj 5 sekund
dotikamo tipke Set (+), dokler
simbol varovala za otroke
ne izgine
so vse funkcije pečice spet na
voljo.
s prikazovalnika. Zdaj
•Ob preteku nastavljenega
časa se oglasi zvočni
signal.
• Če želite preveriti, koliko
časa mora še preteči,
pritisnite na tipko
•Omogoča upravljanje
pečice.
•Omogoča, da nastavite
trajanje pečenja za izbrano
jed.
•Če želite preveriti čas do
konca pečenja, pritisnite na
tipko TIMER.
•Če želite spremeniti
nastavljeno trajanje pečenja,
to storite s pomočjo tipk
TIMER in
•Omogoča določanje časa
za konec pečenja.
•Če želite preveriti
nastavljeni čas za konca
pečenja, pritisnite na
tipko END.
NASTAVITEV TOČNEGA ČASA
OPOZORILO: Po priključitvi pečice in po vsakem izpadu električnega toka
je potrebno ponovno nastaviti čas. Na to vas opozoril utripanje vrednosti
na prikazovalniku. To storite na naslednji način:12:00
•Pritiskajte na tipko 1 časa L1, L2, L3 NASTAVI ZVOČNI SIGNAL
•Nastavi čas z gumbi . •Pritiskajte na tipko 5 časa.
•Sprostite pritisk na vse tipke. •Nastavi čas z gumbi .
•Sprostite pritisk na vse tipke.
Pozor! Pečica deluje le, če je izbran ročni način ali pa je nastavljen čas.
Opomba: Nekateri modeli so namesto s tipkama opremljeni s tipkama " - " in " + “.
60
20
50
30
S pomočjo tega gumba lahko
nastavite ustrezen čas pečenja
(največ 120 minut); po preteku
nastavljenega časa se pečica
samodejno izklopi.
40
Čas se bo odšteval od nastavljene
vrednosti navzdol; ko se gumb vrne v
položaj O, se bo pečica samodejno
izklopila. Če želite pečico uporabljati
brez programske ure, obrnite gumb v
položaj . Ko želite nastaviti pečico,
preverite, da s programsko uro ni v
položaju O.
NAMEN
•Števec minut lahko
uporabljate kot običajno
kuhinjsko uro (ne glede
na to, če pečica deluje ali
ne).
•Za peko različnih jedi.
•Ko preteče nastavljeni čas,
se pečica samodejno izklopi
in oglasi se zvočni signal.
•Ta funkcija se običajno
uporablja skupaj s funkcijo
Trajanje pečenja. Če na
primer želite, da se jed peče
45 minut in mora biti gotova
ob 12:30, preprosto izberete
želeno funk cijo, nastavite
Trajanje pečenja na 45 minut
in Konec pečenja na 12:30.
•Pečenje se samodejno
začne ob 11:45 (12:30 minus
45 minut) in poteka do
nastavljenega časa za konec
pečenja, ko se pečica
samodejno izklopi.
OPOZORILO:
Če nastavite samo čas za
konec pečenja, ne da bi
določili čas trajanja
pečenja, začne pečica
delovati takoj in se izklopi
ob času, določenem za
konec pečenja.
79 SI
Page 79
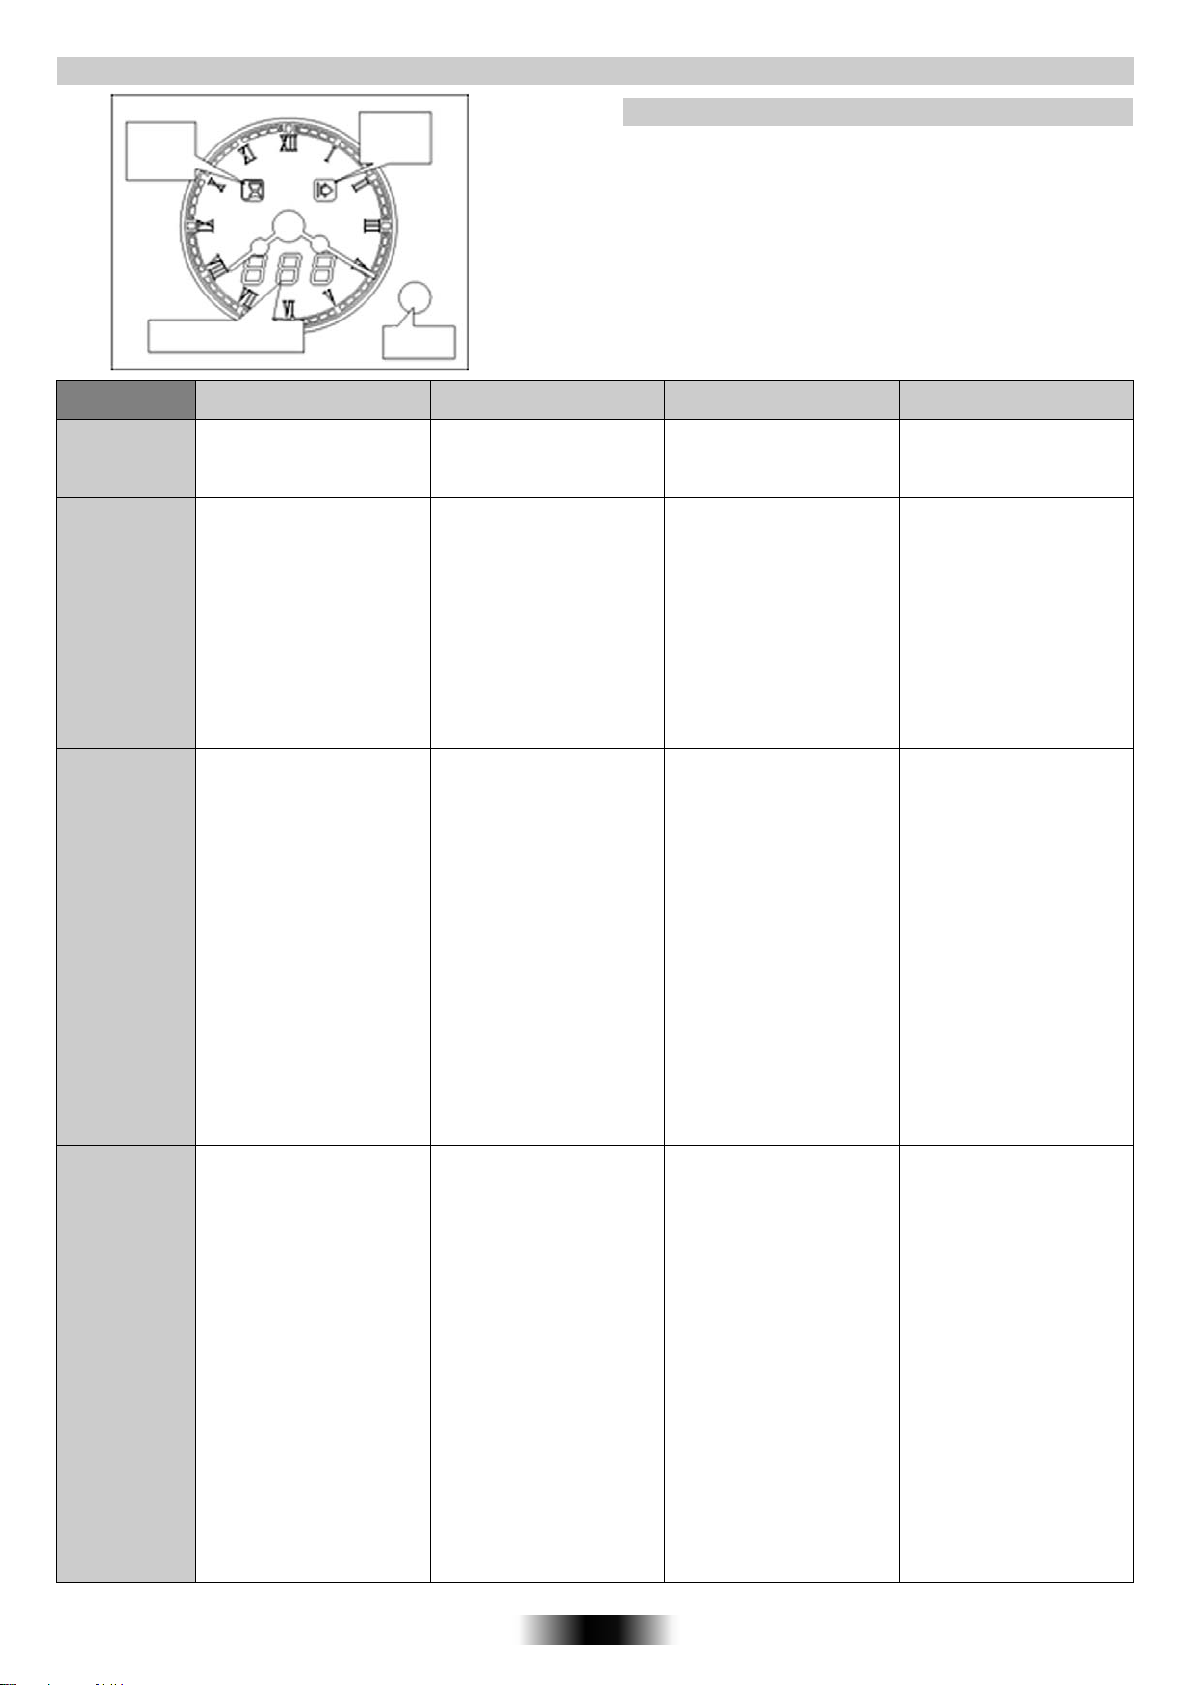
UPORABA ANALOGNE URE S PROGRAMATORJEM
Kontrolna
lučka
trajanja
pečenja
Prikaz nastavitve
FUNKCIJA
ROČNO
UPRAVLJANJE
PEČICE
ŠTEVEC MINUT
NAJVEČ
90 MIN.
PRIKAZ »BEL«
Kontrolna
lučka začetka
pečenja
Tipka za
AKTIVIRANJE
• Nastavite ga lahko le v načinu
za pečenje, ko programska ura
ni nastavljena.
•Dvakrat pritisnite na gumb
za nastavitve; na
prikazovalniku se prikaže
napis »BEL« in »--«
NASTAVITEV TOČNEGA ČASA
• • Štiri sekunde pritiskajte na tipko za nastavitve. Na prikazovalniku
se prikaže napis »SET«. Oglasi se zvočni signal.
S pritiskanjem na tipko nastavite točen čas. Kazalec se premika
v korakih po 1 minuto; če ohranite pritisk na gumb, se kazalec
premika hitreje.
Operacijo morate opraviti v roku 4 sekund, sicer bo
Prikaz trajanja pečenja ali čas, ki se prikaže, zanemarite.
DEAKTIVIRANJE DELOVANJE UPORABA
• Obrnite gumb v izklopljeni
položaj.
• Med odštevanjem je
prikazan preostali čas, v
minutah in nato sekundah.
Ko preteče nastavljeni čas
se prikaže vrednost »000«
in se oglasi zvočni signal.
Izklopite ga s pritiskom na
gumb za nastavitve.
Nastavljeno vrednost lahko
vsakem trenutku
v
spremenite ali prekličete.
• Omogoča upravljanje
pečice.
• Ob preteku nastavljenega
časa se oglasi zvočni signal.
• Za običajno uporabo
pečice.
• Programsko uro lahko
uporabljate kot običajno
programsko uro, tudi če je
pečica izklopljena.
preklicana.
TRAJANJE
PEČENJA
NAJVEČ 24 UR
PRIKAZ »DUR«
POVSEM
SAMODEJNO
PEČENJE
NAJDALJŠI
ZAMIK 24 UR
PRIKAZ »PAU«
• Najprej izberite funkcijo
pečice in ustrezno
temperaturo.
• Enkrat pritisnite na gumb
za nastavitve. Na
prikazovalniku se prikaže
napis »DUR«, kontrolna
lučka za trajanje pečenja
utripa.
• S pomočjo gumba
nastavite trajanje pečenja.
Čas do konca pečenja
prikazan, kontrolna lučka
trajanja pečenja osvetljena.
• Najprej izberite funkcijo
pečice in ustrezno
temperaturo.
• Enkrat pritisnite na gumb
za nastavitve, kot za
nastavljanje trajanja pečenja.
• Pritisnite še enkrat; na
prikazovalniku se prikaže
napis »PAU« in dve črtici »-«, kontrolna lučka Start
utripa.
• Nastavite čas do vklopa
pečice. Med tem časom se
pečica ne segreva, na
prikazovalniku se odšteva
preostali čas do vklopa.
Kontrolni lučki Start in Stop
sta osvetljeni. Ko preteče
nastavljeni čas, se pečica
vklopi in osvetljena je samo
kontrolna lučka Stop.
je
• Ko preteče nastavljeni čas,
se na prikazovalniku prikaže
napis »END«, kontrolna
lučka trajanja pečenja
utripa, pečica se samodejno
izklopi. Oglasi se zvočni
Izklopite ga s
signal.
pritiskom na gumb za
nastavitve. Če želite
ponovno vklopiti pečico, še
enkrat pritisnite na gumb.
Nato obrnite gumb nazaj v
izhodiščni položaj.
Med delovanjem pečice
lahko čas trajanja pečenja
spremenite ali prekličete
funkcijo.
• Ob nastavljenem času za
konec pečenja se pečica
samodejno izklopi; oglasi se
zvočni signal. Utišate ga s
pritiskom na gumb za
nastavitve. Če je potrebno
nadaljevati s pečenjem,
znova pritisnite na gumb.
Obrnite gumbe nazaj na
izhodiščni položaj. Med
delovanjem pečice lahko
čas trajanja pečenja
spremenite ali prekličete
funkcijo.
• Omogoča vnaprejšnjo
nastavitev trajanja pečenja
za izbrani recept.
• Omogoča programiranje
pečice, tako da je jed gotova
ob želenem času.
• Ko preteče nastavljeni čas,
se pečica samodejno
izklopi, ob tem pa se oglasi
zvočni signal.
• Primer: Ura je 10. Jed
se mora kuhati 45
minut, gotova mora biti
ob 12.
1. Izberite ustrezno funkcijo
in temperaturo. 2. Nastavite
trajanje pečenja 45 min. 3.
Nastavite čas pavze - 75
minut (10H/11H15). Pečica
bo mirovala od 10 ure do
11.15, nato pa se bo vklopila
in se samodejno izklopila
12.
ob
80 SI
Page 80
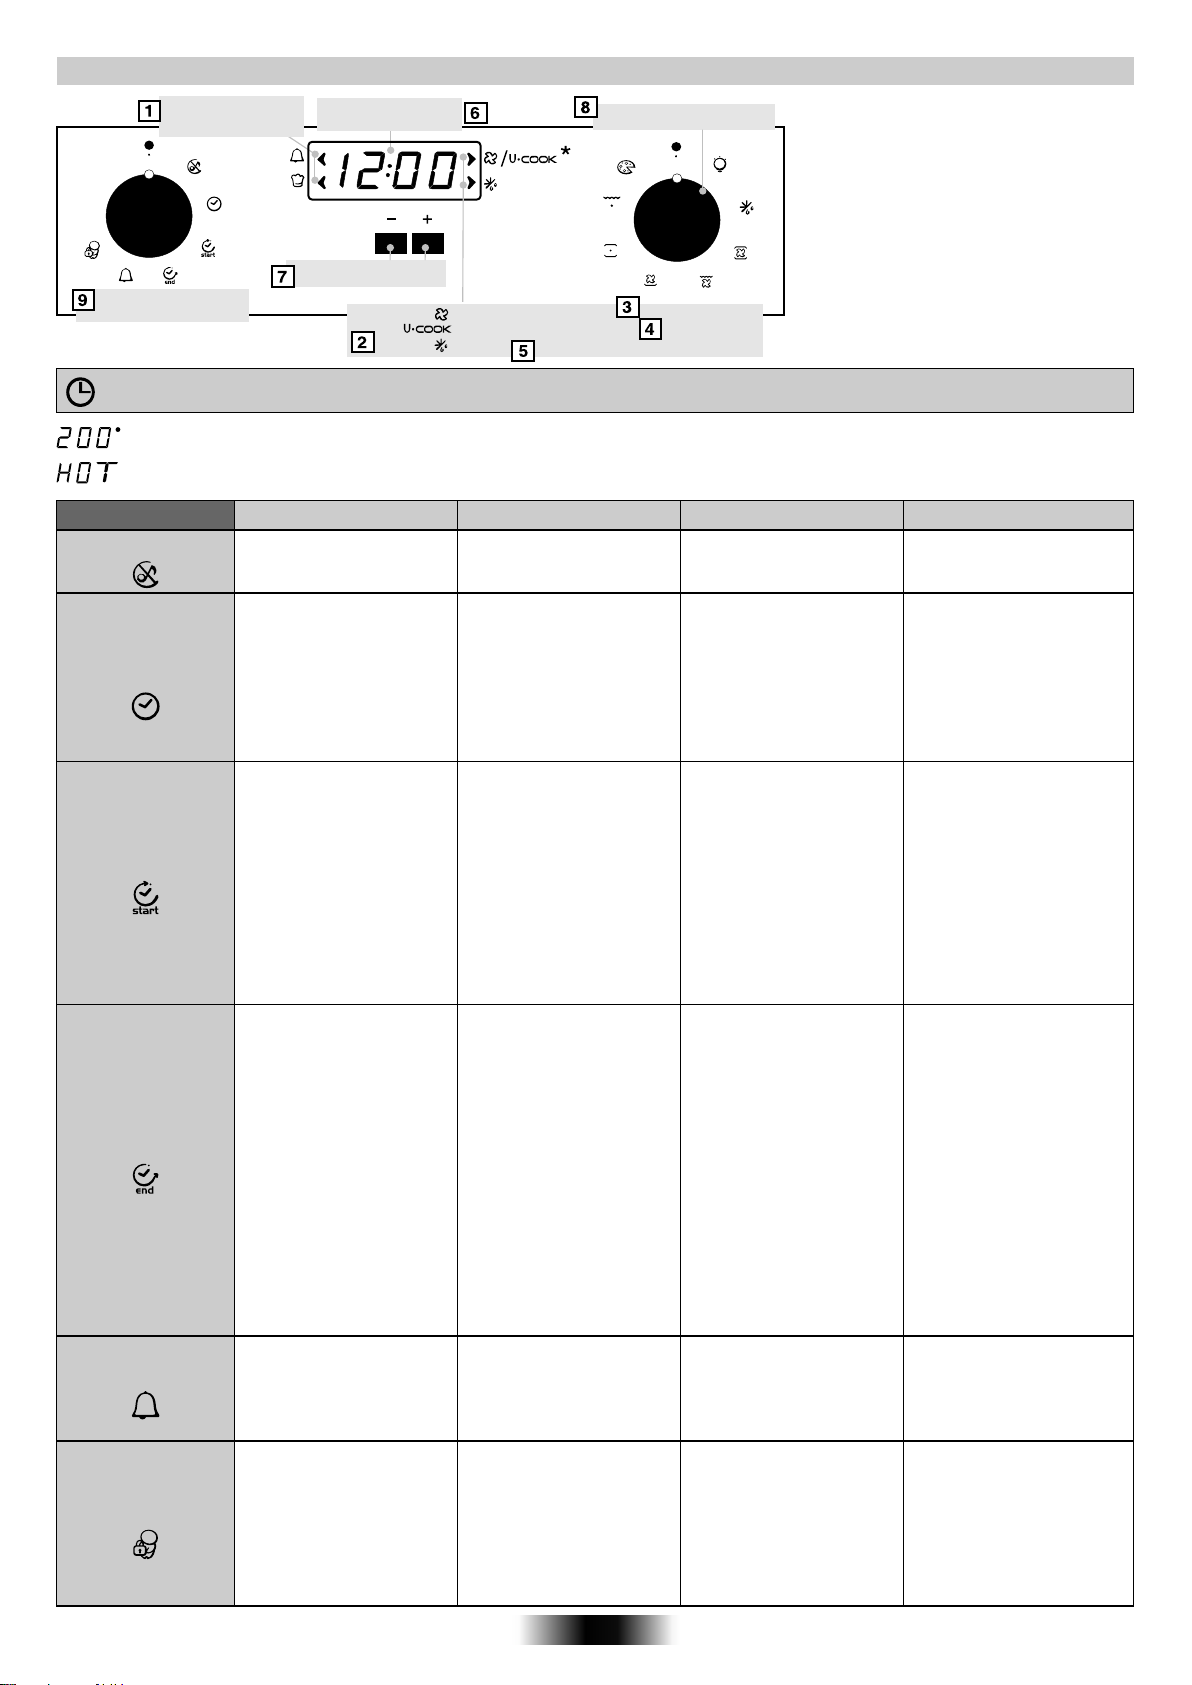
UPORABA ELEKTRONSKE PROGRAMSKE URE (TIP A)
Indikator:
števec minut ali
Automatsko
Gumb programske ure
OPOZORILO!
Lučka »º« indikatorja temperature utripa, dokler se pečica ne segreje na nastavljeno temperaturo.
Ko je program pečenja zaključen, se na prikazovalniku izmenično kaže čas in napis »HOT«, tudi če sta oba gumba v izklopljenem
položaju.
FUNKCIJA
TIHI NAČIN
KAKO JO AKTIVIRATE?
• Obrnite gumb na levi na
tihi način.
Prikaz
Temperature ali ĉasa
Tipke za nastavitve
Funkcija z VARIOFAN
Odtaljevanje
Gumb za izbiranje funkcij
Po priključitvi ali izpadu električnega toka morate najprej nastaviti točen čas
(na prikazovalniku utripa vrednosti 12:00).
KAKO JO IZKLOPITE?
•Obrnite gumb na OFF.
1.Kontrolna lučka števca minut ali
samodejnega delovanja
2.Luči
3.Funkcije z ventilatorjem
4.Funkcije z VARIOFAN
5.Odtaljevanje
6.Prikaz temperature ali časa
7.Tipke za nastavitve
8.Gumb za izbiranje funkcij
9.Gumb programske ure
* Odvisno od modela
UČINEK ?
• Utišate zvok števca minut.
NAMEN ?
• Izklop zvočnega opozorila
ob preteku časa
NASTAVLJANJE
ČASA
TRAJANJE
PEČENJA
KONEC PEČENJA
• Obrnite gumb na levi na
simbol ure. S pomočjo tipk
»-« ali »+« nastavite čas.
• Obrnite gumb na desni na
ustrezno funkcijo.
Obrnite gumb na levi na
simbol za trajanje pečenja.
S pomočjo tipk »-« ali »+«
nastavite trajanje pečenja.
Osvetli se napis Auto.
• Obrnite gumb na desni na
ustrezno funkcijo.
Obrnite gumb na levi na
simbol za konec pečenja.
•S pomočjo tipk »-« ali »+«
nastavite trajanje pečenja.
Osvetli se napis Auto.
• Obrnite gumb na OFF.
•Ko preteče nastav-ljeni čas,
se pečica samodejno izklopi
in nekaj sekund se oglaša
zvočni signal. Če želite
predčasno prekiniti pečenje,
obrnite gumb za izbiranje
funkcij na OFF ali nastavite
čas 00:00, tako da obrnete
gumb na levi na simbol za
trajanje pečenja in s pomočjo
tipk »-« ali »+« nastavite
vrednost 00:00.
• Ko preteče nastavljeni čas,
se pečica samodejno izklopi.
Če želite predčasno prekiniti
pečenje, obrnite gumb za
izbiranje funkcij na OFF.
• Nastavljate čas, ki je
prikazan na prikazovalniku.
• Tako lahko določite trajanje
pečenja za posamezen
recept.
Ko ste nastavili trajanje
pečenja, obrnite gumb na
OFF, da se spet prikaže čas
dneva. Če želite preveriti
nastavljeni čas, obrnite
gumb na simbol za trajanje
pečenja.
•Tako lahko določite trajanje
pečenja za posamezen
recept.
•Ko ste nastavili čas za
konec pečenja, obrnite
gumb na OFF, da se spet
prikaže čas dneva.
•Če želite preveriti
nastavljeni čas, obrnite
gumb na simbol za trajanje
pečenja.
• Nastavljanje časa.
Opomba: Po priklju-čitvi ali
izpadu električnega toka
morate najprej na-staviti
točen čas (na
prikazovalniku
utripa vrednosti 12:00).
• Za pečenje različnih jedi.
•
Ta funkcija omogo-ča
programiranje vnaprej.
Če npr. že-lite, da se jed peče
45 min in da je goto-va ob
12.30, nasta-vite trajanje
pečenja in čas za konec
pečenja 12.30.
Pečica se začne segrevati
ob 11.45 (12.30 minus 45)
in se izklopi ob
nas-tavljenem času.
ŠTEVEC MINUT
KLJUČAVNICA
ZA VARNOST
OTROK
• Obrnite levi gumb na
funkcijo števca minut in
določite čas s pomočjo
tipk »-« ali »+«.
• Obrnite levi gumb na
simbol ključavnice in v roku
3 sekund pritisnite na
tipko »+«.
Ko se na prikazovalniku
prikaže napis STOP, je
ključavnica aktivirana
• Obrnite levi gumb na
funkcijo števca minut in s
pomočjo tipk »-« ali »+«
nastavite čas 00:00.
• Obrnite levi gumb na
simbol ključavnice in v roku
3 sekund pritisnite na
tipko »+«.
•Napis STOP izgine s
prikazovalnika.
81 SI
• Nekaj sekund po preteku
nastavljenega časa se
oglaša zvočni signal.
• Pečice ni mogoče
uporabljati.
•
Ta funkcija deluje, tudi če
pečice ne uporabljate in je
izklopljena.
•
Zelo koristno, predvsem če
imate majhne otroke.
Page 81
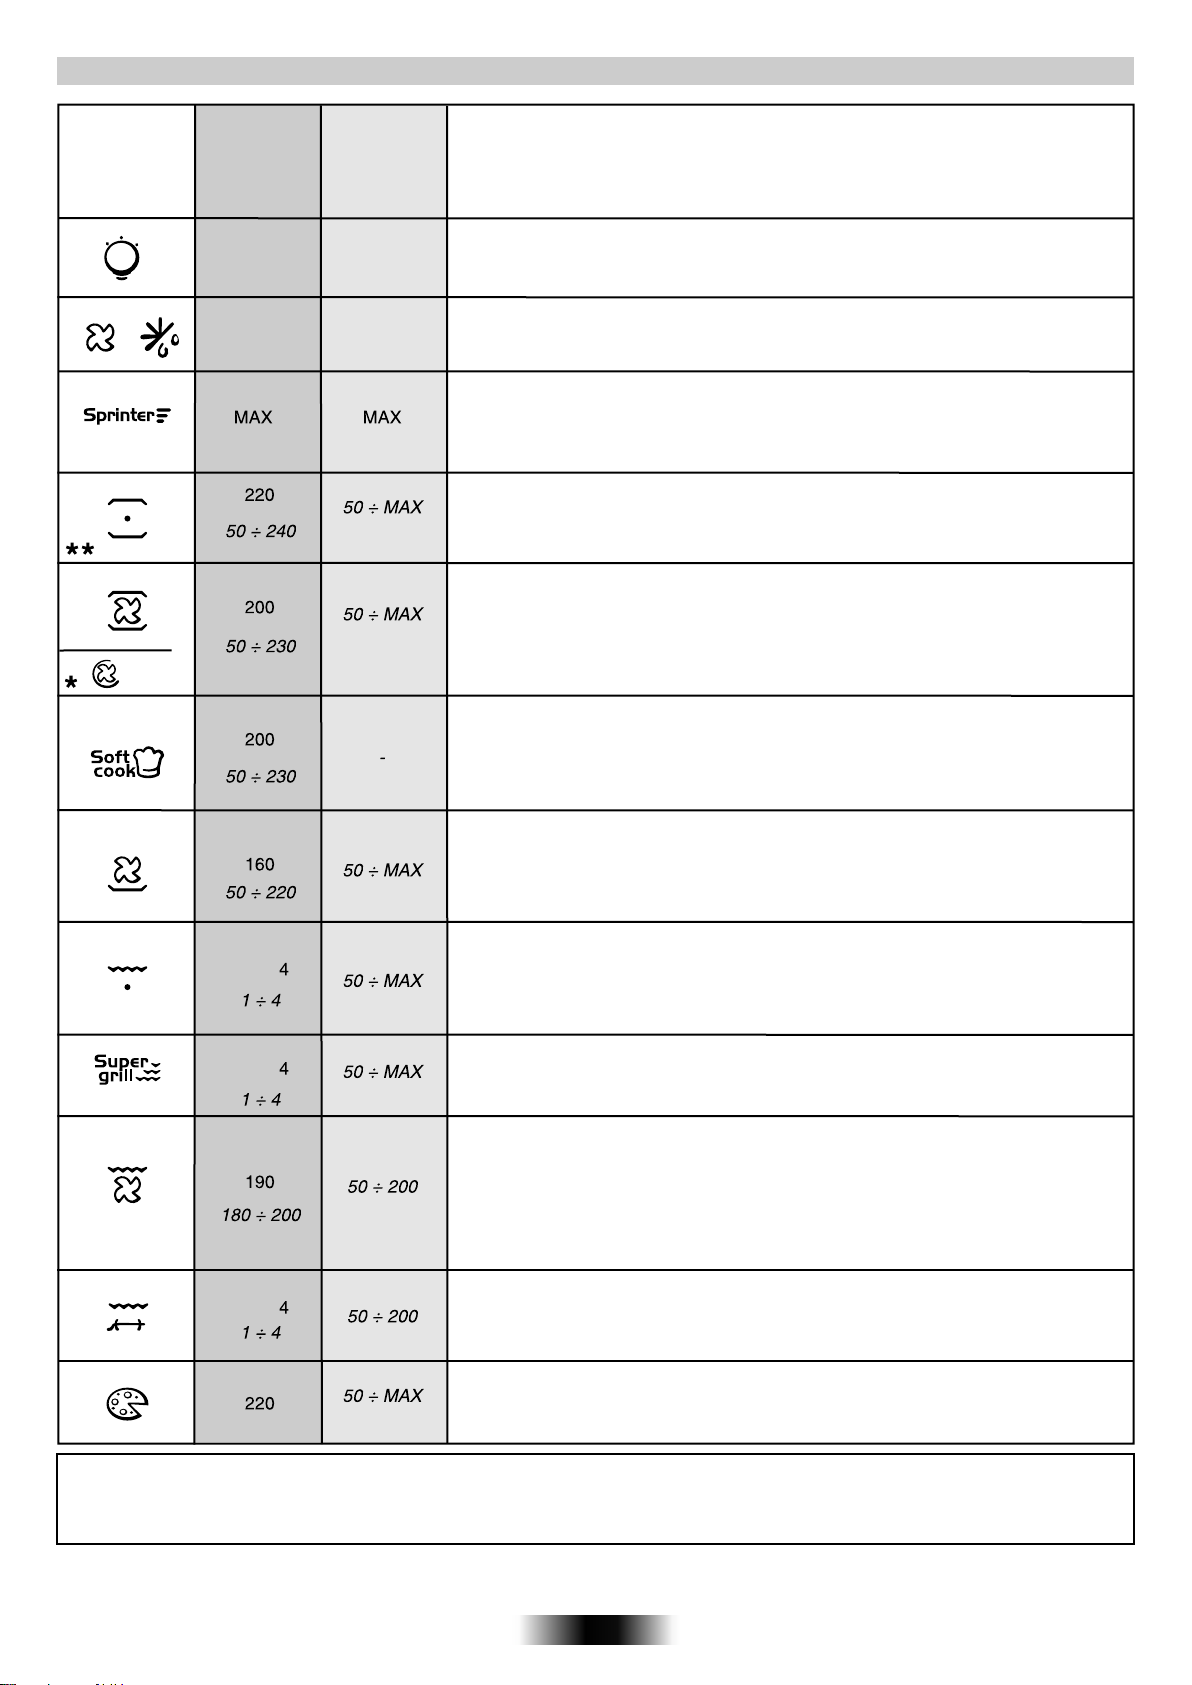
FUNKCIJE (ODVISNO OD MODELA - * MODELI Z ELEKTRONSKO PROGR. URO TIPA A)
Funkcije
Predvide- na
temp.*
Gumb
termost.
Funkcije
Za prižiganje luči v pečici
Samodejno se aktivira tudi ventilator za hlajenje (modeli z ventilatorjem)
ODTALJEVANJE: Okoli živila kroži zrak sobne temperature; tako se živilo hitro
odtali z ohranjanjem vseh lastnosti živila.
SUPER ŽAR : za hrustljave jedi. V primerjavi z običajnimi žari je moč 50 % večja.
ZGORNJI/SPODNJI GRELEC : Delujeta spodnji
primerna za tradicionalni način peke in jo priporočamo za peko krač,divjačine,
peciva, keksov, jabolk ter za vse jedi, ki jih želite hrustljavo zapeči.
VENTILIRANA PEČICA : Delujeta oba grelca ter ventilator, tako da vroč zrak kroži
v pečici. Ta način priporočamo za peko perutnine, sladic, rib
Enakomerna temperatura v notranjosti skrajša čas pečenja in predhodnega
segrevanja pečice. Naenkrat lahko pečete različne jedi; vonji se ne bodo pomešali.
Če pečete več jedi hkrati, pečenje podaljšajte za približno 10 minut.
in zgornji grelec;ta funkcija je
in zelenjave.
Višina
Višina
Višina
SOFT COOK (a) :Funkcija je namenjena peki peciv in kruha. Nižja hitrost
ventilatorja zagotavlja več vlage v notranjosti
peko jedi, ki morajo ostati elastične (npr. kolači, kruh ipd.) in skorjica ne sme počiti.
VENTILATOR IN SPODNJI GRELEC (a): Pečico segreva spodnji grelec, vroč zrak
pa zahvaljujoč ventilatorju kroži v notranjosti pečice. Funkcija je namenjena peki
občutljivih jedi (pite - narastki). Jed se ne izsuši in bolje naraste, predvsem to velja
za kolače, kruh in druge jedi, ki se morajo segrevati od spodaj. Pekač potisnite v
spodnjo višino vodila.
ŽAR : Pri zaprtih vratih pečice.Ta funkcija je primerna za peko tanjših kosov mesa.
Nastavljanje temperature ni mogoče. Najprej pečico segrevajte 5 minut, nato
postavite jed vanjo. Primerno za peko
meso naj bo od grelca bolj oddaljeno, peče se dlje časa, a bo bolj okusno. Rdeče
meso ali ribe pecite na rešetki, pod katero potisnete pekač za lovljenje maščobe.
SUPER ŽAR :Na voljo sta dva položaja:
Žar: 2200 W, Super žar: 3000 W
KROŽENJEM ZRAKA (a): pri zaprtih vratih pečice. Grelec segreva zrak,
ŽAR S
ki s pomočjo ventilatorja kroži okoli živila. Za rdeče meso je potrebno predhodno
ogrevanje pečice. Ta funkcija je primerna za peko debelejših kosov mesa, a pazite,
da živilo ni preblizu grelca. Ta način je primeren za tudi za peko večje količine
perutnine, klobas,
višini ter podstavite pekač za lovljenje maščobe. Na polovici predvidenega časa
pečenja živilo obrnite.
RAŽENJ : pri zaprtih vratih pečice.
Vročino oddaja zgornji grelec, živilo pa se vrti na ražnju. Temperaturo lahko
prilagodite. Ta način je najbolj primeren za srednje velike kose, idealno,
obuditi okus klasične pečenke. Predhodno segrevanje pečice ni potrebno.
rdečega mesa... Postavite živilo na sredino rešetke, v srednji
kebaba, mesa na žaru, gratiniranje .. Belo
pečice, kar so idealne razmere za
če si želite
FUNKCIJA PIZZA : Vroč zrak, ki kroži v pečici, zagotavlja popolne rezultate pri pek
pizz in podobnih jedi.
(a) Nekateri modeli: funkcija z Vario Fan: VarioFan je ekskluzivni sistem, ki so ga razvili pri Candyju in omogoča doseganje optimalnih
rezultatov
pri funkcijah, kjer se vklopi tudi ventilator (označene s črtkano črto na stikalni plošči).
*Testni program skladno s CENELEC EN 50304
*Testni program skladno s CENELEC EN 50304 za določanje energijskega razreda.
pečenja, nadzor nad temperaturo in vlago v notranjosti pečice. To je samodejno delujoči sistem, ki prilagaja hitrost ventilatorja
82 SI
Page 82
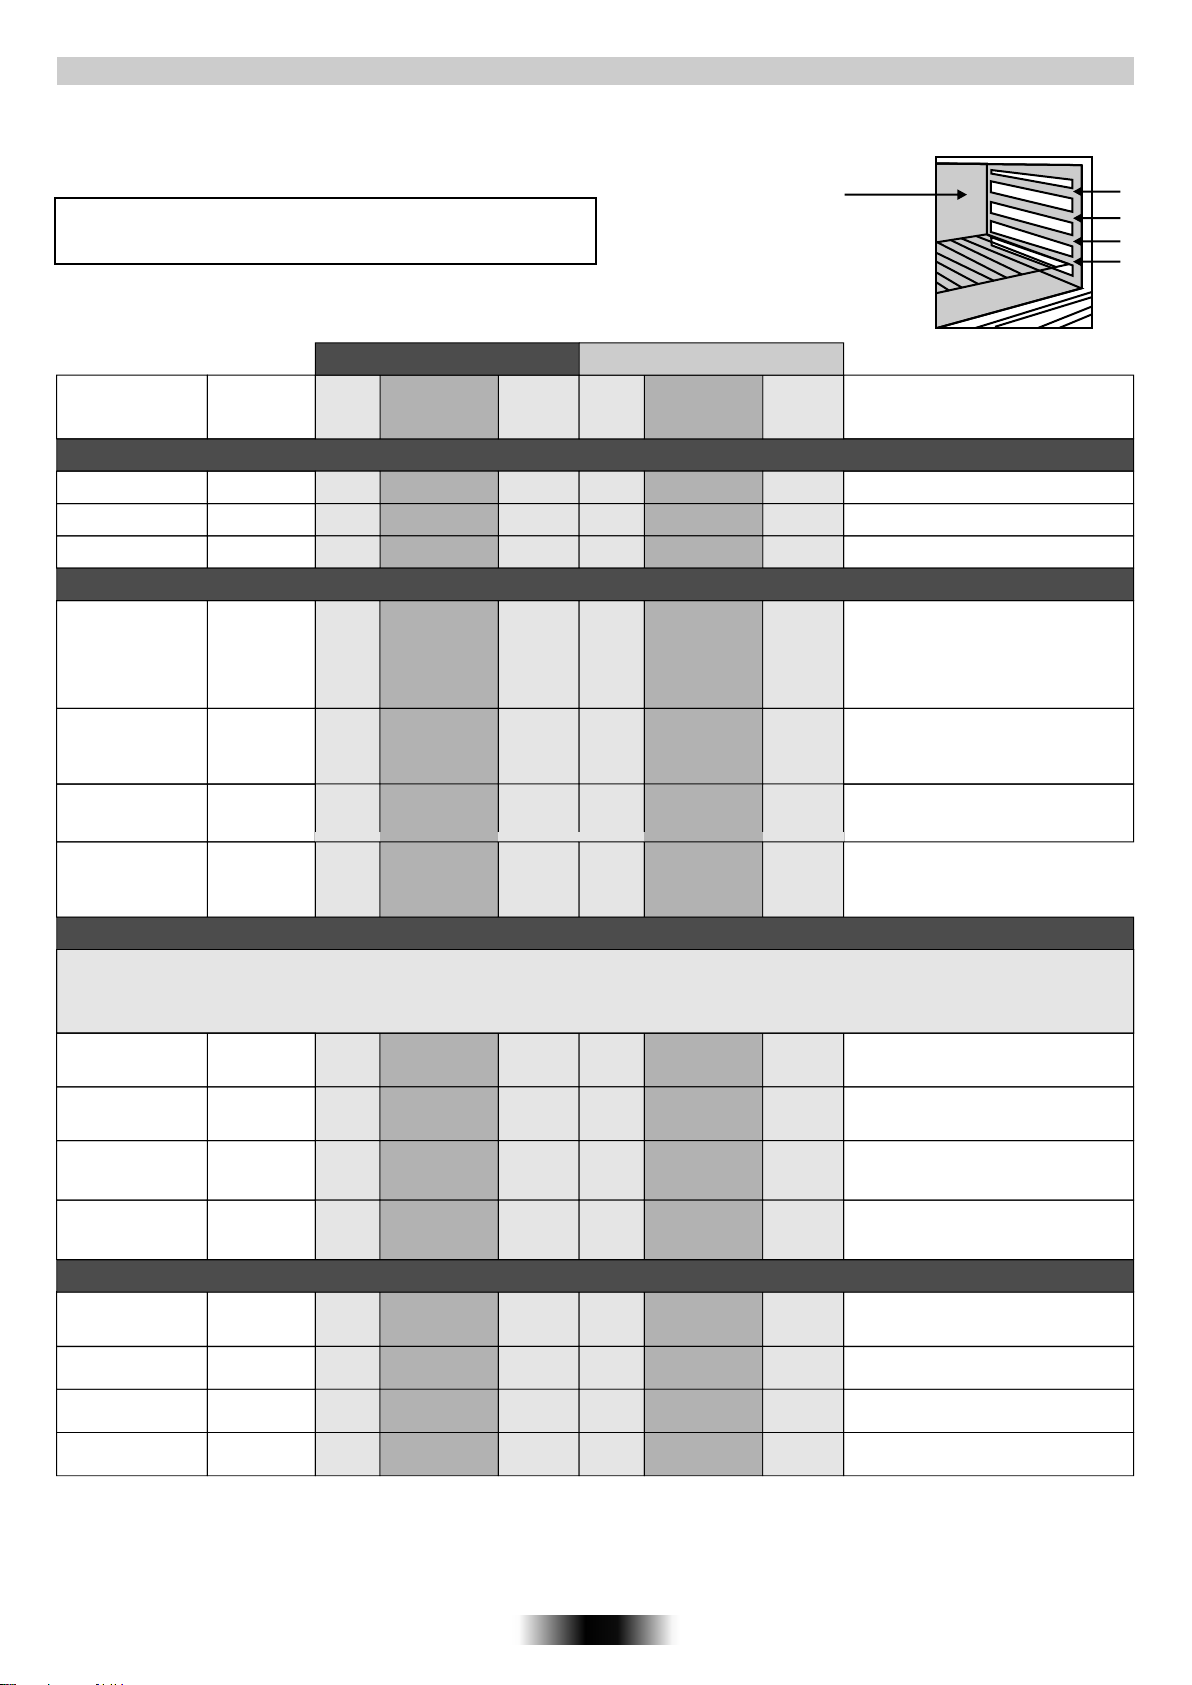
RAZPREDELNICE ČASOV PEČENJA
Priporočeni časi pečenja, ki so navedeni v tabelah na naslednjih straneh, se lahko razlikujejo od dejanskih glede na kakovost,svežino, količino
in debelino živil. Po končani peki pustite jedi po končani peki pred serviranjem vedno počivati nekaj časa, saj se kuhanje nadaljuje tudi potem,
ko jedi vzamete iz pečice.
Priporočamo, da nekoliko znižate temperaturo, da se jedi na
površini ne bi preveč osušile.
STATIČNA
ČAS PEKE V
MIN.
TEMP.
PEČICE
0
V C
JED
KOLIČINA
VODILO
ELEKTRIČNA
ČAS PEKE V
MIN.
TEMP.
PEČICE
0
V C
VODILO
•TESTENINE
Vi ine vodilš
Lazanja
Kaneloni
Pečene testenine
3,5 Kg
1,8 Kg
2,5 Kg
22
22
22
70 ÷ 75
50 ÷ 60
55 ÷ 60
220
220
220
60 ÷ 65
40 ÷ 50
45 ÷ 50
200
200
200
Lazanjo postavıte v hladno pečıco.
Kanelone postavite v hladno pečico
Testenıne postavıte v hladno pečıco
•SLANO TESTO
Naredite testo v obliki hlebca in vanj
križno zarežite po zgornji strani.
Hlebec pustite vzhajati najmanj 2 uri.
Namažite pekač in položite hlebec na
sredino.
Pe ico predogrevajte prıbli no 15 min.
čž
Pripravite testo za pizzo in ga polo ite v nızek
peka . Obložite s paradi niki, mozzarello,
čž
prsutom, oljem, soljo in origanom.
Na peka polo ite 24 kosov maslenih
paštetk.
č
Pe ıco predogrevajte približno 15
minut. Namažite pekac in položite vanj
4 poga e in jih pustite vzhajati najmanj
2 uri.
Kruh
Pizze
Zamrznjene
maslene paštetke
(vol au vent)
Poga ač
1 Kg
testa
Kg
24 Kosov
200 Gr
vsaka
35
Predogre-
22
vanje
200
10min.
25 ÷ 35
30 ÷ 35
25 ÷ 30
190
220
200
11
21
22
30 ÷ 35
Predogre-
vanje
10min.
20 ÷ 25
25 ÷ 30
20 ÷ 25
180
190
200
180
• MESO
Vse vrste mesa lahko pečete , da ne
boste preveč umazali pečice z maščobo in začimbami.
Meso, ki bolj sočno, medtem ko je meso, ki bolj hrustljavo.
Navedeni
Roastbeef v kosu
se peče pokrito, je se peče odkrito,
časi se nanašajo na peko mesa v
Zvita svinjska
pečenka
Zvita telečja
pečenka
globokih ali plitvih pekačih. Priporočamo, da plitvi pekač med peko pokrijete
pokritih ali nepokritih pekačih.
1 Kg
1 Kg
1,3 Kg
70 ÷ 80
100 ÷ 110
90 ÷ 110
220
220
220
33
22
21
50 ÷ 60
80 ÷ 90
90 ÷ 100
Meso položite v globok ognjevarni pekač,
posolite in poporajte. Po preteku
200
popoprajte. časa ga obrnite.
Meso pecite v pokriti pokritem ognjevarnem
pekaču.Meso nasolite, popoprajte in posujte z
200
naravnimi začimbami, oljem in maslom.
200
Enako kot zgoraj.
4
3
2
1
OPOMBE
ž
čž
č
Zvita goveja
pečenka
• Fish
• RIBE
Postrv
Losos
List
Orada
1 Kg
3 cele -1 Kg
700 Gr narezanih
na rezine debeline
2,5 cm
Fileji-1 Kg
2 celi
80 ÷ 90
40 ÷ 45
30 ÷ 35
40 ÷ 45
220
220
220
220
40 ÷ 45 220
83 SI
22
22
22
22
22
80 ÷ 90
35 ÷ 40
25
30 ÷
35 ÷ 40
35 ÷ 40
200
Enako kot zgoraj.
Postrvi pecite v pokritem ognjevarnem pekaču,
premažite z oljem in jih posolite ter potresite s
200
čebulo.
Lososa nasolite, poporajte in naoljite ter
200
pecite v nepokritem ognjevarnem pekaču.
List pecite z eno žlico olja.
200
Orade pecite v pokritem pekaču z oljem
200
in soljo.
Page 83
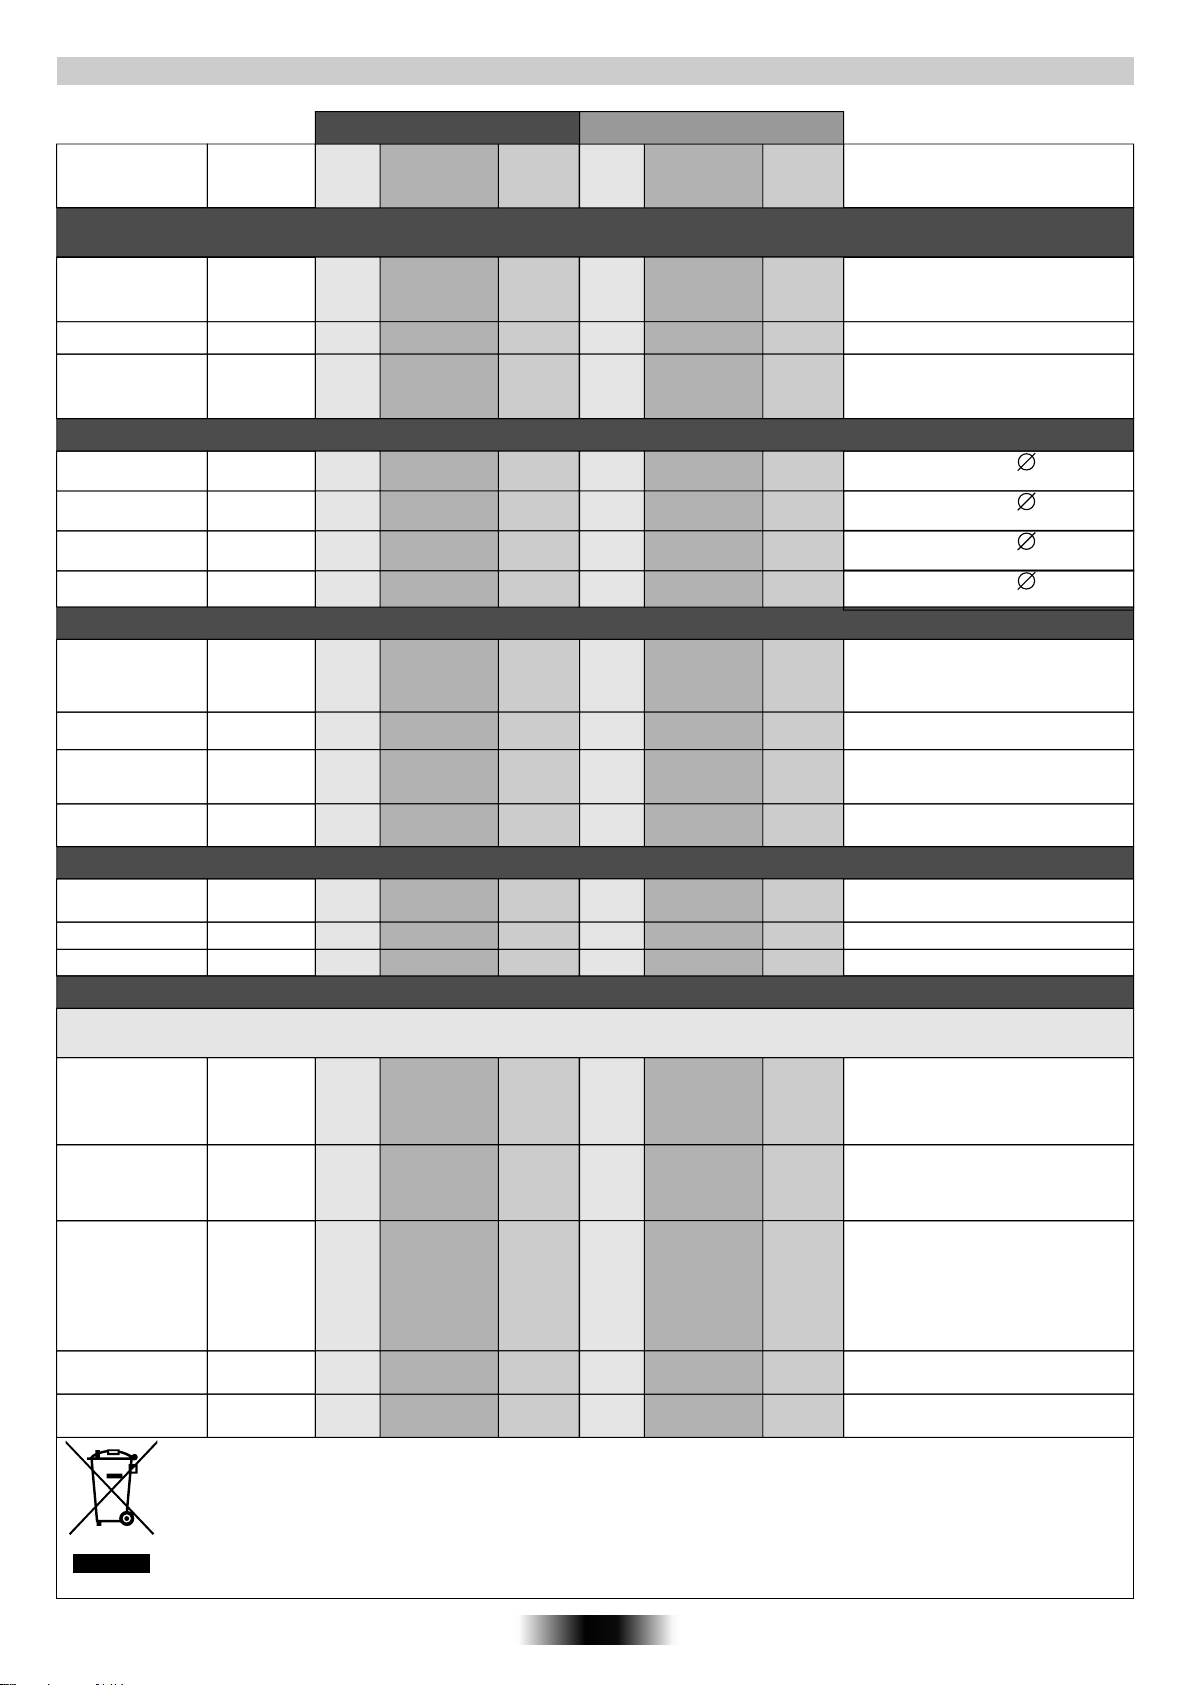
RAZPREDELNICE ČASOV PEČENJA
Ventilirana električna pečica
Vodilo
Čas
Peke v
Minutah
Tempera-
Pečice v c
tura
Opembe
Jed
Količina
Statična električna pečica
Čas
Vodilo
Peke v
Minutah
Tempera-
tura
Pečice v c
• PERUTNINA,
ZAJČJE MESO
Pegatko položite v globok pekač iz
Pegatka
Pisčanec
Razkosan zajec
1-1,3 Kg
1,5-1,7 Kg
1-1,2 Kg
22
22
22
60 ÷ 80
110 ÷ 120
55 ÷ 65
220
220
220
60 ÷ 70
100 ÷ 110
50 ÷ 60
ognjevarnega stekla ali keramike in jo
200
premažite z malo olja in posujte naravnimi
začimbmi.
Enako kot zgoraj.
200
Enako velike kose položite v emajlıran
pekač in jih začınite z naravnımı
200
začimbami. po potrebi kose na polovici
pečenja obrnite.
• SLADICE IN TORTE
Kakaova torta
Torta margerita
Korenčkova torta
Marelična pita
Pripravljeno
testo
Pripravljeno
testo
Pripravljeno
testo
700 Gr
1
1
1
1
55
55
65
40
180
175
180
200
1
1
1
2
50
40 ÷ 45
50 ÷ 60
30 ÷ 35
Pecite v tortnem modelu 22cm. Pečico
160
predogrevajte 10 minut.
Pecite v tortnem modelu 22cm. Pečico
160
predogrevajte 10 minut.
Pecite v tortnem modelu 22cm. Pečico
160
predogrevajte 10 minut.
Pecite v tortnem modelu 22cm. Pečico
180
predogrevajte 10 minut.
• ZELENJAVA
Koromač razrežite na četrtinke razporedite
Koromač
Bučke
Krompir
Korenje
800 gr
800 gr
800 gr
800 gr
1
1
2
1
70 ÷ 80
70
60 ÷ 65
80 ÷ 85
220
220
220
220
1
1
2
1
60 ÷ 70
60 ÷ 70
60 ÷ 65
70 ÷ 80
v pekač iz ognjevarnega stekla tako, da so
200
razrezani deli obrnjeni navzgor. Dodajte
maslo in sol ter pecite v pokritem pekaču.
Bučke narežite in jih zložite v pekač iz ognjevarnega stekla.
200
Dodajte maslo in sol ter pecite v pokritem pekaču.
Nasoljen krompir razrežite na enake kose in ga pecite v v
pokritem pekaču iz ognjevarnega stekla, dodajte olje in
200
posutejte z origanom ali rožmarınom.
Korenje narežite in ga zložite v posodo iz pirexa.
200
Dodajte maslo in sol ter pecite v pokritem pekaču.
• SADJE
Cela jabolka
ške
Hru
Breskve
1 Kg
1 Kg
1 Kg
1
1
1
45 ÷ 55
45 ÷ 55
45 ÷ 55
220
220
220
2
2
2
45 ÷ 55
45 ÷ 55
45 ÷ 55
Sadje pecite v odkritem pekaču iz ognjevarnega
200
stekla ali keramike. Pustite ohladiti v pečici.
Enako kot zgoraj.
200
Enako kot zgoraj.
200
• PEKA NA ŽARU
Jedi, ki jih želite peči na žaru morate postaviti pod infrardeči električni žar. Opozorilo: Žar se med segrevanjem močno segreje in postane
živordeče barve. Pod jed morate obvezno postaviti pladenj za zbiranje sokov, ki nastajajo med peko.
Rezine toasta položite na nosilno mrežo.
Ko je toast zapečen na eni strani, ga
obrnite, da se popeče še na drugi strani.
Toast hranite na toplem do serviranja.
Nadevane rezine toasta položite na nosilno
mrežo, pod katero ste vstavili pladenj. Ko je
toast zapečen na eni strani, ga obrnite, da se
popeče še na drugi strani.
Klobase prerežite po polovici in jih položite na
nosilno nrežo s prerezano stranjo navzgor. Po
preteku polovice časa klobase obrnite, da se
zapečejo
peko občasno preverite ali so klobase
enakomerno zapečene. če niso, premestite
tiste manj pečene na mesto, kjer so bolj
zapečene in obratno.
Kotlete položite na mrežo in jih med peko
dvakrat obrnite.
Bedrca začinite z naravnimi začimbami in
jih občasno obrnite.
še na drugi strani. Opozorilo: Med
Toast
Nadevan toast
Klobase
T ele ji kotletič
Pi an ja bedrcašč č
4 rezine
44
segrevanje
Žar
za
5 predogrevanje 5 min.
Žar
grelca
za
33
4 rezine
6 kosov
0,9 kg
4 kosi-
1,5 kg
4 kosi-
1,5 kg
Izdelek je označen skladno z direktivo evropske Gospodarske zbornice 2002/96 o odpadni električni in elektronski opremi (WEEE).
S pravilnim načinom odstranjevanja izdelka boste pomagali preprečiti morebitne negativne posledice na okolje in zdravje ljudi, ki bi jih
lahko povzročilo nepravilno odstranjevanje aparata.
Simbol na izdelku označuje, da s tem izdelkom ni dovoljeno
zbirno mesto za predelavo električne in elektronske opreme.
Odstranjevanje mora biti opravljeno skladno z lokalnimi okoljevarstvenimi predpisi o odstranjevanju odpadkov.
Za podrobnejše informacije o odstranjevanju in predelavi tega izdelka se obrnite na pristojen mestni organ za odstranjevanje odpadkov,
komunalno službo ali trgovino,
segrevanje
grelca
za
44
segrevanje
grelca
za segrevanje
44
33
grelca
za segrevanje
grelca
v kateri ste izdelek kupili.
Žar
Žar
Žar
Žar
ravnati kot z običajnimi gospodinjskimi odpadki. Izdelek odpeljite na ustrezno
10 predogrevanje 5 min.
25/30 predogrevanje 5 min.
25 predogrevanje 5 min.
50/60predogrevanje 5 min.
Žar
Žar
Žar
Žar
84 SI
Page 84
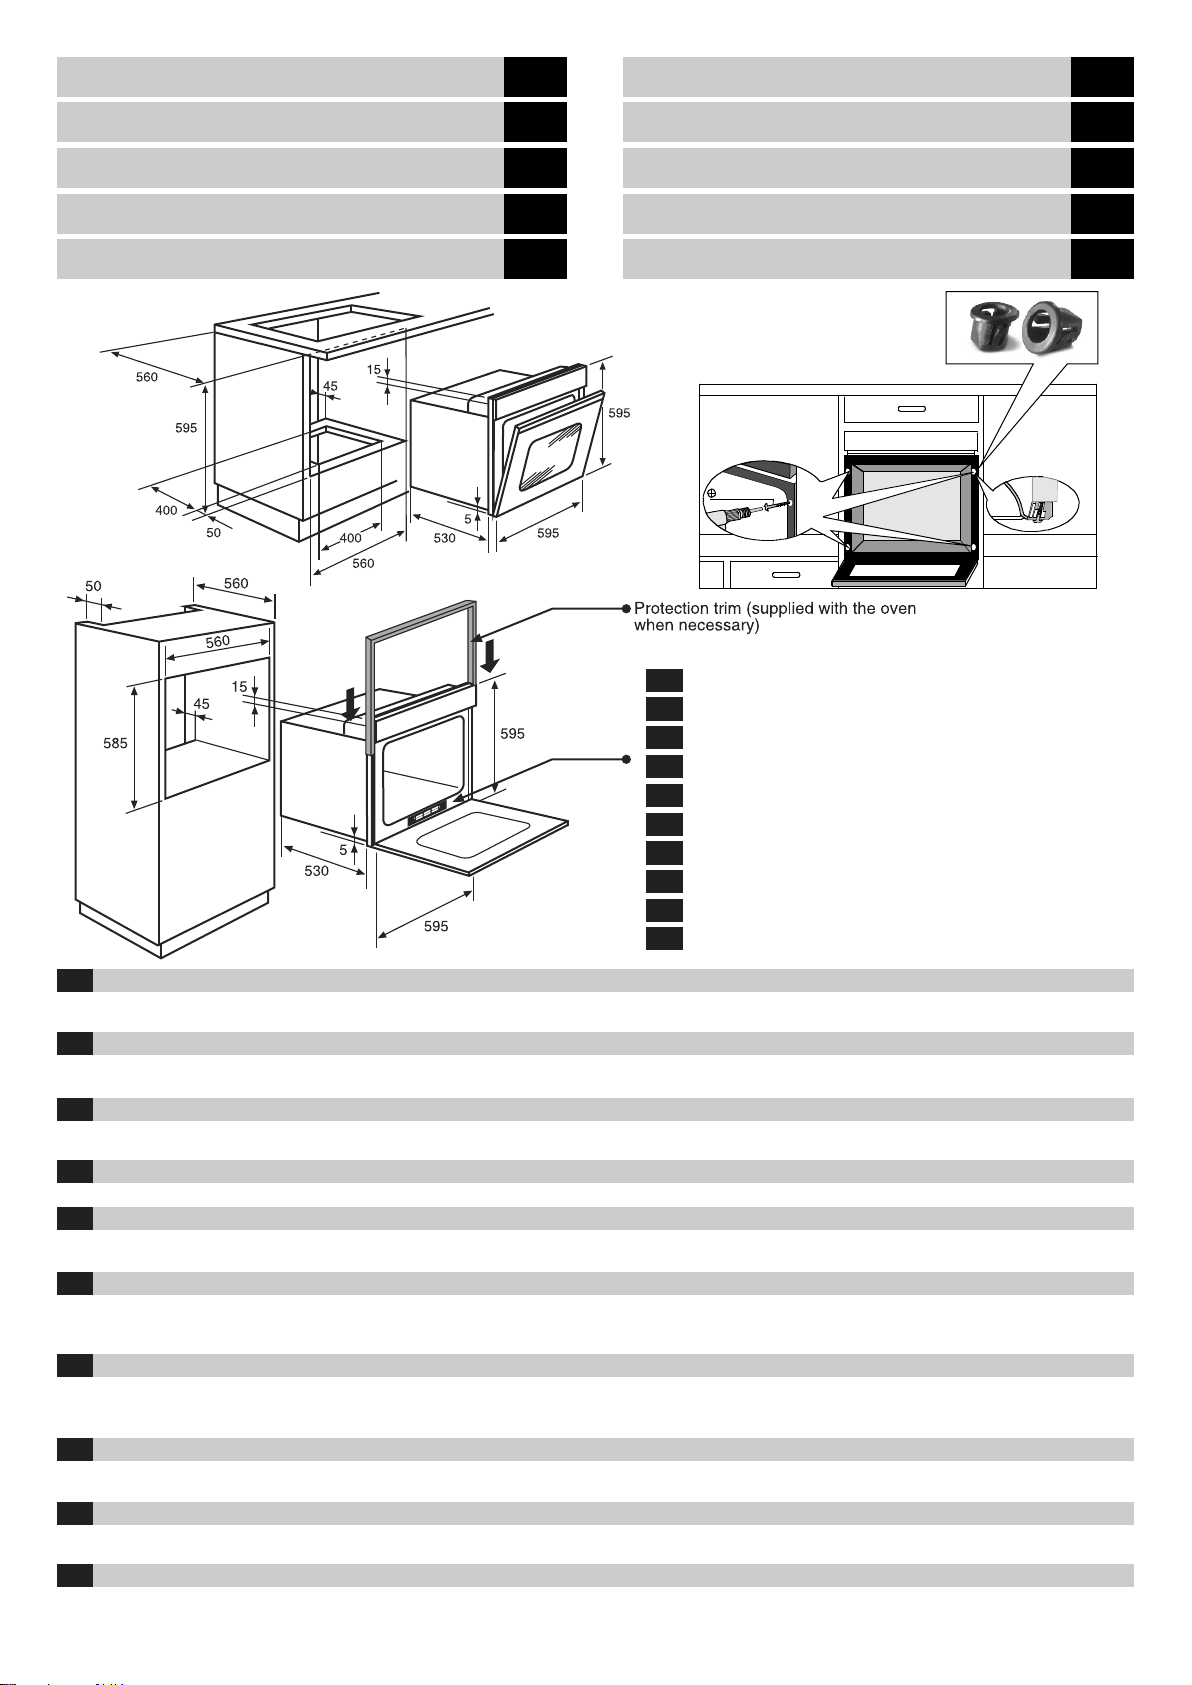
INSTALLAZIONE
IT
INSTALLATION
FR
INSTALLATION
INSTALACIÓN
INSTALLATIE
INSTALLATION
GB
ES
NL
DE
INSTALAÇÂO
УСТАНОВKА
INSTALACJA
VGRADNJA
4x3.5x25
Targhetta matricola
IT
Rating plate
GB
Tarjeta matrícula
ES
Typeplaatje
NL
Typenschild
DE
Plaque signalitique
FR
Plata de características
PT
Tabliczka znamionowa
PL
Маркировочная табличка
RU
Tablica s podatki
SI
PT
RU
PL
SI
02.2012 • REV.0 • 42808896
IT
La Ditta costruttrice declina ogni responsabilità per eventuali errori di stampa contenuti nel presente libretto. Si riserva inoltre il diritto di apportare le modifiche
che si renderanno utili ai propri prodotti senza compromettere le caratteristiche essenziali.
GB
The manufacturer will not be responsible for any inaccuracy resulting from printing or transcript errors contained in this brochure. We reserve the right to carry
out modifications to products as required, including the interests of consumption, without prejudice to the characteristics relating to safety or function.
ES
La empresa constructora declina toda responsabilidad derivada de eventuales errores de impresión contenidos en el presente libro. Se reserva además el
derecho de realizar las modificaciones que se consideren útiles a los productos sin las características esenciales.
NL
De fabrikant stelt zich niet aansprakelijk voor eventuele drukfouten in deze brochure. Kleine veranderingen en technische ontwikkelingen zijn voorbehouden.
DE
Der Hersteller übernimmt keine Hauftung für eventuelle Druck-oder Übersetzungsfehler dieser Bedienungsanleitung. Der Hersteller behält sich vor,
technische Änderungen zur Verbesserung der Produktqualität im Interesse des Endverbrauchers vorzunehmen.
FR
Le constructeur décline toute responsabilité concernant d'éventuelles Inexacltudes Imputables à des erreurs d'impression ou de transcription contenue dans
cette notice. Le constructeur se réserve le droit de modifier les produits en cas de nécessité, même dans l'intérêt de l'utilisation, sans causer de préjudices
aux caractéristiques de fonctionnement de sécurité des appareils.
PT
O fabricante declina toda e qualquer responsabilidade por gralhas, erros tipográficos ou de transcrição/tradução contidos neste manual. Reservamo-nos o
direito de Introduzir alterações nos nossos produtos, conforme necessário, tendo Inclusive em atenção os Interesses relativos ao respectivo consumo, sem
prejuízo das características associadas à segurança ou ao funcionamento dos electrodomésticos.
RU
Производитель не берет на себя ответственность за ошибки в данной инструкции, возникшие в процессе печати. Производитель имеет право
вносить в свои изделия изменения, которые он сочтет полезными для своих изделий, сохраняя при этом основные характеристики.
PL
Producent nie ponosi Żadnej odpowiedzialności za ewentualne błędy w druku niniejszej instrukcji. Ponadto zastrzega sobie prawo do wprowadzania zmian
do własnych produktów, uznanych przez niego za użyteczne, bez pogarszania podstawowych parametrów.
SI
Proizvajalec ne prevzema odgovornosti za morebitne tiskarske napake v tej knjižici. Pridržujemo si pravico do sprememb in izboljšav brez predhodnega
obvestila.
 Loading...