

Page 1
Sede Legale: 20124 Milano - Piazza IV Novembre, 4
Sede Amm.va: 27020 Torre d’Isola (PV) - Via del Torchio, 1
Tel. +39.0382.408.911 - Fax +39.0382.407.384
www.ariadne.it
www.ariadnecontentmanager.com
Ver
Status
Date
Prepared
Revised
Ariadne ref.
A
Draft
12/03/2015
M. Re
candy-catalog -porta l-documentation-mre-20150312-v-
a.doc
B
Draft
22/03/2015
M. Re
candy-catalog -porta l-documentation-mre-20150322-v-
b.doc
C
Deliv
27/03/2015
M. Re
candy-catalog -porta l-documentation-mre-20150327-v-
c.do c
D
Draft
31/03/2015
F. Chiesa
M. Re
candy-catalog -porta l-documentation-mre-20150331-v-
d.doc
E
Draft
07/04/2015
F. Chiesa
M. Re
candy-catalog -porta l-documentation-mre-20150331-v-
e.doc
F
Deliv
08/04/2015
M. Re
candy-catalog -porta l-documentation-mre-20150408-v-
f.doc
G
Deliv
08/04/2015
F. Chiesa
M. Re
candy-catalog -porta l-documentation-mre-20150408-v-
g.do c
H
Draft
09/04/2015
F. Chiesa
M. Re
candy-catalog -porta l-documentation-mre-20150408-v-
h.doc
I
Deliv
09/04/2015
F. Chiesa
M. Re
candy-catalog -porta l-documentation-mre-20150408-v-
i-.doc
L
Deliv
20/04/2015
F. Chiesa
M. Re
candy-catalog -porta l-documentation-mre-20150416-v-
l-.doc
M
Deliv
22/04/2015
F. Chiesa
M. Re
candy-catalog -porta l-documentation-mre-20150422-v-
m-.doc
N
Deliv
24/04/2015
F. Chiesa
M. Re
candy-catalog -porta l-documentation-mre-20150424-v-
n-.doc
O
Deliv
28/04/2015
F. Chiesa
M. Re
candy-catalog -porta l-documentation-mre-20150428-v-
o-.d oc
P
Deliv
04/05/2015
F. Chiesa
M. Re
candy-catalog -porta l-documentation-mre-20150504-v-
p-.d oc
Q
Deliv
05/05/2015
F. Chiesa
M. Re
candy-catalog -porta l-documentation-mre-20150505-v-
q.do c
R
Deliv
05/05/2015
F. Chiesa
M. Re
candy-catalog -porta l-documentation-mre-20150506-v-
r.doc
S
Deliv
20/05/2015
F. Chiesa
M. Re
candy-catalog -porta l-documentation-mre-20150520-v-
s.do c
T
Deliv
27/05/2015
F. Chiesa
M. Re
candy-catalog -porta l-documentation-mre-20150527-v-
t.doc
U
Deliv
28/05/2015
F. Fruci
M. Re
candy-catalog -porta l-documentation-mre-20150604-v-
u.doc
V
Deliv
04/06/2015
F. Chiesa
M. Re
candy-catalog -porta l-documentation-mre-20150604-v-
v.do c
W
Deliv
18/06/2015
F. Chiesa
M. Re
candy-catalog -porta l-documentation-mre-20150618-v-
w.doc
Ariadne S.r.l. - C.F. 01633710189 - Partita Iva 13374030156 - Registro Imprese MI 01633710189 – Cap. Sociale 50.000 Euro i.v.
Page 2

2
Candy – Catalog Portal
Project Documentation and Back Office Management
candy-catalog-portal-documentation-mre-20150618-v-w
Page 3

3
TABLE OF CONTENTS
TABLE OF CONTENTS ......................................................................................................................... 3
1 HOW TO READ THIS MANUAL ................................................................................................... 5
1.1 BOLD TEXT USAGE ......................................................................................................................................................................... 5
1.2 HYPERLINKS ................................................................................................................................................................................... 5
1.3 SCREENSHOTS ............................................................................................................................................................................... 5
1.4 INFO BOXES .................................................................................................................................................................................... 5
1.5 WARNING BOXES ........................................................................................................................................................................... 5
1.6 ALERT BOXES ................................................................................................................................................................................. 5
2 INTRODUCTION ....................................................................................................................... 6
3 LOG INTO THE BACK OFFICE .................................................................................................... 6
3.1 CONTROL PANEL AND SITE ADMINISTRATION ............................................................................................................................ 6
4 EDIT THE LOGO ........................................................................................................................ 6
5 SITE PAGES.............................................................................................................................. 7
5.1 ADD OR EDIT A SITE PAGE .......................................................................................................................................................... 7
5.2 OPEN A PAGE IN AN EXTERNAL WINDOW .................................................................................................................................... 8
5.3 TOP HEAD LINKS ........................................................................................................................................................................... 9
5.4 FOOTER LINKS ................................................................................................................................................................................ 9
5.5 MAIN MENU LINKS ....................................................................................................................................................................... 10
5.6 SECTION PRODUCTS NAVIGATION SIDEBAR .............................................................................................................................. 10
5.7 HIDE A PAGE FROM SITEMAP.XML .............................................................................................................................................. 12
5.8 CUSTOMIZE THE 404 PAGE ........................................................................................................................................................ 13
6 ADD AN APPLICATION (PORTLET) TO A PAGE ....................................................................... 14
7 EDIT THE PAGE LAYOUT ......................................................................................................... 15
7.1 THE CANDY - HOME – LAYOUT .................................................................................................................................................. 17
7.2 THE CANDY - 1 - 3 - 3 - 3 - LAYOUT ....................................................................................................................................... 17
7.3 THE CANDY – SECTION - PRODUCTS - LAYOUT ....................................................................................................................... 17
7.4 THE CANDY – SECTION - PRODUCTS – LAYOUT – 2 - COLUMNS ........................................................................................... 17
7.5 THE CANDY – SECTION - SECTION – LINE – 2 - COLUMNS ................................................................................................... 18
8 THE STAGING SITE AND THE LIVE SITE ................................................................................. 18
8.1 PUBLISH PAGES AND CONTENTS TO THE LIVE ENVIRONMENT ................................................................................................ 20
9 REMOVE THE BORDER FROM A PORTLET ................................................................................ 22
10 WEB CONTENTS ..................................................................................................................... 23
10.1 MANAGE A WEB CONTENT .......................................................................................................................................................... 23
10.2 DOCUMENTS AND MEDIA ............................................................................................................................................................ 24
10.3 MANAGE A CATEGORY ................................................................................................................................................................. 24
10.4 ADD OR EDIT A WEB CONTENT .................................................................................................................................................. 25
10.5 DISABLE THE RESEARCH FOR A WEB CONTENT ........................................................................................................................ 26
10.6 PUBLISH A WEB CONTENT INTO PAGES .................................................................................................................................... 26
10.6.1 Configure a Web Content Display Layout ............................................................................................................. 26
10.6.2 Configure an Asset Publisher Layout ...................................................................................................................... 27
10.7 THE CANDY - GENERIC STRUCTURE - GLOBAL ......................................................................................................................... 29
10.7.1 The Candy - Generic Template Single Column – Global ................................................................................. 30
10.7.2 The Candy - Generic Template Double Column – Global ................................................................................ 31
10.7.3 The Candy - Generic Template Image Left – Global ........................................................................................ 31
10.7.4 The Candy - Generic Template Central Image – Global.................................................................................. 32
10.7.5 The Candy – Slider Left Image Template – Global ........................................................................................... 33
10.7.6 The Candy – Security Alert Details Template – Global .................................................................................... 33
10.7.7 The Candy – Security Alert Template – Global................................................................................................... 34
10.7.8 The Candy – Ask Form Template – Global ........................................................................................................... 34
10.8 THE CANDY - GENERIC BANNER STRUCTURE - GLOBAL .......................................................................................................... 36
10.8.1 The Candy - Generic Banner Template – Global ................................................................................................ 36
10.8.2 The Candy - Ico Banner Template – Global ......................................................................................................... 36
10.9 THE CANDY – BANNER NEWSLETTER STRUCTURE - GLOBAL .................................................................................................. 37
10.9.1 The Candy - Banner Newsletter Template – Global .......................................................................................... 37
10.10 THE CANDY – HELP SHORTCUT STRUCTURE - GLOBAL....................................................................................................... 38
10.10.1 The Candy – Help Shortcut Template – Global .................................................................................................. 38
10.11 THE CANDY – SLIDER STRUCTURE - GLOBAL ...................................................................................................................... 39
10.11.1 The Candy – Slider Template – Global .................................................................................................................. 39
10.11.2 The Candy – Slider Main Section Template – Global ........................................................................................ 40
10.12 THE CANDY – PRODUCT LINE STRUCTURE - GLOBAL ......................................................................................................... 40
candy-catalog-portal-documentation-mre-20150618-v-w
Page 4

4
10.12.1 The Candy – Product Line Template – Global ..................................................................................................... 41
10.12.2 The Candy – Second Product Line Template – Global ..................................................................................... 41
10.13 THE CANDY – TITLE STRUCTURE - GLOBAL ......................................................................................................................... 42
10.13.1 The Candy – Title Slider Template – Global ........................................................................................................ 42
10.13.2 The Candy – Title Slider Image Left Template – Global ................................................................................. 43
10.13.3 The Candy – Title Product Line Template – Global ........................................................................................... 43
10.13.4 The Candy - Title Assistance Template - Global ................................................................................................ 43
10.13.5 The Candy – Title Blog List (Image) Template – Global ................................................................................. 44
10.13.6 The Candy – Title Blog List (Image) Template – Global ................................................................................. 44
10.13.7 The Candy – Title Catalog Template - Global ..................................................................................................... 45
10.13.8 The Candy – Family Title Template – Global ....................................................................................................... 45
10.14 THE CANDY - ASSISTANCE GENERIC STRUCTURE - GLOBAL .............................................................................................. 45
10.14.1 The Candy – Generic Assistance Template – Global ........................................................................................ 46
10.15 THE CANDY – BLOG POST STRUCTURE - GLOBAL ............................................................................................................... 47
10.15.1 The Candy – Blog Post Template – Global ........................................................................................................... 48
10.15.2 The Candy – Blog List Template – Global............................................................................................................. 49
10.16 THE CANDY – CATALOG STRUCTURE - GLOBAL ................................................................................................................... 50
10.16.1 The Candy – Catalog Template – Global .............................................................................................................. 51
10.17 THE CANDY –PROMO STRUCTURE - GLOBAL ....................................................................................................................... 51
10.17.1 The Candy – Promo Template – Global ................................................................................................................. 51
10.18 THE CANDY –FAMILY STRUCTURE - GLOBAL........................................................................................................................ 52
10.18.1 The Candy – Family Template – Global ................................................................................................................ 53
11 MANAGE PRODUCTS ............................................................................................................... 53
12 CONFIGURE THE ASSET PUBLISHER FOR THE BLOG LIST ....................................................... 54
13 OPEN A WEB CONTENT IN THE SAME PAGE OF AN ASSET PUBLISHER ................................... 56
14 EDIT THE PORTAL MESSAGES ................................................................................................ 57
14.1 THE MESSAGES PLUGIN ................................ ................................................................ ............................................................... 57
14.2 EDIT THE FOOTER LEGAL INFORMATION .................................................................................................................................... 57
14.3 EDIT THE COOKIE BANNER TITLE AND TEXT .............................................................................................................................. 58
14.4 EDIT THE GOOGLE ANALYTICS ID ................................................................................................ .............................................. 58
14.5 ENABLE SEARCH FORM AND LANGUAGE SELECTOR .................................................................................................................. 58
14.6 EDIT THE GOOGLE MAPS API KEY ................................ ................................................................ ............................................. 59
15 MANAGE EXTERNAL LINK FOR A PRODUCT ............................................................................ 60
16 RESEARCH CONFIGURATION.................................................................................................. 61
17 CANDY BOOKLET CONFIGURATION ........................................................................................ 62
candy-catalog-portal-documentation-mre-20150618-v-w
Page 5
5
Image description
Info message
Warning message
Alert message
1 HOW TO READ THIS MANUAL
1.1 Bold text usage
The use of the bold text is done in the following cases:
to emphasize some concepts;
to indicate the back office path to perform the desired action or indicate back office elements.
1.2 Hyperlinks
Frequently actions are referred in this manual using the hyperlinks.
Example:
Hyperlink to the paragraph Introduction: Introduction.
1.3 Screenshots
Sometimes, to better understand the instructions the text is combined with the use of the screenshot of the
back office or the portal front end. The screenshots can be identified by gray tables followed by the image
description.
1.4 Info boxes
Green info boxes are used to give additional detailed information about Liferay or the project’s architecture.
1.5 Warning boxes
Yellow warning boxes are used to give additional notes when the operation needs a specific attention.
1.6 Alert boxes
Red alert boxes are used to give alerts about operations that, if occur, may cause an unexpected functioning of
the system, potentially serious.
candy-catalog-portal-documentation-mre-20150618-v-w
Page 6
6
Additional information about the back office of Liferay can be found on the following link:
https://www.liferay.com/it/documentation/liferay-portal/6.2/user-guide.
Log into the back office
2 INTRODUCTION
This document contains all the instructions required to manage all Candy’s catalog sites. Each site is located on
its domain; in the next chapters we will use www.candy.it as reference but the same instructions are valid for
any other site (www.candy.es, www.candy.ru, ...).
3 LOG INTO THE BACK OFFICE
Go to http://www.candy.it/[language]/login (example: http://www.candy.it/it/login) and enter your credentials
(user and password).
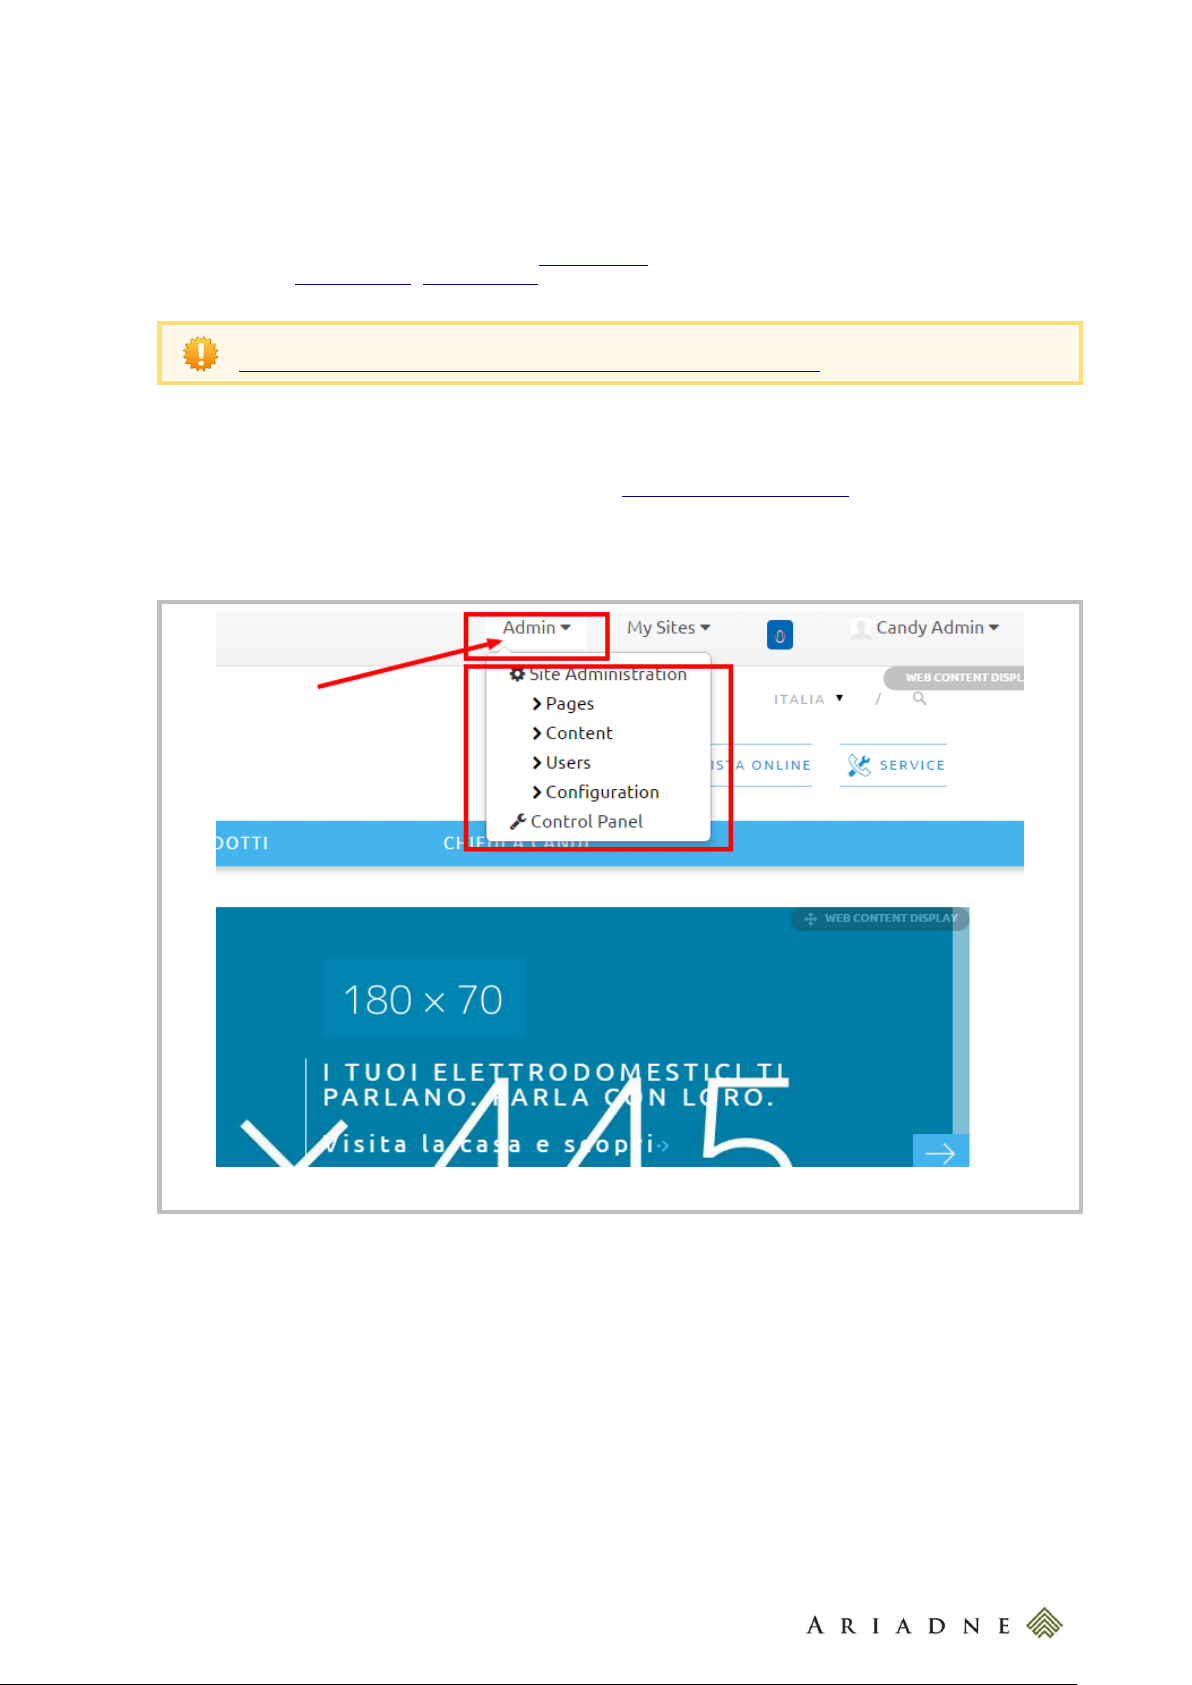
Once logged in, you can access to the back office using the Administration Menu located in the top of the
page.
3.1 Control Panel and Site Administration
Once you are logged in the site, in the Administration Menu you can see several links depending on your
privileges (see the image here above). The Control Panel link allow to access to all portal’s functionalities (for
alla sites). The Site Administration links instead allow you to access to the current site’s functionalities.
4 EDIT THE LOGO
candy-catalog-portal-documentation-mre-20150618-v-w
Page 7
7
The site’s logo
Edit the logo
The default friendly url of a Page is the name of this Page in lowercase. In case of
names with more than one words, “-” is used to separate words, i.e. “http://candy-
valid.ariadnedev.it/it/web/candy-it/lavare-e-asciugare”. If you want to customize
the friendly url (for example “http://candy-valid.ariadnedev.it/it/web/candyit/products/lavare-e-asciugare”) you have to insert it into the field Friendly Url.
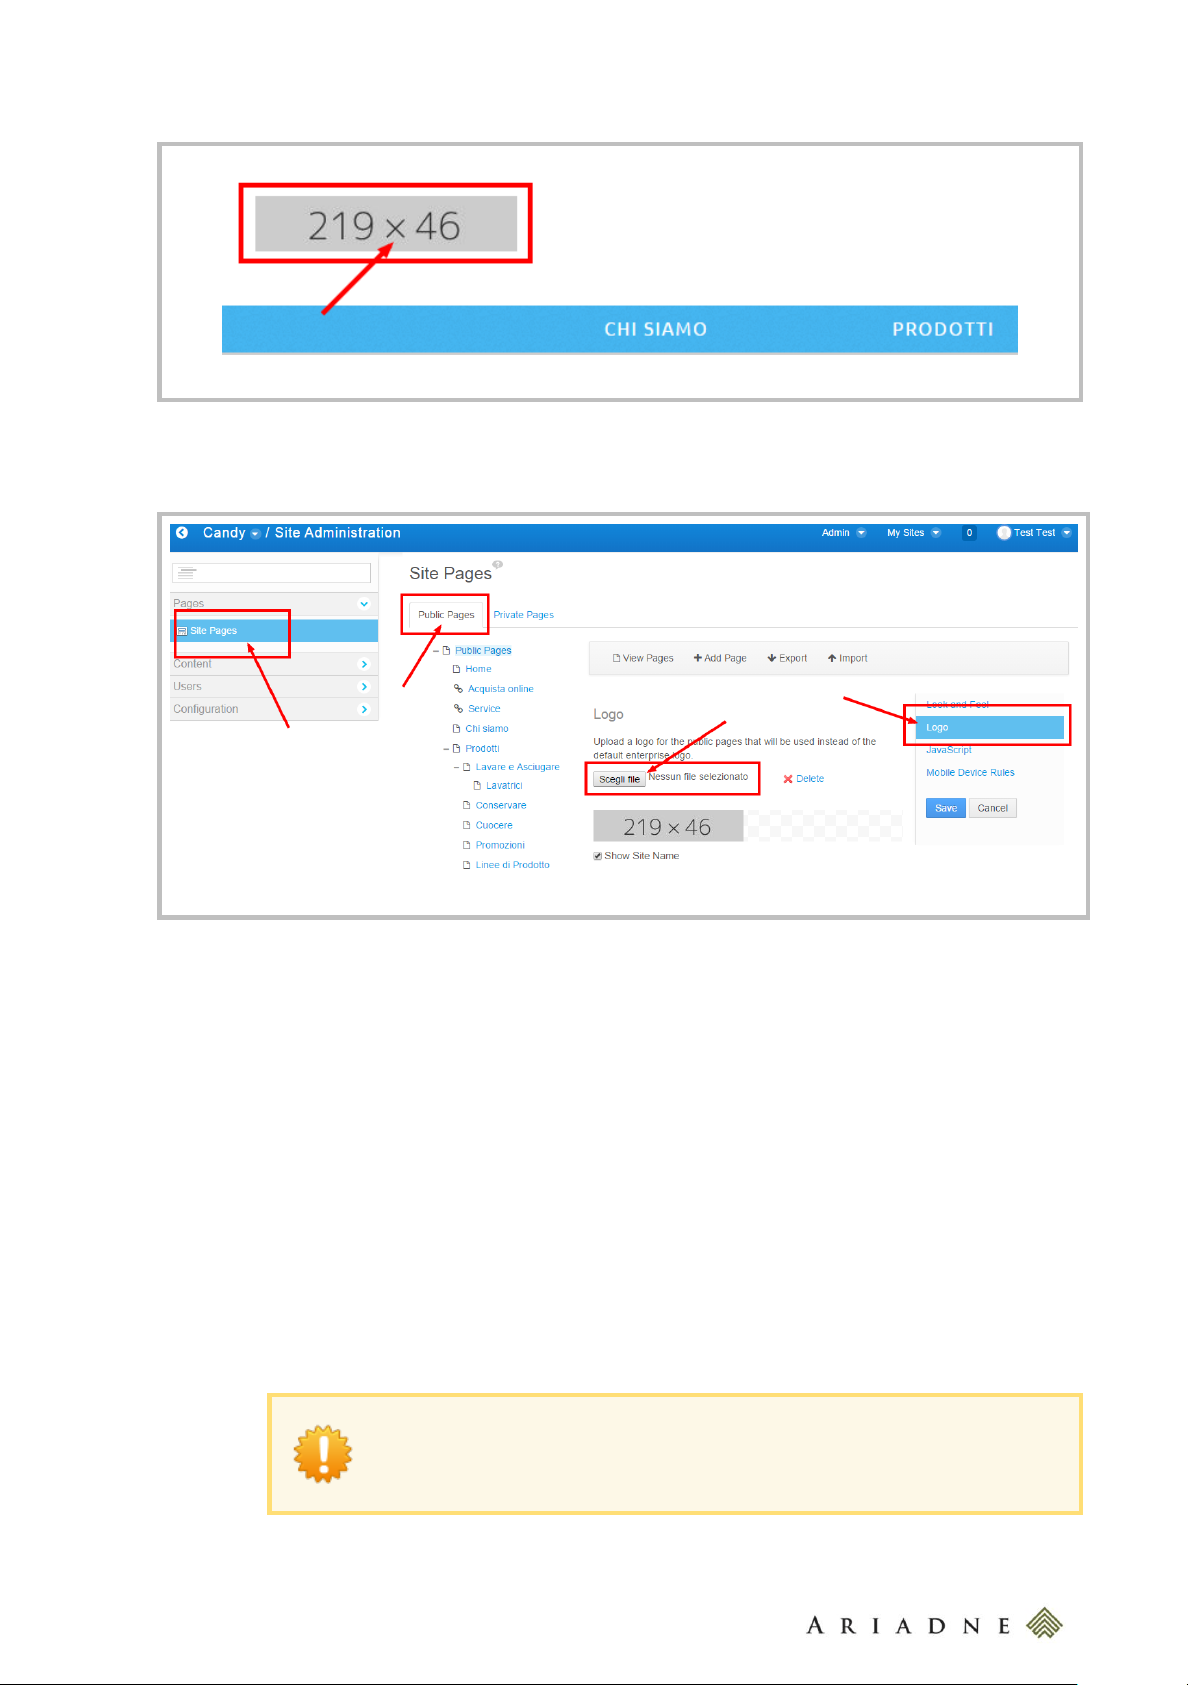
Go to Admin > Site Administration > Pages and then click on Logo on the right side menu. Here you can
upload a 219x46 px image.
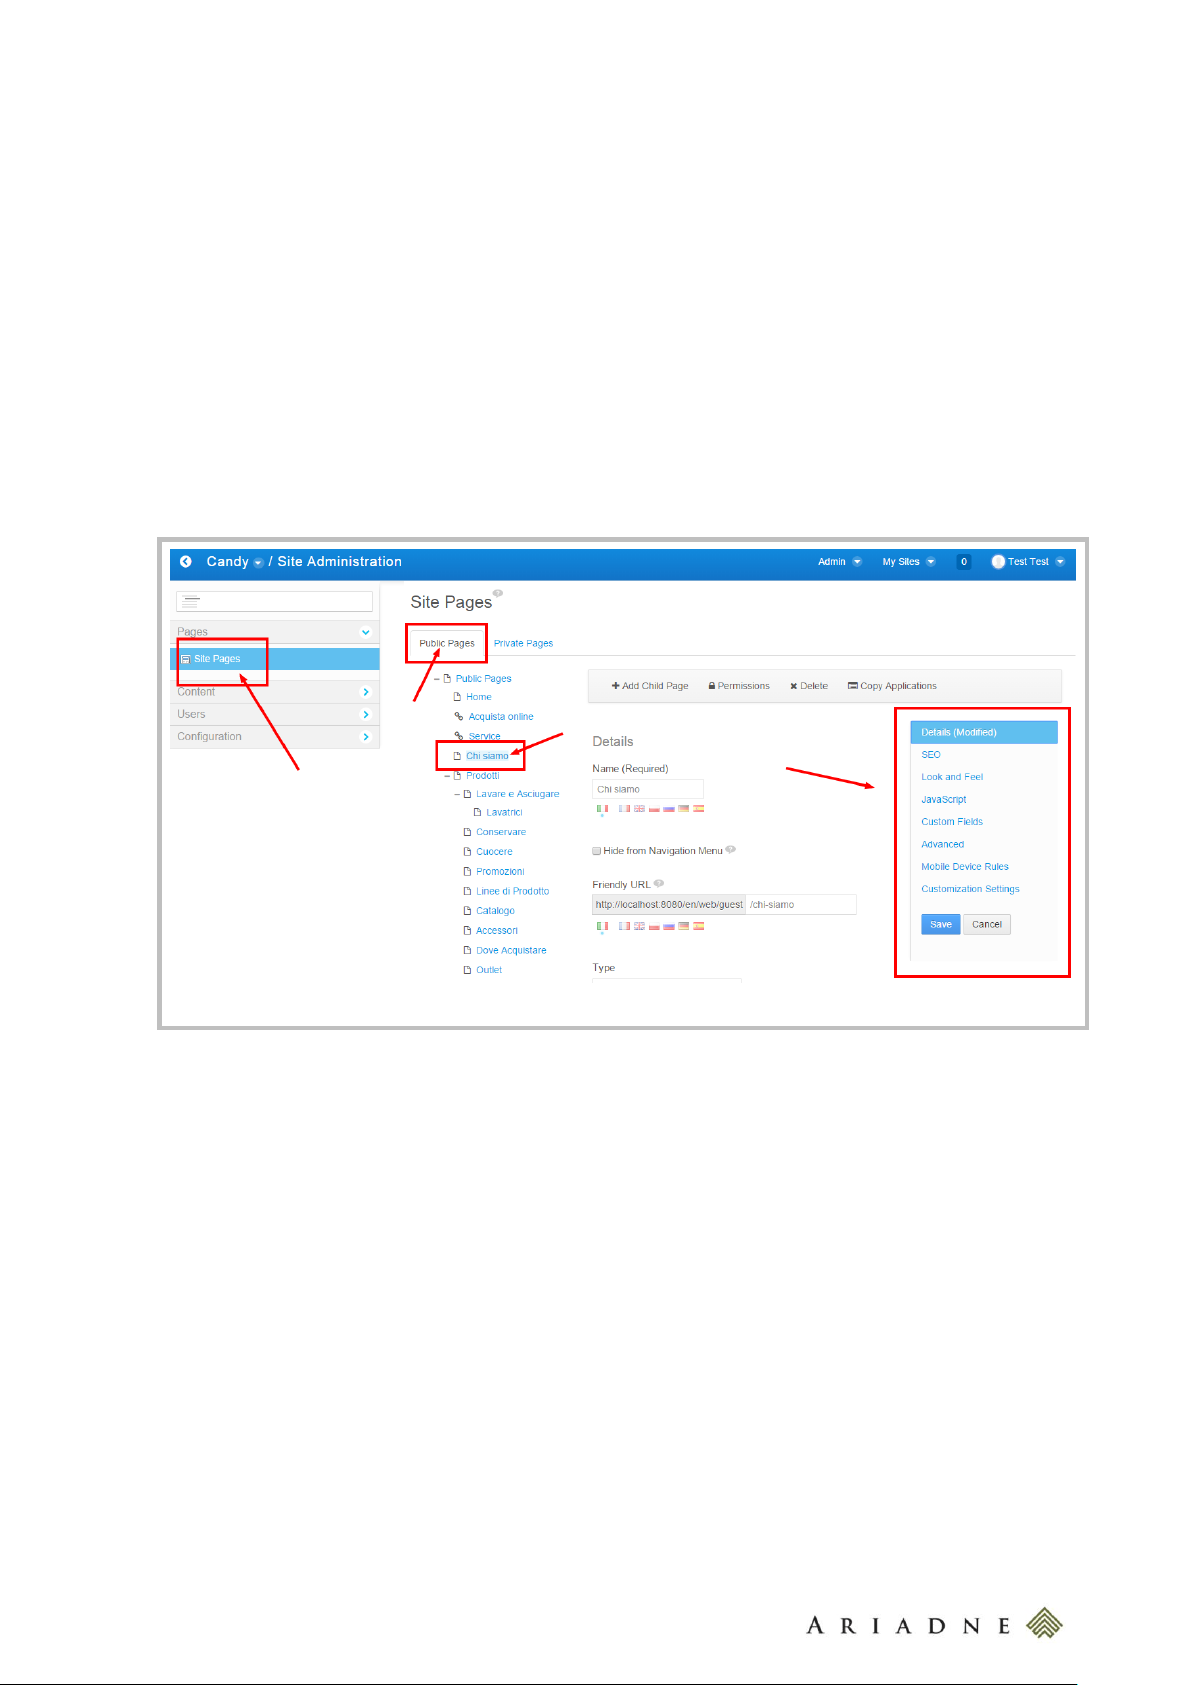
5 SITE PAGES
5.1 Add or Edit a Site Page
To add or edit a page go to Admin > Site Administration > Pages; here you can see the list of the site’s
pages.
To add a page click on Public Pages and then click on Add Page. In the popup give a Page title for each
available site’s languages.
To edit a page click on the page you want to edit and then change the page settings. Pages have several
settings divided in a few tabs:
Details:
o Name: the page name (in each available language);
o Hide from the navigation menu: to make it visible or not visibible in the menu and in the
Page of the Sitemap;
o Friendly URL: the friendly url (in each available language);
candy-catalog-portal-documentation-mre-20150618-v-w
Page 8
8
Page settings
o Type:
Layout: standard page (below this option you can see the layout of the page);
Link to URL: a page link. Here you can enter the link where the page has to pint to
(starting with “http://”);
Link to a page of this site: a page link to another page of the site;
SEO:
o HTML title: the meta-title (in each available language);
o Meta Tags: meta-description, meta-keywords and the robots directives (in each available
language);
o Sitemaps: the sitemap directives;
Look and Feel: this setting allow to give a specific theme for the page;
JavaScript: here you can add a custom JavaScript for this page;
Custom Fields: here you can specify the settings for each Custom Field;
Mobile Device Rules and Customization Settings: are not used;
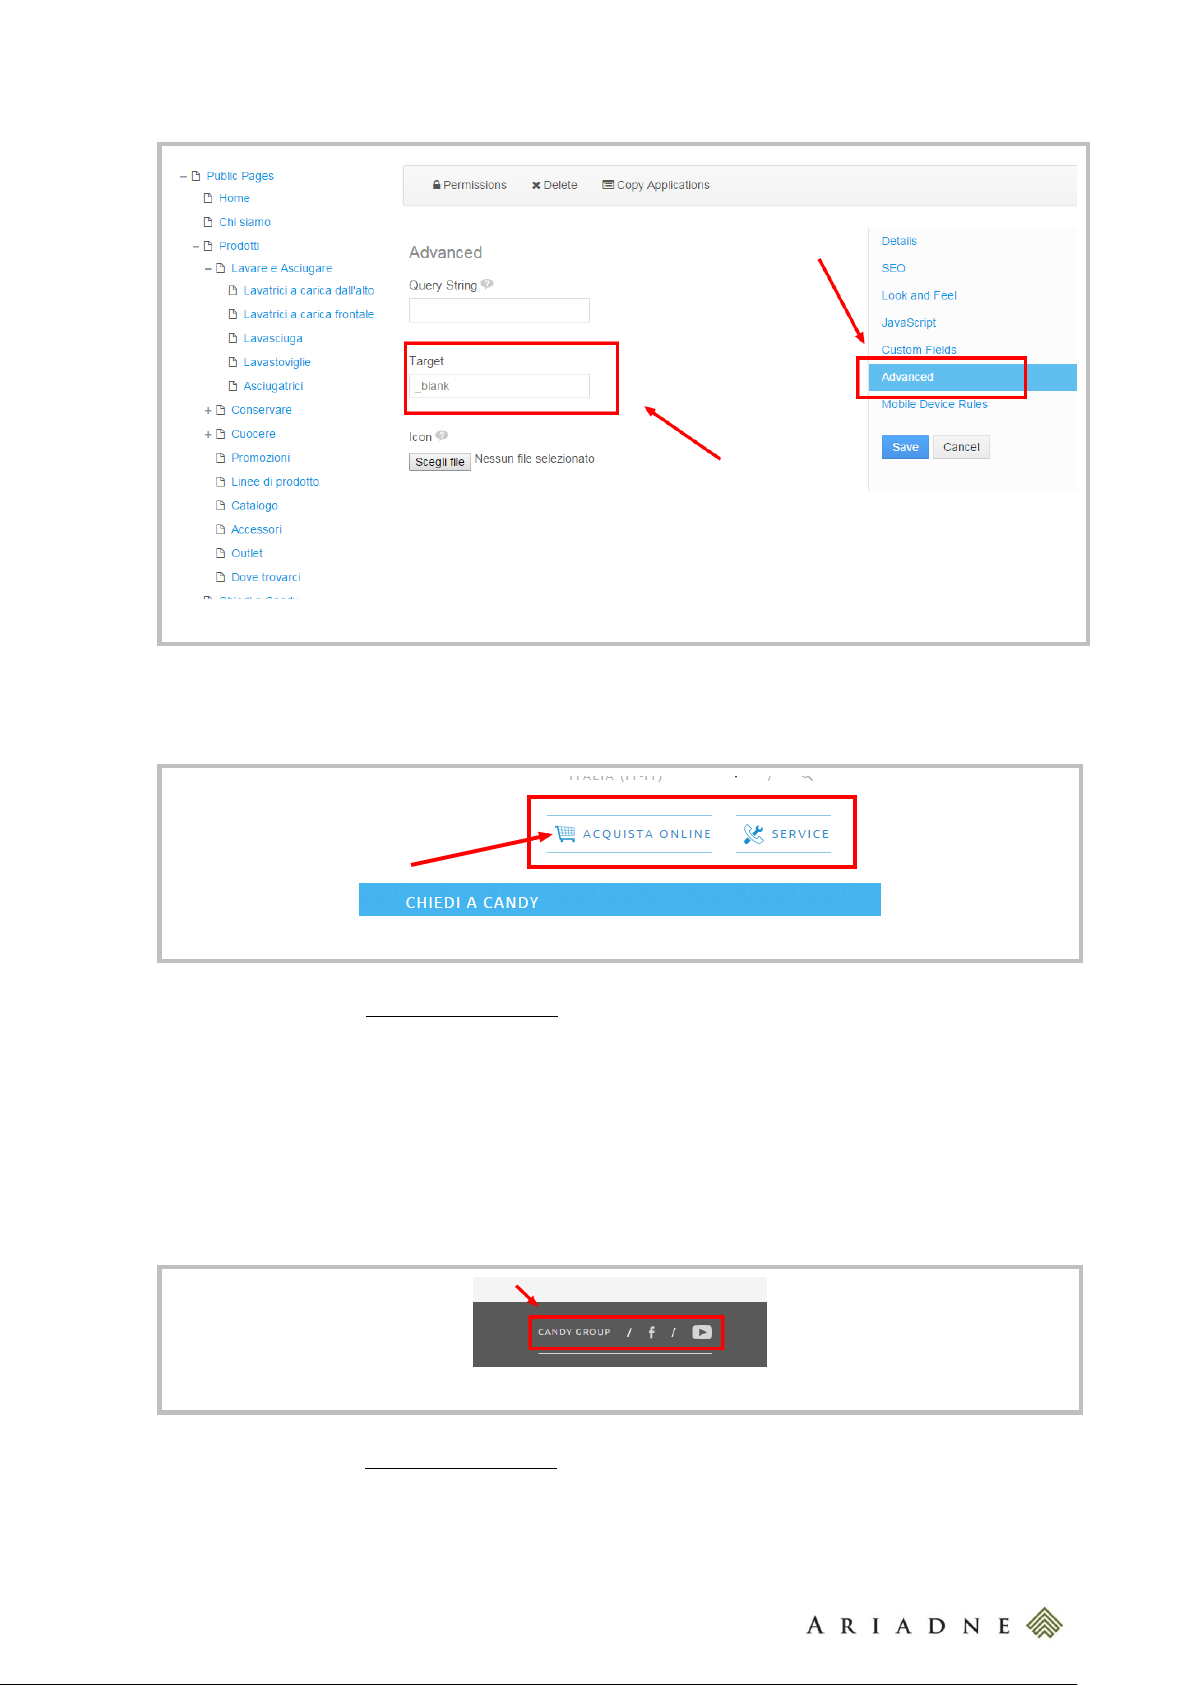
5.2 Open a Page in an external Window
To open a Page in an external Window, go to Admin > Site Administration > Pages, choose the Page you
are interested in and go to Advanced>Target and add “_blank” in this field.
candy-catalog-portal-documentation-mre-20150618-v-w
Page 9
9
Open a Page in an external Window
The site top head links
The footer links
5.3 Top Head Links
Add or edit a page (see Add or Edit a Site Page) specifying it as a Link to URL, then go to Custom Fields and
then:
Candy Menu: enter topHead;
Candy Menu Icon: enter one of the followings:
o cart for the cart icon;
o service for the service icon;
5.4 Footer links
Add or edit a page (see Add or Edit a Site Page), then go to Custom Fields and then:
Candy Menu: enter footer;
Candy Menu Icon: enter one of the followings:
o facebook for the Facebook icon
candy-catalog-portal-documentation-mre-20150618-v-w
Page 10
10
The Main menu links
The mainMenuSidebar work only for the second level pages!
o youtube for the Youtube icon;
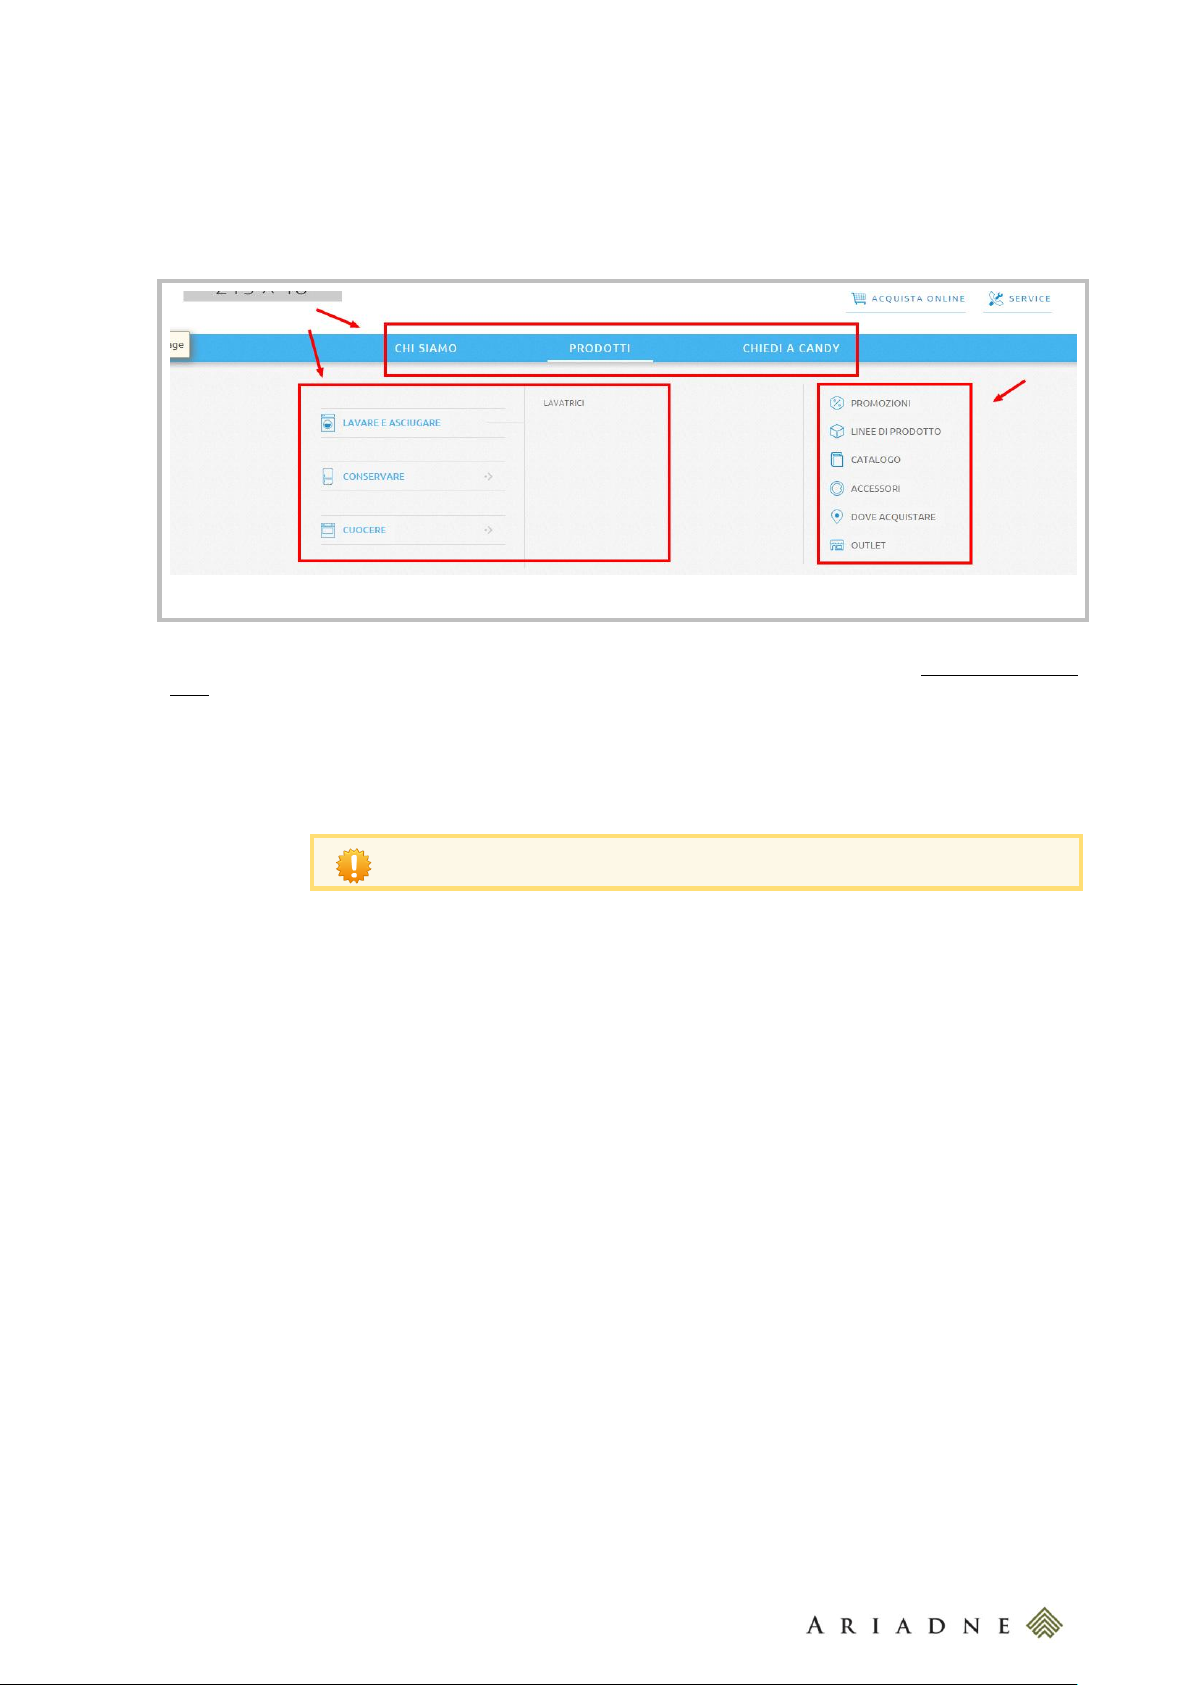
5.5 Main menu links
Main menu links are divided in three levels and a sidebar. When you edit the pages (see Add or Edit a Site
Page) the links hierarchy correspond to the pages hierarchy of the control panel. Once you created a page go to
Custom Fields and then:
Candy Menu:
o leave it empty to put the page in the main menu;
o enter mainMenuSidebar to add the page in the sidebar
Candy Menu Icon:
o enter one of the followings for the second level pages:
lavare-asciugare for the washing and drying machines
conservare for refrigerators machines;
cuocere for the ovens;
o enter one of the followings for the sidebar pages:
promo for promotions;
lines for the product lines;
catalog for the catalog;
accessories for the accessories;
store for where to buy;
outlet for the outlet link;
5.6 Section products navigation sidebar
candy-catalog-portal-documentation-mre-20150618-v-w
Page 11
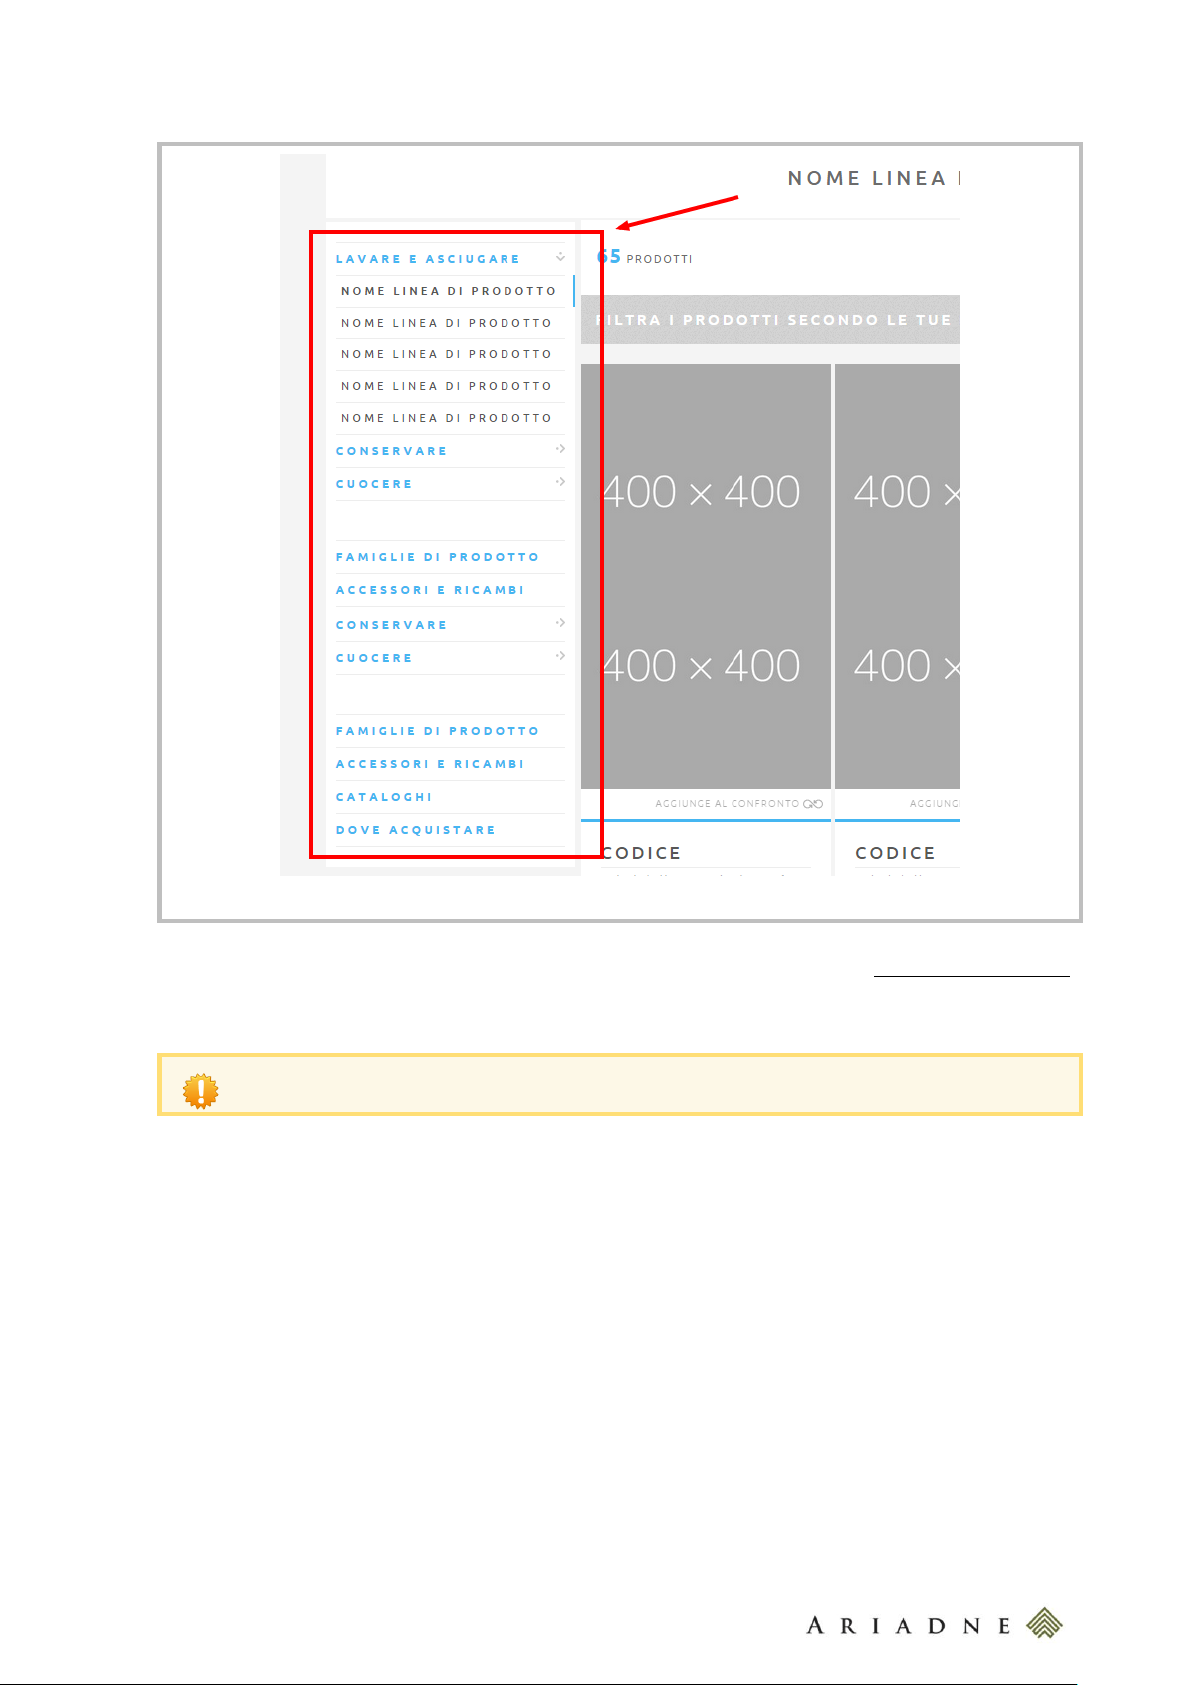
11
Section products navigation sidebar
The pages will not appear immediately after the changes because the list of pages is stored and it is
refreshed periodically. Wait till the page will appear.
To add a page into the section products navigation sidebar edit an existing page (see Add or Edit a Site Page)
and set the Custom Field Candy Section Product Navigation to true; then the selected page and all its
child pages will appear in the sidebar menu.
candy-catalog-portal-documentation-mre-20150618-v-w
Page 12
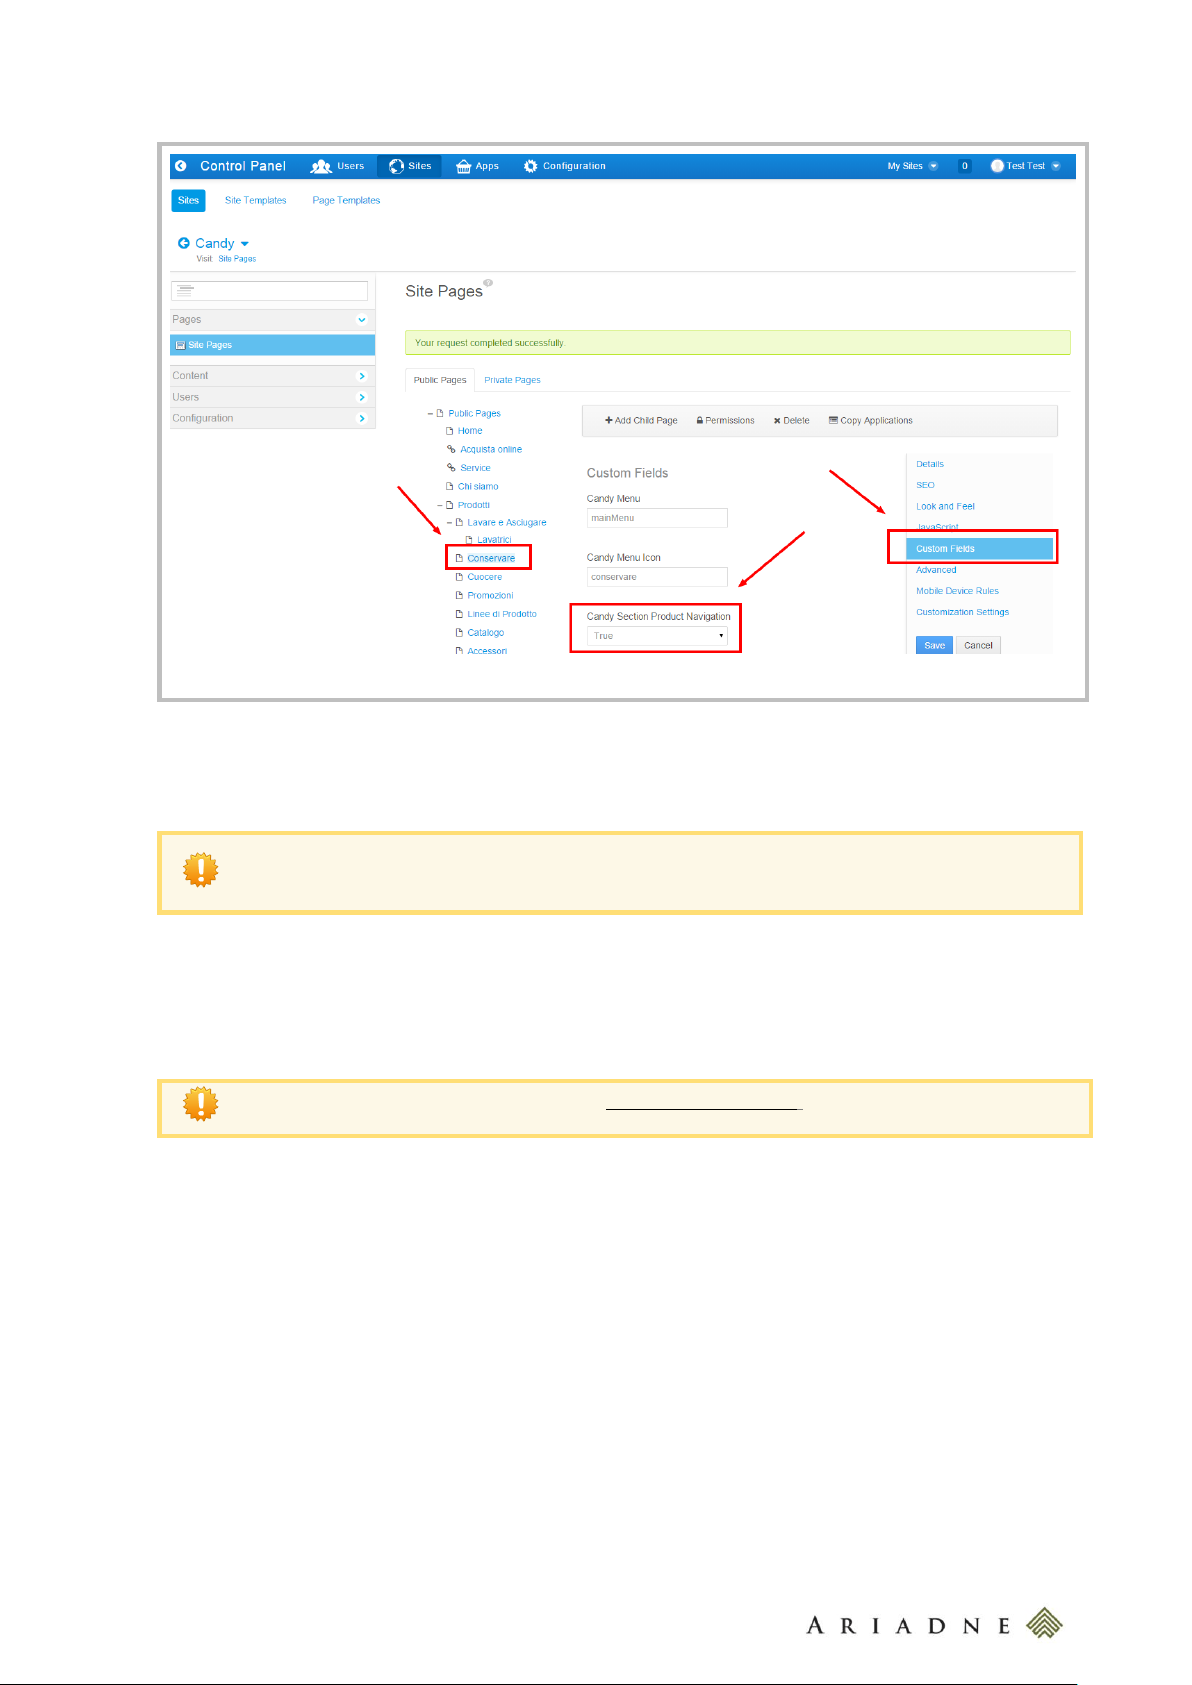
12
Adding a page in the section products navigation sidebar
If you don’t want the Page to appear into the Candy Section Product Navigation, you have to put both
the Custom Fields of Candy Section Product Navigation and Candy Section Product Navigation to
“False”.
To hide a Page from the Sitemap Page see Add or Edit a Site Page.
If you want that the Page will appear in the top side of the Candy Section Product Navigation, put the Custom
Filed Candy Bottom Section Product Navigation to “False” and the Custom Filed Candy Section Product
Navigation to “True”.
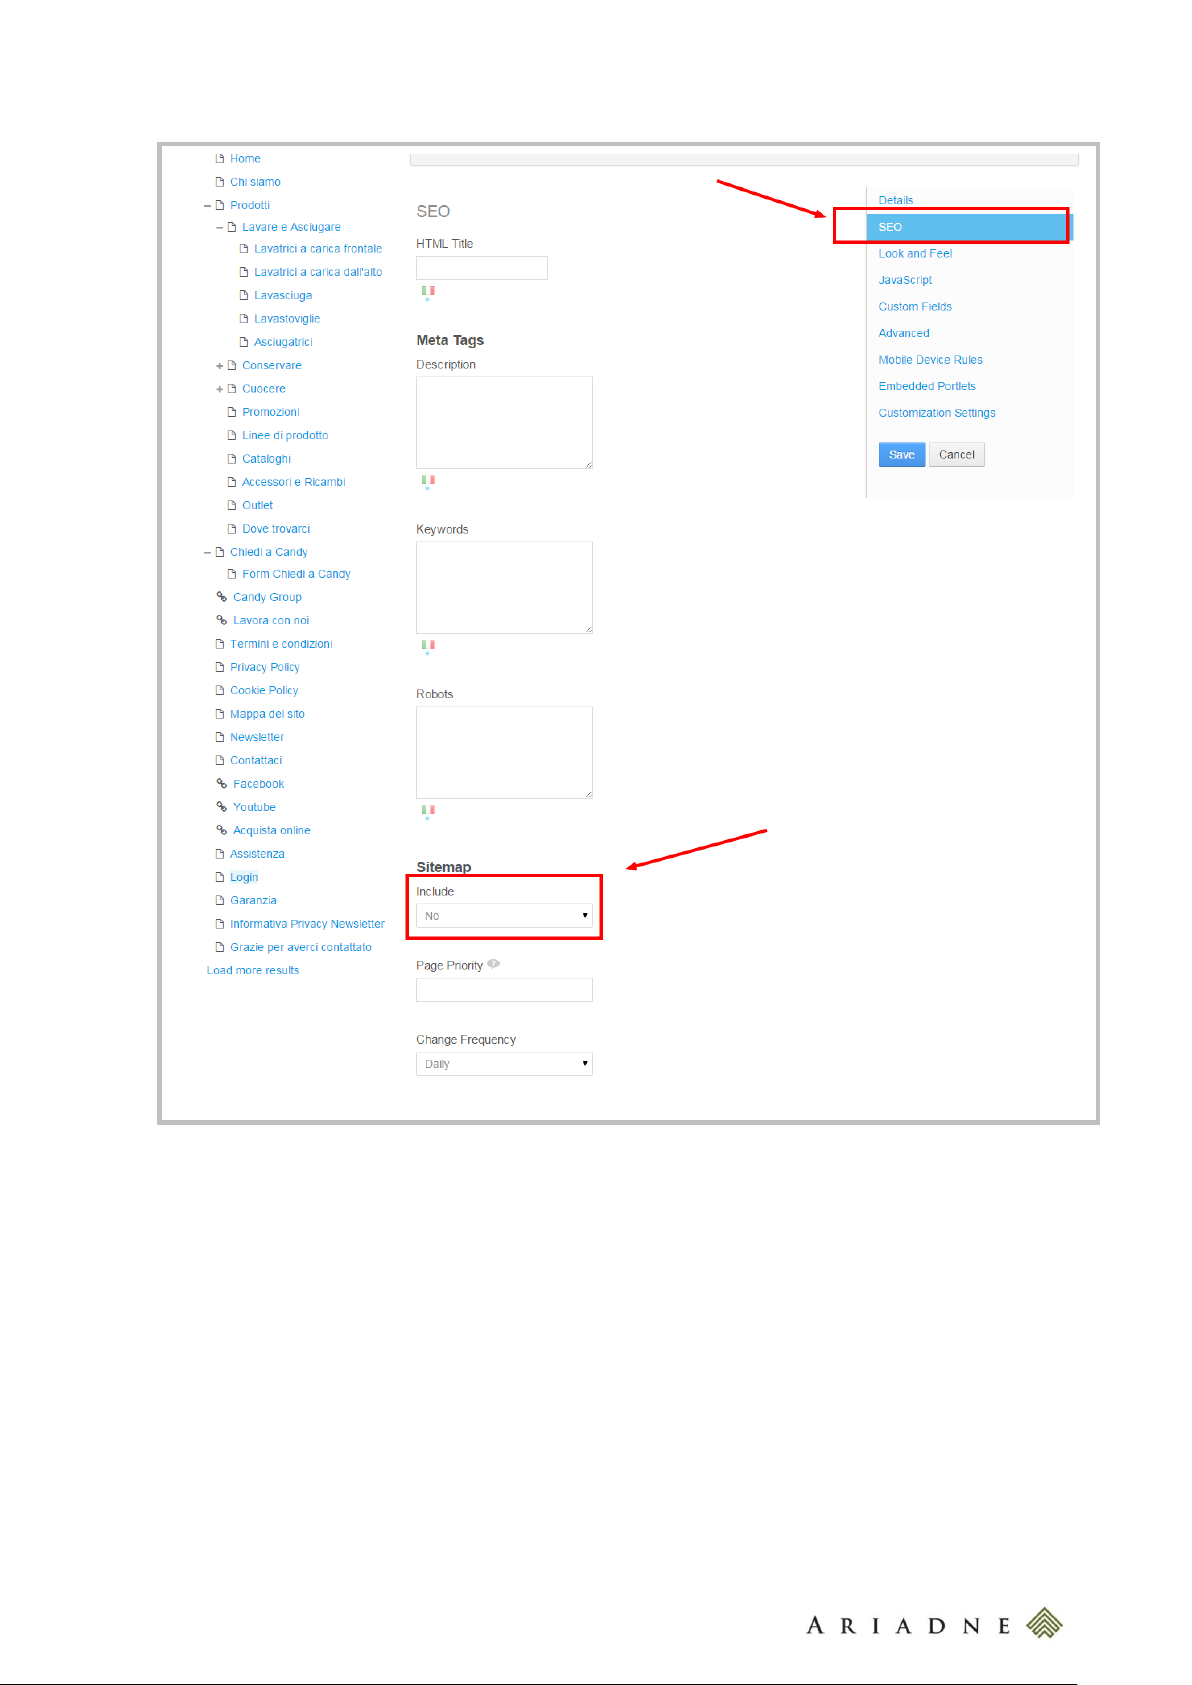
5.7 Hide a Page from sitemap.xml
To hide a Page from the sitemap.xml, go to Admin > Site Administration > Pages and choose the Page you
want to hide. Then go to SEO > Sitemap and select “No” for the field “Include”.
candy-catalog-portal-documentation-mre-20150618-v-w
Page 13
13
Hiding a page from sitemap.xml
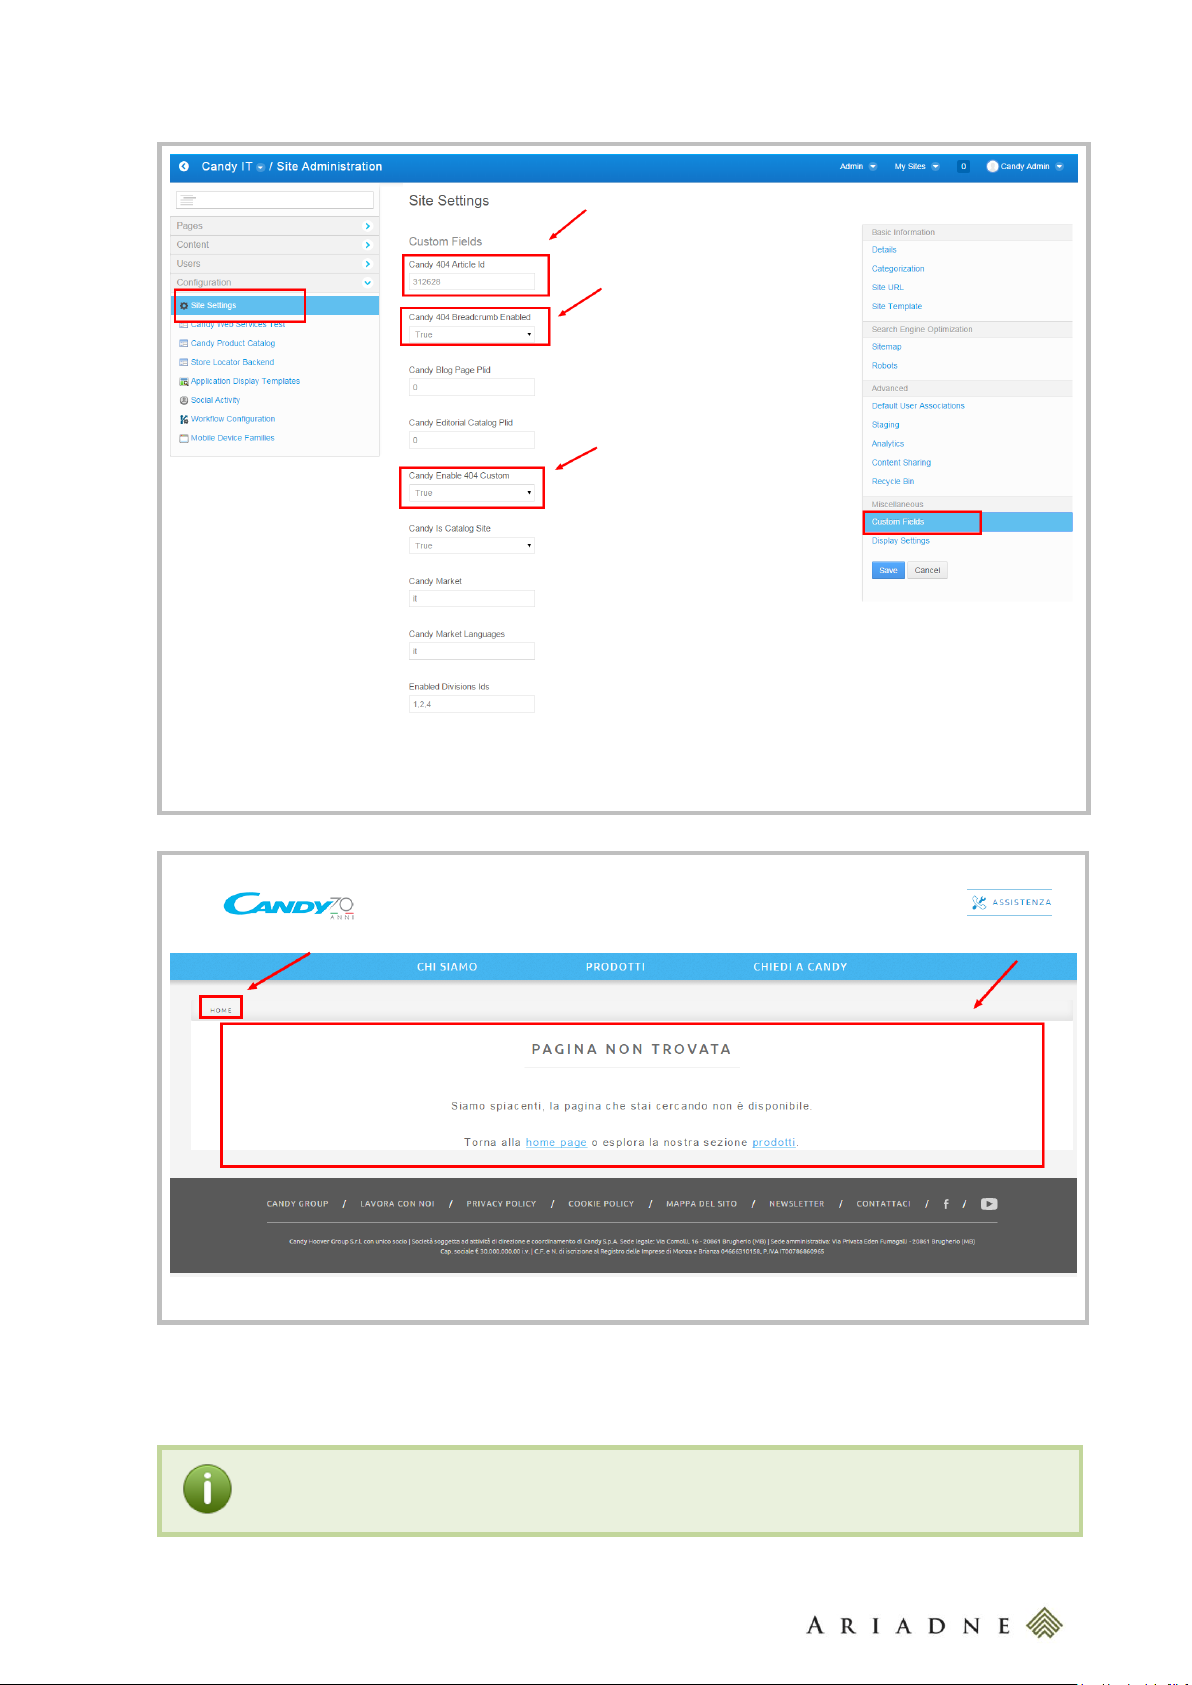
5.8 Customize the 404 Page
To customize the 404 Page go to Admin> Configuration > Site Settings and choose the Custom Fields
section. Here choose “True” for the Candy Enable 404 Custom Custom Field and in the Candy 404 Article
Id Custom Field put the Article Id of the Web Content that you have already created for the 404 Page.
Besides if you want to add the Breadcrumb to this 404 Page, choose “True” for the Candy 404 Breadcrumb
Enabled Custom Field.
candy-catalog-portal-documentation-mre-20150618-v-w
Page 14
14
Customizing the 404 Page
The 404 Page
Application and Portlet in Liferay are synonymous. A portlet is a “widget” or a “box” that can be
placed in one or more pages (or in a portion of a page!).
In Liferay a page is composed by Portlet.
6 ADD AN APPLICATION (PORTLET) TO A PAGE
candy-catalog-portal-documentation-mre-20150618-v-w
Page 15
15
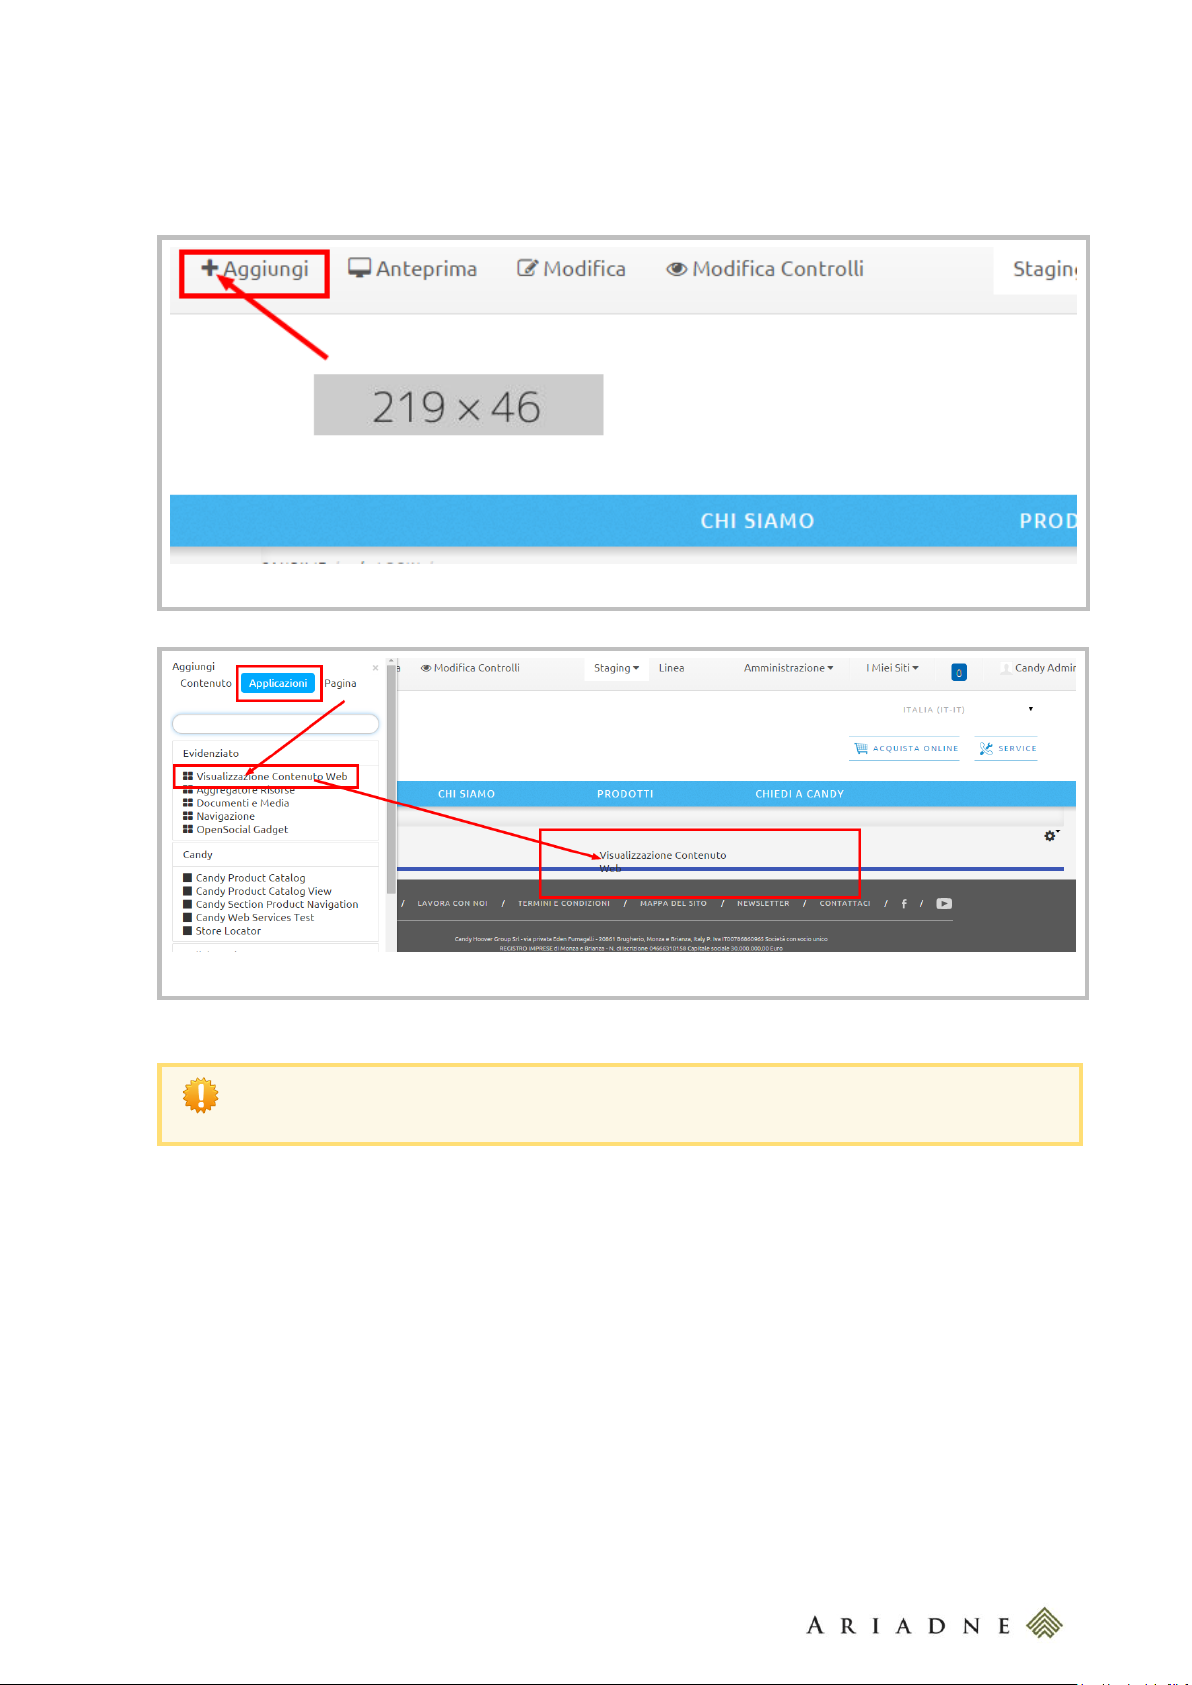
The button to add a portlet
Find and Drag&Drop the portlet in a page
When you Drag the portlet in the Page you’ll see a few places where a blue line appears. These are
the boxes where you can put the Portlet. The number of them depends according to the Page Layout
have been chosen for that page.
To add a Porltlet in a page you must be authenticated; then go to the page you want to add a portlet and then
click on the Add button on the top left portion of the page and then, locate your portlet from the list and then
drag and drop it into the page. You’ll see a blue row indicating where your portlet will be placed.
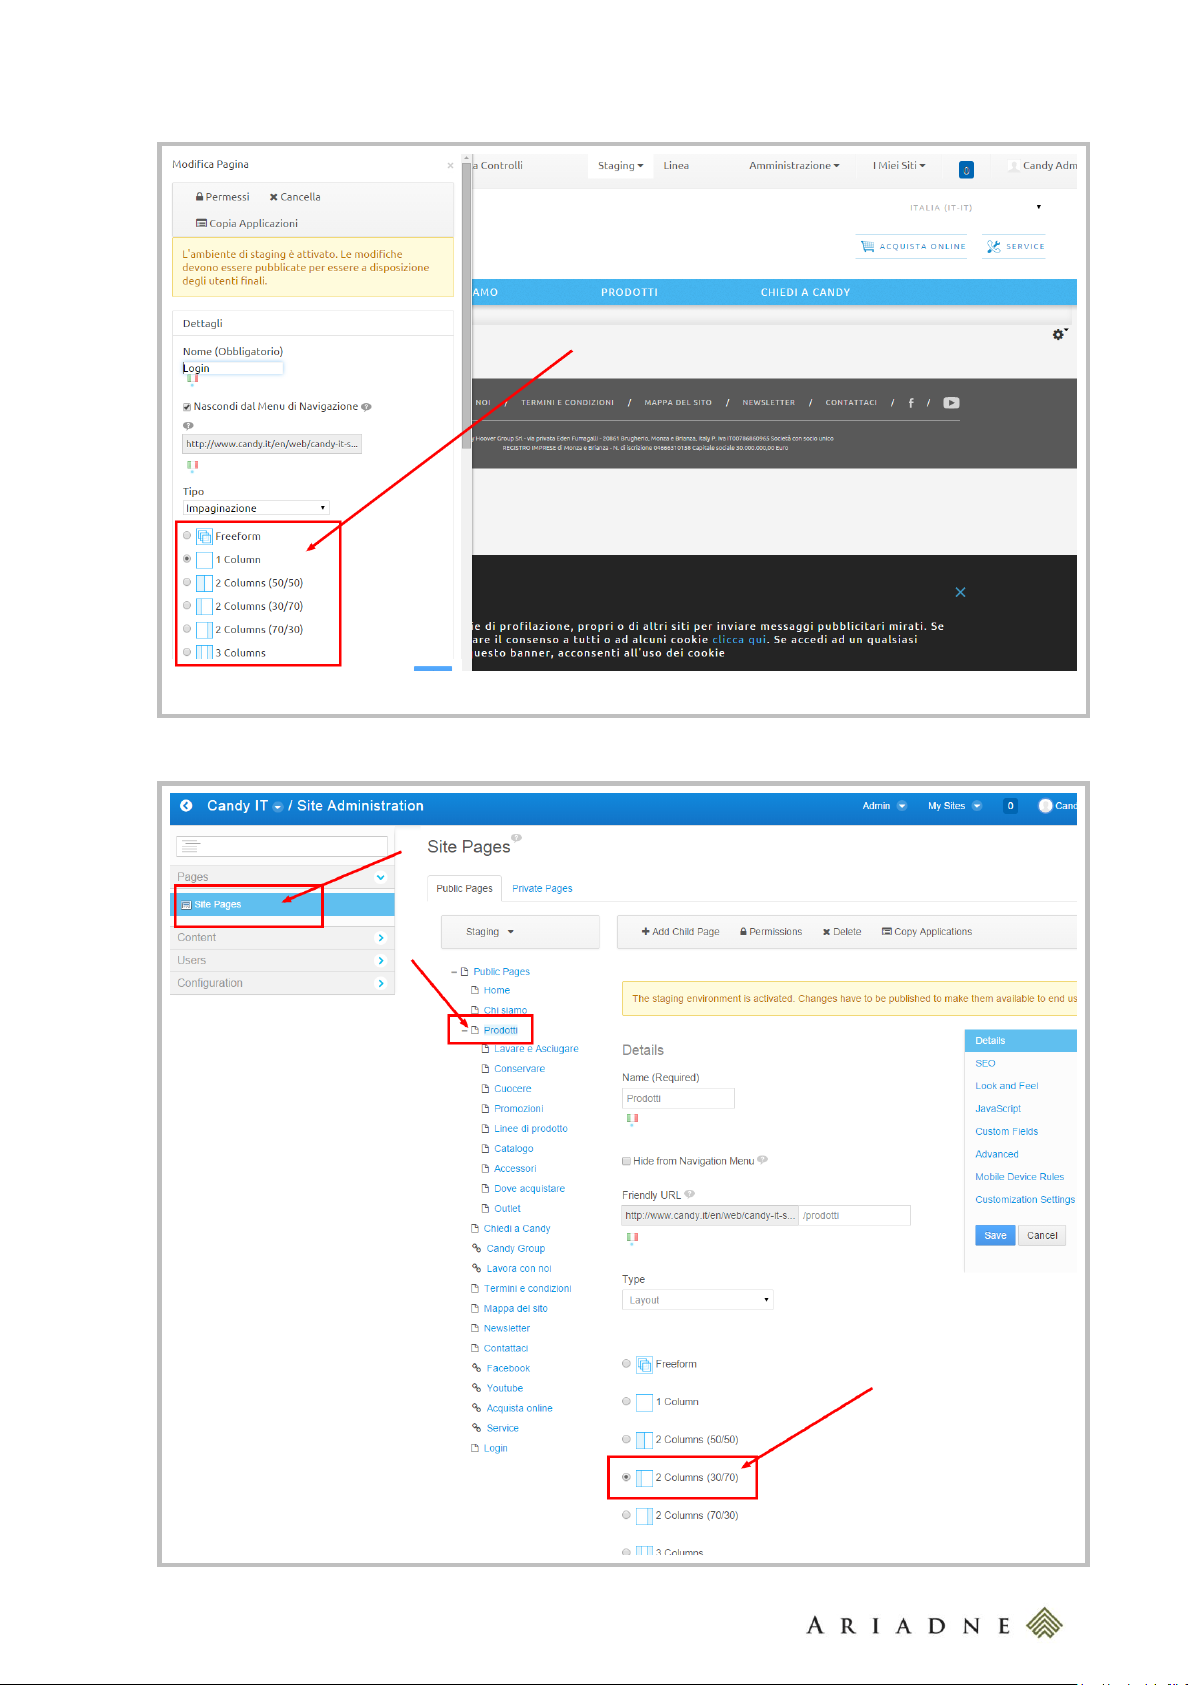
7 EDIT THE PAGE LAYOUT
When you add or edit a page you can select its Page Layout. The Layout indicates how the portlets will be
placed in the page. A layout is composed by rows and columns.
The page layout can be directly in the front end of the page by clicking on the Edit button in the top left of the
page or edited in the list of the pages (Admin > Site Administration > Pages) selecting the page you want
to edit the layout.
candy-catalog-portal-documentation-mre-20150618-v-w
Page 16
16
Editing the Page Layout directly from the page
candy-catalog-portal-documentation-mre-20150618-v-w
Page 17
17
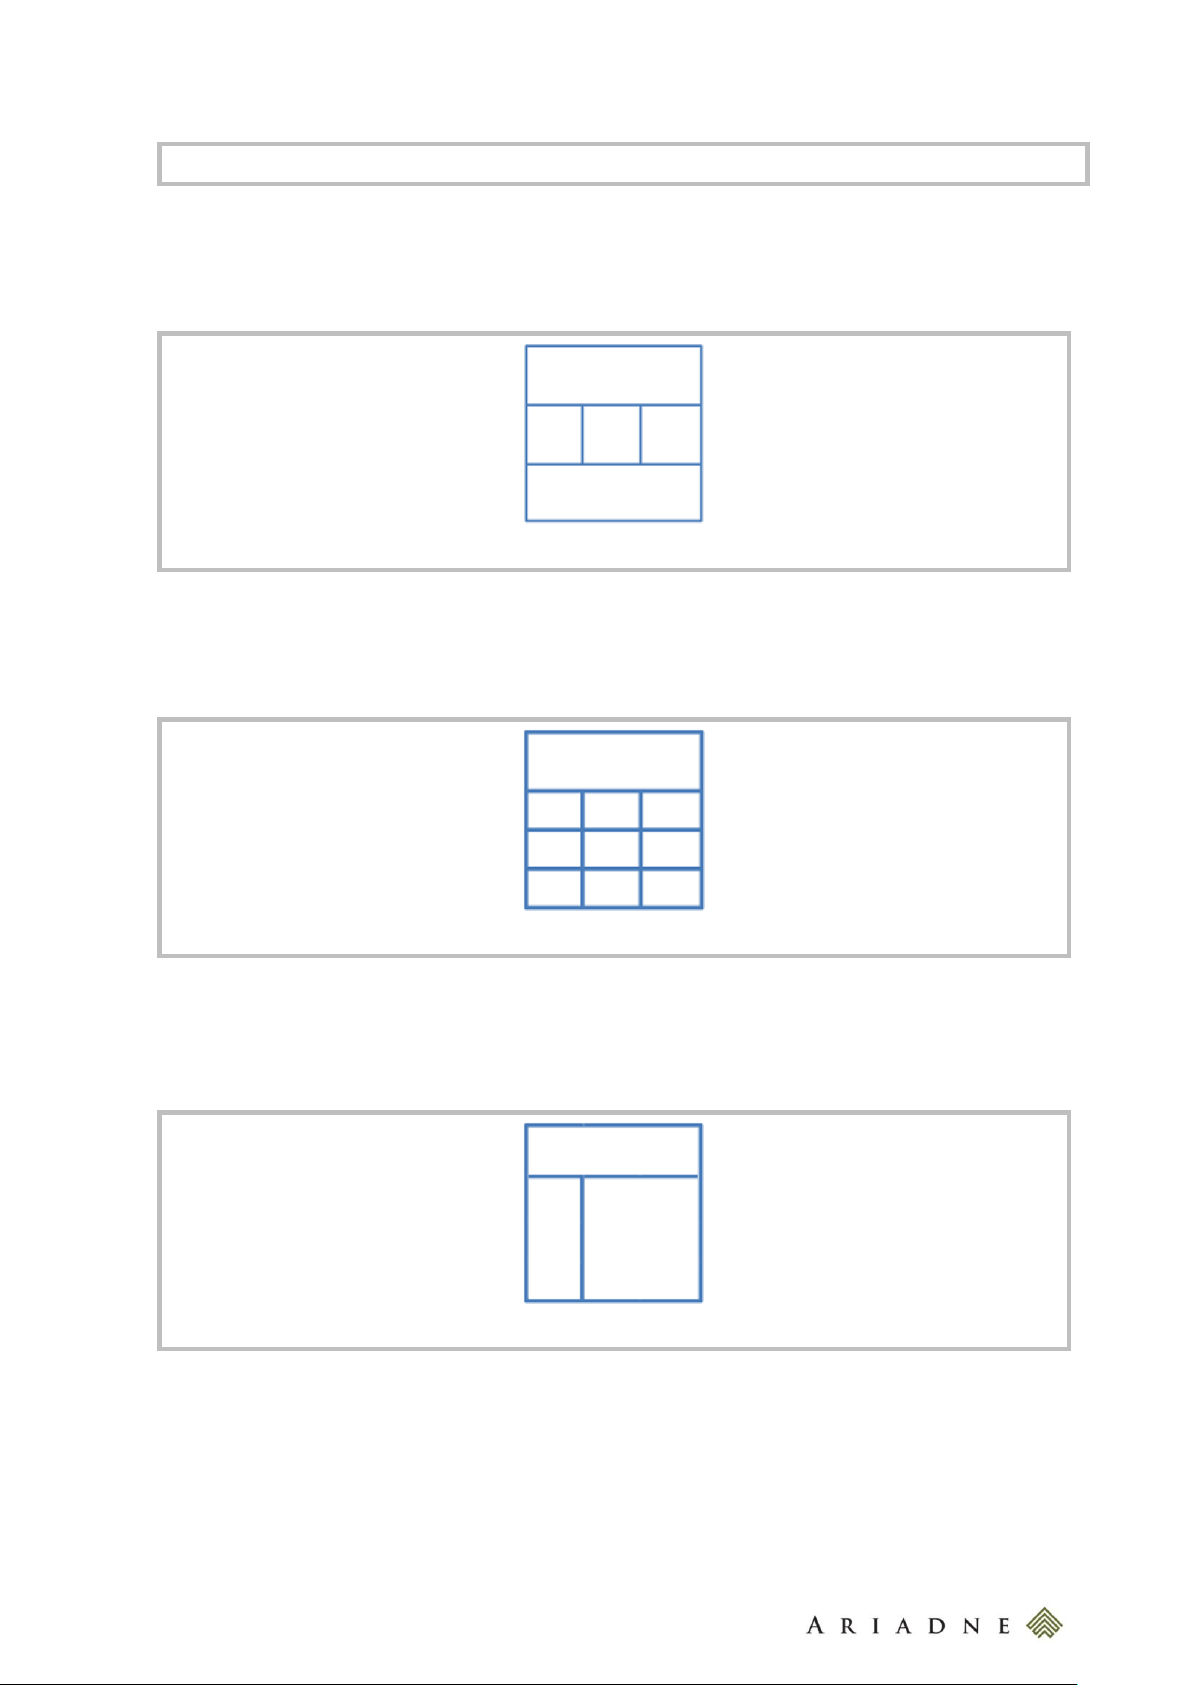
Editing the Page Layout from the page list in the back office
The Candy – Home - Layout
The Candy – 1 - 3 - 3 - 3 - Layout
The Candy – Section - Products - Layout
7.1 The Candy - Home – Layout
The Candy - Home – Layout is used in the Home Page.
7.2 The Candy - 1 - 3 - 3 - 3 - Layout
The Candy - 1 - 3 - 3 - 3 – Layout is used in the Assistance Page.
7.3 The Candy – Section - Products - Layout
The Candy - Section - Products - Layout is used in the Products Page.
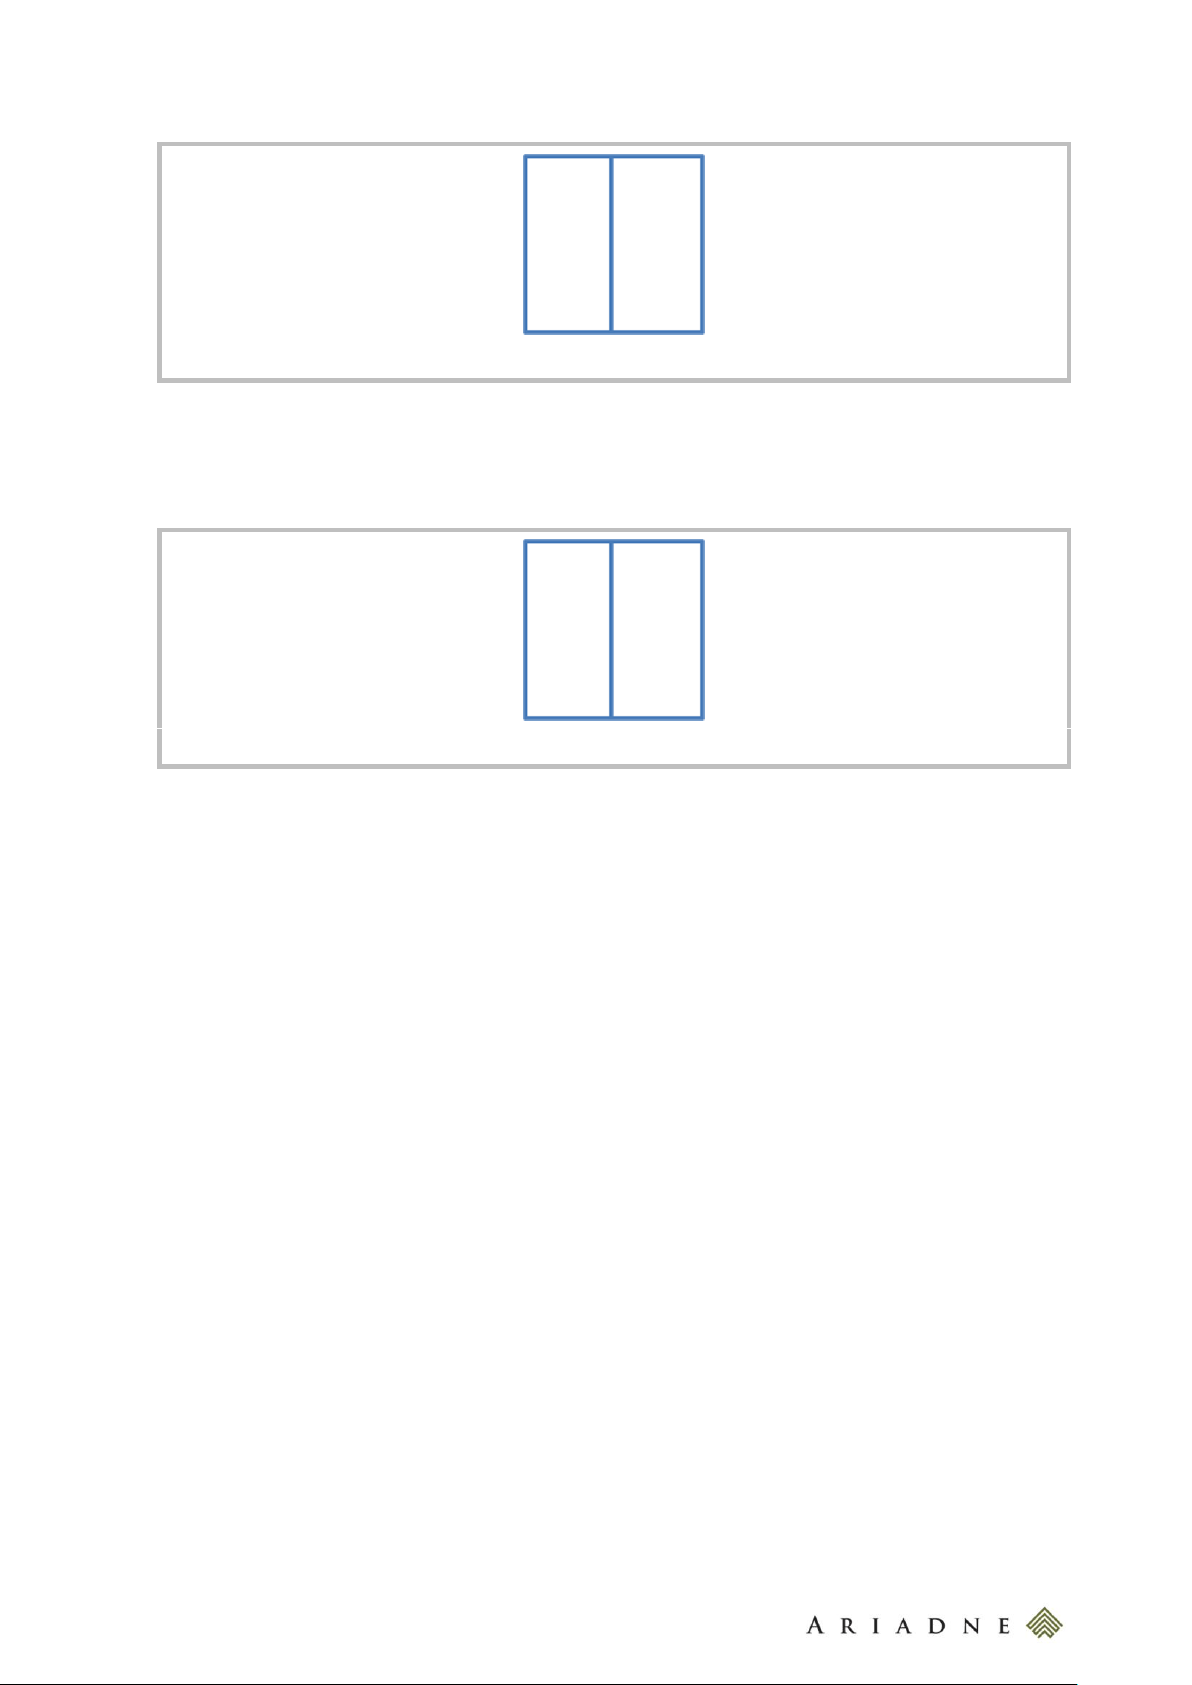
7.4 The Candy – Section - Products – Layout – 2 - Columns
The Candy - Section - Products – Layout – 2 - Columns is used in the Products Page.
candy-catalog-portal-documentation-mre-20150618-v-w
Page 18
18
The Candy – Section - Products – Layout – 2 - Columns
The Candy – Section - Section – Line – 2 - Columns
7.5 The Candy – Section - Section – Line – 2 - Columns
The Candy - Section - Section – Line – 2 - Columns is used in the Products Page.
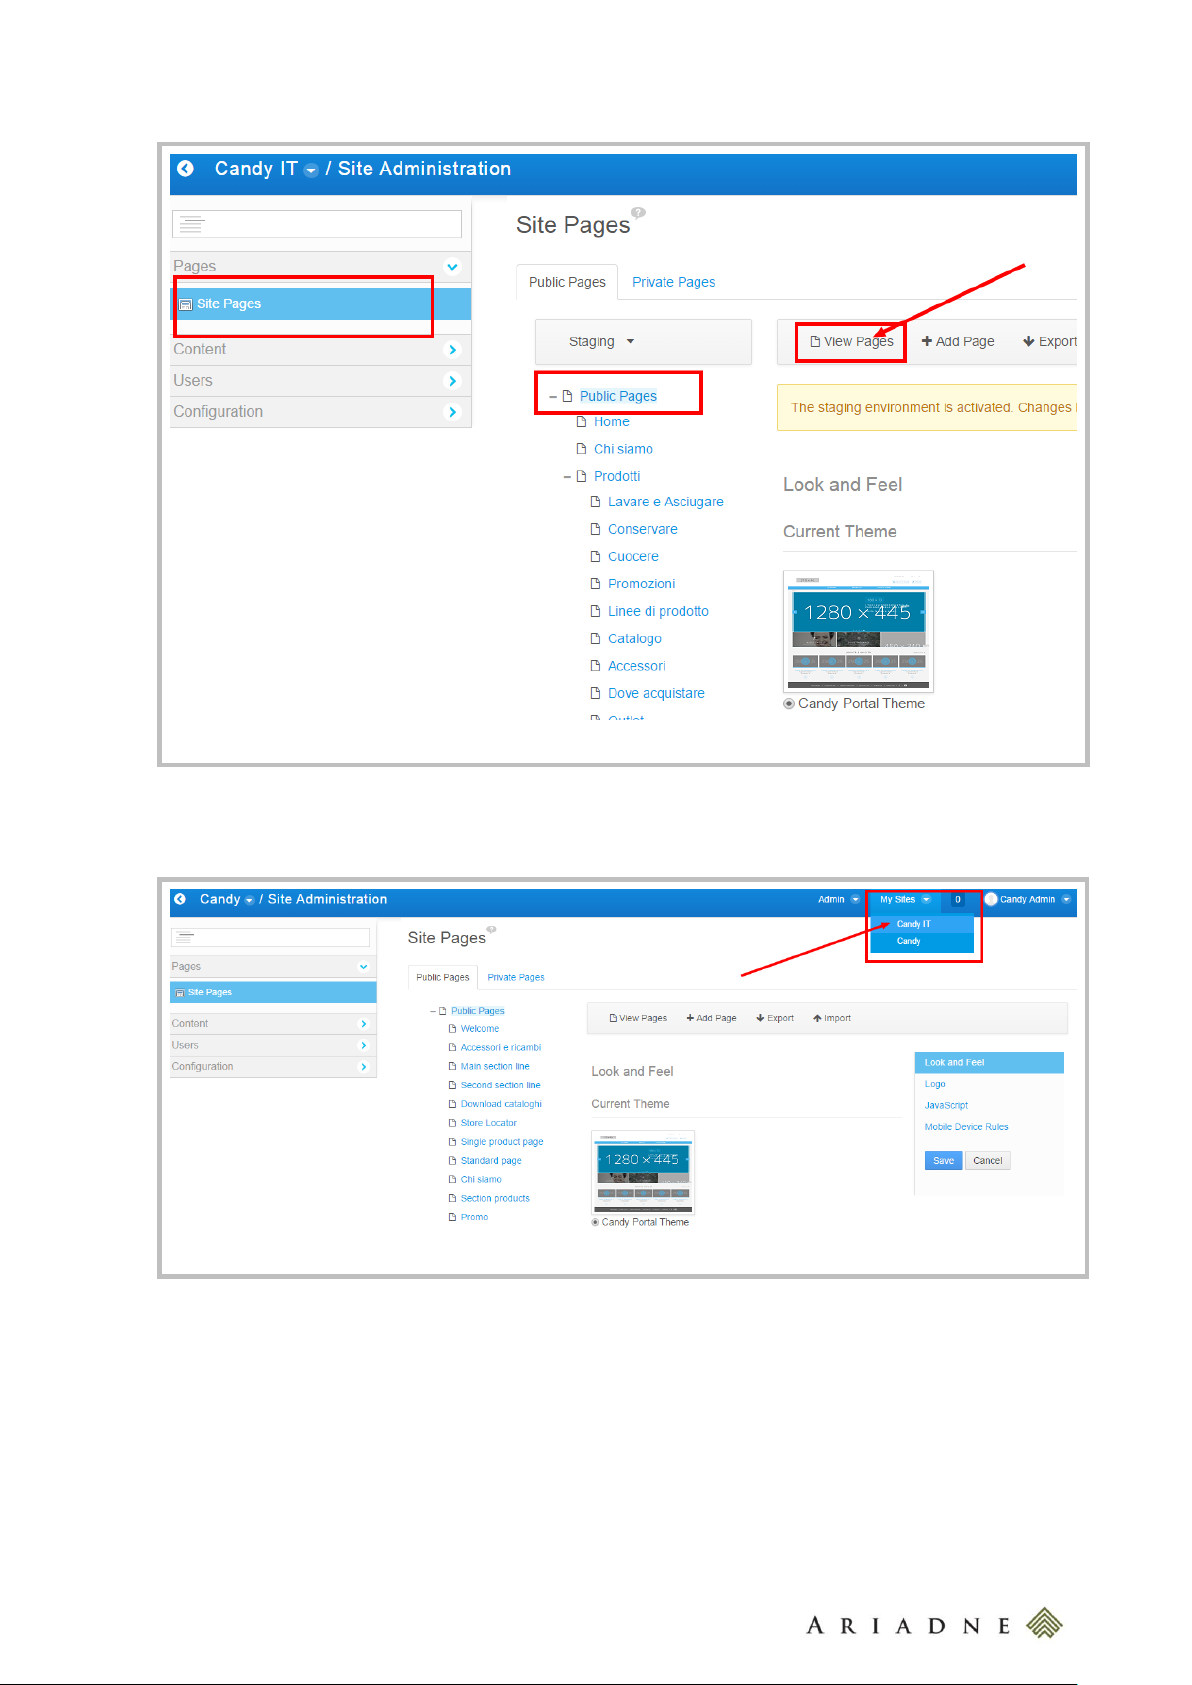
8 THE STAGING SITE AND THE LIVE SITE
When you add or edit a page add or edit a content the changes will not be directly published “online”. These
changes will leave on the Staging Site till you publish the changes on the Live Site.
To see the Staging Site click on View Pages from the pages list in the back office (Admin > Site
Administration > Pages).
candy-catalog-portal-documentation-mre-20150618-v-w
Page 19
19
Accessing to the Staging Site
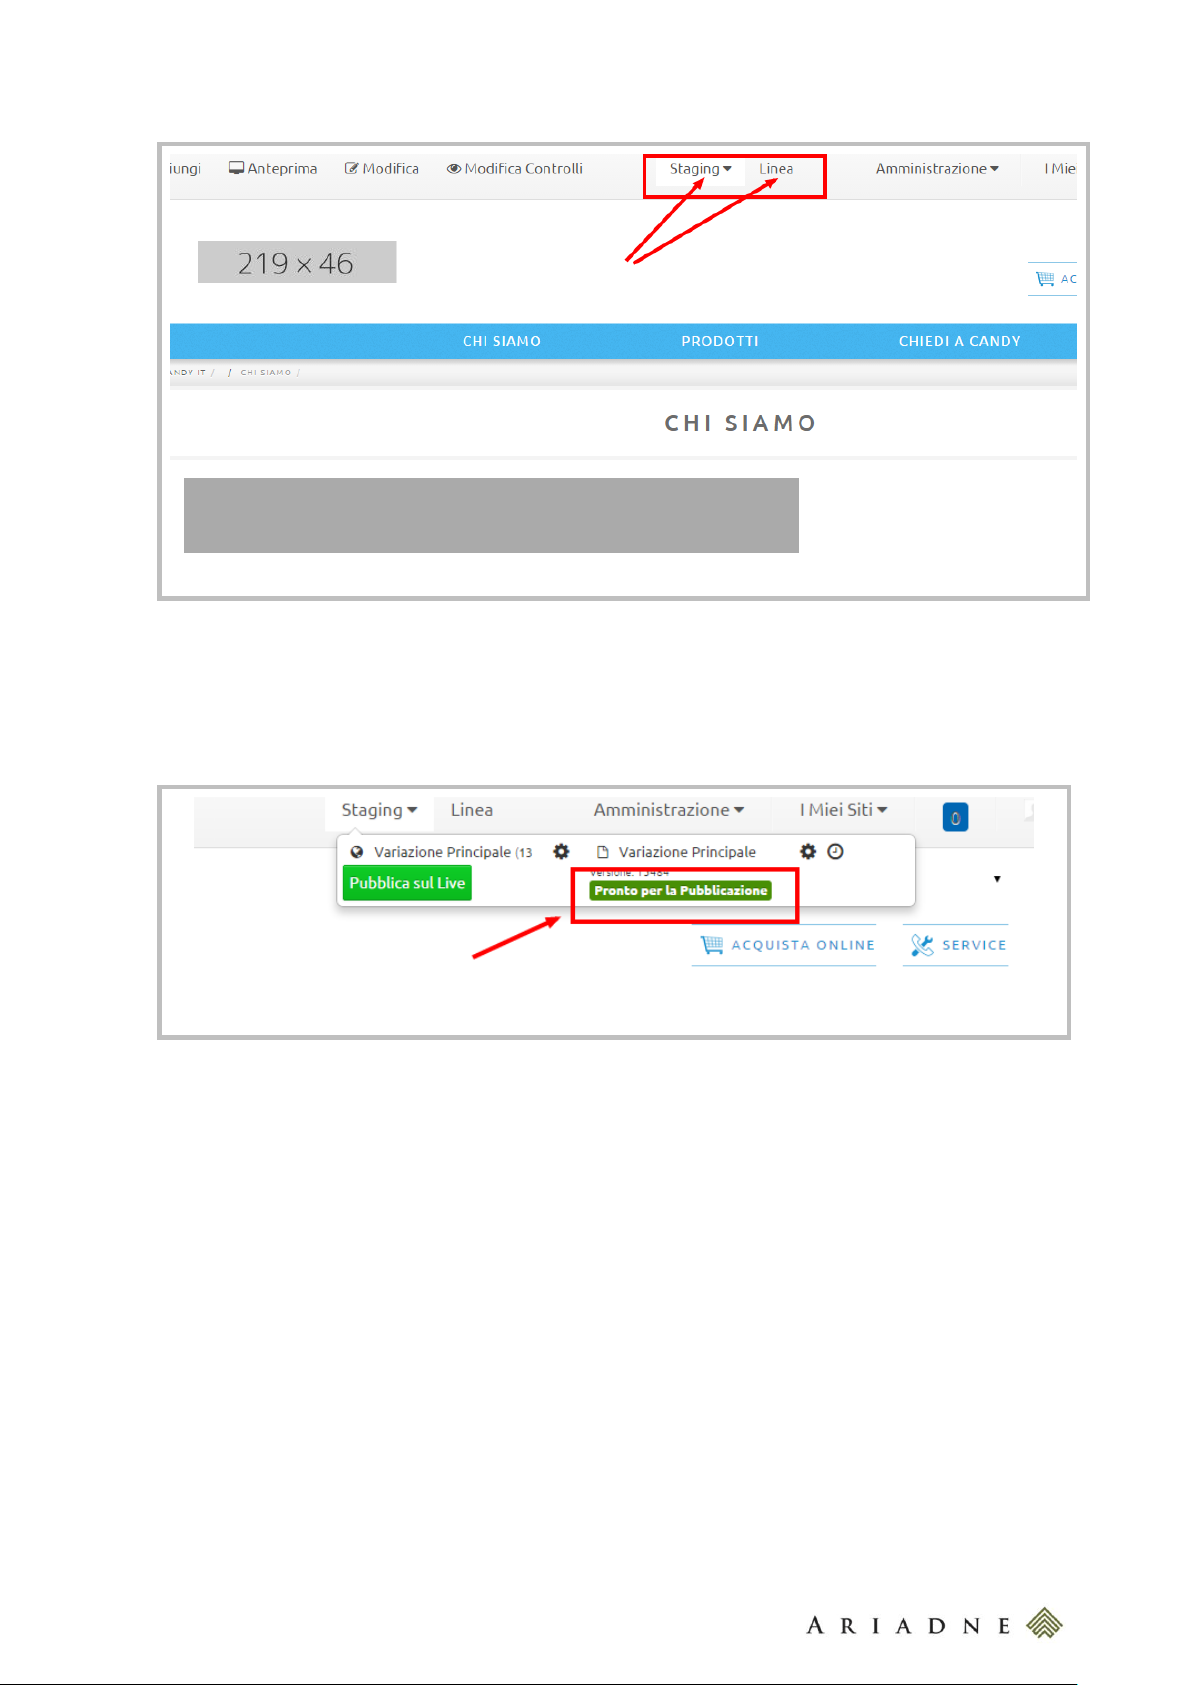
Accessing to the Live Site
Where you are in the back office, you can see the Live Site going under My Sites and selecting your site (es
Candy IT); you will be redirected to the Live Site.
Once you’re in the Staging Site or Live Site you can switch between them selecting Live or Staging in the
top bar.
candy-catalog-portal-documentation-mre-20150618-v-w
Page 20
20
Switching between the Staging Site and the Live Site
Marking a Page as Ready to Publish
8.1 Publish Pages and Contents to the Live Environment
Actually you are working in the Staging Area, so you have to Publish to Live the Page that has been
modified in order to see it in the public site. To do this, you have to mark as “Ready to Publish” the page you
want to publish.
You can publish this Page pressing the “Publish to Live” button or you can do this from the Back Office.
After marking the Pages ready to be published, go to Administration>Site Pages>Staging>Publish to
Live.
candy-catalog-portal-documentation-mre-20150618-v-w
Page 21

21
Publishing from the Back Office
Scheduling the publication of the Pages
In the popup, you can Schedule the release of the Pages establishing the specific date and time.
If some Pages have been deleted in the Staging Area, you have to click on “Change” and then select the
“Delete Missing Pages” label.
candy-catalog-portal-documentation-mre-20150618-v-w
Page 22

22
Publishing the deletion of a Page
Publishing the Permissions
Besides you can publish also the Permissions selecting the label Permissions.
9 REMOVE THE BORDER FROM A PORTLET
To remove the border from a Portlet, click on the configuration button of the Portlet that you want to modify.
candy-catalog-portal-documentation-mre-20150618-v-w
Page 23

23
Look and Feel of a Portlet
Removing the border from a Portlet
Go to Options>Look And Feel and select “No” in the Show Borders field.
10 WEB CONTENTS
10.1 Manage a Web Content
A Web Content allows to manage multimedia contents and to publish them. The Web Contents are organized
as a File System; in Admin > Site Administration > Contents there is a directory for each Page of the site
and beside some directories for the common elements.
candy-catalog-portal-documentation-mre-20150618-v-w
Page 24

24
Organization of Web Content
Organization of Document and Media
10.2 Documents and Media
The resources available, like text files or images, are organized as a File System; in Admin > Site
Administration > Documents and Media there is a directory for each Page of the site and beside some
directories for the common elements.
10.3 Manage a Category
You can add a new Category going to Admin > Site Administration > Categories > Add Category.
candy-catalog-portal-documentation-mre-20150618-v-w
Page 25

25
Categories are used to obtain a taxonomy of the AssetEntries.
Vocabularies are used to classified Categories
Don’t modify the name of the Vocabulary in use (“candy-blog-vocabulary”).
Adding a Category
A Structure is the definition of different kind of fields that you can fill in. A Structure could have
more Templates associated to itself.
A Template is the visualization of the Structure.
Adding a Web Content
10.4 Add or Edit a Web Content
To add or edit a Web Content go to Admin > Site Administration > Contents; here you can see the list of
the site’s Web Contents.
To add a Web Contents click on Add; here you can choose between the existing Structures.
candy-catalog-portal-documentation-mre-20150618-v-w
Page 26

26
In Liferay, the Research is implemented on all those elements that are searchable (for example Pages,
Web Contents, Asset Publisher and more).
Disable Searching for a Web Content
In Liferay, an Asset can belong to every kind of content for example Web Contents, Documents
and Media, Blogs Entries, Message Boards Replies and so on.
After selecting a Structure, in the popup you can associate the Structure to a specific Template choosing
between the existent Templates.
Add the required Title for the Web Content and then fill in the fields below. They will be displayed according to
the Template you have chosen.
After including the Web Content in the Page, pay attention to remove the border from it (see Remove the
border from a Portlet)
10.5 Disable the Research for a Web Content
If you want to hide a Web Content from the Research Page, you have to go to Admin > Site
Administration > Contents and choose the Web Content you’re interested in. Then deselect the
Searchable field.
Otherwise if you want that Web Content to be found by the Research, select the Searchable field.
10.6 Publish a Web Content into Pages
In Liferay there are two ways to publish a Web Content into Pages, using two different Portlets :
Web Content Display: it shows only one Web Content
Asset Publisher: it shows one or more Assets
10.6.1 Configure a Web Content Display Layout
After adding a Web Content Display into a Page, you must configure its layout: on the right top of the
Portlet go to Options>Configuration. Here you can choose among the Web Contents that you’ve already
added.
candy-catalog-portal-documentation-mre-20150618-v-w
Page 27

27
Selecting the Web Content to be displayed into the Web Content Display
Pay attention to deselect the two fields at the end of the popup, before saving the configuration.
Removing the selections in the Configuration popup of the Web Content Display
10.6.2 Configure an Asset Publisher Layout
After inserting an Asset Publisher into a Page (see Add an Application (Portlet) to a page ), you must
configure its layout: on the right top of the Portlet go to Options>Configuration in the section Asset
Selection. Here choose the “Manual” Asset Selection, that allows to select specific Web Contents to be
displayed.
candy-catalog-portal-documentation-mre-20150618-v-w
Page 28

28
Selecting the Manual kind of Asset Selection and Adding Web Contents to be displayed
Selecting the Display Template and the Pagination Type
The go in the section Display Settings and select the Display Template that you want to use. Pay attention
to select Pagination Type equals to “None”.
candy-catalog-portal-documentation-mre-20150618-v-w
Page 29

29
10.7 The Candy - Generic Structure - Global
The Generic Structure is a Structure that provides:
Online Title
Online Subtitle
Online Text
Main Image (640 x 320 pixels)
Main Image Alt
Html Form
The visualization of these fields depends on the Template chosen; in particular this Structure could be linked
to:
Candy - Generic Template Single Column – Global
Candy - Generic Template Double Column – Global
Candy - Generic Template Image Left – Global
Candy - Generic Template Central Image – Global
Candy – Slider Left Image Template – Global
Candy – Security Alert Details Template – Global
Candy - Security Alerts Template – Global
Candy – Ask Form Template - Global
candy-catalog-portal-documentation-mre-20150618-v-w
Page 30

30
Editing a Web Content
10.7.1 The Candy - Generic Template Single Column – Global
The Candy - Generic Template – Global displays only:
Online Title
Online Text, displayed on two columns
Controls are provided in case of empty fields:
Empty Online Title: only Online Text displayed
Empty Online Text: only Online Title displayed
Empty Online Title and Online Text: empty Web Content displayed
The Web Content will be displayed on a single column.
candy-catalog-portal-documentation-mre-20150618-v-w
Page 31

31
Editing a Candy - Generic Template Single Column – Global
Editing a Candy - Generic Template Double Column – Global
10.7.2 The Candy - Generic Template Double Column – Global
The Candy - Generic Template – Global displays only:
Online Title
Online Text, displayed on two columns
Controls are provided in case of empty fields:
Empty Online Title: only Online Text displayed
Empty Online Text: only Online Title displayed
Empty Online Title and Online Text: empty Web Content displayed
The Web Content will be displayed on two columns.
10.7.3 The Candy - Generic Template Image Left – Global
The Candy - Generic Template Image Left – Global displays:
Online Title
Online text, displayed on two columns
Main Image (640 x 320 pixels)
Main Image Alt, when the Main Image isn’t available
Controls are provided in case of empty fields:
Empty Online Title: only Online Text, Main Image displayed
Empty Online Text: only Online Title, Main Image displayed
Empty Main Image: only Online Title, Online Text displayed
candy-catalog-portal-documentation-mre-20150618-v-w
Page 32

32
Editing a Candy - Generic Template Image Left– Global
Empty Online Title, Online Text and Main Image: empty Web Content displayed
10.7.4 The Candy - Generic Template Central Image – Global
The Candy - Generic Template Central Image– Global displays:
Online Title
Online text, displayed on two columns
Main Image (640 x 320 pixels)
Main Image Alt, displayed when the Main Image isn’t available
Controls are provided in case of empty fields:
Empty Online Title: only Online Text, Main Image displayed
Empty Online Text: only Online Title, Main Image displayed
Empty Main Image: only Online Title, Online Text displayed
Empty Online Title, Online Text and Main Image: empty Web Content displayed
candy-catalog-portal-documentation-mre-20150618-v-w
Page 33

33
Editing a Candy - Generic Template Central Image – Global
Editing a Candy – Slider Left Image Template – Global
10.7.5 The Candy – Slider Left Image Template – Global
The Candy - Slider Left Image Template – Global displays only:
Main Image (530x400 pixels)
Main Image Alt
Online Text
Controls are provided in case of empty fields:
Empty Main Image: empty Web Content displayed
Empty Online Text: only Main Image and Main Image Alt displayed
10.7.6 The Candy – Security Alert Details Template – Global
The Candy - Security Alert Details Template – Global displays only:
candy-catalog-portal-documentation-mre-20150618-v-w
Page 34

34
Editing a Candy – Security Alert Details Template – Global
Editing a Candy – Security Alert Template – Global
Online Title
Online text, displayed on two columns
Controls are provided in case of empty fields:
Empty Online Title: only Online Text displayed
Empty Online Text: only Online Title displayed
Empty Online Text, empty Online Text: empty Web Content displayed
10.7.7 The Candy – Security Alert Template – Global
The Candy - Security Alert Details Template – Global displays only:
Online Title
Controls are provided in case of empty fields:
Empty Online Text: empty Web Content displayed
The date corresponds to the date of the last modification and it will be displayed automatically.
10.7.8 The Candy – Ask Form Template – Global
The Candy - Security Alert Details Template – Global displays only:
Online Title
Online Subtitle
Html Form
Controls are provided in case of empty fields:
Online Title: only Html Form, Online Subtitle displayed
candy-catalog-portal-documentation-mre-20150618-v-w
Page 35

35
Editing a Candy – Ask Form Template – Global
Empty Online Subtitle: only Online Title , Html Form displayed
Empty Html Form: only Online Title , Online Subtitle displayed
The Html Form will be filled in with the form provided from Salesforce, for each available language.
candy-catalog-portal-documentation-mre-20150618-v-w
Page 36

36
Editing a Candy – Generic Banner Template– Global
10.8 The Candy - Generic Banner Structure - Global
The Candy - Generic Banner Structure - Global is a Structure that provides:
Label
Link
Main Image (450 x 340 pixels)
Main Image Alt
Image Ico
Text
The visualization of these fields depends on the Template chosen; in particular this Structure could be linked
to:
Candy – Generic Banner Template – Global
Candy - Ico Banner Template – Global
10.8.1 The Candy - Generic Banner Template – Global
The Candy - Generic Banner Template – Global displays only:
Main Image (450 x 340 pixels)
Main Image Alt
Label
Link
Controls are provided in case of empty fields:
Empty Main Image: empty Web Content displayed
Empty Label and Link: only Main Image displayed
10.8.2 The Candy - Ico Banner Template – Global
The Candy – Ico Generic Template – Global displays only:
Main Image (450 x 340 pixels)
Main Image Alt
Label
Link
Text
candy-catalog-portal-documentation-mre-20150618-v-w
Page 37

37
Editing a Candy – Ico Banner Template– Global
Controls are provided in case of empty fields:
Empty Main Image: empty Web Content displayed
Empty Image Ico: only Main Image displayed
Empty Label and Link: only Main Image and Image Ico displayed
Empty Text and Link: only Main Image, Image Ico and Label displayed
10.9 The Candy – Banner Newsletter Structure - Global
The Candy – Banner Newsletter Structure - Global is a Structure that provides:
Text
Link
The visualization of these fields depends on the Template chosen; in particular this Structure could be linked
to:
Candy – Banner Newsletter Template – Global
10.9.1 The Candy - Banner Newsletter Template – Global
The Candy – Banner Newsletter Template – Global displays only:
Text
Link
Controls are provided in case of empty fields:
Empty Text: only Title, the Submit Button and the Label displayed
Empty Link : only Title, the Submit Button, Text and the Label displayed
candy-catalog-portal-documentation-mre-20150618-v-w
Page 38

38
Editing a Candy – Banner Newsletter Template– Global
Title, the Submit Button and the Label will be displayed automatically.
10.10 The Candy – Help Shortcut Structure - Global
The Candy - Generic Banner Structure – Global is a Structure that provides:
Main Label
Main Link
Ico1
Link1
Label1
Ico2
Link2
Label2
Ico3
Link3
Label3
Ico4
Link4
Label4
The visualization of these fields depends on the Template chosen; in particular this Structure could be linked
to:
Candy – Help Shortcut Template – Global
10.10.1 The Candy – Help Shortcut Template – Global
The Candy – Help Shortcut Template – Global displays all the fields of the Candy – Help Shortcut
Structure – Global.
Controls are provided in case of empty fields:
Empty Main Label: Ico1, Link1, Ico2, Link2, Ico3, Link3, Ico4, Link4 displayed
One of the Ico and its Link are empty: Main Label and the other Icos and Links (that aren’t empty)
displayed
Empty Label and Link: only Main Image and Image Ico displayed
candy-catalog-portal-documentation-mre-20150618-v-w
Page 39

39
Editing a Candy – Help Shortcut Template– Global
10.11 The Candy – Slider Structure - Global
The Candy - Slider Structure - Global is a Structure that provides:
Main Image (1280 x 445 pixels)
Main Image Alt
Logo Image
Logo Image Alt
Main Text
Minor text
Link
The visualization of these fields depends on the Template chosen; in particular this Structure could be linked
to:
Candy – No Template Slider –Global, which is an empty Template.
10.11.1 The Candy – Slider Template – Global
The Candy – Slider Template – Global displays all the fields of the Candy - Slider Structure – Global.
Controls are provided in case of empty fields:
Empty Main Image: the slide of the Web Content will not be displayed
Empty Logo Image: only Main Image, Main Image Alt, Minor Text, Link displayed
Empty Main Text: only Main Image, Main Image Alt, Logo Image, Logo Image Alt, Minor Text
and Link displayed
Empty Minor Text: only Main Image, Main Image Alt, Logo Image, Logo Image Alt, Main Text
and Link displayed
candy-catalog-portal-documentation-mre-20150618-v-w
Page 40

40
Editing a Candy – Slider Template– Global
Editing a Candy – Slider Main Section Template– Global
10.11.2 The Candy – Slider Main Section Template – Global
The Candy – Slider Main Section Template – Global displays only:
Main Image (1280 x 445 pixels)
Main Image Alt
Link
Controls are provided in case of empty fields:
Empty Main Image: the slide of the Web Content will not be displayed
10.12 The Candy – Product Line Structure - Global
The Candy - Slider Structure - Global is a Structure that provides:
Image (1280 x 445 pixels)
Image Alt
Data Ico
Label
Title
Text
candy-catalog-portal-documentation-mre-20150618-v-w
Page 41

41
Editing a Candy – Product Line Template– Global
Link
The visualization of these fields depends on the Template chosen; in particular this Structure could be linked
to:
Candy – No Template Product Line –Global, which is an empty Template.
10.12.1 The Candy – Product Line Template – Global
The Candy – Product Line Template – Global displays only:
Image (250 x 125 pixels)
Image Alt
Data Ico
Title
Text
Link
Controls are provided in case of empty fields:
Empty Image: the slide of the Web Content will not be displayed
Empty Data Ico: only Image, Image Alt, Text, Title, Link displayed
Empty Text: only Image, Image Alt, Data Ico, Title and Link displayed
Empty Title: only Image, Image Alt, Data Ico, Text and Link displayed
10.12.2 The Candy – Second Product Line Template – Global
The Candy – Second Product Line Template – Global displays only:
Image (425 x 310 pixels)
Image Alt
Data Ico
Label
Text
Link
Controls are provided in case of empty fields:
candy-catalog-portal-documentation-mre-20150618-v-w
Page 42

42
Editing a Candy – Second Product Line Template – Global
Empty Image: the slide of the Web Content will not be displayed
Empty Data Ico: only Image, Image Alt, Text, Label, Link displayed
Empty Text: only Image, Image Alt, Data Ico, Label and Link displayed
Empty Label: only Image, Image Alt, Data Ico, Text and Link displayed
10.13 The Candy – Title Structure - Global
The Candy - Title Structure - Global is a Structure that provides:
Title
Label
Link
Text
Image
Alt Image
The visualization of these fields depends on the Template chosen; in particular this Structure could be linked
to:
Candy - Title Slider Template –Global
Candy - Title Product Line Template –Global
Candy - Title Slider Image Left Template –Global
Candy - Title Assistance Template – Global
Candy - Title Blog List (Image) Template – Global
Candy - Title Blog List (Label) Template – Global
Candy - Catalog Title Template - Global
Candy _ Family Title Template - Global
10.13.1 The Candy – Title Slider Template – Global
The Candy – Title Slider Template – Global displays only:
Title
Text
Controls are provided in case of empty fields:
Empty Title: only Text
candy-catalog-portal-documentation-mre-20150618-v-w
Page 43

43
Editing a Candy – Title Slider Template – Global
Editing a Candy – Title Slider Image Left Template – Global
Editing a Candy – Title Product Line Template – Global
Empty Text: only Title
10.13.2 The Candy – Title Slider Image Left Template – Global
The Candy – Title Slider Image Left Template – Global displays only:
Title
Controls are provided in case of empty fields:
Empty Title: empty Web Content
This Template is used as title section for the Candy – Slider Left Image Template – Global.
10.13.3 The Candy – Title Product Line Template – Global
The Candy – Title Product Line Template – Global displays only:
Title
Label
Link
Controls are provided in case of empty fields:
Empty Title: only Label displayed
Empty Label: only Title displayed
This Template is used as title section for the Candy – Product Line Template – Global.
10.13.4 The Candy - Title Assistance Template - Global
The Candy – Title Assistance Template – Global displays only:
Title
Text
Controls are provided in case of empty fields:
Empty Title: only Text
candy-catalog-portal-documentation-mre-20150618-v-w
Page 44

44
Editing a Candy – Title Assistance Template – Global
Editing a Candy – Title Blog List (Image) Template – Global
Empty Text: only Title
10.13.5 The Candy – Title Blog List (Image) Template – Global
The Candy – Title Assistance Template – Global displays only:
Title
Text
Image
Alt Image
Controls are provided in case of empty fields:
Empty Title: only Text, Image displayed
Empty Text: only Title, Image displayed
Empty Image: only Title, Text displayed
10.13.6 The Candy – Title Blog List (Image) Template – Global
The Candy – Title Assistance Template – Global displays only:
Title
Text
Link
Label
Controls are provided in case of empty fields:
Empty Title: only Text, Label, Link displayed
Empty Text: only Title, Label, Link displayed
Empty Label: only Title, Text displayed
Empty Link: only Title, Text displayed
candy-catalog-portal-documentation-mre-20150618-v-w
Page 45

45
Editing a Candy – Title Blog List (Label) Template – Global
Editing a Candy – Title Catalog Template – Global
Editing a Candy – Family Title Template – Global
10.13.7 The Candy – Title Catalog Template - Global
The Candy – Title Catalog Template – Global displays only:
Title
Text
Controls are provided in case of empty fields:
Empty Title: only Text, displayed
Empty Text: only Title, displayed
10.13.8 The Candy – Family Title Template – Global
The Candy – Family Title Template – Global displays only:
Title
Text
Controls are provided in case of empty fields:
Empty Title: only Text
Empty Text: only Title
10.14 The Candy - Assistance Generic Structure - Global
The Candy - Assistance Generic Structure - Global is a Structure that provides:
Data Ico
Title
Text1
candy-catalog-portal-documentation-mre-20150618-v-w
Page 46

46
Label1
Link1
Target label
Target Link
Text2
Label2
Link2
The visualization of these fields depends on the Template chosen; in particular this Structure could be linked
to:
Candy – Generic Assistance Template –Global
10.14.1 The Candy – Generic Assistance Template – Global
The Candy – Generic Assistance Template – Global displays all the fields provided by the Structure.
If you want that another Page is open when one of the buttons is pushed, you have to fill in:
- Target Label1 and Target Link1 instead of Link1 and Label1 (in case of button1)
- Target Label2 and Target Link2 instead of Link2 and Label2 (in case of button2)
- Target Label1, Target Link1, Target Label2, Target Link2 instead of Link1, Label1, Link2, Label2
(for both buttons)
Controls are provided in case of empty fields:
Empty Title and Data Ico: only Text1, Label1, Link1, Text2, Label2, Link2 displayed.
Empty Title and Data Ico: only Text1, Label1, Link1, Text2, Label2, Link2 displayed.
Empty Text1: only Title, Data Ico, Text1, Label1, Link1, Text2, Label2, Link2 displayed.
Empty Label1 and Link1: only Title, Data Ico, Text1, Target Label1, Target Link1 Text2,
Label2, Link2 displayed.
Empty Target Label1 and Target Link1: only Title, Data Ico, Label1, Link1, Text1, Text2,
Label2, Link2 displayed.
Empty Target Label2 and Target Link2: only Title, Data Ico, Label1, Link1, Text1, Text2,
Label2, Link2 displayed.
Empty Text2: only Title, Data Ico, Label1, Link1, Text2, Label2, Link2 displayed.
Empty Label2 and Link2: only Title, Data Ico, Text1, Label1, Link1, Text2, Target Label2
Target Link2 displayed.
candy-catalog-portal-documentation-mre-20150618-v-w
Page 47

47
Editing a Candy – Generic Assistance Template – Global
10.15 The Candy – Blog Post Structure - Global
The Candy – Blog Post Structure - Global is a Structure that provides:
Online Title
Text
Image1 (1280x445 pixels)
Alt1
Link1
Image2 (1280x445 pixels)
Alt2
Link2
Image3 (1280x445 pixels)
Alt3
Link3
Image4 (1280x445 pixels)
Alt4
Link4
Image5 (1280x445 pixels)
Alt5
Link5
Image6 (1280x445 pixels)
Alt6
Link6
candy-catalog-portal-documentation-mre-20150618-v-w
Page 48

48
Editing a Candy – Blog Post Template – Global
Enabling Ratings for Candy – Blog Post Template - Global
The visualization of these fields depends on the Template chosen; in particular this Structure could be linked
to:
Candy – Blog Post Template – Global
Candy – Blog List Template – Global
10.15.1 The Candy – Blog Post Template – Global
The Candy – Title Assistance Template – Global displays all the fields provided by the Structure.
Controls are provided in case of empty fields:
Empty Title: only Text, Images, Labels, Links displayed
Empty Text: only Title, Images, Labels, Links displayed
Empty Images: only Title, Text displayed
Date and Categories will be displayed automatically.
Pay attention to enable Ratings in Options>Configurations>Setup.
candy-catalog-portal-documentation-mre-20150618-v-w
Page 49

49
If you don’t want your Web Content with the Candy - Blog Post Structure - Global to be displayed
temporarily into the Asset Publisher of the Blog List (see
To publish a Product into the Candy Product Catalog View Portlet, go to Admin > Site
Administration > Contents and choose the System Products folder; here you can find all the
Products imported into the Portal, both in status draft and approved.
If you want to publish a Product, search for it in this folder and click on its name to edit it. So in the Page of
the Product click on the Publish button.
Publishing a Web Content
Instead if you want to put a Product in draft, click the Save as Draft button.
Saving a Web Content as draft
The procedure to publish or save as draft a Product is the same used to publish or save as draft a general
candy-catalog-portal-documentation-mre-20150618-v-w
Page 50

50
Web Content (see Manage a Web Content).
), disable the Searchable field.
While in normal cases, the Searchable field must be selected (see Disable the Research for a Web Content).
10.15.2 The Candy – Blog List Template – Global
The Candy – Blog List Template – Global displays:
Online Title
Text
Image1 (600x300 pixels)
Alt1
Link1
Controls are provided in case of empty fields:
Empty Title: only Text, Image1, Label1, Link1 displayed
Empty Text: only Image1, Label1, Link1 displayed
Empty Images: only Title, Text displayed
candy-catalog-portal-documentation-mre-20150618-v-w
Page 51

51
Editing a Candy – Blog List Template – Global
Categories, Date, pagination, the counter, the “Order by” and the “Filter by category” are displayed
automatically.
To configure the Asset publisher see
To publish a Product into the Candy Product Catalog View Portlet, go to Admin > Site Administration >
Contents and choose the System Products folder; here you can find all the Products imported into the Portal,
both in status draft and approved.
If you want to publish a Product, search for it in this folder and click on its name to edit it. So in the Page of
the Product click on the Publish button.
candy-catalog-portal-documentation-mre-20150618-v-w
Page 52

52
Publishing a Web Content
Saving a Web Content as draft
The procedure to publish or save as draft a Product is the same used to publish or save as draft a general
Web Content (see Manage a Web Content).
Instead if you want to put a Product in draft, click the Save as Draft button.
.
To open the whole Blog Post in the same Page of the Blog List see Open a Web Content in the same page of an
Asset Publisher.
candy-catalog-portal-documentation-mre-20150618-v-w
Page 53

53
Editing a Candy – Catalog Template – Global
10.16 The Candy – Catalog Structure - Global
The Candy - Catalog Structure – Global displays:
Image
Alt Image
Document
Data Ico
The visualization of these fields depends on the Template chosen; in particular this Structure could be linked
to:
Candy – Catalog No Template –Global, which is an empty Template.
10.16.1 The Candy – Catalog Template – Global
The Candy – Catalog Template – Global displays all the fields provided by the Structure.
In particular, the first and the second web Content will be displayed with their Image, while the others will be
displayed without the Image but with the Data Ico.
Controls are provided in case of empty fields:
Empty Image: only the Title and the Summary of the Web Content displayed
Empty Document: only Title and the Summary of the Web Content, Image displayed
10.17 The Candy –Promo Structure - Global
The Candy - Promo Structure - Global is a Structure that provides:
Main Image
Alt Main Image
Small Image
Alt Small Image
Text
Document
Label
The visualization of these fields depends on the Template chosen; in particular this Structure could be linked
to:
Candy – Promo No Template –Global, which is an empty Template.
10.17.1 The Candy – Promo Template – Global
The Candy – Promo Template – Global displays all the fields provided by the Structure.
Controls are provided in case of empty fields:
Empty Main Image: only Small Image, Text, Label displayed
candy-catalog-portal-documentation-mre-20150618-v-w
Page 54

54
Editing a Candy – Promo Template – Global
Empty Small Image: only Main Image, Text, Label displayed
Empty Text: only Small Image, Main Image, Text, Label displayed
Empty Document: only Small Image, Main Image, Text displayed
Empty Label: only Small Image, Main Image, Text displayed
candy-catalog-portal-documentation-mre-20150618-v-w
Page 55

55
Editing a Candy – Family Template – Global
10.18 The Candy –Family Structure - Global
The Candy - Family Structure – Global displays:
Main Image
Alt Main Image
Small Image
Alt Small Image
Text
Link
Label
The visualization of these fields depends on the Template chosen; in particular this Structure could be linked
to:
Candy – No Template Family –Global, which is an empty Template.
10.18.1 The Candy – Family Template – Global
The Candy – Family Template – Global displays all the fields provided by the Structure.
The Data Ico and the name of the Category, at the top of the slider, will be displayed automatically.
Controls are provided in case of empty fields:
Empty Main Image: only Small Image, Text, Label displayed
Empty Small Image: only Main Image, Text, Label displayed
Empty Text: only Small Image, Main Image, Text, Label displayed
Empty Link: only Small Image, Main Image, Text displayed
Empty Label: only Small Image, Main Image, Text displayed
11 MANAGE PRODUCTS
To publish a Product into the Candy Product Catalog View Portlet, go to Admin > Site Administration >
Contents and choose the System Products folder; here you can find all the Products imported into the Portal,
both in status draft and approved.
If you want to publish a Product, search for it in this folder and click on its name to edit it. So in the Page of
the Product click on the Publish button.
candy-catalog-portal-documentation-mre-20150618-v-w
Page 56

56
Publishing a Web Content
Saving a Web Content as draft
The procedure to publish or save as draft a Product is the same used to publish or save as draft a
general Web Content (see Manage a Web Content).
Instead if you want to put a Product in draft, click the Save as Draft button.
12 CONFIGURE THE ASSET PUBLISHER FOR THE BLOG LIST
To configure the Asset Publisher for the Candy - Blog List Template – Global go to
Options>Configuration>Setup and choose “Dynamic” in the Select Resource section.
candy-catalog-portal-documentation-mre-20150618-v-w
Page 57

57
Configuring the Asset Publisher for the Blog List
Then go to Resource Type: choose Web Content and Candy - Blog Post Structure - Global from the two
drop-down menus. Finally choose Publication Date and Descendent from the two drop-down menus in the
Order and Group By section.
candy-catalog-portal-documentation-mre-20150618-v-w
Page 58

58
Configuring the Asset Publisher for the Blog List
Select the Page in which the WeB Content will be displayed
If a Web Content with the Candy - Blog Post Template - Global doesn’t have to be temporarily displayed
into the Blog List Asset publisher, disable the Searchable field of the Web Content (see The Candy – Blog Post
Template – Global).
13 OPEN A WEB CONTENT IN THE SAME PAGE OF AN ASSET PUBLISHER
In order to open a single post in the same page of the Blog List, you have to go to Admin > Content choose
the Web Content of the Blog Post; then go in Page and select the page of the Asset Publisher in which the
Web Content will be displayed.
Then you have to go in Configuration > Display Settings of the Asset Publisher you want to use and select
“Sets as the Default Asset Publisher of the Page”.
candy-catalog-portal-documentation-mre-20150618-v-w
Page 59

59
Set the Asset Publisher as the default for the Page
To perform this operation contact your IT Department Team.
Legal information
14 EDIT THE PORTAL MESSAGES
14.1 The messages plugin
In the site there are a few messages that cannot be edited using the control panel for example the error
messages and the application messages.
This messages can be edited modifying the Language.properties files contained in the candy-messages-hook
plugin of the portal.
In this plugin you can find one Language.properties file for each language (eg. Language_it.properties).
In the file you can find a list of key values pairs (key=value). Search for the text you want to edit, modify the
text and then deploy the plugin again.
14.2 Edit the footer legal information
candy-catalog-portal-documentation-mre-20150618-v-w
Page 60

60
The cookie banner
Editing the GA Id
Don’t modify the Google Analytics ID setting in Admin > Site Administration > Configuration >
Analytics.
Edit the value of the key footer-legal-info of the plugin messages (see The messages plugin).
14.3 Edit the Cookie banner title and text
Edit the value of the keys cookie-policy-title and cookie-policy-text of the plugin messages (see The
messages plugin).
14.4 Edit the Google Analytics Id
To edit the Google Analytics Id go to Admin > Pages > Site Pages > Look and feel and in the section
Settings change the Google Analytics ID setting.
14.5 Enable Search Form and Language Selector
To enable the Search Form or the Language Selector go to Admin > Site Administration > Public Pages >
Look and Feel > Settings and select the checkbox you’re interested in.
By default the value of both these checkboxes is false.
candy-catalog-portal-documentation-mre-20150618-v-w
Page 61

61
Enable Search Form or Language Selector
14.6 Edit the Google Maps API Key
To edit the Google Maps API Key go to Admin > Site Administration > Configuration and click on Public
Pages, then enter the key in the Google Maps API Key Theme Setting.
candy-catalog-portal-documentation-mre-20150618-v-w
Page 62

62
Editing the Google Maps API Key
The folder which contains the Web Contents of the Products is called System Products.
To access it, go to Admin > Site Administration > Web Contents.
15 MANAGE EXTERNAL LINK FOR A PRODUCT
To open the the Product in an external Page, select the Product you are interested in, search the field of this
Structure called “External Site URL” with the address of the external page.
candy-catalog-portal-documentation-mre-20150618-v-w
Page 63

63
The other fields of the Structure will be filled in automatically and you don’t have to modify them.
Opening the detail of a Product in an external Page
The research segmentation is based on the categories of the "segmented-research-vocabulary"
wich is a site vocabulary.
These categories are the filter of the research.
16 RESEARCH CONFIGURATION
To enable Search Form see Enable Search Form and Language Selector.
It's possible to configure search filter adding categories to the "segmented-research-vocabulary" (see
Manage a Category).
candy-catalog-portal-documentation-mre-20150618-v-w
Page 64

64
Now it's set with the keyword "candy". This configuration could be made only by system
admin, don't change.
Only for System Admin:
The keyword candy is the final part of the JSP used to visualize research results
(main_search_result_form_candy.jsp).
If the Custom view mode field is empty the JSP used for visualize research results will be
main_serach_result_form.jsp .
Keyword for JSP used for visualize research results.
Don’t modify them without the help of the System Admin.
To configure the Candy Booklet Portlet, go to Admin > Configuration > Site Settings > Custom
Fields and fill in the Candy Available Booklet Plid field and the Candy Not Available Booklet
Plid field with the two Plids (Portal Layout Id) of the Pages of the available Booklets and Not
Available Booklets.
Adding the Plid of the Page for available Booklets
It's possible to configure the view mode of the results of the research setting the field Custom view mode, in
Options > Configuration under the Other settings section.
17 CANDY BOOKLET CONFIGURATION
To configure the Candy Booklet Portlet, it is necessary to set two Custom Fields.
candy-catalog-portal-documentation-mre-20150618-v-w
Page 65

65
Adding the Plid of the Page for not available Booklets
candy-catalog-portal-documentation-mre-20150618-v-w
 Loading...