

Page 1
IT
DE
EN
ES
FR
Page 2

!
2
Grazie per aver scelto questo prodotto.
Siamo orgogliosi di offrirti un prodotto ideale
per te e la miglior gamma completa di
elettrodomestici per la vita di tutti i giorni.
La lettura completa di questo libretto
permetterà un utilizzo corretto e sicuro
dell’apparecchiatura e darà anche utili
consigli sulla manutenzione più efficiente.
Mettere in funzione la lavatrice solo
dopo aver letto attentamente le istruzioni. Si
consiglia di tenere sempre il manuale a
portata di mano e di conservarlo con cura
per eventuali futuri proprietari.
Ogni prodotto è identificato da un codice
univoco di 16 caratteri, definito anche
“numero di serie”, che si trova nell’adesivo
applicato sull’elettrodomestico (zona oblò) o
nella busta documenti posta all’interno del
prodotto. Questo codice è una sorta di carta
d’identità specifica per il prodotto che
servirà per registrare il prodotto e se fosse
necessario contattare il Centro Assistenza
Tecnica.
Questo elettrodomestico è marcato
conformemente alla Direttiva Europea
2012/19/UE sui Rifiuti da
Apparecchiature Elettriche ed
Elettroniche (RAEE).
I RAEE contengono sia sostanze inquinanti
(che possono avere un impatto negativo
sull’ambiente) sia materie prime (che possono
essere riutilizzate). E’ perciò necessario
sottoporre i RAEE ad apposite operazioni di
trattamento, per rimuovere e smaltire in modo
sicuro le sostanze inquinanti ed estrarre e
riciclare le materie prime. Ogni cittadino può
giocare un ruolo decisivo nell’assicurare che i
RAEE non diventino un problema ambientale;
basta seguire qualche semplice regola:
! i RAEE non vanno mai buttati nella
spazzatura indifferenziata;
! i RAEE devono essere consegnati ai Centri di
Raccolta (chiamati anche isole ecologiche,
riciclerie, piattaforme ecologiche …) allestiti dai
Comuni o dalle Società di igiene urbana; in
molte località viene anche effettuato il servizio
di ritiro a domicilio dei RAEE ingombranti.
In molte nazioni, quando si acquista una nuova
apparecchiatura, si può consegnare il RAEE al
negoziante, che è tenuto a ritirarlo gratuitamente
(ritiro "uno contro uno") a patto che il nuovo
apparecchio sia dello stesso tipo e svolga le
stesse funzioni di quello reso.
1. NORME GENERALI DI SICUREZZA
2. INSTALLAZIONE
3. CONSIGLI PRATICI
4. PULIZIA E MANUTENZIONE ORDINARIA
5. GUIDA RAPIDA ALL'USO
6. COMANDI E PROGRAMMI
7.
RISOLUZIONE PROBLEMI E GARANZIA
Indicazioni ambientali
Indice
Page 3

!
IT
3
1. NORME GENERALI DI
SICUREZZA
! Questo apparecchio è destinato
ad uso in ambienti domestici e
simili come per esempio:
− aree di ristoro di negozi, uffici
o altri ambienti di lavoro;
− negli agriturismo;
− dai clienti di hotel, motel o
altre aree residenziali simili;
− nei bed & breakfast.
Un utilizzo diverso da quello tipico
dell’ambiente domestico, come
l’uso professionale da parte di
esperti o di persone addestrate, è
escluso anche dagli ambienti
sopra descritti. Un utilizzo non
coerente con quello riportato, può
ridurre la vita del prodotto e può
invalidare la garanzia del
costruttore. Qualsiasi danno
all’apparecchio o ad altro, derivante da
un utilizzo diverso da quello domestico
(anche quando l’apparecchio è
installato in un ambiente domestico)
non sarà ammesso dal costruttore
in sede legale.
!
Questo apparecchio può essere
utilizzato da bambini di 8 anni e
oltre e da persone con capacità
fisiche, sensoriali o mentali ridotte
o con mancanza di esperienza e
di conoscenza a patto che siano
supervisionate o che siano date
loro istruzioni in merito all’utilizzo
sicuro dell’apparecchio e che
capiscano i pericoli del suo utilizzo.
Evitare che i bambini giochino
con la lavatrice o che si occupino
della sua pulizia e manutenzione
senza supervisione.
! I bambini dovrebbero essere
supervisionati per assicurarsi che
non giochino con l'apparecchio.
! I bambini di età inferiore a 3 anni
devono essere tenuti lontano
dalla macchina, a meno che non
vengano continuamente sorvegliati.
! Se il cavo di alimentazione è
danneggiato, esso deve essere
sostituito da un cavo o da un
assemblaggio speciale, disponibile
presso il costruttore o il suo
servizio assistenza tecnica.
! Utilizzare unicamente il tubo di carico
fornito con l'apparecchio per il
collegamento alla rete idrica. I vecchi
tubi non devono essere riutilizzati.
! La pressione idrica deve essere
compresa tra un minimo di 0,05
MPa ed un massimo di 0,8 Mpa.
! Assicurarsi che nessun tappeto
ostruisca la base della lavatrice
né i condotti di ventilazione.
! La lavatrice risulta “spenta” solo
se l’apposito segnale sulla
manopola o sul pannello di
controllo è in posizione verticale.
In qualsiasi altra posizione, la
macchina risulta ancora “accesa”
(solo per modelli con programmi
selezionabili con manopola).
Page 4

!
4
! Dopo l’installazione, l’apparecchio
deve essere posizionato in modo
che la spina sia raggiungibile.
! La massima capacità di carico
di biancheria asciutta differisce
a seconda del modello (fare
riferimento al cruscotto).
! Per ulteriori informazioni sul
prodotto o per consultare la
scheda tecnica fare riferimento
al sito internet del produttore.
! I dati elettrici (tensione di
alimentazione e potenza
assorbita) sono riportati nella
targhetta dati apposta sul
prodotto.
! Assicurarsi che l'impianto
elettrico sia provvisto di messa
a terra, che la presa di corrente
sia conforme alle normative
nazionali e che la spina e
la presa di alimentazione
corrispondano.
! L'uso di adattatori, prese
multiple e/o prolunghe è
fortemente sconsigliato.
! Prima di qualsiasi intervento di
pulizia e manutenzione della
lavatrice, togliere la spina e
chiudere il rubinetto dell’acqua.
! Non tirare il cavo di
alimentazione o l’apparecchio
stesso per staccare la spina
dalla presa di corrente.
! Non lasciare la lavatrice
esposta a pioggia, sole o ad
altri agenti atmosferici.
! In ogni caso di guasto e/o di
malfunzionamento, si consiglia di
spegnere la lavatrice, chiudere
il rubinetto dell’acqua e non
manomettere l’apparecchio.
Contattare immediatamente il
Centro
Assistenza Tecnica,
richiedendo solo ricambi originali.
Il mancato rispetto di quanto
sopra, può compromettere la
sicurezza dell’apparecchio.
Collegamento elettrico e
prescrizioni di sicurezza
ATTENZIONE:
durante il lavaggio, l’acqua
può raggiungere temperature
molto elevate.
Page 5
!
IT
5
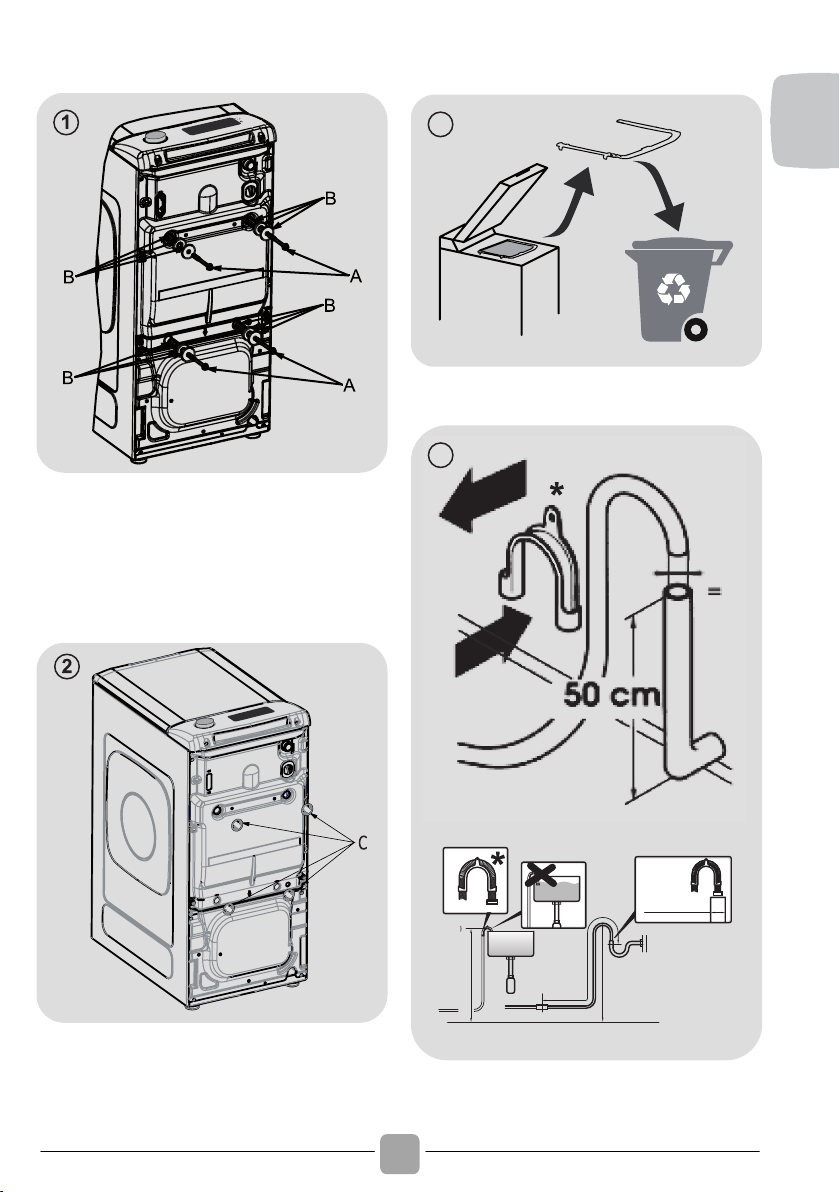
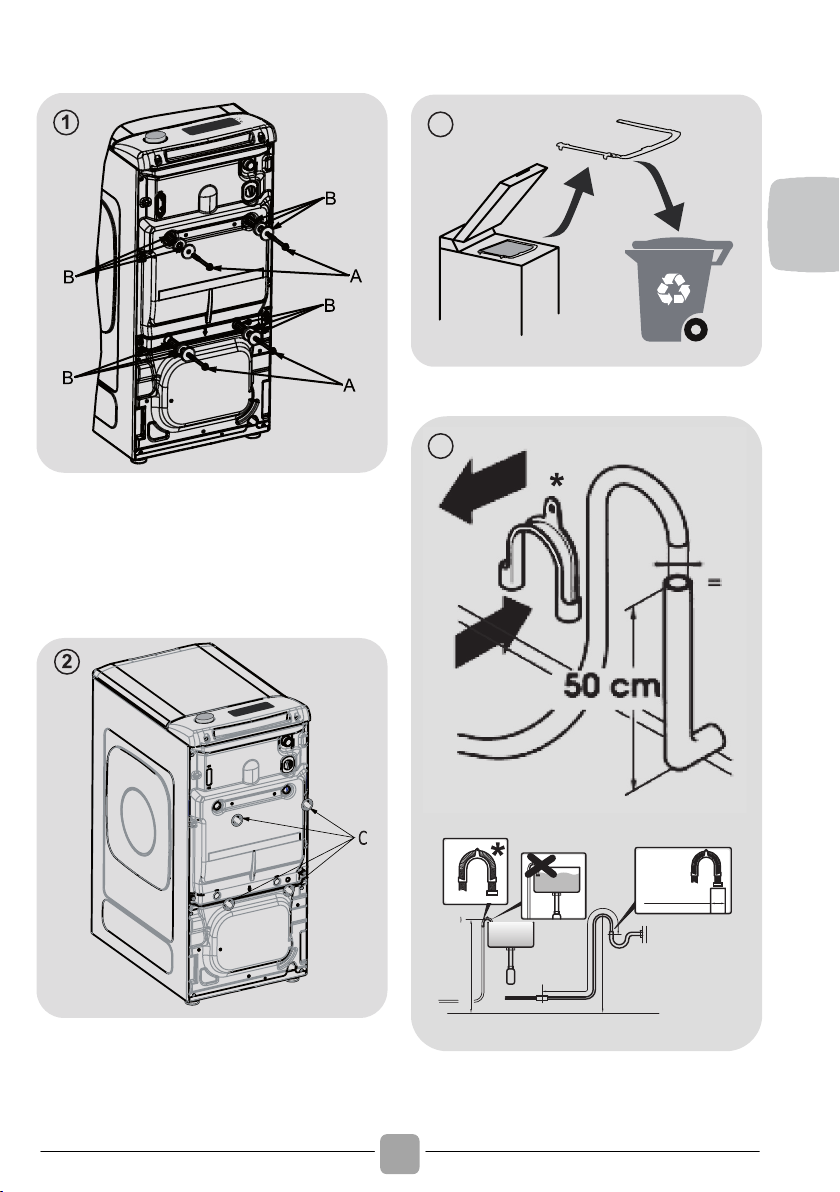
2. INSTALLAZIONE
! Svitare le 2 o 4 viti "A" sul lato
posteriore e rimuovere i 2 o 4
distanziali "B" come in figura 1.
! Porre gli accessori di protezione
in dotazione "C" (figura 2).
3
4
min 50 cm
max 85 cm
+2,6 mt
max
max 100 cm
min 4 cm
* ACCESSORIO VENDUTO SEPARATAMENTE
Page 6
!
6
5
! La lavatrice deve essere collegata
alla rete di distribuzione d’acqua
usando un tubo nuovo, che sarà
fornito con l’apparecchio (all’interno
del cestello). Non utilizzare il tubo
vecchio a tale scopo.
! Collegare il tubo di entrata d’acqua
da un’estremità, quella del gomito,
all’elettrovalvola (parte superiore
posteriore della macchina) e
dall’altra a un rubinetto o una presa
d’acqua, con bocca filettata di 3/4"
gas.
!
Avvicinare la lavatrice al muro
avendo cura che non si formino
curve o strangolamenti; fissare il
tubo di scarico al bordo di una vasca
o, meglio ancora, a uno scarico
fisso, avente un diametro maggiore
di quello del tubo della lavatrice, a
un’altezza minima di 50 cm. e
massima di 75 cm. dal pavimento
(figura 4).
! Se necessario, utilizzare l’accessorio
curvo* per un miglior fissaggio e
supporto del tubo di scarico.
Se in dotazione al modello
acquistato:
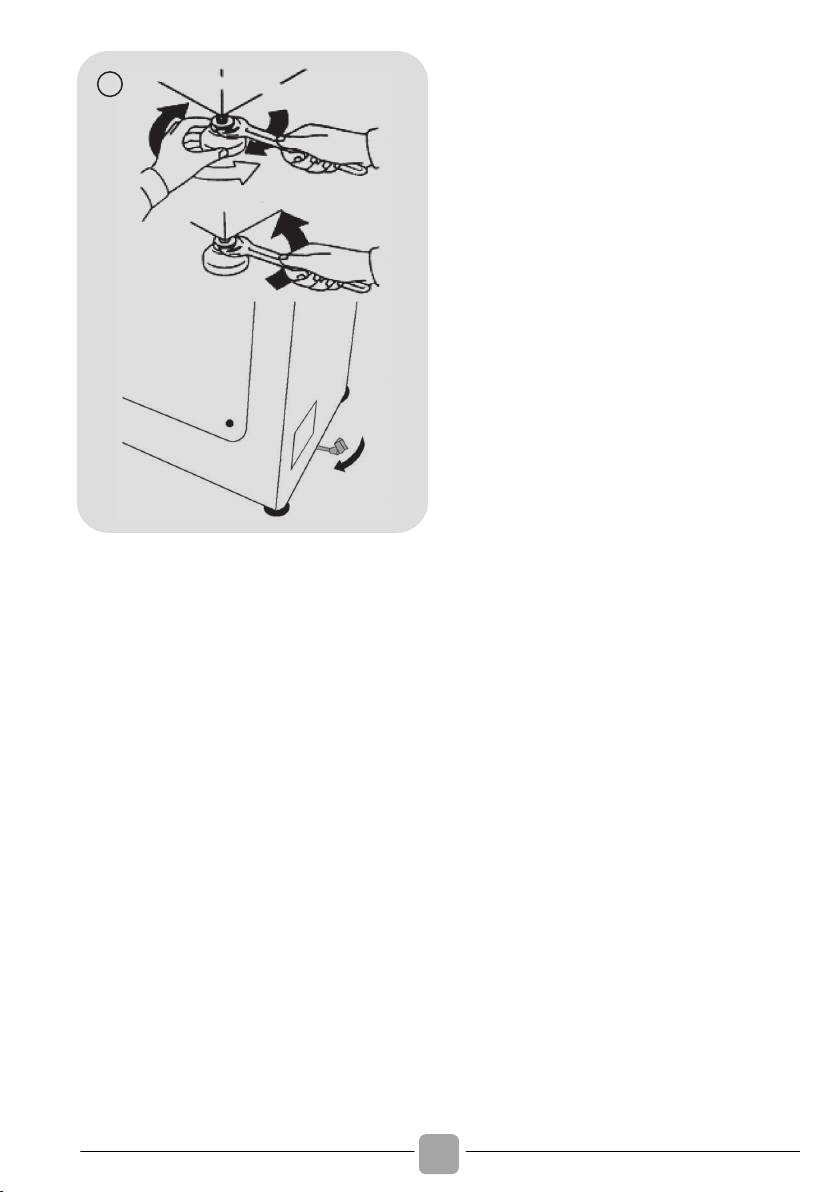
! Per spostare facilmente la lavatrice,
fare girare a destra la leva di
comando del carrello. Una volta
conclusa l’operazione, riportare la
leva nella posizione iniziale.
! Livellare la macchina con i piedini
anteriori (figura 5).
a) Girare il dado in senso orario per
sbloccare la vite del piedino.
b) Girare il piedino e farlo abbassare
o alzare fino ad ottenere la perfetta
stabilità sul pavimento.
c) Bloccare il piedino girando il dado
in senso antiorario fino a farlo
aderire al fondo della lavatrice.
! Verificare che l’apparecchio sia
debitamente livellato.
! A tale scopo, cercare di muovere
la lavatrice, senza spostarla,
appoggiandosi consecutivamente
sulle estremità in diagonale dalla
parte superiore e verificare che non
oscilli.
! Nel caso in cui si renda necessario
cambiare posto alla lavatrice,
livellare di nuovo i piedini.
Page 7
!
IT
7
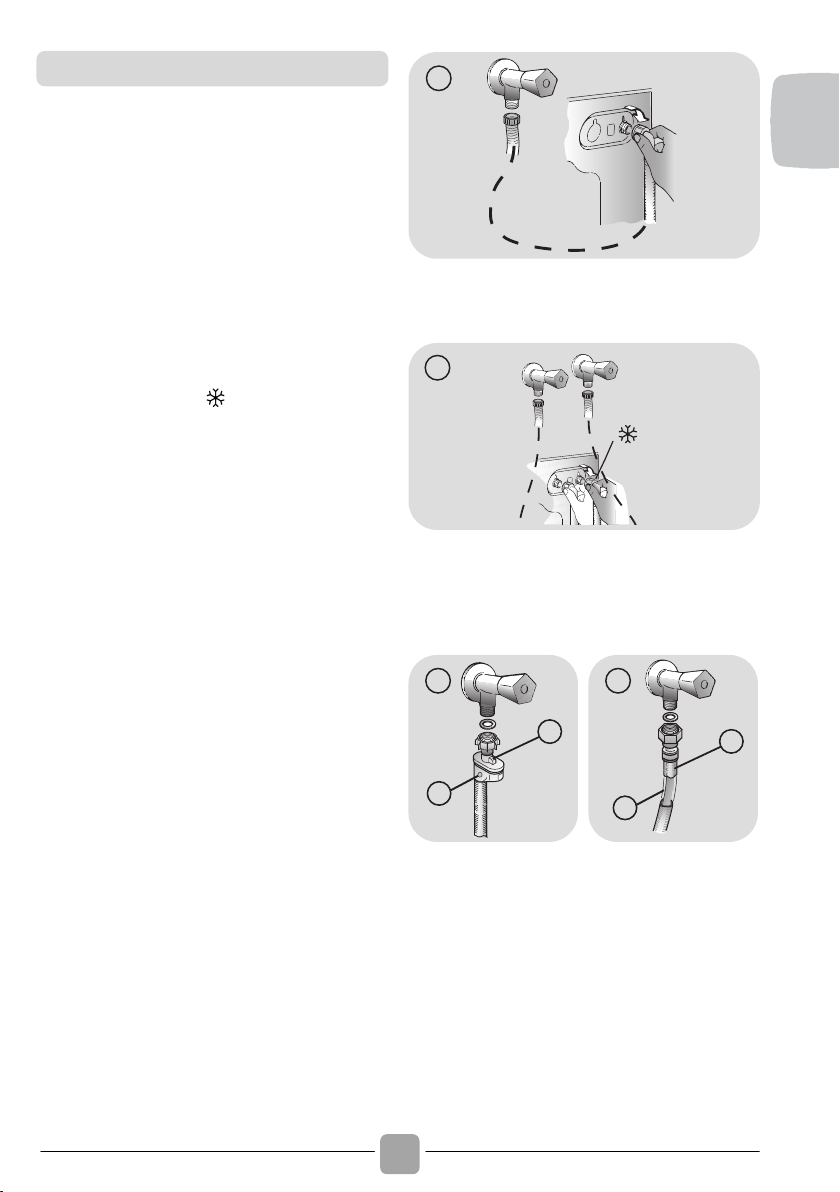
! Allacciare il tubo dell’acqua al rubinetto
(figura 6) utilizzando solamente il tubo
fornito con l'apparecchio (i vecchi tubi non
devono essere riutilizzati).
! IN ALCUNI MODELLI, potrebbero essere
presenti una o più delle seguenti
caratteristiche:
! HOT&COLD (figura 7): predisposizione
al collegamento alla rete idrica con acqua
calda e fredda per un maggiore risparmio
energetico.
Collegare il tubo grigio al rubinetto
dell’acqua fredda e quello rosso al
rubinetto dell’acqua calda. La macchina può
essere comunque collegata anche solo
all’acqua fredda: in tal caso, l’inizio di alcuni
programmi sarà ritardato di alcuni minuti.
! AQUASTOP (figura 8): dispositivo
posizionato sul tubo di carico che blocca
l’afflusso dell’acqua se il tubo si deteriora; in
tal caso, apparirà una tacca rossa nella
finestrella “A” e sarà necessario sostituire il
tubo. Per svitare la ghiera, premere il
dispositivo di antisvitamento “B”.
! AQUAPROTECT - TUBO DI CARICO
CON PROTEZIONE (figura 9): in caso di
perdita d’acqua dal tubo primario interno
“C”, la guaina di contenimento trasparente
“D” conterrà l’acqua, permettendo di
terminare il lavaggio. Finito il ciclo,
sostituire il tubo di carico contattando il
Centro Assistenza Tecnica.
6
1
7
B
A
8
D
C
9
Collegamento idraulico
Page 8

!
8
3. CONSIGLI PRATICI
Durante la selezione del bucato,
assicurarsi:
- di avere eliminato dalla biancheria oggetti
metallici, come fermagli, spille, monete;
- di aver abbottonato federe, chiuso le
cerniere lampo, annodato cinghie sciolte e
lunghi nastri di vestaglie;
- di aver tolto dalle tendine anche i rulli di
scorrimento;
- di aver osservato attentamente le indicazioni
dei tessuti sulle etichette;
- di aver rimosso eventuali macchie persistenti
con un apposito detersivo.
! In caso si debbano lavare tappeti,
copriletto o altri indumenti pesanti, si
consiglia di evitare la centrifuga.
! In caso si debba lavare biancheria di lana,
assicurarsi che sia idonea al lavaggio in
lavatrice, controllando l'etichetta dei tessuti.
Brevi suggerimenti per un utilizzo del
proprio elettrodomestico nel rispetto
dell’ambiente e con il massimo risparmio.
! Caricare la macchina fino alla massima
capacità indicata nella tabella programmi
per i rispettivi programmi contribuirà al
RISPARMIO di energia e acqua.
! Il rumore e l’umidità residua nella
biancheria sono influenzati dalla velocità
di centrifuga: più alta è la velocità nella
fase di centrifuga, maggiore è il rumore e
minore è l’umidità residua nella biancheria.
! I programmi più efficienti in termini di
consumo combinato di acqua e energia
sono generalmente quelli che operano ad
una temperatura più bassa e con una
maggior durata.
Caricare al massimo la propria
lavabiancheria
! Per eliminare eventuali sprechi di
energia, acqua o detersivo si raccomanda
di utilizzare la massima capacità di carico
della propria lavabiancheria. È possibile
infatti risparmiare fino al 50% di energia
con un carico pieno effettuato con un
unico lavaggio rispetto a due lavaggi a
mezzo carico.
Quando serve veramente il prelavaggio?
! Solamente per carichi particolarmente
sporchi! Si risparmia dal 5 al 15% di
energia evitando di selezionare l’opzione
prelavaggio per biancheria normalmente
sporca.
E' necessario lavare ad alte temperature?
! L’utilizzo di smacchiatori prima del
lavaggio in lavabiancheria riduce la
necessità di lavare ad alte temperature.
È possibile risparmiare energia utilizzando
un programma di lavaggio a bassa
temperatura.
Prima di utilizzare un programma di
asciugatura (LAVASCIUGA)
! Selezionare un alto numero di giri prima
di un programma di asciugatura per
ridurre l’umidità residua nella biancheria.
Si ottengono così notevoli RISPARMI di
energia e acqua.
Di seguito, viene riportata una breve guida
con consigli e raccomandazioni sull’uso del
detersivo.
! Utilizzate soltanto detersivi adatti per
l’impiego in lavatrice.
! Scegliere il detersivo in base al tipo di
tessuto (cotone, delicato, sintetico, lana,
seta, ecc… ) al colore, al tipo e grado di
sporco e alla temperatura di lavaggio
impostata.
Indicazioni sul carico
Consigli utili per risparmiare
Dosaggio del detersivo
Page 9

!
IT
9
! Per utilizzare la quantità appropriata di
detersivo, ammorbidente o eventuali altri
additivi, ad ogni lavaggio attenersi
scrupolosamente alle indicazioni fornite
dal produttore: un uso e un dosaggio
corretto permettono di evitare sprechi
e di ridurre l'impatto sull'ambiente.
! Un utilizzo eccessivo di detersivo
produrrà schiuma che non consentirà un
corretto svolgimento del ciclo e potrebbe
pregiudicare la qualità del lavaggio e del
risciacquo.
L’utilizzo di detersivi ecologici senza fosfati
può produrre i seguenti effetti:
- acqua di scarico dei risciacqui più
torbida: è un effetto legato alla presenza
di zeoliti in sospensione che non ha effetti
negativi sull’efficacia del risciacquo.
- presenza di polvere bianca (zeoliti) sul
bucato al termine del lavaggio: è un
effetto normale, la polvere non si ingloba
nei tessuti e non ne altererà il loro colore.
Per rimuoverla, effettuare un ciclo di
risciacqui. Provare ad utilizzare meno
detersivo per i futuri lavaggi.
- presenza di schiuma nell’acqua
dell’ultimo risciacquo: non è
necessariamente indice di un cattivo
risciacquo. Provare ad utilizzare meno
detersivo per i futuri lavaggi.
- vistosa formazione di schiuma: è
spesso dovuta ai tensioattivi anionici
presenti nella formulazione dei detersivi
che difficilmente sono allontanabili dalla
biancheria stessa.
In questi casi, non è necessario eseguire
più cicli di risciacquo per eliminare questi
effetti: non si otterrà alcun beneficio.
Se l’inconveniente persiste o se si pensi
che ci sia un malfunzionamento, contattare
immediatamente un nostro Centro
Assistenza Tecnica Autorizzato.
Per lavaggi con programmi cotone a
temperature da 60°C in su di capi bianchi
resistenti molto sporchi, si consiglia
l’utilizzo di un detersivo in polvere normale
(heavy-duty) che contiene agenti
sbiancanti e che a temperature medio-alte
fornisce ottime prestazioni.
Per lavaggi con programmi a
temperature tra 60°C e 40°C, la scelta
del detersivo deve essere fatta in base
al tessuto, ai colori e al grado di sporco.
In generale, per capi bianchi resistenti
con un grado di sporco elevato, si
raccomanda un detersivo in polvere
normale; per capi colorati e in assenza
di macchie difficili, si consiglia un
detersivo liquido o in polvere indicato per
la protezione dei colori.
Per lavaggi a basse temperature fino
a 40°C, è consigliabile l’utilizzo di
detersivi liquidi o polvere specifici per le
basse temperature.
Per lana e seta, utilizzare esclusivamente
prodotti specifici.
Page 10
!
10
4.
PULIZIA E MANUTENZIONE
ORDINARIA
Una corretta cura dell’elettrodomestico può
prolungarne il ciclo di vita.
! Scollegare la macchina dalla rete elettrica.
Per la pulizia del mobile esterno della lavatrice,
utilizzare un panno umido, evitando abrasivi,
alcol e/o diluenti. La lavatrice ha bisogno di
poche accortezze per una pulizia ordinaria:
pulizia vaschette e pulizia filtro; di seguito
vengono indicati anche suggerimenti in caso
di traslochi o lunghi periodi di fermo macchina.
! La lavatrice è dotata di uno speciale filtro
in grado di trattenere i residui più grossi
che potrebbero bloccare lo scarico, come
ad esempio bottoni o monete.
! SOLO SU ALCUNI MODELLI: estragga il
tubicino, tolga il tappo e raccolga l’acqua
in un contenitore.
!
Prima di svitare il filtro, è consigliabile collocare
sotto di esso un panno assorbente onde
evitare che l’acqua residua bagni il pavimento.
! Ruotare il filtro in senso antiorario fino
all’arresto, in posizione verticale.
! Estrarre il filtro e pulirlo; successivamente
riposizionarlo e girarlo in senso orario.
! Ripetere le precedenti istruzioni all’inverso
per rimontare tutti gli elementi.
! Nel caso la lavatrice resti in un luogo non
riscaldato per molto tempo, è necessario
svuotare completamente i tubi da ogni
residuo d’acqua.
! Scollegare la lavatrice dalla presa di
corrente.
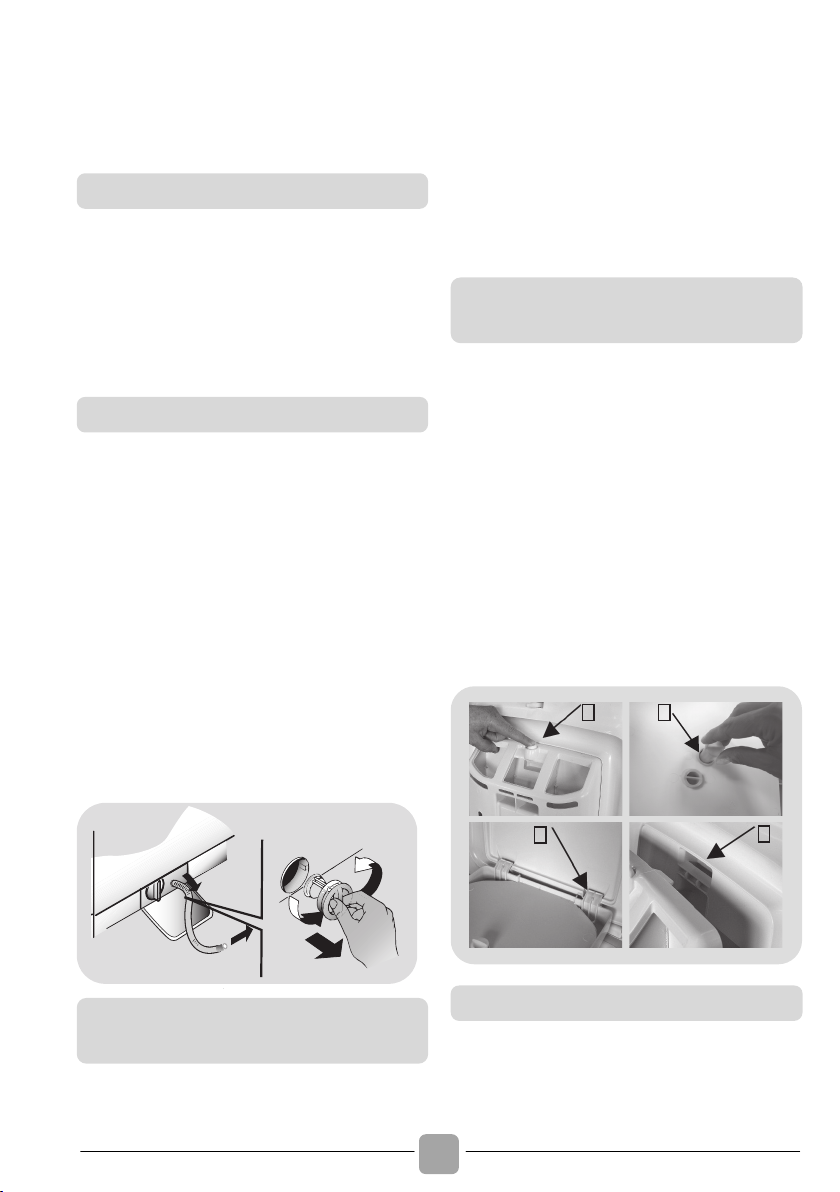
! Staccare il tubo dalla fascetta e portare il
tubo verso il basso, svuotando l’acqua
completamente in un catino.
! Fissare infine il tubo di scarico
all’apposita fascetta.
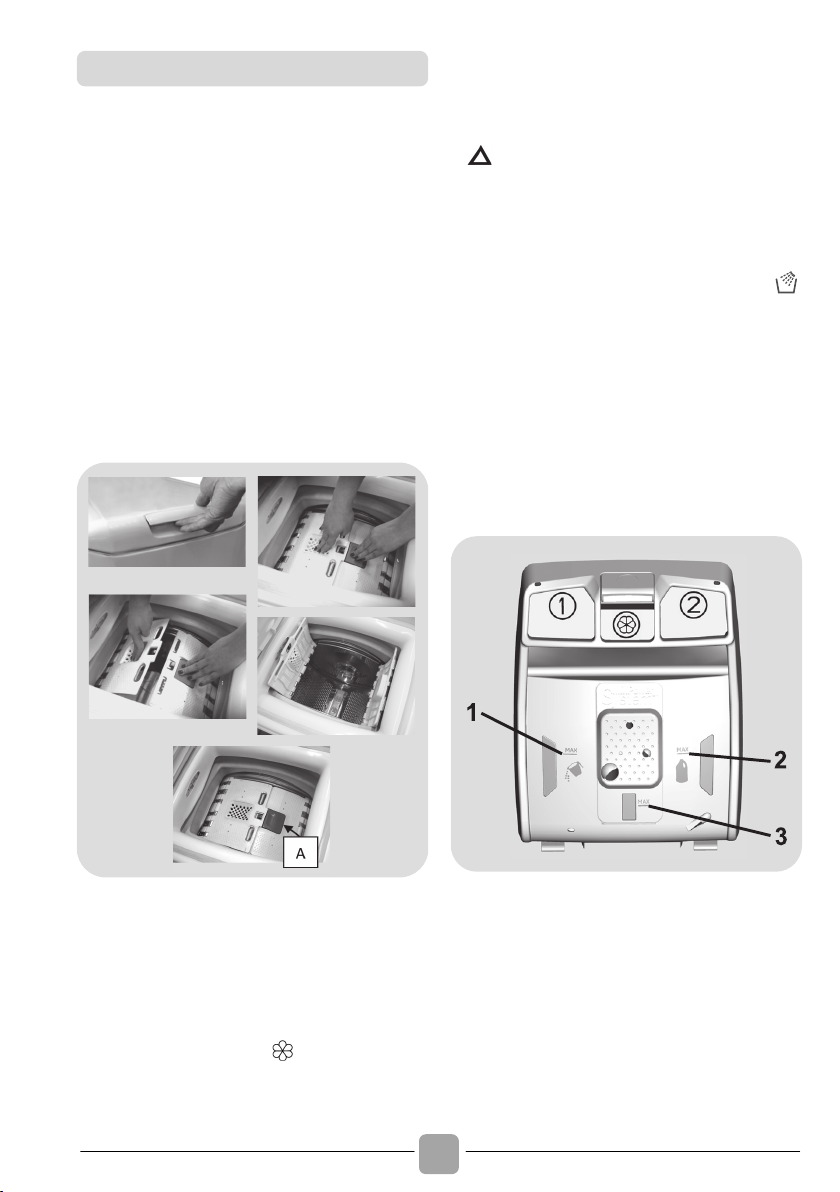
! Premere sul pulsante (A).
! Mantenendo premuto il pulsante, girare la
vaschetta verso l’esterno.
! Estrarre la vaschetta e pulirla.
! Si consiglia di eliminare da tutti gli
scomparti ogni eventuale residuo di
detersivo che impedisca il flusso dello
stesso nel cestello.
! Tirandoli verso l’esterno, estrarre il
sifone/i sifoni “S” che si trovano nella
parte posteriore della vaschetta e pulirli
accuratamente.
! Rimuovere eventuali incrostazioni che
potrebbero ostruire il foro degli scomparti.
B
A
C
S
Introdurre i bordi come indicato (B). Girare la
vaschetta verso il coperchio fino ad inserire il
bordo nella sua sede (C). Nell’inserirla, si
sentirà il suono caratteristico (clack).
Pulizia esterna dell'apparecchio
Pulizia filtro
Suggerimenti in caso di
traslochi o periodi di fermo
Pulizia della vaschetta del
detersivo e dei relativi scomparti
Montare
Page 11
!
IT
11
5. GUIDA RAPIDA ALL'USO
Questa lavatrice è in grado di adattare
automaticamente il livello dell’acqua al tipo
e alla quantità della biancheria. Questo
sistema porta ad una diminuzione dei
consumi d’energia e ad una riduzione
sensibile dei tempi di lavaggio.
! Accendere la lavatrice e selezionare il
programma desiderato.
! Eventualmente modificare la temperatura
di lavaggio e premere i tasti “opzione”
desiderati.
! Premere il tasto AVVIO/PAUSA per avviare
il programma.
Se dovesse mancare la corrente durante
il funzionamento dell’ apparecchio, una
speciale memoria conserverà l’impostazione
effettuata e, al ritorno della corrente, la
macchina ripartirà dalla fase del ciclo in
cui si era fermata.
! Alla fine del programma, sul display viene
visualizzata la scritta “End” oppure in
alcuni modelli si illumineranno tutte le
spie delle fasi di lavaggio.
! Spegnere la lavatrice.
Per qualsiasi tipo di lavaggio consultare la
tabella dei programmi e seguire la
sequenza delle operazioni come indicato.
Pressione dell’impianto idraulico:
min 0,05 Mpa / max 0,8 Mpa
Giri di centrifuga:
vedere targhetta dati.
Potenza Assorbita/ Ampere fusibile /
Tensione:
vedere targhetta dati.
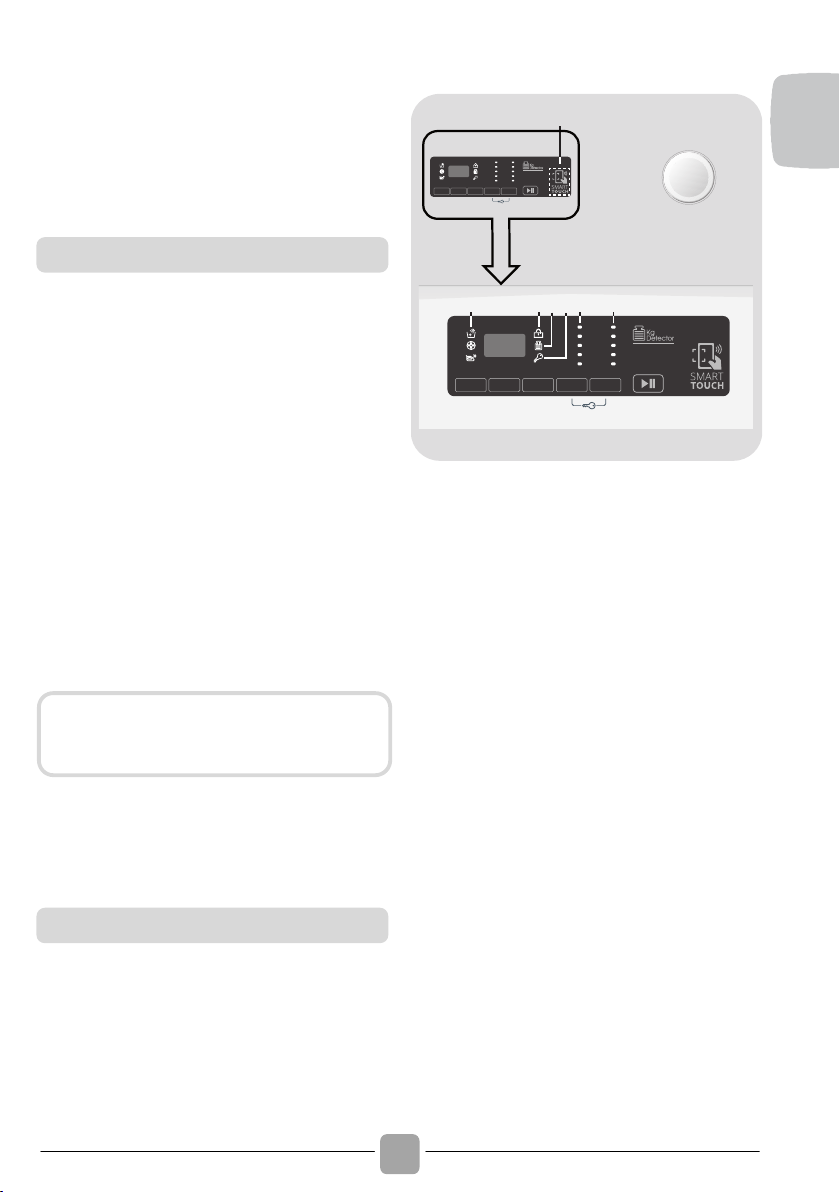
6.
COMANDI E PROGRAMMI
A
H
Q
EDFGCB
IOPLMN
A
Manopola programmi con
posizione di OFF
B
Tasto AVVIO/PAUSA
C
Tasto PARTENZA DIFFERITA
D
Tasto OPZIONI
E
Tasto RAPIDI / LIVELLO DI SPORCO
F
Tasto SELEZIONE TEMPERATURA
G
Tasto SELEZIONE CENTRIFUGA
F+G
Blocco tasti
H
Display
I
Spie OPZIONI
L
Spia PORTA BLOCCATA
M
Spia KG DETECTOR
N
Spia BLOCCO TASTI
O
Spie SELEZIONE TEMPERATURA
P
Spie SELEZIONE CENTRIFUGA
Q
Area SMART TOUCH
Selezione del programma
Attendere lo spegnimento della spia
PORTA BLOCCATA prima di aprire
l'oblò.
Dati tecnici
Page 12

!
12
! Premere il tasto AVVIO/PAUSA per iniziare
il ciclo di lavaggio.
! Il ciclo di lavaggio avverrà con la manopola
programmi ferma sul programma
selezionato sino alla fine del lavaggio.
! A fine ciclo spegnere la lavabiancheria
portando la manopola programmi in
posizione OFF.
! Premere per avviare il ciclo impostato con
la manopola programmi.
AGGIUNGERE O TOGLIERE CAPI DOPO
L'AVVIO DEL PROGRAMMA (PAUSA)
! Tenere premuto il tasto AVVIO/PAUSA
per circa 2 secondi (alcune spiee
l'indicazione del tempo residuo
lampeggeranno, indicando che la macchina
è in pausa).
! Attendere DUE minuti affinché il
dispositivo di sicurezza sblocchi la
PORTA e ne permetta l’apertura.
! Dopo aver aggiunto o tolto i capi,
chiudere la PORTA e premere il tasto
AVVIO/PAUSA (il programma ripartirà
dal punto in cui era stato interrotto).
CANCELLAZIONE PROGRAMMA IMPOSTATO
! Per annullare il programma, portare il
selettore in posizione OFF.
! Questo tasto permette di programmare
l’avvio del ciclo di lavaggio con un ritardo
massimo di 24h.
! Per impostare la partenza ritardata
procedere nel seguente modo:
- Impostare il programma desiderato.
- Premere il pulsante una prima volta per
attivarlo (sul display viene visualizzato
h00) e premere nuovamente per
impostare un ritardo di 1 ora (sul display
viene visualizzato h01). Ad ogni
pressione successiva il ritardo
impostato aumenta di 1 ora fino a h24
mentre con un ulteriore pressione si
azzera la partenza ritardata.
Apertura PORTA
Uno speciale dispositivo di sicurezza
impedisce che la PORTA possa
venire aperto immediatamente dopo
la fine di un ciclo di lavaggio.
Dopo 2 minuti dalla fine del lavaggio
la spia si spegne per indicare che è
possibile aprire la PORTA.
Manopola programmi con posizione
di OFF
Ruotando la manopola il display si
illumina visualizzando i parametri del
programma scelto.
A fine ciclo o dopo un periodo di inattività,
la luminosità del display diminuisce per un
risparmio energetico.
N.B.: Per spegnere la macchina ruotare
la manopola programmi sulla posizione
OFF.
La manopola programmi deve essere
sempre portata in posizione di OFF
alla fine di un lavaggio e prima di
selezionarne uno nuovo.
Tasto AVVIO/PAUSA
Chiudere la PORTA PRIMA di premere
il tasto AVVIO/PAUSA.
Dopo avere avviato la lavabiancheria
con il tasto AVVIO/PAUSA si dovrà
attendere alcuni secondi affinché la
macchina inizi il programma.
Tasto PARTENZA DIFFERITA
Page 13

!
IT
13
- Confermare premendo il tasto
AVVIO/PAUSA per iniziare il conteggio
alla fine del quale il programma inizierà
automaticamente.
! È possibile annullare la partenza ritardata,
portando la manopola programmi in
posizione OFF.
Se dovesse mancare la corrente durante
il funzionamento della lavabiancheria,
una speciale memoria conserverà
l’impostazione effettuata e, al ritorno
della corrente, la macchina ripartirà dal
punto in cui si era fermata.
Questo tasto permette di scegliere tra tre
differenti opzioni:
- EXTRA RISCIACQUO
! Questa opzione permette di aggiungere
un risciacquo alla fine del ciclo di
lavaggio ed è stata studiata
appositamente per le persone con pelle
delicata e sensibile, per le quali anche un
minimo residuo di detersivo può causare
irritazioni o allergie.
! Si consiglia di utilizzare questa funzione
anche per i capi dei bambini e per tessuti
molto sporchi, per i quali è necessario
utilizzare più detersivo, oppure nel
lavaggio di capi di spugna le cui fibre
tendono maggiormente a trattenere il
detersivo.
- IGIENE +
Attivabile solo quando si impostano almeno
60°C, questa opzione permette di igienizzare
la biancheria, mantenendo costante la
temperatura durante l'intera fase di lavaggio.
- STIRO FACILE
Questa funzione permette di ridurre al
minimo la formazione di pieghe, eliminando
le centrifughe intermedie o riducendo
l'intensità dell'ultima centrifuga.
Questo tasto permette di scegliere tra due
differenti opzioni, a seconda del programma
selezionato:
- RAPIDI
L'opzione è attivabile quando viene selezionato
il programma RAPIDI (14/30/44 Min.) e
permette di scegliere una delle tre durate
disponibili.
- LIVELLO DI SPORCO
! Al momento della selezione di un
programma, verrà automaticamente
indicato il tempo di lavaggio preimpostato
per quel programma.
! Questa opzione permette di scegliere tra
3 livelli di intensità di lavaggio, a
seconda del grado di sporco dei
tessuti, modificando la durata del
programma selezionato (può essere
utilizzata solo in alcuni programmi come
riportato nella tabella programmi).
! Questo tasto permette di cambiare la
temperatura dei cicli di lavaggio.
! Per la salvaguardia dei tessuti, non è
possibile aumentare la temperatura oltre
la massima prevista per ogni programma.
I tasti opzione devono essere selezionati
prima di premere il tasto AVVIO/PAUSA.
Tasto OPZIONI
Nel caso sia stata selezionata
un’opzione non compatibile con il
programma scelto, la relativa spia
prima lampeggerà e poi si spegnerà.
Tasto RAPIDI / LIVELLO DI SPORCO
Tasto SELEZIONE TEMPERATURA
Page 14
!
14
! Se si vuole eseguire un programma di
lavaggio a freddo le spie devono essere
tutte spente.
! Premendo questo tasto, si può ridurre la
massima velocità di centrifuga possibile per
il programma selezionato, fino alla sua
completa esclusione.
! Se l’etichetta non riporta alcuna
indicazione è possibile centrifugare alla
massima velocità prevista dal programma.
! Per riattivare la centrifuga, è sufficiente
premere nuovamente il tasto, fino al
raggiungimento della velocità scelta.
! È possibile modificare la velocità della
centrifuga in qualsiasi momento, anche
senza portare la macchina in PAUSA.
! Le pressione contemporanea dei
tasti SELEZIONE TEMPERATURA e
SELEZIONE CENTRIFUGA per circa
3 secondi permette di bloccare i tasti.
In questo modo, si può evitare che
vengano effettuate modifiche indesiderate
o accidentali.
! Il blocco tasti può essere annullato,
semplicemente premendo nuovamente i
due tasti di attivazione o spegnendo
l'apparecchio.
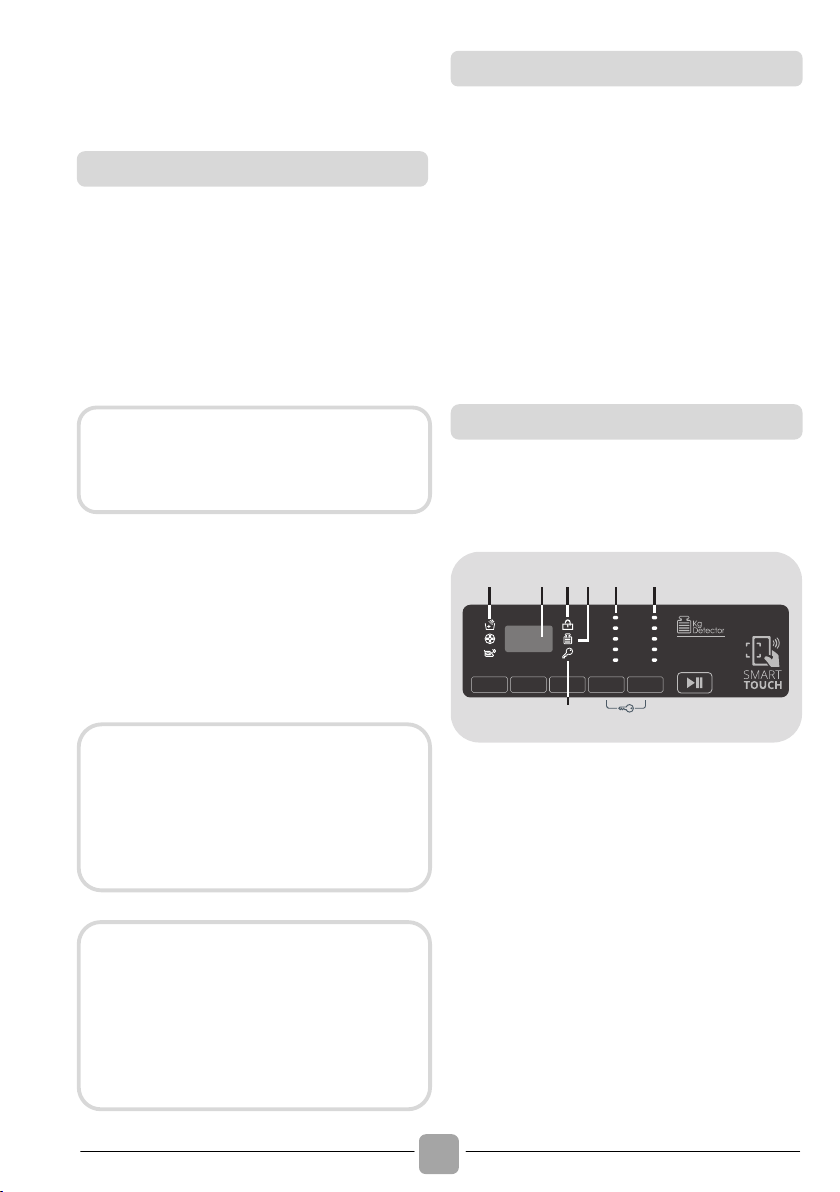
Il sistema di segnalazione del display
consente di essere costantemente informati
sul funzionamento dell’apparecchio.
1 2 3 4 6 7
5
1) SPIE OPZIONI
Indicano le opzioni selezionabili tramite
l'apposito tasto.
2) DURATA CICLO
! Al momento della selezione di un
programma, verrà automaticamente
indicata la durata del ciclo che potrà
variare a seconda delle opzioni che
verranno selezionate.
! Dopo l’avvio del programma il display vi
terrà costantemente informati sul tempo
restante alla fine del lavaggio.
Tasto SELEZIONE CENTRIFUGA
Per la salvaguardia dei tessuti, non
è possibile aumentare la velocità
oltre la massima prevista per ogni
programma.
Un sovradosaggio di detersivo può
causare un'eccessiva formazione
di schiuma. Se la lavatrice rileva
un'eccessiva presenza di schiuma,
può escludere la centrifuga o
prolungare la durata del programma
e aumentare il consumo d'acqua.
Il modello è dotato di un particolare
dispositivo elettronico che impedisce
la partenza della centrifuga, senza
carico o con carichi particolarmente
sbilanciati. Questo serve a ridurre le
vibrazioni e a migliorare la silenziosità,
salvaguardando la durata della
lavabiancheria.
BLOCCO TASTI
Display
Page 15

!
IT
15
! L’apparecchio calcola tale tempo in base
a un carico standard, ma durante il ciclo
la macchina corregge il tempo a seconda
del volume e della composizione del
carico.
3) SPIA PORTA BLOCCATA
! La spia indica la chiusura dell'oblò.
! Dopo aver premuto il tasto AVVIO/PAUSA,
inizialmente la spia lampeggia per poi
diventare fissa sino alla fine del lavaggio.
! Uno speciale dispositivo di sicurezza
impedisce che l’oblò possa venire aperto
immediatamente dopo la fine di un ciclo
di lavaggio. Attendere 2 minuti che la
spia si spenga e quindi spegnere
la macchina portando la manopola
programmi in posizione di OFF.
4) SPIA Kg Detector (attiva solo nei
programmi Cotone e Sintetici)
! Durante i primi minuti di funzionamento la
spia "Kg Detector" rimane accesa
mentre la macchina calcola il tempo
restante alla fine del ciclo, in base alla
quantità di biancheria effettivamente
introdotta all’ interno del cestello.
! "Kg Detector" consente di misurare
durante tutte le fasi del lavaggio una serie
di informazioni sulla biancheria inserita
all’interno del cesto e nei primi minuti del
ciclo di lavaggio:
- regola la quantità di acqua necessaria;
- determina la durata del lavaggio;
- regola i risciacqui in base al carico e al
tipo di biancheria che si è scelto di
lavare;
- regola il ritmo di rotazione del cesto per
adattarlo al tipo di tessuto;
- riconosce la presenza di schiuma,
aumentando eventualmente il livello
dell’acqua durante i risciacqui;
- regola il numero di giri della centrifuga
in funzione del carico, evitando che ci
siano squilibri.
5) SPIA BLOCCO TASTI
Indica che i tasti sono stati bloccati.
6) SPIE SELEZIONE TEMPERATURA
Indicano la temperatura di lavaggio del
programma selezionato che può essere
cambiata (dove previsto) tramite il relativo
tasto.
Se si vuole eseguire un programma di
lavaggio a freddo le spie devono essere
tutte spente.
7) SPIE SELEZIONE CENTRIFUGA
Indicano la velocità di centrifuga del
programma selezionato che può essere
variata o annullata, tramite l'apposito tasto.
Chiudere l'oblò PRIMA di premere il
tasto AVVIO/PAUSA.
Nel caso in cui l'oblò non venga chiuso
correttamente la spia continuerà a
lampeggiare per circa 7 secondi,
dopodiché il comando d'avvio si
cancellerà automaticamente. In tal
caso, chiudere correttamente l'oblò
e premere nuovamente il tasto
AVVIO/PAUSA.
Page 16

!
16
Questo apparecchio è equipaggiato di
tecnologia Smart Touch che consente di
interagire, tramite App, con gli smartphone
basati sul sistema operativo Android e
dotati della funzione NFC (Near Field
Communication).
! Scaricare l'App Candy simply-Fi sul
proprio smartphone.
FUNZIONI
Le principali funzioni attivabili mediante
l’App sono:
! Voice Assistant – Guida alla scelta del ciclo
ideale tramite inserimento di tre input vocali
(capi/tessuti, colore, grado di sporco).
! Cycles – Possibilità di scaricare e avviare
nuovi programmi di lavaggio.
! Smart Care – Cicli di Smart Check-up,
Auto-Clean e guida alla risoluzione dei
problemi.
! My Statistics – Statistiche di lavaggio e
suggerimenti per un utilizzo più efficiente
della macchina
COME USARE SMART TOUCH
PRIMA VOLTA – Registrazione macchina
su App
! Accedere al menu "Impostazioni" del
proprio smartphone Android e attivare la
funzione NFC all’interno di "Wireless e
Reti".
! Ruotare la manopola nella posizione
Smart Touch per abilitare il sensore sul
cruscotto.
! Aprire l’App, creare il profilo utente e
registrare l'elettrodomestico seguendo le
indicazioni sul display del telefono o la
procedura descritta nella "Quick Guide"
allegata alla macchina.
SMART TOUCH
L’App Candy simply-Fi è disponibile
sia per dispositivi con sistema
operativo Android che per iOS, sia per
tablet che per smartphone; è tuttavia
possibile interagire con la macchina e
sfruttare le potenzialità offerte da
Smart Touch solo con smartphone
Android dotati di tecnologia NFC,
secondo il seguente schema:
Smartphone Android
con tecnologia NFC
Interazione con la
macchina + contenuti
Smartphone Android
senza tecnologia NFC
Solo contenuti
Tablet Android
Solo contenuti
Apple iPhone
Solo contenuti
Apple iPad
Solo contenuti
Per scoprire tutti i dettagli delle
funzioni Smart Touch, esplora i menu
accedendo in modalità DEMO o
andare su:
www.candysmarttouch.com
In relazione al modello dello
smartphone impiegato e alla versione
del sistema operativo Android, il
processo di attivazione della funzione
NFC potrebbe essere differente.
Consultare il relativo manuale per
maggiori dettagli.
Ulteriori informazioni, le F.A.Q. ed il
video per una facile registrazione del
prodotto sono disponibili su:
www.candysmarttouch.com/how-to
Page 17

!
IT
17
VOLTE SUCCESSIVE – Utilizzo abituale
! Ogni volta che si intende operare con l’App
sulla macchina, occorre prima abilitare la
modalità Smart Touch ruotando la
manopola nell’omonima posizione.
! Assicurarsi di avere sbloccato lo schermo
del telefono (acceso e senza codice) e
attivata la funzione NFC; in caso
contrario, seguire la procedura descritta
in precedenza.
! Se si vuole avviare un ciclo di lavaggio,
caricare la biancheria, il detersivo e
chiudere l'oblò.
! Selezionare la funzione desiderata
sull’App (es: avvio di un programma,
Smart Check-up, aggiornamento
statistiche, ecc…).
!
Seguire le istruzioni sul display del
telefono, APPOGGIANDOLO al logo
Smart Touch quando indicato dall'App.
NOTE:
Posizionare lo smartphone in modo
che l’antenna NFC sul retro dello
stesso sia in corrispondenza del logo
Smart Touch sul cruscotto della
macchina.
Se non si conosce la posizione
dell'antenna NFC, spostare leggermente
lo smartphone con movimento circolare
sul logo Smart Touch fino a quando
l’App segnala l’avvenuta connessione.
Affinchè il trasferimento di dati vada a
buon fine è fondamentale MANTENERE
IL
TELEFONO APPOGGIATO SUL
CRUSCOTTO DURANTE TUTTA LA
PROCEDURA (pochi secondi); una
schermata sul dispositivo informerà
sull’esito dell’operazione e quando sarà
possibile allontanare lo smartphone.
Custodie spesse o adesivi metallici sullo
smartphone potrebbero influenzare o
impedire la trasmissione dei dati fra
macchina e telefono. Se necessario,
rimuoverli.
La sostituzione di alcuni componenti
dello smartphone (es: cover posteriore,
batteria, ecc…) con altri non originali,
potrebbe comportare la rimozione
dell’antenna NFC, impedendo l'utilizzo
completo dell’App.
La gestione ed il controllo della macchina
tramite App avviene solo “per prossimità”:
non è quindi possibile eseguire
un’operazione da remoto (es: da
un'altra stanza, fuori casa).
Page 18
!
18
PROGRAMMA
(MAX.) *
1)
DETERSIVO
(fare riferimento al cruscotto)
(MAX.)
1 o 2
COTONE
2)
5
5,5 6 6,5 7 8
90°
ECO 40-60
2)
5
5,5 6 6,5 7 8
60°
COTONE +
PRELAVAGGIO
2)
5
5,5 6 6,5 7 8
60°
( )
LANA/A MANO
1 1 1 1 1
2
30°
SINTETICI
2)
2,5
2,5 3 3
3,5
4
60°
RISCIACQUI
- - - - -
-
-
SCARICO +
CENTRIFUGA
- - - - -
-
-
DELICATI 59'
2 2 2 2 2,5
2,5
40°
SPORT PLUS 39'
1,5
1,5 2 2 2 2,5
30°
IGIENE PLUS 59'
1,5
1,5 2 2 2 2
60°
14'
1 1 1 1 1
1,5
30°
RAPIDI
3)
30'
1,5
1,5 2 2
2,5
2,5
30°
44'
3 3 3 3 3,5
3,5
40°
MISTI & COLORATI
59'
5 5 6 6 7
8
40°
COTONE
PERFETTO 59'
2,5
2,5 3 3
3,5
4
40°
SPECIAL 49'
2,5
2,5 3 3
3,5
4
40°
Posizione "riscrivibile" della manopola da selezionare per interagire con l'App per smartphone e
trasferire i cicli download (fare riferimento al paragrafo dedicato). In fabbrica viene caricato il
ciclo Auto-Clean, studiato per la sanificazione della macchina.
Tabella programmi
Page 19
!
IT
19
Note da considerare
* La massima capacità di carico di
biancheria asciutta differisce a seconda
del modello (fare riferimento al cruscotto).
"
"
In tutti i programmi è possibile ridurre la
velocità della centrifuga secondo il consiglio
del fabbricante del tessuto, oppure per capi
molto delicati eliminare la fase di centrifuga.
Questa funzione è attivabile con il tasto
SELEZIONE CENTRIFUGA. Se l’etichetta
non riporta alcuna indicazione è possibile
centrifugare alla massima velocità prevista dal
programma. Un sovradosaggio di detersivo
può causare un'eccessiva formazione di
schiuma. Se la lavatrice rileva un'eccessiva
presenza di schiuma, può escludere la
centrifuga o prolungare la durata del
programma e aumentare il consumo d'acqua.
( )
Solo con l’opzione PRELAVAGGIO
selezionata (programmi con opzione
PRELAVAGGIO disponibile).
1)
Quando si seleziona un
programma, sul display viene
indicata la temperatura consigliata
che può essere cambiata (dove
previsto) tramite il relativo tasto,
ma non può essere aumentata
oltre la massima prevista.
2)
Per i programmi indicati è possibile,
tramite il tasto LIVELLO DI SPORCO,
regolare il tempo e l'intensità del
lavaggio.
3)
Selezionando il programma RAPIDI
dalla manopola programmi ed
agendo sul tasto RAPIDI, sarà
possibile selezionare uno dei 3
programmi rapidi a disposizione,
ovvero 14’, 30’ e 44’.
! PRELAVAGGIO: Versare il detersivo
nell’apposito comparto, se presente sul
dispenser. Altrimenti, versarlo nella zona
forata presente sullo sportello del cesto
nelle dosi indicate dal produttore del
detergente.
** PROGRAMMI COTONE DI PROVA
SECONDO (EU) No 1015/2010 e No
1061/2010.
PROGRAMMA COTONE CON
TEMPERATURA DI 60°C
PROGRAMMA COTONE CON
TEMPERATURA DI 40°C
Questi programmi sono indicati per
lavare capi di cotone normalmente
sporchi e sono i più efficienti in termine
di consumo combinato di acqua e
energia per lavaggi di biancheria in
cotone.
Questi programmi sono stati sviluppati
per essere conformi con le temperature
di lavaggio delle etichette degli
indumenti e la temperatura effettiva
dell’acqua potrebbe differire leggermente
da
quella dichiarata dal ciclo.
Prima di chiudere il coperchio ed avviare
la Lavabiancheria verificare che gli
sportelli siano chiusi correttamente.
Quando possibile, allineare gli indicatori
di posizione su cesto e vasca (in questo
modo si assicura la massima efficacia di
lavaggio.
IMPORTANTE: non utilizzare la
modalità prelavaggio con l’opzione
avvio temporizzato.
Page 20

!
20
Per trattare i vari tipi di tessuto e le varie
gradazioni di sporco, la lavatrice è dotata di
programmi specifici, adatti ad ogni esigenza
di lavaggio (vedere tabella programmi).
Smart Touch
Posizione "riscrivibile" della manopola da
selezionare ogni volta che si vuole trasferire
un comando dall'App alla macchina e per
scaricare e/o avviare un ciclo download (per
il dettaglio sulle funzioni attivabili, fare
riferimento al paragrafo dedicato e alle
istruzioni sull'App). In fabbrica la posizione
Smart Touch viene scritta con il ciclo
"Auto-Clean", studiato per l'igienizzazione
del cestello, rimuovere i cattivi odori e
assicurare lunga durata alla lavatrice. Il
programma va eseguito a macchina vuota,
utilizzando solo detersivo in polvere e
avendo cura di lasciare l'oblò aperto al
termine per asciugare il cesto.
Raccomandato ogni 50 lavaggi.
COTONE
Questo programma è indicato per lavare
capi di cotone colorato a 40°C oppure per
sviluppare il massimo grado di lavaggio per
biancheria di cotone resistente, a 60°C o
90°C. La centrifuga finale alla massima
velocità assicura un’ottima strizzatura.
ECO 40-60
Il programma ECO 40-60 è in grado di lavare
biancheria di cotone normalmente sporca,
dichiarata lavabile a 40°C o 60°C, insieme
nello stesso ciclo. Questo programma viene
utilizzato per valutare la conformità con la
Direttiva UE Ecodesign (progettazione
ecocompatibile dei prodotti).
COTONE + PRELAVAGGIO
Programma studiato per eliminare le macchie
dai capi bianchi resistenti in cotone. La fase
di prelavaggio assicura la rimozione dello
sporco più ostinato. Aggiungere nello scomparto
"1" una quantità di detersivo pari al 20% di
quella utilizzata per il lavaggio principale.
LANA/A MANO
Questo programma effettua un ciclo di lavaggio
dedicato ai tessuti in "Lana lavabile in
lavatrice", per i capi da lavare esclusivamente
a
mano o per capi in seta lavabili in lavatrice.
SINTETICI
Questo programma permette di lavare in
modo congiunto biancheria di diverso
colore e tessuto. Il lavaggio ed il risciacquo
sono ottimizzati nei ritmi di rotazione del
cesto e nei livelli di acqua. La centrifuga ad
azione delicata, assicura una ridotta
formazione di pieghe sui tessuti.
RISCIACQUI
Questo programma effettua 3 risciacqui
della biancheria con centrifuga intermedia
(eventualmente riducibile o annullabile
tramite l’apposito tasto). È utilizzabile per
risciacquare qualsiasi tipo di tessuto, ad
esempio dopo un lavaggio effettuato a mano.
SCARICO + CENTRIFUGA
Tramite questo programma la macchina
effettuerà direttamente lo scarico dell’acqua
e una centrifuga ad alta velocità. Qualora si
voglia effettuare solo lo scarico o ridurre
l’intensità della centrifuga, sarà sufficiente
agire sul tasto SELEZIONE CENTRIFUGA.
DELICATI 59'
Sviluppato per lavare e trattare i delicati ed i
tessuti più preziosi. Il programma prevede
un lavaggio a bassa temperatura in 59
minuti. Consigliato per piccoli carichi.
Selezione programmi
Nella scelta del programma, attenersi
alle raccomandazioni riportate sulle
etichette dei capi, in particolare alla
temperatura massima consigliata.
ATTENZIONE:
CONSIGLI IMPORTANTI PER LE
PRESTAZIONI DI LAVAGGIO.
! Il primo lavaggio di capi colorati
nuovi deve essere effettuato
separatamente.
! Capi scuri voluminosi come jeans
ed asciugamani dovrebbero essere
lavati separatamente.
! In ogni caso, non mischiare mai
CAPI COLORATI STINGENTI.
Page 21

!
IT
21
SPORT PLUS 39'
Realizzato per rimuovere lo sporco dagli
indumenti tecnici utilizzati per la palestra e
lo sport. Il programma prevede un lavaggio
di 39 minuti a bassa temperatura.
Consigliato per piccoli carichi di capi
sintetici.
IGIENE PLUS 59'
Questo programma, grazie alla miglior
combinazione tra alta temperatura, tempo e
azione pulente, garantisce in soli 59 minuti,
la massima forza igienizzante contro i
batteri. Indicato per capi in cotone, prevede
una temperatura di 60°C ed è suggerito per
un carico ridotto.
RAPIDI 14'/30'/44'
Risparmio, ma senza compromessi. Il nuovo
programma consente di ottenere un eccellente
bucato risparmiando acqua, consumi energetici,
detersivo e tempo. Tale opzione, lavando a
media temperatura, si adatta perfettamente
a tutti i tipi di tessuto. Si consiglia per piccoli
carichi e indumenti poco sporchi.
MISTI & COLORATI 59'*
Il programma offre la libertà di lavare tutti i
tipi di tessuti e di colori non stingenti insieme,
a
pieno carico, con eccellenti risultati in soli
59 minuti. Con un lavaggio a temperatura
media, si raccomanda tale programma per
capi poco sporchi.
*Temperatura preselezionata di 20°C
(modificabile tramite l'apposito tasto).
Programma compatibile anche per il
lavaggio dei tessuti in cotone.
COTONE PERFETTO 59'
Questo programma garantisce ottimi
risultati per i capi in cotone. L'opzione è
stata progettata per ridurre il tempo di
lavaggio, a media temperatura, dei capi in
cotone abbastanza sporchi.
Si consiglia il mezzo carico per ottenere i
risultati migliori.
SPECIAL 49'
Grazie alla sua innovativa tecnologia,
questo programma consente di ridurre il
tempo da dedicare al bucato garantendo
comunque alte performance di lavaggio a
media temperatura in soli 49 minuti. Per
ottenere i risultati migliori si consiglia il
mezzo carico.
Page 22
!
22
Apertura / Chiusura del cestello
! Aprire lo sportello della lavatrice.
! Aprire il cestello premendo sul pulsante
(A) e porre allo stesso tempo l’altra mano
sull’altro sportello.
! Introdurre uno per uno i capi da lavare nel
cestello, senza comprimerli. Rispettare i
carichi raccomandati nella “tabella
programmi”. Un sovraccarico della
lavatrice darà risultati meno soddisfacenti
e stropiccerà i capi.
! Per chiudere il cestello, avvicinare gli
sportelli inserendo quello del pulsante (A)
sotto l’altro, fino ad agganciarli
perfettamente.
Carico detersivo
La vaschetta del detersivo è divisa in 3 scomparti:
! Lo scomparto 1 serve per il detersivo in
polvere.
! Lo scomparto 2 serve per il detersivo
liquido.
! Lo scomparto serve per
ammorbidenti, profumi ed additivi speciali,
quali inamidanti, turchinetto, ecc..
! MAX, La vaschetta detergente presenta
le tacche per l’indicazione di livello
massimo di detersivo che non deve
essere superato
!
Quando i tessuti presentano macchie
che necessitano pretrattamento con
prodotti sbiancanti liquidi, si puó procedere
con il lavaggio preliminare nella
lavabiancheria. Per farlo: introdurre il
prodotto sbiancante nel "compartimento 2"
e azionare il programma di risciaqui .
Una volta finito il ciclo riportare il selettore
alla posizione OFF, aggiungere il resto del
bucato e procedere al lavaggio normale
con il programma desiderato.
1) Livello massimo detersivo in polvere
2) Livello massimo detersivo liquido
3) Livello massimo ammorbidenti/additivi
Preparazione del lavaggio
Page 23
!
IT
23
7. RISOLUZIONE PROBLEMI E GARANZIA
Nel caso si pensi che la lavatrice non funzioni in modo corretto, consultare la breve guida
sotto riportata, con alcuni suggerimenti pratici per risolvere le anomalie più comuni.
SEGNALAZIONE ERRORI
Errore visualizzato
Significato e soluzioni
E2 (con display)
2 lampeggìi delle spie
(senza display)
La macchina non carica acqua.
Verificare che il rubinetto dell’acqua sia aperto.
Appurare che il tubo di carico non sia piegato o schiacciato.
Tubo scarico non ad altezza corretta (vedere sezione istallazione).
Chiudere il rubinetto, svitare il tubo di carico dal retro della lavatrice e
verificare che il filtro "antisabbia" non sia intasato.
Verificare che il filtro non sia intasato o che non ci siano corpi estranei
all'interno del vano filtro che possano ostruire il corretto deflusso dell'acqua.
E3 (con display)
3 lampeggìi delle spie
(senza display)
La macchina non scarica l’acqua.
Verificare che il filtro non sia intasato o che non ci siano corpi estranei
all'interno del vano filtro che possano ostruire il corretto deflusso dell'acqua.
Appurare che il tubo di scarico non sia piegato, schiacciato o ostruito.
Verificare che l’impianto di scarico a muro non sia intasato, provando
a far scaricare la macchina nel lavandino.
E4 (con display)
4 lampeggìi delle spie
(senza display)
La macchina ha rilevato eccessiva schiuma e/o acqua.
Verificare di non aver usato dosi eccessive di detersivo oppure un
prodotto non adatto al lavaggio in lavatrice.
E7 (con display)
7 lampeggìi delle spie
(senza display)
Problema oblò.
Verificare la corretta chiusura dell'oblò. Assicurarsi che non vi siano
panni all'interno del cesto che possano ostacolarne la chiusura.
Se l'oblò è bloccato, staccare la spina ed attendere 2-3 minuti prima
di riprovare ad aprirlo.
Qualsiasi altro codice
d'errore
Spegnere la lavatrice, staccare la spina e attendere un minuto.
Accendere nuovamente la macchina e avviare un programma. Se
l'errore dovesse ripresentarsi, contattare un Centro Assistenza
Tecnica Autorizzato, comunicando l'errore visualizzato.
SOLO PER I MODELLI DOTATI DI TECNOLOGIA SMART TOUCH
Grazie al ciclo Smart Check-up all'interno dell'App Candy simply-Fi e con uno
smartphone Android dotato di tecnologia NFC, è possibile verificare in ogni
momento la corretta funzionalità della macchina. Maggiori dettagli sull'App.
In caso di errore sul display della macchina (segnalato tramite codice o
lampeggio delle spie), aprendo l'App e appoggiando lo smartphone Android
dotato di NFC al logo Smart Touch sul cruscotto, è possibile avviare la guida alla
risoluzione del problema.
! Modelli dotati di display: gli errori verranno visualizzati tramite un numero
preceduto da una "E" (esempio: Errore 2 = E2).
! Modelli senza display: gli errori verranno indicati tramite il lampeggìo di tutte le spie
per un numero di volte pari al codice dell'errore, seguiti da una pausa di 5 secondi
(esempio: Errore 2 = 2 lampeggìi, pausa di 5 secondi, 2 lampeggìi, ecc…).
Page 24
!
24
ALTRE ANOMALIE
Problema
Possibili cause e soluzioni pratiche
La lavatrice non
funziona / non parte
Verificare che la spina sia inserita in modo corretto.
Controllare che non manchi l’alimentazione elettrica.
Appurare che la presa di corrente funzioni, provandola con un altro
apparecchio come ad esempio una lampada.
Verificare la corretta chiusura dell'oblò.
Verificare di aver selezionato e avviato correttamente il programma
di lavaggio.
Assicurarsi che la macchina non sia stata messa erroneamente in
pausa.
Presenza di acqua sul
pavimento vicino alla
lavatrice
È possibile che sia dovuto ad una perdita dalla guarnizione posta tra
rubinetto e tubo di carico. Verificare il corretto serraggio del tubo ed
eventualmente sostituire la guarnizione.
Assicurarsi che il filtro sia chiuso correttamente.
La lavatrice non
centrifuga
In alcuni condizioni di disposizione non ottimale della biancheria nel
cesto, la lavatrice potrebbe:
• Aumentare il tempo d’esecuzione della centrifuga nel tentativo di
ridistribuire in maniera omogenea il carico.
• Abbassare la velocità di centrifuga per ridurre le vibrazioni e
migliorare la silenziosità.
• Escludere la centrifuga per salvaguardare la durata della
lavabiancheria.
Assicurarsi che il carico sia distribuito in modo uniforme; in caso
contrario, riposizionarlo e riavviare la macchina.
Potrebbe essere dovuto al fatto che l’acqua non sia ancora stata
scaricata completamente: attendere alcuni minuti. Se il problema
persiste, vedere descrizione Errore 3.
In alcuni modelli, è presente la funzione "esclusione centrifuga":
verificare che non sia stata attivata.
Verificare che non siano state selezionate opzioni che modifichino la
centrifuga.
Un eccessivo utilizzo di detersivo può impedire l’esecuzione della
centrifuga: ridurre il quantitativo per i successivi lavaggi.
Si sentono forti
vibrazioni / rumore
durante la centrifuga
La lavatrice potrebbe non essere completamente in piano: in caso,
regolare i piedini come indicato nell’apposita sezione.
Verificare di aver disimballato correttamente la macchina
rimuovendo tutte le viti, i gommini e i distanziali presenti sul retro
della stessa.
Assicurarsi che non vi siano corpi estranei nel cesto (monete,
cerniere, bottoni, ecc…).
La garanzia convenzionale copre difetti elettrici e/o meccanici del prodotto
attribuibili ad un'azione o omissione del produttore.
Se un difetto riscontrato è imputabile a fattori esterni, uso scorretto, errata
installazione o mancato rispetto di quanto riportato nelle istruzioni d'uso, i costi
per l'eventuale riparazione saranno a carico del cliente.
Page 25

!
IT
25
Si consiglia di utilizzare sempre ricambi
originali, disponibili presso i nostri Centri
Assistenza Tecnica Autorizzati.
Apponendo la marcatura su questo
prodotto, dichiariamo, sotto la nostra
responsabilità, di ottemperare a tutti i
requisiti relativi alla tutela di sicurezza,
salute e ambiente previsti dalla
legislazione europea in essere per
questo prodotto.
La ditta costruttrice declina ogni
responsabilità per eventuali errori di stampa
contenuti nel libretto presente in questo
prodotto. Si riserva inoltre il diritto di
apportare le modifiche che si renderanno
utili ai proprio prodotti senza
compromettere le caratteristiche essenziali.
Garanzia
Il prodotto è garantito, oltre che ai sensi di
legge, alle condizioni e nei termini riportati
sul certificato di garanzia convenzionale
inserito nel prodotto. Il certificato dovrà
essere conservato e mostrato al nostro
Centro di Assistenza Tecnica Autorizzato, in
caso di necessità, insieme allo scontrino
comprovante l’acquisto dell’elettrodomestico.
Puoi consultare le condizioni di garanzia
anche sul nostro sito internet.
Per ottenere assistenza compila l’apposito
form on-line oppure contattaci al numero
che trovi indicato nella pagina di assistenza
del nostro sito internet.
Page 26

!
26
Vielen Dank, dass Sie sich für dieses Produkt
entschieden haben. Wir freuen uns, Ihnen das
ideale Produkt und das bestmögliche,
vollständige Sortiment an Haushaltsgeräten
für Ihren Alltag bieten zu können.
Bitte nehmen Sie sich vor der
Installation und vor dem ersten Gebrauch
unbedingt ausreichend Zeit, um die vorliegende
Gebrauchsanleitung aufmerksam zu lesen und
sich in Ruhe mit der Bedienung des Gerätes
vertraut zu machen. Dadurch schützen Sie
sich und verhindern Schäden an der
Waschmaschine. Die Anleitung enthält wichtige
Hinweise - bitte daher für evtl. Rückfragen
unbedingt aufbewahren bzw. bei der
Weitergabe des Gerätes an Nachbesitzer
mitgeben.
Jedes unserer Geräte verfügt über eine 16stellige Matrikelnummer, die sich auf dem
Typenschild im Innenbereich des Bullauges
befindet. Bitte notieren Sie sich diese
unbedingt, damit Ihnen der Kundendienst bei
Fragen oder im Servicefall schneller und
gezielter helfen kann.
Dieses Gerät ist entsprechend der
europäischen Richtlinie 2012/19/EU
als elektrisches / elektronisches Altgerät
(WEEE) gekennzeichnet.
Elektrische und elektronische Altgeräte
enthalten vielfach noch wertvolle Materialien.
Sie enthalten aber auch schädliche Stoffe, die
für ihre Funktion und Sicherheit notwendig
waren. Im Restmüll oder bei falscher
Behandlung können diese der menschlichen
Gesundheit und der Umwelt schaden. Es ist
daher sehr wichtig, dass elektrische und
elektronische Altgeräte (WEEE) einer
speziellen Verwertung zugeführt werden, damit
die schädlichen Stoffe ordnungsgemäß entfernt
und entsorgt werden bzw. wertvolle Rohstoffe der
Wiederverwertung zugeführt werden können. Sie
können mit der Beachtung der folgenden simplen
Hinweise einen wichtigen Beitrag dazu leisten,
dass elektrische und elektronische Altgeräte
(WEEE) der menschlichen Gesundheit und der
Umwelt nicht schaden:
! Elektrische- und elektronische Altgeräte
(WEEE) sollten keinesfalls wie Rest- oder
Haushaltsmüll behandelt werden.
! Nutzen Sie stattdessen die an Ihrem Wohnort
eingerichteten kommunalen oder gewerblichen
Sammelstellen zur Rückgabe und Verwertung
elektrischer und elektronischer Altgeräte (WEEE).
Informieren Sie sich, ob ggf. in Ihrem Land bzw.
Ihrer Region für große/sperrige elektrische und
elektronische Altgeräte (WEEE) eine Abholung
angeboten wird. Sorgen Sie in jedem Falle dafür,
dass Ihr Altgerät bis zum Abtransport kindersicher
aufbewahrt wird.
In einigen Ländern sind Händler unterbestimmten
Voraussetzungen beim Geräteneukauf auch zur
Rücknahme des Altgerätes verpflichtet, wenn das
Altgerät dem neuen Fabrikat in der Funktion
entspricht.
1. GENERELLE SICHERHEITSHINWEISE
2. INSTALLATION
3. PRAKTISCHE TIPPS
4. WARTUNG UND REINIGUNG
5. KURZANLEITUNG
6. STEUERUNG UND PROGRAMME
7.
PROBLEMLÖSUNGEN UND GARANTIE
Umweltbedingungen
Inhalt
Page 27

!
DE
27
1. GENERELLE
SICHERHEITSHINWEISE
! Dieses Gerät ist ausschließlich
für den Haushaltsgebrauch konzipiert
bzw. für den haushaltsnahen
Gebrauch, wie z.B:
- Teeküchen für das Personal von
Büros, Geschäften oder ähnlichen
Arbeitsbereichen;
- Ferienhäuser;
- Gäste von Hotels, Motels und
anderen Wohneinrichtungen;
- Gäste von Apartments/
Ferienwohnungen, Bed and
Breakfast Einrichtungen
Eine andere Nutzung als die
normale Haushaltsnutzung, wie z.B.
gewerbliche oder professionelle
Nutzung durch Fachpersonal, ist
auch im Falle der oben erwähnten
Einrichtungen ausgeschlossen.
Sollte das Gerät entgegen diesen
Vorschriften betrieben werden,
kann dies die Lebensdauer des
Gerätes beeinträchtigen und den
Garantieanspruch gegenüber dem
Hersteller verwirken.
Eventuelle Schäden am Gerät oder
andere Schäden oder Verluste, die
durch eine nicht haushaltsnahe
Nutzung hervorgerufen werden
sollten (selbst wenn sie in einem
Haushalt erfolgen), werden, so weit
vom Gesetz ermöglicht, vom
Hersteller nicht anerkannt.
!
Kinder unter 8 Jahren sowie
Personen, die aufgrund ihrer
physischen, sensorischen oder
geistigen Fähigkeiten oder ihrer
Unerfahrenheit oder Unkenntnis
nicht in der Lage sind, die
Waschmaschine sicher zu bedienen,
dürfen die Waschmaschine nicht
ohne Aufsicht oder Anweisung durch
eine verantwortliche Person benutzen,
sich in der Nähe aufhalten oder das
Gerät saubermachen. Kinder sollten
nicht mit dem Gerät
spielen. Reinigung
und Benutzerwartung
sollten nicht
von Kindern ohne Einführung,
ausgeführt werden.
! Kinder sollten über das Gerät
aufgeklärt werden, damit Sie
nicht mit dem gerät spielen.
! Kinder unter 3 Jahren dürfen
sich nicht unbeaufsichtigt in der
Nähe des Gerätes aufhalten
oder spielen.
!
Sollte das Anschlusskabel
beschädigt sein, so muss es
durch einen Fachmann mittels
eines Orginalteils ersetzt werden.
! Verwenden Sie nur die mit dem
Gerät zusammen gelieferten
Schläuche.
!
Für einen ordnungsgemäßen Betrieb
muss der Wasserleitungsdruck
konstant zwischen min. 0,05 MPa
und max. 0,8 MPa liegen.
Page 28

!
28
!
Vergewissern Sie sich, dass
ein Teppich nicht die Maschine
und Ventilatorenöffnungen,
behindert.
! Das Gerät ist abgeschaltet,
wenn sich der Referenzpunkt
auf dem Bedienknauf in der
Position AUS/OFF befindet. In
jeder anderen Stellung ist das
Gerät eingeschaltet und
betriebsbereit (nur für Modelle
mit Bedienknebel).
! Nach der Installation, sollte das
Gerät so positioniert sein, dass
der Stecker frei zugänglich ist.
! Die maximale Beladungskapazität
(trockene Kleidung lt. Normtest)
hängt von dem jeweiligen
Gerätemodell ab (s. Bedienblende).
!
Für die technischen Daten des
Produktes schauen Sie bitte
auf der Internetseite des
Herstellers nach.
! Die technischen Details
(Versorgungsspannung und
Leistungsaufnahme) sind auf
dem Typenschild angegeben
! Vergewissern Sie sich, dass die
elektrische Anlage geerdet ist, alle
geltenden Gesetze eingehalten
werden und dass Ihre Steckdose
mit dem Stecker des Gerätes
kompatibel ist. Ansonsten
holen Sie sich bitte qualifizierte
professionelle Unterstützung.
!
Die Verwendung von Spannungswandlern, Mehrfachsteckdosen
oder Verlängerungskabeln bitte
in jedem Fall unterlassen.
!
Bevor Sie die Waschmaschine
reinigen, ziehen Sie das Gerät vor
und drehen Sie die Wasserzufuhr ab.
! Bringen Sie keine Schnur an,
um die Maschine vorzuziehen.
! Setzen Sie das Gerät keinem
Regen, direktem Sonnenlicht oder
anderen Wetterelementen aus.
! Im Falle einer Störung schalten
Sie die Maschine aus, schließen
Sie die Wasserzufuhr und ändern
Sie nichts mehr an dem Gerät.
Kontaktieren Sie umgehend den
Kundendienst und verwenden Sie
nur Originale als Ersatzteile.
Elektrische Anschlüsse und
Sicherheitshinweise
WARNUNG:
Wasser kann eine hohe
Temperatur während des
Waschvorgangs annehmen.
Page 29
!
DE
29
2. INSTALLATION
!
Lösen Sie die 2 bzw. 4 Schrauben
"A" auf der Geräterückseite und
entfernen die 2 bzw. 4 Distanzstücke
"B" wie in Abbildung 1 gezeigt.
! Anziehen die mitgelieferten
Zierteile “C” anbringen (Abbildung 2).
3
4
min 50 cm
max 85 cm
+2,6 mt
max
max 100 cm
min 4 cm
* SEPARAT ERHÄLTLICHES ZUBEHÖR
Page 30

!
30
5
! Die Waschmaschine ist mit dem
mitgelieferten neuen Rohr (befindet
sich in der Trommel) an das
Wassernetz angeschlossen zu werden.
Das alte Rohr darf hierfür nicht mehr
benutzt werden.
!
Den EInlaufstutzen für das Wasser
mit einem Ende an das Elektroventil
(oberer, hinterer Bereich der
Waschmaschine) und mit dem
anderen Ende an einen Wasserhahn
oder einen anderen Wasseranschluß
mit einem 3/4” Gewindeanschluß
anschließen.
! Die Waschmaschine an die Wand
heranrücken und darauf achten, daß
der Schlauch nicht geknickt wird.
Den Ablaufschlauch am Wannenrand
befestigen oder – wenn möglich, da
besser - in einer Mindesthöhe von 50
cm und höchstens 75 cm. vom
Boden an einen festen Abfluß
anschließen, dessen Durchmesser
größer als der des Geräteschlauchs
sein muß (Abbildung 4).
! Falls notwendig, benutzen Sie das
gebogene* Zusatzteil um einen
besseren Halt für das Abwasserrohr
zu erreichen.
Wenn das Modell damit ausgestattet
ist:
!
Um das Umstellen der Waschmaschine
zu vereinfachen, wird der Steuerhebel
des Wagens nach rechts gedreht.
Nach erfolgter Umstellung wird der
Hebel wieder in seine Grundstellung
zurückgebracht.
!
Bringen Sie die Maschine an
den Vorderfüßen ins Gleichgewicht
(Abbildung 5).
! Den Fuß nach oben oder nach unten
drehen, bis optimale Bodenhaftung
erreicht ist.
! Das Gerät auf ordnungsgemäße
Ausrichtung überprüfen. Versuchen
Sie hierzu bitte, die Waschmaschine
zu bewegen, ohne sie jedoch zu
verschieben. Sie sollten sich im
oberen Gerätebereich an beiden
Geräteenden abstützen und sich
vergewissern, daß die Waschmaschine
sich nicht bewegt.
!
Soll die Waschmaschine umgestellt
werden, so sind die Füße erneut
auszurichten.
Page 31

!
DE
31
! Bitte das Gerät ausschließlich mit dem
mitgelieferten Zulaufschlauch (keinesfalls
alten Schlauch benutzen) mit dem
Wasseranschluß verbinden (s. Abbildung 6).
! EINIGE MODELLE enthalten ein oder
mehrere der folgenden Eigenschaften:
HEIß&KALT (Abbildung 7):
Wasserverbindungseinstellungen mit heiß
und kalt für höhere Energieeinsparungen.
Verbinden Sie den grauen Schlauch mit
dem Wasserhahn und den roten mit dem
Heißwasserhahn. Die Waschmaschine
kann auch nur mit dem Kaltwasserhahn
verbunden werden: In diesem Fall brauche
einige Programme etwas länger, um zu
starten.
WASSERSTOP (Abbildung 8): Im Falle
eines defekten Schlauches stoppt die
Wasserzufuhr. In diesem Fall erscheint auf
dem Fenster „A“ ein rotes Feld und der
Schlauch muss entfernt werden. Um die
Schraubenmutter zu lösen, drücken Sie den
Entsicherungsknopf „B“.
WASSERSCHUTZ (Abbildung 9): Sollte
Wasser aus dem Hauptschlauch „C“
austreten, schützt die Hülle „D“ vor
kompletten Wasseraustritt.
! Am Ende dieses Vorganges kontaktieren
Sie den Kundenservice, damit der
Schlauch ausgewechselt wird.
6
1
7
B
A
8
D
C
9
Wasseranschluss
Page 32

!
32
3. PRAKTISCHE TIPPS
Beim Sortieren der Wäsche, beachten
Sie folgende Punkte:
- Wurden metallische Objekte aus der
Wäsche entfernt;
- Reißverschlüsse geschlossen;
- Kissen auf links gezogen;
- Clips von Vorhängen entfernt;
- Waschanweisungen auf Schildchen in der
Kleidung gelesen.
! Wir empfehlen beim Waschen von
Teppichen/Läufern, Oberbetten und
anderen schweren Textilien den
Schleudervorgang gänzlich abzustellen,
um mögliche Schäden am Gerät zu
vermeiden.
! Stellen Sie sicher, dass Ihr
Kleidungsstück aus Wolle mit der
Maschine gewaschen werden darf.
Überprüfen Sie das Stoff-Etikett.
Tipps, wie Sie bei der Nutzung Ihres Geräts
Geld sparen und etwas für die Umwelt tun
können.
! Füllen Sie die Maschine bis zur
maximalen Kapazität, die in der Tabelle
für jedes Programm angegeben ist.
Dadurch SPAREN Sie Energie und
Wasser.
! Lautstärke und restliche Feuchtigkeit der
Wäsche hängen von der Drehzahl des
Schleudergangs ab: Ein schnellerer
Schleudergang erzeugt mehr Lärm, die
Wäsche ist dann jedoch weniger feucht.
! Die effizientesten Programme bei
Energie- und Wasserverbrauch sind für
gewöhnlich die längeren Programme mit
niedrigerer Temperatur.
Maximieren Sie die Füllmenge
! Erzielen Sie den besten Energie-, Wasser-
und Waschmittelverbrauch, in dem sie Ihre
Waschmaschine immer voll füllen. Sichern
Sie 50% Energie beim Waschen einer vollen
Ladung im Gegensatz zu zwei halben
Ladungen.
Wann ist eine Vorwäsche wirklich notwendig?
! In der Regel nur für stark verschmutzte
Wäsche!
Wenn Sie normal oder wenig
verschmutzte Wäsche waschen, sparen
Sie zwischen 5% und 15% Strom, wenn
Sie keine Vorwäsche wählen.
Ist eine Warm- oder Heißwäsche zwingend
erforderlich?
!
Flecken mit Fleckenentferner vorbehandeln
oder vor dem Waschen eingetrocknete
Flecken in Wasser einweichen, um die
Notwendigkeit eines Warm- oder
Heißwaschprogramms zu reduzieren.
Sparen Sie Energie durch ein
Niedrigtemperatur-Waschprogramm.
Bevor Sie ein Trockenprogramm starten
(WASCHTROCKNER)
! Sie SPAREN Energie und Zeit, indem Sie
eine hohe Schleuderdrehzahl auswählen,
um den Restfeuchtegehalt in der Wäsche
bereits vor der Trockenprogramms zu
reduzieren.
Unten finden Sie eine kurze
Dosierungsanleitung mit Tipps und
Ratschlägen zur Verwendung von
Waschmittel.
! Verwenden Sie nur Waschmittel, die für
die Waschmaschine geeignet sind.
! Wählen Sie das zum Stoff (Baumwolle,
Feines, Synthetik, Wolle, Seide usw.), zur
Farbe, zum Grad der Verschmutzung und
zur gewählten Waschtemperatur
passende Waschmittel aus.
Beladungstipps
Praktischer Spartipp
Einfüllen von Waschmittel
Page 33

!
DE
33
! Befolgen Sie für eine richtige Dosierung
des Waschmittels, Weichspüler oder
sonstiger Reinigungsmittel immer die
Empfehlungen des Herstellers: Eine
ordnungsgemäße Verwendung des
Geräts mit der richtigen Dosierung
verhindert Verschwendung und ist
umweltfreundlicher.
! Zu viel Waschmittel führt zu übermäßiger
Schaumbildung, die verhindert, dass der
Waschgang richtig ausgeführt werden
kann. Sie kann auch die Qualität der
Wäsche und des Spülgangs
beeinträchtigen.
Bei der Nutzung von phosphatfreien
Waschmitteln können folgende Dinge
resultieren:
- Trüberes Abwasser: Dieser Effekt
ist bedingt durch die suspendierten
Zeolithe, was jedoch keine negativen
Auswirkungen auf die Wascheffizienz hat.
- Weißer Schleier auf der Kleidung am
Ende des Waschvorgangs: Dies ist
normal, da das Waschmittel nicht von der
Wäsche aufgenommen wird.
- Schaumbildung im letzten Spülgang:
Dies ist nicht zwingend ein Zeichen für ein
schlechtes Spülergebnis.
- Übermäßige Schaumbildung: Dies tritt
häufig beim Einsatz von anionischen
Tensiden in Waschmitteln auf.
Starten Sie in den vorgenannten Fällen
keinen erneuten Waschvorgang, da dies
nicht helfen wird.
Wenn das Problem fortbesteht oder wenn
Sie einen technischen Defekt vermuten,
kontaktieren Sie umgehend ein autorisiertes
Kundendienstzentrum.
Beim Waschen von weißen Sachen,
empfehlen wir das 60 Grad
Baumwollprogramm und ein normales
Waschpulver.
Für Waschvorgänge zwischen 40 und
60 Grad muss ein für die Verschmutzung
der Wäsche passendes Waschmittel
ausgewählt werden. Normale
Waschpulver können für weiße oder
leichte Farben verwendet werden,
während flüssige Waschmittel für
Farbschutz geeignet sind.
Für Waschvorgänge unter 40 Grad
empfehlen wir den Gebrauch von
flüssigen Waschmitteln, die für niedrige
Temperaturen geeignet sind.
Zum Waschen von Wolle oder Seide
empfehlen wir nur den Gebrauch von
Spezial- und Feinwaschmitteln.
Page 34

!
34
4. WARTUNG UND
REINIGUNG
Die richtige Wartung und Pflege Ihres
Elektrogeräts kann seine Lebensdauer
verlängern.
! Das Gerät von der Stromversorgung
trennen.
Um die Waschmaschine von außen zu
reinigen, nutzen Sie ein feuchtes Tuch mit
leichten Reinigungsmitteln. Das Gerät
erfordert keine besondere Reinigung
von außen: reinigen Sie lediglich die
Schubladen für Waschmittel und den Filter.
! Die Waschmaschine besitzt eine
spezielle Vorrichtung zum Auffangen
von größeren Gegenständen (z.B.
Knöpfe/Münzen), welche die Pumpe oder
den Ablaufschlauch verstopfen könnten.
!
NUR BEI EINIGEN MODELLEN: Schlauch
herausziehen, Stöpsel entfernen und
Restwasser in einem Behälter auffangen.
! Bevor Sie die Klammerfalle öffnen,
empfehlen wir, den Boden mit einer
saugfähigen Unterlage auszulegen.
! Drehen Sie den Verschluss gegen den
Uhrzeigersinn.
! Entnehmen und Reinigen Sie die Abdeckung
mit dem Grobschmutzfilter und drehen sie
anschließend im Uhrzeigersinn wieder ein.
! Wiederholen Sie die restlichen Schritte in
umgekehrter Reihenfolge, um die Teile wieder
einzubauen.
! Sollte die Maschine in einem überhitzten
Raum gelagert sein, lassen Sie das
gesamte Wasser aus den Schläuchen.
! Ziehen Sie alle Stecker aus der Maschine.
! Trennen Sie den Schlauch von dem Riegel und
füllen Sie das gesamte Wasser in eine Schüssel.
! Sichern Sie den Schlauch wieder mit den Riegeln.
! Taste (A) drücken.
! Taste gedrückt halten und den Behälter
drehend herausziehen.
! Den Behälter herausziehen und reinigen.
!
Es wird empfohlen, sämtliche Waschmittelreste
stets vollständig aus dem Waschmittelbehälter
zu entfernen, um eventuelle Verstopfungen
zu
verhindern.
! Bitte die markierten Stellen (S) auf der
Rückseite des Waschmittelbehälters
regelmäßig sorgfältig reinigen.
! Eventuelle Verkrustungen entfernen, die die
Öffnung der Abteilung verstopfen könnten.
B
A
C
S
Lippen wie abgebildet einschieben (B). Behälter
zum Deckel hin drehen, bis die Lippe in ihre
Aufnahme (C) einrastet. Beim Einrasten ist ein
typisches Klicken zu hören.
Reinigen der Außenseite
Reinigung der Klammerfalle
Vorschläge für anhaltenden
Nichtgebrauch
Reinigung des waschmittelbehälters
und seiner fächer
Einbau
Page 35

!
DE
35
5. KURZANLEITUNG
Dieses Gerät verfügt über eine moderne
Mengenautomatik, die automatisch die benötigte
Wassermenge, den Energieverbrauch und die
Waschdauer anpasst.
! Schalten Sie Ihr Gerät ein und wählen Sie
das benötigte Programm aus.
! Stellen Sie wenn nötig eine
Waschtemperatur ein.
! Drücken Sie den Button START/PAUSE
um den Waschvorgang zu starten.
Fällt der Strom aus, während die
Maschine läuft, nimmt die Maschine das
Programm am unterbrochenen Zeitpunkt
wieder auf, wenn der Strom zurück ist.
! Am Ende des Programms erscheint die
Nachricht "End" auf der Anzeige bzw. bei
einigen Modellen schalten sich alle
Waschgang-Anzeigelampen an.
! Schalten Sie die Waschmaschine nun
aus..
Für jeden Waschtyp sehen Sie in der
Tabelle die passenden Sequenzen.
Wasserdruck:
min 0,05 Mpa / max 0,8 Mpa
Schleuderdrehzahl:
Siehe Typenschild.
Gesamtanschlußwert/Absicherung/
Spannung:
Siehe Typenschild.
6. STEUERUNG UND
PROGRAMME
A
H
Q
EDFGCB
IOPLMN
A
Programmwahlschalter mit
Position AUS (OFF)
B
Taste START/PAUSE
C
Taste STARTZEITVORWAHL
D
OPTIONSTASTEN
E
Taste KURZPROGRAMME/
VERSCHMUTZUNGSGRAD
F
Taste WASCHTEMPERATURWAHL
G
Taste SCHLEUDERDREHZAHLWAHL
F+G
TASTENSPERRE
H
Anzeigebereich
I
OPTIONSANZEIGELAMPEN
L
Anzeige TÜRVERRIEGELUNG
M
Anzeige KG DETECTOR
N
Anzeige TASTENSPERRE
O
Anzeigen WASCHTEMPERATUR
P
Anzeigen SCHLEUDERDREHZAHL
Q
SMART TOUCH-Bereich
Programmauswahl
Warten bis die Anzeige TÜRVERRIEGELUNG
erloschen ist, bevor die Tür geöffnet
wird.
Technische Daten
Page 36

!
36
! Drücken Sie die Taste START/PAUSE, um
das gewählte Waschprogramm zu
beginnen.
! Die Position des Programmwahlschalters
ändert sich während des kompletten
Programmablaufs nicht.
! Um das Gerät auszuschalten, bitte den
Programmwahlschalter auf die Position
AUS stellen.
! Drücken Sie die Taste START/PAUSE,
um das gewählte Waschprogramm zu
beginnen.
WÄSCHE NACHLEGEN ODER ENTNEHMEN,
NACHDEM DAS PROGRAMM BEGONNEN
HAT (PAUSE)
! Die Taste START/PAUSE für mindestens
2 Sekunden gedrückt halten (einige der
Anzeigeleuchten sowie die
Restlaufzeitanzeige beginnen zu blinken,
während das Programm unterbrochen
ist).
! Nach 2 Minuten wird die Türverriegelung
automatisch deaktiviert und das Bullauge
kann geöffnet werden.
! Nachdem Entnehmen oder Nachlegen
von Wäsche das Bullauge wieder
schließen und die Taste START/PAUSE
erneut drücken (Programm wird an der
ursprünglichen Stelle fortgesetzt).
WASCHPROGRAMM ABBRECHEN
! Um ein Programm zu beenden, den
Programmwahlschalter auf die Position
AUS stellen.
! Der Programmstart kann zwischen 1
Stunde und 24 Stunden verzögert
werden.
! Um den Programmstart zu verzögern,
bitte diesen Schritten folgen:
Bullauge öffnen
Eine Sicherheitsvorrichtung verhindert,
dass das Bullauge unmittelbar nach
Beendigung des Waschvorganges
geöffnet werden kann. Nach zwei
Minuten erlischt die Anzeige
“Türverriegelung” und das Bullauge
kann geöffnet werden.
Programmwahlschalter mit
Position AUS (OFF)
Im Displaybereich werden die gewählten
Programmparameter und Optionen
angezeigt. Um Energie zu sparen wird
die Helligkeit des Displays während des
Waschvorganges und wenn längere Zeit
keine Eingaben vorgenommen wurden
verringert.
Um das Gerät auszuschalten, bitte den
Programmwahlschalter auf die Position
AUS stellen.
Der Programmwahlschalter muss am
Ende jedes Waschvorganges oder vor
der Wahl eines neuen Waschprogramms
auf die Position AUS gedreht werden.
Taste START/PAUSE
ZUERST das Bullauge schliessen und
dann die Taste START/PAUSE drücken.
Wenn die Taste START/PAUSE gedrückt
wurde, kann es einige Sekunden dauern,
bevor der Waschvorgang beginnt.
Bitte überprüfen Sie vor dem Öffnen
der Tür, dass der Wasserstand
unterhalb der Türöffnung liegt, um
das Herausfließen von Wasser zu
verhindern.
Taste STARTZEITVORWAHL
Page 37

!
DE
37
- Stellen Sie das gewünschte Programm ein.
-
Drücken Sie die Taste STARTZEITVORWAHL
einmal, um die Funktion zu aktivieren
(es erscheint die Anzeige h00 auf dem Display).
Für eine einstündige Verzögerung drücken Sie
die Taste erneut (im Display erscheint die
Anzeige h01). Wiederholen Sie diesen Vorgang
so oft, bis die gewünschte Verzögerung im
Display erscheint. Zum Zurücksetzen der
Startzeitvorwahl die Taste so oft drücken, bis im
Display wieder die Anzeige h00 erscheint.
- Durch das Drücken der Taste
START/PAUSE bestätigen Sie Ihre
Auswahl. Der Countdown beginnt und
das Programm startet automatisch.
! Die eingestellte Startzeitvorwahl kann
unterbrochen werden, indem der
Programmwähler auf AUS gestellt wird.
Sollte es eine Unterbrechung der
Stromversorgung während eines laufenden
Waschvorgangs geben, werden die
Einstellungen gespeichert, um das Programm
bei Wiederinbetriebnahme automatisch
fortzusetzen.
Mit dieser Taste haben Sie die Auswahl
zwischen drei Optionen:
- EXTRA SPÜLEN
! Mit dieser Option können Sie am Ende
des Waschgangs noch ein weiteres Mal
spülen. Diese Option wurde für
Menschen mit empfindlicher und
sensibler Haut entwickelt, bei denen
schon kleinste Waschmittelrückstände zu
Hautreizungen oder Allergien führen.
! Der Einsatz dieser Funktion ist auch
ratsam für Gegenstände von Kindern und
für den Fall stark verschmutzter Wäsche,
für die eine größere Menge an
Waschmittel notwendig ist, oder beim
Waschen von Hand- und Badetüchern,
deren Fasern meistens die Tendenz
haben, das Waschmittel zu speichern.
- HYGIENE+
Sie können diese Funktion nur aktivieren,
wenn Sie als Waschtemperatur 60°C
eingestellt haben. Mit dieser Option wird
während des gesamten Waschgangs Ihre
Kleidung mit konstanter Temperatur gewaschen.
- LEICHTBÜGELN
Durch das Zuwählen dieser Option lässt sich
die Knitterbildung durch Weglassen der
Zwischenschleudergänge bzw. Durchführung
des Endschleuderns bei reduzierter
Schleuderdrehzahl weitestgehend reduzieren.
Mit dieser Taste haben Sie je nach
ausgewähltem Programm die Auswahl
zwischen zwei verschiedenen Optionen.
- KURZPROGRAMME
Die Taste wird aktiv, wenn Sie das
Programm KURZ (14/30/44 Min.) mit dem
Knopf auswählen, und ermöglicht Ihnen,
eine der drei angezeigten Zeiten
auszuwählen.
- VERSCHMUTZUNGSGRAD
! Sobald das Programm ausgewählt wurde,
wird die eingestellte Waschzeit für dieses
Programm automatisch angezeigt.
! Mit dieser Option haben Sie je nach
Verschmutzungsgrad des Stoffs die
Auswahl zwischen 3 Waschintensitätsstufen,
die die Länge des Programms verändern
(sie kann nur bei einigen Programmen
genutzt werden – siehe Programmtabelle).
Die Optionstasten sollten vor dem
Drücken der START/PAUSE-Taste
gewählt werden.
OPTIONSTASTEN
Wenn eine Option ausgewählt wurde,
die mit dem ausgewählten Programm
nicht kompatibel ist, dann blinkt die
Optionsanzeigelampe zuerst und geht
dann aus.
Taste KURZPROGRAMME/
VERSCHMUTZUNGSGRAD
Page 38

!
38
! Mit dieser Taste können Sie die
Temperatur des Waschgangs verändern.
! Um die Stoffe zu schützen, kann die für
jedes Programm erlaubte Höchsttemperatur
nicht überschritten werden.
! Wenn Sie eine Kaltwäsche durchführen
wollen, müssen alle Anzeigelampen
ausgeschaltet sein.
! Durch das Drücken dieser Taste kann die
Höchstgeschwindigkeit gesenkt und,
wenn Sie wollen, der Schleudergang
abgebrochen werden.
! Wenn das Etikett keine spezifischen
Angaben macht, kann die in dem
Programm erwartete maximale
Schleudergeschwindigkeit verwendet
werden.
! Drücken Sie für die Reaktivierung des
Schleudergangs die Taste, bis Sie die
gewünschte Schleudergeschwindigkeit
eingestellt haben.
! Sie können die Schleudergeschwindigkeit
ohne ein Anhalten der Maschine ändern.
! Drücken Sie gleichzeitig die Tasten
WASCHTEMPERATURWAHL und
SCHLEUDERDREHZAHLWAHL für
ungefähr 3 Sekunden, dann können die
Tasten der Maschine gesperrt werden.
Auf diese Art können Sie versehentliche
oder ungewollte Änderungen vermeiden,
wenn eine Taste auf der Anzeige
während eines Waschgangs aus
Versehen gedrückt wird.
! Die Tastensperre kann ganz einfach
durch das gleichzeitige Drücken der zwei
Tasten oder durch das Abschalten des
Geräts aufgehoben werden.
Im Displaybereich werden wichtige
Informationen für den Benutzer angezeigt.
1 2 3 4 6 7
5
1) OPTIONSANZEIGELAMPEN
Die Anzeigelampen zeigen die Optionen an,
die mit der entsprechenden Taste
ausgewählt werden können.
Taste WASCHTEMPERATURWAHL
Taste SCHLEUDERDREHZAHLWAHL
Um eine Schädigung des Stoffes zu
vermeiden, kann die für jedes Programm
erlaubte Höchstgeschwindigkeit nicht
überschritten werden.
Eine Überdosierung von Waschmittel
kann zu übermäßiger Schaumbildung
führen. Wenn das Gerät übermäßigen
Schaum entdeckt, kann es die
Schleuderphase aussetzen oder die
Dauer des Programms verlängern und
den Wasserverbrauch erhöhen.
Die machine is uitgerust met een
speciaal elektronisch apparaat, dat!
centrifugeren voorkomt indien er
geen belading! is of bij bijzonder
asymmetrische belading.! Dit vermindert
het lawaai en de trillingen in de
machine en! verlengt aldus de
levensduur van uw machine.
TASTENSPERRE
Anzeigebereich
Page 39

!
DE
39
2) PROGRAMMDAUER
! Sobald ein Waschprogramm ausgewählt wurde,
wird automatisch die Standardprogrammlaufzeit
im Display angezeigt.
! Nachdem das Programm gestartet wurde, wird
die Programmlaufzeit nach einigen Minuten den
jeweiligen Programmbedingungen angepasst.
Die Mengenautomatik berechnet die
Programmlaufzeit anhand diverser Parameter
wie Wasserdruck, -härte, -einlauftemperatur,
Raumtemperatur, Wäscheart, -menge und verschmutzung, verwendetem Waschmittel,
Schwankungen in der Netzspannung und
gewählten Optionen etc.
3) ANZEIGE TÜRVERRIEGELUNG
! Die Anzeige beginnt zu leuchten, sobald
das Bullauge richtig geschlossen.
! Wenn die Taste START/PAUSE gedrückt
wird blinkt die Anzeige zuerst kurz auf
und leuchtet dann permanent.
! Eine Sicherheitsvorrichtung verhindert,
dass das Bullauge unmittelbar nach
Beendigung des Waschvorganges geöffnet
werden kann. Nach zwei Minuten erlischt
die Anzeige TÜRVERRIEGELUNG und
das Bullauge kann geöffnet werden. Drehen
Sie am Ende des Waschvorganges den
Programmwahlschalter auf die Position
AUS.
4) ANZEIGE "Kg Detector" - Anzeige
MENGENAUTOMATIK (nur in Baumwoll und Synthetikprogrammen)
! Während der ersten Minuten des
Waschprogramm ermittelt die moderne
Mengenautomatik alle Waschparameter
Verbrauchswerte Dieses wird durch die
Anzeige "Kg Detector" im Display
visualisiert.
! Alle Verbrauchswerte und Programmschritte
werden dahingehend automatisch optimiert
und angepasst:
- Benötigte Wassermenge nach Art und
Menge der eingefüllten Wäsche
- Programmdauer nach Art und Menge
des eingefüllten Wäsche
- Anzahl und Intensität der Spülgänge
nach Art und Menge des eingesetzten
Waschmittels
- Trommeldrehrhythmus nach Art und
Menge der eingefüllten Wäsche
- Zusätzliche Spülgänge bei übermäßiger
Schaumbildung
- Schleuderdrehzahl nach Art und Menge
der eingefüllten Wäsche, um
Unwuchten zu vermeiden.
5) ANZEIGE TASTENSPERRE
Die Anzeigelampe zeigt an, dass die Tür
verriegelt ist.
6) ANZEIGEN WASCHTEMPERATUR
Das zeigt die Waschtemperatur des
ausgewählten Programms an, das mit der
entsprechenden Taste (falls erlaubt)
geändert werden kann. Wenn Sie eine
Kaltwäsche durchführen wollen, müssen
alle Anzeigelampen ausgeschaltet sein.
7) ANZEIGEN SCHLEUDERDREHZAHL
Das zeigt die Schleudergeschwindigkeit des
ausgewählten Programms an, das mit der
entsprechenden Taste geändert oder
weggelassen werden kann.
ZUERST das Bullauge schliessen und
dann die Taste START/PAUSE drücken.
Wird die START/PAUSE Taste nicht
innerhalb von 7 Sekunden nach dem
Schließen des Bullauges gedrückt, muss
das Programm neu gestartet werden.
Page 40

!
40
Dieses Gerät ist mit Smart Touch
Technologie ausgestattet. Damit können
Sie mit Smartphones, die mit Android
arbeiten und NFC (Near Field
Communication) unterstützen, über die App
darauf direkt zugreifen.
! Laden Sie die Candy simply-Fi App. auf
Ihr Smartphone .
FUNKTIONEN
Dies sind die wichtigsten Funktionen der
App:
! VoiceAssistant - Eine Anleitung, um
den passenden Waschgang mit
lediglich drei Eingaben auszuwählen
(Kleidung/Stoffe, Farbe, Grad der
Verschmutzung).
! Waschgänge - Herunterladen und Anwenden
neuer Waschprogrmme.
! SmartCare – SmartCheckUp und
Selbstreinigungsprogramm sowie eine
Anleitung zur Fehlerbehebung.
! Meine Statistiken - Statistiken zu den
einzelnen Wäschen und Tipps für eine
effizientere Nutzung der Maschine.
ARBEITEN MIT SMART TOUCH
ALS ERSTES - das Gerät registrieren
! Gehen Sie auf "Einstellungen" in Ihrem
Android Smartphone und aktivieren Sie
im Menü "Wireless & Networks" die
NFC Funktion.
! Stellen Sie den Programmschalter auf
Smart Touch, um den Sensor auf dem
Bedienelement zu aktivieren.
! Starten Sie die App, legen Sie ein
Benutzerprofil an und registrieren Sie das
Gerät. Folgen Sie den Anweisungen auf
dem Display Ihres Smartphones oder der
"Kurzanleitung" des Gerätes.
SMART TOUCH
Die Candy simply-Fi App funktioniert
mit Android und auch mit iOS auf
Tablets und Smartphones. Sie
können mit dem Gerät interagieren,
allerdings können Sie die
Möglichkeiten, die Ihnen Smart Touch
bietet, nur auf Android-Smartphones
mit NFC Technologie nutzen,
wie an folgendem Funktionsschema
dargestellt:
Android
Smartphone
mit NFC
Technologie
Interaktion mit dem
Gerät + Ansicht der
Funktionen
Smartphone
ohne
Nur Ansicht der
Funktionen
Android Tablet
Nur Ansicht der
Funktionen
Apple iPhone
Nur Ansicht der
Funktionen
Apple iPad
Nur Ansicht der
Funktionen
Schauen Sie sich alle Details der
Smart Touch Funktionen an, holen Sie
sich die App im Demo-Modus oder
gehen Sie zu:
www.candysmarttouch.com
Je nach Smartphone Model und
Android Version, kann die Aktivierung
der NFC verschieden ausfallen.
Schauen Sie für Näheres in das
Handbuch Ihres Smartphones.
Weitere Informationen, häufige Fragen
(F.A.Q.) und das Video für eine
einfache Registrierung finden Sie auf:
www.candysmarttouch
.com/how-to
Page 41

!
DE
41
BEIM NÄCHSTEN MAL - Die normale Anwendung
! Immer, wenn Sie das Gerät über die App
steuern möchten, müsse Sie zunächst den
Smart Touch Modus aktivieren, indem Sie
ihn an die entsprechende Stelle drehen.
! Stellen Sie sicher, dass die Standby-Funktion
nicht aktiviert ist, der Sperrbildschirm nicht
aktiv ist und die NFC-Funktion eingeschaltet
ist; anderfalls den vorher beschriebenen
Anweisungen folgen.
! Zum Starten eines Programms legen Sie
die Wäsche ein, geben das Waschmittel
dazu und schließen die Tür.
! Wählen Sie die gewünschte Funktion in
der App (z.B.: Programm,
SmartCheckUp
,
Aktualisierung der Statistiken, etc. …).
! Folgen Sie den Anweisungen auf dem
Telefondisplay und halten das Gerät
UNMITTELBAR VOR das Smart TouchLogo an der Bedienblende wenn Sie dazu
aufgefordert werden.
ANMERKUNGEN:
Halten Sie hr Smartphone so, dass
die NFC Antenne auf der Rückseite
sich am Logo von Smart Touch
befindet (siehe Abbildung hier unten).
Wenn Sie die genaue Position der
NFC-Antenne in Ihrem Smartphone
nicht kennen, bewegen Sie das
Telefon mit kreisenden Bewegungen
vor dem Smart Touch-Logo auf der
Bedienblende, bis die Verbindung in
der App bestätigt wird. Um den
ordnungsgemäßen Datentransfer zu
gewährleisten, ist es wichtig, das
SMARTPHONE FÜR EINIGE SEKUNDEN
VOR DIE BEDIENBLENDE ZU HALTEN;
nach erfolgtem Datenautausch wird
eine entsprechende Nachricht in der
App angezeigt, dass das Smartphone
entfernt werden kann.
Falls Sie eine dicke Schutzhülle
benutzen oder Aufkleber aus Metall
am Smartphone angebracht haben,
könnte dies die Daten-Übertragung
zwischen Gerät und Smartphone
beeinträchtigen oder verhindern.
Falls
erforderlich, entfernen Sie diese.
Der Austausch bestimmter Teile des
Smartphones (z.B. Abdeckungen,
Covers, Akku etc.) gegen NichtOriginalteile kann zum Verlust der
NFC-Empfangsfähigkeit führen und
damit zu Fehlfunktionen in der App.
Managen und Kontrollieren des Gerätes
durch die App funktioniert nur " aus der
Nähe": eine Fernbedienung ist nicht
möglich (z.B. aus einem anderen
Zimmer oder außer Haus).
Page 42

!
42
PROGRAMM
(MAX.) *
1)
WASCHMITTEL
(siehe Steuertafel)
(MAX.)
1 o 2
BAUMWOLLE
2)
5
5,5 6 6,5 7 8
90°
ECO 40-60
2)
5
5,5 6 6,5 7 8
60°
BAUMWOLLE +
VORWÄSCHE
2)
5
5,5 6 6,5 7 8
60°
( )
WOLLE/
HANDWÄSCHE
1 1 1 1 1
2
30°
MISCHWÄSCHE
2)
2,5
2,5 3 3
3,5
4
60°
SPÜLEN
- - - - -
-
-
ABPUMPEN +
SCHLEUDERN
- - - - -
-
-
FEINWÄSCHE 59'
2 2 2 2 2,5
2,5
40°
SPORT PLUS 39'
1,5
1,5 2 2 2 2,5
30°
HYGIENE PLUS 59'
1,5
1,5 2 2 2 2
60°
14'
1 1 1 1 1
1,5
30°
KURZ
3)
30'
1,5
1,5 2 2
2,5
2,5
30°
44'
3 3 3 3 3,5
3,5
40°
MISCH &
BUNTWÄSCHE 59'
5 5 6 6 7
8
40°
BAUMWOLLE
PERFEKT 59'
2,5
2,5 3 3
3,5
4
40°
SPECIAL 49'
2,5
2,5 3 3
3,5
4
40°
Anpassbare Einstellung des Knopfes, den Sie auszuwählen haben, um mit
der App für Smartphones interagieren und die Waschgänge herunterladen zu
können (siehe den entsprechenden Abschnitt). Die Werkseinstellung des
Selbstreinigungsprogramm reinigt die Waschmaschine.
Programmübersicht
Page 43

!
DE
43
Bitte beachten Sie folgende Hinweise:
*
Die maximale Beladungskapazität (trockene
Kleidung lt. Normtest) hängt von dem
jeweiligen Gerätemodell ab (s. Bedienblende).
"
"
Die Schleuderdrehzahl kann je nach Modell
und den Angaben auf dem Wäscheetikett auch
angepasst bzw. das Endschleudern komplett
unterbunden werden. Die Steuerung geschieht dabei
über die Taste SCHLEUDERDREHZAHLWAHL.
Werden auf dem Wäscheetikett keine Angaben
hierzu gemacht, kann jeweils die maximal mögliche
Schleuderdrehzahl genutzt werden. Waschmittel
bitte immer nach Herstellerangabe und Wasserhärte
dosieren. Eine Überdosierung des verwendeten
Waschmittels bzw. der Waschzusätze kann zu
übermäßiger Schaumbildung führen. Erkennt das
Gerät eine vermehrte Schaumbildung, beendet es
ggf. automatisch den Schleudervorgang vorzeitig, die
Programmlaufzeit wird entsprechend verlängert und
der Wasserverbrauch angepasst.
( )
Nur bei gewählter VORWÄSCHEOption verfügbar (Nur bei
Programmen verfügbar, in denen die
VORWÄSCHE-Option zuwählbar ist).
1)
Wenn ein Programm ausgewählt wurde,
wird auf der Anzeige die empfohlene
Waschtemperatur angezeigt, die mit der
entsprechenden Taste (falls erlaubt)
geändert werden kann. Die für jedes
Programm erlaubte Höchsttemperatur
kann jedoch nicht überschritten werden.
2)
Für die aufgeführten Programme
kann über die Optionstaste
VERSCHMUTZUNGSGRAD die
Dauer und Intensität des
Waschprogramms angepasst werden.
3)
Nachdem der Programmwähler auf die
Position KURZ gestellt wurde, können
Sie über die Taste KURZPROGRAMME
eines der drei KURZPROGRAMME
(14/30/44 Minuten) auswählen.
! VORWÄSCHE: wenn der Waschmittelbehälter
ein spezielles Fach für die Vorwäsche hat, die
hierfür vorgesehene Waschmittelmenge bitte
hier einfüllen. Andernfalls das Waschmittel bitte
in der vom Waschmittehersteller empfohlenen
Menge direkt an der gelochten Stelle direkt auf
der Trommel (s. Abbildung) einfüllen.
**STANDARDBAUMWOLLPROGRAMME
für Prüfung und Energieetikettierung
gemäß Richtlinie (EU) 1015/2010 und
1061/2010.
BAUMWOLLPROGRAMM mit einer
Waschtemperatur von 60°C.
BAUMWOLLPROGRAMM mit einer
Waschtemperatur von 40°C.
Diese Programme eignen sich zur Reinigung
normal verschmutzter Baumwollwäsche und
sind die effizientesten Programme in Bezug
auf den kombinierten Energie- und
Wasserverbrauch zum Waschen von
Baumwollwäsche.
Die Temperaturangaben zu den
Programmen sind auf die Angaben auf
dem Wäscheetikett abgestimmt. Die
tatsächliche Wassertemperatur kann ggf.
leicht abweichen.
Bevor Sie die Abdeckung schließen und den
Waschvorgang starten, vergewissern Sie
sich, dass die Trommelöffnung geschlossen
ist. Wenn möglich, richten Sie die angezeigte
Trommelpositionierung ein. Sie erreichen
hierdurch beste Waschergebnisse.
WICHTIG: Bitte die Vorwäsche-Option
nicht in Kombination mit der
Startzeitvorwahl verwenden.
Page 44

!
44
Zur Reinigung unterschiedlicher Gewebesorten
und Verschmutzungen bietet die Waschmaschine
eigene programme an, die allen Anforderungen
gerecht werden (siehe Programmtabelle).
Smart Touch
Anpassbare Einstellung des Knopfes, den
Sie auszuwählen haben, wenn Sie mit der
App die Maschine steuern möchten und
einen Waschgang herunterladen/starten
wollen (siehe den entsprechenden
Abschnitt und die Bedienungsanleitung
der App für weitere Informationen).
Bei der Option Smart Touch ist
der "Selbstreinigungsprogramm" als
Werkseinstellung zur Reinigung der
Trommel, zur Entfernung schlechter
Gerüche und zur Verlängerung der
Lebensdauer der Waschmaschine
eingestellt. Stellen Sie sicher, dass
der "Selbstreinigungsprogramm" ohne
Kleider in der Maschine und nur mit
Waschpulver gestartet wird. Lassen Sie
die Tür der Maschine am Ende des
Waschgangs offen, damit die Trommel
trocknen kann. Alle 50 Wäschen
empfohlen.
BAUMWOLLE
Das Programm eignet sich besonders zum
Waschen von farbigen Baumwollkleidungsstücken
bei 40°C oder zur Reinigung für
baumwollhaltige Wäsche bei 60°C oder
90°C mit besten Ergebnissen.
Der letzte Schleudergang erfolgt bei
maximaler Drehzahl und hinterlässt somit
eine geringe Restfeuchte der Wäsche.
ECO 40-60
Das ECO 40-60 Programm wäscht normal
verschmutzte Baumwollwäsche, die laut
Etikett bei 40°C oder 60°C gewaschen
werden kann, zusammen in einem Waschgang
sauber. Dieses Programm wird verwendet,
um die Einhaltung der EU-Richtlinie
Ecodesign (umweltgerechte Gestaltung von
Produkten) zu bewerten.
BAUMWOLLE + VORWÄSCHE
Dieses Programm wurde zur Entfernung
von hartnäckigen Flecken aus weißer
Baumwolle konzipiert. Die Vorwäsche
garantiert die Entfernung von hartnäckigen
Flecken. Geben Sie in das Fach "1" die
Menge an Waschmittel, die 20% des
für den Hauptwaschgang genutzten
Waschmittels entspricht.
WOLLE/HANDWÄSCHE
Dieses Programm wäscht Textilien aus
Wolle, die laut Etikett für die
Maschinenwäsche oder ausschließlich für
die Wäsche von Hand geeignet sind, oder
Textilien aus Seide, die für die
Maschinenwäsche geeignet sind.
MISCHWÄSCHE
Bei diesem Programm können Sie verschiedene
Stoffe und Farben gemeinsam waschen.
Das präzise Schleudern und die
Wasserstände werden beim Waschen und
Spülen optimiert. Optimal angepasstes
Schleudern bedeutet weniger Knitterfalten.
SPÜLEN
Bei diesem Waschgang werden drei
Spülgänge bei mittlerer Schleuder-leistung
durchgeführt (das Schleudern kann mit der
entsprechenden Taste verrkürzt oder
ausgeschaltet werden), was z. B. nach
einer Handwäsche nützlich ist.
Programmbeschreibungen
Wählen Sie das zur Waschanleitung
auf dem Etikett des Kleidungsstücks
passende Programm, vor allem die
empfohlene Höchsttemperatur, aus.
WARNUNG:
WICHTIGER HINWEIS ZUR
WASCHLEISTUNG.
! Neue, bunte Wäschestücke sollten
mindestens fünf- bis sechsmal
separat gewaschen werden.
! Bestimmte große, dunkle
Wäschestücke wie Jeans und große
Handtücher sollten immer separat
gewaschen werden.
!
Keine Textilien, die NICHT FARBECHT
sind, mit anderen waschen.
Page 45

!
DE
45
ABPUMPEN + SCHLEUDERN
Dieses Programm ist eine Kombination aus
Abpumpen und maximaler Schleuderleistung
.
Sie können den Schleudervorgang mit der
SCHLEUDERGANG-Taste auch verkürzten
oder ganz entfallen lassen.
FEINWÄSCHE 59'
Entwickelt für die Feinwäsche und kostbare
Textilien. Dieses Programm wäscht 59
Minuten bei niedriger Temperatur.
Empfohlen für kleine Waschladungen.
SPORT PLUS 39'
Entfernt Schmutz und Schweiß aus
technischen Textilien und Sportbekleidung.
Das Programm wäscht 39 Minuten lang bei
niedriger Temperatur. Empfohlen für kleine
Waschladungen von Synthetikkleidung.
HYGIENE PLUS 59'
Dieses Programm bietet die bestmögliche
Kombination aus hoher Temperatur,
Waschdauer und Reinigung, um eine
maximale Desinfektion von Bakterien in nur
59 Minuten zu garantieren. Empfohlen für
Baumwolltextilien und kleine
Waschladungen bei 60°C.
KURZ (14'/30'/44')
Schont den Geldbeutel ohne Kompromisse!
Dieses neue Programm erzielt hervorragende
Ergebnisse und spart gleichzeitig Wasser,
Strom, Waschmittel und Zeit. Es ist
geeignet für alle Textilien, die bei mittlerer
Temperatur gewaschen werden können.
Empfohlen für kleine Waschladungen und
leicht verschmutzte Wäsche.
MISCH & BUNTWÄSCHE 59' *
Dieses Programm wäscht alle Textilien und
waschechte Farben zusammen in einer
vollen Waschladung in nur 59 Minuten
perfekt sauber. Bei einer mittleren
Temperatur wird dieses Programm für leicht
verschmutzte Wäsche empfohlen.
*Die voreingestellte Temperatur beträgt
20°C (kann durch Drücken der
entsprechenden Taste geändert werden).
Der Waschzyklus eignen sich auch zum
Waschen von Baumwollgeweben.
BAUMWOLLE PERFEKT 59'
Dieses Programm garantiert für perfekt
saubere Baumwollwäsche. Die Option
wurde speziell für eine verkürzte
Waschdauer mittelstark verschmutzter
Baumwollwäsche bei mittlerer Temperatur
entwickelt. Für bessere Resultate wird eine
halbe Waschladung empfohlen.
SPECIAL 49'
Dank seiner innovativen Technologie
ermöglicht Ihnen dieses Programm, die Zeit
für die Wäsche zu verkürzen und dennoch
bei mittlerer Temperatur in nur 49 Minuten
eine hohe Waschleistung zu erzielen. Für
beste Ergebnisse befüllen Sie die Maschine
nur halb.
Page 46

!
46
Trommel öffnen / schließen
! Tür des Waschautomaten öffnen.
! Die Trommel beim Betätigen des Knopfes
(A) öffnen, und gleichzeitig die andere
Hand auf die Klappe legen.
! Wäschestücke, ohne diese
zusammenzudrücken, einzeln in die
Trommel geben. Bitte achten Sie darauf,
dass die auf der “Programmtabelle”
empfohlenen Lademengen nicht
überschritten werden. Bei überladenen
Waschautomaten fällt das Ergebnis nicht
zufriedenstellend aus und die Wäsche
wird zerknittert.
! Um die Trommel zu schliessen , muss
man wieder die Trommelklappen
betätigen, bei dem Knopf (A) unter der
anderen angebracht wird, bis sie
vollkommen verkoppelt sind.
Waschmittelmenge
Der Waschmittelbehälter ist in 3 Fächer
unterteilt:
! Waschmittelfach 1 ist für Pulverwaschmittel.
!
Waschmittelfach 2 ist für Flüssigwaschmittel.
! Fach
ist für Weichspüler, Duftmittel,
Stärke und spezielle Zusatzmittel (wie
z.B. Stärke und Waschblau) vorgesehen.
! Die Beschriftung MAX am Waschmittelbehälter
gibt die maximale Befüllung mit Waschmittel
an. Keinesfalls mehr einfüllen.
!
Wenn die Textilien Flecken beinhalten, die
eine Behandlung durch flüssige Bleichmittel
benötigen, kann man sie in der Vorstufe
der Waschmaschine reinigen. Dazu das
Bleichmittel in die “Abteilung 2" eingeben und
das Abspülungsprogramm betätigen. Nach
Beendigung des Vorgangs, den Programmierer
in Position OFF stellen, den Rest der Wäsche
zufügen und mit dem gewünschten Programm
zur normalen Spülung schreiten.
1) Maximale Spülung mit Waschpulver
2) Maximale Spülung mit Spülmittel
3) Maximale Duftstoffe
Waschvorbereitung
Page 47

!
DE
47
7. PROBLEMLÖSUNGEN UND GARANTIE
Wenn Sie der Meinung sind, das Gerät würde nicht korrekt funktionieren, dann finden Sie
in der beigelegten Kurzanleitung einige praktische Tipps, wie die häufigsten Probleme zu
beheben sind.
FEHLER-BERICHT
Fehleranzeige
Mögliche Ursachen und praktische Lösungen
E2 (mit Display)
2 x Blinken der
LED (ohne Display)
Das Gerät erhält kein Wasser.
Stellen Sie sicher, dass der Wasserhahn geöffnet ist.
Stellen Sie sicher, dass der Schlauch für den Wasserzulauf nicht geknickt
oder eingeklemmt ist.
Wasser-Anschlüsse nicht in der korrekten Höhe (s. unter Installation)
Wasserhahn des Wasserzulaufs schliessen, am Gerät aufschrauben und
prüfen, ob der "Sandfilter" sauber ist und nicht verstopft.
Vergewissern Sie sich, dass der Filter nicht verstopft ist und dass sich
keine Fremdkörper im Filterabteil befinden, die den Wasserfluss behindern können.
E3 (mit Display)
3 x Blinken der
LED (ohne Display)
Wasser in der Waschmaschine läuft nicht ab.
Vergewissern Sie sich, dass der Filter nicht verstopft ist und dass sich
keine Fremdkörper im Filterabteil befinden, die den Wasserfluss behindern können.
Stellen Sie sicher, dass der Schlauch nicht geknickt, oder eingeklemmt ist.
Vergewissern Sie sich, dass die Abflüsse im Haus nicht verstopft sind
und Wasser ohne Probleme ablaufen kann. Prüfen Sie, ob das Wasser
im Waschbecken abläuft.
E4 (mit Display)
4 x Blinken der
LED (ohne Display)
Es gibt zu viel Schaum und/oder Wasser.
Überprüfen Sie, ob Sie eventuell zuviel Waschmittel benutzt haben oder
ein für Waschmaschinen ungeeignetes Waschmittel.
E7 (mit Display)
7 x Blinken der
LED (ohne Display)
Probleme mit der Tür.
Stellen Sie sicher, dass die Tür richtig geschlossen ist. Stellen Sie sicher,
daß keine Wäsche im Gerät das Schließen der Tür behindert.
Falls die Tür sich nicht öffnen lässt, das Gerät ausschalten, den Stecker aus der
Steckdose ziehen, 2-3 Minuten warten und die Tür noch einmal öffnen.
Alle anderen
Codes
Schalten Sie das Gerät aus und ziehen Sie den Stecker aus der
Steckdose. Schalten Sie das Gerät wieder ein und starten Sie ein
Programm. Wenn der Fehler erneut auftritt, wenden Sie sich bitte an ein
autorisiertes Kunden-Service-Center.
NUR FÜR GERÄTE MIT SMART TOUCH.
Mit der Funktion SmartCheckUp Ihrer Candy simply-Fi-App können Sie jederzeit
prüfen, ob Ihr Gerät ordungsgemäß arbeitet. Sie benötigen nur ein Android
Smartphone mit NFC Technologie. Weitere Infos finden Sie der App.
Wenn das Gerät eine Störung anzeigt (durch einen Code oder aufblinkende LED),
schalten Sie bitte Ihre App ein, und halten Ihr Android Smartphone mit NFC an
das Smart Touch-Logo auf dem Bedienerfeld. Sie können jetzt direkt in der
Anwendung nach dem Problem suchen.
! Geräte mit Display: die Störung wird durch den Buchstaben E zusammen mit einer
Nummer angezeigt (Beispiel: Error 2 = E2)
! Geräte ohne Display: die Störung wird angezeigt, indem die LED so häufig blinken,
wie es dem Fehlercode entspricht, gefolgt von einer Pause von 5 Sekunden
(Beispiel: Error 2 = 2 x Blinken - Pause - 2 x Blinken - usw...)
Page 48

!
48
SONSTIGE AUFFÄLLIGKEITEN
Problem
Mögliche Ursachen und praktische Lösungen
Die Waschmaschine
geht nicht/startet nicht
.
Stellen Sie sicher, dass das Gerät an einer funktionierenden
Steckdose angeschlossen ist.
Stellen Sie sicher, dass das Gerät eingeschaltet ist.
Stellen Sie sicher, dass die Steckdose funktioniert, und testen Sie
das mit einem anderen Gerät (eine Lampe)
Es kann sein, dass die Tür nicht korrekt geschlossen ist: öffnen und
schließen Sie es noch einmal.
Überprüfen Sie, ob das gewünschte Programm richtig gewählt und
die Start-Taste gedrückt ist.
Stellen Sie sicher, dass sich das Gerät nicht im Pause-Modus
befindet.
Wasser ist auf den
Boden in der Nähe
Waschmaschine
ausgelaufen.
Dies kann an einem Leck in der Dichtung zwischen Wasserhahn und
Schlauch liegen; in diesem Fall die Dichtung erneuern und alles gut
festziehen.
Stellen Sie sicher, dass der Filter richtig geschlossen ist.
Die Trommel der
Waschmaschine dreht
sich nicht.
Falls die Wäsche nicht optimal in die Maschine geladen wurde, kann
folgendes passieren:
• Es wird versucht, das Gewicht auszubalanzieren, und dadurch
verlangsamt sich die Umdrehungszahl.
• Drehzahl der Trommel wird langsamer, um Vibrationen und Lärm
zu verringern.
• Trommel schaltet sich ab, um die Waschmachine zu schützen.
Stellen Sie sicher, dass die Wäsche gleichmäßig verteilt ist. Falls
dies nicht so ist, entwirren Sie die Wäsche, füllen Sie die Maschine
erneut und starten Sie das Programm noch einmal.
Dies könnte daran liegen, dass das Wasser noch nicht komplett
eingelaufen ist:
warten Sie ein paar Minuten. Falls dies Problem sich nicht beheben
läßt, schauen Sie unter Abschnitt Fehler 3.
Einige Modelle verfügen über eine Funktion "Nicht schleudern":
stellen Sie sicher, dass diese nicht aktiviert ist.
Stellen Sie sicher, dass nichts aktiviert ist, was das Schleudern
beeinträchtigt.
Zu viel Waschmittel könnte den Beginn des Schleuderorgangs
verzögern.
Während des
Schleuderns hört man
starke Vibrationen /
Geräusche.
Eventuell steht die Waschmaschine nicht vollständig eben: falls
notwendig,
die Füße einstellen, wie in der Anleitung beschrieben.
Stellen Sie sicher, dass Befestigungsschrauben, Gummistopfen
und Schlauchverlängerungen für den Transport entfernt wurden.
Stellen Sie sicher, daß keine Fremdkörper in die Trommel
(Münzen, Scharniere, Knöpfe, usw...) gelangen.
Die Standard-Garantie des Herstellers umfasst Fehler, welche durch elektrische
oder mechanische Fehler des Produktes verursacht wurden, als Handlung oder
Unterlassung des Herstellers. Falls ein Fehler durch Faktoren außerhalb des
gelieferten Produktes verursacht wurde, durch Fehlbedienung oder als Resultat
einer nicht beachteten Gebrauchsanleitung, kann eine Gebühr erhoben werden.
Page 49

!
DE
49
Es empfiehlt sich immer Originalersatzteile
zu benutzen, die in unseren autorisierten
Kundendienstzentren erhältlich sind.
Mit der Anbringung des -Zeichens
am Gerät zeigen wir an, dass wir
sämtliche für dieses Produkt geltenden
und notwendigen europäischen
Sicherheits-,
Gesundheits-
und
Umweltstandards einhalten und hierfür
haftbar sind.
Wir schließen die Haftung für alle evtl.
Druckfehler aus.
Kleinere Änderungen und technische
Weiterentwicklungen im Detail
vorbehalten.
Garantie
Die Garantiezeit des Gerätes entspricht
den jeweiligen gesetzlichen Vorschriften.
Nähere Angaben zu Art und Umfang
der Garantiebedingungen finden
Sie im Garantieheft. Bitte das
Original der Kaufrechnung für die
Garantieersatzansprüche aufbewahren,
um diese im Bedarfsfall unserem
Werkskundendienst vorzulegen. Ohne
diese Nachweise können wir und unser
Werkskundendienst den Anspruch nicht
anerkennen
Page 50

!
50
Thank you for choosing this product.
We are proud to offer the ideal product for
you and the best complete range of home
appliances for your daily routine.
Carefully read this manual for correct and
safe appliance use and for helpful tips on
efficient maintenance.
Only use the washing machine after
carefully reading these instructions. We
recommend you always keep this manual on
hand and in good condition for any future
owners.
Each product is identified by a unique 16character code, also called the “serial
number”, printed on the sticker. This can be
found inside the door opening. This code is
a unique code for your product that you will
need to register the product warranty, or if
you need to contact the Customer Service
Centre.
This appliance is marked according to
the European directive 2012/19/EU
on Waste Electrical and Electronic
Equipment (WEEE).
WEEE contains both polluting substances (which
can cause negative consequences for the
environment) and basic components (which can
be re-used). It is important to have WEEE
subjected to specific treatments, in order to
remove and dispose properly all pollutants, and
recover and recycle all materials. Individuals can
play an important role in ensuring that WEEE
does not become an environmental issue; it is
essential to follow some basic rules:
! WEEE should not be treated as household
waste;
! WEEE should be handed over to the relevant
collection points managed by the municipality or
by registered companies. In many countries, for
large WEEE, home collection could be present.
In many countries, when you buy a new
appliance, the old one may be returned to the
retailer who has to collect it free of charge on a
one-to-one basis, as long as the equipment is of
equivalent type and has the same functions as
the supplied equipment.
1. GENERAL SAFETY RULES
2. INSTALLATION
3. PRACTICAL HINTS
4. CLEANING AND MAINTENANCE
5. QUICK USER GUIDE
6. CONTROLS AND PROGRAMS
7.
TROUBLESHOOTING AND WARRANTY
FOR U.K. ONLY
On receipt of your appliance please
check it carefully for damage. Any
damage found must be reported
to the
delivery driver immediately.
Alternatively damage found must be
reported to the retailer within 2 days of
receipt.
Environmental conditions
Contents
Page 51

!
EN
51
1. GENERAL SAFETY
RULES
! This appliance is intended to
be used in household and
similar applications such as:
- Staff kitchen areas in shops, offices
and other working environments;
- Farm houses;
- By clients in hotels, motels and
other residential type environments;
- Bed and breakfast type environments.
A different use of this appliance
from household environment
or from typical housekeeping
functions, as commercial use by
expert or trained users, is excluded
even in the above applications. If
the appliance is used in a manner
inconsistent with this it may reduce
the life of the appliance and may
void the manufacturer’s warranty.
Any damage to the appliance or
other damage or loss arising
through use that is not consistent
with domestic or household use
(even if located in a domestic or
household environment) shall not
be accepted by the manufacturer to
the fullest extent permitted by law.
! This appliance can be used by
children aged from 8 years and
above and persons with reduced
physical, sensory or mental
capabilities or lack of experience
and knowledge if they have been
given supervision or instruction
concerning use of the appliance
in a safe way and understand the
hazards involved.
Children shall not play with the
appliance. Cleaning and user
maintenance shall not be made
by children without supervision.
! Children should be supervised
to ensure that they do not play
with the appliance.
! Children of less than 3 years
should be kept away unless
continuously supervised.
! If the supply cord is damaged, it
must be replaced by a special
cord or assembly available from
the manufacturer or its service
agent.
! Only use the hose-sets
supplied with the appliance for
the water supply connection
(do not reuse old hose-sets).
! Water pressure must be between
0.05 MPa and 0.8 MPa.
! Make sure carpets or rugs do
not obstruct the base or any of
the ventilation openings.
! The OFF condition is reached
by
placing the reference mark on
the programmes control/knob in
the vertical position. Any other
different position of such control
sets the machine in ON condition
(only for models with programmes
knob).
Page 52

!
52
! After installation, the appliance
must be positioned so that the
plug is accessible.
! The maximum load capacity of
dry clothes depends on the
model used (see control panel).
! To consult the product technical
specification please refer to the
manufacturer website.
! The technical details (supply
voltage and power input) are
indicated on the product rating
plate
! Make sure that the electrical
system is earthed, complies
with all applicable law and that
the (electricity) socket is
compatible with the plug of the
appliance. Otherwise, seek
qualified professional assistance.
! The use of converters, multiple
sockets or extension cords is
strongly advised against
! Before cleaning or maintaining
the washing machine, unplug
the appliance and turn off the
water tap.
! Do not pull on the power cord
or appliance to unplug the
machine.
! Do not expose the washing
machine to rain, direct sunlight
or other weather elements.
Protect from possible freezing.
! In the event of fault and/or
malfunction, turn off the
washing machine, close the
water tap and do not tamper
with the appliance.
Immediately contact the
Customer Service Centre and
only use original spare parts.
Failure to observe these
instruction may jeopardise
appliance safety.
Electrical connections and
safety instructions
WARNING:
water may reach very high
temperatures during the
wash cycle.
Page 53

!
EN
53
2. INSTALLATION
!
Remove the 2 or 4 transportation
screws (A) on the back and
remove the 2 or 4 flat washers,
rubber bungs and plastic spacer
tubes (B) as illustrated in figure 1
.
!
Fit the trims provided "C" (fig. 2).
3
4
min 50 cm
max 85 cm
+2,6 mt
max
max 100 cm
min 4 cm
* ACCESSORY SOLD SEPARATELY
Page 54

!
54
5
! The washing machine should be
connected to the water mains via the
new tube supplied with the
appliance (inside the drum). Do not
use the old tube for this purpose.
! Connect one end of the water inlet
pipe with the elbow bend to the
electrovalve (top rear part of the
machine) and the other end to a tap
or a plumbed-in 3/4" gas threaded
connection.
!
Place the washing machine close to
the wall, ensuring that there are no
bends or kinks anywhere in the tube.
Hook the outlet pipe to the edge of
the sink or preferably to a fixed
drainage outlet of a diameter greater
than that of the outlet pipe and at a
height of min. 50 cm. and a
maximum of 75 cm. from the floor
(fig. 4).
! If necessary, use the curved*
accessory to attach and support
the outlet pipe more securely.
If your model offers this function:
! To move the washing machine
easily, turn the trolley lever to the
right. Once you have finished
moving the machine, return the lever
to its original position.
! Level the machine by adjusting the
front feet (fig. 5).
a) Turn the nut clockwise to release
the screw on the foot.
b) Raise or lower the foot by rotating
it until it stands firmly on the floor.
c) Lock the foot in position by turning
the nut anticlockwise until it comes
up against the bottom of the
washing machine.
! Check that the appliance is properly
levelled.
! Check that the washing machine
does not rock by trying to move two
diagonally opposite top corners at
the same time.
! If you move the washing machine
from one place to another, you must
level the feet again afterwards.
Page 55

!
EN
55
! Connect the water hose to the water
supply tap (fig. 6) only using the hose
supplied with the appliance (do not reuse
old hose-sets).
! SOME MODELS may include one or
more of the following features:
! HOT&COLD (fig. 7):
water mains connection settings with hot
and cold water for higher energy savings.
Connect the grey tube to the cold water
faucet and the red one to the hot water
faucet. The machine can be connected to
the cold water faucet only: in this case,
some programs may start a few minutes
later.
! AQUASTOP (fig. 8):
a device located on the supply tube that
stops water flow if the tube deteriorates;
in this case, a red mark will appear in the
window “A” and the tube must be
replaced. To unscrew the nut, press the
one-way lock device "B".
! AQUAPROTECT – SUPPLY TUBE WITH
GUARD (fig. 9):
Should water leak from the primary
internal tube "C", the transparent
containment sheath "D" will contain water
to permit the washing cycle to complete.
At the end of the cycle, contact the
Customer Service Centre to replace the
supply tube.
6
1
7
B
A
8
D
C
9
Hydraulic connections
Page 56

!
56
3. PRACTICAL HINTS
When sorting laundry, make sure:
- have eliminated metallic objects such as
hair clips, pins, coins, from laundry;
- to have buttoned pillow cases, closed
zips, tied loose belts and long robe
ribbons;
- to have removed rollers, hooks or clips
from curtains;
- to have carefully read clothing washing
labels;
- to have removed any persistent stains
using specific detergents.
! When washing rugs, bedcovers or other
heavy clothing, we recommend you avoid
the spinning cycle.
! To wash wool, make sure the item can be
machine washed. Check the fabric label.
Tips on how to save money and not
damage the environment when using your
appliance.
! Load the machine to the highest capacity
shown in the programme table for each
programme - this will allow you to SAVE
energy and water.
! Noise and residual laundry moisture are
affected by spin speed: a faster spin is
associated with greater noise and lower
residual moisture in the laundry.
! The most efficient programmes in terms
of combined use of water and energy are
usually the longer-lasting ones with lower
temperature.
Maximise the load size
! Achieve the best use of energy, water,
detergent and time by using the
recommended maximum load size.
Save up to 50% energy by washing a full
load instead of 2 half loads.
Do you need to pre-wash?
! For heavily soiled laundry only!
SAVE detergent, time, water and
between 5 to 15% energy consumption
by NOT selecting Prewash for slight to
normally soiled laundry.
Is a hot wash required?
! Pretreat stains with stain remover or soak
dried in stains in water before washing to
reduce the necessity of a hot wash
programme. Save energy by using a low
temperature wash programme.
Before using a drying programme
(WASHER-DRYERS)
! SAVE energy and time by selecting a
high spin speed to reduce the water
content in laundry before using a drying
programme.
Below is a short guide with tips and advice
on the use of detergent.
! Only use detergents suitable for machine
washing.
! Select your detergent according to the
type of fabric (cotton, delicates,
synthetics, wool, silk, etc.), the colour, the
type and level of soiling and the
programmed washing temperature.
! To use the right amount of detergent,
softener or any other additives, carefully
follow the manufacturer’s instructions
every time: correctly using the
appliance with the right dose allows
you to avoid waste and to reduce the
environmental impact.
Load tips
Useful advice for saving
Dosing the detergent
Page 57

!
EN
57
! Too much detergent leads to excessive
foam, which prevents the cycle being
carried out correctly. It could also affect
the quality of the washing and rinsing.
The use of ecological detergents without
phosphates may cause the following
effects:
- cloudier rinse drain water: This effect is
tied to the suspended zeolites which do
not have negative effects on rinse
efficiency.
- white powder (zeolites) on laundry at
the end of the wash: this is normal, the
powder is not absorbed by fabric and does
not change its colour.
To remove the zeolites, select a rinse
programme. In the future consider using
slightly less detergent.
- foam in the water at last rinse: this does
not necessary indicate poor rinsing.
Consider using less detergent in future
washes.
- abundant foam: This is often due to the
anionic surfactants found in the detergents
which are hard to eliminate from laundry.
In this case, do not re-rinse to eliminate
these effects: it will not help at all.
We suggest conducting a maintenance
wash using a proprietary cleaner.
If the problem persists or if you suspect a
malfunction, immediately contact an
Authorised Customer Service Centre.
When washing heavily soiled whites,
we recommend using cotton programs
of
60°C or above and a normal washing
powder (heavy duty) that contains
bleaching agents that at medium/high
temperatures provide excellent results.
For washes between 40°C and 60°C
the type of detergent used needs to be
appropriate for the type of fabric and
level of soiling. Normal powders are
suitable for “white” or colour fast fabrics
with high soiling, while liquid detergents
or “colour protecting” powders are
suitable for coloured fabrics with light
levels of soiling.
For washing at temperatures below
40°C we recommend the use of liquid
detergents or detergents specifically
labeled as suitable for low temperature
washing.
For washing wool or silk, only use
detergents specifically formulated for
these fabrics.
Page 58

!
58
4. CLEANING AND
MAINTENANCE
Looking after your appliance correctly can
extend its lifespan.
! Disconnect the machine from the power
supply.
To clean the washing machine exterior, use a
damp cloth, avoiding abrasives, alcohol and/or
solvents. The washing machine does not
require any special care for ordinary cleaning:
clean drawer compartments and the filter;
some tips on how to move the machine or on
long periods of disuse are provided below.
!
The washing machine comes with a special
filter able to trap large residue, such as
buttons or coins, which could clog the drain.
!
ONLY AVAILABLE ON CERTAIN MODELS:
pull out the corrugated hose, remove the
stopper and drain the water into a container.
! Before unscrewing the filter, we
recommend you place an absorbent cloth
under it to keep the floor dry.
! Turn the filter counter-clockwise to the
limit stop in the vertical position.
! Remove and clean the filter; when
finished, replace it turning it clockwise.
! Repeat the previous steps in reverse
order to reassemble all parts.
! Should the washing machine be stored in
an unheated room for a long period of
time, drain all water from tubes.
! Unplug the washing machine.
! Detach the tube from the strap and lower
it, fully draining water into a bowl.
! Secure the drain tube with the strap when
finished.
! Press button (A).
! Hold down the button and turn the
detergent dispenser outwards.
! Remove the dispenser and clean it.
! It is recommended to remove any
remamining detergent in the
compartments to avoid any build up that
could cause blockages and restrict the
water flow from the dispenser to drum.
! Pulling out and extract the trap/traps (S)
that are located in the back part of the
dispenser and clean them carefully.
! Remove any solid residue which could
block the holes in the compartments.
B
A
C
S
Fit in the tabs as shown (B).
Turn the detergent dispenser towards the housing
(C) in the door until the tab clicks into place.
Cleaning the appliance’s exterior
Filter cleaning
Suggestions for moves or
prolonged disuse
Cleaning the detergent dispenser
and its compartments
Fitting
Page 59

!
EN
59
5. QUICK USER GUIDE
This washing machine automatically adjusts
the level of the water to the type and
quantity of washing. This system gives a
reduction in energy consumption and a
saving in washing times.
! Turn on the washing machine and select
the required program.
! Adjust the washing temperature if
necessary and press the required "option"
buttons.
! Press the START/PAUSE button to start
washing.
If there is a break in the power supply
whilst the machine is operating, when
the power is restored, the machine will
restart from the beginning of the phase it
was in when the power was lost.
! At the end of the programme, the
message "End" will appear on the display
or, on some models, all wash stage
indicator lights will turn on.
! Turn off the washing machine.
For any type of wash, see the program
table and follow the operating sequence
as indicated.
Water pressure:
min 0.05 Mpa / max 0.8 Mpa
(0.05 MPa dispenses approximately 1 litre
of water in 10 seconds)
Spin r.p.m.: See rating plate.
Power input / Power current fuse amp /
Supply voltage: See rating plate.
6. CONTROLS AND
PROGRAMS
A
H
Q
EDFGCB
IOPLMN
A
Programme selector with OFF
position
B
START/PAUSE button
C
DELAY START button
D
OPTIONS button
E
RAPID / STAIN LEVEL button
F
TEMPERATURE SELECTION
button
G
SPIN SPEED button
F+G
KEY LOCK
H
Digital display
I
OPTIONS indicator lights
L
DOOR LOCKED indicator light
M
KG DETECTOR indicator light
N
KEY LOCK indicator light
O
TEMPERATURE SELECTION
indicator lights
P
SPIN SPEED indicator lights
Q
SMART TOUCH area
Program selection
Wait until the DOOR LOCKED light has
gone out before opening the door.
Technical data
Page 60

!
60
! Press the START/PAUSE button to start
the selected cycle.
! Once a programme is selected the
programme selector remains stationary on
the selected programme till cycle ends.
! Switch off the washing machine by
turning the selector to OFF.
! Press to start the selected cycle.
ADD OR REMOVE ITEMS AFTER THE
PROGRAMMES HAS STARTED (PAUSE)
! Press and hold the START/PAUSE
button for about 2 seconds (some
indicator light and the time remaining
indicator will flash, showing that the
machine has been paused).
! Wait 2 minutes until the safety device
unlocks the door.
! After you have added or removed items,
close the door and press the
START/PAUSE button (the programme
will start from where it left off).
CANCELLING THE PROGRAMME
! To cancel the programme, set the
selector to the OFF position.
! This button allows you to pre-programme
the wash cycle to delay the start of the
cycle for up to 24 hours.
! To delay the start use the following
procedure:
- Select the required programme.
- Press the delay start button once to
activate it (h00 appears on the display)
and then press it again to set a 1 hour
delay (h01 appears on the display). The
pre-set delay increases by 1 hour each
Opening the door
A special safety device prevents the
door from being opened immediately
after the end of the cycle.
Wait for 2 minutes after the wash
cycle has finished and the "Door
Security" light has gone out before
opening the door.
PROGRAMME selector with OFF
position
When the programme selector is turned
the display lights up to show the settings
for the programme selected.
For energy saving, at the end of the
cycle or with an inactivity period, the
display level contrast will decrease.
N.B.: To switch the machine off, turn
the programme selector to the OFF
position.
The programme selector must be
returned to the OFF position at the end
of each cycle or when starting a
subsequent wash cycle prior to the next
programme being selected and started.
START/PAUSE button
Close the door BEFORE selecting the
button START/PAUSE.
When the START/PAUSE button has
been pressed, the appliance can take
few seconds before it starts working.
Before you open the door, please
check water level is below the door
opening to avoid flooding.
DELAY START button
Page 61

!
EN
61
time the button is pressed, until h24
appears on the display, at which point
pressing the button again will reset the
delay start to zero.
- Confirm by pressing the START/PAUSE
button. The delay countdown will begin
and when it has finished the programme
will start automatically.
! It is possible to cancel the delay start by
turning the programme selector to OFF.
If there is any break in the power supply
while the machine is operating, a special
memory stores the selected programme
and, when the power is restored, it
continues where it left OFF.
This button allows you to choose between
three different options:
- EXTRA RINSE
! This option allows you to add one rinse at
the end of the washing cycle and is useful
for people with delicate and sensitive
skin, for which a small amount of
detergent residue can cause irritations or
allergies.
! It is advisable to also use this function for
the children clothes and for the washing
of heavily soiled items, which requires a
lot of detergent to be used, or for the
washing of toweling items whose fibres
mostly have the tendency to hold the
detergent.
- HYGIENE +
Activated when you set 60°C of
temperature. This option allows deep
cleaning of your clothes by maintaining the
same temperature for the whole wash.
- EASY IRON
This function allows you to minimizes
creases as much as possible, eliminating
the intermediate spins or reducing the
intensity of the last one.
This button allows you to choose between
two different options, depending on the
selected programme.
- RAPID
The button becomes active when
you select the RAPID (14/30/44 Min.)
programme on the knob and allows you to
select one of three durations indicated.
- STAIN LEVEL button
! Once the programme has been selected
the wash time set for that programme will
be automatically shown.
! This option allows you to choose between
3 levels of wash intensity modifying the
length of the programme, depending on
how much the fabrics are soiled (can only
be used on some programmes as shown
in the table of programmes).
! This button allows you to change the
temperature of the wash cycles.
! It is not possible to raise the temperature
over the maximum allowed for the
programme, in order to protect the
fabrics.
! If you want carry out a cold wash all the
indicators must be off.
The option buttons should be
selected before pressing the
START/PAUSE button.
OPTIONS button
If an option is selected that is not
compatible with the selected
programme then the option indicator
light first flashes and then goes off.
RAPID / STAIN LEVEL button
TEMPERATURE SELECTION
button
Page 62

!
62
! By pressing this button, it is possible to
reduce the maximum speed, and if you
wish, the spin cycle can be cancelled.
! If the label does not indicate specific
information, it is possible to use the
maximum spin expected in the program.
! To reactivate the spin cycle press the
button until you reach the spin speed you
would like to set.
! It is possible to modify the spin speed
without pausing the machine.
! Pressing simultaneously the buttons
TEMPERATURE SELECTION and SPIN
SPEED for about 3 seconds, the
machine allows you to lock the keys. In
this way, you can avoid making
accidental or unwanted changes if a
button on the display is pressed
accidently during a cycle.
! The key lock can be simply cancelled by
pressing the two buttons simultaneously
again or turning off the appliance.
The display’s indicator system allows you to
be constantly informed about the status of
the machine.
1 2 3 4 6 7
5
1) OPTIONS INDICATOR LIGHTS
The indicator lights show the options that
can be selected by the relevant button.
2) CYCLE DURATION
! When a programme is selected the
display automatically shows the cycle
duration, which can vary, depending on
the options selected.
! During the initial filling phase of the cycle
the machine calculates the actual cycle
time needed based on the load size,
content and options selected. The real
time of the wash will then be displayed.
This time can recaulculate during the
wash depending on detergent levels and
load balancing.
3) DOOR LOCKED INDICATOR LIGHT
! The indicator light is illuminated when the
door is fully closed.
SPIN SPEED button
To prevent damage to the fabrics, it is
not possible to increase the speed
over the maximum allowed for the
programme.
An over dosing of detergent can
cause excessive foaming. If the
appliance detects the presence of
excessive foam, it may exclude the
spinning phase or extend the duration
of the program and increase water
consumption.
The machine is fitted with a special!
electronic device, which prevents the!
spin cycle without load or on
particularly unbalanced load.! This
reduces the noise and vibration in!the
machine and so prolongs the life of!
your machine.
KEY LOCK
Digital Display
Close the door BEFORE selecting the
START/PAUSE button.
Page 63

!
EN
63
! When START/PAUSE is pressed on
the machine with the door closed, the
indicator will flash momentarily and then
illuminate.
! A special safety device prevents the door
from being opened immediately after the
end of the cycle. Wait for 2 minutes after
the wash cycle has finished and the
DOOR LOCKED light has gone out before
opening the door. At the end of the cycle
turn the programme selector to OFF.
4) Kg Detector INDICATOR LIGHT
(function active only on Cotton and
Synthetics programmes)
! During the first minutes of the cycle, the
"Kg Detector" indicator will remain on
while the intelligent sensor will weigh the
laundry and adjust the cycle time, water
and electricity consumption accordingly.
! Through every wash phase "Kg Detector"
allows to monitor information on the wash
load in the drum and in the first minutes of
the wash it:
- adjusts the amount of water required;
- determines the length of the wash cycle;
- controls rinsing according to the type of
fabric selected to be washed it;
- adjusts the rhythm of drum rotation for
the type of fabric being washed;
- recognises the presence of too much
soap suds, and if necessary, adjust the
amount of rinse water.
- adjusts the spin speed according to the
load, thus avoiding any imbalance.
5) KEY LOCK INDICATOR LIGHT
The indicator light show that the keys are
locked.
6) WASH TEMPERATURE INDICATOR
LIGHTS
This show the washing temperature of the
selected programme that can be changed
(where allowed) by the relevant button.
If you want carry out a cold wash all the
indicators must be off.
7) SPIN SPEED INDICATOR LIGHTS
This show the spin speed of the selected
programme, you can reduce or omit by the
relevant button.
If the door is not properly closed,
the light will continue to flash for
about 7 seconds, after which the
start command will be automatically
cancelled. In this case, close the
door in the proper way and press
the START/PAUSE button.
Page 64

!
64
This appliance is equipped with Smart
Touch technology that allows you to
interact, via the App, with smartphones
based on Android operating system and
equipped with NFC (Near Field
Communication) function.
! Download on your smartphone the
Candy simply-Fi App.
FUNCTIONS
The main functions available using the App
are:
! Voice Assistant – A guide to help you
choose the ideal cycle with only three
voice inputs (clothes/fabrics, color, stain
level).
! Cycles – To download and launch new
washing programmes.
! Smart Care – Smart Check-up and Auto-
Clean cycles and a troubleshooting guide.
! My Statistics – Washing statistics and
tips for a more efficient use of your
machine.
HOW TO USE SMART TOUCH
FIRST TIME - Machine registration
! Enter the "Settings" menu of your
Android smartphone and activate the
NFC function inside the "Wireless &
Networks" menu.
! Turn the knob to the Smart Touch
position to enable the sensor on the
dashboard.
! Open the App, create the user profile and
register the appliance following the
instructions on the phone display or the
"Quick Guide" attached on the machine.
SMART TOUCH
The Candy simply-Fi App is available
for devices running both Android and
iOS, both for tablets and for
smartphones. However, you can
interact with the machine and take
advantage of the potential offered
by Smart Touch only with Android
smartphones equipped with NFC
technology, according to following
functional scheme:
Android smartphone
with NFC technology
Interaction with the
machine + contents
Android smartphone
without NFC technology
Contents only
Android Tablet
Contents only
Apple iPhone
Contents only
Apple iPad
Contents only
Get all the details of the Smart Touch
functions, browsing the App in DEMO
mode or go to:
www.candysmarttouch.com
Depending on the smartphone model
and its Android OS version, the
process of the NFC activation may be
different. Refer to the smartphone
manual for more details.
More information, F.A.Q. and the
video for an easy registration are
available on:
www.candysmarttouch.com/how-to
Page 65

!
EN
65
NEXT TIME – Regular usage
! Every time you want to manage the
machine through the App, first you have
to enable the Smart Touch mode by
turning the knob to the Smart Touch
indicator.
! Make sure you have unlocked your phone
(from stand-by mode) and you have
activated the NFC function; then, follow
the steps mentioned earlier.
! If you want to start a washing cycle, load
the laundry, the detergent and close the
door.
! Select the desired function in the App
(e.g.: starting a programme, the Smart
Check-up cycle, update statistics, etc…).
! Follow the instructions on the phone
display, KEEPING IT ON the Smart
Touch logo on the machine dashboard,
when requested to do so by the App.
NOTES:
Place your smartphone so that the
NFC antenna on its back matches
the position of the Smart Touch logo
on the appliance (as illustred below).
If you do not know the position of
your NFC antenna, slightly move the
smartphone in a circular motion over
the Smart Touch logo until the App
confirms the connection. In order for
the data transfer to be successful, it is
essential TO KEEP THE SMARTPHONE
ON THE DASHBOARD DURING THESE
THE FEW SECONDS OF THE
PROCEDURE;
a message on the
device will inform about the correct
outcome of the operation and advise
you when it is possible to move the
smartphone away.
Thick cases or metallic stickers on
your smartphone could affect or
prevent the transmission of data
between machine and telephone. If
necessary, remove them.
The replacement of some components of
the smartphone (e.g. back cover, battery,
etc...) with non-original ones, could result
in the NFC antenna removal, preventing
the full use of the App.
The management and the control of the
machine via App is only possible "by
proximity": it is therefore not possible to
perform remote operations (e.g.:
from
another room
; outside of the house).
Page 66

!
66
PROGRAMME
(MAX.) *
1)
DETERGENT
(see control panel)
(MAX.)
1 o 2
COTTONS
2)
5
5,5 6 6,5 7 8
90°
ECO 40-60
2)
5
5,5 6 6,5 7 8
60°
COTTON +
PREWASH
2)
5
5,5 6 6,5 7 8
60°
( )
WOOL/HAND WASH
1 1 1 1 1
2
30°
SYNTHETICS
2)
2,5
2,5 3 3
3,5
4
60°
RINSE
- - - - -
-
-
DRAIN + SPIN
- - - - -
-
-
DELICATE 59'
2 2 2 2 2,5
2,5
40°
SPORT PLUS 39'
1,5
1,5 2 2 2 2,5
30°
HYGIENE PLUS 59'
1,5
1,5 2 2 2 2
60°
14'
1 1 1 1 1
1,5
30°
RAPID
3)
30'
1,5
1,5 2 2
2,5
2,5
30°
44'
3 3 3 3 3,5
3,5
40°
MIXED &
COLOURED 59'
5 5 6 6 7
8
40°
PERFECT COTTON
59'
2,5
2,5 3 3
3,5
4
40°
SPECIAL 49'
2,5
2,5 3 3
3,5
4
40°
Customizable setting that interacts with the App on your smartphone and to
download the cycles (see the dedicated section). The factory sets the default
programme Auto-Clean, which will sanitize the machine.
Table of programmes
Page 67

!
EN
67
Please read these notes:
* Maximum load capacity of dry clothes,
according to the model used (see control
panel).
"
"
The spin speed may also be reduced, to
match any guidelines suggested on the
fabric label, or for very delicate fabrics
cancel the spin completely this option is
available with a spin speed button. This
function can be activated with the button
SPIN SELECTION. If the label does not
indicate specific information, it is possible to
use the maximum spin expected in the
program. An over dosing of detergent can
cause excessive foaming. If the appliance
detects the presence of excessive foam, it
may exclude the spinning phase or extend
the duration of the program and increase
water consumption.
( )
Only with PREWASH option
selected (programmes with
PREWASH option available).
1)
When a programme is selected,
on the display is shown the
display shows the recommended
wash temperature that can be
reduced (where allowed) by the
relevant button.
2)
For the programmes shown you
can adjust the duration and
intensity of the wash using the
STAIN LEVEL button.
3)
Selecting the RAPID program on
the knob, it will be possible to
select with the RAPID button, one
of the three rapid programs
available among 14’, 30’ and 44’.
! PREWASH: if the dispenser has the
specific compartment for pre-wash, pour
the detergent in it. Otherwise, pour the
detergent in the perforated area present
on the drum, following the dosage
indications of the detergent producer.
** STANDARD COTTON PROGRAMMES
ACCORDING TO (EU) No 1015/2010 and
No 1061/2010.
COTTON PROGRAMME WITH A
TEMPERATURE OF 60°C.
COTTON PROGRAMME WITH A
TEMPERATURE OF 40°C.
These programmes are suitable to
clean normally soiled cotton laundry and
they are the most efficient programmes
in terms of combined energy and water
consumptions for washing cotton
laundry.
These programmes have been
developed to be compliant with the
temperature on the wash label on the
garments and the actual water
temperature may slightly differ from the
declared temperature of the cycle.
Before closing the cover and start the
washing process, please check that the
internal drum is perfectly closed. When
possible, please align the position
indicators with drum to assure the best
washing performance.
IMPORTANT: do not use the pre-wash
mode with start-delay option.
Page 68

!
68
To clean different types of fabrics and
various levels of dirt, the washing machine
has specific programs to meet every need
of washing (see table of programmes).
Smart Touch
Customizable setting of the knob that you
have to select when you would like to
transfer a command from the App to the
machine and to download/start a cycle (see
the dedicated section and the user manual
of the App for more info).
In the Smart Touch option the factory sets
as a default the "Auto-Clean" cycle, made
to clean the drum, remove bad smells and
extend the life of the washing machine.
Make sure there is no load in the drum
before starting the "Auto-Clean" cycle, use
a proprietary washing machine cleaning
agent or powder detergent. Leave the door
of the machine open at the end of the cycle
to allow the drum to dry.
Recommended every 50 washes.
COTTONS
This programme is suitable for washing
coloured cotton garments at 40°C or for
ensuring the highest degree of cleanliness
for cotton resistant laundry washing at 60°C or
90°C. The final spin is at maximum speed that
ensures excellent water removal.
ECO 40-60
The ECO 40-60 programme is able to clean
normally soiled cotton laundry declared to
be washable at 40°C or 60°C, together in
the same cycle. This programme is used
to assess the compliance with the EU
Ecodesign legislation (environmentally
friendly products design).
COTTON + PREWASH
This programme has been designed to
remove the stronger stains from cotton
white clothes. The prewash guarantees the
tough dirt removal. Add into compartment
"1" a quantity of detergent equal to 20% of
that used for main wash.
WOOL/HAND WASH
This programme performs a wash cycle
dedicated to the wool fabrics that can be
washed in a washing machine, the articles
to be washed by hand or laundry items
made from silk or specified as "Wash as
Silk" on the fabric label.
SYNTHETICS
This programme allows you to wash
different type’s fabrics and different colours
all together. The rotation movement of the
drum and the water levels are optimized,
both during the washing the rinsing phase.
The accurate spin action, ensures a
reduced formation of creases in the fabrics.
RINSE
This program performs 3 rinses with an
intermediate spin (which can be reduced or
excluded by using the appropriate button). It
is used for rinsing any type of fabric, for
example after a wash carried out by hand.
DRAIN + SPIN
The program completes the drain and a
maximum spin. It is possible to delete or
reduce the spin through the SPIN
SELECTION button.
Description of programmes
Choose programme in accordance
with the laundry instructions appearing
on labels, especially the maximum
recommended temperature.
WARNING:
IMPORTANT WASH PERFORMANCE
ADVICE.
! New, coloured garments should be
washed separately for at least 5 or 6
washes.
! Certain large dark items such as
jeans and towels should always be
washed separately.
! Never mix NON COLOURFAST fabrics.
Page 69

!
EN
69
DELICATE 59'
Developed to wash and treat delicate
garments and precious fabrics. This
programme washes at a low temperature
for 59 minutes. Recommended for small
loads.
SPORT PLUS 39'
Created to remove dirt from technical
garments used in the gym and for sports.
The programme washes for 39 minutes at a
low temperature. Recommended for small
loads of synthetic garments.
HYGIENE PLUS 59'
This programme offers the best possible
combination of high temperature, time and
cleaning action to guarantee maximum
sanitising power against bacteria in only 59
minutes. Recommended for cotton laundry,
it washes at a temperature of 60°C and is
best used with small loads.
RAPID (14'/30'/44')
Saving without compromising! This new
programme may be used to obtain excellent
results while saving water, energy,
detergent and time. This option washes at a
medium temperature suitable for any kind of
fabric. Recommended for small loads and
lightly soiled items.
MIXED & COLOURED 59' *
This programme offers you the freedom to
wash all kinds of fabrics and non-fading
colours together, with a full load, obtaining
excellent results in only 59 minutes. With
washing at medium temperature, this
programme is recommended for laundry
that is not particularly dirty.
*Preset temperature of 20°C (modifiable
by the relevant button). The washing
cycle is also suitable for washing cotton
fabrics.
PERFECT COTTON 59'
This programme guarantees excellent
results for cotton laundry. This option was
designed to cut washing time at medium
temperatures for medium-soiled cotton
laundry. Fill the machine only halfway for
best results.
SPECIAL 49'
This programme’s innovative technology
cuts the amount of time we spend doing
laundry ensuring anyway high washing
performance at medium temperatures in
only 49 minutes. Fill machine only half full
for best results.
Page 70

!
70
Opening/ closing the drum
! Open the washing machine lid.
! Open the drum by pressing the (A) button
with one hand while pressing down on the
opposite door with the other.
! Place clothes in the drum one item at a
time, and without squashing. Do not
exceed the load limits recommended in
the “programme table”. An overloaded
washing machine will not wash properly,
and will leave clothing wrinkled.
! To close the drum, place the doors so
that the one with the (A) button is below
the other and they fit together perfectly.
Detergent load
The detergent dispenser is divided into 3
compartments:
! Compartment 1
is for powder detergent
.
!
Compartment 2
is for liquid detergent.
! The compartment is for fabric
conditioners, scenting agents and special
additives such as starch, blueing, etc.
! MAX - on the detergent case is underlined
the maximum level of detergent to be used.
Do not exceed this level.
! When the clothes present stains that
need treatment with bleaches liquids
products, you can proceed to their
preliminary cleaning in the washing
machine. For that: Introduce the bleach
product in the "compartment 2", and set
the rinse program. Once finished the
treatment set the programmer to the OFF
position, add the rest of the laundry, and
proceed to the normal washing with the
wanted program.
1) Maximum Main wash washing powder
2) Maximum Main wash washing liquid
3) Maximum scenting agent
Preparing the wash
Page 71

!
EN
71
7. TROUBLESHOOTING AND WARRANTY
If you believe the washing machine is not working correctly, consult the quick guide
provided below which includes some practical tips on how to fix the most common
problems.
ERROR CODE FORMAT
Error shown
Possible causes and practical solutions
E2 (with display)
2 flashes of the LEDs
(without display)
The machine cannot load water.
Make sure the water supply tap is open.
Make sure the water supply hose isn’t bent, kinked or trapped.
Make sure the drain pipe is at the proper height (see installation section).
Close the water supply tap, unscrew the filler hose from the back of
the washing machine and make sure the “anti-sand” filter is clean
and not blocked.
Check that the filter is not clogged or that there are no foreign bodies
inside the filter compartment that can obstruct the proper flow of water.
E3 (with display)
3 flashes of the LEDs
(without display)
The washing machine does not drain water.
Check that the filter is not clogged or that there are no foreign bodies
inside the filter compartment that can obstruct the proper flow of water.
Make sure the drain hose isn’t bent, kinked or trapped.
Make sure the home drainage system is not blocked and is allowing
water to flow through without obstruction. Try to drain the water in the sink.
E4 (with display)
4 flashes of the LEDs
(without display)
There is too much foam and/or water.
Ensure the correct amount of detergent is being used and the
detergent is designed for use in a washing machine.
E7 (with display)
7 flashes of the LEDs
(without display)
Door problem.
Make sure the door is correctly closed.
Make sure the clothes inside the drum are not preventing the door
from closing fully.
If the door is locked, turn off and unplug the washing machine from
the electrical supply socket, wait 2-3 minutes and reopen the door.
Any other code
Turn off and unplug the washing machine, wait a minute. Turn on the
machine and restart a program. If the error occurs again contact an
Authorised Customer Service Centre directly.
FOR SMART TOUCH MODELS
The Candy simply-Fi app has a Smart Check-up function that allows you to confirm
the functionality and status of the product at any time. To use the Candy simply-Fi app you
will need an Android smartphone with NFC technology. More info can be found on the App.
If the display of the machine is showing an error (by a code or blinking LEDs), you
should turn on the App on your Android smartphone, with NFC on.
Place your smart phone against the Smart Touch logo on the control panel. You should
now be able to read the fault directory to solve the issue.
! Models with a display: the error is shown by a number preceded by the letter “E”
(example: E2 = Error 2).
! Models without display: an error is shown by a sequence of flashes of every LED.
The error code is shown by the number of flashes followed by a pause of 5 seconds
(example: two flashes – pause 5 seconds – two flashes – repeating = Error 2).
Page 72

!
72
OTHER ANOMALIES
Problem
Possible causes and practical solutions
The washing machine
does not work / start
Make sure the product is plugged into a working supply socket.
Make sure power is on.
Make sure the wall socket is working, testing it with another
appliance such as a lamp.
The door may not be correctly closed: open and close it again.
Check whether the required program was correctly selected and the
start button pressed.
Make sure the washing machine is not in pause or time delay mode.
Water leaked on the
floor near the
washing machine
This may be due to a leak from the seal between the tap, supply
hose and fill valve; in this case, replace it and tighten the hose
connections correctly.
Make sure the front filter is correctly closed.
The washing machine
does not spin
The machine is fitted with a detection system that protects the load
and product from damage if the load is not balanced before spinning.
This may result in:-
• The machine attempts to balance the load, increasing the time of
spin.
• Reduction of the speed of spin to decrease vibrations and noise.
• The spin cycle aborting to protect the machine and load.
If this is experienced remove the load de-tangle it, reload it and
restart the spin program.
This could be due to the fact that water has not been completely
drained: wait a few minutes. If the problem persists, see Error 3
section.
Some models include a "no spin" function: make sure it is not
selected.
Check which options are selected and their effect on the spin cycle.
Excessive detergent can impede the spin cycle, ensure the correct
amount of detergent is being used.
Strong vibrations /
noises are heard
during the spin cycle
The washing machine may not be fully levelled: if necessary, adjust
the feet as indicated in the specific section.
Make sure transport screws, rubber bungs and spacer tubes were
removed.
Make sure there are no foreign objects inside the drum (coins,
hinges, buttons, etc…).
The standard manufacturer warranty covers faults caused by electrical or
mechanical faults in the product due to an act or omission of the manufacturer. If
a fault is found to be caused by factors outside the product supplied, miss-use or
as a result of the instructions on use not being followed, a charge may be
applied.
Page 73

!
EN
73
It is always recommended to use original
spare parts, that are available at our
Authorised Customer Service Centres.
By placing the mark on this
product, we are confirming compliance
to all relevant European safety, health
and environmental requirements which
are applicable in legislation for this
product.
The manufacturer declines all
responsibility for any printing errors in
the booklet included with this product.
Moreover, it also reserves the right to
make any changes deemed useful to its
products without changing their
essential characteristics.
Warranty
The product is guaranteed under the
terms and conditions stated on the
certificate included with the product. The
certificate has to be stored so as to be
shown to the Authorized Customer
Service Centre in case of need. You can
also check the warranty conditions on
our web site. To obtain assistance,
please fill in the form on-line or contact
us at the number indicated on the
support page of our web site.
Page 74

!
74
Gracias por haber elegido este producto.
Estamos orgullosos de ofrecer el producto
ideal para ti y la mejor gama completa de
electrodomésticos para tu rutina diaria.
Lea atentamente este manual de instrucciones
para aprender a usar la lavadora de manera
correcta y segura y para obtener consejos útiles
acerca de su mantenimiento.
Antes de usar su nueva lavadora,
lea atentamente este manual de
instrucciones para optimizar su
funcionamiento. Guarde el manual en buen
estado para otros usuarios que pudieran
necesitarlo más adelante.
Todos los productos están identificados con
un único código o número de serie de 16
caracteres, que figura en una etiqueta
adherida al aparato (puerta de carga) o en
el sobre que se encuentra dentro de la
lavadora. El código es una especie de
documento de identidad, necesario para
registrar el producto y para solicitar la
asistencia del Servicio de Atención al
Cliente.
Este dispositivo tiene el distintivo de la
directiva europea 2012/19/UE sobre
Residuos de Aparatos Eléctricos y
Electrónicos (RAEE).
Los RAEE contienen tanto sustancias
contaminantes (que pueden repercutir
negativamente en el medio ambiente) como
componentes básicos (que pueden
reutilizarse). Es importante que los RAEE
se sometan a tratamientos específicos
con el objeto de extraer y eliminar, de
forma adecuada, todos los agentes
contaminantes. Igual de importante es
recuperar y reciclar todo el material posible.
La gente puede desempeñar una función
importante a la hora de asegurarse de que
los RAEE no se convierten en un problema
medioambiental; es crucial seguir algunas
normas básicas:
! Los RAEE no han de tratarse como
residuos domésticos.
! Los RAEE han de depositarse en los
puntos de recogida habilitados para ello
que gestiona el ayuntamiento o empresas
contratadas para ello. En muchos países
se ofrece la posibilidad de recogida a
domicilio de los RAEE de mayor volumen.
En muchos países, cuando la gente compra
un nuevo dispositivo, el antiguo se puede
entregar al vendedor, quien lo recoge de
forma gratuita (un dispositivo antiguo por
cada dispositivo adquirido) siempre que el
equipo entregado sea similar y disponga de
las mismas funciones que el adquirido.
1. NORMAS DE SEGURIDAD
2. INSTALACIÓN
3. CONSEJOS PRÁCTICOS
4. LIMPIEZA Y MANTENIMIENTO
5. GUÍA RÁPIDA
6. CONTROLES Y PROGRAMAS
7.
DIAGNÓSTICO DE AVERÍAS Y GARANTÍA
Normas ambientales
Índice
Page 75

!
ES
75
1. NORMAS DE
SEGURIDAD
! Este producto es exclusivamente
para uso doméstico o similar:
− zona de cocina para el
personal de tiendas, oficinas y
otros entornos laborales;
− granjas;
− pasajeros de hoteles, moteles
u otros entornos residenciales;
− hostales (B&B).
No se recomienda el uso de este
producto con fines diferentes del
doméstico o similar, por ejemplo,
con fines comerciales o
profesionales. El empleo de
la lavadora con fines no
recomendados puede reducir la
vida útil del artefacto e invalidar
la garantía. Todos los daños,
averías o pérdidas ocasionados
por un uso diferente del
doméstico o similar (aunque ese
uso se realice en un entorno
doméstico) no serán reconocidos
por el fabricante en la medida en
que lo permita la ley.
! Este electrodoméstico puede ser
utilizado por niños mayores de 8
años y por personas con
capacidades físicas, sensoriales
o mentales limitadas o que
carezcan de la experiencia
y el conocimiento necesarios,
siempre y cuando estén
supervisadas por una persona
encargada de velar por su
seguridad o hayan sido
instruidas en su utilización de
manera segura.
Los niños no deben jugar con el
electrodoméstico. Los niños no
deben ocuparse del mantenimiento
ni de la limpieza del electrodoméstico,
salvo que estén supervisados una
persona encargada de velar por su
seguridad.
! Vigile a los niños de manera
que se asegure que no juegan
con el aparato.
! Los niños menores de 3 años se
deben mantener lejos a menos que
estén supervisados de forma continua.
! Si el cable de alimentación está
dañado, por seguridad debe
reemplazarlo el fabricante, un
técnico del Servicio de Atención
al Cliente o una persona
debidamente cualificada.
!
Sólo deben emplearse las
mangueras de suministro de
agua proporcionadas con el
electrodoméstico. No reutilizar
mangueras de lavadoras antiguas
.
! La presión de agua debe estar
entre 0,05 MPa y 0,8 MPa.
! Ninguna alfombrilla debe obstruir
las rejillas de ventilación situadas
en la base de la lavadora.
! Para apagar la lavadora, se debe la
marca de referencia del selector de
programas a la posición vertical.
Si la marca no se encuentra en
posición vertical, la lavadora está
Page 76

!
76
encendida (solo para modelos con
mando programador).
!
Una vez instalado el
electrodoméstico, se debe poder
acceder fácilmente al enchufe.
! La capacidad máxima de colada
seca depende del modelo
usado (ver panel de control).
! Para consultar la ficha del
producto, visitar la web del
fabricante.
! Desenchufar la lavadora y
cerrar el grifo del agua antes de
proceder a su limpieza o a
cualquier operación de
mantenimiento.
! Asegurarse de que la toma de
corriente tenga conexión a
tierra. Si no se dispone de toma
con conexión a tierra, llamar a
un técnico especializado.
! No utilizar adaptadores, regletas
ni alargues.
! No desenchufar la lavadora
tirando del cable de alimentación
ni del aparato.
! No instalar la lavadora en el
exterior, ni exponerla a la
lluvia, a los rayos del sol, o a
otros factores ambientales.
! En caso de fallo o mal
funcionamiento, apagar la lavadora,
cerrar el grifo del agua y no intentar
repararla. Llamar de inmediato al
Servicio de Atención al Cliente y
utilizar sólo piezas de recambio
originales. El incumplimiento de
estas instrucciones puede afectar
la seguridad del aparato.
Instrucciones de seguridad
ATENCIÓN:
el agua puede alcanzar
temperaturas muy elevadas
durante el ciclo de lavado.
Page 77

!
ES
77
2. INSTALACIÓN
! Extraer los 2 o 4 tornillos "A" que
se encuentran en la parte posterior
de la lavadora y quitar los dos 2 o
4 seguros de transporte "B", tal y
como se muestra en la figura 1.
! Poner los embellecedores
suministrados “C” (figura 2).
3
4
min 50 cm
max 85 cm
+2,6 mt
max
max 100 cm
min 4 cm
* ACCESORIO VENDIDO POR SEPARADO
Page 78

!
78
5
! La lavadora debe ser conexionada a
la red de distribución de agua
usando un nuevo tubo que le será
suministrado junto con el aparato
(en el interior del tambor). No utilizar
el tubo viejo para este menester.
!
Conectar el tubo de entrada de
agua por un extremo, el del codo, a
la electroválvula (parte superior
trasera de la máquina), y por el otro
a un grifo o toma de agua, con boca
roscada de ¾” gas.
!
Acerque la lavadora a la pared,
procurando que no se formen
curvas o estrangulamientos, fije el
tubo de desagüe al borde de la pila,
o mejor aún, a un desagüe fijo, con
un diámetro mayor que el tubo de la
lavadora, a una altura mínima de 50
cm. y máxima de 75 cm. del suelo
(figura 4).
! En caso necesario, utilice el
accesorio curvado* para una mejor
fijación y soporte del tubo desagüe.
En caso de que su modelo cuente
con éllo:
! Para desplazar fácilmente la
lavadora, hacer girar a la derecha la
palanca de mando del carro. Una vez
concluida la operación volver a colocar
la palanca en la posición inicial.
! Nivele la máquina con las patas
delanteras (figura 5).
a) Girar la tuerca en el sentido de las
agujas del reloj para desbloquear el
tornillo de la pata.
b) Girar la pata y hacerla subir o
bajar hasta conseguir su perfecta
adherencia al suelo.
c) Bloquear la pata girando la tuerca
en el sentido contrario a las agujas
del reloj, hasta que se adhiera al
fondo de la lavadora.
! Compruebe que el aparato está
debidamente nivelado.
! Para éllo, intente mover la lavadora,
sin desplazarla, apoyándose
consecutivamente sobre los
extremos en diagonal de la parte
superior, y compruebe que no se
balancea.
!
Caso de cambiar la lavadora de
sitio, vuelva a nivelar los pies.
Page 79

!
ES
79
! Conectar la manguera de agua al
grifo (figura 6), empleando únicamente
la manguera suministrada con el
electrodoméstico (no reutilizar mangueras
antiguas).
! ALGUNOS MODELOS tienen una o más
de las siguientes características:
! Conexiones HOT&COLD para agua fría
y caliente (figura 7): Favorecen el ahorro
de energía.
Conectar el tubo gris al grifo del agua fría
y el rojo, al del agua caliente. El
electrodoméstico se puede conectar sólo
al grifo del agua fría, en cuyo caso se
retrasará el inicio de algunos programas.
! AQUASTOP (figura
8):
Un dispositivo
situado en el tubo de alimentación impide
la entrada de agua si el tubo está
deteriorado. En caso de avería, aparece
una marca de color rojo en la ventana
"A", que indica que debe reemplazarse el
tubo. Para extraer la tuerca, presionar el
dispositivo de bloqueo unidireccional "B".
!
AQUAPROTECT – TUBO DE ALIMENTACIÓN
CON PROTECCIÓN (figura 9): Si el
tubo principal "C" pierde agua, el
depósito transparente "D" contiene
agua que permite que se complete el
ciclo de lavado. Al finalizar el ciclo,
solicitar al Servicio de Atención al
Cliente el reemplazo del tubo de
entrada de agua.
6
1
7
B
A
8
D
C
9
Conexión a la red de agua
Page 80

!
80
3. CONSEJOS PRÁCTICOS
Al clasificar las prendas, asegurarse de:
- quitar objetos metálicos como broches,
ganchos, monedas, etc.;
- abotonar fundas, cerrar cremalleras,
ajustar cinturones y cintas;
- retirar enganches de las cortinas;
- leer las instrucciones de lavado de cada
prenda;
- tratar previamente las manchas difíciles con
productos especiales.
! Al lavar alfombras, mantas o prendas
pesadas, se recomienda desactivar la
función de centrifugado.
! Para lavar lana, asegúrate de que la
prenda puede ser lavada a máquina.
Verifica la etiqueta de la prenda.
Cómo reducir el consumo y no perjudicar el
medio ambiente al utilizar el electrodoméstico.
! Cargue el electrodoméstico hasta su
máxima capacidad en función del
programa elegido (consulte la tabla de
programas), de este modo podrá
REDUCIR EL CONSUMO de agua y
energía.
! El ruido y la humedad residual en la
colada dependerán de las revoluciones
durante el centrifugado: a mayor número
de revoluciones, más elevado será el
nivel de ruido y menor la humedad
residual en la colada.
! Los programas más eficientes en
términos de uso combinado de agua y
energía suelen ser los más largos a las
temperaturas más bajas.
Cargar al máximo la lavadora
! Para ahorrar energía, detergente y tiempo,
se recomienda cargar al máximo la lavadora.
Es posible ahorrar hasta un 50% de energía
con una única colada de carga llena, en
lugar de dos coladas a media carga.
¿Cuándo es necesario el prelavado?
! ¡Sólo cuando las prendas están muy
sucias! Cuando la ropa tiene una
suciedad normal, es posible ahorrar entre
un 5% y un 15% de energía si no se
utiliza la función de prelavado.
¿ Es necesario lavar a altas temperaturas?
! Si se emplea un quitamanchas o se
sumergen las prendas manchadas antes
de lavarlas en la lavadora, se reduce la
necesidad de seleccionar un programa
de
lavado de alta temperatura. Seleccionando
un programa de lavado de baja
temperatura se puede ahorrar energía.
Antes de utilizar un programa de secado
(LAVASECADORAS)
! AHORRE energía y tiempo seleccionando
una velocidad de centrifugado elevada para
reducir el contenido de agua en la colada
antes de utilizar un programa de secado.
A continuación, se incluye una guía breve
con sugerencias y consejos sobre el uso
del detergente.
! Utilice solo detergentes aptos para los
lavados en lavadora.
! Elija su detergente en función del tipo de
tejido (algodón, tejidos delicados, tejidos
sintéticos, lana, seda, etc.), el color, el
tipo y el grado de suciedad y la
temperatura de lavado del programa
elegido.
Para utilizar la cantidad adecuada de
detergente, suavizante y otros aditivos, siga
detenidamente las instrucciones del
fabricante: utilizar correctamente el
electrodoméstico con la dosis adecuada
evitará el despilfarro y reducirá el
impacto medioambiental.
Consejos para colocar la ropa
en la lavadora
Consejos prácticos para reducir
el consumo
Dosificación del detergente
Page 81

!
ES
81
! Un exceso de detergente producirá un
exceso de espuma, lo cual evitará que el
ciclo se desarrolle correctamente.
También podría afectar a la calidad del
lavado y del aclarado.
El uso de detergentes ecológicos sin
fosfatos puede producir los siguientes
efectos:
- El agua de vaciado del aclarado es más
turbia debido a la presencia de zeolitos
en suspensión, sin que resulte
perjudicada la eficacia del aclarado.
- Presencia de polvo blanco (zeolitos) en
la ropa al finalizar el lavado, que no se
incrusta en el tejido ni altera los colores.
- Presencia de espuma en el agua del
último aclarado, que no necesariamente
es indicación de un aclarado deficiente.
- Presencia de abundante espuma debido
a los tensoactivos aniónicos presentes en
las formulaciones de los detergentes para
lavadoras y que son difíciles de separar
de la ropa. Volver a aclarar la ropa en
estos casos no conlleva ningún beneficio.
Si el problema persiste o sospechas de la
existencia de una avería, contacta
inmediatamente con el Servicio de Atención
al Cliente autorizado.
Para lavar ropa blanca muy sucia
y obtener excelentes resultados, emplear
programas para algodón con temperaturas
de 60°C o superiores y un detergente en
polvo normal con agentes blanqueadores.
Para temperaturas de lavado de 40°C
a 60°C, se debe elegir un detergente
apropiado para el tipo de género y el
nivel de suciedad. Los detergentes
en polvo normales dan excelentes
resultados en el lavado de ropa muy
sucia "blanca" o de colores resistentes,
mientras que los detergentes en
polvo para prendas de color son
recomendables para el lavado de ropa
de color con bajo nivel de suciedad.
Para temperaturas de lavado inferiores
a 40°C, se recomienda emplear
detergentes líquidos o adecuados para
el lavado a bajas temperaturas.
Para el lavado de prendas de lana o seda,
emplear sólo detergentes formulados
especialmente para ese tipo de géneros.
Page 82

!
82
4. LIMPIEZA Y
MANTENIMIENTO
Un mantenimiento adecuado de su electrodoméstico puede prolongar su vida útil.
! Desconecte el electrodoméstico de la red
eléctrica.
Para limpiar el exterior de la lavadora no usar
productos abrasivos ni alcohol ni solventes; basta
con pasar un paño húmedo. La lavadora no
requiere cuidados especiales para mantenerla
limpia. Mantener limpios los compartimentos de
detergente y suavizante y el filtro. A continuación
ofrecemos algunos consejos para el traslado o
para largos períodos de inactividad de la lavadora.
! La lavadora está provista de un filtro
especial que retiene los objetos de tamaño
relativamente grande, como monedas o
botones, que podrían obstruir el desagüe.
! SÓLO ALGUNOS MODELOS: extraiga el
tubo, saque el tapón y recoja el agua en un
contenedor.
! Antes de extraer el filtro, se recomienda
colocar un paño absorbente en el suelo para
evitar que se moje.
! Girar el filtro en sentido contrario al de las
agujas del reloj hasta que se detenga en
la posición vertical.
! Extraer el filtro, limpiarlo y volver a colocarlo
girándolo en el sentido de las agujas del reloj.
! Para volver a colocar todo en su sitio, repetir
los pasos previos siguiendo las instrucciones
en sentido contrario.
! En el caso de que la lavadora estuviese
inactiva durante un largo período de tiempo en
lugares a bajas temperaturas, se recomienda
vaciar por completo los restos de agua que
hayan quedado en el interior de los tubos.
! Desenchufar la lavadora.
! Soltar el tubo de la abrazadera y colocar
el extremo en un recipiente en el suelo
para recoger toda el agua.
! Volver a asegurar el tubo de desagüe con la
abrazadera una vez concluida la operación.
! Pulse sobre el botón (A).
! Manteniendo pulsado el botón, gire la
cubeta hacia fuera.
! Extraiga la cubeta y limpiela.
!
Se aconseja eliminar de todos los compartimentos,
los restos de detergente que impidan el
flujo correcto hacia el cesto.
!
Empujando hacia afuera, extraer el sifón/es
que se encuantran en la parte posterior
del dispensador y limpiarlo adecuadamente.
! Quitar eventuales incrustaciones que pidieran
obstruir el orificio del compartimento
B
A
C
S
Introduzca las pestañas según se indica (B).
Gire la cubeta hacia la tapa hasta que la pestaña
encaje en su alojamiento (C). Al encajarse oirá
un sonido característico (clack).
Limpieza exterior del
electrodoméstico
Limpieza del filtro
Recomendaciones para el traslado
o para largos períodos de
inactividad de la lavadora
Limpieza de la cubeta del
detergente y sus compartimento
Montar
Page 83

!
ES
83
5. GUÍA RÁPIDA
La lavadora regula automáticamente el
nivel de agua según el tipo de ropa y la
carga. Este sistema reduce el consumo
energético y el tiempo de lavado.
! Encender la lavadora y seleccionar el
programa de lavado.
! Regular la temperatura de lavado si es
necesario y configurar las opciones
necesarias.
! Pulsar la tecla INICIO/PAUSA para iniciar el
lavado.
Si se produce una interrupción en la
fuente de alimentación mientras el
electrodoméstico está en funcionamiento,
al restaurarse la alimentación, el
electrodoméstico se reiniciará desde el
comienzo de la fase en la que se
encontraba cuando se produjo el corte.
! Al finalizar el programa, el mensaje "End"
aparecerá en el display o, en algunos
modelos, todos los pilotos de los ciclos
de lavado se encenderán.
! Apagar la lavadora.
Para distintos tipos de lavado, consultar
la tabla de programas y seguir los pasos
indicados.
Presión en el circuito hidráulico:
min 0,05 Mpa / max 0,8 Mpa
Revoluciones de centrifugado:
ver tarjeta de datos.
Potencia absorbida/ Amperios del
fusible de la red/ Tension:
ver tarjeta de datos.
6. CONTROLES Y
PROGRAMAS
A
H
Q
EDFGCB
IOPLMN
A
Selector de programas con
posición APAGADO
B
Tecla INICIO/PAUSA
C
Tecla INICIO DIFERIDO
D
Tecla OPCIONES
E
Tecla RÁPIDOS / NIVEL DE
SUCIEDAD
F
Tecla SELECCIÓN TEMPERATURA
G
Tecla SELECCIÓN CENTRIFUGADO
F+G
BLOQUEO DE TECLA
H
Display digital
I
Indicadores OPCIONES
L
Indicador SEGURIDAD PUERTA
M
Indicador KG DETECTOR
N
Indicador BLOQUEO DE TECLA
O
Indicadores SELECCIÓN
TEMPERATURA
P
Indicadores SELECCIÓN
CENTRIFUGADO
Q
Área SMART TOUCH
Selección de programas
Esperar hasta que la luz SEGURIDAD
PUERTA se haya apagado antes de
abrir la puerta.
Datos técnicos
Page 84

!
84
! Accionar la tecla INICIO/PAUSA para
iniciar el ciclo seleccionado.
! Una vez que se selecciona un programa
el selector de programa se mantiene
inmóvil en el programa seleccionado
hasta que termine el ciclo.
! Apague la lavadora girando el selector en
la posición APAGADO.
! Presionar para iniciar el ciclo.
AÑADIR O ELIMINAR ELEMENTOS TRAS
LOS PROGRAMAS HA COMENZADO
(PAUSA)
! Mantenga pulsado la tecla INICIO/
PAUSA durante unos 2 segundos
(algunas luces indicadoras y el indicador
de tiempo restante parpadeará, indicando
que la máquina se ha detenido).
! Espere 2 minutos hasta que el
dispositivo de seguridad permita abrir la
puerta.
! Después de haber agregado o quitado
elementos a la colada, cierre la puerta y
presione la tecla INICIO/PAUSA (el
programa se iniciará a partir de donde se
detuvo).
CANCELACIÓN DE UN PROGRAMA
! Para cancelar un programa, sitúe el
selector en la posición APAGADO.
! Esta opción le permite pre-programar el
ciclo de lavado para iniciarlo con una
posterioridad de hasta 24 horas.
! Para diferir el inicio del ciclo:
- Introduzca el programa deseado.
Apertura puerta
Un dispositivo de seguridad impide
que la puerta se abra inmediatamente
después del final del ciclo.
Espere 2 minutos después de que el
ciclo de lavado haya terminado y la
luz de "Puerta de seguridad" se ha
apagado antes de abrir la puerta.
PROGRAMA selector con
posición APAGADO
Cuando el selector de programa se
activa la pantalla se ilumina para
mostrar los ajustes para el programa
seleccionado.
Para el ahorro de energía, al final del
ciclo o con un período de inactividad, el
contraste nivel de visualización
disminuirá.
N.B.: Para apagar la máquina, gire el
selector de programas en la posición
APAGADO
El selector de programa se debe volver
a la posición APAGADO al final de cada
ciclo o cuando se inicia un ciclo de lavado
posterior antes del próximo programa
que se está seleccionado y se inicia.
Tecla INICIO/PAUSA
Cierre la escotilla ANTES de
seleccionar INICIO/PAUSA.
Cuando la tecla INICIO/PAUSA ha sido
accionada, la lavadora puede tomar
unos segundos antes de iniciar el cilo.
Antes de abrir la puerta, por favor
comprueba que el nivel de agua está
por debajo de la apertura de la puerta
para evitar que se desborde.
Tecla INICIO DIFERIDO
Page 85

!
ES
85
- Pulse el botón una vez para activarlo
(h00 aparece en la pantalla) y luego
pulse de nuevo para fijar un intervalo de
1 hora (h01 aparece en la pantalla). El
retardo preestablecido aumenta en 1
hora cada vez que se pulsa el botón,
hasta que aparezca h24 en la pantalla,
y en ese momento, al pulsar el botón de
nuevo, se restablecerá el inicio diferido
a cero
-
Confirme pulsando la tecla INICIO/PAUSA
.
La cuenta atrás comienza y cuando
termina el programa se iniciará
automáticamente.
! Es posible cancelar el inicio diferido
girando el selector de programas a la
posición APAGADO.
Si hay alguna interrupción en el
suministro de energía mientras la
lavadora está en funcionamiento, una
memoria especial almacena el programa
seleccionado y, cuando se restablezca la
energía, continúa donde lo dejó.
Esta tecla permite escoger entre tres
opciones diferentes:
- ACLARADO EXTRA
! Esta opción permite añadir un aclarado al
final del ciclo de lavado y está diseñado
especialmente para las personas con
pieles delicadas y sensibles, para las
cuales el mínimo resto de detergente
puede causarles irritación y alergia.
! Esta función también está recomendada
para las prendas de niños en caso de
suciedad extrema, en los que se usa
mucho detergente, o para el lavado de
toallas cuyas fibras en su mayoría
tienden a retener el detergente.
- HYGIENE +
Solo puedes activarla cuando hayas
seleccionado una temperatura de 60ºC.
Esta opción te permite higienizar tus
prendas manteniendo la misma
temperatura durante todo el lavado.
- PLANCHADO FÁCIL
Esta tecla le permite minimizar las arrugas
al máximo eliminando las vueltas
intermedias o reduciendo la intensidad de
las últimas vueltas.
Esta tecla permite escoger entre dos
opciones diferentes, dependiendo del
programa seleccionado.
- RÁPIDOS
Esta tecla se activa cuando seleccionas el
programa RÁPIDOS (14/30/44 Min.) en el
mando y te permite seleccionar uno de los
tres ciclos indicados.
- NIVEL DE SUCIEDAD
! Una vez se ha seleccionado el programa,
el tiempo de lavado establecido para ese
programa se mostrará automáticamente.
! Esta opción te permite escoger entre 3
niveles de intensidad de lavado,
modificando la duración del programa, y
dependiendo de la suciedad de las
prendas (solo pueden usarse en algunos
programas tal y como se muestra en la
tabla de programas).
Las opciones deberán seleccionarse
antes de pulsar la tecla de
INICIO/PAUSA.
Tecla OPCIONES
Si escoges una opción que no
es compatible con el programa
seleccionado, el piloto correspondiente
parpadeará primero y se apagará
después.
Tecla RÁPIDOS / NIVEL DE
SUCIEDAD
Page 86

!
86
! Esta tecla permite cambiar la temperatura
de los ciclos de lavado.
! No se puede aumentar la temperatura
por encima del máximo permitido para
cada programa, para conservar los
tejidos.
! Si deseas lavar con un programa frío,
todos los indicadores deben estar
desconectados.
! Si pulsas esta tecla, es posible reducir la
velocidad máxima, y si lo deseas, puedes
cancelar el ciclo de centrifugado.
! Si la etiqueta no proporciona información
específica, significa que se puede usar el
centrifugado máximo previsto por el
programa.
! Para reactivar el ciclo de centrifugado,
pulsa la tecla hasta alcanzar la velocidad
de centrifugado deseada.
! Es posible modificar la velocidad de
centrifugado sin detener la lavadora.
! Pulsando simultáneamente las teclas
SELECCIÓN TEMPERATURA y
SELECCIÓN CENTRIFUGADO durante
3 segundos, la lavadora te permitirá
bloquear las teclas. De esta forma, si
pulsas accidentalmente alguna de las
teclas en el display durante un ciclo,
podrás evitar que se cambie el programa
accidentalmente.
! El bloqueo de tecla se desactiva
sencillamente pulsando ambas teclas
de nuevo, o desconectando el
electrodoméstico.
El Display digital le permite estar
constantemente informado sobre el estado
de la lavadora.
1 2 3 4 6 7
5
1) INDICADORES OPCIONES
Los indicadores muestran las opciones que
pueden seleccionarse con las teclas
correspondientes.
Tecla SELECCIÓN TEMPERATURA
Tecla SELECCIÓN CENTRIFUGADO
Para evitar dañar los tejidos, no es
posible aumentar la velocidad por
encima del máximo permitido para
cada programa.
Una cantidad excesiva de detergente
puede provocar un exceso de
espuma. Si el electrodoméstico
detecta la presencia de una cantidad
excesiva de espuma, puede descartar
la fase de centrifugado, o extender la
duración del programa y aumentar el
consumo de agua.
Este electrodoméstico está equipado
con un dispositivo electrónico especial
que descarta el ciclo de centrifugado
en ausencia de carga o si la carga está
desequilibrada. Esto reduce el ruido y
la vibración en el aparato, prolongando
la vida de tu electrodoméstico.
BLOQUEO DE TECLA
Display digital
Page 87

!
ES
87
2) DURACIÓN CICLO
! Cuando se selecciona un programa, el
display muestra automáticamente la
duración del ciclo, que puede variar,
dependiendo de las opciones seleccionadas.
! Una vez que el programa ha comenzado se
le mantiene informado constantemente del
tiempo restante hasta el final del lavado.
! La lavadora calcula el tiempo hasta el
final del programa seleccionado sobre la
base de una carga estándar, durante el
ciclo, el aparato corrige el tiempo al que
se aplica según tamaño y la composición
de la carga.
3) INDICADOR SEGURIDAD PUERTA
! El icono indica que la puerta está cerrada.
! Cuando INICIO/PAUSA se presiona
con la puerta cerrada, el indicador se
parpadeará y luego de manera fija.
! Un dispositivo de seguridad impide que la
puerta se abra inmediatamente después
del final del ciclo. Espere 2 minutos
después de que el ciclo de lavado haya
terminado y la luz de SEGURIDAD PUERTA
se haya apagado antes de abrir la puerta.
Al final del ciclo, gire el selector de
programas a la posición APAGADO.
4) INDICADOR Kg Detector (función
activa solo en algodón y sintéticos)
! Durante los primeros minutos del ciclo, el
indicador "Kg Detector" permanecerá
encendido mientras el sensor inteligente
obtendrá el peso de la ropa y ajustará el
tiempo de ciclo, el agua y el consumo de
electricidad en consecuencia.
! A través de cada fase de lavado "Kg
Detector" permite monitorear la
información sobre la carga de ropa en el
tambor y en los primeros minutos de la
colada él:
- Ajusta la cantidad de agua necesaria;
- Determina la duración del ciclo;
- Control de los aclarados en function del
tip ode tejido a seleccionado para ser
lavado;
- Ajusta el ritmo de rotación del tambor
para el tipo de tejido que se lava;
- Reconoce la presencia de espuma,
aumentando, si es necesario, la
cantidad de agua durante el aclarado;
- Ajusta la velocidad de centrifugado de
acuerdo a la carga, evitando así
cualquier desequilibrio.
5) INDICADOR BLOQUEO DE TECLA
El indicador muestra que las teclas están
bloqueadas.
6) INDICADORES SELECCIÓN
TEMPERATURA
Los indicadores muestran la temperatura
de lavado del programa seleccionado que
puede cambiarse (si está permitido) con la
tecla correspondiente.
Si deseas lavar con un programa frío, todos
los indicadores deben estar desconectados.
7) INDICADORES SELECCIÓN
CENTRIFUGADO
Los indicadores muestran la velocidad de
centrifugado del programa seleccionado
que puede cambiarse o descartarse con la
tecla correspondiente.
Cierre la escotilla ANTES de
seleccionar INICIO/PAUSA.
Si la puerta no está bien cerrada, la
luz seguirá parpadeando durante unos
7 segundos, después de lo cual
la orden de marcha se elimina
automáticamente. En este caso, cierre
la puerta de la manera adecuada y
pulse la tecla INICIO/PAUSA.
Page 88

!
88
Este electrodoméstico está equipado con
tecnología Smart Touch que permite
interactuar, a través de la App, con
smartphones con el sistema operativo
Android y equipados con la función NFC
(Near Field Communication).
! Descarga en tu smartphone la App
Candy simply-Fi.
FUNCIONES
Las principales funciones disponibles de la
App son:
! Asistente de Voz – Una guía para
escoger el ciclo ideal con solo tres
entradas de voz (prendas/tejidos, color,
nivel de suciedad).
! Ciclos – Para descargar y lanzar nuevos
programas de lavado.
! Cuidado Smart – Ciclos de Smart
Check-up y Autolimpieza y la guía de
diagnóstico de averías.
! Mis Estadísticas – Estadísticas y
consejos de lavado para un uso más
eficiente de la lavadora.
CÓMO USAR SMART TOUCH
PRIMERA VEZ - Registro de la lavadora
! Entra en el menú "Ajustes" de tu
smartphone Android y activa la función
NFC en el menú "Redes Móviles".
! Gira el mando hasta la posición Smart
Touch para activar el sensor en el panel.
! Abre la App, crea el perfil de usuario y
registra el electrodoméstico siguiendo las
instrucciones en la pantalla del teléfono,
o en la "Guía Rápida" adjunta a la
lavadora.
SMART TOUCH
La App Candy simply-Fi está
disponible para dispositivos con
sistema Android y iOS, tanto para
tablets como para smartphones. Sin
embargo, puedes interactuar con la
lavadora y aprovecharte del potencial
que ofrece Smart Touch solo con
smartphones Android equipados con
la tecnología NFC, de acuerdo al
siguiente programa funcional:
Smartphone
Android con
tecnología NFC
Interacción con la
lavadora +
contenidos
Smartphone
Android sin
tecnología NFC
Solo contenidos
Tablet Android
Solo contenidos
iPhone Apple
Solo contenidos
iPad Apple
Solo contenidos
Obtén todos los detalles de las
funciones Smart Touch, navegando
por la App en modo DEMO, o vete a:
www.candysmarttouch.com
Según el modelo de smartphone, y su
versión OS Android, el proceso de
activación de la NFC puede ser
diferente. Para obtener más detalles,
consulta el manual del smartphone.
Para más información, las F.A.Q. y el
video para un registro sencillo están
disponibles en:
www.candysmarttouch.com/how-to
Page 89

!
ES
89
SIGUIENTE VEZ – Uso regular
! Cada vez que quieras gestionar la
lavadora a través de la App, primero
deberás conectar el modo Smart Touch,
colocando el mando en el lugar homónimo.
! Asegurarse de que se ha desbloqueado
la pantalla del teléfono (posiblemente del
modo stand-by) y se ha activado la
función NFC; de lo contrario, se deben
seguir los pasos mencionados anteriormente.
! Si deseas iniciar un ciclo de lavado, carga la
colada, pon el detergente y cierra la puerta.
! Selecciona la función deseada en la App
(p.e.: iniciar programa, ciclo Smart
Check-up, actualizar estadísticas, etc...).
! Seguir las instrucciones mostradas en la
pantalla del teléfono, MANTENIÉNDOLO
sobre el logotipo Smart Touch ubicado
en el panel de mandos de la lavadora,
cuando lo solicite la App.
NOTAS:
Coloca tu smartphone de forma que la
antena posterior del NFC coincida con
la posición del logo Smart Touch en el
electrodoméstico (ver foto más abajo).
Si se desconoce la posición de la
antena NFC, se debe mover
ligeramente el teléfono en forma
circular sobre el logotipo de Smart
Touch hasta que la App confirme la
conexión. Para que la transferencia
de datos sea exitosa, es esencial
MANTENER EL SMARTPHONE EN EL
PANEL DE MANDOS DURANTE LOS
SEGUNDOS QUE REQUIERE EL
PROCEDIMIENTO. Un mensaje en el
dispositivo informará del éxito de la
operación e indica el momento en el
que se puede alejar el Smartphone.
Fundas gruesas o pegatinas
metálicas en tu smartphone pueden
afectar o impedir la transmisión de
datos entre la lavadora y el teléfono.
Si fuera necesario, quítalas.
La sustitución de algunos
componentes del smartphone (por
ejemplo, funda trasera, batería, etc ...)
por componentes no originales,
puede afectar al sistema NFC,
provocando incluso su eliminación,
por lo que impediría el uso por
completo de la App.
La gestión y el control de la lavadora
a través de la App solo es posible
"por proximidad": por lo tanto, no es
posible realizar operaciones en
remoto (ej.: desde otra habitación;
fuera de casa).
Page 90

!
90
PROGRAMA
(MAX.) *
1)
DETERGENTE
(ver panel de control)
(MAX.)
1 o 2
ALGODÓN
2)
5
5,5 6 6,5 7 8
90°
ECO 40-60
2)
5
5,5 6 6,5 7 8
60°
ALGODÓN +
PRELAVADO
2)
5
5,5 6 6,5 7 8
60°
( )
LANA/A MANO
1 1 1 1 1
2
30°
SINTÉTICOS
2)
2,5
2,5 3 3
3,5
4
60°
ACLARADOS
- - - - -
-
-
DESAGÜE +
CENTRIFUGADO
- - - - -
-
-
DELICADOS 59'
2 2 2 2 2,5
2,5
40°
DEPORTE PLUS 39'
1,5
1,5 2 2 2 2,5
30°
HIGIENE PLUS 59'
1,5
1,5 2 2 2 2
60°
14'
1 1 1 1 1
1,5
30°
RAPIDOS
3)
30'
1,5
1,5 2 2
2,5
2,5
30°
44'
3 3 3 3 3,5
3,5
40°
COLOR Y MIXTOS
59’
5 5 6 6 7
8
40°
ALGODÓN
PERFECTO 59'
2,5
2,5 3 3
3,5
4
40°
SPECIAL 49'
2,5
2,5 3 3
3,5
4
40°
Configuración personalizada del mando que tienes que seleccionar para interactuar
con la App para smartphone y para descargar los ciclos (ir a la sección
especializada). Por defecto viene determinado de fábrica el programa Autolimpieza,
diseñado para higienizar la lavadora.
Tabla de programas
Page 91

!
ES
91
Por favor lea estas notas:
* La capacidad máxima de colada seca
depende del modelo usado (ver panel de
control).
"
"
La velocidad de centrifugado puede
reducirse también, para que coincida con
las directrices sugeridas en la etiqueta de la
prenda, o incluso para tejidos muy
delicados cancelar completamente las
revoluciones de centrifugado. Esta opción
está disponible en la opción de selección
de velocidad de centrifugado y se puede
activar con la tecla SELECCIÓN
CENTRIFUGADO. Si la etiqueta no indica
información específica, es posible utilizar la
máxima prevista en el programa. Una sobre
dosificación de detergente puede causar
exceso de espuma. Si el aparato detecta la
presencia de exceso de espuma, puede
excluir la fase de centrifugado o ampliar la
duración del programa y aumentar el
consumo de agua.
( )
Sólo con la opción PRELAVADO
seleccionada (programas con
opción PRELAVADO disponible).
1)
Cuando se selecciona un programa,
aparece en el display la temperatura
de lavado recomendada que puede
cambiarse (si está permitido) con la
tecla correspondiente, pero no se
puede aumentar por encima del
máximo permitido.
2)
Para los programas mostrados se
puede ajustar la duración y la
intensidad del lavado con la tecla
NIVEL DE SUCIEDAD.
3)
Selección del programa RÁPIDOS
en el mando, será posible
seleccionar con la tecla RÁPIDOS,
uno de los tres programas rápidos
disponibles entre el 14 ', 30' y 44 '.
! PRELAVADO: Introducir el detergente
en el compartimento correspondiente,
situado en dispensador. O también,
introducirlo directamente en las tapas
perforadas del cesto, en la dosis indicada
por el fabricante de detergente.
** PROGRAMAS DE ALGODÓN
ESTÁNDAR SEGÚN (UE) nº 1015/2010
y nº 1061/2010.
PROGRAMA DE ALGODÓN CON
UNA TEMPERATURA DE 60°C.
PROGRAMA DE ALGODÓN CON
UNA TEMPERATURA DE 40°C.
Estos programas son adecuados para
limpiar suciedad normal de lavado de
algodón y son los programas más
eficientes en términos de consumo
combinado de energía y agua para
lavar la ropa de algodón lavado.
Estos programas se han desarrollado
para ser compatibles con la
temperatura en la etiqueta de lavado de
las prendas y la temperatura real del
agua pueden diferir ligeramente de la
temperatura declarada del ciclo.
Antes de cerrar la cubierta e iniciar el
ciclo de lavado, por favor, comprobar
que las puertas del tambor esten
perfectamente cerradas. Cuando sea
posible, por favor, alinear los
indicadores de posición con el tambor
para asegurar el mejor rendimiento del
lavado.
IMPORTANTE: No utilizar la modalidad
prelavado con la opción de inicio diferido.
Page 92

!
92
A fin de poder lavar diferentes tipos de
tejidos y con varios grados de suciedad, la
lavadora cuenta con programas específicos
adaptados a cada necesidad de lavado
(véase tabla de programas).
Smart Touch
Configuración personalizada del mando
que tienes que seleccionar cuando quieras
transferir una orden de la App a la lavadora
y descargar/iniciar un ciclo (para más
información, ir a la sección especializada y
el manual de usuario para la App).
En la opción Smart Touch, por defecto
viene determinado de fábrica el ciclo
"Autolimpieza", diseñado para higienizar
el tambor, eliminar los malos olores y
mejorar la vida de la lavadora.
Asegúrate de iniciar el ciclo "Autolimpieza"
sin prendas en la lavadora, usando solo
detergente en polvo. Deje la puerta de la
lavadora abierta al final del ciclo para
permitir que se seque el tambor.
Recomendado cada 50 lavados.
ALGODÓN
Este programa es adecuado para lavar
prendas de algodón de color a 40°C o para
garantizar el mayor grado de limpieza en el
lavado de prendas de algodón resistente a
60°C o 90°C. El centrifugado final es a
máxima velocidad para garantizar una
excelente eliminación del agua.
ECO 40-60
El programa ECO 40-60 lava prendas de
algodón con un grado de suciedad normal
que se pueden lavar a 40°C o 60°C juntas
en el mismo ciclo.
Este programa se utiliza para evaluar la
conformidad con la normativa en materia de
Ecodesign de la UE (diseño de productos
que no perjudica el medio ambiente).
ALGODÓN + PRELAVADO
Este programa está estudiado para eliminar
las manchas más resistentes de las
prendas blancas de algodón.
El prelavado garantiza la eliminación de la
suciedad más resistente.
Añadir al compartimento "1" una cantidad
de detergente igual al 20% de lo que se
usaría en un lavado principal.
LANA/A MANO
Este programa ejecuta un ciclo de lavado
específico para tejidos de lana que se
pueden lavar en lavadora, para prendas
que se deben lavar a mano o para ropa de
seda o en cuya etiqueta se indica «Lavar
como seda».
SINTÉTICOS
Este programa nos permite lavar tejidos y
colores diferentes todos juntos. Se han
optimizado tanto el movimiento de rotación
del tambor como los niveles de agua
durante el lavado, pero también durante la
fase de aclarado.
El centrifugado preciso reduce la formación
de arrugas en los tejidos.
ACLARADOS
Este programa lleva a cabo 3 aclarados con
un centrifugado intermedio (a una velocidad
que se puede reducir o el cual se puede
cancelar con el botón correspondiente). Se
utiliza para aclarar todo tipo de tejidos, por
ejemplo, tras un lavado a mano.
Descripción de los programas
Escoja un programa de conformidad
con las instrucciones que figuran en
las etiquetas de lavado, especialmente
por lo que se refiere a la temperatura
máxima recomendada.
ATENCIÓN:
AVISO IMPORTANTE SOBRE EL
RENDIMIENTO DE LAVADO.
! Las prendas de color nuevas deben
lavarse por separado, como mínimo,
durante los 5 o 6 primeros lavados.
! Algunas prendas oscuras, como
vaqueros y toallas, deben lavarse
siempre por separado.
! No deben mezclarse nunca prendas
que DESTIÑAN.
Page 93

!
ES
93
DESAGÜE + CENTRIFUGADO
Este programa completa el escurrido y lleva
a cabo un centrifugado a máxima
velocidad. Es posible cancelar o reducir el
centrifugado por medio del botón de
SELECCIÓN DE CENTRIFUGADO.
DELICADOS 59'
Desarrollado para lavar y tratar las prendas
delicadas y los tejidos preciados. Este
programa lava a baja temperatura durante
59 minutos. Recomendado para cargas
pequeñas.
DEPORTE PLUS 39'
Creado para eliminar la suciedad de las
prendas técnicas utilizadas en el gimnasio y
para practicar deportes. El programa lava a
baja temperatura durante 29 minutos.
Recomendado para pequeñas cargas de
prendas sintéticas.
HIGIENE PLUS 59'
Este programa ofrece la mejor combinación
posible de alta temperatura, tiempo y
acción de limpieza para garantizar la
máxima potencia de desinfección contra las
bacterias en tan solo 59 minutos.
Recomendado para colada de algodón,
lava a una temperatura de 60°C y rinde
mejor con cargas pequeñas.
RÁPIDOS (14'/30'/44')
¡Ahorro total! Este nuevo programa se
puede utilizar para conseguir resultados
excelentes, ahorrando agua, energía,
detergente y tiempo. Esta opción lava a una
temperatura media adecuada para
cualquier tipo de tejido.
Recomendado para cargas pequeñas y
artículos poco sucios.
COLOR Y MIXTOS 59’ *
Este programa ofrece la libertad de lavar
juntos todo tipo de tejidos y colores que no
decoloran, con una carga completa,
obteniendo resultados excelentes en tan
solo 59 minutos.
Con el lavado a temperatura media, se
recomienda este programa para lavar
colada que no esté muy sucia.
*Temperatura preestablecida de 20 °C
(se puede modificar usando el botón
correspondiente). El ciclo de lavado
también es adecuado para lavar telas de
algodón.
ALGODÓN PERFECTO 59'
Este programa garantiza unos resultados
excelentes para las prendas de algodón.
Ha sido diseñado para reducir el tiempo de
lavado de las prendas de algodón con
suciedad media a temperaturas medias.
Para obtener los mejores resultados, se
recomienda llevar a cabo solo media carga.
ESPECIAL 49'
La tecnología innovadora de este programa
reduce la cantidad de tiempo que pasamos
lavando ropa y garantizando de igual forma
un alto rendimiento de lavado a
temperaturas medias en tan solo 49
minutos. Llene el electrodoméstico solo
hasta la mitad para obtener mejores
resultados.
Page 94

!
94
Apertura / Cierre del tambor
! Abrir la puerta de la lavadora.
! Abrir el tambor apoyando sobre el botón
(A), y posicionar al mismo tiempo la otra
mano sobre la tapa.
! Introducir las piezas de ropa, de una en
una, en el tambor, sin comprimirlas.
Respetar las cargas recomendadas en la
“tabla de programas”. Una sobrecarga de
la lavadora dará resultados menos
satisfactorios, y arrugará la ropa.
Para cerrar el tambor, manipular de nuevo
las tapas del tambor, poniendo la del botón
(A) por debajo de la otra, hasta que queden
perfectamente enganchadas.
Carga del detergente
La cubeta del detergente está dividida en 3
compartimentos:
! El compartimento 1 está destinado para
el detergente en polvo.
! El compartimento 2 está destinado para
el detergente líquido.
! MAX- El compartimento detergente
presenta la línea para la indicación del
nivel máximo de detergente que no debe
ser superado
! Cuando los tejidos presenten
manchas que necesitan tratamiento con
productos blanqueadores líquidos, se
puede proceder a su limpieza preliminar
en la lavadora. Para éllo: Introducir
el producto blanqueante en el
"compartimento 2", y accionar el
programa de aclarados. Acabado el
tratamiento llevar el programador a la
posición OFF, anadir el resto de la
colada, y proceder al lavado normal con
el programa deseado.
1) Máximo lavado detergente en polvo
2) Máximo lavado detergente líquido
3) Máximo perfumante
Preparación de lavado
Page 95

!
ES
95
7. DIAGNÓSTICO DE AVERÍAS Y GARANTÍA
Si consideras que su lavadora no está funcionando correctamente, consulta la guía rápida
que se suministra más abajo con algunos consejos prácticos sobre cómo solucionar los
problemas más comunes.
INFORME DE ERROR
Tipo de error
Posibles causas y soluciones prácticas
E2 (con display)
2 parpadeos de las
LEDs (sin display)
La lavadora no se llena de agua.
Asegúrate de que la llave de suministro de agua esté abierta.
Asegúrate de que la manguera de alimentación de agua no esté
doblada, retorcida o atrapada.
El tubo de desagüe no está a la altura adecuada (ir a la sección instalación).
Cierra la llave de suministro de agua, desenrosca la manguera de
alimentación de la parte de atrás de la lavadora y asegúrate de que
el filtro "anti-arena" esté limpio, no obstruido.
Compruebe que el filtro no esté obstruido y que no hay cuerpos extraños en
el interior del compartimento del filtro que puedan obstruir el flujo correcto del agua.
E3 (con display)
3 parpadeos de las
LEDs (sin display)
La lavadora no desagua.
Compruebe que el filtro no esté obstruido y que no hay cuerpos extraños en
el interior del compartimento del filtro que puedan obstruir el flujo correcto del agua.
Asegúrate de que la manguera de desagüe no esté doblada,
retorcida o atrapada.
Asegúrate de que el sistema de desagüe no esté bloqueado y que permita
al agua fluir sin obstrucciones. Intenta drenar el agua en el lavadero.
E4 (con display)
4 parpadeos de las
LEDs (sin display)
Hay mucha espuma y/o agua.
Asegúrate de no haber utilizado una cantidad excesiva de
detergente o de un producto no adecuado para lavadoras.
E7 (con display)
7 parpadeos de las
LEDs (sin display)
Problema con la puerta.
Asegúrate de que la puerta está cerrada correctamente. Asegúrate
de que no hay prendas en el interior de la lavadora que puedan
obstruir el cierre de la puerta.
Si la puerta está bloqueada, apagua y desenchufa la lavadora del
suministro eléctrico, espera 2-3 minutos y vuelve a abrir la puerta.
Cualquier otro código
Apaga y desenchufa la lavadora, y espera un minuto. Enciende de
nuevo la lavadora e inicia un programa. Si el error persiste, contacta
directamente con el Servicio de Atención al Cliente autorizado.
SOLO PARA MODELOS SMART TOUCH.
Gracias al ciclo Smart Check-up de tu App Candy simply-Fi puedes comprobar en
cualquier momento el correcto funcionamiento de tu lavadora. Solo necesitas un
smartphone Android con tecnología NFC. Puedes encontrar información adicional en la
App. Si el display de la lavadora muestra un error (a través de un código o de LEDs
parpadeando), deberías conectar la App y acercar el smartphone Android con NFC al logo
Smart Touch situado en el panel para acceder a la guía y resolver el problema.
! Modelos con display: el error se muestra como un número precedido por la letra
“E” (ejemplo: Error 2 = E2)
! Modelos sin display: El error se muestra con el parpadeo de cada LED tantas
veces como represente el código del error, seguido de una pausa de 5 segundos
(ejemplo: Error 2 = dos parpadeos – pausa 5 segundos – dos parpadeos – etc…)
Page 96

!
96
OTRAS ANOMALÍAS
Problema
Posibles causas y soluciones prácticas
La lavadora no
funciona
/no se enciende
Asegúrate de que el producto está enchufado a una toma que
funcione.
Asegúrate de que hay electricidad.
Asegúrate de que el enchufe de la pared está funcionando,
enchufando otro aparato, por ejemplo una lámpara.
La puerta puede no estar cerrada correctamente: ábrela y ciérrala
de nuevo.
Comprueba que se ha seleccionado el programa escogido y que se
ha pulsado la tecla de inicio.
Asegúrate de que la lavadora no está en modo pausa.
Agua derramada
sobre
el suelo cerca de la
lavadora
Esto puede ser debido a una fuga en la junta entre la llave y la
manguera de suministro; en este caso, sustitúyela y ajusta la
manguera y la llave.
Asegúrate de que el filtro está correctamente cerrado.
La lavadora no
centrifuga
Debido a una distribución no óptima de las prendas, la lavadora
puede:
Intentar equilibrar la carga, aumentando el tiempo de centrifugado.
Reducir la velocidad de centrifugado para reducir las vibraciones y el
ruido.
Descartar el centrifugado para proteger la lavadora.
Asegúrate de que la carga está equilibrada. De lo contrario,
desenrédala, vuelve a meterla y continúa con el programa.
Esto puede deberse al hecho de que el agua no se haya drenado
completamente: espera unos minutos. Si el problema persiste, ir a la
sección de Error 3.
La mayoría de los modelos incluyen una función de "no
centrifugado": asegúrate de que no está activada.
Asegúrate de que no tiene activada ninguna opción que cambie el
centrifugado.
Un exceso de detergente puede dificultar el inicio del centrifugado.
Se oyen
vibraciones/ruidos
fuertes durante el
centrifugado
La lavadora puede no estar completamente nivelada: si es
necesario, ajusta las bases tal y como se indica en la sección
correspondiente.
Asegúrate de que se han retirado los tornillos colocados para el
transporte, los tapones de caucho y los tubos separadores.
Asegúrate de que no hay cuerpos extraños en el interior del tambor
(monedas, bisagras, botones, etc...)
La garantía estándar del fabricante cubre los defectos causados por fallos
eléctricos o mecánicos en el producto debidos a un acto u omisión del
fabricante. Si el defecto detectado se debe a factores externos al producto
suministrado, a un uso incorrecto o como resultado de no seguir las
instrucciones de uso, se aplicará un cargo.
Page 97

!
ES
97
Se recomienda siempre utilizar las piezas
de recambio originales, que están
disponibles en el Servicio de Atención al
Cliente autorizado.
Al mostrar el logo
marcado en este
producto, declaramos, bajo nuestra
propia responsabilidad, el cumplimiento
de todos los requisitos europeos en
términos de seguridad, salud y medio
ambiente, establecidos en la legislación
de este producto.
El fabricante no se responsabiliza por
eventuales erratas de imprenta contenidas
en el presente manual de instrucciones.
Asimismo, se reserva el derecho de
efectuar las modificaciones que considere
oportunas para sus productos sin
comprometer sus características
fundamentales.
Garantía
El producto tiene unas condiciones de
garantía establecidas en el certificado
que se incluye en el producto. El
certificado de garantía debe completarse
debidamente y archivarse, para poder
mostrarlo al Servicio de Atención al
Cliente autorizado en caso necesario.
Page 98

!
98
Merci d'avoir choisi ce produit.
Nous sommes fiers d’offrir le produit idéal
pour vous et la meilleure gamme complète
d’électroménagers pour votre routine
quotidienne.
Lisez attentivement ce manuel pour une
utilisation de votre produit en toute sécurité
et bénéficier de conseils pratiques pour
l’entretenir efficacement.
Nous vous recommandons de
toujours garder ce manuel à portée de main
et dans de bonnes conditions afin qu’il
puisse également servir aux éventuels
futurs propriétaires.
Chaque produit est identifié par un code à
16 caractères unique également appelé
«numéro de série», imprimé sur l’étiquette
apposée sur l’appareil ou dans l’enveloppe
du document se trouvant à l’intérieur du
produit.
Ce code est nécessaire pour inscrire le
produit ou bien pour prendre contact avec
notre service clientèle.
Cet appareil est commercialisé
en accord avec la directive
européenne 2012/19/EU sur
les déchets des équipements
électriques et électroniques (DEEE).
Les déchets des équipements électriques et
électroniques (DEEE) contiennent des
substances polluantes (ce qui peut
entraîner des conséquences négatives pour
l’environnement) et des composants de
base (qui peuvent être réutilisés). Il est
important de traiter ce type de déchets de
manière appropriée afin de pouvoir éliminer
correctement tous les polluants et de
recycler les matériaux. Les particuliers
peuvent jouer un rôle important en veillant à
ce que les DEEE ne deviennent pas un
problème environnemental. Il est essentiel
de suivre quelques règles simples:
! Les DEEE ne doivent pas être traités
comme les déchets ménagers;
! Les DEEE doivent être remis aux points
de collecte enregistrés. Dans de
nombreux pays, la collecte des produits
gros électroménagers peut être effectuée
à domicile.
Dans de nombreux pays, lorsque vous
achetez un nouvel appareil, l’ancien peut
être retourné au détaillant qui doit collecter
gratuitement sur la base un contre un.
L’équipement repris doit être équivalent
ou bien avoir les mêmes fonctions que le
produit acquis.
1. RÈGLES GÉNÉRALES DE SÉCURITÉ
2. INSTALLATION
3. CONSEILS PRATIQUES
4. ENTRETIEN ET NETTOYAGE
5. GUIDE D'UTILISATION RAPIDE
6. CONTRÔLES ET PROGRAMMES
7. DÉPANNAGE ET GARANTIES
Règles environnementales
Index
Page 99

!
FR
99
1. RÈGLES GÉNÉRALES
DE SÉCURITÉ
! Le produit est conçu pour être
utilisé dans un foyer domestique,
comme:
- Le coin cuisine dans des
magasins ou des lieux de
travail,
- Employés et clients dans
un hôtel, un motel ou
résidence de ce type,
- Dans des bed and
breakfast,
- Service de stock ou
similaire, mais pas pour de
la vente au détail.
La durée de vie de l’appareil
peut être réduite ou la garantie
du fabricant annulée si
l’appareil n’est pas utilisée
correctement. Tout dommage
ou perte résultant d'un usage qui
n'est pas conforme à un usage
domestique (même s'ils sont
situés dans un environnement
domestique ou un ménage) ne
sera pas acceptée par le
fabricant dans toute la mesure
permise par la loi.
! Cet appareil peut être utilisé
par des enfants âgés de 8 ans
et plus, ou des personnes
présentant un handicap physique,
moteur ou mental, et manquant
de connaissance sur l’utilisation
de
l’appareil, si elles sont sous la
surveillance d’une personne, donnant
des instructions pour une utilisation
en toute sécurité de l’appareil.
Les
enfants ne doivent pas jouer
avec l'appareil. Le nettoyage et
l’entretien de l’appareil ne doit
pas être fait par des enfants sans
surveillance d’un adulte.
! Les enfants doivent être
surveillés pour être sûr qu’ils
ne jouent pas avec l’appareil.
! Les enfants de moins de 3 ans
doivent être tenus à l’écart ou
bien être sous surveillance de
manière continue.
! Si le câble d'alimentation est
endommagé, il doit impérativement
être remplacé par un câble
spécifique qui peut être fourni par
le fabricant ou son agent de
service compétent.
!
N’utilisez que les colliers fournis
avec l’appareil pour la connexion
de l’alimentation en eau.
! La pression hydraulique doit être
comprise d'un minimum de 0,05
MPa à un maximum de 0,8 MPa.
! Assurez-vous qu’aucun tapis
n’obstrue la base de la
machine et les ventilations.
!
La mise OFF est obtenue en
positionnant le sélecteur en
position verticale, tout autre
positionnement met la machine
en fonction (uniquement pour
les modèles équipés d’un
sélecteur)
.
Page 100

!
100
! Le positionnement de l’appareil
doit permettre un accès facile à
la prise de courant après
installation.
! Capacité de chargement maximale
de vêtements secs selon le
modèle utilisé (voir le bandeau de
commande).
! Consulter le site web du
fabricant pour plus d’informations.
! Les détails techniques (voltage
et puissance) sont indiqués sur
l’étiquette du produit
! Assurez-vous que le système
électrique est bien connecté à
la terre, qu’il respecte toutes
les lois applicables et que les
prises de courant sont bien
compatibles avec la prise
électrique de l’appareil. Dans le
cas contraire, veuillez contacter
un professionnel qualifié.
! L’utilisation de transformateurs,
de multiprises ou de rallonges
électriques et fortement déconseillé
! Eteignez la machine avant
nettoyage: débranchez l’appareil
et fermer l’arrivée d’eau.
! Ne tirez pas sur le cordon
d’alimentation pour débrancher
l’appareil.
! N’exposez pas la machine à la
pluie, au soleil ou aux
intempéries.
! En cas de panne ou de
dysfonctionnement: éteindre la
machine, fermer le robinet
d’eau et ne pas toucher la
machine. Appelez immédiatement
le service client et n’utilisez que
des pièces de rechange d’origine.
Le non-respect de ces consignes
peut compromettre la sécurité de
l’appareil.
Connexions électriques et
instructions de sécurité
ATTENTION:
l’eau peut atteindre des
températures très élevées
pendant le lavage.
 Loading...