

Page 1

DA
SV
FI
EN
Page 2

90
Thank-you for choosing a Candy washing
machine. We are confident it will loyally
assist you in safely washing your clothes,
even delicates, day after day.
You can register your product at
www.registercandy.com to gain faster
access to supplementary services solely
reserved to our most loyal customers.
Carefully read this manual for correct and
safe appliance use and for helpful tips on
efficient maintenance.
Only use the washing machine
after carefully reading these instructions.
We recommend you always keep this
manual on hand and in good condition for
any future owners.
Please check that the appliance is
delivered with this instruction manual,
warranty certificate, service centre address
and energy efficiency label. Also check that
plugs, drain hose support hook and liquid
detergent or bleach tray (only on some
models) are included. We recommend you
keep all these components.
Each product is identified by a unique 16character code, also called the “serial
number”, printed on the sticker. This can be
found inside the door opening. This code is
a unique code for your product that you will
need to register the product warranty, or if
you need to contact the Customer Service
Centre.
This appliance is marked according to
the European directive 2012/19/EU
on Waste Electrical and Electronic
Equipment (WEEE).
WEEE contains both polluting substances (which
can cause negative consequences for the
environment) and basic components (which can
be re-used). It is important to have WEEE
subjected to specific treatments, in order to
remove and dispose properly all pollutants, and
recover and recycle all materials. Individuals can
play an important role in ensuring that WEEE
does not become an environmental issue; it is
essential to follow some basic rules:
! WEEE should not be treated as household
waste;
! WEEE should be handed over to the relevant
collection points managed by the municipality or
by registered companies. In many countries, for
large WEEE, home collection could be present.
In many countries, when you buy a new
appliance, the old one may be returned to the
retailer who has to collect it free of charge on a
one-to-one basis, as long as the equipment is of
equivalent type and has the same functions as
the supplied equipment.
1. GENERAL SAFETY RULES
2. INSTALLATION
3. PRACTICAL TIPS
4. MAINTENANCE AND CLEANING
5. QUICK USER GUIDE
6. CONTROLS AND PROGRAMS
7.
THROUBLESHOOTING AND WARRANTY
Environmental conditions
Contents
Page 3

EN
91
1. GENERAL SAFETY
RULES
! This appliances is intended to
be used in household and
similar applications such as:
- Staff kitchen areas in shops, offices
and other working environments;
- Farm houses;
- By clients in hotels, motels and
other residential type environments;
- Bed and breakfast type environments.
A different use of this appliance
from household environment
or from typical housekeeping
functions, as commercial use by
expert or trained users, is excluded
even in the above applications. If
the appliance is used in a manner
inconsistent with this it may reduce
the life of the appliance and may
void the manufacturer’s warranty.
Any damage to the appliance or
other damage or loss arising
through use that is not consistent
with domestic or household use
(even if located in a domestic or
household environment) shall not
be accepted by the manufacturer to
the fullest extent permitted by law.
! This appliance can be used by
children aged from 8 years and
above and persons with reduced
physical, sensory or mental
capabilities or lack of experience
and knowledge if they have been
given supervision or instruction
concerning use of the appliance
in a safe way and understand the
hazards involved.
Children shall not play with the
appliance. Cleaning and user
maintenance shall not be made
by children without supervision.
! Children should be supervised
to ensure that they do not play
with the appliance.
! Children of less than 3 years
should be kept away unless
continuously supervised.
! If the supply cord is damaged, it
must be replaced by the
manufacturer, its service agent
or similarly qualified persons in
order to avoid a hazard.
! Only use the hose-sets
supplied with the appliance for
the water supply connection
(do not reuse old hose-sets).
! Water pressure must be between
0,05 MPa and 0,8 MPa.
! Make sure that a carpet do not
obstruct the base of the machine
and ventilation openings.
! The OFF condition is reached
by
placing the reference mark on
the programmes control/knob in
the vertical position. Any other
different position of such control
sets the machine in ON condition
(only for models with programmes
knob).
Page 4
92
! After installation, the appliance
must be positioned so that the
plug is accessible.
! The maximum load capacity of
dry clothes depends on the
model used (see control panel).
! To consult the product fiche
please refer to the manufacturer
website.
! Before cleaning or maintaining
the washing machine, unplug
the appliance and turn off the
water faucet.
! Make sure the electrical system
is grounded. Otherwise, seek
qualified professional assistance.
! Please do not use converters,
multiple sockets or extension
cords.
! Do not pull on the power cord
or appliance to unplug the
machine.
! Do not expose the washing
machine to rain, direct sunlight
or other weather elements.
! In the event of fault and/or
malfunction, turn off the
washing machine, close the
water faucet and do not tamper
with the appliance.
Immediately contact the
Customer Service Centre and
only use original spare parts.
Failure to observe these
instruction may jeopardise
appliance safety.
By placing the
mark on this
product, we are confirming
compliance to all relevant
European safety, health and
environmental requirements which
are applicable in legislation for
this product.
Safety instructions
WARNING:
water may reach very high
temperatures during the
wash cycle.
Page 5

EN
93
2. INSTALLATION
A
B
B
B
B
A
1
!
Remove the 2 or 4 transportation
screws (A) on the back and
remove the 2 or 4 flat washers,
rubber bungs and plastic spacer
tubes (B) as illustrated in figure 1
.
2
!
Fit the trims provided "C" (fig. 2).
3
4
min 50 cm
max 85 cm
+2,6 mt
max
max 100 cm
min 4 cm
Page 6

94
5
! The washing machine should be
connected to the water mains via the
new tube supplied with the
appliance (inside the drum). Do not
use the old tube for this purpose.
! Connect one end of the water inlet
pipe with the elbow bend to the
electrovalve (top rear part of the
machine) and the other end to a tap
or a plumbed-in 3/4" gas threaded
connection.
!
Place the washing machine close to
the wall, ensuring that there are no
bends or kinks anywhere in the tube.
Hook the outlet pipe to the edge of
the sink or preferably to a fixed
drainage outlet of a diameter greater
than that of the outlet pipe and at a
height of min. 50 cm. and a
maximum of 75 cm. from the floor
(fig. 4).
! If necessary, use the curved
accessory to attach and support
the outlet pipe more securely.
If your model offers this function:
! To move the washing machine
easily, turn the trolley lever to the
right. Once you have finished
moving the machine, return the lever
to its original position.
! Level the machine by adjusting the
front feet (fig. 5).
a) Turn the nut clockwise to release
the screw on the foot.
b) Raise or lower the foot by rotating
it until it stands firmly on the floor.
c) Lock the foot in position by turning
the nut anticlockwise until it comes
up against the bottom of the
washing machine.
! Check that the appliance is properly
levelled.
! Check that the washing machine
does not rock by trying to move two
diagonally opposite top corners at
the same time.
! If you move the washing machine
from one place to another, you must
level the feet again afterwards.
Page 7
EN
95
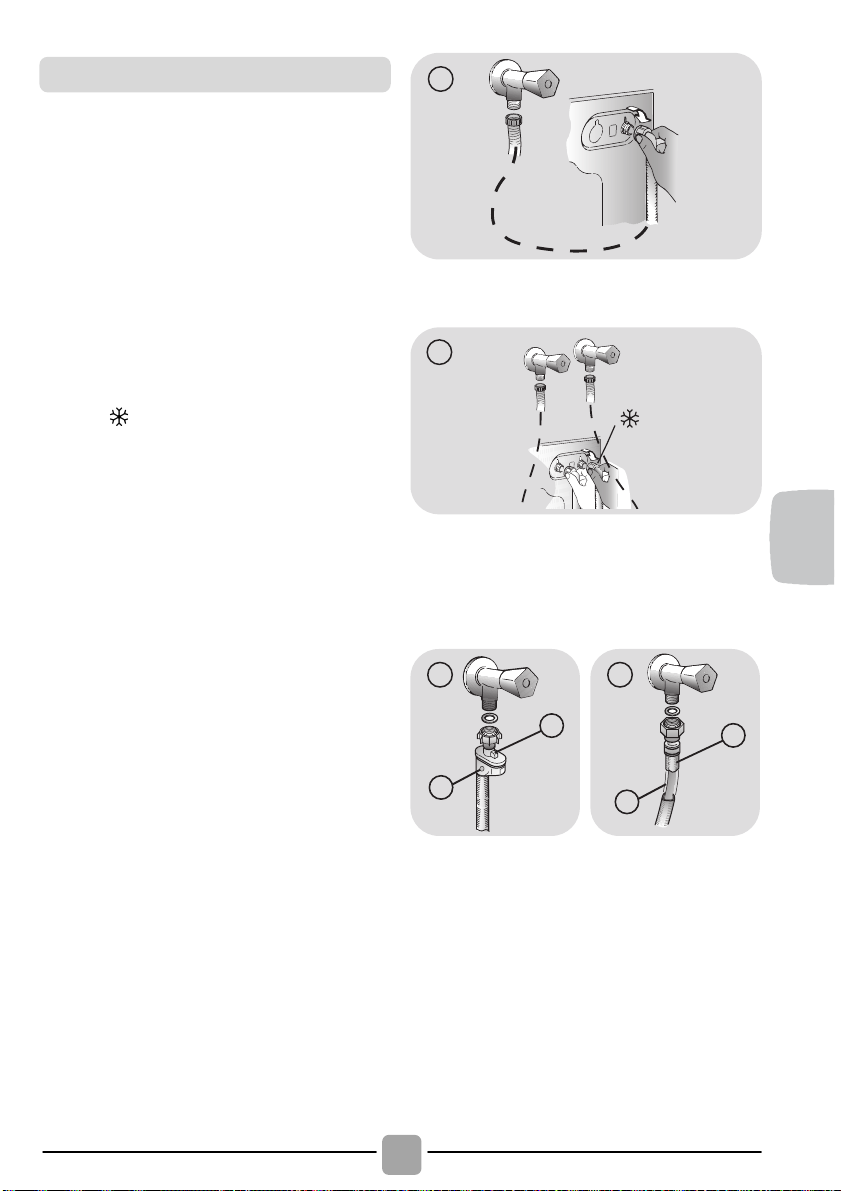
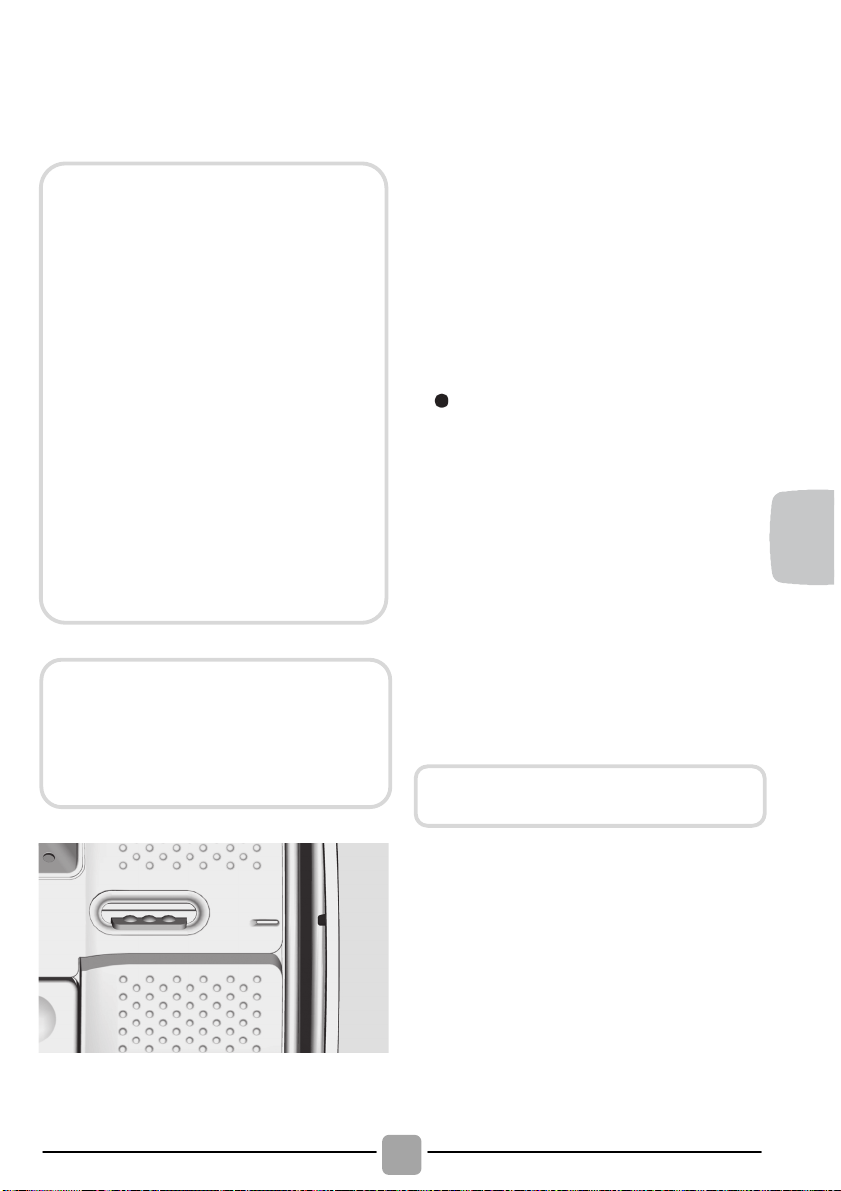
! Connect the water hose to the water
supply tap (fig. 6) only using the hose
supplied with the appliance (do not reuse
old hose-sets).
! Some models may include one or more of
the following features:
! HOT&COLD (fig. 7):
water mains connection settings with hot
and cold water for higher energy savings.
Connect the grey tube to the cold water
faucet and the red one to the hot water
faucet. The machine can be connected to
the cold water faucet only: in this case,
some programs may start a few minutes
later.
! AQUASTOP (fig. 8):
a device located on the supply tube that
stops water flow if the tube deteriorates;
in this case, a red mark will appear in the
window “A” and the tube must be
replaced. To unscrew the nut, press the
one-way lock device "B".
! AQUAPROTECT – SUPPLY TUBE WITH
GUARD (fig. 9):
Should water leak from the primary
internal tube "C", the transparent
containment sheath "D" will contain water
to permit the washing cycle to complete.
At the end of the cycle, contact the
Customer Service Centre to replace the
supply tube.
6
1
7
B
A
8
D
C
9
Hydraulic connections
Page 8

96
3. PRACTICAL TIPS
WARNING: when sorting laundry, make
sure:
- have eliminated metallic objects such as
hair clips, pins, coins, from laundry;
- to have buttoned pillow cases, closed
zips, tied loose belts and long robe
ribbons;
- to have removed rollers, hooks or clips
from curtains;
- to have carefully read clothing washing
labels;
- to have removed any persistent stains
using specific detergents.
! When washing rugs, bedcovers or other
heavy clothing, we recommend you avoid
the spinning cycle.
! To wash wool, make sure the item can be
machine washed and marked by the
“Pure virgin wool” symbol with the “Does
not mat” or “Machine washable” label.
A guide environmentally friendly and
economic use of your appliance.
Maximise The Load Size
! Achieve the best use of energy, water,
detergent and time by using the
recommended maximum load size.
Save up to 50% energy by washing a full
load instead of 2 half loads.
Do you need to pre-wash?
! For heavily soiled laundry only!
SAVE detergent, time, water and
between 5 to 15% energy consumption
by NOT selecting Prewash for slight to
normally soiled laundry.
Is a hot wash required?
! Pretreat stains with stain remover or soak
dried in stains in water before washing to
reduce the necessity of a hot wash
programme.
Save up to 50% energy by using a 60°C
wash programme.
Following is a quick guide with tips and
recommendations on detergent use at the
various temperatures. In any case, always
read the instructions on the detergent for
correct use and doses.
Load tips
Helpful suggestions for the user
When washing heavily soiled whites,
we recommend using cotton
programs of 60°C or above and a
normal washing powder (heavy duty)
that contains bleaching agents that at
medium/high temperatures provide
excellent results.
For washes between 40°C and 60°C
the type of detergent used needs to be
appropriate for the type of fabric and
level of soiling.
Normal powders are suitable for “white”
or colour fast fabrics with high soiling,
while liquid detergents or “colour
protecting” powders are suitable for
coloured fabrics with light levels of
soiling.
For washing at temperatures below
40°C we recommend the use of liquid
detergents or detergents specifically
labeled as suitable for low temperature
washing.
For washing wool or silk, only use
detergents specifically formulated for
these fabrics.
Page 9

EN
97
4. MAINTENANCE AND
CLEANING
To clean the washing machine exterior, use a
damp cloth, avoiding abrasives, alcohol and/or
solvents. The washing machine does not
require any special care for ordinary cleaning:
clean drawer compartments and the filter;
some tips on how to move the machine or on
long periods of disuse are provided below.
! The washing machine comes with a
special filter able to trap large residue,
such as buttons or coins, which could
clog the drain.
! Only available on certain models: pull out
the corrugated hose, remove the stopper
and drain the water into a container.
! Before unscrewing the filter, we
recommend you place an absorbent cloth
under it to keep the floor dry.
! Turn the filter counter-clockwise to the
limit stop in the vertical position.
! Remove and clean the filter; when
finished, replace it turning it clockwise.
! Repeat the previous steps in reverse
order to reassemble all parts.
! Should the washing machine be stored in
an unheated room for a long period of
time, drain all water from tubes.
! Unplug the washing machine.
! Detach the tube from the strap and lower
it, fully draining water into a bowl.
! Secure the drain tube with the strap when
finished.
! Press button (A).
! Hold down the button and turn the
detergent dispenser outwards.
! Remove the dispenser and clean it.
! It is recommended to remove any
remamining detergent in the
compartments to avoid any build up that
could cause blockages and restrict the
water flow from the dispenser to drum.
! Pulling out and extract the trap/traps (S)
that are located in the back part of the
dispenser and clean them carefully.
! Remove any solid residue which could
block the holes in the compartments.
B
A
C
S
Fit in the tabs as shown (B).
Turn the detergent dispenser towards the housing
(C) in the door until the tab clicks into place.
Filter cleaning
Suggestions for moves or
prolonged disuse
Cleaning the detergent dispenser
and its compartments
Fitting
Page 10
98
5. QUICK USER GUIDE
This washing machine automatically adjusts
the level of the water to the type and
quantity of washing. This system gives a
reduction in energy consumption and a
saving in washing times.
! Turn on the washing machine and select
the required program.
! Adjust the washing temperature if
necessary and press the required "option"
buttons.
! Press the START/PAUSE button to start
washing.
Should power go out when the washing
machine is running, a special memory
saves the settings and, when power
returns, the machine resumes the cycle
from where it left off.
! At the end of the programme, the
message "End" will appear on the display
or, on some models, all wash stage
indicator lights will turn on.
! Turn off the washing machine.
For any type of wash, see the program
table and follow the operating sequence
as indicated.
Water pressure:
min 0.05 Mpa / max 0.8 Mpa
(0.05 MPa dispenses approximately 1 litre
of water in 10 seconds)
Spin r.p.m.: See rating plate.
Power input / Power current fuse amp /
Supply voltage: See rating plate.
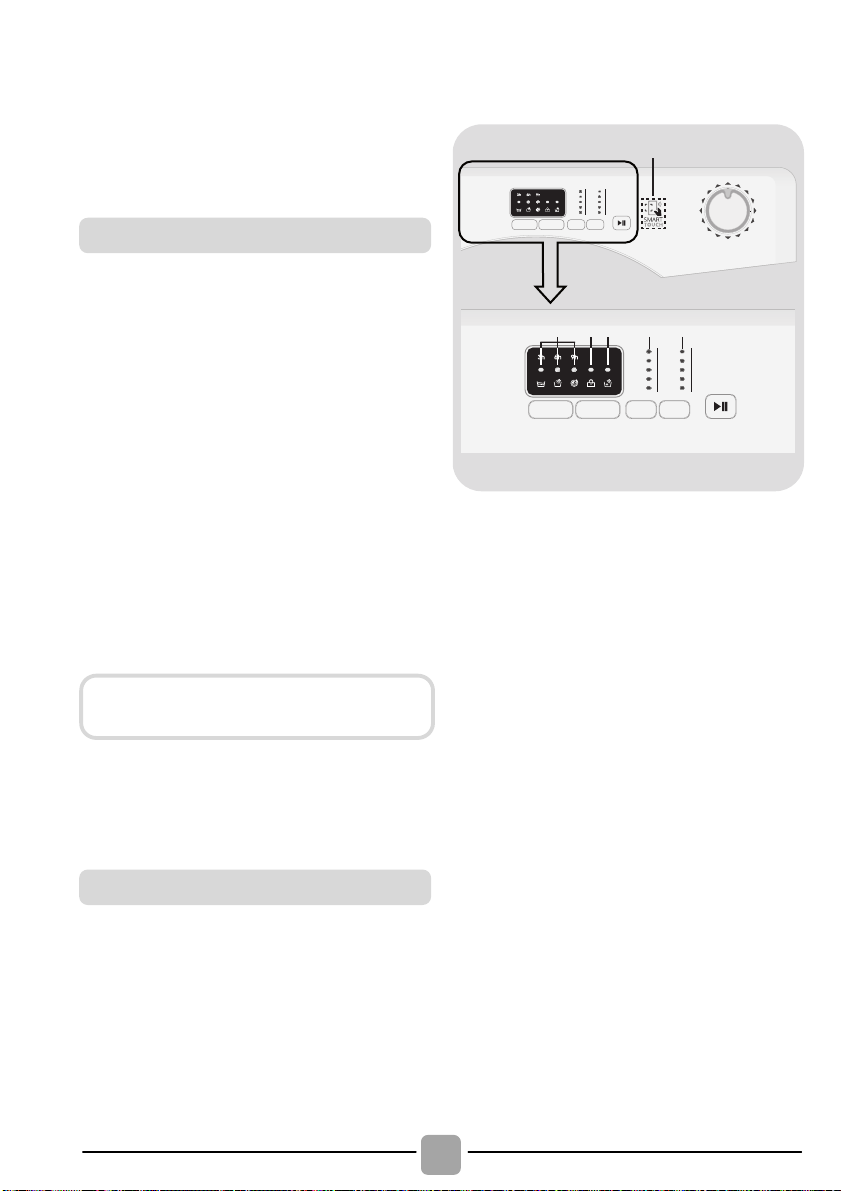
6. CONTROLS AND
PROGRAMS
A
CDEFB
N
IHG LM
A
Programme selector with OFF
position
B
START/PAUSE button
C
DELAY START button
D
EXTRA RINSE button
E
TEMPERATURE SELECTION
button
F
SPIN SPEED button
G
DELAY START TIME / WASH
STAGE indicator lights
H
DOOR LOCKED indicator light
I
EXTRA RINSE indicator light
L
TEMPERATURE SELECTION
indicator lights
M
SPIN SPEED indicator lights
N
SMART TOUCH area
Program selection
Wait until the DOOR LOCKED light has
gone out before opening the door.
Technical data
Page 11

EN
99
! Press the START/PAUSE button to start
the selected cycle.
! Once a programme is selected the
programme selector remains stationary on
the selected programme till cycle ends.
! Switch off the washing machine by
turning the selector to OFF.
! Press to start the selected cycle
(according to the selected cycle one of
the wash stage indicator lights will
illuminate).
ADD OR REMOVE ITEMS AFTER THE
PROGRAMMES HAS STARTED (PAUSE)
! Press and hold the START/PAUSE
button for about 2 seconds (some
indicator lights will flash, showing that the
machine has been paused).
! Wait 2 minutes until the safety device
unlocks the door.
! After you have added or removed items,
close the door and press the
START/PAUSE button (the programme
will start from where it left off).
CANCELLING THE PROGRAMME
! To cancel the programme, set the
selector to the OFF position.
! Appliance start time can be set with this
button, delaying the start by 3, 6 or 9
hours.
! Proceed as follows to set a delayed start:
- Select a programme.
- Wait until the indicator lights related to
temperature and spin of the programme
selected light up.
- Press the delay start button (each time
the button is pressed the start will be
delayed by 3, 6 or 9 hours respectively
and the corresponding time indicator
light will blink).
Opening the door
A special safety device prevents the
door from being opened immediately
after the end of the cycle.
Wait for 2 minutes after the wash
cycle has finished and the "Door
Security" light has gone out before
opening the door.
PROGRAMME selector with OFF
position
When you select a programme the
indicator lights related to temperature
and spin of that cycle will light up.
N.B.: To switch the machine off, turn the
programme selector to the OFF
position.
The programme selector must be
returned to the OFF position at the end
of each cycle or when starting a
subsequent wash cycle prior to the next
programme being selected and started.
START/PAUSE button
Close the door BEFORE selecting the
button START/PAUSE.
When the START/PAUSE button has
been pressed, the appliance can take
few seconds before it starts working.
Before you open the door, please
check water level is below the door
opening to avoid flooding.
DELAY START button
Page 12

100
- Press START/PAUSE button to
commence the delay start operation (the
indicator light associated with the
selected delay start time stops blinking
and remains on). At the end of the
required time delay the programme will
start.
! It is possible to cancel the delay start by
turning the programme selector to OFF.
If there is any break in the power supply
while the machine is operating, a special
memory stores the selected programme
and, when the power is restored, it
continues where it left OFF.
! This option allows you to add one rinse at
the end of the washing cycle and is useful
for people with delicate and sensitive
skin, for which a small amount of
detergent residue can cause irritations or
allergies.
! It is advisable to also use this function for
the children clothes and for the washing
of heavily soiled items, which requires a
lot of detergent to be used, or for the
washing of toweling items whose fibres
mostly have the tendency to hold the
detergent.
! This button allows you to change the
temperature of the wash cycles.
! It is not possible to raise the temperature
over the maximum allowed for the
programme, in order to protect the
fabrics.
! If you want carry out a cold wash all the
indicators must be off.
! By pressing this button, it is possible to
reduce the maximum speed, and if you
wish, the spin cycle can be cancelled.
! If the label does not indicate specific
information, it is possible to use the
maximum spin expected in the program.
! To reactivate the spin cycle press the
button until you reach the spin speed you
would like to set.
! It is possible to modify the spin speed
without pausing the machine.
The option buttons should be
selected before pressing the
START/PAUSE button.
EXTRA RINSE button
If the option is not compatible with the
selected programme, the relevant
indicator light first flashes and then
goes off.
TEMPERATURE SELECTION
button
SPIN SPEED button
To prevent damage to the fabrics, it is
not possible to increase the speed
over the maximum allowed for the
programme.
An over dosing of detergent can
cause excessive foaming. If the
appliance detects the presence of
excessive foam, it may exclude the
spinning phase or extend the duration
of the program and increase water
consumption.
The machine is fitted with a special!
electronic device, which prevents the!
spin cycle without load or on
particularly unbalanced load.! This
reduces the noise and vibration in!the
machine and so prolongs the life of!
your machine.
Page 13

EN
101
! Each time the DELAY START button is
pressed the indicator lights show how
many hours of delay you chosen (3, 6 or
9 hours) and the countdown until the end
of it.
! When a programme is running, the
indicator lights will light in sequence to
indicate the current phase:
main wash
rinse
spin
! The indicator light is illuminated when the
door is fully closed.
! When START/PAUSE is pressed on
the machine with the door closed, the
indicator will flash momentarily and then
illuminate.
! A special safety device prevents the door
from being opened immediately after the
end of the cycle. Wait for 2 minutes after
the wash cycle has finished and the
DOOR LOCKED light has gone out before
opening the door. At the end of the cycle
turn the programme selector to OFF.
The indicator light will light up when the
button is pressed.
If the option is not compatible with the
selected programme, the relevant indicator
light first flashes and then goes off.
This show the washing temperature of the
selected programme that can be changed
(where allowed) by the relevant button.
If you want carry out a cold wash all the
indicators must be off.
This show the spin speed of the selected
programme, you can reduce or omit by the
relevant button.
DELAY START TIME / WASH
STAGE indicator lights
DOOR LOCKED indicator light
Close the door BEFORE selecting the
START/PAUSE button.
If the door is not properly closed,
the light will continue to flash for
about 7 seconds, after which the
start command will be automatically
cancelled. In this case, close the
door in the proper way and press
the START/PAUSE button.
EXTRA RINSE indicator light
WASH TEMPERATURE indicator
lights
SPIN SPEED indicator lights
Page 14

102
This appliance is equipped with Smart
Touch technology that allows you to
interact, via the App, with smartphones
based on Android operating system and
equipped with NFC (Near Field
Communication) function.
! Download on your smartphone the
Candy simply-Fi App.
FUNCTIONS
The main functions available using the App
are:
! Voice Assistant – A guide to help you
choose the ideal cycle with only three
voice inputs (clothes/fabrics, color, stain
level).
! Cycles – To download and launch new
washing programmes.
! Smart Care – Smart Check-up and Auto-
Clean cycles and a troubleshooting guide.
! My Statistics – Washing statistics and
tips for a more efficient use of your
machine.
HOW TO USE SMART TOUCH
FIRST TIME - Machine registration
! Enter the "Settings" menu of your
Android smartphone and activate the
NFC function inside the "Wireless &
Networks" menu.
! Turn the knob to the Smart Touch
position to enable the sensor on the
dashboard.
! Open the App, create the user profile and
register the appliance following the
instructions on the phone display or the
"Quick Guide" attached on the machine.
SMART TOUCH
The Candy simply-Fi App is available
for devices running both Android and
iOS, both for tablets and for
smartphones. However, you can
interact with the machine and take
advantage of the potential offered
by Smart Touch only with Android
smartphones equipped with NFC
technology, according to following
functional scheme:
Android smartphone
with NFC technology
Interaction with the
machine + contents
Android smartphone
without NFC technology
Contents only
Android Tablet
Contents only
Apple iPhone
Contents only
Apple iPad
Contents only
Get all the details of the Smart Touch
functions, browsing the App in DEMO
mode or go to:
www.candysmarttouch.com
Depending on the smartphone model
and its Android OS version, the
process of the NFC activation may be
different. Refer to the smartphone
manual for more details.
More information, F.A.Q. and the
video for an easy registration are
available on:
www.candysmarttouch.com/how-to
Page 15

EN
103
NEXT TIME – Regular usage
! Every time you want to manage the
machine through the App, first you have
to enable the Smart Touch mode by
turning the knob to the Smart Touch
indicator.
! Make sure you have unlocked your phone
(from stand-by mode) and you have
activated the NFC function; then, follow
the steps mentioned earlier.
! If you want to start a washing cycle, load
the laundry, the detergent and close the
door.
! Select the desired function in the App
(e.g.: starting a programme, the Smart
Check-up cycle, update statistics, etc…).
! Follow the instructions on the phone
display, KEEPING IT ON the Smart
Touch logo on the machine dashboard,
when requested to do so by the App.
NOTES:
Place your smartphone so that the
NFC antenna on its back matches
the position of the Smart Touch logo
on the appliance (as illustred below).
If you do not know the position of
your NFC antenna, slightly move the
smartphone in a circular motion over
the Smart Touch logo until the App
confirms the connection. In order for
the data transfer to be successful, it is
essential TO KEEP THE SMARTPHONE
ON THE DASHBOARD DURING THESE
THE FEW SECONDS OF THE
PROCEDURE;
a message on the
device will inform about the correct
outcome of the operation and advise
you when it is possible to move the
smartphone away.
Thick cases or metallic stickers on
your smartphone could affect or
prevent the transmission of data
between machine and telephone. If
necessary, remove them.
The replacement of some components of
the smartphone (e.g. back cover, battery,
etc...) with non-original ones, could result
in the NFC antenna removal, preventing
the full use of the App.
The management and the control of the
machine via App is only possible "by
proximity": it is therefore not possible to
perform remote operations (e.g.:
from
another room
; outside of the house).
Page 16
104
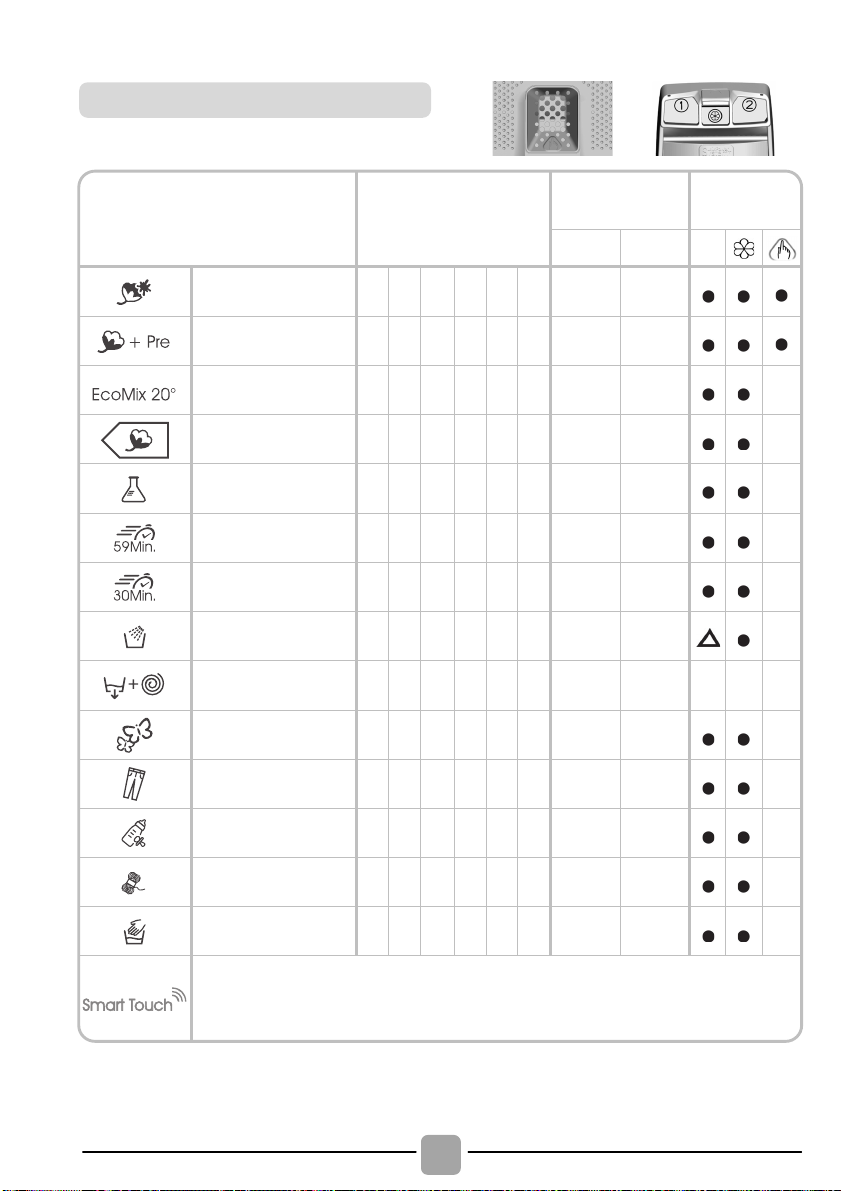
PROGRAMME
kg *
(MAX.)
TEMP.°C
1)
DETERGENT
Recommended
Max.
1 o 2
Whites
5
5,5 6 6,5 7 8
60°
90°
( )
Cottons +
Prewash
5
5,5 6 6,5 7 8
40°
60°
( )
EcoMix 20°
5
5,5 6 6,5 7 8
20°
20°
Cottons**
5
5,5 6 6,5 7 8
40°
60°
Synthetics
3 3 3 3 3
3,5
40°
60°
Daily 59 Min.
2 2 2
2,5
2,5
2,5
60°
60°
Rapid 30 Min.
1,5
1,5
1,5
1,5
1,5
2,5
30°
30°
Rinse
- - - - -
-
-
-
Drain + Spin
- - - - -
-
- -
Delicates
2 2 2 2 2
2,5
40°
40°
Jeans
3 3 3 3 3
3
40°
40°
Baby Care
4 4 4 4 4
4,5
60°
60°
Wool
1 1 1 1 1
1,5
40°
40°
Hand Wash
1 1 1 1 1
1,5
30°
30°
Customizable setting that interacts with the App on your smartphone and to
download the cycles (see the dedicated section). The factory sets the default
programme Auto-Clean, which will sanitize the machine.
Table of programmes
Page 17
EN
105
Please read these notes:
* Maximum load capacity of dry clothes,
according to the model used (see control
panel).
"
"
The spin speed may also be reduced, to
match any guidelines suggested on the
fabric label, or for very delicate fabrics
cancel the spin completely this option is
available with a spin speed button. This
function can be activated with the button
SPIN SELECTION. If the label does not
indicate specific information, it is possible to
use the maximum spin expected in the
program. An over dosing of detergent can
cause excessive foaming. If the appliance
detects the presence of excessive foam, it
may exclude the spinning phase or extend
the duration of the program and increase
water consumption.
( )
Only with PREWASH option
selected (programmes with
PREWASH option available).
1)
When a programme is selected,
on the display is shown the
display shows the recommended
wash temperature that can be
reduced (where allowed) by the
relevant button.
! PREWASH: if the dispenser has the
specific compartment for pre-wash, pour
the detergent in it. Otherwise, pour the
detergent in the perforated area present
on the drum, following the dosage
indications of the detergent producer.
** STANDARD COTTON PROGRAMMES
ACCORDING TO (EU) No 1015/2010 and
No 1061/2010.
COTTON PROGRAMME WITH A
TEMPERATURE OF 60°C.
COTTON PROGRAMME WITH A
TEMPERATURE OF 40°C.
These programmes are suitable to
clean normally soiled cotton laundry and
they are the most efficient programmes
in terms of combined energy and water
consumptions for washing cotton
laundry.
These programmes have been
developed to be compliant with the
temperature on the wash label on the
garments and the actual water
temperature may slightly differ from the
declared temperature of the cycle.
Before closing the cover and start the
washing process, please check that the
internal drum is perfectly closed. When
possible, please align the position
indicators with drum to assure the best
washing performance.
IMPORTANT: do not use the pre-wash
mode with start-delay option.
Page 18

106
To clean different types of fabrics and
various levels of dirt, the washing machine
has specific programs to meet every need
of washing (see table of programmes).
Whites
An intensive wash. The final spin at
maximum speed gives more efficient
removal.
Cotton + Prewash
This programme has been designed to
remove the stronger stains from cotton
white clothes. The prewash guarantees the
tough dirt removal. Add into compartment
"1" a quantity of detergent equal to 20% of
that used for main wash.
EcoMix 20°
This innovative programme, allows you to wash
different fabrics and colours together, such as
cottons, synthetics and mixed fabrics at only
20°C and provides an excellent cleaning
performance. Consumption on this program is
about 40% of a conventional 40°C. cottons
wash.
Cottons
This program is suitable to clean normally soiled
cotton laundry and it is the most efficient program
in terms of combined energy and water
consumptions for washing cotton laundry.
Synthetics
The washing and rinsing optimise the speed
and rhythm of the drum action and water
levels. The gentle spin, ensures a reduced
formation of creases in the fabric.
Daily 59 Min.
This specially designed programme
maintains the high quality wash performance
whilst greatly reducing the wash time. The
programme is designed for a reduced load
(see table of programmes).
Rapid 30 Min.
A complete washing cycle (wash, rinse and
spin). This programme is particularly suited
to slightly dirty cottons and mixed fabrics.
With this programme it is recommended to
use only 20% of the detergent normally
used to avoid waste.
Rinse
This program performs 3 rinses with an
intermediate spin (which can be reduced or
excluded by using the appropriate button) . It
is used for rinsing any type of fabric, for
example after a wash carried out by hand.
Drain + Spin
The program completes the drain and a
maximum spin. It is possible to delete or
reduce the spin with the SPIN SPEED
button.
Delicates
This program has reduced periods of drum
rotation during the cycle and is particularly
suitable or washing delicate fabrics. The
wash cycle and rinses are carried out with a
high level of water to ensure the best
performance.
Jeans
This program has been designed to have the
highest quality cleaning of fabrics such as
denim: ideal for removing dirt without affecting
the elasticity of the fibers.
Baby Care
This program allows you to wash all baby
clothes getting a perfect clean and
sanitizing effect, setting the temperature at
60°C minimum.
To optimize the result of the sanitizing effect
we recommend the use of powder detergent.
Wool
This program performs a wash cycle
dedicated to the wool fabrics that can be
washed in a washing machine, or the
articles to be washed by hand.
Hand Wash
Program for hand wash only clothes, the
program ends with 3 rinses and a slow spin.
Programmes selection
Page 19

EN
107
Smart Touch
Customizable setting of the knob that you
have to select when you would like to
transfer a command from the App to the
machine and to download/start a cycle (see
the dedicated section and the user manual
of the App for more info).
In the Smart Touch option the factory sets
as a default the "Auto-Clean" cycle, made
to clean the drum, remove bad smells and
extend the life of the washing machine.
Make sure there is no load in the drum
before starting the "Auto-Clean" cycle, use
a proprietary washing machine cleaning
agent or powder detergent. Leave the door
of the machine open at the end of the cycle
to allow the drum to dry.
Recommended every 50 washes.
Page 20

108
Opening/ closing the drum
! Open the washing machine lid.
! Open the drum by pressing the (A) button
with one hand while pressing down on the
opposite door with the other.
! Place clothes in the drum one item at a
time, and without squashing. Do not
exceed the load limits recommended in
the “programme table”. An overloaded
washing machine will not wash properly,
and will leave clothing wrinkled.
! To close the drum, place the doors so
that the one with the (A) button is below
the other and they fit together perfectly.
Detergent load
The detergent dispenser is divided into 3
compartments:
! Compartment 1
is for powder detergent
.
!
Compartment 2
is for liquid detergent.
! The compartment is for fabric
conditioners, scenting agents and special
additives such as starch, blueing, etc.
! MAX - on the detergent case is underlined
the maximum level of detergent to be used.
Do not exceed this level.
! When the clothes present stains that
need treatment with bleaches liquids
products, you can proceed to their
preliminary cleaning in the washing
machine. For that: Introduce the bleach
product in the "compartment 2", and set
the rinse program . Once finished the
treatment set the programmer to the OFF
position, add the rest of the laundry, and
proceed to the normal washing with the
wanted program.
1) Maximum Main wash washing powder
2) Maximum Main wash washing liquid
3) Maximum scenting agent
Preparing the wash
Page 21

EN
109
7. THROUBLESHOOTING AND WARRANTY
If you believe the washing machine is not working correctly, consult the quick guide
provided below which includes some practical tips on how to fix the most common
problems.
ERROR CODE FORMAT
Error shown
Possible causes and practical solutions
E2 (with display)
2 flashes of the LEDs
(without display)
The machine cannot load water.
Make sure the water supply tap is open.
Make sure the water supply hose isn’t bent, kinked or trapped.
Make sure the drain pipe is at the proper height (see installation section).
Close the water supply tap, unscrew the filler hose from the back of
the washing machine and make sure the “anti-sand” filter is clean
and not blocked.
E3 (with display)
3 flashes of the LEDs
(without display)
The washing machine does not drain water.
Make sure the filter is not clogged.
Make sure the drain hose isn’t bent, kinked or trapped.
Make sure the home drainage system is not blocked and is allowing
water to flow through without obstruction. Try to drain the water in the sink.
E4 (with display)
4 flashes of the LEDs
(without display)
There is too much foam and/or water.
Ensure the correct amount of detergent is being used and the
detergent is designed for use in a washing machine.
E7 (with display)
7 flashes of the LEDs
(without display)
Door problem.
Make sure the door is correctly closed.
Make sure the clothes inside the drum are not preventing the door
from closing fully.
If the door is locked, turn off and unplug the washing machine from
the electrical supply socket, wait 2-3 minutes and reopen the door.
Any other code
Turn off and unplug the washing machine, wait a minute. Turn on the
machine and restart a program. If the error occurs again contact an
Authorised Customer Service Centre directly.
FOR SMART TOUCH MODELS
The Candy simply-Fi app has a Smart Check-up function that allows you to confirm
the functionality and status of the product at any time. To use the Candy simply-Fi app
you will need an Android smartphone with NFC technology.
More info can be found on the App.
If the display of the machine is showing an error (by a code or blinking LEDs), you
should turn on the App on your Android smartphone, with NFC on.
Place your smart phone against the Smart Touch logo on the control panel. You should
now be able to read the fault directory to solve the issue.
! Models with a display: the error is shown by a number preceded by the letter “E”
(example: E2 = Error 2).
! Models without display: an error is shown by a sequence of flashes of every LED.
The error code is shown by the number of flashes followed by a pause of 5 seconds
(example: two flashes – pause 5 seconds – two flashes – repeating = Error 2).
Page 22

110
OTHER ANOMALIES
Problem
Possible causes and practical solutions
The washing machine
does not work / start
Make sure the product is plugged into a working supply socket.
Make sure power is on.
Make sure the wall socket is working, testing it with another
appliance such as a lamp.
The door may not be correctly closed: open and close it again.
Check whether the required program was correctly selected and the
start button pressed.
Make sure the washing machine is not in pause or time delay mode.
Water leaked on the
floor near the
washing machine
This may be due to a leak from the seal between the tap, supply
hose and fill valve; in this case, replace it and tighten the hose
connections correctly.
Make sure the front filter is correctly closed.
The washing machine
does not spin
The machine is fitted with a detection system that protects the load
and product from damage if the load is not balanced before spinning.
This may result in:-
• The machine attempts to balance the load, increasing the time of
spin.
• Reduction of the speed of spin to decrease vibrations and noise.
• The spin cycle aborting to protect the machine and load.
If this is experienced remove the load de-tangle it, reload it and
restart the spin program.
This could be due to the fact that water has not been completely
drained: wait a few minutes. If the problem persists, see Error 3
section.
Some models include a "no spin" function: make sure it is not
selected.
Check which options are selected and their effect on the spin cycle.
Excessive detergent can impede the spin cycle, ensure the correct
amount of detergent is being used.
Strong vibrations /
noises are heard
during the spin cycle
The washing machine may not be fully levelled: if necessary, adjust
the feet as indicated in the specific section.
Make sure transport screws, rubber bungs and spacer tubes were
removed.
Make sure there are no foreign objects inside the drum (coins,
hinges, buttons, etc…).
The standard manufacturer warranty covers faults caused by electrical or
mechanical faults in the product due to an act or omission of the manufacturer. If
a fault is found to be caused by factors outside the product supplied, miss-use or
as a result of the instructions on use not being followed, a charge may be
applied.
Page 23

EN
111
The use of ecological detergents without
phosphates may cause the following effects:
- cloudier rinse drain water: This effect is
tied to the suspended zeolites which do
not have negative effects on rinse
efficiency.
- white powder (zeolites) on laundry at
the end of the wash: this is normal, the
powder is not absorbed by fabric and
does not change its colour.
To remove the zeolites, select a rinse
programme. In the future consider using
slightly less detergent.
- foam in the water at last rinse: this
does not necessary indicate poor rinsing.
Consider using less detergent in future
washes.
- abundant foam: This is often due to the
anionic surfactants found in the
detergents which are hard to eliminate
from laundry.
In this case, do not re-rinse to eliminate
these effects: it will not help at all.
We suggest conducting a maintenance
wash using a proprietary cleaner.
If the problem persists or if you suspect a
malfunction, immediately contact an
Authorised Customer Service Centre.
It is always recommended to use original
spare parts, that are available at our
Authorised Customer Service Centres.
The manufacturer declines all
responsibility for any printing errors in
the booklet included with this product.
Moreover, it also reserves the right to
make any changes deemed useful to its
products without changing their essential
characteristics.
Warranty
The product is guaranteed under the
terms and conditions stated on the
certificate included with the product. The
warranty certificate must be duly filled in
and stored, so as to be shown to the
Authorised Customer Service Centre in
case of need. Proof of purchase must
be made available at the time of any
warranty related repair.
Page 24
2
Tak fordi du har valgt en Candyvaskemaskine. Vi er overbeviste om, at den
på loyal vis vil hjælpe dig med at vaske dit tøj
sikkert, endda det sarte, dag efter dag.
Læs omhyggeligt denne manual for korrekt
og sikker anvendelse og for hjælpsomme
tips om effektiv vedligeholdelse.
Brug kun vaskemaskinen efter du
omhyggeligt har læst disse instruktioner. Vi
anbefaler, at du holder denne manual klar ved
hånden og i god stand til mulige fremtidige ejere.
Tjek venligst om apparatet leveres
med denne brugermanual, garantibevis
,
servicecenteradresse og energimærke. Tjek
også at stik, holder til afløbsslange og bakker til
flydende vaskemiddel eller blegemiddel (kun
visse modeller) er inkluderet. Vi anbefaler, at du
beholder alle disse komponenter.
Hvert produkt er identificeret med en unik 16cifret kode, også kaldet "serienummer", som
står på klistermærket på bagsiden
af apparatet (ved åbningen) eller i
dokumentkuverten indeni produktet. Denne
kode er et slags specifikt produkt-ID-kort,
som du skal bruge for registrere det, og hvis
du kontakter Candy-servicecenter.
Dette apparat er mærket i
henhold til det europæiske
direktiv 2012/19/EU om affald af
elektrisk og elektronisk udstyr
(WEEE).
Affald af elektrisk og elektronisk udstyr
(WEEE) indeholder både forurenende dele
(som kan have negative konsekvenser for
miljøet) og grundkomponenter (som kan
genanvendes). Det er vigtigt at underlægge
affald af elektrisk og elektronisk udstyr
(WEEE) specifikke behandlinger for at
fjerne og skaffe sig af med alle
forureningskilder på den rigtige måde og
udvinde og genbruge alle materialer.
Det enkelte individ kan spille en vigtig rolle i
at sikre, at affald af elektrisk og elektronisk
udstyr (WEEE) ikke bliver et miljømæssigt
problem; det er altafgørende, at følge nogle
grundlæggende regler:
! affald af elektrisk og elektronisk udstyr
(WEEE) må ikke behandles som
husholdningsaffald.
! affald af elektrisk og elektronisk udstyr
(WEEE) skal afleveres til det relevante
indsamlingssted, som administreres af
kommunen eller registrerede firmaer. Der
findes i mange lande afhentning ved
husstanden af store affald af elektrisk og
elektronisk udstyr (WEEE)-produkter.
Når du køber et nyt apparat, er det i mange
lande således, at det gamle apparat kan
returneres til forhandleren, som skal hente
det gratis fra gang til gang, så længe
apparatet er en lignende type og har de
samme funktioner, som det leverede apparat.
1. GENERELLE SIKKERHEDSREGLER
2. MONTERING
3. PRAKTISKE TIPS
4. VEDLIGEHOLDELSE OG RENGØRING
5. KVIKBRUGERGUIDE
6. STYRING OG PROGRAMMER
7. KUNDESERVICECENTER OG GARANTI
Miljøbetingelser
Indhold
Page 25

DA
3
1. GENERELLE
SIKKERHEDSREGLER
! Hensigten med dette apparat er, at
det bruges til husholdningsformål
eller lignende såsom:
− Personalekøkkenområder i
butikker, kontorer og andre
arbejdsmiljøer;
− Stuehuse;
− Af klienter på hoteller, moteller
og andre lignende boligmiljø;
− Bed & breakfast-miljøer.
Anden brug af dette apparat end
i husholdningsmiljø eller til
typiske
husholdningsformål, som
kommerciel brug af eksperter eller
trænede brugere, udelukkes, selv
ved de ovennævnte anvendelser.
Hvis dette apparat anvendes på en
måde, ikke i overensstemmelse med
dette, kan det reducere apparatets
levetid og annullere producentens
garanti. Ethvert ansvar for skade på
apparatet eller anden skade eller tab i
forbindelse med brug, der ikke er i
overensstemmelse med hjemlig
eller husholdningsbrug (selv hvis
apparatet befinder sig i et hjemmeeller husholdningsmiljø), vil ikke blive
accepteret af producenten, i fuld
overensstemmelse med gældende
lovgivning.
! Dette apparat kan bruges af børn
fra 8 år og op, og af personer med
reduceret fysiske, sansende eller
mentale evner, eller manglende
erfaring og viden, hvis de er under
opsyn eller gives instruktioner
angående brugen af apparatet på
en sikker måde og forstår de
medfølgende risici.
Børn må ikke lege med apparatet.
Rengøring og vedligeholdelse må
ikke udføres af børn uden opsyn.
! Børn bør være under opsyn for
at sikre, at de ikke leger med
apparatet.
! Børn under 3 år bør holdes
væk, medmindre de er under
konstant opsyn.
!
Hvis ledningen er skadet, skal den
udskiftes af producenten, dens
servicerepræsentant eller lignende
kvalificeret personale, for at undgå
fare.
!
Brug kun de medfølgende slanger
til vandforsyning stilslutningen
(genbrug ikke gamle slanger).
!
Vandtrykket skal være mellem
0,05 MPa og 0,8 MPa.
! Vær sikker på, at et tæppe ikke
blokerer maskinens bund og
ventilationsåbningerne.
! Tilstanden SLUKKET opnås ved at
indstille referencemarkøren på
programstyringen/knappen i den
vertikale position. Enhver anden
position af denne styring sætter
maskinen i tilstanden TÆNDT (kun
for modeller med programvælgere).
Page 26

4
!
Efter montering skal apparatet
placeres således at stikket er
tilgængeligt.
!
Maks. kapacitet for tørt tøj
afhænger af den brugte model
(se kontrolpanel).
! For at se apparatets bilagskort
refereres der til producentens
hjemmeside.
!
Før rengøring og vedligeholdelse
af maskinen, skal stikket tages ud
og vandhanen lukkes.
! Vær sikker på, at det elektriske
system har jordforbindelse.
Hvis ikke, så søg professionel
assistance.
! Brug venligst ikke omformere,
stikdåser eller forlængerledninger.
! Træk ikke i ledningen eller
apparatet for at trække
maskinens stik ud.
! Udsæt ikke vaskemaskinen for
regn, direkte sollys eller andet
vejr.
!
I tilfælde af defekt og/eller funktionsfejl,
så sluk for vaskemaskinen, luk for
vandhanen og pil ikke ved apparatet.
Tag omgående kontakt til
kundeservicecenteret og brug kun
originale reservedele. Undladelse
af at følge disse instruktioner kan
udgøre risici for apparatets
sikkerhed.
Apparatet er i overensstemmelse
med følgende europæiske
direktiver:
! 2006/95/EC (LVD);
! 2004/108/EC (EMC);
! 2009/125/EC (ErP);
! 2011/65/EU (RoHS);
og efterfølgende ændringer.
Sikkerhedsinstruktioner
ADVARSEL:
vandet kan nå meget høje
temperaturer under vask.
Page 27

DA
5
2. MONTERING
1
! De 4 skruer, "A", løsnes på
begge
vinkelbeslag og ligeledes
de 4 skruer, "B". (figur 1).
!
De 4 skruer, "A", anbringes igen
og de
vedlagte pyntekapsler
monteres, "C" (figur 2).
3
4
min 50 cm
max 85 cm
+2,6 mt
max
max 100 cm
min 4 cm
Page 28

6
5
! Vaskemaskinen bør tilsluttes
vandindtagelseshanen med den nye
vandledning, som leveres vedlagt
apparatet, (indeni tromlen). Brug IKKE
den gamle vandledning til dette formål.
!
Vandindtagelsesledningen forbindes
i den ene ende, den med bøjningen,
til elektroventilen, (der sidder
øverst bagpå maskinen) og i
den aden ende til en vandhane
eller vandindtagelsestap, med
skruemundstykke på 3/4" gas.
!
Vaskemaskinen nærmes væggen,
idet der sørges for, at ledningen
ikke danner bøjninger eller knuder
undervejs, og vandudledningsslangen
fastgøres til vaskekummens kant eller
såfremt det er muligt forbindes slangen
til et fast installeret vandudløb/kloak,
der har en større diameter end
vaskemaskinens vandudledningsrør,
med en minimumshøjde fra 50 cm og
en maksimumhøjde på 75 cm fra
gulvet (figur 4).
! Hvis det er nødvendigt, bruges det
rundformede stykke tilbehør til at
fastholde og støtte vandudledningsrøret.
Såfremt Deres model måtte
være forsynet dermed:
! For nemt at kunne flytte
vaskemaskinen, drejes understellets
styrestang mod højre. Efter denne
operation, anbringes styrestangen
atter i dens oprindelige position.
! Vaskemaskinen højdereguleres og
indstilles vandret ved at drje på dens
forreste fødder (figur 5).
a) Møtrikken drejes med urets visere
for at deblokere fodens skrue.
b)
Der drejes på foden, og den hæves
eller sænkes, indtil den berører gulvet
med hele dens overflade.
c) Foden blokeres og fastgøres ved at
dreje møtrikken imod urets visere, indtil
den rører ved vaskemaskinens bund.
! Kontroller venligst, at apparatet er
fuldstændigt vandret indstillet.
! For at udføre denne kontrol, forsøges
det at bevæge vaskemaskinen uden
at flytte den, ved skiftevis at støtte
sig til diagonalernes yderpunkter
øverst på vaskemaskinen og det
kontrolleres, at apparatet ikke vipper.
! Hvis vaskemaskinen flytter sig, skal
dens fødder atter højdereguleres,
(indstilles vandret).
Page 29

DA
7
! Tilslut vandslangen til vandhanen; brug
kun den afløbsslange, der følger med
vaskemaskinen (fig. 6).
ÅBN IKKE FOR VANDHANEN.
! Nogle modeller kan have en eller flere af
følgende funktioner:
! VARM&KOLD (fig. 7): Indstillinger for
vandtilslutning med varmt og koldt vand
for højere energibesparelser.
Forbind det grå rør til den kolde vandhane
og den røde til den varme vandhane.
Maskinen kan også forbindes til en enkelt
kold vandhane: i dette tilfælde kan nogle
programmer starte få minutter senere.
! AQUASTOP (fig. 8): en enhed i
forsyningsrøret, der stopper
vandstrømningen hvis røret forfalder; i
dette tilfælde vil et rødt mærke vises i
vinduet “A” og røret skal skiftes ud. For at
skrue bolten løs, så tryk på
envejslåsemekanismen "B".
! AQUAPROTECT - FORSYNINGSRØR
MED SKÆRM (fig. 9): Skulle vand lække
fra det primære indre rør "C", vil det
gennemsigtige inddæmningshylster "D"
opsamle vandet for at lade vaskecyklussen
køre færdig. Ved slutningen af cyklussen,
så kontakt kundeservicecenteret for at
udskifte forsyningsrøret.
6
1
7
B
A
8
D
C
9
Hydrauliske forbindelser
Page 30

8
3. PRAKTISKE TIPS
ADVARSEL: ved sortering af vasketøj så
sørg for:
- at have fjernet metalliske objekter så som
hårspænder, nåle og mønter fra vasketøjet;
- at have knappet pudebetræk, lukket lynlåse,
snøret løse stropper og lange bånd;
- at have fjernet ringe fra gardiner;
- at have læst vaskemærker i tøjet grundigt;
- at have fjernet alle genstridige pletter m
ed
pletfjernere.
! Ved vask af tæpper, sengetøj og andre
tungere stoffer anbefaler vi, at du a
t
undgår centrifugering.
! Ved uldvaske, så sørg for at artiklen kan
maskinvaskes og er mærket med
symbolet "Ny uld", symbolet med "Filtrer
ikke" eller mærket "Egnet til maskinvask".
En guide til miljøvenlig og økonomisk brug
af dit apparat.
Maksimér portionsstørrelsen
! Opnå den bedste udnyttelse af energi,
vand, vaskemiddel og tid ved at bruge den
anbefalede maksimale portionsstørrelse.
Spar op til 50% energi ved at vaske med én
fuld portion i stedet for 2 halve portioner.
Har du brug for at forvaske?
! Kun til meget snavset vasketøj! SPAR
vaskemiddel, tid, vand og mellem 5 til 15%
energiforbrug ved IKKE at vælge forvask
ved let til mellemsnavset vasketøj.
Er en varm vask nødvendig?
! Forbehandl pletter med pletfjerner eller
læg pletter i blød før der vaskes, for a
t
reducere nødvendigheden for et varmt
vaskeprogram. Spar op til 50% energi
ved at bruge et 60°C vaskeprogram.
Nedenfor findes en kvikguide med tips og
anbefalinger for brug af vaskemiddel ved
forskellige temperaturer. I alle tilfælde, så
læs altid instruktionerne på vaskemidlet for
korrekt brug og dosering.
Påfyldningstips
Hjælpsomme forslag til brugeren
Ved vask af meget snavset hvidt
vasketøj, anbefaler vi at bruge
bomuldsprogrammer på 60°C eller
derover og et normalt vaskepulver
(ekstra kraftigt), der indeholder
blegemidler, og som ved mellem/høje
temperaturer giver fremragende
resultater.
For vaske mellem 40°C og 60°C skal
den anvendte type vaskemiddel passe til
stoffets type og niveauet af snavs.
Normalt pulver er egnet til "hvide" eller
farvede faste stoffer som er meget
snavsede, mens flydende vaskemiddel
eller "farvebeskyttende" pulver er egnet
til farvede stoffer med let snavs.
For vaske under 40°C anbefaler vi, at
bruge flydende vaskemidler eller
vaskemidler, som er specifikt egnede til
vaske ved lave temperaturer.
Ved vask af uld eller silke, brug kun
vaskemiddel specifikt udarbejdet til disse
stoffer.
Page 31

DA
9
4. VEDLIGEHOLDELSE OG
RENGØRING
For at rengøre vaskemaskinens ydre, så
brug en fugtig klud, og undgå skurepulver,
alkohol og/eller opløsningsmiddel.
Vaskemaskinen behøver ikke nogen speciel
behandling ved normal rengøring: rengør
bakkerummet og filteret; tips til flytning af
maskinen eller ved længere tids manglende
brug findes nedenfor.
! Vaskemaskinen kommer med et specielt
filter, som er i stand til at indfange større
restelementer såsom knapper eller
mønter, der kunne blokere afløbsrøret.
! Afhængig af model: Træk drænslangen
ud, tag proppen af og tøm pumpen for
vand i en skål.
! Før filteret skrues ud anbefaler vi, at du
placerer en absorberende klud under det for
at holde gulvet tørt.
! Drej filteret mod uret indtil stoppunktet i
den vertikale position nås.
! Fjern og rengør filteret; sæt det derefter i
igen ved at dreje med uret.
! Gentag foregående trin i modsat rækkefølge
for samle alle delene igen.
! Skal vaskemaskinen opbevares i et
opvarmet rum uden opvarmning i en
længere periode, så dræn al vand fra
rørene.
! Træk stikket ud.
! Frigør røret fra stroppen, sænk det ned
og dræn al vandet ned i et kar.
! Fastgør afløbsrøret med stroppen
bagefter.
! Der trykkes på knappen, (A).
! Imens knappen holdes trykket ind, drejes
skuffen udad.
! Derefter tages skuffen ud og rengøres.
! Det anbefales at fjerne enhver eventuel
vaskemiddel tilbage fra hver rum for at undgå
dem til at blokere for strømmen fra
dispenseren at tromme.
! Træk bakkerne ud af dispenseren og
rengør dispenseren grundigt.
! Fjern eventuelle aflejringer som kan
tilstoppe åbningen i rummet.
B
A
C
S
Tapperne introduceres som vist (B).
Skuffen drejes imod dækslet, indtil tappen
falder på plads, (C). Når den sidder rigtigt,
vil der kunne høres en lyd, (smæld).
Rengøring af filter
Forslag ved længere manglende
brug
Rengøring af skuffen til vaskemiddel
og dens rum
Montering
Page 32

Programvalg
5.
55
DA
KVIKBRUGERGUIDE
Denne vaskemaskine tilpasser automatisk
vandniveauet til vaskens type og størrelse.
Dette system medfører nedsat energiforbrug
og en reducering af vasketider.
Tænd for vaskemaskinen, og vælg det
ønskede program.
Justér vasketemperaturen, hvis
nødvendigt, og tr yk på de r el eva nt e k napper
for "indstill ing".
Tryk på knappen START/PAUSE for at
starte vasken.
Skulle strømmen gå ud, mens vaskemaskinen kører, gemmer en speciel hukommelse indstillingerne, og når strømmen kommer tilbage, vil maskinen fortsætte hvor den stoppede.
Ved afslutningen af programmet vises
meddelelsen "afslutning" på displayet, på
nogle modeller vil alle indikatorlampern e for
vaskeetape tændes.
Vent, indtil dørlåslampen slukkes ca. 2 minutter efter programmet slutter.
Sluk for vaskem askinen.
Ved enhver vasketype bør programoversigten rådføres, og rækkefølgen for brug følges som angivet.
Teknisk information
6.
KNAPPER OG PROGRAMMER
A Programvælger med FRA-
position (OFF)
B Knappen START/PAUSE
C KnappenUDSKYD START
D AQUA PLUS E Knappen
E TEMPERATURVALG knappen
F
CENTRIFUGERINGSHASTIGHED
G UDSKYDD/VASKE TID knappen
H TASTELÅS inidkatorlys
I AQUA PLUS
L TEMPRATURV
M CENTRIFUGERINGSHASTIGHET
indikatorlys
Indikatorlys
ALG indikatorlys
Vandtryk.:
min. 0,05 MPa/maks. 0,8 MPa
(0,05 MPa afgiver ca. 1 liter vand på 10
sekunder)
Centrifugeringshastighed: Se oversigt.
Tilslutning/sikring/spænding: Se oversigt.
N Område med SMART TOUCH
Page 33

til FRA positionen ved slutningen af
hver cyklus, eller når du starter en
11
sættes i, da maskinen kalibrerer
systemet i de første sekunder: Hvis
der røres ved displayet, virker
knappen, kan det tage nogle
En særlig sikkerhedsanordning
forhindrer døren i at blive åbnet
t efter afslutningen af
afsluttes og lampen "Dørsikkerhed"
Programvælger
position (OFF)
med
FRA
Når programvælgeren drejes, lyser
For at spare energy, vil displayets
cyklussen eller efter en inaktivitet
skal du dreje programvælgeren til
DA
efterfølgende vask, før du kan vælge
og starte et nyt program .
ADVARSEL:
Rør ikke ved displayet, mens stikket
maskinen ikke rigtigt. I det tilfælde,
tag stikket ud, og gentag proceduren.
Åbning af døren
umiddelbar
cyklussen.
Vent 2 minutter efter vaskecyklussen
er slukket, før du åbner døren.
displayet op, for at vise indstilli ngerne for
det valgte program.
kontrastniveau falde ved afslutningen af
periode.
START/PAUSE-knap
Luk lågen FØR du vælger knappen
START/PAUSE.
Tryk for at starte den valgte cyklus.
Når der er trykket på START/PAUSE-
sekunder, før maskinen begynder at
TILFØJ ELLER FJERN GENSTANDE EFTER AT PROGRAMMET ER STARTET (PAUSE)
Tryk
og
inde i cirka
og displayet med den resterende tid vil
blinke, hvilket viser at maskin en er blevet
sat på pause).
Vent 2 minutter indtil sikkerhedsanordningen
åbner døren.
hold
START/PAUSE
2 sekunder
(en kontrollampe
knappen
N.B.: For at slukke for maskinen,
positionen FRA.
Tryk på START/PAUSE
starte den valgte cyklus.
Når
et
program
programvælgeren stationær p å det valgt
program, indtil cyklussen slutter.
Sluk
for
ælgeren til
v
vaskemaskinen,
FRA
.
-knappen, for at
er
valgt,
ved
forbliver
at
dreje
Efter
at
genstande, luk døren og tryk
START/PAUSE
programmet fra hvor det blev afbrudt).
ANNULLERING AF PROGRAM MET
For
at
indstille vælgeren til
e
Vælg et andet program.
Nulstil
positionen.
have
-knappen (starter
annullere
programvælgeren
tilføjet
programmet,
FRA
eller
skal
-positionen.
til
fjernet
på
FRA
du
-
Page 34

12
CENTRIFUGERINGSVALG-knap
Funktionsknappen bør vælges, før der
presses på START/PAUSE-knappen.
Hvis der væl ges en indstilling, der
ikke er kompatibel med det valgte
program, blinker indstillingsknappen
først og slukker derefter.
For helt at undgå en centrifugering, skal
De holde tasten indtrykket indtil de tre
indikationslamper for hastighed slukkes.
De kan vælge den ønskede
centrifugeringshastighed på et
hvilket som helst tidspunkt under
vaskeprogrammet.
UDSKYD START-knap
Det er muligt at forsinke starttidspunktet
for det valgte vaskeprogram, således at
vaskemaskinen kan indlede den valgte
vaskecyklus efter forløbet af 3, 6, eller 9
timer. For at aktivere denne mulighed,
skal nedenstående fremgangsmåde
følges:
- D
et ønskede vaskeprogr am vælges ved
programvælger A.
- Tasten til forskudt starttidspunkt trykkes
ind, indtil indikationslampen lyser på det
antal timer, vasken ønskes forsinket.
- Start/Pause tasten aktiveres.
- Herefter vil vaskemaskinen automatisk
starte, efter udløbet af det valgte
tidsrum.
Såfremt
vaskeprogrammets forskudte starttidspunkt,
trykkes der atter på tasten, C,
indtil indikationslyset, afslutning på
vaskecyklussen, tændes.
Ved
has
centrifugering vælges, men altid indenfor
den hastighedsramme, som det valgt
pr
Disse hastigheder er angivet på den dertil
hørende indikationslamp e.
De
måtte
at
trykke
på
tigheden af den afsluttende
ogram giver mulighed for.
ønske
denne
at
annulere
tast,
AQUAPLUS-knap
Takket
betegnelsen, SENSOR ACTI V A SYSTEM,
kan der ved at trykke på denne tast,
udføres en speciel vaskecyklus, der
passer til samtlige program mer og til alle
stoftyper, idet tøjets fibre plej es, hvorefter
tøjet er blødt og nænsomt for bruger en at
have på.
Tilførslen af det ekstra vand i denne nye
unktion kombineret med tromlens
f
omdrejningscyklusser med påfyldning og
udtømning af vand, gør det m uligt at opnå
et fuldstændigt rent og gennemskyllet
vasketøj.
Vandmægden
opløse sæbepulveret, idet der samtidigt
garanteres for en perfekt ekffektivitet af
vasken.
Vandmængden
s
kyllefaserne for at fjerne selv den
mindste rest af vaskepulver i tøj ets fibre.
Denne
personer med særligt sart og føl som hud,
som en hvilken som helst rest af
sæbepulver og skyllemiddel kan genere
kan
eller som kan fremkalde aller gi reaktioner.
Det anbefales ligeledes at bruge denne
askefunktion ved vask af børnetøj og
v
e
ved vask af sart tøj i almindelighed, især
hvis det drejer sig om badeværelsestøj,
håndklæder, badekåber, mv, hvis fibr
har
tendens til ikke at kunne skylles helt
rene for sæbepulver.
funktion
være
et
forøges
er
er
nyt
for
ligeledes
især
system
bedre
forøget
henvendt
med
at
i
til
e
Page 35

DA
Denne mulighed er ikke anvendelig ved
dprogrammer.
ul
KOLDT VAND-knap
Ved at trykke på denne tast, kan samtlige
v
askeprogrammer afvikles uden at det
vand, som vaskemaskinen tager ind,
varmes op, samtidigt med at de
resterende vaskekarakteristika bevares:
(vandniveau, vasketid, vaskef o rløb, etc.).
Programmerne med koldt vand anbefales
til vask af alle former for tøj, hvis farver
kan smitte af og til vask af gardiner,
sengetæpper, sarte syntetiske fibre, små
tæpper og af let snavset vaske tøj.
Page 36

l l
SMART TOUCH
Android-tablet
Kun indhold
Kun jndhold
Apple iPad
111 Smart Care - Intelligent check-up-
Clean-cytdusser
og
en guide til fejlfinding.
og
Auto-
Delle apparat er udstyret med Smart Touch-
teknologi, der g0r det muligt at interagere via
appen med smartphones med Androld
operativsystemet
og
udstyret med NFC (Near
Field Communicalion)-funktion.
UU Download
Candy sim
ply-Fi
-appen.
Can dy simp ly-Fi-appen er tilgamgelig
for enheder, der kerer ba de Android
iO S, bade for tabletter
og
smart phones.
og
Men du kan kun interagere med
maskinen og udnytte det potentiale, der
tilbydes of Smart Touch med Androi d-
smartphones, der har NFC-teknologi i
henhold til felgende funk1ion stabel:
And:rold smartphon•
m e d N FC -t e kn o l og i
A nd r o i d s m ;i rt p h one
ud•n NFC·t•knologi
Appl• iPhon•
lnt•r.akdo n m • d
m as k inen + in d h o ld
K un in dho l d
Kun indhold
Lr
Mine
stati stikker - vaskestatistikker
til en mereeffekliv udnyttelse af maskinen.
-
Fa all e detaljer for Smart Touch -
funktionerne, surf
l stand, eller ga
t i
til:www.candysmarttouch.oom
ix\ a ppen i D E M O-
SADANBRUGES SMART TOUCH
F0RSTE GANG - registrering af maskinen
r r Ga til menuen " fndstill inger" pa din
oid -sma rtp ho ne
A nd r
funktionen i menuen "Tradl0se og netvierk".
Afhiengi gt af smartphone-modellen
dens Android OS.version, kan
fremgangsm&den for NFC. ak1i ver ing
v
ie r e ande r ledes . F or yde r liger e
oplys ni nge r he nv ises ti l sm artp ho ne
m an ua le n .
Orel knappen
til
Smart Touch-posltionen ror
at aklivere sensorenpa instrumentlmettet.
og aktiver NFC-
og
lips
og
-
FUNKTIONER
De vi
er:
gtigste funktioner tilgamgelige
Stemmestyring - En guide
ideelle cyklus med kun Ire stemmeinput
(tej/tekstiler, faive, pletniveau).
Cyklusser - Iii at downloade
n
ye vaskeprog
rammer.
med appen
til
at voolge den
og
opslarte
Abn appen, opret brugerprofilen, og registrer
apparatet ved at f0lge instruktioneme
te le fonens display eller den "Quick Guide",
der er fastgjort
pa m askinen.
Flere oplysninger, ofte stillede
spergsm&I
registrering er
og
videoen ti l nern
tilgie ngelige
p.\:www.candysmarttouch.com/how-to
pa
Page 37

WESTE
GANG - r
DD Hver gang, du
appen, ska! du fl1irst aktivere Smart Touch-
tilstanden ved at dreje knappen til Smart
Touch-indikatoren.
DD Serg for, at du har last op for telefonens
skiennbillede(fra en eventuel standbytilstand)
og har akliveret NFC-funktiooen, ellers f0lg
trinene nievnt tidligere.
DD Hvis du oosker at starte en vaskecyklus, skal
du il
ieggevasket0j samt vaskem
d0ren.
DD Vi;elg den 0nskede funktion i appen (f.eks.
start et program, Check -U yklussen, opdater
statistikkerosv...).
DD Feig anvisningeme pa telefooensdisplay, og
HOLD DEN TIL Smart Touch ogoet
maskinens instrumentooet, nar appen beder
dig omdet.
egelmiessig
11in s k
brug
er at styre maskinen via
iddel
og lukke
pa
H v i s d u ik ke k ender placeringen af din
NFC-antenne, sa flyt sma
cirkulier beviegelse over Smart Touch-
logoet in clti l appen bekrie fter forbi ndelsen.
For at dataoverferslen ska! kunne lykkes,
er det vi gtigt at holde SMARTPHONENTIL
INSTRUMENTB
FA
SEKUNDER PROCESSEN V
besked
korrekte· resultat af operationen og
fortielle, oar det er muligt at flytte
smartphonen viek.
Tykke overfladematerialer eller
metallis,ke klistennierker pa din
smartphone kan pavirke eller forhindre
overforsel af data mellem maskine og
telefon. Fjern dem om n0dvendigt.
Udskiftn ing af visse kornponenter pa
sm artphlooen (f.eks. bagstykke, batteri
osv... ) med uoriginale dele kan resultere
i, at NF'C-antennen fjernes og forhindre
den fulde udnyttelse af appen.
RtETT
pa
enheden vii inform
rtphon
ET I L0
en lidt i
BET
AF
ARER. En
ere om
en
DE
det
BEM.'ERKNINGER:
er din smartphone,
Plac
tennen pa ryggen passer til
an
placeringen af Smart Touch-logoet
ap p aratet ( s e bill e det nedenfor) .
sa N F C-
pa
Administr ation og styring af maskinen
via app er kun muligt "i nierheden", Det
er derior ikke muligt at udfere
fjemoperationer (f.eks. fra et andet rum
eller uden for huset).
Page 38

2
2,5
forvask
Centrifugering
1
PROGRAM
Hurtigvask
Daily 59 min.
Blandet
Bomull+
Skylninger
30’
Hvidt
Jeans
Baby
30°
60°
90°
60°
40°
60°
60°
-
VASKEMIDDEL
2
1
( )
( )
kg *
(MAKS.)
1)
2,5
2,5 2,5 2,5
2 2 2,5
5 6 7 8
3 3 3 3,5
3 3 3 3
4
4
5 6 7 8
- - - -
4
4,5
TEMP.°C
Anbefalet Maks.
30°
60°
60°
40°
40°
60°
60°
-
Tømning +
Håndvask
Uld
Finvask
EcoMix 20°
Bomuld **
- - - -
2 2 2 2
1 1 1
2 2 2 2,5
5 6
5 6 7 8
1,5
7 8
-
30°
40°
40°
20°
40°
-
30°
40°
40°
20°
60°
( )
Page 39

14 DA15
Page 40

Læs venligst disse bemærkninger:
* Maks. kapacitet for tørt tøj afhænger af
den brugte model (se kontrolpanel).
"
"
Centrifugeringshastigheden kan også
reduceres, for at matche alle retningslinjer
på stoffets etiket, eller for meget sarte
stoffer kan centrifugering annulleres helt;
denne indstilling er tilgængelig med
en centrifugeringshastighedsknap. Denne
funktion kan aktiveres med knappen
CENTRIFUGERINGSVALG. Hvis etiketten
ikke angiver specifikke oplysninger, er det
muligt at anvende den maksimale
centrifugering angivet for programmet.
Overdosering af vaskemiddel kan forårsage
overdreven skumdannelse.
Hvis maskinen detekterer tilstedeværelsen
af meget skum, kan en centrifugering
udelukkes eller programmet kan forlænges,
hvormed vandforbruget øges.
( )
Kun med indstillingen FORVASK
valgt (programmer med FORVASK
indstilling).
1)
For de viste programmer kan du
tilpasse længde og intensitet af
vasken ved at bruge knappen til
indstilling af graden af snavs.
! FORVASK: Hvis dispenseren har det
specifikke rum til forvask, hæld
vaskemiddel i det. Ellers hæld
vaskemiddel i det perforerede område på
tromlen (se billedet), efter dosering
indikationer af vaskemiddel producent.
** STANDARD BOMULDSPROGRAMMER
IFØLGE (EU) Nr 1015/2010 og Nr
1061/2010.
BOMULDSPROGRAM MED EN
TEMPERATUR PÅ 60°C.
BOMULDSPROGRAM MED EN
TEMPERATUR PÅ 40°C.
Disse programmer er egnede til
at rengøre normalt snavset
bomuldsvasketøj og de er de mest
effektive programmer i form af
kombineret energi-og vandforbrug for
tøjvask af bomuld.
Disse programmer er blevet udviklet i
overensstemmelse med temperaturen
på vaskemærket på tøjet og den
faktiske vandtemperatur kan afvige let
fra den angivne temperatur på
cyklussen.
Før du lukker låget og starte
vaskeprocessen, skal du kontrollere,
at lågen på tromlen er helt lukket. Når
det er muligt, skal du justere
positionsindikatorer med tromme for at
sikre den bedste vaskeevne.
Vigtig: Brug ikke forvask program, når
start forsinkelse er på.
Page 41

For at rense forskellige typer af stoffer og
forskellige niveauer af snavs, har
vaskemaskinen specifikke programmer der
vil opfylde ethvert behov for vask (se t abel ).
Hurtigvask
Vaskecyklus foreslået for lav belastning og
lidt beskidt. Med dette program anbefales
det, at reducere mængde n af vaskemiddel,
der normalt anvendes, for at undgå
unødvendigt spild. Hvis du vælger
HURTIGVASK-programmet kan du kan
vælge en af tre programmer til r ådighed.
Hvidt/Hvidt+forvask
Lavet til en perfekt vask. Den endelige
centrifugering ved maksimal has tighed giver
mere effektiv rengøring.
Blandet
Vask og skylning optimeres med rytmer i
tromlens rotation og vandstanden. Den blide
centrifugering sikrer en reduceret dannelse
af folder i stoffet.
Jeans
Dette program er designet t il at tilbyde den
højeste kvalitet af rengøring af stoffer såsom
jeans: ideelt til at fjerne snavs, uden at
påvirke elasticiteten af fibrene.
Baby
Dette all baby program vasker perfekt rent
ved 60 grader.
Vi anbefaler at der bruges vaskepul ver .
Skylninger
Dette program udfører 3 sky lninger med en
mellemliggende centrifugering (som kan
nedsættes eller udelukke s ved hjælp af den
relevante knap). Det bruges til skylning af
enhver form for stof, for eksempel efter en
vask udføres manuelt.
Tømning + Centrifugering
Programmet afslutter med en tømning og en
maksimal centrifugering. Det er muligt at
slette eller reducere centrifugering med
CENTRIFUGERINGSVALG-knappen.
Håndvask
Program til tøj der kun tåler håndvask,
programmet slutter med 3 skylninger og en
langsom centrifugering.
Uld
Dette program udfører en vaskecyklus
dedikeret til uldstoffer, der kan vaskes i
vaskemaskine, eller genstande, der skal
vaskes i hånden.
Finvask
Dette program veksler mellem øjeblikke med
arbejde og pauser, og er især velegnet til
vask af sarte tekstiler. Vaskepr ogrammet og
skylninger udføres med meget vand, for at
sikre den bedste ydeevne.
EcoMix 20°
Dette nyskabende program giver dig
mulighed for at vaske forskellige stoffer og
farver sammen, som bomuld, syntet iske og
blandede tekstiler på kun 20°C og giv er en
fremragende rengøringsydeevne. Forbruget
på dette program er omkring 40% af en
konventionel 40°C bomuldsvask.
Bomuld 40°C – 60°C
Dette program er velegnet til at vaske normalt
snavset bomuldsvasketøj, og det er det mest
effektive program i form af det kombinerede
energi- og vandforbrug for vask af bomuld.
Page 42

DA
17
Håndvask
Dette program giver en delikat vask af tøj, der
er angivet som "kun håndvask" samt andre
vaskbare genstande fremstillet af silke eller
angivet som "vask som silke" på etiketten.
Uld
Dette program udfører en vaskecyklus
dedikeret til uldstoffer, der kan vaskes i
vaskemaskine, eller genstande, der skal
vaskes i hånden.
Bomuld 40°C – 60°C
Dette program er velegnet til at vaske normalt
snavset bomuldsvasketøj, og det er det mest
effektive program i form af det kombinerede
energi- og vandforbrug for vask af bomuld.
Hvidt
Lavet til en perfekt vask. Den endelige
centrifugering ved maksimal hastighed giver
mere effektiv rengøring.
.
Baby
Dette program gør det muligt at vaske al
babytøj og opnå et rent resultat med en
temperaturindstilling på min. 60° C.
For at optimere den rensende effekt anbefaler
vi, at der bruges vaskepulver.
Smart Touch
Brugertilpass et indstilling af knappen, s om du
skal vælge, når du ønsker at overføre en
kommando fra appen til maskinen og for at
downloade/starte en cyklus (se det relevante
afsnit og appens brugervejledning for flere
oplysninger).
I den Smart Touch-indstilling fabr ik k en s æt ter
som standard, vil cyklussen "Auto-Clean",
der er lavet til at rense tromlen, fjerne dårlig
lugt og forlænge vaskemaskinens levetid.
Kontrollér, at tromlen er tom, før cyklussen
"Auto-Clean" påbegyndes, og anvend et
kendt rengøringsmiddel eller vaskepulver til
vaskemaskiner. Lad maskinens dør stå åben
efter endt cyklus for at lade tromlen tørre.
Anbefalet for hver 50 vaske.
Page 43

18
Åbning/Lukning af tromlen
! Der åbnes for vaskemaskinens dæksel.
!
Luk tromlen op ved at trykke på knappen (A)
og samtidig placere den anden hånd på låget.
! Beklædningsgenstandene lægges ned i
vaskemaskinens tromle, een efter een,
uden at trykke dem ned. De anbefalede
mængder af tøj, som fremgår af
”programskemaet”, bør respekteres. En
overfyuldning af vaskemaskinen medfører
ikke tilfredsstillende vaskeresultater og
krøller tøjet unødigt.
! Tromlen lukkes ved at samle lågene på
tromlen. Det gøres ved at placere låget
med knappen (A) neden under det andet
låg således at de er fuldstændig koblet
sammen.
Mængde af vaskemiddel
Vaskemiddelskuffen er opdelt i 3 rum:
! Dispenser 1 er for pulver vaskemiddel.
! Dispenser 2 er for flydende vaskemiddel.
!
Rum , er beregnet til skyllemiddel,
parfumeessenser og særlige tilsætningstoffer,
så som stivelse og blåning, etc.
! MAX - Max mærket angiver største
mængde vaskemiddel, der anbefales til
brug. Fyld ikke mere i end dette.
! Hvis der forekommer pletter på tøjet
som det er nødvendigt at behandle med
flydende blegemidler, kan der foretages en
forbehandling af tøjet i vaskemaskinen.
Fremgangsmåde: kom blegemidlet i
"skuffe 2", og start skylleprogrammet
.
Når
forbehandlingen er færdig, stilles
programvælgeren på OFF. Derefter
kommes resten af vasketøjet i maskinen,
og tøjet vaskes normalt på det ønskede
program.
1) Maksimum vask vaskepulve
2) Maksimum vask fyldende vaskemidde
3) Maksimum duftmiddel
Forberedelse af vasken
Page 44
7. FEJLFINDING OG GARANTI
E2 (med display)
Maskinen tager ikke vand ind.
Sørg for at vandhanen er åben.
Afløbsrøret er ikke i den rette højde (se installationsafsnittet).
Luk vandhanen, løsn påfyldningsslangen fra bagsiden af vaskemaskinen og
E3 (med display)
Vaskemaskinen tømmes ikke for vand.
Sørg for at filteret ikke er tilstoppet.
Sørg for at vandslangen ikke er bøjet, knækket eller sidder fast.
Sørg for at hjemme-afløbssystemet ikke er blokeret og lader vand strømme frit
igennem. Forsøg at tømme vandet i vaskekummen.
E4 (med display)
Der er for meget skum og/eller vand.
Sikr, at den rette mængde vaskemiddel anvendes, og at vaskemidlet er
E7 (med display)
Problem med døren.
Hvis døren er blokeret, skak du slukke for vaskemaskinen, tage elstikket ud
Enhver anden kode
Sluk for vaskemaskinen og tag elstikket ud af kontakten, vent et minut. Tænd
66
Hvis du mener, at vaskemaskinen ikke fungerer korrekt, så konsultér kvikguiden anført nedenfor, som
indeholder praktiske tips til, hvordan de mest almindelige problemer løses.
KUN FOR SMART TOUCH-MODELLER.
Candy simply-Fi-appen har en Smart Check-up-funktion, som gør det muligt for dig til hver
en tid at bekræfte produktets funktionalitet og status. For at anvende Candy simply-Fi-
appen har du brug for en smartphone med NFC-teknologi Find flere oplysninger på appen.
Hvis displayet på maskinen viser en fejl (med en kode eller blinkende lysdioder), skal du
tænde for appen og nærme din Android-smartphone med NFC slået til. Placer din
smartphone mod Smart Touch-logoet på instrumentbrættet. Du bør nu kunne læse
fejlmappen for at løse probleme t.
FEJLKODEFORMAT
Modeller med display: Fe jlen vises ved et tal efterfulgt af bogstavet "E" (eksempel: E2
= Fejl 2).
Modeller uden display: Fejle n vises med en ser ie af blink af hver l ysdiode. Fejlkoden
fremgår af antallet af blink fulgt af en pause på 5 sekunder (fx: To blink – pause 5
sekunder – to blink – gentaget = Fejl 2).
Fejlvisning
Mulige årsager og praktiske løsninger
2 blink af lysdioderne
(uden display)
Sørg for at vandslangen ikke er bøjet, knækket eller sidder fast.
kontroller at anti-sand filteret er rent og ikke tilstoppet.
3 blink af lysdioderne
(uden display)
4 blink af lysdioderne
(uden display)
7 blink af lysdioderne
(uden display)
designet til brug i vaskemaskine.
Sørg for at døren er lukket korrekt.
Sørg for, at tøjet i tromlen ikke hindrer døren i at lukke helt.
af kontakten, vente 2-3 minutter og så åbne døren.
for vaskemaskinen, og genstart et program. Kontakt et autoriseret
kundeservicecenter direkte, hvis fejlen opstår igen.
Page 45

ANDRE UREGELMÆSSIGHEDER
Vaskemaskinen
Sørg for at produktet er tilslutt et en f un ger en de elkontakt.
Sørg for at strømmen er tilsluttet.
Sørg for at stikkontakten fungerer, test den med et andet apparat
såsom en lampe.
Døren er muligvis ikke lukket korrekt: åbn og luk den igen.
Kontroller, at det ønskede program er valgt korrekt og at startknappen er
aktiveret.
Sørg for, at vaskemaskinen ikke er i tilstanden pause eller udskyd start.
Der lækkes vand på
Dette kan skyldes en lækage i pakningen mellem hanen og
Sørg for, at filteret er lukket korrekt.
Vaskemaskinen
Maskinen er udstyret med et detektionssystem, der beskytter vasketøjet og
Dette kan være fordi vandet ikke er drænet helt: vent et par minutter. Se Fejl
Visse modeller har en ikke-centrifugeringsfunktion. Sørg for at den
ikke er aktiveret.
Sikr, at den rette mængde vaskemiddel anvendes, og at vaskemidlet er
Stærke vibrationer/støj
Vaskemaskinen står måske ujævnt: hvis nødvendigt, så justér fødderne som
indikeret i den tilhørende sektion
Sørg for at transportskruer, gummispunse og afstandskomponentrør er
blevet fjernet.
knapper osv...).
Problem Mulige årsager og praktiske løsninger
virker/starter ikke
gulvet nær
vaskemaskinen
centrifugerer ikke
forsyningsrøret og f yld ning sv e ntil e n. I det tilfæ ld e sk al den uds k i ftes og
slangen og hanen sammenspændes korrekt.
produktet fra sk ader, hvis vasketøjet ikke er balan ceret før centrifugering.
Dette kan føre til, at:
•
maskinen forsøger at afbalancere indholdet og derved forøge
centrifugeringstiden
•
hastigheden af centrifugeringen reduceres for at reducere vibrationer og støj
•
den udelukker centrifugering for at beskytte maskinen.
Hvis dette er tilfældet, så tag vasketøjet ud, omarranger det, læg det i
igen, og genstart programmet.
3-afsnittet, hvis problemet fortsætter.
Kontroller, hvilke valg er indstillet og deres indflydelse på centrifugeringen.
designet til brug i vaskemaskine.
høres under
centrifugering
Sørg for, at der ikke er fremmedlegemer inde i tromlen (mønter, hængsler,
Standardproduce ntgarantien dæ kker fejl forår saget af elektri ske eller mekaniske fej l i
produktet, som skyldes en ha ndling eller undl adelse fra produc enten. Hvis der fi ndes
fejl forårsaget af faktorer uden for det leverede pr odukt, forker t anvendelse eller som
følge af at betjeningsvejledningen ikke er blevet f ulgt, kan en afgift blive opkrævet.
Page 46

Page 47
FI
21
Kiitos, että valitsit Candy-pesukoneen.
Olemme varmoja, että se palvelee sinua
uskollisesti ja turvallisesti vaatteiden – myös
arkojen – päivittäisessä pesussa.
Lue tästä käyttöohjeesta, kuinka laitetta
käytetään oikein ja turvallisesti ja kuinka
siitä pidetään tehokkaasti huolta.
Käytä pesukonetta vasta, kun
olet lukenut nämä ohjeet huolellisesti.
Suosittelemme, että säilytät tämän
käyttöohjeen helposti saatavilla ja hyvässä
kunnossa myös mahdollisia myöhempiä
omistajia varten.
Tarkista, että laitteen mukana toimitetaan tämä
käyttöohje, takuutodistus, huoltokeskuksen
osoite ja energiatehokkuustarra. Tarkista myös,
että tulpat, poistoletkun käyrä sekä nestemäisen
pesu- tai valkaisuaineen lokero (vain joissain
malleissa) ovat mukana. Suosittelemme, että
säilytät kaikki nämä osat.
Jokaisen tuotteen tunnisteena on
yksilöllinen 16-merkkinen koodi, jota
kutsutaan myös sarjanumeroksi. Koodi on
painettu tarraan, joka on liimattu laitteeseen
(luukun lähelle) tai joka löytyy tuotteen
sisällä olevasta asiakirjakuoresta. Koodi on
eräänlainen tuotekohtainen tunnistekortti,
jota tarvitaan tuotteen rekisteröimiseen ja
otettaessa yhteyttä huoltoliikkeeseen.
Tämä laite on merkitty
eurooppalaisen direktiivin sähkö- ja
elektroniikkalaiteromusta (WEEE)
2012/19/EU mukaisesti
.
Sähkö- ja elektroniikkalaiteromu sisältää
saastuttavia aineita (jotka voivat aiheuttaa
haittaa ympäristölle) ja peruskomponentteja
(jotka voidaan käyttää uudelleen). On
tärkeää, että sähkö- ja elektroniikkalaiteromu
toimitetaan erikoiskäsittelyyn, jotta siitä
voidaan poistaa kaikki saastuttavat aineet ja
käsitellä ne asianmukaisesti ja jotta kaikki
materiaalit voidaan kerätä ja kierrättää.
Yksityishenkilöillä on tärkeä tehtävä varmistaa,
että sähkö- ja elektroniikkalaiteromusta ei tule
ympäristöongelmaa. Seuraavien perussääntöjen
noudattaminen on tärkeää:
! Sähkö- ja elektroniikkalaiteromua ei saa
käsitellä kotitalousjätteenä.
! Sähkö- ja elektroniikkalaiteromu on
toimitettava jätehuolto-organisaation tai
rekisteröityjen yhtiöiden ylläpitämiin
asianmukaisiin keräyspisteisiin. Monissa
maissa on suurikokoisen sähkö- ja
elektroniikkalaiterom
un
kotikeräyspalveluja.
Monissa maissa voit uuden laitteen oston
yhteydessä palauttaa vanhan laitteesi
jälleenmyyjälle, jonka on vastaanotettava
veloituksetta yksi vanha laite yhtä uutta
laitetta kohden, mikäli laite on vastaavaa lajia
ja vastaa toiminnoiltaan toimitettua laitetta.
1. YLEISET TURVALLISUUSOHJEET
2. ASENNUS
3. KÄYTÄNNÖLLISIÄ VINKKEJÄ
4. YLLÄPITO JA PUHDISTUS
5. PIKAKÄYTTÖOPAS
6. OHJAIMET JA OHJELMAT
7. ASIAKASPALVELUKESKUS JA TAKUU
Ympäristöehdot
Sisällys
Page 48

22
1. YLEISET
TURVALLISUUSOHJEET
! Tämä laite on tarkoitettu
käytettäväksi kotitalouksissa ja
vastaavissa paikoissa, esimerkiksi:
− myymälöiden, toimistojen ja
muiden työpaikkojen henkilöstön
keittiötiloissa;
− maatiloilla;
− hotellien, motellien ja muiden
asuinpaikan tyyppisten paikkojen
asiakkaiden käytössä;
− aamiaismajoituksen
kaltaisessa käytössä.
Laitteen käyttö kotitalousympäristöstä
poikkeavissa paikoissa tai
tavanomaisista kodinhoitotoimista
poikkeavalla tavalla, kuten
kaupallinen asiantuntija- tai
ammattilaiskäyttö, on kiellettyä
myös edellä kuvatuissa paikoissa.
Jos laitetta käytetään näistä
ohjeista poikkeavalla tavalla, sen
käyttöikä voi lyhentyä ja
valmistajan takuu voi raueta.
Valmistaja ei hyväksy mitään
laitteelle aiheutuvia vahinkoja tai
muita vahinkoja ja menetyksiä,
jotka aiheutuvat kotitalouskäytöstä
poikkeavasta käytöstä (myös
laitteen ollessa kotitalousympäristössä),
lain sallimassa enimmäislaajuudessa.
! Tätä laitetta voivat käyttää
vähintään 8-vuotiaat lapset sekä
henkilöt, joiden fyysiset tai
henkiset valmiudet eivät riitä
laitteen turvallisen käsittelyyn tai
joilla ei ole laitteen käytön
edellyttämää kokemusta tai
tietoa, jos he toimivat toisen
henkilön valvonnassa tai ovat
saaneet ohjeistuksen laitteen
käyttöön ja käyttö tapahtuu
turvallisella tavalla ja he
ymmärtävät laitteen käyttöön
liittyvät vaarat. Älä anna lasten
leikkiä laitteella. Lapset eivät
saa puhdistaa ja huoltaa
laitetta ilman valvontaa.
! Lapsia on valvottava, etteivät
he leiki laitteella.
! Alle 3-vuotiaat lapset on
pidettävä loitolla, ellei heitä
valvota jatkuvasti.
!
Jos virtajohto on vaurioitunut,
valmistajan tai valmistajan
huoltoedustajan tai muun vastaavan
pätevän henkilön on vaihdettava se
vaaran välttämiseksi.
! Käytä veden syöttöliitäntään
vain laitteen mukana toimitettuja
letkuja (älä käytä vanhoja letkuja).
! Vedenpaineen tulee olla 0,05–
0,8 MPa.
! Varmista, että matto ei tuki
koneen pohjaa ja tuuletusaukkoja.
!
Kone sammutetaan kääntämällä
ohjelmavalitsimen osoitinmerkki
pystysuoraan. Valitsimen kaikissa
muissa asennoissa kone on
päällä
(vain mallit, joissa on
ohjelmasäädin).
Page 49

FI
23
! Laite on asennettava siten, että
pistotulppaan on esteetön pääsy.
!
Kuivien vaatteiden enimmäiskapasiteetti
riippuu käytössä olevasta mallista
(katso ohjauspaneeli).
! Tietoja tuotteen mikrokortista on
saatavana valmistajan verkkosivulta.
! Irrota pesukoneen virtajohto ja
sulje vesihana ennen kuin
puhdistat tai huollat konetta.
! Varmista, että sähköjärjestelmä on
maadoitettu. Jos näin ei ole,
pyydä valtuutetun ammattilaisen
apua.
! Älä käytä muuntimia,
haaroituspistorasioita tai jatkojohtoja.
! Älä koskaan irrota virtajohtoa
pistorasiasta vetämällä johdosta
tai koneesta.
! Älä altista pesukonetta sateelle,
suoralle auringonvalolle tai muille
sääilmiöille.
! Vian tai toimintahäiriön sattuessa
sammuta pesukone ja sulje
vesihana, älä yritä korjata konetta
itse. Ota välittömästi yhteyttä
asiakaspalveluun ja käytä vain
alkuperäisiä varaosia. Näiden
ohjeiden noudattamatta jättäminen
voi tehdä koneesta vaarallisen.
Laite noudattaa eurooppalaisia
direktiivejä:
! 2006/95/EC (LVD);
! 2004/108/EC (EMC);
! 2009/125/EC (ErP);
! 2011/65/EU (RoHS);
ja niiden myöhemmät muutokset.
Turvallisuusohjeet
VAROITUS:
veden lämpötila voi nousta
hyvin korkeaksi pesun aikana.
Page 50

24
2. ASENNUS
1
! Irrota kaikki 4 ruuvia "A"
molemmista kulmavahvisteista
sekä myös kaikki 4 ruuvia "B”
(piirroksen 1).
2
! Kiinnitä uudelleen 4 ruuvia "A"
ja aseta paikoilleen koneen
mukana toimitetut nupit "C"
(piirroksen 2).
3
4
min 50 cm
max 85 cm
+2,6 mt
max
max 100 cm
min 4 cm
Page 51

FI
25
5
! Pesukone on liitettävä vedenjakeluun
uuden letkun välityksellä. Tämä letku
seuraa koneen mukana (rummun
sisällä). Vanhan letkun käyttöä tähän
tarkoitukseen on vältettävä.
!
Kiinnitä vedenottoletku kulmavahvisteisesta
päästään sähköventtiiliin (koneen
takapuolen yläosassa) ja toisesta
päästään vesihanaan tai
vedenottoon, jonka suukappaleessa
on 3/4" kierteet.
!
Aseta kone lähelle seinää niin, että
letkuun ei tule mutkia eikä tukoksia.
Kiinnitä vedenpoistoputki vesialtaan
reunaan tai mieluummin kiinteään
vedenpoistoaukkoon, jonka halkaisijan
tulee olla suurempi kuin koneen putken
halkaisijan, vähintään 50 cm:n ja
korkeintaan 75 cm:n korkeudelle
lattiasta (piirroksen 4).
! Käytä tarvittaessa käyrää lisäosaa
vedenpoistoputken parempaan
kiinnittämiseen ja tukemiseen.
Siinä tapauksessa, että koneessasi
on kyseinen toiminto:
! Koneen liikuttelu on helpompaa, kun
käännät pyörillä varustetun alustan
ohjainvipua oikealle. Kun toimenpide
on suoritettu, tulee ohjainvipu
kääntää uudelleen alkuperäiseen
asentoonsa.
!
Aseta pesukone tasapainoon sen
etummaisista jaloista säätämällä
(piirroksen 5).
a) Käännä mutteria myötäpäivään
jalan ruuvin irrottamiseksi.
b) Käännä jalkaa ylös- tai alaspäin,
kunnes se kiinnittyy täydellisesti
lattiaan.
c) Lukitse jalka kääntämällä mutteria
vastapäivään, kunnes se kiinnittyy
pesukoneen pohjaan.
! Varmista, että kone on täysin
tasapainossa.
! Yritä liikuttaa konetta siirtämättä
sitä paikoiltaan nojaamalla
vuoronperään yläosan eri kulmiin
ja tarkista, että se ei keinu.
!
Mikäli joudut siirtämään koneen
toiseen paikkaan, tasapainota jalat
uudelleen.
Page 52

26
! Liitä vesiletku hanaan ja käytä
vain pesukoneen mukana toimitettua
tyhjennysletkua (piirros 6).
ÄLÄ AVAA HANAA.
! Joissain malleissa voi olla yksi tai
useampi seuraavista ominaisuuksista:
! KUUMA JA KYLMÄ (piirros 7): Kuuma-
ja kylmävesiliitäntä säästää energiaa.
Liitä harmaa letku kylmävesihanaan
ja
punainen letku kuumavesihanaan. Jos kone
voidaan liittää vain kylmävesihanaan,
joidenkin ohjelmien käynnistyminen kestää
muutaman minuutin pidempään.
! AQUASTOP (piirros 8): Syöttöletkussa
oleva laite, joka pysäyttää veden
virtauksen letkun vaurioituessa. Tällöin
“A”-ruutuun ilmestyy punainen merkki, ja
letku on vaihdettava uuteen. Avaa mutteri
painamalla yksisuuntaista lukitsinta “B”.
! AQUAPROTECT - SUOJATTU SYÖTTÖLETKU
(piirros 9): Jos varsinaisesta sisäletkusta
“C” vuotaa vettä, läpinäkyvä suojavaippa
“D” pitää veden sisällään ja pesuohjelma
voidaan suorittaa loppuun. Kun
pesuohjelma on päättynyt, ota yhteyttä
asiakaspalveluun syöttöletkun vaihtamista
varten.
6
1
7
B
A
8
D
C
9
Vesiliitännät
Page 53

FI
27
3. KÄYTÄNNÖLLISIÄ
VINKKEJÄ
VAROITUS: Huomaa seuraavat asiat,
kun lajittelet pyykkiä:
- Poista pyykistä metalliesineet, kuten
hiussoljet, neulat ja kolikot;
- Sulje vetoketjut ja tyynyliinojen napit, solmi
irralliset vyöt ja pitkät nauhat;
- Irrota verhoista ripustimet;
- Tutustu vaatteiden pesuohjeisiin huolellisesti;
- Poista sitkeät tahrat tahranpoistoaineilla.
! Kun peset huopia, peittoja tai muita raskaita
tekstiilejä, suosittelemme välttämään linkousta.
! Kun peset villaa, varmista, että tekstiili on
konepestävä ja että siinä on ”puhdasta
uutta villaa” -symbolin lisäksi merkintä ”ei
huovutu” tai ”konepestävä”.
Opas koneen ympäristöystävälliseen ja
taloudelliseen käyttöön.
Täytä kone mahdollisimman täyteen
! Energian, veden, pesuaineen ja ajan
käyttö on tehokkainta, kun käytetään
suositeltua enimmäistäyttömäärää.
Energiaa säästyy jopa 50% pestäessä
täysi koneellinen kahden puolikkaan
koneellisen sijaan.
Tarvitaanko esipesua?
! Vain hyvin likaiselle pyykille! SÄÄSTÄT
pesuainetta, aikaa, vettä ja 5–15%
energiaa, kun ET valitse esipesuohjelm
aa
vähän tai tavanomaisesti likaantuneelle
pyykille.
Tarvitaanko kuumaa vettä?
!
Kun tahrat esikäsitellään tahranpoistoaineella
tai kuivuneet tahrat liotetaan
vedessä ennen pesua, pesuohjelman
lämpötilaa voidaan laskea. Energiaa
säästyy jopa 50% käytettäessä
60°C:n pesuohjelmaa.
Seuraavassa pikaoppaassa on vinkkejä
ja suosituksia pesuaineen käytöstä
eri lämpötiloissa. Lue aina
pesuainepakkauksesta ohjeet oikeaan
käyttöön ja annosteluun.
Täyttövinkkejä
Hyödyllisiä neuvoja käyttäjälle
Erittäin likaiseen valkopesuun
suosittelemme puuvillaohjelmaa,
vähintään 60°C:n lämpötilaa ja
normaalia pesujauhetta (tehokäyttöön
sopivaa), joka sisältää keskimääräisessä
tai korkeassa lämpötilassa erinomaisesti
toimivia valkaisuaineita.
40—60°C:n pesuohjelmiin valitaan
sopiva pesuaine tekstiilien kuidun ja
likaantumisasteen mukaan.
Normaalit pesujauheet sopivat hyvin
likaisten valkoisten tai haalistumattomien
tekstiilien pesuun, ja nestemäiset
pesuaineet tai värilliselle pyykille
tarkoitetut pesujauheet sopivat vähän
likaantuneille värjätyille tekstiileille.
Alle 40°C:n pesuohjelmiin suosittelemme
nestemäisiä pesuaineita tai pesujauheita,
joiden erikseen mainitaan sopivan alhaisessa
lämpötilassa pesemiseen.
Villan tai silkin pesuun tulee käyttää
vain erikseen näille tekstiileille
tarkoitettuja pesuaineita.
Page 54

28
4. YLLÄPITO JA
PUHDISTUS
Puhdista pesukoneen ulkopinnat kostealla
pyyhkeellä. Älä käytä hankaavia aineita,
alkoholia tai liuottimia. Pesukoneen
tavanomainen puhdistus ei edellytä
erityistoimia: puhdista pesuainelokerot ja
suodatin. Jäljempänä annetaan vinkkejä
pesukoneen siirtämiseen ja pidempiaikaiseen
käytöstäpoistoon.
! Pesukoneessa on erikoissuodatin, joka
kerää suuret irtokappaleet, kuten napit tai
kolikot, jotka voivat tukkia viemärin.
! Saatavana vain tietyissä malleissa: vedä
mutkalla oleva letku auki, poista tulppa ja
poista vesi letkusta astiaan.
! Suosittelemme, että ennen suodattimen
avaamista panet sen alle imukykyis
en
pyyhkeen, jotta lattia pysyy kuivana.
! Käännä suodatinta vastapäivään
pystyasennossa olevaan pysäyttimeen asti.
! Irrota suodatin ja puhdista se. Kun olet
valmis, kiinnitä se takaisin kääntämällä
myötäpäivään.
! Kiinnitä kaikki pesukoneen osat
päinvastaisessa järjestyksessä kuin edell
ä
on kuvattu.
! Jos pesukonetta pidetään varastossa
lämmittämättömässä tilassa pidemmän
aikaa, tyhjennä kaikista letkuista vesi.
! Irrota pesukone verkkovirrasta.
! Irrota letku kiinnikkeestään, laske se alas
ja tyhjennä kaikki vesi astiaan.
! Kun olet valmis, kiinnitä poistoletku
kiinnikkeeseen.
! Paina kytkintä (A).
! Samalla, kun pidät kytkintä alas
painettuna, väännä täyttölokeroa ulospäin.
! Vedä täyttölokero ulos ja puhdista se.
! Suositellaan että pesuainelokerosta
poistetaan mahdolliset pesuainejäämistöt
ettei veden ja pesuaineitten kulk
u
lokerosta rumpuun esty.
! Vedä lokerot pois annostelijasta ja
puhdista myös annostelija huolellisesti.
! Poista mahdolliset jäännökset jotka voivat
tukkia lokeron reiä
t.
B
A
C
S
Kohdista kiinnitysläpät ohjeiden mukaan
(B). Väännä täyttölokeroa kantta kohden,
kunnes kiinnitysläppä asettuu paikalleen
(C). Läpän asettuessa paikalleen kuulet
tyypillisen äänen (klak).
Suodattimen puhdistus
Suosituksia pesukoneen siirtoon
ja pitkäaikaiseen varastointiin
Pesuaineen täyttölokeron ja sen
osioiden puhdistaminen
Takaisin asettaminen
Page 55

55
55
Ohjelman valinta
Tekniset tiedot
5.
Odota, kunnes luukun lukituksen
merkkivalo sammuu. Tämä tapahtuu
e pesukoneen virta.
FI
PIKAKÄYTTÖOPAS
Pesukone sovittaa ves imäär än aut omaatt is esti
pyykin laadun ja määrän mukaiseksi.
Järjestelmä vähentää energiankulutusta ja
lyhentää pesuaikoja.
Kytke pesukoneeseen virta ja valitse
haluamasi ohjelm a.
Säädä tarvittaessa pesulämpötilaa ja
paina tarvittavia lisävalintapainikkeita.
Aloita pesuohjelma painamalla
KÄYNNISTÄ/TAUKO-painiketta.
Mikäli sähkövirta katkeaa pesukoneen ollessa käynnissä, asetukset pysyvät tallessa koneen muistissa ja sähkövirran palatessa kone jatkaa pesuohjelmaa keskeytyskohdasta.
Ohjelman lopussa näytössä luk ee ”End” tai
joissakin malleissa kaikki pesuvaiheiden
merkkivalot syttyvät.
noin kahden minuutin kuluttua ohjelman
päKäatytkttayisä
Katso sopiva pesuohjelma
ohjelmataulukosta ja noudata sen ohjeita.
Tarvittava vedenp aine:
väh. 0,05 Mpa / enint. 0,8 Mpa
(0,05 MPa annostelee noin litran vettä
kymmenessä sek unnissa)
Linkousteho: Katso arvokilvestä.
Liitäntäteho/ Tarvittava sulake/
Syöttöjännite: Katso arvokilvestä.
6.
SÄÄTIMET JA OHJELMAT
A Ohjelmanvalitsin ja POIS-asento
B KÄYNNISTÄ/TAUKO
painike
C AJASTETTU ALOITUS -
painike
D LISÄHUUHTELU-painike
E LÄMPÖTILAN VALINTA-painike
F LINKOUSNOPEUS-painike
G AJASTIN/PESUVAIHE
-merkkivalo
F+G NÄPPÄINLUKKO
H LUUKUN LUKITUS
I LISÄHUUHTELUN merkkivalo
L LÄMPÖTILAN VALINTA-merkkivalo
M LINKOUSNOPEUDEN merkkivalo
N SMART TOUCH -alue
-
Page 56

29
VAROITUS:
pistotulppaa, sillä koneet kalibroivat
Ohjelmanvalitsin on palautettava
POIS-asentoon jokaisen ohjelman
jälkeen tai aloitettaessa uutta
pesuohjelmaa ennen ohjelman
valintaa ja käynnistämistä.
KÄYNNISTÄ/TAUKO-painike
Turvalaite estää luukun avaamisen
(OFF)
Kun ohjelmanvalitsinta käännetään,
näyttöön ilmestyvät valitun ohjelman
Ohjelman loputtua tai laitteen ollessa
FI
Älä kosketa näyttöä s amalla, kun kytket
järjestelmänsä ensimmäisten sekuntien
aikana. Jos näyttöön k osketaan, kone ei
ehkä toimi oikein. Jos näin käy, irrota
pistotulppa ja kiinnitä se uudelleen.
Luukun avaaminen
välitt ömästi ohjel man päätyttyä.
Odota kaksi minuuttia pesuohjelman
päättymisen jälkeen, kunnes luukun
turvamerkkivalo on sammunut, ennen
kuin avaat luukun.
Ohjelmanvalitsin ja POIS-asento
asetukset.
koskematta tietyn ajan näytön kirkkautta
vähennetään energian sääst ämiseksi.
HUOM. Kone sammutetaan kääntämällä
ohjelmanvalitsin POIS-asentoon.
Aloita
valittu
pesuohjelma
KÄYNNISTÄ/TAUKO
painamalla
-painiketta.
Kun ohjelma on valittu, ohjelmanvalitsin
pysyy valitun ohjelman kohdalla koko
ohjelman ajan.
Katkaise
valitsin
pesukoneen
POIS
-asentoon.
virta
kääntämällä
Sulje luukku ENNEN kuin painat
KÄYNNISTÄ/TAUKO-painiketta.
Aloita
valittu
pesuohjelma
tätä.
Kun KÄYNNISTÄ/TAUKO-painiketta
on painettu, laitteen käynnistymisessä
voi kulua muutama sekun ti.
PYYKIN LISÄÄMIN EN OHJELMAN
KÄYNNISTYKSEN JÄLKEEN (TAUKO)
Paina
KÄYNNISTÄ/TAUKO
noin
2 sekunnin
ja jäljellä olevan ajan ilmaisin osoittavat
vilkkumalla, että kone on pysä htyny t) .
Odota
2
turvalukitus aukeaa.
Kun
olet
pyykkiä, sulje luukku ja paina
KÄYNNISTÄ/TAUKO
jatkaa siitä, mihin se jäi).
ajan (osa merkkivaloista
minuuttia,
lisännyt
-painiketta (ohjelma
kunnes
tai
painamalla
-painiketta
luukun
poistanut
OHJELMAN KE S KEYTTÄMINEN
Ohjelma
valitsin
keskeytetään
POIS
-asentoon.
kääntämällä
Valitse toinen ohjelma.
Palauta ohjelmanvalitsin POIS
-asentoon.
Page 57

villavaatteille tarkoitetun ohjelman
30
LINKOUKSEN VALINTA-painike
Valintapainikkeiden valinnat on
tehtävä ennen KÄYNNISTÄ/TAUKO-
valittuun ohjelmaan, valintailmaisin
painikkeen painamista.
Valittaessa toimintoa, joka ei sovellu
ensin vilkkuu ja sitten sammuu.
AJASTETTU ALOITUS-painike
Valitun
ohjelman
iivyttää, jolloin pesukone alkaa toimia
v
joko 3, 6, tai 9 tunnin kuluttua. Toimi
seuraavalla tavalla:
alkamista
voidaan
Voit valita haluamasi nopeuden millä
etkellä hyvänsä ohj elmaa.
h
AQUAPLUS-painike
Uuden
toiminnon ansiosta painamalla kyseistä
k
ytkintä valitset erikoispesuohj elman, joka
on mahdollinen kaikille ohjelmille ja
tekstiilityypeille. Tämä ohjelma on
hellävarainen sekä tekstiilikuiduille, ett
ukoneen käyttäjän herkäll e iholle.
pes
SENSOR
ACTIVA
SYSTEM
–
ä
- Valitse haluamasi ohjelma
ohjelmanvalitsimella A.
- Paina ajastimellinen aloitus –kytkintä,
kunnes valitsemasi viiveajan merkki valo
syttyy.
- Paina käynnistys/pysäytys-kytkintä B.
- Kone alkaa toimia valitsemasi ajan
kuluttua.
Jos
ohjelman
poistaa, paina uudestaan nappia C
kunnes kaikki ajastusta ilmaisevat
valomerkit sammuu.
Tätä kytkintä painamalla valitaan haluttu
nopeus loppulinkoukselle, jonka on
kuitenkin oltava valitulle ohjelm alle sopi va.
Nämä nopeudet on merkitty vastaavaan
merkkivaloon. Jos haluat poistaa
linkouksen kokonaan, aseta nopeuden
osoitin asentoon.
Pidä
kytkin
utta osoitt avaa merkkivaloa
nope
sammuu.
ajastettu
painettuna,
käynti
kunnes
halutaan
kolme
Huomattavasti runsaampi määrä vettä ja
koneen uusi toimintatapa, joka yhdistää
rummun pyörimisen sekä veden oton,
että sen poistamisen kanssa,
mahdollistaa täydellisesti pestyn ja
huuhdellun pyykin.
Pesuohjelma käyttää suurempaa määrää
v
että, jotta pesuaine liukenisi täydellisest
eteen, ja jotta pesu olisi tehokasta.
v
Vesimäärää on lisätty myös huuhtelujen
yhteydessä, jotta kuituihin ei jäisi
pesuainetta.
Tämä
toiminto
herkkäihoisille henkilöille, joille pieniki
pyykkiin jäänyt pesuaine saattaisi
aiheuttaa ärsytystä tai jopa allergisen
reaktion.
Tätä toimintoa suositellaan käytettäväksi
myös lasten vaatteita ja arkoja tekstiilejä
pestäessä, erityisesti kylpyhuonetekstiilejä,
joiden kuituihin jää helposti pesuainetta.
Tämä
yhteydessä.
toiminto
on
ei
tarkoitettu
ole
erityisesti
käytettävissä
i
n
Page 58

KYLMÄPESU-painike
FI
Painettaessa
suorittaa minkä tahansa pesuohjelman
vettä lämmittämättä. Pesuohjelman muut
ominaisuudet eivät muutu (veden määrä,
pesuaika, pesurytmi jne.).
Kylmässä
kun kyseessä on tekstiili, jonka värien
kestävyydestä ei ole varmuutta, tai kun
puhdistettavana on verhot, peitot,
erityisen arat tekokuidut, pienet matot tai
vain vähän likaiset tekstiilit.
vedessä
tätä
kytkintä
pesua
pesukone
suositellaan,
Page 59

SMART TOUCH
NFC-toiminnon
Vuor ova ikut us
And roid «alypu he l.in
ssi auo
ssi auo
A pp le iPho ne
ssi a
uo
A pp le iPad
ssi a
uo
OCSma rt Care - Koneen tarkistus- ja
puhdistusohjelmat ja vianetsintaopas.
Tama kodinkone on varustettu Smart Touch -
teknii
kalla, jonka avulla laite
kautta keskustelemaan NFC-lahitie<lonsiirto-
ominaisuudella varustettujen Android-pohjaisten
alypuhelinten kanssa.
OCLataa alypuhelimeesi Candy simply -Fi -
sovellus
Can dy simply-F i -sovellus on saatavill a
sekii Android- ettii iOS-pohjaisille
tableteille ja iilypuhelimille.
Vuorovaikutus koneen kanssa ja Smart
Touch -tekniikan tarjoamien
mahdolli suuksien hyodyntaminen
onnistuu kuitenkin vain NFC-toiminnon
sisii ltii villii Android-alypuhelimilla, ks.
taulukko alla:
sisau ava Andro id-
.i lypuh e lin
ilm an NFC-toimintoa
A nd r oid -tablett i
pystyy sovelluk
koneen + sis.ill On
ka.nssa
Va i n
Vain
Vain
Vain
sen
OCMy Statistics - Pesutilastoja ja vinkkeja
koneen tehokkaampaan kayttoon.
Tutustu liihemmin Smart Touch -
toimintoihin kiiyttiimii llii sovellusta
DEMO-tilassa tai mene osoitteeseen
www.candysmarttouch.com
SMART
TO UCH
-
OMINAISUUDEN
KAYTTO
EN
SIMMA
reki sterointi
OCMene Android-alypuhelimesi
INEN KERTA - Kodinkon
asetusvalikkoon
kohdassa" Langaton ja verkot" .
Alypuhelimen mallin ja Android-version
mukaan NFC:n aktivointi voi tapahtua eri
tavalla. lisiitietoja saat iilypuhelimesi
kii yttooppaasta.
ja
aktivoi NFC
een
-ominaisu
us
TOIMINNOT
Sovelluksen paatoiminnot ovat:
OGVoice Assistan t - Aaniavustaja, joka auttaa
sinua
kolmella aanikomennolla (tekstiili, vari, lian
maara).
OC Cycles - Uusien pesuohjelmien lataus ja
aktivointi.
valitsemaan pa
rhaan pesuohjelman van
OCAseta ohjelmanvalitsin kohtaan "Smart Touch' ,
jolloin laitt
kaynnistyy.
OCAvaa sovellus, luo kayttajaprofiili ja rekisteri5i
kodinkone alypuhelimen nayit5De tu lev ie n
oh je i de n tai kodinkoneen pikaoppaan
i
ohieidenmukaisesti.
een kayttop
aneelissa oleva
Lisatietoja, usein kysytyt
kysymykset seka video
rekisteri:iinnistali:iytyvat
osoitteesta
www.candysmartt ouch.com /how -to
anturi
Page 60

N laittee
aalla,
k
Touch..Jogon
p
---·--
unsovenussitaPwt
SEURAAVAKERTA - Normaali kaytto
OCKun haluat ohjata kodinkonetta sovelluksen
k:autta, ka)'llnista Smart Touch -toimintalila
asettamalla ohjelmanvalitsin Smart Touch -
asentoon.
OOVarmista, etta olet avannut puhelimen
lukituksen (valmiustilasta) ja aktivofnut
puhelimen NFC-ominaisuuden. Noudata sitten
ectella esttettyja ohjeita.
DC Kun haluat kaynnistaa pesuohjelman, tayta
konepyykilla, lisaa pesuaine ja sulje luukku.
Mikali et tieda, missa puhelimen NFC-
antenni on, liikuttele puhelinta hitaasti
ympyrassa Smart Touch -logon edessa,
kunnes sovellus vahvistaa yhte,yden. Jotta
tiedonsiirto onnistuu, on tarkeaa PITAA
PUHELIN KAYTTOPANEELIN PAALLA
TOIMENPITEESEEN
MUUTAMIEN SEKUNTIEN AJAN. Laite
ilmoittaa viestiIla toimenpiteen
onnistumisesta ja neuvoo,, milloin
puhelimen voi siirtaa pois.
KULUVIEN
u.
OOValitse toiminto sovelluksesta (esim.
ohjelman kaynnistys, alykas tarkistus, tilastojen
paivitys jne.).
DCNoudata puhelimen n
PIDA PUHELI n kayttopaneelin Smart
TARKEAA:
Pida alypuhelinta siten, etta sen NFC-
antenni on kodinkoneen Smart Touch -
logon kohdalla (ks. kuva alla).
aytolle tulevai ohjeita ja
a:i.
Alypuhelimen paksu suojakotelo tai
metallinen tarra voi haitata kooinkoneen
ja puhelimen valistii yhteytta. Poista ne
tarvittaessa.
Jos puhelimen osia (esim. takakansi,
akku jne.) on vaihdettu muihin kuin
alkuperaisiin osiin, on myos NFC-
antenni voitu poi staa, mi kii estaa
sovelluksen kayton kokonai suudessaan.
Kodinkonetta voi hallita j a ohjata
sovelluksen kautta vain koneen vieressii
- etaohjaus ei onnistu (esim. toisesta
huoneesta tai talon ulkopuolelt a).
Page 61
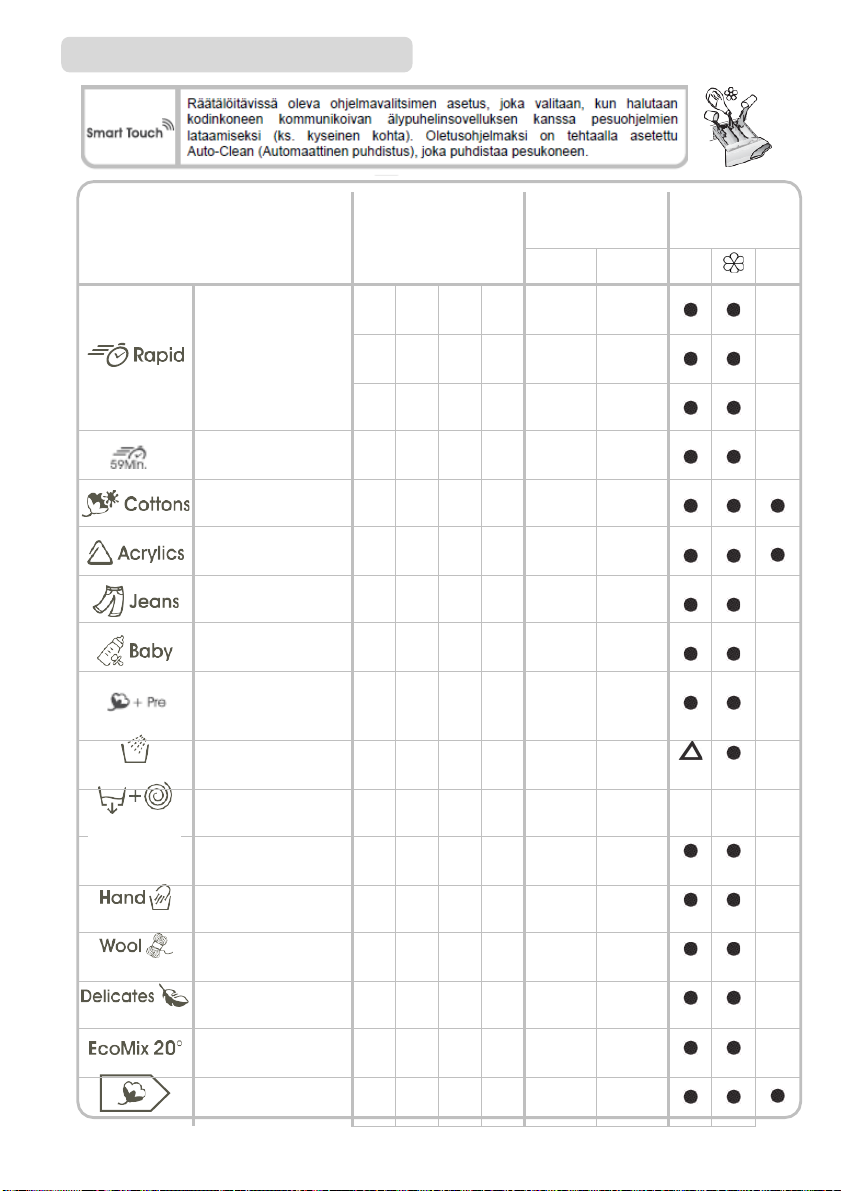
esipesu
Linkous
1
Ohjelmataulukko
2
OHJELMA
Daily 59 min.
Valkopyykki
Sekapyykki
Puuvilla+
Huuhtelut
Pika
30’
Farkut
Baby
30°
60°
90°
60°
40°
60°
60
-
PESUAINEMÄÄ
2
1
( )
( )
kg *
(ENINT.)
1)
1,5 1,5 1,5 2,5
2
5 6 7 8
3
3 3 3 3
4 4 4 4,5
5 6 7 8
- - - -
2
3
2,5
3
3,5
LÄMPÖT. °C
Suositus Enint.
30°
2,5
60°
60°
40°
40°
60°
40
-
Tyhjennys ja
Käsinpesu
Villa
Arat kuidut
EcoMix 20°
Puuvilla **
- - - -
1 1 1 1,5
1 1 1 1,5
2 2 2 2,5
5 6 7 8
5 6 7 8
-
30°
40°
40°
20°
40°
-
30°
40°
40°
20°
60°
( )
Page 62

34
Lue nämä huomautukset:
*
Kuivien vaatteiden enimmäiskapasiteetti
riippuu käytössä olevasta mallista (katso
ohjauspaneeli).
"
"
Linkousnopeutta voidaan myös vähentää
vastaamaan vaatteen pesuohjemerkintöjen
suosituksia, ja erittäin arkojen tekstiilien
linkous voidaan poistaa käytöstä
linkousnopeuspainikkeesta. Toiminto
voidaan ottaa käyttöön LINKOUKSEN
VALINTA -painikkeesta. Jos pesuohjemerkinnöissä
ei ole erikoisohjeita, voidaan käyttää
ohjelman tavanomaista suurinta
linkousnopeutta. Liian suuri pesuainemäärä
voi aiheuttaa liiallista vaahtoamista. Jos
laite havaitsee liikaa vaahtoa, se voi ohittaa
linkousvaiheen tai pidentää ohjelman
kestoa ja lisätä vedenkulutusta.
( )
Vain, kun ESIPESU-valinta on
valittuna (ohjelmat, joissa voidaan
valita ESIPESU-valinta).
1)
Esitettyjen ohjelmien pesuvaiheen
kestoa ja tehokkuutta voidaan
säätää LIAN MÄÄRÄ -painikkeesta.
! ESIPESU - Jos pesuainelokerossa on
erityinen lokero esipesua varte kaada
pesuainetta siihen. Muuten kaada
pesuaineet rummun yläosassa olevaan
reitettyyn alueeseen ( katso kuvaa ),
seuraa pesuaineen valmistajan
suosituksia.
** VAKIOPUUVILLAOHJELMAT (EU)
Nro 1015/2010:n ja Nro 1061/2010:n
MUKAISESTI.
PUUVILLAOHJELMAN LÄMPÖTILA 60°C.
PUUVILLAOHJELMAN LÄMPÖTILA 40°C.
Nämä ohjelmat soveltuvat tavanomaisesti
likaantuneen puuvillapyykin pesemiseen, ja
ne ovat tehokkaimmat puuvillapyykin
pesuohjelmat yhdistetyllä sähkön- ja
vedenkulutuksella mitattuna.
Nämä ohjelmat noudattavat vaatteiden
pesuohjeiden lämpötilamerkintää, ja
todellinen veden lämpötila voi hieman
poiketa ohjelman ilmoitetusta lämpötilasta.
Ennen kuin suljet kannen ja aloitat
pesuprosessin pitää tarkistaa että luukku
on täysin suljettu. Jos mahdollista,
voit säätää indikaattoreita rummussa
varmistaaksesi parhaan pesutuloksen.
TÄRKEÄÄ - Älä käytä esipesua
ajastetun ohjelman yhteydessä.
Page 63

joka voidaan ohittaa kokonaan
kaikenlaisia tekstiilejä esimerkiksi
Ohjelmaan kuuluu konepestäville
villakankaille tai käsinpestäville
Ohjelma soveltuu tavanomaisesti
Ohjelman valinta
Pesukoneessa on ohjelmia, jotka on
suunniteltu erilaisille tekstiileille ja eri tavalla
likaantuneelle pyykille (katso t aul ukko).
Pika
Pesuohjelmaa suositellaan pienille määrille
vähän likaantunutta pyykkiä. Tähän
ohjelmaan suositellaan käytettäväksi
tavallista vähemmän pesuainetta, jotta sitä
ei mene tarpeettomasti hukkaan. PIKAohjelman valitsemisen jälkeen voidaan
painikkeesta valita yksi kolmesta
käytettävissä olevasta ohjelmasta.
Daily 59 min.
Ohjelman avulla voit sekoittaa eri kuituja
(esim. puuvillaa, keinokuituja jne.) ja pestä
ne energiaa säästäen, sillä pesuvaiheen
lämpötila ei ole yli 40°C.
Valkopyykki ja puuvilla
Pesee täydellisesti. Loppulinkous
enimmäisnopeudella poistaa kosteutta
tehokkaasti.
Sekapyykki
Pesu- ja huuhteluvaiheissa optimoidaan
rummun pyörimistahti ja veden määrä.
Hellävarainen linkous rypistää tekstiilejä
vähemmän.
Farkut
Ohjelma kestävien tekstiilien, kuten
farkkukankaiden, parhaaseen pesuun.
Poistaa erittäin hyvin likaa vaikuttamatta
tekstiilien joustavuuteen.
Baby
Tämän ohjelman avulla voit pestä kaikki
vauvan vaatteet täydellisen puhtaaksi , aseta
pesulämpötilaksi vähintään 60 astetta.
Optimoidaksesi puhdistus tuloksen
suosittelemme jauhemaisen pesuaineen
käyttöä.
Huuhtelut
Ohjelma suorittaa kolme huuhtelua, joiden
välissä on linkous (jota voidaan hidastaa tai
painikkeesta). Käytetään huuhtelemaan
käsinpesun jälkeen.
Tyhjennys ja Linkous
Ohjelma tyhjentää veden kok ona an
ja suorittaa täyden linkouksen.
Linkousnopeutta voidaan pienentää tai
linkous voidaan poistaa LINKOUKSEN
VALINTA -painikkeesta.
Käsinpesu
Ohjelma käsinpestäville vaatteille. Ohjelma
päättyy kolmeen huuhteluun ja hitaaseen
linkoukseen.
Villa
villavaatteille sopiva pesujaks o.
Arat kuidut
Ohjelma vuorottelee työv aiheita ja taukoja
ja sopii etenkin arkojen tekstiilien
pesemiseen. Pesujaksossa ja huuhteluissa
käytetään runsaasti vettä, jotta lopputulos
on paras mahdollinen.
EcoMix 20°
Tämän innovatiivisen ohjelman avulla voit
pestä samaan aikaan erilaisia materiaaleja
ja värejä, kuten puuvillaa, synteettisiä
kuituja ja sekoitekankaita, vain 20°C:n
lämpötilassa, ja se tuottaa erinomaisen
pesutuloksen. Ohjelma kuluttaa vain
noin 40 prosenttia perinteisen 40°C:n
kirjopesuohjelman kulutuksesta.
Puuvilla 40°C–60°C
likaantuneen puuvillapyykin pesemiseen, ja
se on tehokkain puuvillapyykin pesuohjelma
yhdistetyllä sähkön- ja vedenkulutuksella
mitattuna.
Page 64

36
Smart Touch
Mukautettava ohjelmanvalitsimen asetus, joka valitaan, kun halutaan lähettää komento
älypuhelinsovelluksesta laitteeseen tai ladata/käynnistää pesuohjelma (ks. kyseinen luku
sekä sovelluksen käyttöohje).
Smart Touch -toiminnon tehdasasetuksena on Automaattinen puhdistus -ohjelma, joka
puhdistaa pesurummun, poistaa hajuja ja pidentää pesukoneen käyttöikää.
Tarkista, että rummussa ei ole pyykkiä, ennen kuin aloitat Automaattinen puhdistus ohjelman. Käytä valmistajan pesukonepuhdistusainetta tai -jauhetta. Jätä
pesukoneen luukku auki ohjelman päätyttyä, jotta pesurumpu kuivuu. Puhdistusohjelma
on suositeltavaa ajaa 50 pesun välein
Page 65

FI
37
Rummun avaaminen/sulkeminen
! Avaa pesukoneen kansi.
! Avaa rumpu painamalla nappia (A), ja
asettamalla samaan aikaan toinen käsi
kannen päälle.
! Pane pestävät vaatekappaleet yksitellen
rumpuun tunkematta niitä tiukkaan.
Huomioi “ohjelmataulukossa” suositellut
täyttömäärät. Jos pesukonetta täytetään
liiaksi, pesutulokset huononevat ja
tekstiilit rypistyvät.
! Rummun sulkemiseksi, aseta rummun
kannet uudestaan paikoilleen,
asettamalla (A) napin kansi toisen kannen
alapuolelle kunnes ne ovat täysin
kiinnitetty.
Pesuaineen annostus
Pesuainelokero on jaettu 3 osioon:
!
Lokero 1 on jauhemaista pesuainetta varten.
!
Lokero 2 on nestemäistä pesuainetta varten.
! Osio on tarkoitettu huuhtelu- ja
hajusteaineille sekä erikoisaineille, kuten
tärkkäysaineet, inivärjäysaineet jne.
! MAX - Max Merkki osoittaa suurimman
määrän pesuaineita jota suositellaan
käytettäväksi. Älä täytä lokeroa tätä
merkkiä enempää.
! Jos vaatteissa on tahroja jotka
tarvitsevat erikoista käsittelyä
nestemäisillä valkaisuaineilla, voit
suorittaa niiden esipuhdistuksen
pesukoneessa. Tämän toimituksen
suoritat asettamalla valkaisuaine
“lokeroon 2” ja käynnistämällä huuhtelu
ohjelman
. Kun toimitus on loppu
asenna ohjelmoija OFF asentoon, asenna
loput pyykistä pesukoneen sisään
ja toimita tavallinen pesu halutulla
ohjelmalla.
1) Maksimi pesu pulveri pesuaine
2) Maksimi pesu nestemäinen pesuaine
3) Maksimi hajustusaine
Pesun valmistaminen
Page 66

7. VIANMÄÄRITYS JA TAKUU
E2 (näytöllinen malli)
Kone ei saa vettä.
Tarkista, että hana on auki.
Varmista, että poistolet k u on oikealla korkeudella (ks. asennus).
Sulje hana, irrota täyttöletku pesukoneen takaa ja tarkista, ettei suodatin ole
E3 (näytöllinen malli)
Pesukone ei poista vettä.
Tarkista, että suodatin ei ole tukossa.
Tarkista, että poistoletku ei ole mutkalla tai puristuksissa.
Tarkista, että viemäri ei ole tukossa ja vesi pääsee virtaamaan siinä
esteettömästi. Yritä tyhjentää vesi pesualtaaseen.
E4 (näytöllinen malli)
Liikaa vaahtoa ja/tai ve tt ä.
Varmista, että käytössä on oikea määrä pesuainetta ja käytetty pesuaine on
E7 (näytöllinen malli)
Luukkuongelma.
Jos luukku on lukittuna, sulje virta, irrota koneen pistotulppa pistorasiasta,
Muu virhekoodi
Sulje virta ja irrota virtajohto pistorasiasta, odota minuutti. Kytke laitteeseen
virhe ilmoitetaan kaikkien valojen välkkymisellä. Virhekoodi
llä näkyy virhe (joko virhekoodi tai vilkkuvia merkkivaloja),
12
Jos epäilet, että pesukone ei toimi oikein, katso ohjeita seuraavasta pikaoppaasta, jossa on vinkkejä
yleisimpien ongelmien korjaamiseen.
KOSKEE VAIN SMART TOUCH -MALLEJA
Candy simply-Fi -sovellus sisältää älykkään tarkastustoiminnon, jonka avulla tuotteen
toimivuuden ja tilan voi tarkistaa milloin vain. Sovelluksen käyttämiseen tarvitset vain
Android-älypuhelimen, jossa on NFC-ominaisuus. Lisätietoja on sovelluksessa.
Jos kodinkoneen näytö
käynnistä sovellus Android-älypuhelimessasi NFC-ominaisuuden ollessa käytössä. Aseta
älypuhelin ohjauspaneelissa olevaa Smart Touch -logoa vasten. Tämän pitäisi avata
vikahakemisto, jonka avulla ongelma voidaan selvittää.
VIRHEKOODIT
Näytölliset mallit: virhe esitetään numerona, jonka edes s ä on ki r jain E ( esim erkk i : E2 =
Virhe 2).
Näytöttömät mallit:
esitetään tietyllä määrällä välähdyksiä, joita seuraa viiden sekunnin tauko (esimerkki:
kaksi välähdystä – viiden sekunnin tauko – kaksi välähd ystä – toistuu = Virhe 2).
Virheilmoitus
Mahdolliset syyt ja ratkaisut
2 välähdystä
(näytötön malli)
Tarkista, että veden syöttöletku ei ole mutkalla tai puristuksissa.
tukossa.
3 välähdystä
(näytötön malli)
4 välähdystä
(näytötön malli)
7 välähdystä
(näytötön malli)
tarkoitettu pesukoneisiin.
Tarkista, että luukku on kunnolla suljettu.
Tarkista, etteivät rummun sisällä olevat vaatteet estä luukkua
sulkeutumasta kokonaan.
odota 2–3 minuuttia ja avaa luukku.
virta ja käynnistä ohjelma uudestaan. Jos virhe ei poistu, ota yhteyttä
valtuutettuun asiak as pal v eluun.
Page 67

MUITA HÄIRIÖTILANTEITA
Pesukone ei
Tarkista, että kone on kytketty toimivaan pistorasiaan.
Tarkista, että virta on päällä.
Tarkista jollain toisella laitteella, kuten lampulla, että pistorasiaan
tulee virtaa.
Luukkua ei ehkä ole suljettu kunnolla. Avaa luukku ja sulje se uudelleen.
Tarkista, onko haluttu ohjelma valittu oikein ja onko käynnistyspainiketta
painettu.
Tarkista, ettei pesukone ole pysäytys- tai viivetilassa.
Lattialle pesukoneen
Tämä voi johtua hanan ja syöttöletkun välisen tiivisteen vuodosta. Vaihda
Tarkista, että etusuodatin on kunnolla kiinni.
Pesukone ei linkoa
Laitteessa on tunnistinjärjestelmä, joka suojaa pyykkiä ja laitetta vahingoilta
Tämä voi johtua siitä, että kaikkea vettä ei ole vielä poistettu. Odota muutama
Joissakin malleissa on mahdollista estää linkous. Tarkista, että
linkous on sallittu.
Liian suuri määrä pesuainetta saattaa haitata linkousohjelmaa. Varmista, että
Linkous aiheuttaa
Pesukone ei ehkä ole kunnolla vaakatasossa. Säädä tarvittaessa koneen
jalkoja toisaalla tässä käyttöohjeessa esitetyllä tavalla.
Tarkista, että kuljetusruuvit, kumitulpat ja holkit on poistettu.
yms.).
aiheutuneet laitteen ulkopuolisista tekijöistä, väärinkäytöstä tai käyttöohjeiden
FI
Ongelma Mahdolliset syyt ja ratkaisut
toimi/käynnisty
lähelle vuotaa vettä
tällöin tiiviste ja kiristä letkun ja hanan liitoskohta.
silloin, kun pyykkikuorma ei ole jakautunut tasapainoisesti linkousta varten.
Seuraavat tilanteet saattavat johtua järjestelmästä:
•
Laite yrittää tasapainottaa kuormaa, mikä pidentää linkousaikaa.
•
Laite alentaa linkousnopeutta tärinän ja melun vähentämiseksi.
•
Laite keskeyttää linkouksen koneen suojelemiseksi.
Tarvittaessa poista pyykit, aseta ne koneeseen uudestaan tasaisesti ja
käynnistä sitten linkousohjelma.
minuutti. Jos ongelma jatkuu, ks. virhe 3.
Tarkista valinnat ja niiden vaikutus linkousohjelmaan.
käytät oikeaa määrää pesuainetta.
tärinää/melua
Tarkista, ettei pesurum m us sa ole ylimääräisiä esineitä (kolikoita, nap peja
Normaali valmist ajan takuu kattaa viat , jotka ovat seuraust a tuotteen valmist uksessa
syntyneistä sähköisistä tai mekaanisista virheistä. Takuu ei kata vikoja, jotka ovat
vastaisesta kä ytöstä.
Page 68

Page 69

40
Tack för att du har valt en tvättmaskin från
Candy. Vi är övertygade om att den här
maskinen kommer att hjälpa dig med att hålla
dina kläder, också de allra ömtåligaste, rena
och fina under lång tid framöver.
Läs den här bruksanvisningen noggrant
eftersom den innehåller viktig information
om användning och säkerhet samt
praktiska tips om underhållet.
Läs instruktionerna noggrant innan
du börjar använda tvättmaskinen. Vi
rekommenderar att du förvarar bruksanvisningen
inom räckhåll för användaren och att den
skyddas så att den är i gott skick under hela
tvättmaskinens livslängd.
Kontrollera att bruksanvisning, garantibevis,
information om servicecenter samt
energieffektivitetsmärkning levereras med
tillsammans med produkten. Kontrollera också
att pluggar, hållare för avloppsslang samt
kopp för flytande tvättmedel eller blekmedel
(endast vissa modeller) finns med. Vi
rekommenderar att du behåller alla dessa
komponenter.
Varje enskild produkt identifieras med en unik
kod med 16 tecken, som brukar kallas
”serienummer”. Koden finns på en etikett sitter
fast på maskinen (i närheten av luckan) eller i
kuvertet med dokumentation som ligger inuti
produkten. Den här koden fungerar som ett
specifikt produkt-ID som används vid
produktregistreringen samt i kontakter med
Candys servicecenter.
Maskinen är märkt enligt EUdirektivet 2012/19/EU för avfall
som utgörs av eller innehåller
elektrisk och elektronisk utrustning
(WEEE).
Avfall som utgörs av eller innehåller
elektrisk och elektronisk utrustning (WEEE)
innehåller både förorenande ämnen (som
kan leda till skada på miljön) och
grundläggande komponenter (som kan
återanvändas). Det är viktigt att behandla
avfall som utgörs av eller innehåller
elektrisk och elektronisk utrustning (WEEE)
på rätt sätt så att alla förorenande ämnen
omhändertas och att samla in och återvinna
allt material.
Även som privatperson kan du bidra till att
avfall som utgörs av eller innehåller elektrisk
och elektronisk utrustning (WEEE) inte
orsakar miljöskada och det är av största vikt
att följa vissa grundläggande regler:
!
Avfall som utgörs av eller innehåller
elektrisk och elektronisk utrustning (WEEE)
ska inte hanteras som hushållsavfall.
! Avfall som utgörs av eller innehåller
elektrisk och elektronisk utrustning
(WEEE) ska lämnas in på därför avsedda
avfallsstationer i offentlig eller privat regi.
I många länder går det att beställa
hämtning av större volymer avfall som
utgörs av eller innehåller elektrisk och
elektronisk utrustning (WEEE).
I många länder går det att återlämna den
gamla apparaten till butiken när du köper en
ny. De måste då ta emot den utan extra
kostnad så länge som den är av samma
produktslag och har samma funktioner som
den apparat som ursprungligen levererades.
1. ALLMÄNNA
SÄKERHETSFÖRESKRIFTER
2. INSTALLATION
3. PRAKTISKA TIPS
4. UNDERHÅLL OCH RENGÖRING
5. SNABBGUIDE
6. REGLAGE OCH PROGRAM
7. SERVICECENTER OCH GARANTI
Miljörelaterad information
Innehåll
Page 70

SV
41
1. ALLMÄNNA
SÄKERHETSFÖRESKRIFTER
! Den här apparaten är avsett
för hushållsbruk och liknande
användningsområden såsom:
− i personalutrymmen i butiker,
kontor och andra arbetsplatser;
− lantbruk;
− för gäster på hotell, motell
och andra bostadsliknande
miljöer;
− på bed and breakfast-
liknande inrättningar.
Maskinen är inte avsedd för annan
användning än vad som kan
betecknas som normalt hushållsbruk,
t.ex. kommersiell användning
av experter eller professionella
användare. Detta gäller även om
användningen sker inom ovan
nämnda användningsområden.
Om apparaten används på ett
annat sätt än det avsedda, kan
livslängden påverkas och garantin
upphöra att gälla. Tillverkaren
ansvarar inte för eventuella skador
på maskinen eller annan skada
eller förlust som uppstår på grund
av användning som inte faller inom
ramen för normalt hushållsbruk
(även om maskinen placerats i en
hushållsliknande miljö) i den fulla
utsträckning som lagen tillåter.
!
Produkten får användas av barn
över 8 års ålder och personer
med nedsatt fysisk, sensorisk
eller mental förmåga, eller som
saknar nödvändig erfarenhet och
kunskap, förutsatt att de får
tillräckligt bistånd och anvisningar
om säker användning och förstår
vilka risker som finns. Låt inte
barn leka med apparaten. Låt inte
barn utföra rengöring eller
underhåll utan tillsyn.
! Håll uppsikt över barn så att de
inte leker med apparaten.
!
Barn under 3 år får endast
vistas i närheten under konstant
tillsyn.
!
Om elkabeln är skadad måste den
bytas av tillverkaren, serviceombudet
eller personer med likvärdig
behörighet för undvikande av fara.
!
Använd alltid den slanguppsättning
som följde med maskinen vid
anslutning till avloppet (återanvänd
inte gamla slangar).
! Vattentrycket måste vara
mellan 0,05 MPa och 0,8 MPa.
! Kontrollera att inte golvmattan
ligger mot maskinens sockel eller
mot ventilationsöppningarna.
! Maskinen är AV när referensmärket
på programratten placeras i lodrät
position. I alla andra positioner för
ratten är maskinen PÅ (endast för
modeller med programvred).
! Maskinen måste installeras så
att elkontakten är nåbar.
Page 71

42
! Högsta tvättmängd för torra
kläder beror på modellen (se
kontrollpanelen).
! Informationsblad för produkten
kan hämtas på tillverkarens
webbplats.
! Före rengöring eller underhåll
av tvättmaskinen måste
strömmen brytas och
vattentillförseln stängas av.
! Kontrollera att elförsörjningen
är jordad. I annat fall måste en
behörig elektriker tillkallas.
! Använd inte konverterare,
dosor med flera uttag eller
förlängningskablar.
! Dra aldrig i elkabeln eller i
maskinen vid frånkoppling från
elnätet.
! Tvättmaskinen ska skyddas
mot regn, direkt solljus och
andra klimatyttringar.
!
Om tvättmaskinen slutar att
fungera under drift stänger du av
tvättmaskinen och vattentillförseln.
Försök inte reparera maskinen
på egen hand. Kontakta
servicecentret omedelbart. Använd
bara originaldelar vid reparation.
Produktsäkerheten äventyras om
dessa anvisningar inte följs.
Produkten är utformad i
enlighet med följande
EU-direktiv:
! 2006/95/EC (LVD);
! 2004/108/EC (EMC);
! 2009/125/EC (ErP);
! 2011/65/EU (RoHS);
med senare ändringar.
Säkerhetsanvisningar
VARNING!:
Vattentemperaturen kan bli
mycket hög under tvättcykelns
gång.
Page 72

SV
43
2. INSTALLATION
1
! Lossa de 4 skruvarna "A" vid
de två
vinkeljärnen och de 4
skruvarna "B" (figur 1).
2
!
Skruva fast de 4 skruvarna "A"
och sätt dit de medföljande
beslagen "C" (figur 2).
3
4
min 50 cm
max 85 cm
+2,6 mt
max
max 100 cm
min 4 cm
Page 73

44
5
!
Tvättmaskinen ska anslutas till
vattenledningsnätet med den nya
slangen som levereras med
maskinen (i trumman). Använd
inte den gamla slangen!
!
Koppla ena änden av
vattenslangen (den vinklade) till
reläventilen (övre delen på
maskinens baksida) och den
andra änden av slangen till en
gängad 3/4" kran.
!
Skjut maskinen mot väggen och
se till att det inte bildas veck på
slangen. Fäst avloppsröret i en
kant på tvätthon eller, ännu hellre,
koppla det till ett fast avlopp med
en diameter som är större än
tvättmaskinens, placerat 50-75
över golv (figur 4).
! Om det är nödvändigt kan du
använda medföljande tillbehör
för att fästa slangen bättre.
Om din maskin är försedd med
hjul:
! Förflytta spaken vid hjulen åt
höger för att flytta tvättmaskinen.
För den tillbaka när maskinen står
uppställd i rätt läge.
!
Ställ in maskinen så att den står
vågrätt med hjälp av de främre
hjulen (figur 5).
a) Vrid muttern medsols för att lossa
fotens skruv.
b) Skruva foten tills den har ordentlig
kontakt med golvet.
c) Lås foten genom att skruva
muttern motsols tills det tar emot vid
maskinens botten.
!
Se till att maskinen står jämnt.
!
Dra maskinen åt olika håll utan att
flytta den och tryck på de övre
hörnen och se till att alla fötterna
har god kontakt med golvet.
!
Om du flyttar maskinen ska du
justera fötterna på nytt.
Page 74

SV
45
! Anslut vattenslangen till vattenkranen.
Använd bara den slang som följde med
tvättmaskinen (fig. 6).
ÖPPNA INTE KRANEN.
! Visa modeller kan innehåller en eller flera
av följande funktioner:
! VARMT och KALLT (fig. 7): Inställningar
för tillförsel av varmt och kallt vatten för
energisparande. Anslut den grå slangen
till kallvattenkranen
och den röda till
varmvattnet. Maskinen kan anslutas enbart
till kallvattnet. I sådana fall förskjuts
programstarten några minuter för vissa
program.
!
AQUASTOP (fig. 8): En enhet som sitter
på tillförselslangen och som stoppar
vattenflödet om slangen är defekt. I sådana
fall visar en röd indikator på panelen ”A” att
slangen måste bytas. Skruva loss muttern
genom att trycka ned spärren "B".
! AQUAPROTECT - TILLFÖRSELSLANG
MED ÖVERVAKNINGSFUNKTION (fig. 9):
Om vatten läcker från den primära inre
slangen "A" kommer den transparenta
behållaren "B" att innehålla så mycket
vatten att det räcker för att slutföra
tvättcykeln. När tvätten är klar kontaktar du
servicecentret och beställer en ny slang.
6
1
7
B
A
8
D
C
9
Hydrauliska anslutningar
Page 75

46
3. PRAKTISKA TIPS
VARNING! Tänk på följande när du
sorterar tvätten:
- töm plaggen på metallföremål som
spännen, nålar eller mynt;
- knäpp igen örngott med knappar, stäng
blixtlås, knyt ihop lösa bälten och l
ånga
band;
- ta bort upphängningsanordningar fr
ån
gardiner;
- läs igenom tvättmärkningarna noggrant;
- ta bort besvärliga fläckar med speciella
borttagningsmedel.
! Vid tvätt av mattor, sängkläder eller andra
tunga textilier rekommenderas tvätt utan
centrifugering.
! Kontrollera vid tvätt av ylle att plagget kan
maskintvättas och att det är märkt med
etiketten ”Ren ny ull” samt symbolen för
”Tål tvätt” eller ”Maskintvätt”.
Så här använder du maskinen på ett
miljövänligt och ekonomiskt sätt..
Fyll maskinen
! Du sparar energi, vatten, tvättmedel och tid
genom att fylla maskinen maximalt. D
u
sparar upp till 50 % av energiförbrukningen
genom att tvätta en full maskin istället för
två halvfulla.
Behöver tvätten förtvättas?
! Förtvätt behövs bara om tvätten är
mycket smutsig! SPARA tvättmedel, tid,
vatten och mellan 5 och 15 %
av
energiförbrukningen genom att INTE välja
förtvätt för lätt till normalt smutsad tvätt.
Vilken temperatur krävs?
! Ta bort fläckar med fläckborttagningsmedel
eller blötlägg före tvätt för att minsk
a
behovet av höga temperaturer. Upp till 50%
av energin kan sparas genom att välja ett
program i 60°C.
Nedan följer en snabbguide med tips och
rekommendationer om tvättmedelsanvändning
vid olika temperaturer. Läs dessutom alltid
anvisningarna och doseringsråden för tvättmedlet
som du använder.
Tips om tvättlast
Några råd till användaren
För mycket nedsmutsad vittvätt
rekommenderas bomullstvättprogram
på 60°C eller däröver samt normalt
tvättmedel i pulverform (för mycket
smutsad tvätt) med tillsats av blekmedel
avsett för tvätt vid medelhög/hög
temperatur.
För tvättar mellan 40°C och 60°C bör
du välja tvättmedel som passar för
materialen som ska tvättas samt deras
nedsmutsningsgrad.
Vanliga pulvertvättmedel är lämpliga för
vita och färgäkta plagg som är mycket
nedsmutsade, medan flytande tvättmedel
eller ”färgskyddande” pulvertvättmedel är
lämpliga för färgade material som är lätt
nedsmutsade.
För tvätt vid temperaturer under 40°C
rekommenderar vi användning av
flytande tvättmedel eller tvättmedel som
märkts för tvätt vid låga temperaturer.
För tvätt av ylle eller siden
rekommenderas tvättmedel som
utformats speciellt för dessa material.
Page 76

SV
47
4. UNDERHÅLL OCH
RENGÖRING
Maskinen rengörs utvändigt med hjälp av
en fuktig trasa. Använd inte slipmedel,
alkohol och/eller lösningsmedel. Det finns
inga speciella förbehåll när det gäller
normal rengöring. Rengör tvättmedlets fack
och filtret. Nedan följer några tips vid
flyttning av maskinen samt för hantering vid
långa uppehåll utan användning.
! Tvättmaskinen innehåller ett speciellt filter
för uppsamling av lösa föremål, t.ex
.
knappar eller mynt, som annars kan sätta
igen avloppet.
! Finns bara på vissa modeller: dra ut den
korrugerade slangen, ta bort pluggen och
led ut vattnet i en behållare.
! Innan du skruvar bort filtret rekommenderar
vi att du placerar en handduk eller liknande
under filtret för att samla upp överblivet
vatten.
! Vrid filtret motsols tills det tar stopp i
vertikal position.
!
Dra ut och rengör filtret, och sätt sedan tillbaka
det genom att vrida det i medsols riktning.
! Sätt tillbaka alla delar genom att upprepa
föregående steg i omvänd ordning.
! Om tvättmaskinen ska förvaras i ett
ouppvärmt utrymme under en längre ti
d
måste slangarna tömmas på allt vatten.
! Koppla från tvättmaskinen från elnätet.
! Koppla loss slangen från hållaren och håll
ner den i en hink eller liknande så att allt
vatten rinner ut.
!
Fäst avloppsslangen i hållaren när du är klar.
! Tryck in knapp (A).
! Vrid lådan utåt medan knappen hålls
intryckt.
! Ta ur lådan och rengör den.
! Det rekomenderas att putsa
tvättmedelsbehållaren från eventuella
tvättmedelsrester.
! Dra ut tvättmedelsbehållaren (na) som
finns i den bakre delen av dispenser och
rengör dem noga.
! Avlägsna eventuella beläggningar som
kan täppa till fackets hål.
B
A
C
S
För in flikarna såsom anges. Vrid lådan mot
locket tills fliken passar in på sin plats (C).
När den kommer på plats hörs ett
karakteristiskt ljud (klick).
Rengöring av filtret
Råd vid flyttning av maskinen eller
längre uppehåll i användningen
Rengöring av tvättmedelsfacken
Sätta tillbaka
Page 77

55
55
Val av program
5.
SV
SNABBGUIDE
Den här tvättmaskinen justerar automatiskt
vattenmängden efter tvättens typ och mängd.
Det ger minskad ener gif ör bruk ni ng oc h k or tar e
tvättider.
Sätt på tvättmaskinen och välj önskat
program.
Justera tvättemperaturen om det behövs
och tryck på knapparna för ”tillval”.
Tryck på knappen START/PAUS när du
vill starta programmet.
Om strömmen bryts medan tvättmaskinen är igång sparas inställningarna i tvättmaskinens minne så att tvättcykeln kan fortsätta från samma ställe när strömmen kommer tillbaka.
I slutet av programmet visar displayen
meddelandet ”End” , på vis sa modeller t änds
i stället alla lampor.
Vänta tills luckans lampa släcks, ca 2
minuter efter programmets slut.
6.
REGLAGE OCH PROGRAM
A Programväljare med AV-
position
B START/PAUS-knapp
C FÖRDRÖJD START-knapp
D AQUA PLUS-knapp
E TEMPERATURVAL--knapp
Stäng av tvättmas kinen.
För alla typer av tvätt , se programtabellen
och följ anvisningarna.
Tekniska data
Vattentryck:
min 0,05 MPa/max 0, 8 M Pa
(0,05 MPa ger ca 1 liter vatten på 10
sekunder)
Varvtal vid centrifugering: se märkplåten.
Anslutningseffekt / Anslutningseffekt/
Spänning: se märkplåten.
F CENTRIFUGHASTIG HET-knapp
G FÖRDRÖJD/VASKE TID-KNAPP
H LUCKLÅS-indikatorlampa
I AQUA PLUS-indikatorlampo
L TEMPERATURVAL-
indikatorlampa
M CENTRIFUGHASTIGHET-
indikatorlampa
N SMART TOUCH- område
Page 78

47
Det kan ta några sekunder innan
VARNING:
När du vrider programväljaren tänds
För att spara energi kommer
OBS: Vill du stänga av maskinen
vrida tillbaka programväljaren
startar nästa
SV
Rör inte skärmen när du sätter i
kontakten då maskinen kalibrerar
systemet under de första sekunderna:
om du rör vid skärmen kanske
maskinen inte fungerar som den ska.
Om detta händer drar du ut kontakten
och försöker igen.
Du måste
till AV-positionen när varje cykel är klar
eller innan du väljer och
program.
START/PAUS-knapp
Öppna dörren
En särskild säkerhetsanordning
förhindrar att dörren öppnas direkt
när en cykel är klar.
Vänta 2 minuter efter att tvättcykeln är
klar och lampan för "Dörrsäkring" har
slocknat innan du öppnar dörren.
Programväljare med AV-position
(OFF)
skärmen för att visa inställningarna för
det program du valt.
skärmkontrasten att minskas vid slutet
av en cykel eller vid längre inaktivitet.
vrider du programväljaren till AVpositionen.
Tryck på START/PAUS
påbörja den valda cykeln.
-knappen för att
Stäng luckan INNAN du trycker på
knappen START/PAUS.
Tryck för att starta den valda cykeln.
maskinen börjar arbeta efter det att du
tryckt på START/PAUS-knappen.
LÄGGA TILL ELL E R TA PLAGG NÄR ETT PROGRA M H AR STARTAT (PAUS)
Håll inne START/PAUS
sekunder
tillsammans med indikatorn för
återstående tid för att visa att maskinen
pausats).
Vänta 2 minuter tills säkerhetsanordningen
på luckan låses upp.
När du har lagt till eller tagit ut plaggen
tänger du luckan och trycker p
s
START/PAUS
fortsätter).
AVBRYTA ETT PROGRAM
(någon lampa blinkar
-knappen (programmet
-knappen i cirka 2
å
När
du
har
valt
ett
ogramväljaren inte att flyttas från det
pr
valda programmet förrän cykel n är klar.
Stäng av tvättmaskinen genom att vrida
AV
väljaren till
.
program
kommer
Vill
du
avbryta
ett
äljaren till
v
Välj ett annat program.
Vrid tillbaka väljaren till AV
AV
-positionen.
program
vrider
-positionen.
du
Page 79

48
Du väljer dina alternativ med
knapparna innan du trycker på
START/PAUS-knappen.
kompatibelt med det valda
Om du väljer ett alternativ som inte är
programmet blinkar alternativlampan
och släck s sedan.
FÖRDRÖJD START-knapp
Tvättmaskinen kan ställas in för att starta
valda programmet 3, 6, eller 9 tim mar
det
efter inställningen. För detta går man
tillväga på följande sätt:
- Välj önskat program med
programväljaren A.
- Tryck in knappen för senarelagd start
tills kontrollampan för önskad
senarelagd start tänds.
- Tryck in start/paus pknapp en B.
- Maskinen startar efter den valda tiden.
Man kan välja önskad hastighet när som
st under programmets gång.
hel
AQUAPLUS-knapp
Bara genom att trycka på en knapp är det
möjligt, tack vare det nya SENSOR
ACTIVA SYSTEM, att använda en
speciell tvättcykel som kan tillämpas på
alla program och alla typer av tyger och
som skyddar textilfibrerna och huden på
dem som använder dessa.
Den mycket större vattenmängden och
trummans nya rotationscykel som
kombineras med påfyllning och tömning
av vatten gör att man får kläderna perfekt
rena och välsköljda.
Vid
tvätt
ökas
tvättmedlet ska lösas perfekt, så att en
effektiv tvätt ska garanteras.
mängden
vatten
för
att
Om du vill ta bort programmets fördröjda
tart, tryck åter in knappen C tills alla
s
kontrollampor för fördröjd start har
släckts.
VARVTALSVAL-knapp
Genom att trycka in denna knapp kan
man välja hastighet för den sista
centrifugeringen, dock alltid bara de
hastigheter som är möjliga i det valda
programmet.
Dessa hastigheter anges på motsvarande
kontrollampa.
Om
man
centrifugeringen, räcker d et med att hålla
knappen nedtryckt tills de tre
kontrolllamporna släckts.
helt vill
utelämna
Vattenmängden
också ökats för att avlägsna alla spår av
tvättmedel i fibrerna.
Denna
personer som har känslig och ömtålig
hud, eftersom en minsta rest av
tvättmedel kan orsaka irritation eller
allergi.
Det
tillrådes
denna funktion för barnkläder och
ömtåliga kläder i allmänhet, i syn nerhet
för tvätt av handdukar och ba drockar där
fibrerna har en tendens att hålla kvar
tvättmedlet.
Detta
pr
ogrammet för ylletvätt.
funktion
tillval
är
vid
är
också
sköljningarna
speciellt
att
man
inte
uttänkt
använder
tillgängligt
har
för
i
Page 80

KALLTVÄTT-knapp
SV
När man trycker på denna knapp kan
programmet gå igenom alla tvättfaser
utan att vattnet värms upp, medan all
andr
a inställningar förblir oförändrade
(vattennivå, tider, tvättrytm, etc.).
Programmen för kalltvätt rekommenderas
för tvätt av alla typer av kläd er vars färger
inte är färgäkta och för tvätt av gardiner,
överkast, speciellt ömtåliga syntetfibrer,
småmattor och lätt smutsad tv ät t.
a
Page 81

pa:
SMART TOUCH
Android-sm arttele fon
Endast innehAII
E nda s t i nneh .111
App l e i Pa d
E n das t i nneh .111
DD Smart Care - Smart kontroll, autorengoring
och en felsokningsguide.
Med hjalp av Smart Touch-tekniken kan du
kommuniceramed maskinen med hjalp appar pa
smarttelefoner me<I Android-operativsystem
och
NFC-funklion (nartal!skornmunikationJ.
DD lns ta ll era ap
Candy simply-Fi
Appen
enheter med Android eller
pen
pa
d in sma rtt el ef on.
Candy simply-Fi
!i nn s for
iOS,
bade
surl plattor och s mart telefoner . Men du
kan endast kornmunicera med
maskinen och dra nytta av
mojligheterna som One Touch erbjuder
med Android-smarttelefoner med NFC
te
knik, enligt foljande
funkt ionsscherna:
Android-sm arttele fon
med NFC-teknik
utan NFC-teknik
Android-surfplatta
App l e i Phon e
Kommun ikation med
maski n
+
inneh£U
Endast inneh.111
-
DD Min st atistik - statistik och
effektivare anvandning av din maskin.
tips
for
Fa all i nforma tion om Smart Touch-
funktionerna genom att anvanda appens
demolage ell er besoka:
www.candysmarttouch.com
ANV.A.NDA SMART TOUCH
FORSTA GANGEN - Maskinregistrering
DD Oppoa menyn "l nstallningar " pa din
Android-smarttelefon
och
akliv
era
NFC-
funktioneni menyn"Tr8dl0st ochnatverk".
Processen for NFC-akti vering kan
var iera mellan olika telefonmodeller och
Android-versioner.
Se
bruksanvisning for mer information.
telefonens
FUN KTIONER
Appens huvudfunklioner ar:
DD Rostassistent - en guide som hjalper dig
valja det pertekta programme! me<I endast tre
ros tinma tninga r (klader/ly ger, farg, smuts).
DD Program - ladda ner och
tvattprogram.
DD Vrid vredet till Smart Touch for att aktivera
sensom
pa
ins tru me n tpanelen.
starta
DD Oppna appen, skapa en anvandarprfoil och
registrera maskinen enligt anvisningama
te l efo ne n s cfispla y ener "Snabbguiden" pa
maskinen.
Mer info rm ati on, fragor och svar samt en
video for enkel registrering !inns
nya
www . candysmartt
ouch.com
/how - t o
pa
Page 82

NASTA GANG - regelbunden anva11d n i n g
DD D u maste aktivera Smart Touch genom att
stalla in vredet pa Smart Touch varje gang du
viii hantera maskinen med hjalp av appen.
DD Se till att du har last upp telefonen (fran
eventuellt vantelage) och att du hlar aktiverat
NFC-funktionen pa din smarttelefon enligt
foregaende steg.
DD Om du viii starta ett tvattprogram, laggi tvatt,
tvattmedel och stang luckan.
Om du inte vet var NFC-a
ntennen sitter kan
du fora telefonen i en cirkelrorelse over
Smart Touch-logotypen tills appen
bekraftar anslutningen. For att W
dataoverforingen ska lyckas ar det mycket Ul
viktigt att HALLA SMARTTELEFONEN PA
INSTRUMENTBRADAN TILLS
FORFARANDET AR FARDIGT. Appen
kommer att informera om att forfarandet
har lyckats och att du kan ta bort
smarttelefonen.
DD Valj onskad funktion i appen (t.ex. starta ett
program, kontrollprogram, uppdateringsstatistik
osv...).
DD Ftilj instruktionerna pa telefonens display
och HALL DEN PA logotypen for Smart
Touch pa maskinens instrumentbrada nar
appen ber dig gtira det.
OBS:
Placera din sm arttelefon sa att NFCantennen pa baksidan ligger em ot Smart
Touch-logotypen pa tvattm askinen
(enligt bilden nedan).
Tjocka skal eller k liste rmarken i metall
pa din telefon kan paverka eller
for hindra ti verf tir ing av data mell an
dator och telefon. Ta bor t dem vid behov.
Att byta ut vissa delar av din
smarttelefon (t.ex. bakstycket , batteriet,
osv...) mot andra an originaldelar kan
leda till att NFC-antennen tas bort oc h
att du inte kan anvanda appen fullt ut.
Hantering och kontroll av maskinen via
appen ar bara mtijligt i " narheten", det ar
inte mtijligt att utf tira fjarratgarder (t.ex.
fran ett annat rum eller utanftir huset).
Page 83

2
Rekommen
deras
Bomull+f
Centrifugering
1
Programtabell
PROGRAM
Daily 59 min.
Blandat
Sköljning
Utpumpning +
Snabb
30
Vit
Jeans
Baby
örvask
-
-
TVÄTTMEDE
2
( )
( )
1
TEMP.°C
30°
40°
60°
40°
40°
60°
40°
-
-
Max.
30°
40°
90°
60°
40°
60°
60°
kg *
(MAX.)
1)
1,5 1,5 1,5 2,5
2 2
2,5 2,5
5 6 7 8
3
3
3 3 3 3
4
5
- - - -
- - - -
4
4
6
3,5
3,5
7 8
4,5
Hand
Ull
Ömtåligt
EcoMix 20°
Bomull **
1 1 1
1
1 1
2,5 2,5 2,5 2,5
5 6 7 8
5 6 7 8
1,5
1,5
30°
30°
40°
40°
40°
40°
20°
20°
40°
60°
( )
Page 84

52
Anpassningsbar inställning som interagerar med appen på din smarttelefon och
kan ladda ner tvättprogram (se särskilt avsnitt). Fabriken ställer in
standardprogrammet Autorengöring, för rengöring av maskinen.
Page 85

SV
53
Läs följande:
* Högsta tvättmängd för torra kläder beror
på modellen (se kontrollpanelen).
"
"
Varvtalet för centrifugeringen kan också
minskas för att följa riktlinjerna på etiketten
eller så kan centrifugeringen hoppas över
helt för mycket ömtåliga material.
Alternativet är tillgängligt med en varvtalsknapp. Funktionen kan aktiveras med
VARVTALSVAL-knappen.
Om det inte finns några specifika uppgifter
på märkningen kan du använda det högsta
varvtalet för programmet. Använder du för
mycket tvättmedel kan det leda till
överdrivna mängder skum.
Om maskinen känner av stora mängder
skum kan centrifugeringen hoppas över
eller så kan programmet förlängas och
vattenförbrukningen ökas.
( )
Endast när alternativet FÖRTVÄTT
har valts (program som kan användas
med alternativet FÖRTVÄTT).
1)
För de visade programmen kan du
justera tid och intensitet för tvätten
med SMUTSNIVÅ-knappen.
! FÖRTVÄTT: om tvättmedelsbehållaren
har ett specifikt fack för förtvätt så häll
tvättmedlet i det. Annars häll tvättmedlet
i det perforerade området på trumman
(se bild), följ tvättmedelsproducenten
doserings indikationer.
** STANDARDPROGRAM FÖR BOMULL
ENLIGT (EU) Nr. 1015/2010 och Nr.
1061/2010.
BOMULLSPROGRAM MED
TEMPERATUR PÅ 60°C.
BOMULLSPROGRAM MED
TEMPERATUR PÅ 40°C.
De här programmen är lämpliga för tvätt
av normalsmutsig bomullstvätt och är
också de mest effektiva programmen för
vatten- och energiförbrukning för
bomullstvätt.
Programmen har utvecklats för att följa
temperaturerna på klädernas tvättmärkning
och den faktiska vattentemperaturen kan
skilja sig något från den temperatur som
anges för cykeln.
Innan du stänger locket och startar
tvättprocessen bör du kontrollera att
dörren till trumman är helt stängd. När
det är möjligt, kan du justera positionen
på trumman enligt indikatorerna för att
säkerställa bästa tvättprestanda.
VIKTIGT: Använd inte förtvätts läget i
samband med startfördröjningalternativet.
Page 86

Vill du tvätta olika slags material som är olika
20°C med utmärkt tvättresultat.
smutsiga finns det specifika program på
tvättmaskinen för alla dina tv ättbehov (se
tabellen).
Snabb
En tvättcykel som passar små tvätt mängder
som inte är så smutsiga. Använder du det här
programmet rekommenderar vi att du
använder mindre tvättmedel är vanligt för
att undvika slöseri. Välj SNABB- programmet
och använd SNABB-knapp en för att välja ett
av de tre programmen.
Daily 59 min.
Med det här programmet kan du blanda olika
material (som bomull + syntetiskt och
liknande) och tvätta dem med låg
energiförbrukning eftersom tvättemperaturen
inte överstiger 40°C.
Vit
För perfekt tvätt. Den sista centrifugeri ngen
med högsta hastighet ger effektiv
borttagning.
Blandat
Tvätt och skölj optimeras i trummans
rotationsrytm och vattennivåerna. De
försiktigare rotationerna ger färre rynkor i
materialen.
Jeans
Det här programmet har utformats för högsta
möjliga kvalitet vid tvätt av material som
jeans: perfekt för borttagning av smut s utan
att påverka fibrernas elasticitet.
Baby
Med det här programmet ka n du tvätta alla
babykläder i lägst 60°C och få ett perfekt och
hygieniskt resultat.
För bästa tvätteffekt rekommenderar vi
pulvertvättmedel.
Sköljning
Det här programmet består av 3 sköljningar
med centrifugering emellan (som kan
minskas eller hoppas över med lämplig
knapp). Används för sköljning av alla typer av
tyger, exempelvis efter handtv ät t.
Utpumpning + Centrifugering
Det här programmet avslutar utpumpningen
och kör en maximal centrifugeri ng. Det går
att minska eller hoppa över cent rifugeringen
med VARVTALSV AL-knappen.
Hand
Ett program för plagg som endast ska
handtvättas. Avslutas med 3 s köljningar och
en långsam centrifugering.
Ull
Det här programmet har en tvättcykel särskilt
utformad för maskintvättbara ulltyger eller för
plagg som ska tvättas för hand .
Ömtåligt
Det här programmet växlar mellan aktivitet
och inaktivitet och är särskilt lämpligt för tvätt
av ömtåliga tyger. Tvättcykeln och
sköljningen görs med hög vattennivå för
bästa resultat.
EcoMix 20°
Med det här innovativa programmet kan du
tvätta olika tyger och kulörer ihop, som
bomull, syntet och blandade tyger i bara
Förbrukningen är cirka 40% av en vanlig
40°C bomullstvätt.
Bomull 40°C - 60°C
Det här programmet är lämpli gt för tvätt av
normalsmutsig bomullstvätt och är också det
mest effektiva programmet för vatten- och
energiförbrukning för bomullstvätt.
Page 87

SV
55
Hand
Med det här programmet får du en skonsam
tvättcykel för material som märkts som
"Endast handtvätt" och tvättbara plagg av
silke eller liknande material som tvättas
som silke enligt märkningen.
Ull
Det här programmet har en tvättcykel särskilt
utformad för maskintvättbara ulltyger eller
för plagg som ska tvättas för hand.
Bomull 40°C - 60°C
Det här programmet är lämpligt för tvätt av
normalsmutsig bomullstvätt och är också
det mest effektiva programmet för vatten-
och energiförbrukning för bomullstvätt.
90°C + Pre
För perfekt tvätt. Den sista centrifugeringen
med högsta hastighet ger effektiv
borttagning
.
Baby
Med det här programmet kan du tv
ätta alla
babykläder i lägst 60 °C och få ett perfekt
och hygieniskt resultat.
För bästa tvätteffekt rekommenderar vi
pulvertvättmedel.
Smart Touch
Anpassningsbar inställning som du måste
välja när du vill skicka ett kommando från
appen till maski nen och f ör att ladda ner/ star ta
ett tvättprogram (se särskilt avsnitt och appens
handbok för mer i nformation).
Med alternativet Smar t Touch ställer fabriken
in programmet ”Autorengöring” som
standard, för att rengöra trumman, ta bort
dåliga lukter och förbättra tvättmaskinens
livslängd.
Se till att det inte fi nns tvätt i trumman innan
du startar programmet ”Autorengöring”.
Använd särskilt medel för
tvättmaskinsrengöring eller pulvertvättmedel.
Lämna luckan öppen ef ter programmet för att
låta trumman torka.
Rekommenderas var 50:e tvätt.
Page 88

7. FE LSÖKNING OCH GARANTI
E2 (med display)
Maskinen får inte in vatten.
Se till att vattenkranen är öppen.
Se till att avloppsslangen sitter i rätt höjd (se installationsavsnittet).
Stäng av vattenkranen, skruva loss vattenslangen från baksidan av
E3 (med display)
Tvättmaskinen tömmer inte ut vattnet
Se till att filtret inte är igensatt.
Se till att avloppsslangen inte är böjd, tilltrasslad eller instängd.
Se till att husets avloppssystem inte är igensatt och låter vatten flöda igenom
utan hinder. Försök t.ex. att tömma ur vattnet i diskhon.
E4 (med display)
För mycket skum och/eller vatten.
Se till att rätt mängd tvättmedel används och att tvättmedlet är avsett för
E7 (med display)
Problem med luckan
Om luckan är låst, stäng av maskinen och dra ur/stäng av elförsörjningen,
Någon annan kod
Stäng av maskinen och dra ur/stäng av elförsörjningen, vänta en minut. Starta
12
Om du tror att tvättmaskinen inte fungerar som avsett kan du läsa tipsen i snabbguiden nedan för
praktiska råd om hur du löser de vanligaste problemen.
FÖR SMART TOUCH-MODELLER
Med den smarta kontrollfunktionen i appen Candy simply-Fi kan du när som helst
kontrollera produktens funktion och status. Du behöver en Android-smarttelefon med NFCteknik för att använda appen Candy simply-Fi. Mer information finns i appe n.
Om maskinens display visar ett fel (med en kod eller blinkande lampor) aktiverar du appen
och NFC på din Android-smarttelefon. Placera din smarttelefon mot Smart Touch-logotypen
på kontrollpanelen. Nu bör du kunna läsa felkatalogen för att lösa problemet.
FELKODFORMAT
Modeller med display: fel et visas med bok staven "E" och en siff ra (exempel: E2 = Fel
2).
Modeller utan display: f elet visas genom att alla lampor blinkar ett visst antal gånger.
Felkoden tolkas genom antalet blinkningar föl jt av en paus på 5 sekunder (exempel: t vå
bl
inkningar – 5 sekunders paus – två blinkningar – upprepas = Fel 2).
Fel som visas
Möjliga orsaker och praktiska lösningar:
lamporna blinkar 2
gånger
(utan display)
Se till att vattenslangen inte är böjd, tilltrasslad eller instängd.
tvättmaskinen och se till att ”sandfiltret” inte är igensatt.
lamporna blinkar 3
gånger
(utan display)
lamporna blinkar 4
gånger
lamporna blinkar 7
gånger
användning i tvättmaskin.
Se till att luckan är ordentligt stängd.
Se till att kläderna i trumman inte hindrar luckan från att stängas helt.
(utan display)
vänta 2-3 minuter och öppna luckan.
maskinen och starta ett program igen. Kontakta ett auktoriserat servicecenter
om problemet uppstår igen.
Page 89

ANDRA PROBLEM
Tvättmaskinen
Kontrollera att mask inen är ansluten till fungerande eluttag/elförsörjning.
Se till att elen är påslagen.
Kontrollera att ev. väggu tta g fungerar med en annan apparat, t.ex.
en lampa.
Luckan är kanske inte ordentligt stängd, öppna och stäng den igen.
Se till att önskat program har valts på rätt sätt och att startknappen är intryckt.
Kontrollera att tvättmaskinen inte är i pausläge eller inställd på fördröjd start.
Vatten har läckt ut på
Det kan bero på en läcka i packningen mellan kranen, vattenslangen och
Se till att filtret på framsidan sitter fast ordentligt.
Tvättmaskinen
Maskinen är utrust ad med ett s ystem som sk yddar tvätten och prod ukten från
Det kan bero på att vattnet inte tömts ut helt och hållet: vänta några minuter.
Vissa modeller en har funktion för att hoppa över centrifugering, se till
att den inte är vald.
Se till att rätt mängd tvättmedel används, för mycket tvättmedel kan påverka
Kraftiga
Tvättmaskinen kanske inte står plant: justera vid behov stöden enligt
anvisningarna i tillämpligt avsnitt.
Se till att transportskruvar, gummipluggar och distansrör tagits bort.
knappar osv.).
av faktorer utanför den levererade produkten, felaktig användning eller att
SE
Problem Tänkbara orsaker och praktiska lösningar
fungerar/startar inte
golvet bredvid
påfyllningen. Om så är fallet, byt packning och dra åt anslutningarna.
tvättmaskinen
centrifugerar inte
skador på grund av at t tvätten inte är balanserad i nnan centrifugering. D etta
kan resultera i att:
•
Maskinen försöker balansera tvätten och öka tiden för centrifugering.
•
Centrifughastigheten minskas för att minska vibrationer och buller.
•
Centrifugeringen hoppas över för att skydda maskinen och tvätten.
Om det här inträffar, fördela om tvätten och starta om
centrifugprogrammet.
Om problemet kvarstår, se avsnittet Fel 3.
Kontrollera vilka alternativ som valts och deras effekt på centrifugeringen.
centrifugeringen.
vibrationer/buller hörs
under centrifugeringen
Kontrollera att det inte finns några främmande föremål i trumman (mynt,
Tillverkargarantin omfattar fel som orsakats av elektriska eller mekaniska fel på
produkten till föl jd av handling eller underlåtenhet av t illverkaren. Om et t fel orsakats
användningsinstruktionerna inte följts, får en avgi ft debiteras.
Page 90

Page 91

- #MODEL_DESC# -
 Loading...