

Page 1

INVERSIONE DEL SENSO DI APERTURA DELLE PORTE
. . . . . . . . . . . . . . . . . . . . . .da pag. 2
IT
REVERSING THE OPENING OF THE DOORS
INVERSER LE SENS D'OUVERTURE DES PORTES
WECHSEL DES TÜRANSCHLAGES
. . . . . . . . . . . . . . . . . . . . . . . . . . . . . . . . . . . . . . . . . . .Seite 5
INVERTIR EL SENTIDO DE APERTURA DE LAS PUERTAS
INVERSÃO DE ABERTURA DAS PORTAS
. . . . . . . . . . . . . . . . . . . . . . . . . . . . . . . . . . .page 3
. . . . . . . . . . . . . . . . . . . . . . . . . . de page 4
. . . . . . . . . . . . . . . . . . . . .de pág. 6
. . . . . . . . . . . . . . . . . . . . . . . . . . . . . . . . . . . .de pág. 7
ΑΝΤΙΣΤΡΟΦΗ ΤΗΣ ΦΟΡΑΣ ΠΟΥ ΑΝΟΙΓΟΥΝ ΟΙ ΠΟΡΤΕΣ . . . . . . . . . . . . . . . . . . από σελ. 8
ODWRACANIE KIERUNKU OTWIERANIA DRZWI
ZMĚNA SMĚRU OTEVÍRÁNÍ DVEŘÍ
. . . . . . . . . . . . . . . . . . . . . . . . . . . . . . . . . . . . . . . od str. 10
OPENINGSRICHTING VAN DE DEUREN VERANDEREN
OVIEN KÄTISYYDEN VAIHTAMINEN
SNUING AV DØRÅPNINGEN
OMHÄNGNING AV DÖRRAR
. . . . . . . . . . . . . . . . . . . . . . . . . . . . . . . . . . . . . . . . . . . . . . . . side 13
. . . . . . . . . . . . . . . . . . . . . . . . . . . . . . . . . . . . . . . . . . . . från sida 14
VENDING AF DØRÅBNINGERNE
. . . . . . . . . . . . . . . . . . . . . . . . . . . . . . . . . . . . . . . . . . sivu 12
. . . . . . . . . . . . . . . . . . . . . . . . . . . . . . . . . . . . . . . . . . . . . . . fra side 15
. . . . . . . . . . . . . . . . . . . . . . . . . . . . . str. 9
. . . . . . . . . . . . . . . . . . . . . van pagina 11
EN
FR
DE
ES
PT
EL
PL
CZ
NL
FI
NO
SV
DA
Page 2

INVERSIONE DEL SENSO DI APERTURA DELLE PORTE
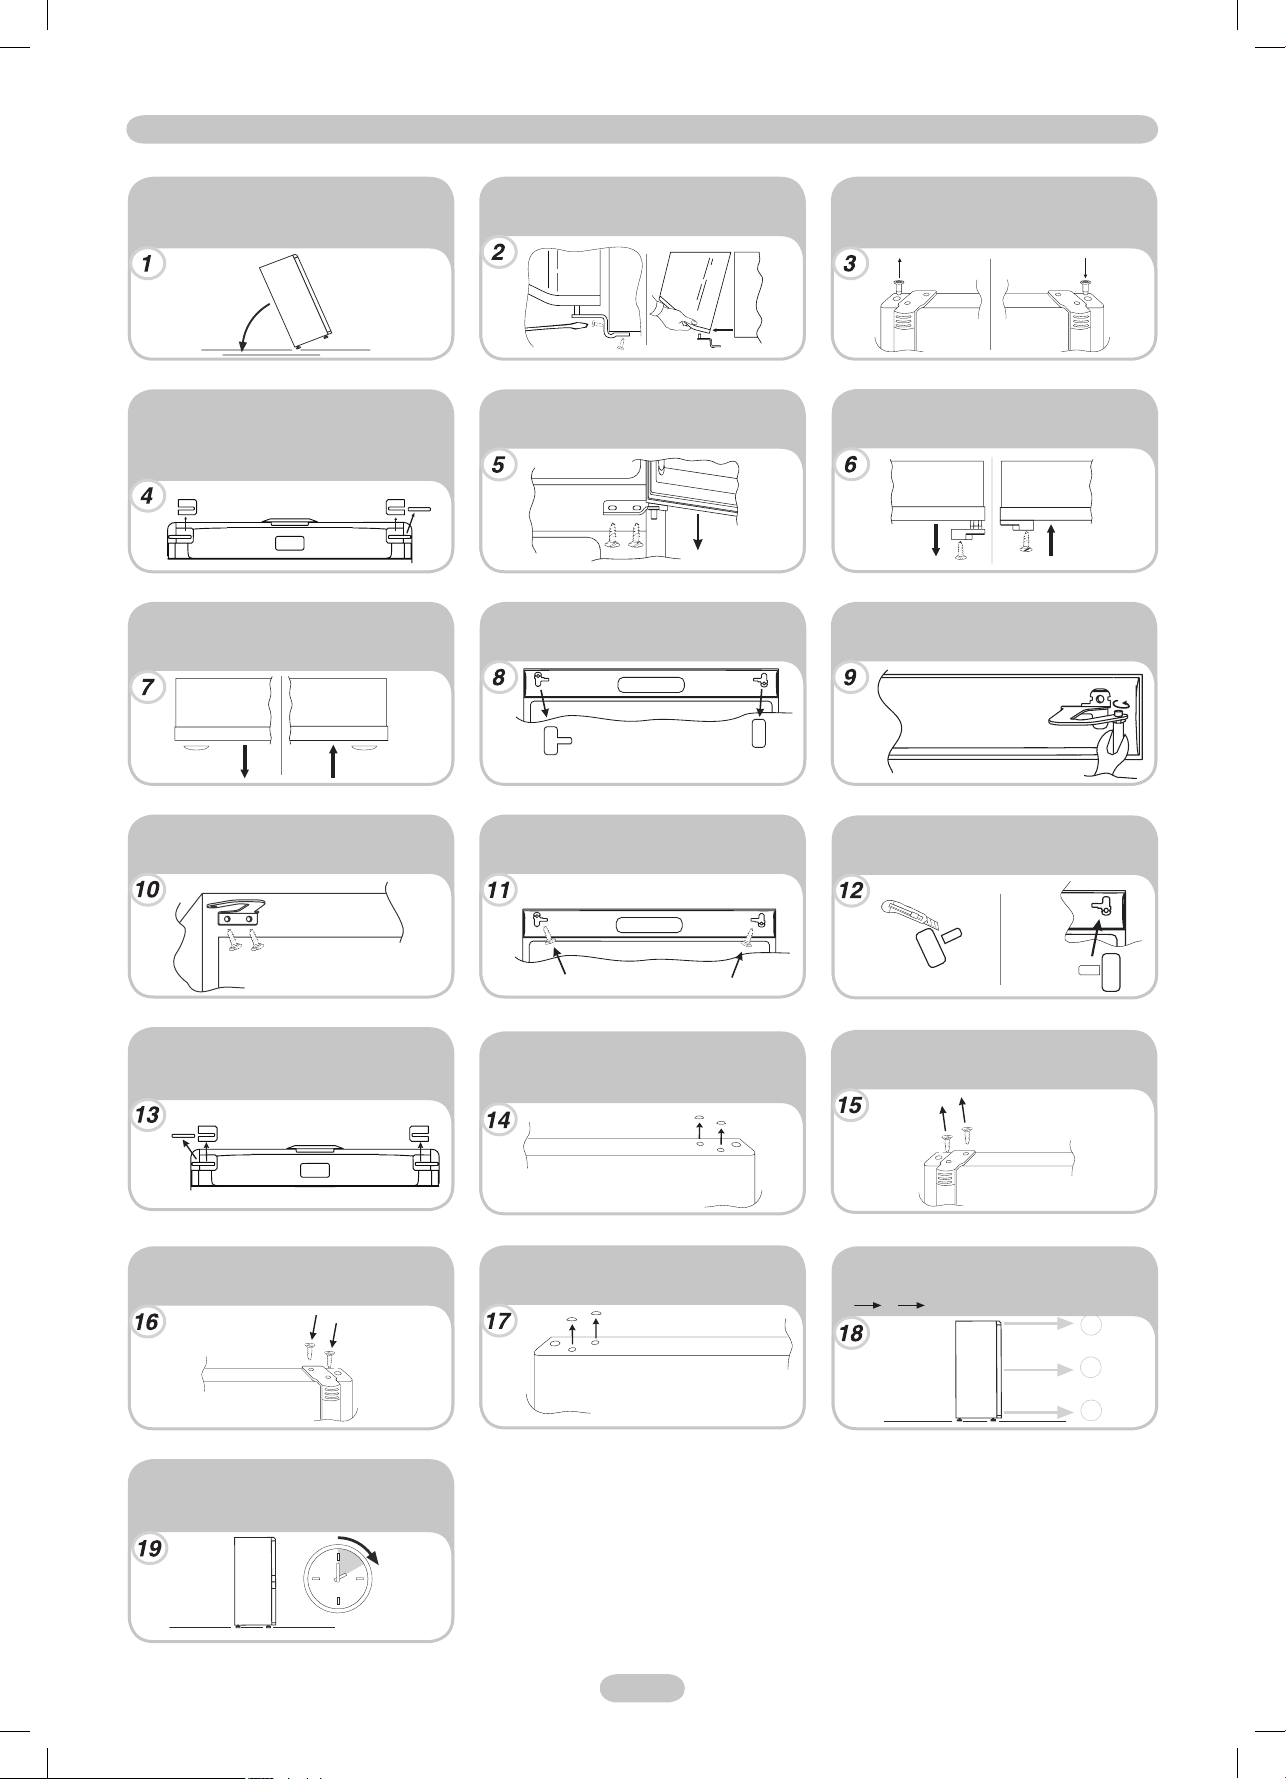
Sdraiare o inclinare di 45° il frigorifero, per
facilitare le operazioni nella parte inferiore
dello stesso.
45°
Rimuovere tappi destro (A), sinistro (B) e
mezzo tappo (C) dalla controporta nella
chiusura testata con cacciavite a taglio nella
apposita fessura posta in basso.
(A)
(B)
Rimuovere il t appo dal lato sini stro e montarlo
sul lato destro al posto del fermoporta.
(C)
Togliere la cerniera inferiore destra svitando
le viti, quindi togliere la porta.
Svit are l a cer niera centrale e togliere la porta
superiore.
estrarre parzialmente il cruscotto.
E
D
Rimuovere bussole di destra e tappi di
sinistra dalla porta freezer, sia in alto che in
basso ed invertire la posizione.
Svitare il fermo dalla porta frigo e montare
quello in dotazione sull‘altro lato.
Svitare il perno e la cerniera unifi cata.Togliere i tappi (D) e (E), svitare le viti ed
Avvitare il perno e la cerniera unifi cata
usando i fori inferiori.
Inserire i tappi (A) e (B) sulla chiusura testata
e fi ssare il tappo (C) montandolo dal tappo
(B) a quello (A).
(A)
(C)
Rimontare le maniglie sul lato destro.
(B)
Fissare il cruscotto.
Per effettuare la reversibilità delle maniglie:
Togliere i tappini estetici sul lato destro delle
porte.
Posizionare i tappini estetici sul lato sinistro
delle porte.
Incidere il tappo (E) e rimontare i tappi sul
cruscotto (lato destro).
Svitare le maniglie dal lato sinistro.
Rimontare le cerniere e le porte operando
dal basso verso l‘alto 1 2 3.
3
2
1
Riportare l‘apparecchio in posizione
verticale e attendere 2 ore prima di rimetterlo
in funzione.
2 ore
2 IT
2 IT
Page 3

REVERSING THE OPENING OF THE DOORS
Place the appliance on the fl oor or at a 45°
angle, since it is necessary to work on the
bottom of the appliance.
45°
Remove the right-hand cap (A), left-hand cap
(B) and middle cap (C) from the Storm Door
in the fastening with cutting screwdriver in
the slot provided at the bottom.
(A)
(B)
Remove the cap from the left-hand side and
mount it on the right-hand side of the Storm
Door.
(C)
Remove the bottom right-hand hinge by
loosening the screws, then remove the door.
Unscrew the central hinge and remove the
top door.
screws and partially take out the panel.
E
D
Remove the right-hand Bush and the lefthand caps of the freezer door, both at the top
and at the bottom and reverse the position.
Unscrew the stopper of the fridge door and
mount the one provided on the other side.
Unscrew the pin and the joint hinge.Remove the caps (D) and (E), remove the
Screw the pin and the joint hinge by using
the bottom holes.
Insert the caps (A) and (B) in the fastening
and fi x the cap (C) by mounting it from the
cap (B) to the cap (A).
(A)
(C)
Remount the handles on the right-hand
side.
(B)
Fasten the panel.
To reverse the handles: remove the outer
caps from the right-hand side of the doors.
Position the caps on the left-hand side of the
doors.
Insert the cap (E) and remount the caps on
the panel (right-hand side).
Unscrew the handles from the left-hand
side.
Remount the hinges and the doors by
working from bottom to top 1 2 3.
3
2
1
Replace the Appliance in a vertical position
and wait 2 hours before operating it again.
2 Hours
3 EN
Page 4
INVERSER LE SENS D'OUVERTURE DES PORTES
Allongez l'appareil au sol ou à un angle de
45° car il est nécessaire d'intervenir sur le
bas de l'appareil.
45°
Retirez le cache de droite (A), le cache de
gauche (B) et le cache central (C) de la
contre-porte en utilisant un tournevis pour
s'insérer daus les fentes se trouvant au bas.
(A)
(B)
Retirez le cache de gauche et remontez-le à la
place de la bretce.
(C)
Retirez la charnière du bas à droite en
devissant les vis puis retirez la porte.
Dévissez la charnière du milieu et retirez la
porte du haut.
enlevez partiellement le bandeau.
E
D
Retirez la bag ue de droite ains i que les cache s
de gauche sur la porte du congélateur, en
haut et en bas, puis inversez leur position.
Dévissez la butée de la porte du réfrigérateur
et installez celle fournie de l'autre côté.
Dévissez l'axe et la charnière.Retirez les caches (D) et (E), retirez les vis et
Vissez l'axe et la charnière dans les orifi ces
du bas.
Insérez les caches (A) et (B) sur les attaches
et fi xez le cache (C) en le montant du cache
(B) vers le cache (A).
(A)
(C)
Remontez les poignées du côté droit.
(B)
Fixez le bandeau.
Pour inverser l es poignées: retirez les caches
Suppress du côté droit des portes.
Placez les caches à gauche des portes.
Incisez le cache (E) et remontez les caches
sur le bandeau (à droite).
Dévissez les poignées du côté gauche.
Remontez les charnières et les portes en
partant du bas et en remontant vers le haut
1 2 3.
3
2
1
Replacez l'appareil en position verticale et
patientez 2 heures avant de le remettre en
marche.
2 heures.
4 FR
Page 5

WECHSEL DES TÜRANSCHLAGES
Stellen Sie den Kühlschrank auf den
Fußboden oder kippen Sie ihn um 45°,
um leichter an der Unterseite arbeiten zu
können.
45°
Entfernen Sie die Schutzkappe (A) auf der rechten,
die Schutzkappe (B) auf der linken Seite und die
Schutzkappe (C) in der Mitte der Windfangtür mit
einem Sch litzschr aubendreher au s der Befestigu ng
in dem auf der Unterseite vorgesehenen Schlitz.
(A)
(B)
Entfernen Sie die Schutzkappe des linken
Scharniers und befestigen Sie es auf der rechten
Seite der Windfangtür.
(C)
Entfernen Sie das Scharnier auf der rechten
Seite, indem Sie die Schrauben lösen und
anschließend die Tür entfernen.
Schrauben Sie das mit tlere Scharnier heraus
und entfernen Sie die obere Tür.
Entfernen Sie die Schutzkappen (D) und (E),
entfernen Sie die Schrauben und ziehen Sie
die Stirnwand teilweise heraus.
E
D
Entfernen Sie die Buchse auf der rechten und
die Schutzkappen auf der linken Seite der
Gefrierschranktür, sowohl an der Ober- als auch
an der Unterseite, und tauschen Sie die Position.
Schraub en Sie den Stop per der Kühlsc hranktür
heraus und montieren Sie den bereitgestellten
Stopper auf der anderen Seite.
Schrauben Sie den Stift und das
Scharnierband heraus.
Schraub en Sie den Stif t und das Sc harnierban d
über die unteren Löcher heraus.
Setzen Sie die Schutzkappen (A) und (B)
in die Befestigung ein und fi xieren Sie die
Schutzkappe (C) durch die Montage von
Schutzkappe (B) zu Schutzkappe (A).
(A)
(C)
Montieren Sie die Griffe wieder auf der
rechten Seite.
(B)
Montieren Sie die Stirnwand.
Um die Griffe nach der anderen Richtung
auszurichten: Entfernen Sie die Zierkappen
von der rechten Seite der Türen.
Positionieren Sie die Schutzkappen auf der
linken Seite der Türen.
Setzen Sie die Schutzkappe (E) ein und
montieren Sie die Schutzkappen wieder auf
der Stirnwand (rechte Seite).
Schrauben Sie die Griffe von der linken Seite
heraus.
Bauen Sie die Scharniere und die Türen
wieder an, beginnen Sie dabei von unten
1 2 3.
3
2
1
Bringen Sie das Gerät wieder in eine
senkrechte Position und war ten Sie 2 Stunden,
bevor Sie es in Betrieb nehmen.
2 Stunden.
5 DE
Page 6

INVERTIR EL SENTIDO DE APERTURA DE LAS PUERTAS
Coloque el aparato en el suelo, respetando
un ángulo de 45°, ya que deberá trabajar
sobre la parte inferior del aparato.
45°
Saque el tope derecho (A), el tope izquierdo
(B) y el tope intermedio (C) de la antepuerta
de la sujeción con un destornillador en la
ranura prevista en la parte inferior.
(A)
(B)
Saque la tapa de la parte izquierda y colóquela
en la parte derecha de la antepuerta.
(C)
Saque la bisagra de la parte inferior derecha
desafl ojando los tornillos y a continuación,
saque la puerta.
Desatornille la bisagra central y saque la
puerta superior.
saque una parte del panel.
E
D
Saque el cojinete de la parte derecha y
las tapas de la izquierda de la puerta del
congelador, ambas ubicadas en la parte
superior e inferior e invier ta la posición.
Desajus te el tope de la puer ta del refrigera dor
e instale el tope suministrado en la parte
opuesta.
Afl oje la clavija y la bisagra de unión.Quite las tapas (D) y (E), saque los tornillos y
Apriete la clavija y la bisagra adjunta
utilizando los orifi cios de la parte inferior.
Introduzca las tapas (A) y (B) en la sujeción y
fi je la tapa (C) montándola desde la tapa (B)
hasta la tapa (A).
(A)
(C)
Vuelva a colocar las asas en la parte
derecha.
(B)
Apriete el panel.
Para invertir el sentido de las asas: saque
las tapas exteriores de la parte derecha
de las puertas.
Coloque las tapas en la parte izquierda de
las puertas.
Introduzca la tapa (E) y vuelva a colocar las
tapas en el panel (zona derecha).
Afl oje las asas desde la parte izquierda.
Vuelva a colocar las bisagras y las puertas,
operando desde abajo hacia arriba
1 2 3.
3
2
1
Vuelva a colocar el aparato en posición
vertical y espere 2 horas antes de volver a
ponerlo en funcionamiento.
2 horas
6 ES
Page 7

INVERSÃO DE ABERTURA DAS PORTAS
Deite ou incline o frigorífi co a 45°, para
facilitar as operações na parte inferior do
mesmo.
45°
Retire a tampa no lado direito (A), a tampa no
lado esquerdo (B) e a tampa do meio (C) da
porta Storm ao apertar com uma chave de
fendas na ranhura situada na parte inferior.
(A)
(B)
Retire a tampa no lado esquerdo e monte-o no
lado direito da porta Storm.
(C)
Retire o fecho no canto inferior direito
libertando os parafusos e depois retire a
porta.
Desaparafuse o fecho central e retire a porta
superior.
parafusos e remova parcialmente o painel.
E
D
Retire o cas quilho no lado direito e as tampas
no lado esquerdo da porta do congelador,
tanto na parte superior como inferior e
inverta a posição.
Desaperte a bucha da porta do frigorífi co e
monte a bucha fornecida no outro lado.
Desaparafuse o pinto e a dobradiça.Retire as tampas (D) e (E), desaperte os
Aperte o pino e a dobradiça nos buracos da
parte inferior.
Coloque as tampas (A) e (B) na fi xação e
monte a tampa (C) montando-a a partir da
tampa (B) na tampa (A).
(A)
(C)
Monte novamente as pegas no lado direito.
(B)
Aparafuse o painel.
Para inverter os puxadores: retire as tampas
exteriores no lado direito das portas.
Posicione as tampas no lado esquerdo das
portas.
Coloque a tampa (E) e monte de novo as
tampas no painel (no lado direito).
Desaparafuse as pegas no lado esquerdo.
Monte novamente os fechos e as
portas, começando de baixo para cima
1 2 3.
3
2
1
Coloque o aparelho na vertical e aguarde 2
horas antes de o utilizar novamente.
2 horas
7 PT
Page 8

ΑΝΤΙΣΤΡΟΦΗ ΤΗΣ ΦΟΡΑΣ ΠΟΥ ΑΝΟΙΓΟΥΝ ΟΙ ΠΟΡΤΕΣ
Τοποθετήστε τη συσκευή στο δάπεδο ή
σε γωνία 45°, αφού είναι απαραίτητο να
εργαστείτε στο κάτω μέρος της.
45°
Αφαιρέστε από την προστατευτική πόρτα
στο σημείο στερέωσης το δεξιό καπάκι
(A), το αριστερό καπάκι (B) και με πλακέ
κατσαβίδι το μεσαίο καπάκι (Γ) από τη
σχισμή που υπάρχει στο κάτω μέρος.
(B)
Αφαιρέστε το καπάκι από την αρισ τερή πλευρά
και τοποθετήστε το στη δεξιά πλευρά της
προστατευτικής πόρτας.
(A)
(Γ)
Αφαιρέστε τον κάτω δεξιό μεντεσέ
ξεβιδώνοντας τις βίδες και κατόπιν
αφαιρέστε την πόρτα.
Ξεβιδώστε τον κεντρικό μεντεσέ και
αφαιρέστε την πάνω πόρτα.
Αφαιρέστε τα καπάκια (Δ) και (Ε), αφαιρέστε
τις βίδες και βγάλτε εν μέρει τον πίνακα.
E
Δ
Αφαιρέστε το δεξιό αντιτριβικό δακτύλιο
και τα αριστερά καπάκια της πόρτας του
καταψύκτη, τόσο στο πάνω όσο και στο
κάτω μέρος και αν τιστρέψτε τις θέσεις τους.
Ξεβιδώστε το εξάρτημα συγκράτησης της
πόρτας του ψυγείου και εγκαταστήστε στην
άλλη πλευρά αυτό που σας έχει παραδοθεί.
Ξεβιδώστε τον πείρο και το μεντεσέ της
άρθρωσης.
Βιδώστε τον πείρο και το μεντεσέ της
άρθρωσης χρησιμοποιώντας τις οπές στο
κάτω μέρος του.
Τοποθετήστε τα καπάκια (Α) και (Β) στο
σημείο στερέωσης και βάλτε στη θέση του
το καπάκι (Γ) αφαιρώντας το από το καπάκι
(Β) και τοποθετώντας το στο καπάκι (Α).
(A)
(Γ)
Εγκαταστήστε πάλι τις λαβές στη δεξιά
πλευρά.
(B)
Στερεώστε τ ον π ίνακα.
Για να αντιστρέψετε τις λαβές: αφαιρέστε τα
εξωτερικά καπάκια από τη δεξιά
πλευρά στις πόρτες.
Τοποθετήστε τα καπάκια στην αριστερή
πλευρά στις πόρτες.
Τοποθετήστε το καπάκι (Ε) και τοποθετήστε
πάλι τα καπάκια στον πίνακα (δεξιά
πλευρά).
Ξεβιδώστε τις λαβές από την αριστερή
πλευρά.
Εγκαταστήστε πάλι τους μεντεσέδες και τις
πόρτες εργαζόμενοι από το κάτω προς το
πάνω μέρος 1 2 3.
3
2
1
Φέρτε πάλι τη συσκευή σε κατακόρυφη
θέση και περιμένετε 2 ώρες πριν τη θέσετε
πάλι σε λειτουργία.
2 Ώρες
8 EL
Page 9

ODWRACANIE KIERUNKU OTWIERANIA DRZWI
Przechylić urządzenie pod kątem ok. 45°,
tak aby uzyskać dostęp do dolnej części
urządzenia.
45°
Zdjąć prawą zatyczkę (A), lewą zatyczkę
(B) oraz środkową zatyczkę (C) z drzwi
dodatkowych za pomocą śrubokręta
w szczelinie na dole.
(A)
(B)
Wyjąć zatyczkę z lewej strony i zamontować po
prawej stronie dodatkowych drzwi.
(C)
Usunąć prawy dolny zawias, najpierw
poluzowując wkręty. Następnie zdjąć drzwi.
Odkręcić środkowy zawias i zdjąć górne
drzwi.
i częściowo wyjąć panel.
E
D
Zdjąć prawą tuleję oraz lewe zatyczki z drzwi
zamrażarki na górze i na dole, a następnie
zamocować odwrotnie.
Odkręcić element blokujący z drzwi
zamrażarki i zamontować dostarczony w
zestawie element blokujący po drugiej stronie.
Odkręcić trzpień i zawias łączony.Wyjąć zatyczki (D) i (E), wykręcić śruby
Przykręcić trzpień i zawias do dolnych
otworów.
Włożyć zatyczki (A) i (B) do zespołu i założyć
zatyczkę (C) (przekładając z części (B) do
(A).
(A)
(C)
Zamocować uchwyty po prawej stronie.
(B)
Przymocować panel.
Przekładanie uchwytów: zdjąć zewnętrzne
zatyczki z prawej strony drzwi.
Umieścić zatyczki po lewej stronie drzwi.
Włożyć zatyczkę (E) i ponownie zamontować
zatyczki na panelu (prawa strona).
Odkręcić uchwyty z lewej strony.
Założyć zawiasy i drzwi, idąc od dołu ku
górze (czynności 1 2 3).
3
2
1
Umieścić urządzenie w pozycji pionowej.
Przed uruchomieniem odczekać 2 godziny.
2 godziny
9 PL
Page 10

ZMĚNA SMĚRU OTEVÍRÁNÍ DVEŘÍ
Spotřebič postavte na podlahu nebo nakloňte
v úhlu 45°, protože bude nezbytné pracovat
na spodní části spotřebiče.
45.
Demontujte pravou záslepku (A), levou
záslepku (B) a prostřední záslepku (C)
z upevnění dvířek vložením šroubováku do
drážky ve spodní části.
(A)
(B)
Demontujte záslepku z levé strany a instalujte
ho na pravou stranu dvířek.
(C)
Demontujte spodní pravý závěs uvolněním
šroubů, potom sundejte dvířka.
Demontujte prostřední závěs a sundejte
horní dvířka.
šrouby a částečně vyjměte panel.
E
D
Demontujte pravé těsnění a levé záslepky
dvířek mrazničky, jak nahoře, tak dole,
a prohoďte jejich umístění.
Odšroubujte pojistku dvířek mrazničky
a instalujte další pojistku dodanou na
opačnou stranu.
Odšroubujte čep a závěs.Demontujte záslepky (D) a (E), odšroubujte
Zašroubujte čep a závěs do spodních
otvorů.
Nasaďte záslepky (A) a (B) na upevnění
dvířek a připevněte záslepku (C) jeho
nasazením ze záslepky (B) na záslepku (A).
(A)
(C)
Namontujte rukojeti na pravou stranu.
(B)
Utáhněte panel.
Obrácení rukojetí: demontujte vnější záslepky
z pravé strany dvířek.
Záslepky nasaďte na levou stranu dvířek.
Instalujte záslepku (E) a nasaďte záslepky
na panel (na pravou stranu).
Odšroubujte madlo z levé strany.
Namontujte zpět závěsy a dvířka, postupujte
zdola nahoru 1 2 3.
3
2
1
Vraťte zařízení do veritkální polohy a před
jeho zapojením vyčkejte 2 hodiny.
2 hodiny
10 CZ
Page 11

OPENINGSRICHTING VAN DE DEUREN VERANDEREN
Plaats het apparaat op de grond of onder een
hoek van 45°, aangezien er aan de onderkant
van het apparaat gewerkt moet worden.
45°
Verwijder dopje A (rechts), dopje B (links) en
dopje C (midden) in de bevestiging van de
deur. Doe dit door een schroevendraaier in
de sleuf aan de onderzijde te steken.
(A)
(B)
Verwijder het dopje van de linkerzijde en bevestig
het aan de rechterzijde van de deur.
(C)
Verwijder het scharnier aan de
rechteronderzijde door de schroeven los te
draaien, verwijder vervolgens de deur.
Schroef de middelste scharnier los en
verwijder de bovenste deur.
de schroeven en verwijder het paneel
gedeeltelijk.
E
D
Verwijder zowel aan de bovenkant als de
onderkant van de koelkastdeur de huls
(rechts) en de dopjes (links) en plaats de
dopjes rechts en de huls links.
Schroef de pal van de koelkastdeur los
en bevestig de meegeleverde pal aan de
andere kant van de deur.
Schroef de pin en het scharnier los.Verwijder de dopjes (D) en (E), verwijder
Schroef de pin weer vast en monteer het
scharnier middels de onderste gaten.
Plaats de dopjes (A) en (B) in de bevestiging
en bevestig dopje (C) van dopje (B) in dopje
(A).
(A)
(C)
Monteer de handgrepen aan de
rechterzijde.
(B)
Bevestig het paneel.
Voor het omdraaien van de handgrepen
verwijdert u de buitenste dopjes aan de
rechterkant van de deuren.
Plaats de dopjes aan de linkerkant van de
deuren.
Breng dopje (E) aan en bevestig de dopjes
op het paneel (rechterkant).
Schroef de handgrepen aan de linkerzijde
los.
Monteer de scharnieren en de deuren door van
onder naar boven te werken 1 2 3.
3
2
1
Zet het apparaat weer in verticale positie
en wacht 2 uur voordat u het apparaat weer
inschakelt.
2 uur
11 NL
Page 12

OVIEN KÄTISYYDEN VAIHTAMINEN
Laita jääkaappi lattialle tai kallista sitä 45°,
koska on tarpeen työskennellä laitteen
pohjassa.
45°
Irrota oikeanpuoleinen tulppa (A),
vasemmanpuoleinen tulppa (B) ja
keskitulppa (C) ulko-ovesta ruuvimeisselillä
pohjassa olevan aukon kautta.
(A)
(B)
Irrota tulppa vasemmalta puolelta ja kiinnitä se
ulomman oven oikealle puolelle.
(C)
Irrota oikeanpuoleinen alasarana avaamalla
ruuvit ja irrota sitten ovi.
Ruuvaa keskimmäinen sarana irti ja irrota
yläovi.
poista paneeli osittain.
E
D
Irrota oikeanpuoleinen holkki ja pakastimen
oven vasemmanpuoleiset tulpat sekä ylhäältä
että alhaalta ja vaihda niiden paikat.
Ruuvaa pysäytin irti jääkaapin ovesta ja
asenna toimitettu se toiselle puolelle.
Irrota tappi ja sarana.Poista tulpat (D) ja (E), kierrä ruuvit auki ja
Ruuvaa tappi ja sarana käyttämällä alhaalla
olevia reikiä.
Laita tulpat (A) ja (B) paikalleen ja kiinnitä
tulppa (C) siirtämällä se tulpasta (B) tulppaan
(A).
(A)
(C)
Asenna kahvat uudelleen oikealle puolelle.
(B)
Kiinnitä paneeli.
Kahvojen kätisyyden vaihto: irrota tulpat
ovien oikealta puolelta.
Aseta tulpat ovien vasemmalle puolelle.
Laita tappi (E) ja aseta tulpat uudelleen
paneeliin (oikea puoli).
Ruuvaa kahvat irti vasemmalta puolelta.
Asenna saranat ja ovet paikalleen
järjestyksessä ylhäältä alas 1 2 3.
3
2
1
Nosta laite pystyyn ja odota 2 tuntia ennen
kuin käytät sitä uudelleen.
2 tuntia
12 FI
Page 13

SNUING AV DØRÅPNINGEN
For å gjøre det lettere å komme til nederst på
kjøleskapet, kan du legge det ned på gulvet
eller bikke det over 45°.
45°
Fjern hettene på høyre side (A), venstre side
(B) og i midten (C) fra dobbeltdørene i festet
ved hjelp av en skrutrekker og sporene i
bunn.
(A)
(B)
Fjern hetten på venstre side og sett den på høyre
side av dobbeltdøren.
(C)
Fjern hengselet nede til høyre ved å løsne
på skruene, og ta av døren.
Skru ut det midtre hengselet og fjern den
øverste døren.
trekk dekselet delvis av.
E
D
Fjern hylsen på høyre side og hettene på
venstre side av fryserdøren, både oppe og
nede, og bytt side.
Skru løs stopperen på kjøleskapsdøren og
monter den leverte stopperen på den andre
siden.
Skru løs pluggen og hengselet.Fjern hettene (D) og (E), skru ut skruene og
Skru fast pluggen og hengselet ved hjelp av
hullene i bunn.
Sett i hettene (A) og (B) i festet og fest hetten
(C) ved å montere den fra hette (B) til hette
(A).
(A)
(C)
Monter håndtakene på høyre side.
(B)
Fest dekselet.
For å fl ytte håndtakene til motsatt side: ta av
de ytre hettene fra høyresiden til dørene.
Plasser hettene på dørenes venstre side.
Sett i hetten (E) og monter hettene på
dekselet igjen (på høyre side).
Skru løs håndtakene fra venstre side.
Monter hengslene og dørene fra bunn til
topp 1 2 3.
3
2
1
Sett apparatet vertikalt og vent 2 timer før du
slår det på igjen.
2 timer
13 NO
Page 14

OMHÄNGNING AV DÖRRAR
Placera kylskåpet på golvet i en vinkel på
45° eftersom det är nödvändigt att arbeta på
botten av det.
45 °
Ta bort höger täckplugg (A), vänster
täckplugg (B) och mittentäckpluggen (C)
från stormdörren genom att använda en
skruvmejsel i uttaget längst ner.
(A)
(B)
Ta bort täckpluggen från vänster sida och sätt
fast det på höger sida av stormdörrren.
(C)
Ta bort det nedre högra gångjärnet genom
att lossa skruvarna, ta sedan bort dörren.
Skruva loss det mittersta gångjärnet och
avlägsna den övre dörren.
loss skruvarna och avlägsna delvis panelen.
E
D
Ta bort bussningen på höger sida och
täckpluggarna på frysdörrens vänstra sida,
både längst upp och längst ner, sedan byter
du plats på dem.
Skruva loss stoppet från kylskåpsdörren och
montera det medlevererade på den motsatta
sidan.
Skruva loss stiftet och gångjärnet.Avlägsna täckpluggarna (A) och (B), skruva
Skruva fast gångjärnet och stiftet med hjälp
av bottenhålen.
Sätt in täckpluggarna (A) och (B) i fästet och
fi xera täckpluggen (C) genom att sätta fast
den från täckplugg (B) ttill täckplugg (A).
(A)
(C)
Sätt tillbaka handtagen på höger sida.
(B)
Sätt fast panelen.
För att fl ytta om handtagen: ta bort de yttre
täckpluggarna från den högra sidan av
dörrarna.
Positionera täckpluggarna på dörrens
vänstra sida.
Sätt in täckpluggen (E) och sätt tillbaka
täckpluggarna på panelen (höger sida).
Skruva loss handtagen från vänster sida.
Montera gångjärnen och dörrarna på nytt
nedifrån och upp 1 2 3.
3
2
1
Ställ apparaten i vertikalt läge igen och vänta
i två timmar innan du sätter på den.
2 timmar
14 SV
Page 15

VENDING AF DØRÅBNINGERNE
Sæt apparatet på gulvet eller i en 45° vinkel,
da det er nødvendigt at kunne arbejde med
bunden af apparatet.
45°
Fjern den højre hætte (A), venstre hætte
(B) og den miderste hætte (C) fra "Storm"
dørens fastskruninger med skruetrækker i
åbningen som fi ndes i bunden.
(A)
(B)
Fjern hætten fra den venstre side, og sæt den på
igen på den højre side af "Storm" døren.
(C)
Fjern det underste højre hængsel ved at
løsne skruerne, derefter fjernes døren.
Skru det midterste hængsel af, og fjern den
øverste dør.
fjern så panelet delvist.
E
D
Fjern den højre bøsning og de venstre hætter
fra fryserdøren, både i toppen og bunden og
vend placeringen om.
Skru køleskabsdørens stopper af og monter
den fra den anden side.
Skru splitten og samlingshængslet af.Fjern hætterne (D) og (E), fjern skruerne og
Skru splitten og samlingshængslet på ved
hjælp af bundhullerne.
Isæt hætterne (A) og (B) i fastskruningerne
og fastgør hætten (C) ved at montere den fra
hætte (B) til hætte (A).
(A)
(C)
Genmonter håndtagene på højre side.
(B)
Fastgør panelet.
Sådan vendes håndtagene: fjern de ydre
hætter fra højre side af dørene.
Placer hætterne på venstre side af dørene.
Isæt hætten (E) og genmonter hætterne på
panelet (højre side).
Skru venstre sides håndtag af.
Genmonter hængslerne og dørene, gående
fra bund til top 1 2 3.
3
2
1
Placer igen apparatet i vertikal position og
vent 2 timer inden det igen tændes.
2 timer
15 DA
Page 16

Z STUDIO > 05-2007 – Cod. 41025210
16 IT
 Loading...