

Page 1
BUILT-IN WARMING DRAWER
Cassetto scaldavivande da incasso
Tiroir chauffant incastrable
Cajón calientaplatos empotrado
Wärmeschublade
Ingebouwde Verwarmingslade
Vestavěná ohřevná zásuvka
Zabudovaná ohrievacia zásuvka
OPERATION MANUAL
Manuale per l’utente
Mode d’emploi
Manual de funcionamiento
Gebrauchsanleitung
Gebruikshandleiding
Provozní příručka
Návod na obsluhu
Page 2
en
Table of contents
Warning and Safety instructions.......................... 2
Caring for the environment ................................... 4
Before using for the first time .............................. 5
Guide to the appliance .......................................... 5
Control panel............................................................ 6
Operation ................................................................ 6
Function settings ...................................................... 6
Temperature settings ............................................... 7
Duration ................................................................... 7
Capacity .................................................................. 7
Keeping food warm ............................................... 8
Low temperature cooking ..................................... 9
Other uses ............................................................ 16
Cleaning and care ................................................ 17
Problem solving guide ........................................ 19
Safety instruction for installation....................... 21
Building-in dimensions ....................................... 22
Technical data ...................................................... 23
Environmental protection ................................... 23
Warning and Safety instructions
This appliance complies with all relevant safety requirements.
Inappropriate use can, however, lead to personal injury and
damage to property.
To avoid the risk of accidents and damage to the appliance,
please read these instructions carefully before installation and
before using it for the first time. They contain important notes
on installation, safety, use and maintenance.
Keep these instructions in a safe place and ensure that new
users are familiar with the content. Pass them on to any future
owner.
Warning and Safety instructions
Correct application
► The appliance is not designed for commercial use. It is
intended for use in domestic households and similar
working and residential environments.
► The appliance is not intended for outdoor use.
► It is intended for domestic use only as described in these
operating and installation instructions.
Any other usage is not supported by the manufacturer and
could be dangerous.
► The appliance can only be used by people with reduced
physical, sensory or mental capabilities, or lack of
experience and knowledge, if they are supervised whilst
using it, or have been shown how to use it in a safe way
and understand the hazards involved.
Safety with children
► Children under 8 years of age must be kept away from the
appliance unless they are constantly supervised.
► Children 8 years and older may only use the appliance if
they have been shown how to use it in a safe way and
understand the hazards involved.
► Children must not be allowed to clean the appliance
unsupervised.
► This appliance is not a toy! To avoid the risk of injury, do not
let children play with the appliance or its controls.
► The appliance gets hot when in use and remains hot for
quite a while after being switched off. Keep children well
away from the appliance until it has cooled down and there
is no danger of burning.
EN-2
Page 3

► Packaging, e.g. cling film, polystyrene and plastic
wrappings, must be kept out of the reach of babies and
children. Danger of suffocation. Dispose of or recycle all
packaging safely as soon as possible.
Technical safety
► Installation, maintenance and repair work may only be
carried out by a suitably qualified and competent person
in strict accordance with national and local safety
regulations. Installation, maintenance and repairs by
unqualified persons could be dangerous.
► A damaged appliance can be dangerous. Before
installation, check the appliance for visible signs of
damage. Do not use a damaged appliance.
► The electrical safety of this appliance can only be
guaranteed when correctly earthed. It is most important
that this basic safety requirement is observed and
regularly tested, and where there is any doubt, the
household wiring system should be inspected b y a
qualified electrician.
► To avoid the risk of damage to the appliance, make sure
that the connection data (frequency and voltage) on the
data plate corresponds to the household supply, before
connecting the appliance to the mains supply. Consult a
qualified electrician if in any doubt.
► Do not connect the appliance to the mains electricity
supply by a multi-socket adapter or an extension lead.
These do not guarantee the required safety of the
appliance (e.g. danger of overheating).
► For safety reasons, this appliance may only be used
when it has been built in.
This appliance must not be used in a non-stationary
location (e.g. on a ship).
► Do not open the casing of the appliance.
Tampering with electrical connections or components and
mechanical parts is highly dangerous to the user and can
cause operational faults.
► While the appliance is under guarantee, repairs should
only be undertaken by a service technician.
Otherwise the guarantee is invalidated.
► The manufacturer can only guarantee the safety of the
appliance when replacement parts are used.
Faulty components must only be replaced by genuine
Midea original spare parts.
► If the plug is removed from the connection cable or if the
appliance is supplied without a plug, the appliance must
connected to the electrical supply by a suitably qualified
electrician.
► The appliance must be disconnected from the mains
electricity supply during installation, maintenance and
repair work. Ensure that power is not supplied to the
appliance until after it has been installed or until any
maintenance or repair work has been carried out.
► In areas which may be subject to infestation by
cockroaches or other vermin, pay particular attention to
keeping the appliance a n d its surroundings in a clean
condition at all times. Any damage which may be caused
by cockroaches or other vermin will not be covered by the
guarantee.
Correct use
► THE DRAWER IS DESIGNED TO KEEP HOT FOOD
WARM AND NOT TO WARM FOOD UP. ENSURE FOOD
IS REALLY HOT WHEN PLACED INSIDE THE WARMING
DRAWER.
► You could burn yourself on the hot drawer or crockery.
Protect your hands with heat-resistant pot holders or gloves
when using the appliance. Do not let them get wet or damp,
as this causes heat to transfer through the material more
quickly with the risk of scalding or burning yourself.
► Do not store any plastic containers or flammable objects in
the warming drawer. They could melt or catch fire when the
appliance is switched on, causing a fire hazard.
► Due to the high temperatures radiated, objects left near the
appliance when it is in use could catch fire. Do not use the
appliance to heat up the room.
► Never replace the anti-slip mat supplied with the appliance
with paper kitchen towel or similar.
► If you overload the drawer, or sit or lean on it, the
telescopic runners will be damaged. The telescopic runners
can support a maximum load of 25 kg.
► If the appliance is installed behind a kitchen furniture door,
it may only be used with the furniture door open. Only close
the door if the appliance is switched off.
EN-3
Page 4
► Do not heat up unopened tins or jars of food in the
drawer, as pressure will build up in the tin or jar causing it
to explode. This could result in injury and scalding or
damage.
► The underside of the drawer gets hot when switched on.
Be careful not to touch it when the drawer is open.
► Do not use plastic or aluminium containers.
These melt at high temperatures and could catch fire. Use
only heat-resistant crockery made of glass, porcelain, etc.
► Take care when opening and closing the loaded d rawer,
that liquids do not spill over and get through the vents. This
can cause the appliance to short circuit.
► Bacteria can develop on the food if the temperature is too
low. Make sure that you set a high enough temperature to
keep food warm.
Cleaning and care
► Danger of injury.
Do not use a steam cleaning appliance to clean this
appliance. The steam could reach electrical components
and cause a short circuit.
Caring for the environment
Disposal of the packing material
The transport and protective packing has been selected from
materials which are environmentally friendly for disposal,
and should be recycled.
Ensure that any plastic wrappings, bags, etc. are disposed of
safely and kept out of the reach of babies and young
children. Danger of suffocation.
Disposal of your old appliance
Electrical and electronic appliances often contain materials
which, if handled or disposed of incorrectly, could be
potentially hazardous to human health and to the
environment. They are, however, essential for the correct
functioning of your appliance.
Please do not therefore dispose of it
with your household waste.
Please dispose of it at your local
community waste collection/recycling
centre or contact your dealer for
advice. Please ensure that it presents
no danger to children while being
stored for disposal.
Important information
Electrical connection
The appliance is fitted with a plug and must only be connected to a properly installed earthed socket.
Only a qualified electrician who takes the appropriate regulations into account may install the socket or
replace the connecting cable. If the plug is no longer accessible following installation, an all-pole
isolating switch must be present on the installation side with a contact gap of at least 3 mm. Contact
protection must be ensured by the installation.
EN-4
Page 5
Before using for the first time
A display test is carried out for 10 seconds after the
appliance has been installed and after a power cut. The fan
comes on at the same time. The appliance cannot be used
during this time.
Please stick the extra data plate for the appliance supplied
with this documentation in the space provided in the "After
sales service, data plate" section of this booklet.
Cleaning and heating up for the first time
Remove any protective foil and sticky labels.
Remove the anti-slip mat and, if applicable, the rack from
the drawer, and sponge both with warm water and a little
washing-up liquid. Dry using a soft cloth.
Wipe the appliance inside and out with a damp cloth only,
and then dry with a soft cloth.
Replace the anti-slip mat and the rack (if applicable) in the
drawer.
Then heat the empty drawer for at least two hours.
Switch the appliance on by touching the sensor.
Touch the sensor repeatedly until the LED light.
Touch the sensor repeatedly until the LED on the far
right lights up.
Touch the sensor repeatedly until 2h lights up.
Close the drawer.
The warming drawer is fitted with a soft close self-closing
mechanism.
It also has a contact switch, which ensures that the
heating element and fan in the appliance only work when
the drawer is closed.
Metal components have a protective coating which may
give off a slight smell when heated up for the first time.
The smell and any vapours will dissipate after a short time,
and do not indicate a faulty connection or appliance.
Ensure that the kitchen is well ventilated whilst the
appliance is being heated up for the first time.
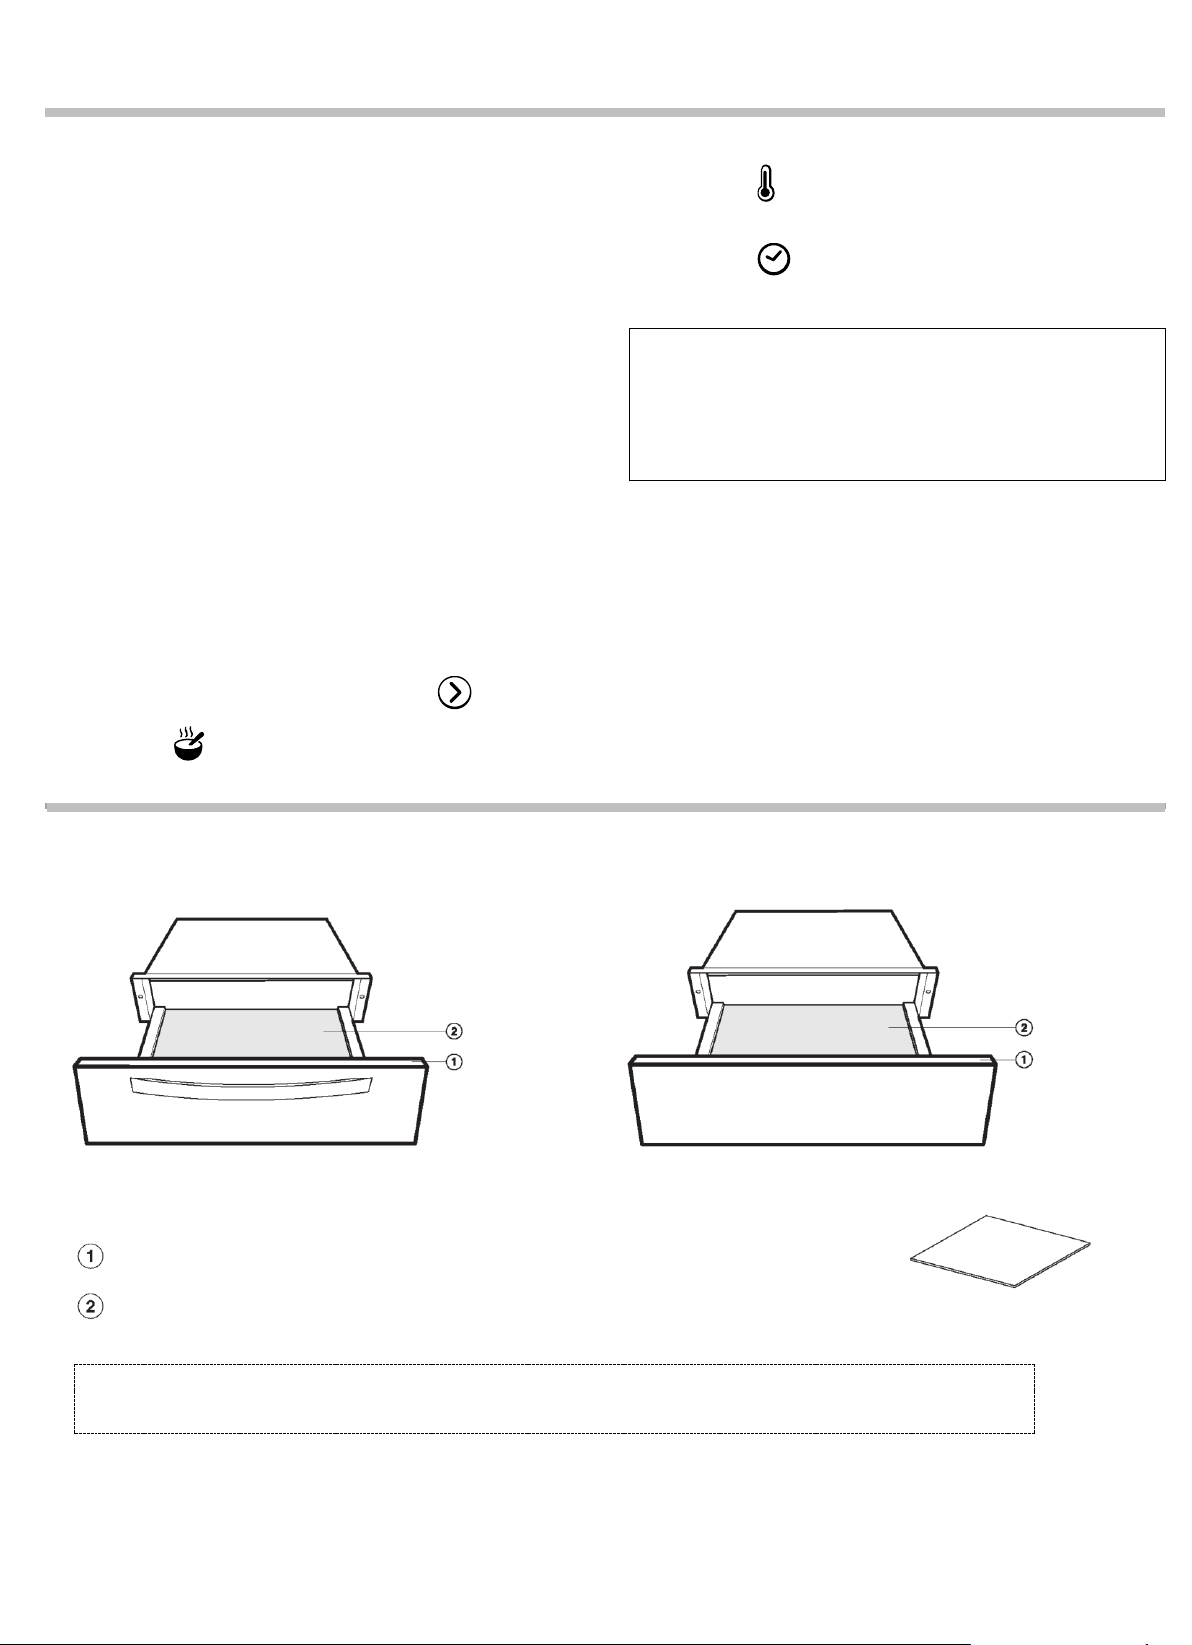
Guide to the appliance
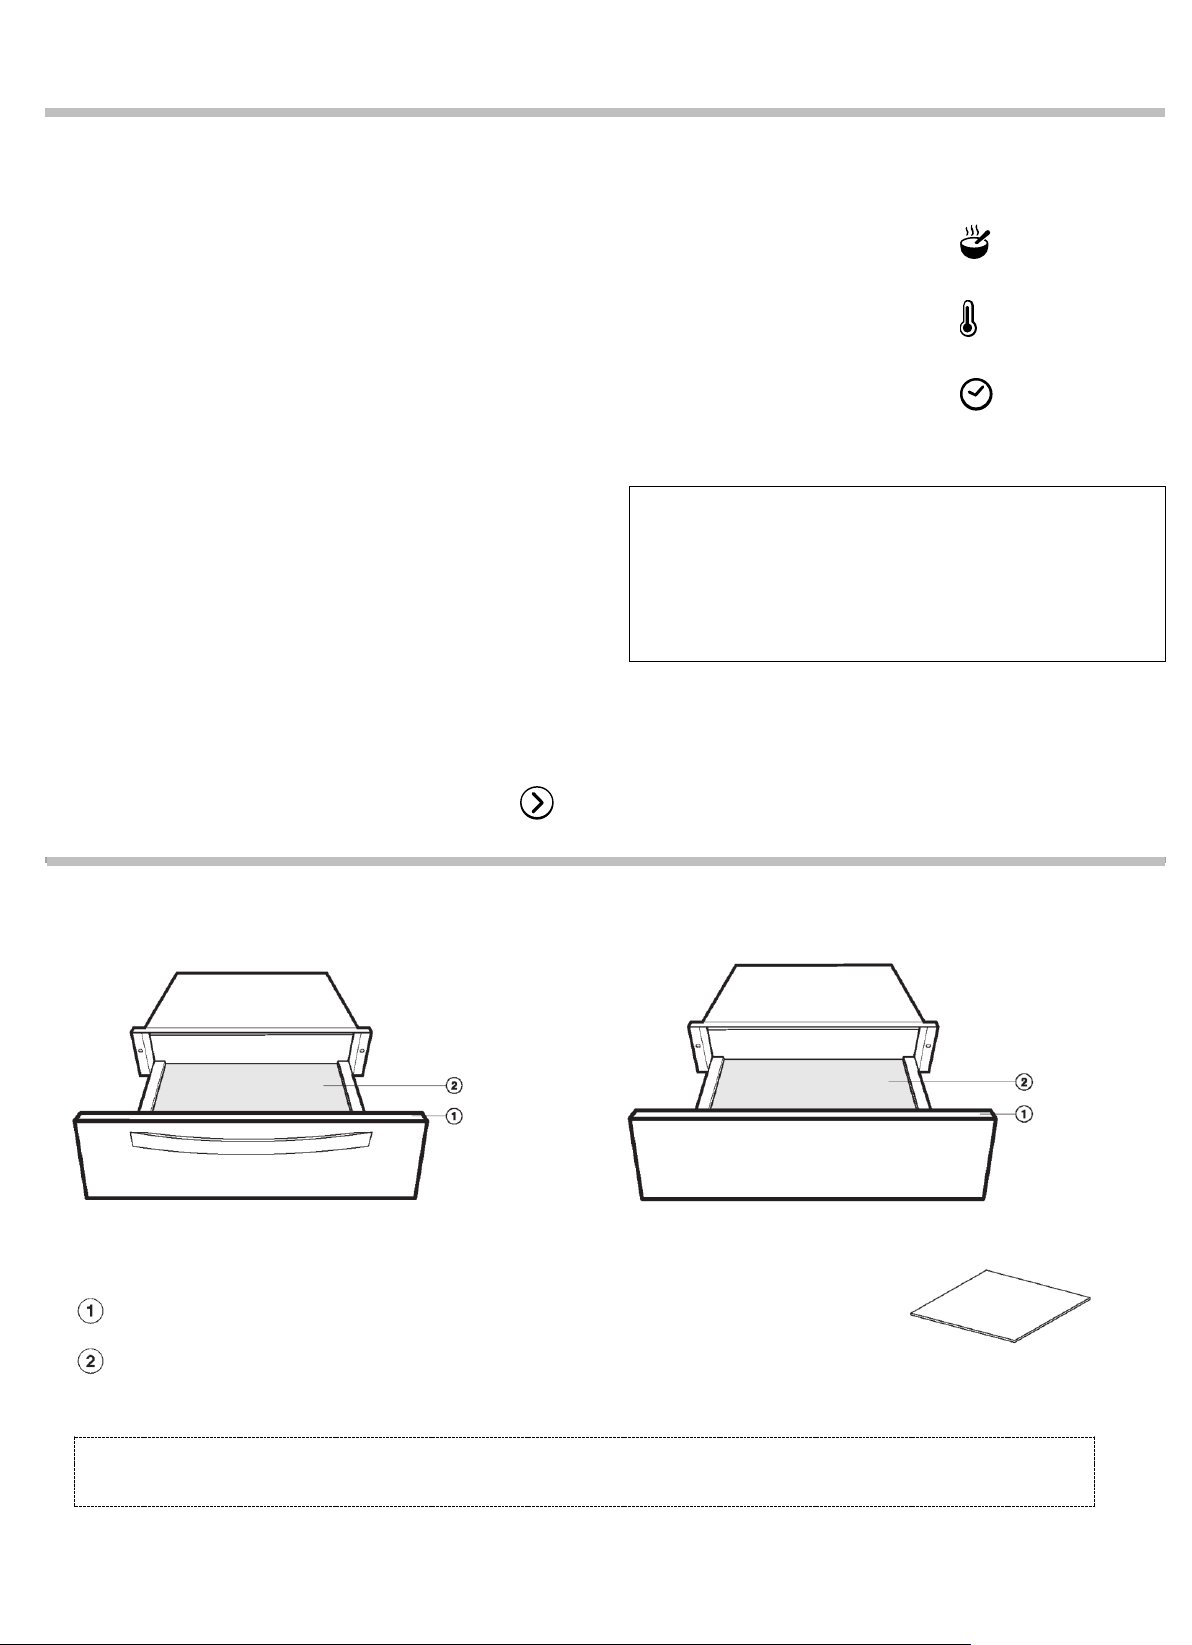
For appliances with no handle: Press the middle of the drawer to open or close it.
When opening, the drawer pops out slightly. You can then pull it out towards you.
Control panel
Anti-slip mat: For keeping crockery secure(Optional accessories)
EN-5
Page 6
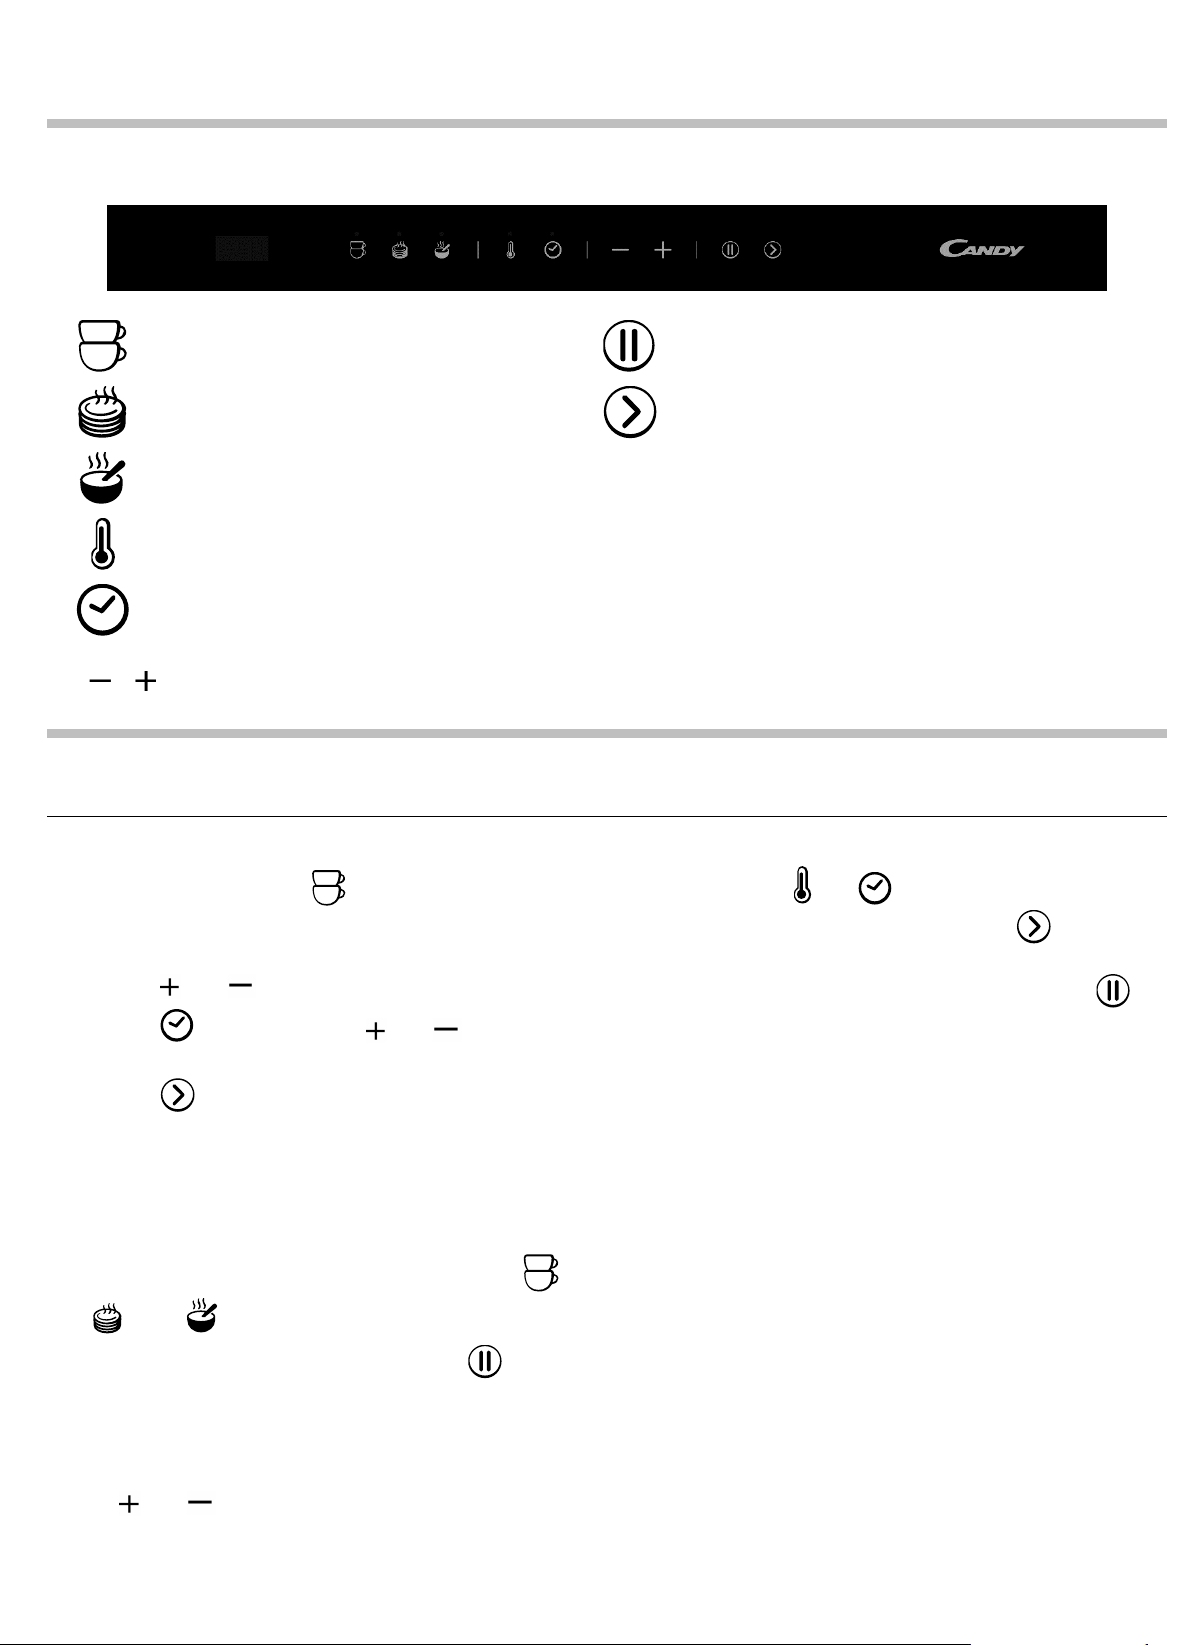
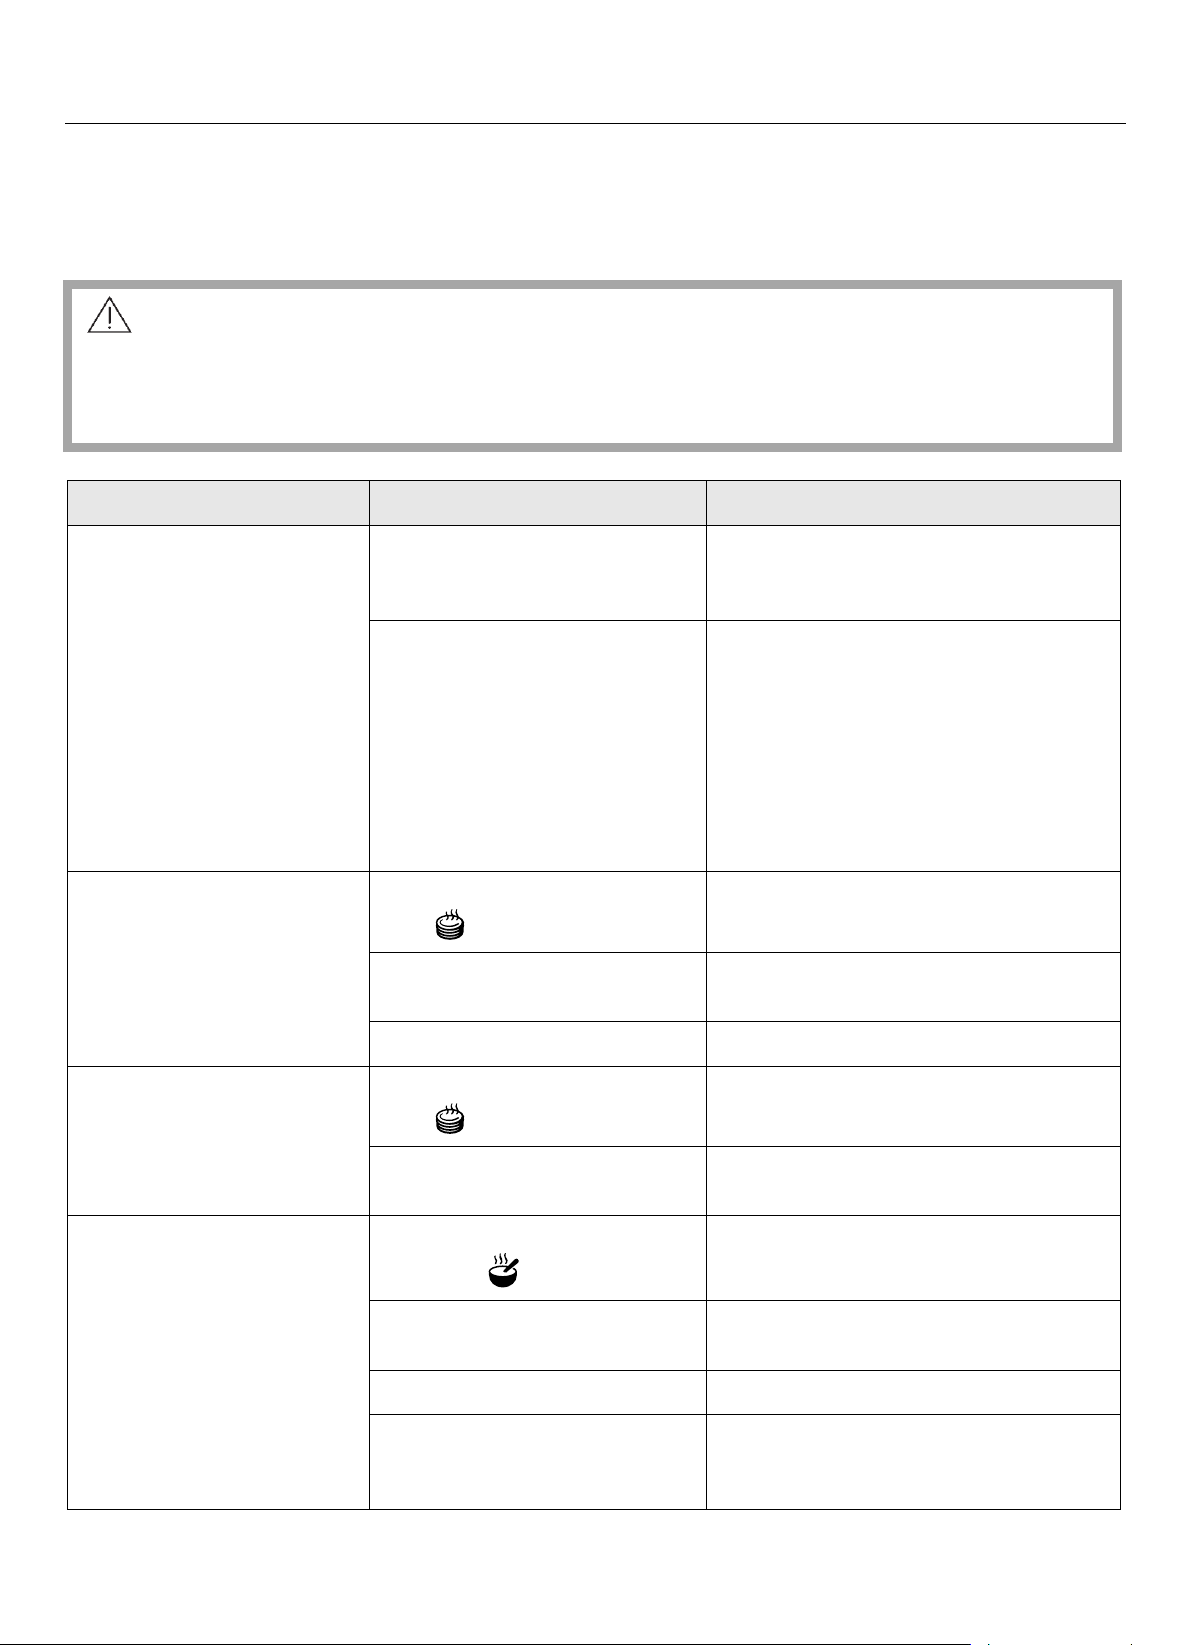
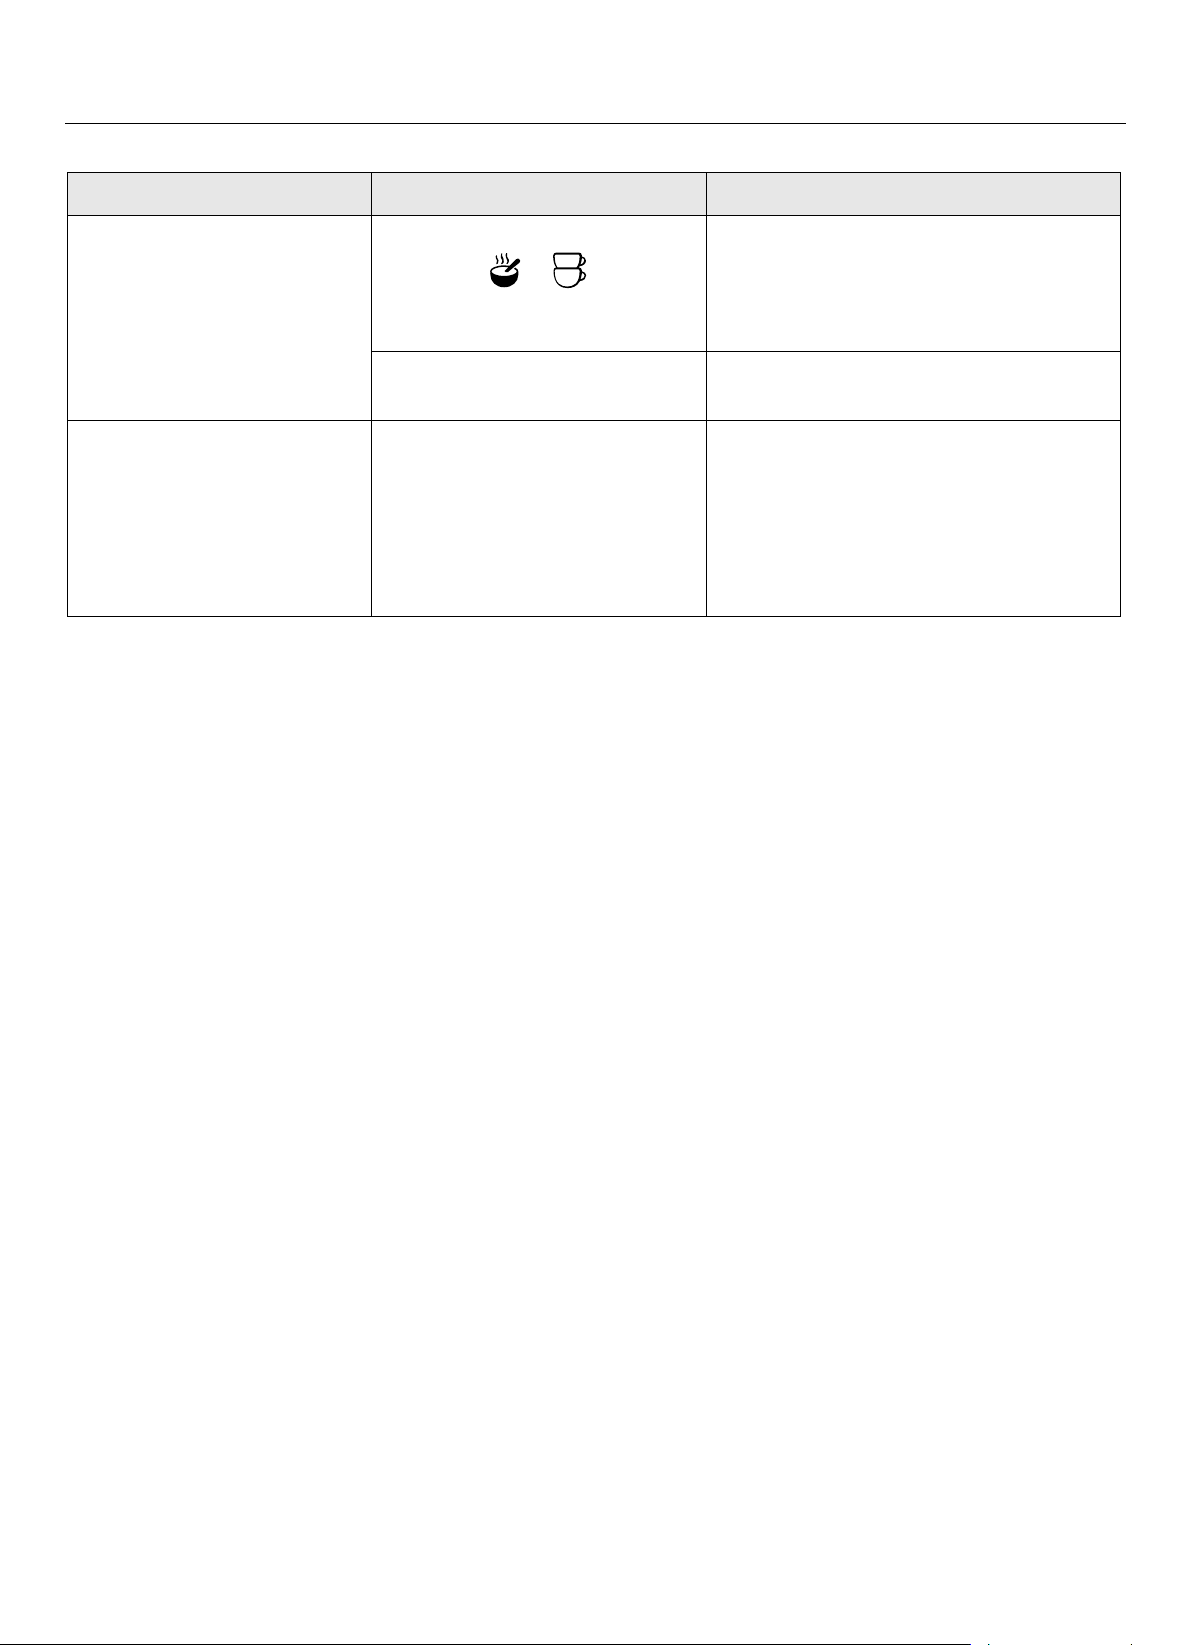
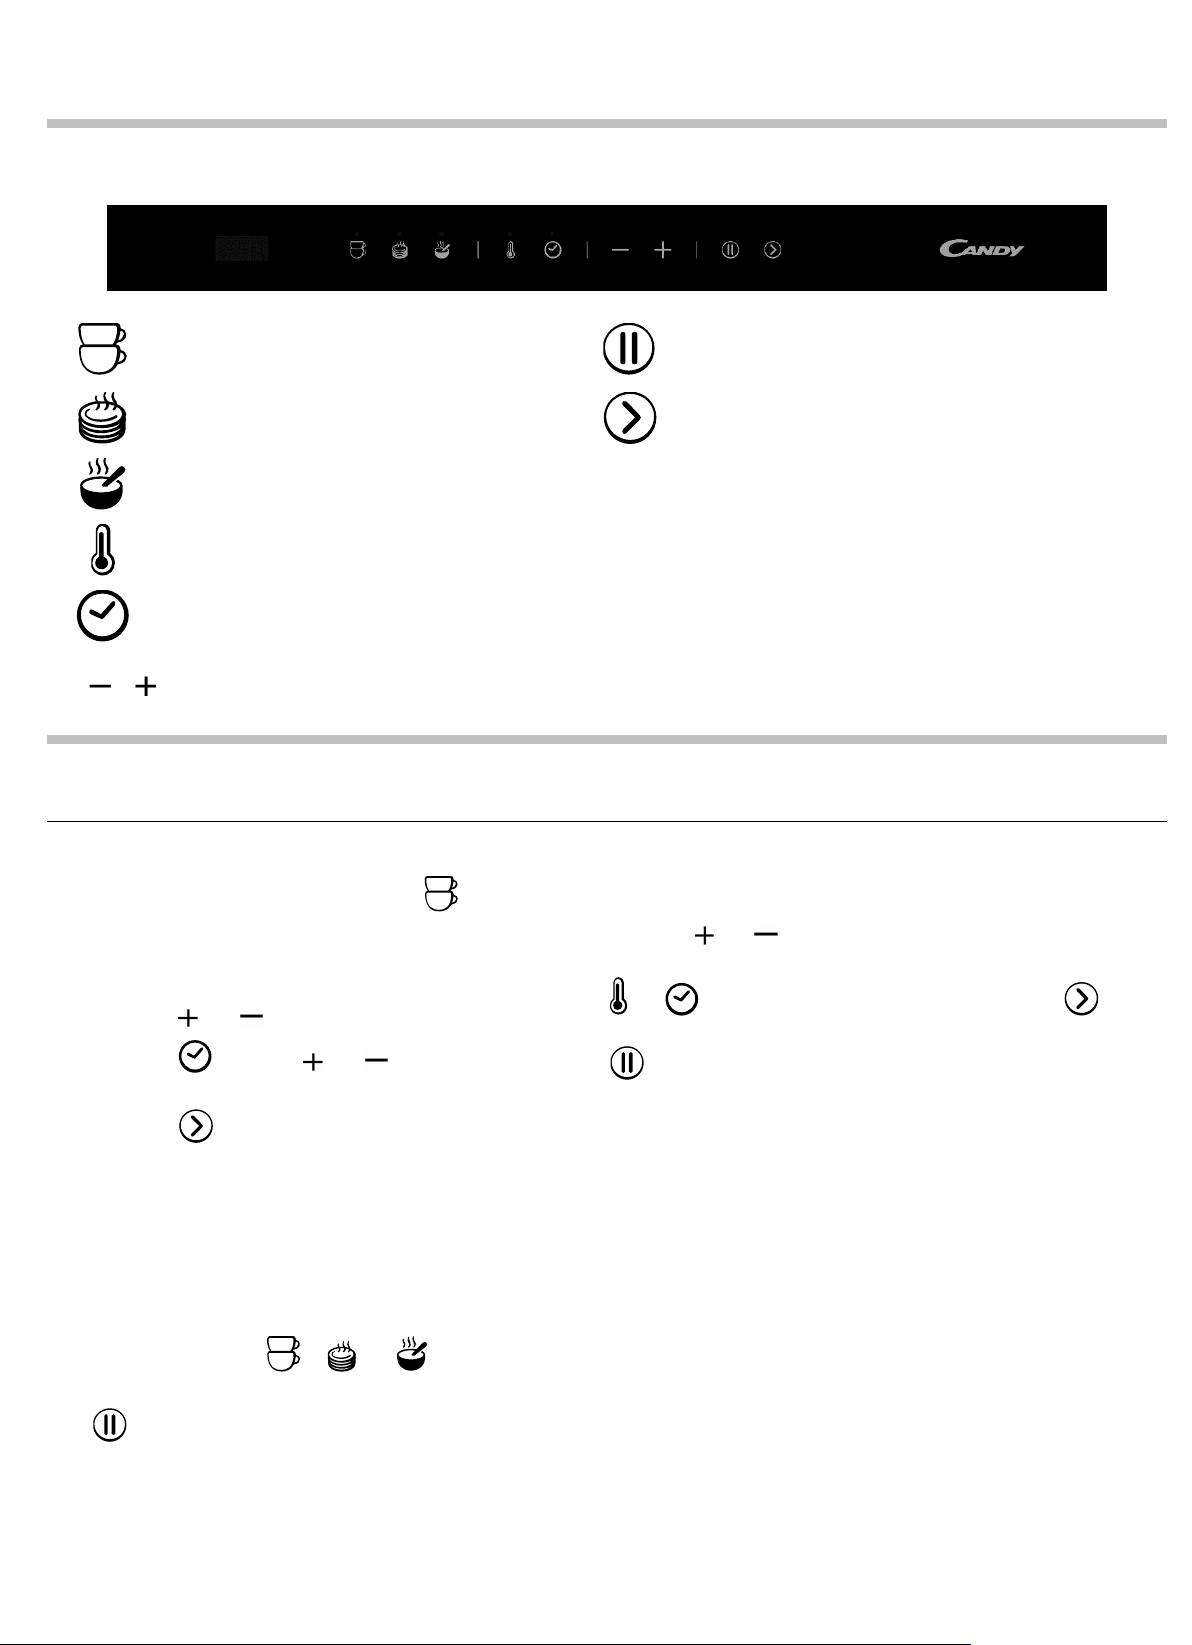
CONTROL PANEL
For warming cups and glasses
Cancel Button
For warming plates and dishes
Start Button
For keeping food warm
The appliance can be used to keep food warm
at the same time as warming plates and dishes.
But the food must be covered properly and dry
the dishes when finished.
Take care. The plates and dishes will take
longer to warm up, but can get very hot on
this function.
For setting the temperature
For setting the duration
For adjust temperature and time
Operation
Function settings
(1) In waiting state, press “ ” key to start the function
of warming cups and glasses with 40 °C.
(2) “40°C” will display.
(3) Touch “ ” or “ ” to adjust the temperature.
(4) Touch “ ” and then touch “ ” or “ ” to adjust
the warming time.
(5) Touch “ ” to save the temperature and time.
(5) Close the door and there will be a beep. Then the
appliance will start working.
Note:
(1)During parameters setting, you can press other
function keys to change the function among “ ”,
“ ” and “ ”.
(2)Before closing the door, you can touch “ ” to
cancel the setting. And the appliance will go back to
waiting state.
(3) During the process of working, open the door to
enter to the parameters adjusting mode. And then
press “ ” or “ ” to adjust the temperature.
You can press the “ ” or “ ” to change the parameter
which you want to adjust. And then press “ ” to save
the setting.
(4) After saving the setting as above, you can press “ ”
to enter to the waiting state, or close the door to start
working.
Specifications
(1) When the appliance is electrified, open the door. The
buzzer will ring once and the appliance will enter to
waiting state. “0” will display.
(2) In the process of clock setting, if there is no operation
within 3 minute, the oven will go back to the waiting
state.
(3) The buzzer sounds once by efficient press.
(4) The buzzer will sound thrice to remind you when
cooking is finished.
EN-6
Page 7
Temperature settings
Each function has its own temperature range. The factory-set
recommended temperatures are printed in bold. The
temperature can be altered in 5° steps by touching the
sensor. The last temperature selected is automatically
activated the next time the drawer is switched on, and this is
shown in the display.
Temperature °C*
40
60
60
45
65
65
50
70
70
55
75
75
60
80
80
* Approximate temperature values, measured in the middle of
the drawer when empty
Duration
The appliance is set for continuous operation mode.
A limited duration can be selected by touching the
sensor. One touch for 1 hour (1h), two touches for 2
hours (2h) etc.
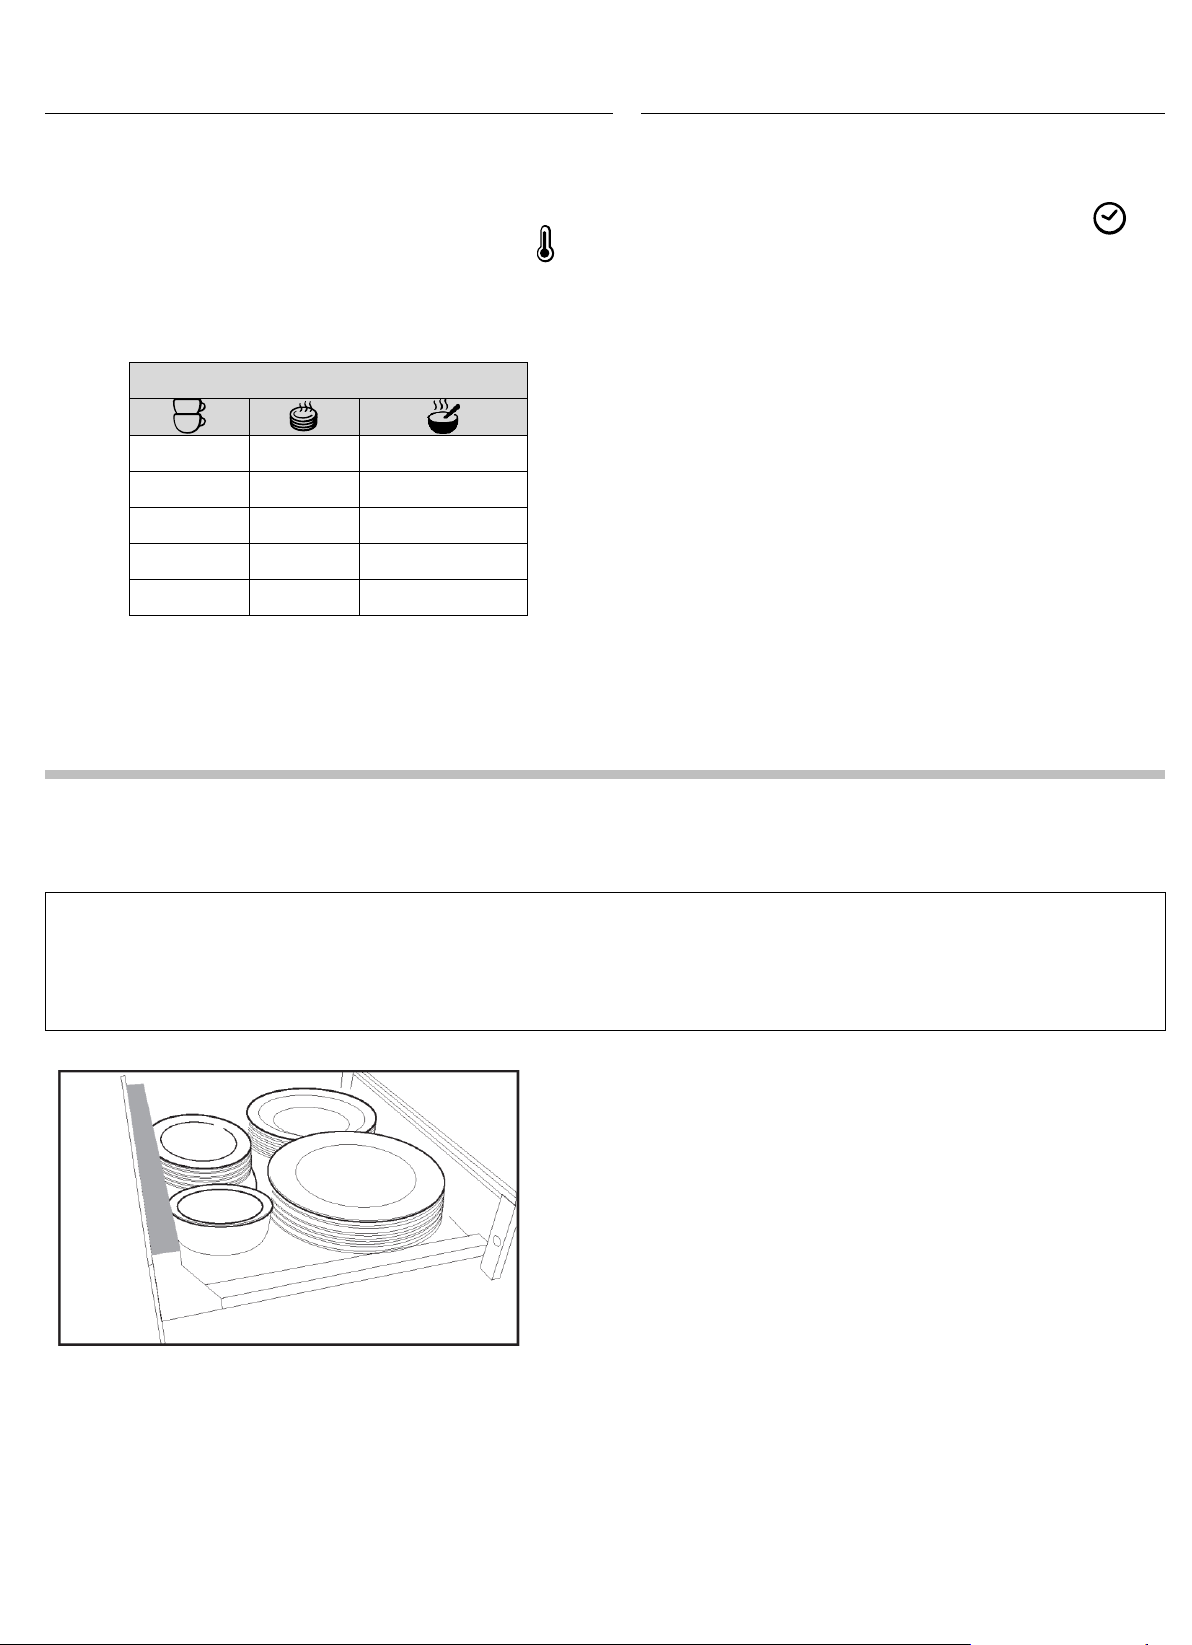
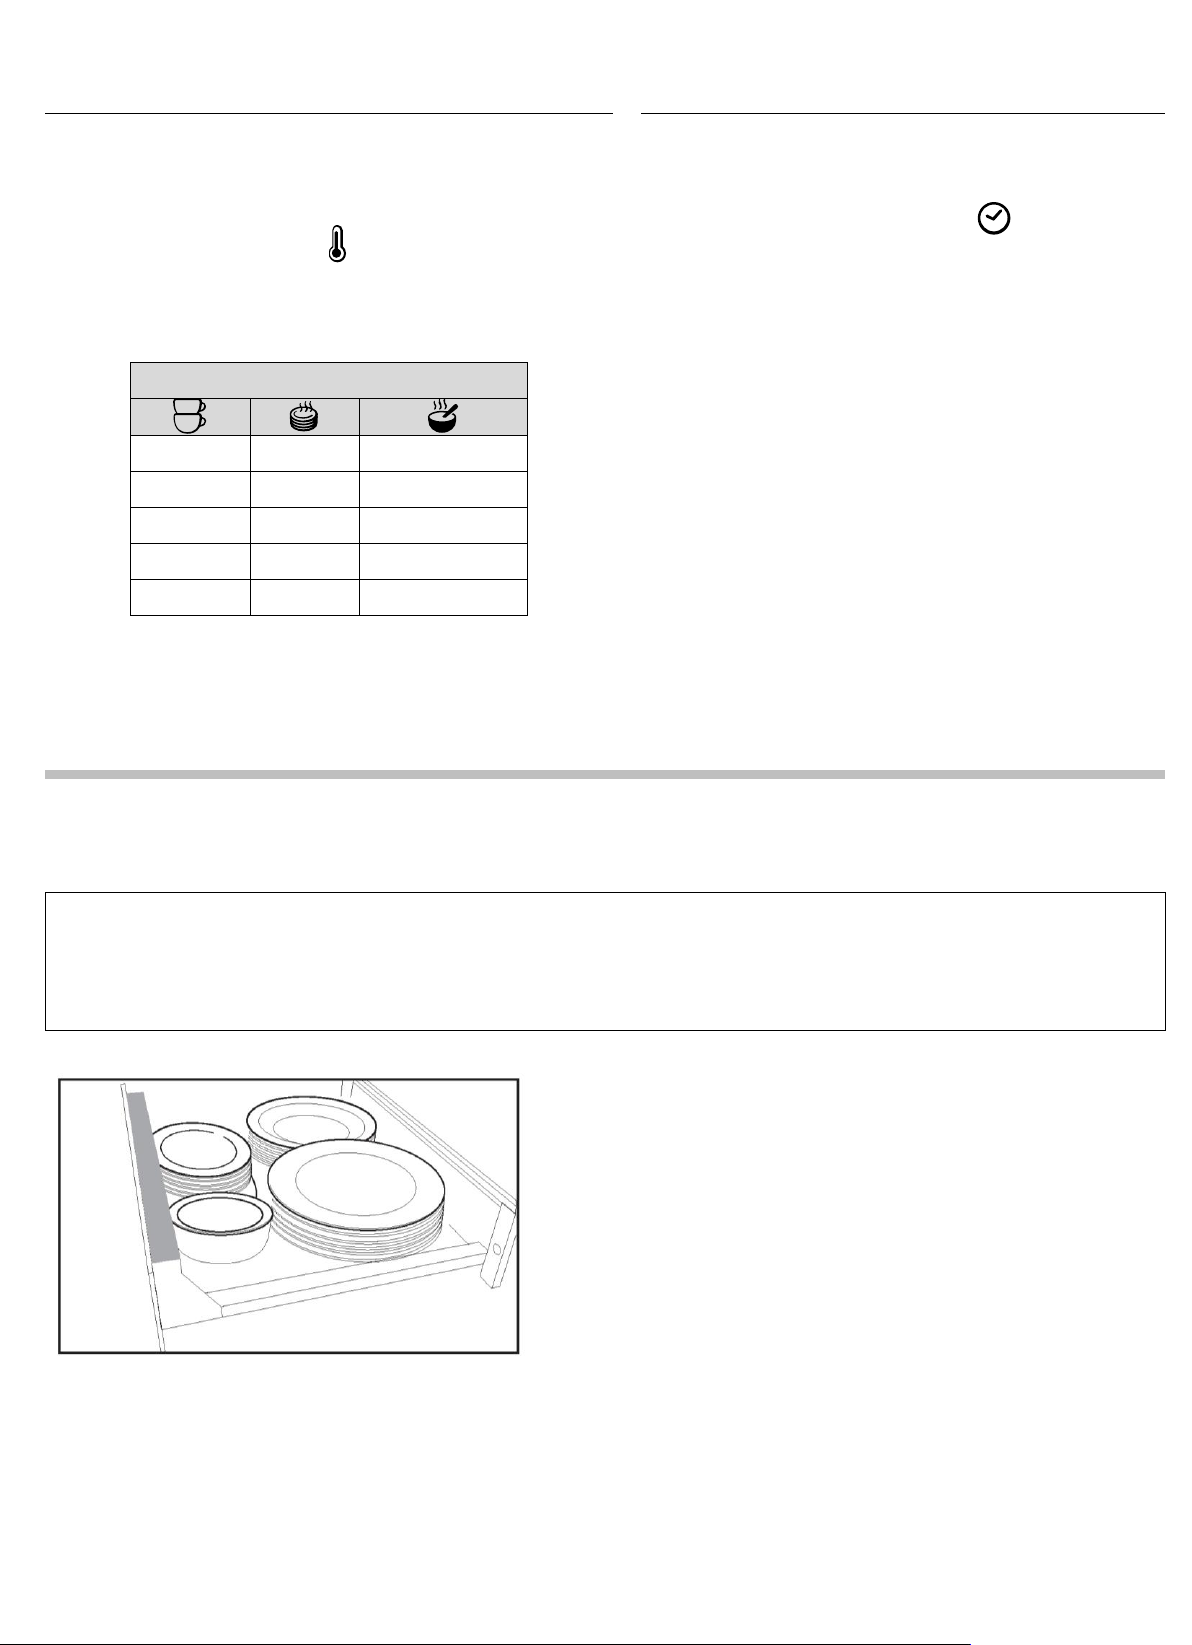
Capacity
The quantity that can be loaded will depend to a great extent on the size and weight of
your own crockery. Do not overload the drawer. The maximum load bearing capacity of
the drawer is 25 kg. Under the maximum load bearing capacity, the drawer should be
opened or closed slightly.
The loading examples shown here are
suggestions only.
– preheat dinnerware for people:
6 dinner plates
Ø 26 cm
6 soup plates
Ø 23 cm
6 dessert dishes
Ø 19 cm
1 oval platter
32 cm
1 medium serving bowl
Ø 16 cm
1 small serving bowl
Ø 13 cm
EN-7
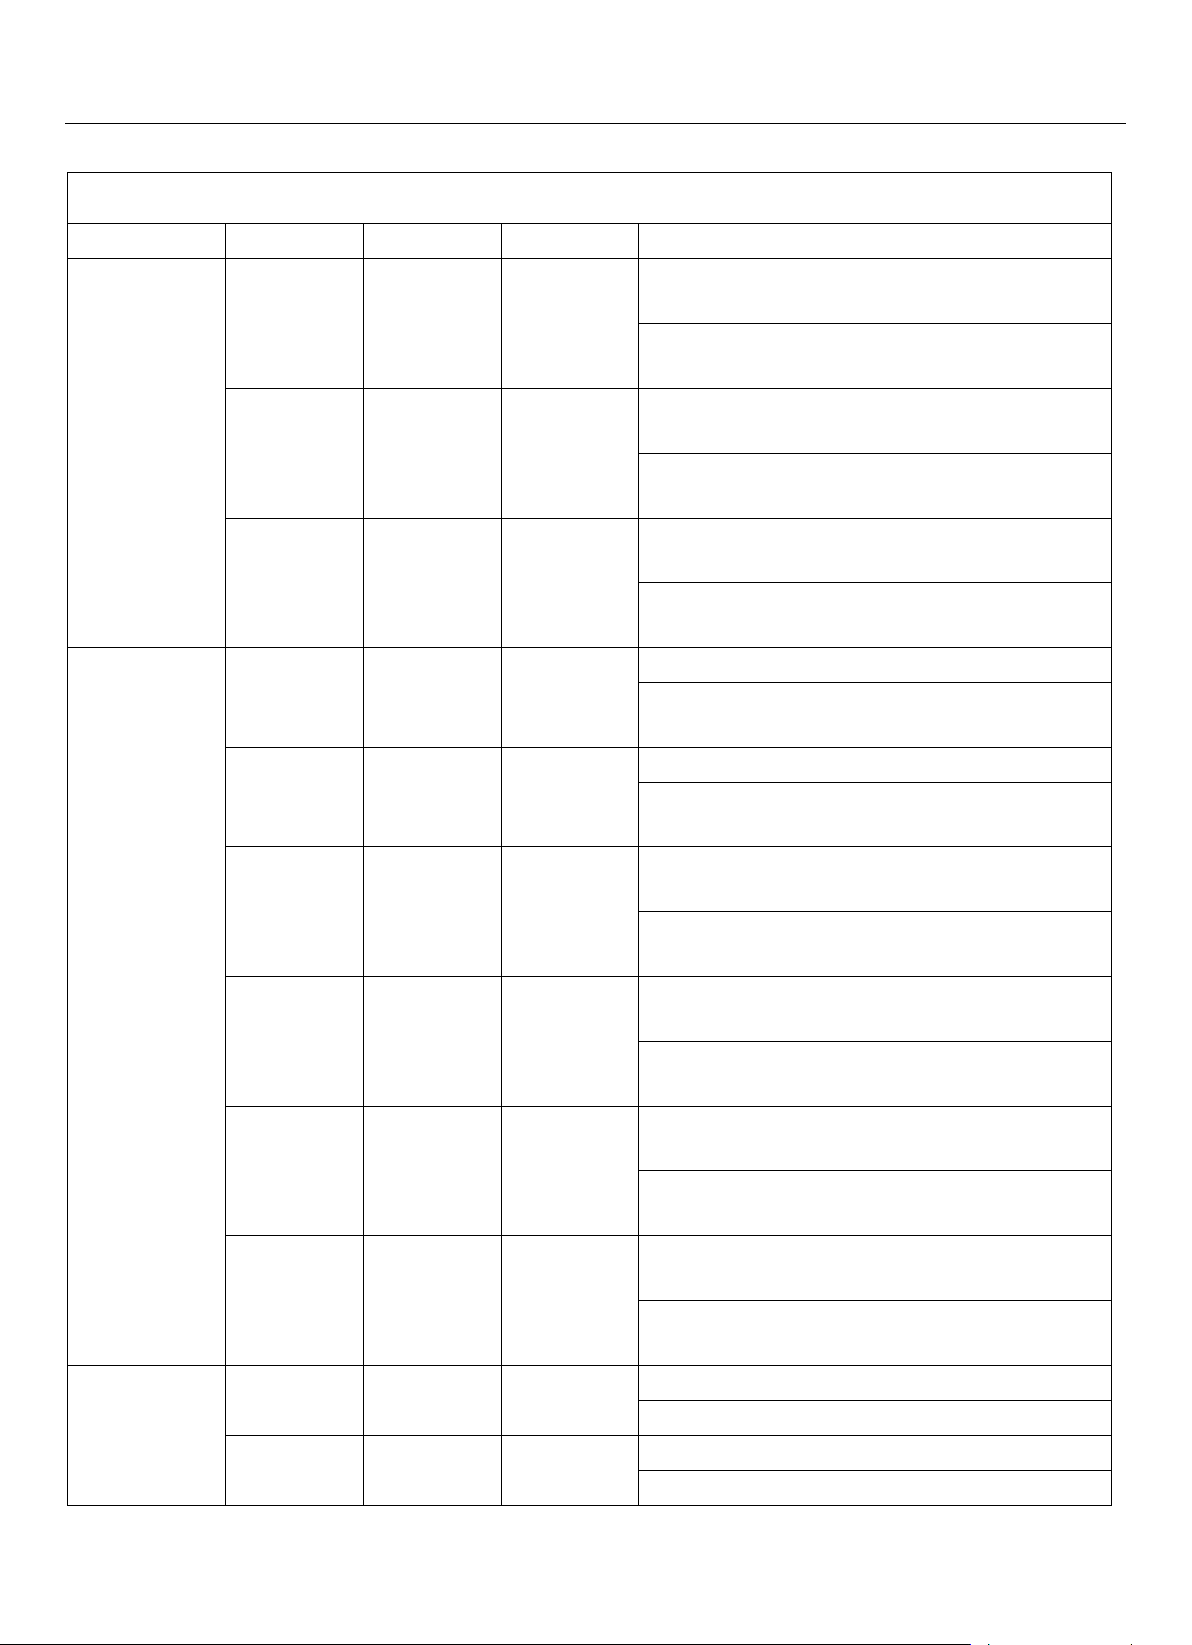
Page 8
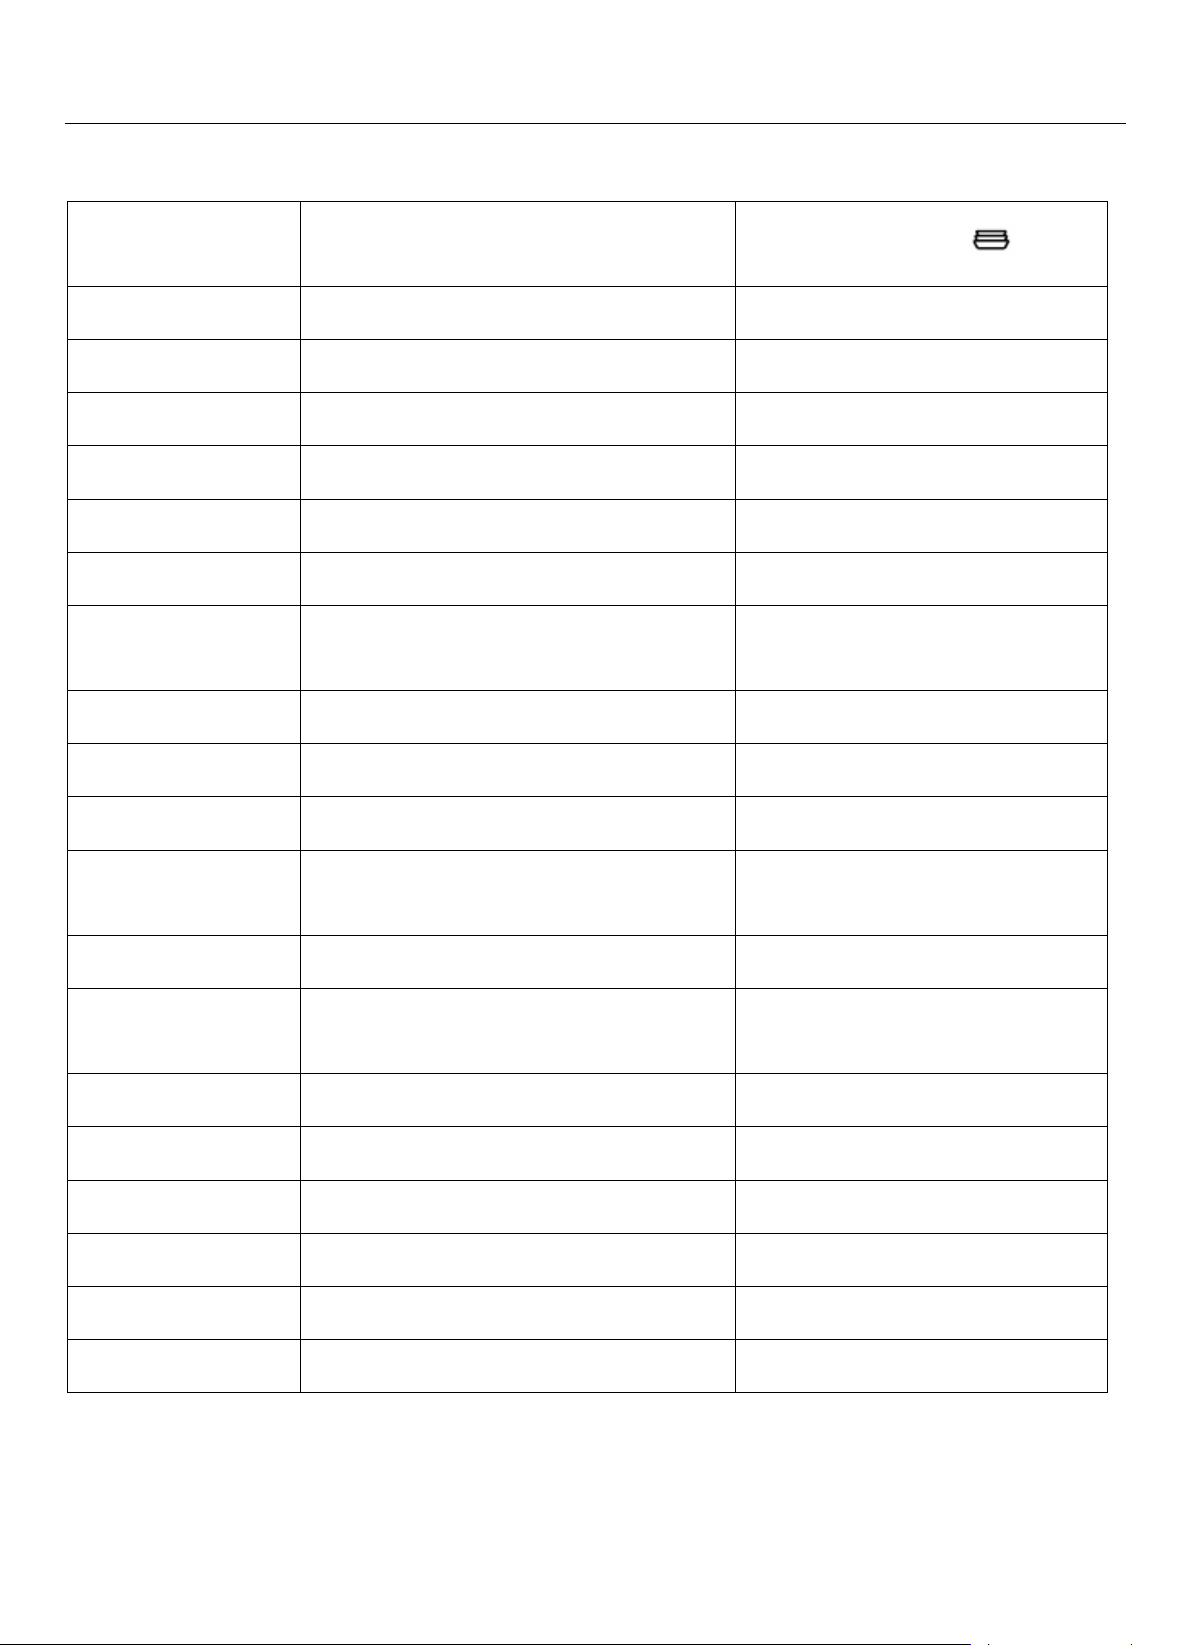
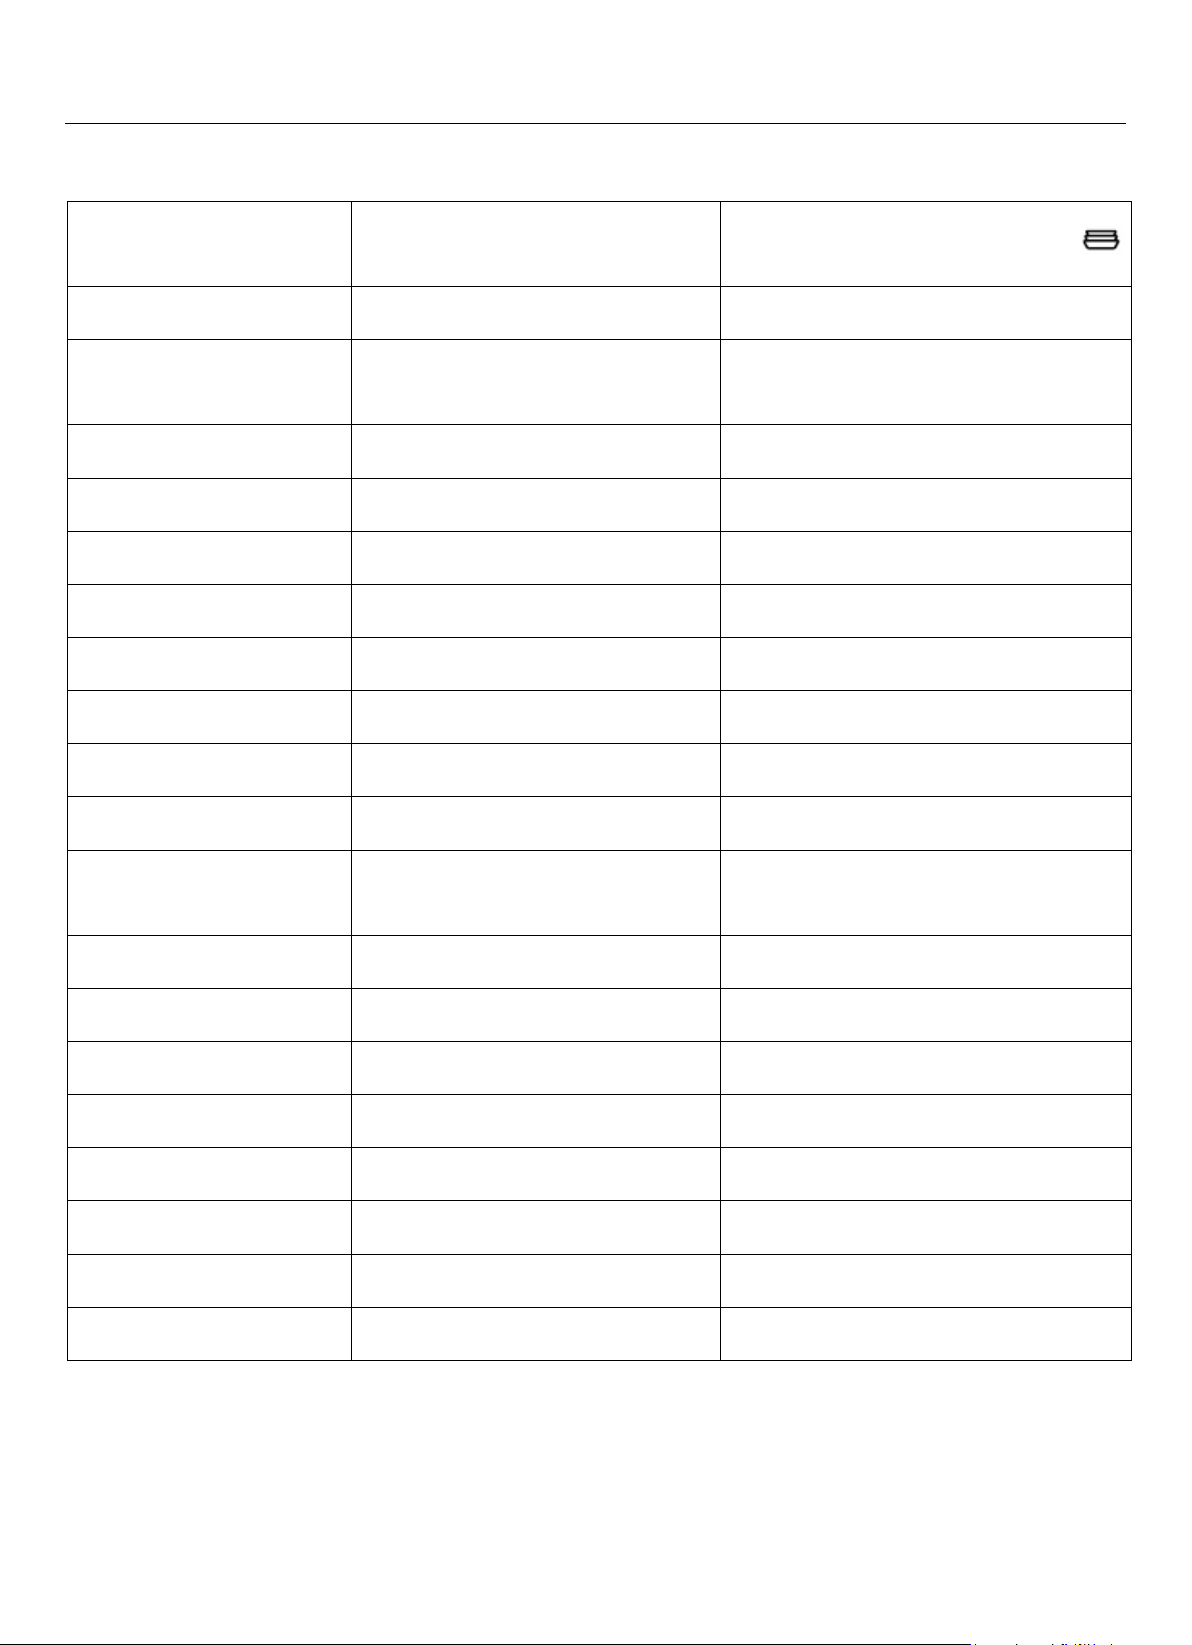
Food
Cover the container?
Temperature for the setting
Steak (rare)
yes
65
Bake/gratin
yes
80
Roast meat
yes
75
Casserole
yes
80
Fish fingers
no
80
Meat in a sauce
yes
80
Vegetables in a
sauce
yes
80
Goulash
yes
80
Mashed potato
yes
75
Plated meal
yes
80
Baked potatoes /
New potatoes
yes
75
Breaded escalope
no
80
Pancakes/ potato
pancakes
no
80
Pizza
no
80
Boiled potatoes
yes
80
Gravy
yes
80
Strudel
no
80
To warm bread
no
65
To warm rolls
no
65
Keeping food warm
Settings
Depending on model
The containers depend on the quantity, or food, or type of recipe
EN-8
Page 9

What it is?
It is any cooking procedure where the cooking temperature is at or
close to the desired final core temp. In traditional cooking, the
cooking temperature always exceeds the desired ready-to-eat
temperatures. With low temperature cooking meat cooks at a low
temperature over a long period of time. Using this method, meat
loses less liquid (less molecule breaking), maintain organoleptic
characteristic (vitamins, proteins and so on) keeping Freshness,
flavor and juiciness intact.
This cooking method is particularly suitable for large and tender
pieces of meat.
For precision we recommend using a proprietary food thermometer
to monitor the core temperature.
Core temperature
Food can be cooked to a core temperature of up to 70 °C in the
food warming drawer. Meat which needs to be cooked to a core
temperature higher than 70 °C is not suitable for cooking in the
food warming drawer.
The core temperature reading gives information about the degree
of cooking in the middle of a piece of meat. The lower the core
temperature, the less cooked the meat is in the middle:
45-50 °C
= rare
55-60 °C
= medium
65 °C
= well done
How to use it
1. Preheat the hot cabinet for 15 min to 70 °C.
2. Cover the meat properly with cling wrap.
3. The cooking duration depends on the size of the individual
pieces of meat (check table)
Low temperature cooking
EN-9
Page 10

4. Put the covered meat on a plate and use a chronometer to
calculate the time.
5. Sear the meat to give flavour (check the table)
Low temperature cooking
EN-10
Page 11
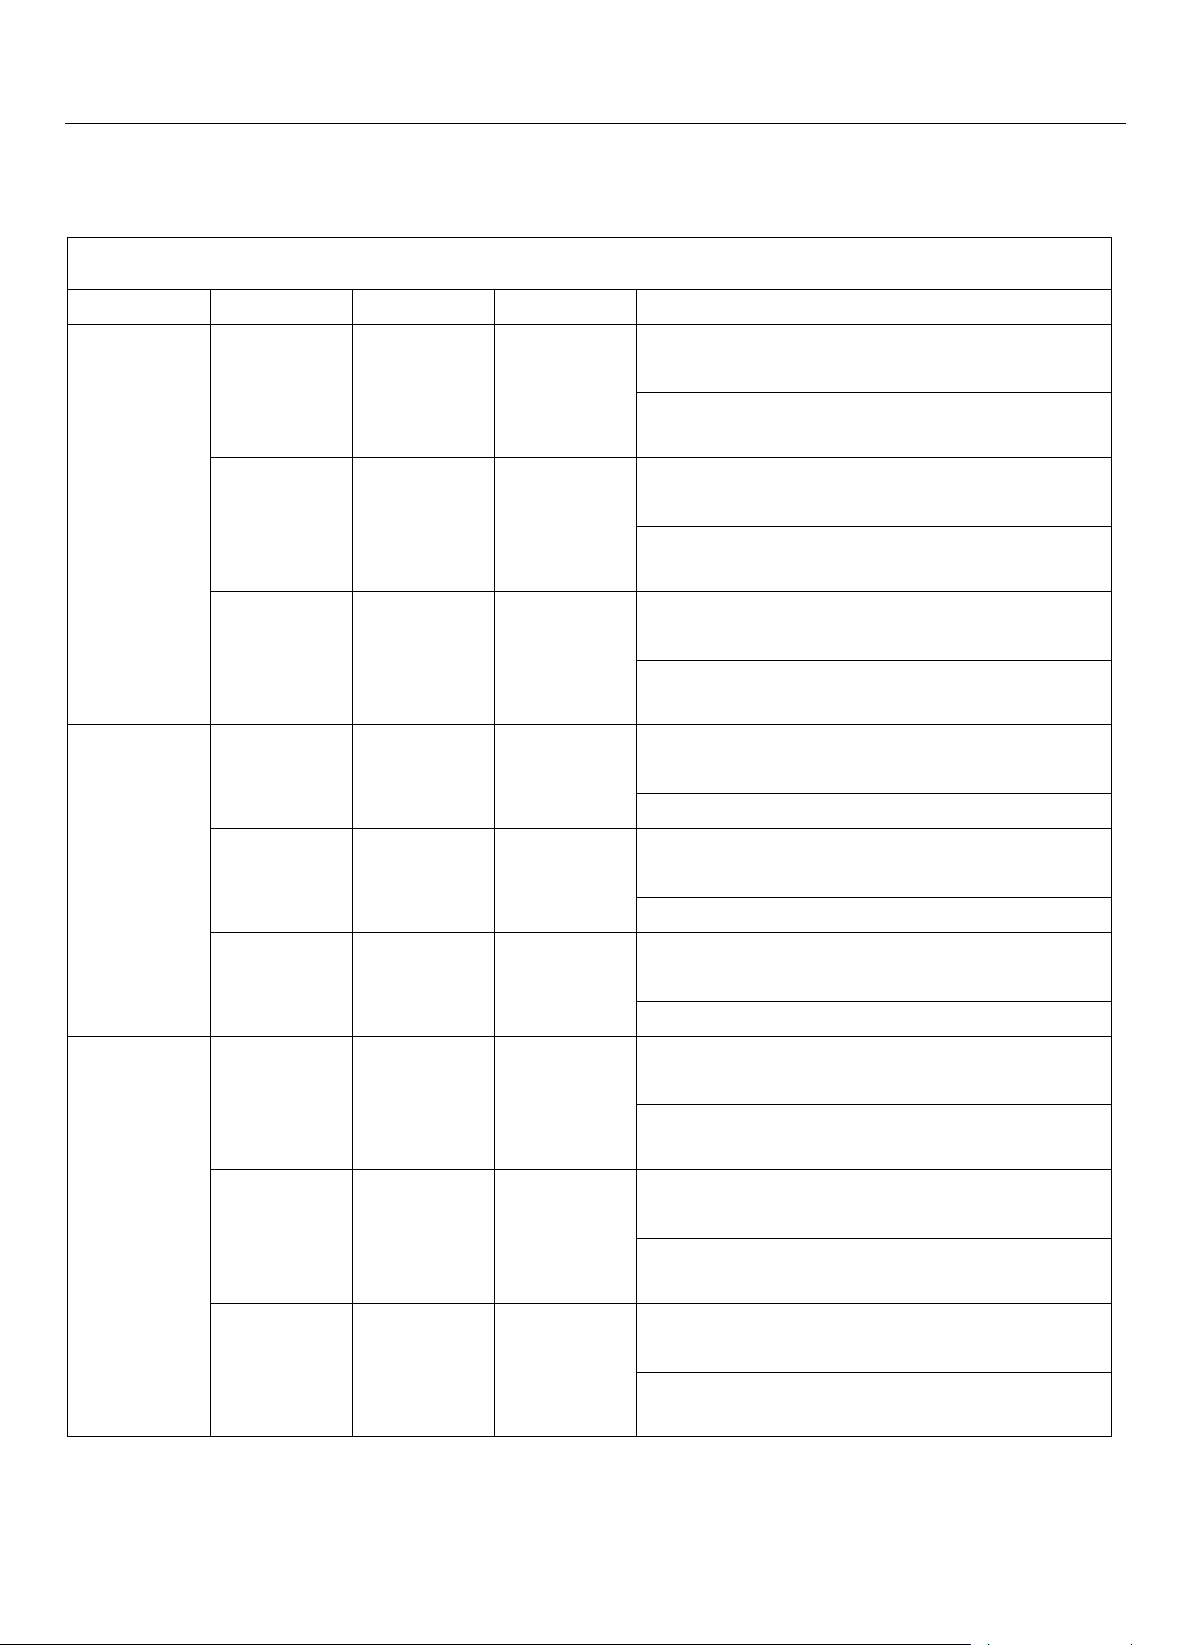
Beef and Veal
Part
Thickness
Doneness
Time
Searing time and indications
Whole Fillet
50 mm
Rare
1h 35min
90 seconds for outer side with full power of the
stove
Medium
2h 35min
Well done
3h 30min
3 min. for outer side with medium-high power of the
stove
60 mm
Rare
1h 45min
90 seconds for outer side with full power of the
stove
Medium
2h 50min
Well done
4h
3 min. for outer side with medium-high power of the
stove
70 mm
Rare
2h
90 seconds for outer side with full power of the
stove
Medium
3h
Well done
4h 40min
3 min. for outer side with medium-high power of the
stove
Medallions
Rib eye
T-bone
Rump Steak
20 mm
Rare
50 min
90 seconds for side with full power of the stove
Medium
1h 30min
Well done
2h
3 min. for side with medium-high power of the stove
30 mm
Rare
1h 5min
90 seconds for side with full power of the stove
Medium
1h 50min
Well done
2h 20min
3 min. for side with medium-high power of the stove
40 mm
Rare
1h 20min
2 min for side with full power of the stove
Medium
2h 10min
Well done
3h
4 min. for side with medium-high power of the stove
Sirloin joint
Roast Beef
60 mm
Rare
1h 45min
4 min. for outer side with medium-high power of the
stove
Medium
2h 50min
Well done
4h
6 min. for outer side with medium power of the
stove
70 mm
Rare
2h
4 min. for outer side with medium-high power of the
stove
Medium
3h
Well done
4h 40min
6 min. for outer side with medium power of the
stove
80 mm
Rare
2h 20min
4 min. for outer side with medium-high power of the
stove
Medium
3h 30min
Well done
5h 40min
6 min. for outer side with medium power of the
stove
Low temperature cooking
Cooking table
EN-11
Page 12
Pork
Part
Thickness
Doneness
Time
Searing time and indications
Whole filet
40mm
Medium
2h 20min
90 seconds for outer side with full power of the
stove
Well done
3h 10min
3 min. for outer side with medium-high power of the
stove
50mm
Medium
2h 35min
90 seconds for outer side with full power of the
stove
Well done
3h 25min
3 min. for outer side with medium-high power of the
stove
60mm
Medium
3h
90 seconds for outer side with full power of the
stove
Well done
4h 5min
3 min. for outer side with medium-high power of the
stove
Boned gammon
Roulades
Roast pork
Whole pork loin
30mm
Medium
1 h 50min
2 min. for outer side with high power of the stove
Well done
2h 40min
3 min. for outer side with medium-high power of the
stove
40mm
Medium
2h 20min
2 min. for outer side with high power of the stove
Well done
3h 10min
3 min. for outer side with medium-high power of the
stove
50mm
Medium
2h 35min
4 min. for outer side with medium-high power of the
stove
Well done
3h 25min
6 min. for outer side with medium power of the
stove
60mm
Medium
3h
4 min. for outer side with medium-high power of the
stove
Well done
4h 5min
6 min. for outer side with medium power of the
stove
70mm
Medium
3h 20min
4 min. for outer side with medium-high power of the
stove
Well done
4h 45min
6 min. for outer side with medium power of the
stove
80mm
Medium
3h 40min
4 min. for outer side with medium-high power of the
stove
Well done
5h 30min
6 min. for outer side with medium power of the
stove
Chop loin
10mm
Medium
1 h 10min
60 seconds for side with full power of the stove
Well done
1 h 30min
2 min. for side with full power of the stove
20mm
Medium
1 h 30min
90 seconds for side with full power of the stove
Well done
2h 10min
3 min. for side with high power of the stove
Low temperature cooking
EN-12
Page 13
Poultry
Part
Thickness
Doneness
Time
Searing time and indications
Chicken breast
25mm
Medium
1h 30min
60 seconds for side with full power of the stove
Well done
2h
90 seconds for side with full power of the stove
35mm
Medium
1h 45min
60 seconds for side with full power of the stove
Well done
2h 20min
90 seconds for side with high power of the stove
Duck breast (Magret)
35mm
Rare
1h
4 min. for the skin side with medium-high power of
the stove
Medium
1h 30min
4 min. for the skin side with medium-high power of
the stove
Well done
2h
4 min. for the skin side with medium-high power of
the stove
40mm
Rare
1h 45min
4 min. for the skin side with medium-high power of
the stove
Medium
2h 20min
4 min. for the skin side with medium-high power of
the stove
Well done
3h
4 min. for the skin side with medium-high power of
the stove
Turkey breast
40mm
Medium
3h
90 seconds for side with full power of the stove
Well done
4h
3 min. for side with high power of the stove
50mm
Medium
3h 50min
90 seconds for side with full power of the stove
Well done
5h
3 min. for side with high power of the stove
Foie Medallion (Duck
or Goose liver)
10mm
Medium
30min
60 seconds for side with full power of the stove
20mm
Medium
40min
60 seconds for side with full power of the stove
30mm
Medium
50min
60 seconds for side with full power of the stove
Whole Foie (Duck or
Goose liver )
35mm
Medium
48min
90 seconds for outer side with full power of the
stove
45mm
Medium
1h
90 seconds for outer side with full power of the
stove
55mm
Medium
1h 15min
90 seconds for outer side with full power of the
stove
Low temperature cooking
EN-13
Page 14
Lamb
Part
Thickness
Doneness
Time/Temp.
Searing time and indications
Rack of lamb
40 mm
Rare
1h 20min
90 seconds for outer side with full power of the
stove.
Medium
2h 10min
Well done
3h
3 min. for outer side with medium-high power of
the stove.
50 mm
Rare
1 h 35min
90 seconds for outer side with full power of the
stove.
Medium
2h 35min
Well done
3h 30min
3 min. for outer side with medium-high power of
the stove.
60 mm
Rare
1 h 45min
90 seconds for outer side with full power of the
stove.
Medium
2h 50min
Well done
4h
3 min. for outer side with medium-high power of
the stove.
Saddle of Lamb
60 mm
Rare
1 h 45min
3 min for outer side with full power of the stove.
Medium
2h 50min
4 min. for outer side with medium-high power of
the stove.
Well done
4h
70 mm
Rare
2h
3 min for outer side with full power of the stove.
Medium
3h
4 min. for outer side with medium-high power of
the stove.
Well done
4h 40min
80 mm
Rare
2h 20min
3 min for outer side with full power of the stove.
Medium
3h 30min
4 min. for outer side with medium-high power of
the stove.
Well done
5h 40min
Boned leg of lamb
Gigot
60 mm
Rare
1 h 45min
2 min for outer side with full power of the stove.
Medium
2h 50min
3 min. for outer side with medium-high power of
the stove.
Well done
4h
70 mm
Rare
2h
2 min for outer side with full power of the stove.
Medium
3h
3 min. for outer side with medium-high power of
the stove.
Well done
4h 40min
80 mm
Rare
2h 20min
2 min for outer side with full power of the stove.
Medium
3h 30min
3 min. for outer side with medium-high power of
the stove.
Well done
5h 40min
Lamb chops
10 mm
Rare
35min
60 seconds for side with full power of the stove.
Medium
1h 10min
Well done
2h
90 seconds for side with full power of the stove.
20 mm
Rare
50min
60 seconds for side with full power of the stove.
Medium
1 h 30min
Well done
2h 30min
90 seconds for side with full power of the stove.
Low temperature cooking
EN-14
Page 15
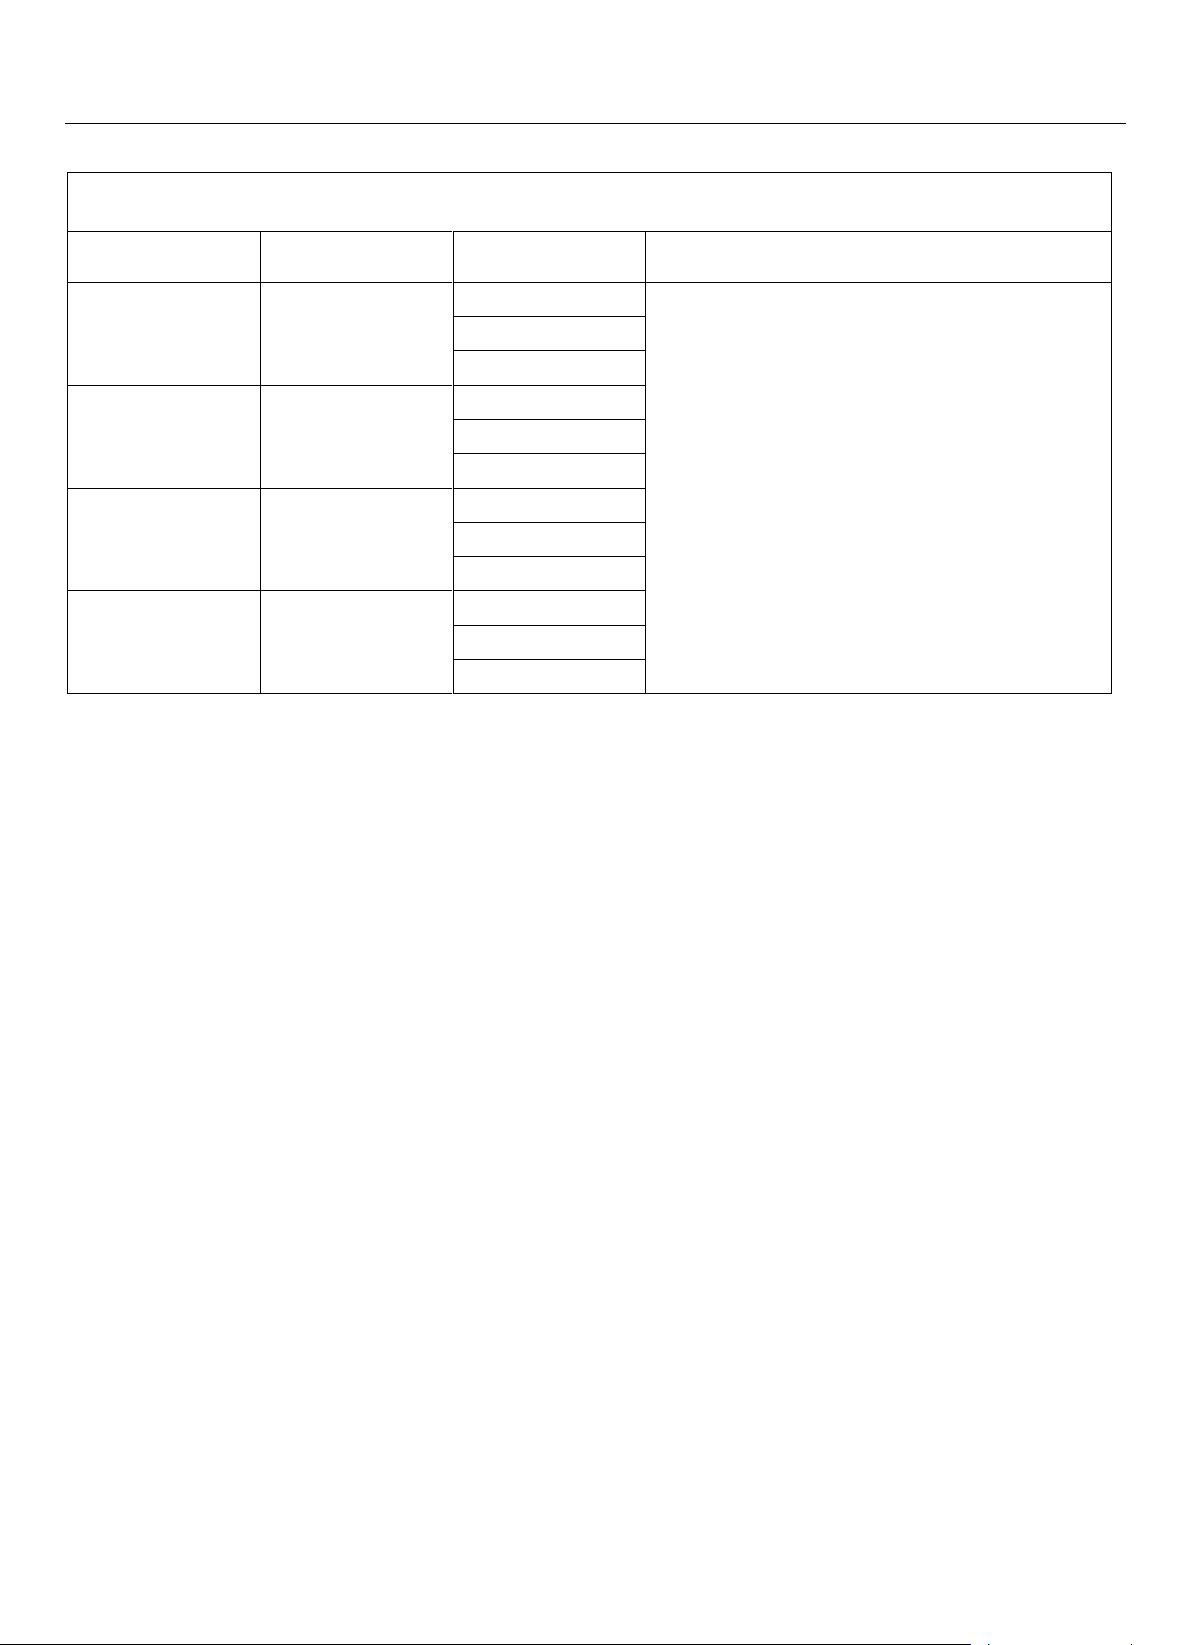
Eggs
Size
Weight
Time
Remarks
2h 20min
Very Large
73g and over
2h 30min
3h 10min
2h 11min
Large
63g< 73g
2h 31min
3h 1min
2h 5min
Medium
53g < 63g
2h 25min
2h 55min
2h
Small
53 and under
2h 20min
2h 50min
Low temperature cooking
EN-15
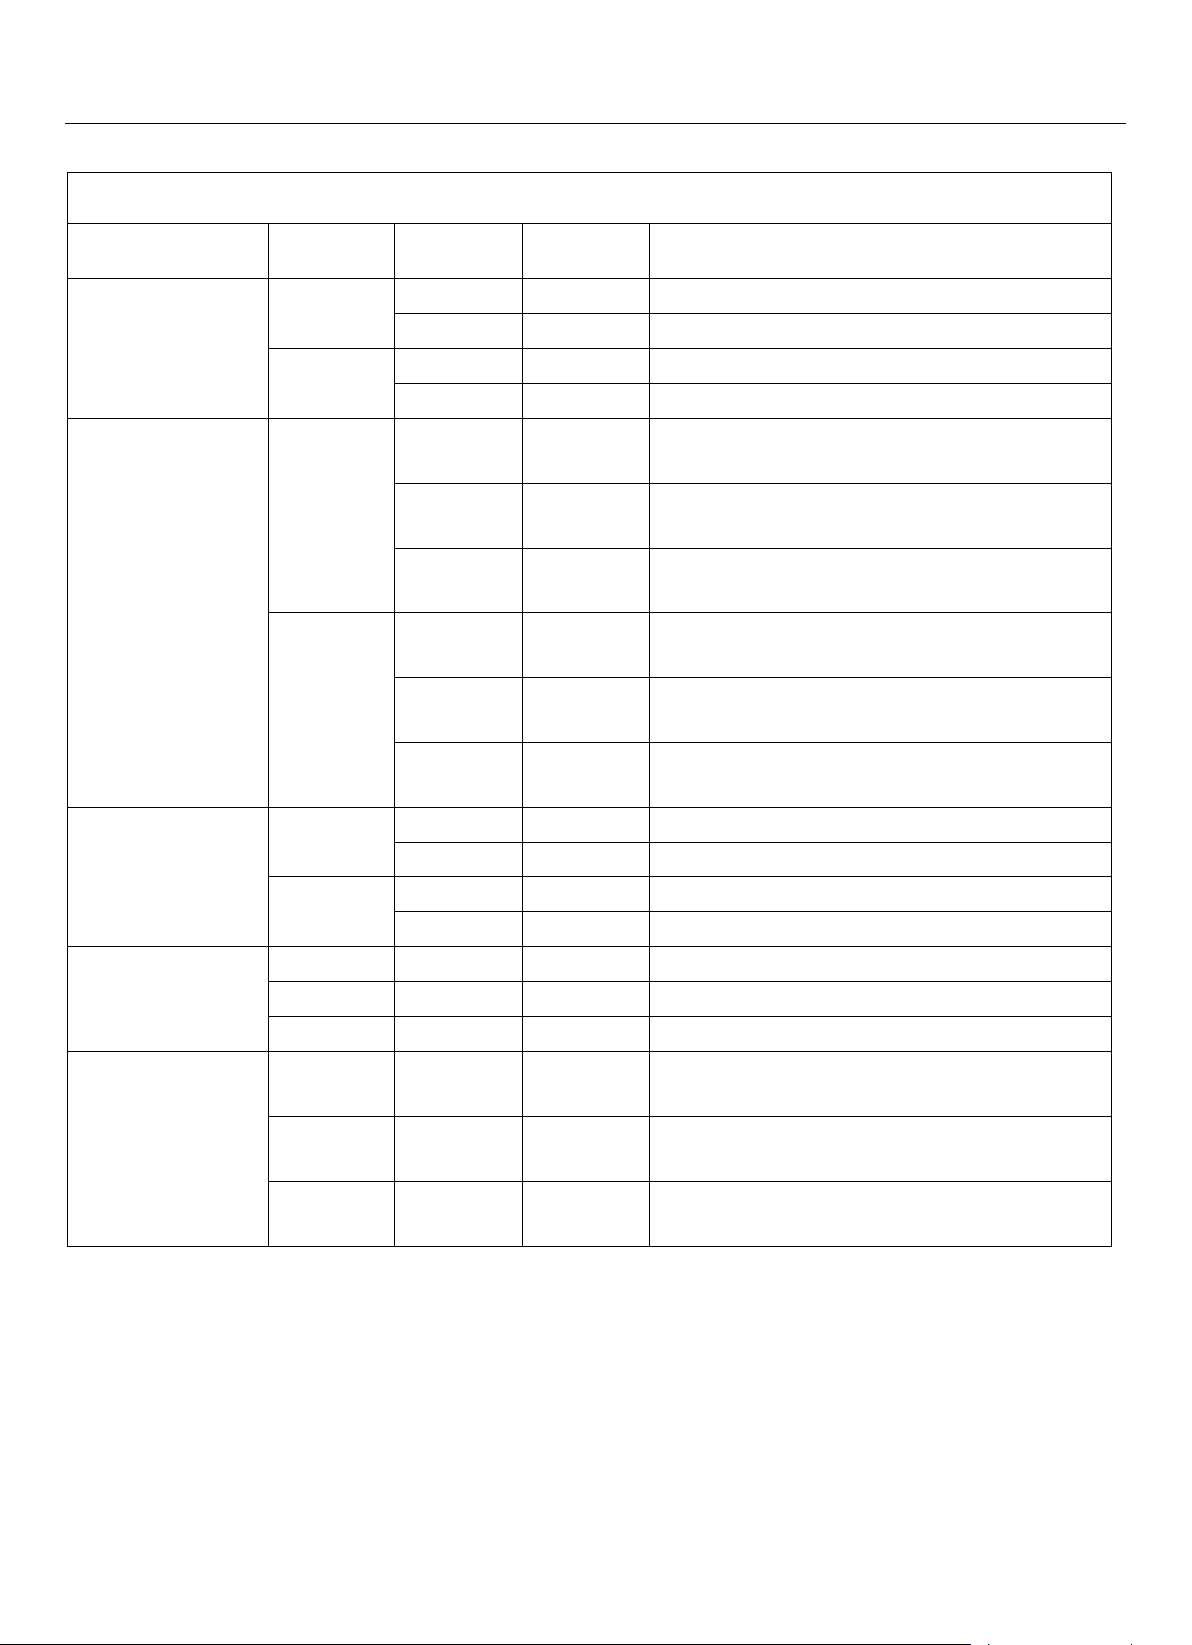
Page 16
Type of food
Container
Cover the
container
Temperature of
the setting
Duration in hours
Defrosting
berries
Plate
no
65 °C
1 hour
Defrosting
Frozen
Plate
no
65 °C
1 hour
Vegetables
Proving dough
Bowl
yes
45 °C
1/2 hour
Making yoghurt
Yoghurt jars with
lids
yes
45 °C
6 hours
Melt chocolate
Bowl
no
50 °C
1 hour
Infusion oil
Bowl covered with
cling wrap
yes
75 °C
4 hours
Infusion water
Bowl covered with
cling wrap
yes
65 °C
4 hours
Dry tomatoes
Plate with baking
paper
no
60 °C
20 hours
Dry Vegetable
Plate
no
60 °C
12 hours
Dry sliced fruits
Plate
no
60 °C
12 hours
Dry herbs
Plate
no
70 °C
4 hours
Dry bread for
bread crumbs
Plate
no
80 °C
4 hours
Confited
Tupperware
cover and open the
vent
50 °C
Depends on size
between 1 to 2h.
fish in oil
Microwaveable
White Melba
toast
Plate
no
80 °C
2 hours
Slow cooking
stew
Pyrex container
yes
80 °C
Between 1 to 12 hours
Other uses
* Depending on model
EN-16
Page 17
Danger of injury.
Do not use a steam cleaning appliance to clean this
appliance. The steam could reach electrical components
and cause a short circuit.
Danger of damage.
Unsuitable cleaning agents can damage the surfaces of the
appliance. Only use domestic washing-up liquid to clean the
appliance.
Clean and dry the entire appliance after each use. Allow the
appliance to cool down to a safe temperature before
cleaning.
Appliance front and interior
Remove any soiling immediately.
If this is not done, it might become impossible to remove
and could cause the surfaces to alter or discolour.
Clean all surfaces with a clean sponge and a solution of hot
water and washing-up liquid. Then dry with a soft cloth.
A clean, damp microfibre E-cloth without cleaning agent can
also be used.
All surfaces are susceptible to scratching. Scratches on
glass surfaces could even cause a breakage.
Contact with unsuitable cleaning agents can alter or
discolour the surfaces.
Cleaning and care
EN-17
Page 18

To avoid damaging the surfaces of your appliance, do not
use:
– cleaning agents containing soda, ammonia, acids or chlorides,
– cleaning agents containing descaling agents,
– abrasive cleaning agents, e.g. powder cleaners and cream
cleaners,
– solvent-based cleaning agents,
– stainless steel cleaning agents,
– dishwasher cleaner,
– oven sprays,
– glass cleaning agents,
– hard, abrasive sponges and brushes, e.g. pot scourers,
– sharp metal scrapers.
Anti-slip mat
Remove the anti-slip mat from the drawer before cleaning it.
Clean the anti-slip mat by hand only, using a solution of hot
water and a little washing-up liquid, and then dry with a cloth.
Do not put the anti-slip mat back into the drawer until it is
completely dry.
Do not wash the anti-slip mat in a dishwasher or washing
machine.
Never place the anti-slip mat in the oven to dry.
Cleaning and care
EN-18
Page 19
With the help of the following guide, minor faults in the performance of the
appliance, some of which may result from incorrect operation, can be put right
without contacting the Service Department.
Installation work and repairs to electrical appliances must only be carried out
by a suitably qualified person in strict accordance with current local and national
safety regulations. Repairs and other work by unqualified persons could be
dangerous.
Problem
Possible cause
Remedy
The appliance does not
heat up.
The appliance is not correctly
plugged in and switched on at
the mains socket.
Insert the plug and switch on at the
socket.
The mains fuse has tripped.
Reset the trip switch in the mains fuse
box (minimum fuse rating - see data
plate).
If, after resetting the trip switch in the
mains fuse box and switching the
appliance back on, the appliance will still
not heat up, contact a qualified
electrician.
The food is not hot enough.
The function for keeping food
warm is not selected.
Select the correct function.
The temperature setting is too
low.
Select a higher temperature.
The vents are covered.
Ensure that the air can circulate freely.
The food is too hot.
The function for keeping food
warm is not selected.
Select the correct function.
The temperature setting is too
high.
Select a lower temperature.
The crockery is not warm
enough.
The function for warming plates
and dishes is not selected.
Select the correct function.
The temperature setting is too
low.
Select a higher temperature.
The vents are covered.
Ensure that the air can circulate freely.
The crockery has not been
allowed to heat up for a
sufficiently long time.
Various factors will affect how long the
crockery will take to heat up (see
“Warming crockery”).
Problem solving guide
EN-19
Page 20
Problem
Possible cause
Remedy
The crockery is too hot.
The function for warming plates
and dishes or warming
cups and glasses is not
selected.
Select the correct function.
The temperature setting is too
high.
Select a lower temperature.
A noise can be heard when
the drawer is being used.
The noise is caused by the fan
which distributes the heat evenly
through the drawer.
The fan operates at intervals
when the functions for keeping
food warm and low temperature
cooking are being used.
This is not a fault.
Problem solving guide
EN-20
Page 21

When building in the combination appliance, it is essential
to follow the instructions given in the operating and
installation instructions supplied with the combination
appliance.
All dimensions in this instruction booklet are given in mm.
Safety instruction for installation
► Before connecting the appliance to the mains electricity supply make sure that the
connection data on the data plate (voltage and frequency) correspond with the mains
electricity supply, otherwise the appliance could be damaged. Consult a qualified
electrician if in any doubt.
► The socket and on-off switch should be easily accessible after the appliance has been
built in.
► The warming drawer may only be built in combination with those appliances quoted by
the manufacturer as being suitable. The manufacturer cannot guarantee trouble-free
operation if the appliance is operated in combination with appliances other than those
quoted by the manufacturer as being suitable.
► When building in the warming drawer in combination with another suitable appliance,
the food warming drawer must be fitted above a fixed interim shelf in the housing unit.
Please ensure that the housing unit can support both its weight and that of the other
appliance.
► As the combination appliance is placed directly on top of the warming drawer once it is
built in, an interim shelf is not necessary between the two appliances.
► The appliance must be built in so that the contents of the drawer can be seen.
This is to avoid scalding from hot food spilling over. There must be enough space for the
drawer to be pulled out fully.
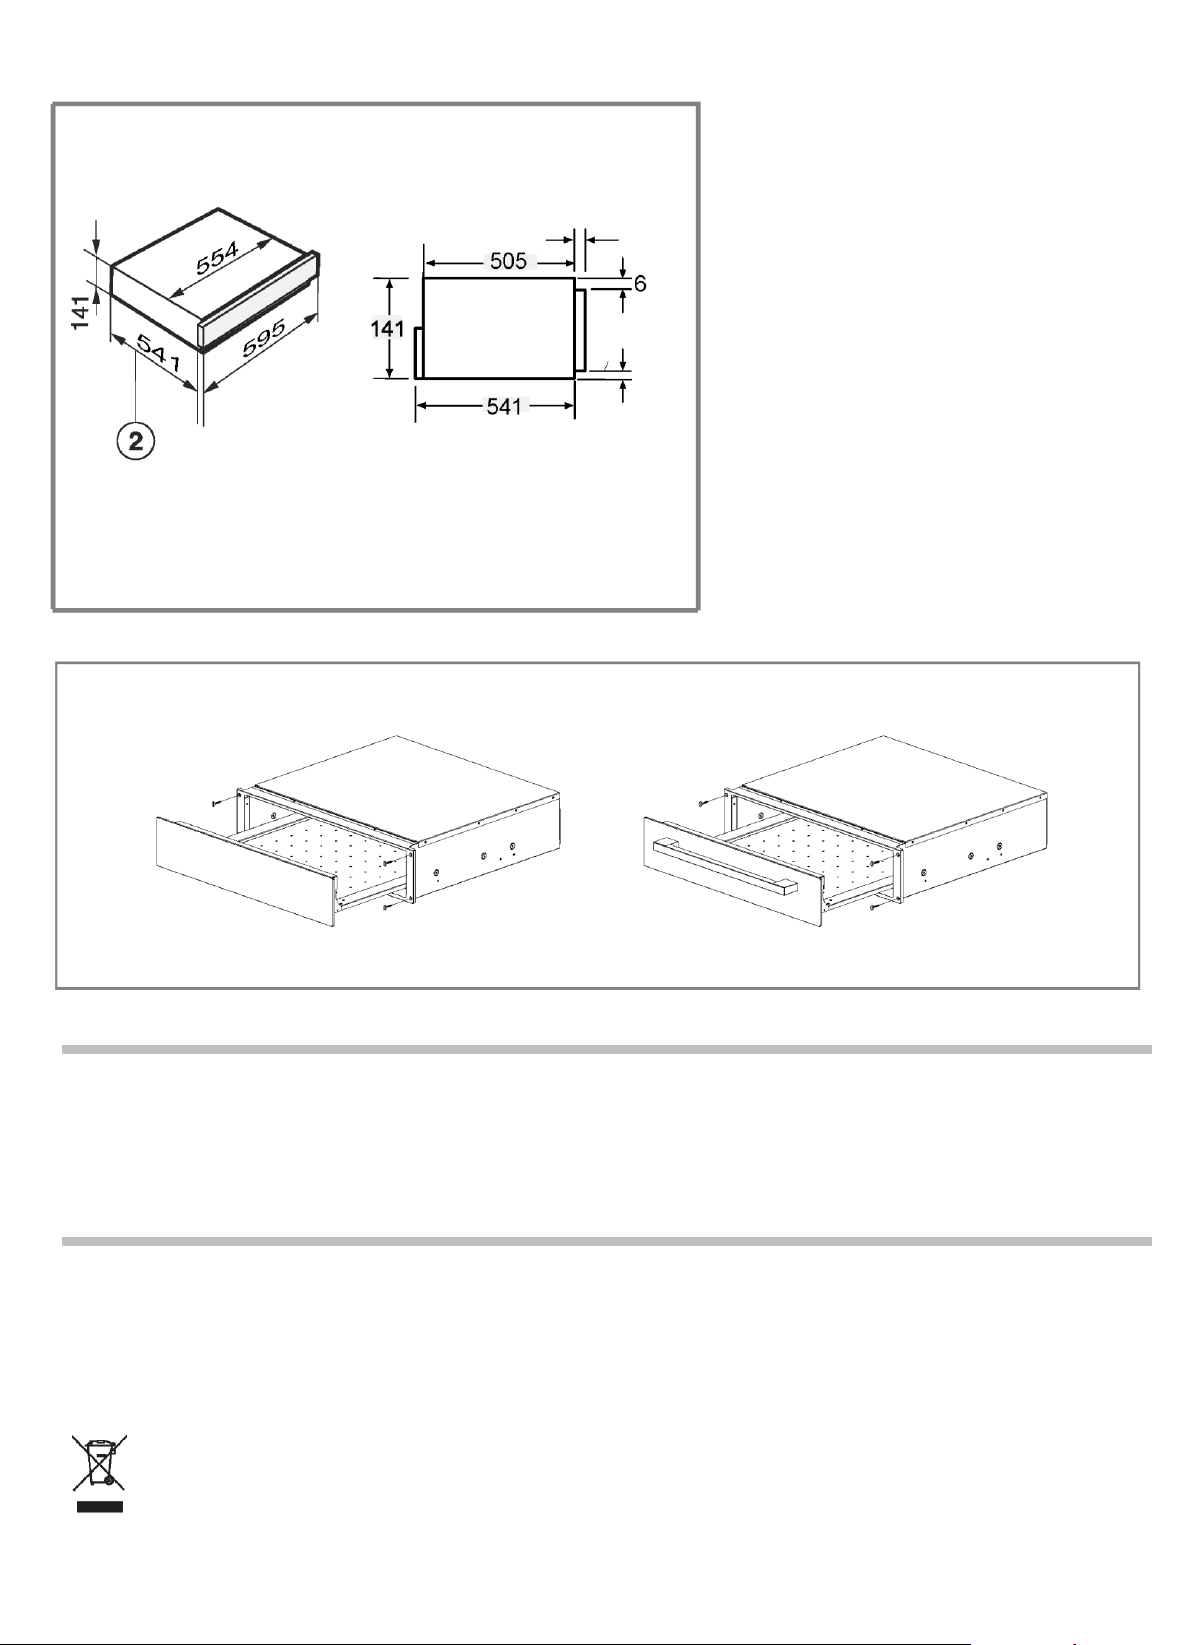
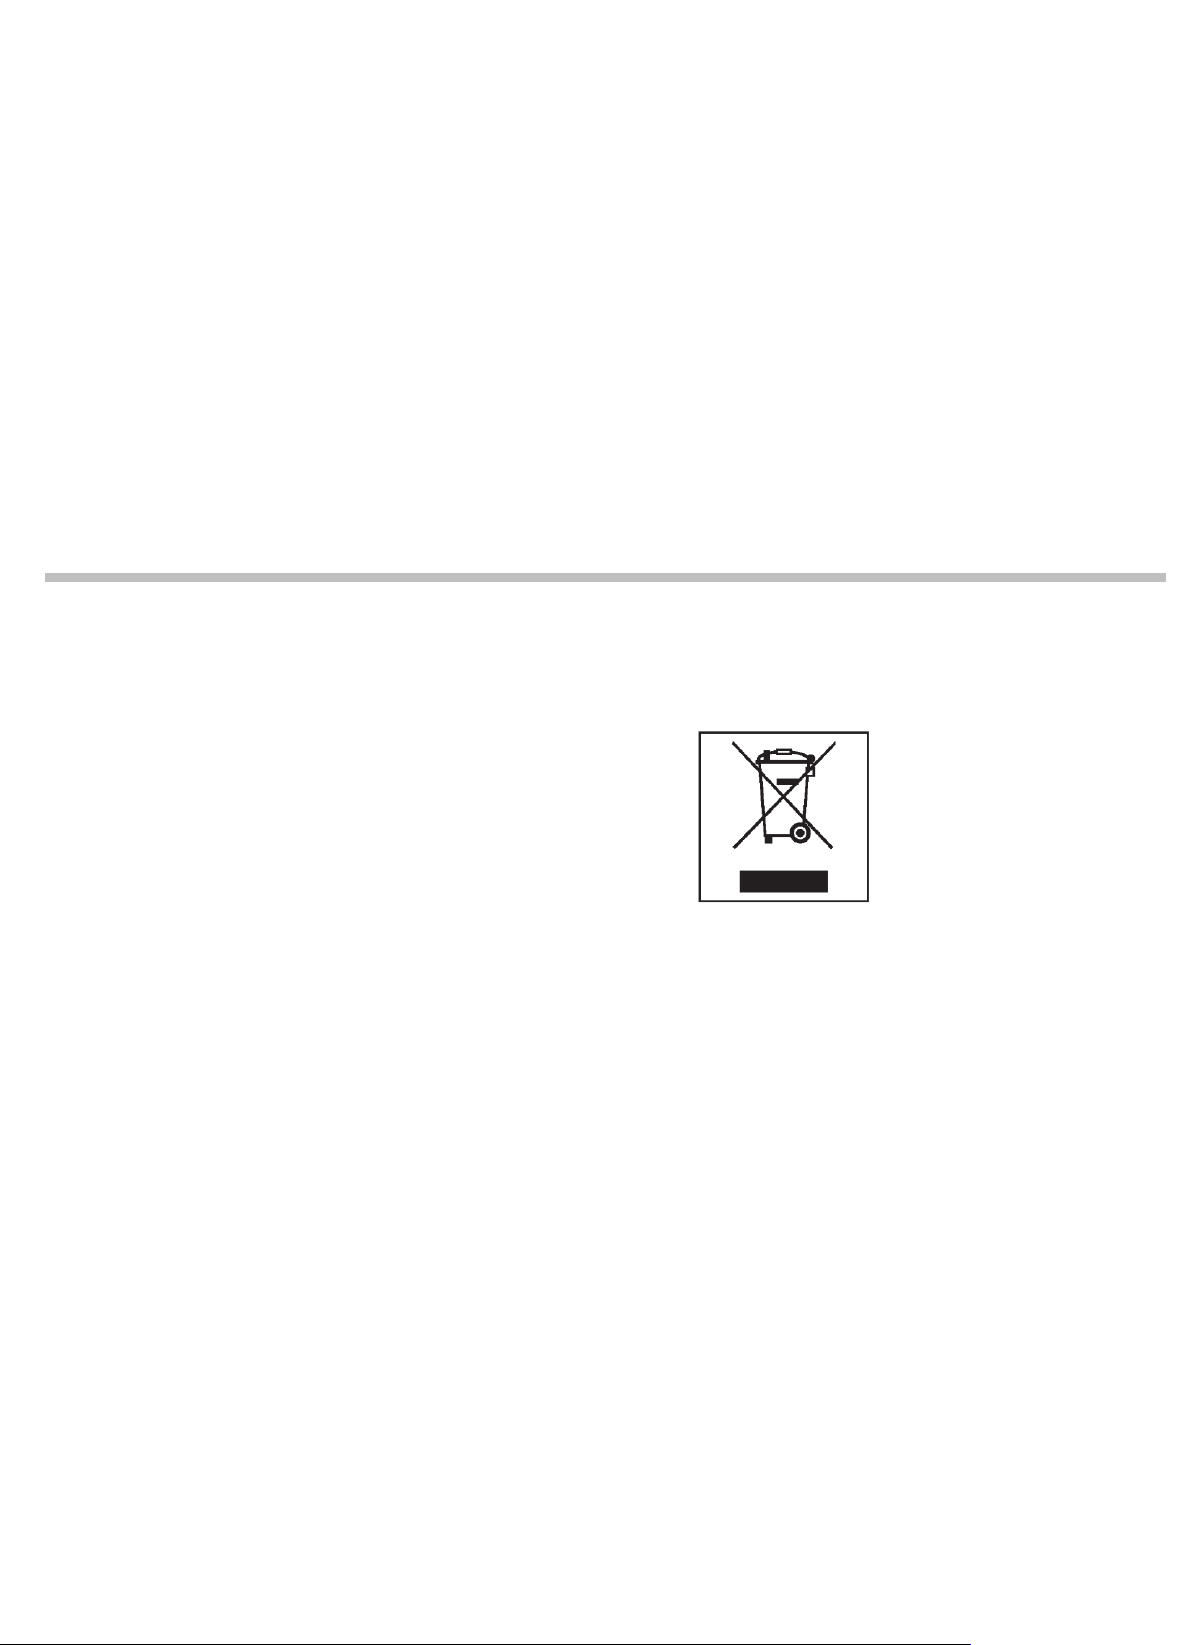
► The warming drawer is available in two models, which differ in opening the door.
The building-in dimensions for the warming drawer must be added to the building in
dimensions for the combination appliance to establish the niche size required.
EN-21
Page 22
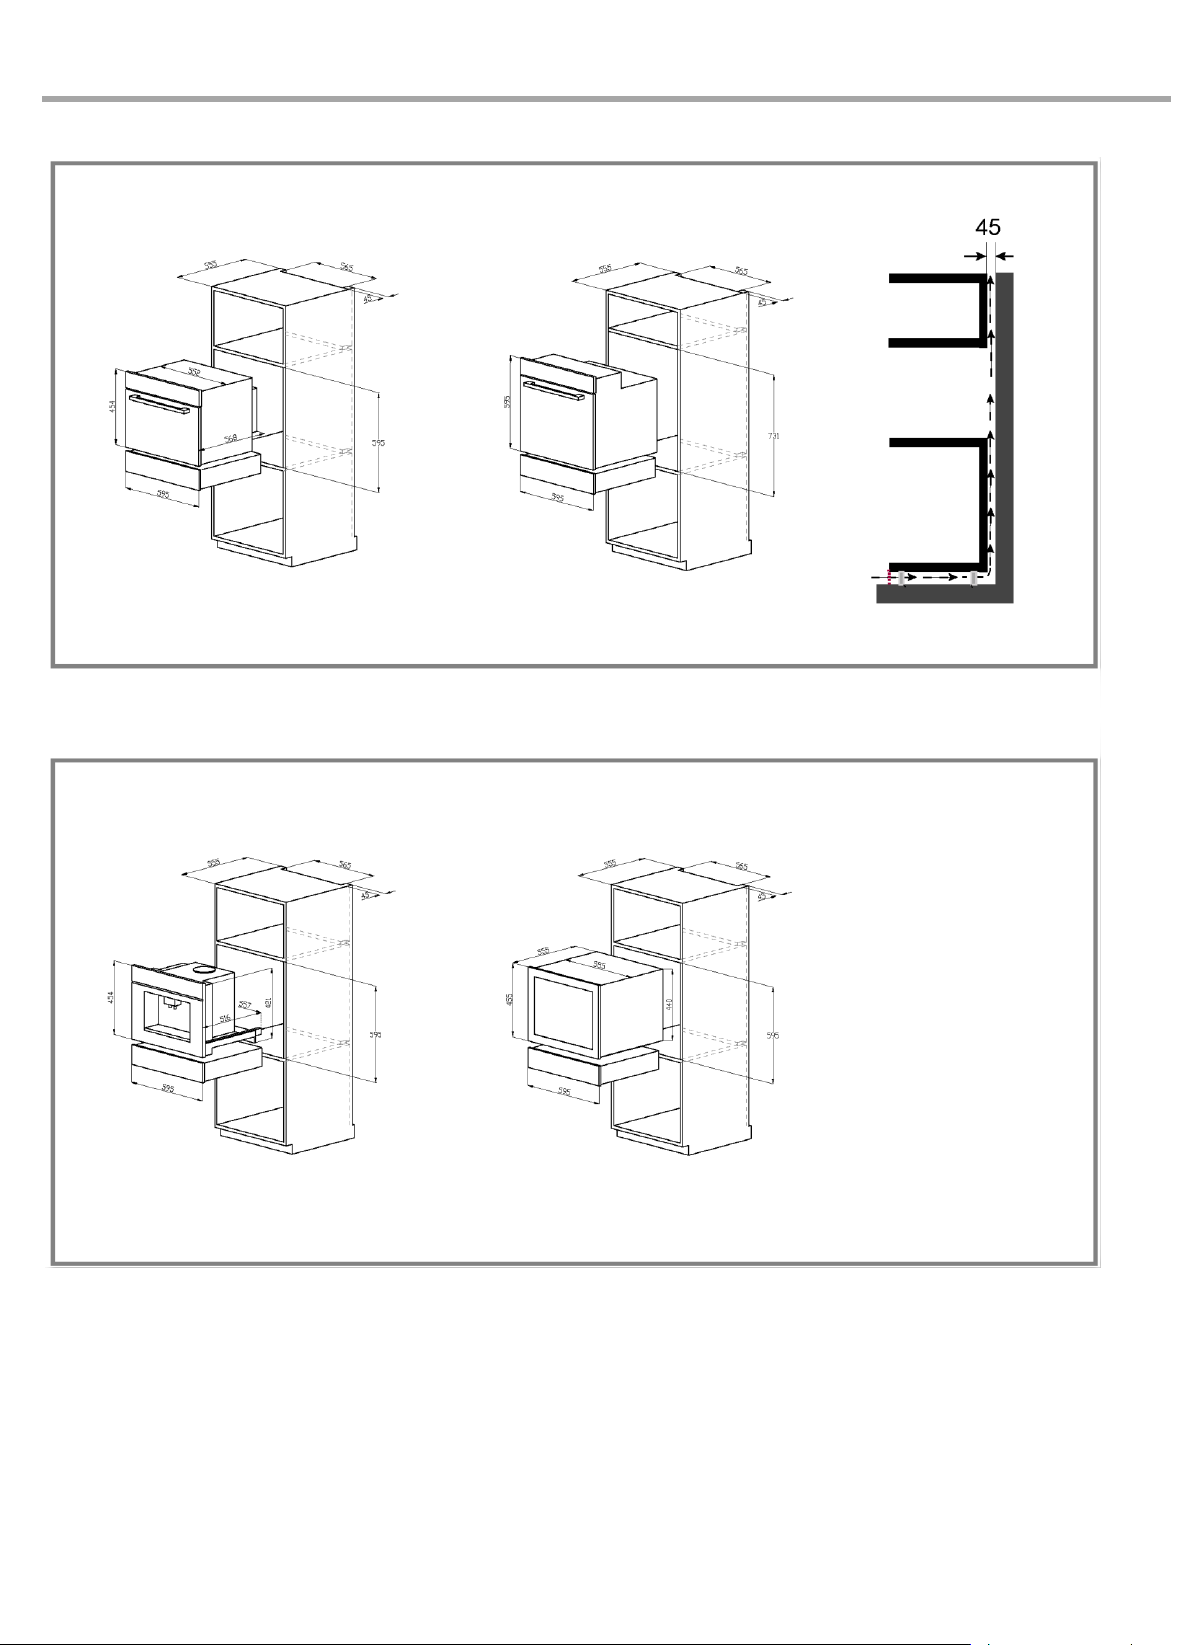
Coffee machine H:454mm
Wine cooler H:455mm
Oven H:595mm
Rack side air intakes
Compact appliances H:454mm
Building-in dimensions
EN-22
Page 23
Ventilation cut-out required when
combined with a pyrolytic oven
Building-in dimension including
mains supply cable connection
Connection cable L = 1000 mm
* Appliances with glass front
** Appliances with metal front
NOTE:
The maximum power of compact
appliances is 3350W.
Technical data
Power supply:
220 -240 V
50/60Hz
Total connected load:
1000 W
Environmental protection
Unpack the appliance and dispose of the packaging in an
environmentally-responsible manner.
Environmental protection
This appliance is labeled in accordance with the
European Directive 2012/19/EC concerning used
electrical and electronic appliances (WEEE waste electrical and electronic equipment). The
guideline determines the framework for the return
and recycling of used appliances as applicable.
* Colour-fronted appliances
19.5*/20.5
122.5
12.5
An intermediate floor is not required.
Measurements in mm
EN-23
Page 24

it
Indice
Avvertenze e istruzioni di sicurezza .................... 2
Rispetto dell’ambiente .......................................... 4
Operazioni preliminari al primo utilizzo .............. 5
Guida all’elettrodomestico .................................... 5
Pannello di controllo ................................................ 6
Funzionamento ...................................................... 6
Impostazione delle funzioni ..................................... 6
Impostazioni della temperatura ................................ 7
Durata ...................................................................... 7
Capacità .................................................................. 7
Conservazione degli alimenti al caldo ................. 8
Cottura a bassa temperatura ................................ 9
Cottura a bassa temperatura .............................. 10
Altri usi .................................................................. 16
Pulizia e manutenzione ....................................... 17
Parte anteriore e interna dell’elettrodomestico ... 17
Guida alla soluzione dei problemi...................... 19
Istruzioni per l’installazione sicura .................... 21
Dimensioni di incasso ......................................... 22
Dati tecnici ............................................................ 23
Protezione dell’ambiente .................................... 23
Avvertenze e istruzioni di
sicurezza
Questo elettrodomestico è conforme a tutti i requisiti di
sicurezza pertinenti. L’uso inappropriato, tuttavia, può causare
lesioni personali e danni ai beni.
Per evitare il rischio di incidenti e danni all’elettrodomestico,
consultare attentamente queste istruzioni prima
dell’installazione e prima di utilizzare l’elettrodomestico per la
prima volta. Queste istruzioni contengono note importanti
sull’installazione, sulla sicurezza, sull’uso e sulla
manutenzione.
Conservare queste istruzioni in un luogo sicuro e accertarsi
che i nuovi utilizzatori ne conoscano il contenuto. Se
l’elettrodomestico viene ceduto ad altri, cedere anche le
relative istruzioni.
Avvertenze e istruzioni di sicurezza
Utilizzo corretto
► L’elettrodomestico non è destinato a utilizzi commerciali,
ma all’uso domestico in ambienti residenziali.
► Non utilizzare l’elettrodomestico all’esterno,
► Ma solo negli ambienti domestici descritti in queste
istruzioni per l’installazione e l’uso.
Altri utilizzi non sono consentiti dal produttore e possono
essere pericolosi.
► L’elettrodomestico può essere utilizzato da persone con
ridotte capacità fisiche, sensoriali o mentali, o prive di
conoscenze ed esperienza solo sotto supervisione oppure
se tali persone sono state istruite sull’uso sicuro e sono
consapevoli dei relativi rischi.
Protezione dei bambini
► Tenere lontani dall’elettrodomestico i bambini di età
inferiore a 8 anni, a meno che non vengano controllati
costantemente.
► I bambini di età superiore a 8 anni possono adoperare
l’elettrodomestico solo se sono stati istruiti sull’uso sicuro e
sono consapevoli dei relativi rischi.
► Non consentire ai bambini di pulire l’elettrodomestico senza
sorveglianza.
► L’elettrodomestico non è un giocattolo. Per evitare il rischio
di lesioni, non lasciare che i bambini giochino con
l’elettrodomestico o con i relativi comandi.
► Quando viene utilizzato, l’elettrodomestico si riscalda e
rimane caldo per un po’ di tempo anche dopo che è stato
spento. Tenere lontani i bambini dall’elettrodomestico fino a
quando non si sia raffreddato e non possano scottarsi.
IT-2
Page 25

► Tenere lontano dai neonati e dai bambini i materiali di
imballaggio (ad es. pellicole alimentari, polistirene e
involucri di plastica) per scongiurare il rischio di
soffocamento. Smaltire o riciclare in sicurezza tutti i
materiali di imballaggio non appena possibile.
Sicurezza tecnica
► L’installazione, la manutenzione e le riparazioni possono
essere eseguite solo da persone qualificate e competenti, in
conformità alle normative di sicurezza locali e nazionali.
L’installazione, la manutenzione e le riparazioni eseguite da
persone non qualificate possono essere pericolose.
► Un elettrodomestico danneggiato può essere pericoloso.
Prima dell’installazione, accertarsi che l’elettrodomestico
non presenti segni di danni. Non utilizzare un
elettrodomestico pericoloso.
► La sicurezza elettrica di questo elettrodomestico può
essere garantita solo se è collegato correttamente a
terra. È molto importante rispettare e controllare
regolarmente questo requisito di sicurezza fondamentale;
in caso di dubbi, rivolgersi a un elettricista qualificato per
un’ispezione dell’impianto elettrico domestico.
► Per evitare danni all’elettrodomestico, prima di collegarlo
alla corrente accertarsi che i dati di collegamento
(frequenza e tensione) riportati sulla targhetta
corrispondano a quelli dell’impianto elettrico domestico.
In caso di dubbi, consultare un elettricista qualificato.
► Non adoperare adattatori o prolunghe per collegare
l’elettrodomestico all’alimentazione elettrica di rete,
altrimenti non è possibile garantire la necessaria
sicurezza dell’elettrodomestico (ad es. pericolo di
surriscaldamento).
► Per motivi di sicurezza, questo elettrodomestico può
essere utilizzato solo a incasso e solo in sedi fisse (non
deve essere utilizzato, ad esempio, su imbarcazioni).
► Non aprire l’involucro dell’elettrodomestico.
La manomissione dei collegamenti elettrici, dei
componenti e delle parti meccaniche è estremamente
pericolosa e può causare lesioni personali o
malfunzionamenti.
► Nel periodo di copertura della garanzia
dell’elettrodomestico, eventuali riparazioni devono essere
effettuate solo da un tecnico dell’assistenza, altrimenti la
garanzia non sarà più valida.
► Il produttore può garantire la sicurezza dell’elettrodomestico
solo se vengono utilizzati i ricambi corretti.
► I componenti difettosi devono essere sostituiti solo con
ricambi originali Midea.Se si stacca la spina dal cavo di
collegamento o se l’elettrodomestico viene alimentato
senza spina, deve essere collegato alla presa elettrica solo
da un elettricista qualificato.
► Durante l’installazione, la manutenzione e le riparazioni,
scollegare l’elettrodomestico dalla corrente elettrica.
Accertarsi che l’elettrodomestico sia alimentato solo dopo
che è stato installato o al termine delle operazioni di
manutenzione o riparazione.
► Nelle zone soggette a infestazioni di blatte o altri parassiti,
è molto importante tenere sempre pulito l’elettrodomestico
e l’ambiente in cui è installato. Eventuali danni causati da
blatte o altri parassiti non sono coperti dalla garanzia.
Uso corretto
► IL CASSETTO È PROGETTATO PER TENERE CALDI I
CIBI, NON PER RISCALDARLI. ACCERTARSI CHE GLI
ALIMENTI SIANO BEN CALDI QUANDO VENGONO
COLLOCATI NEL CASSETTO SCALDAVIVANDE.
► Il cassetto o i piatti caldi potrebbero causare ustioni.
Quando si utilizza l’elettrodomestico, proteggersi le mani
indossando guanti o presine. Se le mani non sono ben
asciutte, il calore dei materiali si trasferisce più
rapidamente e può provocare scottature o ustioni.
► Non conservare contenitori di plastica oppure oggetti
infiammabili nel cassetto scaldavivande, perché potrebbero
fondersi o prendere fuoco quando viene acceso
l’elettrodomestico, provocando un incendio.
► Poiché la temperatura irradiata è alta, se si lasciano oggetti
vicino all’elettrodomestico mentre viene utilizzato,
potrebbero prendere fuoco. Non utilizzare
l’elettrodomestico per riscaldare l’ambiente.
► Non sostituire il tappetino antiscivolo fornito con
l’elettrodomestico con tovaglie di carta da cucina o simili.
► Per evitare danni alle guide di scorrimento telescopiche,
non appoggiare oggetti sopra il cassetto e non
sovraccaricarlo. Le guide di scorrimento telescopiche sono
in grado di sostenere un carico massimo di 25 kg.
► Se l’elettrodomestico viene installato dietro uno sportello di
un mobile di cucina, può essere utilizzato solo con lo
sportello del mobile aperto. Chiudere lo sportello del mobile
solo dopo aver spento l’elettrodomestico.
IT-3
Page 26
► Nel cassetto non riscaldare vasi o barattoli di alimenti non
aperti, perché la pressione interna potrebbe farli
esplodere causando lesioni, ustioni o danni.
► La parte inferiore del cassetto diventa calda quando è
acceso. Non toccarla quando il cassetto è aperto.
► Non utilizzare contenitori di plastica o alluminio,
perché potrebbero fondersi ad alta temperatura e
provocare incendi. Adoperare solo stoviglie di vetro,
porcellana o materiali simili in grado di resistere al calore.
► L’apertura e la chiusura del cassetto carico richiedono
particolare attenzione per evitare la fuoriuscita di liquidi
dagli sfiati che potrebbero provocare un corto circuito
dell’elettrodomestico.
► Se la temperatura è troppo bassa, negli alimenti potrebbero
svilupparsi batteri. Accertarsi che la temperatura impostata
sia sufficiente a mantenere caldi gli alimenti.
Pulizia e manutenzione
► Pericolo di lesioni.
Per pulire questo elettrodomestico non utilizzare apparecchi
a vapore, perché il vapore potrebbe raggiungere i
componenti elettrici e provocare un corto circuito.
Rispetto dell’ambiente
Smaltimento dei materiali di imballaggio
I materiali di imballaggio per il trasporto e la protezione sono
riciclabili.
Accertarsi che gli involucri di plastica, i sacchetti ecc. siano
smaltiti in sicurezza e tenerli lontani dalla portata di bambini
e neonati per scongiurare il rischio di soffocamento.
Smaltimento dei vecchi elettrodomestici
Le apparecchiature elettriche ed elettroniche spesso
contengono materiali che possono essere nocivi alla salute e
all’ambiente se non vengono manipolati o gestiti
correttamente. L’uso di tali materiali, tuttavia, è
indispensabile per il corretto funzionamento
dell’elettrodomestico.
Non smaltire tali materiali tra i rifiuti
indifferenziati,
ma conferirli in un centro di raccolta
differenziata o rivolgersi al fornitore
per ottenere assistenza. Accertarsi
che i materiali conservati in attesa
dello smaltimento non costituiscano
un pericolo per i bambini.
Informazioni importanti
Collegamento elettrico
La spina dell’elettrodomestico deve essere collegata solo a una presa dotata di messa a terra.
L’installazione della presa o la sostituzione del cavo di collegamento possono essere effettuate solo da
un elettricista qualificato nel rispetto delle normative. Se non è possibile accedere alla spina dopo
l’installazione, predisporre un interruttore sezionatore di tutti i poli dal lato dell’impianto, con una
distanza tra i contatti di almeno 3 mm e protezione dei contatti garantita dall’impianto.
IT-4
Page 27
Operazioni preliminari al primo
utilizzo
Dopo l’installazione dell’elettrodomestico e dopo
un’interruzione della corrente, viene eseguito un test del
display per 10 secondi. Contemporaneamente, si accendere
la ventola. Durante il test, l’elettrodomestico non può essere
utilizzato.
Affiggere la targhetta supplementare per l’elettrodomestico
fornita con la presente documentazione nell’apposito spazio
nella sezione “Targhetta assistenza post-vendita”.
Prima operazione di pulizia e riscaldamento
Togliere il foglio protettivo e le etichette adesive.
Togliere dal cassetto il tappetino antiscivolo e il cestello
(se presente); pulire con una spugna imbevuta di acqua
calda e un po’ di detersivo liquido per i piatti. Asciugare
con un panno morbido.
Strofinare la parte interna e quella esterna
dell’elettrodomestico adoperando solo un panno umido e
asciugare con un panno morbido.
Rimontare il tappetino antiscivolo e il cestello (se
presente) nel cassetto.
Riscaldare il cassetto vuoto per almeno due ore.
Accendere l’elettrodomestico toccando il sensore .
Toccare ripetutamente il sensore fino a quando si
accende il LED.
Toccare ripetutamente il sensore fino a quando si
accende il LED all’estrema destra.
Toccare ripetutamente il sensore fino a quando
viene visualizzato “2h”.
Chiudere il cassetto.
Il cassetto scaldavivande è dotato di meccanismo di
chiusura automatica graduale.
È dotato anche di un interruttore a contatto che
garantisce che l’elemento scaldante e la ventola
dell’elettrodomestico entrino in funzione solo quando il
cassetto è chiuso.
I componenti metallici sono coperti da un rivestimento
protettivo che potrebbe emettere un lieve odore quando
viene scaldato per la prima volta.
L’odore ed eventuali vapori scompariranno dopo breve
tempo e non indicano un guasto dell’elettrodomestico.
Ventilare adeguatamente la cucina quando
l’elettrodomestico viene riscaldato per la prima volta.
Guida all’elettrodomestico
Per elettrodomestici senza maniglia Premere la parte centrale del cassetto per aprirlo o chiuderlo.
Quando è aperto, il cassetto fuoriesce leggermente ed è possibile tirarlo per estrarlo.
Pannello di controllo
Tappetino antiscivolo: per evitare che le stoviglie si spostino
(accessorio opzionale)
IT-5
Page 28
PANNELLO DI CONTROLLO
Per il riscaldamento di tazze e
bicchieri
Pulsante di annullamento
Per il riscaldamento di piatti
Pulsante di avvio
Per mantenere caldi gli alimenti
L’elettrodomestico può essere utilizzato per
mantenere caldi gli alimenti e nello stesso
tempo anche i piatti. Gli alimenti, però, devono
essere coperti e i piatti devono essere asciutti.
Attenzione: il riscaldamento dei piatti
richiede più tempo e i piatti potrebbero
diventare molto caldi.
Per l’impostazione della temperatura
Per l’impostazione della durata
Per la regolazione della temperatura
e del tempo
Funzionamento
Impostazione delle funzioni
1) In stato di attesa, premere il tasto “ ” per avviare
la funzione di riscaldamento di tazze e bicchieri a
40 °C.
2) Viene visualizzato “40 °C”.
3) Toccare “ ” o “ ” per regolare la temperatura.
4) Toccare “ ”, quindi “ ” o “ ” per regolare il
tempo di riscaldamento.
5) Toccare “ ” per salvare la temperatura e il
tempo.
5) Chiudere lo sportello. Viene emesso un segnale
acustico e l’elettrodomestico comincia a funzionare.
Nota:
1) Durante l’impostazione dei parametri, è possibile
premere altri tasti funzione per scegliere la modalità
di funzionamento “ ”, “ ” e “ ”.
2) Prima di chiudere lo sportello, è possibile toccare
“ ” per annullare l’impostazione; in tal modo,
l’elettrodomestico torna in stato di attesa.
3) Durante il funzionamento, aprire lo sportello per
accedere alla modalità di regolazione dei parametri e
premere “ ” o “ ” per regolare la temperatura.
Per modificare i parametri da regolare, è possibile premere
“ ” o “ ”; per salvare l’impostazione, premere “ ”.
4) Dopo aver salvato l’impostazione, è possibile premere
“ ” per accedere allo stato di attesa o chiudere lo
sportello per avviare l’elettrodomestico.
Specifiche
1) Con l’elettrodomestico collegato alla corrente, aprire
lo sportello. Viene emesso un segnale acustico,
l’elettrodomestico accede allo stato di attesa e viene
visualizzato “0”.
2) Nel processo di impostazione dell’orologio, se non
viene eseguita alcuna operazione entro 3 minuti, il forno
torna allo stato di attesa.
3) Se si preme un tasto, viene emesso il segnale
acustico.
4) Per segnalare la fine della cottura, viene emesso un
doppio segnale acustico.
IT-6
Page 29
Impostazioni della temperatura
Ogni funzione ha un proprio intervallo di temperatura. Le
temperature consigliate dal fabbricante sono stampate in
grassetto. Toccando il sensore , è possibile variare la
temperatura con incrementi di 5 °C. L’ultima temperatura
selezionata viene attivata automaticamente alla successiva
accensione del cassetto e viene visualizzata sul display.
Temperature °C*
40
60
60
45
65
65
50
70
70
55
75
75
60
80
80
* Valori della temperatura approssimativi, misurati al centro del
cassetto vuoto
Durata
L’elettrodomestico è impostato in modalità di
funzionamento continuo. Toccando il , è possibile
selezionare una durata limitata: un tocco per un’ora (1h),
due tocchi per due ore (2h) e così via.
Capacità
La quantità che è possibile caricare dipende principalmente dalle dimensioni e dal peso
delle stoviglie. Non sovraccaricare il cassetto. La massima capacità di carico del
cassetto è 25 kg. Se il cassetto non è caricato fino alla capacità massima, deve essere
aperto o chiuso lentamente.
Gli esempi di caricamento seguenti sono
riportati solo a scopo di suggerimento.
– preriscaldamento stoviglie:
6 piatti piani
Ø 26 cm
6 piatti fondi
Ø 23 cm
6 piatti da dessert
Ø 19 cm
1 vassoio ovale
32 cm
1 scodella media
Ø 16 cm
1 scodella piccola
Ø 13 cm
IT-7
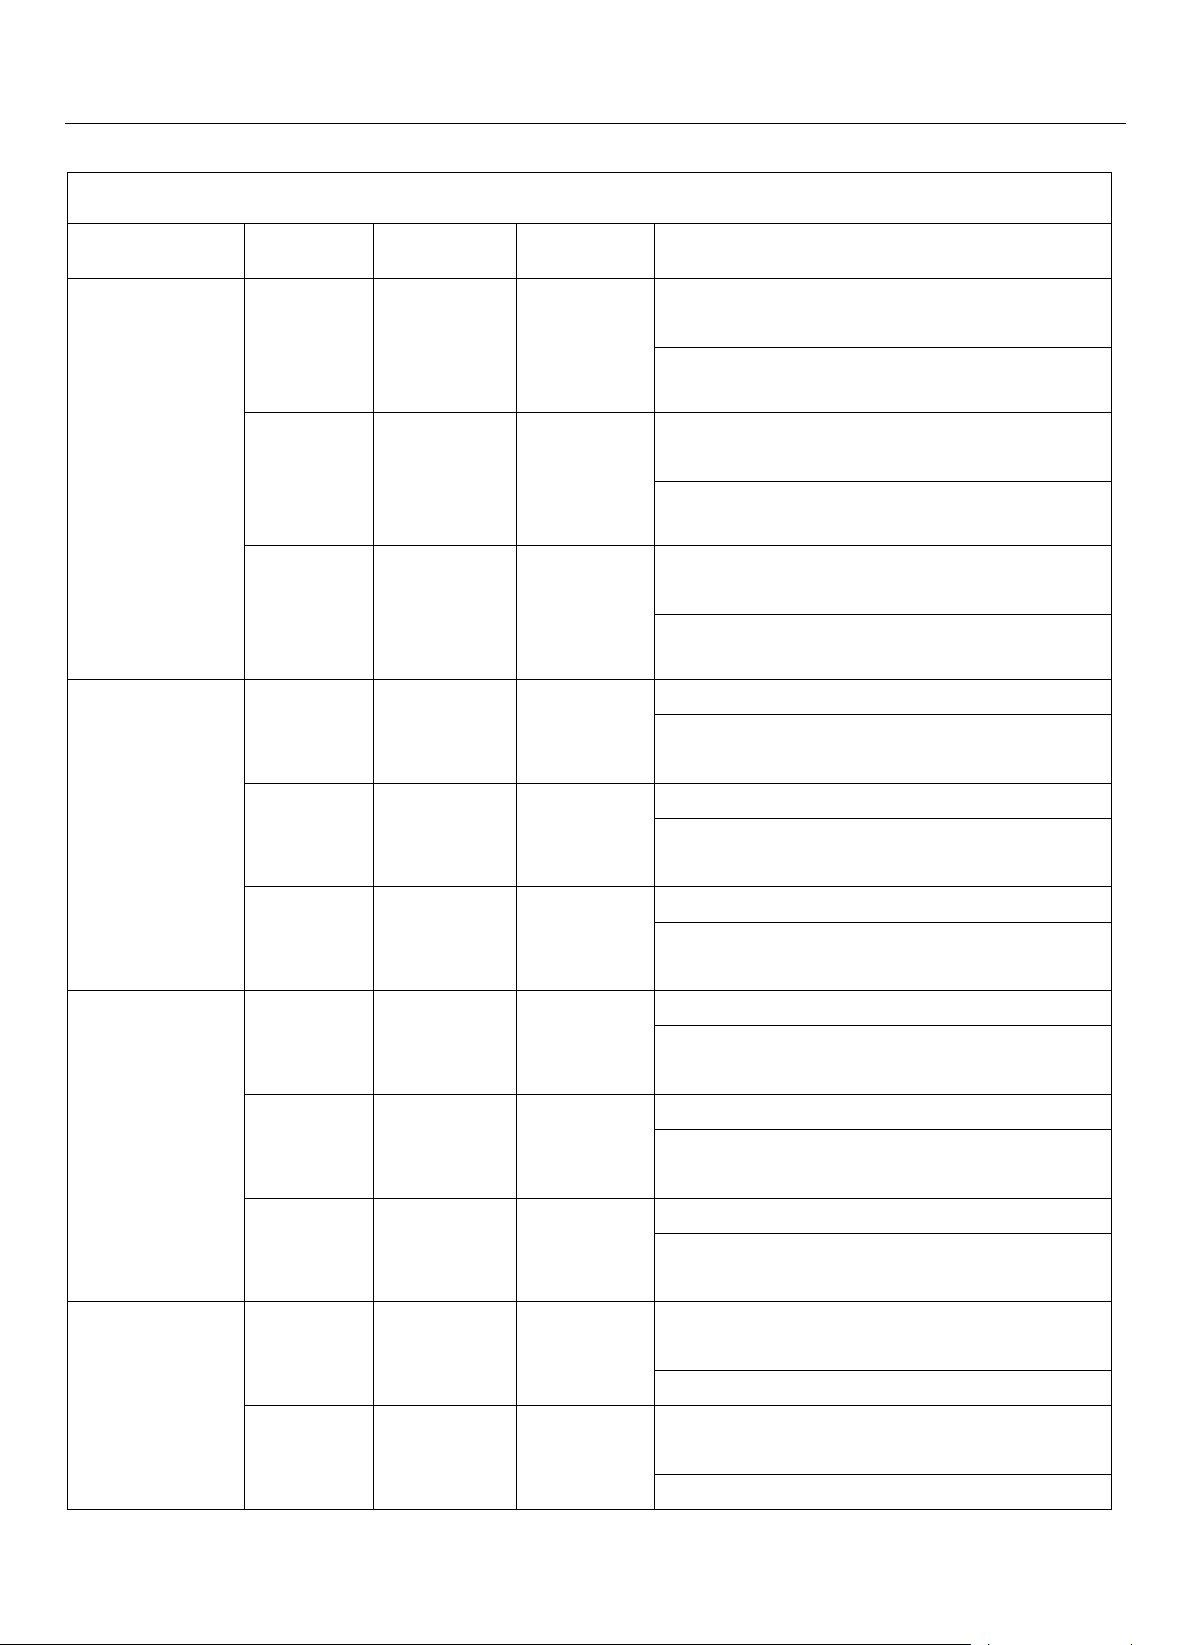
Page 30
Alimento
Coprire il contenitore?
Temperatura per l’impostazione
Bistecca (poco cotta)
sì
65
Cibi cotti al forno o
gratinati
sì
80
Carne arrosto
sì
75
Cibi cotti in casseruola
sì
80
Bastoncini di pesce
no
80
Carne al sugo
sì
80
Ortaggi in salsa
sì
80
Gulasch
sì
80
Purè di patate
sì
75
Piatto precotto
sì
80
Patate al forno / patate
novelle
sì
75
Scaloppina impanata
no
80
Frittelle / frittelle di patate
no
80
Pizza
no
80
Patate bollite
sì
80
Salsa
sì
80
Strudel
no
80
Riscaldamento pane
no
65
Riscaldamento involtini
no
65
Conservazione degli alimenti al caldo
Impostazioni
A seconda del modello
I contenitori dipendono dalla quantità, dagli alimenti o dal tipo di ricetta
IT-8
Page 31

Che significa?
È una procedura di cottura in cui la temperatura di cottura è uguale
o prossima alla temperatura finale desiderata per la parte interna
dell’alimento. Nella cottura tradizionale, la temperatura di cottura è
sempre superiore alle temperature desiderate per gli alimenti
pronti da mangiare. Con la cottura a bassa temperatura, la carne
viene cotta a bassa temperatura per lungo tempo. Adoperando
questo metodo, la carne perde meno liquido (si spezzano meno
molecole) e conserva le caratteristiche organolettiche (vitamine,
proteine e così via), la freschezza, il sapore e la succosità.
Questo metodo di cottura è particolarmente idoneo per cuocere
grossi pezzi di carne tenera.
Per una cottura di precisione, si consiglia l’uso di un termometro
per alimenti dedicato per controllare la temperatura della parte
interna dell’alimento.
Temperatura interna
Nel cassetto scaldavivande è possibile cuocere alimenti con una
temperatura interna fino a 70 °C. La carne che richiede una
cottura a una temperatura interna superiore a 70 °C non può
essere cotta nel cassetto scaldavivande.
L’indicazione della temperatura interna indica il grado di cottura
della parte centrale di un pezzo di carne. Più bassa è la
temperatura interna, meno cotta è la parte centrale della carne:
45-50 °C
= poco cotta
55-60 °C
= cottura media
65 °C
= ben cotta
Utilizzo
1. Preriscaldare il vano per 15 minuti a 70 °C.
2. Coprire adeguatamente la carne con una pellicola alimentare.
3. La durata della cottura dipende dalle dimensioni dei singoli
pezzi di carne (v. tabella)
Cottura a bassa temperatura
IT-9
Page 32

4. Collocare la carne coperta su un piatto e calcolare il tempo con
un cronometro.
5. Abbrustolire la carne per renderla saporita (v. tabella)
Cottura a bassa temperatura
IT-10
Page 33

Manzo e vitello
Parte
Spessore
Grado di
cottura
Tempo
Tempo di abbrustolimento e indicazioni
Filetto intero
50 mm
Poco cotta
1 h e 35 min
90 secondi per il lato esterno con il forno alla
massima potenza
Cottura media
2 h e 35 min
Ben cotta
3 h e 30 min
3 minuti per il lato esterno con il forno a potenza
medio-alta
60 mm
Poco cotta
1 h e 45 min
90 secondi per il lato esterno con il forno alla
massima potenza
Cottura media
2 h e 50 min
Ben cotta
4 h
3 minuti per il lato esterno con il forno a potenza
medio-alta
70 mm
Poco cotta
2 h
90 secondi per il lato esterno con il forno alla
massima potenza
Cottura media
3 h
Ben cotta
4 h e 40 min
3 minuti per il lato esterno con il forno a potenza
medio-alta
Medaglioni
Costata di
manzo
Fiorentina
Bistecca di
girello
20 mm
Poco cotta
50 min
90 secondi per lato con il forno alla massima
potenza
Cottura media
1 h e 30 min
Ben cotta
2 h
3 minuti per lato con il forno a potenza medio-alta
30 mm
Poco cotta
1 h e 5 min
90 secondi per lato con il forno alla massima
potenza
Cottura media
1 h e 50 min
Ben cotta
2 h e 20 min
3 minuti per lato con il forno a potenza medio-alta
40 mm
Poco cotta
1 h e 20 min
2 minuti per lato con il forno alla massima potenza
Cottura media
2 h e 10 min
Ben cotta
3 h
4 minuti per lato con il forno a potenza medio-alta
Lombo di
manzo
Roast beef
60 mm
Poco cotta
1 h e 45 min
4 minuti per il lato esterno con il forno a potenza
medio-alta
Cottura media
2 h e 50 min
Ben cotta
4 h
6 minuti per il lato esterno con il forno a media
potenza
70 mm
Poco cotta
2 h
4 minuti per il lato esterno con il forno a potenza
medio-alta
Cottura media
3 h
Ben cotta
4 h e 40 min
6 minuti per il lato esterno con il forno a media
potenza
80 mm
Poco cotta
2 h e 20 min
4 minuti per il lato esterno con il forno a potenza
medio-alta
Cottura media
3 h e 30 min
Ben cotta
5 h e 40 min
6 minuti per il lato esterno con il forno a media
potenza
Cottura a bassa temperatura
Tabella di cottura
IT-11
Page 34

Carne di suino
Parte
Spessore
Grado di cottura
Tempo
Tempo di abbrustolimento e indicazioni
Filetto intero
40 mm
Cottura media
2 h e 20 min
90 secondi per il lato esterno con il forno alla
massima potenza
Ben cotta
3 h e 10 min
3 minuti per il lato esterno con il forno a potenza
medio-alta
50 mm
Cottura media
2 h e 35 min
90 secondi per il lato esterno con il forno alla
massima potenza
Ben cotta
3 h e 25 min
3 minuti per il lato esterno con il forno a potenza
medio-alta
60 mm
Cottura media
3 h
90 secondi per il lato esterno con il forno alla
massima potenza
Ben cotta
4 h e 5 min
3 minuti per il lato esterno con il forno a potenza
medio-alta
Prosciutto
disossato
Involtini
Arrosto di
maiale
Lombata di
maiale
30 mm
Cottura media
1 h e 50 min
2 minuti per il lato esterno con il forno ad alta
potenza
Ben cotta
2 h e 40 min
3 minuti per il lato esterno con il forno a potenza
medio-alta
40 mm
Cottura media
2 h e 20 min
2 minuti per il lato esterno con il forno ad alta
potenza
Ben cotta
3 h e 10 min
3 minuti per il lato esterno con il forno a potenza
medio-alta
50 mm
Cottura media
2 h e 35 min
4 minuti per il lato esterno con il forno a potenza
medio-alta
Ben cotta
3 h e 25 min
6 minuti per il lato esterno con il forno a media
potenza
60 mm
Cottura media
3 h
4 minuti per il lato esterno con il forno a potenza
medio-alta
Ben cotta
4 h e 5 min
6 minuti per il lato esterno con il forno a media
potenza
70 mm
Cottura media
3 h e 20 min
4 minuti per il lato esterno con il forno a potenza
medio-alta
Ben cotta
4 h e 45 min
6 minuti per il lato esterno con il forno a media
potenza
80 mm
Cottura media
3 h e 40 min
4 minuti per il lato esterno con il forno a potenza
medio-alta
Ben cotta
5 h e 30 min
6 minuti per il lato esterno con il forno a media
potenza
Braciola di
lonza
10 mm
Cottura media
1 h e 10 min
60 secondi per lato con il forno alla massima
potenza
Ben cotta
1 h e 30 min
2 minuti per lato con il forno alla massima potenza
20 mm
Cottura media
1 h e 30 min
90 secondi per lato con il forno alla massima
potenza
Ben cotta
2 h e 10 min
3 minuti per lato con il forno ad alta potenza
Cottura a bassa temperatura
IT-12
Page 35

Pollame
Parte
Spessore
Grado di
cottura
Tempo
Tempo di abbrustolimento e indicazioni
Petto di pollo
25 mm
Cottura
media
1 h e 30 min
60 secondi per lato con il forno alla massima
potenza
Ben cotta
2 h
90 secondi per lato con il forno alla massima
potenza
35 mm
Cottura
media
1 h e 45 min
60 secondi per lato con il forno alla massima
potenza
Ben cotta
2 h e 20 min
90 secondi per lato con il forno ad alta potenza
Petto/filetto di anatra
35 mm
Poco cotta
1 h
4 minuti per la pelle con il forno a potenza medioalta
Cottura
media
1 h e 30 min
4 minuti per la pelle con il forno a potenza medioalta
Ben cotta
2 h
4 minuti per la pelle con il forno a potenza medioalta
40 mm
Poco cotta
1 h e 45 min
4 minuti per la pelle con il forno a potenza medioalta
Cottura
media
2 h e 20 min
4 minuti per la pelle con il forno a potenza medioalta
Ben cotta
3 h
4 minuti per la pelle con il forno a potenza medioalta
Petto di tacchino
40 mm
Cottura
media
3 h
90 secondi per lato con il forno alla massima
potenza
Ben cotta
4 h
3 minuti per lato con il forno ad alta potenza
50 mm
Cottura
media
3 h e 50 min
90 secondi per lato con il forno alla massima
potenza
Ben cotta
5 h
3 minuti per lato con il forno ad alta potenza
Medaglione di fegato
d’oca
10 mm
Cottura
media
30 min
60 secondi per lato con il forno alla massima
potenza
20 mm
Cottura
media
40 min
60 secondi per lato con il forno alla massima
potenza
30 mm
Cottura
media
50 min
60 secondi per lato con il forno alla massima
potenza
Fegato d’oca intero
35 mm
Cottura
media
48 min
90 secondi per il lato esterno con il forno alla
massima potenza
45 mm
Cottura
media
1 h
90 secondi per il lato esterno con il forno alla
massima potenza
55 mm
Cottura
media
1 h e 15 min
90 secondi per il lato esterno con il forno alla
massima potenza
Cottura a bassa temperatura
IT-13
Page 36

Agnello
Parte
Spessore
Grado di
cottura
Tempo/
Temperatura
Tempo di abbrustolimento e indicazioni
Carré di agnello
40 mm
Poco cotta
1 h e 20 min
90 secondi per il lato esterno con il forno alla
massima potenza
Cottura media
2 h e 10 min
Ben cotta
3 h
3 minuti per il lato esterno con il forno a potenza
medio-alta
50 mm
Poco cotta
1 h e 35 min
90 secondi per il lato esterno con il forno alla
massima potenza
Cottura media
2 h e 35 min
Ben cotta
3 h e 30 min
3 minuti per il lato esterno con il forno a potenza
medio-alta
60 mm
Poco cotta
1 h e 45 min
90 secondi per il lato esterno con il forno alla
massima potenza
Cottura media
2 h e 50 min
Ben cotta
4 h
3 minuti per il lato esterno con il forno a potenza
medio-alta
Sella di agnello
60 mm
Poco cotta
1 h e 45 min
3 minuti per il lato esterno con il forno alla
massima potenza
Cottura media
2 h e 50 min
4 minuti per il lato esterno con il forno a potenza
medio-alta
Ben cotta
4 h
70 mm
Poco cotta
2 h
3 minuti per il lato esterno con il forno alla
massima potenza
Cottura media
3 h
4 minuti per il lato esterno con il forno a potenza
medio-alta
Ben cotta
4 h e 40 min
80 mm
Poco cotta
2 h e 20 min
3 minuti per il lato esterno con il forno alla
massima potenza
Cottura media
3 h e 30 min
4 minuti per il lato esterno con il forno a potenza
medio-alta
Ben cotta
5 h e 40 min
Cosciotto di
agnello disossato
60 mm
Poco cotta
1 h e 45 min
2 minuti per il lato esterno con il forno alla
massima potenza
Cottura media
2 h e 50 min
3 minuti per il lato esterno con il forno a potenza
medio-alta
Ben cotta
4 h
70 mm
Poco cotta
2 h
2 minuti per il lato esterno con il forno alla
massima potenza
Cottura media
3 h
3 minuti per il lato esterno con il forno a potenza
medio-alta
Ben cotta
4 h e 40 min
80 mm
Poco cotta
2 h e 20 min
2 minuti per il lato esterno con il forno alla
massima potenza
Cottura media
3 h e 30 min
3 minuti per il lato esterno con il forno a potenza
medio-alta
Ben cotta
5 h e 40 min
Costolette di
agnello
10 mm
Poco cotta
35 min
60 secondi per lato con il forno alla massima
potenza
Cottura media
1 h e 10 min
Ben cotta
2 h
90 secondi per lato con il forno alla massima
potenza
20 mm
Poco cotta
50 min
60 secondi per lato con il forno alla massima
potenza
Cottura media
1 h e 30 min
Ben cotta
2 h e 30 min
90 secondi per lato con il forno alla massima
potenza
Cottura a bassa temperatura
IT-14
Page 37

Uova
Dimensioni
Peso
Tempo
Note:
2 h e 20 min
Molto grandi
Almeno 73 g
2 h e 30 min
3 h e 10 min
2 h e 11 min
Grandi
Da 63 a 73 g
2 h e 31 min
3 h e 1 min
2 h e 5 min
Cottura media
Da 53 a 63 g
2 h e 25 min
2 h e 55 min
2 h
Piccole
Max 53
2 h e 20 min
2 h e 50 min
Cottura a bassa temperatura
IT-15
Page 38

Tipo di
alimento
Contenitore
Coprire il
contenitore?
Temperatura per
l’impostazione
Durata (ore)
Scongelamento
di bacche
Piatto
no
65 °C
1 ora
Scongelamento
Congelamento
Piatto
no
65 °C
1 ora
Verdure
Impasto lievitato
Scodella
sì
45 °C
1/2 ora
Yogurt
Vasetti per yogurt con
coperchi
sì
45 °C
6 ore
Cioccolato fuso
Scodella
no
50 °C
1 ora
Tisane oleose
Scodella coperta con
pellicola alimentare
sì
75 °C
4 ore
Tisane acquose
Scodella coperta con
pellicola alimentare
sì
65 °C
4 ore
Pomodori secchi
Piatto con carta da
forno
no
60 °C
20 ore
Verdura
disidratata
Piatto
no
60 °C
12 ore
Frutta disidratata
a fette
Piatto
no
60 °C
12 ore
Erbe disidratate
Piatto
no
70 °C
4 ore
Pane secco per
briciole
Piatto
no
80 °C
4 ore
Conserve
Contenitore di plastica
coprire e aprire gli
sfiati
50 °C
1 o 2 h, a seconda
della dimensione
Pesce in olio
per forno a microonde
Pane bianco
tostato
Piatto
no
80 °C
2 ore
Stufato a lenta
cottura
Contenitore in pirex
sì
80 °C
Da 1 a 12 ore
Altri usi
* A seconda del modello
IT-16
Page 39

Pericolo di lesioni.
Per pulire questo elettrodomestico non utilizzare apparecchi
a vapore, perché il vapore potrebbe raggiungere i
componenti elettrici e provocare un corto circuito.
Pericolo di danni.
Detergenti non adatti possono danneggiare le superfici
dell’elettrodomestico. Per pulire l’elettrodomestico,
adoperare solo detersivo liquido per i piatti.
Pulire e asciugare perfettamente l’elettrodomestico prima
dell’uso. Lasciare raffreddare l’elettrodomestico prima di
pulirlo.
Parte anteriore e interna dell’elettrodomestico
Eventuali incrostazioni devono essere rimosse
immediatamente.
In caso contrario, potrebbe diventare impossibile toglierle e
le superfici potrebbero alterarsi o scolorirsi.
Pulire tutte le superfici con una spugna pulita e una
soluzione di acqua calda e detersivo liquido per i piatti.
Asciugare con un panno morbido.
È possibile utilizzare anche un panno morbido e pulito in
microfibra senza detergenti.
Tutte le superfici sono sensibili ai graffi. Se le superfici di
vetro si graffiano, potrebbero rompersi.
L’uso di detergenti non idonei può alterare o scolorire le
superfici.
Pulizia e manutenzione
IT-17
Page 40

Per evitare di danneggiare le superfici dell’elettrodomestico,
non utilizzare:
– detergenti contenenti soda, ammoniaca, acidi o cloruri;
– detergenti contenenti sostanze anticalcare;
– detergenti abrasivi (ad es. detergenti cremosi e in polvere);
– detergenti contenenti solventi;
– detergenti per l’acciaio inox;
– detergenti per lavastoviglie;
– spray per i forni;
– detergenti per vetri;
– spugne e spazzole abrasive dure (ad es. pagliette);
– raschietti metallici affilati.
Tappetino antiscivolo
Togliere il tappetino antiscivolo dal cassetto prima di pulirlo.
Pulire il tappetino antiscivolo solo a mano, con una soluzione di
acqua calda e un po’ di detersivo liquido per i piatti, poi
asciugarlo con un panno.
Ricollocare il tappetino antiscivolo nel cassetto solo quando è
perfettamente asciutto.
Non lavare il tappetino antiscivolo in lavatrice o in lavastoviglie.
Non collocare il tappetino antiscivolo nel forno per asciugarlo.
Pulizia e manutenzione
IT-18
Page 41

La guida seguente consente di risolvere problemi lievi dell’elettrodomestico (ad es.
quelli dovuti a un utilizzo errato) senza bisogno di rivolgersi all’assistenza tecnica.
L’installazione e le riparazioni delle apparecchiature elettriche possono
essere eseguite solo da persone qualificate, in conformità alle normative di
sicurezza locali e nazionali. Eventuali riparazioni eseguite da persone non
qualificate possono essere pericolose.
Problema
Causa possibile
Soluzione
L’elettrodomestico
non si riscalda.
La spina non è collegata correttamente
alla presa di corrente, per cui
l’elettrodomestico non si accende.
Inserire correttamente la spina nella
presa e accendere l’elettrodomestico.
Il fusibile di rete si è bruciato.
Resettare l’interruttore differenziale nel
vano fusibili di rete (per le caratteristiche
nominali del fusibile, si veda la
targhetta).
Dopo il reset dell’interruttore differenziale
nel vano fusibili di rete, se
l’elettrodomestico viene acceso e ancora
non riscalda, rivolgersi a un elettricista
qualificato.
Gli alimenti non sono
abbastanza caldi.
La funzione di conservazione degli
alimenti al caldo non è selezionata.
Selezionare la funzione corretta.
La temperatura impostata è
insufficiente.
Selezionare una temperatura superiore.
Gli sfiati sono coperti.
Accertarsi che l’aria possa circolare
liberamente.
Gli alimenti sono
troppo caldi.
La funzione di conservazione degli
alimenti al caldo non è selezionata.
Selezionare la funzione corretta.
La temperatura impostata è eccessiva.
Selezionare una temperatura inferiore.
Le stoviglie non sono
abbastanza calde.
La funzione di riscaldamento dei piatti
non è selezionata.
Selezionare la funzione corretta.
La temperatura impostata è
insufficiente.
Selezionare una temperatura superiore.
Gli sfiati sono coperti.
Accertarsi che l’aria possa circolare
liberamente.
Il riscaldamento delle stoviglie non è
durato abbastanza.
Il tempo necessario per il riscaldamento
delle stoviglie dipende da vari fattori (v.
“Riscaldamento delle stoviglie”).
Guida alla soluzione dei problemi
IT-19
Page 42

Problema
Causa possibile
Soluzione
Le stoviglie sono troppo
calde.
La funzione di riscaldamento dei
piatti o delle tazze e dei
bicchieri non è selezionata.
Selezionare la funzione corretta.
La temperatura impostata è
eccessiva.
Selezionare una temperatura inferiore.
Quando si utilizza il
cassetto, si sente un
rumore.
Il rumore è causato dalla ventola
che distribuisce il calore in
maniera omogenea nel cassetto.
Quando si utilizza la funzione di
conservazione degli alimenti al
caldo e la funzione di cottura a
bassa temperatura, la ventola
funziona in maniera
intermittente.
Non si tratta di un guasto.
Guida alla soluzione dei problemi
IT-20
Page 43

Per l’incasso dell’elettrodomestico in combinata, è essenziale
attenersi alle relative istruzioni per l’installazione e l’uso.
Tutte le dimensioni nel presente manuale sono fornite in mm.
Istruzioni per l’installazione sicura
► Prima di collegare l’elettrodomestico alla rete elettrica, accertarsi che i dati di
collegamento sulla targhetta (tensione e frequenza) corrispondano a quelli della rete
elettrica, altrimenti l’elettrodomestico potrebbe subire danni. In caso di dubbi, consultare
un elettricista qualificato.
► Una volta incassato l’elettrodomestico, la presa e l’interruttore di accensione devono
essere facilmente accessibili.
► Il cassetto scaldavivande può essere incassato solo con elettrodomestici compatibili,
come indicato dal produttore. Il produttore non può garantire un funzionamento privo di
problemi se l’elettrodomestico viene utilizzato assieme ad altre apparecchiature la cui
compatibilità non sia indicata dal produttore.
► Quando il cassetto scaldavivande viene incassato con un altro elettrodomestico
compatibile, deve essere montato su uno scaffale fisso nel vano. Accertarsi che il vano
sia in grado di sostenere il peso dell’elettrodomestico e dell’altra apparecchiatura.
► Se l’apparecchiatura in combinata viene collocata direttamente sopra il cassetto
scaldavivande incassato, non è necessario frapporre uno scaffale tra i due
elettrodomestici.
► L’elettrodomestico deve essere incassato in modo da poter vedere il contenuto del
cassetto,
per evitare scottature dovute a fuoriuscite di cibi caldi. Lo spazio deve essere tale da
poter estrarre il cassetto interamente.
► Il cassetto scaldavivande è disponibile in due modelli che si distinguono per l’apertura
dello sportello.
Per determinare lo spazio totale necessario nell’incasso, occorre sommare le
dimensioni di incasso del cassetto scaldavivande a quelle dell’elettrodomestico in
combinata.
IT-21
Page 44

Macchina del caffè H = 454 mm
Secchiello del ghiaccio H = 455 mm
Forno H = 595 mm
Prese d’aria laterali
Apparecchiature compatte H = 454 mm
Dimensioni di incasso
IT-22
Page 45

Foro di ventilazione necessario in
combinata con un forno pirolitico
Dimensioni di incasso incluso il
collegamento del cavo alla presa
di corrente
Cavo di collegamento
L = 1000 mm
* Elettrodomestici con parte
anteriore in vetro
* Elettrodomestici con parte
anteriore in metallo
NOTA:
La potenza massima degli
elettrodomestici compatti è 3350 W.
Dati tecnici
Alimentazione:
220-240 V
50/60 Hz
Carico totale collegato:
1000 W
Protezione dell’ambiente
Disimballare l’elettrodomestico e smaltire l’imballo rispettando
l’ambiente.
Protezione dell’ambiente
Questo elettrodomestico è etichettato in
conformità alla Direttiva europea 2012/19/CE
riguardante i rifiuti costituiti da apparecchiature
elettriche ed elettroniche (WEEE). Le linee guida
indicano le procedure di restituzione e riciclo degli
elettrodomestici usati in conformità alle leggi
vigenti.
* Elettrodomestici con la parte anteriore colorata
19,5*/20,5
122,5
12,5
Non è necessario un piano intermedio.
Misure in mm
IT-23
Page 46

fr
Table des matières
Mise en garde et prescriptions de sécurité ......... 2
Protection de l’environnement ............................. 4
Avant la première utilisation ................................. 5
Guide de l’appareil ................................................. 5
Panneau de commande ........................................... 6
Fonctionnement ..................................................... 6
Réglages des fonctions ........................................... 6
Réglages de la température .................................... 7
Durée ....................................................................... 7
Capacité .................................................................. 7
Maintenir au chaud les aliments .......................... 8
Cuisson à basse température ............................... 9
Cuisson à basse température ............................. 10
Autres usages ...................................................... 16
Nettoyage et entretien ......................................... 17
Façade et intérieur de l’appareil ......................... 17
Guide de dépannage ........................................... 19
Instructions de sécurité pour l’installation ....... 21
Dimensions encastré ........................................... 22
Données techniques ............................................ 23
Protection de l’environnement ........................... 23
Mise en garde et prescriptions
de sécurité
Cet appareil est conforme aux principales prescriptions de
sécurité. Cependant, mal utilisé il peut provoquer des
préjudices personnels ou matériels
Lisez attentivement ces instructions avant d’installer et utiliser
l’appareil pour la première fois, afin d’éviter le risque
d’accident et d’endommager l’appareil, Elles contiennent des
remarques importantes sur l’installation, la sécurité, l’utilisation
et l’entretien.
Rangez ces instructions en lieu sûr et veillez à ce que les
nouveaux utilisateurs en prennent connaissance. Elles doivent
accompagner la machine en cas de changement de
propriétaire.
Mise en garde et prescriptions de sécurité
Application correcte
► L’appareil n’est pas conçu pour un usage commercial. Il
est destiné à un usage domestique et à un
fonctionnement similaire et dans des environnements
résidentiels.
► L’appareil n’est pas conçu pour être utilisé à l’extérieur.
► Il n’est destiné qu’à l’usage domestique décrit dans ces
instructions d’utilisation et d’installation,
Toute autre utilisation n’est pas prise en charge par le
fabricant et pourrait s’avérer dangereuse.
► L’appareil ne peut être utilisé par des personnes ayant
des capacités physiques, sensorielles ou mentales
réduites, dépourvues d’expérience et de connaissances,
que si elles sont surveillées pendant l’utilisation ou si elles
ont appris comment l’utiliser de façon sûre et si elles
comprennent les dangers impliqués.
Sécurité des enfants
► Les enfants de moins de 8 ans doivent rester à l’écart de
l’appareil, à moins d’être constamment surveillés.
► Les enfants de 8 ans ou davantage ne peuvent utiliser
l’appareil que s’ils ont appris comment l’utiliser de façon
sûre et s’ils comprennent les dangers impliqués.
► Il est interdit aux enfants de nettoyer l’appareil s’ils ne sont
pas surveillés.
► Cet appareil n’est pas un jouet ! Les enfants ne doivent
jouer ni avec l’appareil, ni avec ses commandes afin d’éviter
tout risque de blessure.
► L’appareil devient chaud pendant on utilisation et il le reste
longtemps après avoir été éteint. Les enfants doivent rester
à l’écart de l’appareil tant qu’il n’a pas refroidi et qu’il ne
risquent plus de se brûler.
FR-2
Page 47

► Les matériaux d’emballage, tels que pellicule rétractable,
polystyrène et enveloppes en plastique, doivent être
rangés hors de portée des bébés et des enfants. Danger
d’étouffement. Éliminez ou recyclez tous les emballages
dès que possible.
Sécurité technique
► Les travaux d’installation, d’entretien et de réparation ne
peuvent être accomplis que par une personne dûment
qualifiée et compétente, de façon strictement conforme aux
règlements de sécurité nationaux et locaux. Les travaux
d’installation, d’entretien et les réparations accomplis par
des personnes non qualifiées peuvent être dangereux.
► Un appareil endommagé peut être dangereux. Avant de
procéder à l’installation, vérifiez visuellement s’il n’est pas
endommagé.. N’utilisez pas un appareil endommagé.
► La sécurité électrique de cet appareil ne peut être
garantie que s’il est correctement mis à la terre. Il est
essentiel que cette exigence de sécurité de base soit
respectée et vérifiée régulièrement et que, en cas de
doute, le système de câblage domestique soit inspecté
par un électricien qualifié.
► Pour éviter le risque d’endommager l’appareil, vérifiez si
les données du branchement (fréquence et tension) de la
plaque signalétique correspondent à l’alimentation
électrique domestique, avant de brancher l’appareil sur le
secteur. Consultez un électricien qualifié en cas de doute.
► Ne branchez pas l’appareil sur le secteur en utilisant une
multiprise ou une rallonge. Cela ne garantit pas la
sécurité qu’exige l’appareil (par ex. danger de
surchauffe).
► Par mesure de sécurité. cet appareil ne peut être utilisé
qu’une fois encastré.
Cet appareil ne doit pas être utilisé dans un lieu mobile
(par ex. un navire).
► N’ouvrez pas le boitier de l’appareil.
Il est très dangereux pour l’utilisateur de trafiquer avec les
branchements ou les éléments électriques et les pièces
mécaniques et cela peut occasionner des pannes.
► Tant que l’appareil est sous garantie, les réparations ne
doivent être accomplies que par un technicien du SAV.
En cas contraire, la garantie n’est plus valable.
► Le fabricant ne peut garantir la sécurité de l’appareil que
si des pièces de rechange sont utilisées.
Les éléments défectueux ne doivent être remplacés que
par des pièces détachées d’origine Midea.
► Si le connecteur fiche est retiré du câble de connexion ou si
l’appareil est vendu sans connecteur fiche, l’appareil doit être
branché sur l’alimentation électrique par un électricien qualifié.
► L’appareil doit être débranché du secteur pendant les travaux
d’installation, d’entretien et de réparation. Veillez à ce que
l’appareil reste hors tension tant que les travaux d’installation,
d’entretien ou de réparation ne sont pas achevés.
► Dans les endroits soumis à des infestations de cafards ou
autres vermines, faites très attention à ce que les alentours
de l’appareil soient toujours propres. Les dommages
éventuellement causés par les cafards ou autres vermines
ne sont pas couverts par la garantie.
Utilisation correcte
► LE TIROIR EST CONCU POUR MAINTENIR LES
ALIMENTS AU CHAUD MAIS PAS POUR LES
RECHAUFFER. VERIFIEZ SI LES ALIMENTS SONT
VRAIMENT CHAUDS LORSQUE VOUS LES PLACEZ
DANS LE TIROIR CHAUFFANT.
► Vous pourriez vous brûler avec le tiroir chaud ou avec la
vaisselle chaude. Protégez vos mains avec des maniques
ou des gants lorsque vous utilisez l’appareil. Ne les laissez
pas devenir humides ou mouillées, afin d’éviter que la
chaleur ne se transmette à travers le tissu plus rapidement
et de risquer de vous brûler.
► Ne placez ni récipients en plastique ni objets inflammables
dans le tiroir chauffant, Ils risqueraient de fondre ou de
s’enflammer lorsque vous allumez l’appareil est de causer
un incendie.
► En raison de la température rayonnante élevée, les objets
laissés à proximité de l’appareil en marche risquent de
prendre feu. N’utilisez pas l’appareil pour chauffer la pièce.
► Ne remplacez jamais le fond antidérapant fourni avec
l’appareil par du papier absorbant ni tout autre matériau
similaire.
► Si vous surchargez le tiroir, si vous vous asseyez ou
penchez dessus, les glissières télescopiques seront
endommagées. Les glissières télescopiques ne peuvent
supporter que 25 kg maximum.
► Si l’appareil est installé derrière la porte d’un élément de
cuisine, il ne peut être utilisé que si la porte est ouverte. Ne
fermez la porte que si l’appareil est éteint.
FR-3
Page 48

► Ne chauffez pas de pots de conserve ni de bocaux de
nourriture dans le tiroir, la pression qui s’accumule dans
le pot ou le bocal pourrait les faire exploser. Cela pourrait
se solder par des blessures, des brûlures ou des dégâts
matériels.
► La partie inférieure du tiroir devient très chaude lorsqu’il
est allumé. Faites très attention lorsque vous la touchez
quand le tiroir est ouvert.
► N’utilisez pas de récipients en plastique ou en aluminium.
Ils fondent si la température est élevée et ils pourraient
prendre feu. N’utilisez que des plats résistants à la
chaleur, en verre, en porcelaine, etc..
► Faites très attention, lorsque vous ouvrez ou fermez le tiroir
plein, à ce que les liquides ne débordent pas et ne
s’introduisirent pas dans les évents. Cela risque de court-
circuiter l’appareil.
► Des bactéries peuvent se développer sur les aliments si la
température est trop basse. Veillez à régler l’appareil sur
une température suffisamment élevée pour que les aliments
restent chauds.
Nettoyage et entretien
► Risque de blessure.
N’utilisez pas de nettoyeur vapeur pour nettoyer cet
appareil. La vapeur pourrait atteindre les éléments
électriques et provoquer un court-circuit.
Protection de l’environnement
Mise au rebut du matériau d’emballage
Les matériaux de l’emballage de protection et de transport
sélectionnés, qui peuvent être mis au rebut de façon
écologiques, doivent être recyclés.
Veillez à ce que les enveloppes, sachets, etc.. en plastique
soient mis au rebut de façon sûre et rangés hors de portée
des bébés et des enfants. Danger d’étouffement.
Mise au rebut de votre vieil appareil
Les appareils électriques et électroniques contiennent
souvent des matériaux qui, manipulés et mis au rebut de
façon erronée, risquent de nuire à la santé et à
l’environnement. Ils sont cependant essentiels au bon
fonctionnement de votre appareil.
Ne les mettez donc pas au rebut avec
vos ordures ménagères.
Confiez-les au centre de tri sélectif de
votre commune ou demandez conseil
à votre revendeur. Veillez à ce qu’ils
ne présentent pas de danger pour les
enfants, pendant leur stockage avant
leur mise au rebut.
Informations importantes
Connexion électrique
L’appareil est muni d’un connecteur fiche et il ne doit être branché que sur une prise correctement mise
à la terre. Ne faites installer la prise ou remplacer le câble de connexion que par un électricien qualifié,
qui respect les règlements en la matière. Si le connecteur fiche n’est plus accessible après l’installation,
un interrupteur d’isolement tous pôles doit être monté du côté installation avec une ouverture de contact
d’au moins 3 mm. La protection du contact doit être assurée par l’installation.
FR-4
Page 49

Avant la première utilisation
L’afficheur est testé pendant 10 secondes après l’installation
de l’appareil et après une panne de courant. Le ventilateur
s’active en même temps. L’appareil ne peut pas être utilisé
pendant ce temps.
Collez la plaque signalétique supplémentaire de l’appareil
fournie avec cette documentation dans l’espace prévu dans
la section « Service après-vente, plaque signalétique » de ce
manuel
Premiers nettoyage et montée en
température
Retirez le film protecteur et les autocollants.
Retirez le fond antidérapant et l’éventuelle étagère du
tiroir et nettoyez-les avec une éponge imbibée d’eau tiède
et de savon liquide. Séchez-les avec un chiffon doux.
Essuyez l’intérieur et l’extérieur de l’appareil avec un
chiffon humide et séchez avec un chiffon doux.
Remettez en place le fond antidérapant et l’étagère
éventuelle dans le tiroir.
Chauffez ensuite le tiroir vide pendant au moins deux heures.
Allumez l’appareil en touchant le capteur.
Touchez plusieurs fois le capteur jusqu’à ce que la
LED s’éclaire.
Touchez plusieurs fois le capteur jusqu’à ce que la
LED à l’extrême droite s’éclaire.
Touchez plusieurs fois le capteur jusqu’à ce que 2h
s’éclaire.
Fermez le tiroir.
Le tiroir chauffant est muni d’un mécanisme de fermeture
automatique avec amortissement.
Il est aussi muni d’un interrupteur qui garantit que
l’élément chauffant et le ventilateur de l’appareil ne
fonctionnent que si le tiroir est fermé.
Les éléments en métal sont protégés par un revêtement
qui peut dégager une légère odeur lorsqu’il chauffe pour la
première fois.
L’odeur et l’éventuelle vapeur d’eau dégagées
disparaissent rapidement et n’indiquent en aucun cas une
erreur de branchement ni un défaut de l’appareil.
Veillez à ce que la cuisine soit bien aérée lorsque vous
allumez l’appareil pour la première fois.
Guide de l’appareil
Pour les appareils sans poignée : pressez le milieu du tiroir pour l’ouvrir ou le fermer.
Lorsqu’il s’ouvre le tiroir sort légèrement. Vous pouvez alors le tirer vers vous.
Panneau de commande
Fond antidérapant : pour éviter que la vaisselle ne glisse
(accessoires facultatifs)
FR-5
Page 50

PANNEAU DE COMMANDE
Pour chauffer les tasses et les verres
Touche Annuler
Pour chauffer les assiettes et les plats
Touche Démarrer
Pour maintenir au chaud les aliments
L’appareil peut servir à maintenir au chaud
les aliments tout en chauffant les assiettes
et les plats. Mais ensuite vous devez
couvrir correctement les aliments et sécher
les plats
Faites attention. Avec cette fonction les
assiettes et les plats chauffent plus
lentement mais ils peuvent devenir très
chauds.
Pour régler la température
Pour régler la durée
Pour ajuster la température et l’horaire
Fonctionnement
Réglages des fonctions
(1) En l’état d’attente, appuyez sur la touche « » pour
démarrer la fonction de chauffage des tasses et des
verres à 40 °C.
(2) « 40°C » s’affiche.
(3) Avec « » ou « » réglez la température.
(4) Ensuite avec « » et ensuite « » ou « » réglez la
durée du chauffage.
(5) Avec « » sauvegardez la température et la durée.
(5) Fermez la porte et un bip retentit. L’appareil commence
alors à fonctionner.
Remarque :
(1)Lorsque vous réglez les paramètres vous pouvez appuyer
sur d’autres touches fonctions pour changer de fonction
entre « », « » et « ».
(2)Avant de refermer la porte, vous pouvez annuler le réglage
avec « » . L’appareil se remet alors en état d’attente.
(3) Pendant le fonctionnement, ouvrez la porte pour aller dans
le mode réglage des paramètres. Appuyez ensuite sur « »
ou « » pour régler la température.
Vous pouvez appuyer sur « » ou « »
pour modifier le paramètre que vous voulez
régler. Appuyez ensuite sur « » pour
sauvegarder le réglage.
(4) Après avoir sauvegardé le réglage, vous
pouvez appuyer sur « » pour remettre
l’appareil dans l’état d’attente ou fermer la porte
pour le mettre en marche.
Caractéristiques
(1) Quand l’appareil est sous tension, ouvrez la
porte. La sonnerie retentit une fois et l’appareil
se met en état d’attente. 0 s’affiche.
(2) Dans le processus de réglage horaire, après
3 minutes d’absence de mode de
fonctionnement, le four se remet en état d’attente.
(3) La sonnerie retentit une fois par pression
efficace.
(4) La sonnerie retentira trois fois pour vous
signaler que la cuisson est terminée.
FR-6
Page 51

Réglages de la température
Chaque fonction a sa propre plage de température. Les
températures d’usine recommandées sont imprimées en
caractères gras. Vous pouvez modifier la température en 5
étapes à l’aide du capteur. La dernière température
sélectionnée s’active automatiquement lorsque vous allumez
le tiroir à nouveau et elle apparaît sur l’afficheur.
Température °C*
40
60
60
45
65
65
50
70
70
55
75
75
60
80
80
* Valeurs de température indicatives, mesurées au milieu du
tiroir vide.
Durée
L’appareil est conçu pour fonctionner de façon continue.
Vous pouvez choisir une durée limitée à l’aide du
capteur. Une pression pour 1 heure (1h), deux pressions
pour 2 heures (2h).
Capacité
La quantité de vaisselle qui peut être chargée dans l’appareil dépend essentiellement de
sa dimension et de son poids. Ne surchargez pas le tiroir. La capacité de charge
maximum du tiroir est 25 kg. Si le tiroir est chargé au maximum de sa capacité, ouvrezle et fermez-le lentement.
Les exemples de charge ci-dessous ne sont
que des conseils.
– préchauffer la vaisselle de table :
6 assiettes plates
Ø 26 cm
6 assiettes creuses
Ø 23 cm
6 assiettes à dessert
Ø 19 cm
1 plateau ovale
32 cm
1 saladier de taille
moyenne
Ø 16 cm
1 petit saladier
Ø 13 cm
FR-7
Page 52

Aliments
Couvrir le récipient ?
Température pour le réglage
Steak (saignant)
oui
65
Cuire/gratiner
oui
80
Viande rôtie
oui
75
Sauté
oui
80
Bâtonnets de poisson pané
non
80
Viande en sauce
oui
80
Légumes en sauce
oui
80
Goulasch
oui
80
Purée de pommes de terre
oui
75
Plat cuisiné
oui
80
Pommes de terre au
four/pommes de terre nouvelles
oui
75
Escalope panée
non
80
Galettes/croquettes de pommes
de terre
non
80
Pizza
non
80
Pommes de terre bouillies
oui
80
Sauce
oui
80
Strudel
non
80
Pour chauffer du pain
non
65
Pour chauffer des petits pains
non
65
Maintenir au chaud les aliments
Réglages
* Selon le modèle
* Les récipients dépendent de la quantité ou de l’aliment contenu ou de la
recette.
FR-8
Page 53

De quoi s’agit-il ?
C’est un processus de cuisson où la température de cuisson est
proche de la température interne finale voulue. Dans la cuisson
traditionnelle, la température de cuisson dépasse toujours la
température de consommation voulue. Avec la cuisson à basse
température, la viande cuit longtemps à une température peu
élevée. Cette méthode permet de retenir le suc des viandes
(moins de rupture de molécule), de maintenir les caractéristiques
organoleptiques (vitamines, protéines etc..) et de conserver
fraîcheur, saveur et jutosité.
Cette méthode de cuisson est particulièrement adaptée aux
grandes pièces de viande tendre.
Pour la précision, nous vous recommandons d’utiliser un
thermomètre pour aliments pour surveiller la température interne.
Température interne
Vous pouvez cuire les aliments dans le tiroir chauffant à une
température interne maximum de 70°C. Si vous devez cuire de la
viande avec une température interne supérieure à 70°C, n’utilisez
pas le tiroir chauffant.
La lecture de la température interne indique le degré de cuisson
interne de la pièce de viande. Plus la température interne est
basse, moins la viande est cuite au milieu.
45-50 °C
= saignant
55-60 °C
= à point
65 °C
= bien cuit
Comment l’utiliser
1. Préchauffez l’élément chaud pendant 15 minutes jusqu’à 70°C.
2. Couvrez la viande avec une pellicule.
3. Le temps de cuisson dépend de la dimension de chaque pièce
de viande (consultez le tableau).
Cuisson à basse température
FR-9
Page 54

4. Placez la viande couverte sur un plat et calculez le temps de
cuisson avec un chronomètre.
5. Saisissez la viande pour lui donner du goût (consultez le
tableau)
Cuisson à basse température
FR-10
Page 55

Bœuf et veau
Pièce
Épaisseur
Cuisson
Temps
Temps de saisie et indications
Filet entier
50 mm
Saignant
1h 35min
90 secondes pour l’extérieur à la puissance
maximum du four
A point
2h 35min
Bien cuit
3h 30min
3 minutes pour l’extérieur à la puissance moyenneélevée du four
60 mm
Saignant
1h 45min
90 secondes pour l’extérieur à la puissance
maximum du four
A point
2h 50min
Bien cuit
4h
3 minutes pour l’extérieur à la puissance moyenneélevée du four
70 mm
Saignant
2h
90 secondes pour l’extérieur à la puissance
maximum du four
A point
3h
Bien cuit
4h 40min
3 minutes pour l’extérieur à la puissance moyenneélevée du four
Médaillons
Faux-filet
Côte de bœuf
Rumsteck
20 mm
Saignant
50 min
90 secondes de chaque côté à la puissance
maximum du four
A point
1h 30min
Bien cuit
2h
3 minutes de chaque côté à la puissance moyenneélevée du four
30 mm
Saignant
1h 5min
90 secondes de chaque côté à la puissance
maximum du four
A point
1h 50min
Bien cuit
2h 20min
3 minutes de chaque côté à la puissance moyenneélevée du four
40 mm
Saignant
1h 20min
2 minutes de chaque côté à la puissance maximum
du four
A point
2h 10min
Bien cuit
3h
4 minutes de chaque côté à la puissance moyenneélevée du four
Surlonge
Rôti
60 mm
Saignant
1h 45min
4 minutes pour l’extérieur à la puissance moyenneélevée du four
A point
2h 50min
Bien cuit
4h
6 minutes pour l’extérieur à la puissance moyenne
du four
70 mm
Saignant
2h
4 minutes pour l’extérieur à la puissance moyenneélevée du four
A point
3h
Bien cuit
4h 40min
6 minutes pour l’extérieur à la puissance moyenne
du four
80 mm
Saignant
2h 20min
4 minutes pour l’extérieur à la puissance moyenneélevée du four
A point
3h 30min
Bien cuit
5h 40min
6 minutes pour l’extérieur à la puissance moyenne
du four
Cuisson à basse température
Tableau de cuisson
FR-11
Page 56

Porc
Pièce
Épaisseur
Cuisson
Temps
Temps de saisie et indications
Filet entier
40mm
A point
2h 20min
90 secondes pour l’extérieur à la puissance maximum du
four
Bien cuit
3h 10min
3 minutes pour l’extérieur à la puissance moyenne-élevée
du four
50mm
A point
2h 35min
90 secondes pour l’extérieur à la puissance maximum du
four
Bien cuit
3h 25min
3 minutes pour l’extérieur à la puissance moyenne-élevée
du four
60mm
A point
3h
90 secondes pour l’extérieur à la puissance maximum du
four
Bien cuit
4h 5min
3 minutes pour l’extérieur à la puissance moyenne-élevée
du four
Jambon à l’os
Roulades
Rôti de porc
Longe de porc
entière
30mm
A point
1 h 50min
2 minutes pour l’extérieur à la puissance élevée du four
Bien cuit
2h 40min
3 minutes pour l’extérieur à la puissance moyenne-élevée
du four
40mm
A point
2h 20min
2 minutes pour l’extérieur à la puissance élevée du four
Bien cuit
3h 10min
3 minutes pour l’extérieur à la puissance moyenne-élevée
du four
50mm
A point
2h 35min
4 minutes pour l’extérieur à la puissance moyenne-élevée
du four
Bien cuit
3h 25min
6 minutes pour l’extérieur à la puissance moyenne du four
60mm
A point
3h
4 minutes pour l’extérieur à la puissance moyenne-élevée
du four
Bien cuit
4h 5min
6 minutes pour l’extérieur à la puissance moyenne du four
70mm
A point
3h 20min
4 minutes pour l’extérieur à la puissance moyenne-élevée
du four
Bien cuit
4h 45min
6 minutes pour l’extérieur à la puissance moyenne du four
80mm
A point
3h 40min
4 minutes pour l’extérieur à la puissance moyenne-élevée
du four
Bien cuit
5h 30min
6 minutes pour l’extérieur à la puissance moyenne du four
Côtelette
10mm
A point
1 h 10min
60 secondes de chaque côté à la puissance maximum du
four
Bien cuit
1 h 30min
2 minutes de chaque côté à la puissance maximum du four
20mm
A point
1 h 30min
90 secondes de chaque côté à la puissance maximum du
four
Bien cuit
2h 10min
3 minutes de chaque côté à la puissance élevée du four
Cuisson à basse température
FR-12
Page 57

Volaille
Pièce
Épaisseur
Cuisson
Temps
Temps de saisie et indications
Blanc de poulet
25mm
A point
1h 30min
60 secondes de chaque côté à la puissance maximum
du four
Bien cuit
2h
90 secondes de chaque côté à la puissance maximum
du four
35mm
A point
1h 45min
60 secondes de chaque côté à la puissance maximum
du four
Bien cuit
2h 20min
90 secondes de chaque côté à la puissance maximum
du four
Magret de canard
35mm
Saignant
1h
4 minutes pour le côté peau à la puissance moyenneélevée du four
A point
1h 30min
4 minutes pour le côté peau à la puissance moyenneélevée du four
Bien cuit
2h
4 minutes pour le côté peau à la puissance moyenneélevée du four
40mm
Saignant
1h 45min
4 minutes pour le côté peau à la puissance moyenneélevée du four
A point
2h 20min
4 minutes pour le côté peau à la puissance moyenneélevée du four
Bien cuit
3h
4 minutes pour le côté peau à la puissance moyenneélevée du four
Poitrine de dinde
40mm
A point
3h
90 secondes de chaque côté à la puissance maximum
du four
Bien cuit
4h
3 minutes de chaque côté à la puissance élevée du four
50mm
A point
3h 50min
90 secondes de chaque côté à la puissance maximum
du four
Bien cuit
5h
3 minutes de chaque côté à la puissance élevée du four
Médaillons de foie
(foie de canard ou
d’oie)
10mm
A point
30min
60 secondes de chaque côté à la puissance maximum
du four
20mm
A point
40min
60 secondes de chaque côté à la puissance maximum
du four
30mm
A point
50min
60 secondes de chaque côté à la puissance maximum
du four
Foie entier (foie de
canard ou d’oie)
35mm
A point
48min
90 secondes pour l’extérieur à la puissance maximum
du four
45mm
A point
1h
90 secondes pour l’extérieur à la puissance maximum
du four
55mm
A point
1h 15min
90 secondes pour l’extérieur à la puissance maximum
du four
Cuisson à basse température
FR-13
Page 58

Agneau
Pièce
Épaisseur
Cuisson
Temps/Temp.
Temps de saisie et indications
Couronne
d’agneau
40 mm
Saignant
1h 20min
90 secondes pour l’extérieur à la puissance maximum du
four
A point
2h 10min
Bien cuit
3h
3 minutes pour l’extérieur à la puissance moyenne-élevée
du four
50 mm
Saignant
1 h 35min
90 secondes pour l’extérieur à la puissance maximum du
four
A point
2h 35min
Bien cuit
3h 30min
3 minutes pour l’extérieur à la puissance moyenne-élevée
du four
60 mm
Saignant
1 h 45min
90 secondes pour l’extérieur à la puissance maximum du
four
A point
2h 50min
Bien cuit
4h
3 minutes pour l’extérieur à la puissance moyenne-élevée
du four
Selle
d’agneau
60 mm
Saignant
1 h 45min
3 minutes pour l’extérieur à la puissance maximum du four
A point
2h 50min
4 minutes pour l’extérieur à la puissance moyenne-élevée
du four
Bien cuit
4h
70 mm
Saignant
2h
3 minutes pour l’extérieur à la puissance maximum du four
A point
3h
4 minutes pour l’extérieur à la puissance moyenne-élevée
du four
Bien cuit
4h 40min
80 mm
Saignant
2h 20min
3 minutes pour l’extérieur à la puissance maximum du four
A point
3h 30min
4 minutes pour l’extérieur à la puissance moyenne-élevée
du four
Bien cuit
5h 40min
Gigot
d’agneau
60 mm
Saignant
1 h 45min
2 minutes pour l’extérieur à la puissance maximum du four
A point
2h 50min
3 minutes pour l’extérieur à la puissance moyenne-élevée
du four
Bien cuit
4h
70 mm
Saignant
2h
2 minutes pour l’extérieur à la puissance maximum du four
A point
3h
3 minutes pour l’extérieur à la puissance moyenne-élevée
du four
Bien cuit
4h 40min
80 mm
Saignant
2h 20min
2 minutes pour l’extérieur à la puissance maximum du four
A point
3h 30min
3 minutes pour l’extérieur à la puissance moyenne-élevée
du four
Bien cuit
5h 40min
Côtelettes
d’agneau
10 mm
Saignant
35min
60 secondes de chaque côté à la puissance maximum du
four
A point
1h 10min
Bien cuit
2h
90 secondes de chaque côté à la puissance maximum du
four
20 mm
Saignant
50min
60 secondes de chaque côté à la puissance maximum du
four
A point
1 h 30min
Bien cuit
2h 30min
90 secondes de chaque côté à la puissance maximum du
four
Cuisson à basse température
FR-14
Page 59

Œufs
Taille
Poids
Temps
Remarques
2h 20min
Très gros
73 g et au-delà
2h 30min
3h 10min
2h 11min
Gros
63g < 73g
2h 31min
3h 1min
2h 5min
A point
53g < 63g
2h 25min
2h 55min
2h
Petit
53 et au-dessous
2h 20min
2h 50min
Cuisson à basse température
FR-15
Page 60

Type
d’aliment
Récipient
Couvrir le
récipient
Température du
réglage
Durée en heures
Décongeler les
fruits rouges
Plat
non
65 °C
1 heure
Décongeler les
légumes
congelés
Plat
non
65 °C
1 heure
Pâte levée
Saladier
oui
45 °C
1/2 heure
Faire du yaourt
Pots de yaourt avec
couvercles
oui
45 °C
6 heures
Chocolat fondu
Saladier
non
50 °C
1 heure
Huile essentielle
Saladier couvert de
pellicule
oui
75 °C
4 heures
Eau d’infusion
Saladier couvert de
pellicule
oui
65 °C
4 heures
Tomates
séchées
Plat avec papier de
cuisson
non
60 °C
20 heures
Légumes
déshydratés
Plat
non
60 °C
12 heures
Fruits en tanches
déshydratés
Plat
non
60 °C
12 heures
Fines herbes
séchées
Plat
non
70 °C
4 heures
Pain sec pour
chapelure
Plat
non
80 °C
4 heures
Poisson confit à
l’huile
Tupperware
couvrir et ouvrir
l’évent
50 °C
Selon la taille entre 1 ou
2 h
allant au
microondes
Biscottes
blanches
Plat
non
80 °C
2 heures
Ragoût mijoté
Récipient en Pyrex
oui
80 °C
Entre 1 et 12 heures
Autres usages
* Selon le modèle
FR-16
Page 61

risque de blessure.
N’utilisez pas de nettoyeur vapeur pour nettoyer cet
appareil. La vapeur pourrait atteindre les éléments
électriques et provoquer un court-circuit.
Risque de dommage.
Vous risquez d’endommager les surfaces de l’appareil en
utilisant des produits détergents inadaptés. N’utilisez que
des produits ménagers pour nettoyer l’appareil.
Nettoyez et séchez tout l’appareil avant de l’utiliser. Laissez
refroidir suffisamment l’appareil avant de le nettoyer.
Façade et intérieur de l’appareil
Éliminez les salissures immédiatement.
En cas contraire elles risquent de ne plus pouvoir être
éliminées et même de modifier l’aspect des surfaces ou de
les décolorer.
Nettoyez toutes les surfaces avec une éponge propre, du
liquide vaisselle et de l’eau chaude. Séchez-les ensuite à
l’aide d’un chiffon doux.
Vous pouvez aussi utiliser un chiffon propre et humide en
microfibre sans aucun produit nettoyant.
Toutes les surfaces peuvent se rayer. Les surfaces en verre
peuvent même se fissurer en cas de rayure.
Le contact avec des produits nettoyants non adaptés risque
de modifier l’aspect des surfaces et de les décolorer.
Nettoyage et entretien
FR-17
Page 62

Pour éviter d’endommager les surfaces de votre appareil
n’utilisez pas :
– de produit nettoyant à base de soude, d’ammoniaque, d’acide
ou de chlorure,
– de détergent contenant un anticalcaire,
– de détergent abrasif, comme la poudre ou la crème à récurer,
– de détergent contenant des solvants,
– de produit pour acier inoxydable,
– de détergent pour lave-vaisselle,
– de décapant four en bombe,
– de produit nettoyant pour verre,
– d’éponge et de brosse abrasive dures, comme les tampons à
récurer,
– de grattoir en métal acéré.
Fond antidérapant
Enlevez le fond antidérapant du tiroir pour le nettoyer.
Nettoyez le fond antidérapant uniquement à la main, avec de
l’eau chaude et du liquide vaisselle doux, puis séchez-le avec
un torchon.
Ne remettez le fond antidérapant dans le tiroir que lorsqu’il est
parfaitement sec.
Ne lavez pas le fond antidérapant dans le lave-vaisselle ni dans
la machine à laver.
Ne séchez jamais le fond antidérapant au four.
Nettoyage et entretien
FR-18
Page 63

Ce guide vous permettra de régler la plupart des petits problèmes de l’appareil,
susceptibles de se solder par un mauvais fonctionnement, sans faire appel au SAV.
Les travaux d’installation et de réparation des appareils électriques ne
peuvent être accomplis que par une personne dûment qualifiée et compétente, de
façon strictement conforme aux règlements de sécurité nationaux et locaux. Les
travaux d’installation et les réparations accomplis par des personnes non
qualifiées peuvent être dangereux.
Problème
Cause possible
Solution
L’appareil ne
chauffe pas.
L’appareil n’est pas branché
correctement sur le secteur ni allumé.
Enfilez la fiche et allumez-le.
Le fusible du secteur a sauté.
Réarmez le disjoncteur dans la boîte à fusibles
(calibre minimum fusible, voir plaque
signalétique).
Si après avoir réarmé le disjoncteur dans la
boîte à fusible et allumé l’appareil, celui-ci ne
chauffe pas, adressez-vous à un électricien
qualifié.
Les aliments ne
sont pas assez
chauds.
La fonction permettant de maintenir
au chaud les aliments n’est pas
sélectionnée.
Sélectionnez la fonction correcte.
Le réglage de la température est trop
bas.
Sélectionnez une température plus élevée.
Les évents sont couverts.
Veillez à ce que l’air puisse circuler librement.
Les aliments sont
trop chauds.
La fonction permettant de maintenir
au chaud les aliments n’est pas
sélectionnée.
Sélectionnez la fonction correcte.
Le réglage de la température est trop
élevé.
Sélectionnez une température plus basse.
La vaisselle n’est
pas assez
chaude.
La fonction permettant de chauffer les
assiettes et les plats n’est pas
sélectionnée.
Sélectionnez la fonction correcte.
Le réglage de la température est trop
bas.
Sélectionnez une température plus élevée.
Les évents sont couverts.
Veillez à ce que l’air puisse circuler librement.
La vaisselle n’a pas chauffé
suffisamment longtemps.
Le temps de chauffage de la vaisselle dépend
de plusieurs paramètres (voir Mise en garde
vaisselle).
Guide de dépannage
FR-19
Page 64

Problème
Cause possible
Solution
La vaisselle est trop
chaude.
La fonction permettant de
chauffer les assiettes et les plats
ou les tasses et les
verres n’est pas sélectionnée.
Sélectionnez la fonction correcte.
Le réglage de la température est
trop élevé.
Sélectionnez une température plus
basse.
Quand vous utilisez le tiroir
celui-ci émet un bruit.
Le bruit est causé par le
ventilateur qui distribue la
chaleur de façon homogène
dans le tiroir.
Le ventilateur marche de façon
intermittente lorsque vous
utilisez les fonctions permettant
de maintenir au chaud les
aliments et la cuisson à basse
température.
Ce n’est pas une défaillance.
Guide de dépannage
FR-20
Page 65

Pour encastrer l’appareil combiné, il est essentiel de
suivre les instructions d’installation et d’utilisation qui
accompagnent l’appareil associé.
Toutes les dimensions de ce manuel sont données en
millimètres.
Instructions de sécurité pour l’installation
► Avant de brancher l’appareil sur le secteur, assurez-vous que les données de
raccordement (tension et fréquence) figurant sur la plaque signalétique correspondent à
celles du secteur, afin de ne pas endommager l’appareil. Consultez un électricien qualifié
en cas de doute.
► La prise et l’interrupteur de marche/arrêt doivent être facilement accessibles lorsque
l’appareil est encastré.
► L’appareil ne peut être encastré qu’en association avec les appareils que le fabricant
indique comme adaptés. Le fabricant n’est pas en mesure de garantir un fonctionnement
parfait si l’appareil est utilisé en association avec des appareils autres que ceux qu’il
indique comme adaptés.
► Si le tiroir chauffant est encastré en association avec un autre appareil adapté, le tiroir
chauffant doit être fixé sur une tablette intermédiaire dans le module. Vérifiez si le module
est en mesure de supporter son poids et celui de l’autre appareil.
► L’appareil associé étant placé directement au-dessus du tiroir chauffant une fois
encastré, une tablette intermédiaire n’est pas nécessaire entre les deux appareils.
► L’appareil doit être encastré de façon à ce que le contenu du tiroir soit visible.
Cela vous évitera de vous brûler avec les aliments chauds qui débordent. Laissez assez
de place pour extraire complètement le tiroir.
► Il y a deux modèles de tiroir chauffant, qui diffèrent par l’ouverture de la porte.
Les dimensions d’encastrement du tiroir chauffant doivent être ajoutées à celles de
l’appareil combiné afin d’établir la dimension de la niche nécessaire.
FR-21
Page 66

Machine à café H 454 mm
Rafraîchisseur de vin H 455 mm
Four H 595 mm
Prises d’air latérales
de l’étagère
Appareils compacts H 454 mm
Dimensions encastré
FR-22
Page 67

Fente d’aération exigée en
combinaison avec un four à
pyrolyse
Dimensions encastré y compris le
câble de branchement sur le
secteur Câble de branchement L
= 1000 mm
* Appareils à façade en verre
* Appareils à façade en métal
REMARQUE :
La puissance maximum des
appareils compacts est 3350W.
Données techniques
Alimentation électrique
220 -240 V
50/60Hz
Charge branchée totale
1000 W
Protection de l’environnement
Déballez l’appareil et mettez au rebut l’emballage d’une façon
respectueuse de l’environnement.
Protection de l’environnement
L’appareil est étiqueté conformément à la Directive
européenne 2012/19/CE sur les appareils électriques et
électroniques usagés (DEEE- déchets d’équipements
électriques et électroniques) Les lignes directrices établissent
le cadre réglementaire du retour et du recyclage éventuel des
appareils usagés.
* Appareils à façade de couleur
19,5*/20,5
122,5
12,5
Un plancher intermédiaire est inutile.
Mesures en mm
FR-23
Page 68

es
Índice
Advertencias e instrucciones de seguridad ....... 2
Responsabilidad medioambiental ....................... 4
Antes del primer uso ............................................. 5
Guía del electrodoméstico .................................... 5
Panel de control ....................................................... 6
Funcionamiento ..................................................... 6
Ajuste de funciones ................................................. 6
Ajuste de la temperatura .......................................... 7
Duración ................................................................... 7
Capacidad ............................................................... 7
Mantener la comida caliente ................................. 8
Cocción a baja temperatura .................................. 9
Cocción a baja temperatura ................................ 10
Otros usos ............................................................ 16
Limpieza y mantenimiento .................................. 17
Frente e interior del electrodoméstico .............. 17
Guía de resolución de problemas ...................... 19
Instrucciones de seguridad para la instalación ... 21
Dimensiones de empotrado ................................ 22
Datos técnicos ..................................................... 23
Protección del medio ambiente .......................... 23
Advertencias e instrucciones de
seguridad
Este electrodoméstico cumple todas las normativas de
seguridad relevantes. Sin embargo, un uso inapropiado puede
ocasionar lesiones personales y daños materiales.
Para evitar el riesgo de accidentes y daños al
electrodoméstico, lea estas instrucciones detenidamente
antes de la instalación y antes de usarlo por primera vez.
Estas contienen notas importantes sobre su instalación,
seguridad, uso y mantenimiento.
Guarde estas instrucciones en un lugar seguro y asegúrese
de que los nuevos usuarios se familiaricen con su contenido.
Déselas a cualquier futuro propietario.
Advertencias e instrucciones de seguridad
Aplicación correcta
► Este electrodoméstico no ha sido diseñado para darle un
uso comercial. Está diseñado para usarlo en hogares y
entornos laborales y residenciales similares.
► Este electrodoméstico no ha sido diseñado para usarlo en
exteriores.
► Está diseñado solo para darle un uso doméstico como el
descrito en estas instrucciones de funcionamiento e
instalación.
Cualquier otro uso no está recomendado por el fabricante
y podría ser peligroso.
► El electrodoméstico solo puede ser utilizado por personas
con capacidades físicas, sensoriales o mentales
reducidas o con falta de experiencia y conocimiento si
son supervisadas mientras lo usan, o si se les ha
mostrado cómo usarlo de una manera segura y
comprenden los peligros asociados.
Seguridad con niños
► Los niños menores de 8 años deben mantenerse alejados
del electrodoméstico a menos que estén constantemente
supervisados.
► Los niños de 8 años en adelante solo pueden usar el
electrodoméstico si se les ha enseñado cómo usarlo de una
manera segura y comprenden los peligros involucrados.
► No permita que los niños limpien el electrodoméstico sin
supervisión.
► ¡Este electrodoméstico no es un juguete! Para evitar el
riesgo de lesiones, no permita que los niños jueguen con el
electrodoméstico o sus controles.
► Este electrodoméstico se calienta cuando está en uso y
permanece caliente durante bastante tiempo después de
apagarse. Mantenga a los niños alejados del
electrodoméstico hasta que se haya enfriado y no haya
peligro de quemarse.
ES-2
Page 69

► El embalaje, como el film de plástico, el poliestireno y los
envoltorios de plástico, deben mantenerse fuera del alcance
de bebés y niños. Existe peligro de asfixia. Deseche o
recicle todo el embalaje de forma segura lo antes posible.
Seguridad técnica
► Los trabajos de instalación, mantenimiento y reparación
solo pueden ser realizados por una persona debidamente
cualificada y competente, de estricta conformidad con las
normas de seguridad locales y nacionales. La instalación,
el mantenimiento y las reparaciones por parte de
personas no cualificadas podrían ser peligrosas.
► Un electrodoméstico dañado puede ser peligroso. Antes de
la instalación, revise el electrodoméstico para detectar
signos visibles de daños. No use un electrodoméstico
dañado.
► La seguridad eléctrica de este electrodoméstico solo puede
garantizarse cuando está correctamente conectado a tierra.
Es muy importante que este requisito básico de seguridad
se observe y se pruebe regularmente y, en caso de duda, el
sistema de cableado doméstico debe ser inspeccionado por
un electricista cualificado.
► Para evitar el riesgo de daños al electrodoméstico,
asegúrese de que los datos de conexión (frecuencia y
voltaje) en la placa de datos correspondan con el
suministro doméstico antes de conectar el
electrodoméstico a la red eléctrica. Consulte a un
electricista cualificado si tiene alguna duda.
► No conecte el electrodoméstico a la red eléctrica
mediante un adaptador de enchufe múltiple o un cable de
extensión. Estos no garantizan la seguridad requerida del
electrodoméstico (por ejemplo, peligro de
sobrecalentamiento).
► Por razones de seguridad, este electrodoméstico solo se
puede usar cuando está empotrado en el mueble.
Este electrodoméstico no debe usarse en una ubicación
móvil (por ejemplo, en un barco).
► No abra la carcasa del electrodoméstico.
La manipulación de conexiones eléctricas o
componentes y piezas mecánicas es altamente peligrosa
para el usuario y puede causar fallos de funcionamiento.
► Mientras el electrodoméstico esté bajo garantía, las
reparaciones solo deben ser realizadas por un técnico de
mantenimiento.
De lo contrario, la garantía quedará sin validez.
► El fabricante solo puede garantizar la seguridad del
electrodoméstico cuando se utilizan piezas de repuesto.
Los componentes defectuosos solo deben reemplazarse
por piezas de repuesto originales de Midea.
► Si se quita la clavija del cable de conexión, o si el
electrodoméstico se suministra sin clavija, solo un
electricista cualificado debe conectarlo al suministro
eléctrico.
► El electrodoméstico debe desconectarse de la red eléctrica
durante los trabajos de instalación, mantenimiento y
reparación. Asegúrese de que no se suministre energía al
electrodoméstico hasta después de que se haya instalado
o hasta que se haya llevado a cabo cualquier trabajo de
mantenimiento o reparación.
► En áreas que puedan estar sujetas a la infestación de
cucarachas u otras plagas, preste especial atención a
mantener el electrodoméstico y su entorno en buenas
condiciones de limpieza en todo momento. Cualquier daño
que pueda ser causado por cucarachas u otras plagas no
estará cubierto por la garantía.
Uso correcto
► EL CAJÓN ESTÁ DISEÑADO PARA MANTENER LA
COMIDA CALIENTE, NO PARA CALENTARLA.
ASEGÚRESE DE QUE LA COMIDA ESTÉ MUY
CALIENTE CUANDO VAYA A COLOCARLA DENTRO
DEL CAJÓN CALENTADOR.
► El calor del cajón o de la vajilla puede suponer un riesgo de
quemadura. Proteja sus manos con agarraderas o
manoplas resistentes al calor cuando utilice este
electrodoméstico. No permita que se mojen o humedezcan,
ya que esto hace que el calor se transfiera a través del
material más rápidamente, con el riesgo de escaldarse o
quemarse.
► No guarde ningún recipiente de plástico u objetos
inflamables en el cajón calentador. Estos podrían derretirse
o prender fuego cuando el electrodoméstico está
encendido, con el consiguiente riesgo de incendio.
► Debido a las altas temperaturas irradiadas, los objetos que
se dejan cerca del electrodoméstico cuando está en uso
podrían incendiarse. No use el electrodoméstico para
calentar la habitación.
► Nunca reemplace la alfombrilla antideslizante suministrada
con el electrodoméstico con papel de cocina o similar.
► Si sobrecarga el cajón, o se sienta o se apoya en él, las
correderas telescópicas se dañarán. Las correderas
telescópicas pueden soportar una carga máxima de 25 kg.
► Si el electrodoméstico está instalado detrás de una puerta
de mueble de cocina, solo se puede usar con la puerta del
mueble abierta. Cierre la puerta solo si el electrodoméstico
está apagado.
ES-3
Page 70

► No caliente latas o frascos de alimentos sin abrir en el
cajón, ya que se acumulará presión en la lata o frasco y
explotará. Esto podría provocar lesiones y escaldaduras
o daños.
► La parte inferior del cajón se calienta cuando se
enciende. Tenga cuidado de no tocarla cuando el cajón
esté abierto.
► No use recipientes de plástico o aluminio.
Estos se derriten a altas temperaturas y podrían
incendiarse. Utilice únicamente una vajilla resistente al
calor hecha de cristal, porcelana, etc.
► Tenga cuidado al abrir y cerrar el cajón cuando esté
cargado para evitar que los líquidos se derramen y
atraviesen las rejillas de ventilación. Esto puede causar
cortocircuitos en el electrodoméstico.
► Las bacterias pueden proliferar en la comida si la
temperatura es demasiado baja. Asegúrese de establecer
una temperatura lo suficientemente alta para mantener los
alimentos calientes.
Limpieza y mantenimiento
► Peligro de lesiones.
No use un aparato de limpieza con vapor para limpiar este
electrodoméstico. El vapor puede llegar a los componentes
eléctricos y provocar un cortocircuito.
Responsabilidad
medioambiental
Desechar el material de embalaje
El embalaje de transporte y protección ha sido seleccionado
a partir de materiales ecológicos para su eliminación, y
deben reciclarse.
Asegúrese de que cualquier envoltorio de plástico, bolsas, etc.
se deseche de forma segura y se mantenga fuera del alcance
de bebés y niños pequeños. Existe peligro de asfixia.
Desechar los electrodomésticos viejos
Los aparatos eléctricos y electrónicos a menudo contienen
materiales que, si se manipulan o eliminan de forma incorrecta,
podrían ser potencialmente peligrosos para la salud humana y
el medio ambiente. Sin embargo, son esenciales para el
correcto funcionamiento de su electrodoméstico.
Por lo tanto, no los deseche con la
basura doméstica.
Por favor, deséchelos en su centro
comunitario de recogida/reciclaje de
residuos o póngase en contacto con
su distribuidor para obtener
asesoramiento. Asegúrese de que no
representen ningún peligro para los
niños mientras los almacena para su
eliminación.
Información importante
Conexión eléctrica
Este electrodoméstico está equipado con una clavija y solo debe conectarse a un enchufe con toma de
tierra debidamente instalado. Solo un electricista cualificado que tenga en cuenta las normas aplicables
puede instalar el enchufe o reemplazar el cable de conexión. Si ya no se puede acceder a la clavija
después de la instalación, debe haber un interruptor aislante multipolar en el lado de la instalación con
un espacio de contacto de al menos 3 mm. La protección de contacto debe estar garantizada por la
instalación.
ES-4
Page 71

Antes del primer uso
Después de la instalación del electrodoméstico y después de
un corte de energía, se lleva a cabo una prueba de
visualización durante 10 segundos. El ventilador se
enciende al mismo tiempo. El electrodoméstico no puede
usarse durante este tiempo.
Pegue la placa de datos adicional para el electrodoméstico
suministrada con esta documentación en el espacio
estipulado en la sección “Servicio posventa, placa de datos”
de este folleto.
Primera limpieza y calentamiento
Retire cualquier lámina protectora y etiquetas adhesivas.
Retire la alfombrilla antideslizante y, si corresponde, el
estante del cajón, y lávelos con esponja con agua tibia y
un poco de detergente líquido. Séquelos con un paño
suave.
Limpie el electrodoméstico por dentro y por fuera con un
paño húmedo y luego séquelo con un paño suave.
Vuelva a colocar la alfombrilla antideslizante y el estante
(si corresponde) en el cajón.
Luego caliente el cajón vacío durante al menos dos horas.
Encienda el electrodoméstico tocando el sensor .
Toque el sensor varias veces hasta que se encienda
el LED.
Toque el sensor varias veces hasta que se encienda
el LED de la derecha.
Toque el sensor varias veces hasta que se vea
«2h» en la pantalla.
Cierre el cajón.
El cajón calentador está equipado con un mecanismo
automático de cierre suave.
También tiene un interruptor de contacto, que garantiza
que la resistencia y el ventilador del electrodoméstico
funcionen solo cuando el cajón está cerrado.
Los componentes metálicos tienen un revestimiento
protector que puede emitir un ligero olor cuando se
calienta por primera vez.
El olor y los vapores se disiparán después de un breve
período de tiempo, y no indican una conexión o
electrodoméstico defectuosos.
Asegúrese de que la cocina esté bien ventilada mientras el
electrodoméstico se está calentando por primera vez.
Guía del electrodoméstico
Para electrodomésticos sin tirador: Presione en el medio del cajón para abrirlo o cerrarlo.
Al abrirse, el cajón lo hace ligeramente. Entonces puede tirar de él hacia usted.
Panel de control.
Alfombrilla antideslizante: para proteger la vajilla (accesorios opcionales).
ES-5
Page 72

PANEL DE CONTROL
Para calentar tazas y vasos.
Cancelar.
Para calentar platos.
Inicio.
Para mantener la comida caliente.
El electrodoméstico puede usarse para
mantener la comida caliente al mismo tiempo
que se utiliza para calentar platos. Pero la
comida debe estar cubierta adecuadamente y
se deben secar los platos al terminar.
Cuidado. Los platos tardarán más en
calentarse, pero pueden calentarse mucho
con esta función.
Para ajustar la temperatura.
Para ajustar el tiempo.
Para ajustar temperatura y tiempo.
Funcionamiento
Ajuste de funciones
(1) Con el electrodoméstico en estado de espera,
pulse la tecla “ ” para iniciar la función de
calentar tazas y vasos a 40 °C.
(2) “40°C” aparecerá en pantalla.
(3) Pulse “ “ o “ “ para ajustar la temperatura.
(4) Pulse “ ” y luego “ ” o “ ” para ajustar el
tiempo de calentamiento.
(5) Pulse “ ” para guardar la temperatura y la hora.
(6) Cierre la puerta y oirá un pitido. Entonces el
electrodoméstico empezará a funcionar.
Nota:
(1)Durante la configuración de los parámetros, puede
pulsar otras teclas de función para cambiar la
función entre “ ”, “ ” y “ ”.
(2)Antes de cerrar la puerta, puede tocar “ ” para
cancelar la configuración. El electrodoméstico
volverá al estado de espera.
(3) Abra la puerta durante el funcionamiento para acceder
al modo de ajuste de parámetros. A continuación, pulse
“ ” o “ ” para ajustar la temperatura.
Puede pulsar “ ” o “ ” para cambiar el parámetro que
desea ajustar. A continuación, pulse “ ” para guardar
el ajuste.
(4) Después de guardar el ajuste realizado como se
indica anteriormente, puede pulsar “ ” para acceder al
estado de espera o cerrar la puerta para iniciar el
funcionamiento.
Especificaciones
(1) Cuando el electrodoméstico esté electrificado, abra
la puerta. La señal sonora sonará una vez y el
electrodoméstico entrará en estado de espera. “0”
aparecerá en pantalla.
(2) Si durante el proceso de ajuste del reloj no se realiza
ninguna operación en 3 minutos, el horno volverá al
estado de espera.
(3) La señal sonora suena una vez con un toque
eficiente.
(4) La señal sonora sonará tres veces para recordarle el
fin del proceso.
ES-6
Page 73

Ajuste de la temperatura
Cada función tiene su propio rango de temperatura. Las
temperaturas recomendadas establecidas de fábrica están
impresas en negrita. La temperatura puede modificarse en
intervalos de 5° tocando el sensor . La última temperatura
seleccionada se activa y se muestra en pantalla
automáticamente la próxima vez que se encienda el cajón.
Temperatura en °C*
40
60
60
45
65
65
50
70
70
55
75
75
60
80
80
* Valores de temperatura aproximados, medidos en la zona
media del cajón cuando está vacío.
Duración
Este electrodoméstico está configurado para el modo de
funcionamiento continuo. Se puede seleccionar una
duración limitada tocando el sensor . Un toque para 1
hora (1h), dos toques por 2 horas (2 h), etc.
Capacidad
La cantidad que se puede cargar dependerá en gran medida del tamaño y el peso de su
propia vajilla. No sobrecargue el cajón. La capacidad de carga máxima del cajón es de
25 kg. Bajo la capacidad de carga máxima, el cajón debe abrirse o cerrarse
suavemente.
Los ejemplos de carga aquí mostrados son
solo sugerencias.
– Precalentamiento de vajilla:
6 plato llanos
Ø 26 cm
6 platos hondos
Ø 23 cm
6 platos de postre
Ø 19 cm
1 fuente oval
32 cm
1 cuenco mediano
Ø 16cm
1 cuenco pequeño
Ø 13 cm
ES-7
Page 74

Alimento
¿Recipiente cubierto?
Temperatura para la función
Bistec (poco hecho)
Sí
65
Plato al horno / gratinado
Sí
80
Carne asada
Sí
75
Guiso
Sí
80
Palitos de pescado
No
80
Carne en salsa
Sí
80
Verduras en salsa
Sí
80
Estofado
Sí
80
Puré de patata
Sí
75
Comida emplatada
Sí
80
Patatas al horno / Patatas
baby
Sí
75
Filete empanado
No
80
Tortitas / Tortitas de patata
No
80
Pizza
No
80
Patatas hervidas
Sí
80
Salsas
Sí
80
Strudel
No
80
Para calentar pan
No
65
Para calentar panecillos
No
65
Mantener la comida caliente
Ajustes
Según el modelo.
El recipiente usado depende de la cantidad, el alimento o el tipo de receta.
ES-8
Page 75

¿Qué es?
Es cualquier procedimiento de cocción en el que la temperatura de
cocción es igual o cercana a la temperatura final interna del
alimento deseada. En la cocina tradicional, la temperatura de
cocción siempre excede las temperaturas listas para el consumo
deseadas. Con la cocción a baja temperatura, la carne se cocina a
baja temperatura durante un largo período de tiempo. Mediante
este método, la carne pierde menos líquido (menos ruptura
molecular), mantiene sus características organoléptica (vitaminas,
proteínas, etc.) y conserva su frescura, sabor y jugosidad intactos.
Este método de cocción es especialmente adecuado para piezas
grandes y tiernas de carne.
Para lograr una mayor precisión, recomendamos usar un
termómetro alimentario patentado para supervisar la temperatura
interna.
Temperatura interna
Los alimentos se pueden cocinar a una temperatura de hasta 70°
C en el cajón calentador de alimentos. La carne que debe
cocinarse a una temperatura superior a 70° C no es adecuada
para cocinarla en el cajón calentador de alimentos.
La lectura de la temperatura interna proporciona información sobre
el grado de cocción en la parte central de un trozo de carne. Cuanto
menor es la temperatura, menos cocida está la carne en el medio:
45-50°C
= poco hecha
55-60 °C
= al punto
65 °C
= bien hecha
Instrucciones de uso
1. Precaliente el armario durante 15 minutos a 70° C.
2. Cubra la carne adecuadamente con film transparente.
3. La duración de la cocción depende del tamaño de las piezas
individuales de carne (consulte la tabla).
Cocción a baja temperatura
ES-9
Page 76

4. Coloque la carne tapada en un plato y use un cronómetro para
calcular la hora.
5. Soase la carne para darle sabor (consulte la tabla).
Cocción a baja temperatura
ES-10
Page 77

Carne de res y ternera
Parte
Grosor
Punto
deseado
Tiempo
Indicaciones y tiempo de soasado
Filete entero
50 mm
Poco hecho
1 h 35 min
90 segundos para la parte externa con el fogón a
toda potencia
Al punto
2 h 35 min
Muy hecho
3 h 30 min
3 minutos para la parte externa con el fogón a
potencia media-alta
60 mm
Poco hecho
1 h 45 min
90 segundos para la parte externa con el fogón a
toda potencia
Al punto
2 h 50 min
Muy hecho
4 h
3 minutos para la parte externa con el fogón a
potencia media-alta
70 mm
Poco hecho
2 h
90 segundos para la parte externa con el fogón a
toda potencia
Al punto
3 h
Muy hecho
4 h 40 min
3 minutos para la parte externa con el fogón a
potencia media-alta
Medallones
Entrecot
Chuletas
Cuarto trasero
20 mm
Poco hecho
50 min
90 segundos por cada lado con el fogón a toda
potencia
Al punto
1 h 30 min
Muy hecho
2 h
3 minutos por cada lado con el fogón a potencia
media-alta
30 mm
Poco hecho
1 h 5 min
90 segundos por cada lado con el fogón a toda
potencia
Al punto
1 h 50 min
Muy hecho
2 h 20 min
3 minutos por cada lado con el fogón a potencia
media-alta
40 mm
Poco hecho
1 h 20 min
2 minutos por cada lado con el fogón a toda
potencia
Al punto
2 h 10 min
Muy hecho
3 h
4 minutos por cada lado con el fogón a potencia
media-alta
Solomillo
Rosbif
60 mm
Poco hecho
1 h 45 min
4 minutos para la parte externa con el fogón a
potencia media-alta
Al punto
2 h 50 min
Muy hecho
4 h
6 minutos para la parte externa con el fogón a
potencia media
70 mm
Poco hecho
2 h
4 minutos para la parte externa con el fogón a
potencia media-alta
Al punto
3 h
Muy hecho
4 h 40 min
6 minutos para la parte externa con el fogón a
potencia media
80 mm
Poco hecho
2 h 20 min
4 minutos para la parte externa con el fogón a
potencia media-alta
Al punto
3 h 30 min
Muy hecho
5 h 40 min
6 minutos para la parte externa con el fogón a
potencia media
Cocción a baja temperatura
Tabla de cocción
ES-11
Page 78

Cerdo
Parte
Grosor
Punto
deseado
Tiempo
Indicaciones y tiempo de soasado
Filete entero
40 mm
Al punto
2 h 20 min
90 segundos para la parte externa con el fogón a toda
potencia
Muy hecho
3 h 10 min
3 minutos para la parte externa con el fogón a potencia
media-alta
50 mm
Al punto
2 h 35 min
90 segundos para la parte externa con el fogón a toda
potencia
Muy hecho
3 h 25 min
3 minutos para la parte externa con el fogón a potencia
media-alta
60 mm
Al punto
3 h
90 segundos para la parte externa con el fogón a toda
potencia
Muy hecho
4 h 5 min
3 minutos para la parte externa con el fogón a potencia
media-alta
Jamón
deshuesado
Roulade
Cerdo asado
Lomo de cerdo
entero
30 mm
Al punto
1 h 50 min
2 minutos para la parte externa con el fogón a potencia alta
Muy hecho
2 h 40 min
3 minutos para la parte externa con el fogón a potencia
media-alta
40 mm
Al punto
2 h 20 min
2 minutos para la parte externa con el fogón a potencia alta
Muy hecho
3 h 10 min
3 minutos para la parte externa con el fogón a potencia
media-alta
50 mm
Al punto
2 h 35 min
4 minutos para la parte externa con el fogón a potencia
media-alta
Muy hecho
3 h 25 min
6 minutos para la parte externa con el fogón a potencia media
60 mm
Al punto
3 h
4 minutos para la parte externa con el fogón a potencia
media-alta
Muy hecho
4 h 5 min
6 minutos para la parte externa con el fogón a potencia media
70 mm
Al punto
3 h 20 min
4 minutos para la parte externa con el fogón a potencia
media-alta
Muy hecho
4 h 45 min
6 minutos para la parte externa con el fogón a potencia media
80 mm
Al punto
3 h 40 min
4 minutos para la parte externa con el fogón a potencia
media-alta
Muy hecho
5 h 30 min
6 minutos para la parte externa con el fogón a potencia media
Chuletas
10 mm
Al punto
1 h 10 min
60 segundos por cada lado con el fogón a toda potencia
Muy hechas
1 h 30 min
2 minutos por cada lado con el fogón a toda potencia
20 mm
Al punto
1 h 30 min
90 segundos por cada lado con el fogón a toda potencia
Muy hechas
2 h 10 min
3 minutos por cada lado con el fogón a potencia alta
Cocción a baja temperatura
ES-12
Page 79

Aves de corral
Parte
Grosor
Punto
deseado
Tiempo
Indicaciones y tiempo de soasado
Pechuga de pollo
25 mm
Al punto
1 h 30 min
60 segundos por cada lado con el fogón a toda
potencia
Muy hecha
2 h
90 segundos por cada lado con el fogón a toda
potencia
35 mm
Al punto
1 h 45 min
60 segundos por cada lado con el fogón a toda
potencia
Muy hecha
2 h 20 min
90 segundos por cada lado con el fogón a potencia
alta
Pechuga de pato
(Magret)
35 mm
Poco hecha
1 h
4 minutos por el lado de la piel con el fogón a
potencia media-alta
Al punto
1 h 30 min
4 minutos por el lado de la piel con el fogón a
potencia media-alta
Muy hecha
2 h
4 minutos por el lado de la piel con el fogón a
potencia media-alta
40 mm
Poco hecha
1 h 45 min
4 minutos por el lado de la piel con el fogón a
potencia media-alta
Al punto
2 h 20 min
4 minutos por el lado de la piel con el fogón a
potencia media-alta
Muy hecha
3 h
4 minutos por el lado de la piel con el fogón a
potencia media-alta
Pechuga de pavo
40 mm
Al punto
3 h
90 segundos por cada lado con el fogón a toda
potencia
Muy hecha
4 h
3 minutos por cada lado con el fogón a potencia alta
50 mm
Al punto
3 h 50 min
90 segundos por cada lado con el fogón a toda
potencia
Muy hecha
5 h
3 minutos por cada lado con el fogón a potencia alta
Medallón de foie
(hígado de pato o
ganso)
10 mm
Al punto
30 min
60 segundos por cada lado con el fogón a toda
potencia
20 mm
Al punto
40 min
60 segundos por cada lado con el fogón a toda
potencia
30 mm
Al punto
50 min
60 segundos por cada lado con el fogón a toda
potencia
Foie entero (hígado
de pato o ganso)
35 mm
Al punto
48 min
90 segundos para la parte externa con el fogón a
toda potencia
45 mm
Al punto
1 h
90 segundos para la parte externa con el fogón a
toda potencia
55 mm
Al punto
1 h 15 min
90 segundos para la parte externa con el fogón a
toda potencia
Cocción a baja temperatura
ES-13
Page 80

Cordero
Parte
Grosor
Punto deseado
Tiempo/Temp.
Indicaciones y tiempo de soasado
Costillar
40 mm
Poco hecho
1 h 20 min
90 segundos para la parte externa con el fogón a
toda potencia
Al punto
2 h 10 min
Muy hecho
3 h
3 minutos para la parte externa con el fogón a
potencia media-alta
50 mm
Poco hecho
1 h 35 min
90 segundos para la parte externa con el fogón a
toda potencia
Al punto
2 h 35 min
Muy hecho
3 h 30 min
3 minutos para la parte externa con el fogón a
potencia media-alta
60 mm
Poco hecho
1 h 45 min
90 segundos para la parte externa con el fogón a
toda potencia
Al punto
2 h 50 min
Muy hecho
4 h
3 minutos para la parte externa con el fogón a
potencia media-alta
Silla de cordero
60 mm
Poco hecha
1 h 45 min
3 minutos para la parte externa con el fogón a
toda potencia
Al punto
2 h 50 min
4 minutos para la parte externa con el fogón a
potencia media-alta
Muy hecha
4 h
70 mm
Poco hecha
2 h
3 minutos para la parte externa con el fogón a
toda potencia
Al punto
3 h
4 minutos para la parte externa con el fogón a
potencia media-alta
Muy hecha
4 h 40 min
80 mm
Poco hecha
2 h 20 min
3 minutos para la parte externa con el fogón a
toda potencia
Al punto
3 h 30 min
4 minutos para la parte externa con el fogón a
potencia media-alta
Muy hecha
5 h 40 min
Pata de cordero
Gigot
60 mm
Poco hecha
1 h 45 min
2 minutos para la parte externa con el fogón a
toda potencia
Al punto
2 h 50 min
3 minutos para la parte externa con el fogón a
potencia media-alta
Muy hecha
4 h
70 mm
Poco hecha
2 h
2 minutos para la parte externa con el fogón a
toda potencia
Al punto
3 h
3 minutos para la parte externa con el fogón a
potencia media-alta
Muy hecha
4 h 40 min
80 mm
Poco hecha
2 h 20 min
2 minutos para la parte externa con el fogón a
toda potencia
Al punto
3 h 30 min
3 minutos para la parte externa con el fogón a
potencia media-alta
Muy hecha
5 h 40 min
Chuletas de
cordero
10 mm
Poco hechas
35 min
60 segundos por cada lado con el fogón a toda
potencia
Al punto
1 h 10 min
Muy hechas
2 h
90 segundos por cada lado con el fogón a toda
potencia
20 mm
Poco hechas
50 min
60 segundos por cada lado con el fogón a toda
potencia
Al punto
1 h 30 min
Muy hechas
2 h 30 min
90 segundos por cada lado con el fogón a toda
potencia
Cocción a baja temperatura
ES-14
Page 81

Huevos
Tamaño
Peso
Tiempo
Observaciones
2 h 20 min
Muy grandes
73 g o más
2 h 30 min
3 h 10 min
2 h 11 min
Grandes
63 g < 73 g
2 h 31 min
3 h 1 min
2 h 5 min
Medianos
53 g < 63 g
2 h 25 min
2 h 55 min
2 h
Pequeños
53 g o menos
2 h 20 min
2 h 50 min
Cocción a baja temperatura
ES-15
Page 82

Tipo de
alimento
Recipiente
Recipiente
cubierto
Temperatura de la
función
Duración en
horas
Descongelar
bayas
Plato
No
65 °C
1 hora
Descongelar
verduras
congeladas
Plato
No
65 °C
1 hora
Leudar masas
Bol
Sí
45 °C
1/2 hora
Hacer yogur
Tarros de yogur con
tapa
Sí
45 °C
6 horas
Derretir
chocolate
Bol
No
50 °C
1 hora
Infusión en
aceite
Bol cubierto con
film transparente
Sí
75 °C
4 horas
Infusión en agua
Bol cubierto con
film transparente
Sí
65 °C
4 horas
Secar tomates
Plato con papel de
horno
No
60 °C
20 horas
Deshidratar
verduras
Plato
No
60 °C
12 horas
Hacer rodajas de
fruta
deshidratada
Plato
No
60 °C
12 horas
Secar hierbas
Plato
No
70 °C
4 horas
Secar pan para
hacer pan rallado
Plato
No
80 °C
4 horas
Pescado
confitado en
aceite
Táper
Cubrir y abrir la
ventilación
50 °C
Según el tamaño, entre 1
y 2 horas
apto para
microondas
Biscotes blancos
Plato
No
80 °C
2 horas
Estofado de
cocción lenta
Recipiente de pyrex
Sí
80 °C
Entre 1 y 12 horas
Otros usos
* Según el modelo.
ES-16
Page 83

Peligro de lesiones.
No use un aparato de limpieza con vapor para limpiar este
electrodoméstico. El vapor puede llegar a los componentes
eléctricos y provocar un cortocircuito.
Peligro de daños.
Los agentes de limpieza inadecuados pueden dañar las
superficies del electrodoméstico. Utilice únicamente
detergente líquido doméstico para lavarlo.
Limpie y seque todo el electrodoméstico después de cada
uso. Deje que se enfríe hasta alcanzar una temperatura
segura antes de limpiarlo.
Frente e interior del electrodoméstico
Elimine cualquier traza de suciedad de inmediato.
De no hacerlo así, podría volverse imposible de eliminar y
causar que las superficies se alteren o decoloren.
Lave todas las superficies con una esponja limpia y una
solución de agua caliente y detergente líquido. Luego
séquelas con un paño suave.
También puede usar un e-cloth, un paño de microfibra limpio
y humedecido sin agente limpiador.
Todas las superficies son susceptibles a los arañazos. Los
arañazos en las superficies de vidrio podrían incluso causar
una rotura.
El contacto con agentes de limpieza inadecuados puede
alterar o decolorar las superficies.
Limpieza y mantenimiento
ES-17
Page 84

Para evitar dañar la superficie de su electrodoméstico, no
use:
– Agentes de limpieza que contengan sosa, amoniaco, ácidos o
cloruros.
– Agentes de limpieza que contengan agentes desincrustantes.
– Agentes de limpieza abrasivos, como limpiadores en polvo y
limpiadores en crema.
– Agentes de limpieza a base de disolvente.
– Limpiadores de acero inoxidable.
– Limpiador de lavavajillas.
– Esprays para horno.
– Limpiadores de cristal.
– Esponjas y cepillos duros y abrasivos, como estropajos para
ollas.
– Raspadores metálicos afilados.
Alfombrilla
antideslizante
Retire la alfombrilla antideslizante del cajón antes de limpiarla.
Lave la alfombrilla antideslizante a mano, con una solución de
agua caliente y un poco de detergente líquido, y luego séquela
con un paño.
No coloque la alfombrilla antideslizante en el cajón hasta que
esté completamente seca.
No lave la alfombrilla antideslizante en un lavavajillas o lavadora.
Nunca coloque la alfombrilla antideslizante en el horno para que
se seque.
Limpieza y mantenimiento
ES-18
Page 85

Con la ayuda de la siguiente guía, los fallos menores en el funcionamiento del
electrodoméstico, algunos de las cuales pueden ser el resultado de un
funcionamiento incorrecto, se pueden corregir sin necesidad de ponerse en
contacto con el Departamento de Servicio.
El trabajo de instalación y reparación de los aparatos eléctricos solo debe llevarlo a
cabo una persona debidamente cualificada y de estricta conformidad con las normas de
seguridad locales y nacionales vigentes. Las reparaciones y otros trabajos
realizados por personas no cualificadas podrían ser peligrosos.
Problema
Causa posible
Solución
El electrodoméstico
no se calienta.
El electrodoméstico no está
correctamente enchufado y
encendido en la toma de corriente.
Inserte la clavija y enciéndalo en la toma de
corriente.
El fusible de la red eléctrica ha
saltado.
Restablezca el interruptor a su posición en la
caja de fusibles de la red (clasificación
mínima del fusible: consulte la placa de
datos).
Si después de restablecer el interruptor en la
caja de fusibles de la red y volver a encender
el electrodoméstico este aún no se calienta,
póngase en contacto con un electricista
cualificado.
La comida no está
lo suficientemente
caliente.
La función para mantener los
alimentos calientes no está
seleccionada.
Seleccione la función correcta.
La configuración de temperatura es
demasiado baja.
Seleccione una temperatura más alta.
Las rejillas de ventilación están
cubiertas.
Asegúrese de que el aire pueda circular
libremente.
La comida está
demasiado caliente.
La función para mantener los
alimentos calientes no está
seleccionada.
Seleccione la función correcta.
La configuración de temperatura es
demasiado alta.
Seleccione una temperatura más baja.
La vajilla no está lo
suficientemente
caliente.
La función para calentar platos
no está seleccionada.
Seleccione la función correcta.
La configuración de temperatura es
demasiado baja.
Seleccione una temperatura más alta.
Las rejillas de ventilación están
cubiertas.
Asegúrese de que el aire pueda circular
libremente.
La vajilla no se ha calentado
durante el tiempo suficiente.
Hay varios factores que afectarán al tiempo
de calentamiento de la vajilla (consulte
“Calentar la vajilla”).
Guía de resolución de problemas
ES-19
Page 86

Problema
Causa posible
Solución
La vajilla está demasiado
caliente.
La función para calentar platos o
calentar tazas y vasos no está
seleccionada.
Seleccione la función correcta.
La configuración de temperatura es
demasiado alta.
Seleccione una temperatura más
baja.
Se puede oír un ruido
cuando el cajón está en
uso.
El ruido está causado por el
ventilador que distribuye el calor de
manera uniforme a través del cajón.
El ventilador funciona a intervalos
cuando se utilizan las funciones para
mantener los alimentos calientes y
cocinar a baja temperatura.
Esto no es un fallo.
Guía de resolución de problemas
ES-20
Page 87

Al empotrar el electrodoméstico combinado, es esencial seguir las
instrucciones proporcionadas en las instrucciones de funcionamiento
e instalación provistas con el electrodoméstico combinado.
Todas las dimensiones de este folleto de instrucciones se dan en mm.
Instrucciones de seguridad para la instalación
► Antes de conectar el electrodoméstico a la red eléctrica, asegúrese de que los datos
de conexión de la placa de datos (tensión y frecuencia) corresponden a la red eléctrica;
de lo contrario, el electrodoméstico podría dañarse. Consulte a un electricista
cualificado si tiene alguna duda.
► La toma de corriente y el interruptor de encendido/apagado deberían ser fácilmente
accesibles después de que el electrodoméstico haya sido empotrado.
► El cajón calentador solo se puede empotrar en combinación con los
electrodomésticos citados por el fabricante como adecuados. El fabricante no puede
garantizar un funcionamiento sin problemas si el electrodoméstico se utiliza en
combinación con otros electrodomésticos diferentes a los indicados por el fabricante
como adecuados.
► Al empotrar el cajón calentador en combinación con otro electrodoméstico adecuado,
el cajón calentador de alimentos debe colocarse sobre un estante provisional fijado en
la unidad de alojamiento. Asegúrese de que la unidad de alojamiento pueda soportar
tanto su peso como el del otro electrodoméstico.
► Dado que el electrodoméstico combinado se coloca directamente encima del cajón
calentador una vez empotrado, no es necesario un estante intermedio entre los dos
electrodomésticos.
► El electrodoméstico debe empotrarse de modo que se pueda ver el contenido del
cajón.
Esto es así para evitar quemaduras por derrames de comida caliente. Debe haber
suficiente espacio para que el cajón pueda extraerse por completo.
► El cajón calentador está disponible en dos modelos, que difieren en la apertura de la
puerta.
Las dimensiones de empotrado para el cajón calentador deben agregarse a las
dimensiones de empotrado del electrodoméstico combinado para determinar el tamaño
de nicho requerido.
ES-21
Page 88

Cafetera H: 454 mm
Cámara de vino H: 455 mm
Horno H: 595 mm
Entradas de aire del
lado del estante
Electrodomésticos compactos H: 454 mm
Dimensiones de empotrado
ES-22
Page 89

Se requiere un corte de
ventilación cuando se combina
con un horno pirolítico.
Dimensiones de empotrado,
incluida la conexión del cable de
suministro de red Cable de
conexión L = 1000 mm
* Electrodomésticos con frente de
cristal
** Electrodomésticos con frente de
metal
NOTA:
La potencia máxima de los
electrodomésticos compactos es de
3350 W.
Datos técnicos
Alimentación:
220 - 240 V
50/60 Hz
Potencia total conectada
1000 W
Protección del medio ambiente
Desempaque el electrodoméstico y deseche el embalaje de forma
ambientalmente responsable.
Protección del medio ambiente
Este electrodoméstico está etiquetado de acuerdo con la
Directiva Europea 2012/19/EC sobre aparatos eléctricos y
electrónicos usados (WEEE, equipos eléctricos y electrónicos
de desecho, por sus siglas en inglés). La norma determina el
marco para la devolución y el reciclaje de los
electrodomésticos usados según corresponda.
* Electrodomésticos con frente de color
19,5*/20,5
122,5
12,5
No se requiere estante intermedio.
Mediciones en mm
ES-23
Page 90

Lieferung / Bedienelemente ............................. 3
Lieferumfang ................................................ 3
Lieferung kontrollieren ................................. 3
Verpackungstipps ........................................ 3
Sicherheit ......................................................... 4
Bestimmungsgemäßer Gebrauch ................ 4
Begriffserklärung .......................................... 4
Sicherheitshinweise ..................................... 4
Einbau und Installation .................................... 9
Sicherheitshinweise für den Einbau ............. 9
Einbauvoraussetzungen ............................ 10
Transportieren ............................................ 10
Einbauen und ausrichten ........................... 10
Grundreinigung .......................................... 11
Inbetriebnahme .............................................. 12
Voraussetzungen ....................................... 12
Antirutsch-Matte ......................................... 12
Erstes Aufheizen ........................................ 12
Beladen .......................................................... 13
Bedienung ...................................................... 14
Display und Bedienblende ......................... 14
Betriebsart, -temperatur und -dauer .......... 14
Gerät nutzen .............................................. 14
Tipps .......................................................... 15
Pflege und Wartung ....................................... 16
Gerät reinigen ............................................ 16
Antirutsch-Matte reinigen ........................... 16
Fehlersuchtabelle .......................................... 17
Service ........................................................... 18
Beratung, Bestellung und Reklamation ..... 18
Ersatzteile .................................................. 18
Umweltschutz................................................. 19
Gerät entsorgen ......................................... 19
Unser Beitrag zum Schutz der
Ozonschicht ............................................... 19
Technische Daten .......................................... 20
Bevor Sie das Gerät benutzen,
lesen Sie bitte zuerst die
Sicherheitshinweise und die
Gebrauchsanleitung
aufmerksam durch.
Nur so können Sie alle Funktionen sicher
und zuverlässig nutzen. Beachten Sie
unbedingt auch die nationalen
Vorschriften in Ihrem Land, die zusätzlich
zu den in dieser Anleitung genannten
Vorschriften gültig sind.
Bewahren Sie alle Sicherheitshinweise
und Anweisungen für die Zukunft auf.
Geben Sie alle Sicherheitshinweise und
Anweisungen an den nachfolgenden
Verwender des Produkts weiter.
Inhaltsverzeichnis
DE-2
Page 91

Lieferumfang
– Wärmeschublade mit Display (2) und
Bedienblende (3)
– Antirutsch-Matte (1)
– Beutel mit vier Kreuzschlitzschrauben
(4) (ohne Abbildung)
– Gebrauchsanleitung
Lieferung kontrollieren
1. Prüfen Sie, ob die Lieferung vollständig
ist.
2. Kontrollieren Sie, ob das Gerät
Transportschäden aufweist.
3. Sollte die Lieferung unvollständig sein
oder das Gerät einen Transportschaden
aufweisen, nehmen Sie bitte Kontakt mit
unserem Service auf (siehe „Service"
auf Seite 18).
WARNUNG!
Nehmen Sie nie ein beschädigtes
Gerät in Betrieb.
Verpackungstipps
Sollten es Ihre räumlichen
Verhältnisse zulassen, empfehlen
wir Ihnen, die Verpackung
zumindest während der
Garantiezeit aufzubewahren.
Sollte das Gerät zur Reparatur
eingeschickt werden müssen, ist es nur in
der Originalverpackung ausreichend
geschützt.
Wenn Sie sich von der Verpackung
trennen möchten, entsorgen Sie diese
bitte umweltfreundlich.
Lieferung / Bedienelemente
DE-3
Page 92

Bestimmungsgemäßer
Gebrauch
Verwenden Sie das Gerät ausschließlich
wie in dieser Gebrauchsanleitung
beschrieben. Jede andere Verwendung
gilt als nicht bestimmungsgemäß und
kann zu Sach- oder sogar
Personenschäden führen.
Der Hersteller übernimmt keine Haftung
für Schäden, die durch nicht
bestimmungsgemäßen Gebrauch
entstanden sind.
Das Gerät ist bestimmt zum
– Warmhalten von Speisen
– Antauen von Beeren und Gemüse
– Gehenlassen von Hefeteig
– Erwärmen von Geschirr bestimmt.
Es eignet sich nicht zum Auftauen,
Erwärmen, Wiederwärmen oder Garen
von Speisen.
Das Gerät eignet sich nicht zum
Beheizen eines Raumes.
Das Gerät ist nur zur Verwendung im
privaten Haushalt bestimmt, eine
gewerbliche Nutzung ist ausgeschlossen.
Das Gerät ist zur Verwendung in
haushaltsähnlichen Umgebungen
bestimmt. Die Verwendung im
Außenbereich und an nicht-stationären
Orten (Schiffe, Wohnmobile etc.) ist
ausgeschlossen.
Das Gerät darf nur in eingebautem
Zustand betrieben werden.
Es darf nicht als Stütze, Sitzfläche oder
Trittbrett verwendet werden.
Begriffserklärung
Folgende Signalbegriffe finden Sie in
dieser Gebrauchsanleitung.
WARNUNG
Dieser Signalbegriff bezeichnet eine
Gefährdung mit einem mittleren
Risikograd, die, wenn sie nicht vermieden
wird, den Tod oder eine schwere
Verletzung zur Folge haben kann.
VORSICHT
Dieser Signalbegriff bezeichnet eine
Gefährdung mit einem niedrigen
Risikograd, die, wenn sie nicht vermieden
wird, eine geringfügige oder mäßige
Verletzung zur Folge haben kann.
HINWEIS
Dieser Signalbegriff warnt vor möglichen
Sachschäden.
Dieses Symbol verweist auf
nützliche Zusatzinformationen.
Sicherheitshinweise
In diesem Kapitel finden Sie allgemeine
Sicherheitshinweise, die Sie zu Ihrem
eigenen Schutz und zum Schutz Dritter
stets beachten müssen. Beachten Sie
zusätzlich die Warnhinweise in den
einzelnen Kapiteln zu Bedienung, Einbau
und Installation etc.
Sicherheit
DE-4
Page 93

Risiken im Umgang mit elektrischen
Haushaltsgeräten
In diesen Fällen Gerät sofort vom
Stromnetz trennen (Sicherungen
herausdrehen bzw. ausschalten). Gerät
reparieren lassen (siehe „Service“ auf
Seite 18).
Wenn das Netzkabel des Gerätes
beschädigt ist, muss es durch den
Hersteller, dessen Kundendienst oder
eine qualifizierte Fachkraft
ausgetauscht werden, um
Gefährdungen zu vermeiden.
Keine Gegenstände in oder durch die
Gehäuseöffnungen stecken und
sicherstellen, dass auch Kinder keine
Gegenstände hineinstecken können.
Niemals das Gehäuse öffnen.
Gerät, Netzstecker und -kabel von
offenem Feuer und heißen Flächen
fernhalten.
Netzkabel nicht knicken oder klemmen
und nicht über scharfe Kanten legen.
Die Folge kann ein Kabelbruch sein.
Netzkabel nie als Tragegriff verwenden.
Immer am Netzstecker selbst, nicht am
Netzkabel anfassen.
Netzstecker niemals mit feuchten
Händen anfassen.
Gerät, Netzkabel und -stecker nie in
Wasser oder andere Flüssigkeiten
tauchen.
Niemals versuchen, das defekte oder
vermeintlich defekte Gerät selbst zu
reparieren. Sie können sich und
spätere Benutzer in Gefahr bringen.
Nur autorisierte Fachkräfte dürfen diese
Reparaturen ausführen.
Im Fehlerfall sowie vor umfangreichen
Reinigungsarbeiten den Netzstecker
ziehen bzw. die Sicherung
ausschalten/herausdrehen.
WARNUNG
Stromschlaggefahr!
Unsachgemäßer Umgang kann zu
elektrischem Schlag oder Kurzschluss
führen.
Gerät nur anschließen, wenn die
Netzspannung der Steckdose mit der
Angabe auf dem Typschild
übereinstimmt.
Das Gerät entspricht der Schutzklasse
1 und darf nur an eine Steckdose mit
ordnungsgemäß installiertem
Schutzleiter angeschlossen werden.
Der Anschluss an eine
Steckdosenleiste, eine
Mehrfachsteckdose, eine Zeitschaltuhr
oder ein separates Fernwirksystem zur
Fernüberwachung und -steuerung ist
unzulässig.
Das Gerät nur in Innenräumen
verwenden, nie in Feuchträumen oder
im Regen betreiben.
Gerät nur in eingebautem Zustand
betreiben.
Falls der Netzstecker nach dem
Einbau nicht mehr zugänglich ist,
muss eine allpolige Trennvorrichtung
gemäß Überspannungskategorie III in
der Hausinstallation mit mindestens 3
mm Kontaktabstand vorgeschaltet
sein; hierzu zählen Sicherungen, LSSchalter und Schütze.
Gerät nicht in Betrieb nehmen oder
weiter betreiben, wenn es
sichtbare Schäden aufweist, z. B.
die Anschlussleitung defekt ist.
ungewohnte Geräusche von sich
gibt.
DE-5
Page 94

Risiken für bestimmte
Personengruppen
Reinigung und Benutzerwartung dürfen
nicht von Kindern ohne Beaufsichtigung
durchgeführt werden.
Stellen Sie sicher, dass Kinder keinen
Zugriff auf das Gerät haben, wenn sie
unbeaufsichtigt sind.
WARNUNG
Gefahren für Kinder und Personen mit
verringerten physischen, sensorischen
oder mentalen Fähigkeiten
(beispielsweise teilweise Behinderte,
ältere Personen mit Einschränkung ihrer
physischen und mentalen Fähigkeiten)
oder Mangel an Erfahrung und Wissen
(beispielsweise ältere Kinder)!
Kinder können sich beim Spielen in der
Verpackungsfolie verfangen und
ersticken. Stellen Sie sicher, dass die
Verpackungsfolie nicht in Reichweite
von Kindern kommt.
Kinder können sich an Kleinteilen
verschlucken und ersticken. Stellen Sie
sicher, dass Kinder keine kleinen Teile
vom Gerät abziehen oder aus dem
Zubehörbeutel nehmen und in den
Mund stecken können.
Risiken im Umgang mit diesem Gerät
WARNUNG
Stromschlaggefahr!
Zur Erhöhung der Sicherheit empfiehlt
der VDE bzw. ÖDE, der Schublade
einen FI-Schutzschalter mit einem
Auslösestrom von 30 mA vorzuschalten.
VORSICHT
Verbrühungsgefahr!
Die Antirutsch-Matte sorgt für festen Halt
des Geschirrs beim Schließen und Öffnen
der Schublade, damit die warmen
Speisen, insbesondere Flüssigkeiten nicht
überschwappen und Sie verbrühen.
Gerät nur mit Antirutsch-Matte (1)
betreiben.
Antirutsch-Matte nicht durch
Küchenpapier oder Ähnliches ersetzen.
Geschirr nur zu 2/3 füllen, damit nichts
überschwappt.
Keine geschlossenen Behälter wie
Konservendosen erhitzen. Durch den
entstehenden Überdruck können die
Behälter platzen.
VORSICHT
Dieses Gerät kann von Kindern ab acht
Jahren sowie von Personen mit
verringerten physischen, sensorischen
oder mentalen Fähigkeiten oder
Mangel an Erfahrung und Wissen
benutzt werden, wenn sie beaufsichtigt
werden oder bezüglich des sicheren
Gebrauchs des Geräts unterwiesen
wurden und die daraus resultierenden
Gefahren verstanden haben.
Kinder dürfen nicht mit dem Gerät
spielen.
DE-6
Page 95

Verbrennungsgefahr!
Die Unterseite des Geräts und das
Geschirr werden während des Betriebs
heiß.
Zum Schutz der Hände
Topfhandschuhe oder -lappen
verwenden. Nur trockene Textilien
verwenden, feuchte leiten die Wärme
besser und können Verbrennungen
durch Dampf verursachen.
Körper von der ausgezogenen
Schublade fern halten.
Brandgefahr!
Gerät nicht als Stauraum verwenden.
Gerät nicht zum Beheizen des Raums
verwenden. Gegenstände in der Nähe
könnten zu brennen beginnen.
Wenn das Gerät hinter einer Möbeltür
eingebaut ist, darf es nur bei geöffneter
Möbeltür betrieben werden. Möbeltür
erst schließen, wenn das Gerät
ausgeschaltet ist.
Beim Warmhalten von Speisen in Öl, in
Fett oder mit Alkohol Gerät nicht ohne
Aufsicht lassen! Die Speisen können
sich selbst entzünden.
Bei Feuer im Gerät:
Gerät geschlossen lassen!
Brennendes Öl oder Fett nie mit
Wasserlöschen!
Im Brandfall sofort den
Sicherungsautomaten ausschalten
bzw. die Sicherungen herausdrehen.
Zum Löschen einen geeigneten
Feuerlöscher mit Kennzeichnung „F“
oder eine Löschdecke verwenden.
Nach dem Erlöschen des Feuers
unseren Service verständigen (siehe
„Service“ auf Seite 18).
Kurzschlussgefahr!
Wenn Flüssigkeiten durch die
Lüftungsschlitze in das Innere des
Gerätes gelangen, kann dies zu einem
Kurzschluss führen. Beladene
Schublade vorsichtig öffnen und
schließen, damit keine Flüssigkeit
überschwappt.
Der Dampf eines Dampfreinigers kann
an spannungsführende Teile gelangen
und einen Kurzschluss auslösen. Zum
Reinigen niemals einen Dampfreiniger
verwenden.
Gesundheitsgefahr!
Bei zu niedrigen Temperaturen können
sich auf bestimmten Speisen Bakterien
entwickeln.
Nur heiße Speisen in das Gerät stellen
und Betriebsart „Speisen warm
halten“ wählen, denn nur diese stellt die
erforderliche Mindesttemperatur von 60
°C sicher.
Gerät nicht zum Garen von Speisen
oder zum Wiedererwärmen erkalteter
Speisen verwenden.
HINWEIS
Beschädigungsgefahr!
Die Schublade darf mit maximal 25 kg
belastet werden. Anderenfalls würde
der Teleskopauszug zum Öffnen und
Schließen des Geräts Schaden
nehmen.
Während des Beladens mehrfach
testen, ob sich die Schublade noch
leicht öffnen und schließen lässt.
Nicht auf die herausgezogene
Wärmeschublade stützen oder setzen.
DE-7
Page 96

Verschmutzungen möglichst sofort
entfernen. Anderenfalls lassen sie sich
nur schwer beseitigen oder können zu
Verfärbungen führen.
Um Beschädigungen an der
Oberfläche zu verhindern, nur
Spülwasser und ein weiches Tuch zum
Reinigen verwenden.
Antirutsch-Matte (1) nur von Hand mit
warmem Wasser und einem milden
Spülmittel reinigen. Niemals in der Spüloder Waschmaschine reinigen.
Antirutsch-Matte (1) mit einem weichen
Tuch trocknen. Niemals im Backofen
oder in der Mikrowelle trocknen.
Geschirr aus Kunststoff schmilzt bei
hohen Temperaturen. Nur
hitzebeständiges Geschirr aus Glas,
Porzellan etc. verwenden.
DE-8
Page 97

Sicherheitshinweise für den
Einbau
VORSICHT
Verbrennungsgefahr!
Die Einbauhöhe muss so gewählt
sein, dass die Benutzer den Inhalt des
Geschirrs einsehen können. Nur so
lassen sich Verbrühungen durch das
Überschwappen heißer Speisen
verhindern.
Brandgefahr!
Gerät nicht an eine
Mehrfachsteckdose oder mit Hilfe
eines Verlängerungskabels an die
Stromversorgung anschließen.
Furniere, Kunststoffbeläge und
verwendete Kleber des
Umbauschranks müssen
hitzebeständig sein (100 °C)
Das Gerät darf nicht hinter eine
Möbelfront gebaut werden.
Die Lüftungsschlitze und
Ansaugöffnungen dürfen nicht
verdeckt sein.
WARNUNG
Stromschlaggefahr!
Unsachgemäßer Umgang mit dem Gerät
kann zu elektrischem Schlag oder
Kurzschluss führen.
Gerät nur anschließen, wenn die
Netzspannung der Steckdose mit der
Angabe auf dem Typschild
übereinstimmt.
Falls der Netzstecker nach dem
Einbau nicht mehr zugänglich ist,
muss eine allpolige Trennvorrichtung
gemäß Überspannungskategorie III in
der Hausinstallation mit mindestens 3
mm Kontaktabstand vorgeschaltet
sein; hierzu zählen Sicherungen, LSSchalter und Schütze.
Netzkabel nicht knicken oder klemmen
und nicht über scharfe Kanten legen.
Das Netzkabel darf nach dem Einbau
weder die Rückwand noch den Boden
des Gerätes berühren.
Einbau und Installation
DE-9
Page 98

Einbauvoraussetzungen
– Die Wärmeschublade muss gemeinsam mit
einem Kombinationsgerät wie einer
Einbaumikrowelle eingebaut werden.
– Das Kombinationsgerät darf in
beladenem Zustand maximal 60 kg
wiegen.
– Das Kombinationsgerät muss ohne
Zwischenboden auf der
Wärmeschublade positioniert werden.
– Beachten Sie beim Einbau die Montage-
und Gebrauchsanleitung des
Kombinationsgerät.
– Es muss ein fest eingebauter, waagerecht
ausgerichteter Boden vorhanden sein, der
die erforderliche Tragfähigkeit für beide
Geräte gewährleistet (Gerätegewicht siehe
„Technische Daten" auf Seite 20).
– Um ausreichend Luftzirkulation zu
ermöglichen,
– darf die Einbaunische keine Rückwand
besitzen, sondern nur eine Anstellkante
von max. 50 mm.
– muss zwischen dem Einbauschrank und
der Wand ein Abstand von mindestens
45 mm bestehen.
Transportieren
Das Gerät wird in einer stabilen Verpackung
geliefert; es ist so schwer, dass es sich
empfiehlt, es zu zweit zu tragen.
Einbauen und ausrichten
Wenn Ihre handwerklichen Fähigkeiten
ausreichen, können Sie den Einbau selbst
durchführen.
1. Entfernen Sie vorsichtig alle
Verpackungsteile wie Kunststoffprofile,
Klebestreifen und Schaumpolster, falls noch
nicht geschehen. Ziehen Sie alle
Schutzfolien ab, insbesondere von der
beiliegenden Antirutsch-Matte (1).
2. Schieben Sie das Gerät so weit in die
Nische, bis die Gerätefront an den
Seitenwänden des Einbauschranks anliegt.
3. Öffnen Sie die Wärmeschublade.
min
min 590
min
590
min
45
min. 550
Einbaunische
Wand
Alle Angaben in mm
Seitenansicht Einbauschrank
DE-10
Page 99

Grundreinigung
Um Fett- und Öl-Rückstände aus der
Produktion sowie hartnäckige
Staubablagerungen, die durch Lagerung und
Transport entstanden sind, zuverlässig zu
lösen, muss das Gerät vor dem ersten
Gebrauch gereinigt werden.
1. Wischen Sie das Gerät mit ein wenig
Spülmittel aus und trocknen Sie es
anschließend mit einem weichen Tuch.
2. Reinigen Sie die Antirutsch-Matte (1) mit
ein wenig warmer Seifenlauge. Trocknen
Sie sie gründlich mit einem weichen Tuch.
4. Befestigen Sie das Gerät mit den
beiliegenden Schrauben (4) an den
Seitenwänden des Umbauschranks.
5. Bauen Sie das Zusatzgerät gemäß seiner
Gebrauchs- und Montageanleitung ein.
Um die Front der Wärmeschublade mit
dem Zusatzgerät zu fluchten, können Sie den
Abstand zwischen Schubladentür und Gehäuse
anpassen. Nutzen Sie dazu die seitlichen
Einstellrädchen (5).
DE-11
Page 100

Voraussetzungen
– Sie haben das Kapitel „Sicherheit“ gelesen
und alle Sicherheitshinweise verstanden
(siehe Seite 4).
– Das Gerät ist eingebaut, angeschlossen und
gereinigt, wie im Kapitel „Einbau und
Installation“ beschrieben (siehe Seite 9).
Antirutsch-Matte
Vor dem eigentlichen Gebrauch muss die
Schublade einmal leer beheizt werden.
Verwenden Sie folgende Einstellungen:
– Betriebsart:
– Betriebstemperatur: 60°C
– Betriebsdauer: 2hr
Zum generellen Vorgehen siehe Kapitel
„Bedienung“ auf Seite 14.
VORSICHT
Verbrühungsgefahr!
Beim Schließen und Öffnen der
Schublade können warme Speisen,
insbesondere Flüssigkeiten
überschwappen.
Gerät nur mit Antirutsch-Matte (1)
betreiben.
Antirutsch-Matte (1) nicht durch
Küchenpapier oder Ähnliches
ersetzen.
Die Antirutsch-Matte (1) sorgt für festen
Halt des Geschirrs. Betreiben Sie sie
Gerät deshalb nur mit eingelegter
Antirutsch-Matte.
Erstes Aufheizen
HINWEIS
Beim ersten Aufheizen kann es zu
Geruchsbildung kommen. Diese ist
unschädlich und verflüchtigt sich nach
kurzer Zeit. Grund sind Pflegemittel,
welche die Metallteile schützen.
Sorgen Sie für gute Belüftung des
Raumes während des ersten
Aufheizens
Inbetriebnahme
DE-12
 Loading...