

Page 1

Mode d’emploi
User instructions
FR
EN
CN 40.1/F
Page 2
CHAPITRE
CHAPTER
1
2
3
4
5
6
7
8
9
10
11
12
13
3
FR
INDEX
Avant-propos
Notes générales à la
livraison
Garantie
Mesures de sécurité
Données techniques
Mise en place, installation
Description des commandes
Tiroir à lessive
Sélection/Conseils utiles
pour l’utilisateur
Le produit
Ta bleau des programmes
Lavage
Nettoyage et entretien
ordinaire
Recherche des pannes
EN
INDEX
Introduction
General points on delivery
Guarantee
Safety Measures
Technical Data
Setting up and Installation
Control Description
Detergent drawer
Selection/Customer
Awareness
The Product
Ta ble of Programmes
Washing
Cleaning and routine
maintenance
Faults Search
2
FR
TOUS NOS
COMPLIMENTS
En achetant cet appareil
ménager Candy, vous avez
démontré que vous
n’acceptez aucun
compromis: vous voulez
toujours ce qu’il y a de
mieux.
Candy a le plaisir de vous
proposer cette nouvelle
machine à laver qui est le
résultat d’années de
recherches et d’études des
besoins du consommateur.
Vo us avez fait le choix de la
qualité, de la fiabilité et de
l’efficacité.
Candy vous propose une
large gamme d’appareils
électroménagers: machines
à laver la vaisselle,machines
à laver et sécher le linge,
cuisinières, fours à microondes, fours et tables de
cuisson, hottes, réfrigerateurs
et congélateurs.
Demandez à votre
Revendeur le catalogue
complet des produits
Candy.
Nous vous prions de lire
attentivement les conseils
contenus dans ce livret. Il
contient d’importantes
indications concernant les
procédures d’installation,
d’emploi, d’entretien et
quelques suggestions utiles
en vue d’améliorer
l’utilisation de la machine à
laver.
Conservez avec soin ce
livret: vous pourrez le
consulter bien souvent.
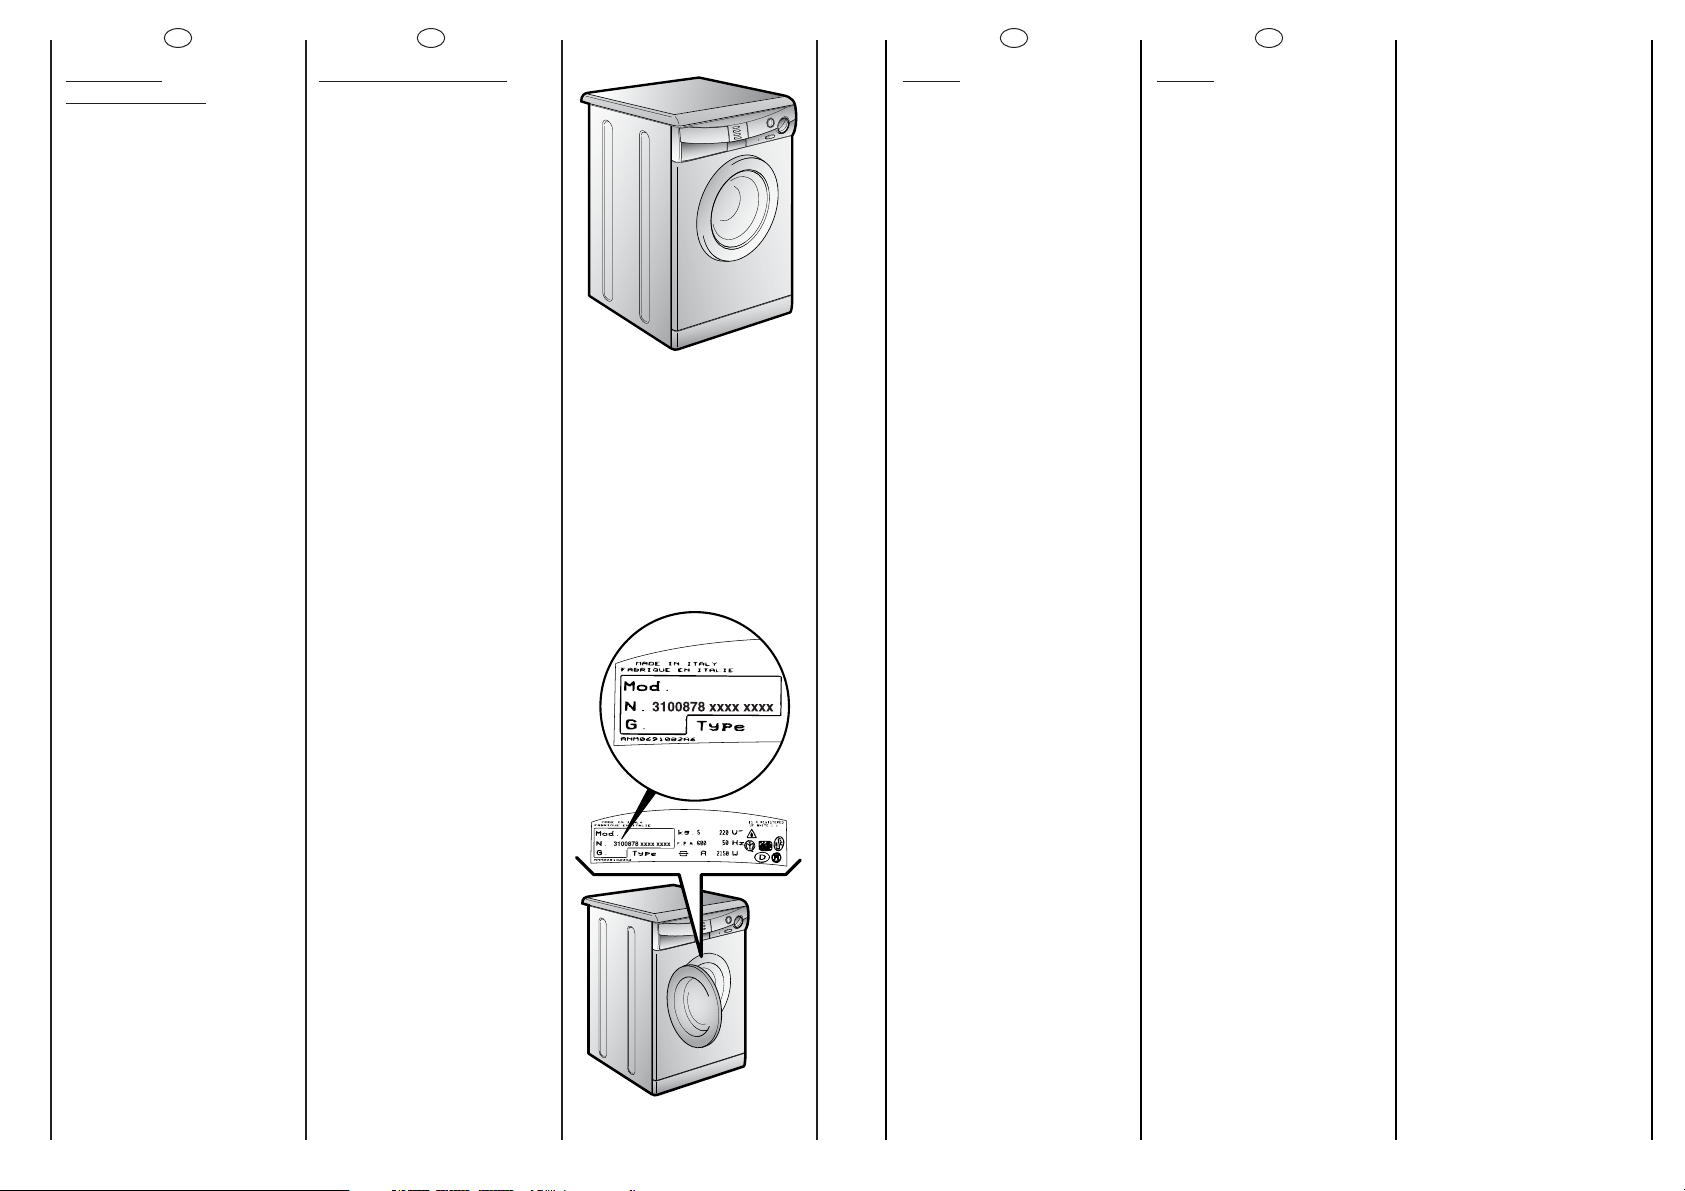
Quand vous communiquez
avec Candy, ou avec ses
centres d’assistance, veuillez
citer le Modèle, le n° et le
numéro G (éventuellement).
EN
OUR COMPLIMENTS
With the purchase of this
Candy household appliance,
you have shown that you will
not accept compromises:
you want only the best.
Candy is happy to present
their new washing machine,
the result of years of research
and market experience
through direct contact with
Consumers. You have chosen
the quality, durability and
high performance that this
washing machine offers.
Candy is also able to offer a
vast range of other
household appliances:
washing machines,
dishwashers, washer-dryers,
cookers, microwave ovens.
Traditional ovens and hobs,
refrigerators and freezers.
Ask your local retailer for the
complete catalogue of
Candy products.
Please read this booklet
carefully as it provides
important guide lines for safe
installation, use and
maintenance and some
useful advise for best results
when using your washing
machine.
Keep this booklet in a safe
place for further consultation.
When contacting Candy
or a Customer Services
Centre always refer to the
Model, No., and G number (if
applicable of the appliance
see panel).
Page 3
5
FR
CHAPITRE 2
GARANTIE
L’ a ppareil est accompagné
par un certificat de
gàrantie.
EN
CHAPTER 2
GUARANTEE
The appliance is supplied
with a guarantee certificate
which allows free use of the
Technical Assistance Service.
4
SPEDIRE
TRATTENERE
AB
C
EUROPE
Dovunque
tu sia.
E
F
3
2
'
32'
G
FR
CHAPITRE 1
NOTES GENERALES
A LA LIVRAISON
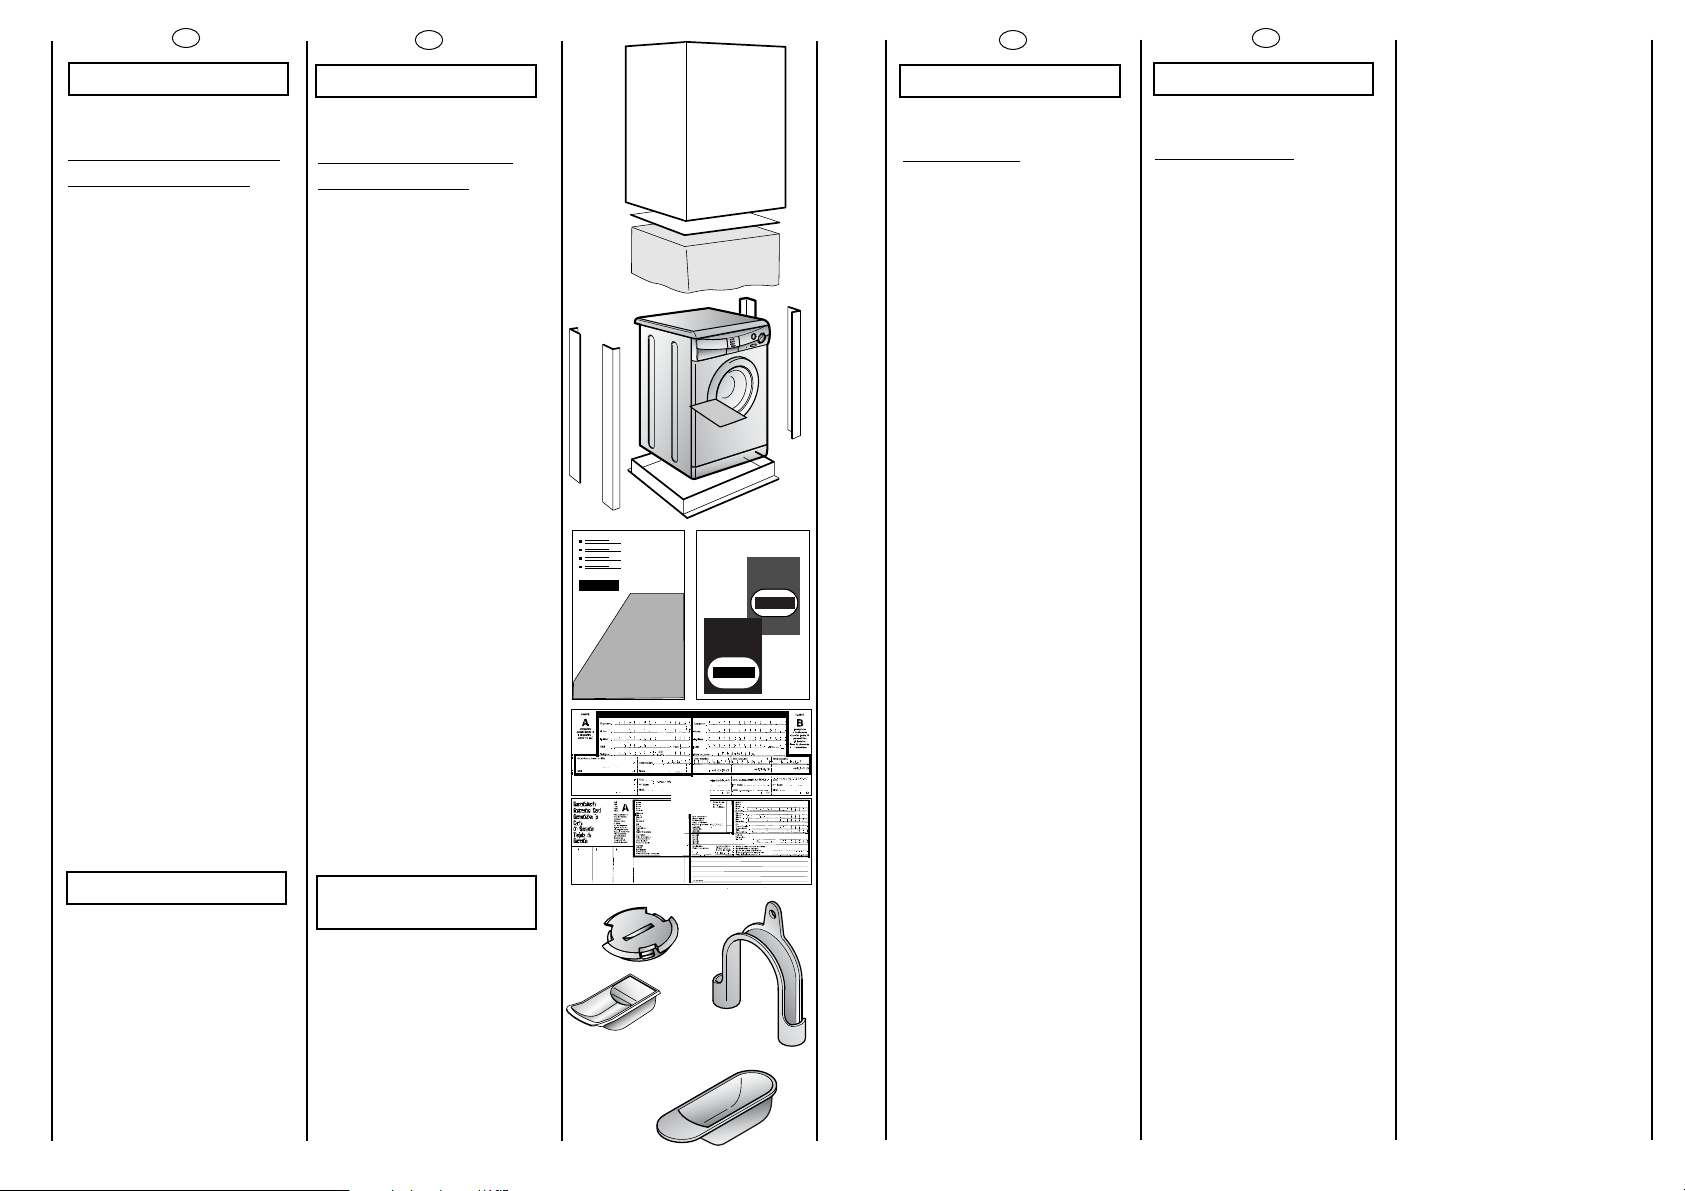
A la livraison veuillez
contrôler que le matériel
suivant accompagne la
machine:
A) LIVRET
D’INSTRUCTIONS
B) ADRESSES DE SERVICE
APRES VENTE
C) CERTIFICAT DE
GARANTIE
D) BOUCHON
E) COUDES POUR LE TUBE
DE VIDANGE
F) BAC POUR LES
PRODUITS LIQUIDES
G) DOSEUR
PROGRAMME 32’
LES CONSERVER
et contrôler que ce matériel
soit en bon état; si tel n’est
pas le cas appelez le centre
Candy le plus proche.
EN
CHAPTER 1
GENERAL POINTS
ON DELIVERY
On delivery, check that the
following are included with
the machine:
A) INSTRUCTION MANUAL
B) CUSTOMER SERVICE
ADDRESSES
C) GUARANTEE
CERTIFICATES
D) CAP
E) BEND FOR OUTLET TUBE
F) LIQUID DETERGENT
COMPARTMENT
G) 32 MINUTE
PROGRAMME DOSING
SCOOP
KEEP THEM IN A SAFE
PLACE
Check that the machine has
not incurred damage during
transport. If this is the case,
contact your nearest Candy
Centre.
D
Page 4
7
FR
● Ne pas utiliser
d’adaptateurs ou de prises
multiples.
● Cet appareil ne doit pas
être utilisé sans surveillance.
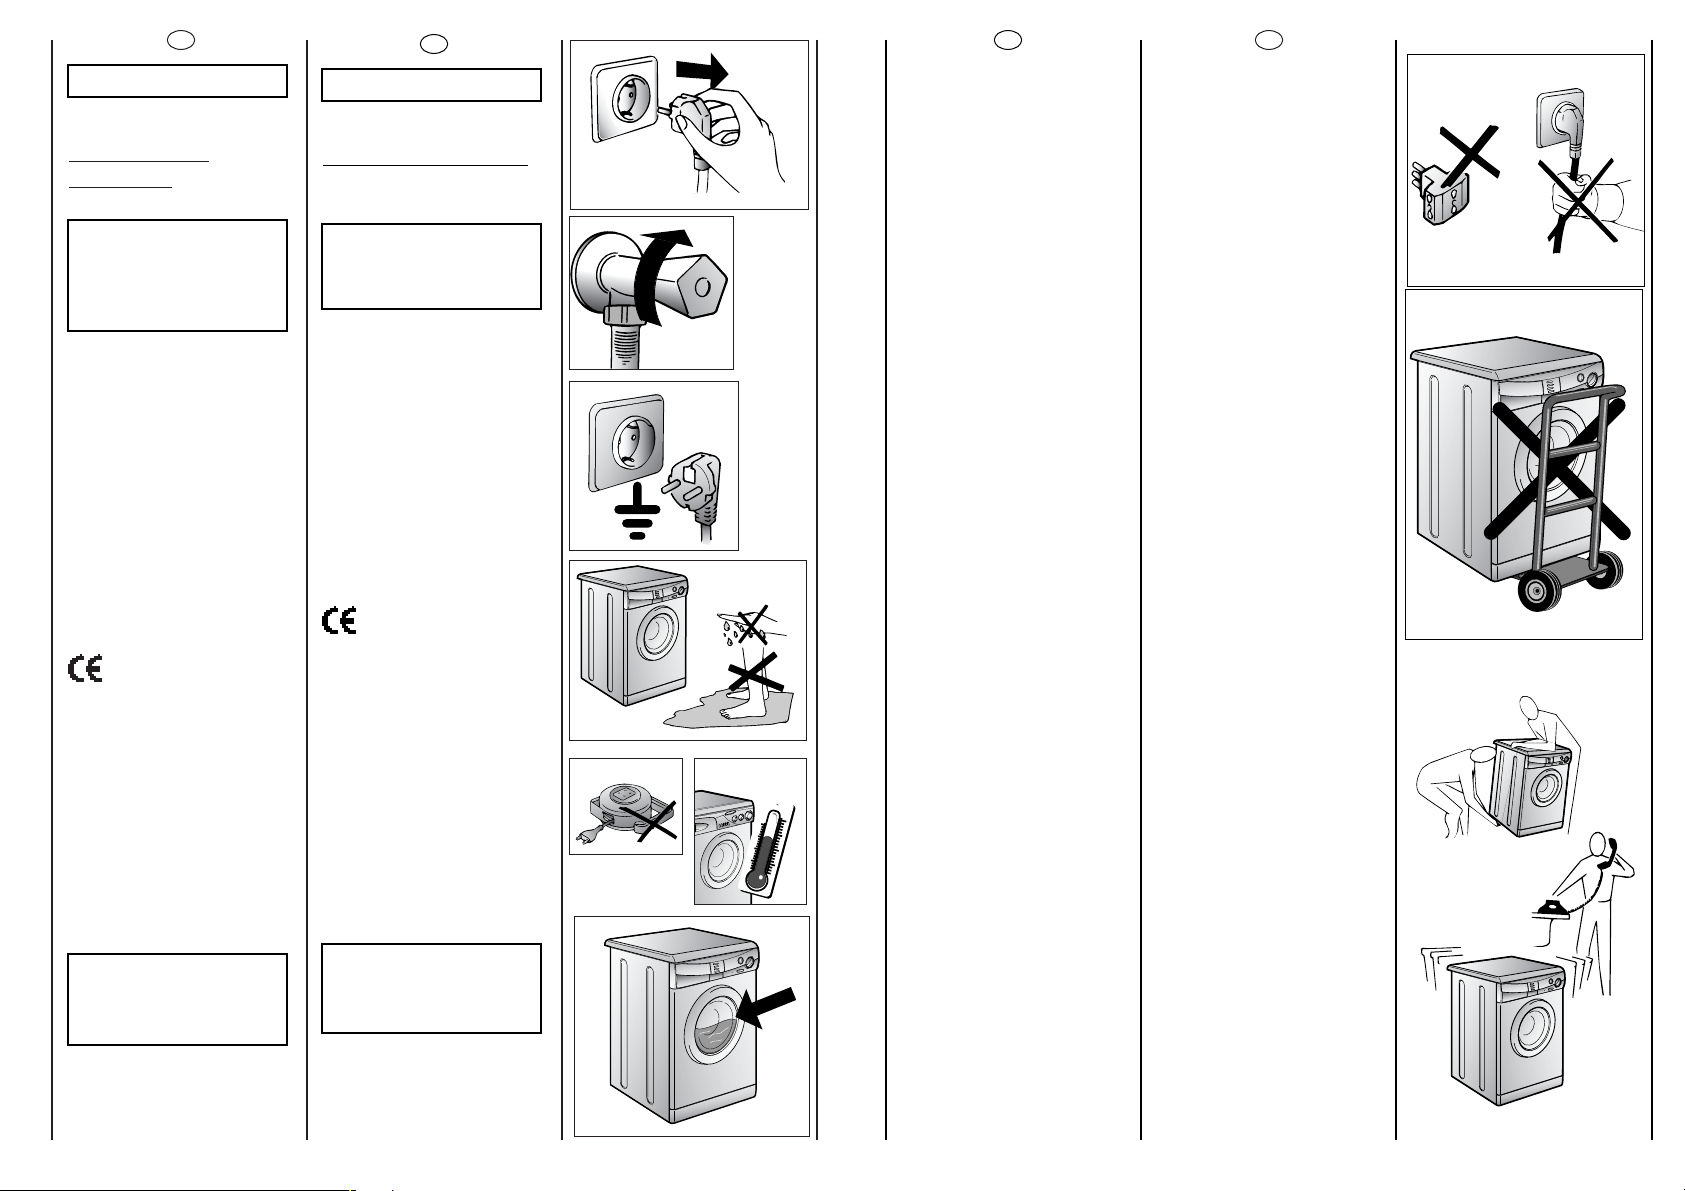
● Pour débrancher la prise,
ne pas tirer sur le câble.
● Ne pas laisser la machine
exposée aux agents
atmosphériques (pluie, soleil,
etc...).
● En cas de déménagement
ne jamais soulever la
machine par les boutons ou
par le tiroir des produits
lessiviels.
● Pendant le transport ne
pas appuyer le hublot sur le
chariot.
Important!
Les ouvertures à la base de
l’appareil ne doivent en
aucun cas être obstruées par
des tapis, moquette ou
autres objets.
● 2 personnes pour soulever
la machine (voir dessin).
● En cas de panne et/ou de
mauvais fonctionnement
éteindre la machine, fermer
le robinet d’alimentation
d’eau et ne pas toucher à la
machine. Pour toute
réparation adressez-vous
exclusivement à un centre
d’assistance technique
Candy en demandant des
pièces de rechange
certifiées constructeur.Le fait
de ne pas respecter les
indications susmentionnées
peut compromettre la
sécurité de l’appareil.
● Si le remplacement du
câble d’alimentation s’avère
nécessaire, il devra être
remplacé par un câble
special fourni par le service
après-vente.
EN
● Do not use adaptors or
multiple plugs.
● Do not allow the appliance
to be used by children or the
incompetent without due
supervision.
● Do not pull the mains lead
or the appliance itself to
remove the plug from the
socket.
● Do not leave the
appliance exposed to
atmospheric agents (rain, sun
etc.)
● In the case of removal,
never lift the appliance by
the knobs or detersive
drawer.
● During transportation
do not lean the door against
the trolley.
Important!
When the appliance
location is on carpet floors,
attention must be paid so as
to ensure that there is no
obstruction to the bottom
vents.
● Lift the appliance in pairs
as illustrated in the diagram.
● In the case of failure
and/or incorrect operation,
turn the washing machine
off, close the water inlet tap
and do not tamper with the
appliance. Contact a Candy
Technical Assistance Centre
for any repairs and ask for
original Candy spare parts.
Avoidance of these norms
may compromise the safety
of the appliance.
● Should the supply cord
(mains cable) be demaged,
this is to be replaced by a
specific cable available from
the after sales service centre.
6
FR
CHAPITRE 3
MESURES DE
SECURITE
ATTENTION:
EN CAS
D’INTERVENTION DE
NETTOYAGE ET
D’ENTRETIEN
● Débrancher la prise de
courant.
● Fermer le robinet
d’alimentation d’eau.
● Toutes les machines
Candy sont pourvues de
mise à la terre.
Vérifier que l’installation
électrique soit alimentée
par une prise de terre, en
cas contraire demander
l’intervention du personnel
qualifié.
Cet appareil est
conforme aux directives
89/336/EEC, 73/23/EEC et
modifications successives.
● Ne pas toucher l’appareil
pieds nus.
● Autant que possible éviter
l’usage de rallonges dans
les salles de bains ou les
douches.
ATTENTION:
PENDANT LE LAVAGE
L’EAU PEUT ATTEINDRE
60°C.
● Avant d’ouvrir le hublot
vérifier que le tambour soit
sans eau.
EN
CHAPTER 3
SAFETY MEASURES
IMPORTANT:
FOR ALL CLEANING
AND MAINTENANCE
WORK
● Remove the plug
● Turn off the water inlet tap.
● All Candy appliances are
earthed. Ensure that the main
electricity circuit is earthed.
Contact a qualified
electrician if this is not the
case.
This appliance
complies with Directives
89/336/EEC, 73/23/EEC and
following changes.
● Do not touch the appliance
with wet or damp hands or
feet.
● Do not use the appliance
when bare-footed.
● Extreme care should be
taken if extension leads are
used in bathrooms or shower
rooms. Avoid this where
possible.
WARNING: DURING THE
WASHING CYCLE, THE
WATER CAN REACH A
TEMPERATURE OF 60°C.
● Before opening the washing
machine door, ensure that
there is no water in the drum.
60°C
Page 5
9
FR
CHAPITRE 5
MISE EN PLACE
INSTALLATION
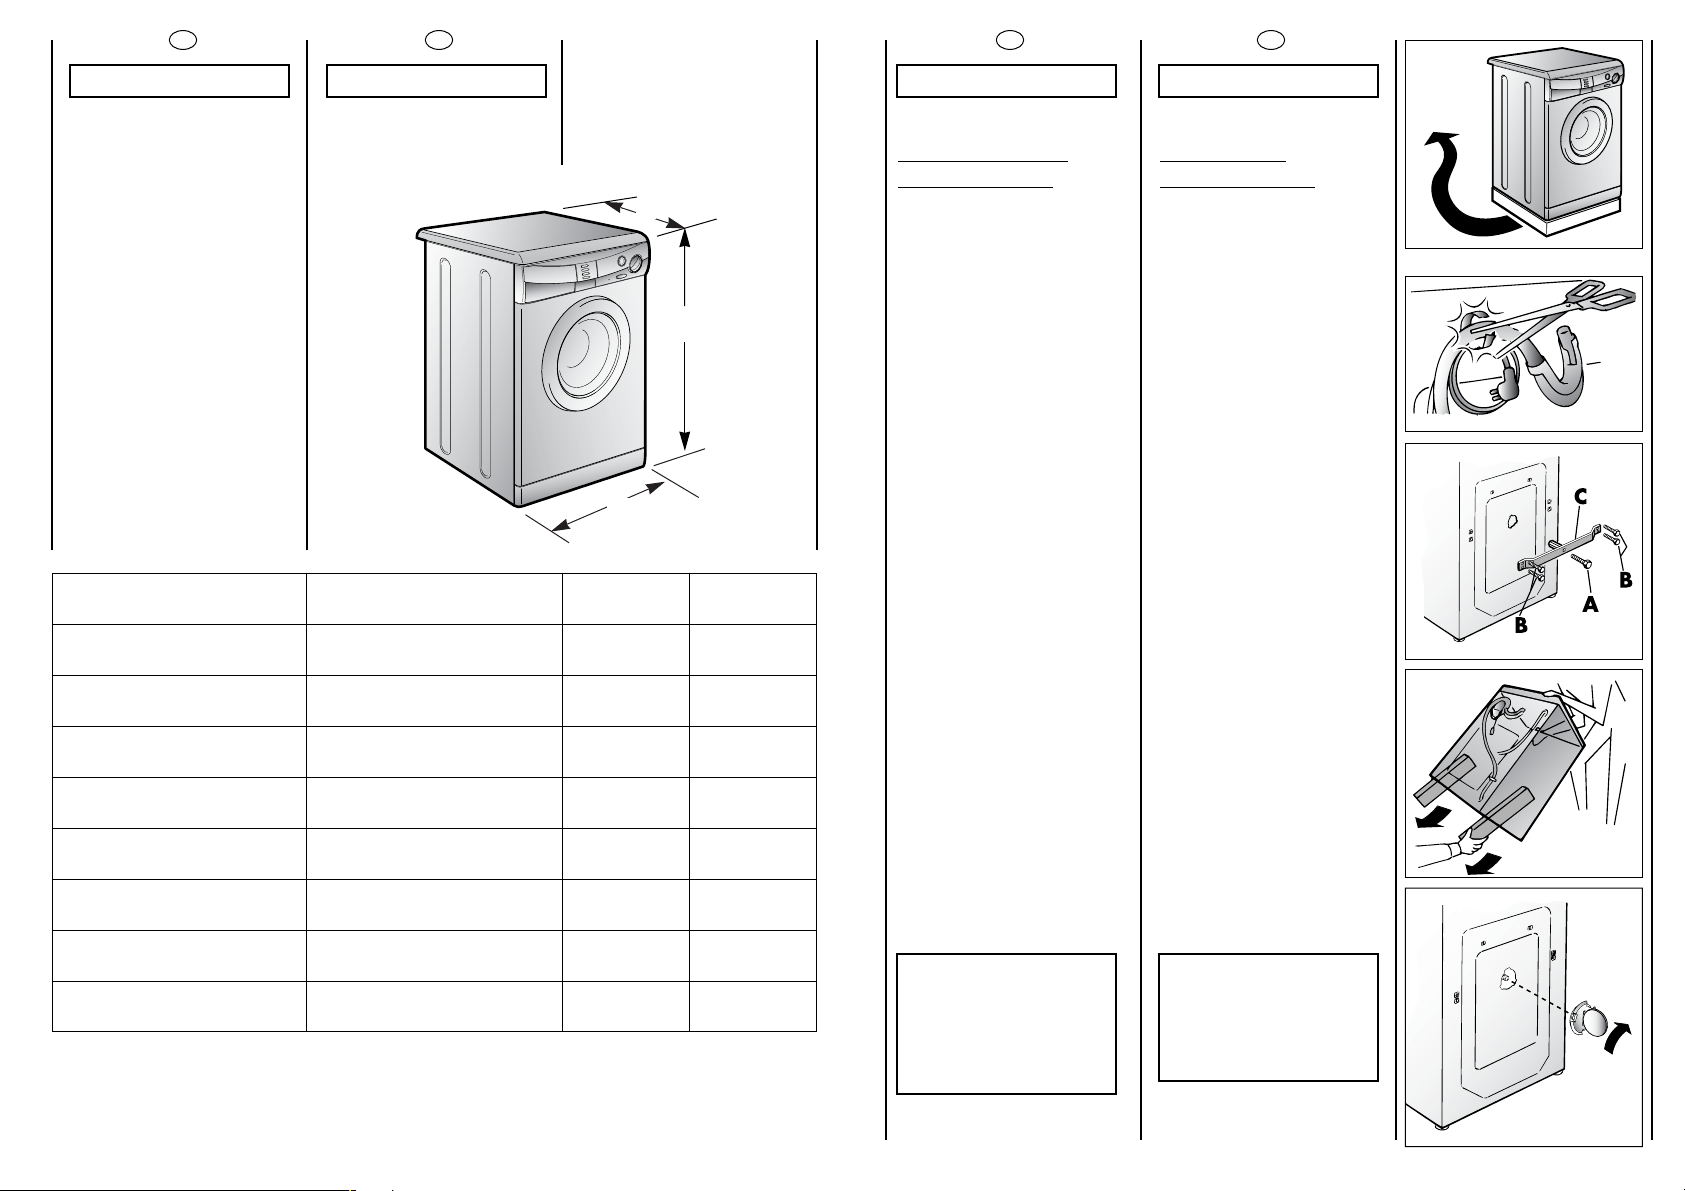
Placer la machine sur le lieu
d’utilisation sans le socle
d’emballage.
Couper les colliers
serre-tubes
Dévisser la vis centrale (A);
dévisser les 4 vis latérales (B)
et enlever l’axe (C).
Incliner la machine en avant
et enlever les sachets en
plastique qui contennent les
2 arrêts en polystyrène qui
se trouvent sur les 2 côtés en
tirant vers le bas.
Refermer le trou en utilisant
le bouchon qui se trouvè
dans le sachet “instructions”.
ATTENTION:
NE PAS LAISSER À LA
PORTÉE DES ENFANTS
DES ELEMENTS
D’EMBALLAGE QUI
PEUVENT CAUSER DES
RISQUES.
EN
CHAPTER 5
SETTING UP
INSTALLATION
Move the machine near its
permanent position without
the packaging base.
Cut tube-holding straps.
Unscrew the central screw
(A); unscrew the 4 lateral
screws (B) and remove the
cross piece (C).
Lean the machine forward
and remove the plastic
bags containing the two
polystyrene blocks at the
sides, pulling downwards.
Press the plug (to be found
in the envelope with the
instructions) into the hole.
WARNING:
DO NOT LEAVE THE
PACKAGING IN THE
REACH OF CHILDREN AS
IT IS A POTENTIAL
SOURCE OF DANGER.
MPa
8
kg 5
19
2300
2,0
10
400
min. 0,05
max. 0,8
220
60
l
15l
W
kWh
A
giri/min.
V
Hz
FR
CHAPITRE 4
PRESSION DANS
L’INSTALLATION HYDRAULIQUE
TENSION
CAPACITE DE LINGE
SEC
EAU NIVEAU NORMAL
NIVEAU ECONOMIQUE
DE L’AU
PUISSANCE
ABSORBEE
CONSOMMATION ENERGIE
(PROG. 1)
AMPERAGE
ESSORAGE
(Tours/min.)
EN
CHAPTER 4
WATER PRESSURE
SUPPLY
VOLTAGE
MAXIMUM WASH
LOAD DRY
NORMAL WATER LEVEL
POWER INPUT
ENERGY CONSUMPTION
(PROG. 1)
POWER CURRENT FUSE
AMP
SPIN
r.p .m.
ECONOMIC WATER LEVEL
85 cm
60 cm
52 cm
Page 6

11
A
B
C
FR
Mettre la machine à niveau
avec les pieds avant.
a) Tourner dans le sens des
aiguilles d’une montre
l’écrou de façon à
dévérouiller la vis du pied.
b) Tourner le pied et le faire
monter ou descendre
jusqu’à obtenir une parfaite
adhérence au sol.
c) Enfin bloquer le pied en
revissant l’écrou dans le sens
inverse des aiguilles d’une
montre et le faire adhérer au
fond de la machine.
Vérifier que le bouton
Marche/Arrêt (C) ne soit pas
enfoncé.
Vérifier que toutes les
manettes soient sur la
position “0” et que le hublot
soit fermé.
Brancher la prise.
Une fois l'appareil installé, la
prise électrique doit rester
accessible .
Appuyer sur la touche
Marche/Arrêt (C) pour
allumer la lampe-témoin de
fonctionnement courant
branché (G); si elle ne
s’allume pas se reporter à la
liste des recherches de
panne.
EN
Use front feet to level the
machine with the floor.
a) Turn the nut clockwise to
release the screw adjuster of
the foot.
b) Rotate foot to raise or
lower it until it stands firmly
on the ground.
c) Lock the foot in position
by turning the nut anticlockwise until it comes up
against the bottom of the
machine.
Ensure that the Off/On
button (C) is not pressed.
Ensure that all the knobs are
on the “0” position and that
the door is closed.
Insert the plug.
After installation, the
appliance must be
positioned so that the plug is
accessible.
Press the START (C) button.
The power on (G) light will
light up.
If this does not light up see
faults search.
10
FR
Appliquer la feuille
supplémentaire sur le fond
comme dans la figure.
Raccorder le tube de l’eau
aux robinets.
L'appareil doit être relié à
l'arrivée d'eau exlusivement
avec les tuyaux fournis .
Ne pas réutiliser les anciens
tuyaux .
ATTENTION:
NE PAS OUVRIR LE
ROBINET
Approcher la machine
contre le mur en faisant
attention à ce que le tuyau
n’ait ni coudes ni
étranglements.
Raccorder le tuyau de
vidange au rebord de la
baignoire ou, mieux encore,
à un dispositif fixe
d’évacuation, hauteur mini.
50 cm et de diamètre
supérieur au tuyau de la
machine à laver.
En cas de besoin, utiliser le
coude rigide livré avec la
machine.
EN
Fix the sheet of corrugated
material on the bottom as
shown in picture.
Connect the fill hose
to the tap.
The appliance must be
connected to the water
mains using new hose-sets.
The old hose-sets should not
be reused.
IMPORTANT:
DO NOT TURN THE TAP
ON AT THIS TIME.
Position the washing
machine next to the wall.
Hook the outlet tube to the
edge of the bath tub,
paying attention that there
are no bends or
contractions along the tube.
It is better to connect the
discharge hose to a fixed
outlet of a diameter greater
than that of the outlet tube
and at a height of min. 50
cm. If is necessary to use the
plastic sleeve supplied.
min 4 cm
max 100 cm
+2,6 mt max
min 50 cm
max 85 cm
Page 7
13
C
D
B
2 min.
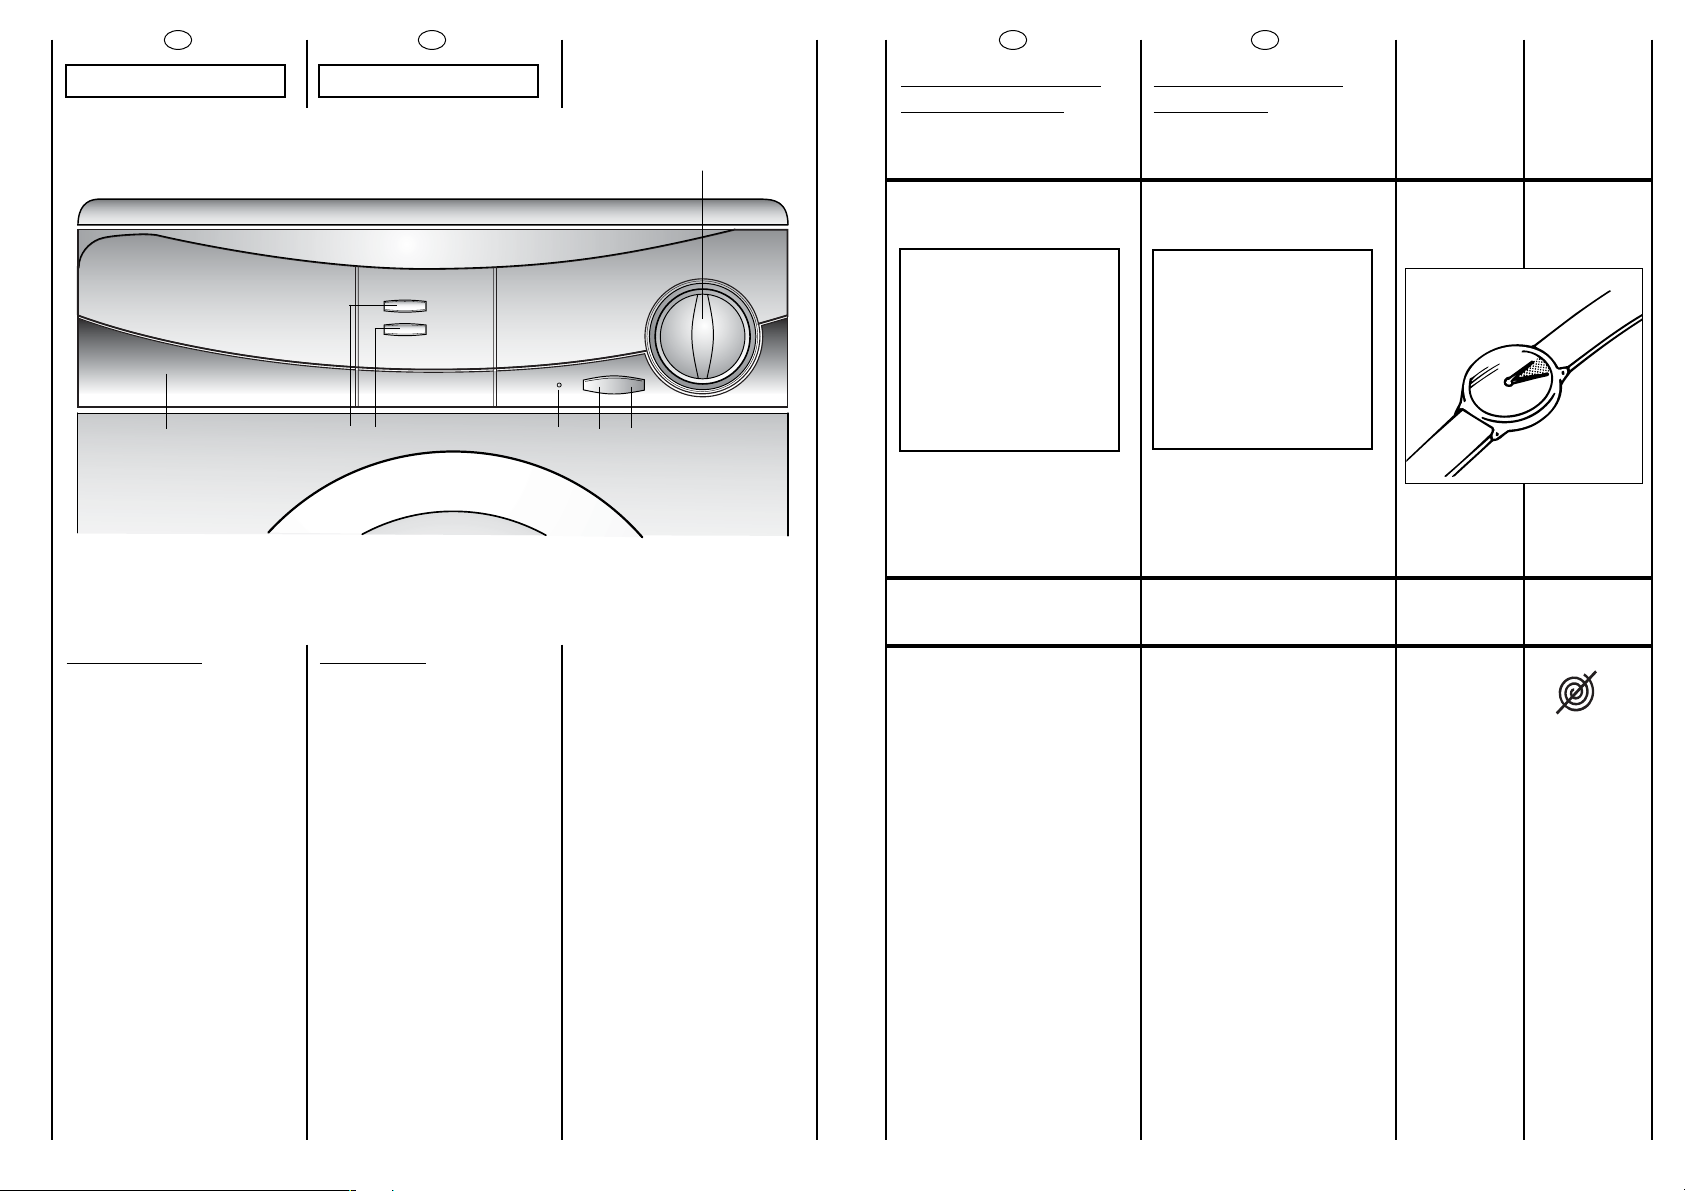
FR
DESCRIPTION DES
COMMANDES
TOUCHE D’OUVERTURE DU
HUBLOT
ATTENTION:
UN DISPOSITIF SPECIAL
DE SECURITE EMPECHE
L’OUVERTURE
IMMEDIATE DU HUBLOT
A LA FIN DU LAVAGE.
APRES LA PHASE
D’ESSORAGE, ATTENDRE
2 MINUTES AVANT
D’OUVRIR LE HUBLOT.
TOUCHE MARCHE/ARRET
TOUCHE EXCLUSION
ESSORAGE
L’ operation d’exclusion
essorage est
particulièrement utile dans
les programmes à 60°C et à
40°C, en cas de lavage de
tissus qui ont eu des
traitements particuliers
(genre cottonova,
permanent press), ou bien
pour des tissus délicats en
fibres mixtes.
EN
DESCRIPTION OF
CONTROL
DOOR OPEN BUTTON
IMPORTANT:
A SPECIAL SAFETY
DEVICE PREVENTS THE
DOOR FROM OPENING
AT THE END OF THE
WASH/SPIN CYCLE. AT
THE END OF THE SPIN
PHASE WAIT UP TO 2
MINUTES BEFORE
OPENING THE DOOR.
OFF/ON BUTTON
NO SPIN BUTTON
By pressing this button it is
possible to eliminate the
spin-drying on all
programmes.This operation
is suitable for programmes at
60°C and at 40°C in case of
special treated fabrics
(cottonova or permanent
press) or for mixed delicate
fabrics .
12
A
B
C
D
E
G
L
FR
CHAPITRE 6
COMMANDES
Bacs à produits
Touche ouverture hublot
Touche marche/arrêt
Touche exclusion essorage
Touche niveau economiseur
Voy ant mise sous tension
Manette des programmes
de lavage
EN
CHAPTER 6
CONTROLS
Detergent drawer
Door open button
Off/On button
No spin button
Reduced water level
Off/On indicator light
Timer knob for wash
programmes
AD E
L
G B C
Page 8
15
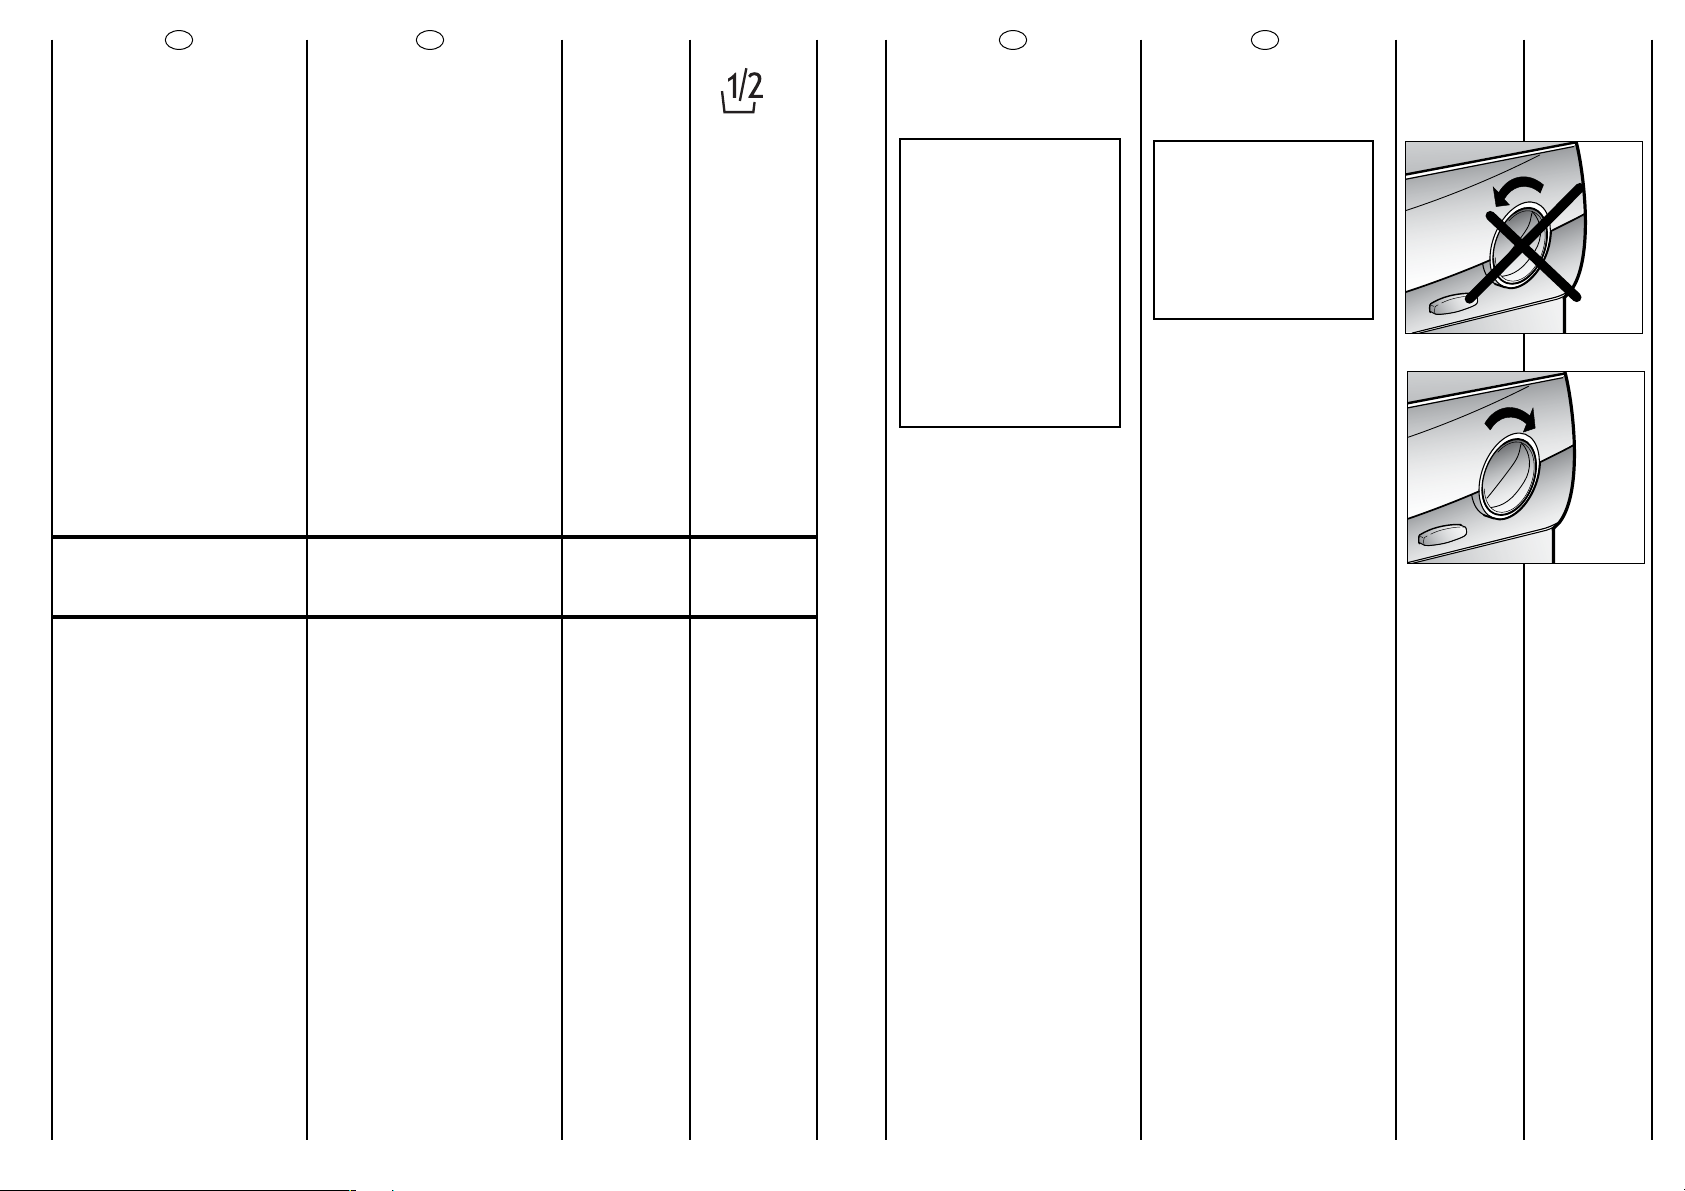
FR
MANETTE DES PROGRAMMES
DE LAVAGE
ATTENTION:
NE JAMAIS FAIRE
TOURNER LA POIGNEE
DANS LE SENS
CONTRAIRE A CELUI
DES AIGUILLES D’UNE
MONTRE: TOURNER LA
MANETTE DANS LE SENS
HORAIRE ET NE JAMAIS
APPUYER SUR LA
TOUCHE DE MARCHE
(C) AVANT D’AVOIR
EFFECTUÉ LA
SELECTION DU
PROGRAMME.
Les tableaux indiquent quel
est le programme de lavage
selon le numéro ou le
symbole choisi.
L
EN
TIMER KNOB FOR WASH
PROGRAMMES
IMPORTANT:
ALWAYS ROTATE THE
KNOB IN A CLOCKWISE
DIRECTION, NEVER IN
AN ANTI-CLOCKWISE
DIRECTION. DO NOT
PRESS THE “ON” BUTTON
(C) BEFORE SELECTING
THE PROGRAMME
The tables describe the
washing programme on the
basis of the number or
symbol chosen.
14
E
G
FR
TOUCHE NIVEAU
ECONOMISEUR 1/2
La machine peut avoir deux
niveaux d’eau différents.
Quand le poids du linge,
dans les programmes pour
tissus résistants n’atteint pas
la charge complète on peut
utiliser le niveau réduit qui
permet une économie
d’eau, de lessive et
d’énergie électrique.
Appuyer sur la touche
correspondante au symbole
indiqué.
ATTENTION! Pour tissus
délicats et trés délicats,
la touche “Niveau
Economiseur” ne doit
pas être enclenchée.
VOYANT DE MISE SOUS
TENSION
EN
REDUCED WATER LEVEL
The water level for a small
wash may be reduced right
through the wash from
soaking to rinsing by pressing
the 1/2 pushbutton, this way
you will save electricity,
detergent, and water too.
WARNING: NEVER press the
1/2 pushbutton when you
are washing PURE NEW
WOOL, since wool absorbs
water and therefore needs
all the water the machine will
hold. DO NOT use it for
delicate fabrics either,since
they need the extra water to
float them and protect them.
ON/OFF INDICATOR LIGHT
OK
Page 9

17
FR
CHAPITRE 8
SELECTION
Pour traiter les divers types
de tissus et les différents
degrés de salissures, la
machine a 2 niveaux de
programmes qui se
différencient par le type de
lavage, la température et la
durée (voir le tableau des
programmes de lavage).
1 Tissus résistants
Les programmes sont
conçus pour optimiser les
résultats de lavage.
Des phases d’essorage qui
garantissent un rinçage
parfait.
2 Tissus mixtes et délicats
Le lavage et le rinçage sont
optìmisés dans les rythmes
de rotation du tambour et
dans les niveaux d’eau.
L’ essorage à action délicate
assure une formation de plis
réduite sur les tissus.
Au terme du dernier
rinçage, le linge reste
immergé dans l’eau.
Pour terminer le cycle des
tissus mixtes et très délicats,
les opérations peuvent être:
-vidange uniquement
-essorage délicat
Le programme essorage
délicat est indispensable
surtout pour la lingerie afin
d’éviter des formations de
plis pendant la phase de
sèchage à l’air.
EN
CHAPTER 8
SELECTION
For the various types of
fabrics and various degrees
of dirt the washing machine
has 2 different programme
bands according to: wash
cycle, temperature and
lenght of cycle (see table of
washing cycle
programmes).
1 Resistants Fabrics
The programmes have been
designed for a maximum
wash and the rinses, with
spin intervals, ensure perfect
rinsing.
The final spin gives more
efficient removal of water.
2 Mixed and Delicates
Fabrics
The main wash and the rinse
gives best results thanks to
the rotation rhythms of the
drum and to the water
levels.
A gentle spin will mean that
the fabrics become less
creased.
The machine will stop with
the water still in the drum
after rinsing.
The programme for mixed
and very delicate fabrics
can be concluded by
selecting:
- discharge only or
- delicate spin
The delicate spin
programme is indispensable
particularly for knitwear.
16
FR
CHAPITRE 7
TIROIR A LESSIVE
Le tiroir à lessive est divisé en
4 petits bacs:
- le compartiment "I" a
été conçu pour la
lessive du prélavage et
pour le programme 32
minutes.
-le deuxième II sert pour
les produits de lavage
Pour le s produits liquides il
faut utiliser le bac special
fourni avec l’appareil et
l’introduire dans le bac (voir
dessin).
ATTENTION:
NOUS RAPPELONS QUE
CERTAINS PRODUITS
SONT DES DIFFICULTES A
ETRE EVACUES; DANS
CE CAS NOUS VOUS
CONSEILLONS D’UTILISER
LE GODET QUI VA
DIRECTEMENT DANS LE
TAMBOUR.
-le troisième sert pour
le produit blanchissant
(eau de javel)
ATTENTION:
DANS LE TROISIEME ET LE
QUATRIEME BAC
N’INTRODUIRE QUE DES
PRODUITS LIQUIDES.
-le quatrième ✿✿ sert
pour des additifs
spéciaux: adoucisseurs,
parfums, amidon,
produits pour l’azurage,
etc.
EN
CHAPTER 7
DETERGENT
DRAWER
The detergent drawer is
divided into 4
compartments:
- the first,labelled "I",is for
prewash detergent or for
32 minute rapid
programme detergent
-The second II for the
main wash detergent
A special container is
supplied for use with liquid
detergent. This can be
placed inside the draw as
shown in fig.
IMPORTANT:
REMEMBER THAT SOME
DETERGENT ARE
DIFFICULT TO REMOVE.
IN THIS CASE WE ADVISE
THE USE OF THE SPECIAL
CONTAINER TO BE USED
INSIDE THE DRUM.
-The third bleach
compartment
IMPORTANT:
ONLY INTRODUCE
LIQUID PRODUCTS IN
THE THIRD AND FOURTH
COMPARTMENTS.
-The fourth ✿✿ is for
special additives,
softeners, perfumes,
starches, whiteners, etc.
cl
Page 10

19
FR
CHAPITRE 9
LE PRODUIT
ATTENTION:
si vous devez laver des tapis,
des couvre-lits ou d’autres
pièces lourdes, nous
conseillons de ne pas
essorer.
Pour laver à la machine des
vêtements et de la lingerie
en laine, ils doivent avoir
l’étiquette “pure laine
vierge” et l’indication “ne se
feutre pas” ou “peut être
lavé en machine”.
ATTENTION:
Au cours de la phase
de sélection vérifier
que:
- aucun objet métallique
ne se trouve dans le
linge à laver (boucles,
épingles de nourrice,
épingles, monnaie,
etc.);
-les taies d’oreiller soient
boutonnées, les
fermetures à glissière,
les crochets, les oeillets
soient fermés, les
ceintures et les rubans
des robes de chambre
soient noués;
-les anneaux soient
enlevés des rideaux;
-n’oublier pas de lire
attentivement
l’étiquette sur les tissus;
-Si,au cours de la
sélection, vous trouvez
des taches résistantes,
les enlever à l’aide
d’un nettoyant spécial.
EN
CHAPTER 9
THE PRODUCT
IMPORTANT:
When washing heavy rugs,
bed spreads and other
heavy articles, it is advisable
not to spin.
To be machine-washed,
woollen garments and other
articles in wool must bear
the “Machine Washable
Label”.
IMPORTANT:
When sorting articles
ensure that:
-there are no metal
objects in the washing
(e.g. brooches, safety
pins, pins, coins etc.).
- cushion covers are
buttoned, zips and
hooks are closed, loose
belts and long tapes on
dressing gowns are
knotted.
-runners from curtains
are removed.
attention is paid to
garment labels.
-when sorting,any tough
stains should be
removed prior to
washing using stain
removers only
recommended on
label.
18
FR
CONSEILS UTILES
POUR L’UTILISATEUR
SUGGESTION POUR
L’UTILISATION DE VOTRE LAVELINGE
Dans le souci du respect de
l’environnement et avec le
maximum d’économie
d’énergie, charger au
maximum votre lave-linge
pour éliminer les éventuels
gaspillages d’énergie et
d’eau. Nous recommandons
d’utiliser la capacité
maximale de chargement
de votre lave-linge.Vous
pouvez ainsi économiser
jusqu’à 50% d’énergie si vous
pratiquez le chargement
maximal.
Effectuez un lavage unique à
l’opposé de 2 lavages en 1/2
charge.
QUAND LE PRELAVAGE EST-IL
VRAIMENT NÉCESSAIRE ?
Seulement dans le cas d’un
linge particulièrement sale.
Dans le cas d’un linge
normalement sale, ne
sélectionnez pas l’option
" prélavage ", ceci vous
permettra une économie
d’énergie de 5 à 15%.
QUELLE TEMPÉRATURE DE
LAVAGE SÉLECTIONNER ?
L’ utilisation des détachants
avant le lavage en machine
ne rend pas nécessaire le
lavage au-delà de 60°C.
L’ utilisation de la température
de 60°C permet de diminuer
la consommation d’énergie
de 50%.
EN
CUSTOMER
AWARENESS
A guide environmentally
friendly and economic use of
your appliance.
MAXIMISE THE LOAD SIZE
Achieve the best use of
energy, water, detergent and
time by using the
recommended maximum
load size.
Save up to 50% energy by
washing a full load instead of
2 half loads.
DO YOU NEED TO PRE-WASH?
For heavily soiled laundry
only!
SAVE detergent, time, water
and between 5 to 15%
energy consumption by NOT
selecting Prewash for slight to
normally soiled laundry.
IS A HOT WASH REQUIRED?
Pretreat stains with stain
remover or soak dried in
stains in water before
washing to reduce the
necessity of a hot wash
programme.
Save up to 50% energy by
using a 60°C wash
programme.
Page 11

SELEC.
PROG.
1
2
3
4
5
6
7
8
32’
Rapid
Z
FR
TABLEAU DES PROGRAMMES
20 21
TYPE DE TISSU
Tissus résistants
Coton, lin, chanvre
Coton, mixtes
résistants
Coton, mixte
Coton
Coton, lin
Tissus mixtes et
délicats
Mixtes résistants
Mixtes, cotons,
Synthétiques
Synthétiques (Nylon,
mixtes de coton)
Laine
Synthétiques
acryliques
Mixtes, Synthétiques
délicats, laine
Specifiques
Pour le linge à ne pas
essorer
PROGRAMME POUR
Intensif - Très sale
Lavage normal
Couleurs résistantes
Couleurs délicates
Rinçages
Adoucissant
Essorage fort
Très sale
Lavage normal
Couleurs
Laine “lavable en machine”
très délicats
Rinçages
Essorage délicat
Super rapide
Javel
Vidange seule
CHARGE
MAXI
kg
5
5
5
3,5
-
-
-
2
2
2
1
-
-
2
5
-
TEMP.
°C
60°
60°
50°
40°
-
-
-
50°
40°
30°
30°
-
-
30°
-
-
❙❙ ❙
●● ●
●● ●
●● ●
●● ●
●
●
●●
●●
●●
●●
●
●
●
❀
CHARGE DE LESSIVE
CHAPITRE 10
Notes importantes
Si les sous-vêtements sont très sales, réduire le chargement à
3 kg maxi.
Dans les programmes indiqués, on peut effectuer le
blanchissage automatique en mettant de l’eau de javel liquide
dans le tiroir à lessive .
Programme Rapide 32 Minutes
Ce programme permet d’effectuer un cycle de lavage complet en 30
minutes environ pour des charges de linge jusqu’à 2 kg et à une
température maximale de 30°C.
La quantité maximale de lessive qui peut être utilisée est indiquée sur la
jauge spécifique fournie avec l’appareil.
La lessive doit être placée dans le bac pour le “Programme rapide 32
minutes” (marqué I) du tiroir à produits lessiviels.
Le programme rapide 32 minutes peut également servir de prélavage
en cas de linge très sale, avant de sélectionner le programme de
lavage principal.
Obtenez les meilleurs résultats avec votre nouvelle Candy
Pour obtenir les meilleurs résultats de lavage avec votre nouveau lavelinge Candy, il est important de choisir une lessive parfaitement
appropriée pour vos lavages en machine quotidiens.Dans les magasins
aujourd’hui, il y a tellement de lessives différentes que nous savons qu’il
est parfois difficile de faire un choix parmi tout ce qui est proposé.
Chez Candy, nous testons régulièrement différentes lessives afin de
déterminer celles qui donneront les meilleurs résultats de lavage dans
nos machines. Nous n’avons trouvé qu’une seule marque pour satisfaire
à tous nos critères. Elle permet d’enlever un très grand nombre de
taches, tout en préservant l’aspect des vêtements. C’est pour celà que
Candy recommande Ariel.
POUR VOTRE NOUVEAU LAVE-LINGE
Page 12

SELECT
PROG.
1
2
3
4
5
6
7
8
32’
Rapid
Z
EN
TABLE OF PROGRAMMES
22 23
FABRIC
Resistants fabrics
Cotton, linen
Cotton, mixed
resistants
Cotton, mixed
Cotton
Cotton, linen
Mixed fabrics and
delicates
Mixed, resistants
Cotton, mixed fabrics,
synthetics
Synthetics (nylon,
perlon), mixed cotton
Woll ens
Synthetics (Dralon,
Acryl, Trevira)
Mixed, delicate
synthetics, wool
Specials
For fabrics that should
not be spin
PROGRAM FOR
Intensive - Heavily soiled
Normally soiled
Coloureds fast
Coloureds non fast
Rinsing
Conditioner,fragrance, softener
Fast spin
Heavily soiled
UNIVERSAL programme
Non fast coloureds
WOOLLENS “machine washable”
Rinsing
Slow spin
Rapid cycle
Organic stains
bleaching
Drain only
WEIGHT
MAX
kg
5
5
5
3,5
-
-
-
2
2
2
1
-
-
2
5
-
TEMP.
°C
60°
60°
50°
40°
-
-
-
50°
40°
30°
30°
-
-
30°
-
-
❙❙ ❙
●● ●
●● ●
●● ●
●● ●
●
●
●●
●●
●●
●●
●
●
●
❀
CHARGE DETERGENT
CHAPTER 10
Please, read these notes
In case of very dirty underwear,a 3 kg maximum load is
advised.
In the programs as shown in the table, automatic bleaching is
possible by pouring the liquid bleach into the detergent
draw .
32 Minute Rapid Programme
The 32 minute rapid programme allows a complete washing
cycle to be carried out in approximately 30 minutes, with up to
a maximum load of 2 kg and a the temperature of up to 30°C.
The maximum quantity of detergent that can be used is marked
on the enclosed 32 minute gauge.
The detergent must be placed in the “ 32 minute rapid
programme” compartment (marked I) in the detergent
dispenser.
The 32 minute rapid programme can also be used as a
prewash cycle in the case of heavily soiled garments, before
selecting the main wash programme.
Get the best results from your new Candy machine
To ensure you get the best results from your new Candy
machine it is important to use the right detergent in your
everyday wash. There are many detergents available in the
market and making a choice from the wide range available
can often be confusing.
At Candy we regularly test many different types of detergent
to assess which give the best wash results in our machines.We
found only one brand always lives up to our exacting
standards and provides outstanding cleaning across a broad
range of dirt and stains, as well as providing high levels of
fabric care.That’s why Candy gave Ariel their official seal of
approval.
FOR YOUR NEW WASHING MACHINE
Page 13

25
FR
EXEMPLE:
Consulter le tableau des
divers programmes de
lavage et vous trouverez les
conseils de Candy:
● Les étiquettes doivent
indiquer “60° C”.
● Ouvrir le hublot à l’aide
de la touche (B).
● Remplir le tambour (maxi.
5 kg de linge sec).
● Fermer le hublot.
ATTENTION:
AU MOMENT DE
CHOISIR LE
PROGRAMME VERIFIER
QUE LA TOUCHE
MARCHE/ARRET NE SOIT
PAS ENFONCEE.
Choisir le programme 2:
pour choisir le programme,
tourner la manette (L) DANS
LE SENS DES AIGUILLES D’UNE
MONTRE et faire coïncider le
numéro du programme
avec l’index.
● Ouvrir le tiroir à produits
lessiviels (A).
60° C
5 kg MAX
EN
EXAMPLE:
The advice of Candy is set
out in the washing
programme table:
● Ensure that article labels
carry the indication 60°C.
● Open the door by pressing
button (B).
● Load the drum with a
maximum of 5 kg of dry
washing.
● Close the door
IMPORTANT:
WHEN SETTING THE
PROGRAMME ENSURE
THAT THE ON/OFF
BUTTON IS NOT TURNED
ON.
Select programme 2:
Choose the programme by
rotating the knob (L) in a
CLOCKWISE DIRECTION and
make the number of the
programme coincide with
the sign.
● Open the detergent
drawer (A).
24
FR
CHAPITRE 11
LAVAGE
Supposons que le linge à
laver soit en COTON
EXTREMEMENT SALE (s’il a des
taches particulièrement
résistantes les enlever avec
un detachant).
Quand certaines pièces ont
des taches qui doivent être
traitées par un produit
blanchissant liquide, vous
pouvez les détacher dans la
machine. Verser le produit
blanchissant liquide dans le
bac et placer la manette (L)
sur le programme spécial:
“DETACHAGE
PRE-LAVAGE” .
Après ce traitement, ajouter
à ces pièces le reste du linge
et effectuer un lavage
normal selon le programme
choisi.
Nous vous conseillons de ne
pas faire un lavage
exclusivement de servietteséponge qui, absorbant
beaucoup d’eau,
deviennent trop lourdes.
La charge admise pour les
tissus résistants est de 5 kg,
tandis qu’en cas de tissus
délicats nous conseillons de
ne pas dépasser 2 kg (1 kg
en cas de pièces en “pure
laine vierge” lavables dans la
machine à laver), pour éviter
la formation de plis difficiles à
repasser.Pour les tissus
extrêmement délicats nous
conseillons d’utiliser un filet.
cl
EN
CHAPTER 11
WASHING
Let us suppose that the
washing consists of HEAVILY
SOILED COTTON (tough stains
should be removed with the
special cream). When only a
limited number of articles
have stains which require
treatment with liquid
bleaching agents,
preliminary removal of stains
can be carried out in the
washing machine. Pour the
bleach into the special
compartment and set the
knob (L) on the special
programme “PRE-WASH STAIN
REMOVAL” .
When this phase has
terminated add the rest of
the washing and proceed
with a normal wash on the
most suitable programme.
It is advisable not to wash a
load made up entirely of
articles in towelling fabric
which absorb a lot of water
and become too heavy.
The maximum load for heavy
fabrics is 5 kg, while, in the
case of delicate fabrics, it is
advisable not to exceed 2 kg
(1 kg in the case of machine
washable articles in “Pure
New Wool”) so as to avoid
the formation of creases
which may be difficult to iron.
A net bag should be used for
particularly delicate fabrics.
OK
cl
Page 14

27
FR
CHAPITRE 12
NETTOYAGE ET
ENTRETIEN
ORDINAIRE
Ne jamais utiliser de produits
abrasifs, d’alcool et/ou de
diluant, pour laver l’extérieur
de votre machine; il suffit de
passer un chiffon humide.
La machine n’a besoin que
de peu d’entretien:
● Nettoyage des bacs.
● Nettoyage filtre.
● Déménagements ou
longues périodes d’arrêt de
la machine.
NETTOYAGE DES BACS
Même si cette opération
n’est pas strictement
nécessaire, il vaut mieux
nettoyer de temps en temps
les bacs à produits lessiviels.
Il suffit de tirer légèrement
sur le tiroir pour l’extraire.
Nettoyer le tiroir sous un jet
d’eau.
Remettre le tiroir dans sa
niche.
EN
CHAPTER 12
CLEANING AND
ROUTINE
MAINTENANCE
Do not use abrasives, spirits
and/or diluents on the
exterior of the appliance. It is
sufficient to use a damp
cloth.
The washing machine
requires very little
maintenance:
● Cleaning of drawer
compartments.
● Filter cleaning
● Removals or long periods
when the machine is left
standing.
CLEANING OF DRAWER
COMPARTMENTS
Although not strictly
necessary,it is advisable to
clean the detergent, bleach
and additives
compartments occasionally.
Remove the compartments
by pulling gently.
Clean with water.
Put the compartments back
into place
26
FR
● Remplir le deuxième bac
II de lavage avec 60 g de
produit.
● Remplir le bac de
blanchissage avec 100 cc
d’eau-de-javel.
● En cas de besoin, remplir
le bac des additifs avec 50
cc de produit ✿✿.
● Fermer le tiroir (A).
● Vérifier que le robinet
d’eau soit ouvert.
● Vérifier que la vidange
soit placée correctement.
● Appuyer sur le bouton de
mise en route (C). Le témoin
de fonctionnement (G)
s’allumera.
La machine accomplira le
programme demandé.
● A la fin, appuyer sur la
touche (C) marche/arrêt et
la lampe-témoin s’éteindra.
● Ouvrir le hublot et retirer le
linge.
POUR TOUS LES TYPES
DE LAVAGE CONSULTER
TOUJOURS LE TABLEAU
DES PROGRAMMES ET
SUIVRE LA SEQUENCE
DES OPERATIONS
INDIQUEE.
cl
EN
● Put 60 g in the second II
wash compartment .
● Put 100 cc of bleach in the
bleach compartment .
● Put 50 cc of the desired
additive in the additives
compartment ✿✿.
● Close the detergent
drawer (A).
● Ensure that the water inlet
tap is turned on.
● And that the discharge
tube is in place.
● Press the “ON” button (C).
The light (G) will come on.
The washing machine will
carry out the set
programme.
● At the end of the
programme, press the
On/Off button (C).The light
will go out.
● Open the door and
remove the washed articles.
FOR ALL TYPES OF
WASH CONSULT THE
PROGRAMME TABLE
AND FOLLOW THE
OPERATIONS IN THE
ORDER INDICATED.
cl
cl
Page 15

29
CHAPITRE 13
FR
ANOMALIE
Si le mauvais fonctionnement persiste,adressez-vous au Centre d’Assistance Technique Candy; communiquez
le nom du modèle indiqué sur la plaque-signaletique se trouvant sur la carrosserie à l’intérieur du hublot ou sur
le certificat de garantie.
En indiquant ces informations vous obtiendrez une intervention plus rapide et efficace.
1L’utilisation des produits écologiques sans phosphates peut produire les effets suivants:
-L’eau de vidange du rinçage est trouble à cause de zéolites en suspension; l’efficacité du rinçage n’est
absolument pas compromis;
-Présence de poudre blanche (zéolites) sur le linge à la fin du lavage: cette poudre ne pénètre pas dans le
tissu et n’en altère pas la couleur;
-présence de mousse dans l’eau du dernier rinçage: elle ne signifie pas pour autant un mauvais rinçage;
-Les tensioactifs anioniques de la formule des produits pour machines à laver, s’enlèvent difficilement du
linge et, même en toute petite quantité, ils peuvent provoquer d’importants phénomènes de formation de
mousse;
-L’exécution d’autres cycles de rinçage,en de tels cas, n’apporte aucun avantage.
2Avant d’appeler le Centre d’Assistance technique Candy, si votre machine ne fonctionne pas, effectuer les
contrôles susmentionnés.
1. Aucun
fonctionnement
sur n’importe quel
programme
2. Absence
d’alimentation
d’eau
3. L’eau n’est pas
évacuèe
4. Présence d’eau sur
le sol tout autour
de la machine
5. La machine
n’essore pas
6. De fortes vibrations
pendant la phase
d’essorage
La fiche n’est pas introduite dans la
prise de courant
L’interrupteur géneral n’est pas branché
L’ alimentation électrique est coupée
Les valves de l’installation électrique
sont dèfectueuses
Por tillon ouvert
Vo ir cause 1
Robinet de l’eau fermé
Programmateur mal positionné
Tuyau de vidange plié
Présence de corps étrangers dans le
filtre
Fuite du joint se trouvant entre le robinet
et le tuyau de remplissage
La machine n’a pas encore évacué
l’eau
La fonction “Exclusion essorage” est
introduite (exclusivement sur certains
modèles)
La machine n’est pas à niveau
Les étriers de transport n’ont pas été
enlevés
La charge de linge n’est pas répartie
de façon uniforme
Brancher la prise
Brancher l’interrupteur général
Contróler
Contróler
Fermer le portillon
Contróler
Ouvrir le robinet d’alimentation d’eau
Positionner correctement le
programmateur
Redresser le tuyau de vidange
Inspecter le filtre
Remplacer le joint et serrer à fond le
tube sur le robinet
Attendre quelques minutes et la
machine évacuera l’eau
Relever la touche “exclusion essorage”
Régler les pieds
Enlever les étriers de transport
Répartir le linge de façon uniforme
CAUSE
REMEDE
28
FR
NETTOYAGE FILTRE
La machine à laver est
équipée d’un filtre spécial
qui peut retenir les résidus les
plus gros qui pourraient
bloquer le tuyau
d’évacuation (pièces de
monnaie, boutons, etc.). Ce
dispositif permet de les
récupérer facilement.Pour
nettoyer le filtre,suivre les
indications ci-dessous:
● Enlever le socle comme
indique dans la figure.
● Utiliser la base pour
recueillir l’eau qui reste dans
le filtre.
● Desserrer la vis qui fixe le
filtre.
● Tourner dans le sens antihoraire des aiguilles d’une
montre jusqu’à l’arrêt, en
position verticale.
● Enlever et nettoyer.
● Apres avoir nettoyé,utilisez
l’entaille et remontez le filtre
en faisant toutes les
opérations précédentes
dans le sens inverse.
DEMENAGEMENTS OU
LONGUES PERIODES D’ARRET
DE LA MACHINE
En cas de déménagement,
ou de longues périodes
d’arrêt de la machine dans
des endroits non chauffés,il
faut vidanger
soigneusement tous ses
tuyaux.
Débrancher le courant et se
servir d’un seau.
Enlever la bague sur le tuyau
et le plier vers le bas, dans le
seau, jusqu’à ce qu’il ne
sorte plus d’eau.
Après cette opération, la
répéter en sens inverse.
EN
FILTER CLEANING
The washing-machine is
equipped with a special filter
to retain large foreign matter
which could clog up the
drain, such as coins, buttons,
etc. These can, therefore,
easily be recovered.The
procedures for cleaning the
filter are as follows:
● Ease off the base as shown
in fig.
● Use the base as a tray to
collect leftover water in filter.
● Loosen the screw holding
the filter.
● Turn the filter anticlockwise
till it stops in vertical position.
● Remove and clean.
● After cleaning, replace by
turning the notch on the end
of the filter clockwise.Then
follow all procedures
described above in reverse
order.
REMOVALS OR LONG PERIODS
WHEN THE MACHINE IS LEFT
STANDING
For eventual removals or
when the machine is left
standing for long periods in
unheated rooms, the drain
hose should be emptied of
all remaining water.
The appliance must be
switched off and unplugged.
A bowl is needed. Detach
the drainage hose from the
clamp and lower it over the
bowl until all the water is
removed.
Repeat the same operation
with the water inlet hose.
Page 16

30
CHAPTER 13
EN
FAU LT
If the fault should persist, contact a Candy Technical Assistance Centre. For prompt servicing, give the model of
the washing machine,to be found on the label placed on the cabinet inside of the porthole or on the
guarantee certificate.
Important
1The use of environment friendly detersives without phosphates may produce the following effects:
-The discharge rinse water may result cloudier due to the presence of zeolites in suspension. This does not
compromise the efficiency of the rinses.
-The presence of white powder (zeolites) on the washing at the end of the washing cycle. This does not
remain incorporated in the fabric and does not alter the colour.
-The presence of foam in the last rinse water which is not necessarily a sign of inadequate rinsing.
-The non-ionic surface-active agents present in the composition of washing machine detersives are often
difficult to remove from the washing itself and, even in small quantities, may produce visible signs of the
formation of foam.
- Carrying out further rinses, in cases such as this, is not useful.
2 If your washing machine fails to function,carry out the above-mentioned checks before calling the Candy
Technical Assistance Service.
1. Does not function
on any
programme
2. Does not load
water
3. Does not discharge
water
4. Water on floor
around washing
machine
5. Does not spin
6. Strong vibrations
during spin
Mains plug not plugged in
Mains switch not on
No power
Electric circuit fuses failure
Load door open
See cause 1
Inlet tap turned off
Timer not set correctly
Discharge tube bent
Odd material blocking filter
Leak from the washer between the tap
and inlet tube
The washing machine has not
discharged water
“No spin” setting (some models only)
Washing machine not perfectly level
Transport bracket not removed
Washing load not evenly distributed
Insert plug
Turn on mains switch
Check
Check
Close load door
Check
Turn on water inlet tap
Set timer on correct position
Straighten discharge tube
Check filter
Replace washer and tighten the tube
on the tap
Wait a few minutes until the machine
discharges water
Turn the programme dial onto spin
setting
Adjust special feet
Remove transport bracket
Distribute the washing evenly
CAUSE
REMEDY
Le constructeur décline toute responsabilité pour les éventuelles erreurs d’imprimerie
contenues dans le présent mode d’emploi. Il se réserve en outre le droit d’apporter
toutes modifications qui se révèleraient utiles à ses propes produits sans pour autant
en compromettre les caractéristiques essentielles.
The manufacturer declines all responsibility in the event of any printing mistakes in
this booklet. The manufacturer also reserves the right to make appropriate
modifications to its products without changing the essential characteristics.
Page 17

......................................................................................................................................................................................................................
......................................................................................................................................................................................................................
......................................................................................................................................................................................................................
......................................................................................................................................................................................................................
......................................................................................................................................................................................................................
......................................................................................................................................................................................................................
......................................................................................................................................................................................................................
......................................................................................................................................................................................................................
......................................................................................................................................................................................................................
......................................................................................................................................................................................................................
......................................................................................................................................................................................................................
......................................................................................................................................................................................................................
......................................................................................................................................................................................................................
......................................................................................................................................................................................................................
......................................................................................................................................................................................................................
......................................................................................................................................................................................................................
......................................................................................................................................................................................................................
......................................................................................................................................................................................................................
......................................................................................................................................................................................................................
......................................................................................................................................................................................................................
......................................................................................................................................................................................................................
......................................................................................................................................................................................................................
......................................................................................................................................................................................................................
......................................................................................................................................................................................................................
......................................................................................................................................................................................................................
......................................................................................................................................................................................................................
......................................................................................................................................................................................................................
......................................................................................................................................................................................................................
......................................................................................................................................................................................................................
......................................................................................................................................................................................................................
......................................................................................................................................................................................................................
......................................................................................................................................................................................................................
......................................................................................................................................................................................................................
......................................................................................................................................................................................................................
......................................................................................................................................................................................................................
......................................................................................................................................................................................................................
......................................................................................................................................................................................................................
......................................................................................................................................................................................................................
......................................................................................................................................................................................................................
......................................................................................................................................................................................................................
......................................................................................................................................................................................................................
......................................................................................................................................................................................................................
......................................................................................................................................................................................................................
......................................................................................................................................................................................................................
......................................................................................................................................................................................................................
......................................................................................................................................................................................................................
......................................................................................................................................................................................................................
......................................................................................................................................................................................................................
.....................................................................................................................................................................................................................
NOTE
32 33
Page 18

......................................................................................................................................................................................................................
......................................................................................................................................................................................................................
......................................................................................................................................................................................................................
......................................................................................................................................................................................................................
......................................................................................................................................................................................................................
......................................................................................................................................................................................................................
......................................................................................................................................................................................................................
......................................................................................................................................................................................................................
......................................................................................................................................................................................................................
......................................................................................................................................................................................................................
......................................................................................................................................................................................................................
......................................................................................................................................................................................................................
......................................................................................................................................................................................................................
......................................................................................................................................................................................................................
......................................................................................................................................................................................................................
......................................................................................................................................................................................................................
......................................................................................................................................................................................................................
......................................................................................................................................................................................................................
......................................................................................................................................................................................................................
......................................................................................................................................................................................................................
......................................................................................................................................................................................................................
......................................................................................................................................................................................................................
......................................................................................................................................................................................................................
......................................................................................................................................................................................................................
.....................................................................................................................................................................................................................
34
......................................................................................................................................................................................................................
......................................................................................................................................................................................................................
......................................................................................................................................................................................................................
......................................................................................................................................................................................................................
......................................................................................................................................................................................................................
......................................................................................................................................................................................................................
......................................................................................................................................................................................................................
......................................................................................................................................................................................................................
......................................................................................................................................................................................................................
......................................................................................................................................................................................................................
......................................................................................................................................................................................................................
......................................................................................................................................................................................................................
......................................................................................................................................................................................................................
......................................................................................................................................................................................................................
......................................................................................................................................................................................................................
......................................................................................................................................................................................................................
......................................................................................................................................................................................................................
......................................................................................................................................................................................................................
......................................................................................................................................................................................................................
......................................................................................................................................................................................................................
......................................................................................................................................................................................................................
......................................................................................................................................................................................................................
......................................................................................................................................................................................................................
......................................................................................................................................................................................................................
.....................................................................................................................................................................................................................
35
Page 19

12
Page 20

1011
Page 21

cl
9
8
Page 22

❀
❙ ❙ ❙
●●●
●●●
●●●
●●●
●
●
●●
●●
●●
●●
●
●
●
7 6
1
2
3
4
5
6
7
8
32’
Rapid
Z
5
5
3,5
3,5
-
-
-
2
2
2
1
-
-
2
5
-
60°
60°
50°
40°
-
-
-
50°
40°
30°
30°
-
-
30°
-
-
Page 23

5 4
B
C
E
D
L
2 min.
G
AD E
L
G B C
40
60
OK
Page 24

2
3
min 4 cm
C
max 100 cm
+2,6 mt max
min 50 cm
max 85 cm
A
B
Page 25

CN 40.1/F
03.05 - 41009084 - Printed in Italy - Imprimé en Italie
 Loading...