

Page 1

CMXW22DW
CMXW22DS
MICROWAVE OVENS
USER INSTRUCTIONS
FORNI A MICROONDE
MANUALE DI ISTRUZIONI
KUCHENKI MIKROFALOWE
INSTRUKCJA OBSŁUGI
GB
IT
PL
Page 2

Page 3

GB
1
Microwave Oven
INSTRUCTION MANUAL
MODEL:
CMXW22DW
CMXW22DS
Read these instructions carefully before using your
microwave oven, and keep it carefully.
If you follow the instructions, your oven will provide you with
many years of good service.
SAVE THESE INSTRUCTIONS CAREFULLY
By placing the CE
we declare ,on
our own responsibility,
( )
marking on
this product ,
compliance
to all of European
requirements stated
safety ,health and
in the legislation for
environmental
this product
.
Page 4
GB
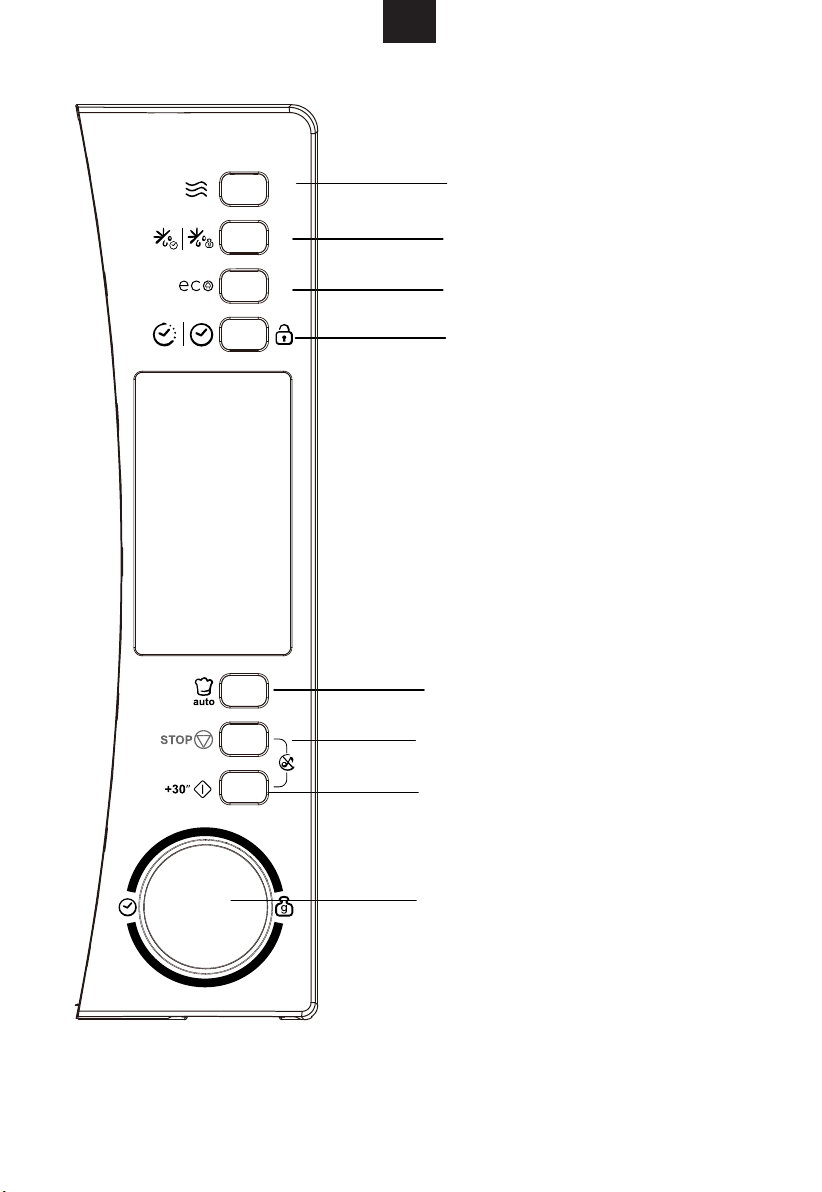
2
MICRO
DEFROST BY WEIGHT
DEFROST BY TIME
ECO FUNCTION
CLOCK/PRE-SET
AUTO MENU
STOP/CLEAR
START/EXPRESS
TIME/WEIGHT
/CHILD LOCK
Page 5

GB
3
PRECAUTIONS TO AVOID POSSIBLE EXPOSURE
TO EXCESSIVE MICROWAVE ENERGY
(a) Do not attempt to operate this oven with the door
open since this canresult in harmful exposure to
microwave energy. It is important not to break or tamper
with the safety interlocks.
(b) Do not place any object between the oven front face
and the door or allow soil or cleaner residue to accumulate
on sealing surfaces.
(c) WARNING: If the door or door seals are damaged, the
oven must not be operated until it has been repaired by
a competent person.
ADDENDUM
If the apparatus is not maintained in a good state of
cleanliness, its surface could be degraded and affect the
lifespan of the apparatus and lead to a dangerous situation.
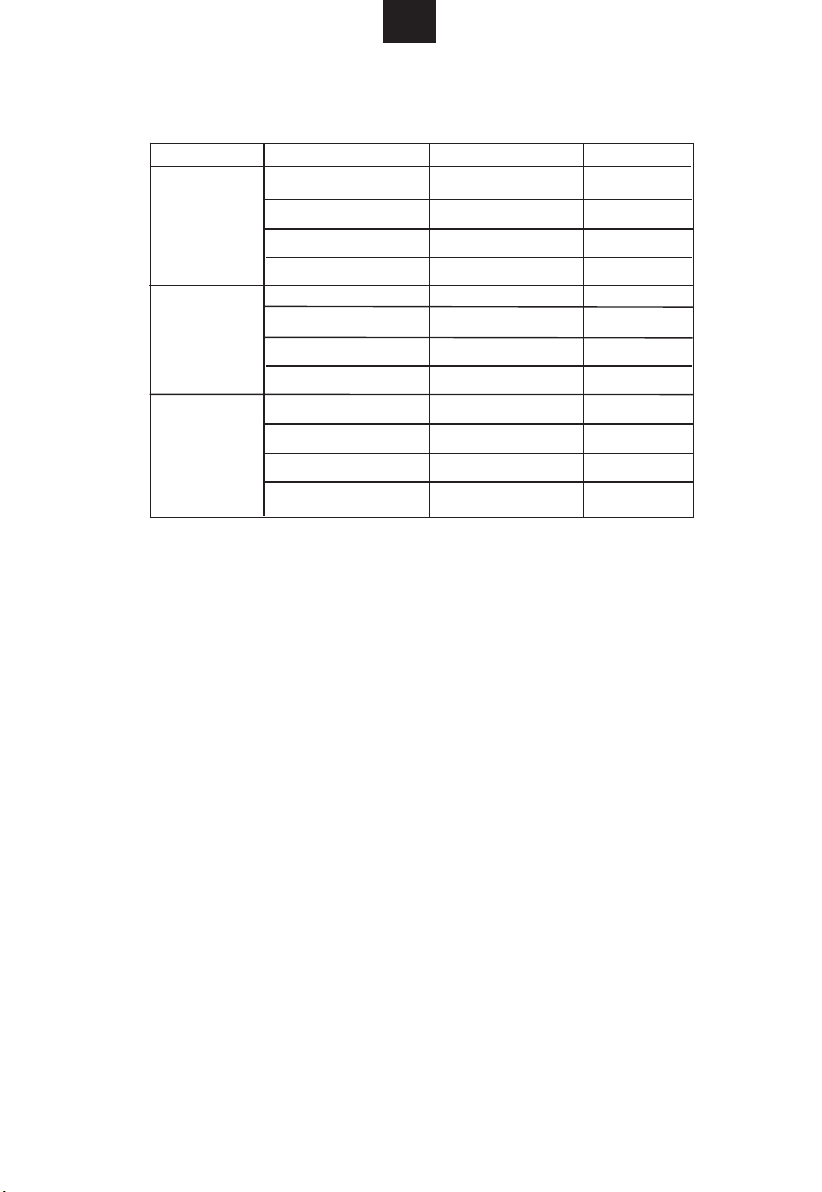
Specifications
Model:
Rated Voltage:
Rated Input Power(Microwave):
Rated Output Power(Microwave):
Oven Capacity:
Turntable Diameter:
External Dimensions(LxWxH):
Net Weight:
CMXW22DW / CMXW22DS
230V~50Hz
1250W
8
00 W
2
L
2
mm
245
461 x 3
65x 290 mm
11,8 kg
Page 6

GB
4
IMPORTANT SAFETY INSTRUCTIONS
WARNING
To reduce the risk of fire, electric shock, injury to
personsor exposure to excessive microwave oven
energy whenusing your appliance, follow basic
precautions, including he following:
1. Warning: Liquids and other foods must not be heated
in sealed containers since they are liable to explode.
2. Warning: It is hazardous for anyone other than a
competent person to carry out any service or repair
operation that involves the removal of a cover which
gives protection against exposure to microwave energy.
3. This appliance can be used by children aged from 8
years and above and persons with reduced physical,
sensory or mental capabilities or lack of experience
and knowledge if they have been givensupervision or
instruction concerning useof the appliance in a safe way
andunderstand the hazards involved.Children shall not
play with the appliance.Cleaning and user maintenance
shallnot be made by children unless they are older than
8 and supervised.
4. Keep the appliance and its cord out of reach of
children less than 8 years.
5. Only use utensils suitable for use in microwave ovens.
6. The oven should be cleaned regularly and any food
deposits should be removed.
7. Read and follow the specific:"PRECAU- TIONS TO
AVOID POSSIBLE EXPOSURE TO EXCESSIVE
MICROWAVE ENERGY".
8. When heating food in plastic or paper containers,
keep an eye on the oven due to the possibility of ignition.
Page 7

GB
5
9. If smoke is emitted, switch off or unplug the appliance
and keep the door closed in order to stifle any flames.
10. Do not overcook food.
11. Do not use the oven cavity for storage purposes.
Do not store items, such as bread, cookies, etc. inside
the oven.
12. Remove wire twist-ties and metal handles from
paper or plastic containers/bags before placing them in
the oven.
13. Install or locate this oven only in accordance with the
installation instructions provided.
14. Eggs in the shell and whole hard-boiled eggs should
not be heated in microwave ovens since they may
explode, even after microwave heating has ended.
15.This appliance is intended to be used in household
and similar applications such as:
-staff kitchen areas in shops, offices and other working
environments;
-by clients in hotels, motels and other residential type
environments;
-farm houses;
-bed and breakfast type environments.
16. If the supply cord is damaged, it must be replaced by
the manufacturer, its service agent or similarly qualified
persons in order to avoid a hazard.
17. Do not store or use this appliance outdoors.
18. Do not use this oven near water, in a wet basement
or near a swimming pool.
19. The temperature of accessible surfaces may be high
when the appliance is operating. The surfaces are liable
to get hot during use.Keep cord away from heated
surface, and do not cover any vents on the oven.
Page 8

GB
6
20. Do not let cord hang over edge of table or counter.
21. Failure to maintain the oven in a clean condition
could lead to deterioration of the surface that could
adversely affect the life of the appliance and possibly
result in a hazardous situation.
22.The contents of feeding bottles and baby food jars
shall be stirred or shaken and the temperature checked
before consumption, in order to avoid burns.
23. Microwave heating of beverages can result in
delayed eruptive boiling, therefore care must be taken
when handling the container.
24.The appliance is not intended for use by persons
(including children) with reduced physical , sensory or
mental capabilities, or lack of experience and knowledge,
unless they have been given supervision or instruction
concerning use of the appliance by a person responsible
for their safety.
25.Children should be supervised to ensure that they do
not play with the appliance.
26.The appliances are not intended to be operated by
means of an external timer or separate remote-control
system.
27.Accessible parts may become hot during use. Young
children should be kept away.
28.Steam cleaner is not to be used.
29.During use the appliance becomes hot. Care should
be taken to avoid touching heating elements inside the
oven.
30.Only use the temperature probe recommended for
this oven.(for ovens provided with a facility to use a
temperature-sensing probe.)
Page 9

GB
7
31. WARNING: The appliance and its accessible parts
become hot during use.Care should be taken to avoid
touching heating elements. Children less than 8 years
of age shall be kept away unless continuously
supervised.
32.The microwave oven must be operated with the
decorative door open.(for ovens with a decorative door.)
33.The rear surface of appliance shall be placed against
a wall.
34.The microwave oven shall not be placed in a cabinet
unless it has been tested in a cabinet.
READ CAREFULLY AND KEEP FOR FUTURE
REFERENCE
Page 10

GB
8
To Reduce the Risk of Injury to Persons
Grounding Installation
DANGER
Electric Shock Hazard
Touching some of the
internal componentscan
cause serious personal
injury or death.Do not
disassemble this
appliance.
WARNING
Electric Shock HazardImproper
use of the grounding can
result inelectric shock.
Do not plug into an outlet
untilappliance is properly
installed and grounded.
This appliance must be
grounded. In theevent of
an electrical short circuit,
grounding reduces the
risk of electricshock by
providing an escape wire
forthe electric current.
This appliance isequipped
with a cord having a
groundingwire with
a grounding plug. The
plug mustbe plugged into
an outlet that is properly
installed and grounded.
Consult a qualified
electrician orserviceman
if the grounding instructio
nsare not completely
understood or if doubtexists
as to whether the appliance
isproperly grounded.
If it is necessary touse an
extension cord , use only
a 3-wire
1. A short power-supply cord
is provided to reduce the risks
resulting from becoming
entangled in or tripping over a
longer cord.2. If a long cord set
or extension cord isused:
1)The marked electrical rating
of the cordset or extension cord
should be at least asgreat as
the electrical rating of the
appliance.
2)The extension cord must be
a grounding-type 3-wire cord.
3)The long cord should be
arranged so thatit will not drape
over the counter top ortabletop
where it can be pulled on
bychildren or tripped over
unintentionally.
Page 11

GB
9
CLEANING
Be sure to unplug the
appliance from thepower
supply.
1. Clean the cavity of the oven after using with a slightly damp
cloth.
2. Clean the accessories in the usual way in soapy water.
3. The door frame and seal and neighbouring parts must be
cleaned carefully with a damp cloth when they are dirty.
4. Do not use harsh abrasive cleaners or sharp metal scrapers
to clean the oven door glass since they can scratch the surface,
which may result in shattering of the glass.
5. Cleaning Tip---For easier cleaning of the cavity walls that the
food cooked can touch: Place half a lemon in a bowl, add 300ml
(1/2 pint) water and heat on 100% microwave power for 10
minutes. Wipe the oven clean using a soft, dry cloth.
UTENSILS
CAUTION
Personal Injury Hazard
It is hazardous for
anyone other than a
compentent personto
carry out any service
or repairo peration that
involves the removalof
a cover which gives
protection against
exposure to microwave
energy.
See the instructions on "Materials you can use in
microwave oven or to be avoided in microwave oven."
There may be certain non-metallic utensils that are not
safe to use for microwaving. If in doubt, you can test the
utensil in question following the procedure below.
Utensil Test:
1. Fill a microwave-safe container with 1 cup of cold
water (250ml) along with the utensil in question.
2. Cook on maximum power for 1 minute.
3. Carefully feel the utensil. If the empty utensil is
warm, do not use it for microwave cooking.
4. Do not exceed 1 minute cooking time.
Page 12

GB
10
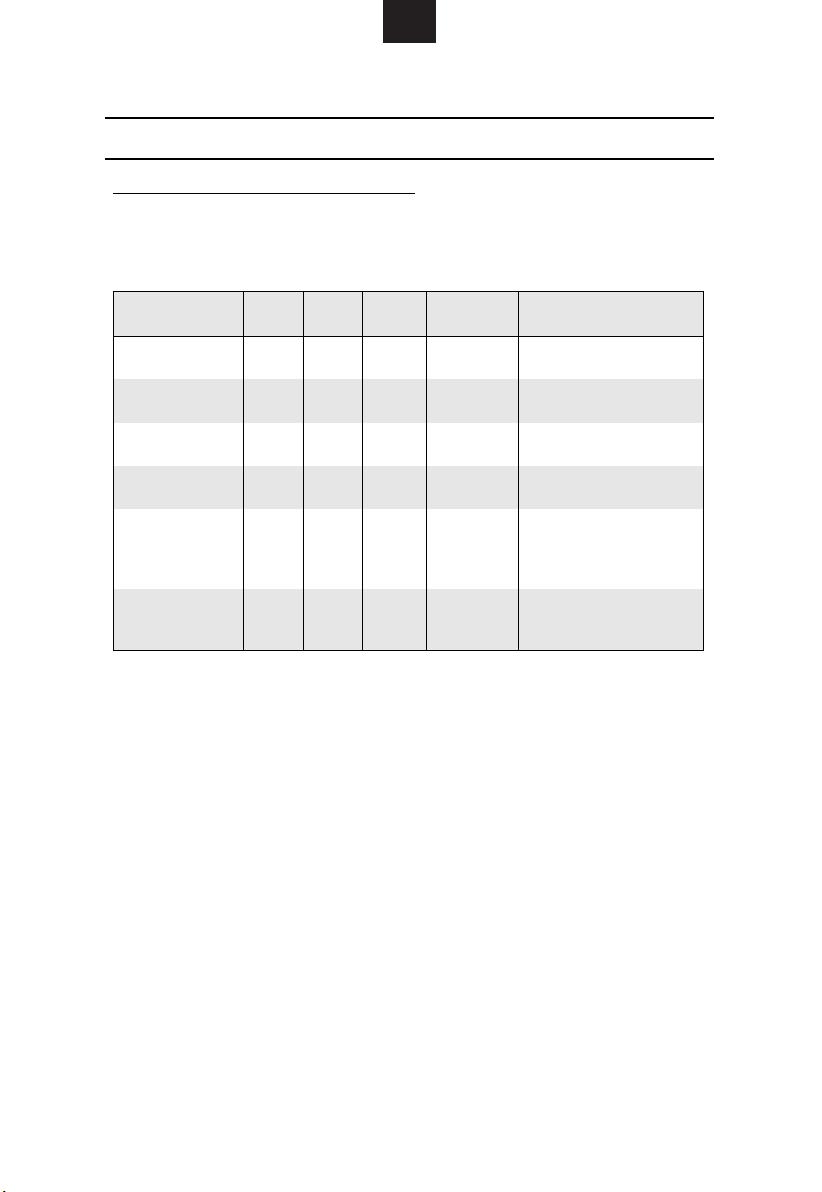
Materials you can use in microwave oven
Utensils Remarks
Aluminum foil Shielding only. Small smooth pieces can be used to cover thin parts of
meat or poultry to prevent overcooking. Arcing can occur if foil is too
close to oven walls. The foil should be at least 1 inch (2.5cm) away from
oven walls.
Browning dish
Dinnerware
Glass jars
Glassware
Oven cooking
bags
Paper plates
and cups
Paper towels
Parchment
paper
Plastic
Plastic wrap
Thermometers Microwave-safe only (meat and candy thermometers).
Wax paper Use as a cover to prevent splattering and retain moisture.
Follow manufacturer’s instructions. The bottom of browning dish must be
at least 3/16 inch (5mm) above the turntable. Incorrect usage may cause
the turntable to break.
Microwave-safe only. Follow manufacturer's instructions. Do not use
cracked or chipped dishes.
Always remove lid. Use only to heat food until just warm. Most glass jars
are not heat resistant and may break.
Heat-resistant oven glassware only. Make sure there is no metallic trim.
Do not use cracked or chipped dishes.
Follow manufacturer’s instructions. Do not close with metal tie. Make
slits to allow steam to escape.
Use for short–term cooking/warming only. Do not leave oven unattended
while cooking.
Use to cover food for reheating and absorbing fat. Use with supervision
for a short-term cooking only.
Use as a cover to prevent splattering or a wrap for steaming.
Microwave-safe only. Follow the manufacturer’s instructions. Should be
labeled "Microwave Safe". Some plastic containers soften, as the food
inside gets hot. "Boiling bags" and tightly closed plastic bags should be
slit, pierced or vented as directed by package.
Microwave-safe only. Use to cover food during cooking to retain
moisture. Do not allow plastic wrap to touch food.
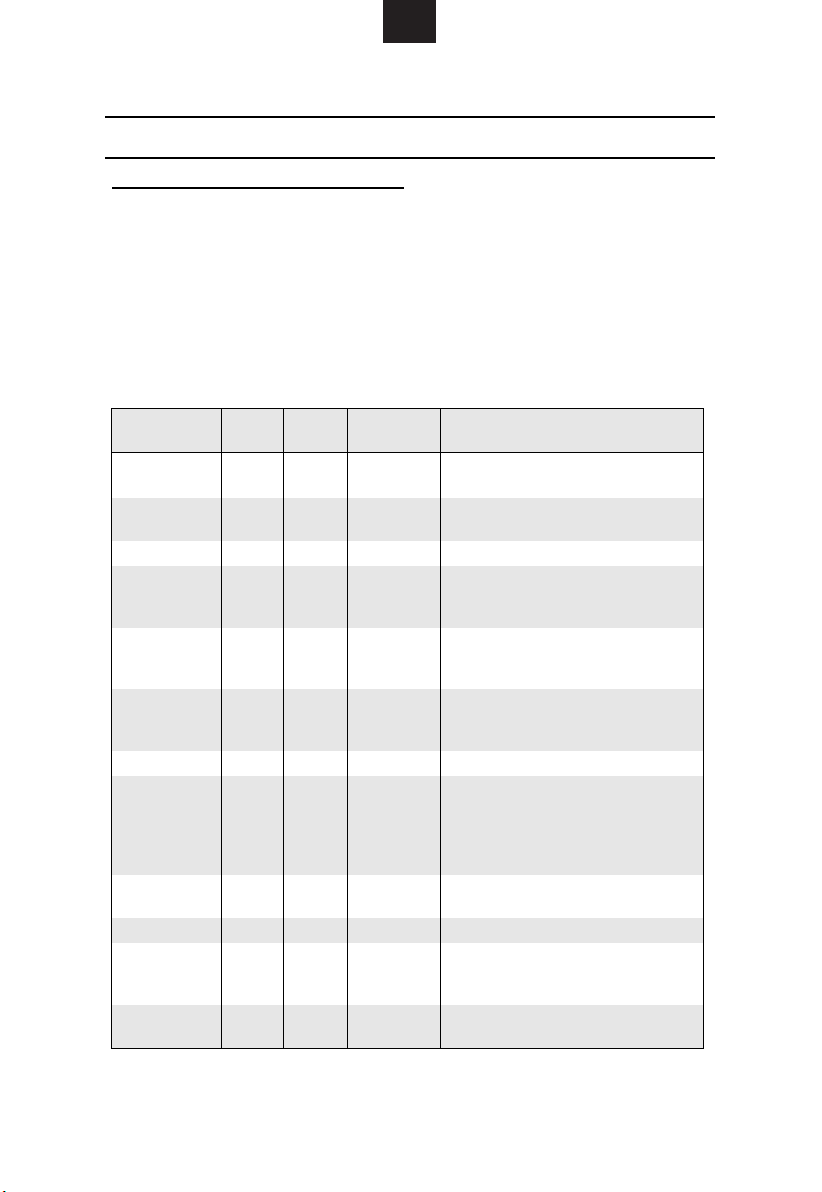
Materials to be avoided in microwave oven
Utensils Remarks
Aluminum tray
Food carton with
metal handle
Metal or metaltrimmed utensils
Metal twist ties
Paper bags
Plastic foam
Wood
May cause arcing. Transfer food into microwave-safe dish.
May cause arcing. Transfer food into microwave-safe dish.
Metal shields the food from microwave energy. Metal trim may
cause arcing.
May cause arcing and could cause a fire in the oven.
May cause a fire in the oven.
Plastic foam may melt or contaminate the liquid inside when exposed
to high temperature.
Wood will dry out when used in the microwave oven and may split
or crack.
Page 13
GB
11
SETTING UP YOUR OVEN
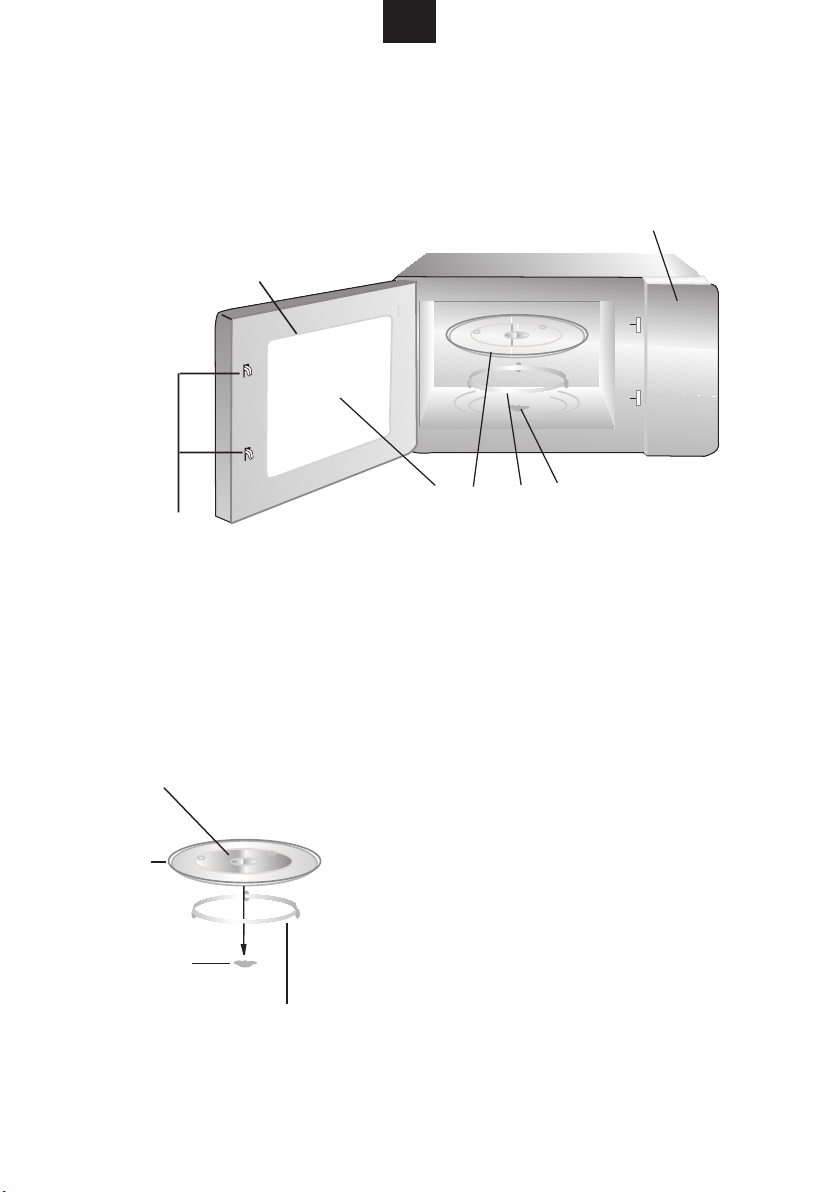
Names of Oven Parts and Accessories
Remove the oven and all materials from the carton and oven cavity.
Your oven comes with the following accessories:
Glass tray 1
Turntable ring assembly 1
Instruction Manual 1
F
A
G
Turntable Installation
Hub (underside)
Glass tray
Turntable shaft
Turntable ring assembly
E
a. Never place the
tray should never be restricted.
b. Both
always be used during cooking.
c. All food and containers of food are always placed
on the
d. If
breaks, contact your nearest authorized service
center.
glass tray
glass tray
glass tray
or
CB
D
A) Control panel
B) Turntable shaft
C) Turntable ring assembly
D) Glass tray
E) Observation window
F) Door assembly
G) Safety interlock system
glass tray
and
for cooking.
turntable ring assembly
upside down. The glass
turntable ring assembly
must
cracks or
Page 14
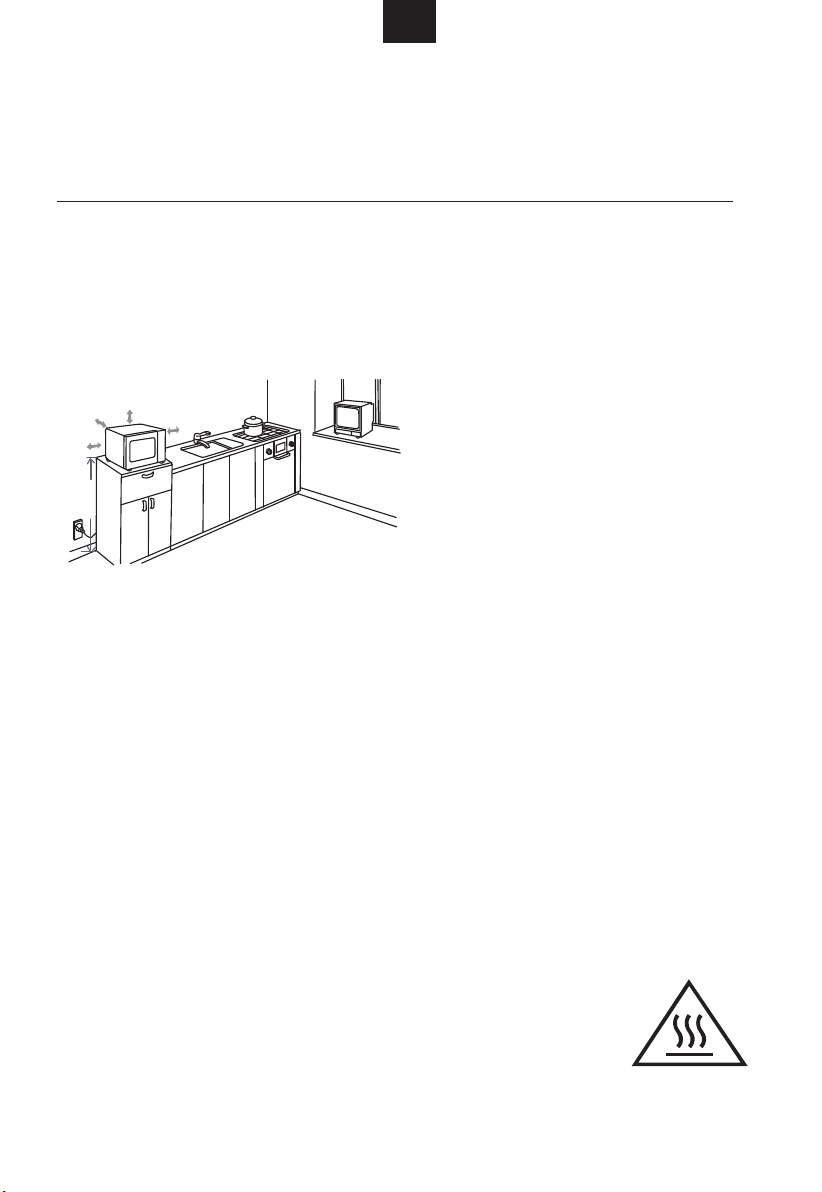
Countertop Installation
12
Remove all packing material and accessories.
Examine the oven for any damage such as
dents or broken door. Do not install if oven is
damaged.
Installation
1.Select a level surface that
provideenough open space
for the intakeand/or outlet
vents.
30cm
0cm
20cm
min85cm
(1) The minimum installation
height is 85cm.
(2) The rear surface of
appliance shall be placed
against a wall.
Leave a minimum clearance
of 30cm above the oven, a
minimum clearance of 20cm
is required between the oven
and any adjacent walls.
(3) Do not remove the legs
from the bottom of the oven.
20cm
GB
Cabinet: Remove any protective film found
on the microwave oven cabinet surface.
Do not remove the light brown Mica cover
that is attached to the oven cavity to
protect the magnetron.
(4) Blocking the intake and/
or outlet openings can
damage the oven.
(5) Place the oven as far
away from radios and TV
as possible. Operation of
microwave oven may
cause interference to your
radio or TV reception.
2. Plug your oven into a
standard household outlet.
Be sure the voltage and
the frequency is the same
as the voltage and the
frequency on the rating
label.
WARNING: Do not install
oven over arange cooktop
or other heat-producing
appliance. If installed near
or over a heatsource, the
oven could be damaged
andthe warranty would be
void.
The accessible
surfacemay be
hot duringoperation.
Page 15
GB
13
OPERATION INSTRUCTION
This microwave oven uses modern electronic control to adjust cooking parameters
to meet your needs better for cooking.
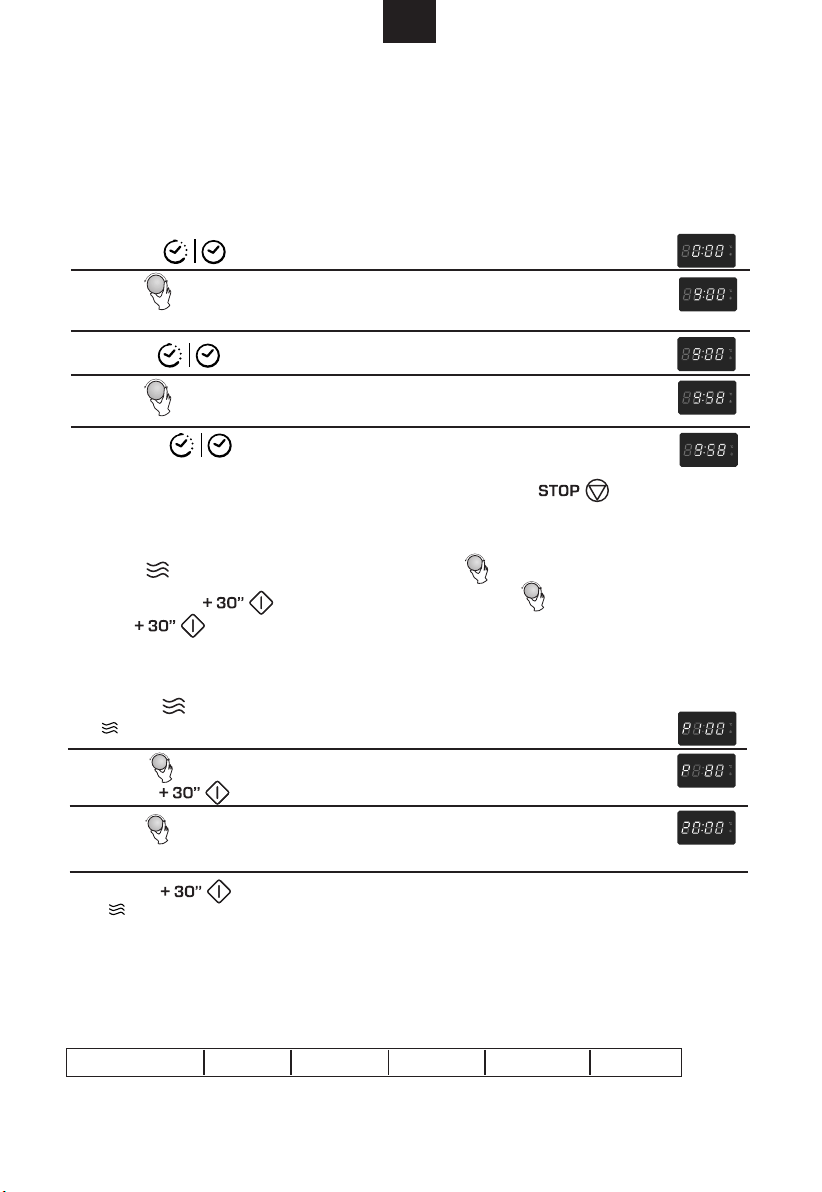
1.Clock Setting
When the microwave oven is electrified,the oven will display "0:00", buzzer will ring
once.
1) Press " , the hour figures will flah.
2) Turn " " to adjust the hour figures, the input time should be within
0--23.
3) Press " ", the minute figures will flash.
4) Turn " " to adjust the minute figures, the input time should be within
0--59.
5) Press " " to finish clock setting. ":" will flash.
Note: 1) If the clock is not set, it would not function when powered.
2) During the process of clock setting, if you press " " or no operation
in one minute, the oven will exit the setting.
2. Microwave Cooking
Press " "once, "P100" displays. Then turn " "to select the function
you want.
Press "
Example: If you want to use 80% power to cook for 20 minutes, you can
operate the oven as the following steps.
1) Press " " once, the LED will display "P100",
" " indicator will be lighted.
2) Turn "
Press " " to confirm power.
"
Press " " to confirm the [power.
" to start cooking.
" to choose 80% power, the
LED will display "P80".
" " to adjust the cooking time.
Turn
3) Turn " " to adjust the cooking time until the oven display"20:00"
(The maximum cooking time is 95 minutes.)
4) Press " " to start cooking, ":" will light and the
" " indicator will flash (Buzzer will sound five times after finishing).
NOTE: the step quantities for the adjustment time of the coding switch are as follow:
0---1 min : 5 seconds
1---5 min : 10 seconds
5---10 min : 30 seconds
Microwave Power Chart
Microwave Power
80% 50% 30% 10%100%
10---30 min : 1 minute
30---95 min : 5 minutes
Page 16
GB
14
3. Speedy Cooking
1).When the oven is in the waiting states, press "
with full microwave power for 30 seconds. The cooking time will add 30 seconds by
every press on " " key,and the maximum setting time is 95 minutes.
Note: Time can be increased by press " " button except weight defrost and
auto menu program.
2).In waiting state, turn " " left to choose cooking time directly then press
"
" key to cook with 100% microwave power.
This program can be set as the first one of multi-stage.
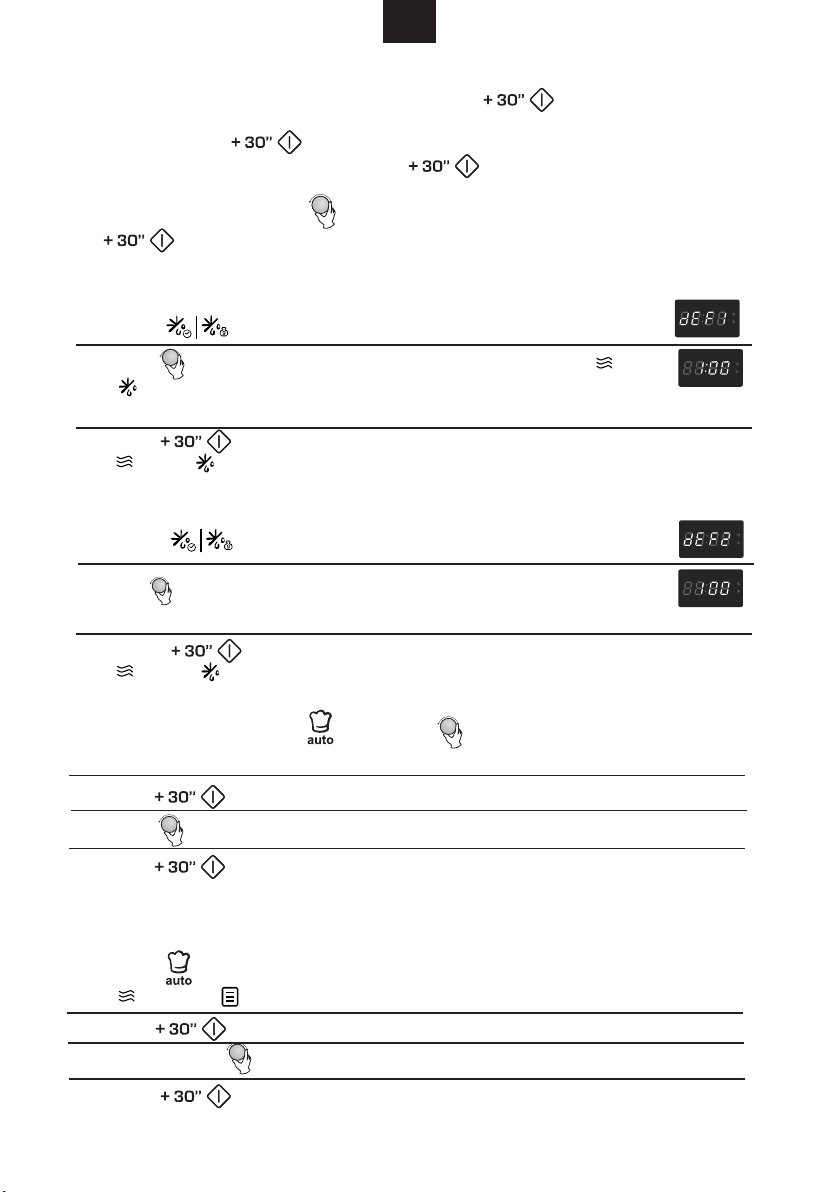
4. Defrost By Time
1) Press " " key once, the LED will display "dEF1".
2) Turn " " to select the cooking time. At the same time, " " and
" " will be lighted. The time setting is from 00:05 to 95:00.
The default power level is P30. It is not adjustable.
3) Press " " key to start defrosting.
" " and " " indicators will flash .
" key to start cooking
5. Defrost by
1) Press " " pad twice,the LED will display "dEF2".
2) Turn " " to select the weight of food.At the same time, "g" will light.
The weight should be 100-2000g.
3) Press " " key to start defrosting.
" " and " " indicators will flash and "g" indicator will go out.
Weight
6. Auto Menu
1). In waiting states, press " " or turn " " right to choose the menu you need.
"A-01","A-02"...."A-10" will display in order.
2) Press "
2). Turn " " to select the menu from b-1 to b-4.
3) Press " " to start cooking.
When cooking finish, buzzer will sound five times. If the clock has been set before,
the current time will be displayed, otherwise, 0:00 will be displayed.
For example: to cook the pasta.
1) Press " " for seven times, "A-07" displays and pasta menu is selected.
" " and " " indicator will light.
2) Press "
3). Stop turning " " when "b-4" displays.
3) Press " " to start cooking.
When cooking finish, buzzer will sound five times. Then turn back to waiting states.
" to confirm the selected main menu.
" to confirm the selected main menu.
Page 17
GB
15
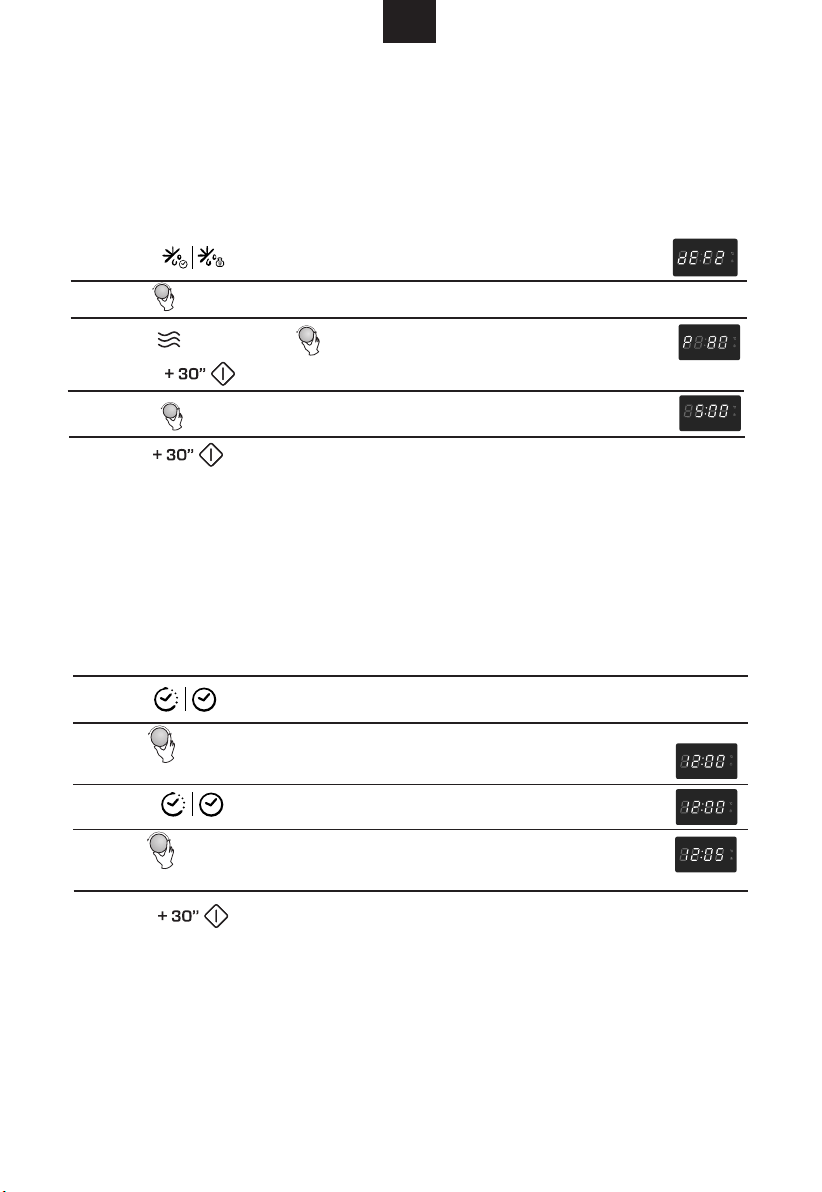
Multi-Stage Cooking
7.
Two stages of cooking can be maximumly set. If one stages is defrosting, it will be put in
the first stage automatically. The buzzer will ring once after each stage and the next stage will
begin.
Note: Auto menu cannot be set as one of the multi-stage.
Example: if you want to defrost the food of 500g + 80% microwave power for 5 minutes.
The steps are as following:
1) Press " "twice, "dEF2" displays;
2) Turn " " to adjust the weight of the food. Stop turning when "500" displays;
3) Press" " once, turn " "o choose 80% microwave power;
Press " " to confirm the power;
4) Turn " " to adjust the cooking time of 5 minutes;
5) Press " " to start cooking.
Note: When the first stage finish, buzzer sounds once then the second stage
begins.
back to the waiting
8. Pre-set Function
1) Set the clock first. (Consult the instruction of clock setting.)
2) Input the cooking program. Two stages can be set at most. Defrosting
should not be set here.
When all of them finish, buzzer sounds five times and the unit turn
states.
3) Press " ". The current clock is displayed. The hour figure flash;
4) Turn " " to adjust the hour figures, the input time should be within
0--23.
5) Press " minute figures will flash.
6) Turn " " to adjust the minute figures, the input time should
be within 0--59.
7) Press " " to finish setting. ":" will light, buzzer will
ring twice when the time arrives, then cooking will start automatically.
Note: 1) Clock must be set first. Otherwise,pre-set function will not work.
2) If the pre-set program has been set without the cooking program,
the whole setting will be used as an alarm clock. That means when
pre-set time arrives, buzzer will sound five times only.
", the
Page 18
GB
16
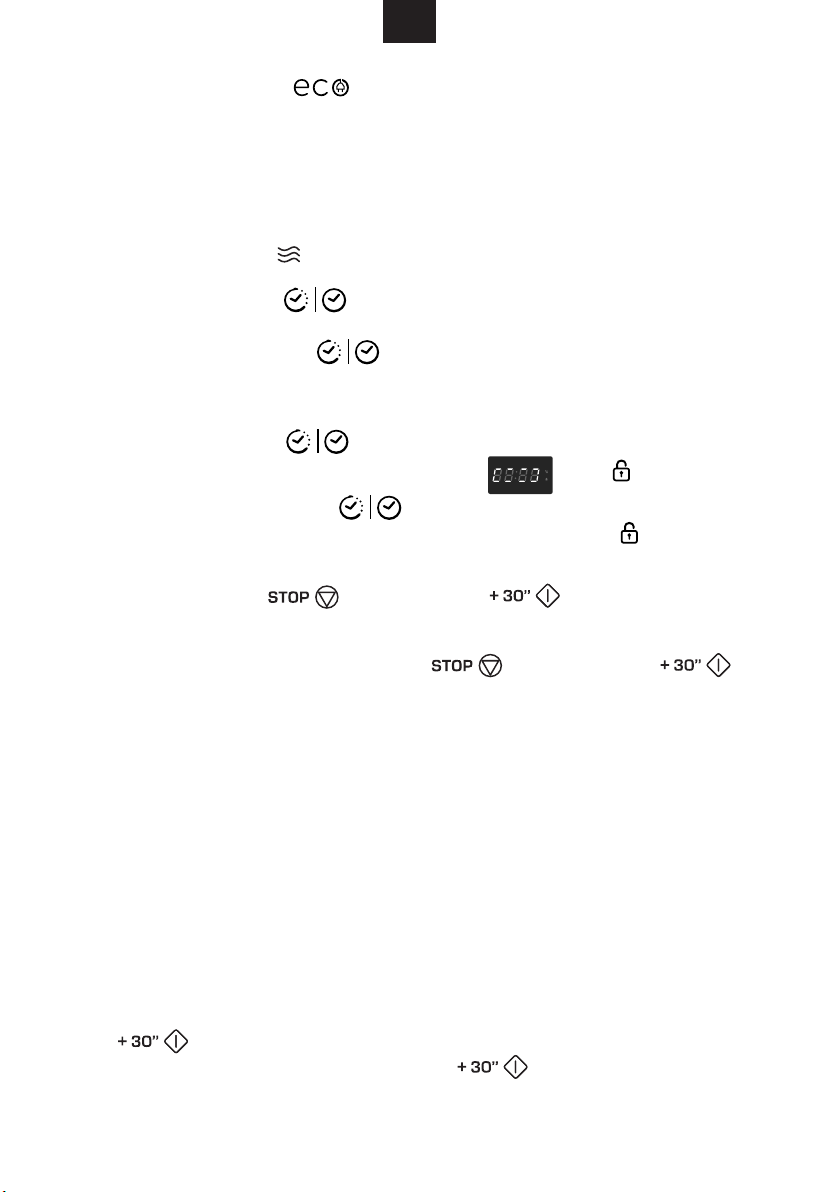
9. ECO Function
In waiting state, Press " " or if no operation in 1 minute, the screen
will be off. At this time, press any button to turn the screen on.
Note: 1). The oven cannot enter ECO mode if the door is open.
2). Press any button or open the door to turn the screen on under ECO mode.
3). If enter ECO mode under child lock state, recover to still child lock state.
10. Inquiring Function
(1) In cooking state, press " ", the current microwave power
will be displayed for 3 seconds.
(2) In pre-set state, press " " to inquire the time for delay start cooking.
The pre-set time will flash for 3 seconds, then the oven will turn back to the clock display.
(3) During cooking state, press " " to check the current time. It will be displayed
for 3 seconds.
11. Lock-out Function for Children
Lock: In waiting state, press " " for 3 seconds, there will be a long "beep" denoting
entering into the children-lock state and LED will display " " and "
Lock quitting: In locked state, press " " for 3 seconds, there will be a long "beep"
denoting that the lock is released, and LED will turn back to the clock stae, " " will go out.
ilent Mode
12. S
In waiting states, press “ ”, and then press “ ” simotanoesly in 3 seconds
to enter silent mode. All the buttons and buzzers will stop ringing under silent mode.
To active the sound: in waiting state, press “ ”, and then press “ ”
simotanoesly in 3 seconds to exit the silent mode.
13. Protection of Fan
When the microwave or combination cooking works over 5 minutes, it stops working
at the last 15 seconds, only fan runs.
14. Protection Function of Magnetron Control Pipe
When the unit runs for 30 minutes with high power level, it will adjust to 80% microwave power
to protect the magnetron control pipe.
This function works under multi-stage and other states.
15. Automatic Going Out Function
When the door is kept open for 10 minutes, the oven light will be off. Press any key after
opening the door, time will count down again. The oven lamp will light.
16. Specification
(1) The buzzer will sound once when turning the knob at the beginning;
(2) " " must be pressed to continue cooking if the door is opened during cooking;
(3) Once the cooking programme has been set , " " is not pressed
in 1 minute. The current time will be displayed. The setting will be cancelled.
(4) The buzzer sounds once by efficient press, inefficient press will be no responce.
" will light.
Page 19
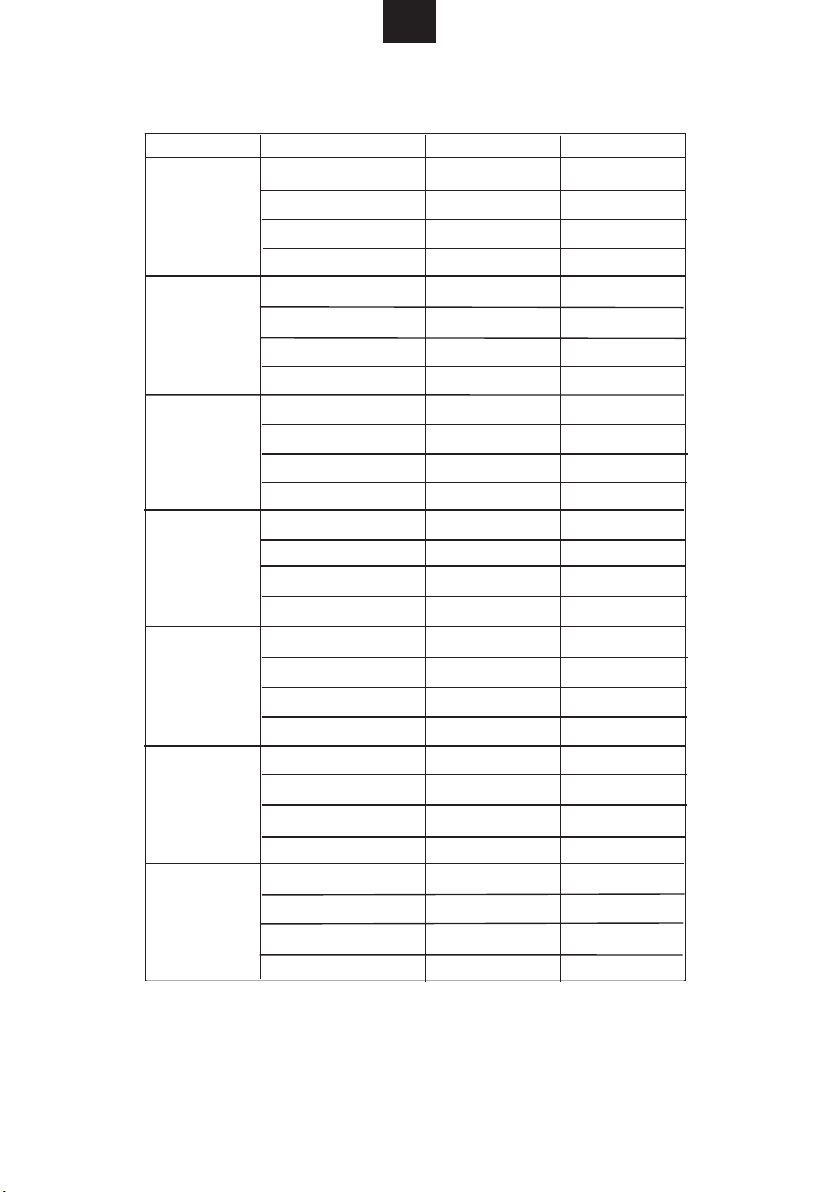
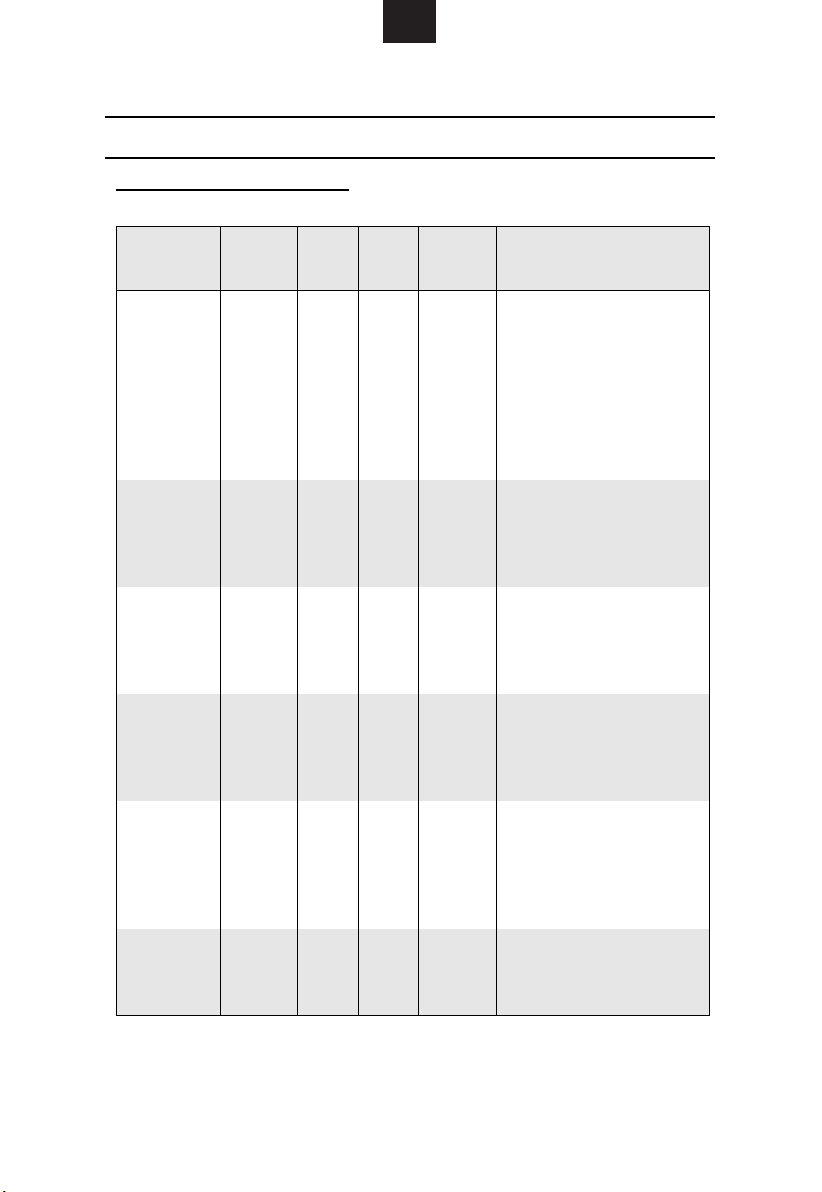
Auto menu Chart
17
GB
Menu
A-01
BAKERY
A-02
POTATOES
A-03
MEAT
A-04
FISH
A-05
VEGETABLES
A-06
HOT BEVERAGE
A-07
PASTA-RICE
Display
b-1 Pizza reheat
b-2 Bread reheat
b-3 Savoury pie
b-4 Dough
b-1 Steam
b-2 Potato croquettes
b-3 Potato bake
b-4 French fries
b-1 Chicken
b-2 Turkey
b-3 Pork
b-4 Red meat
b-1 Mussels
b-2 Salmon(Fish)
b-3 Tuna
b-4 Sea bass
b-1 Broccoli
b-2 Spinach
b-3 Carrots
b-4 Fennel
b-1 Milk(1 cup/240ml)
b-2 Coffee(1 cup/120ml)
b-3 Tea
b-4 Hot chocolate
b-1 Pasta parcels
b-2 Rice
b-3 Soup
(reheat vegetable soup)
b-4 Pasta
Weight(g)
200
200
400
500
400
250
1
200
800
800
450
800
200
350
350
350
400
400
400
200-400
1 cup
1 cup
1 cup
200
450
1 cup
250
50(add water 500ml)
Power
P100
P100
P80+P0+P80
P30
P100
P80+turn over+P0
P80+P0
P100
P100
P100
P100
P100
P80
P80
P80
P80
P100
P100
P100
P80+P0
P100
P100
P100
P70
P80
P100+P50
P100
P80
Page 20
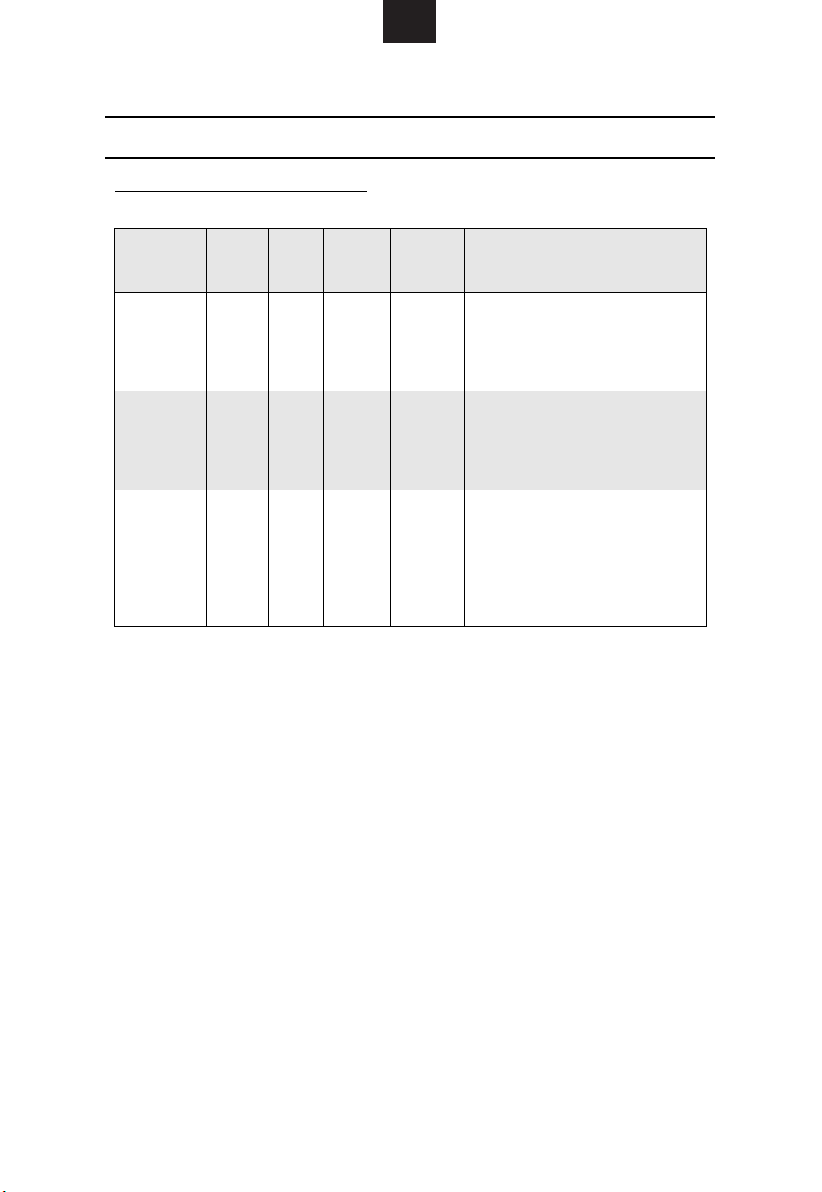
Auto menu Chart
18
GB
Menu
A-08
PATISSERIE
A-09
HEALTHY
A-10
BABY
Display
b-1 Biscuits
b-2 Cake
b-3 Jam
b-4 Muffins
b-1 Dried food
b-2 Homemade yogurt
b-3 Wholemeal pasta
b-4 Legumes
b-1 Pureed Baby Food
b-2 Broth
b-3 Sterilization
b-4 Baby milk
Weight(g)
150(add water 500l)
200
1 cup
400
400
100
1 liter
500
150
200
1 bottom
100 ml
Power
P80+P0+P80
P80
P100+P0
P100
P80+P0
P30
P100
P100
P80+P0
P100+P0
P100
P30
Page 21

Trouble shooting
19
GB
It is forbidden to run the unit without any food inside.
It is very dangerous.
CUSTOMER ASSISTANCE SERVICE
If you cannot identify the cause of the operating anomaly: switch off the appliance (do not subject it
to rought treatment) and contact the Assistance Service.
PRODUCT SERIAL NUMBER. Where can I find it?
It is important that you to inform the Assistance Service of your product code and its serial number (a 16
character code which begins with the number 3); this can be found on the guarantee certificate or on
the data plate located on the appliance.
It will help to avoid wasted journerys to technicians, thereby (and most significantly) saving the
corresponding callout charges.
Page 22

GB
20
applicable collection point for the recycling of electrical and electronic equipment
Disposal must be carried out in accordance with local environmental regulations for
waste disposal.
For more detailed information about treatment, recovery and recycling of this
product, please contact your local city office, your household waste disposal service
or the shop where you purchased the product
This appliance is marked according to the European directive
2012/19/EU
By ensuring this product is disposed of correctly, you will help
prevent potential negative consequences for the environment and
human health, which could otherwise be caused by inappropriate
waste handling of this product.
The symbol on the product indicates that this product may not be
treated as household waste. Instead it shall be handed over to the
on Waste Electrical and Electronic Equipment (WEEE).
.
Page 23

GB
21
Cooking Guide
MICROWAVES
Microwave energy actually penetrates food, attracted and absorbed by its water,
fat and sugar content.
The microwaves cause the molecules in the food to move rapidly. The rapid
movement of these molecules creates friction and the resulting heat cooks the
food.
COOKING
Cookware for microwave cooking:
Cookware must allow microwave energy to pass through it for maximum efficiency.
Microwaves can penetrate through ceramic, glass, porcelain and plastic as well
as paper and wood, but they are reflected by metal, such as stainless steel,
aluminium and copper. So food must never be cooked in metal containers.
Foods suitable for microwave cooking:
Many kinds of food are suitable for microwave cooking, including fresh or frozen
vegetables, fruit, pasta, rice, grains, beans, fish, and meat. Sauces, custard,
soups, steamed puddings, preserves, and chutneys can also be cooked in a
microwave oven. Generally speaking, microwave cooking is ideal for any food
that would normally be prepared on a hob.
Covering during cooking
To cover the food during cooking is very important, as the evaporated water rises
as steam and contributes to cooking process. Food can be covered in different
ways: e.g. with a ceramic plate, plastic cover or microwave suitable cling film.
Standing times
After cooking is over food the standing time is important to allow the temperature
to even out within the food.
Page 24
GB
22
Cooking Guide
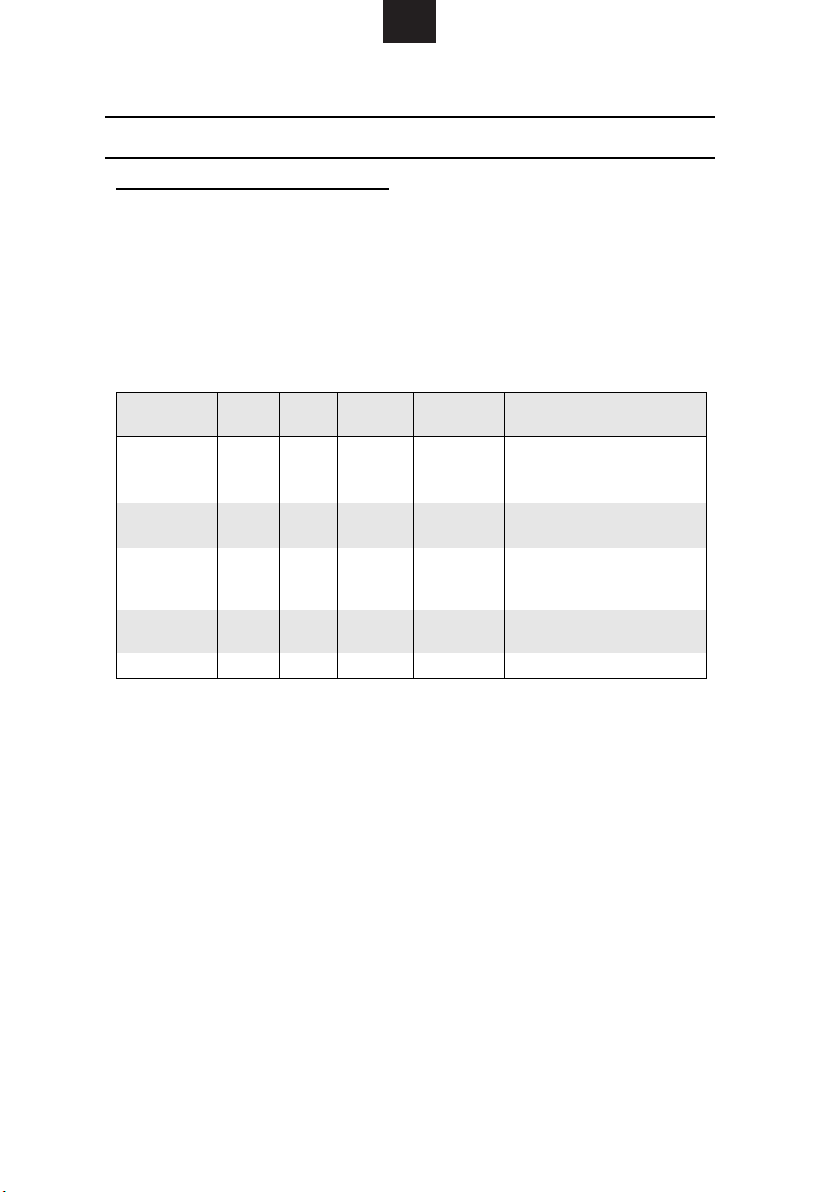
Cooking Guide for frozen vegetables
Use a suitable glass pyrex bowl with lid. Cook covered for the minimum time - see
table. Continue cooking to get the result you prefer.
Stir twice during cooking and once after cooking. Add salt, herbs or butter after
cooking. Cover during standing time..
Food Portion Power
Spinach
Broccoli
Peas
Green Beans
Mixed
Vegetables
(carrots/peas/
corn)
Mixed
Vegetables
(Chinese style)
150g P80 5-6 2-3
300g P80 8-9 2-3
300g P80 7-8 2-3
300g P80 7½-8½ 2-3
300g P80 7-8 2-3
300g P80 7½-8½ 2-3
Time
(min. )
Standing
Time (min. )
Instructions
Add 15 ml (1 tablespoon)
cold water.
Add30ml(2tbsp.)cold
water.
Add15ml(1tbsp.)cold
water.
Add30ml(2tbsp.)cold
water.
Add15ml(1tbsp.)cold
water.
Add15ml(1tbsp.)cold
water.
Page 25
GB
23
Cooking Guide
Cooking Guide for fresh vegetables
Use a suitable glass pyrex bowl with lid. Add 30-45 ml cold water (2-3 tbsp.) for
every 250 g unless another water quantity is recommended - see table. Cook
covered for the minimum time - see table. Continue cooking to get the result you
prefer. Stir once during and once after cooking. Add salt, herbs or butter after
cooking. Cover during a standing time of 3 minutes.
Hint: Cut the fresh vegetables into even sized pieces. The smaller they
All fresh vegetables should be cooked using full microwave power (P100).
Food
Broccoli
Brussels
Sprouts
Carrots
Cauliflower
Courgettes
Egg Plants
Leeks
Mushrooms
Onions
Pepper
Potatoes
Turnip
Cabbage
are cut, the quicker they will cook.
Portion
250g
500g
250g 5-5½ 3
250g 3½-4 3
250g
500g
250g 3-3½ 3
250g 2½-3 3
250g 3-3½ 3
125g
250g
250g 4-4½ 3
250g 3½-4 3
250g
500g
250g
Time
(min. )
3½-4
4-4½
6½-7½
1-1½
2-2½
4½-5
6-7
3-4
6-7
Standing
Time (min. )
3
3
3
3
3
Prepare even sized florets. Arrange
the stems to the centre.
Add 60-75 ml (5-6 tbsp.) water.
Cut carrots into even sized slices.
Prepare even sized florets. Cut big
florets into halves. Arrange stems to
the centre.
Cut courgettes into slices. Add 30 ml
(2 tbsp.) water or a knob of butter.
Cook until just tender.
Cut egg plants into small slices and
sprinkle with 1 tablespoon lemon
juice.
Cut leeks into thick slices.
Prepare small whole or sliced
mushrooms. Do not add any water.
Sprinkle with lemon juice. Spice with
salt and pepper. Drain before
serving.
Cut onions into slices or halves. Add
only 15 ml (1 tbsp.) water.
Cut pepper into small slices.
Weigh the peeled potatoes and cut
them into similar sized halves or
quarters.
Cut turnip cabbage into small cubes.
Instructions
Page 26
GB
24
Cooking Guide
Cooking Guide for rice and pasta
Rice: Use a large glass pyrex bowl with lid - rice doubles in volume during
Pasta: Use a large glass pyrex bowl. Add boiling water, a pinch of salt and
Food Portion Power
White Rice
(parboiled)
Brown Rice
(parboiled)
Mixed Rice
(rice + wild
rice)
Mixed Corn
(rice + grain)
Pasta
cooking. Cook covered.
After the cooking time is over, stir before standing time and salt or
add herbs and butter.
Remark: the rice may not have absorbed all water after the cooking
time is finished.
stir well. Cook uncovered.
Stir occasionally during and after cooking. Cover during standing
time and drain thoroughly afterwards.
Time
(min. )
250g
P100
375g
250g
P100
375g
250g P100 16-17 5
250g P100 17-18 5
250g P100 10-11 5
15-16
17½-
18½
20-21
22-23
Standing
Time (min. )
5
5
Instructions
Add 500 ml cold water.
Add 750 ml cold water.
Add 500 ml cold water.
Add 750 ml cold water.
Add 500 ml cold water.
Add 400 ml cold water.
Add 1000 ml hot water.
REHEATING
Your microwave oven will reheat food in a fraction of the time that conventional
ovens hobs normally take.
Use the power levels and reheating times in the following chart as a guide. The
times in the chart consider liquids with a room temperature of about +18 to +20°C
or a chilled food with a temperature of about +5 to +7°C.
Arranging and covering
Avoid reheating large items such as joint of meat - they tend to overcook and dry
out before the centre is piping hot. Reheating small pieces will be more
successful.
Power levels and stirring
Some foods can be reheated using maximum power while others should be
reheated using lower power.
Check the tables for guidance. In general, it is better to reheat food using a lower
power level, if the food is delicate, in large quantities, or if it is likely to heat up
very quickly (mince pies, for example).
Stir well or turn food over during reheating for best results. When possible, stir
again before serving.
Page 27

GB
25
Cooking Guide
Take particular care when heating liquids and baby foods. To prevent eruptive
boiling of liquids and possible scalding , stir before, during and after heating.
Keep them in the microwave oven during standing time. We recommend putting a
plastic spoon or glass stick into the liquids. Avoid overheating (and therefore
spoiling) the food.
It is preferable to underestimate cooking time and add extra heating time, if
necessary.
Heating and standing times
When reheating food for the first time, it is helpful to make a note of the time
taken - for future reference.
Always make sure that the reheated food is piping hot throughout.
Allow food to stand for a short time after reheating - to let the temperature even
out. The recommended standing time after reheating is 2-4 minutes, unless
another time is recommended in the chart..
Take particular care when heating liquids and baby food. See also the chapter
with the safety precautions.
REHEATING LIQUIDS
Always allow a standing time of at least 20 seconds after the oven has been
switched off to allow the temperature to even out. Stir during heating, if
necessary, and ALWAYS stir after heating. To prevent eruptive boiling and
possible scalding, you should put a spoon or glass stick into the beverages and
stir before, during and after heating.
REHEATING BABY FOOD
BABY FOOD:
Empty into a deep ceramic plate. Cover with plastic lid. Stir well after reheating!
Let stand for 2-3 minutes before serving. Stir again and check the temperature.
Recommended serving temperature: between 30-40°C.
BABY MILK:
Pour milk into a sterilised glass bottle. Reheat uncovered. Never heat a baby’s
bottle with teat on, as the bottle may explode if overheated. Shake well before
standing time and again before serving ! Always carefully check the temperature
of baby milk or food before giving it to the baby. Recommended serving
temperature: ca. 37°C.
REMARK:
Baby food particularly needs to be checked carefully before serving to prevent
burns.
Use the power levels and times in the next table as a guide lines for reheating.
Page 28
GB
26
Cooking Guide
Reheating Liquids and Food
Use the power levels and times in this table as a guide lines for reheating.
Standing
Food Portion Power
150 ml
Drinks
(coffee,milk,
tea, water
with room
temperature)
Soup
(chilled)
Stew
(chilled)
Pasta with
sauce
(chilled)
Filled pasta
with sauce
(chilled)
Plated Meal
(chilled)
(1cup)
300 ml
(2cups)
450 ml
(3cups)
600 ml
(4cups)
250g
350g
450g
550g
350g P80
350g P80 3½-4½ 3
350g P80
350g
450g
550g
P100
P100
P80
Time
(min. )
1-1½
1½-2
2½-3
3-3½
2-2½
2½-3
3-3½
3½-4
4½-5½ 2-3
4-5 3
4½-5½
5-6
5½-6½
Time
(min. )
1-2
2-3
3
Instructions
Pour into a ceramic cup and
reheat uncovered. Place 1
cupinthecentre,2
opposite of each other and
3 or 4 in a circle. Stir
carefully before and after
standing time, be careful
while taking them out of
oven.
Pour into a deep ceramic
plate or deep ceramic bowl.
Cover with plastic lid. Stir
well after reheating. Stir
again before serving.
Put stew in a deep ceramic
plate. Cover with plastic
lid.Stir occasionally during
reheating and again before
standing and serving.
Put pasta (e.g. spaghetti or
egg noodles) on a flat
ceramic plate. Cover with
microwave cling film. Stir
before serving.
Put filled pasta (e.g. ravioli,
tortellini) in a deep ceramic
plate. Cover with plastic lid.
Stir occasionally during
reheating and again before
standing and serving.
Plate a meal of 2-3 chilled
components on a ceramic
dish. Cover with microwave
cling-film.
Page 29
GB
27
Cooking Guide
Reheating Baby Food and Milk
Use the power levels and times in this table as guide lines for reheating.
Food Portion Power Time
Baby food
(vegetables
+ meat)
Baby
porridge
(grain +
milk + fruit)
Baby milk
190g P80 30sec. 2-3
190g P80 20sec. 2-3
100ml
P30
200ml
30-40
sec.
1min.
to
1min.
10 sec.
Standing
Time
(min. )
2-3
Instructions
Empty into ceramic deep plate.
Cook covered. Stir after cooking
time. Stand for 2-3 minutes.
Before serving, stir well and
check the tem- perature carefully.
Empty into ceramic deep plate.
Cook covered. Stir after cooking
time. Stand for 2-3 minutes.
Before serving, stir well and
check the tem- perature carefully.
Stir or shake well and pour into a
sterilised glass bottle. Place into
the centre of turntable. Cook
uncovered. Shake well and stand
for at least 3 minutes. Before
serving, shake well and check the
tempera- ture carefully.
Page 30

GB
28
Cooking Guide
RILL
G
The grill-heating element is located underneath the ceiling of the cavity. It
operates while the door is closed and the turntable is rotating. The turntable’s
rotation makes the food brown more evenly. Preheating the grill for 4 minutes will
make the food brown more quickly.
Cookware for grilling:
Should be flameproof and may include metal. Do not use any type of plastic
cookware, as it can melt.
Food suitable for grilling:
Chops, sausages, steaks, hamburgers, bacon and gammon rashers, thin fish
portions, sandwiches and all kinds of toast with toppings.
IMPORTANT REMARK:
Please remember that food must be placed on the high rack, unless another
instruction is recommended.
MICROWAVE + GRILL
This cooking mode combines the radiant heat that is coming from the grill with the
speed of microwave cooking. It operates only while the door is closed and the
turntable is rotating. Due to the rotation of the turntable, the food browns evenly.
Cookware for cooking with microwave + grill
Please use cookware that microwaves can pass through. Cookware should be
flameproof. Do not use metal cookware with combination mo de. Do not use any
type of plastic cookware, as it can melt.
Food suitable for microwave + grill cooking:
Food suitable for combination mode cooking include all kinds of cooked food
which need reheating and browning (e.g. baked pasta), as well as foods which
require a short cooking time to brown the top of the food. Also, this mode can be
used for thick food portions that benefit from a browned and crispy top (e.g.
chicken pieces, turning them over half way through cooking). Please refer to the
grill table for further details.
The food must be turned over, if it is to be browned on both sides.
Page 31

GB
29
Cooking Guide
Grill Guide for fresh food
Preheat the grill with the grill-function for 4 minutes.
Use the power levels and times in this table as guide lines for grilling.
Fresh Food Portion Power
Toast Slices
Bread Rolls
(already
baked)
Grilled
Tomatoes
TomatoCheese
Toast
Toast
Hawaii
(pineapple,
ham,cheese
slices)
Baked
Potatoes
Gratin
Potatoes/
vegetables
(chilled)
Chicken
Pieces
Roast
Chicken
4pcs
(each25g
2-4
pieces
200g
(2pcs)
400g
(4pcs)
4pcs
(300g)
2pcs
(300g)
4pcs
(600g)
250g
500g
500g C1
450g
(2pcs)
650g
(2-3pcs)
850g
(4pcs)
900g
1100g
Grill
only
)
Grill
only
C2
C2 4-5 -
C1
C1
C2
C1 10-12
1. Side
3½-4½ 3-4
2½-3½ 1½-2½
3½-4½
3½-4½
4½-5½
6½-7½
2. Side
Time
(min)
5-6
6-7
9-11 -
7-8
9-10
11-12
12-14
Time
(min)
-
-
-
7-8
8-9
9-10
9-11
11-13
Instructions
Putthetoastslicesside by side
on the rack.
Put bread rolls first with the
bottomsideupinacircle
directly on the turntable.
Cut tomatoes into halves. Put
some cheese on top. Arrange
in a circle in a flat glass pyrex
dish. Place it on the rack.
Toast the breas slices first. Put
the toast with topping on the
rack. Stand for 2-3 minutes.
Toast the bread slices first. Put
the toast with topping on the
rack. Put 2 toasts opposite
directly on the rack. Stand for
2-3 minutes.
Cut potatoes into halves. Put
theminacircleontherackwith
the cut side to the grill.
Putthefreshgratinintoasmall
glass Grill pyrex dish. Put the
dish on the rack. After cooking
stand for 2-3 minutes.
Brush chicken pieces with oil
and spices. Put them in a circle
with the bones to the middle.
Put one chicken piece not into
thecentreofthe rack. Stand for
2-3 minutes.
Brush chicken with oil and
spices. Put chicken first breast
side down, second side breast
side up directly on turntable.
Stand for 5 minutes after
grilling.
Page 32

Cooking Guide
30
Grill Guide for fresh food
Fresh Food Portion Power
Lamb Chops
(medium)
Pork Steaks
Roast Fish
Baked
Apples
400g
(4pcs)
250 g
(2pcs)
500 g
(4pcs)
450g
650g
2 apple
(ca.400g)
4 apples
(ca.800g)
Grill
only
MW +
Grill
C2
C2
GB
1. Side
Time
(min)
10-12 8-9
10-12
C2
6-7
8-10
6-7
7-8
6-7
2. Side
Time
(min)
(Grill
only)
Instructions
Brush the lamb chops with oil
and spices. Lay them in a
circle on the rack.After
grilling stand for 2-3 minutes.
Brush the pork steaks with oil
and spices. Lay them in a
circle on the rack. After
5-6
grilling stand for 2-3 minutes.
7-8
Brush skin of whole fish with
oil and herbs and spices. Put
7-8
fish side by side (head to tail)
8-9
on rack.
Core the apples and fill them
with raisins and jam. Put
some almond slices on top.
-
Put apples on a flat glass
pyrex dish. Place the dish
directly on the turntable.
Page 33

GB
31
Cooking Guide
Grill Guide for frozen food
Use the power levels and times in this table as guide lines for grilling.
Fresh Food Portion Power
Bread Rolls
(each ca. 50 g)
Baguettes/
Garlic Bread
Gratin
(vegetables or
potatoes)
Pasta
(Cannelloni,
Macaroni,
Lasagne)
Fish Gratin 400g C1
2pcs
4pcs
200-250g
(1pc)
400g C1
400g C1 14-16 -
MW+
Grill
MW+
Grill
1. Side
(min)
2. Side
Time
1½-2
2½-3
C1
3½-4
13-15 -
16-18 -
C2
Time
(min)
Grill
only
2-3
2-3
Grill
only
2-3
Instructions
Arrange rolls in a circle
with the bottom side up
directly on the turntable.
Grill the second side of
the rolls up to the crisp
you prefer. Stand for 2-5
minutes.
Put frozen baguette
diagonally on baking
paper on the rack. After
grilling stand for 2-3
minutes.
Put frozen gratin into a
small glass pyrex dish.
Put the dish on the rack.
After cooking stand for 23 minutes.
Put frozen pasta into a
small flat rectangular
glass pyrex dish. Put the
dish directly on the
turntable. After cooking
stand for 2-3 minutes.
Put frozen fish gratin into
a small flat rectangular
glass pyrex dish. Put the
dish directly on the
turntable. After cooking
stand for 2-3 minutes.
Page 34

IT
32
Forno a microonde
MANUALE DI ISTRUZIONI
MODELLI:
CMXW22DW
CMXW22DS
Leggere attentamente queste istruzioni prima dell'utilizzo
del forno a microonde e conservarle con cura.
Se seguirete le istruzioni qui contenute, il vostro forno vi garantirà un servizio
eccellente per molti anni.
CONSERVARE QUESTE ISTRUZIONI CON CURA
Inserendo la marcatura CE( ) su questo prodotto,
si dichiara , sotto la nostra responsabilità , la conformità a
tutti i requisiti sulla sicurezza europea, sulla salute e
sull’ambiente stabiliti dalla legislazione per questo
prodotto.
Page 35

IT
33
M RO
IC
SCONGELA PER PESO
SCONGELA PER TEMPO
FUNZIONE ECO
OROLOGIO/IMPOSTA/
BLOCCO SICUREZZA
MENU AUTOMATICO
STOP/CANCELLA
START/EXPRESS
TEMPO/PESO
Page 36

IT
34
PRECAUZIONI PER EVITARE LA POSSIBILE
ESPOSIZIONE A UN'ENERGIA ECCESSIVA DEL
MICROONDE
(a) Non utilizzare il forno a microonde quando lo sportello
è aperto perché ciò potrebbe comportare il rischio di
esposizione all'energia prodotta dal forno stesso, con il
conseguente rischio di danni per la salute. Non rompere o
manomettere gli interblocchi di sicurezza.
(b) Non collocare alcun oggetto tra il lato anteriore del forno
e lo sportello e rimuovere sempre tutto lo sporco e i residui
di soluzioni detergenti dalle superfici di tenuta.
(c) AVVERTENZA: se lo sportello è aperto o le tenute sono
danneggiate, non utilizzare il forno a microonde e farlo
riparare da una persona competente.
AGGIUNTA
La mancata pulizia del forno a microonde potrebbe deteriorare
le sue superfici, ridurre la vita utile del forno stesso e dar
luogo a situazioni pericolose.
Specifiche tecniche
Modelli
Tensione nominale
Potenza nominale in ingresso
(Microonde)
Potenza nominale in uscita (Microonde)
Capacità del forno
Diametro del piatto rotante
Dimensioni esterne(LxPxH)
Peso netto
CMX 22D / CMX 22D
230V~50Hz
1250W
8
00 W
2
2 L
mm
245
461 x 3
65x 290 mm
11.8 kg
SWW W
Page 37

IT
35
ISTRUZIONI IMPORTANTI PER LA SICUREZZA
AVVERTENZA
Per limitare il rischio di scosse elettriche, lesioni personali
o di un'esposizione a un'energia eccessiva del microonde,
attenersi alle seguenti precauzioni di base durante l'uso
del forno:
1. Avvertenza: non riscaldare liquidi e altri alimenti in
contenitori chiusi poiché potrebbero esplodere.
2. Avvertenza: la copertura che protegge dall'esposizione
all'energia prodotta dal forno a microonde deve essere
rimossa solo da persone competenti.
3. Avvertenza: non permettere ai bambini di usare il forno
senza la supervisione di un adulto se non sono state fornite
loro istruzioni adeguate in modo che sappiano come usarlo
in modo sicuro e siano consapevoli dei possibili rischi
risultanti da un uso improprio.
4. Avvertenza: in modalità Combi, l'uso del forno è
consentito ai bambini solo sotto la supervisione di un
adulto a causa delle temperature alte prodotte in questa
modalità (solo per i modelli muniti di grill).
5. Utilizzare solo utensili compatibili con i forni a
microonde.
6. Pulire regolarmente il forno e rimuovere tutti i depositi di
cibo.
7. Leggere e attenersi a quanto indicato nella sezione
"PRECAUZIONI PER EVITARE LA POSSIBILE
ESPOSIZIONE A UN'ECCESSIVA ENERGIA DEL
MICROONDE".
8. Durante il riscaldamento di alimenti contenuti in vaschette
in plastica o carta, controllare il forno perché è possibile
che i contenitori si incendino.
Page 38

IT
36
9. Se si nota la presenza di fumo, spegnere il forno o
scollegarlo dall'alimentazione elettrica e chiudere lo sportello
per impedire alle fiamme di propagarsi.
10. Non riscaldare eccessivamente gli alimenti.
11. Non utilizzare la cavità per conservare gli alimenti. Non
conservare alimenti come pane, biscotti, ecc., all'interno
del forno.
12. Rimuovere sempre i laccetti di chiusura e le impugnature
in metallo dai sacchetti in carta o plastica prima di inserirli nel
forno.
13. Installare e posizionare il forno solo in conformità a
quanto indicato nelle istruzioni di installazione.
14. Non riscaldare uova racchiuse nel guscio o bollite per
lunghi periodi di tempo nel microonde poiché potrebbero
esplodere anche dopo il termine della cottura.
15. Utilizzare il forno solo per l'uso previsto e in conformità
a quanto indicato in questo manuale. Non usare sostanze
chimiche o vapori che potrebbero corrodere il forno. Questo
forno è espressamente progettato per il riscaldamento di
alimenti. Non è indicato per essere usato per applicazioni
industriali o di laboratorio.
16. Se il cavo di alimentazione è danneggiato, deve essere
sostituito dal costruttore, da un rappresentante o da una
persona con analoga qualifica per evitare danni.
17. Non conservare o utilizzare il forno in ambienti aperti.
18. Non utilizzare il forno in presenza di acqua, in cantine
umide o vicino a piscine.
19. La temperatura delle superfici esterne potrebbe
raggiungere valori molti alti quando il forno è in uso.
Le superfici si riscaldano durante l'uso. Tenere il cavo di
alimentazione lontano dalle superfici calde e non coprire
nessuna delle aperture di ventilazione.
Page 39

IT
37
20. Non lasciare pendere il cavo di alimentazione dal bordo
di un tavolo o banco.
21. La mancata pulizia regolare del forno potrebbe
deteriorare le superfici, ridurre la vita utile del forno e
causare situazioni pericolose.
22. Per evitare possibili ustioni, mescolare e agitare il
contenuto di biberon e barattoli contenenti alimenti per
neonati.
23. Il riscaldamento di bibite con il forno a microonde
potrebbe provocare un'ebollizione ritardata. Manipolare il
contenitore con estrema cautela.
24. Questo apparecchio non deve essere utilizzata da
persone (bambini inclusi) con ridotte capacità fisiche,
sensoriali o mentali o senza esperienza e sufficiente
conoscenza del suo utilizzo, a meno che ciò avvenga sotto
la supervisione di una persona responsabile della loro
sicurezza o siano state date istruzioni relative al suo utilizzo.
25. Verificare sempre che i bambini non giochino con la
piastra.
26. Le unità non sono progettate per essere comandate
mediante l'utilizzo di un timer esterno o un telecomando
dedicato.
27. AVVERTENZA: per evitare possibili scosse elettriche,
verificare che l'unità sia spenta prima di sostituire la
lampadina.
28. Le parti accessibili potrebbe riscaldarsi durante l'uso.
Evitare che i bambini possano avvicinarsi. Non utilizzare
sistemi di pulizia a vapore.
29.Non utilizzare detergenti aggressivi o raschietti in metallo
appuntiti per pulire il vetro dello sportello perché potrebbero
graffiare le superfici e scheggiare il vetro.
30. Il forno si riscalda durante l'uso. Fare attenzione a non
toccare le resistenze all'interno del forno.
Page 40

IT
38
31. Utilizzare solo la sonda di temperatura consigliata per
questo forno (per i modelli muniti di sonda di rilevamento
della temperatura).
32. Posizionare la superficie posteriore contro il muro.
33.Questo apparecchio può essere utilizzato da bambini di
età superiore agli 8 anni, da persone con ridotte capacità
sensoriali o mentali o con poca esperienza che siano stati
istruiti in merito all’uso dell’apparecchio in sicurezza e che
siano consapevoli dei relativi rischi. I bambini non devono
giocare con l’apparecchio né eseguire operazioni di pulizia e
manutenzione senza la supervisione di un adulto.
34.Tenere l’apparecchio e il cavo fuori dalla portata di
bambini al di sotto degli 8 anni.
35.In caso di emissione di fumo, disattivare o scollegare
l’apparecchio e tenere la porta chiusa al fine di fermare
eventuali fiamme
36.L’apparecchio è destinato all’uso
domestico e trova le seguenti applicazioni:
–personale di cucina all’interno di negozi, uffici e altri
ambienti lavorativi;
– clienti di hotel, motel e altri ambienti abitativi;
– Agriturismi;
– bed and breakfast.
37.ATTENZIONE:l’apparecchio e le sue parti visibili si
surriscaldano durante l’uso. Evitare accuratamente di toccare
gli elementi incandescenti. Evitare l’uso da parte di bambini
al di sotto degli 8 anni se non sotto la supervisione continua
da parte di un adulto.
38.durante l’uso del forno a microonde lo sportello decorativo
deve restare aperto (per modelli con uno sportello decorativo.)
39.Non pulire con l’uso del vapore.
40.Non usare detergenti abrasivi acidi o spugnette abrasive
di metallo per pulire lo sportello di vetro del forno poiché
possono scheggiare la superficie e portare alla frantumazione
del vetro.
LEGGERE ATTENTAMENTE E CONSERVARE
Page 41

IT
39
Per ridurre il rischio di lesioni alle persone
Collegamento del forno a microonde a terra
PERICOLO
Pericolo di scariche elettriche
Il contatto con alcuni
componenti interni può
causare lesioni personali
gravi o la morte. Non
smontare l'unità.
AVVERTENZA
Rischio di scosse elettriche
Un uso improprio del
collegamento di terra può
causare scosse elettriche.
Collegare l'unità alla presa
elettrica solo dopo che è
stata installata e
correttamente collegata
a terra.
PULIZIA
Scollegare sempre l'unità
dall'alimentazione elettrica.
1. Pulire l'interno del forno a
microonde dopo l'uso con un
panno leggermente inumidito.
2. Pulire gli accessori
seguendo la normale
procedura e utilizzando
acqua e sapone.
3. Pulire a fondo il telaio
dello sportello e i componenti
vicini con un panno inumidito
se sporchi.
L'unità deve essere dotata
di messa a terra. In caso
di cortocircuito, la messa a
terra limita il rischio di
scosse elettriche poiché
fornisce un percorso per la
dissipazione della corrente
elettrica. Questo forno viene
fornito con un cavo dotato
di un filo e una spina di
messa a terra. Deve essere
collegato a una presa a
muro correttamente installata
e dotata di idonea messa a
terra. Rivolgersi a un
elettricista o a un tecnico
qualificato se le istruzioni
per la messa a terra non
sono chiare o se si sospetta
che l'unità non sia stata
correttamente collegata a
terra. Se si rende necessario
utilizzare un cavo di prolunga,
utilizzare solo con un cavo
con 3 fili.
Page 42

IT
40
1. Insieme all'unità viene fornito solo un cavo di alimentazione
corto per limitare al minimo il rischio di rimanere intrappolati o
di inciampare.
2. Nel caso si utilizzi un cavo di alimentazione
lungo o un cavo di prolunga:
1) Verificare che le caratteristiche elettriche del set di cavi o
del cavo di prolunga corrispondano o siano superiori a quelle
dell'unità.
2) Verificare che il cavo di prolunga sia un cavo di messa a terra
con 3 fili.
3) Disporre il cavo lungo in modo che non penda dal bancone o
dal tavolo e possa quindi essere tirato da bambini o sia
accidentalmente di intralcio.
Page 43

IT
41
UTENSILI
ATTENZIONE
Rischio di lesioni per il personale
Per limitare al minimo i rischi, verificare sempre che le
operazioni di manutenzione o riparazione, che comportano
la rimozione della copertura di protezione contro l'energia
a microonde, vengano effettuate solo da personale
qualificato.
Fare riferimento alle istruzioni al paragrafo “Materiali che possono essere utilizzati
nel forno a microonde o che devono essere evitati nel forno a microonde."
Potrebbero esserci utensili non metallici non idonei per utilizzo nel forno a
microonde. In caso di dubbio, è possibile provare l’utensile in questione seguendo
la seguente procedura.
Test degli utensili:
1. Riempire un contenitore idoneo per utilizzo nel forno a microonde con una tazza
di acqua fredda (250 ml) e con l’utensile in questione.
2. Cuocere alla massima temperature per 1 minuto.
3. Cautamente toccare l’utensile. Se l’utensile vuoto è caldo, non utilizzatelo per
cotture a microonde.
4. Non superare il tempo di cottura di 1 minuto.
Materiali che possono essere utilizzati nel forno a microonde
Solo per protezione. Piccoli pezzi lisci possono essere utilizzati
Pellicola di
alluminio
Contenitori in
terracotta
per coprire parti sottili di carne o pollame per prevenire una
cottura eccessiva. E’ possibile che si verifichi la formazione di
arco se la pellicola è troppo vicina alle pareti del forno. La
pellicola dovrebbe essere posizionata ad una distanza minima
di 1 pollice (2,5 cm) dalle pareti del forno.
Seguire le istruzioni del produttore. Il fondo di un contenitore in
terracotta deve essere posizionato almeno 3/16 di pollice
(5mm) sopra il piatto rotante. Un utilizzo non corretto potrebbe
causare la rottura del piatto rotante.
Piatti da tavola
Vasi in vetro
Prodotti in vetro
Borse per
cottura in forno
Tazze e piatti di
carta
Solo quelli idonei per utilizzo in forni a microonde. Seguire le
istruzioni del produttore. Non utilizzare piatti rotti o sbeccati.
Rimuovere sempre il coperchio. Utilizzare solo per scaldare il
cibo solo sino a quando sarà caldo. Molti vasi in vetro non sono
resistenti al calore e potrebbero rompersi.
Utilizzare solo prodotti in vetro resistenti al calore e idonei per
utilizzo in forno, Assicuratevi che non vi siano bordi in metallo.
Non utilizzare piatti rotti o sbeccati.
Seguire le istruzioni del produttore. Non chiudere con chiusure
metalliche. Praticare dei tagli per consentire la fuoriuscita di
vapore.
Utilizzare per brevi periodi unicamente per cuocere/scaldare.
Non lasciare il forno incustodito durante la cottura.
Page 44

IT
42
Tovaglioli di
carta
Carta uso
pergamena
Plastica
Pellicola in
plastica
Termometri
Carta oleata
Materiali da evitare nei forni a microonde
Vassoi in alluminio
Contenitori per alimenti in
cartone con maniglie in
metallo
Utilizzare per coprire il cibo durante il riscaldamento per
assorbire eventuale grasso. Utilizzare, controllando, solo per
cotture brevi.
Utilizzare come copertura per prevenire schizzi o come
copertura per il vapore.
Solo quella idonea per utilizzo in forni a microonde. Seguire le
istruzioni del produttore. Dovrebbe essere marcata “Idonea per
microonde”. Alcuni contenitori in plastica si ammorbidiscono
quando il cibo in essi contenuto si scalda. Sacchetti per la
cottura e borse in plastica chiuse ermeticamente dovrebbero
essere tagliate o forate come indicato sull’imballo stesso.
Solo quella idonea a utilizzo in forni a microonde. Utilizzare per
coprire il cibo durante la cottura per mantenere l’umidità.
Assicurarsi che la pellicola in plastica non entri in contatto con il
cibo.
Solo quelli idonei per utilizzo con forni a microonde (termometri
per carne e per dolci).
Utilizzare per coprire il cibo per prevenire schizzi e mantenere
l’umidità.
Può causare la formazione di arco. Trasferire il cibo in
piatti idonei per utilizzo in forni a microonde.
Può causare la formazione di arco. Trasferire il cibo in
piatti idonei per utilizzo in forni a microonde.
Utensili in metallo o Il metallo protegge il cibo dall’energia a microonde. Il
Chiusure in metallo
Sacchetti di carta Potrebbe causare un incendio all’interno del forno.
Contenitori in polistirene
o poliuretano
Legno
metallo può causare la formazione di arco.
Può causare la formazione di arco e potrebbe causare
un incendio all’interno del forno.
I contenitori potrebbero sciogliersi o contaminare il
liquido interno quando esposti ad alte temperature.
Il legno si asciuga quando utilizzato in forni a
microonde e potrebbe dividersi o rompersi.
Page 45

IT
43
INSTALLARE IL VOSTRO FORNO
Nomi dei componenti e degli accessori del forno
Estrarre il forno e tutti i materiali dall’imballo e dalla cavità del forno.
Il forno è fornito con i seguenti accessori:
1 Piatto girevole in vetro
1 Insieme anello rotante
1 Manuale di istruzioni
A) Pannello di controllo
B) Albero del piatto rotante
C) Anello di supporto
D) Piatto in vetro
E) Finestra di osservazione
F) Porta
G) Sistema di bloccaggio di sicurezza
Installazione del piatto rotante
F
E
C
D
G
A
B
Mozzo (parte inferiore)
Piatto in vetro
Albero del piatto rotante
Anello di supporto
a. Non posizionate mai il piatto in vetro al contrario. Il piatto in vetro non dovrebbe
mai essere vincolato.
b. Sia il piatto in vetro, sia l’anello di supporto devono sempre essere utilizzati
durante la cottura.
c. Il cibo e i contenitori devono sempre essere posizionati sul piatto in vetro per la
cottura.
d. Se il piatto in vetro o l’insieme anello piatto rotante dovessero incrinarsi o
rompersi, contattate il centro di assistenza più vicino.
Page 46

IT
44
Installazione del piano di lavoro
Rimuovere tutto il materiale di imballo e gli accessori. Esaminare il forno per
verificare che non vi siano danni quali ammaccature o danni alla porta. Non
installare il forno se danneggiato.
Parte interna: Rimuovere tutte le pellicole protettive presenti sulle superfici della
parte interna del forno a microonde.
Non rimuovere il sottile rivestimento marrone chiaro attaccato alla cavità del
forno per proteggere il magnetron.
Installazione
1. Selezionare una superficie piana che fornisca uno spazio
sufficiente per l’aerazione in ingresso o in uscita.
30cm
0cm
20cm
min85cm
20cm
Uno spazio minimo di pollici (20cm) è richiesto tra il forno
7.9
e qualsiasi parete adiacente.
(1) Lasciare uno spazio minimo di 12 pollici (30cm) sopra il forno.
(2) Non rimuovere i piedini dalla parte inferiore del forno.
(3) Il bloccaggio delle aperture in ingresso e/o in uscita
potrebbe danneggiare il forno.
(4) Posizionare il forno il più lontano possibile da radio o
televisione. Il funzionamento del forno a microonde può
causare interferenze nella ricezione di radio o televisione.
2. Collegare il forno a una presa domestica standard.
Assicurarsi che il voltaggio e la frequenza sia uguale al
voltaggio e alla frequenza indicati nella targhetta dei valori
nominali.
ATTENZIONE: Non installare il forno su una cucina o altri
elettrodomestici che producano calore. Se installato in
prossimità o sopra una fonte di calore, il forno potrebbe
danneggiarsi e la garanzia non sarebbe più valida.
La superficie accessibile potrebbe essere calda nel corso
del funzionamento.
Page 47

IT
45
ISTRUZIONI DI FUNZIONAMENTO
Questo forno a microonde utilizza controlli elettronici moderni per regolare i
parametri di cottura così da soddisfare il più possibile le vostre esigenze.
1. Impostazione dell’orario
Quando il forno a microonde viene collegato alla presa di corrente, il forno
visualizzerà "0:00", un segnale acustico emetterà un suono.
1) Premere " " , le cifre dell’ora lampeggeranno.
2) Ruotare " " per regolare le ore; la cifra inserita per le ore dovrebbe essere
compresa tra 0--23.
3) Premere " ",le cifre dei minuti lampeggeranno.
4) Ruotare " " per regolare I minuti, la cifra inserita per I
minuti dovrebbe essere
5) Premere " " per completare l’impostazione dell’ora
. ":" lampeggerà.
Nota: 1) se l’orologio non viene impostato, questo non funzionerà quando collegato
elettricamente.
2) Nel corso dell’impostazione dell’orologio, se premete " " o se non
effettuate nessuna operazione nel corso di un minuto, il forno uscirà dalla funzione
di impostazione.
2. Cottura a microonde
Premere " "una volta, ruotare " " per selezionare la funzione desiderata.
Premere " "
Premere " " per iniziare la
Esempio: se volete utilizzare una potenza dell’ 80% per cuocere per 20 minuti,
dovrete far funzionare il forno seguendo i passi seguenti:
1)Premere " " una volta, il LED visualizzerà "P100",
l’indicatore " " sarà acceso
2) Ruotare " " ancora una volta per scegliere una
il LED visualizzerà "P80".
compresa tra 0--59.
Ruotare " " per regolare il tempo di cottura.
cottura.
Premere " "
.
potenza
dell’80%,
3) Ruotare " " per regolare il tempo di cottura sino a quando il display
visualizzerà
4) Premere " " per iniziare la cottura, ":" si accenderà e l’indicatore
" "lampeggerà (un segnale acustico emetterà cinque suoni al termine della
cottura).
NOTA: I livelli per la regolazione del tempo di programmazione sono i seguenti:
"20:00"
(Il tempo di cottura massimo è 95 minuti.)
0---1 min : 5 secondi
1---5 min : 10 secondi
5---10 min : 30 secondi
10---30 min : 1 minuto
30---95 min : 5 minuti
Page 48

IT
46
Tabella delle potenze del forno a microonde
Potenza del
microonde
3. Avvio rapido ed estens
1).Quando il forno è in condi
iziare la
aumenterà di 30 secondi ogni volta che verrà premuto il tasto " "; il tempo
massimo di impostazione è di 95 minuti.
cottura alla massima potenza microonde per 30 secondi. Il tempo di cottura
80% 50% 30% 10%100%
ione del tempo di cottura
zioni di attesa, premere il tasto
"
" per in
Nota: La durata può essere aumentata premendo il tasto “ ” tranne per la
programmazione di menu automatico e dello scongelamento a peso
2) In stato di attesa, girare “ ” a sinistra per selezionare la durata di cottura
direttamente premendo il tasto “ ” per cuocere al 100% della potenza del
microonde.
Questo programma deve essere impostato come il primo di più fasi.
4. Scongelamento in base al tempo
1) Premere il tasto " " una volta, il LED visualizzerà "dEF1".
2) Ruotare " " per selezionare il tempo di cottura. Contemporaneamente, " "
e "
" saranno accesi. Il tempo di impostazione va da 00:05 a 95:00
livello di
3) Premere il tasto " " per iniziare lo scongelamento. Gli indicatori
" " e " " lampeggeranno.
5. Scongelamento in base al peso
1) Premere " " due volta; il LED visualizzerà "dEF2".
potenza
impostato è P30. Non è regolabile.
. Il
2) Ruotare " " per selezionare il peso del cibo da scongelare.
Contemporaneamente, "g" sarà acceso. Il peso dovrà essere compreso
tra 100 e
3) Premere il tasto " " per iniziare lo scongelamento. Gli indicatori
" " e " " lampeggeranno e l’indicatore "g" si spegnerà.
6. Menù Automatici di Cottura
1) In condizioni di attesa ,premere
richiesto .
2) Premere “ ”per confermare il menu principale selezionato
3) Gira “ ”per selezionare il menù da b-1 a b-4.
4) Premere
acustico emetterà cinque suoni. Se l’orologio è stato impostato in precedenza, verrà
visualizzato il tempo corrente; in caso contrario, verrà visualizzato 0:00.
2000 gr.
o ruotare a destra per scegliere il menu
saranno visualizzati in questo ordine .
.
" " per iniziare la cottura. Al termine della cottura, segnale
Page 49

IT
47
Per esempio :cuocere la pasta
1) Premere sette volte " ", verrà visualizzato "A-07" e il menu per la pasta
sarà selezionato. Gli indicatori " " e " " saranno accesi.
2) Premere “ ”per confermare il menu principale selezionato.
3) Smettere di girare quando viene visualizzato “b-4”
4) Premere “ ”per iniziare a cucinare.
Al termine della cottura, un segnale acustico emetterà cinque suoni. Quindi,
riportare la manopola allo stato di attesa.
7.
Cotture in sequenza
E’ possibile impostare al massimo due programmi di cottura in sequenza. Se un
programma è lo scongelamento, questo passerà automaticamente al primo posto.
Un segnale acustico verrà emesso dopo ogni programma e quindi avrà inizio il
programma successivo.
Nota: Il menu Auto non può essere impostato come uno dei menu in sequenza
Esempio: se volete scongelare 500 gr di cibo e cuocerlo con una potenza
microonde dell’80% per 5 minuti.
I passi da seguire sono i seguenti:
1) Premere " " verrà visualizzato "dEF2";
2) Ruotare " " per regolare il peso del cibo. Smettere di ruotare
quando verrà
3)Preme
l’indicatore " " sarà acceso
4) Ruotare "
il LED visualizzerà "P80".
5) Ruotare " " per regolare il tempo di cottura di 5 minuti
visualizzato "500";
re " " una volta, il LED visualizzerà "P100",
" ancora una volta per scegliere una
due volte,
Premere " "
.
potenza
dell’80%,
6) Premere
Nota: al termine del primo programma, il
qui
emetterà cinque suoni e l’unità tornerà allo stato di attesa.
" " per iniziare la cottura.
ndi avr
à inizio il secondo programma. Al termine di tutti i programmi, il
prodotto emetterà un s
egnale acustico e
prodotto
Page 50

IT
48
8. Cotture con partenza differita
tare l’or
1) Prima impos
dell’orologio.)
2) Impostare il programma di cottura. È possibile impostare al massimo due
programmi. Lo scongelamento non può essere impostato con questa funzione
3) Premere " ". L’orologio viene visualizzato. La cifra relativa alle ore
lampeggia.;
4) Ruotare " " per regolare l’ora; la cifra inserita per le ore dovrebbe essere
compresa tra 0--23.
5) Premere " ",le cifre dei minuti lampeggeranno.
ologio. (Consultare le istruzioni relative all’impostazione
6) Ruotare " " per regolare I minuti, la cifra inserita per I
minuti dovrebbe essere
compresa tra 0--59.
7) Premere " " per terminare l’impostazione. " :" sarà acceso, il segnale
acustico emetterà due suoni all’ora impostata e quindi la cottura avrà inizio
automaticamente.
Nota: 1) L’orologio deve essere impostato prima di iniziare l’operazione. In
caso contrario, la funzione di partenza differita non funzionerà.
2) se il programma di partenza differita è stato impostato senza definire il
programma di cottura, l’inte
gnifica
si
9. FUNZIONE ECO
In caso di attesa, premere “ECO” oppure non fare alcuna operazione per 1 minuto e lo schermo
si spegnerà.
A questo punto, premere un tasto qualsiasi per accendere lo schermo.
Nota:
1) Il forno non può entrare in modalità ECO se la porta è aperta.
2) Premere un tasto qualsiasi o aprire la porta per accendere lo schermo che è rimasto in
modalità ECO.
3) Se entra in modalità ECO con il blocco “sicurezza bambino”, rimane attivo il blocco “sicurezza
bambino”.
che all’ora impostata, il segnale acustico emetterà solo cinque suon
ra impostazione varrà come sveglia. Ciò
i.
10. Funzione di verifica impostazioni
(1) Durante la cottura, premere " "; la potenza microonde
corrente verrà visualizzata per 3 secondi.
(2) Nella fase di partenza differita, premere "
l’orario prescelto per la cottura differita. Il te
per 3
secondi, quindi il forno tornerà alla visualizzazione dell’ora.
(3) Durante la cottura, premere "
" per controllare l’ora corrente. Sarà
" per visualizzare
mpo di inizio cottura lampeggerà
visualizzata per 3 secondi.
Page 51

IT
49
1 1 .Attivazione modalità silenziosa:
Con il microonde in stand by, premere “ ” e “ ” simultaneamente per
3 secondi. Nessun tasto suonerà durante la modalità silenziosa.
Riattivazione del suono: con il microonde in stand by, premere “ ” e poi
“ ” simultaneamente per 3 secondi, il suono verrà così ripristinato.
12. Funzione di blocco per bambini
Blocco: nella condizione di riposo, premere " " per 3 secondi, si udirà
un lungo suono a conferma dell’avvenuta impostazione del blocco bambini; il LED
visualizzerà "
Uscita dalla funzione di blocco: nello stato di blocco, premere " " per 3
secondi; si udirà un lungo suono a conferma dell’avvenuto sblocco; il LED tornerà
all’orologio e " si spegnerà.
13. Protezione della ventola
Dopo una cottura a microonde o combinata di oltre 5 minuti, il forno si arresterà
negli ultimi 15 secondi e funzionerà solo la ventola.
14. Funzione protettiva del Magnetron
Se l’unità funziona per 30 minuti al massimo livello di potenza, il forno si imposterà
automaticamente all’80% della potenza microonde per proteggere il magnetron.
15. Funzione di spegnimento automatico
Se la porta rimane aperta per 10 minuti, la luce del forno si spegnerà. Premere
qualsiasi tasto dopo l’apertura della porta per riattivare il conto alla rovescia. La luce
del forno si accenderà.
" e " " sarà acceso
15. Specifiche
(1) Il segnale acustico emetterà un suono quando la manopola viene ruotata
all’inizio del procedimento;
(2) In caso di apertura della porta nel corso della cottura, si dovrà premere il tasto
" " per continuare;
(3) una volta impostato il programma di cottura, il tasto " " deve essere
premuto entro 1 minuto; in caso contrario, verrà visualizzata l’ora corrente e
l’impostazione verrà cancellata..
(4) Il segnale acustico emetterà un suono in caso di pressione corretta; in caso
contrario, non vi sarà alcun suono.
Page 52

50
Tabella Menù Automatici di Cottura
b-3 Zuppa (Riscaldate zuppa di
verdure )
50(aggiungere 500ml di
acqua )
A-01
A-08 TORTA
A-07
A-06 BEVANDE
CALDE
A-05 VERDURE
A-04 PESCE
A-03 CARNE
A-02 PATATE
Menu
Farinacei
Pasta/Riso
A-09 LIGHT
A-10 BABY
IT
Display
b-1 Riscaldare Pizza 200 P100
b-2 Riscaldare Pane 200 P100
b-3 Torta salata 400 P80+P0+P80
b-4 500 P30
Impasto Pizza
b-1 400 P100
Patate al vapore
b-2 Crocchette di patate
b-3
Patate al forno
b-4 Patatine fritte 200 P100
b-1 pollo 800 P100
b-2 Tacchino 800 P100
b-3 Maiale 450 P100
b-4 Carne rossa 800
b-1 Cozze 200 P80
b-2 Salmone 350 P80
b-3 Filetto di tonno 350 P80
b-4 Spigola 350 P80
b-1 Broccoli 400 P100
b-2 Spinaci 400 P100
b-3 Carote 400 P100
Finocchio
b-4 200-400 P80+P0
b-1Latte (1 tazzina/240ml) 1 tazzina P100
b-2 Caffe(1 tazzina/120ml) 1 tazzina P100
b-3 Te 1 tazzina P100
b-4 Ciccolata calda P70
b-1 Pasta ripiena (es. Ravioli) 450 P80
b-2 Riso 1 tazzina P100+P50
b-4 Pasta
b-1 Biscotti 200 P80+P0+P80
b-2 Torta 1 tazzina P80
b-3 Marmellata 400 P100+P0
b-4 Muffins 400 P100
b-1 Cibi disdratati 100 P80+P0
b-2 Yogurt fatto in casa 1 litro P30
b-3 Pasta integrate
b-4 Legumi 500 P100
b-1 Omogenizzati
b-2 Brodo
b-3
Sterilizzazione
(es.ciuccio,biberon)
b-4 Latte in polvere
Peso(gr)
250
1
200
250 P100
150 (aggiungere 500ml di
acqua)
150
200
1 recipiente
100 ml
Potenze
P80+P0
P80+P0
P100
P80
P100
P80+P0
P100+P0
P100
P30
Page 53

Ricerca dei problemi
Interferenza del forno a
microonde con la ricezione
televisiva
Luce affievolita
Si accumula del vapore
sulla porta, esce aria calda
dalle aperture di sfiato
Il forno viene acceso
accidentalmente senza che
vi sia del cibo all’interno
dello stesso
IT51IT
NORMALE
E’ possibile che vi siano interferenze con la
ricezione di radio o televisione nel corso del
funzionamento del forno a microonde. Si tratta di un
fenomeno simile a quello possibile con altri piccoli
elettrodomestici, quali miscelatori, aspirapolvere,
ventilatori elettrici. Si tratta di una condizione
normale.
Nel corso di cotture a microonde a bassa pressione,
la luce del forno può affievolirsi. Si tratta di una
condizione normale.
Nel corso della cottura, è possibile che del vapore
fuoriesca dal cibo. Buona parte di questo vapore
viene espulso dalle aperture di sfiato. Ma parte del
vapore potrebbe accumularsi sulle superfici fredde,
quali per esempio la porta del forno. Si tratta di una
condizione normale.
Il funzionamento per periodi limitati del forno senza
che al proprio interno vi sia del cibo non crea alcun
danno al forno stesso. Questa condizione, però,
dovrebbe essere evitata.
Problema Possibile causa Rimedio
Il forno non si
accende
Il forno non scalda
Il piatto di vetro è
rumoroso durante il
funzionamento del
forno
Il cavo di alimentazione
non è inserito
correttamente nella presa
di corrente
Il fusibile salta o entra in
funzione l’interruttore
automatico
Problemi con l’uscita
La porta non è chiusa
correttamente
Rulli sporchi e residui sul
fondo del forno
Staccare la spina dalla presa,
quindi ricollegare dopo 10
secondi
Sostituire il fusibile o
ripristinare l’interruttore
automatico (riparato da
personale qualificato della
nostra società)
Verificare l’uscita con un altro
elettrodomestico
Chiudere bene la porta
Fare riferimento al paragrafo
“manutenzione del microonde”
per pulire le parti sporche.
Page 54

Questa apparecchiatura è marchiata secondo la Direttiva Europea
52
2012/19/EU
elettroniche (Waste Electrical and Electronic Equipment, WEEE).
Facendo in modo che questo prodotto venga smaltito
correttamente aiuterete a prevenire potenziali conseguenze
negative per l’ambiente e la salute dell’uomo, che potrebbero
essere causate da uno smaltimento non corretto. Il simbolo su
questo prodotto indica che esso non deve essere trattato come rifiuto domestico.
L’elettrodomestico deve essere consegnato al punto di raccolta predisposto per il
riciclo delle apparecchiature elettriche ed elettroniche. Lo smaltimento deve
avvenire secondo le norme locali vigenti sullo smaltimento dei rifiuti. Per maggiori
informazioni sul trattamento, il ritiro e il riciclo di questo prodotto consultare le
autorità comunali, il servizio per la raccolta dei rifiuti o il negozio in cui il prodotto è
stato acquistato.
per lo smaltimento delle apparecchiature elettriche ed
Page 55

IT
53
SERVIZIO ASSISTENZA CLIENTI
CERTIFICATO DI GARANZIA CONVENZIONALE: cosa fare?
Il Suo prodotto è garantito, alle condizioni e nei termini riportati
sul certificato inserito nel prodotto ed in base alle previsioni del
decreto legislativo 24/02, nonché del decreto legislativo 6 settembre
2005, n. 206, per un periodo di 24 mesi decorrenti dalla data di
consegna del bene.
Così come riportato nei testi dei Decreti Legislativi citati, il certificato
di garanzia dovrà essere da Lei conservato, debitamente compilato,
per essere mostrato al Servizio Assistenza Tecnica Autorizzato,
in caso di necessità, unitamente ad un documento fiscalmente
valido rilasciato dal rivenditore al momento dell’acquisto (bolla di
consegna, fattura, scontrino fiscale, altro) sul quale siano indicati
il nominativo del rivenditore, la data di consegna, gli estremi
identificativi del prodotto ed il prezzo di cessione
Resta pure inteso che, salvo prova contraria, poiché si presume
che i difetti di conformità che si manifestano entro sei mesi dalla
consegna del bene esistessero già a tale data, a meno che tale
ipotesi sia incompatibile con la natura del bene o con la natura
del difetto di conformità, il Servizio di Assistenza Tecnica Autorizzato
Gias, verificato il diritto all’intervento, lo effettuerà senza addebitare
il diritto fisso di intervento a domicilio, la manodopera ed i ricambi.
Per contro, nel successivo periodo di diciotto mesi di vigenza della
garanzia, sarà invece onere del consumatore che intenda fruire
dei rimedi accordati dalla garanzia stessa provare l’esistenza del
difetto di conformità del bene sin dal momento della consegna;
nel caso in cui il consumatore non fosse in grado di fornire detta
prova, non potranno essere applicate le condizioni di garanzia
previste e pertanto il Servizio di Assistenza Tecnica Autorizzato
Gias effettuerà l’intervento addebitando al consumatore tutti i costi
relativi.
ESTENSIONE DELLA GARANZIA FINO A 5 ANNI : come?
Le ricordiamo inoltre che sullo stesso certificato di garanzia
convenzionale Lei troverà le informazioni ed i documenti necessari
per prolungare la garanzia dell’apparecchio sino a 5 anni e così,
in caso di guasto, non pagare il diritto fisso di intervento a domicilio,
la manodopera ed i ricambi.
Per qualsiasi informazione necessitasse, La preghiamo rivolgersi
al numero telefonico del Servizio Clienti 199121314.
ANOMALIE E MALFUNZIONAMENTI: a chi rivolgersi ?
Per qualsiasi necessità il centro assistenza autorizzato è a Sua
completa disposizione per fornirLe i chiarimenti necessari;
comunque qualora il Suo prodotto presenti anomalie o mal
funzionamenti, prima di rivolgersi al Servizio Assistenza Autorizzato,
consigliamo vivamente di effettuare i controlli indicati sopra.
UN SOLO NUMERO TELEFONICO PER OTTENERE ASSISTENZA.
Qualora il problema dovesse persistere, componendo il “Numero
Utile” sotto indicato, sarà messo in contatto direttamente con il
dell’operatore telefonico utilizzato. Dettagli sono presenti sul sito
internet www.candy.it
MATRICOLA DEL PRODOTTO. Dove si trova?
E’ indispensabile che comunichi al Servizio Assistenza Tecnica
Autorizzato la sigla del prodotto ed il numero di matricola (16
caratteri che iniziano con la cifra 3) che troverà sul certificato di
garanzia.
In questo modo Lei potrà contribuire ad evitare trasferte
inutili del tecnico, risparmiando oltretutto i relativi costi.
Servizio Assistenza Tecnica Autorizzato
che opera nella Sua zona di residenza.
Attenzione, la chiamata è a pagamento;
il costo verrà comunicato, tramite
messaggio vocale, dal Servizio clienti
Page 56

IT
54
Guida alla Cottura
MICROONDE
L’acqua, i grassi e i carboidrati che costituiscono il cibo assorbono l'energia
delle microonde in un processo che induce le molecole a vibrare rapidamente.
Questo rapido movimento, creando attrito e frizione, genera il calore che cucina
gli alimenti.
COTTURA
Stoviglie per cuocere nel microonde:
Le stoviglie devono permettere all’energia delle microonde di attraversarle per
avere la massima efficacia.
Le microonde possono penetrare attraverso la ceramica, il vetro, la porcellana e
la plastica, come anche la carta ed il legno. Al contrario, vengono riflesse da
metallo, acciaio inossidabile, alluminio e rame, per cui gli alimenti non vanno
mai cotti in contenitori di questo genere.
Alimenti adatti ad essere cotti nel microonde:
Molti tipi di alimenti sono adatti ad essere cotti nel microonde, come verdura
fresca o congelata, frutta, pasta, riso, cereali, fagioli, pesce, e carne, nonché
sughi, creme, minestre, budini, marmellate e salse.
In generale si può dire che la cottura con il microonde è ideale per
qualsiasi alimento che si prepara su un normale piano di cottura.
Copertura durante la cottura
E’ molto importante coprire gli alimenti durante la cottura perché l’acqua diventa
vapore e contribuisce al processo di cottura. Gli alimenti possono essere coperti
in vari modi: ad esempio con un piatto di ceramica, con una copertura di plastica
o con una pellicola aderente adatta al microonde.
TempidiRiposo
E’ importante attendere un po’ quando avete terminato la cottura degli alimenti in
modo da permettere alla loro temperatura di equilibrarsi.
Page 57

IT
55
Guida alla Cottura
Guida alla Cottura della verdura congelata
Usate una pirofila di vetro a forma di scodella con coperchio che sia adatta.
Cucinate gli alimenti coperti per il tempo minimo, facendo riferimento alla tabella
sottostante. Continuate la cottura fino a quando otterrete il risultato desiderato.
Mescolate gli alimenti due volte durante la cottura e una volta a fine cottura.
Aggiungete sale, erbe aromatiche o burro dopo la cottura. Coprite durante il
tempo di riposo.
Alimenti Porzioni Potenza
Spinaci 150g P80
Broccoli 300g P80 8-9 2-3
Piselli 300g P80
Fagiolini
Verdi
Verdura
Mista
(carote/
piselli/
cereali)
Verdura
Mista (alla
cinese)
300g P80 7½-8½ 2-3
300g P80
300g P80 7½-8½ 2-3
Tempo
(min.)
Tempo di
Riposo
(min.)
5-6 2-3
7-8 2-3
7-8 2-3
Istruzioni
Aggiungete 15 ml (1
cucchiaio da tavola) di
acqua fredda.
Aggiungete 30 ml (2
cucchiai da tavola.) di
acqua fredda.
Aggiungete 15 ml (1
cucchiaio da tavola) di
acqua fredda.
AAggiungete 30 ml (2
cucchiai da tavola.) di
acqua fredda.
Aggiungete 15 ml (1
cucchiaio da tavola) di
acqua fredda.
Aggiungete 15 ml (1
cucchiaio da tavola) di
acqua fredda.
Page 58

IT
56
Guida alla Cottura (continua)
Guida alla Cottura di verdura fresca
Usate una pirofila di vetro a forma di scodella con coperchio che sia adatta.
Aggiungete 30-45 ml di acqua fredda (2-3 cucchiai da tavola) per ogni 250 g, se
non è consigliata un’altra quantità di acqua: fate riferimento alla tabella. Cuocete
la verdura, coperta per il tempo minimo consigliato. Continuate a cucinare fino
ad ottenere il risultato che desiderate. Mescolate una volta durante la cottura
e una volta do po la cottura. Aggiungete sale, erbe aromatiche o burro dopo la
cottura. Coprite durante il tempo di riposo di tre minuti.
Consiglio: tagliate la verdura fresca in pezzi uniformi. Più piccoli sono, più
Tutte le verdure fresche vanno cotte con il forno a piena potenza
Alimenti Porzioni
Broccoli
Cavolini di
Bruxelles
Carote 250g 3½-4 3
Cavolfiore
Zucchine 250g 3-3½ 3
Melanzane 250g 2½-3 3
Porri 250g 3-3½ 3 Tagliate i porri a fettine sottili.
Funghi
Cipolle 250g 4-4½ 3
velocemente si cucinano.
Tempo
250g
500g
250g 5-5½ 3
250g
500g
6½-7½
125g
250g
Tempo di
Riposo
(min.)
(min.)
3½-4
6-7 Sistemate i gambi nel centro.
4-4½
1-1½
2-2½
Istruzioni
Preparate parti uniformi.
3
Aggiungete 60-75 ml (5-6 cucchiai
da tavola) di acqua.
Tagliate le carote a fettine
uniformi.
Preparate parti uniformi.
Se ci sono parti grandi, tagliatele a
3
metà. Sistemate i gambi nel
centro.
Tagliate le zucchine a fette.
Aggiungete 30 ml (2 cucchiai da
tavola) di acqua o una noce di
burro. Cucinate fino a quando
diventano tenere.
Tagliate le melanzane a fettine e
cospargetele con un cucchiaio da
tavola di succo di limone.
Preparate i funghi interi se sono
piccoli o a fettine.
Non aggiungete acqua.
3
Cospargeteli di succo di limone.
Aromatizzateli con sale e pepe.
Scolateli prima di servire.
Tagliate le cipolle a fettine o a
metà. Aggiungete solo 15 ml (1
cucchiaio da tavola) di acqua.
(P100).
Page 59

IT
57
Guida alla Cottura (continua)
3-4
6-7
Tempo di
Riposo
(min.)
3
Istruzioni
Pesate le patate sbucciate e
tagliatele a metà o quartini
uniformi.
Alimenti Porzioni
Peperone 250g 3½-4 3 Tagliate il peperone a fettine.
Patate
Cavolo rapa 250g 4½-5 3 Il cavolo rapa va tagliato a cubetti.
Tempo
(min.)
250g
500g
Guida alla Cottura per riso e pasta
Riso : Usate una pirofila di vetro, capiente, a forma di scodella, con
Pasta : Usate una pirofila di vetro capiente a forma di scodella. Aggiungete
Alimenti Porzioni Potenza
Riso
(parboiled)
Risone
(parboiled)
Riso Misto
(riso
coltivato e
non)
Cereali Misti
(riso +
frumento)
Pasta 250g P100
coperchio. Il riso raddoppia il suo volume durante la cottura. Va
cucinato coperto.
Una volta terminato il tempo di cottura, mescolate prima del tempo
di riposo, salate o aggiungete erbe aromatiche e burro.
Nota: il riso potrebbe non aver assorbito tutta l’acqua una volta
terminato il tempo di cottura.
acqua bollente, un pizzico di sale e mescolate bene. Va cucinata
scoperta. Mescolate di tanto in tanto durante e dopo la cottura.
Coprite durante il tempo di riposo, poi scolatela bene.
18½
Tempo di
Riposo
(min.)
5
5
Istruzioni
Aggiungete 500 ml di
acqua fredda.
Aggiungete 500 ml di
acqua fredda.
Aggiungete 500 ml di
acqua fredda.
Aggiungete 400 ml di
acqua fredda.
Aggiungete 1000 ml di
acqua calda
Tempo
(min.)
250g
375g
250g
375g
250g P100
250g P100 17-18 5
P100
P100
15-16
17½-
20-21
22-23
16-17 5
10-11 5
Page 60

IT
58
Guida alla Cottura (continua)
RISCALDARE ALIMENTI
Il vostro forno a microonde riscalderà gli alimenti in meno tempo rispetto a quanto
impiegano i normali piani di cottura.
Usate i livelli di potenza e i tempi di riscaldamento indicati nello schema seguente
che va considerato come una guida.
I tempi dello schema considerano i liquidi ad una temperatura ambiente di circa
+18 / +20°C o alimenti freddi ad una temperatura di circa +5 / +7°C.
Sistemate gli alimenti e copriteli.
Evitate di riscaldare pezzi grandi come tagli di carne, poiché tendono a cuocere
troppo e a seccarsi prima che il centro sia caldo bollente. Riscaldare piccoli pezzi
darà migliori risultati.
Livelli di potenza e mescolatura
Alcuni alimenti possono essere riscaldati usando la massima potenza, mentre
altri devono essere riscaldati a potenze inferiori.
Controllate le tabelle a titolo indicativo. Generalmente è meglio riscaldare gli
alimenti usando poca potenza, se gli alimenti sono delicati, in grande quantità o
se si riscaldano rapidamente (pasticci di carne tritata, ad esempio).
Mescolate bene o capovolgete gli alimenti quando li riscaldate per ottenere i
migliori risultati. Se possibile, mescolate ancora prima di servire.
Fate particolare attenzione quando riscaldate liquidi e alimenti per bambini. Per
eventuali scottature e che i liquidi trabocchino bollendo, mescolate
evitare
prima, durante e dopo che li avete riscaldati. Teneteli nel microonde per il tempo
di riposo. Vi consigliamo di mettere un cucchiaio di plastica o una barretta di vetro
nei liquidi
E’ preferibile sottovalutare il tempo di cottura e aggiungere altro tempo al
riscaldamento se necessario.
Tempi di riscaldamento e di riposo
Quando riscaldate gli alimenti per la prima volta, è utile prendere nota dei
tempi utilizzati per un riferimento futuro.
Assicuratevi sempre che il cibo riscaldato sia completamente caldo bollente.
Fate riposare gli alimenti per un tempo breve dopo averli riscaldati per permettere
alla temperatura di equilibrarsi. Il tempo di riposo suggerito dopo il riscaldamento
è di 2-4 minuti, se nello schema non è consigliato un tempo diverso.
Fate particolare attenzione quando riscaldate liquidi e alimenti per bambini. Fate
riferimento anche al capitolo delle misure di sicurezza.
; eviterete così di surriscaldare (e quindi rovinare) gli alimenti.
Page 61

IT
59
Guida alla Cottura (continua)
RISCALDARE LIQUIDI
Fate sempre riposare i liquidi per almeno 20 secondi dopo che il forno è stato
spento per permettere alla temperatura di equilibrarsi. Mescolate SEMPRE
dopo averli riscaldati.
Per evitare che i liquidi trabocchino, causando eventuali scottature, mettete un
cucchiaio o una barretta di vetro nelle bevande e mescolate prima, durante e
dopo averli riscaldati.
RISCALDARE ALIMENTI PER BAMBINI
ALIMENTI PER BAMBINI:
Metteteli in un piatto fondo di ceramica, coprendolo con un coperchio di plastica.
Mescolate bene dopo averli riscaldati! Lasciateli riposare per 2-3 minuti prima di
servire. Mescolate nuovamente e controllate la temperatura. Temperatura
consigliata per servire: tra 30-40°C.
LATTE PER BAMBINI:
Versate il latte in un biberon di vetro sterilizzato. Va riscaldato scoperto. Non
riscaldate mai un biberon con la tettarella perché la bottiglia potrebbe esplodere
se surriscaldata.
Agitate bene prima del tempo di riposo e di nuovo prima di servire! Controllate
sempre attentamente la temperatura del latte o degli alimenti per bambini prima
di darli al bambino.
Temperatura consigliata per servire : ca. 37°C.
NOTA:
Gli alimenti per bambini devono essere particolarmente e attentamente controllati
prima di essere serviti per evitare scottature . Utilizzate i livelli di potenza e i tempi
della tabella seguente come linee guida per riscaldare gli alimenti.
Page 62

IT
60
Guida alla Cottura (continua)
Riscaldare Liquidi e Alimenti
Usate i livelli di potenza e i tempi di questa tabella come linee guida per
riscaldarli.
Tempo
Alimenti Porzioni Potenza
150 ml
Bevande
(caffè, latte,
tè, acqua a
temperatura
ambiente)
Minestre
(fredde)
Spezzatino
(freddo)
Pasta al
sugo
(fredda)
(1 tazzina)
300 ml
(2 tazzine)
450 ml
(3 tazzine)
600 ml
(4 tazzine)
250g
350g
450g
550g
350g P80
350g P80 3½-4½ 3
P100
P100
Tempo
(min.)
1-1½
1½-2
2½-3
3-3½
2-2½
2½-3
3-3½
3½-4
4½-5½ 2-3
di
Riposo
(min.)
1-2
2-3
Istruzioni
Versateli in una tazzina di
ceramica e riscaldateli
scoperti. Mettete la tazzina
o la tazza nel centro del
piatto rotante. Mescolate
attentamente prima e dopo
il tempo di riposo.
Versatele in un piatto
fondo di ceramica o in una
scodella fonda di
ceramica.
Coprite con un coperchio
diplastica.Mescolatebene
dopo averle riscaldate.
Mescolate ancora prima di
servire.
Mettete lo spezzatino in un
piatto fondo di ceramica.
Copritelo con un coperchio
di plastica.
Mescolate di tanto in tanto
quando riscaldate e una
voltaancoraprimadi
lasciarlo riposare e di
servirlo.
Mettete la pasta (ad
esempio spaghetti o
tagliolini all’uovo) su un
piatto liscio di ceramica.
Coprite con pellicola
aderente per microonde.
Mescolate prima di servire.
Page 63

IT
61
Guida alla Cottura (continua)
P80
Tempo
(min.)
4½-5½
5-6
5½-6½
Alimenti Porzioni Potenza
Pastaripiena
al sugo
(fredda)
Alimenti
Pronti
(freddi)
350g P80 4-5 3
350g
450g
550g
Tempo
di
Riposo
(min.)
3
Istruzioni
Mettetelapastaripiena(ad
esempioravioli,tortellini)in
un piatto fondo di
ceramica. Coprite con un
coperchio di
plastica.
Mescolate di tanto in tanto
quandoriscaldateeancora
una volta prima di lasciarli
riposare e di servirli.
Mettete gli alimenti freddi,
pronti peressereriscaldati,
da 2-3 porzioni su un piatto
di ceramica. Coprite con
pellicola aderente per
microonde.
Page 64

IT
62
Guida alla Cottura (continua)
scaldare Alimenti e Latte per Bambini
Ri
Usate i livelli di potenza e i tempi di questa tabella come linee guida per
riscaldarli.
Alimenti Porzioni Potenza
Alimenti
per
bambini
(verdura +
carne)
Pappe per
bambini
(frumento
+ latte +
frutta)
Latte per
bambini
190g P80
190g P80 20sec. 2-3
100ml
P30
200ml
Tempo
(min.)
30sec. 2-3
30-40
sec.
1min.
1min.
10 sec.
Tempodi
Riposo
(min.)
-
2-3
Istruzioni
Metteteli in unpiattofondo
di ceramica.
Vanno cotti coperti.
Mescolate al termine del
tempo di cottura.
Fate riposare per 2-3
minuti.
Prima di servire,
mescolate bene e
controllate la temperatura
accuratamente.
Mettetele in un piatto
fondo di ceramica.
Vanno cotte coperte.
Mescolate una volta
terminato il tempo di
cottura.
Lasciate riposare per 2-3
minuti. Prima di servire,
mescolate bene e
controllate la temperatura
accuratamente.
Mescolate o agitate bene
e versatelo in un biberon
di vetro sterilizzato.
Posizionare nel centro del
piatto rotante. Va
riscaldato scoperto.
Agitate bene e lasciate
riposare per almeno tre
minuti. Prima di servire,
mescolate bene e
controllate la temperatura
accuratamente.
Page 65

IT
63
Guida alla Cottura (continua)
GRILL
L’elemento riscaldante del grill si trova sotto la parte superiore della cavità e
funziona quando lo sportello è chiuso e il piatto rotante ruota. La rotazione del
piatto rotante dora gli alimenti in modo più uniforme. Se preriscaldate il grill per 4
minuti, la doratura avverrà più rapidamente.
Stoviglie per il grill:
Devono essere resistenti al calore e possono essere di metallo. Non usate nessuna stoviglia di plastica poiché potrebbe fondersi.
Alimenti adatti al grill:
Braciole, salsicce, bistecche, hamburger, fette di pancetta e prosciutto, piccole
porzioni di pesce, sandwich e tutti i tipi di toast.
NOTA IMPORTANTE:
Ricordatevi che gli alimenti vanno posti sulla griglia, se non diversamente
suggerito.
MICROONDE + GRILL
Questa modalità di cottura combina il calore radiante che proviene dal forno con
la velocità della cottura a microonde. Funziona solo quando lo sportello è chiuso
e il piatto rotante sta ruotando. Gli alimenti si dorano uniformemente grazie alla
rotazione del piatto rotante
Stoviglie per cucinare con il microonde + grill :
Le stoviglie devono permettere all'energia delle microonde di attraversarle e
devono essere resistenti al calore. Non usate stoviglie di metallo in modalità
combinata. Non usate nessuna stoviglia di plastica poiché potrebbe fondersi.
Alimenti adatti alla cottura con microonde + grill:
Gli alimenti adatti alla cottura con modalità combinato comprendono tutti i tipi di
alimenti cotti che hanno bisogno di essere riscaldati e dorati (ad esempio pastaal
forno), come anche alimenti che richiedono un breve tempo di cottura per dorare
la parte superiore.
Inoltre questa modalità può essere utilizzata per grosse porzioni di alimenti che
traggono vantaggio da una parte superiore dorata e croccante (ad esempio i
pezzi di pollo vanno girati a metà cottura).
Fate riferimento alla tabella per il grill per ulteriori dettagli.
Gli alimenti devono essere girati, se li volete dorati da entrambe le parti.
Page 66

IT
64
Guida alla Cottura (continua)
Guida al grill per alimenti congelati
Usate i livelli di potenza e i tempi di questa tabella come linee guida per il grill.
Alimenti
congelati
Panini
(ciascuno ca.
50 g)
Baguette/
Bruschetta
Patate/verdure
gratinate
Pasta
(Cannelloni,
Maccheroni,
Lasagne)
Pesce
gratinate
Tempo
Grill
Grill
per 1.
(min.)
1½-2
2½-3
3½-4
13-15 -
16-18 -
Porzioni Potenza
2 pezzi
4 pezzi
200-250g
(1pc)
400g C1
400g C1 14-16 -
400g C1
MW+
MW+
lato
C2
C1
Tempo
per 2.
lato
(min.)
Solo
grill
2-3
2-3
Solo
grill
2-3
Istruzioni
Sistemate i panini in
cerchio sulla griglia.
Usate il grill per l’altra
parte dei panini fino a
raggiungere la
croccantezza che
desiderate. Lasciateli
riposare per 2-5 minuti.
Mettete
una
baguette
surgelate diagonalmente
sucartadacucinasulla
griglia. Lasciate riposare
2-3 minuti.
il gratin su un
Mettete
piatto
di vetro
e
p
osizionare sulla griglia
Lasciate riposare 2-3
minuti.
Mettete la pasta
congelata in un piatto di
P
osizionare sulla
vetro.
griglia.Lasciate riposare
2-3 minuti.
Mettete il pesce
congelato nel mezzo di
un piatto liscio
rettangolaro di vetro.
P
osizionare sulla piatto
rotante.Lasciate
riposare 2-3 minuti.
.
Page 67

IT
65
Guida alla Cottura (continua)
Guida al grill per alimenti freschi
Preriscaldate il grill con la funzione grill per 4 minuti.
Usate i livelli di potenza e i tempi di questa tabella come linee guida per il grill.
Alimenti
freschi
Toast
Panini (già
cotti)
Tempo
Porzioni Potenza
4 pezzi
(ciascuno
25 g)
2-4 pezzi Solo gril 2½-3½ 1½-2½
Solo
grill
3½-4½ 3-4
per 1.
lato
(min.)
Tempo
per 2.
lato
(min.)
Istruzioni
Mettete i toast uno vicino
all’altro sulla griglia.
Mettete i panini con la parte
inferiore rivolta verso l’alto
in cerchio direttamente sul
piatto rotante.
Pomodori
alla griglia
Toast
Formaggio/
Pomodori
Toast tipo
Hawaii
(ananas,
prosciutto,
fettine di
formaggio)
Patate al
forno
Patate/
verdure
gratinate
(fredde)
200g
(2 pezzi)
400g
(4 pezzi)
4 pezzi
(300g)
2 pezzi
(300g)
4 pezzi
(600g)
250g
500g
500g C1
3½-4½
C2
5-6
C2 4-5 -
3½-4½
C1
6-7
C1 4½-5½
6½-7½
9-11 -
Tagliate i pomodori a metà.
Mettete un po’ di formaggio
-
in cima. Sistemateli in
cerchio su una pirofila di
vetrolisciaaformadipiatto.
Mettete sulla griglia
Tostate le fette di pane.
Mettete il toast con le
guarnizioni sulla griglia.
Lasciate riposare 2-3
minuti.
Tostate le fette di pane.
Mettete il toast con le
guarnizioni sulla griglia.
Mettete 2toastunodifronte
all’altro sulla griglia.
Lasciate riposare 2-3
minuti.
Tagliate le patate a metà.
Mettetele in cerchio sulla
griglia con la parte tagliata
verso il grill.
Mettete il gratin su un piatto
. Mettete sulla
di vetro
griglia. Lasciate riposare 23 minuti.
Page 68

IT
66
Guida alla Cottura (continua)
Alimenti
freschi
Pezzi di
Pollo
Arrosto di
pollo
Braciole di
Agnello
(medio)
Bistecchedi
maiale
Porzioni Potenza
450g
(2pezzi)
650g
(2-3 pezzi)
850g
(4 pezzi)
900g
1100g
400g
(4 pezzi)
250 g
(2 pezzi)
500 g
(4 pezzi)
C2
C1
Solo
grill
MW +
Grill
Tempo
Tempo
per 1.
lato
(min.)
11-12
10-12
12-14
10-12 8-9
per 2.
(min.)
7-8
9-10
11-13
C2
solo)
6-7
8-10
lato
Preparate i pezzi di pollo
7-8
con olio e spezie. Metteteli
in cerchio con le ossa verso
8-9
il mezzo. Mettete un pezzo
di pollo ma non nel centro
9-10
della griglia. Lasciate
riposare 2-3 minuti
Spennellate con olio e
spezie. Mettete il petto di
pollo verso il basso per 1.
9-11
lato e verso l’alto per 2. lato
sul piatto rotante. Lasciate
riposare 5 minuti.
Spennellate le braciole di
agnello con olio e spezie.
Mettetele in cerchio sulla
griglia. Dopo la cottura,
lasciate riposare 2-3 minuti.
Spennellate la pelle di
(Grill
maiale con olio e spezie.
Mettetele in cerchio sulla
5-6
griglia. Dopo la cottura,
lasciate riposare 2-3 minuti.
7-8
Istruzioni
Arrosto di
pesce
Mele Cotte
450g
650g
2 mela
(ca.400g)
4mela
(ca.800g)
C2
C2
6-7
7-8
6-7
10-12
Spennellate con olio e
7-8
spezie. Mettete testa -
8-9
croce sulla griglia
Togliete il torsolo alle mele
e riempitele con uvetta e
marmellata.Mettetecisopra
scaglie di mandorle.
-
Mettete le mele in una
pirofila di vetro liscia a
forma di piatto.
direttamente sul piatto
rotante
PN:16170000A42322
P
osizionare
Page 69

PL
Kuchenka mikrofalowa
INSTRUKCJA OBSŁUGI
MODEL:CMXW22DW
CMXW22DS
Przed użyciem kuchenki mikrofalowej należy uważnie przeczytać
niniejszą instrukcję i zachować ją.
Jeśli zastosujesz się do instrukcji, piekarnik zapewni wieloletnią obsługę.
ZACHOWAĆ NINIEJSZE INSTRUKCJE
Umieszczając oznakowanie CE ( ) na tym produkcie, deklarujemy, na
własną odpowiedzialność, zgodność ze wszystkimi europejskimi
wymaganiami bezpieczeństwa, zdrowia i ochrony środowiska
określonymi w prawodawstwie dotyczącym tego produktu.
67
Page 70

PL
68
GOTO
ROZMRAŻANIE WG MASY
ROZMRAŻANIE WG CZASU
FUNKCJA EKO
ZEGAR/USTAWIENIA
MENU AUTOMATYCZNEGO
ZATRZYMAJ/WYCZYŚĆ
START/EKSPRES
CZAS/MASA
Page 71

PL
69
ŚRODKI OSTROŻNOŚCI W CELU UNIKNIĘCIA MOŻLIWEGO
NARAŻENIA NA NADMIERNĄ ENERGIĘ MIKROFALOWĄ
(a) Nie należy uruchamiać kuchenki z otwartymi drzwiami, ponieważ
może to spowodować szkodliwe narażenie na działanie energii
mikrofalowej. Ważne jest, aby nie łamać ani nie modyfikować blokad
bezpieczeństwa.
(b) Nie wolno umieszczać żadnych przedmiotów między frontem
kuchenki a drzwiami ani pozwalać, aby na powierzchniach
uszczelniających gromadziły się zanieczyszczenia lub pozostałości po
czyszczeniu.
(c) OSTRZEŻENIE: Jeśli drzwi lub ich uszczelki są uszkodzone,
kuchenki nie wolno obsługiwać, dopóki nie zostanie naprawiona przez
kompetentną osobę.
UZUPEŁNIENIE
Jeżeli urządzenie nie jest utrzymywane w stanie czystości, jego
powierzchnia może ulec degradacji i wpłynąć na żywotność urządzenia
oraz doprowadzić do niebezpiecznej sytuacji.
Specyfikacja
Model:
CMXW22DW / CMXW22DS
Napięcie znamionowe:
230 V~50 Hz
Znamionowa moc wejściowa (fale
mikrofalowe):
1250 W
Znamionowa moc wyjściowa (fale
mikrofalowe):
800 W
Pojemność kuchenki:
22 l
Średnica talerza obrotowego:
245 mm
Wymiary zewnętrzne (dł. x szer.
x wys.):
461 x 365 x 290 mm
Ciężar netto:
11,8 kg
Page 72

PL
70
WAŻNE ZALECENIA DOTYCZĄCE BEZPIECZEŃSTWA
OSTRZEŻENIE
Aby zmniejszyć ryzyko pożaru, porażenia prądem elektrycznym,
obrażeń ciała lub narażenia na nadmierną energię kuchenki
mikrofalowej podczas użytkowania urządzenia, należy przestrzegać
podstawowych środków ostrożności, w tym:
1. Ostrzeżenie: Płyny ani inna żywność nie mogą być podgrzewane w
szczelnych pojemnikach, ponieważ są narażone na wybuch.
2. Ostrzeżenie: Wykonywanie jakichkolwiek czynności serwisowych
lub naprawczych polegających na usunięciu pokrywy zabezpieczającej
przed narażeniem na działanie energii mikrofalowej jest bezpieczne
wyłącznie dla kompetentnych osób.
3. Urządzenie to może być obsługiwane przez dzieci powyżej 8. roku
życia oraz osoby o ograniczonej zdolności fizycznej, czuciowej lub
psychicznej bądź nieposiadające doświadczenia i wiedzy, jeśli są one
pod nadzorem lub poinstruowano je w zakresie bezpiecznej obsługi
urządzenia i zrozumiały one potencjalne zagrożenia. Nie zezwalać
dzieciom na zabawę z urządzeniem. Czyszczenie i konserwacja nie
mogą być wykonywane przez dzieci, chyba że ukończyły one 8 lat i są
nadzorowane.
4. Trzymać urządzenie i jego przewód z dala od dostępu przez dzieci
w wieku poniżej 8 lat.
5. Używać wyłącznie naczyń nadających się do użytku w kuchenkach
mikrofalowych.
6. Kuchenkę należy regularnie czyścić i usuwać wszelkie osady
żywności.
7. Przeczytać i postępować zgodnie z poniższymi wskazówkami:
„ŚRODKI OSTROŻNOŚCI W CELU UNIKNIĘCIA MOŻLIWEGO
NARAŻENIA NA NADMIERNĄ ENERGIĘ MIKROFALOWĄ”.
8. Podczas podgrzewania potraw w pojemnikach z tworzywa
sztucznego lub papieru należy obserwować kuchenkę pod kątem
ewentualnego zapalenia.
Page 73

PL
71
9. W przypadku emisji dymu należy wyłączyć lub odłączyć urządzenie
i zamknąć drzwi, aby stłumić płomienie.
10. Nie należy nadmiernie podgrzewać potraw.
11. Nie używać komory kuchenki do przechowywania.
Nie przechowywać w kuchence chleba, ciastek itp.
12. Przed włożeniem do kuchenki pojemników/toreb z papieru lub
tworzywa usunąć druciane opaski i metalowe uchwyty.
13. Zamontować lub ustawić kuchenkę wyłącznie zgodnie z
dostarczonymi instrukcjami montażu.
14. Jaja w skorupkach i całe jaja na twardo nie powinny być
podgrzewane w kuchenkach mikrofalowych, ponieważ mogą
eksplodować nawet po zakończeniu podgrzewania w kuchence
mikrofalowej.
15. To urządzenie jest przeznaczone do używania w gospodarstwach
domowych i podobnych zastosowaniach, które wymieniono poniżej:
– w kuchniach pracowniczych w sklepach, biurach i innych miejscach
pracy;
– dla klientów hoteli, moteli i innych miejsc zakwaterowania;
– w domach na wsi,
– w zajazdach.
16. W razie uszkodzenia kabla zasilającego powinien go wymienić
producent, serwisant lub inna wykwalifikowana osoba, aby uniknąć
zagrożenia.
17. Nie przechowywać ani nie używać tego urządzenia na zewnątrz.
18. Nie używać kuchenki w pobliżu wody, w mokrej piwnicy lub w
pobliżu basenu.
19. Temperatura dostępnych powierzchni może być wysoka podczas
pracy urządzenia. Powierzchnie są podatne na nagrzewanie do
wysokich temperatur. Trzymać przewód z dala od ogrzanej powierzchni
i nie przykrywać żadnych otworów wentylacyjnych kuchenki.
Page 74

PL
72
20. Nie pozwól, aby przewód zwisał nad krawędzią stołu lub blatu.
21. Nieprzetrzymywanie kuchenki w czystości może prowadzić do
zniszczenia powierzchni, co może niekorzystnie wpłynąć na żywotność
urządzenia i potencjalnie doprowadzić do niebezpiecznej sytuacji.
22. Zawartość butelek do karmienia i słoików dla niemowląt należy
wymieszać lub nią wstrząsać, a przed spożyciem sprawdzić
temperaturę, aby uniknąć oparzeń.
23. Podgrzewanie napojów w kuchence mikrofalowej może
spowodować opóźnione wrzenie z wyrzutem płynu, dlatego należy
zachować ostrożność podczas obchodzenia się z pojemnikiem.
24. Urządzenie nie jest przeznaczone do użytkowania przez osoby (w
tym dzieci) o ograniczonych zdolnościach fizycznych, sensorycznych
lub umysłowych, lub osoby nie posiadające doświadczenia i wiedzy,
chyba że osoba odpowiedzialna za ich bezpieczeństwo udzieliła im
instrukcji dotyczących użytkowania urządzenia lub nadzoruje takie
osoby.
25. Dzieci powinny być pod nadzorem osoby dorosłej, która zapewni,
że nie będą się one bawić tym urządzeniem.
26. Urządzenia nie powinny być sterowane przez zewnętrzny regulator
czasowy lub osobny system sterowania zdalnego.
27. Dostępne elementy mogą rozgrzać się podczas używania. Małe
dzieci należy trzymać z daleka.
28. Nie należy używać myjki parowej.
29. Podczas używania urządzenie nagrzewa się. Należy uważać, aby
nie dotknąć elementów grzejnych wewnątrz kuchenki.
30. Używać wyłącznie czujnika temperatury zalecanego dla tej
kuchenki (w przypadku kuchenek wyposażonych w funkcję
wykorzystywania czujnika temperatury).
Page 75

PL
73
31. OSTRZEŻENIE: Podczas użytkowania urządzenie i dostępne
części nagrzewają się do wysokiej temperatury. Należy zachować
ostrożność aby uniknąć dotykania elementów grzejnych. Należy
upewnić się, że dzieci do 8 roku życia nie mają dostępu do urządzenia.
32. Kuchenkę mikrofalową należy obsługiwać z
33. otwartymi drzwiami dekoracyjnymi (w przypadku kuchenek z
drzwiami dekoracyjnymi).
34. Tylną powierzchnię urządzenia umieszcza się pod ścianą.
35. Kuchenka mikrofalowa nie może być umieszczona w szafie, chyba
że została przetestowana w miejscu tego typu.
PRZECZYTAĆ UWAŻNIE I ZACHOWAĆ NA PRZYSZŁOŚĆ
Page 76

PL
74
Zmniejszenie ryzyka obrażeń ciała osób
uziemiających instalację
NIEBEZPIECZEŃSTWO!
Zagrożenie porażeniem prądem
Dotknięcie niektórych elementów
wewnętrznych może spowodować
ciężki obrażenia ciała lub śmierć.
Nie demontować urządzenia.
OSTRZEŻENIE
Niebezpieczeństwo porażenia
prądem Nieprawidłowe użycie
uziemienia może spowodować
porażenie prądem elektrycznym.
Nie podłączać do gniazda, dopóki
urządzenie nie zostanie
prawidłowo zainstalowane i
uziemione.
Urządzenie musi być uziemione. W
przypadku zwarcia elektrycznego
uziemienie zmniejsza ryzyko
porażenia prądem elektrycznym
poprzez zapewnienie odpływu dla
prądu elektrycznego.
Urządzenie jest wyposażone w
przewód wyposażony w żyłę
uziemiającą z wtykiem
uziemiającym. Wtyk musi być
podłączony do gniazda, które jest
prawidłowo zainstalowane i
uziemione.
Skonsultować się z
wykwalifikowanym elektrykiem lub
serwisantem, jeśli instrukcje
uziemienia nie są do końca
zrozumiałe lub istnieją wątpliwości
co do prawidłowego uziemienia
urządzenia.
Jeśli konieczne jest użycie
przedłużacza, należy używać tylko
modelu 3-żyłowego.
1. Przewód zasilający jest krótki,
aby zmniejszyć ryzyko związane ze
splątaniem lub potknięciem się o
dłuższy przewód. 2. W przypadku
użycia długiego przewodu lub
przedłużacza:
1) Oznaczona wartość
znamionowa prądu elektrycznego
przewodu zasilającego lub
przedłużacza powinna być co
najmniej tak duża, jak prąd
elektryczny urządzenia.
2) Przedłużacz musi być
uziemiającym przewodem 3żyłowym.
3) Długi przewód powinien być tak
ułożony, aby nie zasłaniał blatu lub
blatu stołu, gdzie może być
pociągnięty przez dzieci lub gdzie
można się o niego przypadkowo
potknąć.
Page 77

PL
75
CZYSZCZENIE
Należy się upewnić, że urządzenie jest odłączone od zasilania.
1.
Po użyciu należy oczyścić komorę kuchenki lekko wilgotną szmatką.
2.
Akcesoria czyścić w zwykły sposób w wodzie z mydłem.
3.
Ramę drzwi, uszczelkę i sąsiednie części należy starannie wyczyścić
wilgotną szmatką, gdy są zabrudzone.
4.
Nie należy używać ostrych, ściernych środków czyszczących ani ostrych,
metalowych skrobaków do czyszczenia szyby drzwiczek kuchenki,
ponieważ mogą one zarysować powierzchnię, co grozi uszkodzeniem
szyby.
5.
Wskazówka dotycząca czyszczenia – w celu łatwiejszego czyszczenia
ścian komory, których może dotknąć gotowana żywność: Umieścić pół
cytryny w misce, dodać 300 ml (1/2 pinty) wody i ogrzewać przy 100% mocy
mikrofal przez 10 minut. Wytrzeć kuchenkę miękką, suchą szmatką.
NACZYNIA
UWAGA
Zagrożenie obrażeniami ciała
Wykonywanie jakichkolwiek
czynności serwisowych lub
naprawczych polegających na
usunięciu pokrywy
zabezpieczającej przed
narażeniem na działanie energii
mikrofalowej jest bezpieczne
wyłącznie dla kompetentnych
osób.
Patrz instrukcje „Materiały, których można
używać w kuchence mikrofalowej lub których
należy unikać w kuchence mikrofalowej”. Mogą
istnieć pewne naczynia niewykonane z metalu,
które nie są bezpieczne do użycia podczas
gotowania mikrofalowego. W razie wątpliwości
można przetestować dane naczynie zgodnie z
poniższą procedurą.
Test naczyń:
1. Napełnić pojemnik nadający się do użycia w
kuchence mikrofalowej 1 szklanką zimnej
wody (250 ml) wraz z danym naczyniem.
2. Gotować przy maksymalnej mocy przez 1
minutę.
3. Ostrożnie dotknąć naczynia. Jeśli puste
naczynie jest ciepłe, nie należy używać go
do gotowania w kuchence mikrofalowej.
4. Nie przekraczać 1 minuty czasu
gotowania.
Page 78

PL
76
Materiały do użytku w kuchence mikrofalowej
Naczynia
Uwagi
Folia aluminiowa
Tylko osłony. Małe gładkie kawałki mogą być stosowane do zakrycia cienkich części mięsa
lub drobiu, aby zapobiec nadmiernemu podgrzaniu. Może wytworzyć się łuk elektryczny,
jeśli folia znajduje się zbyt blisko ścian kuchenki. Folia powinna znajdować się co najmniej
2,5 cm (1 cal) od ścian kuchenki.
Naczynie do
podsmażania
Postępować zgodnie z instrukcjami producenta. Dno naczynia do podsmażania musi
znajdować się co najmniej 3/16 cala (5 mm) nad układem obrotowym. Nieprawidłowe użycie
może spowodować pęknięcie układu obrotowego.
Serwis stołowy
Tylko przeznaczony do kuchenki mikrofalowej. Postępować zgodnie z instrukcjami
producenta. Nie używać pękniętych ani wyszczerbionych naczyń.
Szklane słoiki
Zawsze zdejmować pokrywę. Stosować tylko do podgrzewania potraw do momentu, w
którym są tylko ciepłe. Większość szklanych słoików nie jest żaroodporna i może pęknąć.
Naczynia szklane
Wyłącznie żaroodporne naczynia kuchenne do piekarnika. Upewnić się, że nie ma
metalowego wykończenia. Nie używać pękniętych ani wyszczerbionych naczyń.
Woreczki do gotowania w
piekarniku
Postępować zgodnie z instrukcjami producenta. Nie zamykać metalową opaską. Wykonać
szczeliny, aby umożliwić wydostanie się pary.
Papierowe talerze i kubki
Stosować tylko do krótkotrwałego gotowania/podgrzewania. Nie pozostawiać kuchenki bez
nadzoru podczas gotowania.
Ręczniki papierowe
Stosować do przykrywania potraw do odgrzewania i wchłaniania tłuszczu. Stosować pod
nadzorem wyłącznie w przypadku krótkotrwałego gotowania.
Papier do pieczenia
Stosować jako osłonę, aby zapobiec rozpryskom lub do owinięcia w przypadku gotowania
na parze.
Tworzywo sztuczne
Tylko przeznaczone do kuchenki mikrofalowej. Stosować się do zaleceń producenta.
Powinno być oznaczone jako „Przeznaczone do kuchenki mikrofalowej”. Niektóre
pojemniki z tworzywa miękną, gdy jedzenie w środku staje się gorące. „Woreczki do
gotowania” i szczelnie zamknięte torebki z tworzywa powinny być rozcięte, przebite lub
odpowietrzone zgodnie z zaleceniami na opakowaniu.
Osłona z tworzywa
Tylko przeznaczona do kuchenki mikrofalowej. Stosować do przykrywania potraw podczas
gotowania, aby zachować wilgoć. Nie dopuszczać do kontaktu osłony z żywnością.
Termometry
Tylko przeznaczone do kuchenek mikrofalowych (termometry do mięsa i słodyczy).
Papier woskowy
Stosować jako osłonę zapobiegającą rozpryskom i zatrzymującą wilgoć.
Materiały, których należy unikać w kuchence mikrofalowej
Naczynia
Uwagi
Taca aluminiowa
Może powodować powstanie łuku elektrycznego. Przenieść żywność do
naczynia przeznaczonego do kuchenki mikrofalowej.
Pudełko tekturowe z
metalowym uchwytem
Może spowodować powstanie łuku elektrycznego. Przenieść żywność do
naczynia przeznaczonego do kuchenki mikrofalowej.
Naczynia metalowe
lub z metalowym
wykończeniem
Metal chroni żywność przed energią mikrofalową. Metalowe wykończenie
może spowodować powstanie łuku elektrycznego.
Metalowe opaski
Mogą spowodować powstanie łuku elektrycznego i pożar w kuchence.
Worki papierowe
Mogą spowodować pożar w kuchence.
Pianka z tworzywa
Pianka z tworzywa sztucznego może stopić się lub zanieczyścić ciecz
wewnątrz, gdy jest narażona na działanie wysokiej temperatury.
Drewno
Drewno wyschnie po użyciu w kuchence mikrofalowej i może pęknąć.
Page 79

PL
77
A) Panel sterowania
B) Wałek obrotowy
C) Układ pierścienia obrotowego
D) Talerz szklany
E) Okienko do obserwacji
F) Układ drzwi
G) Układ blokady bezpieczeństwa
Piasta (od spodu)
Talerz szklany
Wałek obrotowy
Układ pierścienia
obrotowego
USTAWIANIE KUCHENKI
Nazwy części i akcesoriów kuchenki
Wyjąć kuchenkę i wszystkie materiały z kartonu i komory kuchenki.
Piekarnik jest wyposażony w następujące akcesoria:
Talerz szklany 1
Układ pierścienia obrotowego 1
Instrukcja obsługi 1
Instalacja układu obrotowego
a.
Nigdy nie umieszczaj szklanego talerza
do góry dnem. Szklany talerz nigdy nie
powinien być blokowany.
b.
Zarówno szklany talerz, jak i układ
pierścienia obrotowego muszą być
zawsze używane podczas gotowania.
c.
Wszystkie potrawy i pojemniki z
żywnością są zawsze umieszczane na
szklanym talerzu do gotowania.
d.
W przypadku pęknięcia szklanego talerza
lub układu pierścienia obrotowego
skontaktować się z najbliższym
autoryzowanym punktem serwisowym.
Page 80

PL
78
Instalacja blatu
Usunąć cały materiał do opakowania i akcesoria.
Sprawdzić kuchenkę pod kątem uszkodzeń, takich
jak wgniecenia lub pęknięte drzwi. Nie instalować,
jeśli kuchenka jest uszkodzona.
Obudowa:Usunąć folię ochronną znajdującą się
na powierzchni obudowy kuchenki mikrofalowej.
Nie zdejmować jasnobrązowej pokrywy Mica,
która jest przymocowana do komory kuchenki
w celu ochrony magnetronu.
__________________________________________________________________________________
Instalacja
1. Wybrać płaską powierzchnię,
która zapewnia wystarczającą
otwartą przestrzeń dla otworów
wlotowych i/lub wylotowych.
(1) Minimalna wysokość montażu
wynosi 85 cm.
(2) Tylna powierzchnia urządzeni
a powinna znajdować się pod
ścianą.
Pozostawić minimalny odstęp
30 cm nad kuchenką i minimalny
odstęp 20 cm między kuchenką a
sąsiadującymi ścianami.
(3) Nie wyjmować nóżek z dna
kuchenki.
(4) Zablokowanie otworów
wlotowych i/lub wylotowych może
spowodować uszkodzenie
kuchenki.
(5) Umieścić kuchenkę jak
najdalej od radia i telewizora.
Obsługa kuchenki mikrofalowej
może powodować zakłócenia
odbioru radiowego lub
telewizyjnego.
2. Podłączyć kuchenkę do
standardowego gniazda
domowego. Upewnić się, że
napięcie i częstotliwość są takie
same jak napięcie i częstotliwość
na tabliczce znamionowej.
OSTRZEŻENIE: Nie instalować
kuchenki na płycie kuchenki lub
innym urządzeniu wytwarzającym
ciepło. Jeśli zostanie
zainstalowana w pobliżu źródła
ciepła lub nad nim, może ulec
uszkodzeniu, a
gwarancja straci
ważność.
Dostępna
powierzchnia może być gorąca
podczas pracy.
30 cm
0 cm
20 cm
20 cm
min 85
Page 81

PL
79
INSTRUKCJA UŻYTKOWANIA
Ta kuchenka mikrofalowa wykorzystuje nowoczesne elektroniczne sterowanie do regulacji parametrów
gotowania, aby lepiej zaspokoić potrzeby związane z gotowaniem.
1. Ustawienie zegara
Gdy kuchenka mikrofalowa jest pod napięciem, na wyświetlaczu pojawi się „0: 00”, a sygnalizator
dźwiękowy zadzwoni raz.
1) Nacisnąć „ ”. Zacznie migać liczba godzin.
2) Przekręcić „ ”, aby wyregulować liczby godzin. Czas wejścia powinien mieścić się w zakresie 0–23.
3) Nacisnąć „ ”. Zacznie migać liczba minut.
4) Przekręcić „ ”, aby wyregulować liczbę minut. Czas wprowadzania powinien mieścić się w zakresie 0–59.
5) Nacisnąć „ ”, aby zakończyć ustawianie zegara. „:” zacznie migać.
Uwaga: 1) Jeśli zegar nie jest ustawiony, nie będzie działał przy zasilaniu.
2) Jeśli w trakcie ustawiania zegara zostanie naciśnięty przycisk „ ” lub nie zostanie
wykonana żadna operacja w ciągu jednej minuty, kuchenka opuści tryb ustawień.
2. Gotowanie mikrofalowe
Nacisnąć „ ” raz. Wyświetli się „P100”.. Następnie przekręcić „ ”, aby wybrać żądaną funkcję. Nacisnąć
„ ”, aby potwierdzić zasilanie. Przekręcić „ ”, aby wyregulować czas gotowania. Nacisnąć „
”, aby rozpocząć gotowanie.
Przykład: Jeśli ma zostać użyte 80% mocy do gotowania przez 20 minut, można uruchomić kuchenkę w
następujący sposób.
1) Jednokrotne naciśnięcie „ ” spowoduje wyświetlenie wskaźnika „P100” i zapali się wskaźnik .
2) Obrócić „ ”, aby wybrać 80% mocy. Na wyświetlaczu LED wyświetli się „P80”.
Nacisnąć „ ”, aby potwierdzić zasilanie.
3) Przekręcić „ ”, aby ustawić czas gotowania, aż na wyświetlaczu kuchenki pojawi się „20:00”.
(Maksymalny czas pieczenia wynosi 95 minut).
4) Nacisnąć „ ”, aby rozpocząć gotowanie, „:” zaświeci się, a wskaźnik „ ” zacznie migać
(sygnalizator dźwiękowy zabrzmi pięć razy po zakończeniu).
UWAGA: Ilości dla czasu regulacji przełącznika kodującego są następujące:
0–1 min
: 5 sekund
10–30 min
: 1 minuta
1–5 min
: 10 sekund
30–95 min
: 5 minut
5–10 min
: 30 sekund
Tabela mocy mikrofal
Moc mikrofal
100%
80%
50%
30%
10%
Page 82

PL
80
3. Szybkie gotowanie
1) Gdy kuchenka jest w stanie oczekiwania, nacisnąć przycisk „ ”, aby rozpocząć gotowanie z pełną
mocą mikrofal przez 30 sekund. Czas gotowania zwiększa się o 30 sekund po każdym naciśnięciu przycisku
„ ”, a maksymalny czas ustawienia wynosi 95 minut.
Uwaga: Czas można wydłużyć, naciskając przycisk „ ” z wyjątkiem rozmrażania według masy i
programu automatycznego menu.
2) W stanie oczekiwania przekręcić „ ” w lewo, aby wybrać czas gotowania bezpośrednio, a następnie
nacisnąć przycisk „ ”, aby gotować przy 100% mocy mikrofal.
Program ten można ustawić jako pierwszy z wielu etapów.
4. Rozmrażanie wg czasu
1) Nacisnąć raz przycisk „ ”. Na wyświetlaczu pojawi się „dEF1”.
2) Przekręcić „ ”, aby wybrać czas gotowania. Jednocześnie zaświecą się „ ” i „ ”.
Zakres ustawienia czasu wynosi od „00:05” do „95:00”. Domyślnym poziomem mocy jest P30. Nie można go
regulować.
3) Nacisnąć przycisk „ ”, aby rozpocząć rozmrażanie.
Migają wskaźniki „ ” i „ ”.
5. Rozmrażanie wg masy
1) Nacisnąć dwukrotnie „ ”. Na wyświetlaczu LED pojawi się „dEF2”.
2) Obrócić „ ”, aby wybrać masę żywności. Jednocześnie zapali się „g”.
Masa powinna wynosić 100–2000 g.
3) Nacisnąć przycisk „ ”, aby rozpocząć rozmrażanie.
Wskaźniki „ ” i „ ” będą migać, a wskaźnik „g” zgaśnie.
6. Menu automatycznego gotowania
1) W stanie oczekiwania nacisnąć „ ” lub przekręcić „ ” w prawo, aby wybrać potrzebne menu.
„A-01”, „A-02”… „A-10” wyświetli się po kolei.
2) Nacisnąć „ ”, aby potwierdzić wybrane menu główne.
2) Przekręcić „ ”, aby wybrać menu z „b-1” na „b-4”.
3) Nacisnąć „ ”, aby rozpocząć gotowanie.
Po zakończeniu gotowania sygnalizator dźwiękowy zabrzmi pięć razy. Jeśli zegar został ustawiony wcześniej,
zostanie wyświetlony bieżący czas, w przeciwnym razie zostanie wyświetlone „0:00”.
Na przykład: gotowanie makaronu.
1) Nacisnąć przycisk „ ” siedem razy. Wyświetli się „A-07” i zostanie wybrane menu makaronu.
Zapalą się wskaźniki „ ” i „ ”.
2) Nacisnąć „ ”, aby potwierdzić wybrane menu główne.
3) Zatrzymać obracanie „ ”, gdy wyświetli się „b-4”.
3) Nacisnąć „ ”, aby rozpocząć gotowanie.
Po zakończeniu gotowania sygnalizator dźwiękowy zabrzmi pięć razy. Następnie powrócić do stanu oczekiwania.
Page 83

PL
81
7. Gotowanie wieloetapowe
Można ustawić maksymalnie dwa etapy gotowania. Jeśli jeden etap to rozmrażanie, zostanie ono
umieszczony w pierwszym etapie automatycznie. Sygnalizator dźwiękowy zadzwoni raz po każdym etapie
i rozpocznie się kolejny etap.
Uwaga:Nie można ustawić menu automatycznego jako jednego etapów gotowania wieloetapowego.
Przykład: ma zostać rozmrożona potrawa o masie 500 g na 80% mocy mikrofal przez 5 minut.
Kroki są następujące:
1) Nacisnąć „ ” dwa razy. Wyświetli się „dEF2”.
2) Przekręcić „ ”, aby dostosować masę potrawy. Zatrzymać przekręcanie, gdy wyświetlane jest "500”.
3) Nacisnąć raz „ ” i przekręcić „ ”, aby wybrać 80% mocy mikrofal.
Nacisnąć „ ”, aby potwierdzić zasilanie.
4) Przekręcić „ ”, aby ustawić czas gotowania na 5 minut.
5) Nacisnąć „ ”, aby rozpocząć gotowanie.
Uwaga: Po zakończeniu pierwszego etapu, sygnalizator dźwiękowy zabrzmi raz, a następnie rozpoczyna
się drugi etap. Gdy wszystkie z nich skończą, sygnalizator dźwiękowy zabrzmi pięć razy i urządzenie
powróci do stanu oczekiwania.
8. Wstępnie ustawiona funkcja
1) Najpierw ustawić zegar. (Zapoznać się z instrukcją ustawiania zegara).
2) Wprowadzić program gotowania. Można ustawić maksymalnie dwa etapy. Nie należy ustawiać tutaj rozmrażania.
3) Nacisnąć „ ”. Wyświetlony zostanie bieżący zegar. Liczba godzin miga.
4) Przekręcić „ ”, aby wyregulować liczbę godzin. Czas początkowy powinien mieścić się w zakresie 0–23.
5) Nacisnąć „ ”, a liczba minut zacznie migać.
6) Przekręcić „ ”, aby wyregulować liczbę minut. Czas początkowy powinien mieścić się w zakresie 0–59.
7) Nacisnąć „ ”, aby zakończyć ustawienie. „:” zaświeci się, sygnalizator dźwiękowy zabrzmi dwa
razy, gdy nadejdzie czas, a następnie gotowanie rozpocznie się automatycznie.
Uwaga: 1) Najpierw należy ustawić zegar. W przeciwnym razie wstępnie ustawiona funkcja nie będzie
działać.
2) Jeśli wstępnie ustawiony program został ustawiony bez programu gotowania, całe ustawienie
zostanie wykorzystane jako alarm. Oznacza to, że gdy nadejdzie wstępnie ustawiony czas,
sygnalizator dźwiękowy zabrzmi tylko pięć razy.
Page 84

PL
82
9. FUNKCJA EKO
W stanie oczekiwania nacisnąć „ ” lub jeśli w ciągu 1 minuty nie zostanie wykonana żadna operacja, ekran
zostanie wyłączony. W tym momencie nacisnąć dowolny przycisk, aby włączyć ekran.
Uwaga: 1). Kuchenka nie może wejść w tryb EKO, jeśli drzwi są otwarte.
2). Nacisnąć dowolny przycisk lub otwórz drzwi, aby włączyć ekran w trybie EKO.
3). W przypadku przejścia w tryb EKO w stanie blokady przed dziećmi, powrócić do stanu blokady przed dziećmi.
10. Funkcja zapytania
(1) W stanie gotowania nacisnąć „ ”, a bieżąca moc mikrofal będzie wyświetlana przez 3 sekundy.
(2) W stanie ustawionym wstępnie nacisnąć „ ”, aby zapytać o czas opóźnienia rozpoczęcia gotowania.
Wstępnie ustawiony czas będzie migał przez 3 sekundy, a następnie kuchenka powróci do wyświetlania zegara.
(3) W stanie gotowania nacisnąć „ ”, aby sprawdzić aktualny czas. Zostanie wyświetlony na 3 sekundy.
11. Funkcja blokady dla dzieci
Blokada: W stanie oczekiwania nacisnąć „ ” na 3 sekundy. Rozlegnie się długi sygnał dźwiękowy
oznaczający wejście w stan blokady przed dziećmi, a na wyświetlaczu LED zaświecą się „ ” i „ ”.
Zdejmowanie blokady: W stanie blokady nacisnąć „ ” na 3 sekundy. Rozlegnie się długi sygnał dźwiękowy
oznaczający zwolnienie blokady, wyświetlacz LED powróci do zegara, a „ ” zgaśnie.
12. Tryb cichy
W stanach oczekiwania nacisnąć „ ”, a następnie nacisnąć „ ” jednocześnie przez 3 sekundy, aby
przejść do trybu cichego. Wszystkie przyciski i sygnalizatory dźwiękowe przestaną dzwonić w trybie cichym.
Aby włączyć dźwięk: w stanie oczekiwania, nacisnąć „ ”, a następnie nacisnąć „ ” jednocześnie
przez 3 sekundy, aby wyjść z trybu cichego.
13. Ochrona wentylatora
Gdy kuchenka pracuje w trybie mikrofal lub mieszanym przez ponad 5 minut, przestaje działać w ciągu ostatnich
15 sekund, a działa tylko wentylator.
14. Funkcja ochronna rurki sterującej magnetronu
Gdy urządzenie pracuje przez 30 minut na wysokim poziomie mocy, dostosuje się do 80% mocy mikrofal, aby
chronić rurę sterującą magnetronu.
Funkcja ta działa w stanach wieloetapowych i innych.
15. Funkcja automatycznego wychodzenia
Gdy drzwi pozostaną otwarte przez 10 minut, oświetlenie kuchenki zgaśnie. Nacisnąć dowolny klawisz po otwarciu
drzwi, a czas będzie się ponownie odliczać. Zapali się lampka kuchenki.
16. Specyfikacja
(1) Sygnalizator dźwiękowy zabrzmi raz podczas obracania pokrętła na początku.
(2) Należy nacisnąć „ ”, aby kontynuować gotowanie, jeśli drzwi zostały otwarte podczas gotowania.
(3) Po ustawieniu programu gotowania przycisk „ ” nie ma być wciskany przez 1 minutę. Zostanie
wyświetlony bieżący czas. Ustawienie zostanie anulowane.
(4) Sygnalizator dźwiękowy zabrzmi raz po skutecznym wciśnięciu. Nieskuteczne wciśnięcie nie spowoduje reakcji.
Page 85

PL
83
Tabela menu automatycznego
Menu
Wyświetlacz
Masa (g)
Zasilanie
A-01
PIECZYWO
b-1 Odgrzewanie pizzy
200
P100
b-2 Odgrzewanie chleba
200
P100
b-3 Ciasto słone
400
P80+P0+P80
b-4 Ciasto
500
P30
A-02
ZIEMNIAKI
b-1 Para
400
P100
b-2 Krokiety
ziemniaczane
250
P80+obrót+P0
b-3 Pieczenie
ziemniaków
1
P80+P0
b-4 Frytki
200
P100
A-03
MIĘSO
b-1 Kurczak
800
P100
b-2 Indyk
800
P100
b-3 Wieprzowina
450
P100
b-4 Czerwone mięso
800
P100
A-04
RYBY
b-1 Małże
200
P80
b-2 Łosoś (ryba)
350
P80
b-3 Tuńczyk
350
P80
b-4 Okoń morski
350
P80
A-05
WARZYWA
b-1 Brokuły
400
P100
b-2 Szpinak
400
P100
b-3 Marchew
400
P100
b-4 Koper włoski
200 - 400
P80+P0
A-06
NAPOJE
GORĄCE
b-1 Mleko (1 szklanka /
240 ml)
1 szklanka
P100
b-2 Kawa (1 szklanka /
120 ml)
1 szklanka
P100
b-3 Herbata
1 szklanka
P100
b-4 Gorąca czekolada
200
P70
A-07
MAKARON/RYŻ
b-1 Makaron nadziewany
450
P80
b-2 Ryż
1 szklanka
P100+P50
b-3 Zupa
(odgrzewanie zupy
warzywnej)
250
P100
b-4 Makaron
50 (dodać wodę
500 ml)
P80
Page 86

PL
84
Tabela menu automatycznego
Menu
Wyświetlacz
Masa (g)
Zasilanie
A-08
WYROBY
CUKIERNICZE
b-1 Herbatniki
200
P80+P0+P80
b-2 Ciasto
1 szklanka
P80
b-3 Dżem
400
P100+P0
b-4 Muffinki
400
P100
A-09
ZDROWA
ŻYWNOŚĆ
b-1 Suszona żywność
100
P80+P0
b-2 Jogurt domowej
roboty
1 litr
P30
b-3 Makaron
pełnoziarnisty
150 (dodać wodę 500
ml)
P100
b-4 Rośliny strączkowe
500
P100
A-10
ŻYWNOŚĆ DLA
DZIECI
b-1 Rozdrobniona
żywność dla dzieci
150
P80+P0
b-2 Bulion
200
P100+P0
b-3 Sterylizacja
1 dolny
P100
b-4 Mleko niemowlęce
100 ml
P30
Page 87

PL
85
Rozwiązywanie problemów
Standardowe warunki
Kuchenka mikrofalowa zakłócająca
odbiór telewizora
Odbiór radiowy i telewizyjny może być zakłócony podczas pracy
kuchenki mikrofalowej. Jest to podobne do zakłóceń małych
urządzeń elektrycznych, takich jak mikser, odkurzacz i wentylator
elektryczny.
Jest to normalne zjawisko.
Przyciemnione oświetlenie piekarnika
Podczas gotowania mikrofalowego przy niskiej mocy oświetlenie
piekarnika może zostać przyciemnione. Jest to normalne zjawisko.
Nagromadzenie pary na drzwiach i
gorące powietrze z otworów
wentylacyjnych
Podczas gotowania z potraw może wydobywać się para. Większość
wydobędzie się przez otwory wentylacyjne. Ale część może
zgromadzić się chłodnym miejscu, takim jak drzwi piekarnika. Jest
to normalne zjawisko.
Kuchenka została przypadkowo
uruchomiona bez jedzenia.
Zabrania się pracy urządzenia bez jedzenia w środku. To bardzo
niebezpieczne.
Problem
Możliwa przyczyna
Zalecane działanie
Nie można uruchomić
kuchenki.
(1) Przewód zasilający nie jest
właściwie mocno podłączony.
Odłączyć. Potem znowu po 10 sekundach.
(2) Przepalenie bezpiecznika lub
praca wyłącznika
automatycznego.
Wymienić bezpiecznik lub odłączyć
wyłącznik automatyczny (naprawiony przez
profesjonalny personel naszej firmy).
(3) Problemy z gniazdem.
Sprawdzić gniazdo z innym urządzeniem
elektrycznym.
Kuchenka nie nagrzewa się.
(4) Drzwi nie są odpowiednio
zamknięte.
Odpowiednio zamknąć drzwi.
Szklany talerz obrotowy
wydaje hałas podczas pracy
kuchenki mikrofalowej.
(5) Brudna podstawa rolkowa i
dno kuchenki.
Sprawdzić rozdział „Konserwacja kuchenki
mikrofalowej”, aby wyczyścić brudne
części.
SERWIS POMOCY TECHNICZNEJ
Jeśli nie można zidentyfikować przyczyny nieprawidłowego działania: wyłączyć urządzenie (nie poddawać go
szorstkiej obróbce) i skontaktować się z serwisem pomocy technicznej.
NUMER SERYJNY PRODUKTU Gdzie go znajdę?
Ważne jest, aby poinformować serwis pomocy technicznej o kodzie produktu i jego numerze seryjnym (kod 16
znaków rozpoczynający się od cyfry 3); można go znaleźć na certyfikacie gwarancyjnym lub na tabliczce
znamionowej umieszczonej na urządzeniu.
Pomoże to uniknąć niepotrzebnych podróży do techników, a tym samym (i co najważniejsze) zaoszczędzi
związane z nimi opłaty za ich wywołanie.
Page 88

PL
86
Urządzenie ma oznaczenie zgodne z dyrektywą europejską 2012/19/UE w
sprawie zużytego sprzętu elektrycznego i elektronicznego (WEEE).
Zapewniając, że produkt ten jest utylizowany w prawidłowy sposób, można się
przyczynić do zapobiegania potencjalnie negatywnym konsekwencjom dla
środowiska i zdrowia ludzkiego, jakie mogłyby mieć miejsce w przypadku
nieodpowiedniego posługiwania się odpadami tego produktu.
Ten symbol na produkcie oznacza, że nie należy go traktować tak samo jak
odpady domowe. Należy go przekazać odpowiedniemu punktowi zbiórki
odpadów w celu poddania recyklingowi wyposażenia elektrycznego i
elektronicznego. Utylizację należy przeprowadzać zgodnie z lokalnymi przepisami ochrony
środowiska dotyczącymi utylizacji odpadów.
W celu uzyskania bardziej szczegółowych informacji na temat przetwarzania, odzysku i
recyklingu tego produktu należy skontaktować się z lokalnym urzędem miasta, służbami
utylizującymi odpady domowe lub sklepem, w którym produkt został zakupiony.
Page 89

PL
87
Poradnik gotowania
MIKROFALE
Energia mikrofalowa przenika do żywności, jest przyciągana i wchłaniana przez wodę,
tłuszcz i cukier.
Mikrofale powodują gwałtowny ruch cząsteczek w żywności. Szybkie przemieszczanie się
tych cząsteczek powoduje tarcie, a wynikające z tego ciepło gotuje żywność.
GOTOWANIE
Naczynia kuchenne do gotowania mikrofalowego:
Naczynia kuchenne muszą umożliwiać przepływ energii mikrofalowej dla maksymalnej
wydajności.
Mikrofale mogą przenikać przez ceramikę, szkło, porcelanę i tworzywa sztuczne, a także
papier i drewno, ale odbijają się od metalu, takiego jak stal nierdzewna, aluminium i
miedź. Żywności nie wolno więc gotować w metalowych pojemnikach.
Żywność nadająca się do gotowania w kuchence mikrofalowej:
Wiele rodzajów żywności nadaje się do gotowania w kuchence mikrofalowej, w tym
świeże lub mrożone warzywa, owoce, makaron, ryż, ziarna, fasola, ryby i mięso. Sosy,
budyń, zupy, puddingi na parze, przetwory i sos chutney można również gotować w
kuchence mikrofalowej. Ogólnie rzecz biorąc, gotowanie w kuchence mikrofalowej jest
idealne dla każdej potrawy, która normalnie jest przygotowywana na płycie grzejnej.
Przykrywanie podczas gotowania
Przykrywanie potraw podczas gotowania jest bardzo ważne, ponieważ odparowana woda
rośnie jako para wodna i przyczynia się do procesu gotowania. Żywność można
przykrywać na różne sposoby: np. talerzem ceramicznym, osłoną z tworzywa lub folią
klejącą odpowiednią do mikrofal.
Czas odczekiwania
Po zakończeniu gotowania ważny jest czas odczekiwania, aby umożliwić wyrównanie
temperatury wewnątrz żywności.
Page 90

PL
88
Poradnik gotowania
Poradnik gotowania – mrożone warzywa
Użyć odpowiedniej szklanej misy pyreksowej z pokrywą. Gotować pod przykryciem przez
minimalny czas – patrz tabela. Kontynuować gotowanie, aby uzyskać pożądany rezultat.
Wymieszać dwa razy podczas gotowania i jeden raz po gotowaniu. Po ugotowaniu dodać
sól, zioła lub masło. Przykrywać podczas odczekiwania.
Żywność
Porcja
Zasilanie
Czas
(minuty)
Czas
odczekiwania
(minuty)
Instrukcje
Szpinak
150 g
P80
5–6
2–3
Dodać 15 ml (1 łyżka)
zimnej wody.
Brokuły
300 g
P80
8–9
2–3
Dodać 30 ml (2 łyżki) zimnej
wody.
Groszek
300 g
P80
7–8
2–3
Dodać 15 ml (1 łyżka)
zimnej wody.
Fasolka
szparagowa
300 g
P80
7½–8½
2–3
Dodać 30 ml (2 łyżki) zimnej
wody.
Warzywa mieszane
(marchew/groch/kuk
urydza)
300 g
P80
7–8
2–3
Dodać 15 ml (1 łyżka)
zimnej wody.
Warzywa mieszane
(w stylu chińskim)
300 g
P80
7½–8½
2–3
Dodać 15 ml (1 łyżka)
zimnej wody.
Page 91

PL
89
Poradnik gotowania
Poradnik gotowania – świeże warzywa
Użyć odpowiedniej szklanej misy pyreksowej z pokrywą. Dodać 30–45 ml (2–3 łyżki)
zimnej wody na każde 250 g, chyba że zalecana jest inna ilość wody – patrz tabela.
Gotować pod przykryciem przez minimalny czas – patrz tabela. Kontynuować gotowanie,
aby uzyskać pożądany rezultat. Mieszać raz w trakcie gotowania i raz po nim. Po
ugotowaniu dodać sól, zioła lub masło. Przykrywać podczas odczekiwania przez 3 minuty.
Wskazówka: Pokroić świeże warzywa na równe kawałki. Im mniejsze są krojone
kawałki, tym szybciej się gotują.
Wszystkie świeże warzywa należy gotować przy użyciu pełnej mocy mikrofali
(P100).
Żywność
Porcja
Czas
(minuty)
Czas
odczekiwania
(minuty)
Instrukcje
Brokuły
250 g
500 g
3½–4
6–7
3
Przygotować różyczki o równych
rozmiarach. Ustawić łodygi na środku.
Brukselka
250 g
5–5½
3
Dodać 60–75 ml (5–6 łyżek) wody.
Marchew
250 g
3½–4
3
Pokroić marchew na równe plasterki.
Kalafior
250 g
500 g
4–4½
6½–7½
3
Przygotować różyczki o równych
rozmiarach. Potnij duże różyczki na pół.
Ustawić łodygi na środku.
Cukinia
250 g
3–3½
3
Pokroić cukinię na plasterki. Dodać 30 ml
(2 łyżki) wody lub gałkę masła. Gotować, aż
będzie krucha.
Bakłażan
250 g
2½–3
3
Pokroić bakłażana na małe plasterki i
spryskać 1 łyżką soku cytrynowego.
Pory
250 g
3–3½
3
Pokroić pory na grube plasterki.
Grzyby
125 g
250 g
1–1½
2–2½
3
Przygotować małe grzyby w całości lub w
plasterkach. Nie dodawać wody. Spryskać
sokiem z cytryny. Przyprawić solą i
pieprzem. Odsączyć przed podaniem.
Cebula
250 g
4–4½
3
Pokroić cebulę na plasterki lub połówki.
Dodać tylko 15 ml (1 łyżka) wody.
Papryka
250 g
3½–4
3
Pokroić paprykę na małe plasterki.
Ziemniaki
250 g
500 g
3–4
6–7
3
Zważyć obrane ziemniaki i pokroić je na
podobne połówki lub ćwiartki.
Kalarepa
250 g
4½–5
3
Pokroić kalarepę na małe kostki.
Page 92

PL
90
Poradnik gotowania
Poradnik gotowania – ryż i makaron
Ryż: Stosować dużą szklaną miskę pyreksową z pokrywką – ryż
podwaja objętość podczas gotowania.Gotować pod przykryciem.
Po zakończeniu gotowania wymieszać przed odczekaniem oraz posolić
lub dodać zioła i masło.
Uwaga: ryż mógł nie wchłonąć całej wody po zakończeniu gotowania.
Makaron: Użyć dużej szklanej miski pyreksowej. Dodać wrzącą wodę, szczyptę soli i
dobrze wymieszać.Gotować bez przykrycia.
Mieszać od czasu do czasu podczas gotowania i po nim. Zakryć
podczas odczekiwania, a następnie dokładnie odsączyć.
Żywność
Porcja
Zasilanie
Czas
(minuty)
Czas
odczekiwania
(minuty)
Instrukcje
Ryż biały
(parboiled)
250 g
375 g
P100
15–16
17½–
18½
5
Dodać 500 ml zimnej wody.
Dodać 750 ml zimnej wody.
Ryż brązowy
(parboiled)
250 g
375 g
P100
20–21
22–23
5
Dodać 500 ml zimnej wody.
Dodać 750 ml zimnej wody.
Ryż mieszany
(ryż + ryż
dziki)
250 g
P100
16–17
5
Dodać 500 ml zimnej wody.
Ziarna
mieszane (ryż
+ ziarno)
250 g
P100
17–18
5
Dodać 400 ml zimnej wody.
Makaron
250 g
P100
10–11
5
Dodać 1000 ml gorącej wody.
ODGRZEWANIE
Kuchenka mikrofalowa odgrzeje potrawy przez ułamek czasu, jakiego potrzebują
tradycyjne piekarniki.
Używać poziomów mocy i czasów odgrzewania podanych w poniższej tabeli jako
wskazówki. Czasy w tabeli uwzględniają ciecze o temperaturze pokojowej około +18 do
+20°C lub schłodzoną żywność o temperaturze około +5 do +7°C.
Układanie i przykrywanie
Unikać odgrzewania dużych porcji, takich jak kawałki mięsa – mają tendencję do
nadmiernego podgrzewania i wysychania, zanim ich środek będzie bardzo gorący.
Odgrzewanie małych kawałków zakończy się większym sukcesem.
Poziomy mocy i mieszanie
Niektóre potrawy mogą być odgrzewane przy użyciu maksymalnej mocy, podczas gdy
inne powinny być
odgrzewane przy użyciu niższej mocy.
Sprawdź tabele pod kątem wskazówek. Ogólnie rzecz biorąc, lepiej jest odgrzewać
żywność przy użyciu niższego poziomu mocy, jeśli jest delikatna, w dużych ilościach, lub
jeśli jest prawdopodobne, że bardzo szybko się podgrzeje (nadziewane ciastka).
Dobrze wymieszać lub odwrócić potrawę podczas odgrzewania, aby uzyskać najlepsze
rezultaty. Jeśli to możliwe, wymieszać ponownie przed podaniem.
Page 93

PL
91
Poradnik gotowania
Należy zachować szczególną ostrożność podczas podgrzewania płynów i pokarmów dla
dzieci. Aby zapobiec wrzeniu z wyrzutem płynu i ewentualnemu oparzeniu, należy
mieszać przed podgrzaniem, w trakcie i po nim. Przechowywać je w kuchence
mikrofalowej podczas odczekiwania. Zalecamy umieszczenie plastikowej łyżki lub
szklanego patyczka w płynach. Unikać przegrzania (a tym samym zepsucia) żywności.
Zaleca się niedoszacowanie czasu gotowania i dodanie dodatkowego czasu
podgrzewania, jeśli to konieczne.
Czas podgrzewania i odczekiwania
Podczas odgrzewania żywności po raz pierwszy warto zanotować czas na przyszłość.
Zawsze upewnić się, że odgrzana żywność jest gorąca w całości.
Pozostawić żywność na krótki czas po odgrzaniu, aby wyrównać temperaturę. Zalecany
czas odczekiwania po odgrzaniu wynosi 2–4 minuty, chyba że w tabeli zaleca się inny
czas.
Należy zachować szczególną ostrożność podczas podgrzewania płynów i pokarmów dla
dzieci. Patrz także rozdział dotyczący środków ostrożności.
ODGRZEWANIE PŁYNÓW
Po wyłączeniu kuchenki należy zawsze odczekać co najmniej 20 sekund, aby wyrównać
temperaturę. W razie potrzeby mieszać podczas podgrzewania i ZAWSZE mieszać po
podgrzaniu. Aby zapobiec wrzeniu z wyrzutem płynu i ewentualnemu oparzeniu, należy
włożyć łyżkę lub patyczek szklany do napojów i mieszać przed podgrzaniem, w trakcie i
po nim.
ODGRZEWANIE POKARMÓW DLA DZIECI
POKARMY DLA DZIECI:
Opróżnić na głęboki talerz ceramiczny. Zakryć pokrywą z tworzywa. Dobrze wymieszać po
odgrzaniu! Pozostawić na 2–3 minuty przed podaniem. Wymieszać ponownie i sprawdzić
temperaturę. Zalecana temperatura podawania: 30–40°C.
MLEKO DLA NIEMOWLĄT:
Wlać mleko do wysterylizowanej szklanej butelki. Odgrzewać bez przykrycia. Nigdy nie
podgrzewać butelki dla niemowląt z przymocowanym smoczkiem, ponieważ butelka
może eksplodować w przypadku przegrzania. Dobrze wstrząsnąć przed odczekaniem i
ponownie przed podaniem! Przed podaniem dziecku należy zawsze dokładnie sprawdzić
temperaturę mleka lub pokarmu dla dzieci. Zalecana temperatura podawania: ok. 37°C.
KOMENTARZ:
Pokarm dla dzieci należy szczególnie dokładnie sprawdzić przed podaniem, aby zapobiec
oparzeniom.
Użyć poziomów mocy i czasów podanych w następnej tabeli jako wytycznych odgrzewania.
Page 94

PL
92
Poradnik gotowania
Odgrzewanie cieczy i żywności
Użyć poziomów mocy i czasów podanych w tej tabeli jako wytycznych odgrzewania.
Żywność
Porcja
Zasilanie
Czas
(minuty)
Czas
odczekiwania
(minuty)
Instrukcje
Napoje (kawa,
mleko, herbata,
woda o
temperaturze
pokojowej)
150 ml
(1 szklanka)
300 ml (2
szklanki)
450 ml (3
szklanki)
600 ml (4
szklanki)
P100
1–1½
1½–2
2½–3
3–3½
1–2
Wlać do kubka ceramicznego i
odgrzej bez przykrycia.
Umieścić 1 szklankę na
środku, 2 naprzeciwko siebie,
a 3 lub 4 w okręgu. Ostrożnie
wymieszać przed
odczekaniem i po nim.
Ostrożnie wyjmować je z
kuchenki.
Zupa
(schłodzona)
250 g
350 g
450 g
550 g
P100
2–2½
2½–3
3–3½
3½–4
2–3
Wlać do głębokiego talerza
ceramicznego lub głębokiej
miski ceramicznej. Przykryć
pokrywą z tworzywa. Dobrze
wymieszać po odgrzaniu.
Ponownie wymieszać przed
podaniem.
Potrawka
(schłodzony)
350 g
P80
4½–5½
2–3
Umieścić potrawkę w głębokim
talerzu ceramicznym. Przykryć
pokrywą z tworzywa. Mieszać
od czasu do czasu podczas
odgrzewania i ponownie przed
odczekaniem i podaniem.
Makaron z
sosem
(schłodzony)
350 g
P80
3½–4½
3
Makaron (np. spaghetti lub
makaron jajeczny) umieścić na
płaskim talerzu ceramicznym.
Pokryć folią mikrofalową.
Dobrze wymieszać przed
podaniem.
Makaron
nadziewany z
sosem
(schłodzony)
350 g
P80
4–5
3
Makaron z nadzieniem (np.
ravioli, tortellini) umieścić w
głębokim talerzu
ceramicznym. Przykryć
pokrywą z tworzywa. Mieszać
od czasu do czasu podczas
odgrzewania i ponownie przed
odczekaniem i podaniem.
Posiłek na
talerzu
(schłodzony)
350 g
450 g
550 g
P80
4½–5½
5–6
5½–6½
3
Umieścić posiłek z 2–3
schłodzonych składników na
naczyniu ceramicznym.
Pokryć folią mikrofalową.
Page 95

PL
93
Poradnik gotowania
Odgrzewanie pokarmu dla niemowląt i mleka
Użyć poziomów mocy i czasów podanych w tej tabeli jako wytycznych odgrzewania.
Żywność
Porcja
Zasilanie
Godzina
Czas
odczekiwania
(min.)
Instrukcje
Pokarm dla
dzieci
(warzywa +
mięso)
190g
P80
30 sek.
2–3
Opróżnić do głębokiego talerza
ceramicznego. Gotować pod
przykryciem. Mieszać po
zakończeniu gotowania. Odczekać
przez 2–3 minuty.
Przed podaniem dobrze wymieszać i
dokładnie sprawdzić temperaturę.
Kaszka dla
niemowląt
(ziarno +
mleko +
owoce)
190 g
P80
20 sek.
2–3
Opróżnić do głębokiego talerza
ceramicznego. Gotować pod
przykryciem. Mieszać po
zakończeniu gotowania. Odczekać
przez 2–3 minuty.
Przed podaniem dobrze wymieszać i
dokładnie sprawdzić temperaturę.
Mleko dla
niemowląt
100 ml
200 ml
P30
30–40
sek.
1 min.
do
1 min.
10 sek.
2–3
Dobrze wymieszać lub wstrząsnąć i
wlać do wysterylizowanej szklanej
butelki. Umieścić na środku talerza
obrotowego. Gotować bez przykrycia.
Dobrze wstrząsnąć i odstawić na co
najmniej 3 minuty. Przed podaniem
dobrze wstrząsnąć i dokładnie
sprawdzić temperaturę.
Page 96

PL
94
Poradnik gotowania
GRILL
Grzałka grilla znajduje się pod sufitem komory. Działa, gdy drzwi są zamknięte, a talerz
się obraca. Obrót talerza sprawia, że jedzenie rumieni się bardziej równomiernie.
Wstępne podgrzewanie grilla przez 4 minuty przyspieszy przyrumienienie potrawy.
Naczynia do grillowania:
Powinny być ognioodporne i mogą zawierać metal. Nie używać żadnych plastikowych
naczyń, ponieważ mogą się stopić.
Żywność nadająca się do grillowania:
Kotlety, kiełbaski, steki, hamburgery, kawałki bekony i szynki wędzonej, cienkie porcje
ryb, kanapki i wszelkiego rodzaju tosty z dodatkami.
WAŻNA UWAGA:
Należy pamiętać, że jedzenie musi być umieszczone na wysokiej półce, chyba że
zalecana jest inna instrukcja.
MIKROFALE + GRILL
Ten tryb pieczenia łączy ciepło promieniowania pochodzące z grilla z szybkością
gotowania mikrofalowego. Działa tylko wtedy, gdy drzwi są zamknięte i talerz się obraca.
Dzięki obrotowi talerza potrawy równomiernie się przyrumieniają.
Naczynia do gotowania w kuchence mikrofalowej z grillem
Używać naczyń kuchennych, przez które przechodzą mikrofale. Naczynia powinny być
ognioodporne. Nie używać naczyń metalowych w trybie mieszanym. Nie używać żadnych
plastikowych naczyń, ponieważ mogą się stopić.
Jedzenie nadające się do gotowania w kuchence mikrofalowej z grillem:
Potrawy nadające się do gotowania w trybie mieszanym obejmują wszystkie rodzaje
gotowanych potraw, które wymagają odgrzania i przyrumienienia (np. pieczone
makarony), jak również potrawy, które wymagają krótkiego czasu gotowania, aby
przyrumienić wierzch potrawy. Ponadto tryb ten może być stosowany w przypadku
grubych porcji żywności, którym służy brązowa i chrupiąca skórka (np. kawałki kurczaka
przy obracaniu ich w połowie gotowania). Więcej szczegółów można znaleźć w tabeli
grilla.
Jeśli żywność ma być zarumieniona po obu stronach, należy ją odwrócić.
Page 97

PL
95
Poradnik gotowania
Przewodnik grillowania – świeża żywność
Podgrzewać grill z funkcją grilla przez 4 minuty.
Użyć poziomów mocy i czasów podanych w tej tabeli jako wytycznych grillowania.
Świeża
żywność
Porcja
Zasilanie
1. Czas
dodatkowy
(min)
2. Czas
dodatkowy
(min)
Instrukcje
Kromki tostu
4 szt.
(każda 25
g)
Tylko grill
3½–4½
3–4
Położyć kromki tostu obok siebie
na półce.
Bułki
(upieczone)
2–4
kawałki
Tylko grill
2½–3½
1½–2½
Najpierw ułożyć bułki dolną
stroną do góry w okręgu
bezpośrednio na talerzu
obrotowym.
Grillowane
pomidory
200 g
(2 szt.) 400
g
(4 szt.)
C2
3½–4½
5–6
-
Pokroić pomidory na pół. Położyć
trochę sera na wierzchu.
Rozmieścić w okręgu w płaskim
szklanym naczyniu pyreksowym.
Położyć na półce.
Tosty
pomidorowoserowe
4 szt. (300
g)
C2
4–5
-
Najpierw upiec kromki chleba.
Położyć tosty z dodatkiem na
półce. Odczekać 2–3 minuty.
Tost hawajski
(ananas,
szynka,
plasterki sera)
2 szt. (300
g)
4 szt. (600
g)
C1
3½–4½
6–7
-
Najpierw upiec kromki chleba.
Położyć tosty z dodatkiem na
półce. Położyć dwa tosty
naprzeciwko na półce. Odczekać
2–3 minuty.
Pieczone
ziemniaki
250 g
500 g
C1
4½–5½
6½–7½
-
Pociąć ziemniaki na pół. Umieść
je w okręgu na półce z przyciętą
stroną obróconą do grilla.
Zapiekanka
ziemniaczana
/ warzywa
(schłodzone)
500 g
C1
9–11
-
Włożyć świeżą zapiekankę do
małego szklanego naczynia
pyreksowego do grilla. Położyć
naczynie na półce. Po gotowaniu
odczekać 2–3 minuty.
Kawałki
kurczaka
450 g
(2 szt.) 650
g
(2–3 szt.)
850 g
(4 szt.)
C2
7–8
9–10
11–12
7–8
8–9
9–10
Posmarować kawałki kurczaka
olejem i przyprawami. Umieścić
je w okręgu z kośćmi pośrodku.
Położyć jeden kawałek nie do
środka półki. Odczekać 2–3
minuty.
Pieczony
kurczak
900 g
1100 g
C1
10–12
12–14
9–11
11–13
Posmaruj kurczaka olejem i
przyprawami. Umieścić kurczaka
najpierw piersią skierowaną w
dół, a następnie drugą stroną
skierowaną w górę bezpośrednio
na talerzu obrotowym. Po
grillowaniu odczekać 5 minut.
Page 98

PL
96
Poradnik gotowania
Przewodnik grillowania – świeża żywność
Świeża
żywność
Porcja
Zasilanie
1. Czas
dodatkowy
(min)
2. Czas
dodatkowy
(min)
Instrukcje
Kotlety
jagnięce
(medium)
400 g
(4 szt.)
Tylko grill
10–12
8–9
Posmarować jagnięcinę olejem i
przyprawami. Położyć je w
okręgu na półce. Po grillowaniu
odczekać 2–3 minuty.
Steki
wieprzowe
250 g
(2 szt.)
500 g
(4 szt.)
MW+
Grill
C2
6–7
8–10
(Tylko grill)
5–6
7–8
Posmarować steki wieprzowe
olejem i przyprawami. Położyć je
w okręgu na półce. Po
grillowaniu odczekać 2–3 minuty.
Pieczona ryba
450 g
650 g
C2
6–7
7–8
7–8
8–9
Posmarować skórę całej ryby
olejem, ziołami i przyprawami.
Położyć ryby obok siebie (głowa
– ogon) na półce.
Pieczone
jabłka
2 jabłka (ok.
400 g)
4 jabłka (ok.
800 g)
C2
6–7
10–12
-
Napełnić jabłka rodzynkami i
dżemem. Położyć plasterki
migdałów na wierzchu. Umieścić
jabłka na płaskim szklanym
talerzu pyreksowym. Umieścić
naczynie bezpośrednio na
talerzu obrotowym.
Page 99

PL
97
Poradnik gotowania
Przewodnik grillowania – mrożonki
Użyć poziomów mocy i czasów podanych w tej tabeli jako wytycznych grillowania.
Świeża żywność
Porcja
Zasilanie
1. Czas
dodatkowy
(min)
2. Czas
dodatkowy
(min)
Instrukcje
Bułki (każda ok.
50 g)
2 szt. 4 szt.
MW+
Grill
C2 1½–2
2½–3
Tylko grill
2–3
2–3
Bułki ułożyć w okręgu dolną
stroną do góry bezpośrednio
na talerzu obrotowym.
Grillować drugą stronę bułek
do wybranego poziomu
chrupkości. Odczekać 2–5
minut.
Bagietki / chleb
czosnkowy
200–250 g
(1 szt.)
MW+
Grill
C1 3½–4
Tylko grill
2–3
Zamrożoną bagietkę umieścić
ukośnie na papierze do
pieczenia na półce. Po
grillowaniu odczekać 2–3
minuty.
Zapiekanka
(warzywa lub
ziemniaki)
400 g
C1
13–15
-
Umieścić mrożoną zapiekankę
w małym szklanym naczyniu
pyreksowym. Położyć
naczynie na półce. Po
gotowaniu odstawić na 2–3
minuty.
Makaron
(cannelloni,
macaroni,
lasagne)
400 g
C1
14–16
-
Umieścić mrożony makaron w
małym, płaskim, prostokątnym
szklanym naczyniu
pyreksowym. Położyć
naczynie bezpośrednio na
talerzu obrotowym. Po
gotowaniu odstawić na 2-3
minuty.
Zapiekanka
rybna
400 g
C1
16–18
-
Zamrożoną zapiekankę rybną
umieścić w małym, płaskim,
prostokątnym szklanym
naczyniu pyreksowym.
Położyć naczynie
bezpośrednio na talerzu
obrotowym. Po gotowaniu
odstawić na 2-3 minuty.
 Loading...