

Page 1
HOBS
USER INSTRUCTIONS
GB - IE
CANDY HOOVER GROUP S.R.L. • Via Privata Eden Fumagalli • 20047 Brugherio Milano Italy
Page 2

CONTENT
GB - IE
Safety Instuructions
1. Instructions For The Installer
1.1. Bulding In
1.2. Suitable Location
2. Electrical Connection (For U.K. Only)
2.1. Electrical Connection
2.2. Gas Connection (For U.K. Only)
Adapting The Hob To Different Types Of Gas
2.3.
2.4. Regulating The Minimum Flame
3. Use Of Hob - User Instructions
3.1. Using
3.2. Use Of Cooktop Electrical Plates
4. Maintenance and Cleaning
5.
Aftercare
6. Protection Of The Environment
Gas Type Tables............................................................................08
The Gas Burner
...................................................................................07
....................................................................04
..................................................05
................................................................................05
....................................................................05
....................................05
..............................................................05
..............................................05
.........................06
..............................................06
...............................................06
.............................................................06
............................................06
......................................................07
..............................................07
Page 3
03
accessible space
Figure 3
Min 10 mm
Sp.da 25 a 45 mm
C
AB
Bracket
Seal
60 cm
Figure 2Figure 1
2
2
240 cm
Figure 5Figure 4
120 cm
180 cm
2
2
INJECTOR
1/2 GAS
CONICAL
CYLINDRICAL
CONICAL
Figure 6
Figure 7
Figure 8
YES
Figure 10 Figure 11
Page 4

SAFETY INSTURUCTIONS
WARNING:The appliance andits accessible parts become hotduring use. Care should be taken to avoid
touching heating elements.
• Children under 8 Year of age must be kept away from the appliance unless they are continuously
supervised.
• This appliance can be used by children aged from 8 years and above and persons with reduced
physical, sensory or mental capabilities or lack of experience and knowledge if they have been given
supervision or instruction concerning use of the appliance in a safe way and understand the hazards
involved.
• Children must not play with the appliance.
• Cleaning and user maintenance shall not be made by children without supervision
WARNING:Unattended cooking on a hob with fat or oil can be dangerous and may result in fire.
• NEVER try to extinguish a fire withwater, but switch off the appliance and thencover flame e.g. with a lid
or a fire blanket.
WARNING:Danger of fire: do not store items on the cooking surfaces.
WARNING:If the surface is cracked, switch off the appliance to avoid the possibility of electric shock.
• Do not use a steam cleaner for cleaning operations.
•Any spillage should be removed from the lid before opening.
• The hob surface must be allowed to cool down before closing the lid.
• This appliance is not intended to be operated by means of an external timer or separate remote-control
system.
• The means for disconnection must be incorporated in the fixed wiring in accordance with the wiring
rules.
• The instructions state the type of cord to be used, taking into account the temperature of the rear surface
of the appliance.
• If the supply cord is damaged, it must be replaced by a special cord or assembly available from the
manufacturer or its service agent.
CAUTION: In order to avoid a hazard due to inadvertent resetting of the thermal cutout, this appliance
must not be supplied through an external switching device, such as a timer, or connected to a circuit that
is regularly switched on and off by the utility.
• This appliance must be installed in accordance with the regulations in force and only used in a well
ventilated space. Read the instructions before installing or using this appliance.
• "These instructions are only validif the country symbol appearson the appliance. Ifthe symbol does not
appear on the appliance, it is necessary to refer to the technical instructions which will provide the
necessary instructions concerning modification of the appliance to the conditions of use of the country".
• "Prior to installation, ensure that the local distribution conditions (nature of the gas and gas pressure)
and the adjustment of the appliance are compatible";
• "The adjustment conditions for this appliance are stated on the label (or data plate)";
• "This appliance is not connected to a combustion products evacuation device. It shall be installed and
connected in accordance with current installation regulations. Particular attention shall be given to the
relevant requirements regarding ventilation".
• The use of a gas cooking appliance results in the production of heat and moisture in the room in which it
is installed. Ensure that the kitchen is well ventilated: keep natural ventilation holes open or install a
mechanical ventilation device (mechanical extractor hood). Prolonged intensive use of the appliance
may call for additional ventilation, for example opening of a window, or more effective ventilation, for
example increasing thelevel of mechanical ventilation where present.
04 GB
Page 5

1. INSTRUCTIONS FOR THE INSTALLER
INSTALLING A DOMESTIC APPLIANCE CAN BE A COMPLICATED OPERATION WHICH IF NOT CARRIED OUT CORRECTLY, CAN SERIOUSLY
AFFECT CONSUMER SAFETY. IT IS FOR THIS REASON THAT THE TASK SHOULD BE UNDERTAKEN BY A PROFESSIONALLY QUALIFIED
PERSON WHO WILL CARRY IT OUT INACCORDANCE WITH THE TECHNICAL REGULATIONS IN FORCE. IN THE EVENT THAT THISADVICE IS
IGNORED AND THE INSTALLATION IS CARRIED OUTBYAN UNQUALIFIED PERSON, THE MANUFACTURERDECLINESALL RESPONSIBILITY
FOR ANY TECHNICAL FAILUREOF THEPRODUCT WHETHER OR NOT IT RESULTS IN DAMAGE TO GOODS OR INJURY TO INDIVIDUALS.
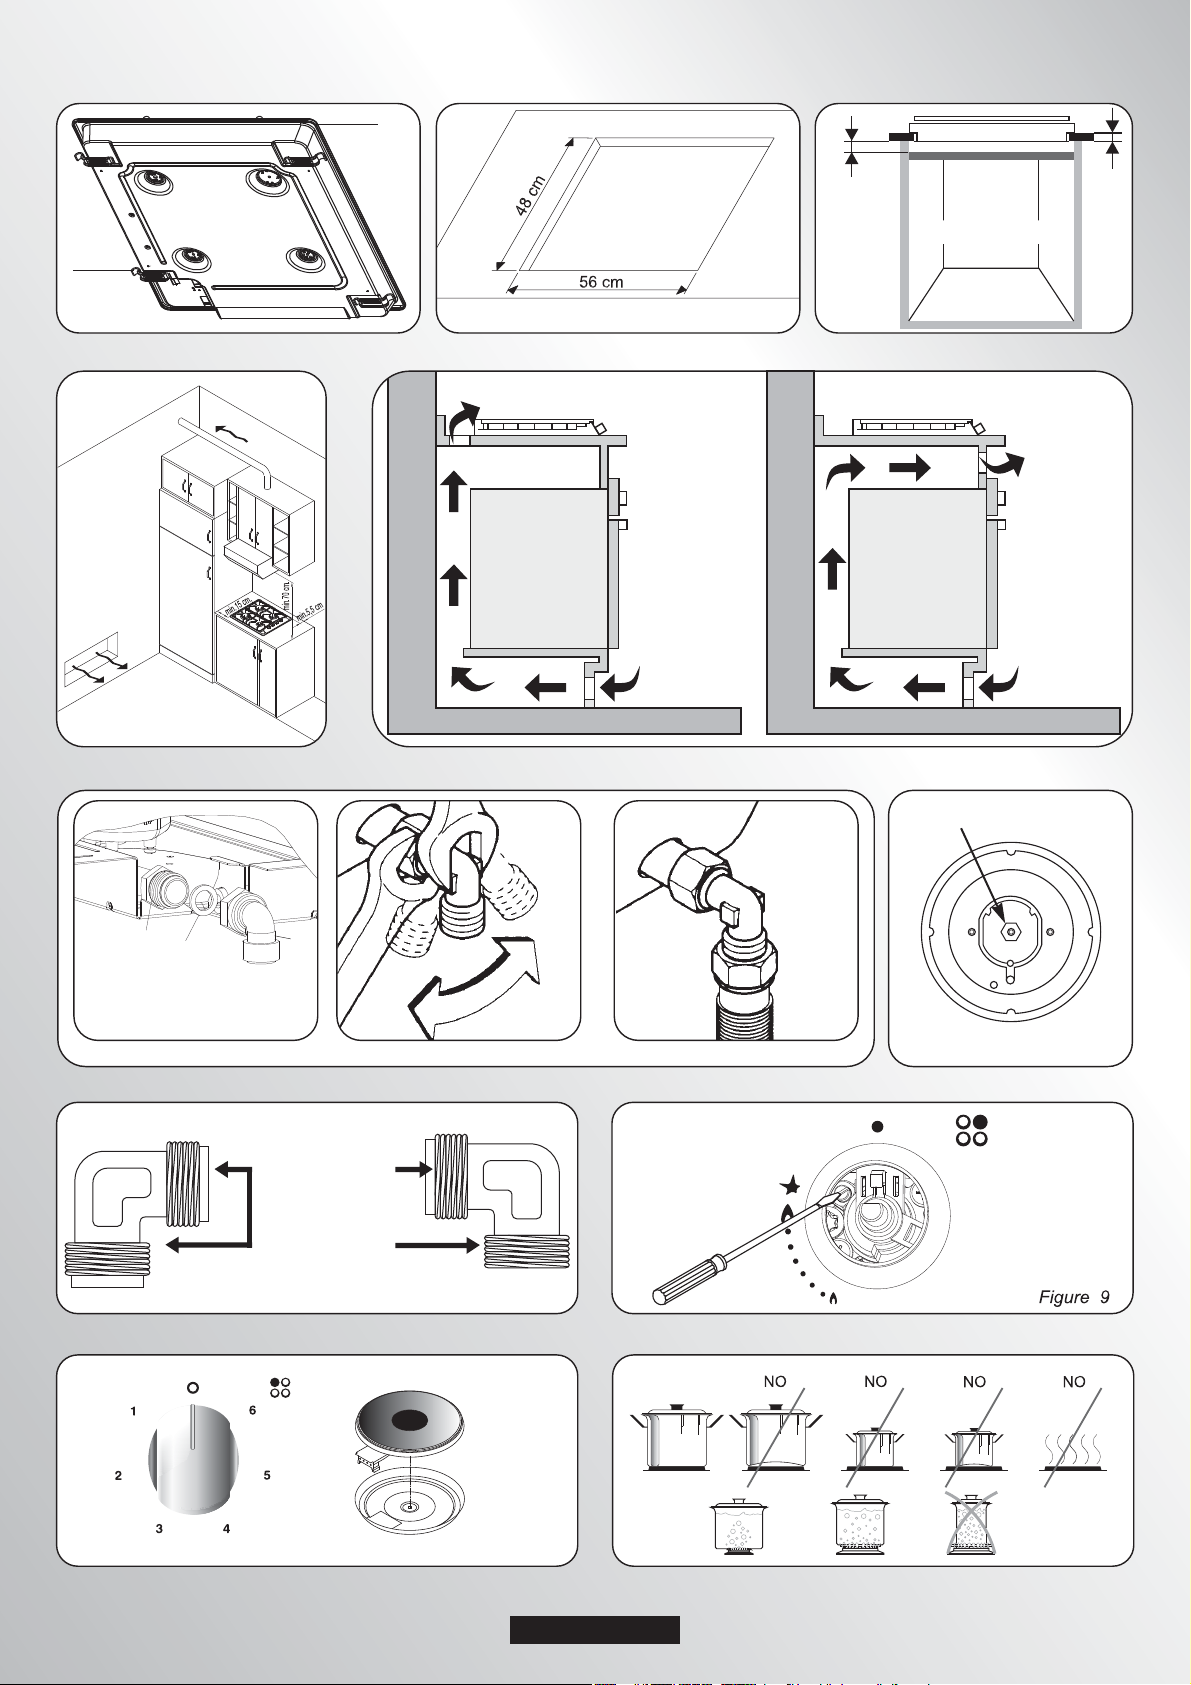
1.1 BUILDING IN
The hob may be installed in any worktop which is heat resistant to a
temperature of 100°C, and has a thickness of 25-45 mm. The
dimensions of the insert to be cut out of the worktop are in shown in
Figure 2.
If the Hob is fitted next to a cabinet on either side, the distance
between the Hob and the cabinet must be at least 15 cm (see Figure
4); while the distance between the hob and the rear wall must be at
least 5,5 cm.
The distance betweenthehob and any other unitor appliance above it
(e.g.Anextractorhood) must be no less than 70 cm .(Figure 4)
When there is an accessible space between the built-in hob and the
cavity below, a dividing wall made of insulating material should be
inserted (wood or a similar material)(Figure3).
Important - The diagram in figure1showshow the sealant should
be applied.
The Hob unit is fitted by attaching the Fixing Clamps supplied, using
the holes at the base of theunit.
If a hob of 60 cm is fitted abovean oven which is not equipped with fan
cooling system it is recommended that openings are created within
the built in furniture to ensure correctaircirculation.
The size of these openings must be at least 300 cm2 and placed as
shown in Figure 5.
When a 75 cm hob is fitted over a built in oven, the latter must be fan
cooled.
This applianceis not intended to be operated by means of an external
timer or separate remote-control system.
Brown Wire Live Connection
Note: We do not advocate the use of earth leakage devices with
electric cooking appliances installed to spur points because of the
«nuisance tripping» which may occur. You are again reminded that
the appliance must be correctly earthed, the manufacturer declines
any responsibility for any event occurring as a result of incorrect
electrical installation.
2.1. ELECTRICAL CONNECTION
Check the data onthe ratingplate, locatedon the outsideof theunit, to
ensure that the supply and input voltageare suitable.
Before connection, check the earthing system.
By Law, this appliance must be earthed. If this regulation is not
complied with, the Manufacturer will not be responsible for any
damage caused to persons or property. If a plug is not already
attached, fit a plug appropriate tothe load indicated onthe rating plate.
The earth wire is coloured yellow/green. The plug should always be
accessible.
Where the Hob is connected direct to the electricity supply, a circuit
breaker must be fitted.
If the power supply cord is damaged this is to be replaced by a
qualified engineer so as to preventany potential risk.
The earth wire ( green and yellow coloured ) must be at least 10 mm
longer than the live and neutral wires.
The section of the cable used must be of the correct size in relation to
the absorbed power of the hob.
Please check rating plate for the power details and ensure that the
power supply cord is of the type3x0.75 mm² H05RR-F.
1.2. SUITABLE LOCATION
This appliance must be installed in accordance with the regulations in
force and only used in a well ventilated space. Read the instructions
before installing or using this appliance.
A gas-powered cooking appliance produces heat and humidity in the
area in which it is installed. For this reason you should ensure good
ventilation either by keeping all natural air passages open or by
installing an extractor hood with an exhaust flue. Intensive and
prolonged use of the appliance may require extra ventilation, such as
the opening of a window or an increase in speed of the electric fan, if
you have one.
If a hood can not be installed, an electric fan should be fitted to an
outside wall or window to ensurethat there is adequate ventilation.
The electric fan should be able tocarry out a completechange of air in
the kitchen 3-5 times every hour. The installer should follow the
relevant national standards.
2. ELECTRICAL CONNECTION (FOR U.K. ONLY)
Warning - this appliance must be earthed
This appliance is designed for domestic use only. Connection to the
main supply must be made by a competant electrician, ensuring that
all current regulations concerning such installationsareobserved.
The appliance mustonly be connected toa suitably rated spurpoint, a
3 pin13 amp plug/socket is not suitable.Adoublepole switch must be
provided and the circuit must have appropriate fuse protection.
Further details of the power requirement of the individual product will
be found in the users’instruction and on the appliance rating plate. In
the case of built-in product you are advised, should you wish to use a
longer cablethan the onesupplied, that asuitably rated heatresistant
type must be used.
The wiring must be connected to themainssupplyasfollows:
CONNECT TO SPUR TERMINAL
Green & Yellow Wire Earth Connection
Blue Wire Neutral Connection
LIVE
Mains Supply
If an appliance is not fitted with a supply cord and a plug, or with other
means for disconnection from the supply mains having a contact
separation in all poles that provide full disconnection under
overvoltage category III conditions, the instructions shall state that
means for disconnection must be incorporated in the fixed wiring in
accordance with the wiring rules.
EARTH
NEUTRAL
Brown Wire
L
Green/Yellow Wire
Blue Wire
N
Power Cable
2.2. GAS CONNECTION
These instructions are for qualified personnel, installation of
equipment must be in line with the relevant national standard. (For
U.K. only: by law the gas installation\commissioning must be
carried out by a "Gas Safe" installer)
All work must be carried out withthe electricity supply disconnected.
The rating plate on the hob shows the type of gas with which it is
designed to be used. Connection to the mains gas supply or gas
cylinder should be carried out after having checked that it is regulated
for the type of gas with which it will be supplied. If it is not correctly
regulated see the instructions in the following paragraphs to change
gas setting.
For liquid gas (cylinder gas) use pressure regulators which comply
with the relevant national standards.
Use only pipes,washers and sealing washers which comply with the
relevant national standards.
For some models a conic link isfurnished to outfit for the installation in
the countries where this type of link is obligatory; in picture 8 it is
pointed out how to recognize the different types of links (CY =
cylindrical, CO = conic). In every case the cylindrical part of the link
has to be connected to the hob.
When connecting the hob to the gas supply via use offlexible hoses
please ensure that the maximum distance covered by the hose does
not exceed 2 metres.
05 GB
Page 6

The flexible tube shall be fitted in such a way that it cannot come into
contact with a moveable part of the housing unit (e.g. a drawer) and
does not pass through any space where it may become crushed/
kinked or damaged in any way.
To prevent any potential damage to the hob please carry out the
installation following this sequence (picture 6):
1)As illustrated, assemble parts in sequence:
A: 1/2 MaleAdaptor Cylindirical
B: 1/2 Seal
C: 1/2 Female Gas Adaptor Conical-Cylindiricalor
Cylindirical-Cylindirical
2)Tighten the joints with the spanner, remembering to twist the
pipes into position.
3)Attach fitting C to mains gas supply using rigid copper pipe or
flexible steel pipe.
IMPORTANT: carry out a final check for leaks on the pipe
connections using a soapy solution. Also,NEVER USE A FLAME.
make sure that the flexible pipe cannot come into contact with a
moving part of the cabinet (eg.adrawer) and that it is not situated
where it could be damaged.
Warning: If gascan besmelt in the vicinityof this appliance turnoff the
gas supply to the appliance and call the engineer directly. Do not
search for a leak with a nakedflame.
For models fitted with a safety tap (which cuts-off the flow of gas if the
flame is accidentally extinguished) the burners are ignited and
described above, but care must be taken.
Prior to switching on the gas hob ensure that the burners and burner
caps are correctly placed within their position.
GENERALADVISE
For best results, use cooking vessels with a flat surface. The size of
the surface should match the gas burnerside as follows. Table A.
Burner Type
Auxiliary Burner
AUX
SR
Semi Rapid Burner
R
Rapid Burner
Ø pan / pot
(cm)
12 - 18
18 - 24
24 - 26
Power
(kW)
1
1,7
3
G20/20 mbar
(Methane)
95 I/h
162 I/h
257 I/h
G30/31 50 mbar
(LPG)
73 g/h
124 g/h
218 g/h
Table A
For smaller containers the gas burner should be regulated so that the
flame does not overlap the base of the pan. Vessels with a concave or
convex base should not be used.
WARNING: If a flame is accidentally extinguished, turn the knob
to the off position and do not attempt to re-ignite if for at least 1
minute.
If over the years the gas taps become stiff to turn it is necessary to
lubricate them.
Such operation must be carried out only by qualified Service
Engineers.
2.3. ADAPTING THE HOB TO DIFFERENT
TYPES OF GAS
To adapt the Hob for use with different types of gas, carry out the
following instructions:
•remove the grids and burners
•insert on hexagonal spanner (7 mm) into the burner support (Figure
7)
•Unscrew the injector and replace it with one suitable for the gas tobe
used (see gas type table)
2.4. REGULATING THE MINIMUM FLAME
After lighting the burners, turn the control knob to the minimum setting
and then remove the knob (this can easily be removed by applying
gentle pressure).
Using a small «Terminal» type screwdriver the regulating screw can
be adjusted as in Turning the screw clockwise reduces theFigure 9.
gas flow, whilst turning it anticlockwise increases the flow – Use this
adjustment to obtain a flame of approximately 3 to 4 mm in length and
then replace the control knob.
When the gas supply available is LPG - the screw to set the idle flame
must be turned (clockwise) to the endstop.
When you have carried outthe new gasregulation, replace theold gas
rating plate on your appliance with one(supplied with hob) suitable for
the type of gas for which ithas been regulated.
3. USE OF HOB - USER INSTRUCTIONS
This appliance must only be used for the purpose for which it is
intended, domestic cooking, and any other use will be considered
improper and could therefore be dangerous. The Manufacturer will
not be responsible for any damage or loss resulting from improper
use.
3.1. USING THE GAS BURNER
To ignitethe burners,place a lighted taper close to the burner,press in
and turn the control knob anti-clockwise.
If the burners have not been used for a couple of days, wait for a few
seconds before lightingthe burner, this will allow any airpresent in the
pipes to escape.
For appliances fitted with electronic ignitioncarry out the following:
• push in and turn the knobanticlockwise to the ignition symbol.
• ignite the burner by pressing thesparker button.
For hobs fitted withautomatic ignition simplypush inand turnthe knob
to the ignition symbol.
The ignition system will continue to generate sparks as long as the
control knob is being pressed.
If the burner has not ignited within 5 seconds, turn the knob to the 0
position and repeat the operation.
3.2. USE OF COOKTOP ELECTRICAL PLATES
Turn the knob to the position for the required temperature of the hot plate.
The indicator lightof the hot plate will come on andthe hotplate will start to
heat.
When cookingis completed, turn the knob to the “ O” position. (Figure ).10
Do not leave the hot plate turned on without a pan on it.The diameter and
the base of the pan you use is critical. The maximum diameter of the pan
base is 14 cm andthe base should be flat.
Leave the hot plate to heat up for 5 minutes before placing a pan on it the
first time you use it. This will allow the heat resistant coating of the plate to
harden due to burning.
Use a wet cloth and detergent for cleaning the hot plates. Do not remove
food residues from the hot plates with a knife or any other hard, sharp
object.
Turn on the hotplate for a fewmoments to dry it aftercleaning. However, it
must never be left onfor more than a few moments without a pan on top.
Power (Watt)
0
135 W
220 W
300 W
850 W
1150 W
1500 W
0
1
2
3
4
5
6
Power (Watt)
0
100 W
180 W
250 W
500 W
750 W
1000 W
Position
Suitability of Cooking Pans (Figure 11)
Keep in mind that largerpans have larger heating surfaces.
This will help them to cook the food faster than pans with smaller heating
surfaces.
Always use pan sizes proportionate to the amount of the food to be
cooked. In order to prevent splashing, do not use very small pans,
especially for foods with excess liquid. If you use excessively large pans
for quick cooked foods, sausages and liquids will stick and residues will
remain attached to the panafter being emptied.
Closed pans and baking trays or moulds are suggested for cooking
sweets. Splashed sugar and juices from an open pan may stick to the
cooker surface and will bedifficult to remove.
This is especially important for pans used for roasting or pressurized
cooking at high temperature.
Do not leave burners unattended without a pan or with an empty pan on
top.
Check the suitability of cookingpans with respect to the following criteria;
They should be heavy.
They should completely cover the burner surface; they may be a little
bigger but no smaller.
Base surfaces should be completely flat and fit well on the cooking
surface.
•For the best use of the electric hotplates and to minimize energy
consumption, only pans with smooth flat bases should be used. The size of
the panshould be as close aspossible to the diameter ofthe hotplate, and
never smaller. The base of the pan should be dry and spillage should be
avoided. Empty pans must not be left on the plates, and the plates should
not be left switched onwithout a pan.
06 GB
Explanation
Off
Heating
Cooking at low temperature
Cooking at low temperature
Cooking, Roasting, Boiling
Cooking, Roasting, Boiling
Cooking, Roasting, Boiling
Page 7

4. MAINTENANCE AND CLEANING
6. PROTECTION OF THE ENVIRONMENT
Before cleaning the hob, ensure the appliance has cooled down.
Remove the plug from the socket or (if connected directly) switch off
the electricity supply.
Cleaning and user maintenance shall not be made by children without
supervision.
Never use abrasives, corrosive detergents, bleaching agents or
acids. Avoid any acid or alkaline substances (lemon, juice, vinegar
etc.) on the enamelled, varnished orstainless steel sections.
When cleaning the enamelled, varnished or chrome sections, use
warm soapy water or a non caustic detergent. For stainless steel use
an appropriate cleaning solution.
The burnerscan be cleaned with soapy water.To restore their original
shine, use a household stainless steel cleaner.After cleaning, dry the
burners and replace.
It is important the Burners are replacedcorrectly.
Chromed grids and burners
Chromed grids and burners have a tendency to discolour with use.
This does not jeopardize the functionality ofthe hob.
Our After Sales Service Centre can provide spare parts if required.
5. AFTERCARE
Before calling out a Service Engineer pleasecheck the following:
• that the plug is correctly insertedand fused;
• that the gas supply is notfaulty.
If the fault cannot be detected:
Switch off the appliance and call the After Service Centre. DO NOT
TAMPER WITH THE APPLIANCE.
This appliance is marked according to the European
directive 2012/19/EU on Waste Electrical and
Electronic Equipment (WEEE). WEEE contains both
polluting substances (which can cause negative
consequences for the environment) and basic
components (which can be re-used). It is important to
have WEEE subjected to specific treatments, in order
to remove and dispose properly all pollutants, and
recover and recycle all materials.
Individuals can play an important role inensuring that WEEE does not
become an environmental issue; it is essential to follow some basic
rules:
• WEEE shall not be treated ashousehold waste.
• WEEE shall be handed over to the relevant collection points
managed by the municipality or by registered companies. In many
countries, for large WEEE, home collection couldbe present.
• When you buy a new appliance, the old one may be returned to the
retailer who has to collect it free of charge on a one-to-one basis, as
long as the equipment is of equivalent type and has the same
functions as the supplied equipment.
Declaration of compliance: This equipment, in the parts intended to
come into contactwith food,complies withthe regulationslaid downin
EEC directives 89/109.
The appliance complies with European Directives 2009/142/EC and
subsequent amendments.
By placing the mark on this product, we are confirming
compliance to all relevant European safety, health and environmental
requirements which are applicable in legislationfor this product.
The Manufacturer willnot be responsible for any inaccuracy resulting from
printing or transcript errors contained in this brochure. We reserve the right
to carry out modifications to productsas required, including the interestsof
consumption, without prejiudice to the characteristics relating to safety or
function.
BUILT IN HOBS
1
Burner
Type / reference
Flame failure device
Auxiliary burner ( AUX Ø 50 mm)
Electric Plate
Semirapid burner ( SR Ø 75 mm)
Rapid burner ( R Ø 100 mm)
Installed Gas Type / Power:
Gas Power
G 20/20 mbar (methane)
G 30/31 50 mbar (LPG)
Installation Class
Voltage / Frequency V / Hz
Electrical input power
Electric ignition
Product dimension
This appliance has been designed for non-professional, i.e. domestic, use.
4 gas
R /2SR / AUX
S60 / HBGS
YES
1
2
1
7.1 kW
676 l/h
38 g/h
5
3
220-240 V / 50-60 Hz
15 W
YES
585 x 510
Table 1
2
3 gas
R / SR / AUX / E
S60 / HBGS
YES
1
1
1
1
5.4 kW
514 l/h
415 g/h
3
220-240 V / 50-60 Hz
1500 W
YES
585 x 510
07 GB
Page 8

GAS TYPEHOBS
II 2H3+
Tipo di gas/Gas type/Gassoort/Gasart/Type de gaz
Tipo de gás/Tύттоς αερіоυ/Gaz type/Gaz Tipi
Pressione gas/Gas pressure/Pression gaz/
Gasdruck/Presion gas/Πίεση του αερίου/
Pressão gás/Tlak plina/Ciśnienie gazu/
Gáz nyomása/Gaz Basıncı
CY, CZ, GB, GR, IE, IT, PT, SI, ES, CH,TR
P (Kw)
Max (kW) Min (kW)
A
SR
R
Tipo di gas/Gas type/Gassoort/Gasart/Type de gaz/
Tipo de gás/Tύттоς αερіоυ/Tipo de gás/Gaz type/
Vrsta plina/Pritisk plina/Typ gazu/Rodzaj gazu
Pressione gas/Gas pressure/Pression gaz/
Gasdruck/Presion gas/Πίεση του αερίου/
Pressão gás/Tlak gasa/Tlak plina/Ciśnienie gazu/
1.00
1.70
2.70
Gáz nyomása
P (Kw)
0.60
0.85
1.20
Max (kW) Min (kW)
A
SR
R
Pressione gas/Gas pressure/Pression gaz/
Gasdruck/Presion gas
1.00
1.70
2.70
0.60
0.85
1.20
G20
20 mbar
Ø
mm
0.83
1.00
1.20
G30 / G31
28-30/37 mbar
Ø mm
0.50
0.65
0.85
50/50 mbar
P (Kw)
Max (kW) Min (kW)
A
SR
R
Wichtig: - AT, DE, CH G30/31 - 50Österreich, Deutschland und der Schweiz
mbar (3B/P) G30/31 - 50 mbar (3B/P)Beim Gastyp dagegen müssen die
Gasdüsen Art.-Nr. 35000230 benutzt werden. Bitte bestellen Sie die
entsprechenden Gasdüsensätze bei unserem autorisierten Werkskundendienst.
1.00
1.70
3.00
0.60
0.85
1.20
Ø mm
0.45
0.60
0.68
08
۳,۰۰
٦۸
Page 9

Page 10
ﺔﺌﻴﺒﻟﺍ ﺔﻳﺎﻤﺣ -٦
ﺔﻴﺑﻭﺭﻭﻷﺍ ﺕﺎﻬﻴﺟﻮﺘﻠﻟ ًﺎﻘﺒﻃ ﺯﺎﻬﺠﻟﺍ ﺍﺬﻫ ﺰﻴﻴﻤﺗ ﻢﺗ
ﺔﻴﺋﺎﺑﺮﻬﻜﻟﺍ ﺕﺍﺪﻌﻤﻟﺍ ﺕﺎﻳﺎﻔﻨﺑ ﺔﺻﺎﺨﻟﺍ EC/٩٦/٢٠٠٢
ﺞﺘﻨﻤﻟﺍ ﻦﻣ ﺺﻠﺨﺘﻟﺍ ﻥﺎﻤﺿ ﻖﻳﺮﻃ
ﺔﻴﺒﻠﺴﻟﺍ ﺭﺎﺛﻵﺍ ﻊﻨﻣ ﻲﻓ ﺪﻋﺎﺴﺗ ﻑﻮﺳ ،ﺔﺤﻴﺤﺻ ﺔﻘﻳﺮﻄﺑ
ﻱﺬﻟﺍ ﺮﻣﻷﺍ ﻮﻫﻭﺔﻳﺮﺸﺒﻟﺍ ﺔﺤﺼﻟﺍﻭ ﺔﺌﻴﺒﻟﺍ ﻰﻠﻋ ﺔﻠﻤﺘﺤﻤﻟﺍ
ﺮﻴﺸﻳ.ﺞﺘﻨﻤﻟﺍ ﺍﺬﻫ ﺕﺎﻳﺎﻔﻨﻟ ﺔﺒﺳﺎﻨﻤﻟﺍﺮﻴﻏ ﺔﺠﻟﺎﻌﻤﻟﺍ ﻪﺒﺒﺴﺗ ﺪﻗ
ﺯﻮﺠﻳ ﻻ ﺞﺘﻨﻤﻟﺍ ﺍﺬﻫ ﻥﺃ ﻰﻟﺇ ﺞﺘﻨﻤﻟﺍ ﻰﻠﻋ ﺩﻮﺟﻮﻤﻟﺍ ﺰﻣﺮﻟﺍ
ﺔﺒﺳﺎﻨﻤﻟﺍ ﻊﻴﻤﺠﺘﻟﺍ ﺔﻄﻘﻧ ﻰﻟﺇ ﻪﻤﻴﻠﺴﺗ ﺐﺠﻳ ﻞﺑ .ﺔﻴﻟﺰﻨﻣ ﺕﺎﻳﺎﻔﻧ ﻪﻧﺃ ﻰﻠﻋ ﻪﻌﻣ ﻞﻣﺎﻌﺘﻟﺍ
.ﺔﻴﻧﻭﺮﺘﻜﻟﻹﺍﻭ ﺔﻴﺋﺎﺑﺮﻬﻜﻟﺍ ﺕﺍﺪﻌﻤﻟﺍ ﺮﻳﻭﺪﺗ ﺓﺩﺎﻋﻹ
ﻦﻣ ﺺﻠﺨﺘﻟﺍ ﺹﻮﺼﺨﺑ ﺔﻴﻠﺤﻤﻟﺍ ﺔﺌﻴﺒﻟﺍ ﺢﺋﺍﻮﻠﻟ ًﺎﻘﺒﻃ ﺯﺎﻬﺠﻟﺍ ﻦﻣ ﺺﻠﺨﺘﻟﺍ ﺬﻴﻔﻨﺗ ﺐﺠﻳ
،ﺞﺘﻨﻤﻟﺍ ﺍﺬﻫ ﺮﻳﻭﺪﺗ ﺓﺩﺎﻋﺇﻭ ﺩﺍﺩﺮﺘﺳﺍﻭ ﻞﻣﺎﻌﺘﻟﺍ ﻦﻋ ﺔﻠﺼﻔﻤﻟﺍ ﺕﺎﻣﻮﻠﻌﻤﻟﺍ ﻦﻣ ﺪﻳﺰﻤﻟ
ﻦﻣ ﺺﻠﺨﺘﻟﺍ ﺔﻣﺪﺨﺑ ﻭﺃ ،ﺎﻬﺑ ﻦﻄﻘﺗ ﻲﺘﻟﺍ ﺔﻨﻳﺪﻤﻟﺎﺑ ﻲﻠﺤﻤﻟﺍ ﺐﺘﻜﻤﻟﺎﺑ ﻝﺎﺼﺗﻻﺍ ءﺎﺟﺮﻟﺍ
.ﺞﺘﻨﻤﻟﺍ ﻪﻨﻣ ﺖﻳﺮﺘﺷﺍ ﻱﺬﻟﺍ ﺮﺠﺘﻤﻟﺎﺑ ﻭﺃ ﻚﺑ ﺔﺻﺎﺨﻟﺍ ﺔﻴﻟﺰﻨﻤﻟﺍ ﺕﺎﻳﺎﻔﻨﻟﺍ
ﺔﺴﻣﻼﻤﻟ ﺔﺼﺼﺨﻤﻟﺍ ءﺍﺰﺟﻷﺍ ﻲﻓ ،ﺯﺎﻬﺠﻟﺍ ﺍﺬﻫ ﻡﺰﺘﻠﻳ :ﻡﺍﺰﺘﻟﻻﺍ ﻥﻼﻋﺇ
١٠٩/٨٩ ﻢﻗﺭ ﻲﺑﻭﺭﻭﻷﺍ ﺩﺎﺤﺗﻻﺍ ﺔﻨﺠﻟ ﻲﻓ ﺔﺤﺿﻮﻤﻟﺍ ﺢﺋﺍﻮﻠﻟﺎﺑ ،ﻡﺎﻌﻄﻟﺍ
/٩٥/٢٠٠٦ ﻢﻗﺭ ﺔﻴﺑﻭﺭﻭﻷﺍ ﺕﺎﻬﻴﺟﻮﺘﻟﺎﺑ ﺞﺘﻨﻤﻟﺍ ﺍﺬﻫ ﻡﺰﺘﻠﻳ
ﺎﻬﺗﻼﻳﺪﻌﺗﻭ ﻲﺳ ﻱﺇ/١٤٢/٢٠٠٩ ﻭ ﻲﺳ ﻱﺇ/١٠٨/٢٠٠٤ ،ﻲﺳ ﻱﺇ
ﻦﻋﻭ .ﺔﻴﻧﻭﺮﺘﻜﻟﻹﺍﻭ
.ﺕﺎﻳﺎﻔﻨﻟﺍ
ﺔﻘﺣﻼﻟﺍ
۲
۲R/SR/AUX/UR ﺯﺎﻏ ٥
HBGPL۲X/S٦۷
ﻡﻌﻧ
۱
-
۱
۱
۱
ﺕﺍﻭ ﻭﻠﻳﻛ ۱۱٫۲٥
ﺔﻋﺎﺳ\ﺭﺗﻟ ۱۰۷۱
ﺔﻋﺎﺳ/مارﺟ ۸٤۰
ﺯﺗﺭﻫ ٦۰-٥۰/ﺕﻟﻭﻓ ۲٤۰-۲۲۰
ﺕﺍﻭ ۱٥
ﻡﻌﻧ
۷٤٥x٥۱۰
۳
QC/R/SR/AUX ﺯﺎﻏ ٤
HBGPL۲X/S٦۷
ﻡﻌﻧ
۱
۱
-
۱
۱
ﺕﺍﻭ ﻭﻠﻳﻛ ۹٫۲٥
ﺔﻋﺎﺳ\ﺭﺗﻟ ۸۸۱
ﺔﻋﺎﺳ/مارﺟ ٦۹٥
۳
ﺯﺗﺭﻫ ٦۰-٥۰/ﺕﻟﻭﻓ ۲٤۰-۲۲۰
ﺕﺍﻭ ۱٥
ﻡﻌﻧ
۷٤٥x٥۱۰
۲
۲R/SR/AUX/QC ﺯﺎﻏ ٥
HBGPL۲X/S٦۷
ﻡﻌﻧ
۱
۱
-
۱
۲
ﺕﺍﻭ ﻭﻠﻳﻛ ۱۱٫۷٥
ﺔﻋﺎﺳ\ﺭﺗﻟ ۱۱۱۹
ﺔﻋﺎﺳ/مارﺟ ۸۷٦
۳
ﺯﺗﺭﻫ ٦۰-٥۰/ﺕﻟﻭﻓ ۲٤۰-۲۲۰
ﺕﺍﻭ ۱٥
٥۱۰ × ۷٤٥
۲SR/AUX/R ﺯﺎﻏ ٤
HBGPL۲X/S٦۷
۳
ﺯﺗﺭﻫ ٦۰-٥۰/ﺕﻟﻭﻓ ۲٤۰-۲۲۰
ﻡﻌﻧ
ﺔﻋﺎﺑﻁﻟﺍ ءﺎﻁﺧﺃ ﻥﻋ ﺞﺗﻧﻳ ﺄﻁﺧ ﻱﺃ ﺔﻟﺎﺣ ﻲﻓ ﺔﻳﻟﻭﺅﺳﻣ ﻱﺃ ﺔﻌﻧﺻﻣﻟﺍ ﺔﻬﺟﻟﺍ ﻝﻣﺣﺗﺗ ﻻ
ﺕﻼﻳﺩﻌﺗﻟﺍ ءﺍﺭﺟﻹ ﺔﻅﻭﻔﺣﻣ ﻕﻭﻘﺣﻟﺍ ﻊﻳﻣﺟ ،ﺏﻳﺗﻛﻟﺍ ﺍﺫﻫ ﺎﻬﻳﻠﻋ ﻱﻭﺗﺣﻳ ﻲﺗﻟﺍ ﺦﺳﻧﻟﺍ ﻭﺃ
ﻝﻼﺧﻹﺍ ﻥﻭﺩ ﻙﻼﻬﺗﺳﻻﺍ ﺕﺎﻣﺩﺧ ﻙﻟﺫ ﻲﻓ ﺎﻣﺑ ﺏﻭﻠﻁﻣﻟﺍ ﻭﺣﻧﻟﺍ ﻰﻠﻋ ﺕﺎﺟﺗﻧﻣﻟﺍ ﻰﻠﻋ
.ﺔﻣﻼﺳﻟﺍ ﻭﺃ ﺔﻔﻳﻅﻭﻟﺎﺑ ﺔﻘﻠﻌﺗﻣﻟﺍ ﺕﺎﻣﺳﻟﺎﺑ
۱
QC/R/SR/AUX ﺯﺎﻏ ٤
ﻡﻌﻧ
۱
-
-
۲
۱
ﺕﺍﻭ ﻭﻠﻳﻛ ۷٫۰۰
ﺔﻋﺎﺳ\ﺭﺗﻟ ٦٦٦
ﺔﻋﺎﺳ/مارﺟ ٥۳۱
۳
ﺯﺗﺭﻫ ٦۰-٥۰/ﺕﻟﻭﻓ ۲٤۰-۲۲۰
ﺕﺍﻭ ۱٥
ﻡﻌﻧ
٥۹٥x٥۱۰
۱
HBGPL۲X/S٦۷
ﻡﻌﻧ
۱
۱
-
۱
۱
ﺕﺍﻭ ﻭﻠﻳﻛ ۹٫۲٥
ﺔﻋﺎﺳ\ﺭﺗﻟ ۸۸۱
ﺔﻋﺎﺳ/مارﺟ ٦۹٥
ﺕﺍﻭ ۱٥
٥۹٥x٥۱۰
(ﺭﺗﻣﻳﻠﻠﻣ ۱۳٥ ۰ QC ) ﺔﻘﻠﺣﻟﺍ ﺝﻭﺩﺯﻣ ﺩﻗﻭﻣ
(ﺭﺗﻣﻳﻠﻠﻣ ۱۱۰ ۰ UR ) ﺔﻋﺭﺳﻟﺍ ﻕﺋﺎﻓ ﺩﻗﻭﻣ
(ﺔﻟﺎﺳﻣ ﺔﯾﻟورﺗﺑ تازﺎﻏ) رﺎﺑ ﻲﻠﻠﻣ
۳
ﻡﻌﻧ
ﺩﻗﻭﻣﻟﺍ
ﻊﺟﺭﻣﻟﺍ \ ﻉﻭﻧﻟﺍ
ﺏﻬﻠﻟﺍ ﻕﺎﻔﺧﺇ ﺯﺎﻬﺟ
(ﺭﺗﻣﻳﻠﻠﻣ ٥۰ ۰ AUX)ﺩﻋﺎﺳﻣ ﺩﻗﻭﻣ
(ﺭﺗﻣﻳﻠﻠﻣ ۷٥ ۰ SR) ﻊﻳﺭﺳ ﻪﺑﺷ ﺩﻗﻭﻣ
(ﺭﺗﻣﻳﻠﻠﻣ ۱۰۰ ۰ R ) ﻊﻳﺭﺳ ﺩﻗﻭﻣ
ﺓﺭﺩﻘﻟﺍ
(ﻥﺎﺛﻳﻣ) ﺭﺎﺑ ﻲﻠﻠﻣ ۲۰/G۲۰
٥۰/G۳۱-G۳۰
ﺏﻳﻛﺭﺗﻟﺍ ﺔﺟﺭﺩ
ﺯﺗﺭﻫ \ ﺕﻟﻭﻓ ﺩﺩﺭﺗ \ ﺩﻬﺟﻟﺍ
ﺔﻳﺋﺎﺑﺭﻬﻛﻟﺍ ﺔﻗﺎﻁﻟﺍ ﻝﺧﺩﻣ
ﻲﺋﺎﺑﺭﻬﻛﻟﺍ ﻝﺎﻌﺷﻹﺍ
ﺞﺗﻧﻣﻟﺍ ﺩﺎﻌﺑﺃ
ﻲﻟﺰﻨﻤﻟﺍ ﻡﺍﺪﺨﺘﺳﻼﻟ ﻱﺃ ،ﻲﻨﻬﻤﻟﺍ ﺮﻴﻏ ﻡﺍﺪﺨﺘﺳﻼﻟ ﺺﺼﺨﻣ ﺯﺎﻬﺠﻟﺍ ﺍﺬﻫ.
0
AR7
Page 11

ﻞﻜﺸﺑ ﺎﻬﻧﺎﻜﻣ ﻞﺧﺍﺩ ﺔﻋﻮﺿﻮﻣ ﺕﻼﻌﺸﻟﺍ ﺔﻴﻄﻏﺃﻭ ﺕﻼﻌﺸﻟﺍ ﻥﺃ ﻦﻣ ﺪﻛﺄﺗ ،ﺯﺎﻐﻟﺍ ﻥﺮﻓ ﺢﺘﻓ ﻞﺒﻗﻭ
.ﺢﻴﺤﺻ
ﺔﻣﺎﻋ ﺢﺋﺎﺼﻧ
ﺢﻄﺴﻟﺍ ﺱﺎﻘﻣ ﻥﻮﻜﻳ ﻥﺃ ﺐﺠﻳﻭ .ِﻮﺘﺴﻣ ﺢﻄﺳ ﺕﺍﺫ ﻲﻬﻃ ﺔﻴﻋﻭﺃ ﻡﺪﺨﺘﺳﺍ ،ﺞﺋﺎﺘﻨﻟﺍ ﻞﻀﻓﺃ ﻖﻴﻘﺤﺘﻟ
ﻑﺍﻮﺣ ﻦﻣ ﺝﺮﺨﺗ ﻝﺎﺒﻘﺘﺳﺍ ﺓﺰﻬﺟﺃ ًﺍﺪﺑﺃ ﻡﺪﺨﺘﺴﺗ ﻻ .ﻲﻟﺎﺘﻟﺍ ﻮﺤﻨﻟﺍ ﻰﻠﻋ ﺯﺎﻐﻟﺍ ﺔﻠﻌﺷ ﺐﻧﺎﺠﻟ ًﺎﺒﺳﺎﻨﻣ
.ﺃ ﻢﻗﺭ ﻝﻭﺪﺠﻟﺍ .ﻥﺮﻔﻟﺍ
ءﺎﻋﻭﻟﺍ\ﺭﺩﻘﻟﺍ
رﺎﺑ ﻲﻠﻠﻣ
٥۰/ G۳۱- G۳۰
(ﺔﻟﺎﺳﻣ ﺔﻳﻟﻭﺭﺗﺑ ﺕﺍﺯﺎﻏ
ﺔﻋﺎﺳ/ﻡﺍﺭﺟ ۷۳
ﺔﻋﺎﺳ/ﻡﺍﺭﺟ ۱۲۷
ﺔﻋﺎﺳ/مارﺟ ۲۱۸
ﺔﻋﺎﺳ/ﻡﺍﺭﺟ ۲٥٥
ﺔﻋﺎﺳ/ﻡﺍﺭﺟ ۲۹۱
ﺭﺎﺑ ﻲﻠﻠﻣ ۲۰/G۲۰
(ﻥﺎﺛﻳﻣ)
ﺔﻋﺎﺳ/ﺭﺗﻟ ۹٥
ﺔﻋﺎﺳ/ﺭﺗﻟ ۱٦۷
ﺔﻋﺎﺳ/ﺭﺗﻟ ۲۳۸
ﺔﻋﺎﺳ/ﻡﺍﺭﺟ ۳۳۳
ﺔﻋﺎﺳ/ﻡﺍﺭﺟ ۳۸۱
ﺓﺭﺩﻘﻟﺍ
(ﻭ ﻙ)
۱,۰۰
۱,۷٥
۳,۰۰
۳,٥۰
٤,۰۰
(ﺭﺗﻣﻳﺗﻧﺳﻟﺎﺑ)
۱۸-۱۲
۲٤-۱۸
۲٦-۲٤
۲۸-۲٤
۲۸-۲٤
ﺭﻳﻐﺗﻟﺍ
ﺩﻋﺎﺳﻣﻟﺍ AUX
ﻊﻳﺭﺳﻟﺍ ﻪﺑﺷ SR
ﻊﻳﺭﺳ R
ﺔﻋﺭﺳﻟﺍ ﻕﺋﺎﻓ UR
ﺔﻘﻠﺣﻟﺍ ﺝﻭﺩﺯﻣ QC
ﺃ ﻢﻗﺭ ﻝﻭﺪﺠﻟﺍ
.ءﺎﻧﻹﺍ ﺓﺪﻋﺎﻗ ﻊﻣ ﺐﻬﻠﻟﺍ ﻞﺧﺍﺪﺘﻳ ﻻ ﺚﻴﺤﺑ ﺯﺎﻐﻟﺍ ﺔﻠﻌﺷ ﻢﻴﻈﻨﺗ ﺐﺠﻳ ﺮﻐﺻﻷﺍ ﺔﻴﻋﻭﻸﻟ ﺔﺒﺴﻨﻟﺎﺑ
.ﺔﺑﺪﺤﻤﻟﺍ ﻭﺃ ﺓﺮﻌﻘﻤﻟﺍ ﺓﺪﻋﺎﻘﻟﺍ ﺕﺍﺫ ﺔﻴﻋﻭﻷﺍ ﻡﺍﺪﺨﺘﺳﺍ ﺐﺠﻳ ﻻﻭ
ﺓﺩﺎﻋﺇ ﻝﻭﺎﺤﺗ ﻻﻭ ﻕﻼﻏﻹﺍ ﻊﺿﻭ ﻰﻟﺇ ﺡﺎﺘﻔﻤﻟﺍ ﺓﺭﺍﺩﺈﺑ ﻢﻗ ،ﺪﺼﻗ ﻥﻭﺪﺑ ﺐﻬﻠﻟﺍ ﺄﻔﻄﻧﺍ ﺍﺫﺇ :ﺮﻳﺬﺤﺗ
.ﻞﻗﻷﺍ ﻰﻠﻋ 1 ﺓﺪﺣﺍﻭ ﺔﻘﻴﻗﺩ ﺓﺪﻤﻟ ﻪﻟﺎﻌﺷﺇ
.ﺎﻬﺘﻴﻳﺰﺗ ﻱﺭﻭﺮﻀﻟﺍ ﻦﻤﻓ ،ﻒﻠﻟﺍ ﺔﺒﻌﺻﻭ ﺓﺪﻣﺎﺟ ﻡﺍﻮﻋﻷﺍ ﺮﻣ ﻰﻠﻋ ﺯﺎﻐﻟﺍ ﺮﻴﺑﺎﻨﺻ ﺖﺤﺒﺻﺃ ﺍﺫﺃ
.ﻂﻘﻓ ﻦﻴﻠﻫﺆﻣ ﺔﻣﺪﺧ ﻲﺳﺪﻨﻬﻣ ﺔﻄﺳﺍﻮﺑ ﺔﻴﻠﻤﻌﻟﺍ ﻩﺬﻫ ﺬﻴﻔﻨﺗ ﻢﺘﻳ ﻥﺃ ﺐﺠﻳﻭ
ﻒﻴﻈﻨﺘﻟﺍﻭ ﺔﻧﺎﻴﺼﻟﺍ -٤
ﺍﺫﺇ ) ﻭﺃ ﺲﺒﻘﻤﻟﺍ ﻦﻣ ﺲﺑﺎﻘﻟﺍ ﻉﺰﻨﺑ ﻢﻗ .ﺩﺮﺑ ﺪﻗ ﺯﺎﻬﺠﻟﺍ ﻥﺃ ﻦﻣ ﺪﻛﺄﺗ ،ﻥﺮﻔﻟﺍ ﻒﻴﻈﻨﺗ ﻞﺒﻗ
.ﻲﺋﺎﺑﺮﻬﻜﻟﺍ ﺭﺎﻴﺘﻟﺍ ﺭﺪﺼﻣ ﻕﻼﻏﺈﺑ ﻢﻗ (ﺮﺷﺎﺒﻣ ﻞﻜﺸﺑ ًﻼﺻﻮﻣ ﻥﺎﻛ
.ﻑﺍﺮﺷﺇ ﻥﻭﺪﺑ ﻡﺪﺨﺘﺴﻤﻟﺍ ﺔﻧﺎﻴﺻﻭ ﻒﻴﻈﻨﺘﻟﺍ ﺔﻴﻠﻤﻌﺑ ﻝﺎﻔﻃﻷﺍ ﻡﻮﻘﻳ ﻻﺃ ﺐﺠﻳ
.ﺽﺎﻤﺣﺃ ﻭﺃ ﺔﻀﻴﺒﻣ ﺩﺍﻮﻣ ﻭﺃ ﻞﻛﺂﺘﻟﺎﺑ ﺕﺍﺮﻬﻄﻣ ﻭﺃ ﺕﻼﻳﺰﻣ ﻡﺍﺪﺨﺘﺳﺍ ﻰﻟﺇ ًﺍﺪﺑﺃ ﺄﺠﻠﺗ ﻻ
ﻰﻠﻋ (.ﻩﺮﻴﻏﻭ ،ﻞﺨﻟﺍ ،ﺮﻴﺼﻌﻟﺍ ،ﻥﻮﻤﻴﻠﻟﺍ ) ﺔﻳﻮﻠﻗ ﻭﺃ ﺔﻴﻀﻤﺣ ﺩﺍﻮﻣ ﺔﻳﺃ ﺐ
.ﻊ
ﻤﻠﻤﻟﺍ ﻭﺃ ﺎﻨﻴﻤﻟﺎﺑ ﻞﻴﺘﺳ ﺲﻠﻧﺎﺘﺳﻻﺍ ﻦﻣ ﺔﻋﻮﻨﺼﻤﻟﺍ ءﺍﺰﺟﻷﺍ
ّ
َ
.ﻥﺮﻔﻟﺍ ﻒﻴﻈﻨﺘﻟ ﺭﺎﺨﺒﻟﺎﺑ ﻒﻈﻨﻣ ﻡﺪﺨﺘﺴﺗ ﻻ -"ﺮﻳﺬﺤﺗ"
،ﻡﻭﺮﻜﻟﺍ ﻦﻣ ﺔﻋﻮﻨﺼﻤﻟﺍ ﻡﺎﺴﻗﻷﺍ ﻭﺃ ﺔﻌﻤﻠﻤﻟﺍ ﻭﺃ ﺎﻨﻴﻤﻟﺎﺑ ﺔﻋﻮﻨﺼﻤﻟﺍ ﻡﺎﺴﻗﻷﺍ ﻒﻈﻨﺗ ﺪﻨﻋ
ﺐﺠﻳ ،ﻞﻴﺘﺳ ﺲﻠﻧﺎﺘﺳﻼﻟ ﺔﺒﺴﻨﻟﺎﺑﻭ .ِﻭﺎﻛ ﺮﻴﻏ ﺮﻬﻄﻣ ﻭﺃ ﻥﻮﺑﺎﺼﻟﺎﺑ ﺊﻓﺍﺩ ءﺎﻣ ﻡﺪﺨﺘﺳﺍ
.ﺐﺳﺎﻨﻣ ﻒﻴﻈﻨﺗ ﻝﻮﻠﺤﻣ ﻡﺍﺪﺨﺘﺳﺍ ﻚﻴﻠﻋ
ﻡﺪﺨﺘﺳﺍ ،ﻲﻠﺻﻷﺍ ﺎﻬﻧﺎﻌﻤﻟ ﺓﺩﺎﻌﺘﺳﻻﻭ .ﻥﻮﺑﺎﺼﻟﺍﻭ ءﺎﻤﻟﺎﺑ ﺕﻼﻌﺸﻟﺍ ﻒﻴﻈﻨﺗ ﻦﻜﻤﻳﻭ
.ﺎﻬﻟﺍﺪﺒﺘﺳﺍﻭ ﺕﻼﻌﺸﻟﺍ ﻒﻴﻔﺠﺘﺑ ﻢﻗ ،ﻒﻴﻈﻨﺘﻟﺍ ﺪﻌﺑﻭ .ﻞﻴﺘﺳ ﺲﻠﻧﺎﺘﺳﻼﻟ ﻲﻟﺰﻨﻣ ﻒﻈﻨﻣ
.ﺢﻴﺤﺻ ﻞﻜﺸﺑ ﺕﻼﻌﺸﻟﺍ ﻝﺍﺪﺒﺘﺳﺍ ﻢﺘﻳ ﻥﺃ ﻢﻬﻤﻟﺍ ﻦﻣ
ﺩﻗﺍﻭﻣﻟﺍﻭ ﻡﻭﺭﻛﻟﺎﺑ ﺔﻳﻠﻁﻣﻟﺍ ﺕﺎﻛﺑﺷﻟﺍ
،ﻡﺍﺩﺧﺗﺳﻻﺍ ﻊﻣ ﺭﻳﻐﺗﻟﺍ ﻰﻟﺇ ﺩﻗﺍﻭﻣﻟﺍﻭ ﻡﻭﺭﻛﻟﺎﺑ ﺔﻳﻠﻁﻣﻟﺍ ﺕﺎﻛﺑﺷﻟﺍ ﻥﻭﻟ ﻝﻳﻣﻳ
.ﻥﺭﻔﻠﻟ ﻲﻔﻳﻅﻭﻟﺍ ءﺍﺩﻷﺍ ﺩﺩﻬﻳ ﻻ ﺍﺫﻫﻭ
.ﺔﻣﺯﻼﻟﺍ ﺭﺎﻳﻐﻟﺍ ﻊﻁﻗ ﺎﻧﻟ ﻊﺑﺎﺗﻟﺍ ﻊﻳﺑﻟﺍ ﺩﻌﺑ ﺎﻣ ﺔﻣﺩﺧ ﺯﻛﺭﻣ ﺭﻓﻭﻳ
ﻨﺠﺗ
8
ً
ﺔﻔﻠﺘﺨﻤﻟﺍ ﺯﺎﻐﻟﺍ ﻉﺍﻮﻧﺃ ﻰﻠﻋ ﻥﺮﻔﻟﺍ ﻒﻴﻴﻜﺗ ٣-٢
:ﺔﻴﻟﺎﺘﻟﺍ ﺕﺎﻤﻴﻠﻌﺘﻟﺍ ﺬﻴﻔﻨﺗ ﻚﻴﻠﻋ ،ﺔﻔﻠﺘﺨﻤﻟﺍ ﺯﺎﻐﻟﺍ ﻉﺍﻮﻧﺃ ﻊﻣ ﻡﺍﺪﺨﺘﺳﻼﻟ ﻥﺮﻔﻟﺍ ﻒﻴﻴﻜﺘﻟ
ﺕﻼﻌﺸﻟﺍﻭ ﺕﺎﻜﺒﺸﻟﺍ ﺔﻟﺍﺯﺈﺑ ﻢﻗ
ﻢﻗﺭ ﻞﻜﺸﻟﺍ) ﺔﻠﻌﺸﻟﺍ ﻢﻋﺪﻟ (ﻢﻣ 7
(7
) ﺔﻴﺳﺍﺪﺴﻟﺍ ﻲﻏﺍﺮﺒﻟﺍ ﺡﺎﺘﻔﻣ ﻝﺎﺧﺩﺈﺑ ﻢﻗ
ﻝﻭﺪﺟ ﺮﻈﻧﺍ) ﻪﻣﺍﺪﺨﺘﺳﺍ ﻢﺘﻴﺳ ﻱﺬﻟﺍ ﺯﺎﻐﻠﻟ ﺐﺳﺎﻨﻣ ﺮﺧﺂﺑ ﻪﻟﺍﺪﺒﺘﺳﺍﻭ ﻦﻘﺤﻤﻟﺍ ﻚﻔﺑ ﻢﻗ •
(ﺯﺎﻐﻟﺍ ﻉﻮﻧ
ﻡﺎﻜﺣﺈﺑ ﻦﻘﺤﻤﻟﺍ ﻂﺑﺮﺑ ﻢﻗ •
ﺕﺎﻜﺒﺸﻟﺍﻭ ﺕﻼﻌﺸﻟﺍ ﻝﺍﺪﺒﺘﺳﺎﺑ ﻢﻗ •
ﺐﻬﻠﻟﺍ ﻦﻣ ﻰﻧﺩﻷﺍ ﺪﺤﻟﺍ ﻢﻴﻈﻨﺗ ٤-٢
ﺡﺎﺘﻔﻤﻟﺍ ﺔﻟﺍﺯﺈﺑ ﻢﻗ ﻢﺛ ﻰﻧﺩﻷﺍ ﺪﺤﻟﺍ ﻰﻠﻋ ﻂﺒﻀﻠﻟ ﻢﻜﺤﺘﻟﺍ ﺡﺎﺘﻔﻣ ﻞﻳﻮﺤﺘﺑ ﻢﻗ ،ﺕﻼﻌﺸﻟﺍ ﺓءﺎﺿﺇ ﺪﻌﺑ
.(ﻒﻄﻠﺑ ﻪﻴﻠﻋ ﻂﻐﻀﻟﺍ ﻖﻳﺮﻃ ﻦﻋ ﺔﻟﻮﻬﺴﺑ ﺡﺎﺘﻔﻤﻟﺍ ﺍﺬﻫ ﺔﻟﺍﺯﺇ ﻦﻜﻤﻤﻟﺍ ﻦﻣ)
ﻮﻫ ﺎﻤﻛ ﻢﻈﻨﻤﻟﺍ ﻲﻏﺮﺒﻟﺍ ﻂﺒﺿ ﻦﻜﻤﻳﻭ ،ﻲﻏﺍﺮﺒﻟﺍ ﻚﻔﻣ ﻉﻮﻧ ﻦﻣ "ﻲﻓﺮﻃ" ﺮﻴﻐﺻ ﻉﻮﻧ ﻡﺍﺪﺨﺘﺳﺎﺑ
،ﺯﺎﻐﻟﺍ ﻖﻓﺪﺗ ﻞﻠﻘﻳ ﺔﻋﺎﺴﻟﺍ ﺏﺭﺎﻘﻋ ﻩﺎﺠﺗﺍ ﻲﻓ ﻲﻏﺮﺒﻟﺍ ﻒﻟ ﻥﺇ ﺚﻴﺣ .9 ﻢﻗﺭ ﻞﻜﺸﻟﺍ ﻲﻓ ﺢﺿﻮﻣ
ﻂﺒﻀﻟﺍ ﺍﺬﻫ ﻡﺪﺨﺘﺳﺍ -ﻖﻓﺪﺘﻟﺍ ﺓﺩﺎﻳﺯ ﻰﻟﺇ ﺔﻋﺎﺴﻟﺍ ﺏﺭﺎﻘﻋ ﻩﺎﺠﺗﺍ ﺲﻜﻋ ﻲﻓ ﻪﻔﻟ ﻱﺩﺆﻳ ﺎﻤﻨﻴﺑ
.ﻢﻜﺤﺘﻟﺍ ﺡﺎﺘﻔﻣ ﻝﺪﺒﺘﺳﺍ ﻢﺛ ًﺎﺒﻳﺮﻘﺗ ﻢﻣ 4 ﻰﻟﺇ 3 ﻝﻮﻄﺑ ﺐﻬﻟ ﻰﻠﻋ ﻝﻮﺼﺤﻠﻟ
ﻂﺒﺿ ﻲﻏﺮﺑ ﻞﻳﻮﺤﺗ ﺐﺠﻳﻭ -ﻝﺎﺴﻤﻟﺍ ﻲﻄﻔﻨﻟﺍ ﺯﺎﻐﻟﺍ ﻦﻣ ﺓﺮﻓﻮﺘﻤﻟﺍ ﺯﺎﻐﻟﺍ ﺕﺍﺩﺍﺪﻣﺇ ﺢﺒﺼﺗ ﺎﻣﺪﻨﻋﻭ
.ﺔﻳﺎﻬﻨﻟﺍ ﺔﻄﻘﻧ ﻰﺘﺣ (ﺔﻋﺎﺴﻟﺍ ﺏﺭﺎﻘﻋ ﻩﺎﺠﺗﺍ ﻲﻓ) ﻲﻟﺎﺜﻤﻟﺍ ﺐﻬﻠﻟﺍ
ﺓﺩﻭﺰﻣ) ﺔﺣﻮﻠﺑ ﻙﺯﺎﻬﺟ ﻰﻠﻋ ﺯﺎﻐﻟﺍ ﻒﻴﻨﺼﺗ ﺔﺣﻮﻟ ﻝﺪﺒﺘﺳﺍ ،ﺯﺎﻐﻟﺍ ﻢﻴﻈﻨﺗ ﺬﻴﻔﻨﺘﺑ ﻡﻮﻘﺗ ﺎﻣﺪﻨﻋﻭ
ﻪﻠﺟﺃ ﻦﻣ ﻪﻤﻴﻈﻨﺗ ﻢﺗ ﻱﺬﻟﺍ ﺯﺎﻐﻟﺍ ﻉﻮﻨﻟ ﺐﺳﺎﻨﻣ (ﻥﺮﻔﺑ
ﻡﺪﺨﺘﺴﻤﻟﺍ ﺕﺎﻤﻴﻠﻌﺗ– ﻥﺮﻔﻟﺍ ﻡﺪﺨﺘﺳﺍ -٣
ﻲﻬﻄﻟﺍ ﺭﺎﺒﺘﻋﺍ ﻢﺘﻳ ﻑﻮﺳﻭ ،ﻂﻘﻓ ﻪﻟ ﺺﺼﺨﻤﻟﺍ ﺽﺮﻐﻠﻟ ﻻﺇ ﺯﺎﻬﺠﻟﺍ ﻩﺬﻫ ﻡﺍﺪﺨﺘﺳﺍ ﺐﺠﻳ ﻻ
ﺔﻛﺮﺸﻟﺍ ﻞﻤﺤﺘﺗ ﻦﻟﻭ .ﻚﻟﺫ ﻰﻠﻋ ءﺎﻨﺑ ًﺍﺮﻄﺧ ﻥﻮﻜﻳ ﺪﻗﻭ ًﺎﺒﺳﺎﻨﻣ ﺮﻴﻏ ﺮﺧﺁ ﻡﺍﺪﺨﺘﺳﺍ ﻱﺃﻭ ﻲﻟﺰﻨﻤﻟﺍ
.ﺐﺳﺎﻨﻤﻟﺍ ﺮﻴﻏ ﻡﺍﺪﺨﺘﺳﻻﺍ ﻦﻋ ﻢﺠﻨﺗ ﺓﺭﺎﺴﺧ ﻭﺃ ﺭﺮﺿ ﻱﺃ ﻦﻋ ﺔﻴﻟﻮﺌﺴﻣ ﺔﻳﺃ ﺔﻌﻨﺼﻤﻟﺍ
ﺯﺎﻐﻟﺍ ﺔﻠﻌﺷ ﻡﺍﺪﺨﺘﺳﺍ ١-٣
ﻢﻜﺤﺘﻟﺍ ﺡﺎﺘﻔﻣ ﺓﺭﺍﺩﺇ ﻊﻣ ﺎﻬﻴﻠﻋ ﻂﻐﺿﺍ ﻢﺛ ﺔﻠﻌﺸﻟﺍ ﻦﻣ ﺔﻋﻻﻭ ﺐﻳﺮﻘﺘﺑ ﻢﻗ ،ﺕﻼﻌﺸﻟﺍ ﻝﺎﻌﺷﻹ
ﻚﻟﺫ ﻥﻷ ،ﺔﻠﻌﺸﻟﺍ ﺭﺎﻌﺷﺇ ﻞﺒﻗ ﺔﻠﻴﻠﻗ ﻲﻧﺍﻮﺛ ﺮﻈﺘﻧﺍ ،ﻦﻴﻣﻮﻳ ﺓﺪﻤﻟ ﺕﻼﻌﺸﻟﺍ ﻡﺍﺪﺨﺘﺳﺍ ﻢﺘﻳ ﻢﻟ ﺍﺫﺇ
.ﺐﻴﺑﺎﻧﻷﺍ ﻞﺧﺍﺩ ﺩﻮﺟﻮﻣ ءﺍﻮﻫ ﻱﺃ ﺝﻭﺮﺨﺑ ﺢﻤﺴﻳ ﻑﻮﺳ
:ﺔﻴﻟﺎﺘﻟﺍ ﺕﺎﻤﻴﻠﻌﺘﻟﺍ ﻲﻔﻨﺗ ﻚﻴﻠﻋ ﺐﺠﻳ ﻲﻧﻭﺮﺘﻜﻟﻹﺍ ﻝﺎﻌﺷﻹﺍ ﺔﻴﺻﺎﺨﺑ ﺓﺩﻭﺰﻤﻟﺍ ﺓﺰﻬﺟﻸﻟ ﺔﺒﺴﻨﻟﺎﺑ
ﻰﻟﺇ ﻞﺼﻳ ﻰﺘﺣ ﺔﻋﺎﺴﻟﺍ ﺏﺭﺎﻘﻋ ﻩﺎﺠﺗﺍ ﺲﻜﻋ ﻲﻓ ﺡﺎﺘﻔﻤﻟﺍ ﺓﺭﺍﺩﺇﻭ ﻊﻓﺩ ﻚﻴﻠﻋ ﺐﺠﻳ •
.ﻝﺎﻌﺷﻹﺍ ﺭﺯ ﻰﻠﻋ ﻂﻐﻀﻟﺍ ﻖﻳﺮﻃ ﻦﻋ ﺔﻠﻌﺸﻟﺍ ﻝﺎﻌﺷﺈﺑ ﻢﻗ •
ﺓﺭﺍﺩﺇﻭ ﻊﻓﺩ ﻮﻫ ﺔﻃﺎﺴﺒﺑ ﻚﻴﻠﻋ ﺎﻣ ﻞﻛ ،ﻲﺗﺍﺬﻟﺍ ﻝﺎﻌﺷﻹﺍ ﺔﻴﺻﺎﺨﺑ ﺓﺩﻭﺰﻤﻟﺍ ﺢﺋﺎﻔﺼﻠﻟ ﺔﺒﺴﻨﻟﺎﺑ•
.ﻝﺎﻌﺷﻹﺍ ﺮﻣﺯ ﻰﻟﺇ ﻞﺼﻳ ﻥﺃ ﻰﻟﺇ ﺡﺎﺘﻔﻤﻟﺍ
.ﻢﻜﺤﺘﻟﺍ ﺡﺎﺘﻔﻣ ﻰﻠﻋ ﻂﻐﻀﻟﺍ ﺮﻤﺘﺳﺍ ﺎﻤﻟﺎﻃ ﺭﺮﺸﻟﺍ ﺪﻴﻟﻮﺗ ﻲﻓ ﻝﺎﻌﺘﺷﻻﺍ ﺰﻣﺭ ﺮﻤﺘﺴﻳ ﻑﻮﺳ
ﺭﺍﺮﻜﺗﻭ (ﺮﻔﺻ) ﻊﺿﻮﻟﺍ ﻰﻟﺇ ﺡﺎﺘﻔﻤﻟﺍ ﺓﺭﺍﺩﺇ ﻢﺘﻳ ،ﻲﻧﺍﻮﺛ 5 ﻥﻮﻀﻏ ﻲﻓ ﺔﻠﻌﺸﻟﺍ ﻞﻌﺘﺸﺗ ﻢﻟ ﺍﺫﺈﻓ
.ﺔﻋﺎﺴﻟﺍ ﺏﺭﺎﻘﻋ ﻩﺎﺠﺗﺍ ﺲﻜﻋ
.ﻝﺎﻌﺘﺷﻻﺍ ﺰﻣﺭ
.ﺔﻴﻠﻤﻌﻟﺍ
•
•
ﺔﻘﺣﻼﻟﺍ ﺔﻳﺎﻋﺮﻟﺍ -٥
:ﻲﺗﻵﺍ ﻦﻣ ﺪﻛﺄﺗ ،ﺔﻣﺪﺨﻟﺍ ﺱﺪﻨﻬﻣ ءﺎﻋﺪﺘﺳﺍ ﻢﺘﻳ ﻥﺃ ﻞﺒﻗ
؛ﺢﻴﺤﺻ ﻞﻜﺸﺑ ﻪﻠﻴﺻﻮﺗﻭ ﻪﻟﺎﺧﺩﺇ ﻢﺗ ﺪﻗ ﺲﺑﺎﻘﻟﺍ ﻥﺃ •
ﺎﺧ ﺖﺴﻴﻟ ﺯﺎﻐﻟﺍ ﺕﺍﺩﺍﺪﻣﺇ ﻥﺃ •
.ﺔﺌﻃ
؛ﺄﻄﺨﻟﺍ ﻒﺸﻛ ﻥﺎﻜﻣﻹﺎﺑ ﻦﻜﻳ ﻢﻟ ﺍﺫﺇ
.ﺔﻘﺣﻼﻟﺍ ﺔﻧﺎﻴﺼﻟﺍ ﻢﺴﻘﺑ ﻞﺼﺗﺍﻭ ﺯﺎﻬﺠﻟﺍ ﻖﻠﻐﺑ ﻢﻗ
.ﺯﺎﻬﺠﻟﺎﺑ ﺚﺒﻌﺗ ﻻ
(ﺪﺼﻗ ﻥﻭﺪﺑ ﺐﻬﻠﻟﺍ ﺄﻔﻄﻧﺍ ﺍﺫﺇ ﺯﺎﻐﻟﺍ ﻖﻓﺪﺗ ﻒﻗﻮﻳ) ﺔﻣﻼﺳ ﺭﻮﺒﻨﺼﺑ ﺓﺰﻬﺠﻤﻟﺍ ﺕﻼﻳﺩﻮﻤﻠﻟ ﺔﺒﺴﻨﻟﺎﺑ
.ﺭﺬﺤﻟﺍﻭ ﺔﻄﻴﺤﻟﺍ ﺬﺧﺃ ﺐﺠﻳ ﻦﻜﻟﻭ ،ﻩﻼﻋﺃ ﺭﻮﻛﺬﻤﻟﺍ ﻮﺤﻨﻟﺍ ﻰﻠﻋ ﺕﻼﻌﺸﻟﺍ ﻝﺎﻌﺷﺇ ﻢﺘﻳ
0
AR6
Page 12

1
ً
ُ
ّ
1-11-2
45-25
ً
ً
ً
ً
10
ً
3
ً
.2
ُ
.(3
100
2
4
.(4
1
60
2 300
ّ
ً
ِ
ً
ً
ً
ً
15
5,5
70
.5
ً
2-1
ً
ً
:(6
2/1 2/1
ﺐﻴﺑﺎﻧﻷﺍ ﺕﻼﺻﻭ ﻰﻠﻋ ﺏﺮﺴﺗ ﺩﻮﺟﻭ ﻡﺪﻋ ﻦﻣ ﺪﻛﺄﺘﻠﻟ ﻲﺋﺎﻬﻨﻟﺍ ﺺﺤﻔﻟﺍ ﺬﻴﻔﻨﺗ ﻢﺘﻳ :ﻡﺎﻫ
ﻻ ﻥﺮﻤﻟﺍ ﺏﻮﺒﻧﻷﺍ ﻥﺃ ﻦﻣ ًﺎﻀﻳﺃ ﺪﻛﺄﺗﻭ ،ًﺍﺪﺑﺃ ﺐﻬﻠﻟﺍ ﻡﺪﺨﺘﺴﺗ ﻻ .ﻲﻧﻮﺑﺎﺻ ﻝﻮﻠﺤﻣ ﻡﺍﺪﺨﺘﺳﺎﺑ
ﺮﻴﻏ ﻪﻧﺃﻭ (ﻝﺎﺜﻤﻟﺍ ﻞﻴﺒﺳ ﻰﻠﻋ ﺝﺭﺪﻟﺍ ) ﺓﺭﻮﺼﻘﻤﻟﺍ ﻦﻣ ﻙﺮﺤﺘﻣ ءﺰﺠﺑ ﻞﺼﺘﻳ ﻥﺃ ﻦﻜﻤﻳ
.ﻒﻠﺘﻠﻟ ﻪﺿﺮﻌﻳ ﻥﺎﻜﻣ ﻲﻓ ﻉﻮﺿﻮﻣ
ﻰﻟﺇ ﺯﺎﻐﻟﺍ ﺩﺍﺪﻣﺇ ﺭﺪﺼﻣ ﻕﻼﻏﺇ ﺐﺠﻳ ،ﺯﺎﻬﺠﻟﺍ ﻦﻣ ﺏﺮﻘﻟﺎﺑ ﺯﺎﻐﻟﺍ ﺔﺤﺋﺍﺭ ﺕﺮﻬﻇ ﺍﺫﺇ :ﺮﻳﺬﺤﺗ
.ﻑﻮﺸﻜﻤﻟﺍ ﺐﻬﻠﻟﺎﺑ ﺏﺮﺴﺘﻟﺍ ﻦﻋ ﺚﺤﺒﺗ ﻻ .ﺓﺮﺷﺎﺒﻣ ﺱﺪﻨﻬﻤﻟﺍ ﺐﻠﻃﻭ ﺯﺎﻬﺠﻟﺍ
2-2
ً
ً
1
2
3
ً
5-3
2
13 3
ً
05
AR
Page 13

ﺔﻣﻼﺳﻟﺍ ﺕﺎﻣﻳﻠﻌﺗ
ﺭﺻﺎﻧﻋ ﺱﻣﻟ ﻱﺩﺎﻔﺗﻟ ﺭﺫﺣﻟﺍ ﻲﺧﻭﺗ ﺏﺟﻳ ﻙﻟﺫﻟﻭ ,ﻡﺍﺩﺧﺗﺳﻻﺍ ءﺎﻧﺛﺃ ﻥﻳﻧﺧﺎﺳ ﺎﻬﻳﻟﺇ ﻝﻭﺻﻭﻟﺍ ﻥﻛﻣﻳ ﻲﺗﻟﺍ ءﺍﺯﺟﻷﺍﻭ ﺯﺎﻬﺟﻟﺍ ﺢﺑﺻﻳ :ﺭﻳﺫﺣﺗ •
.ﻥﻳﺧﺳﺗﻟﺍ
.ﻡﻬﻟ ﺓﺭﻣﺗﺳﻣ ﺔﻌﺑﺎﺗﻣ ﻙﺎﻧﻫ ﺕﻧﺎﻛ ﺍﺫﺇ ﻻﺇ ﻥﺭﻔﻟﺍ ﻥﻋ ﺕﺍﻭﻧﺳ ۸ ﻥﻣ ﻝﻗﻷﺍ ﻝﺎﻔﻁﻷﺍ ﺩﺎﻌﺑﺇ ﺏﺟﻳ• •
ﻥﻳﺫﻟﺍ ﻭﺃ ،ﺔﻳﻠﻘﻌﻟﺍ ﻭﺃ ﺔﻳﺳﺣﻟﺍ ﻭﺃ ﺔﻳﻧﺩﺑﻟﺍ ﻡﻬﺗﺍﺭﺩﻗ ﻲﻓ ﺭﻭﺻﻗ ﻥﻣ ﻥﻭﻧﺎﻌﻳ ﻥﻳﺫﻟﺍ ﺹﺎﺧﺷﻷﺍ ﻭﺃ ﺔﻳﻧﺎﻣﺛﻟﺍ ﻥﺳ ﺍﻭﺯﻭﺎﺟﺗ ﻥﻣﻣ ﻝﺎﻔﻁﻸﻟ ﻥﻛﻣﻳ• •
ﺔﻧﻣﺁ ﺔﻘﻳﺭﻁﺑ ﻥﺭﻔﻟﺍ ﻡﺍﺩﺧﺗﺳﺍ ﻥﺄﺷﺑ ﺕﺎﻣﻳﻠﻌﺗ ﻡﻫﺅﺎﻁﻋﺇ ﻭﺃ ﻡﻬﻳﻠﻋ ﻑﺍﺭﺷﻹﺍ ﻝﺎﺣ ﻲﻓ ﻥﺭﻔﻟﺍ ﺍﺫﻫ ﻡﺍﺩﺧﺗﺳﺍ ﺔﻓﺭﻌﻣﻟﺍﻭ ﺓﺭﺑﺧﻟﺍ ﻡﻫﺯﻭﻌﺗ
.ﺔﻠﻣﺗﺣﻣﻟﺍ ﺭﻁﺎﺧﻣﻠﻟ ﻡﻬﻛﺍﺭﺩﺇﻭ
.ﻥﺭﻔﻟﺍ ﺍﺫﻬﺑ ﺙﺑﻌﻟﺍ ﻝﺎﻔﻁﻷﺍ ﻰﻠﻋ ﺭﻅﺣﻳ •
.ﻡﻬﻳﻠﻋ ﻑﺍﺭﺷﻹﺍ ﻥﻭﺩﺑ ﻪﺗﻧﺎﻳﺻ ﻭﺃ ﺯﺎﻬﺟﻠﻟ ﻝﺎﻔﻁﻷﺍ ﻑﻳﻅﻧﺗ ﺭﻅﺣُﻳ •
.ﻕﻳﺭﺣ ﺏﻭﺷﻧ ﻰﻟﺇ ﻱﺩﺅﻳ ﺩﻗﻭ ﺍًﺭﻁﺧ ﺕﻭﻳﺯﻟﺍ ﻭﺃ ﻥﻭﻫﺩﻟﺍ ﻡﺍﺩﺧﺗﺳﺎﺑ ﻥﺭﻔﻟﺍ ﻰﻠﻋ ﺔﺑﻗﺍﺭﻣ ﻥﻭﺩ ﻲﻬﻁﻟﺍ ﻝﻛﺷﻳ ﻥﺃ ﻥﻛﻣﻳ :ﺭﻳﺫﺣﺗ •
.ﻕﻳﺭﺣﻟﺍ ﺔﻳﻧﺎﻁﺑﺑ ﻭﺃ ءﺎﻁﻐﺑ ﺏﻬﻠﻟﺍ ﺔﻳﻁﻐﺗ ﻡﺛ ﻥﻣﻭ ﺯﺎﻬﺟﻟﺍ ﻝﻳﻐﺷﺗ ﻑﺎﻘﻳﺈﺑ ﻙﻳﻠﻋ ﻥﻛﻟﻭ ،ءﺎﻣﻟﺎﺑ ﺭﺎﻧﻟﺍ ﺩﺎﻣﺧﺇ ﺎًﻘﻠﻁﻣ ﻝﻭﺎﺣﺗ ﻻ• •
.ﻲﻬﻁﻟﺍ ﺢﻁﺳﺃ ﻰﻠﻋ ﺩﺍﻭﻣﻟﺍ ﻥﺯﺧﺗ ﻻ :ﻕﻳﺭﺣﻟﺍ ﺭﻁﺧ :ﺭﻳﺫﺣﺗ •
.ﺔﻳﺋﺎﺑﺭﻬﻛ ﺔﻣﺩﺻ ﺙﻭﺩﺣ ﺔﻳﻟﺎﻣﺗﺣﺍ ﺏﻧﺟﺗﻟ ﺯﺎﻬﺟﻟﺍ ﻝﻳﻐﺷﺗ ﻑﻗﺃ ,ﺢﻁﺳﻟﺍ ﻉﺩﺻﺗ ﺔﻟﺎﺣ ﻲﻓ :ﺭﻳﺫﺣﺗ •
.ﻑﻳﻅﻧﺗﻟﺍ ﺕﺎﻳﻠﻣﻋ ﻲﻓ ﻱﺭﺎﺧﺑ ﻑﻅﻧﻣ ﻡﺍﺩﺧﺗﺳﺍ ﺏﻧﺟﺗ •
.ﺯﺎﻬﺟﻟﺍ ﺢﺗﻓ ﻝﺑﻗ ءﺎﻁﻐﻟﺍ ﻥﻣ ﺕﺎﺑﺎﻛﺳﻧﺍ ﺔﻳﺃ ﺔﻟﺍﺯﺇ ﺏﺟﻳ •
.ءﺎﻁﻐﻟﺍ ﻝﻔﻗ ﻝﺑﻗ ﺩﺭﺑﻳ ﻰﺗﺣ ﺓﺭﺗﻓ ﻥﺭﻔﻟﺍ ﺢﻁﺳ ﻙﺭﺗ ﺏﺟﻳ •
.ﺩﻌﺑ ﻥﻋ ﻡﻛﺣﺗﻠﻟ ﻝﺻﻔﻧﻣ ﻡﺎﻅﻧ ﻭﺃ ﻲﺟﺭﺎﺧ ﺕﻗﻭﻣ ﺔﻁﺳﺍﻭﺑ ﻝﻳﻐﺷﺗﻠﻟ ﻡﻣﺻﻣ ﺭﻳﻏ ﺯﺎﻬﺟﻟﺍ ﺍﺫﻫ •
.ﺕﻼﺑﺎﻛﻟﺍ ﻝﻳﺻﻭﺗ ﺩﻋﺍﻭﻘﻟ ﺎﻘﻓﻭ ﺕﺑﺎﺛﻟﺍ ﻝﺑﻛﻟﺍ ﻲﻓ ﺭﺎﻳﺗﻟﺍ ﻝﺻﻓ ﻝﺋﺎﺳﻭ ﺝﺍﺭﺩﺇ ﺏﺟﻳ •
.ﻥﺭﻔﻠﻟ ﻲﻔﻠﺧﻟﺍ ﺢﻁﺳﻟﺍ ﺓﺭﺍﺭﺣ ﺔﺟﺭﺩ ﺓﺎﻋﺍﺭﻣ ﻊﻣ ﻡﺩﺧﺗﺳﻣﻟﺍ ﻙﻠﺳﻟﺍ ﻉﻭﻧ ﺕﺎﻣﻳﻠﻌﺗﻟﺍ ﺩﺩﺣﺗ •
ﻙﻟﺫﻭ ،ﻙﻟﺫﻟ ﻥﻳﻠﻫﺅﻣ ﺹﺎﺧﺷﺃ ﻥﻣ ﻭﺃ ﻪﻟ ﻊﺑﺎﺗﻟﺍ ﺔﻣﺩﺧﻟﺍ ﻝﻳﻛﻭ ﻭﺃ ﻊﻳﻧﺻﺗﻟﺍ ﺔﻬﺟ ﻥﻣ ﻪﻟﺍﺩﺑﺗﺳﺍ ﺏﺟﻳ ،ﺔﻗﺎﻁﻟﺎﺑ ﺩﺍﺩﻣﻹﺍ ﻝﺑﻛ ﻑﻠﺗ ﻝﺎﺣ ﻲﻓ •
.ﺔﻠﻣﺗﺣﻣ ﺭﻁﺎﺧﻣ ﺔﻳﺃ ﺏﻧﺟﺗﻟ
ﻝﻼﺧ ﻥﻣ ﺔﻗﺎﻁﻟﺎﺑ ﻥﺭﻔﻟﺍ ﺍﺫﻫ ﺩﺍﺩﻣﺇ ﻡﺩﻋ ﺏﺟﻳ ,ﺩﻭﺻﻘﻣ ﺭﻳﻏ ٍﻝﻛﺷﺑ ﻱﺭﺍﺭﺣﻟﺍ ﺭﺎﻳﺗﻟﺍ ﻊﻁﺎﻗ ﻁﺑﺿ ﺓﺩﺎﻋﺇ ﻥﻋ ﺔﺟﺗﺎﻧﻟﺍ ﺭﻁﺎﺧﻣﻟﺍ ﻱﺩﺎﻔﺗﻟ : ﻪﻳﺑﻧﺗ
.ﺓﺩﻋﺎﺳﻣﻟﺍ ﺓﺍﺩﻷﺍ ﻝﺑﻗ ﻥﻣ ﺎﻬﻓﺎﻘﻳﺇﻭ ﺎﻬﻠﻳﻐﺷﺗ ﻡﺗﻳ ﺓﺭﺋﺍﺩﺑ ﻪﻠﻳﺻﻭﺗ ﻭﺃ ،ﺕﻗﻭﻣ ﻝﺛﻣ ،ﻲﺟﺭﺎﺧ ﻝﻳﺩﺑﺗ ﺯﺎﻬﺟ
ﻝﺑﻗ ﺕﺍﺩﺎﺷﺭﻹﺍ ﻊﻳﻣﺟ ﺓءﺍﺭﻗ ﻰﻠﻋ ﺹﺭﺣﺍ ,ﺍﺫﻟ ,ﺔﻳﻭﻬﺗﻟﺍ ﺩﻳﺟ ﻥﺎﻛﻣ ﻲﻓ ﻁﻘﻓ ﻡﺩﺧﺗﺳﻳﻭ ,ﺎﻬﺑ ﻝﻭﻣﻌﻣﻟﺍ ﺢﺋﺍﻭﻠﻟ ﺎًﻘﻓﻭ ﺯﺎﻬﺟﻟﺍ ﺍﺫﻫ ﺕﻳﺑﺛﺗ ﺏﺟﻳ •
.ﻪﻣﺍﺩﺧﺗﺳﺍ ﻭﺃ ﺯﺎﻬﺟﻟﺍ ﺍﺫﻫ ﺕﻳﺑﺛﺗ
ﺕﺍﺩﺎﺷﺭﻹﺍ ﻰﻟﺇ ﻉﻭﺟﺭﻟﺍ ﻲﻐﺑﻧﻳ ﻪﻧﺈﻓ ،ﺯﻭﻣﺭﻟﺍ ﻩﺫﻫ ﺭﻬﻅﺗ ﻡﻟ ﺍﺫﺇﻭ ،ﺯﺎﻬﺟﻟﺍ ﻰﻠﻋ ﺩﻠﺑﻟﺍ ﺯﻣﺭ ﺭﻭﻬﻅ ﺔﻟﺎﺣ ﻲﻓ ﻁﻘﻓ ﺔﺣﻟﺎﺻ ﺕﺎﻣﻳﻠﻌﺗﻟﺍ ﻩﺫﻫ" •
".ﺔﻟﻭﺩﻟﺎﺑ ﺔﺻﺎﺧﻟﺍ ﻡﺍﺩﺧﺗﺳﻻﺍ ﺕﻻﺎﺣﻭ ﻁﻭﺭﺷ ﻰﻠﻋ ﺯﺎﻬﺟﻟﺍ ﻁﺑﺿﻟ ﺔﻣﺯﻼﻟﺍ ﺕﺎﻬﻳﺟﻭﺗﻟﺍ ﺭﻓﻭﺗﺳ ﻲﺗﻟﺍﻭ ﺔﻳﻧﻔﻟﺍ
"؛ﺯﺎﻬﺟﻟﺍ ﻁﺑﺿ ﻥﻋ ًﻼﺿﻓ ,(ﻪﻁﻐﺿ ﻝﺩﻌﻣﻭ ﺯﺎﻐﻟﺍ ﻉﻭﻧ) ﺔﻳﻠﺣﻣﻟﺍ ﻊﻳﺯﻭﺗﻟﺍ ﻁﻭﺭﺷ ﻕﻓﺍﻭﺗ ﻥﻣ ﺩﻛﺄﺗ ،ﺕﻳﺑﺛﺗﻟﺍ ﻝﺑﻗ" •
."(ﺕﺎﻧﺎﻳﺑﻟﺍ ﺔﺣﻭﻟ ﻰﻠﻋ ﻭﺃ) ﻕﺻﻠﻣﻟﺍ ﻰﻠﻋ ﺯﺎﻬﺟﻟﺍ ﺍﺫﻬﺑ ﺔﺻﺎﺧﻟﺍ ﻁﺑﺿﻟﺍ ﻁﻭﺭﺷ ﻊﻳﻣﺟ ﺩﺭﺳ ﻡﺗﻳ" •
ءﻼﻳﺇ ﻲﻐﺑﻧﻳﻭ ,ﺔﻳﻟﺎﺣﻟﺍ ﺕﻳﺑﺛﺗﻟﺍ ﺢﺋﺍﻭﻠﻟ ﺎًﻘﻓﻭ ﻪﻠﻳﺻﻭﺗﻭ ﺯﺎﻬﺟﻟﺍ ﺕﻳﺑﺛﺗ ﻲﻐﺑﻧﻳ ﺍﺫﻟ ,ﻕﺍﺭﺗﺣﻻﺍ ﺞﺗﺍﻭﻧ ءﻼﺧﺇ ﺯﺎﻬﺟﺑ ﻝﺻﺗﻣ ﺭﻳﻏ ﺯﺎﻬﺟﻟﺍ ﺍﺫﻫ" •
".ﺔﻳﻭﻬﺗﻟﺎﺑ ﻕﻠﻌﺗﻳ ﺎﻣﻳﻓ ﺔﻠﺻﻟﺍ ﺕﺍﺫ ﺕﺎﺑﻠﻁﺗﻣﻠﻟ ﺹﺎﺧ ﻡﺎﻣﺗﻫﺍ
ﺹﺭﺣﺍ :ﺔﻳﻭﻬﺗﻟﺍ ﺩﻳﺟ ﺦﺑﻁﻣﻟﺍ ﻥﺃ ﻥﻣ ﺩﻛﺄﺗ ﻙﻟﺫﻟ ،ﺎﻬﺑ ﺕّﺑﺛﻣﻟﺍ ﺔﻓﺭﻐﻟﺎﺑ ﺔﺑﻭﻁﺭﻭ ﺓﺭﺍﺭﺣ ﺯﺎﻐﻟﺎﺑ ﻝﻣﻌﻳ ﻱﺫﻟﺍ ﻲﻬﻁﻟﺍ ﺯﺎﻬﺟ ﻡﺍﺩﺧﺗﺳﺍ ﻥﻋ ﺞﺗﻧﻳ •
ﻥﺄﺑ ﻡﻠﻌﻟﺍ ﻊﻣ ,(ﻲﻛﻳﻧﺎﻛﻳﻣ ﺝﺭﺧﺗﺳﻣ ءﺎﻁﻏ) ﺔﻳﻛﻳﻧﺎﻛﻳﻣﻟﺍ.ﺔﻳﻭﻬﺗﻠﻟ ﺯﺎﻬﺟ ﺏﻳﻛﺭﺗﺑ ﻡﻗ ﻭﺃ ﺭﺍﺭﻣﺗﺳﺎﺑ ﺔﻳﻌﻳﺑﻁﻟﺍ ﺔﻳﻭﻬﺗﻟﺍ ﺫﻓﺎﻧﻣ ﺢﺗﻓ ﻰﻠﻋ
ﻯﻭﺗﺳﻣ ﺓﺩﺎﻳﺯ ﻝﻼﺧ ﻥﻣ ﺔﻳﻠﻋﺎﻓ ﺭﺛﻛﺃ ﺔﻳﻭﻬﺗ ﻭﺃ ,ﺓﺫﻓﺎﻧ ﺢﺗﻔﻛ ،ﺔﻳﻓﺎﺿﺇ ﺔﻳﻭﻬﺗ ﻲﻋﺩﺗﺳﻳ ﺩﻗ ﺯﺎﻬﺟﻠﻟ ﺔﻠﻳﻭﻁ ﺕﺍﺭﺗﻔﻟ ﻑﺛﻛﻣﻟﺍ ﻡﺍﺩﺧﺗﺳﻻﺍ
.ﺕﺩﺟﻭ ﺎﻣﺛﻳﺣ ﺔﻳﻛﻳﻧﺎﻛﻳﻣﻟﺍ ﺔﻳﻭﻬﺗﻟﺍ
04 AR
Page 14

03
accessible space
Figure 3
Min 10 mm
Sp.da 25 a 45 mm
C
AB
Bracket
Seal
60 cm
Figure 2Figure 1
2
2
240 cm
Figure 5Figure 4
120 cm
180 cm
2
2
INJECTOR
1/2 GAS
CONICAL
CYLINDRICAL
CONICAL
Figure 6
Figure 7
Figure 8
YES
Figure 10 Figure 11
Page 15

ﻱﺇ ﻱﺁ -ﻲﺑ ﻲﺟ
ﻯﻮﺘﺤﻤﻟﺍ
٥ ﺖﻴﺒﺜﺘﻟﺎﺑ ﻢﺋﺎﻘﻠﻟ ﺕﺎﻤﻴﻠﻌﺗ-١
٥ ﺞﻣﺪﻟﺍ -١-١
٥ ﺐﺳﺎﻨﻤﻟﺍ ﻊﻗﻮﻤﻟﺍ ٢-١
٥ (ﻂﻘﻓ ﺓﺪﺤﺘﻤﻟﺍ ﺔﻜﻠﻤﻤﻠﻟ ﺔﺒﺴﻨﻟﺎﺑ) ءﺎﺑﺮﻬﻜﻟﺍ ﻞﻴﺻﻮﺗ -٢
٥ ءﺎﺑﺮﻬﻜﻟﺍ ﻞﻴﺻﻮﺗ ١-٢
٥ (ﻂﻘﻓ ﺓﺪﺤﺘﻤﻟﺍ ﺔﻜﻠﻤﻤﻠﻟ ﺔﺒﺴﻨﻟﺎﺑ) ﺯﺎﻐﻟﺍ ﻞﻴﺻﻮﺗ ٢-٢
٦
ﺔﻔﻠﺘﺨﻤﻟﺍ ﺯﺎﻐﻟﺍ ﻉﺍﻮﻧﺃ ﻰﻠﻋ ﻥﺮﻔﻟﺍ ﻒﻴﻴﻜﺗ ٣-٢
٦ ﺐﻬﻠﻟﺍ ﻦﻣ ﻰﻧﺩﻷﺍ ﺪﺤﻟﺍ ﻢﻴﻈﻨﺗ :٤-٢
٦ ﻡﺪﺨﺘﺴﻤﻟﺍ ﻰﻟﺇ ﺕﺎﻴﻤﻠﻌﺗ -ﻥﺮﻔﻟﺍ ﻡﺍﺪﺨﺘﺳﺍ -٣
٦ ﺯﺎﻐﻟﺍ ﺔﻠﻌﺷ ﻡﺍﺪﺨﺘﺳﺍ ١-٣
٦ ﻲﻬﻄﻟﺍ ﺢﻄﺴﻟ ﺔﻴﺋﺎﺑﺮﻬﻜﻟﺍ ﺕﺎﺣﻮﻠﻟﺍ ﻡﺍﺪﺨﺘﺳﺍ -٢-٣
٨
٨
٨
ﻒﻴﻈﻨﺘﻟﺍﻭ ﺔﻧﺎﻴﺼﻟﺍ -٤
ﺐﻴﻛﺮﺘﻟﺍ ﺪﻌﺑ ﺯﺎﻬﺠﻟﺎﺑ ﺔﻳﺎﻨﻌﻟﺍ -٥
ﺔﺌﻴﺒﻟﺍ ﺔﻳﺎﻤﺣ -٦
Page 16

GB - IE
The manufacturer will not be responsible for any inaccuracy resulting from printing or transcript errors contained in this brochure. We reserve the right
to carry out modifications to products as required, including the interests of con sumption, without prejudice to the characteri stics relating to safety or
function.
09.2017•REV:A•42823373
 Loading...