

Page 1
1
CHK64C
Ceramic Hob
Instruction Manual
Page 2

2
Content
1…………………………………..…………………Safety instructions
2…………………………………..…………………Description of the Ceramic hob surface layout
3…………………………………..…………………Installation
4…………………………………..…………………Using the ceramic hob
5…………………………………..…………………Hob guidelines
6…………………………………..…………………Maintenance and cleaning
7…………………………………..…………………Environmental note
Page 3
3
Safety instructions
This User Instruction Manual contains important information, including safety
& installation points, which will enable you to get the most out of your
appliance. Please keep it in a safe place so that it is easily available for future
reference; for you or any person not familiar with the operation of the appliance.
These instructions shall also be available in an alternative format, e.g. on a
website or on request from the user in a format such as a DVD.
Caution!
Do not use the ceramic hob until you
have read this instruction manual.
The ceramic hob is intended for
household use only.
The appliance becomes hot during
operation. Take care not to touch the
hot surface.
Always keep children away from the
ceramic hob.
While in operation direct contact with
the ceramic hob may cause burns!
Ensure that small items of household
equipment, including connection leads,
do not touch the hob as the insulation
material of this equipment is usually
not resistant to high temperatures.
Do not leave the ceramic hob
unattended when frying. Oils and fats
may catch fire due to overheating or
boiling over.
Do not switch on the hob until a pan
has been placed on it.
Do not put pans weighing over 25kg
on the hob.
Do not use the ceramic hob in the
event of a technical fault. Any faults
must be fixed by an appropriately
qualified and authorized person.
In the event of any incident caused by
a technical fault, disconnect the power
and report the fault to the service
centre to be repaired.
The rules and provisions contained in
this instruction manual should be
strictly observed. Do not allow
anybody who is not familiar with the
contents of this instruction manual to
operate the ceramic hob.
The ceramic hob should not be
cleaned using steam cleaning
equipment.
IMPORTANT: The adjacent
furniture or housing and all materials
used in the installation must be able to
withstand a minimum temperature of
85°C above the ambient temperature
of the room it is located in, whilst in
use.
Any damage caused by the appliance
being installed in contravention of this
temperature limit, or by placing
adjacent cabinet materials closer than
4mm to the appliance, will be the
liability of the owner.
This appliance complies with all
current European safety legislation.
We do wish to emphasize that this
compliance does not remove the fact
that the appliance surfaces will
become hot during use and retain heat
after operation.
Child Safety
Page 4

4
We strongly recommend that
babies and young children are
prevented from being near to the
appliance and not allowed to touch
the appliance at any time.
If it is necessary for younger family
members to be in the kitchen,
please ensure that they are kept
under close supervision at all times.
General Safety
Children less than 8 years of age
shall be kept away unless
continuously supervised.
This appliance can be used by
children aged from 8 years and
above and persons with reduced
physical, sensory or mental
capabilities or lack of experience
and knowledge if they have been
given supervision or instruction
concerning use of the appliance in
a safe way and understand the
hazards involved. Children shall not
play with the appliance. Cleaning
and user maintenance shall not be
made by children without
supervision.
NEVER try to extinguish a fire with
water, but switch off the appliance
and then cover flame e.g. with a lid
or a fire blanket.
WARNING: Danger of fire: do not
store items on the cooking surfaces.
Means for disconnection must be
incorporated in the fixed wiring in
accordance with the wiring rules.
Do not allow electrical fittings or
cables to come into contact with
areas on the appliance that get hot.
Do not use the appliance to heat
the room it is located in or to dry
clothing.
Do not install the appliance next to
curtains or soft furnishings.
If the supply cord is damaged, it
must be replaced by the
manufacturer, its service agent or
similarly qualified persons in order
to avoid a hazard.
The appliance is not intended to be
operated by means of an external
timer or separate remote-control
system.
This product can be worked but not
through outside timer and remote
control.
Page 5

5
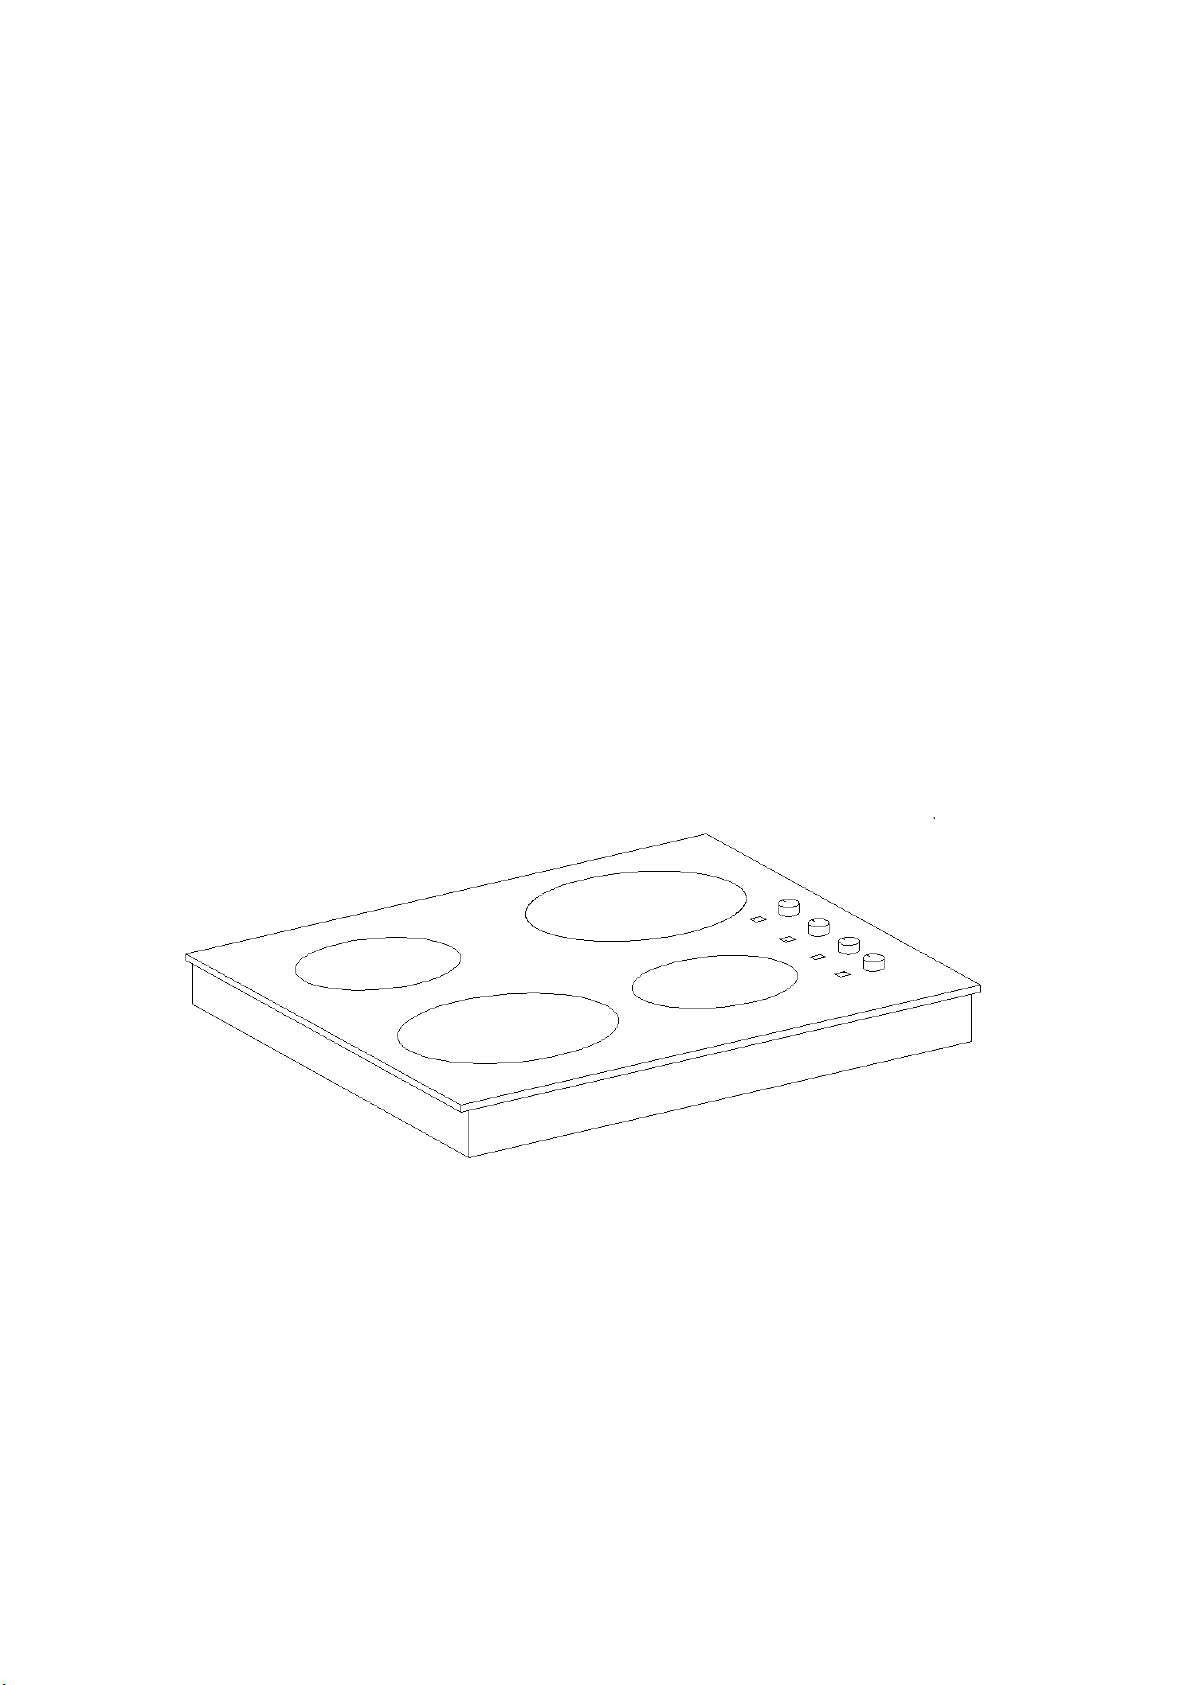
Description of the Ceramic hob surface layout
1) 1.20 kW hyperspeed zones (diameter 160
mm)
2) 1.80 kW hyperspeed zones (diameter 200
mm)
Control panel layout
1. Cooking zone rear left control knob
2. Cooking zone front left control knob
3. Cooking zone rear right control knob
4. Cooking zone front right control knob
Installation
Installing the ceramic hob
The kitchen area should be dry and aired and equipped with efficient ventilation.
When installing the ceramic, easy access to all control elements should be
ensured.
This is a Y-type design built-in ceramic, which means that its back wall and one
side wall can be placed next to a high piece of furniture or a wall .Coating or
veneer used on fitted furniture must be applied with a heat-resistant adhesive
(100℃).This prevents surface deformation or detachment the coating.
Hoods should be installed according to the manufacturer’s instructions.
Assembly of ceramic hob :
Make an opening with the dimensions given in the diagram for the hob to be
mounted on the worktop.
Check seal for perfect fit and overall cover. Lower the ceramic hob into place and
align correctly.
Using a standard screwdriver, tighten the tension clamps evenly starting at the
centre and moving diagonal, until the built-in rim is tight on the worktop.
Page 6

6
Cut a hole in the worktop that corresponds with the drawing shown above.
IMPORTANT: You must observe the ventilation
requirements shown in the drawing opposite.
IMPORTANT: There are ventilation holes around the
outside of the hob. YOU MUST ensure that these
holes are not blocked by the work top, when you put
the hob into position (see drawing opposite).
IMPORTANT: Do not use a silicon sealant to seal the
appliance against the aperture. This will make it
difficult to remove the hob from the aperture in future,
particularly if it needs to be serviced.
Carefully turn the hob back over and then gently lower it into the aperture hole that
you have cut out.
There are holes on the base or the sides of the hob that you can fix the four
brackets to. There are three holes in each one of the brackets.
You should place the bracket on the underneath of the hob, in a position that is
appropriate for the aperture that you have cut out. Using the screws provided, fix
the bracket to the hob. These screws MUST be securely tightened.
Fitting guidelines
560
490
510
580
50
Page 7

7
The ceramic hob is manufactured to work with threephase alternating current (400V3N~50Hz).The voltage
rating of the ceramic hob heating elements is 230V.
Adapting the ceramic hob to operate with one-phase
current is possible by appropriate bridging in the
connection box according to the connection diagram
below. The connection diagram is also found on the
cover of the connection box. Remember that the
connection wire should match the connection type and the power rating of the ceramic
hob.
The connection cable must be secured in a strain-relief clamp.
Warning!
Remember to connect the safety circuit to the connection box terminal marked with
.The electricity supply for the ceramic hob must have a safety switch which
enables the power to be cut off in case of emergency. The distance between the
working contacts of the safety switch must be at least 3mm.
Before connecting the ceramic hob to the power supply it is important to read the
information on the data plate and the connection diagram.
CONNECTION DIAGRAM
Caution! Voltage of heating elements is 230V
Caution! ln the event of any connection
the safety wire must be connected to the PE terminal
Recommended
type of connection
lead
1
For 230 V earthed onephase connection, bridges
connect 1-2 terminals, safety
wire to .
H05VV-F 3G2.5
2
For 400/230V earthed twophase connection, the safety
wire to .
H05VV-F 4G2.5
L1=R,L2=S,L3=T,N=earth terminal, PE= safety wire terminal
The cable connections must be in accordance with the diagram located on the
bottom of the hob .
You should use a good quality screwdriver to carefully, fully tighten ALL of the
terminal screws.
2
1
1 2 3
4
L1
1 2 3
4
N
PE
L1
1 2 3
4
N
PE
L2
Page 8

8
If when the hob is first switched on, only two of the zones work, you should
recheck that the terminal screws are all fully tightened. This should be done
before contacting the Customer Care Department.
IMPORTANT: The appliance must NOT be connected to the mains supply by
means of a 13A plug and socket.
The cable can be looped if necessary, but make sure that is not kinked or trapped
when the hob is in position. Care must be taken to avoid the cable being in contact
with hot parts of the appliance.
Replacing the mains supply cable
If the mains supply cable is damaged, then it must be replaced by an appropriate
replacement.
The mains supply cable should be replaced in accordance with the following
instructions:
➢ Switch the appliance off at the control switch.
➢ Open the terminal block on the underside of the hob.
➢ Unscrew the terminal screws fixing the cable.
➢ The “green-yellow” earth wire must be connected to the terminal marked . It
must be about 10 mm longer than the live and neutral wires.
➢ The “blue” neutral wire must be connected to the terminal marked with letter (N)
- the live wire must be connected to the terminal marked with letter (L).
Using the ceramic hob
Page 9

9
Before first use
IMPORTANT: You should clean the ceramic hob surface (see “Maintenance
and cleaning” section).
✓ You should switch on one cooking zone at a time, for 5 minutes at the maximum
setting. This will help to eliminate any new smell that exists and evaporate any
humidity that has formed on the heating elements during transit.
✓ Do not burn off more than one zone at once.
✓ You must place a saucepan filled half full with cold water on each zone as you
burn it off.
Important!
The inside of the oven should only be washed with warm water and a small amount of
washing-up liquid.
How to use the hot plate
Put the pot in center of the heating zone, Turn the knob clockwise and anticlockwise to
turn on the hob.
High temperature indication lamp:
When the glass plate is too hot, the high temperature indication lamp will light up, don’t
touch the glass plate until the indication lamp goes out.
Shut down:after using,please turn the knob to “OFF”,the hob will stop heating.
Caution!
➢ Ensure the heating plate is clean-a soiled zone does not transfer all of the heat.
➢ Protect the plate against corrosion.
➢ Switch off the plate against corrosion.
➢ Do not leave pans with prepared dishes based on fats and oils unattended on the
switched-on plate; hot fat can spontaneously catch fire.
Heat level selection
0 Switch off
1 MIN. Warming up
2 Stewing vegetables, slow cooking
3 Cooking soups ,larger dishes
4 Slow frying
5 Grilling meat, fish
6 MAX. Fast heating up, fast cooking, frying
IMPORTANT: The hob power should be off when the alarm silences. If you have
finished cooking, you should turn the selector knob to 0.
Page 10

10
The stainless ornamental rings can be cleaned using washing liquids or gentle liquid
scrubbing agents and wiped dry.
The surface of the hotplates should be regularly polished with white mineral oil or
silicone oil. Never use animal or vegetable fats like butter, lard, oil etc. for the purpose.
The enamel working plate should be cleaned using warm water with a bit of washing
liquid. larger stains can be removed using gentle scrubbing liquids.
Caution!
All repairs and regulatory activities should be carried out by the appropriate
service centre or by an appropriately authorized fitter.
IMPORTANT: If your appliance appears not to be operating correctly, Please
contact with dealer.
Hob guidelines
The first few times the hob top is used, it may give off an acrid, burning smell. This
smell will disappear completely with repeated use.
The worktop is fitted with cooking areas of different diameter and power.
The positions where the heat will radiate from are clearly marked on the hob top.
The saucepans must be positioned exactly on these zones for efficient heating to
occur. Pans should have the same diameter as the cooking zone that they are
being used on.
You should not use saucepans with rough bottoms, as this can scratch the
ceramic surface.
Before use, make sure that the bottoms of the saucepans are clean and dry.
When cold, the bottom of the pans should be slightly concave, as they expand
when hot and lie flat on the surface of the hob. This will allow the heat to transfer
more easily.
The best thickness for the bottom of the pans is 2 – 3 mm of enamelled steel and
4 – 6 mm for stainless steel with sandwich type bottoms.
If these rules are not followed, then there will be a great loss of heat and energy.
Heat not absorbed by the saucepan, will spread to the hob, frame and surrounding
cabinets.
Preferably cover pans with a lid to permit cooking at a lower heat.
Always cook vegetables and potatoes, etc. in as little water to reduce cooking
times.
Food or liquid that has high sugar content may damage the hob top if it comes into
contact with the ceramic hob surface. Any spillages should be wiped up
immediately, however this may not prevent the hob surface from becoming
damaged.
IMPORTANT: The ceramic hob surface is tough; however it is not unbreakable
and can be damaged. Especially if pointed or hard objects are allowed to fall on it
with some force.
Page 11

11
DO NOT USE THE HOB IF THE SURFACE BECOMES BROKEN OR CRACKED.
YOU SHOULD SWITCH OFF THE APPLIANCE TO AVOID THE POSSIBILITY
OF ELECTRIC SHOCK AND CONTACT THE BAUMATIC CUSTOMER CARE
DEPARTMENT IMMEDIATELY.
Maintenance and cleaning
Cleaning operations must only be carried out when the hob is cool.
The appliance should be disconnected from your mains supply before
commencing any cleaning process.
Cleaning the ceramic hob top
Any residues that are left on the hob top surface from cleaning agents will
damage it. You should remove any residues with warm water mixed with a little
washing up liquid.
Abrasive cleaners or sharp objects will damage the hob surface; you should clean it
using warm water mixed with a little washing up liquid.
You may find it easier to clean some deposits whilst the hob surface is still warm.
However you should take care not to burn yourself if cleaning the hob surface when it
is still warm.
After each use
Wipe the appliance over with a damp cloth.
Dry the appliance by rubbing the surface with a clean cloth.
Cleaning table
Type of deposit
Remove
immediately?
Remove when
the appliance
has cooled
down?
What should I use
to remove the
deposit?
Sugar or food/liquid
containing sugar
Yes
No
Ceramic hob scraper
Tin foil or plastic
Yes
No
Ceramic hob scraper
Fat splashes
No
Yes
Ceramic hob cleaner
Metallic
discolouration
No
Yes
Ceramic hob cleaner
Water splashes or
water rings
No
Yes
Ceramic hob cleaner
Important!
The inside of the hob should only be washed with warm water and a small amount of
washing-up liquid.
Caution!
Page 12

12
Ensure the heating plate is clean-a soiled zone does not transfer all of the heat.
Protect the hob against corrosion.
Switch off the hob against corrosion.
Do not leave pans with prepared dishes based on fats and oils unattended on the
switched-on plate; hot fat can spontaneously catch fire.
IMPORTANT: If your appliance appears not to be operating correctly, Please
contact with dealer.
DO NOT ATTEMPT TO REPAIR THE APPLIANCE YOURSELF.
Please note that if an engineer is asked to attend whilst the product is under guarantee
and finds that the problem is not the result of an appliance fault, then you may be
liable for the cost of the call out charge.
The appliance must be accessible for the engineer to perform any necessary repair. If
your appliance is installed in such a way that an engineer is concerned that damage
will be caused to the appliance or your kitchen, then he will not complete a repair.
Environmental note
Note: Before discarding an old appliance, switch off and disconnect it from
the power supply. Cut off and render any plug useless. Cut the cable off
directly behind the appliance to prevent misuse. This should be undertaken
by a competent person.
This appliance is marked according to the European directive 2002/96/EC on Waste
electrical and Electronic Equipment (WEEE). By ensuring this product is disposed of
correctly, you will help prevent potential negative consequences for the environment
and human health, which could otherwise be caused by inappropriate waste handling
of this product.
 Loading...