

Page 1
Instruction Manual For Ceramic Hob
ENGLISH
Инструкция по эксплуатации керамической варочной панели
Manuel d'instructions pour la plaque de cuisson en vitrocéramique
Manual de instrucciones para placa vitrocerámica
Návod k použití pro keramické varné desky
Upute za uporabu keramičke ploče za kuhanje
Manual de instrucțiuni pentru plita ceramică
Návod na obsluhu sklokeramickej varnej dosky
Navodila za uporabo keramične kuhalne plošče
Kerámia főzőlap használati útmutatója
Εγχειρίδιο οδηγιών για κεραμικές εστίες
CEHDD30TCT
РУССКИЙ
FRANÇAIS
ESPAÑOL
ČEŠTINA
HRVATSKI
ROMÂNĂ
SLOVENSK
SLOVENŠČINA
MAGYAR
ΕΛΛΗΝΙΚΑ
Thank you for purchasing the CANDY ceramic hob. Please read this instruction manual
carefully before using the hob and keep it in a safe place for future reference.
Page 2

EN-1
By placing the mark on this product, we are
confirming compliance to all relevant European
safety, health and environmental requirements
which are applicable in legislation for this
product.
Safety Warnings
Your safety is important to us. Please read this
information before using your cooktop.
Installation
Electrical Shock Hazard
• Disconnect the appliance from the mains
electricity supply before carrying out any work
or maintenance on it.
• Connection to a good earth wiring system is
essential and mandatory.
• Alterations to the domestic wiring system must
only be made by a qualified electrician.
• Failure to follow this advice may result in
electrical shock or death.
Cut Hazard
• Take care - panel edges are sharp.
• Failure to use caution could result in injury or
cuts.
Important safety instructions
• Read these instructions carefully before
installing or using this appliance.
• No combustible material or products should be
Page 3

EN-2
placed on this appliance at any time.
• Please make this information available to the
person responsible for installing the appliance
as it could reduce your installation costs.
• In order to avoid a hazard, this appliance must
be installed according to these instructions for
installation.
• This appliance is to be properly installed and
earthed only by a suitably qualified person.
• This appliance should be connected to a circuit
which incorporates an isolating switch
providing full disconnection from the power
supply.
• Failure to install the appliance correctly could
invalidate any warranty or liability claims.
Operation and maintenance
Electrical Shock Hazard
• Do not cook on a broken or cracked cooktop. If
the cooktop surface should break or crack, switch
the appliance off immediately at the mains power
supply (wall switch) and contact a qualified
technician.
• Switch the cooktop off at the wall before
cleaning or maintenance.
• Failure to follow this advice may result in
electrical shock or death.
Health Hazard
• This appliance complies with electromagnetic
Page 4

EN-3
safety standards.
Hot Surface Hazard
• During use, accessible parts of this appliance
will become hot enough to cause burns.
• Do not let your body, clothing or any item other
than suitable cookware contact the Induction
glass until the surface is cool.
• Metallic objects such as knives, forks, spoons
and lids should not be placed on the hob surface
since they can get hot.
• Keep children away.
• Handles of saucepans may be hot to touch.
Check saucepan handles do not overhang other
cooking zones that are on. Keep handles out of
reach of children.
• Failure to follow this advice could result in
burns and scalds.
Cut Hazard
• The razor-sharp blade of a cooktop scraper is
exposed when the safety cover is retracted. Use
with extreme care and always store safely and
out of reach of children.
• Failure to use caution could result in injury or
cuts.
Important safety instructions
• Never leave the appliance unattended when in
use. Boilover causes smoking and greasy
spillovers that may ignite.
• Never use your appliance as a work or storage
surface.
• Never leave any objects or utensils on the
Page 5

EN-4
appliance.
• Never use your appliance for warming or
heating the room.
• After use, always turn off the cooking zones
and the cooktop as described in this manual (i.e.
by using the touch controls).
• Do not allow children to play with the appliance
or sit, stand, or climb on it.
• Do not store items of interest to children in
cabinets above the appliance. Children climbing
on the cooktop could be seriously injured.
• Do not leave children alone or unattended in
the area where the appliance is in use.
• Children or persons with a disability which
limits their ability to use the appliance should
have a responsible and competent person to
instruct them in its use. The instructor should be
satisfied that they can use the appliance without
danger to themselves or their surroundings.
• Do not repair or replace any part of the
appliance unless specifically recommended in the
manual. All other servicing should be done by a
qualified technician.
• Do not use a steam cleaner to clean your
cooktop.
• Do not place or drop heavy objects on your
cooktop.
• Do not stand on your cooktop.
• Do not use pans with jagged edges or drag pans
across the Induction glass surface as this can
Page 6

EN-5
scratch the glass.
• Do not use scourers or any other harsh
abrasive cleaning agents to clean your cooktop,
as these can scratch the Induction glass.
• If the supply cord is damaged, it must be
replaced by the manufacturer, its service agent
or similarly qualified persons in order to avoid a
hazard.
•This appliance is intended to be used in
household and similar applications such as:
-staff kitchen areas in shops, offices and other
working environments; -farm houses; -by
clients in hotels, motels and other residential
type environments; -bed and breakfast type
environments.
•WARNING: The appliance and its accessible
parts become hot during use.
Care should be taken to avoid touching heating
elements.
Children less than 8 years of age shall be kept
away unless continuously supervised.
•This appliance can be used by children aged
from 8 years and above and persons with
reduced physical, sensory or mental capabilities
or lack of experience and knowledge if they have
been given supervision or instruction concerning
use of the appliance in a safe way and
understand the hazards involved.
•Children shall not play with the appliance.
Cleaning and user maintenance shall not be
made by children without supervision.
Page 7

EN-6
•WARNING: Unattended cooking on a hob with
fat or oil can be dangerous and may result in fire.
NEVER try to extinguish a fire with water, but
switch off the appliance and then cover flame e.g.
with a lid or a fire blanket.
•WARNING: Danger of fire: do not store items on
the cooking surfaces.
• Warning: If the surface is cracked, switch off
the appliance to avoid the possibility of electric
shock, for hob surfaces of glass-ceramic or
similar material which protect live parts
•A steam cleaner is not to be used.
•The appliance is not intended to be operated by
means of an external timer or separate
remote-control system.
Congratulations on the purchase of your new Ceramic Hob.
We recommend that you spend some time to read this Instruction / Installation
Manual in order to fully understand how to install correctly and operate it.
For installation, please read the installation section.
Read all the safety instructions carefully before use and keep this Instruction /
Installation Manual for future reference.
Page 8
EN-7
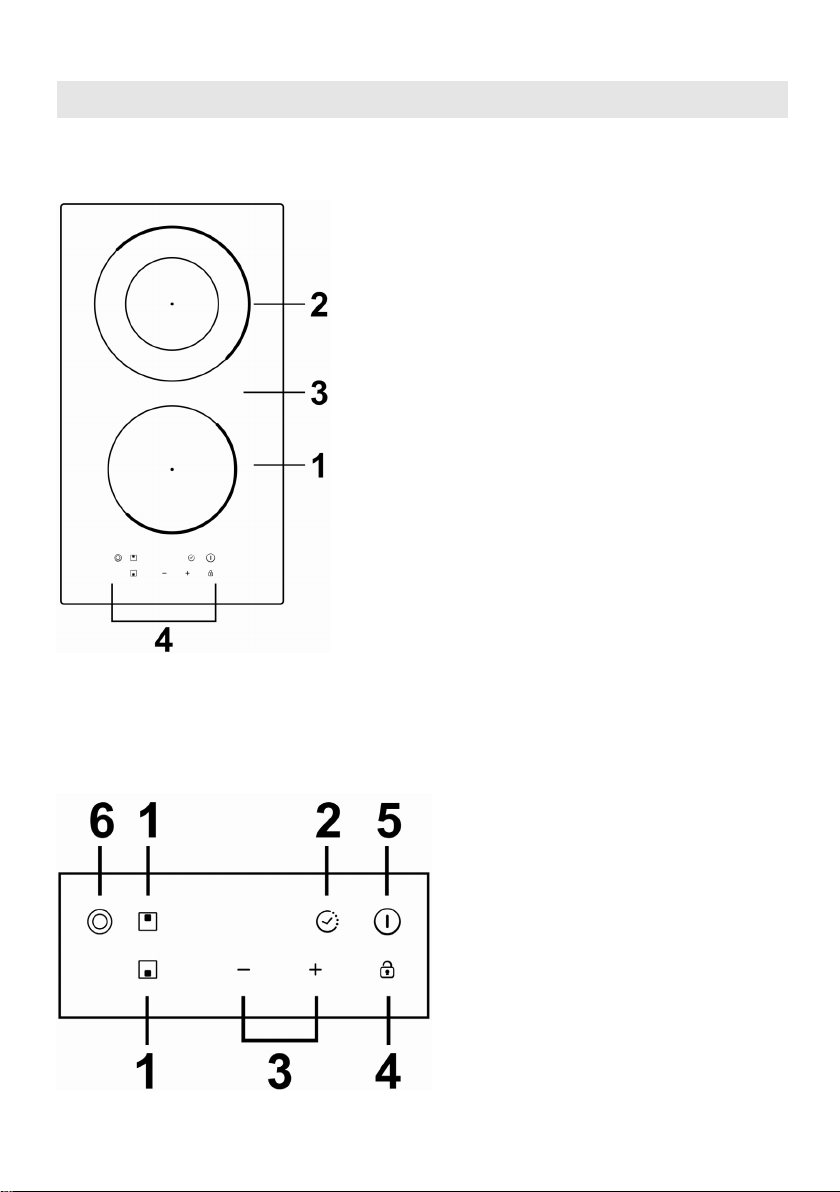
Product Overview
Top View
1. max. 1200 W zone
2. max. 2000/1000 W zone
3. Glass plate
4. Control panel
Control Panel
1. Heating zone selection controls
2. Timer control
3. Power / Timer regulating controls
4. keylock control
5. ON/OFF control
6. Dual zone control
Page 9
EN-8
Product Information
The microcomputer ceramic cooker hob can meet different kinds of cuisine
demands because of resistance wire heating, micro-computerized control and
multi-power selection, really the optimal choice for modern families.
The ceramic cooker hob centers on customers and adopts personalized design.
The hob has safe and reliable performances, making your life comfortable and
enabling to fully enjoy the pleasure from life.
Before using your New Ceramic Hob
• Read this guide, taking special note of the ‘Safety Warnings’ section.
• Remove any protective film that may still be on your ceramic hob.
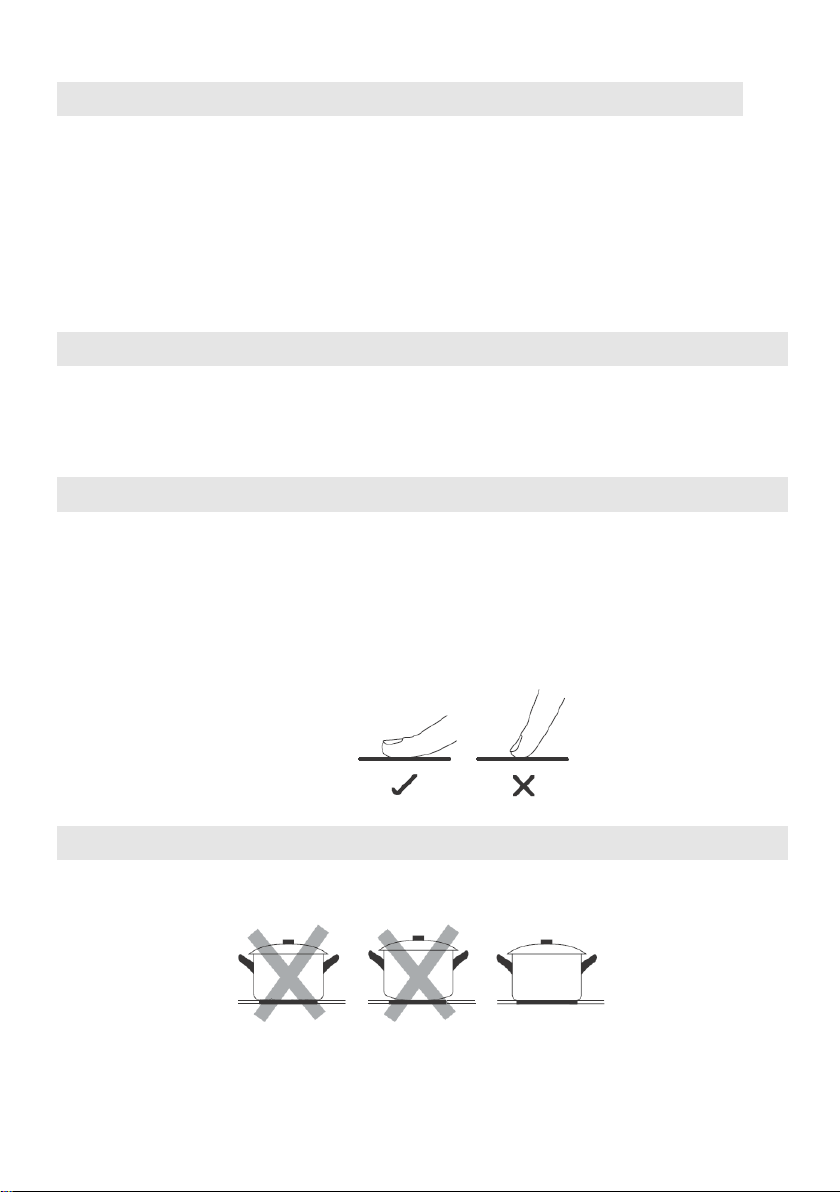
Using the Touch Controls
• The controls respond to touch, so you don’t need to apply any pressure.
• Use the ball of your finger, not its tip.
• You will hear a beep each time a touch is registered.
• Make sure the controls are always clean, dry, and that there is no object (e.g. a
utensil or a cloth) covering them. Even a thin film of water may make the
controls difficult to operate.
Choosing the right Cookware
Do not use cookware with jagged edges or a curved base.
Make sure that the base of your pan is smooth, sits flat against the glass, and is
the same size as the cooking zone. Always centre your pan on the cooking zone.
Page 10
EN-9
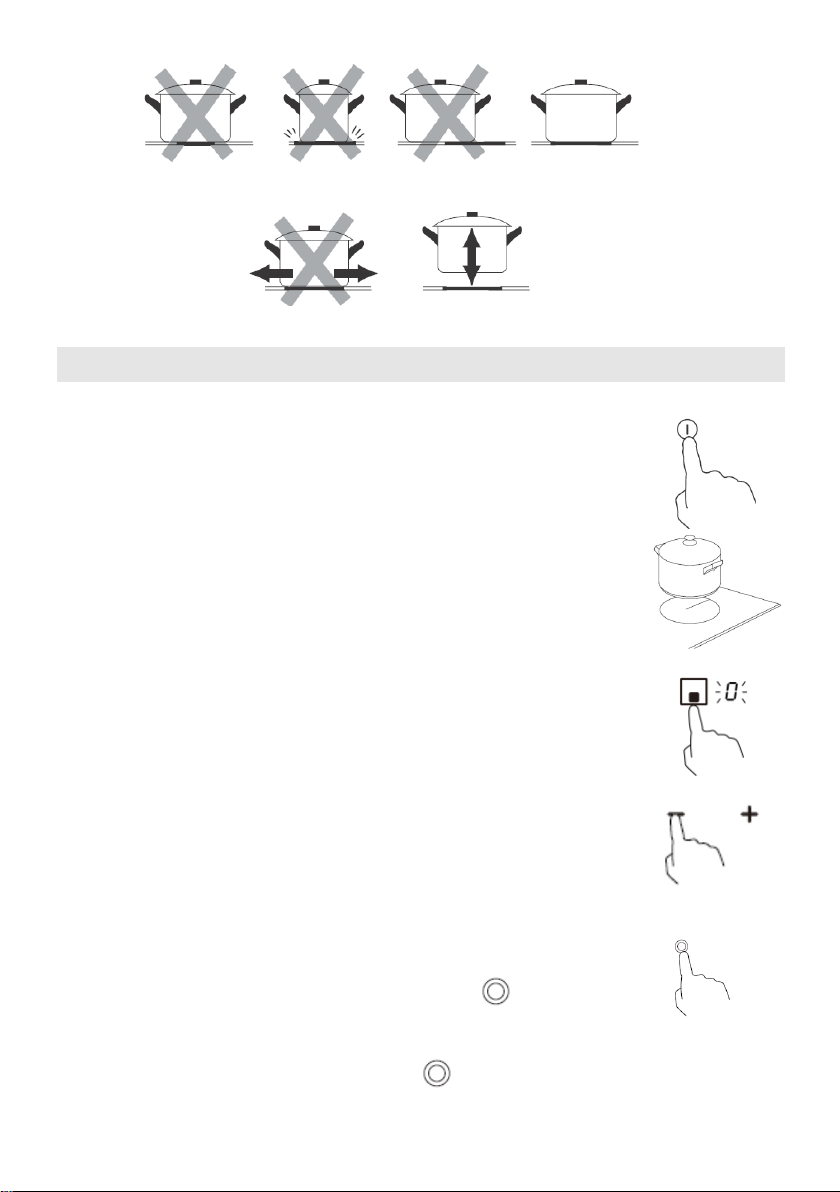
Always lift pans off the ceramic hob – do not slide, or they may scratch the glass.
Using your Ceramic Hob
To start cooking
1. Touch the ON/OFF control.
After power on, the buzzer beeps once, all displays show
“ – “ or “ – – “, indicating that the induction hob has entered
the state of standby mode.
2. Place a suitable pan on the cooking zone that
you wish to use.
• Make sure the bottom of the pan and the surface
Of the cooking zone are clean and dry.
3. Touching the heating zone selection control, and
a indicator next to the key will flash.
4. Set a power level by touching the “-” or “+” control.
• If you don’t choose a heat setting within 1
minute, the ceramic hob will automatically
switch off. You will need to start again at step 1.
• You can modify the heat setting at any time
during cooking.
5. When zone 1 is working, touch the heating zone selection
control then activate double zone by pressing .
When double zone is working, touch the heating zone selection control then
turning off the double zone by pressing
.
Page 11

EN-10
When you have finished cooking
1. Touching the heating zone selection control that you
wish to switch off.
2. Turn the cooking zone off by touching the “-” and scrolling down to “0”, or
holding the “+” and “-” button at the same time for 1 second, it will cut down to ”0”
directly.
Make sure the power display shows “0”, then shows “H”.
3. Turn the whole cooktop off by touching the “ON/OFF” control.
4. Beware of hot surfaces
“H” will show which cooking zone is hot to touch. It will disappear when the
surface has cooled down to a safe temperature. It can also be used as an energy
saving function if you want to heat further pans, use the hotplate that is still hot.
and then
Locking the Controls
• You can lock the controls to prevent unintended use (for example children
accidentally turning the cooking zones on).
• When the controls are locked, all the controls except the ON/OFF control are
disabled.
To lock the controls
Touch the keylock control. The timer indicator will show “Lo”.
To unlock the controls
1. Make sure the ceramic hob is turned on.
2. Touch and hold the keylock control for a while.
3. You can now start using your ceramic hob.
When the hob is in the lock mode, all the controls are disable except the
ON/OFF , you can always turn the ceramic hob off with the ON/OFF
control in an emergency, but you shall unlock the hob first in the next
Operation
Page 12

EN-11
Power level
1 2 3 4 5 6 7 8 9
Default working timer (hour)
8 8 8 4 4 4 2 2 2
Over-Temperature Protection
A temperature sensor equipped can monitor the temperature inside the ceramic
hob. When an excessive temperature is monitored, the ceramic hob will stop
operation automatically.
Over-spillage Protection
Over-spillage protection is a safety protection function. It switch off the hob
automatically within 10s if the water flow to the control panel, while buzzer will
beep 1 second.
Residual Heat Warning
When the hob has been operating for some time, there will be some residual
heat. The letter “ H ”appears to warn you to keep away from it.
Auto Shutdown
Auto shut down is a safety protection function for your ceramic hob. It shut down
automatically if ever you forget to turn off your cooking. The default working times
for various power levels are shown in the below table:
Using the Timer
You can use the timer in two different ways:
• You can use it as a minute minder. In this case, the timer will not turn any
cooking zone off when the set time is up.
• You can set it to turn one cooking zone off or more than one after the set time is
up.
• You can set the timer for up to 99 minutes.
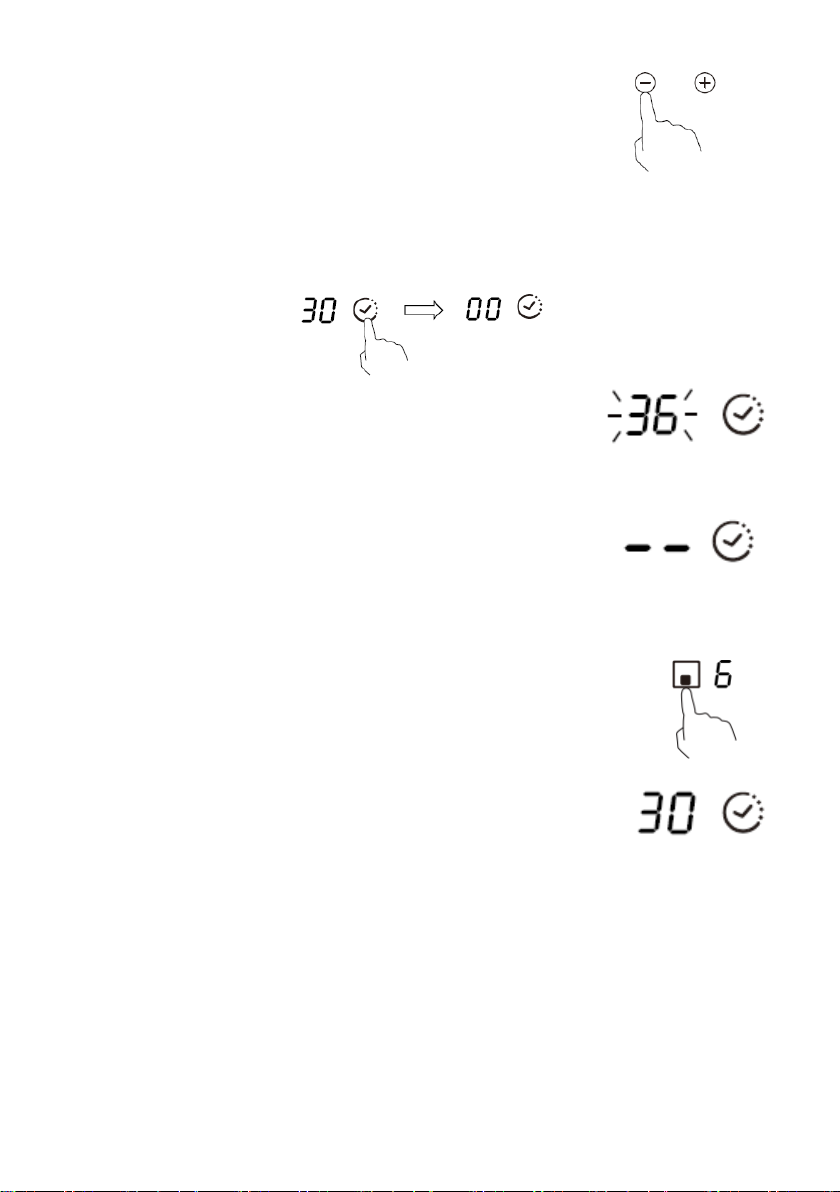
Using the Timer as a Minute Minder
If you are not selecting any cooking zone
1. Make sure the cooktop is turned on.
Note: you can use the minute minder even if you’re not selecting any cooking
zones.
2. Touch timer control, the minder indicator will start
flashing and “30” will show in the timer display.
Page 13
EN-12
3. Set the time by touching the “-” or “+” control
Hint: Touch the “-” or “+” control of the timer
once to decrease or increase by 1 minute.
Touch and hold the “-” or “+” control of the timer to decrease or
increase by 10 minutes.
4. Cancel the time by touching the timer control and the”00” will show in the
minute display.
5. When the time is set, it will begin to count down
immediately. The display will show the remaining
time and the timer indicator will flash for 5 seconds.
6. Buzzer will beep for 30 seconds and the timer indicator
shows “- -” when the set time finished.
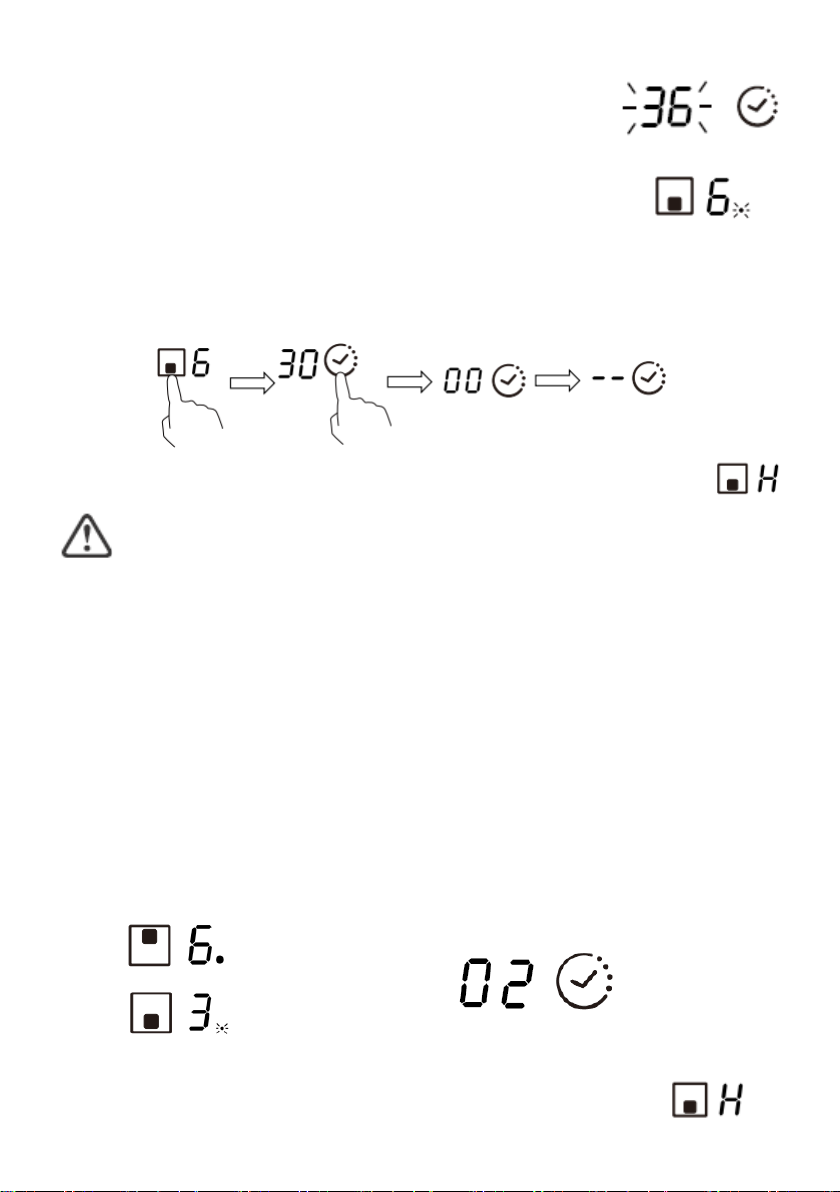
Setting the timer to turn one cooking zone off
Cooking zones set for this feature will:
1. Touching the heating zone selection control
that you want to set the timer for. (e.g. zone 1#)
2. Touch timer control, the minder indicator will start flashing
and “30” will show in the timer display.
3. Set the time by touching the “-” or “+” control.
Hint: Touch the “-” or “+” control of the timer
once will decrease or increase by 1 minute.
Touch and hold the “-” or “+” control of the timer will decrease or
increase by 10 minutes.
If the setting time exceeds 99 minutes, the timer will automatically
return to 0 minute.
Page 14
EN-13
4. When the time is set, it will begin to count down
immediately. The display will show the remaining time and
the timer indicator flash for 5 seconds.
NOTE: The red dot next to power level indicator
will illuminate indicating that zone is selected.
5. To cancel the timer, touch the heating zone selection control, and then touch
the timer control, the timer is cancelled, and the “00” will show in the minute
display, and then “--”.
6. When cooking timer expires, the corresponding cooking zone will be
automatically switch off and show “H”.
Other cooking zone will keep operating if they are turned on previously.
Setting the timer to turn more than one cooking zone
off
1. If more than one heating zone use this function, the timer indicator will show
the shortest time.
(e.g. zone 1# setting time of 2 minutes, zone 2# setting time of 5 minutes,
the timer indicator shows “3”.)
NOTE: The flashing red dot next to power level indicator means the timer
indicator is showing time of the heating zone.
If you want to check the set time of other heating zone, touch the heating
zone selection control. The timer will indicate its set time.
(set to 5 minutes)
(set to 2 minutes)
2. When cooking timer expires, the corresponding cooking zone
will be switch off automatically and show “H”.
Page 15
EN-14
NOTE: If you want to change the time after the timer is set, you have to start
What?
How?
Important!
Everyday soiling on glass
1. Switch the power to the
• When the power to the cooktop is
become stained.
Boilovers, melts, and
Remove these immediately
above.
• Remove stains left by melts and
Spillovers on the
1. Switch the power to the
cooktop back on.
• The cooktop may beep and turn
from step 1.
Care and Cleaning
(fingerprints, marks,
stains left by food or
non-sugary spillovers on
the glass)
hot sugary spills on
the glass
cooktop off.
2. Apply a cooktop cleaner
while the glass is still warm
(but not hot!)
3. Rinse and wipe dry with a
clean cloth or paper towel.
4. Switch the power to the
cooktop back on.
with a fish slice, palette knife or
razor blade scraper suitable for
ceramic glass cooktops, but
beware of hot cooking zone
surfaces:
1. Switch the power to the
cooktop off at the wall.
2. Hold the blade or utensil at a
30° angle and scrape the
soiling or spill to a cool area
of the cooktop.
3. Clean the soiling or spill up
with a dish cloth or paper
towel.
4. Follow steps 2 to 4 for
‘Everyday soiling on glass’
switched off, there will be no ‘hot
surface’ indication but the
cooking zone may still be hot!
Take extreme care.
• Heavy-duty scourers, some nylon
scourers and harsh/abrasive
cleaning agents may scratch the
glass. Always read the label to
check if your cleaner or scourer is
suitable.
• Never leave cleaning residue on
the cooktop: the glass may
sugary food or spillovers as soon
as possible. If left to cool on the
glass, they may be difficult to
remove or even permanently
damage the glass surface.
• Cut hazard: when the safety
cover is retracted, the blade in a
scraper is razor-sharp. Use with
extreme care and always store
safely and out of reach of children.
touch controls
cooktop off.
2. Soak up the spill
3. Wipe the touch control area
with a clean damp sponge or
cloth.
4. Wipe the area completely
dry with a paper towel.
5. Switch the power to the
itself off, and the touch controls
may not function while there is
liquid on them. Make sure you
wipe the touch control area dry
before turning the cooktop back
on.
Page 16
EN-15
Hints and Tips
The cooktop cannot
No power.
Make sure the cooktop is connected
technician.
The touch controls are
The controls are locked.
Unlock the controls. See section
instructions.
The touch controls are
There may be a slight film of
controls.
Make sure the touch control area is
The glass is being
Rough-edged cookware.
cleaning products being used.
Use cookware with flat and smooth
Some pans make
This may be caused by the
vibrating differently).
This is normal for cookware and
Building-in Dimensions A×B (mm)
Problem
Be turned on.
unresponsive.
difficult to operate.
scratched.
crackling or clicking
noises.
Possible causes
water over the controls or you
may be using the tip of your
finger when touching the
Unsuitable, abrasive scourer or
construction of your cookware
(layers of different metals
What to do
to the power supply and that it is
switched on.
Check whether there is a power
outage in your home or area. If
you’ve checked everything and the
problem persists, call a qualified
‘Using your ceramic cooktop’ for
dry and use the ball of your finger
when touching the controls.
bases. See ‘Choosing the right
cookware’.
See ‘Care and cleaning’.
does not indicate a fault.
Technical Specification
Cooking Hob
Cooking Zones
Supply Voltage
Installed Electric Power
Product Size L×W×H(mm)
Weight and Dimensions are approximate. Because we continually strive to
CEHDD30TCT
2 Zones
220-240V~, 50-60Hz
2928-3484W
288X520X52
268X500
Page 17
EN-16
improve our products we may change specifications and designs without prior
268
-0
500
-0
notice.
Installation
Selection of installation equipment
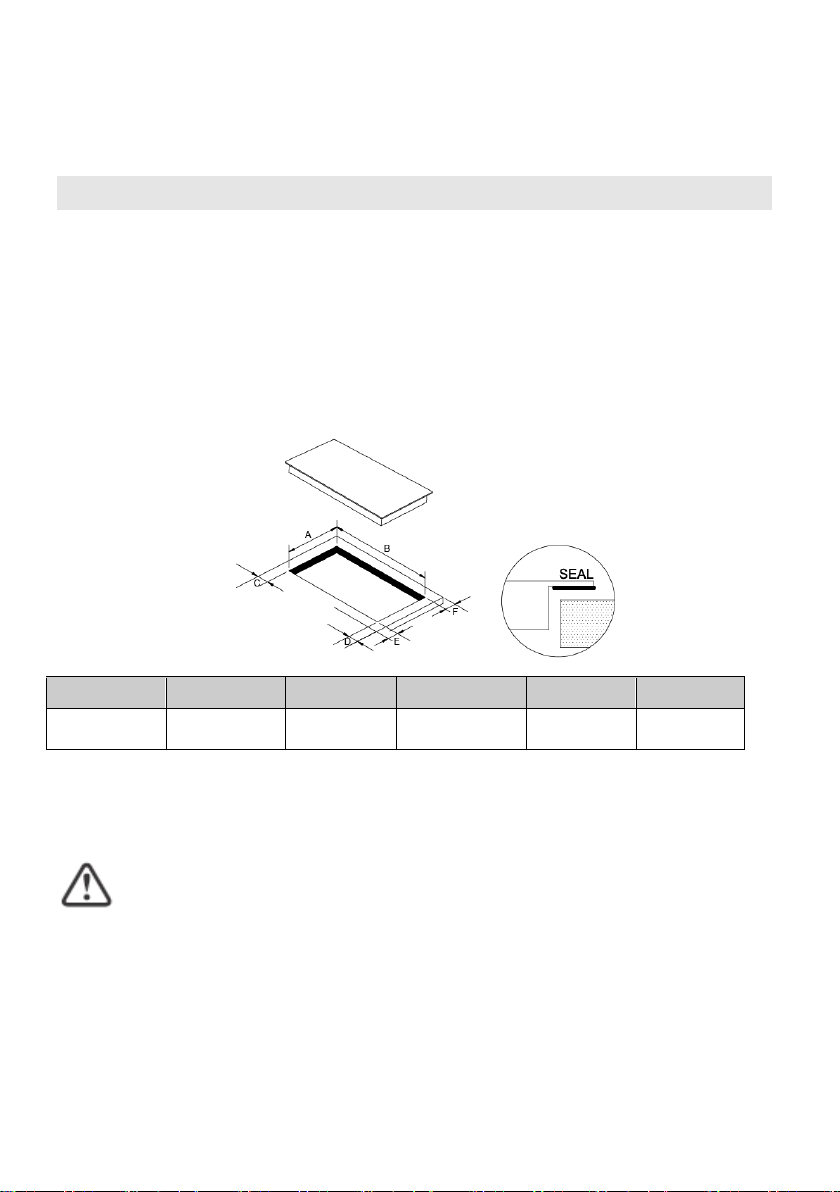
Cut out the work surface according to the sizes shown in the drawing.
For the purpose of installation and use, a minimum of 5 cm space shall be
preserved around the hole.
Be sure the thickness of the work surface is at least 30mm. Please select
heat-resistant work surface material to avoid larger deformation caused by
the heat radiation from the hotplate. As shown below:
A(mm) B(mm) C(mm) D(mm) E(mm) F(mm)
+4
+4
50mini 50 mini 50 mini 50 mini
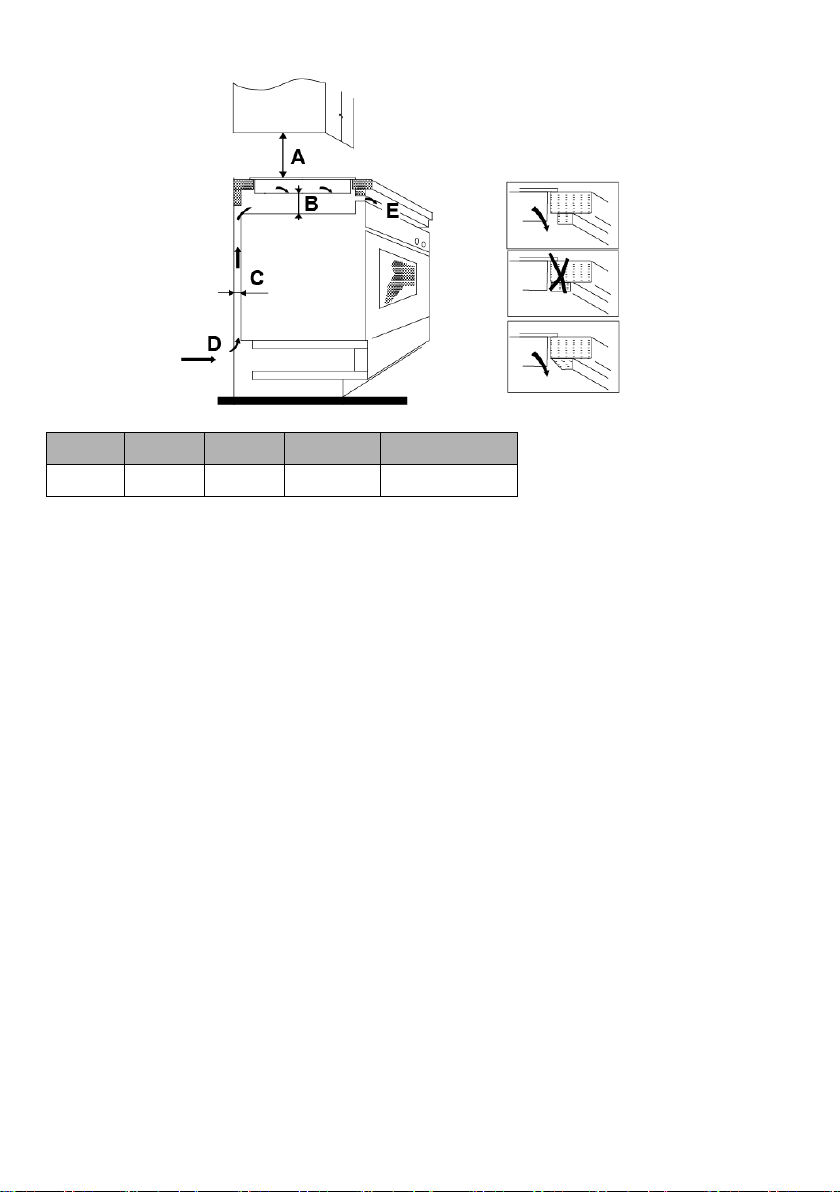
Under any circumstances, make sure the ceramic cooker hob is well ventilated
and the air inlet and outlet are not blocked. Ensure the ceramic cooker hob is in
good work state. As shown below
Note: The safety distance between the hotplate and the cupboard above
the hotplate should be at least 760mm.
Page 18
EN-17
A(mm) B(mm) C(mm) D E
760 50 mini 30 mini Air intake Air exit 10 mm
Before you install the hob, make sure that
• the work surface is square and level, and no structural members interfere with
space requirements
• the work surface is made of a heat-resistant material
• if the hob is installed above an oven, the oven has a built-in cooling fan
• the installation will comply with all clearance requirements and applicable
standards and regulations
• a suitable isolating switch providing full disconnection from the mains power
supply is incorporated in the permanent wiring, mounted and positioned to
comply with the local wiring rules and regulations.
The isolating switch must be of an approved type and provide a 3 mm air gap
contact separation in all poles (or in all active [phase] conductors if the local
wiring rules allow for this variation of the requirements)
• the isolating switch will be easily accessible to the customer with the hob
installed
• you consult local building authorities and by-laws if in doubt regarding
installation
• you use heat-resistant and easy-to-clean finishes (such as ceramic tiles) for the
wall surfaces surrounding the hob.
Page 19
EN-18
When you have installed the hob, make sure that
• the power supply cable is not accessible through cupboard doors or drawers
• there is adequate flow of fresh air from outside the cabinetry to the base of the
hob
• if the hob is installed above a drawer or cupboard space, a thermal protection
barrier is installed below the base of the hob
• the isolating switch is easily accessible by the customer
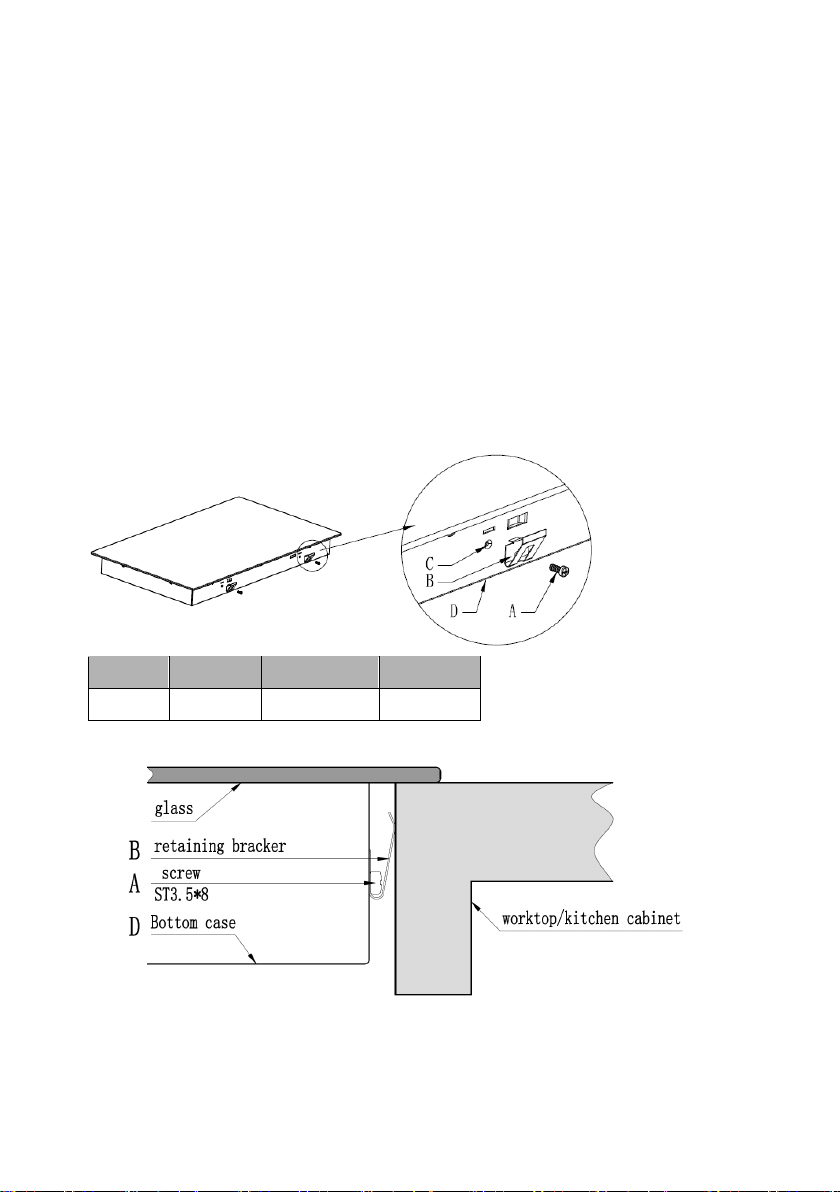
Before locating the fixing brackets
The unit should be placed on a stable, smooth surface (use the packaging). Do not
apply force onto the controls protruding from the hob.
Fix the hob on the work surface by screw 4 brackets on the bottom case of hob
(see picture) after installation.
A B C D
screw bracket Screw hole base
Cautions
1. The ceramic cooker hob must be installed by qualified personnel or technicians.
Page 20
EN-19
We have professionals at your service. Please never conduct the operation by
yourself.
2. The ceramic cooker hob shall not be mounted to cooling equipment,
dishwashers and rotary dryers.
3. The ceramic cooker hob shall be installed such that better heat radiation can be
ensured to enhance its reliability.
4. The wall and induced heating zone above the work surface shall withstand heat.
5. To avoid any damage, the sandwich layer and adhesive must be resistant to
heat.
6. A steam cleaner is not to be used.
7. This ceramic can be connected only to a supply with system impedance no more
than 0.427 ohm. In case necessary, please consult your supply authority for
system impedance information.
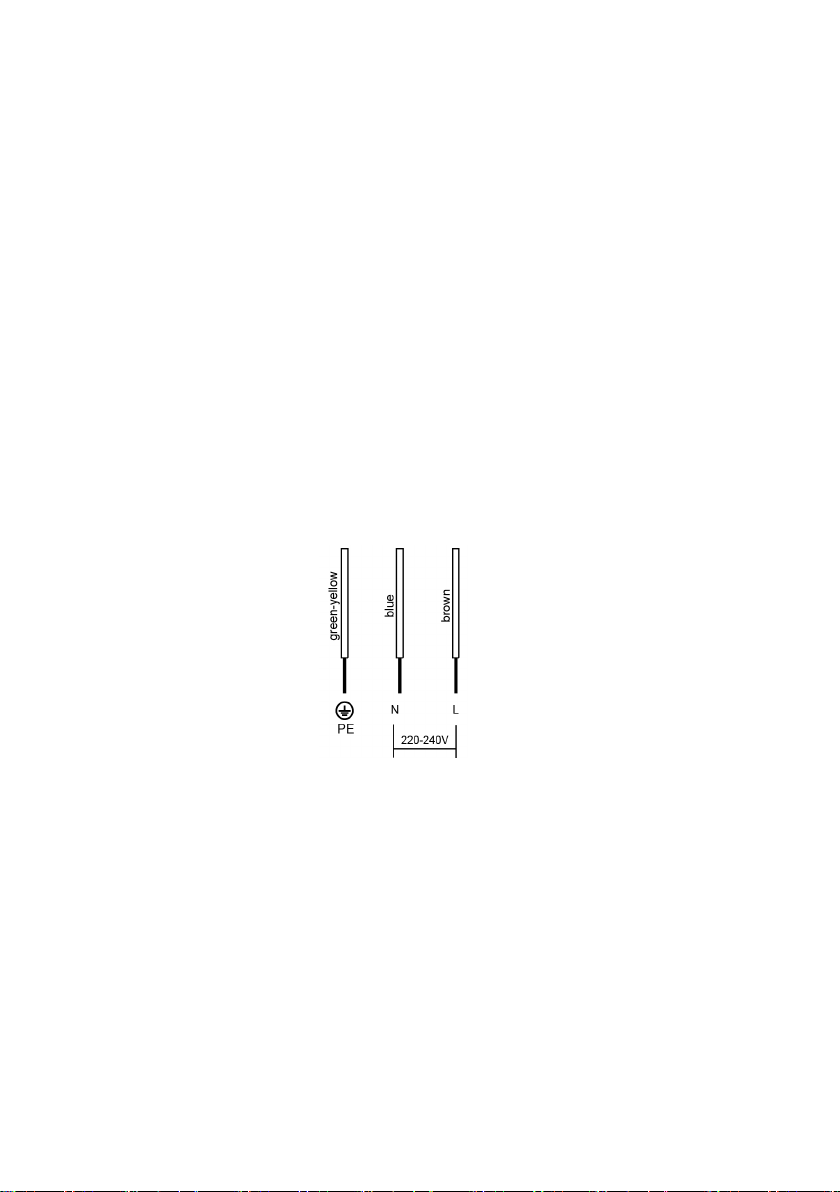
Connecting the hob to the mains power supply
The power supply should be connected in compliance with the relevant standard,
or a single-pole circuit breaker. The method of connection is shown below.
1. If the cable is damaged or needs replacing, this should be done by an
after-sales technician using the proper tools, so as to avoid any accidents.
2. If the appliance is being connected directly to the mains supply, an omnipolar
circuit breaker must be installed with a minimum gap of 3mm between the
contacts.
3. The installer must ensure that the correct electrical connection has been made
and that it complies with safety regulations.
4. The cable must not be bent or compressed.
5. The cable must be checked regularly and only replaced by a properly qualified
person.
Page 21
EN-20
This appliance is labelled in accordance with European Directive 2012/19/EU
regarding electric and electronic appliances (WEEE). The WEEE contain both
polluting substances (that can have a negative effect on the environment) and
base elements (that can be reused). It is important that the WEEE undergo
specific treatments to correctly remove and dispose of the pollutants and
recover all the materials. Individuals can play an important role in ensuring
that the WEEE do not become an environmental problem; It is essential to
-the WEEE should not be treated as domestic waste;
-the WEEE should be taken to dedicated collection areas managed by the town council or a
registered company.
In many countries, domestic collections may be available for large WEEEs. When you buy a
new appliance, the old one can be returned to the vendor who must accept it free of charge as
a one-off, as long as the appliance is of an equivalent type and has the same functions as the
purchased appliance.
follow a few basic rules:
Page 22
EN-21
zones
areas
Induction
cooking zones
Induction
cooking c
areas
radiant cooking
zones
solid
For circular cooking zones or areas:
diameter of useful surface area per
L
W
L
W
W
Product Information for Domestic Electric Hobs Compliant to Commission Regulation (EU) No
66/2014
Position Symbol Value Unit
Model identification CEHDD30TCT
Type of hob: Electric Hob
Number of
cooking zones
and/or areas
Heating
technology
(induction
cooking zones
and cooking
areas, radiant
cooking zones,
solid plates)
electric heated cooking zone,
rounded to the nearest 5mm
2
ooking
plates
Rear left Ø 20,0 cm
Rear central Ø - cm
Rear right Ø - cm
Central left Ø - cm
Central central Ø - cm
Central right Ø - cm
Front left Ø 16,5 cm
X
For non-circular cooking zones or
areas: length and width of useful
surface area per electric heated
cooking zone or area, rounded to
the nearest 5mm
Front central Ø - cm
Front right Ø - cm
Rear left
Rear central
Rear right
L
- cm
- cm
- cm
Page 23
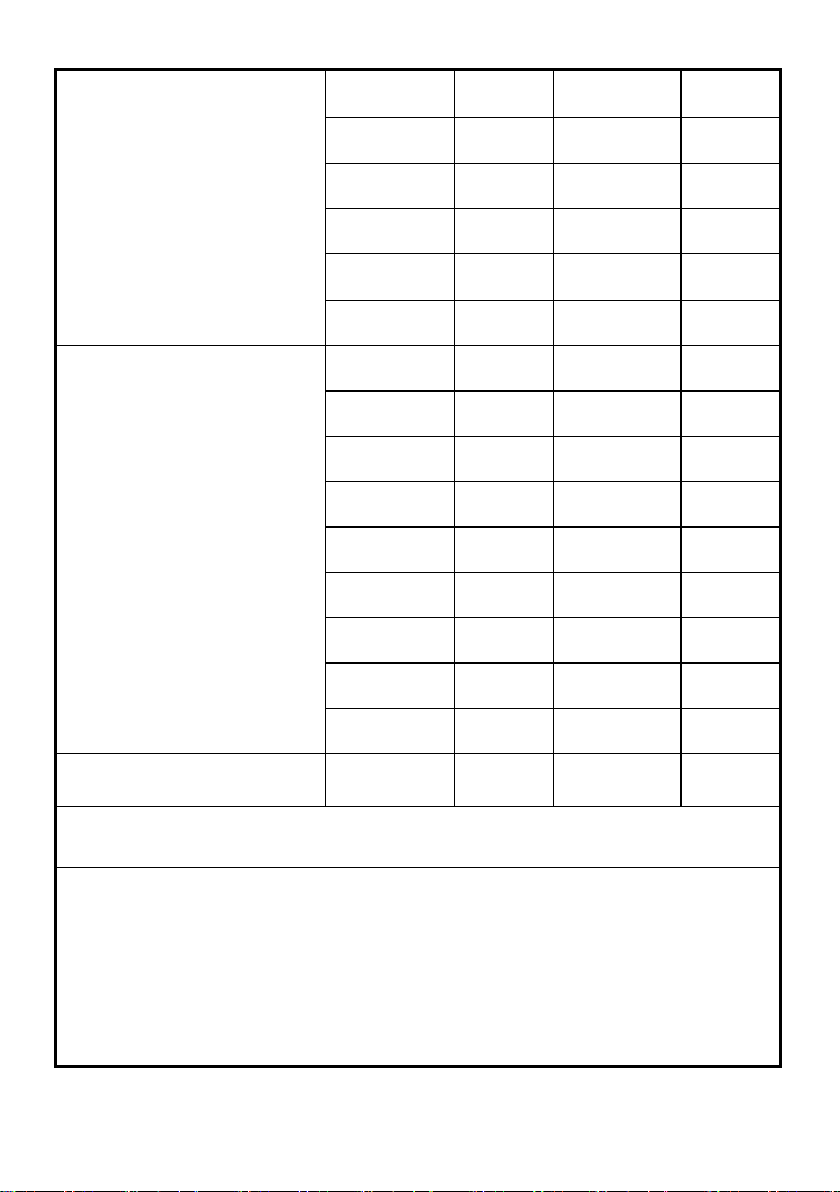
EN-22
Central left
L
W
L
W
L
W
W
L
W
ECelectric
cooking
ECelectric
cooking
cooking
ECelectric
cooking
ECelectric
cooking
ECelectric
cooking
ECelectric
cooking
ECelectric
cooking
cooking
S
Methods for
Suggestions for Energy Saving:
• To obtain the best efficiency of your hob, please place the pan in the centre of the cooking zone.
•
• Minimise the amount of liquid or fat to reduce cooking times.
• Start cooking on a high setting and reduce the setting when the food has heated through.
• Use pans whose diam
L
W
- cm
Energy consumption for cooking
zone or area calculated per kg
Central central
Central right
Front left
Front central
Front right
Rear left
Rear central
Rear right
Central left
Central central
Central right
Front left
Front central
L
ECelectric
-
- cm
- cm
- cm
- cm
187 Wh/kg
- Wh/kg
- Wh/kg
- Wh/kg
- Wh/kg
- Wh/kg
186 Wh/kg
- Wh/kg
cm
Front right
Energy consumption for the hob
calculated per kg
tandard applied: EN 60350-2 Household electric cooking appliances - Part 2: Hobs -
measuring performance
Using a lid will reduce cooking times and save energy by retaining the heat.
eter is as large as the graphic of the zone selected.
ECelectric
ECelectric
hob
- Wh/kg
186.5 Wh/kg
Page 24

Нанесением маркировки на данное изделие
изготовитель подтверждает его соответствие
применимым европейским стандартам
безопасности, охраны здоровья и окружающей
среды.
Меры предосторожности
Ваша безопасность очень важна для нас. Перед
началом использования панели внимательно
прочтите данную информацию.
Установка
Опасность поражения электрическим током
• Перед проведением любых работ или
технического обслуживания отсоединяйте
варочную панель от электрической сети.
• Подключение варочной панели к исправной
системе заземления является обязательным для
безопасной эксплуатации.
• Любые изменения подключения
электрооборудования в доме должны делаться
только квалифицированными электриками.
• Несоблюдение данного указания может привести
к поражению электрическим током, вплоть до
смертельного исхода.
Опасность порезов
• Будьте осторожны - края панели острые.
• Несоблюдение мер предосторожности может
привести к порезам.
RU-1
Page 25

Правила техники безопасности
• Перед установкой и использованием варочной
панели внимательно прочтите настоящее
руководство.
• Запрещается класть на панель горючие
материалы или продукты.
• Доведите данную информацию до лиц,
выполняющих установку варочной панели. Это
может уменьшить ваши затраты.
• Для предотвращения опасностей данная
варочная панель должна устанавливаться в
соответствии указаниями в настоящем
руководстве.
• Панель должна устанавливаться и подключаться
к электрической сети и системе заземления
квалифицированными специалистами.
• Для отключения от электрической сети на линии
питания панели должен быть установлен
выключатель.
• Неверная установка варочной панели приведёт к
немедленному аннулированию гарантии и
освобождает изготовителя от любой
ответственности.
Эксплуатация и уход
Опасность поражения электрическим током
• Запрещается готовить пищу на треснувшей или
лопнувшей панели. При появлении на
поверхности трещин немедленно отключите
RU-2
Page 26

варочную панель от электрической сети
(выключателем) и обратитесь в сервисный центр.
• Всегда отключайте варочную панель перед
проведением очистки и ухода.
• Несоблюдение данного указания может привести
к поражению электрическим током, вплоть до
смертельного исхода.
Опасности для здоровья
• Варочная панель отвечает требованиям
стандартов по электромагнитной безопасности.
Опасность ожогов
• При использовании варочной панели её части
нагреваются до температур, способных
причинить ожоги.
• Не прикасайтесь частями тела, одежды и другими
предметами, за исключением кухонной утвари, к
стеклянной поверхности панели до полного её
остывания.
• Не допускается помещение металлических
предметов: ножей, вилок, ложек, крышек и т.п. на
панель, т.к. они могут сильно нагреваться.
• Не подпускайте к горячей панели детей.
• Рукоятки сковород могут нагреваться до высокой
температуры. Следите за тем, чтобы они не
находились над другими конфорками во время их
работы. Не разрешайте детям баловаться с
варочной панелью.
• Несоблюдение данных указаний может привести к
серьёзным ожогам.
RU-3
Page 27

Опасность порезов
• При снятии защитной крышки можно порезаться
об острый край очистительного скребка.
Используйте скребок с предельной
осторожностью и храните его в месте,
недоступном для детей.
• Несоблюдение мер предосторожности может
привести к порезам.
Правила техники безопасности
• Никогда не оставляйте работающую варочную
панель без присмотра. Выплёскивание пищи
может приводить к появлению дыма. Попавшие
на горячую поверхность масло и жир могут
воспламениться.
• Не используйте варочную панель в качестве
стола или места для хранения.
• Никогда не оставляйте на панели посторонние
предметы.
• Запрещается использовать варочную панель для
отопления помещения.
• После использования всегда выключайте
конфорки панели, как описано в руководстве (т.е.
сенсорными органами управления).
• Не позволяйте детям баловаться с панелью,
залезать на неё или сидеть на ней.
• Не храните никакие детские игрушки или
лакомства в шкафах над панелью. При попытке
добраться до них дети могут получить серьёзные
травмы.
RU-4
Page 28

• Не оставляйте детей одних или без присмотра в
помещении, где работает варочная панель.
• Детей и лиц с психофизическими недостатками
необходимо хорошо обучить использованию
варочной панели. Лицо, проводящее обучение,
должно несколько раз убедиться в том, что дети и
указанные лица хорошо усвоили правила
обращения с варочной панелью и научились
выполнению основных операций.
• Не допускается замена или ремонт частей
панели, если данные работы не описаны в
руководстве. Все работы, не описанные в
руководстве, должны проводиться
квалифицированным сервисным персоналом.
• Не допускается использование отпаривателей и
паровых щёток для очистки варочной панели.
• Запрещается класть или бросать тяжёлые
предметы на панель.
• Запрещается залезать на варочную панель.
• Во избежание повреждения панели (царапания)
запрещается использовать посуду с острыми
углами.
• Запрещается использовать для очистки панели
стальные губки и другие абразивные материалы.
• При повреждении кабеля питания его замена
должна производиться изготовителем, сервисной
службой или квалифицированным
специализированным персоналом.
• Данная варочная панель предназначена для
RU-5
Page 29

бытового использования: - на кухнях в магазинах,
офисах и других рабочих заведениях; - в жилых
домах; - клиентами в отелях, гостиницах и других
жилых помещениях; - клиентами в мотелях,
хостелах и т.п.
ВНИМАНИЕ: Панель и её открытые части
нагреваются во время использования.
Будьте осторожны и не прикасайтесь к
конфоркам.
Не оставляйте детей возрастом менее 8 лет
рядом с варочной панелью без присмотра.
• Варочная панель может использоваться детьми
старше 8 лет и людьми с ограниченными
физическими, сенсорными или умственными
возможностями, а также без опыта и знаний, если
они находятся под присмотром или были
проинструктированы по безопасному
использованию панели и осознают возможные
риски.
• Детям запрещается играть с варочной панелью.
Без надлежащего присмотра детям запрещается
выполнять операции по очистке и уходу за
панелью.
ВНИМАНИЕ: Готовка с жиром или маслом на
варочной панели без присмотра может быть
опасной и может привести к возгоранию.
КАТЕГОРИЧЕСКИ ЗАПРЕЩАЕТСЯ тушить огонь
водой. Отключите панель от сети, после чего
накройте пламя крышкой или негорючим
RU-6
Page 30

материалом.
ВНИМАНИЕ: Опасность воспламенения!
Запрещается класть на панель горючие
предметы.
Внимание: При появлении на поверхности
трещин необходимо немедленно отключить
панель от электрической сети для
предотвращения поражения электрическим током
через металлическую посуду.
• Не допускается использование пароочистителей
для очистки панели.
• Варочная панель не рассчитана на управление
внешним таймером или отдельной системой
управления.
Поздравляем вас с приобретением новой керамической варочной панели.
Для обеспечения правильной установки и эксплуатации варочной панели необходимо
внимательно прочесть настоящее руководство.
Для установки прочтите главу «Установка».
Уделите особое внимание мерам предосторожности и правилам техники
безопасности. Храните руководство для возможных справок в будущем.
RU-7
Page 31

Обзор продукта
Вид сверху
Панель управления
1. Зона 1200 Вт
2. Зона 2000/1000 Вт
3. Стеклянная плита
4. Панель управления
1. К
нопки выбора конфорки
2. Таймер
3. Кнопки выбора мощности/установки
таймера
4. Кнопка блокировки панели
управления
5. Кнопка ВКЛ/ВЫКЛ
6. Управление двойной зоной
RU-8
Page 32

Сведения о керамической варочной панели
Микропроцессорная керамическая варочная панель может удовлетворять
различным требованиям кухни благодаря нагреву проводов высокого
сопротивления, микрокомпьютерному управлению и выбору нескольких
значений мощности, и является оптимальным выбором для современных
семей.
Керамическая варочная панель ориентирована на потребителей и
принимает индивидуальный дизайн. Варочная панель имеет безопасные и
надежные рабочие характеристики, делая вашу жизнь комфортной и
позволяя в полной мере наслаждаться готовкой.
Перед использованием новой керамической
варочной панели
• Внимательно прочтите настоящее руководство, особенно раздел «Меры
предосторожности».
• Снимите с панели защитную плёнку.
Использование сенсорной панели
• Сенсорные кнопки управления реагируют на касание. Их не нужно нажимать.
• Для управления используйте подушечку пальца, а не ноготь.
• При каждом касании будет раздаваться сигнал.
• Поддерживайте органы управления сухими и чистыми. Не закрывайте их
посторонними предметами. Даже тонкая плёнка воды может нарушать работу
сенсорных кнопок.
RU-9
Page 33

Выбор кухонной посуды
Не используйте кухонную посуду с острыми углами или выпуклым днищем.
Убедитесь в том, что дно посуды ровное, плотно прилегает к стеклу и по размеру
совпадает с конфоркой. Всегда ставьте посуду
При съёме всегда поднимайте посуду вверх для предотвращения царапания
поверхности.
строго по центру конфорки.
Использование керамической варочной панели
Для запуска приготовления
1. Коснитесь кнопки включения.
После включения раздастся звуковой с
или «– –», указывая на то, что варочная панель находится в дежурном
режиме.
2. Поставьте подходящую посуду на нужную конфорку.
• Убедитесь в том, что дно посуды и поверхность конфорки чистые
и сухие.
3. Коснитесь кнопки нужной конфорки. Индикатор кнопки замигает.
4. Установите мощность нагрева кнопками «+» и «-».
игнал, на дисплее появится «–»
RU-10
Page 34

a. Если мощность нагрева не будет задана в течение 1 минуты, панель
автоматически выключится. Придётся повторить всё сначала, начиная
с шага 1.
b
. Мощность нагрева можно изменить в любой момент готовки.
5. При работающей зоне 1 коснитесь переключателя зон
нагрева, затем активируйте двойную зону, нажав .
При работающей двойной зоне коснитесь переключателя зон
нагрева, затем выключите двойную зону, нажав
.
После завершения готовки
1. Коснитесь кнопки конфорки, которую необходимо выключить.
2. Выключите конфорку уменьшением мощности до «0» кнопкой «-» или
одновременным касанием на 1 секунду кнопок «+» и «-». При этом мощность
автоматически будет уменьшена до «0».
Убедитесь в том, что на дисплее появляется «0» затем «H».
а затем
3. Выключите всю панель кнопкой включения.
4. Не прикасайтесь к горячей поверхности
Индикатор «H» будет гореть, пока поверхность панели не остынет до безопасной
температуры. После охлаждения поверхности до безопасной температуры данный
индикатор погаснет. Можно использовать это время для экономии
энергии, подогревая пищу на остывающей панели.
Блокировка панели управления
• Можно заблокировать панель управления для предотвращения случайного
изменения (например, включения всех конфорок детьми).
• При блокировке все кнопки за исключением кнопки включения будут отключены.
Блокировка кнопок
Коснитесь кнопки блокировки. На дисплее появится индикатор «L
Разблокировка кнопок
1. Убедитесь в том, что варочная панель включена.
2. Коснитесь и держите кнопку разблокировки
RU-11
o».
Page 35

3. Теперь можно пользоваться варочной панелью.
1 2 3 4 5 6 7 8 9
отключения (часы)
8 8 8 4 4 4 2 2 2
Если панель управления заблокирована, все кнопки кроме кнопки включения
будут отключены. Можно в любой момент отключить варочную панель
кнопкой включения, однако для выполнения другой операции потребуется
сначала разблокировать панель управления.
Защита от перегрева
Встроенный датчик температуры может контролировать температуру варочной
панели. При обнаружении перегрева варочная панель будет автоматически
отключена.
Защита от пролива
Защита от пролива — предохранительная функция. Она автоматически отключает
варочную панель в течение 10 с при обнаружении воды на панели управления. Об
этом также просигнализирует 1 секундный сигнал.
Предупреждение об остаточном нагреве
После работы варочная панель в течение некоторого времени будет сохранять
остаточный нагрев. Появится буква “ H ”, предупреждающая о том, что к ней нельза
прикасаться.
Автоматическое отключение
Автоматическое отключение предотвращает повреждения варочной панели. Панель
отключится автоматически даже если забыть отключить её. Стандартное время
автоматического отключения в зависимости от мощности указано в таблице ниже:
Мощность нагрева
Стандартное время до
Таймер
Таймер можно использовать двумя различными способами:
• Можно использовать его как счётчик минут. В этом случае таймер не будет
отключать конфорки при включении.
• Можно использовать его как выключатель одной или нескольких конфорок по
истечении заданного времени.
• Таймер можно настроить максимум на 99 минут.
RU-12
Page 36

Использование таймера для обратного отсчёта
Если ни одна конфорка не выбрана
1. Убедитесь в том, что варочная панель включена.
Примечание: в качестве счётчика минут таймер можно использовать, даже
если ни одна конфорка не выбрана.
оснитесь кнопки таймера.
2. К
Индикатор таймера начнёт мигать, и на дисплее появится
значение «30».
3. Установите время кнопками «+» и «-»
Полезные советы: Касание кнопок «-» или «+» уменьшает или увеличивает
время на 1 минуту, соответственно.
Длительное касание кнопок «-» или «+» уменьшает или
увеличивает время на 10 минут, соответственно.
4. Для сброса времени коснитесь кнопки таймера. На дисплее появится «00».
5. После ввода времени сразу же начнётся обратный
отсчёт. На дисплее будет показано оставшееся время, а
индикатор таймера будет мигать 5 секунд.
6. По истечении времени таймера на 30 секунд загудит
зуммер, а на дисплее будет отображаться «- -».
Настройка таймера для отключения конфорок
Для использования данной функции:
1. Нажмите кнопку выбора конфорки нагрева, для которой нужно
настроить таймер (например, конфорка 1)
2. Коснитесь кнопки таймера.
Индикатор таймера начнёт мигать, и на дисплее появится
з
начение «30».
3. Установите время кнопками «+» и «-».
RU-13
Page 37

Полезные советы: Касание кнопок «-» или «+» уменьшает или увеличивает время на 1
минуту, соответственно.
Длительное касание кнопок «-» или «+» уменьшает или увеличивает время на
таймере на 10 минут, соответственно.
После «99» время на таймере изменится на 0 минут.
4. После ввода времени сразу же начнётся обратный отсчёт.
На дисплее будет показано оставшееся время, а
индикатор таймера будет мигать 5 секунд.
ПРИМЕЧАНИЕ: Красная точка возле индикатора уровня
мощности загорится, указывая на выбор конфорки.
5. Для сброса таймера коснитесь кнопки выбора конфорки, затем кнопки таймера.
Таймер сбросится, на дисплее сначала появится «00», затем «--».
6. По истечении времени готовки соответствующая конфорка отключится
автоматически и на дисплее появится «H».
Другие работающие конфорки продолжат работу.
Настройка таймера для отключения нескольких конфорок
1. При использовании таймера для отключения нескольких конфорок на дисплее
будет отображаться меньшее время отключения.
(например, для конфорки 1 таймер настроен на 2 минуты, для конфорки 2 — на
5 минут; на дисплее будет «2».)
ПРИМЕЧАНИЕ: Мигающая красная точка возле индикатора уровня мощности
указывает на то, что таймер показывает оставшееся время работы конфорки.
Для проверки таймеров других конфорок коснитесь кнопки нужной конфорки. На
индикаторе будет показано время.
RU-14
Page 38

(установлено на 6 минут)
Что?
Как?
Важно!
Ежедневная очистка
1. Выключите варочную панель.
• При отключении питания на
к стеклу.
Проливы, застывшие
Немедленно удаляйте данные
пп. 2-4, описанные выше.
• Удаляйте остатки пищи и
(установлено на 3 минуты)
2. По истечении времени готовки соответствующая конфорка
отключится автоматически и на дисплее появится «H».
ПРИМЕЧАНИЕ: Для изменения времени после запуска таймера необходимо
повторить все шаги, начиная с 1.
Очистка и уход
стекла (отпечатки
пальцев, разводы,
пятна от пищи и
несладких продуктов
на стекле)
остатки пищи и
сахаросодержащих
продуктов на стекле
2. Нанесите немного моющего
средства на стекло, когда оно
остынет (будет тёплым, но не
горячим!)
3. Протрите стекло влажной
губкой, а затем вытрите
насухо сухим полотенцем или
салфетками.
4. Включите варочную панель.
загрязнения ножом для рыбы
или специальным скребком для
керамических поверхностей,
помня о том, что поверхность
может быть горячей.
1. Отключите варочную панель
выключателем на стене.
2. Скребком под углом около 30°
удалите загрязнения и
переместите их на холодный
участок панели.
3. Удалите загрязнения
кухонным или бумажным
полотенцем.
4. При ежедневной очистке
варочной панели выполняйте
варочной панели не будет
индикации «H», хотя стекло может
быть горячим. Будьте предельно
осторожны.
• Отдельные чистящие салфетки,
губки, средства могут поцарапать
стекло. Всегда проверяйте
пригодность средств по указаниям
в инструкциях к ним.
• Не оставляйте загрязнения на
панели: они могут прочно пристать
сахаросодержащих продуктов при
первой возможности. После
застывания удалить их со стекла
будет тяжело и чревато
повреждениями.
• Опасность порезов: При снятии
защитной крышки острое лезвие
скребка представляет опасность
пореза. Используйте скребок с
предельной осторожностью и храните
его в месте, недоступном для детей.
RU-15
Page 39

Проливы на панель
управления
1. Выключите варочную панель.
• При попадании жидкости на панель
Керамической
Отсутствует напряжение.
Убедитесь в том, что варочная
сервисный центр.
Панель управления не
Панель заблокирована.
Разблокируйте панель. Смотрите
Кнопки плохо работают.
Наличие тонкой плёнки воды на
подушечки пальца.
Убедитесь в том, что панель
прикосновения к кнопкам.
Стекло поцарапано.
Посуда с острыми краями и
абразивных чистящих средств.
Используйте кухонную утварь с
Смотрите раздел «Уход и очистка».
Некоторые виды
звуки
Это может быть вызвано
металлов).
Это нормально для кухонной
2. Удалите пролив
3. Протрите панель управления
чистой чуть влажной губкой
или полотенцем.
4. Вытрите панель насухо
чистым кухонным или бумажным
полотенцем.
5. Включите варочную панель.
Полезные советы
управления варочная панель может
издать сигнал и отключиться. Кнопки
управления могут перестать
работать, пока на панели управления
будет оставаться вода. Перед
включением варочной панели
убедитесь в том, что панель
управления сухая.
Код ошибки
варочная панель не
включается
реагирует на кнопки.
утвари издают треск
или другие неприятные
Возможная причина
панели управления. Попытка
управлять ногтем вместо
углами.
Использование ненадлежащих
конструкцией утвари (различное
термическое расширение разных
Способ устранения
панель подсоединена к
электрической сети и её настенный
выключатель включён.
Убедитесь в наличии напряжения в
сети. Если всё в порядке, а панель
не включается, обратитесь в
раздел «Использование
индукционной варочной панели».
управления сухая и используйте
подушечки пальцев для
ровным гладким днищем.
Смотрите раздел «Выбор кухонной
утвари».
утвари и не является проблемой.
RU-16
Page 40

Технические характеристики
268
-0
500
-0
Индукционная варочная панель CEHDD30TCT
Конфорки 2
Напряжение питания 220-240 В~, 50-60 Гц
Установленная электрическая мощность 2928-3484 Вт
Размеры Д×Ш×В (мм) 288×520×52
Размеры отверстия для установки A×B (мм) 268×500
Размеры и масса являются приблизительными. В связи с постоянной работой по
усовершенствованию продукции изготовитель оставляет право внесения изменений в
документацию и конструкцию изделий без предварительного уведомления.
Установка
Выбор оборудования для монтажа
Вырежьте в столешнице отверстие размерами, указанными на рисунке
Для установки и использования вокруг отверстия под панель должно быть минимум
5 см свободного места.
Толщина столешницы или плиты для установки должна быть не менее 30 мм.
Столешница должна быть из термо- и огнестойкого материала для предотвращения
деформаций, вызванных нагревом от панели. Как показано ниже:
A(mm) B(mm) C(mm) D(mm) E(mm) F(mm)
+4
+4
мин. 50 мин. 50 мин. 50 мин. 50
RU-17
Page 41

Следите за тем, чтобы входное и выходное вентиляционные отверстия варочной
панели никогда не закрывались. Убедитесь в том, что варочная панель находится в
хорошем состоянии. Как показано ниже:
Примечание: Безопасное расстояние от рабочей поверхности панели до
ящика или вытяжки сверху должно быть не менее 760 мм.
A (мм) B (мм) C (мм) D E
760 мин. 50 мин. 20 Вход воздуха Выход воздуха 5 мм
Перед установкой варочной панели необходимо проверить
следующее:
• поверхность столешницы ровная, горизонтальная; установке панели ничего не
мешает
• столешница сделана из термостойкого материала
• при установке варочной панели над духовым шкафом последний должен иметь
встроенный вентилятор охлаждения
• все установочные зазоры и расстояния отвечают требованиям действующих норм
• Поблизости от варочной панели в хорошо доступном месте, в соответствии с
требованиями действующих норм установлен выключатель, полностью
отключающий печь от питающей электрической сети.
Выключатель должен быть сертифицированным с расстоянием между
разомкнутыми контактами не менее 3 мм на всех полюсах (или только на фазных
полюсах, если это допускается действующими нормами).
• Выключатель должен быть легко доступным пользователю
• При необходимости по поводу установки выключателя следует
проконсультироваться у специалистов.
• Расположенные рядом с варочной панелью стены и поверхности сделаны из
термостойких и хорошо моющихся материалов (например, керамической плитки)
RU-18
Page 42

После установки варочной панели необходимо проверить
Стекло
следующее:
• кабель питания не может быть повреждён дверьми или выдвижными ящиками
мебели
• в месте установки варочной панели имеется надлежащая вентиляция
• если варочная панель устанавливается над выдвижными ящиками или полками,
нижняя сторона панели должна быть термоизолирована
• выключатель варочной панели легкодоступен пользователю
Перед установкой креплений
Плиту необходимо установить на прочную ровную поверхность (можно использовать
упаковкой). Не следует применять силу к выступающим из корпуса панели кнопкам.
Регулировка положения креплений
Прикрепите варочную панель к столешнице 4 креплениями, как показано на рисунке.
A B C D
Шуруп Крепление Отверстие Корпус варочной панели
Крепление
шуруп
ST3. 5*8
Корпус варочной
RU-19
Тумба
Page 43

Внимание!
1. Керамической варочная панель должна устанавливаться квалифицированным
персоналом. У нас есть такие специалисты. Никогда не выполняйте эту работу
самостоятельно.
2. Не следует присоединять керамическую варочную панель к холодильному
оборудованию, посудомоечным машинам и вращающимся сушилкам.
3. Во избежание сбоев в работе место установки панели должно быть защищено от
прямых солнечных лучей.
4. Стена и смежные элементы мебели должны выдерживать тепло, выделяемое
варочной панелью.
5. Во избежание повреждений материалы столешницы (покрытие, клей, основа)
должны быть термостойкими.
6. Не следует использовать пароочиститель.
7. Керамику следует подключать только к питанию с полным сопротивлением системы
не более 0,427 Ом. В случае необходимости проконсультируйтесь со своей
энергоснабжающей организацией по вопросу о полном сопротивлении системы.
Подключение варочной панели к электрической сети
Подключение к электрической сети должно производиться в соответствии с
требованиями действующих норм. На линии питания варочной панели необходимо
установить выключатель. Схема подключения показана ниже.
Синий
Жёлто-зелёный
PE
Ремонт или замена повреждённого кабеля питания должны проводиться только
специалистами сервисного центра.
• При подключении варочной панели непосредственно к электрической сети на линии
питания следует установить многополюсный выключатель с зазором между
разомкнутыми контактами не менее 3 мм.
• Лицо, проводящее подключение, должно удостовериться в том, что все работы
выполнены в строгом соответствии с положениями действующих норм.
• Не допускается перегиб или пережим кабеля питания.
N
220-240V
RU-20
Коричнев
L
Page 44

• Кабель должен регулярно проверяться квалифицированным специалистом и
Информация о бытовых электрических индукционных варочных панелях в соответствии с регламентом ЕС №
измерения
излучательные зоны
Излучательные зоны
Данное устройство имеет маркировку в соответствии с директивой 2012/19/ЕС,
заменяться при необходимости.
касающейся утилизации электрических и электронных компонентов (WEEE).
Данные компоненты содержат загрязняющие вещества (которые могут оказывать
негативное воздействие на окружающую среду) и безвредные элементы (которые
можно использовать повторно). Поэтому такие отходы подвергают специальной
обработке для отделения вредных компонентов от безвредных. Люди могут играть
важную роль в обеспечении того, чтобы данные отходы не стали экологической
- нельзя смешивать отходы электрического и электронного оборудования с бытовым мусором
- отходы электрического и электронного оборудования должны сдаваться в специализированные
организации для надлежащей утилизации.
В большинстве стран для такого мусора устанавливают специальные контейнеры. Кроме того, при
покупке нового устройства старое можно вернуть продавцу, который должен принять его без
оплаты при условии покупки другого аналогичного изделия.
проблемой. Для этого необходимо соблюдать следующие простые правила:
66/2014
Положение Обозначение Значение
Модель CEHDD30TCT
Тип варочной панели: Электрическая
Количество
конфорок
Способ нагрева
(индукционные
конфорки,
нагрева, обычные
конфорки)
Индукционные
конфорки
Индукционные
конфорки
нагрева
Обычные конфорки
2
X
RU-21
Единица
Page 45

Задняя левая Ø 20,0 см
Задняя
центральная
Центральная
Центральная
правая
центральная
центральная
посередине
Центральная
центральная
Центральная
посередине
правая
Ø - см
Задняя правая Ø - см
Для круглых конфорок: диаметр полезной
площади на конфорку с округлением до
ближайших 5 мм.
Для конфорок некруглой формы: длина и
ширина конфорки и/или зоны нагрева с
округлением до ближайших 5 мм.
левая
посередине
Центральная
Передняя левая Ø 16,5 см
Передняя
Передняя правая
Задняя левая Д Ш - см
Задняя
Задняя правая Д Ш - см
Центральная
левая
Центральная
правая
Передняя левая Д Ш - см
Передняя
центральная
Передняя правая
Ø - см
Ø - см
Ø - см
Ø - см
Ø - см
Д Ш - см
Д Ш - см
Д Ш - см
Д Ш - см
Д Ш - см
Д Ш - см
Потребление энергии конфоркой или
зоной нагрева на кг
Задняя левая ECelectric cooking 187,0 В·ч/кг
Задняя
Задняя правая ECelectric cooking - В·ч/кг
левая
Центральная
Центральная
ECelectric cooking - В·ч/кг
ECelectric cooking - В·ч/кг
ECelectric cooking - В·ч/кг
ECelectric cooking - В·ч/кг
RU-22
Page 46

Передняя левая ECelectric cooking 186,0 В·ч/кг
Передняя
Рекомендации по экономии энергии
• Для достижения максимальной эффективности нагрева
•
• Для уменьшения времени готовки используйте меньше воды или жира.
• Начинайте готовку с высоким уровнем мощности и понижайте его п
• Используйте
очту candymow@candy.ru
центральная
Передняя правая ECelectric cooking - В·ч/кг
Энергопотребление варочной панели на кг
Применимый стандарт: EN 60350-2 Приборы электрические кухонные - Часть 2: Встраиваемые варочные панели -
Методы измерения характеристик
Использование крышки уменьшает время готовки и, благодаря удерживанию тепла, экономит энергию.
посуду, диаметр дна которой превышает диаметр окружности конфорки.
ECelectric cooking - В·ч/кг
ECelectric hob 186,5 В·ч/кг
посуду необходимо ставить строго по центру конфорки.
о мере нагрева пищи.
Сертификат
соответствия
Это изделие соответствует техническим регламентам Таможенн
ого Союза:
- ТР ТС 004/2011 О соответствии низковольтного оборудования»
-
ТР ТС 020/2011«Электромагнитная совместимость технически
х средств»
Изделие с
ертифицировано в органе по сертификации продукции
и услуг«РОСТЕСТ-МОСКВА», г. Москва.
Получить копию сертификата соответствия Вы можете в магазин
е, гдеприобретался товар или, написав запрос на электронную
RU-23
п
Page 47

En plaçant la marque sur ce produit, nous
confirmons la conformité à toutes les exigences
européennes concernant la protection de
l’environnement et de la santé, ainsi que la sécurité,
applicables selon la loi à ce produit.
Consignes de sécurité
Votre sécurité est importante pour nous. Veuillez lire
ces informations avant d’utiliser votre table de cuisson.
Installation
Risque de choc électrique
• Débranchez l’appareil du réseau électrique avant
d’effectuer tout travail ou entretien sur celui-ci.
• Le raccordement à un bon système de mise à la
terre est essentiel et obligatoire.
• Seul un électricien qualifié est habilité à effectuer
des modifications sur le système de câblage
domestique.
• Le non-respect de ces consignes peut entraîner un
choc électrique ou le décès.
Risque de coupure
• Faites attention - les bords des panneaux sont
tranchants.
• Le non-respect de cette précaution peut entraîner
des blessures ou des coupures.
Consignes importantes de sécurité
• Veuillez lire les instructions avant d’installer ou
d’utiliser cet appareil.
FR-1
Page 48

• Aucun matériau ou produit combustible ne doit être
placé sur cet appareil, à aucun moment.
• Veuillez mettre ces informations à la disposition de
la personne responsable de l’installation de
l’appareil afin de réduire vos coûts d’installation.
• Afin d’éviter tout danger, cet appareil doit être
installé conformément aux présentes instructions
d’installation.
• Cet appareil doit être correctement installé et mis à
la terre uniquement par une personne qualifiée.
• Cet appareil doit être raccordé à un circuit
incorporant un sectionneur permettant une
déconnexion complète de l’alimentation électrique.
• L’installation incorrecte de l’appareil peut entraîner
l’annulation de toute garantie ou responsabilité.
Fonctionnement et entretien
Risque de choc électrique
• Ne pas cuisiner sur une table de cuisson cassée ou
fissurée. • En cas de rupture ou de fissuration de la
surface de la table de cuisson, éteignez
immédiatement l’appareil en coupant l’alimentation
électrique du réseau (interrupteur mural) et
contactez un technicien qualifié.
• Coupez l’alimentation réseau de la table de cuisson
avant le nettoyage ou l’entretien.
• Le non-respect de ces consignes peut entraîner un
choc électrique ou le décès.
Risque pour la santé
FR-2
Page 49

• Cet appareil est conforme aux normes de sécurité
électromagnétique.
Risque de surface chaude
• Pendant l’utilisation, les parties accessibles de cet
appareil deviennent suffisamment chaudes pour
causer des brûlures.
• Ne laissez pas votre corps, vos vêtements ou tout
autre objet autre qu’un ustensile de cuisine
approprié entrer en contact avec le verre à jusqu’à
ce que la surface soit froide.
• Les objets métalliques tels que couteaux,
fourchettes, cuillères et couvercles ne doivent pas
être posés sur la surface de la table de cuisson, car
ils peuvent devenir chauds.
• Tenir les enfants à l’écart.
• Les poignées des casseroles peuvent être chaudes
au toucher. Vérifiez que les poignées des casseroles
ne dépassent pas des autres foyers de cuisson qui
sont en fonction. Tenir les poignées hors de portée
des enfants.
• Le non-respect de ces consignes peut entraîner des
brûlures ou un choc électrique.
Risque de coupure
• Lorsque le couvercle de protection est rétracté, la
lame d’un racleur est tranchante comme un rasoir.
Utiliser avec une extrême prudence et toujours
stocker en toute sécurité et hors de portée des
enfants.
FR-3
Page 50

• Le non-respect de cette précaution peut entraîner
des blessures ou des coupures.
Consignes importantes de sécurité
• Ne laissez jamais l’appareil sans surveillance
lorsqu’il est utilisé. L’ébullition cause des vapeurs et
des débordements graisseux qui peuvent
s’enflammer.
• N’utilisez jamais votre appareil comme surface de
travail ou de rangement.
• Ne laissez jamais d’objets ou d’ustensiles sur
l’appareil.
• N’utilisez jamais votre appareil pour réchauffer ou
chauffer la pièce.
• Après utilisation, éteignez toujours les foyers de
cuisson et la table de cuisson comme décrit dans ce
manuel (c’est-à-dire en utilisant les touches tactiles).
• Ne permettez pas aux enfants de jouer avec
l’appareil, de s’asseoir, de se tenir debout ou de
monter dessus.
• Ne rangez pas d’objets d’intérêt pour les enfants
dans des armoires au-dessus de l’appareil. Les
enfants qui montent sur la table de cuisson peuvent
être gravement blessés.
• Ne laissez pas les enfants seuls ou sans
surveillance dans la zone où l’appareil est utilisé.
• Les enfants ou les personnes ayant un handicap qui
limite leur capacité d’utiliser l’appareil devraient avoir
une personne responsable et compétente pour les
instruire sur son utilisation. L’instructeur doit
FR-4
Page 51

s’assurer qu’il peut utiliser l’appareil sans danger
pour lui-même ou son environnement.
• Ne réparez ou ne remplacez aucune pièce de
l’appareil à moins que cela ne soit spécifiquement
recommandé dans le manuel. Tout autre entretien
doit être effectué par un technicien qualifié.
• N’utilisez pas un nettoyeur à vapeur pour les
opérations de nettoyage de la table de cuisson.
• Ne placez pas ou ne laissez pas tomber d’objets
lourds sur votre table de cuisson.
• Ne vous tenez pas debout sur votre table de
cuisson.
• N’utilisez pas de casseroles avec des bords
dentelés et ne traînez pas de casseroles sur la
surface de la vitre à induction, car cela pourrait
érafler le verre.
• N’utilisez pas d’éponges métalliques ou d’autres
produits abrasifs agressifs pour nettoyer votre table
de cuisson, car ils pourraient rayer la vitre à
induction.
• Si le câble d’alimentation est endommagé, il doit
être remplacé par le fabricant, son agent d’entretien
ou des personnes possédant le même type de
qualification, afin d’éviter tout risque.
• Cet appareil est destiné à un usage domestique et
autres applications similaires telles que : - espaces
cuisine du personnel dans des boutiques, bureaux
et autres espaces de travail ; - maisons de ferme ; par les clients dans des hôtels, motels et autres
FR-5
Page 52

espaces de type résidentiel ; - dans les espaces de
type chambre d’hôtes.
AVERTISSEMENT : L’appareil et ses parties
accessibles chauffent pendant l’utilisation.
Évitez de toucher les éléments chauffants.
Les enfants de moins de 8 ans doivent être tenus à
l’écart à moins d’être surveillés en permanence.
• Cet appareil peut être utilisé par des enfants âgés
de 8 ans et plus, par des personnes dont les
capacités physiques, sensorielles ou mentales sont
réduites ou par des personnes dénuées
d’expérience et de connaissances, mais qui ont été
informées sur la manière d’utiliser l’appareil en toute
sécurité, si elles comprennent les risques impliqués.
Les enfants ne doivent pas jouer avec l’appareil.
L’entretien et le nettoyage ne doivent pas être
effectués par des enfants sans surveillance.
AVERTISSEMENT : Faire chauffer la table sans
surveillance avec de la graisse ou de l’huile peut
être dangereux et provoquer un incendie. N’essayez
JAMAIS d’éteindre un feu avec de l’eau, mais
éteignez l’appareil, puis couvrez la flamme avec un
couvercle ou une couverture anti-feu, par exemple.
AVERTISSEMENT : Risque d’incendie : ne pas
stocker d’éléments sur les surfaces de cuisson.
Avertissement : Si la surface est fissurée, éteignez
l’appareil pour éviter tout risque d’électrocution, pour
les tables de cuisson en vitrocéramique ou matériau
similaire qui protègent les pièces sous tension
FR-6
Page 53

• N’utilisez jamais de nettoyeur à vapeur.
• Cet appareil n’est pas conçu pour être actionné par
une minuterie externe ou un système de commande
à distance séparé.
1. Nous vous félicitons de votre choix de la table Table de cuisson vitrocéramique.
Nous vous recommandons de prendre le temps de lire ce manuel d’instruction /
d’installation afin de bien comprendre comment l’installer et l’utiliser correctement.
Pour l’installation, veuillez lire la section installation.
Lisez attentivement toutes les consignes de sécurité avant utilisation et conservez ce
manuel d’instruction / d’installation pour référence ultérieure.
Vue d’ensemble du produit
Vue de dessus
1. Foyer 1200 W
2. Foyer 2000/1000 W
3. Table de verre
4. Panneau de commande
FR-7
Page 54

Panneau de commande
1. Touches de sélection du foyer de
cuisson
2. Touche du temporisateur
3. Touche de réglage de la puissance et
du temporisateur
4. Touche de verrouillage
5. Touche marche/arrêt
6. Touche de commande de la zone
Informations produit
La table de cuisson vitrocéramique à micro-ordinateur peut répondre à différents types
d'exigences culinaires grâce au chauffage par résistance, à la commande microinformatique et à la sélection multi-puissances, ce qui en fait le choix optimal pour les
familles modernes.
La table de cuisson vitrocéramique est centrée sur le client et adopte un design
personnalisé. La table de cuisson a des performances sûres et fiables, rendant votre vie
confortable et vous permettant de profiter pleinement du plaisir de la vie.
2. Avant d’utiliser votre nouvelle table de cuisson vitrocéramique
• Lisez ce guide en prenant note de la section « Consignes de sécurité ».
• Enlevez tout film protecteur qui pourrait encore se trouver sur votre table de cuisson à
induction.
Utilisation des commandes tactiles
• Les commandes répondent au toucher, vous n’avez donc pas besoin d’appuyer fort.
• Utilisez le bout du doigt et non pas l’ongle.
• Vous entendrez un bip à chaque fois qu’une touche est enregistrée.
• Assurez-vous que les commandes sont toujours propres et sèches et qu’aucun objet (p.
ex. un ustensile ou un chiffon) ne les recouvre. Même un mince film d’eau peut rendre
les commandes difficiles à utiliser.
FR-8
Page 55

N’utilisez pas d’ustensiles de cuisson dont les bords sont dentelés ou dont la base est
incurvée.
Assurez-vous que la base de votre poêle est lisse, qu’elle repose à plat contre le verre et
qu’elle est de la même taille que la zone de cuisson. Centrez toujours votre casserole sur le
foyer de cuisson.
Soulevez toujours les casseroles de la table de cuisson à induction - ne les faites pas
glisser, sinon elles risquent d’érafler le verre.
Utilisation de votre table de cuisson vitrocéramique
Comme commencer la cuisson
1. Appuyez sur la touche Marche/Arrêt.
Après la mise en marche, l’avertisseur sonore retentit une fois et
t
outes les touches affichent « – » ou « – – » pour signifier que la
table à induction est en mode de veille.
FR-9
Page 56

2. Posez la casserole sur le foyer de cuisson que vous souhaitez
moment de la cuisson.
Assurez-vous que la touche affiche « 0 » puis « H ».
utiliser.
• Veillez à ce que le fond de la casserole et la surface du foyer de
cuisson soient propres et secs.
3. En appuyant sur la touche de sélection du foyer de cuisson, un
témoin lumineux près de la touche commence à clignoter.
4. Réglez un niveau de puissance à l’aide des touches « - » ou « + ».
a. Si vous ne sélectionnez pas un réglage de cuisson dans un
délai d’une minute, la table à induction s’éteint
automatiquement. Vous devrez alors tout reprendre depuis
l’étape 1.
b. Vous pouvez changer le réglage choisi à n’importe quel
5. Lorsque la zone 1 fonctionne, appuyez sur la commande de sélection de la zone de chauffage
puis activez la zone double en appuyant sur .
Lorsque la zone double fonctionne, appuyez sur la commande de sélection de la
zone de chauffage, puis éteignez la zone double en appuyant sur .
Quand vous avez fini de cuisiner
1. Appuyez sur la touche de sélection du foyer de cuisson
que vous souhaitez éteindre.
2. Éteignez le foyer de cuisson en appuyant sur « - » et en réduisant jusqu’à « 0 » ou en
appuyant en même temps sur les touches « + » et « - » pendant 1 seconde, cela réglera
directement sur « 0 ».
puis
3. Éteignez la table de cuisson en appuyant sur la touche Marche/Arrêt.
FR-10
Page 57

. Prenez garde aux surfaces chaudes.
4
« H » indique un foyer de cuisson encore trop chaud pour être touché. Cette indication
disparaît dès que la surface du foyer a suffisamment refroidi. Vous pouvez économiser de
l’énergie, si vous devez faire chauffer une autre casserole, en la plaçant sur le foyer de
cuisson encore chaud.
Verrouillage des touches de commande
• Vous avez la possibilité de verrouiller les touches de commande pour éviter leur
utilisation inappropriée (par des enfants, par exemple).
• Quand la touche de verrouillage est activée, toutes les touches de commande sont
verrouillées, sauf la touche marche/arrêt.
Verrouillage des touches de commande
Appuyez sur la touche de verrouillage. L’indicateur de temporisation affiche « Lo »
Déverrouillage des touches de commande
1. Vérifiez que la table de cuisson à induction est éteinte.
2. Appuyez longuement sur la touche de verrouillage.
3. Vous pouvez maintenant commencer à utiliser votre table de cuisson à induction.
Quand la table de cuisson est en mode verrouillage, toutes les touches de
commande sont désactivées sauf la touche marche/arrêt. Vous gardez la
possibilité d’éteindre la table à induction en utilisant la touche marche/arrêt en cas
d’urgence, mais, dans ce cas, vous devrez d’abord déverrouiller la table de
cuisson lors de l’utilisation suivante.
Protection contre la surchauffe
Un capteur de température intégré peut surveiller la température à l’intérieur de la table de
cuisson vitrocéramique. Lorsqu’une température excessive est détectée, la table de cuisson
à induction s’arrête automatiquement.
Protection en cas de débordement
La protection en cas de débordement est une fonction de protection de sécurité. Elle éteint
automatiquement la table de cuisson en 10 secondes si de l’eau se déverse sur le tableau
de commandes et un bip retentira pendant 1 seconde.
Indicateur de chaleur résiduelle
Lorsque la table de cuisson fonctionne depuis un certain temps, il y aura de la chaleur
intense. La lettre « H » apparaît pour vous avertir pour s'en éloigner.
FR-11
Page 58

Protection par arrêt automatique
1 2 3 4 5 6 7 8 9
défaut (heure)
8 8 8 4 4 4 2 2 2
L’arrêt automatique est une fonction de protection de sécurité pour votre table de cuisson à
induction. Elle s’éteint automatiquement si vous oubliez d’éteindre votre appareil. Les
durées d’utilisation par défaut des différents niveaux de chauffe sont indiquées dans le
tableau ci-dessous:
Niveau de chauffe
Minuterie de travail par
Utilisation du temporisateur
Vous pouvez utiliser le temporisateur de deux manières différentes :
• Vous pouvez l’utiliser en tant que minuteur. Dans ce cas, le temporisateur ne sert
pas à éteindre l’un des foyers de cuisson lorsque sa durée de cuisson est écoulée.
• Vous pouvez le régler pour éteindre un ou plusieurs foyers de cuisson une fois le
temps sélectionné écoulé.
• Vous pouvez régler le temporisateur jusqu’à 99 minutes.
Utilisation du temporisateur comme minuteur
Si vous ne souhaitez pas sélectionner un foyer de cuisson
1. Vérifiez que la table de cuisson est éteinte.
Remarque : vous pouvez utiliser le minuteur même sans sélectionner de foyer de
cuisson.
2. Appuyez sur la touche du temporisateur. L’indicateur de la
minuterie commence à clignoter et « 30 » s’affiche.
3. Réglez le temps à l’aide des touches « - » ou « + ».
Remarque : Appuyez sur « - » ou « + » une seule fois pour diminuer ou augmenter
d’une minute.
Maintenez appuyée la touche « - » ou « + » pour diminuer ou augmenter de 10
minutes en 10 minutes.
4. Supprimez la durée en appuyant sur le temporisateur et « 00 » s’affiche sur la
touche de la minuterie.
FR-12
Page 59

5. Une fois le temps réglé, le décompte commence immédiatement.
La touche de temporisation affiche le temps restant et l’indicateur de
temporisation clignotera pendant 5 secondes.
6. L’avertisseur sonore retentit pendant 30 secondes et l’indicateur de
temporisation affiche « - -» quand le temps réglé est écoulé.
Réglage du temporisateur pour éteindre une zone de cuisson
Les foyers de cuisson dotés de cette fonction permettront :
1. Appuyez sur la touche de sélection du foyer de cuisson
dont vous souhaitez régler le temps de cuisson. (par ex. foyer 1#)
2. Appuyez sur la touche du temporisateur. L’indicateur de la minuterie commence à
clignoter et « 30 » s’affiche.
3. Réglez le temps à l’aide des touches « - » ou « + ».
Remarque: Appuyez sur « - » ou « + » une seule fois pour diminuer ou augmenter d’une
minute.
Maintenez appuyée la touche « - » ou « + » du temporisateur pour diminuer
ou augmenter de 10 minutes en 10 minutes.
Si le temps de réglage dépasse 99 minutes, la minuterie revient
automatiquement à 0 minute.
4. Une fois le temps réglé, le décompte commence
immédiatement. La touche de temporisation affiche le temps
restant et l’indicateur de temporisation clignote pendant
5 secondes.
REMARQUE: Le point rouge près de l’indicateur du niveau de chauffe
s’allume pour indiquer que le foyer est sélectionné.
5. Pour supprimer la minuterie, appuyez sur la touche de sélection du foyer de cuisson
puis sur la touche du temporisateur ; la minuterie est supprimée et « 00 » s’affiche, puis « -
- ».
FR-13
Page 60

6. Quand le temps de cuisson est terminé, le foyer de cuisson
correspondant s’éteint automatiquement et la touche affiche « H ».
Les foyers éventuellement allumés auparavant continuent de fonctionner
normalement.
Réglage du temporisateur pour éteindre plusieurs foyers de
cuisson
1. Si vous utilisez cette fonction pour plusieurs foyers de cuisson, l’indicateur du temps
affichera le temps restant le plus court.
(par ex. temps de 3 minutes réglé sur le foyer 1#, temps de 6 minutes réglé sur le
foyer 2#, l’indicateur du temps affichera « 3 ».)
REMARQUE: Le point rouge clignotant près de l’indicateur de niveau de chauffe
signifie que l’indicateur de temps affiche le temps de ce foyer de cuisson.
Si vous voulez contrôler le temps de cuisson réglé sur un autre foyer de cuisson,
appuyez sur la touche de sélection du foyer de cuisson. Le temporisateur indiquera le
temps réglé.
(Réglage à 6 minutes)
(Réglage à 3 minutes)
2. Quand le temps de cuisson est terminé, le foyer de cuisson
correspondant s’éteint automatiquement et la touche affiche « H ».
REMARQUE: Si vous voulez changer la durée après le réglage de la minuterie, vous
devez commencer à partir de l’étape 1.
FR-14
Page 61

Entretien et nettoyage
Quoi ?
Comment ?
Important !
Salissure quotidienne
1. Mettez la table de cuisson hors
• Lorsque l’alimentation de la table de
vitre peut se tacher.
Débordements d’eau
Retirez-les immédiatement à l’aide
les jours sur verre ».
• Enlevez le plus rapidement possible
Déversements sur les
1. Mettez la table de cuisson hors
tension.
• La table de cuisson peut émettre un
sur le verre (traces de
doigts, marques,
taches laissées par les
aliments ou retombées
non sucrées sur le
verre).
bouillante, d’aliments
et
de sucre chaud sur
le verre
tension.
2. Appliquez un nettoyant pour
plaque de cuisson alors que le
verre chauffe encore (sans qu’il
soit chaud !)
3. Rincez et essuyez avec un
chiffon propre ou un essuietout.
4. Mettez la table de cuisson sous
tension.
d’une pelle large, d’une spatule ou
d’un racloir à lame adapté aux
surfaces de cuisson à induction,
mais méfiez-vous des surfaces
chaudes des foyers de cuisson :
1. Coupez l’alimentation réseau de
la table de cuisson.
2. Tenez la lame ou l’ustensile à un
angle de 30° et raclez la saleté
ou le déversement vers un
endroit frais de la table de
cuisson.
3. Nettoyez les salissures ou
déversements avec un torchon
ou un essuie-tout.
4. Suivez les étapes 2 à 4 ci-
dessus pour « Salissure de tous
cuisson est coupée, il n’y a pas
d’indication « surface chaude » mais
la zone de cuisson est peut-être
encore chaude ! Soyez extrêmement
prudent.
• L’usage intensif d’éponges
métalliques, de certains racleurs en
nylon et de produits de nettoyage
abrasifs peut érafler le verre. Lisez
toujours l’étiquette pour vérifier si
votre nettoyeur ou éponge métallique
convient.
• Ne laissez jamais de résidus de
nettoyage sur la table de cuisson : la
les taches laissées par les aliments
fondus et sucrés ou par les
débordements. Si on les laisse refroidir
sur le verre, ils peuvent être difficiles à
enlever ou même endommager la
surface du verre de façon permanente.
• Risque de coupure : lorsque le
couvercle de protection est rétracté, la
lame d’un racleur est tranchante comme
un rasoir. Utiliser avec une extrême
prudence et toujours stocker en toute
sécurité et hors de portée des enfants.
touches de commande
tension.
2. Absorbez le déversement
3. Essuyez la zone de commande
tactile avec une éponge ou un
chiffon propre et humide.
4. Essuyez la zone complètement
avec un essuie-tout.
5. Mettez la table de cuisson sous
FR-15
bip et s’éteindre d’elle-même, et les
commandes tactiles peuvent ne pas
fonctionner lorsqu’il y a du liquide
dessus. Veillez à essuyer la zone de
commande tactile avant de rallumer la
table de cuisson.
Page 62

Conseils et astuces
La table de cuisson
Pas d’électricité.
Assurez-vous que la table de cuisson
un technicien qualifié.
Les commandes tactiles
Les commandes sont verrouillées.
Déverrouillez les touches de
à induction » pour les instructions.
Les commandes tactiles
Il se peut qu’il y ait une fine pellicule
lorsque vous touchez la commande.
Assurez-vous que la zone de
vous touchez les commandes.
Le verre est éraflé.
Batterie de cuisine à bords rugueux.
Utilisez des ustensiles de cuisine à
Certaines casseroles
Cela peut être dû à la construction
vibrant de manière différenciée).
Ceci est normal pour les ustensiles
CEHDD30TCT
Problème
vitrocéramique ne peut
pas être allumée.
ne répondent pas.
sont difficiles à utiliser.
font des craquements ou
des cliquetis.
Cause possible
d’eau sur les commandes ou que
vous utilisiez l’extrémité de l’ongle
Utilisation d’éponges métalliques
abrasives ou de produits de
nettoyage inadéquats.
de votre batterie de cuisine
(couches de différents métaux
Solution
vitrocéramique est branchée à
l’alimentation électrique et qu’elle est
allumée.
Vérifiez s’il y a une panne
d’électricité dans votre maison ou
votre région. Si vous avez tout vérifié
et que le problème persiste, appelez
commande. Voir la section
« Utilisation de votre table de cuisson
commande tactile est sèche et
utilisez le bout de votre doigt lorsque
fond plat et lisse. Voir la section
« Choisir une bonne batterie de
cuisine ».
Voir la section « Entretien et
nettoyage ».
de cuisine et n’indique pas un défaut.
Spécifications techniques
Table de cuisson
Zones de cuisson 2 Zones
Tension d’alimentation 220-240 V ~ 50-60Hz
Puissance électrique installée 2928-3484W
Dimensions du produit P×L×H (mm) 288X520X52
Dimensions d’encastrement A×B (mm) 268X500
Le poids et les dimensions sont approximatifs. Du fait que nous nous efforçons
continuellement d’améliorer nos produits, nous pouvons modifier les spécifications et les
conceptions sans préavis.
FR-16
Page 63

Installation
268
-0
500
-0
Choix du matériel d’installation
Découpez la surface de travail selon les dimensions indiquées sur le dessin.
Pour l’installation et l’utilisation, un espace d’au moins 5 cm doit être préservé autour du
trou.
Assurez-vous que l’épaisseur de la surface de travail est d’au moins 30 mm. Veillez à
choisir un matériau résistant à la chaleur pour éviter toute déformation due au
rayonnement thermique de la plaque à induction. Comme illustré ci-dessous:
A(mm) B(mm) C(mm) D(mm) E(mm) F(mm)
+4
+4
50mini 50 mini 50 mini 50 mini
Assurez-vous que la table de cuisson à induction est correctement ventilée et que l’entrée
et la sortie d’air ne sont pas obstruées. Assurez-vous que la table de cuisson à induction
est en bon état de fonctionnement. Comme illustré ci-dessous
Remarque : La distance de sécurité entre la plaque de cuisson et le meuble audessus doit être d’au moins 760 mm.
FR-17
Page 64

A (mm) B (mm) C (mm) D E
760 50 min. 20 min. Entrée d’air Sortie de l’air 5 mm
Avant d’installer la table de cuisson, assurez-vous que
• la surface de travail est d’équerre et de niveau, qu’aucune partie n’interfère avec l’espace
nécessaire
• le plan de travail est constitué d’un matériau résistant à la chaleur
• si la plaque est installée au-dessus d’un four, le four est équipé d’un système de
ventilation interne
• l’installation soit conforme à toutes les exigences de dégagement et aux normes et
réglementations en vigueur
• un interrupteur sectionneur de déconnexion complète du réseau d’alimentation est inclus
dans le circuit électrique et installé conformément aux règles et réglementations locales
en vigueur.
L’interrupteur sectionneur doit correspondre à la typologie requise et prévoir 3 mm d’air
de séparation sur tous les pôles (ou sur tous les conducteurs actifs [phase] si la
réglementation électrique locale l’autorise)
• le client pourra facilement accéder à l’interrupteur sectionneur quand la table de cuisson
sera installée
• vous consultez les organismes de réglementation du bâtiment et les arrêtés locaux si
vous avez des doutes concernant l’installation
• vous utilisez des matériaux de finition résistants à la chaleur et faciles à nettoyer (tels que
du carrelage en céramique) pour le revêtement des murs autour de la table de cuisson.
Une fois que la table de cuisson est installée, assurez-vous que
• le câble d’alimentation n’est pas accessible par les portes d’armoire ou les tiroirs
• un flux d’air frais circule entre l’extérieur du meuble inférieur et la base de la table de
cuisson
• si la table de cuisson est installée au-dessus d’un tiroir ou d’un placard, une barrière
thermique de protection est installée sous la base de la table de cuisson
• l’interrupteur sectionneur est facilement accessible par le client.
Avant d’installer les supports de fixation
L’appareil doit être posé sur une surface lisse et stable (vous pouvez utiliser l’emballage).
N’exercez aucune pression sur les boutons qui dépassent de la table de cuisson.
Réglage de la position du support
Fixez la table de cuisson sur le plan de travail en vissant 4 supports en bas de la table de
cuisson (voir illustration) après l’avoir installée.
FR-18
Page 65

Plan de travail/meuble de cuisine
A B C D
Vis Support trou de vis Face inférieure
verre
crochet de support
vis
ST3. 5*8
Face inférieure
Attention
1. L’installation de la table de cuisson à induction doit être effectuée par du personnel
qualifié. Nous avons des professionnels à votre service. N’effectuez en aucun cas cette
installation vous-même.
2. La plaque de cuisson vitrocéramique ne doit pas être montée sur un équipement de
refroidissement, un lave-vaisselle ou un séchoir rotatif.
3. La table de cuisson à induction doit être installée de manière à favoriser le rayonnement
thermique et garantir sa fiabilité.
4. Le mur et la zone de cuisson à induction à la surface de la table doivent être résistants à
la chaleur.
5. Pour éviter tout dommage, les différentes couches et la colle doivent être résistants à la
chaleur.
6. N’utilisez jamais de nettoyeur à vapeur.
7. Cette vitrocéramique ne peut être raccordée qu'à une alimentation dont l'impédance du
système ne dépasse pas 0,427 inférieure à 0,427 ohm. En cas de besoin, veuillez
consulter votre autorité d'alimentation du réseau pour obtenir des informations sur l'
informations sur l'impédance du système.
FR-19
Page 66

Connexion de la table de cuisson au réseau d’alimentation
Cette table de cuisson ne doit être connectée au réseau d’alimentation que par du
personnel qualifié.
Avant de connecter la table de cuisson au réseau d’alimentation, vérifiez que :
1. le circuit domestique est suffisant pour la puissance nécessaire à la table de
cuisson
2. la tension correspond à la valeur indiquée sur la plaque signalétique
3. les sections de câble d’alimentation peuvent supporter la charge indiquée sur la
plaque signalétique.
Pour raccorder la table de cuisson à l’alimentation du réseau, n’utilisez pas
d’adaptateurs, de réducteurs ou de dispositifs de dérivation, car ils peuvent
provoquer une surchauffe et un incendie.
Le câble d’alimentation ne doit toucher aucune partie chaude et doit être placé de
façon à ce que sa température ne dépasse jamais 75°C en tout point.
Consultez un électricien pour savoir si le système électrique domestique est adapté
ou s’il doit être modifié. Toute modification ne peut être réalisée que par un
électricien qualifié.
La prise d’alimentation doit être raccordée, conformément à la norme en vigueur, à un
disjoncteur unipolaire. La méthode de connexion est illustrée ci-dessous.
Bleu
Jaune / Vert
N L
PE
• Si le câble est endommagé ou s’il doit être remplacé, l’intervention doit être réalisée par
un technicien après-vente munis des outils appropriés, pour éviter tout accident.
• Si l’appareil est raccordé directement au réseau, un disjoncteur omnipolaire doit être
installé avec un espace minimum de 3 mm entre les contacts.
• L’installateur doit s’assurer que le raccordement électrique a été effectué et qu’il est
220-240V
FR-20
Marron
Page 67

conforme aux règles de sécurité.
Cet appareil est étiqueté conformément à la directive européenne 2012/19/EU sur les
mêmes fonctions que l’équipement fourni.
• Le câble ne doit pas être plié ou comprimé.
• Le câble doit être régulièrement contrôlé et remplacé uniquement par une personne
qualifiée.
déchets des équipements électriques et électroniques (DEEE). La catégorie DEEE
recouvre à la fois les substances polluantes (pouvant avoir des retombées négatives
sur l’environnement) et les composants de base (pouvant être réutilisés). Il est
important que les DEEE subissent des traitements spécifiques pour éliminer et jeter
correctement les polluants et récupérer tous les matériaux. Chaque individu peut jouer
un rôle important en veillant à ce que les produits DEEE ne deviennent pas un
problème pour l’environnement. Pour cela, il est essentiel de suivre quelques règles de
base :
- les DEEE ne doivent pas être traités comme des déchets ménagers ;
- les DEEE doivent être amenés à des zones de collecte spécifiques gérées par la municipalité ou une
société dûment enregistrée.
Dans de nombreux pays, des décharges domestiques peuvent être disponibles pour de grands DEEE.
Lorsque vous achetez un nouvel appareil, l’ancien peut être retourné au détaillant qui est en devoir de le
récupérer sans frais de manière individualisée, tant que l’équipement est de type équivalent et a les
FR-21
Page 68

Informations sur la table de cuisson électrique à usage domestique conforme aux normes de la Commission
Table de cuisson
Technologie de chauffe
Foyers de cuisson par
Zones de cuisson par
Foyers à cuisson
rayonnante
utile des zones ou foyers à cuisson électrique,
L
l
L
l
(UE) n° 66/2014
Position Symbole Valeur Unité
Identification du modèle
Type de table de cuisson :
Nombre de foyers
foyers 2
et/ou de zones de
cuisson
zones
induction
(foyers et zones de
cuisson par induction,
induction
foyers à cuisson
rayonnante, plaques
massives)
plaques solides
Pour les foyers ou zones de cuisson
circulaires : diamètre de la surface utile des
zones de cuisson électrique, arrondi à 5mm
près
Arrière gauche Ø mm
Arrière centre Ø mm
Arrière droite Ø mm
Centre gauche Ø mm
Centre centre Ø mm
Centre droite Ø mm
CEHDD30TCT
électrique
X
20,0
-
-
-
-
-
cm
cm
cm
cm
cm
cm
Pour les foyers ou zones de cuisson non
circulaires : longueur et largeur de la surface
arrondi à 5mm près
Avant gauche Ø mm
Avant centre Ø mm
Avant droite Ø mm
Arrière gauche
Arrière centre
Arrière droite
L
l
FR-22
16,5
-
-
- cm
- cm
- cm
cm
cm
cm
Page 69

Centre gauche
l
L
L
l
L
l
L
l
L
l
Cuisson
électrique CE
Cuisson
électrique CE
Table de
électrique CE
Partie 2 : Table
Conseils pour des économies d’énergie :
• Pour obtenir la
cuisson.
•
la chaleur.
• Minimisez la quantité de liqu
• Commencez la cuisson à température élevée et réduisez
• Utilisez des casseroles dont le diamètre est aussi grand que le graphique du foyer
L
- cm
Consommation d’énergie par zone ou foyer
de cuisson calculée par kg
Centre centre
Centre droite
Avant gauche
Avant centre
Avant droite
Arrière gauche
Arrière centre
Arrière droite
Centre gauche
Centre centre
Centre droite
Avant gauche
Avant centre
Avant droite
l
Cuisson
électrique CE
Cuisson
électrique CE
Cuisson
électrique CE
Cuisson
électrique CE
Cuisson
électrique CE
Cuisson
électrique CE
Cuisson
électrique CE
- cm
- cm
- cm
- cm
- cm
187,0
-
-
-
-
-
186,0
-
-
kWh
kWh
kWh
kWh
kWh
kWh
kWh
kWh
kWh
Consommation d’énergie de la table de
cuisson calculée par kg
cuisson
Norme appliquée : EN 60350-2 pour les appareils de cuisson électriques à usage domestique -
de cuisson - Méthodes de calcul des performances
meilleure efficacité de votre table de cuisson, placez la casserole au centre du foyer de
L’utilisation d’un couvercle permet de réduire le temps de cuisson et d’économiser de l’énergie en conservant
ide ou de graisse pour réduire le temps de cuisson.
-la lorsque les aliments sont bien chauds.
FR-23
186,5
sélectionné.
kWh
Page 70

Al colocar la marca en este producto, ratificamos
el cumplimiento todos los requisitos ambientales,
sanitarios y de seguridad aplicables a este producto
según la legislación europea.
Advertencias de seguridad
Su seguridad nos importa. Lea esta información antes
de utilizar la encimera.
Instalación
Riesgo de descarga eléctrica
• Desconecte el electrodoméstico de la red eléctrica
antes de realizar cualquier operación o
mantenimiento en él.
• Una puesta a tierra adecuada es fundamental y
obligatoria.
• La modificación de la instalación eléctrica doméstica
es tarea exclusiva de electricistas cualificados.
• Si no se sigue esta recomendación, puede
producirse una descarga eléctrica o un accidente
mortal.
Riesgo de corte
• Tenga cuidado con las aristas de los paneles, ya que
están afiladas.
• Si no tiene precaución, puede hacerse heridas o
cortes.
Instrucciones de seguridad importantes
• Lea estas instrucciones atentamente antes de
instalar o utilizar el electrodoméstico.
ES-1
Page 71

• No coloque nunca material o productos combustibles
sobre este electrodoméstico.
• Ponga esta información a disposición de la persona
responsable de instalar el electrodoméstico, ya que
podría reducir los costes de instalación.
• Para evitar riesgos, el electrodoméstico debe
instalarse conforme se indica en estas instrucciones.
• Un técnico cualificado debe instalar y conectar
correctamente a tierra este electrodoméstico.
• El electrodoméstico debe conectarse a un circuito
que incorpore un interruptor que permita
desconectarlo por completo de la red eléctrica.
• La garantía o las reclamaciones de responsabilidad
podrían carecer de validez si el electrodoméstico se
instala de forma incorrecta.
Operación y mantenimiento
Riesgo de descarga eléctrica
• No utilice ninguna encimera rota o agrietada. Si la
superficie de la encimera se rompe o agrieta,
apáguela de inmediato mediante el interruptor
principal de la pared y póngase en contacto con un
técnico cualificado.
• Apague la encimera mediante el interruptor de la
pared antes de efectuar operaciones de limpieza o
mantenimiento.
• Si no se sigue esta recomendación, puede
producirse una descarga eléctrica o un accidente
mortal.
ES-2
Page 72

Riesgo de muerte
• Este electrodoméstico cumple normas de seguridad
electromagnética.
Peligro, superficie caliente
• Durante el uso, las partes accesibles del
electrodoméstico se calientan lo suficiente como
para causar quemaduras.
• No permita que el cuerpo, la ropa ni otros objetos,
salvo utensilios de cocina adecuados, entren en
contacto con el vidrio de la encimera hasta que la
superficie se enfríe.
• Los objetos metálicos (como cuchillos, tenedores,
cucharas y tapas) no deben colocarse en la
superficie de la encimera, ya que pueden calentarse.
• Mantenga alejados a los niños.
• Las asas de las ollas pueden estar calientes cuando
las toque. Compruebe que las asas de las ollas no
invadan otras zonas de cocción que estén
encendidas. Manténgalas fuera del alcance de los
niños.
• El incumplimiento de esta recomendación puede
causar quemaduras y escaldaduras.
Riesgo de corte
• La afilada cuchilla de un rascador de la superficie de
la encimera queda expuesta cuando se retira la
cubierta de seguridad. Use el rascador con suma
precaución y guárdelo siempre en un lugar seguro y
fuera del alcance de los niños.
• Si no tiene precaución, puede hacerse heridas o
ES-3
Page 73

cortes.
Instrucciones de seguridad importantes
• No deje nunca el electrodoméstico sin vigilancia
mientras se esté usando. La ebullición produce
humo y derrames grasientos que pueden inflamarse.
• Nunca utilice el electrodoméstico como superficie de
trabajo o almacenamiento.
• Nunca deje objetos o utensilios sobre el
electrodoméstico.
• Nunca utilice el electrodoméstico para calentar el
lugar.
• Después de su uso, apague las zonas de cocción y
la encimera como se describe en este manual (es
decir, con los mandos táctiles).
• No permita que los niños jueguen con el
electrodoméstico, ni que se sienten, se suban o se
pongan de pie en él.
• No guarde objetos que interesen a los niños en los
armarios situados encima del electrodoméstico. Los
niños podrían lesionarse gravemente si se suben a
la placa de cocción.
• No deje a los niños solos o sin vigilancia en la zona
de uso del electrodoméstico.
• Una persona responsable y competente debe
enseñar a usar el electrodoméstico a los niños o a
las personas con discapacidades que limiten su
aptitud para utilizar el electrodoméstico. El instructor
debe comprobar que pueden utilizar el
electrodoméstico sin que esto suponga ningún
ES-4
Page 74

peligro para ellos o para el entorno.
• No repare ni reemplace componentes del
electrodoméstico a menos que se recomiende de
forma expresa en el manual. Un técnico cualificado
debe realizar cualquier otra reparación o
mantenimiento.
• No utilice limpiadores a vapor para limpiar la
encimera.
• No coloque ni deje caer objetos pesados en la
encimera.
• No se ponga en pie encima de la encimera.
• No utilice cacerolas con bordes dentados ni arrastre
las cacerolas por la superficie de vidrio de la placa
vitrocerámica, ya que podría rayar el vidrio.
• No utilice estropajos ni otros limpiadores abrasivos
para limpiar la placa de cocción; podría rayar el
vidrio.
• Para evitar riesgos, el fabricante, su representante
de servicio o cualquier otra persona cualificada
deben cambiar los cables de alimentación que estén
dañados.
• Este electrodoméstico está diseñado para su uso en
el hogar y en aplicaciones parecidas, como: zonas
de cocina para empleados en negocios, oficinas y
otros entornos laborales; granjas; por parte de
clientes de hoteles, moteles y otros establecimientos
de tipo residencial; otros establecimientos de
hospedaje.
ADVERTENCIA: El electrodoméstico y las partes
ES-5
Page 75

accesibles de este se calientan durante el
funcionamiento.
Debe prestarse atención para no tocar los elementos
térmicos.
Debe impedirse que los niños menores de 8 años se
acerquen a menos que estén supervisados en todo
momento.
• Pueden utilizarlo niños a partir de 8 años de edad y
personas con facultades físicas, sensoriales o
mentales reducidas, o con falta de experiencia y
conocimiento, si lo emplean bajo supervisión o se les
instruye acerca de la seguridad del producto y
entienden los riesgos que comporta.
• Los niños no deben jugar con el electrodoméstico.
Los niños no deben limpiar ni mantener el producto
sin supervisión.
ADVERTENCIA: Dejar desatendida la encimera
mientras se cocina con grasa o aceite puede ser
peligroso y originar un incendio. NUNCA intente
apagar el fuego con agua; apague la encimera y
cubra la llama con una tapa o una manta ignífuga,
por ejemplo.
ADVERTENCIA: Peligro de incendio; no coloque
objetos sobre las superficies de cocción.
Advertencia: Si la superficie está agrietada, apague
el electrodoméstico para evitar la posibilidad de
descarga eléctrica porque las partes con corriente
están protegidas por las superficies de la encimera
que son de vidrio cerámico o un material similar.
ES-6
Page 76

• No utilice limpiadores a vapor.
6. Mando Doble zona de cocción
• El electrodoméstico no está diseñado para funcionar
con un temporizador externo ni con ningún sistema
de control remoto independiente.
1. Le felicitamos por la compra de la nueva placa vitrocerámica.
Recomendamos que lea este manual de instrucciones/instalación para que entienda bien
cómo instalar y utilizar el electrodoméstico de forma correcta.
Para instalarlo, lea la sección correspondiente.
Lea atentamente todas las instrucciones de seguridad antes de usarlo y guarde el manual
de instrucciones/instalación para consultas futuras.
Descripción del producto
Vista superior
1. Zona de 1200 W
2. Zona de 2000/1000 W
3. Placa de vidrio
4. Panel de mandos
Panel de mandos
1. Mandos de selección de zona de cocción
2. Mando del temporizador
3. Botón de regulación de
potencia/temporizador
4. Mando de bloqueo
5. Botón de encendido/apagado
ES-7
Page 77

Información del producto
La placa vitrocerámica con microprocesador es perfecta para las familias modernas porque
satisface cualquier tipo de requisito gastronómico gracias a su sistema de calentamiento
por resistencias, al control informatizado y a la selección de varios tipos de alimentación.
La placa vitrocerámica se centra en los clientes y adopta un diseño personalizado. La
encimera ofrece las misas prestaciones en cuanto a seguridad y fiabilidad para que hacerle
la vida más fácil y permitirle disfrutar plenamente de los placeres de la vida.
Antes de utilizar la nueva placa vitrocerámica
• Lea esta guía y preste especial atención a la sección «Advertencias de seguridad».
• Retire las películas protectoras que puedan quedar sobre la placa vitrocerámica.
Uso de los mandos táctiles
• Los mandos responden al tacto, por lo que no es necesario presionarlos.
• Utilice la yema de los dedos en lugar de la punta.
• Oirá un pitido cada vez que se produzca el contacto.
• Asegúrese de que los mandos estén siempre limpios y secos y de que no haya ningún
objeto que los cubra (como un utensilio o un paño). Incluso una capa fina de agua podría
dificultar el uso de los mandos.
Elección de los utensilios de cocina adecuados
No utilice utensilios con bordes dentados o base curva.
Asegúrese de que la base de la cacerola sea lisa, descanse plana sobre el vidrio y tenga el
mismo tamaño que la zona de cocción. Centre siempre la cacerola en la zona de cocción.
ES-8
Page 78

Para apartar las cacerolas de la encimera de cocción, levántelas siempre en lugar de
durante la cocción.
deslizarlas, ya que el vidrio podría rayarse.
Uso de la placa vitrocerámica
Para empezar a cocinar
1. Toque el botón de encendido/apagado.
Después de encender la encimera se escucha un pitido y aparece
«
– » o « – – » en el visor; esto indica que la placa vitrocerámica
ha entrado en el modo de espera.
2. Coloque una cacerola adecuada en la zona de cocción que
desee utilizar.
• Asegúrese de que el fondo de la cacerola y la superficie de la
zona de cocción estén limpios y secos.
3. Cuando se toca el mando de selección de una zona de
cocción, la indicación situada al lado parpadea.
4. Seleccione un nivel de potencia tocando el mando «-» o «+».
Si no elige una zona de cocción en 1 minuto, la encimera
cerámica se apagará de forma automática. Entonces,
tendrá que comenzar por el paso 1 otra vez.
b. La temperatura se puede cambiar en cualquier momento
ES-9
Page 79

5. Cuando la zona 1 esté funcionando, toque el control de selección de la zona
Asegúrese de que el visor de potencia muestra «0» y, a continuación, «H».
de calentamiento y active la zona doble pulsando .
Cuando la zona doble esté funcionando, toque el control de selección
de la zona de calentamiento y apague la zona doble pulsando .
Cuando termine de cocinar
1. Toque el mando de selección de la zona de cocción que
desee apagar.
2. Para apagar la zona de cocción, toque el mando «-» y deslícelo hasta «0», o pulse
«+» y «-» al mismo tiempo durante 1 segundo; saltará a «0» directamente.
seguido de
3. Para apagar la placa de cocción completa, toque el
mando de encendido/apagado.
4. Tenga cuidado con las superficies calientes.
La letra «H» indica q
temperatura de la superficie descienda y esta pueda tocarse sin peligro. También puede
utilizarse como función de ahorro de energía, ya que permite emplear la zona
que todavía está caliente para calentar otras cacerolas.
ue la zona de cocción está caliente. Desaparecerá cuando la
Bloqueo de los mandos
• Los mandos pueden bloquearse para evitar el uso no intencionado (por ejemplo, para
impedir que los niños enciendan las zonas de cocción accidentalmente).
• El bloqueo desactiva todos los mandos, excepto el de encendido/apagado.
Para bloquear los mandos
Toque el mando de bloqueo. En el indicador del temporizador aparecerá «Lo».
ara desbloquear los mandos
P
1. Asegúrese de que la placa vitrocerámica está encendida.
2. Toque el mando de bloqueo durante unos instantes.
3. Ya puede empezar a usar la placa vitrocerámica.
ES-10
Page 80

Cuando está bloqueada, todos los mandos están desactivados, excepto el de
1 2 3 4 5 6 7 8 9
predeterminado (hora)
8 8 8 4 4 4 2 2 2
encendido/apagado. Este mando permite apagar la placa vitrocerámica en caso de
emergencia, pero lo primero que habrá que hacer la próxima vez será desbloquearla.
Protección contra el exceso de temperatura
El sensor de temperatura integrado monitoriza la temperatura en el interior de la placa
vitrocerámica. Cuando se detecta una temperatura excesiva, la placa vitrocerámica deja de
funcionar de forma automática.
Protección contra derrames
La protección contra derrames es una función de seguridad. Apagará la encimera de forma
automática en menos de 10 segundos si el agua llega al panel de mandos; también pitará
durante 1 segundo.
Advertencia de calor residual
Después de funcionar durante un rato, quedará algo de calor residual en la calor. Se
mostrará la letra "H" para advertirte que se mantenga alejado de ella.
Protección con autodesconexión
La autodesconexión es una función de seguridad de la placa vitrocerámica. La encimera se
apagará automáticamente si el usuario se olvida de apagarla. En la tabla siguiente se
muestran los tiempos de uso predeterminados correspondientes a los diferentes niveles de
potencia:
Nivel de potencia
Tiempo de uso
Uso del temporizador
El temporizador se puede utilizar de dos formas distintas:
• Puede utilizarse como minutero. En este caso no se apaga ninguna zona de cocción
cuando termina el tiempo programado.
• Se puede programar para que se apague una zona de cocción después del plazo
establecido.
• Se puede programar en un máximo de 99 minutos.
Uso del temporizador como minutero
ES-11
Page 81

Si no se selecciona ninguna zona de cocción
1. Asegúrese de que la placa de cocción está encendida.
Nota: Puede utilizar el minutero aunque no seleccione ninguna zona de cocción.
2. Cuando toque el mando del temporizador, el indicador del
minutero empezará a parpadear y mostrará «30» en el visor.
3. Programe el tiempo tocando el mando «-» o «+».
Consejo: Para reducir o aumentar minuto a minuto, toque el mando «-» o «+» del
temporizador.
Mantenga el dedo en el mando «-» o «+» para reducir o aumentar el
tiempo 10 minutos, respectivamente.
4. Cancele el tiempo tocando el mando del temporizador;
5. Cuando se programe el tiempo, la cuenta atrás comenzará de
inmediato. En el visor se mostrará el tiempo restante y el
indicador del temporizador parpadeará durante 5 segundos.
6. Se escucha un pitido durante 30 segundos y el indicador del
temporizador muestra «- -» cuando transcurre el tiempo
programado.
el visor mostrará «00».
Programación del temporizador para apagar una zona de
cocción
Esta función afecta a zonas de cocción individuales:
1. Toque el mando de selección de la zona de cocción
cuyo temporizador quiera programar (por ejemplo, la zona 1).
2. Cuando toque el mando del temporizador, el indicador del minutero
empezará a parpadear y mostrará «30» en el visor.
3. Programe el tiempo tocando el mando «-» o «+».
Consejo: Para reducir o aumentar minuto a minuto, toque el mando «-» o «+» del
temporizador.
ES-12
Page 82

Mantenga el dedo en el mando «-» o «+» del temporizador para reducir o
aumentar el tiempo 10 minutos.
Si se intenta programar más de 99 minutos, el temporizador volverá
automáticamente a 0 minutos.
4. Cuando se programe el tiempo, la cuenta atrás comenzará de
inmediato. En el visor se mostrará el tiempo restante y el indicador
del temporizador parpadeará durante 5 segundos.
NOTA: El punto rojo situado junto al indicador del nivel de potencia se
iluminará cuando se seleccione la zona.
5. Para cancelar el temporizador, toque el mando de selección de la zona de cocción y, a
continuación, el mando del temporizador; el temporizador se cancelará y mostrará «00» en
el visor de minutero, seguido de «--».
6. Cuando expira el temporizador de cocción, la zona de cocción
correspondiente se apaga automáticamente y muestra «H».
Las zonas de cocción que se hayan encendido antes seguirán funcionando.
Programación del temporizador para apagar más de una zona
de cocción
1. Si usa esta función para más de una zona de cocción, el indicador del temporizador
mostrará el tiempo restante más breve.
(Por ejemplo, si en la zona 1 se ha programado 2 minutos y en la 2, 5 minutos, el
indicador del temporizador muestra «2»).
NOTA: El punto rojo intermitente junto al indicador de nivel de potencia significa que este
se refiere al tiempo de esa zona de cocción.
Si desea comprobar el tiempo de otra zona de cocción, toque el control deslizante de esa
zona. El temporizador indicará el tiempo programado.
ES-13
Page 83

(tiempo programado de 5 minutos)
Qué
Cómo
Importante
Suciedad del vidrio
1. Apague la encimera.
• Tras apagar la encimera las zonas de
mancharse.
Manchas de ebullición,
Elimine de inmediato con una
diaria» anterior.
• Elimine los derrames o las manchas
(tiempo programado de 2 minutos)
2. Cuando expira el temporizador de cocción, la zona de cocción
correspondiente se apaga automáticamente y muestra «H».
NOTA: Si desea cambiar el tiempo ya programado, tiene que empezar por el paso 1.
Cuidado y limpieza
diaria (huellas
dactilares, marcas,
manchas de comida o
derrames sin azúcar)
de alimentos
derretidos
y de derrames de
alimentos
azucarados calientes
2. Aplique un producto de limpieza
para placas de cocción
mientras el vidrio esté todavía
tibio (pero no caliente).
3. Aclare y seque con un paño
limpio o papel absorbente.
4. Vuelva a encender la placa.
espumadera, una espátula o un
rascador que sean aptos para
placas vitrocerámicas de
inducción, pero tenga cuidado con
las superficies de las zonas de
cocción calientes.
1. Apague la placa mediante el
interruptor de la pared.
2. Sujete la pala o el utensilio en
ángulo de 30°, rasque la
suciedad o el derrame y llévela
a un área fría de la placa.
3. Limpie la suciedad o el derrame
con un paño o papel
absorbente.
4. Realice los pasos de 2 a 4 del
apartado «Suciedad del vidrio
cocción pueden seguir calientes
aunque no esté encendida la
indicación de «superficie caliente».
Extreme las precauciones.
• Los estropajos fuertes, algunos
estropajos de nailon y los productos
de limpieza abrasivos pueden rayar el
vidrio. Lea siempre la etiqueta para
saber si el limpiador o el estropajo
son adecuados.
• Nunca deje restos de limpieza en la
placa, ya que el vidrio podría
de alimentos derretidos y azucarados
tan pronto como sea posible. Si se
permite que se enfríen en el vidrio,
pueden ser difíciles de eliminar o dañar
de forma permanente la superficie de
vidrio.
• Riesgo de corte: los rascadores tienen
una cuchilla afilada que queda expuesta
cuando se retira la cubierta de
seguridad. Use el rascador con suma
precaución y guárdelo siempre en un
lugar seguro y fuera del alcance de los
niños.
ES-14
Page 84

Derrames en los
mandos táctiles
1. Apague la encimera.
5. Vuelva a encender la placa.
• La encimera puede pitar y apagarse;
No se puede encender la
No hay corriente.
Asegúrese de que la placa
cualificado.
vitrocerámica ».
Es difícil utilizar los
Es posible que una fina capa de
del dedo.
Asegúrese de que el área de los
mandos.
que no son adecuados.
Algunas cacerolas
Esto puede deberse a la fabricación
distinta manera).
Es normal y no indica la existencia
2. Limpie el derrame.
3. Limpie el área de los mandos
táctiles con una esponja o un
trapo limpios.
4. Seque el área por completo
con papel absorbente.
Consejos y sugerencias
los mandos táctiles podrían no
funcionar mientras estén cubiertos de
líquido. Asegúrese de secar la zona de
los mandos táctiles antes de encender
la encimera de nuevo.
Problema
placa vitrocerámica.
Los mandos táctiles no
responden.
mandos táctiles.
El vidrio se ha rayado. Los utensilios de cocina tienen
producen chasquidos y
crepitaciones.
Posible causa
Los mandos están bloqueados. Desbloquee los mandos. Consulte
agua cubra los mandos o que esté
tocando los mandos con la punta
bordes rugosos.
Se están usando estropajos o
productos de limpieza abrasivos
del utensilio de cocina (capas de
metales diferentes que vibran de
Qué hacer
vitrocerámica está conectada a la red
eléctrica y encendida.
Compruebe si hay un corte de
corriente en su domicilio o en la
zona. Si ha realizado todas las
comprobaciones y el problema no se
soluciona, avise a un técnico
las instrucciones de la
sección «Uso de la placa
mandos táctiles está seca y utilice la
yema del dedo para accionar los
Utilice utensilios de cocina con base
plana y lisa. Consulte «Elección de
los utensilios de cocina adecuados».
Consulte «Cuidado y limpieza».
de ningún fallo.
ES-15
Page 85

Especificaciones técnicas
Encimera de cocción
CEHDD30TCT
Zonas de cocción
Potencia eléctrica instalada
Tamaño del producto L×An.×Al.
268
-0
500
-0
Tensión de suministro
2 zonas
220-240 V~, 50-60 Hz
2928-3484W
288X520X52
(mm)
Medidas de instalación A×B (mm)
El peso y las medidas son aproximados. Debido a que estamos mejorando continuamente
nuestros productos, podríamos cambiar las especificaciones y el diseño sin previo aviso.
268X500
Instalación
Selección del equipo de instalación
Recorte un hueco en la encimera con arreglo a las medidas mostradas en la figura.
Para instalar y utilizar la encimera habrá que reservar un espacio mínimo de 5 cm
alrededor del hueco realizado.
Asegúrese de que la encimera tenga un grosor mínimo de 30 mm. Elija un material
resistente al calor para la encimera con el fin de evitar que se deforme mucho con el calor
que genera la placa. Consulte la figura siguiente.
A(mm) B(mm) C(mm) D(mm) E(mm) F(mm)
+4
Asegúrese, en cualquier circunstancia, de que la placa vitrocerámica esté ventilada y de
que la entrada y la salida de aire no estén obstruidas. Compruebe que la placa
+4
50mini 50 mini 50 mini 50 mini
ES-16
Page 86

vitrocerámica se encuentra en buen estado de funcionamiento. Consulte la figura siguiente.
Nota: Entre la encimera y el armario situado encima de ella debe haber una
distancia de seguridad de al menos 760 mm.
A(mm) B(mm) C(mm) D E
760 50 mín. 20 mín. Entrada de aire Salida de aire 5 mm
Comprobaciones anteriores a la instalación de la encimera
• La encimera está en ángulo recto y nivelada; además, ningún componente estructural
interfiere con los requisitos de espacio.
• La encimera es de material resistente al calor.
• Si la placa se instala encima de un horno, este debe incorporar un ventilador de
refrigeración.
• La instalación cumple todos los requisitos de espacio libre, además de las normas y los
reglamentos pertinentes.
• El cableado permanente incorpora un interruptor adecuado que garantiza la desconexión
total de la red eléctrica y cuya instalación y posición cumplen las normas y los
reglamentos de cableado locales.
El interruptor debe ser de un tipo homologado y ofrecer una separación física de
contactos de 3 mm en todos los polos (o en todos los conductores activos [fases] si las
normas locales de cableado permiten esta variación de los requisitos).
• El usuario puede acceder con facilidad al interruptor cuando la encimera esté instalada.
• Si tiene dudas acerca de la instalación, consulte a las autoridades locales y las
ordenanzas de construcción.
• La superficie de las paredes que rodean la encimera debe tener un acabado resistente al
calor y fácil de limpiar (como azulejos).
Comprobaciones posteriores a la instalación de la encimera
• No se puede acceder al cable eléctrico a través de cajones o puertas de armarios.
ES-17
Page 87

• Existe una circulación suficiente de aire fresco desde el exterior del mueble hasta la base
vidrio
de la encimera.
• Si la encimera está instalada encima de un cajón o del espacio destinado a un mueble, se
ha colocado una barrera de protección térmica debajo de la base de la placa de
inducción.
• El usuario accede con facilidad al interruptor.
Antes de colocar las abrazaderas de fijación
La unidad debe colocarse en una superficie lisa y estable (utilice el embalaje). No haga
fuerza en los mandos que sobresalen de la encimera.
Ajuste de la posición de las abrazaderas
Para fijar la encimera a la encimera, atornille las 4 abrazaderas en la parte inferior
(consulte la figura) tras la instalación.
A B C D
Tornillo Abrazadera Agujero para tornillo Marco inferior
abrazadera de retención
tornillo
ST3. 5*8
Marco inferior
Encimera de la cocina/sala
ES-18
Page 88

Precauciones
1. La instalación de la placa vitrocerámica es responsabilidad de personal o técnicos
cualificados. Tenemos profesionales a su disposición. Nunca realice la operación
personalmente.
2. La placa vitrocerámica no debe instalarse encima de neveras, lavavajillas y secadoras
de tambor.
3. Para aumentar la fiabilidad de la placa vitrocerámica, debe instalarse de manera que se
garantice una radiación térmica óptima.
4. La pared y la zona situada encima de la superficie de la encimera deben soportar el
calor.
5. Para evitar daños, el aglomerado y el adhesivo también deben soportar el calor.
6. N
o utilice limpiadores a vapor.
7. Esta vitrocerámica solo puede conectarse a un suministro eléctrico con impedancia
máxima de que 0,427 ohmios. Si es necesario, solicite información sobre la impedancia
a la compañía información de impedancia del sistema.
Conexión de la encimera a la red eléctrica
La corriente debe conectarse con arreglo a la normativa pertinente o con un disyuntor
unipolar. A continuación se muestra el método de conexión.
Azul
Amarillo / Verde
PE
• Si el cable resulta dañado o necesita reemplazarse, el servicio posventa debe realizar la
operación con herramientas especiales para evitar accidentes.
• Si el electrodoméstico se conecta directamente a la corriente, habrá que instalar un
disyuntor omnipolar con distancia mínima de 3 mm entre contactos.
• El instalador debe asegurarse de que la conexión eléctrica es correcta y que cumple los
reglamentos de seguridad.
• El cable no debe acodarse ni aplastarse.
• El cable debe comprobarse de forma periódica y solamente debe reemplazarlo un técnico
ES-19
Marrón
N L
220-
240V
Page 89

autorizado.
Este electrodoméstico tiene la marca de conformidad con la Directiva europea
funciones que el suministrado.
2012/19/CE sobre residuos de aparatos eléctricos y electrónicos (RAEE). Los RAEE
contienen sustancias contaminantes (que pueden tener consecuencias negativas para
el medio ambiente) y componentes básicos (que pueden reutilizarse). Es importante
que los RAEE se sometan a tratamientos específicos para retirar y eliminar
correctamente los contaminantes y recuperar todos los materiales. Todos
personalmente somos importantes cuando se trata de garantizar que los RAEE no se
conviertan en un problema ambiental. Para esto, es fundamental respetar algunas
reglas básicas:
- los RAEE no deben tratarse como residuos domésticos;
- los RAEE deben llevarse a zonas de recogida específicas gestionadas por el ayuntamiento o una
empresa registrada.
En muchos países, es posible que haya disponible recogida doméstica de los RAEE de gran tamaño. Es
posible entregar el electrodoméstico antiguo al comprar otro nuevo en el comercio, que deberá recogerlo
de forma gratuita siempre que se trate de un electrodoméstico equivalente y que tenga las mismas
ES-20
Page 90

Información de producto de las placas de cocina eléctricas de uso doméstico según el Reglamento (UE) n.o
66/2014 de la Comisión
Posición Símbolo Valor Unidad
Tecnología (inducción,
calor radiante y placas
Zonas de calor
radiante
Zonas o áreas de cocción circulares: Diámetro
de superficie útil por zona de cocción eléctrica
Trasera
izquierda
Trasera
derecha
Central
izquierda
Central
derecha
Delantera
izquierda
Delantera
central
Delantera
derecha
Longitud y anchura de superficie útil por zona
Trasera
izquierda
L
A
L
A
Identificación de modelo
Tipo de placa: Placa eléctrica
Número de zonas y/o
áreas de cocción
sólidas)
redondeado al valor más próximo a 5 mm
zonas 2
áreas
Zonas de inducción
Áreas de inducción
Placas sólidas
Trasera central
Central central
CEHDD30TCT
Ø
Ø
Ø
Ø
Ø
Ø
20,0
X
cm
cm
-
cm
-
cm
-
cm
-
cm
-
Zonas o áreas de cocción no circulares:
de cocción eléctrica redondeado al valor más
próximo a 5 mm
Trasera central
Trasera
derecha
Ø
Ø
Ø
L
A
cm
16,5
cm
-
cm
-
- cm
- cm
- cm
ES-21
Page 91

Central
L
A
Central
derecha L A
Delantera
izquierda
L
A
Delantera
central L A
Delantera
derecha L A
Trasera
izquierda
Cocina
eléctrica CE
Cocina
eléctrica CE
Trasera
derecha
Cocina
eléctrica CE
Central
izquierda
Cocina
eléctrica CE
Cocina
eléctrica CE
Central
derecha
Cocina
eléctrica CE
Delantera
izquierda
Cocina
eléctrica CE
Delantera
central
Cocina
eléctrica CE
Delantera
derecha
Cocina
eléctrica CE
Placa de
eléctrica CE
Recomendaciones para ahorrar energía:
• Para optimizar la eficiencia de la placa de cocina, coloque la ca
•
• Para reducir los tiempos de cocción, utilice cantidades mínimas de líquido o grasa.
• Empiece a
completo.
• Utilice cacerolas cuyo diámetro coincida con las marcas de la zona elegida.
izquierda
L
A
- cm
Consumo energético en zona o área de
cocción calculado en kg
Central central
Trasera central
Central central
- cm
- cm
- cm
- cm
- cm
Wh/kg
187
Wh/kg
-
Wh/kg
-
Wh/kg
-
Wh/kg
-
Wh/kg
-
Wh/kg
186
Wh/kg
-
Consumo energético por placa de cocción
calculado en kg
Norma aplicada: EN 60350-2 Aparatos electrodomésticos para cocinas eléctricas. Parte 2: Encimeras de
cocción. Métodos de medida de la aptitud a la función.
El uso de una tapa reducirá los tiempos de cocción y ahorrará energía porque el calor no se dispersará.
cocinar con una temperatura alta y redúzcala cuando los alimentos se hayan calentado por
ES-22
cocina
cerola en el centro de la zona de cocción.
Wh/kg
-
Wh/kg
186.5
Page 92

Umístěním značky na tento výrobek potvrzujeme
shodu se všemi příslušnými evropskými požadavky na
bezpečnost, ochranu zdraví a životního prostředí,
které jsou stanovené v právních předpisech platných
pro tento výrobek.
Bezpečnostní upozornění
Vaše bezpečnost je pro nás důležitá. Přečtěte si
prosím tyto informace ještě před použitím varné
desky.
Instalace
Nebezpečí úrazu elektrickým proudem
Před každou údržbou odpojte spotřebič od zdroje
elektrického napájení.
Připojení elektroinstalace k dobrému uzemnění je
nezbytné a povinné.
Změny domácí elektroinstalace smí provést pouze
kvalifikovaný elektrikář.
Nedodržení těchto pokynů může vést k úrazu
elektrickým proudem nebo i smrti.
Nebezpečí pořezání
Opatrně – okraje panelu jsou ostré.
Nedodržení pokynu může způsobit zranění nebo
pořezání.
Důležité bezpečnostní pokyny
Před instalací nebo použitím spotřebiče si laskavě
pečlivě přečtěte tyto pokyny.
Na spotřebič nikdy nedávejte žádné hořlavé
materiály nebo předměty.
Dejte prosím tyto informace k dispozici na osobě
CZ-1
Page 93

odpovědné za instalaci spotřebiče, mohly by snížit
vaše náklady na instalaci.
Tento spotřebič musí být instalován podle návodu k
instalaci, jinak hrozí nebezpečí.
Tento spotřebič musí být správně nainstalován a
uzemněn pouze kvalifikovaným pracovníkem.
Tento spotřebič by měl být připojen k obvodu, který
zahrnuje odpojovač se zárukou plného odpojení od
zdroje napájení.
Provedením nesprávné instalace může dojít ke
ztrátě jakýchkoli záruk nebo ručení.
Obsluha a údržba
Nebezpečí úrazu elektrickým proudem
Prasklou nebo poškozenou varnou desku
nepoužívejte. V případě, že je povrch varné desky
prasklý nebo poškozený, ihned desku odpojte od
napájení ze sítě (nástěnný vypínač) a obraťte se na
kvalifikovaného technika.
Před čištěním nebo údržbou vypněte varnou desku
ve zdi.
Nedodržení těchto pokynů může vést k úrazu
elektrickým proudem nebo i smrti.
Zdravotní riziko
Tento spotřebič je v souladu s elektromagnetickými
bezpečnostními normami.
Nebezpečí horkého povrchu
Během používání se přístupné části spotřebiče
zahřívají na vysokou teplotu a mohou vás popálit.
Dokud povrch nevychladne, nesmíte se tělem,
CZ-2
Page 94

oděvem nebo jakýmkoli jiným předmětem než je
vhodné nádobí dotknout skla.
Na varnou desku nepokládejte žádné kovové
předměty jako nože, vidličky, lžíce nebo pokličky,
protože by se mohly zahřát na velmi vysokou
teplotu.
Nedovolte dětem, aby se ke spotřebiči přibližovaly.
Rukojeti pánví mohou být horké na dotyk. Nesmí
proto přečnívat na jiné zapnuté varné zóny. Děti se
nesmí k rukojetím přibližovat.
Nedodržení těchto pokynů může vést k popálení či
opaření.
Nebezpečí pořezání
Když je bezpečnostní kryt v zatažené poloze, odhalí
se ostří z horní části škrabky. Používejte ji s
nejvyšší opatrností a vždy ukládejte bezpečně a
mimo dosah dětí.
Nedodržení pokynu může způsobit zranění nebo
pořezání.
Důležité bezpečnostní pokyny
Během použití nikdy nenechávejte spotřebič bez
dozoru. Při překypění se vytvoří kouřící a mastná
politá místa, která se mohou vznítit.
Nepoužívejte spotřebič jako pracovní nebo
odkládací plochu.
Na spotřebič nikdy nepokládejte žádné předměty
nebo nástroje.
Spotřebič nikdy nepoužívejte k vyhřívání nebo
vytápění místnosti.
Po použití vždy vypněte varné zóny a varnou desku
CZ-3
Page 95

podle návodu (tj. pomocí dotykových ovladačů).
Nedovolte dětem, aby si hrály se spotřebičem,
seděly, stály na něj nebo na něj šplhaly.
Ve skříňkách nad spotřebičem neskladujte
předměty, o které se zajímají děti. Děti lezoucí na
desku, aby dosáhly na tyto předměty, si mohou
přivodit vážná zranění.
V místě, kde se spotřebič používá, děti nesmějí být
ponechány o samotě nebo bez dozoru.
Děti nebo osoby se zdravotním postižením, jež
omezuje jejich schopnost používat spotřebič, by
měly mít u sebe odpovědnou a kompetentní osobu,
aby je vycvičila v jeho používání. Tato osoba se
musí přesvědčit, že mohou používat spotřebič bez
nebezpečí pro sebe nebo své okolí.
Neopravujte ani nevyměňujte žádnou část
spotřebiče, pokud to není v návodě výslovně
doporučeno. Všechny další služby údržby smí
provádět pouze oprávněný technik.
K čištění varné desky nepoužívejte čisticí spotřebiče
na páru.
Nepokládejte ani nepouštějte těžké předměty na
varnou desku.
Nestůjte na varné desce.
Nepoužívejte nádoby se zubatými hranami,
neposunujte nádoby po indukčním skleněném
povrchu, protože to může poškrábat sklo.
K čištění varné desky nepoužívejte drátěnky nebo
jiné agresivní abrazivní čisticí prostředky, protože by
mohly poškrábat indukční sklo.
Jestliže je poškozený napájecí kabel, smí ho
CZ-4
Page 96

vyměnit pouze výrobce, servisní technik nebo osoba
s podobnou příslušnou kvalifikací, jinak by mohlo
dojít k úrazu.
Spotřebič, který jste si koupili, je určen k použití v
domácnosti a také: - v kuchyňských koutech pro
zaměstnance v obchodech, kancelářích a na jiných
pracovištích; - na farmách; - klienty v hotelech,
motelech a jiných typech ubytování; - v penzionech
typu „bed and breakfast“.
VAROVÁNÍ: Spotřebič a jeho přístupné části se
během používání zahřívají na vysokou teplotu.
Dávejte pozor, abyste se nedotkli topných článků.
Děti do 8 let by se neměly ke spotřebiči přibližovat,
pokud je nesleduje dospělá osoba.
Tento spotřebič smějí používat děti starší 8 let a
osoby se sníženými fyzickými, smyslovými nebo
duševními schopnostmi nebo bez patřičných
zkušeností a znalostí, pokud jsou pod dohledem
osoby odpovědné za jejich bezpečnost, případně
byly poučeny o bezpečném používání spotřebiče a
rozumějí možným nebezpečím.
Děti si se spotřebičem nesmějí hrát. Děti nesmějí
bez dozoru dospělých spotřebič čistit, ani provádět
činnosti údržby.
VAROVÁNÍ: Vaření bez dozoru na varné desce s
tukem nebo olejem může být nebezpečné a
způsobit požár. Nikdy se nepokoušejte uhasit požár
vodou; vypněte spotřebič, a potom zakryjte plamen
např. pokličkou nebo protipožární dekou.
VAROVÁNÍ: Nebezpečí požáru: na varném povrchu
nic neskladujte.
CZ-5
Page 97

Varování: Je-li povrch desky prasklý, vypněte
Přehled výrobku
1. zóna 1200 W,
4. Ovládací panel
spotřebič, abyste zabránili úrazu elektrickým
proudem, protože povrchy desky ze
sklokeramického nebo podobného materiálu chrání
díly pod proudem.
Nepoužívejte čisticí přístroje na páru.
Spotřebič není určen k používání pomocí externího
časovače nebo samostatného dálkového ovládání.
1. Blahopřejeme vám ke koupi nové Keramická deska
.
Dop
oručujeme vám, abyste věnovali nějaký čas přečtení tohoto návodu/ instalačního
návodu a plně pochopili, jak správně spotřebič nainstalovat a používat.
Pro instalací si prosím přečtěte návod k instalaci.
Přečtěte si všechny pokyny ještě před použitím spotřebiče a návod si uschovejte pro další
potřebu.
Pohled shora
2. zóna 2000/1000 W
3. Skleněná deska
CZ-6
Page 98

Ovládací panel
1. Ovladače volby varné zóny
2. Ovladač časovače
3. Tlačítko pro regulaci
výkonu/časování
4. Ovladač zablokování tlačítek
5. Ovladač ZAP/VYP
6. Ovladač dvojité zóny
Informace o produktech
Mikropočítačová keramická varná deska může vyhovět různým požadavkům kuchyně díky
ohřevu odporovým drátem, mikropočítačovému řízení a výběru více zdrojů energie, což je
opravdu optimální volba pro moderní rodiny.
Keramická varná deska se zaměřuje na zákazníky a má personalizovaný design. Deska
má bezpečný a spolehlivý výkon, díky němuž je váš život pohodlný a umožňuje si plně
užívat potěšení ze života.
Před použitím nové Keramická deska
• Přečtěte si tento návod se zvláštním důrazem na část „Bezpečnostní upozornění“.
• Před použitím odstraňte z indukční varné desky všechny ochranné fólie.
Používání dotykového ovládání
• Ovladače reagují na dotyk, takže není nutné tlačit.
• Použijte bříško prstu, nikoliv jeho špičku.
• Jakmile je dotyk zaregistrován, uslyšíte pípnutí.
• Ovladače musí být vždy čisté, suché a nesmí být zakryté žádným předmětem (např.
nádobou nebo utěrkou). I tenká vrstva vody může zhoršit ovládání.
Výběr správné nádoby
Nepoužívejte nádoby se zubatými hranami nebo zakřiveným dnem.
CZ-7
Page 99

Ujistěte se, že spodek nádoby je hladký, sedí naplocho na skle a má stejnou velikost jako
varná zóna. Vždy nádobu na varné zóně vystřeďte.
Nádoby z indukční varné desky vždy zvedejte, neposunujte je, mohou poškrábat sklo.
Používání Keramická deska
Jak začít vaření
1. Stiskněte ovladač ZAP/VYP.
Po zapnutí jednou pípne bzučák, všechny displeje zobrazují „–“ nebo „– –“, což
znamená, že indukční varná deska byla uvedena do stavu pohotovostního
režimu.
2. Na varnou zónu, kterou chcete použít, umístěte vhodnou nádobu.
Ujistěte se, že dno nádoby a povrch varné zóny jsou čisté a suché.
3. Při dotyku ovladače výběru varné zóny začne indikátor vedle tlačítka blikat.
4. Nastavte úroveň výkonu dotykem ovladače „-“ nebo „+“.
a. Jestliže do 1 minuty nevyberete varnou zónu, keramická varná deska se
automaticky vypne. Budete muset začít znovu krokem 1.
b. Kdykoliv během vaření můžete změnit nastavení tepelného výkonu.
CZ-8
Page 100

5. Pokud zóna 1 pracuje, dotkněte se ovladače zvolené varné zóny a
Zablokování ovladačů
stisknutím aktivujte dvojitou zónu.
Pokud pracuje dvojitá zóna, dotkněte se ovladače zvolené varné zóny a stisknutím
tlačítka vypněte dvojitou zónu.
Po skončení vaření
1. Dotkněte se ovladače výběru varné zóny, kterou chcete vypnout.
2. Vypněte varnou zónu dotykem „-“ a posunutím hodnoty dolů na
„0“ anebo přidržte tlačítka „+“ a „-“ současně po dobu 1 sekundy, čímž
přejdete na „0“ přímo.
Ujistěte se, že displej napájení ukazuje „0“ a poté „H“.
a poté
3. Vypněte celou varnou desku dotykem ovladače ZAP/VYP.
4. Pozor na horké povrchy
Když je varná zóna horká na dotyk, zobrazí se „H“. „H“ zmizí, když se
povrch ochladí na bezpečnou teplotu. To můžete použít také jako funkci
úspory energie; jestliže chcete ohřát další nádoby, použijte plotýnku,
která je ještě horká.
• Ovladače můžete zablokovat, abyste zabránili neúmyslnému použití (například
náhodnému zapnutí varných zón dětmi).
• Jsou-li ovladače zablokovány, všechny ovladače kromě ovládání ZAP/VYP jsou
deaktivovány.
Jak ovladače zablokovat
Dotkněte se ovladače zablokování tlačítek. Indikátor časovače zobrazí „Lo“.
Jak ovladače odblokovat
1. Ujistěte se, že je indukční varná deska zapnutá.
2. Dotkněte se ovladače zablokování tlačítek a na chvíli jej podržte.
3. Nyní můžete začít používat indukční varnou desku.
Když je varná deska v režimu zablokování, všechny ovladače kromě ZAP/VYP jsou
deaktivovány, indukční varnou desku můžete v nouzové situaci vždy vypnout pomocí
CZ-9
 Loading...