

Page 1
IT
DE
EN
FR
Page 2
!
2
Grazie per aver scelto una lavastoviglie
Candy, siamo certi, sarà un prezioso
alleato per lavare in tutta tranquillità le
stoviglie di tutti i giorni.
La lettura completa di questo libretto
permetterà un utilizzo corretto e sicuro
dell’apparecchiatura e darà anche utili
consigli sulla manutenzione più efficiente.
Mettere in funzione la lavastoviglie
solo dopo aver letto attentamente le
istruzioni. Si consiglia di tenere sempre il
manuale a portata di mano e di conservarlo
con cura per eventuali futuri proprietari.
Si raccomanda di controllare che al
momento della consegna la macchina sia
dotata di libretto di istruzioni, certificato di
garanzia, indirizzi di assistenza ed etichetta
di efficienza energetica. Ogni prodotto è
identificato da un codice univoco di 16
caratteri definito anche "numero di serie",
che troverà sul certificato di garanzia
oppure sulla targa matricola posta
all'interno dello sportello, sul bordo
superiore destro. Questo codice è una
sorta di carta d’identità specifica per il
prodotto che servirà per registrare il
prodotto e se fosse necessario contattare il
Centro di Assistenza Tecnica.
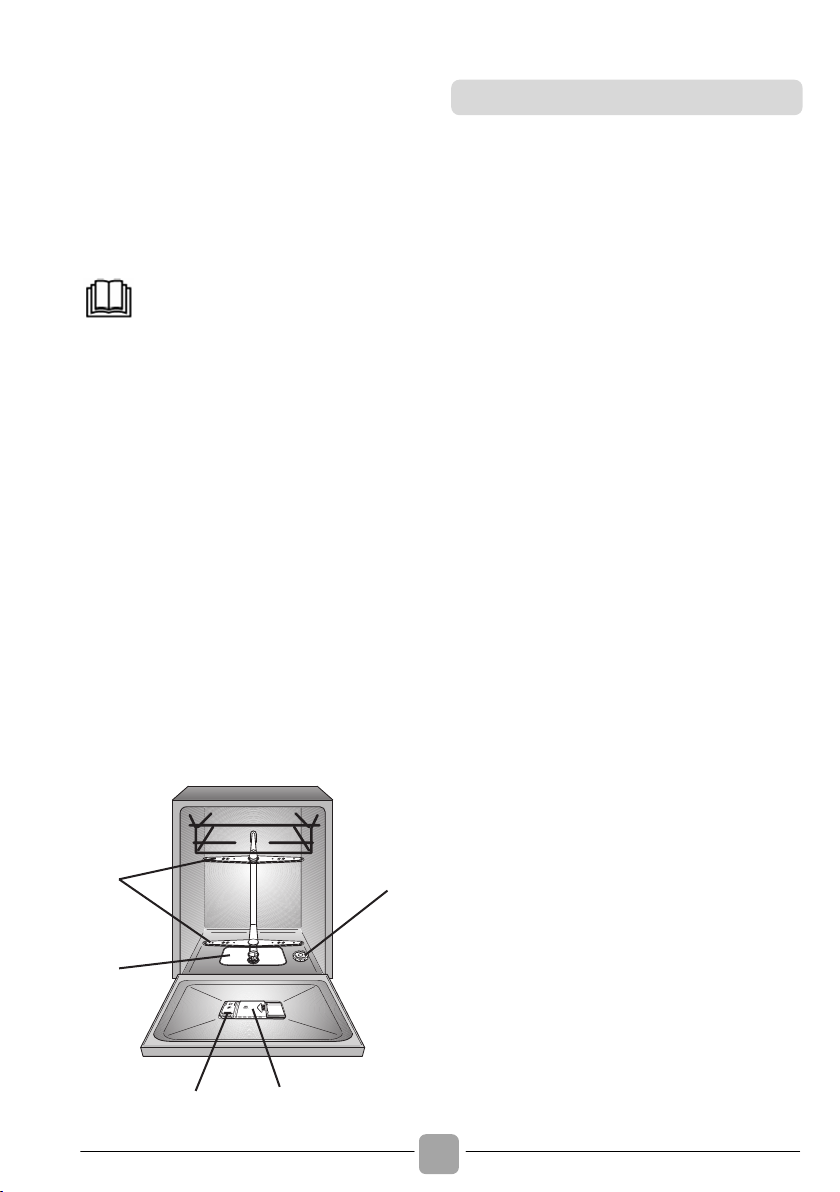
Fig. A
15
4
32
1. NORME GENERALI DI SICUREZZA
2. ALIMENTAZIONE IDRICA
3. CARICARE IL SALE
4. REGOLAZIONE DEL CESTO
SUPERIORE (SOLO NEI MODELLI
DOVE È PRESENTE)
5. CARICAMENTO DELLE STOVIGLIE
6. INFORMAZIONI PER I LABORATORI
DI PROVA
7. CARICAMENTO DETERSIVO
8. TIPO DI DETERSIVO
9. CARICAMENTO BRILLANTANTE
10.
PULIZIA FILTRI
11.
CONSIGLI PRATICI
12.
PULIZIA E MANUTENZIONE ORDINARIA
13.
DESCRIZIONE COMANDI
14.
DATI TECNICI
15.
SCELTA PROGRAMMA E FUNZIONI
16.
CONTROLLO REMOTO (Wi-Fi)
17.
ELENCO PROGRAMMI
18.
IMPIANTO DI DECALCIFICAZIONE
19. RISOLUZIONE PROBLEMI E GARANZIA
20.
INDICAZIONI AMBIENTALI
A.
PARAMETRI WIRELESS (PAG.139)
Indice
Page 3

!
IT
3
1. NORME GENERALI DI
SICUREZZA
! Questo apparecchio è destinato
ad uso in ambienti domestici e
simili come per esempio:
− aree di ristoro di negozi, uffici
altri ambienti di lavoro;
− negli agriturismi;
− dai clienti di hotel, motel o
altre aree residenziali simili;
− nei bed & breakfast.
Un utilizzo diverso da quello tipico
dell’ambiente domestico, come
l’uso professionale da parte di
esperti o di persone addestrate, è
escluso anche dagli ambienti
sopra descritti. Un utilizzo non
coerente con quello riportato, può
ridurre la vita del prodotto e può
invalidare la garanzia del
costruttore. Qualsiasi danno
all’apparecchio o ad altro,
derivante da un utilizzo diverso
da quello domestico (anche
quando l’apparecchio è installato
in un ambiente domestico) non
sarà ammesso dal costruttore in
sede legale.
! Questo apparecchio può essere
utilizzato da bambini di 8 anni e
oltre e da persone con capacità
fisiche, sensoriali o mentali ridotte
con mancanza di esperienza e di
conoscenza a patto che siano
supervisionate o che siano date
loro istruzioni in merito all’utilizzo
sicuro dell’apparecchio e che
capiscano i pericoli del suo
utilizzo.
Evitare che i bambini
giochino con la lavatrice o che si
occupino della sua pulizia e
manutenzione senza supervisione.
! I bambini dovrebbero essere
supervisionati per assicurarsi che
non giochino con l'apparecchio.
! I bambini di età inferiore a 3 anni
devono essere tenuti lontano
dalla macchina, a meno che non
vengano continuamente sorvegliati.
! Se il cavo di alimentazione risulta
danneggiato, deve essere sostituito
dal produttore, da un tecnico
specializzato o da una persona
qualificata per evitare qualsiasi
pericolo.
Si consiglia di utilizzare
un componente originale, che
può essere richiesto al Centro
Assistenza Tecnica.
! Utilizzare unicamente il tubo di carico
fornito con l'apparecchio per il
collegamento alla rete idrica. I vecchi
tubi non devono essere riutilizzati.
! La pressione idrica deve essere
compresa tra un minimo di 0,08
MPa ed un massimo di 0,8 Mpa.
! Assicurarsi che nessun tappeto
ostruisca la base della lavastoviglie
né i condotti di ventilazione.
Page 4

!
4
! Dopo l’installazione, l’apparecchio
deve essere posizionato in modo
che la spina sia raggiungibile.
!
Non lasciare la porta aperta in
posizione orizzontale, al fine di
evitare potenziali pericoli (es.
inciampare).
! Per ulteriori informazioni sul
prodotto o per consultare la
scheda tecnica fare riferimento
al sito internet del produttore.
!
I dati elettrici (tensione di
alimentazione potenza assorbita)
sono riportati nella targhetta dati
apposta sul prodotto.
!
Assicurarsi che l'impianto elettrico
sia provvisto di messa a terra,
che la presa di corrente sia
conforme alle normative nazionali
e che la spina e la presa
di alimentazione corrispondano.
La società costruttrice resta
sollevata da ogni responsabilità
per eventuali danni a persone
cose derivanti dal mancato
allacciamento alla linea di terra.
!
Fare attenzione che l'apparecchiatura
non schiacci il cavo di alimentazione.
! L'uso di adattatori, prese multiple
e/o prolunghe è fortemente sconsigliato.
! Prima di qualsiasi intervento di
pulizia e manutenzione della
lavastoviglie, togliere la spina e
chiudere il rubinetto dell’acqua.
! Non tirare il cavo di
alimentazione o l’apparecchio
stesso per staccare la spina
dalla presa di corrente.
! Non lasciare la lavastoviglie
esposta a pioggia, sole o ad
altri agenti atmosferici.
! Appoggiarsi o sedersi sulla
porta aperta della lavastoviglie,
può causarne il ribaltamento.
! La lavastoviglie è progettata per
il lavaggio di normali utensili
domestici: oggetti contaminati da
benzina, vernice, avanzi di acciaio
e ferro, prodotti chimici corrosivi,
acidi o alcalini non devono essere
lavati in lavastoviglie.
ATTENZIONE:
Coltelli e altri utensili con
l'estremità appuntite devono
essere collocati nel cesto
con le punte rivolte verso
il basso o in posizione
orizzontale.
Collegamento elettrico e
prescrizioni di sicurezza
Page 5

!
IT
5
! Se l'abitazione è dotata di
impianto per addolcire l'acqua non
è necessario aggiungere sale
nell'addolcitore della lavastoviglie.
! In ogni caso di guasto e/o di
malfunzionamento, si consiglia
di spegnere la lavastoviglie,
chiudere il rubinetto dell’acqua e
non manomettere l’apparecchio.
Contattare immediatamente il
Centro Assistenza Tecnica,
richiedendo solo ricambi originali.
Il mancato rispetto di quanto
sopra, può compromettere la
sicurezza dell’apparecchio.
! Qualora fosse necessario
trasportare manualmente la
macchina disimballata, non
impugnare la porta in basso,
ma aprire leggermente la porta
e sollevare impugnando il
ripiano superiore.
Apponendo la marcatura su
questo prodotto, dichiariamo,
sotto la nostra responsabilità, di
ottemperare a tutti i requisiti
relativi alla tutela di sicurezza,
salute e ambiente previsti dalla
legislazione europea in essere
per questo prodotto.
!
Rimuovere tutti gli elementi
che compongono l’imballaggio.
!
Non installare o utilizzare la
lavastoviglie se risulta danneggiata.
!
Rispettare le istruzioni di
istallazione all’interno della
Quick Guide fornita insieme al
prodotto.
Installazione
ATTENZIONE:
Non lasciare gli elementi
dell’imballaggio a portata dei
bambini.
Page 6

!
6
2. ALIMENTAZIONE IDRICA
!
I tubi di carico e scarico possono essere
orientati indifferentemente verso destra o
verso sinistra.
!
La pressione idrica deve essere compresa
tra un minimo di 0.08 Mpa e un massimo
di 0.8MPa.
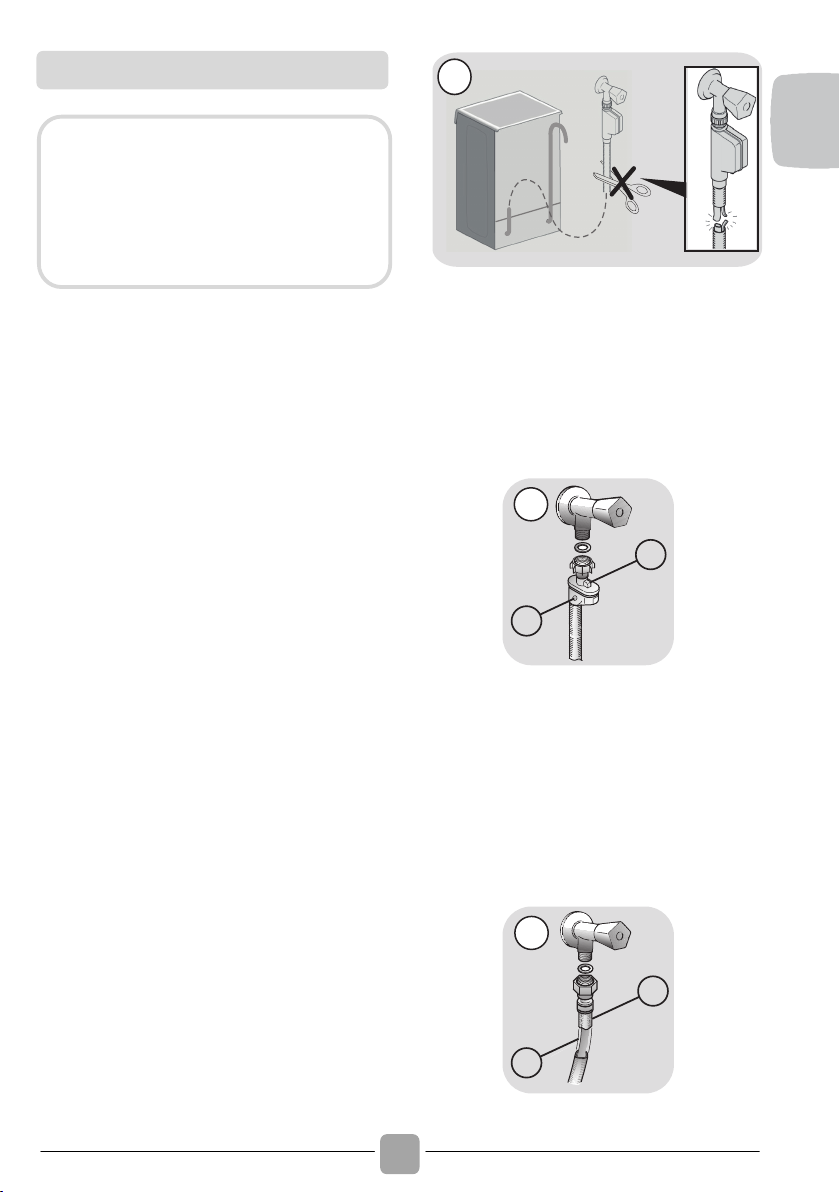
! E' necessario un rubinetto a monte del tubo
di carico per isolare la macchina
dall'impianto idrico quando non è in
funzione (fig.1B).
! La lavastoviglie è dotata di un tubo per la
presa d'acqua terminante con ghiera filettata
(fig. 2).
!
Il tubo di carico "A" deve essere avvitato ad
un rubinetto dell'acqua "B" con attacco da
3/4" assicurandosi che la ghiera sia ben stretta.
!
Se necessario, si può allungare il tubo di
carico fino a 2,5 m. A tale scopo, contattare il
Centro Assistenza Tecnica.
!
Se la macchina viene collegata a tubazioni
nuove o rimaste inutilizzate per lungo
tempo, è consigliabile far scorrere l'acqua
per alcuni minuti prima di allacciare il tubo
di carico. In tal modo eviterete che depositi
di sabbia o di ruggine possano otturare il
filtrino di ingresso acqua.
1
B
2
B
A
L’apparecchio deve essere connesso
alla rete idrica, solo con i nuovi tubi di
carico forniti in dotazione. I vecchi tubi
di carico non devono essere riutilizzati.
La lavastoviglie può essere allacciata
all'impianto dell'acqua fredda o calda
purché non superi i 60°C.
Page 7
!
IT
7
In ALCUNI MODELLI, potrebbero essere
presenti una o più delle seguenti caratteristiche:
! WATERBLOCK (fig. 3)
Lo scopo del «Waterblock» è di rendere
ancora più sicuro il Vostro apparecchio.
Infatti, il «Waterblock» intercetta eventuali
perdite d’acqua che potrebbero causare
allagamenti, dovuti ad anomalie di
funzionamento della macchina o scoppi o
tagli delle tubazioni di gomma e
particolarmente del tubo di carico
dell’acqua.
Come funziona
Il fondo posto sotto l’elettrodomestico
raccoglie eventuali perdite d’acqua che,
trami- te un sensore, chiude la valvola di
sicurezza situata sotto al rubinetto. In questo
modo si impedisce all’acqua di fuoriuscire
anche con il rubinetto aperto.
Se la scatola "A" che contiene parti
elettriche viene danneggiata, togliere
immediatamente la presa di collegamento
alla rete elettrica. Per garantire un perfetto
funzionamento della sicurezza, il tubo con la
scatola "A" deve essere allacciato al
rubinetto, come in Figura. Il tubo di
alimentazione non deve essere tagliato in
quanto contiene parti sotto tensione. Se la
lunghezza del tubo non è sufficiente per un
corretto allacciamento, il tubo stesso dovrà
essere sostituito con uno di lunghezza
adeguata. Richiedere il tubo presso il Centro
Assistenza Tecnica.
3
A
! AQUASTOP (fig. 4):
dispositivo posizionato sul tubo di carico
che blocca l’afflusso dell’acqua se il tubo
si deteriora; in tal caso, apparirà una tacca
rossa nella finestrella "A" e sarà
necessario sostituire il tubo. Per svitare la
ghiera, premere il dispositivo di
antisvitamento "B".
B
A
4
! AQUAPROTECT - TUBO DI CARICO
CON PROTEZIONE (fig. 5):
in caso di perdita d’acqua dal tubo
primario interno "A", la guaina di
contenimento trasparente "B" conterrà
l’acqua, permettendo di terminare il
lavaggio. Finito il ciclo, sostituire il tubo di
carico contattando il Centro Assistenza
Tecnica.
B
A
5
Sicurezze idrauliche
Tutte le lavastoviglie sono dotate di un
dispositivo di sicurezza antitrabocco che,
nel caso in cui l'acqua superi il normale
livello, a causa di un eventuale
malfunzionamento, ne blocca in modo
automatico l'afflusso e/o ne scarica la
quantità in eccesso.
Page 8
!
8
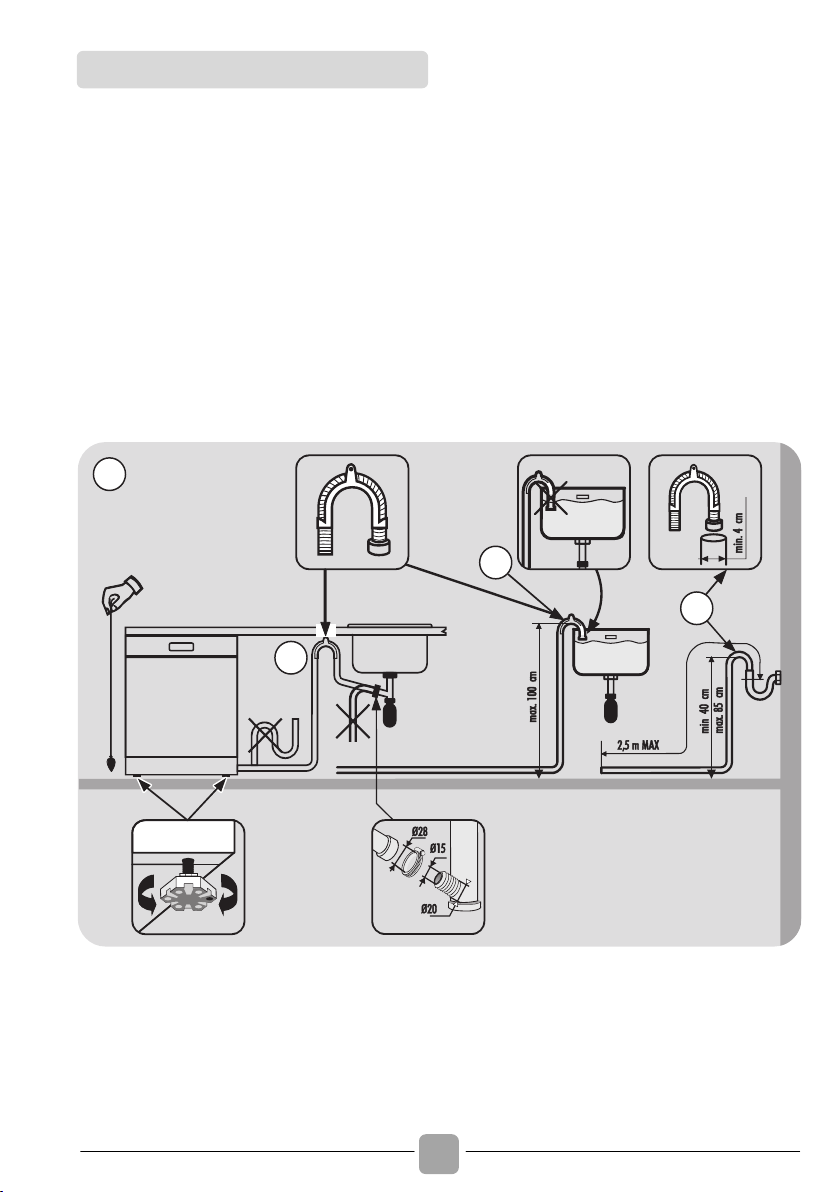
! Infilare il tubo nell'impianto di scarico,
senza creare pieghe (fig. 6).
! Lo scarico fisso deve avere il diametro
interno di almeno 4 cm e dev'essere
posto ad una altezza minima di 40 cm.
! Si raccomanda di predisporre il sifone
antiodore (fig. 6X). Se necessario si può
allungare il tubo di scarico fino a 2,5 m,
tenendolo però ad una altezza massima
di 85 cm dal pavimento. A tale scopo,
contattare il centro Assistenza Tecnica.
! L'estremità ricurva del tubo di scarico può
essere appoggiata al bordo di un lavello,
ma non deve rimanere immersa
nell'acqua, per evitare il risucchio
nell'apparecchio durante il programma di
lavaggio (fig. 6Y).
! Nel caso di installazione sottopiano
continuo, la curva deve essere fissata
immediatamente sotto il piano nel punto
più alto possibile (fig. 6Z).
! Nell'installare la macchina controllare che
i tubi di carico e scarico non siano piegati.
6
Z
Y
X
Collegamento allo scarico d’acqua
Page 9
!
IT
9
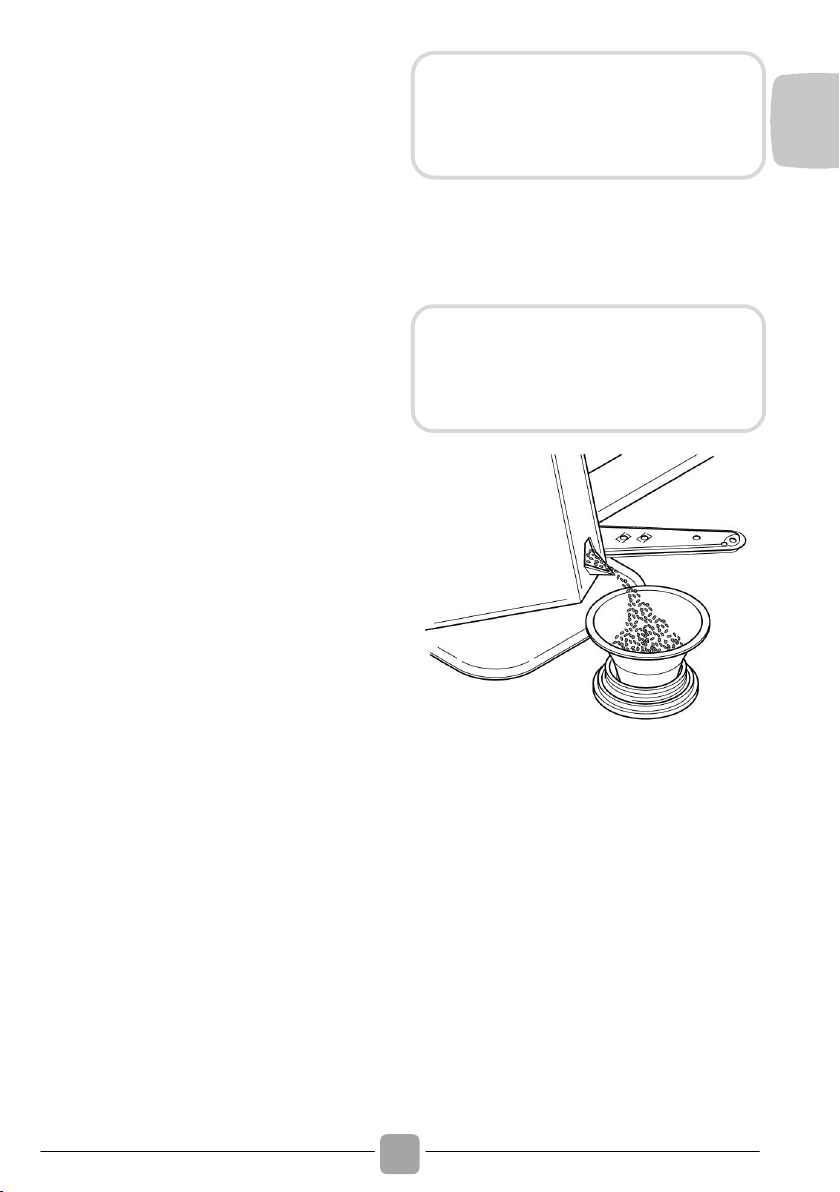
3. CARICARE IL SALE
(Fig. A "1")
! La comparsa di macchie biancastre sulle
stoviglie è generalmente un indice
importante di mancanza del sale.
! Sul fondo della macchina, è sistemato il
contenitore del sale che serve per
rigenerare l'apparecchio decalcificatore.
! È importante utilizzare esclusivamente
sale specifico per lavastoviglie, altri tipi di
sale contengono sensibili percentuali di
sostanze insolubili che potrebbero col
tempo rendere inefficiente l'impianto di
decalcificazione.
! Per l'introduzione del sale, svitare il tappo
del contenitore che si trova sul fondo.
! Durante l'operazione un po' d'acqua
trabocca; continuate in ogni caso a
versare il sale fino al riempimento del
contenitore, mescolando la miscela con
un cucchiaio.
! Ultimata l'operazione, pulire la filettatura
dai resti di sale e riavvitare il tappo.
! Il contenitore ha una capacità di circa
1,5÷1,8 kg di sale e, per una efficace
utilizzazione dell'apparecchio, è necessario
riempirlo periodicamente.
Dopo ogni rifornimento di sale, È
NECESSARIO far eseguire alla
macchina un ciclo di lavaggio
completo, oppure il programma
AMMOLLO/PRELAVAGGIO.
Solo all'installazione della lavastoviglie,
dopo aver riempito completamente il
contenitore del sale, è necessario
aggiungere dell'acqua fino al trabocco
dal contenitore.
Page 10
!
10
4. REGOLAZIONE DEL
CESTO SUPERIORE
(SOLO NEI MODELLI
DOVE È PRESENTE)
! Utilizzando abitualmente piatti da 29 cm a
32,5 cm di diametro, caricarli nel cesto
inferiore dopo aver spostato quello
superiore nella posizione più alta,
procedendo nel seguente modo (a
seconda dei modelli):
Tipo "A":
1. Ruotare i fermi anteriori "A" verso
l'esterno;
2. Sfilare il cesto e rimontarlo nella
posizione più alta;
3. Rimettere i fermi "A" nella posizione
originale.
Con questa operazione, nel cesto superiore
non si possono caricare stoviglie con
diametro superiore a 20 cm e non si possono
utilizzare i supporti mobili nella posizione alta
Tipo "A"
A
A
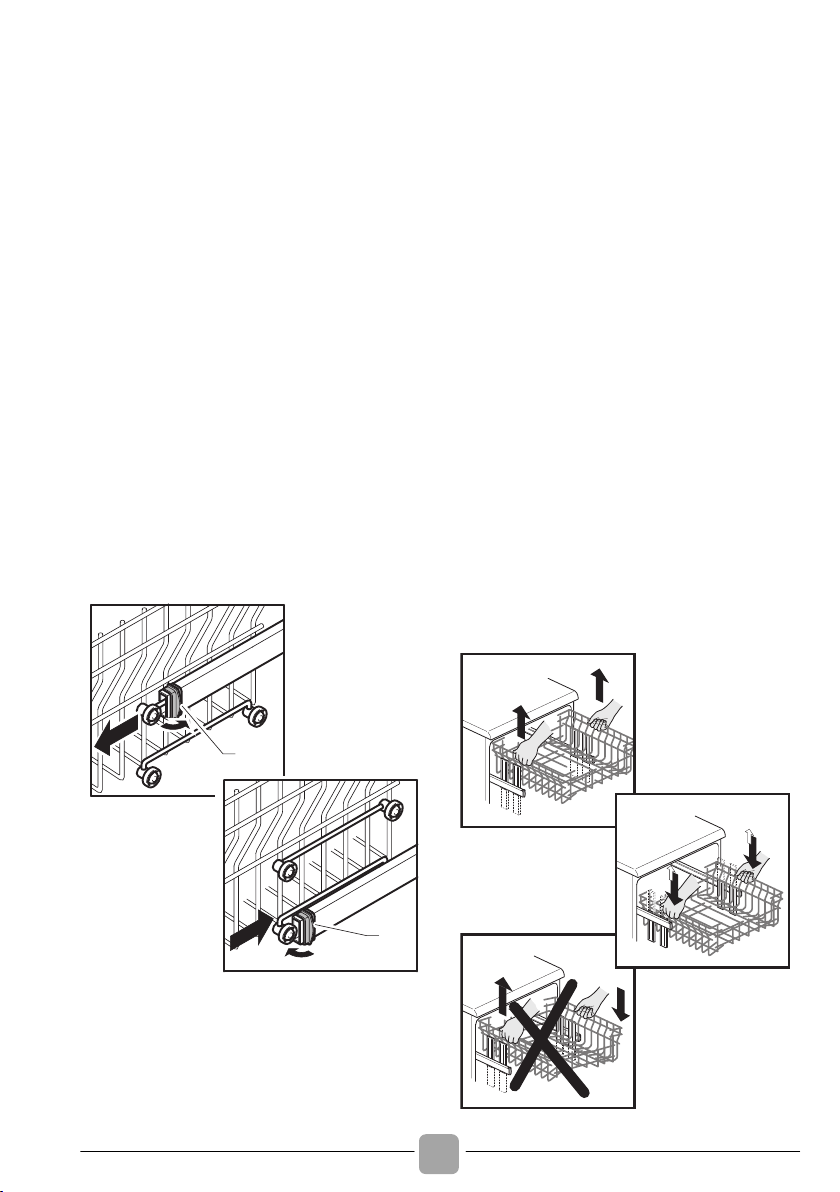
Tipo "B": (SOLO MODELLI CON EASY CLICK):
1. Estrarre il cesto superiore;
2. Impugnare il cesto da entrambi i lati e
tirarlo verso l’alto (fig. 1).
Con questa operazione, nel cesto superiore
non si possono caricare stoviglie con
diametro superiore a 20 cm* e non si
possono utilizzare i supporti mobili nella
posizione alta.
* Nei modelli dotati di terzo cesto, sul
cesto superiore non si possono caricare
stoviglie con diametro superiore a 14
cm.
PER RIPORTARE IL CESTO IN POSIZIONE
BASSA:
1. Impugnare il cesto da entrambi i lati e
tirarlo leggermente verso l’alto (fig. 1);
2. Lasciare lentamente ricadere il cesto
accompagnandolo (fig. 2);
N.B.: NON SOLLEVARE O ABBASSARE
MAI IL CESTO DA UN SOLO LATO fig. 3).
ATTENZIONE:
si consiglia di effettuare la regolazione del
cestello prima del carico delle stoviglie.
Tipo "B"
1
3
a
b
a
b
2
Page 11

!
IT
11
5. CARICAMENTO DELLE
STOVIGLIE
! Il cesto superiore è dotato di supporti
mobili agganciati alla sponda laterale, in
grado di assumere 4 posizioni.
! Nella posizione abbassata (A-A1) i
supporti servono per appoggiarvi tazze
da the, caffè, lunghi coltelli e mestoli.
Sulle estremità dei supporti stessi, si
possono appendere i bicchieri a forma di
calice.
! In posizione rialzata (B-B1) i supporti
permettono l'alloggiamento di piatti piani e
fondi (diametro massimo 19 cm). Questi
ultimi vanno sistemati in posizione verticale
con la parte concava rivolta verso il lato
anteriore, avendo cura di verificare che
rimanga sempre uno spazio tra un piatto e
l'altro, per consentire all'acqua di passare
liberamente.
! Si consiglia di posizionare i piatti di
dimensione maggiore, con un diametro di
circa 26 cm, leggermente inclinati verso il
lato anteriore in modo da favorire il facile
inserimento del cesto all'interno della
macchina.
! Nel cesto superiore possono trovare
alloggiamento anche stoviglie quali
insalatiere e ciotole di plastica, che si
consiglia di bloccare per evitarne il
capovolgimento a causa dei getti.
! Il cesto superiore è stato studiato al fine di
offrire la massima flessibilità di utilizzo.
Esso può essere caricato con soli piatti,
posizionati in doppia fila sino ad un
massimo di 24 pezzi, con soli bicchieri, su
cinque file sino a 30 pezzi, oppure per
carichi misti.
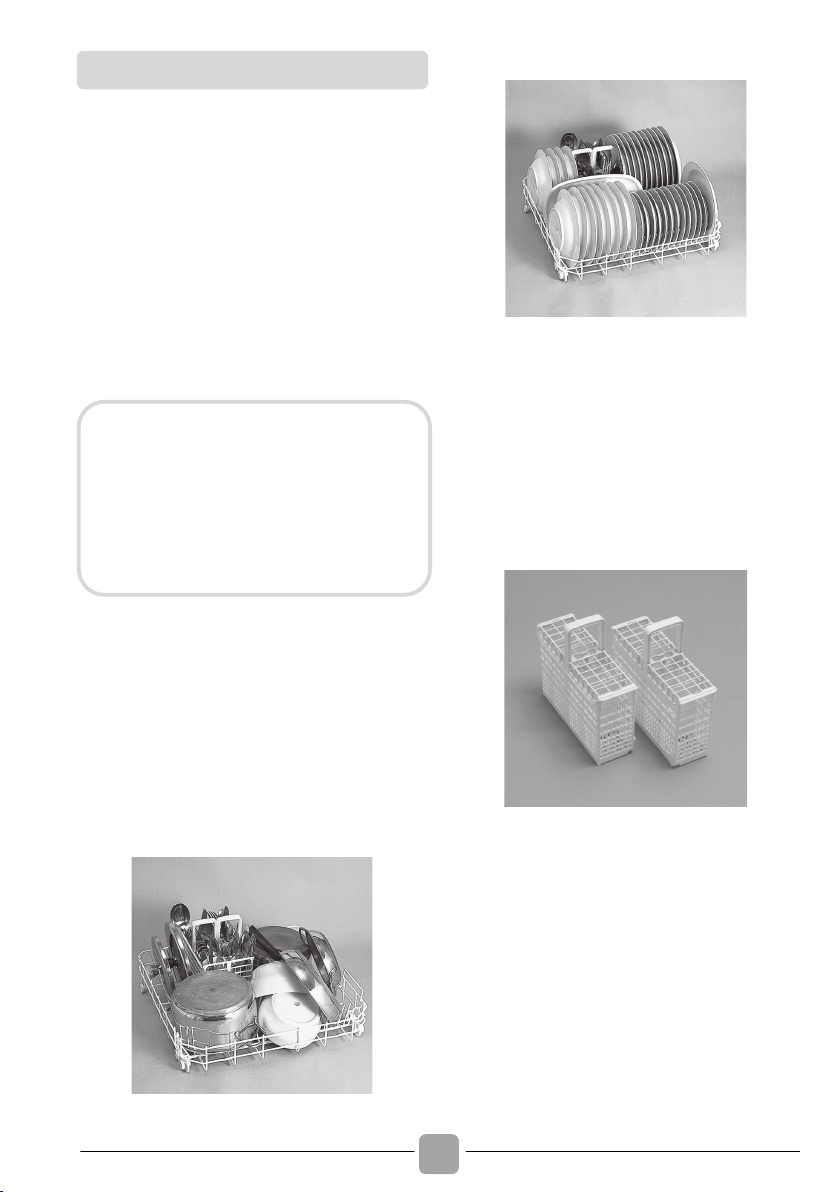
Esempio di un carico standard è
rappresentato nelle fig. 1, 2 e 3.
Cesto superiore (fig. 1)
Cesto superiore (fig. 2)
Cesto superiore (fig. 3)
Utilizzo del cesto superiore
Page 12
!
12
! Nel cesto inferiore vengono alloggiate
pentole, padelle, zuppiere, insalatiere,
coperchi, piatti da portata, piatti piani,
piatti fondi e mestoli.
! Le posate vanno sistemate con il manico
verso il basso, nell'apposito contenitore in
plastica posizionato nel cesto inferiore
(fig. 4 e 5) assicurandosi che le posate
stesse non impediscano la rotazione delle
rampe.
La disposizione razionale e corretta delle
stoviglie è condizione essenziale per un
buon risultato di lavaggio.
Esempio di un carico standard è
rappresentato nelle fig. 4 e 5.
Cesto inferiore (fig. 4)
Cesto inferiore (fig. 5)
Cesto posate (fig. 6)
Il cesto porta posate è formato da due parti
divisibili, così da poter offrire diverse
possibilità di carico. La divisione in due del
cestello avviene facendo scorrere in senso
orizzontale le due parti l'una rispetto all'altra
e viceversa per il riaggancio.
La parte superiore del cesto porta posate
può essere rimossa, così da poter offrire
diverse possibilità di carico.
6. INFORMAZIONI PER I
LABORATORI DI PROVA
Richiedere le informazioni necessarie per
effettuare i test comparativi e le misure di
rumore, secondo le Norme EN, al seguente
indirizzo:
testinfo-dishwasher@candy.it
Nella richiesta, si prega di specificare il
modello ed il numero di matricola della
lavastoviglie (vedere la targhetta dati).
Utilizzo del cesto inferiore
Il cesto inferiore è dotato di un
dispositivo di fine corsa per rendere
sicura la sua estrazione anche a
pieno carico.
Per le operazioni di carico sale,
pulizia filtro e manutenzione
ordinaria, è necessaria l'estrazione
completa del cesto.
Page 13
!
IT
13
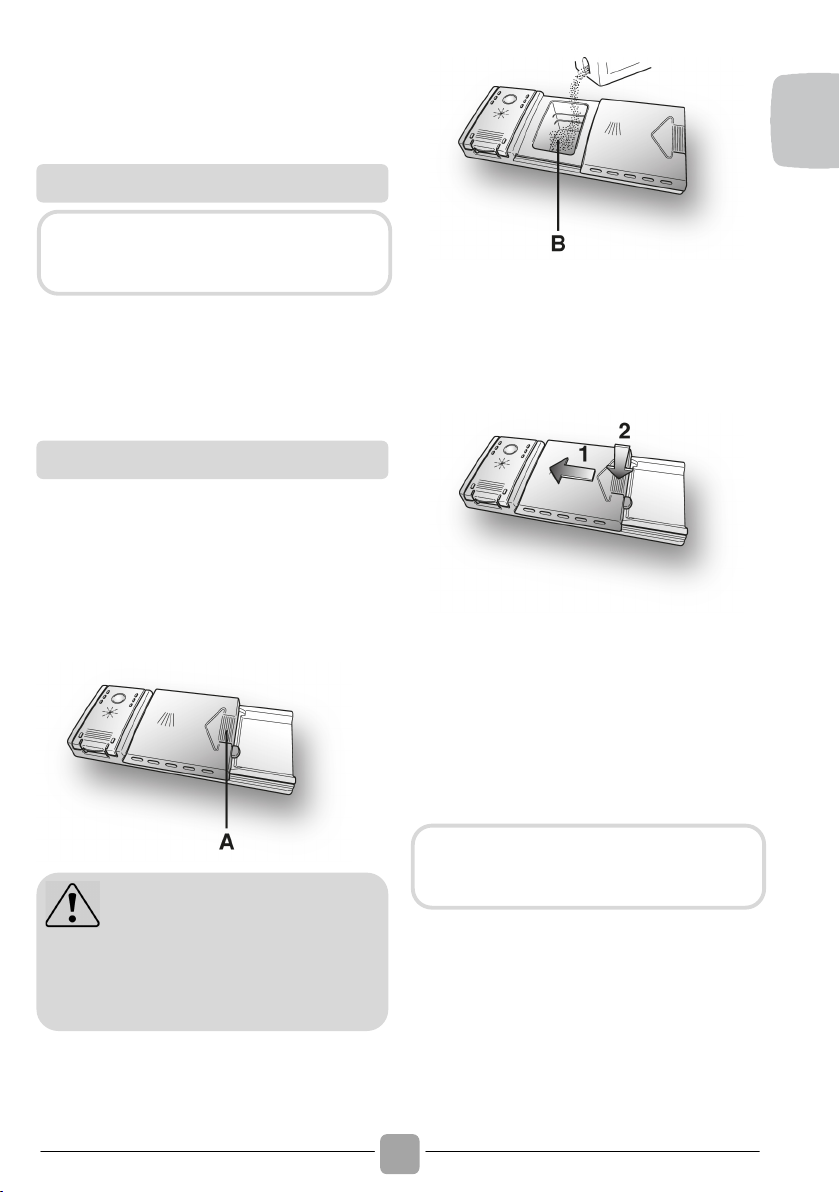
7. CARICAMENTO
DETERSIVO
(Fig. A "2")
Detersivi non idonei (come quelli per il
lavaggio a mano) non contengono gli
ingredienti adatti al lavaggio in lavastoviglie
ed impediscono il corretto funzionamento
della macchina.
La vaschetta per il detersivo del lavaggio è
situata all'interno della porta (fig. A "2"). Se
lo sportellino del contenitore risultasse
chiuso, per aprirlo basterà agire sul
pulsante di aggancio (A): al termine di un
qualsiasi programma di lavaggio lo
sportellino risulta sempre aperto, pronto per
il successivo impiego.
La dose di detersivo può variare in funzione
del grado di sporco e del tipo di stoviglie. Si
consiglia di versare 20 ÷ 30 g di detersivo
nella vaschetta lavaggio (B).
Dopo aver versato il detersivo nel
contenitore, richiudete lo sportellino, prima
spingendolo (1) ed infine premendo
leggermente su di esso (2) fino a sentire lo
scatto d'arresto.
Poiché i detersivi non sono tutti uguali,
consultate anche le istruzioni sulle
confezioni. Ricordiamo che quantità
insufficienti di detersivo provocano una
incompleta asportazione dello sporco,
mentre un eccesso di detersivo, oltre a non
migliorare i risultati di lavaggio, rappresenta
uno spreco.
Il detersivo
Utilizzare esclusivamente detersivi in
polvere, liquidi, gel, o in pastiglie
specifici per lavastoviglie
Caricare il detersivo
ATTENZIONE:
Nel cesto inferiore, non caricare
le stoviglie
in posizione tale a impedire l'apertura
dello
sportellino o da non permettere
l'asportazione del detersivo.
Non eccedere nell'uso di detersivo
rappresenta un contributo al contenimento
dell'inquinamento ambientale.
Page 14

!
14
8. TIPO DI DETERSIVO
I detersivi in pastiglie di differenti produttori
si sciolgono a velocità diverse, quindi nei
programmi brevi, alcune pastiglie
potrebbero non riuscire ad essere
pienamente efficaci non essendosi disciolte
completamente. Se si utilizzano questi
prodotti, si consiglia di scegliere programmi
più lunghi per garantire la completa
utilizzazione del detersivo.
I detersivi concentrati, a ridotta alcalinità e
con enzimi naturali, combinati con i
programmi di lavaggio a 50°C, permettono
di avere un minor impatto sull'ambiente e
salvaguardano le stoviglie rispettando
anche la lavastoviglie. I programmi di
lavaggio a 50°C sono stati ideati
appositamente per sfruttare in pieno le
proprietà di scioglimento dello sporco da
parte degli enzimi, permettendo quindi, con
l'utilizzo dei detersivi concentrati, di
ottenere gli stessi risultati dei programmi a
65°C già ad una temperatura inferiore.
I detersivi che contengono anche il
brillantante devono essere inseriti nella
vaschetta per il detersivo di lavaggio. Il
contenitore del brillantante deve essere
vuoto (se non fosse così, prima di utilizzare
i detersivi combinati, regolare al minimo il
dosatore del brillantante).
Qualora si decida di utilizzare detersivi
combinati ("3 in 1"/"4 in 1"/"5 in 1”, ecc.) che
potrebbero rendere superfluo l’impiego di
sale e/o brillantante, si devono rispettare
scrupolosamente le seguenti avvertenze:
! Leggere attentamente ed attenersi
scrupolosamente alle istruzioni per l’uso e
alle avvertenze indicate sulla confezione
del detersivo combinato che si intende
utilizzare;
! L’efficacia dei prodotti che rendono non
necessario l’utilizzo del sale dipende dalla
durezza dell’acqua di alimentazione
dell’apparecchio. Verificare allo scopo
che la durezza dell’acqua sia compresa
nell’intervallo di funzionamento indicato
nelle istruzioni del detersivo.
Se con l'uso di questo tipo di prodotto si
ottenessero risultati di lavaggio non
soddisfacenti, rivolgersi al produttore
del detersivo.
L’utilizzo improprio di questi prodotti
potrebbe portare:
! Alla formazione di depositi di calcare
nell’apparecchio e sulle stoviglie;
! A un degrado delle prestazioni di
asciugatura e/o di lavaggio.
Si ricorda che l'uso dei detersivi
combinati "TABS" rende superfluo l'uso
delle segnalazioni di mancanza sale e
brillantante (previsti solo in alcuni
modelli).
Nel caso in cui si verificassero problemi di
lavaggio e/o asciugatura si consiglia di
riprendere l’uso dei prodotti tradizionali
(sale, brillantante, detersivo in polvere).
In questo caso, si raccomanda di:
! Riempire nuovamente i contenitori del
sale e del brillantante;
! Eseguire un normale ciclo di lavaggio
senza carico.
Si evidenzia che ritornando all’utilizzo del
sale di tipo tradizionale, saranno necessari
alcuni cicli di lavaggio prima che il sistema
di decalcificazione dell’acqua ritorni a
funzionare in modo ottimale.
Detersivi in pastiglie
Per ottenere risultati di lavaggio
soddisfacenti, le pastiglie DEVONO
essere inserite nella vaschetta per il
detersivo di lavaggio e NON direttamente
in vasca.
Detersivi concentrati.
Detersivi combinati.
Detersivi combinati "TABS"
Nel caso di reclami che possono essere
legati direttamente all’impiego improprio
di questi prodotti, non verrà fornita alcuna
prestazione in garanzia.
Page 15
!
IT
15
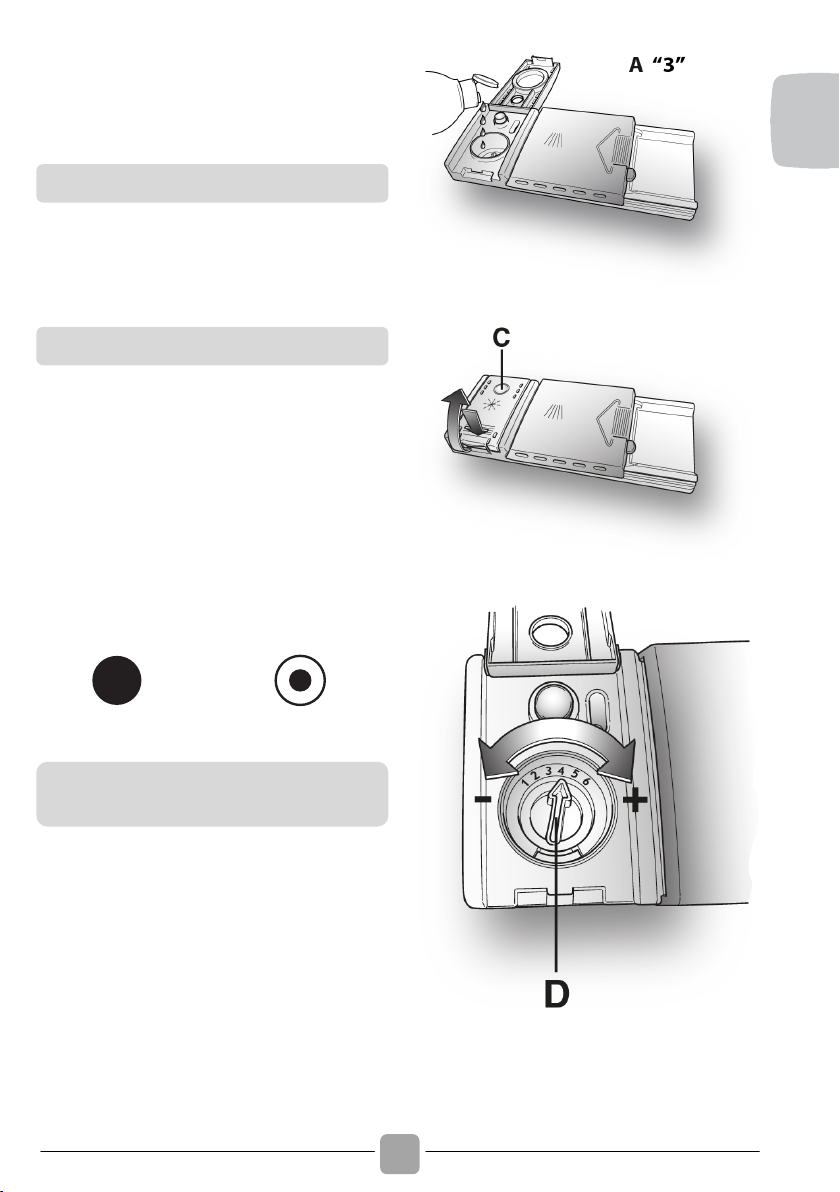
9. CARICAMENTO
BRILLANTANTE
(Fig. A "3")
Questo additivo, che viene immesso
automaticamente nell'ultima fase di
risciacquo, favorisce una rapida asciugatura
delle stoviglie evitando il formarsi di
macchie e sedimenti opachi.
Alla sinistra della vaschetta del detersivo, si
trova il contenitore del brillantante (fig. A
"3"). Per aprire il coperchio, premere in
corrispondenza del riferimento posto su di
esso e contemporaneamente, tirare verso
l'alto la linguetta d'apertura.
Usare sempre additivi di risciacquo adatti a
lavastoviglie automatiche. E' possibile
controllare il livello del brillantante per
mezzo del visualizzatore ottico (C) posto sul
contenitore di erogazione.
PIENO
VUOTO
riflesso scuro
riflesso chiaro
Il regolatore (D) è posto sotto il coperchio e
si può ruotare con una moneta. La
posizione consigliata è 4. Il contenuto in
calcare dell'acqua influenza notevolmente
sia la presenza di incrostazioni che il grado
di asciugatura. E' perciò importante
regolare il dosaggio del brillantante per
ottenere prestazioni sempre ottimali. Nel
caso le stoviglie presentino delle striature al
termine del lavaggio, diminuire la
regolazione di una posizione. Nel caso le
stoviglie presentino macchie o aloni
biancastri aumentare la regolazione di una
posizione.
Il brillantante.
Caricare il brillantante.
Regolazione del brillantante
(da 1 a 6).
Page 16
!
16
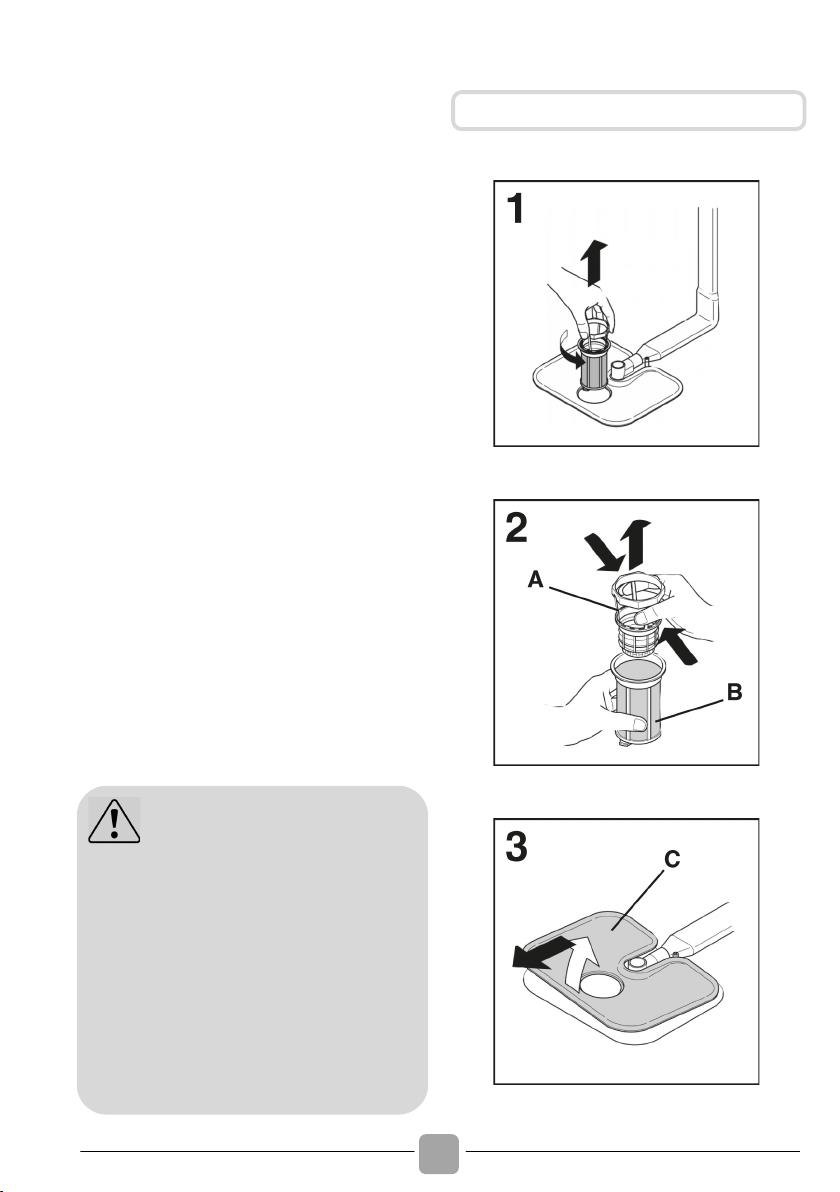
10. PULIZIA FILTRI
(Fig. A "4")
Il sistema filtrante è costituito da:
A. Bicchierino centrale, che trattiene le
particelle più grosse di sporco;
B. Microfiltro, posto sotto la piastra, che
trattiene anche le particelle di sporco
più
piccole assicurando un ottimo risciacquo;
C. Piastra, che filtra continuamente l'acqua
di
lavaggio.
! Per ottenere sempre ottimi risultati, è
necessario ispezionare e pulire i filtri
prima di ogni lavaggio.
!
Per estrarre il gruppo dei filtri, basta impugnare
il manico e ruotarlo in senso antiorario (fig. 1).
! Il bicchierino centrale è asportabile, per
facilitare le operazioni di pulizia (fig. 2).
! Rimuovere la piastra filtro (fig. 3) e lavare il
tutto sotto un getto di acqua, eventualmente
aiutandosi con uno spazzolino.
!
Con il Microfiltro Autopulente, la manutenzione
è ridotta e l'ispezione del gruppo filtri può
essere effettuata ogni 15 giorni. Tuttavia,
è consigliabile controllare dopo ogni lavaggio
che il bicchierino centrale e la piastra non
siano intasati.
ATTENZIONE:
Dopo aver pulito i filtri, assicurarsi che siano
fissati correttamente
tra loro e che la
piastra
sia inserita perfettamente
sul fondo della
lavastoviglie. Avere cura di riavvitare, in
senso orario, il filtro nella piastra perché
un inserimento impreciso del gruppo
filtrante può pregiudicare il funzionamento
della macchina. Avere cura di riavvitare,
in senso orario, il filtro nella piastra
perché un inserimento impreciso del
gruppo filtrante può pregiudicare il
funzionamento della macchina.
Non usare la lavastoviglie senza filtri.
Page 17

!
IT
17
11. CONSIGLI PRATICI
! Prima di disporre le stoviglie nella
macchina, asportare i residui di cibo
(ossicini, lische, avanzi di carne o
verdure, residui di caffè, bucce di frutta,
cenere di sigaretta, stuzzicadenti ecc.)
per evitare di intasare i filtri, lo scarico e
gli spruzzatori dei bracci lavanti.
! Non è necessario risciacquare le stoviglie
prima di collocarle nella macchina.
! Qualora le pentole e padelle fossero
eccessivamente incrostate da residui di
cibo bruciati o arrostiti, si consiglia di
tenerle in ammollo in attesa del lavaggio.
! Sistemare le stoviglie con l'apertura
rivolta verso il basso.
! Se possibile evitare che le stoviglie stiano
a contatto tra di loro, una corretta
sistemazione vi darà migliori risultati di
lavaggio.
! Dopo aver sistemato le stoviglie,
verificare che i bracci lavanti possano
girare liberamente.
! Pentole ed altre stoviglie che presentano
residui di cibo molto tenaci o
bruciacchiati, dovranno essere messe in
ammollo con acqua e detersivo per
lavastoviglie.
! Per il perfetto lavaggio di argenteria è
necessario:
a) sciacquarla appena dopo l'uso,
soprattutto se è stata impiegata per
maionese, uova, pesce, ecc.;
b) non cospargerla con detersivo;
c) non metterla a contatto con altri metalli.
! Nel caso si volesse lavare a pieno carico,
riponete le stoviglie nella macchina
appena terminati i pasti, sistemandole in
più riprese, effettuando eventualmente il
programma AMMOLLO/PRELAVAGGIO
per ammorbidire lo sporco ed eliminare i
residui più grossi tra un carico e l'altro, in
attesa di eseguire il programma di
lavaggio completo.
! In presenza di sporchi poco consistenti o
cesti non molto carichi, selezionate un
programma ECONOMICO, seguendo
le indicazioni riportate nell'elenco
programmi.
! È bene ricordare che non tutte le stoviglie
sono adatte per essere lavate nella
lavastoviglie; evitare di utilizzare pezzi in
materiale termoplastico, posate con
manici di legno o di plastica, pentole con
manici di legno, stoviglie in alluminio, di
cristallo o vetro piombato se non
specificatamente indicato.
! Certe decorazioni possono tendere a
sbiadire, pertanto si consiglia di effettuare
più volte il lavaggio in macchina di un
solo pezzo e solo dopo essere certi che
non si scolori, inserire il carico totale.
! È consigliabile non lavare posate in
argento con posate in acciaio ossidabile,
per evitare che si verifichi una reazione
chimica tra esse.
! Per evitare eventuali sgocciolamenti dal
cestello superiore, estrarre prima il
cestello inferiore.
! Se le stoviglie vengono lasciate per
qualche tempo nella macchina, aprire
leggermente lo sportello, per favorire la
circolazione d'aria e migliorare
ulteriormente l'asciugatura.
Consigli per ottenere ottimi
risultati di lavaggio.
Consigli utili per risparmiare.
Cosa non lavare.
Quando si acquistano nuove stoviglie
accertarsi sempre che siano idonee al
lavaggio in lavastoviglie.
Suggerimenti al termine del
programma.
Page 18

!
18
12.
PULIZIA E MANUTENZIONE
ORDINARIA
(Fig. A “5”)
! Per pulire l'esterno della lavastoviglie non
si devono usare, né solventi (sgrassanti)
né abrasivi, ma solo un panno imbevuto
di acqua tiepida.
! La lavastoviglie non richiede alcuna
manutenzione speciale, poiché la vasca
di lavaggio è autopulente.
! Pulire regolarmente la guarnizione in
gomma dello sportello con un panno
umido, eliminando accuratamente
eventuali tracce di cibo, o brillantante.
! Per meglio garantire la rimozione di
piccoli depositi di calcare o di sporco, si
consiglia di eseguire periodicamente un
lavaggio con prodotti specifici per la
pulizia e la cura della lavastoviglie.
! Se malgrado la normale pulizia dei filtri si
notano stoviglie o pentole
insufficientemente lavate o sciacquate,
controllare che tutti gli spruzzatori dei
bracci lavanti (fig. A "5") siano liberi da
residui di sporco.
Se ciò non fosse, procedere alla loro pulizia
nel seguente modo:
1) togliere il braccio lavante superiore,
ruotandolo fino a portare in posizione il
fermo contrassegnato dalla freccia (fig.
1b). Spingerlo verso l'alto (fig.1) e,
mantenendolo premuto, svitare in senso
orario (per rimontarlo ripetere
l'operazione, ma ruotare in senso
antiorario). Il braccio lavante inferiore
si estrae tirandolo semplicemente verso
l'alto (fig. 2);
2) lavare i bracci rotanti sotto un getto
d'acqua, liberando dallo sporco gli
spruzzatori otturati.
3) al termine dell'operazione, rimettere i
bracci lavanti nella identica posizione,
ricordando per quello superiore di
portare in posizione il fermo e di
avvitare a fondo
! Sia la vasca che l'interno dello sportello
sono d'acciaio inossidabile. Se tuttavia
dovessero riscontrarsi formazioni di
macchie di ossido, ciò dovrà essere
imputato solo ad una forte presenza di
sali di ferro nell'acqua.
! Per togliere le macchie si consiglia l'uso
di abrasivo a grana sottile; non usare mai
sostanze al cloro, pagliette d'acciaio, ecc.
1
1b
2
Dopo ogni lavaggio chiudere il rubinetto
dell'acqua, per isolare la lavastoviglie dalla
rete idrica di alimentazione e disinserire il
tasto di avvio/arresto per isolare la
macchina dalla rete elettrica.
Non utilizzare attrezzi che possano
deformare gli spruzzatori di uscita
acqua.
Dopo l’uso.
Page 19

!
IT
19
Se la macchina deve rimanere ferma a
lungo, consigliamo le seguenti operazioni:
1. eseguire un programma di lavaggio
senza stoviglie, ma con detersivo per
sgrassare la macchina;
2. togliere la spina;
3. chiudere il rubinetto dell'acqua;
4. riempire il contenitore del brillantante
per risciacqui;
5. lasciare la porta leggermente aperta;
6. lasciare l'interno della macchina pulito;
7. se la macchina viene lasciata in
ambienti dove la temperatura è inferiore
a 0°C, l'acqua residua nelle condutture
può gelare. Assicurarsi perciò che la
temperatura sia sopra gli 0°C ed
attendere circa 24 ore prima di attivare
la macchina.
Page 20

!
20
13. DESCRIZIONE COMANDI
G Pulsante "RESET" SPIA SALE
H Spia "ESAURIMENTO SALE"
I Spie "FASI PROGRAMMA" Tempo "RITARDO PARTENZA"
L Spia "SELEZIONE OPZIONE"
M Spie "SELEZIONE PROGRAMMA"
N Spia Addish
A Pulsante "ON/OFF"
B Pulsante "Selezione Programmi"/Arruolamento Wi-Fi
C Pulsante "START"/"RESET" (avvio/annullamento programma)
D Pulsante opzione "EXPRESS"
E D+F PROTEZIONE BAMBINI
F Pulsante "PARTENZA RITARDATA"
14. DATI TECNICI
DIMENSIONI
INCASSO
SCOMPARSA TOTALE
59,8x81,8 ÷ 89,8x55
117
DATI TECNICI (vedi targhetta dati)
16
9 persone
Min. 0,08 – Max. 0,8
Vedere targhetta dati
CRUSCOTTO A VISTA
59,8x81,8 ÷ 89,8x57
117
15
9 persone
ACCOSTO
SENZA PIANO
DI LAVORO
59,8x82x58
117
13
8 persone
CON PIANO DI
LAVORO
60x85x60.9
120
Coperti (EN 50242)
Capacità con pentole e piatti
Pressione nell’impianto idraulico (MPa)
Ampere fusibile / Potenza max assorbita / tensione di
alimentazione
DATI
Larghezza x Altezza x Profondità (cm)
Ingombro con porta aperta (cm)
Page 21

!
IT
21
15. SCELTA PROGRAMMA
E FUNZIONI
! Per accendere e spegnere l’apparecchio
premere tasto ON/OFF (per almeno 3
secondi).
! Collegare la macchina alla rete.
! Aprire lo sportello ed introdurre le stoviglie da
lavare poi richiudere lo sportello.
! Premere il pulsante "ON/OFF" per circa 3
secondi.
! In questa fase rimarranno attivi solo i
pulsanti "ON/OFF" e "Progr." e tutte le
spie dei programmi si accenderanno per
3 sec. Al termine rimarrà accesa la sola
spia "P3", e tutti i pulsanti risulteranno attivi.
! Scegliere un programma premendo il
pulsante "SELEZIONE PROGRAMMA".
! Se si desidera selezionare un'opzione,
premere il pulsante corrispondente (la
relativa spia s'illuminerà).
! Premere il pulsante "Start/Reset", verrà
riprodotto un segnale acustivo, la spia del
programma scelto rimarrà fissa e si
accenderà la spia corrispondente alla
fase di lavaggio. Se il programma viene
avviato con lo sportello aperto si udirà un
segnale acustico ripetuto per 5 volte e il
programma verrà avviato automaticamente
solo quando lo sportello verrà chiuso.
Tenendo premuto il tasto ON/OFF per circa
3 sec, la macchina si accende e rimane
fissa la spia del programma "P3".
Dal menù impostazioni è possibile adattare
vari parametri alle proprie esigenze di
lavaggio.
Entrare nel menù Impostazioni
! Accendere la lavastoviglie tenendo premuto
il pulsante "ON/OFF" per circa 3 sec
! Mantenere premuti i pulsanti "Progr." e
"ON/OFF" per circa 5 sec.
! Tutte le spie lampeggeranno per 5 sec.
! Verrà visualizzata la situazione dei settaggi:
- La regolazione del decalcificatore viene
indicata dall’accensione delle spie dei
programmi corrispondenti. Se risultano
tutti spenti il livello di regolazione è "S0".
- L’attivazione del segnale acustico viene
indicata dall’accensione della spia della
funzione "Express".
- L’attivazione della funzione "Memo"
viene indicata dall’accensione della spia
"6h" della funzione partenza ritardata.
! Premendo il tasto "Progr.", si attiverà la
regolazione del DECALCIFICATORE (per
la regolazione vedere l’apposito Capitolo
del libretto).
! Premendo il tasto "Express" si attiverà la
regolazione del INDICATORE ACUSTICO.
(per la regolazione vedere l’apposito
paragrafo).
! Premendo il tasto "Start Delay" si
attiverà la regolazione del FUNZIONE
MEMO (per l’attivazione o la disattivazione
vedere l’apposito paragrafo ).
Tasto ON/OFF
A fine ciclo ricordarsi di spegnere
l'apparecchio tramite il tasto ON/OFF,
togliere la spina e chiudere il rubinetto
dell’acqua.
Prima accensione
Accensioni successive
Nel caso fosse stata attivata la funzione
di memorizzazione del programma, sul
display si accenderà la spia dell’ultimo
programma completato.
Menù IMPOSTAZIONI
Page 22

!
22
La lavastoviglie è dotata di un sensore di
sporco, in grado di analizzare la torbidità
dell'acqua durante tutte le fasi dei
programmi "AUTOMATICI" (vedi elenco
programmi); grazie a questo dispositivo, i
parametri del ciclo di lavaggio vengono
adattati automaticamente, in base alla reale
quantità di sporco presente sulle stoviglie.
Il grado di torbidità dell’acqua è infatti
correlato alla quantità di sporco presente
sulle stoviglie. In questo modo viene
garantita il miglior lavaggio, ottimizzando i
consumi d'acqua e di energia.
I programmi "IMPULSE" utilizzano una
tecnica di lavaggio ad impulsi, che riduce i
consumi, il rumore e migliora le prestazioni.
A programma avviato, la spia ADDISH
accesa indica la possibilità di aggiungere
ancora delle stoviglie, aprendo lo sportello.
La macchina si fermerà automaticamente e
sul display verrà visualizzato lampeggiante
il tempo rimanente alla fine del ciclo.
Richiudendo lo sportello, senza premere
alcun pulsante, il ciclo ripartirà dal punto in
cui era stato interrotto. Nel caso la relativa
spia sul display risultasse spenta, non sarà
più possibile introdurre le stoviglie.
Sconsigliamo l’apertura dello sportello
durante lo svolgimento del programma, in
particolare durante la fase centrale del
lavaggio e del risciacquo finale caldo.
Tuttavia, se a programma avviato si apre lo
sportello (per esempio perché si vogliono
aggiungere delle stoviglie) la macchina si
ferma automaticamente.
Richiudendo lo sportello, senza premere
alcun pulsante, il ciclo ripartirà dal punto in
cui era stato interrotto.
Se si vuole cambiare o annullare un
programma già in corso, procedere nel
seguente modo:
! Tenere premuto per almeno 3 secondi il
pulsante "Start/Reset". Verranno emessi
dei segnali acustici e le spie dei programmi
si accenderanno e spegneranno singolarmente
e in sequenza.
Programmi “AUTOMATICI” (Solo
nei modelli dove sono presenti).
Programmi "IMPULSE"
Il funzionamento "intermittente" della
pompa di lavaggio NON è indice di
un malfunzionamento, ma è una
caratteristica peculiare del lavaggio
ad impulsi ed è quindi segnale del
corretto svolgimento del programma.
Addish (possibilità di aggiungere
stoviglie dopo l'avvio del programma)
Aprire quindi lo sportello con estrema
cautela e in modo graduale, per evitare di
bagnarsi con schizzi di acqua del lavaggio.
L’introduzione delle stoviglie dopo lo
spegnimento della spia Addish è
vivamente sconsigliato, perché non
viene garantito il corretto lavaggio.
ATTENZIONE:
Se si apre lo sportello mentre la
lavastoviglie è nella fase di asciugatura,
viene attivato un segnale acustico
intermittente, per avvisare che il ciclo
non è ancora terminato.
Interruzione di un programma
ATTENZIONE:
Se si apre lo sportello mentre la
lavastoviglie è nella fase di asciugatura,
viene attivato un segnale acustico
intermittente, per avvisare che il ciclo
non è ancora terminato.
Modifica di un programma in
corso
Page 23

!
IT
23
! Il programma in corso verrà annullato e tutte le
spie dei programmi lampeggeranno.
! A questo punto sarà possibile impostare
un nuovo programma.
Durante lo svolgimento del programma, la
spia del ciclo scelto rimarrà illuminata a luce
fissa e le 3 spie di visualizzazione “FASI
PROGRAMMA” corrispondenti a:
LAVAGGIO
RISCIACQUO
ASCIUGATURA
si illumineranno singolarmente e
sequenzialmente per indicare la fase in corso.
Nel caso d’interruzione di corrente, la
lavastoviglie conserverà in memoria il
programma in fase di svolgimento che
verrà ripreso, dal punto in cui era stato
interrotto, non appena sarà ripristinata
l’alimentazione elettrica.
La fine del programma verrà indicata tramite
un segnale acustico (se non disattivato)
della durata di 5 secondi, ripetuto per 3
volte ad intervalli di 20 secondi.
I tasti opzione vi forniscono un ulteriore
scelta di lavaggio delle vostre stoviglie per
poter personalizzare i programmi di
lavaggio.(nella tabella del capitolo 17 del
manuale sono riportate su quali programmi
sono attivabili).
Prima di avviare il programma le opzioni si
attivano e disattivano mediante gli appositi
tasti e la relativa accensione delle spie .
Il tasto opzione deve essere attivato dopo
che avete scelto il programma di lavaggio.
Pulsante "Express"
Questo pulsante consente un risparmio di
tempo e di energia mediamente del 25% (a
seconda del ciclo scelto) riducendo il
riscaldamento finale dell’acqua ed i tempi
d'asciugatura, durante l’ultimo risciacquo. E’
consigliato per il lavaggio serale, se non è
necessario riavere subito, perfettamente
asciutte, le stoviglie appena lavate. Per ottenere
una migliore asciugatura, si consiglia di socchiudere
la porta a fine ciclo, per favorire la circolazione
naturale dell’aria nella lavastoviglie.
Questo modello è dotato di una spia sul
cruscotto che si accende quando diviene
necessario provvedere a riempire il contenitore
del sale. La comparsa di macchie biancastre
sulle stoviglie è generalmente un indice
importante di mancanza del sale.
Dopo aver riempito il contenitore del sale, è
necessario tenere premuto questo tasto fino
allo spegnimento della relativa spia.
ATTENZIONE:
Prima di far partire un nuovo programma,
è bene accertarsi che non sia già stato
asportato il detersivo; se lo fosse,
ripristinare la dose nel contenitore.
Svolgimento del programma.
Fine del programma
Pulsanti opzione
Nel caso sia stata selezionata un’opzione
non compatibile con il programma
scelto, la relativa spia prima lampeggerà
e poi si spegnerà.
Spia "ESAURIMENTO SALE"
Pulsante "RESET" SPIA SALE
ATTENZIONE:
Effettuare questa operazione senza aver
riempito il contenitore del sale,
compromette il corretto funzionamento
della relativa spia.
Per garantire il corretto funzionamento
della spia che indica l'esaurimento
del sale, RIEMPIRE SEMPRE IL
CONTENITORE COMPLETAMENTE.
Page 24

!
24
Questo pulsante permette di programmare
l'avvio del ciclo di lavaggio, con un ritardo di
3, 6 o 9 ore.
Per impostare la partenza ritardata
procedere nel seguente modo:
! Scegliere un programma premendo il
pulsante "SELEZIONE PROGRAMMA".
!
Premere il pulsante "PARTENZA DIFFERITA"
(ad ogni pressione si potrà impostare una
partenza ritardata rispettivamente di 3, 6
o 9 ore e la spia corrispondente al tempo
scelto s'illuminerà a luce fissa).
! Per avviare il conteggio, premere il
pulsante "Start/Reset" (la spia relativa al
tempo impostato inizierà a lampeggiare).
Nel caso si imposti un ritardo di 9 ore, il
decremento del tempo alla partenza viene
visualizzato attraverso l'accensione della
spia 6h dopo 3 ore e della spia 3h dopo 6
ore.
Al termine delle ultime 3 ore (alla fine del
conteggio) la spia 3h passerà da luce
lampeggiante a fissa indicando la fase di
lavaggio ed il programma partirà
automaticamente.
Se il conto alla rovescia non è ancora terminato
e quindi il programma non è ancora partito, è
possibile cambiare o annullare la partenza
ritardata, scegliere un altro programma o
selezionare / deselezionare il pulsante opzione,
procedendo nel seguente modo:
! Tenere premuto per almeno 3 secondi il
pulsante "Start/Reset". Verranno emessi
dei segnali acustici e le spie dei
programmi si
accenderanno e spegneranno
singolarmente e in sequenza.
! La partenza ritardata ed il programma
selezionato verranno annullati. Le spie dei
programmi lampeggeranno, la lavastoviglie è
pronta per una impostazione dei programmi.
Se il buzzer è impostato su ON, il LED
Express si accende e il cicalino emette un
segnale acustico. Se il buzzer è impostato
su OFF, il LED Express si spegne e
nessun segnale acustico emette un segnale
acustico.
L’attivazione/disattivazione della segnalazione
acustica può essere disattivata nel seguente
modo (è attivata di default):
!
Accendere la lavastoviglie tenendo premuto
il pulsante "ON/OFF" per circa 3 sec
! Mantenere premuti i pulsanti "Progr." e
"ON/OFF" per circa 5 sec.
! Tutte le spie lampeggeranno per 5 sec.
- Se il segnale acustico è attivo, la spia
"Express" risulterà accesa.
- Se il segnale acustico è inattivo, la spia
"Express" risulterà spenta.
1. Per attivare o disattivare il segnale
acustico, premere il tasto "Express"
2. Ogni qualvolta si attiverà il segnale
acustico, oltre alla conferma visiva con
l’accensione del led "Express", sarà
udito un segnale acustico di conferma.
3. Ogni qualvolta si disattivera il segnale
acustico, alla conferma visiva con lo
spegnimento del led "Express", non verrà
udito nessun segnale acustico di conferma.
4. Spegnere la lavastoviglie tenendo
premuto il pulsante "ON/OFF" per circa
3 sec per rendere effettiva la nuova
impostazione.
Per abilitare la memorizzazione dell'ultimo
programma utilizzato procedere nel seguente
modo:
!
Accendere la lavastoviglie tenendo premuto
il
pulsante "ON/OFF" per circa 3 sec.
! Mantenere premuti i pulsanti "Progr." e
"ON/OFF" per circa 5 sec.
Pulsante "PARTENZA DIFFERITA"
Attivazione/Disattivazione della
segnalazione acustica
Memorizzazione dell'ultimo
programma utilizzato
Page 25

!
IT
25
! Tutte le spie lampeggeranno per 5 sec.
1. La spia "6h" della funzione "Partenza
Ritardata" risulterà spenta di default.
2.
Premere il pulsante "Partenza Ritardata",
la spia "6h" si accenderà e verrà emesso
un segnale acustico.
3. Spegnere la lavastoviglie tenendo
premuto il pulsante "ON/OFF" per circa
5 sec per rendere effettiva la nuova
impostazione.
Per disattivare la memorizzazione, seguire
la stessa procedura.
La lavastoviglie è dotata di una protezione
bambini elettronica. La protezione bambini
protegge i bambini dai pericoli potenziali
che possano derivare dalla apertura dello
sportello della lavastoviglie e disabilitando i
comandi eviterà che vengano effettuate
modifiche indesiderate o accidentali.
La protezione bambini può essere attivata
o disattivata nel seguente modo:
!
Accendere la lavastoviglie tenendo premuto
il pulsante "ON/OFF" per circa 3 sec.
! Premere i tasti "Express" e "PARTENZA
RITARDATA" per circa 5 secondi. Le
spie "3h 6h 9h" lampeggeranno per 3
volte e si udirà un segnale acustico.
! In questo modo, risulterà attivo il solo
tasto "ON/OFF".
! Ogni qualvolta si premerà un qualsiasi
tasto, le spie delle fasi programma
lampeggeranno per 3 volte.
! Il blocco tasti può essere annullato,
semplicemente premendo nuovamente i
due tasti "Express" e "PARTENZA
RITARDATA" per 5 sec. o spegnendo
l'apparecchio.
PROTEZIONE BAMBINI
Page 26

!
26
16. CONTROLLO REMOTO
(WI-FI)
Questo apparecchio è equipaggiato di
tecnologia Wi-Fi che consente il controllo
da remoto della macchina tramite App.
! Scaricare l'App Candy simply-Fi sul
proprio dispositivo.
! Assicurarsi che il router sia acceso e di
essere connessi alla rete Wi Fi di casa
con il proprio smartphone/tablet.
! Attivare il BLUETOOTH del proprio
smartphone/tablet (se disponibile).
! Aprire l’App, creare il profilo utente e
arruolare l'elettrodomestico seguendo le
indicazioni sul display del dispositivo.
! Quando indicato dall’App. accendere la
lavastoviglie con il tasto ON/OFF.
! Premere il tasto "Progr. 3sec WiFi" per
3 sec " le spie P3 e P4 lampeggeranno
assieme.
! Entro 60 sec. tenere premuto il tasto
"PARTENZA RITARDATA" per 3 sec.,
dopodichè inizieranno a lampeggiare
contemporaneamente le spie 3h-6h-9h
per un tempo di 5 min.
! Sull’ App. inserire Password della rete
WiFi di casa e concludere la procedura.
Arruolamento riuscito
!
Le spie 3h-6h-9h si spengono e rimangono
accese le spie P3 P4.
! La macchina risulta connessa ed è
possibile controllare la macchina dal App.
Arruolamento fallito
Se l’arruolamento fallisce o sono passati 5
min:
! Le spie 3h-6h-9h e P3 P4 si spengono.
! La macchina risulta non connessa.
! Ripetere la procedura di arruolamento
tenendo premuto nuovamente il tasto
"PARTENZA RITARDATA".
Per ulteriori informazioni fare riferimento
alla "Quick Guide - Enrollment App"
allegata alla macchina, o accessibile al
Link: go.candy-group.com/bm-dw
In caso di problemi o cambio della
password del router di casa occorre
effettuare nuovamente la procedura di
arruolamento.
Ogni volta che si vuole utilzzare la
machhina da remoto :
! Caricare la lavastoviglie, caricare il
detersivo, chiudere la porta
! Accendere la lavastoviglie
! Premere il tasto “Progr. 3sec WiFi” per
3 sec. " si accendono le spie P3 P4
fisse.
! E’ ora possibile operare da App. e gestire
la macchina da remoto tramite device.
Arruolamento macchina su App
L’App Candy simply-Fi è disponibile
sia per dispositivi con sistema operativo
Android che per iOS, sia per tablet che
per smartphone.
Per scoprire tutti i dettagli delle
funzioni Wi-Fi, esplora i menu dell'App
accedendo in modalità DEMO.
Reset WiFi
ABILITAZIONE CONTROLLO
REMOTO
Page 27

!
IT
27
! Per uscire dal controllo remoto, premere il
tasto “Progr. 3sec WiFi” per 3 sec.
! Senza ciclo in esecuzione:
Le spie P3 P4 si spengono e si accende
il led dell’ultimo programma completato
da macchina (o il P3).
! Con ciclo in esecuzione:
Le spie P3 P4 inizieranno a lampeggiare
mentre le spie delle fasi programma
indicheranno il punto il cui il ciclo di
lavaggio è arrivato.
Il ciclo verrà portato a termine senza
avere il controllo da App.
Ulteriore modalità per uscire dal
controllo remoto.
! Premere il tasto "Start/Reset" per 3 sec:
l’eventuale ciclo in esecuzione verrà
annullato e la macchina uscirà dalla
modalità CONTROLLO REMOTO. Sarà
possibile impostare un nuovo ciclo di
lavaggio dal pannello comandi.
DISABILITAZIONE CONTROLLO
REMOTO
Con CONTROLLO REMOTO attivato
e
ciclo in eseguzione, spegnendo e
riaccendendo la macchina tramite il
tasto On/Off (o per mancanza di
corrente) il ciclo prosegue dal punto
di interruzione. Il "CONTROLLO
REMOTO" viene disabilitato.
Page 28
!
28
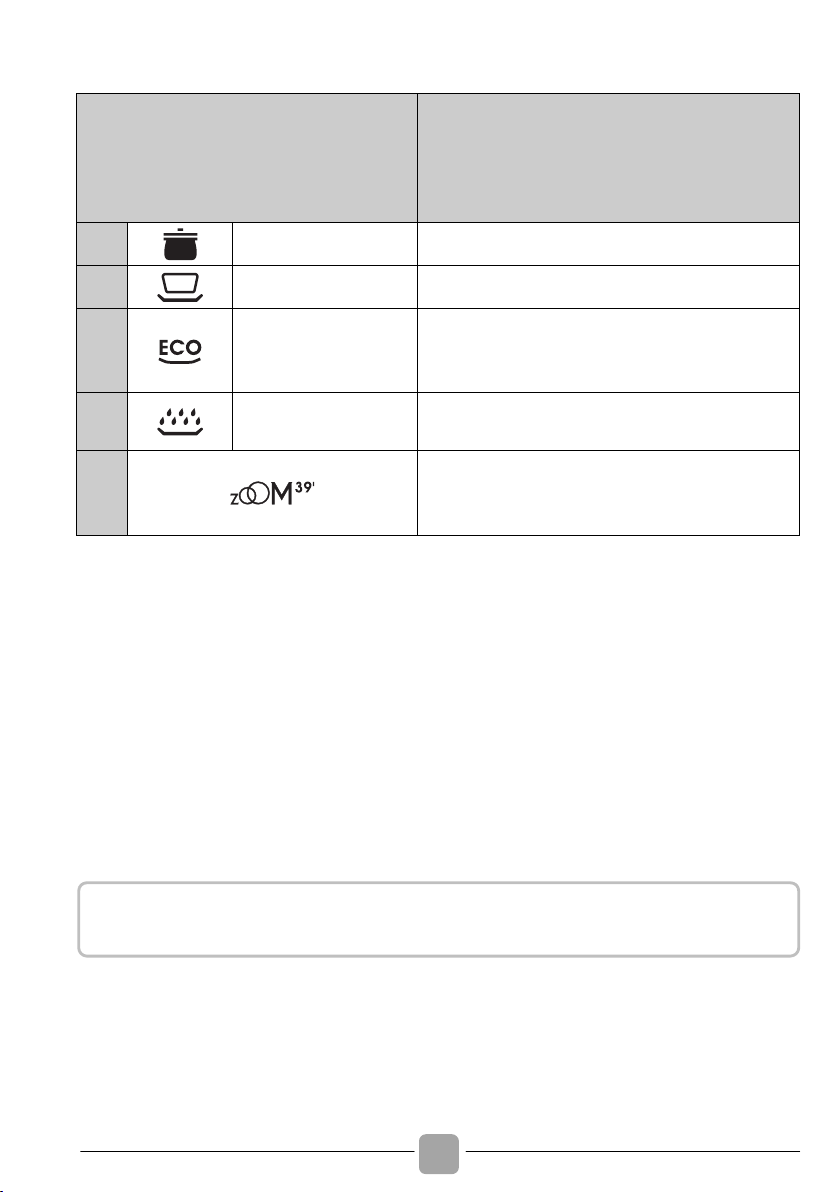
17. ELENCO PROGRAMMI
Programma
Descrizione
P1
Intensivo
Adatto al lavaggio di pentole e di tutte le altre
stoviglie particolarmente sporche.
P2 Universale
Adatto al lavaggio di stoviglie e pentole normalmente
sporche.
P3 Eco
Programma per stoviglie normalmente sporche (il
più efficiente in termini di consumo combinato
d'acqua ed energia per il lavaggio di tali stoviglie).
Programma normalizzato EN 50242.
P4
Prelavaggio
Breve prelavaggio per le stoviglie usate al mattino o
mezzogiorno, quando si vuole rimandare il lavaggio del
carico completo.
P5
Ciclo veloce Wash&Dry in Classe A di lavaggio.
* Indicato per un lavaggio di stoviglie fino a 8 coperti.
Programmi con prelavaggio
Per i programmi con prelavaggio, si consiglia di aggiungere una seconda dose di detersivo (MAX. 10 grammi)
non nella vaschetta del detersivo ma direttamente all’interno della lavastoviglie.
Page 29

!
IT
29
Opzioni
Programma
Detersivo prelavaggio
Programmi "IMPULSE"
Temperatura di lavaggio (°C)
Durata media di
lavaggio ¹ (min.)
Pulsante
"PARTENZA DIFFERITA"
Pulsante "Express"
P1
Intensivo
●
-
75
130
SI
SI
P2 Universale
-
■
60
120
SI
SI
P3
Eco
●
■
45
190
SI
SI
P4
Prelavaggio
- - -
5
SI
N.D
P5
●
■
60
39
SI
SI
● = Aggiunta di detersivo per prelavaggio
■ = Programmi "IMPULSE" (Solo nei modelli dove è presente)
N.D. = OPZIONE NON DISPONIBILE
1) Con acqua fredda (15°C) – Tolleranza ±10%-
Con acqua calda il tempo residuo al termine del programma si aggiorna automaticamente durante
lo svolgimento dello stesso.
Valori misurati in laboratorio secondo la Norma Europea EN 50242 (nell'uso quotidiano, sono
possibili differenze).
Page 30

!
30
18. IMPIANTO DI
DECALCIFICAZIONE
L'acqua contiene in misura variabile, a
seconda delle località, sali calcarei e
minerali che si possono depositare sulle
stoviglie lasciando macchie e depositi
biancastri. Più elevato è il contenuto di
questi sali, maggiore è la durezza
dell'acqua. La lavastoviglie è corredata di
un decalcificatore che, utilizzando del sale
rigenerante specifico per lavastoviglie,
fornisce acqua priva di calcare (addolcita)
per il lavaggio delle stoviglie.
Potete richiedere il grado di durezza della
vostra acqua all'Ente erogatore di zona.
Il decalcificatore può trattare acqua con
durezza fino a 90°fH (gradi francesi), 50°dH
(gradi tedeschi) tramite 6 livelli di regolazione.
I livelli di regolazione vengono riportati nella
tabella seguente con la relativa acqua di
rete da trattare.
Livello
Durezza
dell’acqua
Uso sale
rigenerante
Spia Programma
°fH (gradi
francesi)
°dH (gradi
tedeschi)
S0
0-5
0-3
NO
Nessuna
spia
S1
6-15
4-9
SI
P1
S2
16-30
10-16
SI
P1+P2
*S3
31-45
17-25
SI
P1+P2+P3
S4
46-60
26-33
SI
P1+P2+P3+
P4
S5
61-90
34-50
SI
P1+P2+P3+
P4
+P5
* La regolazione è stata impostata dalla
fabbrica al livello 3 in quanto questo
soddisfa la maggior parte dell'utenza.
A seconda del livello di appartenenza della
vostra acqua, impostare il valore di
decalcificazione nel seguente modo:
1. Accendere la lavastoviglie premendo il
pulsante "ON/OFF".
2.
Premere contemporaneamente il pulsante
"Progr." e "ON/OFF" per 5 sec.
3. Verrà emesso un breve segnale
acustico e tutte le spie lampeggeranno
per 5 sec.
4. Le spie "SELEZIONE PROGRAMMA" si
accenderanno per indicare la regolazione
del decalcificatore. Nel caso non fosse
accesa nessuna spia, sarà stato
impostato il livello "S0".
5.
Premere nuovamente il pulsante "Progr."
per scegliere il livello di decalcificazione
voluto: ad ogni pressione s'illuminerà la
spia corrispondente in base alla tabella
precedente (P1" S1, P1+P2" S2,...)
Per il livello "S0" tutte le spie risulteranno
spente.
6. Spegnere la lavastoviglie tenendo
premuto il pulsante "ON/OFF" per 3
sec per rendere effettiva la nuova
impostazione.
Regolazione del decalcificatore
Iniziare la procedura SEMPRE dalla
condizione di lavastoviglie spenta.
ATTENZIONE:
Se per qualsiasi motivo non si riuscisse
a terminare la procedura, spegnere
la lavastoviglie premendo il tasto
"AVVIO/ARRESTO"
e ripartire dall'inizio
(PUNTO 1).
Page 31

!
IT
31
19. RISOLUZIONE PROBLEMI E GARANZIA
Nel caso si pensi che la lavastoviglie non funzioni in modo corretto, consultare la breve
guida sotto riportata, con alcuni suggerimenti pratici per risolvere le anomalie più comuni.
Se l’anomalia non dovesse risolversi o ripetersi, sarà necessario contattare il servizio assistenza.
Errore visualizzato
Significato e soluzioni
"CHECK WATER"
con un breve segnale
acustico
(Solo nei modelli dove
è presente ).
E2 (con display)
con un breve segnale
acustico.
La macchina non carica acqua.
Verificare che il rubinetto dell’acqua sia aperto.
Appurare che il tubo di carico non sia piegato o schiacciato.
Tubo scarico non ad altezza corretta (vedere sezione istallazione).
Chiudere il rubinetto, svitare il tubo di carico dal retro della lavatrice e
verificare che il filtro "antisabbia" non sia intasato.
E3 (con display)
con un breve segnale
acustico.
La macchina non scarica l’acqua.
Verificare che il tubo di scarico non sia piegato, schiacciato o ostruito
e se i filtri sono intasati.
Verificare che il sifone non sia ostruito.
E4 (con display)
con un breve segnale
acustico.
Perdita d’acqua.
Verificare che il tubo di scarico non sia piegato, schiacciato o ostruito
e se i filtri sono intasati.
Verificare che il sifone non sia ostruito.
E8-Ei (con display)
con un breve segnale
acustico.
Elemento riscaldante dell’acqua non funziona correttamente o
la piastra filtro intasata.
Pulire piastra filtro.
Qualsiasi altro codice
d'errore (con display)
Spegnere la lavastoviglie, staccare la spina e attendere un minuto.
Accendere nuovamente la macchina e avviare un programma. Se
l'errore dovesse ripresentarsi, contattare un Centro Assistenza
Tecnica Autorizzato, comunicando l'errore visualizzato.
SEGNALAZIONE ERRORI
! Modelli dotati di display: gli errori verranno visualizzati tramite un numero
preceduto da una "E" (esempio: Errore 2 = E2) con un breve segnale acustico.
! Modelli senza display: gli errori verranno indicati tramite il lampeggìo di tutte le spie
per un numero di volte pari al codice dell'errore, seguiti da una pausa di 5 secondi
(esempio: Errore 2 = 2 lampeggìi, pausa di 5 secondi, 2 lampeggìi, ecc…).
Solo modelli con display
Page 32

!
32
Qualora durante lo svolgimento di un programma si dovesse verificare un
malfunzionamento o un’anomalia, la spia corrispondente al ciclo scelto lampeggerà in
maniera molto veloce e verrà emesso un segnale acustico intermittente. In questo caso,
spegnere la lavastoviglie premendo il pulsante "ON/OFF".
Dopo aver controllato che il rubinetto dell'acqua sia aperto, che il tubo di scarico non sia piegato,
che il sifone non sia otturato o i filtri intasati, impostare nuovamente il programma scelto.
Se l’anomalia dovesse ripetersi, sarà necessario contattare il Servizio Assistenza Tecnica.
ANOMALIA
CAUSA
SOLUZIONE
1. Non funziona
con qualsiasi
programma
Spina corrente elettrica non
inserita nella presa
Inserire spina
Tasto O/I non inserito
Inserire tasto
Sportello aperto
Chiudere sportello
Manca energia elettrica
Controllare
2. Non carica
acqua
Vedi cause 1
Controllare
E’ chiuso il rubinetto acqua
Aprire il rubinetto acqua
Il tubo di carico è piegato
Eliminate le pieghe del tubo
Il filtro del tubo di carico acqua è
intasato
Pulite il filtro posto all’estremità del
tubo di carico
3. Non scarica
acqua
Filtro sporco
Pulire filtro
Tubo di scarico piegato
Raddrizzare tubo di scarico
La prolunga del tubo di scarico
non è corretta
Seguite esattamente le istruzioni per
il collegamento del tubo di scarico
Lo scarico a muro non ha lo
sfiato in aria
Consultate un tecnico qualificato
4. Scarica acqua
in continuazione
Tubo di scarico in posizione
troppo bassa
Alzare il tubo di scarico ad almeno
40 cm dal pavimento
Solo modelli senza display
Questa lavastoviglie è dotata di un dispositivo di sicurezza antitrabocco che, in caso di
anomalia, interviene scaricando l’acqua in eccesso.
ATTENZIONE:
Per evitare l'intervento intempestivo del dispositivo di sicurezza
antitrabocco, si raccomanda di non muovere o inclinare la
lavastoviglie durante il funzionamento.
Nel caso sia necessario muovere o inclinare la lavastoviglie,
assicurarsi prima che abbia completato il ciclo di lavaggio e che non
ci sia acqua nella vasca.
Altre anomalie
Page 33

!
IT
33
ANOMALIA
CAUSA
SOLUZIONE
5. Non si sentono
ruotare i bracci
di lavaggio
Eccessivo dosaggio di detersivo
Ridurre dose detersivo.
Utilizzare detersivo specifico
Oggetto del carico che impedisce
la
rotazione dei bracci
Controllare
Piastra filtrante e filtro eccessivamente
sporchi
Pulire piastra e filtro
6. Nelle macchine
elettroniche
senza display:
una o più spie
lampeggiano
rapidamente
Rubinetto dell'acqua chiuso
Spegnere la macchina.
Aprire il rubinetto.
Reimpostare il ciclo.
7.
Se il carico viene
parzialmente
lavato
Vedi cause 5
Controllare
Fondo di pentole non perfettamente
lavato
Croste troppo tenaci, da
ammorbidire prima del lavaggio in
lavastoviglie
Bordo di pentole non perfettamente
lavato
Posizionare meglio la pentola
Spruzzatori parzialmente otturati
Smontare i bracci di lavaggio, svitando
le ghiere di fissaggio in senso orario
e lavare il tutto sotto un getto d’acqua
Le stoviglie non sono sistemate
bene
Non addossate troppo le stoviglie tra
di loro
L’estremità del tubo di scarico è
immersa nell’acqua
L’estremità del tubo di scarico non
deve toccare l’acqua scaricata
Il detersivo non è dosato
adeguatamente, è vecchio o
indurito
Aumentate la dose in funzione della
quantità di sporco o sostituite il
prodotto
Il tappo del contenitore sale non
è chiuso bene
Avvitatelo fino in fondo
Il programma di lavaggio scelto
è troppo blando
Scegliete un programma più energico
8.
Mancata o parziale
asportazione del
detersivo
Posate, piatti, pentole, ecc.…
interferiscono con l'apertura
dello sportellino della vaschetta
detersivo.
Caricare le stoviglie in modo che
non impediscano l'apertura dello
sportellino della vaschetta detersivo.
9. Presenza di
macchie bianche
sulle stoviglie
Acqua di rete con eccessiva
durezza
Controllare il livello del sale e del
brillantante e regolarne il dosaggio.
Se l’anomalia persiste, richiedere
intervento Assistenza Tecnica
10.
Rumorosità
durante il
lavaggio
Le stoviglie sbattono tra di loro.
Sistematele meglio nei cesti
I bracci rotanti sbattono sulle
stoviglie.
Sistemate meglio le stoviglie
11. Le stoviglie
non sono
perfettamente
asciutte
Mancanza di circolazione d’aria
Lasciate socchiusa la porta della
macchina alla fine del programma di
lavaggio per favorire l’asciugatura
naturale
Mancanza brillantante
Utilizzare il brillantante
Page 34

!
34
NOTA BENE: Qualora un inconveniente sopracitato provocasse un cattivo lavaggio o una
insufficiente sciacquatura, è necessario rimuovere manualmente lo sporco dalle stoviglie,
in quanto la fase finale di asciugatura provoca l’essicazione dello sporco che un secondo
lavaggio in macchina non è in grado di asportare.
Se il malfunzionamento dovesse persistere, si rivolga al Centro di Assistenza Tecnica
comunicando il modello di lavastoviglie, riportato sulla targhetta posta all’interno dello
sportello nella parte superiore o sul foglio di garanzia. Fornendo tali informazioni, otterrete
un intervento più tempestivo ed efficace.
La Ditta costruttrice declina ogni responsabilità per eventuali errori di stampa contenuti nel
presente libretto. Si riserva inoltre il diritto di apportare le modifiche che si renderanno utili
ai propri prodotti senza comprometterne le caratteristiche essenziali.
Assistenza e Garanzia
Il prodotto è garantito, oltre che ai sensi di legge, alle condizioni e nei termini
riportati sul certificato di garanzia convenzionale inserito nel prodotto. Il
certificato dovrà essere conservato e mostrato al nostro Centro di Assistenza
Tecnica Autorizzato, in caso di necessità, insieme allo scontrino comprovante
l’acquisto dell’elettrodomestico. Puoi consultare le condizioni di garanzia anche
sul nostro sito internet.
Per ottenere assistenza compila l’apposito form on-line oppure contattaci al
numero che trovi indicato nella pagina di assistenza del nostro sito internet.
Page 35

!
IT
35
20. INDICAZIONI AMBIENTALI
Questo elettrodomestico è
marcato conformemente alla
Direttiva Europea 2012/19/UE sui
Rifiuti da Apparecchiature
Elettriche ed Elettroniche (RAEE).
II RAEE contengono sia sostanze inquinanti
(che possono avere un impatto negativo
sull'ambiente) sia materie prime (che
possono essere riutilizzate). E’ perciò
necessario sottoporre i RAEE ad apposite
operazioni di trattamento, per rimuovere e
smaltire in modo sicuro le sostane inquinanti ed
estrarre e riciclare le materie prime.
Ogni cittadino può giocare un ruolo decisivo
nell'assicurare che i RAEE non diventino un
problema ambientale; basta seguire
qualche semplice regola:
! i RAEE non vanno mai buttati nella
spazzatura indifferenziata;
! i RAEE devono essere consegnati ai Centri di
Raccolta (chiamati anche isole ecologiche,
riciclerie, piattaforme ecologiche …) allestiti
dai Comuni o dalle Società di igiene urbana;
in molte località viene anche effettuato il
servizio di ritiro a domicilio dei RAEE
ingombranti.
In molte nazioni, quando si acquista una
nuova apparecchiatura si può consegnare
il RAEE al negoziante, che è tenuto a
ritirarlo gratuitamente (ritiro "uno contro
uno") a patto che il nuovo apparecchio sia
dello stesso tipo e svolga le stesse funzioni
di quello reso.
Page 36

!
36
Vielen Dank, dass Sie sich für eine
Geschirrspülmaschine von Candy entschieden
haben. Wir sind davon überzeugt, dass sie
Sie beim täglichen Abwasch in aller
Sicherheit unterstützen wird.
Lesen Sie dieses Handbuch sorgfältig
durch, um eine richtige und sichere
Bedienung des Geräts zu gewährleisten.
Es enthält außerdem nützliche Tipps für
eine effiziente Wartung und Pflege.
Verwenden Sie die Spülmaschine
erst, nachdem Sie diese Anleitung sorgfältig
durchgelesen haben. Wir empfehlen,
dieses Handbuch sorgfältig aufzubewahren
und bei einem eventuellen Besitzerwechsel
dem neuen Besitzer zu übergeben.
Überprüfen Sie bei der Lieferung des
Geräts, ob dieses Handbuch, der
Garantieschein, die Kundendienstadresse
und
die Energieeffizienzkennzeichnung beiliegen.
Jedes Produkt ist mit einem einzigartigen
16-stelligen Code gekennzeichnet. Die
so genannte Seriennummer befindet sich
auf dem Garantieschein oder auf dem
Schild in der Tür oben rechts. Dieser
Code ist ein produktspezifischer Ausweis,
den
Sie benötigen, um das Produkt zu
registrieren oder um das technische
Kundendienstzentrum zu kontaktieren.
Abb. A
15
4
32
1. GENERELLE SICHERHEITSHINWEISE
2. WASSERANSCHLUSS
3. EINFÜLLEN VON SALZ
4.
ANPASSEN DES OBEREN SPÜLKORBS
(NUR BEI EINIGEN MODELLEN)
5. EINRÄUMEN DES GESCHIRRS
6. INFORMATION FÜR PRÜFLABORE
7. EINFÜLLEN VON SPÜLMITTEL
8. ARTEN VON GESCHIRRSPÜLMITTEL
9. EINFÜLLEN DES KLARSPÜLERS
10.
REINIGEN DER FILTER
11.
PRAKTISCHE TIPPS
12.
WARTUNG UND REINIGUNG
13.
BESCHREIBUNG DES BEDIENFELDS
14.
TECHNISCHE DATEN
15.
PROGRAMMAUSWAHL UND
BESONDERE MERKMALE
16.
FERNBEDIENUNG (WLAN)
17.
PROGRAMMLEGENDE
18.
WASSERENTHÄRTER
19. PROBLEMLÖSUNGEN UND GARANTIE
20.
UMGEBUNGSBEDINGUNGEN
A.
FUNKPARAMETER (SEITE 139)
Inhalt
Page 37

!
DE
37
1. GENERELLE
SICHERHEITSHINWEISE
!
Dieses Gerät ist für den
Haushaltsgebrauch konzipiert
bzw. für den haushaltsnahen
Gebrauch, wie z.B.:
−
Teeküchen für das Personal
von Büros, Geschäften oder
ähnlichen Arbeitsbereichen;
− Ferienhäuser;
−
Gäste von Hotels, Motels und
anderen Wohneinrichtungen;
− Bed and Breakfast Einrichtungen.
Eine andere Nutzung dieses Gerätes
als die normale Haushaltsnutzung,
wie z.B. gewerbliche oder
professionelle Nutzung durch
Fachpersonal, ist auch im Falle
der oben erwähnten Einrichtungen
ausgeschlossen. Sollte das
Gerät
entgegen diesen Vorschriften betrieben
werden, kann dies die Lebensdauer
des Gerätes beeinträchtigen und
den Garantieanspruch gegenüber
dem Hersteller verwirken.
Eventuelle Schäden am Gerät oder
andere Schäden oder Verluste,
die
durch eine nicht haushaltsnahe
Nutzung hervorgerufen werden
sollten (selbst wenn sie in einem
Haushalt erfolgen), werden,
soweit vom Gesetz ermöglicht,
vom Hersteller nicht anerkannt.
!
Dieses Gerät kann von Kindern
ab 8 Jahren und von Personen
mit eingeschränkten physischen,
sensorischen oder geistigen
Fähigkeiten oder eingeschränkter
Erfahrung oder Unkenntnis
benutzt werden, wenn sie in
die sichere Verwendung des
Geräts eingewiesen wurden
und die damit verbundenen
Gefahren verstanden haben.
Kinder dürfen nicht an dem
Geschirrspüler herumspielen.
Die Reinigung und Pflege des
Gerätes darf von Kindern nicht
ohne Aufsicht durchgeführt
werden.
! Kinder sollten beaufsichtigt
werden, um sicherzustellen,
dass sie nicht an dem Gerät
herumspielen.
! Kinder unter 3 Jahren dürfen
sich nicht unbeaufsichtigt in der
Nähe des Gerätes aufhalten
oder spielen.
!
Falls das Netzkabel beschädigt
ist, wenden Sie sich bitte an den
Hersteller, seinen Kundendienst
oder ähnlich qualifizierte Personen,
um es zu ersetzen und eine
Gefährdung zu vermeiden. Wir
empfehlen die Verwendung
eines Originalteils, das im
Kundendienst-Center angefordert
werden kann.
!
Verwenden Sie nur die mit dem
Gerät gelieferten Schläuche,
um
das Gerät an die Wasserversorgung
anzuschließen (alte Schläuche
nicht wiederverwenden).
Page 38

!
38
!
Für einen ordnungsgemäßen Betrieb
muss der Wasserleitungsdruck
konstant zwischen min. 0,08
MPa und max. 0,8 MPa liegen.
! Falls Sie das Gerät auf einen
Teppich oder Teppichboden
aufstellen, achten Sie darauf,
dass die Lufteinlässe am Boden
des Gerätes nicht verstopft
werden.
! Nach der Installation sollte das
Gerät so positioniert sein, dass
der Stecker frei zugänglich ist.
!
Die Tür sollte nach Be- und
Entladen möglichst immer
geschlossen gehalten werden,
um mögliche Gefahren (z.B.
Stolpergefahr) zu vermeiden.
! Weitere Informationen zum
Produkt oder die technischen
Daten des Produktes finden
Sie auf der Internetseite des
Herstellers.
! Die technischen Daten
(Versorgungsspannung und
Leistungsaufnahme) werden
auf dem Typenschild angegeben.
! Stellen Sie sicher, dass die
elektrische Anlage geerdet ist
und mit allen einschlägigen
Gesetzen übereinstimmt und
dass die Steckdose mit dem
Gerätestecker kompatibel ist.
Der Hersteller lehnt jede
Verantwortung für Personenund Sachschäden ab, die auf
eine fehlende Erdung des
Gerätes zurückzuführen sind.
! Achten Sie darauf, dass der
Geschirrspüler die Stromkabel
nicht zerquetscht.
! Generell sollte die Verwendung
von Adaptern, Mehrfachsteckern
und/oder Verlängerungskabeln
vermieden werden.
! Vor der Reinigung oder Wartung
des Geschirrspülers, ziehen Sie
den Netzstecker und schalten
Sie die Wasserzufuhr ab.
! Den Netzstecker niemals am
Kabel aus der Steckdose ziehen,
sondern am Stecker selbst.
! Setzen Sie das Gerät keinen
Witterungseinflüssen (Regen,
Sonne, usw.) aus.
ACHTUNG!
Messer und sonstige scharfe
Gegenstände sind mit der
Spitze nach unten in den
Besteckkorb zu stellen oder in
andere Bereiche der Geschirrkörbe
liegend einzuordnen.
Elektrische Anschlüsse und
Sicherheitshinweise
Page 39

!
DE
39
! Stützen Sie sich oder setzen
Sie sich niemals auf die offene
Tür, da das Gerät umkippen
könnte.
!
Der Geschirrspüler ist zum Spülen
von Küchengeräten und Geschirr
vorgesehen. Mit Benzin, Lack,
Stahl- oder Eisenresten verschmutzte
Gegenstände, sowie Werkzeuge,
die mit ätzenden Chemikalien,
Säuren oder alkalischen Substanzen
in Berührung gekommen sind,
gehören nicht in den Geschirrspüler.
! Ist in Ihrer Wohnung ein
System zur Wasserenthärtung
vorhanden, so brauchen Sie
kein Salz in den Wasserenthärter
des Geschirrspülers zu geben.
! Schalten Sie das Gerät im
Falle von Störungen oder
Fehlfunktionen aus, ziehen Sie
den Netzstecker und schließen
Sie die Wasserzufuhr. Das
Gerät darf in keiner Weise
verändert oder manipuliert
werden. Reparaturarbeiten dürfen
nur vom Kundendienst-Center
durchgeführt werden und es
dürfen nur Original-Ersatzteile
eingebaut werden. Bitte beachten
Sie diese Regeln sorgfältig,
denn die Nichtbeachtung kann
die Sicherheit des Gerätes
beeinträchtigen.
!
Falls Sie die Maschine nach
dem Entfernen der Verpackung
bewegen müssen, versuchen
Sie nicht, diese an der
Unterseite der Tür anzuheben.
Öffnen Sie die Tür leicht und
heben Sie die Maschine an der
Oberseite.
Mit der Kennzeichnung
des Produkts bestätigen wir in
eigener Verantwortung die
vollständige Übereinstimmung
dieses Produkts mit allen relevanten
Sicherheits-, Gesundheitsund Umweltanforderungen der
europäischen Gesetzgebung.
! Alle Elemente der Verpackung
entfernen.
! Installieren oder benutzen Sie
den Geschirrspüler nicht, wenn
er beschädigt ist.
! Befolgen Sie die mit dem
Produkt gelieferten Anweisungen.
Installation
ACHTUNG!
Das Verpackungsmaterial von
Kindern fernhalten.
Page 40

!
40
2. WASSERANSCHLUSS
!
Die Anordunung der Schläuche für den
Zu- und Ablauf des Wassers kann
wahlweise nach rechts oder links erfolgen.
! Für einen ordnungsgemäßen Betrieb muss
der Wasserleitungsdruck constant zwischen
min. 0,08 MPa und max. 0,8 MPa liegen.
!
Am oberen Ende des Zulaufschlauches
sollte ein Absperrhahn angebracht sein,
damit die Maschine bei Nichtgebrauch
vom Wassernetz getrennt werden kann.
! Der Geschirrspüler wird mit einem
Zulaufschlauch mit 3/4" Gewindering
geliefert (Abb. 2).
! Der Zulaufschlauch "A" muß auf den
Wasserhahn "B" mit 3/4 Gewindering
aufgeschraubt werden. Achten Sie darauf,
dass das Gewinde fest angezogen wird.
! Falls erforderlich, kann der Zulaufschlauch
auf eine Länge von bis zu 2,50 Metern
verlängert werden. Den entsprechenden
Schlauch können Sie als Originalzubehör
über den Kundendienst beziehen.
! Wird das Gerät an einem neuen oder an
einem seit längerer Zeit nicht mehr
gebrauchten Wasseranschluss angeschlossen,
so sollte das Wasser einige Minuten
abfließen, bevor der Zulaufschlauch
angeschlossen wird. Somit wird
verhindert, daß Sand- oder Rostpartikeln
den Wasserfilter verstopfen.
1
B
2
B
A
Das Gerät muss an die Wasserversorgung
mit neuen Schläuchen angeschlossen
werden. Alte Schläuche dürfen nicht
wiederverwendet werden.
Der Geschirrspüler kann nach Bedarf
sowohl an einem Kalt- als auch an
einem Warmwasseranschluss angeschlossen
werden. Die Temperatur des Warmwassers
darf 60°C nicht überschreiten. (Abb.1B).
Page 41

!
DE
41
EINIGE MODELLE können eins oder mehr
der folgenden Merkmale beinhalten:
! WATERBLOCK (Abb. 3)
Das Wasser-Blocksystem (Waterblock)
wurde entwickelt, um die Sicherheit Ihres
Geräts zu erhöhen. Das System verhindert
Wasserschäden und Überschwemmungen,
die durch eine Fehlfunktion der Maschine
oder aufgrund eines Schlauchbruchs, vor
allem bei der Wasserzufuhr entstehen
können.
Funktionsprinzip
Ein Sammelbehälter am Geräteboden fängt
eventuell austretendes Wasser auf und ist
mit einem Sensor verbunden. Dieser
schließt ein Ventil unter dem Wasserhahn,
sodass auch bei geöffnetem Hahn kein
Wasser mehr fließt.
Ist der Kasten „A“ mit den Elektroteilen
beschädigt, ziehen Sie den Anschlussstopfen
sofort aus der Buchse. Um eine ordnungsgemäße
Funktion des Sicherheitssystems zu
gewährleisten, sollte der Schlauch mit dem
Kasten „A“ wie in der Abbildung gezeigt,
an den Wasserhahn angeschlossen werden.
Der Wasserschlauch sollte nicht abgeschnitten
werden, weil er stromführende Teile enthält. Ist
der Schlauch zu kurz für einen ordnungsgemäßen
Anschluss, muss er durch einen längeren ersetzt
werden. Der Schlauch ist über das technische
Kundendienstzentrum erhältlich.
3
A
! AQUASTOP (Abb. 4):
Ein Mechanismus an der Wasserzufuhr,
der den Einfluss in den Schlauch
verhindert, sobald sich dessen Qualität
verschlechtert; in diesem Fall erscheint
eine rote Kennzeichnung in Sichtfenster
„A“ und der Schlauch muss ausgetauscht
werden. Drücken Sie zum Abschrauben
der Mutter, die einseitige Sperrvorrichtung „B“.
B
A
4
! AQUAPROTECT - WASSERSCHLAUCH
MIT SCHUTZVORRICHTUNG (Abb. 5):
Wenn Wasser aus dem primären
Innenschlauch „A“ austritt, fängt die
transparente Ummantelung „B“ das
Wasser auf, damit der Spülgang
abgeschlossen werden kann. Kontaktieren
Sie nach Programmende das technische
Kundendienstzentrum, damit der
Versorgungsschlauch ausgetauscht werden
kann.
B
A
5
Hydraulische Sicherheitsvorrichtungen
Alle Spülmaschinen sind mit einer
Überlaufsicherung ausgestattet, die
falls der Wasserstand aufgrund einer
Fehlfunktion einen Normalstand
überschreitet, automatisch die
Wasserzufuhr stoppt.
Page 42

!
42
! Das Schlauchende in dem festen Ablauf
befestigen. Der Schlauch darf nicht
geknickt werden, damit der Wasserablauf
nicht verhindert wird (Abb. 6).
! Das Innendurchmesser des Ablaufrohres
muß mindestens 4 cm betragen und bei
einer Höhe von mindestens 40 cm liegen.
! Es wird empfohlen, einen Siphon zu
verwenden (Abb. 6 X). Falls erforderlich
kann der Ablaufschlauch bis zu 2,5 m
verlängert werden, wobei die Höhe vom
Boden mindestens 85 cm betragen muß.
Der entsprechende Verlängerungsschlauch
ist als Originalzubehör über den
Kundendienst erhältlich.
! Das gebogene Schlauchende kann auch
am Spülbeckenrand eingehängt werden.
Achten Sie darauf, dass der Schlauch
nicht im Wasser getaucht wird, um einen
Rücklauf des Wassers beim Spülen zu
verhindern (Abb. 6 Y).
! Soll das Gerät untergebaut werden, muss
der Krümmer des Ablaufschlauches
direkt unter der Arbeitsplatte an der
höchstmögliche Stelle angebracht werden
(Abb. 6 Z).
! Überprüfen Sie bei der Installation, dass
weder der Zu- noch der Ablaufschlauch
geknickt sind. Für Geräte mit Waterblock
erkundige Sie sich bitte bei Ihrem
Kundendienst, da keine handelsübliche
Verlängerung benutzt werden kann.
6
Z
Y
X
Anschluss an den Wasserablauf
Page 43

!
DE
43
3. EINFÜLLEN VON SALZ
(Abb. A "1")
! Das Auftreten von weißen Flecken auf
Geschirr ist in der Regel ein Warnsignal,
dass der Salzbehälter neu aufgefüllt
werden muss.
! Auf dem Geräteboden finden Sie die Öffnung
für das Einfüllen des Regeneriersalzes.
! Bitte verwenden Sie ausschließlich das
speziell für Geschirrspüler angebotene
Regeneriersalz. Andere Salze enthalten
unlösliche Anteile, die mit der Zeit die
Funktion des Wasserenthärters beeinträchtigen
können.
! Zum Einfüllen des Salzes drehen Sie den
Verschluss des im Boden des Gerätes
befindlichen Salzbehälters auf.
! Während des Nachfüllens wird ein wenig
Wasser überlaufen, füllen Sie weiter Salz
nach, bis der Behälter wieder ganz
aufgefüllt ist und vermischen Sie dabei
das Gemisch mit einem Löffel. Im
Anschluss an das Nachfüllen des Salzes
müssen Salzreste vom Gewinde entfernt
werden. Danach Verschlusskappe wieder
zudrehen.
Nach der Zugabe des Salzes MÜSSEN
SIE einen kompletten Spülprogramm oder
das Vorspül-Programm durchführen.
Nur bei der Installation des Gerätes
muss nach dem vollständigen Auffüllen
des Salzbehälters solange Wasser
zugegeben werden, bis der Behälter
überläuft.
Page 44

!
44
4. ANPASSEN DES
OBEREN SPÜLKORBS
(NUR BEI EINIGEN
MODELLEN)
!
Wenn regelmäßig Teller mit einem
Durchmesser von 29 bis 32,5 cm
verwendet werden, positionieren Sie (je
nach Modell) den oberen Spülkorb wie
unten erläutert in der obersten Position
und räumen Sie das Geschirr in den
unteren Korb ein:
Typ "A":
1. Drehen Sie die Sperrblöcke "A" nach
außen.
2. Nehmen Sie den Spülkorb heraus, und
setzen Sie ihn in der oberen Position
wieder ein.
3. Drehen Sie die Sperrblöcke "A" wieder
in die ursprüngliche Stellung.
Geschirr, dessen Durchmesser 20 cm
übersteigt, kann jetzt nicht mehr in den
oberen Spülkorb eingeräumt werden, und
die herausnehmbaren Stützteile können
nicht mehr verwendet werden, solange er
sich in der obersten Stellung befindet.
Typ "A"
A
A
Typ "B":
(NUR MODELLE MIT EASY CLICK):
1. Nehmen Sie den oberen Spülkorb heraus.
2. Ziehen Sie den Korb dazu mit beiden
Händen senkrecht nach oben heraus
(Abb. 1).
Geschirr, dessen Durchmesser 20 cm*
übersteigt, kann jetzt nicht mehr in den
oberen Spülkorb eingeräumt werden, und
die herausnehmbaren Stützteile können
nicht mehr verwendet werden, solange er
sich in der obersten Stellung befindet.
* Bei Modellen mit einem dritten Spülkorb
können Teller mit einem Durchmesser über
14 cm nicht mehr in den oberen Spülkorb
eingeräumt werden.
Anmerkung: HEBEN ODER SENKEN SIE
DEN KORB NIEMALS EINSEITIG (Abb. 3).
1. Ziehen Sie den Korb mit beiden Händen
vorsichtig senkrecht nach oben heraus
(Abb. 1);
2. Setzen Sie ihn dann langsam in der
richtigen Position ein (Abb. 2).
N.B.: NEVER LIFT OR LOWER THE
BASKET BY ONE SIDE ONLY (fig.3).
ACHTUNG:
Der Spülkorb sollte angepasst werden,
bevor das Geschirr eingeräumt wird.
Typ "B"
1
3
a
b
a
b
2
Page 45

!
DE
45
5. EINRÄUMEN DES
GESCHIRRS
! Die klappbaren Geschirrablagen des
oberen Geschirrkorbes ermöglichen eine
flexible Nutzung des Raumangebots. Sie
können nach unten oder nach oben
geklappt werden.
! Nach unten geklappt (A-A1), finden Tee-
und Kaffeetassen, lange Messer und
Schöpfkellen auf ihnen Platz. An den
Rändern der Ablage können Kelchgläser
eingehängt werden.
!
Stellen Sie die bewegliche Ablage
senkrecht (B-B1) so passen flache und
tiefe Teller in den oberen Korb. Die
letzteren sortieren Sie bitte immer so ein,
dass sie mit den Innenseiten nach vorne
zeigen. Achten Sie auch darauf, dass
zwischen den Tellern immer soviel Platz
bleibt, dass das Wasser die gesamte
Fläche erreichen kann.
!
Größere Teller mit einem Durchmesser
ab 26 cm, sind leicht geneigt, mit der
Innenseite nach vorne zeigend, in den
Korb einzustellen.
!
Im oberen Geschirrkorb kann auch
Spülgut wie Salatschüsseln und
Plastikbehälter Platz finden. Sie sollten
jedoch für einen sicheren Halt dieser
Geschirrteile sorgen, damit sie nicht
durch den Druck der Wasserstrahlen
bewegt werden können.
!
Der obere Geschirrkorb bietet alle
Eigenschaften, die zu einer möglichst
flexiblen Nutzung erforderlich sind. Sie
können ihn in zwei Reihen mit bis zu 24
Tellern bestücken, oder mit Gläsern in 5
Reihen mit bis zu 30 Stück je Spülgang
oder natürlich auch mit gemischtem Spülgut.
Eine Standardbeladung für tägliches Spülen
ist in den Abb. 1, 2 und 3 dargestellt.
Oberer Geschirrkorb (Abb. 1)
Oberer Geschirrkorb (Abb. 2)
Oberer Geschirrkorb (Abb. 3)
Beladen des oberen Geschirrkorbes
Page 46

!
46
! Im unteren Korb können Sie Töpfe,
Pfannen, Suppenschüsseln, Servierplatten,
Salatschüsseln, Deckel, flache und tiefe
Teller und Kellen unterbringen.
! Stellen Sie das Besteck mit den Griffen
nach unten in den dafür vorgesehenen
Plastikbehälter, der dann in den unteren
Geschirrkorb gestellt wird (Abb. 4 und 5).
Achten Sie darauf, dass das Besteck die
Rotation der Sprüharme nicht hindert.
Die richtige und rationelle Bestückung der
Geschirrkörbe ist die Voraussetzung für ein
optimales Spülergebnis.
Eine Standardbeladung für tägliches Spülen
ist in den Abb. 4 und 5 dargestellt.
Unterer Geschirrkorb (Abb. 4)
Unterer Geschirrkorb (Abb. 5)
Besteckkorb (Abb. 6)
Der Besteckkorb besteht aus zwei trennbaren
Teilen und bietet somit verschiedene
Beladungsmöglichkeiten. Die beiden Teile
lassen sich durch entgegengesetztes
Auseinanderschieben trennen. Durch
Ineinanderschieben der beiden Hälften wird
der Besteckkorb wieder zusammengefügt.
Der obere Teil des Besteckkorbes kann
entfernt werden, um eine flexible Nutzung
zu ermöglichen.
6. INFORMATION FÜR
PRÜFLABORE
Sie können die notwendigen Informationen
zur Ausführung von Vergleichstests und
Geräuschpegelmessungen (lt. EN Normen)
an folgende Adresse anfordern:
testinfo-dishwasher@candy.it
Bitte geben Sie bei Ihrer Anfrage unbedingt
die Modellbezeichnung und die komplette
Matrikel- und Seriennummer des Gerätes lt.
Matrikelschild an.
Beladen des unteren Geschirrkorbes
Der Unterkorb verfügt über einen
Sicherheitsstop, der speziell im Fall
der vollen Beladung dafür sorgt, dass
der Korb nicht versehentlich aus der
Führungsschiene gezogen wird. Zum
Nachfüllen des Regeneriersalzes und
zur Reinigung des Filters ist es notwendig,
dass der Korb vollständig aus dem
Gerät genommen wird.
Page 47

!
DE
47
7. EINFÜLLEN VON
SPÜLMITTEL
(Abb. A "2")
Außerdem beeinträchtigen sie den korrekten
Betrieb der Spülmaschine.
Der Spülmittelbehälter befindet sich im
Türinneren (Abb. A "2"). Zum Öffnen des
Deckels reicht ein leichter Druck auf dem
Verschlusshaken (A). Am Ende eines jeden
Spülgangs bleibt der Deckel geöffnet und
ist somit sofort wieder betriebsbereit.
Die Spülmitteldosis kann je nach Art und
Verschmutzungsgrad des Geschirrs variieren.
Empfohlen wird eine Menge zwischen 20und
30 g Spülmittel, das in die Spülmittelkammer
(B) für den Hauptspülgang eingefüllt wird.
Nach Einfüllen des Spülmittels in den
Behälter bitte den Deckel schließen, indem
Sie ihn zuerst zurück über die Öffnung
schieben (1) und dann bis zum spürbaren
Einrasten herunterdrücken (2).
Bitte beachten Sie auch die Dosierungsanweisungen
des Spülmittelherstellers auf der Verpackung.
Eine unzureichende Menge beeinträchtigt
das Spülergebnis, und eine zu hohe
Dosierung bedeutet nur Verschwendung das Resultat wird dadurch nicht verbessert.
Das Spülmittel
WICHTIG
Spülmittel fürs Spülen mit der Hand
eignen sich nicht für die Spülmaschine,
da
wichtige Bestandteile fehlen, die für
beste Spülergebnisse notwendig sind.
Spülmittel einfüllen
ACHTUNG!
Beim Einordnen des Geschirrs im
unteren Korb achten Sie unbedingt
darauf, dass das Geschirr die Öffnung
des Deckels oder die Einspülung des
Spülmittels nicht beeinträchtigt!
Eine richtige Dosierung ist zudem ein
wichtiger Beitrag zum Umweltschutz.
Page 48

!
48
8. ARTEN VON
GESCHIRRSPÜLMITTEL
Spülmittel in Tablettenform von unterschiedlichen
Herstellern lösen sich unterschiedlich schnell
auf. Als Folge davon könnten manche Tabs
bei den Kurzprogrammen ihre Reinigungswirkung
eventuell nicht voll entfalten, da sie sich
nicht vollständig aufgelöst haben. Wenn Sie
Tabs bevorzugen, empfehlen wir, längere
Programme einzustellen, damit gewährleistet wird,
dass das Spülmittel vollständig verbraucht wird.
Konzentrierte Spülmittel sind weniger
alkalisch und enthalten natürliche Enzyme.
Wenn Sie diese Spülmittel in den 50°C
Spülprogrammen verwenden, können Sie
nicht nur einen Beitrag zur Reduzierung der
Umweltbelastung leisten, sondern Sie
schonen sowohl Ihr Geschirr als auch Ihre
Spülmaschine. Spülprogramme bei 50°C
sind speziell für die Verwendung von
konzentrierten Spülmitteln konzipiert, damit
die Enzyme ihre volle Wirkung entfalten und
die Verschmutzungen des Geschirrs vollständig
auflösen können. Somit erreichen Sie
schon bei einer niedrigeren Spültemperatur
dieselben guten Ergebnisse wie mit den
Spülprogrammen bei 65°C.
Spülmittel, die auch den Klarspüler enthalten,
müssen ebenfalls in den Spülmittelbehälter
gegeben werden. Der Behälter für den
Klarspüler muss in diesem Fall leer sein
(falls er noch nicht leer sein sollte,
regulieren Sie die Zugabe von Klarspüler
auf die kleinste Stufe, bevor Sie das
Kombispülmittel verwenden).
Wenn Sie sich für ein Kombispülmittel
"TABS" ("3 in 1" - "4 in 1" - "5 in 1", usw.)
entscheiden, welches die Benutzung
von
Spezialsalz und/oder Klarspüler überflüssig
macht, sind die folgenden Hinweise unbedingt
zu beachten:
! Lesen Sie die Gebrauchshinweise des
Spülmittelherstellers sorgfältig durch und
wenden Sie das Geschirrspülmittel genau
so, wie dort angegeben ist;
! Die Wirksamkeit von Geschirrspülmitteln,
die auch den Einsatz von Maschinensalz
überflüssig machen, hängt von der
Wasserhärte ab. Bitte versichern Sie sich,
dass die Wasserhärte Ihres Versorgungsnetzes
im Wirkungsbereich des Spülmittels liegt.
Sollten Sie bei der Verwendung von
dieser Art Spülmittel unzureichende
Spülergebnisse erhalten, wenden Sie
sich bitte an den Spülmittelherstellern.
Die Verwendung von Kompaktspülmitteln
könnte folgende Folgen haben:
!
Bildung von Kalkablagerungen auf Geschirr
und Geschirrspüler;
! evtl. Verminderung der Spülergebnisse
und/oder der Trockenwirkung.
Wir möchten daran erinnern, dass bei der
Verwendung von Spülmitteln “TABS” die
Salz- und die Klarspülernachfüllanzeige
(nur
für einige Modelle vorgesehen) überflüssig
werden.
Tabs
WICHTIG
Um gute Spülergebnisse zu erzielen,
MÜSSEN Spülmittel-Tabs in den
Spülmittelbehälter und NICHT direkt
ins Geräteinnere gegeben werden.
Konzentrierte Spülmittel
Kombispülmittel mit Klarspüler
Kombispülmittel "TABS"
WICHTIG
Bei Reklamationen, die direkt mit
einer inkorrekten Verwendung dieser
Spülmittel zusammenhängen, wird
keine Garantieleistung gewährt.
Page 49

!
DE
49
Falls Sie schlechte Spül- oder Trocknungsergebnisse
verzeichnen sollten, empfehlen wir, zu den
herkömmlichen Spülmitteln (Enthärtersalz,
Klarspüler, Spülmittel in Pulverform)
zurückzugreifen.
In diesem Fall sollten Sie:
! die Salz- und Klarspülerbehälter erneut
füllen;
!
ein normales Spülprogramm ohne Geschirr
durchführen.
Wir weisen darauf hin, dass das
Enthärtersystem nach der Rückkehr zu
herkömmlichen Spülmitteln mit separatem
Einsatz von Enthärtersalz einige Spülgänge
benötigen wird, um wieder optimal zu
funktionieren.
Page 50

!
50
9. EINFÜLLEN DES
KLARSPÜLERS
(Abb. A "3")
Das Klarspülmittel erleichtert die Trocknung
des Geschirrs und vermeidet die Bildung
von Flecken und matten Ablagerungen. Die
benötigte Menge des Klarspülers wird beim
letzten Spülen automatisch zugegeben, ein
voller Behälter reicht für mehrere Male.
In der Innentür links vom Spülmittelbehälter
befindet sich der Klarspülmittelbehälter
(Abb. A"3"). Zur Öffnung der Einfüllöffnung
drücken Sie bitte den Deckel an der
markierten Stelle nach unten und ziehen
gleichzeitig den Deckel nach oben.
Benutzen Sie nur Klarspülmittel für
Geschirrspülautomaten. Bitte kontrollieren
Sie regelmäßig den Füllstand des
Klarspülmittels durch das Sichtfenster (C)
auf dem Verschlussdeckel um ein gleich
bleibend perfektes Spülergebnis zu
gewährleisten.
VOLL
LEER
dunkel
hell
Die Regulierungsscheibe (D) liegt unter
dem Verschluss und kann mit Hilfe einer
Münze gedreht werden. Die empfohlene
Position ist 4. Der Kalkgehalt des Wassers
kann zu Ablagerungen auf den Heizstäben
führen und so das Trocknen beeinträchtigen.
Wenn das Geschirr gestreift erscheinen
sollte, so ist eine niedrigere Position zu
wählen und wenn es Flecken oder weiße
Spuren aufweist, so wähle man eine höhere
Position.
Das Klarspülmittel
Klarspülmittel einfüllen
Regulierung der
Klarspülmitteldosis 1 bis 6
Page 51

!
DE
51
10. REINIGEN DER FILTER
(Abb. A "4")
Das Filtersystem (Abb. A "4") besteht aus:
A. dem zentralen Filterkorb zum Auffangen
von groben Teilchen;
B. dem Mikrofilter unterhalb der Siebplatte,
der auch die kleinsten Schmutzpartikelchen
auffängt und so eine optimale Spülung
garantiert;
C. der Siebplatte zum ständigen Filtern
des Spülwassers.
!
Um stets beste Spülergebnisse zu erzielen,
ist es ratsam, das Filtersystem vor jeder
Benutzung zu kontrollieren und zu reinigen.
!
Der Filtersatz läßt sich durch Drehen gegen
den Uhrzeigersinn leicht herausziehen (Abb. 1).
!
Der zentrale Filterkorb ist herausnehmbar,
um die Reinigung zu erleichtern (Abb. 2).
! Ziehen Sie schließlich die Siebplatte aus
der Bodenwanne heraus wie in der (Abb.3)
ersichtlich. Spülen Sie alle Teile gründlich
unter fließendem Wasser und reinigen
Sie diese eventuell mit einer Bürste.
!
Dank des selbstreinigenden Mikrofilters
ist
die Wartung reduziert, und die Überprüfung
der Filteranlage braucht nur alle 14 Tage
vorgenommen zu werden. Trotzdem ist
es anzuraten, nach jeder Benutzung zu
kontrollieren, ob der zentrale Filtersatz
und die Siebplatte nicht verstopft sind.
ACHTUNG!
Versichern Sie sich nach der Reinigung
der Filter, dass sie
untereinander richtig
befestigt
sind und dass die Siebplatte
genau in der Bodenwanne eingesetzt
ist. Achten Sie darauf, den Filtereinsatz
im
Uhrzeigersinn in die Siebplatte
wieder
sorgfältig einzuführen. Ein ungenaues
Einsetzen des Filtersatzes
kann den
Betrieb
der Maschine beeinträchtigen.
Benutzen Sie die Spülmaschine niemals
ohne Filter.
Page 52

!
52
11. PRAKTISCHE TIPPS
! Um optimale Spülresultate zu erhalten,
sind erst die gröbsten Speisereste (z.B.
Knochen, Gräten, Fleisch- oder Gemüsereste,
Kaffeesatz, Obstschalen oder -kerne,
Zahnstocher, Zigarettenasche usw.) vom
Geschirrzu entfernen, da sie sich sonst
im Filter, im Wasserablauf oder in den
Sprüharmen festsetzen und so zu einer
Reduzierung der Reinigungsqualität führen
können.
! Das Geschirr braucht nicht vorgespült zu
werden.
! Durch starkes Braten oder angebrannte
Speisereste stark verkrustete Töpfe und
Pfannen sollten vor dem eigentlichen
Spülvorgang vorgeweicht werden.
! Töpfe und anderes Geschirr mit der
Innenseite nach unten einordnen.
! Vermeiden Sie das Aufeinanderstapeln
und ordnen Sie das Geschirr möglichst in
den dafür vorgesehenen Ladebereichen.
Eine korrekte Beladung verbessert das
Spülergebnis.
! Kontrollieren Sie, ob sich nach dem
Geschirreinfüllen die Sprüharme frei
drehen lassen.
! Töpfe und anderes großes Geschirr mit
sehr hartnäckigen oder angebrannten
Speiseresten erst mit Wasser und
Spülmittel einweichen.
! Beim Spülen von Silber ist folgendes zu
beachten:
a)
unmittelbar nach der Benutzung vorspülen,
vor allem bei fetten Speiseresten
(Majonnaise, Eier, Fisch usw.);
b) Silbergeschirr nicht mit Spülmittel
beträufeln;
c) Kontakt mit anderen Metallen
vermeiden.
!
Um zu sparen, sollte die Spülmaschine
immer komplett befüllt werden, bevor
gespült wird. Das Geschirr wird jeweils
nach dem Essen in die Spülmaschine
gefüllt, bis diese voll ist. Eventuell kann
zwischen den Beladungen ein Vorspülprogramm
durchgeführt werden, um die gröbsten
Speisereste einzuweichen und zu entfernen.
! Bei nicht sehr verschmutztem Geschirr
oder nicht voller Ladung wählen Sie das
SPAR-PROGRAMM.
! Nicht alle Geschirrarten eignen sich zum
Spülen in einer Spülmaschine. So dürfen
z.B. Geschirrteile aus Kunststoff, Besteck
mit Holz- oder Kunststoffgriffen, Töpfe mit
Holzgriffen, Geschirr aus Aluminium,
Bleikristall oder verbleitem Glas nur dann
in die Maschine eingefüllt werden, wenn
sie spülmaschinenfest sind.
!
Bei manchen Geschirrarten kann das Dekor
nach häufigerem Gebrauch verblassen.
Vergewissern Sie sich, dass das Dekor
spülmaschinenfest ist, indem Sie erst ein
Geschirrteil einige Male in der Maschine
spülen und es dann mit den übrigen
Teilen auf seine Farbechtheit vergleichen.
!
Spülen Sie Silberbesteck nicht zusammen mit
Stahlbesteck, um eine chemische Reaktion
der beiden Metalle zu vermeiden.
!
Nach dem Programmende ist es empfehlenswert,
erst den unteren Geschirrkorb herauszuziehen,
damit keine Wassertropfen vom oberen
zum unteren Korb herabtropfen.
! Bleibt das Geschirr nach dem Spülen
noch eine gewisse Zeit im Gerät, sollte
die Tür einen Spalt geöffnet werden. Das
Trockenergebnis wird so verbessert.
Hinweise zur Optimierung der
Spülergebnisse
Hinweise zum Sparen
Spülmaschinenfestes Geschirr
WICHTIG
Beim Kauf von neuem Geschirr vergewissern
Sie sich immer, dass es spülmaschinenfest ist.
Nützliche Hinweise
Page 53

!
DE
53
12. WARTUNG UND
REINIGUNG
(Abb. A "5")
! Bitte benutzen Sie zur Reinigung des
Gerätes von außen stets nur ein feuchtes
Tuch und niemals Reinigungsund
Scheuermittel.
! Der Innenbehälter bedarf keiner besonderen
Reinigung.
! Bitte reinigen Sie die Türdichtungen
regelmäßig mit einem feuchten Tuch, um
evtl. anhaftende Lebensmittelreste und
Klarspülerrückstände zu entfernen.
!
Die Geschirrspüler-Reinigung wird empfohlen,
um Kalkablagerungen und Schmutz zu
entfernen. Wir empfehlen Ihnen regelmäßig
ein Spülprogramm mit speziellem
Geschirrspüler-Reiniger durchzuführen.
Für alle Reinigungsvorgänge muss der
Geschirrspüler leer sein.
! Sollte das Geschirr trotz regelmäßiger
Reinigung der Filter schlechte Spülergebnisse
aufweisen, überprüfen Sie, dass die
Sprüharme (Abb. A “5”) nicht von
Schmutzpartikeln verstopft sind.
Sollte dies der Fall sein, reinigen Sie die
Sprüharme wie folgt:
1)
Um den oberen Sprüharm abzunehmen,
drehen Sie ihn bis zur Stop-Position, die
durch einen Pfeil gekennzeichnet ist
(Abb. 1b). Drücken Sie den Sprüharm
nach oben und drehen Sie ihn
gleichzeitig im Uhrzeigersinn (Abb. 1).
Um den Sprüharm wieder zu montieren,
wiederholen Sie den Vorgang, drehen
Sie ihn dabei jedoch gegen den
Uhrzeigersinn.Der untere Sprüharm läßt
sich durch einfaches Ziehen nach oben
abnehmen (Abb. 2);
2) Spülen Sie die Sprüharme unter
fließendem Wasser und befreien Sie
diese von Speiseresten und sonstigen
Rückständen;
3) Danach montieren Sie die beiden
Sprüharme in das Gerät. Achten Sie
beim oberen Sprüharm darauf, dass er
bis zur Stop-Position gedreht wird und
schrauben Sie ihn fest.
! Die Spülkammer und Innentür ist
ebenfalls aus Edelstahl. Sollten hieran
Oxidationserscheinungen auftreten, so
sind diese z.B. durch eisenhaltiges
Wasser hervorgerufen.
! Die Flecken sind mit handelsüblichen
Edelstahl-Reinigern zu entfernen (keine
Stahlwolle benutzen).
1
1b
2
Wenn die Spülmaschine längere Zeit
unbenutzt bleiben soll, empfehlen wir das
folgende Vorgehen:
1. Um Fettreste zu entfernen, ein
Spülprogramm ohne Geschirr aber mit
Spülmittel laufen lassen.
2. Stecker aus der Steckdose ziehen.
LÄNGERE NICHTBENUTZUNG
Page 54

!
54
3. Wasserhahn schließen.
4. Klarspülmittelbehälter füllen.
5. Tür ein wenig öffnen.
6. Halten Sie das Innengehäuse immer
sauber.
7. Steht das Gerät in einem Raum mit
Temperatur unter 0°C, so kann das
Restwasser in den Schläuchen
gefrieren. In diesem Fall sollte zuerst
die Raumtemperatur erhöht und die
Spülmaschine erst nach 24 Stunden in
Betrieb gesetzt werden.
Page 55

!
DE
55
13. BESCHREIBUNG DES
BEDIENFELDS
G "Reset" Taste für "SALZ INFÜLLEN" Leuchtanzeige
H Leuchte "SALZ LEER"
I
Leuchten "PROGRAMMPHASEN" Zeit "STARTVERZÖGERUNG"
L Leuchte "OPTIONSAUSWAHL"
M Leuchte "PROGRAMMAUSWAHL"
N Leuchte "Addish"
A EIN/AUS-Taste
B Taste "PROGRAMMAUSWAHL"/REGISTRIERUNG Wi-Fi
C Taste "Start/Reset" (Programm starten/abbrechen)
D Optionstaste "EXPRESS"
E D+F KINDERSICHERUNG
F Taste "VERZÖGERTER START"
14. TECHNISCHE DATEN
GRÖSSE
EINBAUMODELL
DISPLAY UNSICHTBAR
59,8x81,8 ÷ 89,8x55
117
TECHNISCHE DATEN (siehe Typenschild)
16
9 Personen
Min. 0,08 – Max. 0,8
Siehe Typenschild
DISPLAY SICHTBAR
59,8x81,8 ÷ 89,8x57
117
15
9 Personen
FREISTEHEND
OHNE
ARBEITSPLATTE
59,8x82x58
117
13
8 Personen
MIT
ARBEITSPLATTE
60x85x60.9
120
Gedecke (EN 50242)
Aufnahmefähigkeit inklusive Pfannen und Tellern
Wasserleitungsdruck (MPa)
Sicherung / Eingangsleistung / Netzspannung
DATEN
Breite x Höhe x Tiefe (cm)
Tiefe bei geöffneter Tür (cm)
Page 56

!
56
15. PROGRAMMAUSWAHL
UND BESONDERE
MERKMALE
! Zum Ein- und Ausschalten drücken Sie
die EIN/AUS-Taste (für mindestens 3
Sekunden).
! Schließen Sie die Maschine an die
Stromversorgung an.
! Öffnen Sie die Türe, räumen Sie das
Geschirr ein und schließen Sie die Türe
wieder.
! Drücken Sie die "EIN/AUS"-Taste, und
halten Sie sie zirka 3 Sekunden lang
gedrückt.
! Jetzt sind nur die Tasten "EIN/AUS" und
"Progr." aktiv und alle Programmanzeigeleuchten
sind 3 Sekunden lang an. Danach bleibt
nur noch die Anzeigeleuchte "P3" an und
alle anderen Tasten bleiben aktiv.
! Wählen Sie über die Taste
"PROGRAMMAUSWAHL" ein Programm
aus.
! Drücken Sie zur Auswahl einer Option die
dazugehörige Taste (die Anzeigeleuchte
mit der gewählten Option geht an).
! Drücken Sie "STARTEN/ABBRECHEN"
und ein Signal ertönt. Die Anzeigeleuchte
des gewählten Programms geht an und
die Spülanzeigeleuchte leuchtet auf.
!
Wird das Programm bei geöffneter Tür
gestartet, ertönt fünfmal ein Signalton,
und das Programm wird automatisch
gestartet, sobald die Türe geschlossen wird.
Halten Sie die Taste EIN/AUS zirka 3
Sekunden gedrückt, um die Maschine
anzuschalten. Die Programmanzeigeleuchte
"P3" geht an.
Im Einstellungsmenü können Sie
verschiedene Parameter für die
Spülbedingungen festlegen.
Öffnen des Einstellungsmenüs
! Schalten Sie die Spülmaschine an, indem
Sie die "EIN/AUS"-Taste zirka 3
Sekunden lang gedrückt halten.
! Halten Sie die Tasten "Progr." und
"EIN/AUS" zirka 5 Sekunden gedrückt.
! Alle Anzeigeleuchten blinken 5 Sekunden
lang.
! Die Einstellungen werden angezeigt:
- Wenn die Anzeigeleuchte der
entsprechenden Programme angeht,
werden auch die Einstellungen des
Enthärters angezeigt. Wenn alle aus
sind, gilt die Stufe "S0".
- Wenn das Audiosignal aktiviert ist, geht
die Anzeigeleuchte "Express" an.
- Wenn die „Memo“-Funktion aktiviert ist,
leuchtet die Anzeigeleuchte "6h" der
Funktion SOFORTSTART auf.
! Wenn Sie die Taste "Progr." drücken,
beginnt die Einstellung des ENTKALKER
(siehe Kapitel in der Bedienungsanleitung).
! Drücken Sie die "Express"-Taste, um
das AKUSTISCHES SIGNAL einzustellen.
(Informationen zur Einstellung finden Sie
im Handbuch im entsprechenden Abschnitt).
EIN/AUS-Taste
Schalten Sie das Gerät nach Programmende
über die "EIN/AUS"-Taste aus, ziehen Sie
den Stecker heraus und schließen Sie die
Wasserzufuhr.
Erstmaliges Einschalten des
Geräts
Nächstes Einschalten des Geräts
Wenn Sie die Programmspeicherfunktion
eingeschaltet haben, geht auf dem
Display die Anzeigeleuchte des letzten
Programms an.
Menü "EINSTELLUNGEN"
Page 57

!
DE
57
! Drücken Sie die Taste "Verzögerter
Start", um die MEMO-FUNKTION zu
aktivieren (weitere Infos finden Sie
im entsprechenden Abschnitt der
Bedienungsanleitung).
Die Spülmaschine ist mit einem
Schmutzsensor ausgestattet, der die
Trübung des Wassers in allen
"AUTOMATIK"-Programmphasen (siehe
Programmlegende) analysiert. Dank des
Sensors werden die Spülparameter
automatisch an den tatsächlichen
Verschmutzungsgrad des Geschirrs
angepasst: Dies ist möglich, weil die
Trübung des Wassers mit dem
Verschmutzungsgrad zusammenhängt. Auf
diese Weise können hervorragende
Spülergebnisse garantiert werden, während
Wasser- und Energieverbrauch optimiert werden.
Die "IMPULSE"-Programme setzen eine
Impulsspültechnologie ein, die Verbrauch
und Lärmpegel reduziert und die
Spülleistung verbessert.
Wenn das Programm startet, sollten Sie
die Tür nur dann öffnen, um weiteres
Geschirr hinzuzufügen, wenn die
Anzeigeleuchte ADDISH aufleuchtet.
Die Maschine hält automatisch an. Das
Display blinkt die verbleibende Zeit bis zum
Programmende. Schließen Sie die Tür,
ohne irgendwelche Tasten zu drücken.
Das Programm wird fortgesetzt. Wenn die
entsprechende Anzeigeleuchte ausgeht,
sollte kein weiteres Geschirr mehr
eingeräumt werden.
Die Tür zu öffnen, während ein Programm
läuft, ist nicht zu empfehlen. Vor allem in
den Hauptspülphasen und im finalen
Heißwaschgang sollte dies daher
vermieden werden. Wird die Tür trotzdem
geöffnet, während ein Programm läuft (zum
Beispiel, um weiteres Geschirr einzuräumen),
hält die Maschine automatisch an.
Schließen Sie die Tür, ohne irgendwelche
Tasten zu drücken. Das Programm wird
fortgesetzt.
"AUTOMATIK"-Programme
(nur bei einigen Modellen)
"IMPULSE"-Programme
(nur bei einigen Modellen)
Die "intermittierende" Arbeitsweise der
Spülpumpe bedeutet KEINE Fehlfunktion;
es ist ein typisches Merkmal der
Impulsspültechnologie und gilt daher als
normale Programmeigenschaft.
ADDISH (Möglichkeit, noch nach
dem Programmstart Geschirr
hinzuzufügen)
Öffnen Sie langsam und vorsichtig die
Tür, um nicht vom Spritzwasser nass
zu werden.
Das Hinzufügen von Geschirr, nachdem
die Anzeigeleuchte dafür erloschen ist,
ist
nicht zu empfehlen, da dies die
Spülleistung beeinträchtigen könnte.
ACHTUNG!
Wenn Sie die Tür während eines
Trocknungsvorgangs öffnen, weist Sie
ein intermittierendes Akustiksignal
darauf hin, dass der Trockenvorgang
noch nicht abgeschlossen ist.
Programmunterbrechung
ACHTUNG!
Wenn Sie die Tür während eines
Trocknungsvorgangs öffnen, weist
Sie ein intermittierendes Akustiksignal
darauf hin, dass der Trockenvorgang
noch nicht abgeschlossen ist.
Page 58

!
58
Gehen Sie wie folgt vor, um ein laufendes
Programm zu ändern oder abzubrechen:
! Halten Sie die Taste "STARTEN/
ABBRECHEN" mindestens 3 Sekunden
lang gedrückt. Akustiksignale ertönen und
die Programmanzeigeleuchten gehen der
Reihe nach einzeln an und aus.
!
Audiosignale ertönen und alle Anzeigeleuchten
der Programme leuchten dauerhaft.
! Zu diesem Zeitpunkt kann ein neues
Programm eingestellt werden.
Wenn ein Programm läuft, bleibt die
dazugehörige Anzeigeleuchte an und die
drei Leuchten der "PROGRAMMPHASE":
SPÜLEN
KLARSPÜLEN
TROCKNEN
leuchten einzeln nacheinander auf, um
die aktuelle Phase anzuzeigen.
Wird die Stromzufuhr unterbrochen,
während die Spülmaschine läuft, wird
das gewählte Programm gespeichert
und fortgesetzt, wenn die Stromzufuhr
wieder hergestellt ist.
Es ertönt dreimal im 30 Sekundenabstand
ein fünf Sekunden langes akustisches
Signal (wenn nicht stumm geschaltet), das
das Programmende signalisiert.
Die Optionstasten bieten Ihnen weitere
Spüloptionen, mit denen sich die
Spülprogramme anpassen lassen (siehe
Tabelle in Kapitel 17 für eine Liste der
Programme, in denen jede Option aktiviert
werden kann). Die Optionen werden vor
dem Programmstart über die entsprechenden
Tasten aktiviert (oder deaktiviert). Die
entsprechenden Anzeigeleuchten werden im
Display angezeigt (oder ausgeblendet).
Die Optionstaste sollte erst nach der Auswahl
des Spülprogramms aktiviert werden.
"Express"-Taste
Diese Taste erlaubt eine durchschnittliche
Energie- und Zeitersparnis von 25 % (je
nach ausgewähltem Programm), indem die
Wassertemperatur und die Trocknungsdauer
in
der Endphase reduziert werden. Diese
Option wird für den Spülgang am Abend
empfohlen, wenn das fertige Geschirr noch
nicht hundertprozentig trocken sein muss.
Um die Trocknung zu begünstigen, lassen
Sie die Türe des Geschirrspülers leicht
geöffnet, damit die Luft zirkulieren kann.
Dieses Modell hat eine Anzeigeleuchte auf
dem Bedienfeld, die aufleuchtet, wenn Salz
nachgefüllt werden muss. Weiße Flecken
auf dem Geschirr sind ein Anzeichen dafür,
dass Salz nachgefüllt werden muss.
Nachdem Salz nachgefüllt wurde, halten
Sie diese Taste einige Sekunden lang
gedrückt, bis die Anzeigeleuchte erlischt.
Ändern eines laufenden
Programms
ACHTUNG!
Bevor Sie ein neues Programm
starten, prüfen Sie, ob noch genügend
Geschirrreiniger eingefüllt ist. Wenn
nicht, füllen Sie Reiniger nach.
Programmvorgänge
Programmende
Optionstasten
Wird eine Funktion gewählt, die nicht
mit dem gewählten Programm kompatibel
ist, so blinkt die Funktionskontrollleuchte
zuerst und erlischt danach.
Anzeigeleuchte "KEIN SALZ"
"RESET"-Taste für Anzeigeleuchte
"KEIN SALZ"
Page 59

!
DE
59
Die Startzeit der Spülmaschine kann über
diese Taste eingestellt werden, wobei der
Start um 3, 6 oder 9 Stunden verzögert
werden kann.
Verfahren Sie wie folgt, um einen
verzögerten Start einzustellen:
! Wählen Sie ein Programm aus, indem Sie
die Taste "PROGRAMMAUSWAHL" drücken.
!
Drücken Sie die Taste "VERZÖGERTER
START" (jedes Mal, wenn die Taste
gedrückt wird, verzögert sich der Start um
3, 6 oder 9 Stunden und die entsprechende
Zeitanzeigeleuchte geht an).
! Um den Countdown zu starten, drücken
Sie die
"STARTEN/ABBRECHEN"
-Taste
(die Anzeigeleuchte der gewählten
Verzögerung fängt an zu blinken).
Wird eine Verzögerung von neun Stunden
eingestellt, wird der Countdown nach drei
Stunden durch die Anzeigeleuchte 6h
und nach sechs Stunden durch die
Anzeigeleuchte 3h angezeigt.
Nach Beendigung der drei letzten Stunden
(sobald der Countdown beendet ist), hört
die Anzeigeleuchte 3h auf zu blinken und
bleibt an, um die Spülphase anzuzeigen,
und das Programm wird automatisch gestartet.
Ein verzögerter Start kann geändert oder
abgebrochen werden, solange der
Countdown noch nicht abgeschlossen und
das Programm noch nicht gestartet wurde.
Gehen Sie wie folgt vor, um ein anderes
Programm auszuwählen oder um die
Optionstaste zu aktivieren/deaktivieren:
! Halten Sie die Taste "STARTEN/
ABBRECHEN"
mindestens
3 Sekunden
lang gedrückt.Akustiksignale
ertönen und
die Programmanzeigeleuchten gehen der
Reihe nach einzeln an und aus.
! Der verzögerte Start und das ausgewählte
Programm wird abgebrochen. Die
Programmanzeigeleuchten blinken und es
kann ein neues Programm eingestellt werden.
Sie können das Ein- und Ausschalten des
Audiosignals wie folgt deaktivieren
(werksseitig ist es aktiviert):
! Schalten Sie die Spülmaschine ein,
indem Sie die "EIN/AUS"-Taste zirka 3
Sekunden lang gedrückt halten.
! Halten Sie die Tasten "Progr." und
"EIN/AUS" zirka 5 Sekunden gedrückt.
! Alle Anzeigeleuchten blinken 5 Sekunden
lang.
- Wenn das Audiosignal aktiviert ist, geht
die Anzeigeleuchte "Express" an.
- Wenn das Audiosignal deaktiviert ist,
geht die Anzeigeleuchte "Express" aus.
1. Drücken Sie die "Express"-Taste, um
das Audiosignal an- oder auszuschalten.
2.
Immer wenn das Audiosignal aktiviert wird,
wird dies visuell durch das Aufleuchten
der LED "Express" und durch ein kurzes
akustisches Signal bestätigt.
3. Wenn das Audiosignal deaktiviert wird,
ertönt zur Bestätigung kein akustisches
Signal und die LED "Express" geht aus.
ACHTUNG!
Wird die "Reset"-Taste gedrückt, ohne
dass Salz nachgefüllt wird, beeinträchtigt
dies die ordnungsgemäße Funktion
der Salz-Anzeigeleuchte.
Um die ordnungsgemäße Funktion
der
Salz-Anzeigeleuchte zu garantieren,
MUSS DER SALZBEHÄLTER IMMER
VOLLSTÄNDIG AUFGEFÜLLT WERDEN.
Taste "VERZÖGERTER START"
Ein-und Ausschalten des
Audiosignals
Page 60

!
60
4. Schalten Sie die Spülmaschine aus,
indem Sie die EIN/AUS-Taste 3 Sekunden
gedrückt halten. Danach ist die neue
Einstellung aktiv.
Gehen Sie wie folgt vor, um das zuletzt
verwendete Programm zu speichern:
! Schalten Sie die Spülmaschine ein,
indem Sie die "EIN/AUS"-Taste zirka 3
Sekunden lang gedrückt halten.
! Halten Sie die Tasten "Progr." und
"EIN/AUS" zirka 5 Sekunden gedrückt.
! Alle Anzeigeleuchten blinken 5 Sekunden
lang.
1. Die Anzeigeleuchte "6h" der Funktion
"Verzögerter Start" ist werksseitig aus.
2. Wenn Sie die Taste „Verzögerter Start“
drücken, geht die Anzeigeleuchte "6h" an
und ein Audiosignal ertönt.
3. Schalten Sie die Spülmaschine aus,
indem Sie die EIN/AUS-Taste 5 Sekunden
gedrückt halten. Danach ist die neue
Einstellung aktiv.
Verfahren Sie auf die gleiche Weise, um
den Speicher auszuschalten.
Die Spülmaschine verfügt über eine
elektronische Kindersicherung.
Die Kindersicherung schützt vor Gefahren,
die entstehen können, wenn die
Spülmaschinentüre geöffnet wird, und
deaktiviert das Bedienfeld, sodass keine
unbeabsichtigten Änderungen vorgenommen
werden können.
Auf die folgende Weise können Sie die
Kindersicherung ein- und ausschalten:
! Schalten Sie die Spülmaschine ein,
indem Sie die "EIN/AUS"-Taste zirka 3
Sekunden lang gedrückt halten.
! Halten Sie die Tasten "Express" und
"VERZÖGERTER START" zirka 5
Sekunden gedrückt. Die Anzeigeleuchten
"3h 6h 9h" blinken dreimal und ein
Audiosignal ertönt.
! Danach funktioniert nur die Taste
"EIN/AUS".
! Wird eine andere Taste gedrückt, blinken
die Anzeigeleuchten der Programmphase
dreimal.
! Die Kindersicherung kann ganz einfach
deaktiviert werden, indem Sie die Tasten
"Express" und "VERZÖGERTER START"
gleichzeitig 5 Sekunden lang drücken
oder indem Sie das Gerät ausschalten.
MEMO-FUNKTION (Speichern des
zuletzt verwendeten Programms)
CHILD LOCK
Page 61

!
DE
61
16.
FERNBEDIENUNG (WLAN)
Dieses Gerät ist mit einer WiFi-Technologie
ausgestattet, wodurch es über eine App
ferngesteuert werden kann.
! Laden Sie die Candy simply-Fi-App auf
Ihr Gerät herunter.
! Prüfen Sie, ob der Router eingeschaltet
ist und ob Ihr Smartphone/Tablet mit
Ihrem WLAN zu Hause verbunden ist.
! Schalten Sie an Ihrem Smartphone/
Tablet BLUETOOTH ein (falls vorhanden).
! Öffnen Sie die App, erstellen Sie ein
Nutzerprofil und melden Sie das Gerät
gemäß der Anweisungen am Gerätedisplay
an.
! Wenn die App Sie dazu auffordert,
schalten Sie die Spülmaschine über die
EIN/AUS-Taste an.
! Drücken Sie "Progr. 3sec WiFi" und
halten Sie die Taste 3 Sekunden
gedrückt. " Die Anzeigeleuchten P3 und
P4 blinken beide.
! Drücken Sie die Taste (VERZÖGERTER
START) und halten Sie sie innerhalb von
60 Sekunden nach dem letzten Schritt 3
Sekunden lang gedrückt; die Anzeigeleuchten
3h-6h-9h blinken 5 Minuten lang
gleichzeitig.
!
Geben Sie in der App das Passwort Ihres
WLANs zu Hause ein und schließen Sie
den Vorgang ab.
Anmeldung erfolgreich abgeschlossen
! Die Anzeigeleuchten 3h-6h-9h gehen
aus, während die Anzeigeleuchten P3 P4
anbleiben.
! Das Gerät ist verbunden und kann jetzt
über die App bedient werden.
Anmeldung nicht erfolgreich abgeschlossen
Wenn die Anmeldung fehlschlägt oder
innerhalb von 5 Minuten nicht funktioniert:
! Die Anzeigeleuchten 3h-6h-9h und P3 P4
gehen aus.
! Das Gerät wird nicht verbunden.
! Wiederholen Sie den Anmeldevorgang,
indem Sie die Taste (VERZÖGERTER
START) erneut drücken.
Weitere Informationen finden Sie im
"Enrollment App - Quick Guide", der zur
Maschine gehört oder unter diesem Link:
go.candy-group.com/bm-dw
Wiederholen Sie den Anmeldevorgang,
wenn es Probleme mit dem Router gibt
oder wenn sein Passwort geändert wurde.
Wenn Sie das Gerät über die App remote
bedienen möchten:
! Räumen Sie die Spülmaschine ein, füllen
Sie Reiniger auf und schließen Sie die
Tür.
! Schalten Sie die Spülmaschine an.
! Drücken Sie "Progr. 3sec WiFi" und,
halten Sie die Taste 3 Sekunden
gedrückt"; die Anzeigeleuchten P3 P4
leuchten dauerhaft.
! Sie können Ihr Gerät jetzt dezentral über
die App bedienen.
Pairing der Maschine mit der App
Die Candy simply-Fi-App steht für
Android- und iOS-Tablets und Smartphones
zur Verfügung.
Detaillierte Infos zu den WiFiFunktionen finden Sie im Menü der
App im DEMO-Modus.
Reset des WLAN
AKTIVIEREN DER
FERNSTEUERUNG
Page 62

!
62
! Um die dezentrale Bedienung zu
deaktivieren, drücken Sie "Progr. 3sec
WiFi" 3 Sekunden lang.
! Wenn kein Spülprogramm läuft:
Die Anzeigeleuchten P3 P4 gehen aus
und die LED des letzten Programms, das
abgeschlossen wurde (oder P3), leuchtet
auf.
! Wenn ein Spülprogramm läuft:
Die Anzeigeleuchten P3 P4 fangen an zu
blinken, während die Anzeigeleuchten der
Programmphase den aktuellen Spülstatus
anzeigen.
Der Spülgang wird ohne Steuerung über
die App beendet.
Alternative Möglichkeit, die Fernsteuerung
zu beenden.
! Drücken Sie "Starten/Abbrechen" und
halten Sie die Taste 3 Sekunden lang
gedrückt: Wenn gerade ein Spülprogramm
läuft, wird es abgebrochen und die
Maschine
beendet den Modus REMOTE
CONTROL. Sie können jetzt über das
Gerätebedienfeld ein neues Spülprogramm
einstellen.
DEAKTIVIEREN DER
FERNSTEUERUNG
Wenn Sie die Maschine über die
EIN/AUS-Taste aus und wieder
einschalten während REMOTE CONTROL
aktiviert ist und ein Spülprogramm
läuft (oder wenn der Strom ausfällt),
wird das Spülprogramm an der Stelle
fortgesetzt, wo es unterbrochen
wurde. Die Funktion "REMOTE
CONTROL" wird deaktiviert und die
Anzeigeleuchten P3 und P4 blinken.
Page 63

!
DE
63
17. PROGRAMMLEGENDE
Programm
Beschreibung
P1
Intensiv
Für alle Töpfe und stark verschmutztes Geschirr.
P2 Universal
Für normal verschmutzte Töpfe und Geschirr.
P3 Eco
Programm für normal verschmutztes Geschirr (am
effizientesten im Bezug auf den kombinierten
Energie- und Wasserverbrauch zur Reinigung
dieser Art von Geschirr).
Das Programm entspricht den Normen EN 50242.
P4
Vorspülen
Kurzer Vorspülgang, für Gedecke, die nach dem
Frühstück oder Mittagessen in der Maschine
bleiben, und erst später gespült werden sollen.
P5
Kurzer Vorspülgang, für Gedecke, die nach dem
Frühstück oder Mittagessen in der Maschine
bleiben, und erst später gespült werden sollen.
Spülen mit Vorspülgang
Für alle Programme mit Vorspülgang wird empfohlen, eine zusätzliche Spülmittelmenge (max.10
Gramm) direkt in den Geschirrspüler zu geben.
Page 64

!
64
Zusatzfunktionen
Programm
Reinigungsmittel für
Vorspülprogramm
"IMPULS" Programmen
Spültemperatur (°C)
Durchschnittliche
Spüldauer¹ (Min.)
Taste
"VERZÖGERTER START"
Taste "Express"
P1
Intensiv
●
-
75
130
JA
JA
P2 Universal
-
■
60
120
JA
JA
P3
Eco
●
■
45
190
JA
JA
P4
Vorspülen
- - -
5
JA
N.V
P5
●
■
60
39
JA
JA
● = Reinigungsmittel für Vorspülprogramm
■ = "IMPULS" Programmen (nur bei einigen Modellen)
N.V. = OPTION NICHT VERFÜGBAR
1) Mit kaltem Wasser (15°C) - Toleranz ±10%
Wenn mit heißem Wasser gespült wird, wird die Zeit bis zum Programmende automatisch
aktualisiert, während das Programm läuft.
Die Werte werden im Labor gemäß der Euronorm EN 50242 gemessen (Werte können
entsprechend der Verwendungsbedingungen variieren).
Page 65

!
DE
65
18. WASSERENTHÄRTER
Das Wasser enthält kalkhaltige Salze und
Mineralien in je nach Wohngebieten
unterschiedlich hoher Menge. Diese
Substanzen setzen sich auf dem Geschirr
ab und hinterlassen Flecken und weißliche
Ablagerungen. Je höher der Anteil dieser
Salzverbindungen im Wasser ist, desto
höher ist der Härtegrad des Wassers. Ihr
Gerät ist mit einer Wasserenthärtungsanlage
ausgestattet, die unter Einsatz spezieller
regenerierender Spülmaschinensalze “weiches”,
d.h. kalkfreies Wasser für jeden Spülgang
liefert. Auskunft über die Wasserhärte Ihres
Wohngebietes erhalten Sie jederzeit bei
Ihrem zuständigem Wasserwerk.
Der Enthärter kann Wasser bis zu 90°Fh
(französische Härtegrade) bzw. 50°dH
(deutsche Härtegrade) aufbereiten und
lässt sich in 6 unterschiedlichen Stufen
einstellen. In der nachfolgenden Tabelle finden
Sie die Enthärtereinstellungen entsprechend den
verschiedenen Härtegraden des Wassers.
Stufe
Wasserhärte
Verwendung von
regen. Salzen
Programm
anzeigeleuchte
°fH (franz.
Härtegrade)
°dH (deutsche
Härtegrade)
S0
0-5
0-3
NEIN
Keine
Leuchte
S1
6-15
4-9
JA
P1
S2
16-30
10-16
JA
P1+P2
*S3
31-45
17-25
JA
P1+P2+P3
S4
46-60
26-33
JA
P1+P2+P3
+P4
S5
61-90
34-50
JA
P1+P2+P3
+P4+P5
*
Der Enthärter ist werksseitig auf der Stufe
3 eingestellt und damit den Bedürfnissen
der meisten Haushalte entsprechend
Regulieren Sie den Wasserenthärter je
nach Härtestufe Ihres Wassers wie folgt:
1.
Schalten Sie die Spülmaschine über die
EIN/AUS-Taste an.
2. Drücken Sie die Tasten "Progr." und
EIN/AUS gleichzeitig und halten Sie sie
5 Sekunden lang gedrückt.
3. Ein kurzes Audiosignal ertönt und alle
Anzeigeleuchten blinken 5 Sekunden
lang.
4. Die Anzeigeleuchten für die
PROGRAMMAUSWAHL gehen an, um
die Enthärterstufen anzuzeigen. Wenn
keine Anzeigeleuchte aufleuchtet, wird
die Stufe "S0" eingestellt.
5. Drücken Sie "Progr." erneut, um die
gewünschte Enthärterstufe auszuwählen:
Bei jedem Drücken der Taste geht die
entsprechende Anzeigeleuchte an, wie
in der Tabelle oben gezeigt (P1" S1,
P2" S2,...) Bei Stufe "S0" sind alle
Leuchten aus.
6. Schalten Sie die Spülmaschine aus,
indem Sie die EIN/AUS Taste 3
Sekunden gedrückt halten. Danach ist
die neue Einstellung aktiv.
Enthärtereinstellung am
Salzbehälter
Die Einstellungsprozedur muss IMMER
bei ausgeschaltetem Gerät eingeleitet
werden.
ACHTUNG!
Falls die Einstellung aus irgendwelchem
Grund nicht abgeschlossen werden
sollte, ist das Gerät mit der Taste
"EIN/AUS" auszuschalten und die
Prozedur von Anfang an (ab Punkt 1)
zu wiederholen.
Page 66

!
66
19. PROBLEMLÖSUNGEN UND GARANTIE
Wenn Sie den Eindruck haben, dass die Spülmaschine nicht richtig funktioniert, finden Sie
in der unten stehenden Schnellanleitung praktische Tipps zur Behebung der häufigsten
Fehler. Bleibt das Problem weiterhin bestehen oder kehrt es wieder, kontaktieren Sie
das technische Kundendienstzentrum.
Angezeigter Fehler
Bedeutung und Lösungen
"WASSER PRÜFEN"
und ein kurzes Audiosignal
(nur bei einigen Modellen).
E2 (mit Display) und
ein kurzes Audiosignal
Die Spülmaschine füllt sich nicht mit Wasser
Prüfen Sie, ob die Wasserzufuhr geöffnet ist.
Prüfen Sie, ob der Wasserschlauch geknickt oder eingeklemmt ist.
Prüfen Sie, ob sich der Ablaufschlauch auf der richtigen Höhe befindet
(siehe Abschnitt Installation).
Schließen Sie die Wasserzufuhr. Schrauben Sie den Wasserzufuhrschlauch
von der Rückseite der Spülmaschine ab und prüfen Sie, ob der
„Sandfilter“ nicht verstopft ist.
E3 (mit Display) und
ein kurzes Audiosignal
Die Spülmaschine pumpt kein Wasser ab
Prüfen Sie, ob der Abwasserschlauch geknickt, eingeklemmt oder
blockiert oder ob der Filter verstopft ist.
Prüfen Sie, ob das Siphon verstopft ist.
E4 (mit Display) und
ein kurzes Audiosignal
Wasser läuft aus
Prüfen Sie, ob der Abwasserschlauch geknickt, eingeklemmt oder
blockiert oder ob der Filter verstopft ist.
Prüfen Sie, ob das Siphon verstopft ist.
E8-Ei (mit Display) und
ein kurzes Audiosignal
Das Wasserheizelement funktioniert nicht richtig oder
die Filterplatte ist verstopft
Reinigen Sie die Filterplatte.
Alle anderen Codes
(mit Display)
Schalten Sie das Gerät aus und ziehen Sie den Stecker aus der
Steckdose. Schalten Sie das Gerät wieder ein und starten Sie ein
Programm. Wenn der Fehler erneut auftritt, wenden Sie sich bitte an
ein autorisiertes Kunden-Service-Center.
FEHLERBERICHTE
! Modelle mit Display: Fehler werden als Buchstabe „E“, gefolgt von einer Zahl (z.B.
Fehler 2 = E2) und einem kurzen Audiosignal gemeldet.
! Geräte ohne Display: die Störung wird angezeigt, indem die LED so häufig blinken,
wie es dem Fehlercode entspricht, gefolgt von einer Pause von 5 Sekunden
(Beispiel: Error 2 = 2 x Blinken - Pause - 2 x Blinken - usw...).
Nur Modelle mit Display:
Page 67

!
DE
67
Wenn Fehlfunktionen auftreten während ein Programm läuft, blinkt die zum Programm
gehörige Anzeige schnell hintereinander und ein intermittierendes akustisches Warnsignal
erklingt. Schalten Sie in diesem Fall die Spülmaschine über die Taste „EIN/AUS“ aus.
Prüfen Sie zunächst, ob die Wasserzufuhr geöffnet ist, dann ob der Ablaufschlauch
nicht verknickt ist und ob das Siphon oder die Filter nicht verstopft sind. Stellen Sie
dann das gewünschte Programm wieder ein.
Bleibt das Problem weiterhin bestehen, kontaktieren Sie das technische Kundendienstzentrum.
FEHLER
URSACHE
LÖSUNG
1. Kein Programm
funktioniert
Stecker steckt nicht in der
Steckdose
Stecker in die Steckdose stecken
O/I-Taste nicht gedrückt
Taste drücken
Tür ist auf
Tür schließen
Kein Strom
Überprüfen
2. Spülmaschine
füllt sich nicht
mit Wasser
Siehe Punkt 1
Überprüfen
Der Wasserhahn ist zu
Wasserhahn aufdrehen
Der Wasserschlauch der Zufuhr
ist geknickt
Knicke aus dem Schlauch entfernen
Der Filter des Wasserzufuhrschlauchs
ist verstopft
Filter am Schlauchende reinigen
3. Spülmaschine
pumpt kein
Wasser ab
Der Filter ist schmutzig
Filter reinigen
Abwasserleitung ist verbogen
Knicke aus der Leitung entfernen
Die Verlängerung der
Abwasserleitung
ist nicht richtig
angeschlossen
Anweisungen zum Anschließen der
Abwasserleitung sorgfältig befolgen
Der Abwasseranschluss an der
Wand verläuft nach unten, nicht
nach oben
Rufen Sie einen qualifizierten
Techniker
4. Spülmaschine
pumpt ständig
Wasser ab
Abwasseranschluss sitzt zu
niedrig
Abwasserschlauch mindestens 40
cm über den Boden anheben
Nur Modelle ohne Display
Diese Spülmaschine ist mit einer Überlaufsicherung versehen, die bei einem Fehler
automatisch überschüssiges Wasser ablaufen lässt.
ACHTUNG!
Um eine ordnungsgemäße Funktion der Überlaufsicherung zu
gewährleisten, empfehlen wir, die Spülmaschine während des
Betriebs nicht zu verschieben oder zu kippen.
Sollte es nötig sein, die Spülmaschine zu kippen oder zu
verschieben, achten Sie darauf, dass das Spülprogramm beendet
wurde und dass sich kein Wasser mehr im Gerät befindet.
Sonstige Fehler
Page 68

!
68
FEHLER
URSACHE
LÖSUNG
5. Sprüharme
drehen sich
hörbar nicht
Übermäßig viel Geschirrreiniger
Menge an Geschirrreiniger reduziere
Geeigneten Geschirrreiniger verwenden
Gegenstände blockieren die
Sprüharme
Überprüfen
Filterplatte und Filter sind sehr
schmutzig
Filterplatte und Filter reinigen
6.
Bei Elektrogeräten
ohne Display:
Eine oder mehr
Anzeigeleuchten
blinken schnell
Hahn der Wasserzufuhr ist
abgedreht
Gerät ausschalten Hahn aufdrehen
Spülgang erneut starten
7. Geschirr nur
teilweise sauber
Siehe Punkt 5
Überprüfen
Töpfe und Pfannen sind am
Boden nicht richtig sauber
Töpfe mit angebrannten Essensresten
müssen eingeweicht werden, bevor
sie in die Spülmaschine geräumt
werden
Ränder von Töpfen und Pfannen
sind nicht richtig sauber
Töpfe anders einräumen
Sprüharme sind teilweise
verstopft
Sprüharme herausnehmen, indem die
Schraubringe im Uhrzeigersinn abgedreht
werden. Sprüharme unter fließendem
Wasser abwaschen
Das Geschirr wurde nicht
richtig eingeräumt
Teller nicht zu nah nebeneinander
einräumen
Im Ende des Abwasseranschlusses
steht Wasser
Das Ende des Abwasseranschlusses
darf nicht mit dem abfließenden
Wasser bedeckt sein
Es wurde eine falsche Menge
Reinigungsmittel dosiert oder
der Reiniger ist alt und verklumpt
Dosierung entsprechend der
Verschmutzung des Geschirrs erhöhen
oder Geschirrreiniger wechseln
Die Kappe des Salzbehälters
ist nicht richtig verschlossen
Kappe festdrehen
Das Spülprogramm ist nicht
gründlich genug
Wählen Sie ein stärkeres Programm
aus
8.
Geschirrreiniger
wird nicht oder
nur teilweise
ausgegeben
Besteck, Teller, Pfannen usw.
blockieren den Spender, sodass
kein Reiniger ausgegeben
werden kann
Geschirr so einräumen, dass der
Spender nicht blockiert wird
9. Geschirr hat
weiße Flecken
Das Wasser hat einen hohen
Härtegrad
Salz und Klarspüler überprüfen und
nachfüllen Bleibt das Problem
weiterhin bestehen, kontaktieren Sie
das technische Kundendienstzentrum
10. Geräusche
beim Spülen
Geschirr und Teller schlagen
aneinander
Eingeräumtes Geschirr erneut überprüfen
Die rotierenden Sprüharme
schlagen an die Teller
Eingeräumtes Geschirr erneut überprüfen
Page 69

!
DE
69
FEHLER
URSACHE
LÖSUNG
11. Das Geschirr
ist nicht
richtig trocken
Luft zirkuliert nicht richtig
Spülmaschinentür nach dem
Programmende offen stehen lassen,
damit das Geschirr nachtrocknet
Klarspüler fehlt
Klarspüler nachfüllen
Anmerkung: Sollten die oben genannten Situationen zu einem schlechten Spülergebnis
führen, entfernen Sie die Schmutzablagerungen auf dem Geschirr von Hand, da diese bei
der abschließenden Trocknung in der Maschine eintrocknen und sich anschließend nur
noch schwer entfernen lassen.
Wenn die Fehlfunktion weiterhin besteht, kontaktieren Sie das technische
Kundendienstzentrum und geben Sie das Modell der Spülmaschine an. Sie finden es auf
dem Schild oben auf der Innenseite der Tür oder auf der Garantiekarte. Anhand dieser
Informationen kann der Kundendienst Ihre Anfrage schneller und effektiver beantworten.
Der Hersteller übernimmt keine Haftung für Druckfehler in diesem Handbuch. Ferner
behält sich der Hersteller das Recht vor, notwendige Veränderungen an seinen Produkten
vorzunehmen, ohne deren wesentliche Eigenschaften zu verändern.
Kundendienst und Garantie
Das Produkt ist gesetzlich und gemäß der auf dem Garantieschein genannten
Allgemeinen Geschäftsbedingungen mit einer Garantie versehen. Der
Garantieschein sollte aufbewahrt und dem autorisierten technischen
Kundendienstzentrum bei Bedarf zusammen mit dem Kaufbeleg vorgelegt
werden. Weitere Informationen zu den Garantiebedingungen finden Sie auch auf
unserer Webseite.
Wenn Sie Hilfe benötigen, füllen Sie das Online-Formular aus, oder kontaktieren
Sie uns unter der auf der Supportseite unserer Website angegebenen Nummer.
Page 70

!
70
20. UMGEBUNGSBEDINGUNGEN
Dieses Gerät ist entsprechend
der europäischen Richtlinie
2012/19/EU als elektrisches /
elektronisches Altgerät (WEEE)
gekennzeichnet.
Elektrische und elektronische Altgeräte
enthalten vielfach noch wertvolle Materialien.
Sie enthalten aber auch schädliche Stoffe,
die für ihre Funktion und Sicherheit
notwendig waren. Im Restmüll oder bei
falscher Behandlung können diese der
menschlichen Gesundheit und der Umwelt
schaden.
Es ist daher sehr wichtig, dass elektrische
und elektronische Altgeräte (WEEE) einer
speziellen Verwertung zugeführt werden,
damit die schädlichen Stoffe ordnungsgemäß
entfernt
und entsorgt werden bzw. wertvolle
Rohstoffe der Wiederverwertung zugeführt
werden können.
Sie können mit der
Beachtung der folgenden simplen Hinweise
einen wichtigen Beitrag dazu leisten, dass
elektrische und elektronische Altgeräte
(WEEE) der menschlichen Gesundheit und
der Umwelt nicht schaden:
!
Elektrische- und elektronische Altgeräte
(WEEE) sollten keinesfalls wie Rest-
oder Haushaltsmüll behandelt werden.
!
Nutzen Sie stattdessen die an Ihrem
Wohnort eingerichteten kommunalen
oder gewerblichen Sammelstellen zur
Rückgabe und Verwertung elektrischer
und elektronischer Altgeräte (WEEE).
Informieren Sie sich, ob ggf. in Ihrem
Land bzw. Ihrer Region für große/sperrige
elektrische und elektronische Altgeräte
(
WEEE) eine Abholung angeboten wird.
Sorgen Sie in jedem Falle dafür, dass Ihr
Altgerät bis zum Abtransport kindersicher
aufbewahrt wird.
In einigen Ländern sind Händler
unterbestimmten Voraussetzungen beim
Geräteneukauf auch zur Rücknahme des
Altgerätes verpflichtet, wenn das Altgerät
dem neuen Fabrikat in der Funktion
entspricht.
Page 71

!
EN
71
Thank you for choosing a Candy dish
washer. We are confident it will assist you
loyally in washing your daily dishes in full
safety.
Carefully read this manual for correct and
safe appliance use and for helpful tips on
efficient maintenance.
Only use the dish washer
after
carefully reading these instructions. We
recommend you always keep this manual
to hand and in good condition for any
future owner.
Please check that the appliance is
delivered with this instruction manual, the
warranty certificate, the service centre
address and the energy efficiency label.
Each product is identified by a unique 16digit code, also called the “serial number”,
printed on the warranty
certificate or on
the serial plate found inside the door, on
the upper right hand side. This code is a
sort of product-specific ID card that you
will need to use to register the product or
if you need to contact the Technical
Assistance Centre.
Fig. A
15
4
32
1. GENERAL SAFETY RULES
2. WATER CONNECTION
3. LOADING THE SALT
4. ADJUSTING THE UPPER BASKET
(ONLY ON SOME MODELS)
5. LOADING DISHES
6. INFORMATION FOR TEST
LABORATORIES
7. LOADING THE DETERGENT
8. TYPES OF DETERGENT
9. LOADING THE RINSE AID
10.
CLEANING THE FILTERS
11.
PRACTICAL HINTS
12.
CLEANING AND MAINTENANCE
13. DESCRIPTION OF THE CONTROL PANEL
14.
TECHNICAL DATA
15. PROGRAMME SELECTION AND SPECIAL
FEATURES
16.
REMOTE CONTROL (Wi-Fi)
17.
PROGRAMME LEGEND
18.
WATER SOFTENER UNIT
19. TROUBLESHOOTING AND WARRANTY
20.
ENVIRONMENTAL CONDITIONS
A.
WIRELESS PARAMETERS (PAG.139)
Contents
Page 72

!
72
1. GENERAL SAFETY
RULES
!
This appliance is intended to
be used in household and
similar applications such as:
− Staff kitchen areas in
shops, offices and other
working environments;
− Farm houses;
− By clients in hotels, motels
and other residential type
environments;
− Bed and breakfast type
environments.
A different use of this appliance
from household environment
or from typical housekeeping
functions, as commercial use by
expert or trained users, is excluded
even in the above applications. If
the appliance is used in a manner
inconsistent with this it may reduce
the life of the appliance and may
void the manufacturer’s warranty.
Any damage to the appliance or
other damage or loss arising
through use that is not consistent
with domestic or household use
(even if located in a domestic or
household environment) shall not
be accepted by the manufacturer to
the fullest extent permitted by law.
! This appliance can be used by
children aged from 8 years and
above and persons with reduced
physical, sensory or mental
capabilities or lack of experience
and knowledge if they have been
given supervision or instruction
concerning use of the appliance
in a safe way and understand the
hazards involved. Children shall
not play with the appliance.
Cleaning and user maintenance
shall not be made by children
without supervision.
! Children should be supervised
to ensure that they do not play
with the appliance.
! Children of aged 3 and under
should be kept away unless
continuously supervised.
! If the supply cord is damaged,
it must be replaced by the
manufacturer, its service agent
or similarly qualified persons in
order to avoid a hazard. We
recommend using an original
component, which can be
requested from the Technical
Assistance Centre.
!
Only use the hose-sets
supplied with the appliance for
the water supply connection
(do not reuse old hose-sets).
!
Water pressure must be
between 0.05 MPa and 0.8
MPa.
Page 73

!
EN
73
!
Make sure carpets or rugs do
not obstruct the base or any of
the ventilation openings.
! After installation, the appliance
must be positioned so that the
plug is accessible.
!
Do not leave the door open in
a horizontal position, in order
to avoid potential dangers (e.g.
tripping).
! For further information on the
product or to consult the technical
data sheet, please refer to the
manufacturer's website.
!
The technical details (supply
voltage and power input) are
indicated on the product rating
plate.
!
Make sure that the electrical
system is earthed and complies
with all applicable laws, and
that the socket is compatible
with the plug of the appliance.
The manufacturer declines all
responsibility for any damage
to people or property due to
non-earthing of the machine.
! Ensure that the dishwasher
does not crush power cables.
! In general it is not advisable to
use adaptors, multiple plugs
and/or extension cables.
! Before cleaning or maintaining
the dishwasher, unplug the
appliance and turn off the
water supply.
! Do not pull on the power cord
or appliance to unplug the
machine.
! Do not leave the appliance
exposed to the elements (rain,
sun, etc.).
! Leaning or sitting on the open
door of the dishwasher could
cause it to tip over.
!
The dishwasher is designed for
normal kitchen utensils. Objects
that have been contamined by
petrol, paint, traces of steel or
iron, corrosive chemicals, acids
or alkalis must not be washed in
the dishwasher.
WARNING:
Knives and other utensils
with sharp points must be
loaded in the basket with
their points down or placed
in a horizontal position.
Electrical connections and
safety instructions
Page 74

!
74
!
If there is a water softening
device installed in the home
there is no need to add salt to
the water softener fitted in the
dishwasher.
!
If the appliance breaks down or
stops working properly, switch it
off, turn off the water supply and
do not tamper with it. Repair work
should only be carried out by an
approved service agent and only
genuine spare parts should be
fitted. Any failure to follow the
above advice may have serious
consequences for the safety of
the appliance.
! If it you need to move the
machine after removing the
packaging, do not try to lift it by
the bottom of the door. Open
the door slightly and lift the
machine by holding on the top.
By marking this product,
we confirm, under our own
responsibility, full compliance
of this product with all
relevant safety, health and
environmental requirements
under European legislation.
!
Remove all elements of the
packaging.
! Do not install or use the
dishwasher if it is damaged.
!
Follow the instructions supplied
with the product.
Installation
WARNING:
Keep packaging materials
away from children.
Page 75

!
EN
75
2. WATER CONNECTION
! The inlet and drain hoses can be directed
to left or right.
!
Water pressure must be between 0,08
MPa and 0,8 MPa.
!
The inlet hose must be connected to a tap
so that the water supply can be cut off
when the machine is not in use (fig. 1 B).
! The dishwasher is fitted with 3/4" threaded
connector (fig. 2).
! Connect inlet hose "A" to water tap "B"
with a 3/4" attachment making sure that it
has been properly tightened.
! If it is necessary, the inlet pipe can be
lengthened up to 2,5 m. The extension
pipe is available from the After Sales
Service Centre.
! If the dishwasher is connected to new pipes
or to pipes which have not been inuse for a
long time run water through for a few
minutes before connecting the inlet hose. In
this way no deposits of sand or rust will
clog up the water inflow filter.
1
B
2
B
A
The appliance must be connected to
the water mains using new hose-sets.
The old hose-sets should not be
reused.
The dishwasher can be connected to
either cold or hot water, as long as it
is no hotter than 60°C.
Page 76

!
76
SOME MODELS may include one or more
of the following features:
! WATERBLOCK (fig. 3)
The waterblock system has been designed
to
improve the safety of your appliance. The
system prevents flooding which might be
caused by a machine malfunction or as a
result of a fracture on the rubber pipes
and in particular on the water supply pipe.
How it works
A sump located on the base of the appliance
collects any possible water leakage and
operates a sensor which activates a valve
placed under the water tap and blocks any
water, even with the tap fully opened.
If box "A" containing the electrical parts is
damaged, remove the plug from the socket
immediately. To ensure perfect operation of
the safety system, the hose with box "A"
should be connected to the tap as shown in
the figure. The water supply hose should
not be cut, as it contains live parts. If the
hose is not long enough for correct
connection, it must be replaced with a longer
one. The hose can be obtained from the
Technical Assistance Centre.
3
A
! AQUASTOP (fig. 4):
A device located on the supply tube that
stops water flow if the tube deteriorates;
in this case, a red mark will appear in the
window "A" and the tube must be
replaced. To unscrew the nut, press the
one-way lock device "B".
B
A
4
!
AQUAPROTECT - SUPPLY TUBE WITH
GUARD
(fig. 5):
Should water leak from the primary internal
tube "A", the transparent containment
sheath "B" will contain water to permit
the washing cycle to complete. At the
end of the cycle, contact the Customer
Service Centre to replace the supply
tube.
B
A
5
Hydraulic safety devices
All the dishwashers are equipped with
an overflow safety device which, if
water exceeds normal levels due to
malfunctions, automatically blocks
water flow and/or drains excess
quantities.
Page 77

!
EN
77
! The outlet hose should disharge into a
standpipe, making sure that there are no
kinks (fig. 6).
! The standpipe must be at least 40 cm
above floor level and it must have an
internal diameter of at least 4 cm.
! It is advisable to fit an anti-odour air trap
(fig. 6X). If necessary the outlet hose can
be extended up to 2,5 m, provided that it
is kept at a maximum height of 85 cm
above floor level. The extension pipe is
available from the After Sales Service
Centre.
! The hose can be hooked over the side of
the sink, but it must not be immersed in
water, in order to prevent water from
being syphoned back to the machine
when this is in operation (fig. 6Y).
! When installing the appliance under a
worktop the hose pipe clamp must be
attached to the wall in the highest
possible position under the worktop
(fig. 6Z).
! Check that there are no kinks in the inlet
and outlet hoses.
6
Z
Y
X
Connecting the outlet hose
Page 78

!
78
3. LOADING THE SALT
(Fig. A "1")
! The appearance of white stains on dishes
is generally a warning sign that the salt
container needs filling.
! On the bottom of the machine there is a
container for the salt for regenerating the
softener.
! It is important to use only a salt that is
specifically designed for dishwasher.
Other types of salt contain small
quantities of insoluble particles which
over a long period of time may affect and
deteriorate the softener performance.
! To add salt, unscrew the cap of the
container on the bottom and then refill the
container.
! During this operation a little water will
overflow; but keep adding salt until the
container is full. When the container is
full, clean the thread of salt residue and
retighten the tap.
! After loading the salt, it is recommended
running a complete washing cycle, or
COLD RINSE programme.
! The salt dispenser has a capacity of
between 1.5 and 1.8 kg and, for efficient
use of the appliance, it should be refilled
from time to time .
After loading the salt, YOU MUST run
a complete washing cycle, or the
PRE-WASH/COLD RINSE/REFRESH
programme.
(Only for first start up) When the
appliance is used for the first time,
after completely filling the salt
container, it is necessary to add water
until the container overflows.
Page 79

!
EN
79
4. ADJUSTING THE UPPER
BASKET (ONLY ON
SOME MODELS)
!
If 29 cm to 32.5 cm plates are regularly
used, load them onto the lower basket
after the upper basket has been placed in
its upper position, as detailed below
(according to the model):
Type "A":
1. Turn front blocks "A" outwards;
2. Remove the basket and remount it in
the upper position;
3. Replace blocks "A" in the original
position.
Dishes that are greater than 20 cm in
diameter can no longer be loaded onto the
upper basket, and the mobile supports
cannot be used when the basket is in the
upper position.
Type "A"
A
A
Type "B":
(ONLY MODELS WITH EASY CLICK):
1. Remove the upper basket;
2. Hold the basket on both sides and lift it
upwards (fig. 1).
Dishes that are greater than 20 cm* in
diameter can no longer be loaded onto the
upper basket, and the mobile supports
cannot be used when the basket is in the
upper position.
* In models fitted with a third basket, dishes
measuring more than 14 cm in diameter
can no longer be loaded onto the upper basket.
ADJUSTING THE BASKET TO THE
LOWER POSITION:
1. Hold the basket on both sides and lift it
gently upwards (fig. 1);
2. Then slowly release into the correct
position (fig. 2).
N.B.: NEVER LIFT OR LOWER THE
BASKET FROM ONE SIDE ONLY (fig. 3).
WARNING:
We recommend adjusting the basket before
loading the dishes.
Type "B"
1
3
a
b
a
b
2
Page 80

!
80
5. LOADING DISHES
! The upper basket is provided with mobile
racks hooked to the sides of the basket,
which can be regulated into 4 positions.
! In the lowered position (A-A1) the racks
may be used for such items as: tea and
coffee cups, kitchen knives and ladles.
Also glasses with stems may be safely
hung on the ends of the racks.
!
In the upright position (B-B1) the racks
allow you to load dinner plates and soup
plates. Plates should be loaded vertically
with the underside of the plate towards
the back of the dishwasher with a space
between each plate to allow water to pass
freely.
! It is advisable to load large plates
(approx. 26 or more cm) slightly tilted
towards the rear to facilitate introduction
of the basket into the machine.
! Salad bowls and plastic bowls may also
be loaded on the upper basket. It is
advisable to block these in place so that
the jets of water do not make them
overturn.
!
The upper basket has been designed to
offer maximum flexibility in use and can
be loaded with up to 24 plates on two
rows, up to 30 glasses on five rows or a
mixed load.
example of loading see fig. 1, 2 e 3.
Upper basket (fig. 1)
Upper basket (fig. 2)
Upper basket (fig. 3)
! Saucepans, oven dishes, tureens, salad
bowls, lids, serving dishes, dinner plates,
soup plates and ladles can be loaded on
the lower basket.
Using the upper basket
Using the lower basket
Page 81

!
EN
81
! Place the cutlery in the plastic cutlery
holder with the handles pointing upwards.
! Place the cutlery holder on the lower
basket (fig. 4 and 5), making sure that
the cutlery does not get in the way of the
rotating arms.
Please load the dishwasher sensibly to
ensure the best wash results.
example of loading see. fig. 4 e 5
Lower basket (fig. 4)
Lower basket (fig. 5)
Cutlery basket (fig. 6)
The cutlery basket is made with two
detachable parts which will enable various
loading options. The two parts can be
detached by sliding the left section away
from the right section. The top of cutlery
basket can be removed, for enable various
loading options.
6. INFORMATION FOR
TEST LABORATORIES
Please ask information required for
comparison testing and measuring noise
levels, according to EN normative, to the
following address:
testinfo-dishwasher@candy.it
In the request, please specify model name
and number of the dishwasher (see rating
plate).
The lower basket has a safety-stop
device, for its safe extraction, also
especially useful with a full load. For
loading salt, cleaning filter and for
ordinary maintenance, the complete
extraction of the basket is necessary.
Page 82

!
82
7. LOADING THE
DETERGENT
(Fig. A "2")
Unsuitable detergents (like those for
washing up by hand) do not contain the
proper ingredients for use in a dishwasher,
and stop the dishwasher from working
correctly.
The detergent container is inside the door
(fig. A "2"). If the lid of the container is
closed, press the button (A) to open. At the
end of every wash cycle the lid is always
open and ready for the next time the
dishwasher is used.
The amount of detergent to be used varies
according to how dirty the dishes are and
on the type of dishes to be washed. We
advise using 20:30 g of detergent in the
wash section of detergent compartment (B).
After pouring the detergent into the
container, close the lid, firstly pushing (1)
and then pressing on it (2) until you hear
the click.
Since not all detergents are the same the
instructions on the boxes of detergent can
vary. We should just like to remind users
that too little detergent does not clean the
dishes properly whilst too much detergent
will not produce better results and is also a
waste.
The detergent
It is essential to use a detergent that is
specifically designed for dishwashers
either in powder, liquid,gel or tablet form.
Filling the detergent container
WARNING
When loading the lower basket, please
ensure that the plates or others do not
obstruct the detergent dispenser.
Do not use an excessive amount of
detergent and help limit damage to the
environment at the same time.
Page 83

!
EN
83
8. TYPES OF DETERGENT
Detergent tablets of different manufacturers
dissolve at different speeds, for this reason,
during short programmes, some detergent
tablets may be not fully effective, because
they are not completely dissolved. If these
products are used, is recommended to
choose longer programmes to guarantee
the complete use of the detergent.
The concentrated detergents, with reduced
alkalinity and with natural enzymes, in
conjunction with 50°C wash programmes,
have a smaller impact on the environment
and they protect the dishes and the
dishwasher. The 50°C wash programmes
purposely exploit the dirt-dissolving
properties of the enzymes, allowing
therefore, with the use of the concentrated
detergents, to achieve the same results of
the 65°C programmes but at a lower
temperature.
The detergents that also contain the rinse
aid must be placed in the wash section of
the detergent container. The rinse aid
container must be empty (if it is not empty,
set the rinse aid regulator to lowest position
before using combined detergents).
If you are planning to use "TABS" (“3 in
1 “/ “4 in 1”/ “5 in 1”, etc.) combined
detergents i.e. those with built in salt and/or
rinse agent, we would advise the following:
!
read carefully and follow the manufacturer’s
instructions given on the packaging;
! the effectiveness of detergents
containingthe built in water softener/salt
depends on the hardness of your water
supply. Check that the hardness of your
water supply is within the effective range
given on the detergent packaging.
If when using this type of product, you
don't get satisfactory washing results,
please contact the detergent manufacturer.
In certain circumstances use of combined
detergents can cause:
! limescale deposits on dishes or in the
dishwasher;
! a reduction in washing and drying
performance.
Please note that using the "TABS"
combined detergents, the rinse aid and
salt indicator lights (only used on
selected models) are superfluous, so
you must ignore the lights.
If washing and/or drying problems occur,
we recommend you return to use traditional
separate products (salt, detergent and rinse
agent). This will ensure that the water
softener in the dishwasher operates
correctly.
In this case, we recommends that you:
! refill both the salt and rinse aid container;
! run one normal washing cycle without a
load.
Please note that on return to the use of
conventional salt, a number of cycles will be
required before the system becomes fully
efficient again.
Detergent tablets
To get satisfactory washing results,
the tablets MUST be placed in the
wash section of the detergent
container and NOT directly in the tub.
Concentrated detergents
Combined detergents
"TABS" combined detergents
Any problems which arise as a direct
result of the use of these products are not
covered by our warranty.
Page 84

!
84
9.
LOADING THE RINSE AID
(Fig. A "3")
The rinse aid, which is automatically
released during the last rinsing cycle, helps
the dishes to dry quickly and prevents spots
and stains forming.
The rinse aid container can be found to the
left of the detergent container (fig. A "3").
To open the lid, push the reference mark
and, in the same time, pull the tab of
opening. It is always advisable to use rinse
aid that is specifically designed for
dishwasher. Check the rinse aid level
through the indicator eye (C) which is
located on the dispenser.
FULL
EMPTY
dark
light
The regulator (D) is placed under the lid
and can be turned using a coin. The
recommended position is 4.
The limestone content of the water
considerably affects the formation of
limescale and the drying performance.
It is therefore important to regulate the
quantity of rinse aid to achieve good
washing results.
If, after the wash, streaks occur on the
dishes, decrease the amount by one
position. If whitish spots occur, increase the
amount by one position.
The rinse aid
Filling the rinse aid container.
Regulating the rinse aid from
1 to 6
Page 85

!
EN
85
10. CLEANING THE FILTERS
(Fig. A "4")
The filter system consists of:
A. A central container that traps the larger
particles;
B. A micro filter, located beneath the
gauze, that traps the tiniest particles
ensuring a perfect rinse;
C. A flat gauze that continuously filters the
wash water.
! To achieve excellent results every time,
the filters should be checked and cleaned
after each wash.
! To remove the filter unit, simply turn the
handle anticlockwise (fig. 1).
! For ease of cleaning, the central
container is removable (fig. 2).
! Remove the gauze filter (fig.3) and wash
the whole unit under a jet of water. If
necessary a small brush can be used.
! With the Self-cleaning Micro filter,
maintenance is reduced and the filter unit
need only be checked every two weeks.
Nevertheless, after each wash it is advisable
to check that the central container and the
gauze filter are not clogged.
WARNING
After cleaning the filters, make
sure that
they are correctly reassembled and
that the gauze filter is properly
positioned at the bottom of the
dishwasher. Make sure that the filter
is screwed back, clockwise, into the
gauze, as poor seating of the filter unit
could have an adverse effect on the
efficiency of the appliance.
Never use the dishwasher without the
filters.
Page 86

!
86
11. PRACTICAL HINTS
! Before placing the dishes in the
dishwasher, remove any remaining food
(bones, shells, pieces of meat or
vegetables, coffee grounds, skin of fruit,
cigarette ash, thooth picks etc. to avoid
blocking the filters, water outlet and
washing arm nozzles.
! Try not to rinse the dishes before loading
them into the dishwasher.
! If saucepans and oven dishes are
encrusted with the remains of burnt or
roast food, it is advisable to leave them to
soak before washing.
! Place the dishes face downwards.
! Try to place the dishes in such a way that
they are not touching one another. If they
are loaded properly you will get better
results.
! After loading the dishes check that the
washing arms can rotate freely.
! Pans and other dishes that have
particularly stubborn food particles or
remnants of burnt food should be left to
soak in water with dishwasher detergent.
! To wash silver properly:
a) rinse the silver immediately after use,
especially if it has been used for
mayonnaise, eggs, fish etc.;
b) do not sprinkle detergent onto it;
c) keep it separate from other metals.
! If you want the dishwasher to give a
complete wash, place the dishes in the
dishwasher at the end of each meal and if
necessary turn on the COLD RINSE cycle
to soften the food remains and remove
bigger particles of food from the new load
of dishes. When the dishwasher is full
start the complete wash cycle
programme.
! If the dishes are not very dirty or if the
baskets are not very full select an
ECONOMY programme, following the
instructions in the program list.
! It should be remembered that not all
dishes are suitable for washing in a
dishwasher. We advise against using the
dishwasher to wash items in
thermoplastic, cutlery with wooden or
plastic handles, saucepans with wooden
handles, items in aluminum, crystal
leaded glass unless otherwise stated.
! Certain decorations may fade. It is
therefore a good idea before loading the
whole batch to wash just one of the items
first so as to be sure that others like it will
not fade.
! It is a good idea not to put silver cutlery
with non-stainless steel handles into the
dishwasher as there could be a chemical
reaction between them.
! In order to avoid any dripping from the top
rack, remove the lower rack first.
! If the dishes are to be left in the machine
for some time, leave the door ajar, to let
some air circulate and to improve the
drying performance.
How to get really good wash
results.
How to make savings.
What not to wash.
When buying new crockery or cutlery
always make sure that they are
suitable for washing in a dishwasher.
Useful hints
Page 87

!
EN
87
12. CLEANING AND
MAINTENANCE
(Fig. A “5”)
! To clean the dishwasher outside, do not
use solvents (degreasing action) neither
abrasives, but only a cloth soaked with
water.
! The dishwasher does not require special
maintenance, because the tank is selfcleaning.
! Regularly wipe the door gasket with a
damp cloth to remove any food remains
or rinse aid.
! Dishwasher cleaning is recommended, in
order to remove limestone deposits or
dirt. We suggest you run a washing cycle
periodically with specialist dishwasher
cleaning products. For all cleaning
operations the dishwasher must be
empty.
! If, in spite of the routine cleaning of the
filters, you notice that the dishes or pans
are not properly washed or rinsed, check
that all the spray heads on the rotor arms
(fig. A “5”) are clear.
If they are blocked, clean them in the
following way:
1) to remove the upper rotor arm, turn it
until it lines up with the stop marked by
the arrow (fig. 1b). Push it upwards
(fig. 1) and, keeping it pushed in,
unscrew it in a clockwise direction (to
reassemble it repeat the same
operation, but turn it anticlockwise).
The lower rotor arm can be removed
simply by pulling it upwards (fig. 2);
2) wash the rotor arms under a jet of water
to clear any blockage in the spray
heads.
3) when you have finished, refit the rotor
arms in the same position,
remembering to re-align the arrow and
screw into position.
! Both the door lining and the tank lining
are in stainless steel; however, should
spots caused by oxidation occur, this is
probably due to a high level of iron salts
presents in the water.
! The spots can be removed with a mild
abrasive agent; never use chlorine based
materials, steel wool, etc.
1
1b
2
After every wash it is essential to turn off
water supply and to switch off the machine
by pressing the On/Off button to the off
position.
Do not use tools that can deform the
spray heads.
WHEN CYCLE IS FINISHED.
Page 88

!
88
If the machine is not going to be used for
some time, it is advisable to follow these
rules:
1. do an empty wash with detergent in
order to clean the machine of any
deposits;
2. pull out the electric plug;
3. turn off the water tap;
4. fill the rinse aid container;
5. Ieave the door ajar;
6. keep the inside of the machine clean;
7. If the machine is left in places where the
temperature is below 0°C any water left
inside the pipes may freeze. Wait until
the temperature rises above zero and
then wait for about 24 hours before.
Page 89

!
EN
89
13. DESCRIPTION OF THE
CONTROL PANEL
G "Reset" button for "SALT EMPTY" light
H "RINSE AID EMPTY" light
I
"PROGRAMME STATUS" lights/"DELAY START" time lights
L "DELAY START" time lights
M "PROGRAMME SELECTION" light
N "Addish" light
A ON/OFF Button
B "PROGRAMME SELECTION" button/ENROLMENT Wi-Fi
C "Start/Reset" button (start/cancel programme)
D "EXPRESS" option button
E D+F CHILD LOCK
F "START DELAY" button
14. TECHNICAL DATA
SIZE
BUILT-IN
FULL-INTEGRATED
59,8x81,8 ÷ 89,8x55
117
TECHNICAL DATA (See rating plate)
16
9 people
Min. 0,08 – Max. 0,8
See rating plate
HALF-INTEGRATED
59,8x81,8 ÷ 89,8x57
117
15
9 people
FREE-STANDING
WITHOUT
WORKTOP
59,8x82x58
117
13
8 people
WITH
WORKTOP
60x85x60.9
120
Place settings (EN 50242)
Capacity with pans and dishes
Water supply pressure (MPa)
Fuse / Power input / Supply voltage
DATA
Width x Height x Depth (cm)
Depth with door open (cm)
Page 90

!
90
15.
PROGRAMME SELECTION
AND SPECIAL FEATURES
! To turn the appliance on and off, press
the ON/OFF button (for at least 3
seconds).
! Connect the machine to the power
supply.
! Open the door, put the dishes to be
washed inside, and close the door again.
! Press the "ON/OFF" button and hold for
about 3 seconds.
! At this time only the “ON/OFF” and
”Progr.” buttons will be active, and all the
programme indicator lights will come on
for 3 sec. After this only indicator light
“P3” will stay on, and all the buttons will
still be active.
! Choose a programme with the
"PROGRAMME SELECTION" button.
! If you wish to select an option, press the
corresponding button (the indicator light
representing the selected option will
come on).
! Press "Start/Reset" and a signal will
sound, the indicator light corresponding to
the selected programme will stay on and
the wash indicator light will come on. If
the programme is started with the door
open, a signal will sound 5 times, and the
programme will be started automatically
once the door has been closed.
Hold down the ON/OFF button for about 3
sec. to turn the machine on, and the "P3"
programme indicator light will come on.
From the Settings menu, you can adjust
various parameters to suit your washing
requirements.
Entering the Settings menu
! Turn on the dishwasher by holding the
"ON/OFF" button down for about 3 sec.
! Hold down the "Progr." and "ON/OFF"
buttons for about 5 sec.
! All the indicator lights will flash for 5 sec.
! The settings will be displayed:
- Lime scale prevention settings appear
when the indicator light comes on in the
corresponding programmes. If they are
all off, the level is set to "S0".
- When the audio signal is activated, the
"Express" indicator light comes on.
- When the “Memo” function is activated,
the "6h" indicator light on the start
delay function comes on.
! When you press the "Progr." button,
adjustment of SOFTENER will begin
(refer to the appropriate chapter in the
instruction booklet for information).
! Press the "Express" button to turn on
adjustment of the BUZZER. (refer to the
section on this topic for information on
how to adjust).
ON/OFF button
At the end of the cycle, remember to
switch off the appliance using the
ON/OFF button, then remove the plug
and close the water supply.
First time you switch on the
appliance
Next time you switch on the
appliance
If you have turned on the programme
memorisation function, the indicator
light corresponding to the last
programme completed will appear on
the display.
Settings Menu
Page 91

!
EN
91
! Press the "Start Delay" button to activate
the MEMO FUNCTION (refer to the
appropriate chapter in the instruction
booklet for information on how to turn it
on and off).
The dishwasher is equipped with a dirt sensor,
capable of analysing water murkiness during all
"AUTOMATIC" programme phases (see
programme legend). Thanks to this device,
the wash cycle parameters are automatically
adapted to the real quantity of dirt on dishes.
This is because water murkiness is linked to the
quantity of dirt on dishes. Thus, excellent
washing results are guaranteed while
optimising water and energy consumption.
The "IMPULSE" programmes use an
impulse washing technology, which reduces
consumption and noise, and improves
performance.
When the programme starts, you should
only open the door and add more dishes
when the ADDISH indicator light is
switched on. The appliance will stop
automatically and the time remaining to the
end of the cycle will flash on the display. Close
the door, without pressing any buttons.
The cycle will start from where it left off. When
the relating indicator light switches off, it is no
longer advisable to add further dishes.
Opening the door when a programme is
running is not recommended especially
during the main wash and final hot rinse
phases. However, if the door is opened
while a programme is running (for example,
to add dishes) the machine stops
automatically. Close the door, without
pressing any buttons. The cycle will start
from where it left off.
Proceed as follows to change or cancel a
running program:
! Hold the "Start/Reset" button down for at
least 3 seconds.
! Some audible signals will sound and the
programme indicator lights will turn on
and off individually and sequentially.
"AUTOMATIC" programmes
(only on some models)
"IMPULSE" programmes
(only on some models)
The “intermittent” working of the
washing pump is NOT to be
considered a malfunction; it is a
characteristic of impulse washing,
and therefore should be considered a
normal feature of the programme.
ADDISH (possibility of adding dishes
after the programme has started)
Open the door slowly and carefully, to
avoid getting wet with splashes of
washing water
.
Adding dishes after the ADDISH
indicator light has switched off is
strongly discouraged as this could
affect the wash performance.
WARNING
If you open the door during the drying
cycle, an intermittent audio signal
advises you that the drying cycle has
not yet finished.
Programme interruption
WARNING:
If you open the door during the drying
cycle, an intermittent audio signal
advises you that the drying cycle has
not yet finished.
Changing a running programme.
Page 92

!
92
! The running programme will be cancelled
and all the programme indicator lights will flash
.
! At this point a new programme can be set.
When a programme is running the relevant
indicator light will remain on and the 3
"PROGRAMME STATUS" indicator lights:
WASH
RINSE
DRY
will light singularly and in sequence to
indicate the current phase.
If there is any break in the power supply
while the dishwasher is operating, a
special memory stores the selected
programme and, when the power is
restored, it continues where it left off.
A 5 second buzzer will sound (if not muted)
3 times at 30 second intervals to signal that
the programme has ended.
The option buttons provide you with further
wash options, allowing you to customise the
wash programmes (see the table in chapter
17 for a list of programmes on which each
option can be enabled). Options are
enabled (or disabled) before starting the
programme, using the appropriate buttons.
The relevant indicator lights will appear (or
disappear) on the display. The option button
should be enabled after you have chosen
the wash programme.
"Express" button
This button enables average energy and
time savings of 25% (according to the cycle
selected), reducing the wash water
temperature and the drying time during the
final rinse. This option is recommended for
evening washing when perfectly dry dishes
are not needed immediately.
For better drying, leave the dishwasher
door slightly ajar to promote natural air
circulation in the dishwasher.
This model is provided with an indicator
light on the control panel that lights up when
the salt needs to be topped up. The
appearance of whitish stains on dishes is
generally a warning sign that the salt
container needs filling.
After filling the salt container, you should
press this button for a few seconds, until the
corresponding indicator light switches off.
WARNING:
Before starting a new programme, you
should check that there is still detergent
in the dispenser. If necessary, top up the
dispenser.
Programme operations.
Programme end
Option buttons
If an option is selected that is not
compatible with the selected programme
then the option indicator light first flashes
and then goes off.
"NO SALT" indicator light
"RESET" button for "NO SALT"
indicator light
WARNING:
If you press the reset button without
filling the salt container, this will
interfere with the correct functioning of
the salt indicator light.
In order to guarantee the correct
functioning of the salt indicator light,
YOU MUST ALWAYS FULLY REPLENISH
THE SALT CONTAINER.
Page 93

!
EN
93
The dishwasher start time can be set with
this button, delaying the start by 3, 6 or 9
hours.
Proceed as follows to set a delayed start:
! Choose a programme by pressing the
"PROGRAMME SELECTION" button.
! Press the "START DELAY" button (each
time the button is pressed the start will be
delayed by 3, 6 or 9 hours respectively,
and the corresponding time indicator light
will switch on).
! To start the countdown, press the
"Start/Reset" button (the set time
indicator light will start to flash).
If a 9 hour delay is set, countdown will be
displayed by the 6h indicator light after 3
hours and the 3h indicator light after 6
hours.
At the end of the last 3 hours (at the end of
countdown) the 3h indicator light will stop
flashing and remain on to indicate the
washing phase and the programme will
start automatically.
If countdown has not ended, whereby the
programme has not yet started, it is
possible to change or cancel the delayed
start and select another programme or to
select/deselect the option button,
proceeding as follows:
! Hold the "Start/Reset" button down for at
least 3 seconds. Some audible signals
will sound and the programme indicator
lights will turn on and off individually and
sequentially.
! The delayed start and the selected
programme will be cancelled. The
programme indicator lights will flash, the
dishwasher is ready start Programme.
You can deactivate turning on and off of the
audio signal as follows (the default setting is
active):
! Turn on the dishwasher by pressing the
"ON/OFF" button for about 3 sec.
! Hold down the "Progr." and "ON/OFF"
buttons for about 5 sec.
! All the indicator lights will flash for 5 sec.
- If the audio signal is active, the
"Express" indicator light will be on.
- If the audio signal is not active, the
"Express" indicator light will be off.
1. Press the "Express" button to turn the
audio signal on or off.
2. Whenever the audio signal is turned on,
in addition to visual confirmation given by
turning on the "Express" led, an acoustic
signal will sound as confirmation.
3. If you turn off the audio signal, no audio
signal will sound to accompany the
visual confirmation when the "Express"
led goes off.
4. Turn off the dishwasher by holding down
the "ON/OFF" button for about 3 sec. to
make the new setting effective.
Proceed as follows to enable storage of the
last programme used in memory:
! Turn on the dishwasher by pressing the
"ON/OFF" button for about 3 sec.
! Hold down the "Progr." and "ON/OFF"
buttons for about 5 sec.
! All the indicator lights will flash for 5 sec.
"START DELAY" button
Activation/Muted END-OFPROGRAMME signal.
MEMO FUNCTION (Memorising
the last programme used)
Page 94

!
94
1. The "6h" indicator light on the "Start
Delay" function is off by default.
2. When you press the "Start Delay"
button, the "6h" indicator light will come
on and an audio signal will sound.
3. Turn off the dishwasher by holding down
the "ON/OFF" button for about 5 sec. to
make the new setting effective.
Follow the same procedure to turn off the
memory.
The dishwasher has an electronic child lock
feature. The child lock protects children
against the dangers that can result if the
dishwasher door is opened, and disables
the controls to make sure no undesired or
accidental changes are made.
Turn the child lock feature on and off as
follows:
! Turn on the dishwasher by pressing the
"ON/OFF" button for about 3 sec.
! Hold down the "Express" and "START
DELAY" buttons for about 5 seconds.
The “3h 6h 9h” indicator lights will flash 3
times and an audio signal will sound.
! After this, only the "ON/OFF" button will
work.
! If any other button is pressed, the
programme phase indicator lights will
flash 3 times.
! The child lock may be cancelled by
simply pressing the "Express" and
"START DELAY" buttons and holding
them down for 5 sec. again, or by turning
the appliance off.
CHILD LOCK
Page 95

!
EN
95
16.
REMOTE CONTROL (WI-FI)
This appliance is equipped with Wi-Fi
technology that allows the machine to be
remote controlled via an app.
! Download the Candy simply-Fi app onto
your device.
! Make sure the router is turned on and
your smartphone/tablet is connected to
your home Wi Fi network.
! Turn on BLUETOOTH on your
smartphone/tablet (if available).
! Open the app, create a user profile and
enroll the appliance, following the
instructions appearing on the device’s
display
! Turn on the dishwasher with the ON/OFF
button when instructed to do so in the
app.
! Press "Progr. 3sec WiFi" and hold down
for 3 sec.; à indicator lights P3 and P4 will
both flash.
! Press the "START DELAY" button and
hold down for 3 sec. within 60 sec. of the
previous step; the 3h-6h-9h indicator
lights will all flash simultaneously for 5
min.
!
Enter the password of your home WiFi
network in the app and complete the
procedure.
Successful enrollment
! The 3h-6h-9h indicator lights will go off,
while the P3 P4 indicator lights will stay
on.
! The machine is connected, and you can
now control your machine from the app.
Unsuccessful enrollment
If enrollment fails, or does not succeed
within 5 min.:
! The 3h-6h-9h and P3 P4 indicator lights
will go out.
! The machine will not be connected.
! Repeat the enrollment procedure, holding
down the "START DELAY" button again.
For more information, refer to the
"Enrollment App - Quick Guide" that
comes with your machine, also accessible
at the link : go.candy-group.com/bm-dw
Repeat the enrollment procedure in the
event of problems or a change in your
home router password.
Whenever you want to use the machine
with remote control:
! Fill the dishwasher, add detergent, and
close the door.
! Turn on the dishwasher.
! Press "Progr. 3sec WiFi" and hold down
for 3 sec. "; the P3 P4 indicator lights
will come on steady.
! You may now use the app and remote
control the machine with your device.
Pairing the machine with the app
The Candy simply-Fi app is available
both for Android and for iOS tablets
and smartphones.
To discover all the details of the Wi-Fi
features, explore the app menus in
DEMO mode.
Resetting the WiFi
ENABLING REMOTE CONTROL
Page 96

!
96
! To exit remote control, press “Progr.
3sec WiFi” for 3 sec.
! When no cycle is under way:
Indicator lights P3 P4 will go off and the
led corresponding to the last programme
the machine completed (or P3) will come
on.
! When a cycle is under way:
Indicator lights P3 P4 will start flashing,
while the programme phase indicator
lights will show the point in the washing
cycle that the machine has reached.
The cycle will be completed without
control from the app.
Alternative way to exit remote control.
! Press "Start/Reset" and hold down for 3
sec.: if there is a cycle under way, it will
be cancelled, and the machine will exit
REMOTE CONTROL mode. You may
now set a new wash cycle using the
control panel.
DISABLING REMOTE CONTROL
If you turn the machine off and turn it
back on with the On/Off button while
REMOTE CONTROL is enabled and a
cycle is under way (or if the power
supply is interrupted), the cycle will
resume from the point at which it was
interrupted. "REMOTE CONTROL" will
be disabled and indicator lights P3
and P4 will flash.
Page 97

!
EN
97
17. PROGRAMME LEGEND
Programme
Description
P1
Intensive
Once a day - for heavily soiled pans and any other
items that have been left all day for washing.
P2 Universal
Once a day - for normal soiled pans and any other
items that have been left all day for washing.
P3 Eco
Programme for normally soiled tableware (the
most efficient in terms of its combined energy and
water consumption for that type of tableware).
Programme standardised to EN 50242.
P4
Prewash
Short cold prewash for items that are stored in the
dishwasher until you are ready to wash a full load.
P5
Programme suitable for washing in a single cycle
the most delicate dishes such as glassware and
porcelain in Washing Class A.
Programmes with prewash
For wash programmes with prewash, it is advisable to add a second dose of detergent (max.10 g)
directly in the machine.
Page 98

!
98
Options
Programme
Detergent for soaking
(Prewash)
"IMPULSE" programmes
Temperature of wash (°C)
Average time of
wash ¹ (min.)
"START DELAY" Button
"Express" Button
P1
Intensive
●
-
75
130
YES
YES
P2 Universal
-
■
60
120
YES
YES
P3
Eco
●
■
45
190
YES
YES
P4
Prewash
- - -
5
YES
N/A
P5
●
■
60
39
YES
YES
● = Add detergent for prewash
■ = "IMPULSE" Programmes (only on some models)
N/A= OPTION NOT AVAILABLE
1) With cold water (15°C) – Tollerance ±10%"
With hot water the time remaining until the end of the programme is automatically displayed while
the programme is running."
*Values are measured in a laboratory according to European Standard EN 50242 (consumption
may vary according to conditions of usage)."
Page 99

!
EN
99
18. WATER SOFTENER
UNIT
Depending on the source of the supply,
water contains varying amounts of
limestone and minerals which are deposited
on the dishes leaving whitish stains and
marks. The higher the level of these
minerals present in the water, the harder
the water is.
The dishwasher is fitted with a water
softener unit which, through the use of
special regenerating salt, supplies softened
water for washing the dishes. The degree of
hardness of your water can be obtained
from your water supply company.
Hardness of up to 90°fH (French grading) or
50°dH (German grading) through 6 different
settings. The table below lists different
degrees of water hardness with the
corresponding setting for the softener unit.
Level
Water
hardness
Use of
Regenerating salt
Programme
Indicator Light
ºfH
(French
grading)
ºdH
(German
grading)
S0
0-5
0-3
NO
No indicator
lights
S1
6-15
4-9
YES
P1
S2
16-30
10-16
YES
P1+P2
*S3
31-45
17-25
YES
P1+P2+P3
S4
46-60
26-33
YES
P1+P2+P3+
P4
S5
61-90
34-50
YES
P1+P2+P3+
P4
+P5
* The water softener unit is set in the
factory at level 3, as this is suitable for
the majority of users.
According to the degree of hardness of your
water, regulate the softener unit in the
following way:
1. Turn on the dishwasher by pressing the
"ON/OFF" button.
2. Press the "Progr." and "ON/OFF"
buttons at the same time, and hold for 5
sec.
3. A short audio signal will sound and all
the indicator lights will flash for 5 sec.
4. The "PROGRAMME SELECTION"
indicator lights will come on to show
lime scale remover levels. If no indicator
lights come on, level "S0" will be set.
5. Press "Progr." again to select the
desired level of lime scale removal:
every time you press the button, the
corresponding indicator light will come
on, as shown in the table above
(P1" S1, P2"S2,...) For level "S0", all
the lights will be out.
6. Turn off the dishwasher by holding
down the "ON/OFF" button for 3 sec.
to make the new setting effective.
Regulating the water softener
The dishwasher must ALWAYS be off
before start of this procedure.
WARNING!
If any problem occurs, turn the
dishwasher off by pressing the "ON/OFF"
button and start the procedure again
from the beginning (STEP 1).
Page 100

!
100
19. TROUBLESHOOTING AND WARRANTY
If you believe the dishwasher is not working correctly, consult the quick guide provided
below with some practical tips on how to fix the most common problems. If the
malfunction continues or recurs, contact the Technical Assistance Centre.
Error displayed
Meaning and solutions
"CHECK WATER"
with a short audio signal
(only on some models).
E2 (with display) with a
short audio signal
The dishwasher does not fill with water
Make sure the water supply is open.
Make sure the water supply hose is not bent or crushed.
Make sure the drain pipe is at the proper height (see installation
section).
Close the water supply, unscrew the drain pipe from the back of the
dishwasher and check that the "sand" filter is not clogged.
E3 (with display) with a
short audio signal
The dishwasher does not drain water
Make sure the drain pipe isn’t bent, trapped or blocked, and the filter
is not clogged.
Make sure the siphon is not clogged.
E4 (with display) with a
short audio signal
Water leak
Make sure the drain pipe isn’t bent, trapped or blocked, and the filter
is not clogged.
Make sure the siphon is not clogged.
E8-Ei (with display)
with a short audio signal
The water heating element is not working correctly or the filter
plate is clogged
Clean the filter plate.
Any other code
(with display)
Turn off and unplug the dishwasher, wait a minute. Turn on the
machine and restart a program. If the error occurs again contact an
Authorised Customer Service Centre directly.
BUG REPORTS
! Models with a display: errors are reported by a number preceded by the letter "E"
(e.g. Error 2 = E2) and a short audio signal.
! Models without a display: an error is shown by a sequence of flashes of every
LED. The error code is shown by the number of flashes followed by a pause of 5
seconds (example: two flashes – pause 5 seconds – two flashes – repeating = Error 2).
Only models with a display
 Loading...