

Page 1

EN
User instructions
FR
Mode d’emploi
CDPM 85370
DISHWASHER
LAVE-VAISSELLE
Page 2

Congratulations!
Thank you for choosing a Candy
appliance; quality dishwashers which
guarantee high performance and
reliability.
Candy manufacture a vast range
of domestic appliances: washing
machines, washer/dryers, cookers,
microwave ovens, ovens and hobs,
refrigerators and freezers.
Ask your dealer for the catalogue with
the complete range of Candy products.
Please read this booklet carefully as
it provides important information
regarding the safe installation, use,
and maintenance of the machine,
together with some useful advice on
how to achieve the best results from
your dishwasher.
For future reference please keep this
instruction booklet in a safe place.
CUSTOMER SERVICE AND
GUARANTEE
Your new appliance is fully guaranteed
by the manufacturer for 12 months
against electrical/mechanical breakdown excluding:
A. Any faults which occur due to bad
installation or misuse of the machine.
B. Any faults which occur due to repair
of, or interference with, the machine
by any person not authorised by the
manufacturer to carry out service.
C. Any faults which occur due to
any parts which are fitted to the
machine which are not the original
manufacturers parts.
D. Any faults arising from non-domestic
use or unusual or abnormal use of
the machine.
E. Any faults arising from operation at
incorrect voltage.
F. Any faults arising from incorrect
operation of the machine.
The guarantee applies to Gt Britain
and Northern Ireland only, and is an
addition to your statutory rights.
AFTER SALES SERVICE
For service and repairs call your local engineer on our national telephone number:
GIAS Service Tel: 0884 995599
Support Service (Eire 0818 200021)
2
Page 3
CONTENTS
Safety advice
Setting up, installation
Water softener unit
Loading the salt
Adjusting the upper basket
Loading the dishes
Information for test laboratories
Loading the detergent
Types of detergent
Loading the rinse aid
Cleaning the filters
Some practical hints
Routine cleaning and maintenance
Description of the control panel
Technical data
Programme selection and special functions
Programme guide
The Waterblock system
Identifying minor faults
pag. 4
pag. 5
pag. 9
pag. 10
pag. 11
pag. 12
pag. 14
pag. 15
pag. 16
pag. 17
pag. 18
pag. 19
pag. 20
pag. 21
pag. 21
pag. 22
pag. 26
pag. 28
pag. 29
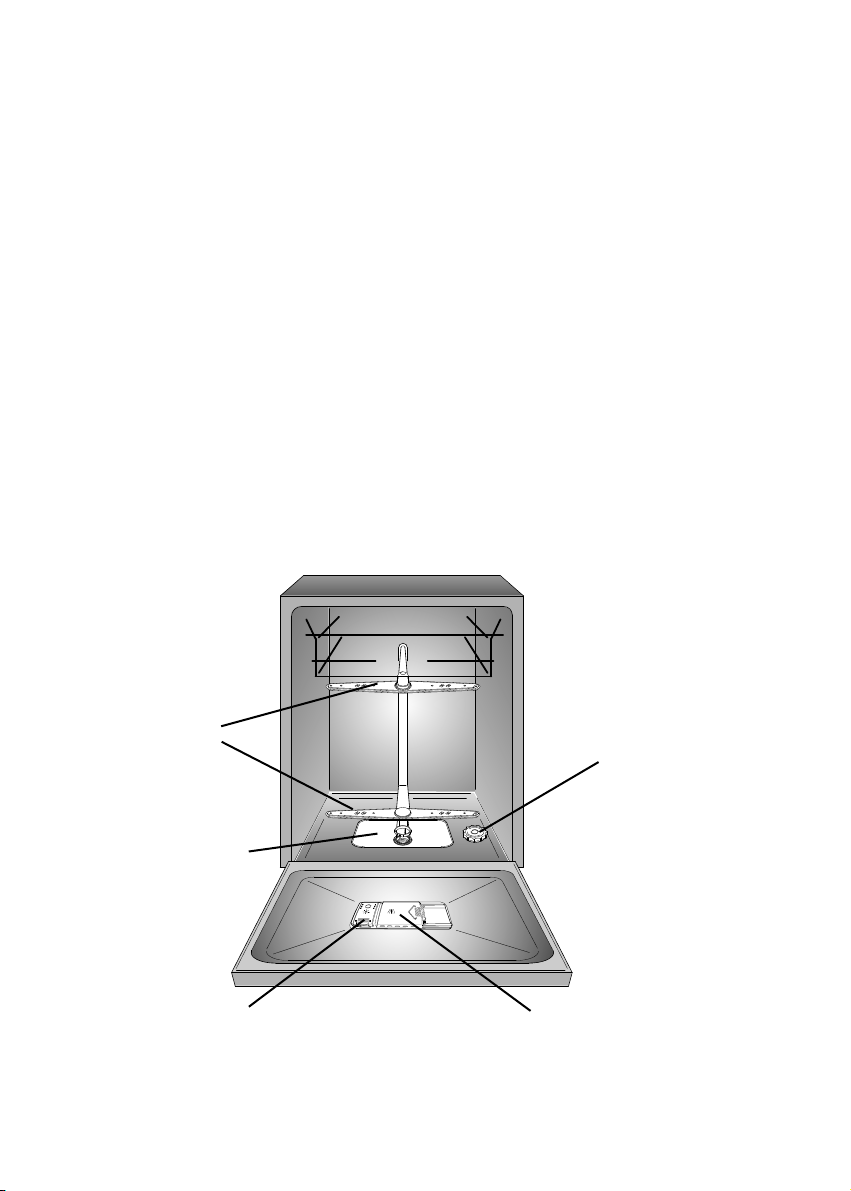
Fig. A
5
1
4
3
Please read the instructions in this booklet carefully because they contain important
information on how to install, use and maintain your dishwasher safely as well as
containing useful tips on how to make the most of it.
Keep this booklet safe for future reference.
3
2
Page 4

SAFETY INSTRUCTIONS
There are certain basic safety rules
which are valid for any domestic
appliance.
■ The door should not be left in the open
position since this could present a potential
hazard ( es. tripping ).
■ Leaning or sitting on the open door of
the dishwasher could cause it to tip over.
Installation
■ Make sure that the plug fitted to the
machine is compatible with the power
supply socket. If it is not, get a suitably
qualified person to fit the correct type,
and to make sure that the cables to the
mains socket are able to cope with the
power rating of the appliance.
■ Ensure that the dishwasher does not
crush power cables.
■ In general it is not advisable to use
adaptors, multiple plugs and/or extension
cables.
■ Should it be necessary to replace the
supply cord, call the After Sales Service
Centre.
Safety
■ Never touch the appliance when your
hands or feet are wet or damp.
■ Do not use when your feet are bare.
■ Do not remove the plug from the mains
supply socket by pulling the mains cable
or the machine itself.
■ Do not leave the appliance exposed to
the elements (rain, sun etc).
■ This appliance is not intended for use by
persons (including children) with reduced
physical, sensory or mental capabilities,
or lack of experience and knowledge,
unless they have been given supervision
or instruction concerning use of the
appliance by a person responsible for
their safety.
Children should be supervised to ensure
that they do not play with the appliance.
■ Water left in the machine or on the
dishes at the end of the wash programme
should not be swallowed.
WARNING !
Knives and other utensils with sharp
points must be loaded in the basket
with their points down or placed in a
horizontal position.
Daily use
■ This appliances is intended to be used in
household and similar applications such
as:
- staff kitchen areas in shops, offices
and other working environments;
- farm houses;
- by clients in hotels, motels and other
residential type environments;
- bed and breakfast type environments.
A different use of this appliance from
household environment or from typical
housekeeping functions, as commercial
use by expert or trained users, is excluded
even in the above applications.
If the appliance is used in a manner
inconsistent with this it may reduce the
life of the appliance and may void the
manufacturer’s warranty.
Any damage to the appliance or other
damage or loss arising through use that is
not consistent with domestic or household
use (even if located in a domestic or
household environment) shall not be
accepted by the manufacturer to the fullest
extent permitted by law.
■ The dishwasher is designed for normal
kitchen utensils.
Objects that have been contamined by
petrol, paint, traces of steel or iron,
corrosive chemicals, acids or alkalis
must not be washed in the dishwasher.
■ If there is a water softening device installed
in the home there is no need to add
salt to the water softener fitted in the
dishwasher.
4
Page 5
■ Cutlery is washed best if it is placed in
the basket with the handles downwards.
Disposal
■ If the appliance breaks down or stops
working properly, switch it off, turn off the
water supply and do not tamper with it.
Repair work should only be carried out
by an approved service agent and only
genuine spare parts should be fitted. Any
failure to follow the above advice may
have serious consequences for the safety
of the appliance.
INSTALLATION
(Technical notes)
■ After unpacking, adjust the height of the
dishwasher. For the dishwasher to work
correctly it must be level. Adjust the feet
so that the machine does not tilt by more
than 2 degrees.
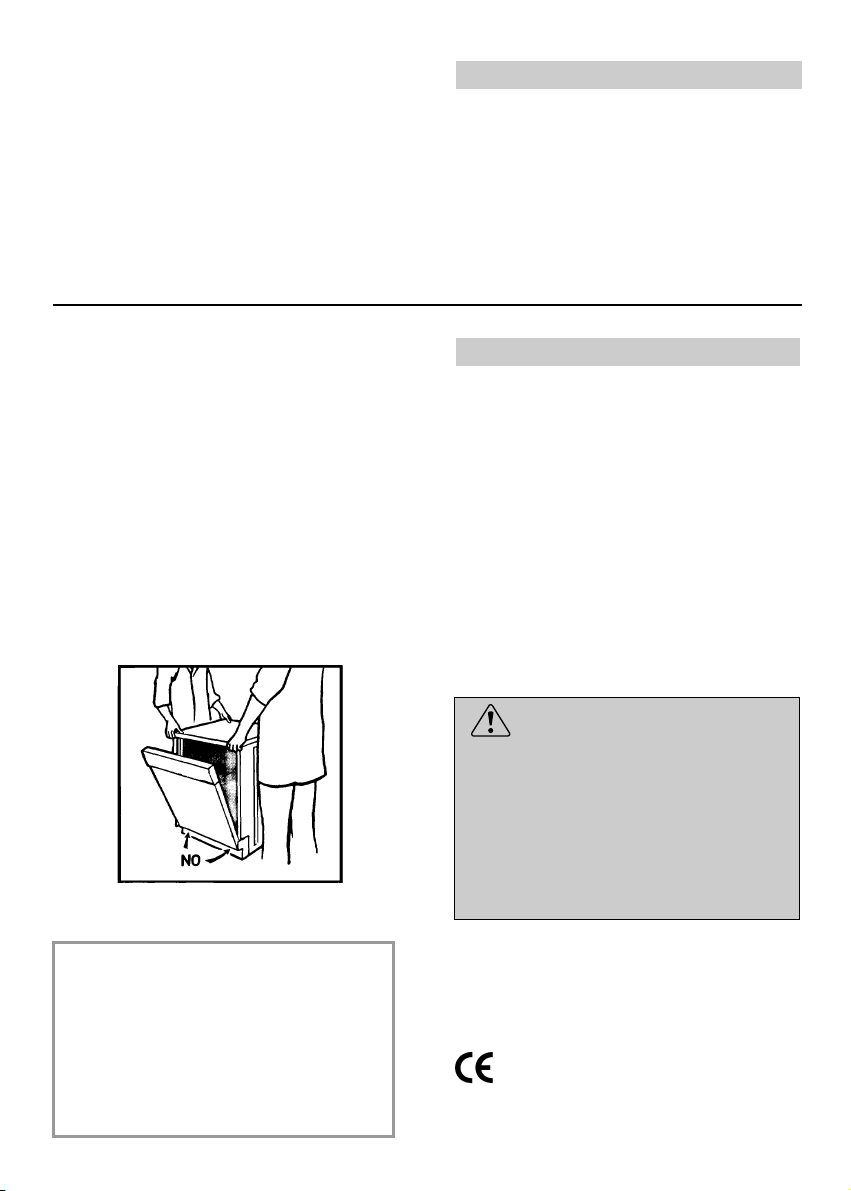
■ If it you need to move the machine after
removing the packaging, do not try to lift
it by the bottom of the door. Follow the
instructions in the figure below. Open the
door slightly and lift the machine by
holding on the top.
■ The dishwasher has been made from
materials which can be recycled so that it
can be disposed of in an environmentally
friendly way.
■ If you wish to dispose of an old dishwasher
be careful to remove the door to
eliminate the risk of children becoming
trapped inside it.
Electrical connection
This appliance complies with international
safety standards, and is fitted with a 3 pin
plug with earth connection to ensure
complete earthing of the product.
Before connecting the appliance to the
mains supply it is important to ensure:
1. that the supply socket is properly
earthed;
2. that your electricity supply is capable of
meeting the consumption requirements
listed on the rating plate of your
appliance.
IMPORTANT
When the appliance is located on a
carpet floor, attention must be paid to
ensure that there is no obstruction to
the bottom vents.
Make sure that the plug on the
appliance remains accessible after
installation.
WARNING!
Ensure that your product is properly
earthed.
In the absence of adequate earthing
you will notice that when touching
the metal parts of your appliance an
electrical dispersion can be felt, due
to the presence of a radio interference
suppressor.
Manufacturer declines all responsibility
for any damage due to non-earthing of
the machine.
Appliance complies with
European Directives 73/23/EEC
and 89/336/EEC, replaced by
2006/95/EC and 2004/108/EC, and
subsequent amendments.
5
Page 6
Water connection
IMPORTANT
The appliance must be connected to
the water mains using new hose-sets.
The old hose-sets should not be reused.
■ The inlet and drain hoses can be directed
to left or right.
IMPORTANT
The dishwasher can be connected to
either cold or hot water, as long as it
is no hotter than 60 °C.
■ Water pressure must be between
0,08 MPa and 0,8 MPa. If the pressure is
below the minimum consult our service
department for advice.
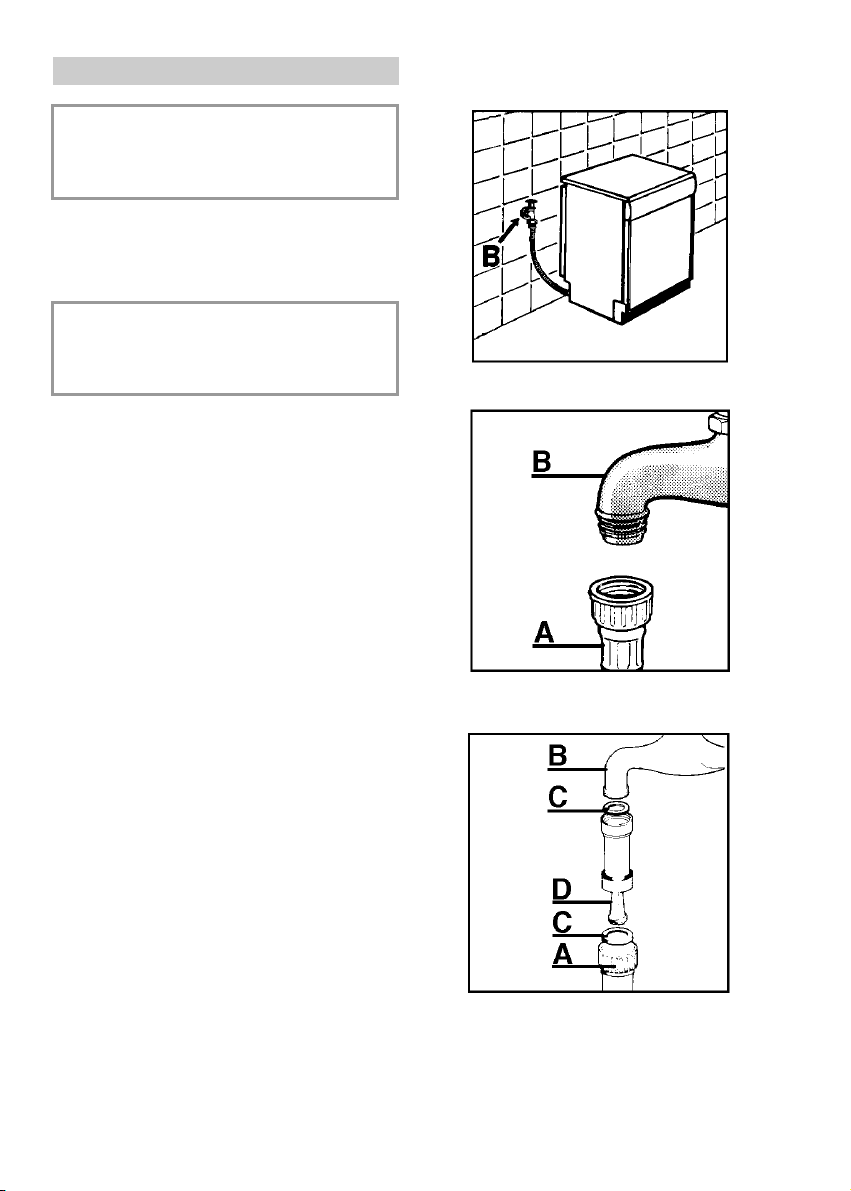
■ The inlet hose must be connected to a
tap so that the water supply can be cut
off when the machine is not in use
(fig. 1 B).
■ The dishwasher is fitted with 3/4" threaded
connector (fig. 2).
■ Connect inlet hose “A” to water tap “B”
with a 3/4" attachment making sure that
it has been properly tightened.
1
2
■ If it is necessary, the inlet pipe can be
lengthened up to 2,5 m. The extension
pipe is available from the After Sales
Service Centre.
■ If limescale deposits or sand are present
in the water, it is advisable to obtain the
appropriate filter, art. 9226085, from the
After Sales Service Centre (fig. 3). The
filter “D” must be inserted between the tap
“B” and the inlet hose “A”, remembering
to fit the washer “C”.
■ If the dishwasher is connected to new
pipes or to pipes which have not been in
use for a long time run water through for
a few minutes before connecting the
inlet hose. In this way no deposits of
sand or rust will clog up the water inflow
filter.
3
6
Page 7
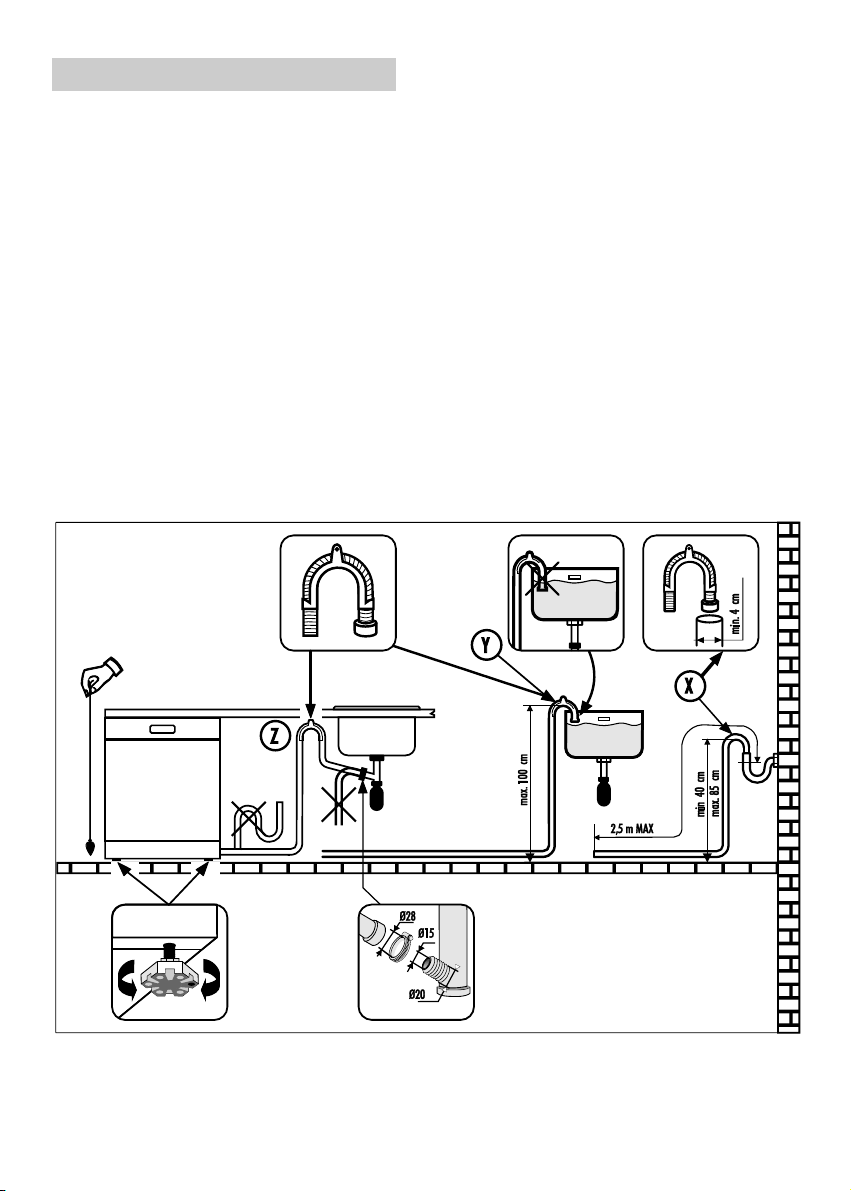
Connecting the outlet hose
■ The outlet hose should disharge into a
standpipe, making sure that there are no
kinks (fig. 4).
■ The standpipe must be at least 40 cm
above floor level and it must have an
internal diameter of at least 4 cm.
■ It is advisable to fit an anti-odour air trap
(fig. 4X).
■ If necessary the outlet hose can be
extended up to 2,5 m, provided that it is
kept at a maximum height of 85 cm
above floor level. The extension pipe is
available from the After Sales Service
Centre.
4
■ The hose can be hooked over the side of
the sink, but it must not be immersed in
water, in order to prevent water from
being syphoned back to the machine
when this is in operation (fig. 4Y).
■ When installing the appliance under a
worktop the hose pipe clamp must be
attached to the wall in the highest possible
position under the worktop (fig. 4Z).
■ Check that there are no kinks in the inlet
and outlet hoses.
7
Page 8
INSTALLATION IN FITTED
KITCHENS
Underneath existing work top
(when fitting beneath a work top)
Fitting between existing cabinets
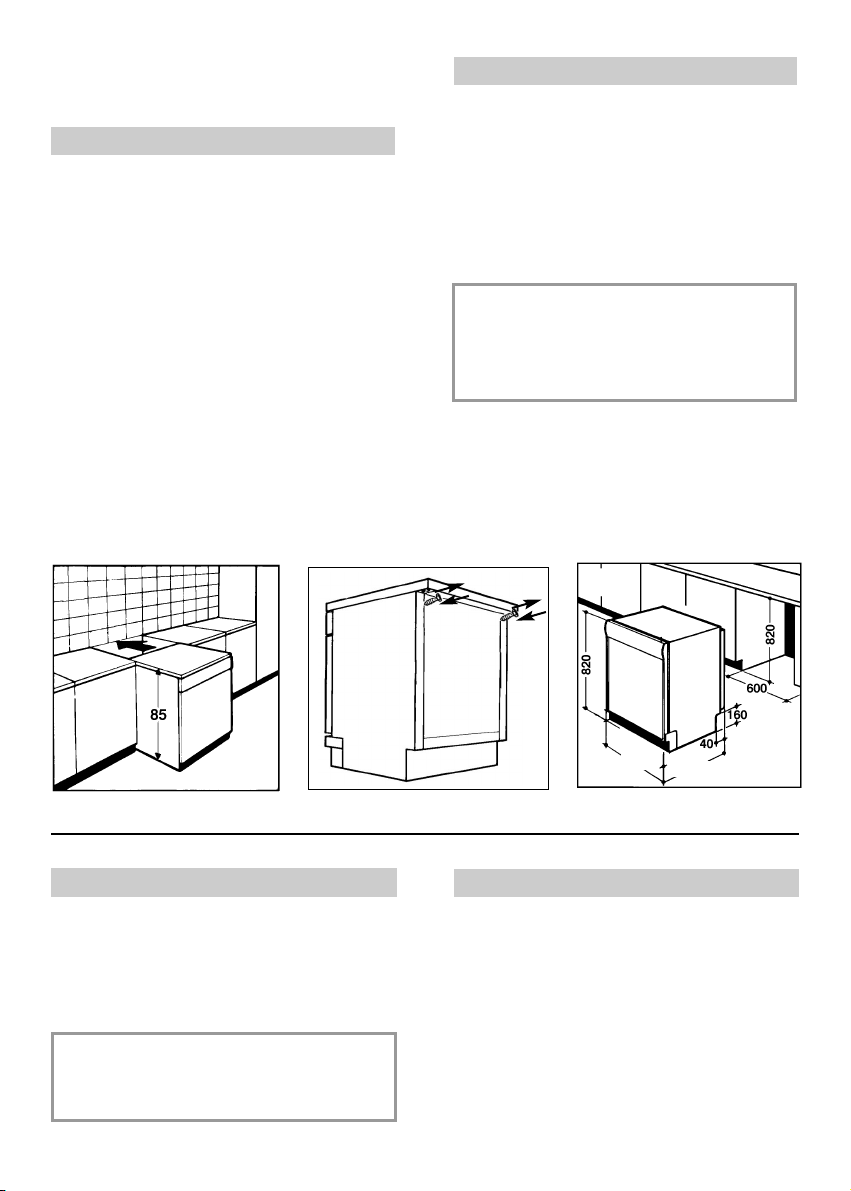
■ The height of the dishwasher, 85 cm, has
been designed in order to allow the
machine to be fitted between existing
cabinets of the same height in modern
fitted kitchens. The feet can be adjusted
so that correct height is reached.
■ The laminated top of the machine does
not require any particular care since it is
heatproof, scratchproof and stainproof
(fig. 5).
5
6
■ In most modern fitted kitchens there is
only one single work top under which
cabinets and electrical appliances are
fitted. In this case remove the work top
of the dishwasher by unscrewing the
screws under the rear edge of the top
(fig. 6a).
IMPORTANT
After removing the work top, the
screws MUST BE screwed again
under the rear edge of the top
(fig. 6b).
■ The height will then be reduced to 82 cm,
as scheduled by the International
Regulations (ISO) and the dishwasher
will fit perfectly under the kitchen
working top (fig. 7).
a
b
a
b
7
Opening the door
Put your hand into the recess and pull.
If the machine comes open while it is working,
an electrical safety device automatically
switches everything off.
IMPORTANT
For the machine to work properly,
the door should not be opened while
it is in operation.
598
556/573
Closing the door
Place the baskets in the machine.
Make sure that both the spray arms are
free to rotate and are not obstructed by
cutlery, crockery or pans. Close the door,
pressing on it to make sure it is firmly shut.
8
Page 9

WATER SOFTENER UNIT
Depending on the source of the supply,
water contains varying amounts of limestone
and minerals which are deposited on the
dishes leaving whitish stains and marks.
The higher the level of these minerals
present in the water, the harder the water is.
The dishwasher is fitted with a water
softener unit which, through the use of
special regenerating salt, supplies
softened water for washing the dishes.
The degree of hardness of your water can
be obtained from your water supply
company.
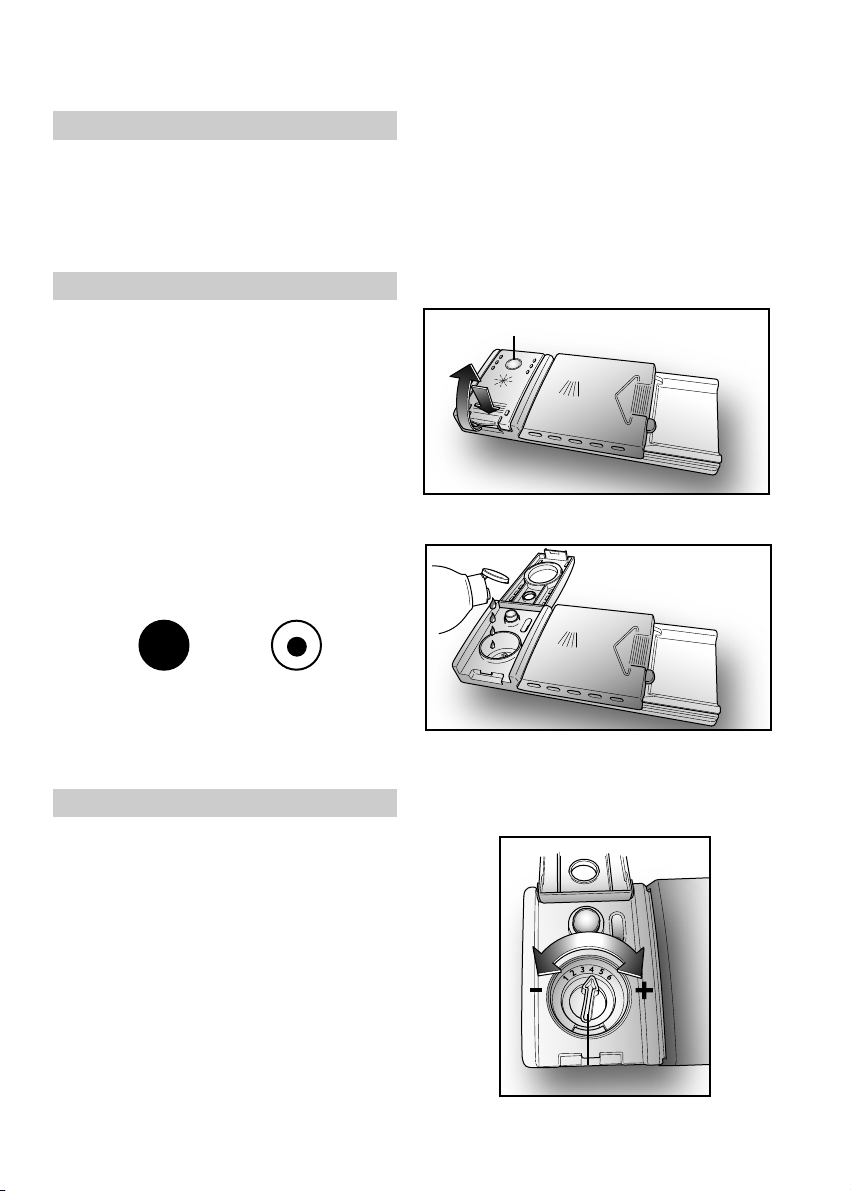
Regulating the water softener
with electronic programmer
The water softener can treat water with a
hardness level of up to 90°fH (French
grading) or 50°dH (German grading)
through 8 settings.
The settings are listed in the table below:
* The softener unit is set in the factory
at level 4 (d4) as this satisfies the
requirements of the majority of users.
Regulate the setting of your water softener
unit according to the degree of hardness
of your water as follows:
IMPORTANT
The dishwasher must ALWAYS be
off before start of this procedure.
1. Hold down the "PROGRAMME
SELECTION" button and at the same
time switch on the dishwasher by
pressing the "ON/OFF" button (a brief
audible signal will sound).
2. Keep the "PROGRAMME SELECTION"
button pressed for at least 5 seconds,
UNTIL an audible signal sounds. The
current water softener setting level will
be shown on the display.
Water
hardness
Level
°fH
(French)
0
0-5
1
6-10
2
11-20
3
21-30
*4
31-40
5
41-50
6
51-60
7
61-90
“ON/OFF” button
°dH
0-3
4-6
7-11
12-16
17-22
23-27
28-33
34-50
Use of
regenerating
(German)
NO
YES
YES
YES
YES
YES
YES
YES
3. Press the same button again to select
salt
Water
setting
softener
d0
4. Turn off the dishwasher by pressing the
d1
d2
d3
d4
d5
d6
d7
DIGITAL DISPLAY
"PROGRAMME SELECTION"
If any problem occurs, turn the
dishwasher off by pressing the
"ON/OFF" button and start the
procedure again from the beginning
(STEP 1).
the required water softener level: each
time the button is pressed, the setting
will increase by one level. When you
have reached "d7", the display will go
back to "d0".
"ON/OFF" button to confirm the new
setting.
WARNING!
button
9
Page 10
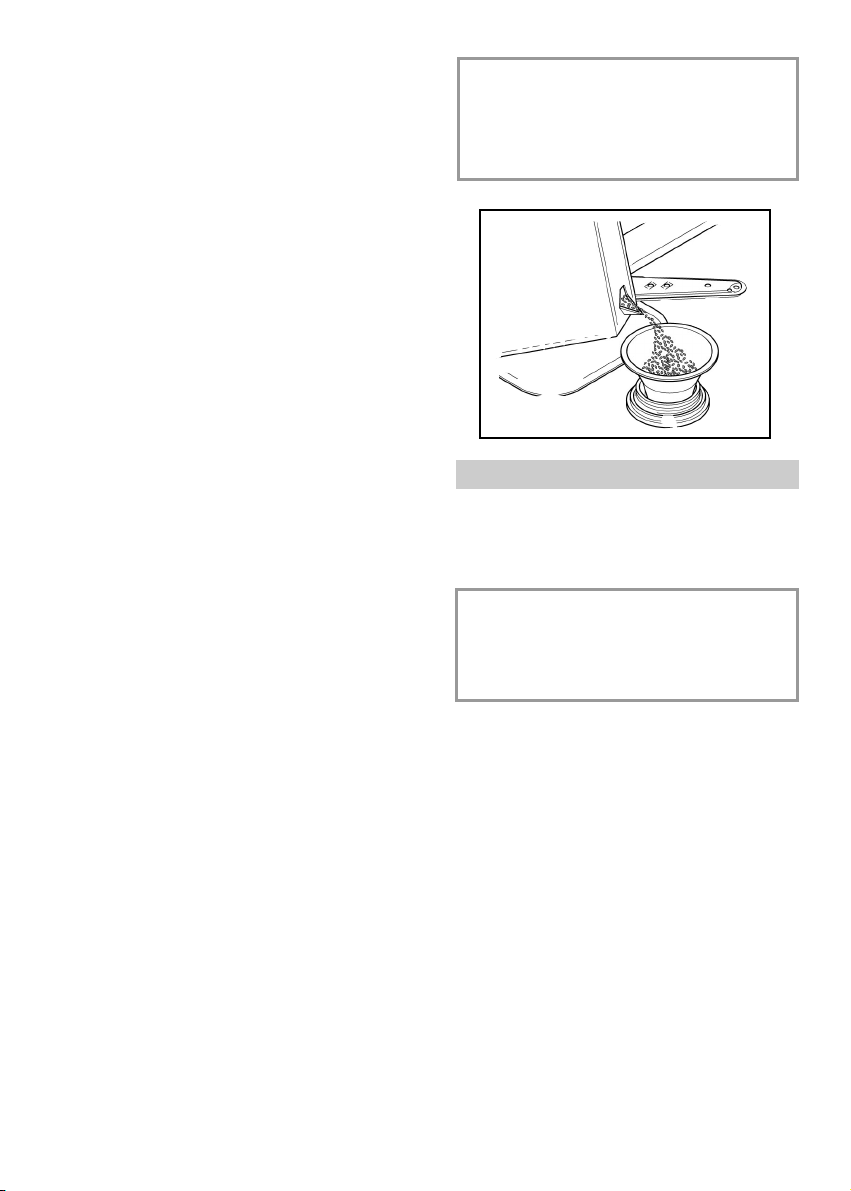
LOADING THE SALT
■ On the bottom of the machine there is a
container for the salt for regenerating
the softener.
■ It is important to use only a salt that is
specifically designed for dishwasher.
Other types of salt contain small quantities
of insoluble particles which over a long
period of time may affect and deteriorate
the softener performance.
■ To add salt, unscrew the cap of the container on the bottom and then refill the
container.
■ During this operation a little water will
overflow; but keep adding salt until the
container is full. When the container is
full, clean the thread of salt residue and
retighten the tap.
■ After loading the salt, it is recommended
running a complete washing cycle,
or COLD RINSE programme. The salt
dispenser has a capacity of between 1.5
and 1.8 kg and, for efficient use of the
appliance, it should be refilled from time
to time according to the regulation of the
water softener unit.
IMPORTANT
(Only for first start up)
When the appliance is used for the
first time, after completely filling the
salt container, it is necessary to add
water until the container overflows.
Salt loading indicator
This model is provided with an indicator light
on the control panel which will light up
when it is necessary to reload the salt
container.
IMPORTANT
The appearance of white stains on
dishes is generally an important
sign that the salt container needs
filling.
10
Page 11
a
b
a
b
ADJUSTMENT OF THE
UPPER BASKET
If 29 cm to 32,5 cm plates are normally
used, load them onto the lower basket after
the upper basket has been placed in its
upper position and proceed as detailed
below:
1. Pull out the upper basket;
1
2. Then grasp the basket from both sides
and lift it upwards (fig. 1).
Dishes that are bigger than 20 cm in
diameter can no longer be loaded onto the
upper basket and the mobile supports
cannot be used when the basket is in the
upper position.
ADJUST BASKET TO THE LOWER
POSITION:
1. Grasp the basket from both sides and lift
slightly upwards (fig. 2a);
2. Then slowly release into the correct
position (fig. 2b).
N. B. : NEVER LIFT OR LOWER THE
BASKET BY ONE SIDE ONLY (fig.3).
Attention :
it is advisable to adjust the basket before
loading the dishes.
2
3
11
Page 12
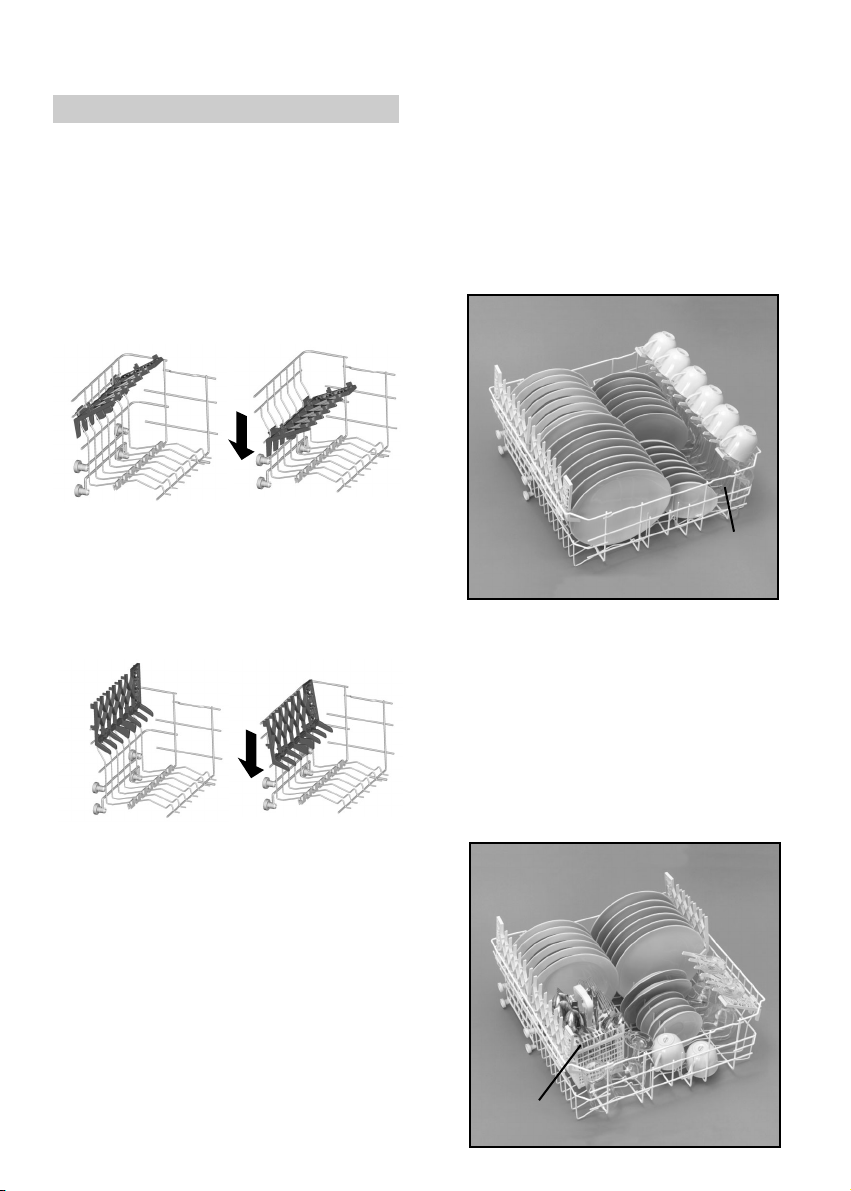
LOADING DISHES
Using the upper basket
■ The upper basket is provided with
mobile racks hooked to the sides of the
basket, which can be regulated into 4
positions.
■ In the lowered position (A-A1) the racks
may be used for such items as: tea and
coffee cups, kitchen knives and ladles.
Also glasses with stems may be safely
hung on the ends of the racks.
AA1
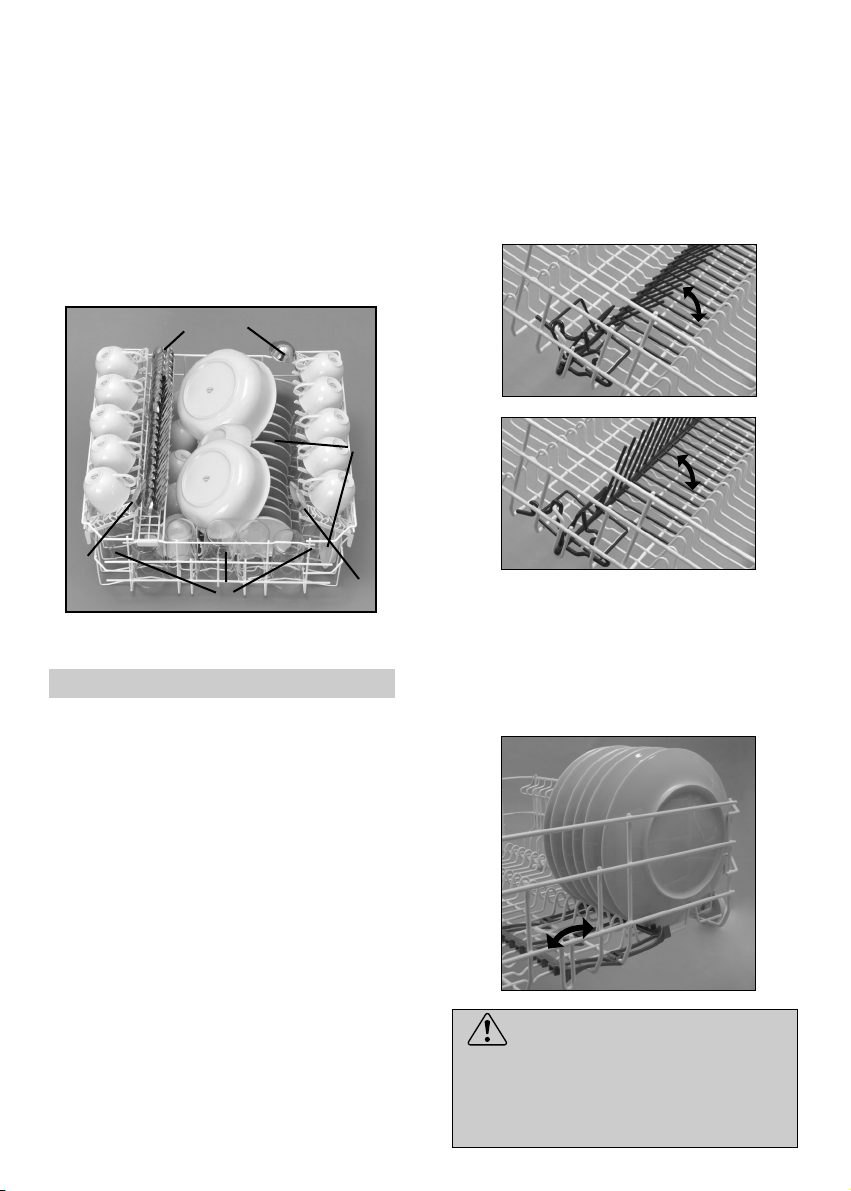
A standard daily load is represented in
figs. 1, 2 and 3.
Upper basket (fig. 1)
A = soup plates
B = dinner plates
C = dessert plates
D = saucers
E = cups
F = glasses
1
■ In the upright position (B-B1) the racks
allow you to load dinner plates and soup
plates. Plates should be loaded
vertically with the underside of the plate
towards the back of the dishwasher with
a space between each plate to allow
water to pass freely.
BB1
■ It is advisable to load large plates
(approx. 26 or more cm) slightly tilted
towards the rear to facilitate introduction
of the basket into the machine.
■ Salad bowls and plastic bowls may also
be loaded on the upper basket. It is
advisable to block these in place so that
the jets of water do not make them
overturn.
A
C
B
Upper basket (fig. 2)
A = soup plates
B = dinner plates
C = dessert plates
D = saucers
E = cups
F = glasses with stems
G = glass
H = cutlery basket
2
A
B
C
D
E
D
F
F
■ The upper basket has been designed to
offer maximum flexibility in use and can
be loaded with up to 24 plates on two
rows, up to 30 glasses on five rows or a
mixed load.
12
H
G
E
F
Page 13
Upper basket (fig. 3)
A = glasses
B = saucers
C = cups
D = small bowl
E = medium bowl
F = large bowl
G = dessert plate
H = serving spoons
I =
ladle
L = cutlery
3
L
- POSITION “B”: for dishes which,
although standard size, have a particular
shape (very deep bowls, square dishes
or ones without borders etc.).
- POSITION “C”: for larger than average
flat plates and/or ones with nonstandard shapes (square, hexagonal,
oval, pizza dishes etc.).
4
B
I
A
D
G
C
B
F
C
C
E
H
A
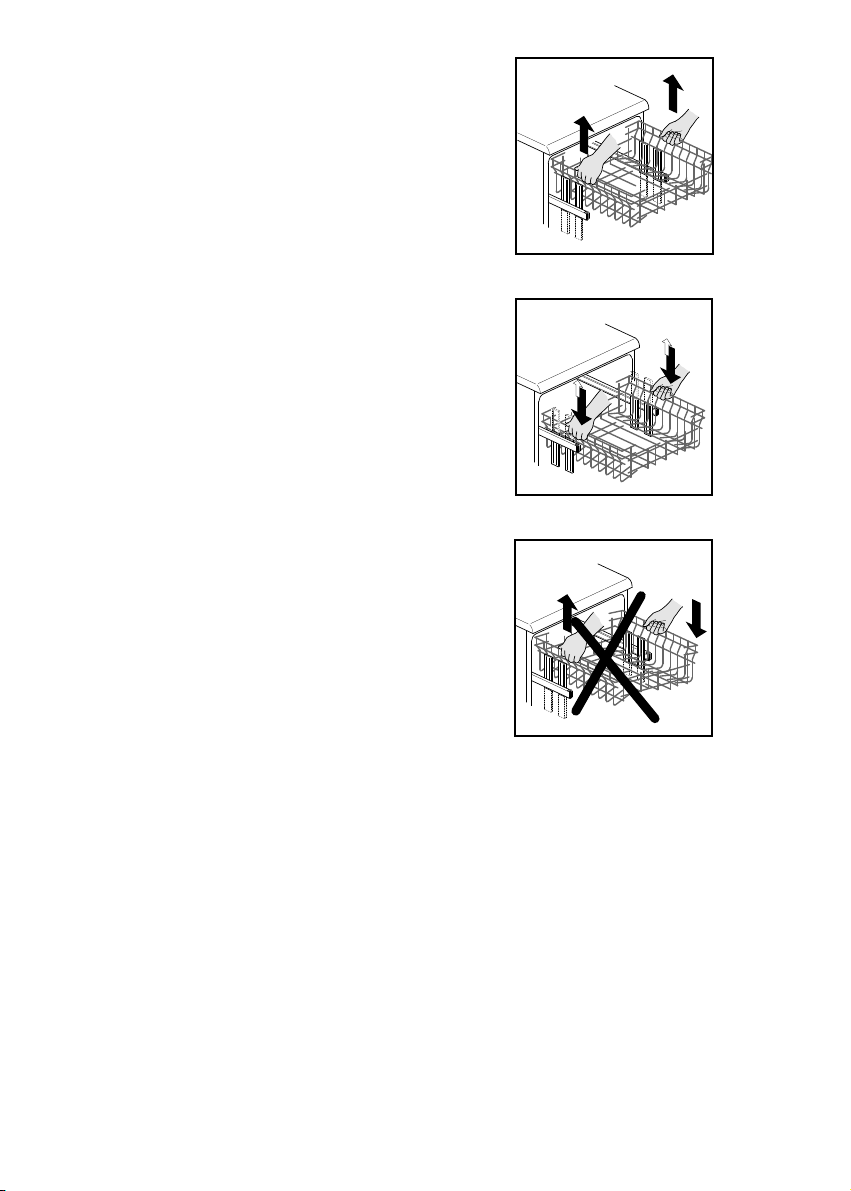
Using the lower basket
■ Saucepans, oven dishes, tureens, salad
bowls, lids, serving dishes, dinner
plates, soup plates and ladles can be
loaded on the lower basket.
■ Place the cutlery in the plastic cutlery
holder with the handles pointing
upwards.
■ Place the cutlery holder on the lower
basket (fig. 7 and 8), making sure that
the cutlery does not get in the way of the
rotating arms.
■ The lower basket is fitted with a special
adjustable central rack (fig. 4 and 5).
This permits stable and optimum
loading, even when the size and/or
shape of the dishes is non-standard.
- POSITION “A”: for a standard load, or
one that excludes pans, salad bowls and
the like.
H
5
C
A
■ The small plates, as those used for
desserts for example, must be placed in
the lower basket as shown in the figure 6,
with the support flap placed outwards ("B").
For normal or large plates the flap must
be in the position ("A").
6
A
WARNING!
If the small plates are placed in the
basket with the support flap in the
incorrect position, the plates will
interfere with the lower spraying arm
preventing it to rotate.
13
B
Page 14
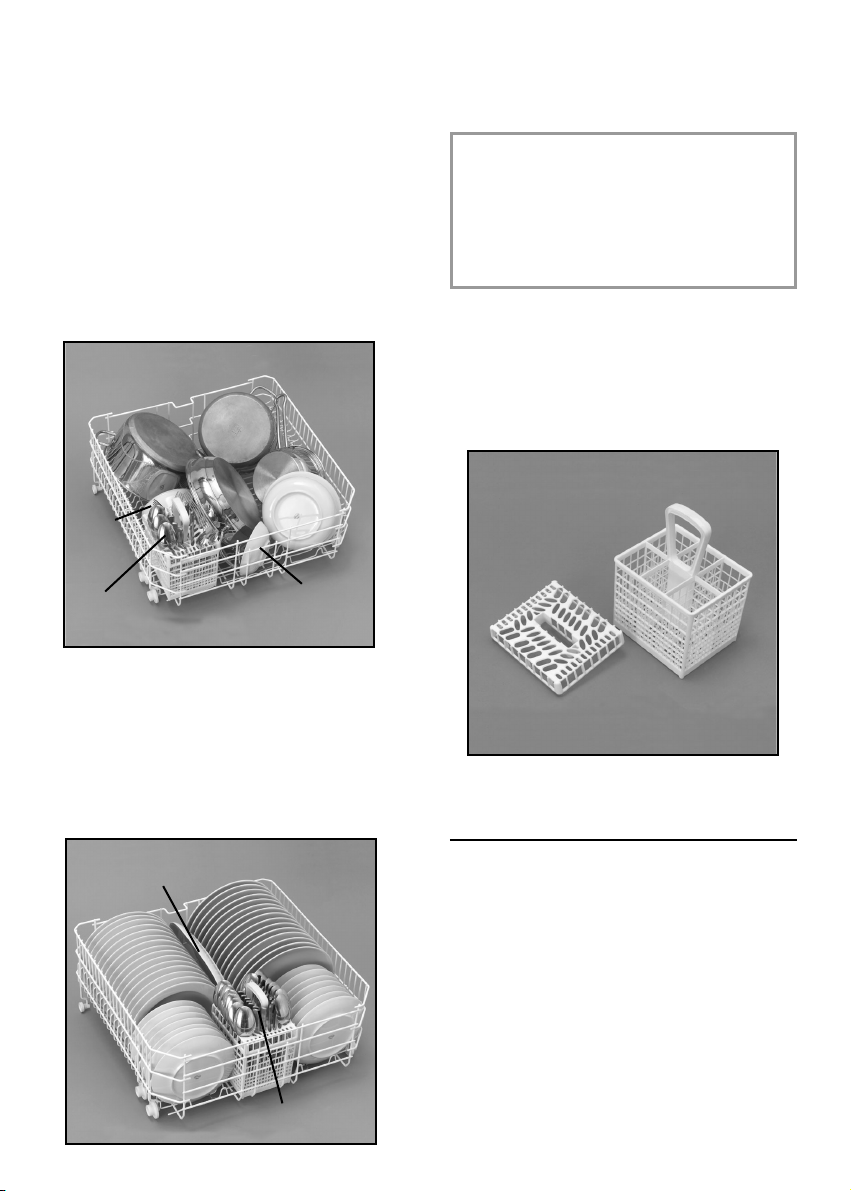
A standard daily load is represented in
figs. 7 and 8.
Please load the dishwasher sensibly to
ensure the best wash results.
Lower basket (fig. 7)
A = medium-sized saucepan
B = large saucepan
C = frying pan
D = tureens, serving dishes
E = cutlery
F = oven dishes
G = medium bowl
H = small bowl
7
B
A
F
G
E
Lower basket (fig. 8)
A = soup plates
B = dinner plates
C = dessert plates
D = serving dish
E = cutlery
IMPORTANT
The lower basket has a safety-stop
device, for its safe extraction, also
especially useful with a full load.
For loading salt, cleaning filter and for
ordinary maintenance, the complete
extraction of the basket is necessary.
Cutlery basket (fig. 9)
The top of cutlery basket can be removed,
for enable various loading options.
C
9
D
H
8
A
D
C
B
E
C
INFORMATION FOR THE TEST
LABORATORIES
Please ask information required for
comparison testing and measuring noise
levels, according to EN normative, to the
following address:
testinfo-dishwasher@candy.it
In the request, please specify model name
and number of the dishwasher (see rating
plate).
14
Page 15
LOADING THE DETERGENT
The detergent
IMPORTANT
It is essential to use a detergent
that is specifically designed for
dishwashers either in powder, liquid
or tablet form.
“FINISH” gives very good results and can
be easily obtained.
Unsuitable detergents (like those for
washing up by hand) do not contain the
proper ingredients for use in a dishwasher,
and stop the dishwasher from working
correctly.
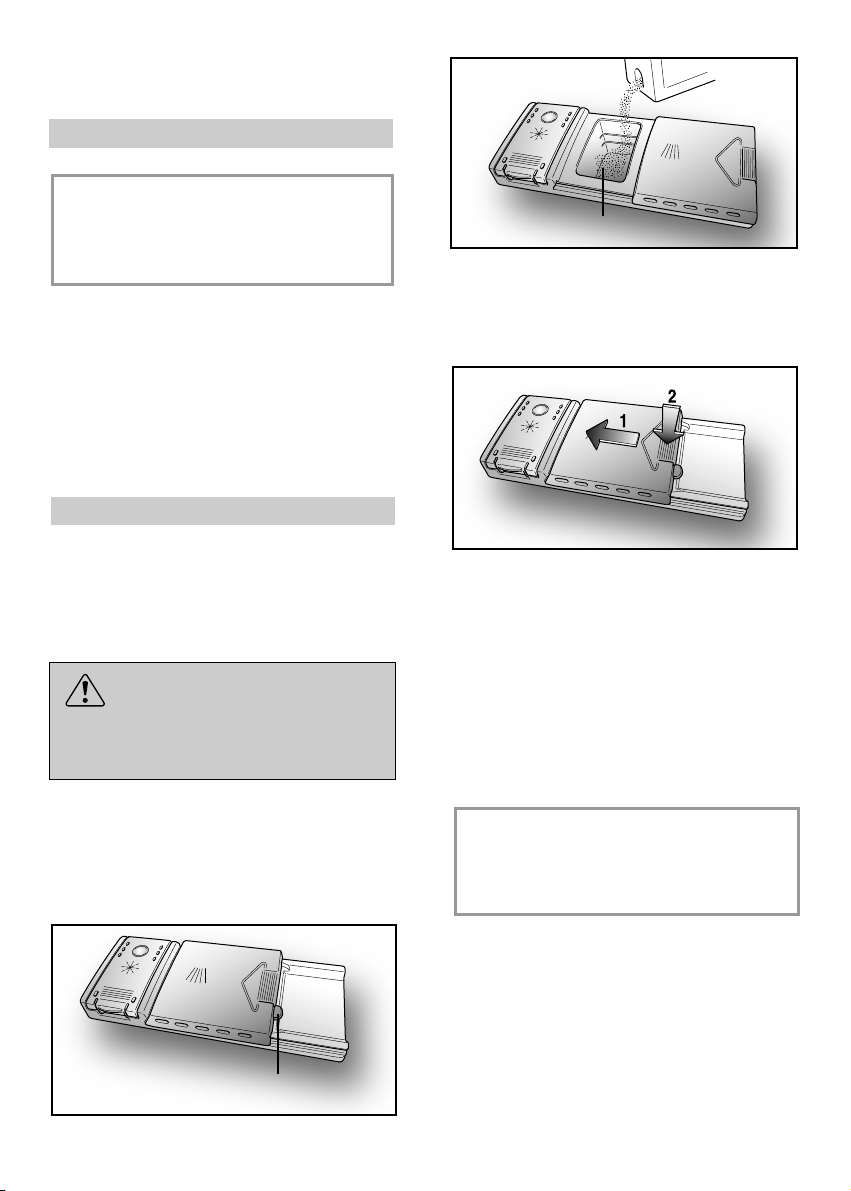
Filling the detergent container
The detergent container is inside the door
(fig. A “2”). If the lid of the container is
closed, press the button (A) to open.
At the end of every wash cycle the lid is
always open and ready for the next time
the dishwasher is used.
WARNING!
When loading the lower basket, please
ensure that the plates or others do not
obstruct the detergent dispenser.
B
After pouring the detergent into the container,
close the lid, firstly pushing (1) and then
pressing on it (2) until you hear the click.
Since not all detergents are the same the
instructions on the boxes of detergent can
vary. We should just like to remind users
that too little detergent does not clean the
dishes properly whilst too much detergent
will not produce better results and is also a
waste.
The amount of detergent to be used varies
according to how dirty the dishes are and
on the type of dishes to be washed.
We advise using 20÷30 g of detergent in the
wash section of detergent compartment (B).
A
IMPORTANT
Do not use an excessive amount of
detergent and help limit damage to
the environment at the same time.
15
Page 16

TYPES OF DETERGENT
Detergent tablets
Detergent tablets of different manufacturers
dissolve at different speeds, for this
reason, during short programmes, some
detergent tablets may be not fully effective,
because they are not completely dissolved.
If these products are used, is recommended
to choose longer programmes to guarantee
the complete use of the detergent.
IMPORTANT
To get satisfactory washing results,
the tablets MUST be placed in the
wash section of the detergent
container and NOT directly in the
tub.
Concentrated detergents
The concentrated detergents, with reduced
alkalinity and with natural enzymes, in
conjunction with 50°C wash programmes,
have a smaller impact on the environment
and they protect the dishes and the
dishwasher.
The 50°C wash programmes purposely
exploit the dirt-dissolving properties of the
enzymes, allowing therefore, with the use
of the concentrated detergents, to achieve
the same results of the 65°C programmes
but at a lower temperature.
■ the effectiveness of detergents containing
the built in water softener/salt depends
on the hardness of your water supply.
Check that the hardness of your water
supply is within the effective range given
on the detergent packaging.
If when using this type of product, you
don't get satisfactory washing results,
please contact the detergent
manufacturer.
In certain circumstances use of combined
detergents can cause:
■ limescale deposits on dishes or in the
dishwasher;
■ a reduction in washing and drying
performance.
IMPORTANT
Any problems which arise as a direct
result of the use of these products
are not covered by our warranty.
Please note that using the "ALL in 1"
combined detergents, the rinse aid and
salt indicator lights (only used on
selected models) are superfluous, so you
must ignore the lights.
Combined detergents
The detergents that also contain the rinse
aid must be placed in the wash section of
the detergent container. The rinse aid
container must be empty (if it is not empty,
set the rinse aid regulator to lowest position
before using combined detergents).
"ALL in 1" combined detergents
If you are planning to use “ALL in 1” (“3 in 1 “/
“4 in 1”/ “5 in 1”, etc.) combined detergents i.e.
those with built in salt and/or rinse agent,
we would advise the following:
■ read carefully and follow the manufacturer’s
instructions given on the packaging;
If washing and/or drying problems occur,
we recommend you return to use traditional
separate products (salt, detergent and
rinse agent). This will ensure that the water
softener in the dishwasher operates
correctly.
In this case, we recommends that you:
■ refill both the salt and rinse aid container;
■ run one normal washing cycle without a
load.
Please note that on return to the use of
conventional salt, a number of cycles will
be required before the system becomes
fully efficient again.
16
Page 17
LOADING THE RINSE AID
The rinse aid
The rinse aid, which is automatically
released during the last rinsing cycle, helps
the dishes to dry quickly and prevents
spots and stains forming.
Filling the rinse aid container
The rinse aid container can be found to the
left of the detergent container (fig. A "3").
To open the lid, push the reference mark
and, in the same time, pull the tab of
opening.
It is always advisable to use rinse aid that
is specifically designed for dishwasher.
Check the rinse aid level through the
indicator eye (C) which is located on the
dispenser.
FULL EMPTY
dark light
Regulating the rinse aid from 1 to 6
The regulator (D) is placed under the lid
and can be turned using a coin.
The recommended position is 4.
The limestone content of the water
considerably affects the formation of
limescale and the drying performance.
It is therefore important to regulate the
quantity of rinse aid to achieve good
washing results.
If, after the wash, streaks occur on the
dishes, decrease the amount by one
position. If whitish spots occur, increase the
amount by one position.
C
D
17
Page 18
CLEANING THE FILTERS
The filter system (fig.A “4”) consists of:
a central container that traps the larger
particles;
a flat gauze that continuously filters the
wash water;
a micro filter, located beneath the gauze,
that traps the tiniest particles ensuring a
perfect rinse.
■ To achieve excellent results every time,
the filters should be checked and
cleaned after each wash.
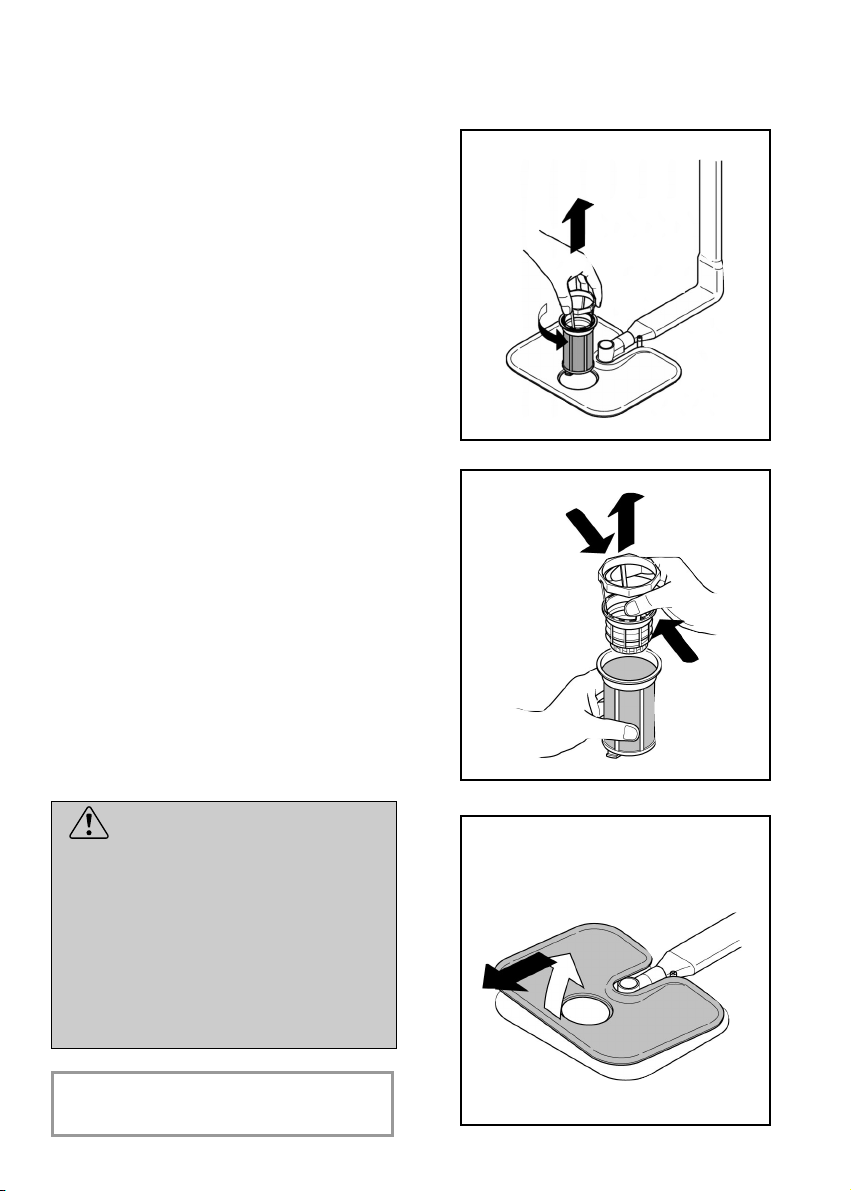
■ To remove the filter unit, simply turn the
handle anticlockwise (fig. 1).
1
■ For ease of cleaning, the central container
is removable (fig. 2).
■ Remove the gauze filter (fig.3) and
wash the whole unit under a jet of
water. If necessary a small brush can
be used.
■ With the Self-cleaning Micro filter,
maintenance is reduced and the filter
unit need only be checked every two
weeks. Nevertheless, after each wash it
is advisable to check that the central
container and the gauze filter are not
clogged.
WARNING!
After cleaning the filters, make sure
that they are correctly reassembled
and that the gauze filter is properly
positioned at the bottom of the
dishwasher.
Make sure that the filter is screwed
back, clockwise, into the gauze, as
poor seating of the filter unit could
have an adverse effect on the
efficiency of the appliance.
IMPORTANT
Never use the dishwasher without
the filters.
2
3
18
Page 19

PRATICAL HINTS
How to make savings
How to get really good wash
results
■ Before placing the dishes in the
dishwasher, remove any remaining
food (bones, shells, pieces of meat or
vegetables, coffee grounds, skin of fruit,
cigarette ash, tooth picks etc. to avoid
blocking the filters, water outlet and
washing arm nozzles.
■ Try not to rinse the dishes before
loading them into the dishwasher.
■ If saucepans and oven dishes are
encrusted with the remains of burnt or
roast food, it is advisable to leave them
to soak before washing.
■ Place the dishes face downwards.
■ Try to place the dishes in such a way
that they are not touching one another.
If they are loaded properly you will get
better results.
■ After loading the dishes check that the
washing arms can rotate freely.
■ Pans and other dishes that have
particularly stubborn food particles or
remnants of burnt food should be left to
soak in water with dishwasher
detergent.
■ To wash silver properly:
a) rinse the silver immediately after
use, especially if it has been used for
mayonnaise, eggs, fish etc.;
b) do not sprinkle detergent onto it;
c) keep it separate from other metals.
■ If you want the dishwasher to give a
complete wash, place the dishes in the
dishwasher at the end of each meal and
if necessary turn on the COLD RINSE
cycle to soften the food remains and
remove bigger particles of food from the
new load of dishes.
When the dishwasher is full start the
complete wash cycle programme.
■ If the dishes are not very dirty or if the
baskets are not very full select an
ECONOMY programme, following the
instructions in the program list.
What not to wash
■ It should be remembered that not all
dishes are suitable for washing in a
dishwasher.We advise against using
the dishwasher to wash items in
thermoplastic, cutlery with wooden or
plastic handles, saucepans with
wooden handles, items in aluminium,
crystal, leaded glass unless otherwise
stated.
■ Certain decorations may fade. It is
therefore a good idea before loading the
whole batch to wash just one of the
items first so as to be sure that others
like it will not fade.
■ It is a good idea not to put silver cutlery
with non-stainless steel handles into
the dishwasher as there could be a
chemical reaction between them.
IMPORTANT
When buying new crockery or
cutlery always make sure that they are
suitable for washing in a dishwasher.
Useful hints
■ In order to avoid any dripping from the
top rack, remove the lower rack first.
■ If the dishes are to be left in the
machine for some time, leave the door
ajar, to let some air circulate and to
improve the drying performance.
19
Page 20
CLEANING AND
MAINTENANCE
■ To clean the dishwasher outside, do not
use solvents (degreasing action) neither
abrasives, but only a cloth soaked with
water.
■ The dishwasher does not require special
maintenance, because the tank is
self-cleaning.
■ Regularly wipe the door gasket with a
damp cloth to remove any food remains
or rinse aid.
■ It is advisable to remove limestone
deposits or dirt periodically, by doing an
empty wash; pour a glass of vinegar on
the bottom of the tank and select the
light wash.
■ If, in spite of the routine cleaning of the
filters, you notice that the dishes or pans
are not properly washed or rinsed, check
that all the spray heads on the rotor
arms (fig. A “5”) are clear.
If they are blocked, clean them in the
following way:
1. to remove the upper rotor arm, turn it
until it lines up with the stop marked
by the arrow (fig. 1). Push it upwards
(fig. 1b) and, keeping it pushed in,
unscrew it in a clockwise direction
(to reassemble it repeat the same
operation, but turn it anticlockwise).
The lower rotor arm can be removed
simply by pulling it upwards (fig. 2);
2. wash the rotor arms under a jet of water
to clear any blockage in the spray
heads;
3. when you have finished, refit the rotor
arms in the same position, remembering
to re-align the arrow and screw into
position.
1
1b
2
WHEN CYCLE IS FINISHED
After every wash it is essential to turn off
water supply and to switch off the machine
by pressing the On/Off button to the off
position.
If the machine is not going to be used for
some time, it is advisable to follow these
rules:
1. do an empty wash with detergent in order
to clean the machine of any deposits;
2. pull out the electric plug;
3. turn off the water tap;
4. fill the rinse aid container;
■ Both the door lining and the tank lining
are in stainless steel; however, should
spots caused by oxidation occur, this is
probably due to a high level of iron salts
presents in the water.
■ The spots can be removed with a mild
abrasive agent; never use chlorine
based materials, steel wool, etc.
5. Ieave the door ajar;
6. keep the inside of the machine clean;
7. If the machine is left in places where the
temperature is below 0°C any water left
inside the pipes may freeze. Wait until
the temperature rises above zero and
then wait for about 24 hours before
starting up the dishwasher.
20
Page 21

DESCRIPTION OF THE CONTROL PANEL
A "ON/OFF" button
B "PROGRAMME SELECTION" button
C "DELAY START" button
D "START"/"RESET" button
(start/cancelling programme)
E "SUPER ECO" option button
"ALL IN 1" option button
F
G
"U WASH"
•
Width x Height x Depth (cm) 60 x 85 x 60
Depth with door open (cm) 120
EN 50242 place load
Capacity with pans and dishes
Water supply pressure (MPa)
Fuse / Power input / Supply voltage
INTENSIVE
UNIVERSAL
ECO
ULTRA RAPID 24'
*Values are measured in a laboratory according to European Standard EN 50242 (consumption may
vary according to conditions of usage).
button
DIMENSIONS
TECHNICAL DATA
CONSUMPTION (main programmes)*
Programme Energy (kWh) Water (L)
Power consumption of the off-mode and of the left-on mode: 0,30 W / 0,45 W
H DIGITAL DISPLAY
I "SALT EMPTY" light
L "RINSE AID EMPTY" light
M "OPTION SELECTION" lights
N
"U WASH"
•
Programme guide
O
With working top Without working top
2,03
1,43
0,83
0,59
21
lights
59,8 x 82 x 57,3
117
15
9 persons
Min. 0,08 - Max. 0,8
See rating plate
20
14
10
9
Page 22

PROGRAMME SELECTION
AND SPECIAL FUNCTIONS
(Use in conjunction with programme guide)
■ When the door is shut, after an audible
signal has sounded, the programme will
start automatically. The display will show
the time remaining to the end of the cycle.
"U WASH" button
•
This button allows you to modify the wash
intensity, according to how dirty your dishes
are, by modifying the wash time and
temperature.
Press the button to increase the intensity of
wash cycle ( indicator light) or to reduce
the intensity of wash, this also allows you to
decrease the wash length time ( indicator
light).
The combination of the button with the 4
main wash programmes enables to have 8
additional wash cycles (achieving a total of
12 programmes of washing).
IMPORTANT
When the dishwasher is switched on,
the setting last used will be indicated.
Programme settings
■ Open the door and place the dirty dishes
inside the appliance.
■ Press the "ON/OFF" button . The
display will show two lines.
■ Choose a programme by pressing the
"PROGRAMME SELECTION" button.
WITHIN one minute of the programme
commencing, another programme
can be selected, simply by pressing
the "PROGRAMME SELECTION"
button (it is also possible to change
the "U WASH" button setting ).
•
"IMPULSE" programmes
The “IMPULSE” programmes use an
impluse washing technology, which reduces
consumption, noise and increases
performances.
IMPORTANT
The “intermittent” working of the
washing pump MUST NOT BE
considered a malfunction, it is a
characteristic of the impulse washing
so must be considered a normal
function of the programme.
Programme interruption
Opening the door when a programme is
running is not recommended especially during
the main wash and final hot rinse phases.
However, if the door is opened while a
programme is running (for example, to add
dishes) the machine stops automatically and
the display will flash the remaining time
before the end of the cycle. Close the door,
without pressing any buttons. The cycle will
start from where it left off.
■ If you wish, press the "U WASH" button.
■ If you wish to select an option, press the
corresponding button (the indicator light
will turn on).
The option buttons can be selected or
deselected WHITIN one minute of the
programme commencing.
■ Press the "START" button.
The length of the program will be shown on
the display alternating hours with
minutes [I.e: 1 h (1 hour) / 25 (25 minutes)].
•
IMPORTANT
A running program can be interrupted
without opening the door by
pressing the "ON/OFF" button. In
this case, simply press the "ON/OFF"
button again to restart the cycle from
where it left off.
WARNING!
If you open the door during the
drying cycle, an audible audio signal
advises you that the drying cycle has
not yet finished.
22
Page 23

Changing a running programme
Proceed as follows to change or cancel a
running program:
Dishes can now be removed and the
dishwasher turned off by pressing the
"ON/OFF" button or dishes can be loaded
for new cycle.
■ Hold the "RESET" button down for at
least 5 seconds. "00" will appear on the
display and some audible signals will
sound.
■ The running programme will be cancelled.
The display will show two lines.
■ At this point a new programme can be set.
WARNING!
Before starting a new programme,
you should check that there is still
detergent in the dispenser.
If necessary, top up the dispenser.
Programme operations
Whilst a programme is running, the display
shows the time remaining to the end of the
cycle, which is automatically updated.
Option buttons
"SUPER ECO" button
This button provides an energy and time
saving of 25% on average (according to
the select cycle) reducing the wash water
temperature and the drying time during the
final rinse.
This programme is recommended for light
soil washes, and for slightly wet dishes that
are not fully dry, & improved drying results.
We advise you to leave the door of the
Dishwasher half-open at the end of the
cycle, to allow for a natural circulation of air
inside the dishwasher.
"ALL IN 1" button
This option optimises the use of "ALL in 1"
("3 in 1"/"4 in 1"/"5 in 1", ecc.) combined
detergents.
By pressing this button, the selected
washing programme is modified to get best
performance from combined detergents
(furthermore, the salt and rinse aid
shortage lights are de-activated).
If there is any break in the power supply
while the dishwasher is operating, a
special memory stores the selected
programme and, when the power is
restored, it continues where it left off.
Programme end
A 5 second alarm will sound (if not muted)
3 times at 30 second intervals to signal that
the programme has ended.
The display and all the indicator lights will
switch off.
WARNING!
Once selected, this option keeps
being on (light on) also for next
washing cycles and it can be de-activate
(light off) only by pressing the button
once again.
IMPORTANT
This option is recommended when
using the ULTRARAPID 24' program,
the duration of which will be
extended for about 15 minutes,
allowing the detergent tablets to
achieve a better performance.
23
Page 24

"DELAY START" button
Dishwasher start time can be set with this
button, delaying start from 1 to 23 hours.
Alarm mute for the PROGRAMME
END
The alarm for the programme end may be
muted as follows:
Proceed as follows to set a delayed start:
■ Press the "DELAY START" button ("00"
will appear on the display).
■ Press the button again to increase the
delay in hours (each time the button is
pressed the delay is increased by 1 hour
to a maximum of 23).
■ To start the countdown, press the
"START" button.
The display will show the time remaining
to the begin of the programme.
At the end of the countdown, the programme
will automatically start and the length of the
selected cycle will be shown in the display.
Proceed as follows to cancel a delayed
start:
■ Hold the "RESET" button down for at
least 5 seconds. "00" will appear on the
display and some audible signals will
sound.
IMPORTANT
The dishwasher must ALWAYS be off
before start of this procedure.
1. Hold down the "PROGRAMME
SELECTION" button and at the same
time switch on the dishwasher by
pressing the "ON/OFF" button (a brief
audible signal will sound).
2. Keep the "PROGRAMME SELECTION"
button pressed for at least 15 seconds
(during this time 2 audible signals will
sound).
3. Release the button when the second
audible signal sounds ("b1" will appear
on the display to indicate that the alarm
is on).
4. Press the same button again ("b0" will
appear on the display to indicate that the
alarm is off).
■ The delayed start and the selected
programme will be cancelled.
The display will show two lines.
■ At this point, a new programme and
option buttons must be set to start a
new programme as indicated in the
"PROGRAMME SETTINGS" section.
5. Turn off the dishwasher by pressing the
"ON/OFF" button to confirm the new
setting.
To turn the alarm on again, follow the same
procedure.
24
Page 25

Memorization of the last
programme used
The last programme used can be
memorized by following the below:
4. Press the same button again ("A1" will
appear on the display to indicate that the
memorization is on).
5. Turn off the dishwasher by pressing the
"ON/OFF" button to confirm the new
setting.
IMPORTANT
The dishwasher must ALWAYS be off
before start of this procedure.
To disable the memorization, follow the
same procedure.
1. Hold down the "PROGRAMME
SELECTION" button and at the same
time switch on the dishwasher by
pressing the "ON/OFF" button (a brief
audible signal will sound).
2. Keep the "PROGRAMME SELECTION"
button pressed for at least 30 seconds
(during this time, 3 audible signals will
sound).
3. Release the button when the THIRD
WARNING!
To ensure the correct operation of
the anti-overflow safety device, we
recommend that the dishwasher is
not moved or tilted during operation.
If however it is necessary to tilt or
move the dishwasher, please ensure
that the washing cycle is complete
and that there is no remaining water
inside the dishwasher.
audible signal sounds ("A0 " will appear
on the display to indicate that the
memorization is off).
The dishwasher is able to signal a series of faults in the display.
AUTOMATIC FAULT SIGNALS
FAULTS CAUSE SOLUTION
E2 appears on the display and
the alarm sounds.
E3 appears on the display and
the alarm sounds.
E4 appears on the display and
the alarm sounds.
E5,E6,E7,Ef or ELappears
on the display and the alarm
sounds.
E8 or Ei appear on the display
and the alarm sounds.
No water (inlet hose closed).
The machine cannot drain water.
Water leak
Electronic control fault.
The water heating element is not
working correctly or the filter plate is
clogged.
25
Turn off the dishwasher, open the
inlet hose and reset the cycle.
Check if the drain tube is bent or if
the siphon or filters are clogged.
If the problem persists, contact
Customer Service.
Check if the drain tube is bent or if
the siphon or filters are clogged.
If the problem persists, contact
Customer Service.
Contact Customer Service.
Clean the filter plate.
If the problem persists, contact
Customer Service.
Page 26

PROGRAMME GUIDE
Wash with prewash
For wash programmes with prewash, it is advisable to add a second dose of detergent (max.
10 g) directly in the machine.
Programme Description
Hygienic
75°C
Intensive
75°C
Strong & Fast
65°C
Universal+
70°C
Universal
60°C
Daily
55°C
Ultra Silent
55°C
Eco
45°C
Delicate
45°C
An antibacterial cycle, intended for washing and
sterilising dishes (even heavily stained ones)
babies’ bottles etc.
Once a day - for heavily soiled pans and any
other items that have been left all day for
washing.
Intended for rapid washing of very dirty dishes.
Intended for everyday dishwashing. Two final
rinses ensure a high level of hygiene and
cleanliness.
Once a day - for normal soiled pans and any other
items that have been left all day for washing.
Fast cycle, for “normally” dirty dishes - intended
for frequent washes and normal loads.
Quietest washing cycle. Ideal for functioning by
night and for taking advantage of reduced energy
fares.
Programme for normally soiled tableware (the
most efficient in terms of its combined energy and
water consumption for that type of tableware).
Programme standardised to EN 50242.
Suitable for delicate crockery and glassware. Also
for less soiled items excluding pans.
Ultra Rapid 60'
Ultra Rapid 24'
= "IMPULSE" programmes
65°C
50°C
Refresh
Suitable for heavily soiled items that are to be
washed straight after a meal (Max 8 place load).
Quick wash for dishes which are to be washed
immediately after the meal. Wash load of
6 persons.
Short cold pre-wash for items that are stored in
the dishwasher until you are ready to wash a full
load.
26
Page 27

Check list
Detergent for soaking
(Prewash)
Detergent for washing
Clean filter
Check rinse aid
dispenser
Check salt container
Hot pre-wash
Programme contents
Cold pre-wash
Main wash
First cold rinse
Avarage
duration
in minutes
*
Second cold rinse
Hot rinse with rinse aid
With cold water (15°C)
-Tolerance ± 10%-
Special function
buttons
available
"DELAY START" button
“SUPER ECO” button
"ALL IN 1" button
•
•
•
•
•••
•
•••
•
•••
•
•••
•
•••
•
•••
•
•••
•
••••
•
•••
75°C
75°C
65°C
70°C
60°C
55°C
55°C
45°C
45°C
140
130
85
125
120
80
240
170
85
YES
YES
YES
YES
YES
YES
YES
YES
YES
YES
YES
YES
YES
YES
YES
YES
YES
YES
YES
YES
YES
YES
YES
YES
YES
YES
YES
•
•
•••
•
•••
•
N/A = OPTION NOT AVAILABLE
65°C
50°C
27
60
24
5
YES
YES
YES
YES
N/A
N/A
YES
YES
WITH HOT WATER THE TIME REMAINING UNTIL THE END OF THE PROGRAMME IS AUTOMATICALLY DISPLAYED WHILE THE
PROGRAMME IS RUNNING.
*
Page 28

THE WATERBLOCK SYSTEM
The waterblock system has been designed to improve the safety of your appliance,
particularly when the machine is left unattended.
The waterblock system actually prevents flooding which might be caused by a
machine malfunction or as a result of a fracture on the pipes.
How does waterblock work
The sump located in the base of the appliance collects any possible water leakage
and operates a sensor which subsequently activates a valve placed under the water
tap and stops any water from the supply even with the tap fully opened. If the box
containing the electrical parts is damaged, remove the plug from the socket
immediately.
To ensure perfect operation of the safety system, box “A” with the hose, should be
connected to the tap as shown in figure “1”. The inlet hose should not be cut, as it
contains parts under load. If the hose is not long enough for correct connection, it
must be replaced with a longer one. The hose can be obtained from your Service
Agent.
This dishwasher is also equipped with an anti-overflow safety device which, if water
exceeds normal levels due to malfunctions, automatically blocks water flow and/or
drains excess quantities.
Fig. 1
28
A
Page 29

IDENTIFYING MINOR FAULTS
Should the dishwasher fail to operate, before contacting the Service Centre, make
the following checks:
FAULT CAUSE REMEDY
1 - Machine completely dead
2 - Machine does not
draw water
3 - Machine does not
discharge water
4 - Machine discharges
water continuously
5 - Spray arms are not heard
to rotate
6 - On electronic appliances
without a display: one or
more indicator lights
flashing quickly.
Plug is not connected to wall
socket
O/I button has not been pressed
Door is open
No electricity
See causes for no. 1
Water tap is turned off
Programme selector is not at
correct position
The inlet hose is bent
The inlet hose filter is not
correctly connected
Filter is dirty
Outlet hose is kinked
The outlet hose extension is
not correctly connected
The outlet connection on the
wall is pointing downwards not
upwards
Position of outlet hose is too
low
Excessive amount of detergent
Item prevents arms from rotating
Plate and cup filter very dirty
Water inlet tap turned off
Connect electric plug
Press button
Close door
Check the fuse in the plug and
the electricity supply
Check
Turn water tap on
Turn programme selector to
correct position
Eliminate the bends in the hose
Clean the filter at the end of the
hose
Clean filter
Straighten outlet hose
Follow the instructions for
connecting the outlet hose
carefully
Call a qualified technician
Lift outlet hose to at least 40 cm
above floor level
Reduce amount of detergent
Use suitable detergent
Check
Clean plate and cup filter
Switch off the appliance.
Turn on the tap.
Re-set the cycle.
29
Page 30

FAULT CAUSE REMEDY
7 - Load of dishes is only
partially washed
8 - Detergent not dispensed
or partially dispensed
9 - Presence of white spots
on dishes
10 -Noise during wash
11 -The dishes are not
completely dry
See causes for no. 5
Bottom of saucepans have not
been washed well
Edge of saucepans have not
been washed well
Spray arms are partially blocked
The dishes have not been
properly loaded
The end of the outlet hose is in
the water
The incorrect amount of
detergent has been measured
out; the detergent is old and hard
The wash programme is not
thorough enough
The lower basket dishes have
not been washed
Cutlery, dishes, pans, etc... stop
the detergent dispenser opening
Water is too hard
The dishes knock against one
another
The revolving arms knock against
the dishes
Inadequate air flow
Rinse aid missing
Check
Burnt on food remains must
be soaked before putting pans
in dishwasher
Reposition saucepans
Remove spray arms by
unscrewing ring nuts clockwise
and wash under running water
Do not place the dishes too
closely together
The end of the outlet hose
must not come into contact
with the outflow water
Increase the measure
according to how dirty the
dishes are and change detergent
Choose a more vigorous
programme
Depress half load button
Position dishes not to obstruct
the dispenser
Check salt and rinse aid level
and regulate amount.
Should the fault persist,
Contact Service Centre
Re-check loading of dishes in
the basket
Again re-check loading
Leave the dishwasher door ajar
at the end of the wash program
to allow the dishes to dry naturally
Fill the rinse aid dispenser
N.B.: Should any of the situations occur and should the machine give a bad wash performance,
it is necessary to remove the deposits from the dishes by hand since the final drying cycle hardens the
deposits which a second wash in the machine would not be able to remove.
If the malfunction continues contact a Service Centre quoting the serial number of the dishwasher.
This is found on the plaque on the inside of the dishwasher door at the top or on the guarantee.
This information will make it possible to take more effective action more quickly.
The manufacturers decline any responsibility for any printing mistakes in this instruction booklet.
They also reserve the right to modify their own appliances as necessary without altering the
essential characteristics.
30
Page 31

Page 32

Compliments,
GARANTIE
en ayant acheté un appareil
électroménager Candy, vous avez fait
preuve d’une très grande éxigence:
vous voulez le meilleur.
Candy est heureux de vous proposer
cette nouvelle machine, fruit d’années
de recherches et d’expériences
confirmées sur le marché. Vous avez
choisi la qualité, la fiabilité et les
prestations techniques élevées.
Candy vous propose de plus,
une gamme complète d’appareils
d’électroménagers: machines-à-laver,
lave-vaisselle, machines-à-laver
séchantes, séche-linge, four à
micro-ondes, fours et plaques de
cuisson, réfrigérateurs et congélateurs.
Demandez à votre Revendeur le
catalogue complet des produits Candy.
Nous vous prions de lire attentivement
les indications contenues dans ce
mode d’emploi. Vous y trouverez
d’importantes indications, sur la
sécurité d’installation, d’emploi, de
manutention et d’autres conseils utiles
pour le meilleur emploi du lave-vaisselle.
Conservez avec soin ce mode
d’emploi pour des consultations
futures.
Cette machine est livrée avec un
certificat de garantie qui permet de
contacter gratuitement l’assistance
technique.
Veuillez garder votre ticket d’achat et
le mettre dans un endroit sûr en cas de
besoin.
32
Page 33

INDICE
Conseils de sécurité
Mise en marche, installation
Adoucisseur d’eau
Chargement du sel
Réglage du panier supérieur
Chargement de la vaisselle
Information pour les tests laboratoire
Chargement du produit de lavage
Types de produits de lavage
Chargement du produit de rinçage
Nettoyage des filtres
Quelques conseils pratiques
Entretien et nettoyage courants
Description de la machine
Données techniques
Sélection du programme et functions particulières
Liste des programmes
Waterblock
Identification des anomalies mineures
pag. 34
pag. 35
pag. 39
pag. 40
pag. 41
pag. 42
pag. 44
pag. 45
pag. 46
pag. 47
pag. 48
pag. 49
pag. 50
pag. 51
pag. 51
pag. 52
pag. 56
pag. 58
pag. 59
Fig. A
5
1
4
3
Lire attentivement les instructions contenues dans ce livret car elles donnent
d'importantes indications sur la sécurité d'installation, d'utilisation et de maintenance
ainsi que quelques conseils utiles pour mieux utiliser le lave-vaisselle.
Conserver avec soin ce livret pour toute consultation ultérieure.
33
2
Page 34

CONSEILS DE SÉCURITÉ
L'emploi de n'importe quel appareil
électrique comporte l'observation de
règles fondamentales.
Installation
■ Le socle ainsi que la prise mâle de
l'appareil doivent correspondre à la
puissance maximum absorbée par
l'appareil.
En cas de nécessité de remplacement
de l'un ou de l'autre de ces éléments,
faire effectuer la modification par un
professionel patenté.
■ S'assurer que l'appareil n'écrase pas le
fil électrique d'alimentation.
■ L'utilisation de prises multiples et/ou
rallonges est déconseillée et dégage le
constructeur de toutes responsabilités.
■ Si le remplacement du câble d'alimentation
s'avère nécessaire, l'opération doit être
réalisée par le Service Après-vente.
■ S’appuyer ou s’asseoir sur la porte
ouverte du lave vaisselle risque
d’entraîner son basculement.
ATTENTION!
Les couteaux et autres ustensiles
avec des parties pointues ou coupantes
doivent être rangés avec les pointes
en bas ou horizontalement.
Usage quotidien
■ Cet appareil a pour vocation d’être
utilisé au sein du foyer, ou dans ces
différentes situations :
- zones réservées au personnel dans
les magasins, bureaux et autres
environnements de travail;
- exploitation agricoles;
- par les clients dans les hôtels, motels
et autres environnements résidentiels;
- environnement de type bed and
breakfast.
Sécurité
■ Ne pas toucher l'appareil avec les mains
ou pieds mouillés ou humides.
■ Ne pas utiliser l'appareil pieds nus.
■ Ne pas tirer sur le câble d'alimentation
de l'appareil pour débrancher la prise du
courant.
■ Ne pas laisser exposer l'appareil à des
agents atmosphériques (pluie, soleil
etc...).
■ Cet appareil n’est pas destiné à être
utilisé par des personnes (notamment
les enfants) incapables, irresponsables
ou sans connaissance sur l’utilisation du
produit, à moins qu’elles ne soient
surveillées, ou instruites sur l’utilisation
de l’appareil, par une personne
responsable de leur sécurité.
Surveillez les enfants pour être sûr qu’ils
ne jouent pas avec l’appareil.
■ A la fin du programme de lavage, l’eau
résiduelle dans l’appareil ou sur la
vaisselle, ne doit pas être consommée.
■ La porte ne doit pas rester en position
ouverte car cela pourrait occasionner
des accidents.
Une utilisation autre que domestique,
comme par exemple une démonstration
commerciale ou une session de formation,
est à exclure également dans les lieux cités
ci-dessus. Une utilisation détournée de
l’appareil est proscrite.
Si l’appareil doit être utilise de manière
incompatible comme défini ci-dessus, la
durée de vie de l’appareil pourrait être
réduite et la garantie du fabricant serait
annulée.
Tout dommage causé à l'appareil, résultant
d’une mauvaise utilisation de l’appareil
(même si l’utilisation en est faite au sein du
foyer), ne permettra pas de recours auprès
du fabriquant, comme il est établi par la loi.
■ Le lave-vaisselle est conçu pour laver
des ustensiles domestiques normaux.
Les objets contaminés par de l'essence,
de la peinture, des restes d'acier ou de
fer, des produits chimiques corrosifs,
acides ou alcalins ne doivent pas être
lavés en machine.
■ S'il y a une installation d'adoucissement
de l'eau dans l'habitation, il n'est pas
nécessaire d'ajouter de sel dans
l'adoucisseur monté dans le
lave-vaisselle.
34
Page 35

■ La coutellerie est mieux lavée si les
manches sont positionnés vers le bas
dans le panier à couverts.
■ En cas de panne et/ou de mauvais
fonctionnement de l'appareil, l'éteindre,
fermer le robinet d'arrivée d'eau et ne
pas ouvrir l'appareil.
Appelez le Service Après-vente de votre
revendeur en lui précisant bien le type
de votre appareil.
Le non respect des prescriptions
énoncées ci-dessus peut compromettre
la sécurité de l'appareil.
Mise au rebut
■ Cet appareil est fabriqué avec des
matériaux recyclables pour permettre de
les éliminer avec facilité.
■ Si l'on veut se débarrasser d'un vieux
lave-vaisselle, enlever le système de
fermeture de la porte pour que les
enfants ne puissent pas s'enfermer dans
la machine.
Coupez le cordon d’alimentation après
l’avoir retiré de la prise murale.
INSTALLATION
(Remarques techniques)
■ Après le déballage, régler la hauteur du
lave-vaisselle.
Pour un fonctionnement parfait, il est
important que le lave-vaisselle soit à
niveau, en règlant les pieds de façon à
ce qu'une éventuelle inclinaison ne
dépasse pas 2 degrés.
■ Dans le cas où vous devez transporter
de façon manuelle la machine sans
emballage, ne pas prendre la porte par
le bas, mais faire comme dans le
schéma; ouvrir légèrement la porte et
soulever l'appareil en utilisant le top
supérieur.
Alimentation Electrique
L'appareil est conforme aux exigences de
sécurité prévues par les différents instituts
de Normes, et c'est la prise tripolaire avec
un pôle de terre qui assure la mise à la
terre complète de l'appareil.
Avant de brancher la machine sur le circuit
électrique s'assurer:
1. que la prise murale est correctement
reliée à la terre;
2. que le réglage du contacteur électrique
correspond bien à la puissance
absorbée indiquée sur la plaque
signalétique du lave-vaisselle.
ATTENTION!
L'efficacité de la sécurité est donc
subordonnée à la mise à la terre
correcte de votre propre installation.
En cas d'absence d'un branchement
efficace de la mise à la terre, il peut
subvenir une légère dispersion de
courant sur les parties métalliques
de la machine, due à la présence d'un
filtre antiparasite radio.
IMPORTANT
Les ouvertures à la base de l'appareil
ne doivent en aucun cas être
obstruées par des tapis, moquette ou
autre objets.
À l'installation il est important de
verifier que la prise soit facilement
accessible.
Le constructeur décline toute
responsabilité pour des dommages
éventuels survenus aux personnes et
aux biens imputables à un mauvais
raccordement de la ligne de terre.
Produit compatible avec les
Directives Européennes 73/23/EEC
et 89/336/EEC, remplacé par
2006/95/EC et 2004/108/EC, et les
35
amendements successifs.
Page 36

Branchement Hydraulique
IMPORTANT
L'appareil doit être relié à l'arrivèe
d'eau, exclusivement avec le tuyaux
fournis.
Ne pas réutiliser les anciens tuyaux.
■ Les tuyaux de vidange et de remplissage
peuvent être orientés de façon
indifférente vers la droite ou vers la
gauche.
IMPORTANT
Le lave-vaisselle peut-être relié de
façon indifférente à l'eau froide ou
chaude à condition que la température
ne dépasse pas les 60°C.
■ La pression hydraulique doit être
comprise d'un minimum de 0,08 MPa à
un maximum de 0,8 MPa.
Pour des pressions inférieures, nous
vous conseillons de demander des
instructions à notre service Après-vente.
■ Il est nécessaire de prévoir un robinet en
amont du tube de chargement pour
isoler la machine du système
hydraulique, quand celle-ci ne fonctionne
pas (fig. 1B).
■ Le lave vaisselle est doté d'un tuyau pour
la prise d'eau avec un embout fileté 3/4"
(fig. 2).
■ Le tuyau d'alimentation "A" devra être
vissé à un robinet d'eau "B" à l'aide de
l'attache 3/4" en s'assurant que le collier
est bien serré.
■ Si nécessaire il est possible de rallonger
le tube de vidange jusqu'à 2,5 m. Cette
rallonge de tube est disponible auprès
du service après-vente.
■ Si des saletés ou du sable sont présents
dans l’eau, il est recommandé de
demander le filtre approprié, art.
9226085, auprès du service après-vente
(fig. 3). Le filtre "D" doit être placé entre
la prise d'eau 3/4" "B" et le tuyau
d'alimentation "A", ne pas oublier de
mettre les joints "C".
■ Si la machine est branchée à des
tuyauteries neuves, ou qui n'ont pas été
utilisées pendant une longue période,
faire couler l'eau pendant quelques
minutes avant de brancher le tuyau
d'alimentation. On évitera ainsi la
formation de dépôts de sable ou de
rouille qui pourraient boucher le filtre
d'entrée de l'eau.
1
2
3
36
Page 37

Raccordement à la vidange
■ Pour la vidange, introduire le tuyau dans
l'installation de vidange, en prenant soin
de ne pas le plier car l'écoulement des
eaux s'en trouverait perturbé (fig. 4).
■ Le tuyau de vidange fixe doit avoir au
moins un diamètre intérieur de 4 cm et
doit être placé à une hauteur minimum
de 40 cm.
■ Pour éviter les odeurs, nous
recommandons de prévoir un siphon
(fig. 4X).
■ Si nécessaire il est possible de rallonger
le tube de vidange jusqu'à 2,5 mètres
en le maintenant cependant à une
hauteur maximum de 85 cm du sol.
Cette rallonge de tube est disponible
auprès du service après-vente.
4
■ L'extrémité recourbée du tuyau de
vidange peut être accrochée au bord
d'un évier, mais ne doit pas rester
immergée, pour éviter le siphonnage de
l'appareil pendant le programme de
lavage (fig. 4Y).
■ En cas d'installation sous un dessus
continu, le coude doit être fixé
immédiatement sous le dessus au point
le plus haut possible (fig. 4Z).
■ Pendant l'installation de la machine,
contrôler que les tubes de remplissage
et de vidange ne sont pas pliés.
37
Page 38

INSTALLATION DANS UN
ENSEMBLE DE CUISINE
MODERNE
Juxtaposition
■ Le lave-vaisselle a été étudié avec une
hauteur standard de 85 cm et peut être
ainsi placé entre des meubles de cuisine
moderne d'une même hauteur. Pour
obtenir un alignement parfait, agir sur les
pieds réglables.
■ Le plan supérieur est un vrai plan de
travail en plastique laminé de haute
résistance (fig. 5).
Encastrement
(Installation sous un plan de travail)
■ Les ensembles de cuisine moderne ont
un plan de travail unique sous lequel
viennent s'insérer les meubles de base
et les appareils ménagers.
Dans ce cas, il suffit de retirer le plan de
travail en dévissant les vis qui se trouvent
au-dessous et à l'arrière (fig. 6a).
IMPORTANT
Après avoir retiré le plan de travail,
les vis DOIVENT être vissées de
nouveau (fig. 6b).
■ La hauteur est ainsi réduite à 82 cm
comme prévue dans la norme
internationale (ISO), et le lave-vaisselle
vient s'intégrer parfaitement sous le plan
(fig. 7).
5
6
Ouverture de la porte
Mettre la main dans le creux, et tirer.
Si la porte s'ouvre durant le fonctionnement
de l'appareil, une sécurité électrique
permet d'interrompre automatiquement les
fonctions préétablies.
IMPORTANT
Pour une utilisation correcte ne pas
ouvrir la porte du lave-vaisselle
pendant son fonctionnement.
a
b
a
b
7
598
556/573
Fermeture de la porte
Mettre les paniers.
Vérifier que les plats ou casseroles ne
gênent pas les rampes avants et s'assurer
que celles-ci tournent librement.
Fermer la porte et la bloquer avec force.
38
Page 39

ADOUCISSEUR D’EAU
Selon la source d’approvisionnement,
l’eau contient des quantités variables de
calcaire et de minéraux qui se déposent
sur la vaisselle en laissant des taches et
des marques blanchâtres.
Plus la densité de minéraux dans l’eau est
élevée, plus celle-ci est dure.
Le lave vaisselle est équipé d’un dispositif
d’adoucisseur d’eau qui, avec l’utilisation
du sel régénérant, fournit de l’eau douce
pour laver la vaisselle.
Le degré de dureté de votre eau peut vous
être communiqué par votre fournisseur
d’eau.
Réglage de l’adoucisseur d’eau
L'adoucisseur d'eau peut traiter l'eau
dont la dureté s'élève jusqu'à 90°fH
(Graduation française) ou 50°dH (Graduation
germanique) et ce à partir de 8 niveaux de
réglage.
Les positions de réglage de l'adoucisseur
d'eau sont indiquées dans le tableau
suivant.
Dureté de
l'eau
Niveau
0
1
2
3
*4
5
6
7
°fH
0-5
6-10
11-20
21-30
31-40
41-50
51-60
61-90
(France)
0-3
4-6
7-11
12-16
17-22
23-27
28-33
34-50
°dH
(Allemagne)
de sel
Utilisation
régénérant
NO
OUI
OUI
OUI
OUI
OUI
OUI
OUI
d'eau
Réglage de
l'adoucisseur
d0
d1
d2
d3
d4
d5
d6
d7
* L'adoucisseur d'eau est pré réglé en
usine sur le niveau 4 (d4) car ce
niveau répond à la majorité des
besoins.
Pour régler la position de l'adoucisseur
d'eau en fonction du degré de dureté de
votre eau, procédez comme suit :
IMPORTANT
Commencer TOUJOURS la procédure
avec le lave-vaisselle éteint.
1. Maintenir enfoncée la touche
"PROGRAMMES" et allumer
simultanément le lave vaisselle à l’aide
de la touche "MARCHE/ARRÊT" (vous
entendrez alors un son).
2. Maintenir enfoncée la touche
"PROGRAMMES" pendant 5 secondes
au moins.
Relâcher la touche SEULEMENT après
avoir entendu le signal sonore.
L'afficheur montre le niveau de diminution
du calcaire.
3. Enfoncer de nouveau la même touche
pour choisir le niveau de diminution du
calcaire désirée: chaque pression sur la
touche augmentera la position d'un
niveau. Quand vous aurez atteint la
position "d7", l'afficheur retournera à la
position "d0".
4. Eteindre le lave-vaisselle en appuyant
sur la touche "MARCHE/ARRÊT" pour
rendre effective la nouvelle configuration.
ATTENTION!
Si, pour quelque raison que ce soit,
la procédure ne peut être terminée
avec succès, éteindre le lave-vaisselle
en appuyant sur la touche
"MARCHE/ARRÊT" et recommencer
depuis début (POINT 1).
Touche
“MARCHE/ARRÊT”
Afficheur
Touche
“PROGRAMMES”
39
Page 40

CHARGEMENT DU SEL
■ Sur le fond de la machine se trouve le
bac à sel pour la régénération de
l'adoucisseur d'eau.
■ Il est important de n’utiliser que le sel
spécifiquement prévu pour les lavevaisselle.
Autres types de sel contenant de
sensibles percentages de substances
insolubles qui pourraient avec le temps
rendre inèfficace le système de
l'adoucisseur.
■ Pour introduire le sel, dévisser le
bouchon du bac.
■ Pendant l'opération de remplissage un
peu d'eau débordera: continuez à
verser le sel jusqu'à ce que le réservoir
soit plein (mélanger à l'aide d'une
cuillère).
Après cette opération nettoyer le
filetage en enlevant les résidus de sel;
revisser le bouchon.
■ Après chargement du sel, il est
recommandé d’effectuer un cycle de
lavage complet ou de mettre en marche
le programme TREMPAGE (ou RINCAGE
A FROID).
Pour une utilisation optimale de
l’appareil, le réservoir à sel, dont
la capacité varie de 1,5 à 1,8 kg, doit
être rempli de temps en temps en fonction du réglage opéré sur l’adoucisseur
d’eau.
IMPORTANT
Ce n'est qu'au cours de la phase
d'installation de la machine à laver la
vaisselle qu'il faudra, après avoir
remplí complètement le bac à sel,
ajouter de l'eau jusqu'à ce qu'elle
déborde du bac.
Indicateur de remplissage
du sel
Ce modèle est pourvu de voyant
électrique sur le tableau de bord qui
s'allume quand il faut remplir le réservoir à
sel.
IMPORTANT
La vaisselle tachée de blanc est
généralement une indication
importante d'absence de sel.
40
Page 41

RÉGLAGE DU PANIER
a
b
a
b
SUPÉRIEUR
Quand on utilise habituellement des
assiettes de 29 à 32,5 cm de diamètre,
charger celles-ci dans le panier inférieur
après avoir mis le panier supérieur à sa
position la plus haute en procédant comme
suit:
1. Faire glisser le panier supérieur vers
l’exterieur;
2. Saisir le panier des deux les côtés et le
tirer vers le haut (fig. 1).
Cette opération ne permet pas de charger
dans le panier supérieur de la vaisselle
d'un diamètre de plus de 20 cm et ne
permet pas d'utiliser les supports mobiles
en position haute.
POUR REMETTRE LE PANIER EN
POSITION BASSE :
1
2
1. Saisir le panier des deux les côtés et le
tirer légèrement vers le haut (fig. 2a);
2. Laisser retomber le panier en
l'accompagnant lentement (fig. 2b).
N. B.: NE JAMAIS SOULEVER OU
BAISSER LE PANIER D'UN SEUL CÔTÉ
(fig 3).
ATTENTION :
Nous vous conseillons d’effectuer le réglage
du panier avant de charger la vaisselle.
3
41
Page 42

CHARGER LA VAISSELLE
Utilisation du panier supérieur
■ Le panier supérieur est pourvu de
supports mobiles accrochés au bord
latéral et pouvant occuper 4 positions.
■ Sur la position basse (A-A1) les supports
servent pour recevoir les tasses à thé, à
café, les couteaux longs et les louches.
Aux extrémités des supports, vous
pouvez suspendre les verres à pied.
AA1
Un chargement standard journalier est
indiqué dans les fig. 1, 2 et 3.
Panier supérieur (fig. 1)
A = assiettes creuses
B = assiettes plates
C = assiettes à dessert
D = soucoupes
E = tasses
F = verres
1
■ Quand les supports occupent la position
haute (B-B1) ils permettent de placer
les assiettes plates et creuses.
Ayez soin de placer les assiettes
creuses verticalement et en tournant
leur partie concave vers l'avant de la
machine; laisser toujours de l'espace
entre chaque assiette pour que l'eau
circule librement.
BB1
■ Nous vous conseillons de ranger les
plats de grande dimension, dont le
diamètre est d'environ 26 cm, légèrement
inclinés vers l'avant de façon à favoriser
l'introduction du panier à l'intérieur de la
machine.
■ Dans le panier supérieur vous pouvez
ranger différente vaisselle comme le
saladier et les bols en plastique qu'il vaut
mieux bloquer afin d'éviter que les jets
d'eau ne les renversent.
■ Le panier supérieur a été conçu pour
permettre une souplesse maximum
d'utilisation. Il peut n'être chargé qu'avec
des assiettes placées sur deux rangées,
24 pièces maximum, avec des verres
sur cinq rangées, 30 pièces maximum,
ou bien avec de la vaisselle mixte.
A
Panier supérieur (fig. 2)
A = assiettes creuses
B = assiettes plates
C = assiettes à dessert
D = soucoupes
E = tasses
F = verres à pied
G = verre
H = panier à couverts
2
A
H
42
B
G
C
B
F
C
D
E
D
F
F
E
Page 43

Panier supérieur (fig. 3)
A = verres
B = soucoupes
C = tasses
D = coupe petite
E = coupe moyenne
F = coupe grande
G = assiette à dessert
H = cuillère à soupe
I = louche
L = couverts
3
L
- POSITION "B": pour les assiettes de
formes particulières même si sont de
dimensions standards (assiettes creuses
très profondes, assiettes carrées, assiettes
sans rebords etc…).
- POSITION "C": pour les assiettes plates,
plus grandes que la moyenne et/ou de
formes particulières (carrées, hexagonales,
ovales, plats à pizza etc…).
4
B
I
A
D
G
C
B
F
C
C
E
H
A
Utilisation du panier inférieur
■ Dans le panier inférieur vous placerez
les casseroles, les poêles, les
soupières, les saladiers, les couvercles,
les plats, les assiettes plates et creuses
et les louches.
■ Les couverts doivent être placés
manche vers le bas dans le panier à
couverts, que l'on placera à son tour
dans le panier inférieur (fig. 7 et 8) en
s'assurant qu'il n'entrave pas la rotation
des bras de lavage.
■ Le panier inférieur est doté d’une grille
centrale mobile (fig. 4 et 5) qui permet
un chargement toujours stable et optimal
des assiettes, même quand les dimensions
et les formes ne sont pas standards.
- POSITION "A": pour le chargement
d’assiettes standards ou pour le chargement
exclusif de poêles, saladiers etc…
H
5
C
A
■ Les assiettes de taille réduite, comme
par exemple les assiettes à dessert,
doivent être chargées dans le panier
inférieur comme indiqué sur la figure 6
en positionnant vers l’extérieur ("B") les
supports orientables prévus à cet effet.
Pour les assiettes normales ou de
grandes dimensions, les supports
doivent être orientés vers l’intérieur ("A").
6
A
ATTENTION !
Si les petites assiettes sont
positionnées sans avoir mis les
supports mobiles dans la bonne
position, le bras de lavage inférieur peut
alors être bloqué par ces assiettes.
43
B
Page 44

Un chargement standard journalier est
indiqué dans les fig. 7 et 8.
Le rangement rationnel et correct de la
vaisselle est la condition essentielle pour
obtenir un excellent lavage.
Panier inférieur (fig. 7)
A = casserole moyenne
B = casserole grande
C = poêle
D = soupières, plats
E = couverts
F = plats à rôtis
G = coupe moyenne
H = coupe petite
7
B
A
F
G
E
Panier inférieur (fig. 8)
A = assiettes creuses
B = assiettes plates
C = assiettes à dessert
D = plat
E = couverts
IMPORTANT
Le panier inférieur possède un dispositif
d’arrêt automatique permettant son
extraction en toute sécurité, très utile
aussi lors du chargement complet du
lave-vaisselle.
L’extraction total du panier inférieur
est nécessaire afin de charger le sel
ainsi que pour le nettoyage du filtre
et de l’entretien ordinaire de la
machine.
Panier à couverts (fig. 9)
Le couvercle du panier à couverts peut être
retiré pour permettre différentes possibilités
de chargement.
C
9
D
H
8
A
D
C
B
E
C
INFORMATION POUR LES
ESSAIS EN LABORATOIRE
Pour toute demande d’informations
relatives aux essais comparatifs et aux
mesures sonores (selon les normes EN),
merci de vous adresser:
testinfo-dishwasher@candy.it
Dans votre, demande, merci de spécifier le
modèle ainsi que le numéro de série du
lave-vaisselle (cf. étiquette données).
44
Page 45

CHARGEMENT DU PRODUIT
DE LAVAGE
Le produit de lavage
IMPORTANT
Il est indispensable d'utiliser de la
lessive en poudre, liquide ou en
pastilles spécialement destiné aux
machines à laver la vaisselle.
"CALGONIT" donne les meilleurs résultats
de lavage et peut être obtenue facilement.
Les lessives non adaptées (comme cettes
pour le lavage à la main) ne contiennent
pas les ingrédients appropriés au
lavage en machine et empêchent le
fonctionnement correct de l'appareil.
Charger la lessive
La boîte à produits se trouve à l'intérieur de
la porte (fig. A "2"). Si le couvercle du
récipient est fermé, pour l'ouvrir il suffit
d'appuyer sur le bouton d'accrochage (A):
à la fin de chaque programme de lavage,
le couvercle est toujours ouvert, prêt pour
l'utilisation suivante.
ATTENTION!
Dans le panier inférieur, ne pas charger
d’assiette ou de couvert qui empêche
l’ouverture du couvercle du récipient à
lessive ou obstrue la dispersion de la
lessive.
B
Après le versement du détergent dans le
bac à lessive, fermer le couvercle, tout
d’abord en le glissant vers la gauche (1)
puis en appuyant dessus (2) jusqu’à ce
que vous entendiez un clic.
Comme les lessives ne sont pas toutes
de même nature, consulter aussi les
instructions sur les emballages.
Nous rappelons que des quantités
insuffisantes de lessive peuvent éliminer la
saleté de façon incomplète, tandis qu'une
dose excessive de lessive, non seulement
n'améliore pas les résultats de lavage,
mais est un gaspillage.
Les doses de lessive peuvent varier selon
le degré de salissure et le type de
vaisselle. Nous conseillons de verser de 20
à 30 g de lessive dans le bac "lavage" (B).
A
IMPORTANT
Ne pas exagérer dans l'utilisation de
la lessive, c'est contribuer à limiter
la pollution de l'environnement.
45
Page 46

TYPES DE PRODUITS DE
LAVAGE
Produits de lavage en tablettes
Les produits de lavage en tablettes des
différents producteurs se dissolvent à des
vitesses différentes. Donc dans les
programmes rapides, certaines tablettes,
ne se dissolvant pas complètement,
peuvent ne pas être totalement efficaces.
Avec les tablettes, il est donc conseillé de
sélectionner des programmes plus longs
afin de garantir la dissolution complète du
produit de lavage.
IMPORTANT
Pour obtenir des résultats de lavage
satisfaisants, les tablettes DOIVENT
être introduites dans le bac à produit
de lavage et PAS directement dans
la cuve.
Produits de lavage concentrés
Les produits de lavage concentrés, à
alcalinité réduite et avec enzymes naturelles,
combinés à des programmes de lavage à
50°C, permettent de réduire l’impact sur
l’environnement tout en respectant la
vaisselle et le lave-vaisselle.
Les programmes de lavage à 50°C ont été
spécialement pensés pour optimiser les
propriétés de dissolution de la saleté par
les enzymes, permettant ainsi d’obtenir,
avec les produits de lavage concentrés, les
mêmes résultats que des programmes à
65°C.
Produits de lavage combinés
“Tout en un”
Si vous envisagez d’utiliser des produits
lessiviels combinés "Tout en un" ("3 en 1"/"4
en 1"/"5 en 1", etc…) par exemple ceux
composés de sel et/ou d’ agents de rinçage,
nous vous conseillons de:
■
lire attentivement et de suivre les
instructions du fabricant, notées sur les
emballages;
■
la performance de certains produits
lessiviels composés de sel/adoucisseur
d’eau dépend de la dureté de votre eau.
Vérifiez que le niveau de dureté de votre
eau est inclus dans l’échelle de
performance donnée sur l’emballage du
produit lessiviel.
Si l’utilisation de ce type de produits ne
donne pas de résultats de lavage
satisfaisants, s’adresser au producteur
du produit de lavage.
Dans certains cas l’utilisation de détergents
combinés peut occasionner:
■
dépots de calcaire sur la vaisselle ou
dans le lave-vaisselle;
■
une réduction des performances lors du
lavage et du séchage.
IMPORTANT
Tout problème dû au résultat direct
de l’utilisation de ces produits
combinés n’est pas couvert par
notre garantie.
Rappel: l’utilisation de produits de
lavage combinés “Tout en un” rend
superflue l’utilisation des témoins de
manque de sel et de produit de rinçage
(présents seulement sur certains
modèles).
En cas de problème de lavage et/ou de
séchage, il est conseillé de reprendre
l’utilisation des produits traditionnels (sel,
produit de lavage, produit de rinçage).
Produits de lavage combinés
Les produits de lavage qui contiennent
aussi le produit de rinçage doivent être
introduits dans le bac à produit de lavage.
Le bac à produit de rinçage doit être vide
(dans le cas contraire, régler le dosage du
produit de rinçage sur le minimum avant
d’utiliser des produits de lavage combinés).
Dans ce cas, il est recommandé de:
■ remplir de nouveau les bac à sel et à
produit de rinçage;
■ exécuter un cycle de lavage normal à
vide.
NB: en revenant à l’utilisation de sel de
type traditionnel, plusieurs cycles de
lavage seront nécessaires avant que le
système d’adoucissement de l’eau soit de
nouveau optimal.
46
Page 47

CHARGEMENT DU PRODUIT DE
RINÇAGE
Le produit de rinçage
Cet additif qui est introduit
automatiquement à la dernière opération
de rinçage, assure le séchage rapide de la
vaisselle et évite la formation sur celle-ci
de taches blanchâtres.
Charger le produit de rinçage
A la gauche du bac à lessive se trouve le
réservoir du produit de rinçage (fig. A "3").
Pour ouvrir le couvercle, appuyer sur le
marquage prévu à cet effet et, en même
temps, tirer la languette vers le haut.
Utiliser toujours un produit de rinçage
adapté au lave-vaisselle automatique.
Il est possible de contrôler le niveau du
produit de rinçage au moyen du voyant
optique (C) placé sur le distributeur.
PLEIN VIDE
C
Reflet sombre Reflet clair
Réglage de dosage du
produit de rinçage de 1 à 6
Le réglage (D) est situé sous le couvercle
et peut être réglé au moyen d'une pièce de
monnaie. La position conseillée est 4.
La présence de calcaire dans l'eau se
manifeste soit par la présence
d'incrustation, soit par le degré de séchage.
C'est pourquoi il est important de régler le
débit du produit de rinçage pour obtenir
des prestations optimales.
Dans le cas où la vaisselle présente des
dépôts à la fin du lavage, diminuer le
réglage d'une position.
Dans le cas de vaisselle présentant des
marques ou auréoles blanchâtres,
augmenter le réglage d'une position.
D
47
Page 48

NETTOYAGE DES FILTRES
Le système de filtrage (fig. A ’’4’’) est
constitué par:
un réservoir central qui retient les grosses
particules;
une plaque métallique qui filtre
continuellement l’eau de lavage;
un micro filtre autonettoyant, situé sous la
plaque métallique, qui piège les micro
salissures pour garantir un rinçage parfait.
■ Afin d’obtenir d’excellents résultats de
lavage dans le temps, les filtres doivent
être contrôlés et nettoyés après chaque
lavage.
■ Pour retirer le micro filtre, il vous suffit
de tourner la poignée dans le sens
contraire des aiguilles d’une montre
(fig.1).
■ Pour un entretien facilité, le réservoir
central est amovible (fig.2).
■ Retirer la plaque métallique (fig.3) et
laver l’ensemble du système de filtrage
sous le robinet d’eau.
Si nécessaire, une petite brosse peut
être utilisée.
■ L’entretien du micro filtre
autonettoyant est limité , un contrôle,
toutes les deux semaines d’utilisation,
est suffisant.
Néanmoins, après chaque lavage il est
recommandé de vérifier que le réservoir
central et la plaque métallique ne sont
pas obstrués.
1
2
ATTENTION!
Après le nettoyage des filtres,
assurez vous qu’ils sont
correctement replacés et que la
plaque métallique est correctement
mise au fond de la cuve du lave
vaisselle.
Assurez vous que le micro filtre est
bien revissé, dans le sens des
aiguilles d’une montre, car une
mauvaise mise en place peut
entraîner une perte d’efficacité de
l’appareil.
IMPORTANT
Ne jamais se servir de l’appareil sans
les filtres.
3
48
Page 49

CONSEILS PRATIQUES
Que faire pour economiser
Que faire pour avoir
d'excellents résultats de lavage
■ Avant de ranger la vaisselle dans
la machine, enlever les résidus de
nourriture (os, arêtes, restes de viande
ou de légumes, résidus de café, é
pluchures de fruits, cendres de cigarettes,
curedents etc...) afin d'éviter d'obstruer
les filtres, la vidange et les gicleurs des
bras de lavage.
■ Eviter de rincer la vaisselle avant de la
placer dans la machine.
■ Si les poêles et les casseroles sont
excessivement incrustées de restes de
mets brûlés, nous vous conseillons de
les laisser tremper avant le lavage.
■ Ranger la vaisselle avec l'ouverture
tournée vers le bas.
■ Si possible, éviter que les différentes
pièces se touchent; une installation
correcte donnera de meilleurs résultats
de lavage.
■ Après avoir rangé la vaisselle, vérifier
que les bras de lavage tournent sans
obstacle.
■ Les casseroles et autre ustensiles qui
présentent des résidus de nourriture
très tenaces ou brûlés devront être mis
à tremper dans de l'eau avec de la
lessive pour lave-vaisselle.
■ Pour un lavage parfait de l'argenterie, il
faut:
a) la rincer dès qu'on a fini de l'utiliser,
surtout si on l'a utilisée avec de la
mayonnaise, des œufs, du poisson,
etc..;
b) ne pas l'asperger de lessive;
c) ne pas la mettre en contact avec
d'autres matériaux.
■ Au cas où l'on voudrait laver à pleine
charge, ranger la vaisselle dans le
lave-vaisselle dès que le repas est
terminé et en effectuant éventuellement
le programme TREMPAGE (ou RINCAGE
A FROID) pour ramollir la saleté et
éliminer les résidus les plus gros entre
chaque charge-ment en attendant
d'effectuer le programme de lavage
complet.
■ En présence de saleté peu consistante
ou de paniers peu chargés, sélectionner
le programme ECONOMIQUE en
suivant les instructions indiquées dans
la liste des programmes.
Ce qu'on ne doit pas laver
■ Il est bon de se rappeler que toute la
vaisselle n'est pas adaptée au lavage
en machine; nous déconseillons de
mettre des pièces en matériau
thermoplastique, des couverts à
poignée en bois ou en plastique, des
casseroles à poignée en bois, de la
vaisselle en aluminium, en cristal ou en
verre plombé si ce n'est pas
spécifiquement indiqué.
■ Certaines décorations tendent à
s'estomper, par conséquent nous
conseillons de laver plusieurs fois en
machine une seule pièce et, seulement
après s'être assuré qu'elle ne se décolore
pas, d'y mettre tout le chargement.
■ Nous conseillons de ne pas laver de
couverts en argent avec des couverts
en acier oxydable pour éviter qu'il ne se
produise de réaction chimique entre
eux.
IMPORTANT
Quand on achète de la vaisselle
neuve, s'assurer toujours qu'elle est
adaptée au lavage en machine.
Suggestions à la fin du
programme
■ Pour éviter d'éventuelles projections de
gouttelettes provenant du panier
supérieur, retirer d'abord le panier
inférieur.
■ Si vous laissez la vaisselle encore
quelques temps dans la machine,
ouvrez légèrement la porte pour favoriser
la circulation de l'air et améliorer encore
le séchage.
49
Page 50

NETTOYAGE EXTERNE ET
ENTRETIEN
■ Pour le nettoyage externe de la machine,
ne pas utiliser de détergent ni d’abrasifs
mais uniquement un chiffon avec du
savon et de l’eau.
■ Le lave-vaisselle ne réclame aucun
entretien spécial car la cuve de lavage
est autonettoyante.
■ Nettoyer périodiquement le joint en
caoutchouc de la porte avec un chiffon
humide de façon à éliminer
éventuellement les traces de déchets ou
de produit de rinçage.
■ Pour mieux garantir l'évacuation des
petits dépôts de calcaire ou de déchets,
il est conseillé de procéder
périodiquement à un lavage complet en
versant auparavant un verre de vinaigre
dans le fond de la cuve et en
positionnant le bouton du programmateur
sur lavage délicat.
■ Si, malgré le nettoyage normal de la
plaque et du filtre vous notez que la
vaisselle ou les casseroles sont
insuffisamment lavées ou rincées,
contrôler que les orifices des bras
rotatifs (fig.A"5") sont propres.
Si cela est nécessaire, nettoyer les de la
façon suivante:
1. Pour démonter le bras supérieur,
tournez le jusqu’à ce qu’il s’aligne avec
le marquage stop inscrit sur la flèche
(fig.1b). Poussez le vers le haut (fig.1)
en le maintenant enfoncé puis dévissez
le dans le sens des aiguilles d’une montre
(pour le remonter procédez de la
même manière, mais en le vissant
dans le sens contraire des aiguilles
d’une montre).
Le bras de lavage inférieur peut être
démonté facilement en le tirant vers le
haut (fig.2).
2. Passez le bras de lavage sous un
robinet d’eau pour éliminer toute saleté.
3. Ensuite, replacez le bras de lavage dans
la même position, en pensant à
positionner le bras supérieur en face du
marquage stop.
■ La cuve, ainsi que la contre-porte sont
en acier inoxydable. Si toutefois vous
devez constater des taches d'oxydation,
celles-ci seraient imputables seulement
à une présence importante de sels de
fer en suspension dans l'eau.
■ Pour retirer les taches, il est conseillé
d'employer un abrasif à grains très fins.
Ne pas utiliser de substance chlorée ou
de laine d'acier. Le lave-vaisselle possède
un adoucisseur et il est conseillé l'usage
de sel pour éviter la formation de dépôt
blanchâtre sur la vaisselle.
En cas de présence de taches
blanchâtres, il est conseillé avant tout
d'intervenir sur le réglage du produit de
rinçage en l'augmentant d'une unité.
1b
1
2
APRES L'UTILISATION
Après chaque lavage, fermer le robinet
d'eau pour isoler le lave-vaisselle de
l'installation hydraulique d'alimentation et
appuyer sur la touche Marche/Arrêt pour
arrêter le fonctionnement de la machine.
Si la machine doit rester inutilisée un
certain temps, il est nécessaire de
procéder aux opérations suivantes:
1. Exécuter un programme de lavage sans
vaisselle avec lessive pour dégraisser la
machine.
2. Débrancher la prise électrique.
3. Fermer le robinet d'eau.
4. Remplir le réservoir du produit de rinçage.
5. Laisser la porte légèrement ouverte.
6. Laisser l'intérieur de la machine propre.
7. Si la machine est laissée dans des
pièces où la température est inférieure à
0°C, l'eau restant dans les tuyauteries
risque de geler. Par conséquent, porter
la température ambiante à plus de 0°C
et attendre environ 24 heures avant
d'activer la machine.
50
Page 51

DESCRIPTION DE LA MACHINE
A Touche "MARCHE/ARRÊT"
B Touche "PROGRAMMES"
C Touche "DEPART DIFFERE"
H AFFICHEUR
I Voyant "MANQUE DE SEL"
L Voyant "MANQUE DE PRODUIT
DE RINÇAGE"
D Touche "START"/"RESET"
(départ/annulation programme)
E Touche option "SUPER ECO"
F Touche option "ALL IN 1"
Touche
G
Largeur x Hauteur x Profondeur (cm) 60 x 85 x 60
Encombrement porte ouverte (cm) 120
Couvert (EN 50242)
Capacité avec casseroles et assiettes
Pression admise pour l'installation hydraulique (MPa)
Fusible / Puissance maximum absorbée / Tension
INTENSIF
UNIVERSEL
ECO
ULTRA RAPIDE 24'
*Valeurs mesurées en laboratoire selon la norme Européenne EN 50242 (des différences sont
possibles lors d’un usage quotidien).
"U WASH"
•
DIMENSIONS
DONNÉES TECHNIQUES
CONSOMMATIONS (programmes principaux)*
Programme Energie (kWh) Eau (L)
Consommation d’électricité en mode éteint et en mode veille: 0,30 W / 0,45 W
M Voyants "SÉLECTION D’OPTION"
N Voyants
"U WASH"
•
O Description des programmes
Avec plan de travail Sans plan de travail
59,8 x 82 x 57,3
117
15
9 personnes
Min. 0,08 - Max. 0,8
Voir plaque signalétique
2,03
1,43
0,83
0,59
20
14
10
9
51
Page 52

SELECTION DES PROGRAMMES
ET FONCTIONS SPÉCIALES
Touche "U WASH"
Cette touche permet de varier l’intensité de
lavage, en fonction du degré de salissure
de la vaisselle, modifiant ainsi la durée et la
température du cycle de lavage.
Appuyer sur la touche pour augmenter
l’intensité de lavage (voyant ) ou pour la
diminuer (voyant ).
La combinaison de cette touche avec les 4
programmes de base, permet d’obtenir 8
programmes de lavage supplémentaires
(soit un total de 12 programmes de lavage).
IMPORTANT
Lors de la mise en service de l’appareil,
la dernière sélection effectuée
apparaît par défaut.
•
automatiquement. L’écran affiche le temps
restant avant la fin du cycle.
DANS UN DÉLAI de une minute
après le début du programme, vous
pouvez encore choisir un autre
programme, simplement en appuyant
sur la touche "PROGRAMMES" (il est
également possible de modifier la
sélection de la touche "U WASH" ).
•
Programmes "IMPULSE"
Les programmes "IMPULSE" utilisent une
technique de lavage qui réduit les
consommations, le bruit et améliore les
performances.
IMPORTANT
Le fonctionnement "intermittent" de
la pompe de lavage N'EST PAS le
signe d'un mauvais fonctionnement,
mais c'est une caractéristique du
lavage "IMPULSE". C’est donc le
signe du déroulement correct du
programme.
Choix des programmes
■ Ouvrez la porte et rangez la vaisselle à laver.
■ Appuyez sur la touche "MARCHE/ARRÊT"
Sur l’écran deux tirets vont apparaître.
■ Choisir un programme en appuyant sur la
touche "PROGRAMMES”.
■ Appuyer éventuellement sur la touche
"U WASH".
•
■ Pour sélectionner une option, appuyez sur
la touche correspondante (le voyant
s'éclaire).
Vous pouvez sélectionner ou
désélectionner les touches option
DANS UN DÉLAI de une minute après le
début du programme.
■ Appuyez sur la touche "START".
L’afficheur indique la durée du programme
en alternant l’indication des heures et des
minutes [I.e: 1 h (1 hour) / 25 (25 minutes)].
■ Avec la porte fermé, après que le signal
sonore ait retenti, le programme démarrera
Interruption du programme
Nous vous déconseillons d’ouvrir la porte
pendant l’exécution du programme, surtout
pendant la phase centrale du lavage et celle
.
du rinçage chaud final.
Cependant, si vous ouvrez la porte lorsque le
programme est en cours (par exemple pour
ajouter de la vaisselle), la machine s’arrête
automatiquement et l'afficheur indiquera
en clignotant le temps restant avant la fin du
cycle.
Lorsque vous refermez la porte, le cycle
repart de l’endroit où il s’était interrompu
sans devoir appuyer sur une touche.
IMPORTANT
Vous pouvez interrompre le programme
en cours même sans ouvrir la porte,
en appuyant sur la touche
"MARCHE/ARRÊT". Dans ce cas,
pour que le cycle redémarre de
l’endroit où il s’est interrompu, il
suffit d’appuyer à nouveau sur la
touche "MARCHE/ARRÊT".
ATTENTION!
Si vous ouvrez la porte pendant que le
lave-vaisselle effectue son cycle de
séchage, un signal sonore vous alerte
que le cycle n’est pas achevé.
52
Page 53

Modification d’un programme
en cours
Touches option
Pour modifier ou annuler un programme en
cours, procédez de la manière suivante:
■ Enfoncez la touche "RESET" sans la
lâcher pendant au moins 5 secondes.
"00" apparaîtra sur l'écran et des
signaux sonores retentiront.
■ Le programme en cours sera annulé.
Sur l’écran deux tirets vont apparaître.
■ Vous pouvez alors configurer un nouveau
programme.
ATTENTION!
Avant de démarrer un nouveau
programme, veuillez contrôler la
présence de lessive dans le compartiment.
Si nécessaire, remplir le compartiment.
Déroulement du programme
Durant le déroulement du programme,
l’écran affiche le temps restant avant la fin
du cycle. Temps qui se met à jour
automatiquement.
En cas de coupure de courant pendant
un programme de lavage, une mémoire
spéciale restaure le programme
sélectionné et, lorsque le courant est
rétabli, reprend le cycle là où il s'est arrêté.
Touche "SUPER ECO"
Selon le programme choisi, cette option
permet de réaliser en moyenne 25%
d’économies en temps et en énergie en
réduisant lors du dernier rinçage, le
chauffage final de l’eau ainsi que les temps
de séchage.
Nous conseillons cette option pour le lavage
du soir, si vous n’avez pas besoin que la
vaisselle qui vient d’être lavée ne soit
parfaitement sèche immédiatement.
Pour obtenir un meilleur séchage, nous
vous conseillons d’entrouvrir la porte en fin
de cycle afin de favoriser la circulation
naturelle de l’air dans le lave-vaisselle.
Touche "ALL IN 1"
Cette option permet l'utilisation optimale de
produits de lavage combinés “Tout en un”
("3 en 1"/"4 en 1"/"5 en 1”, etc.). En appuyant
sur cette touche, le programme de lavage
sélectionné est modifié, de façon à obtenir
les meilleurs résultats des produits combinés
(de plus, les indicateurs de manque sel et
produit de rinçage sont désactivés).
ATTENTION!
Une fois sélectionnée, l'option reste
active (voyant correspondant allumé)
pour programmes de lavage suivants
et pourra être désactivée (voyant
correspondant éteint) simplement en
appuyant de nouveau sur la touche
appropriée.
Fin du programme
La fin du programme est signalée par
un signal acoustique (s’il est activé) de
5 secondes, répété 3 fois toutes les
30 secondes.
L’écran et tous les voyants s’éteindront.
Vous pouvez alors sortir la vaisselle propre
et éteindre le lave-vaisselle en appuyant sur
la touche "MARCHE/ARRÊT" ou effectuer
un nouveau chargement pour un nouveau
cycle de lavage.
IMPORTANT
Cette option est particulièrement
recommandée lorsque vous utilisez le
programme ULTRA RAPIDE 24', dont
la durée sera prolongée d'environ 15
minutes de façon à obtenir les
meilleures performances des
détergents en tablettes.
53
Page 54

Touche "DEPART DIFFERE"
Cette touche permet de retarder le démarrage
du cycle de lavage de 1 à 23 heures.
Pour configurer le départ différé, procédez
de la mantère suivante:
Désactivation du signal acoustique
de FIN PROGRAMME
La fonction du signal acoustique à la fin du
programme peut être désactivée de la
manière suivante:
■ Appuyez sur la touche "DEPART
DIFFERE" (l’afficheur montre "00").
■ Appuyez encore sur la touche pour
augmenter le nombre d’heures
correspondant au départ différé (à
chaque pression le départ différé
augmente d’une heure, jusqu’à un
maximum de 23 heures).
■ Pour démarrer le décompte, appuyez
sur la touche "START".
L’écran affichera le temps restant au
départ du programme.
A la fin du décompte, le programme démarre
automatiquement et l’afficheur indique la
durée du cycle choisi.
Si vous désirez annuler le départ différé,
procédez de la manière suivante:
■ Enfoncez la touche "RESET" sans la
lâcher pendant au moins 5 secondes.
"00" apparaîtra sur l'écran et des
signaux sonores retentiront.
IMPORTANT
Commencer TOUJOURS la procédure
avec le lave-vaisselle éteint.
1. Maintenir enfoncée la touche
"PROGRAMMES" et allumer
simultanément le lave vaisselle à l’aide
de la touche "MARCHE/ARRÊT" (vous
entendrez alors un son).
2. Maintenir enfoncée la touche
"PROGRAMMES" pendant 15
secondes au moins (vous entendrez
pendant cette période 2 sons).
3. Relâcher la touche lorsque vous
entendrez le second signal sonore
(l'afficheur montre "b1" qui indique que
la sonnerie est activée).
4. Appuyer de nouveau sur la même
touche (l'afficheur montre "b0" qui
indique que la sonnerie est désactivée).
■ Le départ différé et le programme
sélectionné seront annulés.
Sur l’écran deux tirets vont apparaître.
■ Vous devez alors, pour faire redémarrer
le lave-vaisselle, reconfigurer le
programme voulu et sélectionner,
éventuellement, les touches Option, de
la façon indiquée au paragraphe
"CHOIX DES PROGRAMMES".
5. Eteindre le lave-vaisselle en appuyant
sur la touche "MARCHE/ARRÊT" pour
rendre effective la nouvelle configuration.
Pour réactiver la sonnerie, suivez la même
procédure.
54
Page 55

Mémorisation du dernier
programme utilisé
5. Eteindre le lave-vaisselle en appuyant
sur la touche "MARCHE/ARRÊT" pour
rendre effective la nouvelle configuration.
La mémorisation du dernier programme
utilisé, peut être activée comme suit:
IMPORTANT
Pour désactiver la mémorisation, suivre la
même procédure.
Commencer TOUJOURS la procédure
avec le lave-vaisselle éteint.
1. Maintenir enfoncée la touche
"SELECTION DE PROGRAMME" et
allumer simultanément le lave vaisselle
à l’aide de la touche "MARCHE/ARRÊT"
(vous entendrez alors un son).
2. Maintenir enfoncée la touche
"SELECTION DE PROGRAMME"
pendant 30 secondes au moins (vous
entendrez pendant cette période 3
sons).
3. Relâchez la touche lorsque vous entendrez le TROISIÈME signal sonore ("A0"
s'affichera sur l'écran pour indiquer que
ATTENTION!
Pour éviter le déclenchement
intempestif du dispositif de sécurité
anti-débordement, il est recommandé
de ne pas remuer ou incliner le
lave-vaisselle pendant son
fonctionnement.
Au cas où il serait nécessaire de
remuer ou d’incliner le lave-vaisselle,
s’assurer d’abord que le cycle de
lavage est terminé et qu’il n’y a plus
d’eau dans la cuve.
la mémorisation n’est pas activée).
4. Appuyez de nouveau sur la même
touche ("A1" s'affichera sur l'écran pour
indiquer que la mémorisation est
activée).
Le lave-vaisselle est en mesure de signaler sur l’afficheur plusieurs anomalies.
SIGNAL AUTOMATIQUE D’ANOMALIE
ANOMALIE CAUSE SOLUTION
apparaît sur l’afficheur,
E2
accompagné par un bref signal
acoustique.
E3 apparaît sur l’afficheur,
accompagné par un bref signal
acoustique.
apparaît sur l’afficheur,
E4
accompagné par un bref signal
acoustique.
E5, E6, E7, Ef ou EL apparaît
sur l’afficheur, accompagné par
un bref signal acoustique.
E8 ou Ei apparaît sur l’afficheur,
accompagné par un bref signal
acoustique.
Manque d’eau (robinet d’eau fermé).
L’appareil n’arrive pas à vider l’eau
de la cuve.
Fuite d’eau.
Panne du contrôle électronique.
L’élément de chauffage de l’eau ne
fonctionne pas correctement ou la
plaque du filtre est colmatée.
55
Eteignez le lave-vaisselle, ouvrez le
robinet et reconfigurez le cycle.
Vérifiez si le tuyau de vidange n’est pas
plié, si le siphon n’est pas bouché et si
les filtres ne sont pas colmatés.
Si le problème persiste,
adressez-vous au Service après-vente.
Vérifiez si le tuyau de vidange n’est
pas plié, si le siphon n’est pas bouché
et si les filtres ne sont pas colmatés.
Si le problème persiste,
adressez-vous au Service après-vente.
Vous devez vous adresser au
Service Après-Vente.
Nettoyez la plaque du filtre.
Si le problème persiste,
adressez-vous au Service Après-Vente.
Page 56

LISTE DES PROGRAMMES
Lavage précédé d'un prélavage
Pour les programmes précédés d'un prélavage, nous vous conseillons de mettre une seconde
dose de détergent (max. 10 grammes) directement dans le lave-vaisselle.
Programme
Puissant 65°C
Ultra Silence
Hygiénique
75°C
Intensif
75°C
Rapide &
Universel+
70°C
Universel
60°C
Quotidien
55°C
55°C
Eco
45°C
Délicat
45°C
Description
Cycle avec action anti-bactérienne, adapté pour
laver et stériliser la vaisselle (même très
incrustée), les biberons, etc…
Conçu pour le lavage des casseroles et de toute
autre vaisselle particulièrement sale.
Programme conçu pour le lavage rapide de vaisselle
très sale.
Programme conçu pour la vaisselle de tous les
jours. 2 rinçages finaux garantissent un niveau
d’hygiène et de propreté élevé.
Destiné au lavage de la vaisselle et casseroles
normalement sale.
Programme rapide, destiné à la vaisselle normalement
sale, adapté aux lavages fréquents et aux
chargements normaux.
Programme très silencieux, idéal pour une utilisation
nocturne.
Programme pour vaisselle normalement sale (le plus
efficace en termes de consommations combinées
d’énergie et d’eau pour ce type de vaisselle).
Programme normalisé EN 50242.
Adapté au lavage de la vaisselle délicate décorée et en
cristal. Indiqué pour le lavage quotidien de la vaisselle
peu sale, à l'exclusion des casseroles.
Ultra Rapide 60'
Ultra Rapide 24'
= Programmes “IMPULSE”
65°C
50°C
Rinçage
Destiné au lavage quotidien de la vaisselle et casseroles
normalement sale. A utiliser immédiatement après le
repas (Max 8 couverts).
Cycle trés rapide à effectuer à la fin du repas.
Recommandé pour un lavage de vaisselle jusqu'à
6 personnes.
Pour la vaisselle utilisée le matin ou à midi,
entreposée dans le lave-vaisselle jusqu'à ce que
vous soyez prêt à laver une charge pleine.
56
Page 57

Opérations à accomplir
Déroulement du programme
froid
froid
à
à
Durée
moyenne
en
minutes
*
Fonctions
facultatives
Lessive prélavage
Lessive lavage
•
•
•
Nettoyage plaque,
filtre
Contrôle provision
du produit de rinçage
Contrôle provision
Sel
Prélavage chaud
Prélavage froid
Lavage
•
•••
•
•••
•
•••
•
•••
•
•••
•
•••
•
•••
•
••••
75°C
75°C
65°C
70°C
60°C
55°C
55°C
45°C
Second rinçage
Premier rinçage
Rinçage chaud avec-
(Tolerance ±10%)
produit de rinçage
140
130
85
125
120
80
240
170
Touche
Avec eau froide (15°C)
OUI
OUI
OUI
OUI
OUI
OUI
OUI
OUI
“DEPART DIFFERE”
Touche “SUPER ECO”
OUI
OUI
OUI
OUI
OUI
OUI
OUI
OUI
OUI
OUI
OUI
OUI
OUI
OUI
Touche “ALL IN 1”
OUI
OUI
•
•••
•
•
•••
•
•••
•
N/A = OPTION NON DISPONIBLE
45°C
65°C
50°C
57
85
60
24
5
OUI
OUI
OUI
OUI
OUI
OUI
N/A
N/A
OUI
OUI
OUI
DE CYCLE.
*AVEC DE L'EAU CHAUDE LE TEMPS RESTANTAVANT LAFIN DU PROGRAMME DE LAVAGE EST AUTOMATIQUEMENTAFFICHÉ EN COURS
Page 58

WATERBLOCK
L’intérêt du waterblok est de rendre encore plus sûr votre appareil en particulier en
cas de votre absence dans votre appartement. Avec le waterblok sont éliminés tous
risques de fuites d’eau et d’innondation provoqués par des anomalies de
fonctionnement de la machine, en cas de rupture de tuyaux et plus particulièrement du
tuyau d’alimentation d’eau.
Fonctionnement
Le fond placé sous l’appareil recueille d’éventuelles fuites d’eau qui à l’aide d’un
sensor pneumatique, actionne la valve de sécurité située sous le robinet empéchant
l’eau de couler même si le robinet est ouvert.
Si la boîte, contenant les parties électriques, devait être endommagée, il est
nécessaire de débrancher l’appareil. Pour installer correctement le systéme de
sécurité, la boîte “A” avec le tuyau doit être reliée au robinet comme indiqué sur la
figure “1”. Le tuyau d’arrivée ne doit pas être coupé car il contient des parties
électriques.
Si le tuyau n’est pas assez long pour permettre un branchement correct, il doit être
remplacé par un tuyau plus long. Le tuyau peut être fourni par votre service
après-vente.
Ce lave-vaisselle dispose en outre d’un dispositif de sécurité anti-débordement
qui se déclenche dès que la hauteur d’eau dépasse le niveau normal et arrête
automatiquement l’arrivée d’eau et/ou vide l’eau en trop.
Fig. 1
A
58
Page 59

IDENTIFICATION D’ANOMALIES MINEURES
Si votre lave-vaisselle ne fonctionne pas, avant d’appeler votre revendeur faire les
contrôles suivants:
ANOMALIES CAUSES REMEDES
1 - La machine ne fonctionne
sur aucun programme
2 - La machine ne prend
pas l’eau
3 - La machine ne vidange pas
4 - La machine vidange
en permanence
Prise de courant mal branchée
Touche M/A non appuyée
Pas de courant
Porte ouverte
Voir causes du N. 1
Robinet d’eau fermé
Programmateur mal positionné
Le tuyau d’alimentation est plié
Le filtre du tuyau d’alimentation est
bouché
Filtre bouché
Tuyau de vidange plié
La rallonge du tuyau de vidange
n’est pas la bonne
La vidange murale n’a pas
d’évent à air
Tuyau en position trop basse
Brancher la prise
Appuyer sur la touche
Contrôler
Fermer la porte
Contrôler
Ouvrir le robinet
Positionner correctement le
programmateur
Déplier le tuyau
Nettoyer le filtre situé à
l’extremité du tuyau d’alimentation
Nettoyer le filtre
Redresser le tuyau
Suivre attentivement les
instructions pour le branchement
du tuyau de vidange
Consulter un technicien qualifié
Réhausser le tuyau de vidange à
40 cm.
5 - Les bras de lavage ne
tournent pas
6 - Sur les appareils électroniques
sans afficheur:
un voyant ou plus clignotant
rapidement.
Quantité excessive de lessive
Une pièce de vaisselle
empêche la rotation
La plaque filtrante et le filtre
sont bouchés par des impuretés
Arrivée d'eau fermée
59
Réduire la quantité de lessive
Contrôler
Nettoyer la plaque et le filtre
Arrêtez l'appareil
Ouvrir le robinet
Réactivez le cycle
Page 60

ANOMALIES CAUSES REMEDES
7 - La vaisselle est
partiellement lavée
8 - Manque ou dispersion
partielle de la lessive
9 - Présence de tâches
blanches sur la vaisselle
10 - Bruit pendant le lavage
11 - La vaisselle n’est pas
parfaitement sèche
Voir causes du N. 5
Le fond des casseroles n’est
pas lavé parfaitement
Le bord des casseroles n’est
pas parfaitement lavé
Orifices partiellement bouchés
La vaisselle n’est pas bien rangée
L’extrémité du tuyau de vidange est
plongée dans l’eau
La lessive n’est pas bien dosé, est
vieux ou durci
Le bouchon du récipient du sel ne
ferme pas bien
Le programme de lavage choisi est
trop faible
Des couverts, des assiettes,
des casseroles, etc… empêchent
l'ouverture du couvercle du récipient
à lessive.
L’eau d’alimentation est
particulièrement dure
Les pièces de vaisselle se cognent
Les bras de lavage tournants
cognent contre la vaisselle
Manque de circulation d’air
Manque de produit de rinçage
Contrôler
Incrustations trop tenaces
qu’il faut enlever avant
le lavage dans la machine
Positionner mieux les
casseroles
Démonter les bras de lavage en
dévissant l’écrou moleté de
fixation dans le sens des
aiguilles d’une montre et les laver
sous un robinet
Ne pas trop serrer la vaisselle
L’extrémité du tuyau de
vidange ne doit pas toucher l’eau
de vidange
Augmenter la dose en fonction de
la quantité de saleté ou
remplacer le produit
Le visser à fond
Choisir un programme plus
énergique
Charger la vaisselle de telle manière
qu'elle n'empêche pas l'ouverture
du couvercle du récipient à lessive.
Contrôler le niveau du sel et du
produit de rinçage et régler le
dosage; si l’anomalie persiste,
demander l’intervention du SAV
Mieux les ranger dans les paniers
Mieux ranger la vaisselle
Laisser la porte de la machine
entrouverte à la fin du
programme de lavage pour
favoriser le séchage naturel
Utiliser du produit de rinçage
N.B.: Quand une anomalie citée ci-dessus provoque un mauvais lavage ou un rinçage insuffisant, il est
nécessaire de retirer manuellement les salissures de la vaisselle car l’opération finale provoque le
séchage des salissures qu’un second lavage en machine ne serait pas susceptible de nettoyer.
Si le mauvais fonctionnement persiste, s’adresser au Centre d’Assistance Technique en communiquant le
modèle du lave-vaisselle indiqué sur la plaquette placée à l’intérieur de la porte, dans la partie supérieure,
ou sur le certificat de garantie. Ces informations vous permettront d’obtenir une intervention plus rapide et
efficace.
Le fabricant décline toute responsabilité pour erreur d’impression contenue dans le présent livret.
Il se réserve en outre, le droit d’apporter les modifications qu’il jugerait utiles sur ses produits sans
en compromettre les caractéristiques essentielles.
60
Page 61

Page 62

Page 63

The manufacturer declines all responsibility in the event of any printing mistakes in this
booklet. The manufacturer also reserves the right to make appropriate modifications to
its products without changing the essential characteristics.
To consult the product fiche, please refer to the manufacturer website.
Le constructeur décline toute responsabilité pour les éventuelles erreurs d’imprimerie
contenues dans le présent mode d’emploi. Il se réserve en outre le droit d’apporter
toutes modifications qui se révèleraient utiles à ses propes produits sans pour autant
en compromettre les caractéristiques essentielles.
Pour voir la fiche technique du produit, reportez-vous au site web du fabricant.
Page 64

This appliance is marked according to the European directive 2002/96/EC on Waste Electrical and Electronic
Equipment (WEEE).
By ensuring this product is disposed of correctly, you will help prevent potential negative consequences for the
environment and human health, which could otherwise be caused by inappropriate waste handling of this product.
The symbol on the product indicates that this product may not be treated as household waste. Instead it shall
be handed over to the applicable collection point for the recycling of electrical and electronic equipment
Disposal must be carried out in accordance with local environmental regulations for waste disposal.
For more detailed information about treatment, recovery and recycling of this product, please contact your local
city office, your household waste disposal service or the shop where you purchased the product.
Cet appareil est commercialisé en accord avec la directive européenne 2002/96/CE sur les déchets
des équipements électriques et électroniques (DEEE).
En vous assurant que ce produit est correctement recyclé, vous participez à la prévention des
conséquences négatives sur l’environnement et la santé publique qui pourrait être causé par une
mise au rebut inappropriée de ce produit.
Le symbole sur ce produit indique qu’il ne doit pas être traité comme un déchet ménager. Il doit être
rapporté jusqu’à un point de recyclage des déchets électriques et électroniques.
La collecte de ce produit doit se faire en accord avec les réglementations environnementales
concernant la mise au rebut de ce type de déchets.
Pour plus d’information au sujet du traitement, de la collecte et du recyclage de ce produit, merci de
contacter votre mairie, votre centre de traitement des déchets ou le magasin où vous avez acheté
ce produit.
EN
FR
14.06 - 41901826
 Loading...