

Page 1
OUR COMPLIMENTS
Please read this booklet carefully as it provides
important guidelines for safe installation, use and
maintenance and some useful advise on how to
get the best results when using your dryer.
Keep this booklet in a safe place for further
consultation.
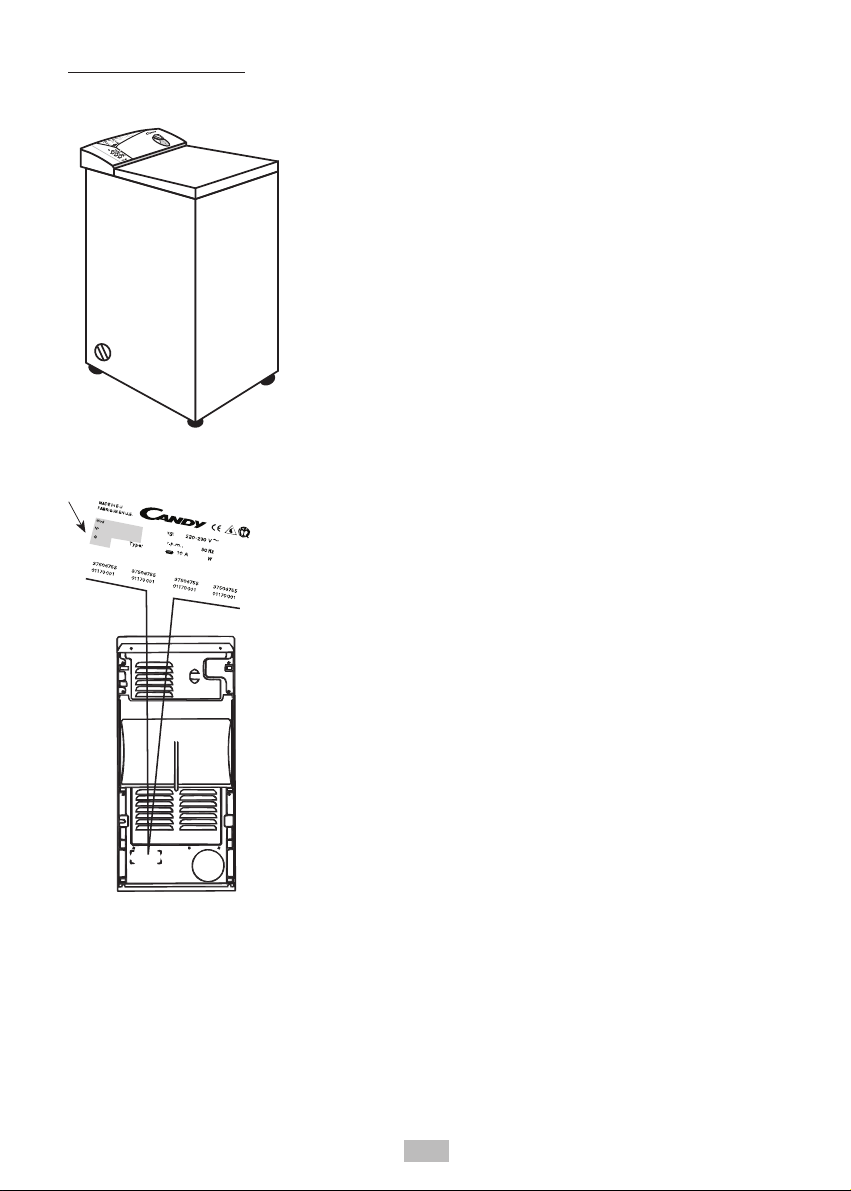
When contacting Candy or a Customer Service
Centre always refer to the Model No. which can
be found on a sticker on the back of the dryer.
3
Page 2
INDEX CHAPTER
page
INTRODUCTION ............................................................................
GENERAL POINTS ON DELIVERY ...............................................
GUARANTEE .................................................................................
SAFETY MEASURES .....................................................................
TECHNICAL DATA .........................................................................
SETTING UP AND INSTALLATION ............................................
CONTROL DESCRIPTION ..........................................................
SELECTION OF CLOTHES AND SYMBOLES USED ................
CLEANING AND ROUTINE MAINTENANCE .............................
TABLE OF PROGRAMMES ........................................................
FAULTS SEARCH .......................................................................
3
5
6
7
9
10
13
18
19
20
21
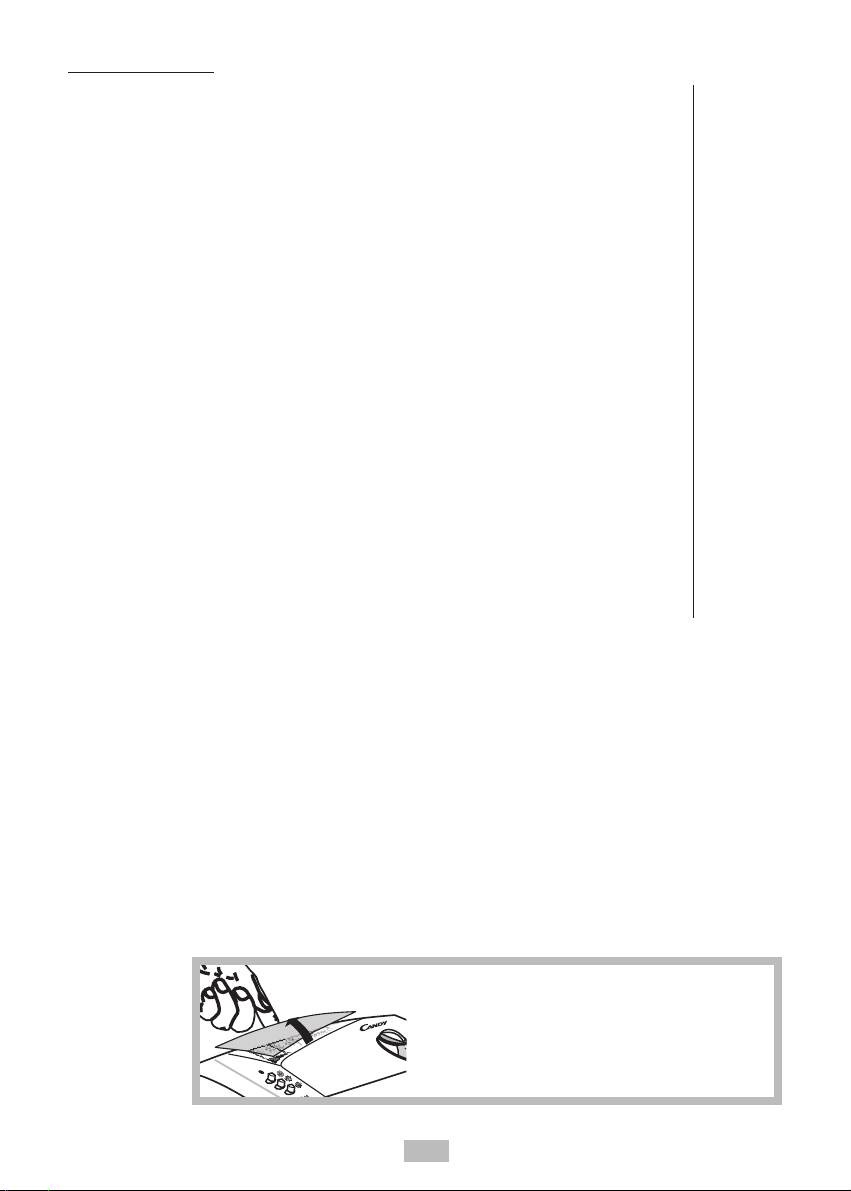
Place the adhesive label, in the
corresponding language, in the
support that slots into the back of the
panel display.
4
Page 3
GENERAL POINT ON DELIVERY
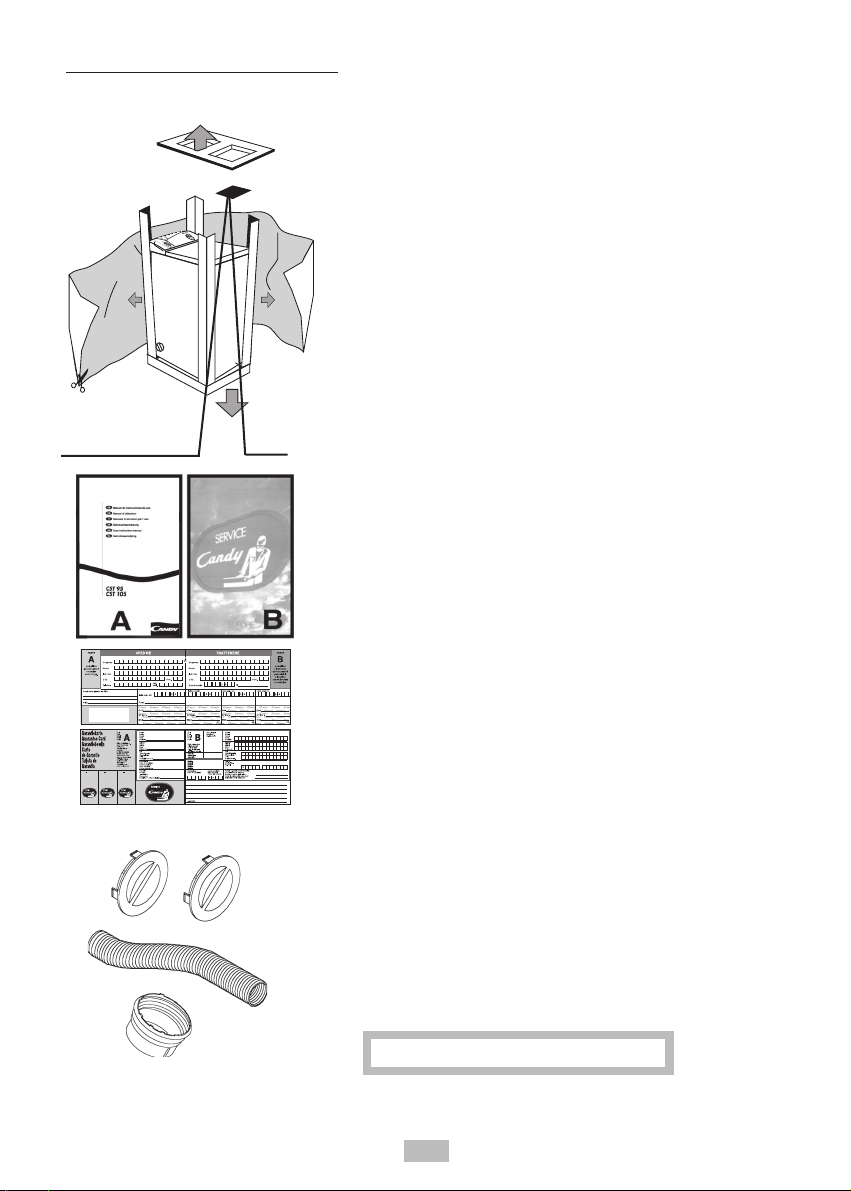
On delivery, check that the following are included
with the machine:
A) INSTRUCTION MANUAL
B) CUSTOMER SERVICE ADDRESSES
C) GUARANTEE CERTIFICATES
D) ACCESSORIES
The bag of accessories containe the following :
-2 plugs to be fitted to the air outlets not being
used.
- 1 flexible hose, 90 mm. in diameter and 2000
mm. long.
- 1 adaptor.
KEEP THEM IN A SAFE PLACE
5
Page 4
GUARANTEE
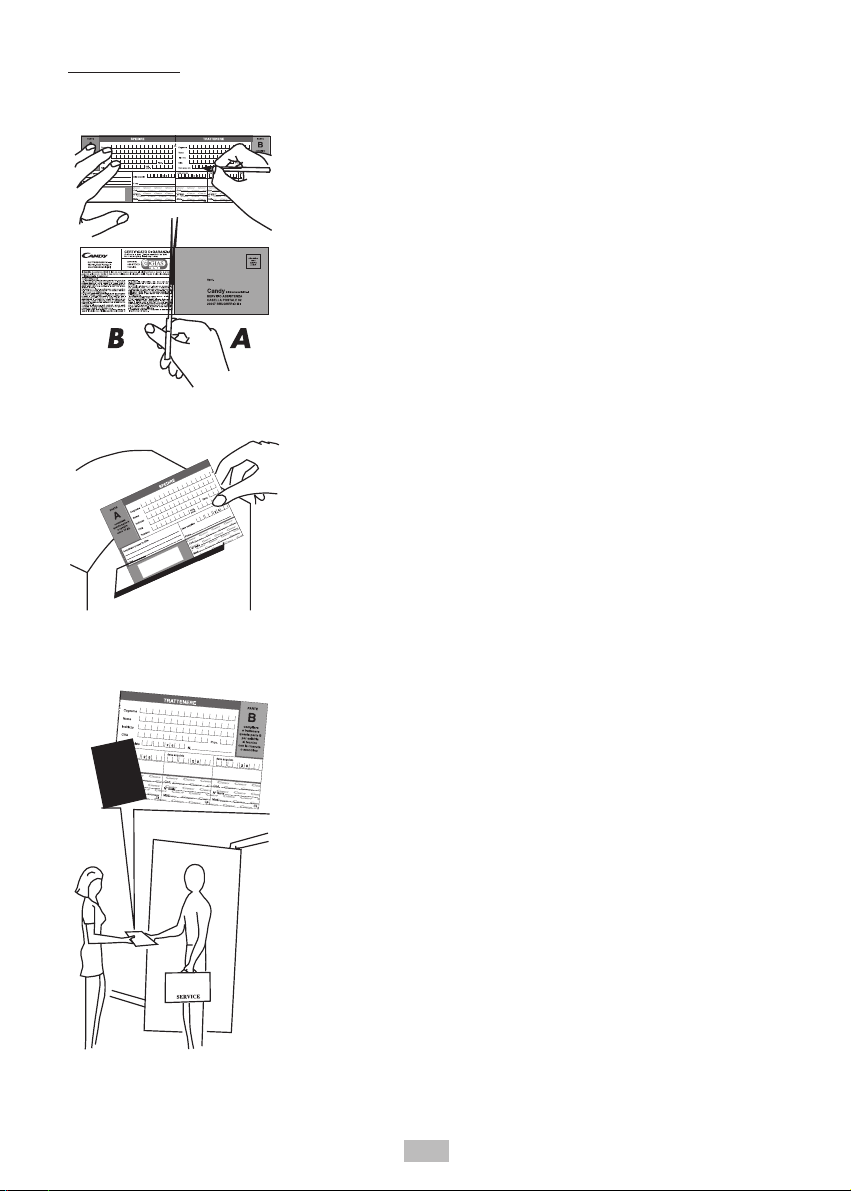
The appliance is supplied with a guarantee certificate
which allows free use of the Technical Assistance
Service for a period of one year from the date of
purchase.
Remember to post part A of the guarantee certificate
within 10 days of the purchase date.
Part B should be filled in and kept by you to be shown
if necessary to the technician from the Technical
Assistance Service. The sales receipt should also be
kept.
6
Page 5
SAFETY MEASURES
IMPORTANT: FOR ALL CLEANING AND
MAINTENANCE WORK
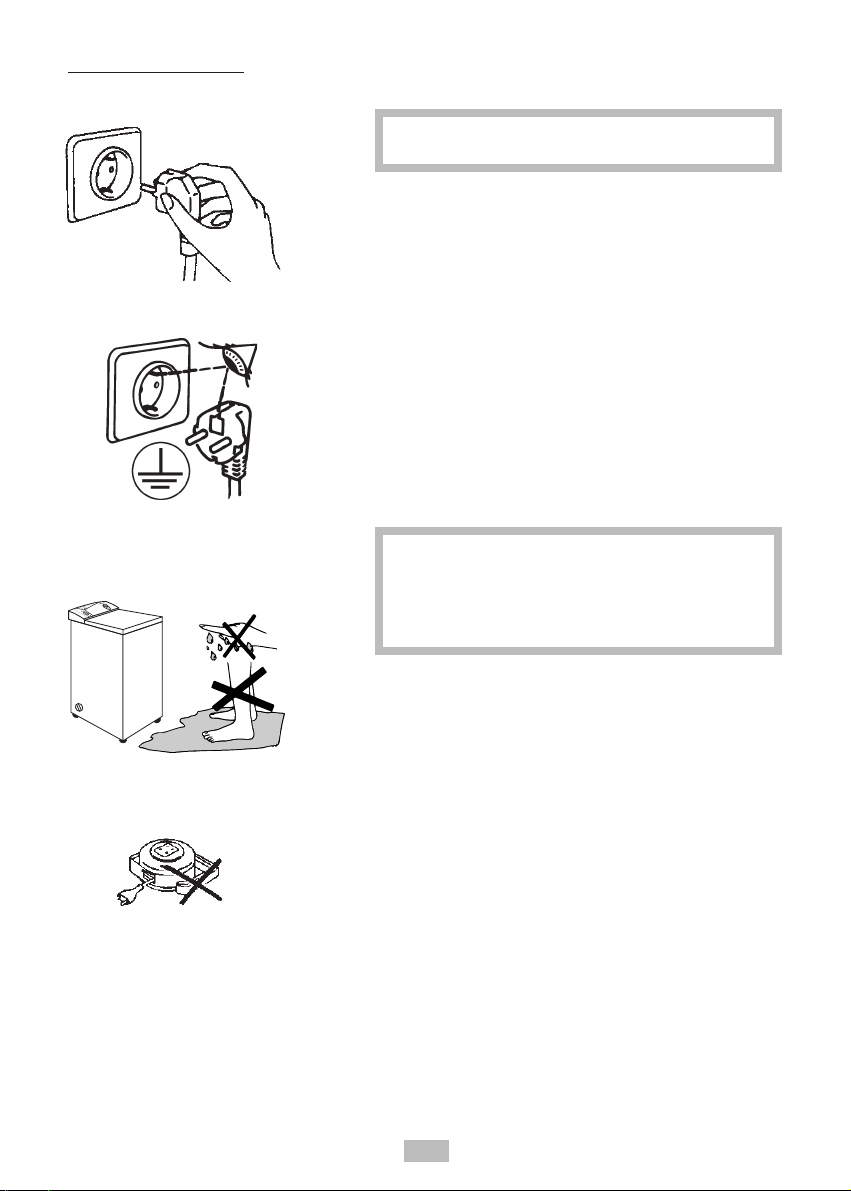
• Remove the plug
• The manufacturer fits all the machines with an earth
connection. Ensure that the electrical installation
has an earth connection and that it is connected; if
not call for service.
The earth connection is essential for user safety, as
it eliminates the risk of electrical discharge.
The manufacturer cannot accept any
responsibility for any damage or injury due
to connection problems or faults, a defective
earth connection or for not having connected
it.
•Do not touch the appliance with wet or damp hands
or feet.
•Do not use the appliance when bare-footed.
•Extreme care should be taken if extension leads
are used in bathrooms or shower
rooms. Avoid this
where possible.
7
Page 6
• Do not use adaptors or multiple plugs.
• Do not allow the appliance to be used by children
or the incompetent without due supervision.
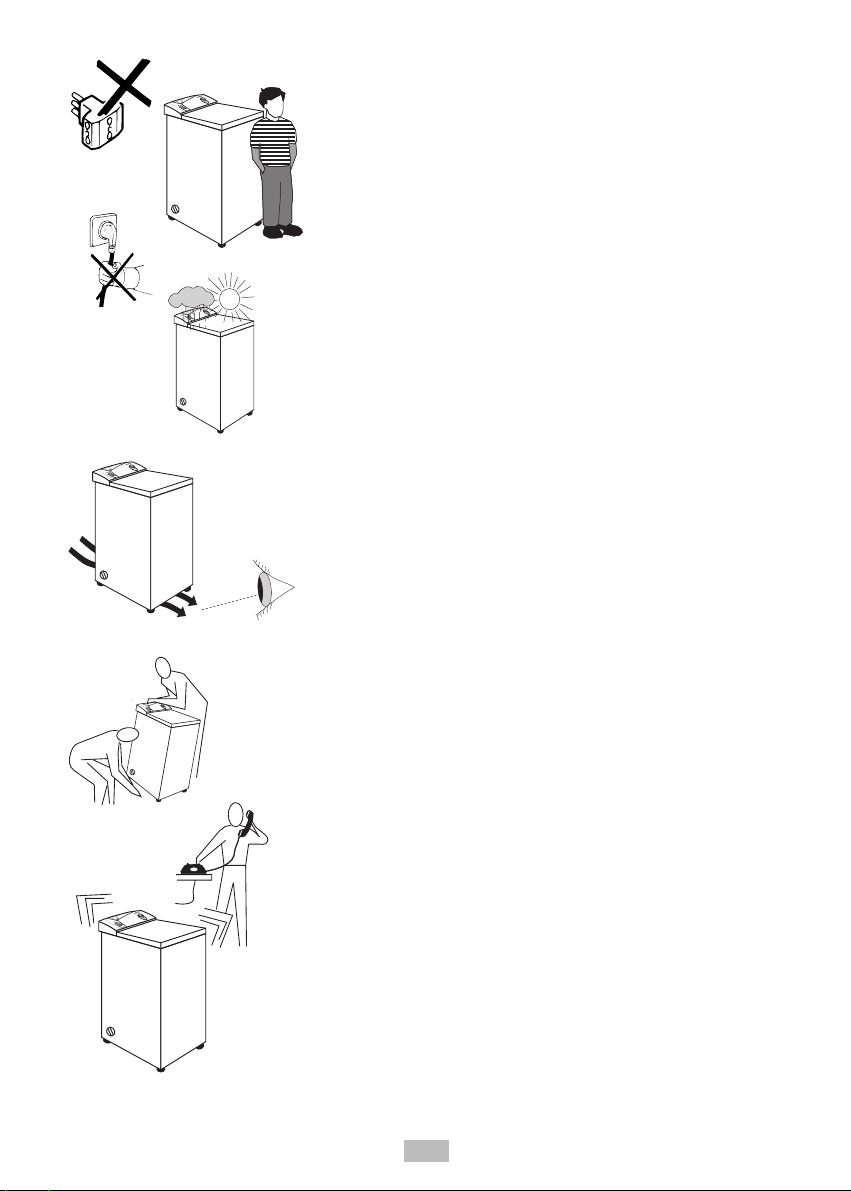
• Do not pull the mains lead or the appliance itself to
remove the plug from the socket.
• Do not leave the appliance exposed to atmospheric
agents (rain, sun etc.)
Important!
Do not install the machine on a surface which blocks
the space be ween the floor and the base of the
appliance, like for example, carpets, rugs, etc., as
this could cause overheating due to lack of
ventilation..
• Lift the appliance in pairs as illustred in the diagram.
• In the case of a breakdown
and/or incorrect functioning, turn the appliance off
and do not tamper with it. Only contact an Official
Candy Service Centre and ask for original Candy
spare parts. If you fail to follow this advice you may
compromise the safety of the appliance.
8
Page 7

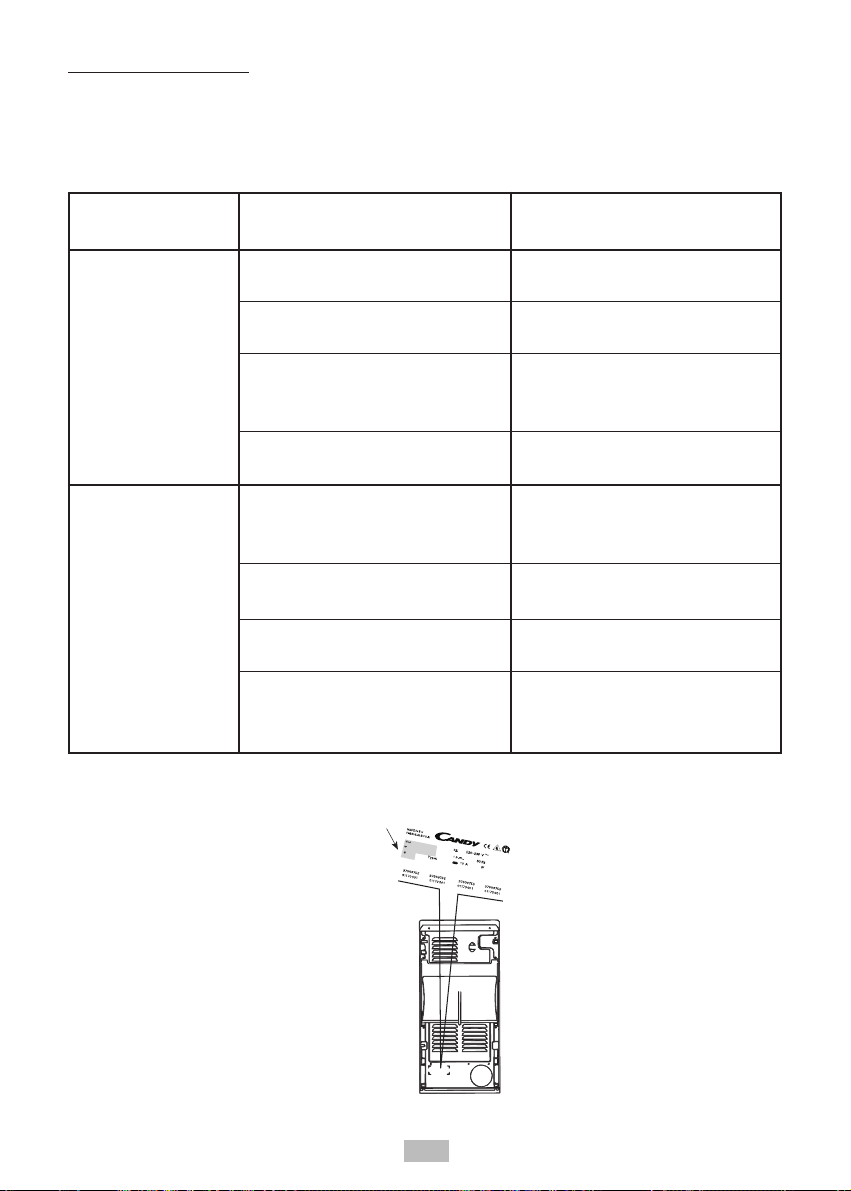
TECHNICAL DATA
CST 10 M
Maximum load ................................................................. kg.
Supply voltage ................................................................... V.
Calorific power .................................................................. W.
Motor ................................................................................ W.
Maximum absorbed power ............................................... W.
Fuse amps ........................................................................ A.
DIMENSIONS
height
width ............................................................................... cm.
depth
4,5
220/230
2000
200
2200
10
85
40
60
9
Page 8

SETTING UP INSTALLATION
WARNING: DO NOT LEAVE THE PACKAGING
IN THE REACH OF CHILDREN AS IT IS A
POTENTIAL SOURCE OF DANGER.
You should place the dryer in an airy room, preferably
close to a window, in order to minimize the amount
of condensation produced during operation.
Once you have chosen the place where you are
going to put your dryer, install a power point.
AIR VENTING
• Straight into the room, if it is well aired.
• Through a vent in the outside wall in front of one of
air outlets of the dryer (at the back and at the bottom
of each side).
• By means of a Ø 90 mm flexible hose, connected at
one end to the appliance. The other end of the hose
can be temporarily left hanging ut of a window or
permanently fitted to a vent in an outside wall.
10
Page 9

• The air outlet must not be connected to chimneys
which are also connected to coal or gas heaters,
cookers, etc.
Fig. 1
Fig. 2
Fig. 3
Fitting the air venting pipe
- Insert the flexible hose into the threaded end of the
adaptor. (Figure 1)
- Turn the hose anticlockwise until it is firmly in place
(Figure 2)
- Fit the adaptor into the dryer outlet required. (Figure
3)
- Fit the 2 plugs supplied into the air outlets not being
used.
ELECTRICAL INSTALLATION
Your dryer comes ready for connection to a 220V230V monophase supply.
You should ensure that your mains supply has a
capacity of at least 3 kW.
Plug the appliance into a 10 amp 220V-230V socket,
with an earth connection.
Check that the socket has an earth connection and
that it is properly connected.The earth connection is
essential for your safety, as it eliminates the risk of
electrical discharge.
Your dryer is equipped with an anti-interference
device to eliminate radio interference and disturbance
which could occur during operation.
NOTE : The manufacturer cannot accept liability for
any possible damage or harm to things or people
caused by improper connection.
11
Page 10

Stick the adhesive label provided on the support
which goes into the groove on the back of the
panel visor.
PUTTING YOUR MACHINE IN PLACE-MOVING
IT
Thanks to its four stabilising feet (the front two are
adjustable), your machine does not require any
special placement, although the floor where the
machine stands should be flat and level.
Ensure that the On/Off button is not pressed
Ensure that all controls are set to “0” and that the
lid is shut.
Insert the plug.
Selecting the programme.
Press the On/Off button. The power on light will
light up. If this does not light up see faults search.
12
Page 11

CONTROLS
CST 10M
SELECTOR KNOB FOR DRYING PROGRAMMES ..................
FRESHEN UP BUTTON .............................................................
SYNTHETICS BUTTON .............................................................
ON/OFF INDICATOR LIGHT ......................................................
ON/OFF BUTTON ......................................................................
LID ..............................................................................................
DRUM .........................................................................................
13
A
E
F
G
H
L
O
Page 12

A
. TIMER KNOB FOR DRY PROGRAMMES
COLD PROGRAMME
Set the dial to this setting if you want to air your clothes.
E
. FRESHEN UP BUTTON
Just press this button, a powerfull jet of fresh air is released penetrating
the garments and removing unpleasant odours. This refreshes the
clothes without the need to wash. A tumble dryer that removes
unpleasant odours agreat.
IMPORTANT:
ALWAYS ROTATE THE KNOB IN A CLOCKWISE
DIRECTION, NEVER IN AN ANTI-CLOCKWISE
DIRECTION. DO NOT PRESS THE “ON” BUTTON
(H) BEFORE SELECTING THE PROGRAMME
The tables describe the drying programme on the
basis of the time or symbol selected.
F
. SYNTHETICS BUTTON
You should press this button when drying synthetics or delicates, which
require a moderate temperature (Gentle drying). Do not press this
button (high position) when drying cotton or resistant fabrics.
G
. ON/OFF INDICATOR LIGHT
H
. ON/OFF BUTTON
14
Page 13

OPENING THE LID
LOADING CLOTHES
Lift the lid. Open the drum door following the
instruction.
Before using your machine for the first time, clean
the inside of the drum with a damp cloth to remove
any dust.
• Open the top door.
• Open the door to the drum
a) By putting your hand on the handle, with your
thumb on the notch.
b) Lift the door
• Put the clothes in.
• Turn the door to the drum, making sure that it closes
securely.
In general terms, clothes that have been washed
together can be dried together, given that they have
been sorted prior to washing.
15
Page 14

The drum capacity of your dryer is similar to that of your washing machine : 4.5 kg. for whites
or cotton fabrics. However, it is best to reduce this load to 2.5 kg. when drying synthetics to
avoid creasing. It is not advisable to use this appliance to dry woollens.
IMPORTANT :
The dryer should only be used for drying fabrics washed in water (see section on "ADVICE
FOR DRYING")
WARNING:
IT IS IMPORTANT TO MAKE SURE THE DRUM IS CAREFULLY CLOSED BEFORE
OPERATING THE MACHINE, AS OTHERWISE DAMAGES CAN OCCUR
TO THE LAUNDRY OR MACHINE
16
Page 15

PREPARING AND LOADING CLOTHES
In order to get the best out of your dryer it is best to observe the following advice :
• Sort the clothes according to the type of fabric and select the most suitable progamme.
• Only dry clothes washed in water. Do not dry clothes treated with inflammable solutions
used for dry cleaning (benzine, alcohol, etc).
• Do not dry clothes which contain rubber or inflammable material.
• Do not use to dry wollens.
• Do not overload the machine. Do not just load the machine with very heavy items. Put in
a mixed load.
• Load the dryer with clothes which have been spin dried beforehand or well wrung out to
avoid the acumulation of water.
• For delicate fabrics, use the special function provided exclusively for this purpose.
17
Page 16

SYMBOLS
To make your dryer easier to use, it is useful to know
what the symbols mean :
• Resistant fabric : eg. cotton, etc. (the dryer can be
loaded to the maximum with this type or fabric : 4.5
kg).
• Delicate fabric, eg. synthetics or cotton mixes. (the
machine should only be loaded with a maximum of
2.5 kg. of clothes).
• Fabric spin dried at 600, 800, 1000 r.p.m.
• Fabric spin dried at 400/500 r.p.m.
• Dried ready for putting away in the wardrobe,
• Dried ready for ironing.
• Dried ready for ironing with an ironing machine.
• Cold ventilation : final cycle to reduce creasing.
18
Page 17

CLEANING AND ROUTINE MAINTENANCE
Do not use abrasives, spirits and/or diluents on the
exterior of the washer-dryer. It is sufficient to use a
ALCOHOL
damp cloth.
CABINET
Do not wash your appliance with scouring or
powdered detergents. Use soapy water or a neutral
detergent and dry the cabinet after cleaning.
CLEANING THE FILTER
The fibres which come off clothes during the operation
of your machine are deposited in a filter on the righthand side of the drum. In order not to block the
circulation of hot air, this filter should be cleaned after
each use of the dryer.
The filter can be removed by putting your hand into
the drum, lifting the catch and pulling the unit
outwards.
Remove the fluff filter. Remove the fluff which has
formed a thin layer in the filter. It is easy to remove.
Use a brush of any type to carry out this operation;
do not wash it.
Put the fluff filter back into the filter cover (it has only
one position).
Put the filter unit back into the drum, pressing the
catch down.
Make sure that the fluff filter is clean after each drying
operation.
If you do not do this, a device that stops the clothes
or the dryer from being damaged in the case of
incorrect use may be activated.
Therefore, if the filter is not cleaned properly, the
internal protection system may be activated and it
may be necessary to call out a service engineer to
reactivate the operation of the dryer.
19
Page 18

TABLE OF PROGRAMMES
As a guideline we offer the following approximate drying times, depending on the type of fabric
and dampness of the clothes.
clothes
2.5 kg.
2.5 kg.
ETC.
4.5 kg.
COTTON OR RESISTANT FABRICS
TABLECLOTHS, BED LINEN, TOWELS,
SYNTHETICS OR DELICATES
SHIRTS, ACRYLIC FABRICS, etc.
4.5 kg.
2.5 kg.
2.5 kg.
1 kg.
1 kg.
Type of dryingAmount of
Ready to put away
Ready to iron
Ready to put away
Ready to iron
Ready to put away
Ready to iron
Ready to put away
Ready to iron
Drying time
A
60´-90´minutes
40´-80´minutes
90´-135´minutes
90´-120´minutes
—
—
—
—
B
100´-120´minutes
80´-100´minutes
120´-135´minutes
120´-135´minutes
60´-80´minutes
40´-60´minutes
40´-60´minutes
30´-40´minutes
A.
For clothes spin-dried at 800/1000 r.p.m.
B.
For clothes spin-dried at 400/600 r.p.m.
NOTES
In washing machines, spin drying is carried out at 500 rpm (max.) for synthetics and delicates.
With higher or lower spin speeds, reduce or increase the drying times for delicates.
20
Page 19
TROUBLESHOOTING
If your dryer does not work properly, make the following checks before calling a Service
Centre :
PROBLEM
1. The appliance
does not work
2. The appliance
does not dry
clothes properly
CAUSE
No programme selected
Door is not closed properly
Appliance not plugged in
Main fuse blown
Wrong programme selected
Filter blocked with fluff
Appliance incorrectly loaded
Air inlets for ventilation blocked
Select programme
Check
Plug it in
Check
Select correct programme
Clean the filter
Load correctly
Check air inlets
REMEDY
If your machine still does not work properly, call your nearest Service Centre, giving the
model number of your dryer which appears on the back of the appliance.
21
 Loading...