

Page 1
Page 2
ES
FR
ENHORABUENA
Le rogamos lea atentamente la
información contenida en este
manual ya que proporciona
importantes instrucciones sobre
seguridad en su instalación,
uso, mantenimiento y algunos
consejos prácticos para que
usted saque el mejor provecho
de su secadora.
Conserve este manual para
cualquier consulta posterior.
Cuando se ponga en contacto
con Candy o con sus centros de
Asistencia mencione siempre el
Modelo y el n° que figura en la
placa de características al dorso
de la secadora.
TOUS NOS
COMPLIMENTS
Nous vous prions de lire
attentivement les conseils
contenus dans ce livret car il
contient d’importantes
indications concernant la sûreté
d’installation, d’emploi,
d’entretien et quelques
suggestions utiles en vue
d’améliorer l’utilisation du sèchelinge.
Conserver avec soins ce livret:
vous pourrez le consulter bien
souvent.
Quand vous communiquez avec
Candy, ou avec ses centres
d’assistance, veuillez citer le
Modèle, et le numéro figurant
sur l´autocollant qui se trouve à
l´arrière du sèche-linge.
2
Page 3
IT
DE
EN
COMPLIMENTI
La preghiamo di leggere
attentamente le avvertenze
contenute nel presente libretto in
quanto forniscono importanti
indicazioni riguardanti la
sicurezza di installazione, d’uso,
di manutenzione e alcuni utili
consigli per il miglior utilizzo
dell´asciugatrice.
Conservi con cura questo
libretto per ogni ulteriore
consultazione.
Quando comunica con la Candy
o con i suoi centri di assistenza
citi sempre il Modello, e il
numero che appare sull´adesivo
al dorso dell´asciugatrice.
HERZLICHEN
GLÜCKWUNSCH!
esen Sie bitte die Anweisungen,
die Sie in diesen Handbuch
finden, aufmerksam durch. Sie
finden dort alle wichtigen
Hinweise zur sicheren
Installation, Bedienung und
Pflege, sowie zur optimalen
Verwendung Ihres
Wäschetrockners.
Bewahren Sie das Heft für eine
spätere Nutzung gut auf.
Geben Sie bitte in allen
Mitteilungen an Candy oder an
Ihre zuständige
Kundendienststelle stets das
Modell an.
OUR COMPLIMENTS
Please read this booklet carefully
as it provides important
guidelines for safe installation,
use and maintenance and some
useful advise on how to get the
best results when using your
dryer.
Keep this booklet in a safe place
for further consultation.
When contacting Candy or a
Customer Service Centre always
refer to the Model No. which can
be found on a sticker on the back
of the dryer.
3
Page 4
ES
FR
ÍNDICE CAPÍTULO
Introduccíon
Notas generales a la entrega
Garantía
Normas de seguridad
Datos técnicos
Puesta en funcionamiento
instalación
Descripción de los mandos
Selección de ropa y simbología
Limpieza y mantenimiento
ordinario
Causas de averías
Tabla de programas
INDEX CHAPITRE
Avant-propos
Notes générales à la livraison
Garantie
Mesures de sécurité
Données tecniques
Mise en place, installation
Description des commandes
Tri du linge et symboles
Nettoyage et entretien ordinaire
Dépistage des pannes
Tableau de programmes
....................... 1 .......................
....................... 2 .......................
....................... 3 .......................
....................... 4 .......................
....................... 5 .......................
....................... 6 .......................
....................... 7 .......................
....................... 8 .......................
....................... 9 .......................
...................... 10 ......................
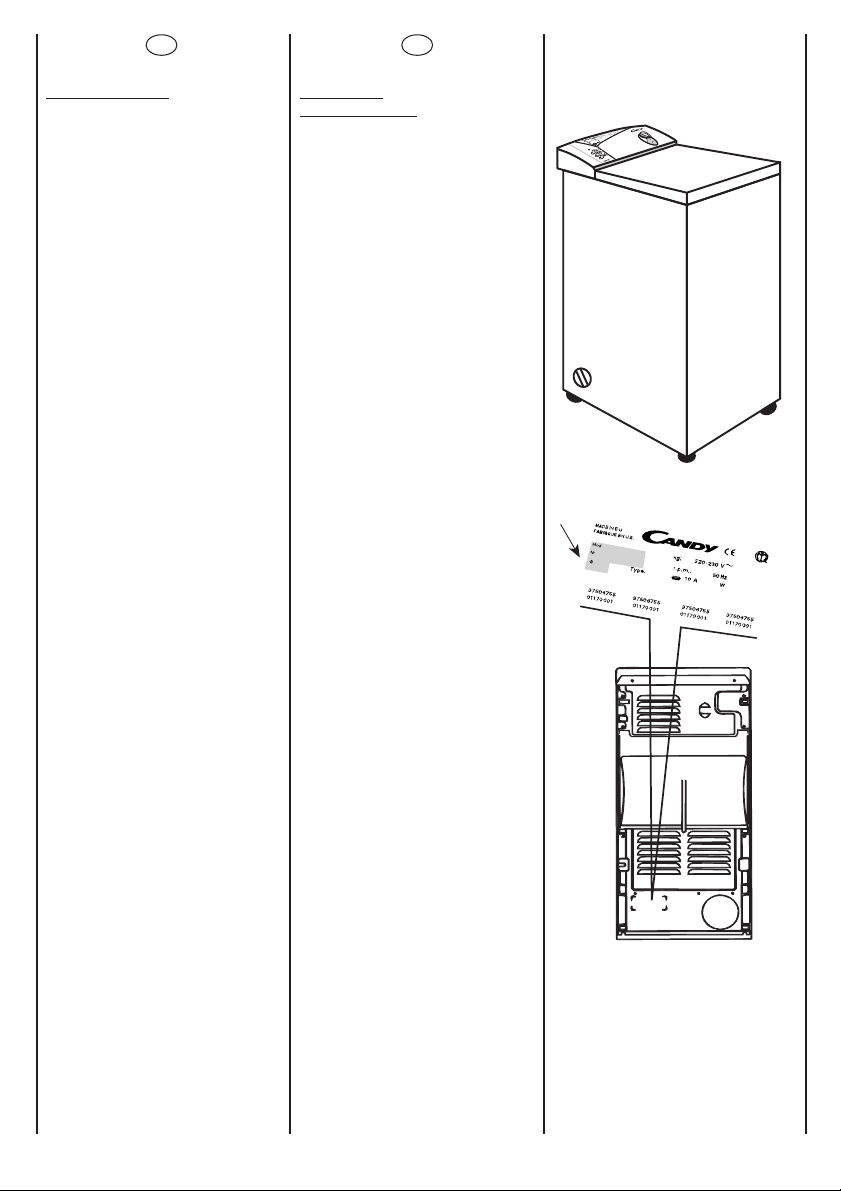
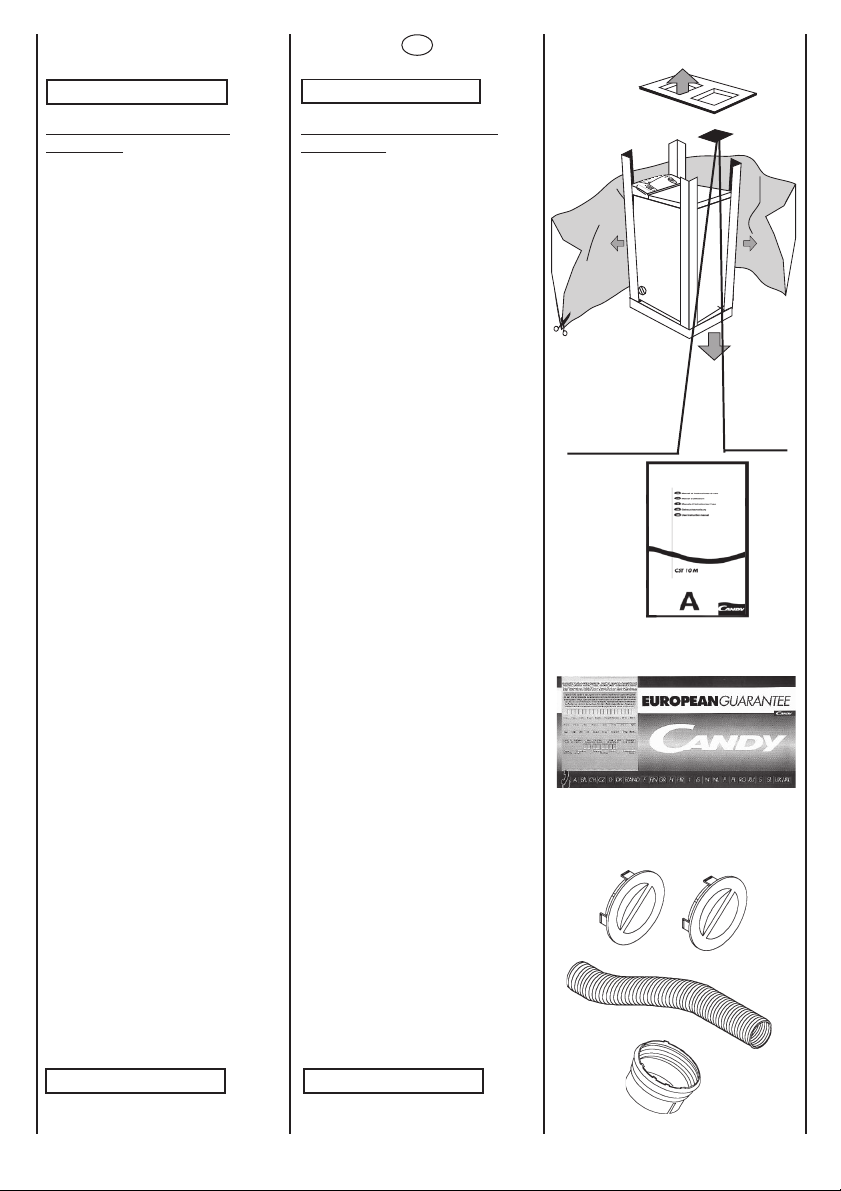
ES Colocar la etiqueta adhesiva que se acompaña en el soporte que se introduce
en la ranura trasera del visor del panel.
FR Apposer l’étiquette adhésive livrée avec l’appareil dans l’emplacement prévu à
cet effet situé à l’arrière du bandeau de commandes.
4
Page 5
IT
DE
EN
INDICE CAPITOLO
Prefazione
Note generali alla consegna
Garanzia
Prescrizioni di sicurezza
Dati tecnici
Messa in opera, installazione
Descrizione comandi
Selezione biancheria e
simbologia
Pulizia e manutenzione ordinaria
Tabella programmi
Ricerca guasti
INHALT KAPITEL
Einleitung
Allgemeine Hinweise zur
Lieferung
Garantie
Sicherheitsvorschriften
Technische Daten
Inbetriebnahme, Installation
Bedienungsanleitung
Auswahl von kleidung und
symbolik der schalter
Reinigung und allgemeine
Wartung
Fehlersuche
Programmtabelle
INDEX CHAPTER
Introduction
General points on delivery
Guarantee
Safety Measures
Technical Data
Setting up and Installation
Control Description
Selection of clothes and
symboles used
Cleaning and routine
maintenance
Faults Search
Table of Programmes
IT Incollare l’etichetta adesiva allegata sul supporto che si inserisce nella fessura
posteriore del visore del quadro comandi.
DE Den mitgelieferten Aufkleber in der Landessprache auf die Halterung
aufkleben, die in den hinteren Schlitz der Sichtanzeige am Bedienfeld
eingeführt wird.
EN Place the adhesive label in the support that slots into the back of the panel dis-
play.
5
Page 6
ES
FR
CAPÍTULO 1
NOTAS GENERALES DE
ENTREGA
A la entrega compruebe que con
la máquina estén:
A) MANUAL DE
INSTRUCCIONES
CHAPITRE 1
NOTES GENERALES A LA
LIVRAISON
A la livraison veuillez contrôler
que le materiél suivant
accompagne la machine:
A) LIVRET D’INSTRUCTIONS
B) CERTIFICADOS DE
GARANTÍA
C) ACCESORIOS
En la bolsa de accesorios se
incluyen :
- 2 tapas para ser colocadas en
las salidas de aire que no se
utilicen.
- 1 tubo flexible de 90 mm. de Ø
y 2000 mm. de largo.
-1 adaptador.
CONSÉRVELOS
B) CERTIFICATS DE
GARANTIE
C) ACCESSOIRES
Le sachet d´accessoires
comprend :
- 2 bouchons à placer dans les
sorties d´air non utilisées.
- 1 tuyau souple de 90 mm. de
Ø et 2000 mm. de long.
-1 adaptateur.
LES CONSERVER
6
Page 7
IT
DE
EN
CAPITOLO 1
NOTE GENERALI ALLA
CONSEGNA
Alla consegna controlli che con
la macchina ci siano:
A) MANUALE D’ISTRUZIONE
KAPITEL 1
ALLGEMEINE HINWEISE ZUR
LIEFERUNG
Kontrollieren Sie bei Anlieferung
des Gerätes, ob das folgende
Zubehör mitgeliefert wurde:
A) BEDIENUNGSANLEITUNG
CHAPTER 1
GENERAL POINT ON
DELIVERY
On delivery, check that the
following are included with the
machine:
A) INSTRUCTION MANUAL
B) CERTIFICATI DI GARANZIA
C) ACCESSORI
Nella confezione con gli
accessori sono compresi :
- 2 lappi da inserire sulle uscite
d´aria che non vengano
impiegate.
- 1 tubo flessibile da 90 mm. di
Ø e 2000 mm. di lunghezza.
- 1 adattatore.
CONSERVATELI
B) GARANTIESCHEIN
C) ZUBEHÖR
Der Seutel mit Zubehör enthält
die folgenden
Teile :
- 2 Abdeckungen für die nicht
verwendeten Luftaustritte.
- Schlauch mit einem
Durchmesser von 90 mm.
Länge, zwischen Ø und 2000
mm. dehnbar.
- Adapter.
BITTE GUT AUFBEWAHREN
7
B) GUARANTEE
CERTIFICATES
C) ACCESSORIES
The bag of accessories containe
the following :
- 2 plugs to be fitted to the air
outlets not being used.
- 1 flexible hose, 90 mm. in
diameter and 2000 mm. long.
- 1 adaptor.
KEEP THEM IN A SAFE
PLACE
Page 8
ES
SERVIC
E
FR
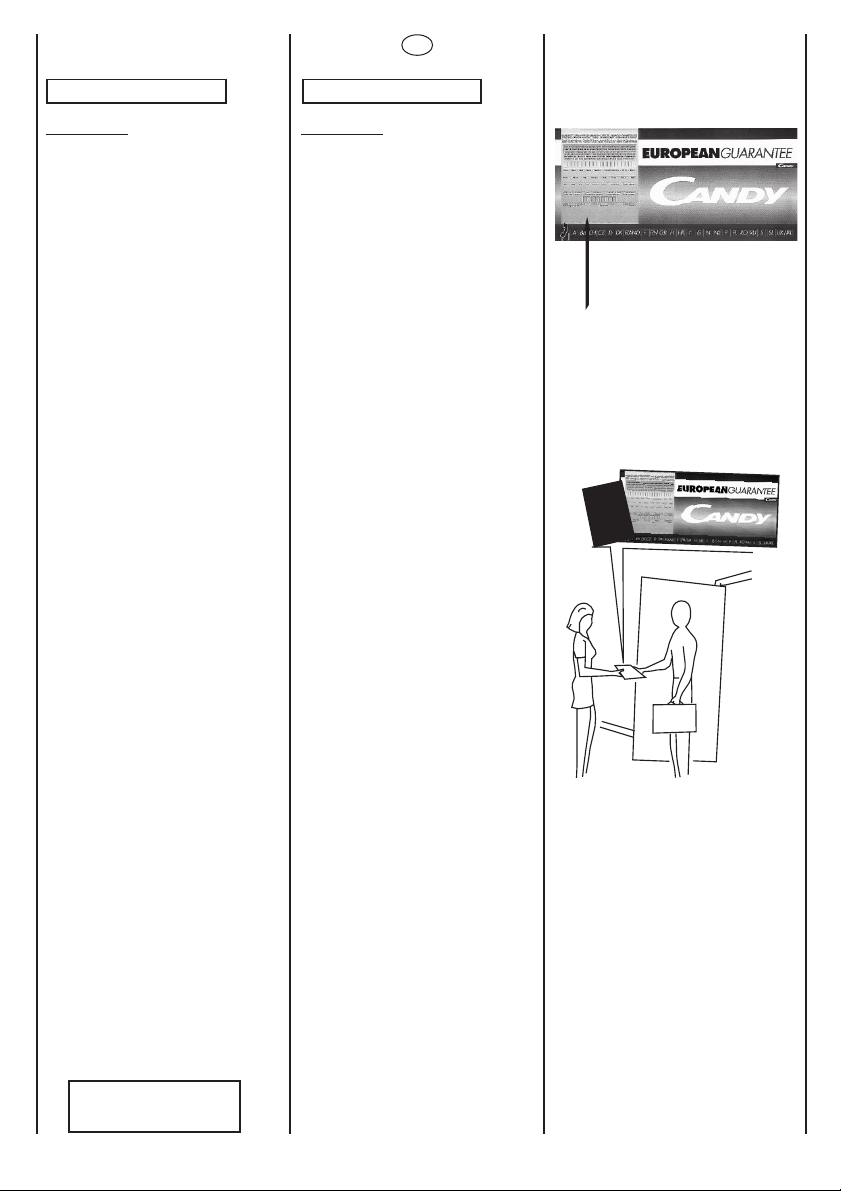
CAPÍTULO 2
GARANTIA
El aparato va acompañado de un
Certificado de Garantía.
La parte A deberá conservarla,
debidamente cumplimentada,
para presentarla al Servicio Técnico de Asistencia, en caso de necesitar su intervención junto a la
factura legal expedida por el vendedor en el momento de compra.
CHAPITRE 2
GARANTIE
L’appareil est livré avec un Certificat de Garantie.
A
Conserver le volet A, dûment
rempli, qui devra être présenté au
Service d’Assistance Technique,
en cas de nécessité, avec la facture légale remise par le vendeur
lors de l’achat de l’appareil.
SERVICIO POST VENTA
902.100.150
☎
8
Page 9
IT
DE
EN
CAPITOLO 2
GARANZIA / SERVIZIO
ASSISTENZA CLIENTI
L´apparecchio è corredato di un
certificato di garanzia che Le
permette di usufruire gratuitamente del Servizio di Assistenza
Tecnica Autorizzato con il solo
addebito di un diritto fisso di
chiamata.
La parte A dovrà essere da Lei
conservata, debitamente
compilata, per essere esibita al
Servizio Assistenza Tecnica
Autorizzato, in caso di necessità
di intervento, insieme alla ricevuta
fiscale rilasciata dal venditore al
momento dell´acquisto.
Le ricordiamo inoltre che nella
busta all´interno del prodotto Lei
troverà le informazioni ed i
documenti necessari per
prolungare la garanzia
dell´apparecchio sino a 5 anni e
così, in caso di guasto, non pagare
manodopera e ricambi ma solamente il diritto fisso di intervento
a domicilio.
Per qualsiasi informazion, La
preghiamo rivolgersi, in ogni caso,
al numero telefonico in basso
citato.
Qualora il prodotto da Lei
acquistato presenti anomalie o
mal funzionamenti, prima di
rivolgersi al Servizio Assistenza
Autorizzato, Le consigliamo di
effetuare i controlli indicati nel
Manuale di installazione e
manutenzione.
Se il problema dovesse persistere,
componendo il «Numero Utile»,
sotto indicato, sarà messo in
contatto direttamente, al costo di
una normale telefonata, con il
Servizio Assistenza Tecnica
Autorizzato a Lei più vicino.
E´importante che comunichi al
Servizio Assistenza Tecnica
Autorizzato la sigla del prodotto ed
il numero di matricola che troverà
sul certificato di garanzia e sulla
targa matricola.
In questo modo Lei potrà
contribuire ad evitare trasferte
inutili del tecnico, risparmiando
oltretutto i relativi costi.
SERVIZIO ASSISTENZA TECNICA
199.123.123
☎
KAPITEL 2
GARANTIE
Das Gerät wird zusammen mit
einer Garantiebescheinigung
ausgeliefert.
Teil A bewahren Sie bitte
ordnungsgemäß ausgefüllt
sorgfältig auf, um ihn im
Bedarfsfall dem Kundendienst in
Verbindung mit der Rechnung
über den Kauf des Gerätes
vorweisen zu können.
9
CHAPTER 2
GUARANTEE
The appliance comes with a
guarantee certificate.
Complete part A and keep it in a
safe place. It should be presented
to the Technical Assistance Centre in the event of a repair being
necessary along with the legal
receipt issued by the dealer on
purchase.
Page 10
ES
FR
CAPÍTULO 3
NORMAS DE SEGURIDAD
ATENCION:
PARA CUALQUIER
TRABAJO DE LIMPIEZA Y
MANTENIMIENTO
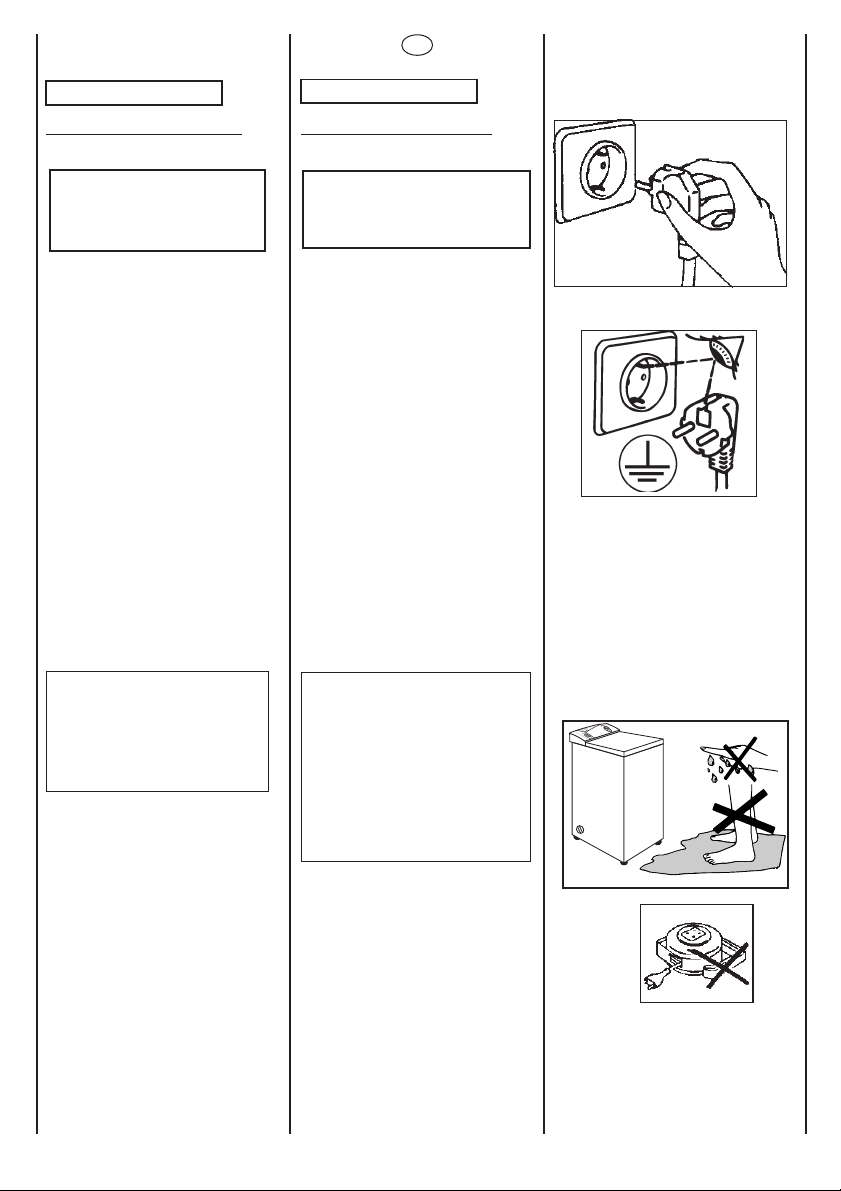
• Desenchúfela.
• La casa fabricante proveé a
todas las máquinas de toma
de tierra.
Asegúrese de que la instalación
eléctrica tenga toma de tierra y
que la misma esté conectada;
en caso contrario llame
a un Servicio cualificado.
La conexión a tierra es indispensable para la seguridad del
usuario, puesto que le elimina el
riesgo de una descarga
eléctrica.
CHAPITRE 3
MESURES DE SECURITE
ATTENTION:
EN CAS D’INTERVENTIONS
DE NETTOYAGE ET
D’ENTRETIEN
• Débrancher la prise de
courant.
• Le fabricant équipe toutes les
machines d´une prise de terre.
Vérifiez que votre installation
électrique est équipée d´une
prise de terre et que celle-ci est
connectée. Dans le cas
contraire faire appel à un service
spécialisé.
La connexion à la prise de terre
est indispensable pour la
sécurité de l´utilisateur,
puisqu´elle élimine les risques
de décharges électriques.
La casa fabricante declina
toda responsabilidad por
eventuales daños a cosas
o personas derivados de
imperfecciones o fallos de
la conexión.
• No toque el aparato cuando
tenga las manos o los pies
mojados.
• No use el aparato estando
descalzo.
• No use, si no es con especial
cuidado, alargaderas en cuartos
de baño o aseos.
Le fabricant décline toute
responsabilité sur les
éventuels dommages
causés aux personnes qui
auraient un défaut dans
leur installation, qui
auraient une prise de terre
défectueuse ou qui
n´auraient pas branché leur
prise de terre.
• Ne pas toucher l’appareil
lorsqu´on a les mains ou les
pieds mouillés.
• Ne pas toucher l’appareil pieds
nus.
• Éviter l’usage de rallonges
électriques dans les salles
d´eau.
10
Page 11
IT
DE
EN
CAPITOLO 3
PRESCRIZIONI DI
SICUREZZA
ATTENZIONE:
PER QUALSIASI
INTERVENTO DI PULIZIA E
MANUTENZIONE DELLA
LAVATRICE
• Tolga la spina.
• Tutti gli apparecchi sono muniti
di presa di terra.
Assicurarsi che l´impianto
elettrico disponga di presa di
terra e che la stessa sia
collegata; in caso contrario
richieda l´intervento di personale
qualificat.
L´allacciamento a terra è
indispensabile per la sicurezza
dell´utente, dato che elimina il
rischio di scossa elettrica.
Il costruttore declina ogni
responsabilità per
eventuali danni a cose o
persone causati da
imperfezioni o guasti di
allacciamento, prese di
terra difettose o mancanza
di allacciamento della
medesima.
KAPITEL 3
SICHERHEITSVORSCHRIFTEN
ZUR BEACHTUNG:
BEI REINIGUNG UND
WARTUNG DES GERÄTES
• Netzstecker ziehen.
• Alle Geräte der Firma
hersteller sind mit einem
Erdanschluß ausgestattet.
Vergewissern Sie sich bitte, daß
die Elektroinstallation über eine
Anschlußmöglichkeit für die
Erdung verfügt und daß dieselbe
angeschlossen ist. Anderenfalls
wenden Sie sich bitte an den
Kundendienst.
Der Erdanschluß ist unerläßlich,
um die Sicherheit des
Anwenders zu garantieren, da
so das Risiko einer elektrischen
Entladung vermieden wird.
Der Hersteller lehnt jede
Verantwortung für Personen- oder Sachschäden,
die auf unsach-gemäßen
Anschluß, nicht
ordnungsgemäßen
Erdungsanschluß oder
Nichtans-chluß
zurückzuführen sind, ab.
CHAPTER 3
SAFETY MEASURES
IMPORTANT:
FOR ALL CLEANING
AND MAINTENANCE
WORK
• Remove the plug
• The manufacturer fits all the
machines with an earth
connection. Ensure that the
electrical installation has an earth
connection and that it is
connected; if not call for service.
The earth connection is essential
for user safety, as it eliminates
the risk of electrical discharge.
The manufacturer cannot
accept any responsibility
for any damage or injury
due to connection problems
or faults, a defective earth
connection or for not
having connected it.
•Non tocchi l’apparecchio con
mani, piedi bagnati o umidi.
•Non usi l’apparecchio a piedi
nudi.
•Non usi, se non con particolare
cautela, prolunghe in locali
adibiti a bagno o doccia.
•Gerät nicht mit den Händen, mit
nassen oder feuchten Füßen
berühren.
•Maschine nie barfuß betreiben.
•Benutzen Sie nach Möglichkeit
keine Verlängerungskabel in
Feuchträumen.
11
•Do not touch the appliance with
wet or damp hands or feet.
•Do not use the appliance when
bare-footed.
•Extreme care should be taken if
extension leads are used in
bathrooms or shower
rooms.
Avoid this where possible.
Page 12
ES
FR
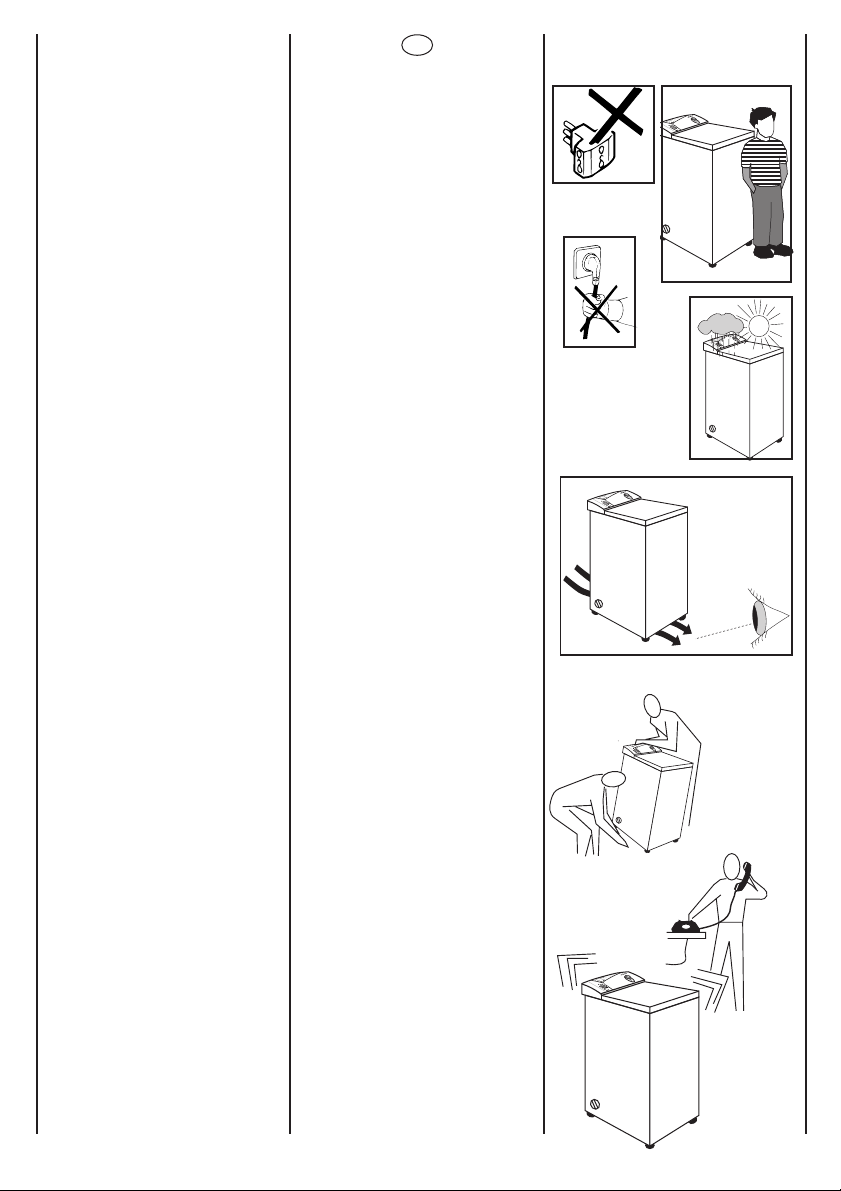
• No use adaptadores o
enchufes múltiples.
• No permita la manipulación del
aparato a niños o incapacitados,
sin vigilancia.
• No tire del cable de alimentación, ni del aparato, para
desconectar la toma de
corriente.
• No deje el aparato a la
intemperie o expuesto a la
acción de los agentes
atmosfericos (lluvia, sol, etc..).
¡Importante!
No instale la máquina sobre una
superficie que obstruya el hueco
que queda entre el suelo y la
base inferior del aparato, como
por ejemplo moquetas, alfombras, etc. pues puede dar lugar
a calentamiento por falta de
ventilación.
• Ne pas utiliser d’adaptateurs
ou de prises multiples.
• Cet appareil ne doit être utilisé
sans surveillance par des
enfants ou par des personnes
inhabiles
• Pour débrancher la prise, ne
pas tirer sur le câble ou sur la
machine.
• Ne pas laisser la machine
exposée aux agents
atmosphériques (pluie, soleil,
etc...).
Important!
N´installez pas votre machine
sur une surface pouvant
obstruer l´espace entre le sol et
la base de l´appareil, comme par
exemple une moquette, un tapis,
etc… car cela peut provoquer un
échauffement du au manque de
ventilation.
• Levántela ayudado por otra
persona tal como aparece en la
figura.
• En caso de avería y/o mal
funcionamiento del aparato,
desconéctelo, no manipule el
electrodoméstico. Para su
eventual reparación diríjase
únicamente a un centro de
Asistencia Técnica Candy y
solicite el uso de recambios
originales. El incumplimiento de
estas sugerencias puede
comprometer la seguridad del
aparato.
• 2 personnes pour soulever la
machine (voire la figure).
• En cas de panne et/ou de
mauvais fonctionnement
éteindre la machine, et ne pas
toucher à la machine. Pour toute
réparation adressez-vous
exclusivement à un centre
d’assistance technique Candy
en demandant des pièces de
rechange originales. Le fait de
ne pas respecter les indications
susmentionnées peut
compromettre la sécurité de
l’appareil.
12
Page 13
IT
DE
EN
• Non usi adattatori o spine
multiple
• Non permetta che
l’apparecchio sia usato dai
bambini o da incapaci, senza
sorveglianza.
• Non tiri il cavo di
alimentazione, o l’apparecchio
stesso, per staccare la spina
dalla presa di corrente.
• Non lasci esposto
l’apparecchio ad agenti
atmosferici (pioggia, sole,
ecc...).
Importante!
Non installare l´apparecchio sul
pavimento ricoperto da un
materiale come ad esempio
moquette, tappeti, ecc., che
possa ostruire il vano che
rimane libero tra il pavimento e
la base inferiore
dell´apparecchio, dato che si
potrebbe verificare un
surriscaldamento per mancanza
di ventilazione.
• Gerät nicht an Adapter oder
Mehrfachsteckdosen
anschließen.
• Achten Sie bitte darauf, daß
Keine kinder oder geistig
Behinderte unbeaufsichtigt an
dem Gerät hantieren.
• Ziehen Sie nie am
Spannungskabel oder am
Apparat selber, wenn Sie die
Stromabnahme abschalten
wollen.
• Setzen Sie das Gerät keinen
Witterungseinflüssen (Regen,
Sonne usw.) aus.
Wichtig!
Die maschine darf nicht auf einer
Fläche montiert werden, die den
Zwischeraum zwischen Boden
und der unteren Basisplatte des
Gerätes versperren könnte, wie
z.B. Teppichboden, Teppiche,
etc., da dies eine Überhitzung
aufgrund fehlender Lüftung
hervorrufen kann.
• Do not use adaptors or multiple
plugs.
• Do not allow the appliance to be
used by children or the
incompetent without due
supervision.
• Do not pull the mains lead or
the appliance itself to remove the
plug from the socket.
• Do not leave the appliance
exposed to atmospheric agents
(rain, sun etc.)
Important!
Do not install the machine on a
surface which blocks the space
be ween the floor and the base of
the appliance, like for example,
carpets, rugs, etc., as this could
cause overheating due to lack of
ventilation..
• Sollevarla in due persone
come illustrato in figura.
• In caso di guasto e/o di cattivo
funzionamento dell’apparecchio,
spegnerlo e non manomettere
l´apparecchio. Per l´eventuale
riparazione, rivolgersi
unicamente ad un centro di
Assistenza Tecnica Candy e
richieda l´utilizzo di ricambi
originali. Il mancato rispetto di
quanto sopra può
compromettere la sicurezza
dell´apparecchio.
• Die Maschine stets, wie auf der
Zeichnung dargestellt, zu zweit
anheben.
• Bei eventuellen Defekten und/
oder Fehlfunktionen ist das
Gerät abzuschalten. Bitte
hantieren Sie nicht selbst an
dem Gerät herum, sondern
wenden Sie sich für eine
eventuelle Reparatur
ausschließlich an die jeweilige
Candy-kundendienststelle und
bestehen Sie auf der
Verwendung von
Originalersatzteilen. Die
Mißachtung der o.a. Vorschriften
kann die Sicherheit des Gerätes
beeinflussen.
13
• Lift the appliance in pairs as
illustred in the diagram.
• In the case of a breakdown
and/or incorrect functioning, turn
the appliance off and do not
tamper with it. Only contact an
Official Candy Service Centre
and ask for original Candy spare
parts. If you fail to follow this
advice you may compromise the
safety of the appliance.
Page 14
ES
FR
CAPÍTULO 4
Máxima carga
Tensión de alimentación
CHAPITRE 4
Charge maxi
Tension d´alimentation
kg.
V
4,5
220/230
Potencia calorífica
Motor
Máxima potencia eléctrica
absorbida
Amperios de Fusible
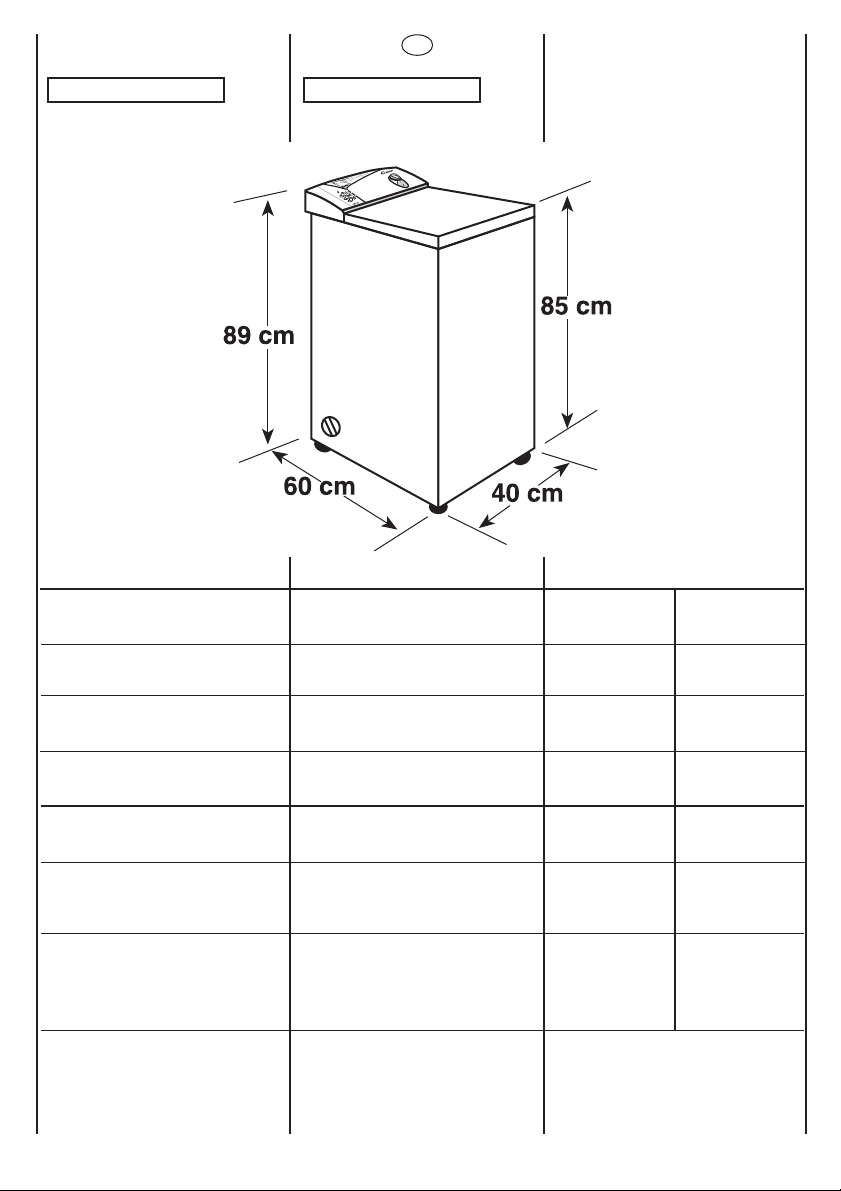
DIMENSIONES
altura
anchura
prof.
Puissance calorifique
Moteur
Puissance électrique maxi
absorbée
Ampères du fusible
DIMENSIONS
hauteur
largeur
profondeur
14
W
W
W
A
cm.
2000
200
2200
10
85
40
60
Page 15

IT
DE
EN
CAPITOLO 4
Carico massimo
Tensione di alimentazione
KAPITEL 4
Höchstladung
Versorgungsspannung
CHAPTER 4
Maximum load
Supply voltage
Potenza calorica
Motore
Massima potenza elettrica
assorbita
Ampère del fusibile
DIMENSIONI
altezza
larghezza
profondità
Heizwert
Motor
Maximal absorbierte elektrische
Leistung
Amper der Sicherungen
ABMESSUNGEN
höhe
breite
tiefe
15
Calorific power
Motor
Maximum absorbed power
Fuse amps
DIMENSIONS
height
width
depth
Page 16

ES
FR
CAPÍTULO 5
PUESTA EN FUNCIONAMIENTO INSTALACIÓN
ATENCIÓN:
NO DEJE AL ALCANCE DE
LOS NIÑOS LOS ELEMENTOS DE EMBALAJE YA
QUE PUEDEN SER
PELIGROSOS.
La secadora debe emplazarse
en una habitación aireada,
preferentemente en la proximidad de una ventana, de forma
que quede atenuado el
fenómeno de condensación que
puede producirse durante el
funcionamiento.
Una vez haya sido determinado
el emplazamiento, es necesario
prever la alimentación eléctrica.
CHAPITRE 5
MISE EN PLACE
INSTALLATION
ATTENTION:
NE PAS LAISSER À LA
PORTÉE DES ENFANTS
DES ELEMENTS
D’EMBALLAGE QUI
PEUVENT CAUSER DES
RISQUES.
Le sèche-linge doit être installé
dans une pièce aérée, de
préférence près d´une fenêtre,
de sorte que le phénomène de
condensation pouvant se
produire en cours de
fonctionnement soit atténué.
Lorsque l´emplacement de
l´appareil a été déterminé, il est
nécessaire d´en prévoir
l´alimentation électrique.
EVACUACION DE AIRE
• Directamente en la habitación,
si está bien aireada.
• A través de una abertura
practicada en la pared exterior
frente a una de las salidas de
aire de la secadora (en la parte
trasera y en la parte
inferior de cada costado).
• Por medio de un tubo flexible
de 90 mm. de Ø, conectado por
un extremo al aparato. El otro
extremo del tubo puede ser
colocado, temporalmente, en una ventana abierta,
o permanentemente a través de
un muro al exterior.
EVACUATION DE L´ AIR
• Directement dans la pièce, si
celle-ci est bien aérée.
• A l´aide d´une ouverture faite
dans un mur donnant à
l´extérieur, par l´une des sorties
d´air du sèche-linge (à l´arrière et
en bas de chaque côté).
• Au moyen d´un tuyau souple de
90 mm de diamètre. L´une de
ses extrémités est raccordée à
l´appareil et l´autre peut être
sortie, temporairement, par une
fenêtre ouverte ou, en
permanence, à travers un mur
donnant à l´extérieur.
16
Page 17

IT
DE
EN
CAPITOLO 5
MESSA IN OPERA
INSTALLAZIONE
ATTENZIONE:
NON LASCI ALLA
PORTATA DEI BAMBINI
GLI ELEMENTI
DELL’IMBALLAGGIO IN
QUANTO POTENZIALI
FONTI DI PERICOLO.
L´asciugatrice deve essere
situata in una stanza arieggiata,
preferibilmente in prossimità di
una finestra, in modo da
attenuare il fenomeno di
condensa che può aver luogo
durante il funzionamento.
Dopo, aver stabilito l´ubicazione,
è necessario provvedere
all´alimentazione elettrica.
KAPITEL 5
INBETRIEBNAHME
INSTALLATION
ACHTUNG:DIE
VERPACKUNG IST IN DEN
HÄNDEN VON KINDERN
EINE GEFAHRENQUELLE.
BITTE ENTSORGEN SIE
DAS
VERPACKUNGSMATERIAL ORDNUNGSGEMÄß.
Der Wäschetrockner sollte in
einem gut gelüfteten Raum,
vorzugsweise in der Nähe eines
Fensters, aufgestellt werden, so
daß die Kondensation, die sich
beim Laufen des Apparates
einstellen kann, abgeschwächt
wird.
Nach Aufstellung des
Wäschetrockners ist es
notwendig, die elektrische
Versorgung zu gewährleisten.
CHAPTER 5
SETTING UP INSTALLATION
WARNING:
DO NOT LEAVE THE
PACKAGING IN THE
REACH OF CHILDREN AS
IT IS A POTENTIAL
SOURCE
OF DANGER.
You should place the dryer in an
airy room, preferably close to a
window, in order to minimize the
amount of condensation
produced during operation.
Once you have chosen the place
where you are going to put your
dryer, install a power point.
ELIMINAZIONE DELL´ ARIA
• Direttamente nella stanza se è
ben arieggiata.
• Per mezzo di un´apertura
praticata nella parete esterna, di
fronte ad una delle uscite d´aria
dell´asciugatrice (nella parte
posteriore e inferiore di ciascun
fianco).
• Per mezzo di un tubo flessibile
da 90 mm. di Ø, collegato
all´apparechio per un´estremità.
L´altra estremità del tubo si può
far uscire all´esterno
provvisoriamente praticando un
foro nella parete.
LUFTABFÜHRUNG
• Direkt in dem Raum, wenn
dieser gut belüftet wird.
• Über eine in der Außenwand
angebrachte Öffnung gegenüber
eines der Luftaustritte des
Wäschetrockners (am hinteren
Teil sowie an dem Unterteil
beider Seiten).
• Mittels eines flexiblen
Schlauches mit 90 mm
Durchmesser, der an das eine
Ende des Apparates
angeschlossen wird. Das andere
Ende des Schlauches kann
zeitweise durch ein offenes
Fenster oder ständig über eine
Mauer nach draußen geführt
werden.
17
AIR VENTING
• Straight into the room, if it is
well aired.
• Through a vent in the outside
wall in front of one of air outlets
of the dryer (at the back and at
the bottom of each side).
• By means of a Ø 90 mm flexible
hose, connected at one end to
the appliance. The other end of
the hose can be temporarily left
hanging ut of a window or
permanently fitted to a vent in an
outside wall.
Page 18

ES
•
No está permitido conectar la
salida de aire a chimeneas a las
que estén conectadas estufas
de carbón o gas, cocinas, etc.
INSTALACIÓN DEL TUBO DE
EVACUACIÓN DE AIRE
- Introducir el tubo flexible en el
extremo roscado del adaptador
(Fig. 1)
- Girar en sentido opuesto a las
agujas del reloj, hasta que el
tubo flexible quede fijo. (Fig. 2)
- Introducir el adaptador en la
salida de la secadora (Fig. 3).
- Coloque las 2 tapas suministradas en las salidas de aire que
no han sido utilizadas.
FR
• Il est interdit de relier la sortie
d´air à une cheminée à laquelle
sont raccordées des chaudières
à charbon ou à gaz, des
cuisiniéres, etc…
INSTALLATION DU TUYAU
D´EVACUATION D´AIR
- Introduire le tuyau souple dans
l´extrémité filetée de
l´adaptateur (Fig.1)
- Faire tourner dans le sens
contraire de celui des aiguilles
d´une montre jusqu´à ce que le
tuyau souple soit fixé (Fig. 2)
- Introduire l´adaptateur dans la
sortie souhaitée du sèche-linge
(Fig. 3)
- Placer les 2 bouchons dans
les sorties d´air qui n´ont pas
été utilisées.
Fig. 1
Fig. 2
INSTALACION ELECTRICA
Las secadoras se suministran
aptas para su conexión a la
tensión (220 V. - 230 V.),
monofásicas.
El usuario tiene que controlar
que la red tenga capacidad de
alimentar al menos 3 kW.
Conectar el enchufe de
alimentación a una toma de 10
amperios para (220 V. - 230 V.)
con toma de tierra.
Verificar que la toma de
corriente tenga la toma de tierra,
y que la misma esté conectada.
La conexión a tierra es indispensable para la seguridad del
usuario, puesto que le elimina el
riesgo de una descarga
eléctrica.
La secadora está dotada de un
elemento antiparasitario,
conectado a la toma de
corriente, para eliminar las
interferencias y perturbaciones
radioeléctricas que pudieran
producirse durante su funcionamiento.
NOTA : La casa fabricante
declina toda responsabilidad por
eventuales daños a cosas o
personas derivados de imperfecciones o fallos de la conexión.
INSTALLATION ELECTRIQUE
Les sèche-linge sont livrés prêts
à être raccordés au réseau
(220V-230V) monopahsé.
L´utilisateur doit vérifier que le
réseau ait une capacité
suffisante pour alimenter au
moins 3 kW.
Brancher la fiche d´alimentation
à une prise de 10 ampères pour
(220V-230V) dotées de prise de
terre.
Vérifier que la prise de courant
dispose d´une prise de terre et
que celle-ci est raccordée.
La mise à la terre est indispensable pour la sécurité de
l´utilisateur étant donné qu´elle
élimine tout risque de décharge
électrique.
Le sèche-linge est doté d´un
élément antiparasites raccordé
à la prise de courant, pour
éliminer les interférences et les
perturbations radio-électriques
pouvant se produire en cours de
fonctionnement.´
REMARQUE : Le Fabriquant
décline toute responsabilité due
à d´éventuels dommages à des
biens ou des personnes et
découlant d´imperfections ou de
défaillances du raccordement.
18
Fig. 3
Page 19

IT
DE
EN
• Non è consentito unire l´uscita
dell´aria a camini a cui siano
collegate stufe a carbone o a
gas, cucine,ecc.
INSTALLAZIONE DEL TUBO DI
SCARICO DELL´ ARIA
- Inserire il tubo flessibile
aull´estremità filettata
dell´adattatora (Fig. 1)
- Girare in senso antiorario
finchè il tubo flessibile non viene
fissato (Fig. 2)
- Inserire l´adattatore sull´uscita
richiesta dell´asciugatrice (Fig. 3)
- Inserire i 2 tappi in dotazione
sulle uscite dell´aria che non
vengano impiegate.
INSTALLAZIONE ELETTRICA
L´ asciugatrice viene fornita di
fabbrica per il collegamento alla
tensione (220V-230V)
monofasica.
L´utente deve controllare che la
rete sia in grado di alimentare
almeno 3 kW.
Inserire la spina in una presa di
corrente da 10 ampère per
(220V-230V) con contatto di
terra.
Verificare che la presa di
corrente disponga di contatto di
terra e che la medesima sia
collegata.
La messa a terra è
indispensabile per la sicurezza
dell´utente, dato che elimina il
rischio di una scossa elettrica.
L´asciugatrice è dotata di un
elemento antiparassitario,
collegato alla presa di corrente,
per eliminare le interferenze e
perturbazioni radioelettriche che
potrebbero verificarsi durante il
funzionamento.
NOTA : Il fabbricante declina
ogni responsabilità per eventuali
danni a cose o persone,
derivanti da imperfezioni o errori
nel collegamento.
• Es ist nicht zulässig, den
Luftaustritt an mit Kohle-oder
Gasheizöfen, Küchen, usw.
verbundene Schornsteine
anzuschliessen.
INSTALLATION DES
SCHLAUCHES FÜR DEN
LUFTAUSTRITT
- Den Schlauch in das Endstück
mit Gewinde des Adapters
einführen (Siehe Abb. 1)
- Solange entgegen dem
Uhrzeigersinn drehen bis der
Schlauch fest sitzt (Siehe Abb. 2)
- Den Adapter in den gewünschten
Austritt des Wäschetrockners
einführen. (Siehe Abb. 3)
- Die 2 mitgelieferten
Abdeckungen auf die nicht
verwendeten Luftaustritte
aufsetzen.
ELEKTRISCHE INSTALLATION
Die Wäschetrockner werden für
ihren Anschluß an einphasige
Spannungen (220V - 230V)
vorbereitet geliefert.
Der Benutzer hat zu überprüfen,
ob das Spannungsnetz instande
ist, mindestens 3kW zu versorgen.
Den Spannungsstecker an einen
Anschluß von 10 Ampere (220V230V) mit Erdung anschliessen.
Überprüfen, ob der
Spannungsanschluß über einen
Erdanschluß verfügt und ob dieser
angeschlossen ist.
Die Erdung des Apparates ist
unerläßlich für die Sicherheit des
Benutzers, weil sie das Risiko
einer elektrischen Entladung
ausschließt.
Der Wäschetrockner ist mit einer
Funkentstörung, welche an den
Stromabnehmer angeschlossen
ist, ausgestattet, um die
Interferenzen und funktechnischen
Störungen, die bei seinem Betrieb
enstehen können, zu beseitigen.
BEMERKUNG : Der Hersteller
lehnt jede Verantwortung für
eventuelle Schäden an Sachen
oder Personen, die durch Mängel
oder Fehler beim Anschluss
verursacht worden sind, ab.
• The air outlet must not be
connected to chimneys which are
also connected to coal or gas
heaters, cookers, etc.
FITTING THE AIR VENTING
PIPE
- Insert the flexible hose into the
threaded end of the adaptor.
(Figure 1)
- Turn the hose anticlockwise
until it is firmly in place (Figure 2)
- Fit the adaptor into the dryer
outlet required. (Figure 3)
- Fit the 2 plugs supplied into the
air outlets not being used.
ELECTRICAL INSTALLATION
Your dryer comes ready for
connection to a 220V-230V
monophase supply.
You should ensure that your
mains supply has a capacity of at
least 3 kW.
Plug the appliance into a 10 amp
220V-230V socket, with an earth
connection.
Check that the socket has an
earth connection and that it is
properly connected.The earth
connection is essential for your
safety, as it eliminates the risk of
electrical discharge.
Your dryer is equipped with an
anti-interference device to
eliminate radio interference and
disturbance which could occur
during operation.
NOTE : The manufacturer cannot
accept liability for any possible
damage or harm to things or
people caused by improper
connection.
19
Page 20

ES
FR
Colocar la etiqueta adhesiva
que se acompaña en el soporte
que se introduce en la ranura
trasera del visor del panel.
COLOCACION-EMPLAZAMIENTO
Gracias a sus cuatro pies
estabilizadores (los dos
anteriores regulables), no
precisa de ninguna colocación
especial, aunque si es aconsejable que el suelo donde descanse la máquina sea plano y
horizontal.
Asegúrese de que la tecla
Marcha/Paro no esté pulsado.
Asegurarse de que todos los
mandos se encuentren en
posición “0” y de que la tapa
esté cerrada.
Placer l´etiquette autocollante
dans le support qui s´introduit
dans la rainure arriére du viseur
du panneau.
MISE EN PLACE
Grâce à ses quatre pieds
stabilisateurs (les deux pieds
avant son réglables), la machine
ne requiert aucune mise en
place particulière. Cependant il
est conseillé que le sol sur
lequel va reposer la machine
soit plat et horizontal.
Vérifier que le bouton
Demarrage/Arret ne soit pas
enfoncé.
S´assurer que toutes les
commandes sont en position “0”
et que le hublot est bien fermè.
Enchúfela.
Seleccione el programa.
A continuación pulse la tecla
Marcha/Paro se encenderá el
piloto de funcionamiento
“conexión de corriente efectuada”; si no se enciende vea
“causas de averías”.
Brancher la prise.
Selection du programme.
Appuyer sur la touche
Demarrage/Arret pour allumer la
lampe-témoin de
fonctionnement courant
branchée; si elle ne s’allume
pas se reporter au dépistage
des pannes.
20
Page 21

IT
DE
EN
Incollare l´etichetta adesiva
allegata, nella lingua
corrispondente, al supporto che
si inserisce nella scanalatura
posteriore del visore del
pannello.
UBICAZIONE-SISTEMAZIONE
Grazie ai quattro piedini
stabilizzatori (i due anteriori
sono regolabili) non è
necessaria alcuna sistemazione
speciale. anche se è
consigliabile che il pavimento su
cui si poggi la macchina sia
liscio ed orizzontale.
Si assicuri che il pulsante
Marcia/Arresto non sia premuto.
Si assicuri che tutte le manopole
siano in posizione “0” e che il
coperchio sia chiuso
Stecken Sie das beigefügte,
haftende Etikett in die Halterung,
die Sie in die hintere Fuge des
Sicktpaneels einführen.
AUFSTELLUNG-STANDORT
Dank seiner vier stabilisierenden
Füsse (die beiden vorderen
regulierbar) benötigt der
Wäschetrockner keinerlei
besondere Maßnahmen bei der
Aufstellung. Allerdings ist es
empfehlenswert, daß der Boden
unter der Maschine plan und
eben ist.
Sicherstellen, daß die Start/Stop
Taste nicht gedruckt ist.
Überprüfen Sie, daß alle
Bedienschalter auf “0” sind und
daß der Deckel zu ist.
Stick the adhesive label provided
on the support which goes into
the groove on the back of the
panel visor.
PUTTING YOUR MACHINE IN
PLACE-MOVING IT
Thanks to its four stabilising feet
(the front two are adjustable),
your machine does not require
any special placement, although
the floor where the machine
stands should be flat and level.
Ensure that the On/Off button is
not pressed
Ensure that all controls are set to
“0” and that the lid is shut.
Inserisca la spina.
Selezione della programma.
Quindi prema il tasto Marcia/
Arresto si accenderà la spia di
funzionamento corrente inserita,
se non si accende veda ricerca
guasti.
Stecker einstecken.
Programmes gedrückt werden.
Bei Betätigen der Start/Stop
Taste leuchtet die
Leuchtanzeige auf. Sollte dies
nicht der Fall sein, bitte im
Kapitel “Fehlersuche”
nachsehen.
21
Insert the plug.
Selecting the programme.
Press the On/Off button. The
power on light will light up. If this
does not light up see faults
search.
Page 22

ES
FR
CAPÍTULO 6
CHAPITRE 6
CST 10 M
CUADRO DE MANDOS
Selector de programas de
secado
Tecla aireación de ropa
Tecla sintéticos
Piloto luminoso de funcionamiento
Tecla de puesta en
Marcha/Paro
Puertecilla
Tambor
COMMANDES
Sélecteur de programme de
séchage
Touche linge aere
Touche synthetiques
Signalisation lumineuse de
fonctionnement
Touche marche/arrêt
Couvercle
Panier
22
........................ A ......................
........................ E .......................
........................ F .......................
........................ G ......................
........................ H ......................
........................ L .......................
........................ O ......................
Page 23

IT
DE
EN
CAPITOLO 6
KAPITEL 6
CHAPTER 6
QUADRO COMANDI
Selettore dei programmi di
asciugatura
Tasto aerazione biancheria
Tasto per i tessuti sintetici
Spia luminosa di funzionamento
Pulsante di avvio/arresto
Sportello
Cestello
BEDIENUNGSELEMENTE
Wahlschalter für die
Trockenprogramme
Taster zur belüftung von
kleidungsstücken
Taste für synthetische Stoffe
Leuchtanzeige “Betrieb”
Start/Stop taste
Deckel
Trommel
23
CONTROLS
Selector knob for drying
programmes
Freshen up button
Synthetics button
ON/OFF indicator light
ON/OFF Button
Lid
Drum
Page 24

ES
FR
SELECTOR DE PROGRAMAS
DE SECADO
ATENCIÓN:
NO GIRE NUNCA EL
PROGRAMADOR EN
SENTIDO CONTRARIO A
LAS MANECILLAS DEL
RELOJ, SINO EN EL
SENTIDO DE ÉSTAS Y NO
PULSE EL BOTÓN DE
PUESTA EN MARCHA (H)
ANTES DE LA SELECCION
DEL PROGRAMA
Las tablas indican el programa
de secado en base al número o
símbolo seleccionado.
PROGRAMA FRIO
Visualice en el dial del selector
si desea airear la ropa.
TECLA AIREACION DE ROPA
Accionando esta tecla un
potente chorro de aire fresco
penetra en los tejidos : se
obtiene así una ropa aireada sin
tener que lavarla.
Elimina los olores de "cerrado" y
de humo.
SELECTEUR DES
PROGRAMMES DE SECHAGE
ATTENTION:
NE JAMAIS FAIRE
TOURNER LA POIGNEE
DANS LE SENS
CONTRAIRE A CELUI DES
AIGUILLES D’UNE
MONTRE: TOURNER LA
POIGNEE EN SENS
HORAIRE ET NE JAMAIS
APPUYER SUR LA
TOUCHE DE MARCHE (H)
AVANT AVOIR EFFECTUE
LA SELECTION DU
PROGRAMME.
Les tableaux indiquent le
programme de séchage selon la
durée ou le symbole choisi.
PROGRAMME FROID
Afficher à la fenêtre du sélecteur
si l´on souhaite aérer le linge.
TOUCHE LINGE AERE
En actionnant cette touche, un
puissant jet d´air frais pénètre
dans les tissus : on obtient ainsi
un linge aéré sans avoir à le
laver. Elimine les odeurs de
"renfermé" et de fumée.
A
E
TECLA SINTETICOS
Se recomienda pulsar esta tecla
cuando se proceda al secado de
tejidos sintéticos o delicados,
que requieren una temperatura
moderada (Secado suave).
Dejar sin pulsar esta tecla
(posición alta) para el secado de
algodón o tejidos resistentes.
PILOTO LUMINOSO DE
FUNCIONAMIENTO
TECLA DE PUESTA EN
MARCHA/PARO
TOUCHE SYNTHETIQUES
Il est conseillé d´appuyer sur
cette touche lorsqu´on va faire
sécher des tissus synthétiques
ou fragiles, qui requièrent une
temperature modérée (séchage
doux). Ne pas appuyer sur cette
touche (position sortie) pour la
séchage de cotons ou de tissus
résistants.
SIGNALISATION LUMINEUSE
DE FONCTIONNEMENT
TOUCHE
MARCHE/ARRÊT
24
F
G
H
Page 25

IT
DE
EN
MANOPOLA PROGRAMMI DI
ASCIUGATURA
ATTENZIONE:
NON RUOTI MAI LA
MANOPOLA IN SENSO
ANTIORARIO MA LA
RUOTI IN SENSO ORARIO
E NON PREMA IL TASTO
MARCIA (H) PRIMA DELLA
SELEZIONE DEL
PROGRAMMA.
Le tabelle descrivono il
programma di asciugatura in
base al numero o simbolo
prescelto.
PROGRAMMA A FREDDO
Visualizzare sul disco della
manopola se si desidera
arieggiare la biancheria.
TASTO AERAZIONE
BIANCHERIA
Premendo questo tasto un forte
getto d´aria fresca penetra nei
tessuti : si ottengono cosi dei
capi aerati senza bisogno di
ulteriore lavaggio.
Eliminazione dell´odore di
"chiuso" e di fumo.
WAHLSCHALTER FÜR DIE
TROCKENPROGRAMME
ACHTUNG:
DIESER SCHALTER DARF
NICHT GEGEN, SONDERN
IMMER IM NUR IM
UHRZEIGERSINN
GEDREHT WERDEN. DIE
“START” TASTE (C) DARF
ERST NACH
EINSTELLUNG DES
GEWÜNSCHTEN
PROGRAMMES
GEDRÜCKT WERDEN
Die Tabellen geben die
einzelnen Trockenprogramme in
Bezug auf die gewählte Zeit
oder das gewählte Symbol an.
KALTPROGRAMM
Stellen Sie gegebenenfalls den
entsprechenden Wahischalter
auf Wäsche lüften.
TASTER ZUR BELÜFTUNG
VON KLEIDUNGSSTÜCKEN
Bei Betätigung dieses Tasters
wird das Gewebe von einem
intensiven Frischluftstrahl
durchströmt. Das Kleidungstück
wird dadurch belüftet ohne
gewaschen werden zu müssen.
Beseitigt "muffigen" und
verrauchten Geruch.
TIMER KNOB FOR DRY
PROGRAMMES
IMPORTANT:
ALWAYS ROTATE THE
KNOB IN A CLOCKWISE
DIRECTION, NEVER IN AN
ANTI-CLOCKWISE
DIRECTION. DO NOT
PRESS THE “ON” BUTTON
(H) BEFORE SELECTING
THE PROGRAMME
The tables describe the drying
programme on the basis of the
time or symbol selected.
COLD PROGRAMME
Set the dial to this setting if you
want to air your clothes.
FRESHEN UP BUTTON
Just press this button, a powerfull
jet of fresh air is released
penetrating the garments and
removing unpleasant odours.
This refreshes the clothes
without the need to wash. A
tumble dryer that removes
unpleasant odours agreat.
TASTO TESSUTI SINTETICI
Si consiglia di premere questo
tasto quando sia necessario
asciugare tessuti sintetici o
delicate che richiedano una
temperatura moderata
(asciugaura leggera). Non
premere questo tasto (posizione
alta) per l´asciugatura di tessuti
di cotone o resistenti.
SEGNALAZIONE LUMINOSA
DI FUNZIONAMENTO
TASTO
MARCIA /ARRESTO
TASTE FÜR SYNTHETISCHE
STOFFE
Es wird empfohlen, diese
Taste zu betätigen, wenn zum
Trocknen von synthetischen
oder empfindlichen Stoffen
übergegangen werden soll, die
eine gemäßigte Temperatur
verlangen (vorsichtiges
Trocknen).
Wenn Baumwolle oder festere
Stoffe getrocknet werden sollen,
so sollte diese Taste nicht
betätigt werden (obere Position).
LEUCHTANZEIGE “BETRIEB”
START/STOP TASTE
25
SYNTHETICS BUTTON
You should press this button
when drying synthetics or
delicates, which require a
moderate temperature (Gentle
drying). Do not press this button
(high position) when drying
cotton or resistant fabrics.
ON/OFF INDICATOR LIGHT
ON/OFF BUTTON
Page 26

ES
FR
ABRIR LA PUERTA
Elevar la puerta y abrirla
completamente. Abrir entonces
el tambor como se indica.
Antes de utilizar por primera vez
el aparato, limpiar el interior del
tambor con un paño húmedo
para eliminar el polvo que
pudiera haberse depositado.
INTRODUCCION DE LA ROPA
• Abrir la tapa superior.
• Abrir la tapa del
tambor :
a) introduciendo la mano en la
empuñadora y posicionando el
dedo pulgar en la muesca.
b) levantar la tapa
OUVERTURE DU
COUVERCLE
Ouvrir complètement le
couvercle. Ouvrir ensuite le
panier en suivant les indications.
Avant d´utiliser pour la première
fois l´appareil, nettoyez
l´intérieur du tambour avec un
linge humide pour éliminer la
poussière qui pourrait s´y être
déposée.
INTRODUCTION DU LINGE
• Ouvrir le couvercle supérieur.
• Ouvrir le couvercle du
tambour:
a) en introduisant la main dans
la poignée et en plaçant la
pouce dans l´encoche.
b) Soulever le couvercle
• Introduzca la ropa.
• Girar la tapa del tambor
asegurandose que esta quede
perfectamente enganchada.
En general, las ropas que se
han lavado juntas pueden ser
secadas juntas, dado que
anteriormente al lavado, han
sido previamente seleccionadas.
• Introduire le linge.
• Fermer le couvercle du
tambour en s´assurant qu´il est
parfaitement accroché.
En général, les vêtements qui
ont été lavés ensemble peuvent
être séchés ensemble puisqu´ils
ont été triés avant le lavage.
26
Page 27

IT
DE
EN
APERTURA SPORTELLO
Sollevare lo sportello ed aprirlo
completamente. Aprire quindi il
cestello come indicato.
Prima di far funzionare
l´apparecchio per la prima volta,
pulire l´interno del cestello con
un panno umido per eliminare la
polvere che eventualmente vi si
fosse depositata.
CARICO DELLA BIANCHERIA
• Aprire il coperchio superiore.
• Aprire il coperchio del cestello :
a) Situare la mano
sull´impugnatura posizionando il
pollice sulla tacca.
b) Sollovare il coperchio.
DECKEL ÖFFNEN
Zuerst den Deckel ganz öffnen.
Dann wird der
Trommelverschluss, durck Durck
auf den Punkt.
Bevor der Wäschetrockner zum
ersten Mal benutzt wird, sollte
das Innere der Trommel mit
einem feuchten Tuch einmal
abgewischt werden, um den
Staub, der sich eventuell
angesammelt hat,
wegzuwischen.
EINLEGEN DER WÄSCHE
• Den oberen Deckel öffnen.
• Den Trommeldeckel öffnen:
a) Den Griff mit der Hand fassen
und den Daumen auf die
Einkerbung halten.
b) Den Deckel anheben.
OPENING THE LID
Lift the lid. Open the drum door
following the instruction.
Before using your machine for
the first time, clean the inside of
the drum with a damp cloth to
remove any dust.
LOADING CLOTHES
• Open the top door.
• Open the door to the drum
a) By putting your hand on the
handle, with your thumb on the
notch.
b) Lift the door
• Caricare la biancheria
• Girare il coperchio del cestello
verificando che rimanga
perfettamente agganoiato.
In genere, la biancheria che è
già stata lavata insieme si può
anche asciugare insieme, dato
che è stata selezionata prima
del lavaggio.
• Legen Sie nun die Wäsche ein.
• Drehen Sie den
Trommeldeckel solange bis Sie
sicher sind, daß er vollkommen
eingerastat und somit gut
verschlossen ist.
Im Allgemeinen kann die
zusammen gewaschene
kleidung ebenfalls zusammen
getrocknet werden, da
vorausgesetzt wird, daß sie
bereits vor dem Waschen
sortiert worden ist.
27
• Put the clothes in.
• Turn the door to the drum,
making sure that it closes
securely.
In general terms, clothes that
have been washed together can
be dried together, given that they
have been sorted prior to
washing.
Page 28

ES
FR
La capacidad del tambor de la
secadora es sensiblemente
equivalente a la de su lavadora :
4,5 kg. para ropa blanca o
algodón. Sin embargo, es
conveniente reducir este peso a
2,5 kg. cuando se procede al
secado de sintéticos para evitar
la formación de pliegues. Se
desaconseja el uso de este
aparato para el secado de
lanas.
IMPORTANTE :
La secadora se empleará
exclusivamente para el secado
de textiles lavados en agua (ver
apartado "CONSEJOS PARA
EL SECADO").
ATENCIÓN:
ES IMPORTANTE QUE LA
OPERACIÓN DE CIERRE
DEL TAMBOR SE EFECTÚE CON CUIDADO PARA
EVITAR POSIBLES DAÑOS
A LA ROPA Y A LA
MÁQUINA.
La capacité du tambour du
sèche-linge est sensiblement
équivalent à celui de votre lavelinge : 4,5 kg pour le linge de
maison ou le coton. Cependant,
il convient de réduire ce poids à
2,5 kg. lorsqu´on va sécher des
synthétiques, pour éviter les
froissage. L´utilisation de cet
appareil est déconseillé pour le
séchage de la laine.
IMPORTANT :
Le sèche-linge sera utilisé
exclusivement pour le séchage
de linge lavé à l´eau (voir
chapitre "CONSEILS POUR LE
LAVAGE").
ATTENZIONE:
L’OPERATION DE
FERMATURE DOIT ÊTRE
FAITE AVEC SOIN POUR
EVITER DES DOMMAGES
EVENTUELS SUR LE
LINGE OU LA MACHINE.
28
Page 29

IT
DE
EN
La capacità del cestello
dell´asciugatrice è equivalente a
quella della lavatrice : 4,5 kg. per
la biancheria bianca o di cotone.
Tuttavia, è conveniente ridurre
questo peso a 2,5 kg. quando si
proceda all´asciugatura di tessuti
sintetici, per evitare la
formazione delle grinze. Si
sconsiglia l´uso di questo
apparecchio per asciugare
tessuti di lana.
NOTA BENE :
L´asciugatrice deve essere
usata esclusivamente per
asciugare tessuti lavati in acqua
(vedi capitolo "CONSIGLI PER
L´ ASCIUGATURA").
ATTENZIONE:
È IMPORTANTE CHE
L’OPERAZIONE DI
CHIUSURA DEL CESTELLO
SIA ACCURATAMENTE
ESEGUITA PER EVITARE
POSSIBILI DANNI ALLA
BIANCHERIA ED ALLA
MACCHINA.
Das Fassungsvermögen der
Trommel entspricht beinahe dem
Ihrer Waschmaschine : 4,5
kilogramm an weißer Wäsche
oder Baumwolle. Allerdings ist
es empfehlenswert dieses
Gewicht auf 2,5 kilogramm zu
verringern sobald zum Trocknen
von synthetischen Stoffen
übergegangen wird, um so die
Bildung von Falten zu
vermeiden. Es wird davon
abgeraten, diesen Apparat für
das Trocken von Wolle zu
verwenden.
WICHTIG :
Der Wäschetrockner ist lediglich
für das Trocknen von mit Wasser
gewaschenen Textilien zu
verwenden (Siehe auch das
kapitel "RATSCHLÄGE FÜR
DAS TROCKNEN"
ACHTUNG:
ES IST WICHTIG, DAß DIE
TROMMEL SORGFÄLTIG
GESCHLOSSEN WIRD, UM
SCHÄDEN AN DER
WÄSCHE BZW. AN DER
MASCHINE ZU
VERMEIDEN.
The drum capacity of your dryer
is similar to that of your washing
machine : 4.5 kg. for whites or
cotton fabrics. However, it is best
to reduce this load to 2.5 kg.
when drying synthetics to avoid
creasing. It is not advisable to
use this appliance to dry
woollens.
IMPORTANT :
The dryer should only be used
for drying fabrics washed in water
(see section on "ADVICE FOR
DRYING")
WARNING:
IT IS IMPORTANT TO MAKE
SURE THE DRUM IS
CAREFULLY CLOSED
BEFORE OPERATING THE
MACHINE, AS OTHERWISE
DAMAGES CAN OCCUR
TO THE LAUNDRY OR
MACHINE
29
Page 30

ES
FR
CAPÍTULO 7
PREPARACION Y CARGA DE
LA ROPA
A fin de aprovechar al máximo
las características de la
secadora es necesario observar
los siguientes consejos :
• Seleccionar la ropa según el
tipo de tejido y seleccionar el
programa más adecuado.
• Secar solamente ropa lavada
con agua, no tratada con
soluciones inflamables para
limpieza en seco (bencina,
alcohol, etc.).
• No secar ropa que contenga
goma o material inflamable.
• No usar tejidos de lana.
• No sobrecargar la máquina. Se
aconseja no cargar la secadora
únicamente con ropa muy
pesada, sino con ropa mixta.
CHAPITRE 7
PREPARATION ET
CHARGEMENT DU LINGE
Afin de profiter au maximum des
caractéristiques du sèche-linge,
il est nécessaire de suivre les
conseils suivants :
• Trier le linge en fonction du
genre de tissu et choisir le
programme adapté.
• Ne sécher que du linge lavé à
l´eau et non traité avec des
solutions inflammables pour
nettoyage à sec (benzine,
alcool, etc…).
• Ne pas sécher de linge
composé de caoutchouc ou de
matériau inflammable.
• Ne pas sécher de laine.
• Ne pas surcharger la machine.
Il est conseillé de ne pas sécher
uniquement du linge ayant un
poids important, mais de le
mélanger à d´autres vêtements
moins lourds.
• Cargar la secadora con la ropa
previamente centrifugada en la
lavadora o bien escurrida a fin
de evitar la acumulación de
agua.
• Para tejido delicado utilizar,
exclusivamente la función que le
corresponde.
• Charger l´appareil avec du
linge bien égoutté ou
préalablement essoré dans le
lave-linge afin d´éviter
l´accumulation d´eau.
• Pour les tissus fragiles, utiliser
exclusivement la fonction
correspondante.
30
Page 31

IT
DE
EN
CAPITOLO 7
PREPARAZIONE E CARICO
DELLA BIANCHERIA
Per sfruttare al massimo le
caratteristiche dell´asciugatrice,
è necessario seguire i consigli
seguenti :
• Selezionare il programma più
idoneo.
• Asciugare solo biancheria
lavata in acqua e non trattata
con soluzioni infiammabili per la
pulizia e secco (benzina, alcool,
ecc.)
• Non asciugare biancheria che
contenga gomma o materiali
infiammabili.
• Non asciugare tessuti di lana.
• Non sovraccaricare la
macchina. Si consiglia di non
caricare l´asciugatrice solo con
biancheria molto pesante, bensi
con biancheria mista.
KAPITEL 7
VORBEREITUNG UND
EINLADEN DER WÄSCHE
Um alle Eigenschaften dieses
Wäschetrockners optimal
nutzen zu können, ist es
notwendig, die folgenden
Ratschläge zu befolgen :
• Die Wäsche nach Stoffsorte
trennen und das jeweils
geeignetste Programm wählen.
• Nur mit Wasser gewaschene
Wäsche trocknen. Auf keinen
Fall darf mit entflammbaren
Lösungen (Benzin, Alkohol,
usw.) behandelte Wäsche
getrocknet werden.
• Keine Wäsche trocknen, die
Gummi oder entflammbares
Material enthält.
• Keine Wolle oder Wollstoffe
verwenden.
• Die Maschine nicht überladen.
Es wird empfohlen, die
Maschine nicht ausschließlich
mit sehr schwerer Wäsche,
sondern mit gemischter Wäsche
zu laden.
CHAPTER 7
PREPARING AND LOADING
CLOTHES
In order to get the best out of
your dryer it is best to observe
the following advice :
• Sort the clothes according to
the type of fabric and select the
most suitable progamme.
• Only dry clothes washed in
water. Do not dry clothes treated
with inflammable solutions used
for dry cleaning (benzine,
alcohol, etc).
• Do not dry clothes which
contain rubber or inflammable
material.
• Do not use to dry wollens.
• Do not overload the machine.
Do not just load the machine
with very heavy items. Put in a
mixed load.
• Caricare, l´asciugatrice con la
biancheria previamente
centrifugata in lavatrice o
comunque ben scolata, per
evitare l´accumulazione
dell´acqua.
• Per i tessuti delicati usare
unicamente la funzione
apposita.
• Die Wäsche sollte vor dem
Trocknen in der
Waschmaschine geschleudert
oder gut ausgewrungen werden,
um Ansammlungen von Wasser
zu vermeiden.
• Für empfindliche Stoffe sollten
nur die für sie vorgesehenen
Funktionen verwendet werden.
31
• Load the dryer with clothes
which have been spin dried
beforehand or well wrung out to
avoid the acumulation of water.
• For delicate fabrics, use the
special function provided
exclusively for this purpose.
Page 32

ES
FR
SIMBOLOGIA
Para facilitar el uso de la
secadora es útil conocer el
significado de los símbolos :
• Tejido resistente : por ejemplo
algodón, etc.
(la secadora puede ser cargada
al máximo con este tipo de
tejido «4,5 kg»).
• Tejido delicado, por ejemplo
sintético o mixto de algodón. (en
este caso debe cargarse un
máximo de 2,5 kg. de ropa).
• Tejido centrifugado a 600, 800,
1000 r.p.m.
• Tejido Centrifugado a 400/500
r.p.m.
SYMBOLES
Pour faciliter l´utilisation du
sèche-linge, il est utilise de
connaître le sens des
symboles:
• Tissu résistant : par exemple
le coton, etc… (Le séche-linge
peut être chargé au maximum
avec ce genre de tissu "4,5
kg").
• Tissu fragile, par exemple
synthétique ou mixte coton
(dans ce cas, charger au
maximum à 2,5 kg de linge).
• Tissu essoré à 600, 800, 1000
t/min.
• Tissu essoré à 400/500
t/min.
• Grado de secado para guardar
directamente la ropa en el
armario.
• Grado de secado para ropa
que vaya a ser planchada.
• Grado de secado para ropa
planchada a máquina.
• Ventilación fría : ciclo final que
reduce la formación de arrugas.
• Degré de séchage permettant
de ranger directement le linge
• Degré de séchage pour le
linge qui va être repassé.
• Degré de séchage pour le
linge qu va être repassé à la
machine à repasser.
• Ventilation froide : Cycle final
qui réduit le froissage.
32
Page 33

IT
DE
EN
SIMBOLOGIA
Per facilitare l´uso
dell´asciugatrice è utile
conoscere il significato dei due
simboli :
• Tessuto resistente : ad
esempio cotone, ecc.
(l´asciugatrice può essere
caricata al massimo con questo
tipo di tessuto, 4,5 kg.)
• Tessuto delicato, ad esempio
sintetico o misto cotone (in
questo caso caricare 2,5 kg. di
biancheria al massimo).
• Tessuto centrifugato a 600,
800, 1000 rpm.
• Tessuto centrifugato a 400/500
rpm.
SYMBOLIK
Für den Gebrauch und den
Umgang mit dem
Wäschetrockner ist es
zweckmässig, die Bedeutung
der folgenden Symbole zu
kennen :
• Feste Stoffe : Zum Beispiel
Baumwolle, usw. (Der
Wäschetrockner kann maximal
mit "4,5 kilogramm" dieses
Stoffes beladen werden).
• Empfindliche Stoffe, zum
Beispiel, synthetische Stoffe
oder Baumwollmischgewebe. (In
diesem Fall sollte der
Wäschetrockner mit maximal 2,5
kilogramm kleidung beladen
werden).
• Bei 600, 800 oder 1000
Umdrehungen pro Minute
geschleuderte Wäsche.
• Bei 400/500 Umdrehungen pro
Minute geschleuderte Wäsche.
SYMBOLS
To make your dryer easier to use,
it is useful to know what the
symbols mean :
• Resistant fabric : eg. cotton, etc.
(the dryer can be loaded to the
maximum with this type or fabric :
4.5 kg).
• Delicate fabric, eg. synthetics or
cotton mixes. (the machine
should only be loaded with a
maximum of 2.5 kg. of clothes).
• Fabric spin dried at 600, 800,
1000 r.p.m.
• Fabric spin dried at
400/500 r.p.m.
• Grado di asciugatura per
mettere direttamente la
biancheria nell´armadio.
• Grado di asciugatura per la
biancheria che dovrà essere
stirata.
• Grado di asciugatura per
biancheria stirata a macchina.
• Ventilazione fredda : ciclo
finale che riduce la formazione
di grinze.
• Trockenstufe für Wäsche, die
sofort in den Schrank gehängt
oder gelegt werden soll.
• Trockenstufe für Bügelwäsche.
• Trockenstufe für
maschinengebügelte Wäsche.
• Kaltlüftung : Endprozeß zur
Reduzierung der Faltenbildung.
33
• Dried ready for putting away in
the wardrobe,
• Dried ready for ironing.
• Dried ready for ironing with an
ironing machine.
• Cold ventilation : final cycle to
reduce creasing.
Page 34

ES
FR
CAPÍTULO 8
LIMPIEZA Y MANTENIMIENTO
ORDINARIO
Para su limpieza exterior no use
productos abrasivos, alcohol y/o
disolventes, basta sólo una pasada
con un paño húmedo.
MUEBLE
No limpie el aparato con esponjas
metálicas o polvos abrasivos. Utilice
agua jabonosa o detergente neutro
y seque el mueble después de su
limpieza.
LIMPIEZA DEL FILTRO
Las fibras que se desprenden de la
ropa durante el funcionamiento de
la máquina se depositan en un filtro
en el costado dcho. del tambor.
Para no obstaculizar la circulación
de aire caliente, este filtro debe
estar limpio en cada proceso de
secado.
El filtro se desmonta introduciendo
la mano en el tambor, levantando el
"Pestillo de cierre" y tirando del
conjunto hacia fuera.
Extraer el tamiz (filtro de pelusas).
Desprender las pelusas depositadas que forman una ligera capa
suelta que puede retirarse con
facilidad. Utilizar para esta
operación un cepillo. No lavarlo.
Montar el tamiz en la tapa de filtro
(tiene una sola posición de
montaje).
Introducir el Conjunto filtro en el
tambor, empujando, a continuación,
el pestillo de cierre hacia abajo.
CHAPITRE 8
NETTOYAGE ET ENTRETIEN
ORDINAIRE
Ne jamais utiliser de produits
abrasifs, d’alcool et/ou de diluant,
pour laver l’extérieur de votre
machine; il suffit de passer un
chiffon humide.
MEUBLE
Ne pas utiliser de tampons
métalliques ni de produits abrasifs.
Utiliser de l´eau savonneuse ou en
détergent neutre puis essuyer le
meuble après nettoyage.
NETTOYAGE DU FILTRE
Les fibres qui se détachent du linge
pendant le fonctionnement de la
machine se déposent dans un filtre
placé du côté droit du tambour.
Pour ne pas Gêner la circulation de
l´air chaud, ce filtre doit être propre
à chaque séchage.
Le filtre se démonte en introduisant
la main dans le tambour, en
soulevant le "Verrou de Fermeture"
et en tirant l´ensemble vers
l´extérieur.
Sortir le filtre fin (filtre à peluches).
Retirer les peluches qui forment une
légère couche non collée et facile à
enlever. Pour cette opération, ne
pas laver le filtre. Utiliser de brosse.
Remonter le filtre fin dans le
couvercle du filtre (une seule
position de montage).
Introduire l´ensemble filtre dans le
tambour et appuyer ensuite sur le
verrou de fermeture.
ALCOHOL
Nota : Verificar la limpieza del filtro
de pelusas, despues de cada
operación de secado. En caso
contrario puede entrar en funcionamiento un dispositivo que evita que
la ropa o la secadora resulten
perjudicadas en caso de un uso
incorrecto.
Por tanto, si la limpieza no se lleva
a cabo convenientemente puede
llegar a activarse el sistema de
protección interno y ser necesaria la
intervención del servicio post-venta
para la reactivación del funcionamiento de la secadora.
Vérifier la propreté du filtre à
peluches après chaque opération
de séchage. Si le filtre est sale, un
dispositif évitant que le linge ou le
sèche-linge ne soient endommagés
en cas d´utilisation incorrecte, entre
en fonction.
Si le nettoyage ne se fait pas
correctement, le système de
protection interne peut se mettre en
marche. L´intervention du S.A.V. est
alors nécessaire pour remettre en
service le lave-linge.
34
Page 35

IT
DE
EN
CAPITOLO 8
PULIZIA E MANUTENZIONE
ORDINARIA
Per la Sua lavatrice all’esterno non
usi abrasivi, alcool e/o diluenti,
basta solo una passata con un
panno umido.
MOBILE
Non pulire l´apparecchio con
spugnette metalliche o detersivi
abrasivi. Usare acqua insaponata o
un detersivo neutro e asciugare il
mobile dopo averlo pulito.
PULIZIA DEL FILTRO
Le fibre che si staccano dalla
biancheria durante il funzionamento
della macchina si depositano in un
filtro situato sul fianco destro del
cestello. Per non ostacolare la
circolazione dell´aria calda, questo
filtro deve essere pulito ad ogni
processo di asciugatura.
Il filtro si smonta inserendo la mano
nel cestello, sollevando l´insieme
del gancio di chiusura e tirando il
tutto verso di sè.
Estrarre il setaccio (filtro delle
lanugini). Eliminare le lanugini
depositate che formano un leggero
strato che si può togliere con
facilità. Per questa operazione .
Usare alcun tipo di spazzola e non
lavare il filtro.
Montare il setaccio nel coperchio
del filtro (ha una sola posizione di
montaggio).
Inserire l´insieme del filtro nel
cestello e spingere quindi il gancio
di chiusura verso il basso.
Dopo ciascuna operazione di
asciugatura, accertarsi che il filtro
sia pulito e privo di lanuggini.
In caso contrario, può entrare in
funzionamento un dispositivo che
evita che la biancheria o
l´asciugatrice vengano danneggiate
in caso di uso errato.
Perciò, se la pulizia non venisse
eseguita correttamente, si può
attivare il sistema di protezione
interno che rende necessario
l´intervento del servizio post-vendita
per la riattivazione del
funzionamento dell´asciu-gatrice.
KAPITEL 8
REINIGUNG UND ALLGEMEINE
WARTUNG
Benutzen Sie für die äußere Reinigung
niemals Scheuermittel, Alkohol oder
Verdünnungsmittel. Es genügt, wenn Sie
die Maschine mit einen feuchten Lappen
CHAPTER 8
CLEANING AND ROUTINE
MAINTENANCE
Do not use abrasives, spirits and/or
diluents on the exterior of the
washer-dryer. It is sufficient to use a
damp cloth.
abwischen.
MÖBEL
Der Apparat darf nicht mit metallischen
Schwämmen oder Poliermitteln in
Pulverform gesäubert werden.
Stattdessen sollte Seifenwasser oder ein
neutrales Reinigungsmittel verwendet
CABINET
Do not wash your appliance with
scouring or powdered detergents.
Use soapy water or a neutral
detergent and dry the cabinet after
cleaning.
und das Möbel nach der Säuberung
getrocknet werden.
SÄUBERUNG DES FILTERS
Die beim Betrieb des Wäschetrockners
von der kleidung abgegangenen Fasern
sammeln sich in einem Filter, der an der
rechten Seite der Trommel
untergebracht ist. Um den Fluß der
Heißluft nicht zu behindern, muß sich
dieser Filter stets in vollkommen
sauberem Zustand befinden.
Der Filter wird entnommen, indem man
mit der Hand in die Trommel greift und
die "Verschlußklinke" löst und die
gesamte Einheit nach draußen zieht.
Das Haarsieb (Fusselfilter) entnehmen.
Die Flusen, die sich abgesetzt haben
und eine leicht zu lösende Schicht
bilden, entfernen. Hierzu sollten Sie eine
Bürste benutzen. Auf keinen Fall
waschen. Das Sieb in den Filterdeckel
einsetzen (es gibt nur eine richtige
CLEANING THE FILTER
The fibres which come off clothes
during the operation of your machine
are deposited in a filter on the righthand side of the drum. In order not to
block the circulation of hot air, this
filter should be cleaned after each
use of the dryer.
The filter can be removed by putting
your hand into the drum, lifting the
catch and pulling the unit outwards.
Remove the fluff filter. Remove the
fluff which has formed a thin layer in
the filter. It is easy to remove. Use a
brush of any type to carry out this
operation; do not wash it.
Put the fluff filter back into the filter
cover (it has only one position).
Put the filter unit back into the drum,
pressing the catch down.
Einbaustellung). Die Filterbaugruppe in
die Trommel einsetzen und
anschließend den Sperrhaken nach
oben bewegen.
Nach jedem Trocknungsprozeß sollte
der Sauberkeitszustand des Fusselfilters
überprüft werden.
Im entgegengesetzten Fall könnte eine
Vorrichtung ausgelöst werden, die es
verhindern soll, daß die Wäsche oder
der Wäschetrockner im Falle eines
unsachgemäßen Gebrauches gefährdet
Make sure that the fluff filter is clean
after each drying operation.
If you do not do this, a device that
stops the clothes or the dryer from
being damaged in the case of
incorrect use may be activated.
Therefore, if the filter is not cleaned
properly, the internal protection
system may be activated and it may
be necessary to call out a service
engineer to reactivate the operation
of the dryer.
oder gar beschädigt werden.
Sollte daher die Säuberung nicht
vorschriftsmäßig durchgeführt werden,
so kann es passieren, daß das interne
Schutzprogramm ausgelöst wird und Sie
sich an den technischen Kundendienst
wenden müssen, um die einwandfreie
Funktionsweise des Wäschetrockners
wiederherzustellen.
35
Page 36

CAPÍTULO 9
ES
A título orientativo indicamos los siguientes tiempos aproximados de secado, en función del tipo de tejido y
de la humedad residual.
Cantidad
de ropa
2,5 kg.
2,5 kg.
4,5 kg.
MANTELES, ROPA CAMA, TOALLAS, etc
TEJIDOS DE ALGODON O RESISTENTES
4,5 kg.
2,5 kg.
2,5 kg.
1 kg.
CAMISAS, FIBRAS ACRILICAS, etc
TEJIDOS SINTETICOS O DELICADOS
1 kg.
Seca para guardar
Seca para planchar
Seca para guardar
Seca para planchar
Seca para guardar
Seca para planchar
Seca para guardar
Seca para planchar
Tipo de
secado
Tiempo de secado
A
60´-90´minutos
40´-80´minutos
90´-135´minutos
90´-120´minutos
—
—
—
—
B
100´-120´minutos
80´-100´minutos
120´-135´minutos
120´-135´minutos
60´-80´minutos
40´-60´minutos
40´-60´minutos
30´-40´minutos
A.
Para ropa centrifugada a 800/1000 r.p.m.
B.
Para ropa centrifugada a 400/600 r.p.m.
En caso de que el selector de programas no indique tiempos posicionelo en el símbolo que se ajuste a sus
necesidades.
NOTAS
El centrifugado en lavadoras de sintéticos y delicados se efectúa a 500 r.p.m. (máx). Con centrifugados
superiores o inferiores en los delicados, disminuir o aumentar los tiempos de secado.
36
Page 37

CHAPITRE 9
FR
linge
Type de séchageQuantité de
2,5 kg.
2,5 kg.
TOILETTE, etc.
4,5 kg.
NAPPES, LITERIE, SERVIETTES DE
TISSUS EN COTON OU RESISTANTS
4,5 kg.
2,5 kg.
2,5 kg.
etc…
1 kg.
CHEMISES, FIBRES, ACRYLIQUES,
TISSUS SYNTHETIQUES OU FRAGILES
1 kg.
Séchage pour rangement
Séchage pour repassage
Séchage pour rangement
Séchage pour repassage
Séchage pour rangement
Séchage pour repassage
Séchage pour rangement
Séchage pour repassage
Temps de séchage
A
60´-90´minutes
40´-80´minutes
90´-135´minutes
90´-120´minutes
—
—
—
—
B
100´-120´minutes
80´-100´minutes
120´-135´minutes
120´-135´minutes
60´-80´minutes
40´-60´minutes
40´-60´minutes
30´-40´minutes
A. Pour du linge essoré à 800/1000 t/min.
B. Pour du linge essoré à 400/600 t/min.
REMARQUE
L´essorage en machine de synthétiques et de linge fragile se fait à 500 t/min (maxi). Pour des vitesses
d´essorage supérieures ou inférieures à celles du linge fragile, réduire ou augmenter les durées de
séchage.
37
Page 38

CAPITOLO 9
IT
Si indicano i seguenti tempi approssimativi di aciugatura, un funzione del tipo di tessuto e dell´umidità
residua.
biancheria
Tipo di asciugaturaQuantità di
2.5 kg.
2.5 kg.
4.5 kg.
TESSUTI DI COTONE O RESISTENTI
TOVAGLIE, BIANCHERIA DA LETTO, ASCIUGAMANI, ECC.
4.5 kg.
2.5 kg.
2.5 kg.
1 kg.
CAMICIE, FIBRE ACRILICHE, ECC.
TESSUTI SINTETICI O DELICATI
1 kg.
Asciutto da riporre
Asciutto da stirare
Asciutto da riporre
Asciutto da stirare
Asciutto da riporre
Asciutto da stirare
Asciutto da riporre
Asciutto da stirare
Tempo dell´asciugatura
A
60´-90´minuti
40´-80´minuti
90´-135´minuti
90´-120´minuti
—
—
—
—
B
100´-120´minuti
80´-100´minuti
120´-135´minuti
120´-135´minuti
60´-80´minuti
40´-60´minuti
40´-60´minuti
30´-40´minuti
A. Per biancheria centrifugata a 800/1000 giri/minuto
B. Per biancheria centrifugata a 400/600 giri/minuto
Se il selettore dei programmi non indicasse i tempi, posizionarlo sul simbolo corrispondente alle proprie
esigenze.
NOTE
Nelle lavatrici, la centrifuga dei tessuti sintetici e delicati viene eseguita a 500 giri/minuto (massimo). Con
centrifughe superiori o inferiori dei tessuti delicati, diminuire o aumentare i tempi di asciugatura.
38
Page 39

KAPITEL 9
DE
Als Orientierungshinweise werden die folgenden ungefähren Trockenzeiten angegeben. Diese
Trockenzeiten hängen von der Stoffart und der in der kleidung enthaltenen Restfeuchtigkeit ab.
kleidung
Trocken-zustandMenge an
.
2,5 kg.
2,5 kg.
HANDTÜCHER, USW
4,5 kg.
TISCHDECKEN, BETTWÄSCHE,
FESTE GEWEBE ODER BAUMWOLLSTOFFE
4,5 kg.
2,5 kg.
2,5 kg.
1 kg.
STOFFE. HEMDEN,
ACRYLLFASER, USW.
1 kg.
SYNTHETISCHE ODER EMPFINDLICHE
Trocken zum Aufbewahren
Trocken zum Bügeln
Trocken zum Aufbewahren
Trocken zum Bügeln
Trocken zum Aufbewahren
Trocken zum Bügeln
Trocken zum Aufbewahren
Trocken zum Bügeln
Trocknungsprozeß
A
60´-90´minuten
40´-80´minuten
90´-135´minuten
90´-120´minuten
—
—
—
—
B
100´-120´minuten
80´-100´minuten
120´-135´minuten
120´-135´minuten
60´-80´minuten
40´-60´minuten
40´-60´minuten
30´-40´minuten
A. Bei 800/1000 Umdrehungen pro Minute geschleuderte Wäsche.
B. Bei 400/600 Umdrehungen pro Minute geschleuderte Wäsche.
BEMERKUNG
Synthetische und empfindliche Stoffe werden bei (maximal) 500 Umdrehungen pro Minute geschleudert. Im
Falle von höheren oder niedrigeren Schleuderzahlen im Falle von empfindlichen Stoffen sind die
Trockenzeiten entsprechend zu verringern oder zu verlängern.
39
Page 40

CHAPTER 9
EN
As a guideline we offer the following approximate drying times, depending on the type of fabric and
dampness of the clothes.
clothes
Type of dryingAmount of
2.5 kg.
2.5 kg.
4.5 kg.
COTTON OR RESISTANT FABRICS
TABLECLOTHS, BED LINEN, TOWELS, ETC.
4.5 kg.
2.5 kg.
2.5 kg.
1 kg.
SYNTHETICS OR DELICATES
SHIRTS, ACRYLIC FABRICS, etc.
1 kg.
Ready to put away
Ready to iron
Ready to put away
Ready to iron
Ready to put away
Ready to iron
Ready to put away
Ready to iron
A
60´-90´minutes
40´-80´minutes
90´-135´minutes
90´-120´minutes
—
—
—
—
Drying time
B
100´-120´minutes
80´-100´minutes
120´-135´minutes
120´-135´minutes
60´-80´minutes
40´-60´minutes
40´-60´minutes
30´-40´minutes
A.
For clothes spin-dried at 800/1000 r.p.m.
B.
For clothes spin-dried at 400/600 r.p.m.
NOTES
In washing machines, spin drying is carried out at 500 rpm (max.) for synthetics and delicates.
With higher or lower spin speeds, reduce or increase the drying times for delicates.
40
Page 41

CAPÍTULO 10
PROBLEMA-SOLUCION
Si su secadora no funcionase, antes de llamar al Centro de Asistencia Técnica, efectuar los siguientes
controles :
ES
ANOMALIA
1. El aparato no fun-
ciona
2. Los resultados de
secado no
son satisfactorios
Si continuara el mal funcionamiento, dirigirse al Centro de Asistencia, indicando el modelo de secadora que
figura en el dorso de la secadora.
No está ajustado el programa
No está bien cerrada la puerta
El enchufe no está insertado en la toma
de corriente
El fusible general no está en orden
Programador colocado incorrectamente
Presencia de pelusas en el filtro
Carga de ropa no recomendada
Tomas de aire para ventilación
obstruidas
CAUSA
Ajustarlo
Comprobar
Conecte correctamente
Comprobar
Colocar el programador correctamente
Verificar la limpieza del filtro
Cargar convenientemente
Inspeccionar las tomas de aire
REMEDIO
41
Page 42

CHAPITRE 10
FR
PROBLEME-SOLUTION
Si votre sèche-linge ne fonctionne pas, et avant de contacter le Service Après-Vente, effectuer les contrôles
suivants :
ANOMALIE
1. L´appareil ne
fonctionne pas
2. Les résultats du
séchage ne sont
pas satisfaisants
CAUSE
Le programme n´est pas ajusté
La porte n´est pas bien fermée
La fiche n´est pas bien introduite dans la
prise
Le fusible général est grillé
Le programmateur est mal positionné
Présence de peluches dans le filtre
Charge de linge non recommandée
Prises d´air de ventilation obstruées
L´ajuster
Vérifier
Brancher correctement
Vérifier
Positionner correctement le
programmateur
Vérifier la propreté du filtre
Charger correctement
Vérifier les prises d´air
REMEDE
Si le mauvais fonctionnement persiste, s´adresser au Service Après-Vente en indiquant le modèle de lavelinge figurant à l´arrière du couvercle`d´accès au filtre.
42
Page 43

CAPITOLO 10
P
ROBLEMA-SOLUZIONE
Se l´asciugatrice non funzionasse, prima di rivolgersi al Centro di Assistenza Tecnica, effettuare le verifiche
seguenti :
IT
ANOMALIA
1. L´apparecchio
non funziona
2. I risultati
dell´asciugatura
non sono
soddisfacenti
S
e il funzionamento inadeguato dovesse persistere, rivolgersi al Centro di Assistenza Tecnica, indicando il
modello di asciugatrice che appare sul dorso dell´apparecchio.
Il programma non è ben inserito
Lo sportello non è ben chiuso
La spina non è inserita nella presa di
corrente
Il fusibile generale non è in ordine
Programmatore mal inserito
Presenza di lanugini nel filtro
Carico di biancheria non consigliato
Prese d´aria per la ventilazione ostruite
CAUSA
Inserito bene
Verificare
Collegare correttamente
Verificare
Inserirlo correttamente
Verificare la pulizia del filtro
Caricare convenientemente
Ispezionare le prese d´aria
SOLUZIONE
43
Page 44

KAPITEL 10
LÖSUNG VON PROBLEM
Sollte Ihr Wäschetrockner einmal nicht funktionieren, so führen Sie bitte die folgenden Kontrollschritte durch,
bevor Sie sich an Ihre kundendienststelle wenden :
DE
STÖRUNG
1. Der Apparat
funktioniert nicht
2. Der Apparat
trocknet nicht
zufriedenstellend
Sollte Ihr Wäschetrockner auch nach Überprüfung dieser Fehlerursachen nicht richtig funktionieren, so
wenden Sie sich bitte unter Angabe des Modelles Ihres Wäschetrockners, welches an der Rückseite
angegeben ist, an Ihre Kundendienststelle.
Das Programm ist nicht richtig eingestellt
Die Tür ist nicht richtig geschlossen
Der Netzstecker ist nicht an das
Spannungsnetz angeschlossen
Die Hauptsicherung ist nicht in Ordnung
Programmierer nicht richtig eingestellt
Auftauchen von Fusseln im Filter
Nicht empfohlene Ladung des Apparates
Die Luftaustritte sind nicht offen
URSACHE
Richtig einstellen
Tür überprüfen
Richtig anschliessen
Hauptsicherung Überprüfen
Den Programmierer richtig einstellen
Die Sauberkeit des Filters überprüfen
Entsprechend richtig laden
Die Luftaustritte überprüfen
ABHILFE
44
Page 45

CHAPTER 10
TROUBLESHOOTING
If your dryer does not work properly, make the following checks before calling a Service Centre :
EN
PROBLEM
1. The appliance
does not work
2. The appliance
does not dry
clothes properly
If your machine still does not work properly, call your nearest Service Centre, giving the model number of
your dryer which appears on the back of the appliance.
No programme selected
Door is not closed properly
Appliance not plugged in
Main fuse blown
Wrong programme selected
Filter blocked with fluff
Appliance incorrectly loaded
Air inlets for ventilation blocked
CAUSE
Select programme
Check
Plug it in
Check
Select correct programme
Clean the filter
Load correctly
Check air inlets
REMEDY
45
Page 46

46
Page 47

47
Page 48

 Loading...