

Page 1
LED CEILING/WALL
TRACK LIGHTING
TOOLS AND MATERIALS REQUIRED:
LCW211A01
LT211A
10/20
Phillips
Screwdriver
Pliers Wrench
Wire Cutters
Wiring supplies
as required by
local electrical
code
SAFETY PRECAUTIONS:
1. TURN OFF ELECTRICAL POWER BEFORE STARTING INSTALLATION OF LIGHT FIXTURE.
2. THIS PRODUCT MUST BE INSTALLED IN ACCORDANCE WITH THE APPLICABLE INSTALLATION CODE
BY A PERSON FAMILIAR WITH THE CONSTRUCTION AND OPERATION OF THE PRODUCT AND THE
HAZARDS INVOLVED.
3. CONNECT THE GROUND WIRES (BARE COPPER OR GREEN) FROM YOUR FIXTURE TO THE GROUND
WIRE (BARE COPPER OR GREEN) OR GROUND SCREW IN THE ELECTRICAL BOX.
4. TO CLEAN THE FIXTURE, TURN OFF THE POWER, WAIT FOR IT TO COOL, AND WIPE THE FIXTURE WITH
A CLEAN, SOFT CLOTH.
NOTE: Product may not look exactly as shown in figures.
INSTALLATION:
Mounting
Bracket
Screw
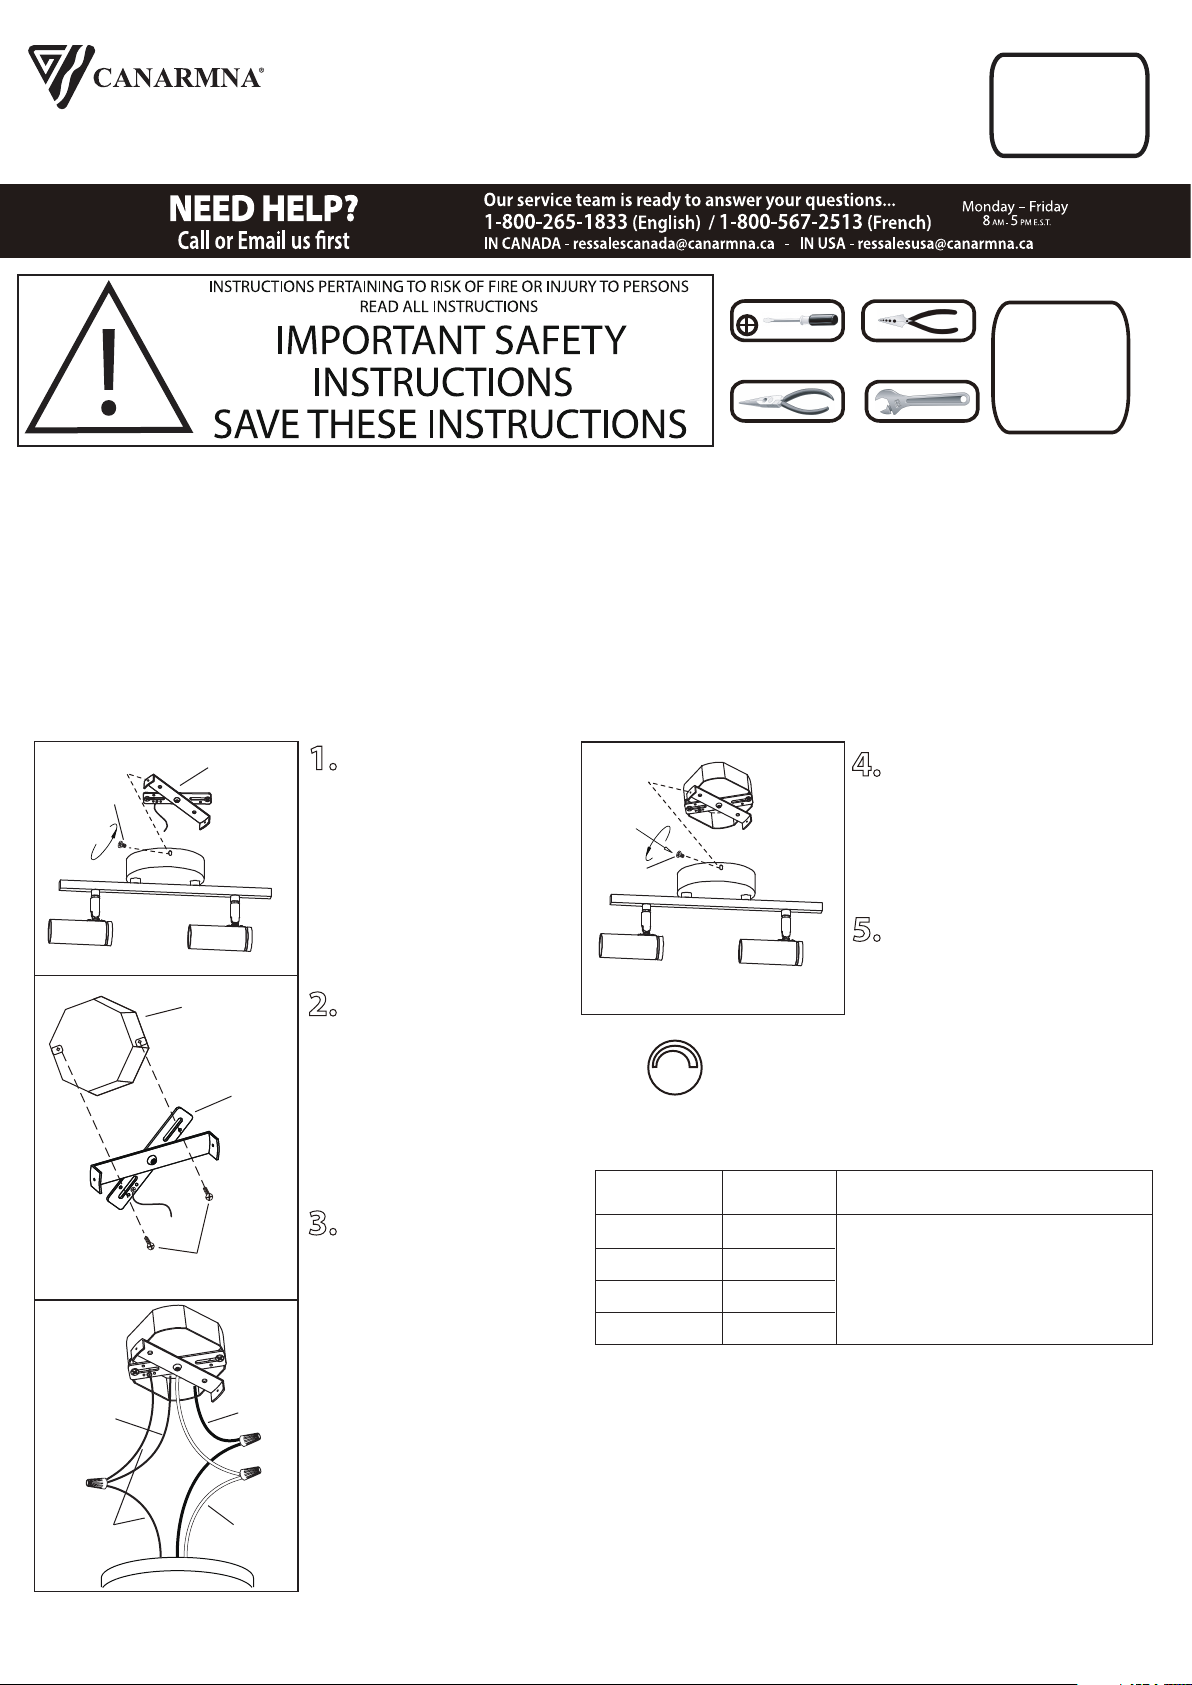
1. Remove the mounting
bracket from the fixture by
unscrewing the 2 screws.
Screw
4. Once connections of wires
are completed, carefully tuck
wires and wire nuts into the
electrical box making sure no
bare wire (on the black and
white) is visible at the wire nuts.
Electrical Box Screws
(not included)
House
supply
Ground
wire
Fixture
Ground
wire
Electrical
Box
Mounting
Bracket
Black
White
2. Mount the mounting
bracket to electrica
electrica
included).
l box screws (not
l box using
3. Connect the ground
wires (bare copper or green)
from your fixture to the
ground wire (bare copper or
green) or ground screw in
the electrical box. Attach
the black wire from the light
fixture to the black wire in
the electrical box. Attach
the white wire from the light
fixture to the white wire in
the electrical box.
NOTE: Do not disconnect
any pre-wired connections.
dimmable
These LED lights are dimmable:
Model#
LCW211A01
LT211A02
LT211A03
LT211A04
MAX rated
wattage
7W
12W
14W
21W
5. Re-tighten the two screws
to install the fixture.
Suitable dimmer
LEVITON# 742-6672-HLW ,
722-6674-PDW MAX 150 W,
Lutron # SCL-153PH-WH MAX 150 W
Tel: (613) 342-5424, Fax: (800) 263-4598
Page 2
ÉCLAIRAGE
PLAFONNIER/MURAL
SUR RAIL AU DEL
LCW211A01
LT211A
10/20
!
INSTRUCTIONS CONCERNANT LE RISQUE
D’INCENDIES OU LES DOMMAGES CORPORELS
LISEZ TOUTES LES INSTRUCTIONS
INSTRUCTIONS DE SÛRETÉ
IMPORTANTES
GARDEZ CES INSTRUCTIONS
OUTILS ET MATERIAUX REQUIS:
Fournitures
Tournevis A
Phillips
Pinces
Coupeur De Fils
Clef
électriques telles
que prescrites
par les normes
locales
MISE EN GARDE:
1. FERMER LE COURANT AU DISJONCTEUR AVANT DE DÉBUTER L’INSTALLATION DE LA FIXTURE.
2. CE PRODUIT DOIT ÊTRE INSTALLÉ SELON LE CODE D’INSTALLATION PERTINENT, PAR UNE PERSONNE
QUI CONNAIT BIEN LE PRODUIT ET SON FONCTIONNEMENT AINSI QUE LES RISQUES INHÉRENTS.
3. BRANCHER LES FILS DE LA MISE A TERRE (CUIVRE NU OU VERT) DE VOTRE LUMINAIRE AU FIL DE LA MISE
À TERRE (CUIVRE NU OU VERT) OU VIS DE LA MISE À TERRE DANS LA BOÎTE ÉLECTRIQUE.
4. POUR NETTOYER LE LUMINAIRE, L’ÉTEINDRE, ATTENDRE QU’IL SOIT FROID, PUIS LE NETTOYER
AVEC LINGE PROPRE ET DOUX.
N.B.: Peut différer de illustration.
INSTALLATION:
Vis
Ferrure
De
Montage
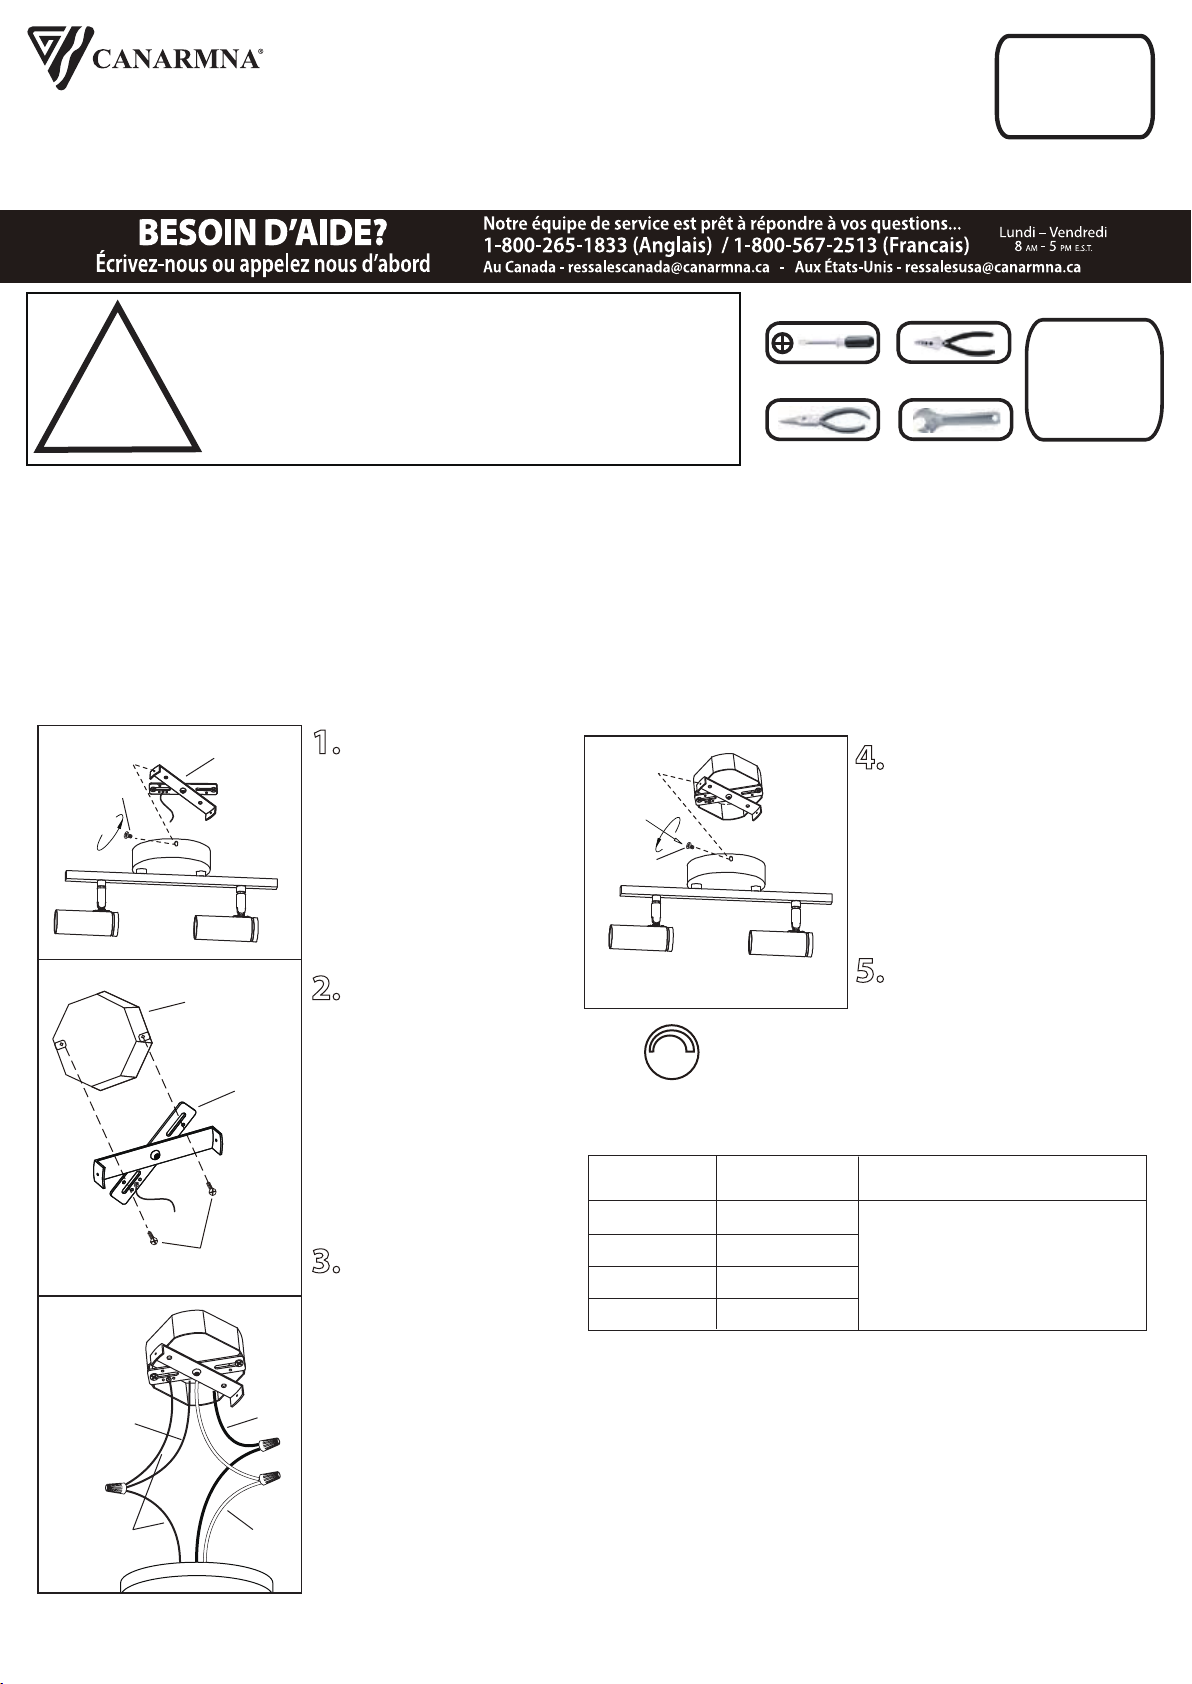
1. Retirer la ferrure
d’installation du luminaire
en retirant les 2 vis.
Vis
4. Une fois les connexions
terminées, poussez
soigneusement les fils et les
marrettes dans la boîte
électrique en vous assurant
qu'aucun fil dénudé (sur les fils
noirs et blancs) est visible des
marrettes.
Boite Électrique
Ferrure
De Montage
Ecrou De Boîte Électrique
(en sus)
Fil de mise
à terre de
la maison
Fil de terre
sur le
luminaire
Noir
Blanc
2. Posez la ferrure
d’installation à la boîte de
sortie électrique à l’aide des
vis de la boîte (en sus).
3. Branchez les fils de la
mise a terre (cuivre nu ou
vert) de votre montage au fil
de la mise a terre (cuivre nu
ou vert) ou vis de la mise a
terre dans la boite
electrique. Posez le fil noir de
la fixture au fil noir dans la
boite électrique et posez le
fil blanc de la fixture au fil
blanc dans la boite.
N.B.; Ne pas défaire les
connexions déjà
existantes.
5. Serrer à nouveau les deux
vis pour installer le luminaire.
variable
Ces lumières DEL sont réglables:
Modèle
LCW211A01
LT211A02
LT211A03
LT211A04
Puissance
watt maximale
7W
12W
14W
21W
Gradateur adapté
LEVITON# 742-6672-HLW ,
722-6674-PDW MAX 150 W,
Lutron # SCL-153PH-WH
MAX 150 W
PH: (450) 665-2535, FX: (450) 665-0910
 Loading...