

Page 1
OUTDOOR
IOL474
12/19
LIGHTING
SUITABLE FOR DAMP LOCATIONS
Questions or Concerns Contact At The Following Phone Numbers Before Returning Product To The Store:
1-800-265-1833 (English) / 1-800-567-2513 (French)
Monday through Friday 8:00 AM to 5:00 PM E.S.T.
INSTRUCTIONS PERTAINING TO RISK OF FIRE OR INJURY TO PERSONS
READ ALL INSTRUCTIONS
IMPORTANT SAFETY
INSTRUCTIONS
!
SAFETY PRECAUTIONS:
1. TURN OFF ELECTRICAL POWER BEFORE STARTING INSTALLATION OF LIGHT FIXTURE.
DO NOT REMOVE INSULATION FROM FIXTURE.
2. THIS PRODUCT MUST BE INSTALLED IN ACCORDANCE WITH THE APPLICABLE INSTALLATION CODE
BY A PERSON FAMILIAR WITH THE CONSTRUCTION AND OPERATION OF THE PRODUCT AND THE
HAZARDS INVOLVED.
3.
CONNECT THE GROUND WIRE (BARE COPPER OR GREEN) FROM YOUR FIXTURE TO THE GROUND
WIRE (BARE COPPER OR GREEN) OF SUPPLY WIRE.
4. TO CLEAN THE FIXTURE, TURN OFF THE POWER, WAIT FOR IT TO COOL, AND WIPE THE FIXTURE WITH A
CLEAN, SOFT CLOTH.
NOTE: Product may not look exactly as shown in figures.
SAVE THESE INSTRUCTIONS
TOOLS AND MATERIALS REQUIRED:
Phillips
Screwdriver
Pliers Wrench
Wire Cutters
Wiring supplies
as required by
local electrical
code
INSTALLATION:
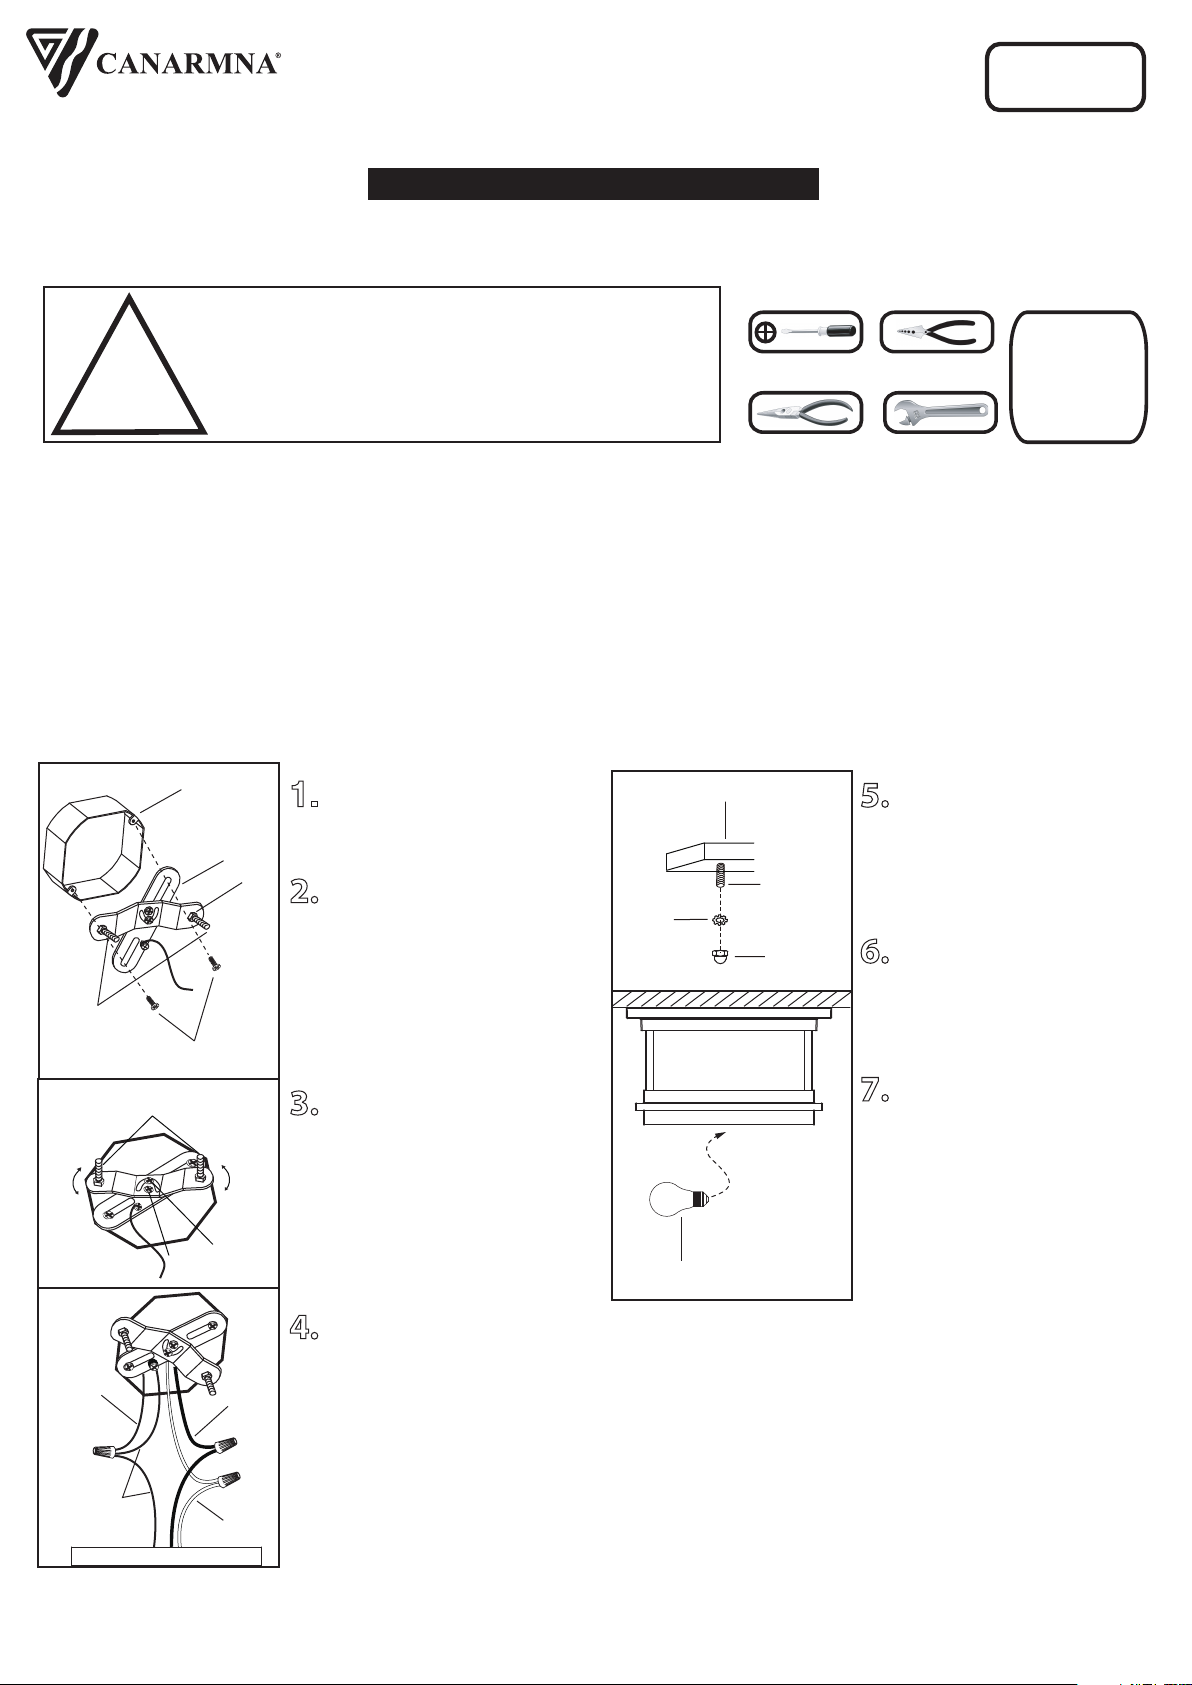
Electrical
Box
Mounting
Bracket
Studs
Electrical Box Screws
(not included)
Studs
Screws
1. Loosen “B”. Adjust stud to
desired length and lock in place
with “B”.
“B”
2. Mount the mounting
bracket to electrical box using
electrical box screws (not
included). Make sure the
studs on the mounting bracket
are facing out from the electrical
box.
3. Position mounting bracket
so
that the fixture will be hung
properly once it is mounted to
the wall. Tighten the screws to
hold in place.
Star
Washer
Bulb
Fixture
Stud
Cap
Nut
5. Once connections of wires
are completed, carefully tuck
wires and wire nuts into the
electrical box making sure no
bare wire (on the black and
white) is visible at the wire nuts.
6. Position fixture over studs
on mounting bracket assembly.
Secure fixture in place with star
washers and cap nuts.
7. Install specified bulb type
and wattage (not included).
House
Supply
Ground
Wire
Fixture
Ground
Wire
Fixture
Black
White
4. Connect the ground wires
(bare copper or green) from your
fixture to the ground wire (bare
copper or green) or ground
screw in the electrical box.
Connect the black wire from the
fixture to the black wire in the
electrical box and connect the
white wire from the fixture to the
white wire in the electrical box.
Tel: (613) 342-5424, Fax: (800) 263-4598
Page 2
ECLAIRAGE
IOL474
12/19
EXTERIEUR
CONVIENT AUX EMPLACEMENTS HUMIDES
Pour Toutes Questions Ou Commentaires, Veuillez Nous Contacter Avant De Retourner Le Produit Au Détaillant:
1-800-265-1833 (Anglais) / 1-800-567-2513 (Français)
Du lundi au vendredi 8 :00am à 5 :00pm E.S.T
INSTRUCTIONS CONCERNANT LE RISQUE
D’INCENDIES OU LES DOMMAGES CORPORELS
LISEZ TOUTES LES INSTRUCTIONS
INSTRUCTIONS DE SÛRETÉ
IMPORTANTES
!
GARDEZ CES INSTRUCTIONS
MISE EN GARDE:
1. FERMEZ LE COURANT AU DISJONCTEUR AVANT DE DÉBUTER L’INSTALLATION DU LUMINAIRE.
N’ENLEVEZ PAS L’ISOLATION DE LA FIXTURE.
2. CE PRODUIT DOIT ÊTRE INSTALLÉ SELON LE CODE D’INSTALLATION PERTINENT, PAR UNE PERSONNE
QUI CONNAÎT BIEN LE PRODUIT ET SON FONCTIONNEMENT AINSI QUE LES RISQUES INHÉRENTS.
3. BRANCHEZ LE FIL DE LA MISE A TERRE (CUIVRE NU OU VERT) DU LUMINAIRE A LA MISE A TERRE
(CUIVRE NU OU VERT) DU FIL SOUS TENSION.
4. POUR NETTOYER LE LUMINAIRE, L’ÉTEINDRE, ATTENDRE QU’IL SOIT FROID, PUIS LE NETTOYER
AVEC LINGE PROPRE ET DOUX.
N.B.: Peut différer de illustration.
OUTILS ET MATERIAUX REQUIS:
Fournitures
Tournevis A
Phillips
Pinces
Coupeur De Fils
Clef
électriques telles
que prescrites
par les normes
locales
INSTALLATION:
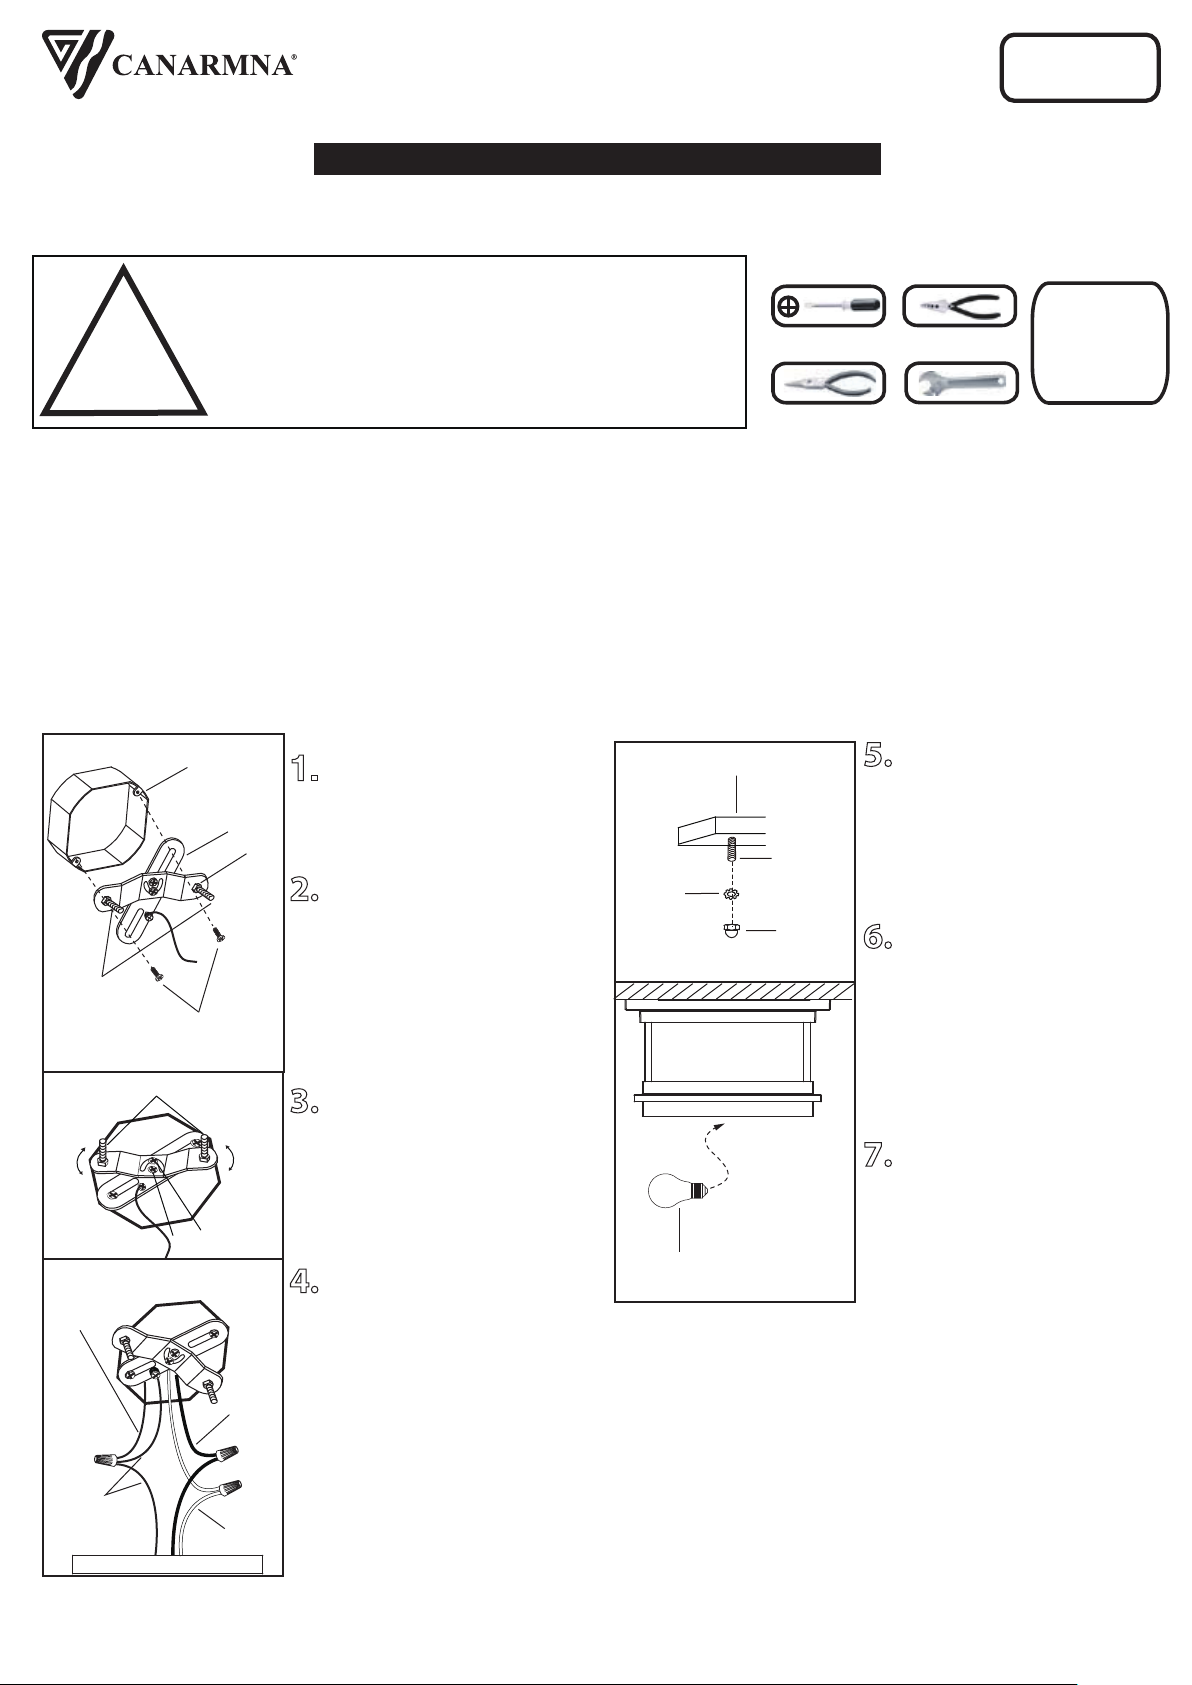
Boite
Électrique
Ferrure De
Montage
Goujon
Vis De La
Boite Électrique
(en sus)
Goujon
Vis
Fil de mise
à terre de
la maison
Fil de mise
à la terre
du luminaire
Fixture
Blanc
Noir
1. Dévissez l’écrou B. Ajustez le
poteau à la longueur désirée et
barrez en place avec cet écrou.
“B”
2. Posez la ferrure d’installation
à la boîte de sortie électrique à
l’aide des vis de la boîte (en sus).
Assurez-vous que les goujons de
la ferrure d’installation font face
vers l’extérieur de la boîte
électrique.
3. Placez la ferrure d’installation
de façon à ce que le luminaire soit
placé correctement lorsqu’il sera
posé au mur. Serrez la vis pour
retenir la ferrure en place.
4. Branchez les fils de la mise a
terre (cuivre nu ou vert) de votre
montage au fil de la mise a terre
(cuivre nu ou vert) ou vis de la
mise a terre dans la boite
electrique. Posez le fil noir de la
fixture au fil noir dans la boite
électrique et posez le fil blanc de
la fixture au fil blanc dans la boite.
Rondelle
en
étoile
Ampoule
Fixture
Goujon
Écrou
À Tête
5. Une fois les connexions
terminées, poussez
soigneusement les fils et les
connecteurs dans la boîte
électrique en vous assurant
qu'aucun fil dénudé (sur les fils
noirs et blancs) est visible des
connecteurs.
6. Poussez délicatement les
fils à l’intérieur de la boîte
électrique et placez le luminaire
sur les goujons sur la ferrure de
montage. Serrez le luminaire en
place à l’aide des écrous étoilés
et les écrous à capuchon.
7.
Posez l'ampoule de type
et de wattage requis (en sus).
PH: (450) 665-2535, FX: (450) 665-0910
 Loading...