

Page 1

Device manual
Encoder
with CANopen interface
RM7
RN7
UK
706362/02 11/2020
Page 2

CANopen encoder
Contents
1 Preliminary note � � � � � � � � � � � � � � � � � � � � � � � � � � � � � � � � � � � � � � � � � � � � � � � � � 4
1�1 Symbols used� � � � � � � � � � � � � � � � � � � � � � � � � � � � � � � � � � � � � � � � � � � � � � � 4
1�2 Warning signs used � � � � � � � � � � � � � � � � � � � � � � � � � � � � � � � � � � � � � � � � � � 4
2 Safety instructions � � � � � � � � � � � � � � � � � � � � � � � � � � � � � � � � � � � � � � � � � � � � � � � 4
3 General information � � � � � � � � � � � � � � � � � � � � � � � � � � � � � � � � � � � � � � � � � � � � � � 5
3�1 CANopen technology � � � � � � � � � � � � � � � � � � � � � � � � � � � � � � � � � � � � � � � � 5
3�1�1 Supported operating modes� � � � � � � � � � � � � � � � � � � � � � � � � � � � � � � � 5
3�2 References � � � � � � � � � � � � � � � � � � � � � � � � � � � � � � � � � � � � � � � � � � � � � � � � � 5
4 Functions and features � � � � � � � � � � � � � � � � � � � � � � � � � � � � � � � � � � � � � � � � � � � 6
5 Electrical connection� � � � � � � � � � � � � � � � � � � � � � � � � � � � � � � � � � � � � � � � � � � � � � 6
5�1 Bus connection� � � � � � � � � � � � � � � � � � � � � � � � � � � � � � � � � � � � � � � � � � � � � � 7
5�2 Setting the node number in the terminal cap � � � � � � � � � � � � � � � � � � � � � � � 8
5�3 Protocol definition � � � � � � � � � � � � � � � � � � � � � � � � � � � � � � � � � � � � � � � � � � � 8
5�4 Baud rate setting � � � � � � � � � � � � � � � � � � � � � � � � � � � � � � � � � � � � � � � � � � � � 9
6 Installation of the encoder� � � � � � � � � � � � � � � � � � � � � � � � � � � � � � � � � � � � � � � � � 10
6�1 Settings of the encoder � � � � � � � � � � � � � � � � � � � � � � � � � � � � � � � � � � � � � � 10
6�2 Signal assignment � � � � � � � � � � � � � � � � � � � � � � � � � � � � � � � � � � � � � � � � � � 10
6�3 Setting of the node number � � � � � � � � � � � � � � � � � � � � � � � � � � � � � � � � � � � 10
6�3�1 Setting of the node number via SDO objects� � � � � � � � � � � � � � � � � � 10
6�3�2 Setting of the baud rate via SDO objects� � � � � � � � � � � � � � � � � � � � � 10
6�3�3 Setting the node number and the baud rate via LSS� � � � � � � � � � � � 10
6�3�4 Bus termination � � � � � � � � � � � � � � � � � � � � � � � � � � � � � � � � � � � � � � � � 10
6�4 LED indications � � � � � � � � � � � � � � � � � � � � � � � � � � � � � � � � � � � � � � � � � � � � �11
7 Configuration � � � � � � � � � � � � � � � � � � � � � � � � � � � � � � � � � � � � � � � � � � � � � � � � � � �11
7�1 Operating modes � � � � � � � � � � � � � � � � � � � � � � � � � � � � � � � � � � � � � � � � � � � �11
7�1�1 General information � � � � � � � � � � � � � � � � � � � � � � � � � � � � � � � � � � � � � �11
7�1�2 Preoperational mode � � � � � � � � � � � � � � � � � � � � � � � � � � � � � � � � � � � � �11
7�1�3 Start-operational mode � � � � � � � � � � � � � � � � � � � � � � � � � � � � � � � � � � 12
7�1�4 Start/stop mode � � � � � � � � � � � � � � � � � � � � � � � � � � � � � � � � � � � � � � � � 12
7�1�5 Reinitialisation of the encoder � � � � � � � � � � � � � � � � � � � � � � � � � � � � � 12
7�2 Standard operation (CAN transmission modes)� � � � � � � � � � � � � � � � � � � � 12
7�3 Storing parameters� � � � � � � � � � � � � � � � � � � � � � � � � � � � � � � � � � � � � � � � � � 13
7�3�1 Object directory � � � � � � � � � � � � � � � � � � � � � � � � � � � � � � � � � � � � � � � � 13
7�3�2 Saving process � � � � � � � � � � � � � � � � � � � � � � � � � � � � � � � � � � � � � � � � 13
7�3�3 Storing without reset � � � � � � � � � � � � � � � � � � � � � � � � � � � � � � � � � � � � 14
7�3�4 Storing with reset � � � � � � � � � � � � � � � � � � � � � � � � � � � � � � � � � � � � � � � 14
7�3�5 Restoring the parameters � � � � � � � � � � � � � � � � � � � � � � � � � � � � � � � � 14
7�3�6 Layer Setting Service (LSS)� � � � � � � � � � � � � � � � � � � � � � � � � � � � � � � 14
8 Programmable parameters� � � � � � � � � � � � � � � � � � � � � � � � � � � � � � � � � � � � � � � � 14
8�1 Object directory � � � � � � � � � � � � � � � � � � � � � � � � � � � � � � � � � � � � � � � � � � � � 15
8�2 Programming example: preset value � � � � � � � � � � � � � � � � � � � � � � � � � � � � 15
2
Page 3

CANopen encoder
8�2�1 Set preset value (master to encoder with node number 1) � � � � � � � 15
8�3 Communication-specific objects of the DS301 from 1000h to 1FFFh
(communication profile DS301 V4�02) � � � � � � � � � � � � � � � � � � � � � � � � � � � � � � 16
8�4 Manufacturer-specific objects from 2000h to 5FFFh � � � � � � � � � � � � � � � � 22
8�5 Device-profile-specific objects from 6000h to 9FFFF� � � � � � � � � � � � � � � � 26
9 Terms and abbreviations� � � � � � � � � � � � � � � � � � � � � � � � � � � � � � � � � � � � � � � � � � 33
UK
3
Page 4

CANopen encoder
1 Preliminary note
1.1 Symbols used
► Instruction
> Reaction, result
[…] Designation of pushbuttons, buttons or indications
→ Cross-reference
Important note
Non-compliance can result in malfunction or interference�
Information
Supplementary note
1.2 Warning signs used
NOTE
Warning of damage to property�
2 Safety instructions
These instructions are part of the device� They contain information and illustrations
about the correct handling of the device and must be read before installation or
use�
Observe the operating instructions�
Non-observance of the instructions, operation which is not in accordance with use
as prescribed below, wrong installation or incorrect handling can affect the safety
of operators and machinery�
The installation and connection must comply with the applicable national and
international standards� Responsibility lies with the person installing the unit�
Only the signals indicated in the technical data or on the device label may be
supplied to the connections or wires�
4
Page 5

CANopen encoder
3 General information
3.1 CANopen technology
The CANopen communication profile is based on the CAN Application Layer (CAL)
specification of the CiA organisation� CANopen is considered as a robust fieldbus
with highly flexible configuration options� It is used in many various applications
which are based on different application profiles� CANopen comprises a concept to
configure and communicate real-time data using synchronous and asynchronous
messages� Four message types (objects) are distinguished�
1� Administration messages (layer management, network management and
identifier distribution)
2� Service Data Objects (SDO)
3� Process Data Objects (PDO)
4� Predefined Objects (synchronisation, time stamp, emergency)
For further information please refer to the CiA-CAN specification (CiA 406 encoders, CiA 301 - CANopen)�
3.1.1 Supported operating modes
Encoders with CANopen interface support the following operating modes:
● RTR (request)
The position value is only given to the bus on request�
● EVENT time
The position value is given to the bus cyclically (interval can be set)�
● Cyclical-synchronous
When the sync telegram has been received by the host, the absolute encoder
transmits the current process value� A sync counter can be programmed so that
the encoder does not send before a defined number of sync telegrams�
In addition other functions can be configured (direction of rotation, resolution etc�)�
UK
3.2 References
http://www�can-cia�org
CAN Application Layer, DS 201 …207 CiA
LSS profile DS305 CiA
CAL-based communication profile, DS 301 CiA
Device profile for encoders DS 406 CiA
CAN specification version 2�0 A Robert Bosch GmbH
CANary CAN controller Atmel
5
Page 6

CANopen encoder
4 Functions and features
● There are 1 SDO server and 2 default value PDOs according to CiA DS 301�
The PDO mapping can be changed (dynamic PDO mapping)� The default value
identifiers have been assigned according to the "predefined connection set" in
the CANopen specification�
● The COB IDs of the PDOs and their baud rate can be configured�
● The module expects a sync object� The CAN identifier of the sync object can
be configured�
● The module supports "node guarding" and "heartbeat"�
● The module supports an emergency object� The COB ID of the EMCY object
can be configured�
● The module stores the last error� The error code of the corresponding
emergency object is stored�
● The module supports the load command (reset function to restore the factory
settings)�
● Alarms and warnings are not displayed�
5 Electrical connection
The encoder is connected with two or three cables depending on whether the
power supply is integrated into the bus cable or connected separately� If the power
supply is integrated into the bus cable, one of the cable glands can be fitted with a
plug� The cable glands are suitable for cable diameters from 6�5 up to 9 mm�
Terminal Description
┴ Ground
+ 24 V voltage supply
- 0 V voltage supply
G CAN Ground
L CAN low
H CAN high
G* CAN Ground
L* CAN low
H* CAN high
* are not connected, if the terminal resistor is
ON
6
On
R
0
1
9
2
8
3
7
4
6
5
Bd x1x10
T
LG H G HL+ -
0
0
1
1
9
9
2
2
8
8
3
3
7
7
4
4
6
6
5
5
Page 7
CANopen encoder
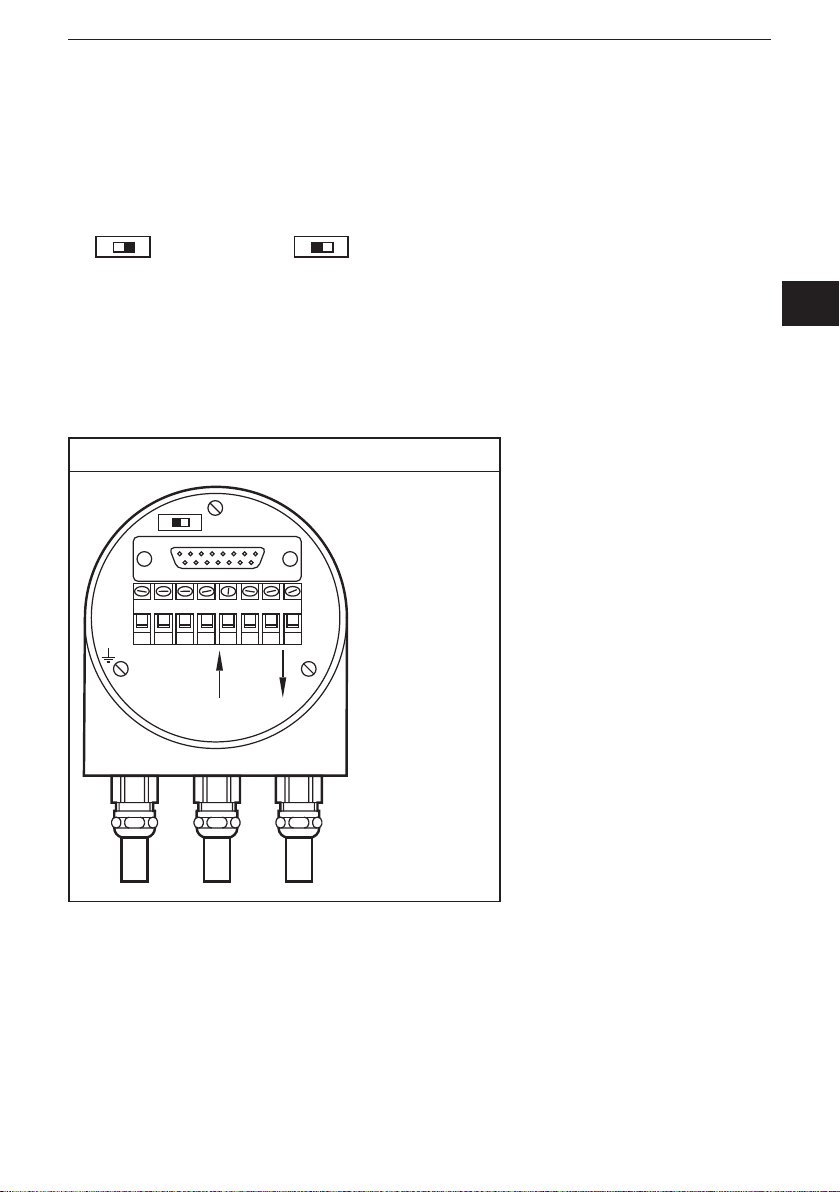
The terminal cap contains a resistor which can be activated as terminating resistor
if necessary� The resistor is to be switched to ON at the ends of the bus line in the
device�
Participant X Last participant
R
On
T
R
On
T
Terminating resistor RT (resistor termination)
5.1 Bus connection
The terminal cap fulfils the function of a T-coupler� From there the wiring must be
done according to the drawing on the left side�
► Observe the assignment of the incoming and outgoing bus signals�
Terminal cap bus In and bus Out
R
T
On
LG H G HL+ -
UK
Bus In Bus Out
7
Page 8

CANopen encoder
5.2 Setting the node number in the terminal cap
► To set the node number remove the terminal cap for the installation�
► Loosen both screws on the back of the encoder�
► Do not damage the seal since otherwise the protection rating will be lost�
The setting is done via coding switches: 0��9 (x1) or 10��90 (x10)�
0
1
9
8
7
2
3
4
6
5
0
1
9
8
7
2
3
4
6
5
0
1
9
8
7
2
3
4
6
5
Bd x1x10
Internally, 1 is always added to the node number to avoid setting of the node
number 0�
Example: The node number 10 has to be set via the coding switch with 0 9�
BCD-coded encoder (binary coded decimal number)
Device address 0���89
x1 Set the CAN-node number
x10 Address reserved 90…99
xBd Set the baud rate
5.3 Protocol definition
x1 Device address 97
x10 Address reserved
x1 Device address 98
x10 Protocol selection according to DS301-V3
x1 Device address 99
x10 Protocol selection according to DS301-V4
8
Page 9

5.4 Baud rate setting
Setting is done via baud rate switch (Bd)�
The following baud rates are adjustable:
Baud rate in kBit/s BCD rotary switch
20 0
50 1
100 2
125 3
250 4
500 5
800 6
1000 7
Reserved 8
Sets the SDO mode* 9
* SCO service data objects
CANopen encoder
UK
9
Page 10
CANopen encoder
6 Installation of the encoder
6.1 Settings of the encoder
► Set the node address of the encoder, the baud rate and the bus termination
before set-up of the device via software�
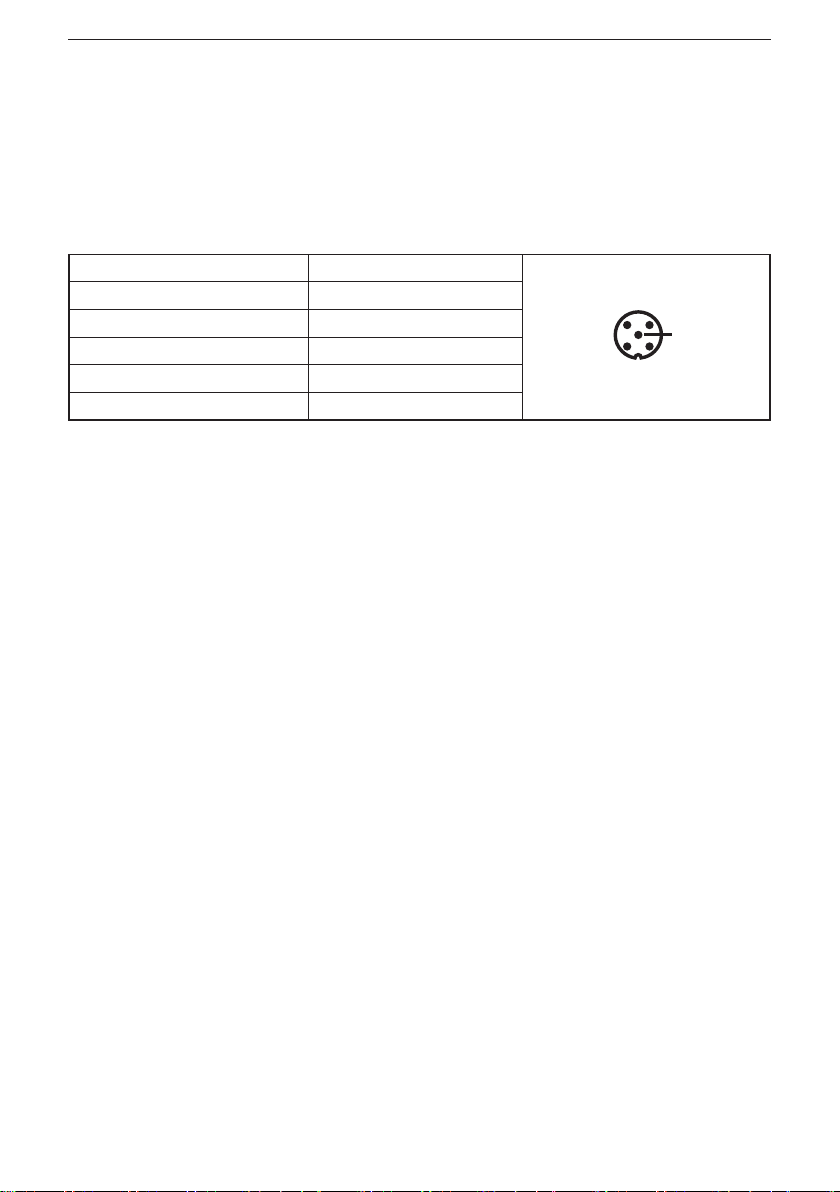
6.2 Signal assignment
Signal 5-pole M12 connector
CAN GND pin 1
24 V supply voltage pin 2
GND (PE) pin 3
CAN high pin 4
CAN low pin 5
► Use screened cable�
6.3 Setting of the node number
6.3.1 Setting of the node number via SDO objects
For devices without terminal cap the address can only be set via SDO objects� The
address of an encoder without terminal cap is set to 32 as standard� Details on
changing the node number → chapter 7.4.
6.3.2 Setting of the baud rate via SDO objects.
For devices without terminal cap the baud rate can only be changed via SDO
objects� The baud rate is set to 125 Kbits/s as default value� Details on changing
the baud rate → chapter 7.4.
6.3.3 Setting the node number and the baud rate via LSS
Another possibility of how to set the node number and the baud rate for encoders
is Layer Setting Services. Further information → chapter 6.3.6.
6.3.4 Bus termination
If the encoder is the last participant, an external terminating resistor or a
terminating T connector has to be used�
10
Page 11

CANopen encoder
6.4 LED indications
LED Status Description
red flashes, 1 Hz operating voltage OK,
red lights "BUS OFF" caused e�g� by short circuit, wire
green flashes, 2�5 Hz master failure,
green/red green flashing, 2�5 Hz
green flashes, 1 Hz bus stopped
green lights operating voltage OK, bus connection OK
green/red green lights/
and red flashing 1x at each 3rd
pulse of the green LED
red flashing, 2�5 Hz
faulty bus connection
break, faulty connector
encoder remains in the preoperational
operating status
> guard and heartbeat error are not indicated
guarding error, either node guard or heartbeat
non reproducible indication (no clear
description of the indication)
7 Configuration
This chapter describes the configuration of the parameters of an absolute encoder
with CANopen interface�
UK
7.1 Operating modes
7.1.1 General information
In the preoperational mode the encoder replies to the CAN bus after sending its
boot up message�
Boot up message: 700 hex + node number (further details in the Communication
Profile chapter 7�3�)
► Change parameters only in the preoperational mode�
This mode decreases the bus load and simplifies the control of the messages sent
and received� It is not possible to send or receive PDO messages in this mode�
7.1.2 Preoperational mode
To set the encoder to the preoperational mode, the master must send the following
message:
Identifier Byte 0 Byte 1 Description
0 h 80 h 00 NMT PreOp, all nodes
0 h 80 h NN NMT PreOp, NN
NN: node number
11
Page 12

CANopen encoder
It is possible to set all nodes (byte 1 = 0) or individual nodes (byte 1 NN) to the
preoperational mode�
7.1.3 Start-operational mode
To set the encoder to the operational mode, the master must send the following
message:
Identifier Byte 0 Byte 1 Description
0 h 01 h 00 NMT start, all nodes
0 h 01 h NN NMT start, NN
NN: node number
It is possible to set all nodes (byte 1 = 0) or individual nodes (byte 1 NN) to the
operational mode�
7.1.4 Start/stop mode
To set the encoder to the stop mode, the master must send the following message:
Identifier Byte 0 Byte 1 Description
0 h 02 h 00 NMT stop, all nodes
0 h 02 h NN NMT stop, NN
NN: node number
It is possible to set all nodes (byte 1 = 0) or individual nodes (byte 1 NN) to the
stop mode�
7.1.5 Reinitialisation of the encoder
► Carry out reinitialisation in the event of incorrect function�
Identifier Byte 0 Byte 1 Description
0 h 81 h 00 reset all nodes
0 h 81 h NN reset node
NN: node number
It is possible to reset all nodes (byte 1 = 0) or individual nodes (byte 1 NN)� After
reinitialisation the device replies again in the preoperational mode�
7.2 Standard operation (CAN transmission modes)
RTR mode The connected host requests the current position value via a remote
EVENT time The absolute encoder cyclically sends the current position value -
12
transmission request telegram� The encoder reads the current position,
sets off set parameters (if applicable) and returns the position value via
the same CAN identifier�
without any request by the host� The cycle time can be programmed in
milliseconds for values between 1 ms and 65536 ms�
Page 13

CANopen encoder
Sync Mode When the sync telegram has been received by the host, the encoder
transmits the current process value� If several nodes reply to the sync
telegram, the individual nodes report one after the other according to
their CAN identifier� The programming of an offset time is not necessary�
A sync counter can be programmed so that the encoder does not send
before a defined number of sync telegrams�
7.3 Storing parameters
7.3.1 Object directory
Object Index Object description
1005h COB ID Sync
100Ch guard time
100Dh life time factor
1016h consumer heartbeat time
1017h producer heartbeat time
1020h verify configuration
1800h communication parameter PDO 1
1801h communication parameter PDO 2
1A00h transmit PDO1 mapping parameter
1A01h transmit PDO2 mapping parameter
2100h operating parameters
2101h resolution per revolution
2102h total resolution
2103h preset value
2104h limit switch, min�
2105h limit switch, max�
2160h customer storage
2200h cyclic timer
3000h node number (NN)
3001h baud rate
6000h operating parameter
6001h steps per revolution
6002h total resolution
6003h preset value
6200h EVENT
UK
7.3.2 Saving process
The parameters are stored in a non-volatile EEPROM� The changes made are
stored in the working memory of the encoder� Once all parameters have been
checked, they can be transferred to the EEPROM in a write cycle�
13
Page 14

CANopen encoder
The stored parameters are activated after a reset (power on, NMT reset)�
7.3.3 Storing without reset
Once the saving process is completed by using the object 1010, there will be no
automatic reset to activate the parameters�
7.3.4 Storing with reset
The object 2300 from the manufacturer-specific directory carries out storage via an
automatic reset� The parameters become active at once� This has to be taken into
account when the node number or the baud rate are changed since there may be
interference on the bus�
7.3.5 Restoring the parameters
The factory-set parameters can be restored� The settings stored in the EEPROM
are not overwritten� Only after the storage command has been sent again will the
default settings be stored in the EEPROM non-volatilely� The restored parameters
are identical for each CANopen encoder of this type and may possibly not
correspond to the original parameters� Please check the restored parameters with
regard to their validity before you perform the storage process again�
7.3.6 Layer Setting Service (LSS)
To configure the encoder via LSS, the encoder is handled like a slave� The
controller must have LSS master functionality� The LSS master device requests
the data of the encoder� The LSS master enquires the LSS information (vendor ID;
product code, revision number, serial number) of the slave� In this case the slave
is unambiguously recognised and the settings, node number and baud rate can be
set�
8 Programmable parameters
The objects are based on the device profile CiA 406 DS V3�2: CANopen profile for
encoders (www�can-cia�org)
Detailed description of the command byte
Command Data length Data type
43h 4 bytes unsigned 32
47h byte 3 unsigned 24
4Bh byte 2 unsigned 16
4Fh 1 byte unsigned 8
23h 4 bytes unsigned 32
27h byte 3 unsigned 24
14
Page 15

CANopen encoder
Command Data length Data type
2Bh byte 2 unsigned 16
2Fh 1 byte unsigned 8
8.1 Object directory
Data is transferred according to CAL exclusively via object-oriented message
telegrams� These objects are classified into groups via an index register� Each
index entry can be further subdivided via a sub index� The complete overview of
the standard object directory is shown in the following table�
Index (hex) Object
0000 not used
0001-001F static data types
0020-003F complex data types
0040-005F manufacturer-specific data types
0060-0FFF reserved
1000-1FFF area of the communication profile
2000-5FFF manufacturer-specific area
6000-9FFF device-specific area
A000-FFFF reserved
UK
8.2 Programming example: preset value
The receipt of the SDO answer is to be monitored in the program since the request
is sent permanently without confirmation of receipt�
If a CANopen device is connected to the bus and configured with correct baud rate
and node number, it replies to the bus with a boot up message�
8.2.1 Set preset value (master to encoder with node number 1)
Set preset value (value 1000)
Identifier DLC Command Index Sub index Service data
NN 1 download 6003h byte 4 byte 5 byte 6 byte 7
601 8 23h 03h 60h 00h 00h 10h 00h 00h
Response from the encoder
Identifier DLC Command Index Sub index Service data
NN 1 download 6003h byte 4 byte 5 byte 6 byte 7
581 8 60h 03h 60h 00h 00h 00h 00h 00h
15
Page 16

CANopen encoder
Read preset value from the encoder
Identifier DLC Command Index Subindex Service data
NN 1 download 6003h byte 4 byte 5 byte 6 byte 7
601 8 40h 03h 60h 00h 00h 00h 00h 00h
Response from the encoder
Identifier DLC Command Index Sub index Service data
NN 1 download 6003h byte 4 byte 5 byte 6 byte 7
581 8 43h 03h 60h 00h 00h 10h 00h 00h
Non-volatile storage of the preset value
Identifier DLC Command Index Sub index Service data
NN 1 download 1010h byte 4 byte 5 byte 6 byte 7
601 8 23h 10h 10h 01h 73h 61h 76h 65h
Response from the encoder
Identifier DLC Command Index Sub index Service data
NN 1 download 6003h byte 4 byte 5 byte 6 byte 7
581 8 60h 10h 10h 00h 00h 00h 00h 00h
8.3 Communication-specific objects of the DS301 from 1000h to 1FFFh (communication profile DS301 V4.02)
Index S-Idx Name Type,
1000 0 Device type u32, ro N/A Device type and device profile
1001 0 Error register u8, ro N/A Indication internal device error
1003 0 Pre-defined
error field
1���10 Error history u32, ro S-Idx 1 last error
1005 0 COB ID sync
object
16
access
u8, ro 0 An error list with 10 entries is supported
u32, rw 80h The object contains the identifier for the
default value Description
0b 0000 0000 generic error
S-Idx 2 second but last error
����������
Deleting the error memory
The error memory is deleted by writing a
zero to the sub index 0�
SYNC object�
Page 17

CANopen encoder
Index S-Idx Name Type,
1006 0 Com cycle
period
1007 0 Synchronous
window length
1008 0 Manufacturer
device name
1009 0 Manufacturer
hardware
version
100A 0 Manufacturer
software
version
100C 0 Guard time u16, rw 0 This object contains the 'guard time' in
100D 0 Life time factor u8, rw 0 This object contains the life time factor
1010 Store
parameters
0 Number of sub
indices
1 Store all
parameters
access
u32, rw 0h The object defines the communication
u32, rw 0h The object contains the sync windows
str, ro RM9000 Device designation
str, ro x�x Hardware version
str, ro x�x Software version
u8, ro 1
u32, rw "save" To write the parameters to the non-
default value Description
cycle (SYNC producer) in μs (max. time
between 2 sync objects)�
length for synchronous PDOs in μs.
milliseconds�
parameter� The life time factor multiplied
with the guard time results in the life time
for the guarding protocol�
This object is used to write the
parameters to the non-volatile memory�
volatile memory the word "save" has to
be sent to the corresponding node�
UK
ASCII e v a s
Hex value 65h 76h 61h 73h
1011 Restore
parameters
0 Number of sub
indices
1 Restore all
parameters
Most significant word Least significant word
The object is used to restore the factory
settings�
u8, ro 1
u32, rw "load" To restore the factory settings the
word "load" has to be sent to the
corresponding node� When the
parameters have been restored, please
check the parameters before the store
command is executed again� The
restored parameters only become active
after a reset or power up�
17
Page 18

CANopen encoder
Index S-Idx Name Type,
ASCII d a o l
Hex value 64h 61h 6Fh 6Ch
Index S-Idx Name Type,
1012 0 COB ID time
stamp object
1013 0 High resolution
time stamp
1014 0 COB ID
emergency
object
1016 Consumer
heartbeat time
0 Number of sub
indices
1 Consumer
heartbeat time
The contents of the sub index 1 is composed as follows:
Bit 31 to 24 23 to 16 15 to 0
value 0h (reserved) address of the
access
Most significant word Least significant word
access
u32, rw 100h The object contains the COB ID of the
u32, rw 0 The object contains a time stamp with a
u32, rw 80h + node ID The object contains the EMCY
u8, ro 1
u32, rw 0
default value Description
default value Description
time stamp object�
resolution of 1 µs�
emergency message identifier�
The consumer heartbeat time defines the
heartbeat cycle time to be expected in
ms� The encoder can only monitor one
device� When the time is set to zero, this
service is not activated� The set time
must be higher than the corresponding
time (object 1017) of the device to be
monitored�
device to be
monitored
monitoring time
(ms)
1017 0 Producer
heartbeat time
18
u16, rw 0 This object contains the time interval in
milliseconds during which it has to send
the message�
Page 19

CANopen encoder
Index S-Idx Name Type,
1018 Identity object This object contains the device
0 Number of
entries
1 Vendor ID u32, ro 0x0069666D
2 Product code u32, ro 0x43 0x41
3 Revision
number
4 Serial number u32, ro see type label
1020 Verify
configuration
0h Number of
entries
1h Configuration
date
2h Configuration
time
1029 Error behaviour The object shows the error behaviour�
0h Number of
entries
1h Communication
error
1800 1st transmit
PDO
communication
parameter
0 Number of sub
indices
1 COB ID u32, rw 180h +
2 Transmission
mode
3 Inhibit time u32, rw 0
4 not available
5 Event timer u32, rw 0x64 or 0
access
u8, ro 1
u32, ro 0x10000
u8, ro 2h
u32, rw 0x0
u32, rw 0x0
u8, ro 1h
u8, rw 0x0
u8, ro 5
u8, rw FE
default value Description
information
The object indexes the loaded
configuration, date and time�
This object contains the communication
parameters of the first transmit PDO�
node number
UK
19
Page 20

CANopen encoder
Index S-Idx Name Type,
1801 2nd transmit
PDO
communication
parameter
0 Number of sub
indices
1 COB ID u32, rw 280h
2 Transmission
mode
3 Transmission
mode
4 not available
5 Event timer u32, rw 1
The transmission mode is set and configured as follows:
Value
(decimal)
0 x x Transmit PDO to first
1���240 x x Transmit PDO every xth
241���251 reserved
252 x x Receive SYNC message
253 x Data update and transmit
254, 255 x Transmit PDO with event
Cyclical Acyclical Synchro-
access
u8, ro 5
u8, rw 1
u32, rw 0
default value Description
node number
Transmission mode
nous
The object contains the communication
parameters of the second transmit PDO�
Please note! This object is only activated
with C6 CANopen encoders�
Asynchronous
Only
RTR
Description
sync messsage after an
event
sync message
and transmit PDO on
remote request
PDO on remote request
Inhibit time
For "transmit PDOs"� The "inhibit time" for PDO transmissions can be set as a
16-bit value� If data changes, the PDO checks if the inhibit time has elapsed since
its last data transmission� Another data transmission is only possible once the
inhibit time has elapsed� It is useful to set a time with asynchronous transmission
(transmission modes 254 and 255) to avoid overlaods on the bus�
Event time
The "event timer" only works in asynchronous transmission modes (transmission
modes 254 and 255)� If the data changes before the event timer elapses, a
temporary telegram is sent� If the value of the timer is >0, the data will be sent
20
Page 21

CANopen encoder
after the timer has elapsed� The value of the timer is written in subindex 5 of the
respective PDO� The data is also transferred without any changes to the data� The
value range is between 1-65536 ms�
Index S-Idx Name Type,
1A00 1st transmit
PDO mapping
parameter
0 Number of sub
indices
1 1st mapped
object
1A01 2nd transmit
PDO mapping
parameter
0 Number of sub
indices
1 2nd mapped
object
1F50 Download
program area
0h Number of sub
indices
1h Domain,
1F51 Program
Control
0h Number of
program control
entries
1h u32, rw The sub index 1h and higher verifies
access
u8, ro 2
u32, rw -
u8, ro 2
u32, rw -
u8, ro 2h
wo
u8, ro
default value Description
The object contains the mapping
parameters of the 1st transmit PDO
The object contains the mapping
parameters of the 2nd transmit PDO�
This is a special object for the boot
loader functionality�
Use this entry to read the Intel hex file
with the program data� For detailed
information about the domain download
and the block transfer see CiA Draft
Standard 301 application layer and
communication profile�
This is a special bootloader object to
update the firmware�
This data area controls the program in
the index 0X1F50�
the storage block functionality� They can
have the following values:
write:
1 - start downloading the program
4 - delete flash memory
UK
21
Page 22

CANopen encoder
8.4 Manufacturer-specific objects from 2000h to 5FFFh
Index S-Idx Name Type,
2000 0 Position value u32, ro
2100 0 Operating
parameters
access
u16, rw 0h The counting direction of the encoder as
default value Description
an operating parameter can be changed
and the two limit switches can be switched
on or off�
The parameter counting direction
(complement) determines the counting
direction of the encoder� With the same
direction of rotation the value can be
indicated either adding or substracting�
The counting direction is set by bit 0 of the
object to 2100h� In addition the two limit
switches can be switched on or off� Bit 1
and bit 2 are used for this purpose�
Note: The counting direction is always
seen looking at the shaft� With clockwise
direction of the shaft (CW) the counting
direction is increasing�
Calculation example:
Goal: encoder with counting direction
decreasing (CCW) and both limit switches
off
Bit matrix:
bit 0 = 1 direction decreasing (CCW)
bit 1 = 0 limit switch min� disabled
bit 2 = 0 limit switch max�disabled
result = 01h
2101 0 Resolution per
revolution
0 Resolution per
revolution
22
u16, rw Requested steps per revolution
(single turn resolution up to 13 bits)
u32, rw Requested steps per revolution
(single turn resolution > 13 bits)
If the requested resolution per revolution
exceeds the physical resolution, the set
value is not transmitted�
► Set correct resolution�
Page 23

CANopen encoder
Index S-Idx Name Type,
2102 0 Total
2103 0 Preset value u32, rw 0 The preset value is a position value which
2104 0 Limit switch,
The limit switch (min) sets bit 30 = 1 with the next telegram transmitted when the set position value
has been reached or fallen below�
resolution
min�
access
u32, rw 0x1000000 Total resolution of the encoder
u32, rw 0 Two position vaues can be programmed as
default value Description
This parameter is used to set the
requested total resolution� The parameter
must not exceed the physical measuring
range of the encoder� The total resolution
and the resolution per revolution must be
entered using the following formula:
GA = (PGA x AU) / PAU
PGA
total physical resolution of the encoder
(see type label)
PAU
physical resolution per revolution of the
enocder (see type label)
GA
total resolution (customer-specific)
AU
resolution per revolution (customerspecific)
If the requested total resolution is lower
than the total physical resolution, the total
resolution parameter must be a multiple of
the physical resolution per revolution�
is to be indicated at a certain physical
position of the axis� The preset value must
not exceed the total physical resolution to
avoid runtime errors�
limit switch positions� When one of these
values has been reached, one of the 32-bit
position values is set� Both values must not
exceed the total physical resolution of the
encoder to avoid runtime errors�
UK
Function Status bit Process value
Bit 31 30 29 28 27 26 25�����0
0 1 X X X X X
23
Page 24

CANopen encoder
Index S-Idx Name Type,
2105 0 Limit switch,
max�
The limit switch (max) sets bit 31 = 1 with the next telegram transmitted when the set position
value has been reached or fallen below�
Function Status bit Process value
Bit 31 30 29 28 27 26 25�����0
1 0 X X X X X
2160 Customer
storage
0h Number of sub
indices
1h Customer
storage 1
2h Customer
storage 2
3h Customer
storage 3
4h Customer
storage 4
2200 0 Cyclic timer
PDO
2300 0 Save
parameter with
reset
3000 0 Node number u8, rw - The object contains the node number of
3001 0 Baud rate u8, rw 0x3 The object contains the baud rate of the
access
u32, rw 0 Two position vaues can be programmed as
u8, rw 4h The object enables the user to store any
u32, rw 0x0
u32, rw 0x0
u32, rw 0x0
u32, rw 0x0
u32, rw 0x0
u16, ro 0 The object contains the value of the event
u32, wo 55AAAA55h With this object the set parameters can be
default value Description
limit switch positions� When one of these
values has been reached, one of the 32-bit
position values is set� Both values must not
exceed the total physical resolution of the
encoder to avoid runtime errors�
value�
timer in ms�
written to the non-volatile memory� After
successful transmission of the access code
a reset will be made�
the device�
The node number must be ≠ 0.
► Always add a 1 to the node number�
Example: 1Fh+1h = 20h = 32 (dec)
device�
24
Page 25

CANopen encoder
Index S-Idx Name Type,
Eight different baud rates are supported� Only one byte is used to set the baud rate�
Baud rate
[kbits/s]
20 0x00
50 0x01
100 0x02
125 0x03
250 0x04
500 0x05
800 0x06
1000 0x07
3010 Speed control Speed measurement, the measurement is
0h Number of sub
indices
1h Enable speed u8, rw 0h
2h Speed mode u8, rw 0h Via this sub-index the filter interval
access
Byte
u8, ro 2h
default value Description
switched off in the factory setting�
and thus the latency time of the speed
measurement can be set� There are three
setting options:
Setting Speed
mode
0 5
1 50
2 500
Delay time
[ms]
UK
3011 0h Speed value u8, romap Speed value [dig/s]
25
Page 26

CANopen encoder
Index S-Idx Name Type,
4000 0h Bootloader
control
access
u32, wo The object controls the bootloader
default value Description
functionality� If the security code is
written to the object, the EEprom and
the information in the flash memory
are deleted� Furthermore the device is
subjected to a reset� After another set-up,
the bootloader verifies the user application
and does not find any other information�
The bootloader starts with a predefined
CANopen node number (0x1) and a fixed
baud rate of 125 Kbits�
Activation of the bootloader entails an
erasing process� Afterwards only a small
number of objects are available� The
encoder is waiting for new programming�
Due to this behaviour the security code for
prevention is not published in this manual
but is only available from ifm on request�
8.5 Device-profile-specific objects from 6000h to 9FFFF
Index S-Idx Name Type,
6000 Operating
parameters
Scaling function:
Using the scaling function the position value provided can be adapted to the requirements of
the application via the software� The objects 6001 and 6002 of the device profile are scaling
parameters� When the scaling bit has been set to zero, scaling is switched off�
Bit structure
access
u16, rw 1h The object sets the counting direction,
default value Description
the diagnostic function and the scaling
function�
Note: The counting direction is always
seen looking at the shaft� With clockwise
direction of the shaft (CW) the counting
direction is increasing�
26
Bit 15 14 13 12 11���4 3 2 1 0
Description MS MS MS MS R MD SFC CD CS
Abbreviations:
MS = manufacturer-specific function (not available)
R = reserved
MD = measurement direction (not available)
SFC = scaling function (0 = off, 1 = on)
CD = commissioning diagnostic control (not available)
CS = counting direction 0 = CW (clockwise); 1 = CCW (counter-clockwise)
Page 27

CANopen encoder
Index S-Idx Name Type,
6001 0 Measuring
units per
revolution
6002 0 Total
measuring
range in
measuring
units
6003 0 Preset value u32, rw 0 Setting the preset value for the encoder
6004 0 Position value u32,
6030 Speed value
0h Number of sub
indices
1h Speed value
channel 1
6200 0 Event time u16, rw 0x64 This object contains the value of the
6300 Cam state
register
0h Number of sub
indices
1h Cam state
channel 1
6301 Cam enable
register
0h Number of sub
indices
1h Cam enable
channel 1
6302 Cam polarity
register
0h Number of sub
indices
1h Cam polarity
channel 1
access
u32, rw see
u32, rw see
romap
u8, ro 1h
integer
16, romap
u8, ro 1h
u8, romap 4h
u8, ro 1h
u8, rw
u8, ro 1h
u8, rw 0h
default value Description
type label
type label
- The object gets the position value
-
Setting steps per revolution
Setting the total resolution of the
measuring range
If the max� possible value is exceeded,
the value stops there� The user can use
the object 3010 (32 bits)�
event timer of the corresponding PDOs�
The value can be set between 1 and
65538 ms�
The object describes the cam state
register� The object contains the current
position of the cam from 1 to 8�
The object describes the cam state�
The object describes the cam behaviour�
UK
27
Page 28

CANopen encoder
List of cam objects
6310h Cam 1 low limit
0h VAR Highest sub-index supported u32 ro 0x1
1h VAR Cam 1 low limit channel 1 u32 rw 0x0
6311h Cam 2 low limit
0h VAR Highest sub-index supported u32 ro 0x1
1h VAR Cam 2 low limit channel 1 u32 rw 0x0
6312h Cam 3 low limit
0h VAR Highest sub-index supported u8 ro 0x1
1h VAR Cam 3 low limit channel 1 u32 rw 0x0
6313h Cam 4 low limit
0h VAR Highest sub-index supported u8 ro 0x1
1h VAR Cam 4 low limit channel 1 u32 rw 0x0
6314h Cam 5 low limit
0h VAR Highest sub-index supported u8 ro 0x1
1h VAR Cam 5 low limit channel 1 u32 rw 0x0
6315h Cam 6 low limit
0h VAR Highest sub-index supported u8 ro 0x1
1h VAR Cam 6 low limit channel 1 u32 rw 0x0
6316h Cam 7 low limit
0h VAR Highest sub-index supported u8 ro 0x1
1h VAR Cam 7 low limit channel 1 u32 rw 0x0
6317h Cam 8 low limit
0h VAR Highest sub-index supported u8 ro 0x1
1h VAR Cam 8 low limit channel 1 u32 rw 0x0
6320h Cam 1 high limit
0h VAR Highest sub-index supported u8 ro 0x1
1h VAR Cam 1 high limit channel 1 u32 rw 0x0
6321h Cam 2 high limit
0h VAR Highest sub-index supported u8 ro 0x1
1h VAR Cam 2 high limit channel 1 u32 rw 0x0
6322h Cam 3 high limit
0h VAR Highest sub-index supported u8 ro 0x1
1h VAR Cam 3 high limit channel 1 u32 rw 0x0
6323h Cam 4 high limit
0h VAR Highest sub-index supported u8 ro 0x1
1h VAR Cam 4 high limit channel 1 u32 rw 0x0
28
Page 29

6324h Cam 5 high limit
0h VAR Highest sub-index supported u8 ro 0x1
1h VAR Cam 5 high limit channel 1 u32 rw 0x0
6325h Cam 6 high limit
0h VAR Highest sub-index supported u8 ro 0x1
1h VAR Cam 6 high limit channel 1 u32 rw 0x0
6326h Cam 7 high limit
0h VAR Highest sub-index supported u8 ro 0x1
1h VAR Cam 7 high limit channel 1 u32 rw 0x0
6327h Cam 8 high limit
0h VAR Highest sub-index supported u8 ro 0x1
1h VAR Cam 8 high limit channel 1 u32 rw 0x0
6330h Cam 1 hysteresis
0h VAR Highest sub-index supported u8 ro 0x1
1h VAR Cam 1 hysteresis channel 1 u32 rw 0x0
6331h Cam 2 hysteresis
0h VAR Highest sub-index supported u8 ro 0x1
1h VAR Cam 2 hysteresis channel 1 u32 rw 0x0
6332h Cam 3 hysteresis
0h VAR Highest sub-index supported u8 ro 0x1
1h VAR Cam 3 hysteresis channel 1 u32 rw 0x0
6333h Cam 4 hysteresis
0h VAR Highest sub-index supported u8 ro 0x1
1h VAR Cam 4 hysteresis channel 1 u32 rw 0x0
6334h Cam 5 hysteresis
0h VAR Highest sub-index supported u8 ro 0x1
1h VAR Cam 5 hysteresis channel 1 u32 rw 0x0
6335h Cam 6 hysteresis
0h VAR Highest sub-index supported u8 ro 0x1
1h VAR Cam 6 hysteresis channel 1 u32 rw 0x0
6336h Cam 7 hysteresis
0h VAR Highest sub-index supported u8 ro 0x1
1h VAR Cam 7 hysteresis channel 1 u32 rw 0x0
6337h Cam 8 hysteresis
0h VAR Highest sub-index supported u8 ro 0x1
1h VAR Cam 8 hysteresis channel 1 u32 rw 0x0
CANopen encoder
UK
29
Page 30

CANopen encoder
Index S-Idx Name Type,
6400 Area state
register
0h Measuring
units per
revolution
1h Total
measuring
range in
measuring
units
Bit structure
7 6 5 4 3 2 1 0
R r r r r Range
MSB LSB
Signal Value Definition
Out of range 0 Position between low and high limit
Range overflow 0 No range overflow
Range underflow 0 No range underflow
r 0 reserved
access
u8, ro 1h
u8, romap -
default value Description
The object describes the area state
register�
In this object the status of the encoder
value is indicated in the area defined
before�
underflow
1 Position out of range (refer to module
identification object, 650Ah) is reached
1 Position is lower than the position value set
in object 6402h "work area low limit“
1 Position is higher than the position value set
in object 6401h "work area high limit“
Range
overflow
Out of
range
6401 Work area low
limit
0h Number of sub
indices
1h Work area low
limit channel 1
30
integer
32, ro
integer
32, rw
- The objects shows the lower value of the
work area� Bit 2 of the existing work area
status in object 6400h will change when
the work area is fallen below�
This object is directly linked with object
2104h (limit switch min�)�
1h
0h
Page 31

CANopen encoder
Index S-Idx Name Type,
6402 Work area high
limit
0h Number of sub
indices
1h Work area high
limit channel 1
6500 0 Operating
status
6501 0 Single-turn
resolution
6502 0 Number of
distinguishable
revolutions
6504 0 Supported
alarms
6507 0 Profile and
software
version
MSB LSB
Software version Profile version
Upper software
version
access
integer
32, ro
integer
32, rw
u16, ro - Operating status of the encoder�
u32, ro see type label The object indicates the physical
u16, ro see type label The object indicates the physical number
u16, ro - Not supported�
u32, ro - The object contains the implemented
Lower software
default value Description
- The object indicates the upper value of
the working area� Bit 1 of the working
status existing in object 6400h will
change when the working area is
exceeded�
This object is directly linked with object
2105h (limit switch max�)�
1h
UK
0h
The operating status object is linked with
the value of the object 6000�
resolution per revolution of the encoder�
of revolutions of the encoder�
profile versions and the manufacturerspecific software version of the encoder�
Upper profile version Lower profile version
version
6509 0 Offset value integer
32, ro
0 Offset value of the encoder� This value is
determined by the preset value and shifts
the physical position by this offset value�
31
Page 32

CANopen encoder
Index S-Idx Name Type,
650A Module
0 Largest
1 Manufacturer-
2 Manufacturer-
3 Manufacturer-
650B 0 Serial number u32, ro - Serial number of the shaft encoder� If the
identification
sub index
specific offset
specific min�
position value
specific max�
position value
access
integer
32, ro
integer
32, ro
integer
32, ro
integer
32, ro
default value Description
The object indicates the manufacturerspecific offset, the manufacturer-specific
minimum and maximum of the position
value�
3
-
-
-
serial number is not supported by the
encoder, the value is always 0xffffffff�
32
Page 33

CANopen encoder
9 Terms and abbreviations
0b ��� Binary value (for bit coding), e�g� 0b0001 0000
0d ��� Decimal value, e�g� 0d100
0x ��� Hexadecimal value, e�g� 0x64 (= 100 decimal)
Baud rate Transmission speed (1 baud = 1 bit/s)
CAL CAN Application Layer
CAN-based network protocol on application level
CAN Controller Area Network (bus system for the use in mobile vehicles)
CAN_H CAN high; CAN connection/cable with high voltage level
CAN_L CAN low; CAN connection/cable with low voltage level
CANopen CAN-based network protocol on the application level with an open
conguration interface (object directory).
CiA "CAN in Automation e�V�"
(user and manufacturer organisation in Germany/Erlangen)
denition and control body for CAN and CAN-based network protocols
CiA DS Draft Standard (published CiA specication which usually has not been
modied or supplemented for one year)
CiA DSP Draft Standard Proposal (published CiA specication draft)
CiA WD Work Draft (work draft accepted for discussion within CiA)
CiA DS 301 Specication concerning the CANopen communication prole;
describes the basic communication mechanisms between the network
participants such as the transfer of process data in real time,
the data exchange between devices or the conguration phase.
Completed by the following CiA specications according to the application:
CiA DS 401 Device prole for digital and analogue I/O modules
CiA DS 402 Device prole for drives
CiA DS 403 Device prole for HMI
CiA DS 404 Device prole for measurement and control technology
CiA DS 405 Specication for interfaces to programmable systems (IEC 61131-3)
CiA DS 406 Device prole for encoders
CiA DS 407 Application prole for local public transport
COB CANopen communication object (PDO, SDO, EMCY, ���)
COB ID CANopen identier of a communication object
Communication The synchronisation time to be monitored; max� time between 2
cycles sync objects
EMCY object Emergency object (alarm message; device signals an error)
Error reg Error register (entry with an error code)
Guarding error Node or network participant could or can no longer be found
Guard MASTER: one or several SLAVES no longer reply
Guard SLAVE: no polling of the device (SLAVE)�
Guard Time Within this time the network participant expects a "node guarding" of the
network master
Heartbeat Congurable cyclic monitoring among network participants.
In contrast to "node guarding" no superior NMT master is required�
ID Identier; identies a CAN message. The numerical value of the ID
(also identier) also contains a priority for the access to the bus system.
ID 0 = top priority�
Idx Index; together with the S index it forms the address of an entry in the object
directory
Life Time Factor Number of attempts in case of a missing guarding response
Monitoring Is used to describe the error class (guarding monitoring, sync etc�)�
NMT Network Management
NMT master/slaves The NMT master controls the operating statuses of the NMT slaves
Node Guarding Adjustable cyclic monitoring of slave network participants by a
UK
33
Page 34

CANopen encoder
higher-level master node as well as monitoring of this polling
process by the slave participants�
Node ID Nodal point identier (identication of a participant in the CANopen
network)
Object (also OBJ) Term for data/messages which can be exchanged in the CANopen
network
Object directory Contains all CANopen communication parameters of a device
as well as device-specic parameters and data.
Access to the individual entries is possible via the index and S-index�
Operational Operating status of a CANopen participant�
In this mode SDOs, NMT commands and PDOs can be transferred�
PDO Process Data Object;
in the CANopen network to transfer process data in real time such
as motor speed�
PDOs have a higher priority than SDOs; in contrast to the SDOs
they are transferred without conrmation.
PDOs consist of a CAN message with identier and up to 8 bytes of
user data�
PDO mapping Describes the application data transferred with a PDO�
Pre-Op Preoperational; operating status of a CANopen participant�
After application of the supply voltage each participant automatically
goes into this state�
In the CANopen network only SDOs and NMT commands can be
transferred in this mode but no process data�
Prepared (Also stopped) operating status of a CANopen participant�
In this mode only NMT commands are transferred�
Rec PDO (Receive) Process Data Object
(also Rx PDO)
ro read only (unidirectional)
rw read-write (bidirectional)
Rx queue Input buer
s16 Data type signed 16 bits (incl� sign, 16-bit format)
SDO Service Data Object
With this object direct access to the object directory of a network
participant is possible (read/write)�
An SDO can consist of several CAN messages� The transfer of the
individual messages is conrmed by the addressed participant.
With the SDOs, devices can be congured and parameters can be
set�
Server SDO Process and parameter set to make the object directory of a network
participant available to other participants (clients)�
S-Idx (also SIdx) Sub index within the object directory of a CANopen-capable device
Start Guarding Start node monitoring
str Data type string (variable for strings such as text "load")
Sync error Missing sync object OBJ in the adjustable synchronisation time
Sync OBJ Synchronisation object for simultaneous update in the complete
network or for accepting process data of the respective
parameterised PDOs�
Sync windows Time during which the synchronous PDOs have to be transferred�
Time stamp Time stamp to align existing clocks in network participants
Trans Type Type of process data transmission; synchronous, asynchronous
Trans PDO Transmit Process Data Object
(also Tx PDO)
Trans SDO (Transmit) Service Data Object
(also Tx SDO)
34
Page 35

CANopen encoder
Tx queue (Transmit) Transmission buer
u8 (16, 32) Data type unsigned 8 (16, 32) bits (without sign, 8 (16, 32) bit-format
wo write only
UK
35
 Loading...