

Page 1

Essential Plus.
Merchant Terminal Guide.
Model: Move5000 with PC-EFTPOS integration
Page 2

Contents
Support 3
Oine Authorisation over the Floor Limit 3
Stationery orders 3
Service Response Time 3
Geing to know your Essential Plus terminal 4
Integrating the Essential Plus terminal with your POS 6
4G/3G backup 6
Status bar 7
Terminal and base pairing 7
Key functions 8
Terminal functions menu 8
Power ON/OFF and Reboot 8
Purchase 9
Purchase - Contactless (total purchase amount less than $100) 9
Purchase - Contactless (total purchase amount above $100) 9
Purchase – Swipe and EMV with PIN/Signature 9
Purchase with cash out 9
Cash out 10
Refund 10
MOTO (Mail Order/Telephone Order) 10
Selement – Manual Selement 10
Cumulative (Pre-Selement) Totals 10
Shi Totals Request 11
Store and Forward (SAF) 11
Obtaining a duplicate receipt 11
Seing the manager refund limit 11
Changing your password 11
Forgoen Password 11
Basic troubleshooting 12
Common Terminal Error Messages 12
Charging the baery 14
Changing the receipt roll 15
Training mode instructions 16
2
Page 3

For support, please call the dedicated CommBank Merchant helpdesk on 1800 230 177,
24 hours a day, 7 days a week.
When calling the Helpdesk, please make sure you have the following information ready:
• Terminal ID (located at the top of your merchant receipt)
• Trading name
• Trading address
• Trading phone number
Oine Authorisation over the Floor Limit
For oine authorisation on all over floor limit debit card transactions, please call 1800 813 700.
For oine authorisation on all over floor limit credit card transactions, please call 13 26 36.
Stationery orders
For stationery orders please visit eposstationery.evolveshop.com.au or call 1800 230 177.
If placing an order online, please ensure you have your CommBank Merchant ID and trading address
Post Code available to sign in.
Service Response Time
CommBank will endeavour to replace a faulty terminal within:
• 4 business hours in all locations except remote areas.
• 3 to 5 business days for remote areas. A remote area is not serviced by a
technician and only phone support is available.
For more information on CommBank merchant services, please visit
commbank.com.au/merchantservices
Support
3
Page 4
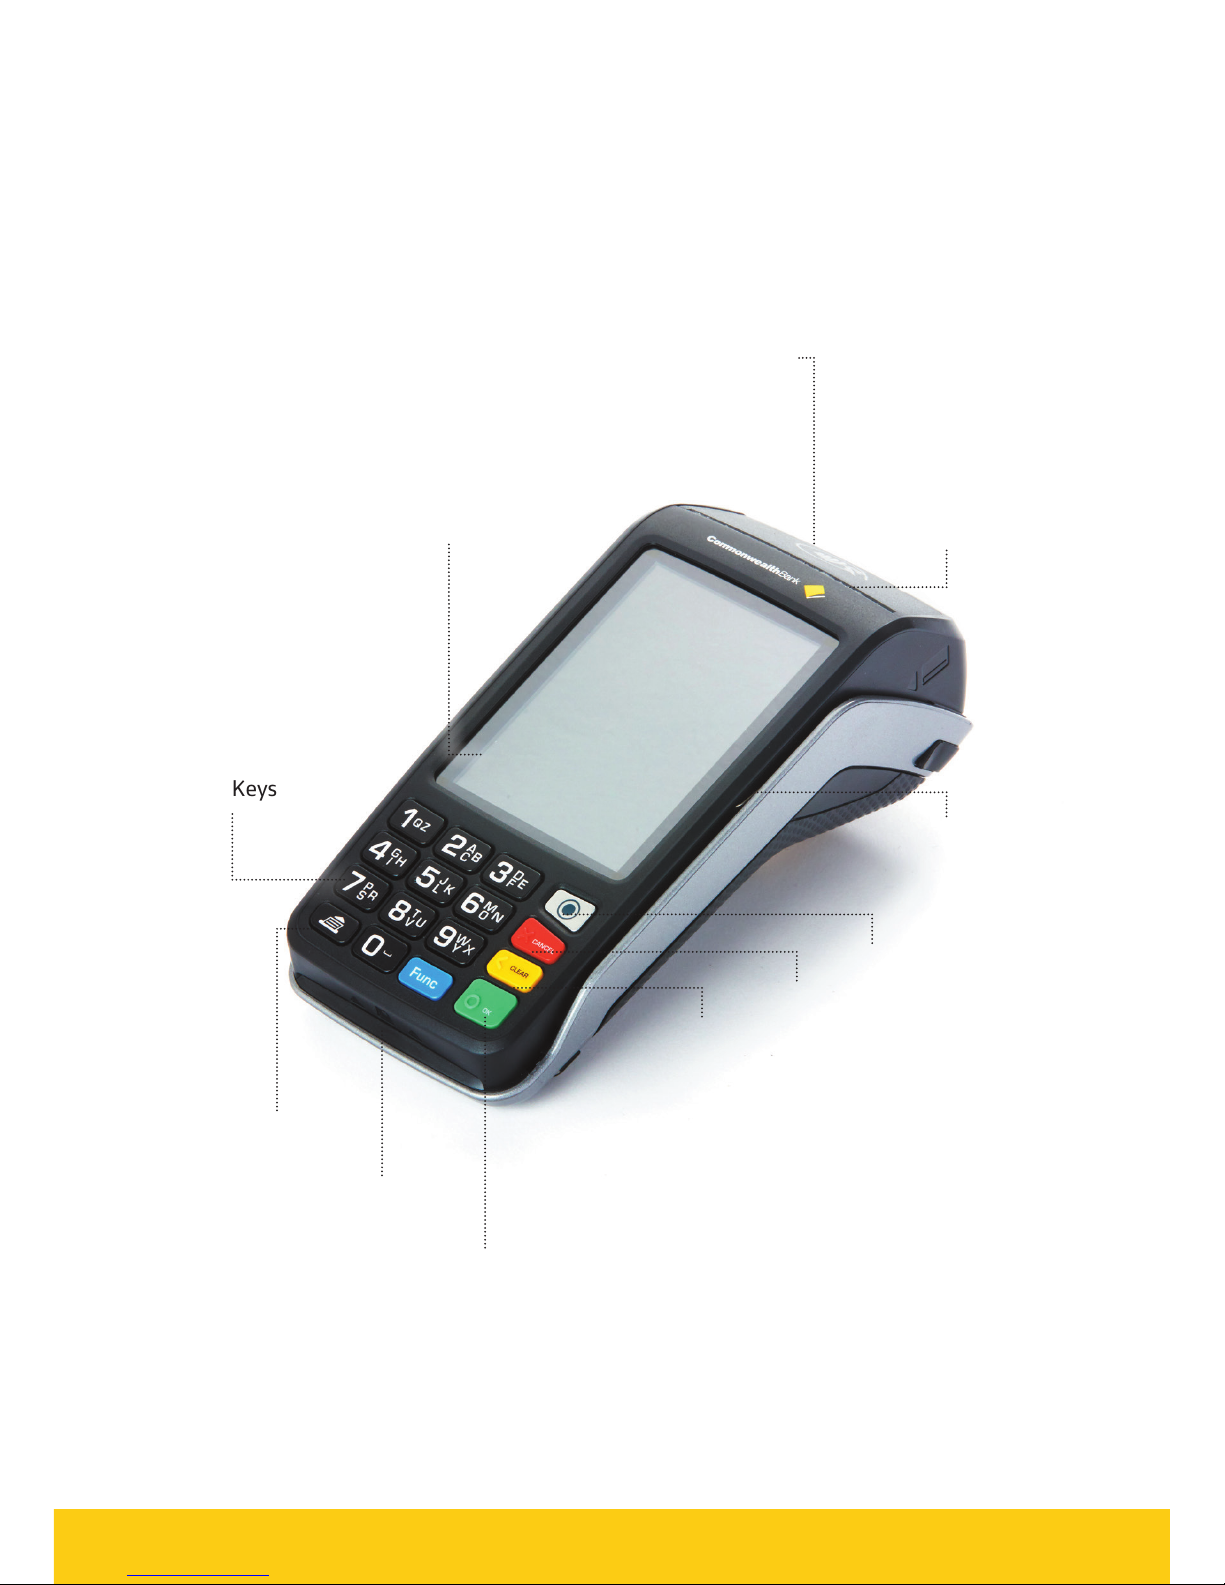
Geing to know your
Essential Plus terminal
Contactless
Landing Zone
Touch Screen
Terminal Display
Alphanumeric
Keys
Feed Key
Chip Card
Reader
OK/Power On Key
Menu Key
Cancel Key
Clear Key
Printed Paper
Swipe Reader
4
Page 5

Parts and cables
Terminal base for charging and cable connection
3 metre OCLR232 EFT30 Cable USB Type B to Type A 3m straight Cable
Charging cable for terminal base
5
Page 6

Integrating the Essential Plus
terminal with your POS
4G/3G Backup
The Essential Plus terminal can integrate with your PC-EFTPOS-certified POS system by the
following two methods:
• Using the serial cable (OCLR232 EFT30 Cable) which should connect to
either the COM0 or COM1 port on the boom of the base
• Using the USB cable (USB Type B to Type A Cable) which should be connected
to the USB type B Jack of the base
If the Point Of Sale loses internet connection, the Essential Plus terminal can fall back to 4G/3G
connection via the internal modem in the terminal. The PC EFTPOS client on the POS will need to be
configured to use the terminals 4G/3G fall back capability for 4G/3G backup to work.
Serial
USB
6
Page 7

Terminal and base pairing
The terminal will come paired with the base that is provided.
Note: to avoid any issues please take care to ensure you place the terminal back on the base it
was installed with. The terminal will not function correctly if it is placed on a dierent base.
Status bar
When the terminal is powered-on, the terminals’ Operating System provides data to display the
Status Bar as follows, and consisting of the information as described below.
Information Indicator Description
System Date and Time
17 : 56
09/03/2018
This shows the current system time and date.
Power Condition
This indicates that the terminal is connected to
mains power.
Baery Level
This is the charge level on the portable device and
indicates whether or not the baery is currently charging.
Bluetooth Icon
This is the status of the Bluetooth link between the
portable device and the base.
Note: The manufacturer’s recommended maximum
operating distance for Bluetooth connectivity is 70m.
This indicates there is a weak Bluetooth signal between
the terminal and the base.
This indicates the terminals has lost Bluetooth
connection with the base.
17 : 56
09/03/2018
No Sim
7
Page 8

Terminal functions menu
Provided below is a Menu Map to assist you with navigating through the terminal.
Power ON/OFF and Reboot
To POWER ON, simply place the terminal on its base (with the base’s external power cable plugged in)
and it will power up automatically. Alternatively, hold down the [OK] key while the terminal is o the
base with a suciently charged baery. To POWER OFF, remove the terminal from its base and hold
down both the [FUNC] and [CLEAR] keys at the same time.
To REBOOT, place the terminal on its base and hold down both the [FUNC] and [CLEAR] keys on the
terminal at the same time.
EFTPOS MENU
1. Details
DETAILS MENU
1. CATID
2. CAIC
3. Options
OPTIONS MENU
7. Cash Out
PC EFTPOS MENU
1. EFTPOS
TERMINAL MENU
1. Configure
2. Passwords
3. Reboot
4. Oine Trans
CONNECTIONS
1. Diagnostics
2. Configure
SPECIAL
FUNCTIONS
1. Refund Limit
2. CTLS Receipt
3. Reset_RSA
CONFIGURE
MENU
2. Audible Tone
3. LCD Contrast
4. TMS Logon
5. Self Test
PASSWORDS
MENU
1. Manager
2. Operator
OFFLINE
TRANS
2. Unsent Trans
3. Failed Trans
4. Idle Timer
EFTPOS MENU
3. Special Functions
Key functions
MAIN MENU
1. EFTPOS
2. Terminal
4. PC EFTPOS
5. Connection
8
Page 9

Purchase – Contactless (total purchase amount less than $100)
1. Initiate a Purchase transaction on the POS
2. If tipping enabled, enter tip and press [OK] or to bypass just press [OK]
To enable tipping, please contact the CommBank 24Hr Merchant Helpdesk on 1800 230 177
3. Tap the card on the contactless reader once “Present Card” sign is displayed
4. Transaction is approved
Purchase - Contactless (total purchase amount above $100)
1. Initiate a Purchase transaction on the POS
2. If tipping is enabled, enter tip and press [OK] or to bypass just press [OK]
To enable tipping, please contact the CommBank 24Hr Merchant Helpdesk on 1800 230 177
3. Tap card on the contactless reader once “Present Card” sign is displayed
4. Enter PIN and press [OK]
5. Transaction is approved
Note: For contactless transactions, the merchant receipt will only be printed if a signature is required
(based on the terminal and contactless card processing rules). A customer copy or a duplicate receipt may
be printed on request.
Purchase – Swipe and EMV with PIN/Signature
1. Initiate a purchase transaction on the POS
2. If tipping enabled, enter tip and press [OK] or to bypass just press [OK]
To enable tipping, please contact the CommBank 24Hr Merchant Helpdesk on 1800 230 177
3. Swipe or insert the card
4. Select the account by pressing the function keys below the CHQ, SAV, CR text
5. Enter PIN or press [OK] for signature (Note: signature is only for credit transactions)
6. Wait for processing to be completed
7. Remove card when prompted by the terminal
8. Verify signature if it is a signature transaction. Press [YES] to approve or [NO] to decline
9. Transaction is approved and merchant copy of the receipt is printed
10. Press [YES] to print customer copy or [NO] to suppress
Purchase with cash out
1. Initiate a purchase with cash out transaction on the POS
2. If tipping enabled, enter tip and press [OK] or to bypass just press [OK]
To enable tipping, please contact the CommBank 24Hr Merchant Helpdesk on 1800 230 177
3. Swipe or insert the card
4. Select the account by pressing the function keys below the CHQ or SAV text
5. Enter PIN and press [OK]
6. Wait for processing to be completed
7. Transaction is approved
8. Remove card when prompted
9
Page 10

Cash out
1. Initiate a cash out transaction on the POS
2. Swipe or insert the card
3. Select the account by pressing the function keys below the CHQ or SAV account
4. Enter PIN and press [OK]
5. Wait for processing to be completed
6. Transaction is approved
7. Remove card when prompted
Refund
1. Initiate a refund transaction on the POS
2. If prompted by the terminal, enter the operator password or the manager password and press [OK]
3. Swipe, insert or tap the card
Note: Remainder of refund transaction flow is the same as that of a purchase transaction.
MOTO (Mail Order/Telephone Order)
MOTO is the ability to process credit card transactions when the card is not present.
1. Initiate a MOTO transaction (enter the complete card number, expiry date, and CCV) on the POS
2. Transaction type defaults to Credit, press [OK]
3. Wait for processing to be completed
4. Transaction is approved
Selement – Manual Selement
Selement will occur automatically at 9:45pm AEST daily if a manual selement is not performed.
Only one Selement can be performed per day.
1. Initiate selement on the POS
2. Wait for processing to be completed
3. Selement report is printed
Note: The terminal can also typically be set via the POS to automatically sele every day at a particular
time. Auto-Selement cannot occur between 22:00 and 0:00 AEST.
Cumulative (Pre-Selement) Totals
Cumulative Totals indicate the amount transacted through the terminal since the last Selement
was processed. A Cumulative total can be done any number of times.
1. Initiate pre-selement on the POS
2. Wait for processing to be completed
3. Pre-selement report is printed
10
Page 11

Shi Totals Request
Shi Totals indicate the amount transacted through the terminal since the last shi totals
request was processed.
1. Initiate selement on the POS
2. Wait for processing to be completed
3. Shi Totals report is printed
Store and Forward (SAF)
Store and Forward (SAF) is the ability to process oine transactions. The PINpad will display ‘SAF’ in
the top right hand corner of the screen to indicate that there are one or more entries in the store and
forward memory of the terminal.
‘Selement Sending Stored Transactions’ is displayed if a selement is triggered and there are SAF
entries that need to be forwarded to the Bank. ‘Sending Stored Transactions’ is displayed when a stored
transaction is sent online aer the idle timer has been triggered or the cumulative totals report has
been requested.
When a transaction that exceeds your floor limit is performed in the SAF mode, an authorisation
number will need to be obtained by calling the authorisation centre.
Obtaining a duplicate receipt
This request is actioned from the POS. Allows you to reprint the last completed transaction,
showing all details of the transaction including whether the transaction was approved.
Seing the manager refund limit
1. Press [Func] or Menu key (with circle icon)
2. Select Option 1 – EFTPOS
3. Enter the Manager Password
4. Select Option 3 – Special Functions
5. Select Option 1 – Refund Limit
6. Select Option 1 – Operator to set the Operator Refund Limit or Option 2 – Manager to
set the Manager Refund Limit
Changing your password
1. Press [Func] or Menu key (with circle icon)
2. Select Option 2 – Terminal
3. Enter the Manager Password
4. Select Option 2 – Passwords
5. Select Option 1 – MANAGER to set the Manager Password or Option 2 –
OPERATOR to set the Operator Password
6. Enter the password and press [OK]. Repeat to confirm the new password
Forgoen Password
If you have forgoen your Manager Password, please contact the CommBank 24 Hour Merchant
Helpdesk on 1800 230 177 in order to have your password reset.
11
Page 12

Common Terminal Error Messages
Below is a list of decline responses you may come across while operating your terminal. If you are
unable to resolve an issue or encounter an issue or decline response not listed below, please contact
the CommBank 24 Hour Merchant Helpdesk on 1800 230 177.
Codes Terminal Display Description Recommended Next Steps
01 DECLINED – 01
CONTACT CARD
ISSUER
Refer to card
issuer
Advise the cardholder to contact their card
issuer for specific details. Ask the Customer for
another form of payment (e.g. dierent card).
05 DECLINED – 05
SYSTEM ERROR
“SECURITY
DECLINE” BY
CARD ISSUER
(DO NOT
HONOR)
Advise the cardholder to contact their card
issuer for specific details. Ask the Customer for
another form of payment (e.g. dierent card).
13 DECLINED – 13
INVALID AMOUNT
Invalid
amount
Dierent limits apply to dierent types of
transactions as defined in the merchant
agreement. For instance, there is a cash out limit
and a refund limit, and if either one is exceeded,
an error message will be displayed. The user
must simply enter a value lower than the
relevant limit defined in the agreement.
41 DECLINED – 41
PHONE AUTH CENTRE
Lost Card Advise the cardholder to contact their card
issuer for specific details. Ask the Customer for
another form of payment (e.g. dierent card).
51 DECLINED – 51
REFER CARD ISSUER
No Sucient
Funds
There are insucient funds on the card.
Ask the Customer for another form of payment.
(e.g. dierent card).
55 DECLINED – 55
INCORRECT PIN
Incorrect PIN Incorrect PIN entered. Customer may retry or
call their bank.
57 DECLINED – 57
TRAN NOT ALLOWED
Transaction
not permied
to cardholder
Advise the cardholder to contact their card
issuer for specific details. Ask the Customer for
another form of payment (e.g. dierent card).
58 DECLINED – 58
TRANS NOT
ALLOWED
Transaction
not permied
to terminal
Contact the CommBank 24 Hour Merchant
Helpdesk on 1800 230 177 for support.
67 DECLINED – 67
PHONE AUTH CENTRE
Black listed
card
Advise the cardholder to contact their card
issuer for specific details. Ask the Customer for
another form of payment (e.g. dierent card).
Basic troubleshooting
12
Page 13

Codes Terminal Display Description Recommended Next Steps
91 DECLINED – 91
ISSUER NOT
AVAILABLE
Issuer or
Switch
Inoperative
Cardholder’s bank is currently not responding.
Advise Customer to use another card from
another bank or pay cash.
IE DECLINED – IE
LOW BATTERY
Insucient
baery level
to process
transaction
Place terminal/PINpad back on its base and reinitiate transaction on POS.
S0 DECLINED –
S0 MODEM ERROR
Modem error This can represent an error with an external
modem, or if the terminal is set to fall back to
internal modem and no phone line has been
plugged in. Check communications link on
base and wall plug. Ensure cables are properly
connected.
S2 DECLINED – S2
NO ANSWER
No answer Contact the CommBank 24 Hour Merchant
Helpdesk on 1800 230 177 for support.
S8 DDECLINED – S8
NO EFT SERVER
Link not setup
on EFT Server
Contact the CommBank 24 Hour Merchant
Helpdesk on 1800 230 177 for support.
X0 DECLINED – X0 No response
from host
Check communications link. Try processing the
transaction again. If still no response, invoke
S A F.
13
Page 14

When does the baery need to be charged?
• On initial start-up, keep the terminal on its base for 16 hours to fully charge the baery.
• The terminal recharges its baeries each time it is placed on its base. Charging is automatic.
• It is recommended that the terminal be kept on its base when not in use, and placed back on its
base aer a transaction is performed.
How can the baery be charged?
• Using the base
• Place the terminal on its base
• Check if the baery symbol is flashing or moving ( = baery charging)
Note: If the base is powered o for any reason, please re-connect the base to the power source, place
the terminal back on the base, and then reboot the terminal. To reboot the device press [FUNC] and
[CLEAR] keys together.
Charging the baery
14
Page 15

1. Open the paper compartment by liing the catch located at the top of the contactless
landing zone, and pull the cover to the rear of the terminal
2. Insert the paper roll into the compartment
3. Pull the paper up towards the top of the terminal
4. Maintain the paper and close the cover
5. Press simultaneously on both upper corners of the contactless landing zone, until it clips
into position
6. If required, press the Feed key on the keypad to advance the paper
Changing the receipt roll
Printer
Compartment Lid
15
Page 16

Training Mode instructions
1. User enables training mode on the POS and initiates a purchase transaction
Note: Only financial transactions can be performed whilst in training mode. Training mode can
also only be enabled when the terminal is in a ready state and when there are no reversal or
advices pending.
2. Card is swiped, tapped or inserted
3. Wait for processing “Training Mode” to be completed
4. Cardholder selects their account type (if applicable)
5. Wait for transaction to be processed. A delay of 2 seconds is added at this stage to simulate
the bank response.
6. The final response is displayed based on the cents received in the total amount of the
POS request.
For example: ‘APPROVED’ would appear when ‘00’ is passed in the cents field.
‘SIGNATURE REQUIRED’ would appear when ‘08’ is passed in the cents field.
Note: All transactions processed in training mode will have the following printed on the
receipt in place of the Merchant Name and Address.
Training Mode instructions
**** TRAINING ONLY ****
NOT A VALID TRANSACTION
16
Page 17

Notes
17
Page 18

Notes
18
Page 19

Notes
19
Page 20

Commonwealth Bank of Australia ABN 48 123 123 124 AFSL and Australian credit licence 234945.
 Loading...