

Page 1

!
!
Camtraptions+PIR+Motion+Sensor+v3#!
Stills!Mode%Manual!
!
Firmware!Version!2.2!
Index!
!
Index!......................................................................................................................!1!
Connecting!Camera!and!Flashes!..............................................................................!2!
Connect'a'Wired'Camera'...........................................................................................................'2!
Connect'a'Wireless'Camera'.......................................................................................................'2!
Wireless'Flashes'with'a'Canon'or'Nikon'Camera'.......................................................................'2!
Wireless'Flashes'with'Other'Cameras'.......................................................................................'3!
Program!Selection!..................................................................................................!3!
Switch!1!&!2:!Day!&!Night!Cut-off!...........................................................................!4!
Switch!3!..................................................................................................................!4!
Interval'Mode'............................................................................................................................'4!
3-shot'Burst'Mode'.....................................................................................................................'5!
Switches!4!to!6:!Transmitter!Programs!....................................................................!5!
Program'1:'Standard'..................................................................................................................'5!
Program'2:'Wake'Flashes'on'CH+1'............................................................................................'5!
Program'3:'Wake'Only'...............................................................................................................'6!
Program'4:'Wired'Only'..............................................................................................................'6!
Program'5:'Speed'Boost'............................................................................................................'6!
Program'6:'Wake'on'CH+1'&'Periodically'Charge'Flashes'.........................................................'6!
Program'7:'Speed'Boost'&'Periodically'Charge'Flashes'............................................................'6!
Program'8:'Speed'Boost'&'Keep'Camera'Awake'.......................................................................'6!
Bulb!Mode!..............................................................................................................!7!
Switch'3:'Enable'Day'Shot'.........................................................................................................'7!
Switch'4:'Enable'Two'Night'Shots'.............................................................................................'7!
Switches'5'&'6:'Transmitter'Program'........................................................................................'7!
Transmitter'Program'1:'Wired'...................................................................................................'8!
Transmitter'Program'2:'Wired'with'delay'.................................................................................'8!
Transmitter'Program'3:'Wireless'Camera'.................................................................................'8!
Transmitter'Program'4:'Wireless'Flash'......................................................................................'8!
Time'Dial'in'Bulb'Mode'..............................................................................................................'9!
Luminosity'Dial'in'Bulb'Mode'....................................................................................................'9!
Quick!Start!PIR!&!Camera!Settings!........................................................................!10!
Page 2
Camtraptions PIR Motion Sensor v3 - Stills Mode Manual Page 2
For Quick Start Settings, skip to Page 10 of this manual.
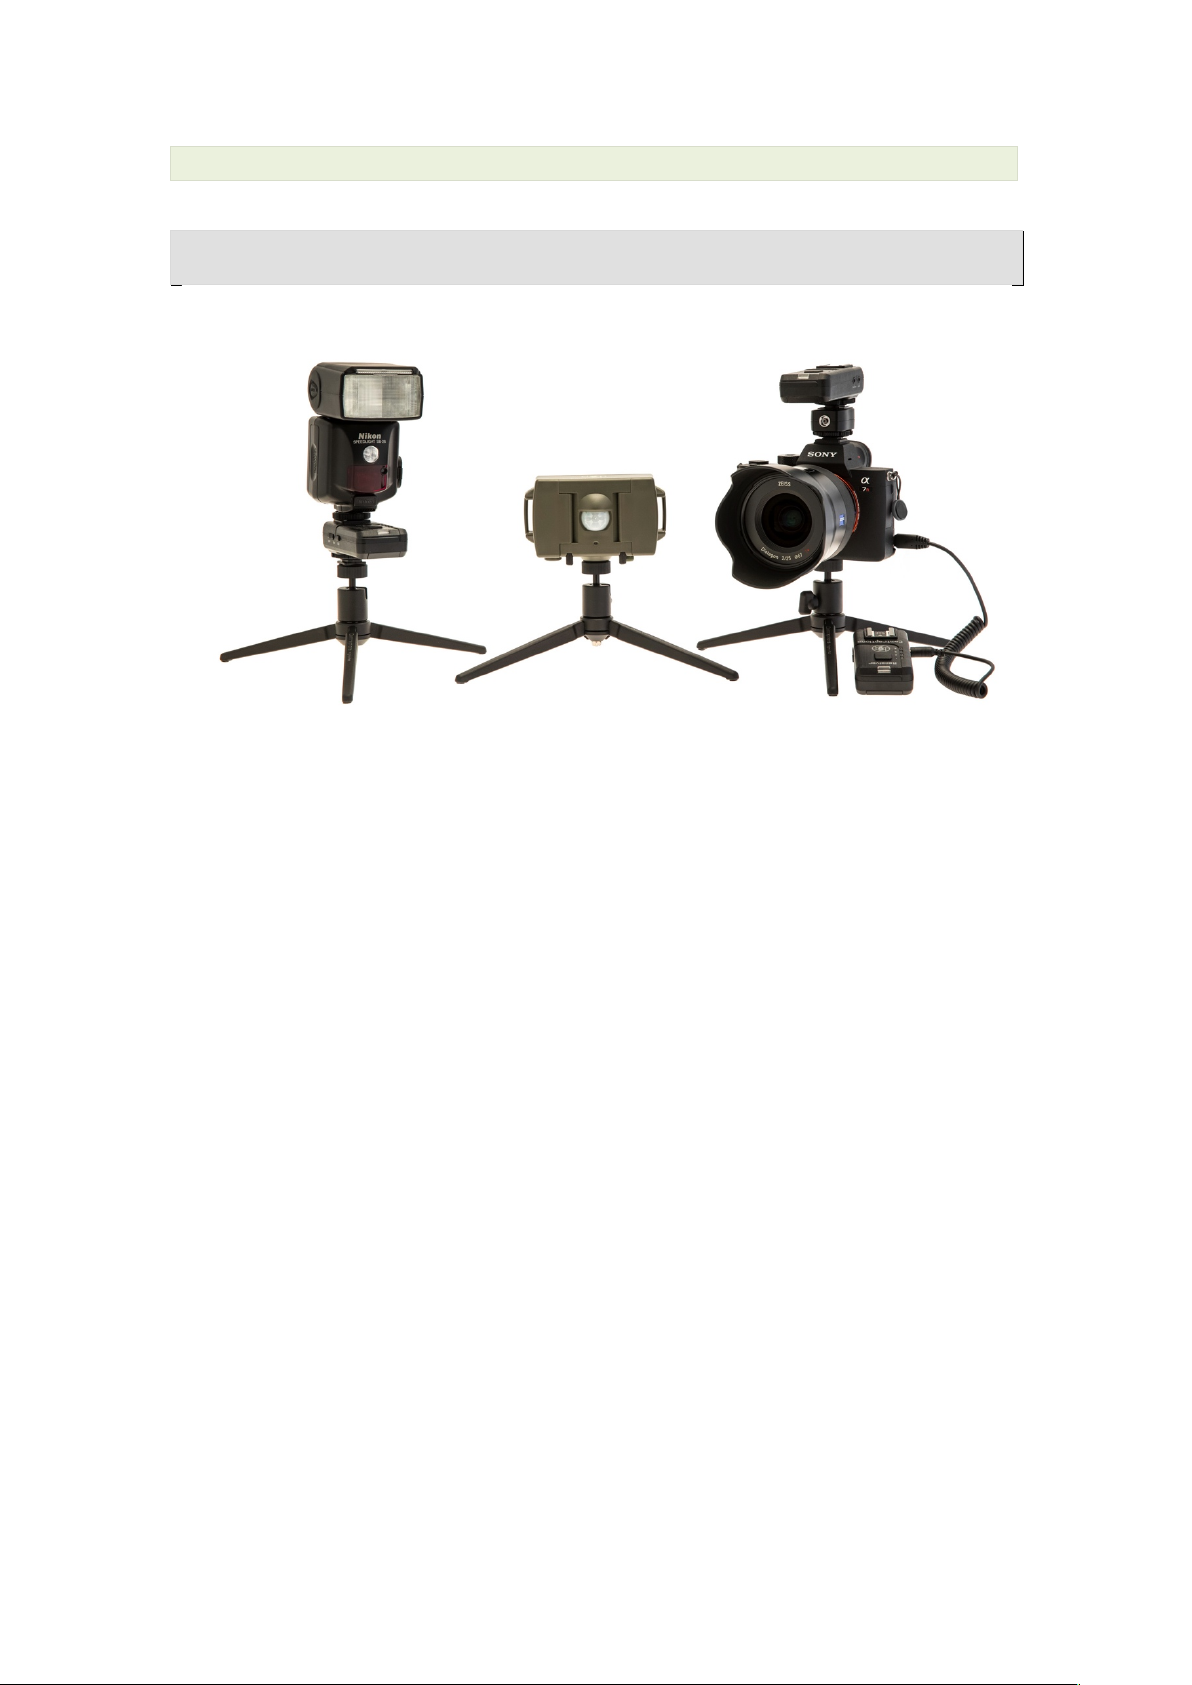
Connecting!Camera!and!Flashes!
Connect!a!Wired!Camera!
To connect a camera to the sensor with a wire, remove the bung in the socket
on the bottom of the sensor and plug in the camera connecting cable.
Connect the other end of the cable to your camera’s shutter release port.
Connect!a!Wireless!Camera!
To connect a camera wirelessly:
• Ensure you know which channel the PIR transmitter is set to. By
default it is Channel 1.
• Set the Camtraptions wireless receiver to the corresponding channel.
• Connect the camera connecting cable to the “Camera” socket on the
receiver and the other end to the camera’s shutter release port.
Wireless!Flashes!with!a!Canon!or!Nikon!Camera!
To set up wireless flashes follow these steps:
• Place a Camtraptions Wireless Transmitter in the camera’s hot shoe
and set the channel to the PIR channel plus one. For example, if the
PIR is set to channel 3, set the flashes to channel 4. If the PIR is set to
channel 7 then the flashes should be set to channel 1.
• Attach flashes to wireless receivers and set them to the same channel
as the hot shoe transmitter.
• Connect the camera shutter release port to the “Camera” socket on a
separate wireless receiver and set this receiver to the PIR channel.
Page 3
Camtraptions PIR Motion Sensor v3 - Stills Mode Manual Page 3
Wireless!Flashes!with!Other!Cameras!
If using a camera other than Canon or Nikon, for example, Sony or Fujifilm,
you may need to use a Nikon hot shoe adapter to attach the Camtraptions
Wireless Transmitter to the camera’s hot shoe. It is possible to source a Sony
to Nikon hot shoe adapter from Amazon or Ebay if you are using a Sony
camera. Set up the flash transmitter following the steps as above for Canon
and Nikon cameras.
Hot shoe adapters will allow the camera to trigger the flashes in sync with the
shutter but they don’t usually transmit a “wake flash” signal. As a result, the
flashes would wake at the first shot and only fire at the second shot. To solve
this, there are several “Wake on CH+1” programs in which the PIR can wake
the flashes prior to triggering the camera, thus ensuring they fire at the first
shot. For these programs to work it is required that the flash channel is one
higher than the PIR Channel. See Pages 5 and 6 for additional details about
these programs.
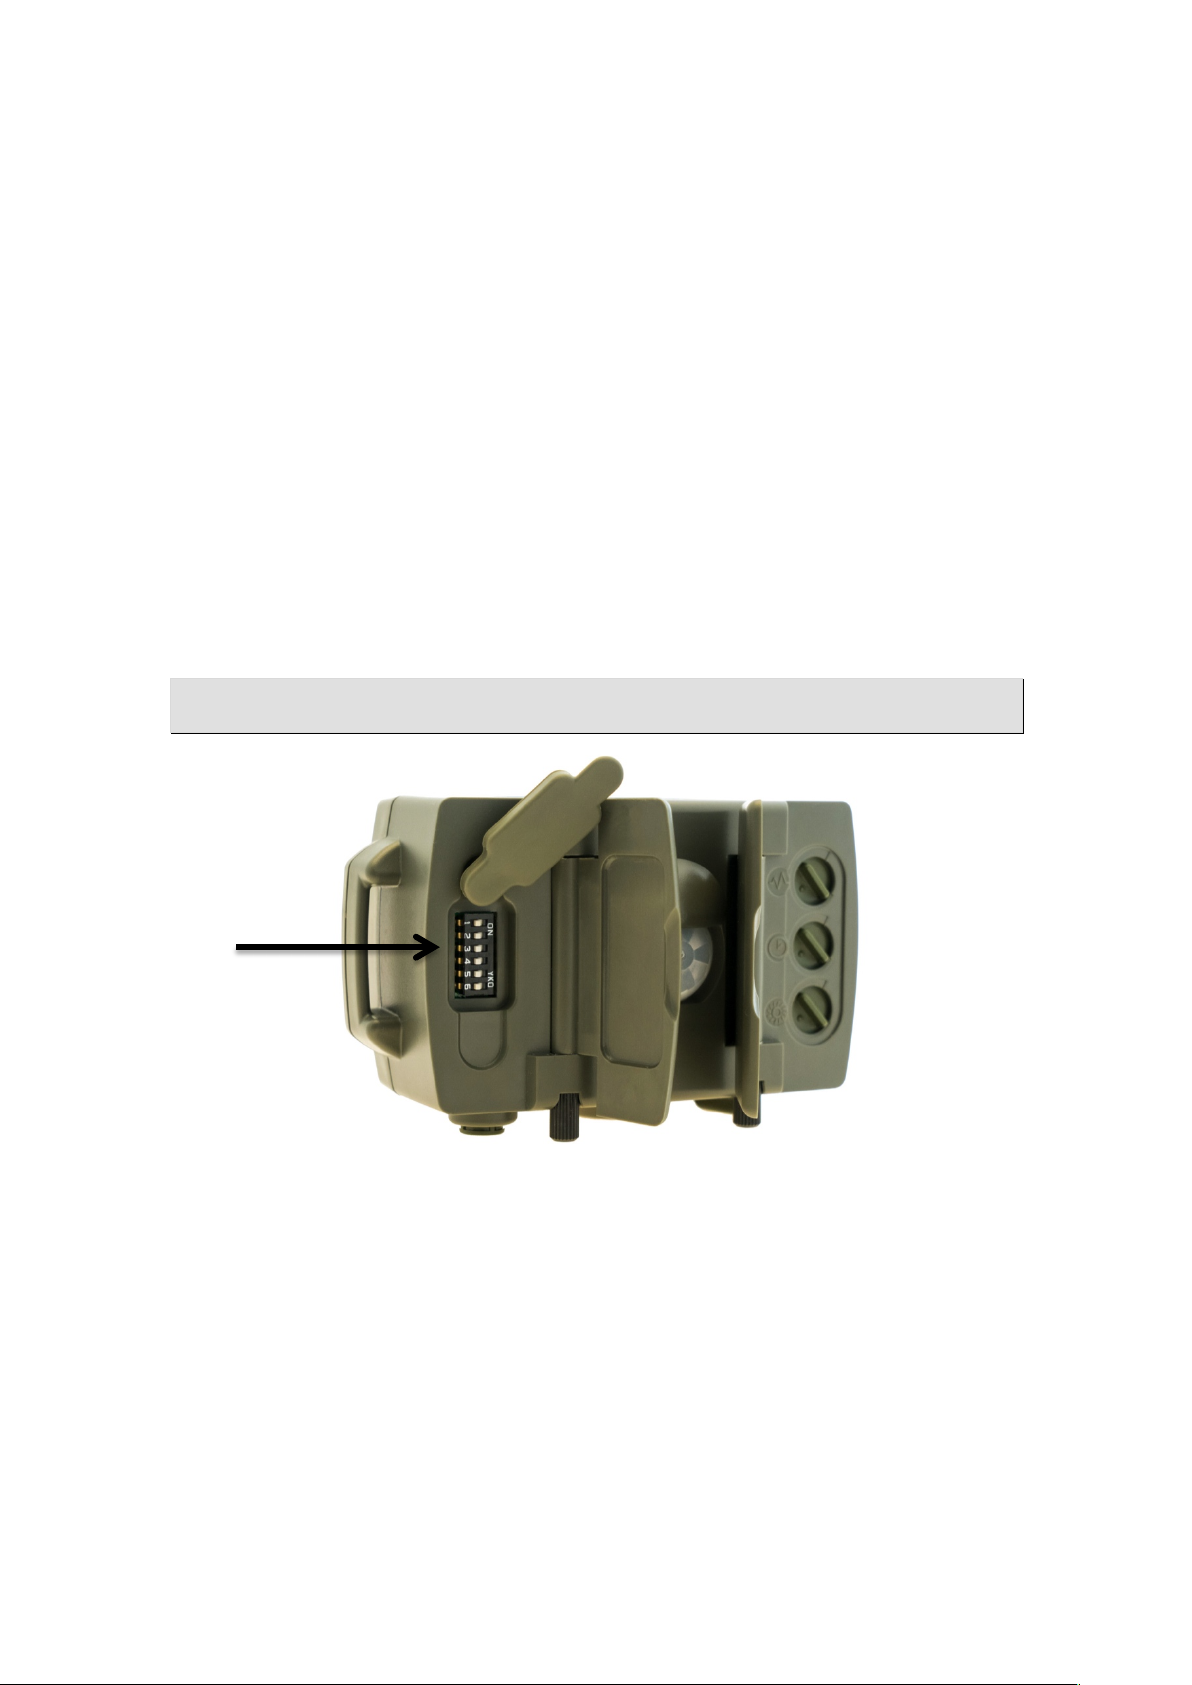
Program!Selection!
Programs are set via Switches 1 to 6 on the front of the device. These
switches are located under the watertight bung, behind the flap, to the left of
the sensor dome.
!
Page 4

Camtraptions PIR Motion Sensor v3 - Stills Mode Manual Page 4
Switch!1!&!2:!Day!&!Night!Cut-off!
Switch 1 and 2 can be used to disable operation during the day or at night.
When both switches are in the Off position, the sensor will operate all of the
time.
When Switch 1 is On, the sensor is disabled when the ambient luminosity is
above the threshold set by the luminosity dial (i.e. daytime disabled).
When Switch 2 is On, the sensor is disabled when the ambient luminosity is
below the threshold set by the luminosity dial (i.e. nighttime disabled).
When both Switch 1 and 2 are On, the sensor operates in Bulb mode, see
Page 7 for details.
A summary of this behaviour is below:
Switch 1 and 2 Off: Regular operation with no luminosity cut-off
Switch 1 ON: Disables daytime operation
Switch 2 ON: Disables nighttime operation
Switch 1 and 2 ON: Bulb mode
Switch!3!
Switch 3 determines the way in which the number and frequency of shots are
set.
Switch 3 OFF: Interval mode
Switch 3 ON: 3-shot burst mode
Interval!Mode!
In Interval Mode, the time dial sets the number of frames from 1 frame
(fully anti-clockwise) to 6 frames (fully clockwise) per detection.
If a day or night luminosity cut off is set then the frame rate is 1 frame
per second. Otherwise, the frame rate can be set via the Luminosity
Dial from between 1 frame every second (fully anti-clockwise) to 1
frame every 7 seconds (fully clockwise).
The gap after each burst is 2 seconds.
!
Page 5
Camtraptions PIR Motion Sensor v3 - Stills Mode Manual Page 5
3-shot!Burst!Mode!
In 3-shot Burst Mode, the PIR will always send 3 trigger signals.
The time dial sets the shot frequency from between 1 frame every
second (fully anti-clockwise) to 1 frame every 7 seconds (fully
clockwise).
If a day or night luminosity cut off is set then the gap after each burst is
2 seconds. Otherwise, the Luminosity Dial sets the gap after burst from
between 2 seconds (fully anti-clockwise) to 30 seconds (fully
clockwise).
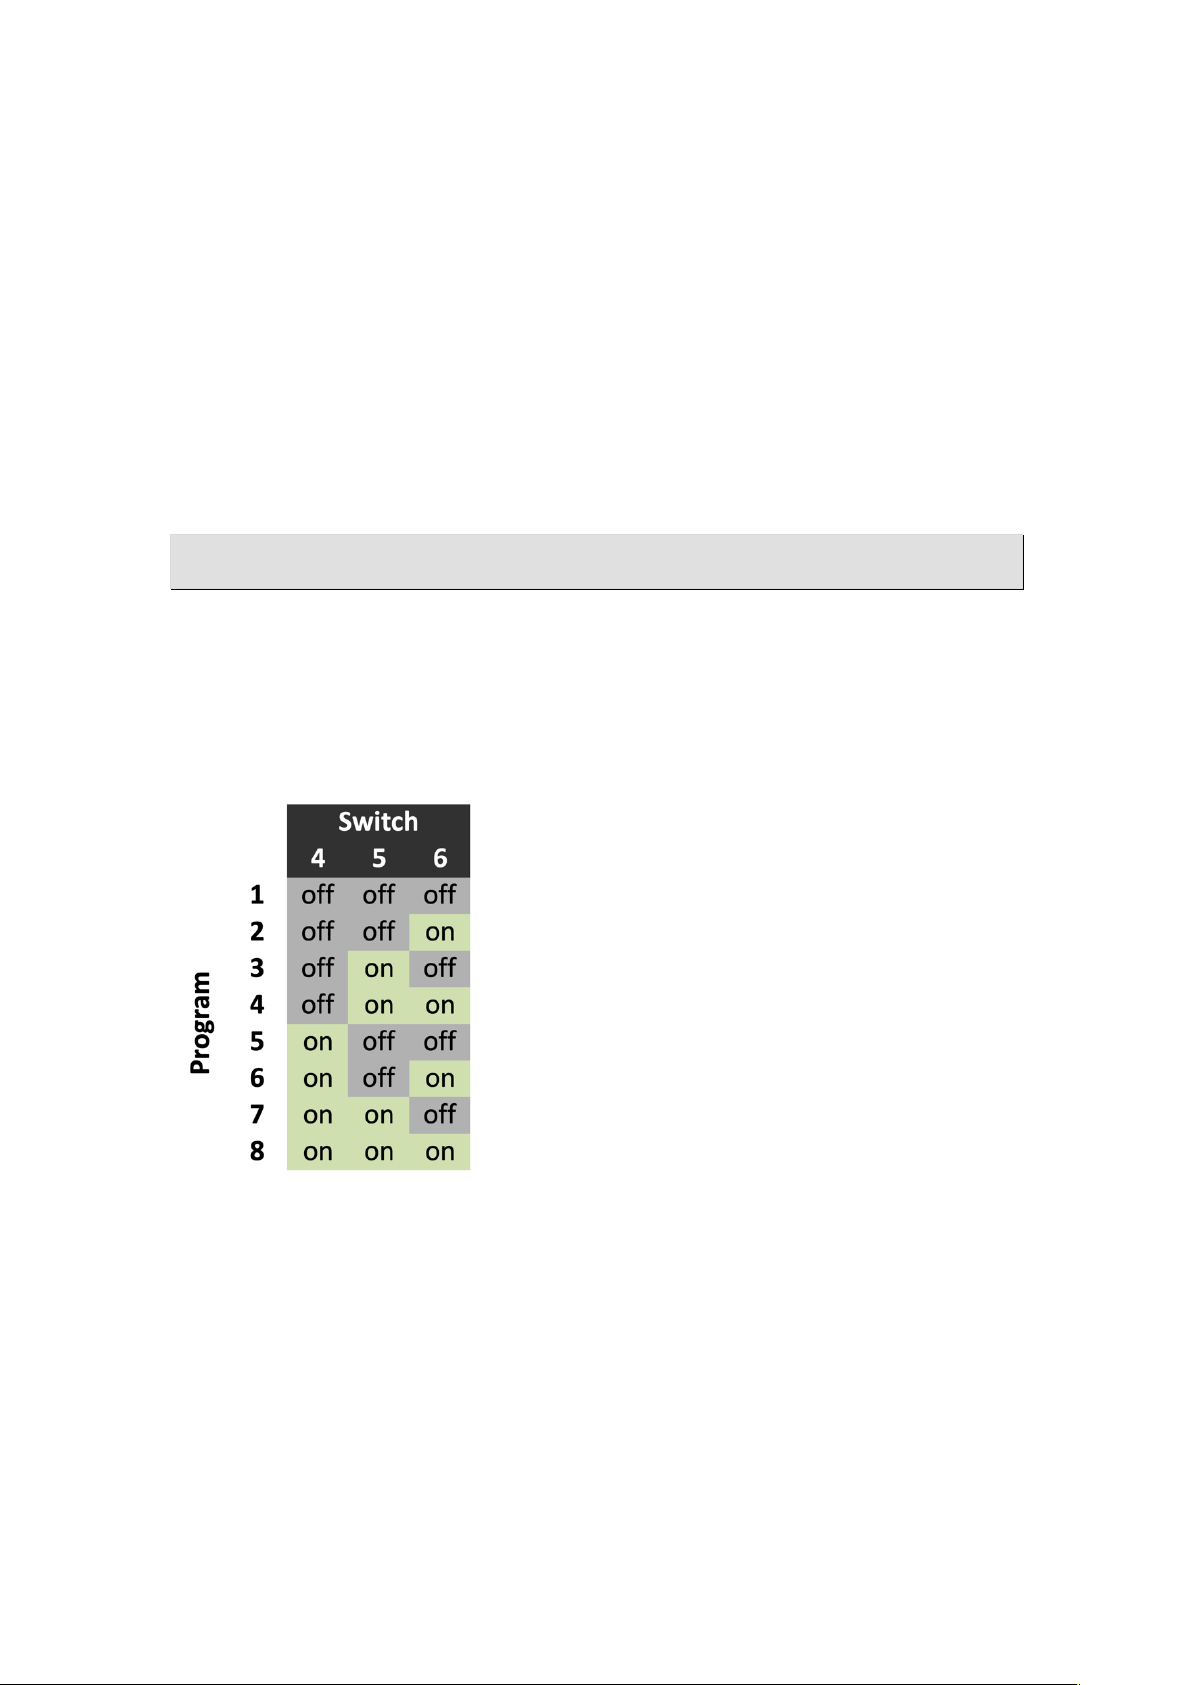
Switches!4!to!6:!Transmitter!Programs!
There are 8 Transmitter Programs to support different cameras and camera
settings. These programs are selected via configuration switches 4, 5 and 6.
The table below shows the switch position and corresponding program
numbers:
Program!1:!Standard!
Wirelessly triggers a camera on the PIR Wireless Channel.
Program!2:!Wake!Flashes!on!CH+1!
Wakes flashes on the flash channel (PIR Channel plus 1) and then
triggers a camera on the PIR Channel.
This allows any camera to be used as a still camera trap triggering
flashes connected to wireless receivers. See Page 3 for more.
Page 6

Camtraptions PIR Motion Sensor v3 - Stills Mode Manual Page 6
Program!3:!Wake!Only!
The sensor just sends a wake signal on the PIR channel. A second
sensor can then be used to trigger the camera. This mode is useful to
give flashes time to charge up before triggering.
Program!4:!Wired!Only!
The Wireless Transmitter is disabled completely. Only the wired
connection is active.
Program!5:!Speed!Boost!
The PIR will respond to motion approximately 0.2 seconds faster,
however, battery life of the PIR will be approximately halved.
Program!6:!Wake!on!CH+1!&!Periodically!Charge!Flashes!
Wakes flashes on the flash channel (PIR Channel plus 1) and then
triggers a camera on the PIR channel.
Additionally, the PIR sends a period wake signal to flashes on the flash
channel (PIR Channel plus 1) so that the flash capacitors remain
topped-up.
Battery life of the PIR will be approximately halved in this mode.
Program!7:!Speed!Boost!&!Periodically!Charge!Flashes!
The PIR will respond to motion approximately 0.2 seconds faster.
Additionally, the PIR sends a period wake signal to flashes on the flash
channel (PIR Channel plus 1) so that the flash capacitors remain
topped-up.
Battery life of the PIR will be approximately halved in this mode.
Program!8:!Speed!Boost!&!Keep!Camera!Awake!
The PIR will respond to motion approximately 0.2 seconds faster.
A wake signal is also sent to the camera every minute to prevent it
from sleeping or powering off.
Battery life of the PIR will be approximately halved in this mode.
!
Page 7
Camtraptions PIR Motion Sensor v3 - Stills Mode Manual Page 7
Bulb!Mode!
When both Switch 1 and 2 are On, the sensor operates in Bulb Mode.
This experimental mode allows the PIR sensor to control the shutter speed of
the camera. To facilitate these programs, the camera shutter speed must be
set to “Bulb”.
In automatic shooting modes, the camera will usually be limited to a maximum
exposure time of 30 seconds. These programs allow exposure times of up to
5 minutes in length. This can be useful for exposing stars or moonlit
backgrounds.
In Bulb Mode, Switches 3 to 6 serve the following functions:
Switch!3:!Enable!Day!Shot!!
When On, the PIR takes a 0.1s exposure during the day. When Off, the
PIR is disabled during the day.
Note that the minimum bulb time on most cameras is around 0.1s or
slow so some ghosting may occur with moving subjects during daylight
exposures.
Switch!4:!Enable!Two!Night!Shots!!
When Off the PIR takes 1 long exposure at night, when On the PIR
takes 1 short exposure followed by 1 long exposure per detection. This
means the first image is a “safety shot” with a black background. The
second shot can be used to expose the night sky and background but
there is high risk of ghosting if there is too much ambient light.
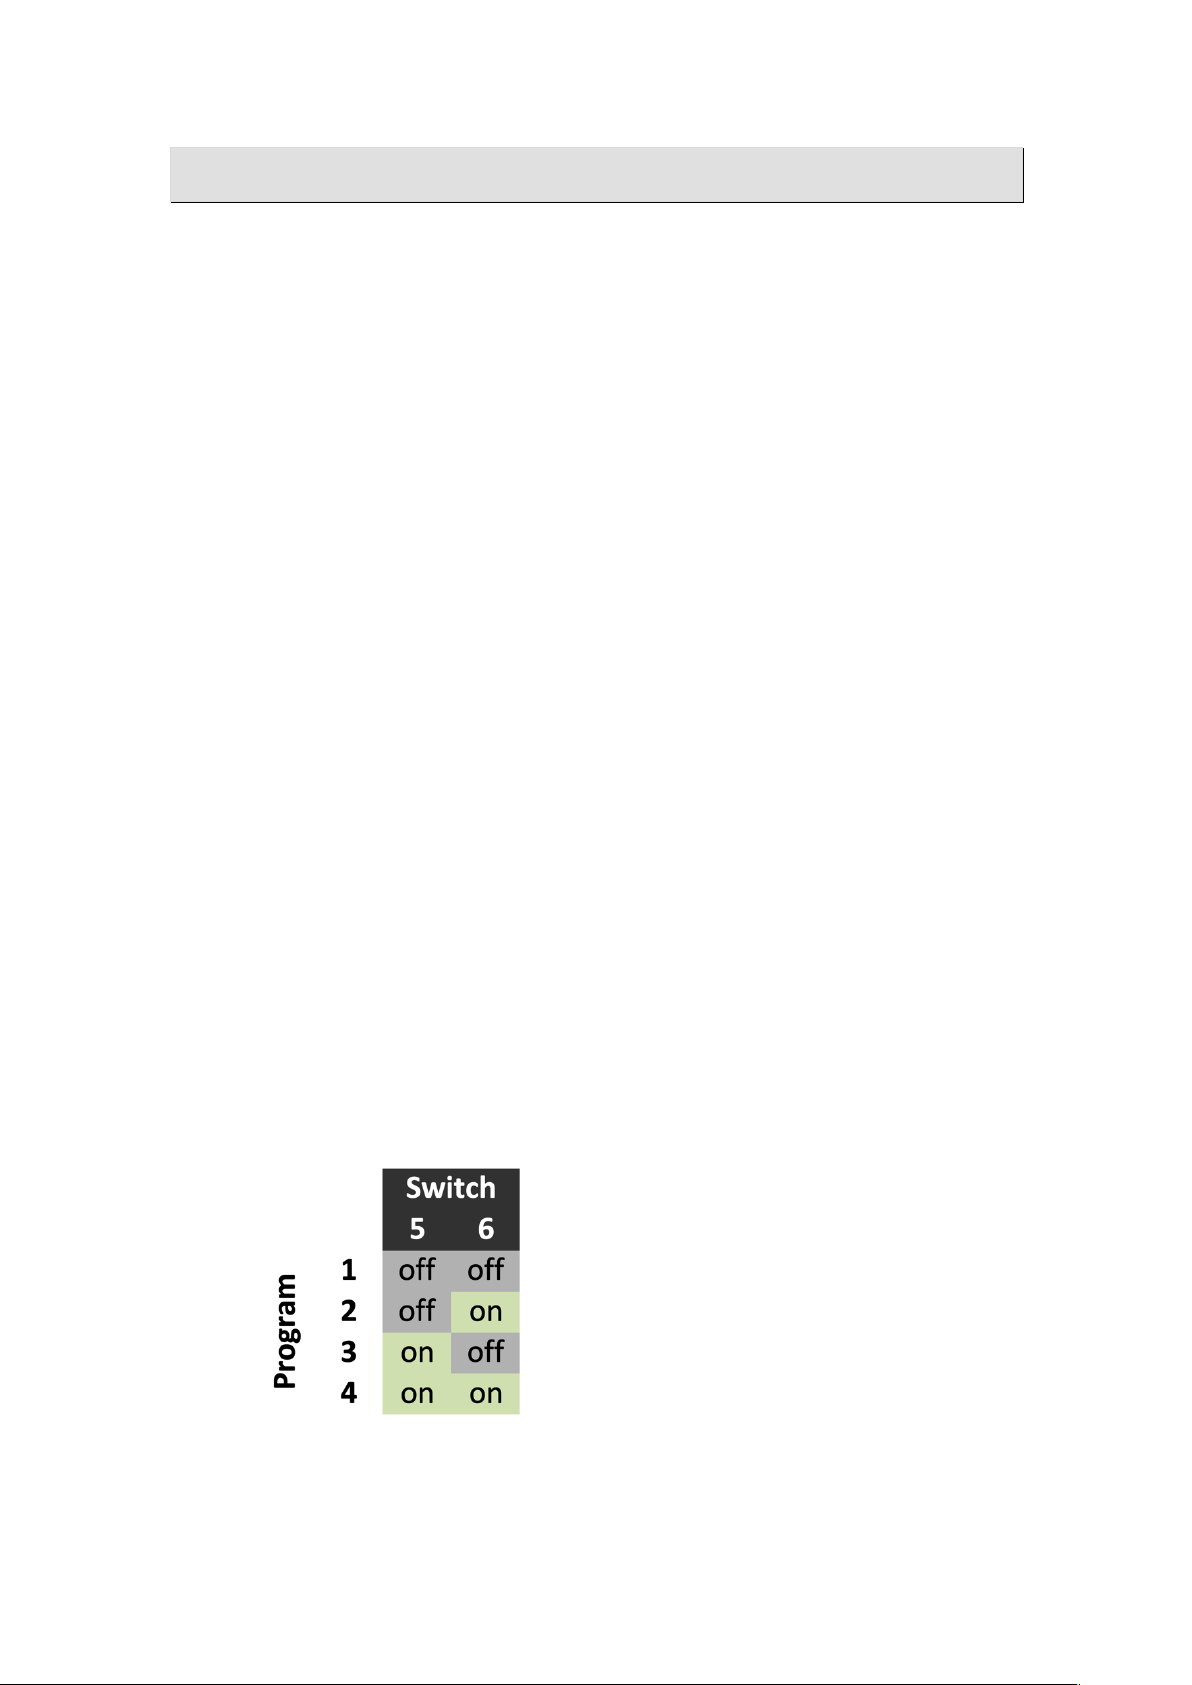
Switches!5!&!6:!Transmitter!Program!
The Transmitter Program is set as shown below:
Page 8

Camtraptions PIR Motion Sensor v3 - Stills Mode Manual Page 8
Transmitter!Program!1:!Wired!
This program requires the camera to have a wired connection to the PIR.
The wireless transmitter is disabled.
Flashes should be triggered via a transmitter in the camera’s hot shoe.
The Luminosity Dial sets the luminosity cut-off threshold for the long bulb
exposure.
Transmitter!Program!2:!Wired!with!delay!
This program requires the camera to have a wired connection to the PIR.
The wireless transmitter is disabled.
Flashes should be triggered via a transmitter in the camera’s hot shoe.
The Luminosity Dial sets a camera wake delay of between 0.2s (fully anticlockwise) to 3 seconds (fully clockwise). This is necessary if a short day
shot or two-shot night sequence is selected, as without the delay, the
camera might not wake up in time for the short 0.1s exposure.
Transmitter!Program!3:!Wireless!Camera!
The sensor will wirelessly trigger the camera.
Flashes should be triggered via a transmitter in the camera’s hot shoe.
The Luminosity Dial sets the luminosity cut-off threshold for the long bulb
exposure.
Transmitter!Program!4:!Wireless!Flash!
This program requires the camera to have a wired connection to the PIR.
The PIR can either wirelessly wake the flashes or can fire the flashes after
a specified delay. The flash receivers should be set to the PIR channel.
When the Luminosity Dial is fully anti-clockwise, only a flash wake signal is
sent prior to the exposure. This allows any camera to trigger the flashes in
time with the shutter via a Wireless Transmitter connected to the hot shoe.
As the Luminoisty dial is turned clockwise, the PIR will start sending a
flash trigger signal after a delay so a separate flash transmitter on the
camera is no longer required. The minimum delay that can be set is 0.2s
and the maximum is around 3 seconds. The necessary delay will depend
on how quickly the camera wakes up and fires the first shot. If the delay is
too short the flash will fire before the shutter opens. If the delay is longer
than necessary then the animal may move further from the trigger area by
the time the flash fires. Finding the most appropriate delay time will take a
Page 9

Camtraptions PIR Motion Sensor v3 - Stills Mode Manual Page 9
bit of trial and error. Note that it may not be possible to time the flash
reliably with the short 0.1s exposure if either Switch 3 or 4 are on.
If the Luminosity Dial is turned fully clockwise, the flash will instead be
timed to fire just as the exposure ends. This is known as rear-sync or
second curtain sync.
Time!Dial!in!Bulb!Mode!
In all programs, the Time Dial sets the length of the nighttime bulb
exposure from between 5 seconds (fully anti-clockwise) to 5 minutes (fully
clockwise).
Luminosity!Dial!in!Bulb!Mode!
In Program 1 and 3, the Luminosity Dial set the light cut-off threshold. The
bulb time set by the time dial will only will be used in complete darkness.
As it gets brighter the bulb time will be prorated down to 5 seconds at the
luminosity cut-off threshold. This means that as it gets brighter, there is
less chance of blowing out the background.
In Program 2 and 4, the Luminosity Dial sets the timing of the wireless
signal as explained above.
!
!
Page 10

Camtraptions PIR Motion Sensor v3 - Stills Mode Manual Page 10
Quick!Start!PIR!&!Camera!Settings
If you just want to start shooting still photographs without reading this entire
manual then the following settings should work in a wide range of scenarios:
Set-up the PIR as follows:
• Push all six configuration switches to the Off position.
• Set the top dial to somewhere in the middle for medium sensitivity.
• Set the middle dial fully anti-clockwise to take 1 photo per detection or
somewhere in the middle to take 3 photos per detection.
• Turn the bottom dial fully anticlockwise.
Connect the camera:
• Use a camera connecting cable to plug the camera directly into the
socket on the bottom of the sensor or the “camera” socket on the side
of a Camtraptions Wireless Receiver.
• If using a Camtraptions Wireless Receiver, set it to Channel 1 as this is
the default PIR Channel.
Configure the camera as follows:
• Manual focus (focus on the spot you expect the animal to be)
• One shot mode rather than continuous drive mode
• Manual exposure mode: shutter speed of 1/250s to ensure no ghosting
and aperture of around f/8 to ensure plenty of depth of field.
• Auto ISO so the camera will adjust the ISO to correctly expose the
image. You may want to limit the maximum ISO setting to 1600 or 3200
to avoid getting excessive noise at night.
• If the lens has image stabilisation/vibration reduction then disable it.
• Check that the menu option is activated that allows the camera to
power down automatically after around 30 seconds.
• Turn off automatic image review after each shot to conserve the
camera battery.
• If you are using a single flash then connect it to the camera via an off-
camera TTL cord and allow the flash output to be set via TTL metering.
• If you are using multiple flashes then you will need to set the power of
each flash manually so the image is correctly exposed in darkness.
• Shoot in RAW to give yourself more flexibility to adjust the image
brightness afterwards.
 Loading...