

Page 1
NOTES
1. MODEL : HCG-P373S(xSxA3) / NOBRAND
2. MATERIAL : 모조지100g/
㎡
3. COLOR : BLACK
4. SIZE : 105(+/-5)mm x 148(+/-5)mm
5. LABEL : 50201270(81x24)mm
6. ANY CHANGE OR ALTERNATION MUST BE
APPROVED BY HITRON DESIGN TEAM.
105(+/-5)mm
UNLESS OTHERWISE SPECIFIED
ALL DIMENSIONS ARE IN MM.
- TOLERANCE
DESCRIPTION/MATERIAL
MANUAL INSTRUCTION
PARTS LIST
DO NOT SCALE
TITLE
MATERIAL CHKED
APPROVALS DATE
COLOR DRAWN
Y.K.CHA
D.G.KIM
A6 B
09-04-12
09-04-12
SIZE
SCALE
REV
ITEM QTY
LABEL
MANUAL
GUIDE
+/-3
+/-5
+/-5
50303290
2
3
협
의
개발팀
이동현
PRODUCTION RELEASE & REVISION
REVADESCRIPT’N/BUYER
INITIAL ----------------- 50303290 Y.K.CHA D.G.KIM 07-18-12
B 내용변경 ----------------- 50303290 Y.K.CHA D.G.KIM 09-04-12
DWG No PATRS No. BY CHK DATE
09-04-12
148(+/-5)mm
REV.B 6p, 7p, 11p, 15p 내용수정 ECO (재고소진 후 변경)
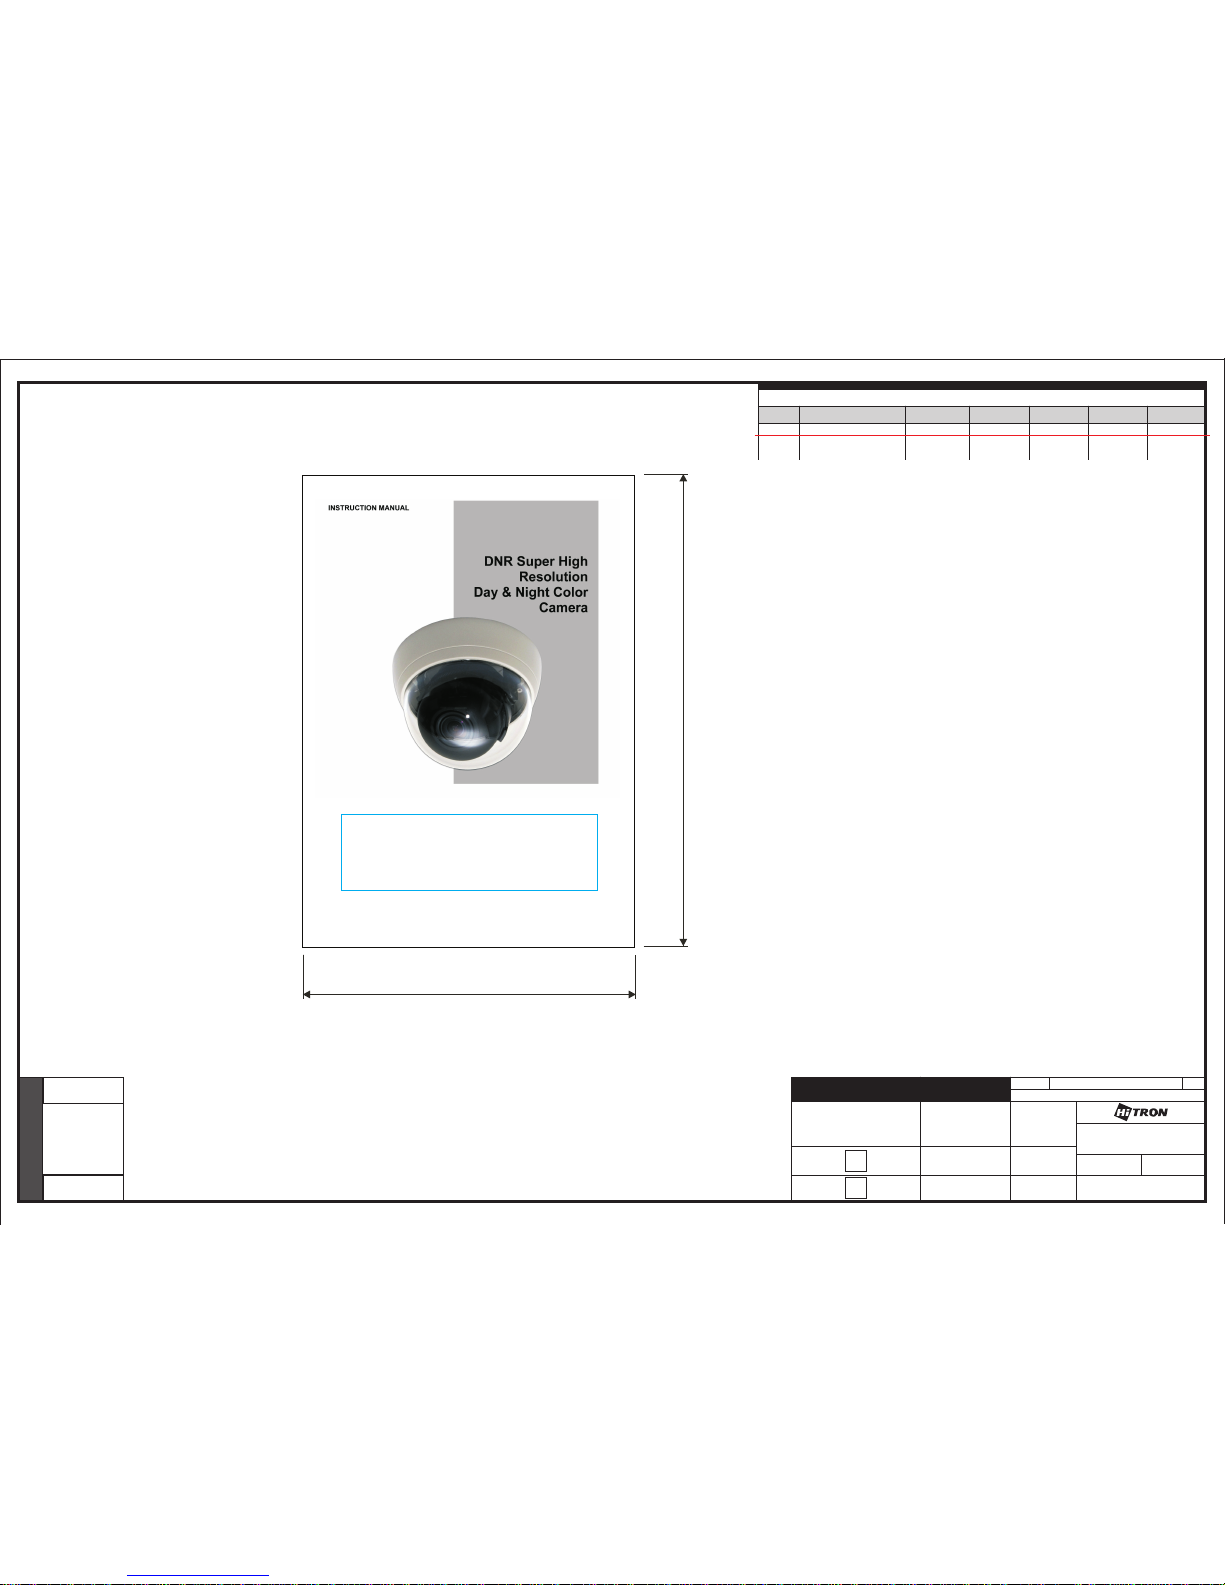
INSTRUCTION MANUAL
DNR Super High
Resolution
Day & Night Color
Camera
Please read this manual thoroughly before use and keep it handy for future reference.
50301270 / 81x24(mm)
Page 2
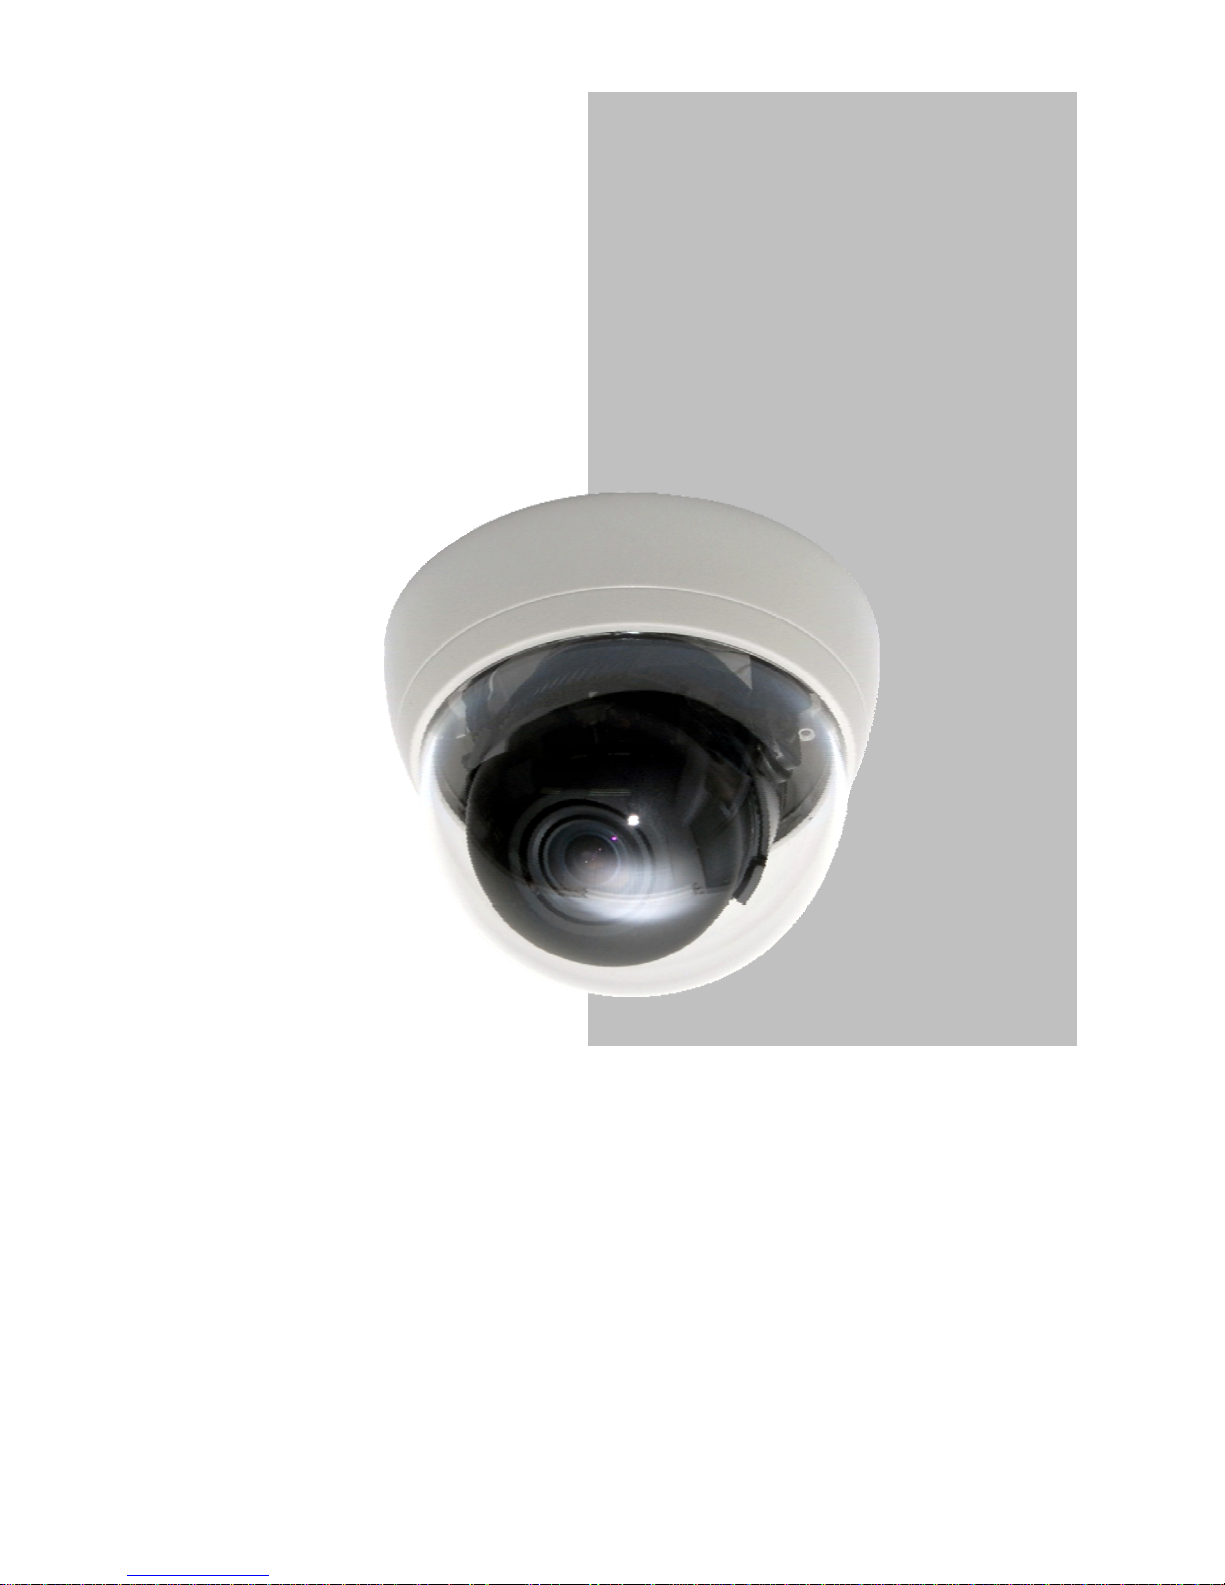
INSTRUCTION MANUAL
DNR Super High
Resolution
Day & Night Color
Camera
Please read this manual thoroughly before use and keep it handy for future reference.
Page 3
WARNINGS AND CAUTIONS
TO REDUCE THE RISK OF FIRE OR ELECTRIC SHOCK, DO NOT EXPOSE THIS
PRODUCT TO RAIN OR MOISTURE. DO NOT INSERT ANY METALLIC OBJECT
THROUGH THE VENTILATION GRILLS OR OTHER OPENINGS ON THE EQUIPMENT.
CAUTIO
RISK OF ELECTRIC SHOCK
DO NOT OPEN
CAUTION : TO REDUCE THE RISK OF ELECTRIC SHOCK,
DO NOT REMOVE COVER(OR BACK).
NO USER-SERVICABLE PARTS INSIDE.
REFFER SERVICING TO QUALIFIED SERVICE PERSONNEL.
CAUTION
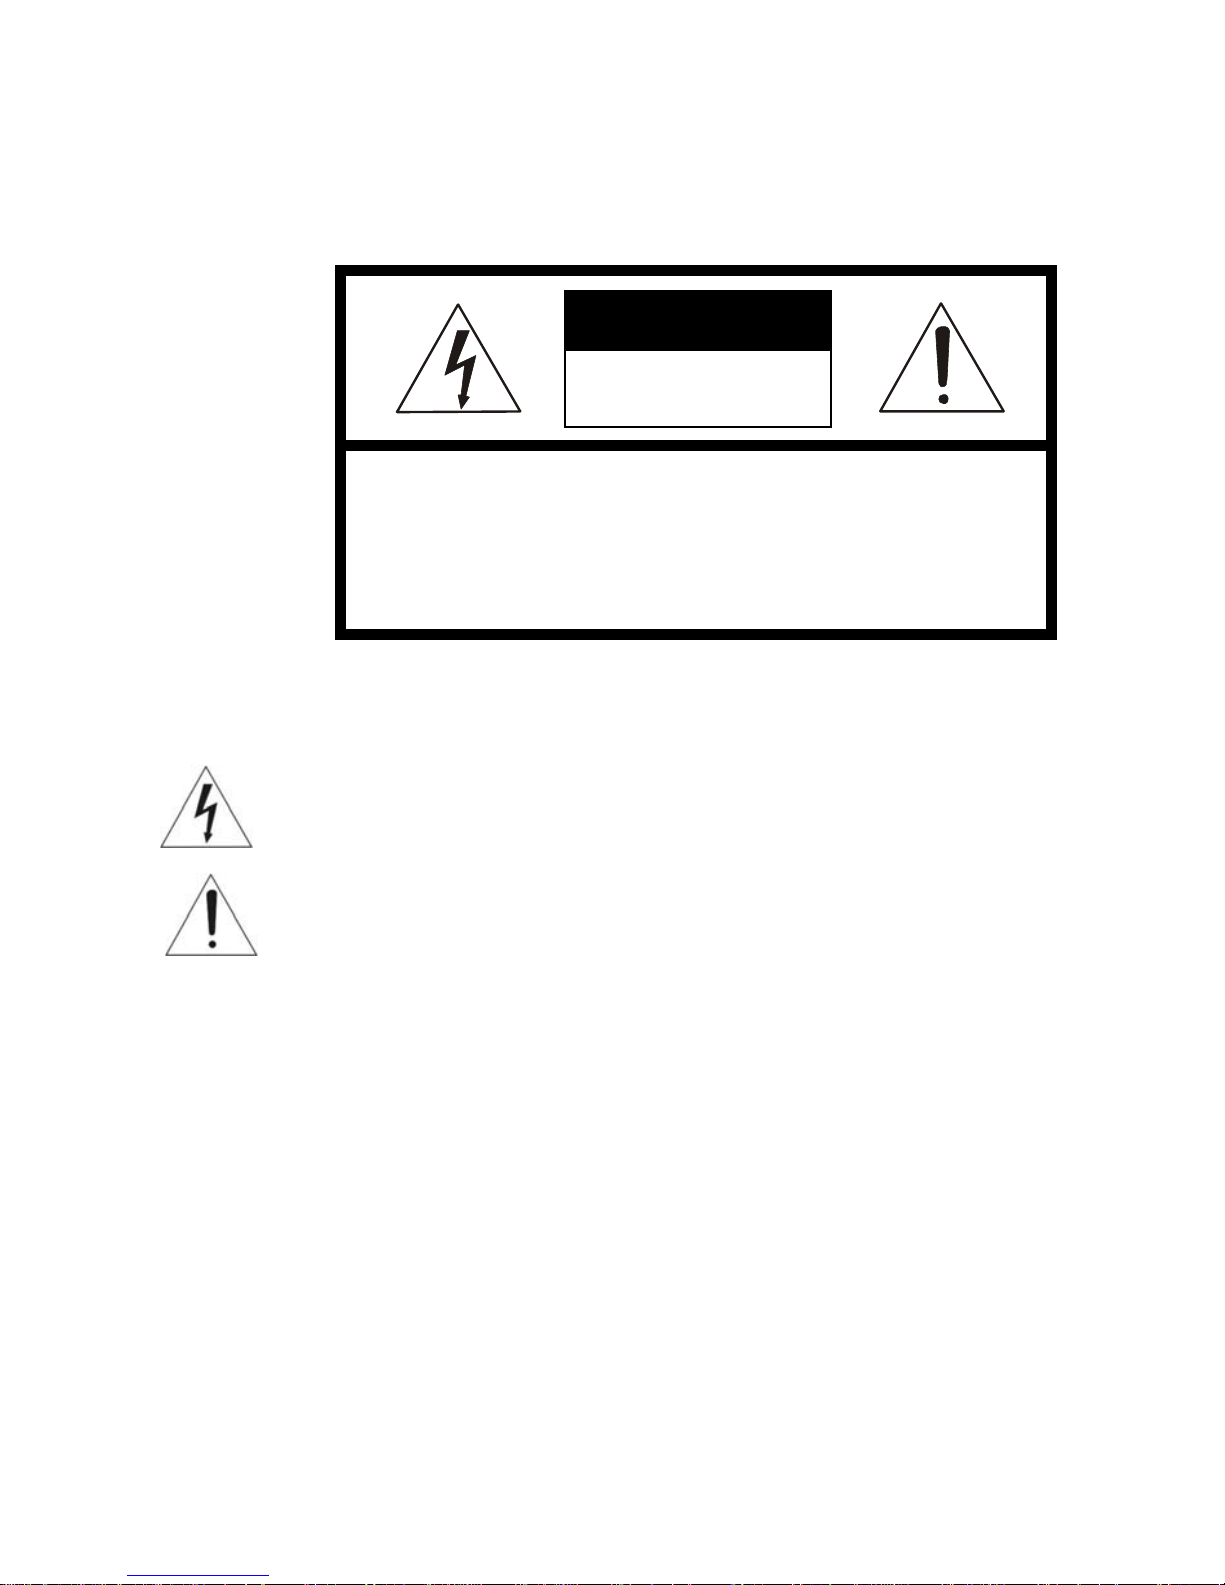
EXPLANATION OF GRAPHICAL SYMBOLS
The lightning flash with arrowhead symbol, within an equilateral triangle,
is intended to alert the user to the presence of uninsulated ''dangerous
voltage'' within the product's enclosure that may be of sufficient magnitude
to constitute a risk of electric shock to persons.
The exclamation point within an equilateral triangle is intended to alert
the user to the presence of important operating and maintenance
(servicing) instructions in the literature accompanying the product.
PRECAUTIONS
Installation
Do not install the unit in an extremely hot or humid place
or in a place subject to excessive dust, mechanical
vibration.
The unit is not designed to be waterproof.
Exposure to rain or water may damage the unit.
Cleaning
Clean the unit with a slightly damp soft cloth.
Use a mild household detergent. Never use strong
solvents such as thinner or benzine as they might
damage the finish of the unit.
Retain the original carton and packing materials for safe
transport of this unit in the future.
ii
Safety
Should any liquid or solid object fall into the cabinet,
unplug the unit and have it checked by
qualified personnel before operating it any further.
Unplug the unit from the wall outlet if it is not going to
be used for several days or more.
To disconnect the cord, pull it out by the plug. Neve
r
pull the cord itself.
A
llow adequate air circulation to prevent internal heat
build-up. Do not place the unit on soft surfaces (rugs,
carpets, sofas, etc.) or near materials (curtains,
draperies) that may block the ventilation holes.
Height and vertical linearity controls located on the
rear panel are for special adjustments by qualified
personnel only.
Page 4
IMPORTANT SAFETY INSTRUCTIONS
1. Read these instructions.
2. Keep these instructions.
3. Heed all warnings.
4. Follow all instructions.
5. Do not use this apparatus near water.
6. Clean only with dry cloth.
7. Do not block any ventilation openings. Install in accordance with the
manufacturer’s instructions.
8. Do not install near any heat sources such as radiators, heat registers, stoves,
or other apparatus (including amplifiers) that produce heat.
9. Do not defeat the safety purpose of the polarized or grounding-type plug. A
polarized plug has two blades with one wider than the other. A grounding
type plug has two blades and a third grounding prong. The wide blade or the
third prong are provided for your safety. If the provided plug does not fit into
your outlet, consult an electrician for replacement of the obsolete outlet.
10. Protect the power cord from being walked on or pinched particularly at
plugs convenience receptacles, and the point where they exit from the
apparatus.
11. Only use attachments/accessories specified by the manufacturer.
12. Use only with the cart, stand, tripod, bracket, or table
specified by the manufacturer, or sold with the apparatus.
When a cart is used, use caution when moving the
cart/apparatus combination to avoid injury from tip-over.
13. Unplug this apparatus during lightning storms or when
unused for long periods of time.
14. Refer all servicing to qualified service personnel. Servicing
is required when the apparatus has been damaged in any
way, such as power-supply cord or plug is damaged, liquid has been
moisture, does not operate normally, or has been dropped.
15. CAUTION – THESE SERVICING INSTRUCTIONS ARE FOR USE BY
QUALIFIED SERVICE PERSONNEL ONLY. TO REDUCE THE RISK OF
ELECTRIC SHOCK DO NOT PERFORM ANY SERVICING OTHER THAN
THAT CONTAINED IN THE OPERATING INSTRUCTIONS UNLESS YOU
QRE QUALIFIED TO DO SO.
16. Use satisfy clause 2.5 of IEC60950-1/UL60950-1 or Certified/Listed
Class 2 power source only.
iii
Page 5
FCC COMPLIANCE STATEMENT
CE COMPLIANCE STATEMENT
INFORMATION TO THE USER: THIS EQUIPMENT HAS BEEN TESTED
AND FOUND TO COMPLY WITH THE LIMITS FOR A CLASS A DIGITAL DEVICE,
PURSUANT TO PART 15 OF THE FCC RULES. THESE LIMITS ARE DESIGNED
TO PROVIDE REASONABLE PROTECTION AGAINST HARMFUL
INTERFERENCE WHEN THE EQUIPMENT IS OPERATED IN A COMMERCIAL
ENVIRONMENT. THIS EQUIPMENT GENERATES, USES, AND CAN RADIATE
RADIO FREQUENCY ENERGY AND IF NOT INSTALLED AND USED IN
ACCORDANCE WITH THE INSTRUCTION MANUAL, MAY CAUSE HARMFUL
INTERFERENCE TO RADIO COMMUNICATIONS.
OPERATION OF THIS EQUIPMENT IN A RESIDENTIAL AREA IS LIKELY TO
CAUSE HARMFUL INTERFERENCE IN WHICH CASE THE USER WILL BE
REQUIRED TO CORRECT THE INTERFERENCE AT HIS OWN EXPENSE.
CAUTION: CHANGES OR MODIFICATIONS NOT EXPRESSLY APPROVED
BY THE PARTY RESPONSIBLE FOR COMPLIANCE COULD VOID THE USER'S
AUTHORITY TO OPERATE THE EQUIPMENT.
THIS CLASS A DIGITAL APPARATUS COMPLIES WITH CANADIAN ICES-003.
CET APPAREIL NUMÉRIQUE DE LA CLASSE A EST CONFORME À LA NORME
NMB-003 DU CANADA.
WARNING: This is a Class A product. In a domestic environment this product
may cause radio interference in which case the user may be required to take
adequate measures.
iv
Page 6

CONTENTS OF PACKAGE
Installation of the camera must be performed by qualified service personnel in
accordance with all local and national electrical and mechanical codes.
Carefully remove the color camera and its accessories from the carton
and verify that they were not damaged in shipment.
The contents of the package includes :
1. Color CCD camera
2. Mounting screw
3. Instruction Manual
TABLE OF CONTENTS
INTRODUCTION ----------------------------------------------------------------------------------------- 1
CAMERA CONNECTION ------------------------------------------------------------------------------ 2
INSTALLATION ------------------------------------------------------------------------------------------ 3
OSD ADJUSTMENT ------------------------------------------------------------------------------------ 5
OSD MAIN MENU TREE ------------------------------------------------------------------------------ 6
OSD MENU SETTINGS ------------------------------------------------------------------------------- 8
AUTO WHITE DEFECT ------------------------------------------------------------------------------ 13
LENS ADJUSTMENT --------------------------------------------------------------------------------- 13
EXTERNAL DIMENSION ---------------------------------------------------------------------------- 14
SPECIFICATIONS ------------------------------------------------------------------------------------ 15
v
Page 7

INTRODUCTION
The camera provides high-quality images using SONY 1/3” CCD and digital
Signal process LSIs.
Features:
● 1/3" EXview HAD CCD Ⅱ for an image of high sensitivity
● 2.6-6 mm(F1.6-2.4) / 4-9 mm(F1.6-2.4) /3.6mm fixed (f 3.0)
● Digital Wide Dynamic Range (Xtended Dynamic Range)
● Excellent picture quality
● 650 lines of resolution
● Color 0.32Lux @ f1.6 (0.18Lux @f1.2)
● Auto electronic shutter [1/60(1/50) ~ 1/10,000] and manual electronic
shutter modes
● OSD (On Screen Display)
● Auto and manual white balance modes
● Auto BLC and HLC, Day & Night (Auto/Manual)
●
2D-NR
● Privacy Zone 4 point, Motion Detection 4 Point
● MIRROR, SHARPNESS, HUE, CONTRAST, GAIN
● AGC (Auto Gain Control)
● VIDEO OUT (BNC)
● Internal
● Quick connect for DC lens with 4-pin connector
● Operates in 12VDC
● Use Certified / Listed Class 2 power source only.
● Auto White Defect
IMPORTANT : The user of this camera is responsible for
checking and complying with local, state, and federal laws and
statutes concerning the recording and monitoring of audio
signals.
1
Page 8
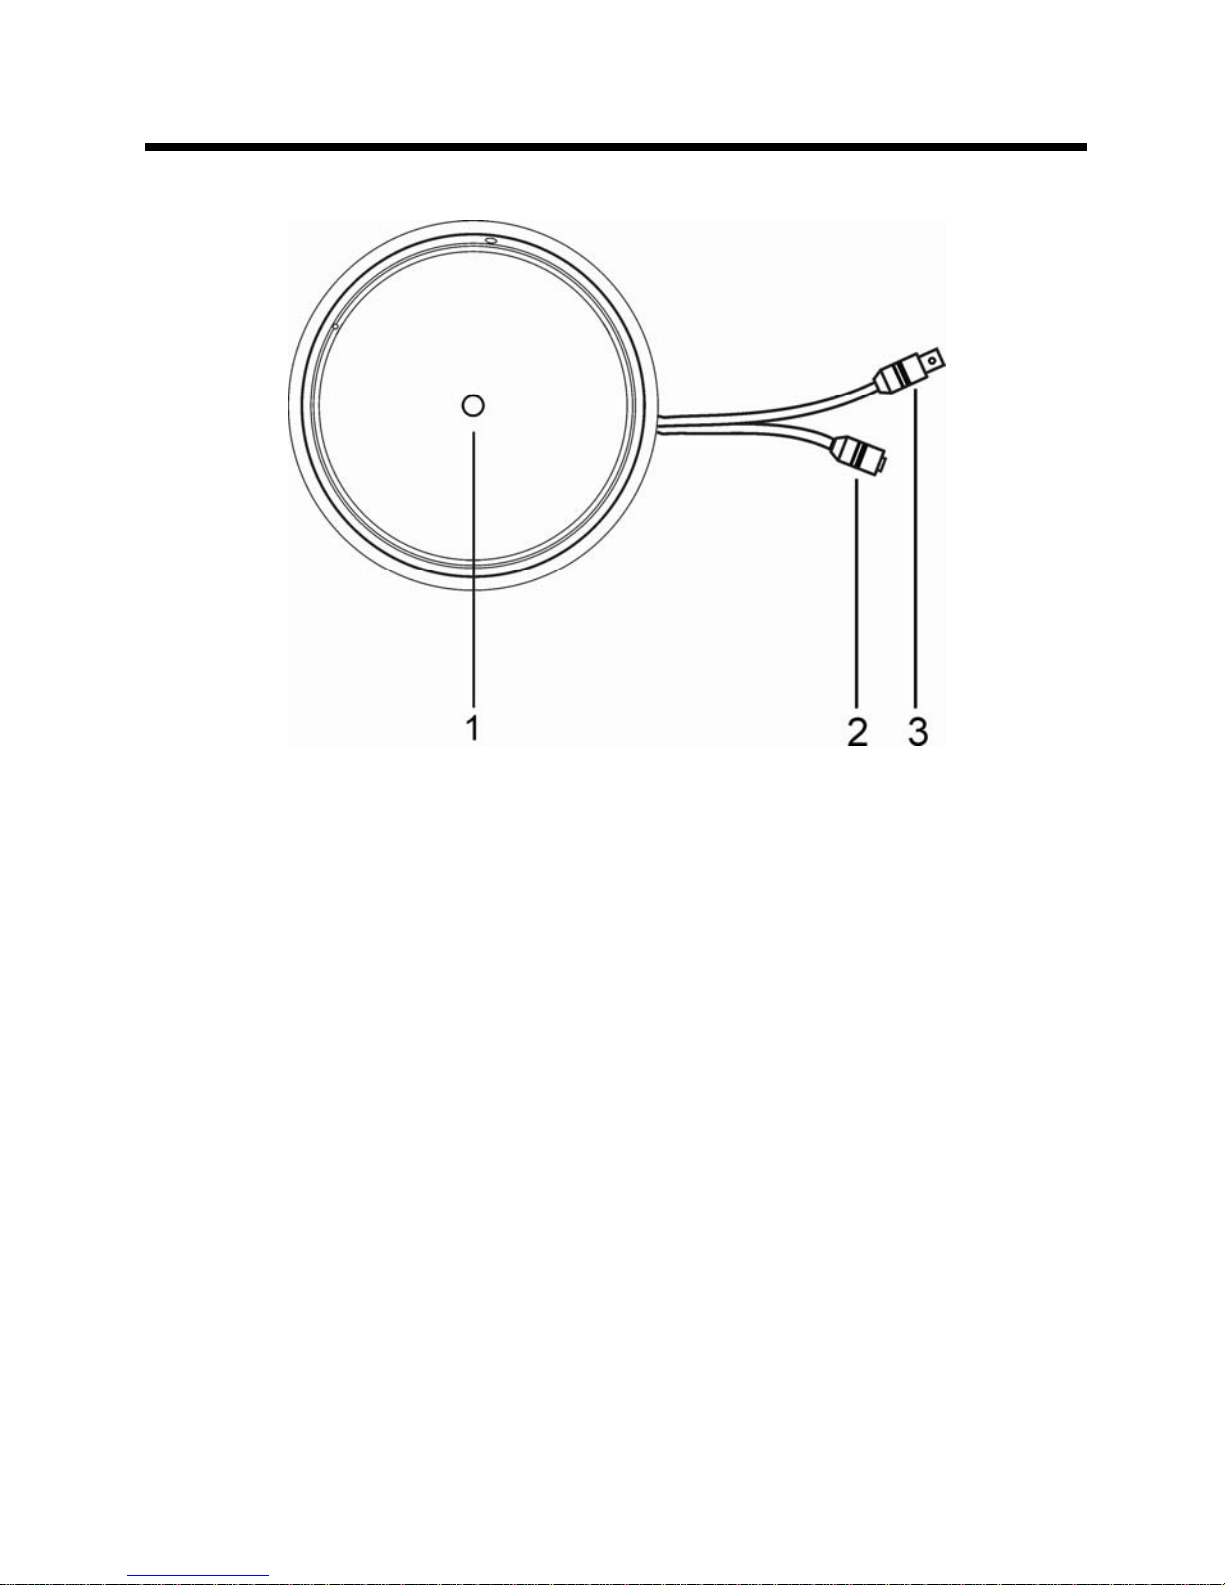
CAMERA CONNECTION
1. Lens : 2.6-6mm / 4-9mm/3.6mm fixed lens for wide area monitoring
2. Power : power source from a DC 12V
3. Video : BNC connector used to connect the camera to a monitor,
switcher.ect.
2
Page 9
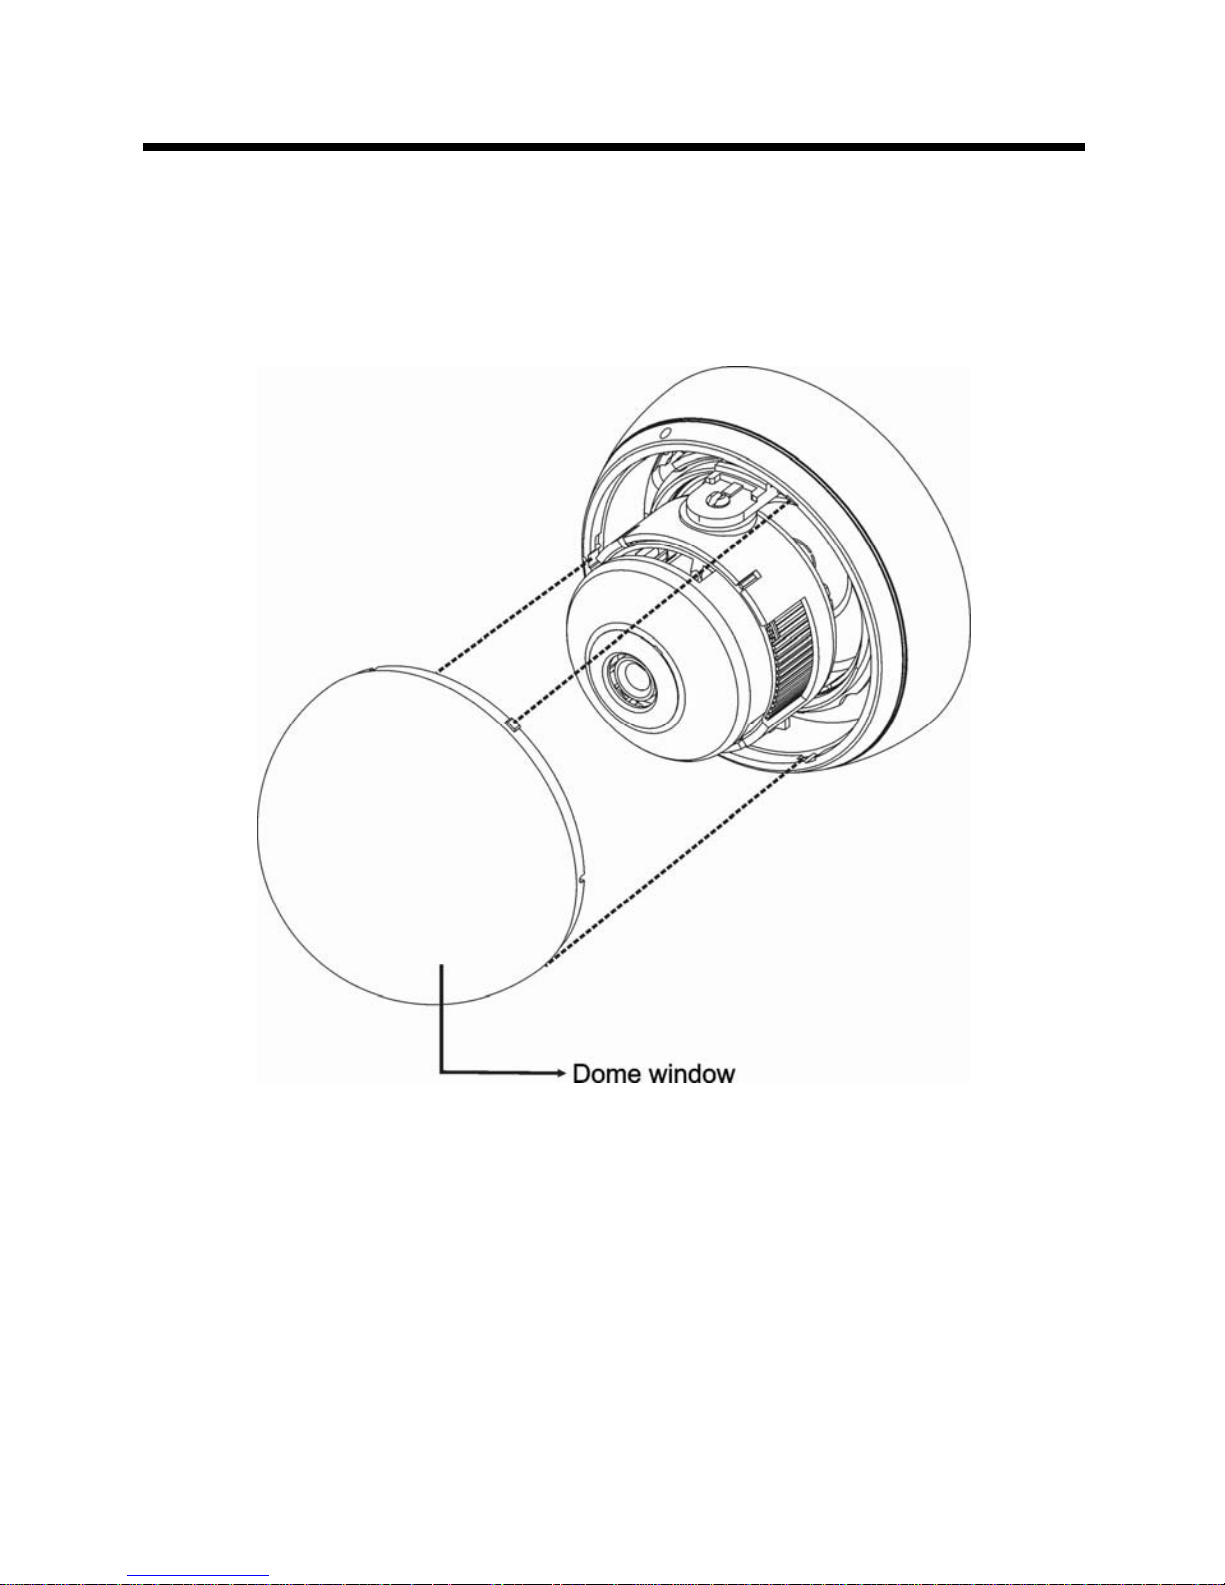
INSTALLATION
1.Make mounting holes and cable hole in the place (ceiling or wall) to which
this dome camera is installed using the Drilling guide label.
3
Page 10
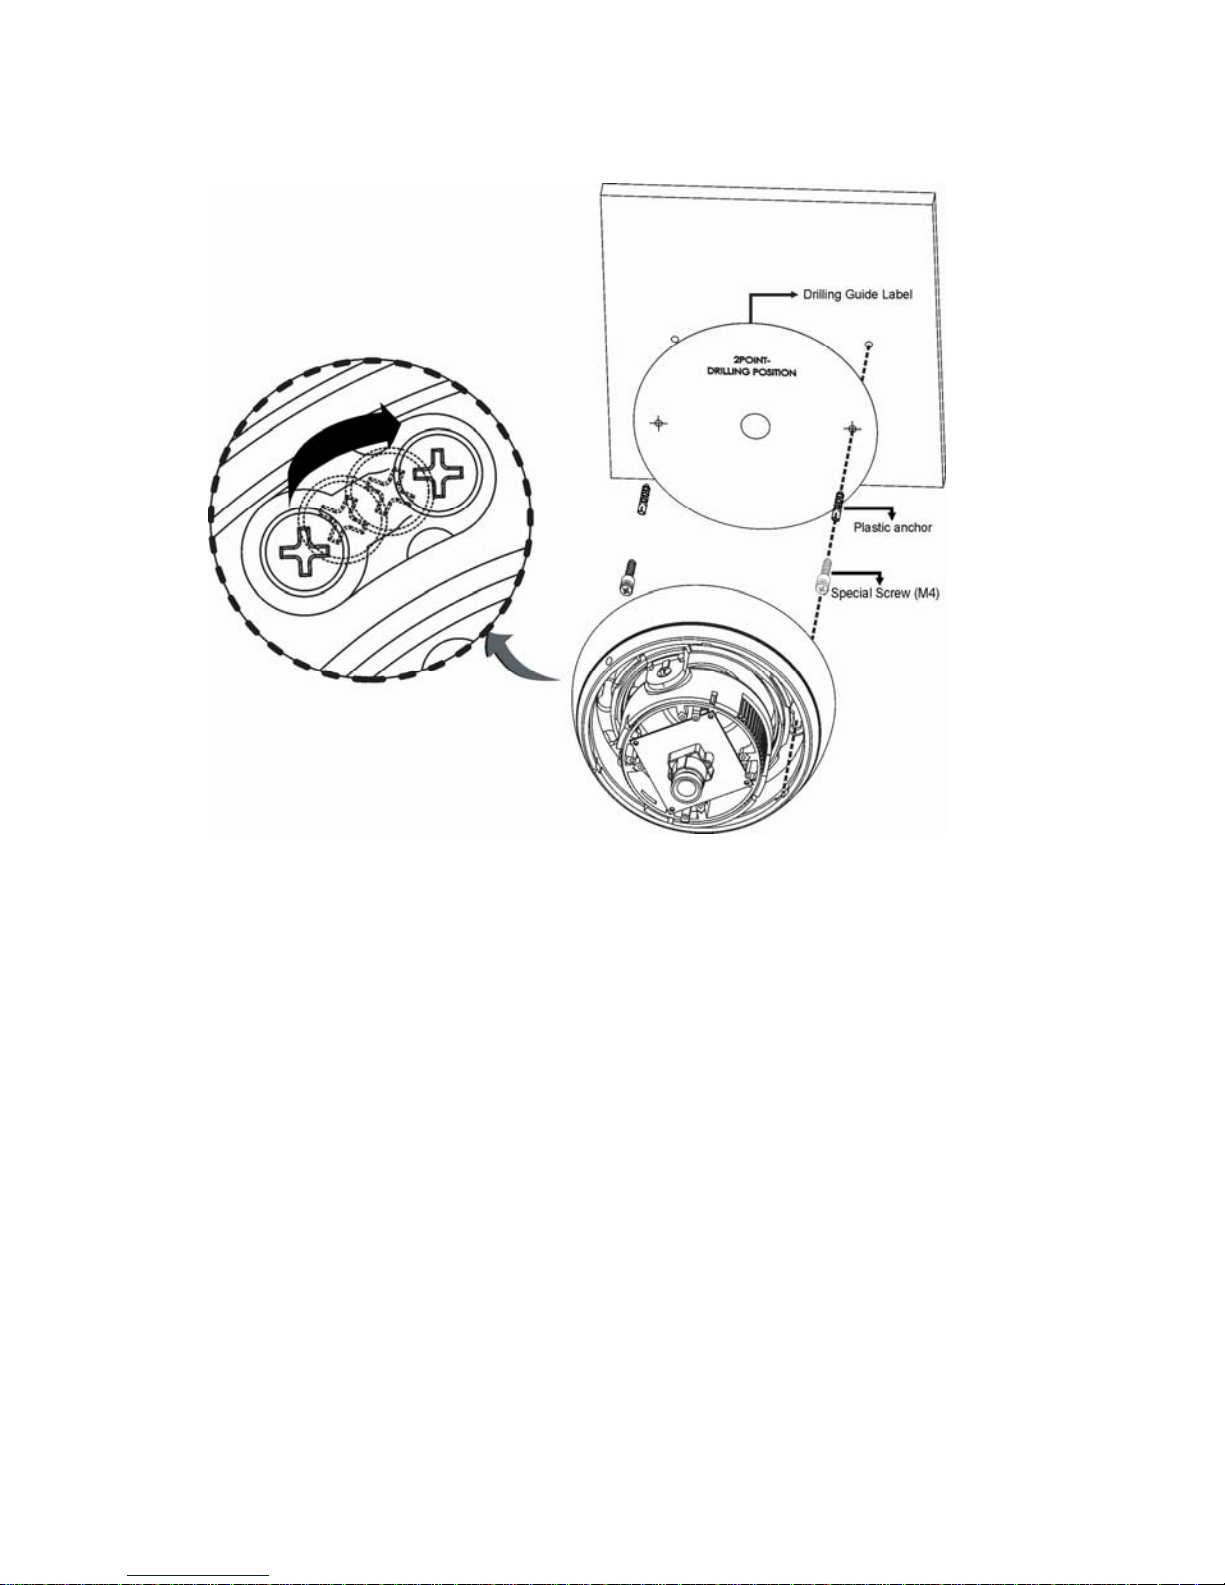
2. Turn open the dome window counterclockwise.
3.Fasten Mounting screws(2X) and align the dome camera with it like above
picture. Turn the dome camera to left direction about 16 degree.
4.The assembly of the dome window is reverse order of disjointing.
Finally, lock dome window with locking screw(M2X4) in a accessory kit.
4
Page 11
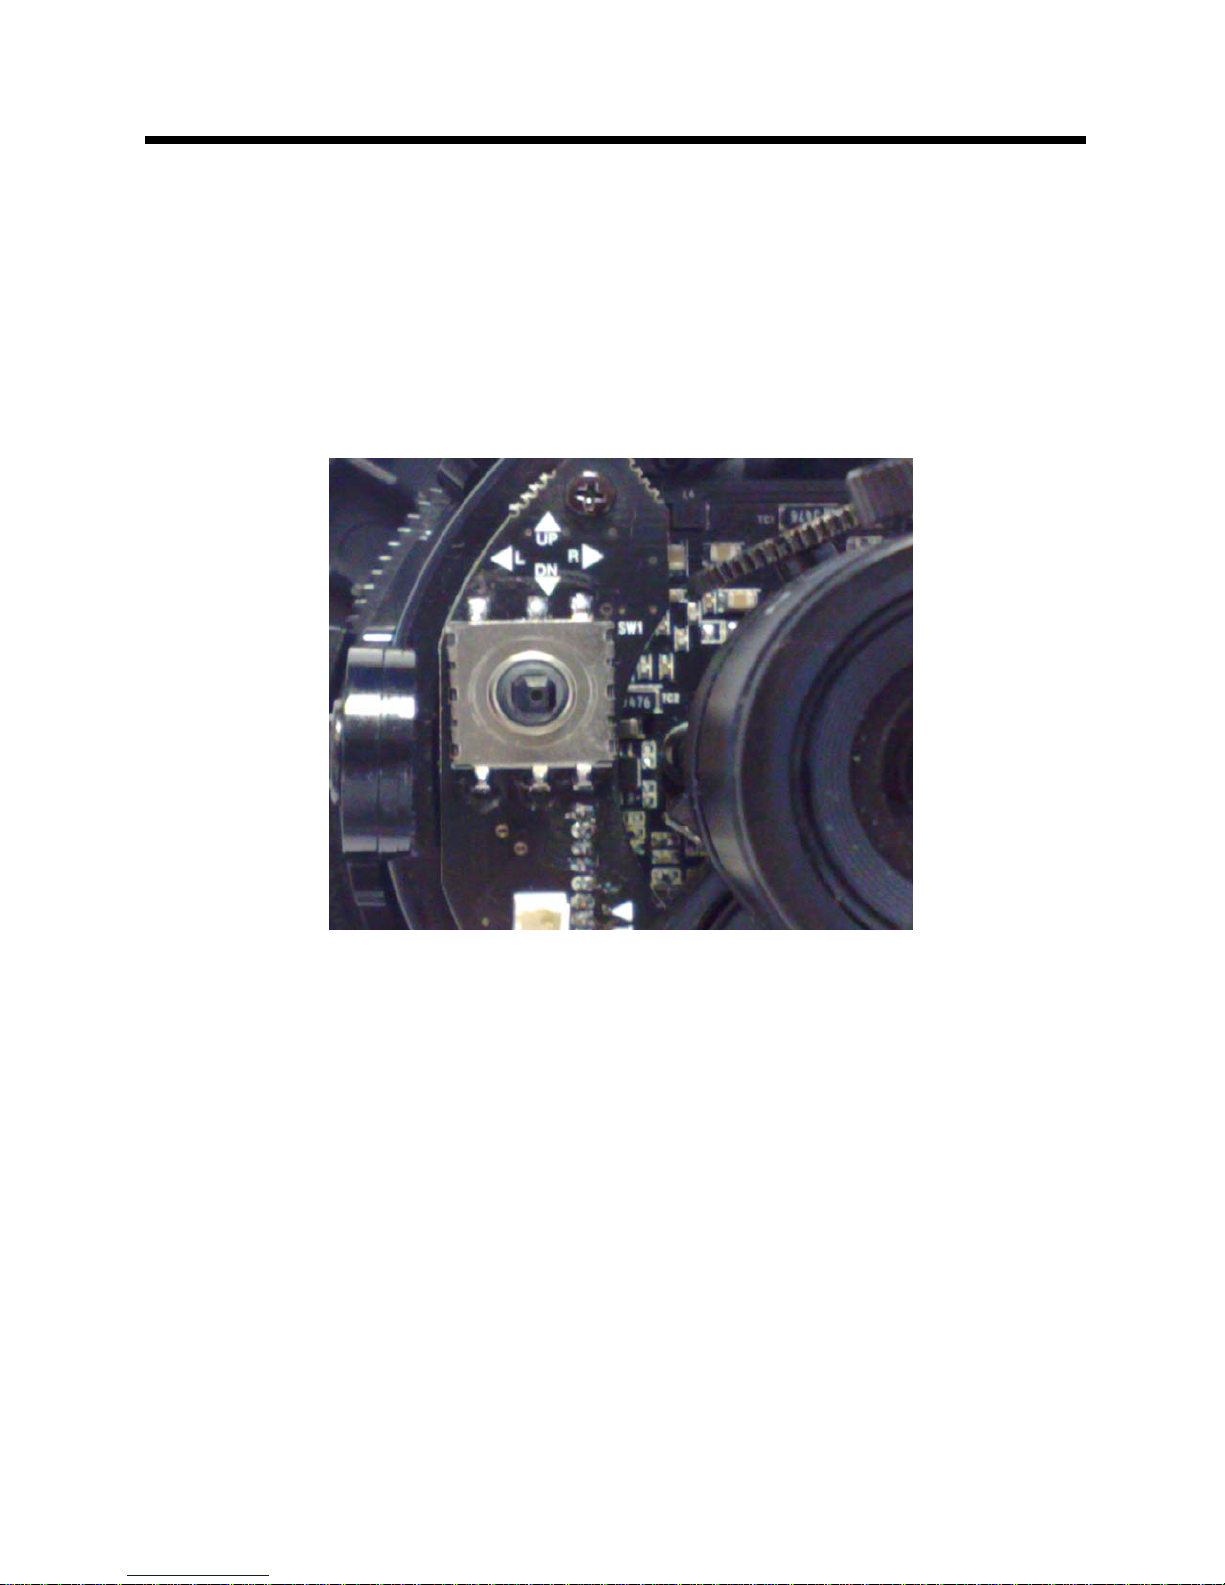
OSD ADJUSTMENT
The tact switch allows both navigation and changes to the OSD Menu. To enter into the
OSD menu push centrally on the joystick and navigate using the up, down, left and right
actions. If there is an arrow to the right of the menu function, this denotes that there is
an accessible sub menu function.
5
Page 12
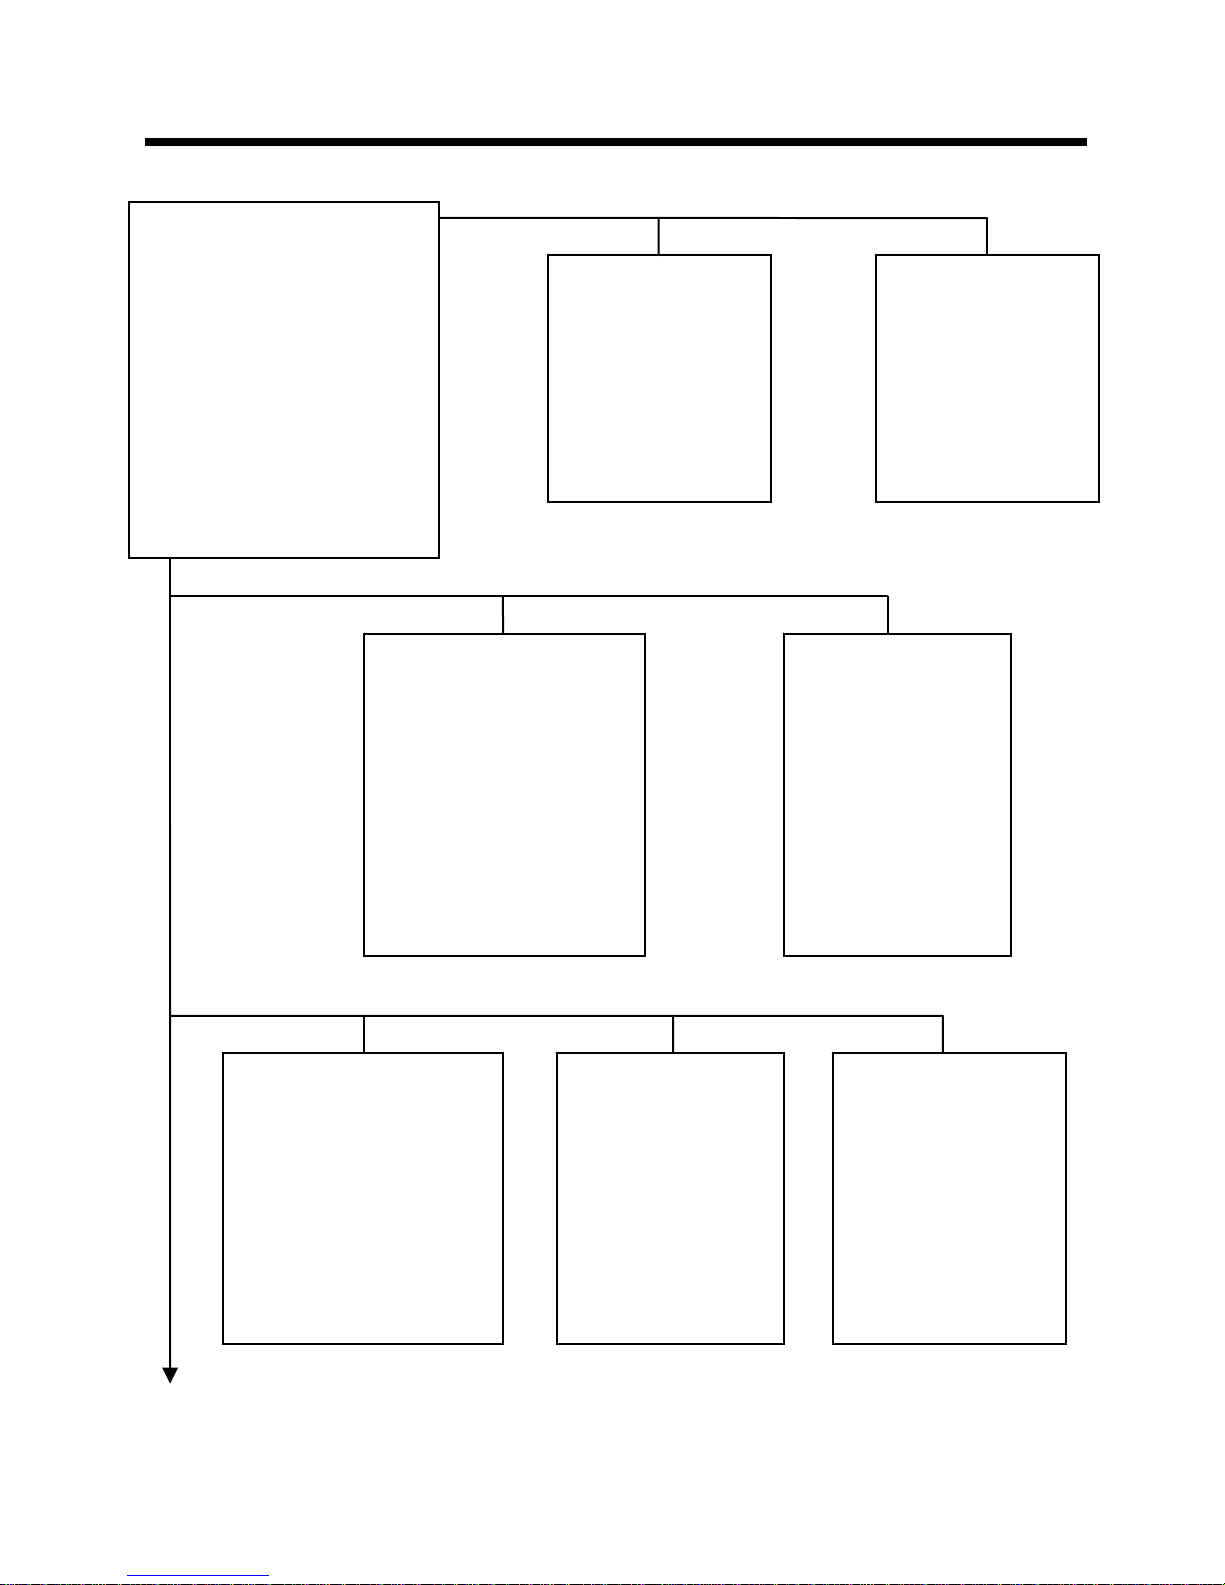
OSD MAIN MENU TREE
SETUP MENU (page 1)
LENS
SHUTTER/AGC
WHITE BAL
BACKLIGHT
PICT ADJUST
ATR
MOTION DET
NEXT (page2)
EXIT SAVE ALL
LENS
AUTO IRIS
MANUAL
RETURN
WHITE BALANCE
ATW
PUSH
USER 1
USER 2
ANTI CR
MANUAL
PUSH LOCK
RETURN
BACKLIGHT
BLC
HLC
RETURN
PICTURE ADJUST
MIRROR
BRIGHTNESS
CONTRAST
SHARPNESS
HUE
GAIN
SHUTTER/AGC
AUTO
MANUAL
RETURN
ATR
LUMINANCE
CONTRAST
MOTION DET
DETECT SENSE
BLOCK DISP
MONITOR AREA
AREA SELECT
6
Page 13
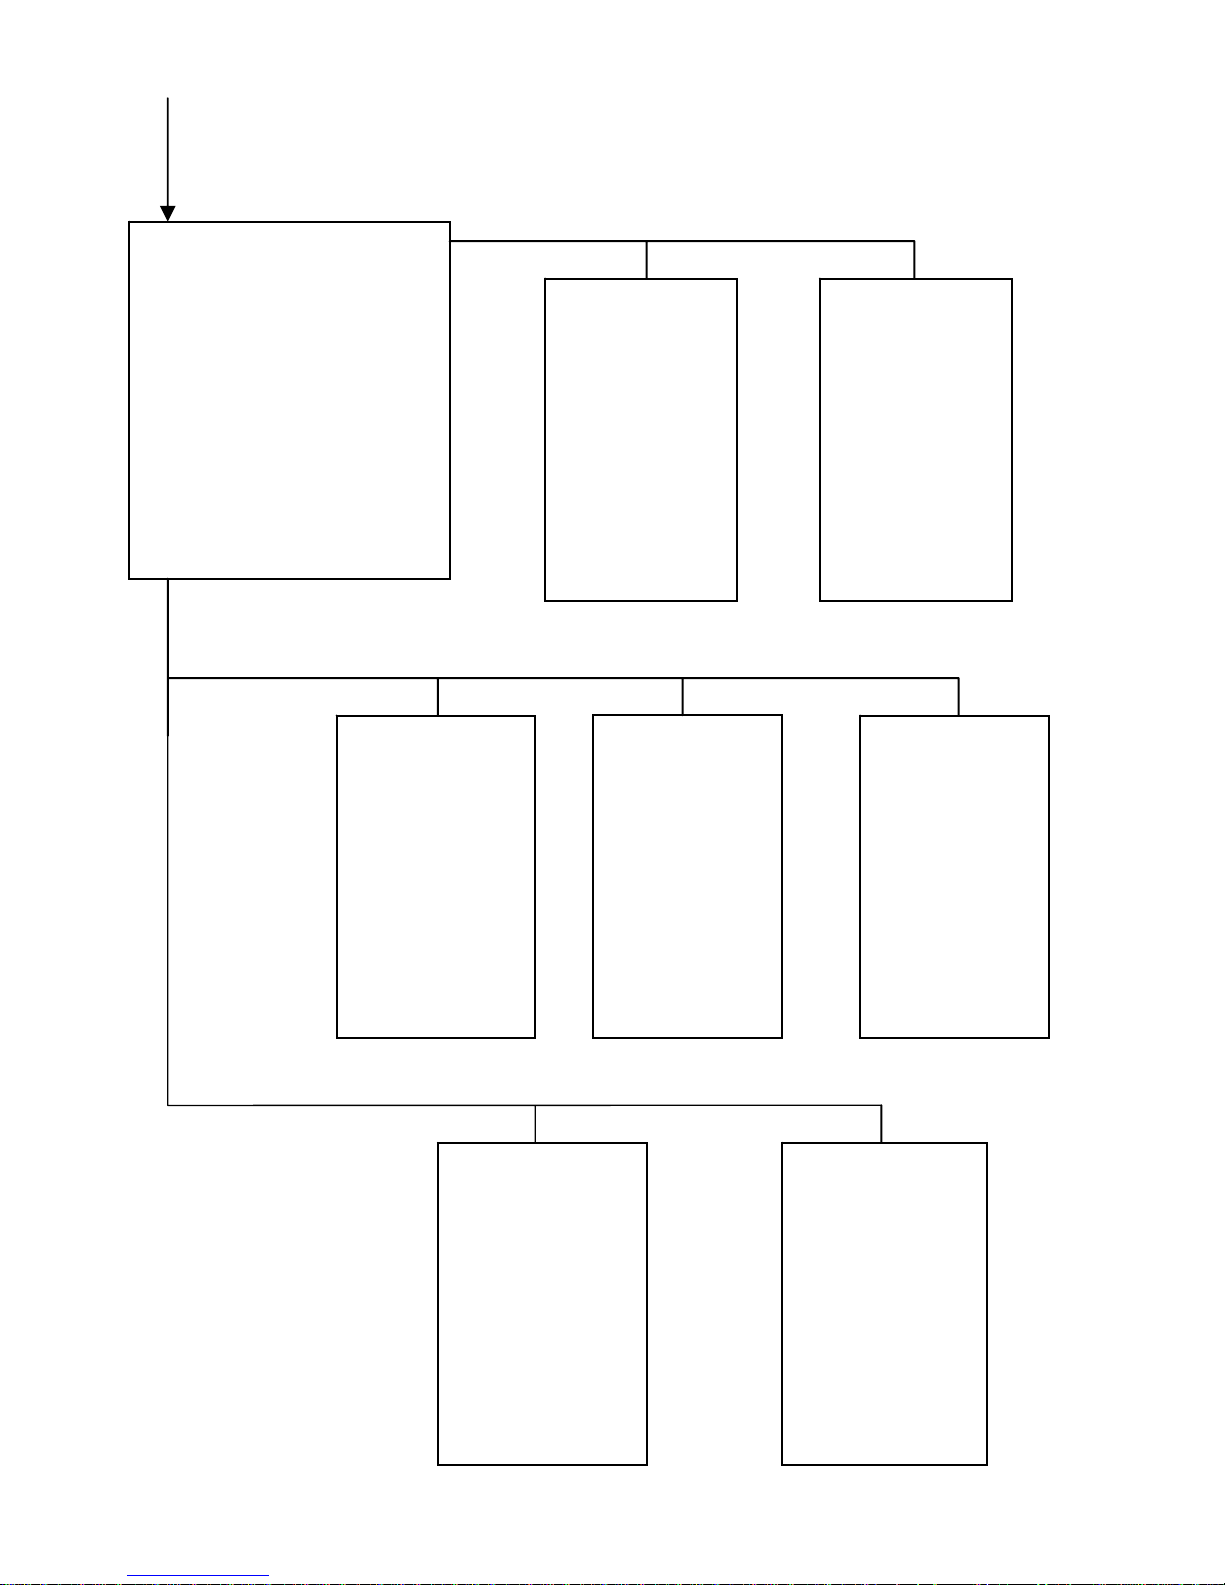
SETUP MENU (page 2)
PRIVACY
DAY/NIGHT
NR
CAMERA ID
SYNC
LANGUAGE
CAMERA RESET
BACK (page 1)
EXIT SAVE ALL
PRIVACY
AREA SEL
COLOR
TRANSP
MOSAIC
RETURN
DAY/NIGHT
AUTO
COLOR
B/W
RETURN
NR
NR MODE
Y LEVEL
C LEVEL
RETURN
CAMERA ID
(titling)
RETURN
LANGUAGE
ENGLISH
CHINESE
GERMAN
FRENCH
RUSSIAN
PORTUGUESE
SPANISH
SYNC
INT
RETURN
CAMERA
RESET
(return the
camera to
factory
defaults)
7
Page 14

OSD MENU SETTINGS
LENS
MANUAL
Manual lens only
AUTO
TYPE (DC / VIDEO)
Sets the type of mechanical iris
(Video lens is not supported)
MODE (OPEN / CLOSE / AUTO)
Sets the type of control to be applied over the mechanical iris.
SPEED (0 – 255)
Sets the convergence speed of the mechanical iris.
SHUTTER/AGC
AUTO
HIGH LUMINANCE
MODE (SHUT / SHUT+AUTO IRIS)
(only SHUT can be selected if LENS is in MANUAL mode)
BRIGHTNESS (0 ~ 255)
Adjusts the brightness
LOW LUMINANCE
MODE (AGC / OFF)
Auto Gain Control on or off
BRIGHTNESS (x0.25 / x0.50 / x0.75/ x1.00)
Amount of AGC applied in low lighting conditions
MANUAL
MODE (SHUT+ AGC / OFF)
Auto gain control
SHUTTER
Select the shutter speed (1/50, 1/120, 1/250, 1/500, 1/1000, 1/2000, 1/4000,
1/10000)
AGC
Sets the AGC gain applied [dB] for ME (manual exposure)
(6, 12, 18, 24, 30, 36, 42, 44.8dB)
8
Page 15

WHITE BAL
ATW (Auto Trace White balance)
SPEED (0~255)
Adjusts the pull-in speed of ATW.
DELAY CNT (0~255)
Sets the time-based hysteresis of ATW.
ATW FRAME (X0.5/X1/X1.5/X2)
Sets the pull-in frame magnification.
ENVIROMENT (indoor/outdoor)
Preset for either indoor or outdoor applications of the ATW
PUSH
Wide range Auto White Balance mode (AWB)
USER1 & 2
Both USER 1 & 2 can be individually set up for specific applications The gain
values for the outdoor fixed mode are used as the adjustment items of USER1
on the internal OSD menu.
B-GAIN (0~255)
R-GAIN (0~255)
ANTI CR
Color rolling suppression
MANUAL
The B and R gain values for manual WB are set on this screen.
LEVEL (14~57)
PUSH LOCK
PUSHLOCK is selected and the Enter input is active
BACKLIGHT
Sharpens subjects with backlight (OFF / BLC / HLC)
PICT ADJUST
MIRROR (ON/OFF) Horizontally inverts image.
BRIGHTNESS (0~255) Sets the screen brightness.
CONTRAST (0~255) Sets the screen contrast.
SHARPNESS (0~255) Sets the screen sharpness.
HUE (0~255) Adjusts the hue.
GAIN (0~255) Adjusts the gain.
9
Page 16

ATR
ATR (Adaptive Tone Reproduction) allows adjustment of the image to assist
with widely contrasting scenes of view.
LUMINANCE (LOW/MID/HIGH)
Sets the extent of the luminance compression
CONTRAST (LOW/MIDLOW/MID/MIDHIGH/HIGH)
Sets the extent of the contrast enhancement
MOTION DET
DETECT SENSE (0~127)
Sets the motion detection sensitivity (0=low sensitivity, 127=high sensitivity)
BLOCK DISP (OFF / ON / ENABLE)
Applies a Motion block trace in the selected area. To define the area, select
Enable and push centrally on the joystick. Use the Joystick to navigate to the
blocks you want to Disable and not include in motion trace. To return to the
menu, push and hold central joystick for 2secs and release.
MOTION AREA (ON/OFF)
Enables/disables the motion detection
AREA SEL (1~4)
Selects the motion detection area
TOP (0~244)
0=top
BOTTOM (0~244)
244=bottom
LEFT (0~474)
0=left
RIGHT (0~474)
474=right
PRIVACY
AREA SEL (1~4)
Selects the motion detection area
TOP (0~244)
0=top
BOTTOM (0~244)
244=bottom
LEFT (0~474)
0=left
RIGHT (0~474)
474=right
10
Page 17

COLOR (1~8)
Sets the colors of the privacy zones.
TRANSP (0.00/0.50/0.75/1.00)
Sets the transparency of the privacy zone area if color is selected.
MOSAIC (ON/OFF)
Sets the mosaic function as the privacy to ON or OFF.
(Note: when ON, transparency needs to be set at 0.00 and privacy zones
can only be 1 color OR mosaic and not mixed)
DAY/NIGHT
AUTO
BURST (ON/OFF)
Allows the color burst signal in monochrome to be removed if required.
DELAY CNT (0-255 secs)
Sets the hysteresis time before switching between color/mono &
mono/color, to reduce the ‘hunting’ effect.
DAY->NIGHT (0-255)
Sets the threshold for switching from day to night operation.
NIGHT->DAY (0-255)
Sets the threshold for switching from night to day operation.
COLOR (color only operation)
B/W (monochrome only operation)
BURST (ON/OFF)
Allows the color burst signal in monochrome to be removed if required.
IR OPTIMIZER (OFF / ON)
Smart IR mode OFF or ON
MODE (ONLY IR OPTIMIZER ON, AUTO / CENTER)
Auto : Histogram integration mode
Center : Center priority mode
LEVEL (ONLY IR OPTIMIZER ON, 0~31)
NR (2D-DNR)
This is used to remove noise from the image in low light conditions when
AGC is applied.
NR MODE (OFF, Y, C, Y/C)
Sets the 2D NR filter mode.
Y LEVEL (0-15)
Sets the Y filter (Luminance) strength.
C LEVEL (0-15)
Sets the C filter (Chrominance) strength.
11
Page 18
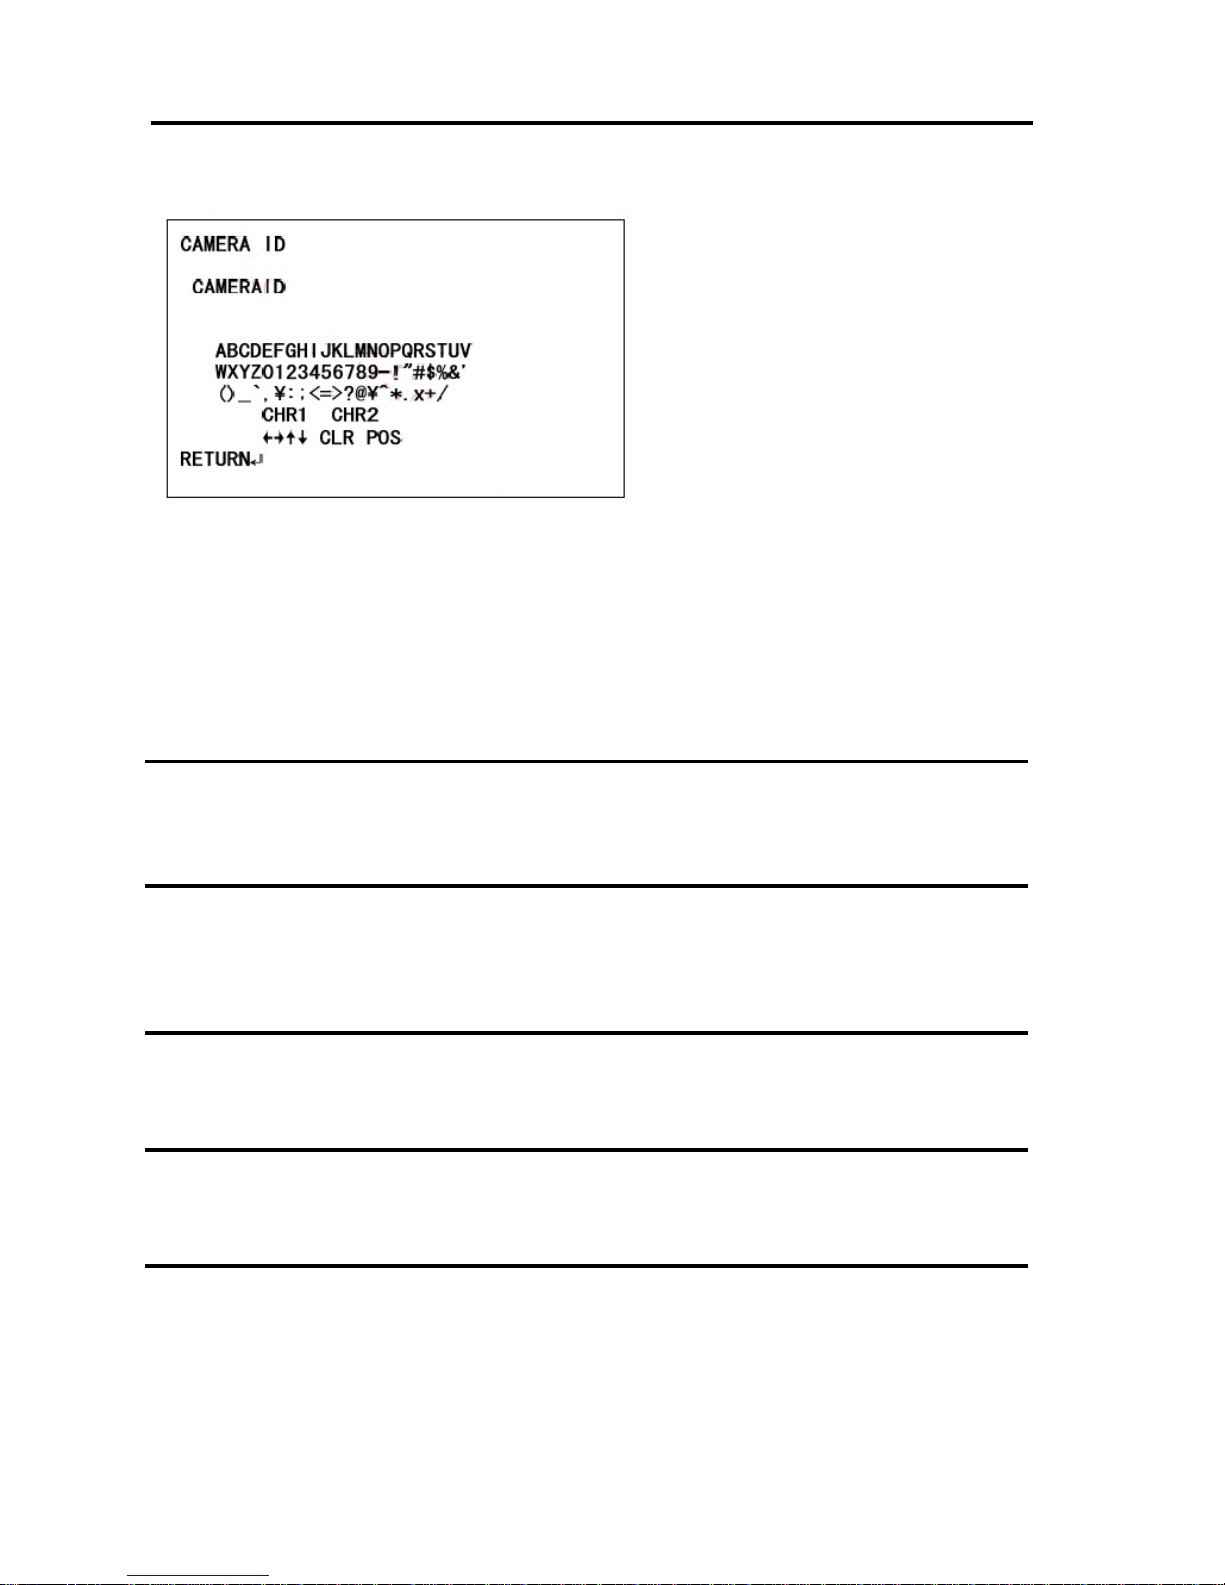
CAMERA ID
Sets the camera ID to ON or OFF. A title of 26 characters per line can be
applied.
CHR1
Allows you to edit line 1
CLR
Inserts a space
POS
Allows you adjust the location of the camera ID title display.
SYNC
INT - This mode is necessary for using the internal synchronization.
LANGUAGE
LANGUAGE select between:
English, Japanese, German, French, Russian, Portuguese & Spanish.
CAMERA RESET
CAMERA RESET - Returns the camera to the factory default settings.
SAVE ALL
SAVE ALL - Saves all the changes made in the menu.
EXIT
Use the joystick to navigate
the cursor. Pushing centrally
on the joystick will allow
selection of that character.
The arrows at the bottom
allow you to move the cursor
without changing the
character.
EXIT – Exits the menu and does not save changes made.
12
Page 19
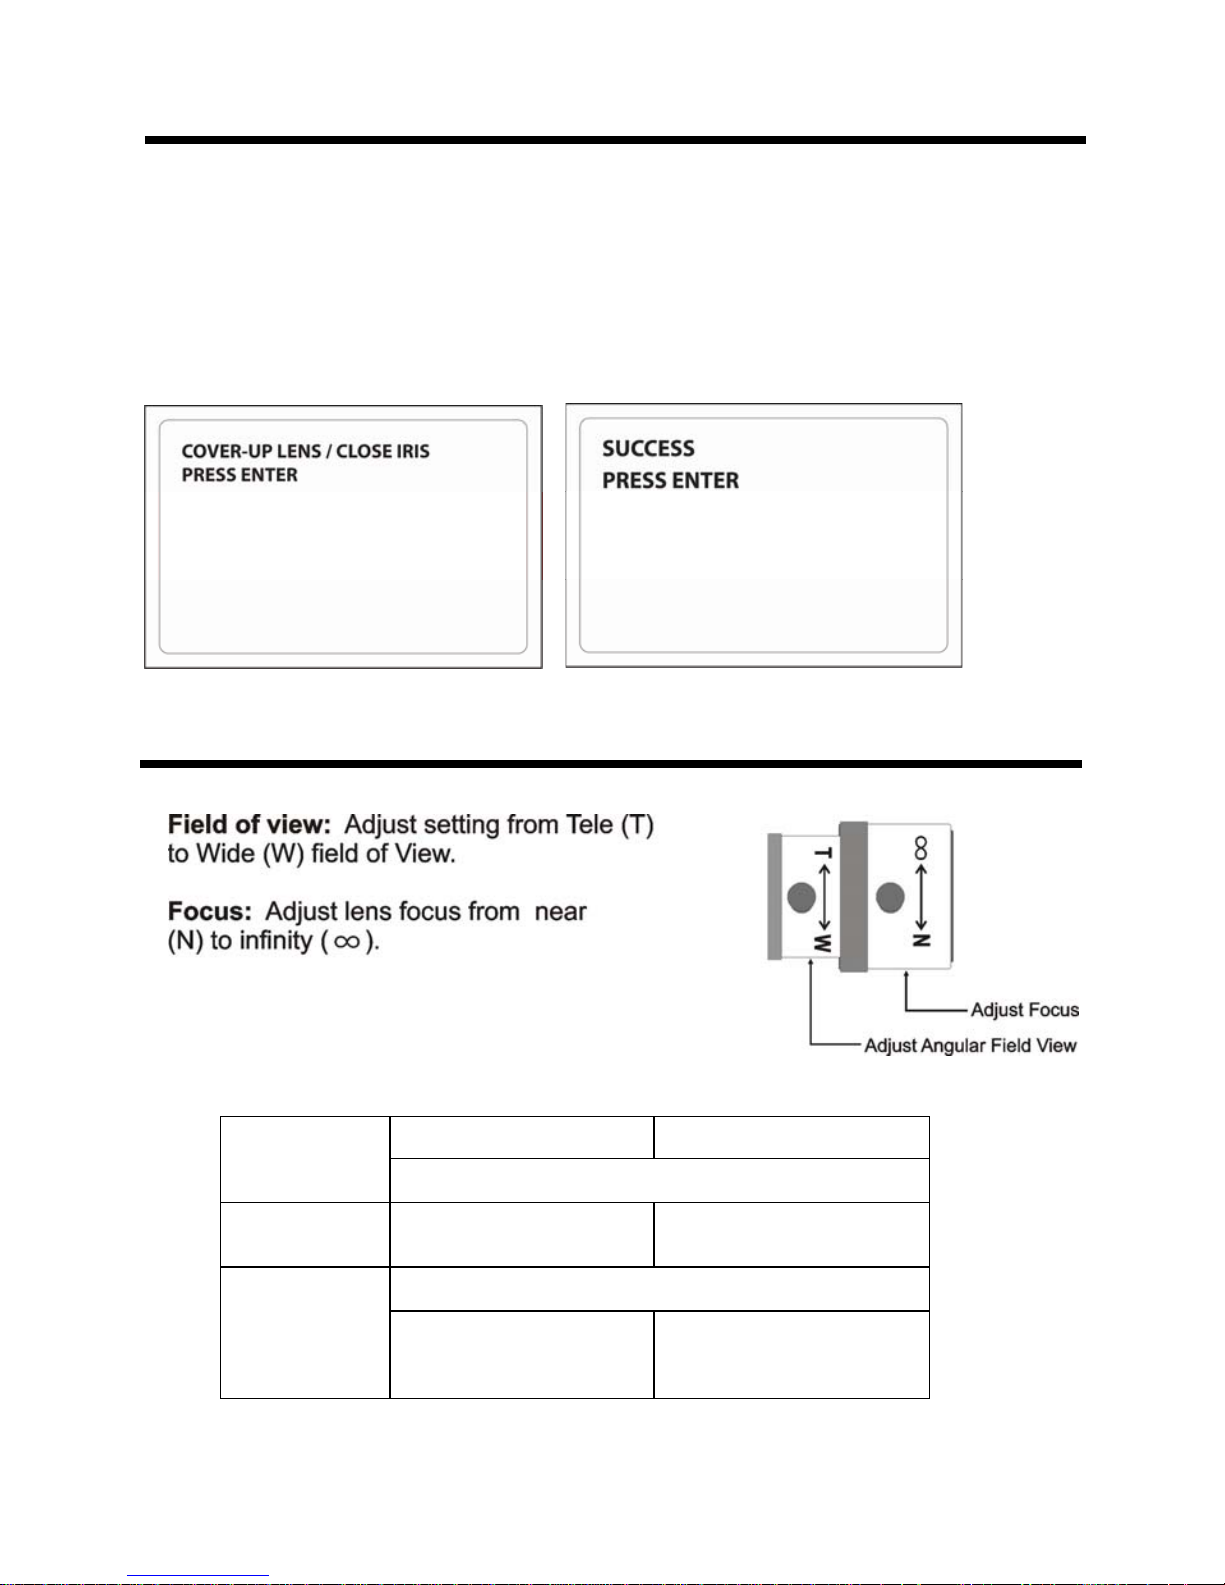
AUTO WHITE DEFECT
Push the left button for 5 seconds and enter Auto white defect menu.
Cover the lens and Enter for starting.
If white defects are over 65pcs, the camera is faulty and auto defect is useless.
Over 70'C Auto white defect can't be activated.
LENS ADJUSTMENT (OPTIONAL VARIFOCAL LENS)
Lens 2 ~ 6mm 4 ~ 9mm
Image Size 1/3’’ CCD
Focal Length
2.6 ~ 6.0mm ± 5% 4.0 ~ 9.0mm ± 5%
HORIZONTAL
2.6mm : 105.8°
Angular Field
of View
6mm : 47.4°
4mm : 70.8°
9mm : 31.4°
13
Page 20
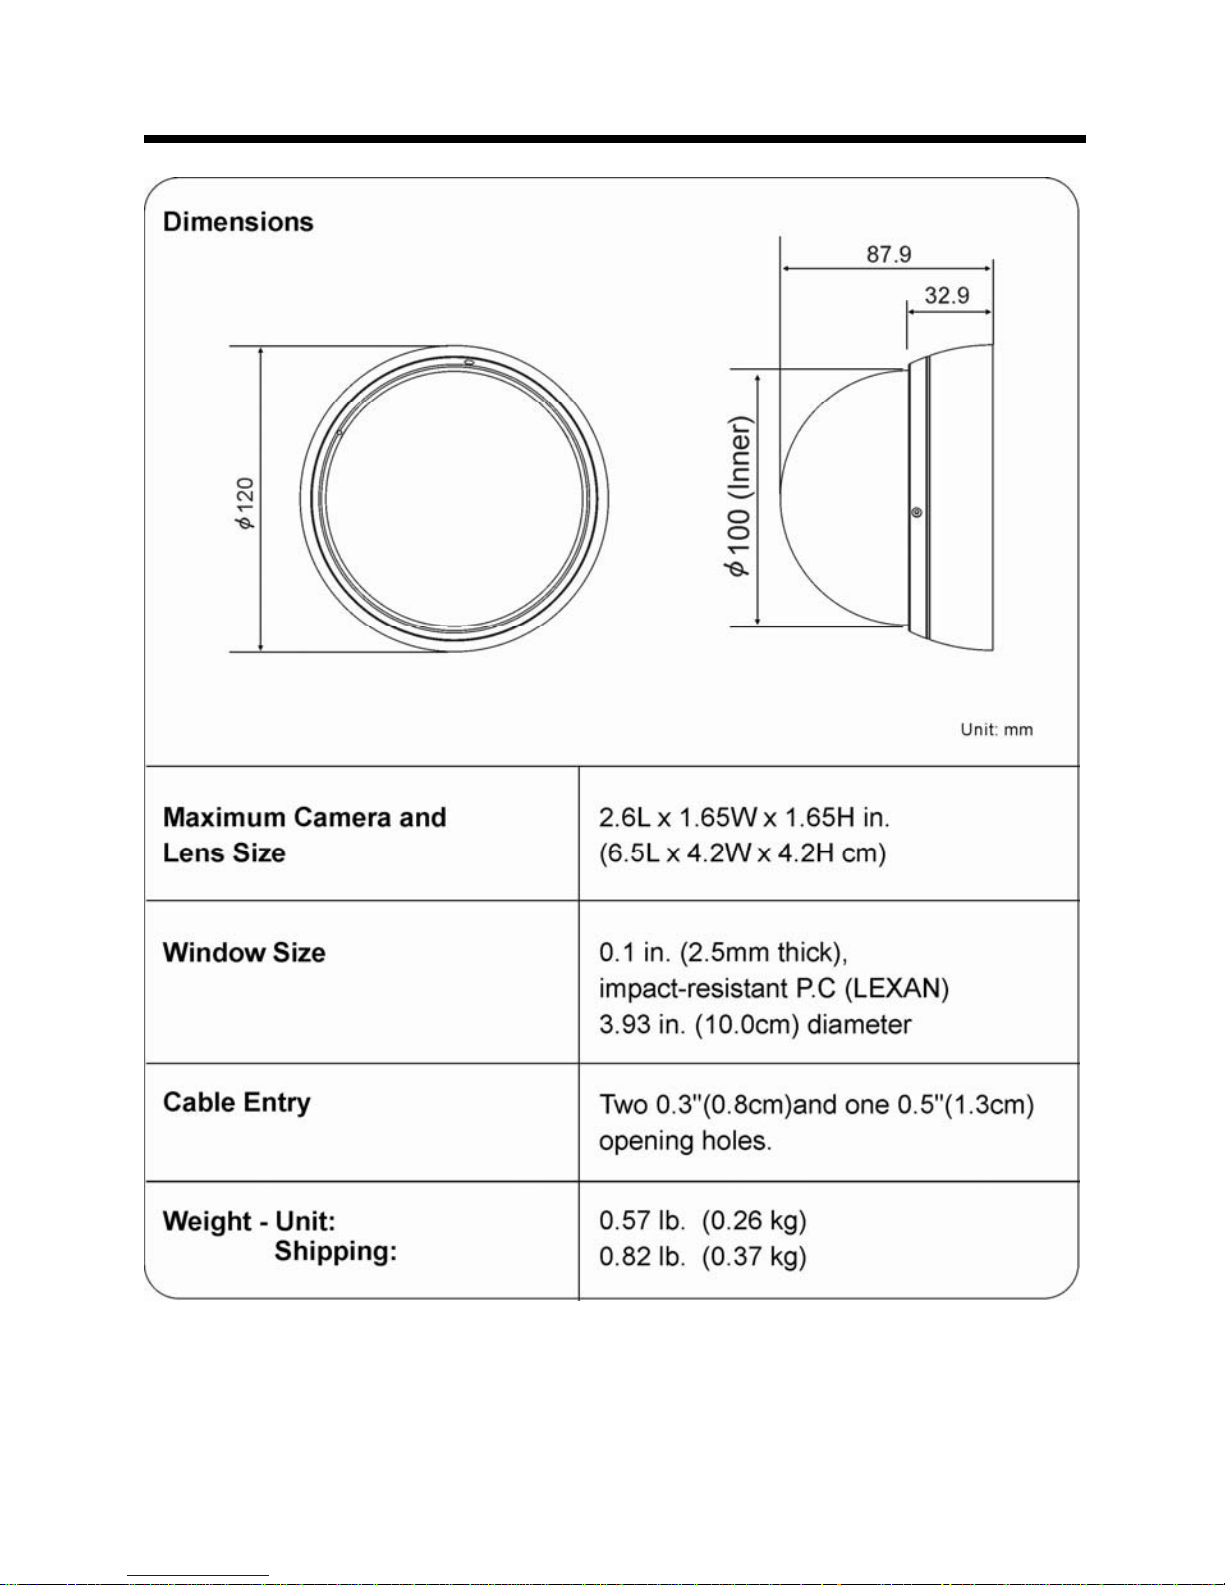
EXTERNAL DIMENSION
14
Page 21
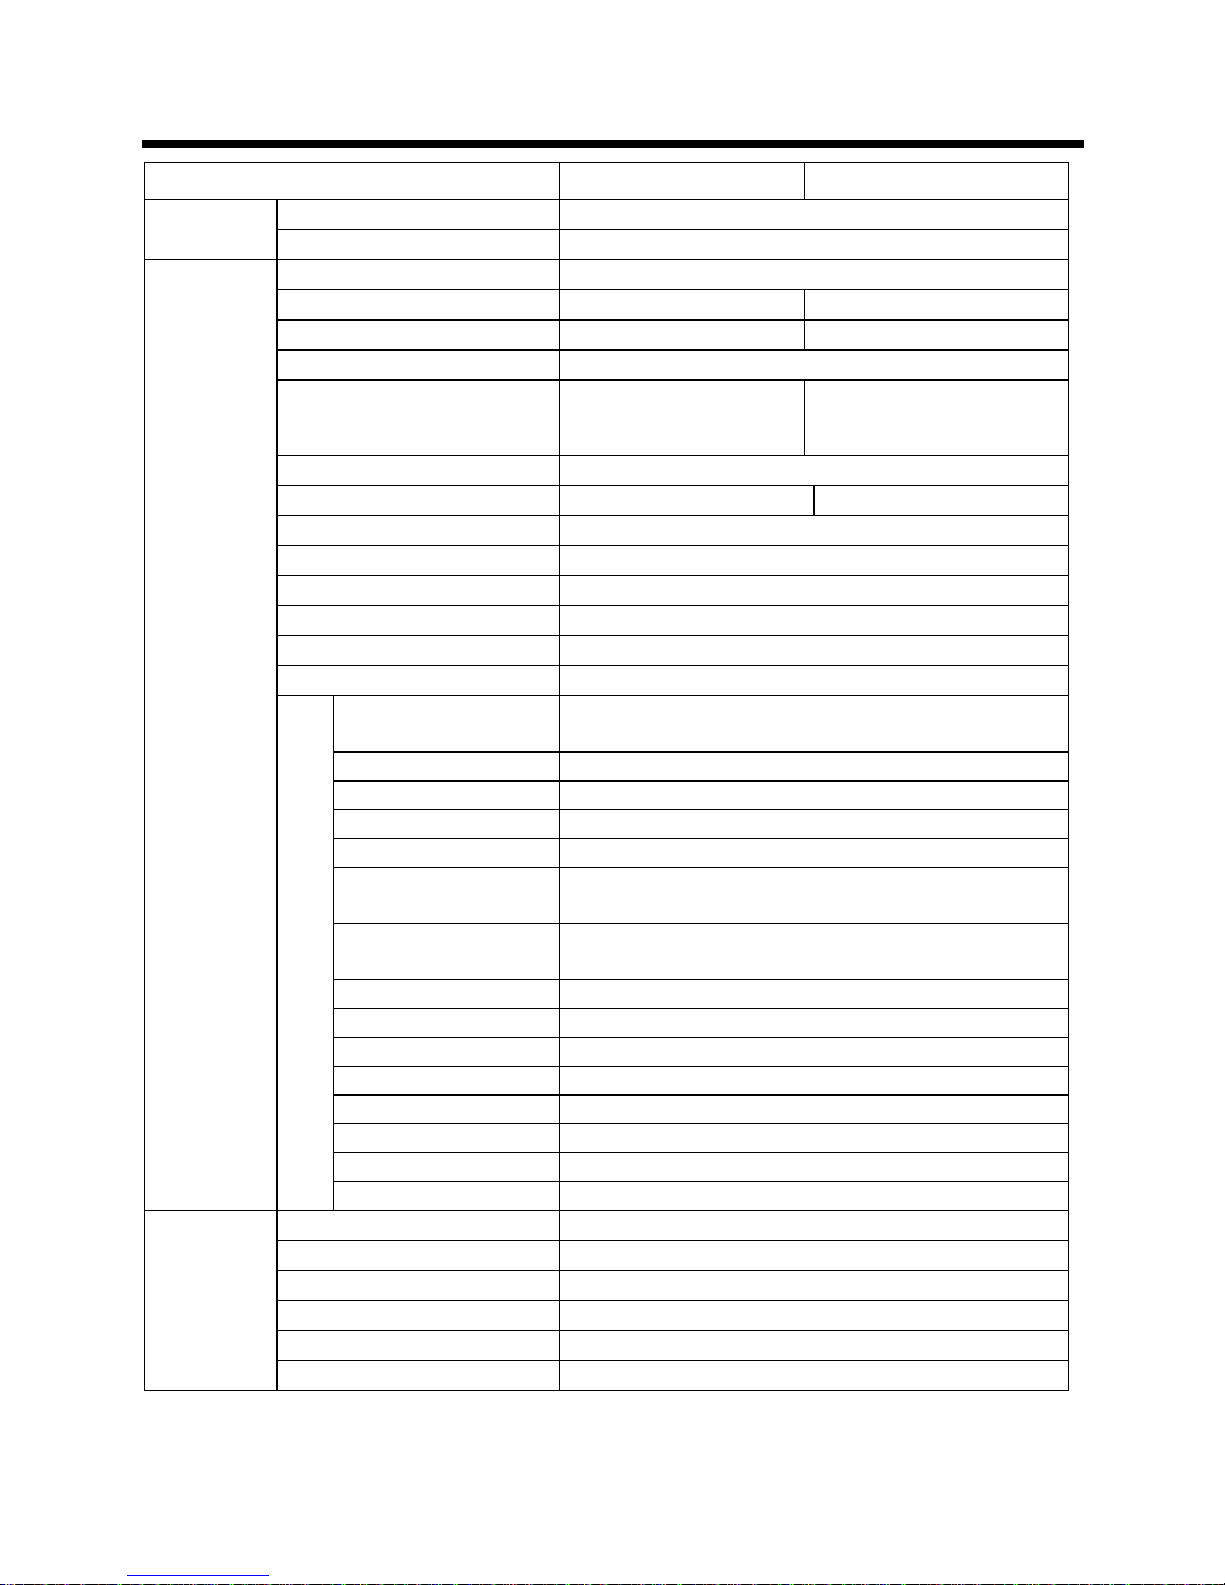
SPECCIFICATIONS
MODEL NTSC PAL
Power source DC 12V ± 10%
Power
Power consumption 2.0 Watts ( 160mA )
Image sensor 1/3″ SONY EXview HAD CCD II
Total pixels 1020(H) x 508(V) 1020(H) x 596(V)
Effective pixels 976(H)x494(V) 976(H)x582(V)
Scanning system 2:1 Interlace
Scanning frequency
15.734KHz(H)
x 59.94Hz(V)
15.625KHz(H) x 50Hz(V)
Sync. system Internal
Electronic Shutter 1/60 ~ 1/10,000 sec 1/50 ~ 1/10,000 sec
Resolution 650TVL
Min. illumination Color 0.32Lux @ f1.6 (0.18Lux @f1.2)
Video output 1.0Vp-p (75 ohm, composite)
S/N ratio 50 dB (AGC OFF)
Lens 2.6-6mm(F1.6-2.4) / 4-9mm(F1.6-2.4) / 3.6mm fixed(F3.0)
Camera Control Internal OSD Key
ATR (Adaptive Tone
Reproduction)
LUMINANCE(L/M/H), CONTRAST(L/LM/M/MH/H)
Backlight OFF / BLC / HLC
Day & Night Color / BW / Auto (Digital D/N)
MD (Motion Detection) "On (4 areas) / Off Adjustable Size & Sensitivity"
PM (Privacy Masking) 0 ~ 4 zone
WB (White Balance) ATW / PUSH / USER1 / USER2
/ ANYICR / MANUAL / PUSH LOCK
AGC (Auto Gain
Control)
On / Off
Exposure Auto Iris / Auto Iris + Electronic Shutter
Brightness 0 ~ 255 steps
Contrast 0 ~ 255 steps
Sharpness 0 ~ 255 steps
HUE 0 ~ 255 steps
Gain 0 ~ 255 steps
NR(Noise Reduction) OFF / Y / C / Y, C
General
F
U
N
C
T
I
O
N
Mirror ON / OFF
Power input DC Jack
Video output BNC connector
Operating temperature -10ºC ~ +50 ºC
Operating humidity 0~96% (non-condensing)
External dimension 120 x 88 mm
Connector
& etc
Weight 240g
15
Page 22

3
Page 23

3
Page 24

3
Page 25
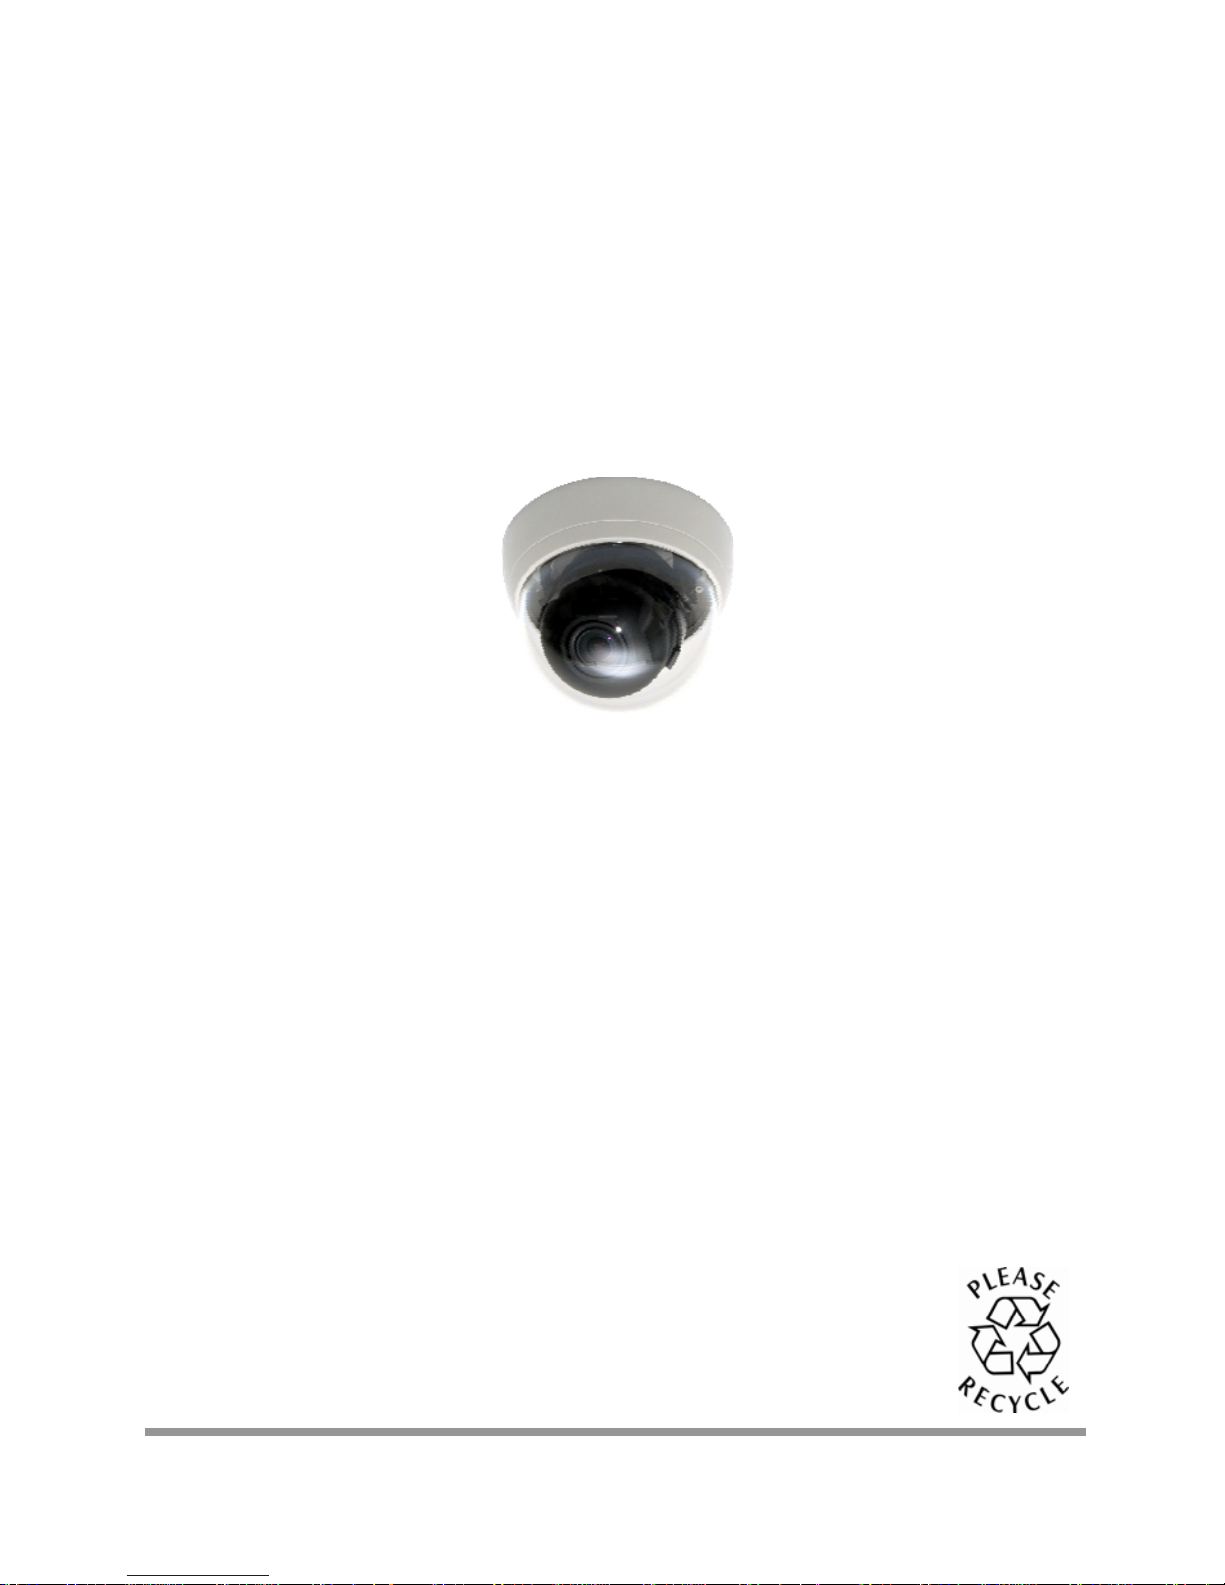
DNR Super High Resolution
Day & Night Color Camera
PRINTED IN KOREA 50303290B
4
 Loading...