

DOME COVER
LED COVER
SCREW
CAMERA MODULE
SCREW
CABLE
DISK
BASE
CONTROL PCB
PUSH BUTTON
HARNESS
SCREW
DUAL POWER PCB
Ø100
Ø130.8
Ø109
48.1
101
SUPER SUPREME RESOLUTION
3-AXIS D&N IR DOME CAMERA
CS-PD6600
MANUAL
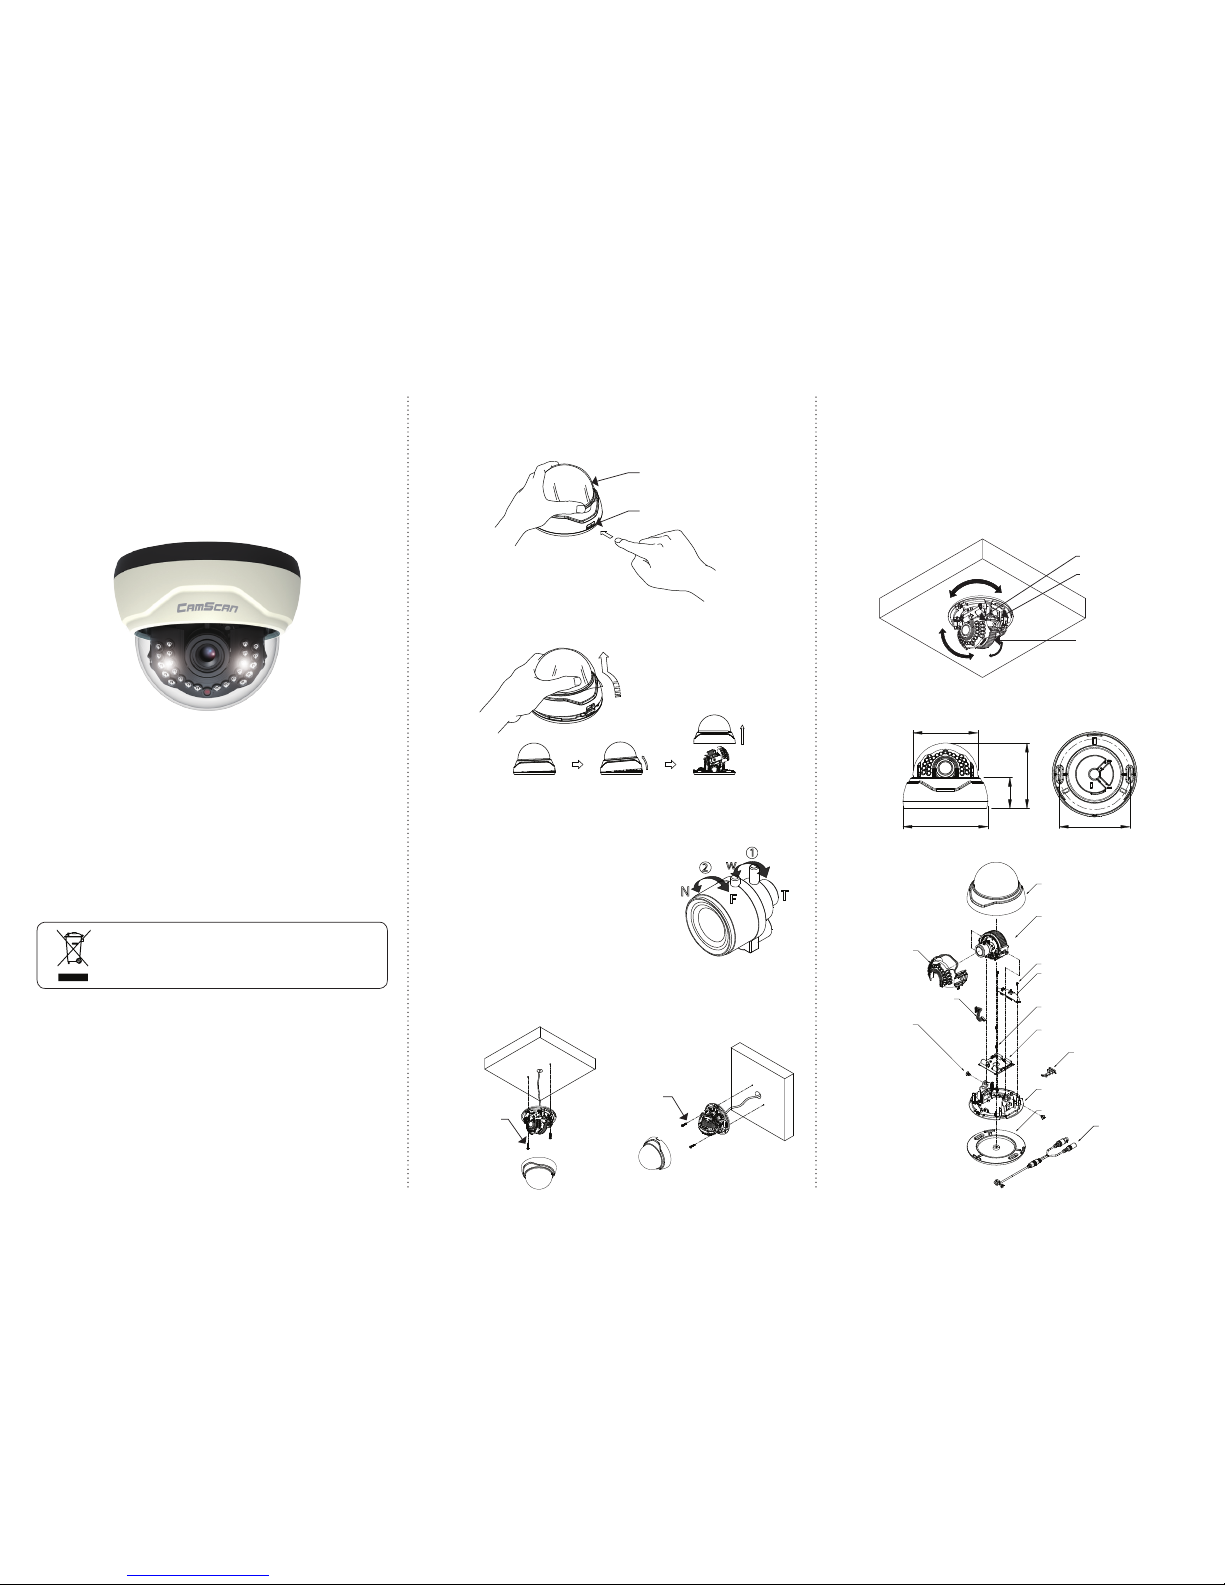
1. Opening the dome : Pushing the latch button.(Remove the
protectionsheet after installing.)
◐ HOW TO INSTALL
2. Removing the dome : Lift the dome. When you push the latch button,
it is unlocked and you can lift the dome.
PROTECTION SHEET
LATCH BUTTON
SCREW TP1
3.5x20 2EA
SCREW TP1
3.5x20 2EA
R
L
U
D
ROTATION
LENS COVER
DISK
CAMERA
HOLDER
1. SONY Effio-E2 DSP adopted
2. 25M range visible in total darkness with 24pcs of IR LEDs.
3. Adopted 2-DNR technology, It reduces noise efficiently in low light
condition.
4. ATR(Adaptive Tone Reproduction)
5. Day & Night function
6. Super Supreme Resolution(700 TVL - Color)
7. Multi function : High Light Mask, Motion Detection, Privacy Mask,
efect Pixel Correction, Mirror
8. Multi-language full OSD support
◐ FEATURES
◐ DIMENSION
◐ ASSEMBLY
1. Do not install the camera outdoors.
2. Choose an ideal location for the camera, since a camera unit must
be protected against vibration.
3. Be careful not to scratch the camera unit, especially lens or dome
cover.
4. Use the camera within the temperature.(-45℃~50℃)
5. Avoid any direct sun light toward the lens.
6. Use the AC adaptor 12V DC, 1A regulated. Dual voltage product
can use 24V AC, 1A adaptor.(option)
◐ PRECAUTION
If the product is to be put out of operation definitively,
take it to a local recycling plant for a disposal which
is not harmful to the environment.
3. Camera installation :
(1) Fix the camera set with the supplied screws on ceiling or wall
mount. If you don't use supplied screws, the camera may fall off.
(2) Please refer to '4. Camera angle
adjustment' regarding adjust camera
angle.
(3) Lens adjustment(Vari-focal Lens only)
After opening the LED cover,
① By turning the "Tele-Wide" knob, you
can access a range of focal lengths
within specified limits.
② Since then, by turning the "Near-Far"
knob, you can set the focus toward the wanted object.
(4) Re-assemble the camera.
<Ceiling mount> <Wall mount>
4. Camera angle adjustment :
(1) Pan adjustment : Grasp the disk of camera and then adjustdirection
to the right or left(-180˚~180˚)
(2) Tilt adjustment : Grasp the LED cover of camera and then adjust
direction to the up or down(6˚~ 90˚)
(3) Roll adjustment : Grasp the camera holder and then rotate
(-178˚~178˚)
<Caution> If you try to adjust the camera out of limited angle, it might
cause troubles and damage to camera.
1
2
w
N
F
T

2. OSD menu structure
1. How to use the jog lever
※All specification is subject to change without notice to improve the quality. 3B26474A
◐ CAMERA / STRUCTURE SPECIFICATION
◐ FUNCTION SETTING
Model No. CS-PD6600
Image Sensor 1/3" COLOR SONY SUPER HAD CCDⅡ(960H)
Effective Pixel 976(H) x 494(V) Pixel(NTSC), 976(H) x 582(V) Pixel(PAL)
Scanning System 2:1 Interlace
Sync. Type Internal
Resolution Color : 700 TV-Line, B/W : 800 TV-Line
S/N 52dB or More(AGC OFF)
Video Output 1.0 Vp-p(Sync. Negative) Termination 75Ω
Min. Illumination 0.1 Lux(F/1.2) : LED OFF, 0 Lux(25M Range) : LED ON
Gamma γ= 0.45 typ.
OSD Yes(Multi Language)
White Balance
ATW(1,800°k~10,500°k)/PUSH/USER1/USER2/ ANTI CR/
MANUAL/PUSH LOCK
Shutter Speed 1/60(1/50) ~ 1/100,000sec
Backlight BLC/HLC/ATR/OFF
AGC X0.25/X0.50/X0.75/X1.00
DNR(2D) ON(Selectable 0~15)/OFF
Motion Detection ON/OFF Selectable(4 Zone)
Privacy Zone ON/OFF Selectable(4 Zone)
Mirror YES
Day & Night ICR / Electronic(AUTO, COLOR, B/W, EXT1)
LED Output IR LED 24pcs
Communication(option)
RS-485(Pelco-D)
Lens
Fixed focal lens
Vari-focal auto iris lens(ICR )
Power Supply 12V DC/24V AC Dual voltage
Current Consumption Max. 400mA(at 12V DC/24V AC) : LED ON
Operation Temp. -45℃ ~ 50℃
Dimension Ø130.8 x 96(H)mm
Weight Approx. 500g
1
2
3
4 5
6
EXT. VIDEO
①ENTER :
•Push the lever : Used to access the menu and confirm selection.
• Push the lever for one second : Open the menu or close the
menu.
②UP, ③DOWN : Used to move the cursor to up or down.
④ LEFT, ⑤RIGHT : Used to move the cursor to left or right and
change the value.
⑥ EXT-VIDEO : Extra video output terminal for installation. Plug
your test monitor in hear. The cable is option.
Select Menu Sub Menu Summary
B/W
Burst : OFF, ON
Fixed at B/W
IR Optimizer : OFF, ON
Mode : Auto, Center
Level : 0~31(022)
EXT1
Auto day & night switching mode for IR
LED built-in type(Default)
EXT2 No use for this model
7. NR(=2DNR)
NR MODE Y/C, OFF, Y, C
Set the 2D NR(Noise Reduction) filter
mode
Y LEVEL 000~015(004)
Set the Y(luminance signal) filter
strength
C LEVEL 000~015(004)
Set the C(chrominance signal) filter
strength
8. PICT ADJUST
MIRROR OFF, ON Set the horizontal flip
BRIGHTNESS 000~255(000) Set the screen brightness
CONTRAST 000~255(128) Set the screen contrast
SHARPNESS 000~255(128) Set the screen sharpness
HUE 000~255(128) Adjust the hue
GAIN 000~255(128) Adjust the color gain
DEFOG OFF/LOW/MID/HIGH Carry out defog function
9. CAMERA ID
OFF Set the camera ID to OFF
ON
Letters A to Z, Numerals 0 to 9,
Symbols
You can enter up to 26 letters & 2 lines
10. MOTION DET
OFF Set the motion detection to OFF
ON
Detect sense, Block disp, Monitor
area, Area sel (Top, Bottom, Left,
Right)
Adjust the settings of motion detection
11. PRIVACY
OFF Set the privacy masks to OFF
ON
Area sel(Top, Bottom, Left, Right),
Color, Trasp, Mosaic
Adjust the settings of privacy
12. LANGUAGE
English, Japanese, Deutsch, Francais, Pyccknn,
Portugues, Espanol
Select language
13. CAMERA RESET
Restore all the settings to the default
values
14. COMMUNICATION
PROTOCOL PELCO-D
ADDRESS 0~254
BAUDRATE
2.40/4.80/9.60/19.20/38.40/
57.60/115.20
15. EXIT
SAVE ALL Save all the setting made
EXIT Exit the OSD menu
• The ' ' icon appeared with desired function, press the set button to move sub
menu.
• The '- - -' icon appeared with function that is unavailable according to function
setting.
Select Menu Sub Menu Summary
1. LENS
AUTO
Type : DC, Video Auto iris lens(only DC type)
Mode : Auto, Open, Close Auto/Open/Close select
Speed : 0~255(48) Iris speed select
MANUAL Manual iris lens
2. SHUTTER/AGC
AUTO
High luminance
Auto exposure setting
Mode : Auto iris, Shut+Auto iris,
Shut
Brightness : 0~255(30)
Low Luminance
Mode : AGC, OFF
Brightness : X0.25, X0.50,
X0.75, X1.00
MANUAL
Mode : Shut + AGC
Manual exposure setting
Shutter : 1/60(1/50),
1/120(1/100),
1/250, 1/500,
1/1000, 1/2000,
1/4000, 1/10000
AGC : 6.00, 12.00, 18.00,
24.00, 30.00, 36.00,
42.00, 44.80
3. WHITE BAL
ATW
Speed : 0~255(250)
Auto trace white balance setting
(1,800°k~ 10,500°k)
Delay CNT : 0~255(16)
ATW Frame : X0.50, X1.00,
X1.50, X2.00
Environment : Indoor, Outdoor
PUSH
Automatically adjust the white balance
under all conditions
USER1 B-Gain, R-Gain
The gain values for the outdoor fixed
mode
(Adjust the Red or Blue values)
USER2 B-Gain, R-Gain
The gain values for the fluorescent
light fixed mode(Adjust the Red or Blue
values)
ANTI CR Level(0~255) Color rolling suppression
MANUAL Manual white balance
PUSH LOCK
Move the camera lens toward to white
paper then press the set button to find
the optimal white balance for current
environment
4. BACKLIGHT
OFF Deactivated function
BLC Back Light Compensation
HLC High Light Compensation
5. ATR(=DWDR) (Adaptive Tone Reproduction)
OFF Set the ATR to OFF
ON
Luminance : Low, Mid, High
Set the extent of the luminance
compression
Contrast : Low, Midlow, Mid,
Midhigh, High
Set the extent of the contrast
enhancement
6. DAY/NIGHT
AUTO
Burst : OFF, ON
Day : Color ↔ Night : B/W (Switching
time & speed adjustable)
Delay CNT : 000~255(005)
Day→Night : 000~255(004)
Night→Day : 000~255(016)
COLOR Fixed at color
 Loading...