

Page 1

4 GAS BURNERS GAS OVEN
C64WTI - C64SGTI
C64FSTI - C64FWTI
Please read these instructions carefully before attempt to install or use this product.
It is advisable to keep these instructions in a safe place for future reference.
Page 2

Page 3

Dear Client,
Thank you about buying our product. You can trust our products. This is a
detailed User’s Manual which you can read it to use your product easier and better.
You can find safety information in page 2. Please check your product that it
has got any failure or lacking. If you find a damage sourced by transportation,
please contact with sales department that you bought product or region store that
sent product to you.
We hope you use your oven in good days.
INDEX:
Section 1
Technical Specifications & Sections of Oven
Section 2
Important Safety Notices
Section 3
Installation of Oven
Section 4
Introduction of Control Panel & Usage of Hotplates
Section 5
Usage of Oven
Section 6
Rotatin Grill (Optional)
Section 7
Maintenance & Cleaning
Section 8
Information About Transportation
Section 9
Troubleshooting
Mechanical Timer
Section 10
-3-
Page 4
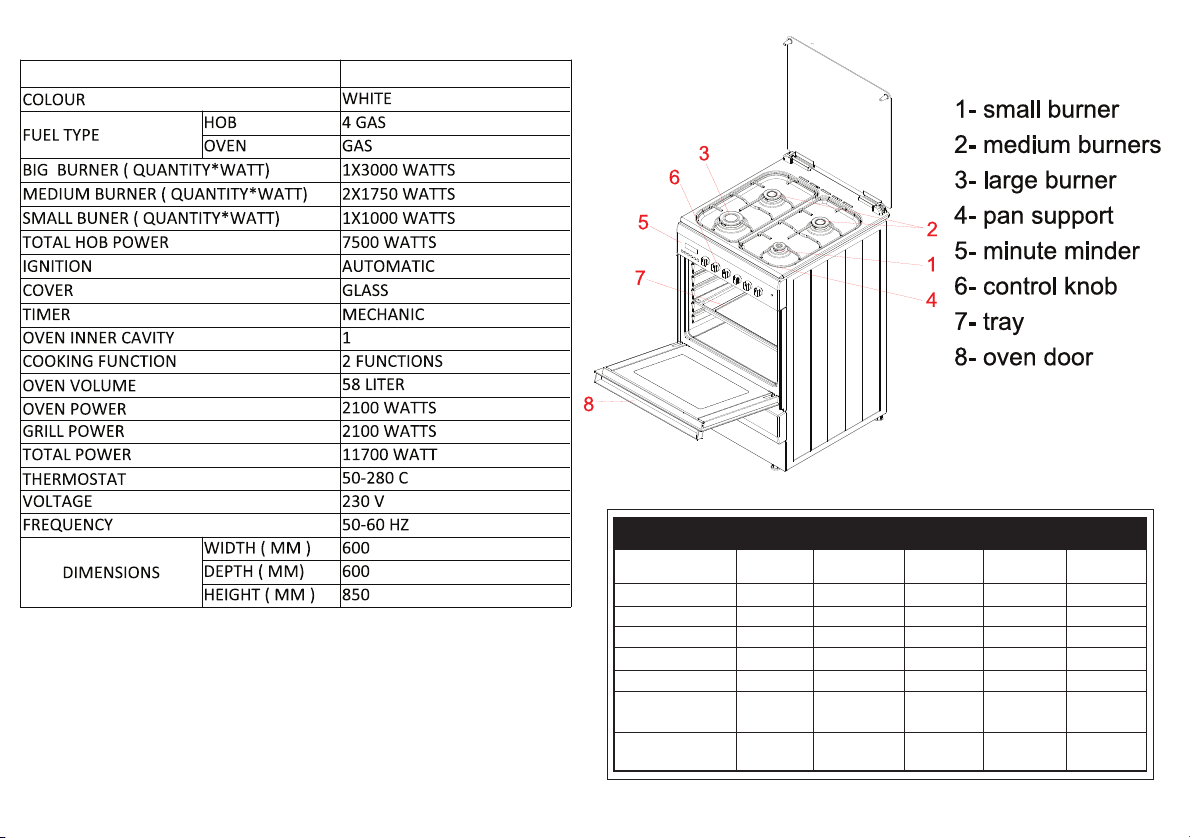
SECTION 1 TECHNICAL FEATURES of OVEN
/ INOX
/ -
/ 7 FUNCTIONS
Injector Diameters of Cooker Burner
0,72
0,72
0,50
0,50
0,43
1
73
Medium Burner
0,97
0,97
0,65
0,65
0,58
1,75
127
Gas Type
G 20 20 mBar
G 25 25 mBar
G 30 30 mBar
G 31 37 mBar
G 30 50 mBar
Natural Gas
Consumpon (kW/h)
LPG Consumpon
(gr/h)
Small Burner
Big Burner
1,15
1,15
0,85
0,85
0,75
3
218
Oven Burner
1,15
1,15
0,85
0,85
0,75
3
218
Grill Burner
1,15
1,15
0,85
0,85
0,75
3
218
-4-
Page 5

-5-
Page 6

-6-
Page 7

-7-
Page 8

SECTION 4 INTRODUCTION of CONTROL PANEL &
USAGE OF COOKER
SECTION 6 ADJUSTMENT of TIMER
A) Adjustment of Mechanical Timer :
Mechanical Timer can be adjusted by its button on front panel. Timer must
be adjusted to start the oven cooking. Cooking time can be adjusted between 5 to
90 minutes with mechanical timer. You should position the button to ‘ON’ manually
if cooking time will exceed 90 minutes.
-8-
Page 9

SECTION 7 ROTATING GRILL ( OPTIONAL)
SECTION 8 MAINTENANCE & CLEANING
-9-
Page 10

CHANGING OVEN LAMP
Removing Oven Door for Easy Cleaning
Before cleaning oven door, we advise you to follow below steps to seperate oven
door from body :
1- Open the door completely
2- Insert the pin as in figure. Make sure that this is done on both hinges.
3- Push up the locking part of hinge with screwdriver as shown in Figure.
4- Lift the door slightly as if closing, then with both hands supporting the door, pull
it away from the oven.
Clean the glass part of oven door with hot water and only a soft cloth.
Inserting the Oven Door
After cleaning set the door to insert oven door to oven body it is recommended to
apply below steps :
1- Hold the door in an open position and push up the locking part with
screwdriver.
2- Place hinges into the hinge holes.
3- Support the oven door and push down the locking part with screwdriver.
4- Remove pins from the hinges. Open and Close the door to make sure that it
-10-
Page 11

Shelling Out Inner Glass of Door
Shelling Out Inner Glass of Door
SECTION 9
SECTION 10
-11-
Page 12

This appliance/fitting is marked according to the European directive
2002/96/EC on Waste Electrical and Electronic Equipment (WEEE). By
ensuring this product is disposed of correctly, you will help prevent potential
negative consequences for the environment and human health, which could
otherwise be caused by inappropriate
waste handling of this product.
The symbol on the product, or on the documents accompanying the product,
the Crossed Out Wheelie Bin symbol, indicates that this appliance/fitting may
not be treated as household waste. Instead it shall be handed over to the
applicable collection point for the recycling of electrical and electronic
equipment. Disposal must be
carried out in accordance with local environmental regulations for waste
disposal. For more detailed information about treatment, recovery and
recycling of this product, please contact your local authority, your household
waste disposal service or the retailer where you purchased the product.
 Loading...