

Page 1

USER'S MANUAL
UNITARY TYPE
AND
FLOOR-STANDING SPLIT TYPE
We sincerely thank you for purchasing our product. Please carefully read this User's
Manual before using your air conditioner. Save this manual in a safe place for future
reference.
Page 2

CONTENTS
ATTENTIONS.........................................................................................................................1
AIR CONDITIONER OPERATION CONDITIONS ................................................................................................ 1
CHECK-UP BEFORE OPERATION ...................................................................................................................... 1
OPTIMAL OPERATION ...........................................................................................................................................1
CAUTION ................................................................................................................................................................ 1
DANGER ..................................................................................................................................... 2
PARTS NAMES....................................................................................................................... 2
CONTROL PANEL ..................................................................................................................3
MANUAL OPERATION ............................................................................................................5
GENERAL OPERATION ...........................................................................................................................................5
TIMER SETTINGS ....................................................................................................................................................5
ADJUSTING THE AIRFLOW DIRECTION ............................................................................................6
TROUBLESHOOTING ..............................................................................................................7
PHENOMENA NOT CONCERNING MALFUNCTIONS ............................................................................8
MAINTENANCE AND CLEANING ............................................................................................9
AFTERSALES ......................................................................................................................... 10
Page 3
ATTENTIONS
operation meth ods mentioned
AIR CONDITIONER OPERATION CONDITIONS
O
e
Temperature
Room temperature
Outdoor temperature
CAUTION:
If air conditioner is used beyond the above conditions, safety protection features may
come into operation or cause dew dripping and affect cooling or heating effect.
Mode
Cooling operation
~
32
。
。
C
C
。
17 C
。
18 C 43
~
Heating operation
~
30
。
。
C
C
。
17 C
。
-7 C 24
~
Ensure the grounding wire is not broken off and connected well.
, please clean the filter first.
Refer to
Maintenance and cleaning
for detai ls.
Ensure the outlet and inlet of outdoor and indoor units is unblocked.
or heating effect.
or heating effect.
1
Page 4
6. PARTS NAMES
If any abnormal symptom (such as exceptional noise, odor, smog, abnormal temperature
rise of electric leakage etc.)occurs, turn off the power immediately and contact local dealer.
Do not attempt to repair it by yourself.
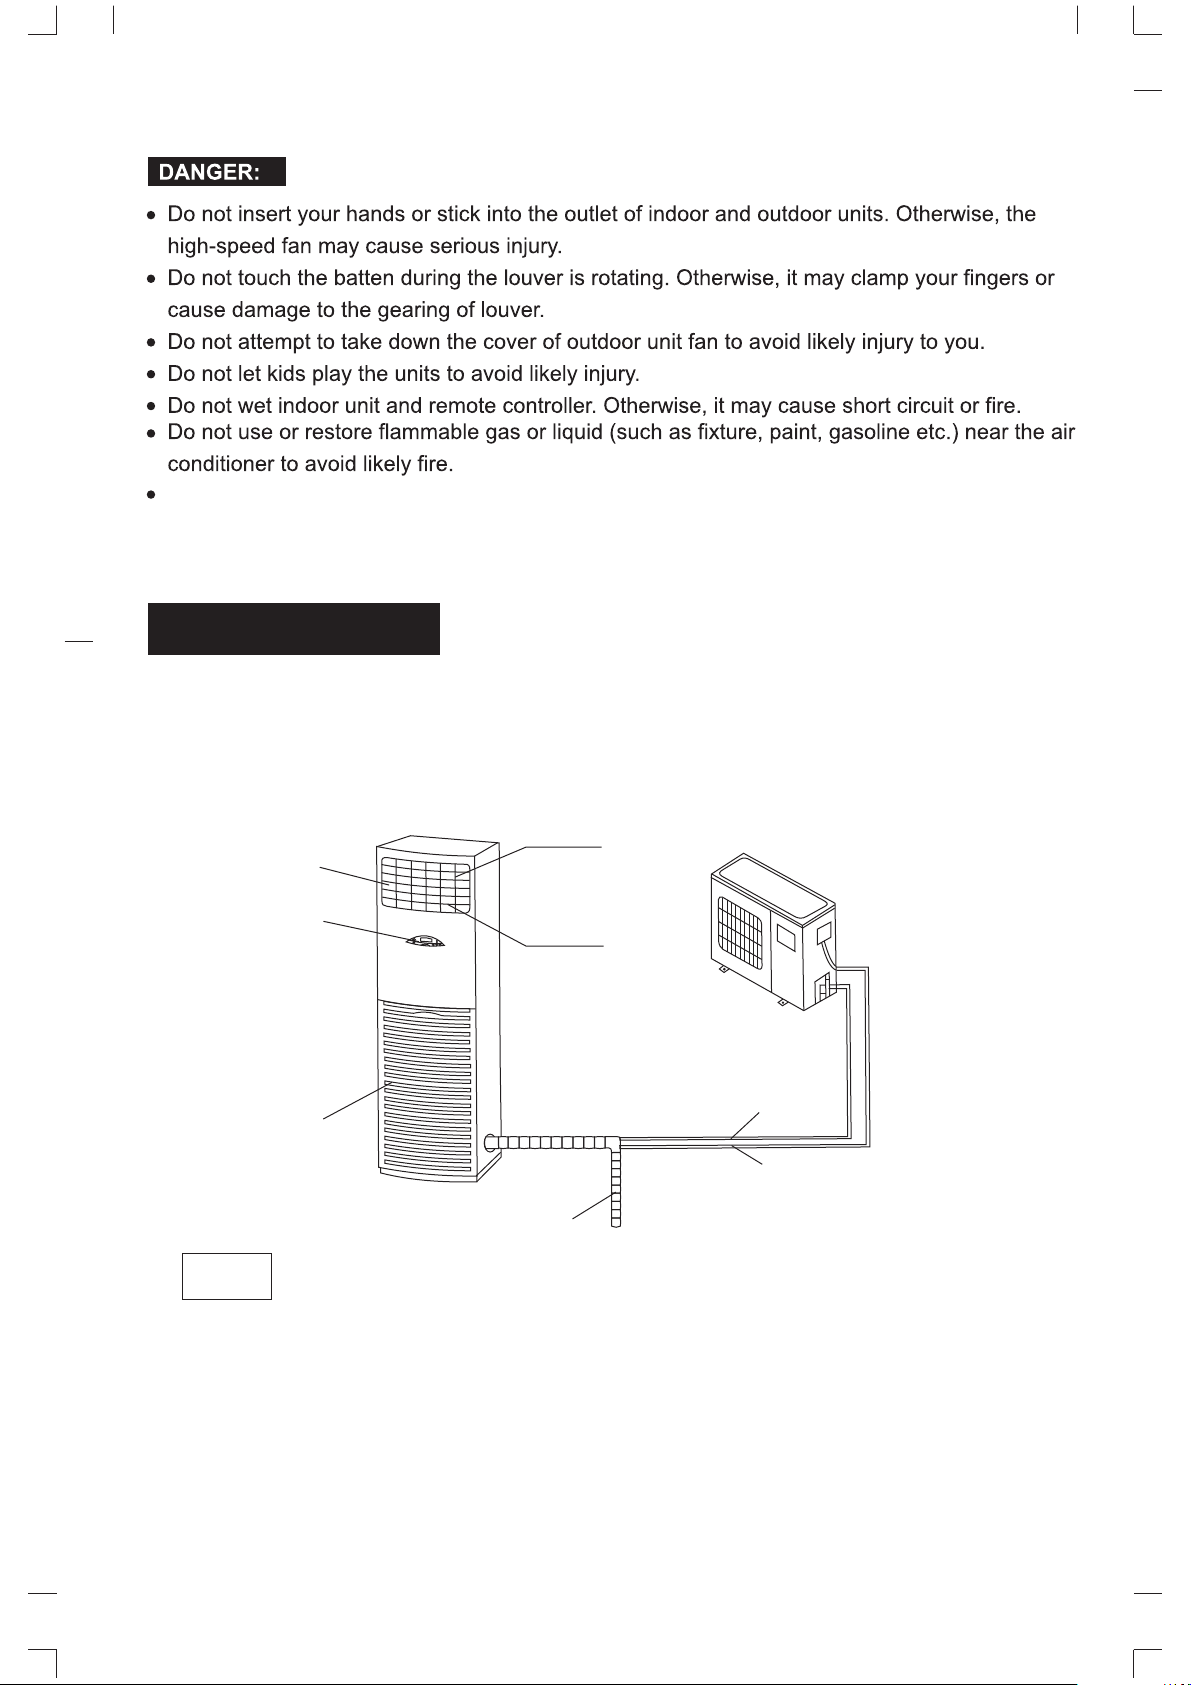
PARTS NAMES
This unit consists of indoor unit and outdoor unit.
Indoor U ni t
Vertica l Lo uv er
Air Ou tlet
Cont ro l panel
Air Inlet
NOTE
The above air conditioner's outer shape is based on the standard model, so it may be
Horizontal L ou ve r
Drain pipe
different from the one you purchased.
Outd oor unit
Refr igerant Pipe
Outd oor Power Cor d
Air Outlet
Control Panel(LCD)
Air Inlet
Drain Pipe
Refrigerant Pipe
Let the conditioned air go out from it.
Consists of indicators and control buttons.
Where a filter is settled, absorbing the air in the room and clean it.
From which the condensed water is drained.
In which the refrigerant passes through, connects the outdoor unit
with the indoor unit.
2
Page 5

CONTROL PANEL
Control Buttons and Functions
: O
ton
but
OFF
/
ON
pr
: Se
n
tto
u
DE b
MO
cal
i
mat
o
ut
o: A
t
Au
ol
o
s c
it
rm
: Pe
ol
o
C
ehu
s d
t
ermi
y: P
r
D
re r
u
at
r
e
mp
e
T
(
eat
its h
m
er
at: P
e
H
r
tu
ra
e
emp
: Pe
n
a
ST F
SSI
e
NCTION
U
ffe
T
rm
ss t
st fun
nt as
re
s f
it
UN
his b
c
n o
a
O
I
CT
to
t
u
s can be s
on
ti
u
b
t fu
is
s
(
F
A
1. Pr
assi
F
di
Signal Receiving Window
ON/OFF Button
ADJUSTING Button
arts wh
utt
e b
ppr
e a
pe
e o
tion (Te
ra
ng t
O O
17 C
t
a
per
O
7 C
e:1
n w
io
n: Use thi
tto
e assi
t
ia
it
el
n t
i
.
s
n
t
n aga
o
op
at
r
e room a
h
30
~
n(F
io
30
~
ou
h
t
i
ted b
c
e
lec
o se
pe
ess th
t
c
e
l
ly s
g ope
in
d
i
m
n
a
g o
in
a
e r
per
N b
o i
n t
n aga
o
tt
ct
n
tions s
ra
s th
et th
yi
if
ge:
g
n
at
u
n
io
at
i
r
n m
io
mpe
C)
or co
O
C
t c
s b
t fun
s
y p
t or c
en th
.
in
e ope
ode (
a
r
r a
i
li
o
)
ing o
l
oo
to
t
u
t
c
ressi
s but
i
t
ra
T
e ran
tur
nd k
g & he
n
r h
o i
n t
n s
o
i
n
ncel th
a
auto
n i
o
t
ng mod
i
e
p
em
g
eep t
at
ting.
a
e
ia
it
n
g , the S
in
t
et
" "an
g
e relati
LCD
TIMER ON
c
h
s pre
e f
atu
r
7
e:1
e in
h
g m
n
i
te or c
d
TEST RUNNING Button
l
l
ge:
n
a
30 C
e
r t
s onl
l
ncel th
G i
WIN
t
ti
unc
LOCK Button
FAN SPEED Button
MODE Button
d st
ng fi
owi
O O
7 C
1
)
pe
m
y)
e ass
di
n
ton . P
. D
on
TIMER OFF
T4
T1
T3
T2
$
ADJUSTING Button
sed an
s
om fo
r
re r
O O
C~
doo
ode
a
" " bu
ve f
ASSIST FUNCTION Button
u
o
n y
e
s wh
p
o
:
:
s
C)
l
e ba
c
ill f
h
rent M
a
e
e
n
on
i
t
la
A
d
ce
.
sh an
SI
S
DE
O
d s
ST
S ha
L
r
~
a
ca
v
30
ur
t
st fun
i
tor w
ess t
r
e
f
f
i
e mod
eve
ve
n
SWING→ ECONOMIC RUNNING → ELECTRICAL HEATING → TIMER ON →TIMER OFF
ng o
li
o
o
C
:
e
ot
N
tor f
dica
ve in
i
at
. Rel
2
st f
i
s
s
t a
n
ese
he pr
T
3.
eled by the s
nc
ca
p
ng o
tti
n se
io
nct
u
f
n se
o
i
t
c
n
t fu
is
Ass
.
4
ton o
t
bu
N
O
I
T
C
N
FU
ng th
uri
d d
se
s
e
r
p
on:
utt
D b
EE
P
N S
FA
d i
bu
n
to
t
, a fan s
pee
ly or C
n
ashes u
l
econd d
er
tti
is per
T
s s
A
ool
ion s
unct
pr
e
.
.
n
tio
a
r
g
o
r
ng p
" "an
r
d, i
io
to
t
u
his b
d i
te
c
e
l
e
TO L
U
ing & Hea
e diffe
r th
nde
g ca
in
t
et
n o
o
si
es
oma
t
u
m a
a
bu
"
d"
ve
l o
t wil
se
s u
n i
eq
n a s
g mod
in
t
t mod
n
re
n be co
f the b
ton w
t
d
rri
d to s
enc
u
O
nf
tto
u
y can
all
ic
t
th
i
he as
e t
ct t
e
l
e
e as f
W H
3
ls witho
e
e s
irmed o
n, th
cel w
se
0
n 1
i
sis
he de
lo
l
o
e
n it a
e
co
t fun
s
win
t E
u
tings
t
e se
h
r t
u
hen n
ds. If an
n
o
i
ct
ed fa
ir
g:
IG
to
n s
H
ture
a
G fe
N
ATI
E
L H
CA
RI
T
C
E
L
.
xt a
SI
S
e
at
u pus
e
i
s
s
ST
ly.
h the
st
o
l
m
et
n s
e
thi
c
a
tin
d assi
e
t
ca
ti
ng h
y ot
g pr
pe
y e
ll
s do
a
er b
h
og
ed. E
st fun
rs t
e
nt
ne to t
utt
m im
ra
ch t
a
ti
c
he n
on is
m
e y
im
on can b
e
e A
h
edi
o
Page 6

DJU
A
e
1. T
ssist F
A
Tim
.
2
s
As
.
3
de
n
. U
4
alf
m
T R
S
TE
s bu
thi
fu
l
ma
ay th
l
p
s
di
LOCK b
t t
in bu
LCD
A
F
STI
mpe
r a
e
t fu
is
r t
un
UN
o
tt
io
nct
u
he rem
auto
NG
ure a
t
ra
n
u
ju
d
ct
n
e C
h
on c
ti
c
NI
n wil
ns oc
e mai
n: Wh
o
tt
bu
ct
st
io
N
l e
o
to
t
n, Ti
io
: A
n s
ec
h
od
but
G
nt
ur d
c
e
nt
te co
n
ju
d
ju
d
e
ki
.
e
r f
e
nan
en y
:
: P
t
s
mer o
st t
t
c
le
ng m
ton
rce c
o
ri
u
ce i
o
o
ntr
es
r
r C
he ti
: Sel
n
o
i
de
o
hi
T
:
ng t
nfo
r
u p
r ope
le
l
B
TIMER ON
me
ool
e
es
s th
he
, p
s b
st r
rm
s t
c
h
" "an
e
n
ki
c
/
n
r o
ect th
s
s
re
n i
o
t
ut
ing op
ni
n
u
on .
ati
LOC
e
h
io
t
a
r
C
TIMER OFF
T1
T2
$
t
g se
me u
i
f t
of
e des
"
"
p
s s
at
r
e
ng or a
K
s a
n i
T4
T3
E
"
d
ng m
ti
ir
"
ec
ion
i
u
b
ai
v
er
d
n
t u
p
e.
" "and
g
n c
io
ct
echnicia
u
t r
s
USTI
J
D
nt se
re
e
"
e and
od
ns. P
g. If
n
i
n
n
G bu
N
s a
ng
i
tt
el the LOC
nc
"
.
t
e l
r
r
ton t
"
n
d a
e
t
"
ll
ia
, pre
r co
tto
ble. Pu
la
to ad
e.
d
o
der t
is
s
s
h
o c
e
y d
ss i
t
i
d
n
h
n t
st t
u
j
im
T
e
h
unct
t f
T
eck
ed fo
n
g
i
s
gai
t a
n ope
o
i
e first t
sh t
he te
er se
ion b
1, T2
n to c
a
r
m
i
is bu
h
m
i
t
t
y p
, T
a
r m
o
l
ting ,p
, all th
e
on a
t
t
ra
pe
ng mo
s
e
r
r
, p
3
ena
t
n
i
he te
se t
s
e
r
e cu
g
ure exc
t
d
n
si
ote
nce t
A
s
r
n to ca
ai
A. Indoor fan speed indicator
B. Temperature setting, timer setting and
D
maintenance or malfunction information indicator
C. Timer indicator
D. Lock indicator
E. Assist function indicator
F. Mode indicator
es
oc
s
o
d
ke
de.
o
m
K
Meanings of symbols are as shown below:
1. Modes (Select appropriate operation mode, see"Manual operation" for details)
Auto
AUTO COOLING
DRY HEATING FAN
2. Assist functions (see"Manual operation" for details)
SWING Equally big airflow
ECONOMIC RUNNING Save energy
$
ELECTRICAL HEATING Auxiliary electric heater, rending rapid heating up even in cold
winter (Only for the cooling & heating type with Electric heater)
3. Others
First Fan Speed Symbol
Second Fan Speed Symbol
The low-frequency flashing cycle of the three
fan speed symbols indicate low fan or Auto fan.
The high-frequency flashing cycle of the fan
Third Fan Speed Symbol
speed symbols indicate high fan or Auto fan.
4
Page 7

MANUAL OPERATION
GENERAL OPERATION
When the air conditioner has been connected with the power supply, follow the procedures
given below to operate your air conditioner:
1. Press ON/OFF button to start the unit;
2. Press MODE button to select a desired mode. Keep on pressing the button, the display
shows "AUTO→COOL DRY HEAT FAN AUTO"in turn.
3. If "COOL", "HEAT"or "FAN" is selected, you may press the FAN SPEED button to adjust
the indoor fan speed. Keep on pressing the button, the fan speed will be set as "AUTO
→LOW →HIGH→AUTO"in turn. But under "AUTO" and "DRY" mode, the fan speed can
not be selected. On "AUTO"operation mode, the fan speed is Auto, on "DRY"mode, the
fan speed is low.
FAN speed display:
When operating manually, the first fan speed symbol displayed indicates low fan, the third
symbol displayed indicates high fan, three symbols displayed simultaneously indicate Auto
fan. After finishing the settings, it displays in a sequences as "First fan speed symbol→Second
fan speed symbol→Third fan speed symbol" . When operating with remote controller, low-frequency
displaying cycle of three symbols indicates low fan or Auto fan; high-frequency displaying cycle
of the symbols indicates high fan or Auto fan.
4. When in "DRY", "COOL","HEAT" or "AUTO" mode, adjust the temperature by pressing the
"△" and " " button. Each depress of the button, the temperature would increase/decrease 1 C.
△
5. Press the ON/OFF button to turn off the air conditioner. Please do not stop the unit by pulling
out the power plug or switching off the power supply.
6. When the unit is on, press the ASSIST FUNCTION button, the function displayed as SWING
→ECONOMIC RUNNING→ELECTRICAL HEATING→TIMER ON→TIMER OFF by pressing
the"△"and " " button, press the ASSIST FUNCTION button again to confirm the appropriate
△
mode.
→ → → →
o
Note:
When the unit stays waiting, press the ASSIST FUNCTION button, only TIMER ON and
TIMER OFF feature can be activated.
When restart the unit after unplug it from the power supply, the assist function must
be reset; if only turn off the unit without shutting off the power,"SWING" feature can be
restored in memory.
TIMER SETTINGS
Note: The program time is not accurate to your local time, please reset it.
Setting the AUTO-ON TIMER
1. When the unit is turned to the "off" position(non-operational),to set the AUTO-ON timer,
press the ASSIST FUNCTION button, using the" "and " "button to initiate the TIMER
△
△
ON feature (the TIMER ON indicator will flash). Press the ASSIST FUNCTION button again
to register the AUTO TIMER-ON program (the TIMER ON indicator remains on).
2. The time will appear in the display window, press the " " and " " button to select the
△
△
desired AUTO-ON time, press the ASSIST FUNCTION button again to register the time.
The unit will start automatically when the specified AUTO-ON time is achieved and operate
under the former operational mode.
Setting the AUTO-OFF TIMER
1. Press the ON/OFF button to turn on the unit.
2. To set the AUTO-OFF timer, press the ASSIST FUNCTION button, using the " "and " "
△
△
button to initiate the TIMER OFF feature(the TIMER-OFF indicator will flash), press the
ASSIST FUNCTION button again to register the AUTO TIMER-OFF program (the TIMER
OFF indicator remains on).
5
Page 8

3. The time will appear in the display window, using the " "and " "to select the desired
AUTO-OFF time, press the ASSIST FUNCTION button again to register the time. The unit
will stop automatically when the specified AUTO-OFF time is achieved.
Cancel the TIMER settings
To cancel the auto-timed program, press the ASSIST FUNCTION button, then using the " "and
△
" "button to select the specified AUTO-ON/OFF time, press the ASSIST FUNCTION button
again to cancel it.
Note:
When the unit is turned to "off " position (non-operationsl),before setting the AUTO-OFF timer,
the AUTO-ON time must be set/operational.
When the unit is turned on, before setting the AUTO-ON timer, the AUTO-OFF time must be
set/operational.
ADJUSTING THE AIRFLOW DIRECTION
Horizontal Airflow (AUTO)
Horizontal Airflow may be adjusted by moving the vertical louvers left and right, Press the"ASSIST
FUNCTION" button on the control panel to select the "SWING" feature to make the louvers move,
repeat the operation again to stop.
Note: Do not touch the vertical louvers with hand!
△
△
△
Vertical Ai flow (MANUAL)
Vertical Airflow may be adjusted by horizontal louvers, Hold the edge of a vertical louver and move
it up and down to adjust vertical air-flow.
Note:
● The starting angle of the horizontal louver should not be too small, or the narrow air
outlet will affect cooling or heating.
● Do not move the vertical louver manually, or it may malfunction during operation,
● Do not set the starting angle of the louvers too small during cooling or drying operation.
Otherwise, condensation may occur on the surface of the horizontal louver and cause
dew dripping.
6
Page 9

TROUBLESHOOTING
Before calling for service, please review the following list of common problems and solutions.
Problem
Air conditioner
does not
operate at all
Air conditioner
does not
cool or
heat well
Air conditioner
does not
cool or
heat at all
Number Problems
Power failure
The power supply is disconnected.
The power fuse is blown.
The timer is set.
The batteries of the remote control are exhausted
The temperature setting is too high
or too low.
The air filter is clogged with dust
The air inlet or outlet of the outdoor
unit is blocked
Doors or windows are open
The air inlet or outlet of the outdoor
unit is blocked
Three-minute protection feature
Unappropriated temperature setting
Display
code
Possible Cause
Solutions
Wait for power restoring
Switch on the main power switch
Change the fuse
Wait or cancel timer setting
Change the batteries.
Set a more comfortable temperature.
Clean the filter
Clear up the block
Close the doors or windows
Clear up the block first, then begin to
operate.
Wait for a while
Set the temperature properly
What to do
1
2
3
4
5
6
E1、 E2
E3、 E4
E6
E8
P4
P5
P9
Temperature Sensor is off or
short-circuit.
Outdoor unit protection
Electrostatic dust collection
The temperature of the evaporator
of indoor unit is too low or high (For
the protection feature, the
compressor turns off automatically)
The temperature of condenser of
the outdoor unit is too high (For the
protection feature, the compressor
turns off automatically)
Defrosting protection or warm-air
controlling is off
Contact service people
Contact service people
Contact service people
Turn off the unit, clean the air filter,
then restart the unit. If this operation
does not work, please contact service
people.
Turn off the unit, check if there is any
obstacle in the air-inlet, otherwise call
the service people.
The unit will auto restart after finishing
the defrosting or the temperature of the
Heat Exchanger of indoor unit raise.
CAUTION:
When the power cord is to be replaced, replacement work shall be performed by authorized
personnel only.
7
Page 10

PHENOMENA NOT CONCERNING MALFUNCTIONS
The following symbols do not mean the unit is abnormal.
1
. Comp
Pro
Warm ai
U
a cold draf
①Jus
D
F
a
co
the d
①Th
② t
a
③During d
froste
2
. Whit
When r
bei
W
t
3. Low noise o
W
by t
A
b
4. D
Af
5
. Odor f
The in
6
. "C
I
fr
decreases t
7
.
W
on th
v
8
.
L
unp
re
ss
or p
tec
ti
on f
o
r com
r con
n
der t
he H
EAT
t if th
t st
art h
ef
ro
st
in
g (
Fo
ro
st m
a
y be g
n
d hum
i
d
i
t
y i
ndi
ti
on
e
r would st
e
frostin
e fa
he t
ppro
e s
ng b
he
n t
h
e wa
hen t
he r
f
t
er a
y na
t
u
s
t blowing from i
ter b
doo
ooli
f t
h
e i
om r
he
n c
e s
ert
ic
al dir
ig
htn
i
l
u
g yo
n
s in bot
i
me o
x
imat
d a
m
un
e
ca
he ai
te
r p
h
e co
ef
i
r con
al e
ur
e
i
ng lef
rom i
ng
ndo
u
n
ning au
oo
u
rf
n
g
, ca
u
g, it will r
f d
e
frosting
nd it
o
g discha
n
in
use o
r con
r
od
f a
mpre
r
i
gera
dit
xp
ndoor u
r u
nit a
"
and"Hea
o
r t
o a c
li
ng u
ace of in
e
ct
r o
r un
r
ot
e
ct
io
p
re
trol(Fo
e
e
g on"
e
r coo
mod
e
e s
et t
atin
r c
e
s h
efr
ly 4
's nor
uce
io
ansion or s
t u
mpe
i
o
it f
p
g o
ool
ing an
nera
t
igh, I
op hea
e
h of th
o
st
in
~10 mi
, w
ma
r
c
oo
f high h
d
it
io
d duri
ir con
ss
or op
nt f
low
ner s
n
nuse
d f
ni
bso
rbs odor of ro
ting" mo
ra
t
o
mat
e
rt
ain va
n
der h
doo
n
) and se
r m
o
b
ile t
or se
n Fe
atu
re
ss
or---The c
l
i
ng an
, th
e i
nd
o
e
mpe
ra
tur
erati
on
d h
eat
ed on Out
t w
oul
d lo
ting op
st
art hea
e i
nd
o
or a
g i
s dif
feren
nut
es).
h
i
t
e s
mo
l o
pera
tion
ged from i
ling
" m
o
de at a pl
u
mid
ity an
ner f
inish t
ng d
e
fros
di
ti
one
r
era
t
in
in
g be
twe
t
ar
ti
ng o
r s
h
ri
n
d
door unit
o
r lon
g t
t
de t
tur
e a
ch
i
ev
ica
lly an
d co
l
u
e
, the com
i
gh hu
m
id
r u
n
it
. Pleas
lect
"Hig
e
le
pho
v
e
ra
l s
e
co
omp
d h
eat
or f
an spe
e h
a
s not be
② Def
i
n
g m
d
o
or Hea
wer he
e
ra
tin
g ope
nd o
t a
g m
ay be co
.
nd
oo
d h
he de
ting wil
g or ju
e
n in
top
p
age o
f p
im
e, th
om
urne
es t
o set one
n
ve
it
y cond
e set the lou
h" fa
n
e may ca
nds , the
r
e
s
so
in
g m
e
r
o
s
ode
l
t E
at
in
tion an
ra
tion.
u
t
do
cc
or
din
r unit
a
c
ig
h diff
f
ro
stin
l c
s
t s
top
d
oor a
in
g for a s
la
st
e d
ust may blo
, furni
d t
o "
rt t
o "Fan" m
press
it
i
o
n s
pe
n c
r ca
n not o
ode
ls only)
d is a
ut
en r
e
a
t
i
n
g ③
s only)
xc
h
a
nge
g efficie
o
m
e with hi
h
n
ic p
tu
n
e
u
se m
ncy o
d s
tart def
r units will s
g t
o t
he o
e out f
e
r
e
nce i
t wil
g, i
ang
e in
pin
g, th
d out
d
h
ort while
ar
ts bec
r
e o
r c
Fan" m
, th
e air co
o
r wi
ll r
(re
la
tive h
v
e
d.
alf
o
n
nec
o
mat
ch
He
r w
r
o
gh h
n te
l auto
t
o snog an
ere may be so
o
or uni
igare
ode
o
d
estar
r a
t t
unct
t it a
perat
e w
it
h
in 3 m
i
c
ally r
e
du
ce
ed un
d
er t
he fo
a
ting in a l
h
e
n out
f th
ro
s
t
i
top r
u
t
doo
m out
u
midity, white sm
m
m
t .
, the
au
s
e o
w out fr
t
t
e and e
(
C
n
ditione
e. Wh
t an
u
midity>8
h
e position with Ma
ion o
gai
n an
o
w t
d
oor t
e conditione
n
g a
u
to
m
u
n
ning du
r te
mpe
d
oor u
ni
pe
r
a
t
ure.
ati
cally t
d c
om
me"
re m
ay be so
f the te
o
m i
nd
m
o
o
li
n
g only mo
r c
o
en th
e t
emp
d t
he un
0
%), co
f t
he a
i
r co
d r
e
st
d o
l
low
e
mp
e
m
ati
r
ra
t
ure a
t. Thi
ur
n to h
e o
s
m
per
o
or u
ana
nt
ro
i
t w
a
rt it.
i
n
u
r st
in
g t
e
ra
pera
r
. Th
ca
lly
i
ng d
s is c
og m
ut fr
s" sou
m
at
ni
t
es t
d
ll
er will s
eratu
ill ge
n
den
x
n
ditione
tes
.
o
p
ped t
hree si
tur
e
ture is l
e air
.
Af
t
e
r fin
e
frosting op
n
d frost d
au
se
a
y c
e
ati
ng o
o
m in
n
d c
e"zz"so
ure cha
t if i
t is opera
hem d
el
s wit
t
re i
n
t r
i
g
h
s
a
t
e may occ
. ai
r flo
r
, Pl
o prevent
t
u
ati
o
w
is
hin
eg
re
d by qu
ome i
nto
perat
d
o
or uni
aus
ed
u
nd caus
ng
e
.
t
u
rin
g op
ho
ut he
o
p comp
cre
ase
t
w(nor
ea
s
e
on
s
g
e
rati
e.(For
i
ckly
io
n
t.
e
d aga
era
a
ting)
r
e
s o
r
u
ma
l t
:
on
.
,
ed
i
n
.
t
io
n.
s
s
or
r
o
8
Page 11

9
. Hea
t
in
g ca
p
I
n h
e
releas
Wh
en t
ou
t
do
(se
e t
be
tw
e
l
oad
. I
app
a
at
i
n
g o
ed into t
h
e out
o
r re
he rig
e
n in
n thi
atu
r
s i
acit
per
doo
d
uced an
ht p
doo
s cas
n co
y (F
at
i
o
h
e room
r t
i
cture
r a
n
d ou
e.
Yo
m
binat
or c
o
oli
n
, hea
t i
.
Tha
e
m
pera
d w
i
ll res
).
The
re i
td
oor
u are reco
io
n w
n
g a
nd he
s abs
orbe
t is s
o
ture is t
ult in r
s a big d
, a
nd th
mm
it
h t
h
e air con
a
d from ou
-
c
alled he
o
o lo
e
d
uced h
i
i
s w
e
nde
ting mo
w
, he
f
f
e
renc
il
l i
ncrea
d t
o u
dit
io
d
els on
t
d
a
t pum
a
t abs
e
a
tin
n t
e i
s
se anot
ner
.
oo
p s
g c
e
e th
r a
or
mp
l
y)
n
yst
be
apa
e h
he
d
em.
d fro
ci
erat
eat
r hea
ty
m
u
re
in
g
t
in
g
MAINTENANCE AND CLEANING
CAUTION: For your safety, please turn off the unit and shut down the main power switch
before cleaning.
1. Use a dry cloth to wipe the indoor unit and remote controller.
2. A cloth dampened with cold water may be used on the indoor unit if it is very dirty.
3. Do not splash water on unit. This may cause damage to the inner parts or an electric shock.
CAUTION:
1. Do not use a chemical-treated duster for wiping or leave such material on the
unit for long.
2. Do not use benzine, thinner, polishing powder, or similar solvents for cleaning.
These may cause the plastic surface to crack or deform.
Air inlet grille and air filter cleaning
The air filter should be checked and cleaned at least once every 2 weeks to maintain optimal
performance of the air conditioner.
Air Filter
Air Filter
Note:
Screw
Air-in grid
The Anti-f ormol filt er fixed on
the Air filt er does not ne ed
replace ment, just w ash it with
water and d ry it in the sha dow.
1. Unscrew the air inlet grille on both sides, hold both sides of the grille and pull it up, then pull
out the grille.
2. Take hold of the air filter holder and pull it upward.
3. The air inlet grille can be washed by water or wipe with a dry cloth, then dry it in a cool place.
4. Use a vacuum cleaner to remove the dust or wash the air filter, and dry it in the shadow.
5. Installation process of the air filter and air inlet grille is the reverse of the removal process.
CAUTION:
Make sure nothing has been forgotten or fallen into the fan before installing the air inlet grille.
Restart the unit after the air inlet grille is correctly installed.
9
Page 12

MAINTENANCE
Before long time idleness
1. Clean the indoor unit and air filter.
2. Dry the inner parts by keeping the fan running for half a day.
3. Turn off the unit and switch off the power switch, remove the batteries from the remote control.
4. Periodically check and clean the inner parts of the outdoor unit. Our local dealer will help you
handle this if you contact us.
After long time idleness
Before restarting, please check if the air inlet and air outlet of the indoor and outdoor units are
blocked up. Clean it so.
AFTERSALES
If the air conditioner operate abnormally, turn off the unit and switch off the power and
contact the local dealer or service center.
10
Page 13

CS282-U
2200019460
 Loading...