

Page 1
USER INSTRUCTIONS
APOLLO / LUX, CONCORDE & SAVANNE
- a Danish quality product
THE HOLIDAY GLOBETROTTER
Page 2

2
Table of contents:
Introduction .......................................................... 3
Coupling .............................................................. 4
Erecting ............................................................... 5
Kitchen section .................................................. 10
Technical specication ....................................... 11
Remember before you go .................................. 12
Remember when you get home ........................ 13
Good advice ...................................................... 14
Details ................................................................ 14
Winter storage ................................................... 16
Maintenance ...................................................... 17
Page 3
3
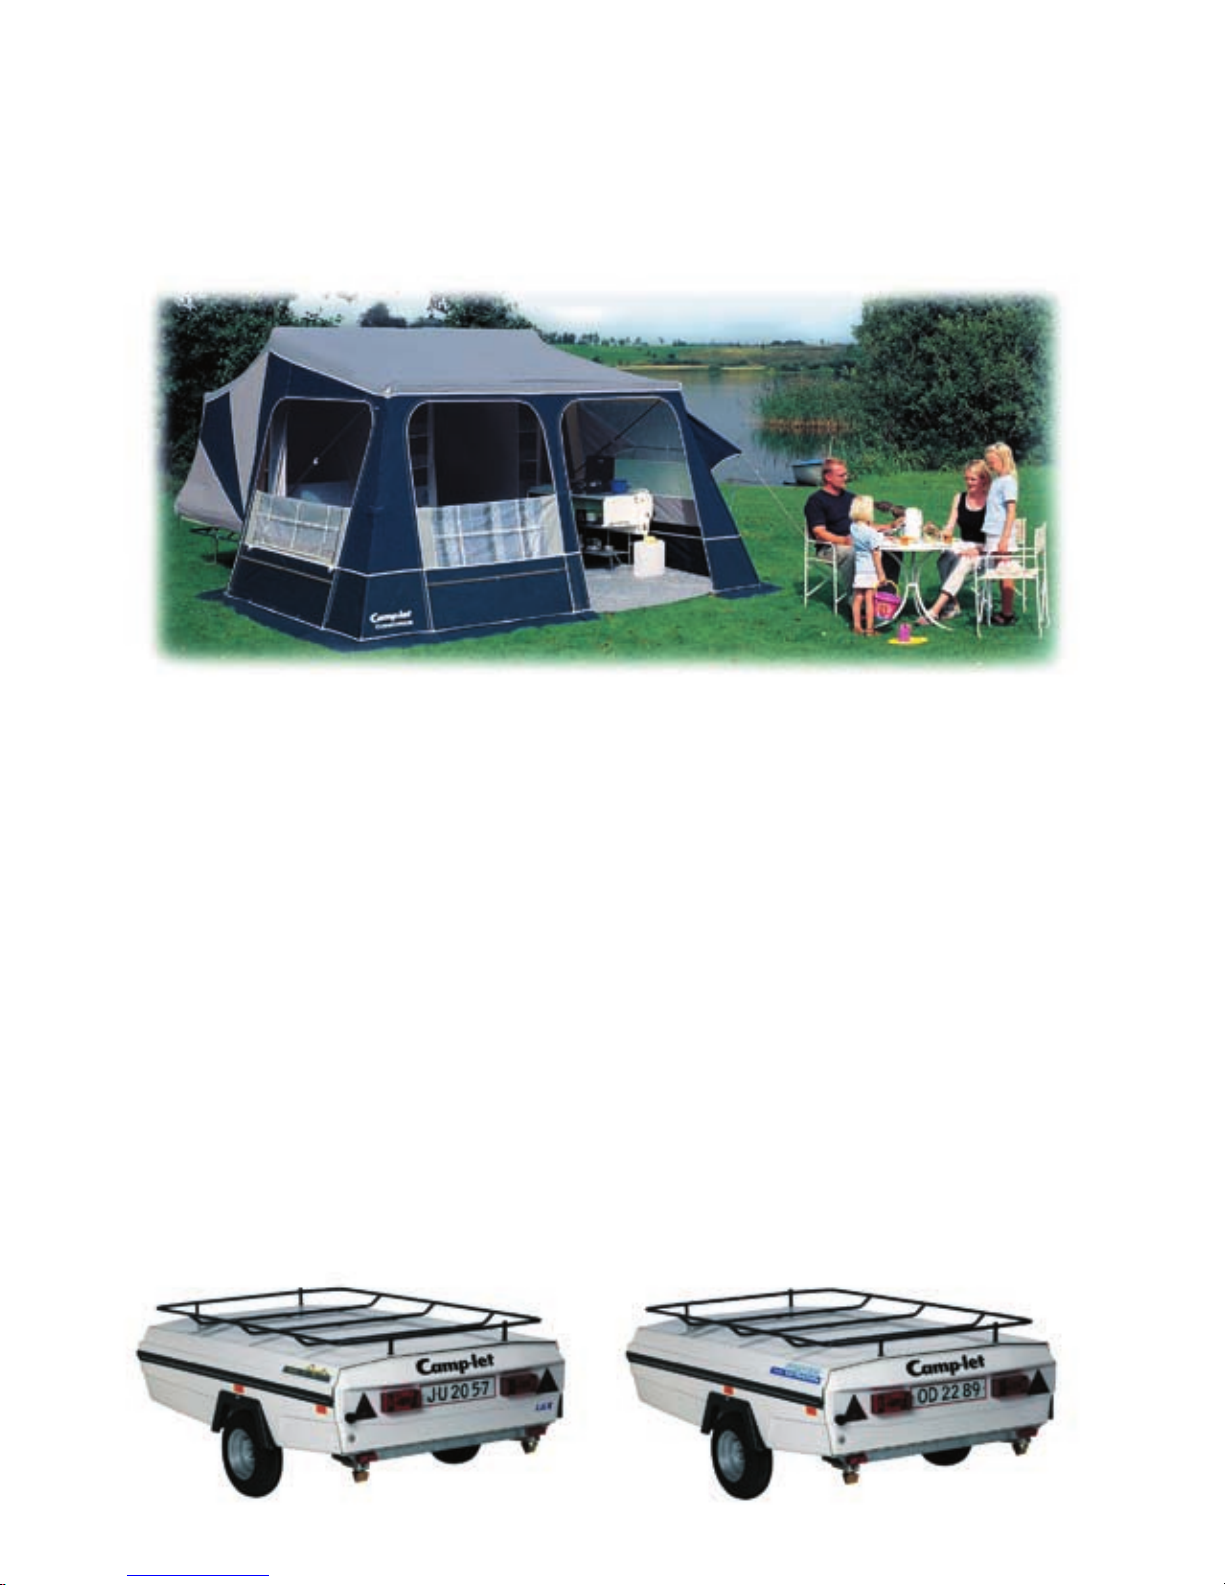
Congratulations on your new tent trailer
from Camp-let
These instructions are to be used after you have received your detailed Camp-let demonstration from your
dealer.
We have gathered vast experience in the use and erection of Camp-let.
By studying these instructions carefully and following
the good advice and demonstration given by your dealer, you can be sure to have many years and pleasure
out of your Camp-let.
Page 4

44
Hitch the trailer onto the tow ball and
plug in the power.
Double check the Camp-let is rmly hitched to your car and check
all the lights are working.
Coupling of the Camp-let
1 L Indicator left Yellow
2 54G Fog light Blue
3 31 Earth White
4 R Indicator right Green
5 58R Light right Brown
6 54 Stop light Red
7 58L Light left Black
9 Constant+ Grey
*only with 13 pole plug
Page 5
5
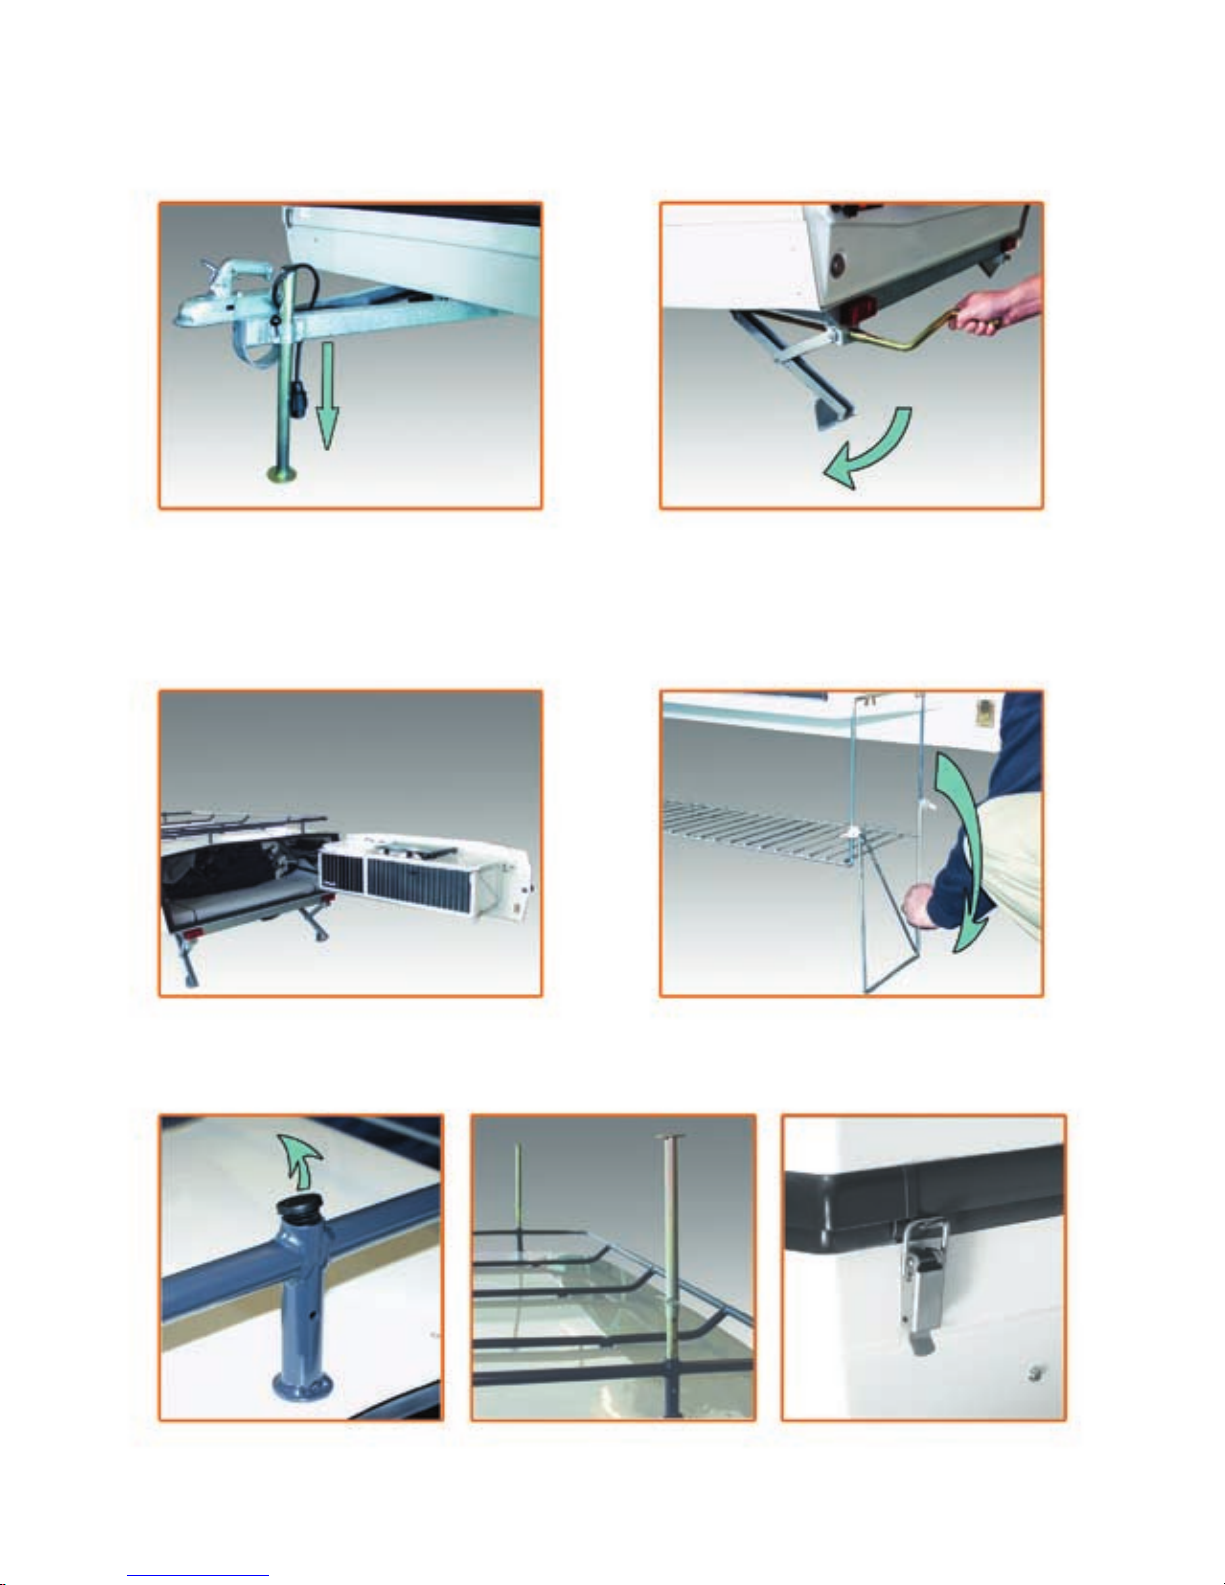
Lower the front parking leg so the
trailer is level.
The rear supporting legs has to be
screwed down and adjusted, so that
the trailer stands horizontal in both
directions. The supporting legs must
be screwed down so the wheels nearly
clear the ground.
Unlock the Camp-let.
Swing the kitchen out and tilt down the
wire clamp.
See “kitchen section”.
The kitchen support must be pivoted
over 180 degrees, lowered down and
then tighten the two thump screws.
Erecting (nd a level camping pitch)
Remove the plastic stoppers
from the luggage rack (keep
the stoppers in a safe place).
Fit the 2 bed supporting legs. Release the catch.
Page 6
6
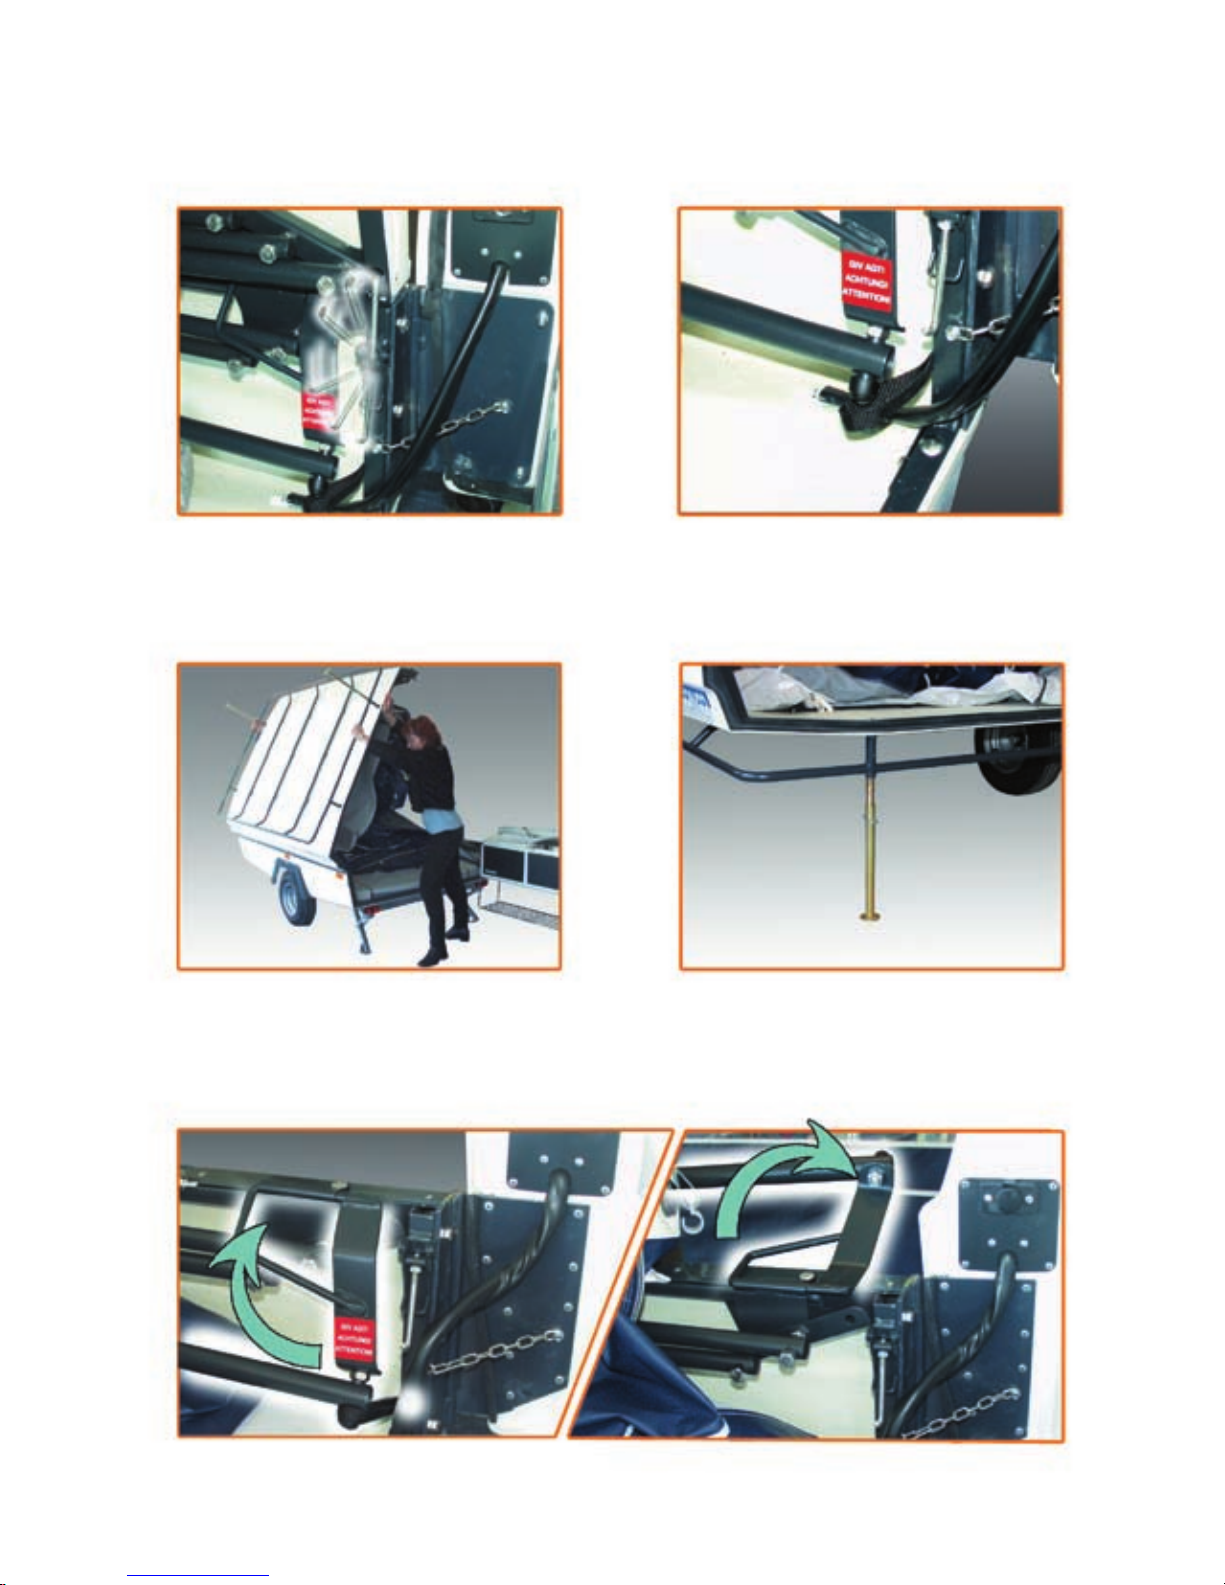
Before the lid can be lifted, the internal
catch must be released.
Erecting…
Take off the strap.
Lift the lid and slowly lower down. The supporting legs must be adjusted,
so that the lid is horizontal.
Pivot tting in transport position. Pivot tting prior to lifting out the canvas.
Page 7
7
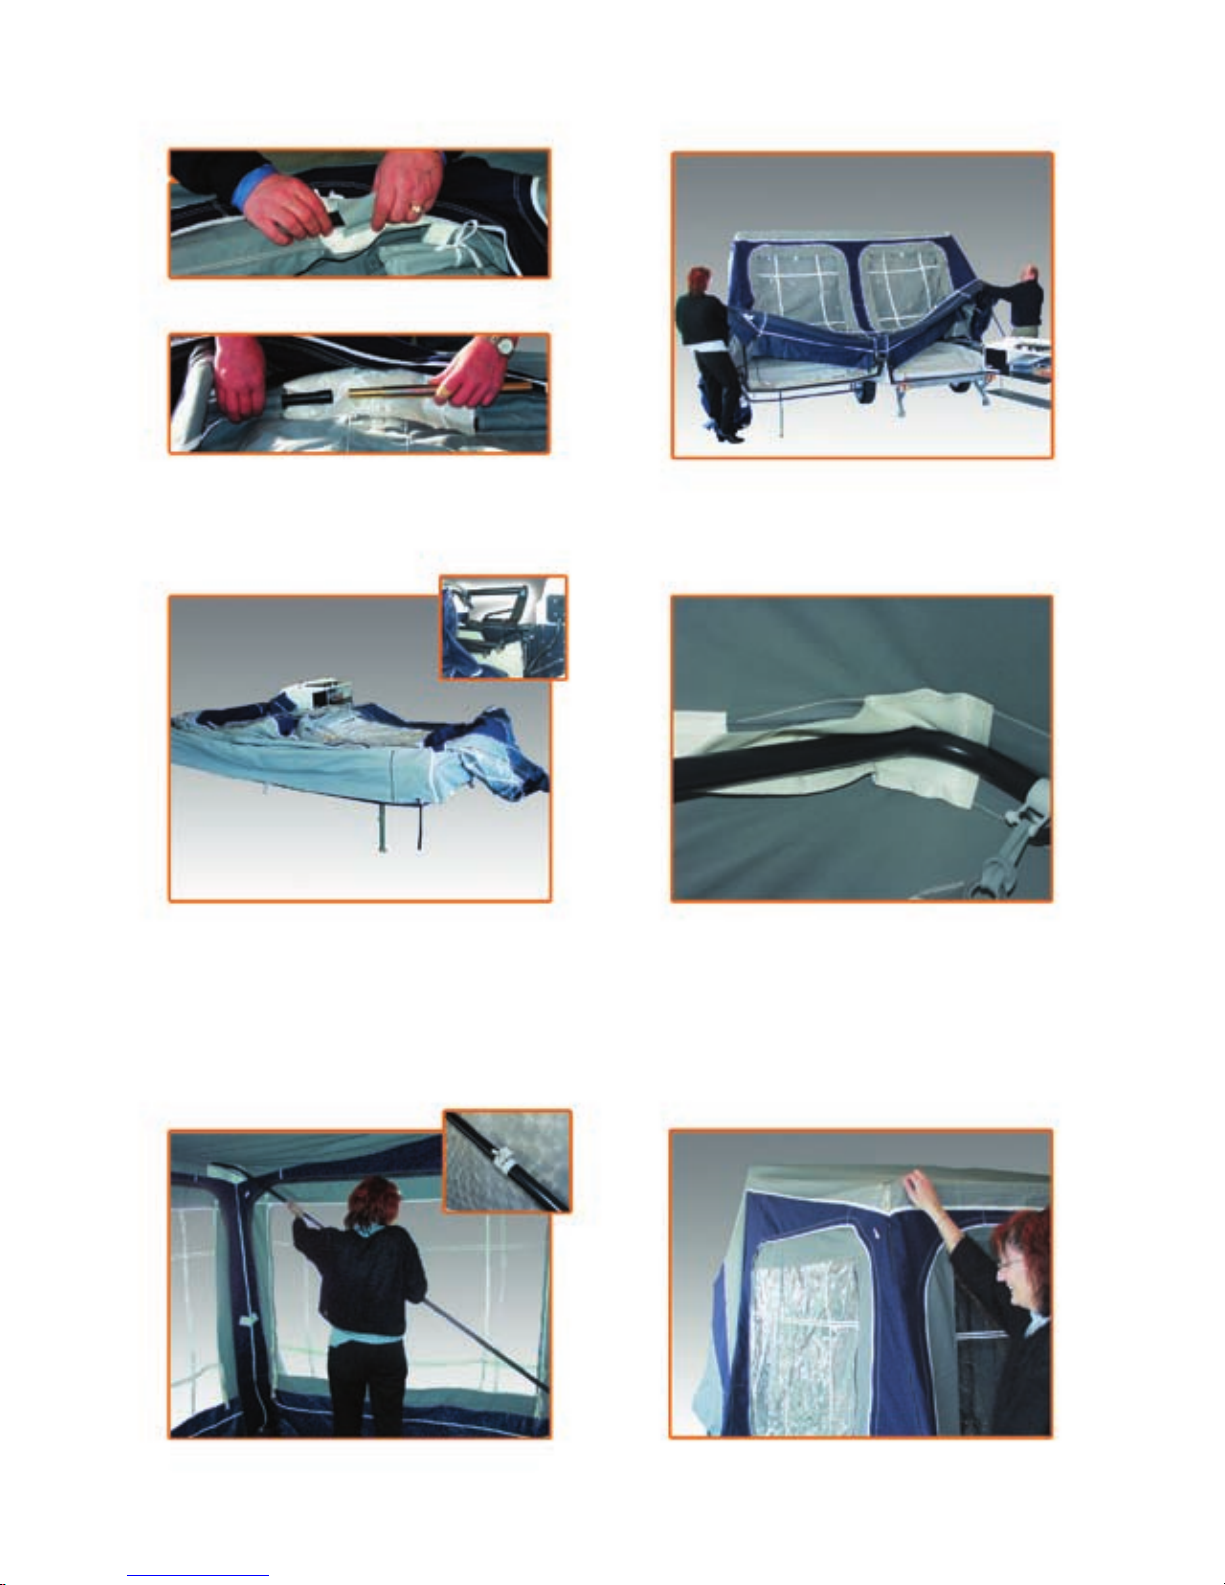
The protective sleeves must be removed (KEEP SAFE).
Connect the centre awning pole. Close
all the zips.
Unfold the tent canvas so the canvas
is draped over the trailer sides. Now
check that the pivot tting is still in the
open position.
By holding the side poles carefully lift
over the canvas. You must stop if you
feel any thing catching.
Ensure the canvas is sitting correctly on
the reinforcements on all 4 corners.
Slide the awning poles out until the
window is level. Tighten the pole collars.
Double check the windows are
horizontal.
Page 8
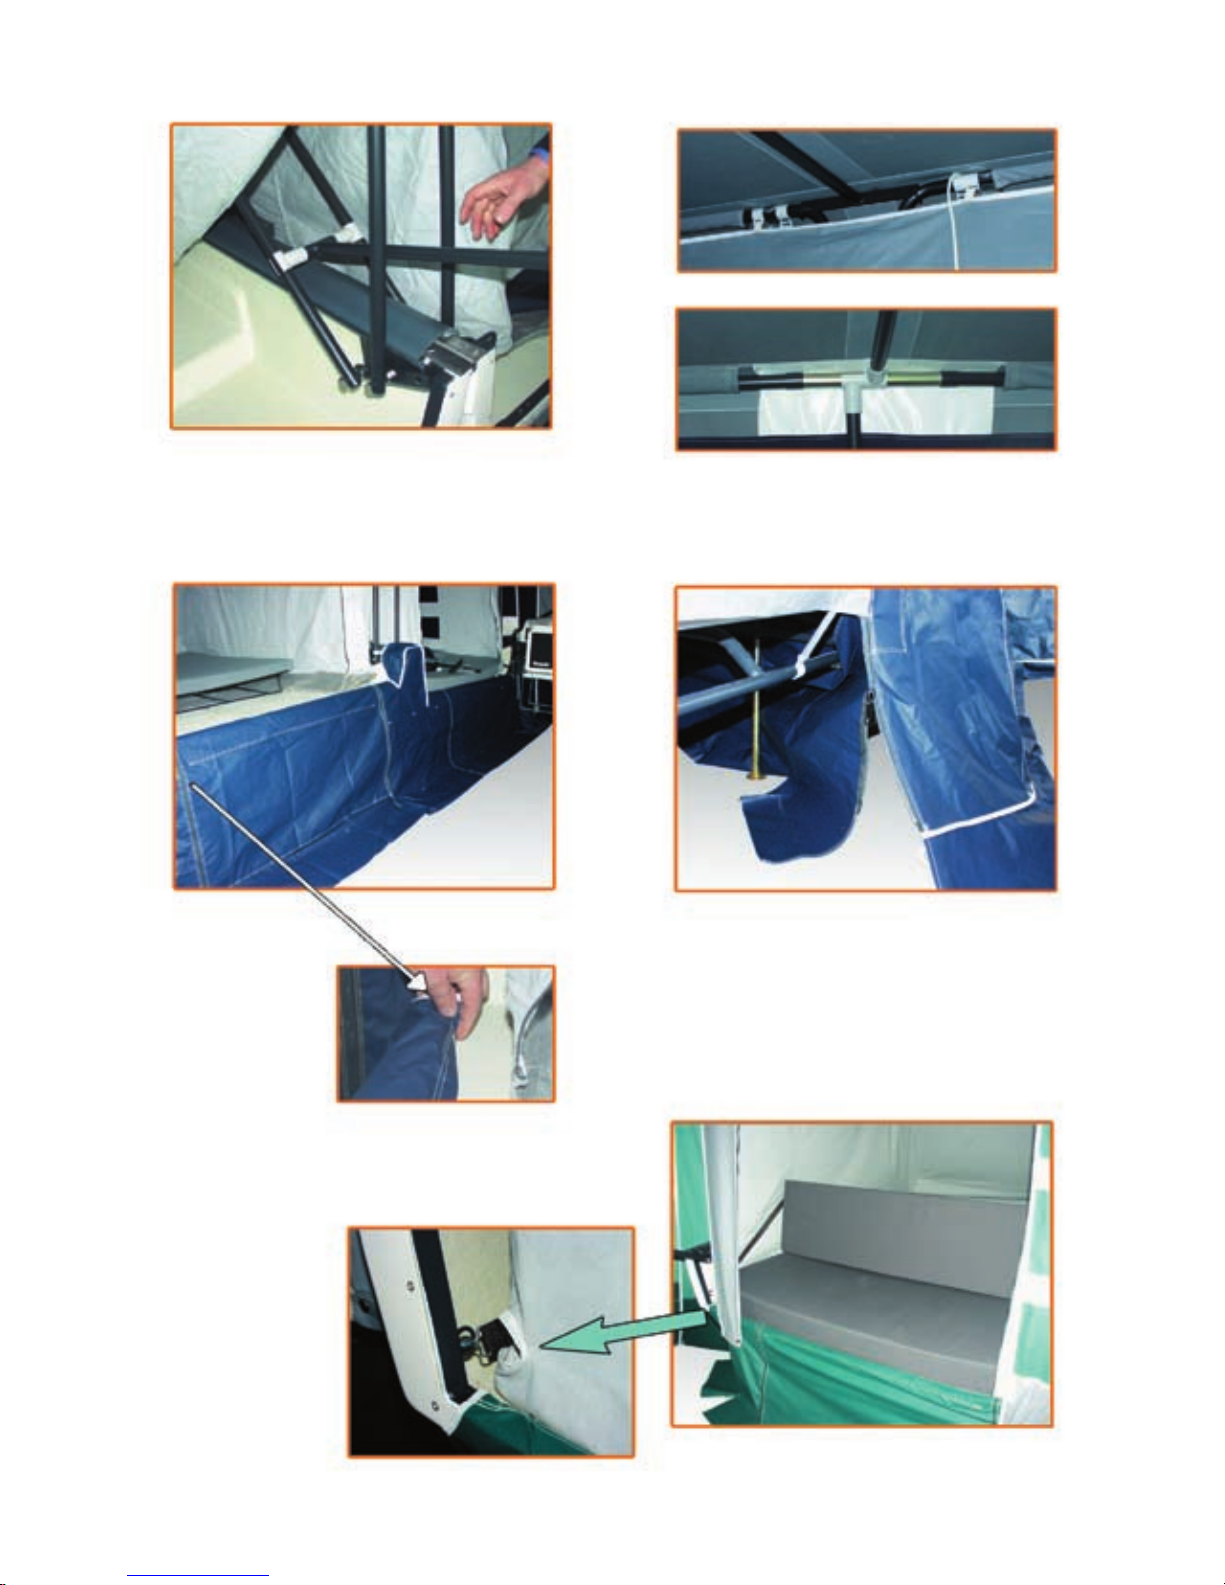
Savanne/Concorde: Before mounting
the wardrobe bar, check the awning
canvas is sitting correctly on the 4
corners of the roof.
Savanne/Concorde: Mounting of front
supporting pole.
To be adjusted after pegging.
Savanne/Concorde: Mount the roof sup. pole.
Fitting the
bottom skirt.
Apollo/Lux: Fitting the bottom skirt.
Savanne/Concorde: Fitting the bottom
skirt with under bed storage.
Zip the skirt to the canvas on both sides
before you do the press-studs.
The back rest strap goes through the
inner tent then hooks onto the ring.
Replace the mattresses.
Page 9
9
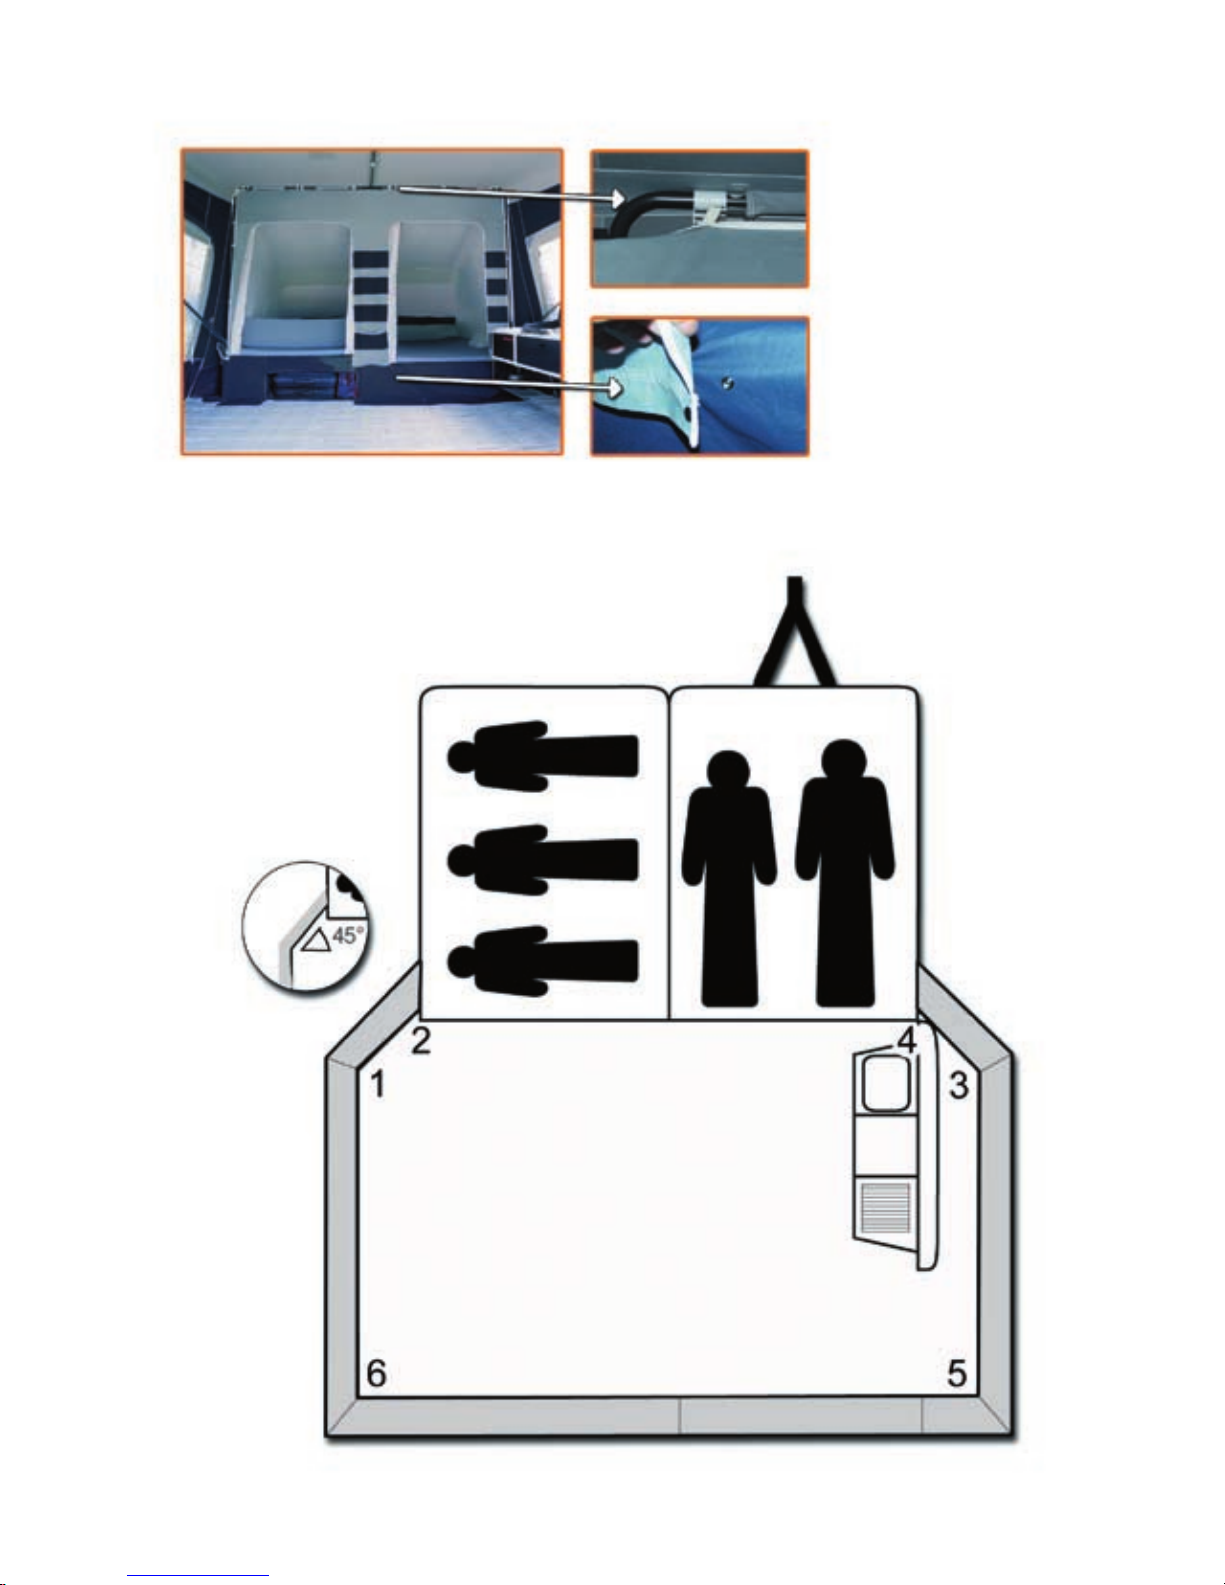
Mounting the pelmet with pockets. (Standard in Savanne/Concorde).
Pegging
Note! All zips must be closed. Using the plastic pegs, start the pegging as per diagram,
then peg in a straight line from corner to
corner. Only peg the mud aps down in poor
weather using the steel wire pegs.
IMPORTANT do not over tension the mud
aps when pegging as this could cause
damage.
In stormy weather peg the 6 guy lines
provided 2 on each side and 2 on the front
corners.
Page 10
10
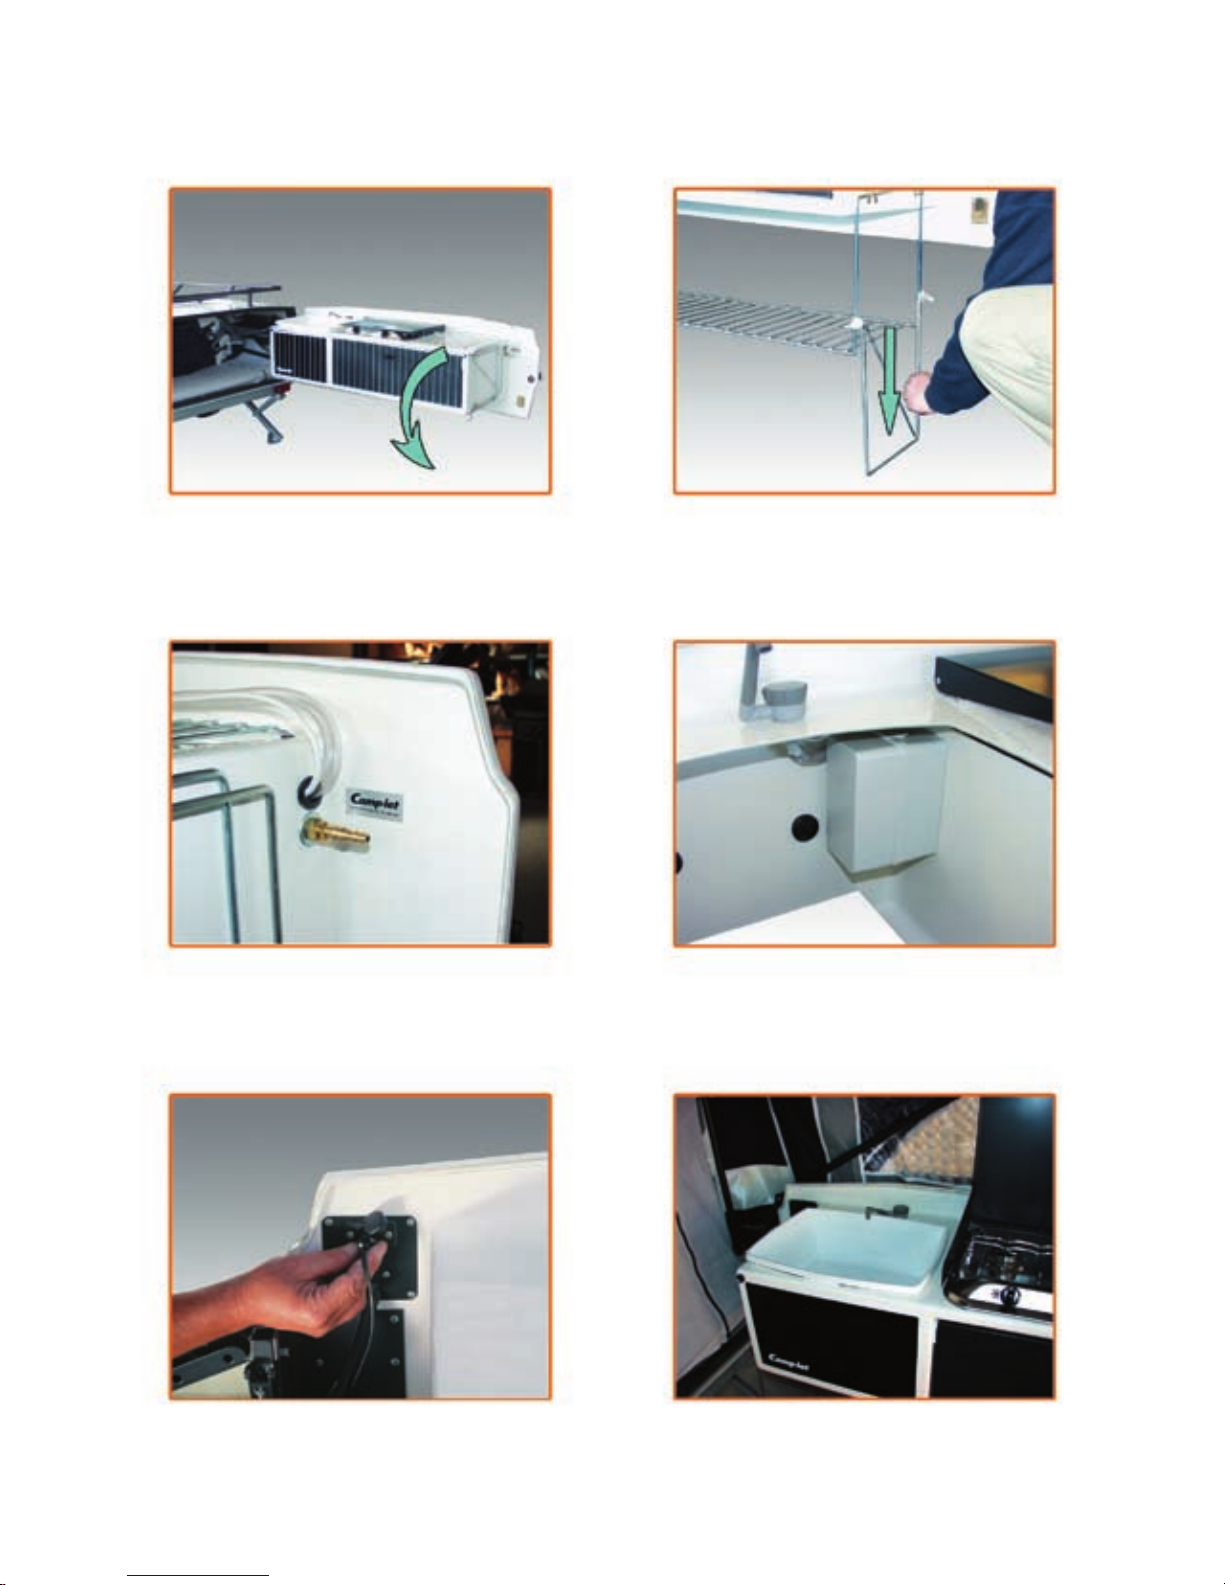
Open the kitchen and slowly swing it out
checking that the electrical cable does
not catch the bolts next to the hinge.
Pivot the supporting leg down, and
tighten the wing nuts, so the kitchen is
horizontal.
Gas pressure: 30 mBar. Battery holder takes 2 x 6V batteries to
run the water pump.
12V power point for minimum consumption.
Sink.
Kitchen section…
Page 11
11
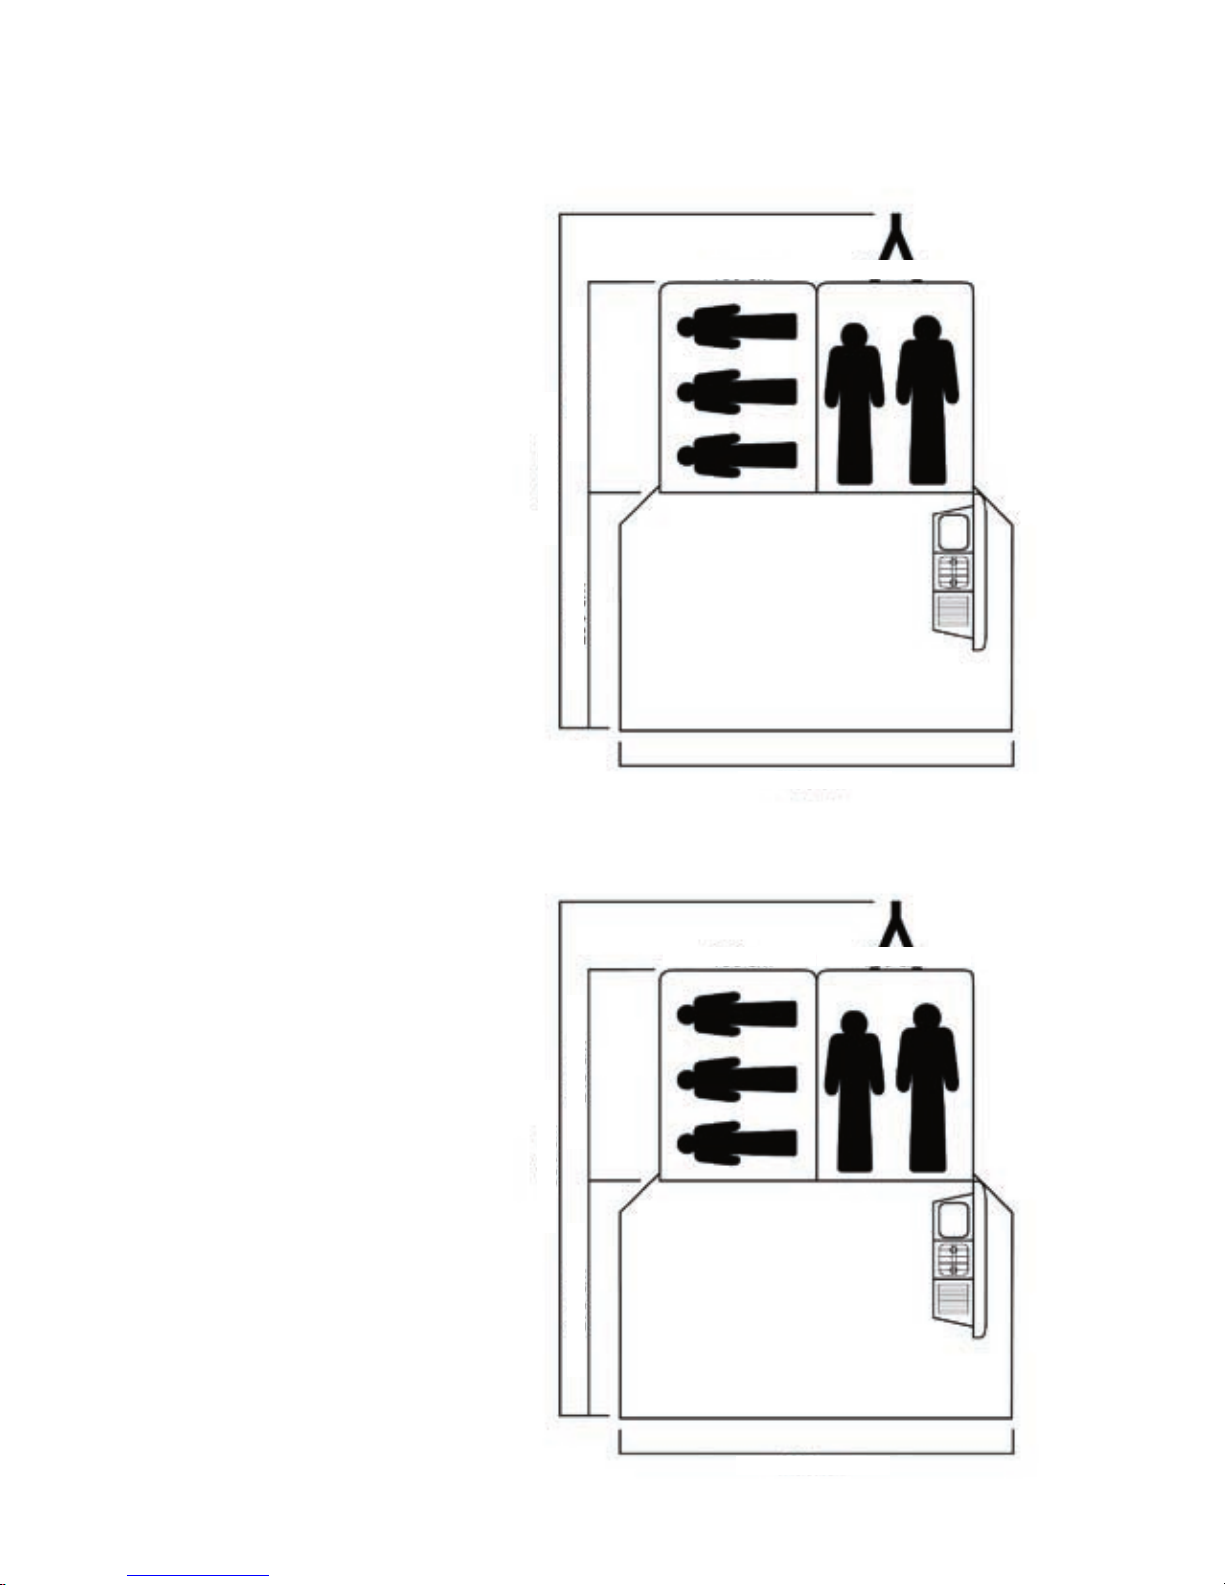
160 cm 160 cm
548 cm
215 cm
250 cm
400 cm
160 cm 160 cm
400 cm
573 cm
215 cm275 cm
Technical specications
Apollo/Lux
Dimension 17 m
2
Net weight 250 kg
Load capacity 250 kg
Total 500 kg
Concorde
Savanne
Dimension 18 m
2
Net weight 250 kg
Load capacity 250 kg
Total 500 kg
Dimension 18 m
2
Net weight 275 kg
Load capacity 225 kg
Total 500 kg
Page 12

12
Before setting off, the Camp-let must be packed with the weight evenly
spread. The optimum tow hitch weight is 25-30 kg. The bre glass
trailer body has a 600 ltr. capacity (aprox). There is extra storage space
on the luggage rack. It is better to load the Camp-let whilst it is up.
Quilts, suitcases etc. must be loaded on the R-H bed (not the lid side).
IMPORTANT— do not load too near the trailer sides, you must leave
enough space for the canvas and the polework. Heavy items must be
placed over the axle. NOTE – the maximum weight on the luggage rack
is 75 kg. (evenly loaded over the rack). DO NOT EXCEED THE MAXI-
MUM GROSS WEIGHT OF THE CAMP-LET, (specied on the trailer
plate).
Before you drive—check the following:
1: The Camp-let is correctly hitched onto the tow ball.
2: That the front and rear supporting legs are up.
3: All the lights are working.
4: The trailer lid and kitchen are correctly closed and locked.
5: Control that the air pressure in the tyres are 28 psi (2 Bar).
You would be well advised to take a spare wheel.
Whilst travelling, remember the Camp-let is hitched on.
Remember before you go…
Page 13
13
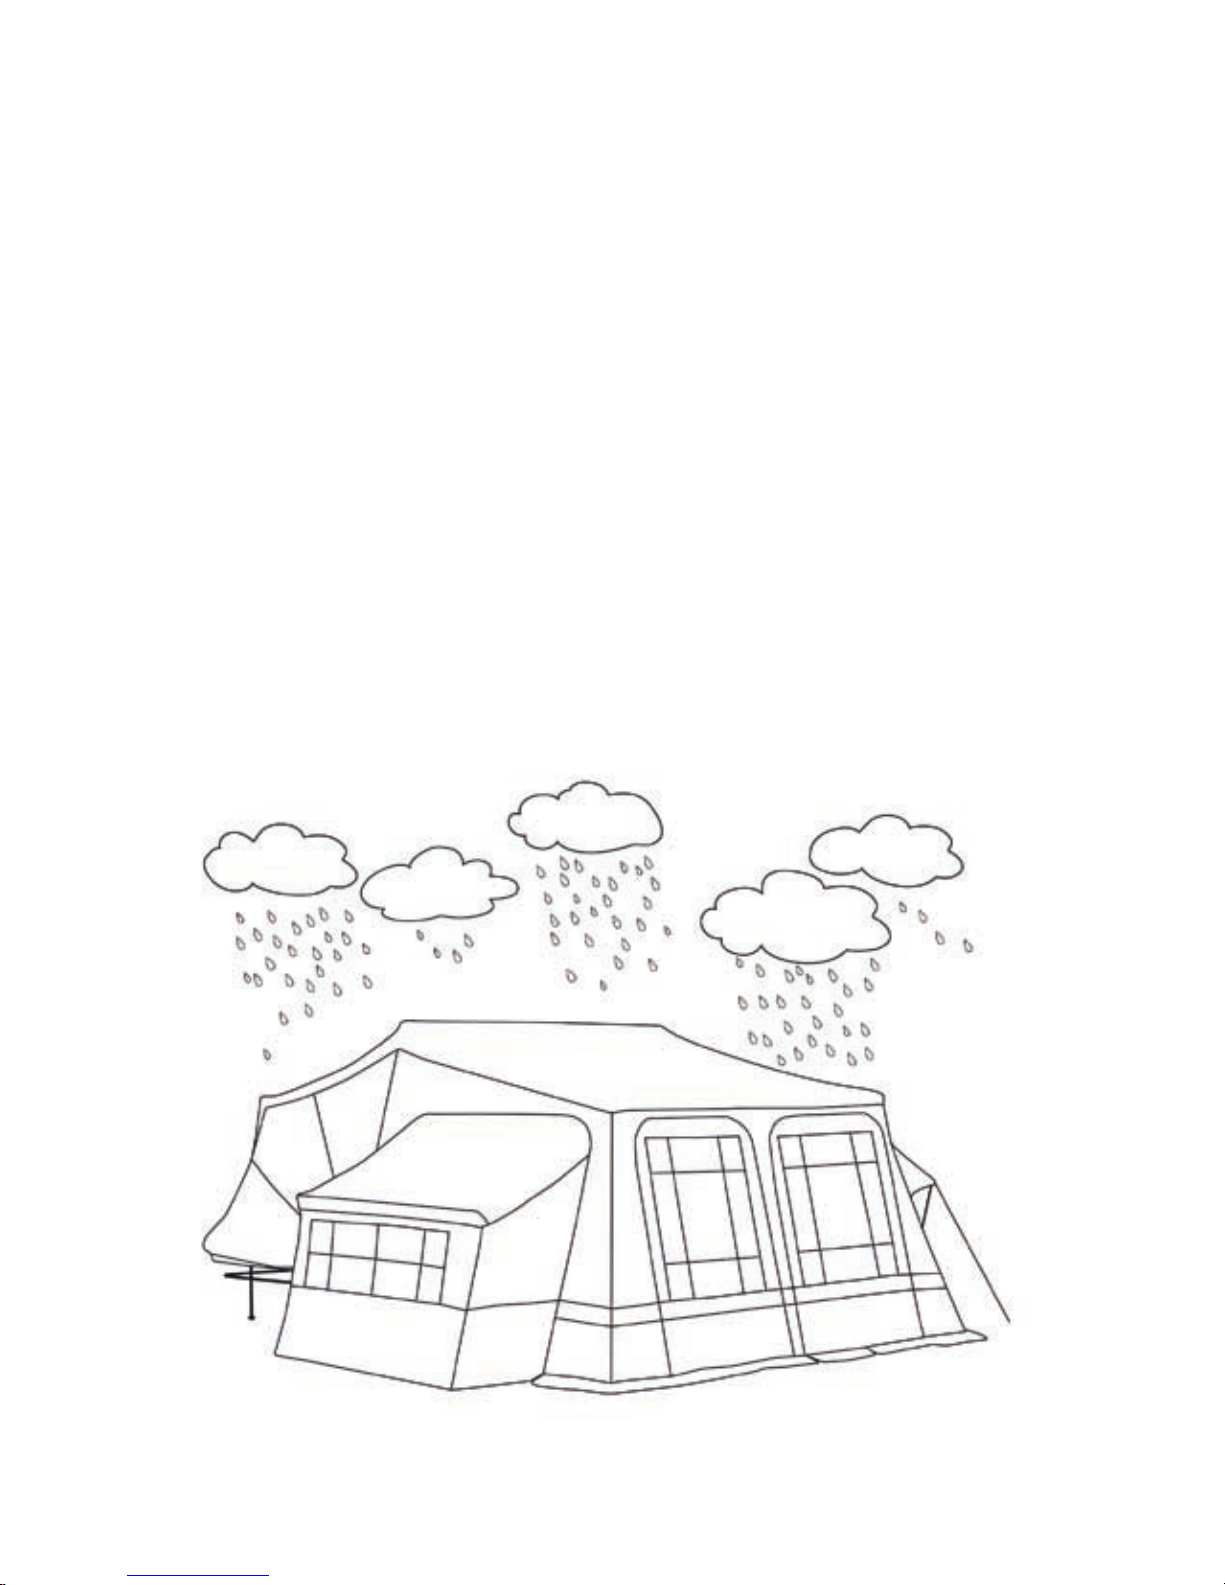
If you have packed away the Camp-let wet or even slightly damp, you
must set up and completely dry it out (within 24 hours).
If you have been travelling in wet conditions you must open up the
Camp-let (within 24 hours) to check that water has not seeped in.
Carry out the same check after you wash the Camp-let.
FAILURE TO FOLLOW THIS ADVICE WILL CAUSE DAMP STAINES
- MILDEW - ROT AND A LARGE REPAIR BILL.
Remember when you get home…
Page 14
14
Dismantling is in reverse order, remember to fold down the back
rest and lye the cushions in the bottom of the trailer. Remove the
centre awning pole and put the protective sleeves on. Take care
not to trap the canvas under the lid and around the kitchen area.
Front and rear clamps must be closed and the kitchen is locked.
Remember to wind up the rear steadies.
After you have taken delivery from your dealer you will have
been given a detailed demonstration, it is recommended to set it
up at home for two reasons. Firstly to further familiarise yourself
and secondly to weather the canvas. Peg the canvas down then
expose the canvas to rain or morning dew. To avoid shrinkage,
the canvas must be evenly pegged out until bone dry. Once the
canvas is dry it is then weathered and waterproof.
Also consider:
1 mobile mains kit (230V)
lights for cabin and awning
awning groundsheet
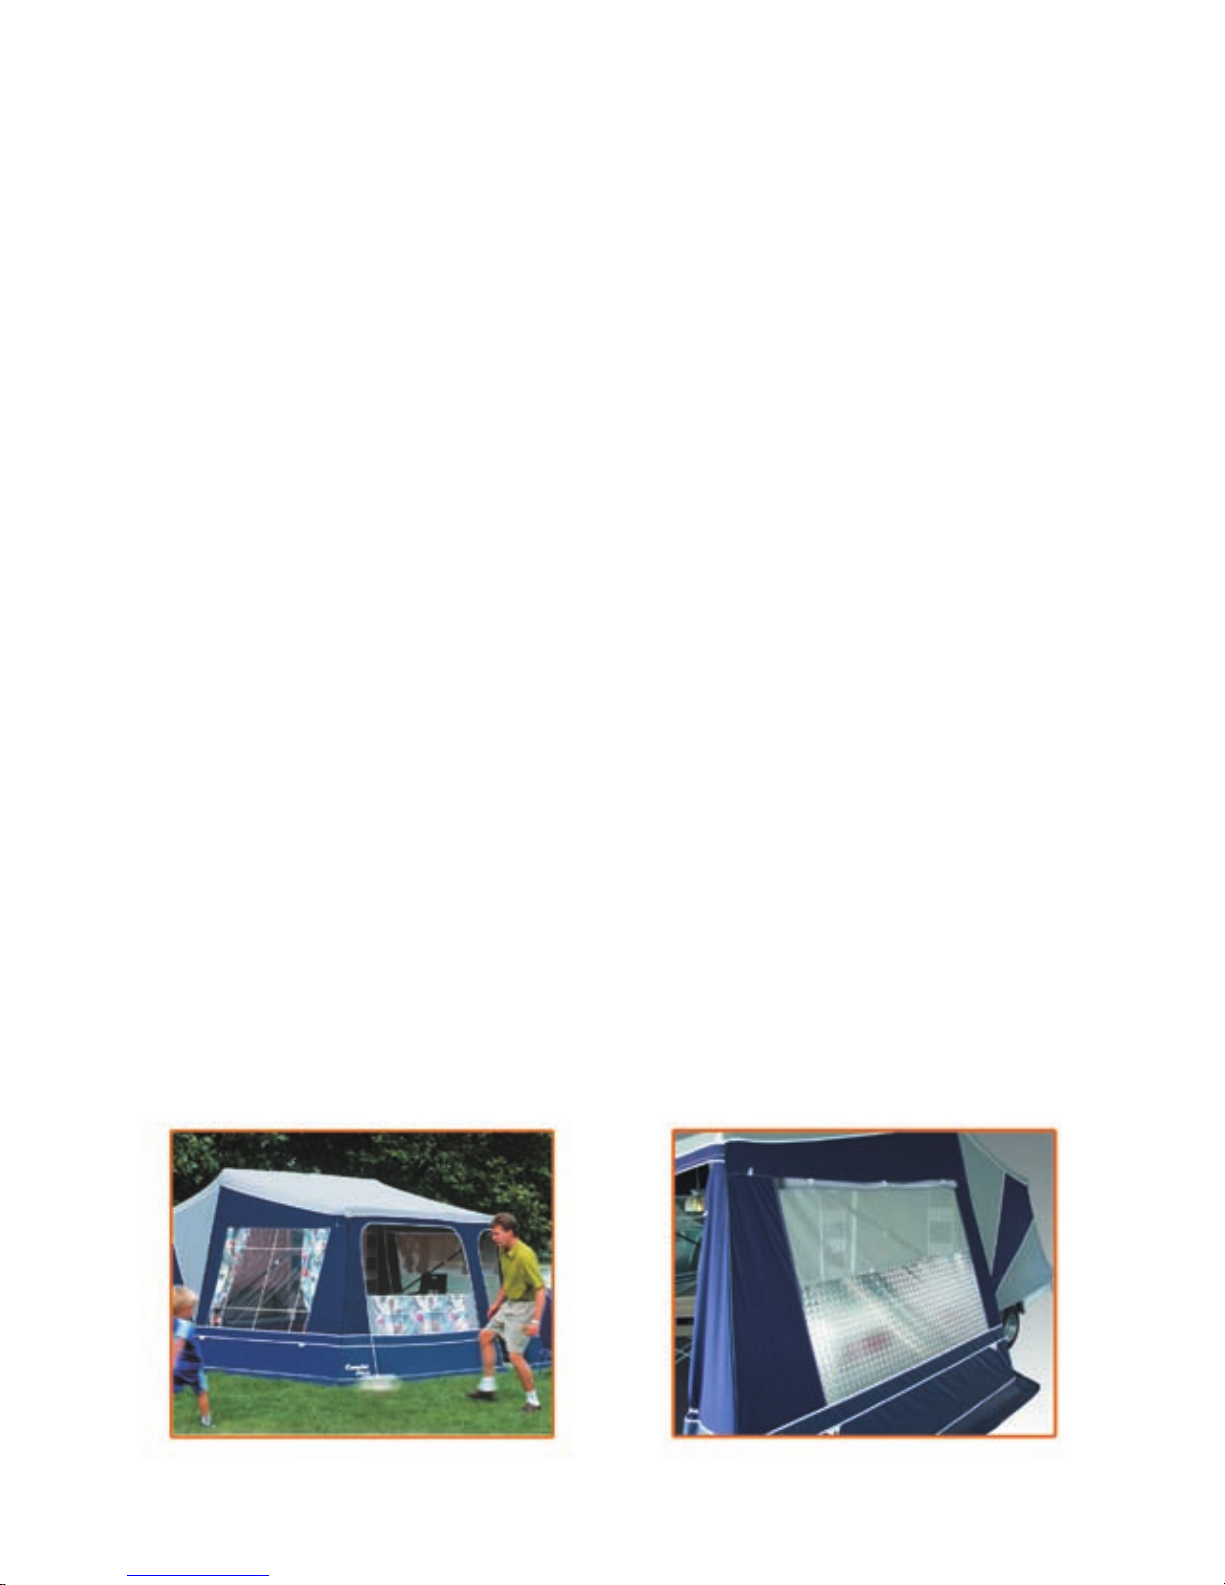
The veranda window semi-opened The kitchen window opened and rolled
Good advice…
Details: Apollo / Lux
Page 15
15
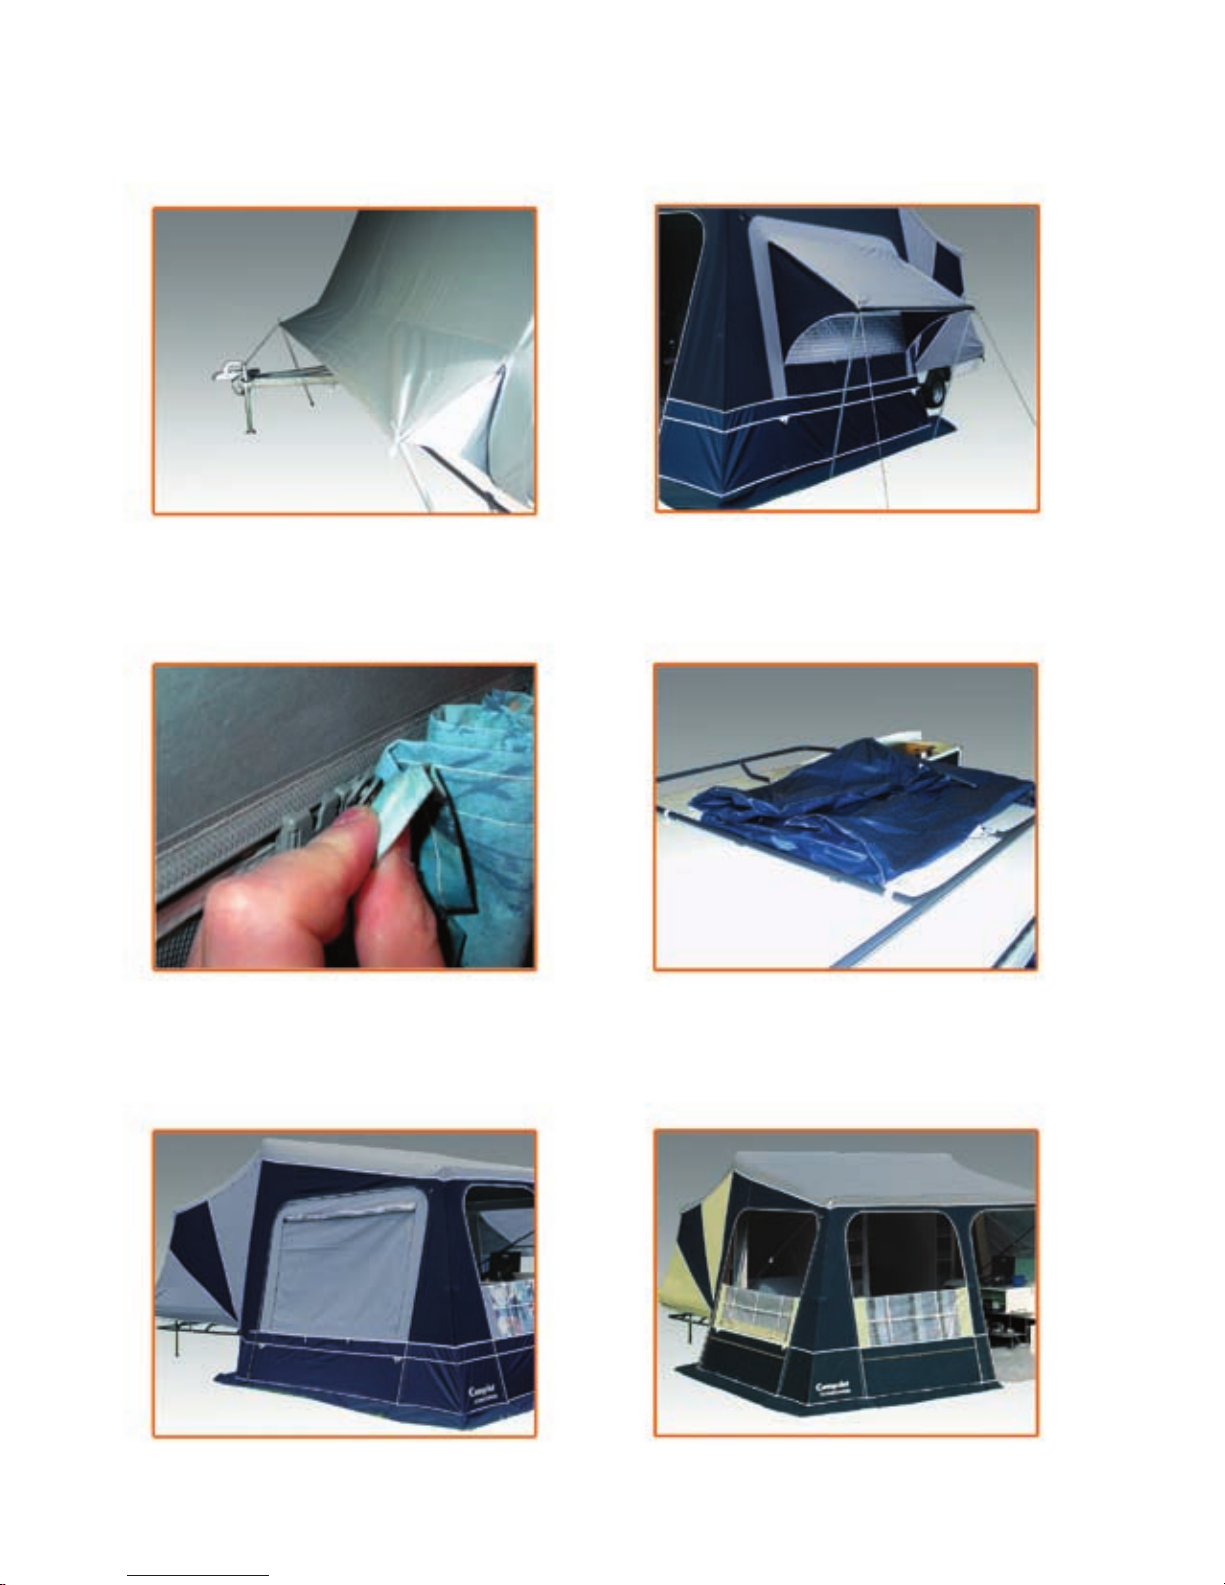
Details: Concorde & Savanne
Ventilation for the sleeping
compartments.
Kitchen window guyed out for ventilation.
Curtain clips. The under bed storage can be mounted
before the lid is lifted over.
The entire side window can be zipped/
rolled up, so the window area is one big
mosquito net.
The veranda doors/windows can be
totally or partially opened.
Page 16
16
Winter storage
Clean the tent for stains/spots and clean the mud ap. The canvas can be removed by opening the zip pockets on the poles and
slide out the canvas from the tent rail.
Canvas and mattresses must be kept dry. Wash the glass bre
body with a mild soap. Hinges, fasteners, spindles, coupling and
connecting link etc. must be lubricated.
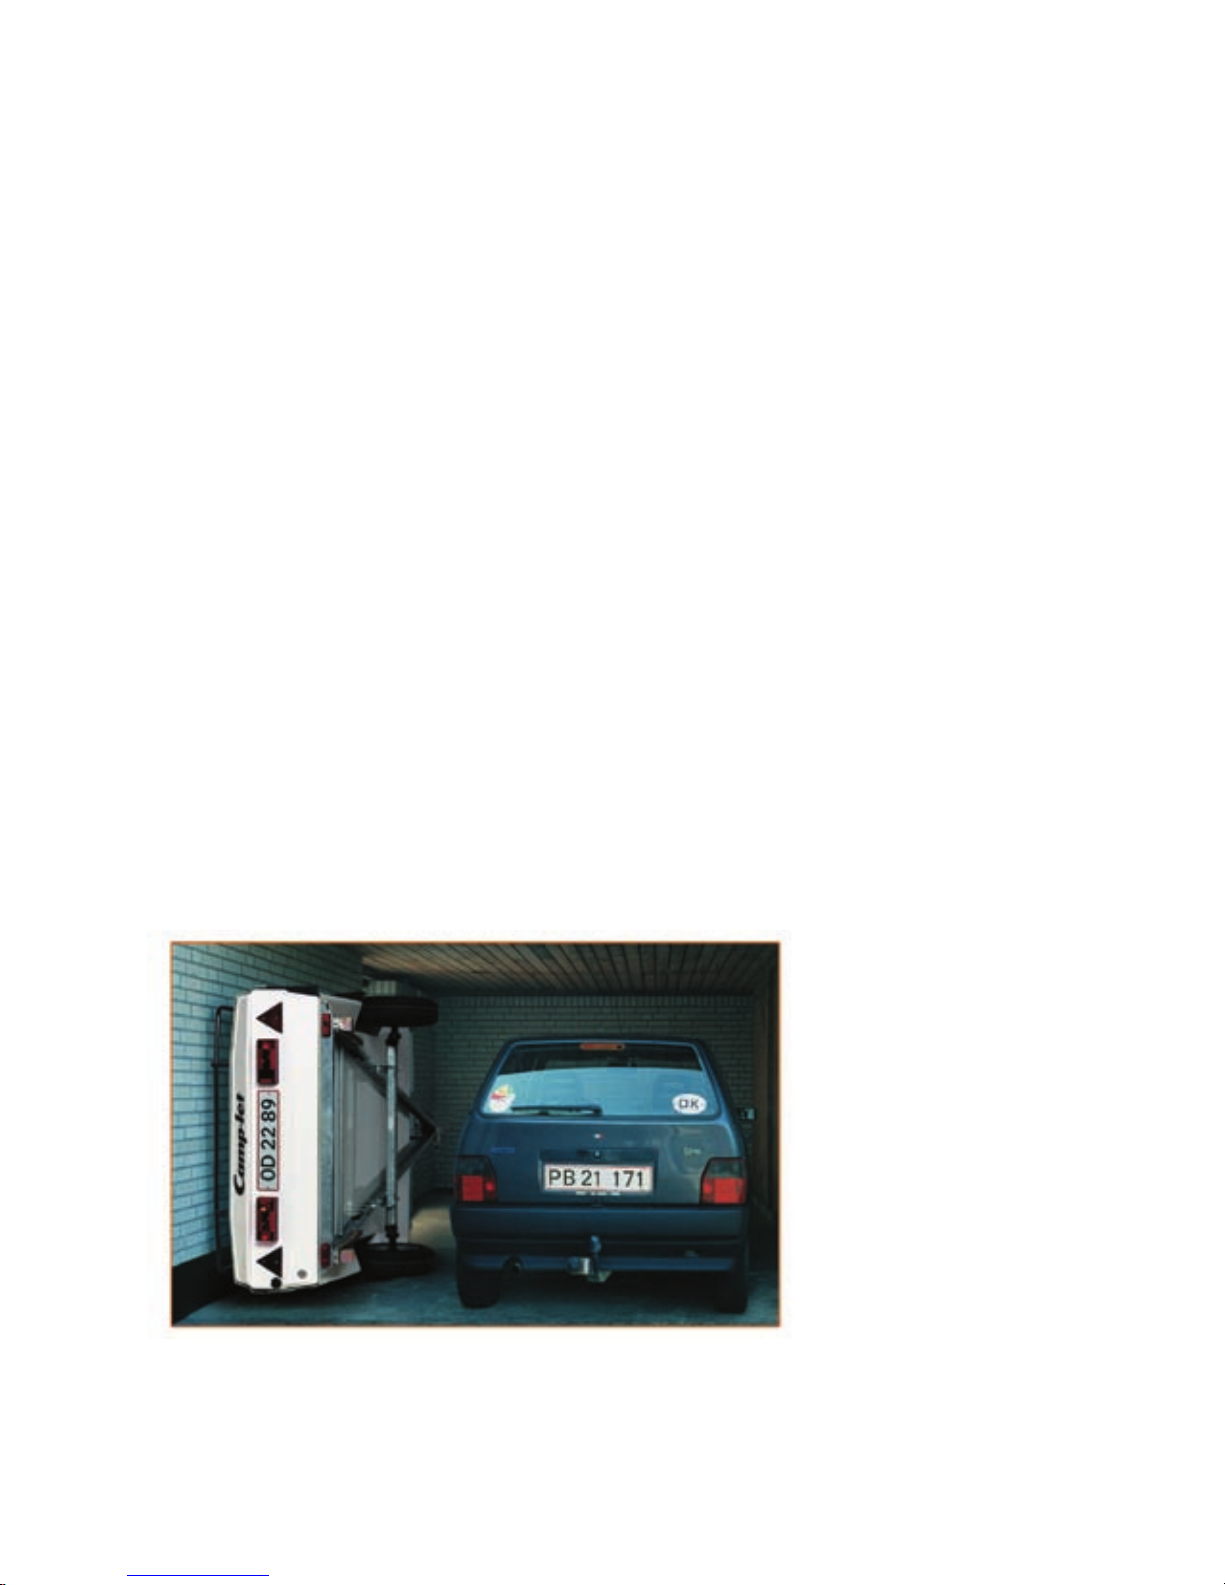
The optimum way to store the Camp-let is in the garage or carport. It is possible to store the Camp-let on its side (in a garage)
using Camp-let side storage brackets available from your dealer.
If the Camp-let must be stored out side, the tent – mattresses
– inner tents – etc. must be removed and stored indoors.
Page 17
17
Regular maintainance…
Tent:
Clean the canvas and mud aps (ask your dealer for advice).
Remember if the canvas is wet or damp always thoroughly dry
it within 24 hours.
Canvas and stitching can be waterproofed again if necessary
(ask your dealer for advice).
Glass bre body:
Wash the body with a mild soap, which does not contain
abrasive.
The body should at least once a year be waxed with car wax.
Wheels, axles & hinges:
Check the wheel bearings for slackness and abnormal sounds.
If your Camp-let is tted with overrunning brakes, disconnect
the brake drum, check the brake linings and remove brake
dust.
Lubricate the links and cables and adjust the brakes (to be
done once a year or for every 3000 km). Check the tyres for
wear and tear, or a possible puncture. For inspection, use the
rear supporting legs as a jack (also use the winding handle as
wheel wrench).
Re-tighten the wheels, axles and coupling etc. (to be done for
every 3000 km).
Page 18
List of framework
18
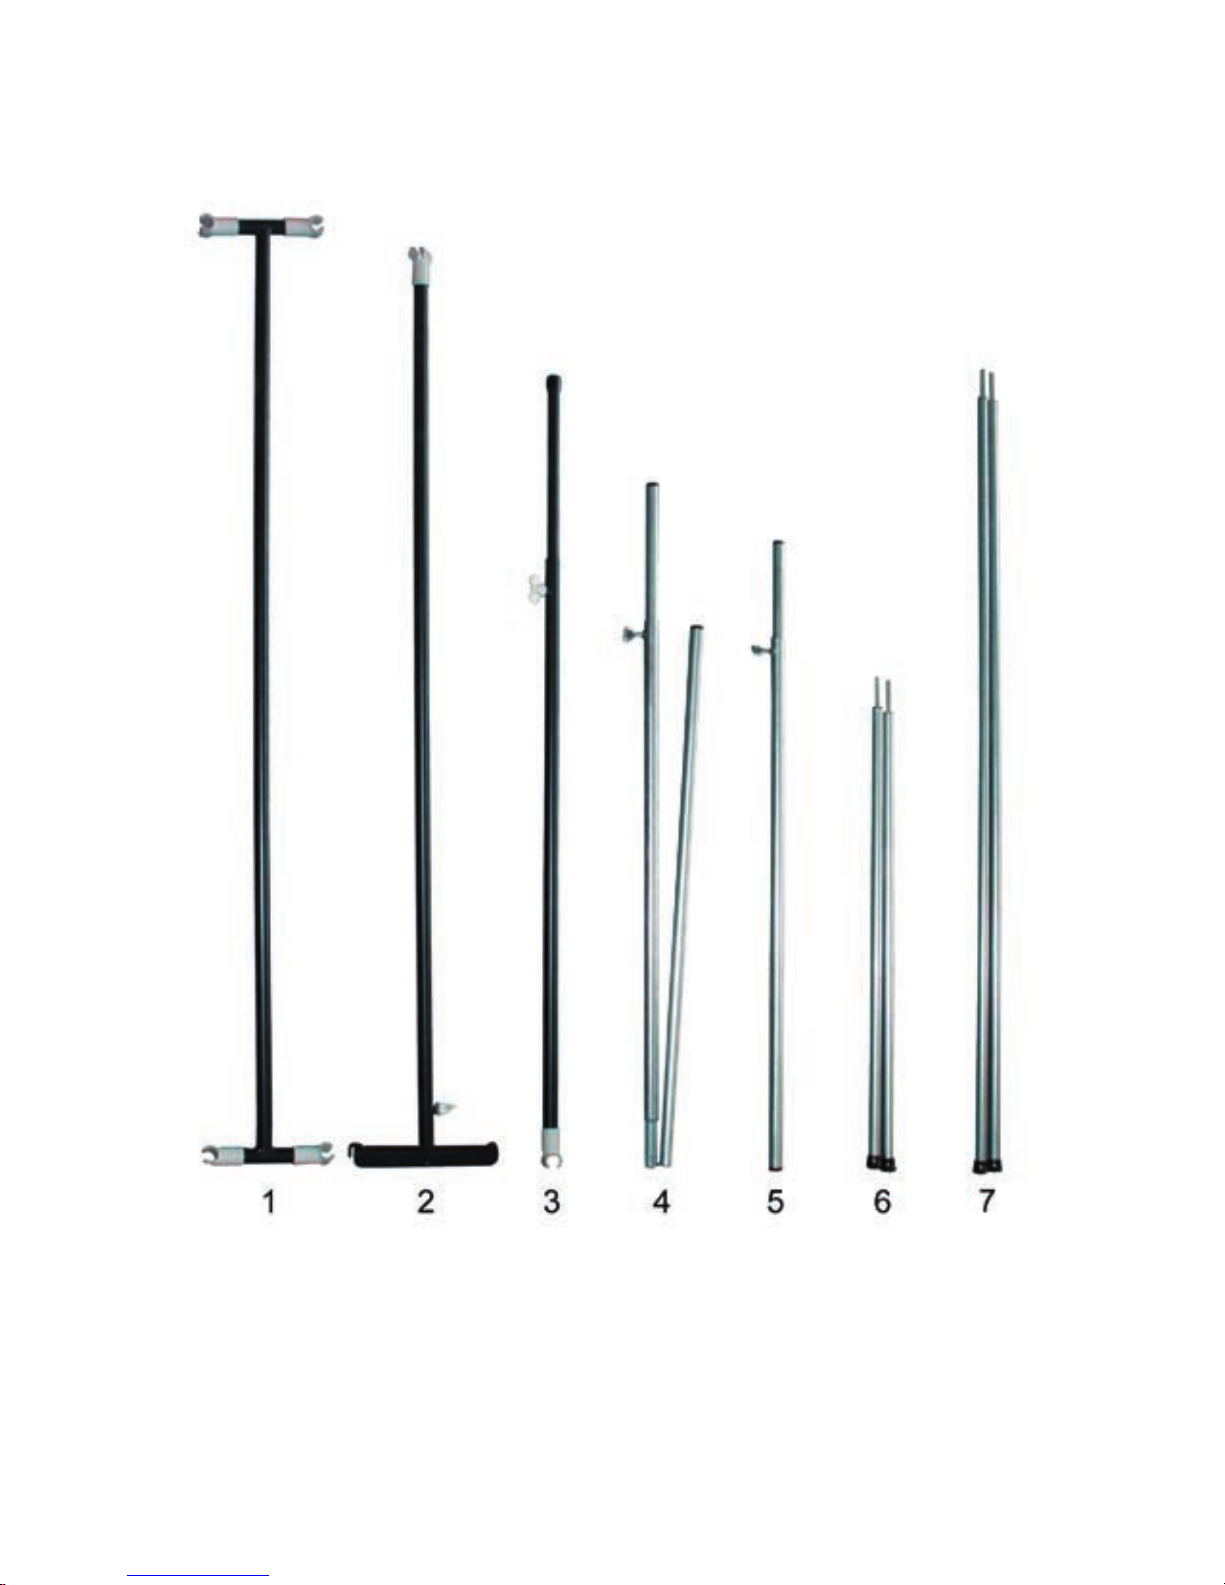
1: Wardrobe rail, Concorde & Savanne
2: Roof supporting pole, Concorde & Savanne
3: Front supporting pole, Concorde & Savanne
4: Veranda bar (side window), Concorde
5: Veranda bar (front window), Concorde & Apollo/Lux
6: Ventilation, Concorde & Savanne
7: Ventilation (kitchen window), Concorde
Page 19

19
Notes
Page 20
Available accessories
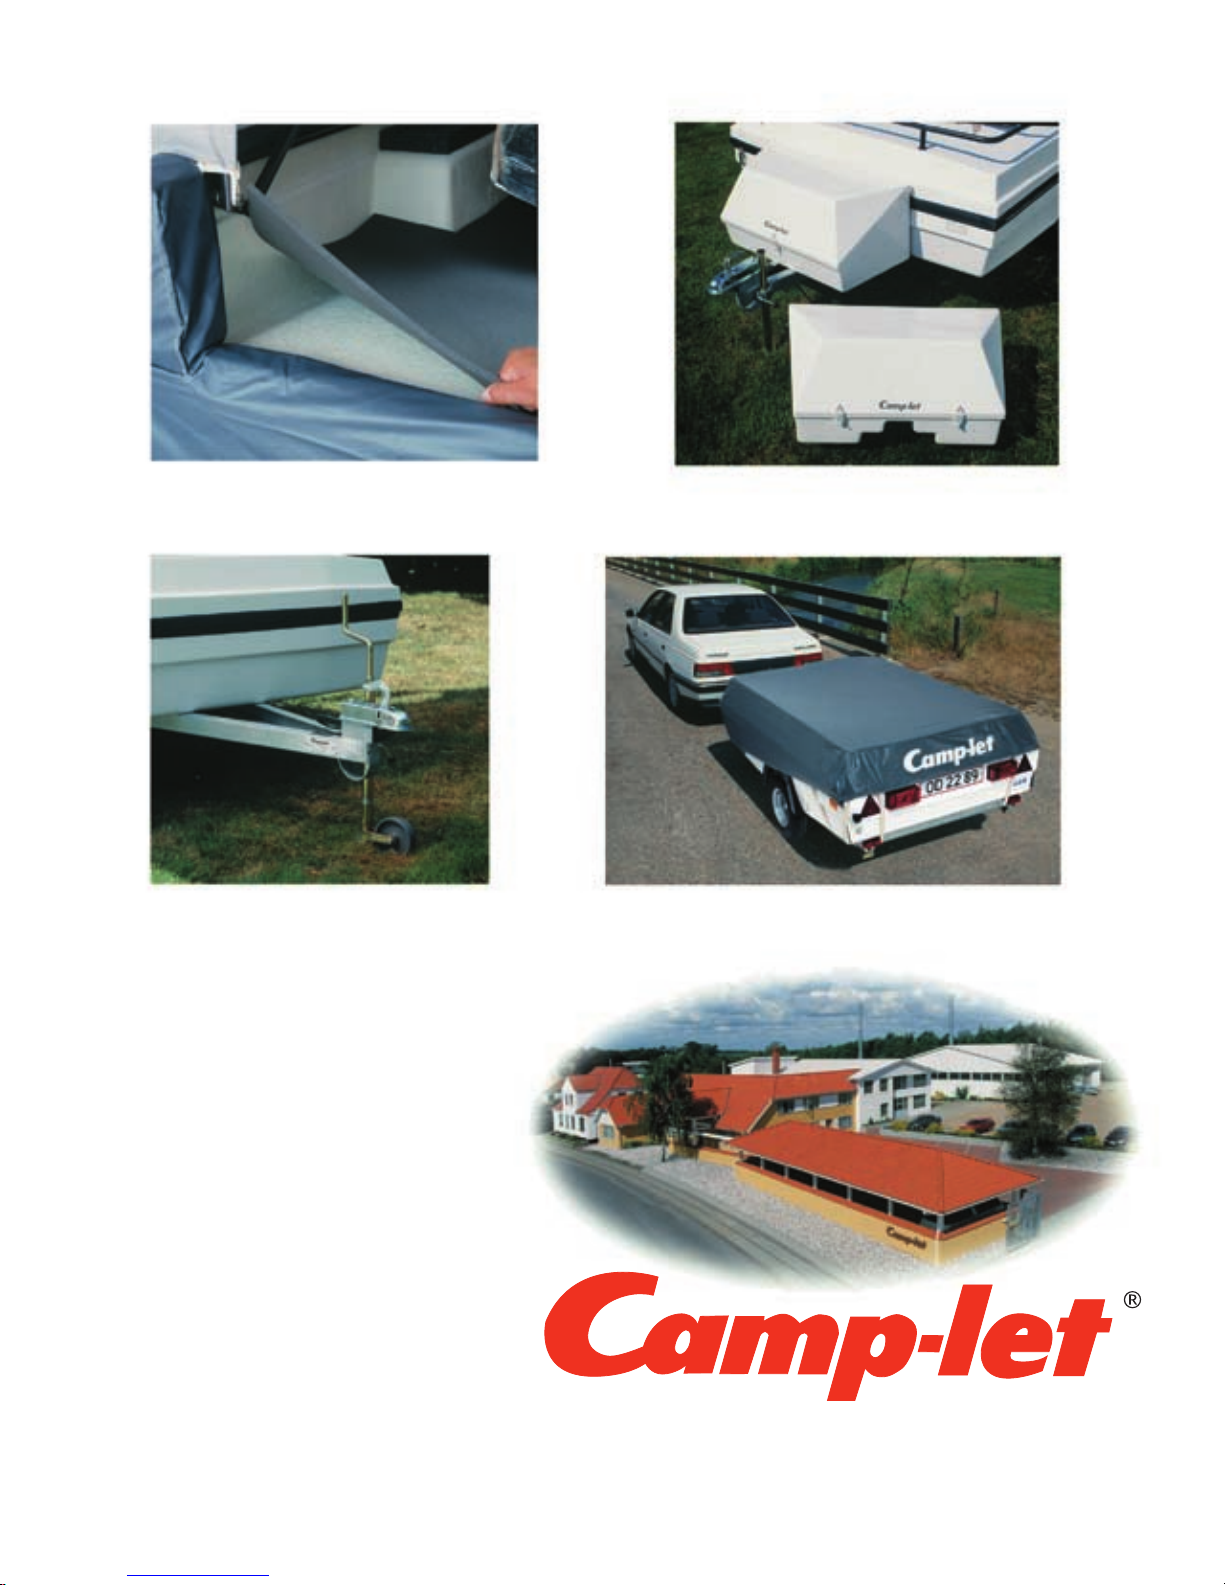
Insulation mats Gas box
Jockey wheel and supporting leg Tarpaulin protects against dirt
The Camp-let factory stands for quality
through a new standard in design, materials and construction.
For more than 40 years we have developed and produced trailers and trailer
tents in our Danish factory.
The product program today includes
Camp-let trailer tents as well as Eurotrailer and Mustang horse trailer.
- a Danish quality product
Camp-let A/S · Arnum : DK- 6510 Gram
Tel. +45 74 82 61 35 : Fax +45 74 82 65 80
www.camp-let.dk
 Loading...